
Vegetarian picnic sandwiches can be sturdier than people expect—if you stop treating them like afterthoughts. The difference between a sandwich that still tastes sharp after a walk to the park and one that slumps into a damp napkin is usually not some magic trick. It’s bread, moisture, and a little bit of discipline.
A soggy tomato and a soft roll can ruin lunch in ten minutes. A crusty loaf, a thick spread, and fillings that have some structure—chickpeas, eggs, lentils, roasted vegetables, halloumi, tofu—hold together with far less drama. That’s the part most picnic sandwich recipes skip. They tell you to “assemble and enjoy,” which is charming until the bottom slice turns into a sponge.
These fifteen vegetarian picnic sandwiches lean into real texture. Some are cold and bright, some are warm enough to wrap in foil, and a few get better after they sit for half an hour. That matters outdoors. A good picnic sandwich should feel planned, not improvised with whatever was closest to the crisper drawer.
Why These Vegetarian Picnic Sandwiches Work
-
Sturdy bread matters: Ciabatta, sourdough, baguettes, seeded rolls, and rye hold up better than soft white bread once they meet juicy fillings and a long ride in a cooler.
-
Protein makes them feel finished: Chickpeas, lentils, eggs, beans, paneer, halloumi, tofu, and cheese give these sandwiches the kind of heft that keeps people from wandering back to the snack bag.
-
Moisture is managed, not ignored: Tomatoes get salted, greens get dried, and spreads sit against the bread so the crumb doesn’t go wet first.
-
They travel well: Most of these fillings can be mixed ahead, chilled, and packed separately or assembled in a way that keeps the bread from collapsing.
-
The flavors stay interesting at room temperature: Acid from lemon or vinegar, herbs, mustard, pickles, and roasted vegetables keeps the filling lively even after it leaves the kitchen.
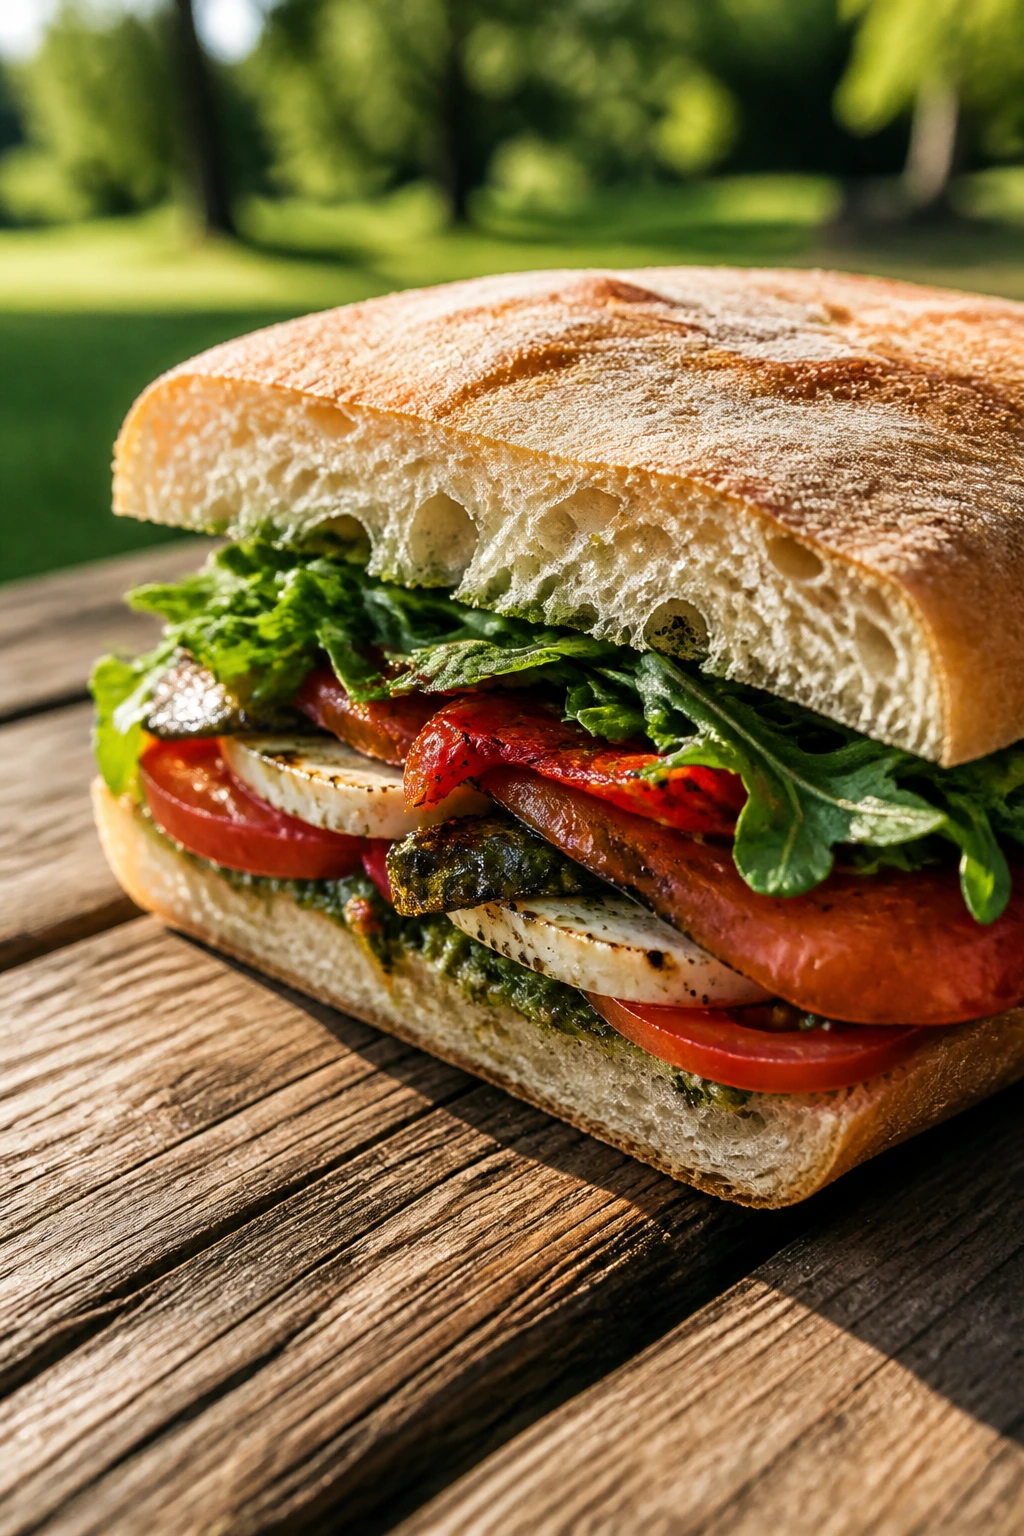
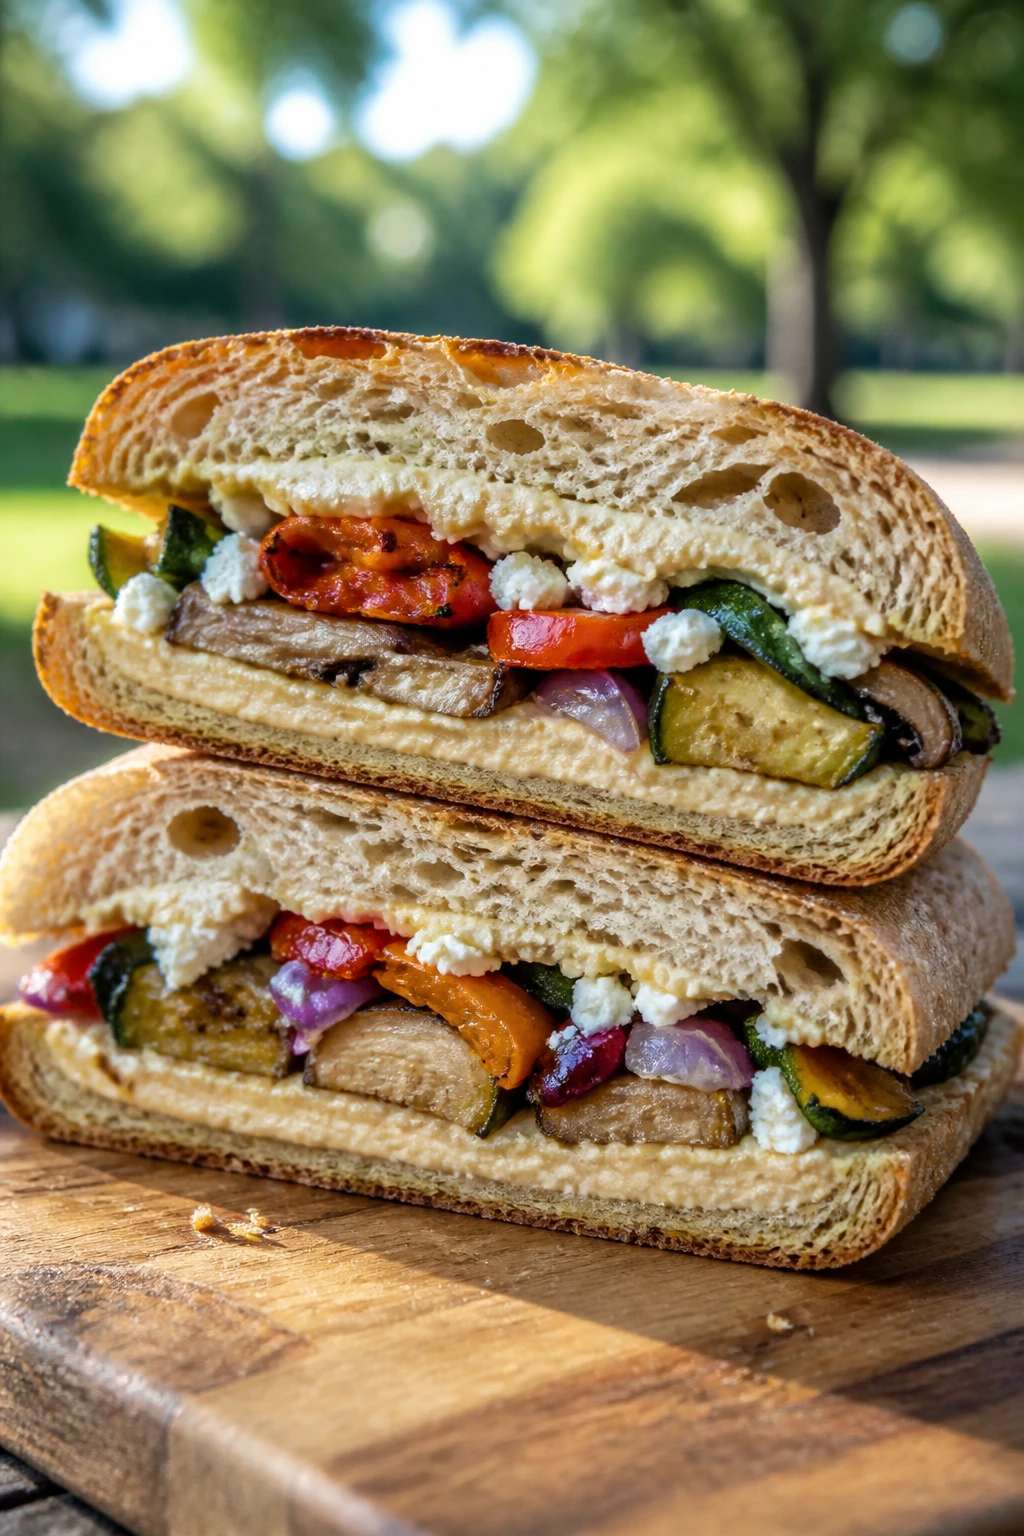
1. Roasted Vegetable Hummus Sandwich
Roasted vegetables do something nice for a sandwich: they soften and sweeten, but they still keep enough structure to feel like food, not paste. This one lands in that sweet spot where the hummus adds body, the feta adds salt, and the greens keep the whole thing from feeling heavy in the wrong way.
It’s the sort of sandwich I reach for when I want something that tastes deliberate. The roasted zucchini, bell pepper, onion, and mushrooms bring a little char, and that char matters outdoors because it keeps the filling tasting vivid even after it cools down.
Why It Works:
The roasted vegetables do the work of both flavor and texture, which is why this sandwich feels bigger than the ingredient list suggests. Hummus acts like a moisture barrier and a spread at the same time, so the bread doesn’t get hit with vegetable juices first. A quick toast on the bread adds enough crunch to survive the trip. The feta and balsamic glaze give you salt and acid, which is the part people forget when they build vegetarian sandwiches. Without those two, the whole thing can taste flat by the second bite.
Key Ingredients:
- 1 medium zucchini, sliced into 1/4-inch planks — thin enough to roast fast, thick enough to stay intact.
- 1 red bell pepper, cut into 1-inch strips — it softens and sweetens in the oven.
- 1 small red onion, cut into wedges — the edges caramelize and give the filling depth.
- 8 ounces cremini mushrooms, halved — they bring a meaty bite without any actual meat.
- 2 tablespoons olive oil — enough to coat the vegetables so they brown instead of dry out.
- 1 teaspoon kosher salt and 1/2 teaspoon black pepper — the vegetables need seasoning before they hit the oven.
- 1 teaspoon dried oregano — a small amount gives the filling a Mediterranean edge.
- 1 cup hummus — use a thick one; thin hummus turns runny on soft bread.
- 4 ciabatta rolls or 1 large ciabatta loaf, split — the chew matters here.
- 2 cups baby arugula — peppery greens keep the sandwich from tasting too soft.
- 4 ounces feta, crumbled — for salty little pockets in every bite.
- 2 tablespoons balsamic glaze — drizzle at the end so it stays bold.
Quick Steps:
-
Roast the vegetables: Preheat the oven to 425°F (220°C). Toss the zucchini, bell pepper, red onion, and mushrooms with olive oil, salt, pepper, and oregano, then spread them on a rimmed sheet pan in a single layer. Roast for 18 to 22 minutes, stirring once halfway through, until the vegetables are softened and browned at the edges.
-
Cool the filling slightly: Pull the vegetables from the oven and let them sit for 5 to 10 minutes. That short pause keeps steam from softening the bread as soon as you assemble the sandwiches.
-
Toast the bread: Split the ciabatta rolls and toast the cut sides for 2 to 3 minutes in the oven or in a dry skillet until they feel dry and lightly crisp. You want structure, not a hard shell.
-
Spread and layer: Smear about 1/4 cup hummus on the bottom half of each roll. Add a handful of arugula, then pile on the roasted vegetables, about 1/4 of the batch per sandwich. Finish with feta and a thin drizzle of balsamic glaze.
-
Press and wrap: Close the sandwiches, press down gently with your palm, and wrap them in parchment or foil if you’re packing them for later. Let them sit 10 to 15 minutes so the flavors settle before slicing.
Equipment for This Recipe:
- Rimmed sheet pan — gives the vegetables room to brown.
- Parchment paper — makes cleanup easier and keeps the mushrooms from sticking.
- Chef’s knife and cutting board — for clean vegetable cuts.
- Dry skillet or oven rack — for toasting the bread.
- Parchment or foil — handy if the sandwiches are going into a cooler.
How to Serve This Dish:
Slice each sandwich in half on a slight diagonal so the layers show. A handful of olives, a pile of grapes, or a simple cucumber salad fits the same basket without fighting the filling. One sandwich makes a solid lunch for one adult with a small side, or two halves can work as part of a bigger picnic spread.
Pro Tips for This Recipe:
- Roast the mushrooms until they look browned and a little wrinkled; pale mushrooms taste watery.
- Use a thick hummus, not a whipped one, or the bread softens too fast.
- Let the vegetables cool before assembly. Hot filling plus soft bread equals mush.
- If you like sharper flavor, rub the cut bread with a halved garlic clove before spreading the hummus.
Variations on This Dish:
- Smoky Chipotle Version: Swap plain hummus for chipotle hummus and add roasted corn for a sweeter, hotter filling.
- Olive Garden Mix: Add chopped Kalamata olives and a little parsley to the vegetables for a briny edge.
- Vegan Pantry Build: Skip the feta and add sliced avocado right before serving; the avocado makes the sandwich richer without changing the basic structure.
Common Mistakes to Avoid with This Dish:
- Overcrowding the pan: Packed vegetables steam instead of roast, and you lose the browned edges that make this sandwich work.
- Using watery hummus: Thin hummus spreads into the bread and turns the bottom slice gummy.
- Assembling too early: If the sandwich sits fully built for hours, the arugula wilts and the bread absorbs the vegetable juices.
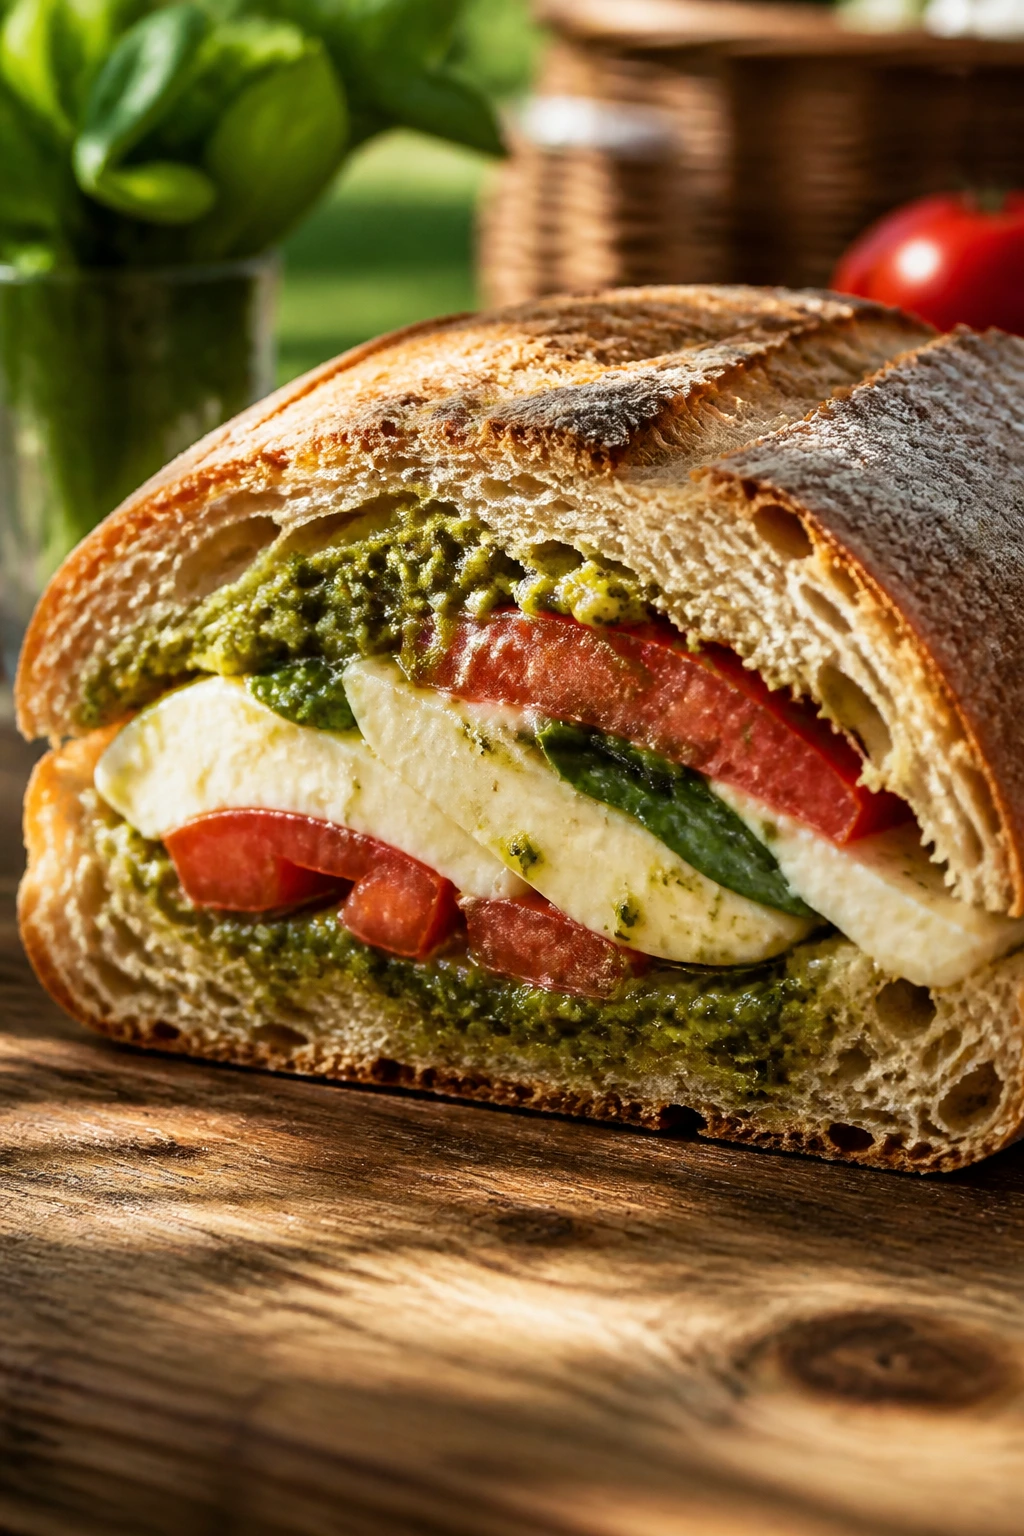
2. Caprese Pesto Picnic Loaf
This is the sandwich that smells like summer the second you slice the tomatoes. The basil pesto hits first, then the sweet tomato juice, then the milky stretch of mozzarella. If the bread is good, it feels clean and luxurious without being fussy.
I like this one on a loaf rather than separate buns because the shape gives you control. You can build a tighter, neater sandwich, and tight matters when you’re carrying lunch in a basket instead of eating over a counter.
Why It Works:
Caprese fillings can become slippery if you don’t pay attention, but a loaf of ciabatta or a split baguette gives the ingredients something to cling to. Salting the tomatoes for a few minutes pulls off excess juice before it reaches the bread. Pesto adds fat and herb flavor, so the sandwich doesn’t rely on raw tomato alone. A little arugula or basil adds bite, while balsamic glaze gives the same finishing note you’d expect from a well-built salad.
Key Ingredients:
- 1 large ciabatta loaf, about 12 to 14 ounces — sturdy enough to hold wet fillings.
- 1/2 cup basil pesto — homemade or store-bought, but it should be thick.
- 12 ounces fresh mozzarella, sliced into 1/4-inch rounds — the soft center gives the sandwich its pull.
- 3 medium ripe tomatoes, sliced 1/4-inch thick — ripe, not overripe and collapsing.
- 1 teaspoon kosher salt — used to draw water from the tomatoes.
- 1 cup baby arugula or torn basil leaves — gives the sandwich a fresh edge.
- 2 tablespoons olive oil — for brushing the bread if you want extra richness.
- 2 tablespoons balsamic glaze — the sweet, dark note at the end.
- Fresh black pepper, to taste — mozzarella needs it more than people think.
Quick Steps:
-
Drain the tomatoes: Lay the tomato slices on a plate, sprinkle them with salt, and let them sit for 10 minutes. Pat them dry with paper towels before assembling.
-
Prep the loaf: Split the ciabatta horizontally. If the inside feels very soft, scoop out a little of the crumb so the sandwich doesn’t get too thick and squishy.
-
Toast lightly: Brush the cut sides with olive oil if you want, then toast them for 2 to 4 minutes at 400°F (205°C) or in a skillet until just lightly crisp.
-
Build the layers: Spread pesto on both cut sides of the bread. Layer mozzarella first, then tomato, then arugula or basil. Finish with black pepper and a thin drizzle of balsamic glaze.
-
Press and rest: Close the loaf, press it gently, and let it sit for 10 to 15 minutes before slicing. That rest helps the bread absorb flavor without getting wet.
Equipment for This Recipe:
- Sharp serrated knife — slices through ciabatta cleanly.
- Cutting board — use one big enough to catch tomato juice.
- Paper towels — essential for draining the tomatoes.
- Small pastry brush — optional, but useful for oiling the bread.
- Foil or parchment — helpful if you’re packing it for a picnic.
How to Serve This Dish:
Cut the loaf into thick wedges and serve it slightly chilled or at cool room temperature. It sits well beside fresh fruit, marinated olives, or a crisp green salad with lemon dressing. One large loaf feeds four people if you’re adding sides, or two hungry eaters if the sandwich is the main event.
Pro Tips for This Recipe:
- Salt the tomatoes and dry them well. This is the difference between a tidy sandwich and tomato soup on bread.
- Use pesto sparingly on the side that faces the tomatoes; too much pesto can slide.
- If you want a cleaner bite, layer mozzarella on both sides of the tomato so the juices stay trapped.
- Make it close to serving time. Caprese is at its best when the tomato still tastes bright.
Variations on This Dish:
- Pesto-Free Basil Stack: Replace pesto with a swipe of olive oil, minced basil, and a little garlic if you want a lighter sandwich.
- Roasted Tomato Version: Use oven-roasted tomato slices when you want deeper flavor and less moisture.
- Spicy Green Caprese: Add a few sliced pepperoncini or a little Calabrian chili paste to the pesto.
Common Mistakes to Avoid with This Dish:
- Skipping tomato drainage: Wet tomatoes soak the bread faster than anything else in this list.
- Using floppy bread: Soft sandwich bread gets crushed by mozzarella and tomato juice.
- Overloading the pesto: Too much pesto makes the loaf slick and overwhelms the tomatoes.
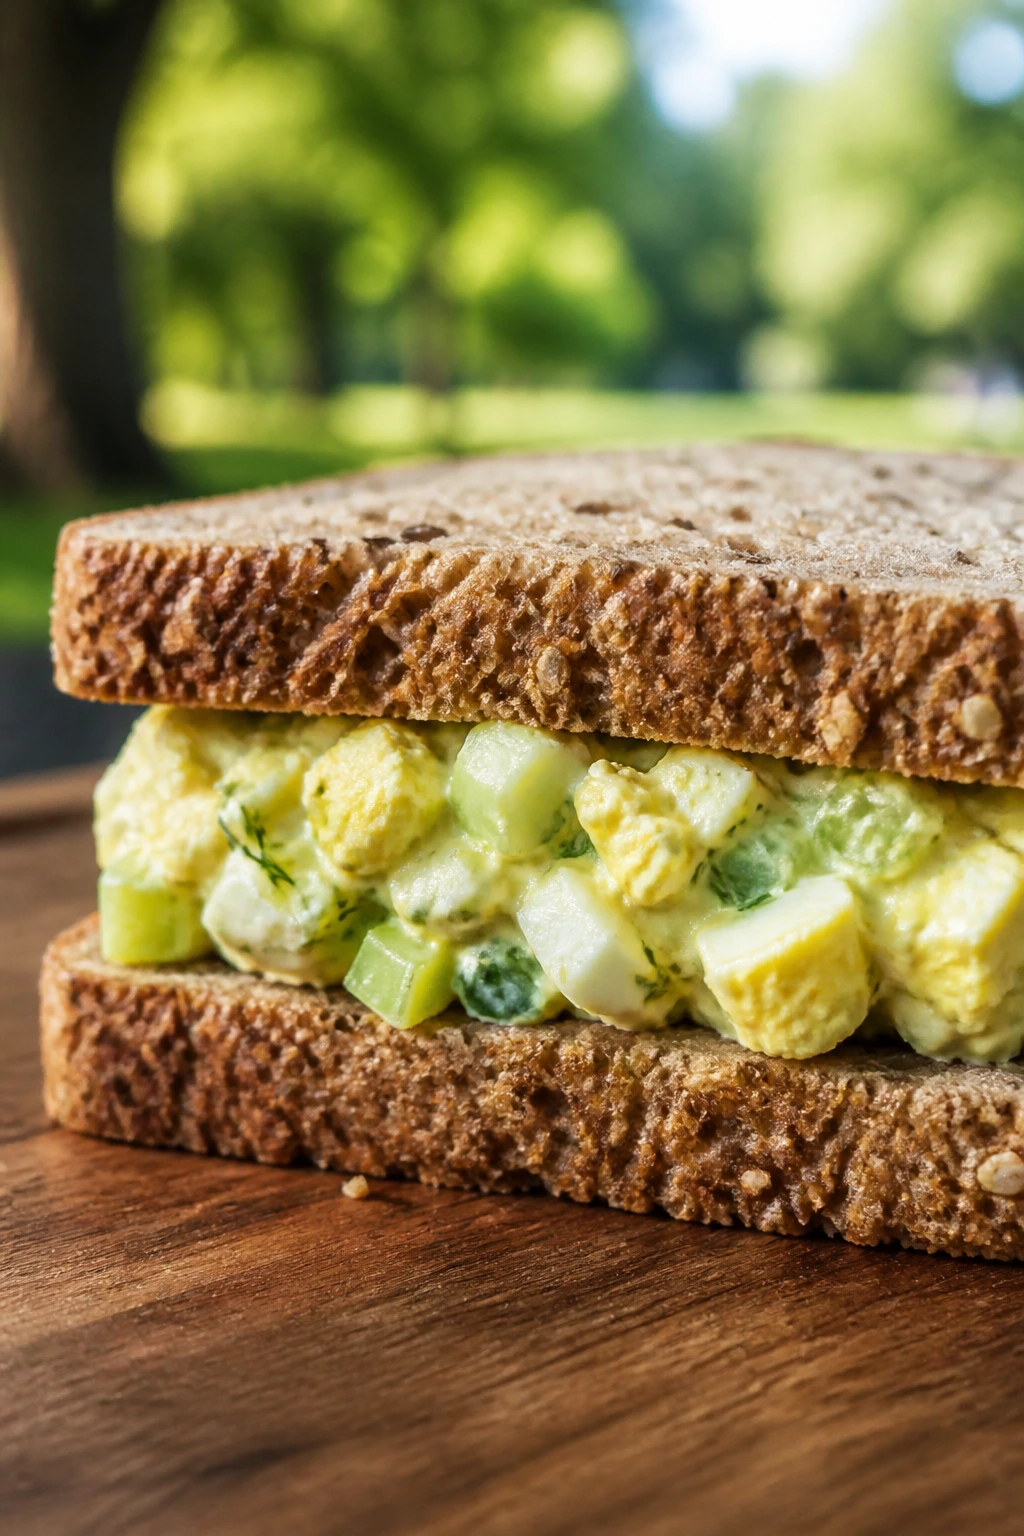
3. Dill Egg Salad on Whole Grain
Eight eggs, a little mayo, some mustard, and a handful of dill can turn into a sandwich that feels old-school in the best possible way. The texture is what sells it: creamy but not runny, with small pieces of egg white and yolk instead of an overblended paste.
This is one of the best picnic sandwiches because it tastes composed even when it’s cold. The key is balancing richness with acid, so the filling stays bright rather than heavy.
Why It Works:
Egg salad brings built-in protein, which means the sandwich eats like a full lunch without needing meat. The celery and pickles give crunch, while lemon and Dijon keep the filling from tasting flat once it chills. Whole grain bread adds sturdiness and a little nuttiness. A thin layer of lettuce under the egg salad helps shield the bread from moisture, which is a small move that pays off every time.
Key Ingredients:
- 8 large eggs — gives you enough filling for 4 sandwiches.
- 1/3 cup mayonnaise — enough for creaminess without turning the filling loose.
- 2 tablespoons plain Greek yogurt — lightens the mix and adds tang.
- 1 tablespoon Dijon mustard — brings sharpness.
- 2 tablespoons finely chopped dill pickles — for crunch and salt.
- 1 celery rib, finely diced — adds fresh snap.
- 2 tablespoons chopped fresh chives — soft onion flavor, no harsh bite.
- 1 teaspoon lemon juice — keeps the filling lively.
- 1/2 teaspoon kosher salt and 1/4 teaspoon black pepper — adjust after chilling.
- 8 slices whole grain bread — or a sturdy sandwich loaf.
- 4 leaves romaine or butter lettuce — a barrier between bread and filling.
Quick Steps:
-
Cook the eggs: Place the eggs in a saucepan, cover with cold water by 1 inch, and bring to a boil over medium-high heat. Turn off the heat, cover the pan, and let the eggs sit for 10 to 11 minutes.
-
Chill and peel: Transfer the eggs to an ice bath for 5 minutes, then peel them while they’re still cool but not icy. Dry them well so the salad doesn’t turn watery.
-
Mix the filling: Chop the eggs into small pieces and place them in a bowl. Fold in the mayonnaise, yogurt, Dijon, pickles, celery, chives, lemon juice, salt, and pepper until the mixture is creamy but still textured.
-
Chill briefly: Refrigerate the egg salad for at least 15 minutes. The flavor settles, and the sandwich is easier to build cleanly.
-
Assemble: Toast the bread lightly if you like, add lettuce to the bottom slice, then spoon on a thick layer of egg salad. Close the sandwich and slice it cleanly with a sharp knife.
Equipment for This Recipe:
- Medium saucepan — for the eggs.
- Bowl for ice water — stops the cooking fast.
- Mixing bowl — wide enough to fold without smashing the eggs.
- Sharp chef’s knife — gives you even egg pieces.
- Serrated knife — helpful for slicing the finished sandwich.
How to Serve This Dish:
Serve it with kettle chips, cherry tomatoes, or a few pickle spears. If you’re packing the sandwiches separately, wrap each one tightly in parchment and then foil so the filling stays in place. One sandwich usually makes a full lunch for one person, especially if you add fruit on the side.
Pro Tips for This Recipe:
- Chop the eggs by hand instead of mashing them into paste. A little texture makes the filling feel fresher.
- Cool the filling before assembling so the bread doesn’t warm and soften.
- Add salt after the egg salad chills; cold food reads less salty than warm food.
- If you like a little bite, add a pinch of celery seed or a spoonful of chopped dill.
Variations on This Dish:
- Curried Egg Salad: Add 1 teaspoon curry powder and a tablespoon of diced apple for a sweet-spicy edge.
- Avocado Egg Salad: Replace half the mayonnaise with mashed avocado and squeeze in extra lemon.
- Herb-Dill Version: Mix in parsley and tarragon for a greener, more aromatic filling.
Common Mistakes to Avoid with This Dish:
- Overcooking the eggs: Gray yolks and rubbery whites make the sandwich taste stale before you even add the mayo.
- Using too much mayo at once: The salad should hold its shape on the bread, not spread like frosting.
- Skipping the chill: Warm egg salad smears and makes a mess when you try to wrap it.
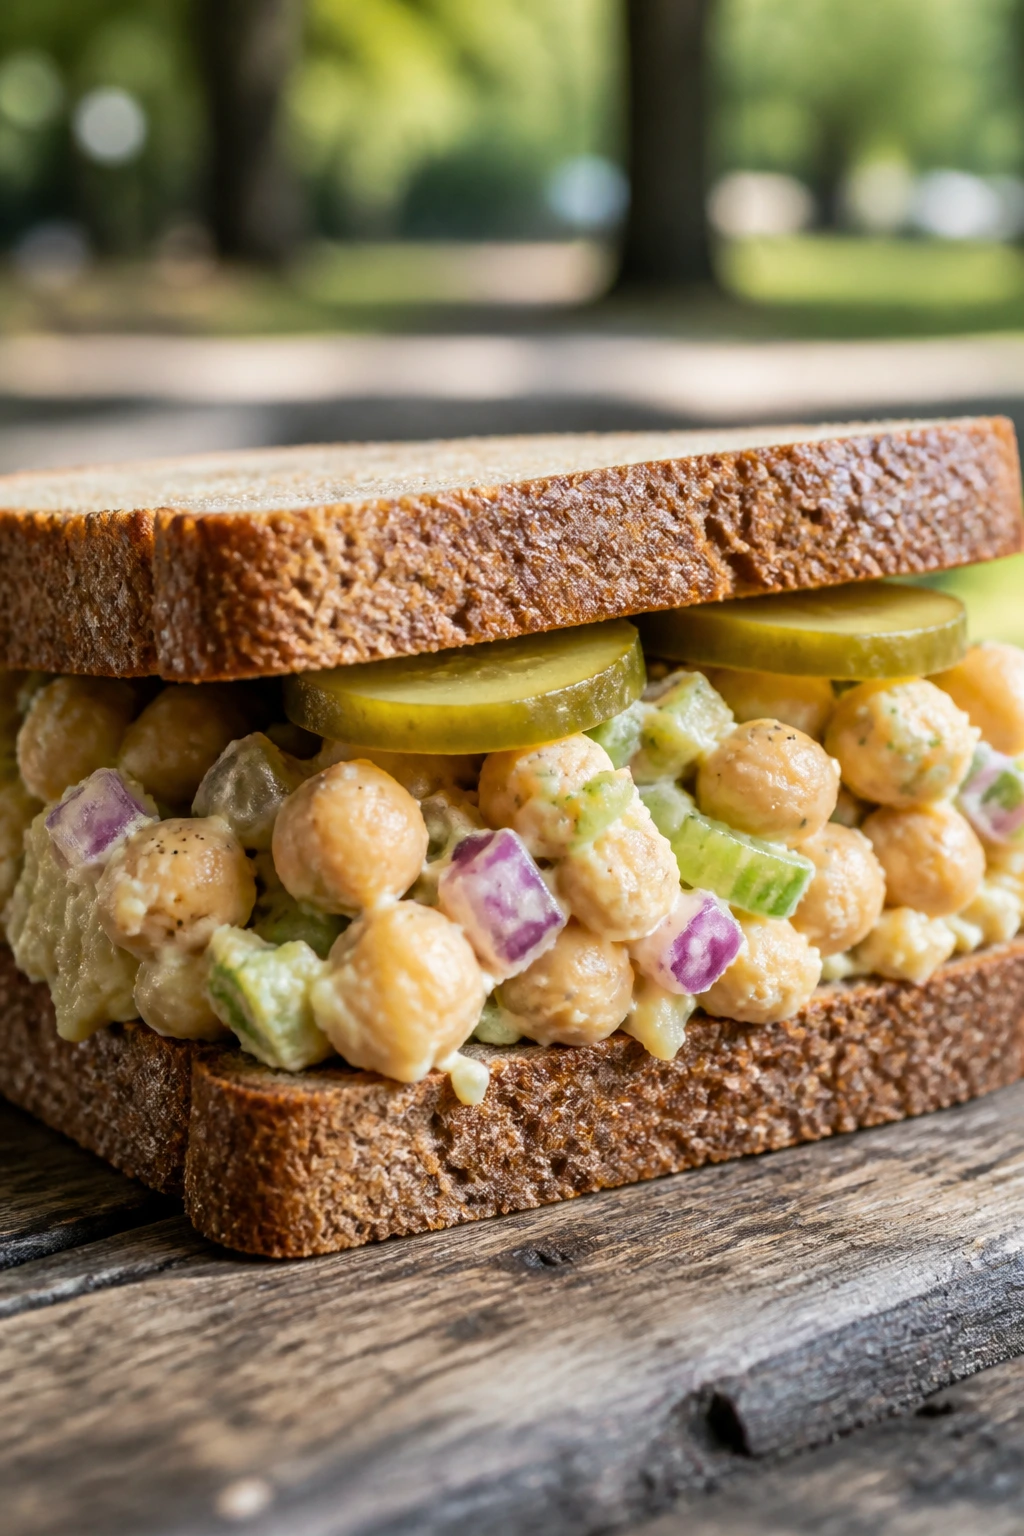
4. Chickpea Salad Sandwich with Pickles
Chickpea salad is the sandwich filling I recommend to people who want something hearty but don’t want to boil pasta, roast vegetables, or babysit a skillet. It’s quick, cold, and flexible. And when it’s made well, it has the same satisfying bite you get from a good tuna salad—just brighter.
The trick is not to blitz the chickpeas into hummus. Leave some pieces whole and some smashed. That gives the filling enough body to sit between slices of rye or sourdough without sliding out in one heavy lump.
Why It Works:
Chickpeas are dense and mild, so they take on mustard, lemon, herbs, and pickles without fighting back. The chopped celery and red onion keep the texture sharp, and a small amount of mayo gives the filling cohesion. Dijon and lemon do a lot of heavy lifting here because chilled bean salads can get dull fast. The sandwich works even better after the filling rests for a little while in the fridge; the flavors settle, and the mustard stops tasting sharp in a rough way.
Key Ingredients:
- 2 cans chickpeas, 15 ounces each, drained and rinsed — the base of the filling.
- 1/4 cup mayonnaise — enough to bind without making it soupy.
- 1 tablespoon Dijon mustard — for tang and backbone.
- 2 tablespoons dill pickles, finely chopped — gives a crunchy, salty bite.
- 1 celery stalk, finely diced — keeps the texture lively.
- 1/4 small red onion, finely minced — use less if you want a softer flavor.
- 1 tablespoon lemon juice — brightens the whole bowl.
- 2 tablespoons chopped parsley — a fresh finish.
- 1/2 teaspoon smoked paprika — optional, but it adds warmth.
- 8 slices rye, sourdough, or seeded bread — all three hold the filling well.
- Lettuce or baby spinach, for layering — keeps the bread from getting wet.
Quick Steps:
-
Mash the chickpeas: Put the chickpeas in a large bowl and mash about two-thirds of them with a fork or potato masher. Leave some whole pieces for texture.
-
Mix the dressing: Stir in the mayonnaise, Dijon, lemon juice, smoked paprika, salt, and pepper until the chickpeas are coated.
-
Fold in crunch: Add the pickles, celery, red onion, and parsley. Stir just until combined; you want a chunky salad, not a paste.
-
Taste and chill: Refrigerate for 15 to 20 minutes, then taste again. Add a pinch more salt or lemon if the chilled filling tastes quiet.
-
Build the sandwich: Toast the bread if you want more structure. Add lettuce or spinach to the bottom slice, spoon on the chickpea salad, and close the sandwich firmly.
Equipment for This Recipe:
- Large mixing bowl — gives you room to mash and fold.
- Fork or potato masher — for controlling the texture.
- Knife and cutting board — for the celery, onion, and herbs.
- Toaster or skillet — optional, but useful for bread that needs a little help.
- Airtight container — for the filling if you’re making it ahead.
How to Serve This Dish:
This sandwich likes chips, sliced cucumbers, or a simple tomato salad with vinegar and salt. Cut it in half and wrap each half in parchment if you’re packing it for a picnic. It’s filling enough to stand alone, but a handful of fruit on the side rounds out the meal nicely.
Pro Tips for This Recipe:
- Don’t mash every chickpea. The contrast between smashed and whole is what keeps the filling interesting.
- Chill before serving so the lemon and mustard blend into the beans.
- If the mixture feels dry after chilling, stir in 1 more tablespoon of mayo or a teaspoon of olive oil.
- Rye bread handles the pickles and mustard especially well, and I’d pick it over soft sandwich bread every time.
Variations on This Dish:
- Avocado Chickpea Smash: Replace half the mayo with mashed avocado for a richer, greener filling.
- Mediterranean Chickpea Salad: Add chopped cucumber, parsley, and a few crumbles of feta.
- Curry Pickle Chickpeas: Stir in curry powder and chopped raisins if you want a sweeter, more eccentric sandwich.
Common Mistakes to Avoid with This Dish:
- Turning it into hummus: Chickpea salad needs texture. If it’s fully blended, the sandwich loses its bite.
- Overdoing the onion: Raw onion can take over the whole filling, especially after it chills.
- Packing it on soft bread: This filling is hearty, but it still needs a loaf with some chew.
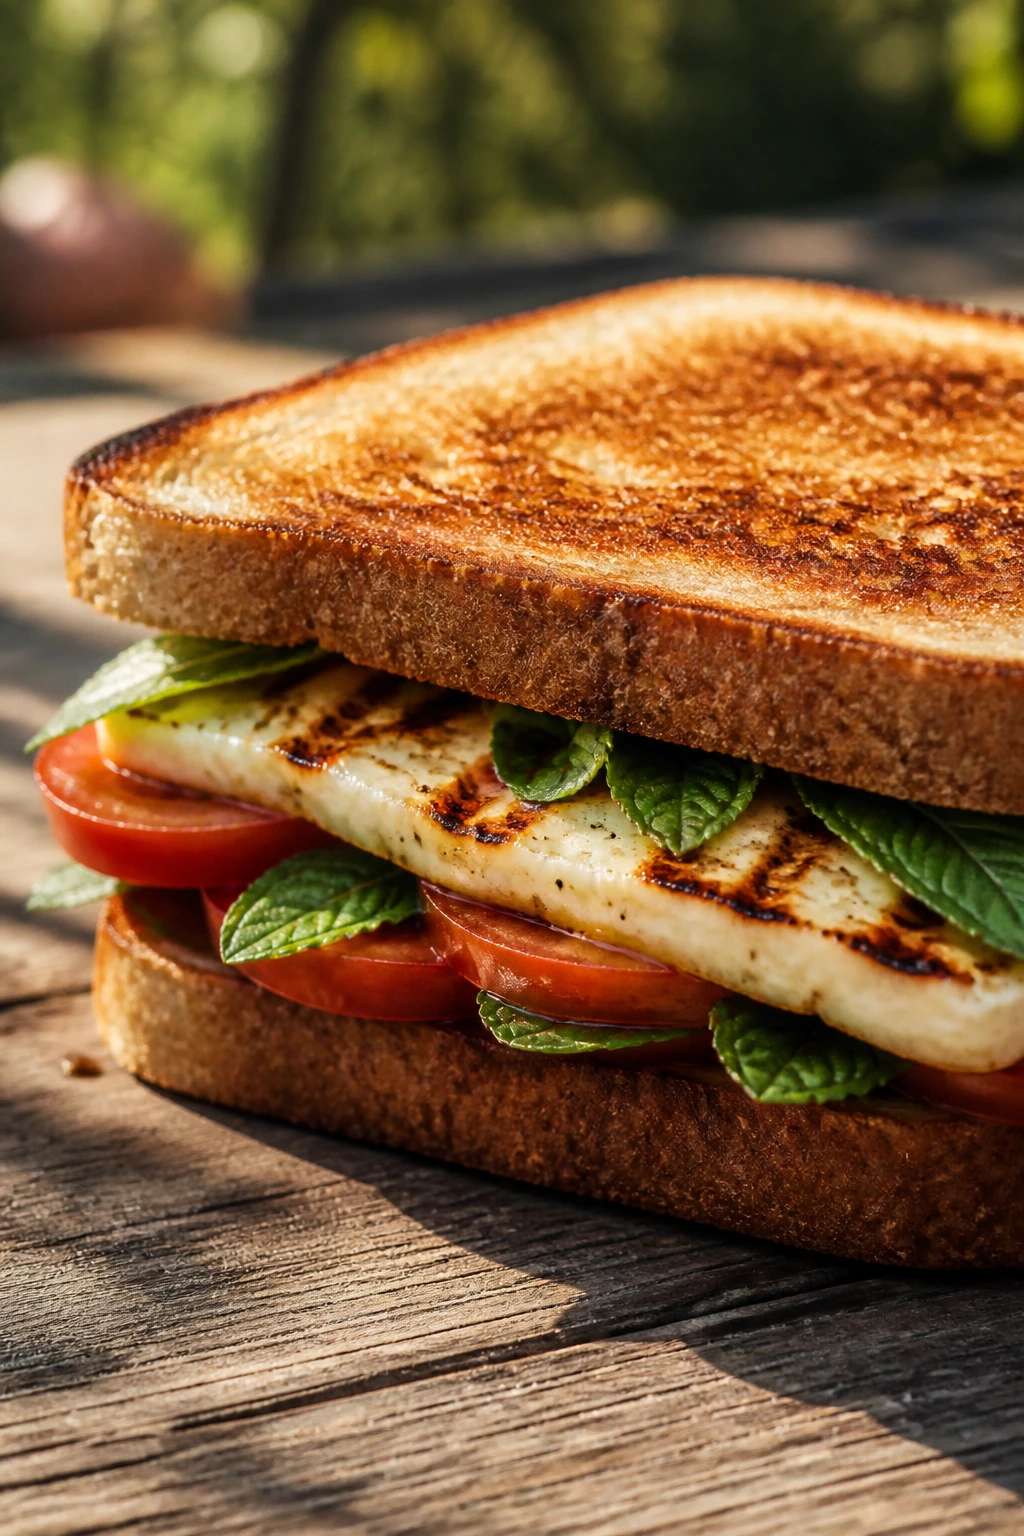
5. Grilled Halloumi and Tomato Sandwich
Halloumi is one of those ingredients that feels a little theatrical in the best way. It squeaks when raw, browns beautifully in a hot pan, and holds together while other cheeses would have turned into a puddle. Put it with tomato and mint, and you get a sandwich that tastes fresh and filling at the same time.
This is a good choice when you want something warm but not messy. Halloumi gives the structure, tomato gives the juice, and the bread gets just enough toast to carry both.
Why It Works:
Halloumi has a high melting point, which means it sears instead of collapsing. That makes it a rare cheese that can actually anchor a picnic sandwich. Tomato and cucumber bring freshness, while mint or basil cuts through the salt. A small swipe of yogurt or mayo on the bread helps the sandwich hold together, but the real key is cooking the halloumi until it’s golden on both sides. Pale halloumi tastes flat; browned halloumi tastes like the whole point.
Key Ingredients:
- 8 ounces halloumi, sliced into 1/4-inch slabs — thick enough to sear cleanly.
- 2 medium tomatoes, sliced and lightly salted — choose ones that are ripe but firm.
- 1/2 cucumber, thinly sliced — adds cool crunch.
- 2 tablespoons plain Greek yogurt or mayo — a thin spread for the bread.
- 1 tablespoon lemon juice — gives the filling lift.
- 1 tablespoon olive oil — for the skillet.
- 1/4 cup fresh mint leaves or basil leaves — keep them whole or roughly torn.
- 4 sturdy rolls or 8 slices sourdough — something with enough chew to hold cheese.
- Black pepper, to taste — halloumi likes it.
Quick Steps:
-
Salt the tomatoes: Slice the tomatoes, sprinkle them lightly with salt, and let them sit for 5 to 10 minutes. Pat them dry before assembly.
-
Sear the halloumi: Heat olive oil in a skillet over medium-high heat. Cook the halloumi for 1 to 2 minutes per side until deep golden and lightly crisp at the edges.
-
Prep the bread: Split the rolls or toast the sourdough slices so the cut sides have a little structure. A brief toast helps more than people expect.
-
Assemble the layers: Spread yogurt or mayo on the bread, add cucumber, tomato, halloumi, and herbs. Finish with black pepper and a squeeze of lemon juice.
-
Serve or wrap: Eat it right away while the halloumi still has a bit of heat, or wrap it tightly if you’re taking it to the park. It holds its shape well for a warm sandwich.
Equipment for This Recipe:
- Skillet — a stainless or cast-iron pan works best.
- Tongs or spatula — for flipping the cheese.
- Paper towels — useful for drying the tomatoes.
- Knife and cutting board — for clean slices.
- Foil or parchment — if you’re carrying it warm.
How to Serve This Dish:
Serve it with olives, lemony potato salad, or a handful of cherry tomatoes and cucumbers. I like it cut into thirds instead of halves because halloumi slices can be thick and a little tall. It works as a main sandwich or as the warm part of a bigger picnic spread.
Pro Tips for This Recipe:
- Dry the halloumi before cooking so it browns instead of steaming.
- Don’t crowd the skillet; halloumi needs direct contact with hot metal.
- Use firm tomatoes. Soft ones release too much juice once you cut into the sandwich.
- Mint keeps the flavor lighter than basil, which I prefer here.
Variations on This Dish:
- Harissa Halloumi: Brush the bread with a little harissa mayo for heat.
- Avocado Halloumi Stack: Add thin avocado slices for a creamier, richer filling.
- Herbed Zucchini Version: Add ribbons of raw zucchini or quick-grilled zucchini for more crunch.
Common Mistakes to Avoid with This Dish:
- Cooking halloumi over low heat: It just sweats and turns rubbery.
- Skipping the tomato drain: Too much tomato juice makes the bread slick.
- Eating it straight from the skillet without a rest: Give it a minute so the cheese firms up a little and doesn’t slide.
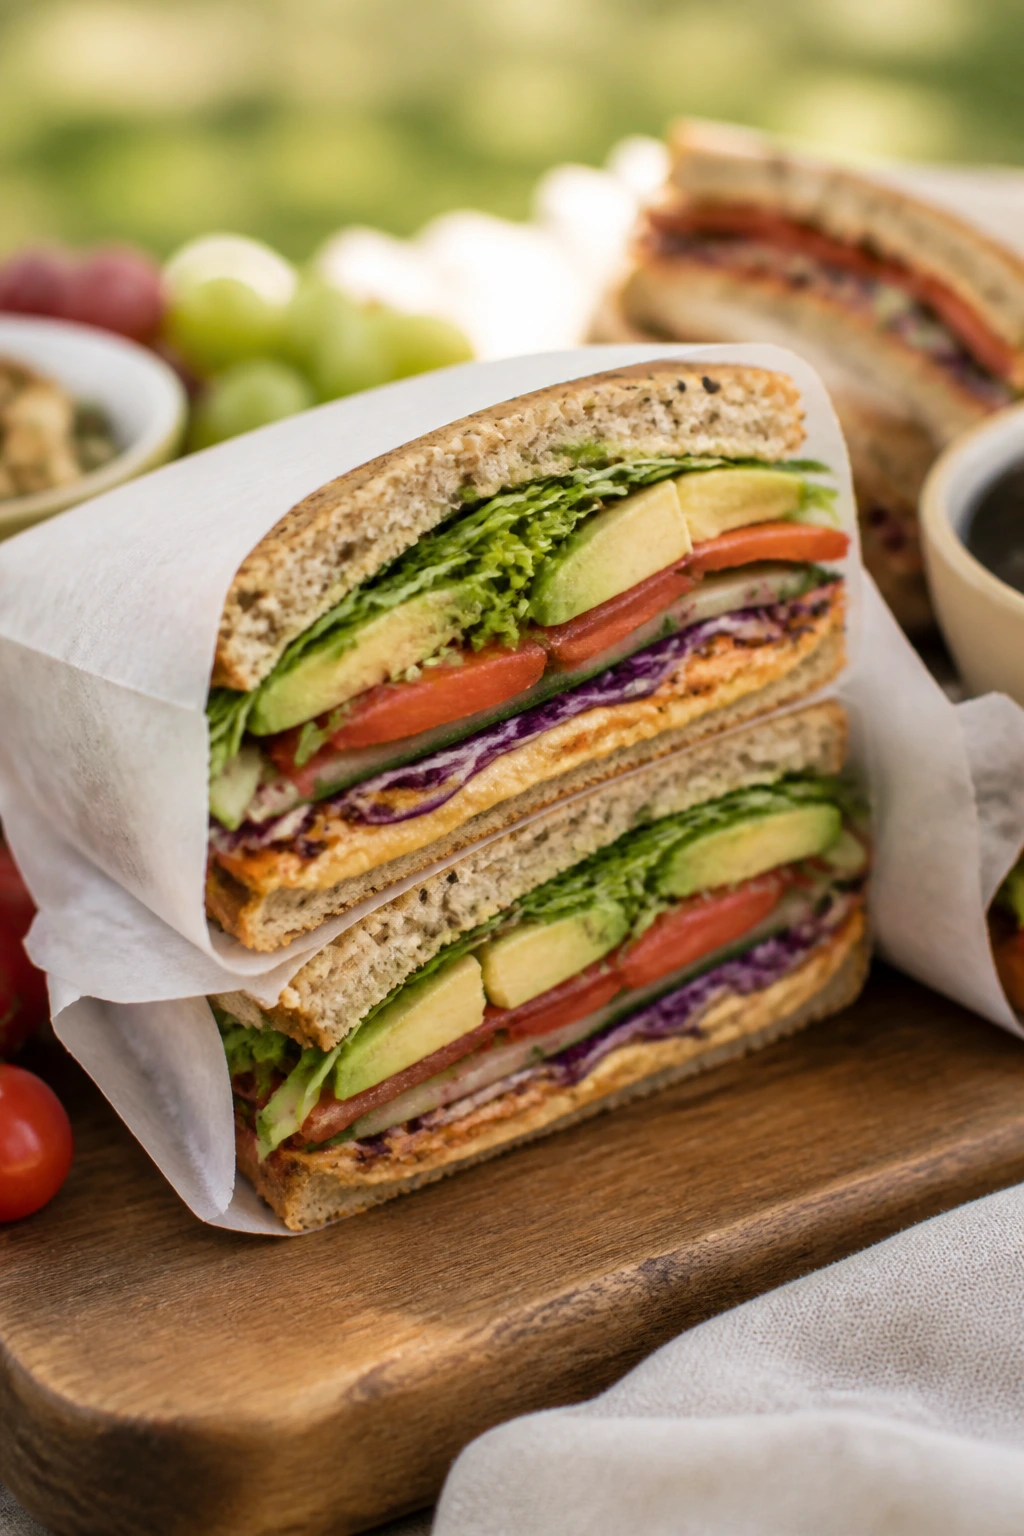
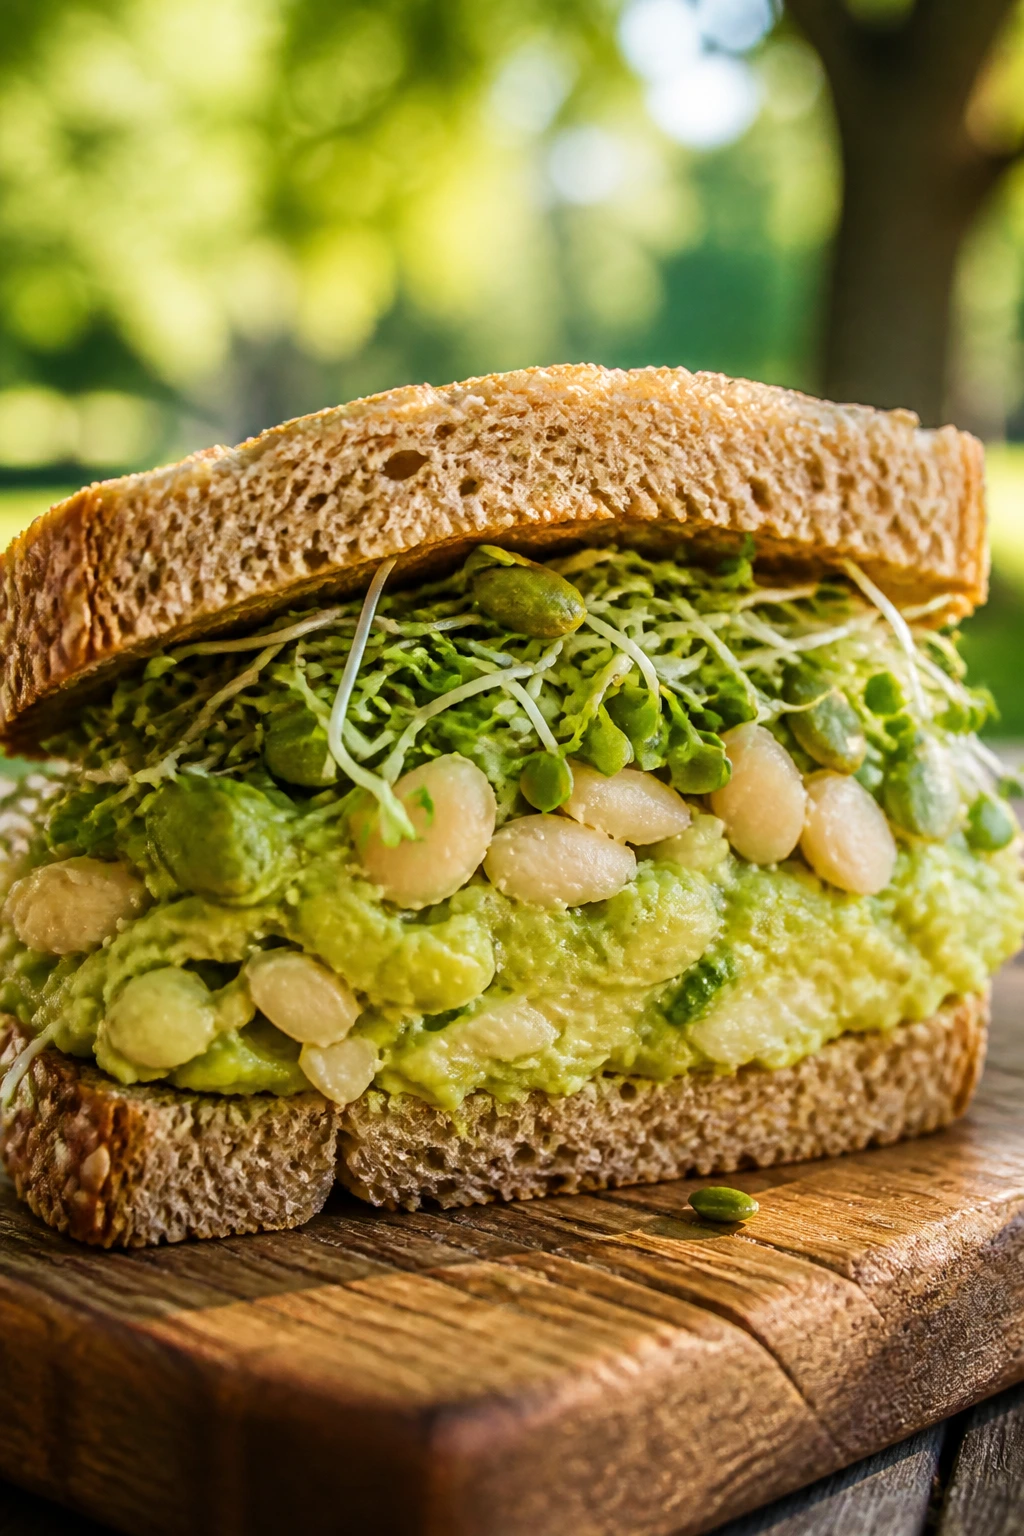
6. White Bean, Avocado, and Sprout Sandwich
This is the sandwich for people who want something green but not flimsy. White beans give the body, avocado gives the creaminess, and sprouts add that fresh snap you miss when everything else is dense.
It’s also one of the easier sandwiches to make look intentional. A neat mash of beans and avocado on good bread, then a few seeds and sprouts on top, and the whole thing feels cleaner than it has any right to.
Why It Works:
Cannellini beans are soft enough to mash but substantial enough to give the filling structure. Avocado replaces some of the usual mayo, which keeps the sandwich rich without feeling heavy or overly slick. Lemon juice slows browning and gives the mash a sharper edge. Sunflower seeds or pepitas bring crunch, and sprouts create lift so the sandwich doesn’t feel like a brick. The flavor is mild, so it benefits from a confident hand with salt.
Key Ingredients:
- 1 can cannellini beans, 15 ounces, drained and rinsed — the base of the filling.
- 1 ripe avocado — gives creaminess and body.
- 1 tablespoon lemon juice — keeps the avocado bright.
- 1 small garlic clove, grated — a little goes a long way.
- 2 tablespoons olive oil — smooths the mash.
- 1/2 teaspoon kosher salt and 1/4 teaspoon black pepper — the filling needs clear seasoning.
- 1/2 cup sunflower seeds or pepitas — for crunch.
- 2 cups baby spinach — the leaves hold up better than delicate lettuce.
- 1 cup alfalfa or broccoli sprouts — fresh and crisp.
- 8 slices multigrain bread — sturdy enough for the mash.
Quick Steps:
-
Mash the beans: Place the beans in a bowl and mash them with a fork until about half of them are broken down. Leave some beans whole for texture.
-
Add the avocado mixture: Mash the avocado with lemon juice, grated garlic, olive oil, salt, and pepper in a separate bowl, then fold it into the beans. You want a chunky spread, not guacamole.
-
Taste and adjust: Add more salt, pepper, or lemon if the mixture tastes flat. Cold avocado needs a little extra seasoning to come alive.
-
Toast the bread: Give the bread a light toast so it doesn’t go soft under the mash.
-
Assemble: Spread the bean-avocado mixture on the bread, layer spinach, sprouts, and sunflower seeds, then close the sandwich firmly.
Equipment for This Recipe:
- Two mixing bowls — one for beans, one for avocado.
- Fork or potato masher — for controlling texture.
- Microplane or grater — for the garlic.
- Toaster or skillet — for the bread.
- Airtight container — if you’re making the mash ahead and keeping the avocado separate.
How to Serve This Dish:
Serve it with cucumber spears, radishes, or a handful of grapes. A squeeze of extra lemon over the plate keeps the avocado from feeling too rich. Cut the sandwich after it rests for a few minutes so the mash stays in place.
Pro Tips for This Recipe:
- Mix the avocado in close to serving time if you want the color to stay bright.
- Toast the bread lightly; too much toast and the sandwich gets brittle.
- Sunflower seeds give more crunch than walnuts here, which I like because they don’t fight the beans.
- If you want a sharper finish, add a few thin slices of pickled onion.
Variations on This Dish:
- Herbed Bean Smash: Add dill and parsley for a greener, more aromatic filling.
- Everything-Seed Version: Sprinkle everything bagel seasoning over the filling before closing the sandwich.
- Lemon-Tahini Swap: Use tahini in place of part of the avocado for a nuttier finish.
Common Mistakes to Avoid with This Dish:
- Making it too smooth: The texture should stay chunky, or the sandwich loses interest.
- Leaving the avocado exposed for too long: It browns fast, and the filling gets dull in both color and taste.
- Using delicate bread: Soft slices can’t handle the mash and will buckle halfway through lunch.
7. Spinach Artichoke Grilled Cheese
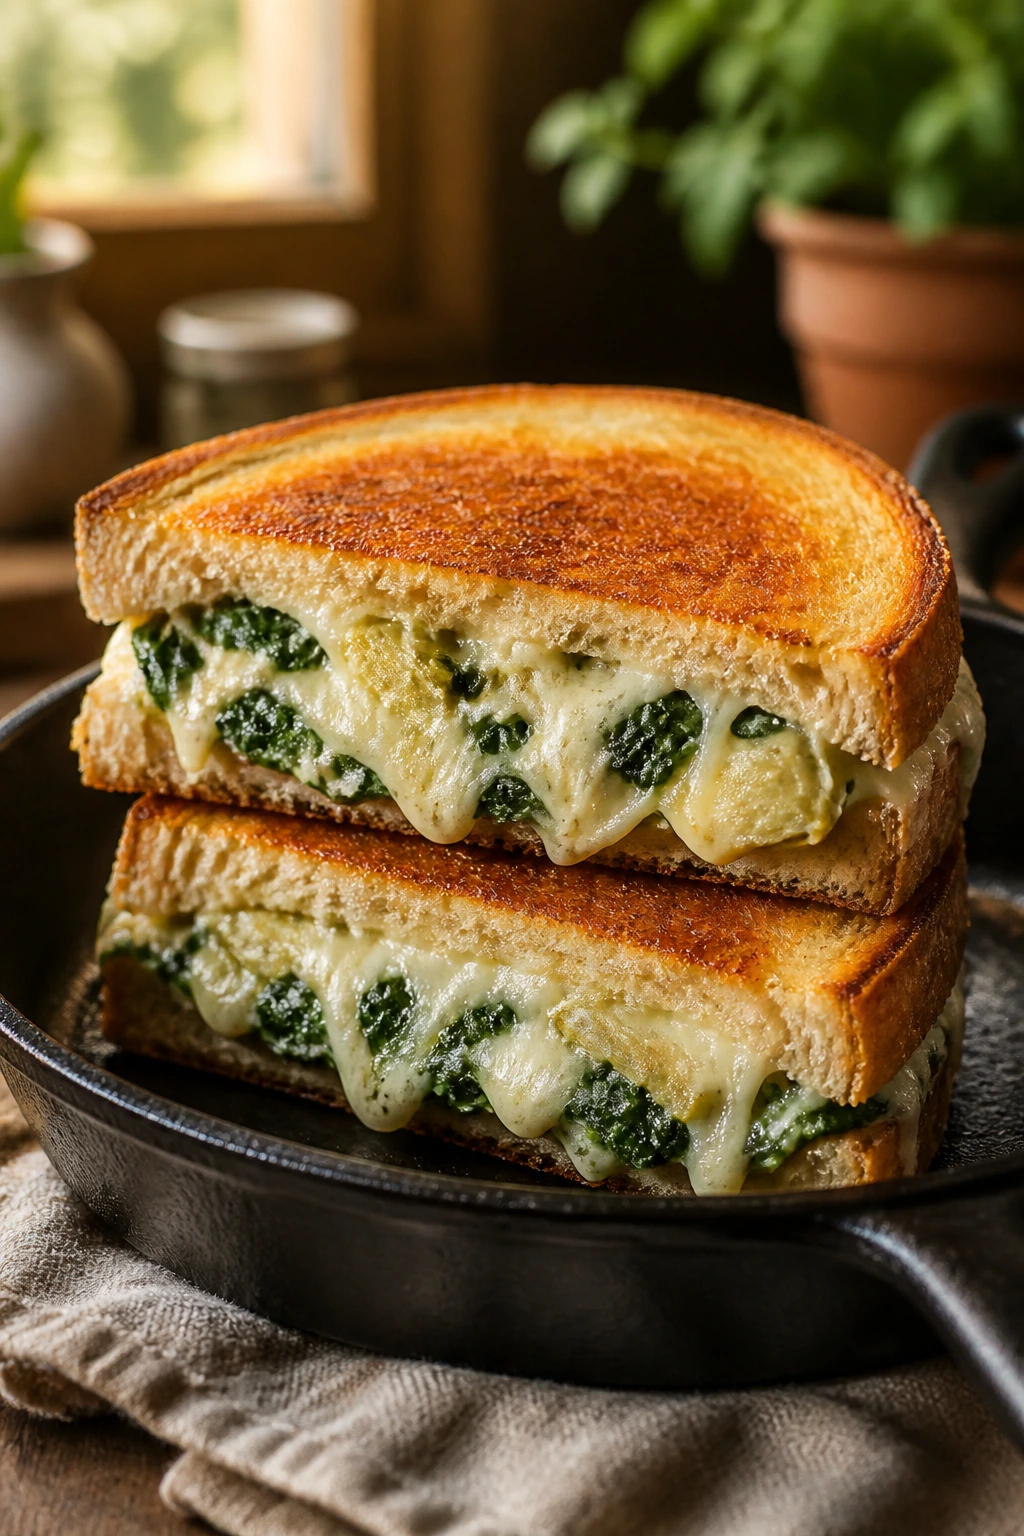
This is the sandwich that tastes like it belongs on a diner menu but can be built at home with a handful of pantry staples. Spinach, artichokes, cream cheese, and mozzarella make a filling that melts into itself instead of sliding apart.
It’s a little richer than the cold sandwiches in this collection, and that’s the point. If you want one warm option for the basket, this is the one I’d make.
Why It Works:
The spinach artichoke filling acts like a built-in dip, which means the sandwich gets flavor from the filling before the cheese even melts. Cream cheese gives body, mozzarella gives stretch, and parmesan adds a salty finish. Because the spinach is squeezed dry, the filling stays thick enough to sit between the bread instead of leaking out. A medium skillet over moderate heat gives you a crisp crust before the cheese burns. That balance matters more than speed.
Key Ingredients:
- 1 cup frozen spinach, thawed and squeezed very dry — water is the enemy here.
- 1 cup canned or jarred artichoke hearts, chopped and drained — the tang wakes up the filling.
- 4 ounces cream cheese, softened — binds the filling.
- 1 cup shredded mozzarella — for melt and stretch.
- 1/2 cup grated parmesan — adds salty depth.
- 1 garlic clove, grated — a little sharpness.
- 8 slices sturdy bread, such as sourdough or country loaf — thin sandwich bread won’t hold up.
- 2 tablespoons butter, softened — for the outside of the bread.
- Black pepper, to taste — the filling can take more than you think.
Quick Steps:
-
Make the filling: Stir together the spinach, artichokes, cream cheese, mozzarella, parmesan, garlic, and black pepper in a bowl until thick and spreadable.
-
Butter the bread: Spread butter on one side of each bread slice. That outer layer should cover the whole surface so the sandwich browns evenly.
-
Build the sandwiches: Spread the filling on the unbuttered side of four slices, then top with the remaining bread slices, buttered side facing out.
-
Cook slowly: Place the sandwiches in a skillet over medium heat and cook for 3 to 4 minutes per side, pressing gently with a spatula, until the bread is deep golden and the cheese inside has melted.
-
Rest before slicing: Let the grilled cheese sit for 2 minutes before cutting. If you slice too early, the filling runs out instead of settling.
Equipment for This Recipe:
- Skillet or griddle — for even browning.
- Mixing bowl — for the filling.
- Spatula — for pressing and flipping.
- Cheese grater — if you’re grating parmesan fresh.
- Paper or foil — for wrapping if you’re packing it warm.
How to Serve This Dish:
Serve it with a handful of cherry tomatoes, pepperoncini, or a simple green salad with lemon vinaigrette. Since this one is richer than the cold sandwiches, I like to cut it into quarters and let people take smaller pieces alongside lighter items. It’s best warm, but it’s still good at room temperature if it’s packed tightly.
Pro Tips for This Recipe:
- Squeeze the spinach until it feels almost dry. If you think you’ve squeezed enough, do one more squeeze.
- Keep the heat at medium. High heat scorches the bread before the cheese melts.
- Use a bread with enough thickness to handle the filling; the sandwich gets heavy once the cheese melts.
- Let it rest for a minute or two before wrapping so the crust doesn’t steam itself soft.
Variations on This Dish:
- Red Pepper Spinach Melt: Add chopped roasted red peppers for sweetness and color.
- Goat Cheese Version: Replace part of the cream cheese with goat cheese for a sharper filling.
- Jalapeño Skillet Melt: Stir in sliced jalapeños if you want heat with the richness.
Common Mistakes to Avoid with This Dish:
- Wet spinach: If the spinach isn’t dry, the filling leaks and the bread softens.
- Too much heat: The bread browns before the cheese inside has time to melt.
- Skipping the rest: Cut too soon and the filling runs out onto the plate.
8. Eggplant Parmesan Sub
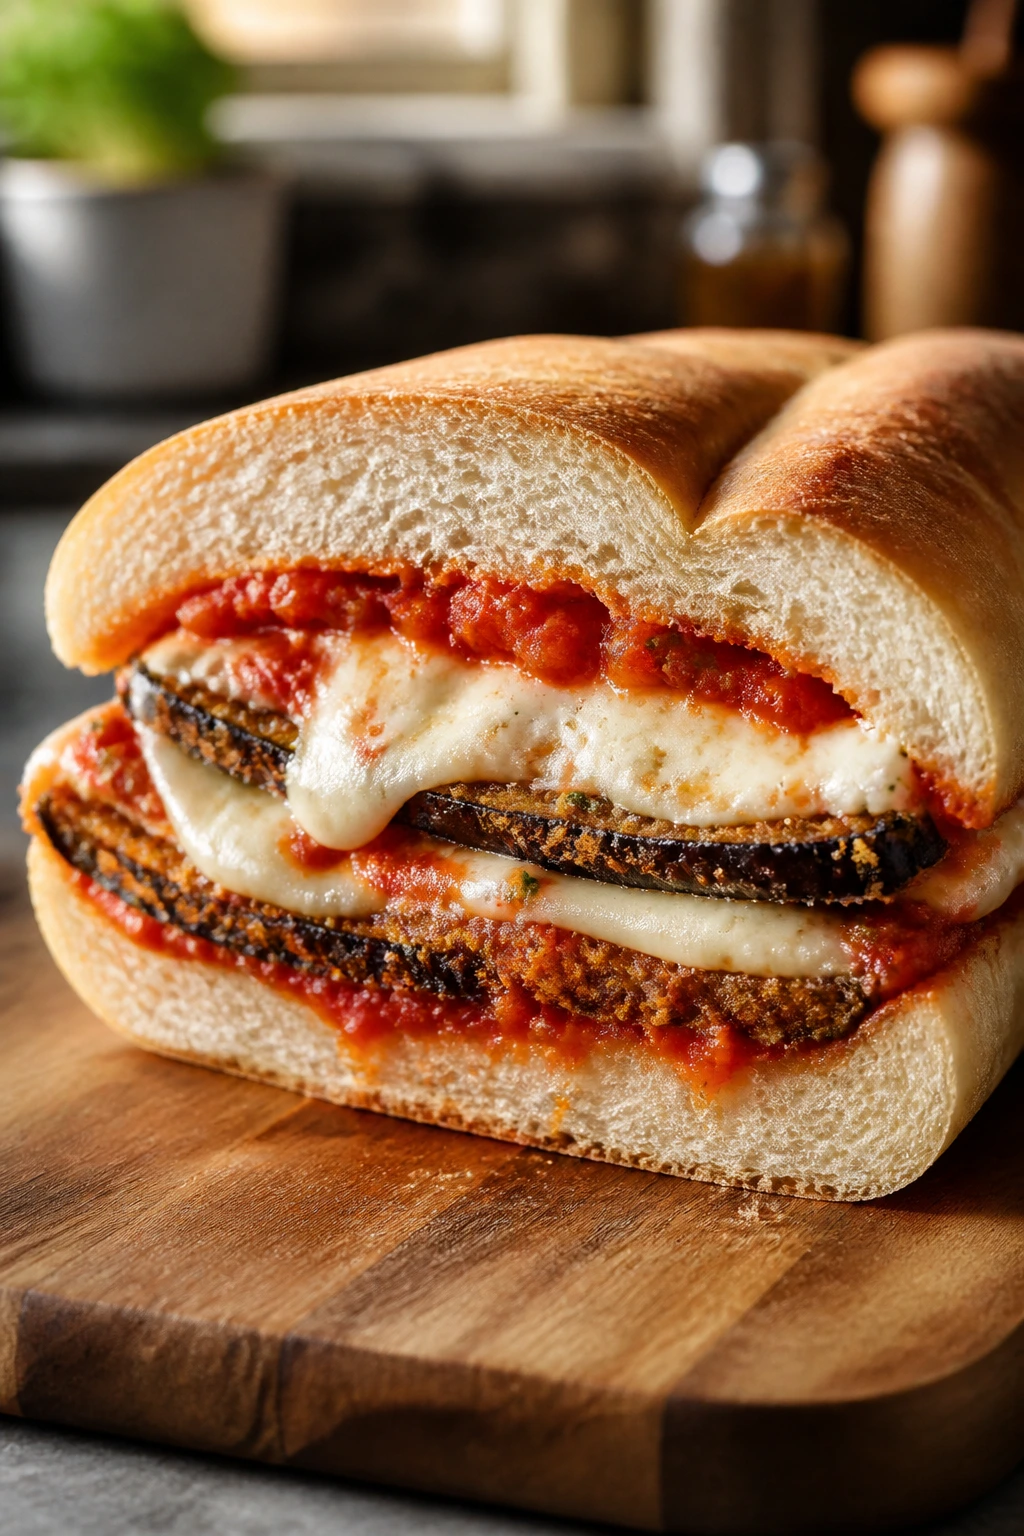
Eggplant parmesan is messy in the way that makes people happy to sit down and eat it. The tomato sauce, the melted mozzarella, the toasted bread, and the fried or baked eggplant all come together into one thick, satisfying sandwich.
If you want a vegetarian picnic sandwich that eats like a full meal, this is near the top of the list. It’s substantial, a little dramatic, and worth the napkins.
Why It Works:
Eggplant has a soft center that turns almost creamy once baked, which gives the sandwich body. The breading adds structure, the marinara keeps the filling juicy, and the cheese locks everything together. Baking or air-frying the slices instead of deep-frying keeps the texture light enough for a sandwich. The trick is to remove enough moisture from the eggplant before breading so the coating sticks and browns instead of going soggy. That step sounds fussy. It is not optional.
Key Ingredients:
- 1 medium eggplant, sliced into 1/3-inch rounds — thick enough to keep its shape.
- 1 teaspoon kosher salt — draws moisture from the eggplant.
- 1/2 cup all-purpose flour — helps the coating stick.
- 2 large eggs, beaten — the binder.
- 1 cup panko breadcrumbs — gives a crisp crust.
- 1 teaspoon Italian seasoning — flavor in the coating.
- 2 cups marinara sauce — use one that isn’t too thin.
- 8 ounces mozzarella, sliced or shredded — for that melt.
- 1/4 cup grated parmesan — for a salty finish.
- 4 sturdy sub rolls — the eggplant needs a roll with some backbone.
- Fresh basil leaves — a few leaves at the end make the sandwich taste brighter.
Quick Steps:
-
Salt the eggplant: Lay the slices on paper towels, salt them lightly, and let them sit for 20 minutes. Pat them dry before breading.
-
Bread the slices: Set up three shallow bowls with flour, beaten eggs, and panko mixed with Italian seasoning. Dredge each slice in flour, then egg, then panko, pressing the crumbs on firmly.
-
Bake the eggplant: Place the breaded slices on a greased sheet pan and bake at 425°F (220°C) for 20 to 25 minutes, flipping once, until golden and crisp.
-
Warm the sauce and rolls: Heat the marinara until steaming and toast the sub rolls lightly so they don’t collapse.
-
Assemble and finish: Spoon sauce into the rolls, add eggplant, more sauce, mozzarella, and parmesan. Broil for 1 to 2 minutes until the cheese melts, then top with basil.
Equipment for This Recipe:
- Sheet pan — for baking the eggplant.
- Three shallow bowls — for the breading station.
- Paper towels — for drying the eggplant.
- Spatula — for flipping slices carefully.
- Sub rolls and foil — useful if you’re carrying the sandwiches warm.
How to Serve This Dish:
Serve it with a crisp salad or roasted peppers so the plate doesn’t feel too heavy. Cut it in half and wrap each half in foil if it’s going on the road; that keeps the cheese in place and makes it easier to eat. One sandwich is enough for a serious lunch, especially with a side.
Pro Tips for This Recipe:
- Salt the eggplant and dry it well. Wet eggplant gives you a limp coating.
- Use thick marinara so the sandwich doesn’t slide apart.
- Toast the roll before assembly. The extra dryness helps a lot.
- If you want a cleaner picnic version, assemble the sandwich, wrap it in foil, and let it sit 10 minutes before slicing so the cheese firms up slightly.
Variations on This Dish:
- Mozzarella and Provolone Mix: Swap half the mozzarella for provolone for a sharper melt.
- Spicy Arrabbiata Version: Use a red pepper–heavy sauce if you want heat.
- No-Breaded Shortcut: Roast the eggplant slices plain and layer them with extra cheese and sauce for a lighter build.
Common Mistakes to Avoid with This Dish:
- Skipping the salting step: The eggplant can release too much water and make the coating soft.
- Using thin sauce: Runny marinara leaks out fast.
- Assembling too far ahead: This sandwich is best when the components are still separate enough to hold their shape.
9. Apple Cheddar and Walnut Sandwich
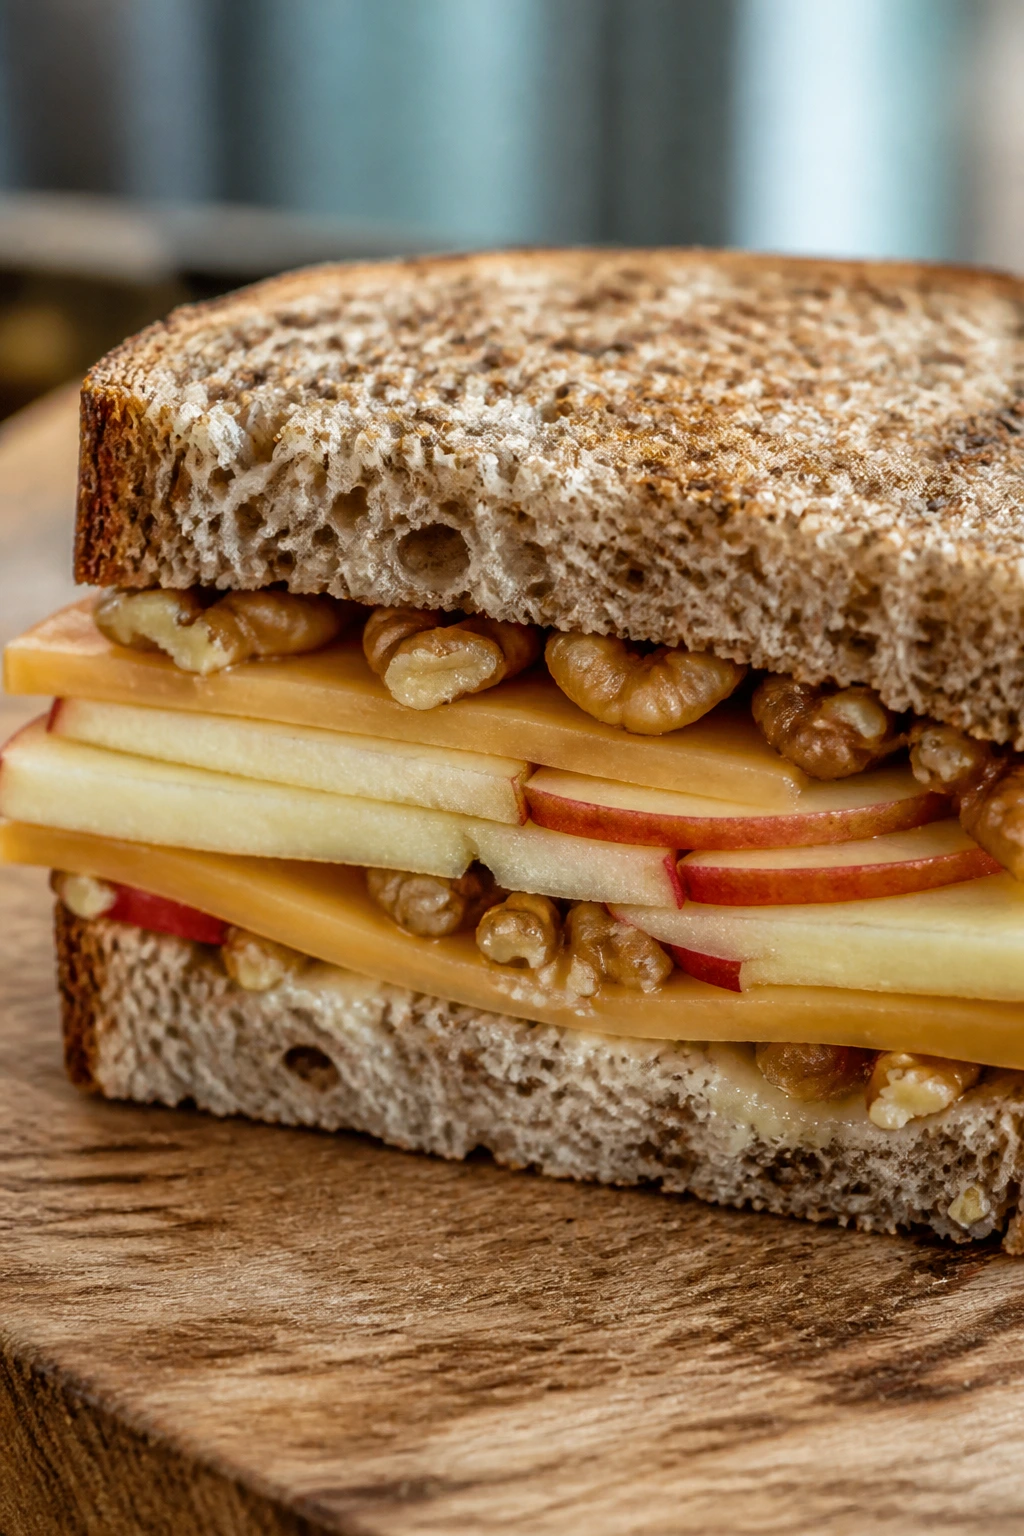
There’s a reason apple and cheddar keep showing up together. The sweet crunch of the apple pulls the sharpness out of the cheese, and the walnuts give the sandwich enough texture to feel like more than a snack. It’s simple, but not plain.
This one is especially good when you want a picnic sandwich that tastes crisp and clean rather than warm and saucy. It’s the easiest sandwich in the group to eat with one hand.
Why It Works:
Cheddar brings salt and fat, apple brings acid and crunch, and walnuts add a nutty finish that keeps each bite moving. A thin swipe of Dijon or mayo on the bread keeps the filling from feeling dry. Spinach gives the sandwich some green lift, but the important part is that the fruit stays crisp. If you cut the apple thin and keep it from browning, the sandwich tastes bright instead of dessert-like.
Key Ingredients:
- 8 slices multigrain or sourdough bread — sturdy enough for cheese and fruit.
- 8 ounces sharp cheddar, sliced thin — the sharper the better.
- 1 crisp apple, such as Honeycrisp or Pink Lady, thinly sliced — choose a firm one.
- 1/2 cup walnuts, roughly chopped and lightly toasted — for crunch.
- 2 tablespoons Dijon mustard — gives the sandwich a clean bite.
- 2 tablespoons mayonnaise or soft cream cheese — optional, but it helps the bread.
- 1 cup baby spinach — a mild green layer.
- 1 teaspoon lemon juice — toss with the apple to slow browning.
- Pinch of salt — makes the apple taste sweeter.
Quick Steps:
-
Prep the apple: Slice the apple thinly and toss it with lemon juice and a tiny pinch of salt. This keeps the fruit crisp and bright.
-
Toast the walnuts: Warm the walnuts in a dry skillet over medium heat for 3 to 4 minutes until fragrant. Cool them before using.
-
Spread the bread: Spread Dijon on four slices and mayo or cream cheese on the other four, if using.
-
Layer the sandwich: Add spinach, cheddar, apple slices, and walnuts. Close the sandwich and press lightly so it holds together.
-
Slice and pack: Cut on the diagonal and wrap tightly if you’re taking it outdoors. It stays crisp best when assembled shortly before eating.
Equipment for This Recipe:
- Sharp knife — for thin apple slices.
- Cutting board — wide enough to work quickly.
- Small skillet — for toasting walnuts.
- Butter knife or spreader — for the mustard or cream cheese.
- Parchment — useful for wrapping.
How to Serve This Dish:
This sandwich works well with salted pretzels, carrot sticks, or a handful of grapes. It also makes sense beside a cup of cold cider or sparkling water with lemon. Because it’s not saucy, it packs neatly and travels better than a lot of richer vegetarian sandwiches.
Pro Tips for This Recipe:
- Pick a firm apple, not a mealy one. Crisp apples make the whole sandwich.
- Toast the walnuts. Raw walnuts taste dull next to sharp cheddar.
- If the bread is very soft, toast it lightly so it doesn’t buckle under the apple slices.
- Slice the cheddar thin enough to fold a little; thick slabs can overpower the fruit.
Variations on This Dish:
- Honeyed Cheddar Stack: Drizzle a tiny bit of honey over the apples for a sweeter finish.
- Mustard and Dill Version: Add chopped dill and a touch more mustard for a savory angle.
- Pear and Cheddar Swap: Use thin pear slices instead of apple when you want a softer, less tart sandwich.
Common Mistakes to Avoid with This Dish:
- Using the wrong apple: Soft apples turn mealy and bland once the sandwich sits.
- Skipping the lemon juice: The apple browns fast and the sandwich loses its bright look.
- Making the filling too thick: A little structure is good; a giant stack just slides apart.
10. Lentil Salad Sandwich with Caramelized Onions
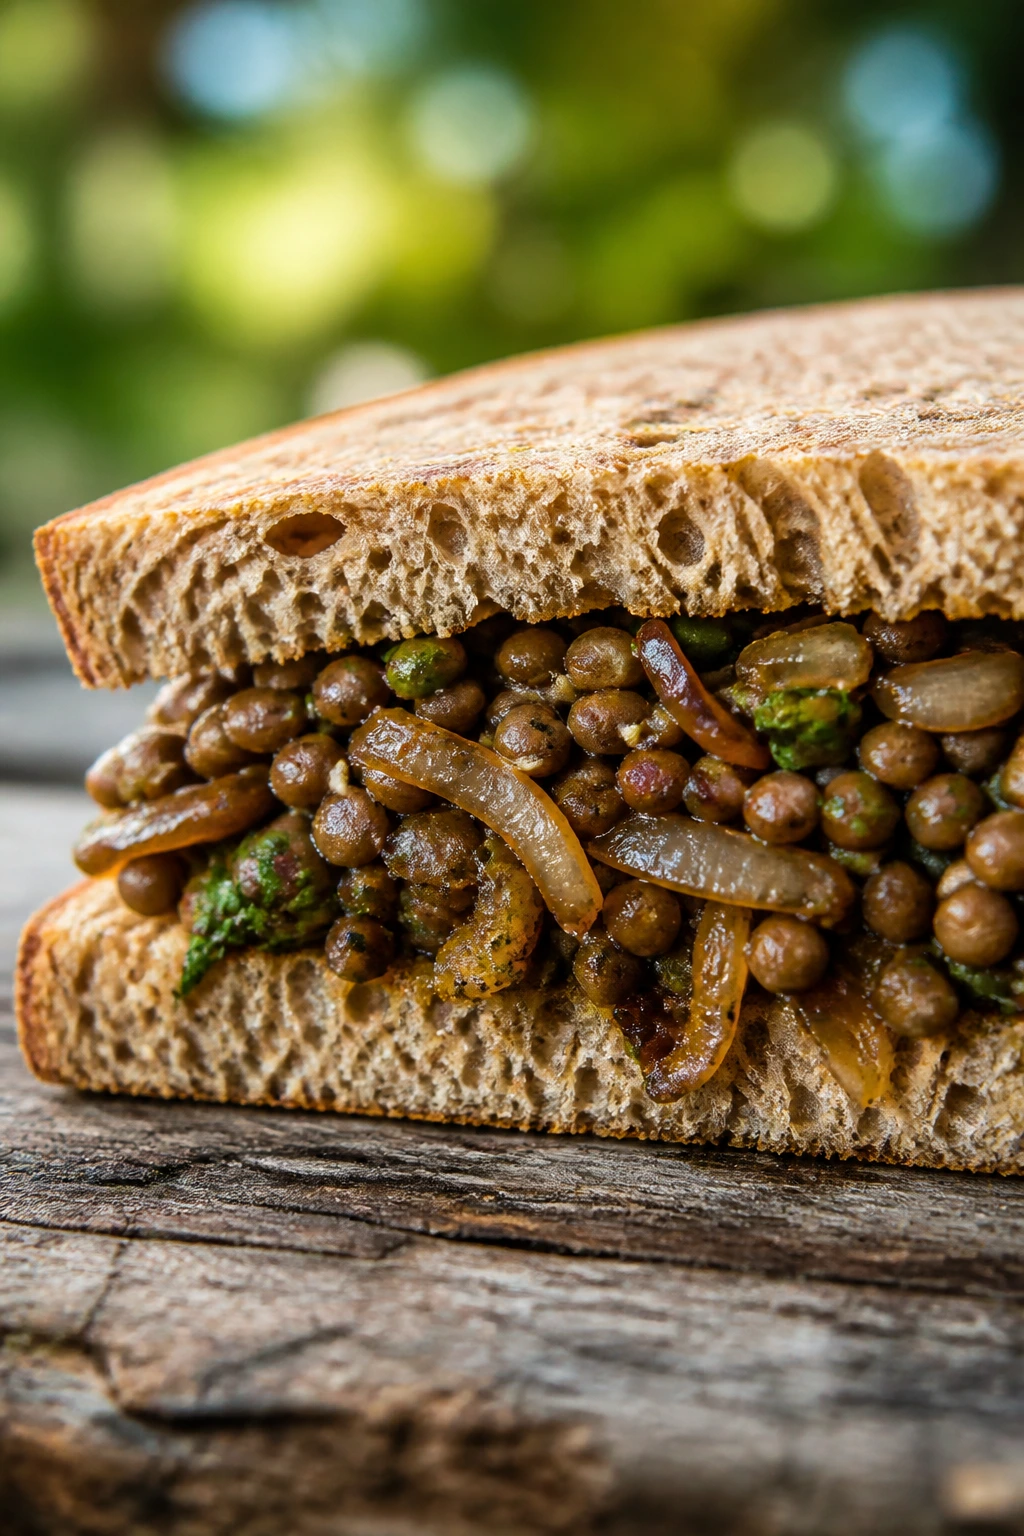
Lentils are one of the best answers to the “how do I make a vegetarian sandwich feel like dinner?” question. They’re earthy, filling, and willing to take on mustard, vinegar, herbs, and sweet onions without getting lost.
This sandwich has a deeper flavor than a lot of cold picnic options. The onions bring sweetness, the lentils bring body, and the whole thing tastes better if it sits for a little while after mixing.
Why It Works:
Cooked lentils have enough structure to stay distinct while still soaking up seasoning. Caramelized onions bring sweetness and softness, which balances the lentils’ earthiness. Dijon and vinegar sharpen the filling so it doesn’t feel heavy after chilling. A sturdy bread—especially whole grain or rye—gives the sandwich enough chew to handle the dense filling. If you add a little feta, you get a salty hit that wakes up the whole thing.
Key Ingredients:
- 1 cup dry green or brown lentils, rinsed — or 2 1/2 cups cooked lentils.
- 1 large yellow onion, thinly sliced — for caramelizing.
- 2 tablespoons olive oil — divided.
- 1 tablespoon balsamic vinegar or red wine vinegar — for brightness.
- 1 tablespoon Dijon mustard — for depth.
- 1 celery rib, finely diced — a crisp counterpoint.
- 1/4 cup chopped parsley — freshens the bowl.
- 1/2 teaspoon kosher salt and 1/4 teaspoon black pepper — season after tasting.
- 4 ounces feta, crumbled — optional, but it makes the filling richer.
- 8 slices whole grain bread or 4 sandwich rolls — the bread should be sturdy.
- A handful of baby greens — for a fresh layer.
Quick Steps:
-
Cook the lentils: Simmer the lentils in salted water for 18 to 22 minutes, until tender but not mushy. Drain well and cool slightly.
-
Caramelize the onions: Cook the onions in 1 tablespoon olive oil over medium-low heat for 20 to 25 minutes, stirring often, until deep golden and sweet.
-
Mix the filling: Combine the lentils, caramelized onions, remaining olive oil, vinegar, Dijon, celery, parsley, salt, pepper, and feta if using.
-
Taste and rest: Let the mixture sit for 10 minutes so the seasonings settle into the lentils. Add more salt or vinegar if it tastes soft.
-
Assemble: Spoon the lentil salad onto bread with a layer of greens underneath. Press gently and slice.
Equipment for This Recipe:
- Medium saucepan — for the lentils.
- Skillet — for the onions.
- Fine-mesh strainer — makes draining easy.
- Mixing bowl — for the salad.
- Spatula or wooden spoon — for stirring the onions.
How to Serve This Dish:
Serve with pickles, carrot sticks, or a tomato-cucumber salad. This sandwich does well cut into halves and wrapped in parchment because the filling is dense and won’t spill much. It’s one of the few vegetarian picnic sandwiches I’d happily pack as the only main course.
Pro Tips for This Recipe:
- Do not overcook the lentils. Mushy lentils make the sandwich feel heavy and muddy.
- Caramelize the onions low and slow; rushed onions taste sharp instead of sweet.
- Let the lentils cool before mixing or the herbs wilt and the feta softens too much.
- A little extra vinegar at the end can make the whole filling taste more awake.
Variations on This Dish:
- French Lentil Dijon: Use French green lentils and extra mustard for a firmer, sharper sandwich.
- Herby Garden Version: Add dill, mint, and chives for a fresher finish.
- Goat Cheese Swap: Replace feta with goat cheese if you want a creamier, tangier filling.
Common Mistakes to Avoid with This Dish:
- Cooking the lentils until they split: Split lentils make the filling dense and pasty.
- Underseasoning after chilling: Lentils absorb salt and acid; the filling often needs a second taste.
- Using flimsy bread: Dense lentil salad needs bread with some chew or it crushes the slice.
11. Smashed White Bean and Sun-Dried Tomato Sandwich
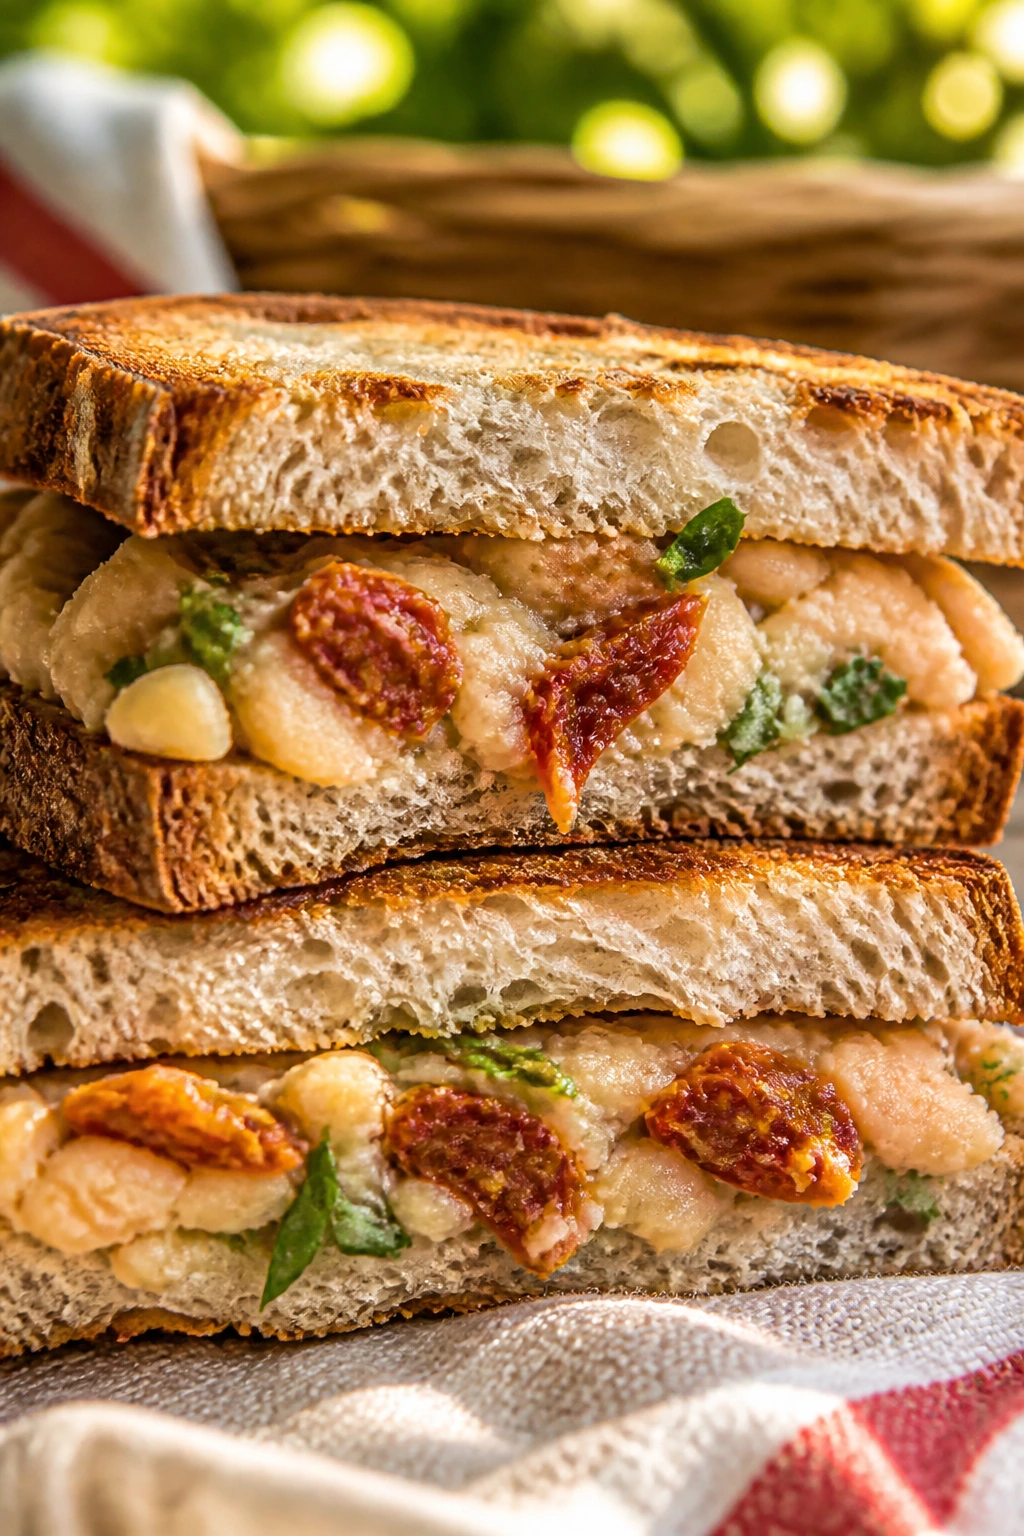
This one tastes like a pantry sandwich that got dressed up for company. The white beans bring creaminess, the sun-dried tomatoes bring chew and concentrated flavor, and the basil gives the whole thing a fresher edge than you might expect.
It’s one of my favorite answers for a picnic lunch when I don’t want to cook much. A can of beans, a jar of tomatoes, a few herbs, and suddenly the sandwich tastes planned.
Why It Works:
Cannellini beans are soft enough to smash but sturdy enough to stay in chunks. Sun-dried tomatoes carry a big punch of savory flavor, so you don’t need many other ingredients. The oil from the jar helps the filling spread without becoming runny, and lemon brightens everything after it chills. A handful of spinach or arugula under the bean mixture keeps the bread dry and adds a little bite.
Key Ingredients:
- 1 can cannellini beans, 15 ounces, drained and rinsed — the creamy base.
- 1/4 cup sun-dried tomatoes, chopped — use oil-packed if possible for better texture.
- 2 tablespoons oil from the sun-dried tomato jar — carries flavor through the mash.
- 1 tablespoon lemon juice — keeps the filling bright.
- 1 small garlic clove, grated — adds sharpness.
- 1/4 cup fresh basil, torn — don’t chop it too fine.
- 2 cups baby spinach or arugula — for a fresh layer.
- 1/2 teaspoon kosher salt and black pepper to taste — season the beans clearly.
- 8 slices focaccia, sourdough, or seeded bread — something with a little chew.
Quick Steps:
-
Smash the beans: Put the beans in a bowl and mash them with a fork until chunky. Leave some whole pieces so the filling has texture.
-
Mix the flavor base: Stir in the sun-dried tomatoes, oil, lemon juice, garlic, basil, salt, and pepper. Taste and adjust so the bean mixture reads savory rather than bland.
-
Toast the bread: Give the bread a light toast if it’s soft. Focaccia can go straight in, but a soft loaf needs extra help.
-
Build the sandwich: Layer spinach or arugula on the bread, spoon over the bean mixture, and close the sandwich. Press gently to settle it.
-
Wrap for transport: If you’re not eating immediately, wrap it tightly in parchment and chill it until packing time.
Equipment for This Recipe:
- Mixing bowl — for the bean mixture.
- Fork or masher — for the beans.
- Knife and cutting board — for tomatoes and basil.
- Toaster or skillet — optional, for the bread.
- Parchment — good for wrapping.
How to Serve This Dish:
Serve it with olives, cucumbers, or a little fruit salad. It’s especially good cut into smaller squares if you use focaccia, because the bread can be a touch rich and the portions feel picnic-friendly. A cold drink with a little acidity, like sparkling lemonade, fits nicely.
Pro Tips for This Recipe:
- Use oil-packed sun-dried tomatoes if you can. They’re softer and taste fuller.
- Smash the beans only partway; a paste is less interesting.
- Add the basil at the end so it stays fragrant.
- If the filling tastes too soft, stir in a spoonful of finely chopped walnuts or sunflower seeds.
Variations on This Dish:
- Roasted Red Pepper Bean Smash: Add chopped roasted red peppers for sweetness.
- Calabrian Chili Version: Stir in a teaspoon of chili paste if you want a little heat.
- Vegan Focaccia Stack: Keep the filling as written and add avocado slices just before serving.
Common Mistakes to Avoid with This Dish:
- Using dry sun-dried tomatoes straight from the bag: They can be tough and chewy in a bad way unless rehydrated.
- Making the mash too smooth: The texture gets dull and spread-like.
- Putting the filling directly on soft bread: A green layer underneath helps keep the slice intact.
12. Olive Tapenade and Grilled Zucchini Sandwich
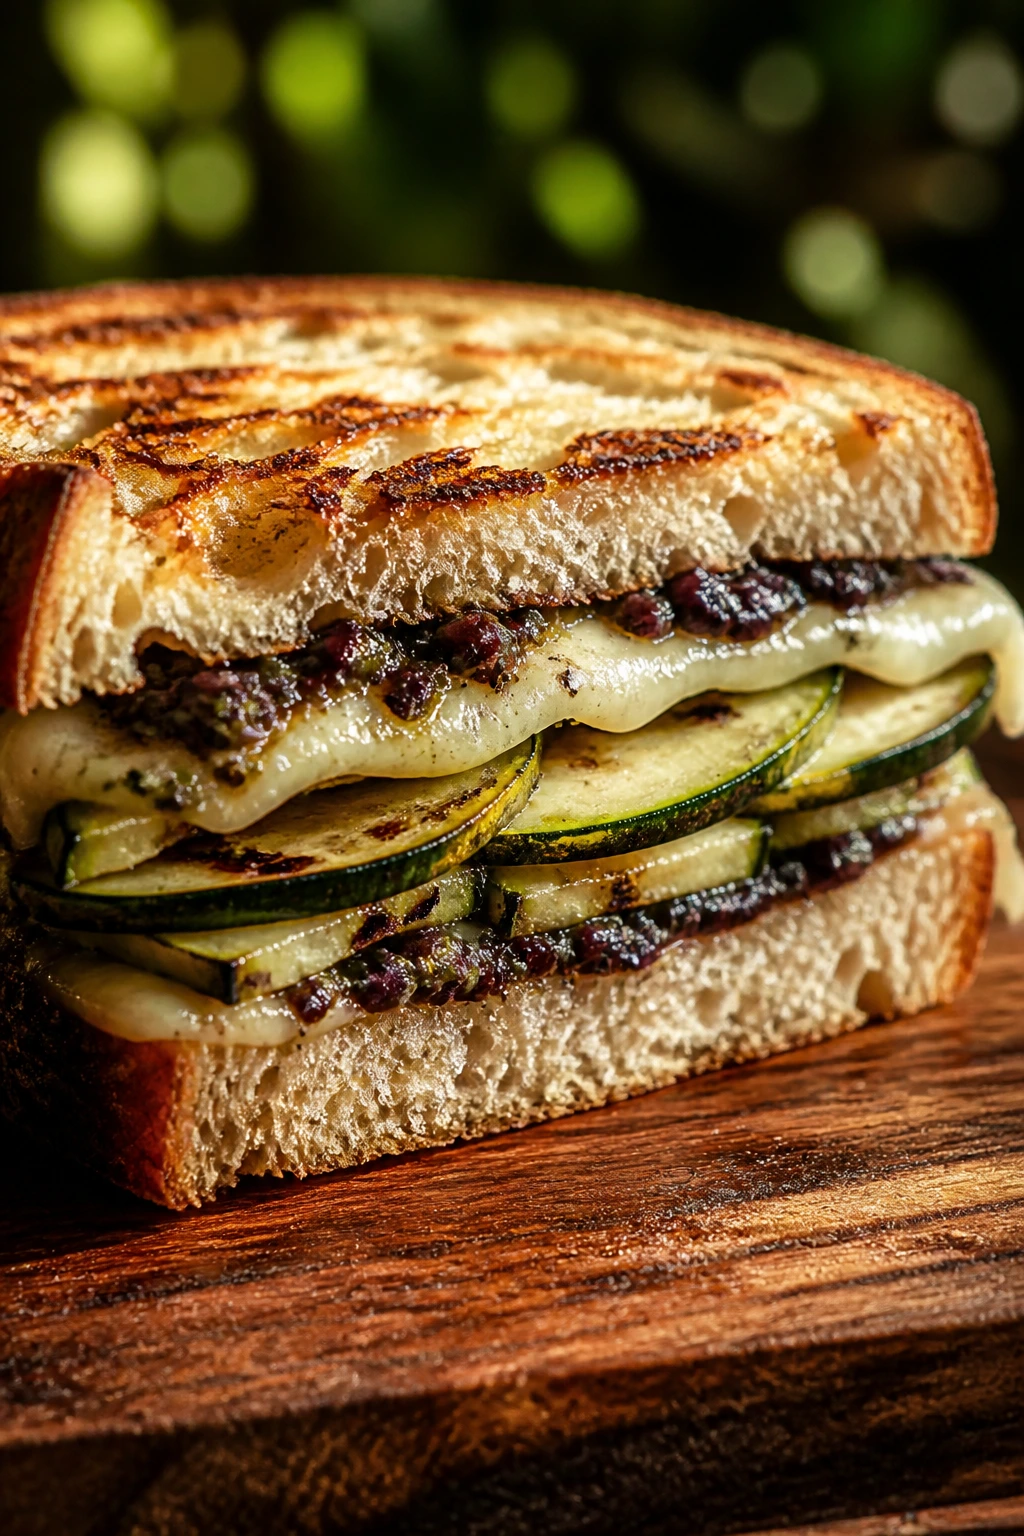
This is the salty, savory sandwich in the group. Olive tapenade can be intense on its own, so the grilled zucchini and cheese help round it out and keep the whole thing from tasting like a condiment on bread.
It’s the kind of sandwich that does a lot with a little. If you like briny flavors, this one gets its flavor in layers rather than from one loud ingredient.
Why It Works:
Tapenade delivers fat, salt, and punch in a single spoonful, which means the rest of the sandwich can stay simple. Grilled zucchini adds a softer, sweeter note and gives you something fresh to bite through. Provolone or manchego provides enough richness to soften the brine, and arugula keeps the sandwich from feeling too dense. Because the tapenade is strong, you don’t need a big amount—just enough to coat the bread and carry the rest of the flavors.
Key Ingredients:
- 1 medium zucchini, sliced lengthwise into 1/4-inch planks — grills quickly and stays flexible.
- 1 tablespoon olive oil — for grilling.
- 1/2 cup olive tapenade — store-bought or homemade.
- 4 ounces provolone or manchego, sliced — enough to mellow the salt.
- 1 roasted red pepper, sliced — optional, but it adds sweetness.
- 1 cup arugula — for peppery lift.
- 1 baguette or 4 sturdy rolls — something with a crust.
- Black pepper, to taste — the zucchini takes it well.
Quick Steps:
-
Grill the zucchini: Brush the zucchini with olive oil and cook it in a grill pan or skillet over medium-high heat for 2 to 3 minutes per side until it has dark grill marks and is tender.
-
Cool the slices: Set the zucchini aside for a few minutes so steam doesn’t soften the bread.
-
Toast the bread: Split the baguette or rolls and toast the cut sides lightly.
-
Assemble the sandwich: Spread tapenade on both sides of the bread. Layer cheese, zucchini, roasted red pepper if using, and arugula. Finish with black pepper.
-
Press and slice: Press the sandwich together for 1 minute, then cut with a serrated knife. The tapenade sticks better once the bread settles.
Equipment for This Recipe:
- Grill pan or skillet — for the zucchini.
- Tongs — for flipping.
- Serrated knife — for the bread.
- Cutting board — for assembly.
- Foil or parchment — for transport.
How to Serve This Dish:
Serve it with kettle chips, marinated artichokes, or a simple tomato salad. Because the tapenade is salty, I’d keep the side dishes fresh and plain. It makes a solid lunch for one or two people, depending on how much bread you use.
Pro Tips for This Recipe:
- Use tapenade sparingly. Too much turns the sandwich muddy and salty.
- Grill the zucchini until it’s tender but not floppy.
- If the bread is soft inside, scoop out a little crumb to make room for the filling.
- A squeeze of lemon over the arugula can wake the whole sandwich up.
Variations on This Dish:
- Feta Tapenade Stack: Add a little crumbled feta if you want more tang.
- Herbed Zucchini Version: Toss the zucchini with oregano or thyme before grilling.
- Roasted Pepper Upgrade: Double the red pepper if you want a sweeter sandwich and less olive punch.
Common Mistakes to Avoid with This Dish:
- Using too much tapenade: The brine can drown out the other ingredients.
- Undercooking the zucchini: Raw zucchini gives the sandwich a watery crunch that doesn’t help.
- Skipping the toast: Tapenade needs sturdy bread or the sandwich slides.
13. Paneer Tikka Picnic Sandwich
Paneer tikka makes a sandwich feel like it traveled farther than it did. The spice, the yogurt marinade, and the browned edges on the paneer give this one a serious presence, but the sandwich itself is still easy to pack and eat.
It’s one of the most filling options here because paneer brings both protein and richness. Add cucumber and mint chutney, and you have the kind of sandwich that stays interesting even after it cools down.
Why It Works:
Paneer has a firm, milky texture that holds up well in a sandwich, especially once it’s lightly seared. The yogurt marinade carries spice into the cheese without making it wet. Cucumber and onion give crunch, mint chutney adds brightness, and the bread softens the edges of the spices. The key is to cook the paneer long enough to brown it lightly. Pale paneer tastes flat; browned paneer tastes like lunch with a point of view.
Key Ingredients:
- 8 ounces paneer, cut into 1/2-inch cubes or slabs — thick pieces hold up best.
- 1/4 cup plain yogurt — for the marinade.
- 1 tablespoon tikka masala spice blend or 2 teaspoons garam masala plus 1 teaspoon paprika — choose one.
- 1 tablespoon lemon juice — adds brightness.
- 1 tablespoon neutral oil — for the pan.
- 1/2 red onion, thinly sliced — gives a sharp bite.
- 1/2 cucumber, thinly sliced — cools the spice.
- 2 tablespoons mint chutney — the fresh, green layer.
- 1/4 cup cilantro leaves — optional, but worth it.
- 4 naan or 8 sturdy rolls — naan makes this feel extra picnic-friendly.
Quick Steps:
-
Marinate the paneer: Stir together the yogurt, spice blend, lemon juice, and a pinch of salt. Coat the paneer and let it sit for 10 to 15 minutes.
-
Sear the paneer: Heat the oil in a skillet over medium-high heat. Cook the paneer for 2 to 3 minutes per side until lightly browned.
-
Warm the bread: Toast naan briefly or split and warm the rolls so they’re soft but not soggy.
-
Build the sandwich: Spread mint chutney on the bread, add paneer, onion, cucumber, and cilantro. Press gently so the layers settle.
-
Pack carefully: Wrap the sandwich once it cools slightly so the chutney doesn’t smear everywhere.
Equipment for This Recipe:
- Skillet — for the paneer.
- Mixing bowl — for the marinade.
- Tongs or spatula — for turning the paneer.
- Knife and cutting board — for the vegetables.
- Foil or parchment — for wrapping.
How to Serve This Dish:
Serve it with sliced mango, salty chips, or a cucumber yogurt salad. The spices make it a good match for something cold and clean on the side. Cut it into halves or quarters and pack it snugly so the paneer doesn’t shift.
Pro Tips for This Recipe:
- Don’t marinate the paneer for hours; it doesn’t need that much time and can get soft.
- Brown the paneer on at least two sides for better flavor.
- Use mint chutney lightly. Too much makes the sandwich wet.
- If you want extra texture, add a few thin slices of bell pepper.
Variations on This Dish:
- Tandoori Paneer Swap: Add a little extra paprika and yogurt for a more vivid red marinade.
- Paneer and Roasted Pepper Version: Add roasted peppers for sweetness and color.
- Lower-Spice Build: Use less garam masala and more yogurt if you want the filling milder.
Common Mistakes to Avoid with This Dish:
- Cooking paneer too hard: It can turn rubbery if the heat is high enough to scorch it.
- Using too much chutney: The sandwich turns slippery fast.
- Skipping the browning: The browned edges are where the flavor lives.
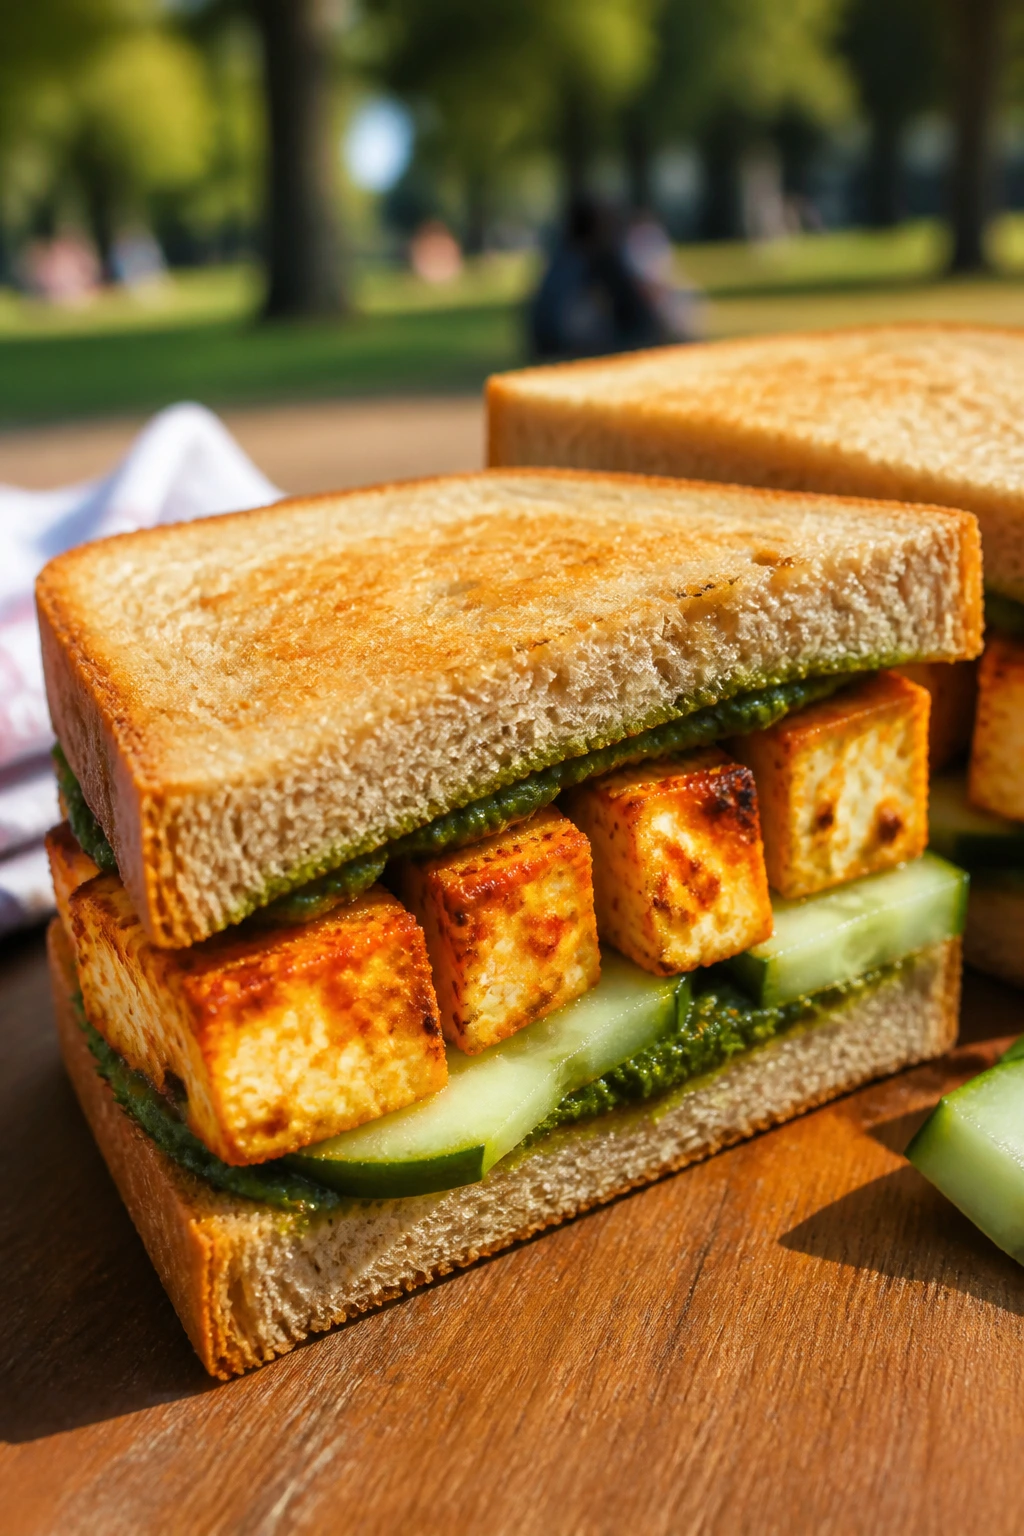
14. Crispy Tofu Banh Mi Sandwich
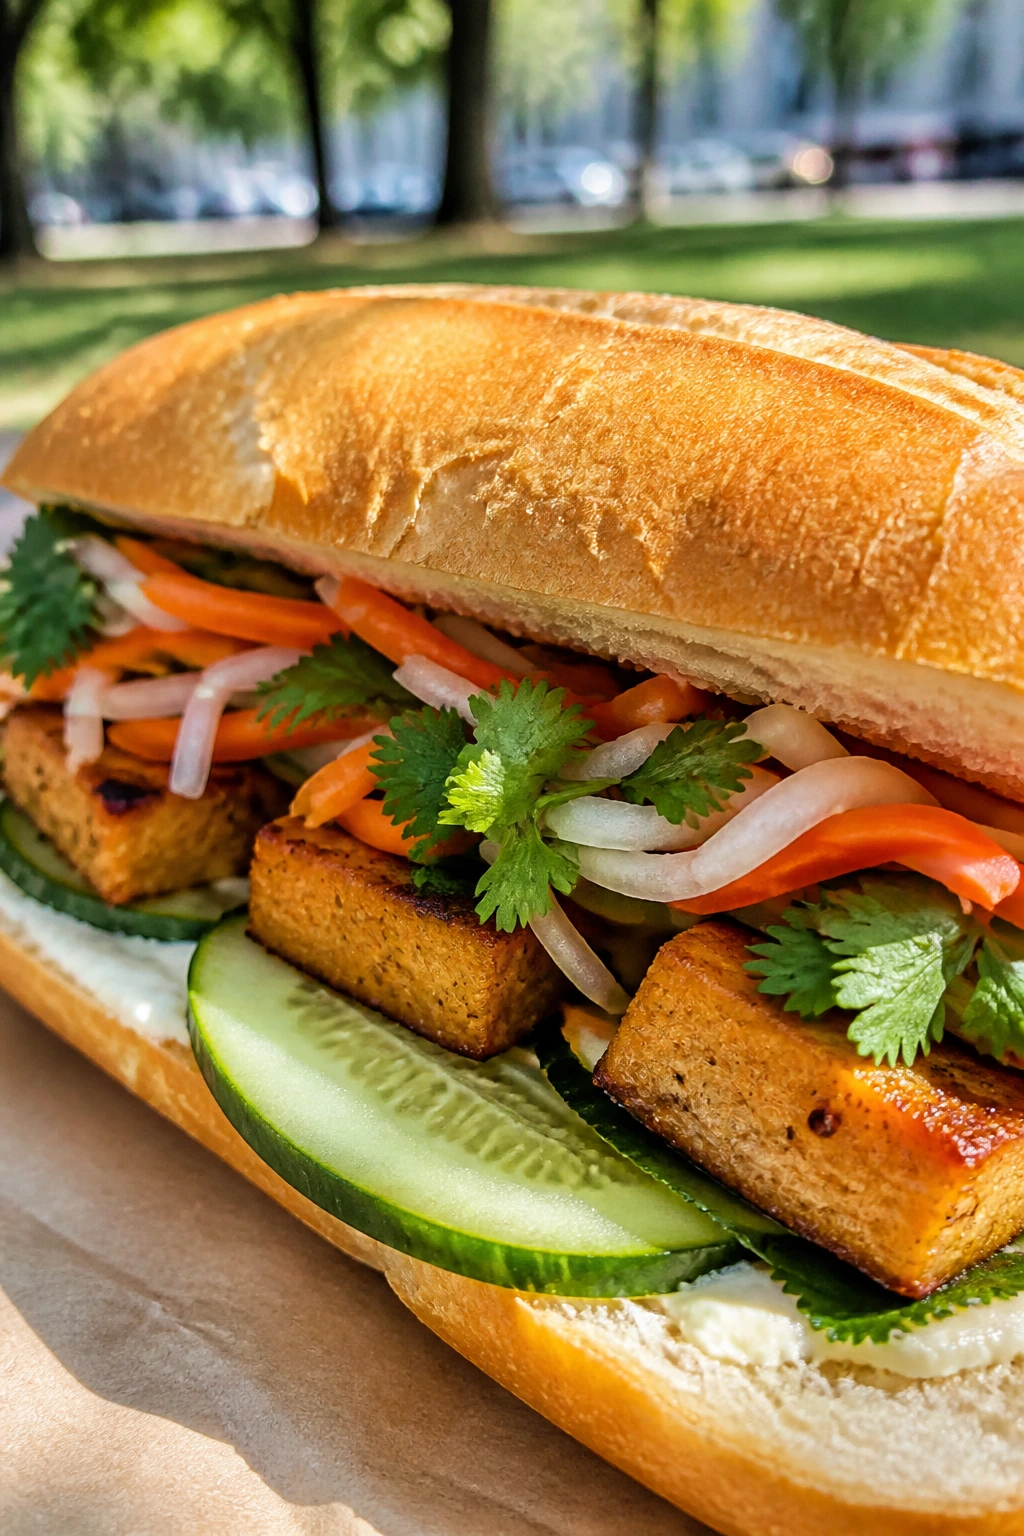
A good banh mi-style sandwich needs contrast: crisp, cool, bright, and a little salty. Tofu is excellent here because it soaks up the seasoning, browns at the edges, and gives the sandwich enough substance to compete with the pickles and herbs.
This is one of the most satisfying vegetarian picnic sandwiches in the lineup because it doesn’t taste like a compromise. It tastes like a sandwich that knew exactly what it was doing.
Why It Works:
Pressed tofu becomes firm enough to brown rather than steam. A little soy sauce and cornstarch give it salt and a crisp shell, while the quick pickled carrots and daikon bring acid and crunch. Cucumber and cilantro add coolness, and mayo keeps the baguette from feeling dry. The French-style bread needs to be crusty on the outside and soft enough inside to give when you bite through the pickles. That contrast is the whole point.
Key Ingredients:
- 1 block extra-firm tofu, 14 to 16 ounces, pressed — the base of the sandwich.
- 2 tablespoons soy sauce — for seasoning the tofu.
- 1 tablespoon cornstarch — helps the tofu crisp.
- 1 tablespoon neutral oil — for baking or pan-frying.
- 1 cup quick-pickled carrots and daikon — for crunch and acidity.
- 1/2 cucumber, cut into sticks or thin slices — cool and fresh.
- 1/4 cup cilantro leaves — adds a herbal finish.
- 2 tablespoons mayonnaise — for the bread.
- 1 jalapeño, thinly sliced, optional — for heat.
- 2 small baguettes — crusty bread works best.
Quick Steps:
-
Press and slice the tofu: Press the tofu for 15 minutes, then cut it into 1/2-inch slabs.
-
Season and coat: Toss the tofu with soy sauce, then dust lightly with cornstarch so the surface looks thinly coated.
-
Cook the tofu: Pan-fry in oil over medium-high heat for 3 to 4 minutes per side, or bake at 425°F (220°C) for 20 to 25 minutes, flipping once, until the edges are crisp.
-
Prep the bread: Split the baguettes and spread mayo on the inside. If the bread is very crusty, a quick toast is enough.
-
Assemble: Add tofu, pickled vegetables, cucumber, cilantro, and jalapeño if using. Press lightly and wrap tightly if packing.
Equipment for This Recipe:
- Tofu press or clean kitchen towel with a heavy pan — for pressing.
- Skillet or sheet pan — for cooking.
- Sharp knife — for slicing the tofu and vegetables.
- Mixing bowl — for tossing the tofu.
- Parchment or foil — for wrapping the baguette.
How to Serve This Dish:
Serve it with extra pickles, lime wedges, or a simple cucumber salad. It’s one of the few sandwiches here that feels fully complete on its own, but a little salty snack on the side works well. If you want a cleaner bite, cut it into shorter sections before packing.
Pro Tips for This Recipe:
- Press the tofu long enough to remove surface moisture; damp tofu steams instead of crisping.
- Keep the pickled vegetables well drained.
- Use a baguette that’s crusty but not hollow and dry inside.
- Add cilantro at the end so it stays fresh and bright.
Variations on This Dish:
- Spicy Mayo Banh Mi: Mix a little sriracha into the mayo for heat.
- Sesame Tofu Version: Add a pinch of sesame seeds over the tofu before assembling.
- Mushroom Banh Mi Swap: Replace half the tofu with sautéed mushrooms for a softer, earthier sandwich.
Common Mistakes to Avoid with This Dish:
- Not pressing the tofu: Water on the surface prevents browning.
- Overfilling the baguette: Too much filling makes the sandwich impossible to bite cleanly.
- Skipping the acid: Without pickles or lime, the sandwich loses its signature brightness.
15. Mushroom, Swiss, and Onion Melt
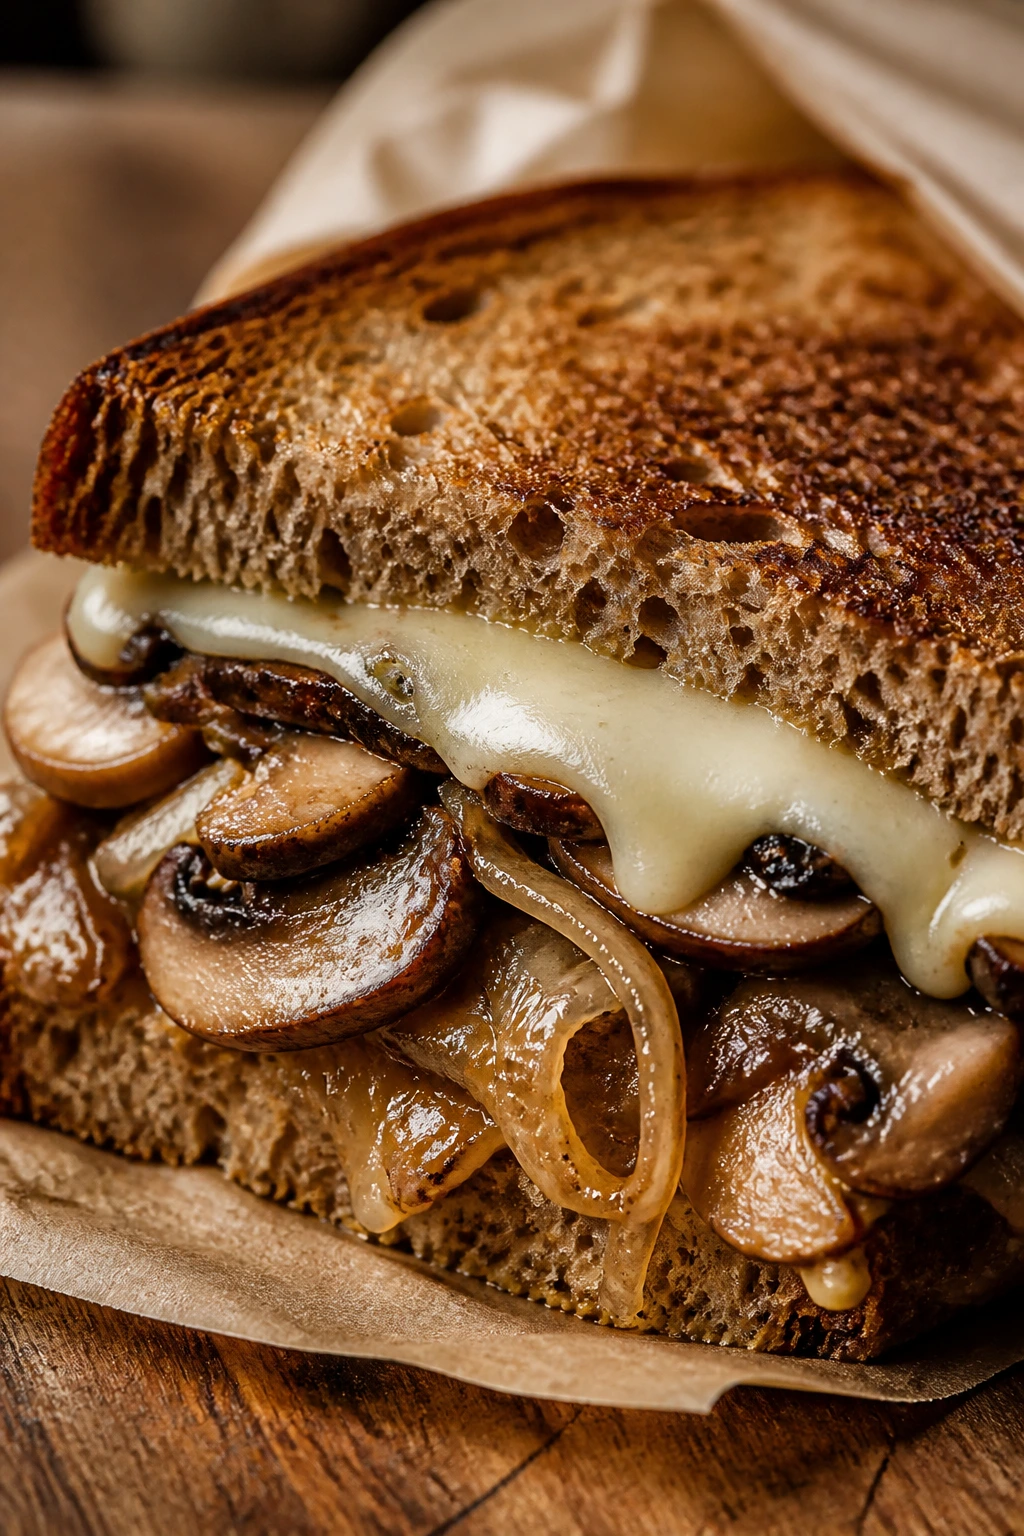
Mushrooms and onions cooked until they’re deeply browned make a filling that tastes richer than it looks. Swiss cheese brings that nutty melt, and rye or sourdough gives the sandwich enough structure to handle the moisture without falling apart.
This is the warmest, coziest sandwich in the batch, but it still belongs at a picnic if you pack it right. It tastes especially good wrapped in parchment while the crust is still crisp and the cheese hasn’t fully settled.
Why It Works:
Mushrooms release water, and that water has to cook off before the filling can taste good. Once that happens, they become meaty and concentrated. Caramelized onions add sweetness, Swiss cheese melts cleanly, and mustard gives the whole sandwich a little spine. This one works because every component has a job: savory, sweet, fat, acid, crunch. There’s no filler, which is maybe the nicest thing you can say about a sandwich.
Key Ingredients:
- 12 ounces cremini mushrooms, sliced — button mushrooms work too, but cremini have more flavor.
- 1 large yellow onion, thinly sliced — for slow caramelizing.
- 1 tablespoon butter — for richness.
- 1 tablespoon olive oil — keeps the butter from scorching.
- 1 teaspoon fresh thyme or 1/2 teaspoon dried thyme — goes beautifully with mushrooms.
- 1 teaspoon soy sauce — optional, but it deepens the mushroom flavor.
- 6 slices Swiss cheese — enough for 3 sandwiches.
- 8 slices rye or sourdough bread — sturdy and a little tangy.
- 1 tablespoon Dijon mustard — sharpens the filling.
- Black pepper, to taste — mushrooms welcome it.
Quick Steps:
-
Cook the onions: Heat butter and olive oil in a skillet over medium-low heat. Add the onions and cook for 20 to 25 minutes, stirring often, until soft and deeply golden.
-
Add the mushrooms: Stir in the mushrooms, thyme, soy sauce if using, salt, and pepper. Cook over medium heat for 8 to 10 minutes, until the mushrooms release their liquid and then start to brown.
-
Toast the bread: Lightly toast the bread so it doesn’t absorb too much moisture.
-
Assemble the sandwiches: Spread Dijon on one side of each sandwich. Add the mushroom-onion mixture and top with Swiss cheese. Close with the remaining bread slices.
-
Warm if desired: If you want the cheese melted, cook the sandwiches in a skillet over medium heat for 2 to 3 minutes per side, or bake them at 375°F (190°C) for 6 to 8 minutes until the cheese softens.
Equipment for This Recipe:
- Large skillet — for the onions and mushrooms.
- Spatula — for stirring.
- Knife and cutting board — for slicing.
- Toaster or skillet — for the bread.
- Foil or parchment — if packing the warm sandwiches.
How to Serve This Dish:
Serve it with mustard pickles, a crisp green salad, or a few apple slices. If you’re taking it outside, wrap it while still warm so the cheese settles into the bread rather than sliding out. This one feels especially good in quarters, almost like a hearty snack board item.
Pro Tips for This Recipe:
- Let the mushroom moisture cook off completely before building the sandwich.
- Use rye if you want a sharper, more traditional flavor; sourdough if you want a little more chew.
- Don’t rush the onions. That sweetness is doing real work.
- A thin smear of mustard is enough. More than that can overpower the mushrooms.
Variations on This Dish:
- Gruyère Upgrade: Swap Swiss for Gruyère if you want a deeper, nuttier melt.
- Garlic Mushroom Version: Add a minced garlic clove near the end of cooking.
- Peppery Arugula Melt: Add a handful of arugula after the skillet cooking for a sharper finish.
Common Mistakes to Avoid with This Dish:
- Leaving moisture in the pan: Wet mushrooms make the sandwich soggy.
- Cranking the heat too high: The onions burn before they sweeten.
- Packing it before it settles: Give the cheese a minute so it doesn’t slide out the first time you bite in.
What Makes a Picnic Sandwich Survive the Cooler
A picnic sandwich has one job that a kitchen sandwich never has to think about: it needs to stay good after a wait. That means the bread, the filling, and the packing all matter at the same time. You can’t save a flimsy loaf with a better pickle. You can’t save a wet tomato with hope.
The bread should be able to resist moisture for at least a little while. That usually means ciabatta, sourdough, rye, baguette, focaccia, seeded rolls, or a split sub roll with a real crust. Soft sandwich bread has its place, but if you’re carrying lunch across a park or leaving it in a cooler, the structure matters. A quick toast helps too. It dries the surface just enough to buy you time.
Fat and acid are the second layer of defense. Hummus, mayo, pesto, olive oil, mustard, and cheese help coat the bread. Lemon juice, vinegar, pickles, and mustard keep the filling from tasting sleepy once it chills. And because these are vegetarian sandwiches, you can lean harder into beans, eggs, lentils, roasted vegetables, and cheese without making the food feel like a compromise. That’s the real trick. The sandwiches are filling because they’re built around ingredients with shape, not because they’re oversized.
Essential Equipment for These Recipes
-
Sharp chef’s knife: Clean cuts matter when you’re handling tomatoes, onions, apples, herbs, and bread.
-
Serrated bread knife: Thick crusty loaves slice better with a serrated blade than a straight one.
-
Cutting board: A large board gives you room to keep wet ingredients away from bread.
-
Sheet pan: Useful for roasting vegetables, baking tofu, and crisping eggplant.
-
Skillet or grill pan: Halloumi, mushrooms, grilled zucchini, and warm melts all do better in a hot pan.
-
Mixing bowls: At least two medium bowls make sandwich prep far less chaotic.
-
Fork, potato masher, or pastry cutter: Handy for chickpea, bean, and egg salads.
-
Parchment paper or foil: Needed when you’re wrapping sandwiches for transport.
-
Airtight containers: Best for fillings that should be made ahead and assembled later.
-
Toaster or broiler: A little dry heat goes a long way with picnic bread.
Smart Shopping and Ingredient Tips
Bread is the first purchase I’d pay attention to. If the loaf bends in half before you cut it, it probably won’t stand up to tomato, hummus, or egg salad for long. Look for ciabatta with a chewy crust, sourdough with enough structure to tear cleanly, rye with a firm crumb, or rolls that feel dense in the hand. If the bakery bread is still warm, let it cool before wrapping it; warm bread steams inside plastic and goes soft fast.
For produce, choose vegetables that are ripe but not collapsing. Tomatoes should give slightly when pressed, not split. Avocados need to be ripe enough to mash but not so soft that they puddle. Cucumbers and apples should feel crisp. If you’re buying greens, pick the varieties that hold a little structure—arugula, spinach, romaine, or sprouts—rather than delicate leaves that wilt at the first sign of dressing.
Cheese can do a lot of heavy lifting in vegetarian sandwiches, but it needs to be chosen carefully. Halloumi should feel firm and springy, not crumbly. Fresh mozzarella is best when it’s drained well and sliced thick enough to handle. Swiss, cheddar, provolone, feta, and paneer all bring different jobs to the table. If a cheese is very wet, pat it dry before building the sandwich. That small move keeps the bread honest.
Beans, lentils, chickpeas, and tofu are the quiet heroes here. Canned beans should be rinsed and drained well so the filling doesn’t taste tinny or salty. Lentils need to be cooked until tender but not falling apart. Tofu needs pressing. Those steps sound basic because they are basic, and they’re the difference between a good sandwich and one that gives up halfway through lunch.
How to Serve These Recipes
Presentation:
Cut the sandwiches on a sharp diagonal and show at least one clean layer in the cross-section. Wrap each half in parchment before foil if you’re packing them, because parchment keeps the bread from getting sweaty. For a platter, stagger the cut ends so the fillings are visible without making a mess.
Accompaniments:
Kettle chips, olives, pickles, grapes, melon, cucumber salad, carrot sticks, and simple green salads all work across this whole collection. If the sandwich is rich—like egg salad, halloumi, or grilled cheese—pair it with something crisp and acidic. If it’s lighter—like hummus, bean smash, or avocado—add a salty side.
Portions:
One substantial sandwich usually feeds one adult as a main lunch, especially if it contains beans, cheese, eggs, or tofu. If the sandwich is cut into quarters or made on a loaf, count on two to three pieces per person alongside sides. For a picnic spread, I’d make a mix of heavy and light sandwiches rather than one giant batch of the same thing.
Beverage Pairing:
Sparkling water with lemon, iced tea, cold cider, and a crisp white wine all fit different parts of this spread. The salty sandwiches like a drink with acidity; the richer ones like something clean and cold. If you’re packing for kids, citrus soda cut with seltzer does the job without overpowering the food.
Additional Tips and Flavor Boosters
Flavor Enhancement:
A thin layer of mustard, hummus, pesto, or mayo against the bread is not a small thing. It’s the part that stops the sandwich from tasting like a pile of ingredients. If you want an easy upgrade, add one sharp element—pickled onion, lemon zest, pepperoncini, or a splash of vinegar—to balance the richer fillings.
Customization:
Use toasted seeds for crunch, fresh herbs for brightness, and roasted peppers or cucumbers for more texture. If you like heat, a little harissa, chili paste, or sliced jalapeño can wake up a bean or cheese sandwich fast. If you like milder flavors, keep the onion cooked or thinly sliced and lean on herbs instead.
Serving Suggestions:
A scattering of flaky salt over tomato or avocado fillings makes a real difference. For warm sandwiches, wrap them in parchment and let them rest a minute before packing so the crust doesn’t steam itself soft. A few herb leaves tucked into the cut face of the sandwich also make the filling taste fresher when it sits.
Make-It-Yours:
For a dairy-free version, lean on hummus, beans, avocado, tofu, or olive tapenade. For extra protein, add eggs, paneer, lentils, or a second bean layer. If you want a sharper finish, add vinegar or mustard; if you want a softer one, use cheese or yogurt as the bridge.
Make-Ahead, Storage, and Reheating Guidance
Most of these sandwich fillings can be made ahead, but I would not assemble every sandwich far in advance. That’s the quickest route to soft bread and dull flavors. Egg salad, chickpea salad, lentil salad, bean mash, and roasted vegetables can usually be kept in airtight containers in the refrigerator for 3 to 4 days. Eggplant parmesan filling and grilled mushroom-onion mixtures are best within 2 to 3 days. Fresh items like sliced tomatoes, cucumbers, herbs, and avocado should be added close to serving time.
If you want to prep for a picnic, store the bread separately whenever possible. Toasted bread can be held at room temperature for a few hours if it’s wrapped loosely in parchment, but once it’s inside a sealed container it loses its edge. For sandwiches with watery ingredients—tomatoes, pickles, grilled zucchini, avocado—use a barrier layer of hummus, mayo, mustard, pesto, or cheese directly against the bread. That small barrier buys you time and keeps the crumb from turning soggy before you arrive.
Freezing is useful for a few components, not for the assembled sandwiches. Lentil filling, roasted vegetables, cooked mushrooms, and some bean mixtures can be frozen for up to 2 months in airtight containers. Egg salad, fresh tomato sandwiches, and avocado-based fillings do not freeze well. For reheating, warm sandwiches like grilled cheese, paneer tikka, eggplant parmesan, and mushroom melts are best in a skillet over medium heat or in a 350°F oven for 8 to 10 minutes until the bread crisps back up and the cheese softens. If a sandwich has been packed cold, let it sit at room temperature for 10 to 15 minutes before eating so the flavors open up a little.
For food safety, keep chilled sandwiches cold in an insulated bag with ice packs and avoid leaving them out too long. Once a sandwich has been sitting in the sun or warm air for more than a short stretch, I would not keep it for later. Picnic food should taste good, but it also has to be handled like food, which is a boring sentence but a useful one.
Variations and Adaptations to Try
Gluten-Free Picnic Pack:
Use sturdy gluten-free bread, toasted if possible, or turn several of these fillings into lettuce wraps or rice-paper rolls. Chickpea salad, egg salad, bean smash, and tofu banh mi fillings adapt particularly well because the filling carries the meal, not just the bread.
Dairy-Free Build:
Lean on hummus, olive tapenade, avocado, tofu, roasted vegetables, lentils, and bean salads. Skip the cheeses and use extra acid—lemon, vinegar, pickles, or mustard—to keep the flavors lively. The halloumi, paneer, and grilled cheese sandwiches need a full swap, not a partial one, so choose a different filling rather than forcing the same structure.
Higher-Protein Lunch:
Double down on eggs, chickpeas, lentils, tofu, paneer, or beans and add seeds or nuts for extra staying power. A sandwich with two layers of legumes or one legume layer plus cheese tends to keep hunger quieter for longer, which matters if the picnic is the only meal for a while.
Kid-Friendly Soft Build:
Use softer rolls, remove raw onion, and keep the fillings milder. Egg salad, apple cheddar, chickpea salad, and peanut butter or seed butter styles work especially well when cut into smaller squares or strips. Crusts can be trimmed if needed; nobody needs to wrestle lunch.
Heat-Lover’s Version:
Add harissa, chili crisp, jalapeños, Calabrian chili paste, or pepper jack where it makes sense. The bean, halloumi, tofu, and hummus sandwiches all tolerate heat well because the filling already has fat and structure. Keep the spice in balance with something cool, like cucumber or yogurt, or the sandwich will taste one-note.
Common Mistakes to Avoid with These Sandwiches
The biggest mistake is using bread that’s too soft. It might look fine at the counter, but once it meets a wet tomato or a bean salad, it starts to cave in. If the loaf has no crust or chew, save it for something else and grab ciabatta, sourdough, rye, or a good roll instead.
Another common problem is packing wet ingredients without a barrier. Tomatoes, cucumbers, pickles, roasted zucchini, and avocado all carry moisture. Put a spread like hummus, mayo, mustard, or pesto directly on the bread first, then add the wetter layers on top. That simple order changes everything.
People also overstuff picnic sandwiches. A sandwich that’s too tall is hard to wrap, hard to bite, and more likely to collapse when you slice it. If a filling looks generous but unstable, press it gently before cutting and keep the filling layers neat rather than mountainous.
Temperature matters more than most recipes admit. Warm fillings wrapped too soon create condensation, and condensation ruins bread. Let roasted vegetables, grilled cheese, eggplant, and paneer cool just enough that steam isn’t trapped inside the wrapper. You still want them warm or at least not icy, but not hot enough to fog the paper.
Finally, underseasoning is a quiet problem. Cold food tastes less loud than hot food, so bean salads, egg salad, lentil fillings, and avocado spreads usually need a little more salt, acid, or mustard than you first think. Taste after chilling. Then taste again.
Picnic Sandwich Questions People Actually Ask

How do you keep vegetarian picnic sandwiches from getting soggy?
Use sturdy bread, toast it lightly, and spread a barrier like hummus, mayo, mustard, pesto, or cheese directly on the bread. Salt watery ingredients like tomatoes, pat them dry, and add them close to serving time instead of hours ahead.
What bread works best for picnic sandwiches?
Ciabatta, sourdough, rye, baguettes, focaccia, and seeded rolls hold up well because they have enough crust and chew. Soft white sandwich bread is fine for immediate eating, but it doesn’t travel nearly as well.
Can I make these the night before?
You can make the fillings ahead, and many of them taste better after they chill. I’d still assemble most sandwiches the morning of the picnic so the bread stays fresh and the greens keep their snap.
Which sandwiches are best eaten cold?
Chickpea salad, egg salad, lentil salad, bean smash, caprese, roasted vegetable hummus, apple cheddar, and tofu banh mi all work cold or at room temperature. The grilled cheese, halloumi, eggplant parmesan, and mushroom melt are better warm but can still be packed if you wrap them well.
What vegetarian filling gives the most protein?
Egg salad, chickpea salad, lentil salad, paneer tikka, halloumi, tofu, and white beans all bring real staying power. If you want a sandwich that feels like a full meal, pair one protein-heavy filling with sturdy bread and a crunchy vegetable layer.
How do I pack these sandwiches for a picnic basket?
Wrap each sandwich in parchment first, then foil if you want it to stay together. Keep chilled fillings in an insulated bag with ice packs, and separate any delicate greens or tomato slices if you’re not eating right away.
Can I reheat the warm sandwiches without drying them out?
Yes. A skillet over medium heat for a few minutes per side gives grilled cheese, halloumi, and mushroom melts the best texture. For eggplant parmesan or paneer sandwiches, a 350°F oven works well if you wrap them loosely in foil for part of the time.
What if I don’t eat eggs or dairy?
Choose the bean, hummus, tofu, roasted vegetable, olive tapenade, or banh mi-style sandwiches. Those fillings still feel complete because they lean on texture, acid, and fat instead of relying on cheese or egg to hold the whole thing together.
How do I keep cut sandwiches from falling apart?
Use a serrated knife, press the sandwich lightly before cutting, and let it rest for a minute after assembly. If the filling is especially loose, pack it a little tighter and cut smaller portions rather than forcing one huge wedge.
A Basket Worth Packing
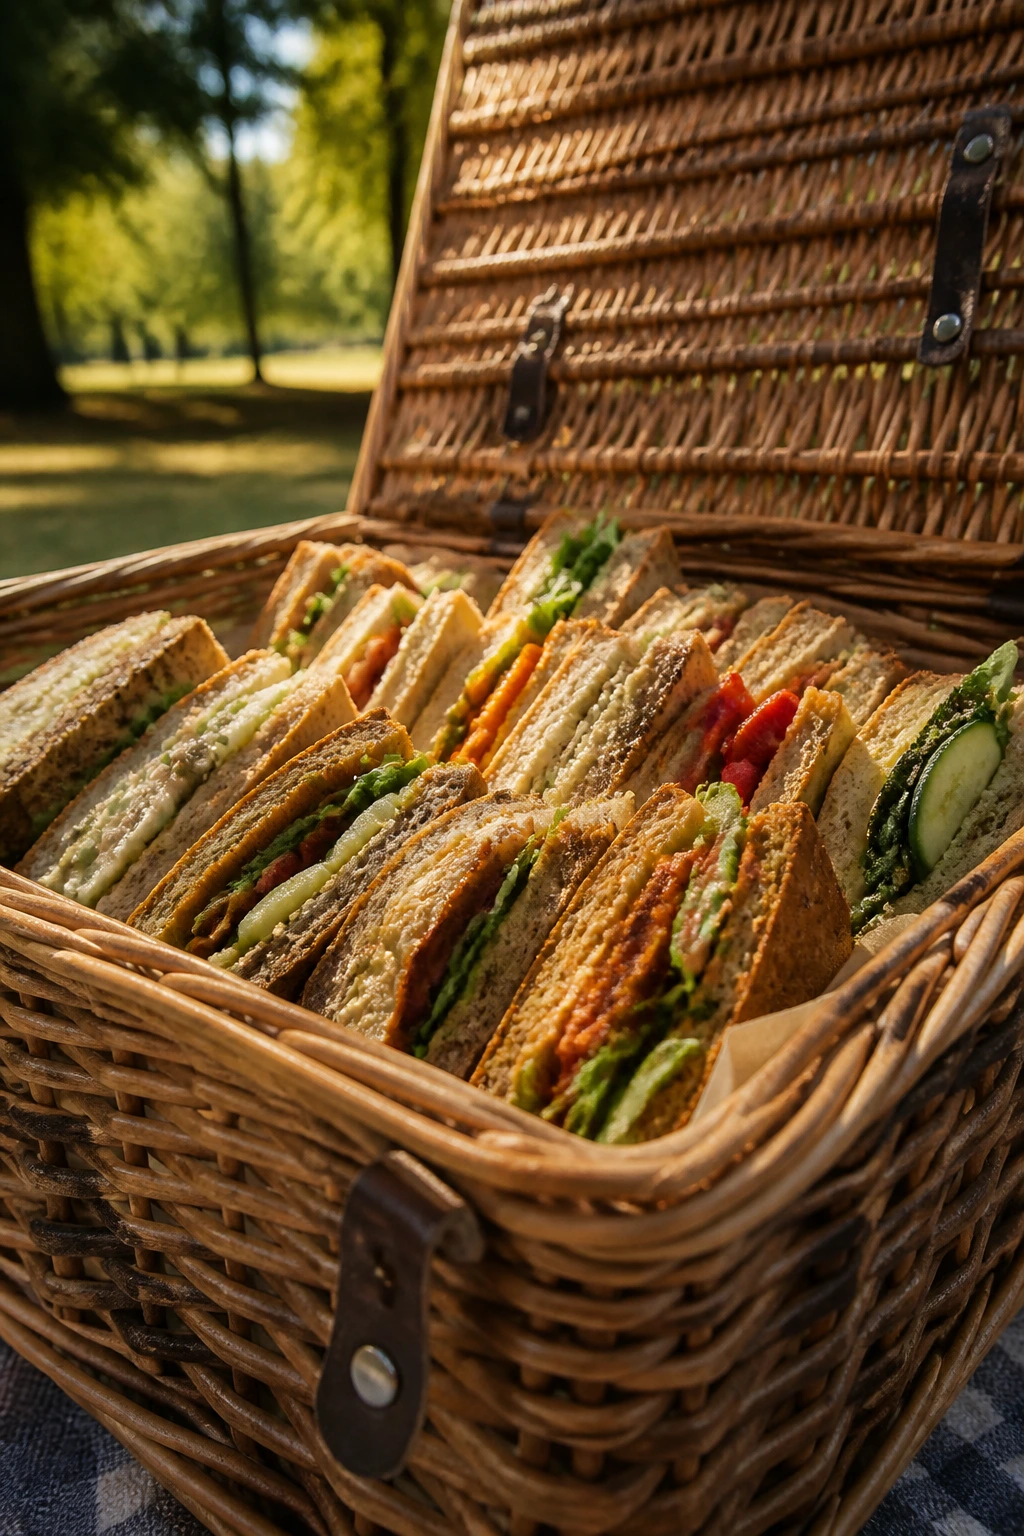
A picnic sandwich should do more than survive the trip. It should still taste like someone cared when you unwrap it. That’s the common thread across these fifteen: strong bread, smart moisture control, and fillings that carry their own weight.
The nice part is that once you start building sandwiches this way, the whole picnic gets easier. You stop relying on one lonely slice of tomato to do all the work, and you start leaning on texture, seasoning, and a little restraint. That’s a much better place to be.
Pick two or three from this list, pack them with something crisp and cold, and the basket will feel a lot less like a gamble.