
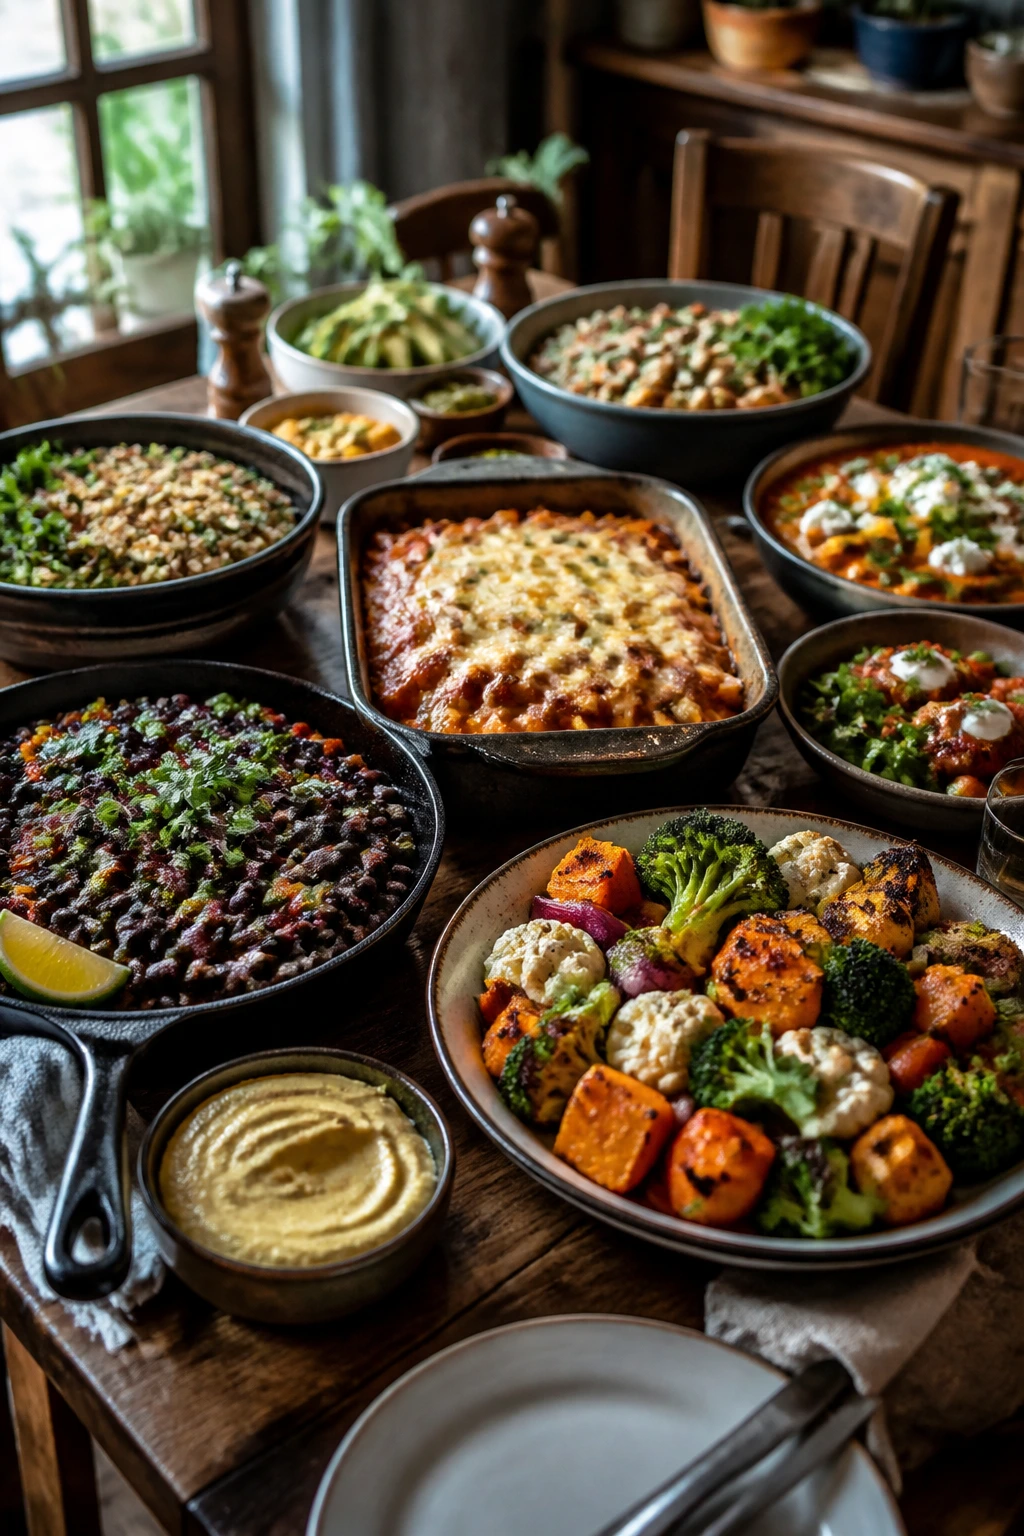
A skillet of smoky black beans, a pan of bubbling baked ziti, or a tray of roasted vegetables with something creamy and salty tucked in among them can calm a skeptical dinner table faster than a speech ever will. Fifty veggie family meals even meat eaters will love sounds like a tall order until you notice what actually makes people keep eating: browned edges, enough salt, a little acid at the end, and textures that don’t collapse into one soft note.
Vegetables alone aren’t the trick. Structure is. A crisp tortilla, a chewy noodle, a blistered mushroom cap, a creamy sauce, a bean that holds its shape, or a crust of baked cheese does more work than a pile of “healthy” ingredients ever will. That’s why these dinners lean hard on familiar formats—skillets, casseroles, soups, sandwiches, bowls, and bakes—because the shape of the meal matters as much as the ingredients inside it.
You’ll see a pattern across the whole collection: plenty of umami from mushrooms, tomatoes, soy sauce, Parmesan, miso, and roasted onions; enough protein from beans, lentils, tofu, eggs, paneer, and cheese to make the plate feel finished; and just enough indulgence to keep the meal from sounding like a compromise. The goal isn’t to fool anyone. It’s to put down a dinner so satisfying that nobody starts asking where the meat went.
Why This Collection Works at a Mixed Table
-
Familiar dinner shapes: Tacos, pasta, burgers, casseroles, soups, and rice bowls already feel like dinner, so the absence of meat doesn’t turn the meal into a project.
-
Real savory depth: Mushrooms, browned onions, tomato paste, soy sauce, miso, roasted garlic, and Parmesan do the heavy lifting that people usually expect from meat drippings.
-
Protein that actually holds its own: Beans, lentils, tofu, eggs, paneer, chickpeas, and cheese give these meals enough body that nobody leaves the table hunting for a second sandwich.
-
Flexible pantry logic: Canned beans, dried pasta, rice, tortillas, frozen vegetables, and shelf-stable gnocchi keep the list practical instead of fussy.
-
Room for texture: Crispy tops, toasted bread, blistered vegetables, crunchy slaw, and melted cheese stop these dinners from sliding into the same soft, same-shaped bite.
-
Built for second helpings: These recipes are designed to reheat well, which matters more than people admit when a family keeps circling back to the stove.
1. Black Bean and Sweet Potato Taco Skillet
A skillet like this looks modest until you taste the first bite. The sweet potato goes soft in the middle and browned at the edges, the black beans turn creamy, and the taco seasoning makes the whole pan smell like a Friday-night dinner someone was actually excited to cook. I like serving it straight from the skillet with warm tortillas tucked around the filling.
Why It Works: Sweet potato brings sweetness and heft, which keeps the beans from feeling thin. Browning the onion and potato first gives the skillet a deeper, almost roasted taste. The tomatoes simmer down into a saucy base that clings to the beans instead of pooling at the bottom. Cheese on top is optional in theory, but in practice it makes the dish feel finished.
Key Ingredients:
- 1 tablespoon olive oil
- 1 medium yellow onion, diced
- 1 medium sweet potato, peeled and cut into 1/2-inch cubes
- 2 cloves garlic, minced
- 1 tablespoon taco seasoning
- 1 can (15 ounces) black beans, drained and rinsed
- 1 can (14.5 ounces) diced tomatoes, undrained
- 8 small flour or corn tortillas
- 1 cup shredded cheddar or Monterey Jack
- 1 lime, cut into wedges
Quick Steps:
- Heat the oil in a 12-inch skillet over medium heat, add the onion and sweet potato, and cook for 8 to 10 minutes until the edges start to brown.
- Stir in the garlic and taco seasoning for 30 seconds, just until fragrant.
- Add the tomatoes and a splash of water, then simmer for 8 to 10 minutes until the sweet potato is tender.
- Stir in the black beans and cook 2 to 3 minutes until hot and thick.
- Top with cheese, cover for 2 minutes, and serve with tortillas and lime.
Equipment for This Recipe:
- 12-inch skillet — wide enough to cook the potato evenly
- Tight-fitting lid or foil — helps melt the cheese
- Sharp knife — for small, even sweet potato cubes
How to Serve This Dish: Spoon the filling into warm tortillas and finish with lime juice and a few cilantro leaves if you have them. A quick cabbage slaw or avocado on the side makes the plate feel fuller without much extra effort.
Pro Tips for This Recipe:
- Cut the sweet potato small; big chunks take too long and make the skillet uneven.
- Drain the beans well so the filling doesn’t turn soupy.
- Let the tomatoes reduce until the liquid looks glossy, not watery.
- A pinch of cumin at the end deepens the taco flavor if your seasoning blend is mild.
Variations on This Dish:
- Breakfast Skillet: Crack 4 eggs on top during the last 5 minutes and cover until the whites set.
- Smoky Chipotle Version: Stir in 1 chopped chipotle in adobo for a hotter, deeper sauce.
- Cheesy Nacho Bowl: Serve the filling over tortilla chips with extra cheese and pickled jalapeños.
Common Mistakes to Avoid with This Dish:
- Don’t rush the sweet potato. If it’s still firm, the skillet tastes undercooked and awkward to eat.
- Don’t pour in extra water unless the pan is dry; too much liquid kills the texture.
- Don’t skip the lime at the end. The acid wakes up the beans and keeps the dish from tasting flat.
2. Creamy Mushroom Stroganoff
This is the kind of meatless dinner that makes people pause halfway through and ask, “Wait, there’s no beef in this?” The mushrooms carry a deep, savory flavor once they’re browned properly, and the sour cream sauce wraps around the noodles like it was built for them. It’s rich, but not heavy in the greasy way some cream sauces can be.
Why It Works: Mushrooms need space and heat to brown instead of steaming, and that browned flavor is the whole point here. A little Dijon sharpens the sauce without making it taste mustardy. Sour cream gives the stroganoff its tang, which keeps the finished bowl from tasting one-note. Wide egg noodles catch every bit of sauce.
Key Ingredients:
- 12 ounces wide egg noodles
- 2 tablespoons butter
- 1 tablespoon olive oil
- 1 1/2 pounds cremini or button mushrooms, sliced
- 1 small yellow onion, sliced
- 3 cloves garlic, minced
- 2 tablespoons all-purpose flour
- 2 cups vegetable broth
- 1 tablespoon Dijon mustard
- 3/4 cup sour cream
- 1 tablespoon Worcestershire sauce or vegetarian Worcestershire
- 2 tablespoons chopped parsley
Quick Steps:
- Cook the noodles in salted water until just tender, then drain.
- Heat butter and oil in a large skillet over medium-high heat, add the mushrooms, and cook 8 to 10 minutes until browned.
- Add the onion and garlic and cook 3 minutes more, then sprinkle in the flour.
- Stir in broth, Dijon, and Worcestershire, then simmer 4 to 5 minutes until slightly thick.
- Lower the heat, stir in sour cream, fold in the noodles, and finish with parsley.
Equipment for This Recipe:
- Large skillet — for browning the mushrooms without crowding
- Large pot — for the noodles
- Wooden spoon — helps scrape up the browned bits
How to Serve This Dish: Serve it in shallow bowls so the sauce stays pooled around the noodles. A crisp green salad or buttered peas on the side is enough; the stroganoff already does most of the work.
Pro Tips for This Recipe:
- Don’t salt the mushrooms right away; let them release moisture first and brown.
- Keep the heat low before adding sour cream so it doesn’t curdle.
- Save a splash of pasta water if the sauce gets too thick.
- A handful of thyme works well if you want a more earthy finish.
Variations on This Dish:
- Lighter Yogurt Version: Swap half the sour cream for plain Greek yogurt and keep the heat low.
- Deep Forest Version: Add 1 teaspoon of dried thyme and 1/2 cup frozen peas.
- Skillet Bake: Top with buttered breadcrumbs and bake at 400°F for 10 minutes.
Common Mistakes to Avoid with This Dish:
- Don’t overcrowd the mushrooms or they’ll steam and taste bland.
- Don’t add sour cream while the pan is bubbling hard.
- Don’t let the sauce get too tight before the noodles go in.
3. Spinach Ricotta Baked Ziti
Baked ziti has the kind of authority that makes a meatless dinner feel settled before anyone sits down. The pasta holds onto the tomato sauce, the ricotta melts into soft pockets, and the top turns golden where the mozzarella meets the heat. Spinach slides into the mix without making a fuss, which is exactly what you want.
Why It Works: Ziti is sturdy enough to hold sauce and cheese without falling apart. Ricotta gives the bake creamy sections instead of one flat texture from top to bottom. Spinach adds color and body, but the real flavor comes from garlic, marinara, and the browned cheese crust. If the sauce tastes good before it goes into the oven, the finished dish will too.
Key Ingredients:
- 1 pound ziti or penne
- 2 tablespoons olive oil
- 3 cloves garlic, minced
- 24 ounces marinara sauce
- 10 ounces frozen spinach, thawed and squeezed dry
- 15 ounces ricotta
- 1 large egg
- 2 cups shredded mozzarella
- 1/2 cup grated Parmesan
- 1 teaspoon dried oregano
Quick Steps:
- Cook the pasta until just shy of al dente, then drain.
- Warm the olive oil in a saucepan, add the garlic, and cook 30 seconds before stirring in the marinara.
- Mix ricotta, egg, spinach, oregano, and half the Parmesan in a bowl.
- Toss pasta with sauce, then layer half in a greased 9×13-inch dish, spread the ricotta mixture over it, and add the remaining pasta.
- Top with mozzarella and the rest of the Parmesan, then bake at 375°F for 25 to 30 minutes until bubbling and browned.
Equipment for This Recipe:
- 9×13-inch baking dish
- Large pot — for the pasta
- Mixing bowl — for the ricotta layer
How to Serve This Dish: Let it rest for 10 minutes before cutting so the layers hold together. A simple arugula salad and garlic bread are enough to round out the plate.
Pro Tips for This Recipe:
- Squeeze the spinach dry or it will leak into the sauce.
- Undercook the pasta by 1 to 2 minutes so it finishes in the oven.
- Use a sauce you’d eat on its own; baked pasta magnifies weak marinara.
- Broil for 1 to 2 minutes at the end if you want a darker top.
Variations on This Dish:
- Sausage-Free Sunday Bake: Add browned mushrooms and chopped roasted peppers for more depth.
- Four-Cheese Version: Mix in fontina or provolone with the mozzarella.
- Gluten-Free Version: Use gluten-free ziti and check the sauce thickness before baking.
Common Mistakes to Avoid with This Dish:
- Don’t overcook the pasta before baking or it turns mushy.
- Don’t skip the resting time; the first cut needs a minute to settle.
- Don’t forget to season the ricotta mixture or the middle layer tastes plain.
4. Chickpea Coconut Curry with Rice
This curry lands somewhere between comforting and bright, which is why it keeps working at the table. The coconut milk gives it a silky body, the chickpeas stay pleasantly firm, and the curry paste brings heat without making the dish harsh. A squeeze of lime at the end is not optional in my kitchen.
Why It Works: Chickpeas soak up sauce without dissolving, so they behave like a proper main ingredient. Coconut milk softens the spice and gives the curry a round finish. Simmering the paste with onion, garlic, and ginger before adding liquid makes the whole pot taste deeper. The rice underneath turns every spoonful into a full meal.
Key Ingredients:
- 1 cup long-grain white rice
- 1 tablespoon oil
- 1 small onion, diced
- 2 cloves garlic, minced
- 1 tablespoon fresh ginger, grated
- 2 tablespoons red curry paste
- 2 cans (15 ounces each) chickpeas, drained and rinsed
- 1 can (13.5 ounces) coconut milk
- 1 cup vegetable broth
- 2 cups baby spinach
- 1 lime, juiced
- 2 tablespoons chopped cilantro
Quick Steps:
- Cook the rice according to package directions.
- Heat oil in a saucepan, then cook onion, garlic, and ginger for 3 minutes until fragrant.
- Stir in curry paste for 30 seconds, then add chickpeas, coconut milk, and broth.
- Simmer for 12 to 15 minutes until the sauce thickens slightly.
- Stir in spinach and lime juice, then serve over rice with cilantro.
Equipment for This Recipe:
- Medium saucepan or Dutch oven
- Small pot or rice cooker — for the rice
- Microplane or fine grater — for the ginger
How to Serve This Dish: Mound the rice in shallow bowls and spoon the curry around it so the sauce stays glossy on top. Cucumber slices or a quick chopped salad add a cold, clean bite beside the richness.
Pro Tips for This Recipe:
- Let the curry paste fry for a moment before liquid goes in.
- Use full-fat coconut milk if you want the sauce to cling better.
- Add the spinach at the end so it stays bright green.
- If the curry gets too thick, loosen it with a splash of broth.
Variations on This Dish:
- Cauliflower Curry: Swap in 4 cups of cauliflower florets for half the chickpeas.
- Peanut Curry: Stir in 2 tablespoons of peanut butter for a deeper, nutty sauce.
- Extra-Green Version: Add green beans and peas during the last 5 minutes.
Common Mistakes to Avoid with This Dish:
- Don’t boil the curry hard or the coconut milk can separate.
- Don’t add lime early; the flavor dulls if it simmers too long.
- Don’t skip salting the rice. Plain rice makes the whole bowl feel flat.
5. Lentil Shepherd’s Pie
A good shepherd’s pie should feel like a closed argument. The lentils give it the dark, meaty base people expect, the vegetables soften into the sauce, and the mashed potatoes on top brown into a crust that cracks under the spoon. It’s the kind of dinner that quietly disappears from the dish.
Why It Works: Brown or green lentils hold their shape and bring an earthy flavor that stands in for the richness of meat. Tomato paste and broth create a savory filling with enough body to sit under mashed potatoes. Baking it finishes the crust and lets the filling thicken underneath. If you want a meatless dinner that still eats like a Sunday plate, this is one to keep.
Key Ingredients:
- 1 1/2 pounds russet potatoes, peeled and cubed
- 3 tablespoons butter
- 1/3 cup milk
- 1 cup brown lentils, rinsed
- 1 tablespoon olive oil
- 1 onion, diced
- 2 carrots, diced
- 2 celery stalks, diced
- 2 tablespoons tomato paste
- 2 cups vegetable broth
- 1 cup frozen peas
- 1 teaspoon thyme
Quick Steps:
- Boil the potatoes until tender, then mash with butter and milk.
- Cook onion, carrots, and celery in oil for 6 to 8 minutes until softened.
- Stir in tomato paste, lentils, broth, and thyme, then simmer 25 to 30 minutes until the lentils are tender and the mixture is thick.
- Fold in peas and spread the filling into a baking dish.
- Top with mashed potatoes and bake at 400°F for 20 minutes until the peaks are browned.
Equipment for This Recipe:
- Large saucepan
- Baking dish
- Potato masher or ricer
How to Serve This Dish: Let it sit for 10 minutes before scooping so the filling doesn’t run. A crisp cucumber salad or buttered green beans balances the mash nicely.
Pro Tips for This Recipe:
- Keep the filling thick; watery lentils make the pie slide apart.
- Rough up the mashed potatoes with a fork before baking for better browning.
- Add a splash of Worcestershire or soy sauce if you want more depth.
- Use Yukon Gold potatoes if you want a softer, richer topping.
Variations on This Dish:
- Mushroom Shepherd’s Pie: Add 8 ounces of chopped mushrooms with the onion.
- Sweet Potato Top: Replace half the potatoes with sweet potatoes for a sweeter lid.
- Cheddar Crust Version: Fold 1 cup shredded cheddar into the mash.
Common Mistakes to Avoid with This Dish:
- Don’t leave the lentils loose and brothy; they should be thick enough to mound.
- Don’t overmix the potatoes or they turn gluey.
- Don’t bake it straight from cold without adding a few extra minutes in the oven.
6. Sheet Pan Gnocchi with Roasted Vegetables
Shelf-stable gnocchi is one of those pantry tricks that feels too simple until you roast it. On the sheet pan, the little dumplings get crisp on the outside and soft inside, while the vegetables caramelize around them. It tastes like more work than it is, which is not a bad thing at dinner.
Why It Works: Gnocchi browns well in the oven without boiling first, so it picks up color from the pan. Roasting tomatoes, peppers, and zucchini concentrates their flavor instead of leaving them watery. A little pesto or olive oil at the end pulls everything together. Mozzarella adds the stretch that keeps the meal from feeling too light.
Key Ingredients:
- 1 pound shelf-stable gnocchi
- 1 zucchini, sliced
- 1 red bell pepper, chopped
- 1 yellow bell pepper, chopped
- 1 small red onion, sliced
- 1 cup cherry tomatoes
- 2 tablespoons olive oil
- 1 teaspoon Italian seasoning
- 1/2 teaspoon salt
- 1 cup mozzarella balls or shredded mozzarella
- 2 tablespoons pesto
Quick Steps:
- Heat the oven to 425°F and line a sheet pan.
- Toss gnocchi and vegetables with olive oil, seasoning, and salt.
- Spread everything in a single layer and roast for 20 to 25 minutes, stirring once halfway through.
- Add mozzarella and roast 3 to 4 minutes more until melted.
- Drizzle with pesto and serve hot.
Equipment for This Recipe:
- Rimmed sheet pan
- Large mixing bowl
- Silicone spatula — for tossing without breaking the gnocchi
How to Serve This Dish: Serve it straight from the pan with a fork and a little extra pesto on the side. A bowl of greens or sliced tomatoes makes the plate feel complete.
Pro Tips for This Recipe:
- Don’t crowd the pan or the gnocchi steams instead of crisping.
- Cut the vegetables into similar sizes so they roast evenly.
- Add pesto after roasting so the basil stays fresh.
- A squeeze of lemon can sharpen the whole tray if it tastes too soft.
Variations on This Dish:
- Creamy Version: Toss with 1/4 cup ricotta after roasting.
- Olive Lover’s Tray: Add Kalamata olives and artichoke hearts.
- Spicy Version: Sprinkle with red pepper flakes before roasting.
Common Mistakes to Avoid with This Dish:
- Don’t use too much oil; the tray should look coated, not slick.
- Don’t stir too often or the gnocchi tears.
- Don’t skip the single layer. Overlapping pieces stay pale.
7. Veggie Enchilada Casserole
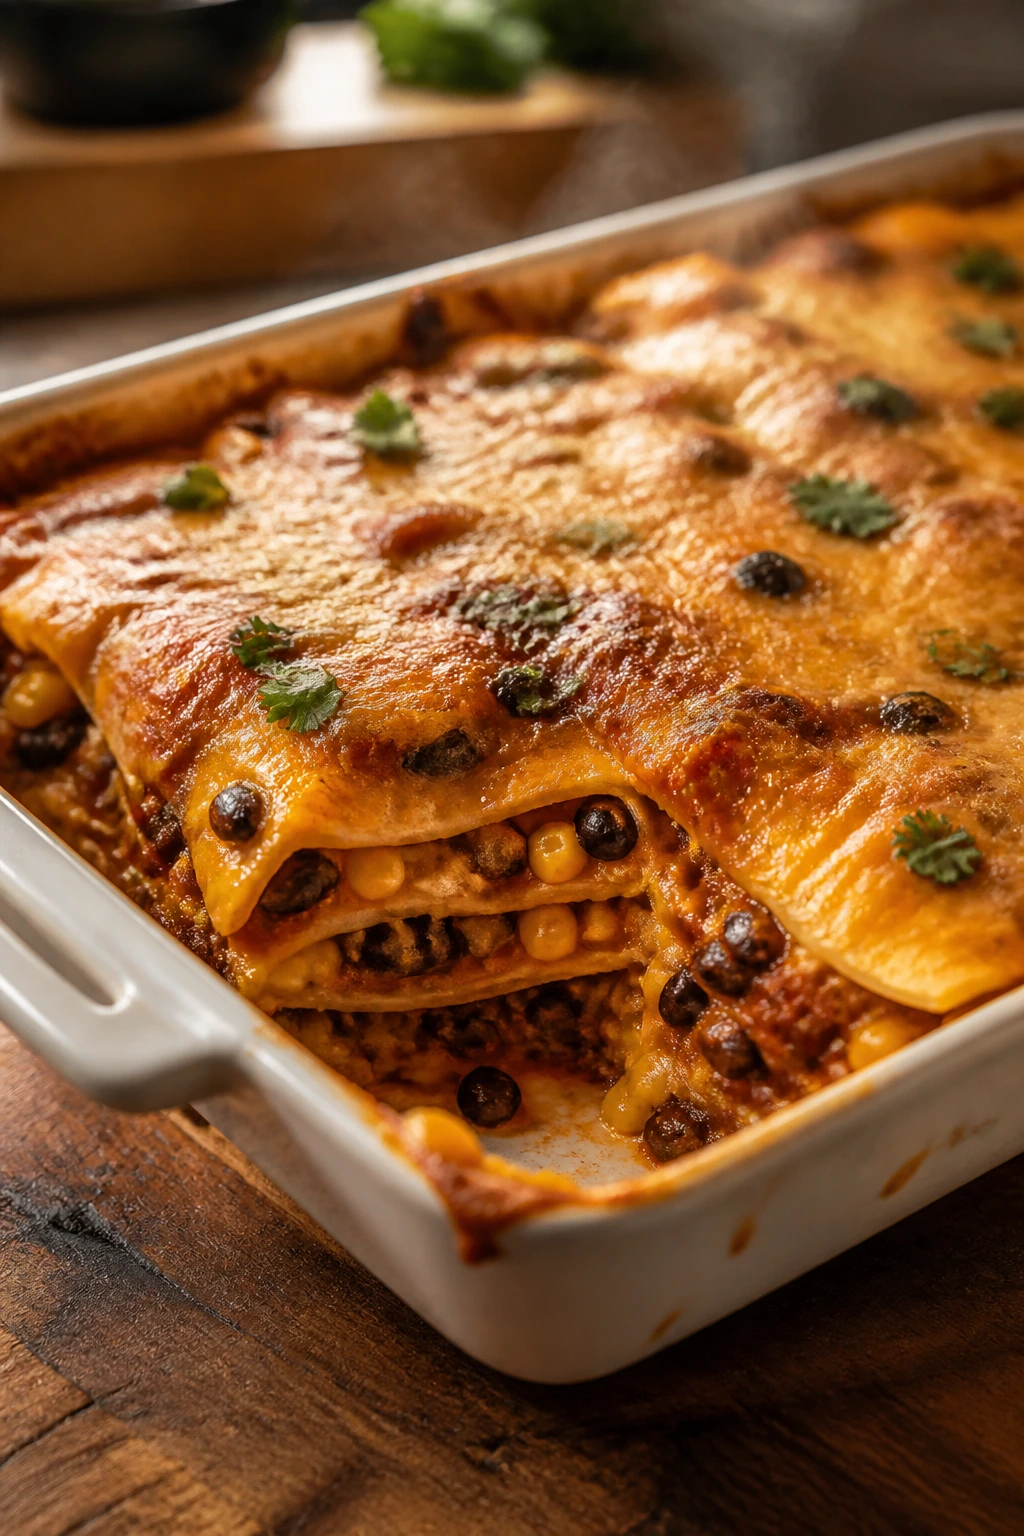
This casserole hits the table looking like a proper dinner, not a set of compromises. Tortillas soak up enchilada sauce, the beans add body, and the melted cheese gives you those browned edges that make people hover over the pan. It’s bold enough to satisfy a crowd that usually wants something heartier.
Why It Works: Layering tortillas with sauce keeps the dish from drying out. Beans and corn give the casserole enough texture that every bite feels full. Enchilada sauce carries the flavor without making you build it from scratch unless you want to. A broiled cheese top gives the whole thing a little drama.
Key Ingredients:
- 10 small corn tortillas, cut into strips
- 1 tablespoon oil
- 1 onion, diced
- 1 red bell pepper, diced
- 1 can (15 ounces) black beans
- 1 cup corn kernels
- 2 cups enchilada sauce
- 2 cups shredded Monterey Jack
- 1 teaspoon cumin
- 1/2 cup chopped cilantro
Quick Steps:
- Cook onion and bell pepper in oil for 5 minutes until softened.
- Stir in beans, corn, and cumin, then cook 2 minutes more.
- Spread a little enchilada sauce in a greased baking dish, add tortillas, then half the vegetable mixture and half the sauce.
- Repeat the layers and top with cheese.
- Bake at 375°F for 25 minutes until bubbling, then finish with cilantro.
Equipment for This Recipe:
- 9×13-inch baking dish
- Skillet
- Sharp knife — for clean tortilla strips
How to Serve This Dish: Let the casserole rest before cutting so the layers stay defined. Serve with avocado, a spoon of sour cream, and shredded lettuce if you want some crunch.
Pro Tips for This Recipe:
- Taste the sauce before layering; weak sauce makes weak casserole.
- Drain the beans well so the middle doesn’t go watery.
- Tear tortillas if they need to fit the dish instead of forcing them.
- Broil for 1 minute at the end if you want a darker top.
Variations on This Dish:
- Green Enchilada Version: Swap red sauce for salsa verde.
- Extra-Bean Version: Add pinto beans for more body.
- Roasted Veggie Version: Mix in roasted zucchini or mushrooms.
Common Mistakes to Avoid with This Dish:
- Don’t drown the layers in sauce; too much makes it slide.
- Don’t cut it too soon. A 10-minute rest helps it hold together.
- Don’t forget to season the filling, or the middle goes bland.
8. Thai Peanut Noodle Bowls
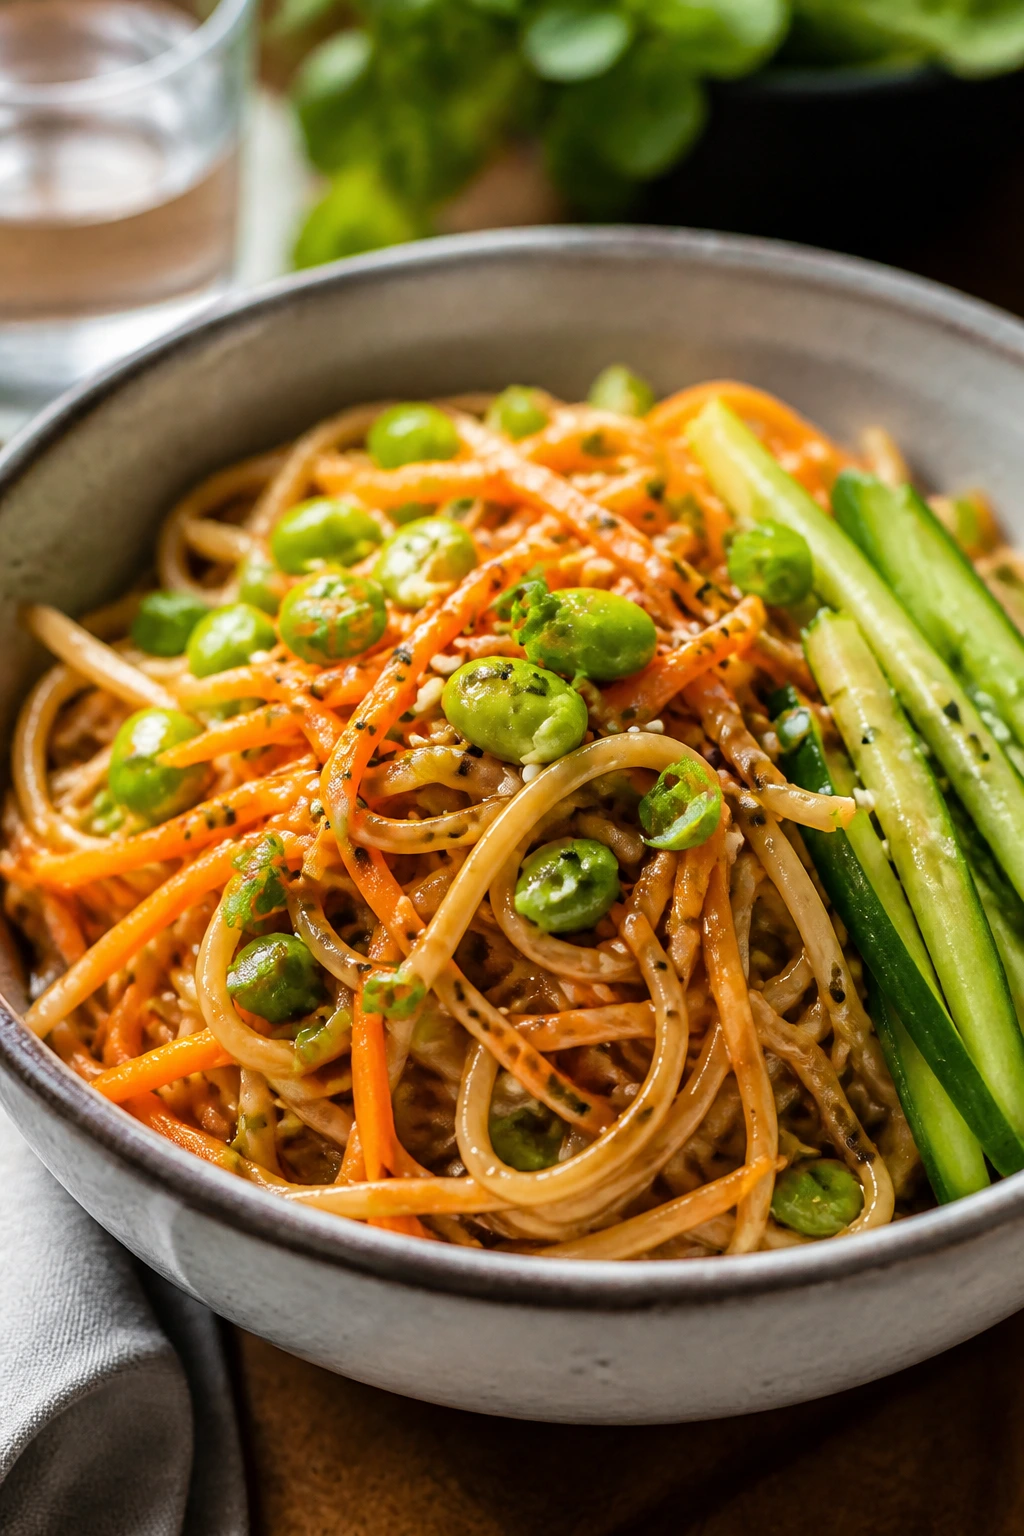
Cold-weather comfort is one thing, but this bowl works because the sauce is loud in the right way. Peanut butter, lime, soy sauce, and a little heat give the noodles a sticky, savory coating that keeps pulling you back for one more bite. The vegetables stay crisp enough to break up the richness.
Why It Works: Peanut sauce needs acid and salt to keep it from tasting heavy, and lime plus soy do that job. Rice noodles carry the sauce without getting chewy. Fresh vegetables cut through the richness so the bowl doesn’t turn sleepy halfway through. Edamame adds protein without changing the texture of the dish.
Key Ingredients:
- 8 ounces rice noodles
- 1/3 cup peanut butter
- 2 tablespoons soy sauce
- 1 tablespoon lime juice
- 1 tablespoon maple syrup or honey
- 1 teaspoon sriracha
- 1 cup shredded carrots
- 1 cup sliced cucumber
- 1 cup shelled edamame, cooked
- 2 scallions, sliced
- 1 tablespoon sesame seeds
Quick Steps:
- Cook the noodles according to package directions, then rinse briefly.
- Whisk peanut butter, soy sauce, lime juice, maple syrup, sriracha, and 2 to 3 tablespoons warm water until smooth.
- Toss the noodles with the sauce.
- Fold in carrots, cucumber, edamame, and scallions.
- Finish with sesame seeds and extra lime.
Equipment for This Recipe:
- Large mixing bowl
- Whisk
- Pot for noodles
How to Serve This Dish: Serve at room temperature or slightly warm in wide bowls so the vegetables stay crisp on top. A handful of chopped peanuts gives the bowls a better crunch if you have them.
Pro Tips for This Recipe:
- Thin the peanut sauce slowly; it should coat, not glue.
- Rinse the noodles briefly so they don’t clump.
- Add the cucumber at the end to keep it crisp.
- A spoonful of tahini can replace part of the peanut butter if needed.
Variations on This Dish:
- Sesame Version: Add 1 teaspoon sesame oil and extra scallions.
- Spicy Version: Double the sriracha and add chopped chili crisp.
- Tofu Bowl: Top with seared tofu cubes for a more filling plate.
Common Mistakes to Avoid with This Dish:
- Don’t drown the noodles in sauce all at once; add half, then taste.
- Don’t skip the lime. Peanut sauce without acid feels dull.
- Don’t use boiling water to loosen the sauce or it can turn oily.
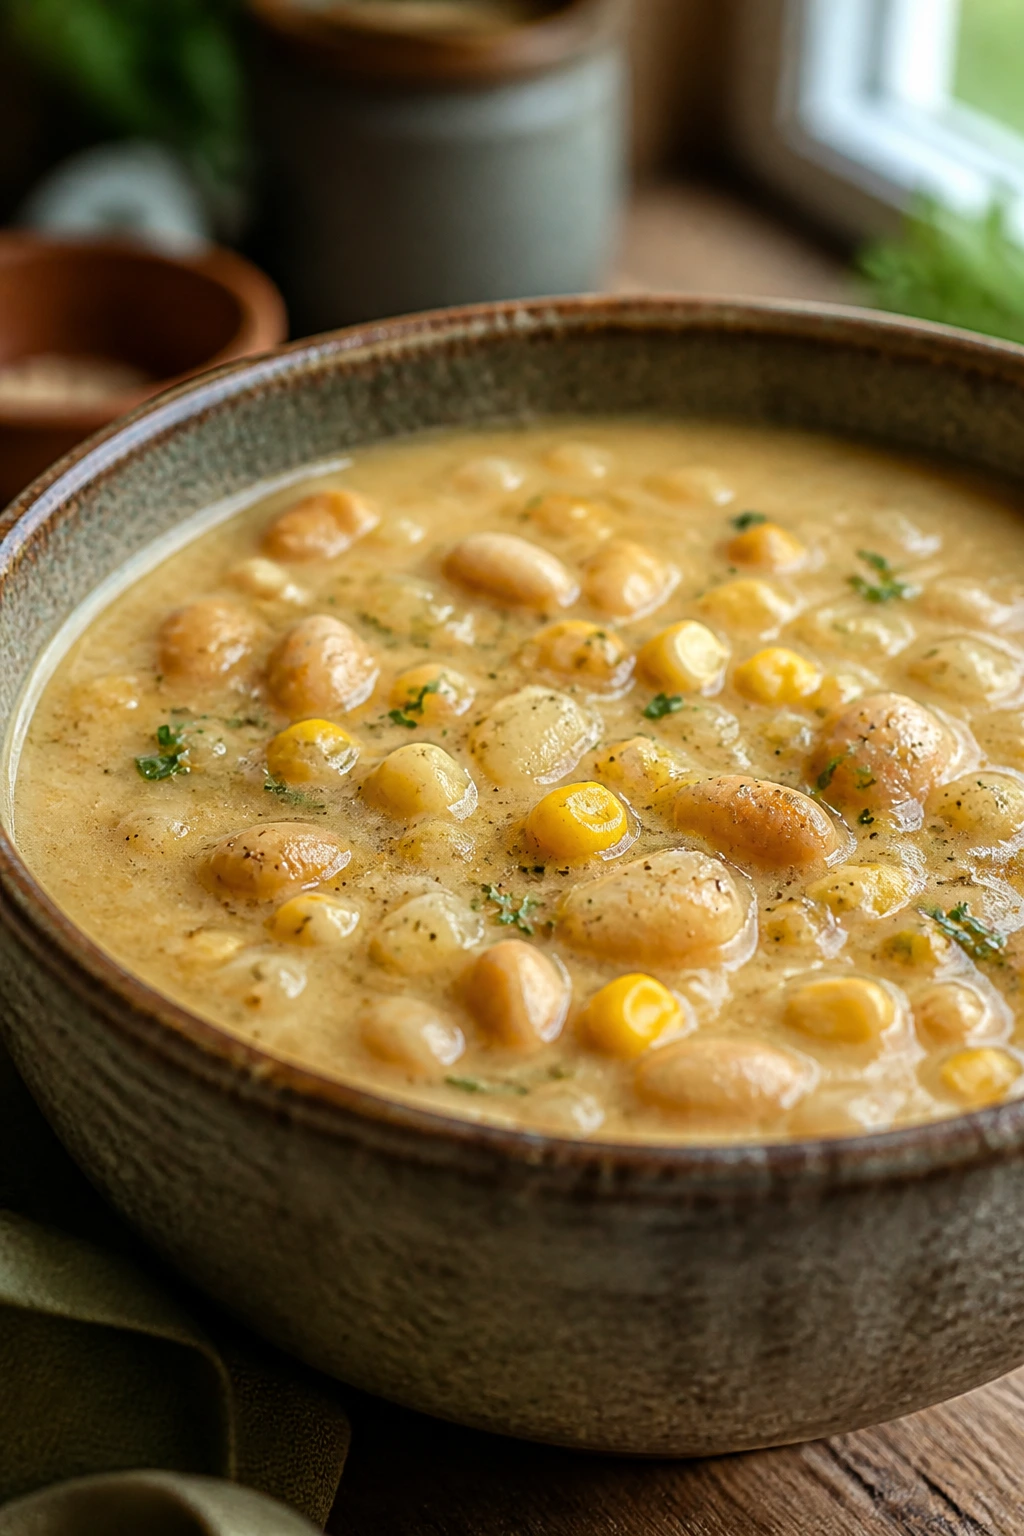
9. Broccoli Cheddar Potato Soup
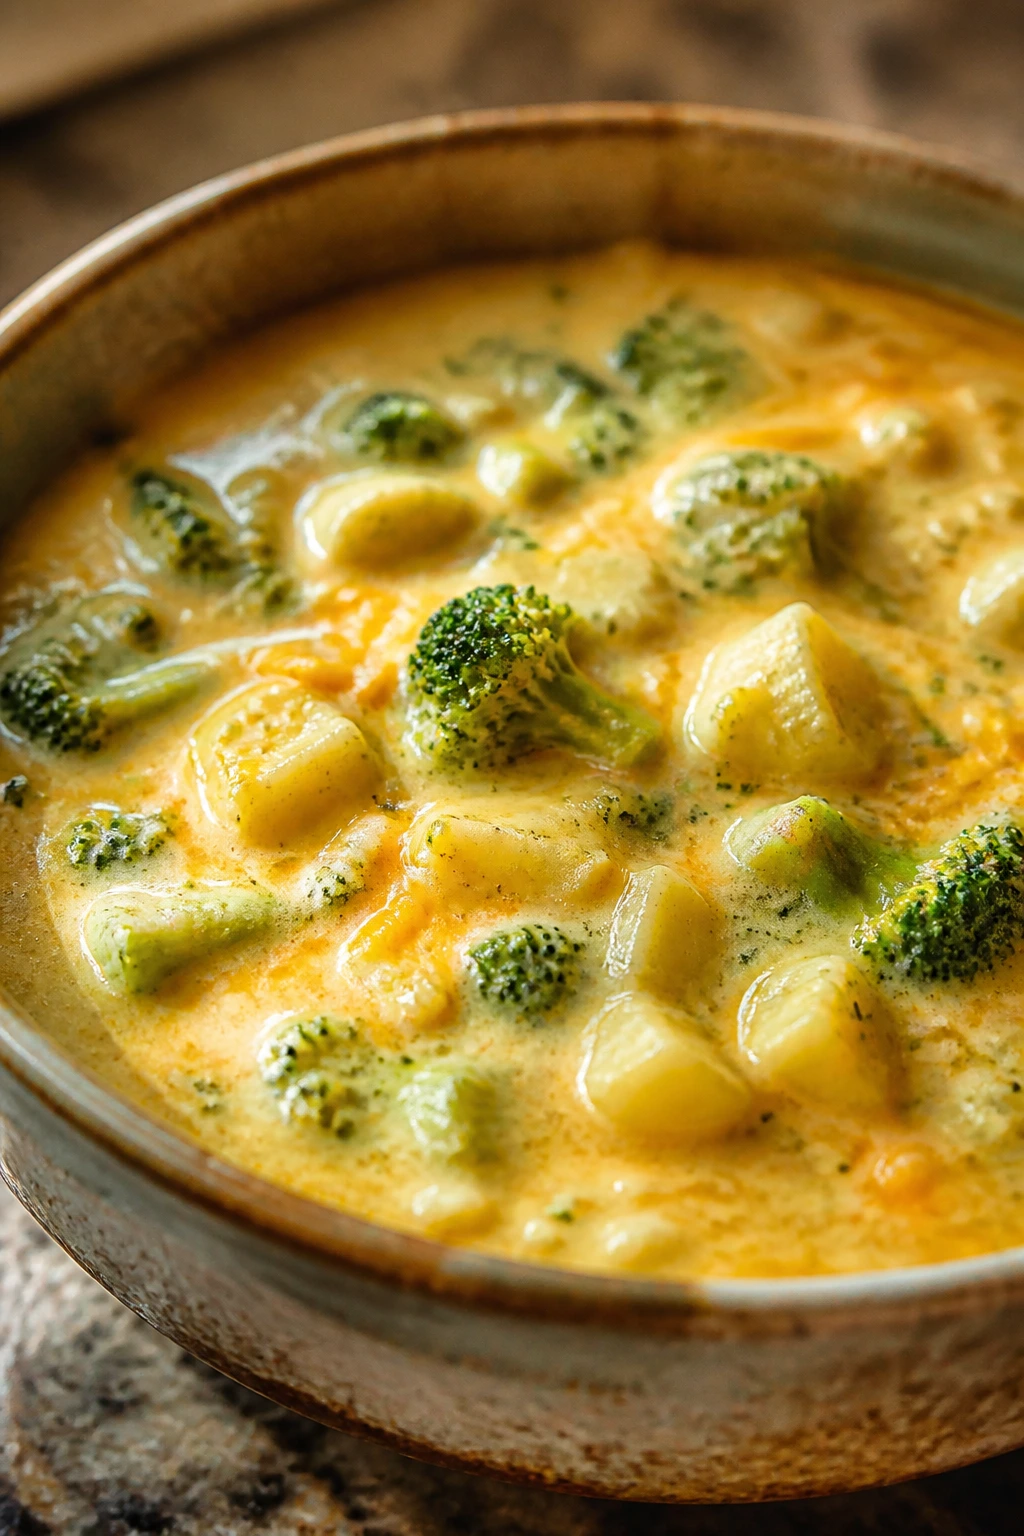
This soup tastes like it belongs in a diner booth, which is part of its charm. The potatoes make it thick, the broccoli stays green and tender, and the cheddar melts into the broth in a way that feels almost unfair. It’s comforting, but it still has enough texture to keep the bowl interesting.
Why It Works: Potatoes thicken the soup naturally once they break down a little. Broccoli gives you bite and color, but it doesn’t need long cooking or it loses character. Sharp cheddar brings flavor fast, so you don’t need a huge pile of it. A little cream makes the texture lush without turning the whole pot into cheese sauce.
Key Ingredients:
- 2 tablespoons butter
- 1 onion, diced
- 2 carrots, diced
- 3 medium russet potatoes, peeled and cubed
- 4 cups broccoli florets
- 4 cups vegetable broth
- 1 cup milk or half-and-half
- 2 cups shredded sharp cheddar
- 1 teaspoon salt
- 1/2 teaspoon black pepper
Quick Steps:
- Melt butter in a pot, then cook onion and carrots for 5 minutes.
- Add potatoes and broth, then simmer 12 to 15 minutes until the potatoes are tender.
- Stir in broccoli and cook 5 minutes more.
- Mash some of the potatoes against the side of the pot to thicken the soup.
- Lower the heat, add milk and cheddar, and stir until melted and smooth.
Equipment for This Recipe:
- Large soup pot
- Potato masher
- Box grater — for cheese that melts cleanly
How to Serve This Dish: Serve with crusty bread or a buttered roll so you can chase the last spoonfuls. A few extra shreds of cheddar on top are never wrong here.
Pro Tips for This Recipe:
- Grate your own cheddar; pre-shredded cheese melts less smoothly.
- Keep the heat low when adding cheese so it doesn’t grain.
- Leave some potato chunks intact for a better spoonful.
- A splash of hot sauce at the end sharpens the flavor without making it spicy.
Variations on This Dish:
- Smoky Version: Add 1/2 teaspoon smoked paprika.
- Extra-Thick Version: Blend half the soup with an immersion blender.
- Cauliflower Swap: Replace half the potato with cauliflower florets.
Common Mistakes to Avoid with This Dish:
- Don’t boil the soup after the cheese goes in or it can split.
- Don’t underseason the broth; potatoes absorb salt fast.
- Don’t overcook the broccoli until it loses color.
10. Portobello Mushroom Burgers

A well-cooked portobello can stand in for a burger better than most people expect. The mushroom turns juicy and dark around the edges, the bun soaks up just enough flavor, and a slice of cheese ties it all together. I usually add onions or aioli because the mushroom loves a little extra help.
Why It Works: Portobellos have a dense bite that feels substantial on a bun. A quick marinade adds seasoning without turning them soggy. High heat gives the caps a browned surface instead of a rubbery one. If you build the burger like a real burger—with acid, fat, and something crisp—it holds up.
Key Ingredients:
- 4 large portobello caps, stems removed
- 2 tablespoons olive oil
- 1 tablespoon soy sauce
- 1 teaspoon balsamic vinegar
- 1 garlic clove, minced
- 4 burger buns
- 4 slices provolone or cheddar
- 1 tomato, sliced
- 1 small red onion, sliced
- Lettuce leaves
- 2 tablespoons mayonnaise or aioli
Quick Steps:
- Mix oil, soy sauce, balsamic, and garlic, then brush over the mushrooms.
- Let the caps sit for 10 minutes while you heat a grill pan or skillet.
- Cook mushrooms 4 to 5 minutes per side until browned and tender.
- Add cheese during the last minute and toast the buns.
- Build the burgers with lettuce, tomato, onion, and aioli.
Equipment for This Recipe:
- Grill pan or cast-iron skillet
- Pastry brush — for the marinade
- Spatula
How to Serve This Dish: Serve with oven fries, a chopped salad, or grilled corn if you want the plate to feel complete. These burgers are sturdy enough to eat with your hands, which is part of the fun.
Pro Tips for This Recipe:
- Don’t soak the mushrooms; brush them instead.
- Salt after cooking if you want the caps to keep a meatier texture.
- Toast the buns or the burger slides apart fast.
- A few pickles add needed sharpness.
Variations on This Dish:
- Blue Cheese Version: Swap in blue cheese and caramelized onions.
- BBQ Version: Brush with barbecue sauce in the last minute of cooking.
- Open-Faced Version: Serve over toast with a fried egg on top.
Common Mistakes to Avoid with This Dish:
- Don’t cook on low heat; the mushrooms need a good sear.
- Don’t skip the acid in the marinade.
- Don’t overload the bun with wet toppings or it gets floppy.
11. Cauliflower Parmesan Subs

Cauliflower Parmesan is the sort of dinner that sounds polite until you bite into the crunchy edges. Once the cauliflower is roasted and coated in marinara and cheese, it starts behaving like a proper sandwich filling. In a toasted sub roll, it feels hearty enough that nobody misses the usual meatball route.
Why It Works: Roasting the cauliflower before saucing it keeps the texture firm. Breadcrumbs give the florets a crisp shell that survives the tomato sauce. Melted mozzarella and Parmesan make the sandwich taste rich and familiar. The sub roll matters here; soft bread turns this into a mess.
Key Ingredients:
- 1 large head cauliflower, cut into florets
- 2 tablespoons olive oil
- 1 cup breadcrumbs
- 1 teaspoon Italian seasoning
- 1 cup marinara sauce
- 1 1/2 cups shredded mozzarella
- 1/4 cup grated Parmesan
- 4 sub rolls
- 2 tablespoons chopped basil
Quick Steps:
- Toss cauliflower with oil, breadcrumbs, and seasoning.
- Roast at 425°F for 20 minutes until golden at the edges.
- Spoon marinara over the cauliflower and top with mozzarella and Parmesan.
- Bake 8 more minutes until the cheese melts.
- Pile into toasted rolls and finish with basil.
Equipment for This Recipe:
- Rimmed sheet pan
- Baking dish
- Knife and cutting board
How to Serve This Dish: These are best served hot and slightly messy, with extra marinara on the side for dipping. A simple Caesar-style salad or sliced peppers keeps the meal from feeling too heavy.
Pro Tips for This Recipe:
- Roast the cauliflower until it has color before saucing it.
- Toast the rolls so they don’t collapse under the filling.
- Use a thick marinara; watery sauce ruins the crust.
- Add red pepper flakes if you want some bite.
Variations on This Dish:
- Eggplant Swap: Replace cauliflower with roasted eggplant slices.
- Spicy Marinara Version: Use arrabbiata sauce.
- Gluten-Free Version: Serve over polenta or on gluten-free rolls.
Common Mistakes to Avoid with This Dish:
- Don’t drown the cauliflower in sauce before baking.
- Don’t use soft bread that can’t handle moisture.
- Don’t skip the roast; this dish needs browning.
12. Mediterranean Chickpea Pitas

These pitas taste like someone took the best parts of a mezze plate and turned them into dinner. You get the soft chickpeas, cool cucumber, salty feta, and creamy hummus all tucked into bread that stays soft but not soggy. The balance is the point here.
Why It Works: Chickpeas are mild enough to take on herbs, lemon, and garlic without losing their shape. Hummus acts as both spread and sauce, which keeps the pita from needing a separate dressing. Feta adds salt and a little bite. If you use crisp vegetables, the sandwich stays lively instead of dense.
Key Ingredients:
- 2 cans (15 ounces each) chickpeas, drained and rinsed
- 1 tablespoon olive oil
- 1 teaspoon cumin
- 1 cucumber, diced
- 1 cup cherry tomatoes, halved
- 1/2 red onion, thinly sliced
- 1/2 cup hummus
- 1/2 cup crumbled feta
- 4 pita breads
- 1 tablespoon lemon juice
- 2 tablespoons chopped parsley
Quick Steps:
- Warm the chickpeas in olive oil and cumin for 3 to 4 minutes.
- Toss cucumber, tomatoes, onion, lemon juice, and parsley together.
- Warm the pita breads so they’re flexible.
- Spread hummus inside each pita, then add chickpeas and vegetables.
- Finish with feta and serve right away.
Equipment for This Recipe:
- Small skillet
- Mixing bowl
- Knife
How to Serve This Dish: Serve with olives, sliced peppers, or a cup of yogurt on the side. Cut the pitas in half so they’re easier to eat without losing filling on the plate.
Pro Tips for This Recipe:
- Warm the chickpeas so they don’t taste flat out of the can.
- Salt the vegetables lightly and let them sit for 5 minutes if they need more flavor.
- Use thick hummus so the pitas don’t leak.
- A drizzle of olive oil on the filling helps the whole thing taste richer.
Variations on This Dish:
- Roasted Veggie Version: Add roasted zucchini or peppers.
- Herbed Yogurt Version: Swap hummus for thick garlic yogurt.
- Spicy Version: Add sliced pepperoncini or chili crisp.
Common Mistakes to Avoid with This Dish:
- Don’t overfill the pita or it splits.
- Don’t use watery tomatoes without draining some juice.
- Don’t serve the pitas cold if the bread is stiff.
13. Stuffed Bell Peppers with Rice and Beans
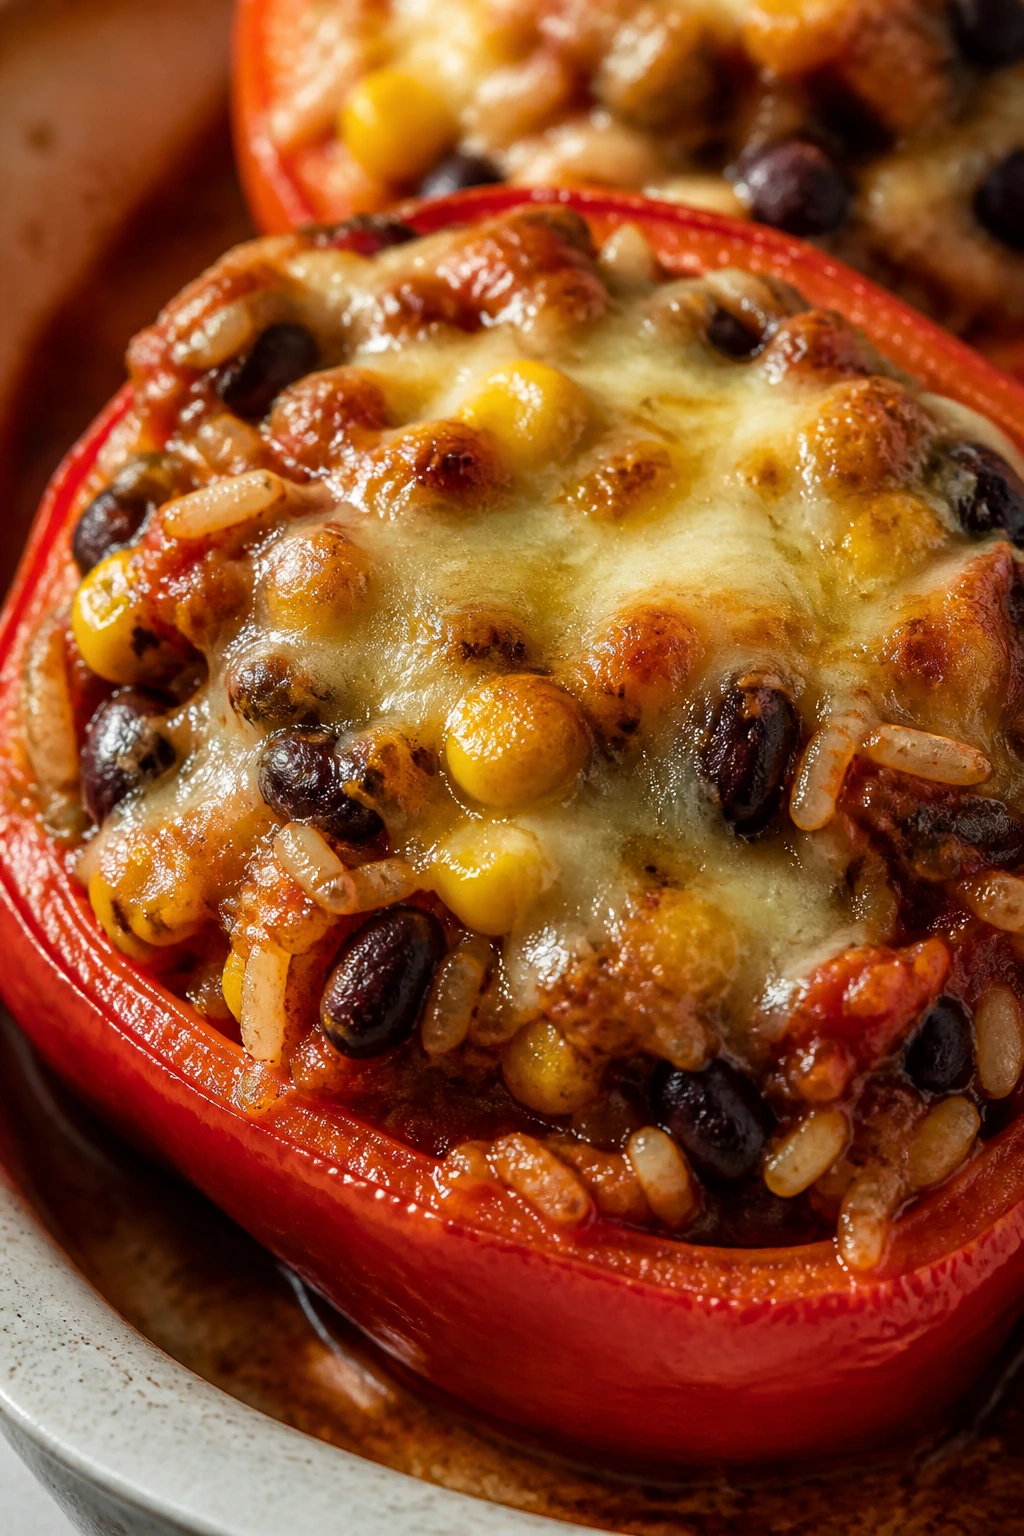
Stuffed peppers can be bland if you treat them like a formality. Give them seasoned rice, beans, tomato sauce, and a proper layer of cheese, though, and they turn into little edible casseroles. The pepper softens just enough in the oven to hold everything together without going floppy.
Why It Works: Bell peppers become sweeter as they roast, which helps offset the savory filling. Rice and beans make a complete, sturdy center that doesn’t collapse when sliced. Tomato sauce keeps the filling moist while the cheese browns on top. It’s a meal that looks tidy and eats like comfort food.
Key Ingredients:
- 4 large bell peppers, halved and seeded
- 1 tablespoon olive oil
- 1 onion, diced
- 2 cloves garlic, minced
- 1 cup cooked rice
- 1 can (15 ounces) black beans, drained
- 1 cup corn kernels
- 1 cup tomato sauce
- 1 teaspoon chili powder
- 1 1/2 cups shredded cheddar or Monterey Jack
Quick Steps:
- Heat oven to 375°F and place the pepper halves cut side up in a baking dish.
- Cook onion and garlic in oil for 3 minutes.
- Stir in rice, beans, corn, tomato sauce, and chili powder.
- Fill the peppers, top with cheese, and add a splash of water to the dish.
- Bake 35 to 40 minutes until the peppers are tender and the cheese is browned.
Equipment for This Recipe:
- Baking dish
- Skillet
- Spoon for stuffing
How to Serve This Dish: Serve two pepper halves per person with sour cream or salsa on the side. A green salad or roasted potatoes makes the meal feel fuller if the family wants more than the peppers alone.
Pro Tips for This Recipe:
- Par-bake the peppers for 10 minutes if you like them softer.
- Pack the filling in firmly so each half holds more.
- Add a little cumin for more depth.
- Use leftover rice if you have it; it firms up the filling.
Variations on This Dish:
- Mexican-Style Version: Add enchilada sauce and a little cotija.
- Italian Version: Use marinara, mozzarella, and basil.
- Protein-Heavy Version: Add lentils with the rice and beans.
Common Mistakes to Avoid with This Dish:
- Don’t under-season the filling; the pepper shell won’t fix that.
- Don’t skip the water in the pan or the peppers can dry out.
- Don’t overbake until the peppers collapse.
14. Butternut Squash Mac and Cheese
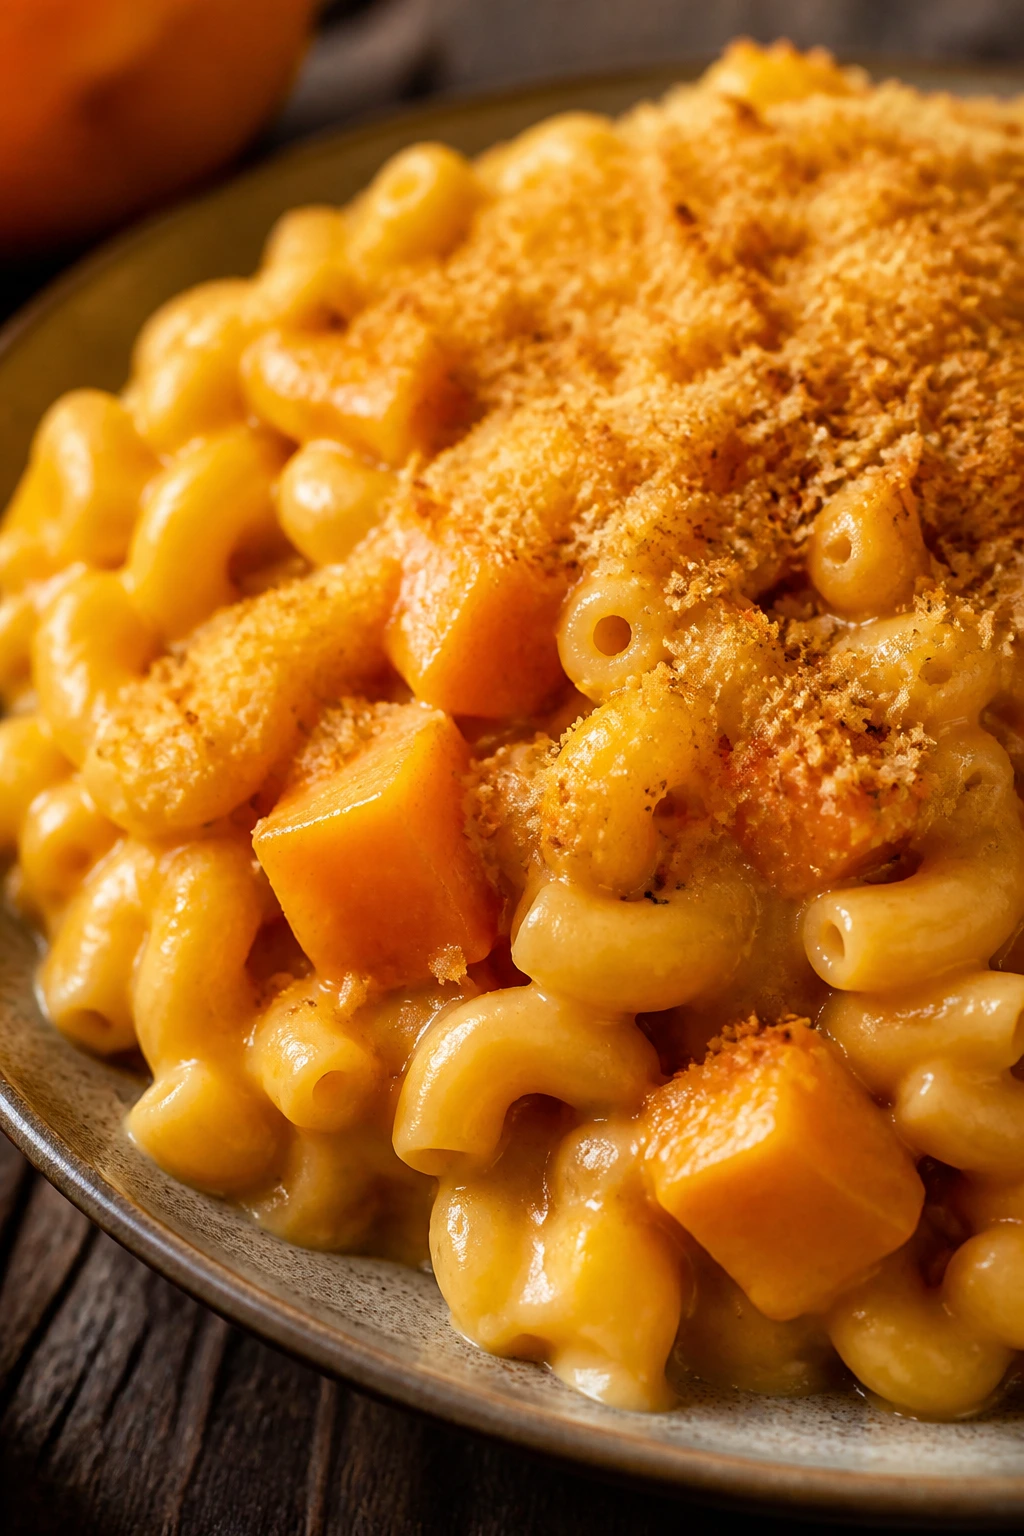
Butternut squash in mac and cheese sounds sneaky until you taste how smooth it makes the sauce. The squash adds body and a soft sweetness that lets the cheddar stretch further without losing the comfort-food feel. Kids usually notice the orange color before they notice the vegetable.
Why It Works: Squash blends into the sauce and thickens it naturally. Cheddar gives the sharp edge you want, while milk keeps the sauce pourable. The pasta shape matters; elbows or shells trap sauce instead of letting it slide off. A breadcrumb top adds crunch so the bowl doesn’t get too soft.
Key Ingredients:
- 12 ounces elbow macaroni or small shells
- 2 cups cubed butternut squash
- 2 tablespoons butter
- 2 tablespoons flour
- 2 cups milk
- 2 cups shredded sharp cheddar
- 1 teaspoon Dijon mustard
- 1/2 teaspoon salt
- 1 cup breadcrumbs
- 1 tablespoon olive oil
Quick Steps:
- Boil the squash until tender, then mash or blend it smooth.
- Cook the pasta until al dente and drain.
- Make a sauce with butter, flour, milk, squash, mustard, salt, and cheddar.
- Stir in the pasta and transfer to a baking dish.
- Top with breadcrumbs mixed with olive oil and bake at 375°F for 15 minutes until golden.
Equipment for This Recipe:
- Saucepan
- Baking dish
- Whisk
- Blender or potato masher
How to Serve This Dish: Serve hot with roasted broccoli or a crisp salad to cut the richness. A little extra black pepper on top sharpens the flavor nicely.
Pro Tips for This Recipe:
- Blend the squash until perfectly smooth so the sauce feels creamy.
- Don’t boil the cheese sauce hard or it can go grainy.
- Salt the pasta water well; the sauce needs that base seasoning.
- Let it rest 5 minutes before serving so the sauce settles.
Variations on This Dish:
- Smoky Version: Add smoked paprika and a handful of Gruyère.
- Cauliflower Blend: Use half cauliflower for a milder sauce.
- Stovetop Version: Skip the bake and eat it straight from the pot.
Common Mistakes to Avoid with This Dish:
- Don’t use too little salt; squash and pasta both need it.
- Don’t overcook the pasta before baking.
- Don’t skip the crunchy top if you want real contrast.
15. Veggie Fried Rice with Crispy Tofu
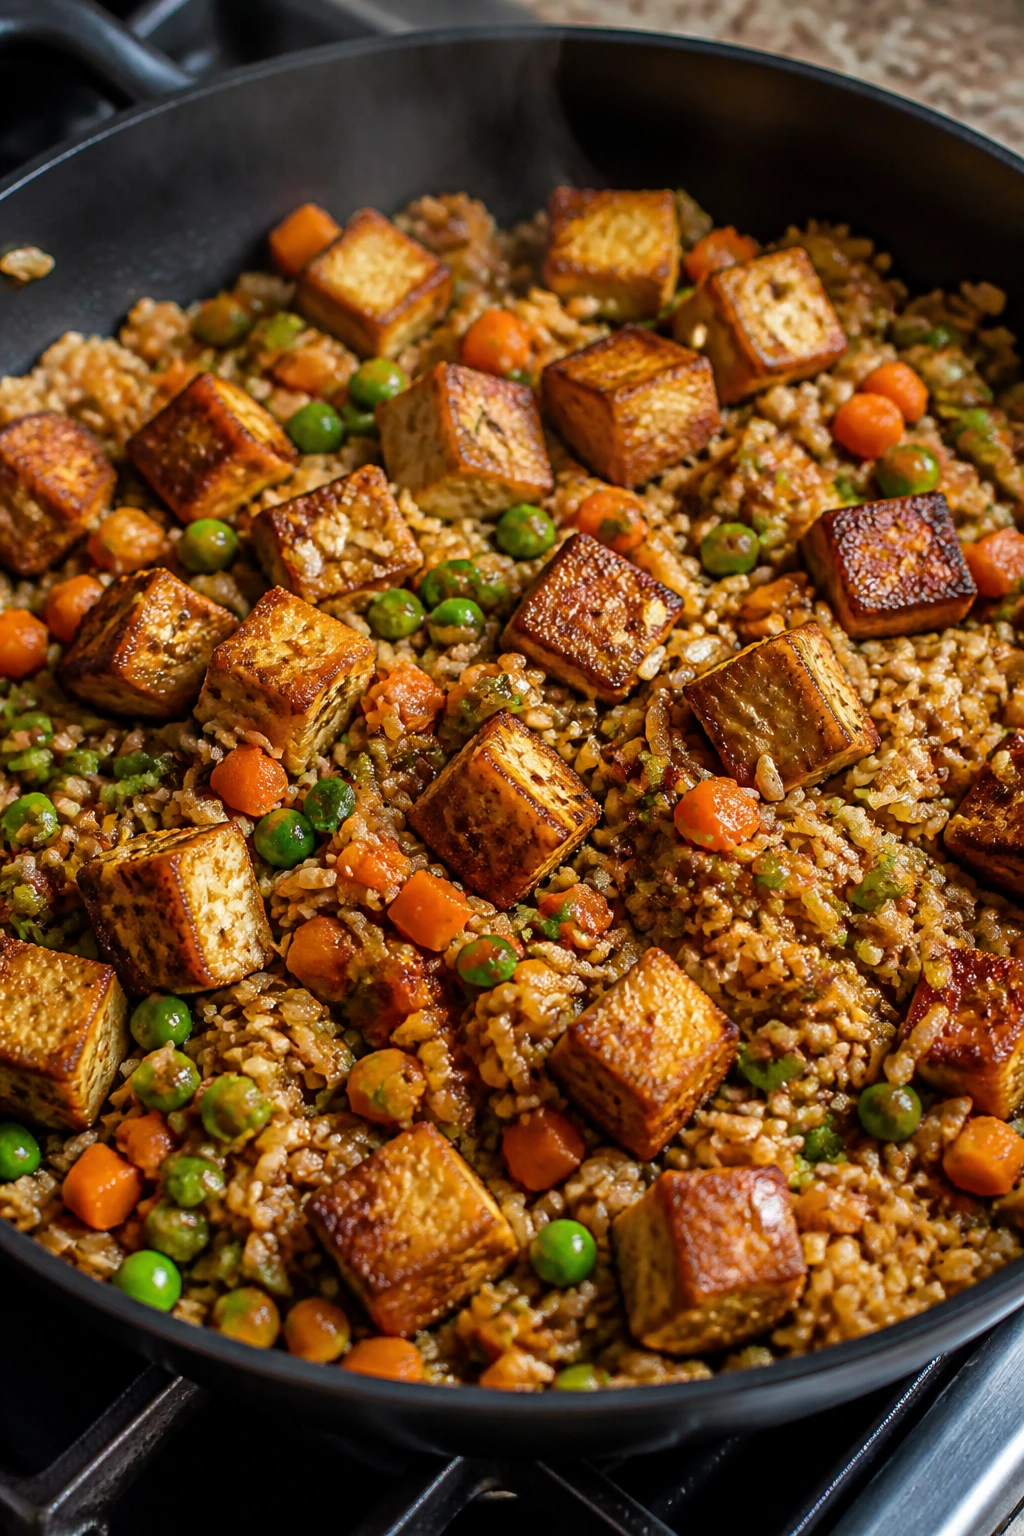
Fried rice should taste like the wok got involved, even if you’re cooking it on a regular stove. Cold rice, well-browned tofu, and a quick soy-based sauce make the whole pan taste sharper and more complete than its simple ingredients suggest. It’s the kind of dish that eats like a full meal and then quietly disappears.
Why It Works: Day-old rice stays separate instead of turning sticky. Pressed tofu browns on the outside and keeps enough chew to matter in the bowl. A hot pan gives you the little bits of caramelized rice that make fried rice taste right. Vegetables add color, but they also stop the dish from feeling too dense.
Key Ingredients:
- 3 cups cooked, chilled rice
- 14 ounces firm tofu, pressed and cubed
- 2 tablespoons oil
- 1 cup diced carrots
- 1 cup frozen peas
- 2 cloves garlic, minced
- 3 tablespoons soy sauce
- 1 tablespoon sesame oil
- 2 scallions, sliced
- 1 egg, beaten, optional
Quick Steps:
- Brown the tofu in 1 tablespoon oil over medium-high heat, then set it aside.
- Add the remaining oil, carrots, and garlic, and cook 2 minutes.
- Stir in the rice and let it sit briefly so it can brown before stirring.
- Add peas, soy sauce, sesame oil, and the tofu.
- Push the rice aside, cook the egg if using, then toss in scallions and serve.
Equipment for This Recipe:
- Large skillet or wok
- Spatula
- Press or clean towel for tofu
How to Serve This Dish: Serve in bowls with sriracha or chili crisp on the side. A cucumber salad or sesame green beans makes a good cold contrast.
Pro Tips for This Recipe:
- Use chilled rice or the pan turns gummy.
- Don’t move the rice too often; let it catch a little color.
- Press the tofu long enough to remove excess water.
- Add sesame oil at the end so it stays fragrant.
Variations on This Dish:
- Pineapple Version: Add diced pineapple for a sweet-salty edge.
- Veggie-Heavy Version: Use mushrooms and cabbage along with the carrots.
- No-Egg Version: Leave out the egg and add extra tofu.
Common Mistakes to Avoid with This Dish:
- Don’t use freshly cooked rice; it steams instead of fries.
- Don’t overcrowd the pan or the tofu won’t brown.
- Don’t drown the dish in soy sauce before tasting.
16. Zucchini Corn Fritters

These fritters are what happen when summer vegetables get a little ambitious. Zucchini brings moisture, corn adds sweetness and pop, and the edges fry up crisp enough to make the plate feel more playful than plain vegetables usually do. I like them with a yogurt dip because the coolness cuts through the fry.
Why It Works: Salted zucchini needs to be squeezed dry or the batter gets loose. Corn gives texture and makes each bite feel less soft than a plain fritter. Eggs and flour hold the mixture together without making it heavy. Pan-frying in a thin layer of oil gives you the crisp edges people actually fight over.
Key Ingredients:
- 2 medium zucchini, grated
- 1 teaspoon salt
- 1 cup corn kernels
- 2 scallions, sliced
- 2 large eggs
- 1/2 cup all-purpose flour
- 1/4 cup grated Parmesan
- 1/2 teaspoon black pepper
- 2 tablespoons oil for frying
- 1/2 cup plain yogurt for serving
Quick Steps:
- Toss the zucchini with salt and let it sit 10 minutes, then squeeze it dry.
- Mix zucchini, corn, scallions, eggs, flour, Parmesan, and pepper.
- Heat oil in a skillet over medium heat.
- Spoon in small mounds and cook 3 to 4 minutes per side until deep golden.
- Drain briefly and serve with yogurt.
Equipment for This Recipe:
- Box grater
- Skillet
- Paper towels or a clean kitchen towel
How to Serve This Dish: Serve as a main with salad, or make them part of a bigger spread with tomatoes and beans. A lemony yogurt dip or sour cream keeps each bite bright.
Pro Tips for This Recipe:
- Squeeze the zucchini harder than you think you need to.
- Keep the fritters small so they turn crisp instead of soggy.
- Don’t flip too early or they tear.
- A little lemon zest in the batter wakes up the flavor.
Variations on This Dish:
- Cheddar Version: Swap Parmesan for cheddar and serve with salsa.
- Herb Version: Add dill or parsley for a greener taste.
- Gluten-Free Version: Use chickpea flour instead of all-purpose flour.
Common Mistakes to Avoid with This Dish:
- Don’t skip the salt-and-squeeze step.
- Don’t crowd the pan, or the fritters steam.
- Don’t make the batter too wet; it should spoon, not pour.
17. White Bean and Kale Soup
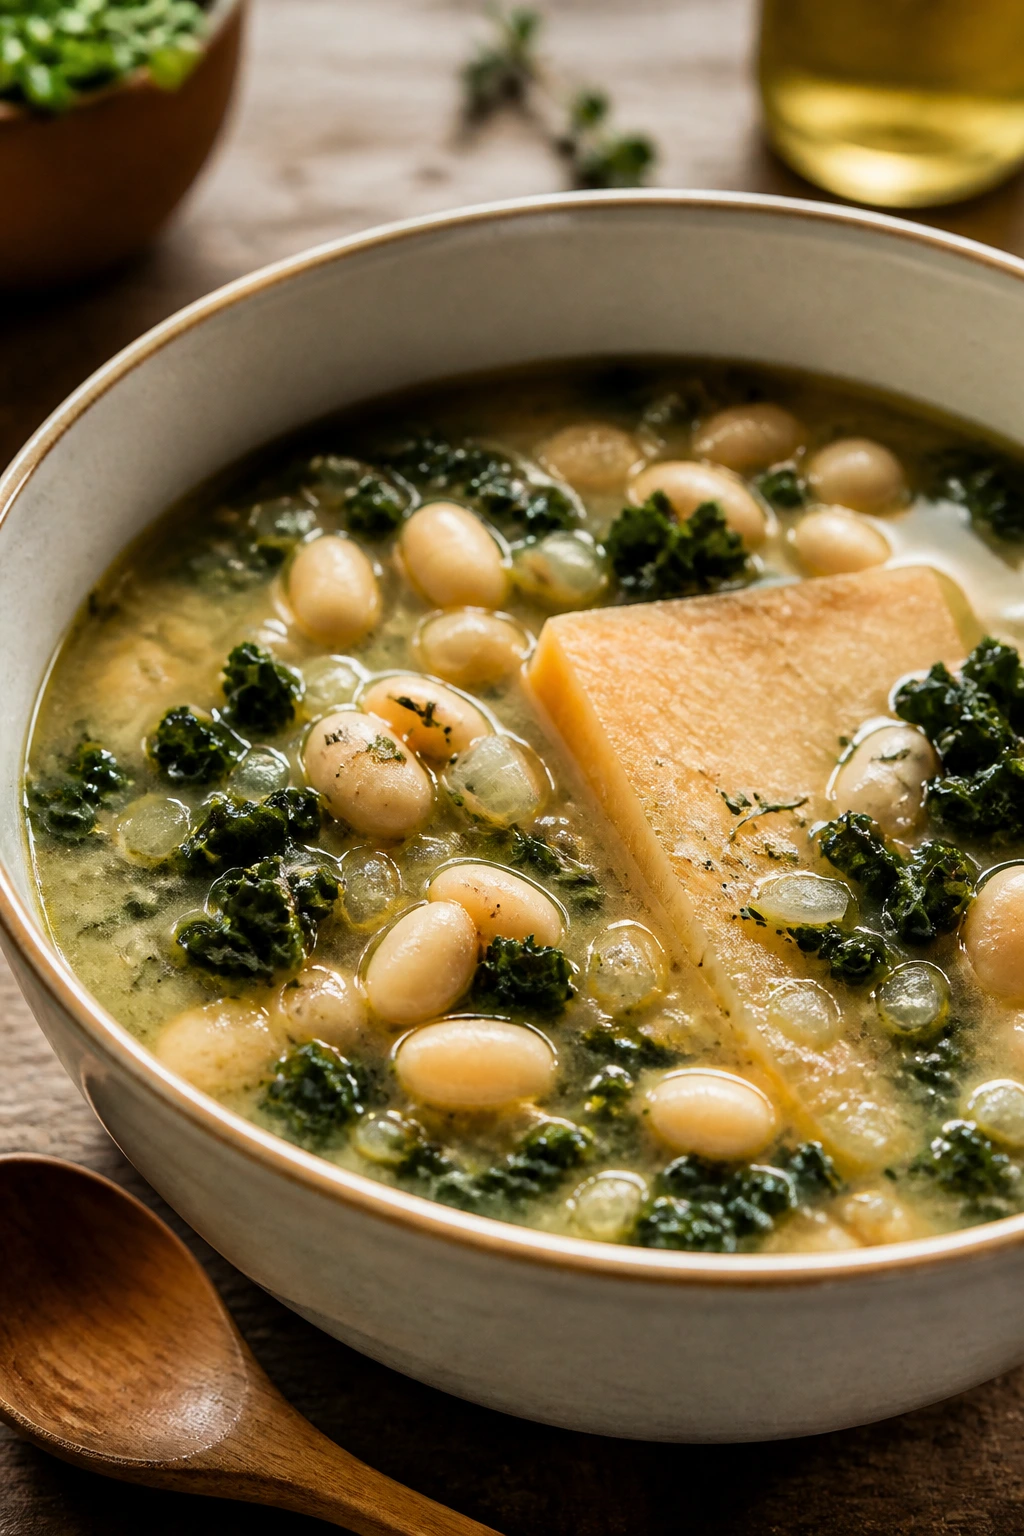
A soup like this knows exactly what it is: humble ingredients, cooked until they taste like they were meant to be together. White beans bring creaminess, kale gives the bowl some resistance, and a Parmesan rind if you have one adds a salty backbone. It’s soup that actually feels like dinner.
Why It Works: White beans break down just enough to thicken the broth. Kale keeps its shape better than softer greens, so the soup stays texturally interesting. Onion, garlic, and broth build the base; a Parmesan rind or grated cheese adds a savory finish. A squeeze of lemon at the end keeps it from feeling sleepy.
Key Ingredients:
- 2 tablespoons olive oil
- 1 onion, diced
- 2 carrots, diced
- 2 cloves garlic, minced
- 2 cans (15 ounces each) white beans, drained
- 6 cups vegetable broth
- 1 Parmesan rind, optional
- 1 bunch kale, stems removed and leaves chopped
- 1 teaspoon salt
- 1 tablespoon lemon juice
Quick Steps:
- Cook onion and carrots in olive oil for 6 minutes.
- Add garlic, white beans, broth, and Parmesan rind, then simmer 15 minutes.
- Mash a few beans against the pot to thicken the soup.
- Stir in kale and cook 5 minutes until tender.
- Finish with salt and lemon juice.
Equipment for This Recipe:
- Soup pot
- Wooden spoon
- Potato masher or spoon for mashing beans
How to Serve This Dish: Serve with toasted sourdough or a hunk of crusty bread. A little grated Parmesan on top is enough; the soup already has a clean, finished feel.
Pro Tips for This Recipe:
- Strip the kale leaves from the stems so the texture stays pleasant.
- Use low-sodium broth so you can control the salt.
- Add the lemon at the end, not during simmering.
- A drizzle of olive oil just before serving makes it taste rounder.
Variations on This Dish:
- Tuscan Version: Add chopped rosemary and a few crushed tomatoes.
- Extra-Hearty Version: Stir in small pasta during the last 8 minutes.
- Creamier Version: Blend 2 cups of the soup and stir it back in.
Common Mistakes to Avoid with This Dish:
- Don’t overcook the kale until it turns dull.
- Don’t forget to taste after the lemon goes in.
- Don’t leave the beans whole if you want a thicker soup.
18. Spinach and Feta Quesadillas
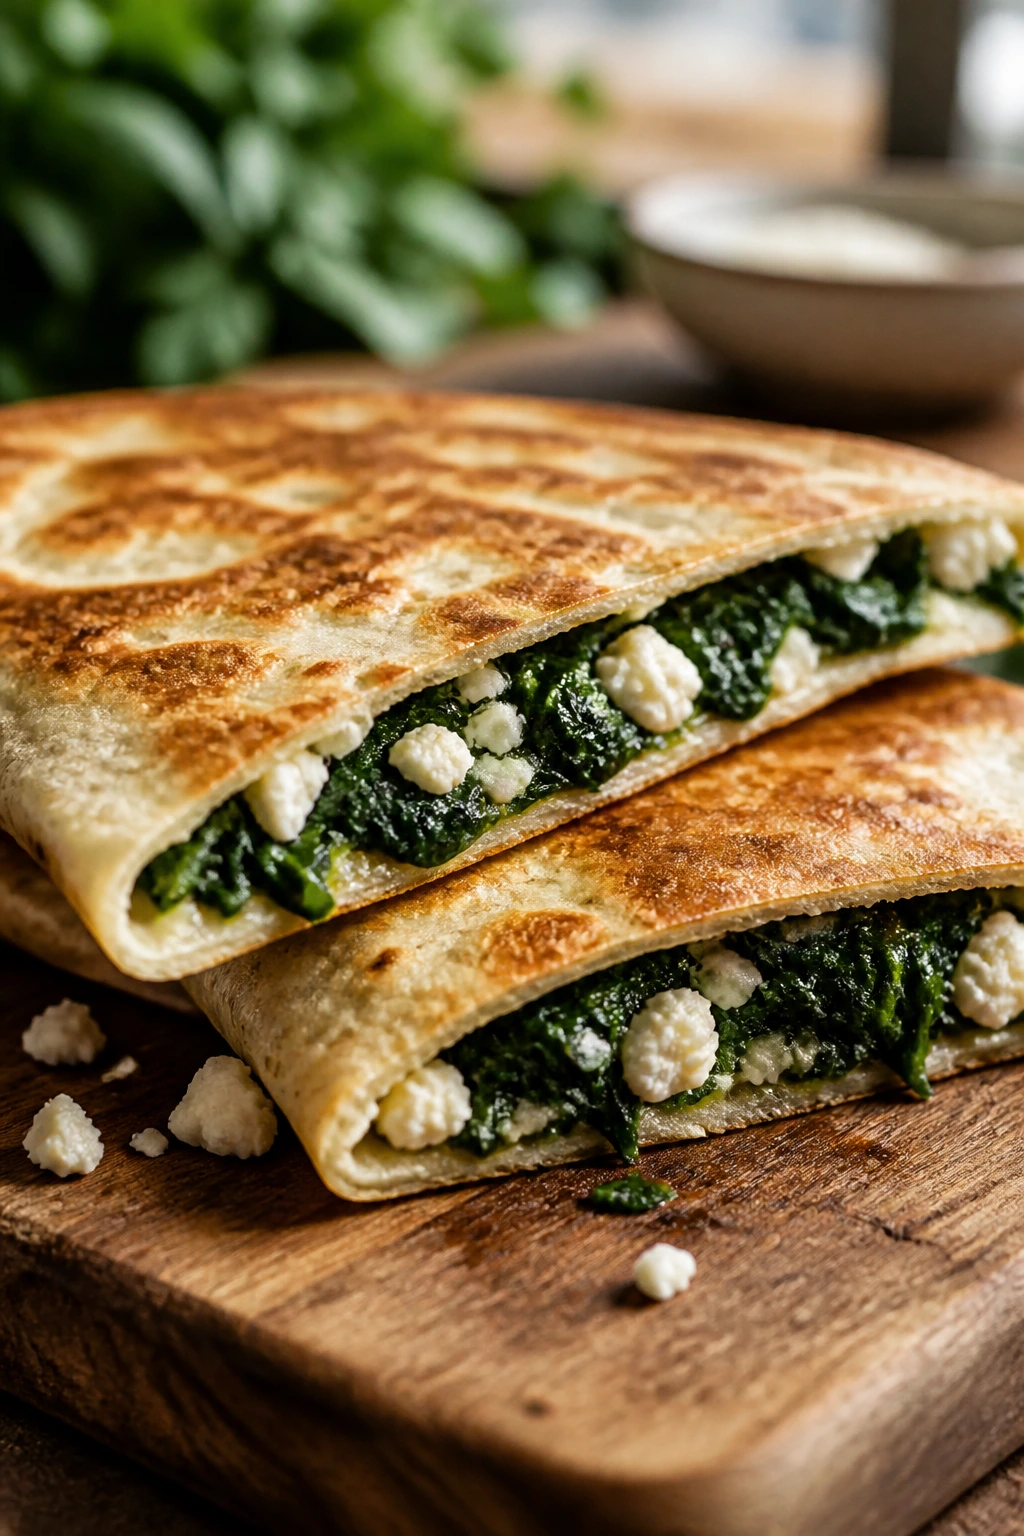
Quesadillas are built on the right kind of laziness: fast, hot, and better when you don’t overthink them. Spinach melts down, feta brings salty bite, and the cheese does the job of binding everything into a crisp, foldable dinner. They work for lunch, but they hold their own at dinner if you add a good side.
Why It Works: Spinach cooks down quickly, so it doesn’t fight the tortilla. Feta gives sharp flavor in small amounts, which keeps the filling lively. A little mozzarella or Monterey Jack helps the quesadilla melt and stretch. Crisping the tortilla in a dry skillet first, then with a touch of oil, gets you the right texture.
Key Ingredients:
- 4 large flour tortillas
- 4 cups baby spinach
- 1 tablespoon olive oil
- 1 clove garlic, minced
- 1 cup shredded mozzarella
- 3/4 cup crumbled feta
- 1/4 teaspoon black pepper
- Salsa, for serving
Quick Steps:
- Wilt the spinach in olive oil with garlic for 1 to 2 minutes, then cool slightly.
- Layer mozzarella, spinach, feta, and pepper on half of each tortilla.
- Fold the tortillas and cook in a dry skillet over medium heat for 2 to 3 minutes per side.
- Press lightly with a spatula until the cheese melts and the tortillas brown.
- Slice into wedges and serve with salsa.
Equipment for This Recipe:
- Skillet
- Spatula
- Cutting board or plate for slicing
How to Serve This Dish: Serve two wedges per person with salsa, sour cream, or guacamole. Add beans or a quick salad if you want the meal to feel bigger.
Pro Tips for This Recipe:
- Don’t overload the filling or the tortillas split.
- Let the spinach cool a bit so it doesn’t steam the tortilla.
- Use medium heat; high heat burns the tortilla before the cheese melts.
- A touch of pepper matters because feta needs contrast.
Variations on This Dish:
- Mushroom Version: Add sautéed mushrooms with the spinach.
- Herb Version: Stir chopped dill or parsley into the filling.
- Spicy Version: Add pickled jalapeños.
Common Mistakes to Avoid with This Dish:
- Don’t use too much wet spinach.
- Don’t cook too fast or you’ll get browned tortillas and cold centers.
- Don’t skip a melty cheese alongside the feta.
19. Eggplant Parmesan Bake
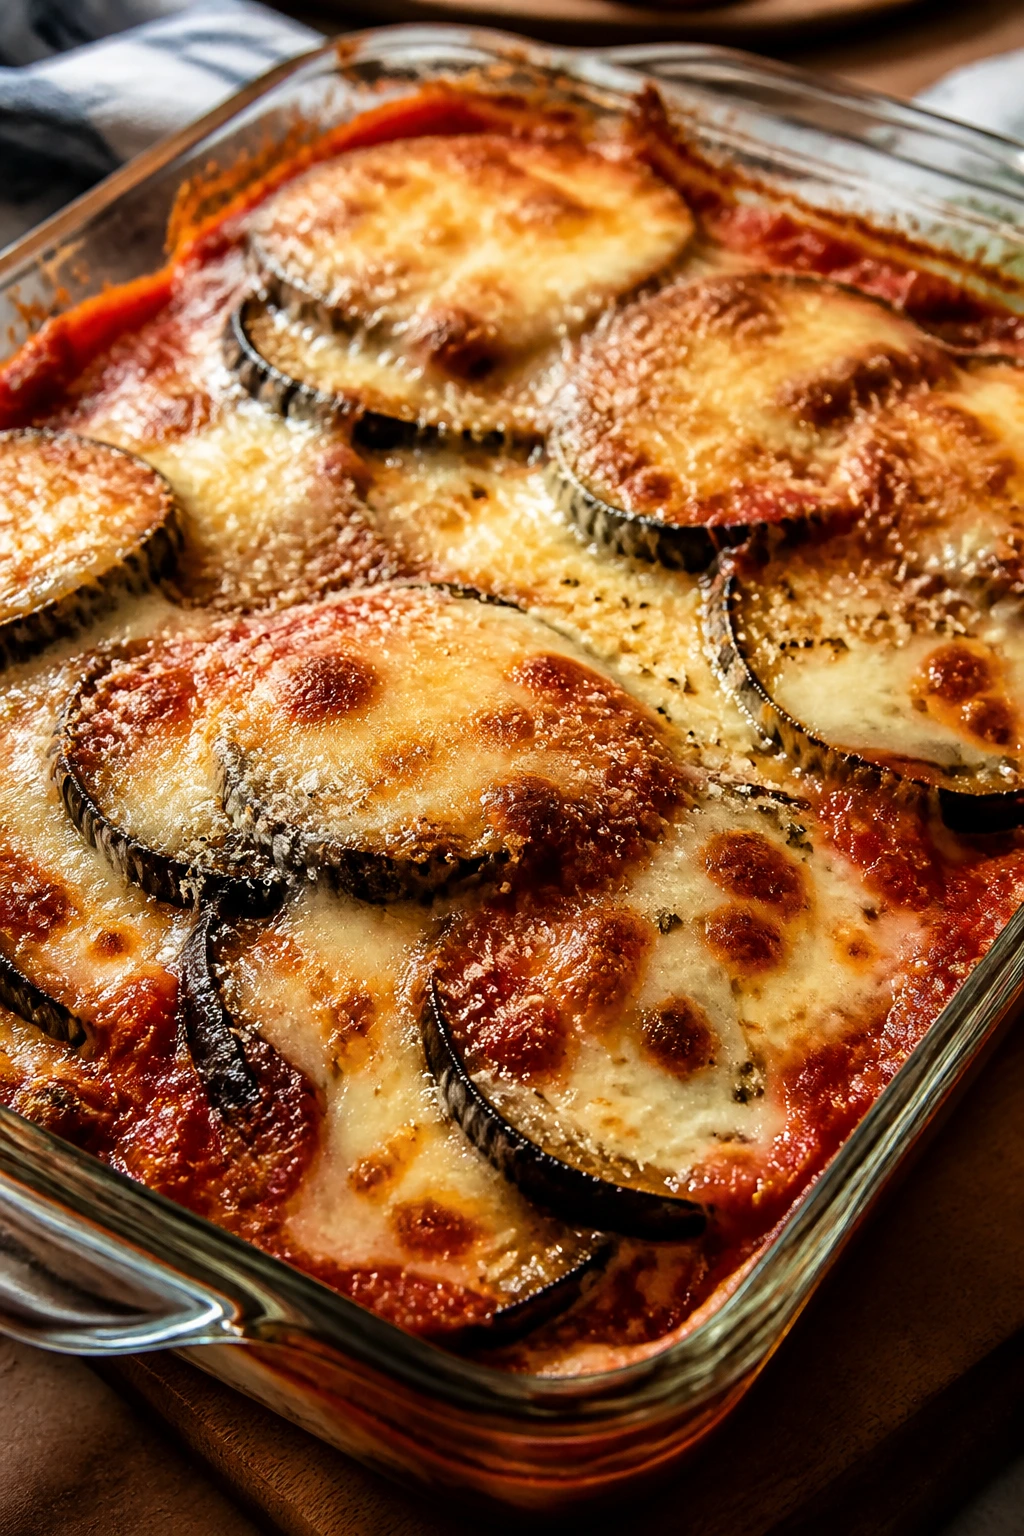
Eggplant Parmesan earns its place when the slices are browned, not limp. The eggplant becomes silky inside, the marinara keeps it saucy, and the cheese bakes into those browned pockets everyone wants first. It’s one of those dishes that feels familiar enough to satisfy and substantial enough to stand in for a heavier dinner.
Why It Works: Salting or roasting the eggplant first keeps it from going soggy. Breadcrumbs give it a light crust that survives the sauce. Marinara and cheese do what they’re supposed to do: provide acid, salt, and melt. A short bake followed by a little broil gives the top a better finish.
Key Ingredients:
- 2 medium eggplants, sliced into 1/2-inch rounds
- 1 teaspoon salt
- 2 tablespoons olive oil
- 1 cup breadcrumbs
- 2 cups marinara sauce
- 2 cups shredded mozzarella
- 1/2 cup grated Parmesan
- 1 teaspoon dried basil
- 2 tablespoons chopped parsley
Quick Steps:
- Salt the eggplant slices and let them rest 20 minutes, then pat dry.
- Brush with olive oil and coat lightly with breadcrumbs.
- Roast at 425°F for 20 minutes until browned.
- Layer eggplant, marinara, mozzarella, and Parmesan in a baking dish.
- Bake 20 minutes more until bubbling, then finish with parsley.
Equipment for This Recipe:
- Sheet pan
- Baking dish
- Paper towels
How to Serve This Dish: Serve with spaghetti, garlic bread, or a green salad. Let it rest before cutting so the layers stay stacked instead of slipping.
Pro Tips for This Recipe:
- Choose smaller eggplants for fewer seeds and better texture.
- Don’t skip the salting if you want firm slices.
- Use a thick marinara so the bake doesn’t get watery.
- Broil only briefly; the cheese can go from golden to scorched fast.
Variations on This Dish:
- Zucchini Blend: Layer zucchini with the eggplant.
- Spicy Version: Add red pepper flakes to the marinara.
- Gluten-Free Version: Use gluten-free crumbs or skip the crust.
Common Mistakes to Avoid with This Dish:
- Don’t layer raw eggplant straight into the sauce.
- Don’t use too much oil or the slices turn greasy.
- Don’t cut it too soon; the structure needs a rest.
20. Teriyaki Tofu Stir-Fry
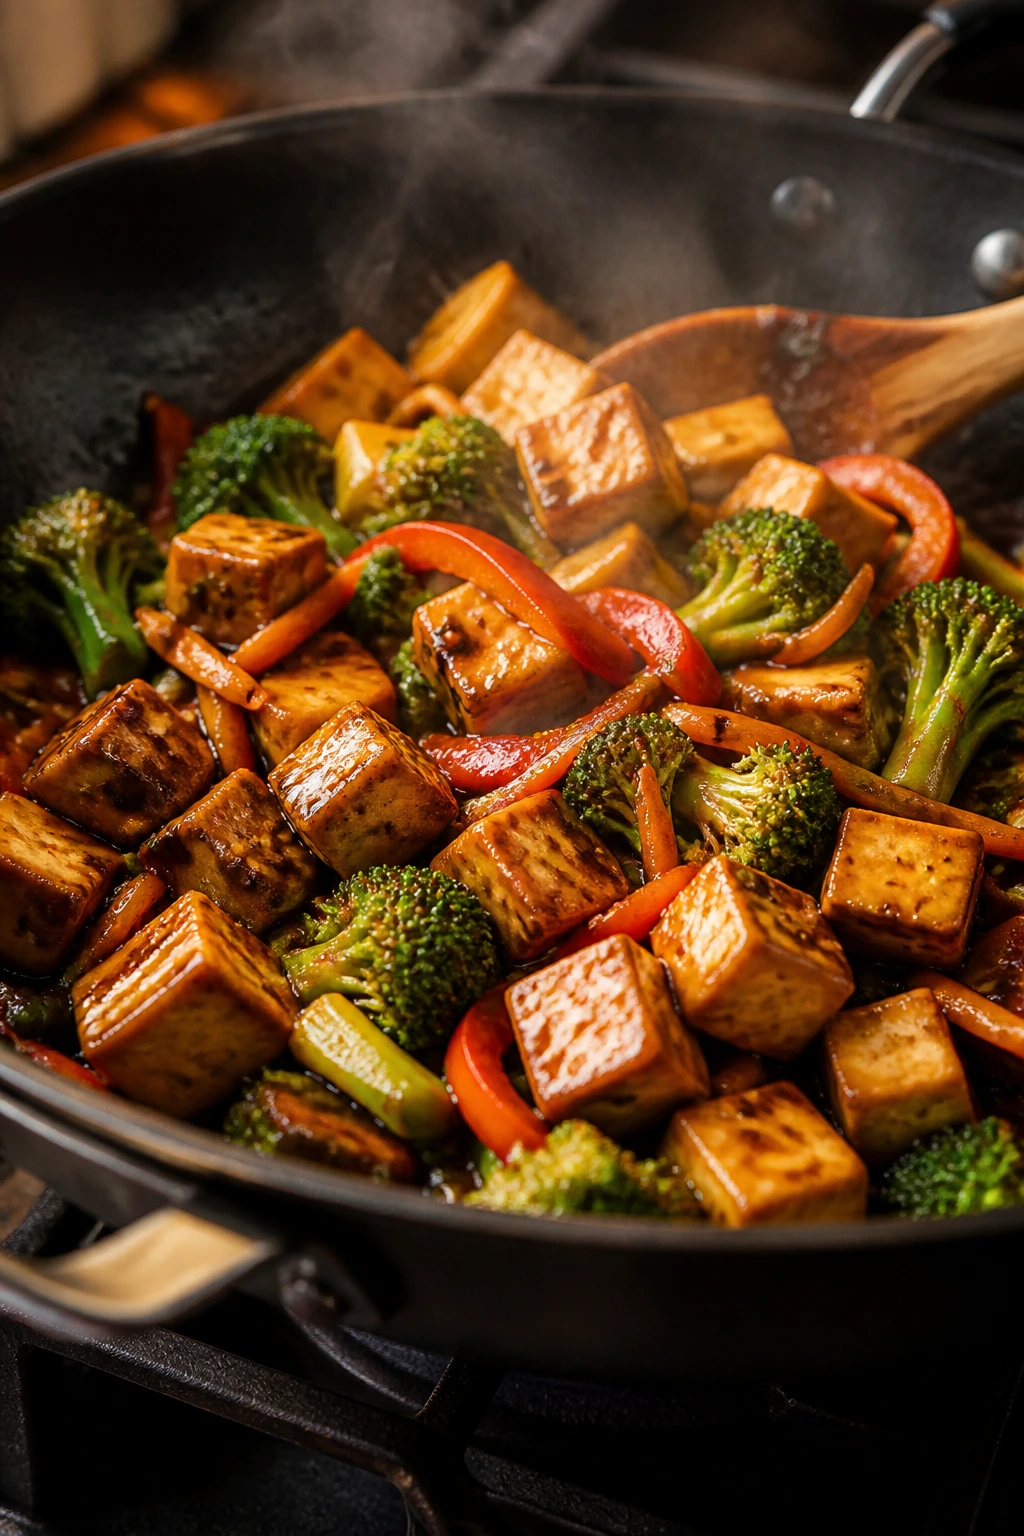
A good stir-fry should move fast and still taste like it had a plan. The tofu takes on a crisp edge, the vegetables stay bright, and the teriyaki glaze coats everything without turning sticky-sweet. It’s one of the easiest ways to get a meatless dinner on the table that still has enough chew and salt to keep meat eaters interested.
Why It Works: Pressed tofu browns before it absorbs sauce, which gives you texture instead of softness. Stir-frying vegetables in stages keeps them from collapsing. Teriyaki sauce adds sweet, salty, and savory in one move, but it works best when you let it reduce for a minute. Served over rice, it feels complete without trying too hard.
Key Ingredients:
- 14 ounces firm tofu, pressed and cubed
- 2 tablespoons cornstarch
- 2 tablespoons oil
- 1 broccoli head, cut into florets
- 1 red bell pepper, sliced
- 2 carrots, thinly sliced
- 2 cloves garlic, minced
- 1/3 cup teriyaki sauce
- 2 cups cooked rice
- 2 scallions, sliced
Quick Steps:
- Toss tofu with cornstarch and brown it in oil until crisp.
- Add broccoli, peppers, carrots, and garlic, and cook 4 minutes.
- Pour in teriyaki sauce and stir until it coats everything.
- Cook 1 to 2 minutes more until glossy.
- Serve over rice with scallions.
Equipment for This Recipe:
- Large skillet or wok
- Spatula
- Bowl for coating tofu
How to Serve This Dish: Spoon it over rice or noodles and finish with sesame seeds if you have them. A side of sliced cucumbers keeps the meal crisp and fresh.
Pro Tips for This Recipe:
- Press the tofu long enough to remove water.
- Cut the vegetables small enough to cook quickly.
- Don’t add the sauce too early or it burns.
- A splash of rice vinegar at the end keeps the glaze lively.
Variations on This Dish:
- Sesame Version: Add sesame oil and toasted seeds.
- Mushroom Version: Swap in sliced mushrooms for the carrots.
- Spicy Version: Add chili garlic sauce.
Common Mistakes to Avoid with This Dish:
- Don’t crowd the tofu or it steams.
- Don’t overcook the broccoli until it turns dull.
- Don’t let the sauce sit in the pan long enough to caramelize hard.
21. Tomato Basil Risotto
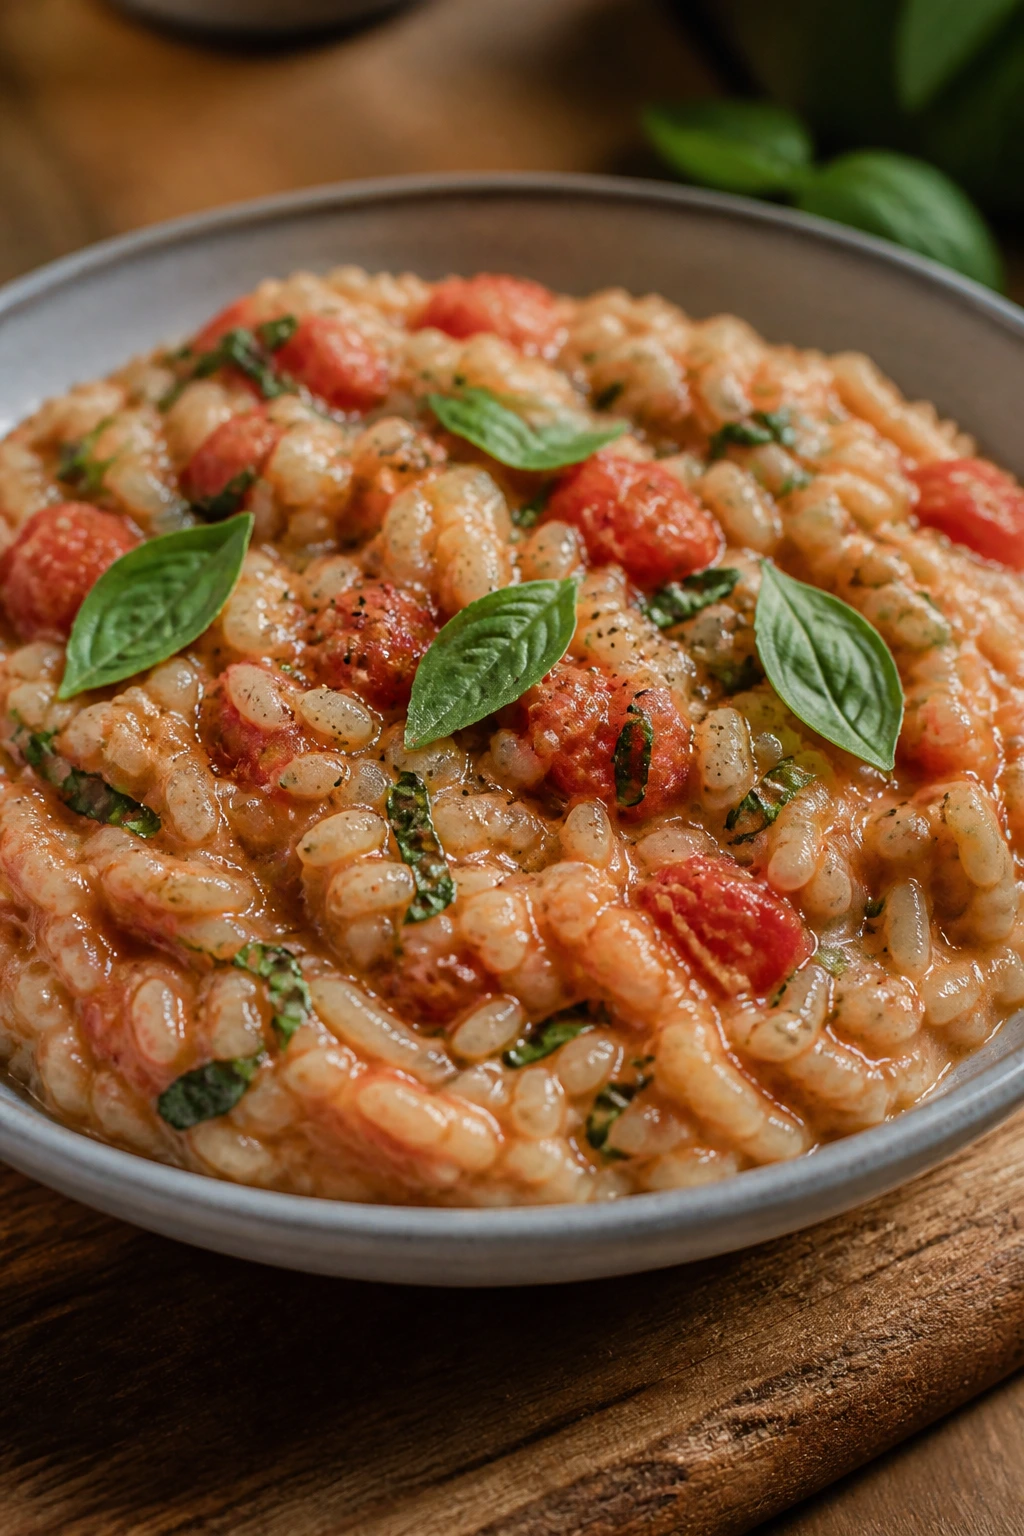
Risotto has a way of making a plain pantry look thoughtful. The rice turns creamy as you stir in the broth, the tomatoes break down into a gentle sauce, and the basil keeps the whole thing bright. It’s not the fastest dinner, but it rewards a few quiet minutes at the stove.
Why It Works: Arborio rice releases starch as it cooks, which creates the creamy texture without needing loads of dairy. Tomato paste or chopped tomatoes add depth and color. Warm broth, added gradually, keeps the grains cooking evenly. Parmesan and basil finish the bowl with salt and freshness.
Key Ingredients:
- 1 1/2 cups arborio rice
- 4 cups warm vegetable broth
- 2 tablespoons olive oil
- 1 small onion, finely diced
- 2 cloves garlic, minced
- 1/2 cup dry white wine
- 1 cup chopped tomatoes
- 1/2 cup grated Parmesan
- 1/4 cup chopped basil
- 1 tablespoon butter
Quick Steps:
- Warm the broth in a saucepan and keep it hot.
- Cook onion and garlic in oil until soft, then stir in the rice.
- Add wine and cook until absorbed.
- Add broth a ladle at a time, stirring until each addition is absorbed.
- Stir in tomatoes, Parmesan, butter, and basil, then serve creamy.
Equipment for This Recipe:
- Wide saucepan or Dutch oven
- Ladle
- Wooden spoon
How to Serve This Dish: Serve in shallow bowls with extra basil and Parmesan on top. A green salad or roasted mushrooms works well beside it if you want more volume.
Pro Tips for This Recipe:
- Keep the broth warm or the rice cooks unevenly.
- Stir often, but not frantically.
- Use ripe tomatoes if you can; they taste sweeter in the risotto.
- Taste the rice near the end so you catch it while it still has a little bite.
Variations on This Dish:
- Roasted Tomato Version: Use oven-roasted tomatoes for deeper flavor.
- Lemon Basil Version: Add lemon zest at the end.
- Mushroom Tomato Version: Stir in sautéed mushrooms before serving.
Common Mistakes to Avoid with This Dish:
- Don’t rush the broth additions.
- Don’t walk away too long or the rice can catch.
- Don’t stop stirring completely once the liquid starts going in.
22. Breakfast-for-Dinner Shakshuka
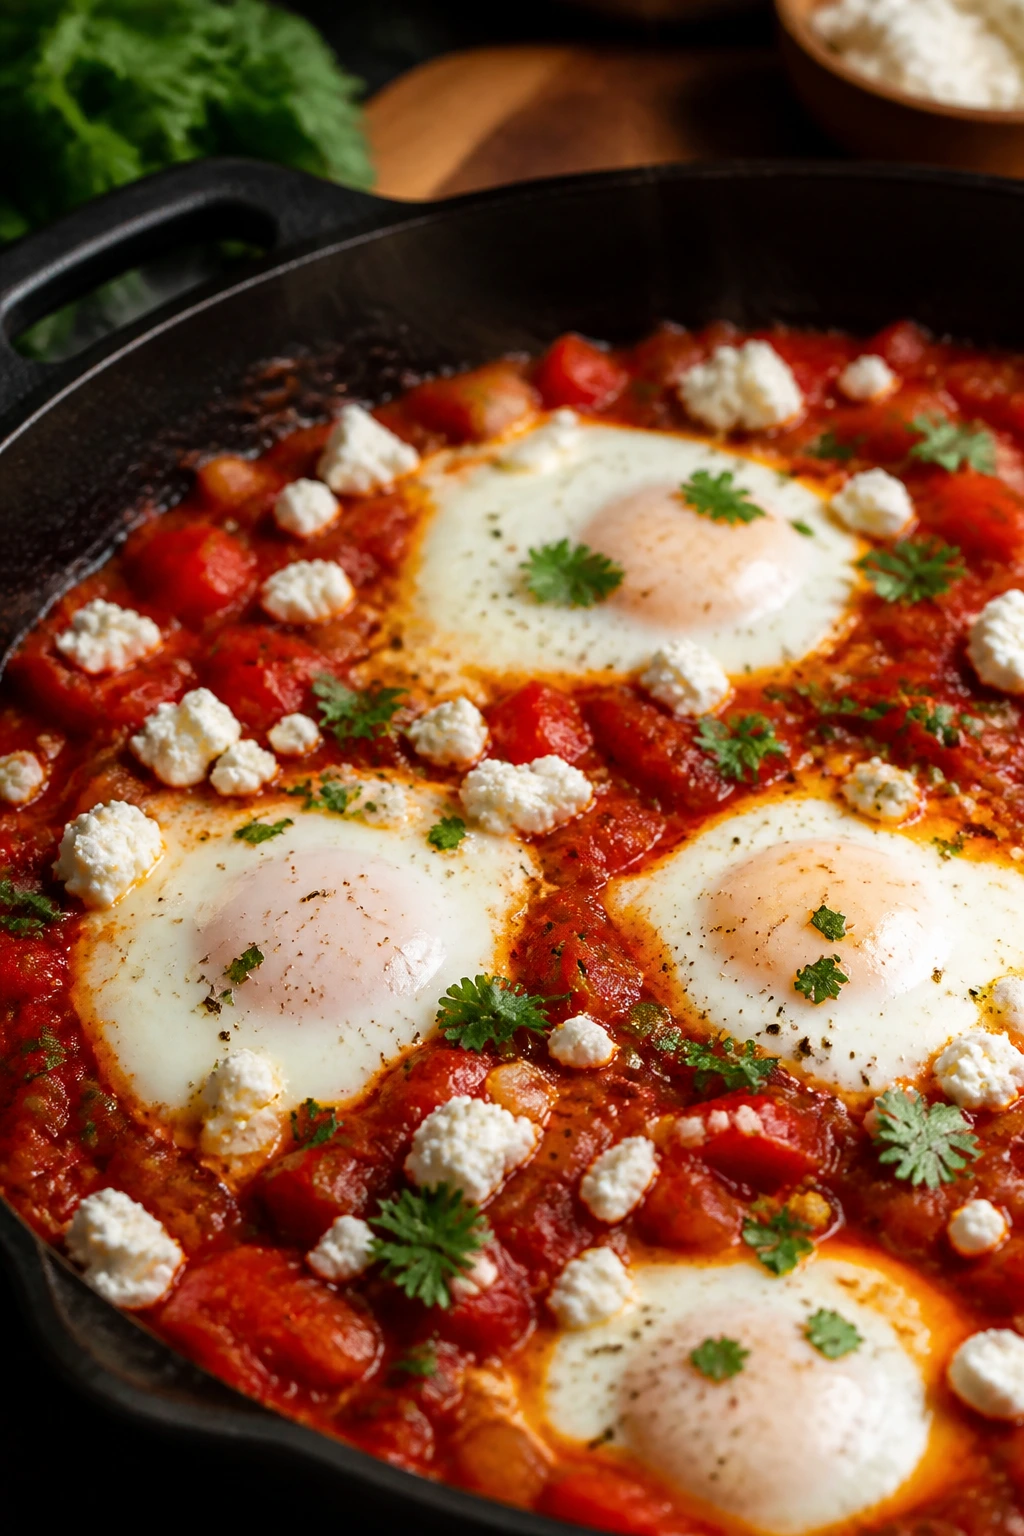
Eggs baked into a tomato-pepper sauce feel like a small trick, but the result is plain and simple: a pan of dinner that people gather around. The sauce gets smoky and a little sweet, the egg whites set into silken folds, and the yolks stay soft enough to mix through the tomatoes. Bread is mandatory.
Why It Works: A well-seasoned tomato base does most of the flavor work before the eggs even go in. Peppers and onions soften into the sauce instead of sitting apart from it. Eggs cook gently in the simmering mixture, which keeps the yolks tender. Feta on top adds salt and a creamy, crumbling finish.
Key Ingredients:
- 2 tablespoons olive oil
- 1 onion, sliced
- 1 red bell pepper, sliced
- 3 cloves garlic, minced
- 1 can (28 ounces) crushed tomatoes
- 1 teaspoon cumin
- 1 teaspoon paprika
- 6 large eggs
- 1/2 cup crumbled feta
- Bread for serving
Quick Steps:
- Cook onion and pepper in oil for 8 minutes until soft.
- Stir in garlic, cumin, and paprika for 30 seconds.
- Add tomatoes and simmer 10 minutes until thick.
- Make 6 small wells, crack in the eggs, cover, and cook 6 to 8 minutes until the whites are set.
- Top with feta and serve with bread.
Equipment for This Recipe:
- Large skillet with a lid
- Spoon
- Sharp knife
How to Serve This Dish: Bring the skillet to the table with crusty bread or warm pita. A spoon of yogurt or chopped herbs adds a cold, clean finish if the sauce feels rich.
Pro Tips for This Recipe:
- Don’t over-thicken the sauce before the eggs go in.
- Keep the heat low so the whites set without rubbery edges.
- Crack eggs into a small bowl first if you want cleaner placement.
- Add chili flakes if you want more heat.
Variations on This Dish:
- Green Shakshuka: Swap part of the tomato sauce for spinach and herbs.
- Chickpea Version: Add a can of chickpeas for more body.
- Cheesy Version: Stir in a little mozzarella before adding the eggs.
Common Mistakes to Avoid with This Dish:
- Don’t boil the eggsauce hard or the whites get tough.
- Don’t skip the lid when cooking the eggs.
- Don’t serve without bread; the sauce deserves to be scooped.
23. Vegetable Pot Pie
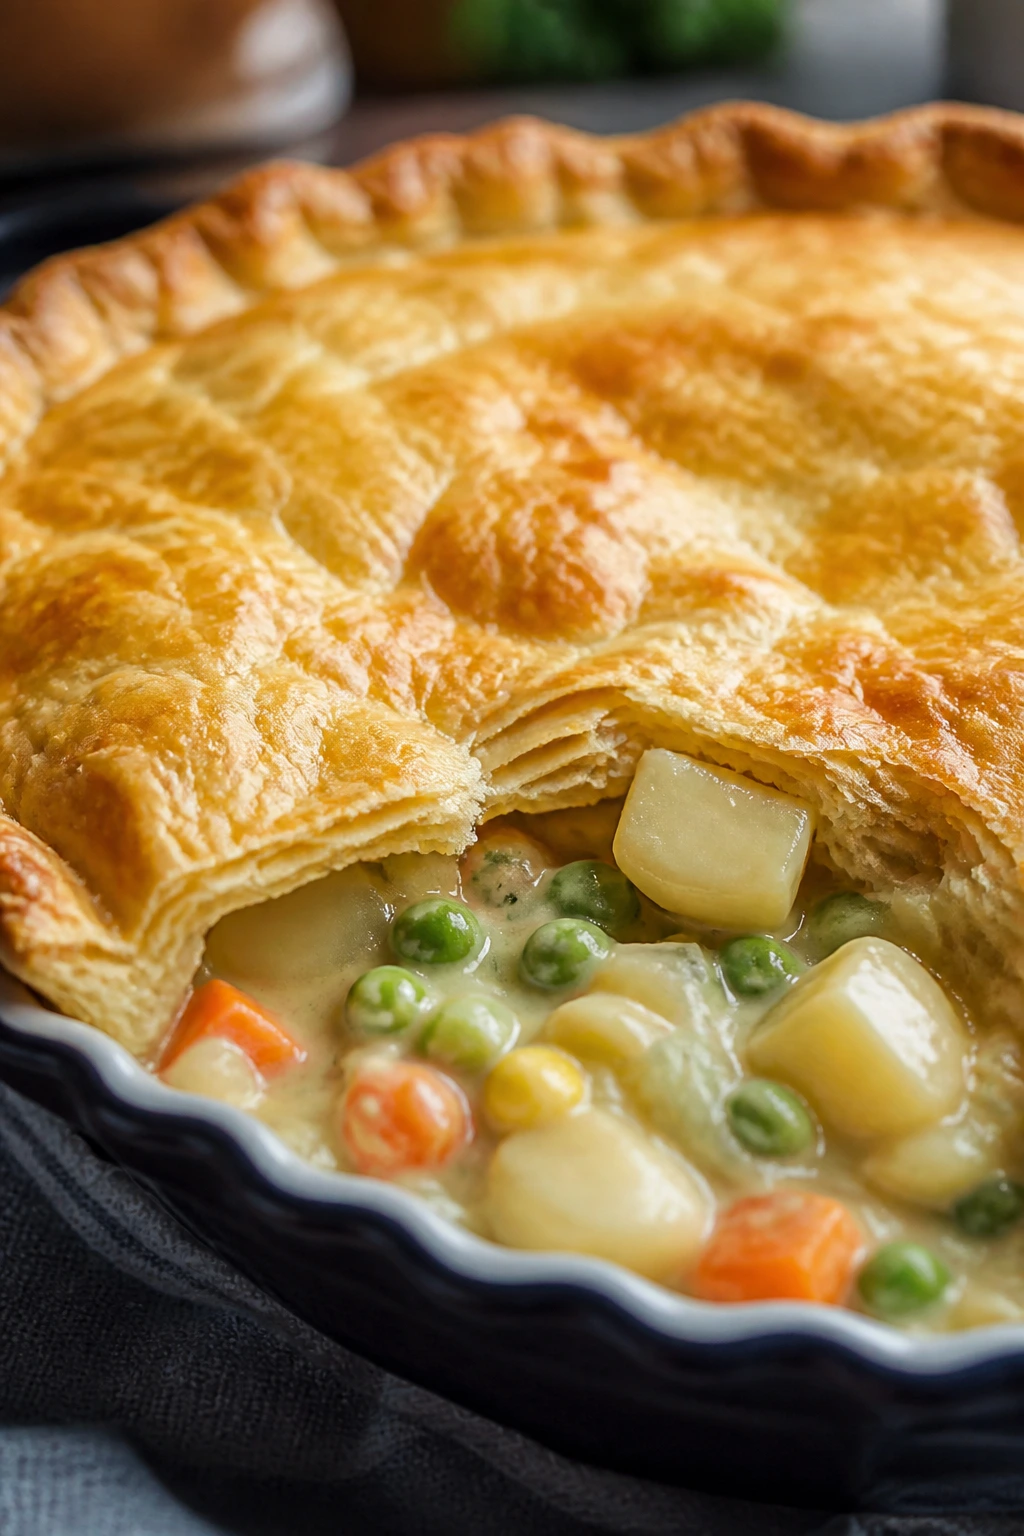
Pot pie is one of the best ways to make vegetables feel like they’ve been dressed for a proper occasion. The filling is creamy, the vegetables stay in distinct pieces, and the crust turns flaky and browned on top. Nobody’s thinking about what’s missing when the spoon hits the pastry.
Why It Works: A thick sauce keeps the filling from running under the crust. Mushrooms and carrots bring depth and sweetness, while peas and potatoes give the pie body. Puff pastry or pie crust creates the contrast that makes each bite feel complete. Baking until deeply golden matters here; pale crust is a letdown.
Key Ingredients:
- 2 tablespoons butter
- 1 onion, diced
- 2 carrots, diced
- 8 ounces mushrooms, chopped
- 2 cups diced potatoes
- 2 tablespoons flour
- 2 cups vegetable broth
- 1/2 cup milk or cream
- 1 cup frozen peas
- 1 sheet puff pastry or 1 pie crust
- 1 egg, beaten, for brushing
Quick Steps:
- Cook onion, carrots, mushrooms, and potatoes in butter until softened.
- Stir in flour, then add broth and milk to make a thick sauce.
- Fold in peas and transfer the filling to a baking dish.
- Cover with pastry, seal the edges, and brush with egg.
- Bake at 400°F for 25 to 30 minutes until the crust is golden.
Equipment for This Recipe:
- Baking dish or pie dish
- Skillet
- Pastry brush
How to Serve This Dish: Let the pot pie sit for 10 minutes so the filling settles. A sharp salad with mustard dressing keeps the meal from feeling too creamy.
Pro Tips for This Recipe:
- Thicken the filling before the crust goes on.
- Cut the vegetables small so they cook evenly.
- Vent the pastry so steam can escape.
- Use puff pastry if you want a lighter top, pie crust if you want a sturdier lid.
Variations on This Dish:
- Herby Version: Add thyme and parsley to the filling.
- Corn Version: Stir in 1 cup corn for sweetness.
- Mini Pie Version: Bake in ramekins for easier serving.
Common Mistakes to Avoid with This Dish:
- Don’t put watery filling under pastry.
- Don’t skip the egg wash if you want color.
- Don’t serve immediately; the filling needs a minute to set.
24. Pesto Tortellini with Peas
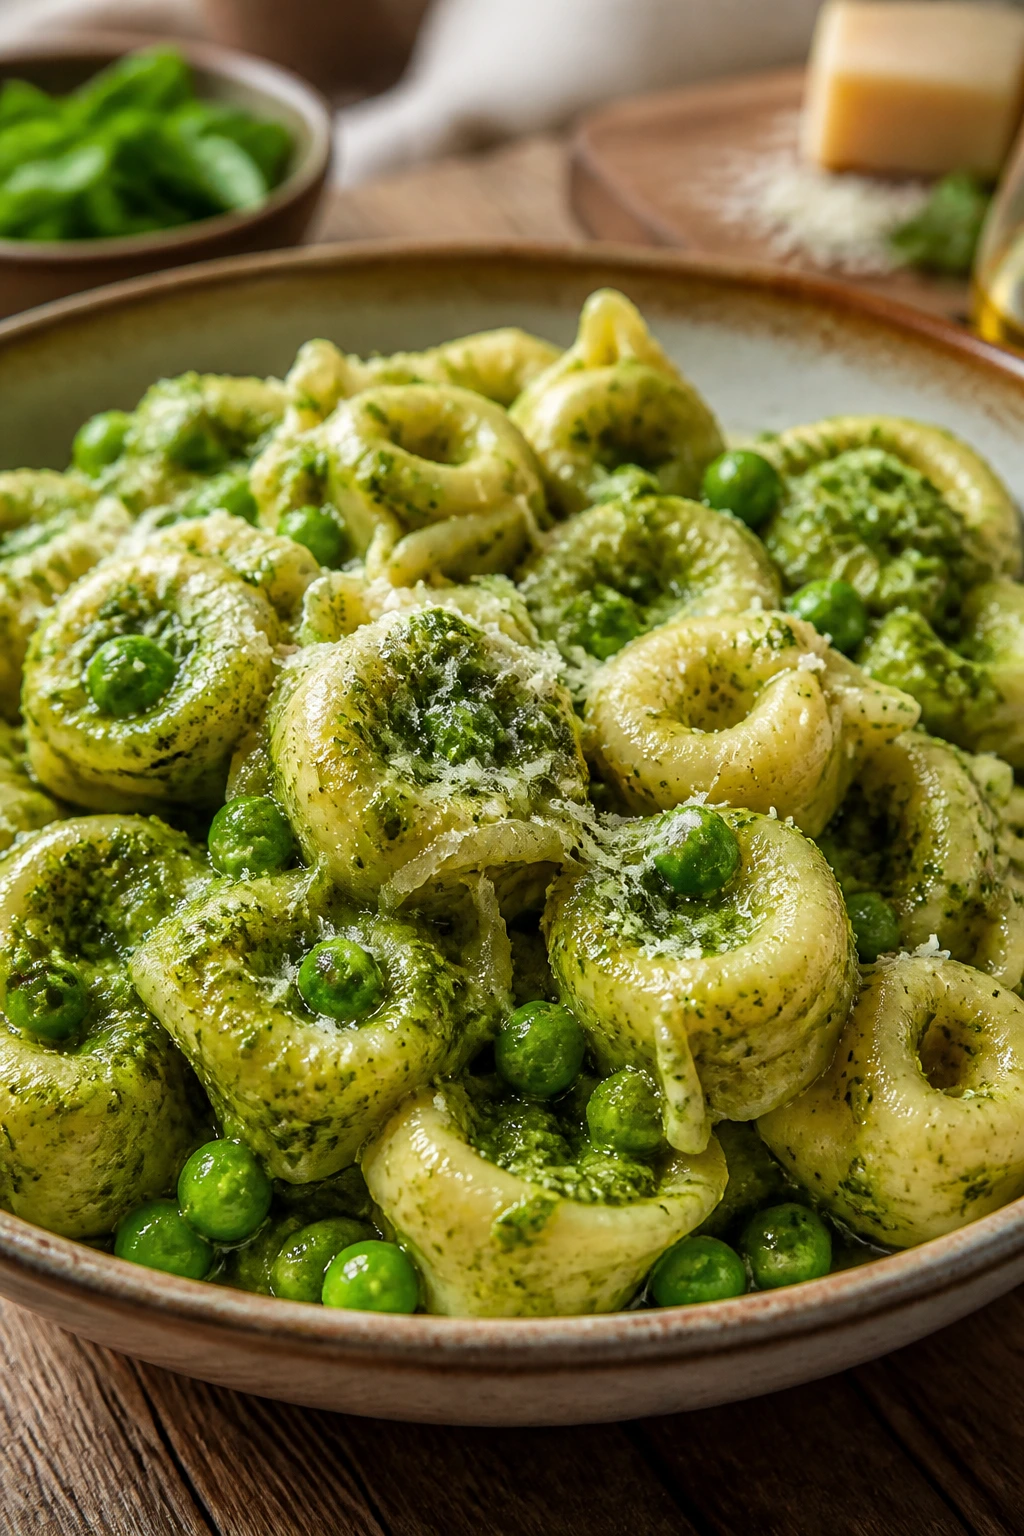
This dish works because it tastes like a shortcut that learned good manners. Cheese tortellini brings built-in richness, pesto coats every curve, and peas cut through the pasta with little sweet bites. It’s fast, but it doesn’t taste hurried.
Why It Works: Tortellini carries filling and sauce at the same time, which makes it feel more substantial than plain pasta. Pesto brings basil, garlic, and cheese in one spoonful. Peas add freshness and just enough sweetness to keep the sauce from feeling heavy. A little lemon at the end sharpens everything.
Key Ingredients:
- 1 pound cheese tortellini
- 1 1/2 cups frozen peas
- 1/2 cup pesto
- 1/4 cup reserved pasta water
- 1 tablespoon olive oil
- 2 cups baby spinach
- 1/4 cup grated Parmesan
- 1 tablespoon lemon juice
Quick Steps:
- Cook the tortellini according to package directions and add peas in the last 2 minutes.
- Drain, saving 1/4 cup pasta water.
- Toss tortellini and peas with pesto, olive oil, and enough pasta water to loosen the sauce.
- Stir in spinach until wilted.
- Finish with Parmesan and lemon juice.
Equipment for This Recipe:
- Large pot
- Colander
- Mixing bowl or serving bowl
How to Serve This Dish: Serve warm with extra Parmesan and black pepper. Toasted bread or a tomato salad makes it feel like dinner instead of just a pasta bowl.
Pro Tips for This Recipe:
- Use pasta water to loosen pesto instead of plain water.
- Add spinach at the end so it barely wilts.
- Don’t overcook the tortellini or it can split.
- A spoonful of ricotta on top is worth trying if you want more creaminess.
Variations on This Dish:
- Roasted Tomato Version: Add roasted cherry tomatoes.
- Nutty Version: Stir in toasted pine nuts.
- Sun-Dried Tomato Version: Replace part of the pesto with chopped sun-dried tomatoes.
Common Mistakes to Avoid with This Dish:
- Don’t rinse the tortellini after cooking; the sauce needs the starch.
- Don’t use too much pesto without loosening it.
- Don’t let the peas go mushy in the pot.
25. Sweet Potato and Black Bean Chili
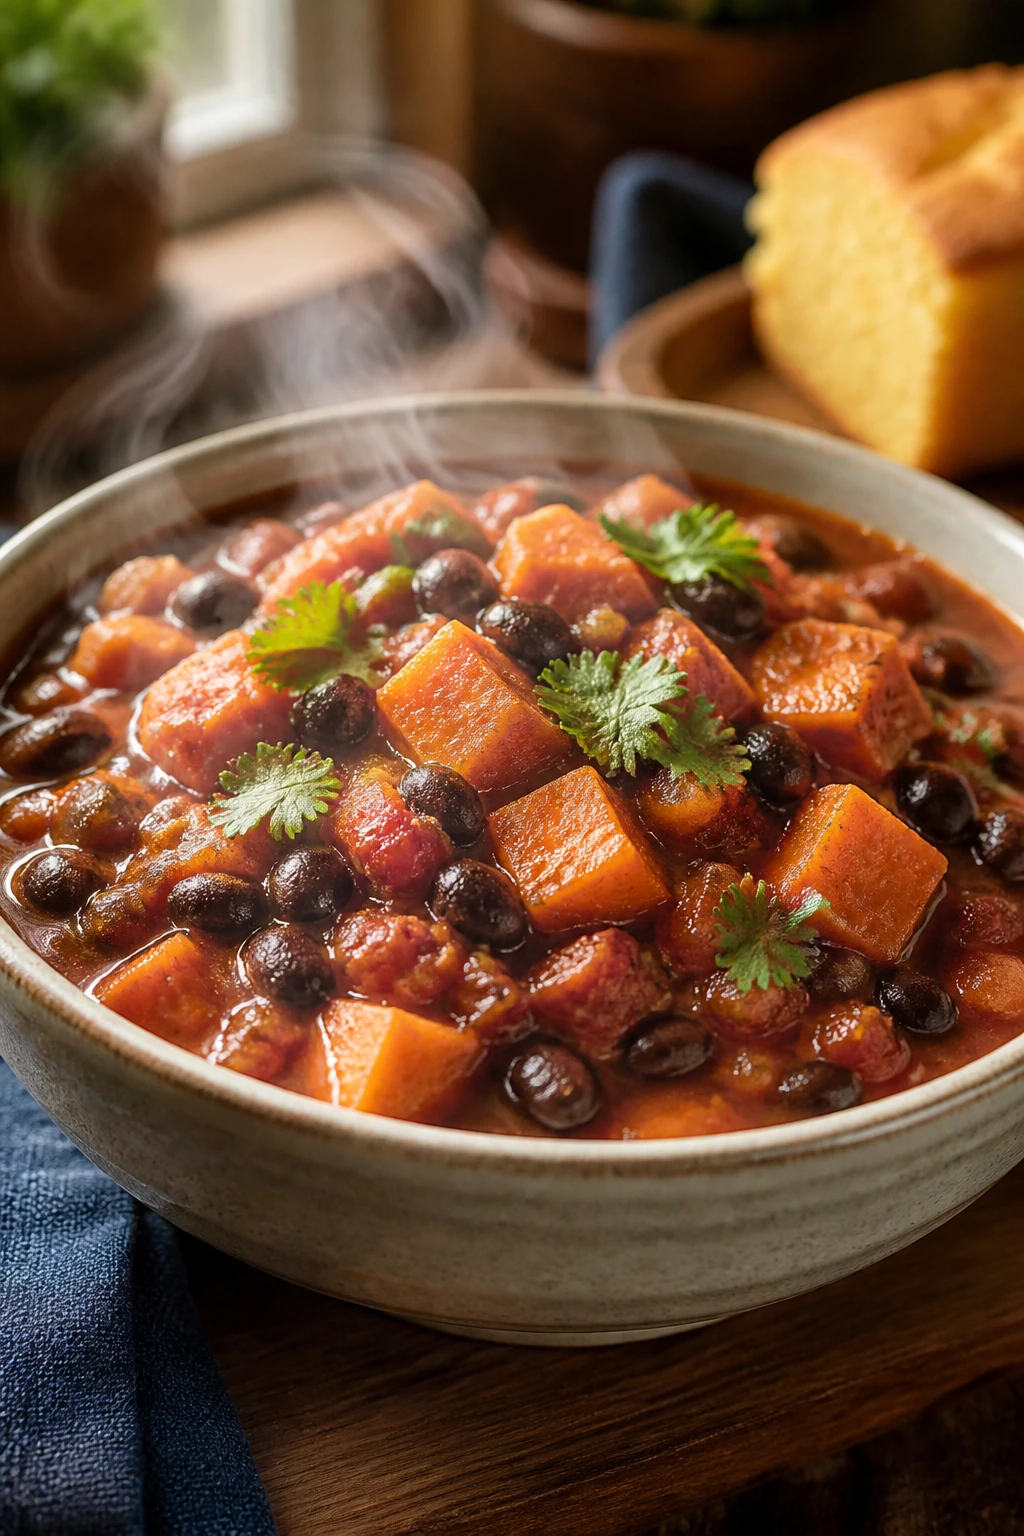
This chili has the kind of depth that makes people stop asking what’s for dinner and start reaching for a bowl. Sweet potatoes soften into the tomato base, black beans add heft, and the spices bring enough warmth to keep each spoonful moving. Cornbread on the side is not a bad idea.
Why It Works: Sweet potato gives the chili a gentle sweetness that balances the tomatoes and spice. Beans provide protein and a thicker texture than many vegetable chilis manage. Long simmering helps the flavors meld into something round and steady. A splash of lime or vinegar at the end keeps it from tasting heavy.
Key Ingredients:
- 1 tablespoon olive oil
- 1 onion, diced
- 2 cloves garlic, minced
- 2 medium sweet potatoes, peeled and cubed
- 2 cans (15 ounces each) black beans
- 1 can (28 ounces) crushed tomatoes
- 2 cups vegetable broth
- 2 tablespoons chili powder
- 1 teaspoon cumin
- 1 cup corn kernels
- Lime wedges and avocado for serving
Quick Steps:
- Cook onion and garlic in oil for 3 minutes.
- Add sweet potatoes, beans, tomatoes, broth, chili powder, and cumin.
- Simmer 25 to 30 minutes until the sweet potatoes are tender.
- Stir in corn and cook 5 minutes more.
- Finish with lime and serve hot.
Equipment for This Recipe:
- Large pot or Dutch oven
- Wooden spoon
- Sharp knife
How to Serve This Dish: Serve with cornbread, tortilla chips, or plain rice. A dollop of sour cream and a few avocado slices give each bowl a colder, richer contrast.
Pro Tips for This Recipe:
- Cut the sweet potatoes evenly so they cook at the same pace.
- Simmer uncovered if you want the chili thicker.
- Use a chili powder blend you like on its own.
- Let leftovers sit overnight if you can; the flavor deepens.
Variations on This Dish:
- Smoky Version: Add smoked paprika or chipotle.
- Bean Mix Version: Use pinto beans with the black beans.
- Mild Version: Cut the chili powder in half and add extra cumin.
Common Mistakes to Avoid with This Dish:
- Don’t undercook the sweet potatoes; they should be soft, not chalky.
- Don’t make the chili too thin.
- Don’t forget acid at the end or the pot tastes dull.
26. Halloumi Veggie Skewers with Couscous
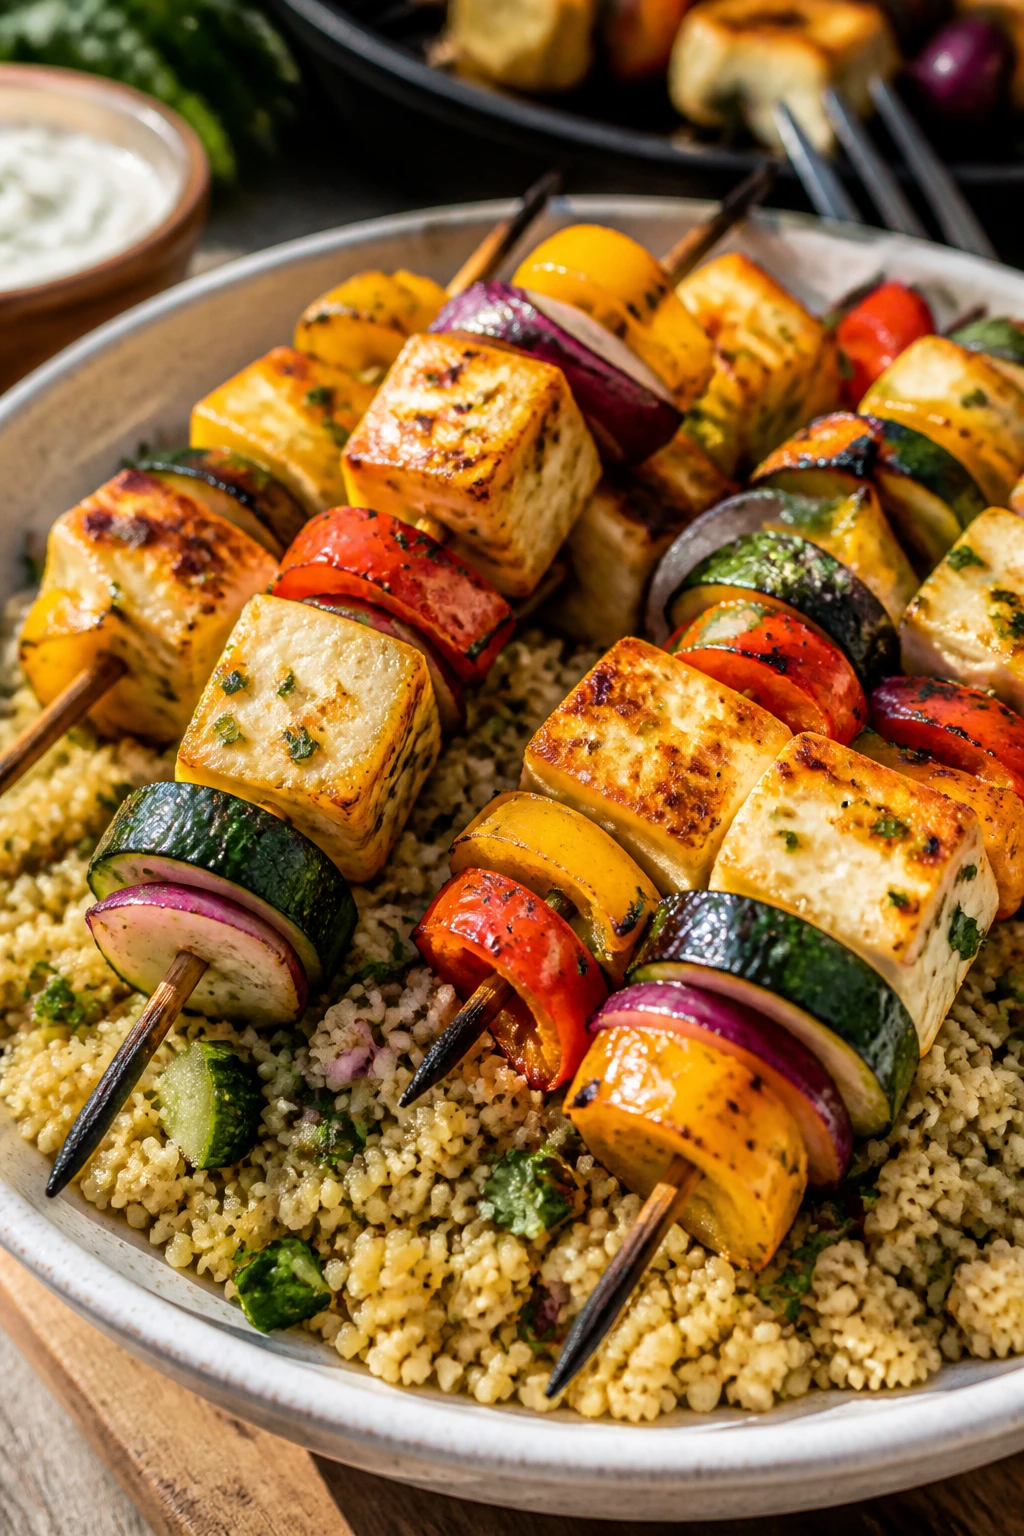
Halloumi is one of the few cheeses that turns into dinner with almost no persuasion. It browns on the grill or in a skillet, stays intact, and brings a salty chew that plays well with roasted vegetables. Paired with couscous, it feels bright and sturdy at the same time.
Why It Works: Halloumi’s high melting point means it browns instead of collapsing. Zucchini, peppers, and onion bring sweetness once they’re cooked. Couscous soaks up any juices from the skewers without getting soggy. A lemony yogurt sauce keeps the whole plate from tasting too salty.
Key Ingredients:
- 8 ounces halloumi, cut into cubes
- 1 zucchini, sliced thick
- 1 red bell pepper, chunked
- 1 red onion, chunked
- 2 tablespoons olive oil
- 1 cup couscous
- 1 cup boiling water or broth
- 1 tablespoon lemon juice
- 1/2 cup plain yogurt
- 1 tablespoon chopped mint or parsley
Quick Steps:
- Thread halloumi and vegetables onto skewers and brush with olive oil.
- Grill or sear 2 to 3 minutes per side until browned.
- Pour boiling water or broth over the couscous, cover, and let it sit 5 minutes.
- Fluff the couscous with lemon juice and herbs.
- Serve the skewers over the couscous with yogurt on the side.
Equipment for This Recipe:
- Skewers
- Grill pan or outdoor grill
- Bowl with lid for couscous
How to Serve This Dish: Pile the couscous on a platter and lay the skewers on top. A chopped cucumber salad or olives fits naturally beside it.
Pro Tips for This Recipe:
- Cut the vegetables into even chunks so they cook together.
- Don’t cook halloumi too long or it goes rubbery.
- Soak wooden skewers if you’re using them.
- Add a pinch of paprika to the oil if you want more color.
Variations on This Dish:
- Mediterranean Version: Add cherry tomatoes and oregano.
- Spicy Version: Brush with chili oil before cooking.
- No-Skewer Version: Cook everything in a sheet pan.
Common Mistakes to Avoid with This Dish:
- Don’t cut the halloumi too small or it dries out.
- Don’t overcook the vegetables until they collapse.
- Don’t leave the couscous plain; it needs lemon or herbs.
27. Broccoli Cheddar Stuffed Baked Potatoes

A baked potato becomes dinner the minute you load it with enough broccoli and cheddar to make it feel intentional. The potato skin crisps up, the inside goes fluffy, and the cheesy broccoli filling melts into the middle. It’s simple, but it doesn’t feel skimpy.
Why It Works: Russet potatoes are fluffy enough to hold a filling without turning dense. Steamed broccoli adds freshness and a little bite against the soft potato. Cheddar sauce gives you richness without needing a long ingredient list. A bit of sour cream on top helps the whole thing taste finished.
Key Ingredients:
- 4 large russet potatoes
- 2 cups broccoli florets
- 2 tablespoons butter
- 2 tablespoons flour
- 1 1/2 cups milk
- 2 cups shredded cheddar
- 1/2 teaspoon salt
- 1/4 teaspoon black pepper
- 1/2 cup sour cream
Quick Steps:
- Bake the potatoes at 400°F for 50 to 60 minutes until tender.
- Steam the broccoli until just tender, then chop it small.
- Make a cheddar sauce with butter, flour, milk, and cheese.
- Split the potatoes, fluff the insides, and top with broccoli and cheese sauce.
- Finish with sour cream and black pepper.
Equipment for This Recipe:
- Baking sheet
- Small saucepan
- Fork or potato masher
How to Serve This Dish: Serve one loaded potato per person with a side salad or tomato soup. If you want them more dinner-like, add a few roasted beans or extra broccoli on the side.
Pro Tips for This Recipe:
- Prick the potatoes before baking so they don’t burst.
- Don’t oversteam the broccoli; it should stay green.
- Keep the cheese sauce smooth and pourable.
- Split the potatoes open right after baking so the steam escapes.
Variations on This Dish:
- Cauliflower Version: Swap half the broccoli for cauliflower.
- Sharp Version: Add a little Dijon to the cheese sauce.
- Crumb-Topped Version: Sprinkle breadcrumbs on top and broil briefly.
Common Mistakes to Avoid with This Dish:
- Don’t use underbaked potatoes; the centers need to be fluffy.
- Don’t drown the filling in sauce or it gets sloppy.
- Don’t let the cheddar sauce boil hard.
28. Pita Pizza with Roasted Veggies
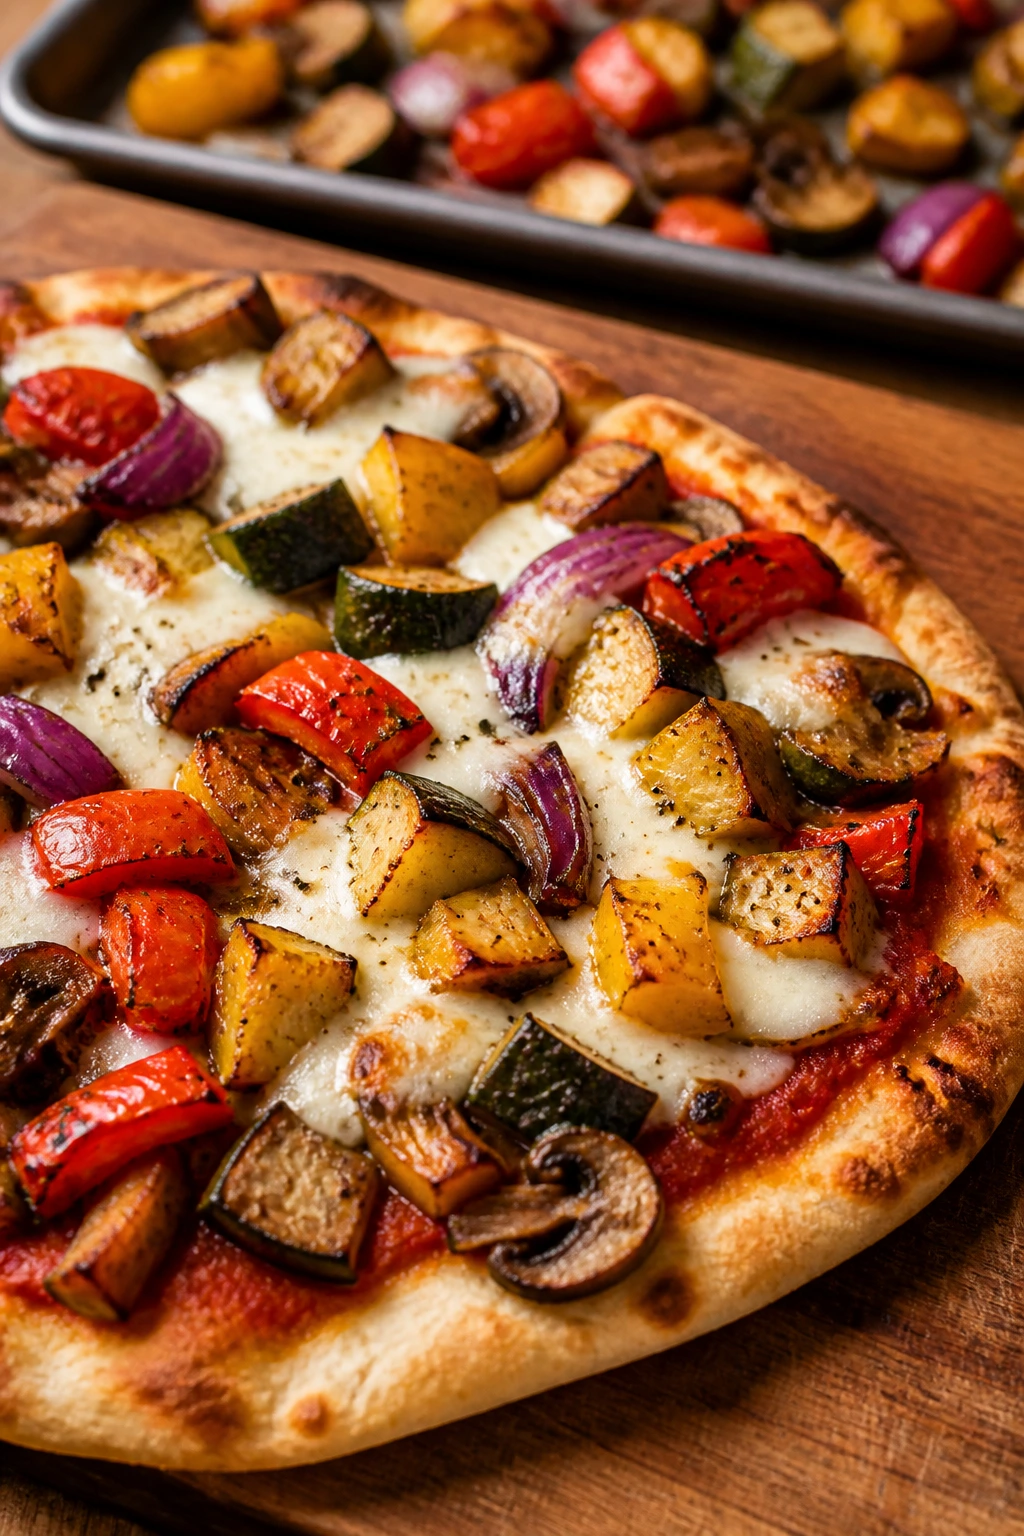
Pita pizza is the sort of dinner that feels casual until you pile it high with roasted vegetables and cheese that actually browns. The thin bread crisps quickly, the tomato sauce stays bright, and the vegetables get a little caramelized around the edges. It’s pizza energy without the waiting.
Why It Works: Pita gives you a crisp base that cooks fast. Roasting the vegetables first avoids the watery mess that ruins a lot of fast pizzas. Mozzarella melts cleanly, and a few olives or herbs at the end sharpen the flavor. It’s a smart move when you need dinner on the table without a dough project.
Key Ingredients:
- 4 pitas
- 1 zucchini, sliced
- 1 red bell pepper, sliced
- 1/2 red onion, sliced
- 1 tablespoon olive oil
- 1/2 cup pizza sauce
- 1 1/2 cups shredded mozzarella
- 1/4 cup sliced olives
- 1 teaspoon dried oregano
- Fresh basil, optional
Quick Steps:
- Roast the vegetables with olive oil at 425°F for 12 to 15 minutes.
- Lay the pitas on a baking sheet and spread with sauce.
- Top with vegetables, mozzarella, olives, and oregano.
- Bake 8 to 10 minutes until the cheese melts and the pita edges crisp.
- Finish with basil.
Equipment for This Recipe:
- Baking sheet
- Sheet pan for vegetables
- Spoon for spreading sauce
How to Serve This Dish: Slice each pita into wedges and serve with a green salad or roasted garlic dip. A few red pepper flakes on the side let everyone adjust the heat.
Pro Tips for This Recipe:
- Roast the vegetables first or the pita gets soggy.
- Use a moderate amount of sauce so the bread stays crisp.
- Watch closely near the end; pita can burn fast.
- Add fresh herbs after baking for a brighter finish.
Variations on This Dish:
- Margherita Version: Use tomatoes, basil, and mozzarella only.
- Mushroom Version: Add sautéed mushrooms and thyme.
- White Pizza Version: Skip tomato sauce and use ricotta.
Common Mistakes to Avoid with This Dish:
- Don’t overload the pita.
- Don’t skip the pre-roast on watery vegetables.
- Don’t bake too long or the base turns hard.
29. Miso-Glazed Eggplant Rice Bowls
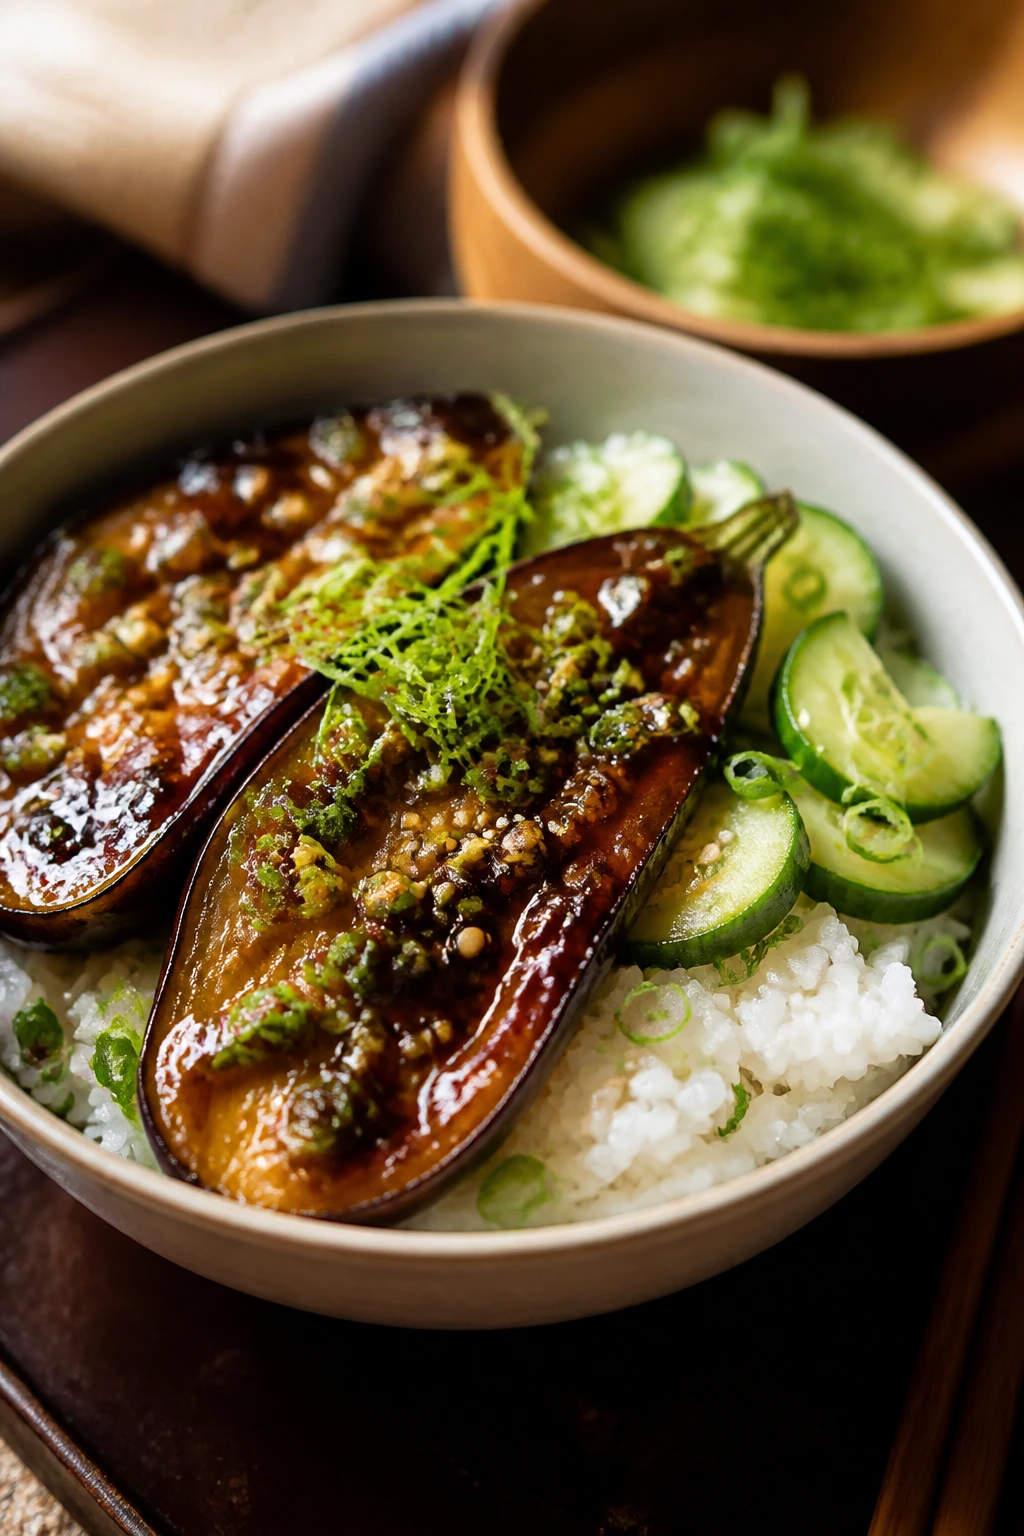
Eggplant is at its best when it’s allowed to go silky and a little sticky. Miso glaze gives it a deep salty edge, rice carries the sauce, and crunchy cucumber or scallions keep the bowl from getting too soft. It tastes deliberate in a way that simple bowls don’t always manage.
Why It Works: Eggplant absorbs glaze like a sponge, which is useful when the glaze has real flavor. Miso and soy sauce add the savory depth that makes people keep eating. Roasting or broiling concentrates the eggplant until it browns around the edges. Rice and fresh vegetables balance the richness.
Key Ingredients:
- 2 medium eggplants, halved lengthwise
- 2 tablespoons white miso
- 1 tablespoon soy sauce
- 1 tablespoon honey or maple syrup
- 1 tablespoon rice vinegar
- 1 tablespoon sesame oil
- 2 cups cooked rice
- 1 cucumber, sliced
- 2 scallions, sliced
- 1 tablespoon sesame seeds
Quick Steps:
- Score the eggplant flesh and roast cut side up at 425°F for 20 minutes.
- Whisk miso, soy sauce, honey, rice vinegar, and sesame oil.
- Brush the glaze over the eggplant and roast 8 minutes more.
- Spoon rice into bowls and top with eggplant and cucumber.
- Finish with scallions and sesame seeds.
Equipment for This Recipe:
- Baking sheet
- Small bowl for glaze
- Sharp knife
How to Serve This Dish: Serve the bowls warm with extra cucumber on top for crunch. A little kimchi or pickled carrots works well if you want more bite.
Pro Tips for This Recipe:
- Score the flesh so the glaze sinks in.
- Don’t overbake until the skin collapses completely.
- Taste the glaze before using it; miso brands vary in salt.
- Add chili crisp if you want heat.
Variations on This Dish:
- Tahini Version: Drizzle with tahini sauce instead of sesame oil.
- Tofu Bowl: Add seared tofu cubes.
- Spicy Version: Add gochujang to the glaze.
Common Mistakes to Avoid with This Dish:
- Don’t skip scoring the eggplant.
- Don’t use low heat; the glaze needs real roasting.
- Don’t serve without something crisp beside the rice.
30. Lentil Sloppy Joes
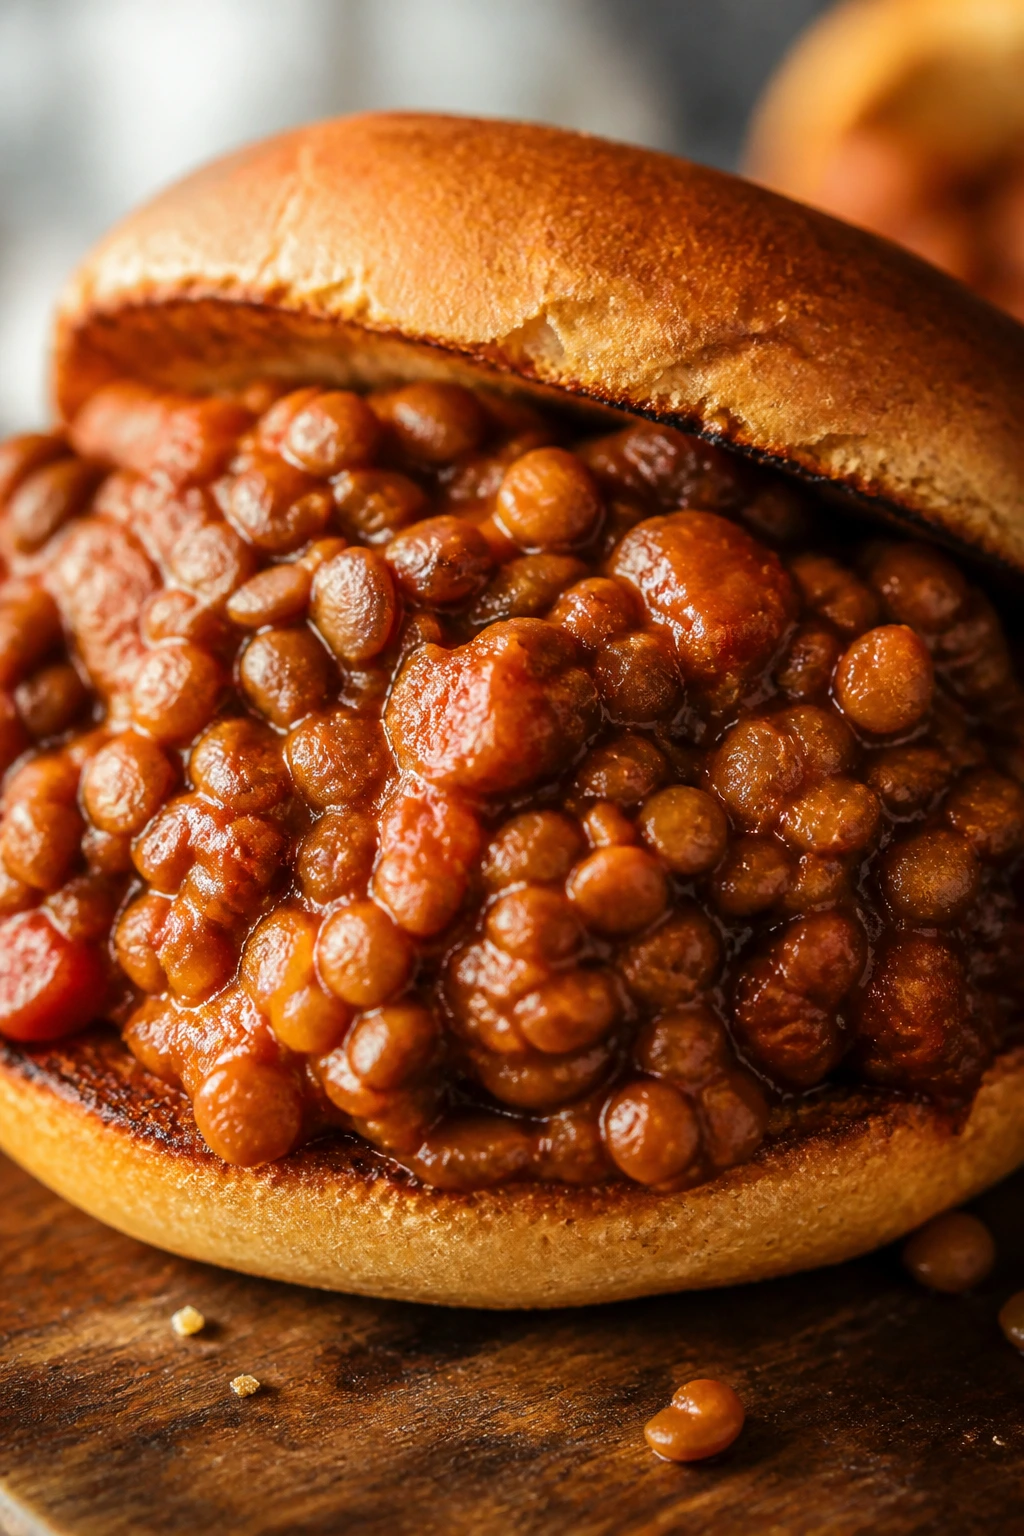
Sloppy Joes work because they are unapologetically messy, and lentils make the mess feel satisfying instead of thin. The filling gets tomatoey, sweet, and a little smoky, then sinks into a toasted bun without falling apart instantly. It’s one of the easiest meatless dinners to sell to people who grew up on the original.
Why It Works: Lentils keep their shape while soaking up the sauce. Tomato paste and ketchup bring the sweet-tangy base, while onion and pepper add background flavor. A little vinegar or mustard keeps the filling from tasting flat. Toasted buns matter because the filling is wet by design.
Key Ingredients:
- 1 cup brown lentils, rinsed
- 1 tablespoon olive oil
- 1 onion, diced
- 1 green bell pepper, diced
- 2 cloves garlic, minced
- 2 tablespoons tomato paste
- 1/2 cup ketchup
- 1 1/2 cups vegetable broth
- 1 tablespoon Worcestershire sauce or vegetarian Worcestershire
- 4 buns
Quick Steps:
- Cook onion and pepper in oil until soft.
- Stir in garlic and tomato paste for 30 seconds.
- Add lentils, ketchup, broth, Worcestershire, and simmer 25 minutes until thick.
- Toast the buns.
- Spoon the filling onto the buns and serve hot.
Equipment for This Recipe:
- Medium saucepan
- Spoon
- Toaster or skillet for buns
How to Serve This Dish: Serve with potato wedges, coleslaw, or pickles. A bun that’s been toasted on the cut side helps the filling stay put long enough to eat.
Pro Tips for This Recipe:
- Keep the filling thick enough to mound.
- Add a dash of smoked paprika if you want a deeper flavor.
- Taste for salt before serving; lentils need it.
- Chop the vegetables small so the filling spreads smoothly.
Variations on This Dish:
- BBQ Version: Swap some ketchup for barbecue sauce.
- Spicy Version: Add hot sauce or minced jalapeño.
- Mushroom Version: Add finely chopped mushrooms with the onion.
Common Mistakes to Avoid with This Dish:
- Don’t make the filling soupy.
- Don’t serve on soft buns that fall apart immediately.
- Don’t underseason the lentils.
31. Corn and Bean Chowder
This chowder is thick enough to eat with a spoon and mild enough that kids usually accept it without a debate. The corn brings sweetness, the beans add body, and the creamy broth makes the bowl feel like real dinner. It’s also one of those soups that reheats without getting sad.
Why It Works: Potatoes and beans thicken the chowder naturally. Corn adds pops of sweetness that keep the base from feeling too heavy. A little milk or cream turns the broth silky without requiring a separate sauce. If you finish with herbs or cheese, the bowl tastes more alive.
Key Ingredients:
- 2 tablespoons butter
- 1 onion, diced
- 2 potatoes, diced
- 2 cans (15 ounces each) white beans, drained
- 2 cups corn kernels
- 4 cups vegetable broth
- 1 cup milk or cream
- 1 teaspoon salt
- 1/2 teaspoon black pepper
- Chives or parsley for serving
Quick Steps:
- Cook onion in butter for 4 minutes.
- Add potatoes, beans, corn, and broth, then simmer 15 to 20 minutes.
- Mash a few potatoes against the pot to thicken the chowder.
- Stir in milk or cream and season well.
- Serve with herbs on top.
Equipment for This Recipe:
- Large soup pot
- Potato masher
- Ladle
How to Serve This Dish: Serve with crackers, cornbread, or toasted sourdough. A sprinkle of chives and a spoonful of sour cream make each bowl feel more composed.
Pro Tips for This Recipe:
- Use low-sodium broth so the soup doesn’t get salty fast.
- Don’t let it boil hard after adding dairy.
- Chop the potatoes evenly so they soften at the same time.
- Frozen corn works fine here.
Variations on This Dish:
- Smoky Version: Add smoked paprika and a little bacon-style seasoning.
- Spicy Version: Stir in diced green chiles.
- Loaded Version: Top with shredded cheese and scallions.
Common Mistakes to Avoid with This Dish:
- Don’t leave the potatoes too large.
- Don’t skip mashing a few pieces for texture.
- Don’t overheat once the milk goes in.
32. Caprese Grilled Cheese with Tomato Soup
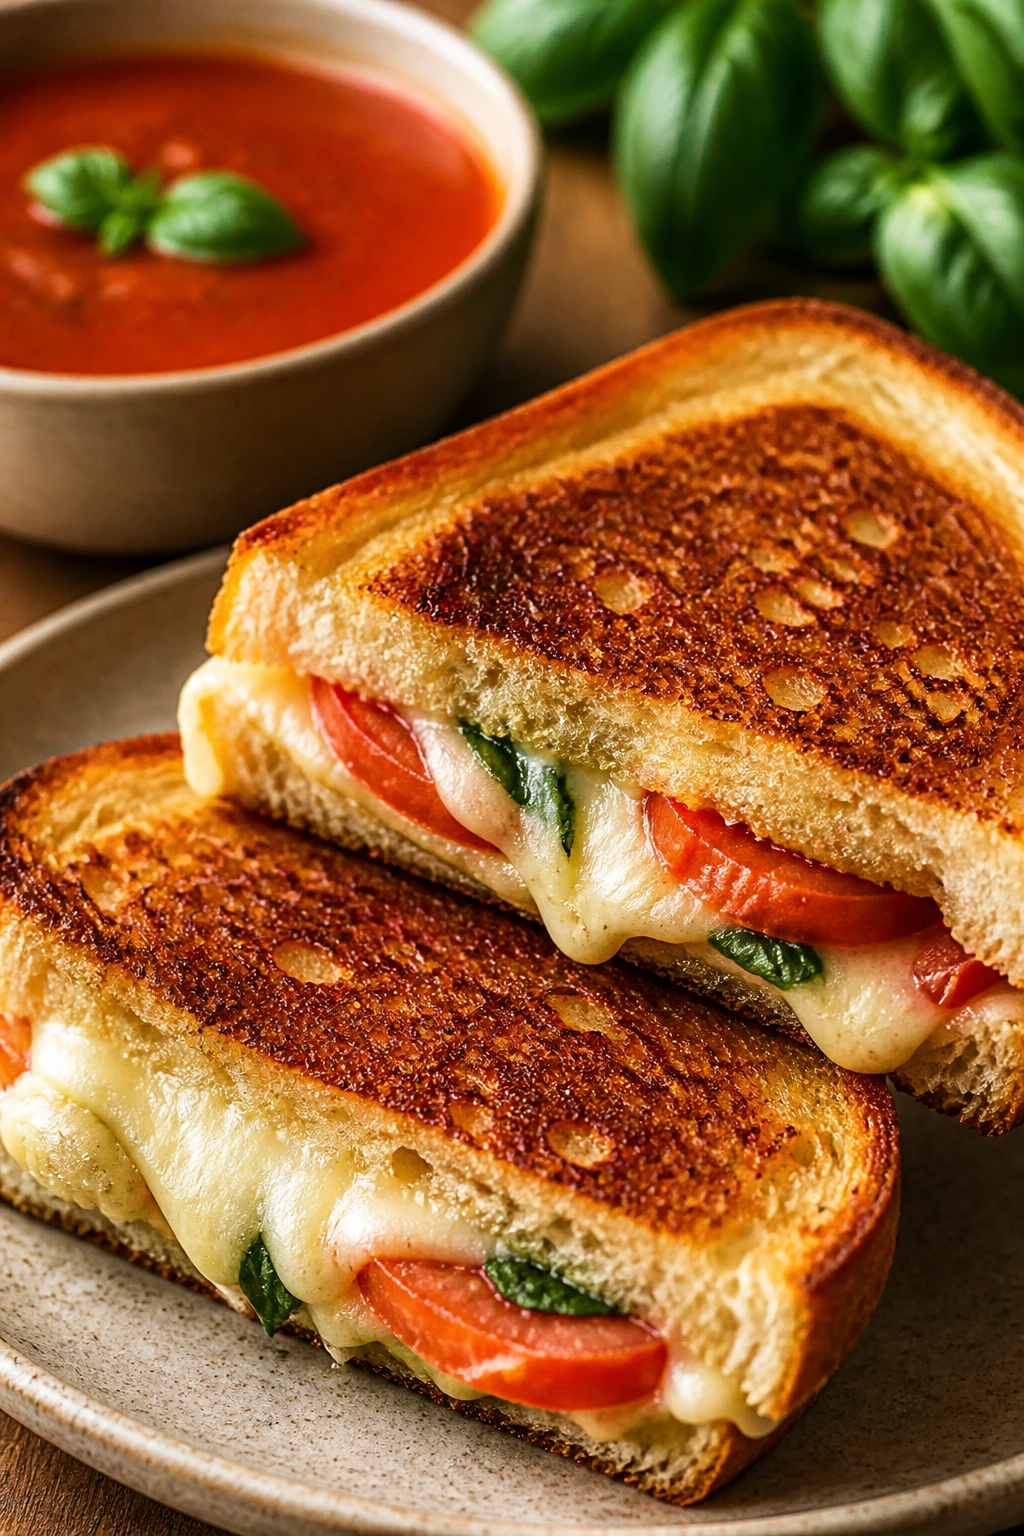
A grilled cheese can carry a dinner if you build it with enough care. Fresh mozzarella melts into soft pockets, tomatoes bring acid, and basil keeps the sandwich from becoming one-dimensional. Paired with tomato soup, it tastes like someone upgraded a childhood meal without making it fussy.
Why It Works: Caprese ingredients need heat and restraint. Mozzarella melts smoothly, tomatoes add juiciness, and basil brings freshness at the end. The soup echoes the sandwich and gives the meal a deeper tomato note. Buttered bread browned slowly is the part people remember.
Key Ingredients:
- 8 slices sourdough or country bread
- 2 tablespoons butter
- 8 ounces fresh mozzarella, sliced
- 2 tomatoes, sliced
- 1/4 cup fresh basil leaves
- 1 can or batch of tomato soup, warmed
- Salt and pepper
Quick Steps:
- Butter the outside of each bread slice.
- Layer mozzarella, tomatoes, basil, salt, and pepper between the bread.
- Cook in a skillet over medium heat for 3 to 4 minutes per side until deeply golden.
- Warm the tomato soup.
- Serve the sandwiches with the soup for dipping.
Equipment for This Recipe:
- Skillet
- Spatula
- Soup pot
How to Serve This Dish: Slice the sandwiches diagonally and serve with the soup in wide bowls. A few extra basil leaves on the soup keep the plate from looking too plain.
Pro Tips for This Recipe:
- Pat the tomato slices dry so the bread doesn’t go soggy.
- Keep the heat moderate so the bread browns before the cheese leaks out.
- Fresh mozzarella is worth it here; the texture matters.
- Add a little garlic to the butter if you want more flavor.
Variations on This Dish:
- Pesto Version: Spread pesto inside the sandwich.
- Roasted Tomato Version: Use roasted tomatoes for less moisture.
- Muenster Version: Swap part of the mozzarella for a meltier cheese.
Common Mistakes to Avoid with This Dish:
- Don’t cook too hot or the bread burns before the cheese melts.
- Don’t use wet tomatoes straight from the cutting board.
- Don’t skip the soup; it completes the meal.
33. Spinach Mushroom Crepes
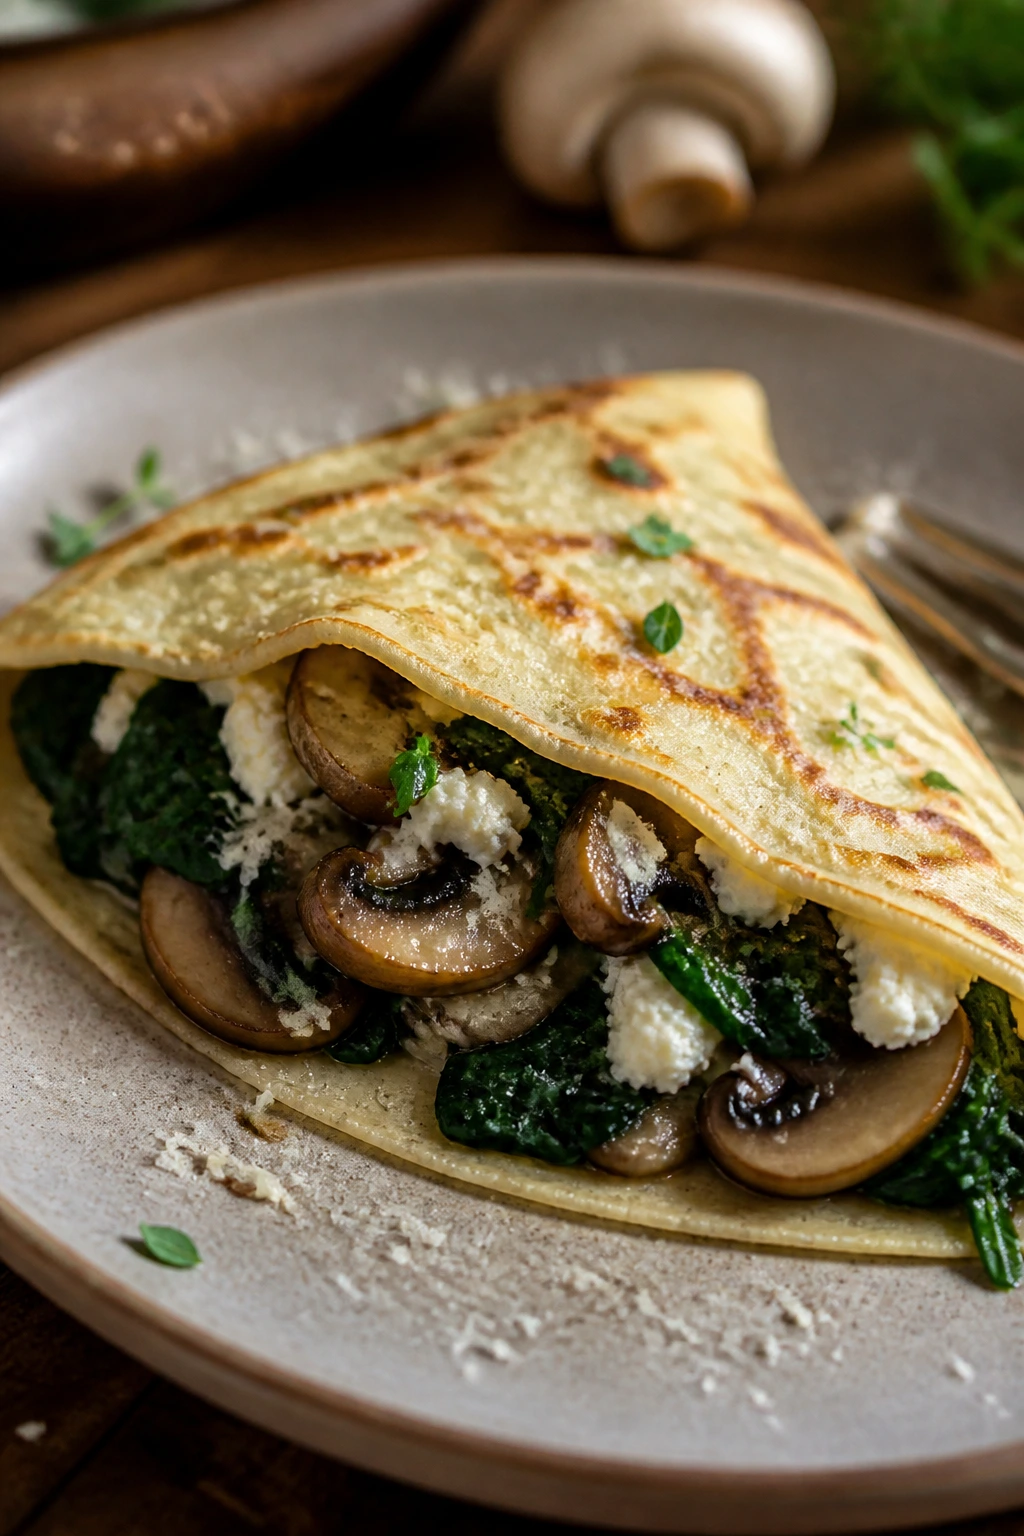
Crepes can feel delicate, but stuffed with spinach and mushrooms they become a very grown-up kind of comfort food. The filling is savory and soft, the crepes stay tender, and a little cheese ties the whole thing together. It’s a useful dinner when you want something that feels special without being complicated.
Why It Works: Crepes are thin enough to let the filling take center stage. Mushrooms bring the browned, savory flavor, and spinach adds color and softness. A creamy filling helps the crepes stay moist without getting watery. Baking them briefly after filling gives the dish a steadier finish.
Key Ingredients:
- 1 cup all-purpose flour
- 2 eggs
- 1 1/2 cups milk
- 2 tablespoons butter, melted
- 1 tablespoon olive oil
- 8 ounces mushrooms, sliced
- 4 cups spinach
- 1 clove garlic, minced
- 1/2 cup ricotta or cream cheese
- 1/4 cup Parmesan
Quick Steps:
- Whisk flour, eggs, milk, and melted butter into a thin batter and rest 15 minutes.
- Cook thin crepes in a lightly oiled skillet and set aside.
- Sauté mushrooms and garlic, then add spinach until wilted.
- Stir in ricotta and Parmesan.
- Fill the crepes, fold, and warm in the oven for 10 minutes.
Equipment for This Recipe:
- Nonstick skillet
- Whisk
- Mixing bowl
- Spatula
How to Serve This Dish: Serve two crepes per person with a green salad or roasted tomatoes. A little extra Parmesan on top gives the plate a more finished look.
Pro Tips for This Recipe:
- Let the batter rest so the crepes cook more evenly.
- Keep the skillet lightly oiled, not greasy.
- Cook the mushrooms until their moisture evaporates.
- Don’t overfill the crepes or they tear when folded.
Variations on This Dish:
- Goat Cheese Version: Swap ricotta for goat cheese.
- Herb Version: Add dill or chives to the filling.
- Savory Breakfast Version: Top with a fried egg.
Common Mistakes to Avoid with This Dish:
- Don’t make the batter too thick.
- Don’t rush the crepe rest time.
- Don’t let the filling get watery.
34. Vegetable Paella
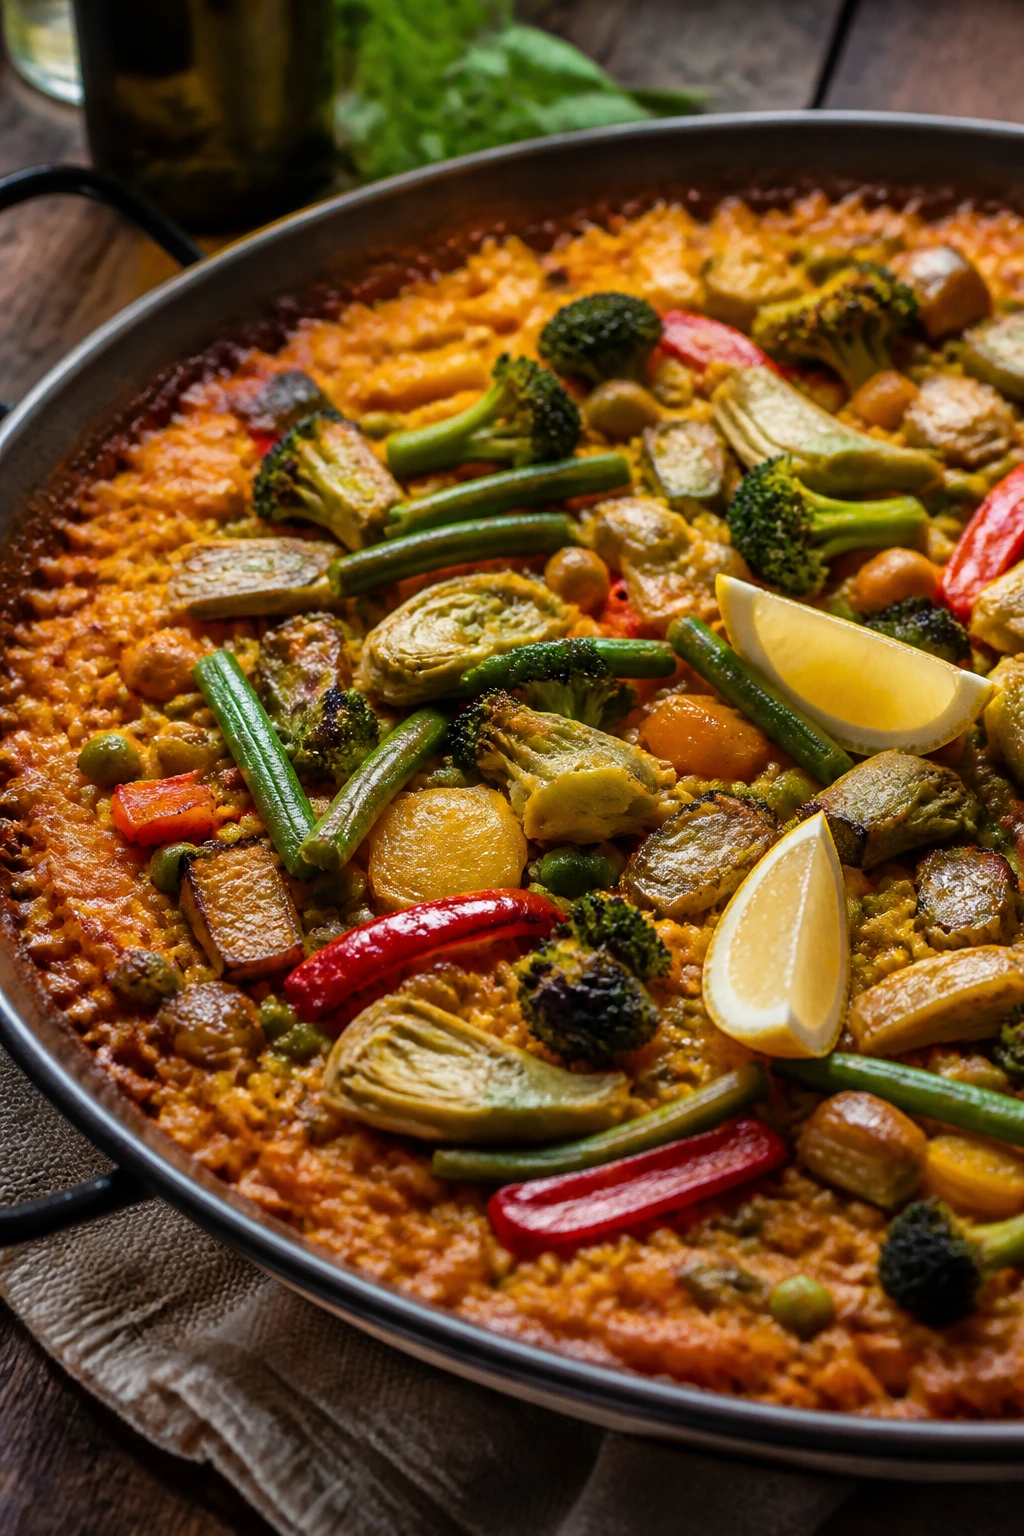
Paella earns attention by being a pan full of color and toasted rice, which is already a good start. The vegetables soften just enough, the rice catches the saffron and broth, and the bottom layer gets that toasty edge people always notice first. It feels festive without requiring a holiday.
Why It Works: Short-grain rice soaks up liquid while staying distinct. Saffron or paprika gives the rice its warm color and aroma. Roasted or sautéed vegetables add layers instead of dumping everything into one soft mixture. The slight crust on the bottom is part of the appeal.
Key Ingredients:
- 2 tablespoons olive oil
- 1 onion, diced
- 1 red bell pepper, sliced
- 2 cups short-grain rice
- 1 teaspoon paprika
- Pinch of saffron, optional
- 5 cups vegetable broth
- 1 cup artichoke hearts
- 1 cup peas
- 1 cup green beans, cut
- Lemon wedges
Quick Steps:
- Cook onion and pepper in oil for 5 minutes.
- Stir in rice, paprika, and saffron for 1 minute.
- Add broth and bring to a simmer without stirring much.
- Scatter in artichokes, peas, and green beans during the last 10 minutes.
- Cook until the rice is tender and the bottom is lightly toasted.
Equipment for This Recipe:
- Wide skillet or paella pan
- Wooden spoon
- Lid or foil, if needed
How to Serve This Dish: Serve straight from the pan with lemon wedges. A simple salad with olives or cucumbers is enough on the side.
Pro Tips for This Recipe:
- Use the widest pan you have so the rice cooks in a thin layer.
- Don’t stir constantly or the bottom crust won’t form.
- Let the broth absorb fully before calling it done.
- A little smoked paprika can stand in for saffron if needed.
Variations on This Dish:
- Mushroom Version: Add browned mushrooms.
- Tomato Version: Stir in a handful of chopped tomatoes.
- Chickpea Version: Add drained chickpeas for more protein.
Common Mistakes to Avoid with This Dish:
- Don’t use the wrong rice if you can avoid it.
- Don’t keep stirring the pot.
- Don’t skip the lemon at the table.
35. Green Curry Vegetable Noodles
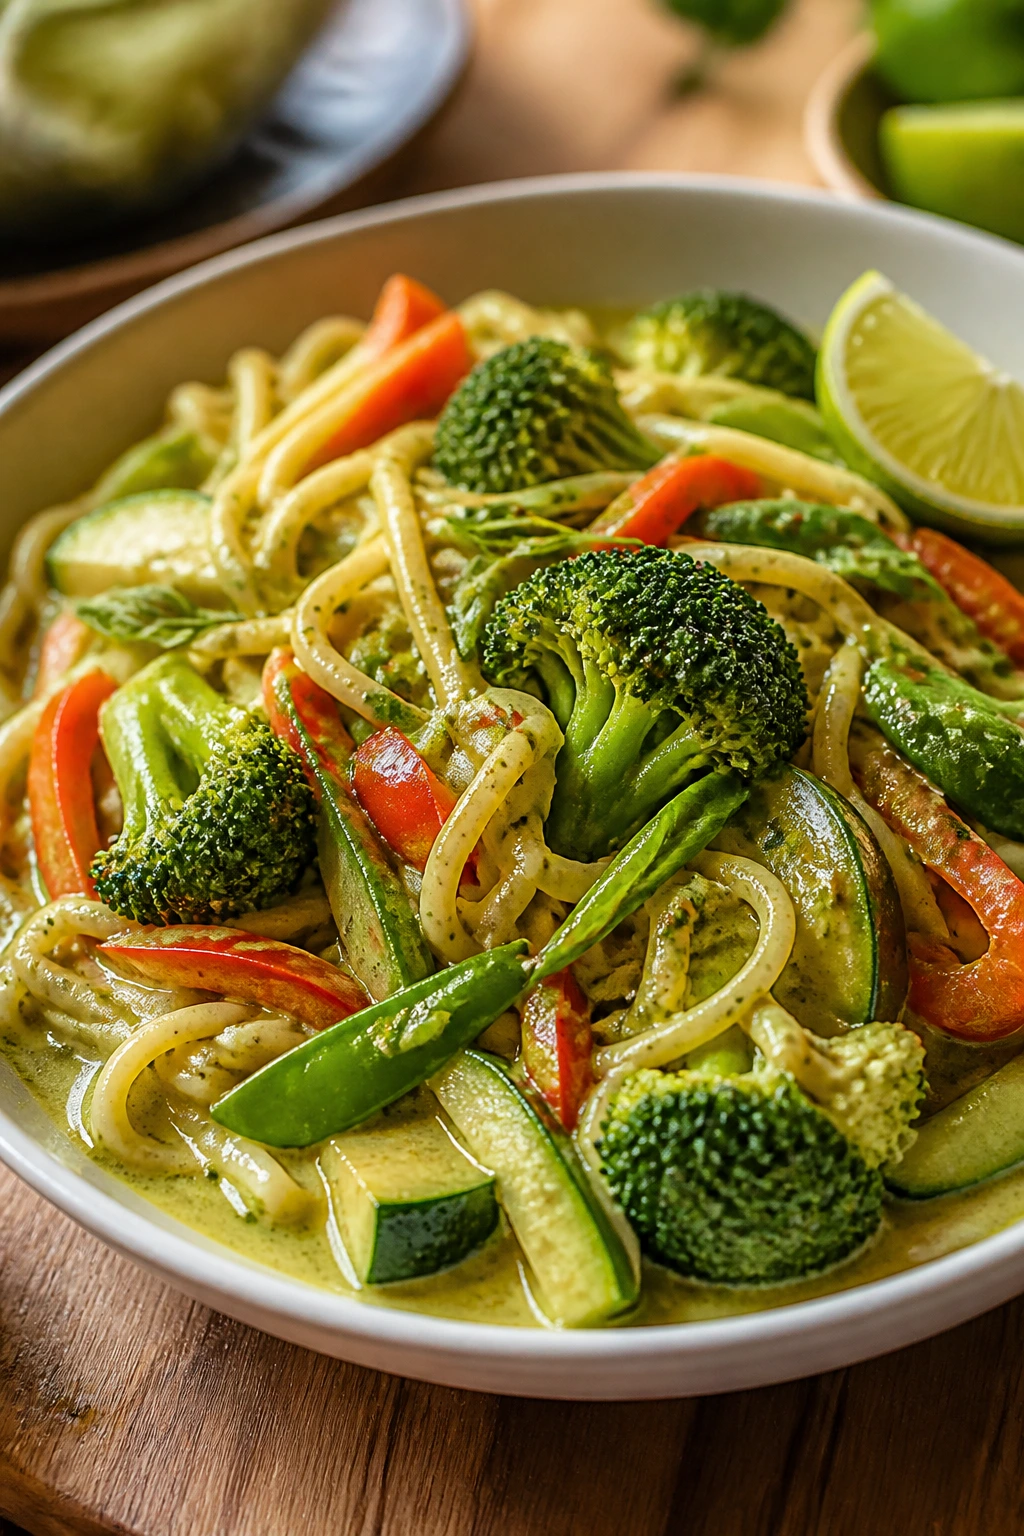
Green curry gives vegetables a backbone. The coconut milk softens the heat, the noodles soak up the sauce, and the vegetables stay crisp enough to give the bowl some shape. It tastes far bigger than the sum of the vegetables in the pot.
Why It Works: Curry paste needs to fry briefly to wake up its flavor. Coconut milk creates the sauce without extra cream. Noodles make the meal feel like a proper main course, and quick-cooking vegetables keep the dish bright. A squeeze of lime at the end wakes up the curry in a way salt alone can’t.
Key Ingredients:
- 8 ounces rice noodles
- 1 tablespoon oil
- 2 tablespoons green curry paste
- 1 can (13.5 ounces) coconut milk
- 1 cup vegetable broth
- 1 cup broccoli florets
- 1 red bell pepper, sliced
- 1 cup snap peas
- 1 zucchini, sliced
- 1 lime, juiced
- Basil or cilantro for serving
Quick Steps:
- Cook the noodles and set aside.
- Fry the curry paste in oil for 30 seconds.
- Add coconut milk and broth, then simmer 3 minutes.
- Add vegetables and cook until crisp-tender.
- Toss in noodles, lime juice, and herbs.
Equipment for This Recipe:
- Large skillet or wok
- Pot for noodles
- Spoon or tongs
How to Serve This Dish: Serve in large bowls with herbs on top. If you want more crunch, add peanuts or fried shallots right before eating.
Pro Tips for This Recipe:
- Don’t let the curry paste sit in cold liquid.
- Cut vegetables into thin pieces so they cook quickly.
- Add lime only after the heat is off.
- Use full-fat coconut milk for a thicker sauce.
Variations on This Dish:
- Peanut Version: Add a spoonful of peanut butter.
- Tofu Version: Add fried tofu cubes.
- Mild Version: Use less curry paste and more coconut milk.
Common Mistakes to Avoid with This Dish:
- Don’t overcook the vegetables until they slump.
- Don’t boil the sauce hard after coconut milk goes in.
- Don’t let the noodles sit too long before saucing.
36. Savory Chickpea Pancakes with Salad
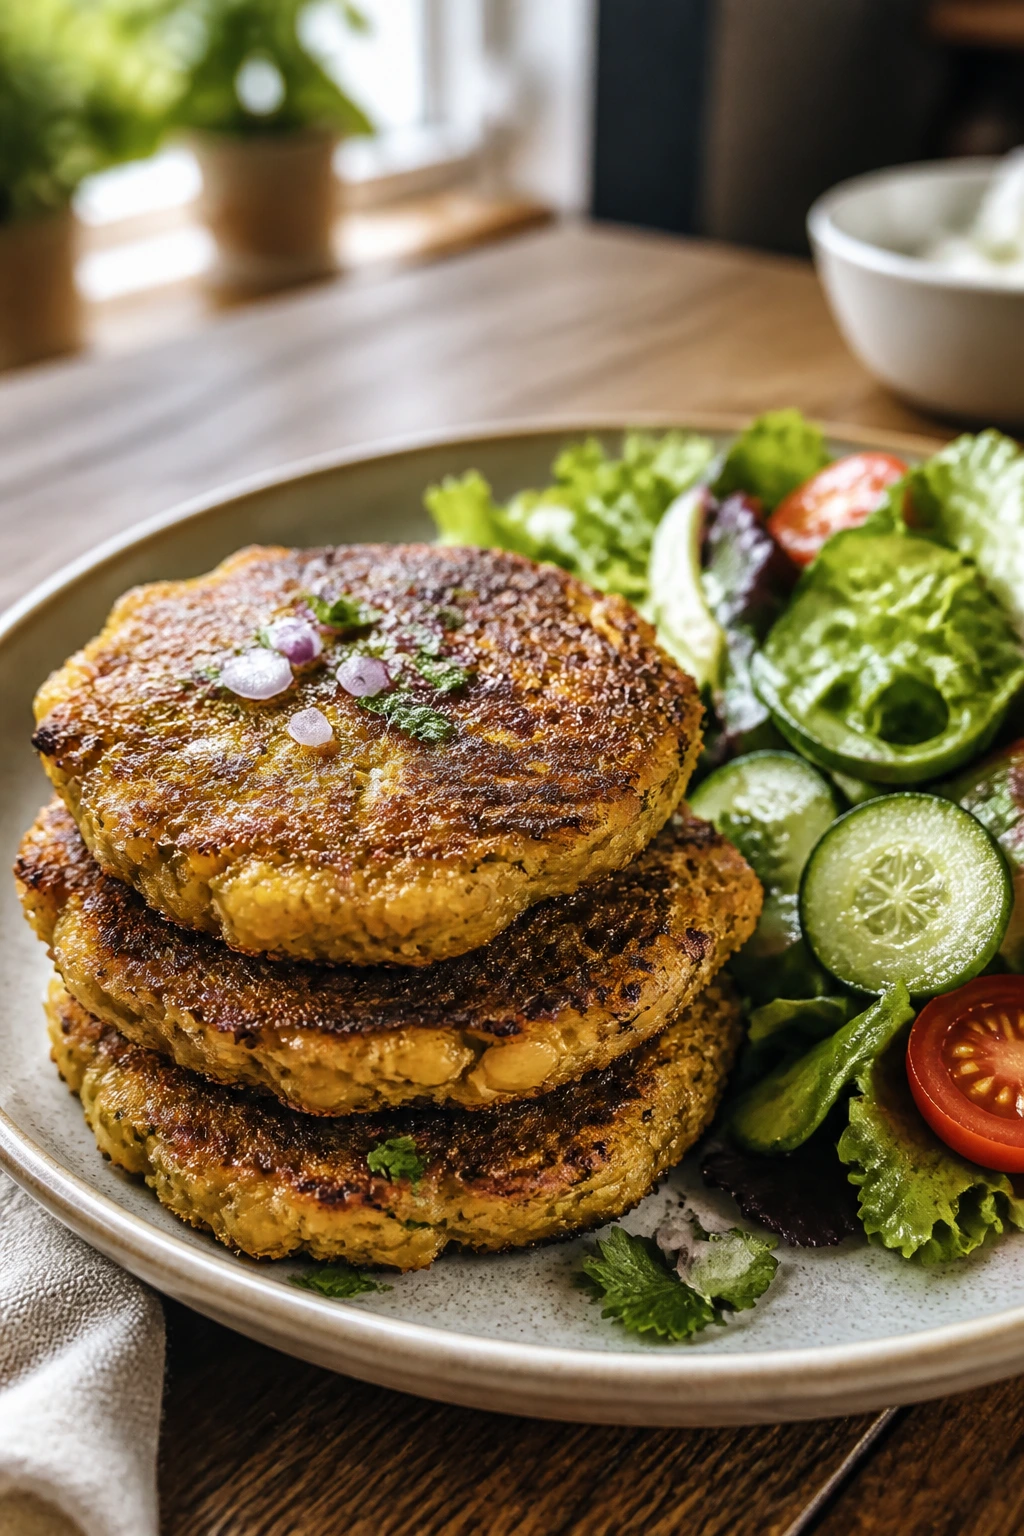
These chickpea pancakes are sturdy, crisp at the edges, and much more dinner-ready than their humble batter suggests. They taste a little nutty, a little herby, and they hold up well under a pile of salad or yogurt. If you’ve only used chickpea flour for baking, this is the better use for it.
Why It Works: Chickpea flour makes a batter that cooks into a firm pancake without eggs if you want it that way. Herbs and onions keep the flavor from tasting plain. Cooking in a thin layer of oil gives the edges a good crunch. A fresh salad on top adds the kind of brightness these need.
Key Ingredients:
- 1 1/2 cups chickpea flour
- 1 1/2 cups water
- 1 small onion, finely diced
- 2 tablespoons chopped parsley
- 1 tablespoon chopped cilantro
- 1 teaspoon cumin
- 1/2 teaspoon salt
- 2 tablespoons olive oil
- 2 cups mixed greens
- 1/2 cup yogurt or tahini sauce
Quick Steps:
- Whisk chickpea flour, water, onion, herbs, cumin, and salt into a smooth batter.
- Rest the batter 10 minutes.
- Heat olive oil in a skillet and pour in small rounds.
- Cook 3 to 4 minutes per side until browned and set.
- Serve with greens and yogurt or tahini sauce.
Equipment for This Recipe:
- Mixing bowl
- Whisk
- Skillet
How to Serve This Dish: Top the pancakes with a salad dressed lightly in lemon and oil. A spoon of yogurt or tahini gives them enough richness to feel like dinner.
Pro Tips for This Recipe:
- Whisk out all the lumps; chickpea flour clumps fast.
- Keep the pancakes modest in size so they flip cleanly.
- Don’t make the batter too thick.
- A pinch of chili flakes works if you want more warmth.
Variations on This Dish:
- Spinach Version: Add chopped spinach to the batter.
- Carrot Version: Fold in grated carrot for sweetness.
- Herb-Heavy Version: Double the parsley and cilantro.
Common Mistakes to Avoid with This Dish:
- Don’t flip too early or the pancake tears.
- Don’t skip the rest time.
- Don’t use high heat; the outside burns before the center sets.
37. Rainbow Sushi Bowls
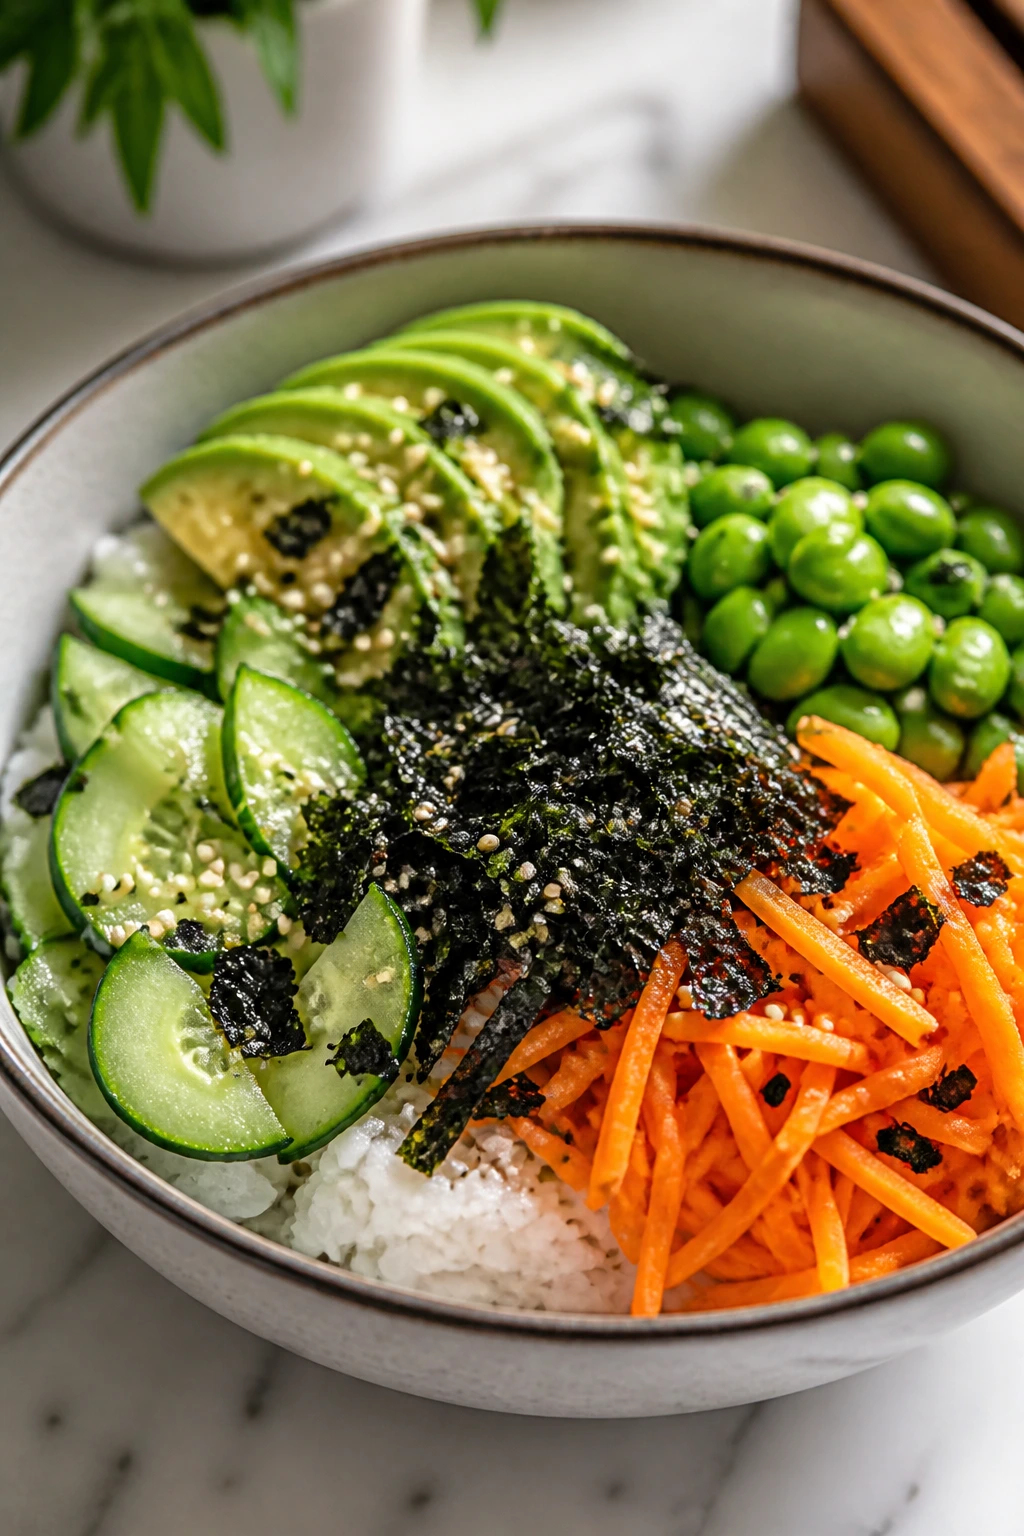
Sushi bowls are proof that you do not need perfect rolling skills to get the point across. Sushi rice gives the bowl its sticky base, avocado and cucumber add coolness, and edamame or tofu make it feel like a real meal. The nori and sesame at the end are what make it taste like the idea you had in mind.
Why It Works: Seasoned rice gives the bowl its sushi character fast. Cool vegetables keep the texture light against the richer toppings. A little soy sauce, rice vinegar, or spicy mayo pulls the flavors together. It’s a useful dinner when people want freshness but still need something filling.
Key Ingredients:
- 2 cups sushi rice
- 2 1/2 cups water
- 3 tablespoons rice vinegar
- 1 tablespoon sugar
- 1 teaspoon salt
- 1 avocado, sliced
- 1 cucumber, sliced
- 1 cup shredded carrots
- 1 cup shelled edamame
- 2 sheets nori, torn
- 1 tablespoon sesame seeds
Quick Steps:
- Cook the rice, then fold in rice vinegar, sugar, and salt.
- Let the rice cool slightly and spoon into bowls.
- Arrange avocado, cucumber, carrots, and edamame over the rice.
- Add torn nori and sesame seeds.
- Serve with soy sauce or spicy mayo.
Equipment for This Recipe:
- Saucepan or rice cooker
- Bowl for seasoning rice
- Sharp knife
How to Serve This Dish: Serve in wide bowls so the toppings stay visible. Pickled ginger, wasabi, or a drizzle of spicy mayo can sit on the side for people who want more punch.
Pro Tips for This Recipe:
- Season the rice while it’s warm so it absorbs the vinegar.
- Use ripe avocado, not soft-brown avocado.
- Keep the vegetables dry so the bowl doesn’t get watery.
- Add toasted sesame oil sparingly; a little goes far.
Variations on This Dish:
- Spicy Tofu Version: Add pan-seared tofu with chili sauce.
- Tempura-Style Version: Add crisp vegetables if you have them.
- Brown Rice Version: Use brown rice if you want a nuttier base.
Common Mistakes to Avoid with This Dish:
- Don’t let the rice dry out before seasoning.
- Don’t overload with watery toppings.
- Don’t forget the nori; that seaweed note matters.
38. Creamy Spinach Polenta
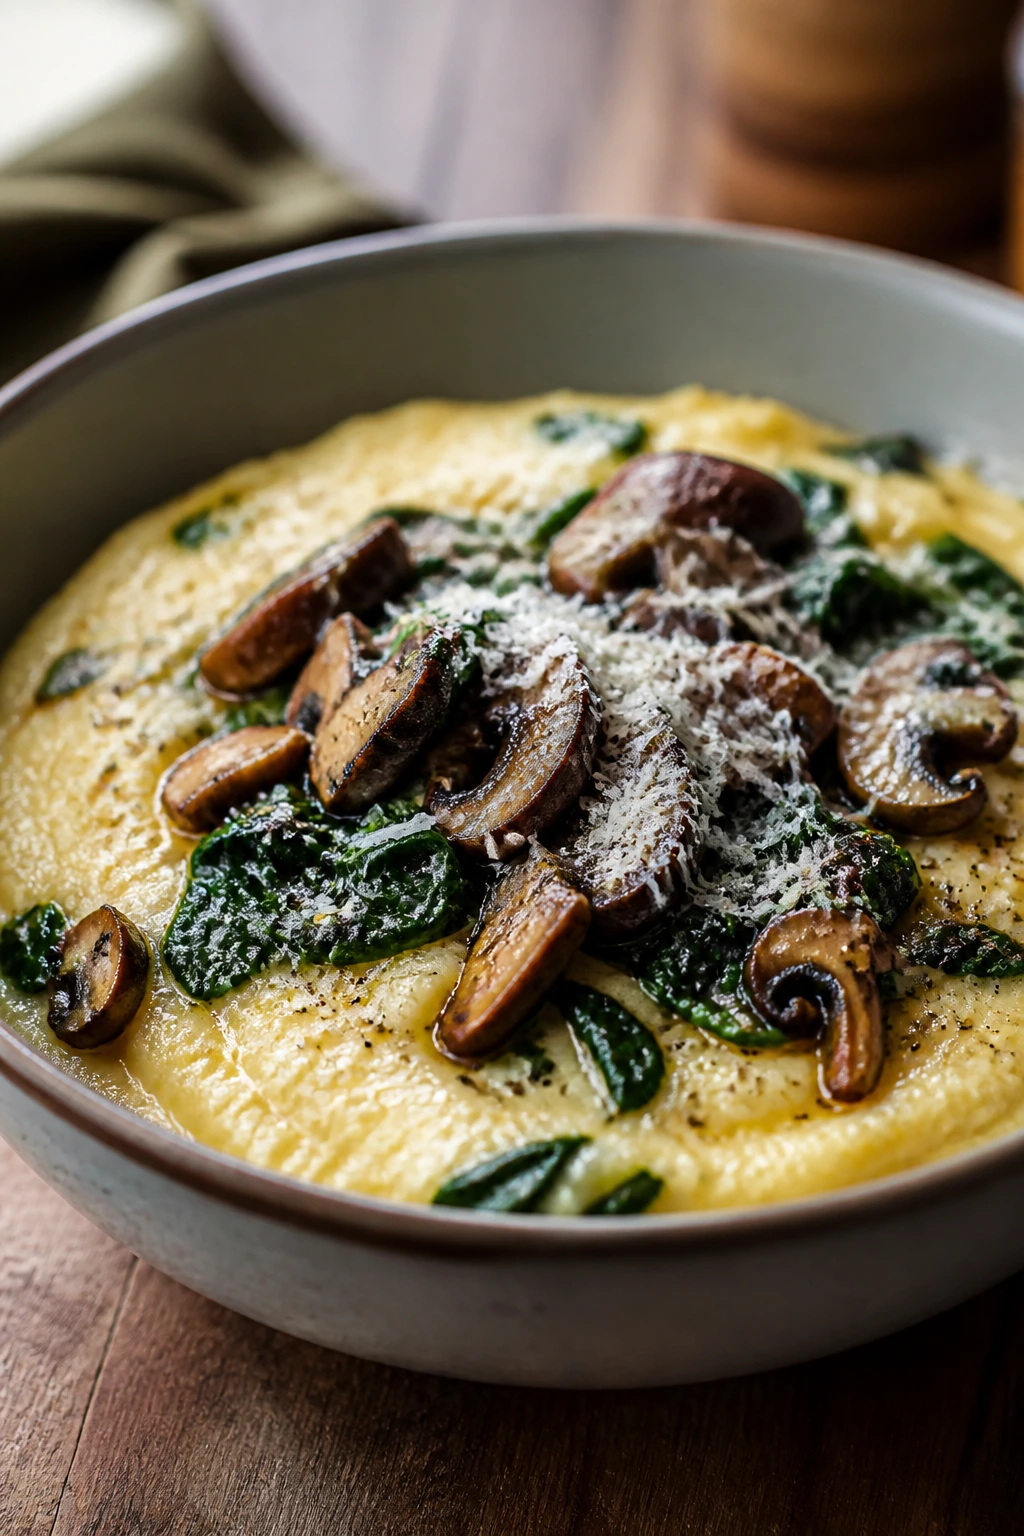
Polenta is one of those dishes that can look plain until the butter and cheese go in. Then it turns silky, rich, and surprisingly satisfying under a tangle of spinach or mushrooms. It’s a good answer when you want something spoonable that still counts as dinner.
Why It Works: Polenta thickens into a soft base that carries toppings well. Spinach wilts quickly and adds color without a lot of extra work. Parmesan, butter, and a little cream make the bowl taste rounded instead of thin. Mushrooms on top bring the browned flavor that makes people trust the plate.
Key Ingredients:
- 1 cup polenta
- 4 cups water or broth
- 2 tablespoons butter
- 1/2 cup grated Parmesan
- 4 cups spinach
- 1 tablespoon olive oil
- 8 ounces mushrooms, sliced
- 2 cloves garlic, minced
- Salt and black pepper
Quick Steps:
- Bring water or broth to a simmer and whisk in the polenta.
- Cook, stirring often, until thick and smooth, about 20 minutes.
- Stir in butter and Parmesan.
- Sauté mushrooms and garlic in olive oil, then wilt the spinach in the same pan.
- Spoon the polenta into bowls and top with the vegetables.
Equipment for This Recipe:
- Saucepan
- Whisk
- Skillet
How to Serve This Dish: Serve immediately while the polenta is soft. A fried egg on top or a slice of toasted bread on the side makes it feel more complete.
Pro Tips for This Recipe:
- Stir often so the polenta doesn’t stick.
- Add liquid if it thickens too quickly.
- Season generously; polenta needs salt.
- Let the mushrooms brown before adding spinach.
Variations on This Dish:
- Cheesy Version: Add fontina or goat cheese.
- Tomato Version: Spoon warm marinara over the top.
- Herb Version: Finish with thyme or rosemary.
Common Mistakes to Avoid with This Dish:
- Don’t rush the cooking time; gritty polenta tastes unfinished.
- Don’t forget enough salt.
- Don’t let the polenta sit too long without loosening it.
39. Loaded Nacho Skillet

Nachos are often treated like a party snack, but with beans, corn, cheese, and enough topping, they become a real dinner. The tortilla chips stay crisp around the edges, the beans give the pan weight, and the melted cheese ties the whole thing together. Put the skillet in the middle of the table and watch it disappear.
Why It Works: Beans add the substance that plain chips can’t provide. Hot sauce or salsa seasons the whole pan without much effort. Cheese melts over the top and binds the layers. A few fresh toppings at the end—avocado, onion, cilantro—keep the skillet from feeling heavy.
Key Ingredients:
- 1 bag sturdy tortilla chips
- 1 can (15 ounces) black beans, drained
- 1 cup corn
- 1 cup salsa
- 2 cups shredded cheddar or Monterey Jack
- 1 jalapeño, sliced
- 1 avocado, diced
- 2 tablespoons chopped cilantro
- Sour cream, for serving
Quick Steps:
- Spread chips in an oven-safe skillet or baking dish.
- Scatter beans, corn, salsa, and cheese over the chips.
- Bake at 400°F for 8 to 10 minutes until the cheese melts.
- Top with jalapeño, avocado, and cilantro.
- Serve immediately with sour cream.
Equipment for This Recipe:
- Oven-safe skillet or sheet pan
- Spoon
- Knife for toppings
How to Serve This Dish: Serve hot and fast, right from the pan. If you want a fuller meal, add a green salad or a bowl of tomato soup beside it.
Pro Tips for This Recipe:
- Use thick chips that can handle the toppings.
- Keep fresh toppings off until after baking.
- Bake just until melted so the chips stay crisp.
- A squeeze of lime makes the pan taste fresher.
Variations on This Dish:
- Buffalo Version: Toss the beans with buffalo sauce.
- Roasted Veggie Version: Add roasted peppers and onions.
- Breakfast Version: Add scrambled eggs after baking.
Common Mistakes to Avoid with This Dish:
- Don’t drown the chips in salsa before baking.
- Don’t let the pan sit too long before serving.
- Don’t use weak chips that break on contact.
40. Cabbage and Noodle Stir-Fry
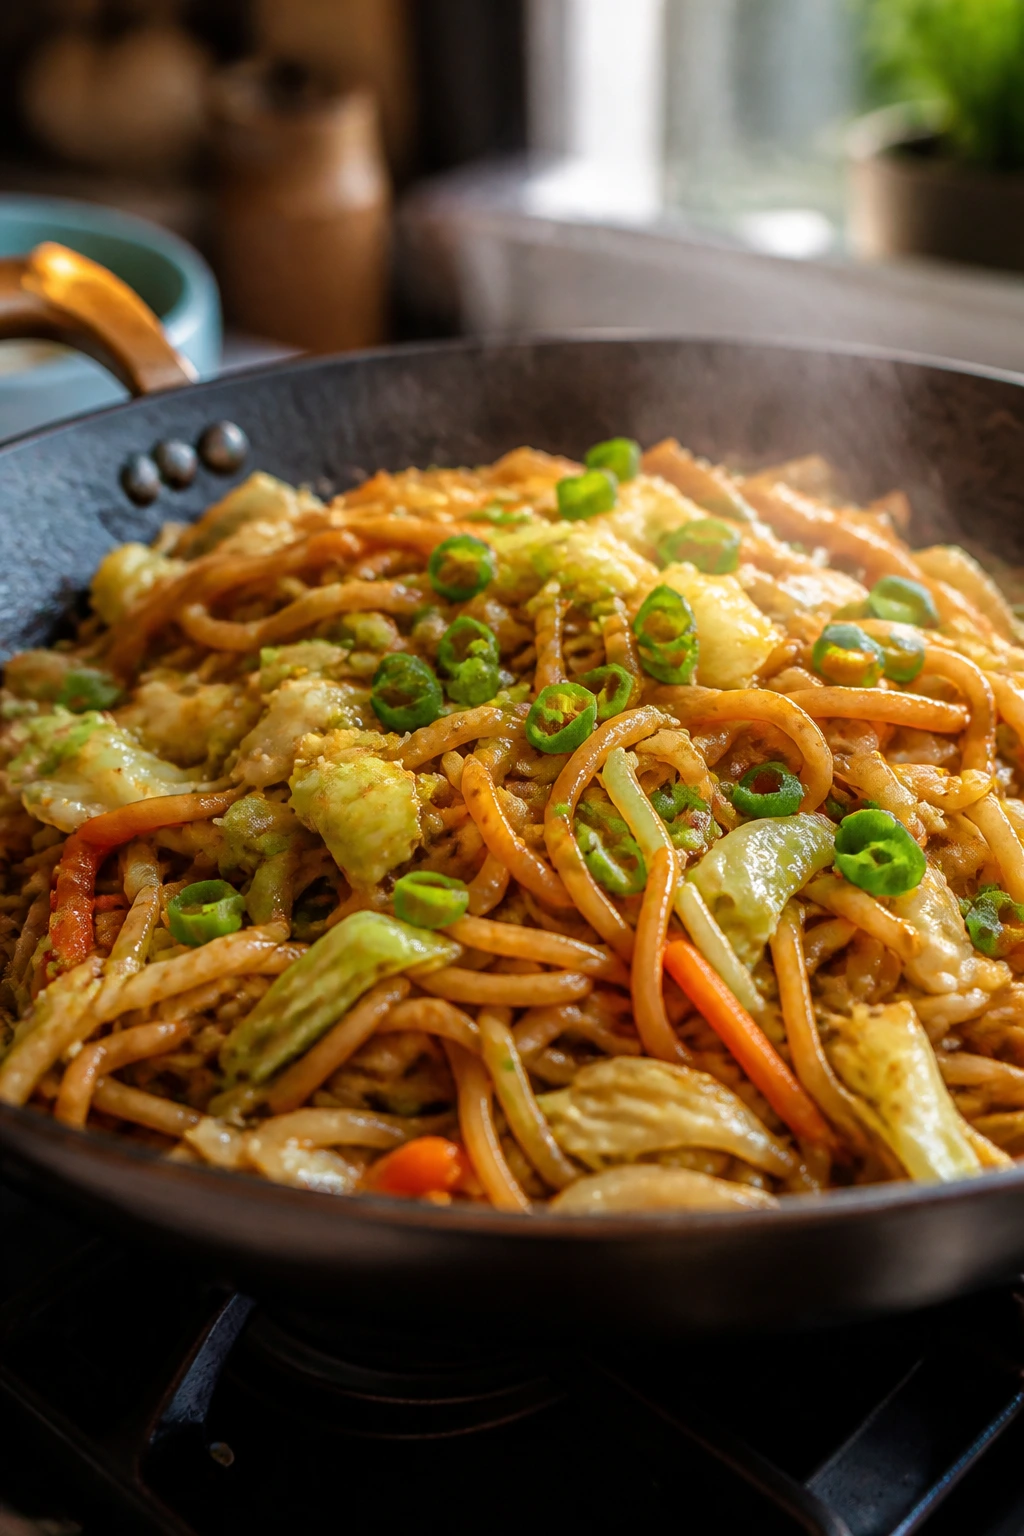
Cabbage is one of those vegetables that gets better once it hits a hot pan. It softens, sweetens, and takes on a little char around the edges, which is exactly what you want in a noodle stir-fry. Add soy sauce, garlic, and a little sesame oil, and you’ve got a dinner that tastes thriftier than it feels.
Why It Works: Cabbage cooks down fast but still leaves bite. Noodles give the dish enough body to serve as a main course. A hot pan creates those browned strands that make stir-fry taste like it came together on purpose. Eggs or tofu can be added if you want more protein, but the base already works.
Key Ingredients:
- 8 ounces noodles
- 2 tablespoons oil
- 4 cups shredded cabbage
- 2 carrots, julienned
- 2 cloves garlic, minced
- 3 tablespoons soy sauce
- 1 tablespoon sesame oil
- 2 scallions, sliced
- 1 egg, optional
- Chili flakes, optional
Quick Steps:
- Cook the noodles and set aside.
- Heat oil in a large skillet and cook cabbage and carrots until slightly browned.
- Add garlic and cook 30 seconds.
- Add noodles, soy sauce, and sesame oil, then toss until coated.
- Add egg if using and finish with scallions.
Equipment for This Recipe:
- Large skillet or wok
- Tongs or spatula
- Pot for noodles
How to Serve This Dish: Serve in bowls with chili flakes or crispy onions on top. A side of cucumbers or simple miso soup gives the meal a cleaner edge.
Pro Tips for This Recipe:
- Shred the cabbage thin so it cooks evenly.
- Don’t overcook it until it turns limp.
- Use noodles that can handle tossing, not delicate ones.
- Add sesame oil at the end for better flavor.
Variations on This Dish:
- Mushroom Version: Add sliced mushrooms with the cabbage.
- Peanut Version: Toss in a spoonful of peanut sauce.
- Tofu Version: Add crispy tofu cubes.
Common Mistakes to Avoid with This Dish:
- Don’t crowd the pan or the cabbage steams.
- Don’t over-sauce the noodles.
- Don’t forget a little heat; the dish needs contrast.
41. BBQ Jackfruit Sandwiches
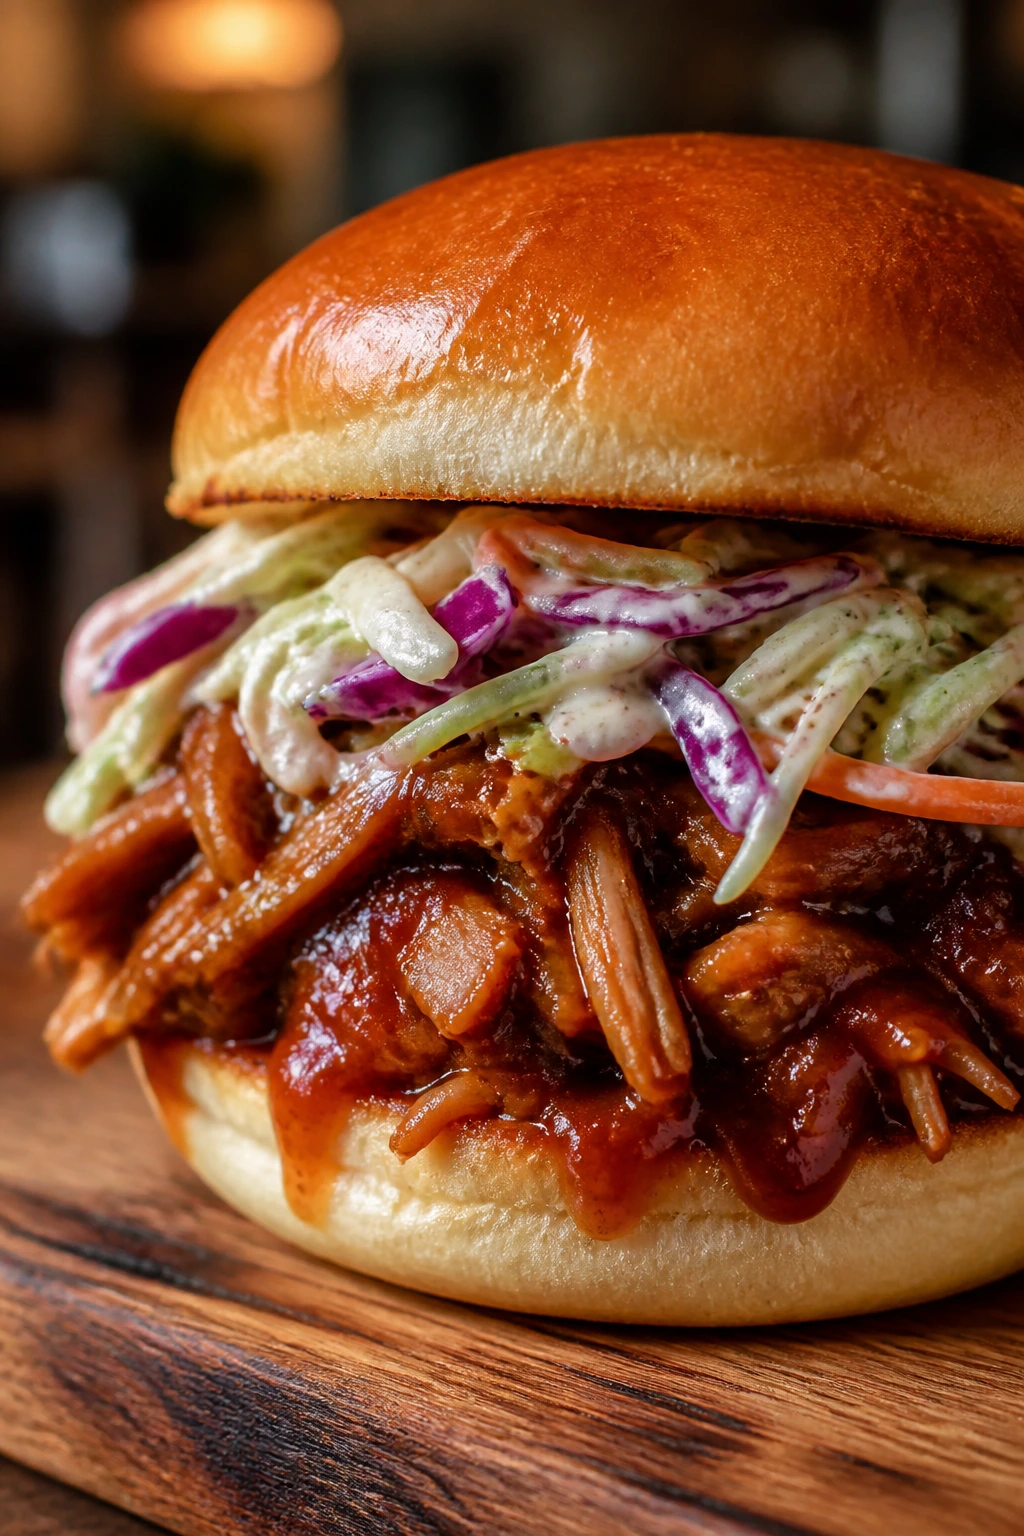
Jackfruit takes a little attitude to win over, but when it’s shredded and simmered in barbecue sauce, it starts behaving like pulled barbecue in all the right ways. The texture is stringy, the sauce is sticky, and the slaw on top keeps each bite from getting too soft. It’s a sandwich with a little drama.
Why It Works: Young jackfruit shreds into strands that catch sauce well. A quick sauté helps it lose the canned flavor before the barbecue goes in. A soft bun makes the sandwich feel right, and slaw adds crunch and acid. If you want a meatless sandwich that still looks like a proper handheld meal, this one’s useful.
Key Ingredients:
- 2 cans young green jackfruit in brine, drained and rinsed
- 1 tablespoon oil
- 1 small onion, sliced
- 1 cup barbecue sauce
- 4 buns
- 2 cups coleslaw mix
- 2 tablespoons mayonnaise or vinegar for slaw
- 1 teaspoon salt
- Pickles, optional
Quick Steps:
- Sauté onion in oil for 4 minutes.
- Add jackfruit and cook 5 minutes, then shred it with a spoon.
- Stir in barbecue sauce and simmer 10 minutes until sticky.
- Toss coleslaw with mayo or vinegar and salt.
- Pile the jackfruit on buns and top with slaw.
Equipment for This Recipe:
- Skillet
- Fork or spoon for shredding
- Bowl for slaw
How to Serve This Dish: Serve with pickles and potato salad or corn on the side. Toast the buns lightly so they hold up under the sauce.
Pro Tips for This Recipe:
- Rinse the jackfruit well before cooking.
- Cook it long enough to lose the briny note.
- Add a little smoked paprika if the sauce tastes too sweet.
- Use slaw with some vinegar bite, not just creamy dressing.
Variations on This Dish:
- Spicy Version: Add hot sauce to the barbecue sauce.
- Carolina Style: Use tangy vinegar sauce instead.
- Mushroom Blend: Mix in chopped mushrooms for extra heft.
Common Mistakes to Avoid with This Dish:
- Don’t use ripe jackfruit in syrup.
- Don’t serve without slaw or the sandwich gets one-dimensional.
- Don’t skip the sauté before saucing.
42. Ricotta Stuffed Shells
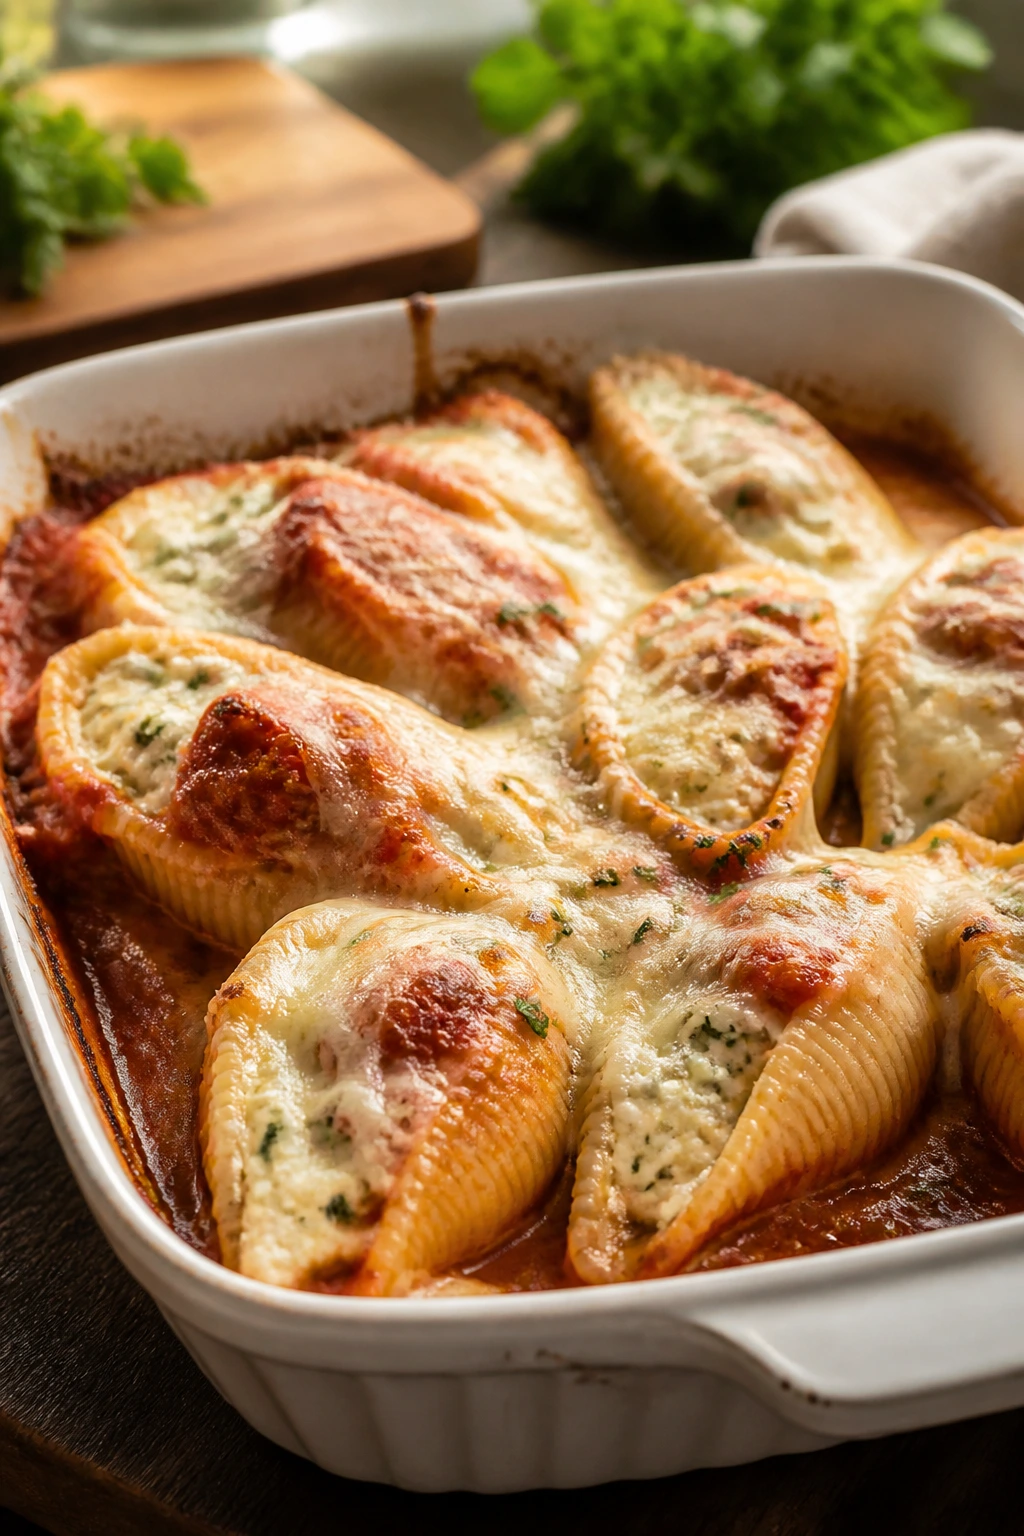
Stuffed shells are what baked pasta looks like when it gets a little formal. The ricotta filling stays creamy, the shells hold sauce in all their curves, and the top layer turns browned and bubbling. It’s hearty enough for a family table but still feels a touch special.
Why It Works: Jumbo shells create built-in portions and hold the filling neatly. Ricotta keeps the center creamy, while spinach adds color and a little substance. Marinara beneath and above the shells prevents dryness. Mozzarella on top gives you that baked-cheese finish people expect.
Key Ingredients:
- 20 jumbo pasta shells
- 15 ounces ricotta
- 1 egg
- 2 cups chopped spinach, cooked and squeezed dry
- 1 cup shredded mozzarella
- 1/2 cup grated Parmesan
- 2 cups marinara sauce
- 1 clove garlic, minced
- 1 teaspoon Italian seasoning
Quick Steps:
- Cook the shells until just tender, then cool.
- Mix ricotta, egg, spinach, half the mozzarella, Parmesan, garlic, and seasoning.
- Spread marinara in a baking dish.
- Fill the shells, nest them into the sauce, and top with the remaining mozzarella.
- Bake at 375°F for 25 minutes until bubbling.
Equipment for This Recipe:
- Large pot
- Baking dish
- Spoon for filling the shells
How to Serve This Dish: Serve with garlic bread and a crisp salad. A few fresh basil leaves or extra Parmesan on top give the dish a better finish.
Pro Tips for This Recipe:
- Don’t overcook the shells or they tear when filling.
- Squeeze the spinach dry so the filling stays thick.
- Use a piping bag or spoon for easier stuffing.
- Let the baked shells rest a few minutes before serving.
Variations on This Dish:
- Mushroom Version: Add finely chopped sautéed mushrooms to the filling.
- Lemon Version: Add lemon zest for brightness.
- Extra-Cheesy Version: Mix in fontina or provolone.
Common Mistakes to Avoid with This Dish:
- Don’t make the filling runny.
- Don’t leave bare spots in the sauce under the shells.
- Don’t cut into them immediately after baking.
43. Saag Paneer with Rice
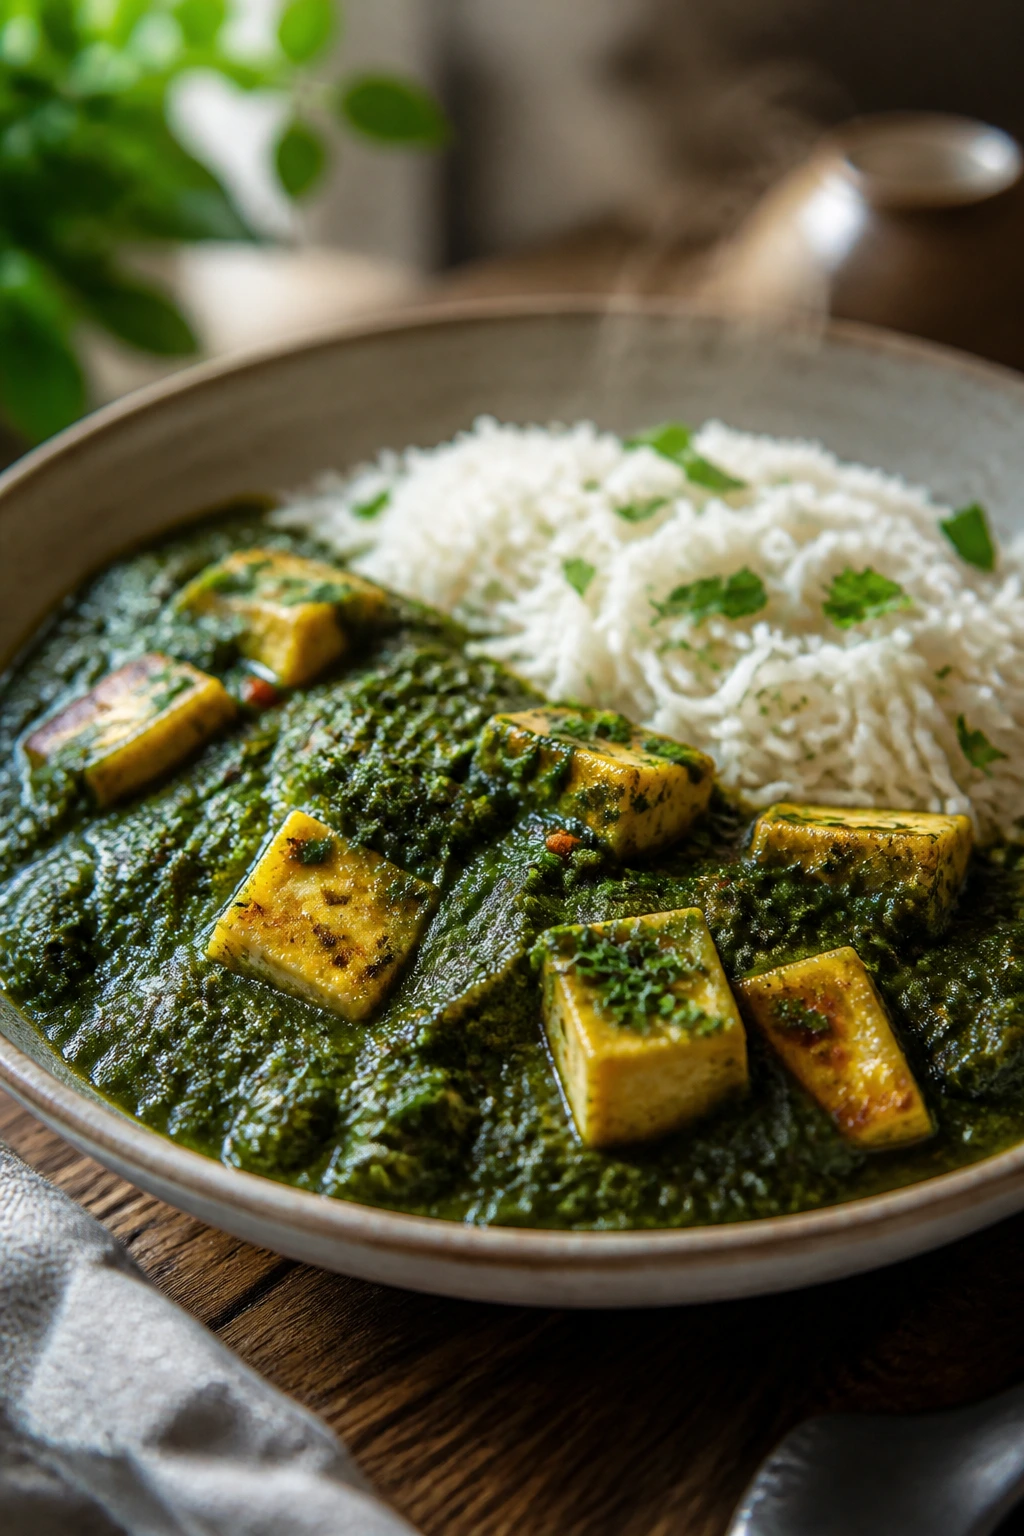
Saag paneer is the sort of dish that makes a kitchen smell like it knew what it was doing all along. The spinach cooks down into a silky sauce, the paneer stays firm and milky, and the spices give the whole pot a warm, savory edge. Served with rice, it’s a complete meal with real presence.
Why It Works: Paneer holds its shape in a hot sauce, which gives the dish satisfying chunks instead of one blended texture. Spinach brings body and color, while onion, ginger, and garlic build the flavor base. A little cream at the end smooths everything out. Rice is the right partner because it catches the sauce without competing.
Key Ingredients:
- 1 cup basmati rice
- 2 tablespoons oil
- 1 onion, chopped
- 2 cloves garlic, minced
- 1 tablespoon grated ginger
- 8 ounces paneer, cubed
- 10 ounces spinach
- 1 teaspoon cumin
- 1/2 teaspoon garam masala
- 1/4 cup cream or yogurt
Quick Steps:
- Cook the rice according to package directions.
- Sauté onion, garlic, and ginger in oil until soft.
- Add spinach and cook until wilted, then blend or mash if you want a smoother sauce.
- Stir in cumin, garam masala, paneer, and cream.
- Simmer briefly and serve over rice.
Equipment for This Recipe:
- Saucepan
- Skillet or Dutch oven
- Spoon or blender, optional for a smoother sauce
How to Serve This Dish: Serve the saag in a shallow bowl over rice with a wedge of lemon on the side. Naan works too if you want something to swipe through the sauce.
Pro Tips for This Recipe:
- Brown the paneer lightly if you want more texture.
- Don’t overcook the spinach until it turns dull.
- Add cream off the heat if you want a softer finish.
- Salt carefully; paneer and spices both carry flavor.
Variations on This Dish:
- Potato Version: Add small potato cubes for extra bulk.
- Creamier Version: Blend more of the spinach for a smoother sauce.
- Lighter Version: Use yogurt instead of cream.
Common Mistakes to Avoid with This Dish:
- Don’t let the paneer simmer too long or it firms up too much.
- Don’t underseason the spinach base.
- Don’t serve without enough rice or bread to catch the sauce.
44. Minestrone with Beans and Pasta
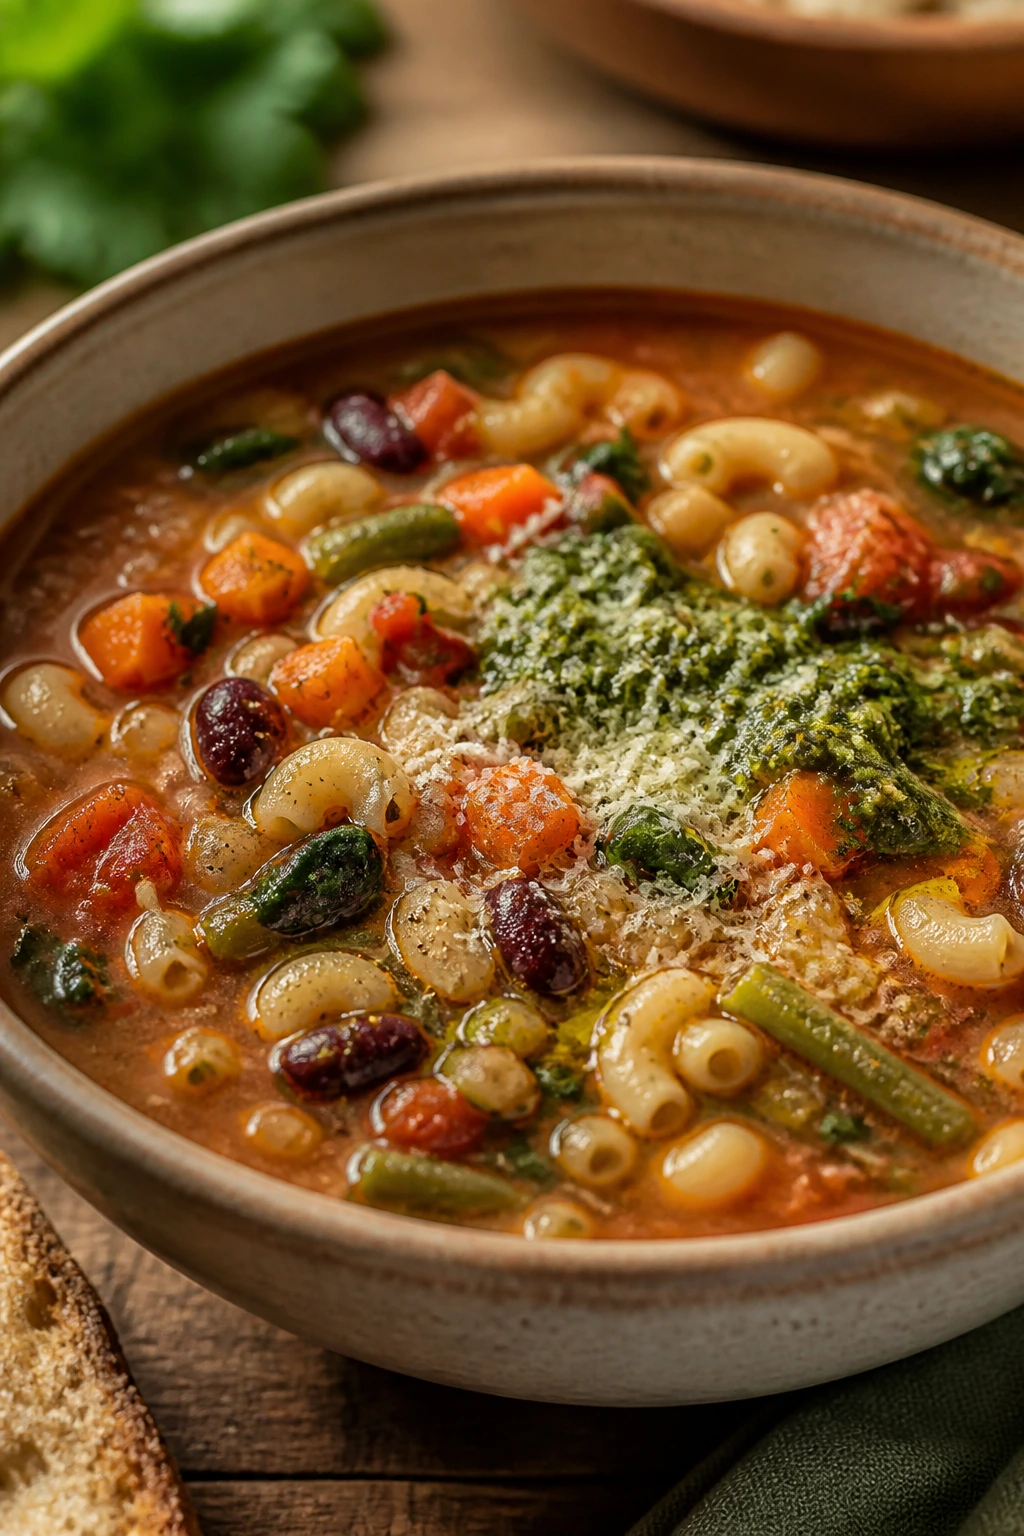
Minestrone is useful because it behaves like dinner even when the fridge is looking thin. Beans give it body, pasta makes it satisfying, and the vegetables turn the broth into something far more grounded than plain soup. A spoon of pesto on top is my favorite shortcut to a better bowl.
Why It Works: Beans and pasta turn soup into a meal. The vegetables soften in the broth without disappearing. Tomato and herbs give the minestrone its familiar Italian shape, while a little cheese or pesto at the end adds depth. It’s the sort of soup that gets better after sitting for a while.
Key Ingredients:
- 2 tablespoons olive oil
- 1 onion, diced
- 2 carrots, diced
- 2 celery stalks, diced
- 2 cans (15 ounces each) beans, drained
- 1 can (28 ounces) diced tomatoes
- 6 cups vegetable broth
- 1 cup small pasta
- 2 cups chopped zucchini or green beans
- 1 teaspoon Italian seasoning
- Pesto or Parmesan for serving
Quick Steps:
- Cook onion, carrots, and celery in olive oil for 6 minutes.
- Add tomatoes, broth, beans, seasoning, and vegetables.
- Simmer 15 minutes.
- Add pasta and cook until tender.
- Finish with pesto or Parmesan.
Equipment for This Recipe:
- Large soup pot
- Ladle
- Spoon
How to Serve This Dish: Serve with crusty bread or toasted bread rubbed with garlic. A drizzle of olive oil on top keeps the soup from tasting too lean.
Pro Tips for This Recipe:
- Add the pasta near the end so it doesn’t swell too much.
- Keep the vegetables bite-sized for easier spooning.
- Taste after the broth reduces.
- A Parmesan rind in the pot adds a salty backbone if you have one.
Variations on This Dish:
- Spinach Version: Stir in spinach at the end.
- Pasta-Free Version: Skip the pasta and add more beans.
- Pesto Version: Spoon pesto on top right before serving.
Common Mistakes to Avoid with This Dish:
- Don’t cook the pasta too early or it turns bloated.
- Don’t leave the soup bland; beans need seasoning.
- Don’t skip a finishing fat or herb.
45. Mushroom and Pea Risotto
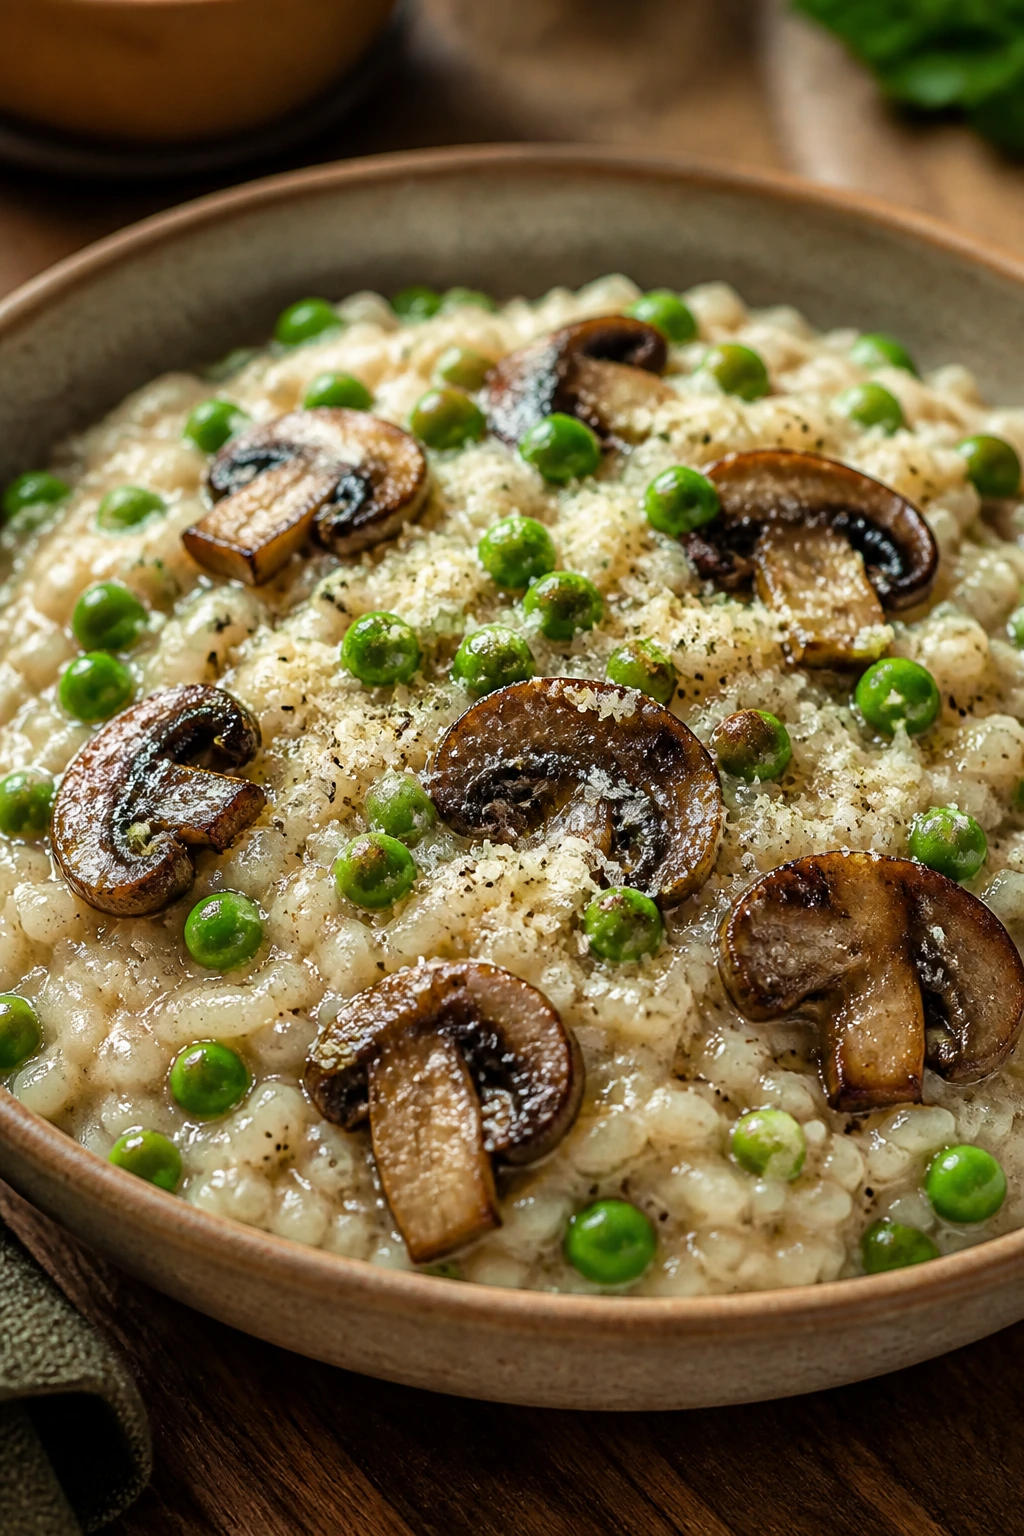
Mushroom risotto has a way of sounding fancier than it is, which is helpful when dinner needs to feel deliberate. The mushrooms bring deep browning, the peas add little bright bursts, and the rice turns creamy without needing cream by the bucket. It’s a slow dish, but a rewarding one.
Why It Works: Arborio rice releases starch as it stirs, giving the risotto its silky texture. Mushrooms need hard heat so they brown before going into the rice. Peas go in late to stay sweet and green. Parmesan finishes the bowl with salt and structure.
Key Ingredients:
- 1 1/2 cups arborio rice
- 6 cups warm vegetable broth
- 2 tablespoons butter
- 1 tablespoon olive oil
- 12 ounces mushrooms, sliced
- 1 small onion, diced
- 1/2 cup dry white wine
- 1 cup frozen peas
- 1/2 cup grated Parmesan
- 2 tablespoons chopped parsley
Quick Steps:
- Warm the broth and keep it on low heat.
- Brown the mushrooms in butter and oil, then set aside.
- Cook onion and rice in the same pan, then add wine and let it absorb.
- Add broth a ladle at a time, stirring until the rice is tender and creamy.
- Stir in mushrooms, peas, Parmesan, and parsley.
Equipment for This Recipe:
- Wide saucepan or Dutch oven
- Ladle
- Wooden spoon
How to Serve This Dish: Serve in shallow bowls with extra Parmesan and black pepper. A simple salad is plenty on the side.
Pro Tips for This Recipe:
- Don’t rush the broth additions.
- Brown the mushrooms well before they go back in.
- Taste the rice near the end; it should still have some bite.
- Add peas only at the end so they stay sweet.
Variations on This Dish:
- Herb Version: Add thyme or tarragon.
- Lemon Version: Finish with lemon zest.
- Truffle Version: Add a small drizzle of truffle oil, if you like it.
Common Mistakes to Avoid with This Dish:
- Don’t leave the broth cold.
- Don’t walk away for too long.
- Don’t overcook the rice until it turns stodgy.
46. Tomato Zucchini Galette
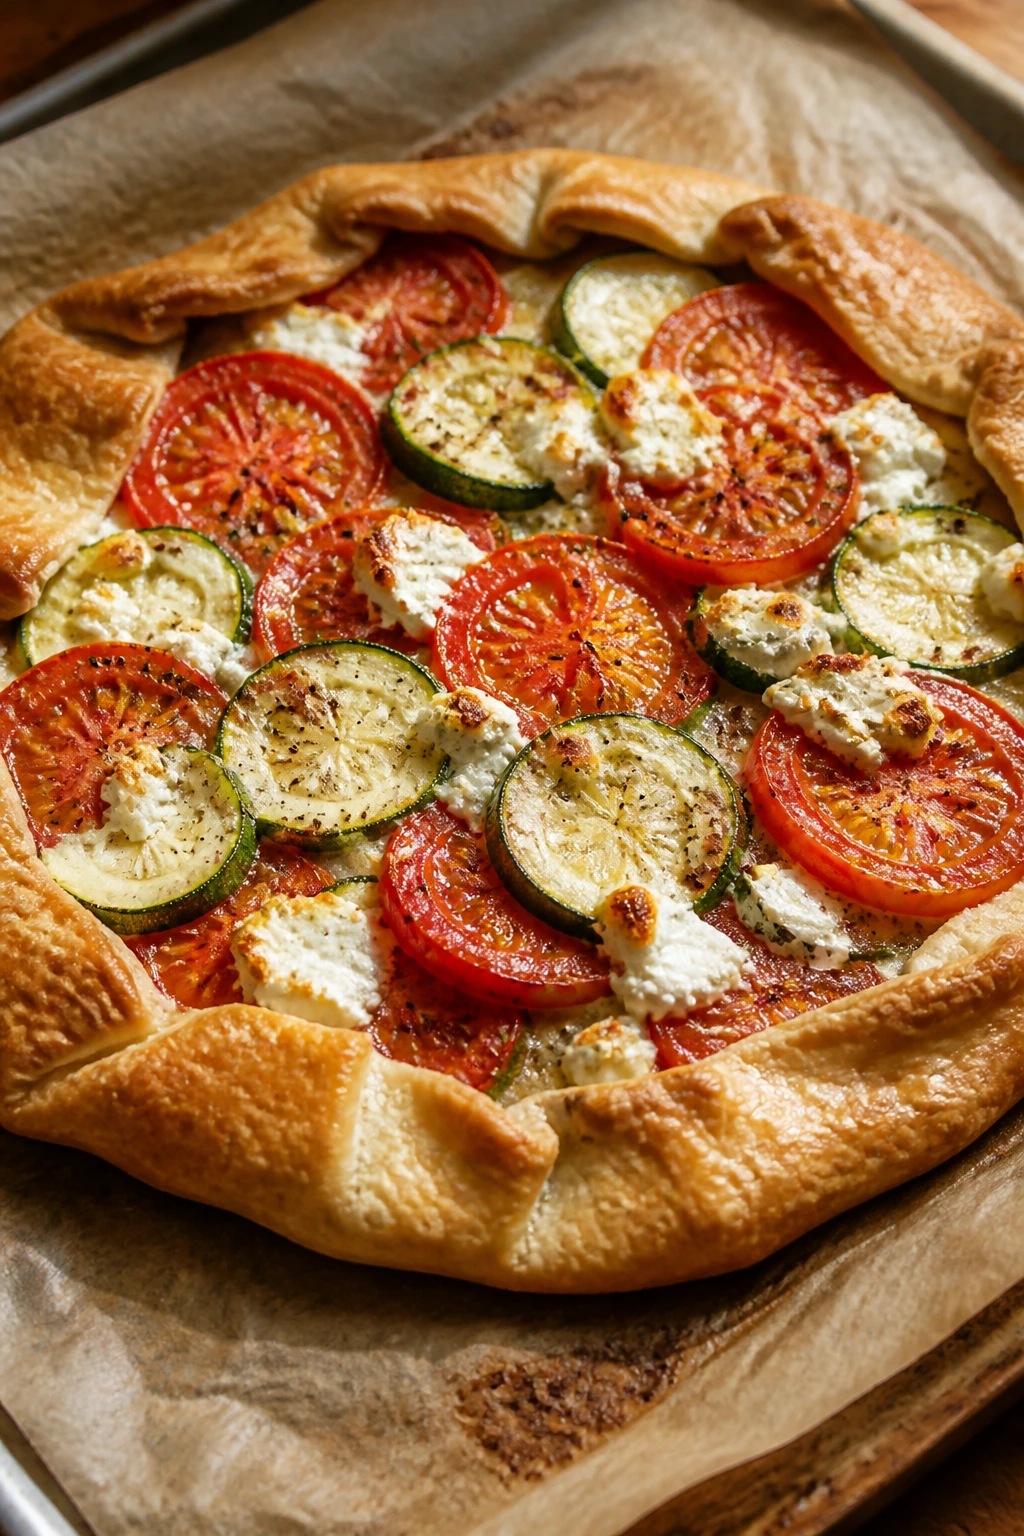
A galette is just a pie that stopped pretending to be formal, and that suits vegetables well. The crust gets crisp, the tomatoes and zucchini soften without flooding the base, and the cheese gives the whole thing enough richness to read as dinner. It looks rustic in the useful way, not the fake one.
Why It Works: A free-form crust bakes faster than a deep pie, which keeps the vegetables from overcooking. Sliced zucchini and tomatoes need a little salt and draining so the bottom stays crisp. Goat cheese or ricotta adds creaminess and contrast. Herbs finish the galette with a sharp, fresh note.
Key Ingredients:
- 1 pie crust, chilled
- 1 zucchini, thinly sliced
- 2 tomatoes, sliced
- 1/2 teaspoon salt
- 4 ounces goat cheese or ricotta
- 1 tablespoon olive oil
- 1 teaspoon thyme or basil
- 1 egg, beaten, for brushing
- Black pepper
Quick Steps:
- Salt the zucchini and tomatoes, then pat them dry after 10 minutes.
- Roll out the crust on a baking sheet and spread cheese in the center.
- Arrange the vegetables on top, leaving a border.
- Fold the edges up and brush with egg.
- Bake at 400°F for 30 to 35 minutes until the crust is golden.
Equipment for This Recipe:
- Baking sheet
- Rolling pin, if needed
- Sharp knife
How to Serve This Dish: Serve warm or at room temperature with a green salad. A little extra cheese or herbs on top makes the edges look more finished.
Pro Tips for This Recipe:
- Dry the vegetables well so the crust stays crisp.
- Keep the cheese layer thin.
- Chill the crust before baking if the kitchen is warm.
- Don’t worry about perfection; the folded edges are the point.
Variations on This Dish:
- Mushroom Version: Add sautéed mushrooms under the vegetables.
- Feta Version: Swap goat cheese for feta.
- Caramelized Onion Version: Add onions for a sweeter base.
Common Mistakes to Avoid with This Dish:
- Don’t skip draining the tomatoes.
- Don’t roll the crust too thin or it breaks.
- Don’t overfill the center.
47. Red Lentil Bolognese
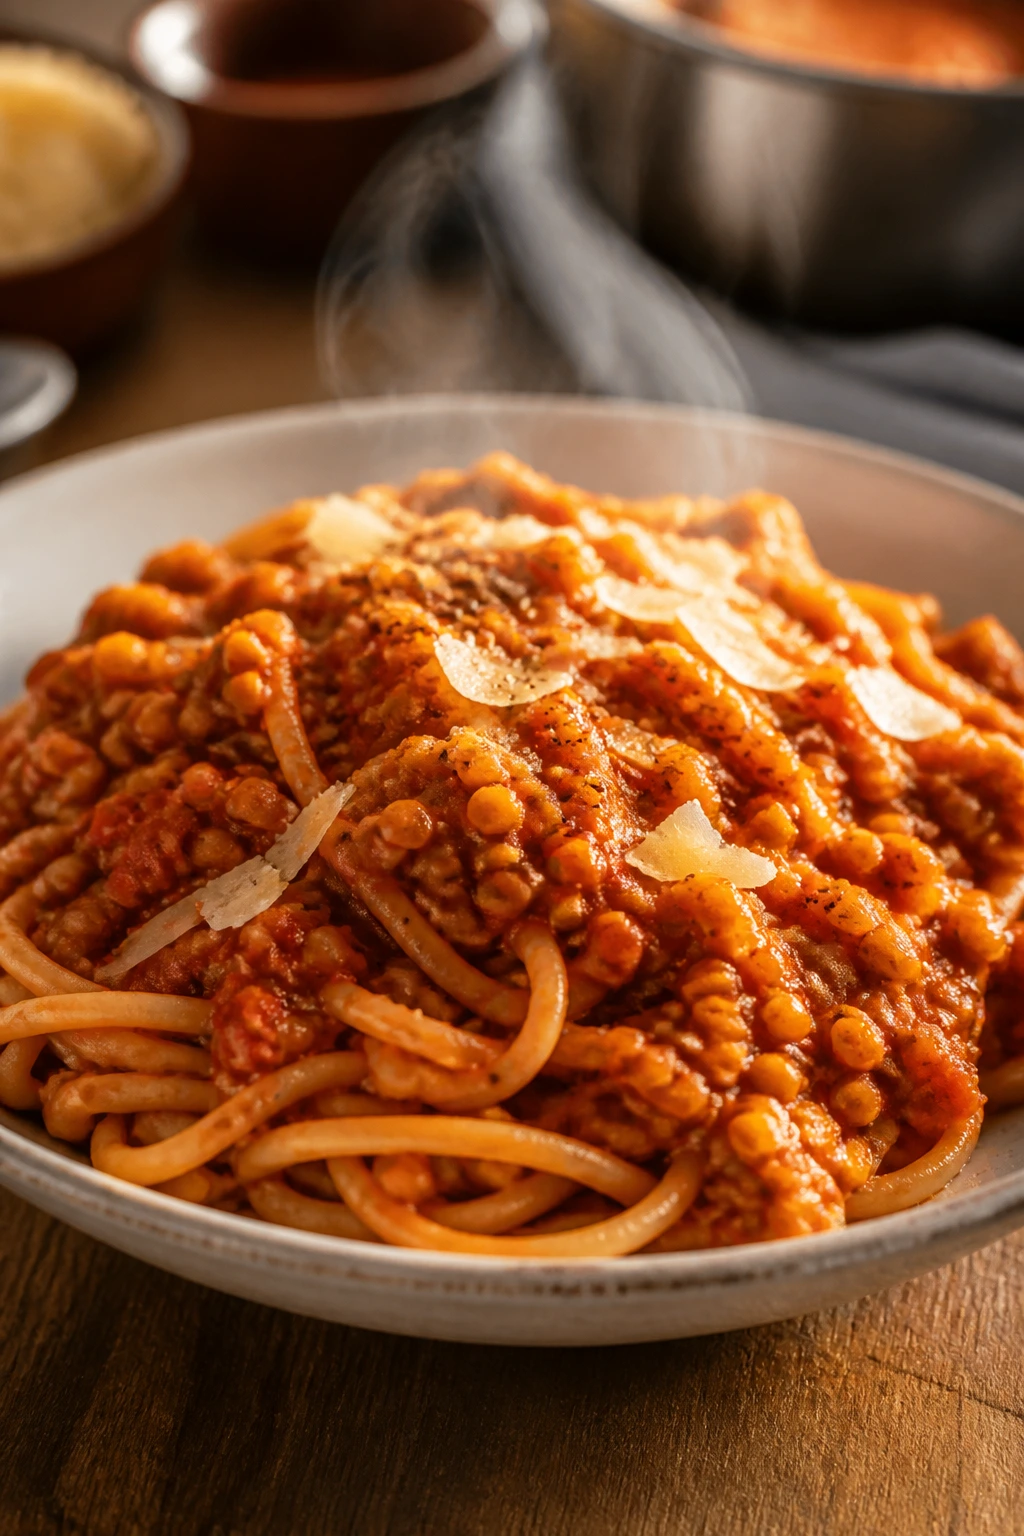
Red lentil Bolognese gets close to the shape of the original without pretending to be something else. The lentils break down into a thick sauce, the tomato base turns savory and deep, and the pasta catches it all. It’s one of the smartest ways to make a meatless red sauce feel full.
Why It Works: Red lentils cook quickly and melt into the sauce, which gives the Bolognese body. Onion, carrot, and celery build the base flavor that plain tomato sauce lacks. Tomato paste adds color and a richer taste. Served over pasta, it scratches the same comfort itch as the original.
Key Ingredients:
- 2 tablespoons olive oil
- 1 onion, diced
- 1 carrot, diced
- 1 celery stalk, diced
- 3 cloves garlic, minced
- 2 tablespoons tomato paste
- 1 cup red lentils, rinsed
- 1 can (28 ounces) crushed tomatoes
- 3 cups vegetable broth
- 12 ounces pasta
- Parmesan for serving
Quick Steps:
- Cook onion, carrot, and celery in oil for 6 minutes.
- Stir in garlic and tomato paste for 1 minute.
- Add lentils, tomatoes, and broth, then simmer 20 minutes until thick.
- Cook the pasta.
- Toss pasta with the sauce and serve with Parmesan.
Equipment for This Recipe:
- Large saucepan
- Pasta pot
- Spoon
How to Serve This Dish: Serve with spaghetti, pappardelle, or rigatoni. A leafy salad or garlic bread gives the meal the right kind of balance.
Pro Tips for This Recipe:
- Simmer until the lentils start to disappear into the sauce.
- Stir often near the end so the lentils don’t stick.
- Use good tomatoes; they carry the sauce.
- A splash of milk or cream at the end softens the acidity if needed.
Variations on This Dish:
- Mushroom Version: Add chopped mushrooms with the vegetables.
- Herb Version: Add oregano and basil.
- Spicy Version: Add red pepper flakes or chili oil.
Common Mistakes to Avoid with This Dish:
- Don’t leave the sauce thin and brothy.
- Don’t undercook the lentils.
- Don’t forget to season the pasta water.
48. Falafel Pita Plates
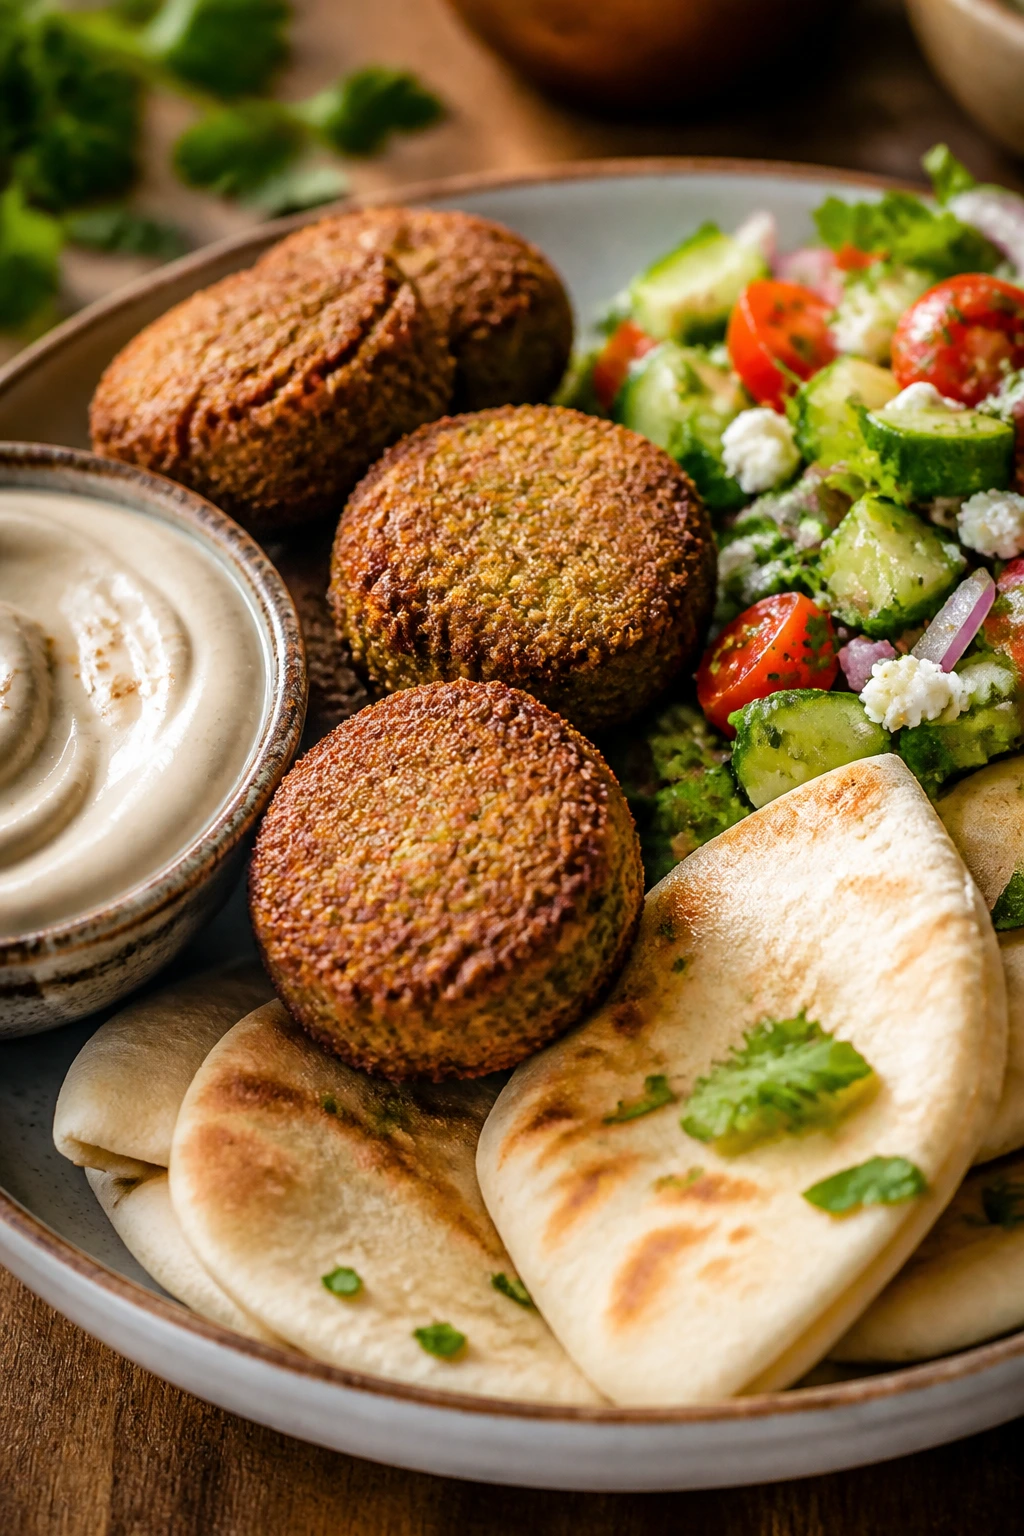
Falafel plates are one of the easiest ways to make a vegetarian meal feel complete without leaning on cheese. The falafel brings crunch and herbs, the pita catches the bits that fall, and the salad and sauce make the plate feel cool and bright. It’s a meal with enough moving parts to stay interesting.
Why It Works: Chickpeas give falafel its body, herbs keep it fresh, and a hot fry or bake creates the crust. Tahini sauce adds creaminess and a little bitterness that falafel needs. Pita and salad turn the fritters into a full plate instead of a snack. If you want something built for dipping, scooping, and sharing, this does it.
Key Ingredients:
- 2 cans (15 ounces each) chickpeas, drained and dried well
- 1 small onion, chopped
- 3 cloves garlic
- 1 cup parsley
- 1/2 cup cilantro
- 1 teaspoon cumin
- 1 teaspoon salt
- 1/2 cup flour or chickpea flour
- Pita breads
- Tahini sauce and salad for serving
Quick Steps:
- Pulse chickpeas, onion, garlic, herbs, cumin, salt, and flour until coarse.
- Chill the mixture for 20 minutes if you have time.
- Form small patties or balls.
- Fry or bake until browned and crisp.
- Serve with pita, salad, and tahini sauce.
Equipment for This Recipe:
- Food processor
- Baking sheet or skillet
- Spatula
How to Serve This Dish: Spread the table with pita, cucumbers, tomatoes, and tahini so everyone can build their own plate. Pickled onions or hot sauce fit naturally here.
Pro Tips for This Recipe:
- Dry the chickpeas well or the mixture turns loose.
- Don’t puree to paste; falafel needs texture.
- Small shapes cook more evenly than big ones.
- If baking, brush lightly with oil for better color.
Variations on This Dish:
- Baked Version: Bake at 425°F for a lighter crust.
- Spicy Version: Add jalapeño or chili flakes.
- Herb-Heavy Version: Double the parsley and cilantro.
Common Mistakes to Avoid with This Dish:
- Don’t use chickpeas that are too wet.
- Don’t make the mixture smooth like hummus.
- Don’t skip the sauce; falafel needs something creamy.
49. Vegetable Lasagna Roll-Ups
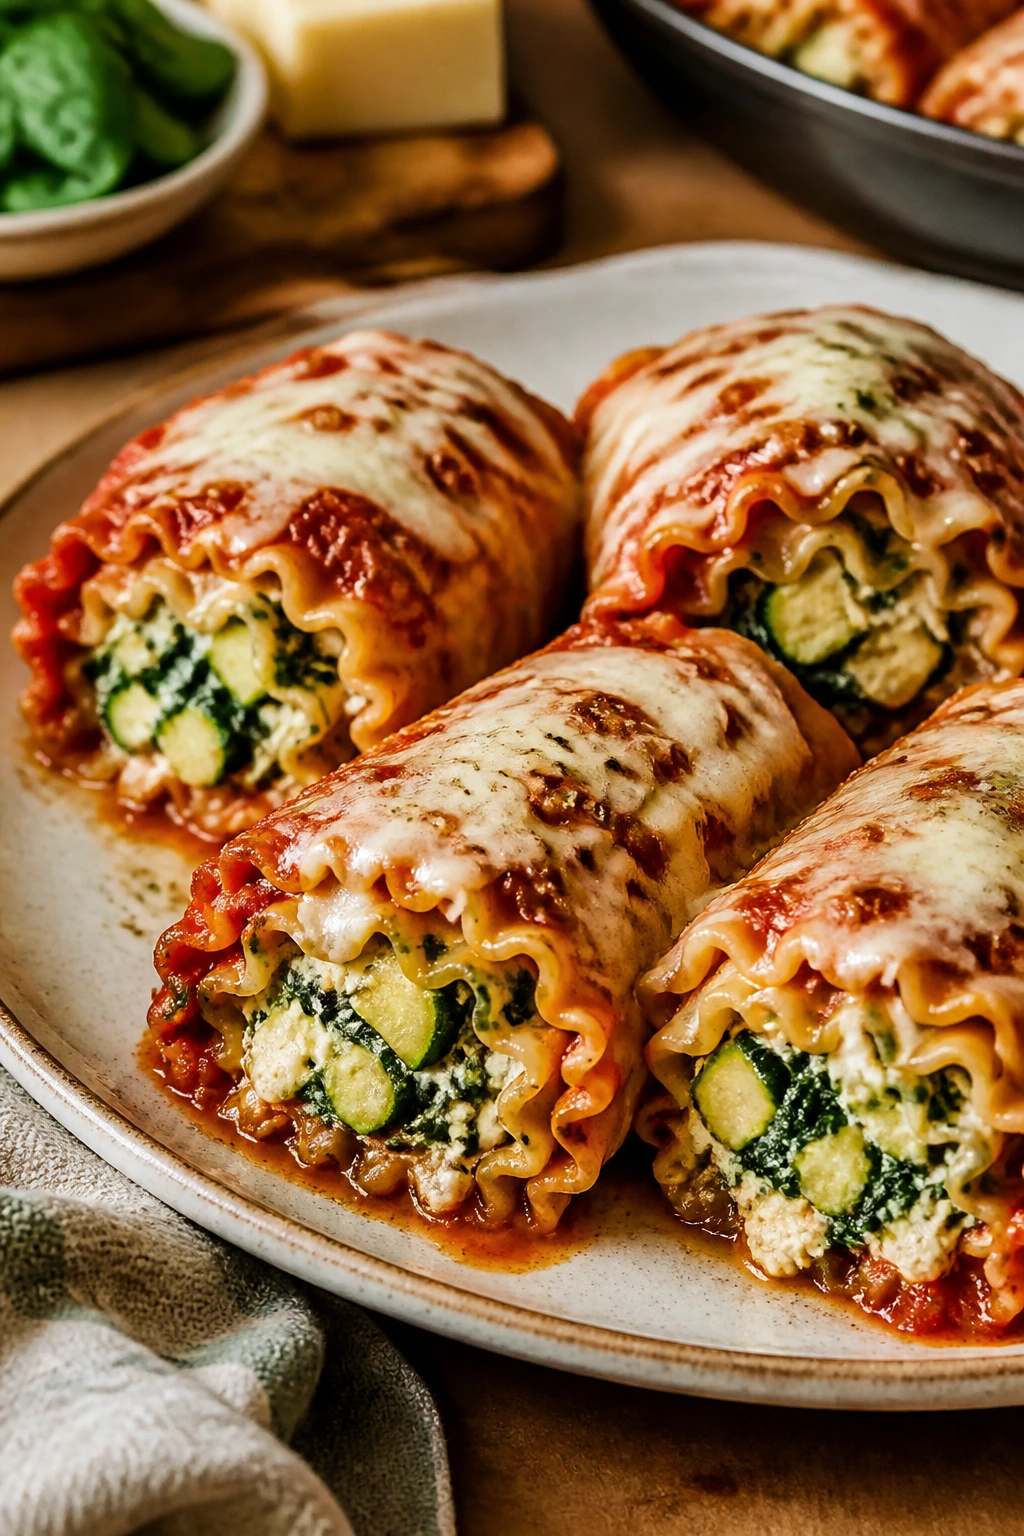
Roll-ups give lasagna a cleaner shape without losing the comfort of the original. Each noodle carries ricotta, spinach, zucchini, and sauce, so every portion tastes balanced instead of like a random scoop from the pan. The edges brown, the center stays creamy, and the whole thing looks more thoughtful than it is.
Why It Works: Separating the noodles into rolls helps with portioning and prevents the layers from sliding. Ricotta makes the filling soft; spinach and zucchini give it enough substance to feel like more than cheese. Sauce underneath and over the top keeps the noodles tender. Mozzarella gives you the baked top everyone expects.
Key Ingredients:
- 12 lasagna noodles
- 15 ounces ricotta
- 2 cups chopped spinach, cooked and squeezed dry
- 1 small zucchini, grated and squeezed dry
- 1 egg
- 2 cups marinara sauce
- 2 cups shredded mozzarella
- 1/4 cup grated Parmesan
- 1 teaspoon Italian seasoning
Quick Steps:
- Cook the noodles until pliable, then lay them flat.
- Mix ricotta, spinach, zucchini, egg, and seasoning.
- Spread filling on each noodle and roll up.
- Spread sauce in a baking dish, nestle in the rolls, and top with remaining sauce and cheese.
- Bake at 375°F for 25 to 30 minutes until bubbling.
Equipment for This Recipe:
- Large pot
- Baking dish
- Spoon or spatula for spreading filling
How to Serve This Dish: Serve two or three roll-ups per person with salad and garlic bread. A little fresh basil or extra Parmesan on top keeps the dish looking fresh.
Pro Tips for This Recipe:
- Dry the zucchini and spinach so the filling doesn’t leak.
- Don’t overcook the noodles or they tear.
- Roll them snugly but not so tight that the filling squeezes out.
- Let the pan rest before serving.
Variations on This Dish:
- Mushroom Version: Add finely chopped sautéed mushrooms to the filling.
- Lemon Version: Add lemon zest to brighten the ricotta.
- Spinach-Only Version: Skip zucchini and use more spinach.
Common Mistakes to Avoid with This Dish:
- Don’t fill the noodles while they’re too hot to handle.
- Don’t leave the filling watery.
- Don’t cut in immediately after baking.
50. Sheet Pan Pesto Veggies and White Beans
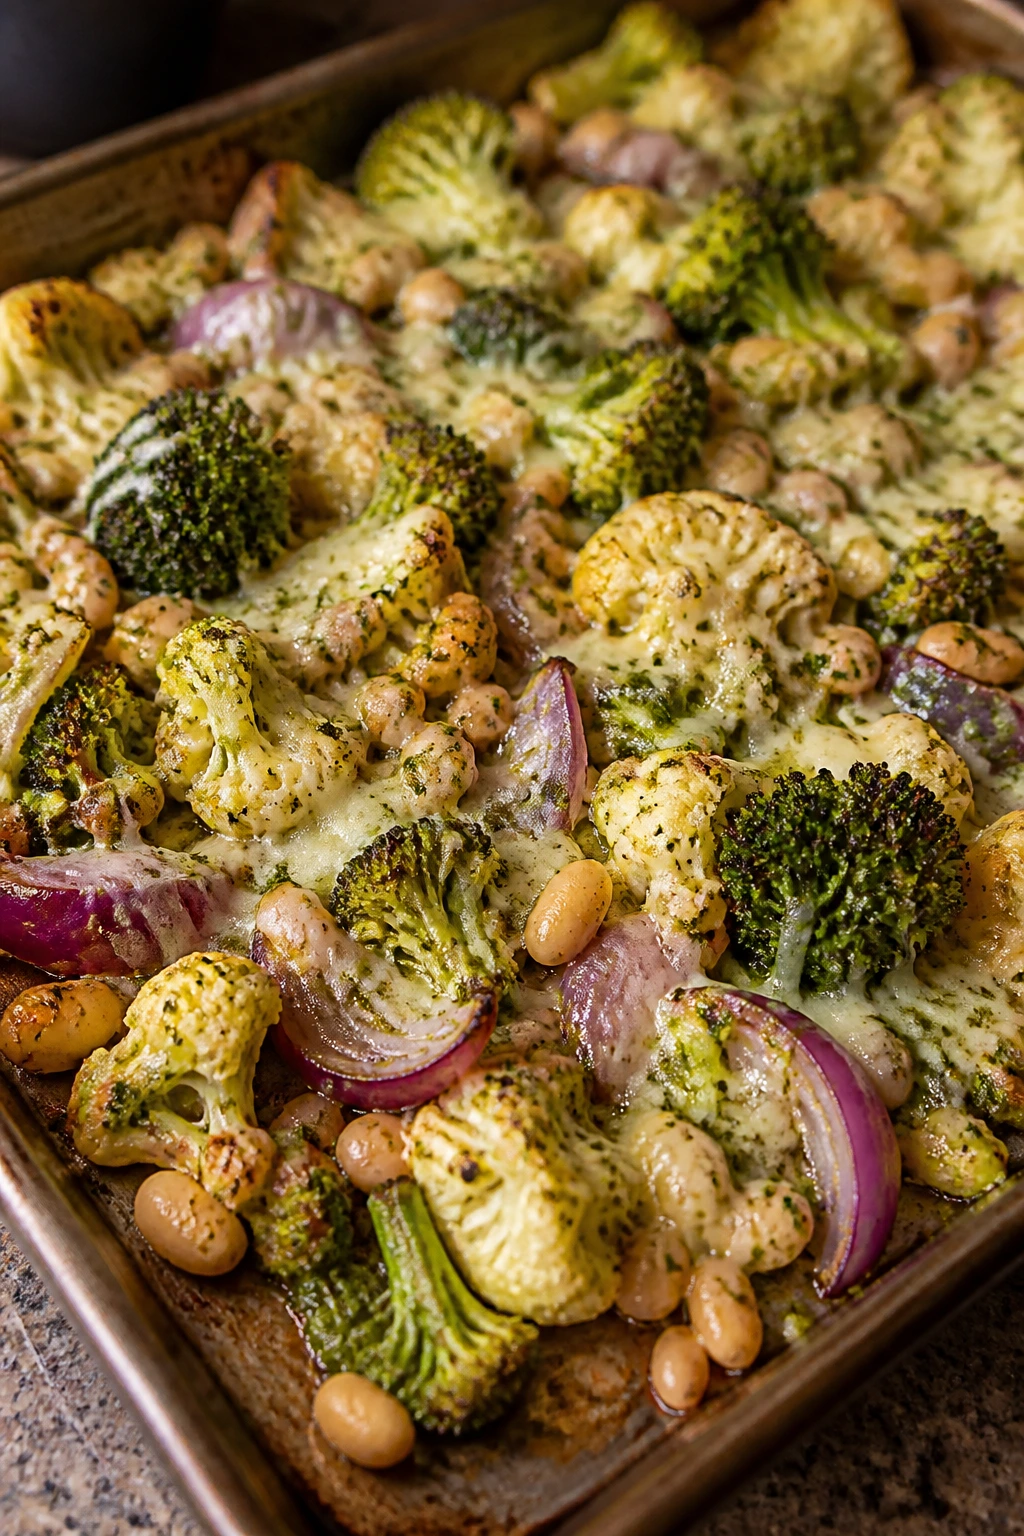
This is the sheet-pan dinner version of good judgment. The vegetables roast until they’re caramelized, the white beans turn creamy at the edges, and the pesto at the end ties everything together with basil and garlic. Mozzarella on top takes it from “healthy tray” to actual dinner without much argument.
Why It Works: White beans add protein and a soft, buttery texture that pairs well with roasted vegetables. Pesto is the fast flavor move here, but it works best after the vegetables come out of the oven. Roasting everything on one pan gives you browned edges and fewer dishes. A little cheese melts into the hot tray and makes the whole thing feel finished.
Key Ingredients:
- 2 cups broccoli florets
- 2 cups cauliflower florets
- 1 red onion, cut into wedges
- 1 can (15 ounces) white beans, drained and rinsed
- 2 tablespoons olive oil
- 1 teaspoon salt
- 1/2 teaspoon black pepper
- 1/3 cup pesto
- 1 cup mozzarella
- Crusty bread or cooked grains, for serving
Quick Steps:
- Toss broccoli, cauliflower, onion, and beans with oil, salt, and pepper.
- Roast at 425°F for 20 to 25 minutes until browned.
- Spoon pesto over the hot tray and toss lightly.
- Sprinkle mozzarella on top and return to the oven for 3 to 4 minutes.
- Serve with bread or grains.
Equipment for This Recipe:
- Rimmed sheet pan
- Large mixing bowl
- Spatula
How to Serve This Dish: Serve the tray over warm farro, rice, or with crusty bread to catch the pesto. A squeeze of lemon at the table sharpens the beans and vegetables.
Pro Tips for This Recipe:
- Don’t crowd the pan or the vegetables steam.
- Add the pesto after roasting so it stays bright.
- Use beans that are well drained so the tray doesn’t get watery.
- A few toasted pine nuts or sunflower seeds add useful crunch.
Variations on This Dish:
- Tomato Version: Add cherry tomatoes for a sweeter tray.
- Tahini Version: Swap pesto for lemon-tahini sauce.
- Spicy Version: Add red pepper flakes and chili oil.
Common Mistakes to Avoid with This Dish:
- Don’t roast on too small a pan.
- Don’t add pesto before baking or it can darken too much.
- Don’t skip the final acid, especially if the cheese is rich.
Why Meatless Family Dinners Taste Better When They’re Built Right
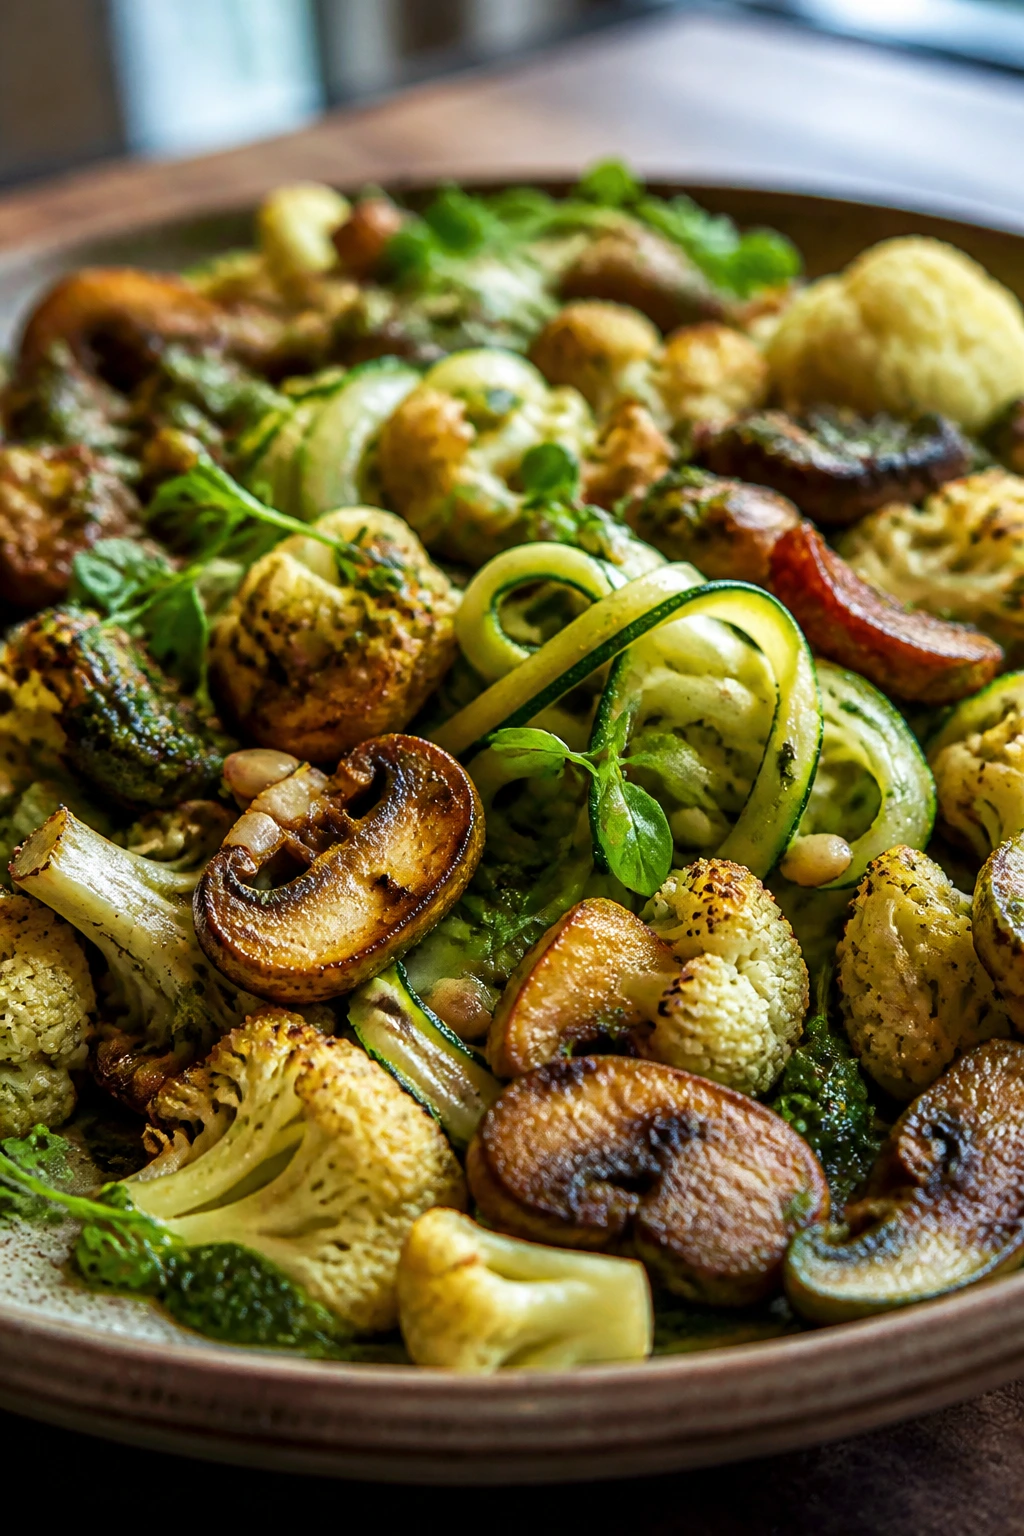
The secret behind these dinners isn’t that they try to hide vegetables inside something else. It’s that they respect what vegetables, beans, grains, and cheese do well when they’re handled with enough heat and seasoning. A browned mushroom tastes different from a boiled one. A roasted cauliflower floret tastes different from a steamed one. A lentil that’s simmered down into a sauce does a job that a sad pile of plain beans never will.
Mixed tables usually need one thing more than anything else: certainty. The food needs to look like dinner, smell like dinner, and eat like dinner without making anybody feel as if they’ve been handed a compromise. That’s why these recipes lean on familiar formats and big texture changes. Crispy against creamy. Hot against cool. Salty against bright. The plate keeps moving.
And yes, leftovers matter. A vegetable dinner that tastes fine on the first night and better on the second night is the kind of dinner that earns a place in rotation. Not every meal needs to be a performance. Some just need to hold up when the pan gets set back on the stove the next day.
Essential Equipment for These Recipes
-
12-inch skillet: Big enough for taco skillets, stir-fries, and quesadillas without crowding.
-
Large Dutch oven or soup pot: Best for chili, chowder, curry, and minestrone where liquid and steam need room.
-
9×13-inch baking dish: The workhorse for baked ziti, enchilada casserole, stuffed shells, and roll-ups.
-
Rimmed sheet pans: Essential for roasted vegetables, gnocchi, cauliflower Parmesan, and galettes.
-
Large pot for pasta: You’ll use this constantly for ziti, shells, tortellini, lasagna noodles, and noodles of all kinds.
-
Good chef’s knife: Uniform cuts matter here; uneven sweet potatoes and peppers cook at different speeds.
-
Box grater: Cheddar, Parmesan, zucchini, and potato all behave better when grated fresh.
-
Colander: For draining pasta, beans, and blanched greens without making a mess.
-
Mixing bowls in at least two sizes: One for fillings, one for sauces, one for a backup because there’s always a second bowl.
-
Wooden spoon or silicone spatula: Useful for scraping browned bits, stirring sauces, and folding fillings without tearing them apart.
-
Lid or foil: Helps melt cheese, steam vegetables, and finish bakes without drying the top too fast.
-
Airtight storage containers: Leftovers hold up well when they’re cooled and packed properly.
Smart Shopping and Ingredient Tips
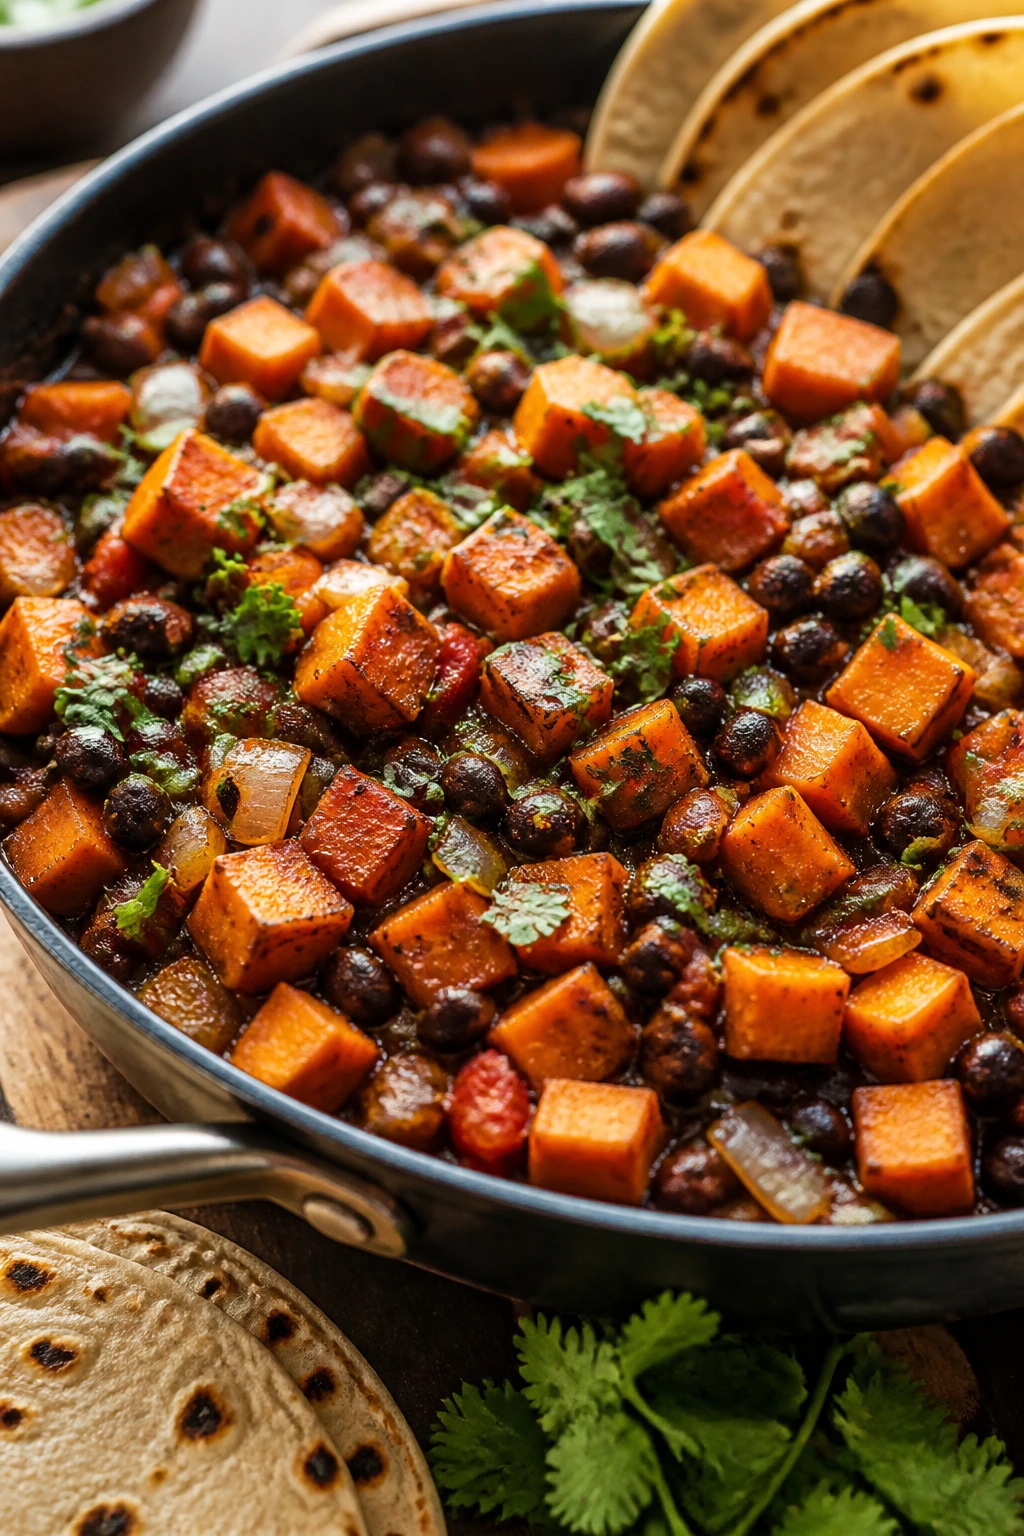
For mixed-family vegetarian dinners, the shopping list gets easier once you stop pretending every ingredient has to be fancy. Canned beans, frozen vegetables, shelf-stable gnocchi, and dried pasta are not fallback ingredients here; they’re the backbone of a lot of these meals. Buy beans with intact skins and a simple ingredient list. Rinse them unless the recipe specifically wants that starchy can liquid. It makes a difference in texture and lets the seasonings land cleanly.
Mushrooms deserve better treatment than most shoppers give them. Choose firm caps with dry surfaces and no slimy spots. If they smell like nothing, that’s fine. If they smell off, skip them. The same goes for tofu: choose firm or extra-firm blocks and press them long enough to release water, or the tofu will steam where you wanted browning. Paneer and halloumi are worth paying attention to, too; both need enough salt in the rest of the dish because they carry a lot of their own.
Cheese is where people often cut the wrong corner. Pre-shredded cheese has its place, but when a recipe depends on smooth melting—mac and cheese, soups, baked pasta, queso-style toppings—freshly grated cheese melts cleaner and tastes better. For dishes where the cheese is just one part of the plate, like tacos or nachos, packaged shredded cheese is fine. No one needs to pretend otherwise.
Don’t forget the pantry acids and sauces that make meatless food taste finished. Lemon juice, lime, vinegar, soy sauce, miso, Dijon, and tomato paste do more heavy lifting than a lot of cooks realize. If you keep those around, the meals in this collection get easier to build and harder to flatten.
How to Serve These Recipes

Presentation: Put the saucy dishes in shallow bowls, the baked dishes on wide plates, and the skillet meals straight into the middle of the table. A last-minute shower of herbs, cheese, scallions, or sesame seeds makes almost every recipe here look more awake.
Accompaniments: Garlic bread, warm pita, rice, cornbread, simple salads, roasted potatoes, and sliced vegetables cover most of the bases. For the richer meals—mac and cheese, pot pie, stuffed shells—a sharp salad or pickles on the side keeps the plate from feeling too heavy.
Portions: Most of these recipes serve 4 to 6 people without much drama. For hungrier crowds, add bread, rice, or a second side instead of stretching the main dish too thin; that keeps the flavor where it belongs. For lighter eaters, the soup, bowl, and noodle recipes shrink more easily than the bakes.
Beverage Pairing: Sparkling water with lemon works across the board. For something with more character, try a chilled herbal iced tea with curry or stir-fry, or a light red or nonalcoholic red-style drink with baked pasta, mushrooms, and tomato-heavy dishes.
Additional Tips and Flavor Boosters
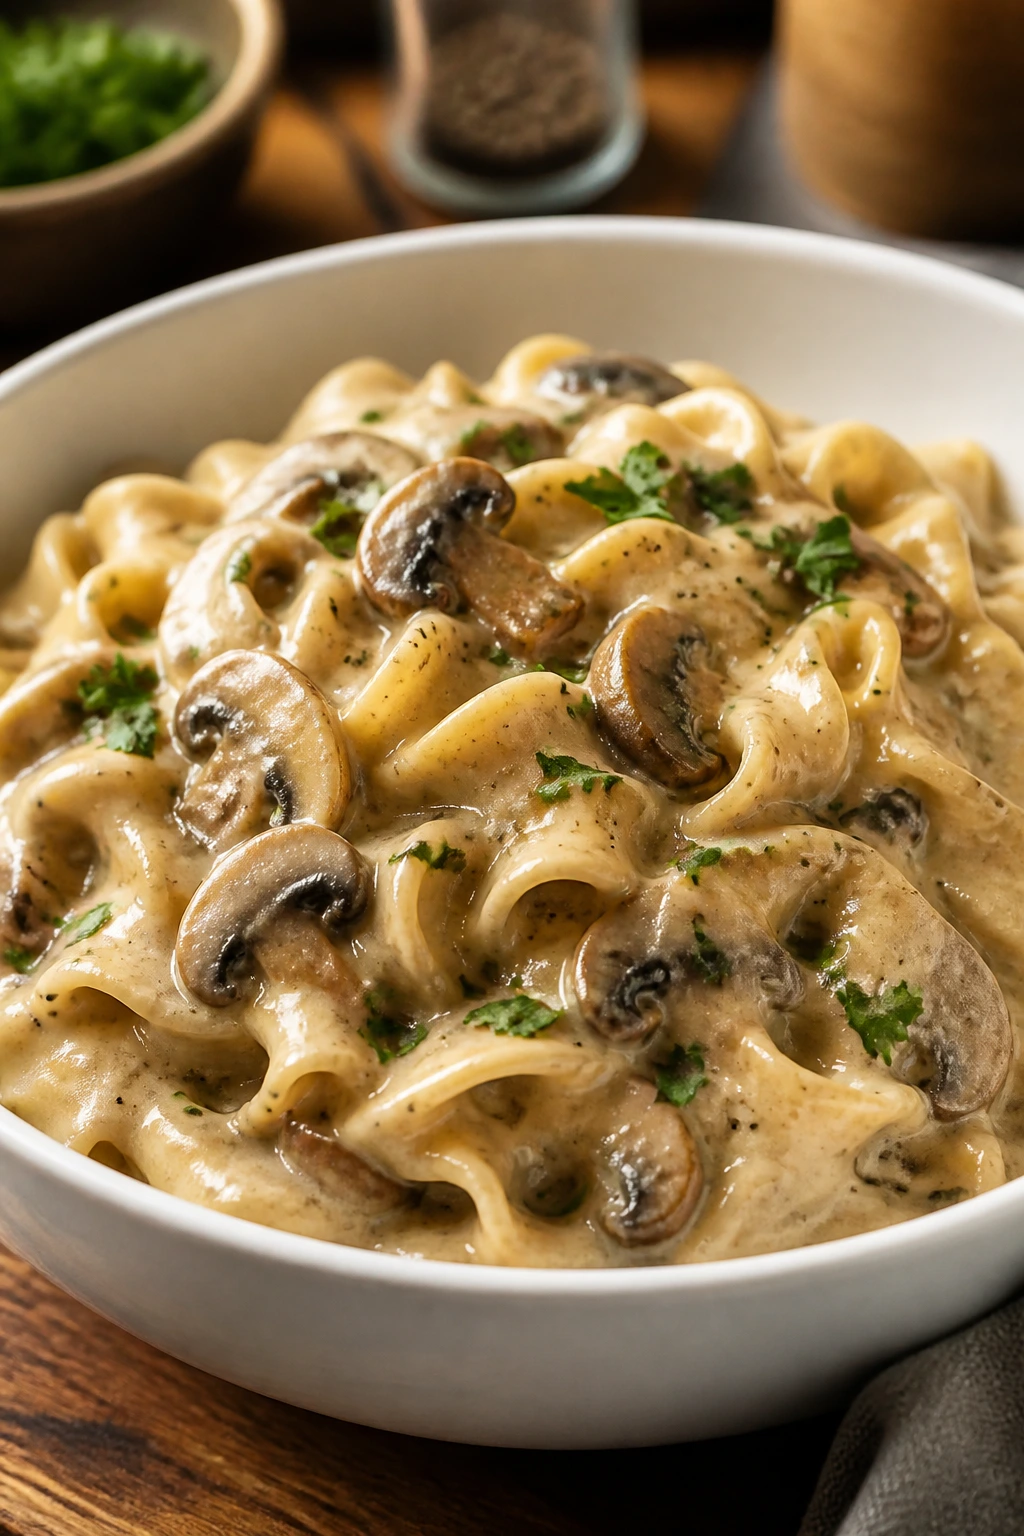
Flavor Enhancement: A squeeze of lemon, lime, or a spoon of vinegar right at the end wakes up beans, soups, curries, and roasted vegetables faster than extra salt alone. I use this trick constantly because it takes flat food and gives it shape.
Customization: If your table likes heat, keep chili crisp, hot sauce, pickled jalapeños, or red pepper flakes nearby and let people tune their own bowls. If the group likes creamier food, add yogurt, sour cream, or an extra handful of cheese at serving rather than loading every dish with richness from the start.
Serving Suggestions: Toasted seeds, fresh herbs, chopped scallions, and crunchy slaw are the easiest way to change a familiar dinner without changing the recipe. They don’t need cooking, which is part of the charm.
Make-It-Yours: For gluten-free meals, lean on rice, beans, polenta, corn tortillas, and gluten-free pasta. For dairy-free plates, use tahini, pesto without cheese, coconut milk, or a cashew cream where it fits. For extra protein, add chickpeas, lentils, edamame, tofu, paneer, or eggs instead of trying to turn every dinner into the same thing.
Make-Ahead, Storage, and Reheating Guidance

The best thing about a lot of these veggie family meals is that they don’t fall apart after a night in the fridge. Soups, chilis, curries, and lentil dishes usually keep 3 to 4 days refrigerated and up to 3 months frozen if cooled properly. Reheat them gently over low heat with a splash of broth or water so the beans and lentils loosen instead of drying into paste.
Baked pasta, stuffed shells, lasagna roll-ups, enchilada casserole, and shepherd’s pie keep 3 to 4 days in the fridge and up to 2 months frozen if wrapped well. For the best texture, reheat covered at 350°F until hot in the center, then uncover for the last few minutes so the top comes back to life. If you freeze them before baking, keep the cheese a little light on top and add a few extra minutes to the bake.
Stir-fries, fried rice, noodle bowls, and skillet dishes are best within 2 to 3 days. Reheat them in a skillet over medium heat with a teaspoon or two of water or oil, depending on the dish. That keeps the vegetables from turning limp in the microwave. Sandwiches and burgers are the one category that don’t love long storage; for those, prep the fillings ahead, then assemble fresh so the bread stays intact.
Some dishes actually improve overnight. Chili, soup, lentil sauces, and tomato-based bakes tend to deepen after sitting, because the salt and acid settle into the starches and beans. Fresh herbs, crunchy toppings, and final citrus are better added at the table than during the first cook.
Variations and Adaptations to Try
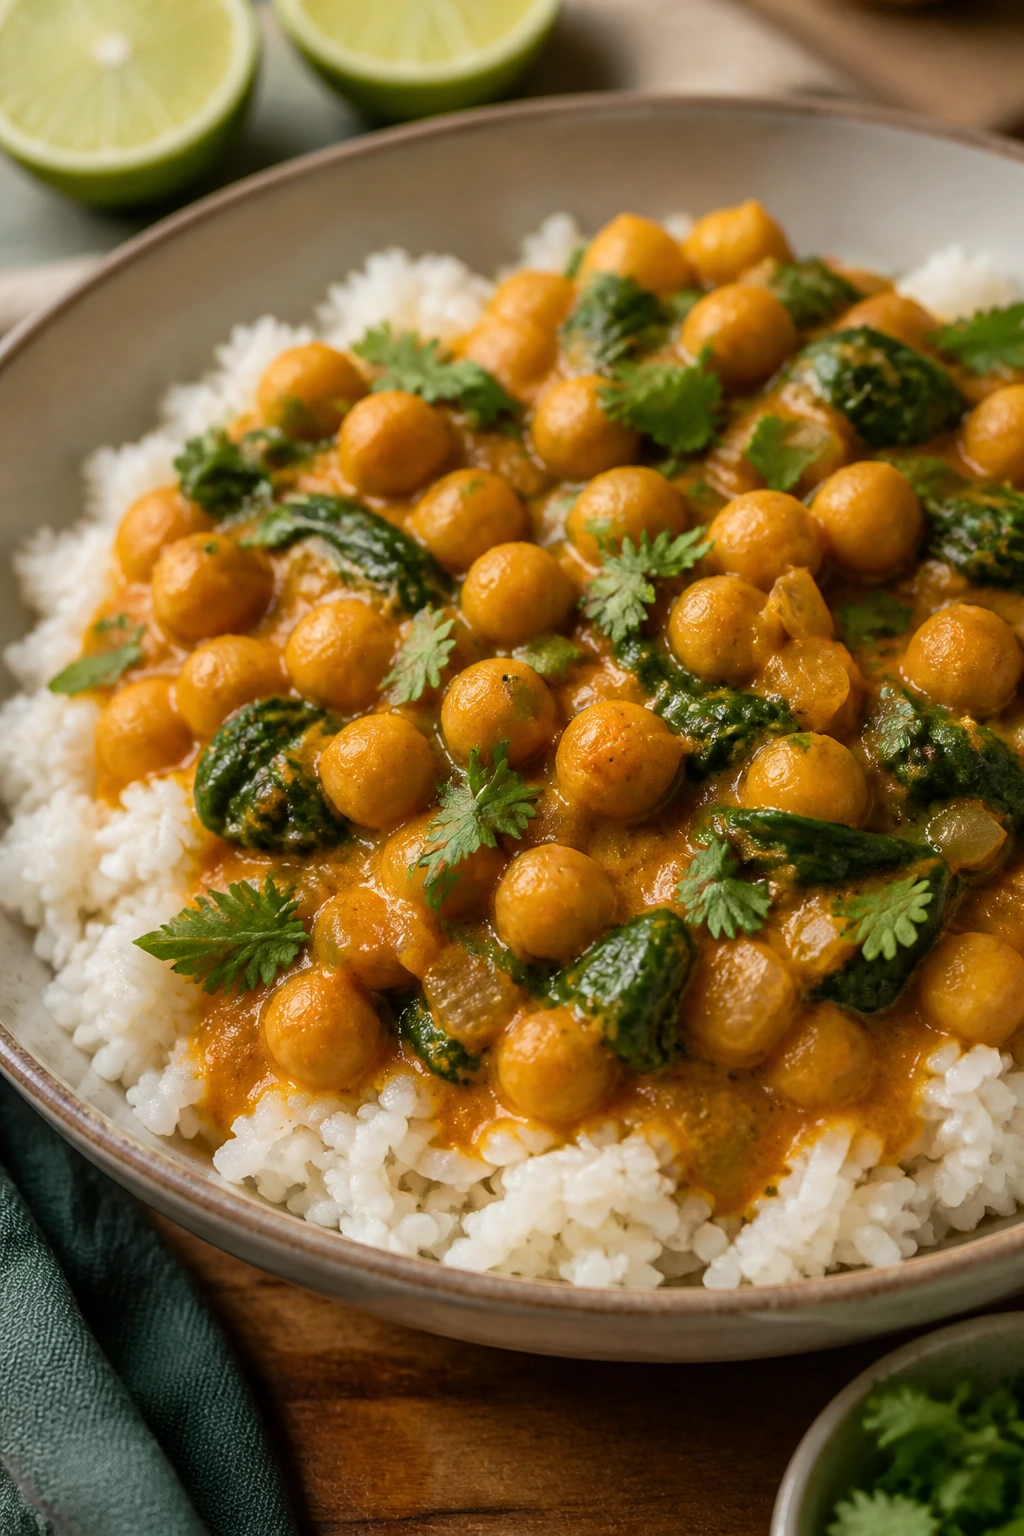
The Pantry-First Night: Build dinner around canned beans, pasta, rice, frozen vegetables, and jarred sauce. This works especially well for taco skillets, pasta bakes, chilis, and soups, where the pantry ingredients can carry the meal without feeling stripped down.
The Extra-Cheesy Route: Add a second cheese with a different job—one for melting, one for sharpness. Mozzarella plus Parmesan, cheddar plus Monterey Jack, or ricotta plus feta gives baked dishes more dimension than a single cheese alone.
The Dairy-Free Plate: Use olive oil, tahini, coconut milk, and extra herbs to replace cream-heavy shortcuts. Chickpea curry, miso bowls, fried rice, and noodle dishes adapt cleanly this way because they already depend on sauce and seasoning more than dairy.
The Higher-Protein Version: Add tofu, paneer, edamame, eggs, chickpeas, white beans, or lentils to the center of the meal instead of treating them like a side note. The easiest wins are in bowls, stir-fries, soups, and stuffed vegetables.
The Kid-Calmer Swap: Reduce spice, keep the sauce tomato-based, and lean on cheese, pasta, potatoes, or rice. If kids are cautious around visible vegetables, choose casseroles, quesadillas, pizza-style dinners, or soups with blended bases.
The Bigger-Flavor Twist: Add smoked paprika, miso, Worcestershire, soy sauce, roasted garlic, lemon zest, or a spoon of tomato paste whenever a dish tastes too soft. These are the ingredients that keep vegetarian food from sounding polite.
Common Mistakes to Avoid
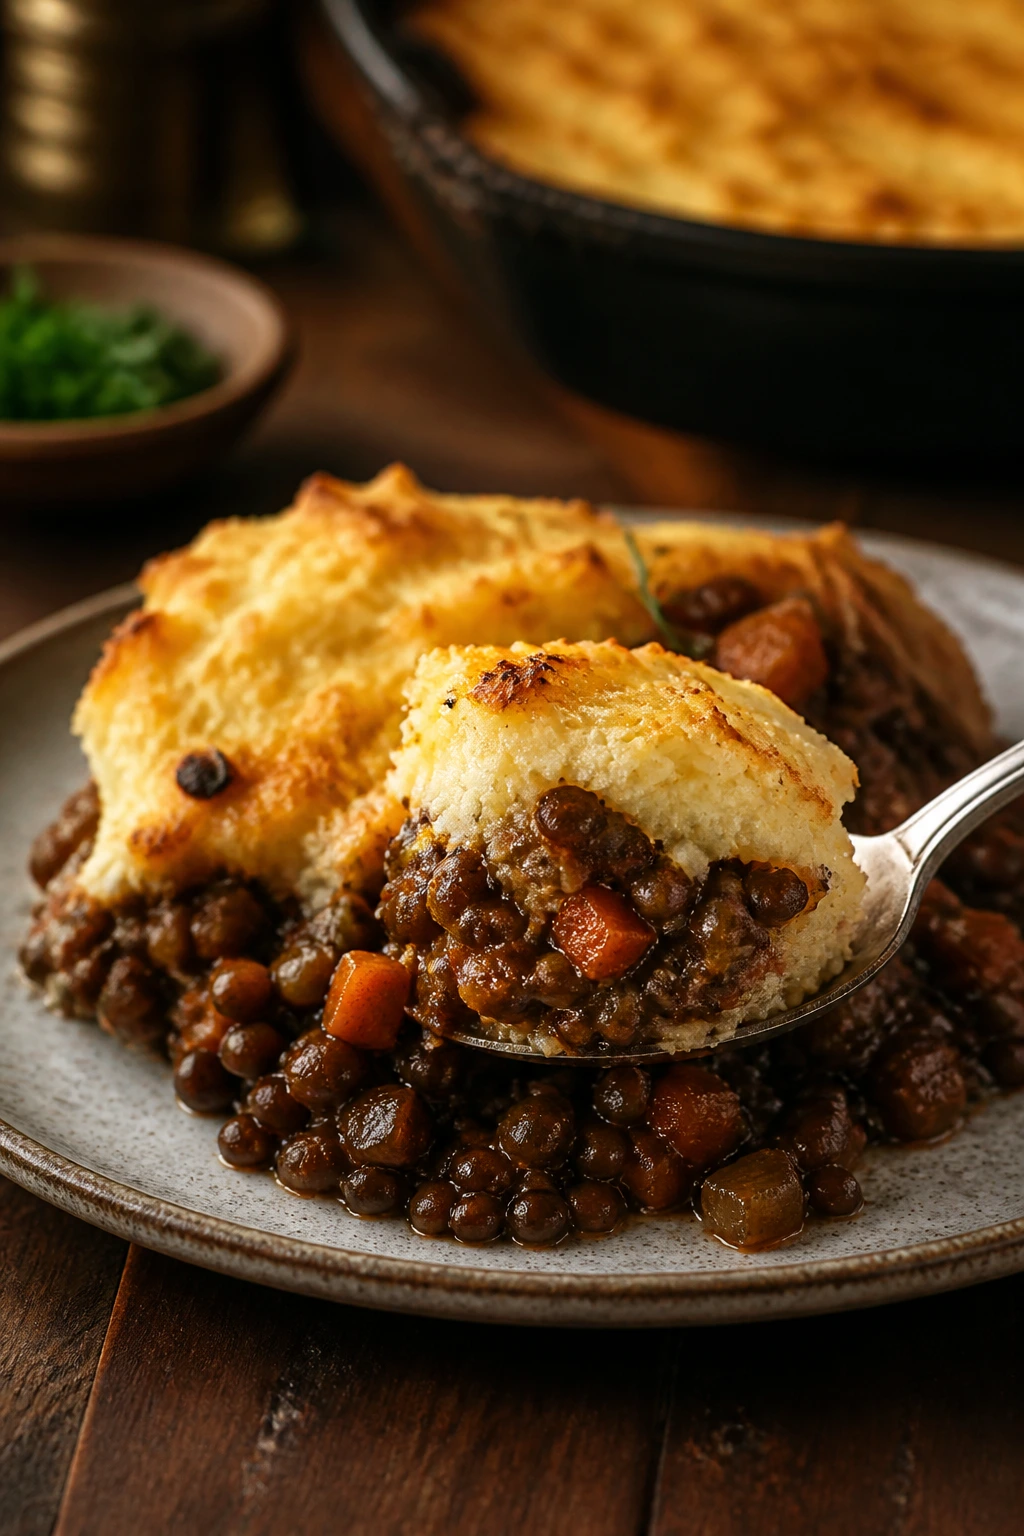
The first mistake is not browning hard enough. If the mushrooms, onions, cauliflower, or tofu never get actual color, the meal tastes thin even if the recipe itself is sound. High enough heat, enough space in the pan, and enough patience fix most of that.
The second mistake is letting everything go wet. Watery spinach, undrained beans, soggy tomatoes, or overcooked zucchini can flatten a dish fast. Press moisture out where needed, roast vegetables when the recipe calls for it, and don’t drown the pan in sauce unless the dish is built for it.
The third mistake is under-seasoning the starches. Pasta water, rice, potatoes, bread, and tortillas all need help. If the base tastes bland, the whole meal reads as unfinished no matter how good the topping is.
The fourth mistake is ignoring contrast. Rich dishes need acid, crisp dishes need cream, soft dishes need something crunchy on top. That little bit of balance is what keeps meat eaters from saying the meal felt “missing” something. Usually, what they’re missing is texture, not meat.
The fifth mistake is trying to make one ingredient do everything. Cheese alone won’t save a bland sauce. Beans alone won’t save a dry casserole. Pesto alone won’t rescue limp vegetables. These dinners work because the parts are doing separate jobs.
The last mistake is serving the wrong temperature. Some of these recipes want to be piping hot and bubbly. Others, like bowls and pitas, are better when the hot and cold parts stay distinct. Match the serving style to the food, and it tastes like you knew exactly what you were doing.
Frequently Asked Questions
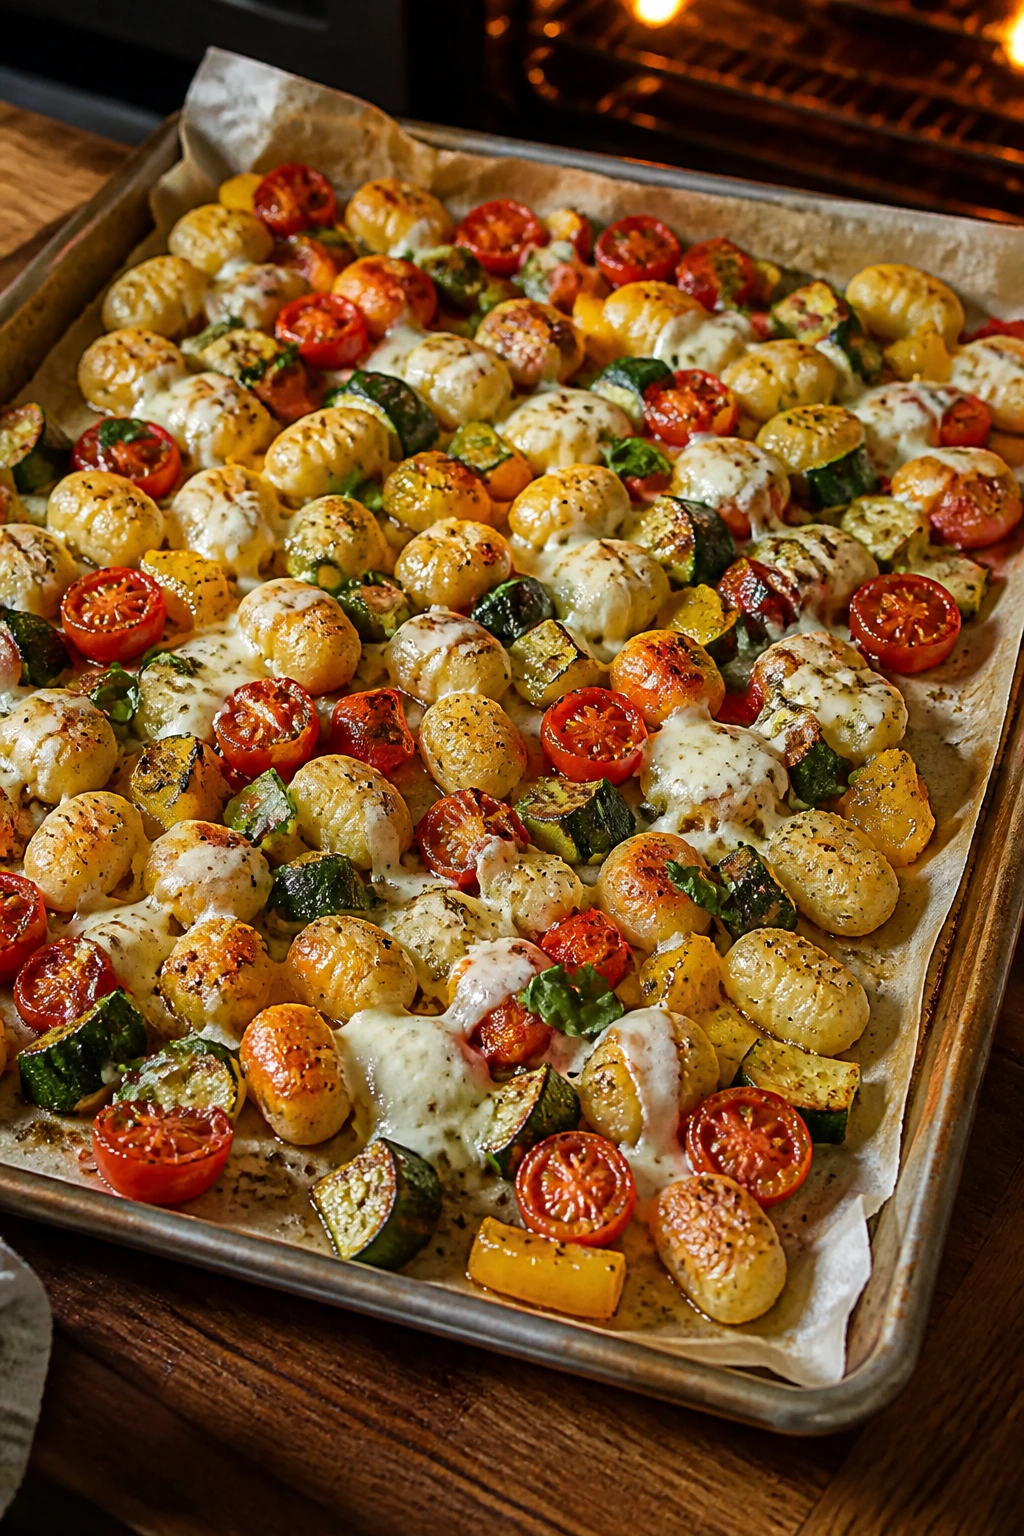
Can meat eaters really be satisfied by vegetarian family meals?
Yes, if the meal has enough browning, salt, fat, and texture. A plate of baked ziti, stroganoff, chili, or a loaded skillet feels complete because it eats like dinner, not like a side dish with a speech attached.
What are the best recipes in this collection for nervous eaters?
Start with baked ziti, mushroom stroganoff, taco skillet, mac and cheese, or quesadillas. Those recipes lean on familiar shapes and flavors, so nobody has to rethink the meal while they’re eating it.
Which of these meals freeze best?
Chili, soups, lentil dishes, shepherd’s pie, baked pasta, and stuffed shells usually freeze well. Rice bowls, fried rice, and crisp sandwiches are better made fresh or frozen only in parts.
How do I get more protein without adding meat?
Use beans, lentils, tofu, paneer, eggs, chickpeas, edamame, or white beans in the center of the meal. The trick is not just adding protein, but giving it a real role in the texture and flavor of the dish.
What if my family doesn’t like mushrooms?
Skip the mushroom-heavy recipes and lean on tomato-based bakes, bean dishes, curry, tacos, stuffed peppers, or halloumi meals. You can also chop mushrooms very finely and mix them into sauces where they disappear into the background.
Can I use frozen vegetables instead of fresh?
Often, yes. Frozen peas, spinach, corn, and broccoli work well in soups, pasta dishes, stir-fries, and casseroles; just cook off extra moisture so the dish doesn’t turn watery.
What do I do if a sauce turns too thin?
Let it simmer uncovered for a few minutes, mash a few beans or potatoes into it, or stir in a spoon of grated cheese, ricotta, or yogurt depending on the recipe. Thin sauce is usually a cooking-time problem, not a lost cause.
How do I keep vegetarian meals from tasting bland?
Use more salt than you think at the base, then finish with acid—lemon, lime, vinegar, or pickled vegetables. Browning onions, mushrooms, or cauliflower also adds a depth that simmering alone never will.
The Meatless Dinner Truce
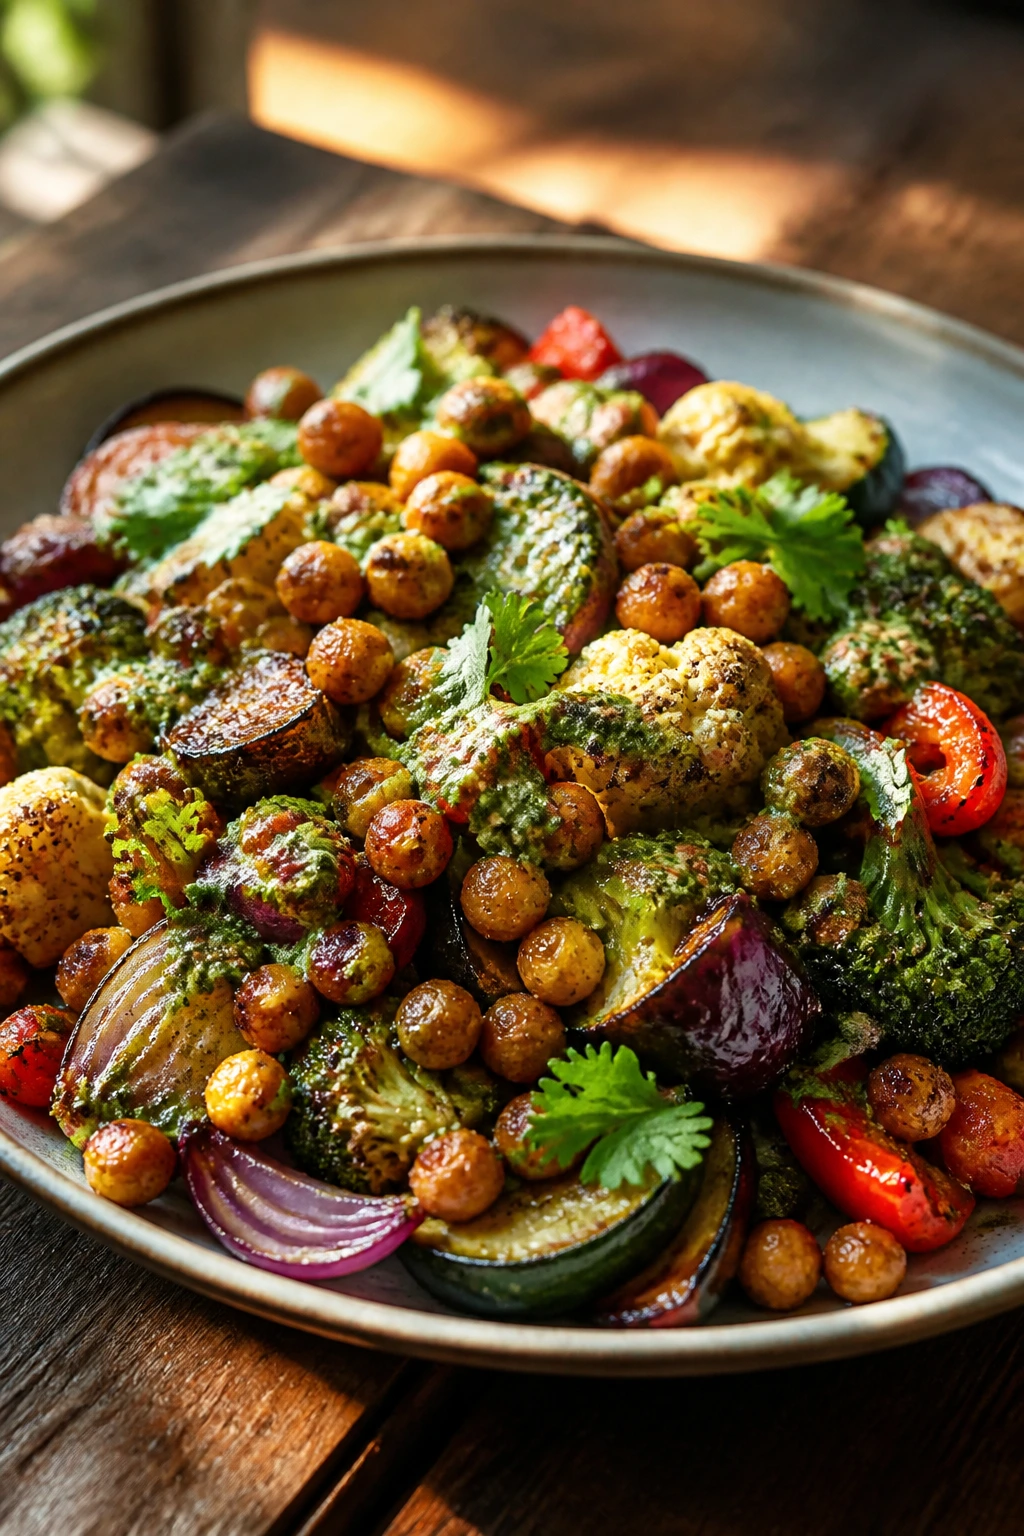
There’s a sweet spot where a vegetarian dinner stops feeling like the “other” option and just becomes the thing everyone wants a second scoop of. That’s the space these recipes live in. They lean on good browning, sensible seasoning, and the sort of textures that make a plate feel finished instead of explained.
If you keep one idea from this collection, let it be this: meatless family meals work best when they’re built around flavor and structure, not apology. Give people something hot, savory, and a little messy in the best way, and nobody at the table will be tallying what’s missing.
The next time dinner needs to satisfy different appetites without splitting into separate pans, start with one of these. Better yet, pick two or three and keep them in rotation—the kind of meals that make a house smell like somebody knew exactly what was for supper.