
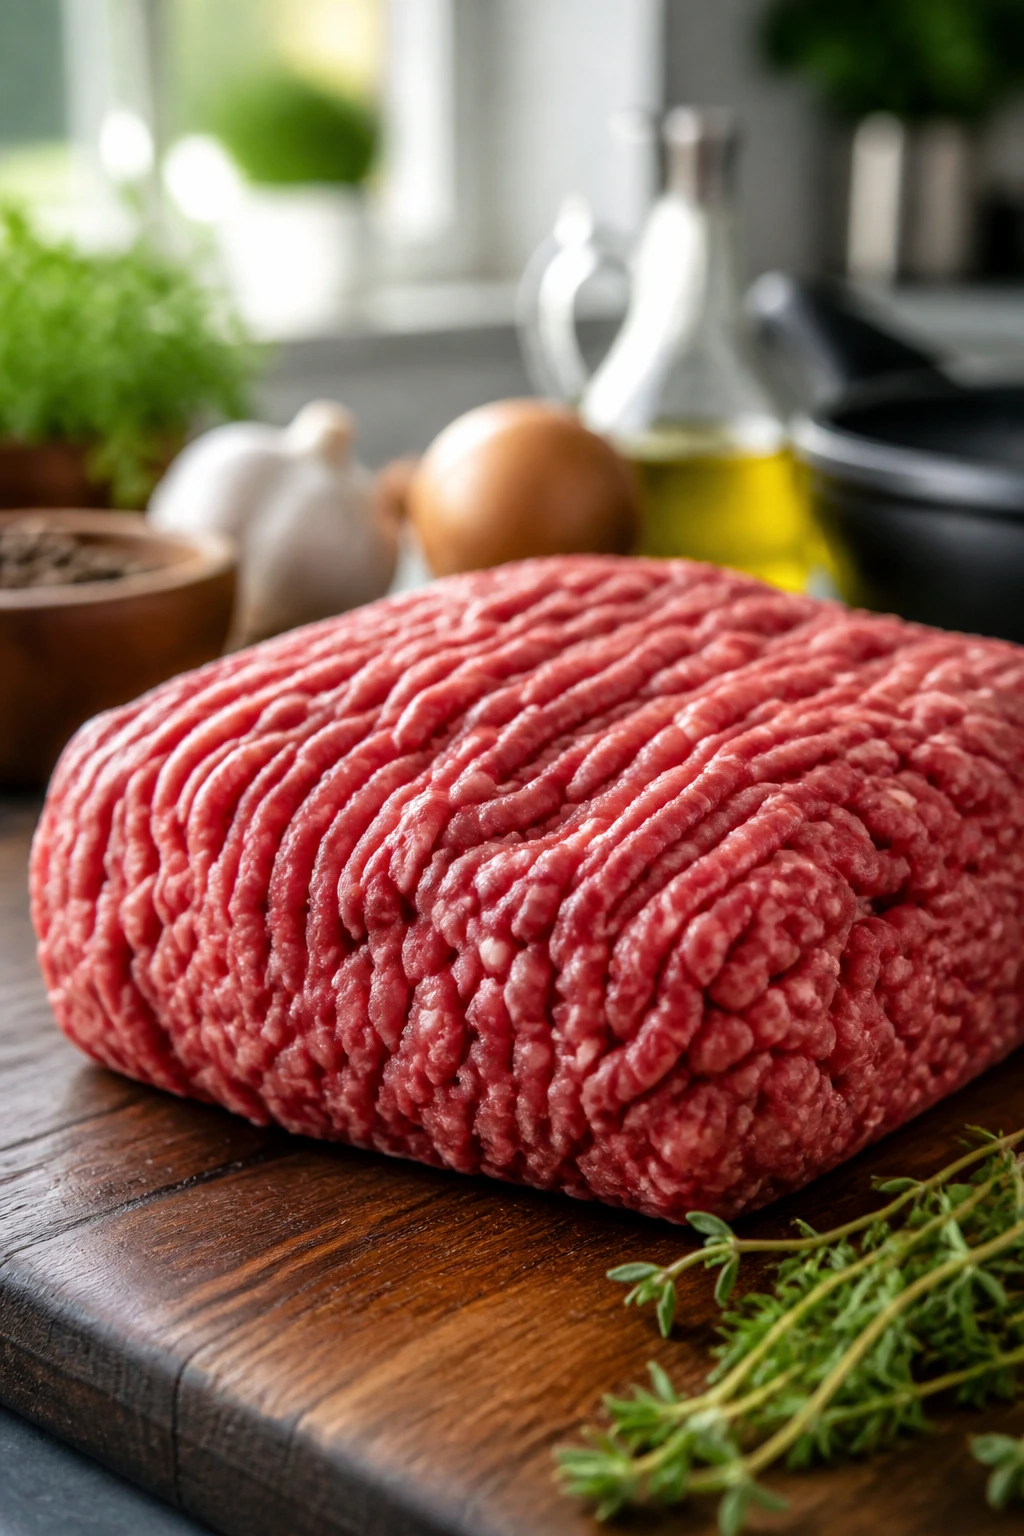
Ground beef recipes earn their place in a family-dinner rotation because they brown fast, take on seasoning like a sponge, and turn a small amount of meat into a pan that feels generous. The minute that beef hits a hot skillet and the onion starts going soft in the fat, dinner stops feeling like a question.
That’s the real appeal here. A pound of ground beef can become pasta, soup, casserole, rice bowls, baked noodles, or something sitting under mashed potatoes and bubbling at the edges, and none of it needs fussy technique to land well.
What matters is how you build the flavor around it. Salt early, brown instead of steaming, and give the pan a little acid or tomato or Worcestershire to keep the whole thing from tasting flat. Small moves. Big payoff.
Why You’ll Keep Coming Back to These Dinners
-
One pound goes farther than you think: Ground beef stretches beautifully once it meets rice, pasta, beans, potatoes, or noodles, which means the skillet feeds more people without turning into a skimpy meal.
-
The flavor base is dependable: Onion, garlic, tomato, broth, and cheese all have an easy relationship with beef, so you can build dinner with ingredients that already live in the pantry.
-
Leftovers hold up well: Many of these dishes taste even better after a night in the fridge because the sauce thickens and the seasoning settles into the meat.
-
Picky eaters usually meet you halfway: Familiar shapes help here—baked pasta, cheesy casseroles, meatloaf, and sloppy Joe filling are easier sells than a bowl of something unidentifiable.
-
You can bend the seasoning fast: Taco seasoning, Italian herbs, curry powder, soy sauce, smoked paprika, or Worcestershire can send the same pound of beef in a completely different direction.
-
Cleanup stays manageable: Most of these dinners come from one skillet, one pot, or one baking dish, which matters when the sink is already annoying enough.
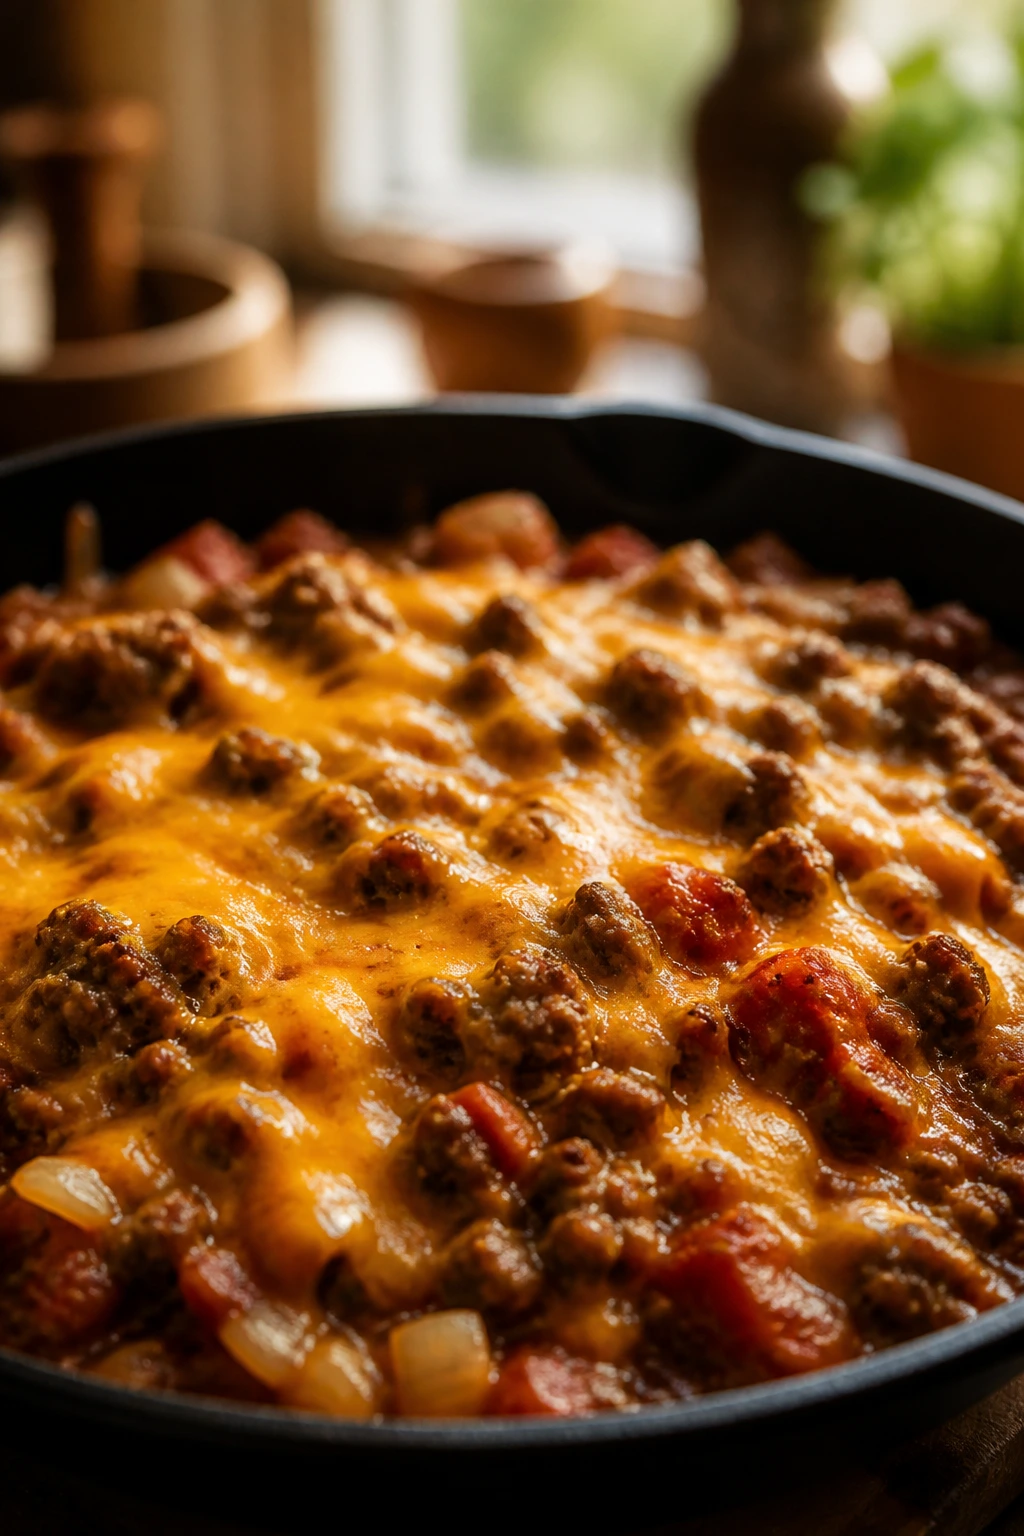
1. One-Pan Cheeseburger Pasta
The smell lands somewhere between a diner booth and a late-night burger run. Beef, onion, ketchup, mustard, and cheddar melt into a glossy skillet sauce that clings to elbow macaroni instead of pooling at the bottom. It’s messy in the best way.
Why It Works:
Cheeseburger flavor is built on fat, salt, tang, and cheddar, and this recipe keeps all four in the pan. The pasta cooks right in the broth, so it drinks up the seasoned liquid instead of getting boiled separately and drained into the sink.
A 12-inch skillet is the right size because it gives the macaroni room to move while the liquid reduces. Too shallow, and you lose sauce; too deep, and the cheese can clump in a heavy layer at the bottom.
Key Ingredients:
- 1 lb 85/15 ground beef — enough fat for flavor without making the sauce greasy.
- 1 medium yellow onion, finely diced — it softens into the beef and gives the pan sweetness.
- 2 cloves garlic, minced — use fresh if you can; it wakes the sauce up.
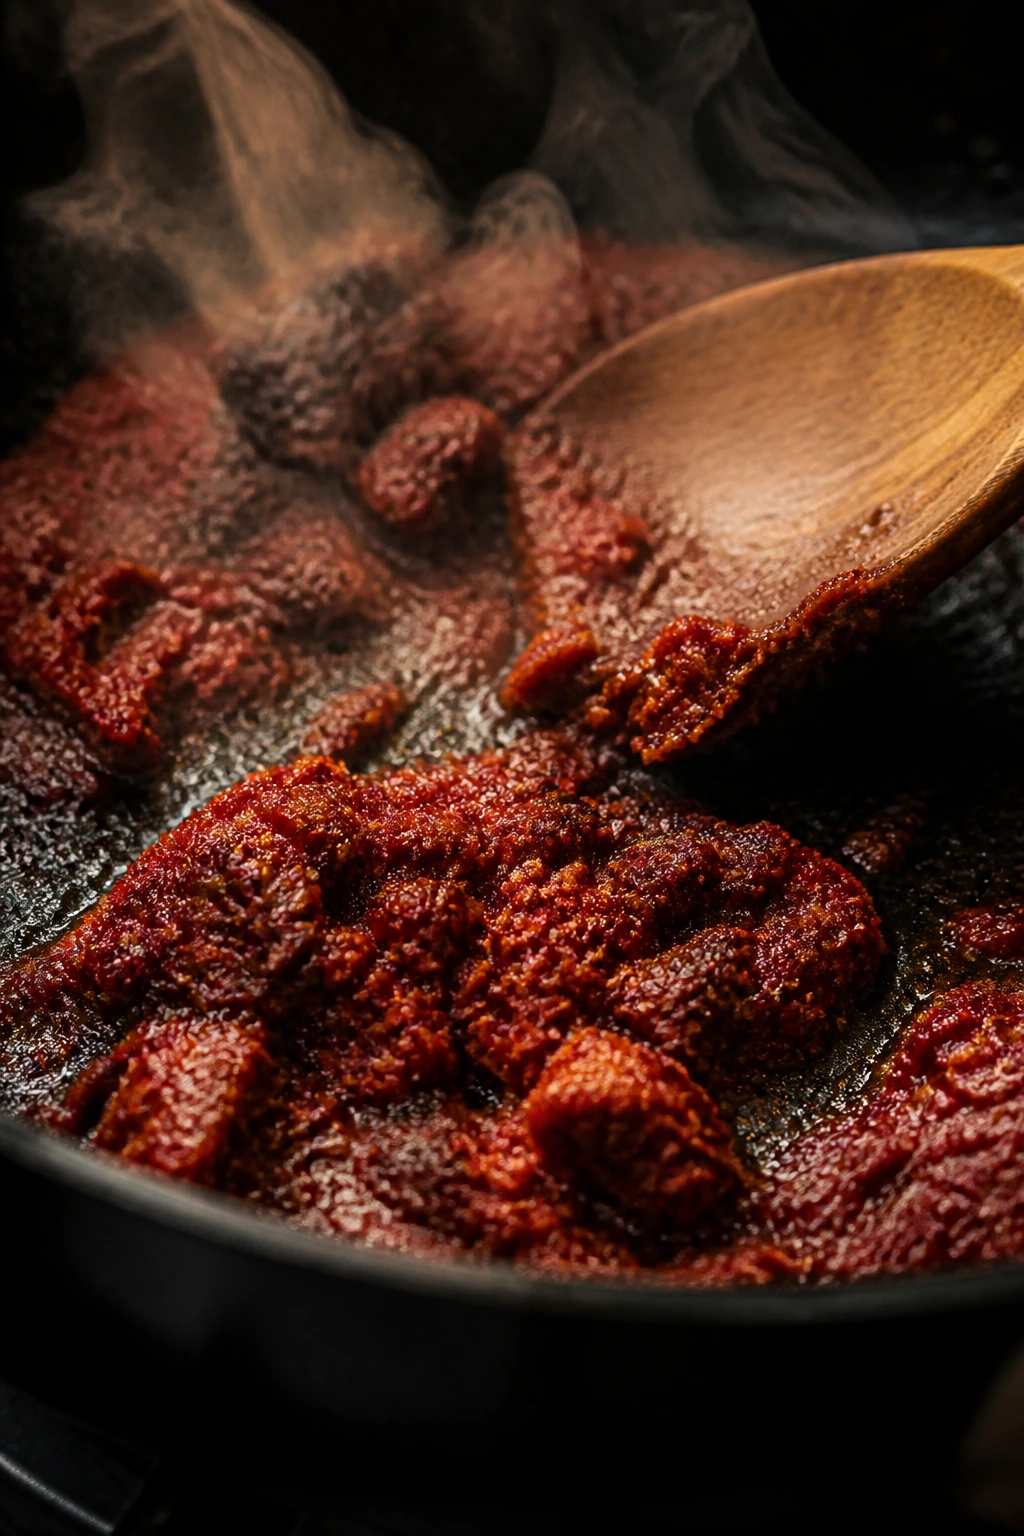
- 2 tablespoons tomato paste — this gives the dish a deeper, cooked tomato note.
- 2 cups beef broth — the pasta needs this to soften in the pan.
- 8 oz elbow macaroni — hold shape well and catch the cheese sauce.
- 2 tablespoons ketchup — the sweet-tangy burger note.
- 1 tablespoon yellow mustard — don’t skip it; it sharpens the whole pot.
- 1 cup whole milk — keeps the sauce creamy without making it heavy.
- 2 cups shredded sharp cheddar — grate it yourself if you want a smoother melt.
- 1 teaspoon Worcestershire sauce — adds the salty, beefy edge.
- Salt and black pepper — season the meat before the liquid goes in.
Quick Steps:
- Brown the ground beef and onion in a large skillet over medium-high heat for 6 to 7 minutes, breaking the meat into small crumbles, until the onion is soft and the beef has no pink left. Drain off excess fat if the pan looks slick.
- Stir in the garlic, tomato paste, ketchup, mustard, and Worcestershire sauce. Cook for 1 minute, until the tomato paste darkens slightly and the pan smells sweet and savory.
- Add the broth, macaroni, salt, and pepper. Bring to a boil, then reduce to a steady simmer, cover, and cook for 10 to 12 minutes, stirring once or twice, until the pasta is tender and most of the liquid is absorbed.
- Pour in the milk and stir in half the cheddar over low heat for 1 to 2 minutes, until the sauce turns creamy and coats the noodles.
- Turn off the heat, fold in the remaining cheese, and let the pan sit for 3 minutes before serving. Top with chopped pickles if you want the full burger-rack effect.
Equipment for This Recipe:
- 12-inch deep skillet with a lid — big enough for pasta and sauce.
- Wooden spoon or spatula — for breaking up the beef.
- Box grater — the cheese melts better when it’s fresh grated.
- Measuring cups and spoons — the sauce needs balance.
How to Serve This Dish:
Pile it into shallow bowls while the cheese is still stretchy and the noodles are glossy. A simple green salad or roasted broccoli keeps the plate from feeling too soft and heavy, and a few pickle slices on top bring the burger note back into focus.
Pro Tips for This Recipe:
- Use sharp cheddar, not mild; the flavor survives the broth.
- If the pasta finishes before the sauce looks creamy, add 2 to 3 tablespoons of milk and stir over low heat.
- Don’t add all the cheese at once over high heat or it can turn grainy.
- A teaspoon of pickle juice at the end works if you want more tang.
Variations on This Dish:
- Bacon Burger Pasta: Stir in 4 strips of crisp chopped bacon right before serving.
- Jalapeño Burger Skillet: Add 1 diced jalapeño with the onion and use pepper jack instead of cheddar.
- Gluten-Free Elbow Bowl: Swap in gluten-free elbows and check the simmer time a minute early.
Common Mistakes to Avoid with This Dish:
- Using too little liquid: The pasta can grab the broth fast; if the pan looks dry before the noodles are tender, add 1/4 cup broth.
- Skipping the mustard: The flavor ends up flat and vaguely cheesy instead of burger-like.
- Boiling the cheese sauce hard: High heat makes the dairy separate, so keep the final melt gentle.
2. Classic Meatloaf with Tangy Glaze
Meatloaf sounds old-school because it is old-school, and that’s the point. When it’s done well, the slices hold together, the top is lacquered with a sticky glaze, and the edges have that dark caramelized ring that makes the whole loaf worth the wait.
Why It Works:
Ground beef needs a binder, a little milk, and enough seasoning to carry the loaf through a long bake. The breadcrumb-and-egg mix keeps the texture tender instead of dense, and the glaze gives you that sweet-sour finish that keeps each bite awake.
A loaf pan can trap grease, but a rimmed sheet pan lets the outside brown better. I prefer shaping the loaf by hand on parchment because the crust gets more edge, and the edge is the best part.
Key Ingredients:
- 2 lb ground beef, preferably 85/15 — enough fat to stay moist.
- 1 cup plain breadcrumbs — they hold the loaf together without making it bready.
- 1/2 cup whole milk — softens the crumbs before mixing.
- 2 large eggs — the glue.
- 1 small yellow onion, grated — gives flavor without big chunks.
- 2 tablespoons Worcestershire sauce — deepens the meat flavor.
- 1 tablespoon Dijon mustard — adds a sharp note under the glaze.
- 1 teaspoon kosher salt and 1/2 teaspoon black pepper — season the loaf all the way through.
- 1/2 cup ketchup — the base of the glaze.
- 2 tablespoons brown sugar — helps the top caramelize.
- 1 tablespoon apple cider vinegar — keeps the glaze from tasting flat.
Quick Steps:
- Preheat the oven to 375°F (190°C) and line a rimmed baking sheet with parchment.
- In a large bowl, mix the breadcrumbs and milk and let them sit for 2 minutes until the crumbs look damp and swollen.
- Add the beef, eggs, grated onion, Worcestershire, mustard, salt, and pepper. Mix gently with your hands just until combined. Do not squeeze the meat into a paste.
- Shape the mixture into a loaf about 9 inches long and 4 inches wide on the baking sheet.
- Stir the ketchup, brown sugar, and vinegar together, brush half over the loaf, and bake for 35 minutes. Brush on the remaining glaze and bake 15 to 20 minutes more, until the center reaches 160°F.
- Rest the meatloaf for 10 to 15 minutes before slicing so the juices stay put.
Equipment for This Recipe:
- Rimmed baking sheet — better browning than a loaf pan.
- Parchment paper — keeps the glaze from welding to the pan.
- Large mixing bowl — enough room for gentle mixing.
- Instant-read thermometer — the easiest way to avoid dry meatloaf.
How to Serve This Dish:
Serve thick slices with mashed potatoes, buttered peas, or green beans slicked with a little butter and salt. The glaze should run a little around the edges of the slice, not flood the plate.
Pro Tips for This Recipe:
- Grating the onion is faster than dicing it, and the loaf stays more uniform.
- If you want cleaner slices, chill the baked loaf for 10 minutes before cutting.
- A spoonful of grated parmesan in the mix adds salt and a faint savory bite.
- Use a thermometer. Guessing meatloaf is how it ends up dry.
Variations on This Dish:
- BBQ Glazed Loaf: Swap ketchup glaze for barbecue sauce and a splash of vinegar.
- Mini Meatloaves: Bake in muffin tins for 22 to 25 minutes for faster portions.
- Turkey-Beef Blend: Use half ground turkey and half beef for a lighter loaf that still tastes like dinner.
Common Mistakes to Avoid with This Dish:
- Overmixing the meat: The loaf turns tight and bouncy instead of tender.
- Using very lean beef: It can bake up dry, especially if the loaf is thick.
- Slicing too soon: The meat runs; wait for the resting time or the loaf won’t hold.
3. Beef and Bean Burrito Casserole
This is what happens when burritos stop pretending to be handheld and move into a baking dish. The tortillas soften into layers, the cheese melts into the beef and beans, and the edges crisp just enough to give the top some structure.
Why It Works:
The casserole format lets beans, rice, salsa, and seasoned beef share the same bite without becoming soupy. Flour tortillas are useful here because they absorb flavor without falling apart the way some corn tortillas can.
It’s also one of those dishes that rewards a sharp salsa. A watery salsa makes a watery casserole, and nobody needs that.
Key Ingredients:
- 1 lb ground beef — the main filling.
- 1 medium onion, diced — it cooks into the beef and softens the texture.
- 2 tablespoons taco seasoning — use your favorite blend.
- 1 can (15 oz) black beans, rinsed and drained — adds body and makes the filling feel bigger.
- 1 can (15 oz) pinto beans, rinsed and drained — softer and creamier than black beans.
- 1 cup salsa — choose a thick one, not a watery one.
- 1 cup cooked rice — fills out the casserole without making it heavy.
- 6 small flour tortillas, cut into strips — they make the layers.
- 2 cups shredded Mexican blend cheese — melts into a clean, stretchy top.
- 1/2 cup sour cream, for serving — cools the spice at the table.
Quick Steps:
- Preheat the oven to 375°F (190°C) and grease a 9×13-inch baking dish.
- Brown the beef and onion in a skillet over medium-high heat for 6 to 8 minutes, until the beef is crumbly and the onion is soft.
- Stir in the taco seasoning, beans, and salsa, then cook for 2 minutes until the mixture smells fragrant and looks thick enough to spoon.
- Layer half the tortilla strips, half the rice, half the beef mixture, and half the cheese in the baking dish. Repeat with the remaining ingredients.
- Bake for 20 to 25 minutes, until the cheese is melted and the edges are bubbling. Rest 5 minutes before cutting so the layers settle.
Equipment for This Recipe:
- 9×13-inch baking dish — the right size for layered casseroles.
- Large skillet — for building the filling.
- Sharp knife or kitchen scissors — for cutting tortillas.
- Measuring cups — helpful when layering evenly.
How to Serve This Dish:
Cut it into squares and spoon a little sour cream on top. A side of shredded lettuce, diced tomato, or sliced avocado keeps the plate fresh and gives the casserole a little contrast.
Pro Tips for This Recipe:
- Use thick salsa so the bottom layer doesn’t go soggy.
- Warm the rice first if it came from the fridge; cold rice can leave the center lukewarm.
- If you like a firmer top, broil the casserole for 1 minute at the end.
- Don’t overpack the layers or the center turns dense instead of sliceable.
Variations on This Dish:
- Enchilada Burrito Bake: Swap half the salsa for enchilada sauce.
- Corn Tortilla Version: Use torn corn tortillas for a rougher, more rustic texture.
- Bean-Heavy Stretch: Add a third can of beans and reduce the beef to 3/4 pound if you want a cheaper pan.
Common Mistakes to Avoid with This Dish:
- Using thin salsa: It leaks into the bottom and makes the casserole watery.
- Skipping the rest time: The layers fall apart when you cut too soon.
- Underseasoning the beef: Beans need salt, too, or the whole pan tastes dull.
4. Shepherd’s Pie with Cheddar Mash
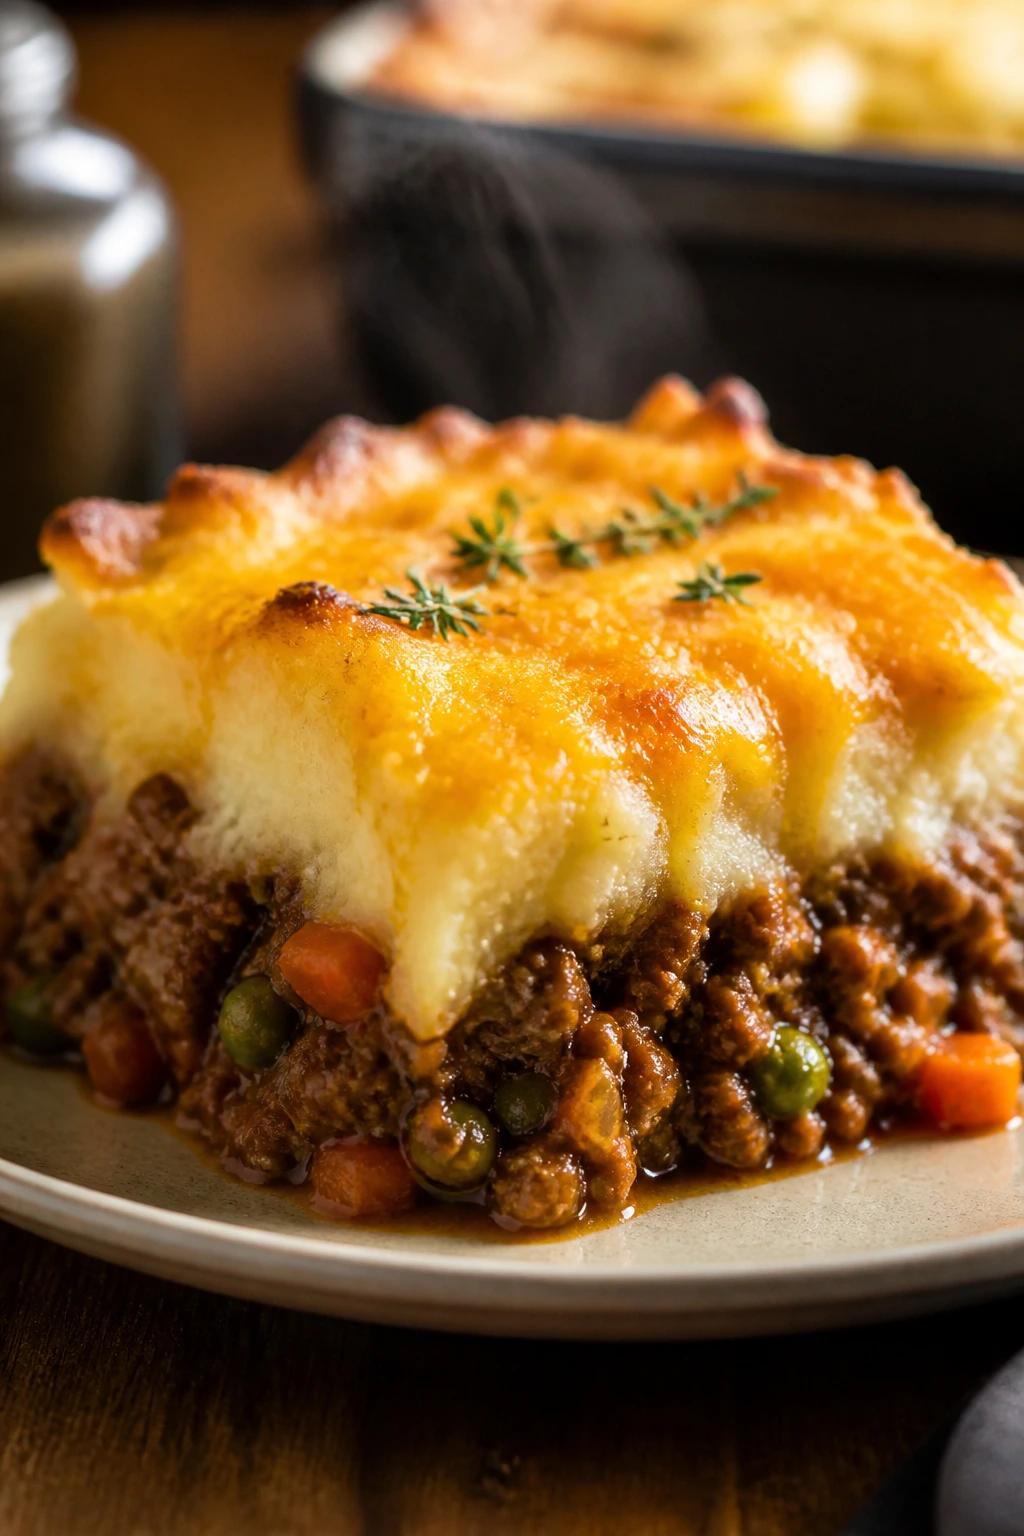
There’s a reason shepherd’s pie still shows up on cold-weather tables: it gives you beef, vegetables, gravy, and potatoes in one cut. The top should be bronzed and a little rough, not smooth like frosting, with the filling bubbling at the edges.
Why It Works:
Ground beef makes a practical version of this classic because it cooks quickly and still carries enough richness for the gravy. The mashed potato lid acts like a seal, trapping steam and keeping the filling saucy underneath.
Cheddar in the mash is optional, but I like it. It gives the top a little sharpness and helps the browning happen faster.
Key Ingredients:
- 1 1/2 lb ground beef — enough to make the filling substantial.
- 1 medium onion, diced — the base note of the gravy.
- 2 carrots, diced small — they soften enough to blend into the filling.
- 1 cup frozen peas — stir in at the end so they stay green.
- 2 tablespoons tomato paste — deepens the gravy.
- 2 tablespoons all-purpose flour — thickens the filling.
- 1 cup beef broth — makes the sauce silky.
- 1 tablespoon Worcestershire sauce — sharpens the beef flavor.
- 2 lb Yukon Gold potatoes, peeled and cubed — they mash smoothly.
- 4 tablespoons butter and 1/2 cup milk — for the potato topping.
- 1 cup shredded cheddar, optional — for a sharper, browned crust.
Quick Steps:
- Boil the potatoes in salted water for 12 to 15 minutes, until they fall apart when pierced with a fork. Drain and mash with butter and milk until smooth.
- Brown the beef and onion in a skillet over medium-high heat for 6 to 7 minutes.
- Add the carrots, tomato paste, flour, broth, Worcestershire, salt, and pepper. Simmer for 5 to 7 minutes, until the mixture thickens and the carrots start to soften. Stir in the peas.
- Spread the beef filling in a 9×13-inch baking dish. Spoon the mashed potatoes over the top and rough them up with a fork so they brown unevenly.
- Sprinkle with cheddar if using and bake at 400°F (205°C) for 20 to 25 minutes, until the top is golden and the edges bubble.
Equipment for This Recipe:
- Large skillet — for the filling.
- Potato pot and colander — for the mash.
- 9×13-inch baking dish — for assembly.
- Potato masher — smoother potatoes, fewer lumps.
How to Serve This Dish:
Let it sit 10 minutes so the filling thickens a little, then scoop deep to get both layers. A crisp green salad or buttered cabbage is enough on the side, because this dish already eats like a full plate.
Pro Tips for This Recipe:
- Mash the potatoes while they’re still hot or they’ll turn gluey.
- Use a fork to create ridges in the top; those ridges brown best.
- If the filling looks too loose, simmer it 2 minutes longer before baking.
- A little paprika in the potatoes gives the top a warmer color.
Variations on This Dish:
- Brown Gravy Pie: Skip the tomato paste and lean into broth, onion, and black pepper.
- Cheddar-Chive Top: Fold chopped chives into the mashed potatoes.
- Sweet Potato Lid: Replace half the potatoes with sweet potatoes for a deeper, sweeter top.
Common Mistakes to Avoid with This Dish:
- Wet filling going into the dish: It slides under the potatoes instead of staying layered.
- Cold mashed potatoes: They don’t spread well and bake unevenly.
- Skipping the browning: Gray beef makes a flat-tasting pie.
5. Stuffed Pepper Skillet
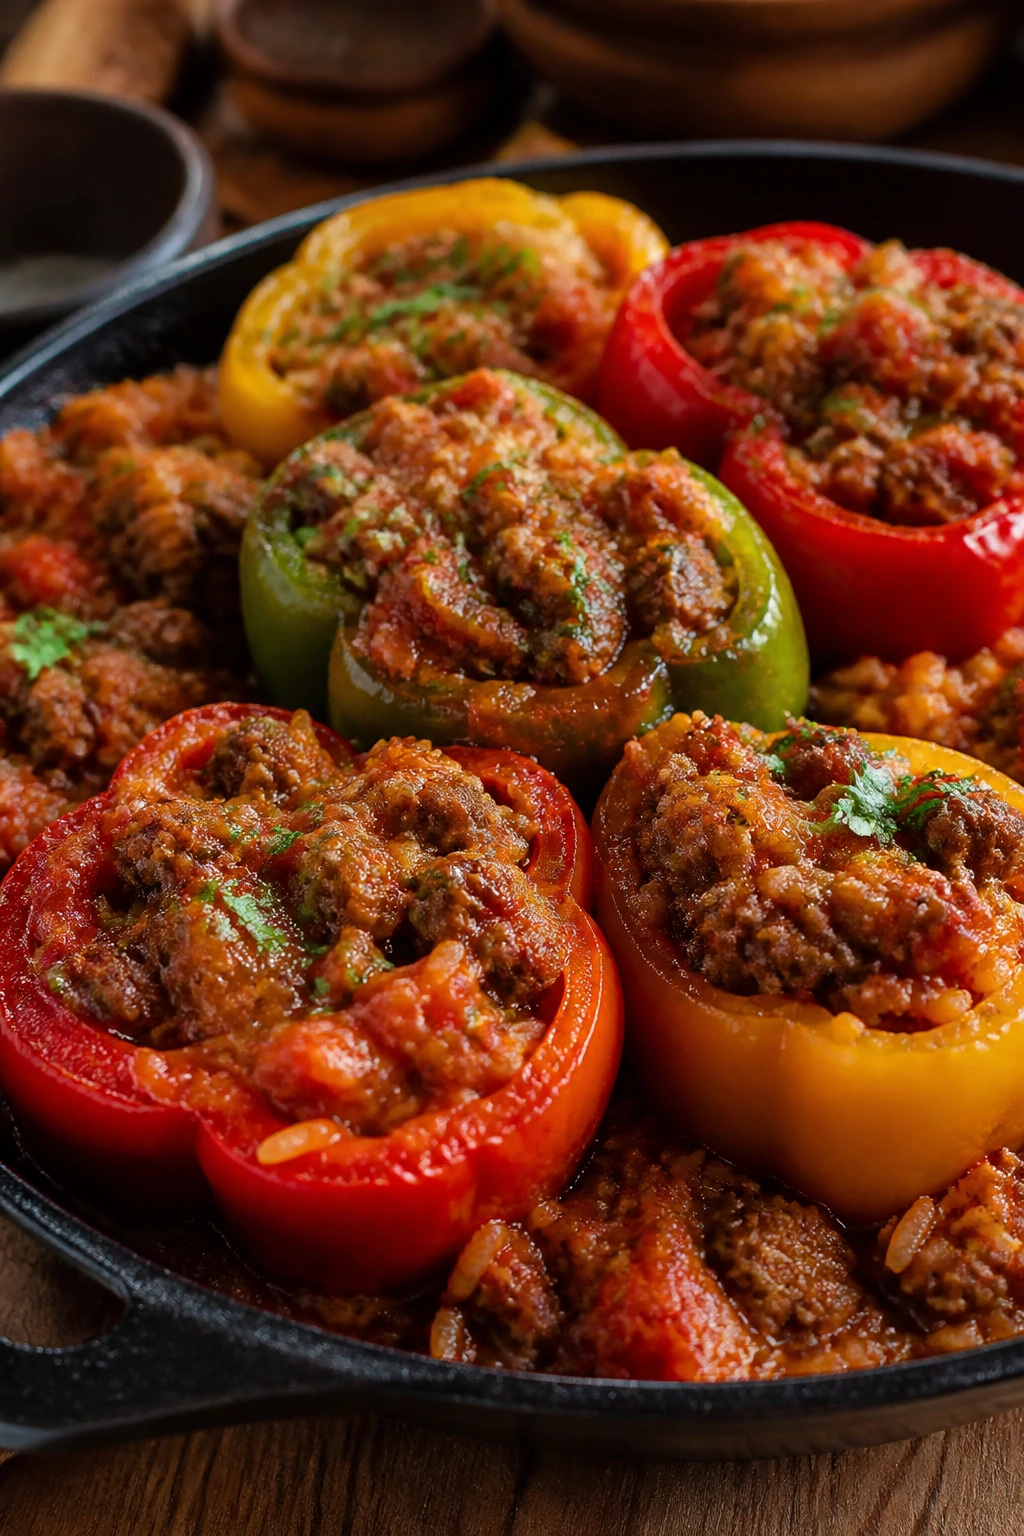
This skillet tastes like stuffed peppers without the fussy hollowing and stuffing. The peppers soften into sweet strips, the rice absorbs tomato and broth, and the whole pan ends up somewhere between a casserole and a one-pan dinner.
Why It Works:
Bell peppers and ground beef want the same things: onion, garlic, tomato, and a little seasoning. Cooking the rice right in the pan lets it drink the sauce as it softens, so the final texture is full and spoonable, not dry.
Green peppers give a sharper edge, while red and yellow ones bring more sweetness. Mixing colors is worth it.
Key Ingredients:
- 1 lb ground beef — the savory base.
- 4 bell peppers, sliced into thin strips — choose a mix of colors if you can.
- 1 medium onion, sliced — softens into the skillet.
- 3 cloves garlic, minced — for the background aroma.
- 1 cup uncooked long-grain white rice — the starch that carries the sauce.
- 1 can (14.5 oz) diced tomatoes — adds juice and tomato flavor.
- 1 cup tomato sauce — makes the pan saucier.
- 2 cups beef broth — cooks the rice.
- 1 teaspoon dried Italian seasoning — keeps the flavor clean.
- 1 cup shredded mozzarella or provolone — for the top.
Quick Steps:
- Brown the beef and onion in a deep skillet over medium-high heat for 5 to 6 minutes.
- Stir in the garlic and bell peppers and cook for 3 minutes, until the peppers start to soften at the edges.
- Add the rice, diced tomatoes, tomato sauce, broth, Italian seasoning, salt, and pepper. Bring to a boil, then reduce to low, cover, and simmer for 18 to 20 minutes.
- Check that the rice is tender and the liquid has mostly absorbed. If it still looks soupy, cook uncovered for 2 more minutes.
- Sprinkle the cheese on top, cover for 2 minutes, and let it melt before serving.
Equipment for This Recipe:
- Deep 12-inch skillet with lid — the rice needs room.
- Wooden spoon — for stirring without crushing the peppers.
- Sharp knife and cutting board — for even pepper strips.
- Measuring cup — rice and broth need precision.
How to Serve This Dish:
Serve it straight from the skillet with a spoon and a little extra black pepper over the top. A slice of crusty bread helps mop up the tomato juices, and a plain cucumber salad is a nice cool counterpoint.
Pro Tips for This Recipe:
- Slice the peppers thin so they soften before the rice finishes.
- If the skillet dries out before the rice is done, add 1/4 cup broth.
- A spoonful of sour cream on top cools the tomato and smooths the edge.
- Don’t lift the lid too often or the rice cooks unevenly.
Variations on This Dish:
- Mexican Pepper Skillet: Swap Italian seasoning for taco seasoning and use cheddar.
- Brown Rice Version: Use cooked brown rice and stir it in at the end instead of simmering it raw.
- No-Cheese Finish: Skip the cheese and finish with chopped parsley and a squeeze of lemon.
Common Mistakes to Avoid with This Dish:
- Cutting peppers too thick: They stay crunchy long after the rice is done.
- Using too little liquid: The rice burns before it softens.
- Adding cheese too early: It can disappear into the rice instead of sitting on top.
6. Sloppy Joe Biscuit Bake

This is Sloppy Joe filling with a lid, and the lid happens to be biscuits. The bottom stays saucy and sweet-tangy, the top bakes into a golden crust, and the cheese in between pulls the whole thing together.
Why It Works:
Sloppy Joe sauce already has the right texture for a bake because it’s thick, clingy, and a little sticky. Once it goes under biscuit dough, the steam helps the top cook while the filling stays loose enough to scoop.
The trick is not making the filling too wet. If it’s runny in the skillet, it’ll turn the biscuits gummy in the oven.
Key Ingredients:
- 1 lb ground beef — the filling base.
- 1 medium onion, diced — helps the sauce taste rounder.
- 1 green bell pepper, diced — classic Sloppy Joe flavor.
- 3/4 cup ketchup — the sauce backbone.
- 1/2 cup tomato sauce — keeps the filling from getting too sweet.
- 1 tablespoon brown sugar — enough sweetness without tasting like dessert.
- 1 tablespoon yellow mustard — sharpens the sauce.
- 1 tablespoon Worcestershire sauce — adds depth.
- 1 can refrigerated biscuits, 8 large biscuits — cut each biscuit in half if you want more coverage.
- 2 cups shredded cheddar — for a cheesy layer between filling and biscuit.
Quick Steps:
- Heat the oven to 400°F (205°C) and grease a 9×13-inch baking dish.
- Brown the beef, onion, and bell pepper in a skillet over medium-high heat for 6 to 8 minutes.
- Stir in the ketchup, tomato sauce, brown sugar, mustard, Worcestershire, salt, and pepper. Simmer for 5 minutes until the sauce turns thick and glossy.
- Spread the beef mixture in the baking dish and top with half the cheese. Arrange the biscuits over the top, leaving a little space between them, and sprinkle the remaining cheese around the edges.
- Bake for 18 to 22 minutes, until the biscuits are golden and the centers feel set when pressed.
Equipment for This Recipe:
- 9×13-inch baking dish — enough room for the biscuits to rise.
- Large skillet — for the filling.
- Wooden spoon — to break up the beef.
- Measuring spoons — the sauce needs balance.
How to Serve This Dish:
Let it rest 5 minutes, then scoop down through the biscuits and into the saucy beef beneath. A few dill pickle slices or a simple slaw on the side keeps the plate from leaning too sweet.
Pro Tips for This Recipe:
- Cook the filling until it looks almost over-thick; the oven loosens it a little.
- Use a metal spoon to press the biscuits lightly into the cheese so they don’t skate around.
- If the biscuits brown too fast, tent loosely with foil for the last few minutes.
- A splash of pickle juice in the sauce gives the filling the classic tang it wants.
Variations on This Dish:
- BBQ Joe Bake: Swap half the ketchup for barbecue sauce.
- Jalapeño Biscuit Bake: Add chopped jalapeños to the filling for heat.
- Cornbread-Topped Version: Replace biscuits with a thick cornbread batter poured over the filling.
Common Mistakes to Avoid with This Dish:
- Runny filling: It soaks the biscuits and makes the center mushy.
- Crowding the biscuits too tightly: They won’t bake through in the middle.
- Baking without cheese: The layer helps keep the top from feeling dry.
7. Beef Chili Mac
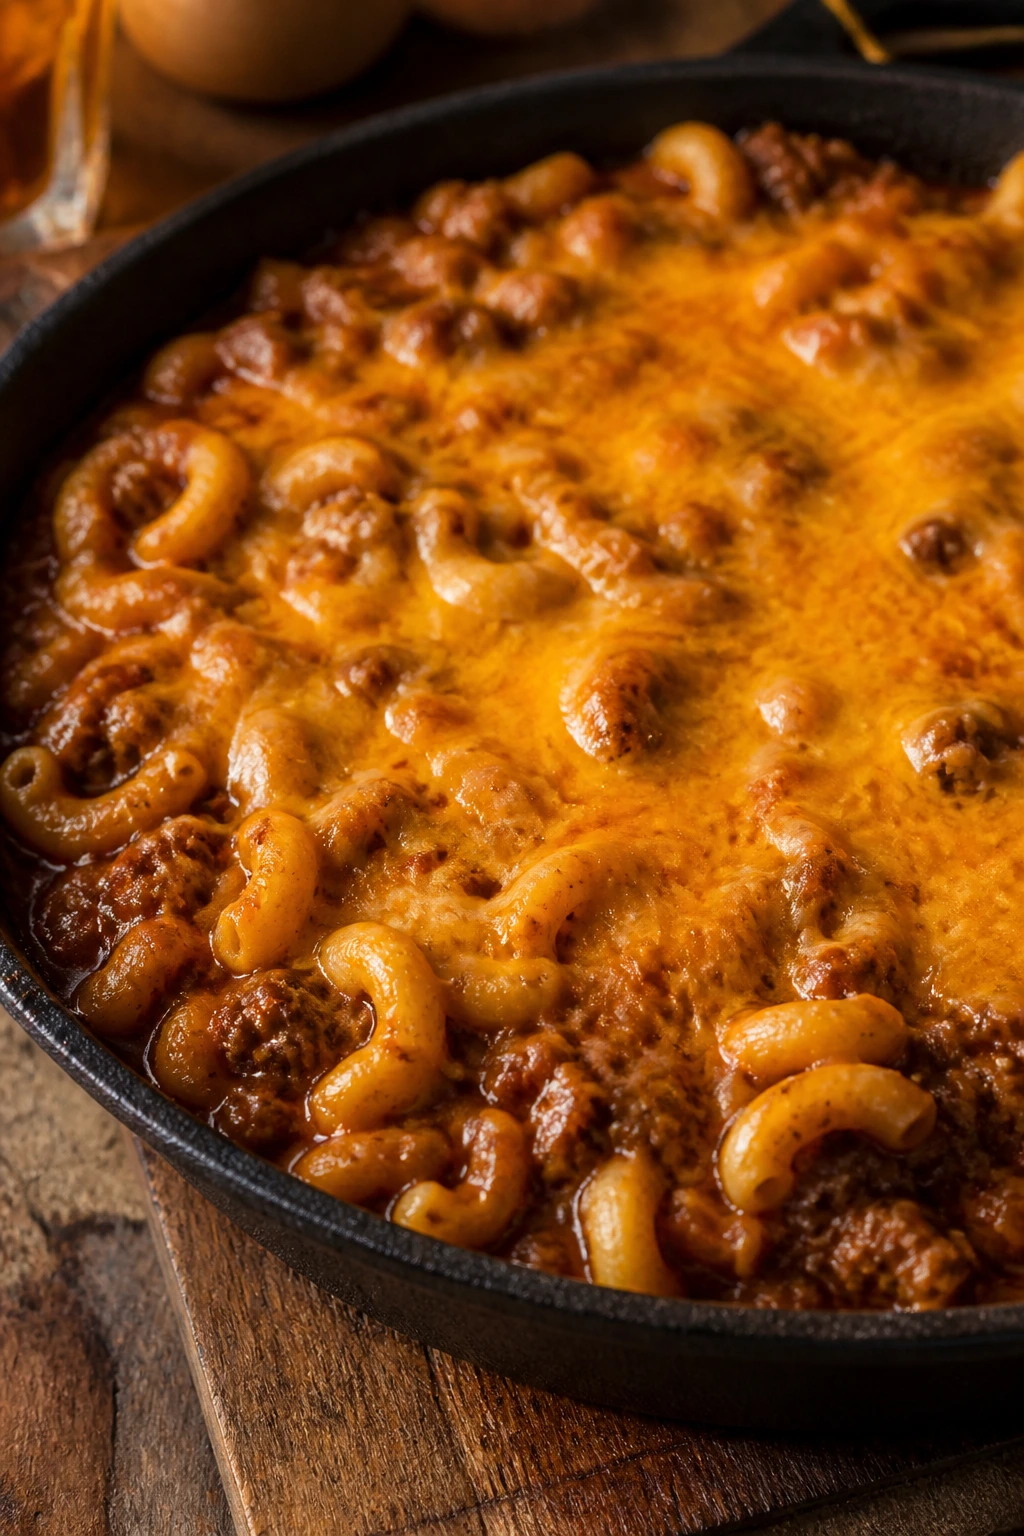
This is the sort of dinner that tastes like it was designed by someone who understands hungry people. The chili is meaty and tomato-forward, the macaroni softens into the sauce, and the cheddar on top gets halfway melted before it even hits the table.
Why It Works:
Chili and pasta both want salt, cumin, and long simmering. Putting them together makes sense because the macaroni catches the chili and turns it into a spoonable casserole without needing a separate pot of noodles.
Beans help the dish feel hearty, and the cheese on top gives the bowl a soft landing. You can serve this one as soupier or thicker depending on how long you simmer it.
Key Ingredients:
- 1 lb ground beef — the main body of the chili.
- 1 small onion, diced — cooks into the base.
- 2 cloves garlic, minced — keeps the chili from tasting flat.
- 2 tablespoons chili powder — the main seasoning.
- 1 teaspoon ground cumin — gives the chili a warm backbone.
- 1 can (15 oz) crushed tomatoes — the sauce base.
- 1 can (15 oz) kidney beans, rinsed and drained — adds heft.
- 2 cups beef broth — cooks the macaroni.
- 8 oz elbow macaroni — small enough to fold into the chili.
- 1 1/2 cups shredded cheddar — for serving.
Quick Steps:
- Brown the beef and onion in a large pot over medium-high heat for 6 to 7 minutes.
- Stir in the garlic, chili powder, cumin, salt, and pepper and cook for 1 minute until the spices smell toasted.
- Add the crushed tomatoes and broth, then bring to a simmer. Stir in the macaroni and cook uncovered for 10 to 12 minutes, stirring now and then, until the pasta is tender.
- Stir in the beans and cook 2 more minutes until everything is hot and thick.
- Ladle into bowls and top with cheddar.
Equipment for This Recipe:
- Large Dutch oven or soup pot — room matters when pasta is involved.
- Wooden spoon — for breaking up the beef.
- Measuring spoons — chili powder and cumin need balance.
- Ladle — because this one gets messy fast.
How to Serve This Dish:
Serve it in deep bowls with a little extra cheese, chopped onion, or crushed tortilla chips on top. Cornbread on the side is not required, but it does make sense.
Pro Tips for This Recipe:
- Salt the pot in layers: beef, tomatoes, then a final adjustment at the end.
- If you want thicker chili mac, simmer uncovered for 3 extra minutes.
- Stir often once the pasta goes in so it doesn’t stick to the bottom.
- A dash of hot sauce at the table wakes up the whole bowl.
Variations on This Dish:
- Smoky Chipotle Chili Mac: Add 1 minced chipotle in adobo.
- Bean-Light Version: Use only one can of beans and add an extra 1/2 pound of beef.
- Veggie Booster Bowl: Stir in diced zucchini or corn with the tomatoes.
Common Mistakes to Avoid with This Dish:
- Letting the pasta overcook: It turns mushy fast once it sits in chili.
- Underseasoning the base: Tomatoes and pasta both blunt flavor, so taste at the end.
- Burning the bottom: Stir more often than you think once the macaroni is in.
8. One-Pot Beef Stroganoff
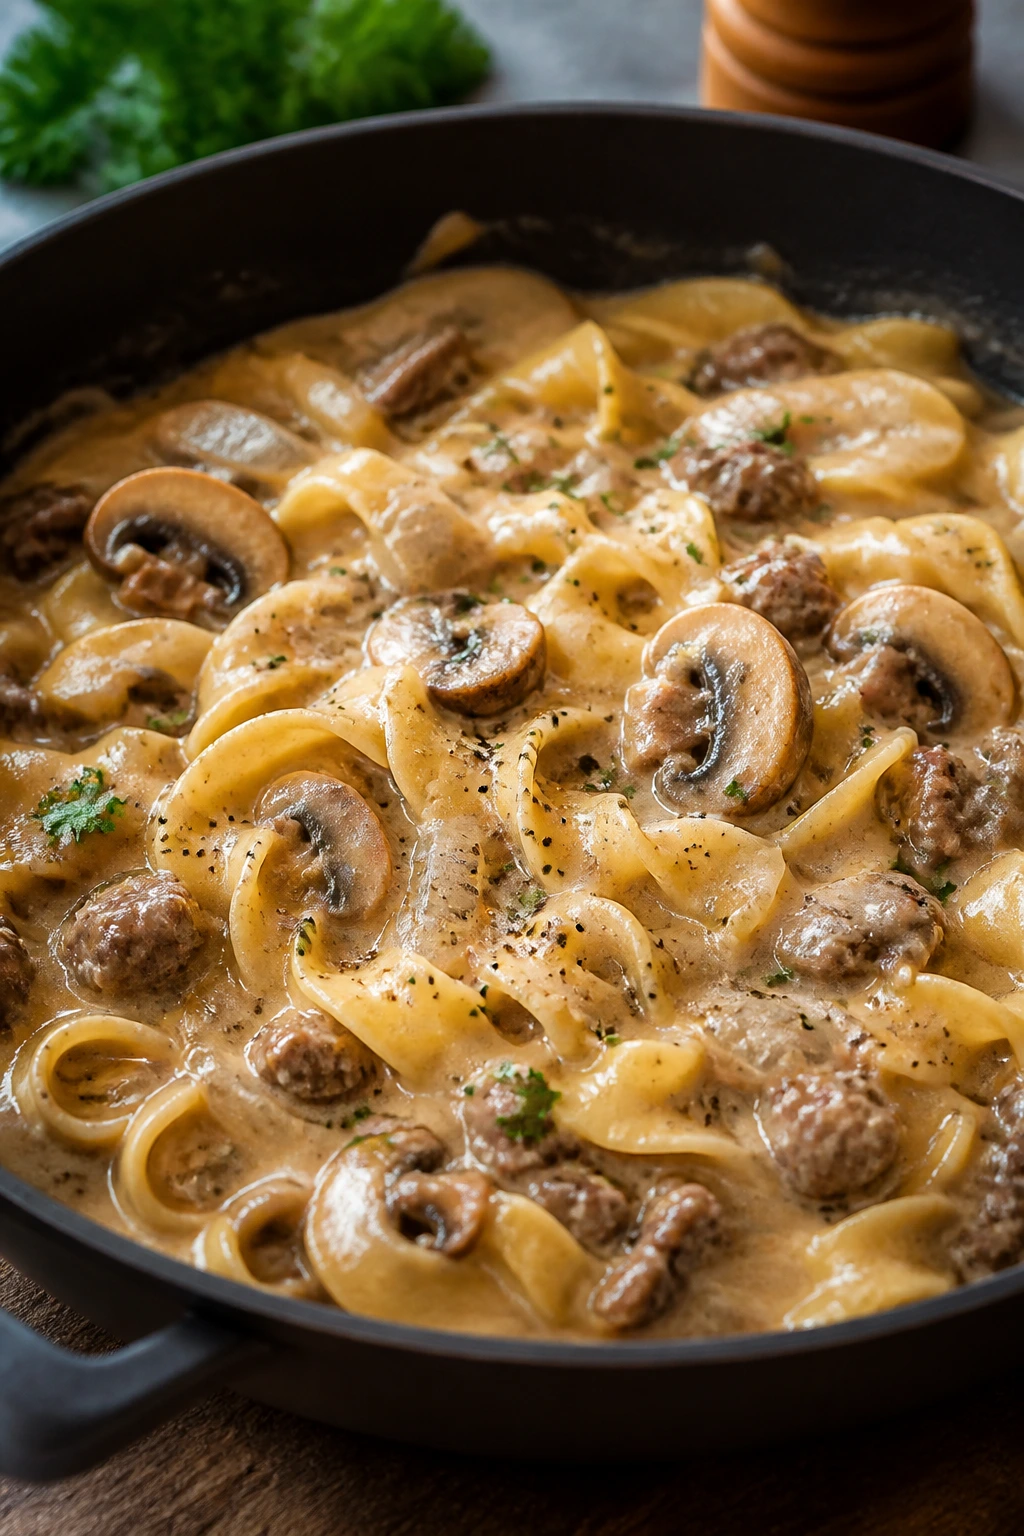
This one has a soft, creamy finish and the kind of sauce that clings to egg noodles instead of sliding off. Mushrooms and onions give it an earthy note, while sour cream at the end makes the whole thing taste like it should be eaten under a blanket.
Why It Works:
Ground beef gives stroganoff a quicker route than sliced steak, and the mushrooms do the heavy lifting on texture. The sauce only needs a short simmer, which keeps the noodles from turning ragged.
Sour cream belongs at the very end, off the heat. Put it into a boiling pot and it can split, and that’s a bad trade for a dinner this simple.
Key Ingredients:
- 1 lb ground beef — the main protein.
- 8 oz mushrooms, sliced — they carry the earthy flavor.
- 1 medium onion, diced — rounds out the sauce.
- 2 cloves garlic, minced — the aroma starts here.
- 2 tablespoons all-purpose flour — thickens the sauce.
- 2 cups beef broth — the liquid base.
- 1 tablespoon Worcestershire sauce — gives the sauce depth.
- 8 oz egg noodles — the classic noodle for stroganoff.
- 1 cup sour cream — stirred in off the heat.
- 1 teaspoon Dijon mustard — a little sharp edge goes a long way.
Quick Steps:
- Brown the beef, onion, and mushrooms in a large deep skillet over medium-high heat for 7 to 8 minutes, until the mushrooms release their liquid and start to brown.
- Stir in the garlic and flour and cook for 1 minute, coating the meat and vegetables.
- Pour in the broth, Worcestershire, Dijon, salt, and pepper. Bring to a simmer and add the egg noodles.
- Cover and cook for 8 to 10 minutes, stirring once or twice, until the noodles are tender and the sauce has thickened.
- Turn off the heat, fold in the sour cream, and let the pan sit for 2 minutes before serving.
Equipment for This Recipe:
- Large deep skillet with lid — the one-pot method depends on it.
- Wooden spoon — to keep the noodles moving.
- Measuring cups — broth and sour cream matter here.
- Knife and board — the mushrooms should be sliced evenly.
How to Serve This Dish:
Spoon it into bowls and finish with black pepper and chopped parsley. A green vegetable, especially green beans or peas, keeps the richness from taking over the plate.
Pro Tips for This Recipe:
- Brown the mushrooms well; pale mushrooms taste watery.
- Keep the sauce at a low simmer once the noodles go in.
- If the pan thickens too much, add a splash of broth before the sour cream.
- Use full-fat sour cream if you want the smoothest finish.
Variations on This Dish:
- Paprika Stroganoff: Add 1 teaspoon smoked paprika for a deeper color.
- Dill Finish: Stir in 1 tablespoon chopped dill at the end.
- No-Mushroom Version: Skip the mushrooms and add peas if the family is picky.
Common Mistakes to Avoid with This Dish:
- Adding sour cream while boiling: It can split and look grainy.
- Undercooking the mushrooms: They should lose moisture and brown a little.
- Using too little broth: The noodles need enough liquid to finish in the pot.
9. Baked Ziti with Ground Beef
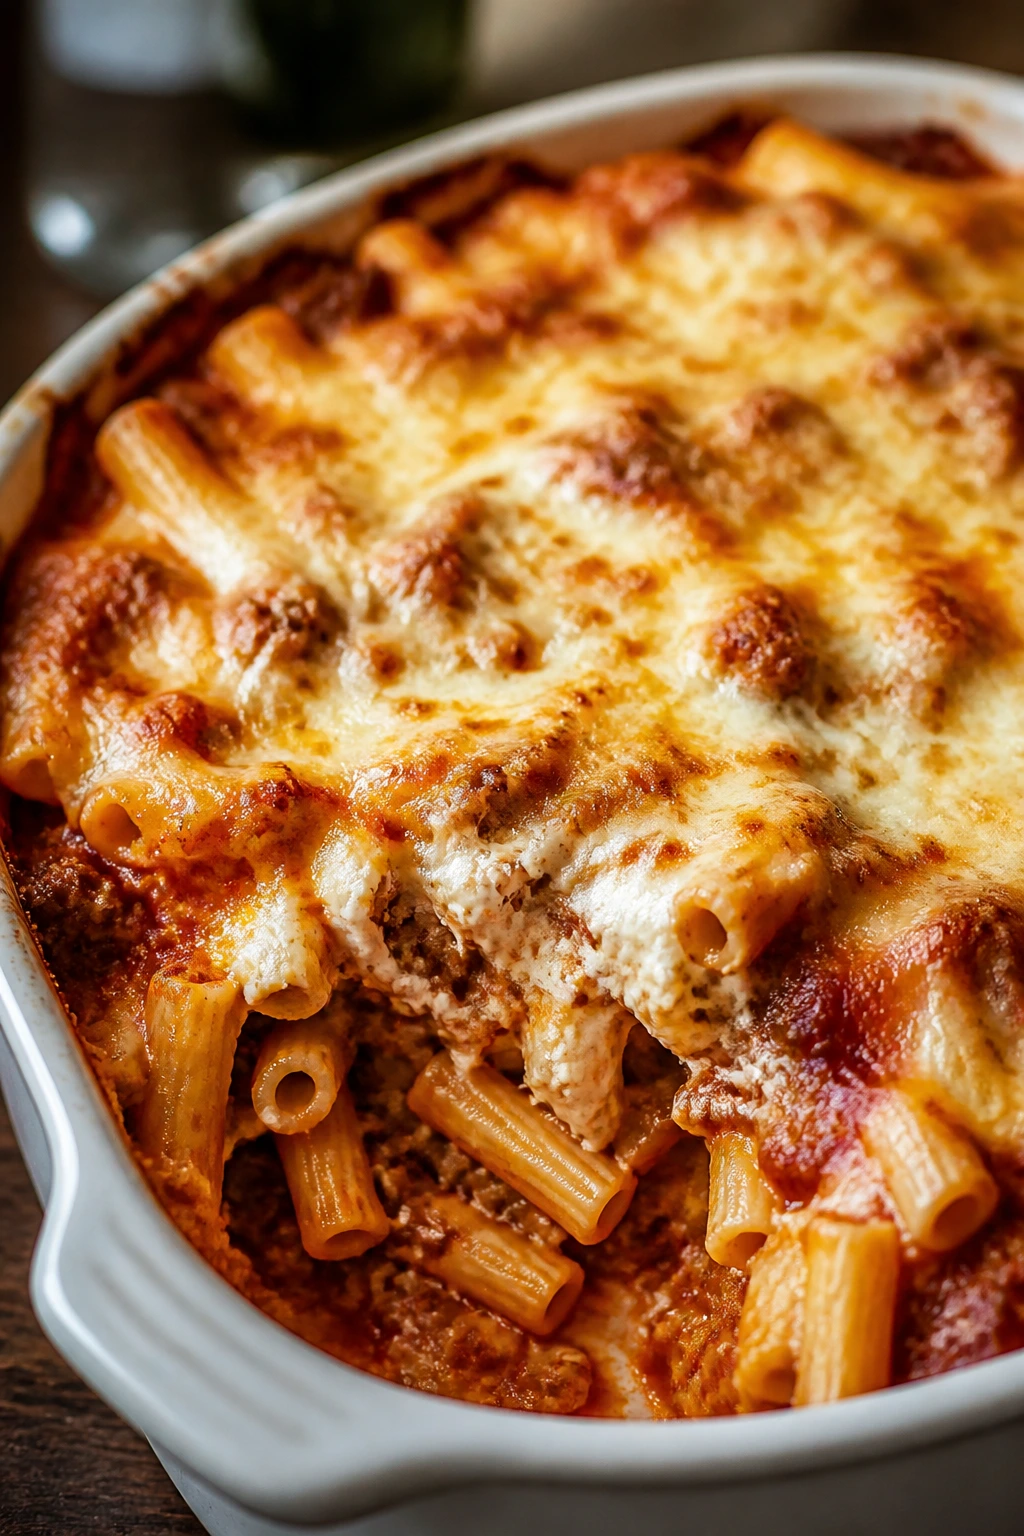
Baked ziti gives you all the things people want from lasagna without the fussy layering. The noodles sit under marinara, ricotta, and mozzarella; the top browns; the edges crisp; and the center stays saucy enough to spoon.
Why It Works:
Ground beef brings extra body to the tomato sauce, which matters because ziti has a lot of noodle surface to coat. Ricotta mixed with egg keeps the cheese layer from disappearing into the sauce during the bake.
The trick is undercooking the pasta by a minute or two. If it goes into the oven fully cooked, it can soften too far by the time the cheese browns.
Key Ingredients:
- 1 lb ground beef — the meat sauce base.
- 1 medium onion, diced — sweetens as it cooks.
- 3 cloves garlic, minced — gives the sauce lift.
- 1 jar (24 oz) marinara sauce — use one with a solid tomato flavor.
- 12 oz ziti — the classic tube pasta.
- 1 cup ricotta — makes the middle creamy.
- 1 large egg — helps the ricotta hold its shape.
- 2 cups shredded mozzarella — for the top and middle.
- 1/2 cup grated parmesan — sharpens the cheese flavor.
- 1 teaspoon Italian seasoning — ties the sauce together.
Quick Steps:
- Cook the ziti in salted water for 1 to 2 minutes less than the package says. Drain.
- Brown the beef and onion in a skillet over medium-high heat for 6 to 7 minutes, then stir in the garlic and cook for 30 seconds.
- Add the marinara and Italian seasoning and simmer for 5 minutes.
- Mix the ricotta with the egg and a pinch of salt.
- Layer half the pasta, half the meat sauce, dollops of ricotta, and half the mozzarella in a 9×13-inch dish. Repeat and finish with parmesan. Bake at 375°F (190°C) for 25 to 30 minutes until bubbling.
Equipment for This Recipe:
- Large pot — for boiling pasta.
- Skillet — for the sauce.
- 9×13-inch baking dish — for layering.
- Colander — to drain the ziti cleanly.
How to Serve This Dish:
Let it rest for 10 minutes so the layers hold together. A garlicky green salad and a slice of bread are enough to round out the plate, though I’d never argue with extra parmesan at the table.
Pro Tips for This Recipe:
- Use shredded mozzarella, not fresh balls, for a cleaner melt.
- Don’t drown the dish in sauce or it slides apart.
- If the top browns too slowly, broil it for 1 minute at the end.
- A little chopped basil after baking makes the whole pan smell fresher.
Variations on This Dish:
- Spinach Ricotta Ziti: Stir 2 cups chopped spinach into the ricotta mixture.
- Spicy Red Ziti: Add red pepper flakes to the meat sauce.
- Half-Veg Ziti: Replace half the beef with sautéed mushrooms.
Common Mistakes to Avoid with This Dish:
- Overcooking the pasta before baking: It turns soft and heavy.
- Using watery sauce: The casserole won’t hold its layers.
- Cutting immediately: The cheese needs a few minutes to settle.
10. Cabbage Roll Casserole
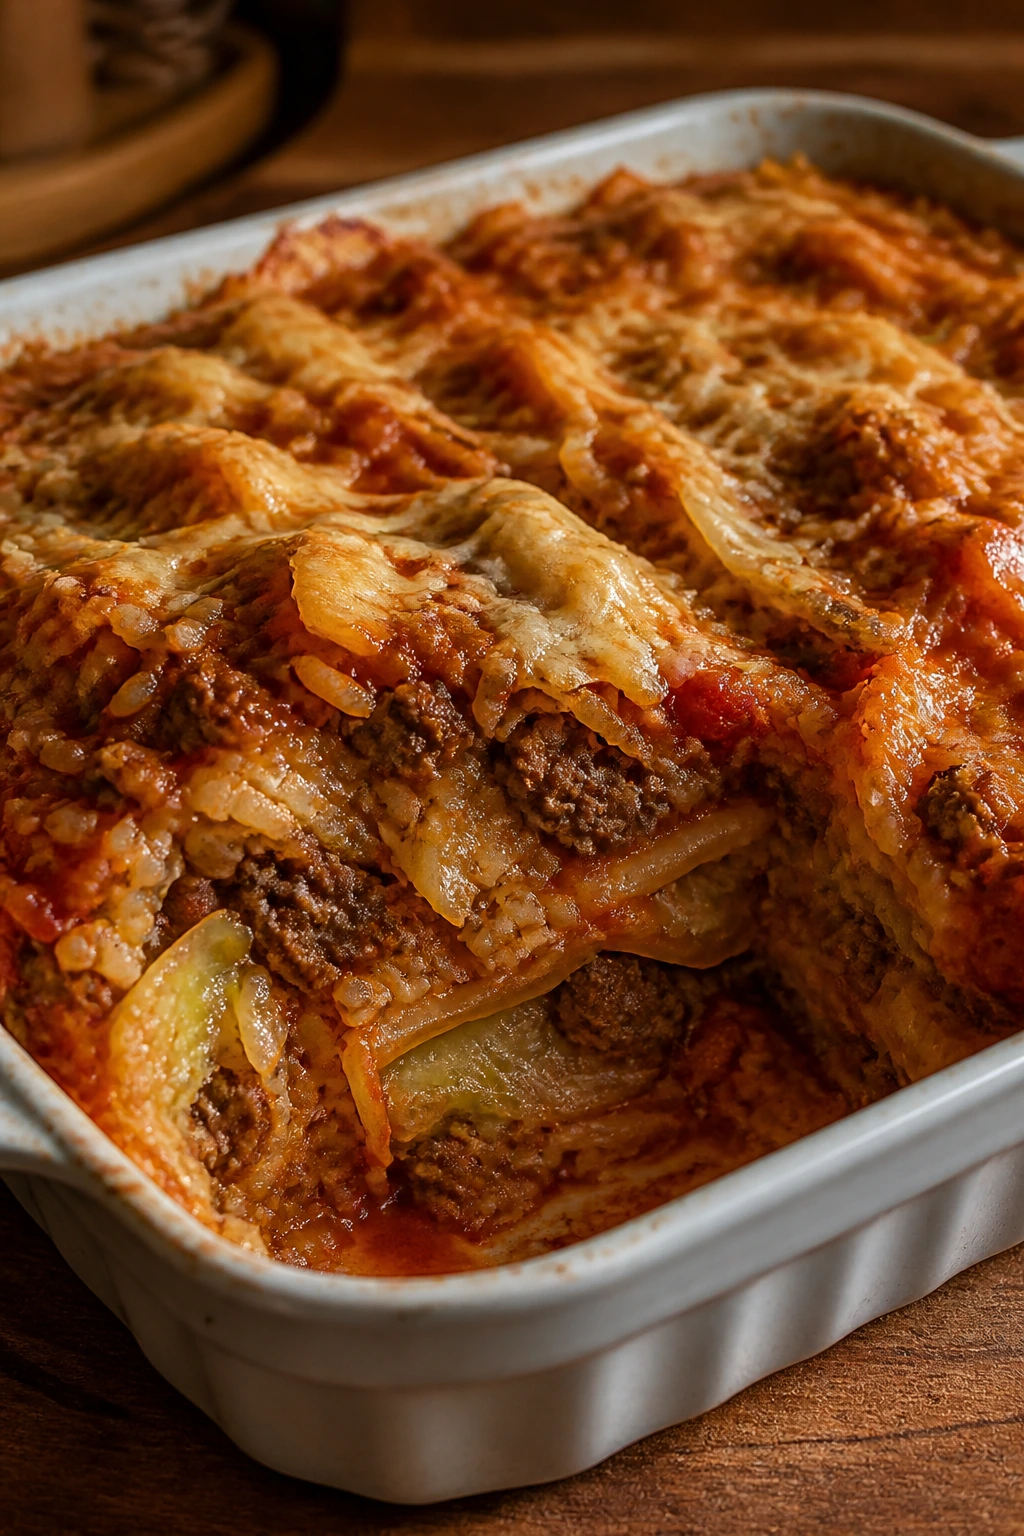
Cabbage rolls are delicious, but they can ask for more patience than a lot of families want on a random Tuesday. This casserole keeps the flavor and drops the rolling. You still get beef, rice, tomato, and tender cabbage, just in a more practical stack.
Why It Works:
Cabbage softens beautifully when it meets tomato sauce and broth, and ground beef gives the casserole enough fat to taste rich without becoming heavy. Cooked rice makes the pan feel like a complete meal, not a side dish stretched too far.
The cabbage should be cut into medium pieces, not shredded into confetti. Bigger pieces hold on to their texture and keep the casserole from becoming a mash.
Key Ingredients:
- 1 1/2 lb ground beef — enough to keep the dish hearty.
- 1 medium onion, diced — the savory start.
- 1 small head green cabbage, chopped into 2-inch pieces — the star vegetable.
- 1 cup cooked white rice — absorbs the sauce.
- 1 can (15 oz) diced tomatoes — adds juice and tomato texture.
- 1 can (15 oz) tomato sauce — smooths the casserole.
- 1 cup beef broth — helps the cabbage soften.
- 2 tablespoons Worcestershire sauce — deepens the flavor.
- 1 teaspoon paprika — adds warmth.
- Salt and black pepper — don’t be shy here.
Quick Steps:
- Preheat the oven to 350°F (175°C).
- Brown the beef and onion in a large skillet for 6 to 7 minutes, then stir in the cabbage and cook for 4 minutes until it starts to wilt.
- Add the rice, diced tomatoes, tomato sauce, broth, Worcestershire, paprika, salt, and pepper. Stir until the cabbage is coated and the mixture looks saucy.
- Transfer to a greased baking dish, cover tightly with foil, and bake for 40 minutes.
- Uncover and bake 10 more minutes until the cabbage is tender and the top looks slightly caramelized.
Equipment for This Recipe:
- Large skillet — for the base.
- Baking dish with foil — the covered bake keeps the cabbage tender.
- Wooden spoon — useful for folding the cabbage into the sauce.
- Sharp knife — cabbage cuts easier when the blade is solid.
How to Serve This Dish:
Spoon it into bowls and add a little sour cream if you want a creamy edge. Rye bread, buttered noodles, or roasted carrots all make sense alongside it.
Pro Tips for This Recipe:
- Don’t shred the cabbage too fine or it disappears.
- A small splash of vinegar at the end brightens the tomato.
- If the casserole looks dry before baking is done, add 1/4 cup broth.
- Let the dish rest before serving so the rice finishes settling.
Variations on This Dish:
- Mild Paprika Version: Keep the seasoning gentle for younger eaters.
- Sauerkraut-Style Twist: Replace 1 cup of cabbage with drained sauerkraut for a tangier version.
- Brown Rice Bake: Use cooked brown rice and add it at the end of the skillet stage.
Common Mistakes to Avoid with This Dish:
- Cutting the cabbage too small: It overcooks and turns limp.
- Skipping the foil cover: The top dries before the cabbage softens.
- Using uncooked rice without enough liquid: The center can end up crunchy.
11. Enchilada Rice Skillet
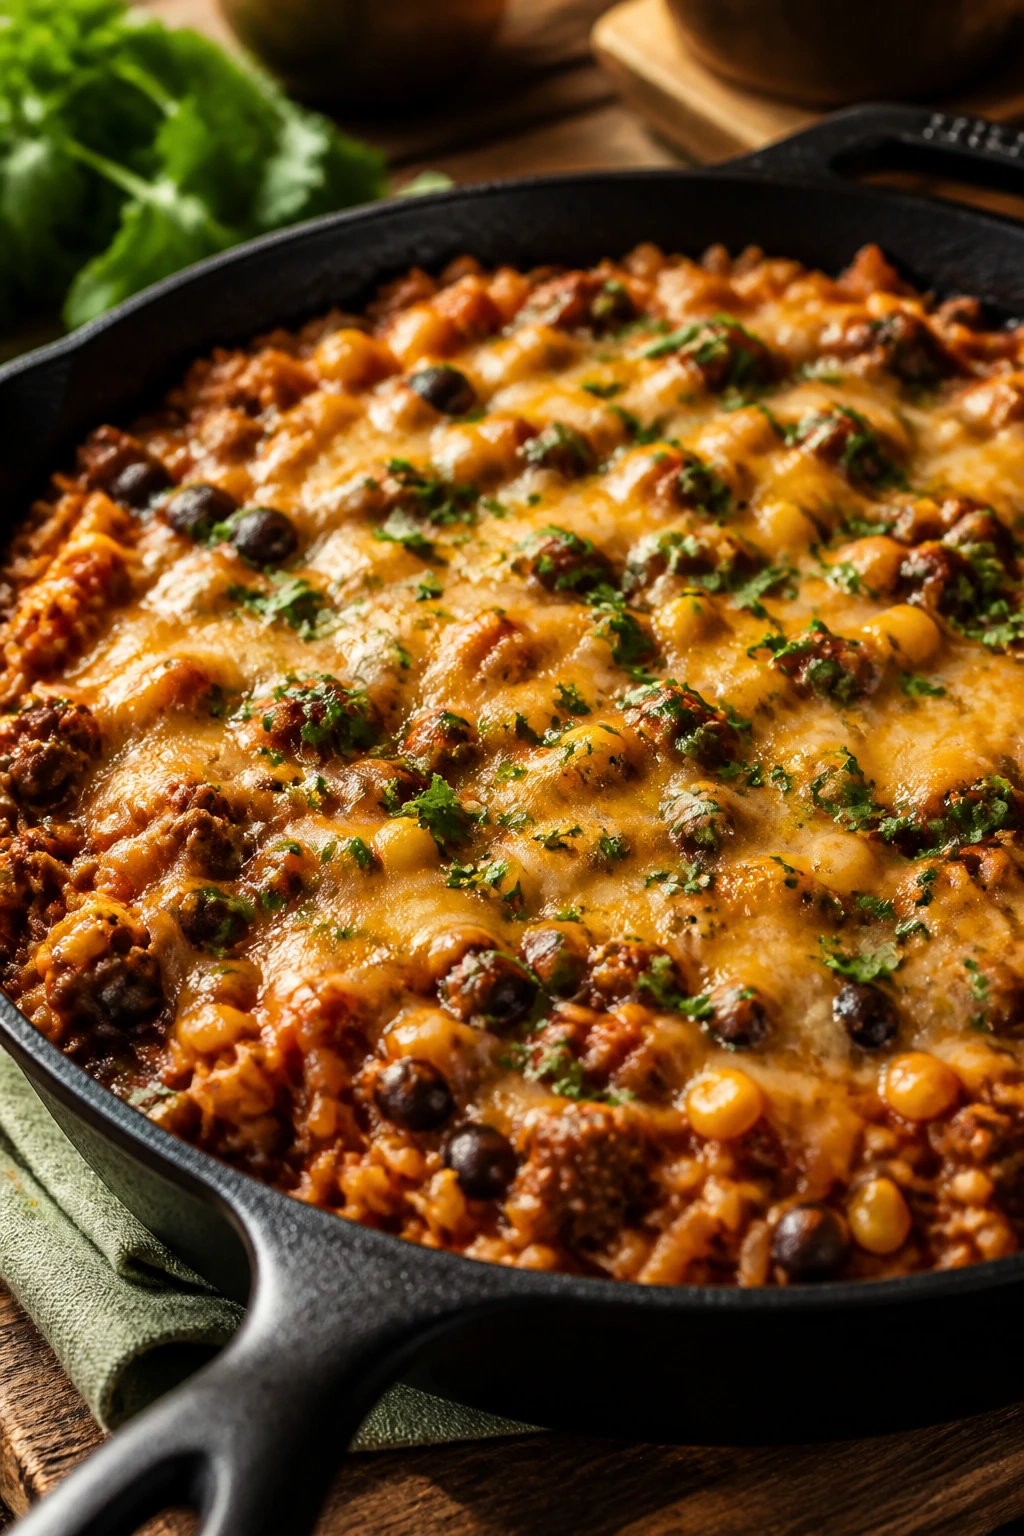
This skillet has the comfort of enchiladas without the rolling step. The rice cooks in red sauce, the beans and corn add texture, and the cheese melts over the top in one soft blanket.
Why It Works:
Rice and enchilada sauce are a natural pair because the grains absorb the chili-spiced tomato base as they cook. Ground beef adds the kind of savory depth that keeps the dish from feeling like a side masquerading as dinner.
A thick enchilada sauce matters more than people think. Thin sauce turns the skillet loose and makes the rice taste watery.
Key Ingredients:
- 1 lb ground beef — the main filling.
- 1 medium onion, diced — the first layer of flavor.
- 2 cloves garlic, minced — for aroma.
- 1 cup uncooked long-grain white rice — the base.
- 2 cups enchilada sauce — red, thick, and not too sweet.
- 2 cups beef broth — for cooking the rice.
- 1 can (15 oz) black beans, rinsed and drained — adds body.
- 1 cup corn kernels — fresh, frozen, or drained canned corn all work.
- 2 cups shredded cheddar or Monterey Jack — for the top.
- Chopped cilantro and lime wedges — for serving.
Quick Steps:
- Brown the beef and onion in a deep skillet over medium-high heat for 6 to 7 minutes.
- Stir in the garlic, rice, enchilada sauce, broth, beans, corn, salt, and pepper. Bring to a boil.
- Reduce heat, cover, and simmer for 18 to 20 minutes, stirring once halfway, until the rice is tender and most liquid is absorbed.
- Sprinkle cheese over the top, cover for 2 minutes, and let it melt.
- Finish with cilantro and lime juice.
Equipment for This Recipe:
- Deep skillet with a lid — crucial for the rice.
- Measuring cup — for the broth and rice.
- Wooden spoon — to keep the bottom from sticking.
- Citrus squeezer — optional, but helpful for limes.
How to Serve This Dish:
Scoop it into bowls and add a spoonful of sour cream if you want a cooler finish. Tortilla chips on the side make sense, but a simple romaine salad with lime dressing works too.
Pro Tips for This Recipe:
- Keep the simmer low so the rice cooks evenly.
- If the skillet gets dry before the rice is tender, add a splash more broth.
- A handful of sliced scallions gives the top a fresh edge.
- Stir once, not constantly, or the rice gets sticky.
Variations on This Dish:
- Green Enchilada Version: Use green sauce and pepper jack.
- Bean-Heavy Skillet: Add an extra can of beans and use less beef.
- Fajita Twist: Stir in sliced bell peppers with the onion.
Common Mistakes to Avoid with This Dish:
- Using thin sauce: It makes the rice mushy and the flavor weak.
- Stirring too often: The rice can break down and clump.
- Adding cheese before the rice is done: It can stick and scorch on the bottom.
12. Hamburger Soup with Veg and Potatoes
Hamburger soup is humble in the best possible way. It smells like carrots, celery, tomatoes, and beef broth simmering together, and by the time the potatoes are tender, the pot tastes like it’s been on the stove for hours even when it hasn’t.
Why It Works:
The soup is built on big, sturdy vegetables that can take a simmer without collapsing. Ground beef adds body quickly, which means you don’t need bones or stock-making to get a rich broth.
A little pasta at the end is optional, but it turns the bowl from “nice soup” into “we might not need seconds, but we probably will.”
Key Ingredients:
- 1 lb ground beef — the base of the soup.
- 1 medium onion, diced — the first aromatic.
- 2 carrots, peeled and sliced — for sweetness.
- 2 celery stalks, sliced — for the classic soup backbone.
- 2 medium potatoes, diced — make it filling.
- 1 can (14.5 oz) diced tomatoes — brings acidity.
- 6 cups beef broth — the main liquid.
- 1 cup frozen peas — stir in near the end.
- 1 teaspoon dried thyme — works especially well with potatoes.
- 1 bay leaf — adds a soft herbal note.
- 1/2 cup small pasta, optional — only if you want a fuller bowl.
Quick Steps:
- Brown the beef and onion in a soup pot over medium-high heat for 6 to 7 minutes.
- Add the carrots, celery, potatoes, diced tomatoes, broth, thyme, bay leaf, salt, and pepper. Bring to a boil.
- Reduce to a simmer and cook for 20 to 25 minutes, until the potatoes are tender and the carrots have some give.
- Stir in the peas and optional pasta, then simmer 8 more minutes if using pasta, until tender.
- Remove the bay leaf and serve hot.
Equipment for This Recipe:
- Large soup pot or Dutch oven — enough room for the vegetables.
- Sharp knife — the dice should be fairly even.
- Wooden spoon — for stirring the bottom.
- Ladle — soup deserves it.
How to Serve This Dish:
Ladle it into big bowls and finish with black pepper or a sprinkle of parsley. Crackers, bread, or buttered toast all work, but the soup is solid enough to stand alone.
Pro Tips for This Recipe:
- Cut the potatoes into small, even cubes so they cook at the same pace.
- If the soup tastes thin, simmer uncovered for 5 extra minutes.
- A spoonful of tomato paste can deepen the broth if you want more body.
- Add the peas near the end so they stay bright and sweet.
Variations on This Dish:
- No-Pasta Version: Skip the pasta and add an extra potato.
- Tomato-Rich Bowl: Stir in 1 tablespoon tomato paste with the broth.
- Barley Swap: Use pearled barley instead of pasta for a chewier soup.
Common Mistakes to Avoid with This Dish:
- Cooking the pasta too long: It can vanish into the broth.
- Leaving the soup underseasoned: Potatoes soak up salt, so taste before serving.
- Cutting vegetables unevenly: Some turn mushy while others stay hard.
13. Korean Beef Rice Bowls
Sweet, salty, garlicky, and fast. That’s the whole charm. The beef gets coated in a soy-sesame sauce that clings to hot rice, and the cool cucumber on top keeps each bite from getting heavy.
Why It Works:
Ground beef takes Korean-style seasoning well because the crumbles pick up sauce on every surface. Brown sugar and soy bring the balance, while sesame oil adds the nutty finish that makes the bowl taste intentional instead of thrown together.
The bowl needs something crisp on top. Cucumber, scallions, or sesame seeds all help, and honestly, I’d use at least two of them.
Key Ingredients:
- 1 lb ground beef — the main component.
- 3 cloves garlic, minced — essential here.
- 1 tablespoon fresh ginger, grated — gives the sauce lift.
- 1/4 cup soy sauce — the salty base.
- 2 tablespoons brown sugar — for the sweet edge.
- 1 tablespoon sesame oil — don’t skip it.
- 1/2 teaspoon red pepper flakes — enough for warmth, not a burn.
- 3 cups cooked rice — white or brown.
- 2 scallions, sliced — for freshness.
- 1 small cucumber, thinly sliced — the crisp contrast.
- 1 tablespoon sesame seeds — a simple finish.
Quick Steps:
- Brown the beef in a skillet over medium-high heat for 5 to 6 minutes, breaking it into fine crumbles.
- Add the garlic and ginger and cook for 30 seconds until fragrant.
- Stir in soy sauce, brown sugar, sesame oil, and red pepper flakes. Simmer 2 to 3 minutes until the sauce coats the beef and looks shiny.
- Spoon the beef over hot rice.
- Top with scallions, cucumber, and sesame seeds.
Equipment for This Recipe:
- Large skillet — quick browning matters.
- Rice cooker or pot — whichever you already use.
- Microplane or grater — for the ginger.
- Sharp knife — for thin cucumber slices.
How to Serve This Dish:
Build the bowls at the table if you want to keep the cucumber crisp. A fried egg on top is optional, but it does make the bowl feel fuller and the yolk adds a nice sauce of its own.
Pro Tips for This Recipe:
- Cook the beef until some edges get a little browned; that’s where the flavor sits.
- If you like more sauce, add 2 tablespoons water with the soy mixture.
- Thin cucumber slices work better than chunks because they stay crisp without stealing the bite.
- A tiny splash of rice vinegar at the end brightens the bowl.
Variations on This Dish:
- Gochujang Heat: Stir in 1 tablespoon gochujang for deeper spice.
- Lettuce Cup Version: Serve the beef in butter lettuce instead of rice.
- Sesame Mushroom Bowl: Add sliced mushrooms with the beef for more bulk.
Common Mistakes to Avoid with This Dish:
- Using too much sugar: The sauce turns sticky-sweet instead of balanced.
- Over-reducing the sauce: It can turn pasty if you cook it too long.
- Skipping the fresh topping: Without cucumber or scallion, the bowl eats heavy.
14. Ground Beef Fried Rice
This is the rescue dinner you make when the rice in the fridge needs a job. The grains stay separate, the beef turns savory, the eggs thread through the pan, and the soy-sesame finish gives the whole thing the right kind of salt.
Why It Works:
Day-old rice is the key because dry grains fry instead of steaming. Ground beef cooks fast enough to keep the whole pan moving, and the vegetables add just enough color to make it feel complete.
You want a hot pan here. If the skillet is too cool, the rice clumps and you end up with a dense, mushy mess that tastes like yesterday’s leftovers wearing makeup.
Key Ingredients:
- 1 lb ground beef — the protein and the flavor.
- 4 cups cold cooked rice — preferably day-old.
- 2 large eggs, beaten — adds richness and helps the rice coat.
- 1 small onion, diced — the aromatic start.
- 1 cup frozen peas and carrots — easy and classic.
- 2 cloves garlic, minced — keeps the pan from tasting flat.
- 3 tablespoons soy sauce — enough to season without drowning.
- 1 tablespoon sesame oil — added at the end.
- 2 scallions, sliced — for the finish.
Quick Steps:
- Heat a large skillet or wok over medium-high heat and brown the beef for 5 to 6 minutes.
- Push the beef to one side, add the eggs to the empty space, and scramble until just set.
- Stir in the onion, peas, carrots, and garlic, cooking for 2 minutes until the vegetables thaw and the onion softens.
- Add the rice and soy sauce, breaking up any clumps and stir-frying for 3 to 4 minutes until the grains are hot and lightly toasted.
- Finish with sesame oil and scallions.
Equipment for This Recipe:
- Large skillet or wok — the wider the better.
- Spatula — for tossing rice without crushing it.
- Bowl for beaten eggs — keeps the sequence clean.
- Rice paddle, optional — helpful if your rice clumps.
How to Serve This Dish:
Serve it straight from the pan with extra scallions and maybe a little sriracha at the table. It’s already a full meal, but a side of simple steamed broccoli gives the plate some balance.
Pro Tips for This Recipe:
- Cold rice is non-negotiable if you want the grains to stay separate.
- Don’t dump in the soy sauce all at once; add it around the edges of the pan.
- A little butter at the end gives the rice a softer finish if you like that style.
- Keep the heat high enough that the rice sizzles instead of steaming.
Variations on This Dish:
- Kimchi Fried Rice: Stir in chopped kimchi for heat and acidity.
- Pineapple Fried Rice: Add small pineapple pieces near the end for sweetness.
- Egg-Light Version: Skip the eggs and add extra peas or diced carrots.
Common Mistakes to Avoid with This Dish:
- Using warm rice: It clumps and turns soft.
- Overcrowding the pan: The rice steams instead of frying.
- Adding too much soy sauce: The dish gets dark and salty fast.
15. Creamy Beef and Egg Noodles
This is plain comfort, and I mean that as a compliment. The sauce is creamy without being heavy, the noodles stay tender, and the beef gives the whole bowl enough salt and body to feel like real dinner instead of a side dish stretched out.
Why It Works:
Egg noodles are fast and forgiving, which makes them a good partner for ground beef. A simple flour-thickened broth turns into sauce quickly, and a little sour cream at the end gives the pan a soft tang.
This recipe is a little less assertive than stroganoff and a little more family-dinner quiet. It’s the one you make when you want the table to go calm.
Key Ingredients:
- 1 lb ground beef — the savory core.
- 1 medium onion, diced — for sweetness.
- 2 cloves garlic, minced — the background note.
- 2 tablespoons all-purpose flour — thickens the sauce.
- 3 cups beef broth — the sauce base.
- 1/2 cup milk — softens the broth into a creamy sauce.
- 8 oz egg noodles — cooks right in the pan.
- 1 cup frozen peas — adds color and a little sweetness.
- 1/2 cup sour cream — stirred in at the end.
- 2 tablespoons chopped parsley — for a fresh finish.
Quick Steps:
- Brown the beef and onion in a deep skillet over medium-high heat for 6 to 7 minutes.
- Stir in the garlic and flour and cook for 1 minute until the flour disappears into the fat.
- Pour in the broth and milk, scraping up any browned bits, then add the egg noodles.
- Simmer covered for 8 to 10 minutes, stirring once or twice, until the noodles are tender and the sauce thickens. Stir in the peas for the last 2 minutes.
- Turn off the heat, fold in the sour cream, and garnish with parsley.
Equipment for This Recipe:
- Deep skillet with lid — so the noodles can cook right in the sauce.
- Wooden spoon — useful for scraping the bottom.
- Measuring cups — the broth and milk matter.
- Colander, optional — if you decide to cook noodles separately.
How to Serve This Dish:
Serve it in bowls with a little black pepper on top. A cucumber salad or roasted green beans adds a cold or crisp edge, which helps more than it sounds like it should.
Pro Tips for This Recipe:
- Let the flour cook for a full minute so the sauce doesn’t taste dusty.
- If the noodles drink too much liquid, add a splash of broth before the sour cream.
- Don’t boil after adding sour cream or the sauce can split.
- Fresh parsley matters here more than you might expect.
Variations on This Dish:
- Mushroom Cream Version: Add 8 oz sliced mushrooms with the onion.
- Cheddar Noodle Twist: Stir in 1 cup shredded cheddar at the end.
- Mustard Cream Style: Add 1 teaspoon Dijon for a sharper finish.
Common Mistakes to Avoid with This Dish:
- Letting the noodles overcook: They go from tender to soft fast.
- Adding sour cream over high heat: The sauce can break.
- Using too little salt: The creamy base needs seasoning to wake up.
16. Swedish Meatballs and Gravy
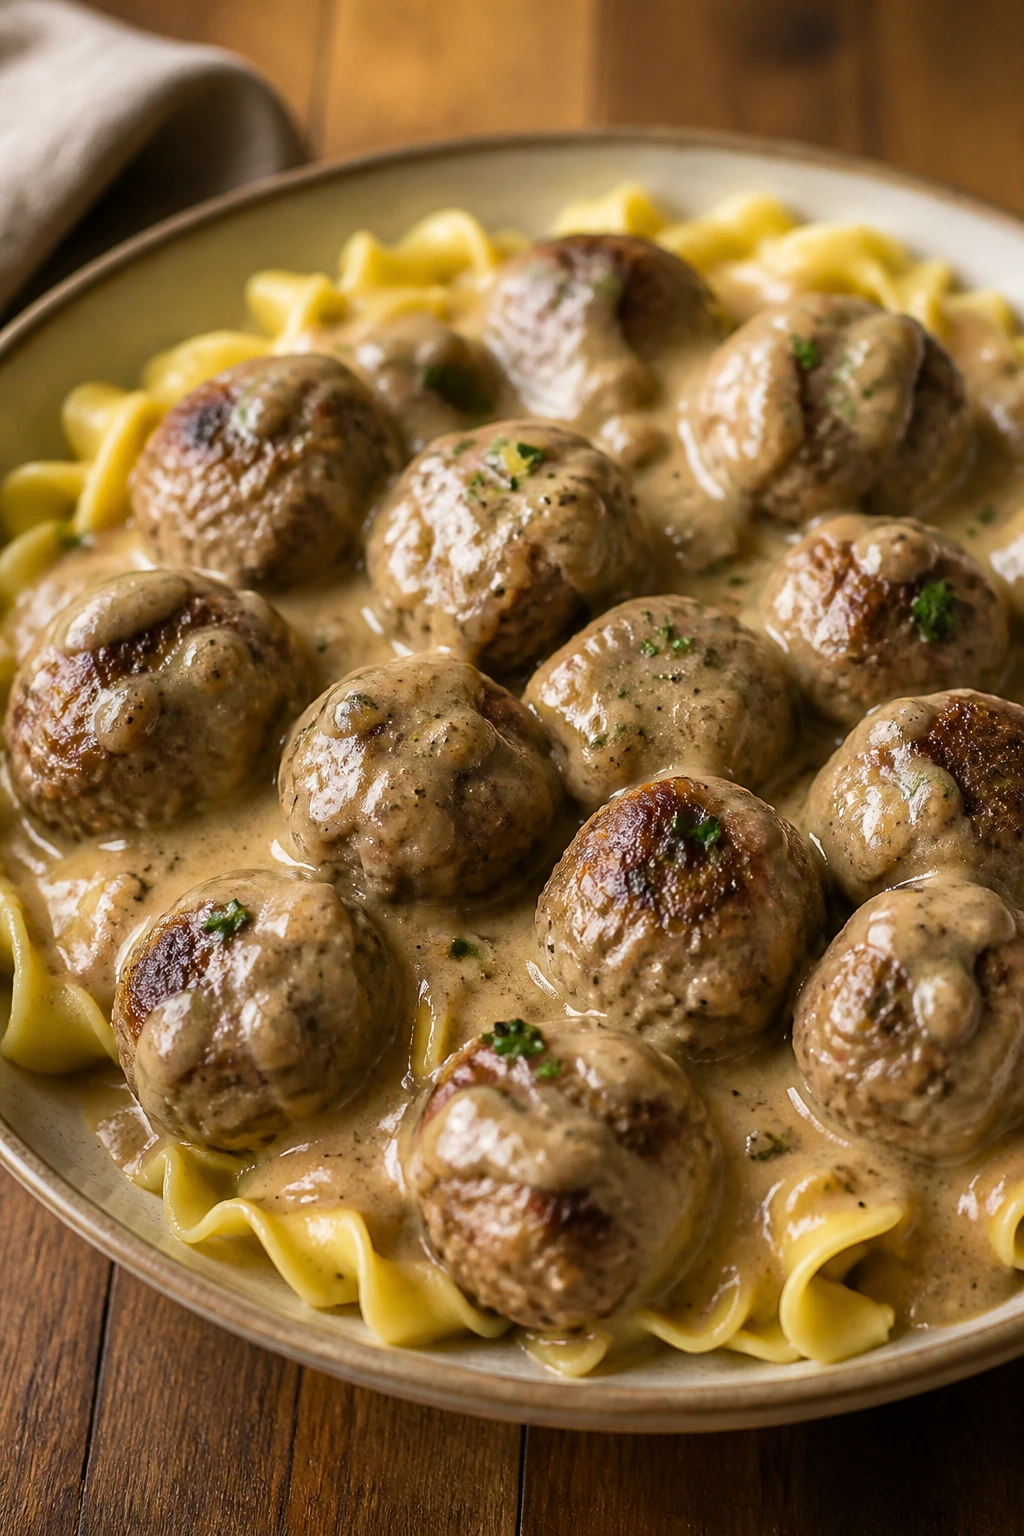
These meatballs are small, tender, and built for gravy. The sauce should be pale, peppery, and smooth, the kind that coats noodles without feeling thick and heavy. It’s a different kind of beef dinner, but still the sort families tend to clear.
Why It Works:
Ground beef needs breadcrumbs, egg, and milk to stay soft once it cooks, and Swedish meatballs lean into that. A touch of allspice or nutmeg gives the dish its signature flavor without turning it sweet.
The gravy comes together from the browned bits left in the pan. That’s the good stuff. Don’t waste it.
Key Ingredients:
- 1 1/2 lb ground beef — enough for a generous batch.
- 1/2 cup breadcrumbs — for tenderness.
- 1/4 cup whole milk — moistens the crumbs.
- 1 large egg — binds the meatballs.
- 1 small onion, finely grated — disappears into the mix.
- 1/2 teaspoon ground allspice — classic here.
- 1/4 teaspoon nutmeg — use a light hand.
- 2 tablespoons butter — for the gravy.
- 2 tablespoons flour — thickens the sauce.
- 2 cups beef broth — builds the gravy.
- 1/2 cup cream or milk — softens the gravy.
- 8 oz egg noodles, for serving — the usual partner.
Quick Steps:
- Mix the breadcrumbs and milk in a bowl and let them sit 2 minutes. Add the beef, egg, onion, allspice, nutmeg, salt, and pepper, then form into 1 1/2-inch meatballs.
- Brown the meatballs in a large skillet over medium heat for 6 to 8 minutes, turning carefully until they’re browned on all sides. Remove to a plate.
- Melt the butter in the same skillet, whisk in the flour, and cook for 1 minute.
- Slowly whisk in the broth and cream, then simmer until the gravy is smooth and lightly thickened. Return the meatballs and cook 5 minutes more.
- Serve over hot egg noodles.
Equipment for This Recipe:
- Large skillet — for browning and gravy.
- Mixing bowl — for the meatball mix.
- Small scoop or spoon — helps keep the meatballs even.
- Whisk — essential for the gravy.
How to Serve This Dish:
Lay the meatballs over buttered egg noodles and spoon gravy over the top. Lingonberry jam is traditional, but a spoonful of cranberry sauce can give you a similar sweet-tart contrast if that’s what you have.
Pro Tips for This Recipe:
- Keep the meatballs small so they cook through evenly.
- Don’t make the gravy too dark; Swedish-style gravy should stay light.
- If the mix feels sticky, wet your hands with cold water before rolling.
- Let the browned bits stay in the pan—they’re the flavor base.
Variations on This Dish:
- Creamy Mushroom Gravy: Add sliced mushrooms after the butter melts.
- Mashed Potato Version: Serve the meatballs over mashed potatoes instead of noodles.
- Turkey-Beef Blend: Use half turkey if you want a lighter batch.
Common Mistakes to Avoid with This Dish:
- Packing the meatballs too tightly: They turn dense.
- Boiling the gravy hard: It can get grainy.
- Skipping the browning step: The sauce loses depth.
17. Picadillo with Olives and Raisins

Picadillo lives in that lovely zone where savory and sweet share the same spoon. The beef is tomato-rich, the olives bring salt, the raisins soften into little bursts, and the potatoes make it feel grounded enough for a full dinner.
Why It Works:
This dish depends on contrast. Ground beef gives you the meat, but the olives, raisins, and cinnamon create the sweet-salty balance that keeps picadillo from tasting like ordinary beef stew.
Potatoes are worth including because they absorb the sauce and make every spoonful feel complete. Cut them small so they can cook in the same time as the beef.
Key Ingredients:
- 1 1/2 lb ground beef — enough to anchor the dish.
- 1 medium onion, diced — the aromatic base.
- 3 cloves garlic, minced — because the dish needs it.
- 2 medium potatoes, peeled and diced small — they soak up the sauce.
- 1 can (14.5 oz) diced tomatoes — adds juice and acidity.
- 1/2 cup tomato sauce — thickens the pot.
- 1/3 cup green olives, sliced — the salty edge.
- 1/4 cup raisins — the sweet counterpoint.
- 1 teaspoon ground cumin — essential spice.
- 1/4 teaspoon cinnamon — keep it subtle.
- 1 tablespoon vinegar — brightens the finish.
Quick Steps:
- Brown the beef and onion in a wide skillet or Dutch oven for 6 to 7 minutes.
- Add the garlic and potatoes and cook for 3 minutes, stirring often.
- Stir in the tomatoes, tomato sauce, cumin, cinnamon, salt, and pepper. Add a splash of water if the pan looks dry.
- Cover and simmer for 15 to 18 minutes, until the potatoes are tender and the sauce thickens. Stir in the olives, raisins, and vinegar for the last 2 minutes.
- Serve over rice.
Equipment for This Recipe:
- Wide skillet or Dutch oven — the potatoes need room.
- Sharp knife — for small, even cubes.
- Wooden spoon — for folding in the olives and raisins.
- Lid — to help the potatoes steam through.
How to Serve This Dish:
Pile picadillo over white rice and spoon some of the tomato sauce around the edges. A sliced avocado or a quick salad on the side cools the sweet-salty mix and makes the plate feel rounder.
Pro Tips for This Recipe:
- Keep the raisins from scorching by adding them near the end.
- A splash of vinegar matters more than you’d think; it sharpens everything.
- If the potatoes are still firm, add 2 tablespoons water and keep simmering.
- Small potato dice cook faster and hold the sauce better.
Variations on This Dish:
- No-Raisin Picadillo: Skip the raisins if your crowd prefers a purely savory pan.
- Extra-Bean Version: Stir in 1 cup cooked black beans near the end.
- Spicy Tomato Picadillo: Add a chopped chipotle pepper for heat.
Common Mistakes to Avoid with This Dish:
- Using too much cinnamon: The dish starts tasting like dessert.
- Cutting the potatoes too large: They won’t finish on time.
- Forgetting the acid: Without vinegar, the flavors stay flat.
18. Tater Tot Casserole
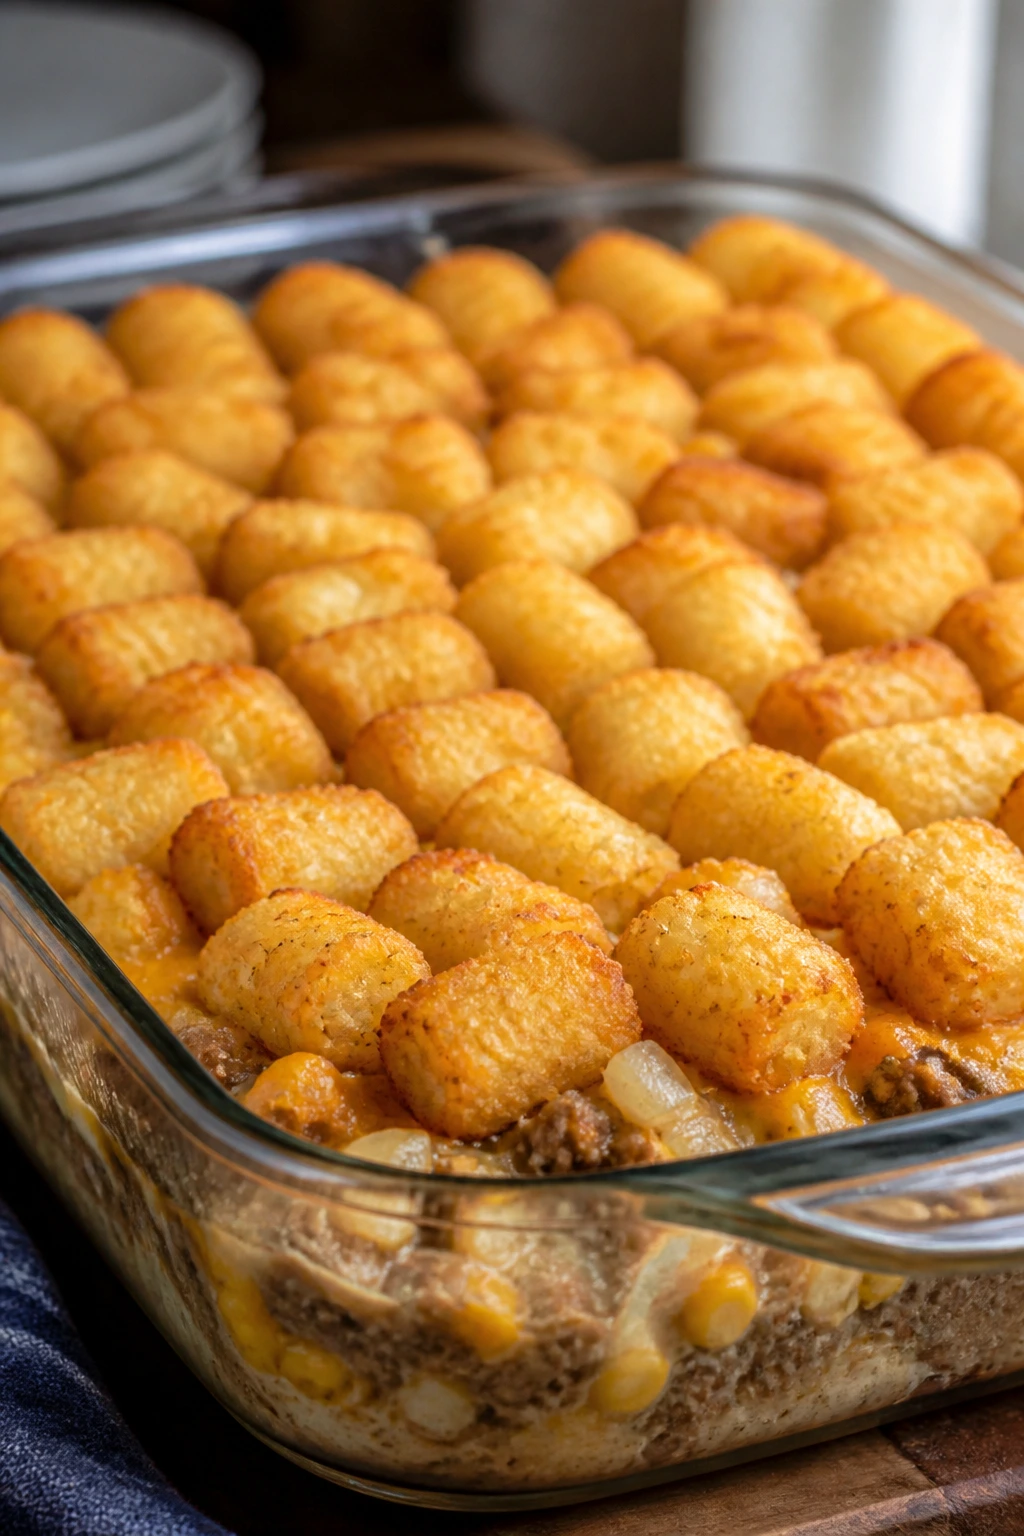
This is the casserole that never pretends to be elegant. It’s beef, sauce, corn, cheese, and a top layer of tater tots that bakes into a rough, crunchy lid. And that crunch matters.
Why It Works:
Tater tots add texture in a way mashed potatoes can’t. The beef mixture underneath should be thick and savory so it supports the crispy top instead of steaming it from below.
Canned soup works here if you use it sparingly, but the pan still benefits from onion and Worcestershire. A little real seasoning keeps the casserole from tasting like a freezer aisle shortcut.
Key Ingredients:
- 1 lb ground beef — the base layer.
- 1 small onion, diced — for flavor.
- 1 can (10.5 oz) cream of mushroom soup — the creamy binder.
- 1/2 cup milk — loosens the soup.
- 1 cup frozen corn — adds sweetness and texture.
- 1 tablespoon Worcestershire sauce — keeps the flavor grounded.
- 1 teaspoon garlic powder — easy background seasoning.
- 2 cups shredded cheddar — between the layers and on top.
- 1 bag frozen tater tots, about 32 oz — the crown.
Quick Steps:
- Preheat the oven to 400°F (205°C) and grease a 9×13-inch dish.
- Brown the beef and onion in a skillet for 6 to 7 minutes. Stir in the soup, milk, corn, Worcestershire, garlic powder, salt, and pepper.
- Spread the beef mixture in the baking dish and sprinkle 1 cup of the cheese over it.
- Arrange the tater tots in a single layer on top. Bake for 30 minutes.
- Sprinkle the remaining cheese over the tots and bake 5 to 10 minutes more, until the cheese melts and the tots look crisp.
Equipment for This Recipe:
- 9×13-inch baking dish — standard casserole size.
- Skillet — for the beef mixture.
- Spatula — for spreading the filling.
- Foil, optional — if the tots brown too fast.
How to Serve This Dish:
Serve it straight from the dish with a spoon, not a knife, because the tots stay a little loose on top. A green salad or steamed broccoli helps cut through the richness.
Pro Tips for This Recipe:
- Make the beef base thicker than you think; it loosens in the oven.
- Keep the tater tots in one layer so they crisp.
- Let the casserole sit 5 to 10 minutes before serving.
- A little chopped chive on top gives the plate color.
Variations on This Dish:
- Green Bean Version: Replace corn with green beans.
- Ranch Tot Bake: Add 1 teaspoon ranch seasoning to the beef mixture.
- Spicy Cheese Top: Use pepper jack instead of cheddar.
Common Mistakes to Avoid with This Dish:
- Too much liquid in the filling: The tots steam instead of crisp.
- Crowding the tots: They won’t brown properly.
- Serving immediately: The casserole needs a short rest to settle.
19. Ground Beef and Potato Skillet
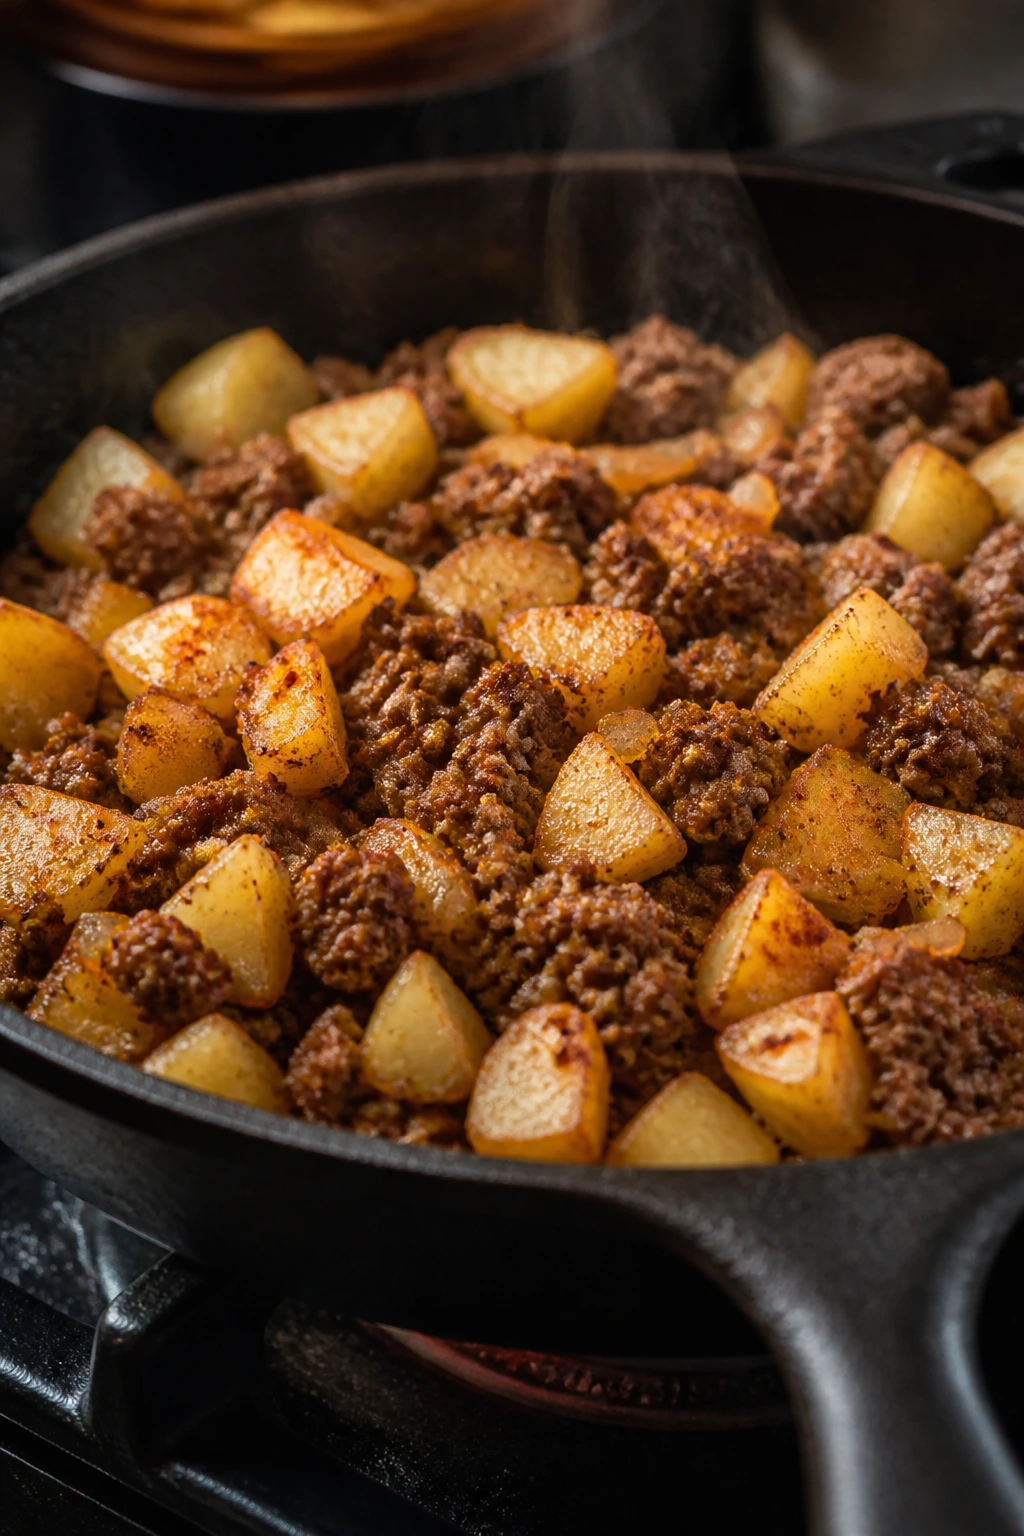
Potatoes and beef have been sharing dinner plates forever because they know how to make each other taste better. Here the potatoes get browned first, then the beef joins in, and the whole skillet ends up rustic, salty, and satisfying in a very direct way.
Why It Works:
Potatoes need space and heat to brown; beef needs the same skillet once the potatoes have some color. Doing them in stages keeps both textures intact, which matters more than people think.
A little paprika and broth help the pan taste finished instead of like two ingredients that happened to meet.
Key Ingredients:
- 1 lb ground beef — the main protein.
- 2 medium Yukon Gold potatoes, diced small — they brown and soften well.
- 1 medium onion, diced — the flavor bridge.
- 1 bell pepper, diced — for color and a little sweetness.
- 2 cloves garlic, minced — always useful here.
- 1 teaspoon smoked paprika — gives the skillet a warm edge.
- 1/2 cup beef broth — loosens the pan and helps the potatoes finish.
- 1 cup frozen peas — stir in at the end.
- 1 tablespoon chopped parsley — for freshness.
- Salt and black pepper — enough to wake the potatoes up.
Quick Steps:
- Heat oil in a large skillet over medium-high heat and cook the potatoes for 8 to 10 minutes, stirring occasionally, until golden at the edges.
- Add the onion and bell pepper and cook for 3 minutes until softened.
- Stir in the beef and garlic and cook for 6 minutes, breaking the meat into crumbles.
- Add the paprika, broth, salt, and pepper, then cover and simmer for 5 minutes until the potatoes are tender and the broth mostly cooks down.
- Stir in peas and parsley, then serve hot.
Equipment for This Recipe:
- Large skillet with lid — the potatoes need steam after browning.
- Spatula — for turning the potato cubes.
- Knife and cutting board — even dice keep the skillet moving.
- Wooden spoon — for the final stir.
How to Serve This Dish:
Serve it as-is in shallow bowls or top it with a fried egg if you want the yolk to make its own sauce. Hot sauce on the table is a good idea, and so is a spoonful of sour cream.
Pro Tips for This Recipe:
- Dice the potatoes small so they brown fast and finish in the same pan.
- Don’t stir too often during the first browning stage.
- A pinch of thyme works if you want a more stew-like flavor.
- If the pan sticks, a splash more broth loosens it without washing away flavor.
Variations on This Dish:
- Breakfast-Style Skillet: Add a fried egg on each portion.
- Cheddar Potato Skillet: Melt cheddar over the top at the end.
- Herb-Roasted Version: Add rosemary and thyme instead of paprika.
Common Mistakes to Avoid with This Dish:
- Cutting the potatoes too big: They take too long and the beef overcooks.
- Skipping the browning step: The skillet tastes boiled.
- Adding too much broth: The potatoes lose their crisp edges.
20. Lasagna Soup
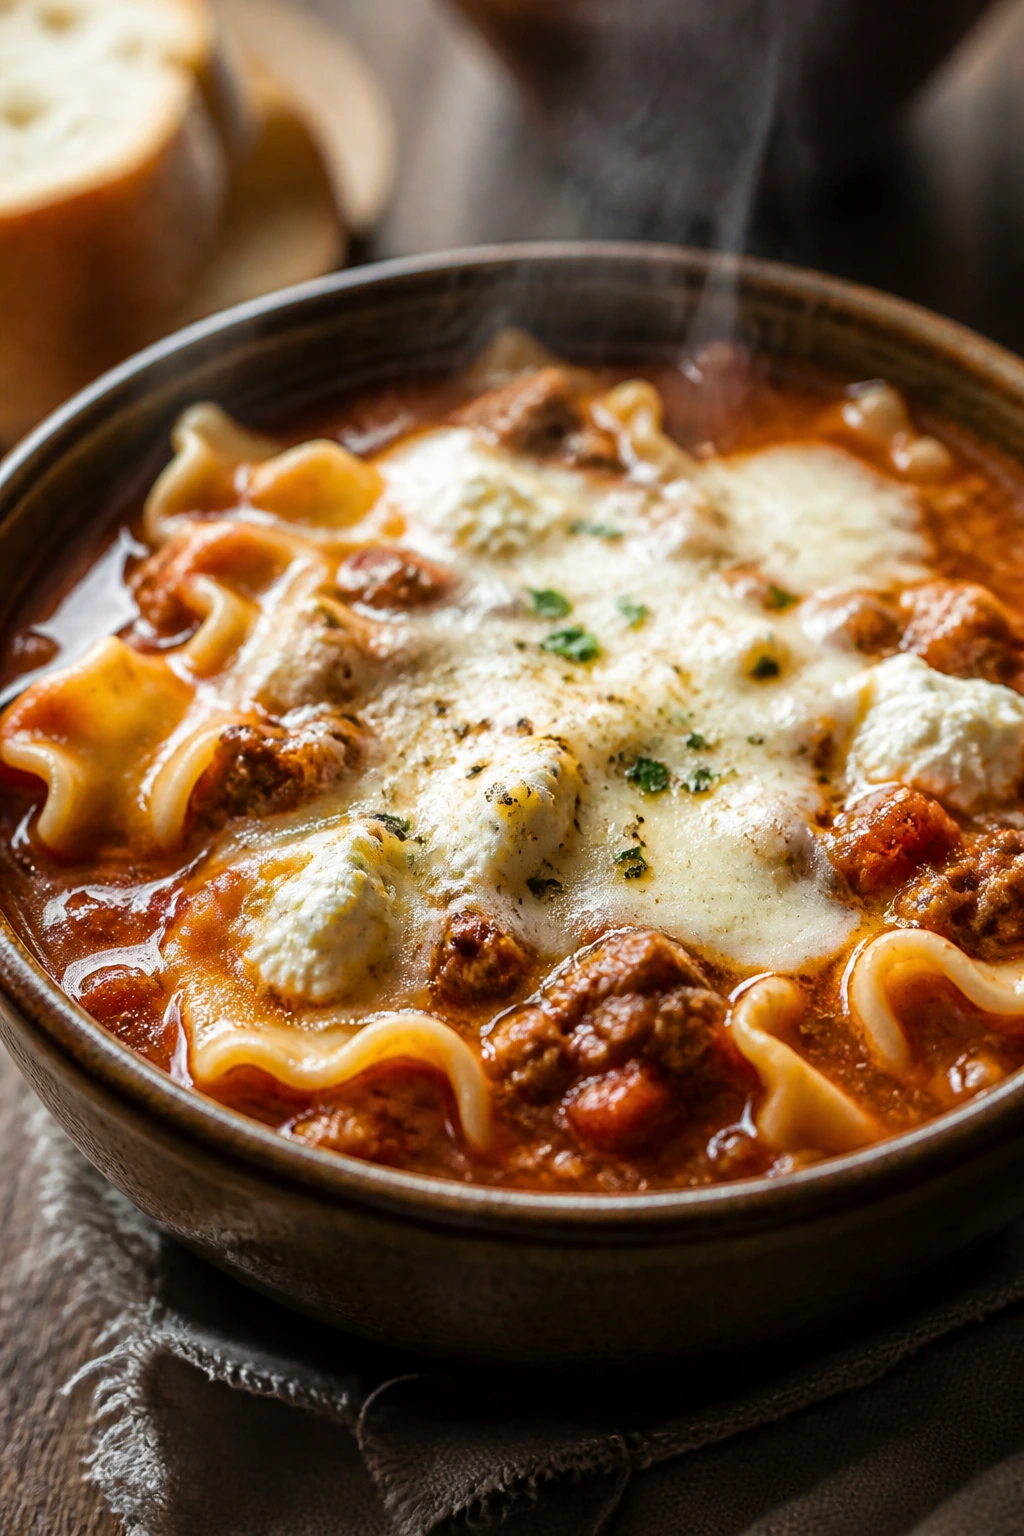
Lasagna soup tastes like someone took the best part of lasagna—the tomato, cheese, noodles, and beef—and put it in a bowl without asking you to assemble a casserole. It’s rich, tomato-forward, and a little messy in the most satisfying way.
Why It Works:
Broken lasagna noodles cook in the broth and thicken the soup as they soften. Ground beef gives the broth enough richness to stand up to ricotta and mozzarella, which are really there to make the bowl feel complete.
This one needs a decent simmer, but not a long one. Letting it drag too far can turn the noodles soft and the broth muddy.
Key Ingredients:
- 1 lb ground beef — the base.
- 1 medium onion, diced — for sweetness.
- 3 cloves garlic, minced — for depth.
- 2 tablespoons tomato paste — deepens the tomato flavor.
- 1 can (28 oz) crushed tomatoes — the main tomato body.
- 6 cups beef broth — the soup base.
- 1 teaspoon Italian seasoning — classic lasagna herbs.
- 8 oz lasagna noodles, broken into pieces — the pasta element.
- 1 cup ricotta — spooned in at serving.
- 1 1/2 cups shredded mozzarella — for melting on top.
- 1/4 cup grated parmesan — for salt and finish.
Quick Steps:
- Brown the beef and onion in a soup pot over medium-high heat for 6 to 7 minutes.
- Stir in the garlic and tomato paste and cook for 1 minute until the paste darkens slightly.
- Add the crushed tomatoes, broth, Italian seasoning, salt, and pepper. Bring to a simmer.
- Stir in the broken noodles and cook uncovered for 10 to 12 minutes, until tender.
- Ladle into bowls and top each serving with ricotta, mozzarella, and parmesan.
Equipment for This Recipe:
- Large soup pot — for the broth and noodles.
- Wooden spoon — for the beef and pasta.
- Ladle — the easiest way to serve it.
- Small bowl — for mixing cheese toppings if you want.
How to Serve This Dish:
Top each bowl with a spoonful of ricotta and let the heat soften it into the broth. Garlic bread on the side is a strong choice, but even plain toast gets the job done.
Pro Tips for This Recipe:
- Break the noodles into uneven pieces; it makes the soup feel more lasagna-like.
- Add extra broth if the soup thickens while sitting.
- A handful of spinach stirred in at the end works if you want more green on the table.
- Keep the ricotta topping separate until serving so it stays creamy.
Variations on This Dish:
- Spinach Lasagna Soup: Stir in chopped spinach near the end.
- Spicy Sausage-Style Heat: Add red pepper flakes and extra black pepper.
- Creamier Bowl: Stir a spoonful of ricotta into the pot right before serving.
Common Mistakes to Avoid with This Dish:
- Overcooking the noodles: They keep softening in the hot broth.
- Using too little broth: The soup can turn thick and sticky fast.
- Skipping the cheese topping: It’s half the fun.
21. Tamale Pie
Tamale pie is a casserole with a cornbread lid, and that lid is the whole point. Underneath, you get beef, beans, and tomato-chili flavor; on top, a golden cornmeal crust that slices cleanly and holds its shape.
Why It Works:
The filling is moist and savory, so the cornbread top can bake into a firm cap without going dry. Cornmeal and beef are already comfortable together, and the black beans make the dish feel bigger and more filling.
The key is baking the filling hot before the topping goes on. If the base is too thin or cool, the crust can sink instead of sitting on top.
Key Ingredients:
- 1 lb ground beef — the filling.
- 1 medium onion, diced — for the first layer of flavor.
- 2 cloves garlic, minced — adds warmth.
- 1 can (15 oz) black beans, rinsed and drained — for body.
- 1 cup corn kernels — sweet and bright.
- 1 can (8 oz) tomato sauce — keeps the filling saucy.
- 2 tablespoons chili powder — the main seasoning.
- 1 teaspoon ground cumin — supports the chili flavor.
- 1 cup cornmeal — for the topping.
- 1 cup all-purpose flour — helps the crust hold.
- 1 cup milk — moistens the batter.
- 1 large egg — binds the topping.
- 1 cup shredded cheddar — sprinkled on top if you want extra richness.
Quick Steps:
- Preheat the oven to 375°F (190°C). Brown the beef and onion in a skillet for 6 to 7 minutes.
- Stir in the garlic, beans, corn, tomato sauce, chili powder, cumin, salt, and pepper. Simmer for 3 minutes.
- Transfer the filling to a greased baking dish.
- Whisk the cornmeal, flour, milk, egg, and a pinch of salt into a batter and pour it over the hot filling. Sprinkle with cheddar if using.
- Bake for 25 to 30 minutes, until the top is golden and a toothpick in the crust comes out mostly clean.
Equipment for This Recipe:
- Skillet — for the filling.
- Baking dish — for assembly.
- Mixing bowl — for the cornbread topping.
- Whisk — to keep the batter smooth.
How to Serve This Dish:
Let it cool for 10 minutes before slicing so the topping firms up. A spoonful of sour cream, diced avocado, or sliced scallions all work well against the chili-corn flavor.
Pro Tips for This Recipe:
- Keep the filling thick so the topping sits on it instead of sinking.
- Don’t overmix the cornbread batter or the crust gets tough.
- If the top browns too fast, tent it with foil for the last 10 minutes.
- A little lime juice at the table sharpens the filling.
Variations on This Dish:
- Green Chile Pie: Use green enchilada sauce and chopped green chiles.
- Beanier Version: Add pinto beans and reduce the beef slightly.
- Jalapeño Corn Top: Fold diced jalapeño into the batter.
Common Mistakes to Avoid with This Dish:
- Too-thin filling: The cornbread sinks.
- Overbaking the top: It dries out before the center is set.
- Cutting too soon: The layers need a short rest to settle.
22. Family-Friendly Beef Curry with Rice
This curry stays mild enough for the whole table, but it still smells like something worth waiting for. The beef simmers with potatoes, carrots, and warm spice until the sauce turns thick and golden, then it lands over rice like it belongs there.
Why It Works:
Ground beef can handle curry powder better than you might expect because the small crumbles pick up spice on every side. Coconut milk softens the edges, potatoes bring body, and peas at the end keep the color lively.
Mild curry is not boring curry. It’s curry you can eat with a full room without hearing complaints from the smallest people at the table.
Key Ingredients:
- 1 1/2 lb ground beef — enough to make the curry filling.
- 1 medium onion, diced — the savory start.
- 3 cloves garlic, minced — essential.
- 1 tablespoon fresh ginger, grated — adds brightness.
- 2 tablespoons curry powder — the main seasoning.
- 2 medium potatoes, diced small — they thicken the curry as they cook.
- 2 carrots, sliced — for sweetness and color.
- 1 can (13.5 oz) coconut milk — makes the sauce silky.
- 1 cup beef broth — helps the vegetables simmer.
- 1 cup frozen peas — stirred in at the end.
- Cooked rice, for serving — white or basmati works well.
Quick Steps:
- Brown the beef and onion in a large skillet or Dutch oven over medium-high heat for 6 to 7 minutes.
- Add the garlic, ginger, and curry powder and cook for 1 minute until fragrant.
- Stir in the potatoes, carrots, coconut milk, broth, salt, and pepper. Bring to a simmer, cover, and cook for 18 to 22 minutes, until the potatoes are tender.
- Stir in the peas and cook 2 more minutes until hot.
- Spoon over rice and serve.
Equipment for This Recipe:
- Large skillet or Dutch oven — enough room for the curry to simmer.
- Wooden spoon — for stirring the spices into the beef.
- Rice pot or rice cooker — for the serving base.
- Grater — for fresh ginger.
How to Serve This Dish:
Serve it over a generous scoop of rice and finish with chopped cilantro or a spoonful of plain yogurt if you want a cooler edge. Flatbread works too, but rice is the cleaner, easier fit.
Pro Tips for This Recipe:
- Toast the curry powder in the pan for a full minute so it blooms.
- Dice the potatoes small so they finish with the carrots.
- If the sauce looks thin at the end, simmer uncovered for 3 to 4 minutes.
- A squeeze of lime brightens the coconut milk nicely.
Variations on This Dish:
- Tomato Curry Version: Stir in 1 cup crushed tomatoes for a redder sauce.
- Milder Cream Curry: Use half coconut milk and half broth for a lighter finish.
- Extra Veg Curry: Add cauliflower florets with the potatoes.
Common Mistakes to Avoid with This Dish:
- Burning the curry powder: It turns bitter fast, so keep the heat moderate.
- Cutting the vegetables too large: They won’t finish on time.
- Oversalting before reduction: Coconut milk concentrates as it simmers.
Why Ground Beef Makes These Dinners Work
Ground beef has a practical kind of magic. It browns quickly, it carries seasoning across every crumb, and it disappears into sauces without losing its own identity, which is why it shows up so often in casseroles, soups, skillet meals, and baked pasta.
The fat percentage matters. I reach for 85/15 most often because it gives you flavor without turning the pan slick, but 80/20 is useful when you want a richer result and don’t mind draining off a little grease. Go too lean and the beef can feel dry, especially in meatloaf, meatballs, or anything baked.
What makes these dinners useful is the way beef behaves around starch. Rice drinks in broth, noodles pull in sauce, potatoes soak up tomato and gravy, and beans fill out the gaps between the crumbles. That’s why a pound can feed four to six people without looking stingy on the plate.
The one thing I’d never skip is browning. Pale beef tastes like obligation; browned beef tastes like dinner.
Essential Equipment for These Ground Beef Dinners
- 12-inch deep skillet: The workhorse for pasta, stroganoff, fried rice, and skillet dinners.
- Dutch oven or soup pot: Best for soup, curry, chili mac, and anything with a lot of liquid.
- 9×13-inch baking dish: The right size for casseroles, baked pasta, and tamale pie.
- Rimmed baking sheet: Better than a loaf pan for meatloaf because it browns the sides.
- Wooden spoon or spatula: Good for breaking up beef and scraping browned bits.
- Instant-read thermometer: Especially useful for meatloaf and meatballs; 160°F is the safe target for ground beef.
- Colander: Helpful for pasta-based dishes where you still need to drain.
- Potato masher: Needed for shepherd’s pie and any mashed-potato topping.
- Box grater: Fresh-grated cheese melts better than bagged shreds.
- Sharp knife and cutting board: The obvious tools, but they matter more than people admit.
Smart Shopping and Ingredient Tips for Ground Beef
Choose ground beef by fat level based on the dish. 85/15 is the sweet spot for most of these dinners because it gives flavor without too much grease, while 80/20 suits chili, sloppy Joes, and skillet casseroles that can absorb a little extra richness. For meatloaf and meatballs, don’t go ultra-lean unless you’re ready to add more milk, breadcrumbs, or sauce.
Look for beef that’s cold, tightly wrapped, and a clean red on the outside. A little darkening where the package touches the tray isn’t a problem; a sour smell or sticky surface is. If you buy in bulk, flatten the meat into 1-pound portions before freezing. Thin packs thaw faster and cook more evenly.
Cheese matters more than people think in these recipes. Block cheddar, mozzarella, and parmesan usually melt or grate better than the pre-shredded stuff because they don’t carry the same anti-caking coating. I still buy pre-shredded sometimes. No shame. But if the goal is a smoother melt, a box grater earns its keep.
For canned tomatoes and sauces, choose the thickest version you can find. Watery salsa, thin tomato sauce, or weak enchilada sauce can throw off a whole casserole. Broth should be low-sodium when possible so you can control the final salt level yourself, especially in dishes that reduce for 20 minutes or more.
How to Serve These Family Dinners

Presentation:
Serve skillet dishes in shallow bowls so the sauce stays visible and the beef doesn’t sink under the starch. Casseroles and baked pasta need a short rest before cutting, then a wide spatula to pull up a clean square or wedge. Meatloaf looks best in thick slices with the glaze still shiny on the cut face.
Accompaniments:
A simple green salad, roasted broccoli, buttered peas, green beans, cucumber salad, or a crisp slaw can keep these dinners from feeling too heavy. Bread helps with soups and saucy bowls, but rice, noodles, or potatoes already do a lot of the work. I’d keep the side dishes plain and crunchy rather than making another rich thing.
Portions:
Most of these recipes serve four to six people if you’re using a full pound to a pound and a half of beef. For smaller eaters, plan on about 3/4 cup of the finished skillet meal or 1 thick slice of meatloaf per person. For hungrier groups, the easiest fix is usually a second starch on the side, not doubling the meat.
Beverage Pairing:
I like cold sparkling water with lemon for the saucier dishes because it cuts through tomato and cheese without fighting the food. For something with more body, an iced tea with a squeeze of lime or a simple amber beer works well with meatloaf, chili mac, and tamale pie.
Additional Tips and Flavor Boosters
Flavor Enhancement:
A spoonful of tomato paste browned for 30 seconds, a splash of Worcestershire, or a few drops of vinegar at the end can turn a flat beef dinner into something much more alive. Acid matters. So does salt added in layers instead of dumped in once at the end.
Customization:
If your table likes heat, keep red pepper flakes, hot sauce, or chipotle in adobo nearby and let people adjust their own bowls. For milder eaters, lean on cheddar, sour cream, and a little extra onion sweetness instead of extra spice. Ground beef accepts both approaches without complaining.
Serving Suggestions:
Fresh herbs matter more than people think with beef. Chopped parsley on stroganoff, cilantro on curry, scallions on rice bowls, and basil on ziti all give the top layer a clean finish that contrasts with the richness below. Pickles, jalapeños, or quick-pickled onions can do the same job when you want sharper edges.
Make-It-Yours:
For gluten-free cooking, swap in gluten-free pasta, use cornstarch instead of flour for thickening, and check that your broth and sauces are labeled carefully. For dairy-free versions, use olive oil, canned coconut milk, or a plain oat milk with a little extra seasoning. For lower-carb plates, most of these recipes work well spooned over cauliflower rice, zucchini noodles, or shredded cabbage.
Make-Ahead, Storage, and Reheating Guidance
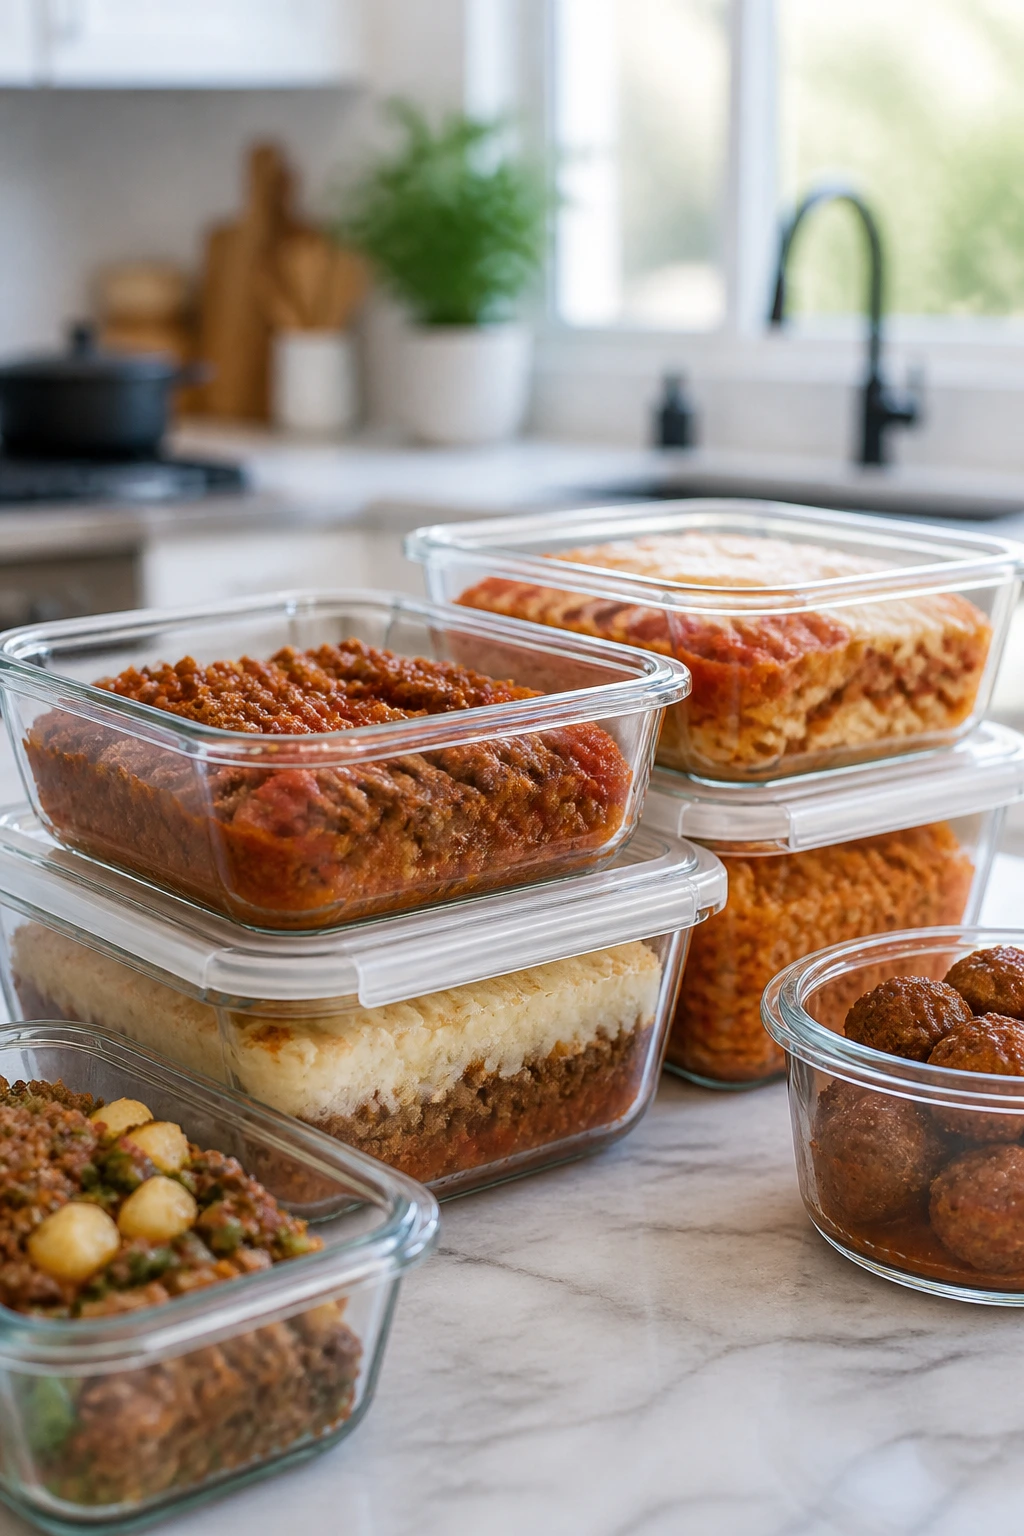
Most of these beef dinners keep well in the fridge for 3 to 4 days in airtight containers. Soups, chili mac, curry, and casseroles with tomato sauce tend to hold the best texture. Pasta dishes and rice dishes can dry a little, but a splash of broth or water brings them back without much trouble.
For freezing, plan on up to 2 to 3 months for most cooked ground beef dishes. Meatloaf, shepherd’s pie, chili mac, lasagna soup base, and casseroles freeze especially well. Dishes with sour cream, cream sauces, or potatoes can still freeze, but the texture softens a bit on thawing, so I’d freeze those only when needed and reheat them gently.
Reheat stovetop dishes over low heat with a spoonful or two of broth, milk, or water, stirring until hot. For casseroles, cover with foil and warm in a 325°F (165°C) oven until the center is hot and the edges start to bubble again. Microwave works in a pinch, but use medium power and stop to stir halfway through or the edges can go rubbery before the center catches up.
If you’re making ahead, cook the beef base fully and keep starches separate when you can. Pasta and rice behave better when added fresh, while meatloaf, chili, and soup can usually be finished or reheated with less drama. One exception: mashed-potato-topped dishes are best assembled close to baking so the top doesn’t dry out.
Variations and Adaptations to Try
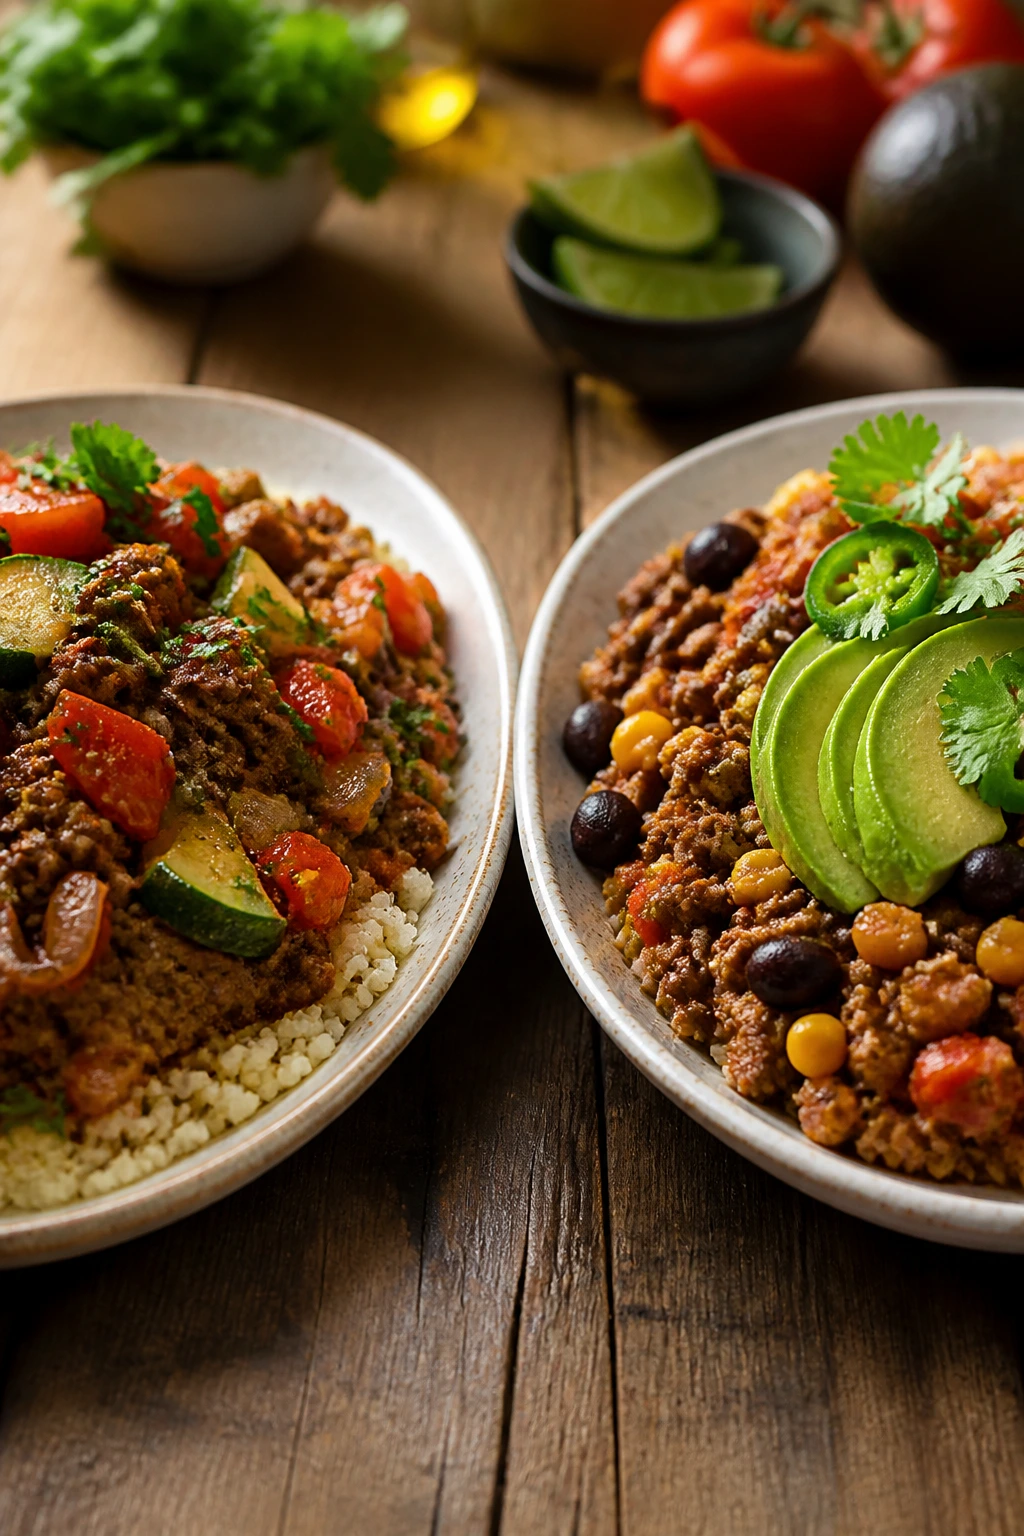
Gluten-Free Swap:
Use gluten-free pasta in the skillet and baked noodle dishes, and thicken sauces with cornstarch instead of flour. Corn tortillas also stand in nicely for flour tortillas in casserole-style recipes. Watch broth labels, because a few hide wheat in plain sight.
Dairy-Free Comfort:
Replace milk with unsweetened oat milk or canned coconut milk depending on the recipe, and skip the cheese or use a dairy-free melt you trust. Dishes with tomato and broth tend to adapt more easily than cream-heavy ones. Meatloaf and meatballs usually need a little extra moisture if the dairy goes out.
Lower-Sodium Kitchen:
Choose low-sodium broth, rinse canned beans, and season the beef in stages so you control the total salt. Add acid—vinegar, lemon, lime, pickle juice—because sharpness can make a low-salt dish taste finished. Don’t lean on packaged seasoning blends alone; they can be salt traps.
Extra-Spicy Nights:
Keep one or two heat sources, not five. Red pepper flakes, diced jalapeños, chipotle in adobo, or hot sauce are usually enough. Chili mac, enchilada rice skillet, and tamale pie all take heat well, while meatloaf and stroganoff usually do better with a milder hand.
Kid-Friendly Mild Versions:
Hold back the pepper and spice, then build flavor with cheese, onion, and tomato instead. The sneaky trick is texture: smaller vegetable pieces, softer sauces, and familiar pasta shapes make a dish easier to accept than a pile of mixed ingredients. That’s not “picky-proofing.” It’s practical cooking.
Regional Twist Nights:
A little Cajun seasoning pushes the skillet dinners toward Louisiana. Soy sauce, ginger, and sesame oil send the beef toward an East Asian bowl. Cumin, chili powder, and enchilada sauce move the same protein into a Southwest frame. One pound of beef does not care where you take it.
Common Mistakes to Avoid
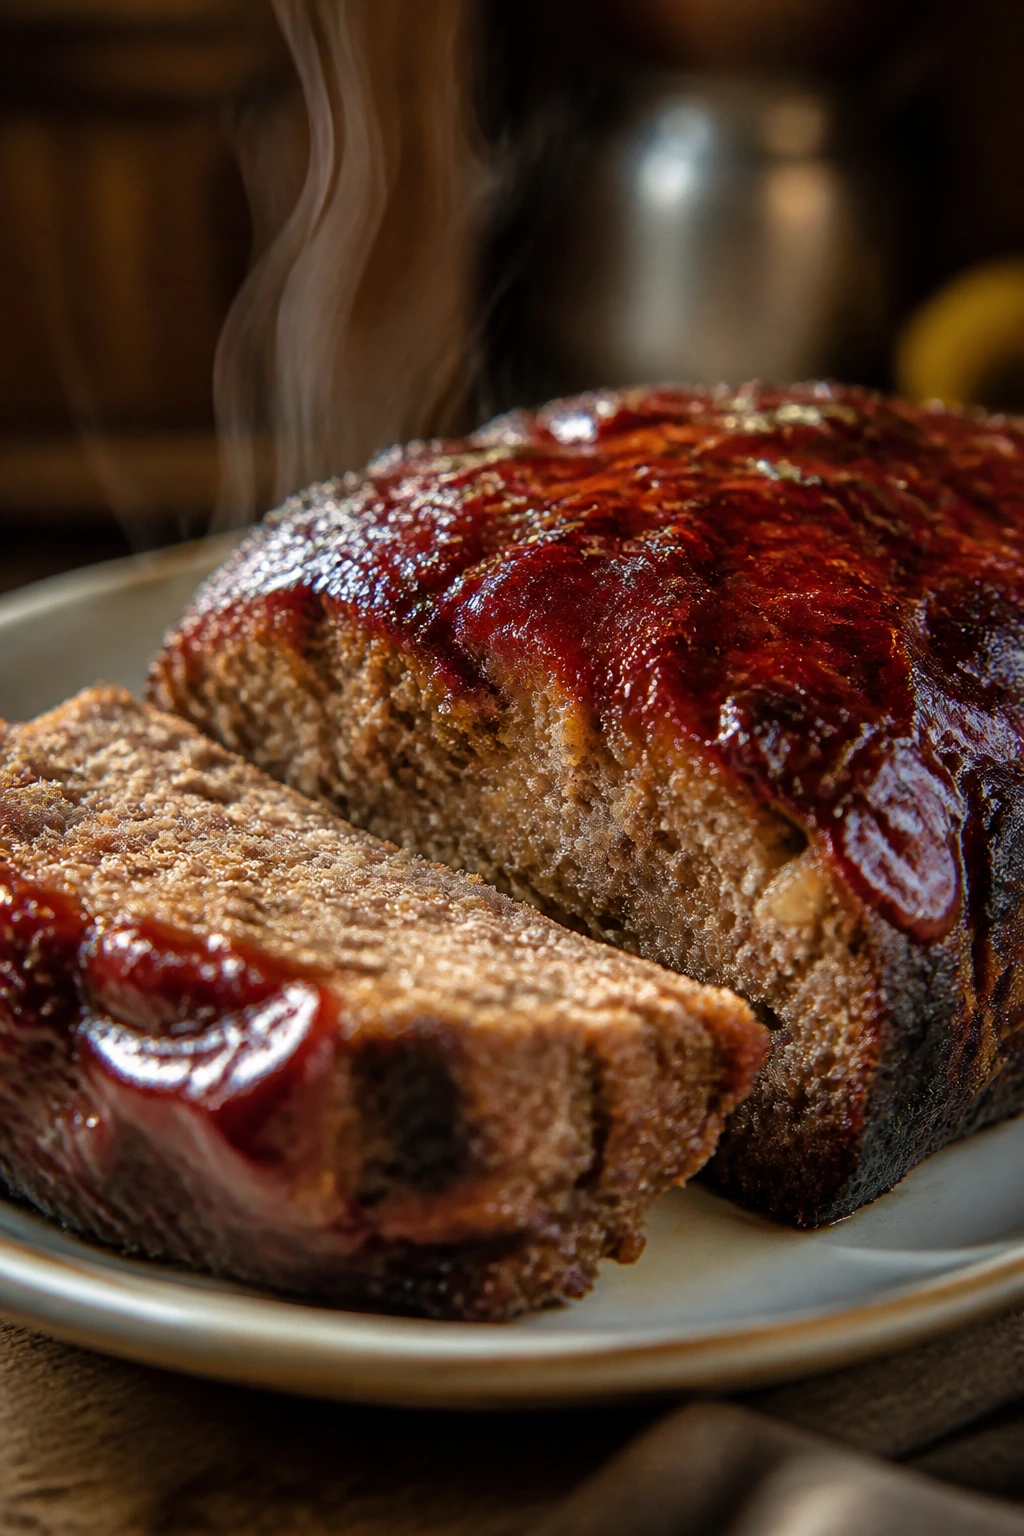
Crowding the Pan:
If you cram too much beef into a small skillet, it steams instead of browns. The meat turns gray and watery, and the flavor drops off. Use a big enough pan or brown in batches if you need to.
Skipping the Drain:
A greasy pan can make cheesier dishes split and casserole fillings slide apart. You don’t need to drain every drop, but if there’s a visible slick of fat, spoon some off before adding sauce or cheese.
Adding Dairy Over High Heat:
Milk, sour cream, and cheese can break when the sauce is boiling hard. Turn the heat down first, then add dairy slowly. That one move saves stroganoff, creamy noodles, and cheesier skillet dishes.
Undercooking the Base Starch:
Rice and potatoes need to finish at the right speed or you get a crunchy center. If you’re cooking them in the same pan as the beef, check early and stir at least once. If they still feel firm, give them time before you add the cheese.
Underseasoning the Beef Early:
People often wait until the end and then wonder why the dinner tastes flat. Salt the meat while it browns, season the sauce as it simmers, and taste before serving. Tomato, pasta, potatoes, and rice all mute flavor more than you expect.
Overbaking the Casserole Top:
A cheesy top can go from browned to dry faster than you think. Pull casseroles when the edges bubble and the center looks set, not when every inch is dark. Let the pan rest and the heat will finish the job.
Frequently Asked Questions
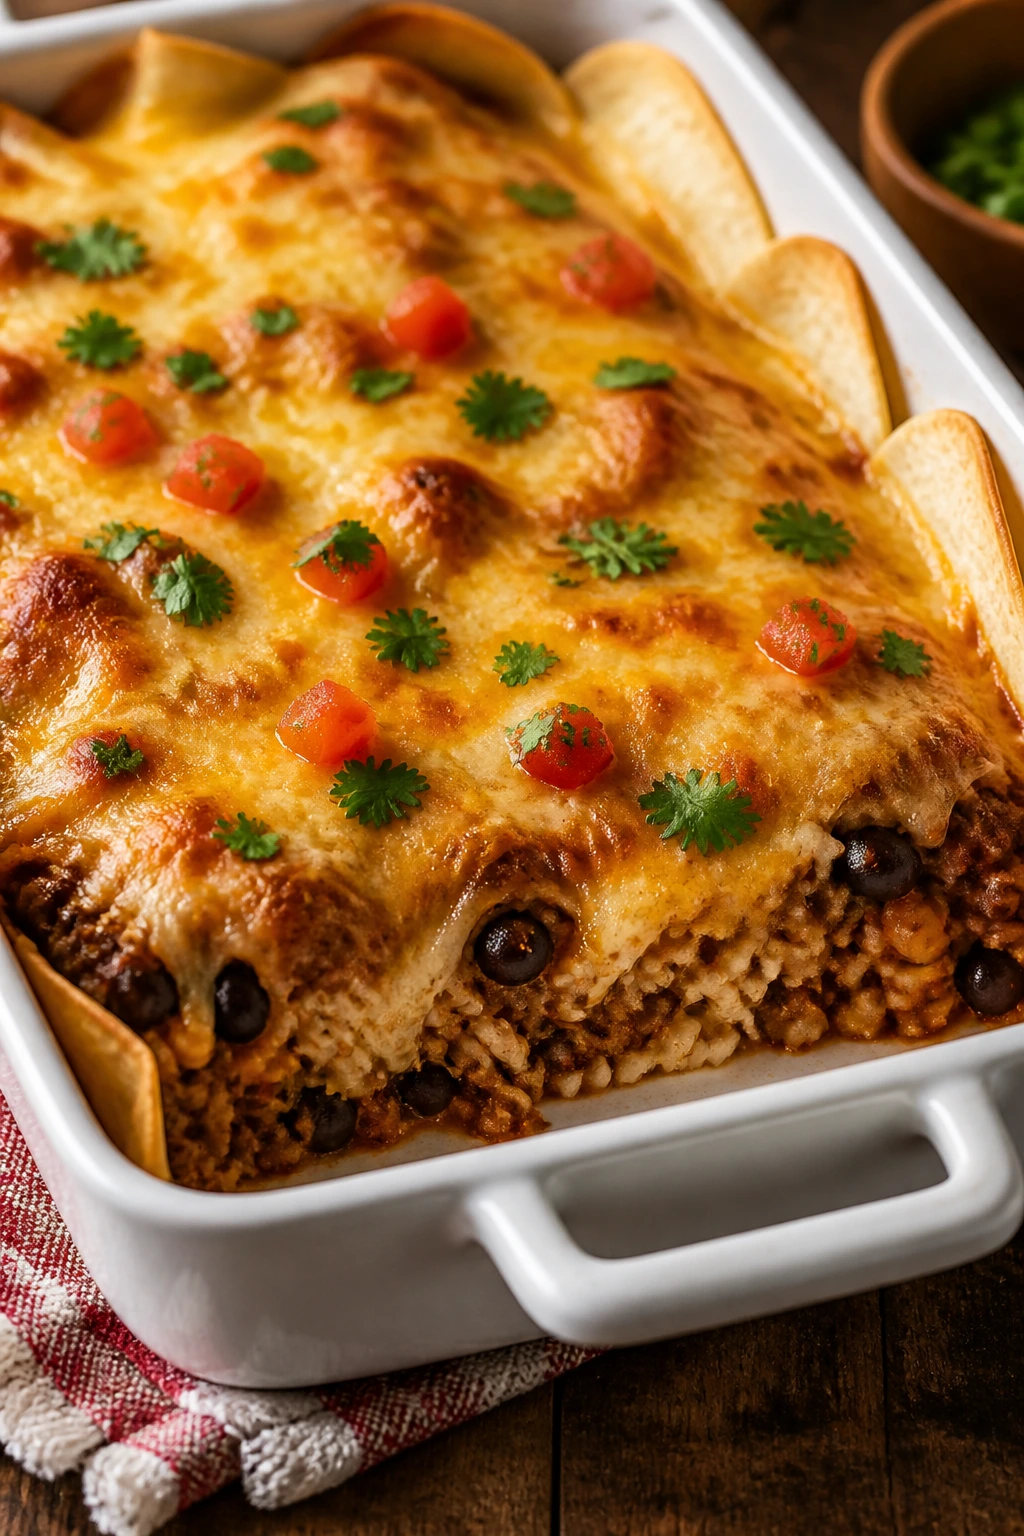
What fat percentage is best for ground beef dinners?
For most of these recipes, 85/15 is the easiest all-purpose choice. Go richer for chili, skillet pasta, and casseroles if you plan to drain a little fat; go leaner for meatloaf or meatballs if you’re adding enough binder and sauce to keep them moist.
Can I swap ground turkey for ground beef in these recipes?
Yes, but turkey is leaner and milder, so it needs extra seasoning and usually a little more oil or broth. It works best in saucy dishes like burrito casserole, chili mac, or enchilada rice skillet. Meatloaf and meatballs need the most help if you make that swap.
How do I keep ground beef from tasting greasy?
Brown it in a hot pan, break it up well, and drain excess fat before adding cheese or cream. Using 85/15 instead of 80/20 also helps. A little acid—tomato, mustard, vinegar, lime, or pickle juice—cuts through the richness too.
Can I freeze pasta or rice dishes with ground beef?
Yes, though the texture softens a little after thawing. The best candidates are chili mac, baked ziti, soups, and curry. Reheat with a splash of broth or water so the starch doesn’t seize up.
What if my sauce turns out too thin?
Simmer it uncovered for a few extra minutes and let some water cook off. If that still isn’t enough, stir in a little flour slurry, cornstarch slurry, or a handful of cheese depending on the recipe. Keep the heat gentle so you don’t scorch the bottom.
Do I have to brown the beef before adding it to soup or casserole?
Yes, if you want the best flavor. Browning creates those browned bits and that deeper taste you can’t fake later. Raw beef tossed straight into a casserole can cook through, but it won’t taste as full or as savory.
How far ahead can I assemble a casserole?
Most casseroles can be assembled a day ahead and kept covered in the fridge. If there’s pasta or rice inside, undercook it a little so it doesn’t over-soften during the wait. Add crunchy toppings like tater tots or biscuits closer to baking so they stay crisp.
What’s the best way to make these dinners more filling without using more meat?
Add beans, potatoes, rice, noodles, or cabbage, depending on the recipe. Those ingredients stretch the beef without making the dish taste skimpy. A good starch does more for satiety than people give it credit for.
A Good Ground Beef Dinner Has a Few Rules
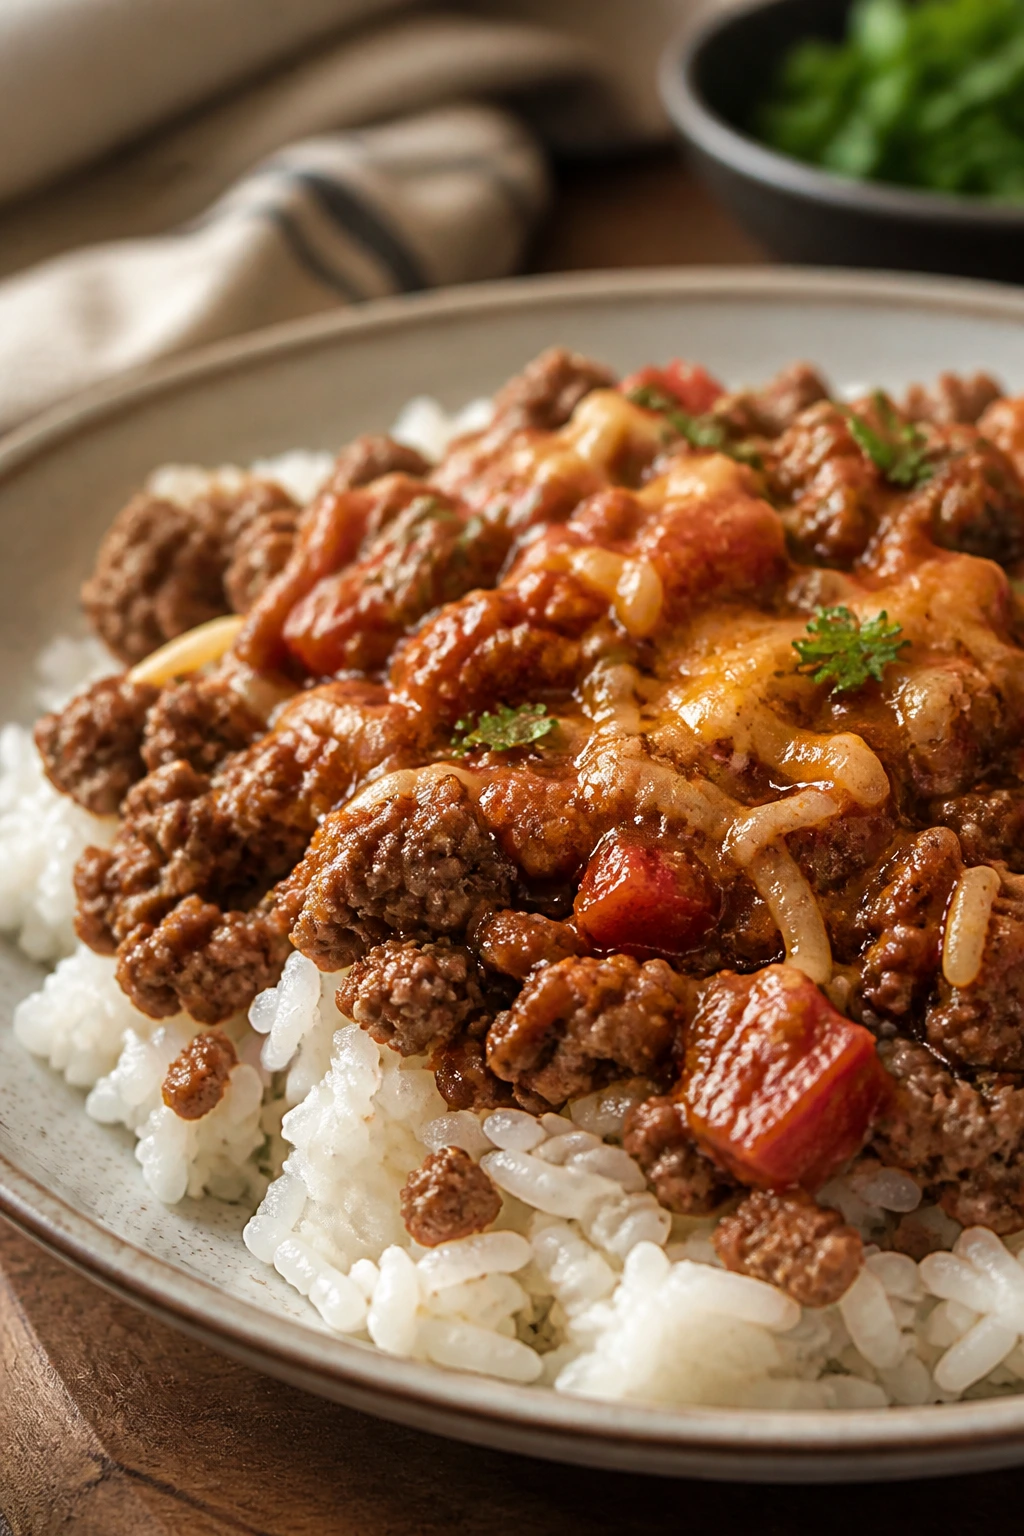
A pound of ground beef can do a lot of work when you treat it like a flavor base instead of the whole show. Brown it well, season it in layers, and give it something useful to sit on—rice, pasta, potatoes, beans, noodles, or a crust that can hold sauce without falling apart.
That’s the real reason these dinners keep showing up at the table. They’re not flashy. They’re practical, filling, and surprisingly flexible, which is usually what families need after a long day and before the sink gets any more crowded. Keep one or two of these in your back pocket, and the “what’s for dinner?” problem gets a little quieter.