
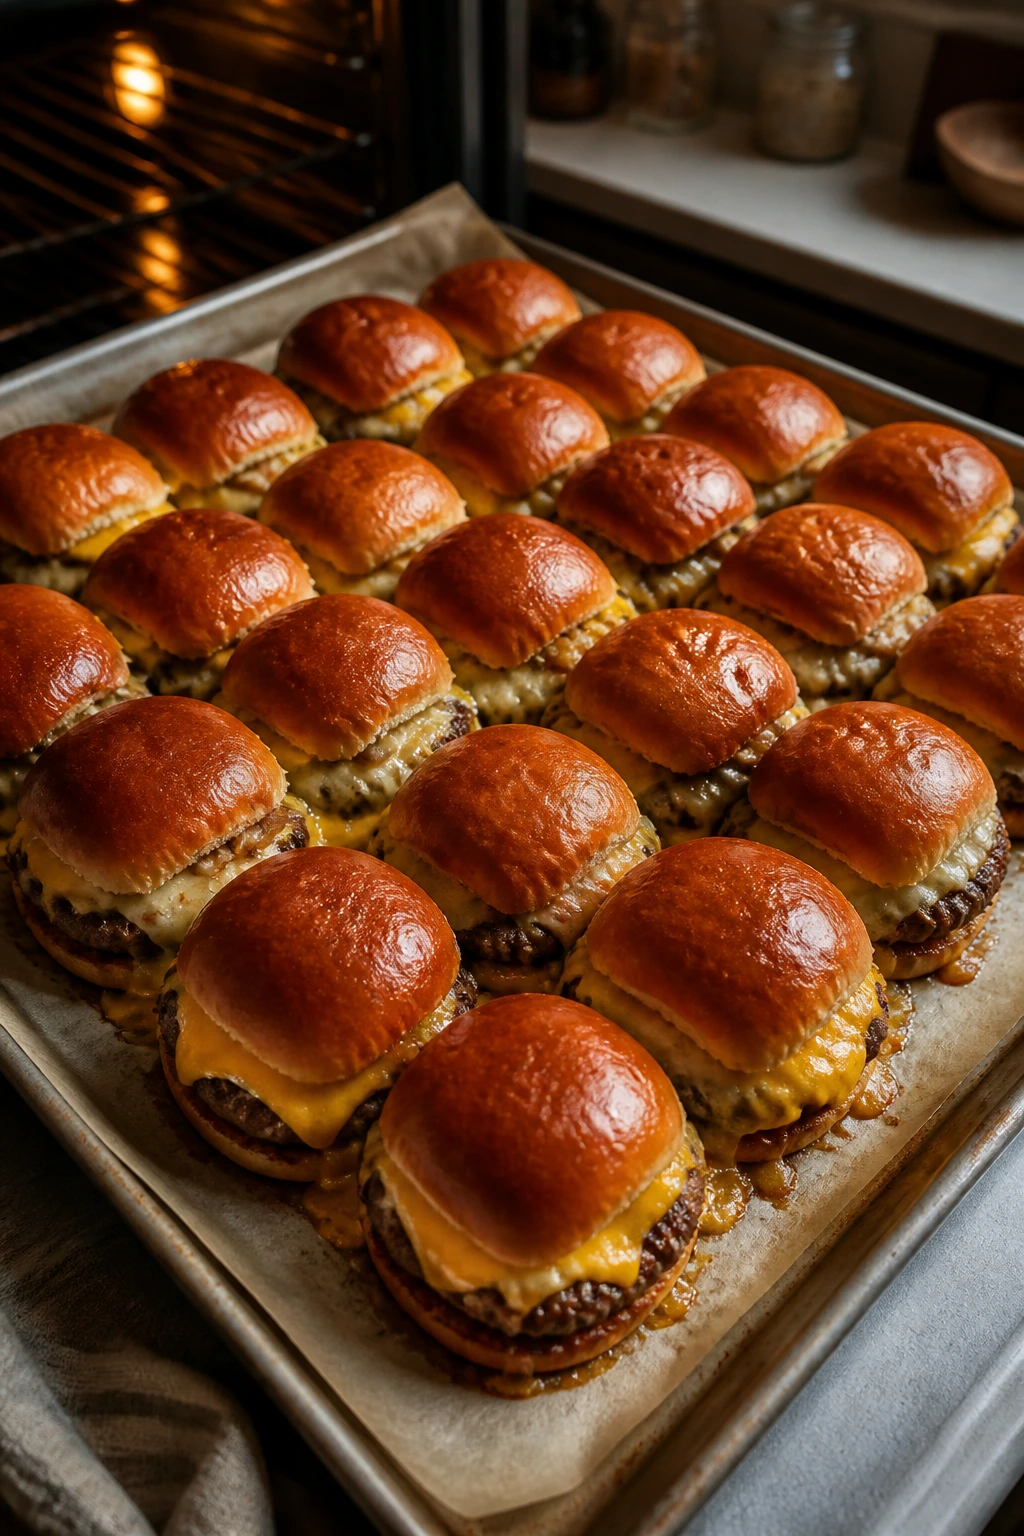
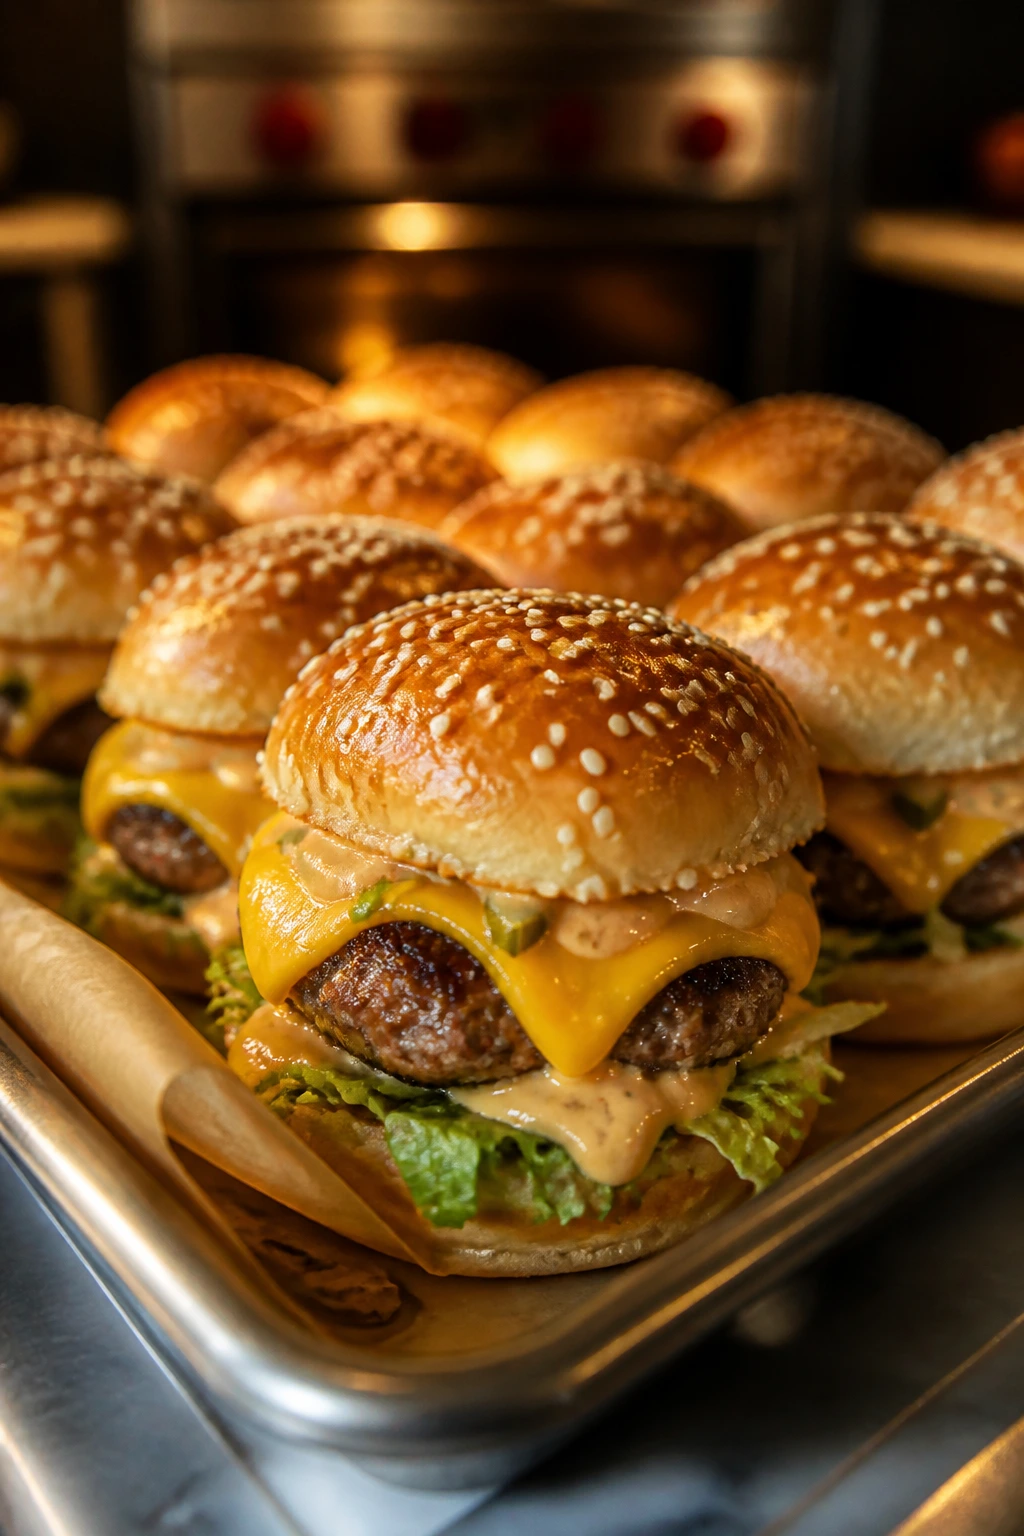
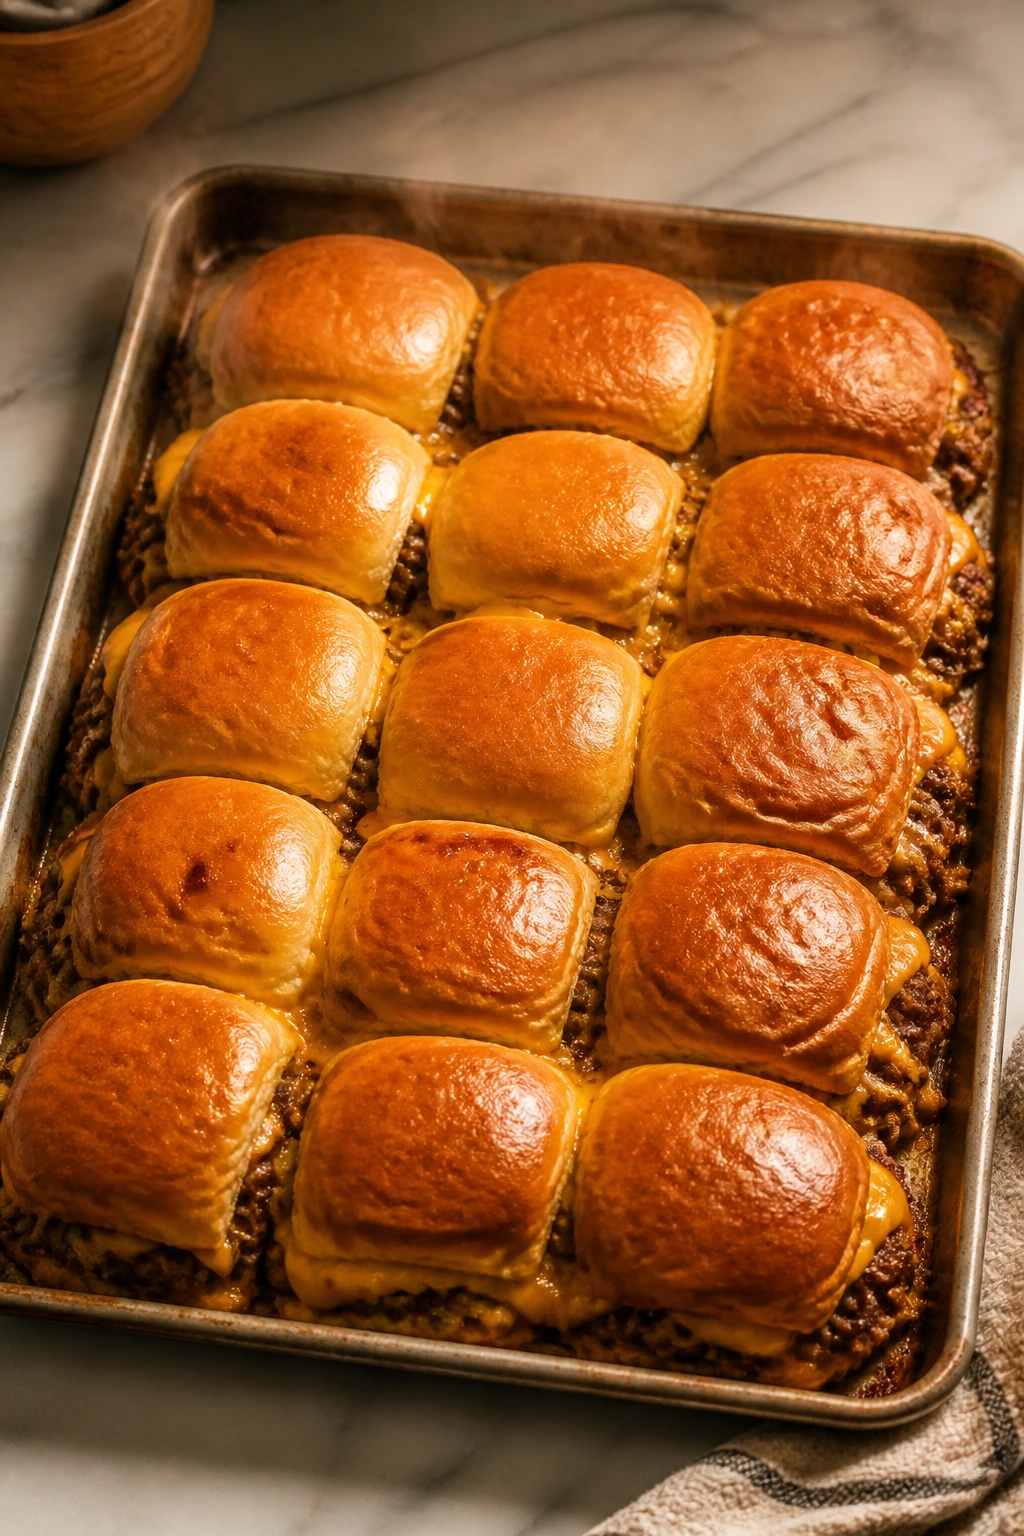
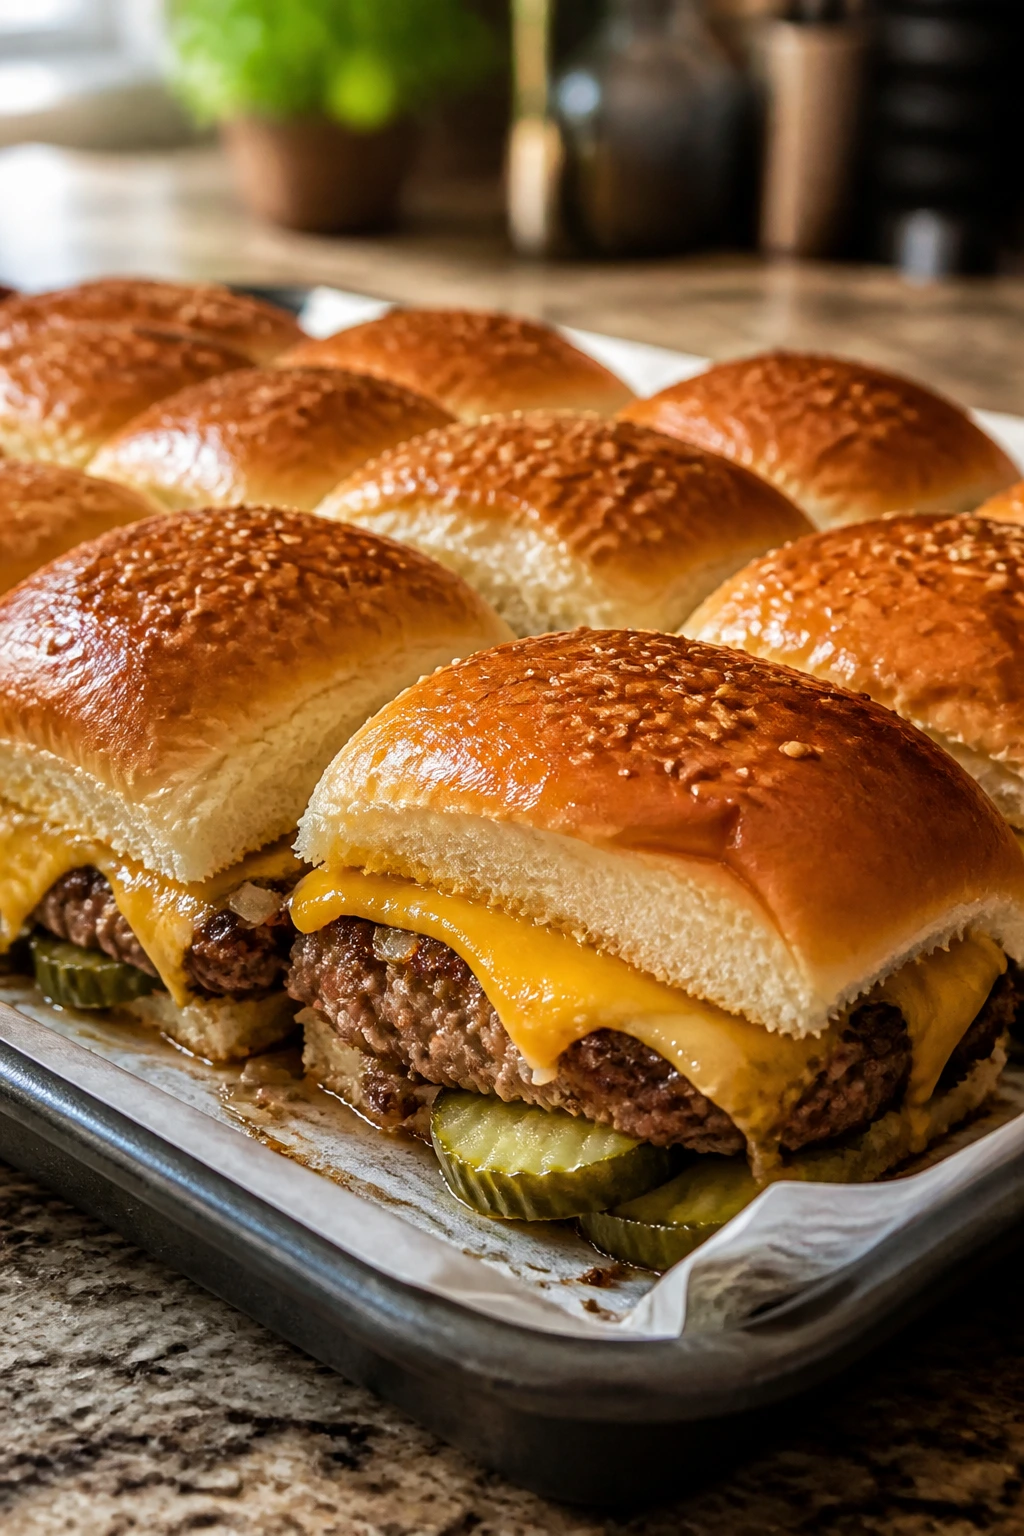
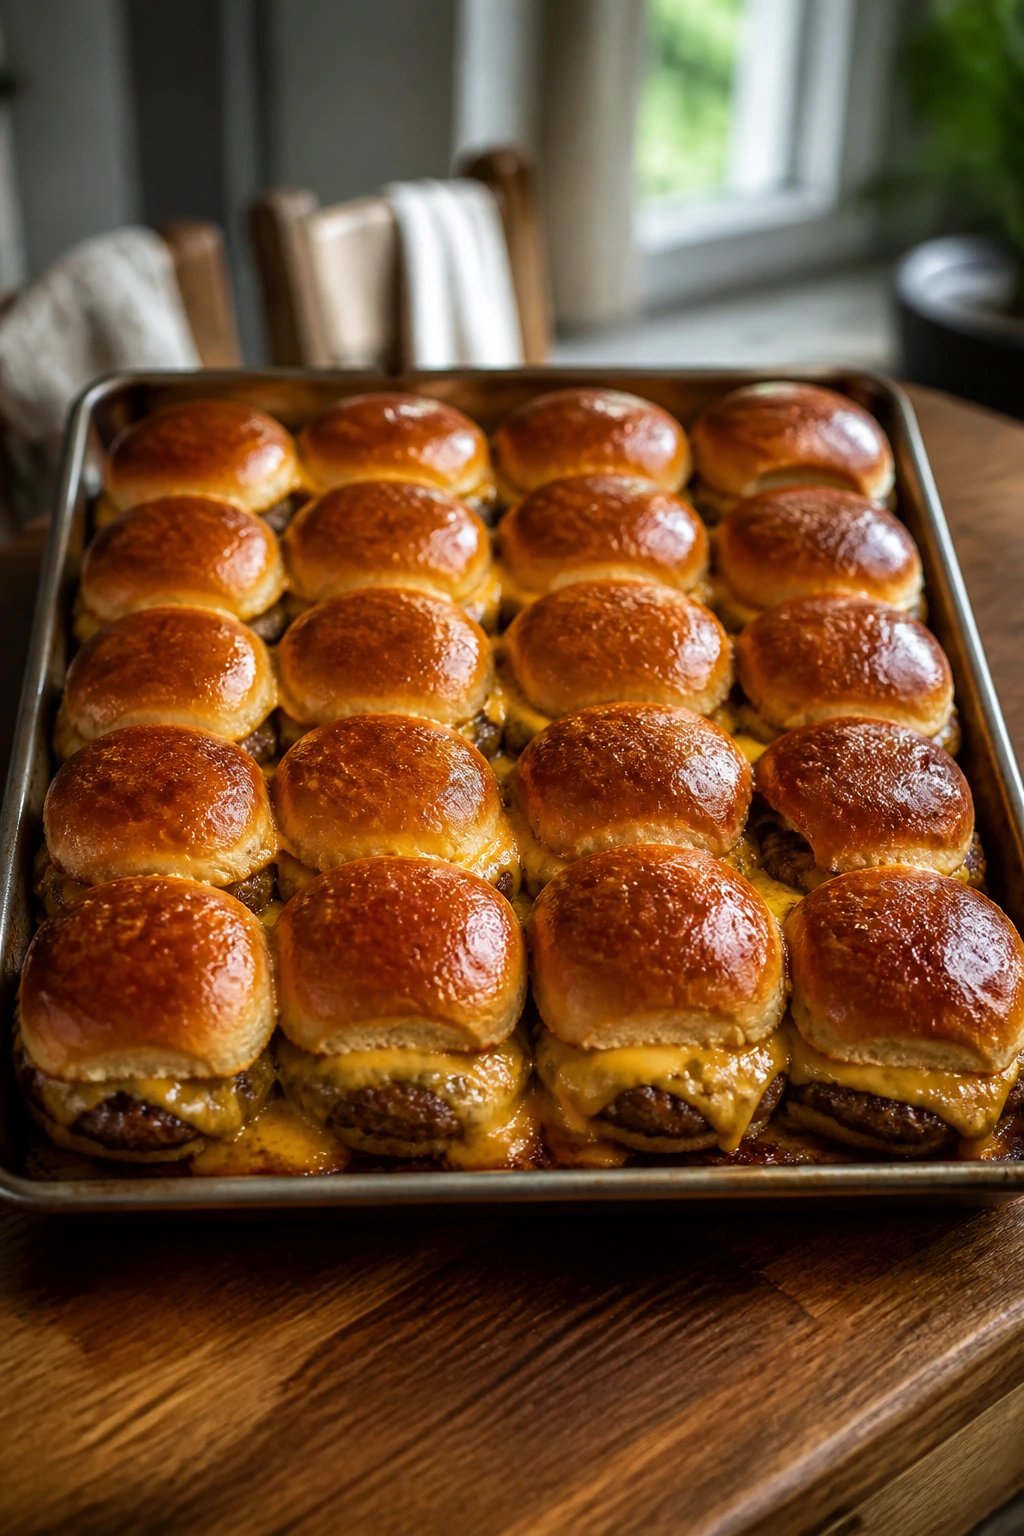
A tray of cheeseburger sliders coming out of the oven has a way of silencing a room. The buns go glossy, the cheese slumps into every seam, and the beef smells like a diner griddle and a backyard cookout had a very happy argument.
That’s the kind of comfort food that earns its keep on a weeknight when you want something warm, salty, and a little messy without standing over the stove flipping 12 separate patties. The slider format is doing real work here: it keeps the beef juicy, gives you crisp bun edges, and lets the cheese melt into a single layer instead of escaping down the sides of a full-size burger.
What makes cheeseburger sliders such a smart dinner move is how much room they give you to play. Some nights you want bacon and cheddar. Other nights you want caramelized onions, a swipe of special sauce, or enough pickles to wake the whole thing up. The collection below leans into that range, but every version keeps the same promise: hot, handheld burgers that disappear fast and never feel fussy.
Why These Sliders Earn Their Spot on the Table
-
One baking dish, one skillet, less chaos: Most of these cheeseburger sliders start with a quick beef mixture and finish in a 9×13-inch pan, which means fewer pans to wash and less time babysitting the stove.
-
The cheese melts like it should: American, cheddar, Swiss, pepper jack, and provolone all behave differently, and the recipes below use each one where it makes sense instead of forcing a single cheese to do every job.
-
Built for crowd feeding: A full pan of sliders gives you clean portions, which matters when people show up hungry and start hovering near the kitchen before dinner even hits the table.
-
Easy to tune for the people in front of you: If someone wants extra pickles, more heat, or no onions, it’s simple to split the tray or tweak one batch without rebuilding the whole meal.
-
Leftovers don’t feel like a punishment: These reheat well if you keep the wet toppings separate. Cold slider meat in a soggy bun is a sad lunch; warm beef tucked back into a toasted roll is not.
-
Comfort food without the grill smoke: You still get that burger-house flavor, but the oven handles the heavy lifting, which is handy when the weather, the schedule, or the outside grill says no.
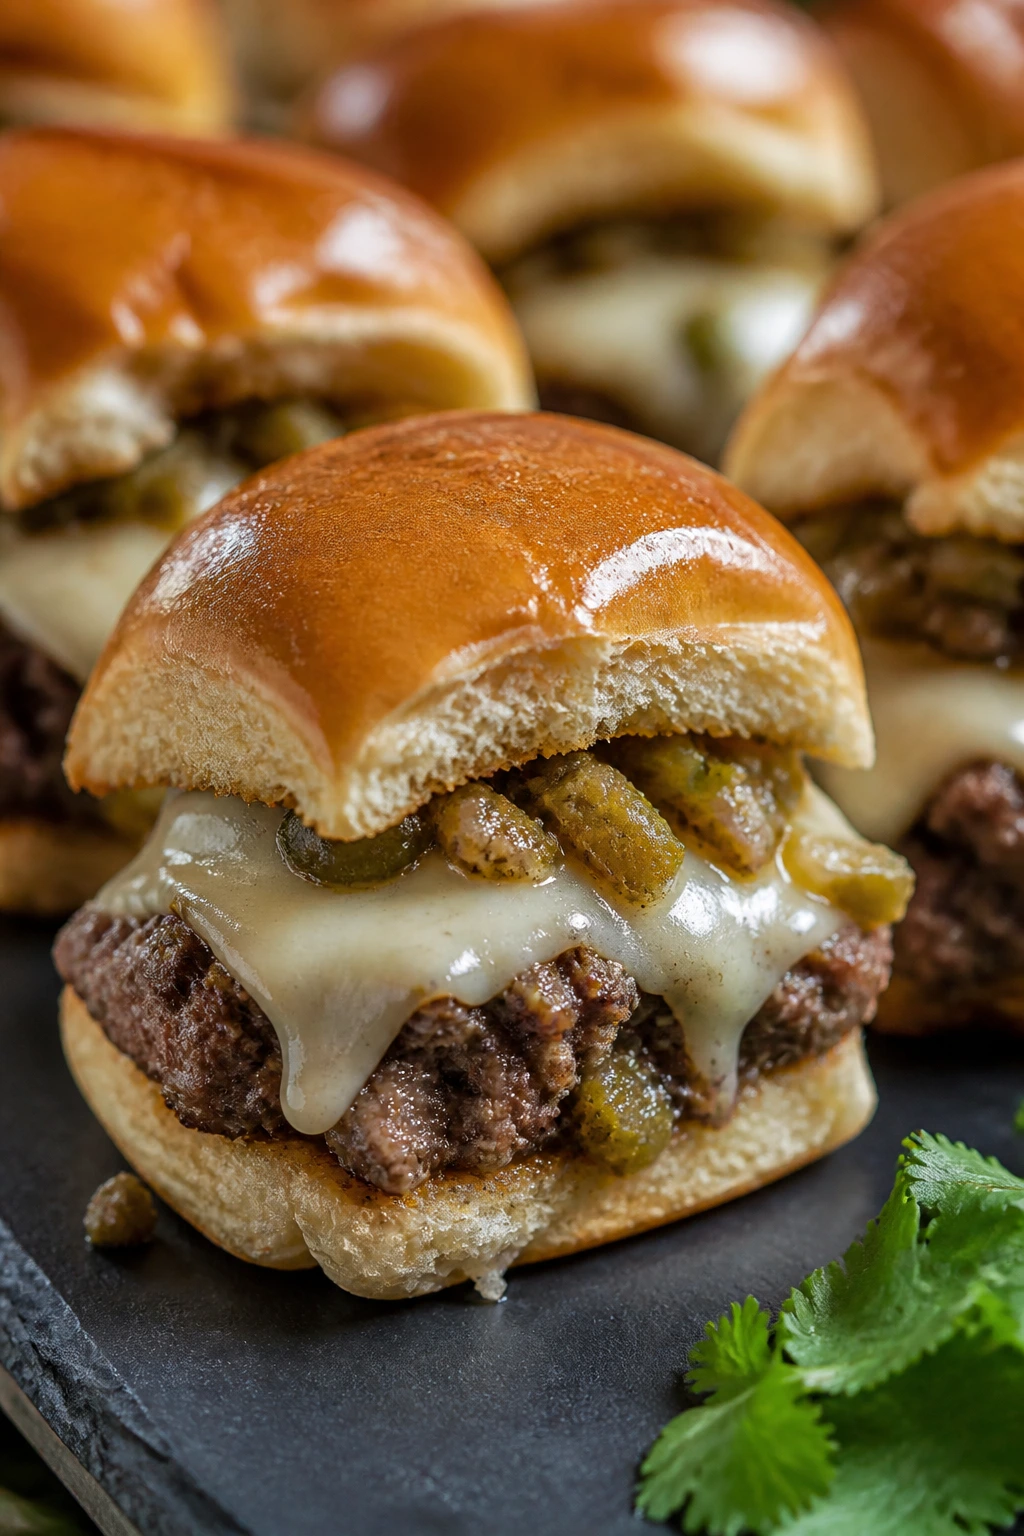
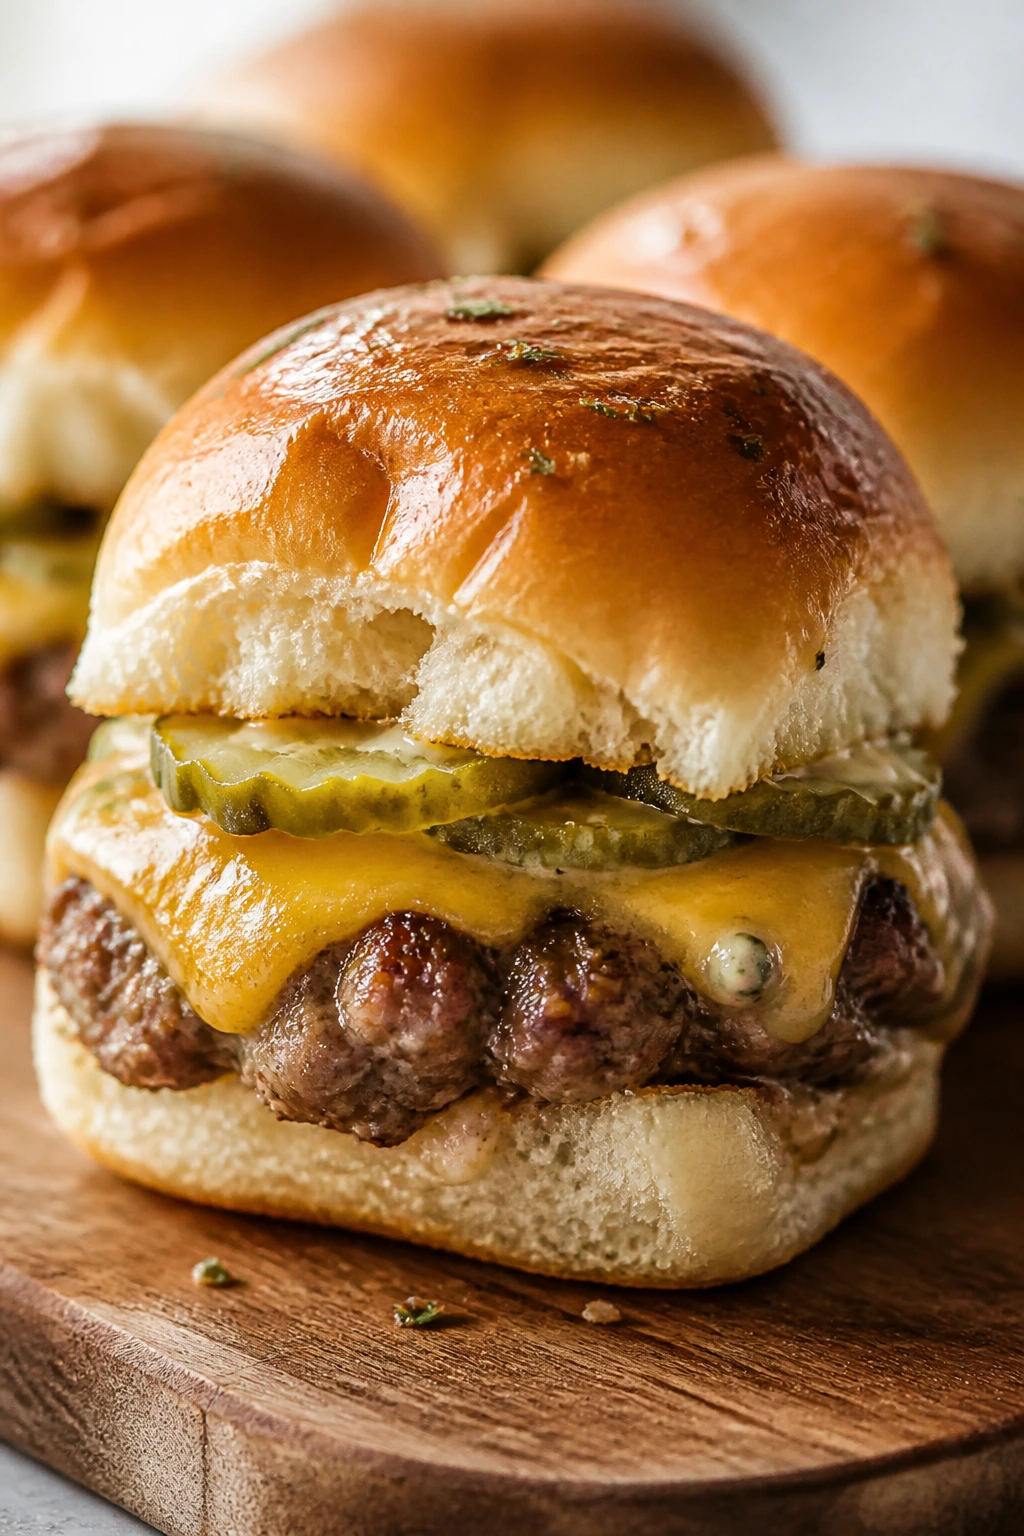
1. Classic American Sheet-Pan Cheeseburger Sliders
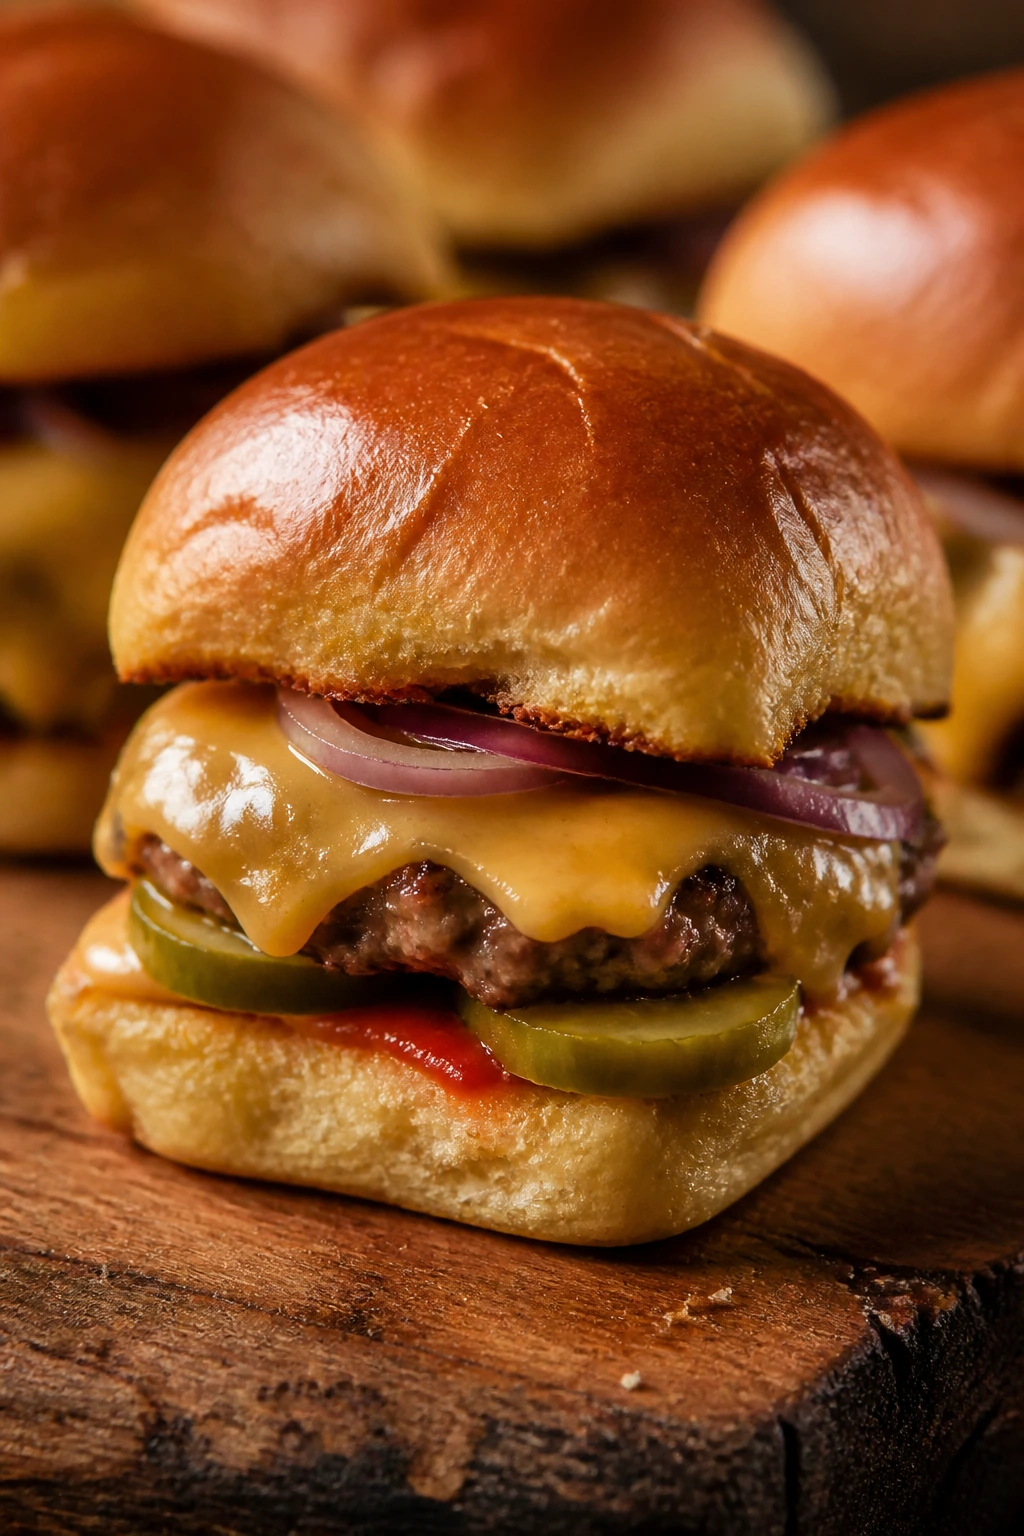
A good classic slider should taste like the burger you remember from the best roadside diner, not the watery version that shows up in too many buffet trays. This one keeps the flavor direct: beef, onion, American cheese, pickles, mustard, and soft buns that pick up a little butter on top.
Why It Works:
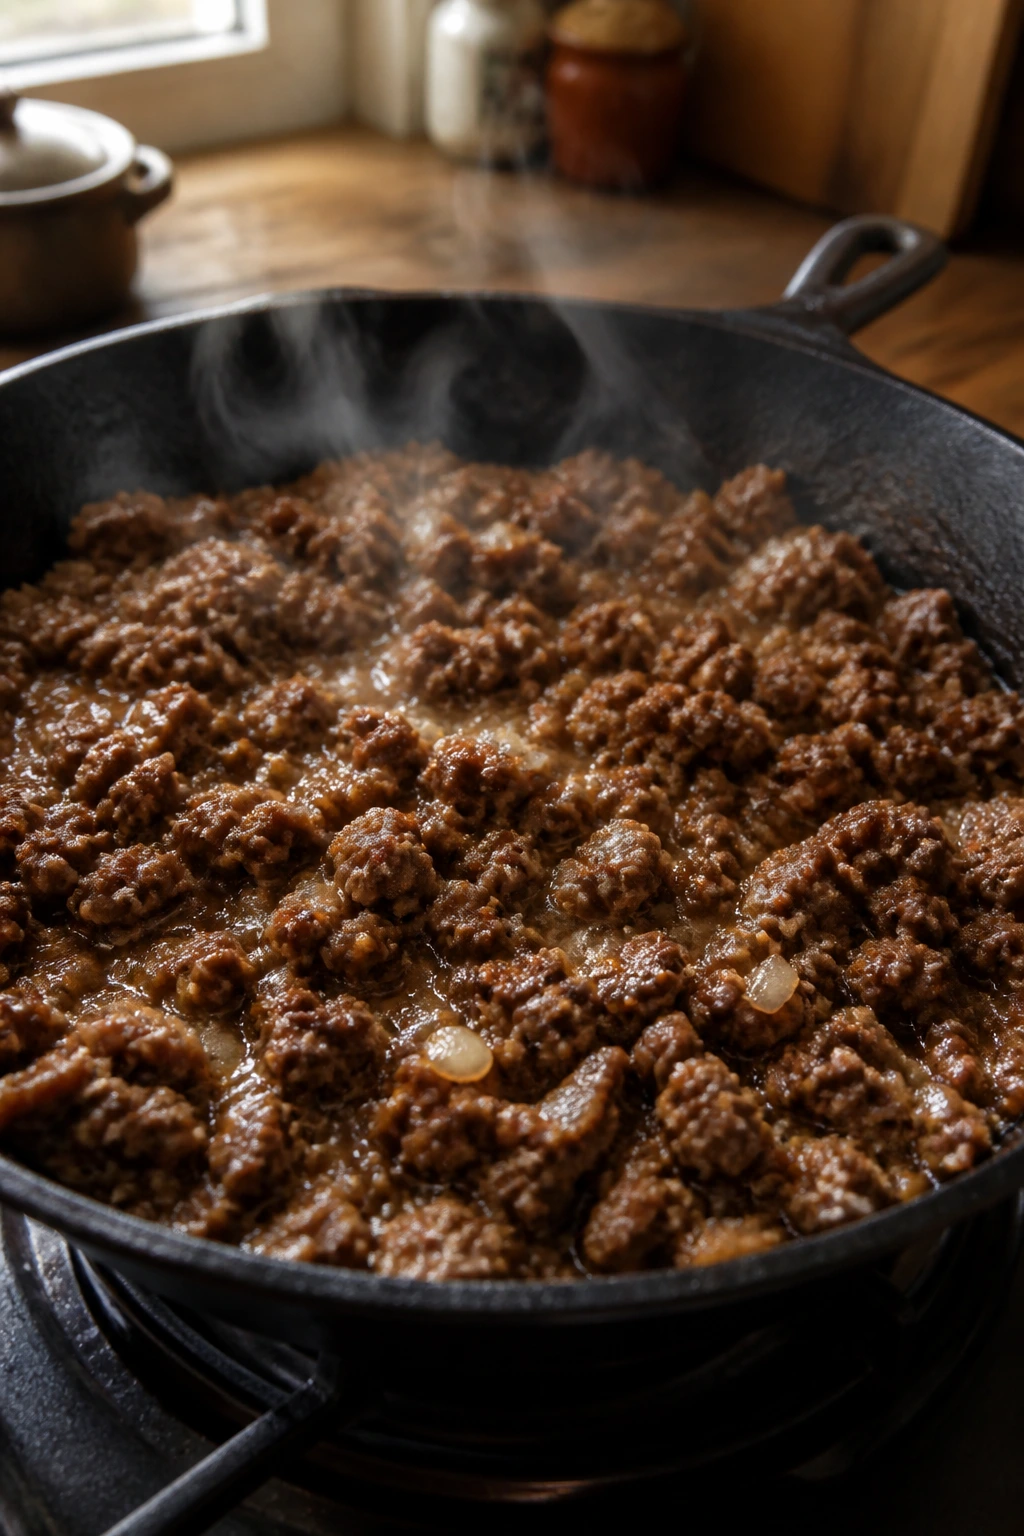
The beef cooks first, which lets you control the seasoning and drain off excess fat before it hits the buns. American cheese melts into a smooth blanket at 375°F, and that matters here because you want every bite to feel cohesive, not patchy. The pickles go in after baking, so they stay sharp and crunchy instead of turning dull in the oven heat.
Key Ingredients:
- 1 1/2 pounds ground beef (80/20) — enough fat to stay juicy without turning greasy.
- 1 teaspoon kosher salt — seasons the meat properly.
- 1/2 teaspoon black pepper — keeps the flavor clean.
- 1 tablespoon Worcestershire sauce — gives the beef that steakhouse edge.
- 1 small yellow onion, finely grated — melts into the meat without big chunks.
- 12 slider buns or Hawaiian rolls, split horizontally — soft enough to absorb juices.
- 6 slices American cheese — the melt is the point.
- 12 dill pickle chips — bring the needed tang.
- 2 tablespoons melted butter — brushed over the tops for color.
- 1 teaspoon yellow mustard — for the classic burger note.
- 1 tablespoon sesame seeds — optional, but they make the tops look right.
Quick Steps:
- Preheat the oven to 375°F and grease a 9×13-inch baking dish.
- Heat a large skillet over medium-high heat. Add the beef, onion, salt, pepper, Worcestershire, and mustard, then cook for 6 to 8 minutes, breaking the meat into small crumbles until no pink remains.
- Drain off excess fat, leaving about 1 tablespoon in the pan for flavor.
- Split the buns and place the bottom halves in the baking dish. Spoon the hot beef evenly over the buns, then lay the cheese slices across the top.
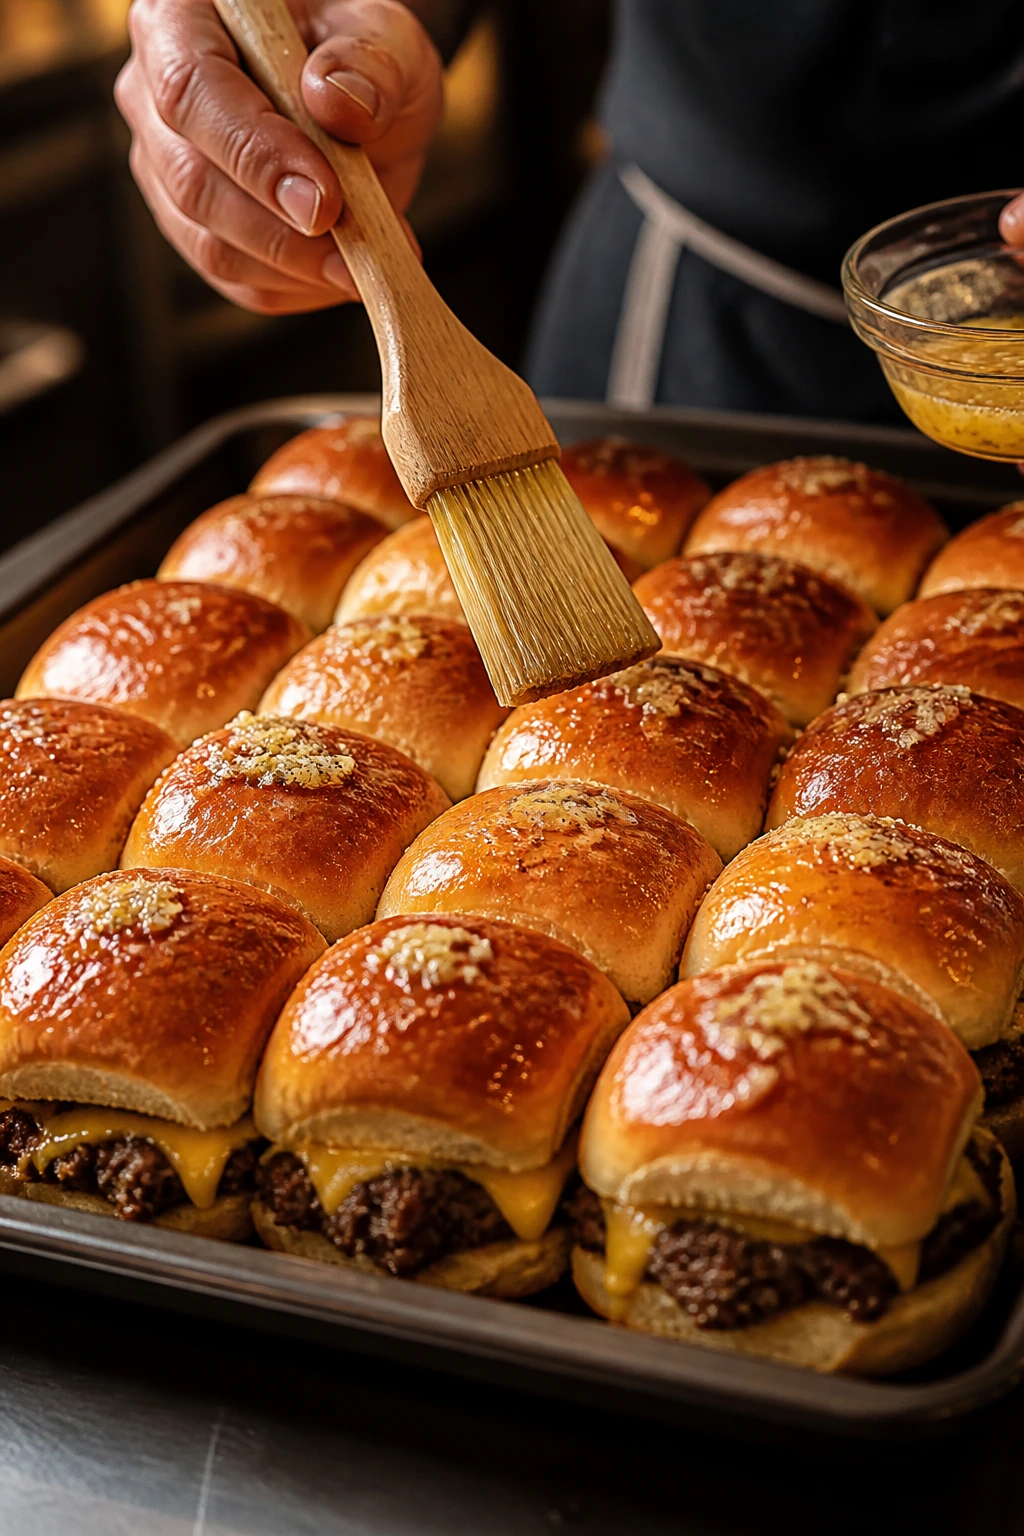
- Add the top buns, brush with melted butter, and sprinkle with sesame seeds.
- Bake covered with foil for 8 minutes, then uncover and bake 4 to 6 minutes more until the tops are lightly golden and the cheese has melted.
- Add pickle chips, slice, and serve hot.
Equipment for This Recipe:
- 9×13-inch baking dish — gives the sliders room without crowding.
- Large skillet — for browning the beef evenly.
- Wooden spoon or spatula — breaks the meat into small crumbles.
- Pastry brush — spreads butter across the bun tops.
How to Serve This Dish:
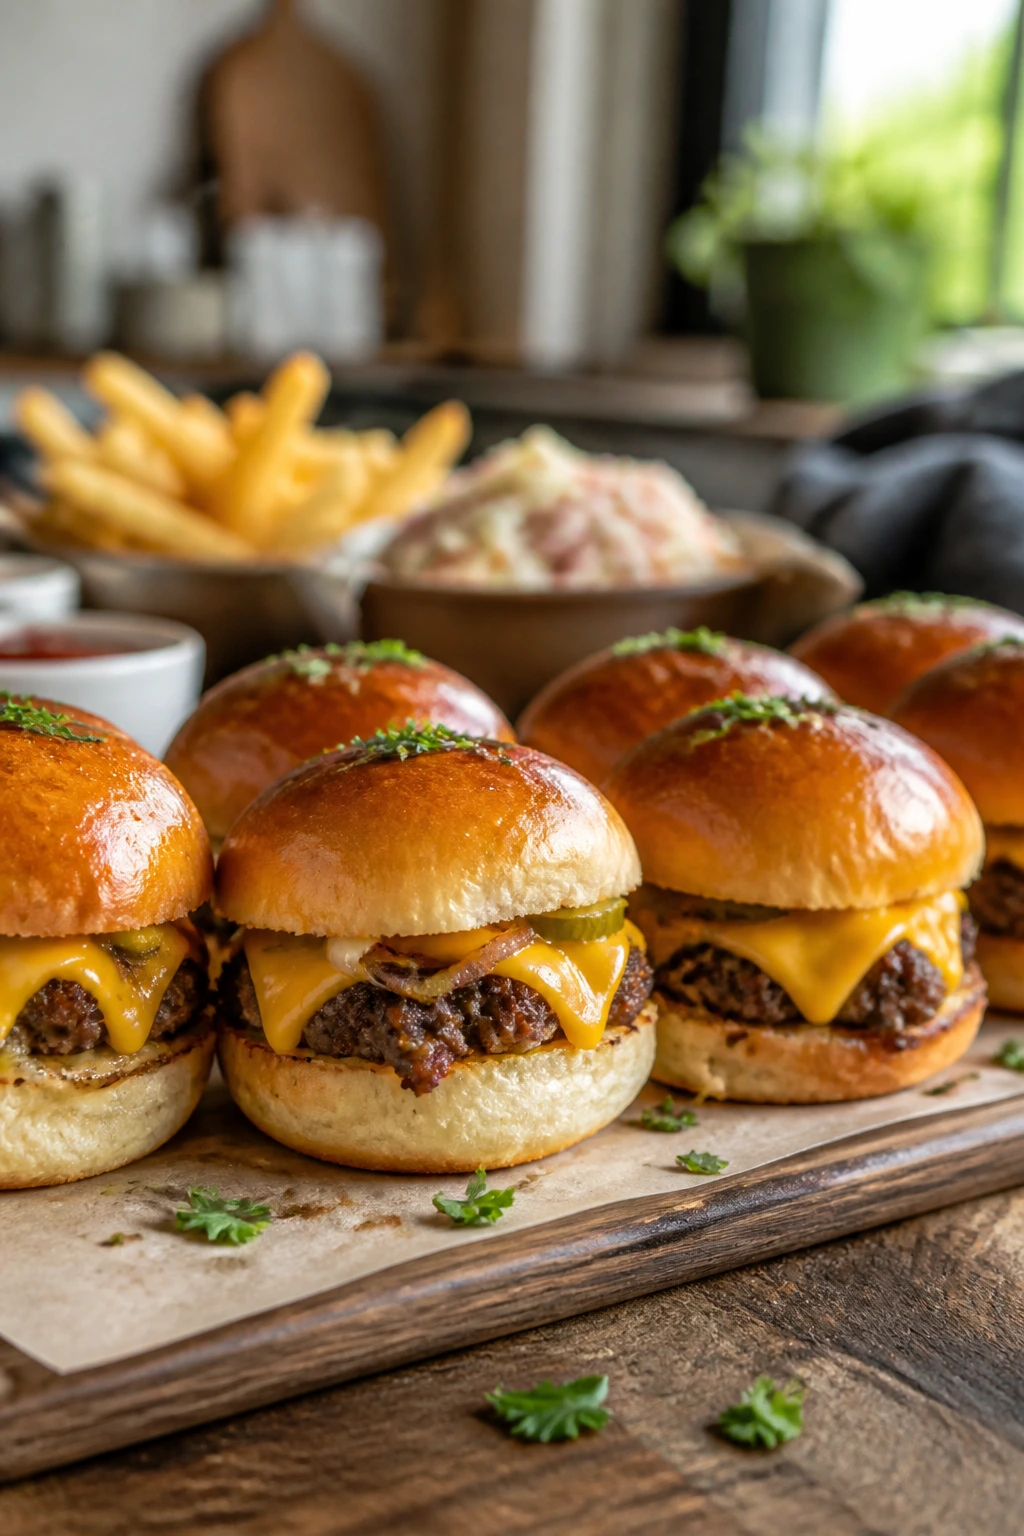
Serve these on a parchment-lined board with extra pickles and a bowl of ketchup-mustard mix on the side. Two sliders make a light dinner, three is the more honest portion, especially if you add chips or fries. The finished tray should look a little old-school and a little casual, which is exactly the point.
Pro Tips for This Recipe:
- Don’t overcook the beef. It should be fully browned, not dry and dusty.
- Use American cheese here. Sharp cheddar tastes good, but it doesn’t melt as smoothly.
- Keep the pickles off until the end. They stay crunchy that way.
- Brush the bun tops evenly. Dry spots brown unevenly and look patchy.
Variations on This Dish:
- Diner Deluxe: Add a thin swipe of mayonnaise under the beef before baking for a richer, looser bite.
- Mustard-Lover’s Version: Double the yellow mustard in the beef and add sliced dill pickles on top of the cheese.
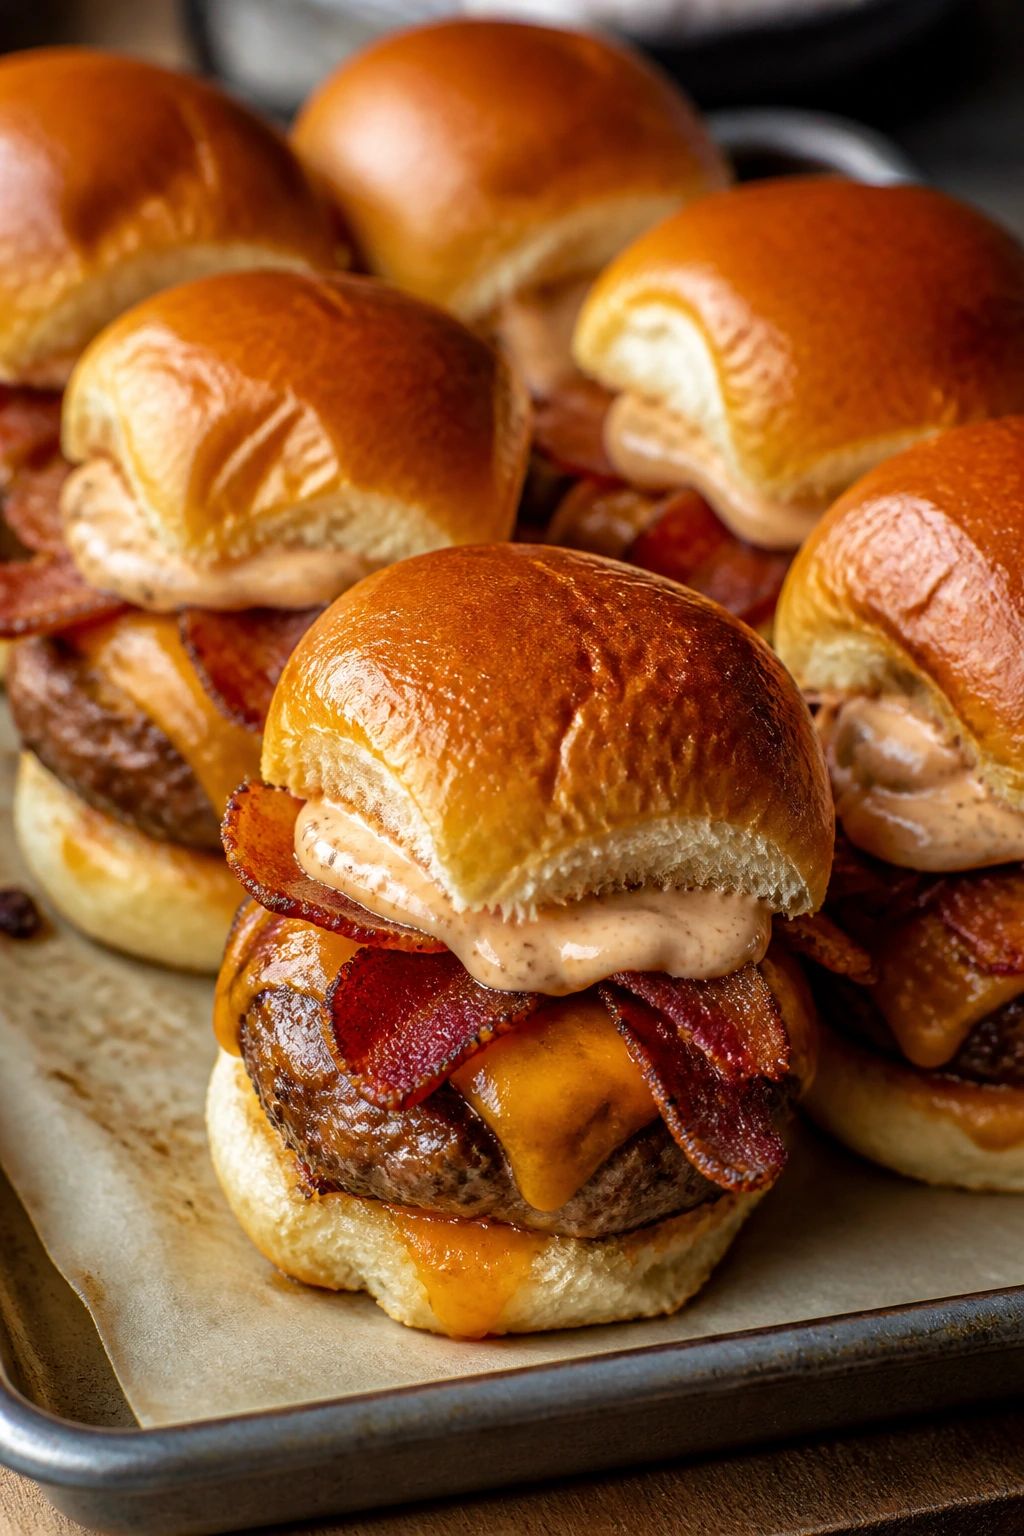
- Bacon-Forward Twist: Add 6 chopped cooked bacon slices over the beef before the cheese goes on.
Common Mistakes to Avoid with This Dish:
- Using too much onion. If the beef mixture starts looking wet, the buns will slide; stick to one small grated onion.
- Skipping the foil cover. The tops can brown before the cheese fully melts.
- Adding pickles too early. They lose their snap and the whole tray tastes flatter.
2. Bacon Cheddar Burger Sliders with Smoky Mayo
These have a little more swagger than the classic tray. Crispy bacon folds into the beef, sharp cheddar melts over the top, and the smoky mayo gives each slider a back-of-the-throat warmth that lingers without turning the whole thing into a spice contest.
Why It Works:
Bacon and cheddar need a little fat management, and the slider format handles that neatly. Cooking the bacon first lets you use a spoonful of the rendered fat in the beef if you want an extra savory note. Smoky mayo keeps the finished sliders from tasting one-note, especially when the buns are soft and the cheese is doing most of the heavy lifting.
Key Ingredients:
- 1 1/2 pounds ground beef (80/20)
- 6 slices thick-cut bacon, cooked crisp and chopped
- 1 teaspoon kosher salt
- 1/2 teaspoon black pepper
- 1 tablespoon Worcestershire sauce
- 8 ounces sharp cheddar, sliced or shredded
- 12 slider buns
- 1/3 cup mayonnaise
- 1 teaspoon smoked paprika
- 1 teaspoon ketchup
- 2 tablespoons melted butter
- 1 tablespoon chopped chives — optional, but nice on the mayo
Quick Steps:
- Preheat the oven to 375°F and grease a 9×13-inch baking dish.
- Stir together the mayonnaise, smoked paprika, ketchup, and chives in a small bowl; chill while you cook.
- Cook the bacon until crisp, then chop it into small pieces.
- Brown the beef with salt, pepper, and Worcestershire over medium-high heat for 6 to 8 minutes.
- Split the buns, add the beef, scatter the bacon over the meat, then cover with cheddar.
- Cap with the top buns, brush with butter, and bake covered for 8 minutes. Uncover and bake 4 to 5 minutes more until the cheese is melted.
- Spread smoky mayo on the top buns or serve it on the side.
Equipment for This Recipe:
- Large skillet — for the bacon and beef.
- Small mixing bowl — for the smoky mayo.
- 9×13-inch baking dish — keeps the sliders lined up.
- Sharp knife — chops bacon cleanly.
How to Serve This Dish:
These want something crisp beside them: potato chips, dill spears, or a vinegar-heavy slaw. One slider feels light; two feel right. If you serve them on a wooden board, let a little bacon crumble fall around the edges. It looks honest. And yes, that matters here.
Pro Tips for This Recipe:
- Cook the bacon first. You’ll know exactly how salty the finished tray will be.
- Shred cheddar finely if you’re short on time. It melts faster than thick slices.
- Keep the smoky mayo separate. If it hits the buns too early, the tops soften too much.
- A tiny spoon of bacon fat in the beef is enough. More than that gets greasy fast.
Variations on This Dish:
- Pepper Jack Swap: Use pepper jack instead of cheddar for more bite.
- Maple Bacon Version: Add 1 teaspoon maple syrup to the smoky mayo for a sweet edge.
- Double Bacon Tray: Reserve half the chopped bacon for the top after baking so it stays crisp.
Common Mistakes to Avoid with This Dish:
- Using flimsy bacon. Thin slices disappear once chopped; thick-cut bacon holds its shape.
- Dumping all the mayo on before baking. It makes the buns soft in a way you probably won’t like.
- Forgetting to drain the beef. Bacon already brings fat; the tray doesn’t need much more.
3. Caramelized Onion Swiss Sliders
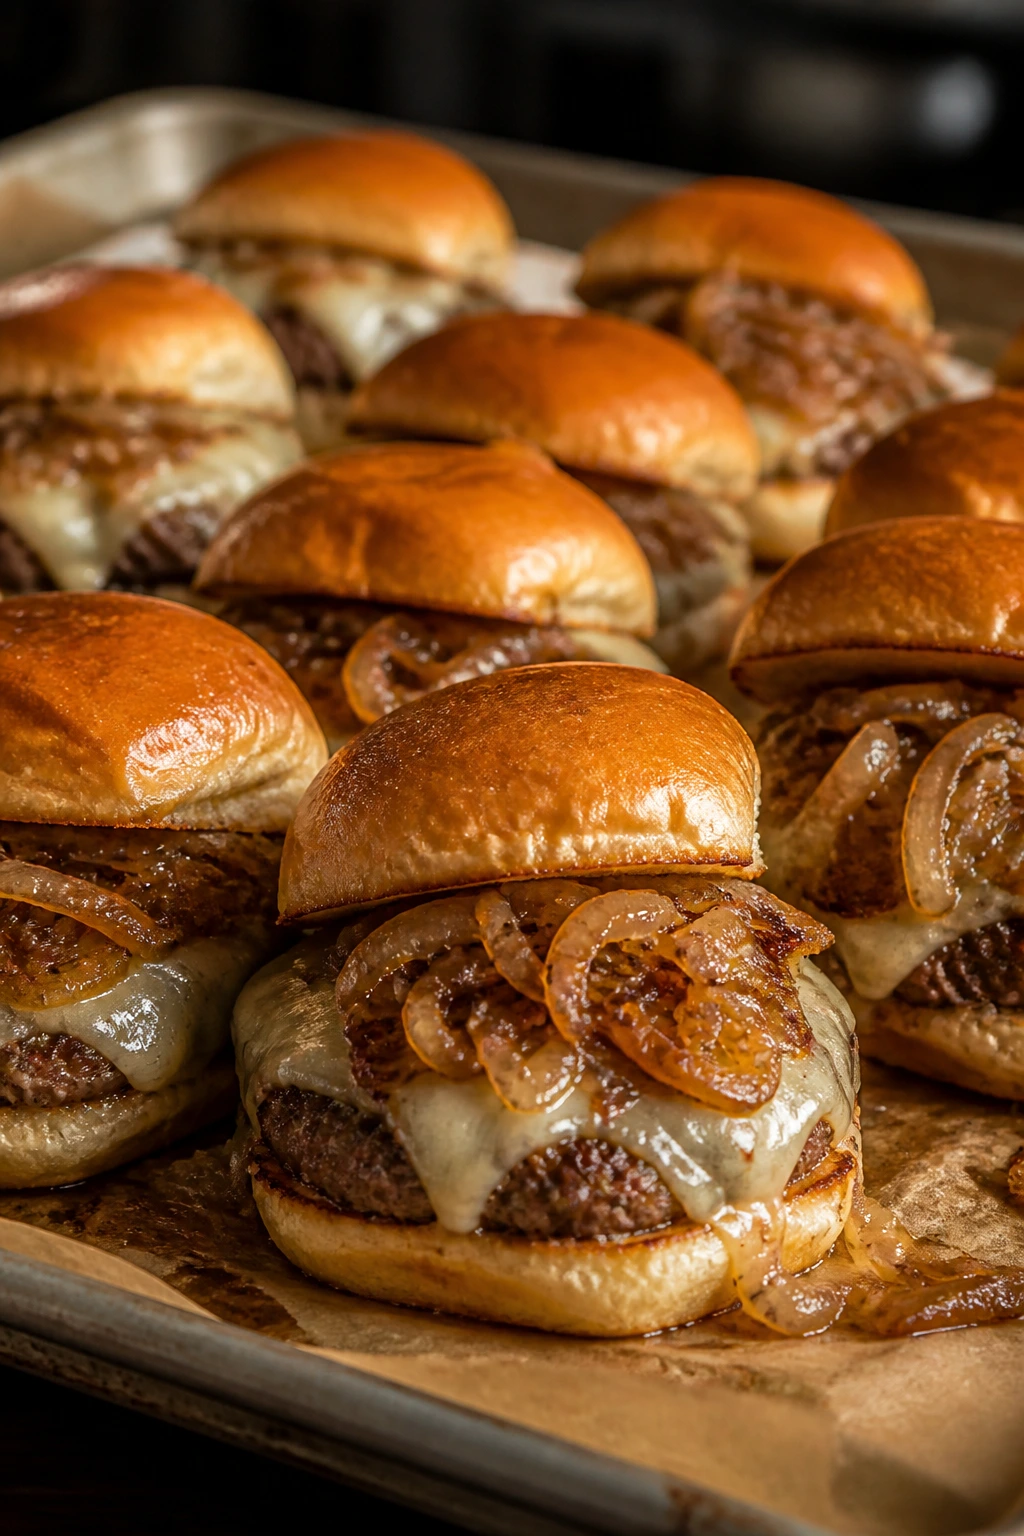
There’s a quieter kind of burger comfort here. Sweet onions cook down until they’re soft and brown at the edges, Swiss cheese melts in a silky layer, and the whole tray tastes a little closer to a patty melt than a basic burger.
Why It Works:
Caramelized onions need time, and sliders give you a place to put that effort to good use. The onions bring sweetness without sugar, which balances the salt and fat in the beef. Swiss cheese melts with enough stretch to tie the onions to the meat, but it doesn’t turn sharp or oily the way some other cheeses do.
Key Ingredients:
- 1 1/2 pounds ground beef (80/20)
- 2 medium yellow onions, thinly sliced
- 2 tablespoons unsalted butter
- 1 tablespoon olive oil
- 1 teaspoon kosher salt
- 1/2 teaspoon black pepper
- 1 tablespoon Dijon mustard
- 1 teaspoon fresh thyme leaves
- 8 ounces Swiss cheese, sliced
- 12 brioche slider buns
- 2 tablespoons melted butter
- 1 teaspoon onion powder — optional, for the beef
Quick Steps:
- Preheat the oven to 375°F and grease a 9×13-inch baking dish.
- Cook the onions slowly in butter and olive oil over medium-low heat for 20 to 25 minutes, stirring often, until they’re deep golden and soft.
- While the onions cook, brown the beef with salt, pepper, Dijon, and thyme over medium-high heat for 6 to 8 minutes.
- Split the buns and place the bottom halves in the dish. Spread the beef over the buns, then pile the onions on top and lay the Swiss over that.
- Add the top buns, brush with melted butter, and bake covered for 8 minutes.
- Uncover and bake 4 to 6 minutes more until the tops are golden and the cheese is fully melted.
Equipment for This Recipe:
- Large skillet — for caramelizing onions and browning beef.
- 9×13-inch baking dish — the buns need a flat base.
- Wooden spoon — keeps onions from scorching.
- Pastry brush — for the butter finish.
How to Serve This Dish:
These are the sliders I’d put next to a bowl of tomato soup or a pile of roasted potatoes. They taste especially good with a sharp mustard on the side. A single tray looks understated until the onions hit the heat and the whole kitchen smells like it’s been working all afternoon.
Pro Tips for This Recipe:
- Don’t rush the onions. High heat gives you burnt edges, not sweetness.
- Use brioche if you want a richer bite. It stands up well to the onions and cheese.
- Taste the beef before assembling. Swiss is mild, so the meat needs enough salt.
- A thin layer of Dijon under the beef makes the onion flavor pop.
Variations on This Dish:
- Gruyère Upgrade: Swap Swiss for Gruyère if you want a deeper, nuttier melt.
- Mushroom-Added Version: Fold in 1 cup sautéed mushrooms with the onions.
- Rosemary Roll Swap: Use soft rosemary dinner rolls if you want the tray to taste a little more savory.
Common Mistakes to Avoid with This Dish:
- Burning the onions. They should be brown and soft, not dark and bitter.
- Using cold cheese straight from the fridge. It melts more slowly; let it sit out while you cook.
- Over-salting the beef before the onions are done. Swiss and Dijon already bring plenty of flavor.
4. Jalapeño Pepper Jack Sliders
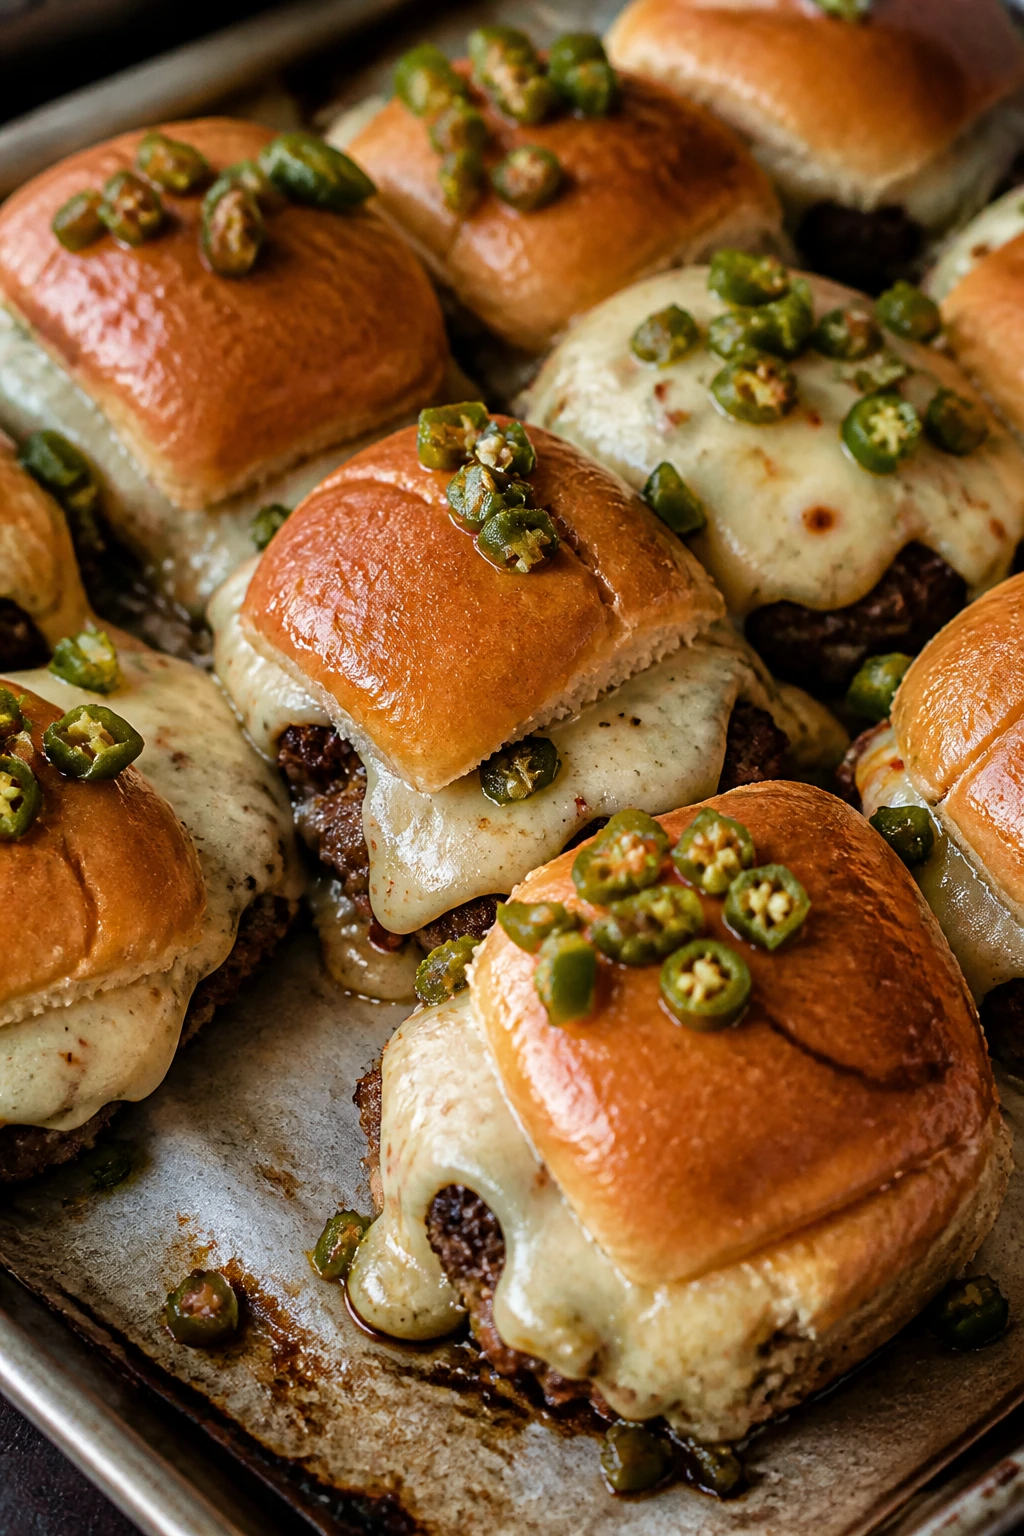
These are for the people who like their comfort food with a small jolt. The pepper jack melts with a soft burn, the jalapeños add snap, and the beef carries enough seasoning to keep the heat from feeling random.
Why It Works:
Pepper jack wants moisture and fat, and slider beef gives it both. Pickled jalapeños are the smart move here because they bring brightness as well as heat; fresh jalapeños can be sharper, but they need a little more cooking to soften. The result is a slider that wakes up the palate without turning into a dare.
Key Ingredients:
- 1 1/2 pounds ground beef (80/20)
- 1 teaspoon kosher salt
- 1/2 teaspoon black pepper
- 1 teaspoon garlic powder
- 1/2 teaspoon ground cumin
- 1 tablespoon Worcestershire sauce
- 8 ounces pepper jack cheese, sliced
- 1/2 cup pickled jalapeños, drained and chopped
- 12 slider buns
- 1/2 cup sour cream
- 1 tablespoon lime juice
- 2 tablespoons melted butter
Quick Steps:
- Preheat the oven to 375°F and grease a 9×13-inch baking dish.
- Stir together sour cream and lime juice for a quick cooling sauce.
- Brown the beef with salt, pepper, garlic powder, cumin, and Worcestershire over medium-high heat for 6 to 8 minutes.
- Split the buns and layer the bottom halves in the pan. Spoon the beef over the buns, scatter the chopped jalapeños on top, and cover with pepper jack.
- Place on the top buns, brush with butter, and bake covered for 8 minutes.
- Uncover and bake 4 to 5 minutes more until the cheese is melted and the tops are lightly golden.
Equipment for This Recipe:
- Large skillet — for the beef.
- 9×13-inch baking dish — for assembly.
- Small bowl — for the lime sour cream.
- Pastry brush — for the butter.
How to Serve This Dish:
Serve these with extra sour cream or a cool ranch dip, because heat without something creamy beside it gets old fast. A crisp cabbage slaw also works well. The plate should look a little messy in the best possible way, with jalapeño rings peeking out from the cheese.
Pro Tips for This Recipe:
- Drain the jalapeños well. Too much brine makes the buns soggy.
- Use pepper jack in slices, not giant cubes. You want even melt.
- If you like more heat, add chopped fresh jalapeño to the beef. Seeds and ribs included if you mean it.
- Let the sliders rest for 2 minutes before cutting. The cheese settles and stays inside the buns.
Variations on This Dish:
- Nacho Heat Version: Add a spoonful of salsa and a few crushed tortilla chips after baking.
- Cooler Ranch Route: Swap the sour cream for ranch dressing and keep the jalapeños pickled.
- Smoked Pepper Jack Twist: Use smoked pepper jack if you want the heat with a little campfire note.
Common Mistakes to Avoid with This Dish:
- Using too many jalapeños. Heat should support the burger, not bury it.
- Skipping the cooling sauce. A creamy dip keeps the flavors balanced.
- Baking uncovered too soon. Pepper jack melts, but it still needs a little help from foil.
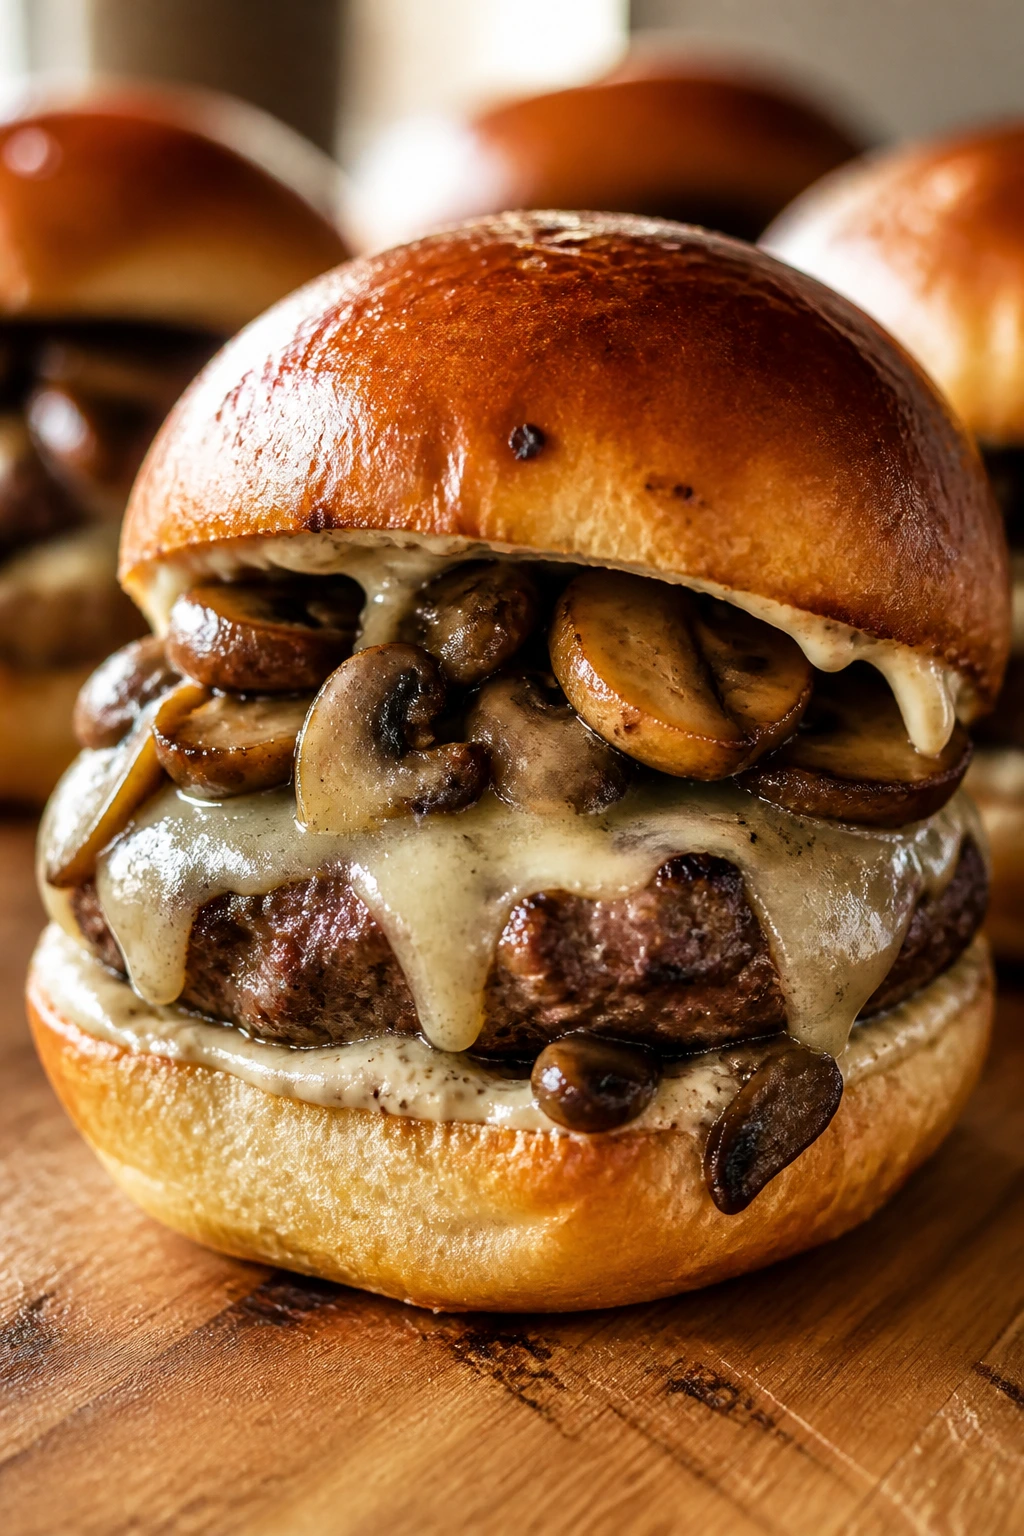
5. Mushroom Swiss Burger Sliders
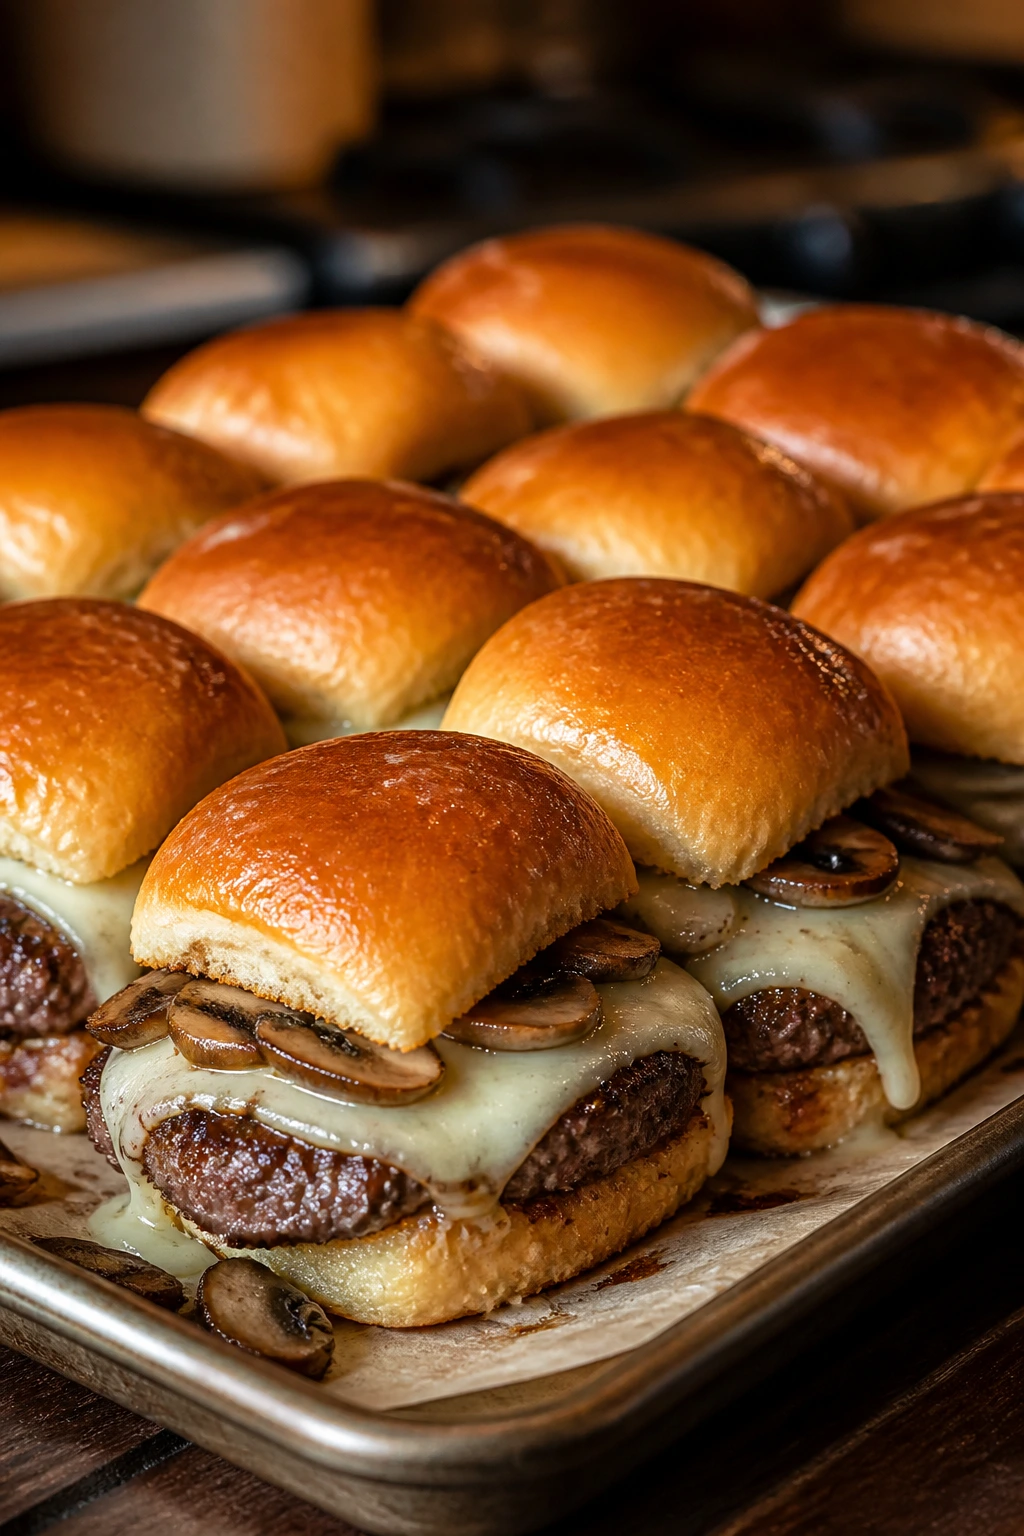
Mushrooms are the trick here, not the garnish. They bring a soft, savory depth that makes the beef taste fuller, and Swiss cheese seals the whole thing together with that mild, nutty melt people keep coming back for.
Why It Works:
Mushrooms release water, so they need a proper sauté before they ever see the bun. Once that moisture cooks off, what’s left tastes concentrated and meaty. Swiss gives you a clean finish, and thyme keeps the filling from feeling heavy.
Key Ingredients:
- 1 1/2 pounds ground beef (80/20)
- 1 pound cremini or button mushrooms, finely chopped
- 2 tablespoons butter
- 1 tablespoon olive oil
- 1 teaspoon kosher salt
- 1/2 teaspoon black pepper
- 1 teaspoon fresh thyme leaves or 1/2 teaspoon dried thyme
- 1 tablespoon Worcestershire sauce
- 8 ounces Swiss cheese, sliced
- 12 slider buns
- 2 tablespoons melted butter
Quick Steps:
- Preheat the oven to 375°F and grease a 9×13-inch baking dish.
- Cook the mushrooms in butter and olive oil over medium-high heat for 8 to 10 minutes until the liquid evaporates and the edges start to brown.
- Brown the beef with salt, pepper, thyme, and Worcestershire for 6 to 8 minutes.
- Split the buns and layer in the beef, then the mushrooms, then the Swiss.
- Cap with the top buns, brush with melted butter, and bake covered for 8 minutes.
- Uncover and bake 4 to 5 minutes more until the cheese is melted and the tops are lightly toasted.
Equipment for This Recipe:
- Large skillet — big enough for the mushrooms and beef.
- 9×13-inch baking dish — holds the sliders in a neat grid.
- Sharp knife — chops mushrooms finely.
- Wooden spoon — helps the mushrooms brown instead of steaming.
How to Serve This Dish:
These go well with a green salad that has a sharp vinaigrette, because the acidity cuts through the richness of the beef and cheese. A bowl of dill pickles on the side is also smart. The finished sliders should smell earthy and buttery, not like a mushroom casserole wearing a burger costume.
Pro Tips for This Recipe:
- Chop the mushrooms finely. Big pieces slide out of the buns.
- Cook off every bit of mushroom moisture. Wet mushrooms are the enemy of a good slider.
- Use cremini if you want a deeper flavor. Button mushrooms are milder.
- Let the beef and mushrooms cool for 3 minutes before assembling. Hot enough to melt, not so hot the buns steam apart.
Variations on This Dish:
- Garlic Mushroom Version: Add 1 minced garlic clove in the last minute of mushroom cooking.
- Onion-Mushroom Blend: Use 1/2 onion with the mushrooms for more sweetness.
- Provolone Swap: If you want a slightly firmer cheese, use provolone instead of Swiss.
Common Mistakes to Avoid with This Dish:
- Leaving the mushrooms wet. The whole tray will slide if you do.
- Overcrowding the skillet. Mushrooms need space to brown.
- Cutting too soon. Give the sliders a short rest so the filling settles.
6. Big Mac-Style Special Sauce Sliders
This is the tray people go back to after they say they’re only taking one. The sauce is tangy and a little sweet, the lettuce stays crisp because it goes on at the end, and the sesame buns make the whole thing feel familiar in a very specific way.
Why It Works:
The special sauce needs to be mixed ahead so the flavors can settle. It tastes better after 10 minutes in the fridge, which gives the relish, mustard, and paprika time to stop sounding like separate ingredients. Adding shredded lettuce after baking keeps the sliders from becoming wet little packets.
Key Ingredients:
- 1 1/2 pounds ground beef (80/20)
- 1 teaspoon kosher salt
- 1/2 teaspoon black pepper
- 1 tablespoon Worcestershire sauce
- 1/2 cup mayonnaise
- 2 tablespoons ketchup
- 1 tablespoon sweet pickle relish
- 1 teaspoon yellow mustard
- 1 teaspoon white vinegar
- 1/2 teaspoon paprika
- 12 sesame slider buns
- 6 slices American cheese
- 1 cup shredded iceberg lettuce
- 1/2 cup finely diced onion
- 12 dill pickle chips
Quick Steps:
- Mix the mayonnaise, ketchup, relish, mustard, vinegar, and paprika in a small bowl; chill while you cook.
- Preheat the oven to 375°F and grease a 9×13-inch baking dish.
- Brown the beef with salt, pepper, and Worcestershire over medium-high heat for 6 to 8 minutes.
- Split the buns and place the bottom halves in the dish. Add the beef and cheese, then bake covered for 8 minutes.
- Uncover, bake 4 minutes more, then top with lettuce, onion, pickles, and a thin layer of special sauce.
- Add the top buns, slice, and serve.
Equipment for This Recipe:
- Small bowl — for the sauce.
- Large skillet — for the beef.
- 9×13-inch baking dish — for baking and assembling.
- Fine knife — for the onion dice.
How to Serve This Dish:
Serve these fast and keep extra napkins nearby. A bowl of kettle chips makes sense here, because the whole tray has that fast-food comfort energy and chips lean into it. If you’re carrying them to a table, assemble the lettuce and sauce right before serving so the tops stay tidy.
Pro Tips for This Recipe:
- Make the sauce first. Even 10 minutes helps.
- Use iceberg lettuce. It gives the cold crunch this tray needs.
- Dice the onion very small. Big onion chunks throw off the balance.
- Add sauce sparingly under the top bun. Too much and the buns slide.
Variations on This Dish:
- Thousand Island Lean: Add 1 teaspoon chopped dill pickle instead of relish if you want a firmer sauce texture.
- Spicy Special Sauce: Stir 1 teaspoon hot sauce into the sauce mix.
- Sesame-Free Version: Use plain buns and sprinkle toasted sesame seeds only on the top layer.
Common Mistakes to Avoid with This Dish:
- Putting lettuce on before baking. It wilts and turns limp.
- Using too much sauce. The tray gets messy in a way that stops being fun.
- Skipping the cheese. The sauce is only half the story without a melt to anchor it.
7. Patty Melt Sliders on Rye
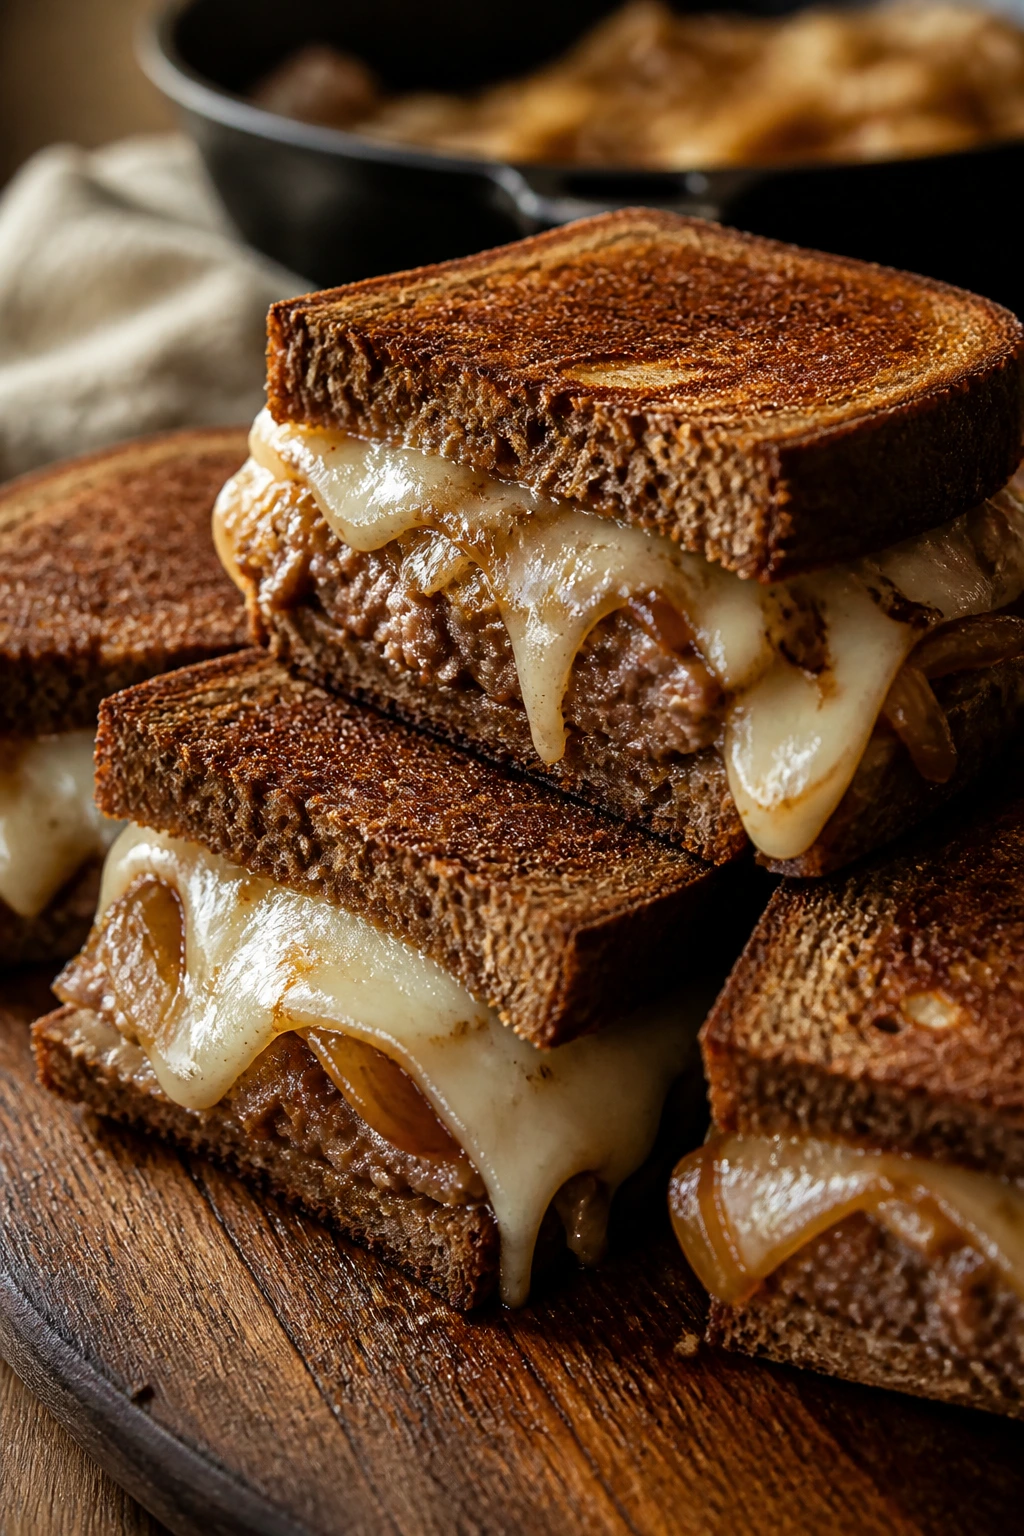
These taste like late-night diner food in the best sense. Rye brings a slightly sour, dark edge, the onions soften into the beef, and the cheese pulls everything together with a little extra depth that standard burger buns don’t give you.
Why It Works:
A patty melt works because it straddles two worlds: burger and grilled sandwich. Rye bread has enough backbone to handle butter and onions without falling apart, and Swiss or provolone melts cleanly between the layers. The butter on the outside turns the tops golden and gives the sliders that unmistakable toasted aroma.
Key Ingredients:
- 1 1/2 pounds ground beef (80/20)
- 2 medium yellow onions, thinly sliced
- 2 tablespoons butter
- 1 tablespoon olive oil
- 1 teaspoon kosher salt
- 1/2 teaspoon black pepper
- 1 tablespoon Worcestershire sauce
- 1 teaspoon Dijon mustard
- 8 slices Swiss or provolone
- 12 mini rye rolls or slider buns
- 2 tablespoons softened butter for the tops
Quick Steps:
- Preheat the oven to 375°F and grease a 9×13-inch baking dish.
- Cook the onions in butter and olive oil over medium-low heat for 18 to 20 minutes until soft, brown, and sweet.
- Brown the beef with salt, pepper, Worcestershire, and Dijon for 6 to 8 minutes.
- Split the rye rolls and layer in the beef, onions, and cheese.
- Add the top buns, brush the outsides with softened butter, and bake covered for 8 minutes.
- Uncover and bake 4 to 6 minutes more until the bread is toasted and the cheese is melted.
Equipment for This Recipe:
- Large skillet — for onions and beef.
- 9×13-inch baking dish — for the tray.
- Pastry brush — for the butter.
- Sharp serrated knife — rye cuts cleaner with teeth.
How to Serve This Dish:
Serve these with dill pickles and a small bowl of mustard, not ketchup. Rye and mustard make a better pair than rye and sweet sauce. The tray should come out smelling nutty and buttery, with onion sweetness running underneath the whole thing.
Pro Tips for This Recipe:
- Go low and slow on the onions. They need time to turn sweet.
- Use mini rye rolls, not sliced sandwich rye. They’re sturdier and easier to serve.
- Butter the outside, not the inside, of the top buns. That’s what gives you the toast.
- Let the beef cool for a minute before layering. Rye softens fast if you pile on piping-hot filling.
Variations on This Dish:
- Caraway Boost: Add a pinch of caraway seeds to the onions if you like stronger rye flavor.
- Gruyère Melt: Use Gruyère instead of Swiss for a nuttier slice.
- Sauerkraut Angle: Add a small layer of well-drained sauerkraut for sharper contrast.
Common Mistakes to Avoid with This Dish:
- Using soft sandwich rye. It falls apart under heat and filling.
- Burning the onions. Bitter onions ruin the whole tray.
- Skipping the butter outside the bread. That toasted edge is the point.
8. BBQ Bacon Cheddar Sliders
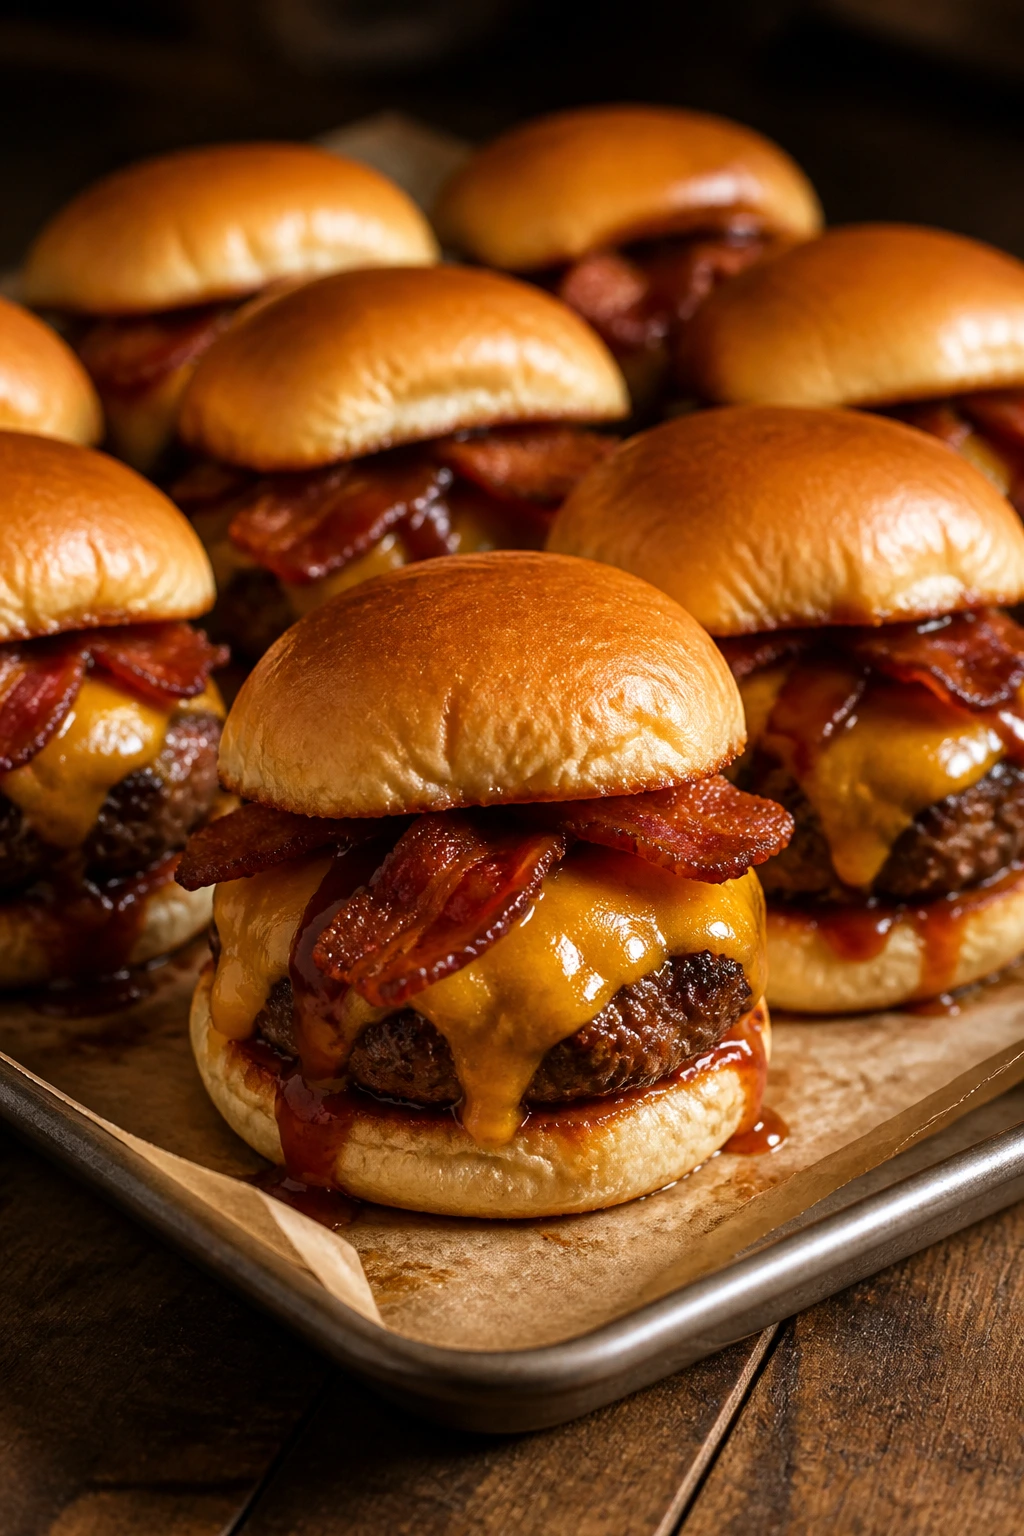
Smoke, salt, and a little sweetness. That’s the rhythm here. Barbecue sauce threads through the beef, cheddar brings the melt, and bacon gives the tray enough snap and savor that it tastes like a cookout moved indoors.
Why It Works:
Barbecue sauce can go cloying if you pour too much into the filling, so this version uses it in a measured way. A few spoonfuls in the beef and a little brushed over the tops is enough. Cheddar holds up better than softer cheeses when barbecue sauce is in the mix, and the bacon keeps the flavor from drifting into sweet territory.
Key Ingredients:
- 1 1/2 pounds ground beef (80/20)
- 1 teaspoon kosher salt
- 1/2 teaspoon black pepper
- 2 tablespoons barbecue sauce
- 1 tablespoon Worcestershire sauce
- 6 slices bacon, cooked crisp and crumbled
- 1 small red onion, very thinly sliced
- 8 ounces sharp cheddar, sliced or shredded
- 12 slider buns
- 2 tablespoons melted butter
- 1 teaspoon smoked paprika
Quick Steps:
- Preheat the oven to 375°F and grease a 9×13-inch baking dish.
- Cook the red onion in a skillet over medium heat for 5 to 6 minutes until softened.
- Brown the beef with salt, pepper, barbecue sauce, Worcestershire, and smoked paprika for 6 to 8 minutes.
- Split the buns, add the beef, scatter the onion and bacon over the meat, then cover with cheddar.
- Add the top buns, brush with butter, and bake covered for 8 minutes.
- Uncover and bake 4 to 5 minutes more until the cheese melts and the tops are lightly browned.
Equipment for This Recipe:
- Large skillet — for beef and onion.
- 9×13-inch baking dish — for baking.
- Pastry brush — for the butter.
- Small spoon — for brushing a little barbecue sauce on top if you want it.
How to Serve This Dish:
These like baked beans, potato salad, or corn on the cob. If you’re serving them for a game-day spread, set them next to a bowl of extra barbecue sauce and let people decide how sticky they want to get. They’re rich enough that a simple vinegar slaw helps more than another heavy side.
Pro Tips for This Recipe:
- Use a thick barbecue sauce. Thin sauce runs into the buns.
- Cook the red onion just enough to soften it. You want a little bite left.
- Don’t drown the beef in sauce. A few tablespoons is plenty.
- Crumble the bacon fine. Big strips slide out of the sliders.
Variations on This Dish:
- Honey Barbecue Version: Add 1 teaspoon honey to the sauce if you want more sweetness.
- Smokier Tray: Use smoked cheddar and extra paprika.
- Spicy BBQ Swap: Stir in a teaspoon of hot sauce for a sharper finish.
Common Mistakes to Avoid with This Dish:
- Using watery barbecue sauce. It soaks the buns fast.
- Adding bacon in large chunks. It makes the sliders hard to bite.
- Skipping a side of acidity. The tray tastes flatter without pickles or slaw nearby.
9. Taco Cheeseburger Sliders
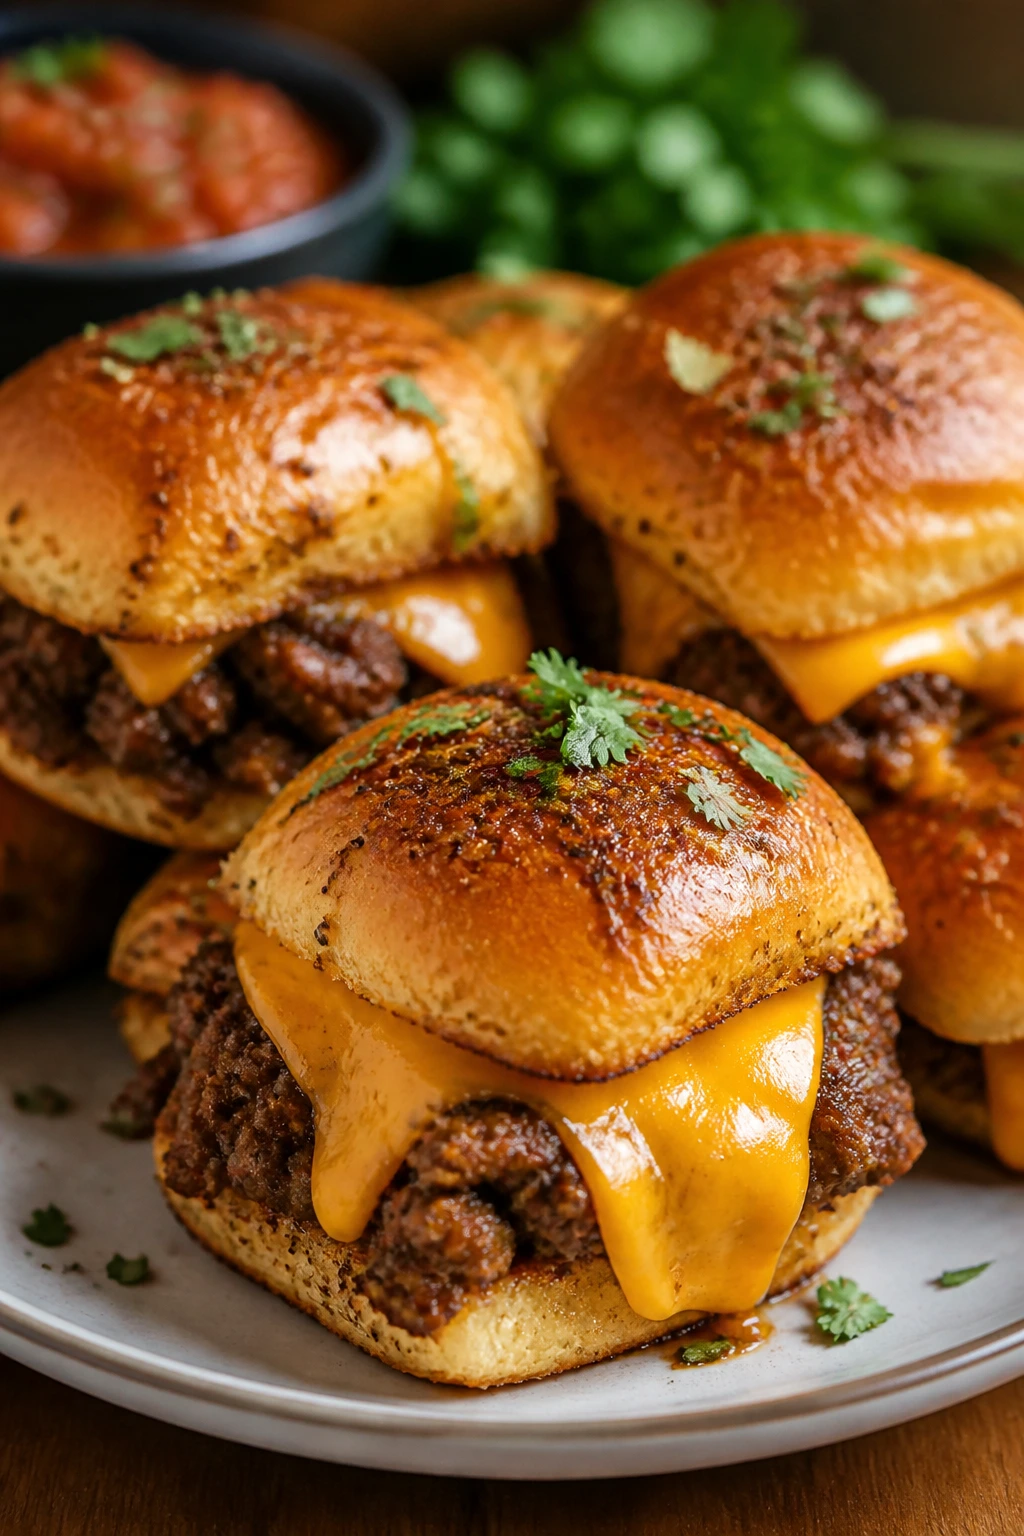
This is the loud, fun tray. Taco seasoning pushes the beef in a different direction, salsa or lime cream adds brightness, and the cheddar pulls everything together so it still reads like a burger, just one with a little more swagger.
Why It Works:
Ground beef takes taco seasoning well because the fat carries the spices evenly. Salsa adds moisture and keeps the filling from tasting dusty. Cheddar is the right cheese here because it bridges burger and taco flavors without acting confused about its job.
Key Ingredients:
- 1 1/2 pounds ground beef (80/20)
- 2 tablespoons taco seasoning
- 1/2 cup salsa
- 1 teaspoon kosher salt, if your seasoning is low-sodium
- 8 ounces cheddar or Mexican blend cheese
- 12 slider buns
- 1/2 cup sour cream
- 1 tablespoon lime juice
- 1/4 cup chopped cilantro
- 2 tablespoons melted butter
- 1/4 cup sliced pickled jalapeños — optional
Quick Steps:
- Preheat the oven to 375°F and grease a 9×13-inch baking dish.
- Mix the sour cream, lime juice, and cilantro in a small bowl.
- Brown the beef with taco seasoning and salsa over medium-high heat for 6 to 8 minutes.
- Split the buns and layer in the beef, cheese, and pickled jalapeños if using.
- Add the top buns, brush with butter, and bake covered for 8 minutes.
- Uncover and bake 4 to 5 minutes more until the cheese melts and the tops are lightly golden.
Equipment for This Recipe:
- Large skillet — for the filling.
- Small bowl — for the lime sour cream.
- 9×13-inch baking dish — for assembly.
- Pastry brush — for butter.
How to Serve This Dish:
Serve these with tortilla chips and a bowl of pico de gallo if you want the whole table to lean into the theme. One or two sliders make a good snack; three is dinner. A cold beer or lime soda works well because the seasoning likes a little fizz beside it.
Pro Tips for This Recipe:
- Use thick salsa. Thin salsa makes the buns soggy.
- Taste the seasoning before salting. Some taco blends are already salty.
- Keep cilantro on the side if you’re serving a mixed crowd. Not everyone wants it.
- Let the sliders rest for a minute before cutting. The cheese settles better.
Variations on This Dish:
- Street-Corn Style: Add a spoonful of crumbled cotija and a little chili powder.
- Extra-Cheesy Version: Layer in both cheddar and Monterey Jack.
- Milder Kid Batch: Skip the jalapeños and use plain sour cream.
Common Mistakes to Avoid with This Dish:
- Overloading with salsa. The filling should be moist, not soupy.
- Using too little cheese. The burger-taco bridge needs that melt.
- Forgetting the lime. A little acid keeps the whole tray lively.
10. Green Chile Monterey Jack Sliders
If you like a burger that tastes a little sunbaked and a little sharp, this is the one. Roasted green chiles bring a mellow heat, Monterey Jack melts into a soft sheet, and the cilantro-lime finish keeps the whole tray from getting heavy.
Why It Works:
Green chiles are one of the best comfort-food shortcuts around because they bring flavor without a lot of chopping or fuss. Their heat is rounder than jalapeños, so they play well with cheese and beef. Monterey Jack melts smoothly and gives you a soft, creamy bite that fits the chiles better than a stronger cheese would.
Key Ingredients:
- 1 1/2 pounds ground beef (80/20)
- 1 teaspoon kosher salt
- 1/2 teaspoon black pepper
- 1 cup roasted diced green chiles, drained
- 1/2 teaspoon ground cumin
- 1 tablespoon Worcestershire sauce
- 8 ounces Monterey Jack cheese, sliced
- 12 slider buns
- 2 tablespoons mayonnaise
- 1 tablespoon lime juice
- 1/4 cup chopped cilantro
- 2 tablespoons melted butter
Quick Steps:
- Preheat the oven to 375°F and grease a 9×13-inch baking dish.
- Stir together the mayonnaise, lime juice, and cilantro.
- Brown the beef with salt, pepper, cumin, Worcestershire, and green chiles over medium-high heat for 6 to 8 minutes.
- Split the buns and layer in the beef and Monterey Jack.
- Add the top buns, brush with melted butter, and bake covered for 8 minutes.
- Uncover and bake 4 to 5 minutes more until the cheese is melted and the tops are lightly toasted.
Equipment for This Recipe:
- Large skillet — for the beef and chiles.
- Small bowl — for the lime mayo.
- 9×13-inch baking dish — for the sliders.
- Pastry brush — for the butter.
How to Serve This Dish:
These are strong with tortilla chips, guacamole, or a chopped tomato salad. The green chile flavor wants something fresh and a little crunchy next to it. If you add the cilantro-lime mayo, keep it light; it should sharpen the slider, not bury it.
Pro Tips for This Recipe:
- Drain the chiles well. Extra liquid softens the buns.
- Use mild chiles if you want comfort over heat. Medium is fine too, but hot chiles can take over.
- Fresh lime juice matters. Bottled lime juice tastes flat here.
- Add the mayo after baking if you want the cleanest texture.
Variations on This Dish:
- Corn-and-Chile Version: Fold in 1/2 cup frozen corn, thawed and patted dry.
- Pepper Jack Swap: Use pepper jack for more heat.
- Avocado Finish: Add thin avocado slices after baking.
Common Mistakes to Avoid with This Dish:
- Using wet chiles straight from the can. Dry them first.
- Overdoing the cumin. It should support the chile flavor, not turn the tray into chili.
- Adding cilantro before baking. It loses its fresh edge.
11. Philly-Style Cheeseburger Sliders
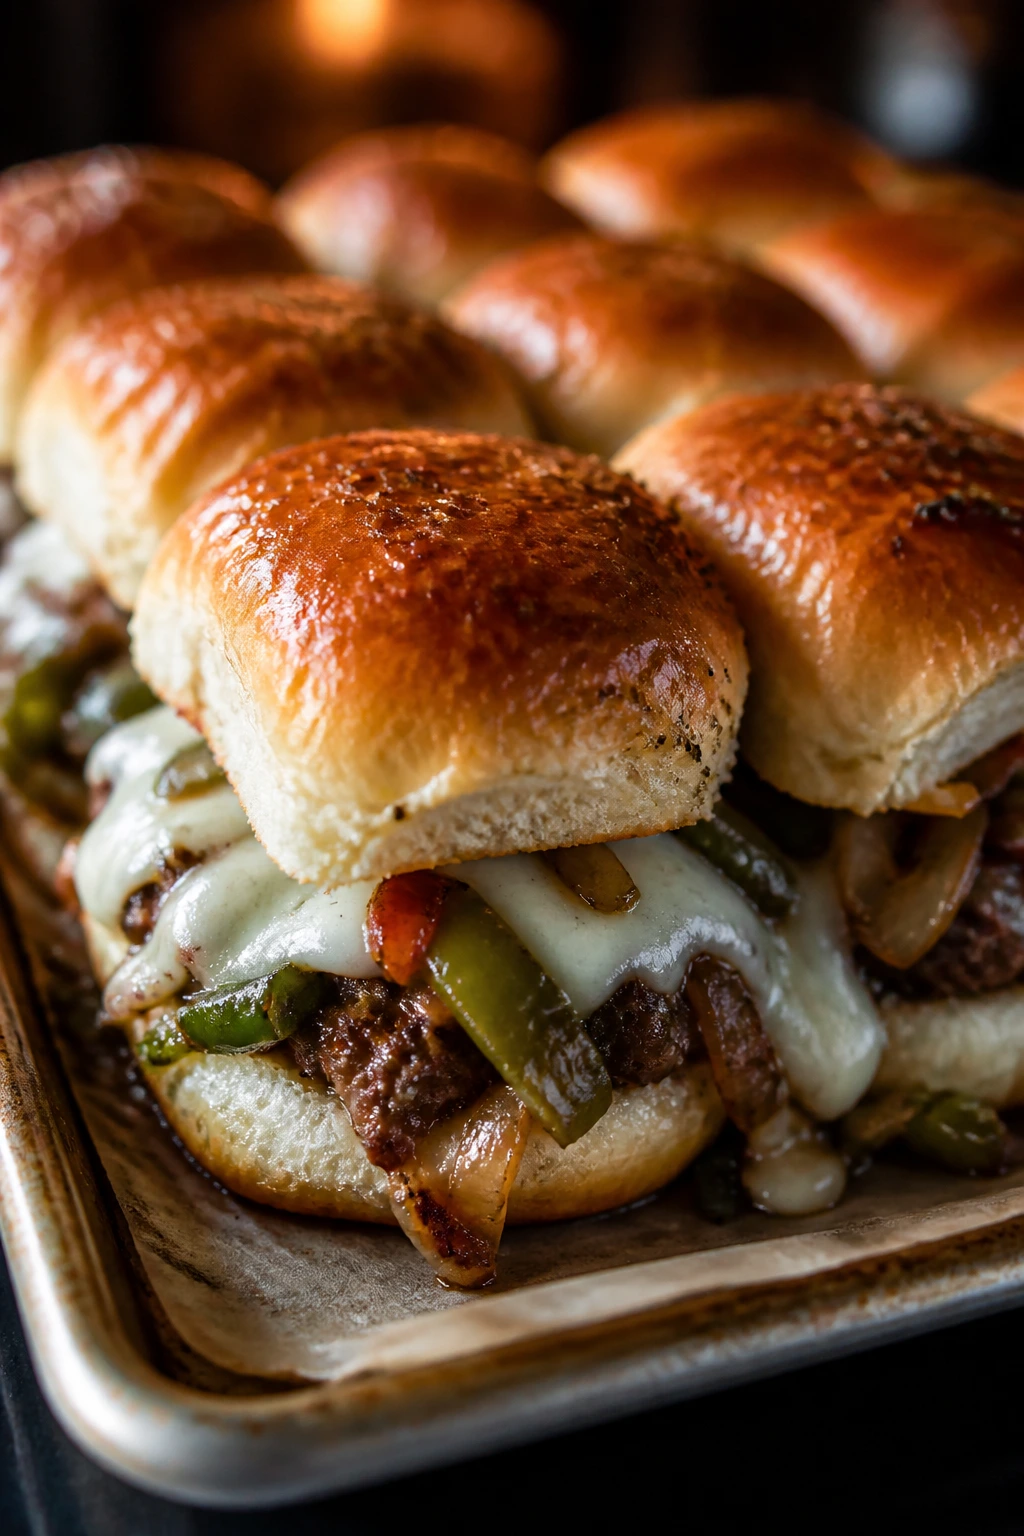
This is the slider for people who like onions and peppers as much as they like meat. The vegetables soften in the pan, provolone melts with a gentle stretch, and the whole thing lands somewhere between a cheeseburger and a cheesesteak without losing its identity.
Why It Works:
The peppers and onions cook first so they can soften before they’re trapped in the bun. That matters. Raw pepper in a slider tastes loud in the wrong way. Provolone gives a mild, creamy melt that doesn’t fight the vegetable sweetness, and Worcestershire keeps the beef from feeling flat.
Key Ingredients:
- 1 1/2 pounds ground beef (80/20)
- 1 green bell pepper, thinly sliced
- 1 small yellow onion, thinly sliced
- 2 tablespoons olive oil
- 1 teaspoon kosher salt
- 1/2 teaspoon black pepper
- 1 tablespoon Worcestershire sauce
- 1 teaspoon garlic powder
- 8 ounces provolone cheese, sliced
- 12 slider buns
- 2 tablespoons melted butter
Quick Steps:
- Preheat the oven to 375°F and grease a 9×13-inch baking dish.
- Cook the pepper and onion in olive oil over medium heat for 8 to 10 minutes until softened and just starting to brown.
- Brown the beef with salt, pepper, Worcestershire, and garlic powder over medium-high heat for 6 to 8 minutes.
- Split the buns and layer the beef, then the peppers and onions, then the provolone.
- Add the top buns, brush with butter, and bake covered for 8 minutes.
- Uncover and bake 4 to 6 minutes more until the cheese is fully melted.
Equipment for This Recipe:
- Large skillet — for the vegetables and beef.
- 9×13-inch baking dish — for the tray.
- Pastry brush — for the tops.
- Sharp knife — for clean pepper slicing.
How to Serve This Dish:
Serve these with hot pickled peppers or a little horseradish mayo if you want some bite. A side of roasted potatoes makes sense, though chips work too. The tray should look a little piled and a little rustic, not carefully stacked like a photo shoot.
Pro Tips for This Recipe:
- Cut the vegetables thin. Thick pepper strips are awkward in slider form.
- Cook the vegetables until soft, not crunchy. They should blend with the beef.
- Use provolone in slices, not shredded. It melts into nicer layers.
- Add a pinch of salt to the peppers and onions while cooking. It brings out their sweetness.
Variations on This Dish:
- White American Swap: Use white American cheese for a more classic melt.
- Mushroom Addition: Add 1 cup sliced mushrooms with the peppers and onions.
- Spicy Philly: Add a few sliced cherry peppers after baking.
Common Mistakes to Avoid with This Dish:
- Putting the vegetables in raw. They won’t soften enough in the oven.
- Using too much pepper. Bell pepper should support, not dominate.
- Skipping the butter on top. It helps the buns toast and ties the fillings together.
12. Breakfast Burger Sliders with Egg and American
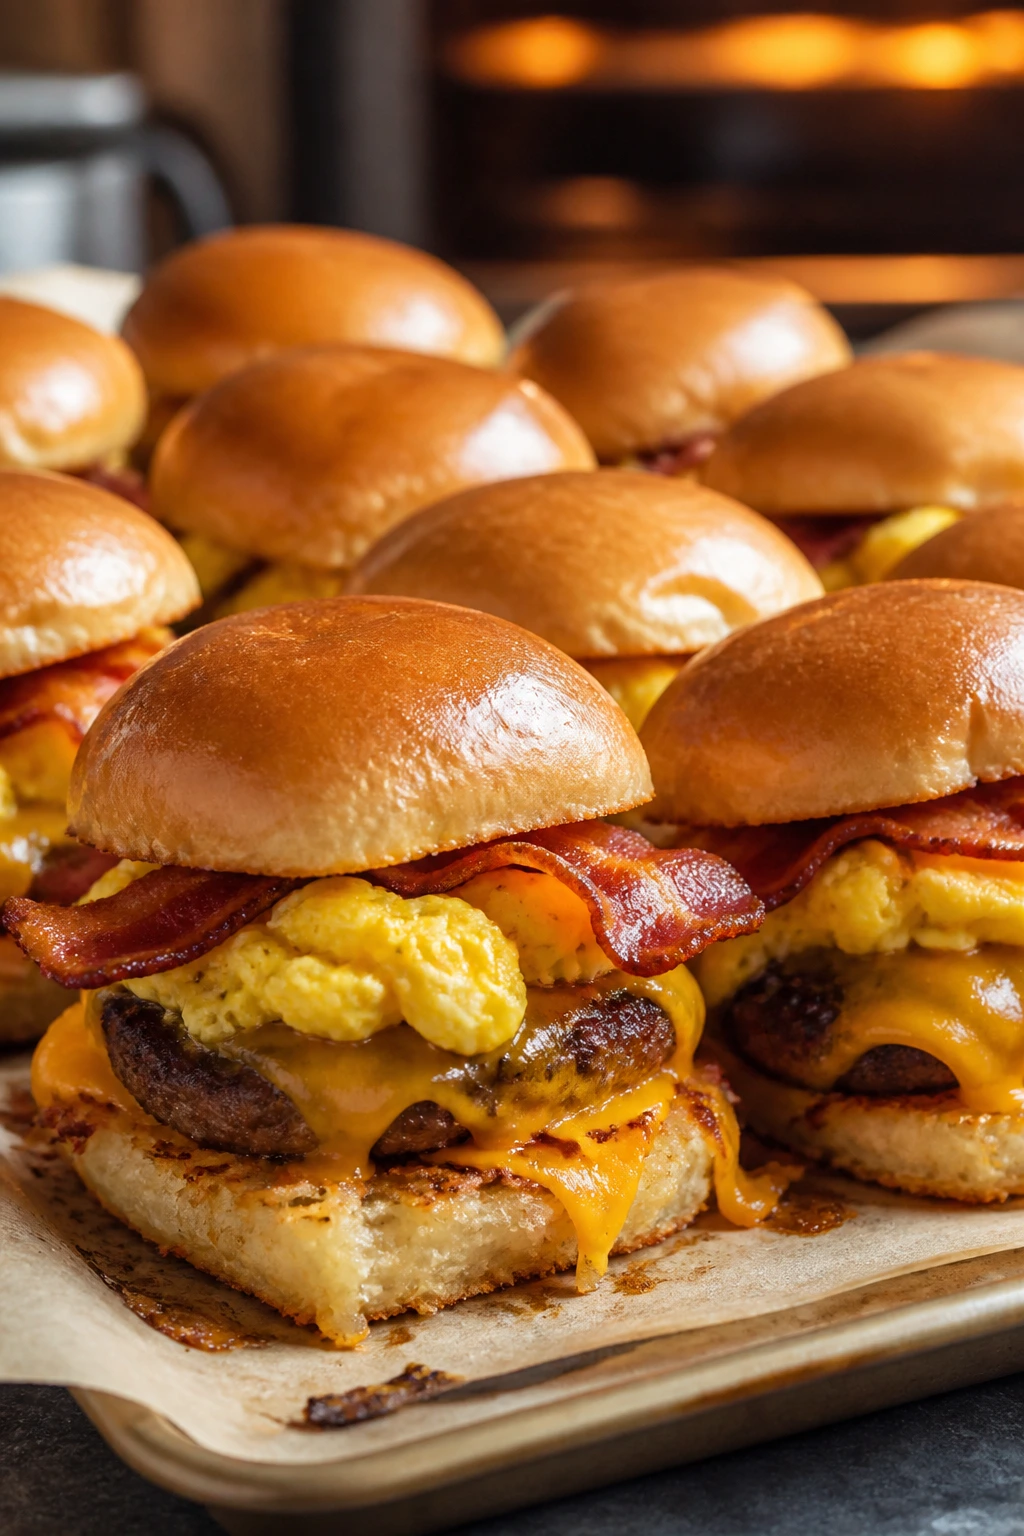
These are the tray you bring out when dinner needs to feel a little indulgent and a little ridiculous in the best way. The eggs add softness, the bacon gives the bite some crunch, and the American cheese melts everything into one warm, sleepy, excellent stack.
Why It Works:
Breakfast flavors can fight each other if you pile them randomly, so this recipe keeps them in layers that make sense. Eggs sit in the middle and bind the bite. Hash browns bring texture, bacon brings salt, and the beef keeps the whole thing grounded so it doesn’t drift into brunch casserole territory.
Key Ingredients:
- 1 1/2 pounds ground beef (80/20)
- 1 teaspoon kosher salt
- 1/2 teaspoon black pepper
- 6 large eggs
- 6 slices bacon, cooked crisp
- 1 1/2 cups frozen hash browns, thawed
- 6 slices American cheese
- 12 slider buns
- 2 tablespoons butter
- 1 tablespoon milk
- 1 tablespoon chopped chives — optional
Quick Steps:
- Preheat the oven to 375°F and grease a 9×13-inch baking dish.
- Cook the hash browns in a skillet with 1 tablespoon butter over medium heat until golden and crisp on both sides, about 6 to 8 minutes.
- Scramble the eggs with milk over low heat until softly set, then remove from the stove while they still look a little glossy.
- Brown the beef with salt and pepper over medium-high heat for 6 to 8 minutes.
- Split the buns and layer in the beef, hash browns, eggs, bacon, and cheese.
- Add the top buns, brush with melted butter, and bake covered for 8 minutes.
- Uncover and bake 4 to 5 minutes more until the cheese melts and the tops are lightly golden.
Equipment for This Recipe:
- Large skillet — for beef and hash browns.
- Second skillet or nonstick pan — for the eggs.
- 9×13-inch baking dish — for assembly.
- Whisk — for the eggs.
How to Serve This Dish:
These work with fruit on the side if you want the plate to feel a little less heavy. They also go well with hot sauce or ketchup, depending on who’s eating. Each slider should feel like a complete breakfast packed into one soft bun.
Pro Tips for This Recipe:
- Leave the eggs slightly soft. They’ll finish in the oven.
- Press the hash browns flat in the skillet. More surface area means more crisp edges.
- Keep bacon crisp. Soft bacon disappears under the eggs.
- Don’t overfill the sliders. Breakfast stacks turn messy fast.
Variations on This Dish:
- Sausage Swap: Replace bacon with cooked breakfast sausage patties.
- Maple Heat Version: Add a tiny drizzle of maple syrup and a pinch of hot sauce.
- Veggie Breakfast Tray: Skip bacon and add sautéed spinach and tomato slices after baking.
Common Mistakes to Avoid with This Dish:
- Cooking the eggs dry. They should stay soft or the sliders get chalky.
- Using watery hash browns. Thaw and dry them first.
- Assembling too far ahead. The eggs and potatoes loosen the buns if they sit.
13. Hawaiian Teriyaki Cheeseburger Sliders
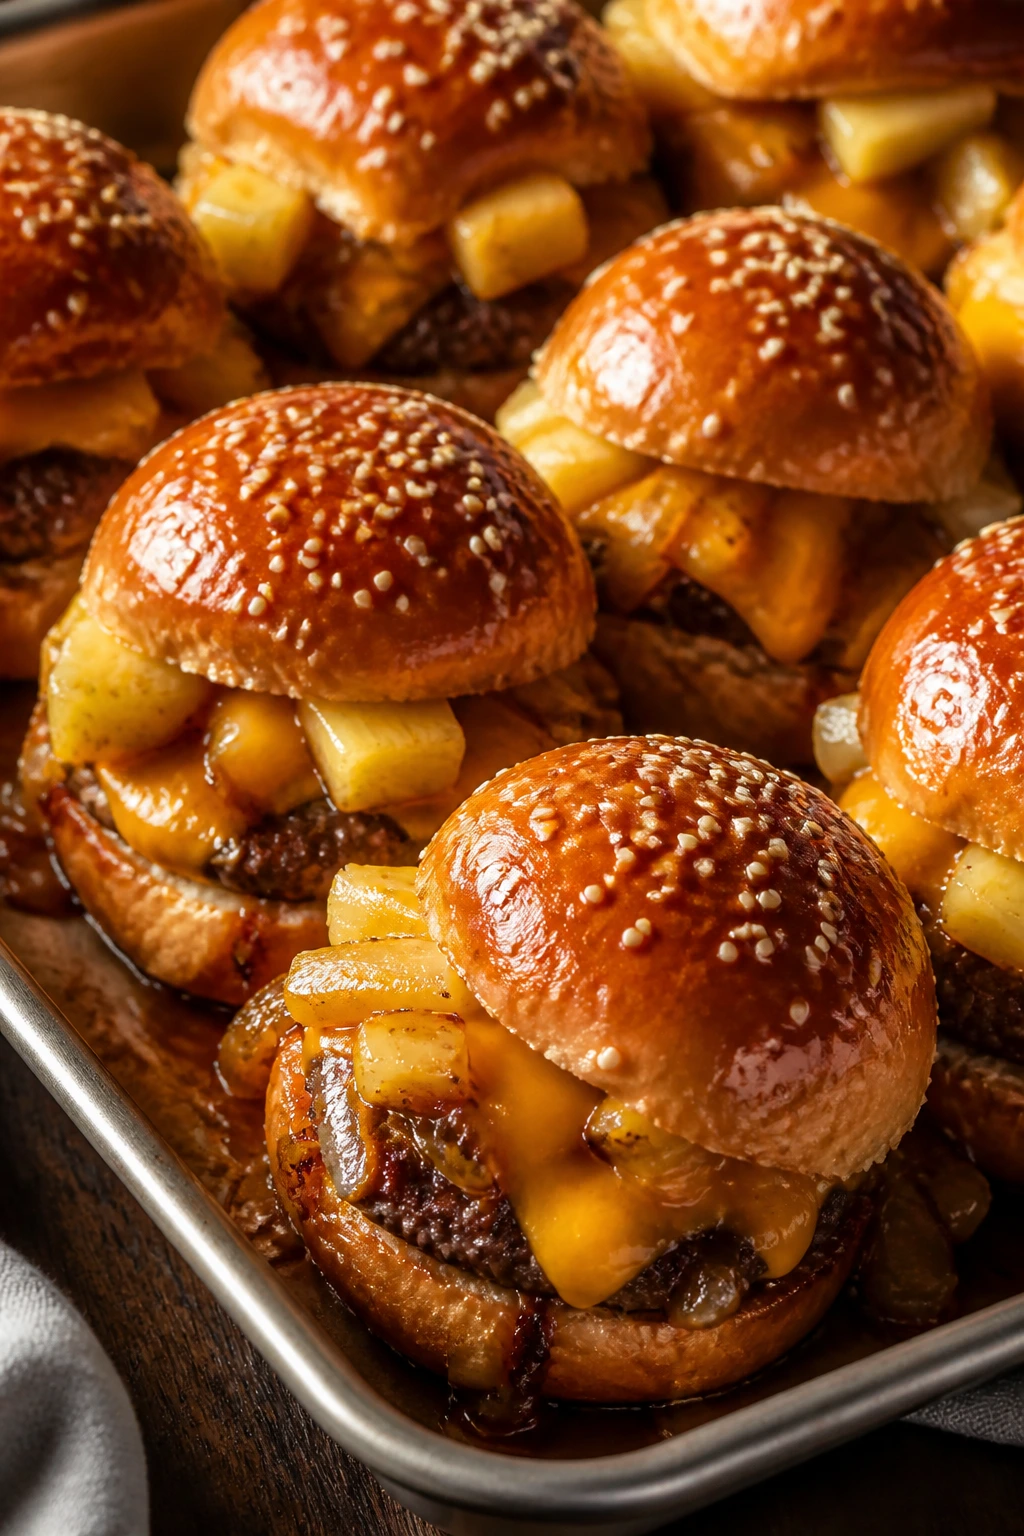
Sweet pineapple and salty teriyaki can sound like a gimmick, but they work when the beef is seasoned properly and the cheese is chosen with a steady hand. These sliders land somewhere juicy, glossy, and faintly caramelized.
Why It Works:
Teriyaki sauce adds shine and salt, while pineapple brings acidity and a soft sweetness that cuts through the beef. The trick is restraint. Too much sauce and the buns collapse; just enough and the tray tastes like a cookout that took a small vacation.
Key Ingredients:
- 1 1/2 pounds ground beef (80/20)
- 1/3 cup teriyaki sauce
- 1 teaspoon grated fresh ginger
- 1 clove garlic, minced
- 8 ounces Swiss cheese or mild cheddar
- 12 slider buns
- 1 1/2 cups diced pineapple, patted dry
- 2 tablespoons melted butter
- 1 tablespoon sesame seeds
- 2 scallions, thinly sliced
Quick Steps:
- Preheat the oven to 375°F and grease a 9×13-inch baking dish.
- Brown the beef with teriyaki sauce, ginger, and garlic over medium-high heat for 6 to 8 minutes.
- Stir in the pineapple and cook for 1 minute more, just to warm it through.
- Split the buns and layer in the beef mixture and cheese.
- Add the top buns, brush with butter, and sprinkle with sesame seeds.
- Bake covered for 8 minutes, then uncover and bake 4 to 5 minutes more until the cheese melts and the tops are lightly browned.
- Finish with scallions.
Equipment for This Recipe:
- Large skillet — for the filling.
- 9×13-inch baking dish — for the tray.
- Pastry brush — for the butter.
- Small cutting board — for the pineapple and scallions.
How to Serve This Dish:
Serve these with a simple cucumber salad or plain chips. The sliders already have sweetness, so don’t pair them with another sugary side. They look especially good with a few scallions scattered on top right before serving, since the green color cuts through all that gold and brown.
Pro Tips for This Recipe:
- Pat the pineapple dry. Wet fruit will flood the buns.
- Use mild cheese. Swiss or mild cheddar lets the teriyaki stay in charge.
- Add the scallions at the end. They’re better fresh and sharp.
- Don’t use too much teriyaki sauce. The beef should taste glazed, not soupy.
Variations on This Dish:
- Grilled Pineapple Style: Use lightly grilled pineapple if you want more caramel notes.
- Spicy Teriyaki Tray: Add a teaspoon of chili garlic sauce.
- Mozzarella Swap: Use mozzarella for a softer, stretchier cheese pull.
Common Mistakes to Avoid with This Dish:
- Leaving pineapple too wet. That’s the fastest route to soggy buns.
- Using a very sharp cheese. It fights the teriyaki.
- Overcooking the filling. The teriyaki can reduce fast and turn sticky.
14. Blue Cheese Bacon Sliders
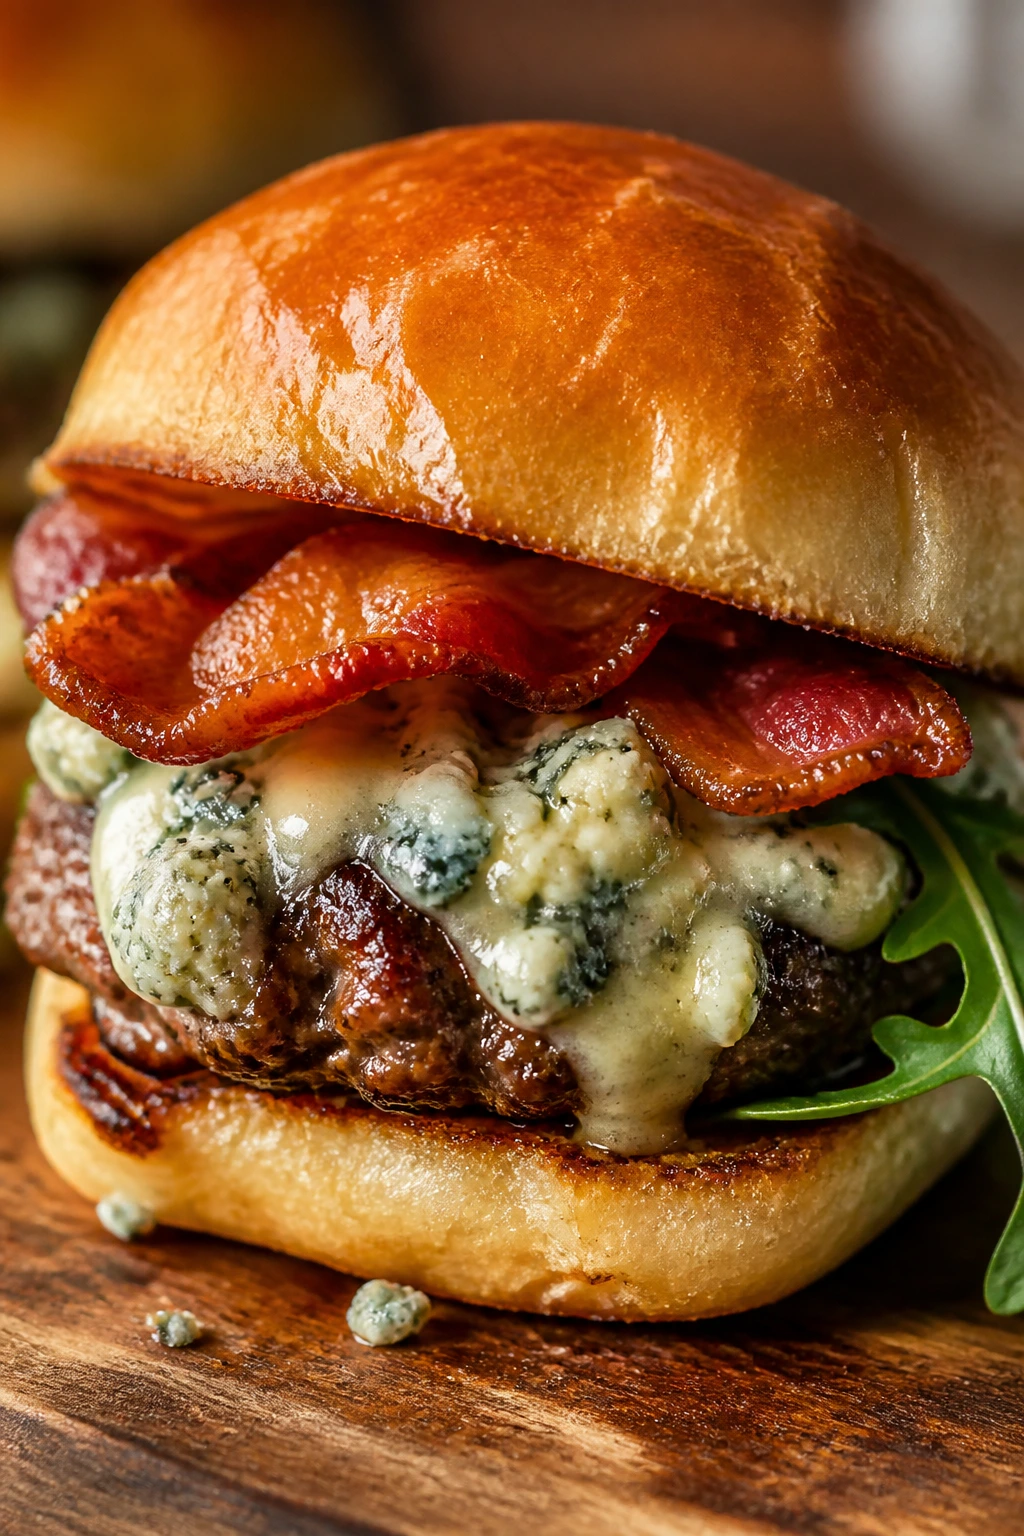
These are rich, assertive, and not shy about it. Blue cheese brings a salty, tangy hit, bacon adds crunch, and the beef holds the whole thing together without pretending to be understated.
Why It Works:
Blue cheese can overwhelm a full burger, but in slider form it has room to be bold without taking over the plate. Bacon keeps the tang from reading too sharp, and arugula gives the finished sliders a peppery bite that cuts the richness. The trick is to use the cheese as a layer, not a flood.
Key Ingredients:
- 1 1/2 pounds ground beef (80/20)
- 1 teaspoon kosher salt
- 1/2 teaspoon black pepper
- 4 ounces blue cheese crumbles
- 6 slices bacon, cooked crisp
- 1 cup baby arugula
- 12 slider buns
- 2 tablespoons mayonnaise
- 1 tablespoon Dijon mustard
- 2 tablespoons melted butter
Quick Steps:
- Preheat the oven to 375°F and grease a 9×13-inch baking dish.
- Mix the mayonnaise and Dijon in a small bowl.
- Brown the beef with salt and pepper over medium-high heat for 6 to 8 minutes.
- Split the buns and layer in the beef, blue cheese, and bacon.
- Add the top buns, brush with butter, and bake covered for 8 minutes.
- Uncover and bake 4 to 5 minutes more until the cheese softens.
- Add arugula after baking and serve.
Equipment for This Recipe:
- Large skillet — for the beef.
- 9×13-inch baking dish — for the tray.
- Small bowl — for the mayo-Dijon spread.
- Pastry brush — for the butter.
How to Serve This Dish:
Serve these with a crisp salad or plain kettle chips; they’re already rich, so the rest of the plate should keep things tidy. Put the arugula on after baking so it stays sharp. A cold lager or sparkling water with lemon does the job here.
Pro Tips for This Recipe:
- Use good blue cheese. Strong flavor needs clean flavor.
- Keep the bacon crisp. Soft bacon disappears under the cheese.
- Add arugula at the end. It should taste fresh, not wilted.
- Go light on the Dijon spread. Too much steals the show.
Variations on This Dish:
- Gorgonzola Swap: Use gorgonzola for a creamier blue cheese profile.
- Balsamic Onion Version: Add sautéed onions with a little balsamic vinegar.
- Walnut Crunch Finish: Scatter a few toasted chopped walnuts over the arugula if you want texture.
Common Mistakes to Avoid with This Dish:
- Using too much blue cheese. The sliders should be tangy, not sharp enough to sting.
- Baking the arugula. It turns limp and loses its point.
- Skipping the bacon crisping step. Blue cheese needs crunch beside it.
15. Chili Cheese Sliders
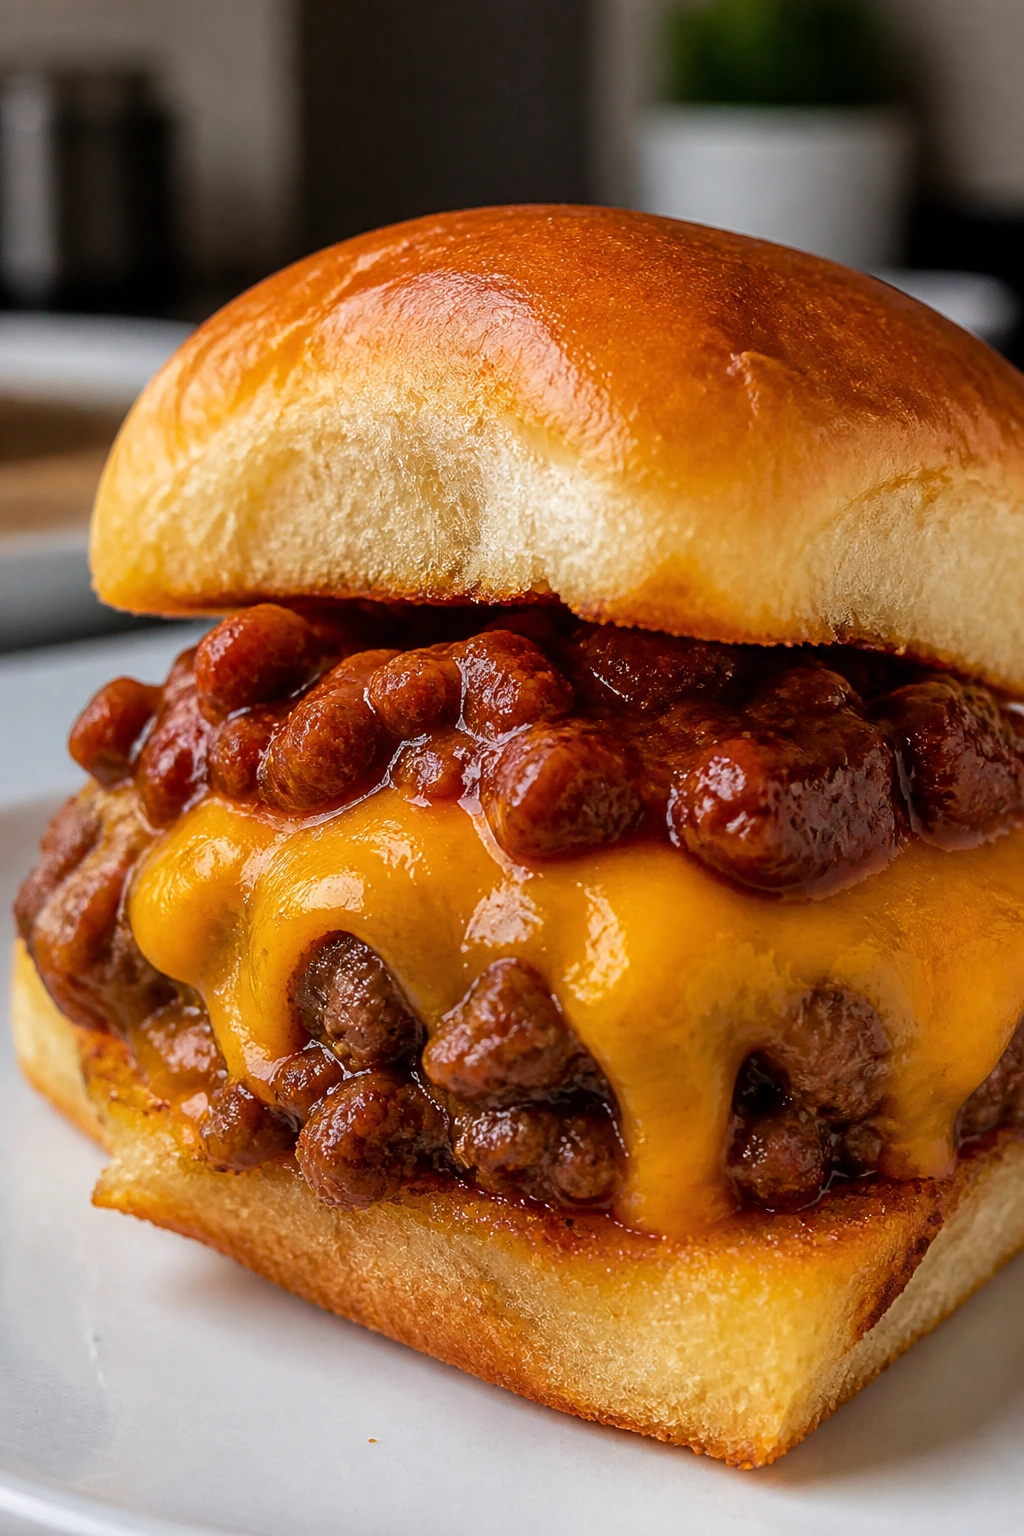
This tray is messy in the way good comfort food should be. Thick chili sinks into the beef, cheddar melts into the seams, and every bite feels like a cross between a backyard burger and a late-night bowl of diner chili.
Why It Works:
Chili adds body and warmth, but only if it’s thick enough to sit on the bun instead of soaking through it. That’s why this recipe uses chili as a layer, not a soup. Cheddar is the right cheese because it stands up to the spice and binds the filling without turning greasy.
Key Ingredients:
- 1 1/2 pounds ground beef (80/20)
- 1 1/2 cups thick chili, homemade or canned
- 1 teaspoon kosher salt
- 1/2 teaspoon black pepper
- 1 small onion, diced
- 1 tablespoon chili powder
- 8 ounces cheddar cheese, shredded
- 12 slider buns
- 2 tablespoons melted butter
- 2 tablespoons sliced scallions
- Pickled jalapeños, optional
Quick Steps:
- Preheat the oven to 375°F and grease a 9×13-inch baking dish.
- Cook the onion in a skillet over medium heat for 4 to 5 minutes until softened.
- Brown the beef with salt, pepper, and chili powder, then stir in the thick chili.
- Split the buns and layer in the beef-chili mixture and cheddar.
- Add the top buns, brush with butter, and bake covered for 8 minutes.
- Uncover and bake 4 to 5 minutes more until the cheese melts.
- Finish with scallions and jalapeños if using.
Equipment for This Recipe:
- Large skillet — for the beef and chili.
- 9×13-inch baking dish — for the sliders.
- Pastry brush — for the butter.
- Spoon — for layering the chili carefully.
How to Serve This Dish:
Serve these with a fork-friendly side, because a little filling may wander. A simple corn salad or crisp slaw is a good match. If you want to make the plate feel a little more diner-style, add pickle chips and a few extra scallions.
Pro Tips for This Recipe:
- Use thick chili only. Thin chili ruins the buns.
- Let the chili mixture cool for a minute. It’s easier to layer cleanly.
- Shred the cheese finely. It melts faster over the chili.
- Keep the jalapeños as a finish. They stay brighter that way.
Variations on This Dish:
- Bean Chili Version: Use chili with beans if you want more heft.
- Spicy Beef Route: Add hot sauce to the chili mixture.
- Cornbread Roll Swap: Use cornbread-style slider rolls for a sweeter edge.
Common Mistakes to Avoid with This Dish:
- Using runny chili. It will soak the buns.
- Adding too much chili. The sliders should still be pick-up-able.
- Cutting while too hot. The filling needs a minute to settle.
16. Mushroom Gruyère Truffle Sliders
This is the fancier tray, though not in a precious way. Mushrooms bring depth, Gruyère melts into a nutty puddle, and a little truffle mayo makes the whole thing feel richer than the ingredient list suggests.
Why It Works:
Gruyère is a strong choice because it has enough character to stand up to mushrooms without making the slider feel heavy. The truffle element should stay in the background; think whisper, not perfume counter. Mushrooms supply the earthy base, and the beef keeps everything from tipping too far into steakhouse territory.
Key Ingredients:
- 1 pound cremini mushrooms, finely chopped
- 2 tablespoons butter
- 1 tablespoon olive oil
- 1 1/2 pounds ground beef (80/20)
- 1 teaspoon kosher salt
- 1/2 teaspoon black pepper
- 1 teaspoon fresh thyme leaves
- 1 tablespoon Worcestershire sauce
- 6 ounces Gruyère cheese, sliced
- 12 brioche slider buns
- 2 tablespoons mayonnaise
- 1/2 teaspoon truffle oil
Quick Steps:
- Preheat the oven to 375°F and grease a 9×13-inch baking dish.
- Cook the mushrooms in butter and olive oil over medium-high heat for 8 to 10 minutes until dry and browned.
- Brown the beef with salt, pepper, thyme, and Worcestershire for 6 to 8 minutes.
- Stir the mayonnaise and truffle oil together in a small bowl.
- Split the buns and layer in the beef, mushrooms, and Gruyère.
- Add the top buns, brush lightly with melted butter if needed, and bake covered for 8 minutes.
- Uncover and bake 4 to 5 minutes more until the cheese is melted. Spread a thin layer of truffle mayo on the top buns or serve it on the side.
Equipment for This Recipe:
- Large skillet — for mushrooms and beef.
- 9×13-inch baking dish — for baking.
- Small bowl — for truffle mayo.
- Sharp knife — for chopping mushrooms fine.
How to Serve This Dish:
These deserve a simple side, maybe roasted potatoes or a lemony green salad. The sliders are rich enough that the rest of the plate should be plain and crisp. Serve the truffle mayo lightly; too much and the whole tray starts smelling like a restaurant that owns too many tiny spoons.
Pro Tips for This Recipe:
- Chop mushrooms fine so they layer cleanly.
- Use real Gruyère if you can. It melts beautifully and tastes worth the cost.
- Go light on the truffle oil. It can take over fast.
- Let the mushrooms brown fully. That’s where the flavor lives.
Variations on This Dish:
- Fontina Swap: Use fontina for a softer, creamier melt.
- Shallot-Mushroom Version: Add 1 finely sliced shallot with the mushrooms.
- No-Truffle Option: Skip the truffle oil and spread plain mayo with a pinch of garlic powder.
Common Mistakes to Avoid with This Dish:
- Using too much truffle oil. It should not smell like the whole meal is wearing cologne.
- Leaving mushroom moisture in the pan. Dry mushrooms are what make this work.
- Choosing a weak cheese. Gruyère earns its place here.
17. Ranch Pickle Cheeseburger Sliders
These are bright, salty, and a little addictive. Ranch seasoning seasons the beef from the inside, dill pickles bring crunch, and American or cheddar makes the whole thing taste like a burger that spent time near a deli counter.
Why It Works:
Ranch seasoning gives the beef a familiar savory flavor without needing a sauce bottle in every direction. Pickles add acid and snap, which keep the sliders from feeling soft or heavy. The cheese choice matters less here than the texture, and American gives the smoothest melt if you want the cleanest bite.
Key Ingredients:
- 1 1/2 pounds ground beef (80/20)
- 2 tablespoons ranch seasoning
- 1/2 teaspoon black pepper
- 1/2 cup chopped dill pickles
- 8 slices American or cheddar cheese
- 12 slider buns
- 3 tablespoons ranch dressing or mayonnaise
- 2 tablespoons melted butter
- 1 teaspoon garlic powder
- 12 pickle chips, for topping
Quick Steps:
- Preheat the oven to 375°F and grease a 9×13-inch baking dish.
- Brown the beef with ranch seasoning and black pepper over medium-high heat for 6 to 8 minutes.
- Stir in the chopped pickles for the last 30 seconds of cooking.
- Split the buns and spread a thin layer of ranch dressing or mayo on the bottom halves.
- Add the beef and cheese, then top with pickle chips and the top buns.
- Brush with melted butter mixed with garlic powder and bake covered for 8 minutes.
- Uncover and bake 4 to 5 minutes more until the cheese is melted.
Equipment for This Recipe:
- Large skillet — for the beef.
- 9×13-inch baking dish — for assembly.
- Small bowl — for the ranch spread.
- Pastry brush — for the butter.
How to Serve This Dish:
Serve these with carrot sticks or a simple slaw if you want something cool beside the salt. They’re also good with plain potato chips, which is probably not subtle but is entirely correct. The pickle chips on top should look a little messy; that’s part of the charm.
Pro Tips for This Recipe:
- Use chopped pickles, not just whole chips. They blend into the filling better.
- Taste the ranch seasoning before adding extra salt. Some blends are already heavy on sodium.
- Keep the mayo layer thin. Too much makes the buns slick.
- Brush the bun tops with garlic butter. It gives the tray a stronger finish.
Variations on This Dish:
- Bacon Ranch Swap: Add 4 chopped bacon slices for more smoke.
- Spicy Pickle Version: Use hot dill pickles and a little cayenne.
- Cheddar-Forward Tray: Use sharp cheddar if you want a firmer cheese bite.
Common Mistakes to Avoid with This Dish:
- Adding too many pickles. The filling can turn watery.
- Skipping the ranch spread. It helps the flavor reach the buns.
- Over-salting. Ranch seasoning and pickles already carry plenty of salt.
18. Pizza Burger Sliders

This is the tray that lands somewhere between game-night pizza and a burger you’d happily eat standing at the counter. Marinara brings tomato richness, mozzarella gives you that familiar stretch, and pepperoni adds just enough salty edge to keep the whole thing moving.
Why It Works:
Pizza flavors work on beef because both want garlic, oregano, and a little salt. The key is not to drown the slider in sauce. A measured layer of marinara keeps the buns from going mushy, and mozzarella melts into long strings that make the whole tray feel indulgent without getting sloppy.
Key Ingredients:
- 1 1/2 pounds ground beef (80/20)
- 1 teaspoon kosher salt
- 1/2 teaspoon black pepper
- 1 teaspoon Italian seasoning
- 1/2 cup marinara sauce
- 1 teaspoon garlic powder
- 8 ounces mozzarella, shredded
- 1 cup mini pepperoni
- 12 slider buns
- 2 tablespoons melted butter
- 2 tablespoons grated Parmesan
- Chopped basil or parsley, for finishing
Quick Steps:
- Preheat the oven to 375°F and grease a 9×13-inch baking dish.
- Brown the beef with salt, pepper, Italian seasoning, garlic powder, and marinara over medium-high heat for 6 to 8 minutes.
- Split the buns and layer in the beef, mozzarella, and mini pepperoni.
- Add the top buns, brush with butter, and sprinkle with Parmesan.
- Bake covered for 8 minutes, then uncover and bake 4 to 5 minutes more until the cheese melts.
- Finish with chopped basil or parsley and serve warm.
Equipment for This Recipe:
- Large skillet — for the beef mixture.
- 9×13-inch baking dish — for baking.
- Pastry brush — for buttering the tops.
- Small grater — for Parmesan if you’re using a block.
How to Serve This Dish:
Serve these with warm marinara for dipping or a plain green salad if you want the plate to feel less heavy. They are the kind of sliders people reach for twice because they taste familiar in the first bite and a little ridiculous in the second, which is a compliment here. Keep a stack of napkins close.
Pro Tips for This Recipe:
- Use thick marinara. Thin sauce will soak the buns.
- Shred the mozzarella yourself if possible. It melts better than pre-shredded cheese.
- Add the Parmesan to the tops, not the filling. It browns better there.
- Finish with herbs after baking. Fresh basil tastes brighter that way.
Variations on This Dish:
- Sausage-Pizza Version: Replace half the beef with Italian sausage.
- Mushroom Pepperoni Swap: Add sautéed mushrooms for a fuller pizza vibe.
- Spicy Red Pepper Tray: Stir crushed red pepper into the marinara.
Common Mistakes to Avoid with This Dish:
- Using too much sauce. The buns should stay intact.
- Choosing low-moisture cheese but not shredding it. Whole slices can melt unevenly.
- Baking too long. Mozzarella goes from stretchy to rubbery fast.
Why the Sheet-Pan Method Fits Cheeseburger Sliders So Well
A sheet-pan slider starts with the same basic logic every time: cook the filling until it tastes finished, layer it on soft buns, cover the tray so the cheese can melt, then uncover it just long enough to toast the tops. That sequence sounds simple because it is. But simple is not the same thing as boring.
The oven does one job that a skillet can’t quite do on its own. It melts the cheese through the filling and warms the buns from the inside out, so the whole tray arrives hot at the same time. You don’t get one cold slider and one scorched one. You get a row of burgers that behave like they were planned as a set, which is part of the comfort here.
There’s also a texture trick built into the method. The buns absorb a little beef juice, the cheese seals the middle, and the butter on top gives you a faint crackle at the edges. If you’ve ever made burgers one by one and watched the first batch go cold while the second batch cooked, this is the fix. Not fancy. Just efficient in the useful way.
Essential Equipment for These Recipes
-
9×13-inch baking dish or rimmed half-sheet pan: This is the backbone of almost every slider tray; it keeps the buns tight and the fillings from wandering.
-
Large skillet: You need enough surface area to brown 1 1/2 pounds of beef without steaming it.
-
Wooden spoon or sturdy spatula: Useful for breaking beef into small crumbles and for scraping up browned bits.
-
Pastry brush: For buttering the tops evenly; a spoon works, but it’s clumsier.
-
Sharp chef’s knife: Thin onion slices, clean pickle cuts, and neat slider portions all depend on it.
-
Cutting board with a damp towel underneath: Keeps the board from slipping when you’re slicing the finished tray.
-
Small mixing bowls: Handy for sauces, mustard spreads, and quick seasoning blends.
-
Aluminum foil: Lets the cheese melt before the tops brown too much.
-
Instant-read thermometer: Not mandatory for every tray, but useful if you want to confirm the beef hits 160°F safely.
Smart Shopping and Ingredient Tips

Ground beef is the part worth paying attention to first. For cheeseburger sliders, 80/20 ground chuck gives you the best mix of flavor and moisture. Leaner beef can work, but it tends to taste drier once the sliders reheat or sit on a buffet. If you buy meat that looks packed tightly and pale, keep looking; you want beef that still looks loose and red, not compressed into a brick.
Buns matter more than people admit. Soft dinner rolls, Hawaiian rolls, or mini brioche buns all work because they’re tender but structured. Super fluffy buns can collapse under juicy fillings, while crusty rolls fight the bite. If you’re making a saucy version like BBQ or chili, choose a sturdier bun. If the filling is drier, softer rolls are fine.
Cheese is not interchangeable in these recipes. American cheese melts cleanest, cheddar brings sharper flavor, Swiss and provolone melt neatly, and pepper jack gives you the heat bump. Pre-sliced cheese is not a cheat here. It often melts more evenly than blocks cut too thick.
Pickles and condiments should be the kind with some snap. Limp pickles, thin barbecue sauce, or watery salsa will soften the tray too fast. Thick sauces cling better, and briny pickles with real crunch keep every bite from feeling flat. If you’re using onions, slice them thin enough to cook quickly; big raw onion chunks don’t soften enough in the oven.
How to Serve These Recipes
Presentation:
Serve the sliders on a parchment-lined board or in the baking dish itself if you want a casual, family-style look. Slice them with a serrated knife so the buns don’t drag and the cheese stays in place. A little scattering of chopped herbs, pickle chips, or sesame seeds on top makes the tray look finished without turning it fussy.
Accompaniments:
Potato chips, fries, slaw, pickle spears, and simple salads all work because these sliders already bring enough richness. For the heavier versions — chili, bacon cheddar, blue cheese — go with something sharp or crunchy on the side. For the cleaner versions — classic, green chile, mushroom Swiss — even plain kettle chips are enough.
Portions:
Plan on 2 sliders per person for a light meal and 3 sliders per person if these are the main event. Hungry adults will absolutely take a third, especially if the tray includes bacon or barbecue sauce. If you’re serving a crowd with other food around, a single slider often works as a tasting portion, which is useful when you’re offering 2 or 3 varieties.
Beverage Pairing:
Cold cola, root beer, amber beer, or a sharp iced tea all fit the comfort-food mood. Sliders with heat, like jalapeño or green chile, also go well with sparkling water and lime because the bubbles clean out the richness. If you’re serving the teriyaki or pizza versions, a dry lager or plain iced tea keeps the sweetness in line.
Additional Tips and Flavor Boosters
Flavor Enhancement:
A little butter on the tops goes farther than people expect, especially if you mix in a pinch of garlic powder or sesame seeds. If a recipe feels too quiet, add a teaspoon of Worcestershire to the beef or a thin swipe of Dijon under the filling.
Customization:
Want more bite? Add pickles or sliced jalapeños after baking. Want more richness? Add bacon or a second cheese layer. Want a cleaner finish? Hold the sauce until the slider hits the plate and let people add their own.
Serving Suggestions:
Chopped scallions, parsley, arugula, sesame seeds, and thinly sliced pickles all make the tray look alive. A tiny bowl of extra sauce on the side is better than drenching the buns before baking. People like options, but they don’t need a flood.
Make-It-Yours:
For a vegetarian-leaning table, you can swap in plant-based beef crumbles for most of these recipes and keep the same cheese and bun structure. For a lighter tray, use leaner beef and add mushrooms or onions to stretch the filling. If you’re cooking for kids, stay with American cheese, plain ketchup, and pickles on the side; let the louder toppings stay optional.
Make-Ahead, Storage, and Reheating Guidance
These sliders are best the day they’re baked, but they’re not fragile if you treat them right. Cooked beef filling keeps for 3 to 4 days in the fridge in a sealed container. If you want to freeze it, pack the cooled filling in a freezer bag or airtight container for up to 2 months. The buns, sauces, and fresh toppings are better stored separately; once they’re assembled, the clock starts moving fast.
For reheating, the filling does best in a skillet over medium-low heat with a splash of water or broth. Stir it until it’s hot all the way through and no longer steaming in cold spots. If you’re reheating assembled sliders, cover them loosely with foil and warm at 325°F for 10 to 15 minutes. Uncover them at the end for 2 or 3 minutes if the tops need a little more color.
Sauce-heavy sliders — like chili cheese, BBQ, or Big Mac-style — are the most likely to soften overnight, so I’d reheat the filling and rebuild them if you can. Dry-ish versions like classic American, Swiss, or ranch pickle hold up a bit better. If you’re making ahead for guests, brown the meat, chill it, and assemble right before baking. That keeps the buns from turning soggy and gives you the freshest texture for very little extra effort.
Variations and Adaptations to Try
Gluten-Free Slider Night:
Use sturdy gluten-free rolls and check labels on Worcestershire, barbecue sauce, and seasoning blends. The fillings here adapt cleanly, but the buns need to be toasted lightly before assembly because gluten-free bread can break down faster. Add the fresh toppings after baking for the best texture.
Dairy-Free Melt:
Swap in a good dairy-free sliceable cheese and brush the tops with olive oil instead of butter. The sliders will still brown, but they won’t have the same soft dairy flavor, so lean on onions, pickles, and sauces to bring more depth. Classic, taco, and BBQ versions work especially well with this route.
Lower-Sodium Tray:
Use unsalted butter, low-sodium cheese if available, and back off the salt in the beef by half. Pickles and ranch seasoning can push the salt level fast, so choose one salty element and let the rest stay calmer. Green chile or mushroom Swiss are easier to keep balanced than ranch pickle or chili cheese.
Kid-Friendly Build:
Stick with American cheese, plain beef, and a thin layer of ketchup or mustard. Leave jalapeños, blue cheese, onions, and heavy sauces on the side. Kids usually like the breakfast and pizza versions too, as long as the heat stays out of the pan.
Heat-Lover’s Upgrade:
Add chopped jalapeños, pepper jack, hot sauce, or chipotle mayo. The jalapeño, taco, and BBQ sliders are the easiest places to turn the heat up without wrecking the balance. A little goes a long way; heat should hit after the cheese, not before the first bite.
Regional Comfort Swap:
Lean toward rye and Swiss for a deli-style tray, teriyaki and pineapple for a sweet-savory one, or chili and cheddar for a diner feel. The base method stays the same, but the pantry accents change the mood fast. That’s one reason sliders keep showing up at group dinners — they take a theme without getting fussy about it.
Common Mistakes to Avoid
The first mistake is overcooking the beef. Once it’s browned and no pink remains, it’s done. Keep cooking until it looks dry and the sliders will taste like they’ve been sitting under a heat lamp.
Another one is overloading the tray with wet ingredients. Salsa, chili, sauce, pineapple, and even onions all bring moisture, and the buns can only handle so much. If a filling looks loose in the skillet, cook it down until it clings to the spoon. Thick is safer than sloppy here.
People also cut too soon. The cheese needs a minute to settle after baking, or it slides out in one hot sheet. Give the tray 2 to 3 minutes on the counter before you slice. You’re not cooling it off. You’re letting it set.
Using the wrong bun causes more problems than it should. Soft buns collapse, hard rolls fight the bite, and stale bread turns the whole thing chewy. You want rolls that feel tender when you squeeze them, not airy enough to vanish or tough enough to wrestle.
Finally, don’t treat the fresh toppings like an afterthought. Pickles, lettuce, herbs, and sauces are the part that keeps all the richness from flattening out. If the recipe includes something fresh, add it at the end. That little bit of brightness is the difference between a tray people enjoy and a tray people finish because they’re polite.
Frequently Asked Questions
Can I make cheeseburger sliders ahead of time?
Yes, but the best move is to cook the beef filling ahead and assemble later. If you fully build the tray too early, the buns absorb too much moisture and get soft before baking.
What’s the best cheese for cheeseburger sliders?
American cheese melts the cleanest, cheddar gives the most obvious burger flavor, and Swiss or provolone work well with mushrooms, onions, or deli-style fillings. Use the cheese that matches the rest of the tray instead of forcing one cheese to do everything.
Can I use lean ground beef?
You can, but 90/10 beef tends to dry out faster in the oven and during reheating. If that’s what you have, add a little butter, onions, or sauce to the filling so the sliders don’t feel dry.
How do I keep the buns from getting soggy?
Drain the beef, keep wet sauces thin and controlled, and add fresh toppings like lettuce or pickles after baking. Thick fillings and a short rest after baking go a long way too.
Can I freeze assembled sliders?
I wouldn’t freeze fully assembled sliders unless you have to. The beef filling freezes well on its own, but buns and sauces lose texture after thawing. Rebuild the sliders fresh if you want the best result.
What if I don’t have Hawaiian rolls?
Use any soft slider bun or small dinner roll that can hold a filling without crumbling. Brioche, mini potato rolls, and some mini sandwich rolls all work, though you may need to adjust the baking time by a minute or two.
Can I make these on the stovetop instead of baking them?
Yes, if you’re making one or two sliders at a time. Brown the beef, melt the cheese in a covered skillet, then toast the buns separately. For a full tray, the oven is still easier and gives you more even heat.
How do I know the beef is cooked safely?
Ground beef should reach 160°F in the center if you’re checking with a thermometer. If you don’t use one, make sure there’s no pink left and the juices run clear, though a thermometer is the cleaner answer.
Can I serve these at room temperature?
You can, but they’re better warm. The cheese sets and the buns firm up as they sit, so if you need to hold them, keep the tray covered and warm rather than leaving it on the counter for long.
A Tray Worth Passing Around
There’s a reason cheeseburger sliders keep showing up at comfort-food nights, game days, and casual family dinners. They’re easy to scale, easy to season in different directions, and forgiving enough to handle a little improvising as long as you respect the basics: good beef, a bun that can hold together, and cheese that melts the way it should.
The best part is how quickly the tray disappears once it hits the table. That’s not an accident. It’s the whole point. Pick one version that fits the mood, or make two smaller trays and let people argue over the blue cheese versus the classic American. Either way, you’ll know exactly why the pan is empty a few minutes later.