
Movie night gets messy fast if dinner demands knives, a dozen side dishes, and a sink full of pans afterward. Easy weeknight meals for family movie night need a different job description: they should land on the table quickly, hold together in the dark on the couch, and still taste like someone cared. That means crisp edges where you want them, saucy centers that stay put, and enough flexibility for the kid who only wants cheese and the adult who wants something with a little bite.
The trick is not to make “movie night dinner” feel lesser. It’s to choose foods that understand the setting. Sliders instead of towering sandwiches. Quesadillas instead of drippy wraps that fall open on the first bite. Skillet pastas, sheet-pan dinners, baked casseroles, and build-your-own bars work here because they’re easy to portion, forgiving when they sit for ten minutes, and not fussy about perfect plating. I’ve cooked enough of these to know the deal: if it can survive being carried from kitchen to living room without collapsing, it probably belongs on this list.
What follows is a stack of family-friendly dinners that stay practical on a school night and still feel like a treat when the house lights dim. Some are pantry rescues. Some are “shove it in the oven and breathe for a minute” meals. All of them are the kind of dinner I’d happily serve when nobody wants to spend the evening making and washing separate pots for every component.
Why These Dinners Are Built for Couch Night
-
Handheld or fork-light: Most of these meals can be eaten from a wrap, slider, bowl, or shallow plate without balancing a steak knife on your knee.
-
Fast enough for a real weeknight: Several of them hit the table in 30 to 40 minutes, and the longer ones lean on the oven or slow cooker instead of constant stirring.
-
Kid-friendly without turning bland: Cheese, pasta, potatoes, tortillas, and mild sauces do a lot of the heavy lifting here, but adults still get flavor from garlic, paprika, salsa, mustard, pesto, and barbecue sauce.
-
Cleanup stays sane: Sheet pans, skillets, casserole dishes, and one-pot meals mean you’re not facing a wrecked kitchen right when the credits roll.
-
Easy to scale up: These recipes stretch for hungry teenagers, friends dropping by, or a “let’s make two pans because somebody will want seconds” kind of evening.
-
They tolerate a pause: If the movie starts five minutes early, these dinners won’t punish you for sitting down a little late.
1. Cheesy Chicken Quesadillas
Warm tortillas, crisp browned spots, and a cheese pull that stretches farther than you expect. That’s the whole point here. These quesadillas are the dinner I make when I want something that feels casual but still gets eaten fast, because nobody likes waiting while a stack of delicate food goes cold.
Why It Works: The chicken is already cooked, which means the skillet only has to crisp the tortilla and melt the cheese. A little drained salsa keeps the filling from feeling dry, and using medium heat gives the tortilla time to turn golden before the cheese burns.
Key Ingredients:
- 2 cups cooked shredded chicken
- 1/2 cup salsa, lightly drained
- 2 cups shredded Monterey Jack or cheddar
- 4 large flour tortillas
- 2 tablespoons softened butter
- 2 scallions, thinly sliced
- Sour cream and lime wedges, for serving
Quick Steps:
- Stir the chicken, salsa, and scallions in a bowl.
- Heat a large skillet over medium heat.
- Butter one side of a tortilla, place it butter-side down, and scatter cheese over half.
- Spoon on the chicken mixture, add a little more cheese, fold, and cook 2 to 3 minutes per side until deeply golden.
- Rest for 1 minute, then cut into wedges.
Equipment for This Recipe:
- 12-inch skillet
- Wide spatula
- Cutting board
- Sharp knife
- Mixing bowl
How to Serve This Dish: Pile the wedges on a platter with sour cream, salsa, and lime on the side. I like to add a handful of baby carrots or sliced cucumbers if the rest of the evening will be spent snacking. Two wedges is a normal dinner portion for most adults; three if you’re making these the whole meal.
Pro Tips for This Recipe:
- Use drained salsa. Wet filling is the fastest way to get limp tortillas.
- Shred the chicken into small strands so the quesadillas press flat instead of bulging.
- Keep the heat at medium, not high. High heat browns the tortilla before the cheese melts.
Variations on This Dish:
- Black Bean Chicken Quesadillas: Add 1 cup rinsed black beans for a more filling version.
- Spicy Pepper Jack Version: Swap in pepper jack and a spoonful of chopped jalapeños for older kids and adults.
- Veggie Swap: Replace the chicken with 2 cups sautéed mushrooms and peppers.
Common Mistakes to Avoid with This Dish:
- Don’t overfill the tortillas. If the stuffing falls out when you fold them, you’ve gone too far.
- Don’t cut them the second they leave the skillet. Give the cheese a minute to settle or it will slide out.
- Don’t use very low heat. The tortilla dries out before it crisps.
2. Sheet Pan Sausage, Potatoes, and Green Beans
This is the kind of dinner that smells like a full kitchen without requiring much effort at all. The potatoes go first so they can roast properly, the sausage gets browned edges, and the green beans stay snappy instead of turning into soft little strings.
Why It Works: Everything cooks on one pan, but not all at once. Potatoes need the longest roast, sausage just needs heat, and green beans only need enough time to blister at the edges. That staggered timing keeps the texture from collapsing into one soft pile.
Key Ingredients:
- 1 1/2 pounds baby potatoes, halved
- 12 ounces green beans, trimmed
- 14 ounces smoked sausage, sliced into 1/2-inch rounds
- 3 tablespoons olive oil
- 1 teaspoon garlic powder
- 1 teaspoon smoked paprika
- 1/2 teaspoon kosher salt
- 1/2 teaspoon black pepper
Quick Steps:
- Heat the oven to 425°F and line a large sheet pan.
- Toss the potatoes with 2 tablespoons oil, garlic powder, paprika, salt, and pepper.
- Roast the potatoes for 15 minutes.
- Add the sausage and green beans, drizzle with the remaining oil, and toss lightly.
- Roast 15 to 18 minutes more until the potatoes are browned and the beans are blistered.
Equipment for This Recipe:
- Large rimmed sheet pan
- Parchment paper
- Mixing bowl
- Spatula or tongs
- Chef’s knife
How to Serve This Dish: Serve it straight from the pan with mustard, ketchup, or a little hot sauce for the grown-ups. A warm roll on the side helps soak up the sausage drippings. This feeds four with regular appetites, or six if you add fruit and bread.
Pro Tips for This Recipe:
- Cut the potatoes evenly so they finish at the same time.
- Give the pan space. If everything is crowded, the vegetables steam instead of roast.
- Add the green beans only near the end or they’ll turn dull and limp.
Variations on This Dish:
- Smoky Kielbasa Version: Use kielbasa instead of smoked sausage for a deeper pork flavor.
- Chicken Sausage Swap: Chicken apple or garlic sausage keeps it lighter.
- Extra Veggie Pan: Add chunks of red onion and bell pepper with the sausage.
Common Mistakes to Avoid with This Dish:
- Don’t pile the ingredients high in the middle of the pan. Spread them out.
- Don’t forget to season the potatoes well; they carry the flavor of the whole dish.
- Don’t roast the beans the entire time unless you want them soft.
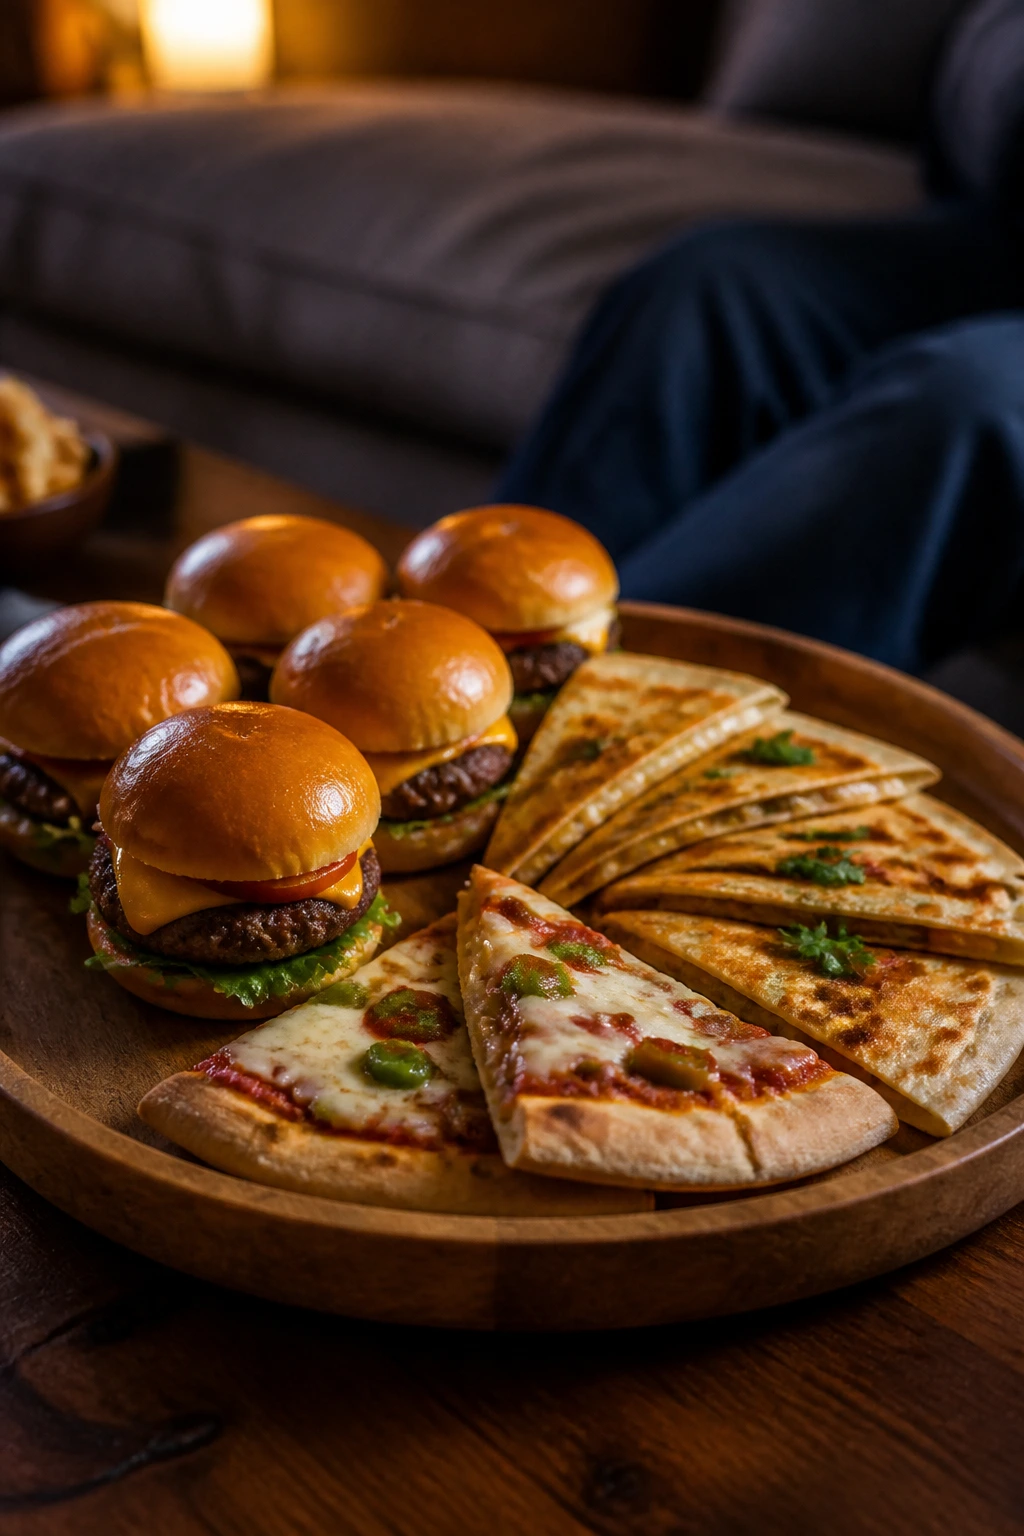
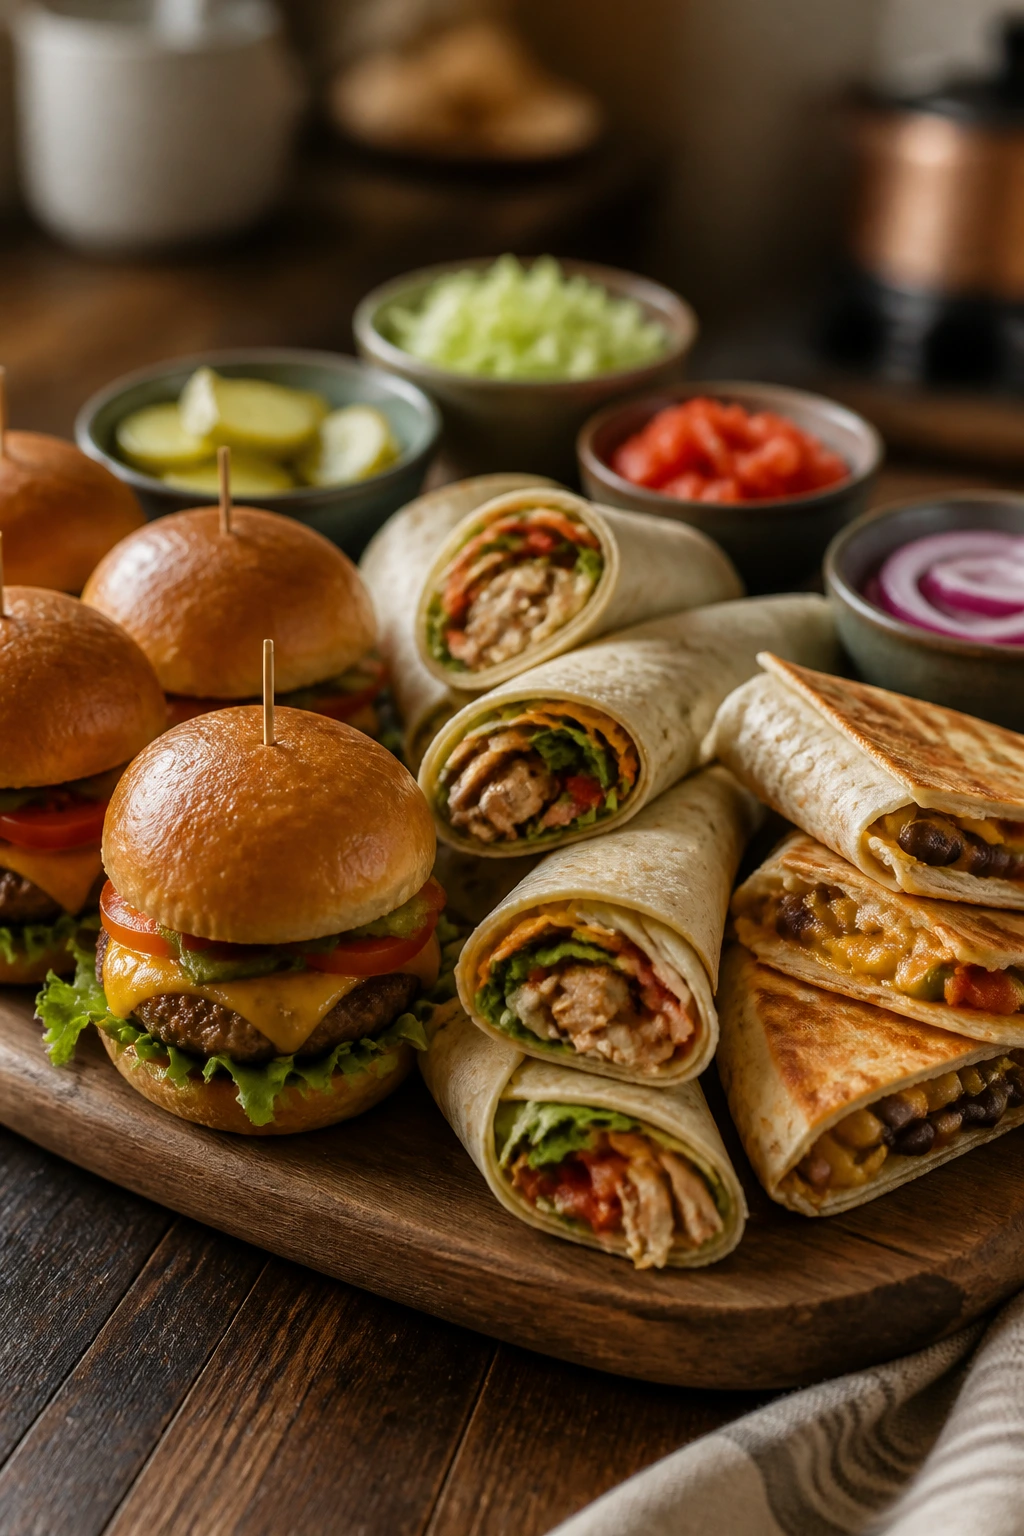
3. Sloppy Joe Sliders
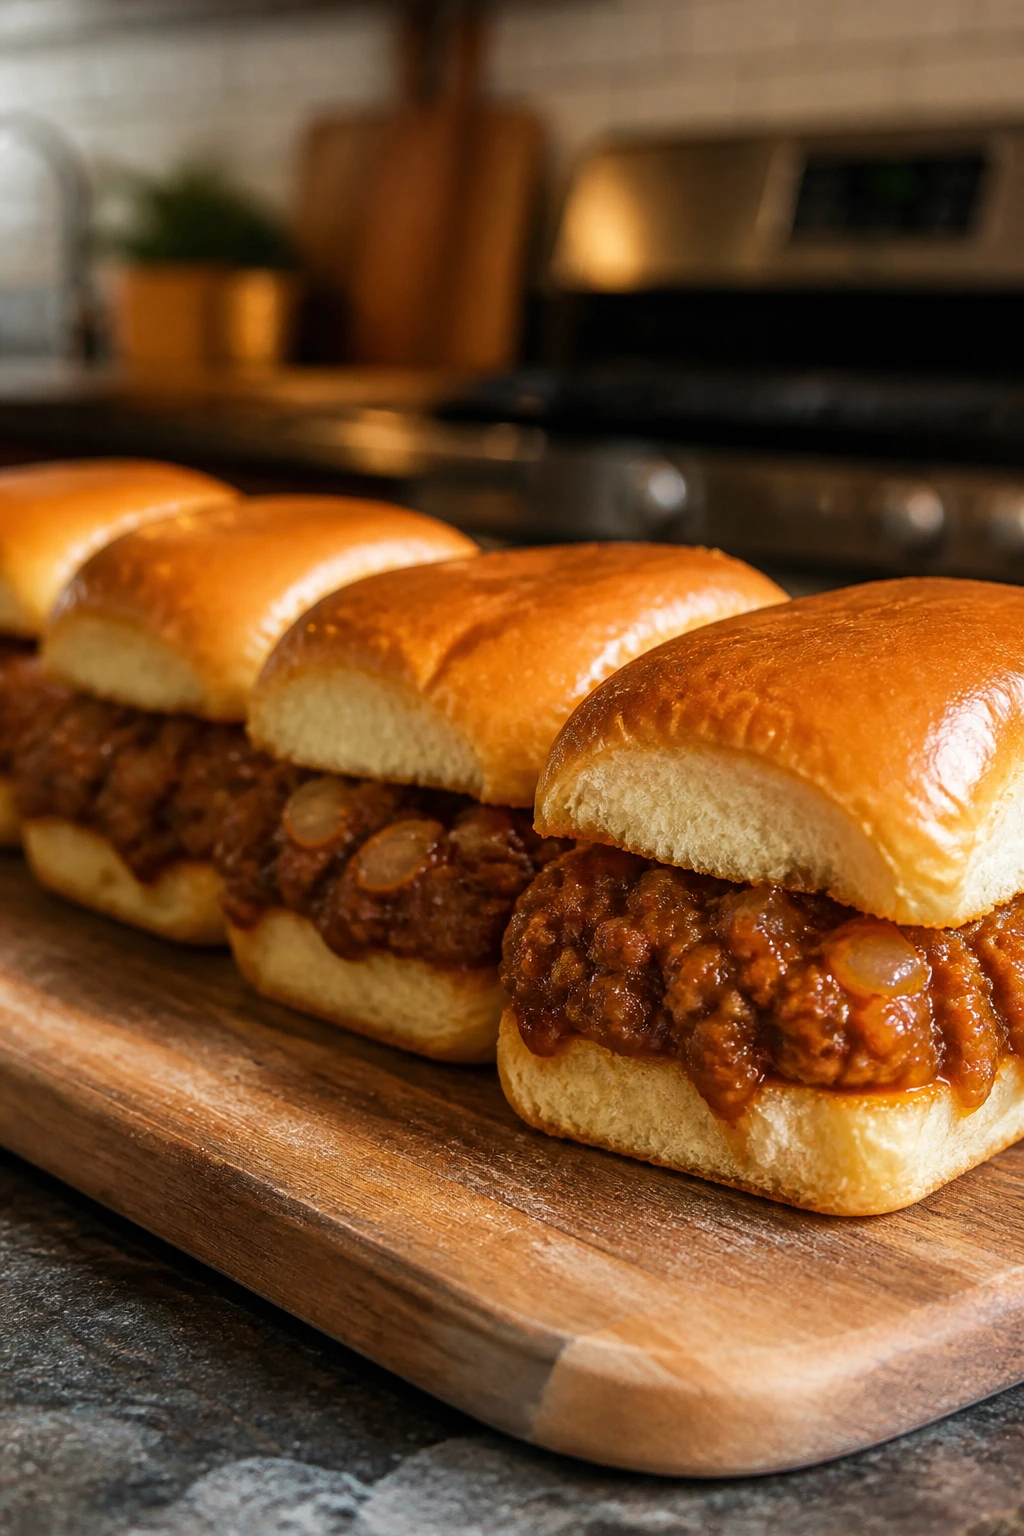
Sloppy Joe sliders are gloriously messy in the exact right way. They’ve got that sweet-savory sauce, soft buns that steam just enough in the oven, and enough nostalgia to make the room feel like everybody is twelve for a minute.
Why It Works: Ground beef takes on the sauce fast, and simmering it for a few minutes thickens the filling so it doesn’t leak straight through the buns. Baking the sliders after assembly warms the tops and melts the cheese into the meat.
Key Ingredients:
- 1 pound ground beef or ground turkey
- 1 small onion, finely diced
- 1 cup ketchup
- 2 tablespoons tomato paste
- 1 tablespoon Worcestershire sauce
- 1 tablespoon brown sugar
- 1 teaspoon chili powder
- 12 slider buns
- 6 slices cheddar, optional
- 1 tablespoon butter, melted, for brushing
Quick Steps:
- Brown the meat and onion in a skillet over medium-high heat, then drain excess fat.
- Stir in ketchup, tomato paste, Worcestershire, brown sugar, and chili powder.
- Simmer 6 to 8 minutes until the sauce looks thick and glossy.
- Spoon the filling onto the bottom buns, add cheese if using, and cap with the tops.
- Brush with butter and bake at 350°F for 8 to 10 minutes.
Equipment for This Recipe:
- Large skillet
- 9×13-inch baking dish
- Wooden spoon
- Sharp knife
- Small brush for butter
How to Serve This Dish: Put a pile of sliders on a platter with pickle chips and a bowl of potato chips. I’d keep napkins within reach; these are meant to be eaten quickly, not politely. Two sliders with chips makes a solid dinner for most people.
Pro Tips for This Recipe:
- Let the filling cook until it’s thick enough to mound on a spoon.
- Use soft buns, not crusty rolls. The filling is soft, and the sandwich should be too.
- Add cheese only if you want extra richness; the sliders hold up fine without it.
Variations on This Dish:
- BBQ Joe Sliders: Swap half the ketchup for barbecue sauce.
- Lentil Sloppy Joes: Use 3 cups cooked lentils instead of meat.
- Spicy Mustard Version: Stir in 1 tablespoon Dijon and a pinch of cayenne.
Common Mistakes to Avoid with This Dish:
- Don’t leave the sauce runny or the bottoms of the buns will turn soggy.
- Don’t skip draining the beef if it released a lot of fat.
- Don’t overbake the assembled sliders; they only need enough time to heat through.
4. One-Pot Beef Taco Pasta
This is what happens when taco night and pasta night stop arguing. The result is rich, cheesy, and a little more substantial than either of them alone, which is handy when dinner needs to survive an evening of people wandering in and out of the living room.
Why It Works: The pasta cooks in the same pot as the beef and broth, so it absorbs seasoning instead of tasting like plain noodles with sauce dumped on top. A little milk at the end softens the edges and turns the whole thing creamy without making it heavy.
Key Ingredients:
- 1 pound ground beef
- 1 small onion, diced
- 2 tablespoons taco seasoning
- 8 ounces elbow macaroni
- 2 cups beef broth
- 1 can (14.5 ounces) diced tomatoes
- 1 cup milk
- 2 cups shredded cheddar
- Salt, to taste
Quick Steps:
- Brown the beef and onion in a deep skillet or Dutch oven.
- Stir in taco seasoning, broth, tomatoes, and macaroni.
- Bring to a simmer, cover, and cook 10 to 12 minutes, stirring once or twice.
- Pour in the milk, then stir in cheddar until melted and creamy.
- Taste, salt lightly if needed, and serve right away.
Equipment for This Recipe:
- Deep 12-inch skillet or Dutch oven
- Wooden spoon
- Measuring cups
- Box grater if shredding cheese
- Lid
How to Serve This Dish: Spoon it into shallow bowls with crushed tortilla chips on top. A little sour cream and chopped lettuce on the side turns it into a taco bar without much extra work. This recipe feeds about six, and it reheats well if there are leftovers.
Pro Tips for This Recipe:
- Use a pot with enough room for the pasta to move. Tight pots make uneven cooking.
- Stir once while it simmers so the noodles don’t stick.
- Pull it from the heat before it looks fully thick; the cheese finishes the job.
Variations on This Dish:
- Bean Stretch Version: Add 1 can of black beans with the tomatoes.
- Chicken Taco Pasta: Use shredded rotisserie chicken instead of beef.
- Mild Family Version: Cut the taco seasoning in half and serve hot sauce at the table.
Common Mistakes to Avoid with This Dish:
- Don’t walk away while the pasta cooks or the bottom can catch.
- Don’t add cheese to a boiling pot; it can turn grainy.
- Don’t over-salt before the cheese goes in, since cheddar brings plenty of salt.
5. Mini Pepperoni Pizza Pitas
If you want a dinner that feels like a Friday night without actually being a project, this is it. The pita base stays crisp, the sauce stays contained, and nobody has to wait for dough to rise or figure out who burned the last corner of the pan.
Why It Works: Small flatbreads bake faster than full pizza crust, which means the cheese melts before the edges dry out. Pepperoni gives you salty little cups of oil that flavor the whole top, and the pitas are sturdy enough to hold in one hand.
Key Ingredients:
- 6 mini naan breads or pitas
- 3/4 cup pizza sauce
- 2 cups shredded mozzarella
- 1 cup pepperoni slices
- 1/2 bell pepper, diced
- 1 teaspoon dried oregano
Quick Steps:
- Heat the oven to 425°F and line a sheet pan.
- Arrange the pitas on the pan and spread each with pizza sauce.
- Top with mozzarella, pepperoni, bell pepper, and oregano.
- Bake 8 to 10 minutes until the cheese bubbles and the edges crisp.
- Rest 2 minutes before serving.
Equipment for This Recipe:
- Sheet pan
- Spoon for spreading sauce
- Cutting board
- Knife
- Oven mitts
How to Serve This Dish: Cut each pita pizza into quarters and stack them on a board. Add a bowl of grapes or sliced cucumbers if you want a little freshness next to the cheese. For kids, one mini pizza is often enough; adults usually want two.
Pro Tips for This Recipe:
- If your pitas are very soft, toast them for 2 minutes before topping.
- Keep the sauce layer thin so the bread stays crisp.
- Slice the bell pepper small; big chunks take too long to soften.
Variations on This Dish:
- Veggie Pita Pizza: Use mushrooms, olives, and spinach instead of pepperoni.
- Hawaiian-Inspired Version: Add diced ham and pineapple, but keep the pineapple well drained.
- White Pizza Twist: Skip the red sauce and use ricotta with garlic and mozzarella.
Common Mistakes to Avoid with This Dish:
- Don’t pile on the toppings or the center will go soft.
- Don’t bake too long; pita dries out fast once the cheese is melted.
- Don’t use very wet vegetables unless you’ve cooked or blotted them first.
6. Baked Chicken Tenders with Parmesan Breadcrumbs
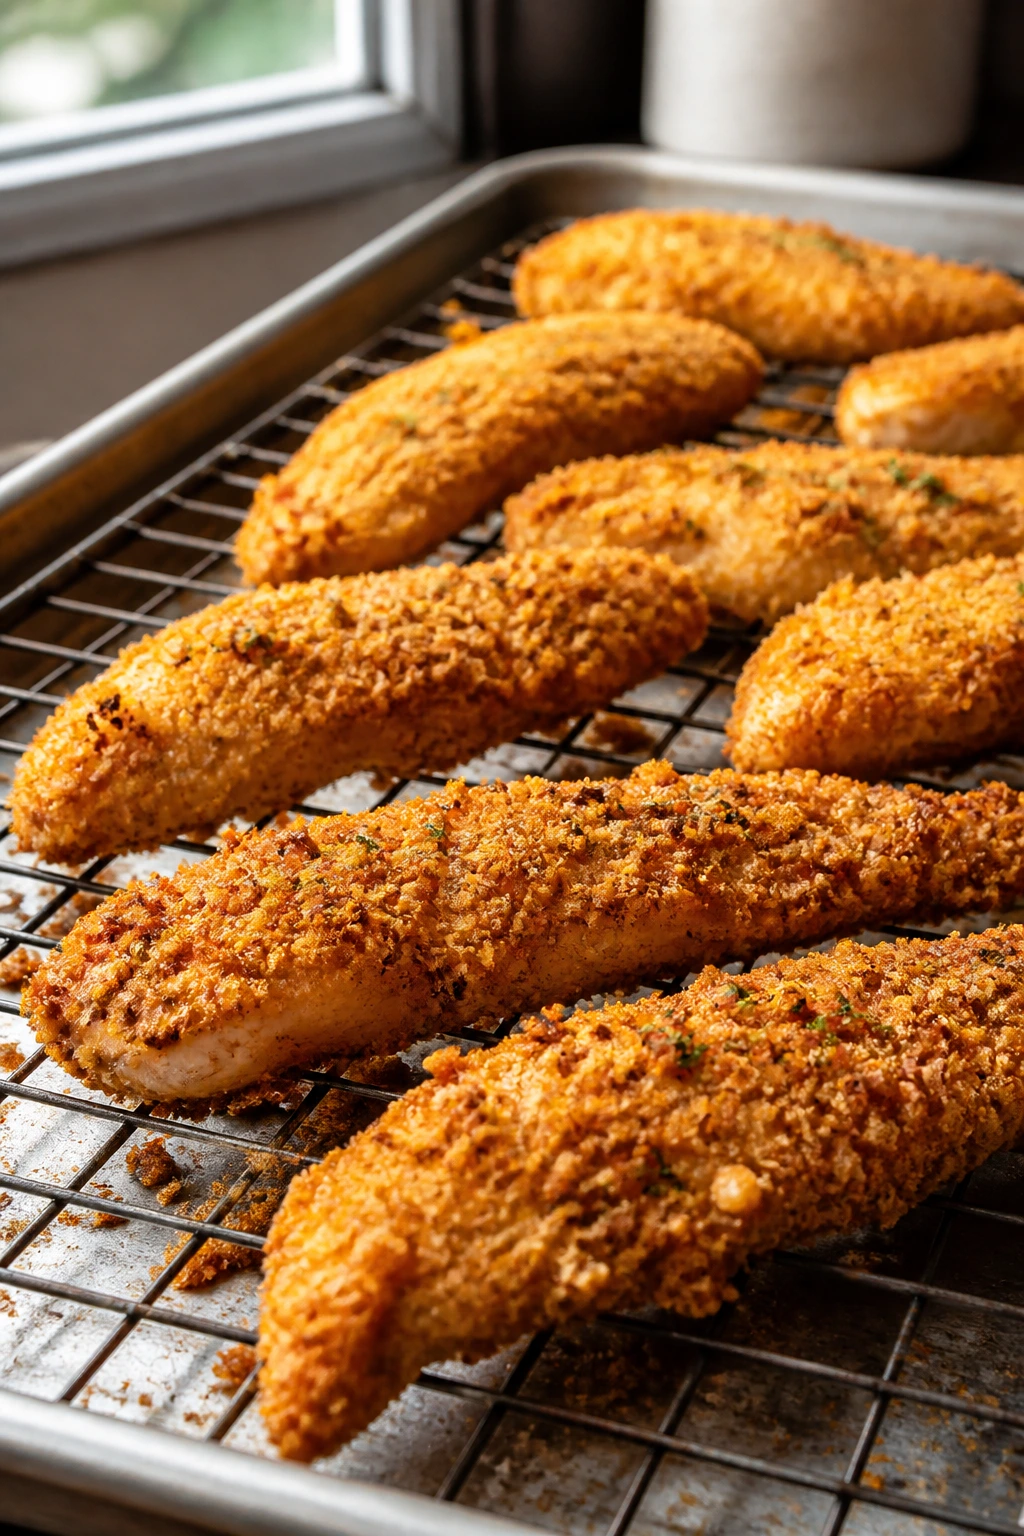
Chicken tenders belong on a family movie night menu because they’re easy to dip, easy to grab, and mercifully less greasy than the drive-through version. The Parmesan in the crust gives you salt and nuttiness, and the panko stays crisp if you don’t rush the bake.
Why It Works: A flour-egg-breadcrumb setup gives the coating something to cling to, and baking on a rack lets hot air move around the tenders instead of trapping steam underneath. That’s the difference between crisp and limp.
Key Ingredients:
- 1 1/2 pounds chicken tenders
- 1/2 cup flour
- 2 eggs
- 1 tablespoon milk
- 1 1/2 cups panko breadcrumbs
- 1/2 cup grated Parmesan
- 1 teaspoon garlic powder
- 1 teaspoon paprika
- Salt and black pepper
- Olive oil spray
Quick Steps:
- Heat the oven to 425°F and set a wire rack on a sheet pan.
- Mix the panko, Parmesan, garlic powder, paprika, salt, and pepper in one bowl.
- Dredge each tender in flour, then egg whisked with milk, then the breadcrumb mixture.
- Place on the rack, spray lightly with oil, and bake 15 to 18 minutes, flipping once.
- Cook until the chicken reaches 165°F and the coating is golden.
Equipment for This Recipe:
- Sheet pan
- Wire rack
- Three shallow bowls
- Tongs
- Instant-read thermometer
How to Serve This Dish: Serve with honey mustard, ketchup, or ranch and a bowl of carrot sticks. Fries, oven chips, or a simple salad all work. Four tenders is a solid adult portion; kids often stop at two or three.
Pro Tips for This Recipe:
- Press the crumbs onto the chicken so they stick before baking.
- Spray the tops lightly with oil; that’s what gives you color.
- Use an instant-read thermometer. Dry chicken tenders are nobody’s idea of a good time.
Variations on This Dish:
- Buffalo Tenders: Toss the baked tenders in buffalo sauce and serve with ranch.
- Gluten-Free Version: Use gluten-free flour and crumbs.
- Cornflake Crust: Crush cornflakes for a slightly sweeter, crunchier shell.
Common Mistakes to Avoid with This Dish:
- Don’t skip the rack or the bottoms can go soft.
- Don’t bake at a low temperature; the coating needs enough heat to crisp.
- Don’t serve before the chicken rests for a few minutes, or the juices will run out.
7. Creamy Stovetop Mac and Cheese
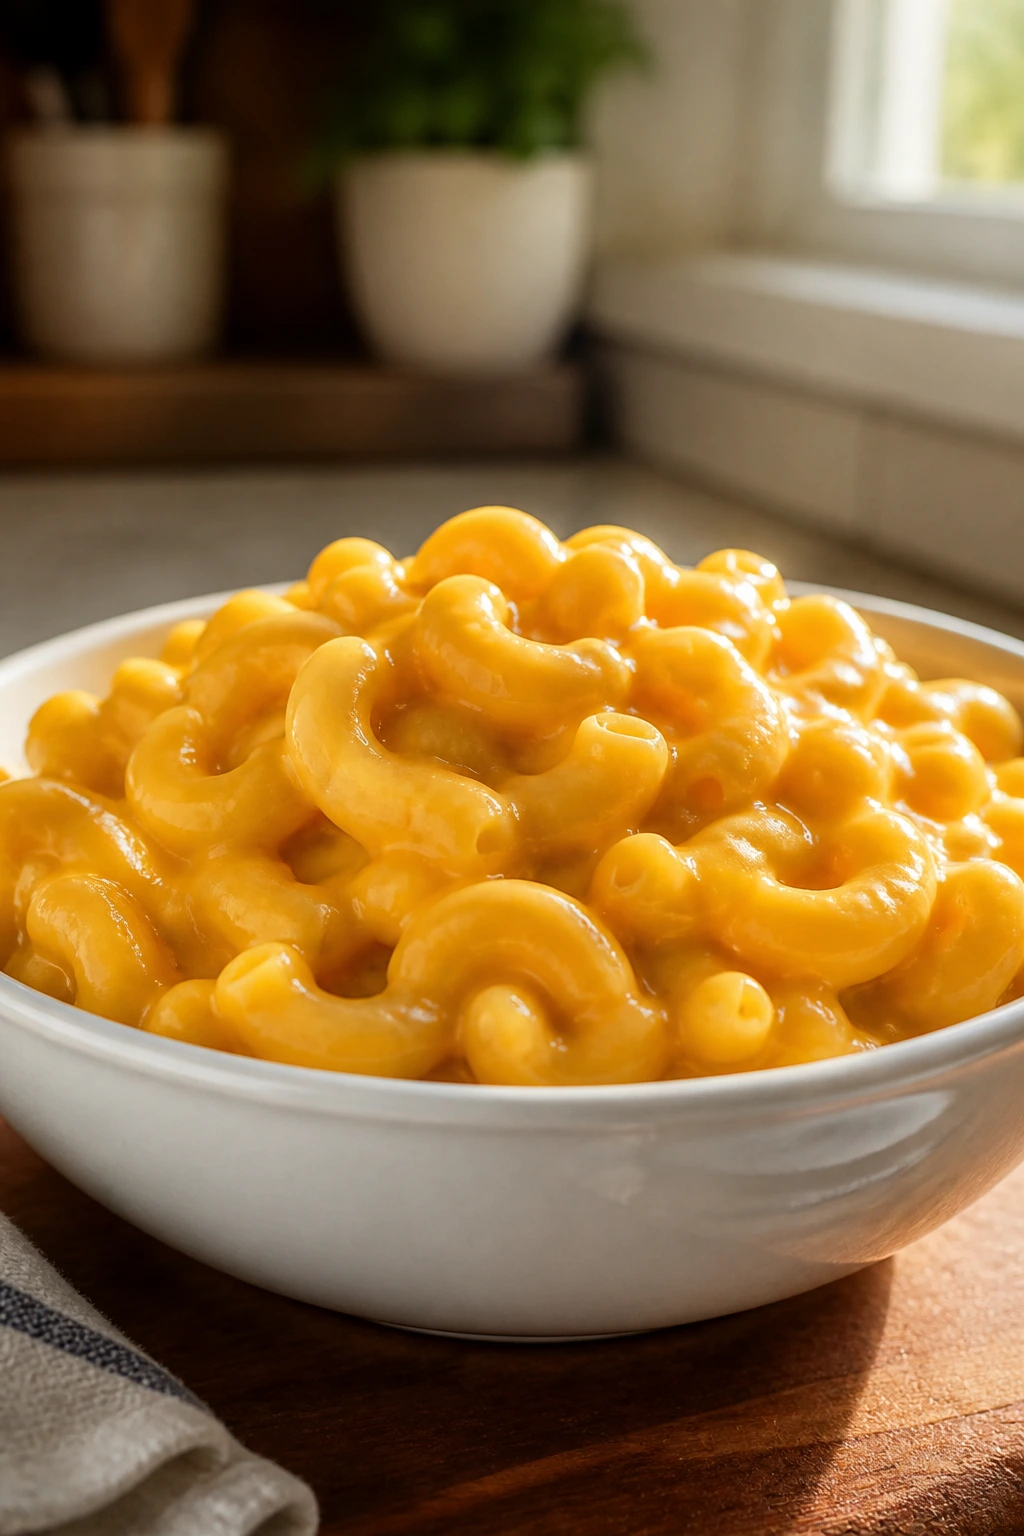
Some dinners don’t need marketing. They need a decent pot, a sharp cheddar, and a little patience. This mac and cheese leans creamy instead of gloppy, with enough structure to scoop cleanly and enough sauce to keep the noodles from drying out.
Why It Works: A quick roux thickens the milk without turning the sauce heavy, and using evaporated milk keeps the texture smooth. Sharp cheddar brings enough bite that the sauce doesn’t taste flat, even after a few minutes on the table.
Key Ingredients:
- 12 ounces elbow macaroni
- 3 tablespoons butter
- 3 tablespoons flour
- 2 cups milk
- 1 cup evaporated milk
- 3 cups shredded sharp cheddar
- 1/2 teaspoon mustard powder
- 1/2 teaspoon salt
- 1/4 teaspoon black pepper
Quick Steps:
- Cook the macaroni in salted water until just al dente, then drain.
- Melt the butter in a pot over medium heat and whisk in the flour for 1 minute.
- Slowly whisk in the milk and evaporated milk until smooth and slightly thickened.
- Stir in cheddar, mustard powder, salt, and pepper until melted.
- Fold in the pasta and serve immediately.
Equipment for This Recipe:
- Medium pot
- Whisk
- Colander
- Wooden spoon
- Box grater
How to Serve This Dish: Spoon it into bowls and top with black pepper or chopped chives. It’s a natural partner for hot dogs, peas, or roasted broccoli if you want to stretch it into a fuller dinner. Four people eat well here, or six with sides.
Pro Tips for This Recipe:
- Shred your own cheese if you can. It melts smoother than bagged shreds.
- Pull the pasta a touch early; it will keep softening in the sauce.
- Add the cheese off the strongest heat so the sauce stays silky.
Variations on This Dish:
- Bacon Mac: Stir in 1/2 cup chopped cooked bacon.
- Broccoli Cheddar Mac: Add 2 cups steamed broccoli florets.
- Jalapeño Mac: Add minced pickled jalapeños for a sharper finish.
Common Mistakes to Avoid with This Dish:
- Don’t let the sauce boil after the cheese goes in.
- Don’t overcook the pasta, or the final dish gets mushy.
- Don’t use too much flour in the roux; the sauce should coat, not gel.
8. BBQ Chicken Flatbread Pizzas
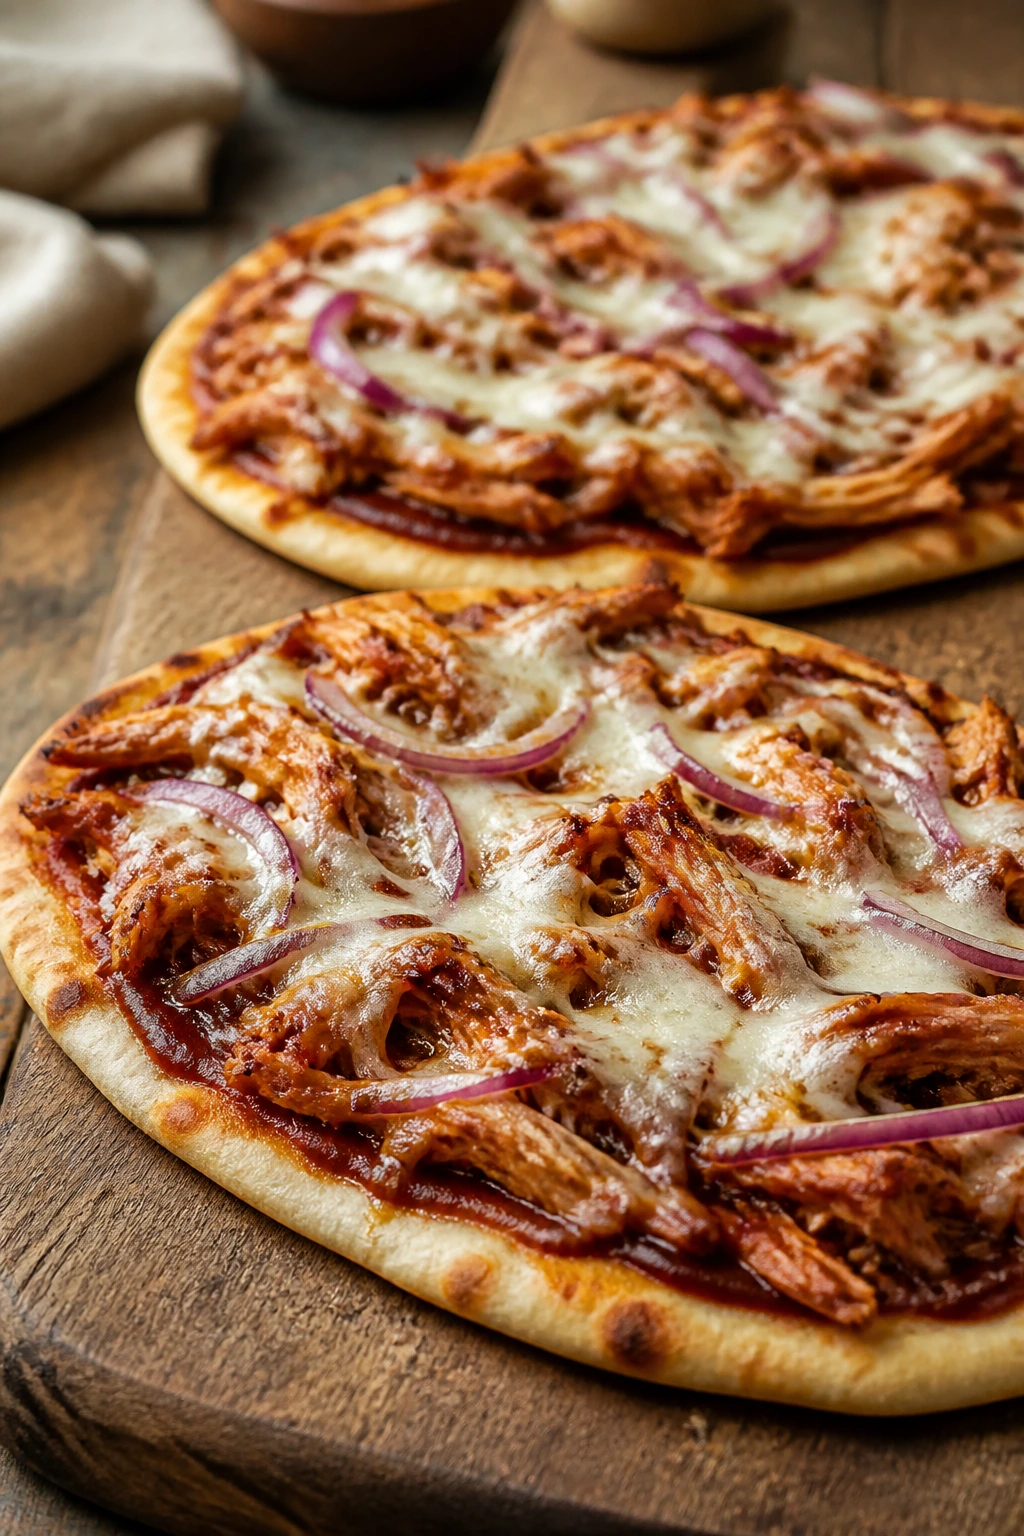
These are what I reach for when pizza night needs to move fast but still feel homemade. The barbecue sauce brings sweet smoke, the flatbread crisps at the edges, and the red onion cuts through the richness so the whole thing doesn’t turn into a wall of cheese.
Why It Works: Flatbreads bake faster than standard pizza dough, and cooked chicken means you only have to warm the topping, not fully cook it. The sauce stays concentrated, which keeps the base from getting soggy.
Key Ingredients:
- 2 cups cooked shredded chicken
- 3/4 cup barbecue sauce
- 4 flatbreads or naan
- 2 cups shredded mozzarella
- 1/2 red onion, thinly sliced
- 2 tablespoons chopped cilantro
Quick Steps:
- Heat the oven to 425°F and line a sheet pan.
- Toss the chicken with barbecue sauce.
- Lay out the flatbreads and top with mozzarella, sauced chicken, and red onion.
- Bake 8 to 10 minutes until the cheese melts and the edges crisp.
- Finish with cilantro and slice.
Equipment for This Recipe:
- Sheet pan
- Mixing bowl
- Spoon
- Sharp knife
- Cutting board
How to Serve This Dish: Cut into strips and serve with a salad or coleslaw if you want something cool next to the heat of the sauce. One flatbread can serve one hungry adult or two lighter eaters. I’d call this a good “share a tray” dinner.
Pro Tips for This Recipe:
- Keep the barbecue sauce layer thin. Too much turns the flatbread slippery.
- Slice the onion very thin so it softens in the oven.
- Add cilantro after baking; heat dulls the fresh flavor.
Variations on This Dish:
- Spicy BBQ Version: Use a chipotle barbecue sauce.
- Pineapple Chicken Flatbread: Add drained pineapple tidbits for sweetness.
- Caramelized Onion Swap: Cook the onions first for a deeper, sweeter finish.
Common Mistakes to Avoid with This Dish:
- Don’t overload the toppings or the bread will droop in the middle.
- Don’t forget to preheat the oven fully.
- Don’t add wet toppings like fresh tomatoes unless you blot them first.
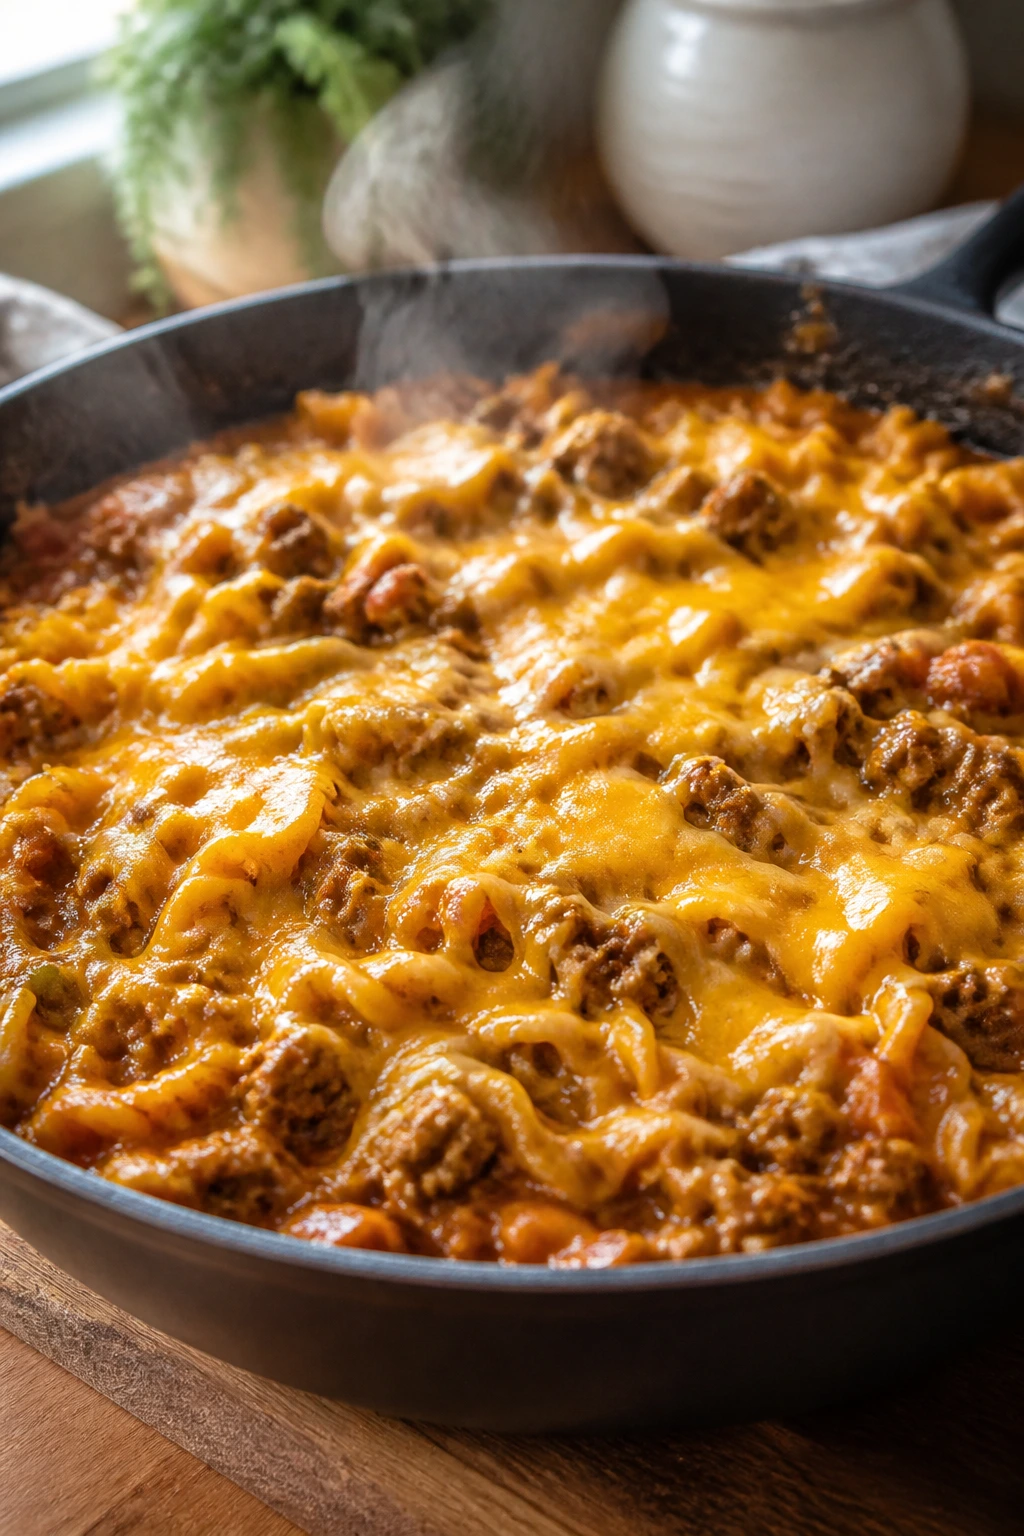
9. Cheeseburger Pasta Skillet
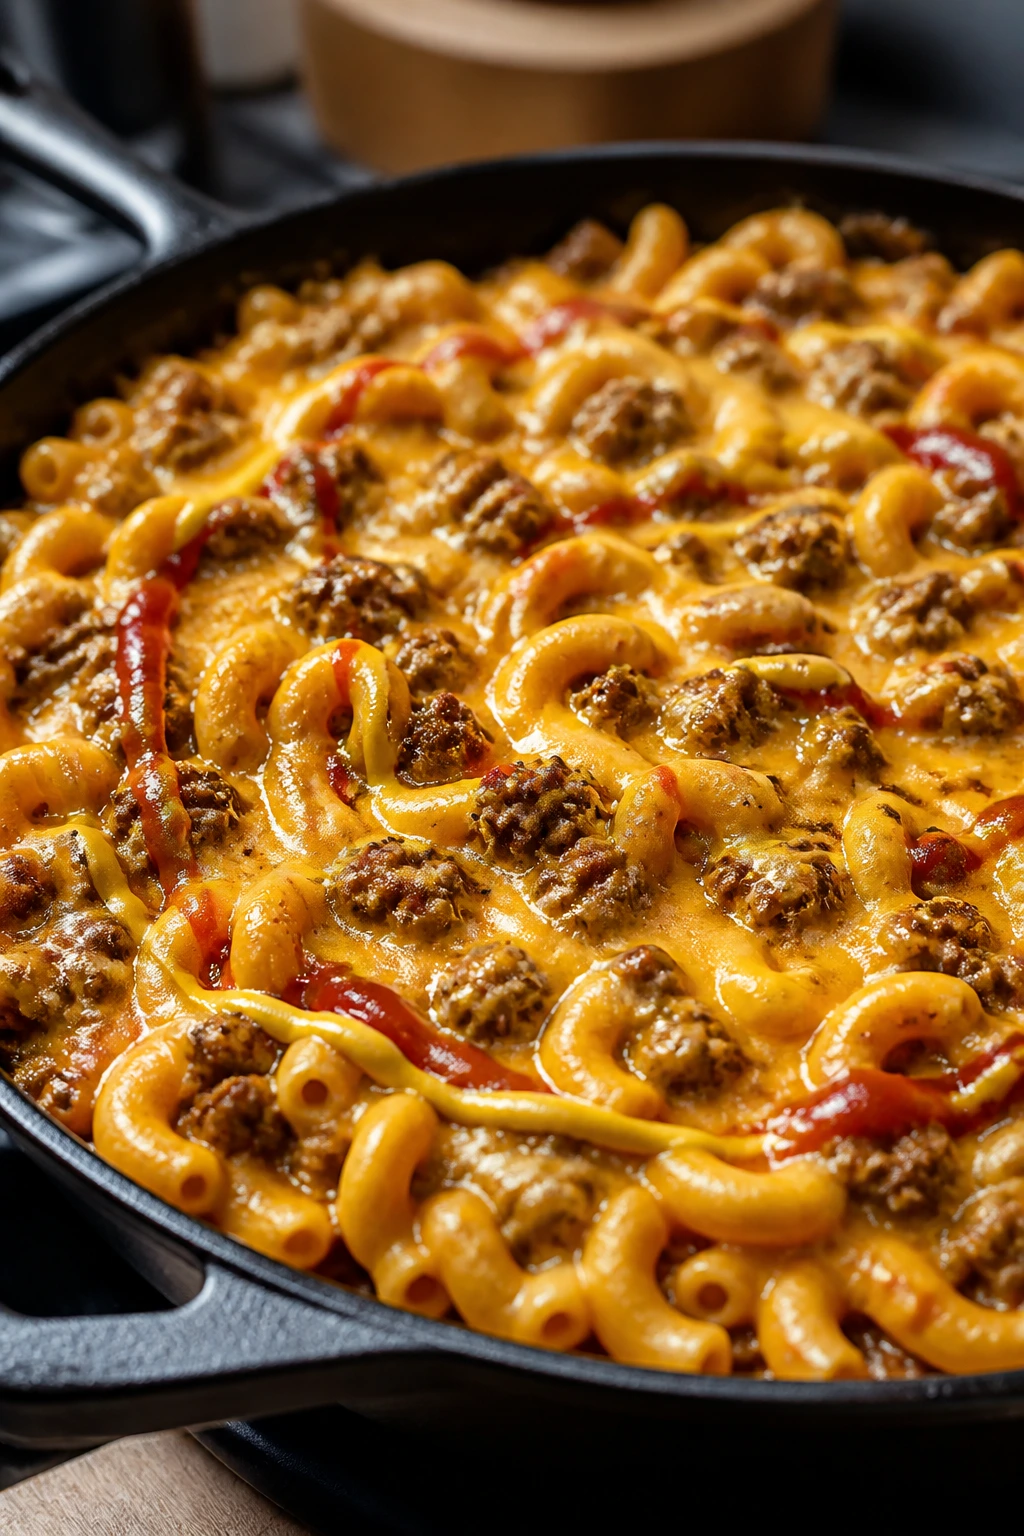
This is pure weeknight consolation food, and I mean that in the best way. It tastes like a cheeseburger met a boxed mac recipe and decided to settle down together. The mustard and ketchup give it that familiar diner flavor, and the pasta soaks up the sauce without turning bland.
Why It Works: Ground beef cooks quickly, and the pasta simmers in the same pan, which means the starch helps thicken the sauce. A splash of milk at the end keeps everything creamy instead of sticky.
Key Ingredients:
- 1 pound ground beef
- 1 small onion, diced
- 8 ounces rotini
- 2 cups beef broth
- 1 cup milk
- 2 cups shredded cheddar
- 2 tablespoons ketchup
- 1 tablespoon yellow mustard
- Salt and pepper, to taste
Quick Steps:
- Brown the beef and onion in a deep skillet, then drain excess fat.
- Stir in the rotini, broth, ketchup, mustard, salt, and pepper.
- Bring to a simmer, cover, and cook 10 to 12 minutes until the pasta is tender.
- Stir in the milk and cheddar until creamy.
- Taste and top with pickle relish if you want the full cheeseburger feel.
Equipment for This Recipe:
- Large deep skillet with lid
- Wooden spoon
- Measuring cups
- Colander, optional
- Cheese grater
How to Serve This Dish: Spoon it into bowls and serve with dill pickles on the side. A simple green salad or apple slices make sense here if you want to offset the richness. This makes a generous six servings.
Pro Tips for This Recipe:
- Rotini holds sauce well, but any short pasta with ridges will work.
- Keep the simmer gentle so the broth doesn’t disappear too fast.
- Add pickle relish at the end if you want bright, crunchy contrast.
Variations on This Dish:
- Bacon Cheeseburger Skillet: Stir in chopped cooked bacon.
- Turkey Burger Pasta: Swap ground turkey for beef.
- Mushroom Burger Version: Cook sliced mushrooms with the onion.
Common Mistakes to Avoid with This Dish:
- Don’t let the skillet dry out before the pasta is tender; add a splash more broth if needed.
- Don’t use a thin pan with low sides or the sauce can spill.
- Don’t forget that the cheese thickens as it sits.
10. Chicken Enchilada Casserole

This casserole tastes like all the good parts of enchiladas without the awkward business of rolling tortillas one by one. The layers soften just enough in the oven, but the top still gets those little crispy edges that make people keep picking at the corner pieces.
Why It Works: The sauce steams the tortillas into the filling, and the beans and corn give the casserole a little bulk so it’s not all chicken and cheese. Corn tortillas hold their shape better here than flour ones.
Key Ingredients:
- 3 cups shredded cooked chicken
- 2 cups red enchilada sauce
- 8 corn tortillas, cut into strips
- 2 cups shredded Monterey Jack
- 1 can black beans, drained
- 1 cup corn kernels
- 1/4 cup chopped cilantro, optional
Quick Steps:
- Heat the oven to 375°F and grease a 9×13-inch baking dish.
- Spread a thin layer of enchilada sauce in the dish.
- Layer tortillas, chicken, beans, corn, sauce, and cheese; repeat once.
- Bake 25 to 30 minutes until bubbly and hot through.
- Rest 10 minutes before slicing.
Equipment for This Recipe:
- 9×13-inch baking dish
- Sharp knife or kitchen shears
- Mixing bowl
- Foil, optional
- Measuring cups
How to Serve This Dish: Top with sour cream, cilantro, and diced avocado. I like serving it with a chopped lettuce salad on the side because the casserole is rich and the crunch helps. Six to eight portions is realistic, depending on what else is on the table.
Pro Tips for This Recipe:
- Cut the tortillas into strips so they layer evenly instead of clumping.
- Let the casserole rest before cutting or it will slide apart.
- If your sauce is very thick, loosen it with a splash of water.
Variations on This Dish:
- Green Enchilada Version: Use salsa verde and pepper jack.
- Beef Enchilada Bake: Swap in seasoned ground beef.
- Vegetarian Bean Casserole: Add pinto beans and sautéed peppers.
Common Mistakes to Avoid with This Dish:
- Don’t use flour tortillas if you want the classic texture.
- Don’t skip the resting time.
- Don’t drown the layers in sauce; enough is enough.
11. Pesto Tortellini with Cherry Tomatoes
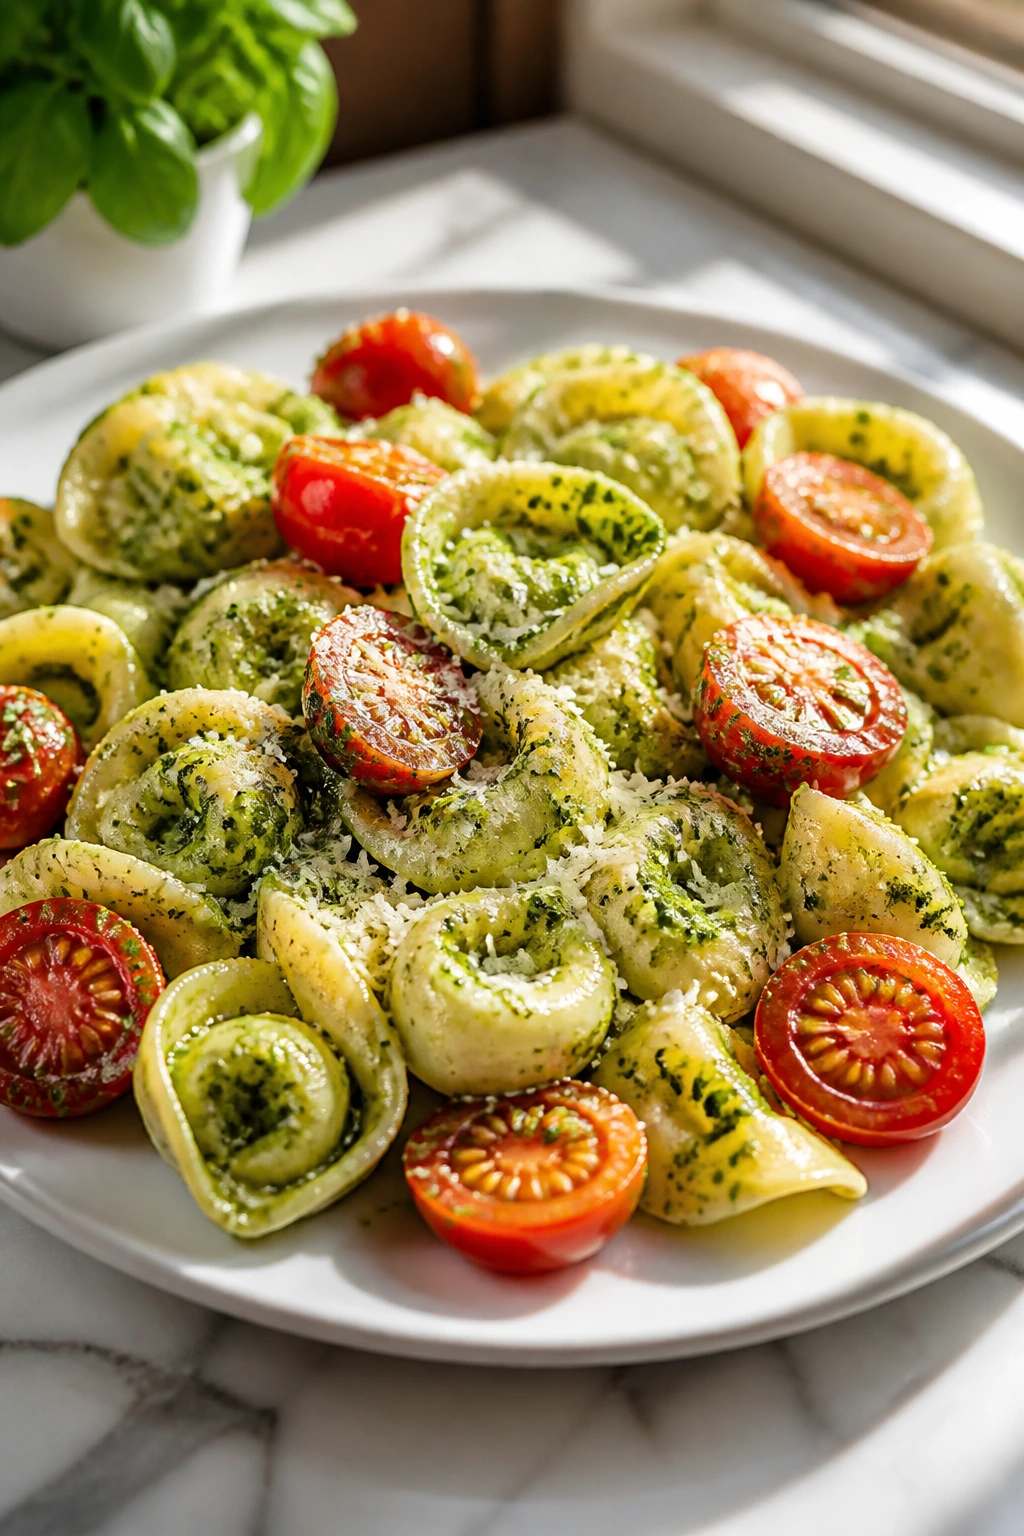
This is the fast, bright dinner in the lineup. It tastes like it took more effort than it did, mostly because pesto and cherry tomatoes do such a good job carrying flavor with almost no help. Good tortellini disappears fast when you hand it to a tired family.
Why It Works: Refrigerated tortellini cooks in minutes, and the tomatoes burst just enough in the pan to make a loose sauce. Pesto clings to the pasta best when you loosen it with a little cooking water.
Key Ingredients:
- 20 ounces refrigerated cheese tortellini
- 1 pint cherry tomatoes
- 1/2 cup pesto
- 2 tablespoons olive oil
- 1 cup baby spinach
- 1/4 cup grated Parmesan
- Salt and black pepper
Quick Steps:
- Boil the tortellini in salted water until it floats and is tender, then drain.
- Warm the olive oil in a skillet and cook the cherry tomatoes 3 to 4 minutes until they start to burst.
- Add the spinach and let it wilt.
- Toss in the tortellini and pesto with a splash of pasta water.
- Finish with Parmesan, salt, and pepper.
Equipment for This Recipe:
- Large pot
- Skillet
- Colander
- Wooden spoon
- Measuring cup
How to Serve This Dish: Serve it in shallow bowls with garlic bread or toasted baguette slices. It works as a main for four people or as a lighter side for more. A few torn basil leaves on top make it look fresh without any real extra work.
Pro Tips for This Recipe:
- Reserve a small cup of pasta water before draining.
- Add pesto off the heat so it stays green and fresh.
- Don’t let the tomatoes collapse into paste; a little shape is part of the appeal.
Variations on This Dish:
- Chicken Pesto Tortellini: Fold in cooked chicken.
- Sun-Dried Tomato Version: Add chopped sun-dried tomatoes for a deeper flavor.
- Dairy-Free Pesto Swap: Use a dairy-free pesto and skip the Parmesan.
Common Mistakes to Avoid with This Dish:
- Don’t overcook the tortellini or the filling can burst.
- Don’t add pesto to a dry pan without a little pasta water.
- Don’t skip seasoning just because pesto tastes bold; the pasta still needs salt.
12. Teriyaki Chicken Rice Bowls
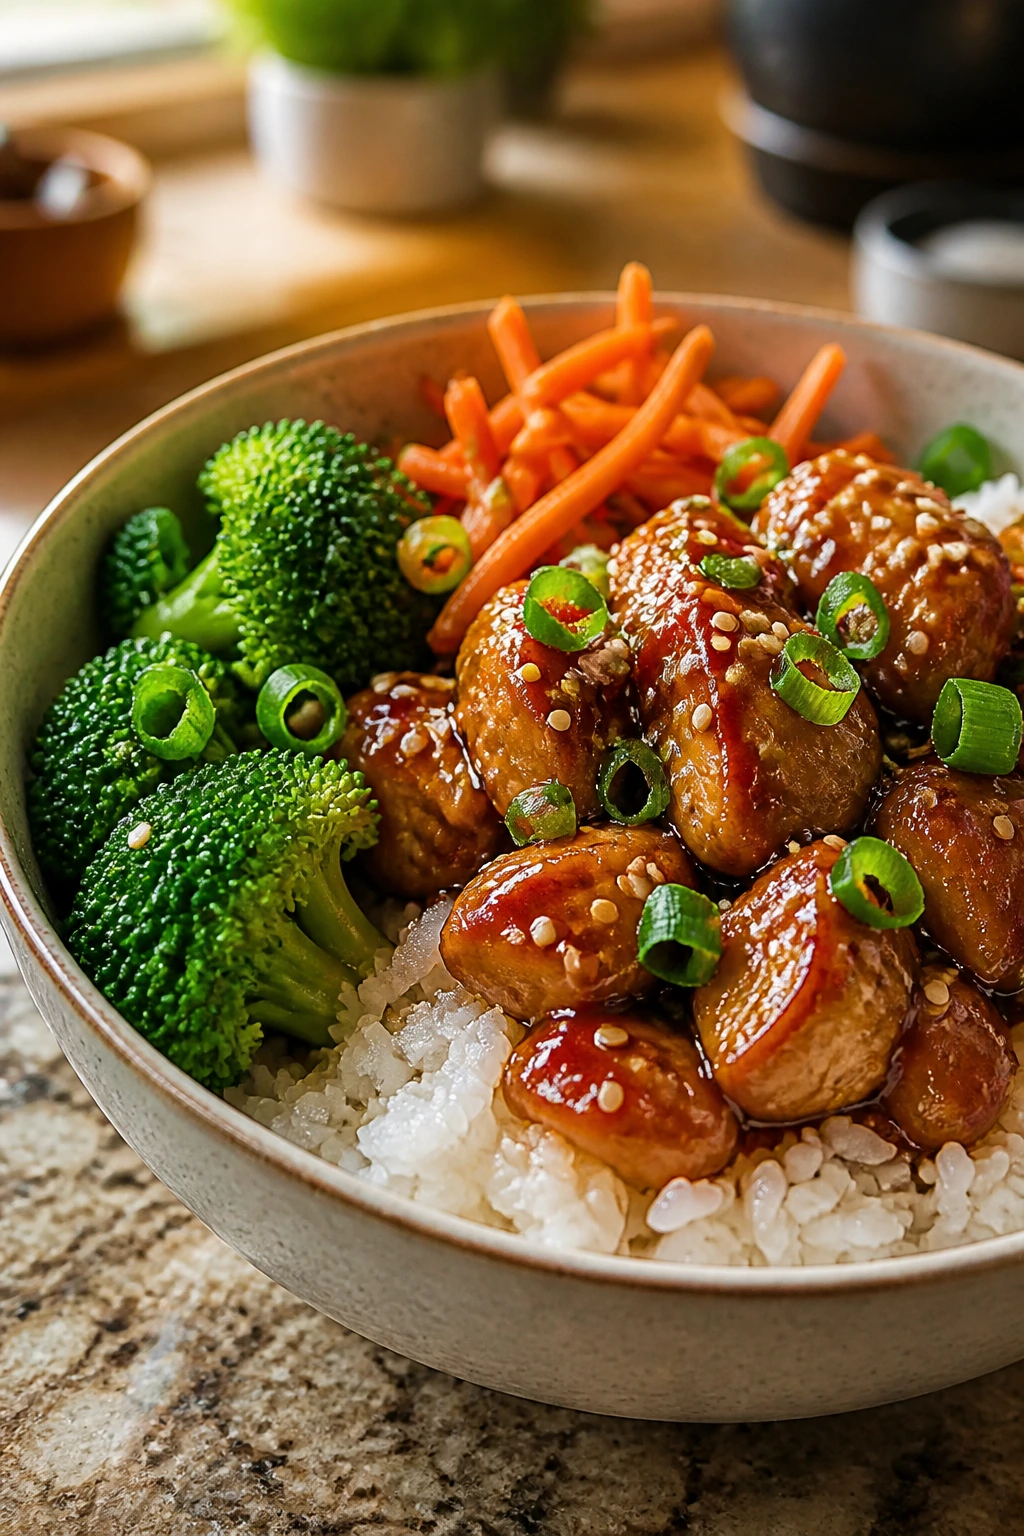
Rice bowls are the quiet hero of a family movie night because every person can build a plate that fits their mood. This version gives you sticky-sweet teriyaki chicken, soft rice, and crisp vegetables that keep the bowl from feeling heavy.
Why It Works: Chicken thighs stay juicy even if they sit for a few minutes, and the teriyaki sauce thickens into a glossy coating when it hits a hot pan. Broccoli and carrots give the bowl a clean crunch that keeps the sweetness in check.
Key Ingredients:
- 1 1/2 pounds boneless chicken thighs
- 1 cup teriyaki sauce
- 3 cups cooked rice
- 2 cups broccoli florets
- 1 carrot, julienned
- 1 tablespoon sesame seeds
- 2 scallions, sliced
Quick Steps:
- Sear the chicken thighs in a skillet over medium-high heat until browned and cooked through.
- Pour in the teriyaki sauce and let it bubble until glossy.
- Steam or blanch the broccoli until bright green and tender-crisp.
- Divide rice into bowls and top with sliced chicken, broccoli, carrots, sesame seeds, and scallions.
- Spoon extra sauce over the top.
Equipment for This Recipe:
- Large skillet
- Saucepan or steamer
- Rice cooker, optional
- Sharp knife
- Cutting board
How to Serve This Dish: Set the bowls out family-style and let people add their own sauce. A few cucumber slices or edamame on the side work well. One bowl is plenty for most adults, especially if the rice portion is measured at about 1 cup cooked.
Pro Tips for This Recipe:
- Cut the chicken into even pieces if you want it done quickly.
- Use day-old rice if you have it; it stays fluffier.
- Add a squeeze of lime if your teriyaki sauce leans very sweet.
Variations on This Dish:
- Tofu Bowl: Swap the chicken for pressed tofu cubes.
- Pineapple Teriyaki: Add small pineapple chunks.
- Spicy Bowl: Stir a little sriracha into the sauce.
Common Mistakes to Avoid with This Recipe:
- Don’t crowd the chicken or it will steam instead of brown.
- Don’t overcook the broccoli; it should still have some bite.
- Don’t use wet, clumpy rice unless you break it up first.
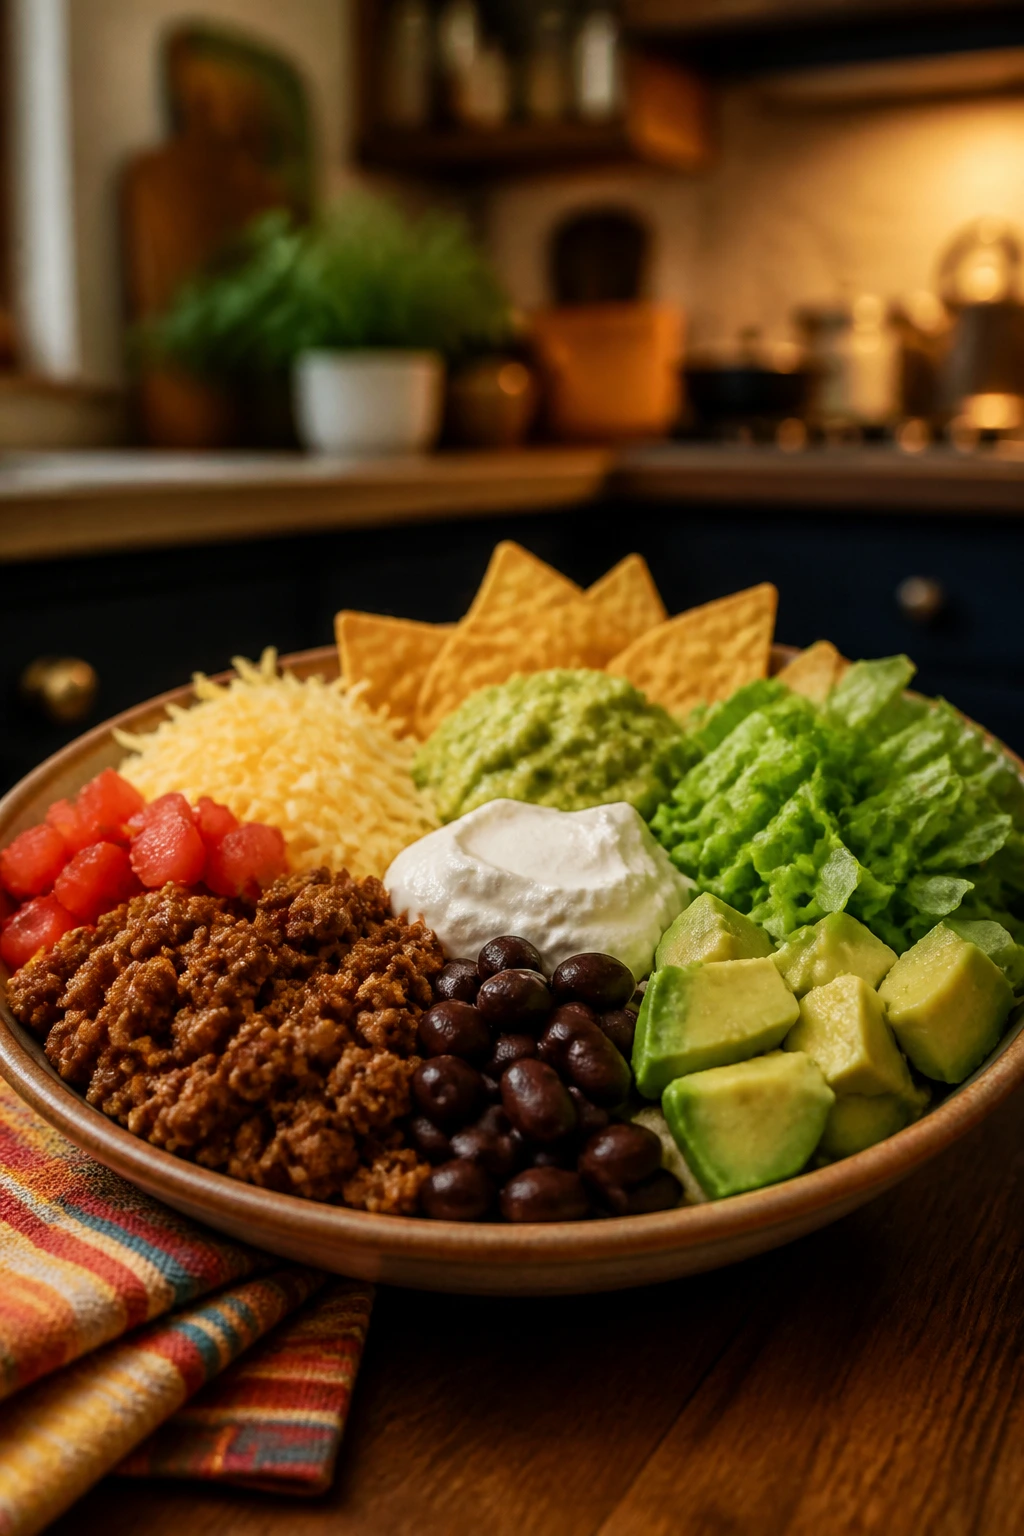
13. Loaded Nacho Skillet
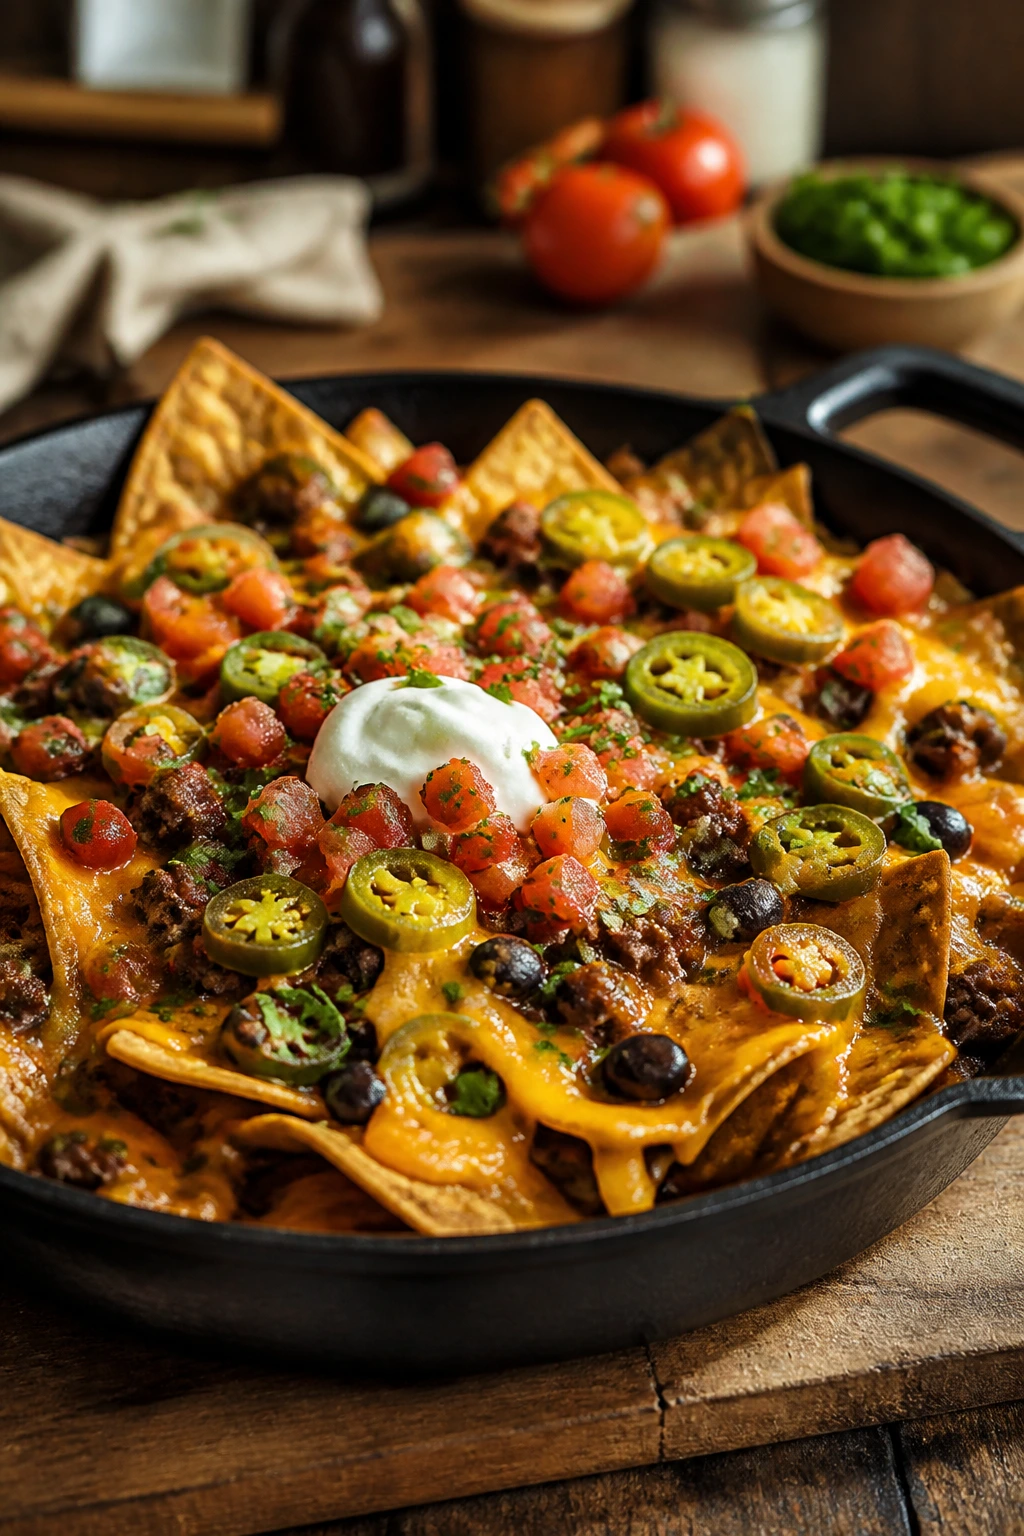
Nachos are not a side dish when you build them properly. They’re a full dinner with attitude. This skillet version keeps the chips in one place, melts the cheese evenly, and gives you enough toppings to make it feel like a real meal instead of a half-hearted snack.
Why It Works: Layering cheese between chips protects them from getting too soggy, and the hot skillet keeps everything molten. The cold toppings go on at the end, which gives you contrast instead of a steam bath.
Key Ingredients:
- 1 pound ground beef
- 1 packet taco seasoning or 2 tablespoons homemade seasoning
- 1 can black beans, rinsed and drained
- 1 bag sturdy tortilla chips
- 2 cups shredded cheddar
- 1 cup salsa
- 1/2 cup sliced jalapeños
- Sour cream and green onions, for serving
Quick Steps:
- Brown the beef in a skillet and stir in the taco seasoning.
- Fold in the black beans and heat through.
- Scatter chips in an oven-safe skillet or dish, then spoon on the beef mixture.
- Cover with cheddar and bake at 400°F for 5 to 7 minutes, or until the cheese melts.
- Finish with salsa, jalapeños, sour cream, and green onions.
Equipment for This Recipe:
- Oven-safe skillet or baking dish
- Spatula
- Measuring cups
- Can opener
- Spoon for toppings
How to Serve This Dish: Bring it to the table hot and let everyone scoop their own corner. It pairs well with shredded lettuce and diced avocado if you want more freshness. I’d call this a dinner for four if nachos are the center of the plate, or six if you put out sides.
Pro Tips for This Recipe:
- Use sturdy chips, not the thin fragile kind.
- Add the salsa after baking, not before.
- Keep a portion of the chips plain on the side if you have very picky eaters.
Variations on This Dish:
- Chicken Nachos: Swap in shredded rotisserie chicken.
- Vegetarian Nachos: Use extra beans and sautéed peppers.
- Breakfast Nachos: Top with scrambled eggs instead of beef.
Common Mistakes to Avoid with This Dish:
- Don’t drown the chips in sauce before baking.
- Don’t broil too long or the cheese turns oily.
- Don’t skip the cold toppings; they make the whole dish taste alive.
14. Meatball Sub Bake
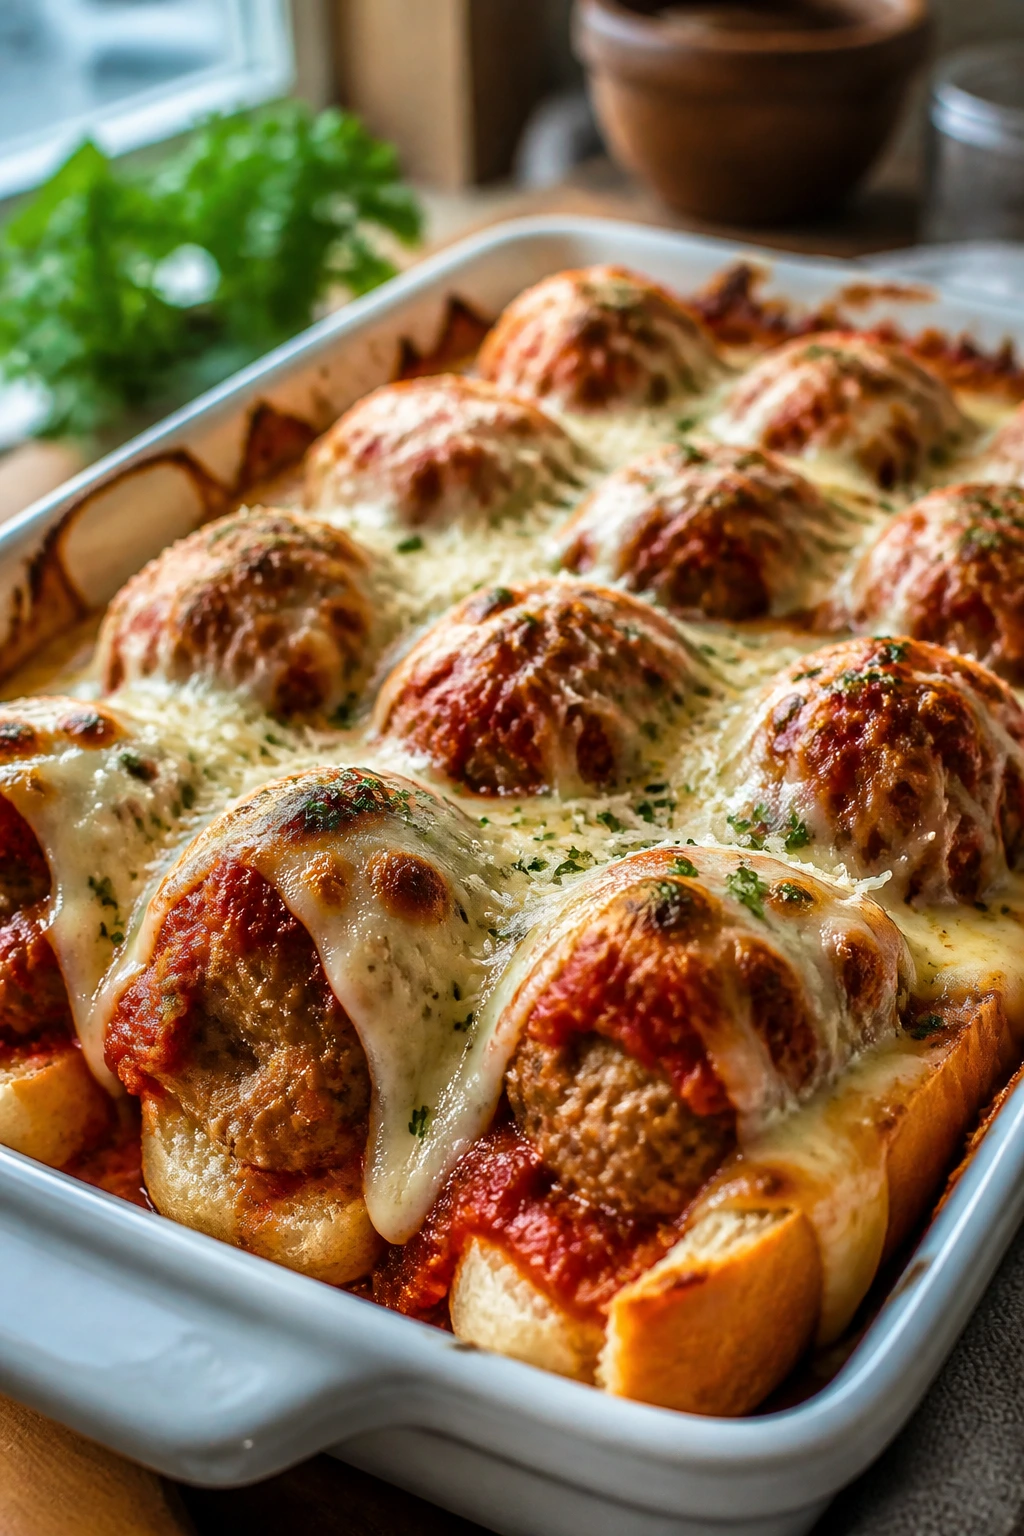
This is what I make when I want the flavor of a sandwich shop without standing in line or paying for someone else to warm the bread. The meatballs stay saucy, the cheese melts into the roll, and the whole thing holds together better than a traditional fully loaded sub.
Why It Works: Heating the meatballs in sauce keeps them moist, and baking the assembled rolls only long enough to melt the cheese stops the bread from turning tough. Sub rolls are sturdy enough for the sauce, but soft enough to bite through easily.
Key Ingredients:
- 20 frozen cooked meatballs
- 2 cups marinara sauce
- 6 hoagie rolls
- 2 cups shredded mozzarella
- 1/4 cup grated Parmesan
- 2 tablespoons butter, melted
- 1 teaspoon garlic powder
Quick Steps:
- Simmer the meatballs in marinara until hot throughout.
- Split the rolls, place them in a baking dish, and spoon a little sauce inside each one.
- Add meatballs, top with mozzarella and Parmesan, and brush the roll tops with butter mixed with garlic powder.
- Bake at 375°F for 10 to 12 minutes until the cheese melts.
- Serve immediately with extra sauce on the side.
Equipment for This Recipe:
- Large skillet or saucepan
- Baking dish
- Knife
- Spoon
- Pastry brush
How to Serve This Dish: Put the subs on a board with small bowls of extra sauce for dipping. A crisp Caesar salad or a handful of pickles balances the richness. One sub per adult is a normal serving, though the hungry ones may come back for half of another.
Pro Tips for This Recipe:
- Toast the rolls lightly before filling if they’re very soft.
- Use meatballs that are already fully cooked to keep this fast.
- Shred the mozzarella yourself for smoother melting.
Variations on This Dish:
- Spicy Marinara Version: Add crushed red pepper to the sauce.
- Turkey Meatball Sub: Use turkey meatballs for a lighter result.
- Veggie Meatball Bake: Swap in plant-based meatballs.
Common Mistakes to Avoid with This Recipe:
- Don’t use tiny rolls; they won’t hold the meatballs well.
- Don’t overbake once the cheese is melted.
- Don’t leave the meatballs dry in the baking dish without enough sauce.
15. Ham and Cheese Crescent Roll-Ups

These are what I reach for when the clock is rude and dinner still has to happen. Crescent dough is forgiving, ham and cheese are familiar, and the whole tray disappears fast because every piece is warm, flaky, and easy to eat one-handed.
Why It Works: Crescent dough bakes quickly, so the cheese melts before the pastry gets too dark. The mustard gives the filling a little bite without making it spicy, which keeps the flavors from flattening out.
Key Ingredients:
- 2 cans crescent roll dough
- 12 slices deli ham
- 8 slices cheddar
- 2 tablespoons Dijon mustard
- 2 tablespoons melted butter
- 1 teaspoon poppy seeds or sesame seeds
Quick Steps:
- Heat the oven to 375°F and line a sheet pan.
- Separate the dough into triangles and brush each with a little Dijon.
- Layer ham and cheddar, then roll each triangle from wide end to point.
- Arrange on the pan, brush with butter, and sprinkle with seeds.
- Bake 12 to 15 minutes until puffed and golden.
Equipment for This Recipe:
- Sheet pan
- Parchment paper
- Pastry brush
- Small bowl
- Knife
How to Serve This Dish: Serve them warm with fruit, pickle spears, or a simple green salad. They also work well alongside tomato soup if you want to turn them into a fuller meal. Two to three roll-ups usually makes a good portion.
Pro Tips for This Recipe:
- Seal the dough edges gently if cheese wants to escape.
- Use sliced cheese that melts cleanly.
- Let them cool for a couple of minutes so the filling doesn’t burn mouths.
Variations on This Dish:
- Turkey and Swiss Roll-Ups: Swap the meat and cheese for a deli-style change.
- Pizza Roll-Up: Use mozzarella and a smear of marinara.
- Everything Bagel Version: Sprinkle everything seasoning instead of seeds.
Common Mistakes to Avoid with This Dish:
- Don’t overload the filling or the dough tears.
- Don’t bake on a dark pan without checking early; crescent dough browns fast.
- Don’t serve straight from the oven if small kids are at the table.
16. Slow Cooker Pulled Pork Sandwiches
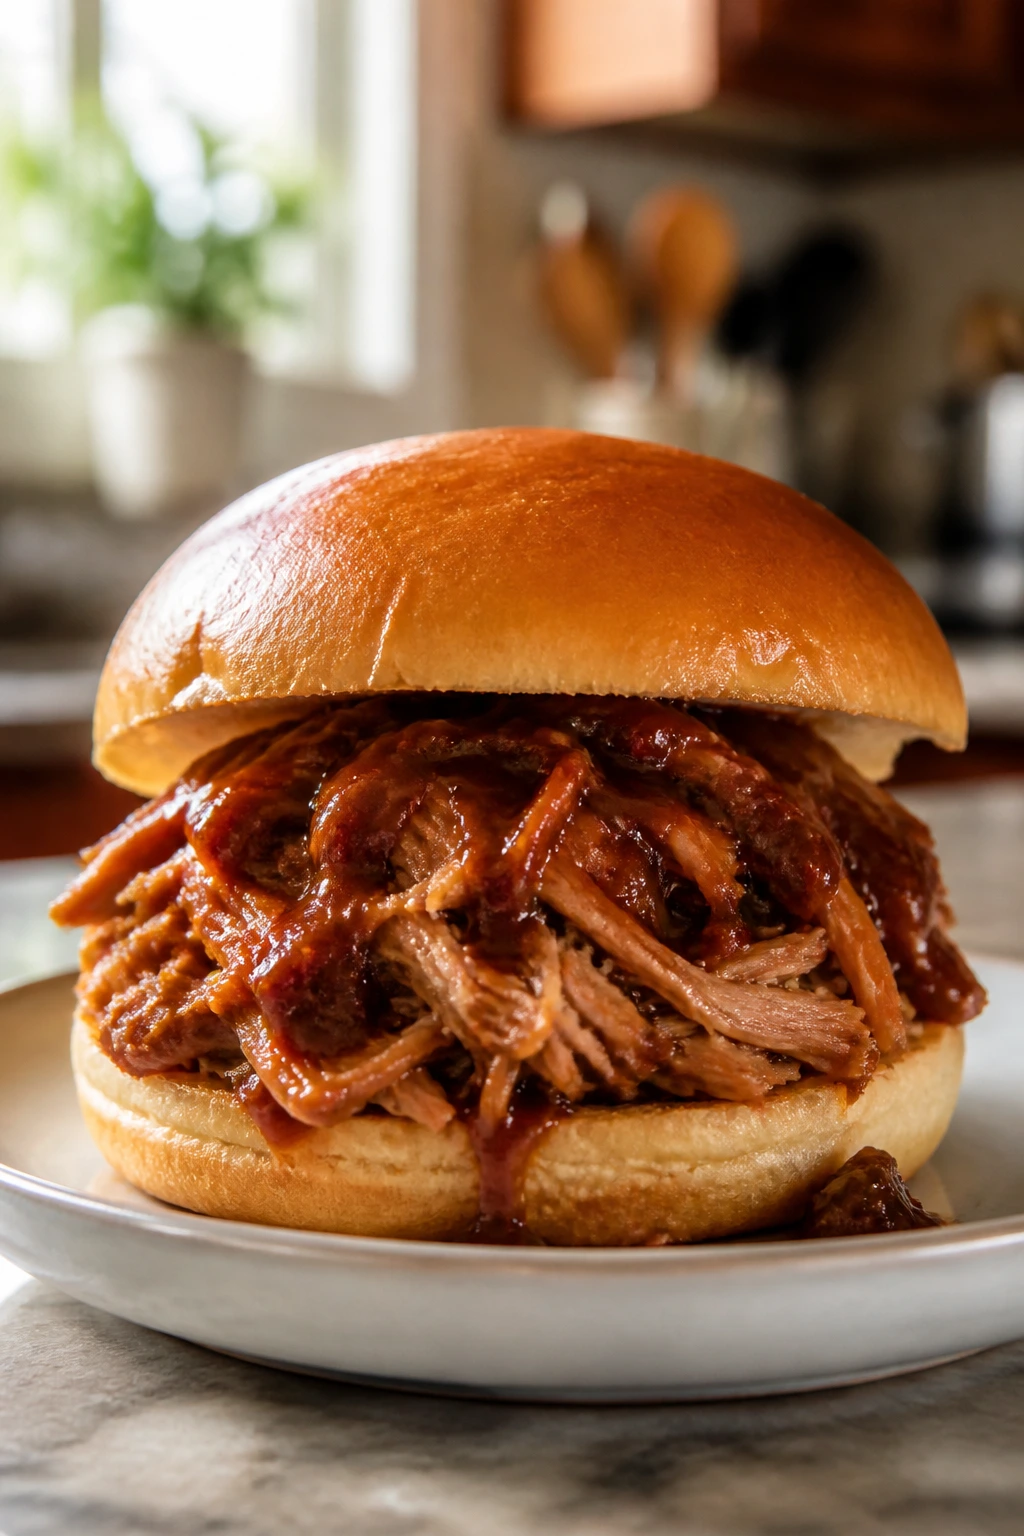
Pulled pork is a quiet kind of magic. You put a few things in the slow cooker, walk away, and come back to meat that shreds with almost no resistance. For a movie-night meal, that means the hard work happens before the opening credits.
Why It Works: Pork shoulder has enough fat and connective tissue to turn tender after a long cook, and the vinegar in the sauce keeps the meat from tasting one-note. Shredding it back into its juices makes every bite moist.
Key Ingredients:
- 3 pounds pork shoulder
- 1 onion, sliced
- 1 cup barbecue sauce
- 1/2 cup apple cider vinegar
- 1/4 cup brown sugar
- 1 tablespoon smoked paprika
- 1 teaspoon salt
- Sandwich buns
Quick Steps:
- Place the onion in the slow cooker, then set the pork on top.
- Stir together barbecue sauce, vinegar, brown sugar, paprika, and salt.
- Pour the mixture over the pork and cook on low for 8 hours or high for 5 to 6 hours.
- Shred the pork with two forks and stir it back into the juices.
- Pile onto buns and serve.
Equipment for This Recipe:
- Slow cooker
- Two forks
- Cutting board
- Sharp knife
- Measuring cup
How to Serve This Dish: Add coleslaw to the sandwich or serve it on the side for crunch. Pickles and baked beans fit the mood too. One sandwich is generous, and the leftovers are excellent the next day.
Pro Tips for This Recipe:
- Keep the lid on. Every peek costs heat and time.
- Shred the pork while it’s still hot so it falls apart cleanly.
- If the sauce tastes too sweet, a splash of vinegar wakes it back up.
Variations on This Dish:
- Carolina-Style Pork: Use more vinegar and less sweet barbecue sauce.
- Spicy Pork Sandwiches: Add chipotle powder or hot sauce.
- Pulled Pork Tacos: Serve the meat in tortillas with slaw.
Common Mistakes to Avoid with This Recipe:
- Don’t use pork loin here; it dries out too easily.
- Don’t drown the pork in sauce at the start.
- Don’t skip the rest after shredding if the meat seems a little loose.
17. Crispy Fish Sticks with Tartar Slaw
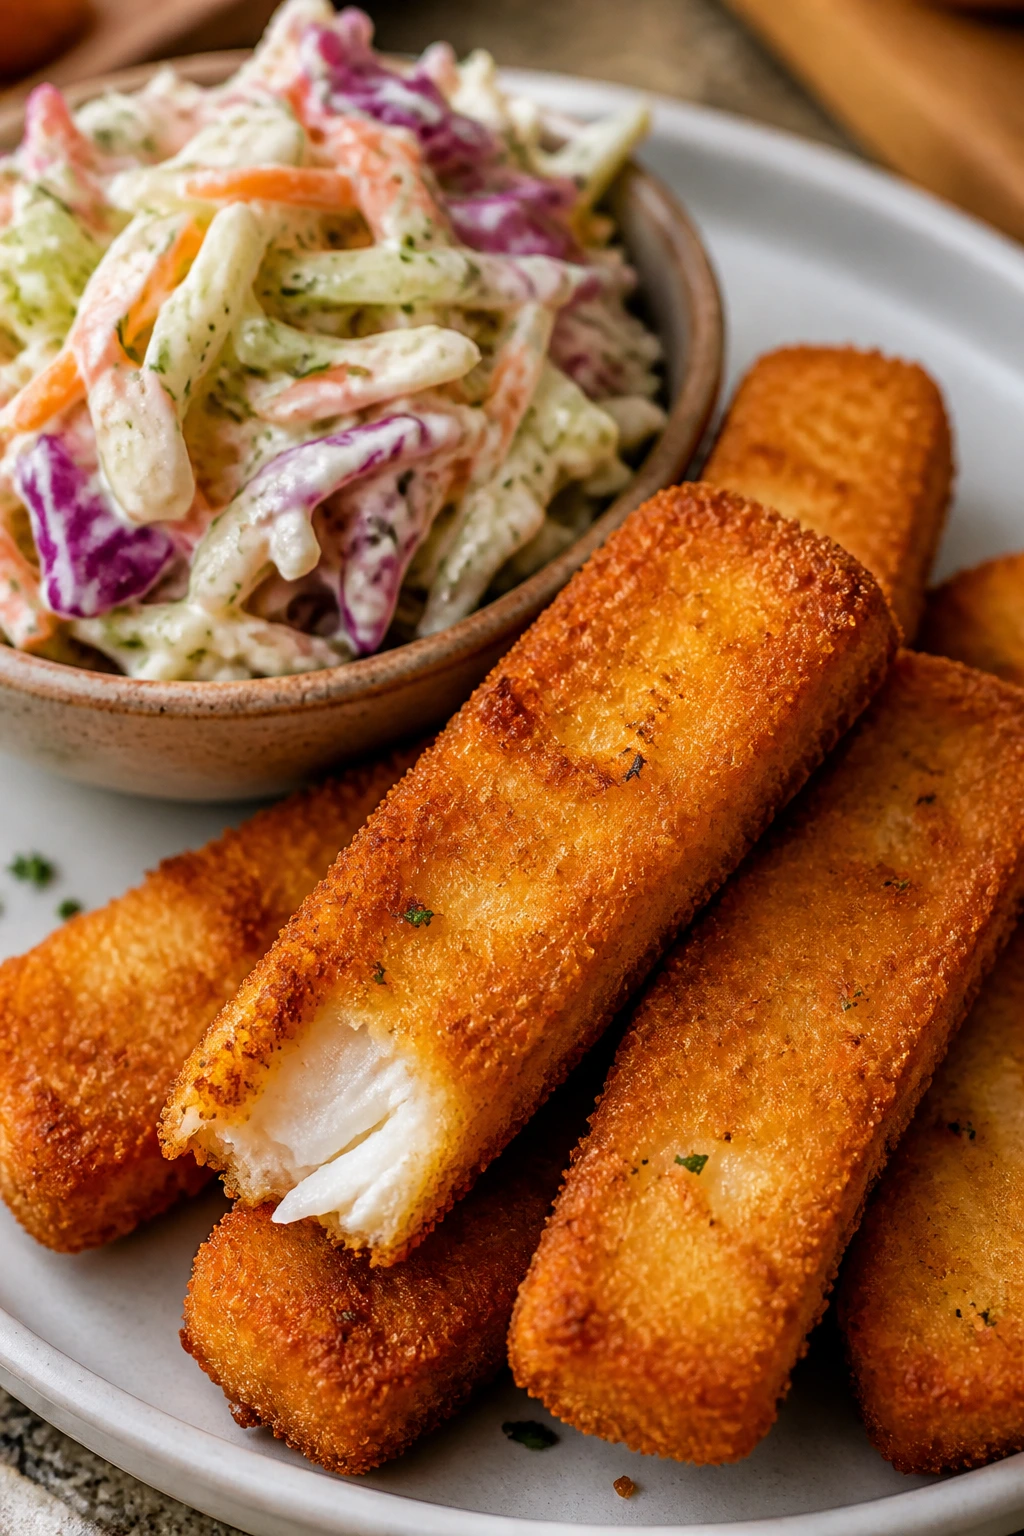
Fish sticks have a bad reputation only because people remember the limp freezer-box version. Done at home, they’re crisp, mild, and easy to dip, which makes them a lot more useful for a family movie night than they get credit for.
Why It Works: Drying the fish before breading helps the coating stick, and panko gives you a lighter crunch than fine crumbs. Baking on a rack keeps air moving around the fish so the bottoms don’t soften.
Key Ingredients:
- 1 1/2 pounds cod or haddock, cut into strips
- 1/2 cup flour
- 2 eggs
- 1 1/2 cups panko breadcrumbs
- 1 teaspoon paprika
- 1/2 teaspoon salt
- Cooking spray
For the Slaw:
- 3 cups shredded cabbage
- 1/4 cup mayonnaise
- 1 tablespoon pickle relish
- 1 tablespoon lemon juice
Quick Steps:
- Heat the oven to 425°F and set a rack on a sheet pan.
- Pat the fish dry, then coat in flour, egg, and panko mixed with paprika and salt.
- Place on the rack, spray lightly with oil, and bake 12 to 15 minutes until crisp and opaque.
- Stir together the slaw ingredients.
- Serve the fish sticks hot with slaw and lemon wedges.
Equipment for This Recipe:
- Sheet pan
- Wire rack
- Three shallow bowls
- Tongs
- Knife
How to Serve This Dish: Serve with tartar slaw, fries, or simple steamed rice if you want a softer meal. Lemon wedges matter here; they cut through the fried flavor and brighten the fish. Four people can eat well from this batch.
Pro Tips for This Recipe:
- Pat the fish dry before breading.
- Keep the pieces about the size of a finger so they cook evenly.
- Make the slaw right before serving so it stays crisp.
Variations on This Dish:
- Spicy Fish Sticks: Add cayenne to the panko.
- Gluten-Free Version: Use GF flour and crumbs.
- Fish Taco Version: Serve in tortillas with slaw and salsa.
Common Mistakes to Avoid with This Recipe:
- Don’t cut the fish too thick or the coating overbrowns before the center cooks.
- Don’t let the slaw sit too long once dressed.
- Don’t skip the rack if you want real crunch.
18. Breakfast-for-Dinner Sheet Pan Hash
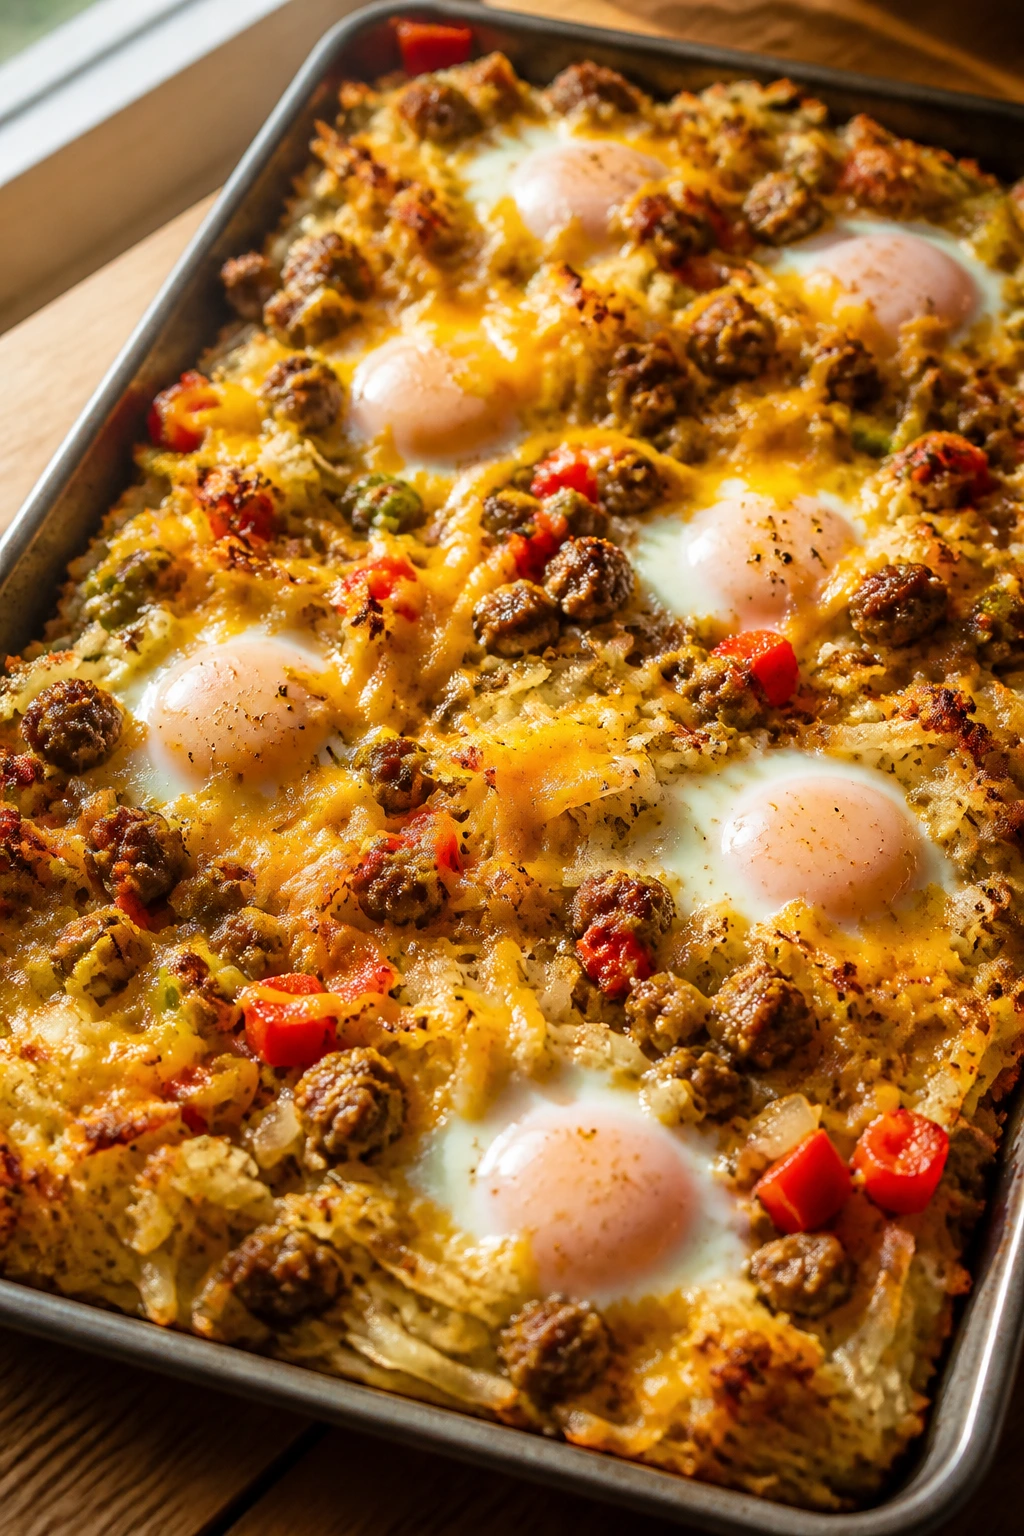
Breakfast for dinner has the nice side effect of making everyone less fussy. Potatoes, sausage, peppers, eggs, and cheese on one pan is the sort of meal that looks casual but still feels complete, which is a useful trick on a tired weeknight.
Why It Works: The frozen hash browns crisp first, the sausage renders flavor into the pan, and the eggs finish on top so they stay soft instead of overcooked. A sheet pan gives you the browned edges that a skillet hash can’t always manage without babysitting.
Key Ingredients:
- 1 bag frozen hash browns, about 20 ounces
- 12 ounces breakfast sausage
- 1 bell pepper, diced
- 1 small onion, diced
- 4 to 6 eggs
- 1 1/2 cups shredded cheddar
- Salt and pepper
Quick Steps:
- Heat the oven to 425°F and spread the hash browns on a sheet pan with the sausage, pepper, and onion.
- Bake 15 minutes, stirring once halfway through.
- Make small wells in the hash, crack in the eggs, and sprinkle with cheese.
- Bake 8 to 10 minutes more until the eggs are set the way you like them.
- Serve straight from the pan.
Equipment for This Recipe:
- Large sheet pan
- Parchment paper
- Spatula
- Knife
- Cutting board
How to Serve This Dish: Add toast, fruit, or a little hot sauce at the table. If you want to make it feel more like a brunch plate, serve it with orange slices, but honestly, it already does the job. Four hungry people can finish this pan fast.
Pro Tips for This Recipe:
- Use parchment for easier cleanup and better browning.
- Break up the hash browns before baking so they roast instead of clump.
- Crack the eggs into a small bowl first if you want tighter yolks and less shell risk.
Variations on This Dish:
- Bacon Hash: Swap sausage for chopped bacon.
- Veggie Hash: Use mushrooms and extra peppers instead of meat.
- Spicy Version: Add jalapeños and pepper jack cheese.
Common Mistakes to Avoid with This Recipe:
- Don’t add the eggs too early or they’ll overcook.
- Don’t use too much cheese before the final bake.
- Don’t skip seasoning the potatoes; they need help.
19. One-Skillet Sausage Gnocchi
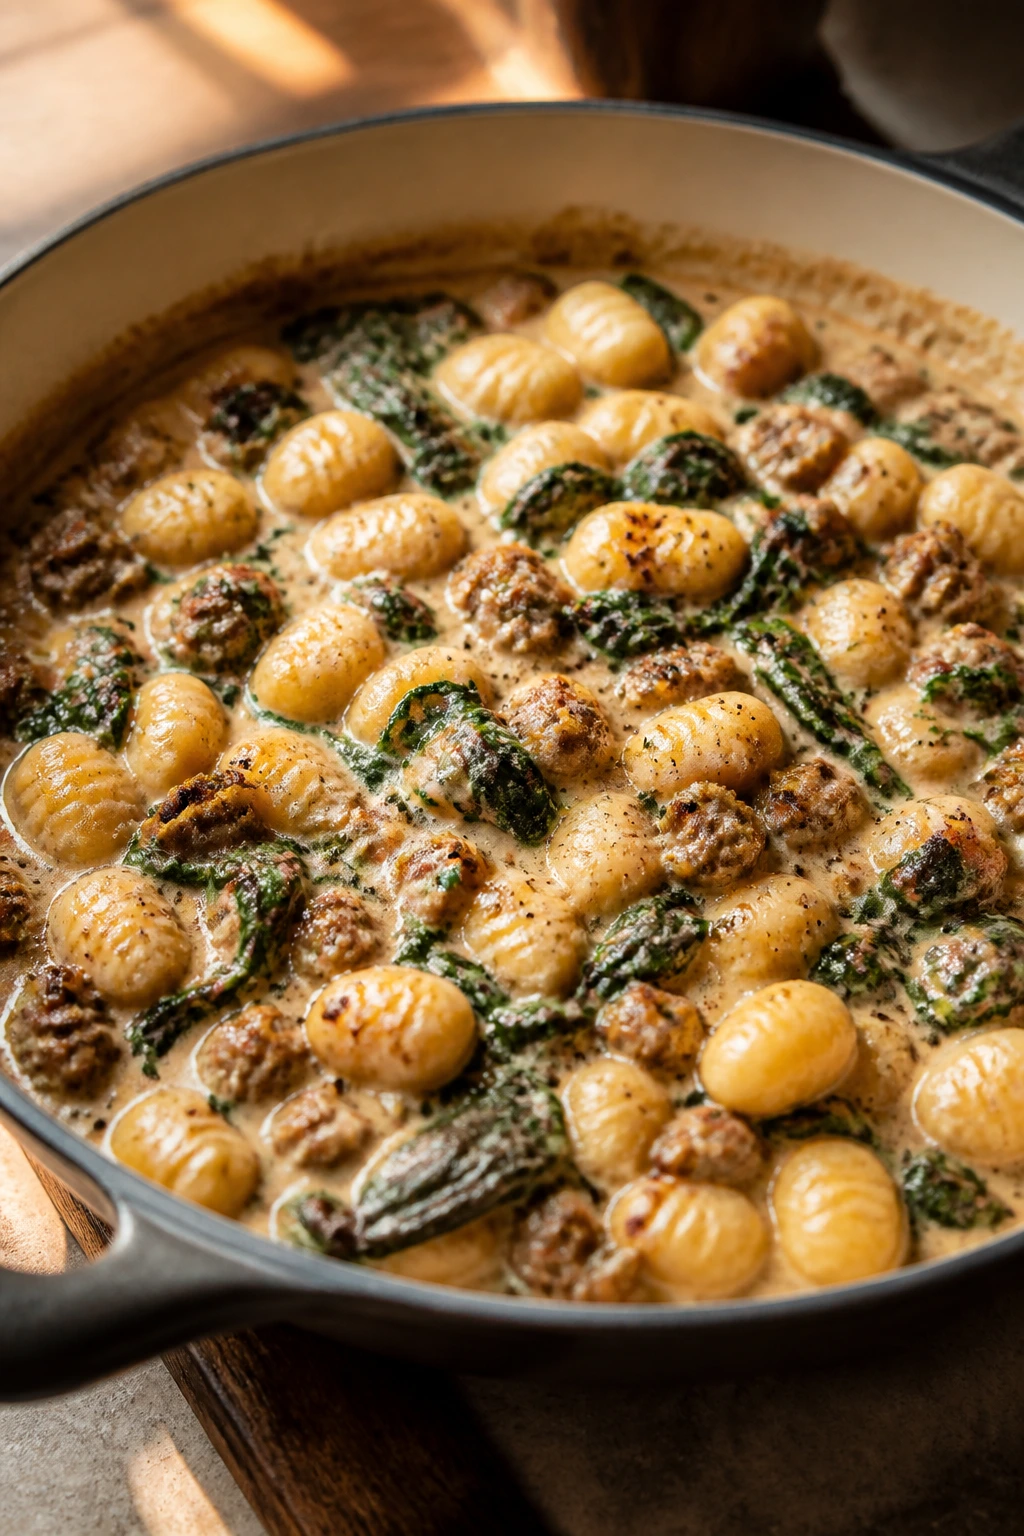
This one feels richer than the effort it takes to cook it, which is a nice surprise on a night when nobody wants a complicated dinner. Shelf-stable gnocchi turns tender in a skillet, and the sausage gives the cream sauce enough backbone to keep it from going flat.
Why It Works: Gnocchi cooks fast and absorbs sauce well, and sausage brings built-in seasoning to the pan. A little broth keeps the cream from feeling too heavy while spinach adds color and a break in the richness.
Key Ingredients:
- 1 pound Italian sausage
- 1 small onion, diced
- 16 ounces shelf-stable gnocchi
- 1 cup chicken broth
- 1 cup heavy cream
- 2 cups baby spinach
- 1/2 cup grated Parmesan
- 1 tablespoon olive oil
Quick Steps:
- Brown the sausage in a large skillet, breaking it apart.
- Add onion and cook until softened.
- Stir in the gnocchi and broth, then simmer until the gnocchi turns tender.
- Pour in the cream and fold in spinach.
- Finish with Parmesan and serve warm.
Equipment for This Recipe:
- Large deep skillet
- Wooden spoon
- Measuring cup
- Knife
- Cutting board
How to Serve This Dish: Spoon it into bowls with a little extra Parmesan on top. A crisp salad or roasted broccoli fits nicely beside it. Four servings is about right, though the skillet can stretch to six with bread.
Pro Tips for This Recipe:
- Don’t boil the cream hard.
- Use a pan wide enough for the gnocchi to spread out.
- Salt carefully at the end, because the sausage and Parmesan already bring plenty.
Variations on This Dish:
- Tomato Sausage Gnocchi: Add 1 cup marinara for a red version.
- Mushroom Version: Cook sliced mushrooms with the onion.
- Lighter Cream Sauce: Use half cream and half milk.
Common Mistakes to Avoid with This Recipe:
- Don’t overcook the gnocchi or it turns mushy.
- Don’t ignore the seasoning in the sausage before adding more salt.
- Don’t let the pan dry out before the gnocchi is tender.
20. Taco Stuffed Sweet Potatoes
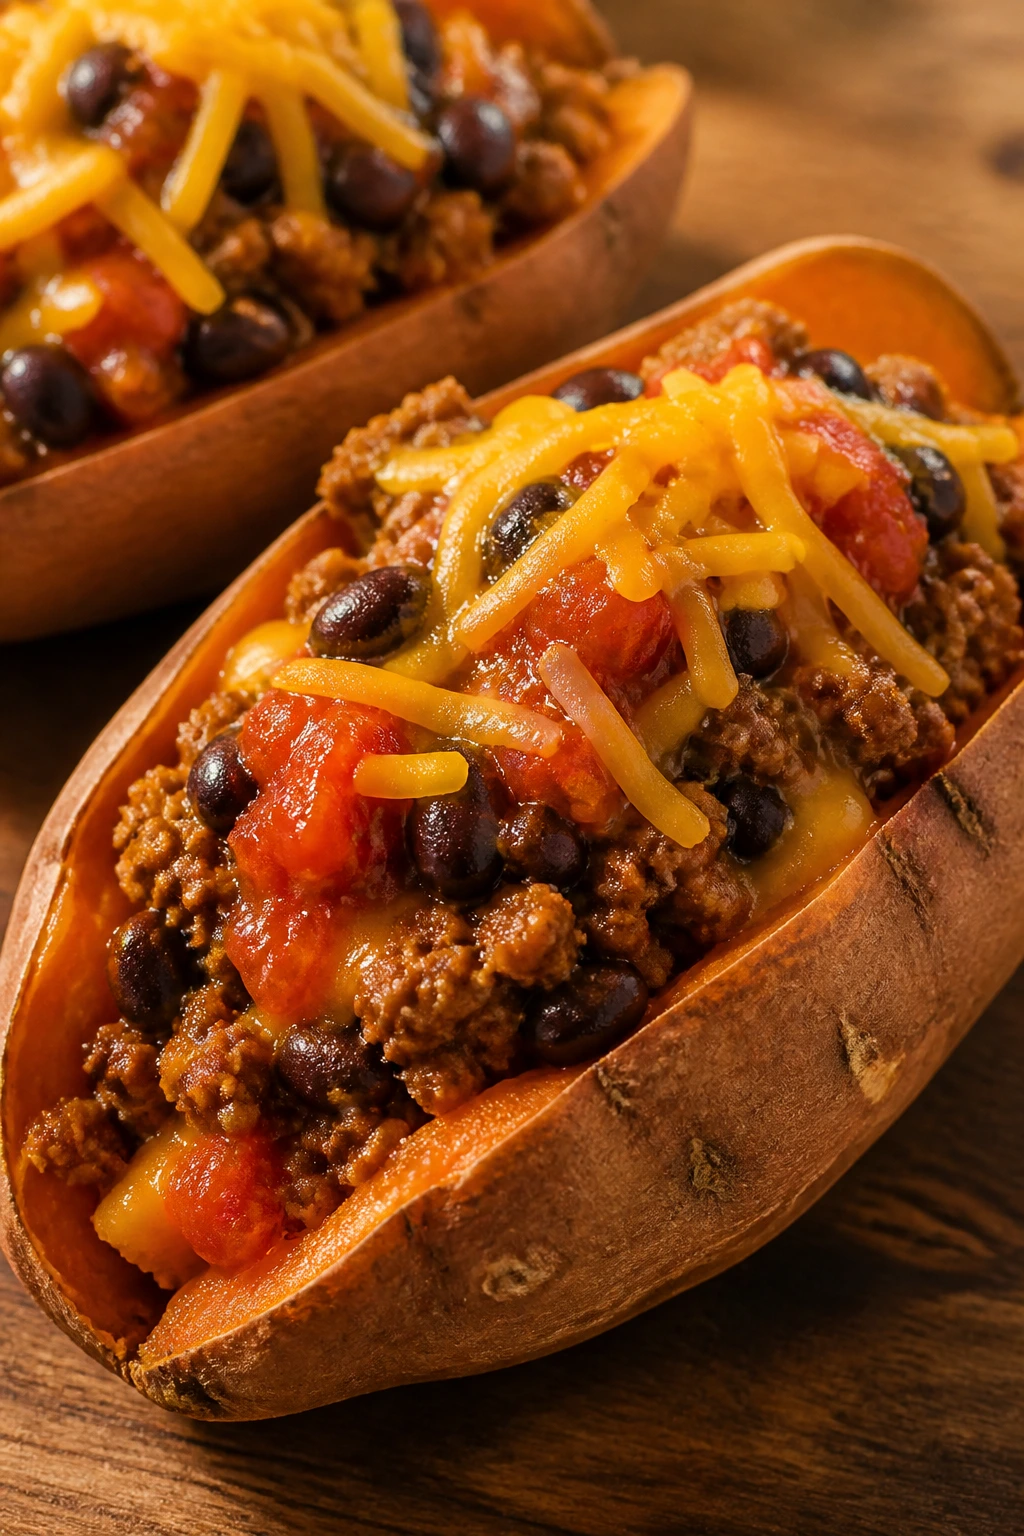
Sweet potatoes are a good container for taco filling because they’re sturdy, a little sweet, and easy to split open with a fork. This recipe hits the sweet-savory balance that kids tend to like and adults tend to finish without complaint.
Why It Works: Baking the potatoes first gives you a soft interior and a caramelized skin, while the taco filling stays bold and savory. Beans and salsa keep the meat moist and give you enough texture to make every bite feel complete.
Key Ingredients:
- 4 medium sweet potatoes
- 1 pound ground turkey or ground beef
- 2 tablespoons taco seasoning
- 1 can black beans, rinsed and drained
- 1 cup salsa
- 1 cup shredded cheddar
- 1 avocado, sliced
Quick Steps:
- Bake the sweet potatoes at 400°F for 45 to 55 minutes until soft.
- Brown the meat in a skillet and stir in taco seasoning, beans, and salsa.
- Split the potatoes open and fluff the centers with a fork.
- Spoon the taco mixture on top and add cheddar.
- Return to the oven for 5 minutes, then finish with avocado.
Equipment for This Recipe:
- Baking sheet
- Skillet
- Fork
- Knife
- Spoon
How to Serve This Dish: Serve each potato on a plate with lime wedges and maybe a handful of tortilla chips. They’re filling enough to stand alone, but a small green salad on the side makes the meal feel more rounded. One potato per adult is usually enough.
Pro Tips for This Recipe:
- Pierce the potatoes before baking so steam can escape.
- Choose similar-sized potatoes so they cook evenly.
- Add avocado at the end so it stays fresh and green.
Variations on This Dish:
- Vegetarian Taco Potato: Use extra beans and corn instead of meat.
- Nacho Potato: Add salsa, jalapeños, and crushed chips.
- Buffalo Swap: Replace taco seasoning with buffalo sauce and chicken.
Common Mistakes to Avoid with This Recipe:
- Don’t underbake the potatoes or the skin stays tough.
- Don’t use a wet filling straight from the pan.
- Don’t skip a little acid, like lime, because it keeps the sweetness in check.
21. Grilled Cheese and Tomato Soup
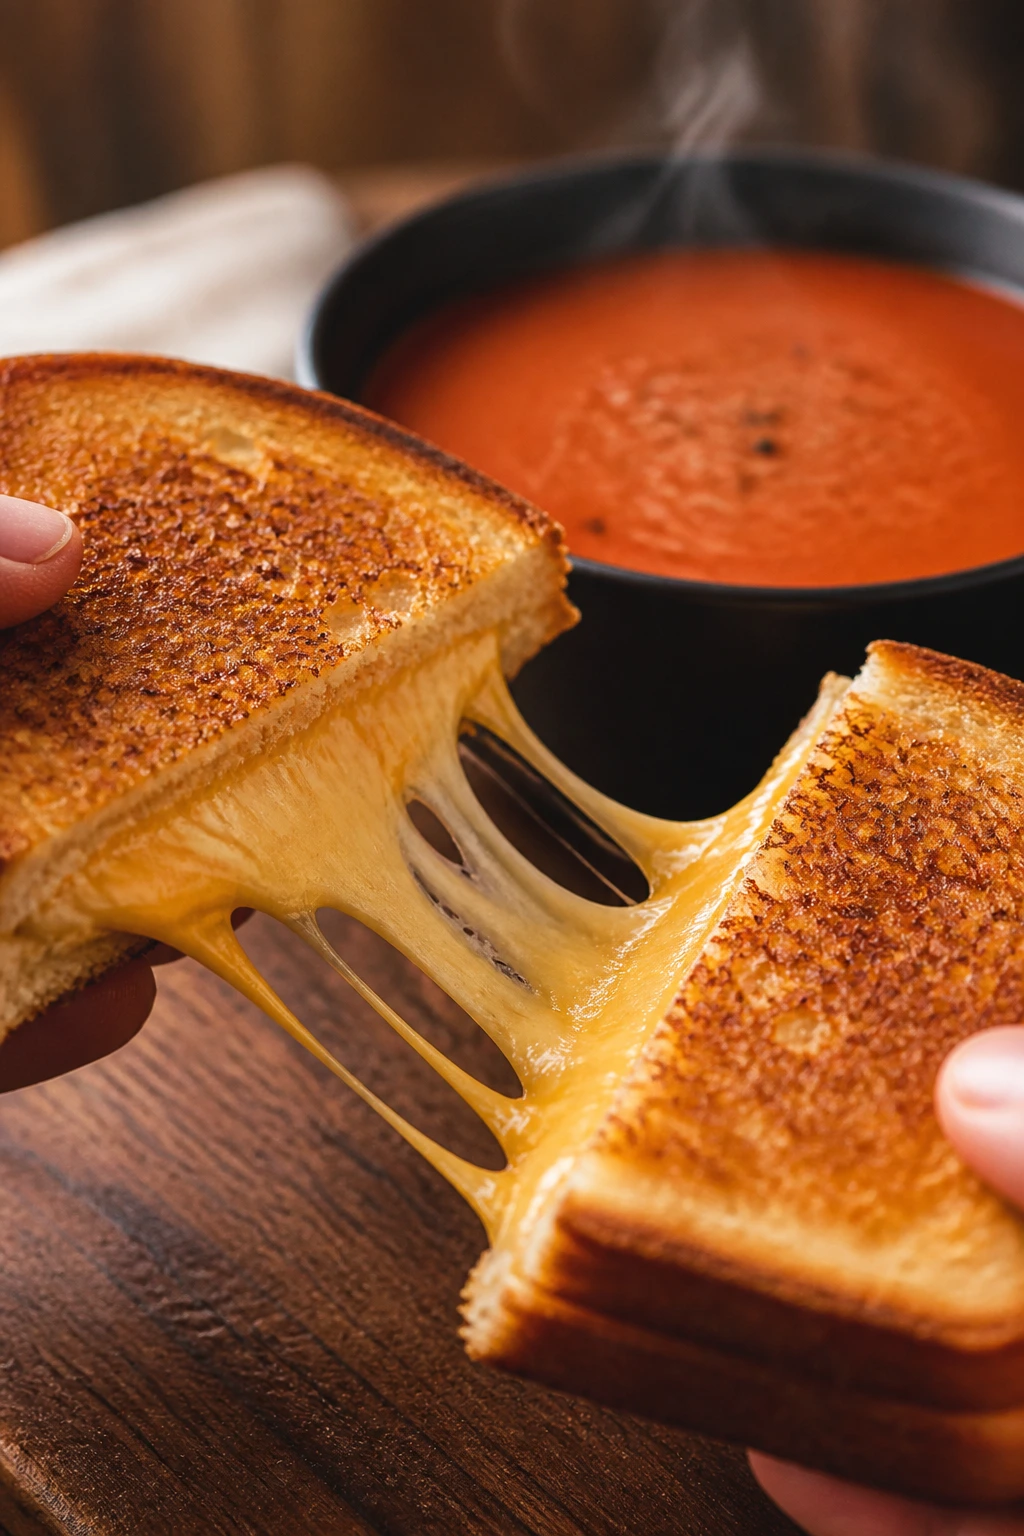
This is the meal that feels like a blanket without being lazy. The soup is bright and a little sweet from the tomatoes, the sandwiches are crisp and molten, and the whole setup is built for dipping, which is half the fun.
Why It Works: A quick simmer softens canned tomatoes and onion into something deeper, and grilled cheese gets its best texture when the bread is buttered all the way to the edges. Soup plus sandwich is a classic for a reason: one is hot and spoonable, the other is crunchy and stretchy.
Key Ingredients:
- 1 onion, chopped
- 2 cloves garlic, minced
- 2 tablespoons butter
- 2 cans crushed tomatoes, 28 ounces each
- 2 cups vegetable or chicken broth
- 1/2 cup cream
- 8 slices bread
- 8 slices cheddar or 2 cups shredded cheese
- 2 tablespoons butter, softened, for sandwiches
Quick Steps:
- Cook onion and garlic in butter until soft.
- Add tomatoes and broth, then simmer 15 to 20 minutes.
- Blend if you want a smoother soup, then stir in cream.
- Build and grill the cheese sandwiches in a skillet over medium heat.
- Cut into strips and serve for dipping.
Equipment for This Recipe:
- Soup pot
- Immersion blender or standard blender
- Skillet
- Spatula
- Knife
How to Serve This Dish: Serve the soup in mugs or bowls and cut the sandwiches into narrow fingers for dunking. A few celery sticks or apple slices on the side keep the meal from feeling one-note. Two halves of a sandwich with a bowl of soup is a proper dinner here.
Pro Tips for This Recipe:
- Butter the bread from edge to edge.
- Keep the soup at a gentle simmer after the cream goes in.
- Use a cheese that melts smoothly; cheddar plus a little mozzarella works well.
Variations on This Dish:
- Basil Tomato Soup: Add fresh basil at the end.
- Ham and Cheese Twist: Add a slice of ham to the sandwich.
- Dairy-Free Version: Use olive oil and a dairy-free cream substitute.
Common Mistakes to Avoid with This Recipe:
- Don’t let the grilled cheese cook over high heat.
- Don’t skip tasting the soup after simmering; canned tomatoes can vary a lot.
- Don’t blend a blazing-hot soup without venting the blender lid.
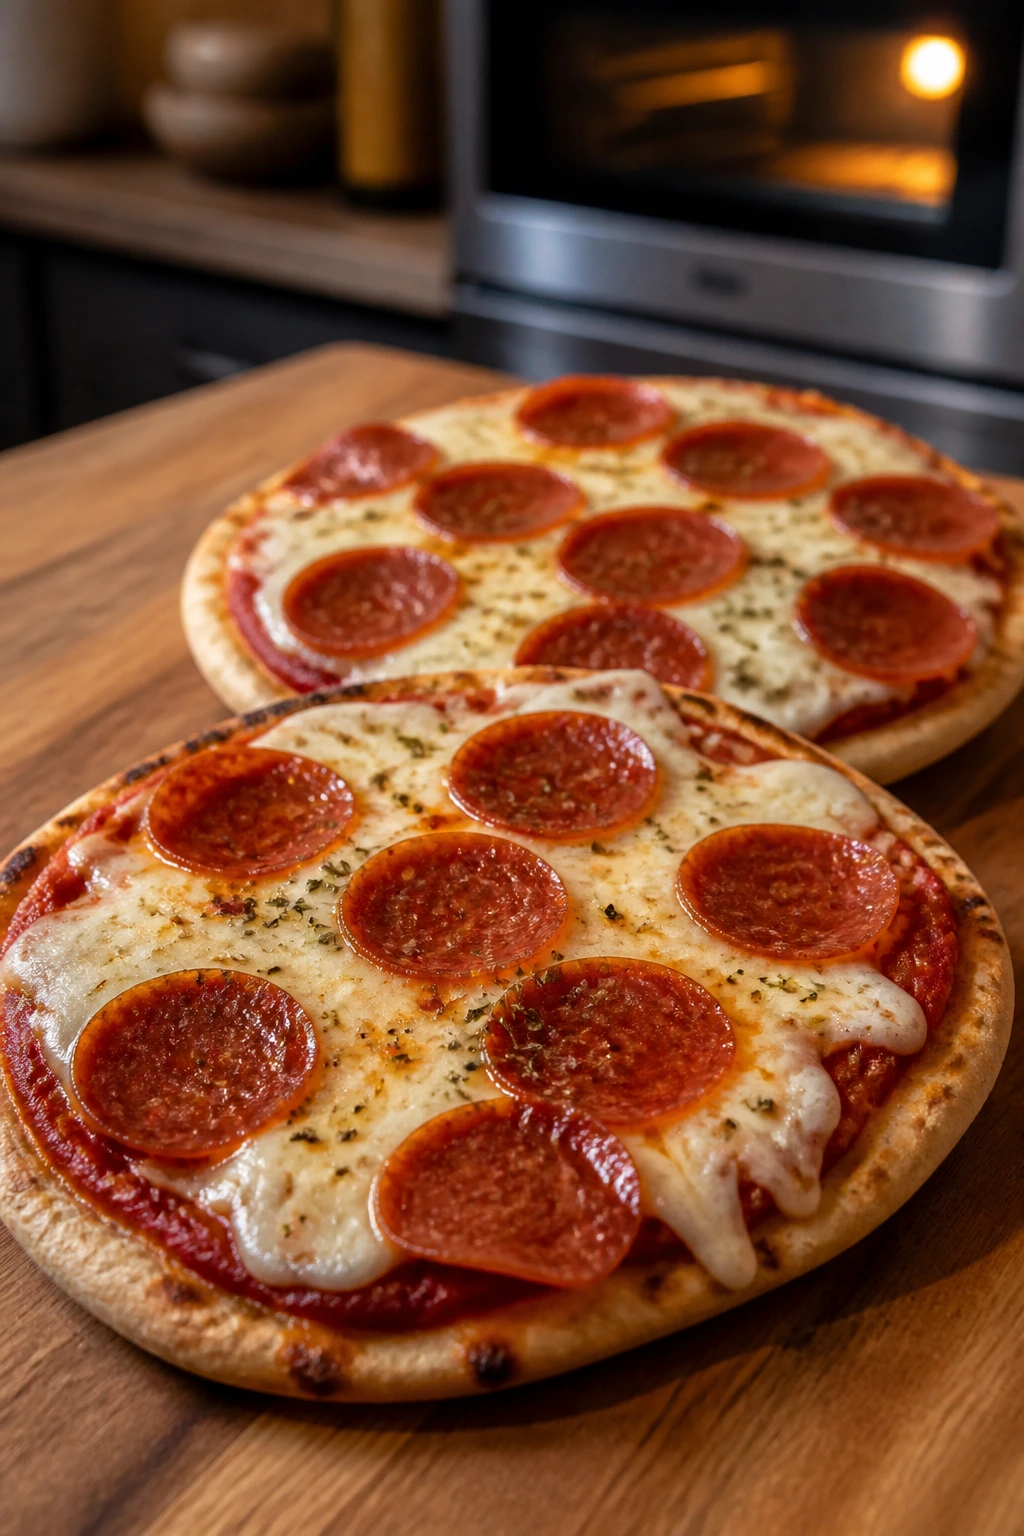
22. Personal Naan Pizzas
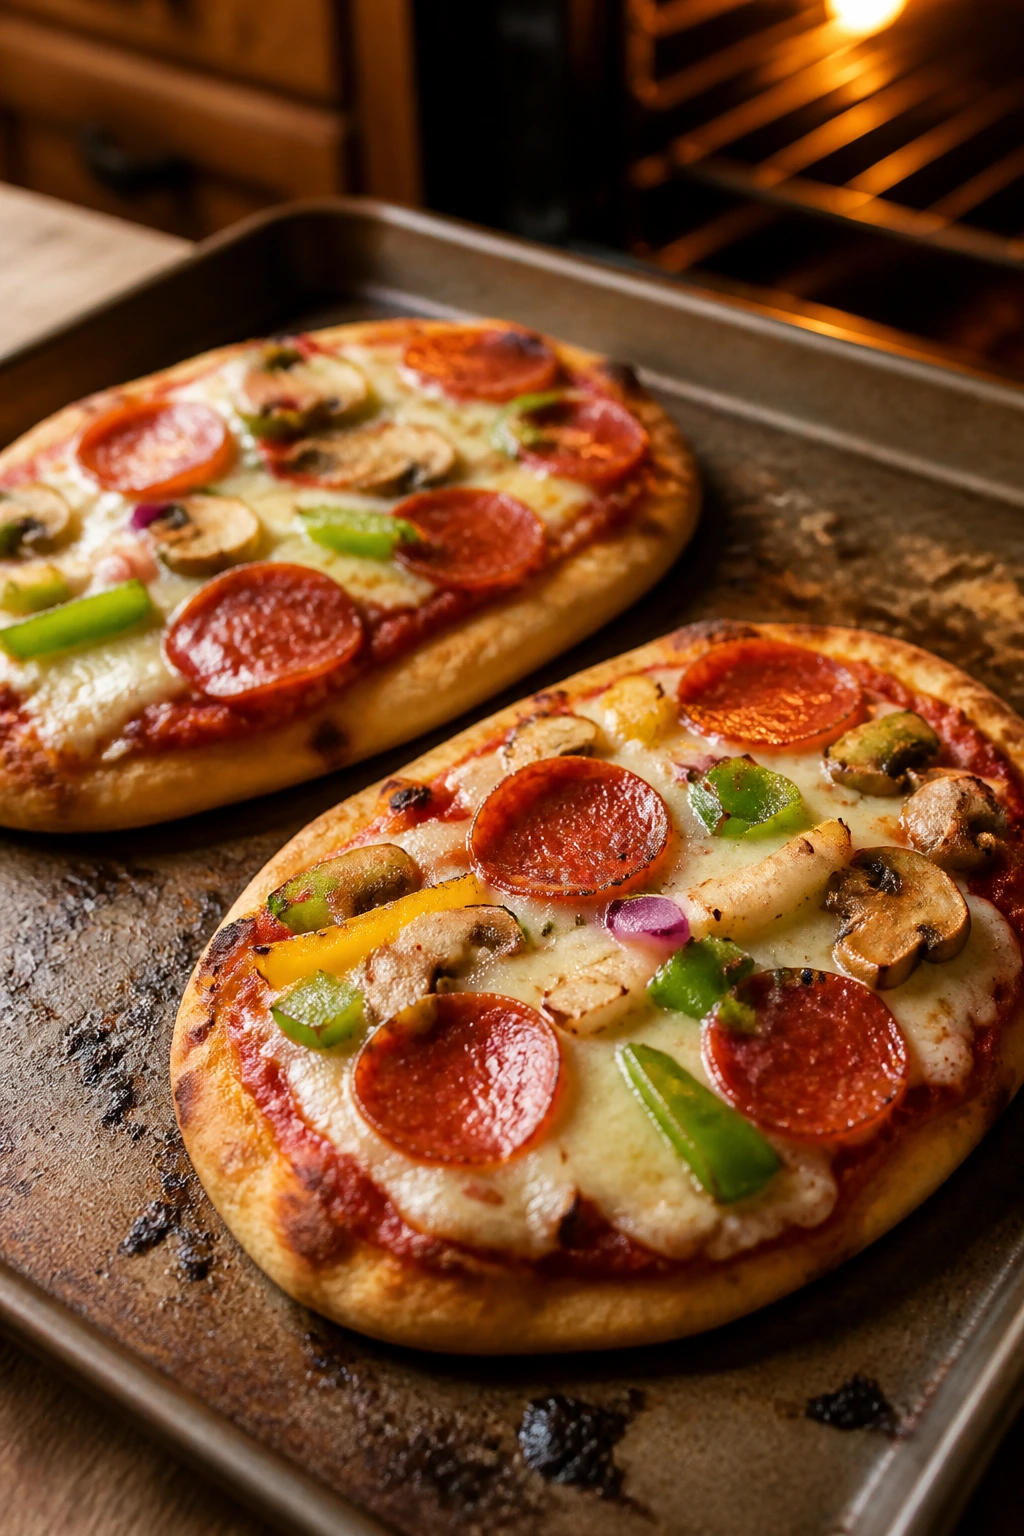
Personal pizzas make movie night feel a little like a build-your-own party, which is useful when everyone wants different toppings and nobody wants to negotiate. Naan gives you a sturdy, chewy base that bakes fast and doesn’t need much babysitting.
Why It Works: Naan is already partially baked, so the oven only needs to heat the toppings and crisp the edges. That makes it one of the easiest ways to get a pizza-like dinner on the table without dough drama.
Key Ingredients:
- 6 naan breads
- 1 cup pizza sauce
- 2 1/2 cups shredded mozzarella
- 1 cup pepperoni, or toppings of choice
- 1/2 cup sliced mushrooms
- 1/2 cup diced bell pepper
- 1 teaspoon Italian seasoning
Quick Steps:
- Heat the oven to 450°F.
- Set the naan on sheet pans and spread each with a thin layer of sauce.
- Add cheese, toppings, and Italian seasoning.
- Bake 8 to 10 minutes until the cheese bubbles and the edges crisp.
- Slice and serve hot.
Equipment for This Recipe:
- Sheet pans
- Spoon
- Knife
- Cutting board
- Oven mitts
How to Serve This Dish: Let each person top their own naan before baking if you want to avoid topping disputes. A salad or sliced fruit keeps the meal feeling balanced. One naan usually feeds one adult or two younger kids.
Pro Tips for This Recipe:
- Pre-bake the naan for 2 to 3 minutes if you want a firmer crust.
- Keep vegetable toppings light and dry.
- Add fresh basil after baking for a bright finish.
Variations on This Dish:
- Breakfast Naan Pizza: Add scrambled eggs and bacon.
- White Pizza Naan: Use ricotta and mozzarella instead of sauce.
- Taco Naan Pizza: Use taco meat, cheddar, and salsa.
Common Mistakes to Avoid with This Recipe:
- Don’t overtop the bread or the center gets floppy.
- Don’t use very wet vegetables without cooking them first.
- Don’t forget the oven needs to be fully hot before the pizzas go in.
23. Turkey Chili with Cornbread Muffins
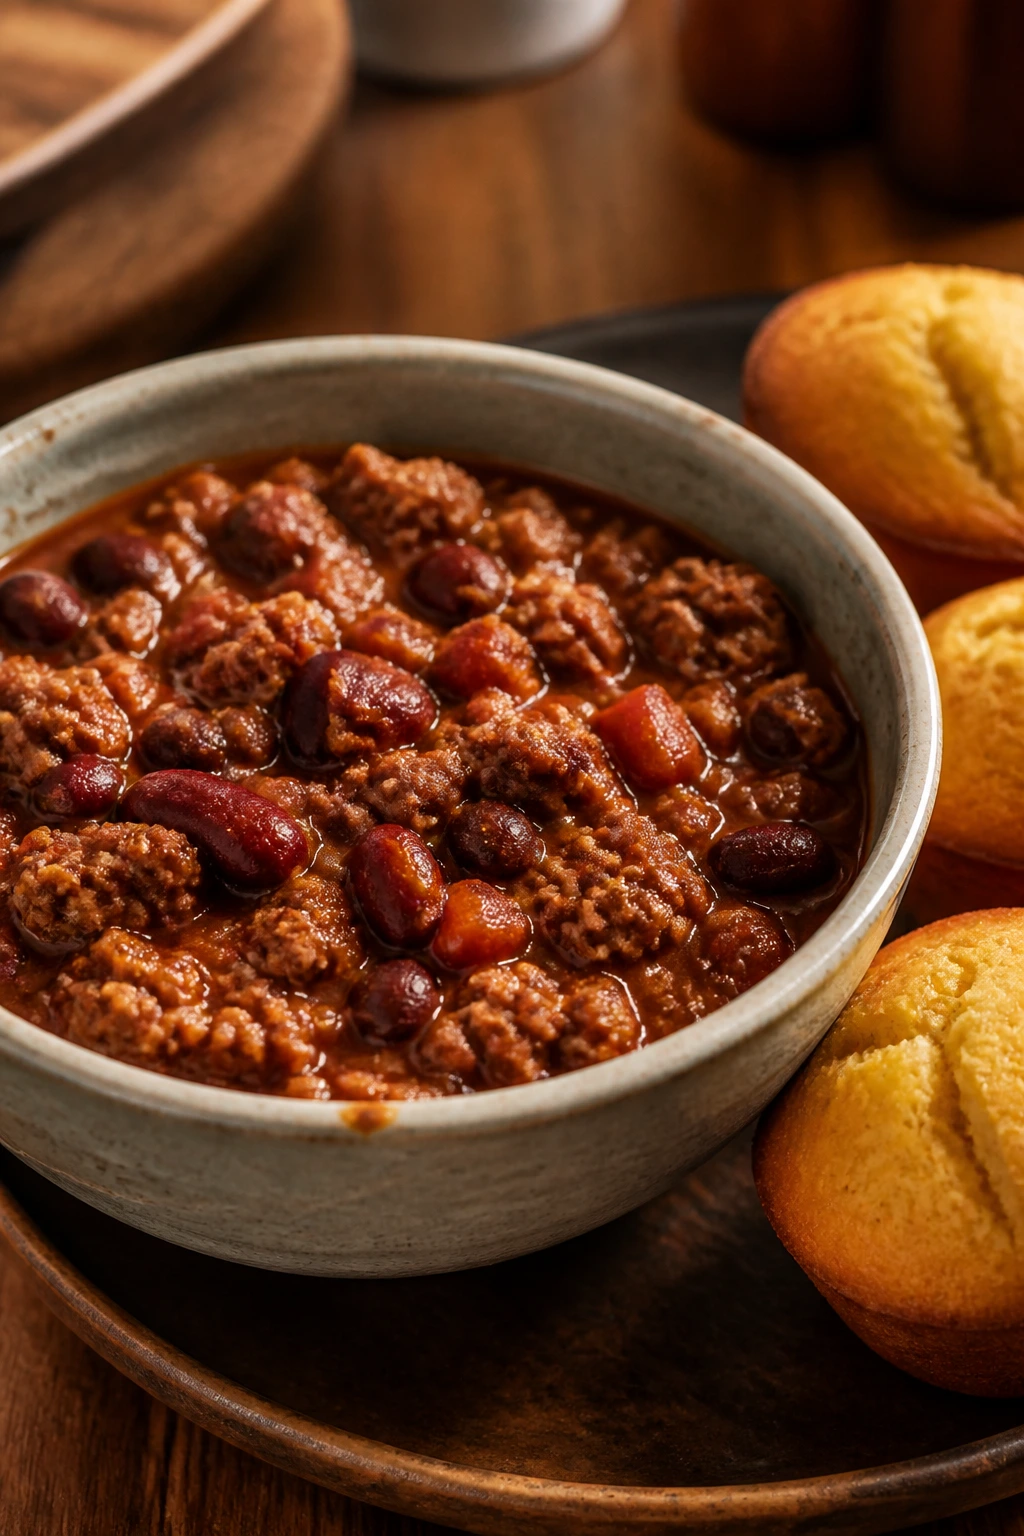
Chili works because it doesn’t rush you. It can sit on low heat, thicken a bit, and get better while you fuss with the rest of dinner. Pair it with cornbread muffins and you’ve got a meal that feels solid and friendly without taking over the evening.
Why It Works: Ground turkey keeps the chili lighter, while beans and tomatoes give it body. Cornbread muffins on the side add the sweet, crumbly contrast that makes chili feel complete instead of just spicy stew.
Key Ingredients:
- 1 pound ground turkey
- 1 onion, diced
- 1 bell pepper, diced
- 2 tablespoons chili powder
- 1 can kidney beans, drained
- 1 can black beans, drained
- 1 can diced tomatoes
- 1 cup broth
For the Muffins:
- 1 box cornbread mix
- 1 egg
- 1/3 cup milk
Quick Steps:
- Brown the turkey with onion and bell pepper.
- Stir in chili powder, beans, tomatoes, and broth, then simmer 20 minutes.
- Mix the cornbread batter with egg and milk.
- Bake the muffins according to the box directions while the chili simmers.
- Serve the chili in bowls with warm muffins on the side.
Equipment for This Recipe:
- Large pot
- Muffin tin
- Mixing bowl
- Wooden spoon
- Ladle
How to Serve This Dish: Top each bowl with cheddar, sour cream, or scallions if you want a richer finish. The muffins are good for dunking, and the chili is thick enough to hold its shape on a spoon. This makes a full six servings, maybe more if you set out extra bread.
Pro Tips for This Recipe:
- Let the chili simmer long enough to lose the raw tomato edge.
- Keep the muffin batter barely mixed.
- If the chili looks thin, simmer uncovered for the last few minutes.
Variations on This Dish:
- Beef Chili Version: Use ground beef instead of turkey.
- Spicy Chili: Add chipotle powder or diced jalapeños.
- Bean-Heavy Version: Reduce the meat and add one extra can of beans.
Common Mistakes to Avoid with This Recipe:
- Don’t serve chili before it has thickened a little.
- Don’t overmix cornbread batter or the muffins turn tough.
- Don’t forget to season at the end after the beans and tomatoes have had their say.
24. Philly Cheesesteak Sliders
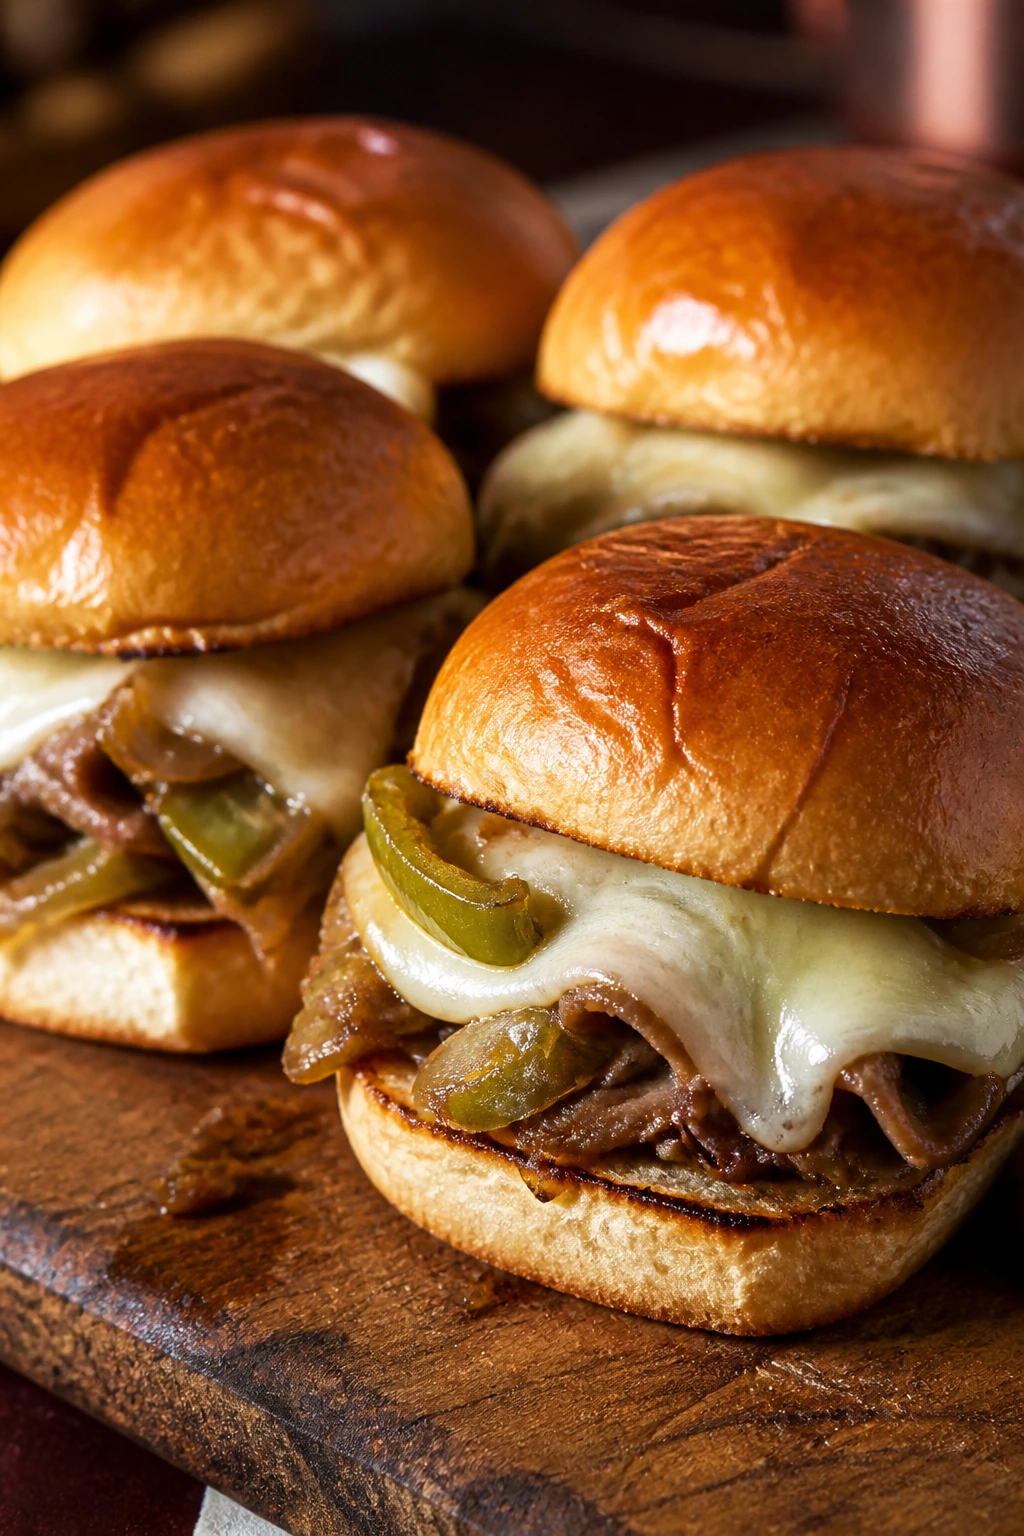
These sliders have all the good parts of a cheesesteak—the savory beef, the sweet onions, the melted cheese—without the need for a griddle or a huge pile of rolls. They’re compact, rich, and easy to eat while half-watching the screen.
Why It Works: Thin beef cooks quickly, onions soften into sweetness, and provolone melts without disappearing into the meat. Baking the sliders after assembly gives you the warm, slightly crisp top that makes them feel finished.
Key Ingredients:
- 1 pound thinly sliced beef steak or deli roast beef
- 1 onion, thinly sliced
- 1 green bell pepper, thinly sliced
- 6 slices provolone
- 12 slider buns
- 2 tablespoons butter
- 1 tablespoon Worcestershire sauce
Quick Steps:
- Cook onion and bell pepper in butter until soft.
- Add the beef and Worcestershire and heat just until the beef is cooked through.
- Split the slider buns and fill them with the beef mixture and provolone.
- Bake at 350°F for 10 minutes until the cheese melts.
- Serve warm and cut apart if needed.
Equipment for This Recipe:
- Skillet
- Baking dish
- Knife
- Spatula
- Foil, optional
How to Serve This Dish: Add a pile of potato chips or pickle spears and you’re set. If you want a lighter side, use a simple slaw. Two sliders usually make a hearty dinner, especially with chips.
Pro Tips for This Recipe:
- Slice the onions thin so they soften in time.
- Don’t cook the beef too long; it only needs to warm through.
- Use soft buns that can absorb the juices without breaking.
Variations on This Dish:
- Mushroom Cheesesteak: Add sliced mushrooms with the onions.
- Chicken Cheesesteak: Use cooked shredded chicken.
- Pepper Jack Version: Swap the cheese for a sharper finish.
Common Mistakes to Avoid with This Recipe:
- Don’t use thick steak chunks unless you plan to cook them much longer.
- Don’t forget to layer cheese so it melts over the meat.
- Don’t let the buns sit too long after baking or they dry out.
25. Chicken and Broccoli Alfredo Pasta
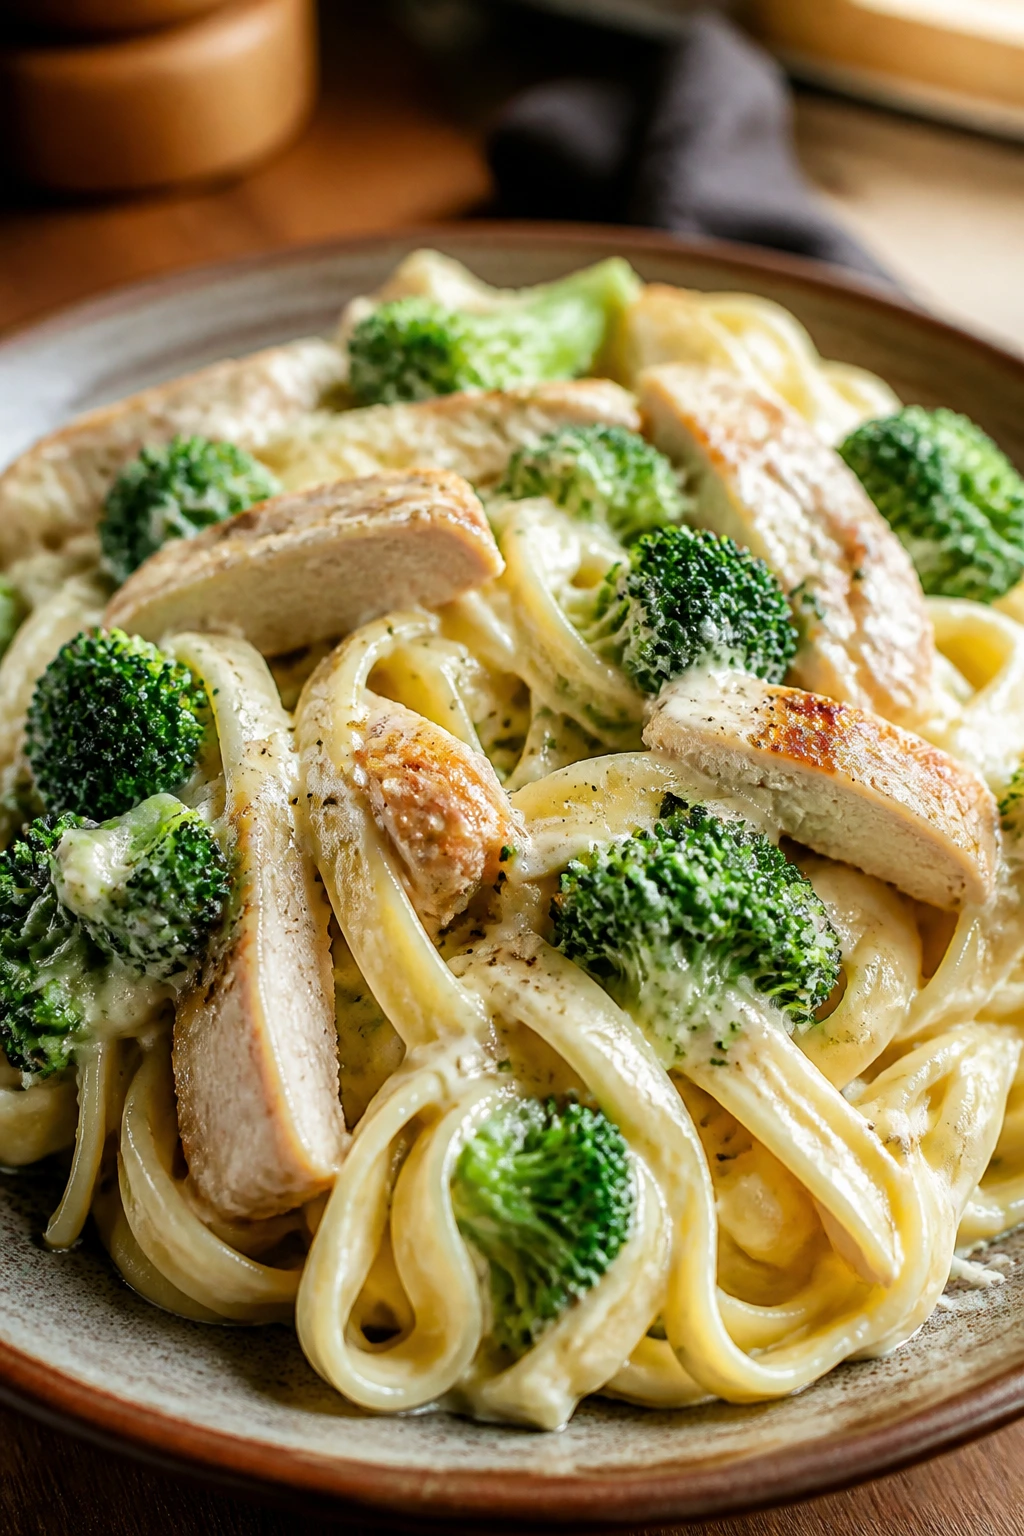
This is the heavier, creamier comfort dinner in the lineup, the one that makes the room go quiet for a minute because everybody is too busy eating. The broccoli keeps it from feeling too rich, and the chicken gives it enough substance to stand on its own.
Why It Works: Alfredo sauce wants a little starch from the pasta water, and the broccoli gives you a fresh, green note that cuts through the cream. Using chicken cutlets or thin pieces means the meat cooks fast and stays tender.
Key Ingredients:
- 12 ounces fettuccine
- 1 pound chicken breast cutlets, sliced if needed
- 3 cups broccoli florets
- 3 tablespoons butter
- 3 cloves garlic, minced
- 1 1/2 cups heavy cream
- 1 cup grated Parmesan
- Salt and black pepper
Quick Steps:
- Cook the fettuccine in salted water and add the broccoli during the last 2 minutes.
- Sear the chicken in a skillet until cooked through, then set aside.
- Melt butter, cook garlic briefly, and add cream.
- Stir in Parmesan until the sauce is smooth, then toss in the pasta, broccoli, and chicken.
- Season and serve immediately.
Equipment for This Recipe:
- Large pot
- Large skillet
- Colander
- Tongs
- Whisk
How to Serve This Dish: Serve with extra Parmesan and a bowl of garlic bread if you want to lean fully into comfort food. The pasta is rich enough that a simple side salad is enough beside it. Four solid servings come from this batch.
Pro Tips for This Recipe:
- Save a little pasta water before draining.
- Grate the Parmesan fresh if you want a smoother sauce.
- Don’t let the cream boil hard; keep it at a low simmer.
Variations on This Dish:
- Shrimp Alfredo: Swap chicken for shrimp cooked just until pink.
- Mushroom Broccoli Alfredo: Use mushrooms instead of chicken.
- Lighter Alfredo: Cut the cream with a little milk and extra pasta water.
Common Mistakes to Avoid with This Recipe:
- Don’t overcook the chicken or it turns stringy.
- Don’t let the sauce sit too long before serving; it thickens fast.
- Don’t skip salting the pasta water or the whole dish falls flat.
26. Veggie Fried Rice with Eggs
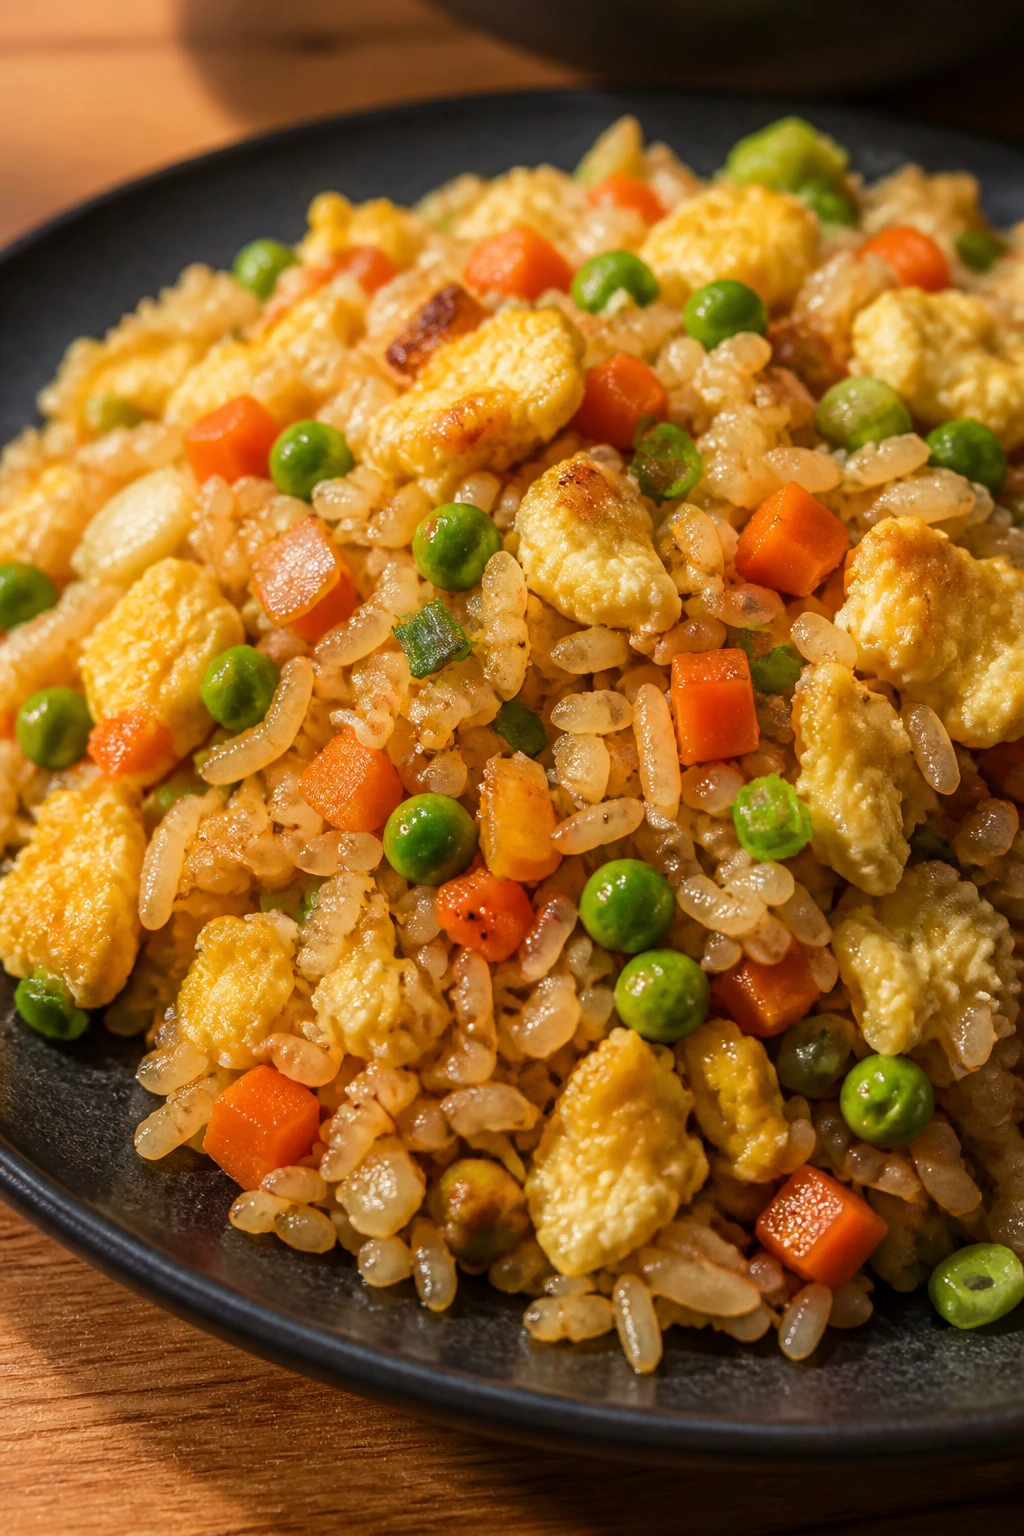
Fried rice is one of those dinners that looks like a cleanup job but actually saves you from one. It’s fast, flexible, and a good place to use cold rice, which is the whole secret to getting the grains to fry instead of clump.
Why It Works: Cold rice is drier, so it picks up sauce and browns in the pan. Eggs add richness, frozen vegetables keep things easy, and sesame oil gives the dish that familiar takeout smell people recognize instantly.
Key Ingredients:
- 3 cups cooked cold rice
- 2 eggs, beaten
- 2 cups frozen peas and carrots
- 1 small onion, diced
- 2 tablespoons soy sauce
- 1 tablespoon sesame oil
- 2 scallions, sliced
- 2 tablespoons neutral oil
Quick Steps:
- Scramble the eggs in a hot skillet, then set them aside.
- Add oil, onion, and frozen vegetables to the skillet and cook until hot.
- Stir in the rice and break up any clumps.
- Add soy sauce and sesame oil, then cook until the rice starts to fry.
- Fold the eggs and scallions back in and serve.
Equipment for This Recipe:
- Large skillet or wok
- Spatula
- Bowl for eggs
- Measuring spoons
- Fork, if needed to break up rice
How to Serve This Dish: Serve with cucumber sticks, extra soy sauce, or a quick side of dumplings if you want a bigger dinner. It’s good as a main for four, and it’s one of the best “leftover rescue” meals in the bunch.
Pro Tips for This Recipe:
- Use rice that has chilled for at least a few hours.
- Don’t add too much soy sauce at once; it’s easier to add than remove.
- Cook over high heat so the rice fries instead of steaming.
Variations on This Dish:
- Chicken Fried Rice: Add diced cooked chicken.
- Ham Fried Rice: Use diced ham and peas.
- Pineapple Fried Rice: Add small pineapple pieces at the end.
Common Mistakes to Avoid with This Recipe:
- Don’t use freshly cooked rice unless you want a mushy pan.
- Don’t crowd the skillet.
- Don’t drown the rice in sauce or the color and texture both suffer.
27. Mini Corn Dog Muffins

These are the fun, slightly goofy dinner that makes kids sit up straight when the tray comes out. They taste like a state-fair mashup, but they’re baked, not fried, and they’re small enough to grab without juggling utensils.
Why It Works: Corn muffin batter bakes up tender around the hot dog pieces, and the mini muffin tin gives you the right ratio of bread to sausage in every bite. Cheese is optional, but it adds salt and keeps the centers from feeling dry.
Key Ingredients:
- 1 box corn muffin mix
- 1 egg
- 1/3 cup milk
- 8 hot dogs, chopped into small pieces
- 1 cup shredded cheddar
- 2 tablespoons melted butter
Quick Steps:
- Heat the oven to 375°F and grease a mini muffin tin well.
- Mix the cornbread batter with the egg and milk.
- Fold in the chopped hot dogs and cheddar.
- Fill the muffin cups about 3/4 full and brush with melted butter.
- Bake 12 to 14 minutes until puffed and golden.
Equipment for This Recipe:
- Mini muffin tin
- Mixing bowl
- Spoon
- Pastry brush
- Cooling rack
How to Serve This Dish: Serve with ketchup and mustard for dipping, plus sliced fruit or a simple slaw. They’re easy to pile onto a plate, and they disappear fast, which is exactly what you want from a movie-night dinner. Eighty percent of the appeal here is the dunking.
Pro Tips for This Recipe:
- Chop the hot dogs small so every muffin gets some.
- Grease the tin well or the bottoms can stick.
- Let them cool for 5 minutes before removing so they hold together.
Variations on This Dish:
- Jalapeño Corn Dog Muffins: Add a spoonful of diced pickled jalapeños.
- Turkey Dog Version: Use turkey hot dogs.
- Sweet Corn Version: Add a handful of corn kernels.
Common Mistakes to Avoid with This Recipe:
- Don’t overfill the muffin cups.
- Don’t underbake the center; cornbread needs time to set.
- Don’t use huge chunks of hot dog or they can sink.
28. Baked Ziti with Ricotta
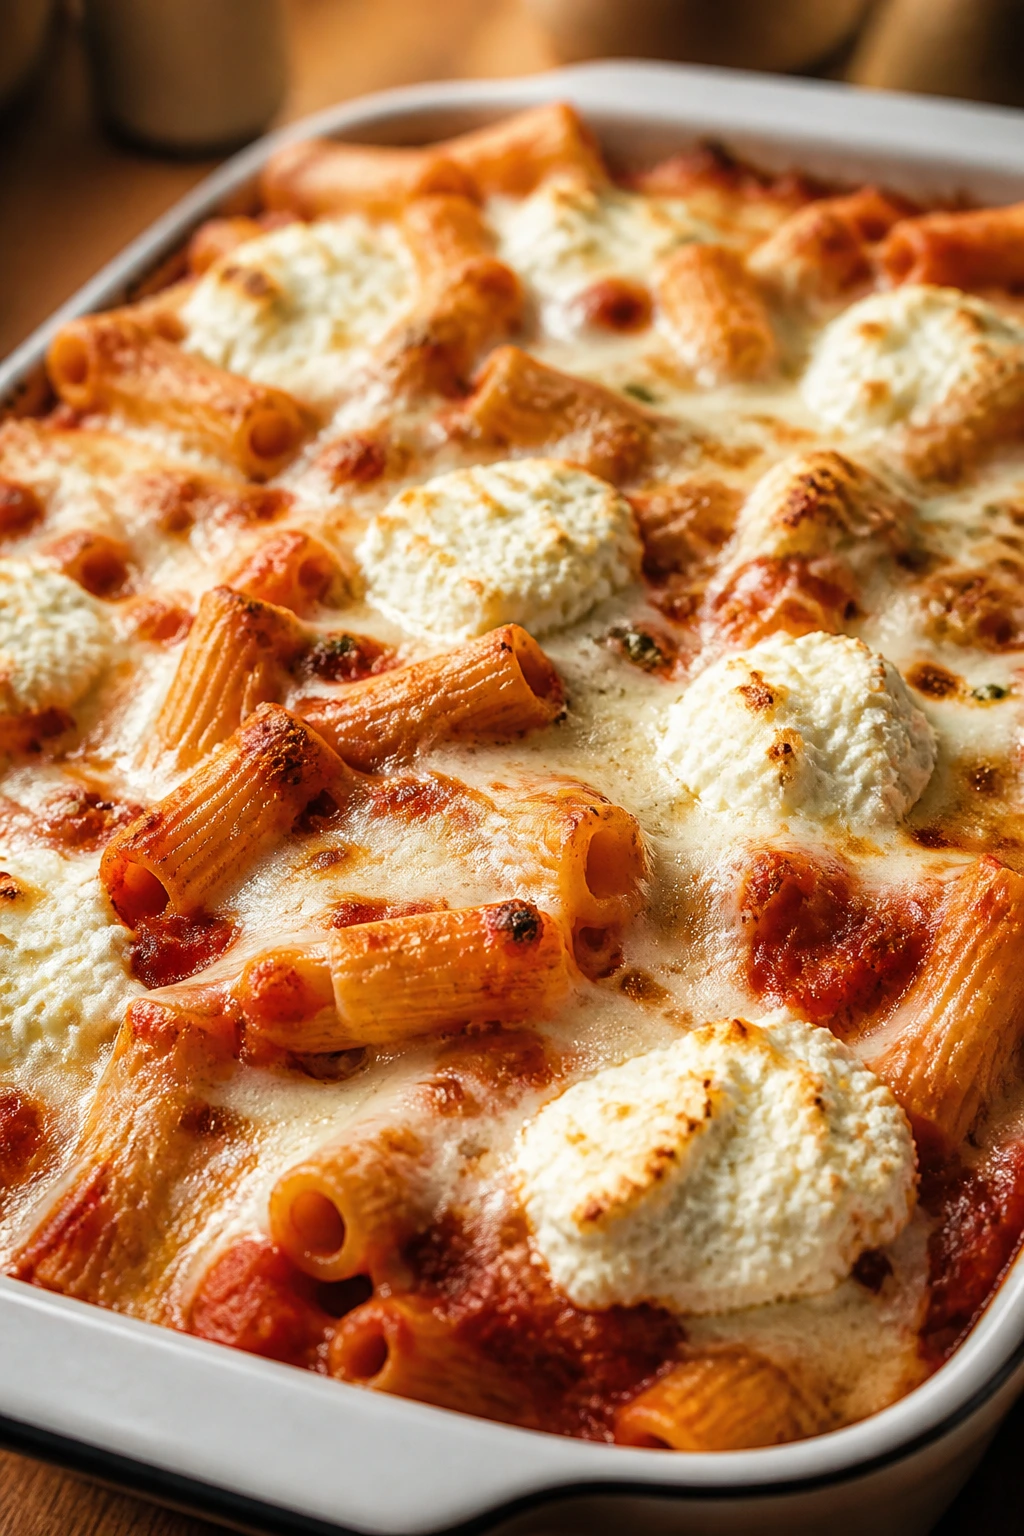
Baked ziti is the sort of dinner that quietly solves a lot of problems. It feeds a crowd, it reheats well, and it tastes even better after the sauce settles into the pasta for a few minutes. For family movie night, that means no one has to eat on a deadline.
Why It Works: The pasta stays slightly firm, the ricotta gives creamy pockets, and the mozzarella on top turns stretchy and browned. The dish is saucy enough to stay moist but not so wet that it falls apart on the plate.
Key Ingredients:
- 1 pound ziti
- 4 cups marinara sauce
- 15 ounces ricotta
- 2 cups shredded mozzarella
- 1/2 cup grated Parmesan
- 1 egg
- 1 teaspoon Italian seasoning
Quick Steps:
- Cook the ziti until just shy of done, then drain.
- Stir ricotta, egg, Parmesan, and Italian seasoning together.
- Mix the pasta with marinara and layer half in a 9×13-inch dish.
- Dot with the ricotta mixture, add the rest of the pasta, and top with mozzarella.
- Bake at 375°F for 25 to 30 minutes until bubbling.
Equipment for This Recipe:
- Large pot
- 9×13-inch baking dish
- Mixing bowl
- Spoon
- Colander
How to Serve This Dish: Let it rest for 10 minutes before cutting so the layers settle. A green salad or garlic bread works well beside it. This feeds about six hungry people, and a square reheats nicely the next day.
Pro Tips for This Recipe:
- Undercook the pasta slightly so it doesn’t go soft in the oven.
- Use enough sauce to coat every piece.
- If you want browning, uncover the dish for the last few minutes.
Variations on This Dish:
- Sausage Ziti: Add cooked Italian sausage.
- Vegetable Ziti: Stir in spinach or sautéed zucchini.
- Dairy-Light Version: Use less ricotta and more sauce.
Common Mistakes to Avoid with This Recipe:
- Don’t overcook the pasta before baking.
- Don’t slice too soon or the layers slide apart.
- Don’t use a very thin sauce; the pasta will drink it up.
29. Buffalo Chicken Wraps
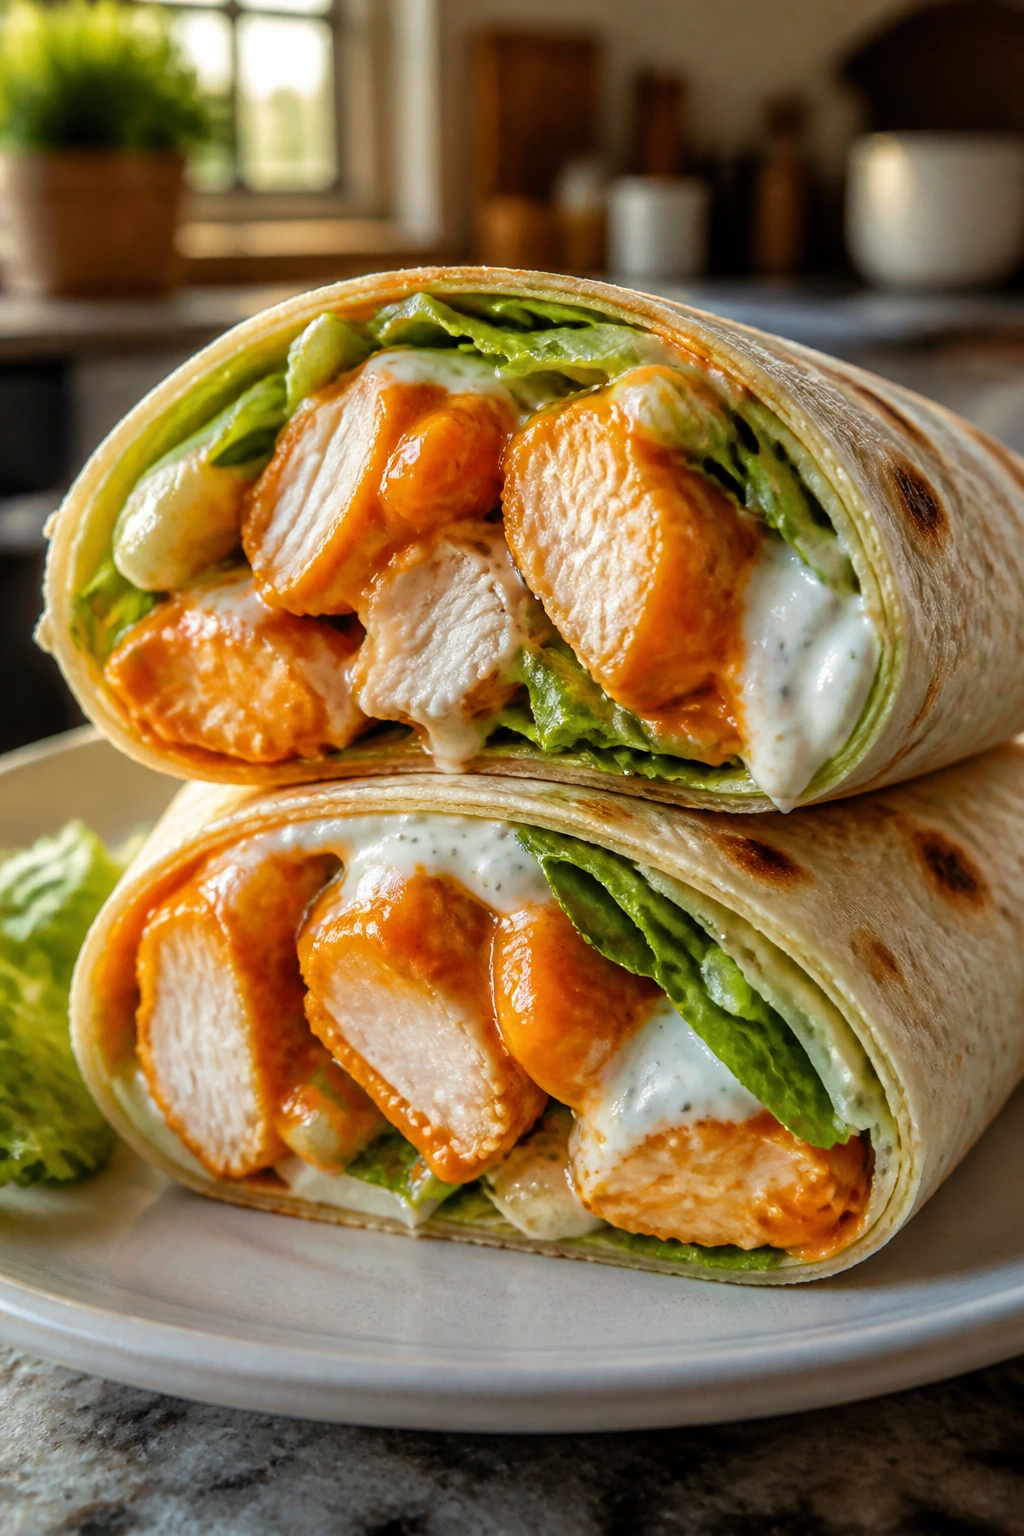
Buffalo chicken wraps are a good move when you want big flavor without a lot of oven time. They’re sharp, salty, creamy, and crunchy at the same time, which keeps them interesting even if the movie is doing something complicated and nobody’s paying full attention.
Why It Works: Buffalo sauce gives the chicken heat and tang, ranch cools it down, and celery adds crunch so the filling doesn’t feel soft from edge to edge. Warm tortillas roll better and stay closed longer.
Key Ingredients:
- 3 cups cooked shredded chicken
- 1/2 cup buffalo sauce
- 1/4 cup ranch dressing
- 4 large flour tortillas
- 2 cups shredded lettuce
- 1 cup diced celery
- 1 cup shredded cheddar
Quick Steps:
- Toss the chicken with buffalo sauce and ranch.
- Warm the tortillas briefly so they’re flexible.
- Layer lettuce, celery, cheddar, and chicken down the center of each tortilla.
- Roll tightly, tucking in the sides as you go.
- Slice and serve, or toast briefly in a skillet if you want a little crunch.
Equipment for This Recipe:
- Mixing bowl
- Skillet, optional
- Knife
- Cutting board
- Spoon
How to Serve This Dish: Serve the wraps with carrot sticks or potato chips. If you want to turn the heat down for kids, keep extra buffalo sauce on the side instead of mixing it into everything. One wrap is plenty for many adults, especially if you add chips.
Pro Tips for This Recipe:
- Warm the tortillas for a few seconds so they don’t split.
- Keep the celery small and crisp.
- Don’t drown the chicken in sauce or the wrap turns slippery.
Variations on This Dish:
- Blue Cheese Version: Use blue cheese dressing instead of ranch.
- Buffalo Cauliflower Wrap: Swap in roasted cauliflower florets.
- Buffalo Melt: Turn the filling into a grilled sandwich.
Common Mistakes to Avoid with This Recipe:
- Don’t skip the lettuce or celery; you need crunch against the sauce.
- Don’t overfill the tortillas.
- Don’t make them far ahead unless you’re okay with soft wraps.
30. Loaded Baked Potato Bar
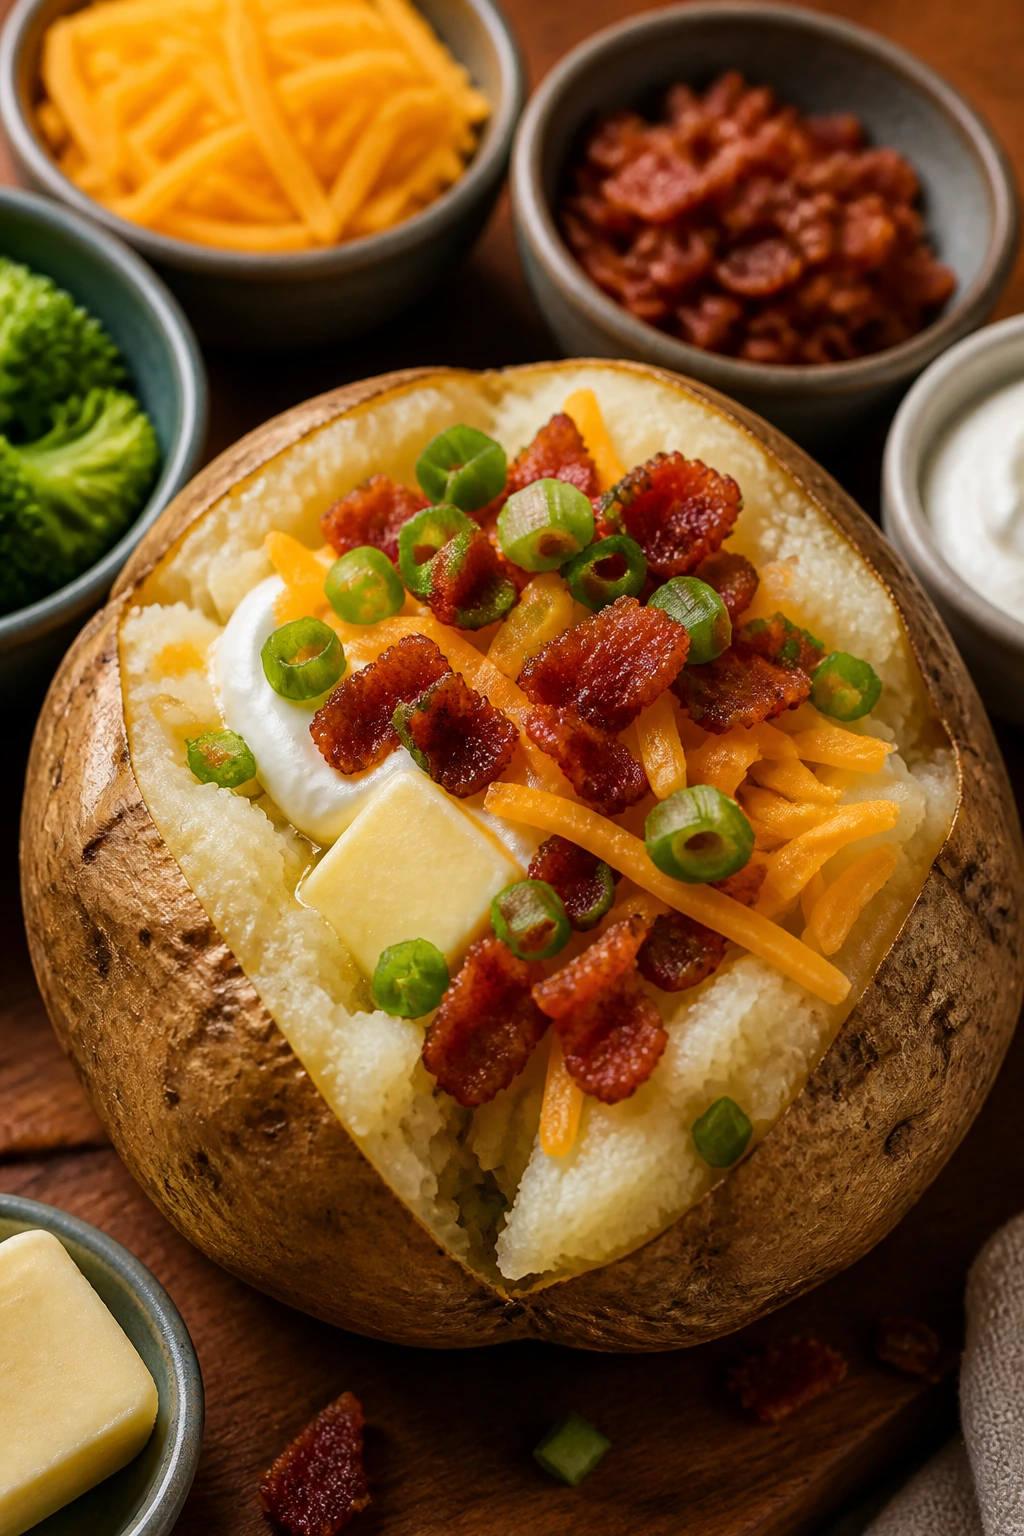
This is the most flexible dinner on the list, which is exactly why it works so well when the evening feels chaotic. Everybody gets a potato, everybody chooses their own toppings, and you don’t have to ask three separate questions about what each person will eat.
Why It Works: Russet potatoes bake into fluffy interiors with crisp skins when they’re rubbed with oil and salt. The toppings can be warm, cold, meaty, or vegetarian, so the bar adapts to whoever is in the room without changing the base meal.
Key Ingredients:
- 4 large russet potatoes
- 2 tablespoons olive oil
- 1 teaspoon kosher salt
- 4 tablespoons butter
- 1 cup sour cream
- 2 cups shredded cheddar
- 6 slices bacon, cooked and crumbled
- 2 scallions, sliced
- Optional steamed broccoli or chili
Quick Steps:
- Heat the oven to 425°F.
- Scrub the potatoes, dry them well, rub with oil and salt, and bake 50 to 60 minutes until tender.
- Split the potatoes open and fluff the centers with a fork.
- Set out butter, sour cream, cheddar, bacon, scallions, and any extras.
- Let everyone build their own plate.
Equipment for This Recipe:
- Sheet pan
- Knife
- Fork
- Small bowls for toppings
- Oven mitts
How to Serve This Dish: Put the potatoes on a platter or in a basket and keep the toppings in small bowls. If you want a stronger meal, add a pot of chili or a tray of roasted broccoli. One large potato per person is usually enough, though teenagers may ask for a second round.
Pro Tips for This Recipe:
- Dry the potatoes thoroughly before oiling them so the skins crisp properly.
- Salt the skins; it’s part of the good part.
- Warm the toppings that should be hot, like chili, before putting them out.
Variations on This Dish:
- Vegetarian Bar: Offer broccoli, beans, and extra cheese.
- Spicy Potato Bar: Add jalapeños and hot sauce.
- Chili Potato Version: Spoon warm chili over the split potatoes.
Common Mistakes to Avoid with This Recipe:
- Don’t underbake the potatoes or the centers stay dense.
- Don’t stuff them so full they collapse.
- Don’t forget that a little salt on the skin matters more than people think.
Why These Easy Weeknight Meals Work So Well for Family Movie Night
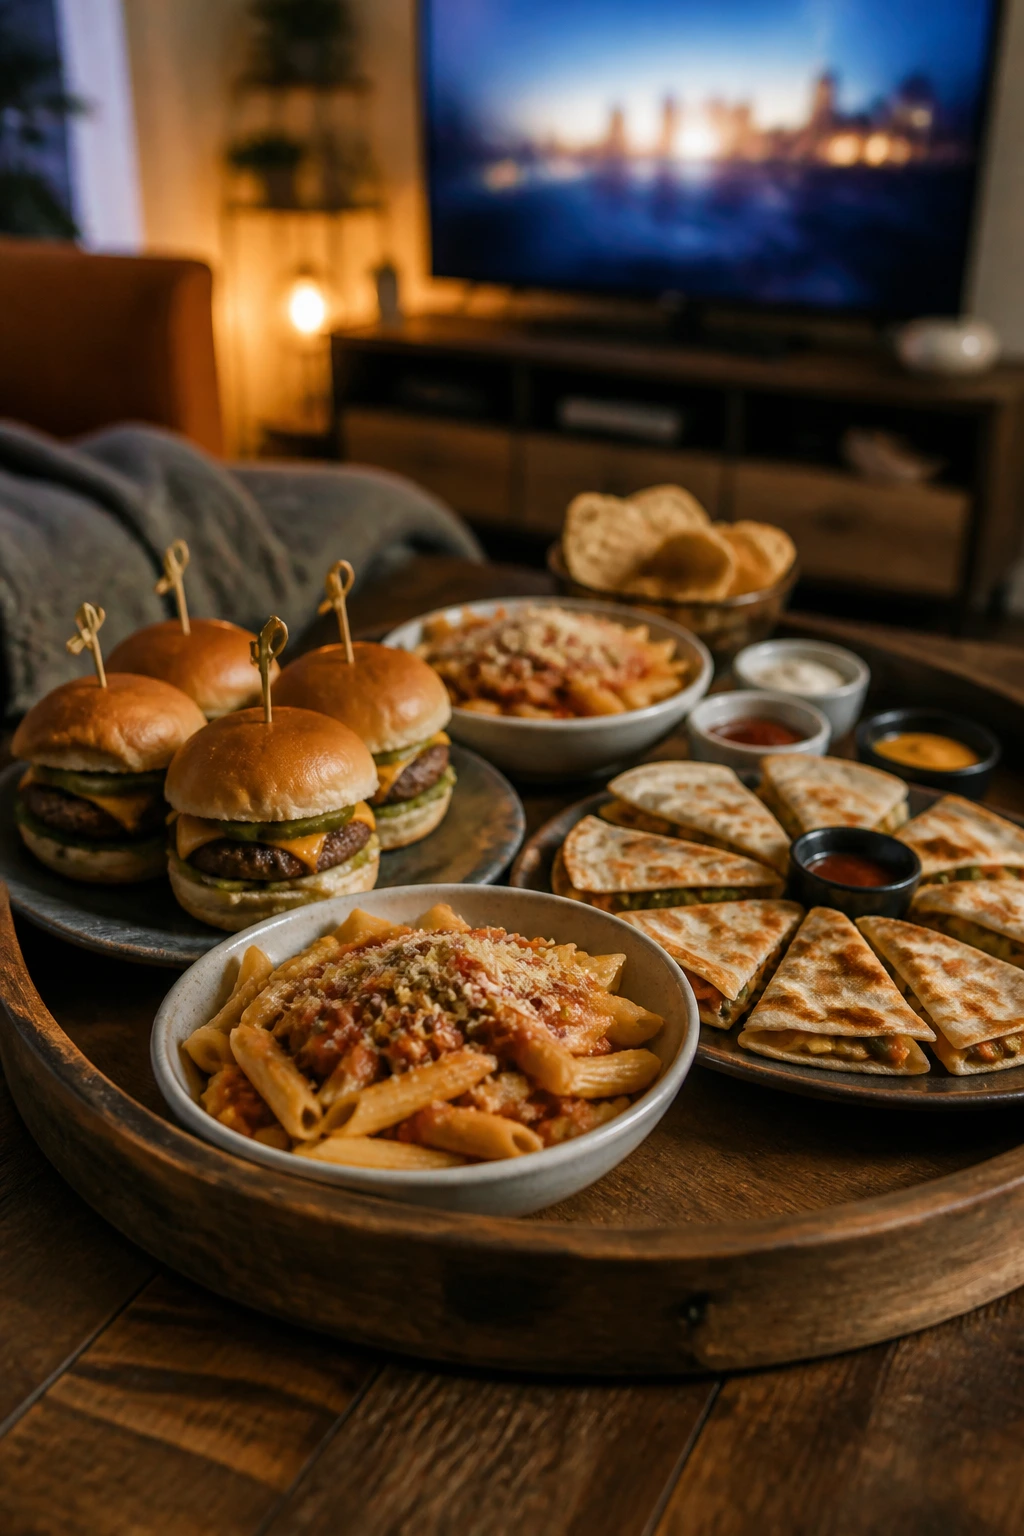
A good movie-night dinner has to do three things at once: taste good, survive the trip to the couch, and not leave you with a second shift in the kitchen after the credits. The recipes above lean into that reality instead of fighting it. They use formats that hold heat, sauces that stay put, and ingredients that can be portioned with one hand while the other hand is reaching for the remote.
That’s the part people often miss. The best family movie night dinners are not the fanciest ones. They’re the ones that sit well, reheat well, and keep their texture long enough for the family to wander in and out of the room without the meal going sideways.
Essential Equipment for These Recipes
- Large rimmed sheet pans: You’ll use these for pizza pitas, chicken tenders, hash, and anything else that needs hot air circulating around it.
- 12-inch skillet: A deep, heavy skillet handles quesadillas, sloppy joes, taco pasta, and fried rice without crowding.
- Dutch oven or large pot: Useful for mac and cheese, chili, soup, and baked-ziti-style sauce work.
- 9×13-inch baking dish: The casserole workhorse for enchiladas, baked ziti, meatball subs, and slider bakes.
- Wire rack: Optional for crisp chicken tenders and fish sticks, but it makes a real difference.
- Sharp chef’s knife: Thin slices matter for onions, peppers, sliders, and wrap fillings.
- Cutting board: A sturdy one keeps the prep from becoming a juggling act.
- Measuring cups and spoons: Especially handy for sauces, seasoning blends, and pasta liquids.
- Mixing bowls: You’ll want at least two, one for dry ingredients and one for wet.
- Tongs and a wide spatula: These help with flipping, stirring, and lifting without tearing tortillas or bread.
- Colander: Needed for pasta, tortellini, and rinsing beans.
- Airtight storage containers: Leftovers are part of the plan, not an accident.
Smart Shopping and Ingredient Tips
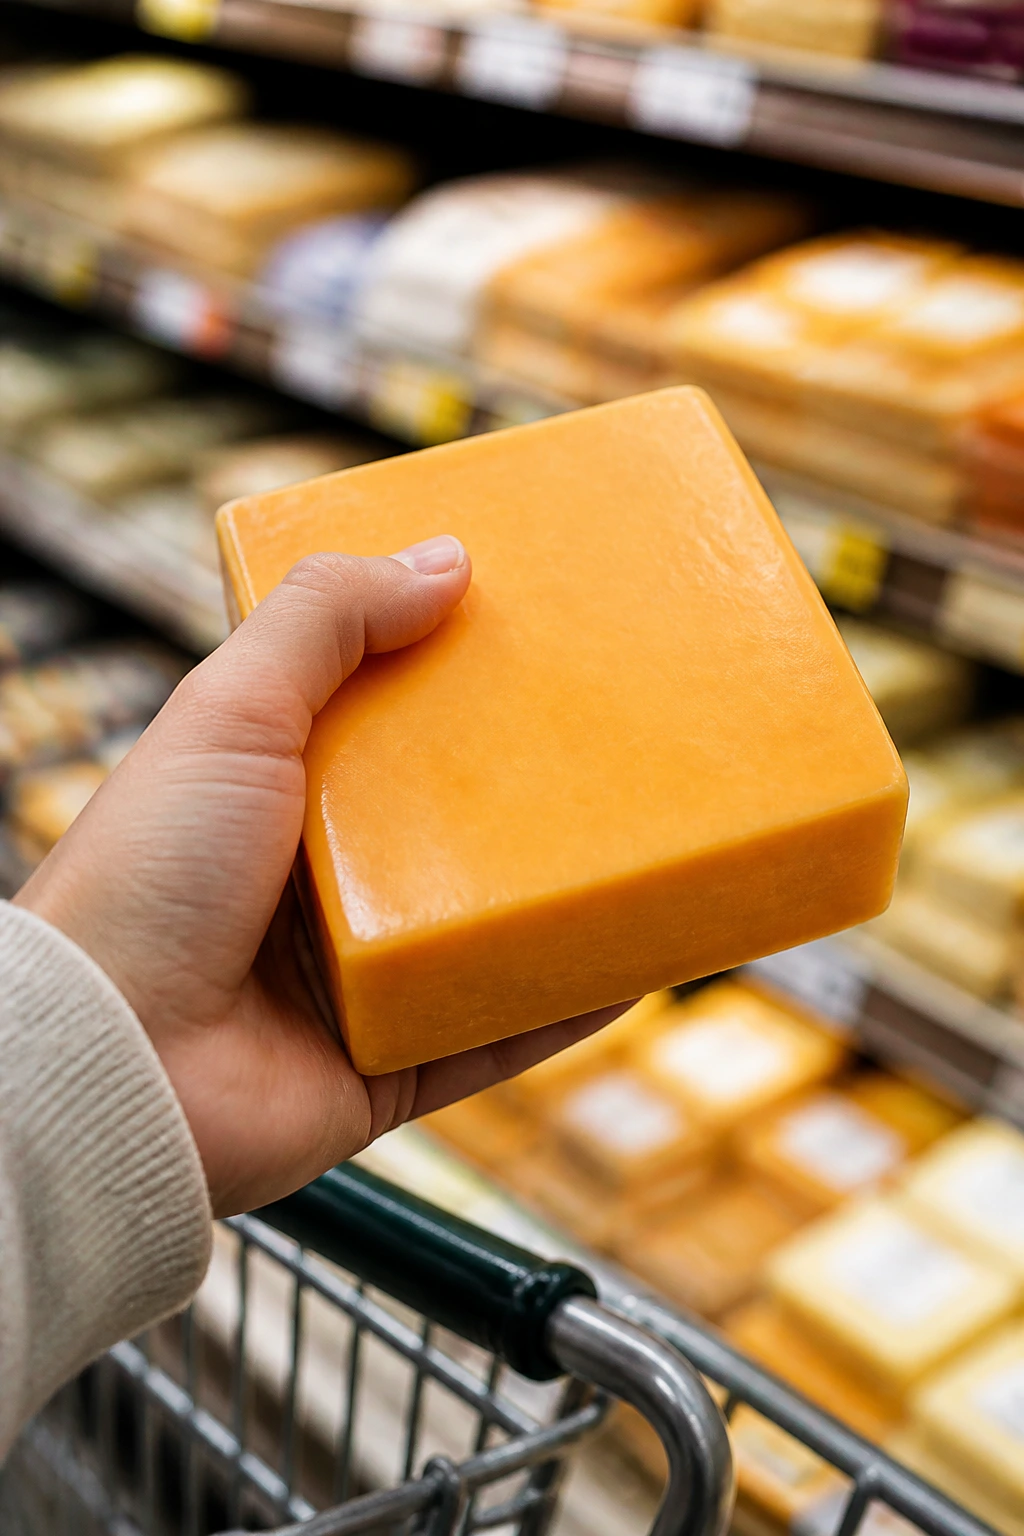
Start with the ingredients that do the heavy lifting: cheese, bread, tortillas, and protein. For cheese, block cheese usually melts more smoothly than bagged shreds because it doesn’t carry the same anti-caking coating. That matters in mac and cheese, quesadillas, alfredo, and casseroles, where a gritty sauce is a real disappointment.
For chicken, a rotisserie bird is a smart shortcut if you need dinner to happen fast. Shred it while it’s still warm enough to pull apart easily, then keep it covered so it doesn’t dry out before you cook. For ground beef, turkey, or sausage, choose the amount of fat that fits the meal: leaner meat works well in taco pasta and chili, while a little more fat brings flavor to sliders and cheeseburger skillet meals.
Bread deserves attention too. Soft slider buns, hoagie rolls, naan, and flour tortillas each play a different role. Soft buns are best for saucy fillings, while sturdier rolls or naan handle heat and topping weight better. If you’re buying tortillas for wraps or quesadillas, check the size before you start; small tortillas make overfilled, awkward dinners, while large ones wrap cleanly and save you from leaks.
Frozen vegetables are not the enemy here. In fried rice, sheet-pan hash, and some skillet dishes, frozen peas, carrots, and green beans are cheaper and faster than fresh, and they behave well if you don’t overcook them. Same goes for canned tomatoes, beans, and broth: choose low-sodium versions when possible so you can control the final salt level yourself. These meals already bring enough flavor without a salt bomb on top.
How to Serve These Easy Weeknight Meals
Presentation: Keep it informal and intentional. Slide sheet-pan meals onto a cutting board or serve directly from the pan, pile sliders on a platter, and put wraps and quesadillas on a board with parchment underneath so they don’t steam themselves soft. For pasta and soup, shallow bowls make the food easier to eat without spillover.
Accompaniments: Choose sides that add crunch or freshness instead of more heaviness. Pickles, cucumber sticks, apple slices, baby carrots, a simple green salad, or fruit all work across the board. If the main is especially rich—think Alfredo, mac and cheese, or baked ziti—lean toward something crisp and acidic. If the main is already light, like fried rice or rice bowls, a few chips or a small slaw can round it out.
Portions: Most of these meals serve four to six people as written, but movie-night appetite is a strange thing. Sliders and wraps often get eaten faster than bowls, while chili, pasta, and casseroles stretch further if you put out bread or salad. For adults, plan on two sliders, one wrap, or one generous bowl of pasta; for kids, build from there and keep seconds close by.
Beverage Pairing: Sparkling water with lemon, unsweetened iced tea, or a cold root beer work across the whole list. For the younger crowd, milk fits the richer dishes better than juice does. If you want a cozy pairing with chili or soup, hot cider is a nice match without being fussy.
Additional Tips and Flavor Boosters
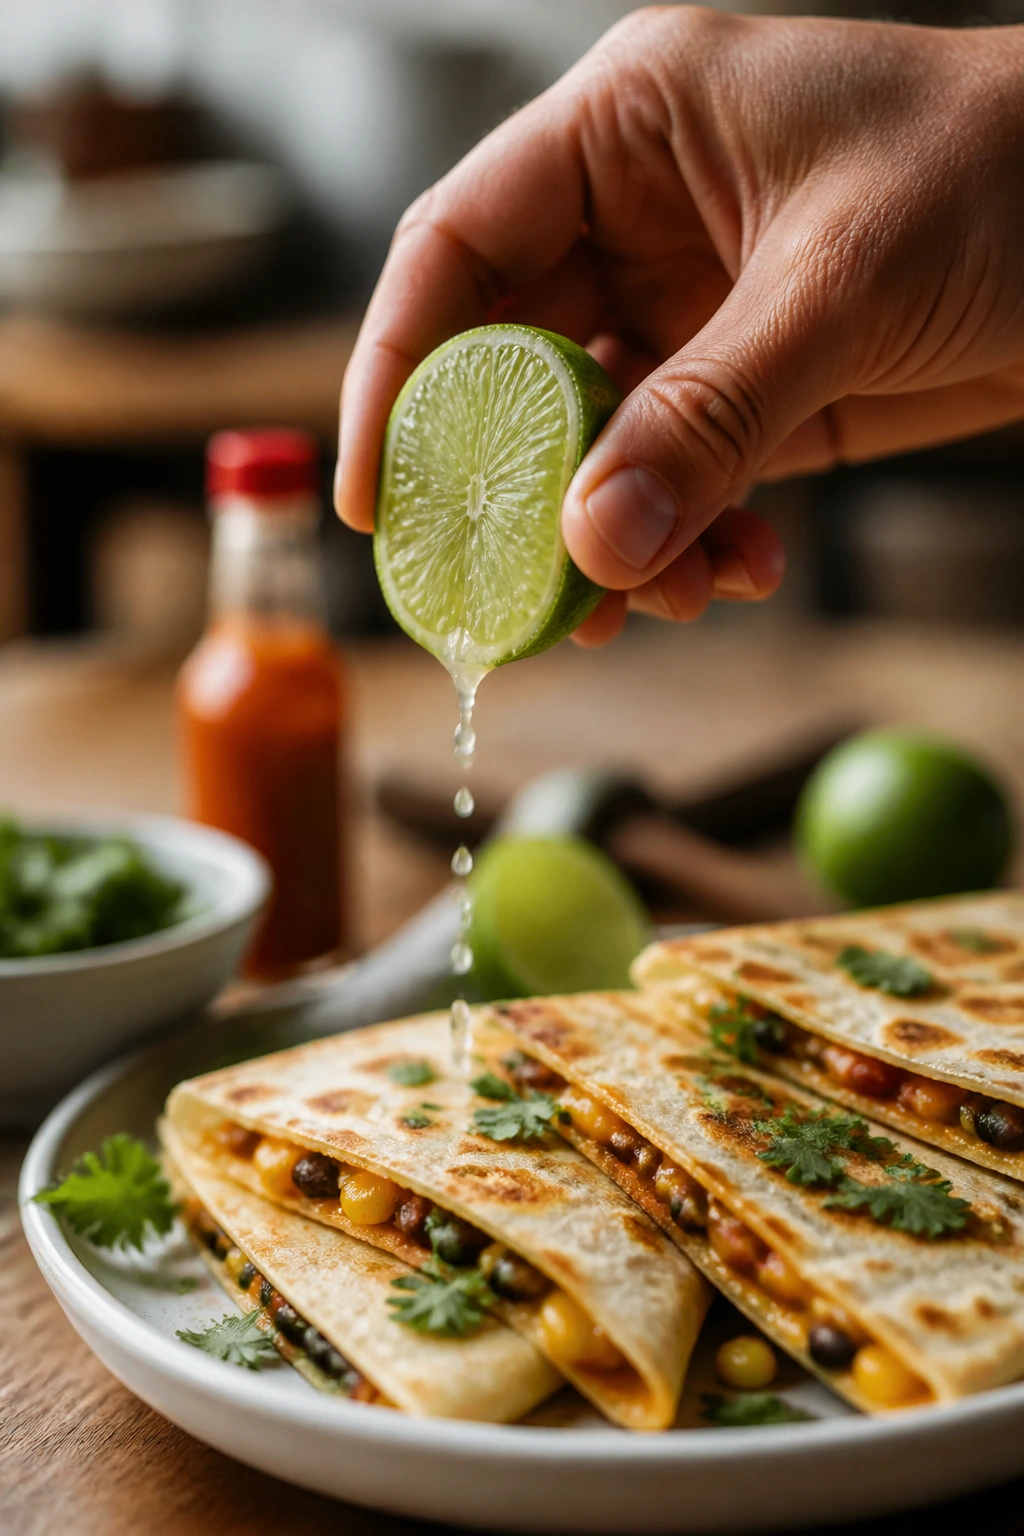
Flavor Enhancement: Keep a small “finish it at the end” habit. A squeeze of lime, a spoonful of pickle relish, a sprinkle of scallions, or a little hot sauce can wake up quesadillas, tacos, bowls, and sandwiches in a way that cooking longer will not.
Customization: Let toppings do the heavy lifting for different tastes. Put jalapeños, ranch, salsa, extra cheese, chopped herbs, and hot sauce in small bowls so people can steer their own plates. That keeps the main dish mild enough for kids without making the adults eat something flat.
Serving Suggestions: Use crunchy things on the side or on top. Chips on nachos, toasted breadcrumbs on casseroles, fried onions on potatoes, or fresh celery in wraps all create texture, and texture is what keeps a simple dinner from feeling monotonous halfway through.
Make-It-Yours: For gluten-free eaters, use corn tortillas, GF pasta, or rice bowls. For dairy-free diners, choose olive oil-based sauces, skip the cheese-heavy toppings, and build around proteins, vegetables, and salsa. For lower-carb plates, turn the fillings into lettuce wraps, bowls, or stuffed peppers instead of forcing a bread-heavy version to do a job it doesn’t want.
Make-Ahead, Storage, and Reheating Guidance
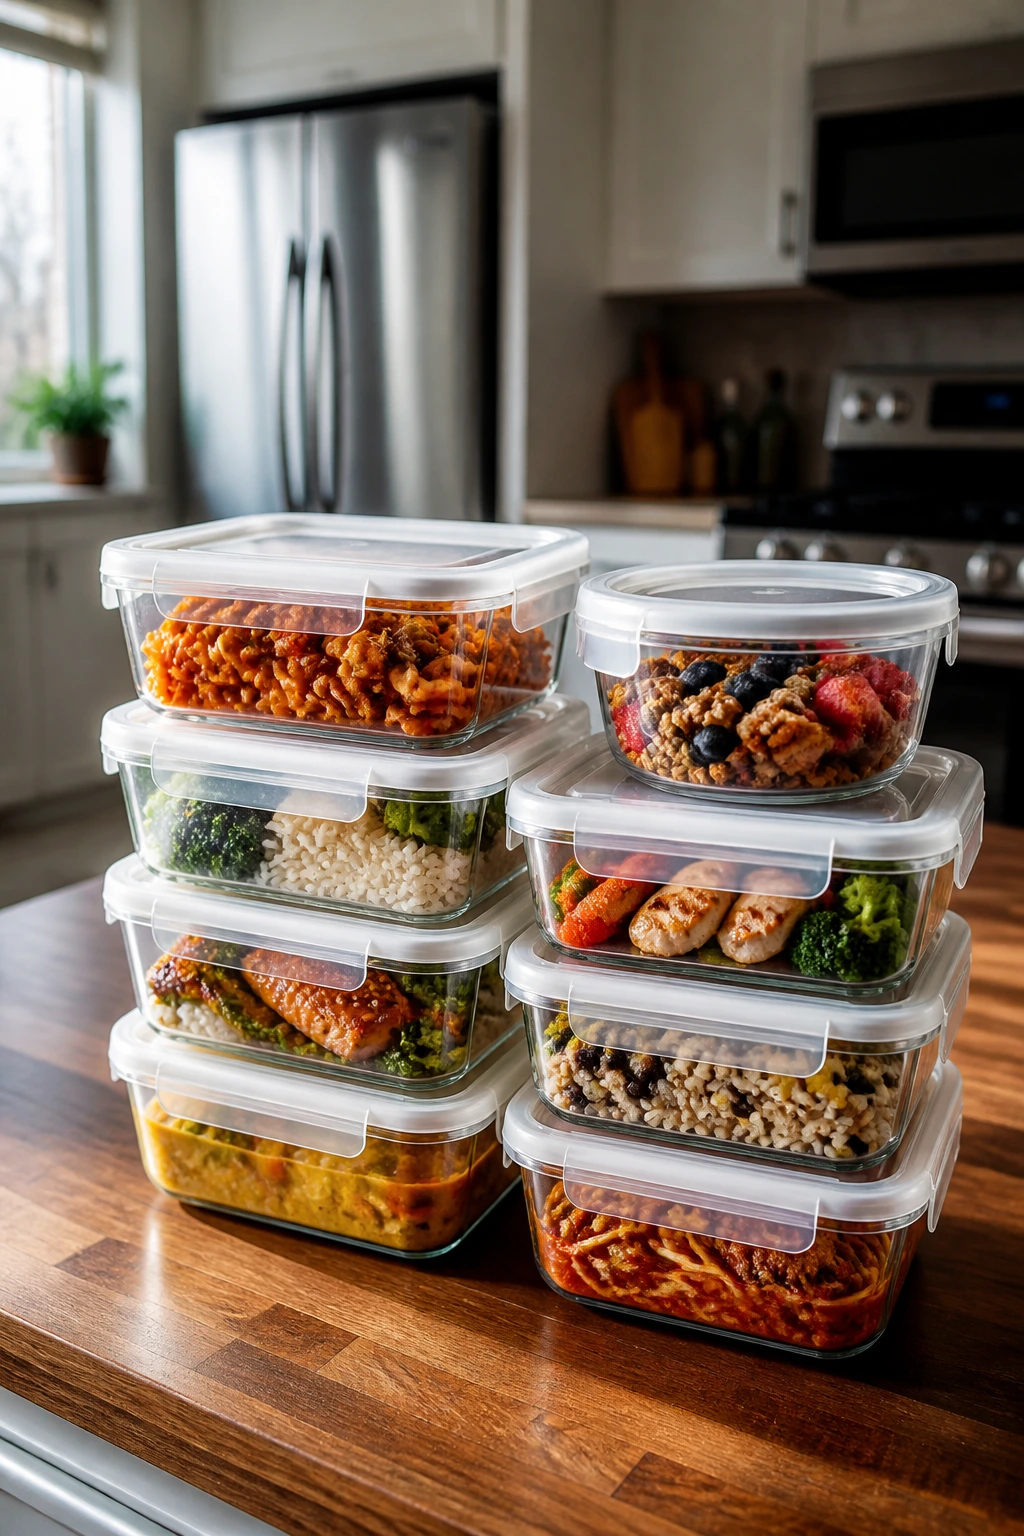
A few of these dinners are best the second they leave the stove, but many hold up well if you plan ahead. Saucy dishes like chili, pulled pork, sloppy joe filling, taco meat, meatballs in sauce, baked ziti, enchilada casserole, and cheese-heavy pasta usually keep 3 to 4 days in the refrigerator in airtight containers. Most of them freeze for up to 2 months, though the texture is best in the first month.
For reheating, use the method that matches the food. Casseroles, ziti, and enchilada bakes do well in a 350°F oven covered with foil for 15 to 20 minutes, then uncovered for the last few minutes. Skillet meals like taco pasta, cheeseburger pasta, and gnocchi reheat better on the stovetop with a splash of broth or milk to loosen the sauce. Microwaving works too, but stir halfway through so the edges don’t overcook while the center stays cold.
Crispy foods need a different plan. Chicken tenders, fish sticks, pizza pitas, and quesadillas are better in a toaster oven, oven, or air fryer at 375°F to 400°F for a few minutes than in a microwave. The microwave makes the cheese hot fast, but it also softens the breading and tortillas. Nobody wants that.
For build-your-own dinners like baked potato bars, wraps, and nacho skillets, store the components separately. Keep tortillas, chips, or buns in one container and fillings in another. Potatoes should be refrigerated once they’ve cooled and reheated in the oven or air fryer, not frozen; they turn grainy after freezing. Rice bowls and fried rice also do best with the rice and toppings stored apart if you can manage it.
Variations and Adaptations to Try
The Gluten-Free Switch: Use corn tortillas for quesadillas and enchiladas, GF pasta for baked ziti or skillet pasta, and gluten-free breadcrumbs for chicken tenders or fish sticks. The rest of the meal can stay almost the same, which is why this swap is easier than people expect.
The Dairy-Light Path: Focus on tomato-based, barbecue-based, salsa-based, or soy-sesame flavored meals. Quesadillas, taco bowls, fried rice, pulled pork sandwiches, and chili are easier to adjust than creamy pasta dishes because the cheese isn’t doing all the work.
The Veggie-First Version: Replace meat with black beans, lentils, mushrooms, or roasted vegetables in sloppy joes, tacos, nachos, pasta, and wraps. I’d keep the seasoning bold and the texture varied; a veggie dinner gets boring fast if everything is soft.
The Low-Sodium Reset: Choose low-sodium broth, rinse canned beans, and use less packaged seasoning. Then lean on garlic, onion, paprika, lemon juice, and fresh herbs to replace the salt you took out. The meal still tastes full, just less heavy on the salt line.
The Mild-to-Spicy Split: Make the base family-friendly, then set out hot sauce, pickled jalapeños, chili crisp, or red pepper flakes for the people who want more heat. That lets one pan serve a mixed-age group without turning into a compromise nobody loves.
The Extra-Quick Shortcut: Use rotisserie chicken, frozen vegetables, pre-cooked meatballs, boxed cornbread mix, and refrigerated dough when time is tight. There’s no prize for making every part from scratch on a weekday.
Common Mistakes to Avoid
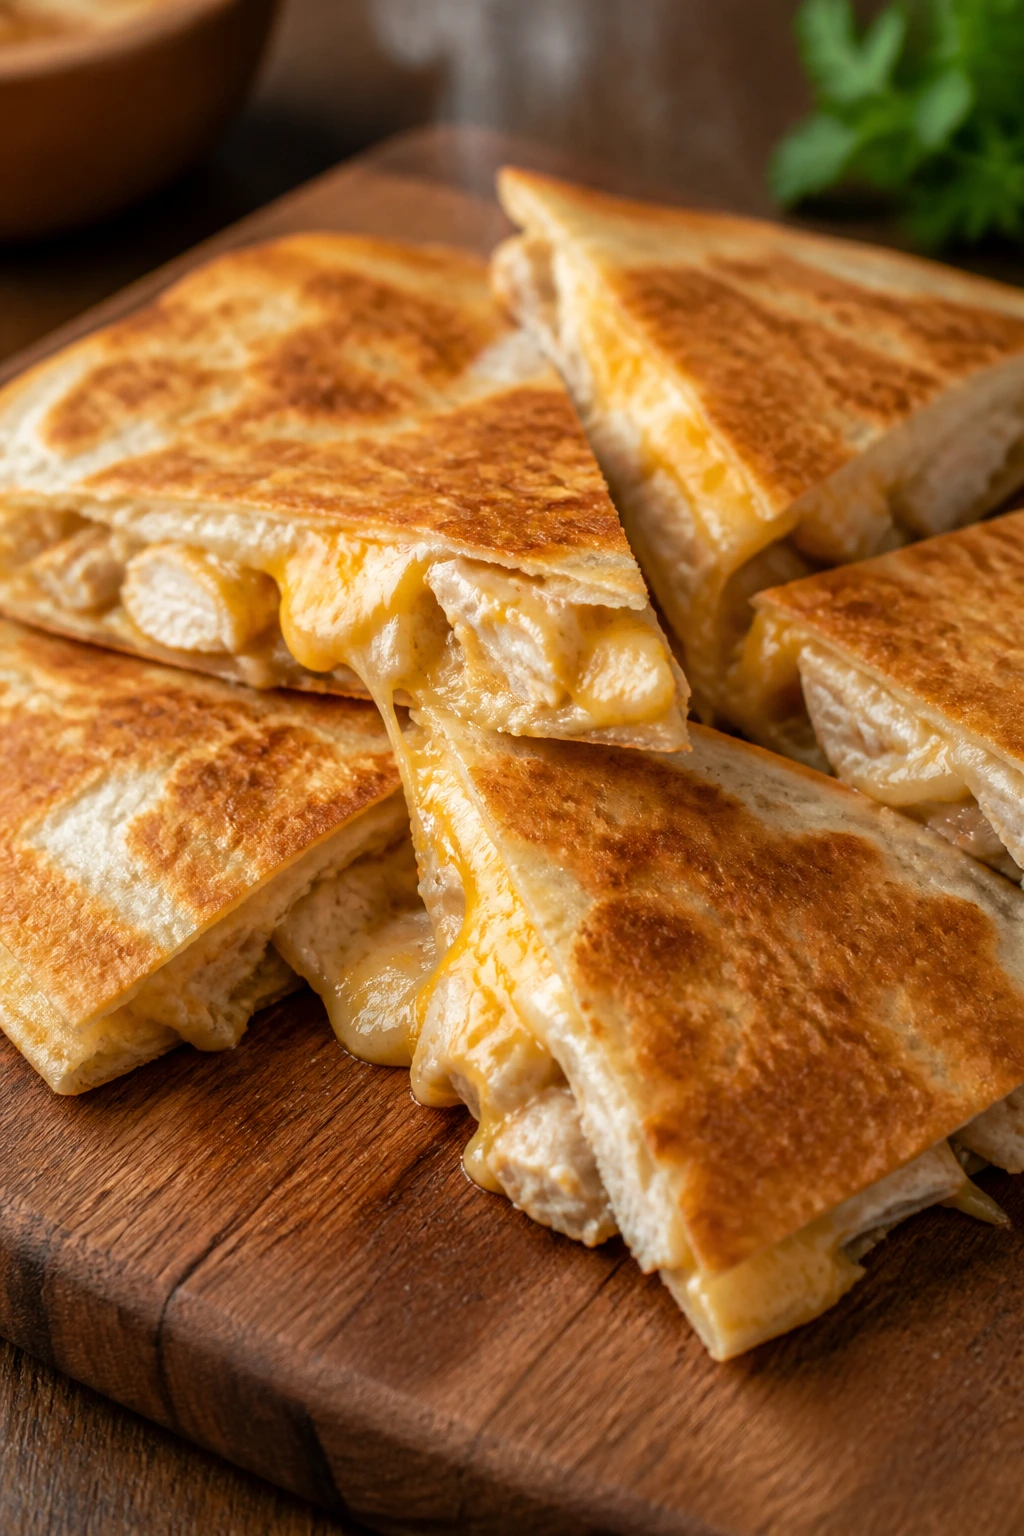
The biggest mistake is trying to make couch food act like formal dinner. If something is saucy, it needs a bun, a bowl, or a plate with a rim. If it’s meant to be handheld, the filling has to be thick enough not to slide straight out when somebody sits down on the sofa and tilts the dish for one second too long.
Another common issue is skipping texture. A meal made entirely of soft things gets tiring fast. That’s why slaw, pickles, celery, chips, toasted bread, browned edges, or crisp vegetables show up so often here. They give the dinner shape. Without them, even a good recipe can feel flat by the third bite.
People also underseason weeknight food because they’re trying to keep it kid-friendly. Mild is fine. Bland is not. Salt the pasta water, season the meat, taste the sauce, and add a finishing touch like lime or herbs at the end. Those small choices matter more than another hour in the oven.
Crowding pans is another easy way to make dinner worse. A sheet pan full of potatoes, sausage, and beans needs room to roast. A skillet full of beef, pasta, and sauce needs enough surface area to simmer without boiling over. If the pan is too full, split the food across two pans. It is cleaner in the end.
And then there’s timing. Some dishes, like quesadillas, tenders, and grilled cheese, are best hot and crisp. Others, like chili, pulled pork, and casserole, are forgiving. Match the dish to the night. If the movie start time is strict, choose something forgiving or make the components ahead.
Frequently Asked Questions
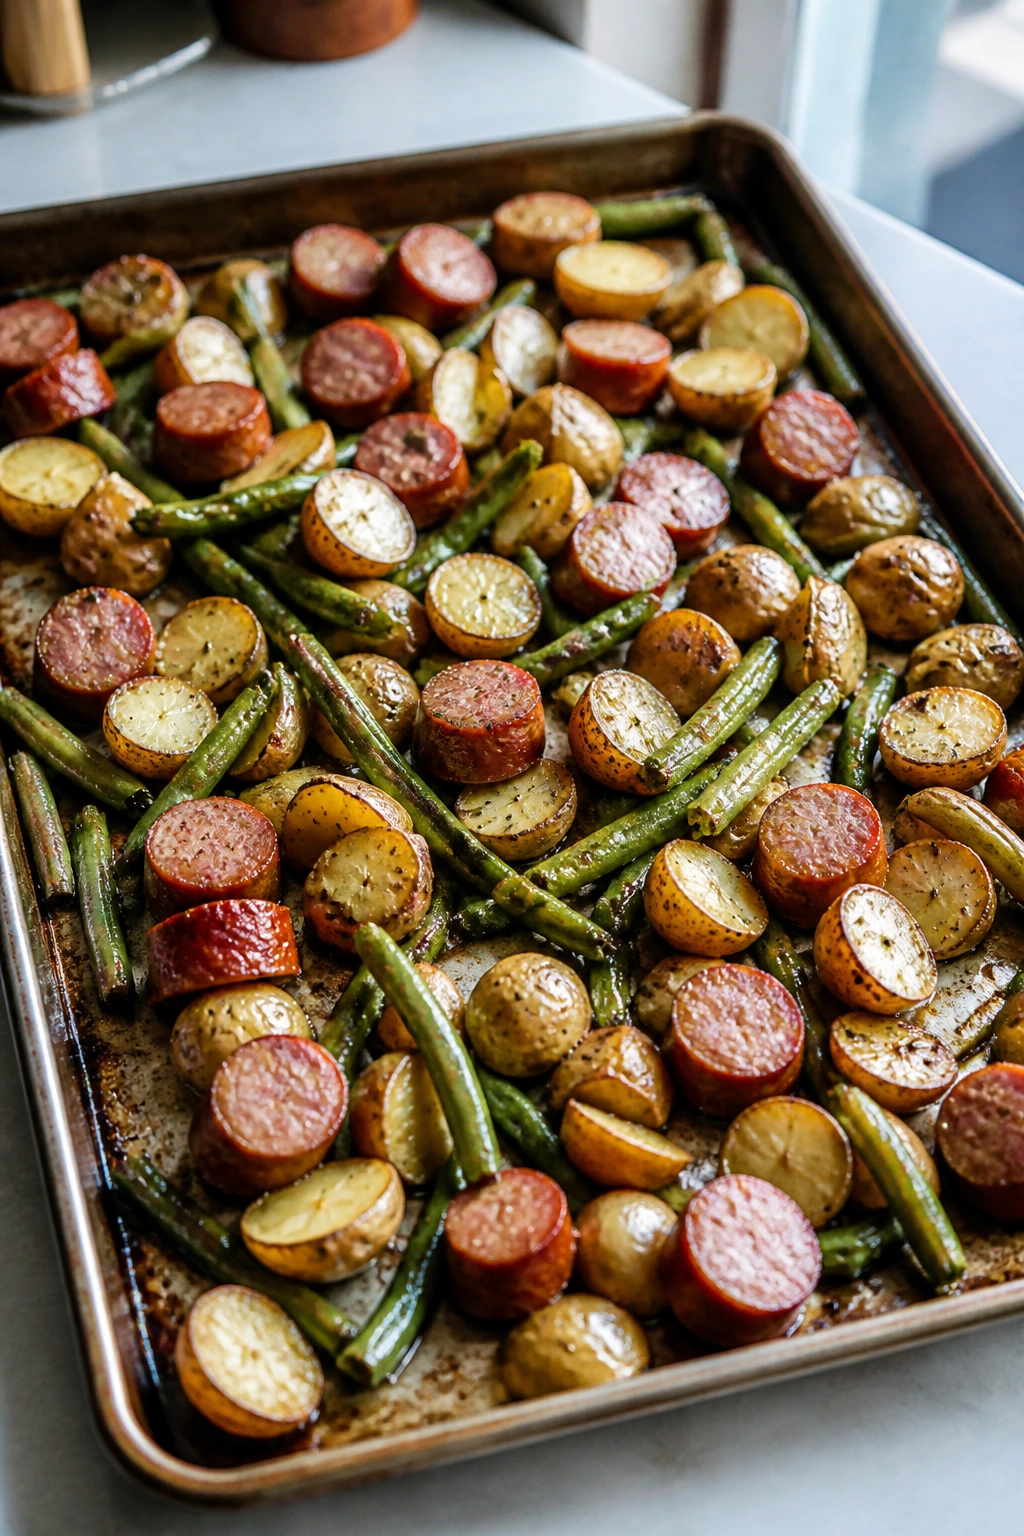
Which of these meals is the fastest on a busy night?
Mini pepperoni pizza pitas, quesadillas, buffalo wraps, and grilled cheese with soup all move quickly because most of the work is assembly and a short bake or skillet time. If you already have cooked chicken or rice, those meals get even faster.
Can I prep parts of these dinners earlier in the day?
Yes. Shred cheese, chop onions, mix sauces, and cook rice or chicken in the morning so dinner at night feels like simple assembly. Casseroles and chili can even be fully made ahead and reheated.
What’s the best way to keep movie-night food from getting soggy?
Keep wet toppings off until the end, especially salsa, tomatoes, slaw dressing, and sauces that are heavy on vinegar. For crispy dishes, reheat in the oven or air fryer instead of the microwave so the texture comes back.
Can I freeze leftovers from these recipes?
Chili, pulled pork, meatball filling, taco meat, pasta bakes, and some casseroles freeze well for up to 2 months. Wraps, quesadillas, and fried items usually lose too much texture, so those are better eaten fresh or kept in the fridge for a short stretch.
What if my family likes different spice levels?
Make the main dish mild and put the heat on the table. Buffalo sauce, jalapeños, hot sauce, and chili flakes can be added after serving, which keeps one pot useful for everyone.
Do I need special equipment for any of these?
Nothing fancy. A sheet pan, skillet, baking dish, pot, and cutting board cover most of the list. A slow cooker helps with pulled pork, and a wire rack is useful for anything you want crisp, but neither one is mandatory.
Can I make these with less meat?
Absolutely. Beans, mushrooms, lentils, and extra vegetables can stand in for part or all of the meat in tacos, pasta, nachos, chili, and casseroles. Keep the seasoning bold so the dish still feels complete.
What if I only have one pan available?
Pick the meals that are truly one-pan or one-pot: sheet pan sausage, nacho skillet, cheesy pasta, fried rice, and skillet gnocchi are all good choices. Anything with multiple components can usually be simplified if you make one part ahead.
Lights Down, Plates Up

Family movie night works better when dinner is built for the setting instead of forced into it. A meal that can be eaten with one hand, shared from a tray, or reheated without falling apart changes the whole evening. It takes pressure off the stove, off the table, and off the person who usually ends up cleaning up while everybody else is already halfway into the opening scene.
That’s what these easy weeknight meals do well. They keep the food friendly, the cleanup reasonable, and the mood relaxed enough that nobody feels like dinner and the movie are competing for attention. Pick the one that matches your grocery bag, your patience level, and your crowd, then let the rest of the night take care of itself.