
Busy school mornings expose every weak breakfast plan. A bowl of cereal goes soggy fast, a skillet breakfast eats too much time, and anything that needs two free hands tends to lose the fight to shoes, backpacks, and a missing library book. If you want food that actually survives that half-awake scramble, you need meals that can be eaten one-handed, reheated in under a minute, or packed up the night before without turning mushy.
I’m picky about morning food for that exact reason. I want things with a little structure: muffins that don’t crumble into the car seat, burritos that hold together after a quick reheat, oats that set up in the fridge instead of sloshing around like wallpaper paste. And I want enough variety that nobody at the table feels trapped in a loop of toast, toast, and more toast.
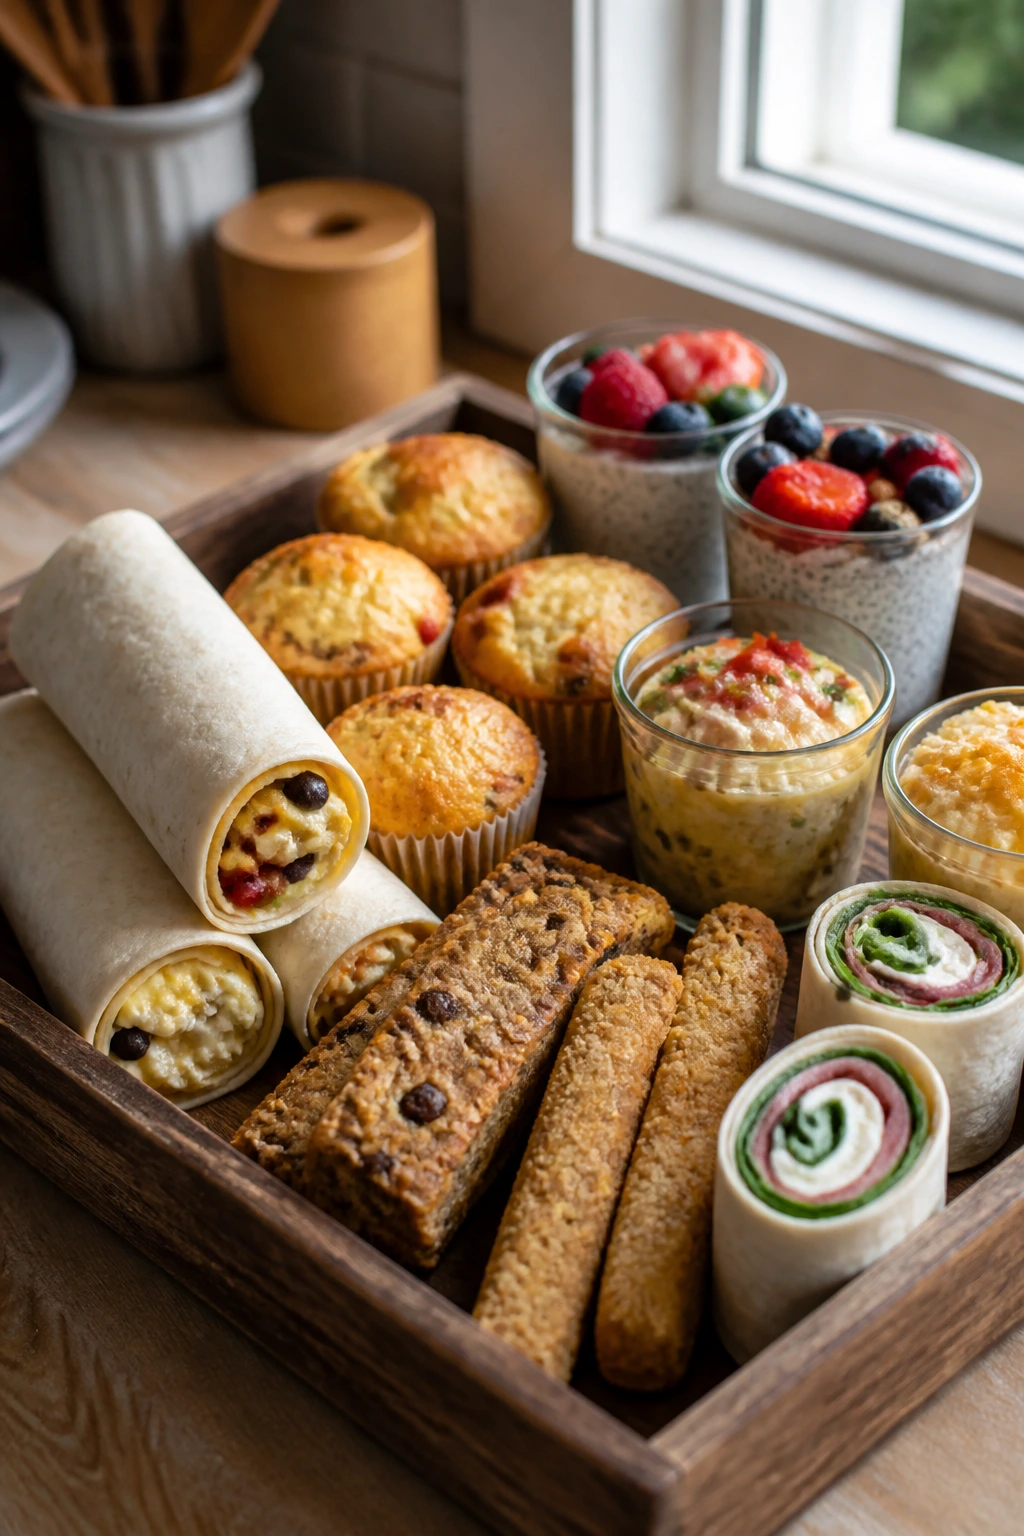
The meals below lean hard on that kind of practical thinking. Some are freezer heroes. Some live in the fridge in neat little jars. Some are for the mornings when you’ve got 12 minutes and a toaster oven working in your favor. All of them are built to keep the first part of the day from becoming a kitchen emergency.
Why This Collection Pulls Its Weight on Busy School Mornings
-
Make-ahead muscle: Most of these can be cooked the night before or over the weekend, so weekday mornings turn into reheat-and-go, not scramble-and-sweat.
-
Handheld and car-friendly: Burritos, muffins, sticks, pinwheels, and bars hold together better than a plate of loose eggs and toast, which matters when someone is halfway out the door.
-
Kid-tested shapes: Familiar forms like muffins, cups, pizzas, sticks, and bars usually get eaten faster than anything that looks “too healthy” on sight.
-
Freezer support: Several of these recipes freeze for 2 to 3 months, which means you can build a small breakfast stash and stop starting from zero every day.
-
Flexible fillings: Eggs, oats, yogurt, fruit, cheese, and tortillas can be swapped around without wrecking the whole plan. That makes picky eaters less of a problem.
-
Low-mess cleanup: Muffin tins, sheet pans, jars, and skillet bakes leave fewer dishes than a full stovetop breakfast. On a school morning, that is half the win.
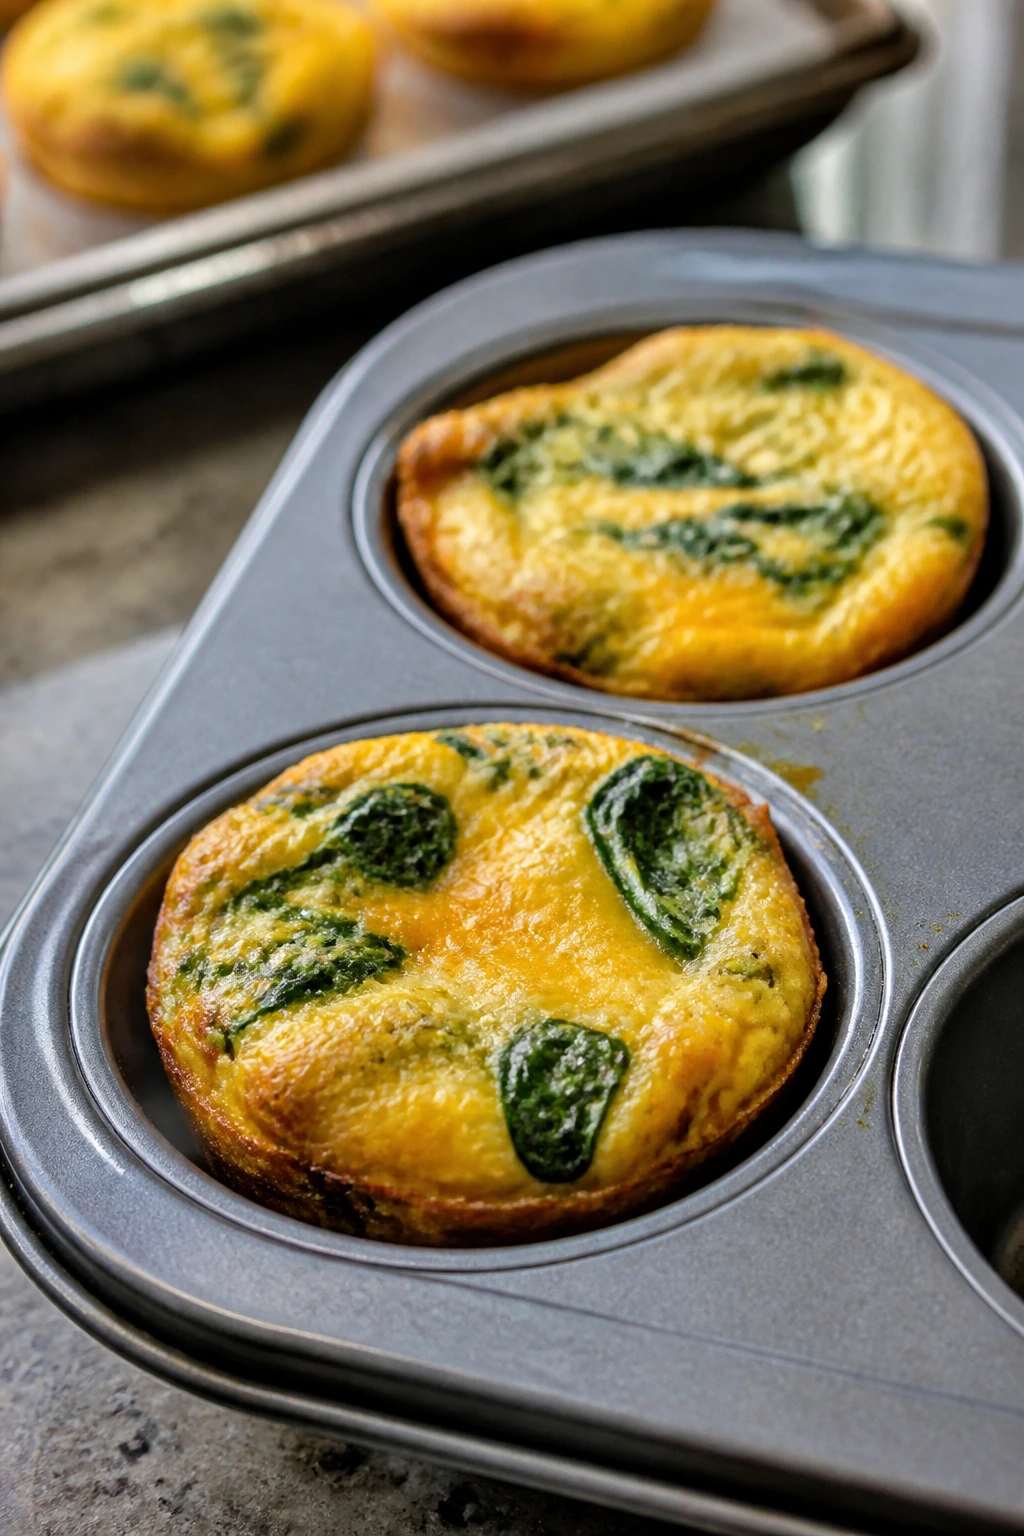
1. Spinach and Cheddar Egg Muffins
These are the breakfast version of a clean getaway. The eggs bake into little domes that feel sturdy in the hand, while the spinach softens into the custard and the cheddar gives you salty pockets that stay melty without getting greasy. If you’ve ever watched scrambled eggs sit around and get sad, you’ll appreciate how neatly these hold their shape.
Why It Works:
The muffin tin does the portioning for you, which makes these faster to pack than a skillet scramble. A small amount of milk keeps the texture tender, and baking at 350°F gives the eggs enough time to set without puffing into dry little sponges. The spinach needs to be squeezed dry; that one detail is the difference between a neat bite and a watery bottom.
Key Ingredients:
- 8 large eggs
- 1/4 cup whole milk
- 1 cup finely chopped spinach, squeezed dry
- 3/4 cup shredded sharp cheddar
- 1/4 cup diced red bell pepper
- 1/4 teaspoon kosher salt
- 1/8 teaspoon black pepper
- Cooking spray or butter for the tin
Quick Steps:
- Preheat the oven to 350°F and grease a 12-cup muffin tin well.
- Whisk the eggs, milk, salt, and pepper until smooth and a little foamy.
- Stir in the spinach, bell pepper, and half the cheese.
- Divide the mixture among 8 to 10 cups, then top with the remaining cheese.
- Bake for 18 to 20 minutes, until the centers are set and the tops spring back when touched. Cool for 5 minutes before loosening them with a thin knife.
Equipment for This Recipe:
- 12-cup muffin tin
- Mixing bowl and whisk
- Measuring cups and spoons
- Rubber spatula
How to Serve This Dish:
Serve two muffins with sliced apples or orange wedges and a few crackers if you need the breakfast to feel more complete. They also tuck nicely into a lunchbox with a small napkin and a cheese stick.
Pro Tips for This Recipe:
- Press the spinach in a clean towel until no more water comes out.
- Don’t overfill the cups; egg muffins puff, then settle.
- Let them cool before packing or they’ll sweat in the container.
Variations on This Dish:
- Ham-and-Swiss Version: Swap the pepper for 1/3 cup diced ham and use Swiss instead of cheddar.
- Veggie-Heavy Version: Add 1/4 cup sautéed mushrooms and 1/4 cup chopped zucchini, both cooled and well-drained.
Common Mistakes to Avoid with This Dish:
- Using wet spinach: The muffins turn soggy underneath. Squeeze it dry first.
- Baking too long: The eggs go rubbery fast. Pull them as soon as the centers are set.
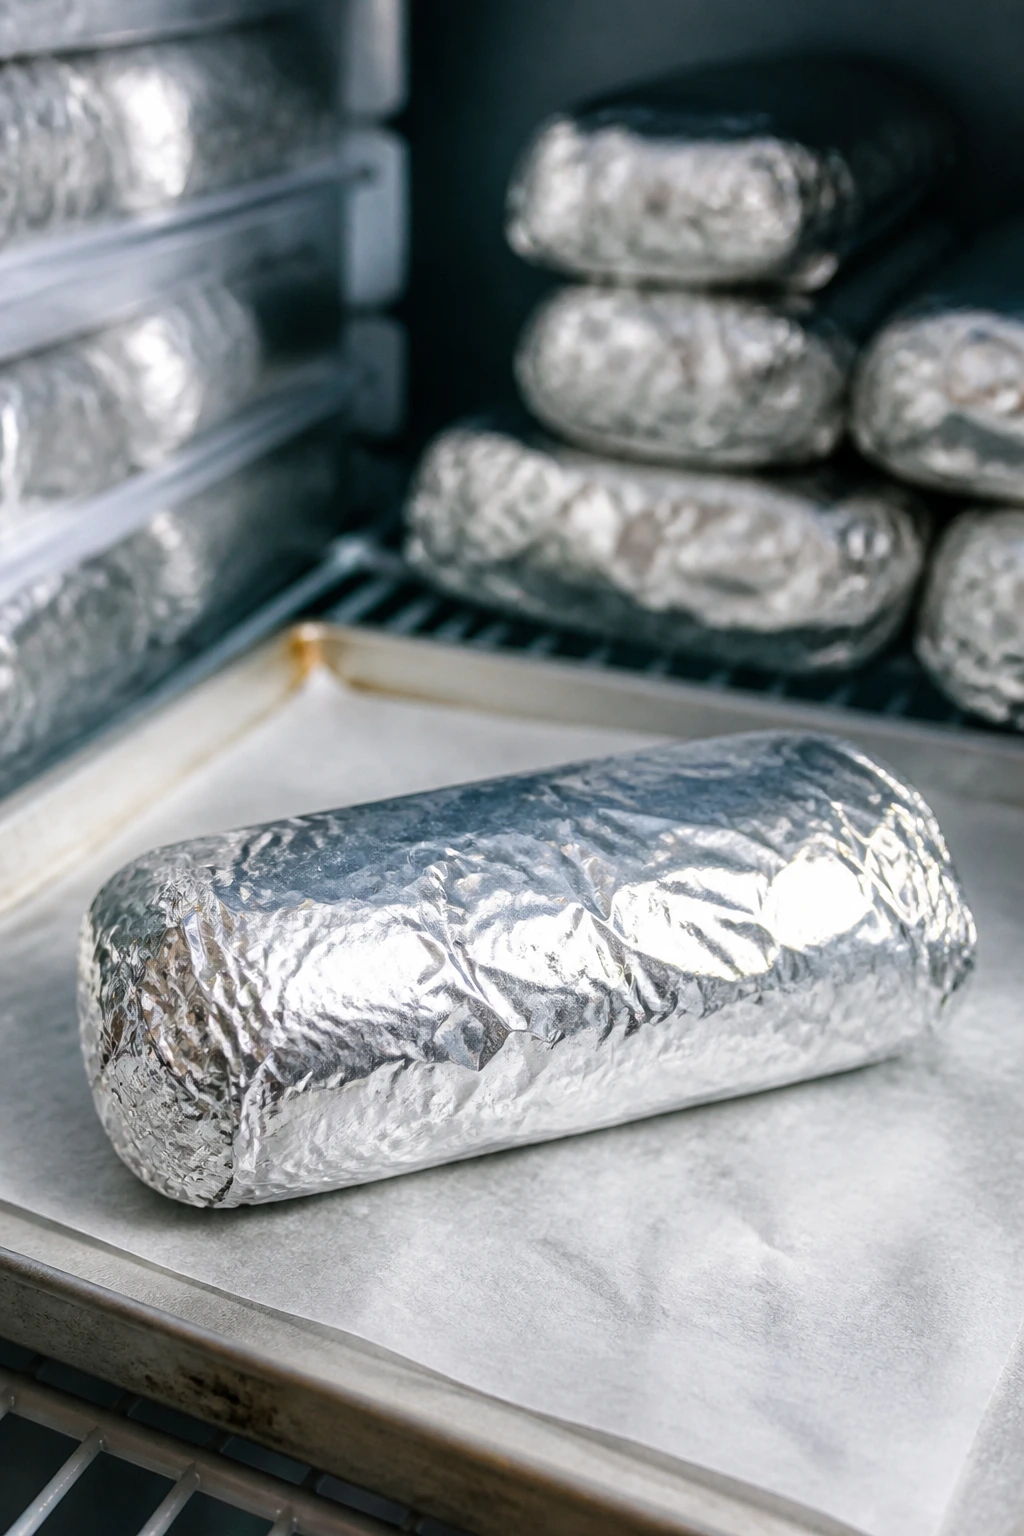
2. Freezer Breakfast Burritos
A good breakfast burrito has to do three things: hold together, reheat cleanly, and keep the eggs from tasting like cardboard. These do all three if you roll them tightly and cool them before freezing. The tortilla softens around the filling, the potatoes give the burrito some weight, and the sausage brings enough salt to make the whole thing taste awake.
Why It Works:
This is the kind of breakfast that rewards batch cooking. One pan of sausage, one pan of eggs, one tray of assembly, and you’ve got several mornings covered. Hash browns give the burrito shape and keep the filling from sliding around, while wrapping each one individually prevents freezer burn and that weird dry edge tortillas get when they sit exposed.
Key Ingredients:
- 8 large eggs
- 1 tablespoon butter
- 8 ounces breakfast sausage
- 2 cups frozen hash browns
- 1 cup shredded cheddar
- 8 medium flour tortillas
- 1/2 cup salsa, for serving
- Salt and black pepper
Quick Steps:
- Cook the sausage in a skillet over medium heat until browned and crumbly, then set it aside.
- In the same pan, cook the hash browns until the edges are crisp and pale gold.
- Scramble the eggs in butter over medium-low heat until just set; stop while they still look soft.
- Warm the tortillas for 15 seconds in the microwave so they bend without cracking.
- Fill each tortilla with eggs, sausage, potatoes, and cheese, then roll tightly, fold in the sides, and wrap in parchment or foil. Freeze.
- Reheat wrapped burritos in the microwave for 1 to 2 minutes, then crisp in a skillet for 1 minute if you want the tortilla firmer.
Equipment for This Recipe:
- Large skillet
- Mixing bowl
- Spatula
- Parchment paper or foil
How to Serve This Dish:
Cut them on the diagonal and serve with salsa or a little sour cream. A handful of grapes beside the burrito turns the plate from rushed to finished.
Pro Tips for This Recipe:
- Let the fillings cool before rolling, or steam will make the tortillas soggy.
- Don’t overstuff them; tight wraps freeze and reheat better.
- Put the seam side down while you’re wrapping so the burrito stays put.
Variations on This Dish:
- Black Bean Morning Wrap: Replace the sausage with 1 cup seasoned black beans for a meatless version.
- Pepper Jack Kick: Use pepper jack cheese and add 2 tablespoons chopped jalapeños for older kids or adults who want heat.
Common Mistakes to Avoid with This Dish:
- Rolling hot fillings: That traps steam and makes the burrito soggy. Cool the filling first.
- Using oversized tortillas: They’re harder to seal neatly. Medium tortillas are easier to manage.
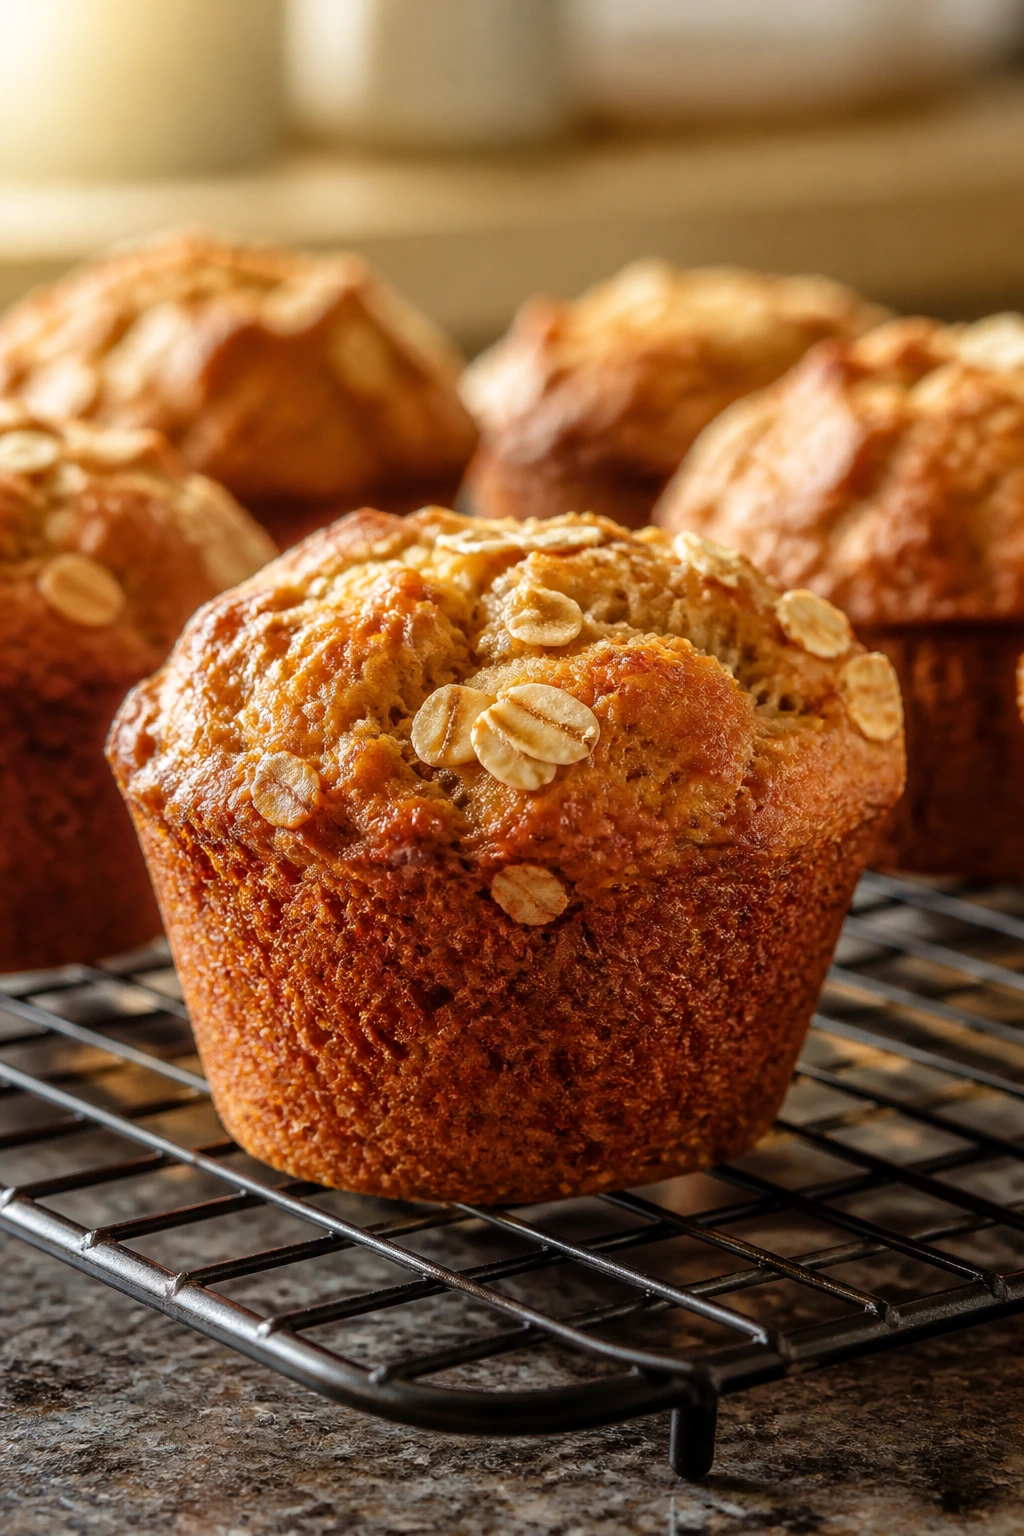
3. Banana Oat Muffins
These are the muffins I reach for when the bananas on the counter have gone from spotted to almost embarrassing. They bake up soft and fragrant, with enough oat texture to keep them from feeling like cake in disguise. The edges take on a faint caramel color, and the inside stays moist for days if you cool them properly.
Why It Works:
Banana brings sweetness and moisture, which lets you keep the sugar lower than in a standard muffin. Oats give the crumb a little chew, so the muffin feels more breakfast-like and less dessert-like. Baking soda reacts with the banana and helps the top dome without needing a fussy batter.
Key Ingredients:
- 3 ripe bananas, mashed
- 2 large eggs
- 1/3 cup melted butter or neutral oil
- 1/2 cup brown sugar
- 1 1/2 cups all-purpose flour
- 1 cup rolled oats
- 1 teaspoon baking soda
- 1 teaspoon cinnamon
- 1/2 teaspoon salt
- 1 teaspoon vanilla extract
Quick Steps:
- Preheat the oven to 350°F and line a 12-cup muffin tin with paper liners.
- Whisk the mashed bananas, eggs, butter, sugar, and vanilla until smooth.
- Stir in the flour, oats, baking soda, cinnamon, and salt just until the flour disappears.
- Divide the batter among the cups, filling each about 3/4 full.
- Bake for 18 to 22 minutes, until the tops are golden and a tester comes out with only a few moist crumbs. Cool in the pan for 5 minutes, then move to a rack.
Equipment for This Recipe:
- Muffin tin
- Mixing bowl
- Fork or potato masher
- Wire rack
How to Serve This Dish:
Serve warm with a smear of butter or peanut butter and a few berries on the side. They’re also good tucked into a napkin for the walk to the car.
Pro Tips for This Recipe:
- Use bananas with dark speckles; they mash smoother and taste sweeter.
- Stop mixing the second the flour disappears.
- If you want better storage, cool them completely before bagging.
Variations on This Dish:
- Blueberry Banana Muffins: Fold in 1 cup blueberries at the end for a fruitier version.
- Nut Butter Swirl: Drop 1 teaspoon peanut butter on top of each muffin and swirl it lightly with a toothpick.
Common Mistakes to Avoid with This Dish:
- Overmixing: That makes the crumb tough. Stir only until combined.
- Using underripe bananas: The muffins taste flat and need more sugar to make up for it.
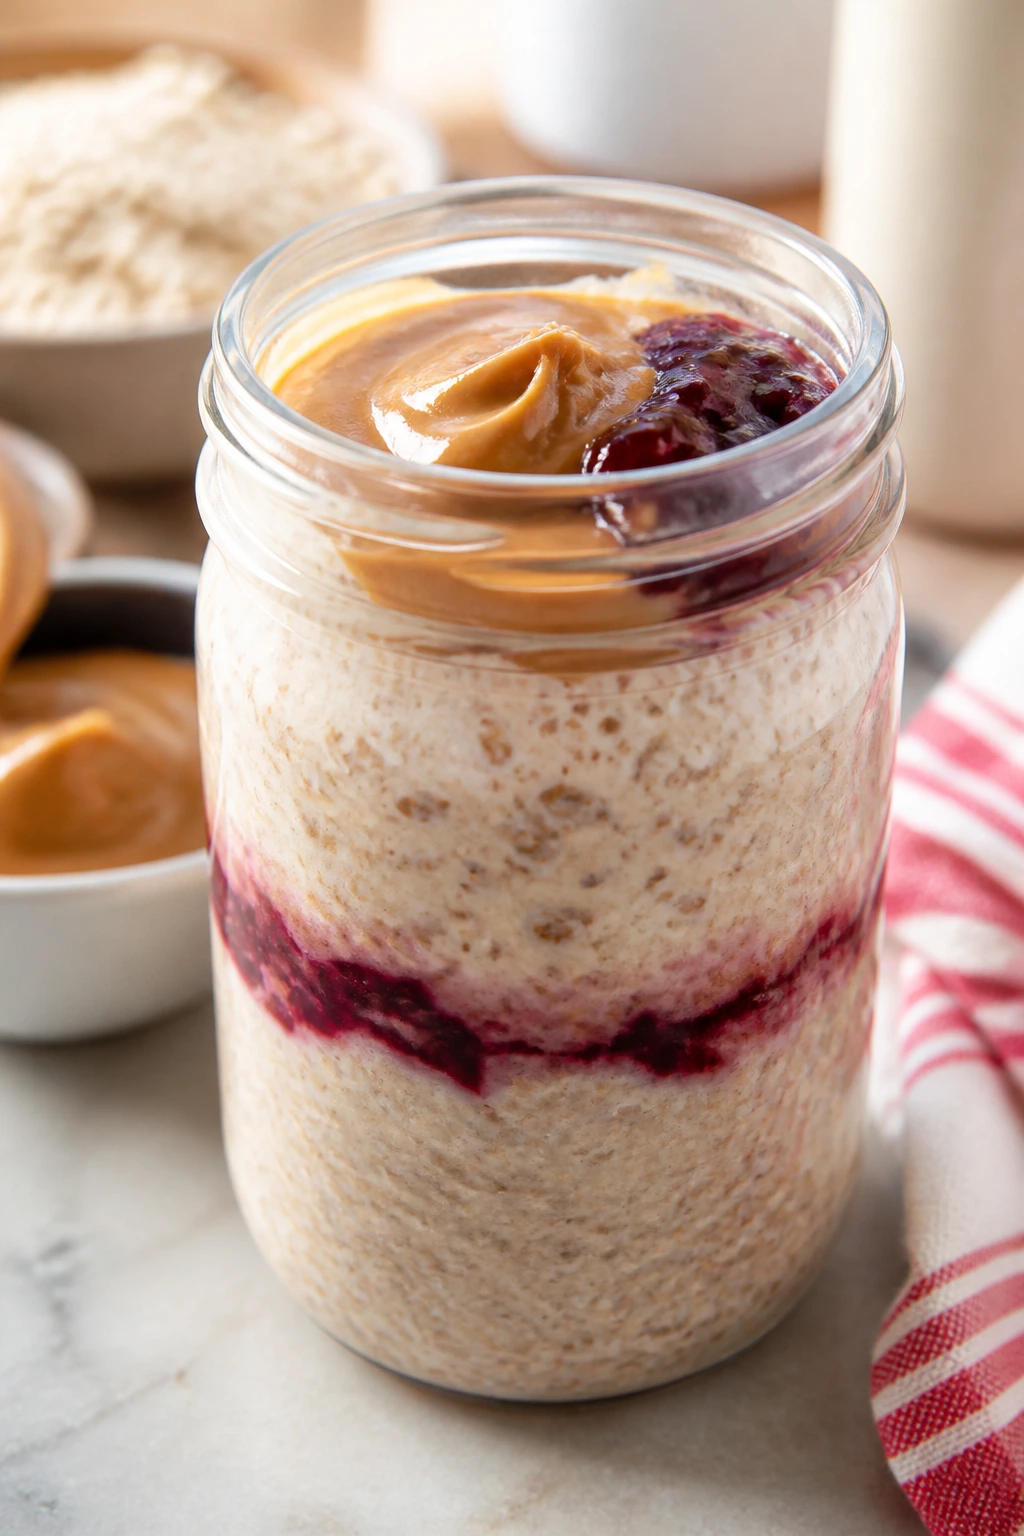
4. Peanut Butter and Jelly Overnight Oats
This one tastes like a lunchbox classic turned into breakfast. The oats soften overnight, the peanut butter turns creamy instead of sticky, and the jam settles into pockets that taste like a spoonful of toast. It’s cold, thick, and ready the moment you open the fridge.
Why It Works:
Overnight oats work because the oats absorb liquid without heat, which means zero stovetop time in the morning. Greek yogurt gives the mixture more body and protein, while chia seeds help it set into a spoonable texture instead of a thin cereal soup. The jam sits on top or gets swirled through, depending on how much time you want to spend pretending breakfast is elaborate.
Key Ingredients:
- 2 cups rolled oats
- 2 cups milk
- 1 cup plain Greek yogurt
- 1/3 cup peanut butter
- 1/4 cup chia seeds
- 1/3 cup strawberry or grape jam
- 1 teaspoon vanilla extract
- Pinch of salt
Quick Steps:
- In a large bowl, whisk the milk, yogurt, peanut butter, jam, vanilla, and salt until the peanut butter breaks down as much as it can.
- Stir in the oats and chia seeds.
- Divide the mixture into 4 jars or containers.
- Chill for at least 4 hours, or overnight, until thick.
- Stir before eating and add a splash of milk if you want it looser.
Equipment for This Recipe:
- Mixing bowl
- Spoon or whisk
- 4 jars or lidded containers
How to Serve This Dish:
Top with sliced banana, a few crushed peanuts, or extra jam if you want it sweeter. It also travels well in a lidded cup with a spoon taped to the lid.
Pro Tips for This Recipe:
- Stir the mixture again after 10 minutes in the fridge; that helps the chia distribute evenly.
- Use salted peanut butter if yours tastes flat.
- If the oats get too thick, loosen them with a tablespoon or two of milk.
Variations on This Dish:
- Sunflower Butter Swap: Use sunflower seed butter for a nut-free school version.
- Chocolate PB&J: Stir in 1 tablespoon cocoa powder and top with raspberries instead of jam.
Common Mistakes to Avoid with This Dish:
- Using instant oats: They can go mushy fast. Rolled oats hold up better.
- Skipping the salt: Peanut butter tastes dull without it.
5. Yogurt Parfait Jars
A parfait jar is mostly about good layering and not messing it up. You want cool, thick yogurt, fruit that doesn’t leak everywhere, and crunchy granola held back until the last second. Done right, every spoonful gives you cream, fruit, and crunch instead of one soggy note.
Why It Works:
Greek yogurt brings protein and a tang that keeps the fruit from tasting too sweet. Layering the fruit between yogurt keeps juices from soaking the granola, and using small jars makes the portions feel finished instead of accidental. This is one of those meals that looks fancy even when it took five minutes.
Key Ingredients:
- 4 cups plain Greek yogurt
- 2 cups berries, patted dry
- 1 1/2 cups granola
- 2 tablespoons honey
- 1 tablespoon chia seeds
- 1 teaspoon vanilla extract
Quick Steps:
- Stir the yogurt with honey and vanilla until smooth.
- Spoon a layer of yogurt into each jar.
- Add berries, then a sprinkle of chia seeds.
- Repeat with another layer of yogurt and fruit.
- Keep the granola separate until serving, or tuck a little in a bag on the side.
Equipment for This Recipe:
- Mixing bowl
- Spoon
- 4 small jars or containers
How to Serve This Dish:
Serve it cold with the granola scattered on top right before eating. A sliced banana on the side makes it feel more like a full breakfast and less like a snack.
Pro Tips for This Recipe:
- Dry the berries with a towel so they don’t stain the yogurt.
- Use thick yogurt; thin yogurt turns the jar soupy.
- If you’re packing these for later, leave the top jar layer plain and add fruit in the morning.
Variations on This Dish:
- Tropical Jar: Swap berries for diced mango and pineapple.
- Cinnamon Apple Jar: Use chopped apples and a pinch of cinnamon instead of berries.
Common Mistakes to Avoid with This Dish:
- Adding granola too early: It loses its crunch. Keep it separate.
- Using watery yogurt: The layers slide apart. Start with thick Greek yogurt.
6. Sheet Pan Pancakes
This is the pancake move for people who do not want to stand at the stove flipping six rounds of batter while the clock gets louder. The batter bakes into one even slab, lightly browned on top and tender in the middle, with whatever mix-ins you choose sitting where they’re supposed to sit instead of falling onto the griddle.
Why It Works:
A sheet pan gives you uniform thickness, so the pancakes cook at the same speed and slice cleanly into squares. The higher oven heat sets the top before the batter dries out, which is why this version feels softer than leftover griddle pancakes that spent too long in a warm oven. The whole batch is also easier to freeze than a stack of fragile rounds.
Key Ingredients:
- 2 cups all-purpose flour
- 2 tablespoons sugar
- 1 tablespoon baking powder
- 1/2 teaspoon salt
- 2 large eggs
- 2 cups milk
- 1/4 cup melted butter
- 1 cup blueberries or chocolate chips
Quick Steps:
- Preheat the oven to 425°F and line a rimmed half-sheet pan with parchment.
- Whisk the flour, sugar, baking powder, and salt in a bowl.
- In another bowl, whisk the eggs, milk, and melted butter, then stir the wet and dry together just until combined.
- Spread the batter into the pan and scatter blueberries or chips over the top.
- Bake for 12 to 15 minutes, until puffed and lightly golden. Rest for 5 minutes, then cut into squares.
Equipment for This Recipe:
- Rimmed sheet pan
- Parchment paper
- Mixing bowls
- Whisk
- Knife or bench scraper
How to Serve This Dish:
Stack two or three squares with butter and syrup, or pack them plain with berries so they can be eaten on the run. They freeze well between layers of parchment.
Pro Tips for This Recipe:
- Don’t make the batter too thick; it should spread with a little help from the spatula.
- Rotate the pan once if your oven has hot spots.
- Let the pan sit before cutting so the squares don’t tear.
Variations on This Dish:
- Cinnamon Swirl Sheet Pan Pancakes: Add 1 teaspoon cinnamon and a quick drizzle of brown sugar butter on top.
- Banana Chip Version: Fold in 1 mashed banana and 1/2 cup mini chocolate chips.
Common Mistakes to Avoid with This Dish:
- Overmixing the batter: The pancakes turn chewy. Stir only until the flour disappears.
- Cutting too soon: The squares tear. Let them rest first.
7. Sausage, Egg, and Cheese Biscuit Sandwiches
There’s a reason these disappear fast. The biscuit gives you something buttery and sturdy, the egg stays soft in the middle, and the sausage brings enough savoriness to make the whole sandwich feel like more than a reheated leftover. Wrapped well, these are one of the easiest breakfasts to pull from the freezer and revive.
Why It Works:
Biscuit sandwiches are built for batch making because each layer can be cooked separately and assembled in a stack. Scrambling the eggs in a sheet pan or skillet keeps the texture tender, and freezing them individually means you can pull out exactly what you need. They reheat better than fried-egg sandwiches because the eggs don’t go chewy.
Key Ingredients:
- 8 biscuits
- 8 large eggs
- 1 tablespoon butter
- 8 sausage patties
- 8 slices cheddar
- Salt and pepper
Quick Steps:
- Bake or heat the biscuits according to package directions, then split them.
- Cook the sausage patties over medium heat until browned and cooked through.
- Scramble the eggs in butter over low heat until just set and still soft.
- Build each sandwich with biscuit, sausage, egg, and cheese.
- Wrap tightly, cool completely, then freeze. Reheat wrapped sandwiches in the microwave for 1 to 1 1/2 minutes, then unwrap and crisp in a toaster oven if you want the biscuit firmer.
Equipment for This Recipe:
- Skillet
- Baking sheet
- Spatula
- Foil or parchment
How to Serve This Dish:
Serve with a clementine and a few cucumber sticks if you want the plate to feel less heavy. If you’re eating on the go, wrap the sandwich in parchment first, then foil.
Pro Tips for This Recipe:
- Scramble the eggs softly; they’ll finish during reheating.
- Cool the sandwich before freezing or the biscuit turns damp.
- If you want cleaner reheating, slice each sandwich in half before freezing.
Variations on This Dish:
- Turkey Sausage Swap: Use turkey sausage patties for a lighter version.
- Pepper Jack Heat: Add pepper jack and a spoonful of salsa for a sharper sandwich.
Common Mistakes to Avoid with This Dish:
- Assembling while everything is steaming: That traps moisture in the biscuit. Let the parts cool.
- Overheating the reheated sandwich: The egg turns rubbery fast. Warm it gently.
8. Apple Cinnamon Baked Oatmeal
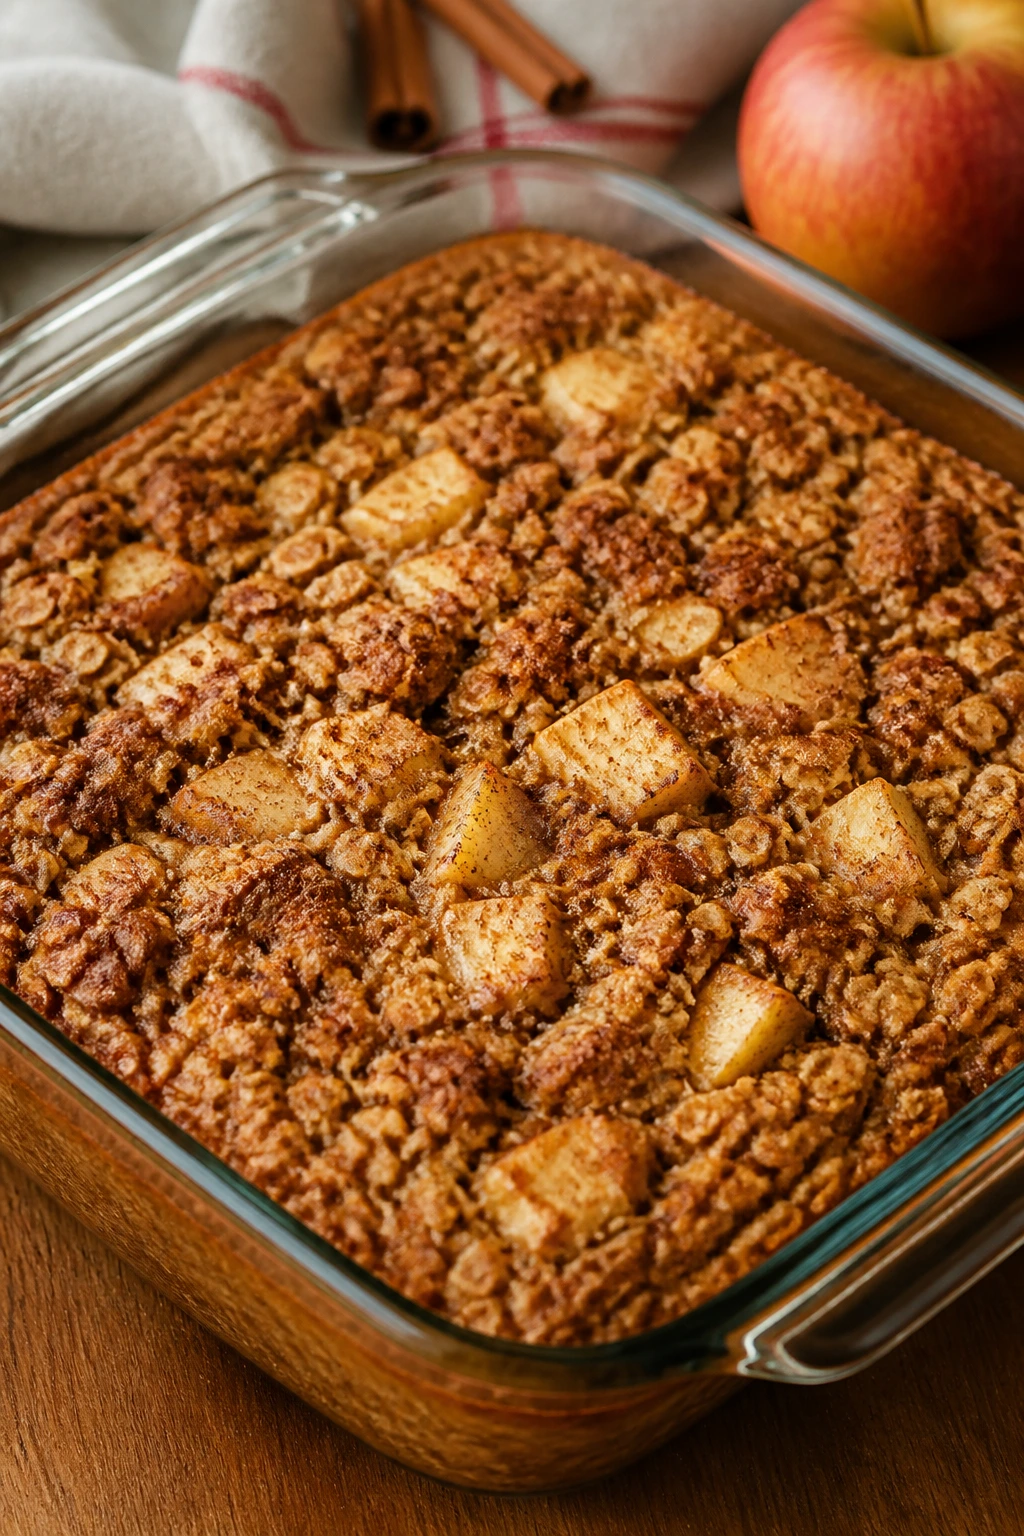
This is the kind of breakfast that fills the kitchen with a smell that makes people wander in wearing socks and no patience. The oats set into a spoonable bake, the apples soften but stay recognizable, and the cinnamon gives the whole pan that warm, bakery smell without asking much from you.
Why It Works:
Baked oatmeal sits at a sweet spot between porridge and cake. The eggs help it set into slices, the milk keeps it moist, and the apples give it enough texture that you’re not eating something paste-like. It’s also one of the rare breakfasts that tastes even better after a night in the fridge.
Key Ingredients:
- 3 cups rolled oats
- 2 apples, diced small
- 2 large eggs
- 2 cups milk
- 1/3 cup maple syrup
- 1/4 cup melted butter
- 1 teaspoon cinnamon
- 2 teaspoons baking powder
- 1 teaspoon vanilla extract
- 1/2 teaspoon salt
Quick Steps:
- Preheat the oven to 350°F and grease an 8×8-inch baking dish.
- Whisk the eggs, milk, maple syrup, butter, and vanilla.
- Stir in the oats, apples, cinnamon, baking powder, and salt.
- Pour into the dish and smooth the top.
- Bake for 35 to 40 minutes, until the center is set and the edges are golden. Let it rest 10 minutes before slicing.
Equipment for This Recipe:
- 8×8-inch baking dish
- Mixing bowl
- Whisk
- Knife and cutting board
How to Serve This Dish:
Spoon it into bowls with plain yogurt or a splash of milk. For a packable version, cut it into squares and wrap them individually.
Pro Tips for This Recipe:
- Dice the apples small so they soften before the oats overbake.
- Let the pan rest; the slices firm up as they cool.
- A little extra cinnamon on top before baking gives the surface a better smell.
Variations on This Dish:
- Raisin-Maple Version: Add 1/3 cup raisins for a sweeter, softer bake.
- Pear and Cardamom Version: Swap apples for pears and use 1/4 teaspoon cardamom.
Common Mistakes to Avoid with This Dish:
- Using quick oats: The texture turns too soft. Rolled oats hold their shape better.
- Cutting it hot: It falls apart. Let it sit first.
9. Berry Green Smoothie Packs
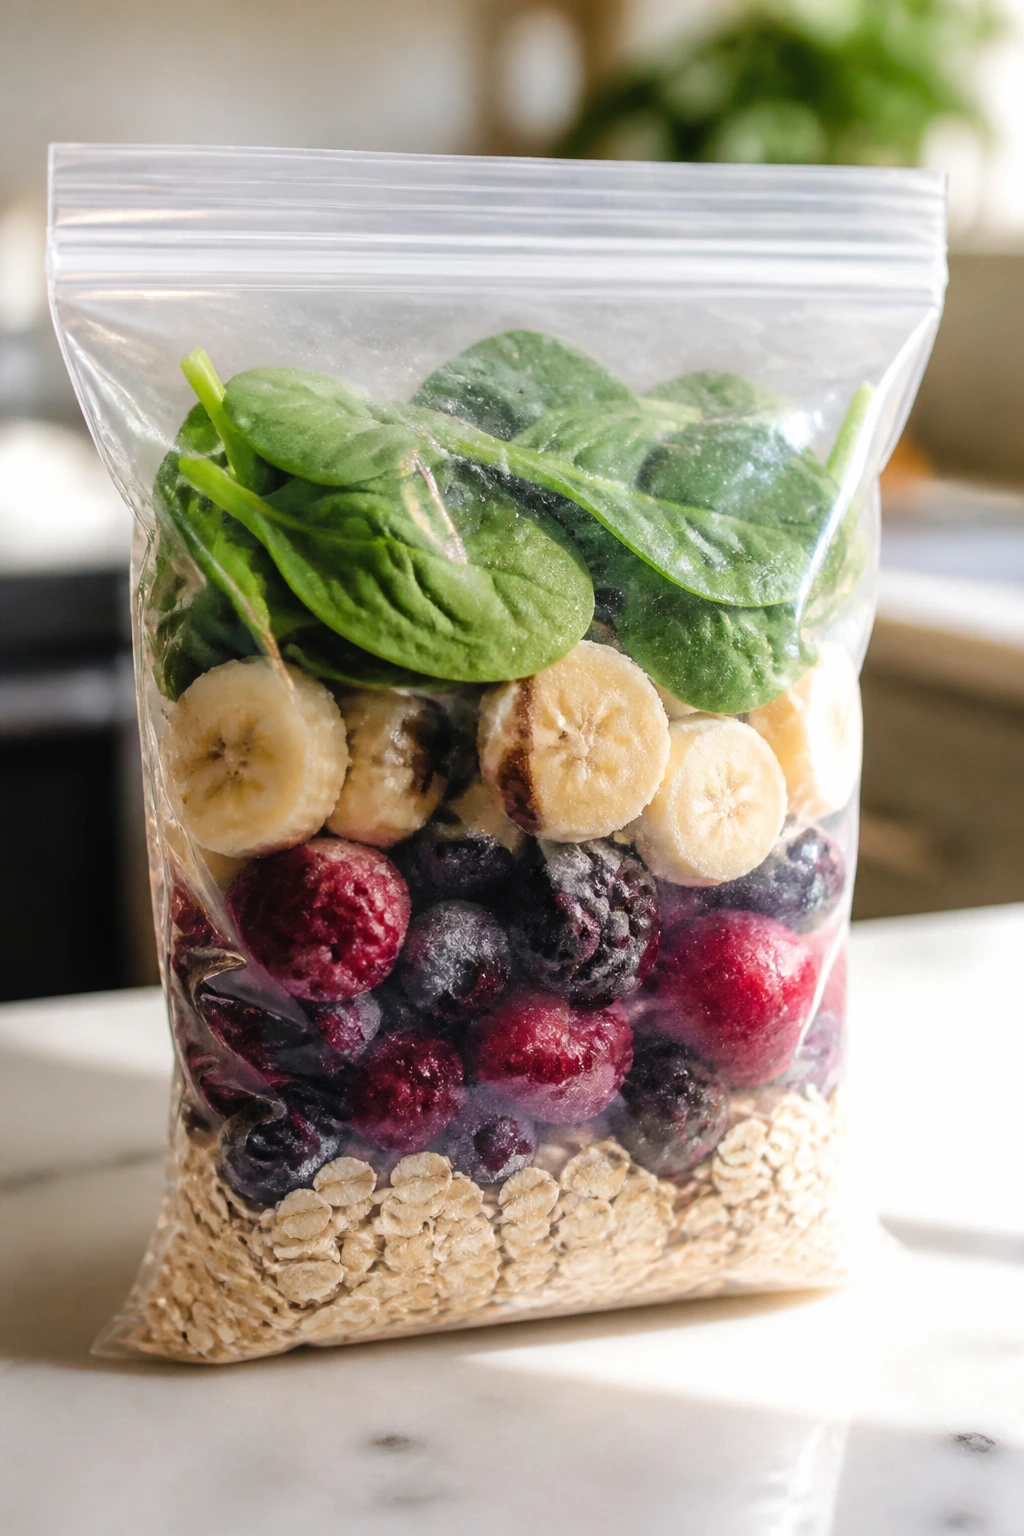
These freezer packs are less a recipe and more a morning rescue plan. You dump the contents into a blender, add milk and yogurt, and 30 seconds later you’ve got something cold, thick, and bright enough to wake up a tired kid who would rather keep pretending the alarm never happened.
Why It Works:
Packing the fruit and greens ahead of time cuts the morning into one simple step: blend. Frozen bananas make the smoothie creamy without ice, and spinach disappears under the berries if you keep the ratio sensible. The oats are optional, but they help the smoothie feel more like breakfast and less like juice in a cup.
Key Ingredients:
- 4 bananas, sliced
- 4 cups mixed berries
- 4 packed cups spinach
- 1 cup rolled oats
- 4 cups milk, for blending
- 2 cups plain Greek yogurt, for blending
- 2 tablespoons honey, optional
Quick Steps:
- Divide the banana slices, berries, spinach, and oats into 4 freezer bags.
- Press out the air, seal, and freeze flat.
- When you’re ready, pour one bag into a blender.
- Add 1 cup milk, 1/2 cup yogurt, and honey if you want it sweeter.
- Blend until smooth and thick, pausing once to scrape the sides if needed.
Equipment for This Recipe:
- Blender
- Freezer bags
- Measuring cups
- Spoon or spatula
How to Serve This Dish:
Pour into a travel cup with a lid and hand it over with a straw. If the smoothie is too thick, add a splash of milk and blend again for a few seconds.
Pro Tips for This Recipe:
- Freeze the packs flat so they thaw and blend faster.
- Use ripe bananas; they take the edge off the spinach.
- If your blender struggles, let the pack sit 2 to 3 minutes before blending.
Variations on This Dish:
- Mango Sunrise Pack: Swap berries for mango and pineapple.
- Protein Boost Pack: Blend in 1 scoop plain protein powder or an extra 1/4 cup yogurt.
Common Mistakes to Avoid with This Dish:
- Adding too much spinach: The smoothie turns muddy. Keep the fruit ratio strong.
- Forgetting the liquid: Frozen fruit alone won’t blend cleanly.
10. Breakfast Quesadillas

A breakfast quesadilla has a nice bit of drama to it. The tortilla goes crisp and spotted, the cheese melts into a soft seam, and the filling stays tucked inside like it knows it has a job to do. Cut into wedges, they’re easy for little hands and fast enough for grown-ups who are already late.
Why It Works:
The tortilla acts like a built-in wrapper, which makes this meal less messy than a burrito and faster than a skillet breakfast. Scrambled eggs cook quickly, and a little cheese on both sides helps seal the quesadilla so it doesn’t slide apart when you flip it. Keep the heat medium, not high, or the tortilla will brown before the cheese melts.
Key Ingredients:
- 4 large flour tortillas
- 6 large eggs
- 1 tablespoon butter
- 1 cup shredded cheddar
- 1/2 cup cooked crumbled bacon or sausage
- 1/2 cup diced bell pepper
- Salsa, for serving
Quick Steps:
- Scramble the eggs in butter over medium-low heat until just set.
- Lay one tortilla in a skillet over medium heat and sprinkle half the cheese over one half.
- Add the eggs, bacon or sausage, and pepper, then top with a little more cheese.
- Fold the tortilla and cook 2 to 3 minutes per side, until crisp and golden.
- Rest for 1 minute, then cut into wedges.
Equipment for This Recipe:
- Large skillet
- Spatula
- Knife or pizza cutter
- Mixing bowl
How to Serve This Dish:
Serve with salsa, avocado slices, or a spoonful of plain yogurt if that’s what you have. They’re easiest to eat cut into triangles and wrapped in parchment.
Pro Tips for This Recipe:
- Keep the filling warm but not wet.
- Use a little cheese near the fold so the quesadilla seals.
- Let it rest before cutting, or the filling spills out.
Variations on This Dish:
- Bean and Cheese Version: Replace the meat with 1/2 cup refried beans.
- Pepper Jack Version: Use pepper jack and a spoonful of salsa for more bite.
Common Mistakes to Avoid with This Dish:
- Turning the heat too high: The tortilla burns before the filling heats through.
- Packing in too much filling: It makes the quesadilla hard to flip cleanly.
11. French Toast Sticks
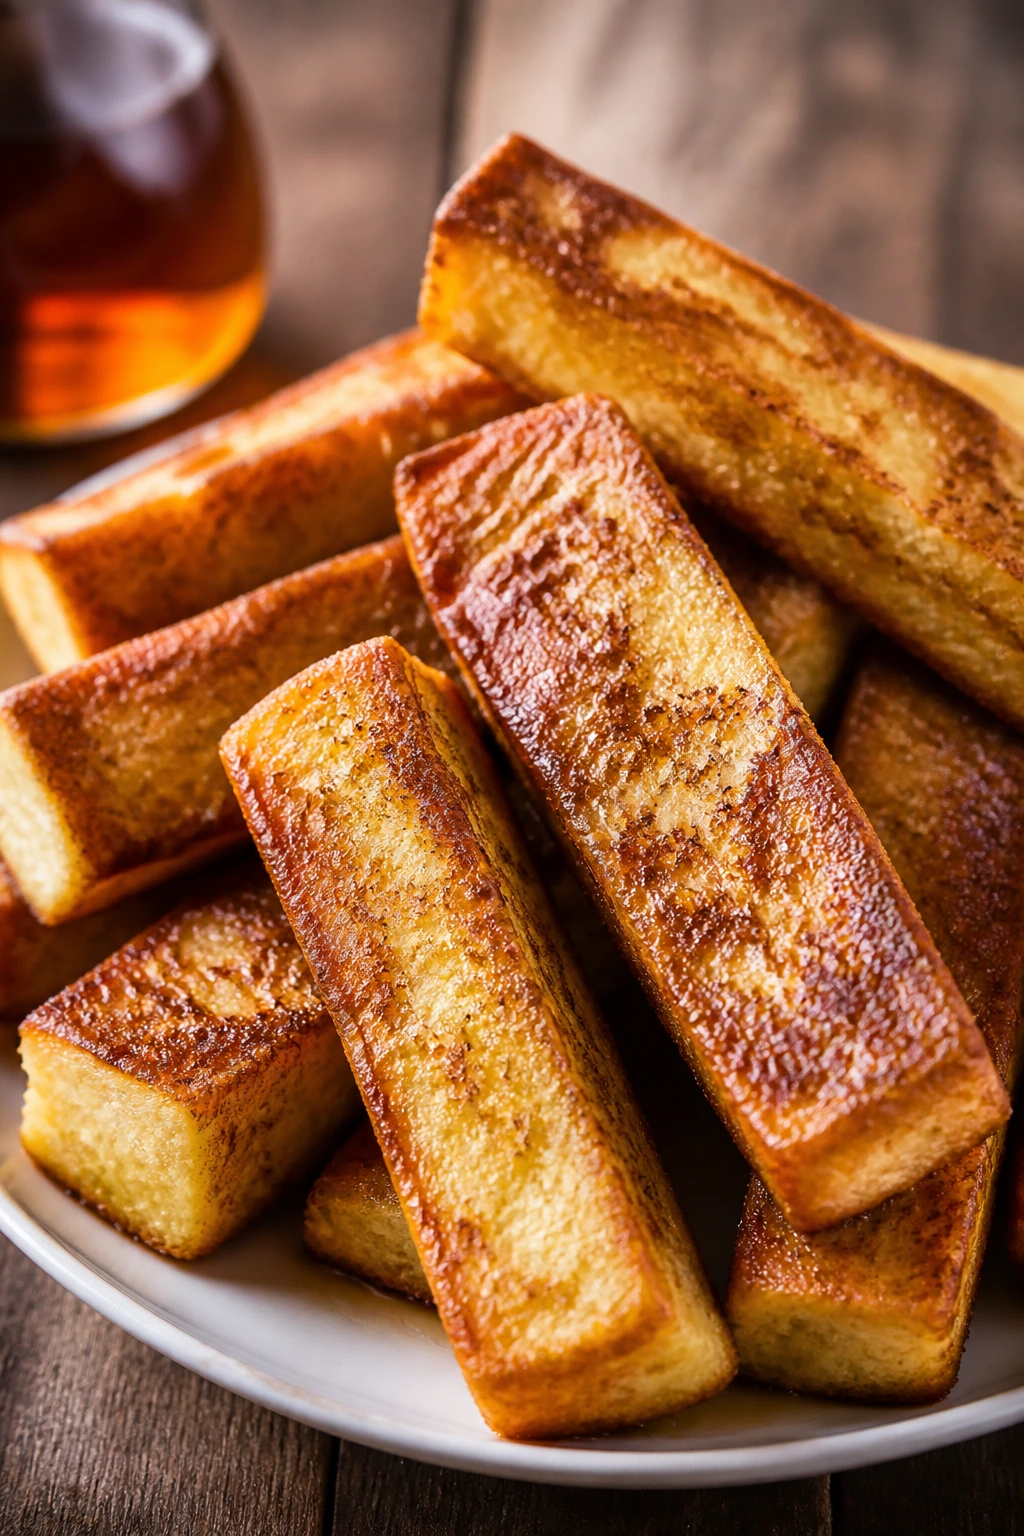
French toast sticks are one of those rare breakfasts that feels playful but still lands as real food. The bread soaks up cinnamon custard, the edges crisp in the oven, and the center stays soft enough to dip into syrup without collapsing into a mushy mess. They’re neat, which matters more than people admit in the morning.
Why It Works:
Cutting the bread into sticks before baking gives you more surface area, so they brown faster and feel less wet than thick slices. Using slightly stale bread helps the custard soak in without turning the whole thing to paste. The oven keeps the batch even, and you don’t have to stand over a skillet turning each piece by hand.
Key Ingredients:
- 12 slices thick bread, cut into sticks
- 4 large eggs
- 1 cup milk
- 1 tablespoon sugar
- 1 teaspoon cinnamon
- 1 teaspoon vanilla extract
- 2 tablespoons butter
- Maple syrup, for serving
Quick Steps:
- Preheat the oven to 425°F and line a sheet pan with parchment.
- Whisk the eggs, milk, sugar, cinnamon, and vanilla in a shallow bowl.
- Dip each bread stick briefly, letting the excess drip off.
- Arrange on the sheet pan, brush lightly with melted butter, and bake for 10 to 12 minutes, flipping once halfway through.
- Bake until the sticks are golden and the edges feel crisp.
Equipment for This Recipe:
- Sheet pan
- Parchment paper
- Shallow bowl
- Whisk
How to Serve This Dish:
Pack them with a small cup of syrup or yogurt for dipping. They also work well with sliced pears or strawberries tucked into the same container.
Pro Tips for This Recipe:
- Use sturdy bread, not sandwich bread that tears when wet.
- Don’t soak the sticks too long.
- Serve them warm if you want the best contrast between crisp edge and soft center.
Variations on This Dish:
- Pumpkin Spice Sticks: Add 1/2 teaspoon pumpkin pie spice to the custard.
- Cream Cheese Filled Sticks: Spread a thin layer of cream cheese between two slices before cutting.
Common Mistakes to Avoid with This Dish:
- Soaking too long: The bread breaks down. Quick dip only.
- Skipping the flip: The bottoms brown too fast if left alone.
12. Oatmeal Breakfast Cookies
These are soft, chewy, and a little bit bendy, which is exactly what you want in a school morning cookie. They’re not trying to fool anyone into thinking they’re dessert. They’re built from oats, banana, and peanut butter, and they hold together in a way that makes them easy to eat in the car or by the front door.
Why It Works:
Banana and peanut butter bind the oats without needing much flour, so the cookies stay tender instead of dry. They also make a batch that feels substantial without weighing you down. If you use parchment and a moderate oven, the edges set while the centers stay soft enough to chew cleanly.
Key Ingredients:
- 2 ripe bananas, mashed
- 1/2 cup peanut butter
- 2 cups rolled oats
- 1 large egg
- 1/3 cup raisins or mini chocolate chips
- 1 teaspoon cinnamon
- 1/2 teaspoon baking powder
- Pinch of salt
Quick Steps:
- Preheat the oven to 350°F and line a baking sheet with parchment.
- Stir the bananas, peanut butter, and egg together until smooth.
- Add the oats, raisins, cinnamon, baking powder, and salt.
- Scoop onto the sheet and flatten each mound slightly with damp fingers.
- Bake for 10 to 12 minutes, until set at the edges but still soft in the middle. Cool on the pan for 5 minutes.
Equipment for This Recipe:
- Baking sheet
- Parchment paper
- Mixing bowl
- Spoon or cookie scoop
How to Serve This Dish:
Serve with milk, a cheese stick, or a sliced apple if the cookie is the main breakfast. They’re also easy to tuck into a breakfast bag with a napkin.
Pro Tips for This Recipe:
- Flatten them before baking or they’ll stay too rounded to hold well.
- Let them cool fully so they firm up.
- If your bananas are small, add an extra tablespoon of peanut butter.
Variations on This Dish:
- Raisin-Maple Cookie: Replace chocolate chips with raisins and add 1 tablespoon maple syrup.
- Sunflower Seed Version: Swap peanut butter for sunflower seed butter to keep it nut-free.
Common Mistakes to Avoid with This Dish:
- Expecting a crisp cookie: These are soft-baked on purpose.
- Adding too much banana: The dough becomes loose and bakes into a mashy cookie.
13. Chia Pudding Cups

Chia pudding has a strange little magic trick: it starts as liquid and ends up spoon-thick without a single minute on the stove. The texture is cool and creamy, with little gelled seeds that feel more like tiny bubbles than anything off-putting. Add fruit on top and it turns into a breakfast that eats like dessert but behaves like fuel.
Why It Works:
Chia seeds absorb liquid and swell, which makes the pudding thicken on its own. Greek yogurt gives the cups a fuller body, so they don’t feel like flavored milk with seeds floating in it. They also hold well for several days, which makes them useful when the whole week is already feeling crowded.
Key Ingredients:
- 1/2 cup chia seeds
- 2 cups milk
- 1 cup plain Greek yogurt
- 2 tablespoons maple syrup
- 1 teaspoon vanilla extract
- 2 cups fruit for topping
Quick Steps:
- Whisk the milk, yogurt, maple syrup, and vanilla in a bowl.
- Stir in the chia seeds.
- Wait 10 minutes, then stir again so the seeds don’t clump at the bottom.
- Divide into 4 cups or jars and chill for at least 4 hours, preferably overnight.
- Top with fruit before serving.
Equipment for This Recipe:
- Mixing bowl
- Whisk or spoon
- 4 jars or cups
How to Serve This Dish:
Serve cold with berries, sliced bananas, or diced peaches. A spoonful of granola on top gives it some crunch if you’re eating it at home.
Pro Tips for This Recipe:
- Stir twice during the first 15 minutes to prevent clumps.
- Use small jars; the pudding feels more finished that way.
- If it gets too thick, stir in a splash of milk.
Variations on This Dish:
- Cocoa Chia Cup: Add 1 tablespoon cocoa powder and top with strawberries.
- Mango Coconut Cup: Use coconut milk and diced mango for a warmer, sweeter flavor.
Common Mistakes to Avoid with This Dish:
- Not stirring enough: The seeds clump and the texture gets uneven.
- Adding crunchy toppings too early: They soften and lose their bite.
14. Ham and Pepper Mini Frittatas

Mini frittatas are what happens when eggs decide to dress up a little. The ham brings salt and smoke, the peppers soften into sweet bites, and the cheese bubbles at the edges so each little round has browned spots you can actually taste. They’re tidy enough for a plate and sturdy enough for a container.
Why It Works:
Eggs baked in a muffin tin give you consistent portions without babysitting a skillet. Ham adds enough flavor that you don’t need a long ingredient list, and peppers keep the centers from feeling one-note. A short bake at 375°F keeps them tender instead of dry.
Key Ingredients:
- 10 large eggs
- 1/2 cup milk
- 1 cup diced ham
- 1 cup diced bell peppers
- 1/2 cup shredded cheese
- 1/4 teaspoon salt
- Black pepper
Quick Steps:
- Preheat the oven to 375°F and grease a muffin tin.
- Whisk the eggs, milk, salt, and pepper.
- Stir in the ham, peppers, and cheese.
- Divide into the cups and bake for 15 to 18 minutes, until the centers are set and the tops are lightly golden.
- Cool for 5 minutes before lifting them out.
Equipment for This Recipe:
- Muffin tin
- Mixing bowl
- Whisk
- Measuring cups
How to Serve This Dish:
Serve two or three with toast or fruit. They also pack well next to sliced tomatoes if you want a breakfast that feels a little less heavy.
Pro Tips for This Recipe:
- Dice the peppers small so they cook through.
- Grease the tin generously; eggs like to cling.
- Pull them as soon as the centers stop wobbling.
Variations on This Dish:
- Spinach and Feta Version: Replace the ham with 1 cup chopped spinach and 1/3 cup feta.
- Bacon and Cheddar Version: Use cooked bacon and sharp cheddar for a saltier, more familiar flavor.
Common Mistakes to Avoid with This Dish:
- Overbaking: They turn spongy and dry.
- Using too much filling: The egg won’t set properly around it.
15. Homemade Granola Bars
These bars are the kind you actually want to eat after you’ve packed them. They’re chewy in the middle, a little crisp at the edges, and dense enough to survive a backpack without crumbling into dust. I prefer them with peanut butter, but the real trick is pressing them hard so they hold together once chilled.
Why It Works:
A sticky binder like honey and peanut butter holds the oats and crisp rice cereal in place. Chill time matters here; it gives the bars structure before you cut them, which is why they slice cleanly instead of unraveling. They also make a good nut-free base if you swap in sunflower butter.
Key Ingredients:
- 3 cups rolled oats
- 1 cup crisp rice cereal
- 1/2 cup honey
- 1/2 cup peanut butter or sunflower butter
- 1/2 cup chopped dried cranberries
- 1/3 cup mini chocolate chips
- 1 teaspoon vanilla extract
- 1/4 teaspoon salt
Quick Steps:
- Line an 8×8-inch pan with parchment.
- Warm the honey and peanut butter in a saucepan over low heat until smooth.
- Stir in the vanilla and salt, then fold in the oats, cereal, cranberries, and chocolate chips.
- Press the mixture firmly into the pan with damp hands or the bottom of a measuring cup.
- Chill for 2 hours, then lift out and cut into bars.
Equipment for This Recipe:
- 8×8-inch pan
- Parchment paper
- Saucepan
- Measuring cup
How to Serve This Dish:
Wrap them individually and hand them out with milk or fruit. They fit neatly into lunchboxes too, which makes them pull double duty.
Pro Tips for This Recipe:
- Press harder than feels natural; loose packing is the enemy.
- Chill fully before slicing.
- Use parchment overhang so you can lift the slab out cleanly.
Variations on This Dish:
- Trail Mix Bars: Add sunflower seeds and chopped apricots.
- Coconut Crunch Bars: Stir in 1/2 cup unsweetened shredded coconut.
Common Mistakes to Avoid with This Dish:
- Cutting too soon: The bars fall apart.
- Using too little binder: They never set firmly enough to hold.
16. Ham and Cheese Croissant Bake

This one feels richer than the name suggests, mostly because croissants already come with butter baked into the deal. Torn into pieces, they soak up the egg custard without losing all their shape, and the ham and cheese settle into the crevices so every bite has a little salt, a little melt, and a little crisp edge.
Why It Works:
The croissants act like built-in layers, which makes the bake taste fancier than the effort required. A short soak helps the eggs move through the bread, while a moderate oven keeps the top golden without drying out the center. It’s a good option when you want something that can sit on the counter for a few minutes and still taste warm.
Key Ingredients:
- 6 croissants, halved or torn
- 8 large eggs
- 1 1/2 cups milk
- 1 teaspoon Dijon mustard
- 1 cup diced ham
- 2 cups shredded cheese
- 1/4 teaspoon salt
- Black pepper
Quick Steps:
- Preheat the oven to 350°F and grease a 9×13-inch baking dish.
- Spread the croissant pieces in the dish with the ham and cheese tucked between them.
- Whisk the eggs, milk, Dijon, salt, and pepper, then pour over the top.
- Let it sit for 10 to 15 minutes so the bread absorbs some custard.
- Bake for 35 to 40 minutes, until puffed and set in the center.
Equipment for This Recipe:
- 9×13-inch baking dish
- Mixing bowl
- Whisk
- Measuring cups
How to Serve This Dish:
Cut into squares and serve with fruit or a simple green salad if you’re feeding a mixed-age crowd. Leftovers reheat well in a toaster oven.
Pro Tips for This Recipe:
- Day-old croissants soak up the custard better than very fresh ones.
- Let the bake rest before slicing so it doesn’t collapse.
- If the top browns too fast, loosely cover it with foil.
Variations on This Dish:
- Turkey and Spinach Version: Replace ham with turkey and add a handful of spinach.
- Swiss and Mustard Version: Use Swiss cheese and bump the Dijon to 2 teaspoons.
Common Mistakes to Avoid with This Dish:
- Skipping the soak time: The center stays dry.
- Using too much liquid: The bake turns heavy and wet.
17. Cheesy Savory Oatmeal Bowls
Savory oatmeal sounds odd until you try it on a cold, rushed morning and realize it feels a lot like grits with a better pantry habit. The oats go creamy, the cheese melts into the bowl, and the egg on top gives you the kind of breakfast that sticks with you longer than a sweet one made of air and optimism.
Why It Works:
Old-fashioned oats cook into a creamy base fast enough for a school morning, especially if you use part broth and part milk. Cheese adds salt and body, and an egg on top turns it into a bowl that eats like a meal instead of a side dish. It’s also a solid option when you’re tired of sweet breakfasts but still want something comforting.
Key Ingredients:
- 2 cups old-fashioned oats
- 4 cups chicken broth or water
- 1 cup milk
- 1 cup shredded cheddar
- 4 large eggs
- 2 scallions, sliced
- 1/4 teaspoon salt
- Black pepper
Quick Steps:
- Bring the broth and milk to a simmer in a saucepan.
- Stir in the oats and salt, then cook for 4 to 5 minutes until creamy.
- Stir in the cheese until melted.
- In a separate skillet, fry or scramble the eggs to your liking.
- Spoon the oats into bowls, top with eggs and scallions, and finish with pepper.
Equipment for This Recipe:
- Saucepan
- Skillet
- Spoon
- Measuring cups
How to Serve This Dish:
Serve hot with toast points or a few cherry tomatoes if you want a sharper bite beside the creamy oats. It works best eaten right away.
Pro Tips for This Recipe:
- Salt the oats enough; bland savory oatmeal is a sad thing.
- Use broth if you want more depth than water gives.
- Don’t let the cheese boil hard or it can get stringy.
Variations on This Dish:
- Bacon Bowl: Add cooked bacon and a spoonful of chives.
- Mushroom Bowl: Stir in sautéed mushrooms for an earthier version.
Common Mistakes to Avoid with This Dish:
- Using instant oats: They go gluey fast.
- Underseasoning: The bowl tastes flat and unfinished.
18. Waffle Breakfast Sandwiches
Waffles make an excellent sandwich bread because they already have pockets for melted cheese and runny-yet-contained fillings. The edges stay crisp, the centers soften just enough, and if you use them frozen, the whole thing lands between toaster and meal with almost no drama.
Why It Works:
The grid pattern traps heat and syrup or melted cheese in little pockets, which gives these sandwiches more staying power than plain toast. They’re also easy to freeze because the waffles are sturdy enough to handle a second heating. If you want a grab-and-go breakfast that feels a little more fun than a standard sandwich, this is it.
Key Ingredients:
- 8 waffles, homemade or frozen
- 6 large eggs
- 4 sausage patties or 8 bacon slices
- 4 slices cheddar
- 1 tablespoon butter
Quick Steps:
- Cook the sausage or bacon and set it aside.
- Scramble the eggs in butter over low heat until soft.
- Warm or toast the waffles lightly so they’re crisp on the outside.
- Build sandwiches with waffle, egg, meat, cheese, and another waffle.
- Wrap, cool, and freeze or serve right away. Reheat in a toaster oven until the cheese softens.
Equipment for This Recipe:
- Skillet
- Toaster or toaster oven
- Spatula
- Foil or parchment
How to Serve This Dish:
Serve with berries or a banana so the plate doesn’t feel too heavy. A small cup of syrup on the side makes sense if you want sweet-savory contrast.
Pro Tips for This Recipe:
- Toast the waffles before assembling.
- Scramble the eggs softly so they don’t turn tough on reheating.
- Wrap each sandwich individually if freezing.
Variations on This Dish:
- Chicken and Waffle Version: Use a small breaded chicken patty if you want a sweet-savory lunchbox spin.
- Veggie Version: Replace the meat with sautéed spinach and a slice of tomato.
Common Mistakes to Avoid with This Dish:
- Skipping the crisping step: Soft waffles get soggy fast.
- Adding syrup inside the sandwich: That turns the whole thing sticky and slippery.
19. Cottage Cheese Toast Boxes
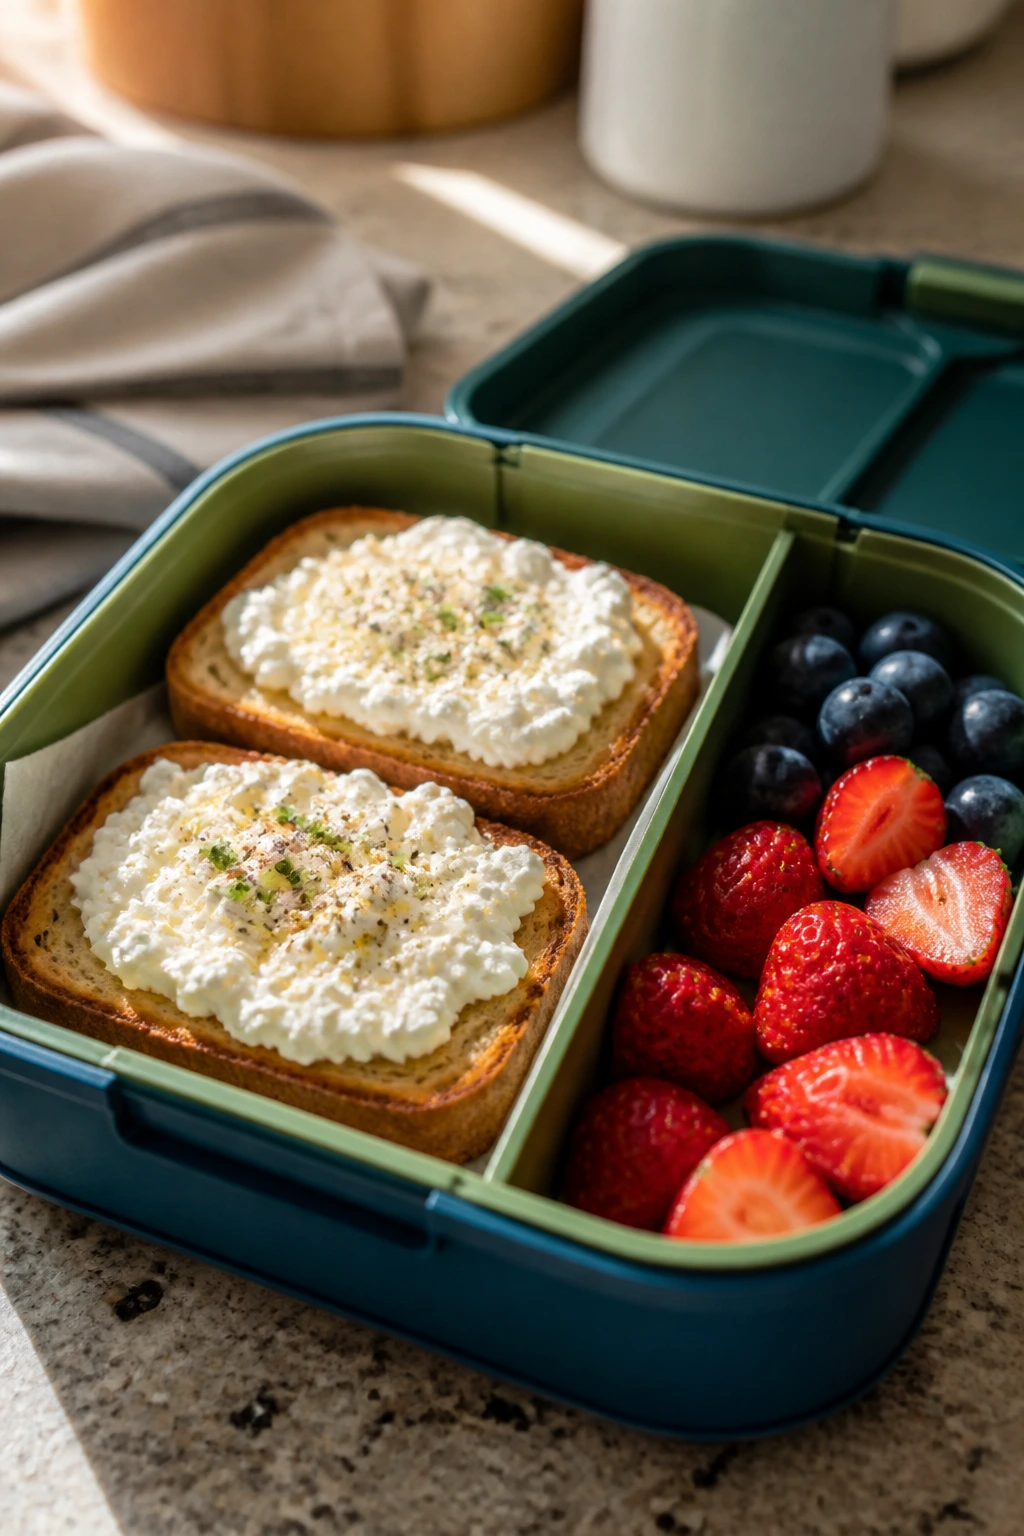
Cottage cheese toast sounds plain until you dress it properly. The bread needs to be sturdy and toasted, the cottage cheese should be cool and well-drained, and the toppings should be chosen with a little thought instead of a raid on the fruit bowl. Done right, it gives you protein, crunch, and fresh flavor in the same few bites.
Why It Works:
Cottage cheese is high in protein and naturally salty, which means it doesn’t need much help. Toasted bread keeps the base from going soft, and packing the toppings separately lets you build the toast only when you’re ready to eat. That’s the whole trick: avoid soggy bread at all costs.
Key Ingredients:
- 8 slices sturdy bread
- 2 cups cottage cheese
- 2 tablespoons honey
- 1 teaspoon cinnamon
- 2 cups berries or sliced peaches
- 2 tablespoons hemp seeds or sunflower seeds
- Pinch of salt
Quick Steps:
- Toast the bread until golden and crisp.
- Stir the cottage cheese with honey, cinnamon, and a pinch of salt.
- Pack the toast, cottage cheese, fruit, and seeds in separate containers if you’re taking it on the go.
- Spread the cottage cheese on the toast just before eating and top with fruit and seeds.
Equipment for This Recipe:
- Toaster
- Mixing bowl
- Knife
- Lunch containers
How to Serve This Dish:
Serve as a build-your-own breakfast with toast on the side, or assemble one slice and keep the second bare for later. It works nicely with sliced cucumbers if you want a savory plate.
Pro Tips for This Recipe:
- Drain watery cottage cheese if it looks loose.
- Use thick bread so it doesn’t bend under the topping.
- Add the fruit at the last minute for the best texture.
Variations on This Dish:
- Savory Everything Toast: Swap honey and cinnamon for everything bagel seasoning and sliced tomato.
- Peach Almond Toast: Use peaches and a few sliced almonds for a sweeter version.
Common Mistakes to Avoid with This Dish:
- Packing assembled toast too early: The bread softens.
- Using flimsy bread: It won’t hold the weight of the topping.
20. English Muffin Breakfast Pizzas

These little pizzas hit the sweet spot between snack and breakfast. The English muffin base toasts up with a firm edge, the eggs and cheese melt into the nooks, and the sausage gives enough heft that you’re not handing someone a round piece of bread with a smile and a prayer.
Why It Works:
English muffins are built for this kind of job because they’re sturdy and split evenly. A brief pre-toast keeps them from getting soggy under the toppings, and the quick bake melts the cheese before the muffin dries out. You can make a whole tray at once, which is the main point.
Key Ingredients:
- 6 English muffins, split
- 6 large eggs, scrambled
- 1 cup shredded cheddar or mozzarella
- 1/2 cup cooked sausage or bacon crumbles
- 1/4 cup diced tomatoes or salsa
- 2 tablespoons chopped scallions
Quick Steps:
- Preheat the oven to 400°F and line a sheet pan with parchment.
- Toast the English muffin halves lightly.
- Scramble the eggs softly and spoon them onto the muffins.
- Top with cheese, sausage, tomatoes, and scallions.
- Bake for 8 to 10 minutes, until the cheese is melted and the edges are crisp.
Equipment for This Recipe:
- Sheet pan
- Toaster
- Small skillet
- Spatula
How to Serve This Dish:
Serve two halves per person with fruit or a handful of baby carrots if you’re packing a more balanced plate. They also reheat well in a toaster oven.
Pro Tips for This Recipe:
- Don’t overload the muffins or they’ll topple.
- Pre-toast the base so it stays crisp under the eggs.
- Let them cool for a minute before packing.
Variations on This Dish:
- Veggie Pizza: Use spinach and peppers instead of meat.
- Salsa Breakfast Pizza: Swap diced tomatoes for salsa and use pepper jack cheese.
Common Mistakes to Avoid with This Dish:
- Using too much sauce or salsa: It soaks through the muffin.
- Skipping the pre-toast: The base turns limp.
21. Turkey and Cheese Pinwheels
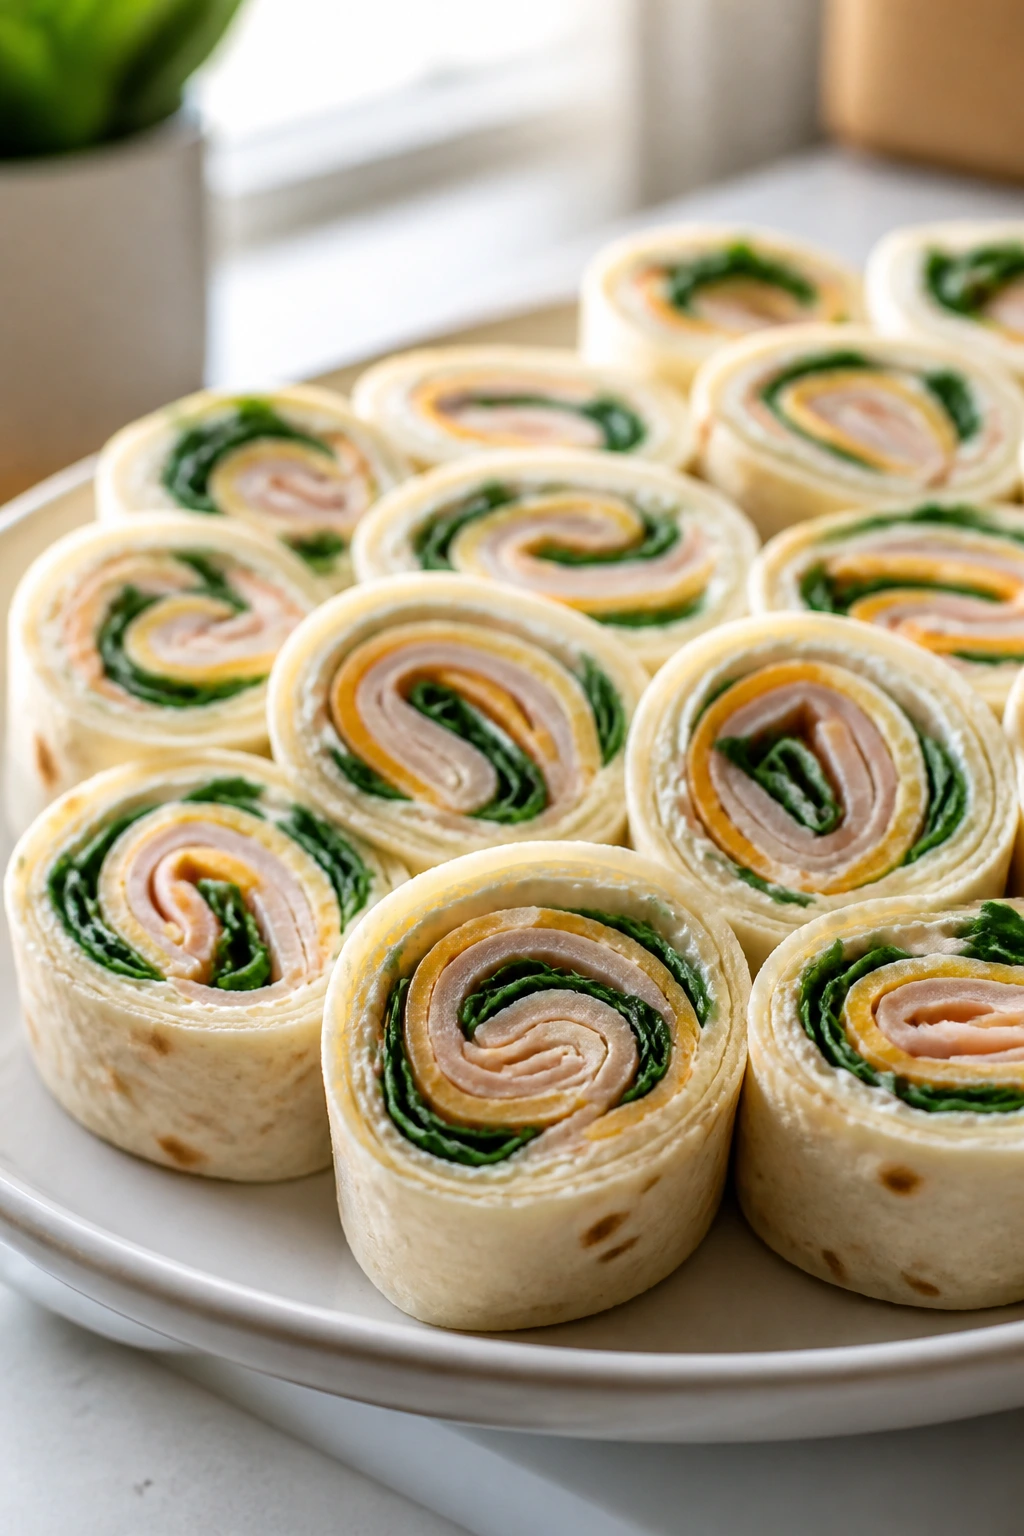
Pinwheels are one of those lunches-that-pass-for-breakfast when the morning is moving fast. The tortilla holds everything together, the cream cheese gives it a soft, tangy glue, and the turkey keeps the whole thing from feeling like an afterthought. Slice them cleanly and they look far more put-together than the effort required.
Why It Works:
Cream cheese binds the fillings and keeps the tortilla from cracking when you roll it. Rolling tightly and chilling before slicing gives you neat spirals instead of messy logs. They’re also easy to pack in a lunchbox or eat one by one on the way out the door.
Key Ingredients:
- 4 large flour tortillas
- 8 ounces cream cheese, softened
- 8 ounces sliced turkey
- 1 cup shredded cheddar
- 2 cups baby spinach
- 1 tablespoon mustard
Quick Steps:
- Spread each tortilla with a thin layer of cream cheese.
- Add turkey, cheddar, spinach, and a light swipe of mustard.
- Roll the tortillas tightly, then wrap and chill for at least 30 minutes.
- Slice into pinwheels with a sharp knife.
Equipment for This Recipe:
- Cutting board
- Sharp knife
- Spatula or butter knife
- Plastic wrap or parchment
How to Serve This Dish:
Serve with grapes, apple slices, or a handful of crackers. They’re nice in bento-style containers because the spirals stay visible and neat.
Pro Tips for This Recipe:
- Dry the spinach so it doesn’t water down the wrap.
- Chill before slicing or the pinwheels smear.
- Use a very thin layer of cream cheese; too much will squish out.
Variations on This Dish:
- Ranch Chicken Pinwheels: Use shredded chicken and a spoonful of ranch seasoning.
- Hummus Veggie Pinwheels: Replace the cream cheese with hummus and load in cucumbers and peppers.
Common Mistakes to Avoid with This Dish:
- Overfilling the tortillas: They won’t roll tightly.
- Cutting before chilling: The slices come apart.
22. Spinach and Feta Puff Pastry Squares
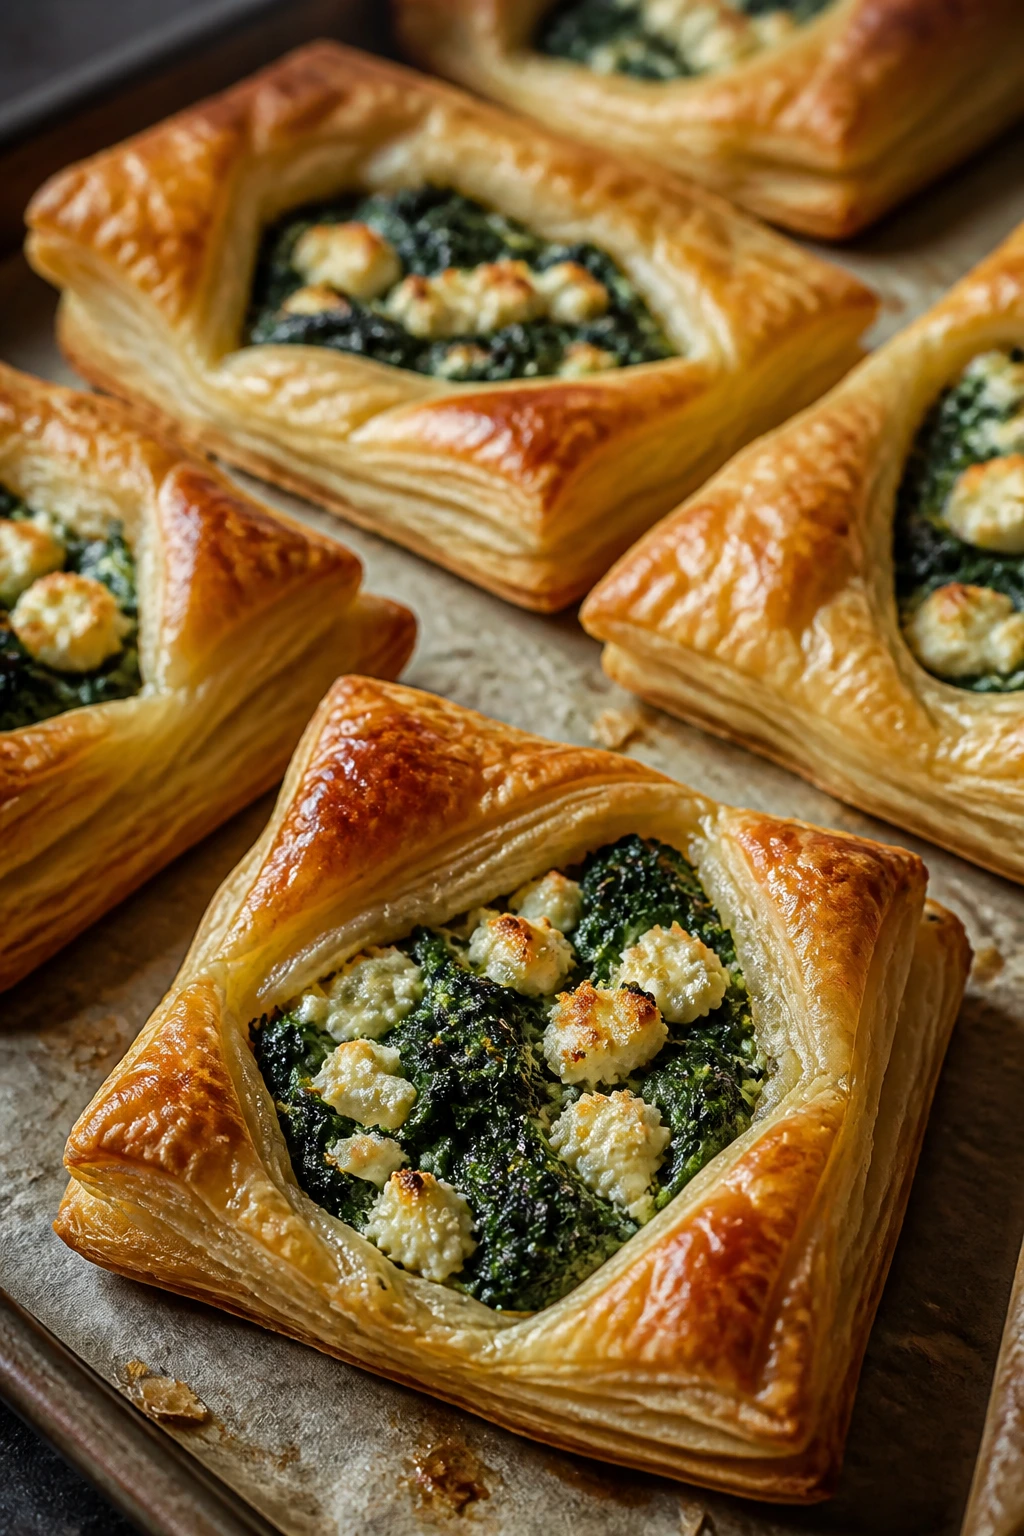
These are the breakfast squares that look like you spent more time than you did. Puff pastry bakes up flaky and crisp, the spinach-feta filling stays savory and creamy, and the corners turn deep golden in a way that feels a little special even if you’re eating them before school drop-off.
Why It Works:
Puff pastry does the heavy lifting. You get buttery layers without mixing dough, and the filling stays contained if you keep the spinach dry and the pastry cold. The feta gives each bite enough salt that you don’t need to over-season, and the squares reheat well in a toaster oven.
Key Ingredients:
- 2 sheets puff pastry, thawed
- 5 ounces spinach, cooked and squeezed dry
- 6 ounces feta
- 1 cup ricotta
- 2 large eggs
- 1 egg, beaten for wash
- 1 tablespoon sesame seeds
Quick Steps:
- Preheat the oven to 400°F and line a baking sheet with parchment.
- Mix the spinach, feta, ricotta, and 2 eggs until combined.
- Cut each pastry sheet into 4 squares and spoon filling into the center of each.
- Fold or seal the edges, brush with egg wash, and sprinkle with sesame seeds.
- Bake for 18 to 20 minutes, until puffed and deeply golden.
Equipment for This Recipe:
- Baking sheet
- Parchment paper
- Mixing bowl
- Pastry brush
How to Serve This Dish:
Serve warm with fruit or a simple cucumber salad if you want something crisp beside the pastry. They’re also good cut in half for smaller hands.
Pro Tips for This Recipe:
- Keep the pastry cold while you work.
- Squeeze the spinach dry or the filling will leak.
- Don’t overfill the squares; puff pastry likes room to rise.
Variations on This Dish:
- Tomato Basil Squares: Add chopped sun-dried tomato and a little basil.
- Mushroom Swiss Squares: Use sautéed mushrooms and shredded Swiss instead of feta.
Common Mistakes to Avoid with This Dish:
- Letting the pastry get warm: It loses its lift.
- Using wet filling: The bottoms go soggy.
23. PB&J Baked Oatmeal Cups
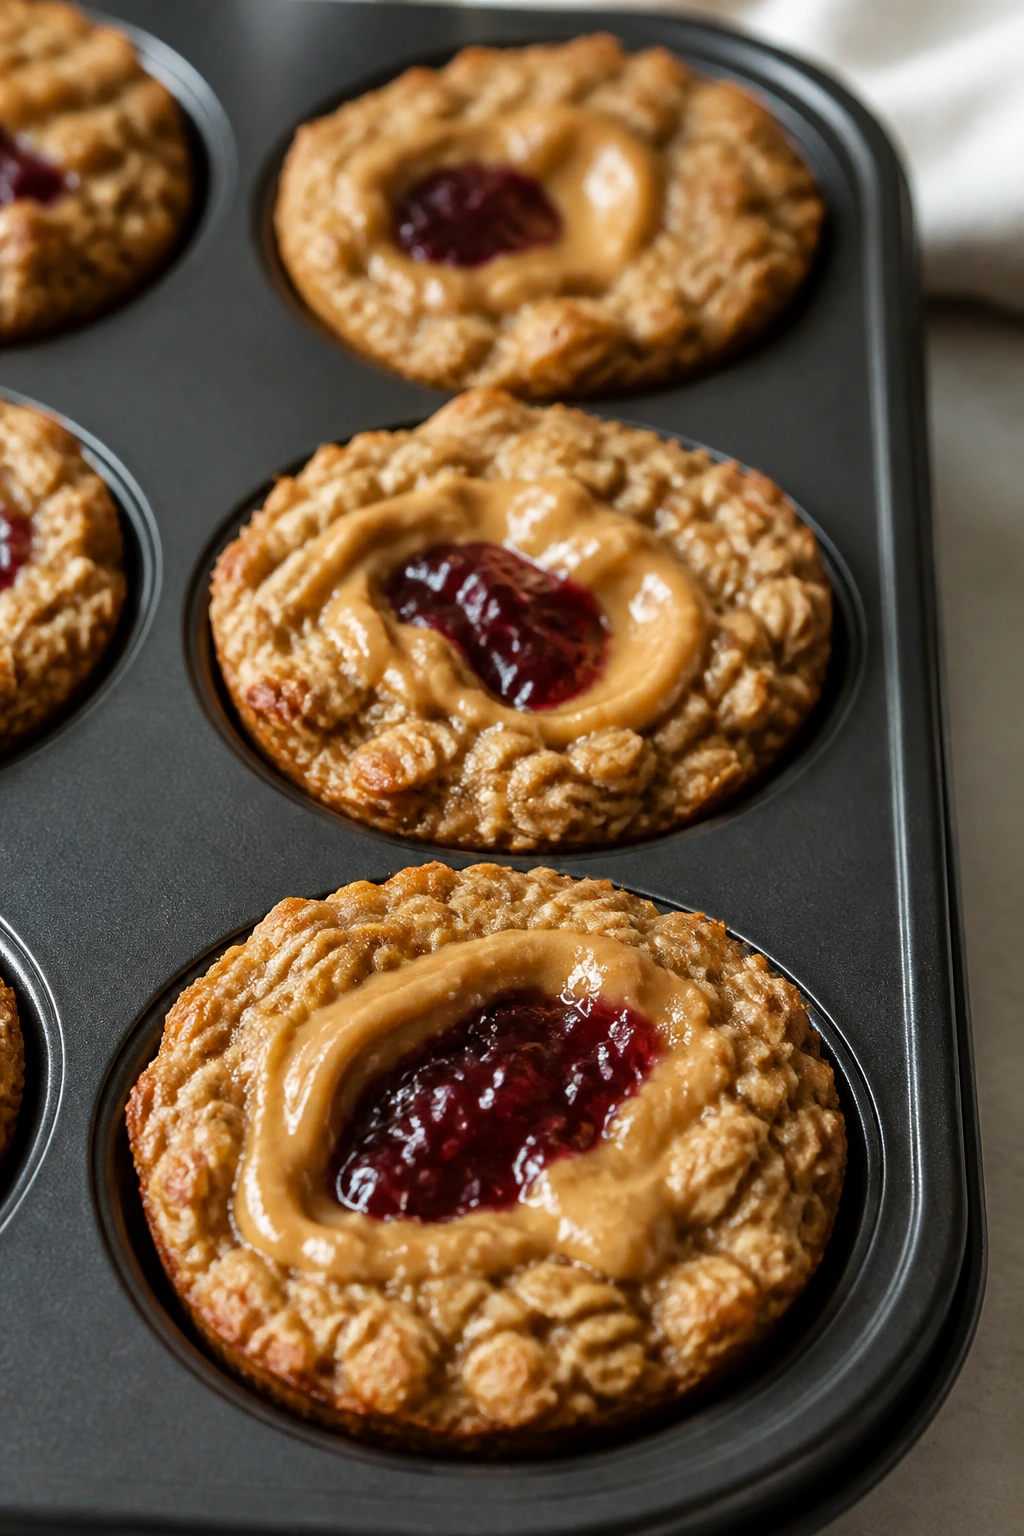
These taste like a lunchbox sandwich got a breakfast upgrade and settled into a muffin tin. The oats bake into soft little cups, the peanut butter adds richness, and the jam sinks into the center in a way that makes each one feel like it has a hidden pocket of sweetness.
Why It Works:
Baked oatmeal cups are easy to portion and easier to freeze. Peanut butter adds fat and protein, which keeps the cups from feeling dry, and the jam bakes into little bursts instead of disappearing completely. They’re sturdy enough to grab with one hand, which is the whole point here.
Key Ingredients:
- 3 cups rolled oats
- 2 large eggs
- 2 cups milk
- 1/2 cup peanut butter
- 1/3 cup jam
- 1/3 cup maple syrup
- 1 teaspoon baking powder
- 1 teaspoon vanilla extract
- 1/2 teaspoon cinnamon
Quick Steps:
- Preheat the oven to 350°F and grease a muffin tin.
- Whisk the eggs, milk, peanut butter, maple syrup, and vanilla until mostly smooth.
- Stir in the oats, baking powder, and cinnamon.
- Spoon into the muffin cups and drop a small dollop of jam into each, swirling lightly.
- Bake for 20 to 22 minutes, until set in the middle and lightly browned around the edges.
Equipment for This Recipe:
- Muffin tin
- Mixing bowl
- Whisk
- Spoon
How to Serve This Dish:
Serve with milk or a banana. They’re also good packed in pairs with a napkin for a fast departure.
Pro Tips for This Recipe:
- Swirl the jam lightly so it stays visible.
- Let the cups cool before lifting them out.
- Freeze them individually so you can grab exactly two at a time.
Variations on This Dish:
- Almond Jam Cups: Use almond butter and apricot jam.
- Sunflower Berry Cups: Use sunflower butter and raspberry jam for a nut-free version.
Common Mistakes to Avoid with This Dish:
- Adding too much jam: The centers don’t set well.
- Removing them too early: They fall apart while warm.
24. Hard-Boiled Egg Snack Boxes
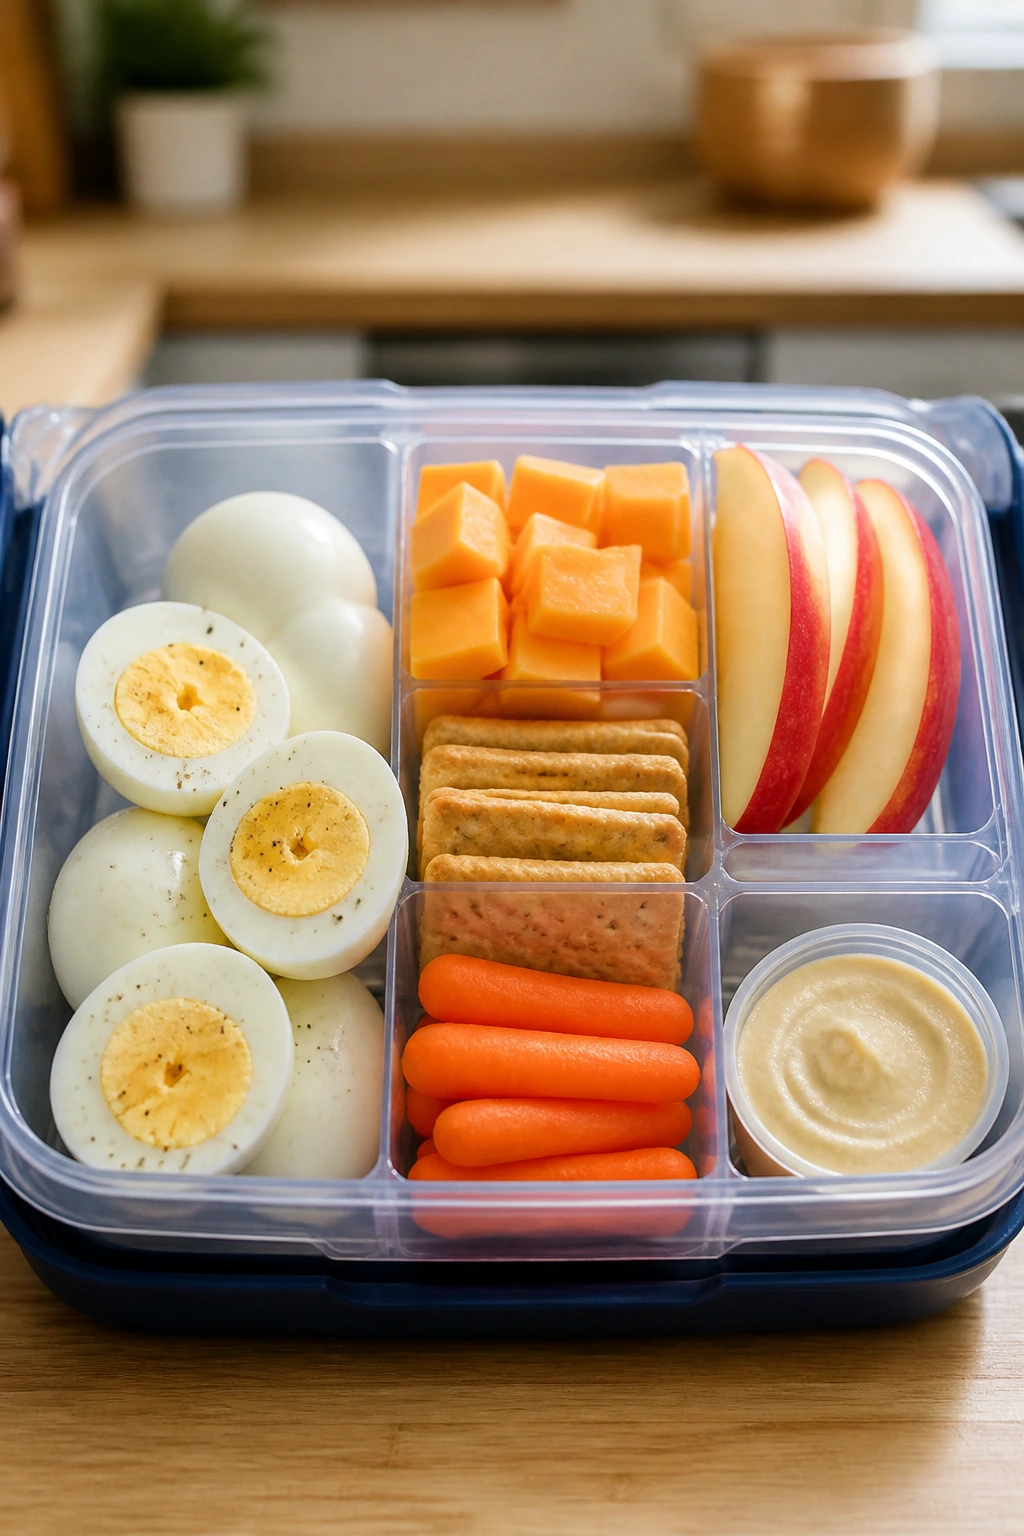
A snack box can absolutely count as breakfast if it’s built with a little thought. Eggs, fruit, cheese, and crackers give you protein, crunch, and something sweet, all in a container that doesn’t require reheating. It’s the breakfast I pack when the morning is so tight that even the toaster feels ambitious.
Why It Works:
Hard-boiled eggs travel well, and they don’t need to be hot to taste complete. Pairing them with fruit and cheese keeps the box from feeling random, while crackers add enough texture to make it feel like a meal instead of a snack tray. The key is separating wet and dry items so nothing softens before you eat it.
Key Ingredients:
- 8 large eggs
- 1 cup cheese cubes
- 2 apples, sliced
- 2 cups crackers
- 1 cup baby carrots
- 1/2 cup hummus or ranch
Quick Steps:
- Boil the eggs for 10 to 11 minutes, then transfer them to an ice bath.
- Peel once cool and slice or leave whole.
- Pack the eggs, cheese, fruit, crackers, and carrots into boxes.
- Keep the dip in a separate small container.
Equipment for This Recipe:
- Saucepan
- Bowl for ice bath
- Knife
- Container with compartments
How to Serve This Dish:
Serve cold or at room temperature. A small square of parchment under the crackers helps keep them crisp if the box sits a while.
Pro Tips for This Recipe:
- Make the eggs the night before and peel them once fully chilled.
- Keep apples in a separate compartment so they don’t stain the crackers.
- A squeeze of lemon on the apple slices slows browning.
Variations on This Dish:
- Mediterranean Box: Add cucumbers, olives, and pita chips.
- Breakfast Box: Use grapes, cereal squares, and a cheese stick instead of crackers.
Common Mistakes to Avoid with This Dish:
- Packing warm eggs: They sweat and smell faintly sulfurous.
- Mixing wet and dry items: Crackers lose their crunch fast.
25. Baked Donut Muffins
These sit somewhere between a muffin and a donut, which is exactly why they work. They bake into tender little rounds with a cinnamon-sugar shell that clings to the outside and leaves your fingers a little sweet. If you want something that feels like a treat but still lands as breakfast, this is a useful compromise.
Why It Works:
A quick batter and a hot oven give these muffins a soft crumb. Brushing them with butter while they’re warm helps the cinnamon sugar stick to the surface instead of sliding off. They also travel well, which matters when the morning is too busy for anything with glaze drips.
Key Ingredients:
- 2 cups all-purpose flour
- 3/4 cup sugar
- 2 teaspoons baking powder
- 1/2 teaspoon salt
- 1 teaspoon cinnamon
- 1 cup milk
- 2 large eggs
- 1/4 cup melted butter
- 1 teaspoon vanilla extract
- 1/4 cup melted butter plus 1/2 cup cinnamon sugar for coating
Quick Steps:
- Preheat the oven to 350°F and grease a muffin tin well.
- Whisk the flour, sugar, baking powder, salt, and cinnamon.
- Stir in the milk, eggs, butter, and vanilla just until combined.
- Fill the cups about 3/4 full and bake for 15 to 18 minutes.
- Brush the warm muffins with melted butter and roll or sprinkle them in cinnamon sugar.
Equipment for This Recipe:
- Muffin tin
- Mixing bowls
- Whisk
- Pastry brush
How to Serve This Dish:
Serve with milk, coffee, or a piece of fruit if you want the sweetness to feel balanced. They also tuck neatly into a paper bag for an out-the-door breakfast.
Pro Tips for This Recipe:
- Coat them while warm so the sugar sticks.
- Don’t overbake or the crumb dries out.
- Mini muffin tins work well if you want smaller portions.
Variations on This Dish:
- Apple Cinnamon Version: Fold in 1/2 cup finely diced apple.
- Lemon Sugar Version: Skip the cinnamon and add 1 teaspoon lemon zest.
Common Mistakes to Avoid with This Dish:
- Waiting too long to coat them: The butter won’t grab the sugar.
- Overfilling the cups: They spill over and bake unevenly.
26. Blueberry Breakfast Skillet Bake
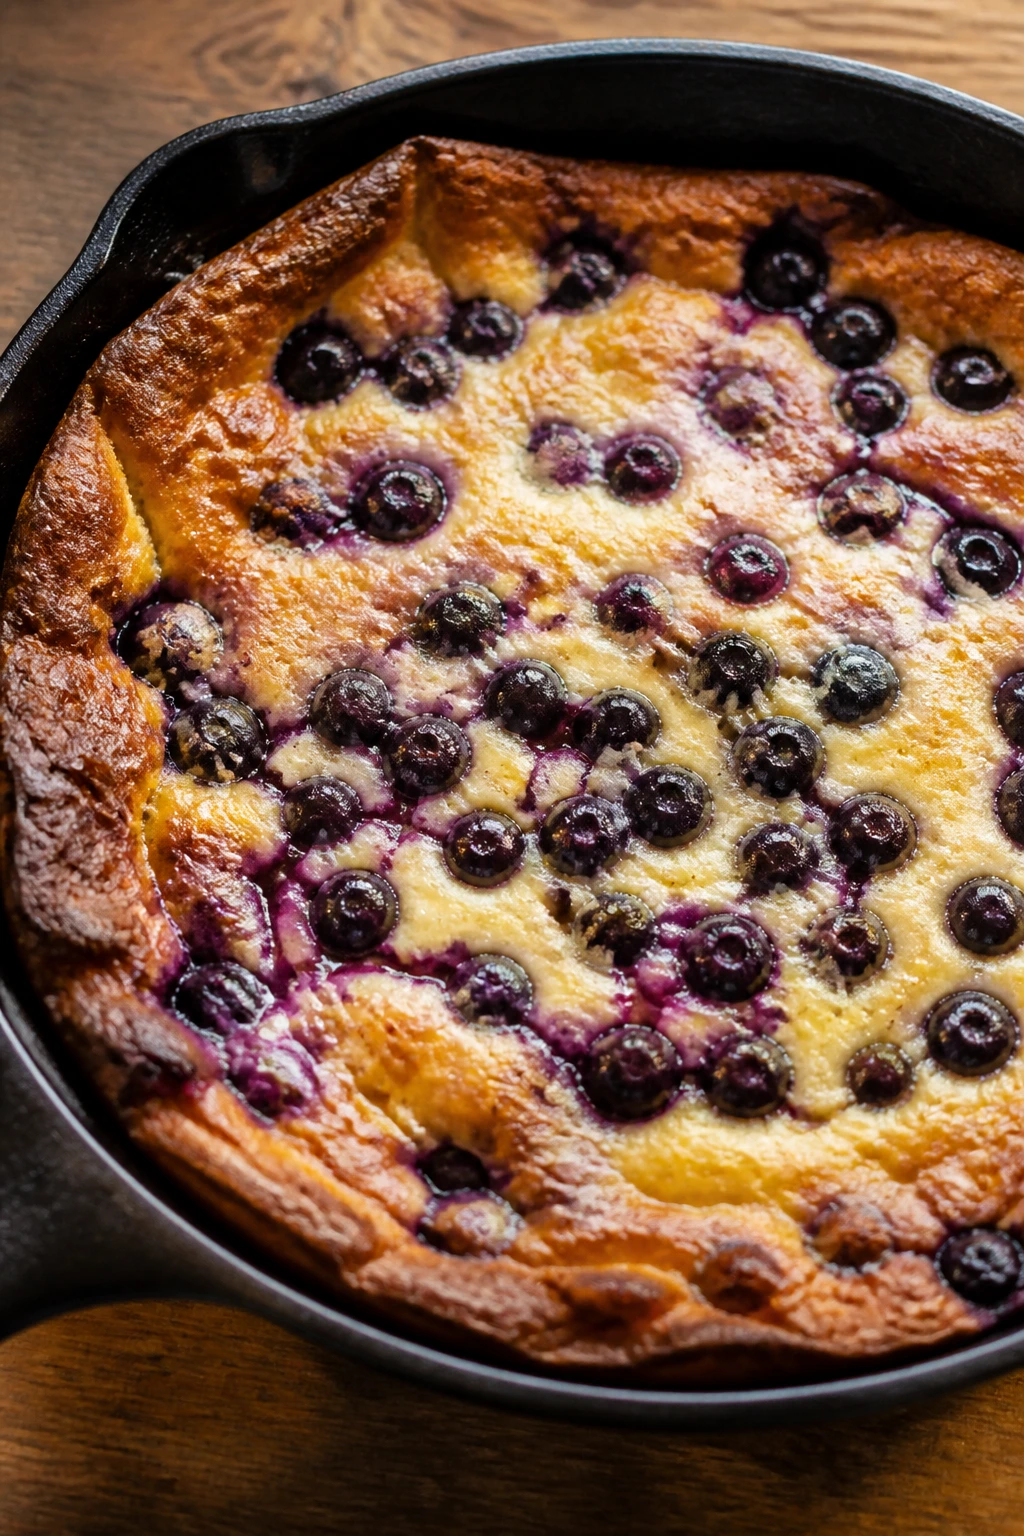
This is the sort of breakfast that looks better in a cast-iron pan than on a plate, which is half the charm. The bread cubes soak up the custard, the blueberries burst into little purple streaks, and the edges brown against the skillet in a way that feels cozy without becoming cloying.
Why It Works:
A skillet keeps the heat even and gives the bottom a little crust. Using slightly stale bread means it absorbs the custard without falling apart, and blueberries distribute themselves more evenly in a skillet bake than in loose pancakes or muffins. If you’ve got a cast-iron pan, it earns its keep here.
Key Ingredients:
- 8 slices brioche or sturdy sandwich bread, cubed
- 6 large eggs
- 1 1/2 cups milk
- 2 cups blueberries
- 1/4 cup sugar
- 1 teaspoon vanilla extract
- 1 teaspoon lemon zest
- Butter for the skillet
- Optional: 4 ounces cream cheese, cubed
Quick Steps:
- Preheat the oven to 375°F and butter a cast-iron skillet generously.
- Scatter the bread cubes and blueberries in the skillet, along with cream cheese if using.
- Whisk the eggs, milk, sugar, vanilla, and lemon zest.
- Pour the custard over the bread and press lightly so it soaks in.
- Bake for 25 to 30 minutes, until set and lightly browned at the edges. Rest for 10 minutes before serving.
Equipment for This Recipe:
- Cast-iron skillet
- Mixing bowl
- Whisk
- Measuring cups
How to Serve This Dish:
Spoon it into bowls with yogurt or a little extra fruit on top. If you need a grab-and-go version, scoop it into containers once it’s cooled a bit.
Pro Tips for This Recipe:
- Use dry bread; fresh bread turns too soft.
- Let the custard soak in before baking.
- Lemon zest makes the blueberries taste brighter.
Variations on This Dish:
- Strawberry Cream Version: Swap blueberries for strawberries and use cream cheese.
- Peach Cinnamon Version: Replace the berries with peaches and add extra cinnamon.
Common Mistakes to Avoid with This Dish:
- Skipping the rest before baking: The custard doesn’t soak evenly.
- Overloading the skillet with liquid: The center stays wet.
27. Mini Bagel Breakfast Pizzas

Mini bagels are smaller, denser, and a little more substantial than English muffins, which makes them good for kids who want a hand-held breakfast that doesn’t bend in half. The eggs, cheese, and sausage sit on top like a tiny loaded lunch, and the edges crisp up just enough to keep the bagel from going floppy.
Why It Works:
Bagels are sturdy, so they hold up to toppings better than thin bread. A quick toast before baking helps them stay crisp, and using scrambled eggs instead of a loose sauce keeps the topping in place. They’re the kind of breakfast that feels fun without becoming a kitchen project.
Key Ingredients:
- 6 mini bagels, split
- 4 large eggs, scrambled
- 1 cup shredded cheddar
- 1/2 cup cooked bacon or sausage crumbles
- 1/4 cup diced bell pepper or tomatoes
- 2 tablespoons chopped scallions
Quick Steps:
- Preheat the oven to 400°F and line a baking sheet with parchment.
- Toast the bagel halves lightly.
- Scramble the eggs softly and spoon them over the bagels.
- Top with cheese, bacon or sausage, peppers, and scallions.
- Bake for 8 to 10 minutes, until the cheese melts and the edges are crisp.
Equipment for This Recipe:
- Baking sheet
- Toaster
- Skillet
- Parchment paper
How to Serve This Dish:
Serve one or two halves with fruit. They also pack well if you wrap each one separately after they cool.
Pro Tips for This Recipe:
- Don’t drown the bagels in toppings.
- Toast first so the base stays firm.
- Let them cool before wrapping or the bagels go gummy.
Variations on This Dish:
- Pepperoni Pizza Bagels: Use pepperoni and a thin swipe of pizza sauce.
- Veggie Garden Bagels: Use spinach, mushrooms, and mozzarella.
Common Mistakes to Avoid with This Dish:
- Skipping the pre-toast: The bagel softens too much.
- Too many wet toppings: They slide off and make a mess.
28. Carrot Cake Oatmeal Cups
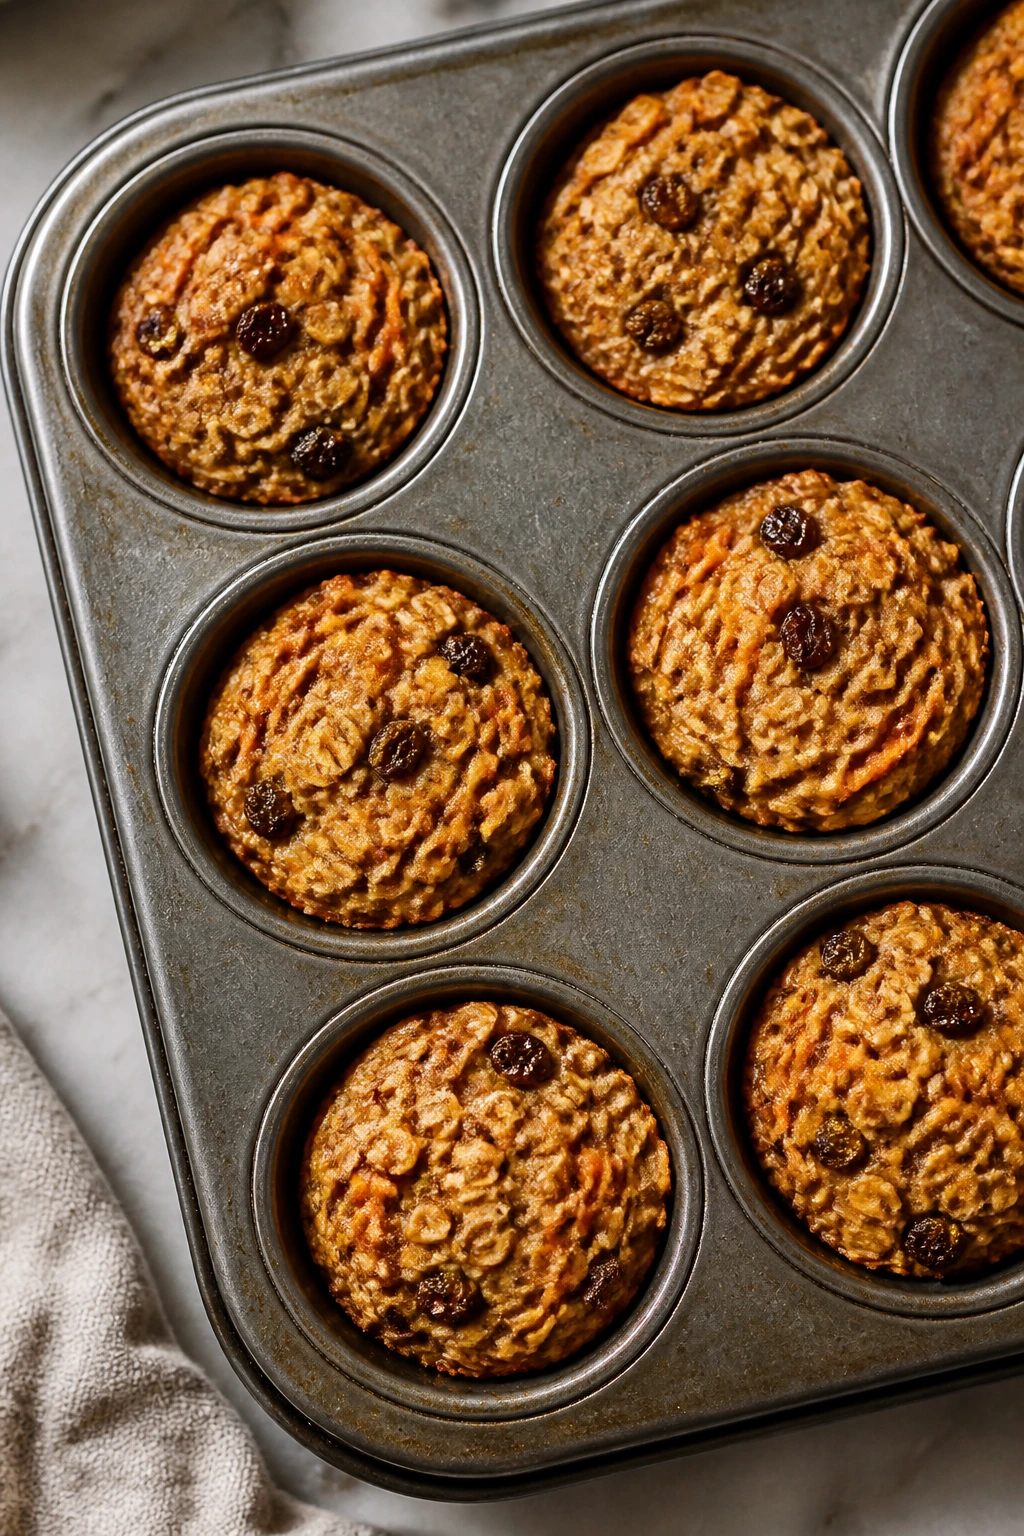
These taste like carrot cake in the morning, but without the frosting and without the nonsense. The grated carrot softens into the oats, the cinnamon and nutmeg do the heavy lifting on flavor, and the little raisin pockets give you bursts of sweetness that make the whole thing feel more complete than a plain muffin.
Why It Works:
Carrot adds moisture and a little texture, while oats keep the cups hearty enough to hold up in the fridge. Baking them in a muffin tin makes them portable and portioned, which is useful when nobody has time to spoon breakfast into a bowl. A small amount of maple syrup keeps them from going too sweet.
Key Ingredients:
- 2 cups rolled oats
- 1 cup finely grated carrot
- 2 large eggs
- 1 1/2 cups milk
- 1/3 cup maple syrup
- 1 teaspoon cinnamon
- 1/4 teaspoon nutmeg
- 1 teaspoon baking powder
- 1/2 teaspoon salt
- 1/3 cup raisins
- Optional: 1/4 cup chopped walnuts
Quick Steps:
- Preheat the oven to 350°F and grease a muffin tin.
- Whisk the eggs, milk, maple syrup, cinnamon, nutmeg, baking powder, and salt.
- Stir in the oats, carrot, raisins, and walnuts if using.
- Divide into the cups and bake for 20 to 22 minutes, until set and lightly browned.
- Cool for 10 minutes before removing.
Equipment for This Recipe:
- Muffin tin
- Mixing bowl
- Whisk
- Box grater
How to Serve This Dish:
Serve with yogurt or a little cream cheese spread if you want it to lean more like carrot cake. They also work cold, which makes them easy to pack.
Pro Tips for This Recipe:
- Grate the carrot finely so it blends into the batter.
- Let the cups cool before trying to lift them out.
- A pinch more salt sharpens the spice flavor.
Variations on This Dish:
- Apple Carrot Cups: Swap half the carrot for grated apple.
- Nut-Free Version: Leave out the walnuts and add sunflower seeds instead.
Common Mistakes to Avoid with This Dish:
- Using coarse carrot shreds: They stay too firm.
- Not greasing the tin well: Oat cups stick hard.
29. French Toast Casserole Cups
These are the smaller, neater cousin of a big French toast casserole, which makes them better for school mornings in my book. The bread bakes into little custardy cubes, the tops get crisp, and each cup can be eaten without cutting or scooping. That alone saves time and effort.
Why It Works:
Baking the mixture in a muffin tin creates built-in portions and gives you more browned edges than a large casserole. Bread cubes soak up the custard evenly, and the cups set fast enough that they don’t go puddly. If you’re trying to get French toast flavor without the frying pan, this is a smart route.
Key Ingredients:
- 8 slices bread, cubed
- 4 large eggs
- 1 1/2 cups milk
- 2 tablespoons maple syrup
- 1 teaspoon cinnamon
- 1 teaspoon vanilla extract
- 1 cup diced strawberries or chocolate chips
- Butter for the muffin tin
Quick Steps:
- Preheat the oven to 350°F and grease a muffin tin well.
- Whisk the eggs, milk, maple syrup, cinnamon, and vanilla.
- Stir in the bread cubes and berries or chocolate chips.
- Let the mixture sit for 5 minutes, then spoon it into the cups.
- Bake for 20 to 22 minutes, until puffed and golden. Cool slightly before removing.
Equipment for This Recipe:
- Muffin tin
- Mixing bowl
- Whisk
- Spoon
How to Serve This Dish:
Serve warm with syrup on the side or a dusting of powdered sugar if you want a sweeter finish. They’re also good in a lunchbox once fully cooled.
Pro Tips for This Recipe:
- Press the bread cubes down gently so they soak properly.
- Day-old bread works better than soft fresh bread.
- Let the cups set for a few minutes after baking so they release cleanly.
Variations on This Dish:
- Apple Pie Cups: Use diced apples and extra cinnamon.
- Berry Cream Cups: Add a few bits of cream cheese with the berries.
Common Mistakes to Avoid with This Dish:
- Using too much custard: The centers stay wet.
- Unmolding too soon: The cups break apart.
30. Breakfast Taquitos

Taquitos are burritos with a crisp edge and a smaller footprint, which makes them especially good for little hands and fast mornings. The tortillas tighten around the filling as they bake, the seams go golden, and the outside gets firm enough to hold up without dripping across the table.
Why It Works:
Rolling the filling thinly gives you more surface area in the oven, so the tortillas crisp instead of steaming. A light brush of oil helps the shell brown, and baking seam-side down keeps the taquitos from unfurling. They freeze well too, which is a nice bonus when you want a stash in the freezer drawer.
Key Ingredients:
- 8 small flour tortillas
- 6 large eggs
- 1 cup shredded cheese
- 2 cups cooked hash browns or diced potatoes
- 1/2 cup cooked sausage or black beans
- 2 tablespoons salsa
- 1 tablespoon oil or melted butter
Quick Steps:
- Preheat the oven to 425°F and line a sheet pan with parchment.
- Scramble the eggs until just set.
- Warm the tortillas briefly so they roll without cracking.
- Fill each tortilla with eggs, potatoes, sausage or beans, cheese, and a little salsa.
- Roll tightly, place seam-side down, brush lightly with oil, and bake for 12 to 15 minutes, until crisp and golden.
- Cool for 2 minutes before serving or freezing.
Equipment for This Recipe:
- Sheet pan
- Parchment paper
- Skillet
- Pastry brush or spoon
How to Serve This Dish:
Serve with salsa or guacamole if you’re eating at home. For school mornings, wrap them in parchment and hand them over with fruit on the side.
Pro Tips for This Recipe:
- Keep the filling modest so the taquitos seal well.
- Bake seam-side down first to lock the roll shut.
- Reheat frozen taquitos in the oven or air fryer for the crispiest shell.
Variations on This Dish:
- Spicy Chorizo Version: Use cooked chorizo and pepper jack cheese.
- Veggie Potato Version: Swap sausage for black beans and add a little corn.
Common Mistakes to Avoid with This Dish:
- Overfilling the tortillas: They split open in the oven.
- Reheating uncovered in the microwave: The shells go soft fast.
Why Make-Ahead Breakfasts Beat the School-Morning Scramble
The morning doesn’t need a fancy breakfast; it needs one that survives the gap between fridge and first bell. That’s why make-ahead meals keep winning. You can cook once, portion well, and spend the next few mornings doing something more useful than waiting for a skillet to recover from yesterday’s chaos.
A lot of these breakfasts get better after a rest. Baked oatmeal slices more neatly after chilling. Egg muffins release cleaner from the tin once they’ve cooled. Burritos freeze into tidy little bricks that reheat faster than you’d expect, which is one of those small practical things that sounds dull until it saves ten minutes on a Tuesday.
The pattern is simple. Pick a base that holds shape, use a filling that doesn’t leak, and think one step ahead about how it will be eaten. If the morning version needs both a fork and a prayer, it’s the wrong breakfast for a school day.
Essential Equipment for These Recipes
- 12-cup muffin tin: Egg muffins, frittatas, oatmeal cups, and donut muffins all rely on this more than you’d think.
- Rimmed sheet pan: Useful for pancakes, taquitos, French toast sticks, and breakfast pizzas.
- 9×13-inch baking dish: The right size for casseroles, croissant bakes, and skillet-style breakfast bakes.
- Cast-iron skillet: Best for skillet bakes and anything that needs even heat and browned edges.
- Large nonstick skillet: A good everyday pan for scrambled eggs, quesadillas, burrito fillings, and sausage.
- Blender: Needed for smoothie packs and handy for smoothing batters or sauces.
- Mixing bowls, assorted sizes: You’ll use at least two at a time for almost every recipe here.
- Whisk and spatula: The whisk handles eggs and batters; the spatula keeps fillings from sticking and tearing.
- Freezer bags and parchment paper: Parchment keeps wraps from freezing together, and freezer bags protect against ice crystals.
- Toaster oven or air fryer: Not required, but excellent for bringing back crisp edges on sandwiches, taquitos, and pastry squares.
Smart Shopping and Ingredient Tips
Eggs are the backbone of a lot of these meals, so buy the size your recipes expect and don’t guess. Large eggs are the standard in most kitchen math, and that matters when you’re mixing custards or muffin batters. If the carton looks cracked or the eggs slosh when you shake them, skip it.
Bread choices make a bigger difference than people think. Thick sandwich bread, brioche, English muffins, mini bagels, croissants, and sturdy tortillas all behave differently in the oven and freezer. For anything with custard, slightly stale bread is your friend because it soaks without turning to mush. For wraps and pinwheels, soft but flexible tortillas are the safe bet; dry ones split the second you roll them.
Oats deserve a small rule of their own. Use rolled oats for baked oatmeal, no-bake bars, and overnight oats. Quick oats can work in a few places, but they go soft faster. Chia seeds should be fresh enough to smell neutral, not dusty or bitter. With yogurt, plain Greek yogurt gives you more protein and less sugar, which makes it easier to control the sweetness of the final dish.
Frozen fruit is fine in baked recipes and smoothies, and in some cases it works better than fresh because it’s already cold and ready to use. For toppings and parfaits, though, pat fruit dry so it doesn’t bleed into the yogurt or granola. And when you’re buying cheese, block cheese often melts a little cleaner, but pre-shredded is still useful when speed matters more than perfect melt. Use the version that keeps you cooking, not the one that sends you searching for a grater at 6:45 a.m.
How to Serve These Recipes
Presentation:
Keep the look simple and clear. Muffins and bars do well on a small plate with a few fruit slices; sandwiches and burritos look better wrapped in parchment and cut once, not mangled into pieces. When you’re plating for home, a little height helps — stack pancakes, lean taquitos against each other, or tuck a spoon beside a jar so it looks intentional.
Accompaniments:
Fruit is the easiest partner for almost everything here: berries, apple slices, orange wedges, grapes, and banana halves all play nicely. For savory meals, a small cup of salsa, plain yogurt, hummus, or avocado gives you something fresh beside the eggs and cheese. Bread-heavy breakfasts are better with a crisp side like cucumbers, carrots, or even a few cherry tomatoes.
Portions:
Most of these recipes work as one solid serving or two smaller ones. Egg muffins and mini frittatas usually land at 2 to 3 pieces per person. Burritos, sandwiches, and taquitos are usually one each, though older kids or hungry adults may want two. For anything sweet, pair one item with fruit or yogurt if you want the breakfast to feel more complete.
Beverage Pairing:
Milk is the obvious match for muffins, bars, and baked oatmeal. Coffee or tea fits the adults’ versions of the savory bakes, and plain water or diluted juice keeps the kid side of the table from turning into a sugar parade. Smoothies can stand alone, but they still benefit from a cold glass of water nearby.
Additional Tips and Flavor Boosters
Flavor Enhancement:
A little finishing salt, a small spoonful of salsa, or a dusting of cinnamon sugar can change a breakfast from serviceable to memorable. I like a pinch of flaky salt on egg muffins and a smear of jam on oatmeal cups. Those tiny moves matter more than people admit.
Customization:
If your household runs sweet, lean into banana, blueberry, cinnamon, and maple. If it runs savory, push toward cheddar, ham, sausage, spinach, and peppers. Don’t make every breakfast chase the same flavor profile; that’s how people get bored and start asking for packaged stuff instead.
Serving Suggestions:
Wrap handheld items in parchment before foil or a lunch container. Add a little fruit cup, a yogurt tube, or a handful of crackers next to the main breakfast so the meal feels complete. A breakfast that arrives neatly is more likely to get eaten neatly.
Make-It-Yours:
For nut-free versions, use sunflower butter, seeds, or cheese-based recipes instead of peanut butter. For dairy-free meals, oat milk, plant-based yogurt, and dairy-free shredded cheese work in many of the oat and egg bakes, though the melt won’t be exactly the same. For gluten-free swaps, use certified gluten-free oats, corn tortillas, and sturdy gluten-free bread where the recipe depends on bread structure.
Make-Ahead, Storage, and Reheating Guidance
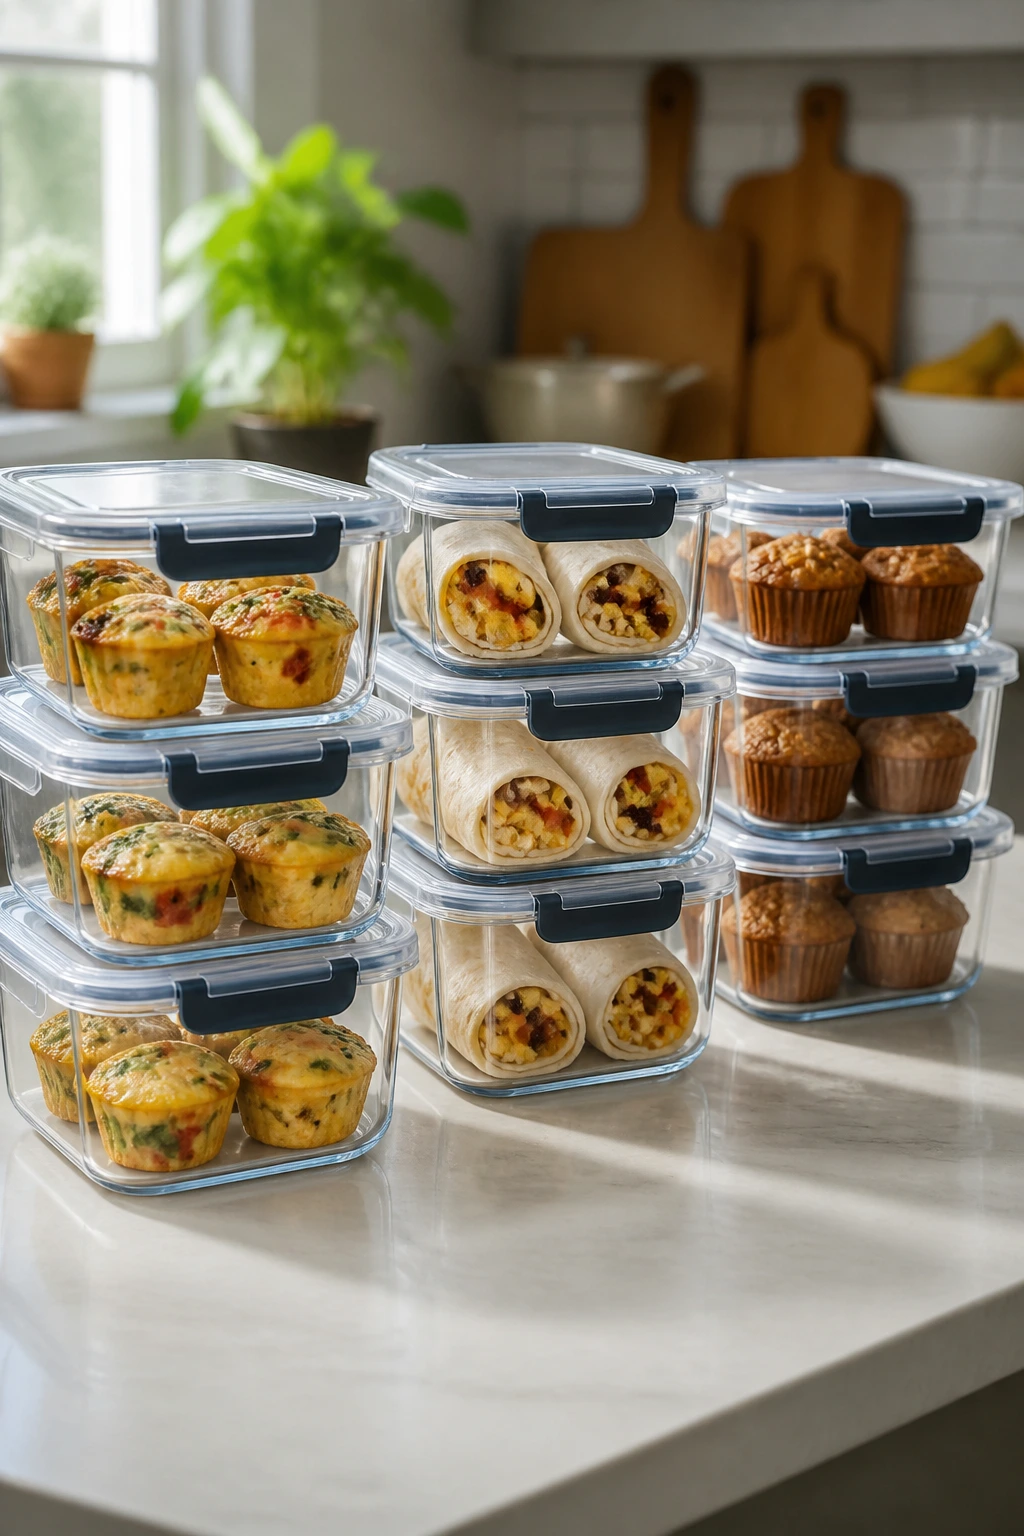
Most of the egg-based breakfasts — muffins, burritos, mini frittatas, taquitos, breakfast sandwiches, and casseroles — keep well in the refrigerator for 3 to 4 days. Wrap them tightly or store them in airtight containers once they’re fully cool. Freezer life is usually 2 to 3 months if you wrap individual portions first and then bag them together. That double layer keeps freezer burn away and makes it easier to grab only what you need.
Muffins, breakfast cookies, granola bars, donut muffins, and baked oatmeal cups can sit at room temperature for 1 to 2 days if your kitchen is cool and the container seals well. After that, move them to the fridge for better texture and safety. Baked oatmeal and oatmeal cups also freeze cleanly for up to 2 months, and they thaw overnight in the fridge without much drama.
For reheating, match the method to the texture you want. Egg muffins and casseroles do fine in the microwave for 30 to 60 seconds, covered with a damp paper towel to keep them from drying out. Burritos, sandwiches, taquitos, and pastry squares come back better in a toaster oven or air fryer at 350°F for 5 to 8 minutes, which brings back the crisp edge. Overnight oats, chia pudding, parfait jars, and snack boxes are best eaten cold, though a cold jar can sit out for a few minutes while you’re packing backpacks.
Smoothie packs should stay frozen until the moment you blend them. That’s the whole point. If you’re building a big weekend prep session, make the freezer-friendly items first, then fill the fridge with the things that need only one or two days of life. Not everything has to last forever. It just has to last long enough to stop Tuesday from getting rude.
Variations and Adaptations to Try
The Nut-Free School Desk:
Swap peanut butter for sunflower butter in the bars, oat cups, and overnight oats. Use seeds, cheese, or yogurt to keep the protein up where nut butter would normally carry the load. This route matters more than people think because it keeps the school lunch rules from wrecking the breakfast plan.
The Higher-Protein Lineup:
Add Greek yogurt, cottage cheese, extra eggs, or turkey sausage to the recipes that need more staying power. This works especially well in baked oatmeal, smoothies, egg muffins, and sandwich breakfasts. A little more protein at breakfast tends to make the whole morning feel less frantic because nobody is hunting for a second snack by 9 a.m.
The Lower-Sugar Route:
Pull back on maple syrup, honey, and jam, then let fruit do more of the work. Banana muffins, baked oatmeal, parfait jars, and chia pudding all adapt cleanly here. I like this route when I want the meal to taste clean and not dessert-ish.
The Dairy-Free Shelf:
Use oat milk or almond milk where the recipe calls for milk, skip the yogurt in smoothie packs or use a plant-based version, and choose dairy-free cheese only when melting matters less than convenience. It won’t taste identical, but the structure holds up in most oat and egg-based meals.
The Sweet-to-Savory Split:
Make one batch of the freezer items sweet and one batch savory, then alternate them through the week. That keeps breakfast from feeling repetitive and prevents the “I’m sick of oats” complaint that shows up whenever the same recipe gets repeated too many times.
Common Mistakes to Avoid
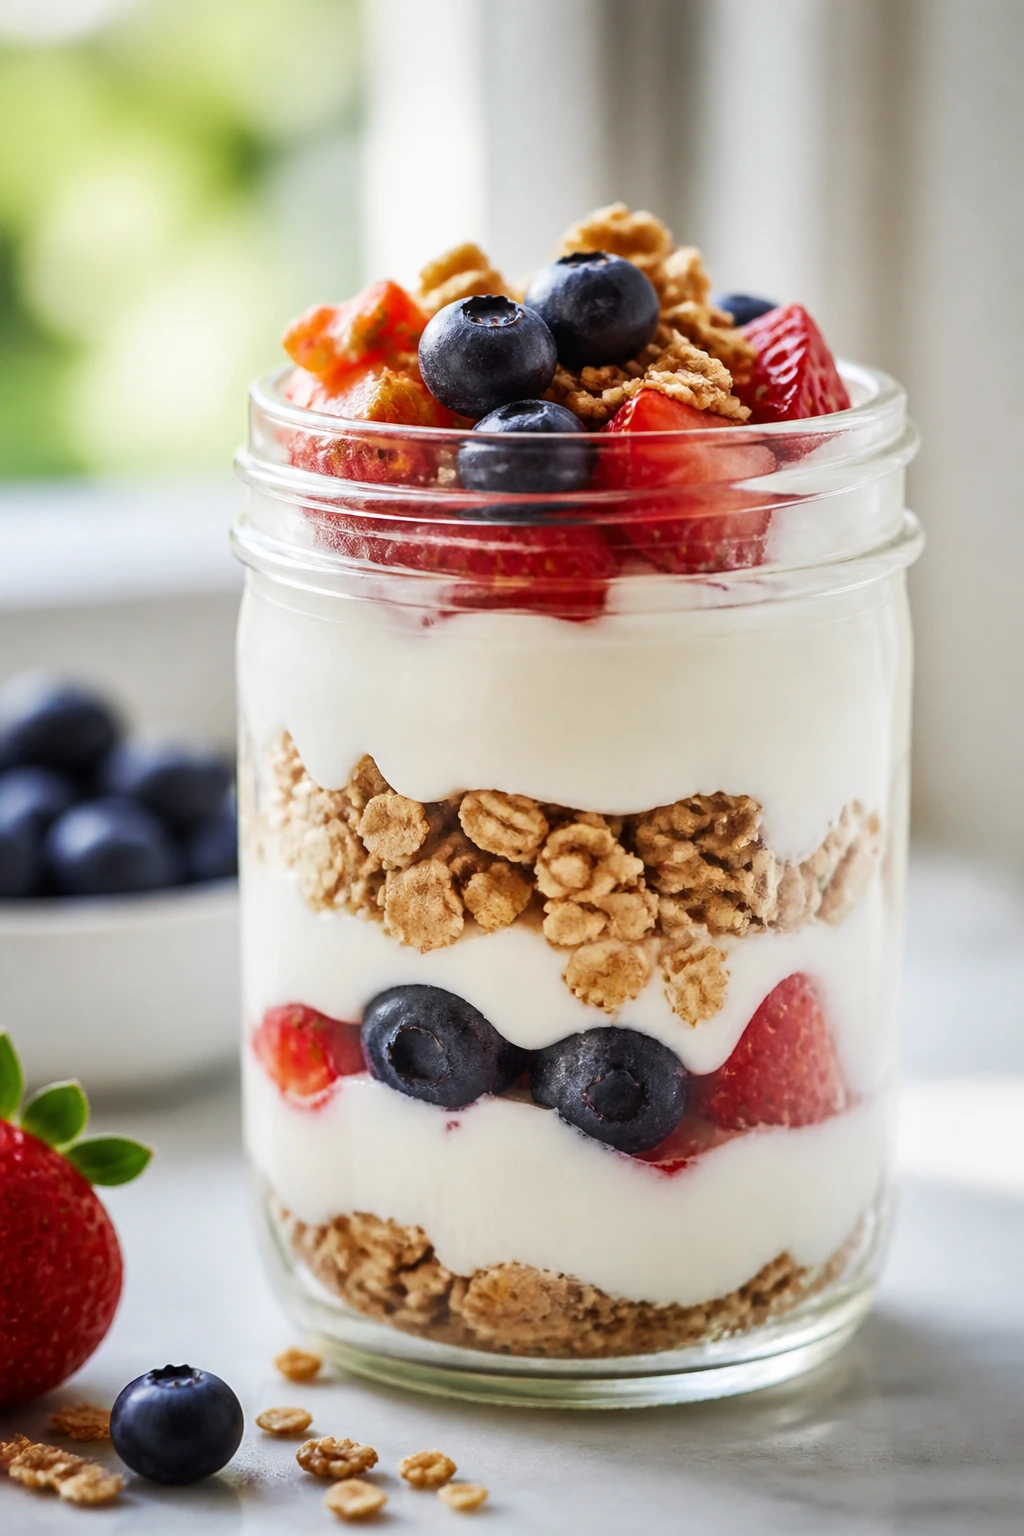
-
Packing food while it’s still hot: That steam has to go somewhere, and it usually goes into sogginess. Cool baked goods and egg dishes completely before sealing them.
-
Using wet fillings: Spinach, tomatoes, berries, and cooked vegetables can all leak moisture if they aren’t handled well. Pat them dry or cook them down first, especially in muffins, pinwheels, and pastry squares.
-
Freezing without wrapping individually: A big batch shoved into one bag turns into a clumped brick. Wrap sandwiches, burritos, and taquitos one at a time, then bag them together.
-
Overbaking eggs: Egg muffins and frittatas go from tender to rubbery fast. Pull them as soon as the centers are set and the tops bounce back lightly.
-
Mixing crunchy and wet too early: Granola in yogurt, crackers in snack boxes, and toast with toppings all soften if they sit too long. Keep the crunchy pieces separate until the last possible second.
-
Choosing the wrong base: Thin bread tears, flimsy tortillas split, and watery yogurt ruins jars. Match the structure to the job and the whole breakfast gets easier.
Frequently Asked Questions
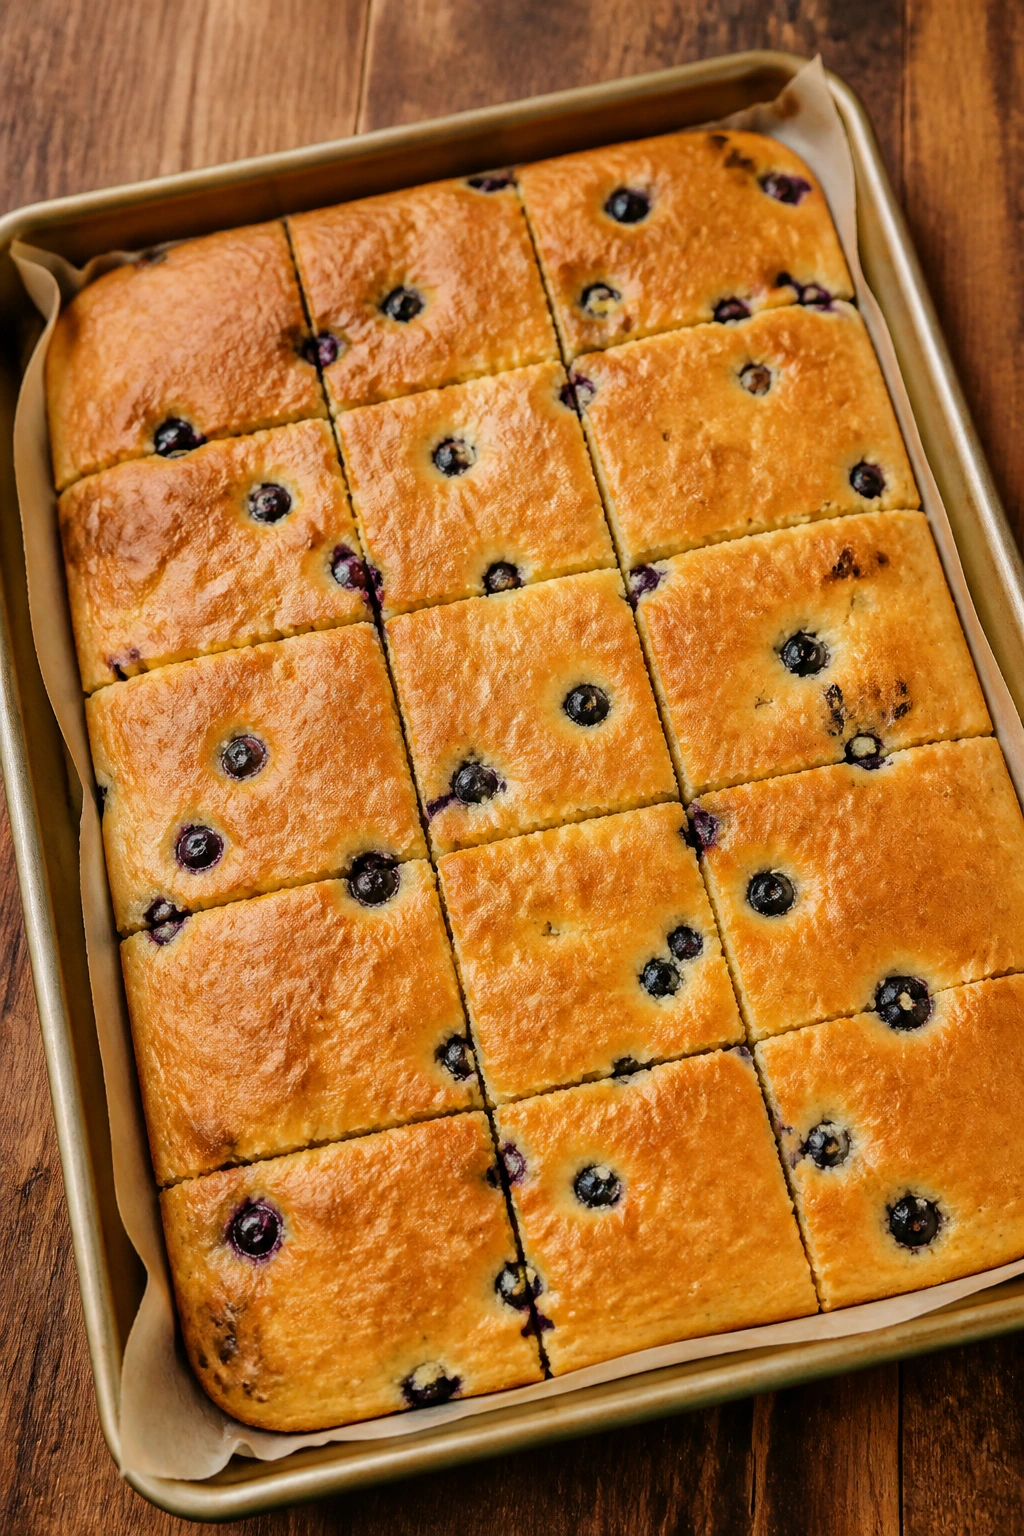
Which of these meals freeze the best?
Breakfast burritos, egg muffins, mini frittatas, taquitos, sandwich-style breakfasts, pancakes, waffles, and baked oatmeal freeze very well. Wrap them individually, then store them in a freezer bag so they don’t dry out or stick together.
How do I keep breakfast from getting soggy?
Let hot food cool all the way before packing it, and keep crunchy or wet parts separate whenever you can. Granola should stay out of yogurt until serving, toast should be assembled at the last minute, and burritos need to cool before freezing.
Can I make these nut-free for school?
Yes, and it’s easier than it sounds. Use sunflower butter in any peanut butter recipe, skip nuts in bars and muffins, and lean on eggs, cheese, yogurt, fruit, and seeds for the protein and fat that keep the meal satisfying.
What if my kids only eat sweet breakfasts?
Build around bananas, cinnamon, maple syrup, apples, berries, and yogurt first, then quietly add oats, eggs, or chia seeds where the texture won’t give you away. Banana muffins, baked oatmeal cups, French toast sticks, and donut muffins usually get the least resistance.
How do I reheat egg sandwiches without making the eggs rubbery?
Warm them gently, not aggressively. Use a microwave for short bursts, 30 to 45 seconds at a time, or move them to a toaster oven so the bread or biscuit gets warm while the eggs stay soft.
Can I prep everything on one day?
You can prep a lot on one day, but not all 30 at once. Focus on the freezer-friendly pieces first — burritos, muffins, bars, pancakes, waffles — then make the fridge items like parfaits, chia pudding, and snack boxes closer to when you’ll eat them.
What if I do not have a microwave in the morning?
Choose breakfasts that are good cold or reheat well in a toaster oven or skillet. Muffins, bars, overnight oats, chia pudding, pinwheels, snack boxes, and smoothie packs are especially useful when a microwave isn’t part of the routine.
Are these meals good for younger kids?
Yes, but size and texture matter. Cut sandwiches, taquitos, and quesadillas into smaller pieces, keep spice levels low, and choose softer foods like muffins, oatmeal cups, and egg muffins when you want less mess and less chewing effort.
How far ahead can I make the fridge items?
Most egg bakes, overnight oats, chia pudding, and baked oatmeal hold for 3 to 4 days in the fridge. Parfaits, toast-based meals, and snack boxes are best made a day ahead or with components stored separately so they stay crisp and fresh.
A Quieter Morning Starts Here

A school morning doesn’t need to be pretty. It needs to be calm enough that nobody is yelling about where the lunchbox went while the toast burns. That’s why these meals matter: they shift the work into a quieter part of the day, when the kitchen is still and your hands are steady.
Pick a couple sweet options, a couple savory ones, and one freezer backup you trust. That mix gives you room to deal with tired moods, strange appetites, and the occasional morning where everyone wants something different. The food won’t solve the whole circus, but it will take a real bite out of it.