
The best family movie night food has a very specific job: it needs to survive a dark room, a soft couch, and at least one kid who keeps asking, “Can I have another snack?” before the opening credits are over. It should be easy to grab, easy to share, and forgiving if you set it down for two minutes while someone finds the remote.
That’s why I lean hard toward recipes that live comfortably between dinner and snack time. A bowl of buttery popcorn. A tray of nachos that comes out bubbling at the edges. Mini pizzas that taste good at room temperature. A sweet thing, a salty thing, a cold drink, maybe one recipe that can be assembled in ten minutes when everyone is already hungry and the movie is about to start. That balance matters more than fancy ingredients ever will.
I’ve always thought the real trick is texture. Crunch next to melty cheese. Sweet next to salty. Something hot at the beginning, something cold by the end, and nothing so fussy that it falls apart in your lap. The recipes below are built for that exact job, and they keep the cleanup sane, which is half the battle on a movie night anyway.
Why These Family Movie Night Recipes Actually Work
- One-hand friendly: Most of these recipes can be eaten from a napkin, a paper tray, or a small bowl, so nobody has to manage a full plate in the dark.
- Mix of hot and cold: Hot nachos and sliders keep the table lively, while fruit cups, slushes, and cheesecake cups give you something cool to balance all that salt and cheese.
- Easy to scale: Nearly every recipe here doubles without drama, which matters when one more cousin shows up with a blanket and a strong opinion about the movie.
- Kid-editable: A lot of these can be split into “plain” and “loaded” sections, so the picky eaters can stay in their lane while the rest of us pile on the jalapeños.
- Make-ahead friendly: Several snacks can be baked early, cooled, and reheated in a short burst so you’re not stuck cooking while the opening scene rolls.
- Low drama cleanup: Sheet pans, muffin tins, and parchment do most of the work here. Nobody wants to scrub a casserole dish after the credits.
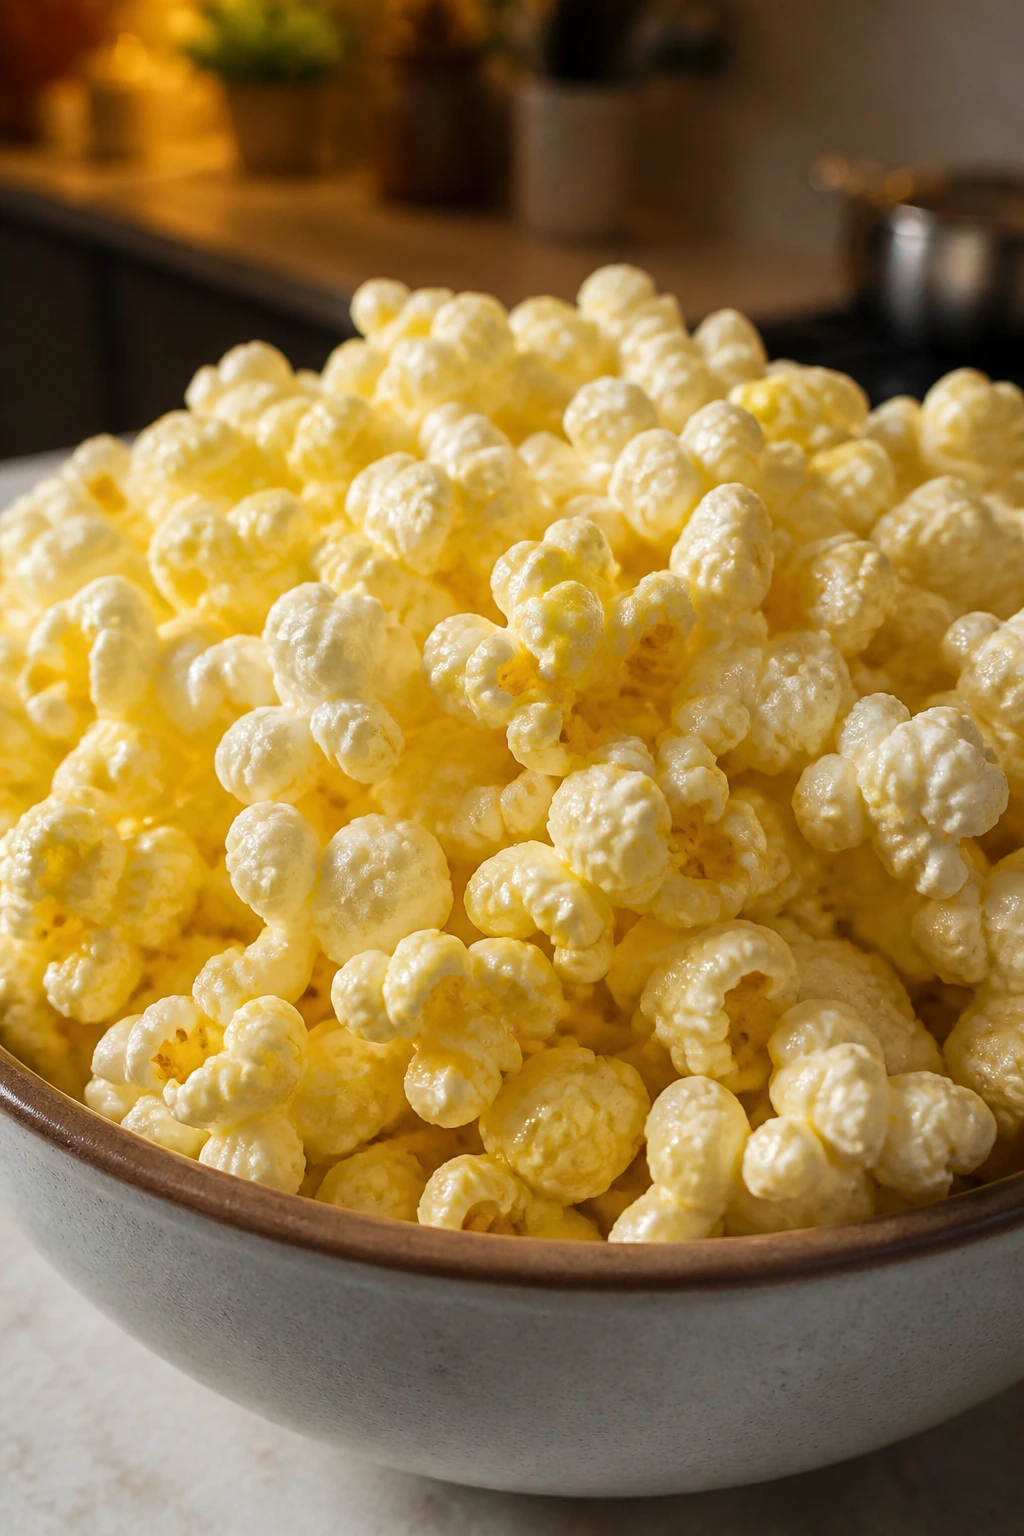
1. Classic Butter Popcorn
The smell of real popcorn hitting hot oil is half the appeal. It’s warm, salty, and a little bit old-school in the best way, with butter clinging to the kernels instead of soaking through them.
Why It Works:
A simple stovetop batch gives you better crunch than most bagged popcorn, and the whole thing takes under 10 minutes. The salt sticks best when the popcorn is still warm and the butter is drizzled slowly, not dumped all at once.
Key Ingredients:
- 1/2 cup popcorn kernels
- 2 tablespoons neutral oil, such as canola or avocado
- 3 tablespoons unsalted butter, melted
- 3/4 teaspoon fine salt
- 1/4 teaspoon garlic powder, optional for a savory edge
Quick Steps:
- Heat the oil in a large pot over medium heat with 3 kernels inside.
- When those kernels pop, add the rest of the kernels, cover the pot, and shake it once or twice.
- Cook until the popping slows to 2 to 3 seconds between pops, then remove from the heat.
- Pour the popcorn into a large bowl and drizzle the melted butter over the top.
- Sprinkle with salt, toss well, and serve right away while the kernels are still crisp.
Equipment for This Recipe:
- Large heavy-bottomed pot with a lid
- Large mixing bowl
- Measuring spoons
- Wooden spoon or heat-safe spatula
How to Serve This Dish:
Pile it into one big bowl or divide it into smaller bowls for easy passing. A little extra melted butter on the side never hurts if your crowd likes a glossier finish.
Pro Tips for This Recipe:
- Use a pot big enough that the kernels have room to move.
- Salt the popcorn while it’s warm, not after it cools.
- If you want a richer flavor, swap half the oil for ghee.
Variations on This Dish:
- Movie Theater Butter: Use clarified butter for a cleaner, richer finish.
- Chili-Lime Popcorn: Add 1/2 teaspoon chili powder and a squeeze of lime zest.
- Cheesy Popcorn: Toss with 2 tablespoons finely grated parmesan while warm.
Common Mistakes to Avoid with This Dish:
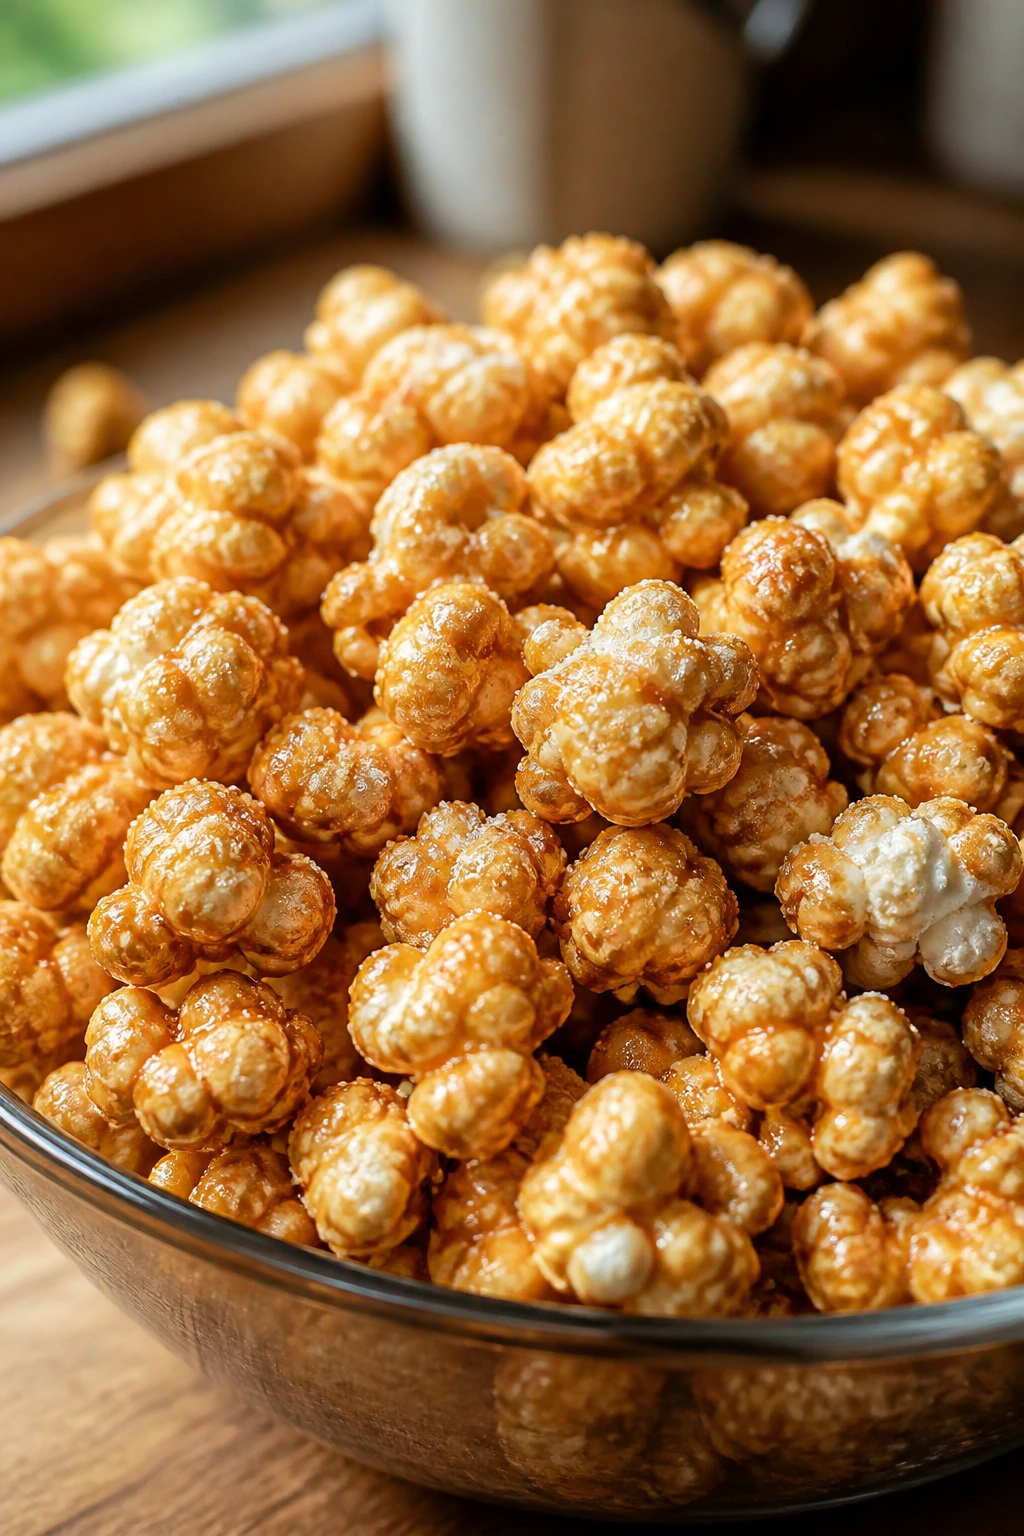
- Overheating the oil: If the oil smokes, the popcorn tastes bitter. Start at medium heat and watch the first kernels.
- Lifting the lid too soon: Steam softens the kernels. Wait until the popping slows before opening the pot.
2. Brown Sugar Kettle Corn
This one gives you that salty-sweet crackle that makes people keep reaching back into the bowl. The sugar melts into a thin glaze, and if you pull it off the heat at the right moment, it stays crisp instead of turning into a sticky mess.
Why It Works:
Kettle corn lives on timing. The sugar cooks with the kernels instead of after them, so you get a thin candy shell without making caramel from scratch. A pinch of salt sharpens the sweetness and keeps the bowl from tasting flat.
Key Ingredients:
- 1/2 cup popcorn kernels
- 2 tablespoons neutral oil
- 1/4 cup granulated sugar
- 1/2 teaspoon fine salt
- 1 tablespoon unsalted butter, optional
- 1/4 teaspoon cinnamon, optional
Quick Steps:
- Heat the oil in a large pot over medium heat.
- Add the kernels and sugar together, then cover the pot immediately.
- Shake the pot every few seconds as the kernels pop and the sugar melts.
- When the popping slows, pull the pot off the heat right away.
- Add the salt, and butter if you want extra shine, then pour into a bowl to cool.
Equipment for This Recipe:
- Large lidded pot
- Heat-safe spoon
- Large bowl
- Measuring cups
How to Serve This Dish:
Let it cool for a minute before serving so the sugar can harden a little. It’s the kind of snack that disappears fastest when it’s poured into smaller bowls instead of one giant pile.
Pro Tips for This Recipe:
- Keep the pot moving so the sugar doesn’t scorch.
- Use a light hand with cinnamon; too much makes it taste like cereal dust.
- Let it cool before sealing it up, or the steam will soften the coating.
Variations on This Dish:
- Vanilla Kettle Corn: Stir in 1/2 teaspoon vanilla after popping.
- Spiced Kettle Corn: Add a pinch of cayenne for a sweet-hot finish.
- Pumpkin Pie Style: Add cinnamon and a tiny pinch of nutmeg.
Common Mistakes to Avoid with This Dish:
- Walking away from the stove: Sugar can go from glossy to burnt in seconds. Stay right there.
- Packing it into a container while warm: That traps steam and ruins the crisp shell.
3. Parmesan Ranch Popcorn
If plain popcorn is the safe choice, this is the one people remember. The ranch seasoning clings to the butter, and the parmesan brings that salty, savory edge that makes the bowl feel more like a snack mix than a side dish.
Why It Works:
Butter is the glue here, and parmesan gives the seasoning something dry to grab onto. You get more flavor per handful than you do with plain salt, which is useful when the movie is loud and nobody wants to keep pausing for refills.
Key Ingredients:
- 8 cups popped popcorn
- 3 tablespoons unsalted butter, melted
- 2 tablespoons ranch seasoning mix
- 2 tablespoons finely grated parmesan
- 1/4 teaspoon garlic powder
Quick Steps:
- Pop the popcorn and put it in a very large bowl.
- Stir the ranch seasoning, parmesan, and garlic powder together in a small bowl.
- Drizzle the melted butter over the popcorn and toss once.
- Sprinkle the seasoning mixture over the top and toss again until coated.
- Serve right away while the popcorn is still warm and fragrant.
Equipment for This Recipe:
- Large mixing bowl
- Small bowl
- Measuring spoons
- Spoon or spatula for tossing
How to Serve This Dish:
This one works best in wide bowls so the seasoning doesn’t get crushed at the bottom. I like it next to something sweet, because the savory hit can be a little addictive.
Pro Tips for This Recipe:
- Use finely grated parmesan, not chunky shreds.
- Toss in stages so the seasoning spreads evenly.
- If your ranch mix is salty, cut the added salt completely.
Variations on This Dish:
- Spicy Ranch Popcorn: Add 1/4 teaspoon cayenne or hot paprika.
- Herb Ranch Popcorn: Add dried dill and parsley.
- Cheddar Ranch Popcorn: Swap parmesan for cheddar powder.
Common Mistakes to Avoid with This Dish:
- Adding too much butter: The popcorn turns soggy fast. Use just enough to coat.
- Using wet cheese: Freshly shredded wet cheese clumps instead of dusting evenly.
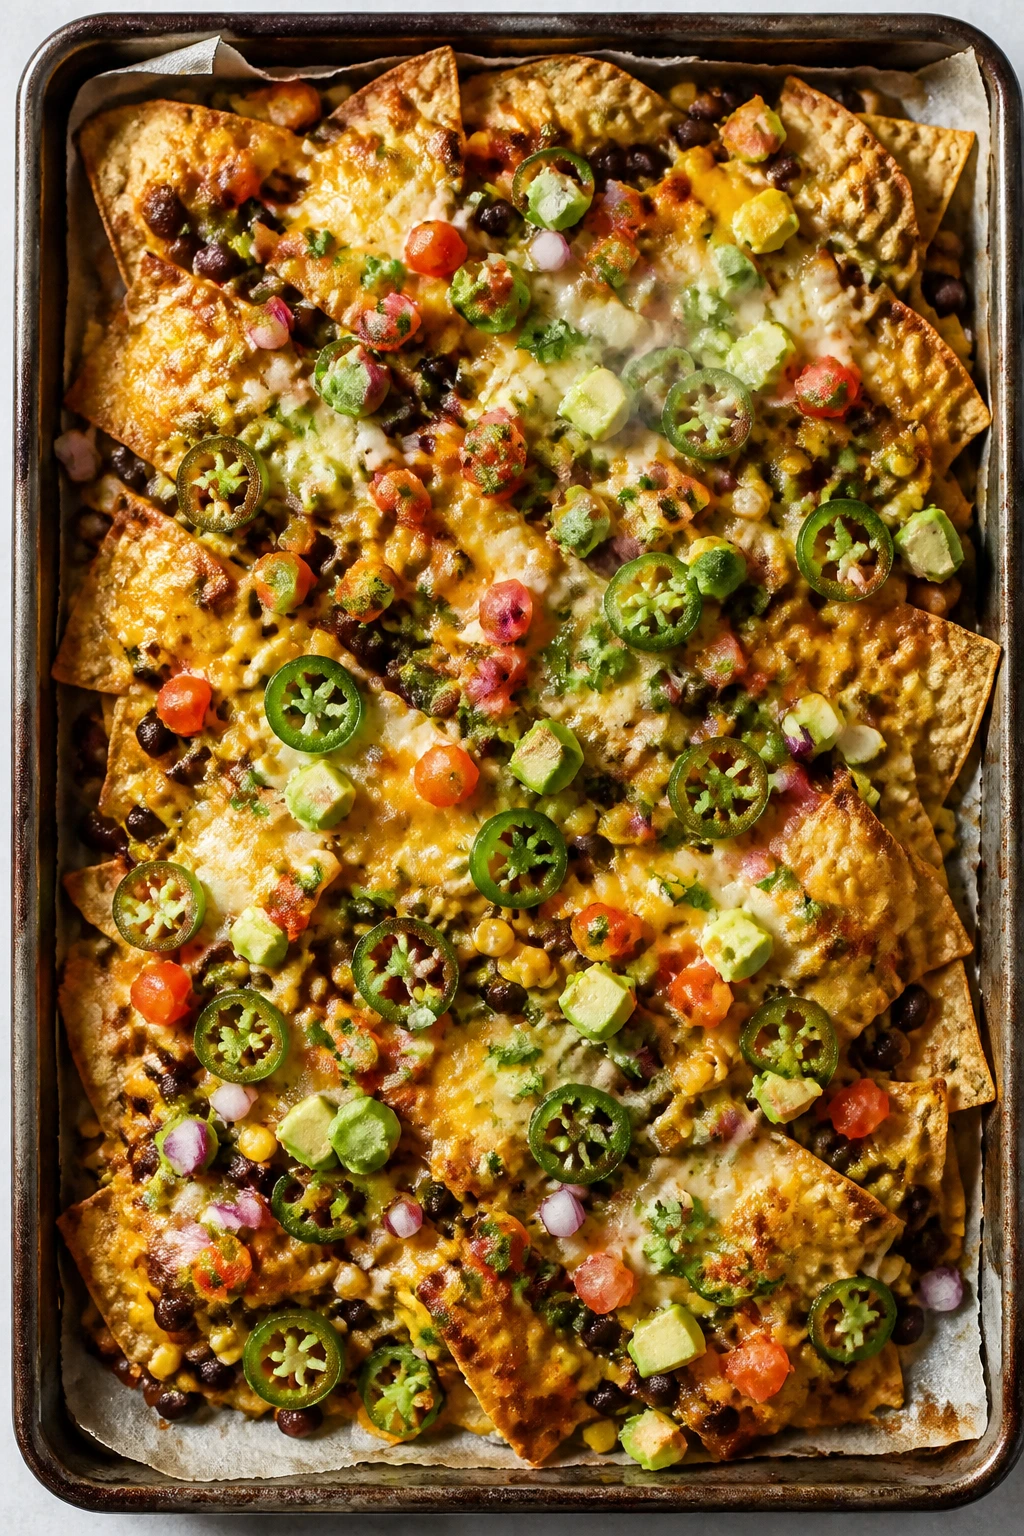
4. Sheet Pan Nachos
This is the tray that usually gets quiet first. The chips stay crisp at the edges, the cheese melts into the middle, and every bite can be built a little differently depending on who reaches in first.
Why It Works:
Sheet pan nachos are perfect for a movie because they cook in one layer and come to the table already shareable. The key is topping them lightly before baking, then adding cold ingredients after they come out, so the chips don’t collapse.
Key Ingredients:
- 8 ounces sturdy tortilla chips
- 2 cups shredded cheddar or Monterey Jack
- 1 cup cooked black beans, drained and rinsed
- 1/2 cup corn kernels, thawed if frozen
- 1/4 cup sliced jalapeños
- 1/2 cup salsa
- 1/4 cup sour cream
- 2 tablespoons sliced green onions
Quick Steps:
- Heat the oven to 400°F and line a sheet pan with parchment.
- Spread the chips in one even layer.
- Scatter the cheese, beans, corn, and jalapeños over the top.
- Bake for 7 to 9 minutes, until the cheese melts and the chips at the edges look toasted.
- Finish with salsa, sour cream, and green onions, then serve immediately.
Equipment for This Recipe:
- Rimmed sheet pan
- Parchment paper
- Box grater if using block cheese
- Small spoon for toppings
How to Serve This Dish:
Serve it straight from the pan for the easiest cleanup, or slide it onto a large cutting board if you want a slightly nicer presentation. Add a second bowl of salsa on the side for the people who take nachos very seriously.
Pro Tips for This Recipe:
- Use thick chips so they don’t snap under the toppings.
- Keep wet toppings off until the end.
- If you’re feeding a crowd, bake two half pans instead of one overloaded tray.
Variations on This Dish:
- Chicken Nachos: Add shredded rotisserie chicken in place of beans.
- Bean-and-Corn Nachos: Skip the meat and double the beans.
- Breakfast Nachos: Use scrambled eggs, bacon, and cheddar.
Common Mistakes to Avoid with This Dish:
- Stacking the chips too high: The bottom layer gets soggy and sogs out the whole pan.
- Baking with salsa already on top: It turns the chips limp fast.
5. Loaded Quesadilla Wedges
A quesadilla is one of those rare foods that still feels good after it cools a little. The tortilla gets crisp, the cheese pulls into clean strands, and the wedges are easy to pass around without a fork.
Why It Works:
This is the fastest way to turn a few pantry items into a hot snack that feels like dinner. The tortilla browns in a skillet in minutes, and the filling can be kept mild or made sharp with salsa and peppers.
Key Ingredients:
- 4 large flour tortillas
- 2 cups shredded Mexican-blend cheese
- 1 cup shredded cooked chicken or black beans
- 1/2 cup diced bell peppers
- 2 tablespoons butter or oil
- Salsa and sour cream, for serving
Quick Steps:
- Heat a large skillet over medium heat.
- Lay one tortilla in the skillet and cover half with cheese, chicken or beans, and peppers.
- Fold the tortilla over and cook for 2 to 3 minutes per side, until golden and crisp.
- Repeat with the remaining tortillas.
- Cut into wedges and serve with salsa and sour cream.
Equipment for This Recipe:
- Large skillet
- Spatula
- Sharp knife or pizza cutter
- Cutting board
How to Serve This Dish:
Cut them into smaller wedges than you would for dinner. That keeps hands cleaner and makes it easier to share with people who only want “a bite.”
Pro Tips for This Recipe:
- Don’t overfill the tortilla or the cheese will leak.
- A thin layer of butter gives a better crust than a heavy slick of oil.
- Let the quesadilla rest for 1 minute before cutting so the filling settles.
Variations on This Dish:
- Pepper Jack Kick: Swap in pepper jack for a little heat.
- Veggie Version: Use sautéed mushrooms and spinach.
- Chicken Bacon Style: Add chopped cooked bacon for extra salt.
Common Mistakes to Avoid with This Dish:
- Cooking over high heat: The tortilla burns before the cheese melts.
- Cutting too early: The filling spills out in a hot, messy slide.
6. Mini Pizza Bagels
These are the snack people smell before they see. The edges get crisp, the sauce stays bright, and the cheese bubbles into little browned pockets that kids somehow notice from across the room.
Why It Works:
Mini pizza bagels are fast, cheap, and built for customization. They bake in a short burst at high heat, which means the bottoms get toasted instead of chewy, and the toppings stay where you put them.
Key Ingredients:
- 6 mini bagels, split
- 3/4 cup pizza sauce
- 2 cups shredded mozzarella
- 1/2 cup mini pepperoni
- 1 teaspoon dried oregano
- 1 tablespoon grated parmesan, optional
Quick Steps:
- Heat the oven to 425°F and line a baking sheet with parchment.
- Place the bagel halves cut-side up on the tray.
- Spread each half with sauce, then top with mozzarella and pepperoni.
- Sprinkle with oregano and parmesan.
- Bake for 8 to 10 minutes, until the cheese melts and the edges turn lightly brown.
Equipment for This Recipe:
- Baking sheet
- Parchment paper
- Spoon for sauce
- Box grater, optional
How to Serve This Dish:
Serve them warm, but not piping hot, so little fingers can handle them. They pair well with sliced cucumbers or grapes if you want to pretend balance is happening.
Pro Tips for This Recipe:
- Toasting the bagels first keeps the bottoms from going soft.
- Use thick pizza sauce, not watery marinara.
- Add toppings sparingly so the cheese doesn’t slide off.
Variations on This Dish:
- Veggie Pizza Bagels: Use chopped olives and bell peppers.
- Breakfast Pizza Bagels: Top with scrambled eggs and bacon.
- White Pizza Bagels: Skip the red sauce and use ricotta.
Common Mistakes to Avoid with This Dish:
- Over-saucing: The bagels turn soggy fast.
- Using too much pepperoni: It curls, burns, and makes the tops greasy.
7. English Muffin Pizzas
English muffins make a slightly crisper base than bagels, and I like that. They toast up around the edges while the center stays sturdy enough to hold sauce, cheese, and whatever else your crowd wants to throw on top.
Why It Works:
The split muffins give you a built-in, evenly sized base, and they cook in almost no time. That means you can make a whole tray without babysitting the oven.
Key Ingredients:
- 6 English muffins, split
- 3/4 cup pizza sauce
- 2 cups shredded mozzarella
- 1/2 cup diced bell pepper
- 1/2 cup sliced mushrooms or pepperoni
- 1 teaspoon Italian seasoning
Quick Steps:
- Heat the oven to 425°F.
- Place the muffin halves cut-side up on a parchment-lined baking sheet.
- Spread with sauce, then add cheese and toppings.
- Sprinkle with Italian seasoning.
- Bake for 8 to 9 minutes, until the cheese melts and the muffin edges look toasted.
Equipment for This Recipe:
- Baking sheet
- Parchment paper
- Spoon
- Knife if slicing toppings
How to Serve This Dish:
Set them out on a board and let people grab their own halves. They’re sturdy enough to hold in one hand, which is exactly what movie-night food should do.
Pro Tips for This Recipe:
- If your muffins are soft, toast them lightly before topping.
- Finely chop toppings so they heat through in the short bake.
- Let the tray sit 1 minute before moving the pizzas.
Variations on This Dish:
- Supreme Muffins: Add olives, peppers, and sausage.
- Margherita Muffins: Use tomato slices, mozzarella, and basil.
- Spinach-Artichoke Style: Mix chopped spinach into ricotta.
Common Mistakes to Avoid with This Dish:
- Skipping the toast step: The muffins can get floppy.
- Using watery vegetables: Mushrooms and tomatoes should be sliced thin and patted dry.
8. Crescent Roll Pizza Poppers

These are the messy-fun version of pizza, and I mean that as a compliment. The dough bakes into soft, golden pockets, the cheese stays molten inside, and the whole tray disappears fast because people keep saying, “Just one more.”
Why It Works:
Refrigerated crescent dough bakes quickly and gives you a soft crust without any kneading. Wrapping the filling inside keeps the cheese from sliding off, which is a nice upgrade when people are eating from the couch.
Key Ingredients:
- 1 tube refrigerated crescent roll dough
- 1/2 cup pizza sauce, plus more for dipping
- 1 cup shredded mozzarella
- 1/2 cup chopped pepperoni
- 1 teaspoon Italian seasoning
- 1 tablespoon melted butter
Quick Steps:
- Heat the oven to 375°F and line a baking sheet with parchment.
- Separate the dough triangles and place a little sauce, cheese, and pepperoni at the wide end.
- Roll up from the wide end to the point, sealing the edges as best you can.
- Brush with melted butter and sprinkle with Italian seasoning.
- Bake for 11 to 13 minutes, until golden and puffed.
Equipment for This Recipe:
- Baking sheet
- Parchment paper
- Small spoon
- Pastry brush or spoon for butter
How to Serve This Dish:
Serve these hot with a bowl of extra pizza sauce for dipping. They’re best when they’re still warm enough that the cheese stretches if you pull one apart.
Pro Tips for This Recipe:
- Don’t overfill the dough or the filling will leak.
- Pinch the seams firmly so the poppers stay closed.
- If they brown too quickly, tent loosely with foil for the last few minutes.
Variations on This Dish:
- Sausage Pizza Poppers: Use crumbled cooked sausage.
- Veggie Poppers: Fill with spinach and chopped peppers.
- Cheesy Garlic Poppers: Skip pepperoni and add garlic butter.
Common Mistakes to Avoid with This Dish:
- Stuffing them too full: The dough splits and the cheese escapes.
- Baking on a bare pan: The bottoms can brown too hard.
9. Baked Mozzarella Sticks
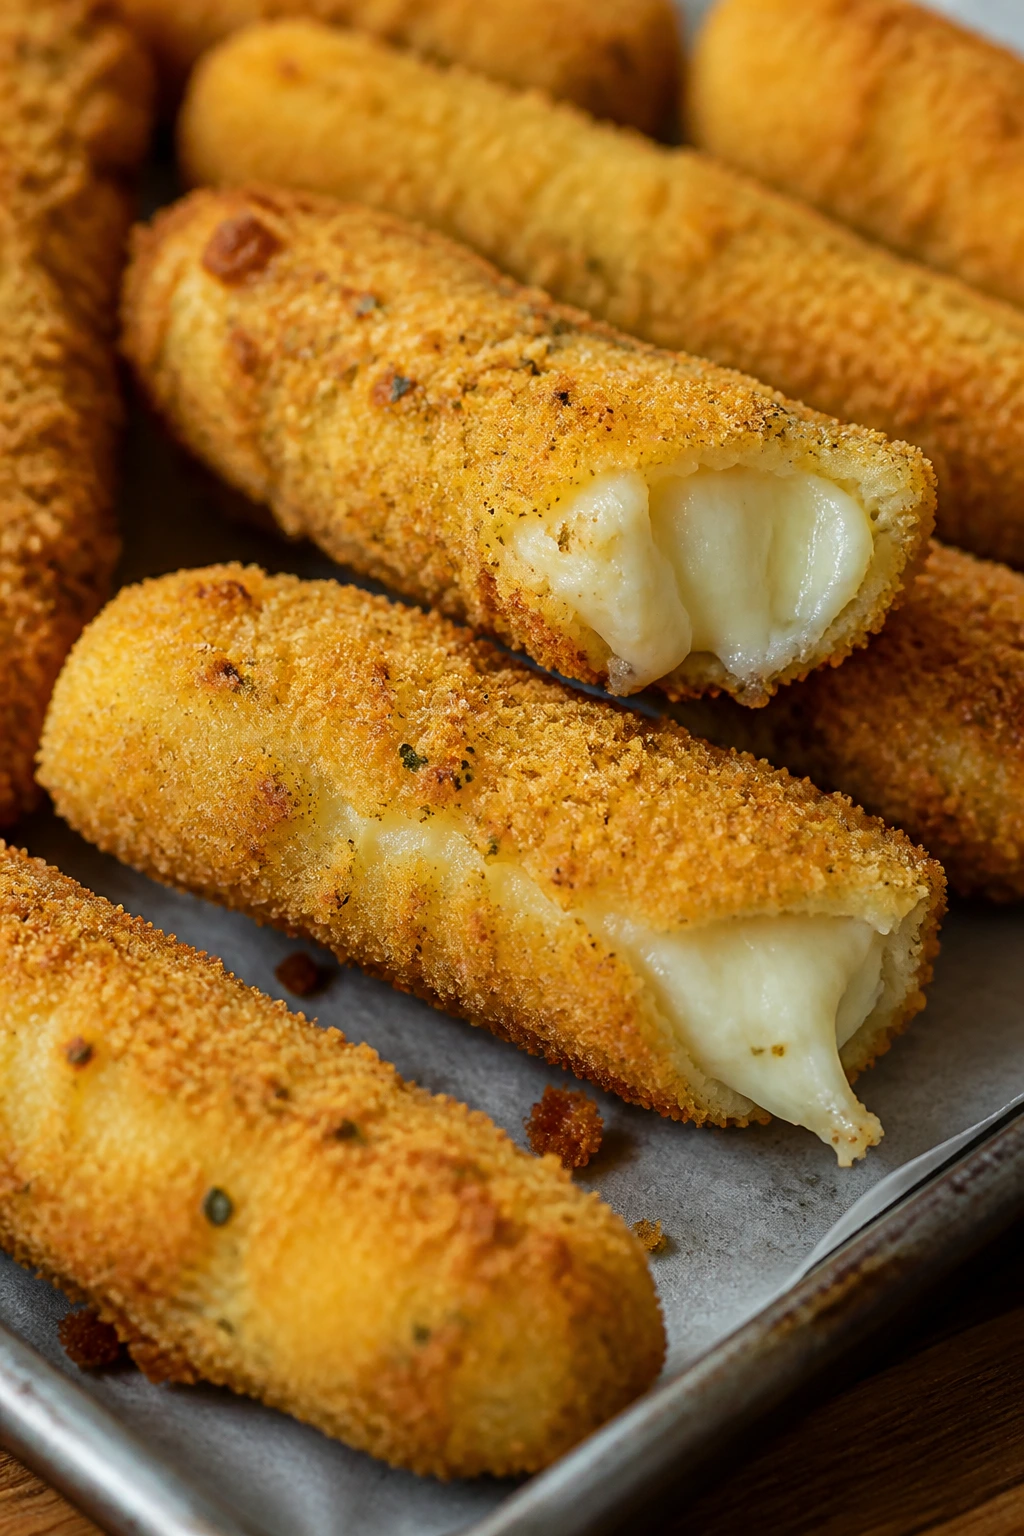
The freezer aisle version has nothing on these when they’re done right. The coating turns crisp, the cheese inside softens just enough, and if you pull one apart while it’s hot, you get the kind of stretch kids cheer for.
Why It Works:
Baking instead of frying keeps the cleanup simple, but the trick is freezing the sticks before they go in the oven. That keeps the cheese from melting out before the crust has time to set.
Key Ingredients:
- 12 string cheese sticks
- 1/2 cup all-purpose flour
- 2 large eggs, beaten
- 1 1/2 cups seasoned breadcrumbs
- 1/4 cup grated parmesan
- 1 teaspoon Italian seasoning
- Marinara sauce, for dipping
Quick Steps:
- Cut each string cheese stick in half and freeze the pieces for 20 minutes.
- Set up three bowls: flour, eggs, and breadcrumbs mixed with parmesan and seasoning.
- Coat each cheese piece in flour, egg, then breadcrumbs, pressing lightly.
- Freeze the coated sticks for another 15 minutes.
- Bake at 425°F for 8 to 10 minutes, until crisp and just starting to brown.
Equipment for This Recipe:
- Baking sheet
- Parchment paper
- Three shallow bowls
- Tongs or clean hands for breading
How to Serve This Dish:
Serve them right away with warm marinara. They’re best when the crust is crisp and the middle still has a little pull.
Pro Tips for This Recipe:
- Freeze between breading steps. Don’t skip that part.
- Press the crumbs on firmly so they don’t fall off.
- Serve immediately; mozzarella sticks get softer the longer they sit.
Variations on This Dish:
- Spicy Version: Add red pepper flakes to the crumbs.
- Gluten-Free Version: Use GF breadcrumbs and flour.
- Herb Version: Mix dried basil into the coating.
Common Mistakes to Avoid with This Dish:
- Not freezing long enough: The cheese leaks out.
- Overbaking: They turn into empty shells.
10. Garlic Butter Pretzel Bites
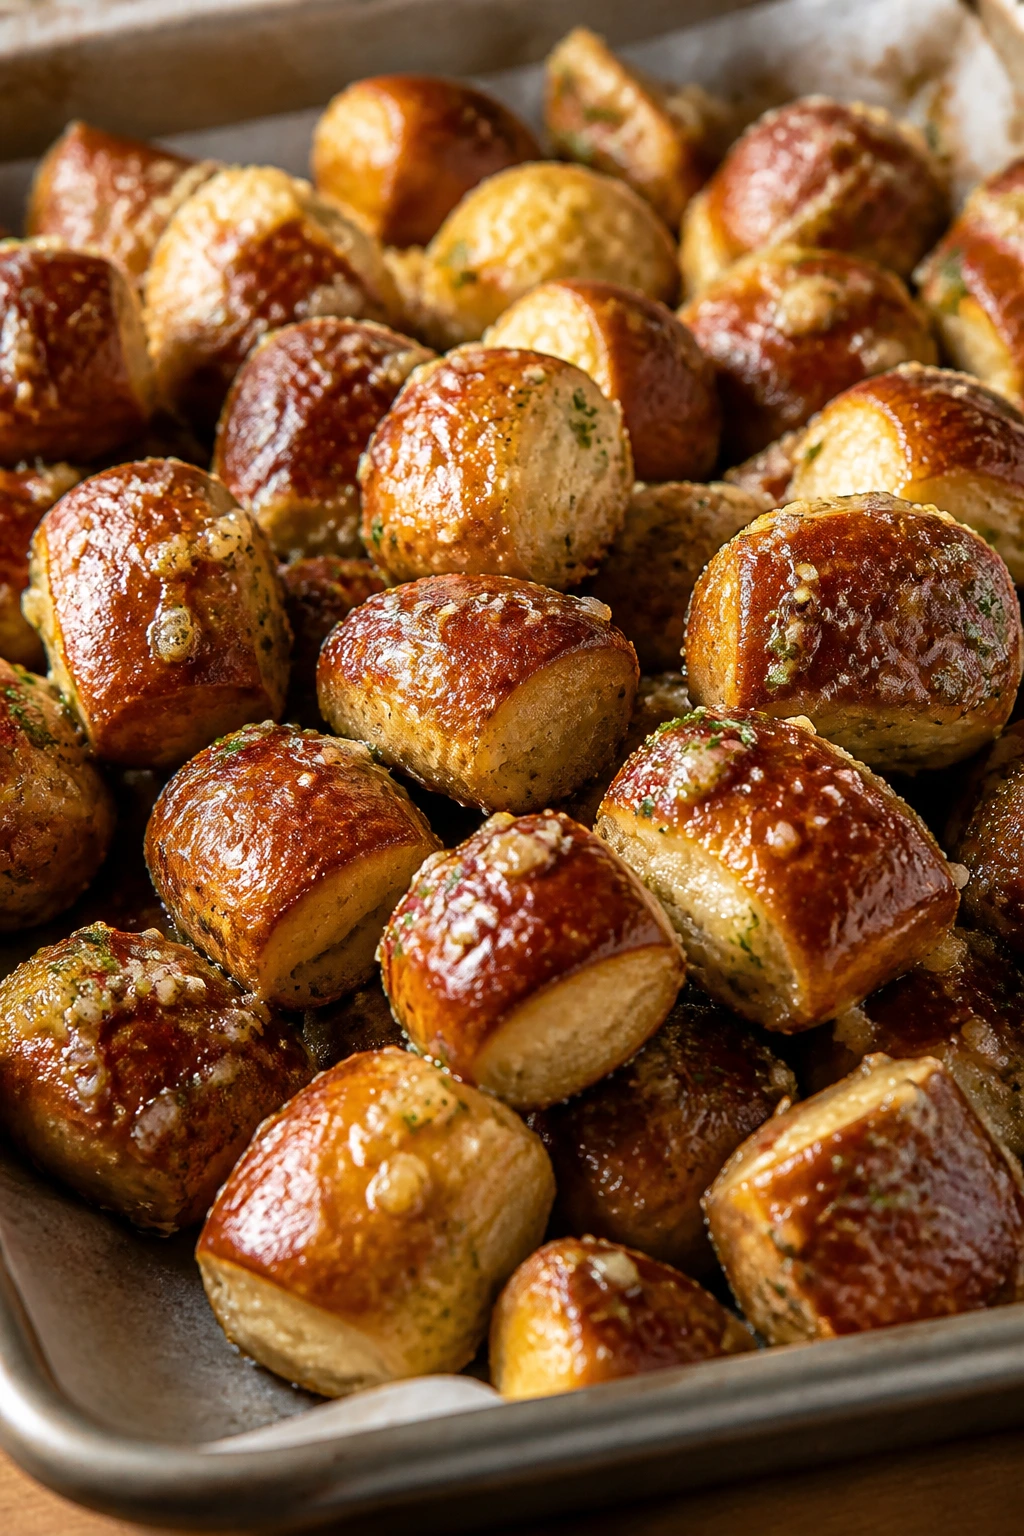
These are chewy in the center, glossy on top, and dangerous when they’re fresh out of the oven. The garlic butter sinks into the cracks, and the salt gives every bite a tiny crunch.
Why It Works:
A quick baking soda bath gives the dough that pretzel flavor without making you stand over a pot of oil. Once baked, the bites soak up melted butter better than a full pretzel twist, which makes them especially snackable.
Key Ingredients:
- 1 pound refrigerated pizza dough
- 8 cups water
- 1/4 cup baking soda
- 3 tablespoons unsalted butter, melted
- 1 teaspoon garlic powder
- 1 teaspoon coarse salt
Quick Steps:
- Heat the oven to 425°F and line a baking sheet with parchment.
- Cut the dough into 1-inch pieces.
- Bring the water and baking soda to a boil, drop in the dough pieces for 30 seconds, then drain well.
- Arrange on the baking sheet, brush with melted butter, and sprinkle with garlic powder and salt.
- Bake for 12 to 14 minutes, until deep golden.
Equipment for This Recipe:
- Large pot
- Slotted spoon
- Baking sheet
- Parchment paper
How to Serve This Dish:
Serve them warm with mustard, cheese dip, or both. A napkin is mandatory, because the butter likes to wander.
Pro Tips for This Recipe:
- Keep the dough pieces roughly the same size so they bake evenly.
- Drain them well after the bath or the bottoms stay pale.
- Brush with more butter the second they come out if you want a shinier finish.
Variations on This Dish:
- Everything Pretzel Bites: Swap garlic powder for everything seasoning.
- Cheddar Pretzel Bites: Sprinkle with shredded cheddar during the last 2 minutes.
- Cinnamon Sugar Bites: Use melted butter, cinnamon, and sugar instead of garlic.
Common Mistakes to Avoid with This Dish:
- Leaving them in the soda bath too long: They can taste harsh.
- Skipping the parchment: The bottoms can stick hard.
11. Soft Pretzel Twists
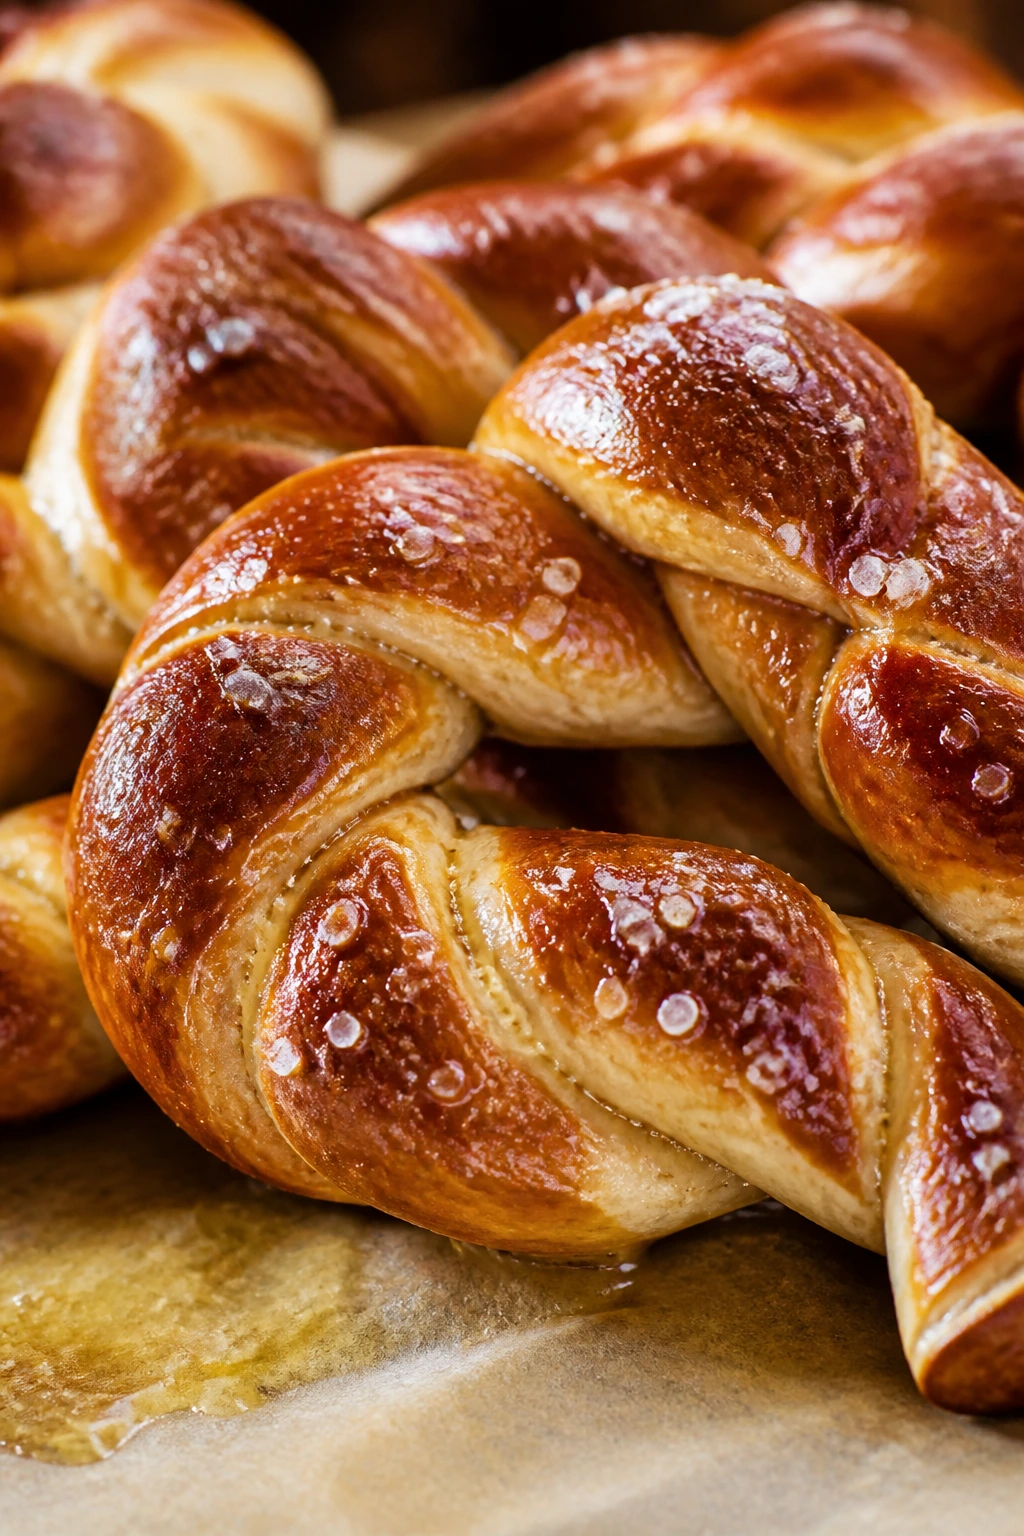
These are a little more hands-on than the bites, but they’re worth the extra minute because the shape feels special. A good twist has a burnished crust, a soft center, and just enough salt to keep the butter from making it taste bland.
Why It Works:
The twist shape gives you more crusty surface area, so each piece gets a better salt-to-dough ratio. That matters when you want a snack that feels a little more substantial without becoming a full meal.
Key Ingredients:
- 1 pound refrigerated pizza dough
- 8 cups water
- 1/4 cup baking soda
- 1 egg, beaten
- 1 tablespoon coarse salt
- 2 tablespoons melted butter
Quick Steps:
- Heat the oven to 425°F and line a sheet pan with parchment.
- Divide the dough into 8 pieces and roll each into a rope.
- Twist each rope into a pretzel shape.
- Simmer each twist in the baking soda water for 30 seconds, then set on the tray.
- Brush with egg, sprinkle with salt, and bake for 12 to 15 minutes until deeply golden.
- Brush with melted butter before serving.
Equipment for This Recipe:
- Large pot
- Baking sheet
- Parchment paper
- Pastry brush
How to Serve This Dish:
These are nice on a tray with mustard and a soft cheese dip. If you slice them into halves, they become easier for smaller hands to manage.
Pro Tips for This Recipe:
- Roll the ropes evenly so the twists bake at the same speed.
- Boil only a few at a time; crowded dough gets clumsy.
- Brush with butter while they’re still warm so it sinks in.
Variations on This Dish:
- Sesame Pretzels: Sprinkle sesame seeds over the egg wash.
- Jalapeño Pretzels: Add minced pickled jalapeños to the dough.
- Cinnamon Pretzels: Use a sugar-cinnamon topping instead of salt.
Common Mistakes to Avoid with This Dish:
- Making the ropes too thick: The centers can stay doughy.
- Forgetting the egg wash: The color stays dull and pale.
12. Mini Grilled Cheese Dippers

This is the kind of snack that makes the whole room smell better. The bread gets buttery and crisp, the cheese turns molten, and cutting it into strips makes it much easier to dunk into soup or sauce.
Why It Works:
Grilled cheese is already a movie-night favorite, but cutting it into dippers solves the biggest problem: messy bites. The strips stay warm longer than a whole sandwich, and they’re easy to pass around.
Key Ingredients:
- 8 slices sandwich bread
- 8 slices cheddar or American cheese
- 3 tablespoons butter, softened
- 1 cup tomato soup, warmed for dipping
- 1/4 teaspoon garlic powder, optional
Quick Steps:
- Spread butter on one side of each bread slice.
- Layer cheese between two slices, buttered sides facing out.
- Cook in a skillet over medium heat for 2 to 3 minutes per side, until golden and the cheese melts.
- Cut into strips.
- Serve with warm tomato soup or extra dipping sauce.
Equipment for This Recipe:
- Skillet
- Spatula
- Knife
- Small bowl for soup
How to Serve This Dish:
Stack the strips in a short pile so people can grab them quickly. Tomato soup in small cups makes this feel more like a snack than a full meal.
Pro Tips for This Recipe:
- Keep the heat at medium so the bread browns before the cheese scorches.
- American cheese melts the smoothest if you want extra gooey filling.
- Cut after a brief rest so the cheese doesn’t spill out.
Variations on This Dish:
- Bacon Grilled Cheese Dippers: Add crisp bacon strips inside.
- Pesto Version: Spread a thin layer of pesto inside.
- Three-Cheese Version: Mix cheddar, mozzarella, and provolone.
Common Mistakes to Avoid with This Dish:
- Using high heat: The bread browns too fast.
- Skipping the rest: The first cut dumps molten cheese everywhere.
13. Crispy Baked Chicken Tenders
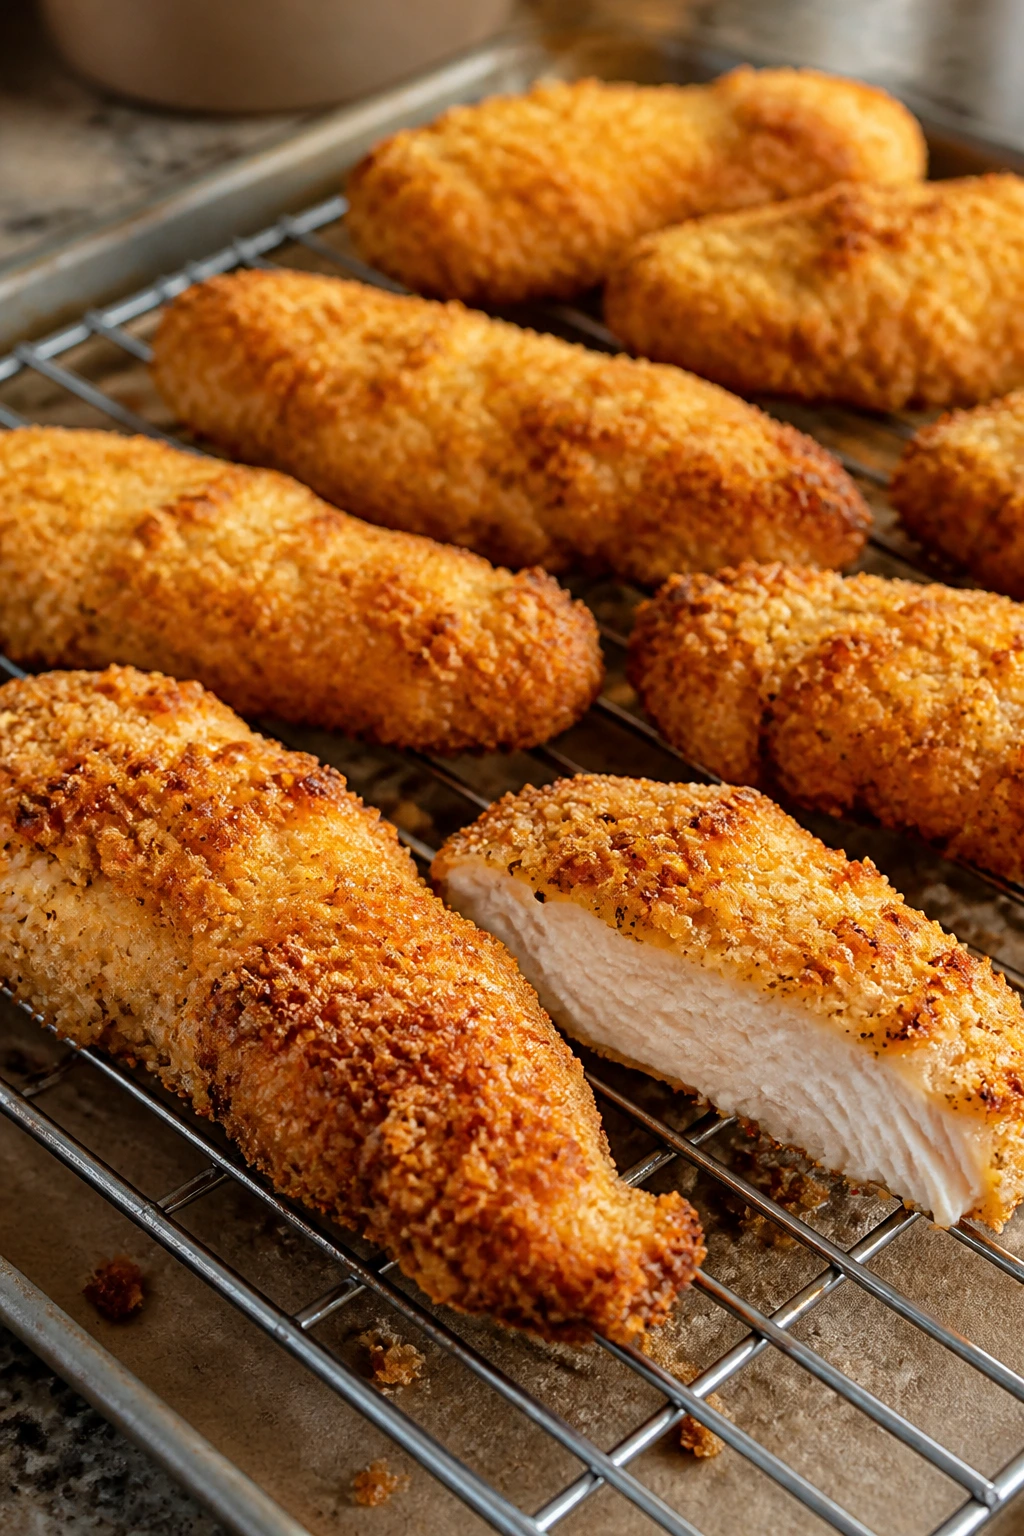
These are the tray that makes the adults happy too. The coating bakes up crunchy, the chicken stays juicy if you don’t overcook it, and the tenders are easy enough to eat one-handed with a dip cup on the side.
Why It Works:
Baking on a rack gives the breading airflow, which helps it crisp instead of going soft on the bottom. The panko and parmesan bring texture, and a short bake keeps the chicken from drying out.
Key Ingredients:
- 1 1/2 pounds chicken tenders
- 1/2 cup flour
- 2 large eggs, beaten
- 1 1/2 cups panko breadcrumbs
- 1/4 cup grated parmesan
- 1 teaspoon paprika
- 3/4 teaspoon salt
Quick Steps:
- Heat the oven to 425°F and set a rack over a sheet pan.
- Set up three bowls: flour, eggs, and panko mixed with parmesan, paprika, and salt.
- Coat each tender in flour, egg, then crumbs.
- Arrange on the rack and spray lightly with oil.
- Bake for 15 to 18 minutes, until golden and the chicken reaches 165°F.
Equipment for This Recipe:
- Sheet pan
- Wire rack
- Three shallow bowls
- Tongs
How to Serve This Dish:
Serve with ketchup, honey mustard, or ranch. Add fries or fruit if you want to turn the snack tray into a simple dinner.
Pro Tips for This Recipe:
- Don’t crowd the rack or the bottoms steam.
- A light oil spray helps the crumbs brown.
- Check the thickest tender with a thermometer; guessing is how dry chicken happens.
Variations on This Dish:
- Spicy Tenders: Add cayenne to the crumb mix.
- Cornflake Tenders: Use crushed cornflakes instead of panko.
- Herbed Tenders: Add dried thyme and parsley to the breading.
Common Mistakes to Avoid with This Dish:
- Skipping the rack: The bottoms turn soggy.
- Overbaking: Chicken tenders dry out fast because they’re thin.
14. Oven Fries with Two Sauces
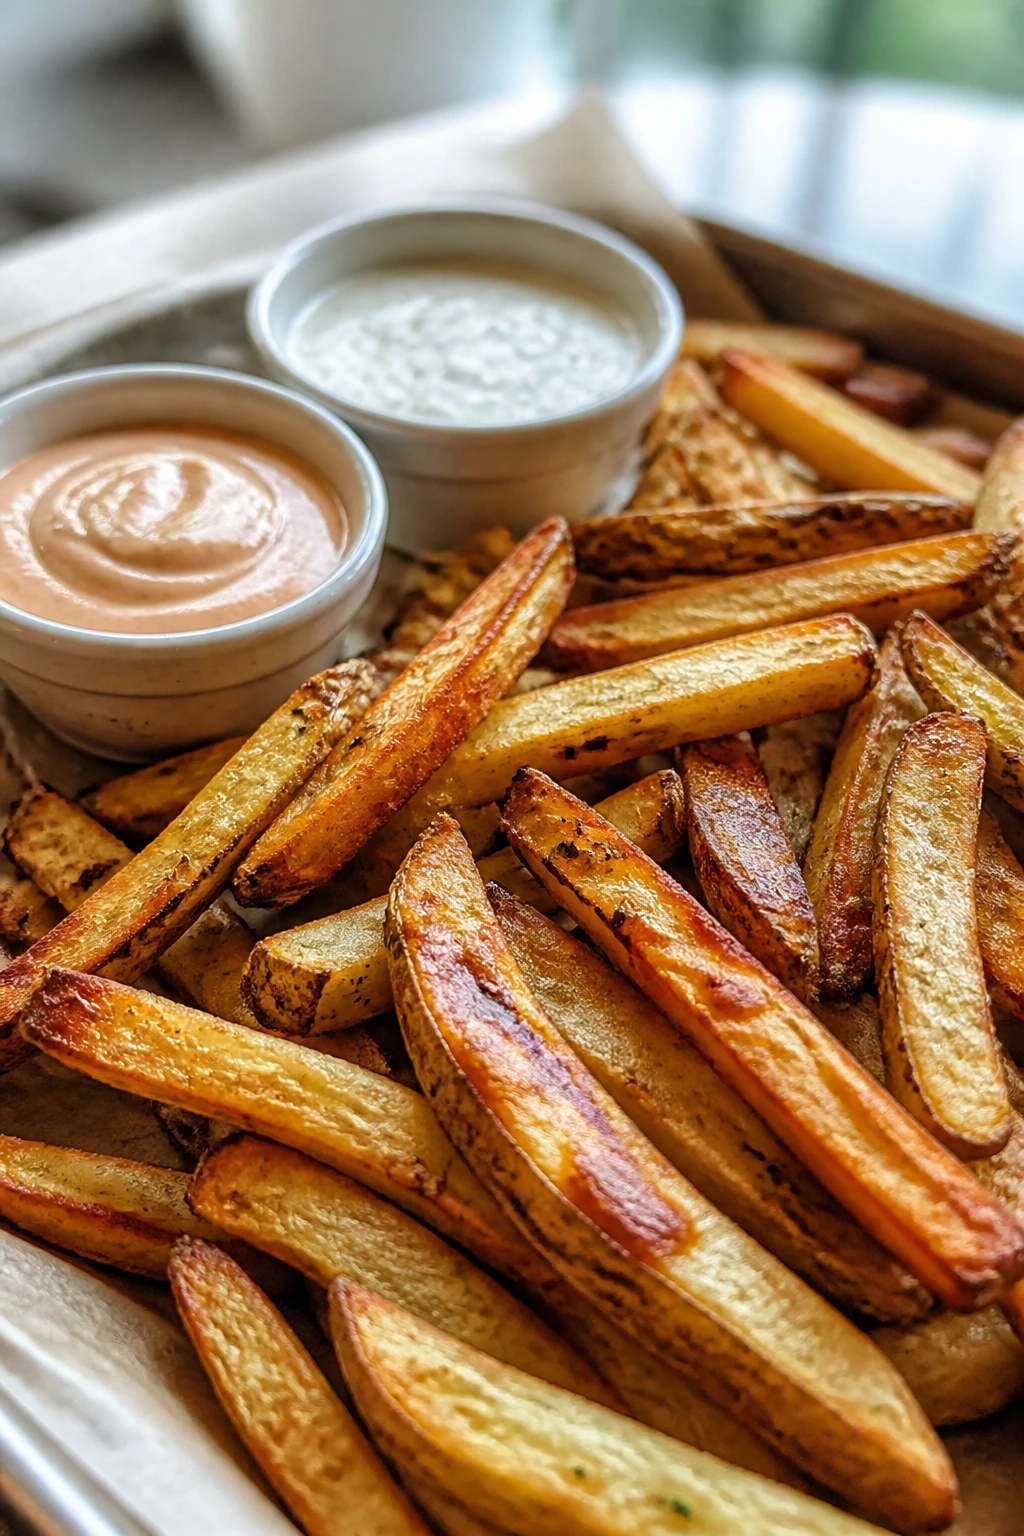
Fries are one of those foods that make the whole table go quiet. These bake until the edges are crisp and the centers stay fluffy, and the sauces let people choose between creamy and tangy without a fight.
Why It Works:
A hot oven and a little cornstarch help the potatoes crisp without deep frying. Serving two dips keeps the tray interesting, and it gives you a way to keep everyone happy with one batch.
Key Ingredients:
- 3 large russet potatoes
- 2 tablespoons olive oil
- 1 tablespoon cornstarch
- 1 teaspoon salt
- 1/2 teaspoon paprika
- 1/4 teaspoon black pepper
- 1/4 cup ketchup mixed with 1 tablespoon mayo
- 1/4 cup ranch or garlic dip
Quick Steps:
- Heat the oven to 450°F and line a sheet pan with parchment.
- Cut the potatoes into fry shapes and pat them dry.
- Toss with oil, cornstarch, salt, paprika, and pepper.
- Spread in a single layer and bake for 20 to 25 minutes, flipping halfway, until golden.
- Serve with both sauces.
Equipment for This Recipe:
- Sheet pan
- Parchment paper
- Large bowl
- Knife and cutting board
How to Serve This Dish:
Fries are best served in a wide bowl or a paper-lined tray with the sauces tucked into separate cups. If you keep them too tightly packed, the steam softens the crust right away.
Pro Tips for This Recipe:
- Dry the potatoes well before tossing.
- Give the fries space on the pan.
- Salt the fries the second they come out of the oven.
Variations on This Dish:
- Sweet Potato Fries: Swap in sweet potatoes and reduce the bake time slightly.
- Garlic Fries: Add garlic powder and parmesan after baking.
- Cajun Fries: Use Cajun seasoning instead of paprika.
Common Mistakes to Avoid with This Dish:
- Overcrowding the pan: The fries steam instead of roast.
- Skipping the flip: One side stays pale and soft.
15. Mini Meatball Subs
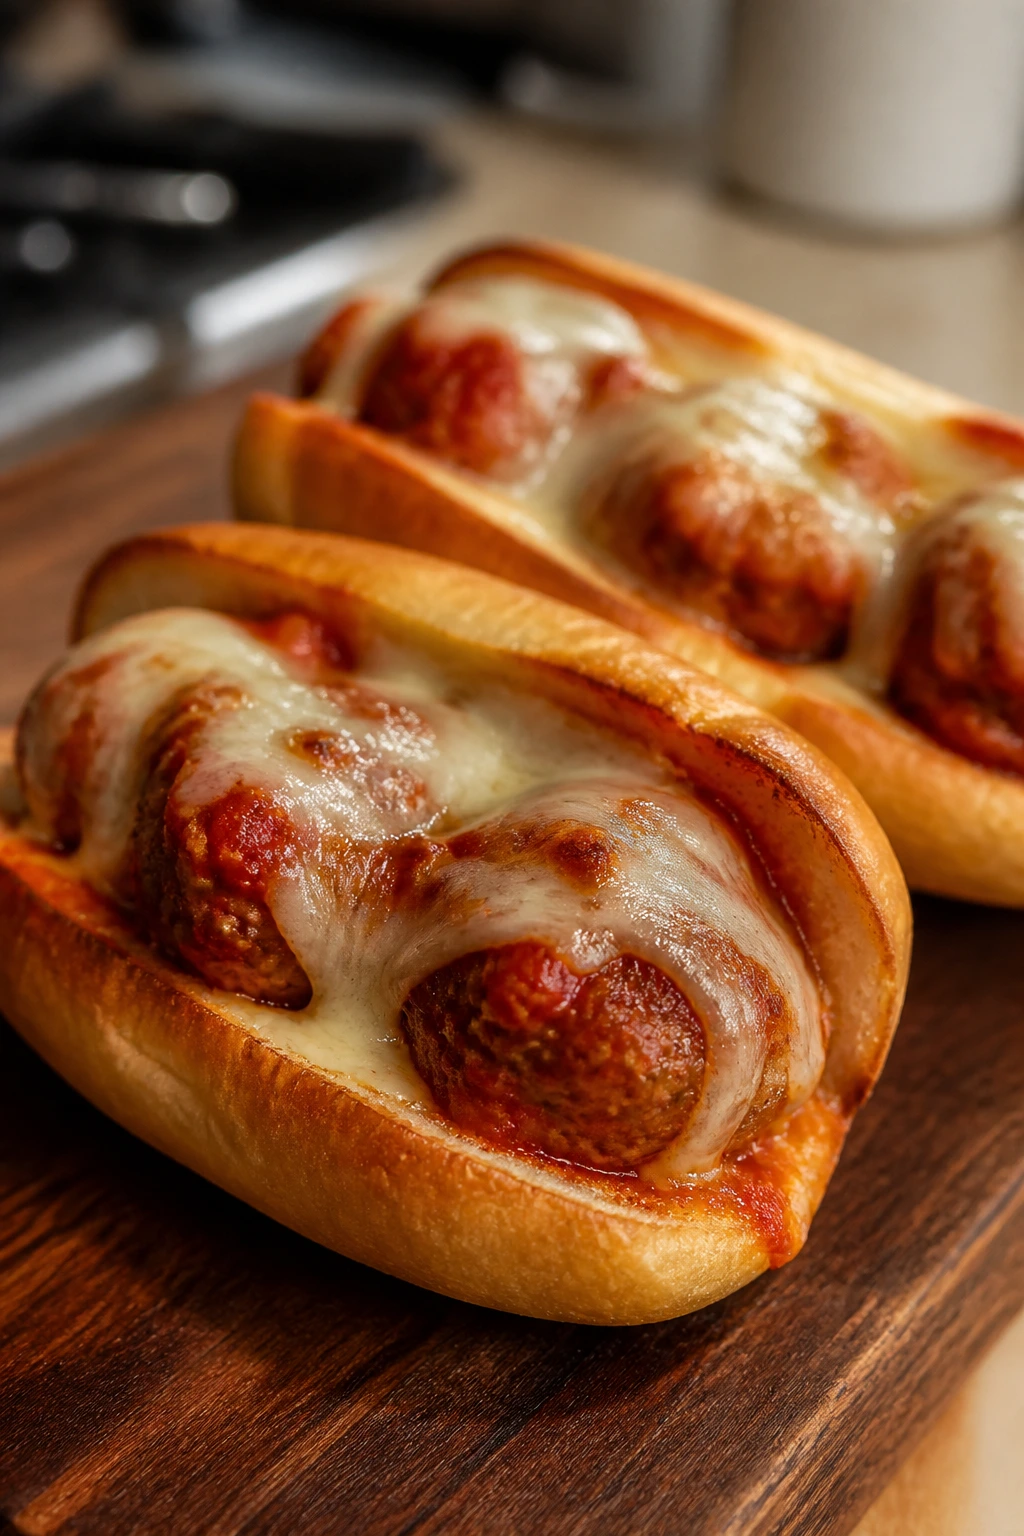
Little meatball subs are exactly the right amount of messy. The sauce soaks into the rolls just enough, the cheese gets gooey, and the size keeps them from falling apart before the movie reaches the good part.
Why It Works:
Using frozen meatballs saves time, and baking everything together lets the sauce and cheese melt into one layer. Slider rolls hold up better than long buns when people are eating from a sofa.
Key Ingredients:
- 12 small meatballs, cooked
- 1 cup marinara sauce
- 6 slider rolls, split
- 1 1/2 cups shredded mozzarella
- 2 tablespoons grated parmesan
- 1 teaspoon dried basil
Quick Steps:
- Heat the oven to 375°F.
- Warm the meatballs in the marinara on the stove until hot.
- Split the rolls and place them in a baking dish.
- Fill with meatballs and sauce, then top with mozzarella, parmesan, and basil.
- Bake for 10 to 12 minutes, until the cheese melts and the rolls are warm.
Equipment for This Recipe:
- Small saucepan
- Baking dish
- Spoon
- Sharp knife
How to Serve This Dish:
Serve them in the dish or transfer to a board for easier grabbing. A handful of napkins nearby is not optional.
Pro Tips for This Recipe:
- Use thick marinara so the rolls don’t turn soggy.
- Slice the rolls almost through, but not all the way apart.
- Add a little extra cheese on top if you like a browned cap.
Variations on This Dish:
- Turkey Meatball Subs: Use turkey meatballs for a lighter version.
- Meatball Parm Style: Add a layer of melted provolone.
- Spicy Marinara Subs: Stir red pepper flakes into the sauce.
Common Mistakes to Avoid with This Dish:
- Using too much sauce: The rolls collapse under the moisture.
- Skipping the bake: The cheese never really binds the sandwich together.
16. Sloppy Joe Sliders
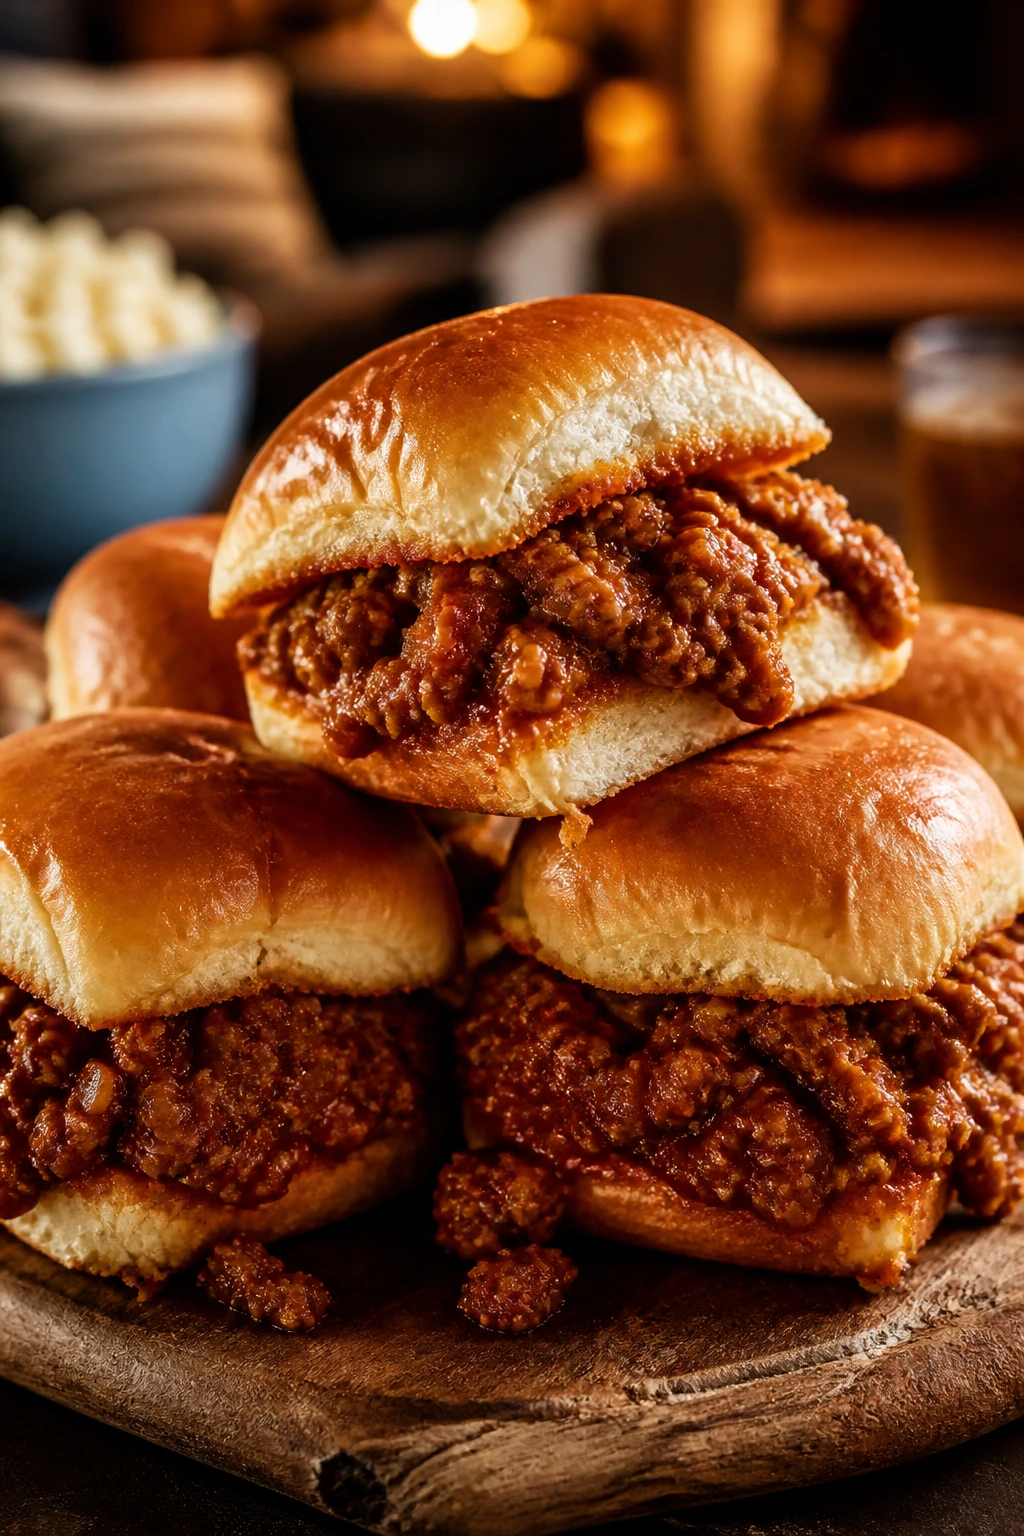
Sloppy Joe sliders are messy by design, but the smaller size keeps the mess from getting out of hand. The sauce should be thick enough to cling to the meat, not run into the bottom of the pan like soup.
Why It Works:
Ground beef cooks quickly, and the sauce can be built in one skillet with pantry ingredients. Slider buns make them easier to serve than full sandwiches, especially when the table is crowded.
Key Ingredients:
- 1 pound ground beef
- 1/2 small onion, finely diced
- 1/2 green bell pepper, finely diced
- 1/2 cup ketchup
- 2 tablespoons tomato paste
- 1 tablespoon Worcestershire sauce
- 1 teaspoon brown sugar
- 8 slider buns
Quick Steps:
- Brown the beef, onion, and bell pepper in a skillet over medium heat.
- Drain excess grease if needed.
- Stir in ketchup, tomato paste, Worcestershire, and brown sugar.
- Simmer for 5 minutes, until thick and glossy.
- Spoon onto buns and serve warm.
Equipment for This Recipe:
- Large skillet
- Wooden spoon
- Slotted spoon
- Serving tray
How to Serve This Dish:
Keep the filling in one bowl and the buns nearby if you want to let people build their own. A pile of pickles on the side cuts through the sweetness nicely.
Pro Tips for This Recipe:
- Cook the sauce until it’s thick enough to mound on a spoon.
- Toast the buns if you want them to hold up longer.
- Add a splash of mustard for a sharper flavor.
Variations on This Dish:
- Turkey Sloppy Joes: Swap in ground turkey.
- BBQ Sloppy Joes: Replace some ketchup with barbecue sauce.
- Cheesy Sloppy Joes: Melt cheddar over the filling.
Common Mistakes to Avoid with This Dish:
- Leaving the sauce too loose: The sliders get swampy.
- Forgetting to drain the beef: The filling tastes greasy.
17. Ham and Cheese Sliders
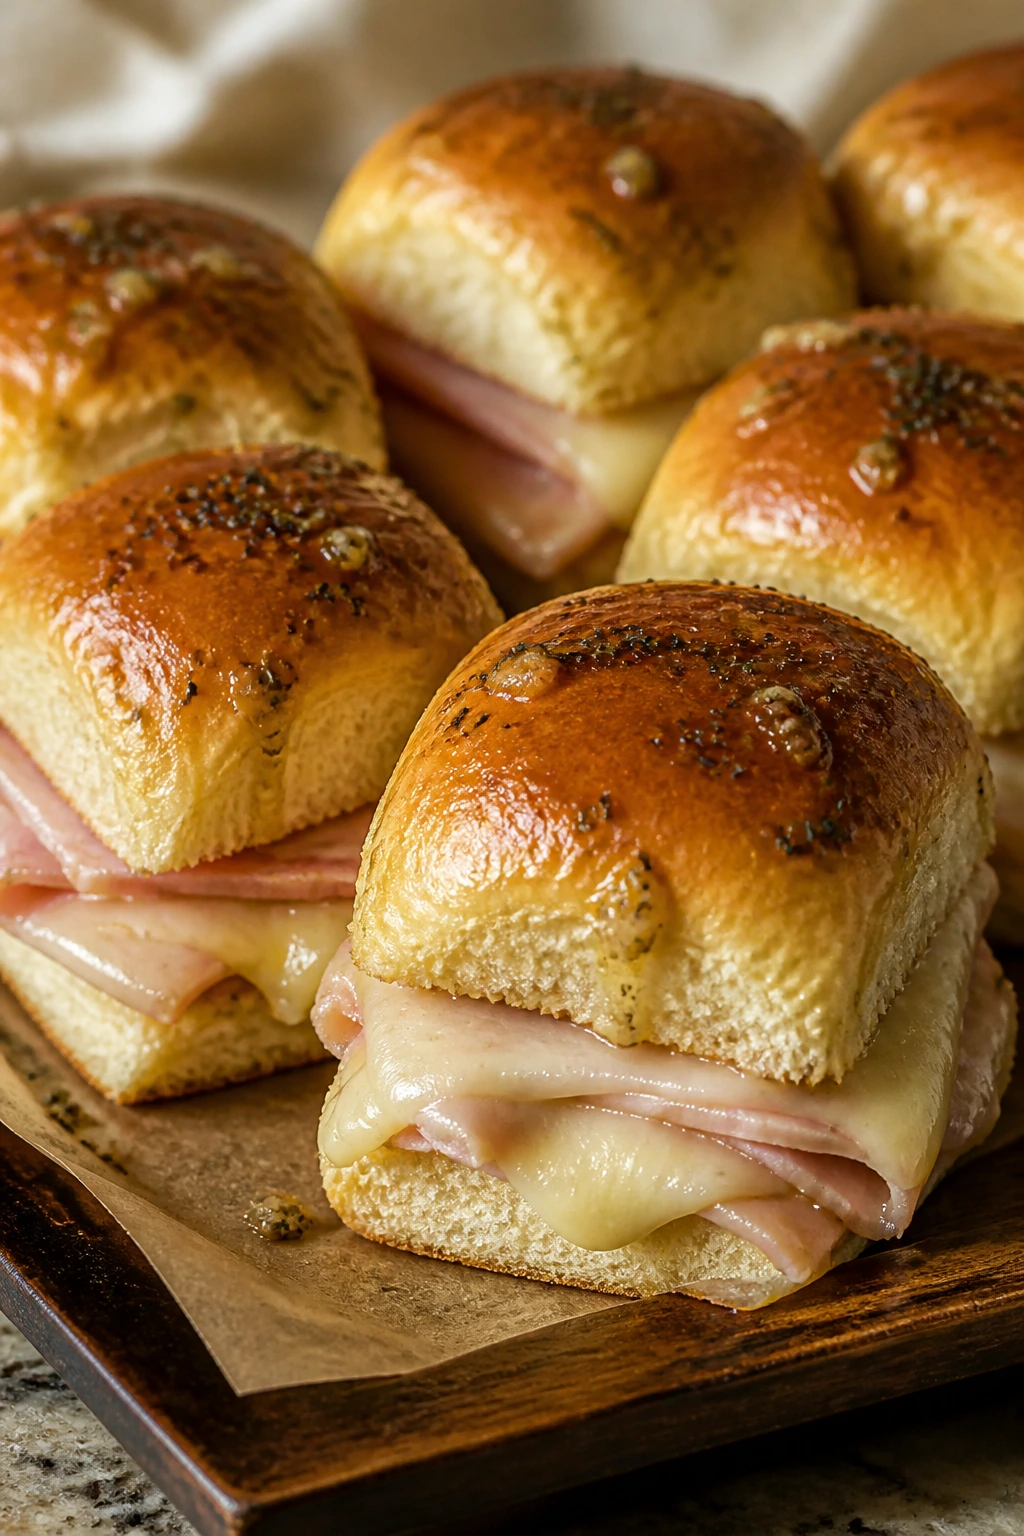
These are the kind of sliders that vanish before you can set the tray down. The buttery mustard glaze bakes into the tops, and the melted cheese makes the rolls stick together in a way that feels almost unfair.
Why It Works:
Sweet rolls, salty ham, and Swiss cheese are a reliable trio, and the buttery topping keeps the bread from drying out in the oven. They’re one of the easiest hot sandwiches to make for a crowd.
Key Ingredients:
- 12 Hawaiian sweet rolls
- 12 slices deli ham
- 6 slices Swiss cheese
- 4 tablespoons butter, melted
- 1 tablespoon Dijon mustard
- 1 teaspoon poppy seeds
Quick Steps:
- Heat the oven to 350°F.
- Slice the rolls as one slab and place the bottom half in a baking dish.
- Layer ham and cheese over the rolls, then replace the tops.
- Mix the butter, mustard, and poppy seeds, and brush over the top.
- Bake for 15 minutes, until the cheese melts and the tops are golden.
Equipment for This Recipe:
- Baking dish
- Pastry brush
- Sharp knife
- Foil, optional
How to Serve This Dish:
Cut them apart after baking and serve warm. They’re tidy enough to hold in one hand, which gives them major movie-night points in my book.
Pro Tips for This Recipe:
- Use enough ham to give the sliders body, but not so much they slide apart.
- Cover with foil for the first half of baking if the tops brown fast.
- Add a thin smear of mustard inside for extra tang.
Variations on This Dish:
- Turkey Swiss Sliders: Swap in turkey slices.
- Pastrami Sliders: Use pastrami and provolone.
- Garlic Butter Sliders: Mix garlic powder into the topping.
Common Mistakes to Avoid with This Dish:
- Separating the rolls before baking: They dry out faster.
- Using too much butter topping: The bottoms can turn soggy.
18. Baked Mac and Cheese Cups
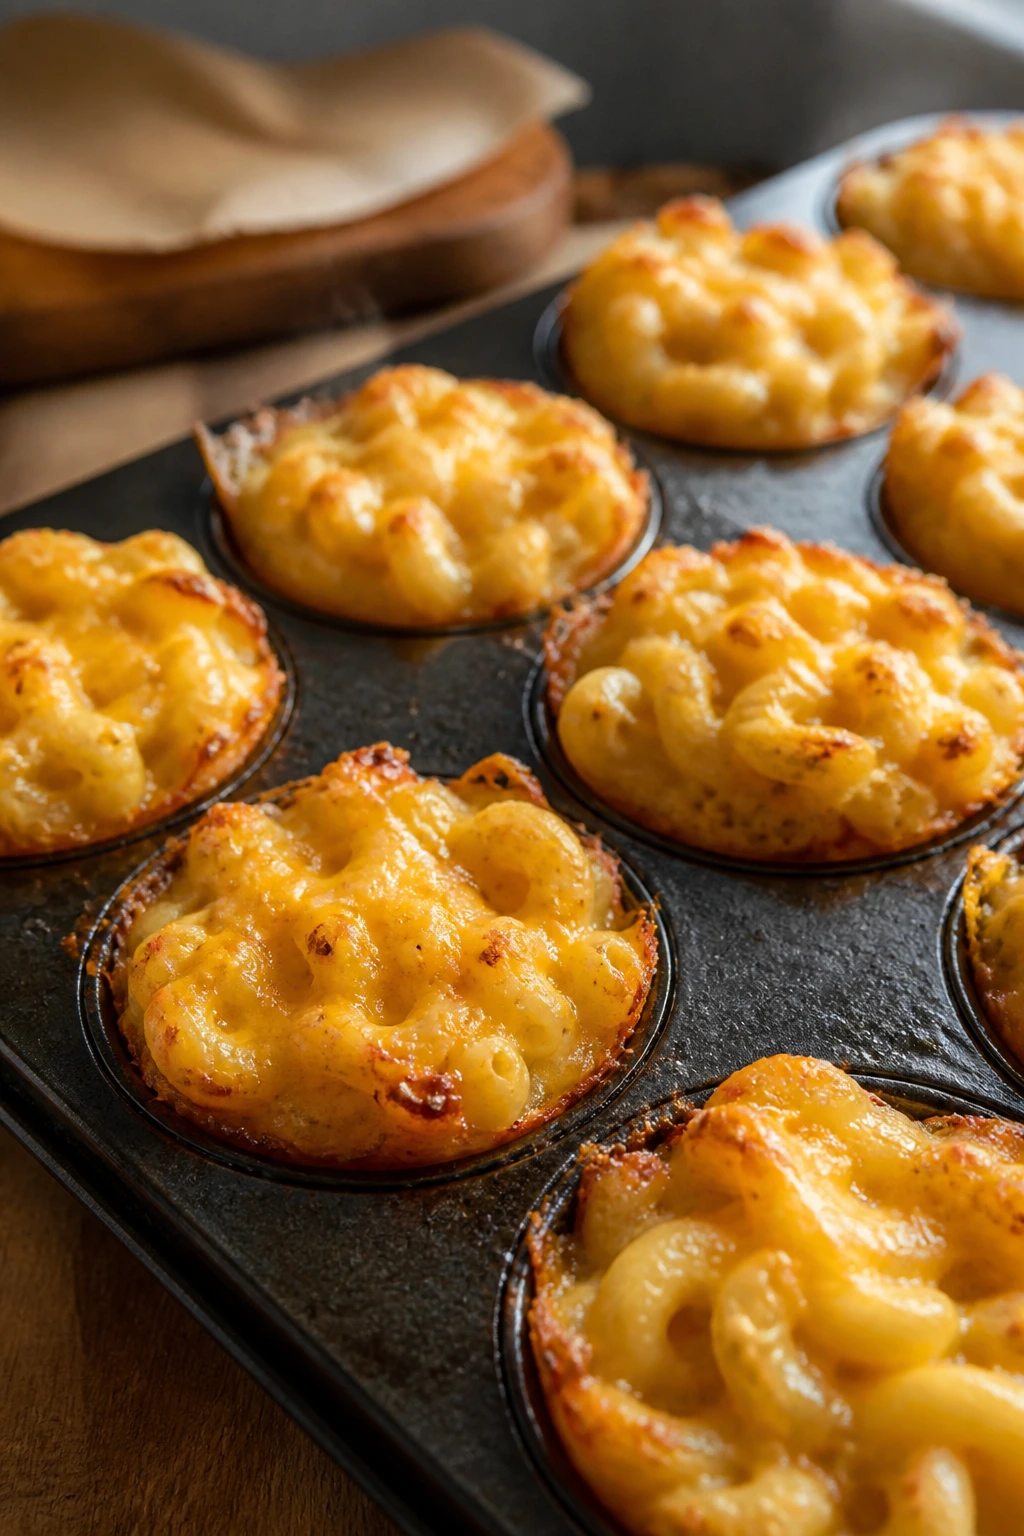
Mac and cheese in cup form is less pretty than a casserole, and I think that’s fine. It’s easier to grab, easier to serve, and the edges get a little browned, which is the part people fight over.
Why It Works:
Baking macaroni in a muffin tin gives you crisp edges and neat portions. The egg helps it set, so the cups hold together instead of turning into a loose pile the second you lift them.
Key Ingredients:
- 2 cups cooked elbow macaroni
- 1 1/2 cups shredded cheddar
- 1/2 cup milk
- 1 large egg
- 2 tablespoons butter, melted
- 1/2 cup breadcrumbs
- 1/4 teaspoon salt
Quick Steps:
- Heat the oven to 375°F and grease a muffin tin.
- Mix the macaroni, cheddar, milk, egg, butter, and salt.
- Spoon into the muffin cups and press down lightly.
- Top with breadcrumbs.
- Bake for 18 to 20 minutes, until set and browned on top.
- Cool for 5 minutes before removing.
Equipment for This Recipe:
- Muffin tin
- Mixing bowl
- Spoon
- Measuring cups
How to Serve This Dish:
Serve these as a side or snack with a little extra ketchup or hot sauce on the side. They’re especially useful when you want something warm that doesn’t need a plate.
Pro Tips for This Recipe:
- Let them cool a few minutes or they’ll fall apart.
- Use sharp cheddar for a stronger flavor.
- Grease the tin well so the edges release cleanly.
Variations on This Dish:
- Broccoli Mac Cups: Stir in tiny broccoli pieces.
- Bacon Mac Cups: Add cooked chopped bacon.
- Three-Cheese Cups: Mix cheddar, mozzarella, and parmesan.
Common Mistakes to Avoid with This Dish:
- Overfilling the cups: The tops spill over and stick.
- Skipping the cooling time: They crumble when you remove them.
19. Taco Cups

Taco cups are the kind of snack that makes everyone lean in. The shell gets crisp, the filling stays warm, and each little cup can be topped differently depending on who’s eating it.
Why It Works:
A muffin tin gives the tortillas a shape that holds fillings without falling apart. They’re sturdy enough for game-night style snacking and small enough that people can take two without feeling ridiculous.
Key Ingredients:
- 8 small flour tortillas or 12 wonton wrappers
- 1 pound ground beef or black beans
- 1 tablespoon taco seasoning
- 1/2 cup water
- 1 cup shredded cheddar
- 1/2 cup salsa
- 1/4 cup sour cream
- Chopped lettuce or cilantro, optional
Quick Steps:
- Heat the oven to 375°F and grease a muffin tin.
- Press the tortillas or wrappers into the cups.
- Cook the beef with taco seasoning and water until thick, or warm the beans with seasoning.
- Fill each cup with the mixture and top with cheese.
- Bake for 10 to 12 minutes, until the shells crisp and the cheese melts.
- Add salsa, sour cream, and lettuce after baking.
Equipment for This Recipe:
- Muffin tin
- Skillet
- Spoon
- Measuring spoons
How to Serve This Dish:
Serve the cups in the muffin tin if you want the easiest cleanup. A squeeze bottle of salsa makes topping them less messy.
Pro Tips for This Recipe:
- Press the tortillas firmly into the cups so they don’t spring back.
- Keep the filling fairly dry or the shells soften.
- Add toppings after baking, not before.
Variations on This Dish:
- Chicken Taco Cups: Use shredded chicken.
- Bean and Corn Cups: Add corn for sweetness.
- Breakfast Taco Cups: Fill with eggs and sausage.
Common Mistakes to Avoid with This Dish:
- Wet filling: It turns the base floppy.
- Underbaking the shells: They should be crisp at the edges before you pull them out.
20. Veggie Hummus Cups
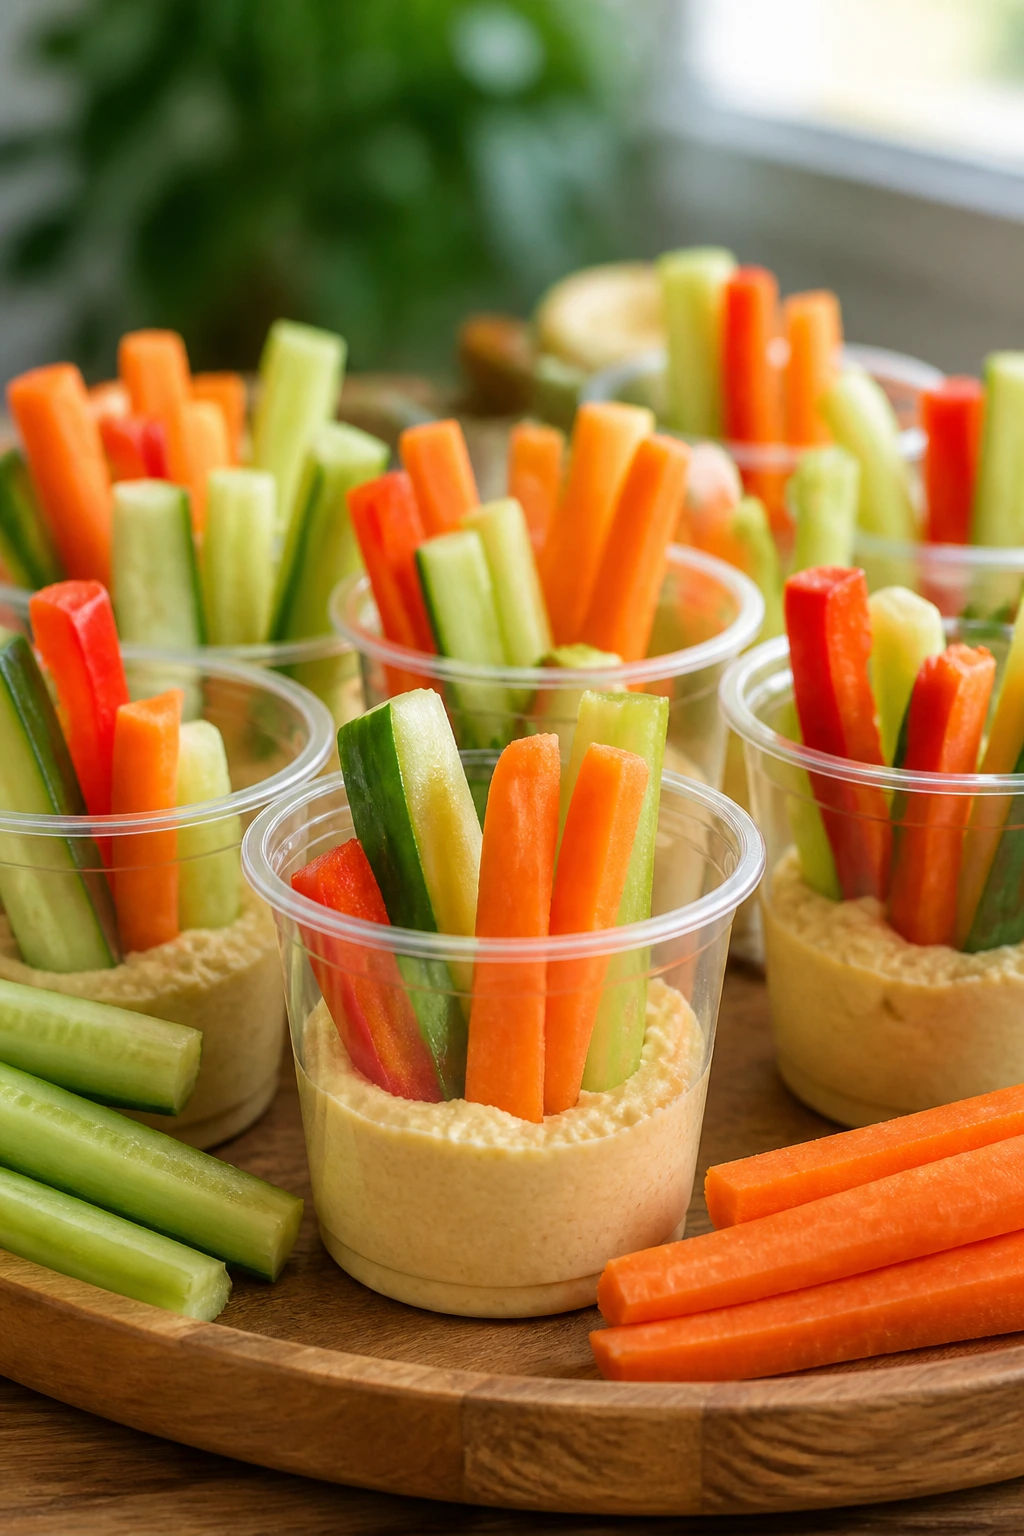
Not every movie snack needs to be hot and heavy. These little cups bring crunch, color, and a welcome break from cheese, and they still feel like a snack instead of a “healthy option” nobody really wanted.
Why It Works:
The hummus gives you something creamy, while the vegetables and pita chips add snap. It’s a fast no-cook plate that can sit on the table without wilting in the first ten minutes.
Key Ingredients:
- 1 1/2 cups hummus
- 1 cucumber, sliced into sticks
- 2 carrots, cut into sticks
- 1 red bell pepper, cut into strips
- 1 cup cherry tomatoes
- 1 cup pita chips
- 1 tablespoon olive oil
- Pinch of salt
Quick Steps:
- Spoon hummus into small cups or a wide bowl.
- Arrange the vegetables around the hummus.
- Drizzle with olive oil and add a pinch of salt.
- Set the pita chips on the side for scooping.
- Serve cold.
Equipment for This Recipe:
- Small cups or serving bowl
- Cutting board
- Knife
- Spoon
How to Serve This Dish:
Use small cups if you want individual portions, or one board for everyone to share. The cups are helpful when you know somebody will double-dip if given the chance.
Pro Tips for This Recipe:
- Chill the vegetables before serving for better crunch.
- Choose a thicker hummus so it holds its shape.
- Cut the sticks to match the height of your cups.
Variations on This Dish:
- Roasted Red Pepper Hummus Cups: Use flavored hummus.
- Everything Bagel Hummus Cups: Sprinkle seasoning on top.
- Greek-Style Cups: Add olives and feta.
Common Mistakes to Avoid with This Dish:
- Using limp vegetables: They make the whole tray feel tired.
- Putting out the pita chips too early: They soften if they sit near the hummus too long.
21. Fruit Skewers with Yogurt Dip
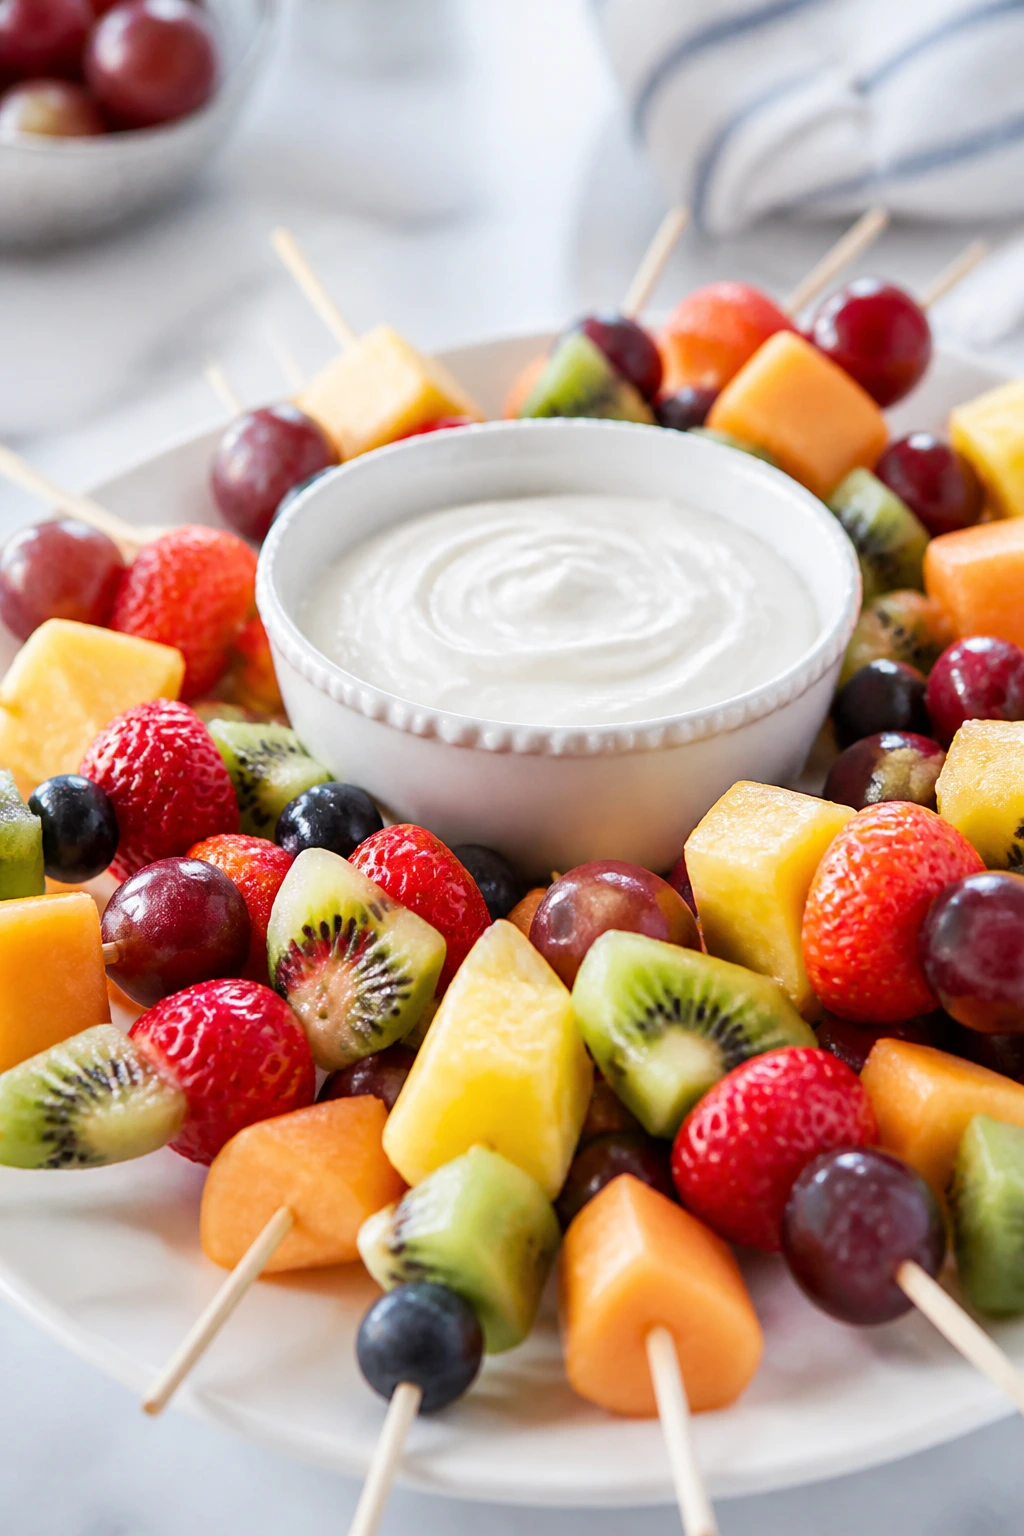
This is the bright, clean snack that makes the table feel less heavy. The fruit stays juicy, the dip adds creaminess, and skewers make it feel like a treat instead of a chore.
Why It Works:
Skewers are faster to eat than a fruit salad and less slippery than a bowl of cut fruit. The yogurt dip gives you a little sweetness without turning the whole spread into dessert.
Key Ingredients:
- 1 cup strawberries, hulled
- 1 cup green grapes
- 1 cup pineapple chunks
- 1 kiwi, peeled and sliced
- 1 cup plain or vanilla yogurt
- 1 tablespoon honey
- 1/2 teaspoon vanilla extract
Quick Steps:
- Thread the fruit onto short skewers.
- Stir the yogurt, honey, and vanilla together.
- Chill both until ready to serve.
- Set the skewers on a platter with the dip in the center.
- Serve cold.
Equipment for This Recipe:
- Short skewers or sturdy toothpicks
- Mixing bowl
- Knife and cutting board
- Serving platter
How to Serve This Dish:
Lay the skewers in a fan pattern if you want the platter to look organized. The dip is easiest to reach when it sits in the middle, not off to the edge.
Pro Tips for This Recipe:
- Cut the fruit into even pieces so the skewers don’t tip.
- Pat pineapple dry so it doesn’t water down the dip.
- Use thick yogurt for the best dipping texture.
Variations on This Dish:
- Chocolate Drizzle Fruit Skewers: Add melted chocolate.
- Coconut Fruit Skewers: Roll the fruit lightly in shredded coconut.
- Citrus Skewers: Add orange segments for extra juice.
Common Mistakes to Avoid with This Dish:
- Using fruit that’s too ripe: It slips off the skewer.
- Making the dip too thin: It runs all over the tray.
22. Apple Nachos
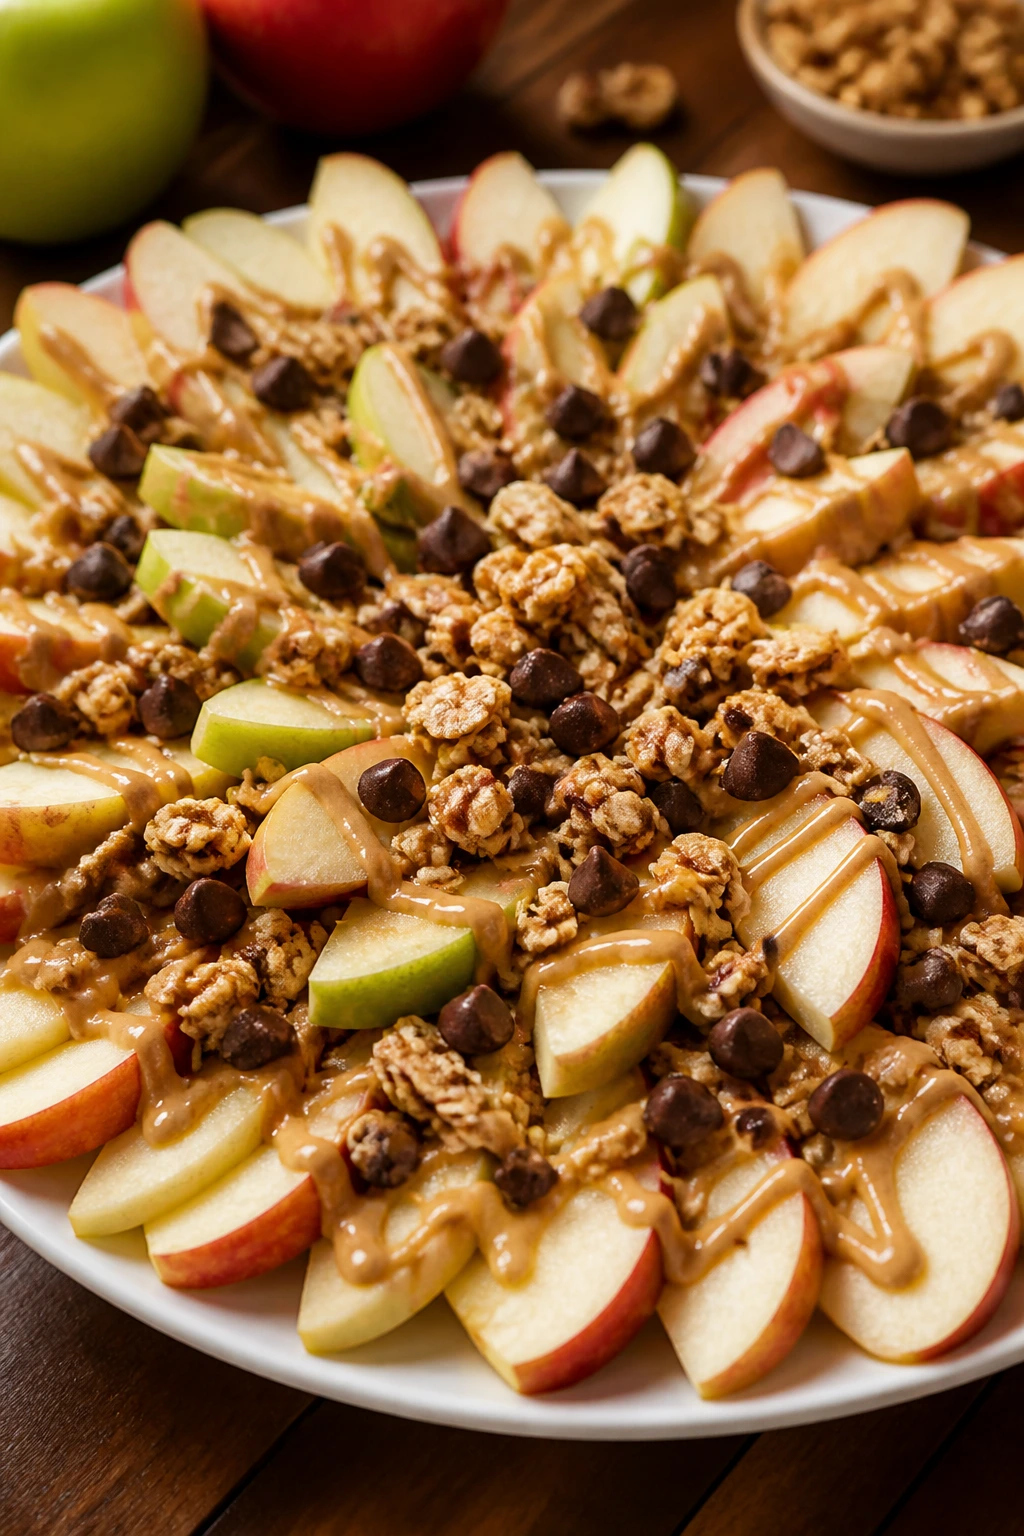
Apple nachos are the rare sweet snack that still feels bright and crisp after a little while. The apples stay firm, the peanut butter adds a salty note, and the toppings make the tray look more elaborate than it really is.
Why It Works:
Sliced apples behave like a blank canvas. Once you add a drizzle, a handful of crunchy toppings, and something sweet, you get a snack that scratches the dessert itch without needing an oven.
Key Ingredients:
- 3 apples, thinly sliced
- 1/3 cup peanut butter, warmed slightly
- 2 tablespoons honey or caramel sauce
- 1/4 cup granola
- 2 tablespoons mini chocolate chips
- 2 tablespoons chopped peanuts, optional
- 1 teaspoon lemon juice
Quick Steps:
- Toss the apple slices with lemon juice.
- Fan them out on a serving platter.
- Warm the peanut butter until drizzly.
- Drizzle peanut butter and honey over the apples.
- Sprinkle with granola, chocolate chips, and peanuts.
- Serve right away.
Equipment for This Recipe:
- Serving platter
- Small microwave-safe bowl
- Knife
- Spoon
How to Serve This Dish:
Spread the apples in a wide layer so the toppings hit more than one slice. If you’re making them ahead by even 20 minutes, keep the topping jars separate until the last second.
Pro Tips for This Recipe:
- Slice the apples thin so they’re easier to bite.
- Use tart apples for a sharper flavor.
- Warm the peanut butter just enough to drizzle, not so much that it turns runny.
Variations on This Dish:
- Almond Butter Apples: Swap peanut butter for almond butter.
- Caramel Apple Nachos: Use caramel instead of honey.
- S’mores Apples: Add marshmallow bits and crushed graham crackers.
Common Mistakes to Avoid with This Dish:
- Skipping the lemon juice: The apples brown fast.
- Overloading the tray: The slices get hard to pick up.
23. Banana Split Bites
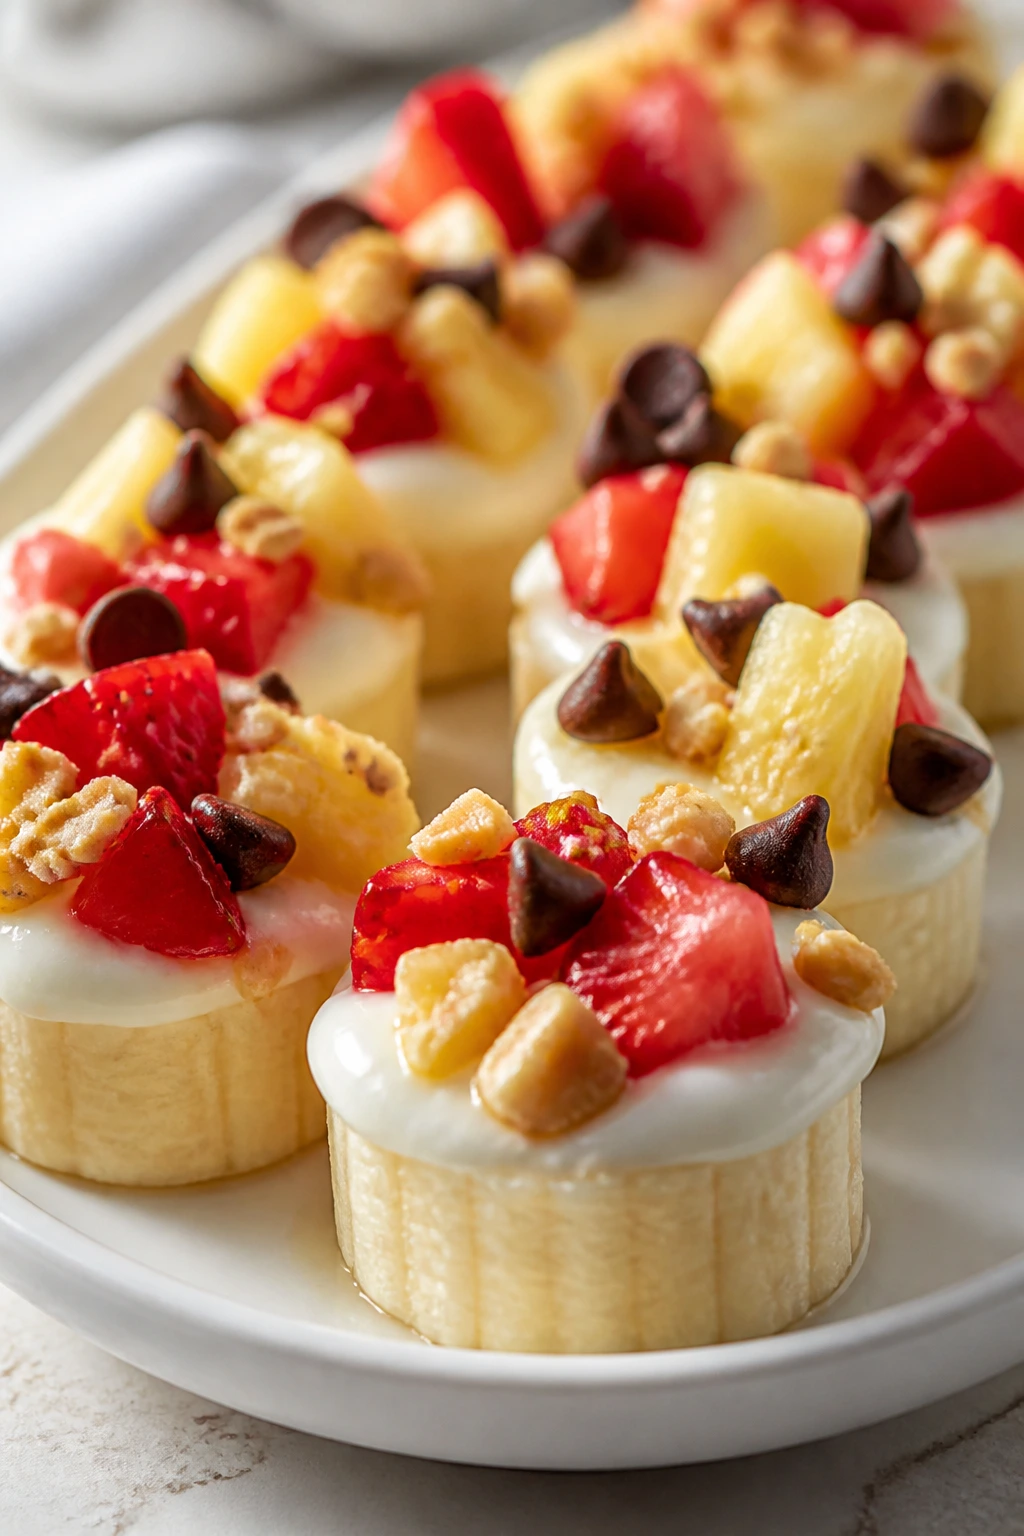
Banana split flavor, minus the bowl and the drippy mess. These bites give you creamy, fruity, sweet little mouthfuls that feel playful enough for kids and nostalgic enough for adults who still remember drive-in snacks.
Why It Works:
Banana rounds are soft enough to feel rich but sturdy enough to stack with toppings. A chilled yogurt or whipped topping keeps the bites cool, which is a nice contrast after all the salty snacks.
Key Ingredients:
- 2 bananas, sliced into thick rounds
- 1 cup strawberries, finely chopped
- 1/2 cup pineapple, finely chopped
- 1/2 cup vanilla yogurt or whipped topping
- 2 tablespoons mini chocolate chips
- 2 tablespoons chopped nuts, optional
Quick Steps:
- Arrange the banana rounds on a plate or tray.
- Top each round with a small spoonful of yogurt.
- Add strawberries and pineapple.
- Sprinkle with chocolate chips and nuts.
- Chill for 10 minutes before serving, if you have time.
Equipment for This Recipe:
- Tray or shallow plate
- Knife
- Small spoon
- Cutting board
How to Serve This Dish:
Serve them in one layer, not piled up. They’re best when cold and slightly firm, so keep the tray chilled until people are ready to eat.
Pro Tips for This Recipe:
- Use bananas that are ripe but still firm.
- Chop the fruit very small so the bites don’t topple.
- Add the chocolate chips at the end so they don’t melt into the yogurt.
Variations on This Dish:
- Strawberry Split Bites: Skip the pineapple and add more strawberries.
- Peanut Butter Split Bites: Add a peanut butter drizzle.
- Frozen Split Bites: Freeze the banana rounds first for a firmer bite.
Common Mistakes to Avoid with This Dish:
- Using overripe bananas: They turn mushy under the toppings.
- Stacking too high: The toppings slide off before the tray reaches the couch.
24. Chocolate Pretzel Bark
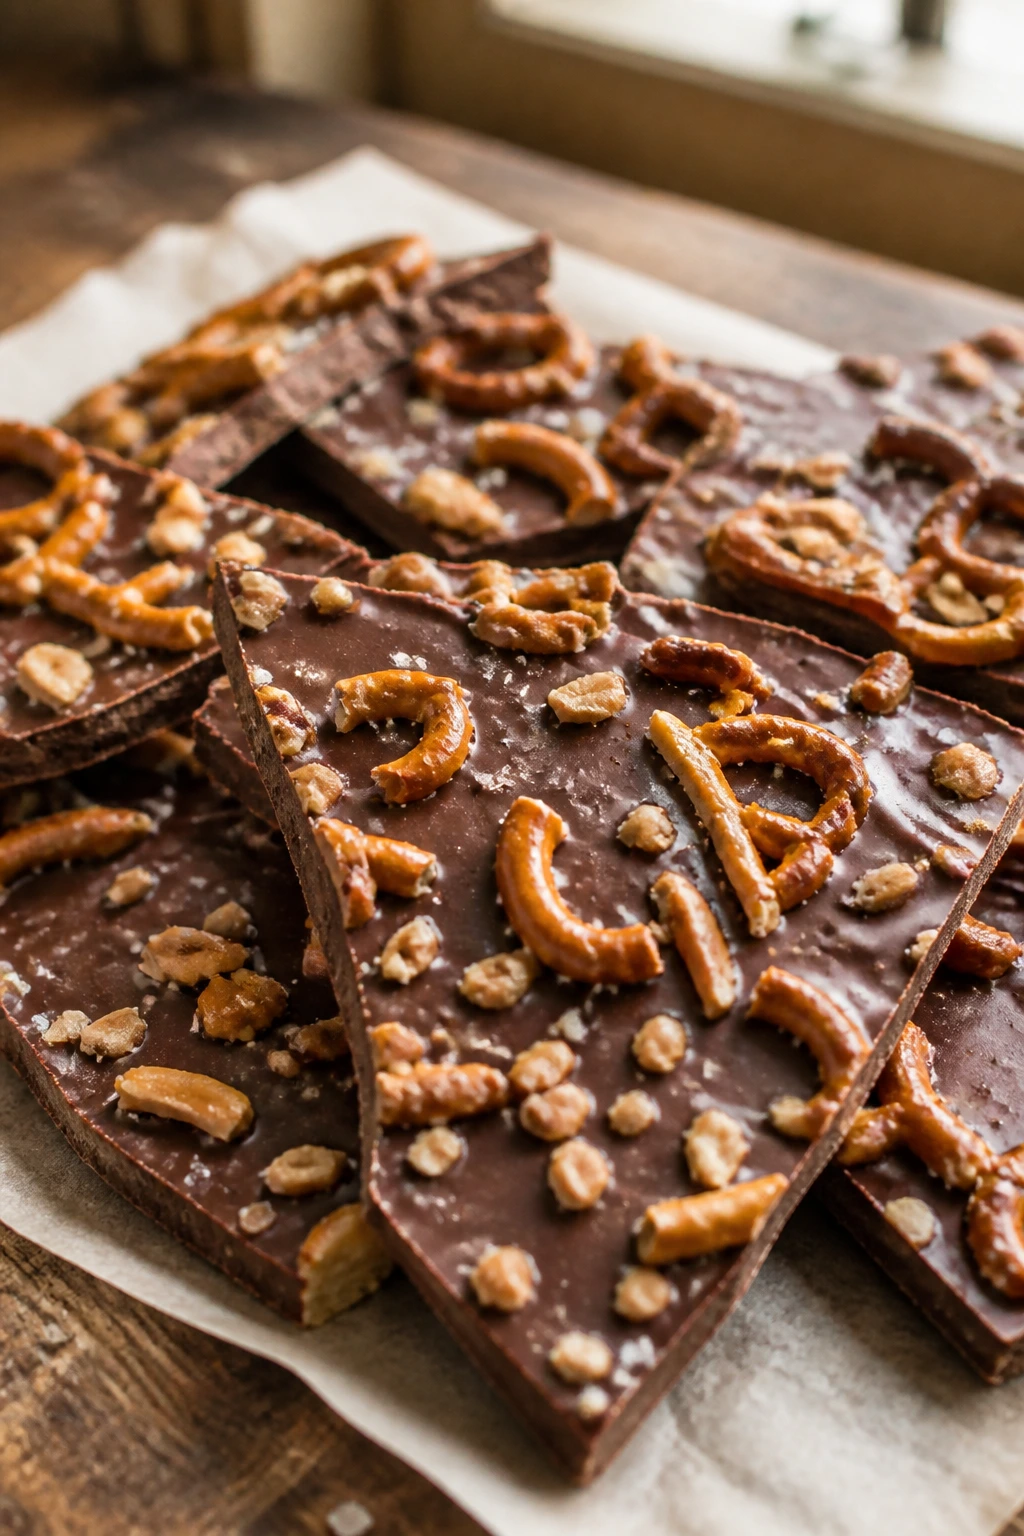
This is the kind of snack that looks like you worked harder than you did. The chocolate sets into a snap, the pretzels stay salty and crunchy, and every broken shard has a different mix of sweet and salty bits.
Why It Works:
Bark needs only a few ingredients, but the contrast matters. Chocolate, salt, and crunch give you a snack that’s rich without being heavy, and it keeps well if you don’t eat it first.
Key Ingredients:
- 2 cups semi-sweet chocolate chips
- 1 cup mini pretzels, lightly crushed
- 1/3 cup roasted peanuts or M&M’s
- 1 tablespoon sprinkles, optional
- Pinch of flaky salt
Quick Steps:
- Line a baking sheet with parchment.
- Melt the chocolate until smooth.
- Spread it into a thin layer on the sheet.
- Scatter pretzels, peanuts, and sprinkles over the chocolate.
- Finish with flaky salt and chill until firm.
- Break into pieces.
Equipment for This Recipe:
- Baking sheet
- Parchment paper
- Microwave-safe bowl
- Spatula
How to Serve This Dish:
Pile the broken bark into a bowl or candy dish. It’s the snack I put out when I want something sweet within arm’s reach but not a full dessert course.
Pro Tips for This Recipe:
- Don’t overheat the chocolate or it seizes.
- Use parchment so the bark lifts cleanly.
- Chill just until set; freezing too long can make the chocolate dull.
Variations on This Dish:
- White Chocolate Bark: Use white chocolate and dried cranberries.
- Peanut Butter Bark: Swirl in peanut butter before topping.
- Halloween-Style Bark: Use candy-coated chocolates and orange sprinkles.
Common Mistakes to Avoid with This Dish:
- Spreading the chocolate too thin: It breaks into dust.
- Adding wet toppings: They make the bark soft.
25. No-Bake Oreo Cheesecake Cups
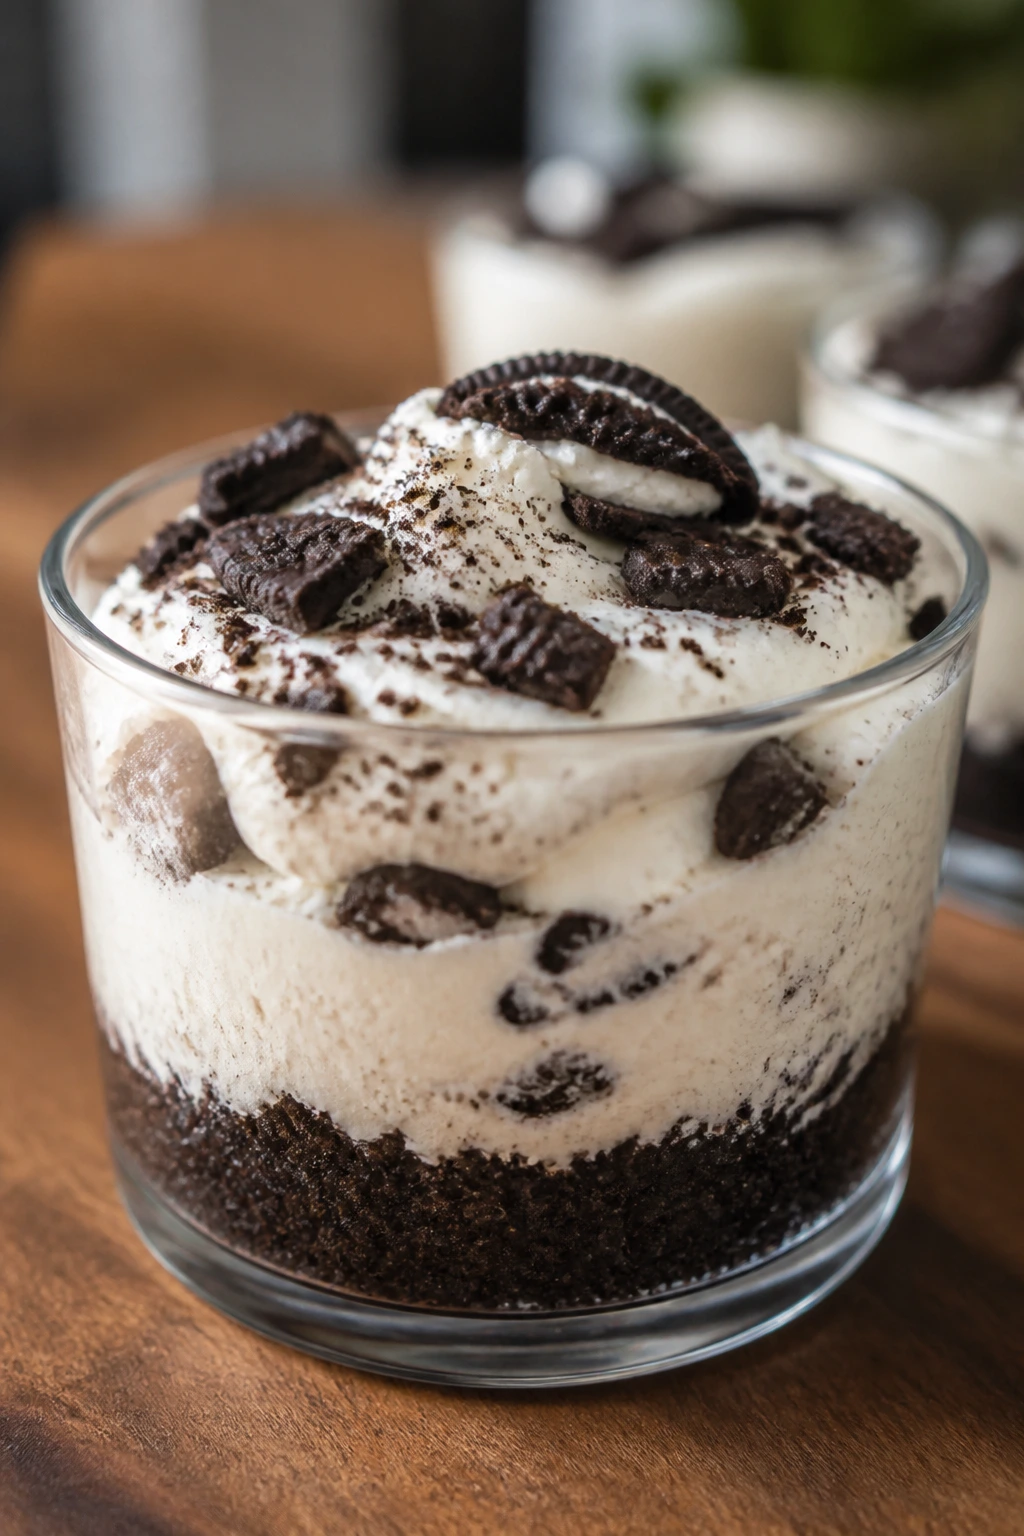
These cups are cold, creamy, and a little messy in the way a proper movie-night dessert should be. The Oreo crumbs give you a soft crunch at the bottom, and the filling tastes richer than the effort suggests.
Why It Works:
No-bake desserts are a gift on a night when the oven is already busy with snacks. The cream cheese and whipped topping set up in the fridge, which gives you time to get the rest of the spread on the table.
Key Ingredients:
- 12 Oreo cookies, crushed
- 8 ounces cream cheese, softened
- 1 cup whipped topping
- 1/4 cup powdered sugar
- 1 teaspoon vanilla extract
- Extra Oreos for topping
Quick Steps:
- Mix the cream cheese, powdered sugar, and vanilla until smooth.
- Fold in the whipped topping.
- Divide half the Oreo crumbs among small cups.
- Spoon the filling over the crumbs, then top with the remaining crumbs.
- Chill for at least 1 hour.
- Garnish with crushed Oreos before serving.
Equipment for This Recipe:
- Mixing bowl
- Hand mixer or sturdy spoon
- Small cups or jars
- Measuring cups
How to Serve This Dish:
Serve these in clear cups if you want the layers to show. They’re easy to hand out and feel a little more special than a scoop from a dish.
Pro Tips for This Recipe:
- Make sure the cream cheese is soft or the filling stays lumpy.
- Crush the cookies fairly fine so the layers pack neatly.
- Chill long enough for the filling to firm up.
Variations on This Dish:
- Mint Oreo Cups: Use mint cookies.
- Peanut Butter Oreo Cups: Add a spoonful of peanut butter to the filling.
- Mini Trifle Cups: Layer in sliced strawberries.
Common Mistakes to Avoid with This Dish:
- Using cold cream cheese: The filling won’t smooth out.
- Skipping the chill time: The cups taste loose and messy.
26. Brownie Bites
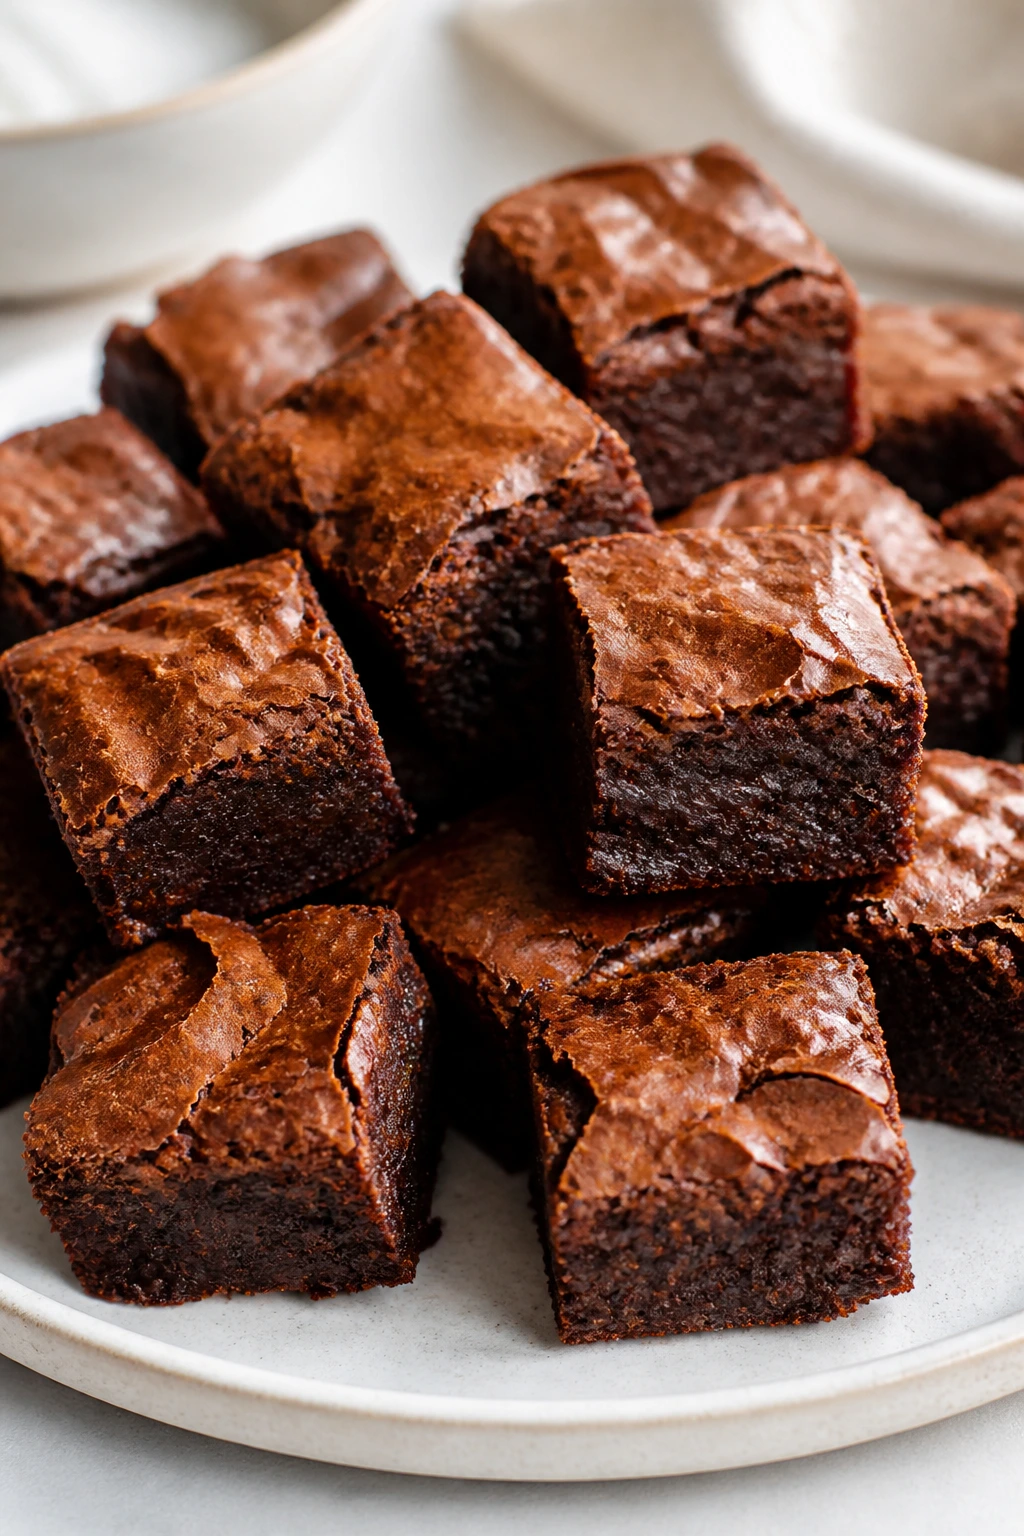
Brownie bites give you the edge piece in every bite, which is honestly the whole point. They’re chewy, fudgy, and small enough that people can grab two without pretending they’re “just sampling.”
Why It Works:
Mini muffin tins create crisp sides and a soft center, and boxed brownie mix makes this one of the easiest desserts in the lineup. A short bake keeps the texture dense instead of cakey.
Key Ingredients:
- 1 box brownie mix
- Ingredients listed on the box, usually eggs, oil, and water
- 1/2 cup chocolate chips, optional
- Powdered sugar for dusting, optional
Quick Steps:
- Heat the oven to 350°F and grease a mini muffin tin.
- Mix the brownie batter according to the box.
- Fold in chocolate chips if using.
- Fill the mini cups about 3/4 full.
- Bake for 12 to 15 minutes, until set at the edges and soft in the center.
- Cool before removing.
Equipment for This Recipe:
- Mini muffin tin
- Mixing bowl
- Spoon or small scoop
- Cooling rack
How to Serve This Dish:
Dust them lightly with powdered sugar or leave them plain. They’re nice with milk, coffee, or anything cold and creamy.
Pro Tips for This Recipe:
- Pull them when the centers still look a little soft.
- Grease the tin well so the bites release cleanly.
- Let them cool before you try to lift them out.
Variations on This Dish:
- Mint Brownie Bites: Add mint chips.
- Nutty Brownie Bites: Fold in chopped walnuts.
- Salted Caramel Brownie Bites: Drizzle with caramel and salt.
Common Mistakes to Avoid with This Dish:
- Overbaking: The bites turn dry fast.
- Trying to remove them too soon: They break apart while warm.
27. Peanut Butter Ritz Sandwiches

These little sandwiches are salty, sweet, and almost too easy to keep eating. The crackers stay crisp, the peanut butter softens the bite, and the chocolate coating, if you use it, turns them into a proper treat.
Why It Works:
Ritz crackers already bring a buttery saltiness, so they don’t need much help. Peanut butter makes the filling sticky enough to hold, and a quick chocolate dip gives the sandwich a candy-bar feel.
Key Ingredients:
- 24 Ritz crackers
- 1/2 cup peanut butter
- 1 cup semi-sweet chocolate chips, optional
- 1 teaspoon coconut oil, optional for melting
- Pinch of flaky salt, optional
Quick Steps:
- Spread peanut butter on 12 crackers.
- Top with the remaining crackers to make sandwiches.
- If using chocolate, melt the chips with coconut oil.
- Dip or drizzle the sandwiches with chocolate.
- Chill until set.
Equipment for This Recipe:
- Mixing bowl, if melting chocolate
- Spoon or knife
- Parchment paper
- Tray
How to Serve This Dish:
Serve them cold or at room temperature. They’re easy to stack on a tray, which makes them useful when you’ve already used up all the big bowls.
Pro Tips for This Recipe:
- Use a thin layer of peanut butter so the crackers don’t slide.
- Chill briefly after assembling to help them set.
- Sprinkle a little salt on top if you want stronger contrast.
Variations on This Dish:
- Almond Butter Version: Swap the filling.
- Cookie Butter Version: Use cookie spread instead of peanut butter.
- Chocolate-Dipped Version: Coat half the sandwich in chocolate.
Common Mistakes to Avoid with This Dish:
- Overfilling the crackers: They squeeze out the sides.
- Storing them warm: The crackers soften too much.
28. Trail Mix Movie Mix
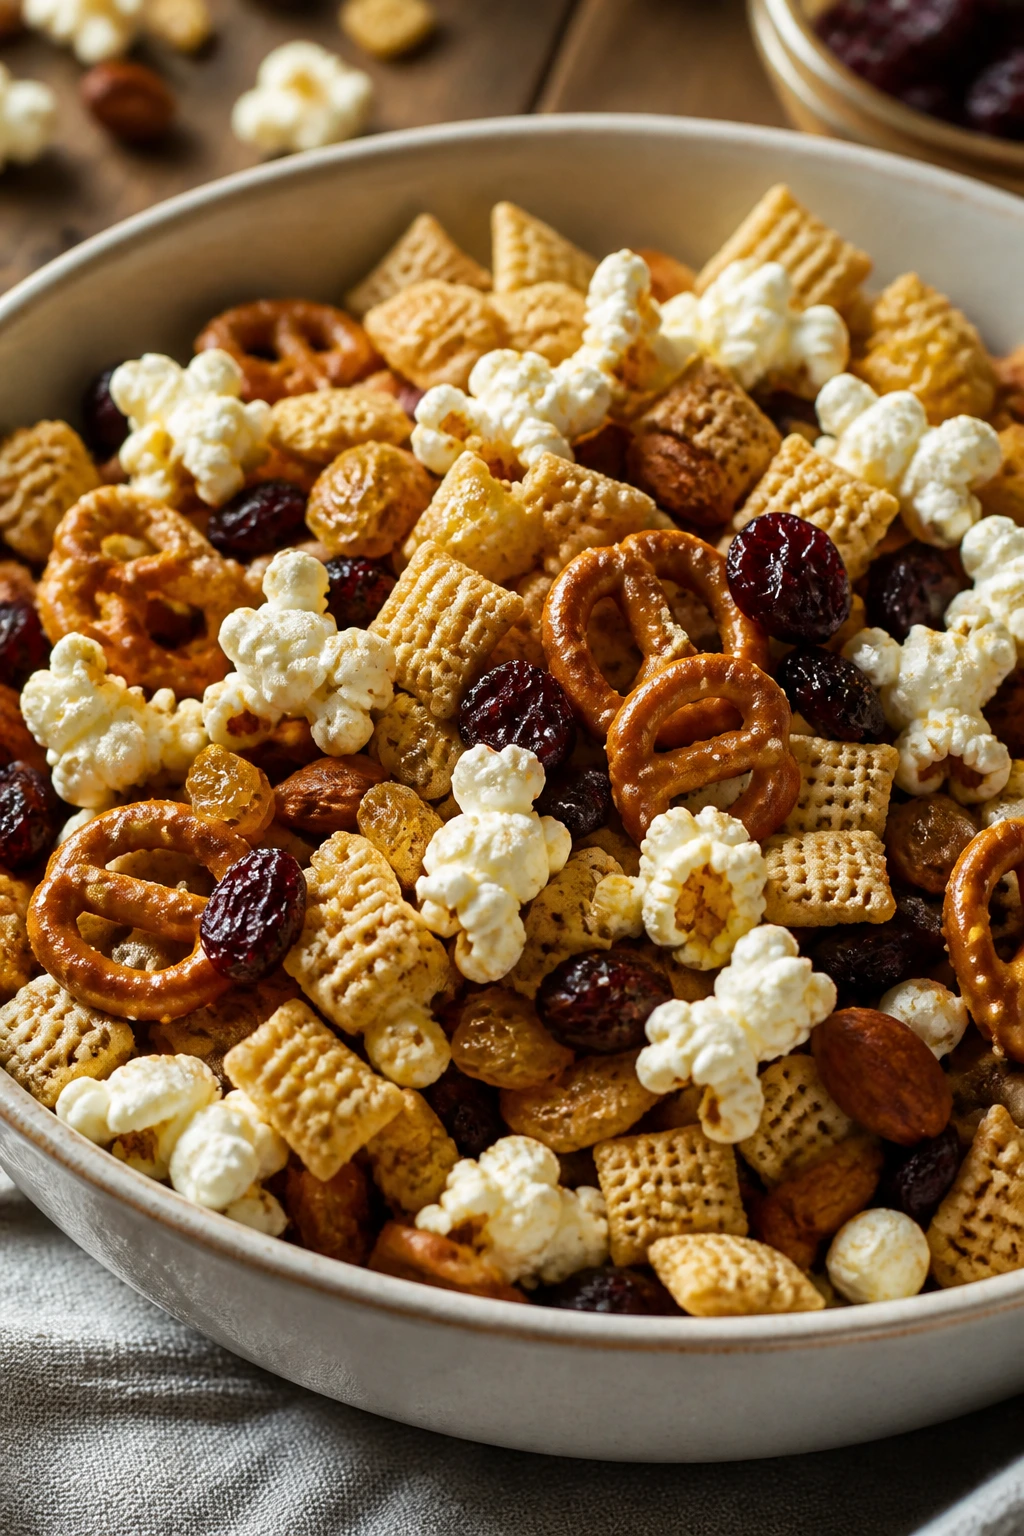
This is the snack bowl I make when I want variety without a cooking project. You get crunch, chew, salt, and a little sweetness all in one handful, which is exactly what movie-night snacking tends to want.
Why It Works:
A good trail mix should move between textures fast. Popcorn keeps it light, pretzels bring salt, and dried fruit or candy keeps people from getting bored halfway through the opening act.
Key Ingredients:
- 4 cups popcorn
- 2 cups pretzels
- 1 cup Chex cereal
- 1/2 cup peanuts or almonds
- 1/2 cup raisins or dried cranberries
- 1/2 cup candy pieces or chocolate chips
- 1/2 teaspoon salt, optional
Quick Steps:
- Combine all the ingredients in a very large bowl.
- Toss gently so the popcorn doesn’t crush.
- Taste and add a pinch of salt if needed.
- Divide into smaller bowls or cups.
- Serve right away, or store in an airtight container.
Equipment for This Recipe:
- Large mixing bowl
- Measuring cups
- Spoon
- Airtight container
How to Serve This Dish:
Small paper cups work better than one giant bowl if you’re trying to keep portions under control. I like this one parked near the sweet snacks so people can drift between both.
Pro Tips for This Recipe:
- Use plain popcorn, not heavily buttered popcorn.
- Choose one candy and one dried fruit so the mix doesn’t get cluttered.
- Add fragile pieces last.
Variations on This Dish:
- Sweet-Salty Mix: Add mini marshmallows and chocolate chunks.
- Nut-Free Mix: Use sunflower seeds and extra cereal.
- Spicy Mix: Add a pinch of chili powder and smoked paprika.
Common Mistakes to Avoid with This Recipe:
- Using too much sticky candy: The mix clumps.
- Making it too salty: The flavor balance disappears.
29. Ranch Snack Mix
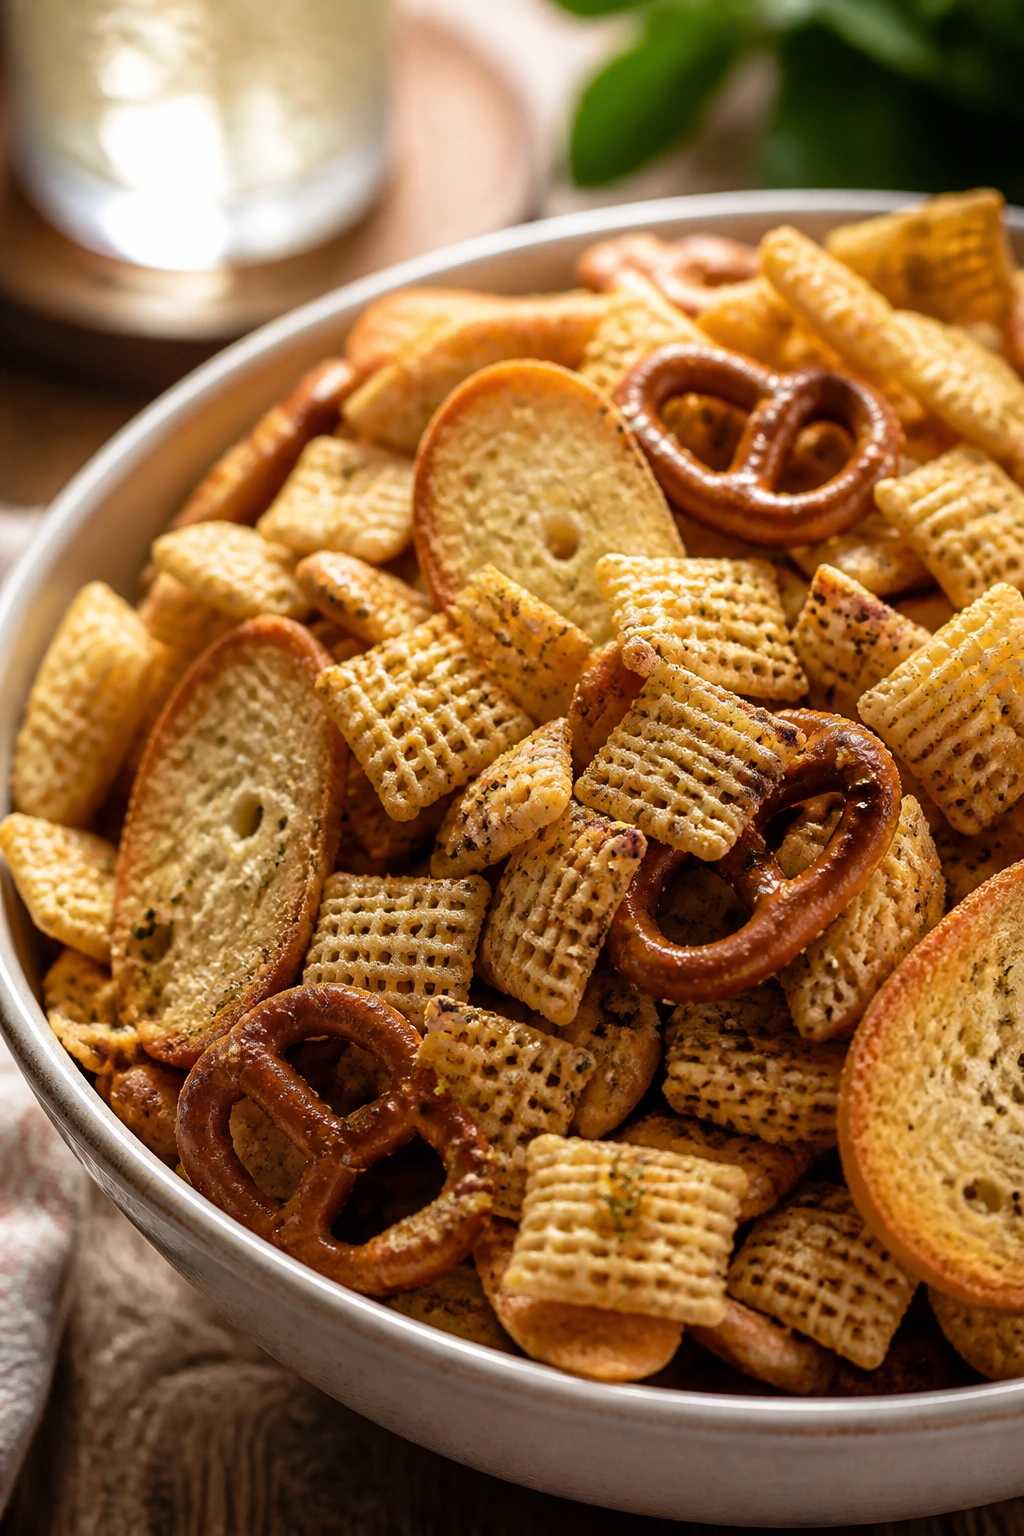
Ranch snack mix is the kind of thing that keeps people hovering near the kitchen. The seasoning coats every bite, the pretzels stay crunchy, and the whole thing has that baked, savory smell that somehow travels farther than popcorn.
Why It Works:
Low oven heat dries the coating onto the cereal and pretzels without roasting them hard. The butter-and-ranch mixture gives you flavor in every bite, not just on the outside of the bowl.
Key Ingredients:
- 3 cups Chex cereal
- 2 cups pretzels
- 1 cup bagel chips or crackers
- 3 tablespoons butter, melted
- 1 packet ranch seasoning mix
- 1/2 teaspoon garlic powder
Quick Steps:
- Heat the oven to 250°F.
- Mix the cereal, pretzels, and bagel chips in a large bowl.
- Stir the melted butter, ranch seasoning, and garlic powder together.
- Pour over the snack mix and toss well.
- Bake for 20 minutes, stirring once halfway through.
- Cool completely before serving.
Equipment for This Recipe:
- Rimmed baking sheet
- Large bowl
- Spoon
- Parchment paper, optional
How to Serve This Dish:
Let it cool fully before you pour it into bowls. Warm snack mix tastes fine, but crisp snack mix disappears faster.
Pro Tips for This Recipe:
- Stir halfway so the coating dries evenly.
- Let it cool before storing or the steam softens it.
- Use sturdy crackers so they don’t crumble under the coating.
Variations on This Dish:
- Cheddar Ranch Mix: Add cheese crackers.
- Spicy Ranch Mix: Add cayenne or hot paprika.
- Dill Ranch Mix: Add dried dill for sharper flavor.
Common Mistakes to Avoid with This Recipe:
- Baking too hot: The seasoning burns.
- Packing it away warm: The crunch disappears.
30. Caramel Corn Clusters
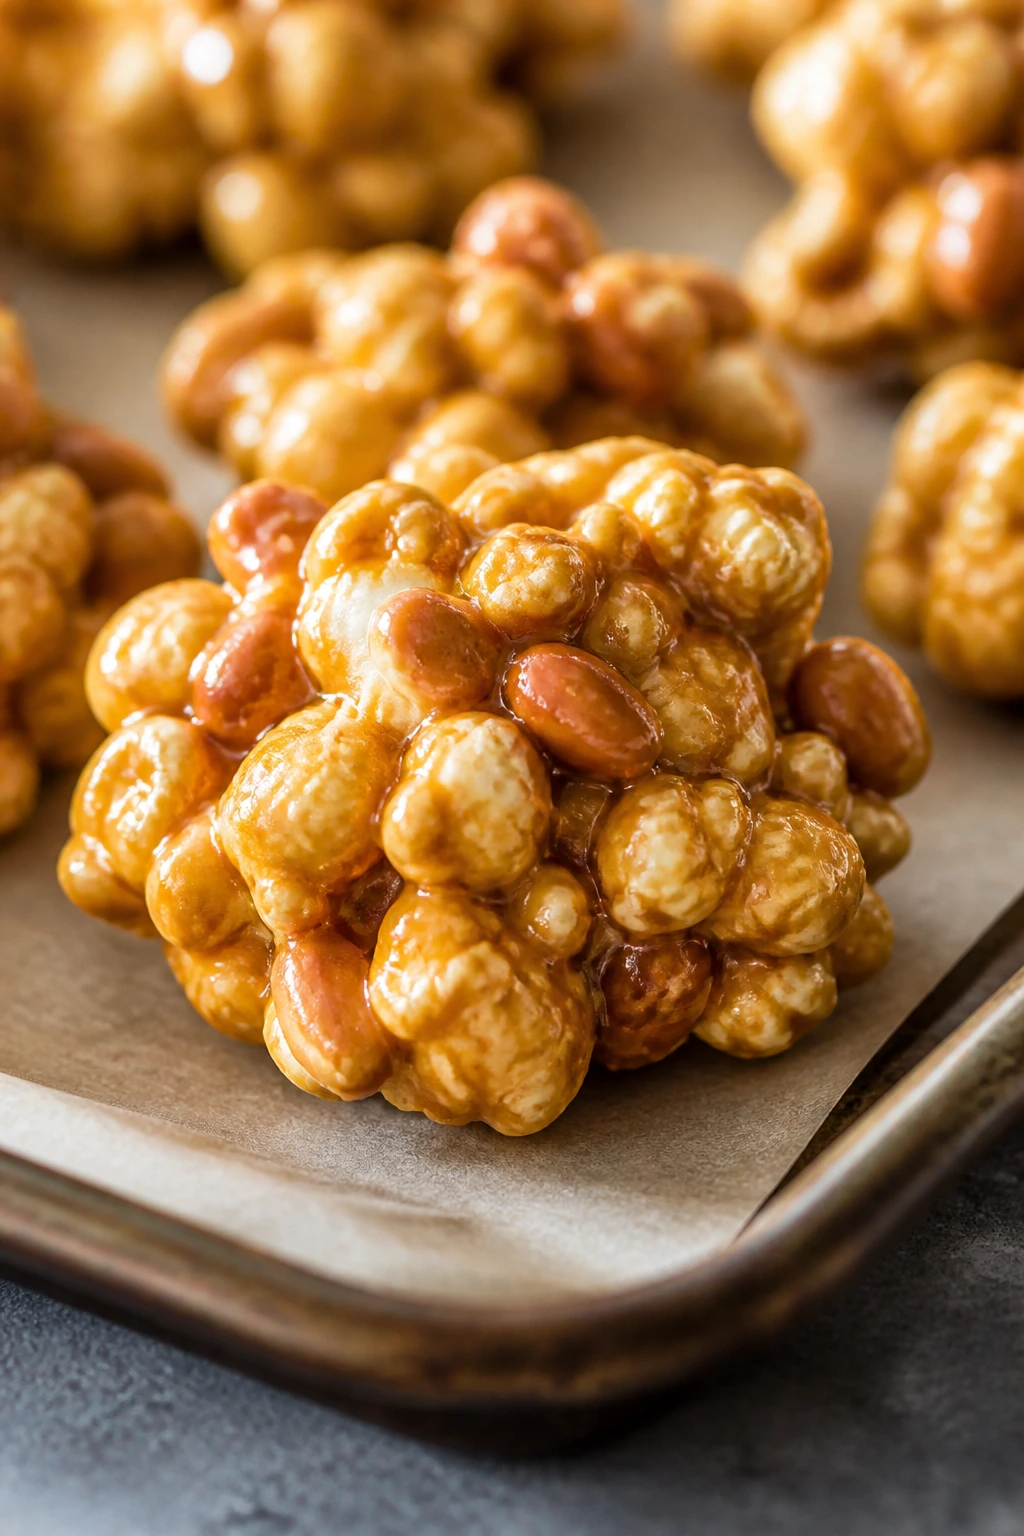
This is popcorn’s richer cousin, the one that shows up when you want something sweet but still crunchy. The caramel coats the kernels in thin layers, and the clusters give you those satisfying broken shards that are easy to grab.
Why It Works:
Caramel corn is best when the coating is thin, not sticky. Baking it for a short stretch helps the caramel dry onto the popcorn so you get crunch instead of chew.
Key Ingredients:
- 10 cups popped popcorn
- 1 cup peanuts
- 1/2 cup butter
- 1/2 cup brown sugar
- 1/4 cup corn syrup
- 1/4 teaspoon baking soda
- 1/2 teaspoon salt
Quick Steps:
- Heat the oven to 250°F and line a baking sheet with parchment.
- Combine the popcorn and peanuts in a large bowl.
- Simmer the butter, brown sugar, corn syrup, and salt for 3 minutes.
- Stir in the baking soda, then pour over the popcorn and toss well.
- Bake for 20 minutes, stirring twice, then cool completely into clusters.
Equipment for This Recipe:
- Large pot
- Baking sheet
- Parchment paper
- Large bowl
How to Serve This Dish:
Break it into clusters and serve in a wide bowl. It’s a good sweet snack to put near the end of the spread, when people start looking for something more dessert-like.
Pro Tips for This Recipe:
- Stir the caramel until the sugar fully dissolves.
- Keep the bake low so the caramel stays crisp, not bitter.
- Cool completely before breaking it up.
Variations on This Dish:
- Pecan Caramel Corn: Swap peanuts for pecans.
- Chocolate Drizzle Caramel Corn: Drizzle cooled clusters with chocolate.
- Cinnamon Caramel Corn: Add cinnamon to the caramel.
Common Mistakes to Avoid with This Dish:
- Stirring the caramel too little: The sugar can stay grainy.
- Eating it warm: It will feel sticky instead of crisp.
31. Mini Pancake Dippers
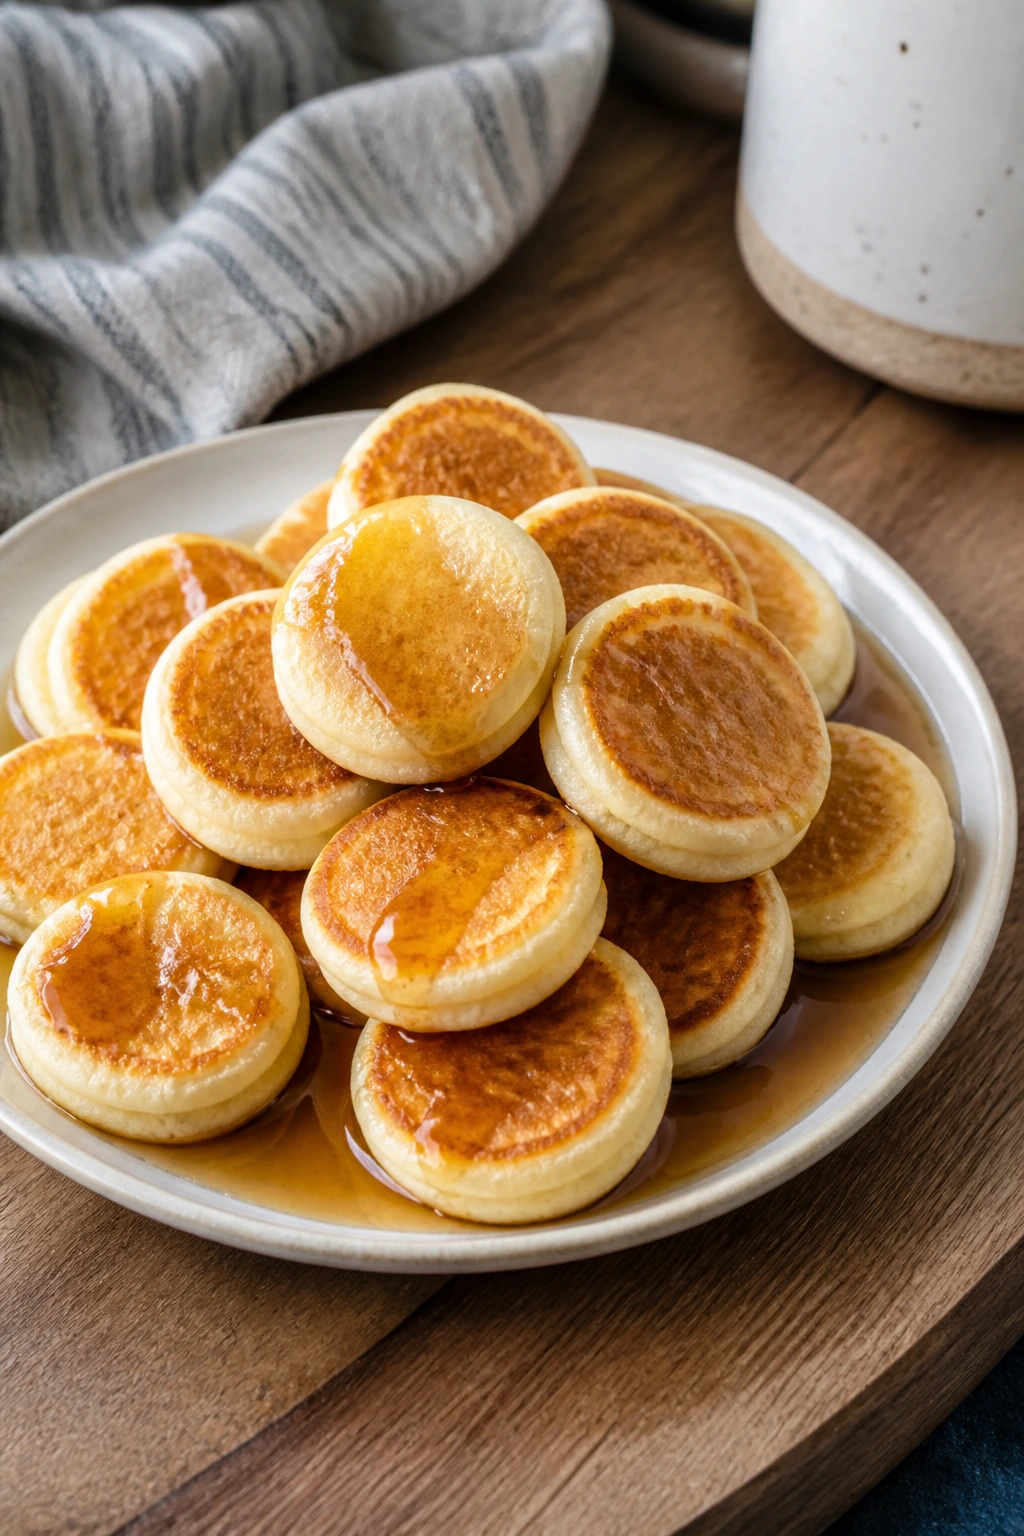
Mini pancake dippers are breakfast food pretending to be movie food, and that’s a trick I’m happy to support. They’re soft, warm, and easy to dip into syrup without needing a knife.
Why It Works:
Small pancakes cook quickly and stay tender. Making them bite-size means you can stack them in a bowl and pass around syrup, fruit, or peanut butter without any slicing.
Key Ingredients:
- 2 cups pancake mix
- 1 egg
- 1 1/2 cups milk
- 2 tablespoons melted butter
- 1/2 teaspoon vanilla extract
- Syrup, for serving
- Fresh berries, optional
Quick Steps:
- Whisk the pancake mix, egg, milk, butter, and vanilla until just combined.
- Heat a skillet or griddle over medium heat.
- Spoon small rounds of batter onto the surface.
- Cook for 1 to 2 minutes per side, until golden and set.
- Serve warm with syrup and berries.
Equipment for This Recipe:
- Skillet or griddle
- Mixing bowl
- Whisk
- Spatula
How to Serve This Dish:
Serve the pancakes in a shallow bowl with syrup in a separate cup. They’re surprisingly good with strawberry slices or a dusting of cinnamon sugar.
Pro Tips for This Recipe:
- Don’t overmix the batter or the pancakes get tough.
- Keep the pancakes small so they cook evenly.
- Use a low-sided bowl for dipping.
Variations on This Dish:
- Chocolate Chip Dippers: Stir mini chips into the batter.
- Banana Dippers: Add mashed banana.
- Cinnamon Roll Dippers: Add cinnamon and a light glaze.
Common Mistakes to Avoid with This Dish:
- Cooking too hot: The outsides brown before the centers set.
- Making them too large: They become awkward to dip.
32. Chewy Marshmallow Popcorn Bars
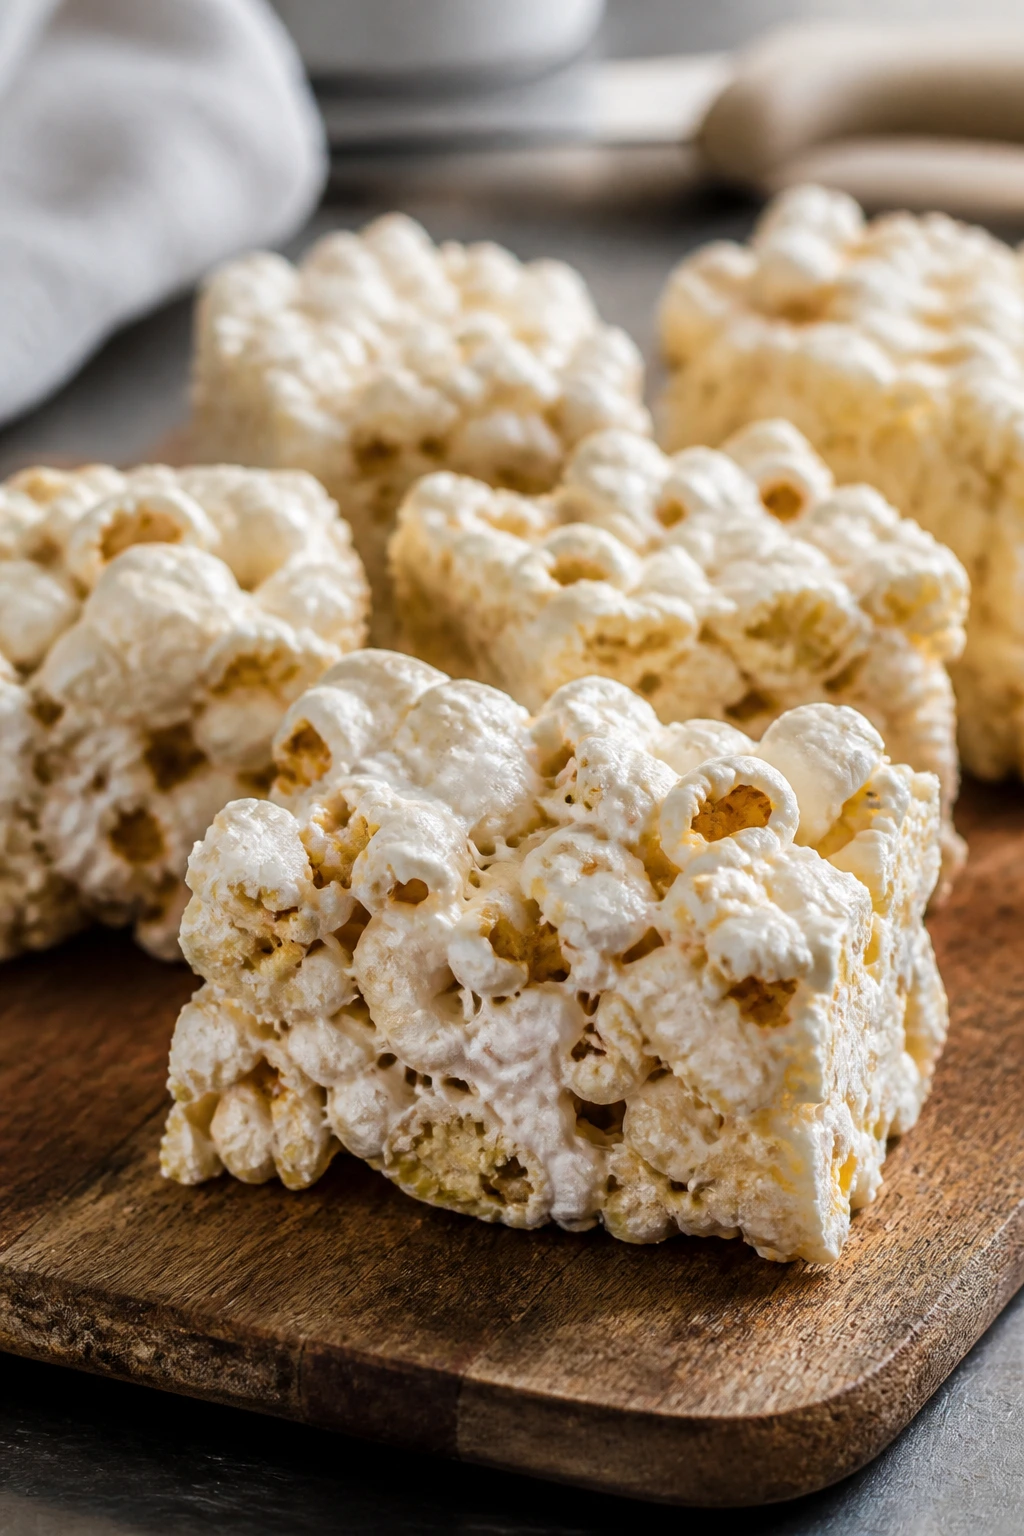
These bars land right in the middle between popcorn and cereal treat, and that’s why I like them. They hold together well, but they still keep the popcorn flavor front and center instead of disappearing into pure sugar.
Why It Works:
Marshmallow acts like glue without making the bars dense. The popcorn stays lighter than rice cereal bars, so the result tastes more like a movie snack and less like a baked square.
Key Ingredients:
- 8 cups popped popcorn
- 3 tablespoons butter
- 4 cups mini marshmallows
- 1/2 teaspoon vanilla extract
- 1/2 teaspoon salt
- 1/2 cup mini chocolate chips, optional
Quick Steps:
- Grease a 9×13-inch pan lightly.
- Melt the butter in a large pot, then stir in the marshmallows until smooth.
- Add the vanilla and salt.
- Fold in the popcorn, then press into the pan with a buttered spatula.
- Sprinkle with chocolate chips if using, then cool and cut into bars.
Equipment for This Recipe:
- Large pot
- 9×13-inch pan
- Buttered spatula
- Mixing bowl, optional
How to Serve This Dish:
Cut them into small bars so they’re easy to grab. They’re better at room temperature than cold, which helps the marshmallow stay soft.
Pro Tips for This Recipe:
- Press lightly; packing too hard makes the bars dense.
- Add the popcorn while the marshmallow is still warm.
- Wrap individual bars if you want them for later.
Variations on This Dish:
- Peanut Butter Bars: Stir in 1/4 cup peanut butter.
- Birthday Cake Bars: Add sprinkles.
- Chocolate Marshmallow Bars: Add cocoa to the melted mixture.
Common Mistakes to Avoid with This Dish:
- Using stale popcorn: The bars taste flat.
- Pressing too hard into the pan: They become brick-like.
33. Strawberry Lemonade Slush

This is the cold drink I want when the room gets a little too warm from all the hot snacks. It’s tart, pink, and icy enough to cut through cheese, butter, and salt.
Why It Works:
Frozen fruit does the heavy lifting, so you don’t need a complicated syrup. The lemon keeps the drink sharp, and the ice gives it that slushy texture people always seem to chase at snack time.
Key Ingredients:
- 2 cups frozen strawberries
- 1 1/2 cups lemonade
- 1 cup ice
- 1 tablespoon honey, optional
- 1 tablespoon lemon juice
- Mint leaves, optional
Quick Steps:
- Add the strawberries, lemonade, ice, honey, and lemon juice to a blender.
- Blend until smooth and slushy.
- Taste and add more honey if needed.
- Pour into glasses.
- Garnish with mint if you want a brighter finish.
Equipment for This Recipe:
- Blender
- Glasses
- Measuring cups
- Straw or spoon
How to Serve This Dish:
Serve immediately before the ice melts. I like these in shorter glasses so the slush feels thicker and colder.
Pro Tips for This Recipe:
- Use frozen strawberries, not fresh, for a thicker drink.
- Start with less lemonade if you want a denser slush.
- Blend just long enough to break up the ice.
Variations on This Dish:
- Strawberry Lime Slush: Swap lime juice for lemon.
- Pink Sherbet Slush: Add a scoop of sherbet.
- Berry Mix Slush: Use mixed frozen berries.
Common Mistakes to Avoid with This Dish:
- Adding too much liquid: The drink turns thin.
- Blending too long: It warms up and loses the icy texture.
34. Hot Chocolate Bar
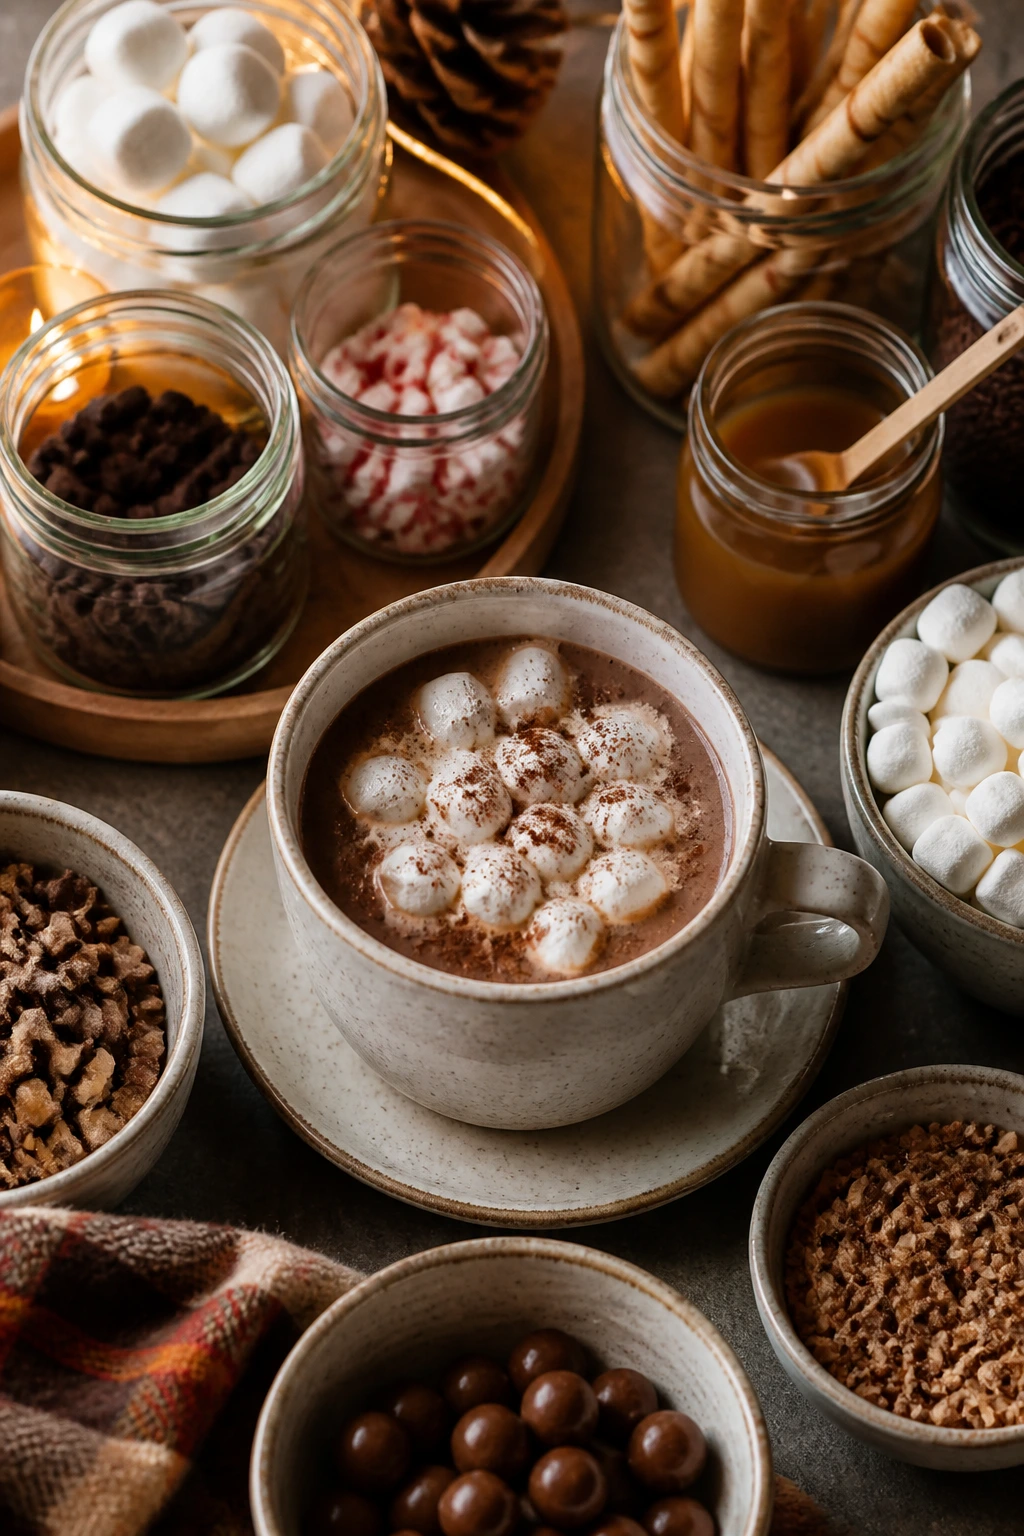
A hot chocolate bar sounds a little fancy, but really it’s just a good excuse to set out a pot of cocoa and let everyone pile on their own toppings. That’s the fun part. Everyone gets a different cup.
Why It Works:
Hot chocolate is easy to scale, and the toppings do the customization for you. One person wants marshmallows, another wants whipped cream, and somebody always wants extra chocolate chips floating on top.
Key Ingredients:
- 4 cups milk
- 1 cup heavy cream
- 1/3 cup unsweetened cocoa powder
- 1/3 cup sugar
- 1 teaspoon vanilla extract
- Pinch of salt
- Mini marshmallows
- Whipped cream
- Chocolate chips
- Crushed peppermint or caramel sauce, optional
Quick Steps:
- Warm the milk and cream in a saucepan over medium heat.
- Whisk in the cocoa, sugar, and salt until smooth.
- Cook until steaming but not boiling.
- Stir in the vanilla.
- Pour into mugs and set out the toppings for everyone to choose.
Equipment for This Recipe:
- Saucepan
- Whisk
- Ladle
- Mugs or heatproof cups
How to Serve This Dish:
Set the cocoa next to a small topping tray or a row of jars. A hot chocolate bar works best when the toppings are easy to see and easy to reach.
Pro Tips for This Recipe:
- Don’t let the milk boil or it can taste cooked.
- Keep the toppings in small bowls so the table doesn’t get cluttered.
- If the cocoa sits awhile, whisk again before pouring.
Variations on This Dish:
- Peppermint Hot Chocolate: Add peppermint extract and crushed candy cane.
- Mexican-Style Cocoa: Add a pinch of cinnamon.
- Salted Caramel Cocoa: Drizzle caramel and add flaky salt.
Common Mistakes to Avoid with This Dish:
- Boiling the milk: It can scorch and lose its clean taste.
- Setting out toppings that melt fast: Use room-temperature toppings where possible.
35. Cinnamon Sugar Tortilla Chips with Fruit Salsa
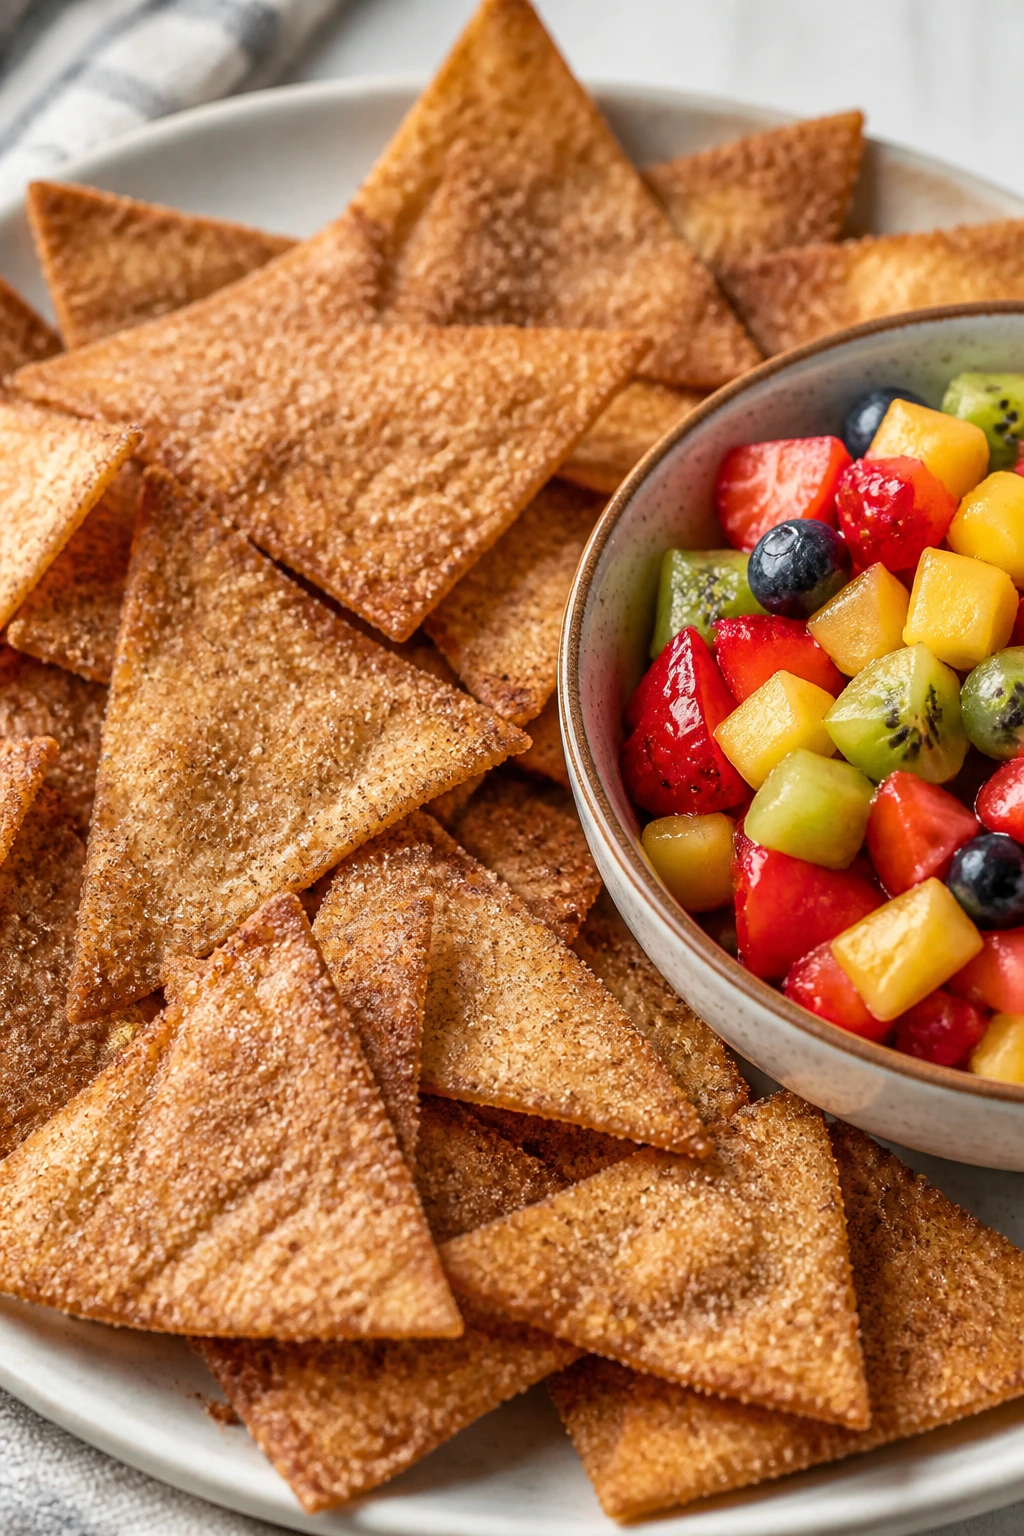
This is the sweet snack I bring out when I want something crunchy that still feels fresh. The chips bake fast, the cinnamon sugar smells warm, and the fruit salsa gives the whole plate a bright, juicy finish.
Why It Works:
Baked tortilla chips are cheap, quick, and much less greasy than fried sweets. Pairing them with fruit salsa keeps the dessert side light enough that people can still eat popcorn afterward, which matters more than we like to admit.
Key Ingredients:
- 4 flour tortillas
- 2 tablespoons melted butter
- 2 tablespoons sugar
- 1 teaspoon cinnamon
- 1 cup strawberries, diced
- 1 kiwi, diced
- 1/2 cup pineapple, diced
- 1 tablespoon lime juice
Quick Steps:
- Heat the oven to 375°F and line a baking sheet with parchment.
- Brush the tortillas with butter and cut them into wedges.
- Mix the sugar and cinnamon, then sprinkle over the wedges.
- Bake for 8 to 10 minutes, until crisp and lightly golden.
- Toss the fruit with lime juice to make the salsa.
- Serve the chips with the salsa.
Equipment for This Recipe:
- Baking sheet
- Parchment paper
- Knife
- Small bowl
How to Serve This Dish:
Serve the chips in one bowl and the salsa in another so the crunch stays intact. If you want the plate to look a little nicer, spoon the salsa into a shallow dish and scatter a few mint leaves on top.
Pro Tips for This Recipe:
- Cut the tortillas evenly so they bake at the same speed.
- Cool the chips fully before serving; they crisp as they cool.
- Dice the fruit small so the salsa scoops easily.
Variations on This Dish:
- Apple Salsa Chips: Use chopped apples and a squeeze of orange juice.
- Berry Salsa Chips: Swap in blueberries and raspberries.
- Churro Chips: Add a little more cinnamon and serve with chocolate dip.
Common Mistakes to Avoid with This Dish:
- Using too much butter: The chips turn greasy instead of crisp.
- Mixing the fruit too early: It can get watery if it sits too long.
Why a Movie-Night Spread Needs a Few Rules
Family movie night food works best when the table has a rhythm to it. One salty thing. One crunchy thing. One hot tray. One cold bowl. If every dish is rich and hot, the whole spread starts to blur together after ten minutes, and the snacks lose their edge.
The other thing I like to remember is that movie-night food should survive time. People arrive late. Somebody pauses the movie. Someone else wanders off to refill a drink. The best recipes here can sit for a few minutes without collapsing into a puddle, which is why the sheet-pan, muffin-tin, and bowl-and-dip approach shows up so often.
Essential Equipment for the Whole Spread
- Rimmed sheet pans: These handle nachos, fries, bark, and baked snacks without spills.
- Parchment paper: It keeps cheese, bark, and baked dough from welding itself to the pan.
- Large mixing bowls: You’ll need at least two for popcorn, snack mix, and batters.
- Muffin tins: Great for mac and cheese cups, taco cups, and mini brownie bites.
- 12-inch skillet: Useful for quesadillas, grilled cheese, and quick fillings.
- Large lidded pot: The best tool for stovetop popcorn and caramel corn.
- Wire rack: Helps tenders and fries stay crisp underneath.
- Small serving cups or ramekins: Perfect for dips, slush, and cheesecake cups.
- Silicone spatula: Better than a spoon for scraping sticky marshmallow or caramel.
- Sharp knife and cutting board: Needed for fruit, sliders, and anything that has to be portioned cleanly.
Smart Shopping for Snacks That Stay Crispy

The ingredient list matters a lot more on movie night than people expect. Cheap tortilla chips with thin walls go soft under nacho cheese in minutes. Bagged shredded cheese can work, but a block you grate yourself melts smoother and usually has fewer anti-caking bits clinging to it.
For popcorn, buy kernels that pop up light and even, not old kernels hiding at the back of the pantry. For pretzels and snack mix, choose sturdy shapes with enough surface area to catch seasoning. Thin rods break too easily once you start tossing them with butter.
Fresh fruit should be firm, not soft. Apples with a crisp bite hold up better than mealy ones, and grapes need to be dry before they go on skewers or into a mix. For hot sandwiches, sweeter rolls like Hawaiian buns and soft slider buns are worth it because they stay intact after baking. And if you’re using frozen meatballs or chicken tenders as a time-saver, buy ones with a short ingredient list and a shape that won’t fall apart in sauce.
How to Serve a Movie-Night Spread
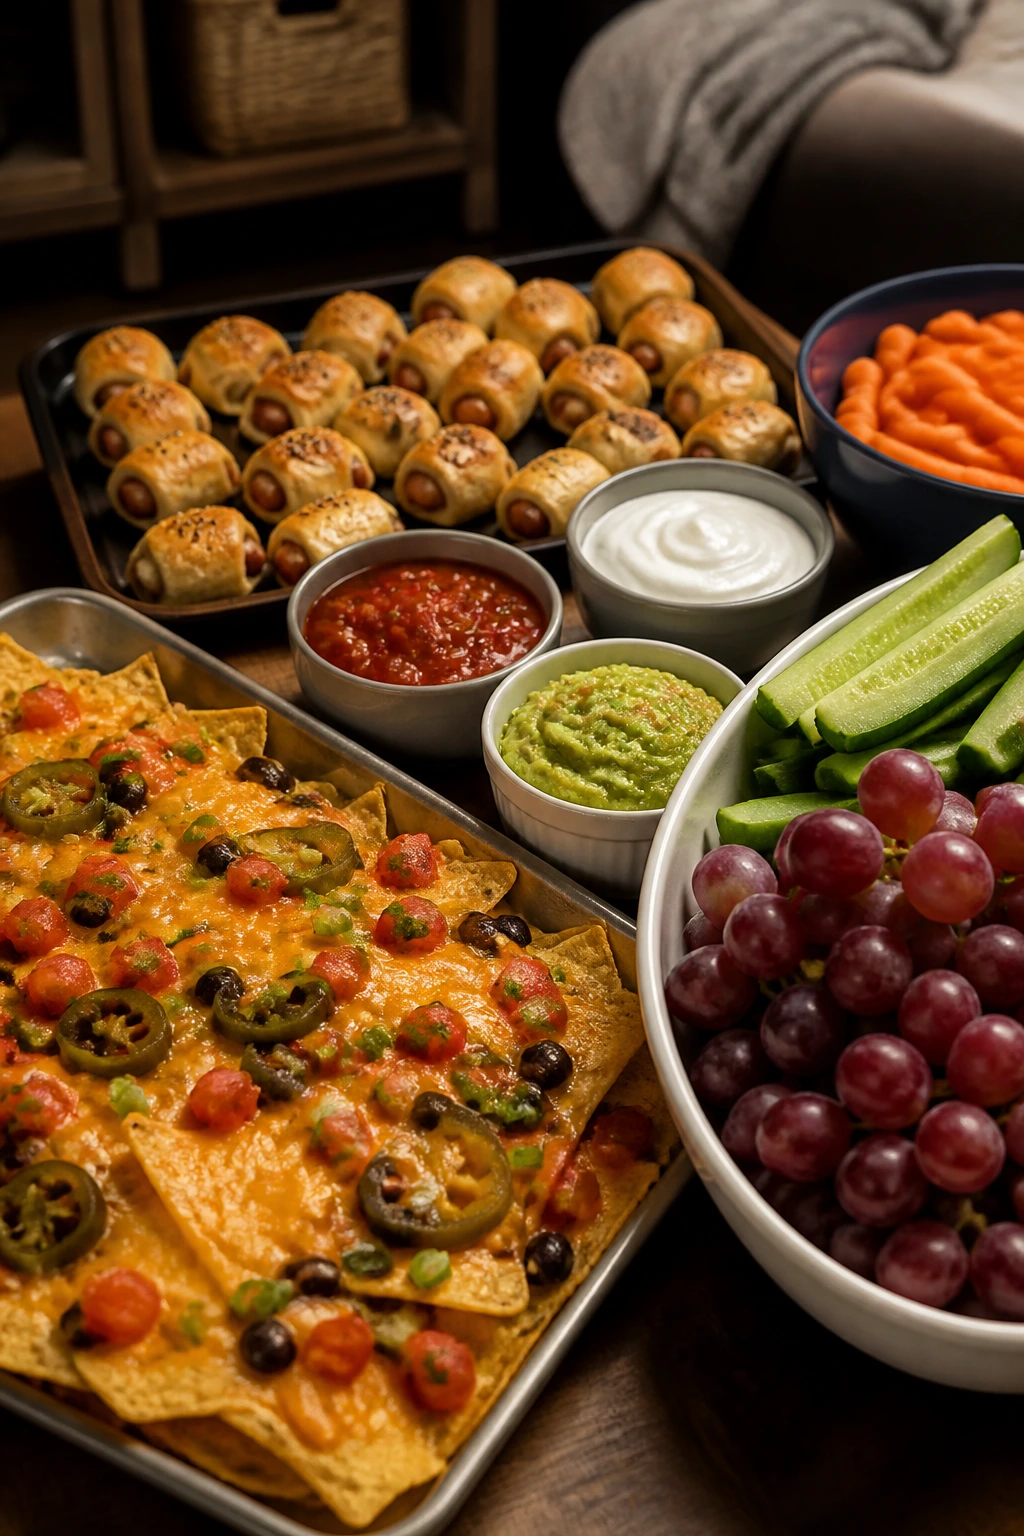
Presentation: Put the loud, crunchy foods in wide bowls or on sheet pans lined with parchment. The softer foods belong in smaller dishes or cups so they don’t get buried under everything else. If you want the table to feel organized, group snacks by temperature: hot on one side, cold on the other, sweets toward the end.
Accompaniments: Keep a few simple sides around to break up the richer snacks: grapes, cucumber sticks, apple slices, pickle spears, or a plain bowl of popcorn. A second dip bowl matters more than it should, especially when nachos, fries, and pretzel bites are all in play.
Portions: For a small family, pick 2 hot snacks, 2 cold snacks, and 1 sweet item. For a bigger crowd, double the popcorn, chips, or bark before you double the sandwiches. The snack foods go farther than the baked ones, and nobody minds an extra bowl of trail mix on the table.
Beverage Pairing: Lemonade, iced tea, and sparkling water all work well with salty snacks. For dessert-heavy spreads, hot chocolate or a strawberry slush keeps the whole thing from feeling too heavy.
Additional Tips for Better Flavor and Less Fuss
Flavor Enhancement: A small finishing salt changes more than people think. A pinch of flaky salt on popcorn, bark, or caramel corn adds a sharper finish and keeps sweet snacks from feeling flat.
Customization: Set out one mild tray and one tray with heat. Jalapeños, red pepper flakes, hot sauce, or cayenne can live on the side, and that solves the “too spicy for the kids” problem without making a second whole recipe.
Serving Suggestions: Small cups make everything easier. Use little ramekins for dips, paper cones for popcorn, and short skewers for fruit. You’ll use fewer napkins, and the table stays much less chaotic.
Make-It-Yours: For dairy-free guests, swap butter for olive oil or plant butter in the savory recipes, use dairy-free cheese where it melts well, and choose yogurt alternatives for the fruit dip. For gluten-free nights, popcorn, fruit, nachos, and taco cups can all stay on the menu with the right tortilla, chip, or breadcrumb swap.
Make-Ahead, Storage, and Reheating Guidance
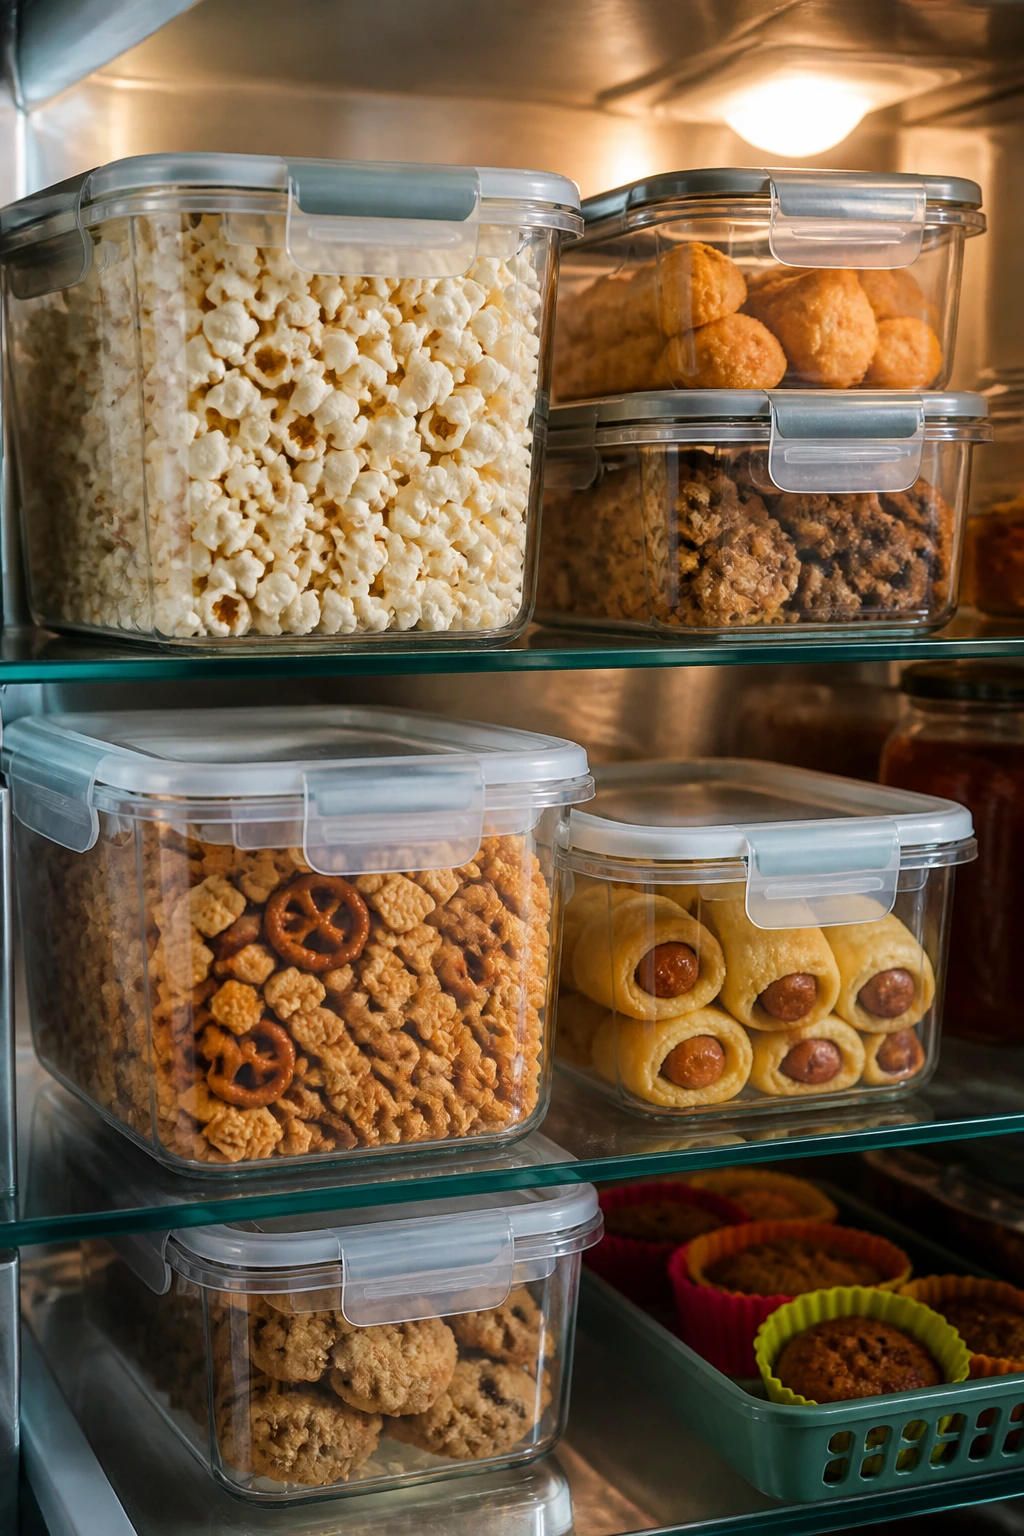
Popcorn and snack mixes are best the day they’re made, but they can stay crisp in an airtight container for about 3 days if you let them cool completely first. If you want to make them ahead, skip any wet toppings until the last minute. Caramel corn and snack mix are fine at room temperature; the fridge makes them stale.
Baked items like sliders, meatball subs, chicken tenders, fries, taco cups, and mac and cheese cups keep well in the fridge for 3 to 4 days. Reheat them on a sheet pan at 350°F for 8 to 15 minutes, depending on size, and cover loosely with foil at first if the tops are browning too fast. Fries and tenders do best uncovered for the last few minutes so they crisp back up.
Cold desserts such as Oreo cheesecake cups and fruit skewers should stay refrigerated and are best within 2 to 3 days. Fruit salsa is nicest within a few hours, before the juices pool. Hot chocolate base can be refrigerated for 2 days and rewarmed gently on the stove over low heat; whisk it so the milk and cocoa come back together.
Easy Swaps and Adaptations
Gluten-Free Movie Night: Use certified gluten-free popcorn, chips, tortillas, and crackers, then swap in GF breadcrumbs for the chicken tenders and mozzarella sticks. Taco cups and nachos are the easiest wins here.
Dairy-Free Tray: Use olive oil or plant butter for savory snacks, dairy-free cheese that melts well on nachos or pizza-style snacks, and coconut or oat yogurt for fruit dips. Skip the cheese-heavy trays if the alternative doesn’t melt cleanly.
Lower-Sugar Sweet Table: Lean harder on fruit skewers, apple nachos with nut butter, and slushes sweetened lightly with honey. You can also halve the sugar in the caramel corn or choose plain popcorn and bark with dark chocolate instead of milk chocolate.
Spice-Light / Spice-Heavy Split: Keep the base recipe mild, then add jalapeños, hot sauce, cayenne, or chili powder to only one tray. It’s easier than making two separate dishes, and it lets the heat lovers keep their snack moving.
Budget Pantry Night: Popcorn, crackers, tortillas, beans, eggs, and pasta stretch further than specialty ingredients. If the budget is tight, build the spread around nachos, snack mix, popcorn, sliders, and one cold dessert.
Common Mistakes That Derail Movie Night Food
The biggest mistake is making everything soft. If the table is all dips, creamy fillings, and melted cheese, the snacks start to blur into one heavy thing. You want crunch in there. You want a few cold items too. That contrast is what keeps people interested after the first few handfuls.
Another common slip is serving hot food on dishes that hold steam. A covered bowl of fries turns limp fast. So do popcorn and snack mix if they’re boxed up before they’re fully cool. Let baked or fried snacks breathe for a minute, then move them to serving bowls or paper-lined trays.
A third problem is over-saucing. Nachos, sliders, quesadillas, and pizza cups all look better when the sauce is moderate and the extra goes on the side. If you drown the bread or chips before serving, you lose texture, and the whole point of these recipes is that they still have a bit of bite.
Last, don’t build a spread that needs constant attention. If the movie starts and you’re still making individual snacks, you’ve lost the night. Make one or two things ahead, keep one no-cook option ready, and give yourself a little breathing room.
Frequently Asked Questions
Can I make most of these family movie night recipes ahead of time?
Yes, and you should when possible. Snack mix, bark, cheesecake cups, and fruit skewers can be made earlier in the day, while sliders, nachos, and fries are better baked close to serving time so they stay crisp.
What’s the best way to keep popcorn crisp?
Cool it completely before storing, and keep it in an airtight container away from steam. If you add butter or seasoning, do it right before serving so the kernels don’t soften while they sit.
How do I feed a bigger crowd without cooking all night?
Pick recipes that scale on a sheet pan or in a bowl: popcorn, nachos, snack mix, sliders, and bark are the easiest. I’d rather make two big trays of one or two snacks than six tiny recipes that all need attention at once.
Can I use an air fryer for any of these recipes?
Yes. Mozzarella sticks, chicken tenders, fries, and some pizza-style snacks work well in an air fryer if you keep them in a single layer. Watch them closely, because they brown faster than they do in a conventional oven.
What if my kids won’t eat spicy food?
Keep the base recipe plain and put the heat on the side. That can mean jalapeños in a separate bowl, hot sauce in a small cup, or one tray of mild nachos and one tray with extra seasoning.
How do I keep hot snacks warm without drying them out?
Set the oven to its lowest warm setting and leave the tray lightly covered with foil for only a short time. If you cover too tightly, steam softens the crust, so use the foil as a tent, not a lid.
Which recipes travel well for a sleepover or basement movie night?
Trail mix, popcorn, bark, fruit skewers, brownies, sliders, and pretzel bites all travel well if they’re packed in separate containers. Anything heavily sauced or covered in cheese is better served where it was cooked.
What if I only have 20 minutes before the movie starts?
Go for popcorn, nachos, fruit skewers, snack mix, hot chocolate, or apple nachos. Those give you the best return on time, and they don’t punish you if the opening scene starts before the tray is perfect.
After the Credits Roll
A good family movie night spread doesn’t need to be fancy. It needs to be easy to eat, easy to pass, and sturdy enough to survive a long stretch on the coffee table while everyone gets comfortable and the plot takes its time getting going.
If you build the table with a mix of crunchy, salty, sweet, hot, and cold, you won’t have to keep rushing back to the kitchen. That’s the real trick. Make a few of these ahead, keep one quick no-cook option in reserve, and the whole night feels calmer before the opening scene even starts.