
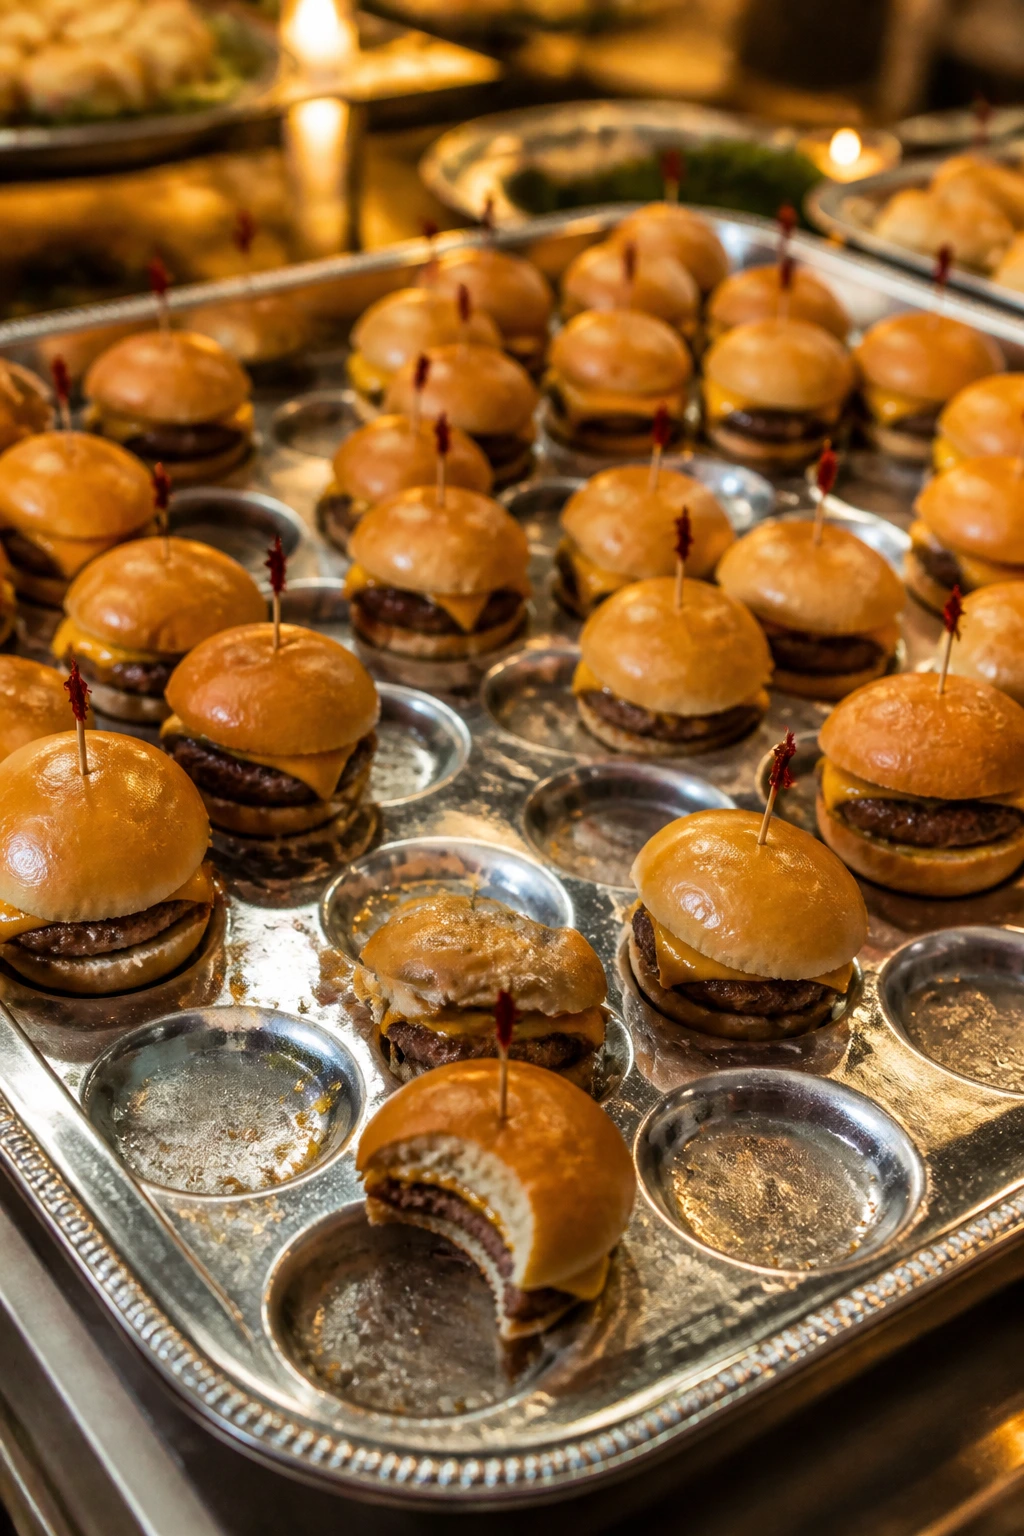
A tray of slider burgers has a way of disappearing before the drinks get warm. The buns are small, the patties are fast, and the whole thing feels a little more generous than a full-size burger because people can grab two, maybe three, without committing to a knife-and-fork situation. That’s the magic here: slider burgers feed a crowd without turning the kitchen into a short-order line.
The good ones still have to behave like real burgers. Beef with enough fat to stay juicy. Cheese that melts instead of sulking. Buns that can handle steam, sauce, and a little pressure from a stack of hands reaching in at once. If you’ve ever bitten into a dry mini burger with a floppy bottom bun, you already know the difference between a tray that gets polished off and one that sits around looking tired.
I’ve always thought sliders work best when they’re a little disciplined. Not plain. Disciplined. Keep the meat seasoned, keep the toppings obvious, and stop short of overstuffing them into chaos. A great slider should still taste like a burger, just compressed into two or three bites with a crisp edge and a soft middle.
Why These Slider Burgers Work So Well for a Crowd
- Fast batch cooking: Most of these recipes use 1½ to 2 pounds of ground beef, which is enough for 12 sliders without forcing you to babysit individual patties for an hour.
- Easy to scale: Double the tray, double the buns, and keep the seasoning ratios steady. That matters when people arrive hungry and early.
- Better texture in small bites: Sliders give you more browned surface area per ounce of beef, so you get that savory crust faster than you do with a thick burger.
- Less table mess: A smaller bun and a thinner patty stay neater on a plate, which is a relief when the rest of the spread already includes chips, slaw, and a sauce or two.
- Built for mixing and matching: Change the cheese, add onions, swap the sauce, and you’ve got a new tray without relearning the whole process.
- Crowd timing is kinder: You can keep patties warm, assemble in waves, or finish the whole batch in the oven for a few minutes right before serving.
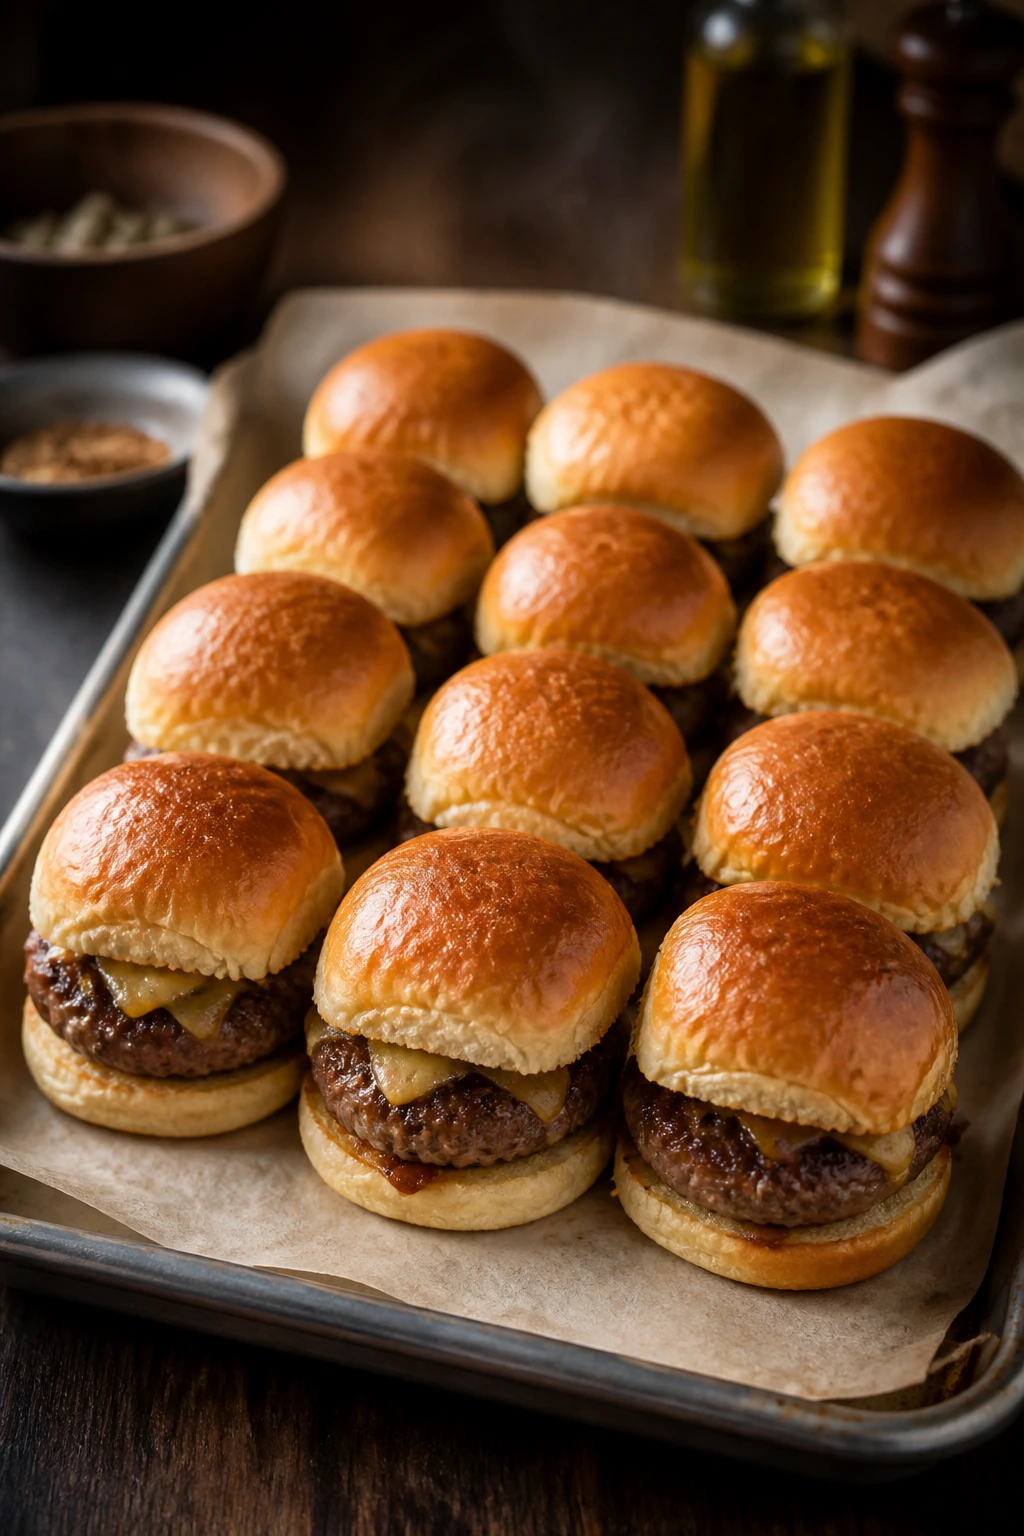
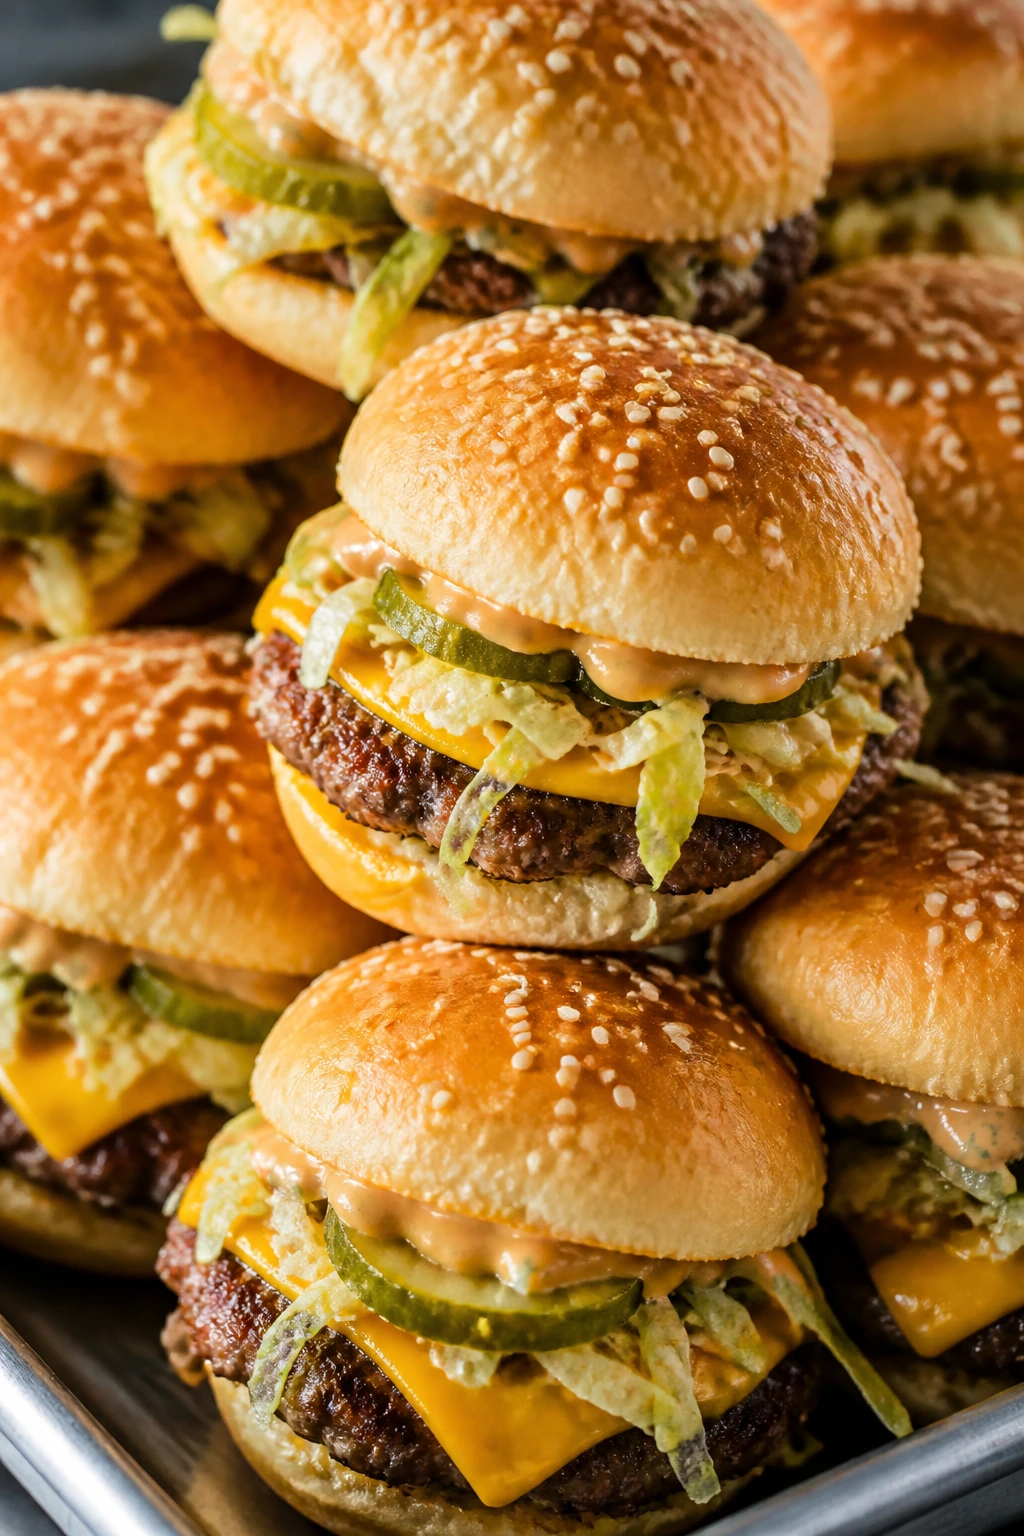
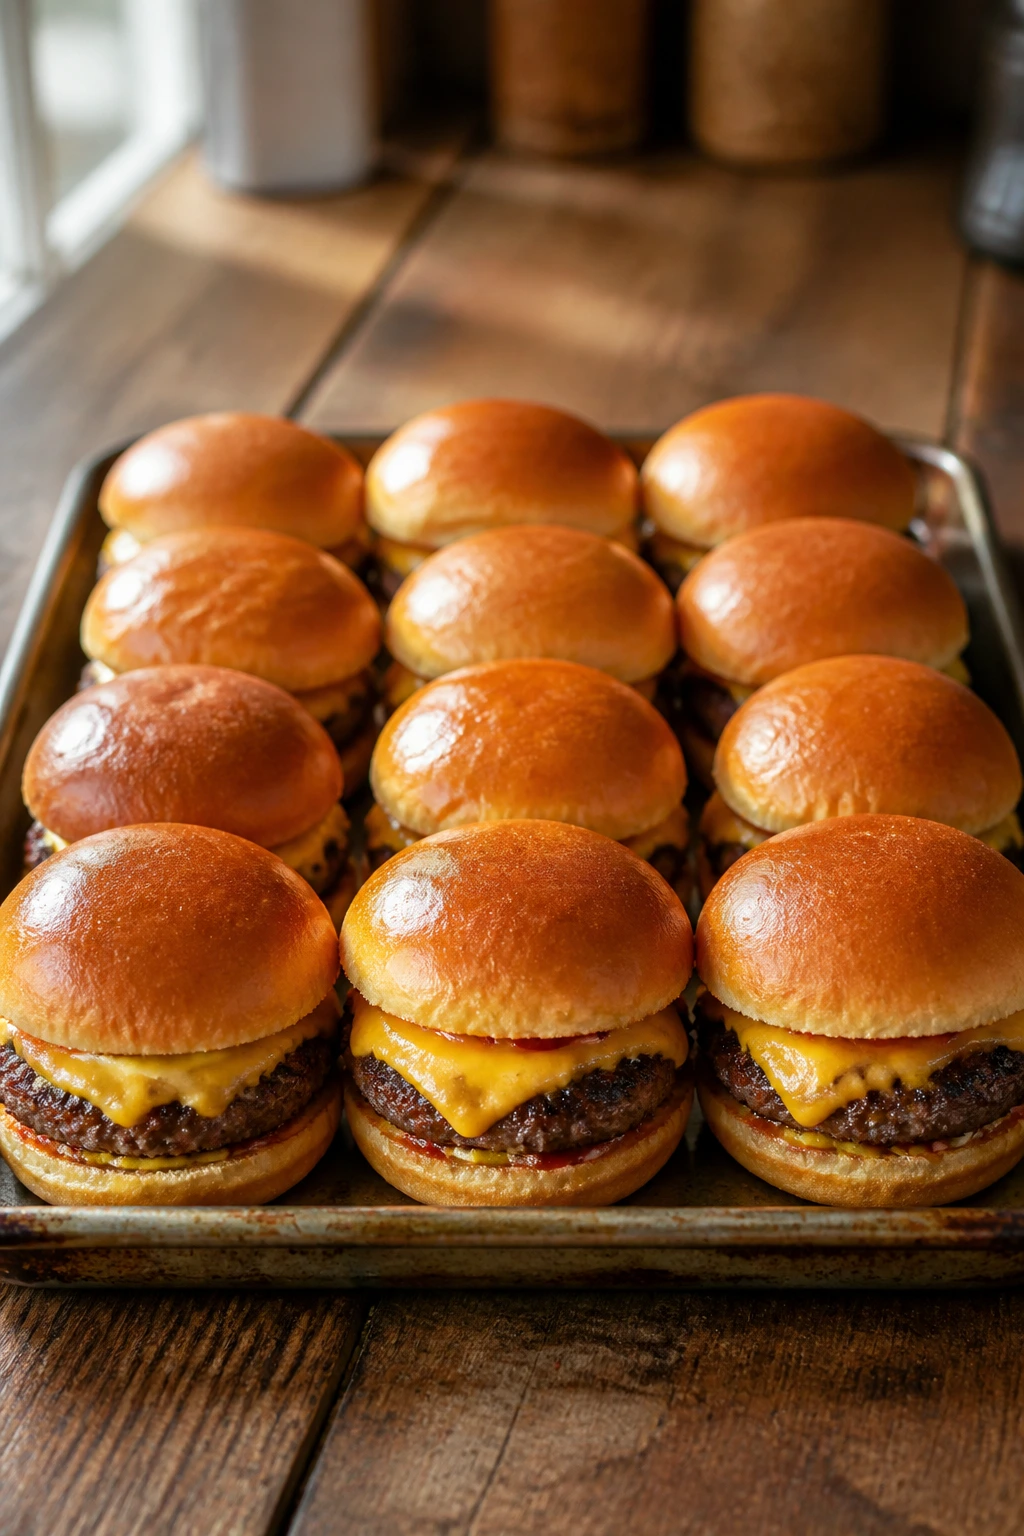
1. Classic Cheeseburger Slider Burgers
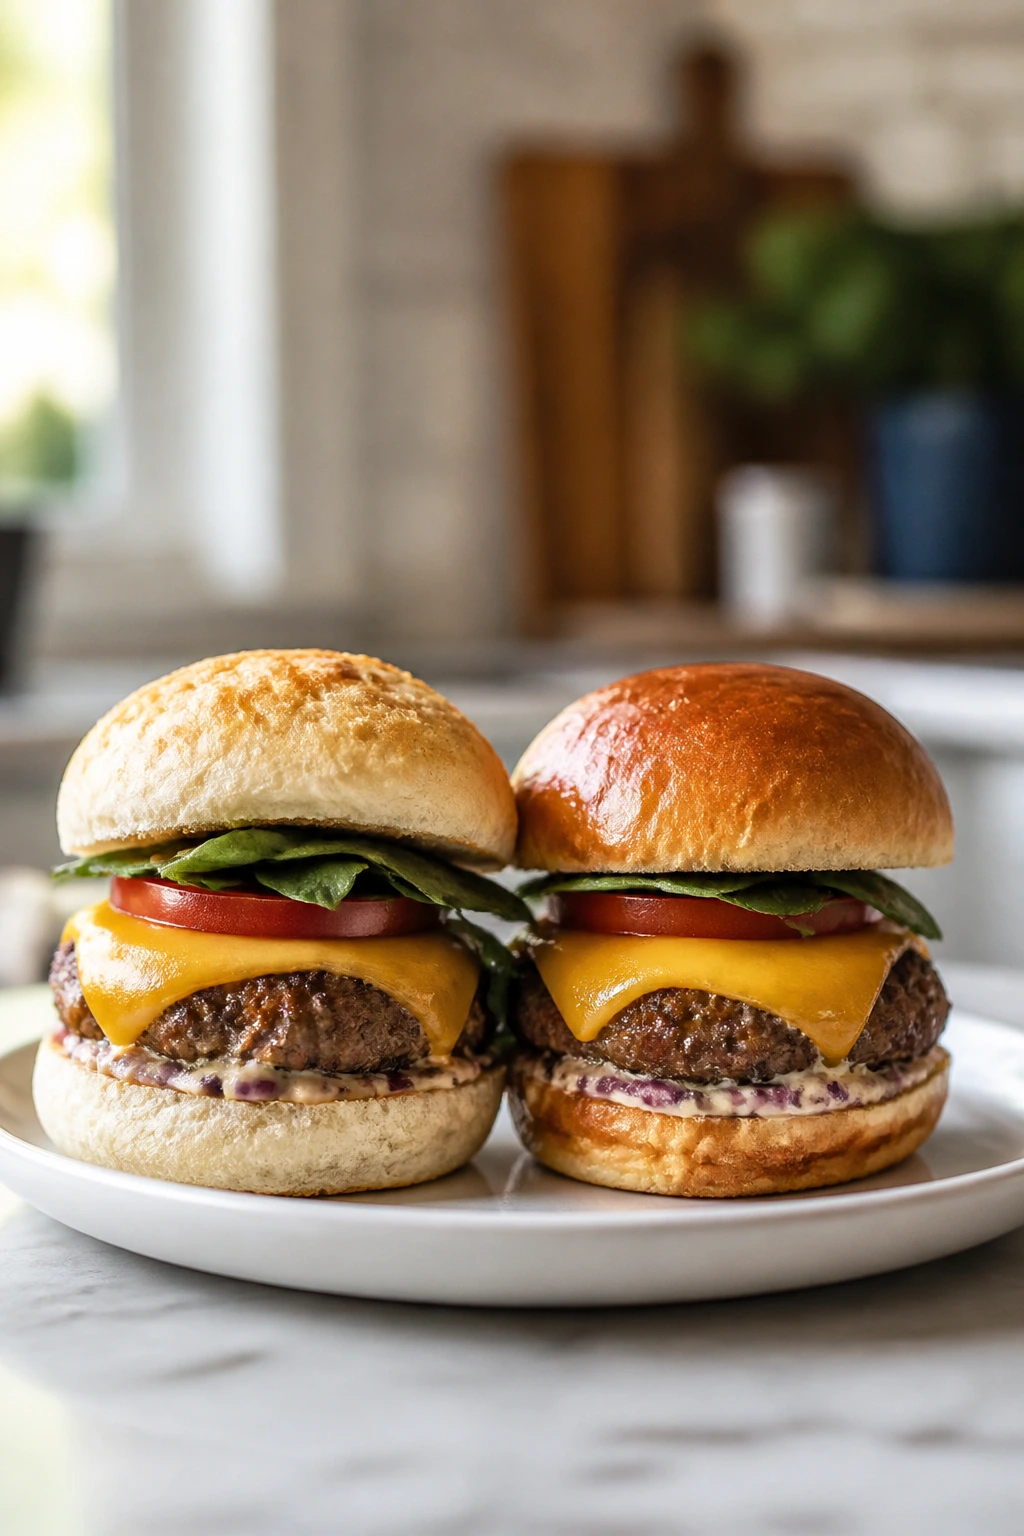
The first tray should taste familiar enough that people grab one without thinking. These classic cheeseburger slider burgers are beefy, salty, and a little buttery at the edges, with American cheese melting into the folds of the meat and the bun soaking up just enough juice to matter. I like this version because it doesn’t pretend to be clever. It’s the benchmark.
Why It Works:
The beef gets a quick season and a hot pan, which means browned edges and a juicy center instead of a gray, steamed patty. American cheese melts into a clean, glossy layer at about the same time the buns toast, so the whole slider finishes together. A thin swipe of ketchup-mustard mayo keeps it from feeling dry, and the pickle slice cuts through the fat without taking over.
Key Ingredients:
- 1½ pounds 80/20 ground beef — The fat keeps the patties juicy after a quick sear.
- 1 teaspoon kosher salt — Salts the meat all the way through.
- 1 teaspoon black pepper — Adds a little bite without turning the burger spicy.
- 1 tablespoon Worcestershire sauce — Brings in a savory note that tastes cooked, not flat.
- 12 slider buns — Soft buns hold the burger together without fighting the cheese.
- 6 slices American cheese, halved — Melts evenly and gives the classic burger stretch.
- 2 tablespoons mayonnaise — Makes the bun softer and helps the sauce cling.
- 2 tablespoons ketchup — Keeps the flavor familiar and slightly sweet.
- 2 tablespoons yellow mustard — Sharpens the richness of the beef.
- 12 dill pickle chips — A crisp, briny finish.
- 2 tablespoons melted butter — For brushing the buns.
- 1 teaspoon sesame seeds — Optional, but they give the tops that diner-burger look.
Quick Steps:
- Preheat the oven to 375°F (190°C) and line a rimmed baking sheet or 9×13-inch dish with parchment.
- Mix the ground beef, salt, pepper, Worcestershire, and garlic powder in a bowl just until combined. Do not pack it tightly or the patties will turn dense.
- Form 12 thin patties, each a little wider than the buns. Chill them for 10 minutes so they hold their shape.
- Heat a cast-iron skillet or griddle over medium-high heat. Cook the patties for 2 to 3 minutes per side, until browned and the internal temperature reaches 160°F (71°C).
- Split the buns, spread mayo on the bottom halves, then layer on the patties, cheese, ketchup, mustard, and pickles. Cap with the tops.
- Brush the tops with melted butter, sprinkle on sesame seeds, and bake for 5 to 7 minutes, just until the buns are lightly toasted and the cheese is fully melted.
Equipment for This Recipe:
- Cast-iron skillet or flat griddle — Best for browning the patties quickly.
- Rimmed baking sheet or 9×13-inch dish — Holds the assembled sliders for the oven finish.
- Mixing bowl — For lightly combining the beef and seasonings.
- Instant-read thermometer — The easiest way to hit 160°F without guessing.
- Pastry brush — Helps the butter coat the bun tops evenly.
How to Serve This Dish:
Stack these on a tray lined with parchment and serve them right out of the oven. A pile of dill chips and a bowl of extra ketchup on the side make the tray feel complete. Two sliders per person works if you’ve got fries, slaw, or beans nearby; three if the burgers are the star.
Pro Tips for This Recipe:
- Use American cheese slices cut in half instead of thicker blocks; they melt faster and cover the patty better.
- Toast the bun tops lightly before baking if your rolls are very soft. It keeps the top from collapsing under steam.
- Make the patties a touch larger than the buns. They shrink as they cook, and a too-small slider looks stingy.
- If you’re feeding a big group, sear the patties in two batches and keep them on a wire rack in a 200°F (95°C) oven until assembly time.
Variations on This Dish:
- Double-Diner Style: Add a second thinner patty to each slider and a spoonful of minced onion for a punchier, old-school burger taste.
- Cheddar Upgrade: Swap in mild cheddar and a few thin onion slices if you want a sharper finish.
- Pickle-Heavy Version: Add chopped pickles into the mayo for more tang in every bite.
Common Mistakes to Avoid with This Dish:
- Packing the beef too hard: The patties get springy and dry. Shape them gently, like you’re patting them into place.
- Skipping the butter finish: The tops look pale and the buns feel plain. A thin brush of butter fixes both.
- Overcooking for the sake of safety: Ground beef should reach 160°F, not 170°F. Past that point, the sliders start losing juice fast.
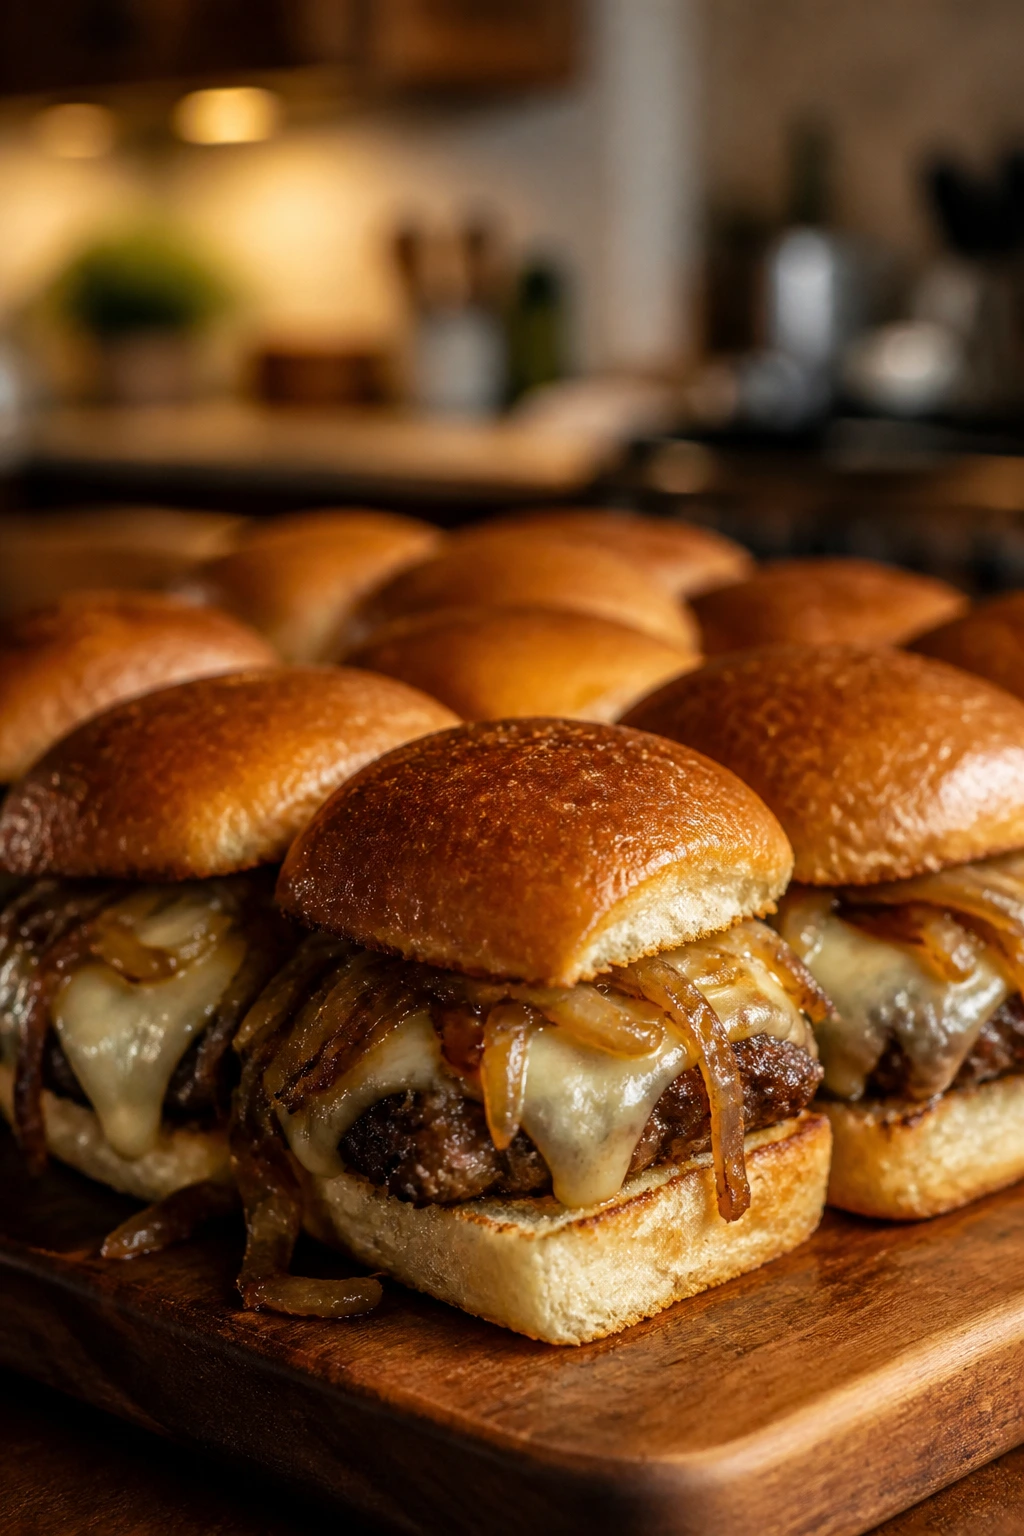
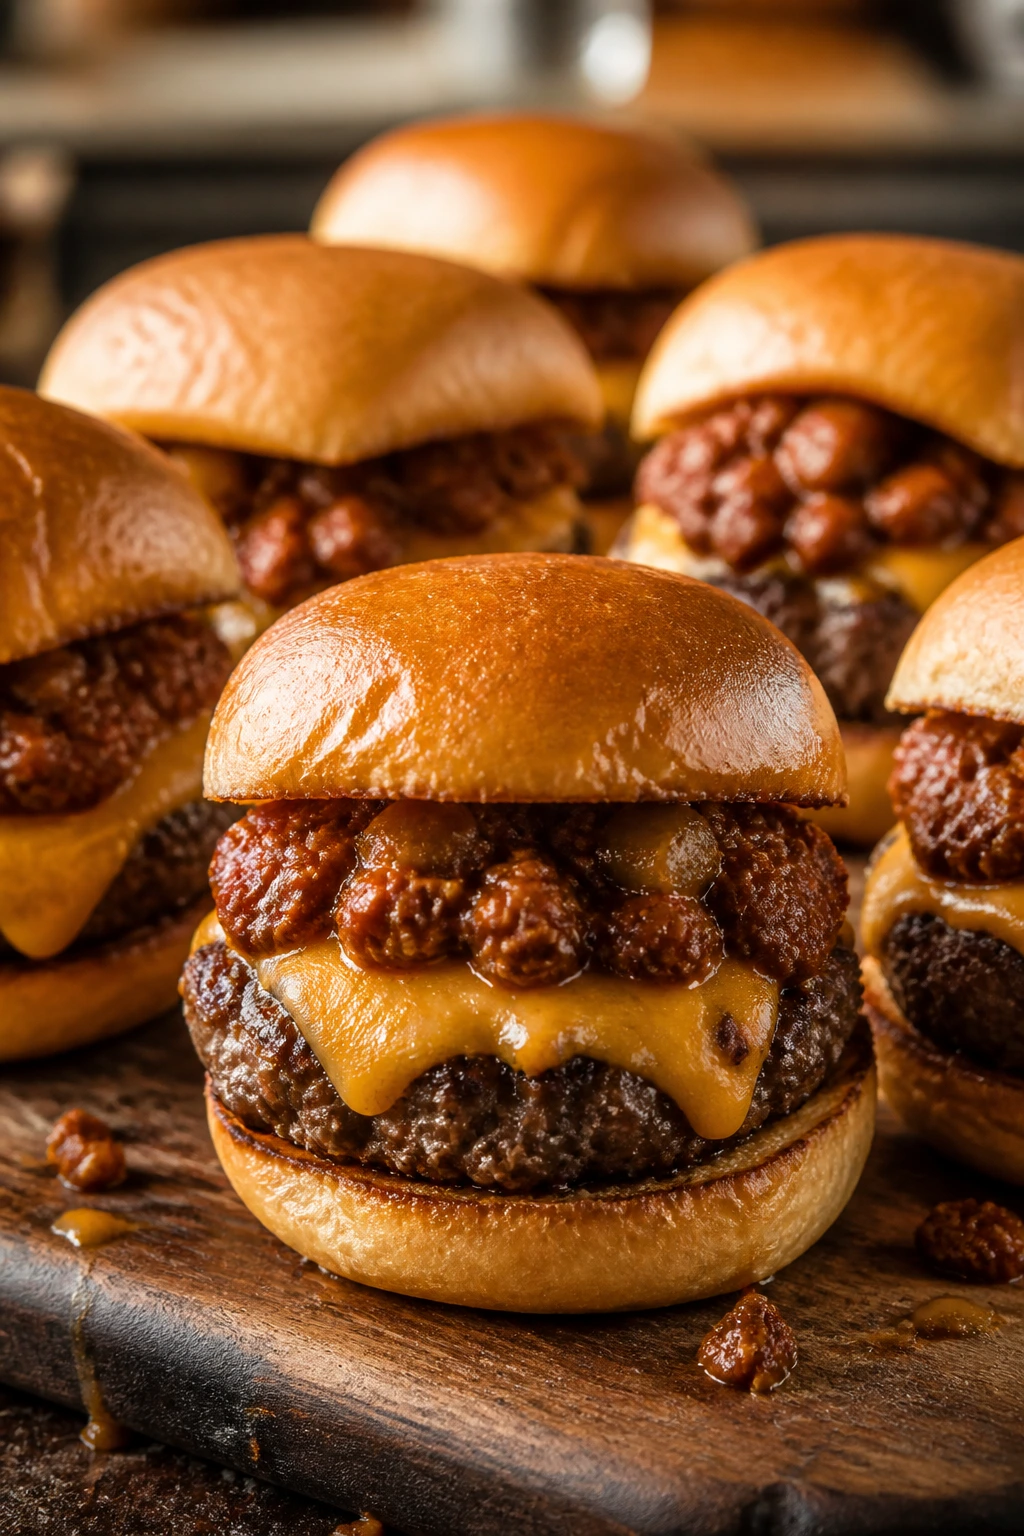
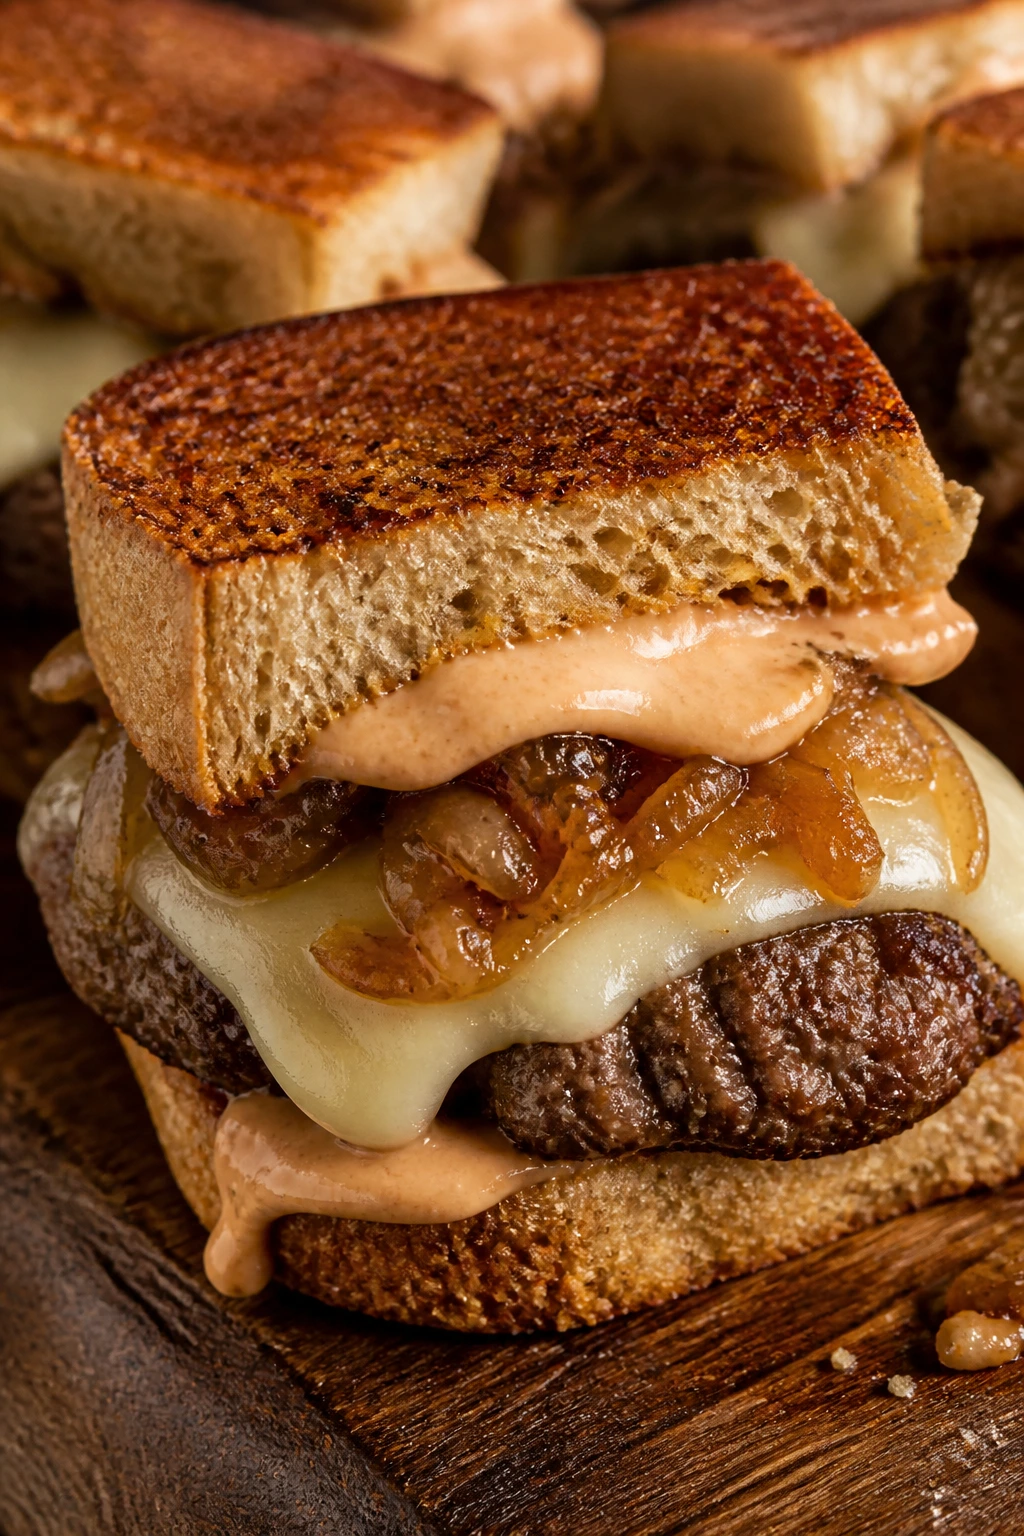
2. Bacon Onion Jam Slider Burgers
These are the sliders that smell like the party has already begun. Bacon onion jam gives the whole tray a sweet, smoky gloss, and it clings to the burger instead of slipping off onto the plate. The onions cook down until they look sticky and dark at the edges, which is exactly what you want; raw onion would feel sharp here, almost rude.
Why It Works:
Bacon and onions both carry salt, smoke, and fat, so the topping does a lot of the heavy lifting. A tiny bit of brown sugar helps the onions glaze instead of scorch, and apple cider vinegar keeps the jam from tasting heavy. Cheddar is the right cheese here because it stands up to the sweet topping without disappearing.
Key Ingredients:
- 1½ pounds ground beef (80/20) — Keeps the sliders moist under the jam.
- 1 teaspoon kosher salt — Enough to season the patties without making them salty.
- 1 teaspoon black pepper — Gives the beef a little edge.
- 6 slices bacon, chopped — Cooks down into the base of the jam.
- 2 large yellow onions, thinly sliced — The main body of the jam.
- 1 teaspoon brown sugar — Helps the onions caramelize.
- 1 tablespoon apple cider vinegar — Cuts the sweetness.
- 6 slices sharp cheddar, halved — Melts well and balances the jam.
- 12 slider buns — Soft rolls keep the topping in place.
- 1 tablespoon Dijon mustard — Optional, but it sharpens the whole thing.
- 2 tablespoons melted butter — For the tops.
Quick Steps:
- Preheat the oven to 375°F (190°C).
- Cook the chopped bacon in a skillet over medium heat until the fat renders and the pieces are crisp, about 6 to 8 minutes.
- Add the onions and cook for 12 to 15 minutes, stirring often, until they turn deep golden and sticky. Stir in the brown sugar and vinegar; cook 2 minutes more.
- Form the beef into 12 thin patties, season with salt and pepper, and sear in a hot skillet for 2 to 3 minutes per side.
- Set each patty on a bun bottom, top with cheddar and a spoonful of bacon onion jam, then cap with the bun tops.
- Brush with melted butter and bake for 5 to 6 minutes until the cheese melts and the buns feel warm through.
Equipment for This Recipe:
- Large skillet — Big enough for the bacon and onions.
- Spatula or wooden spoon — For stirring the jam as it thickens.
- Cast-iron skillet — Best for the burger patties.
- Baking sheet — To finish the assembled sliders.
- Sharp knife — For slicing the onions thinly.
How to Serve This Dish:
Serve these with a pile of kettle chips or a sharp cabbage slaw. The jam is rich, so a crisp side keeps the plate from feeling heavy. They’re strong enough to stand alone, but I like them best with something cold and crunchy on the table.
Pro Tips for This Recipe:
- Slice the onions thin enough that they collapse quickly; thick wedges take forever and burn before they soften.
- Cook the jam until the skillet looks almost dry. If it’s still wet, it will slide off the bun.
- Use cheddar that’s been cut from the block if you want a cleaner melt.
- If the bacon is very salty, cut the added salt in the patties by a quarter teaspoon.
Variations on This Dish:
- Smoky Maple Version: Stir in 1 teaspoon maple syrup for a softer sweetness.
- Gruyère Swap: Replace cheddar with Gruyère for a nuttier finish.
- Mustard-Forward Style: Spread a thin layer of Dijon on the bun bottoms before assembly.
Common Mistakes to Avoid with This Dish:
- Stopping the onions too early: Pale onions taste sharp and raw. Keep cooking until they’re deep gold.
- Adding jam while it’s watery: The buns get soggy fast. The topping should be sticky enough to mound.
- Using lean beef: A 90/10 patty dries out under the sweet topping. Stick with 80/20 if you can.
3. Smash Burger Slider Burgers with Pickle-Dill Sauce
This one has attitude. Smash burger slider burgers get those crunchy, lacy edges that crack a little when you bite down, and the pickle-dill sauce gives them a cold, tangy finish that wakes up the beef. If you want the tray to feel a little more diner-like and a little less polished, this is the move.
Why It Works:
Smashing the beef onto a hot surface creates a deeper browned crust than a thick mini patty ever will. That crust matters, because it gives you a burger with character in two bites instead of one. The sauce is built from mayo, dill relish, and pickle brine, so it tastes sharp enough to cut the fat but still creamy enough to stay put.
Key Ingredients:
- 1½ pounds ground beef — Divide into 12 loose balls for smashing.
- 1 teaspoon kosher salt — Salt after the smash for better browning.
- 1 teaspoon black pepper — Keeps the flavor straightforward.
- 12 slider buns — Brioche or potato buns work well here.
- 6 slices American cheese, halved — Melts fast over the hot crust.
- ½ cup mayonnaise — The base of the sauce.
- 2 tablespoons dill relish — Adds crunch and acidity.
- 1 teaspoon dill pickle brine — Sharpens the sauce.
- 1 teaspoon chopped fresh dill — Optional, but it makes the sauce smell fresher.
- 12 dill pickle chips — For the tray and the top.
- 1 tablespoon butter — For toasting the buns.
Quick Steps:
- Stir the mayonnaise, relish, pickle brine, and dill together and chill it while you cook.
- Divide the beef into 12 loose balls and keep them cold until the pan is hot.
- Heat a cast-iron skillet or griddle over medium-high until it’s smoking lightly.
- Add the beef balls, smash each one flat with a sturdy spatula, and season with salt and pepper. Cook for 2 minutes, flip, add cheese, and cook 1 minute more.
- Butter and toast the cut sides of the buns in a separate skillet for 30 to 45 seconds.
- Spread sauce on the buns, add the patties and pickles, then close the sliders and serve immediately.
Equipment for This Recipe:
- Heavy cast-iron skillet or griddle — Needed for a proper crust.
- Sturdy metal spatula — Must be strong enough to smash the beef.
- Parchment squares — Helpful if you want to press without sticking.
- Small bowl — For the pickle-dill sauce.
How to Serve This Dish:
These need to be eaten hot, right after the cheese melts and before the crust softens. I like them with fries or crunchy potato chips, since the sauce already brings enough acidity. Put extra pickles on the table and don’t overthink the garnish.
Pro Tips for This Recipe:
- Smash the beef only once. Pressing again pushes out juice and makes the patties dry.
- Salt after the smash, not before, or the meat can seize up and steam.
- If your spatula sticks, use a square of parchment between the beef and the tool.
- Keep the sauce cold so it cuts cleanly through the hot burger.
Variations on This Dish:
- Garlic-Dill Version: Add ½ teaspoon garlic powder to the sauce for a sharper bite.
- Spicy Smash Sliders: Stir in chopped pickled jalapeños.
- Cheese Swap: Use white American if you want a milder melt.
Common Mistakes to Avoid with This Dish:
- Smashing onto a lukewarm pan: You lose the crust and get greasy beef. Wait until the skillet is hot enough that the surface shimmers.
- Making the sauce too thin: It drips out instead of clinging. Keep the mayo base thick.
- Stacking the sliders before the cheese melts: The tops slide around and the crust softens.
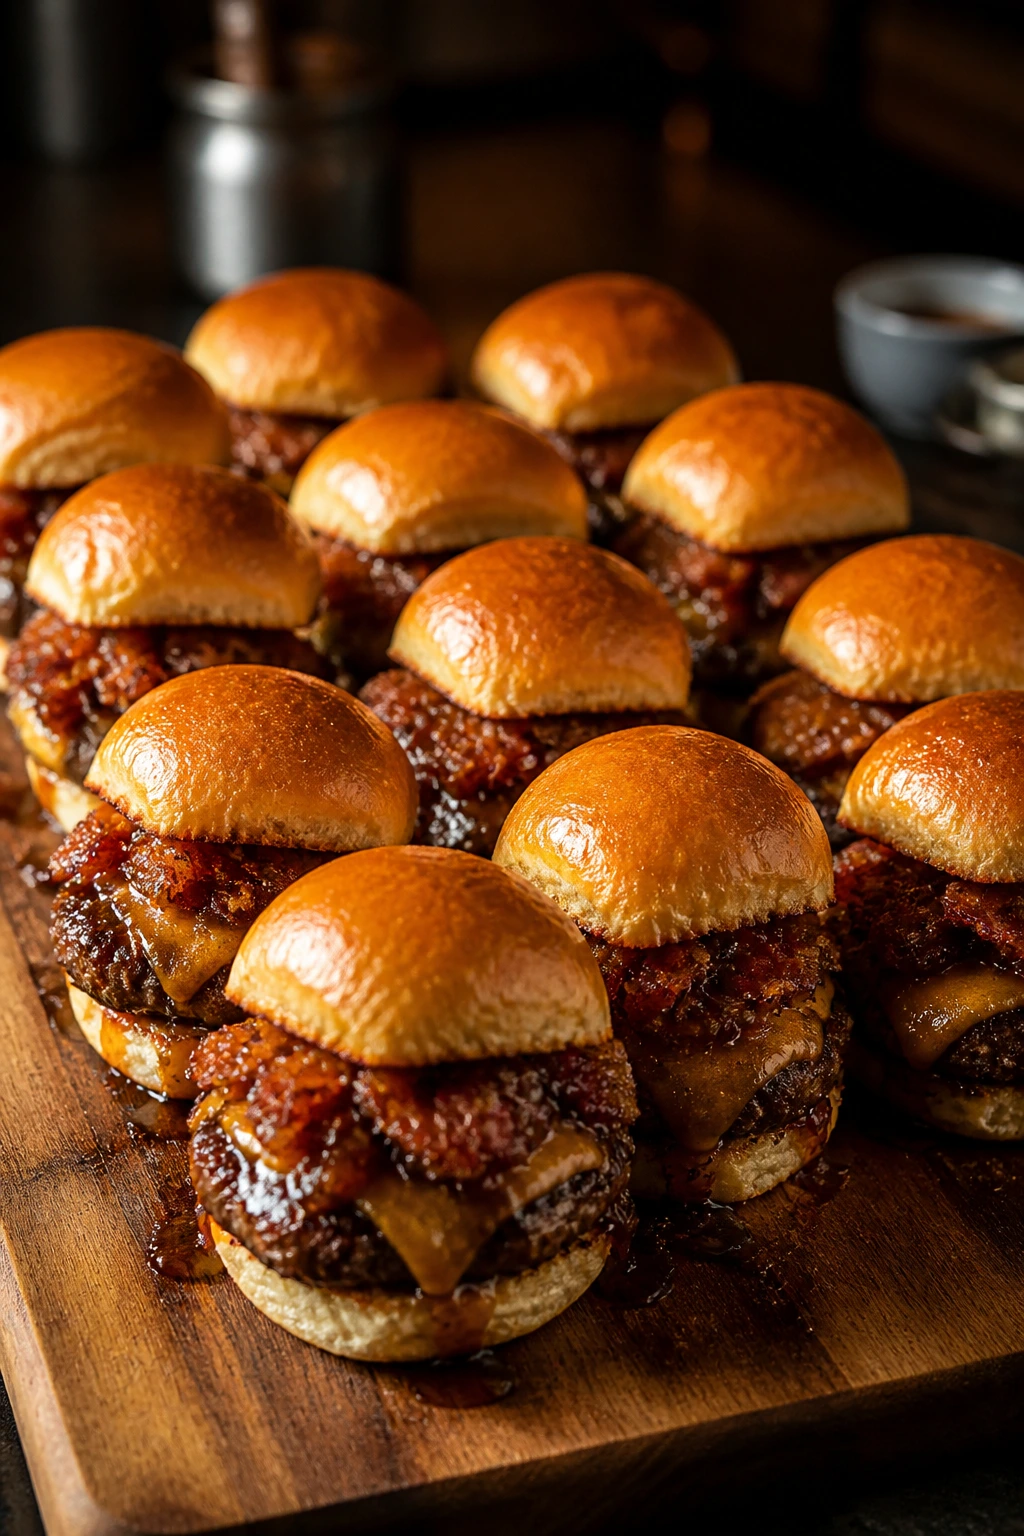
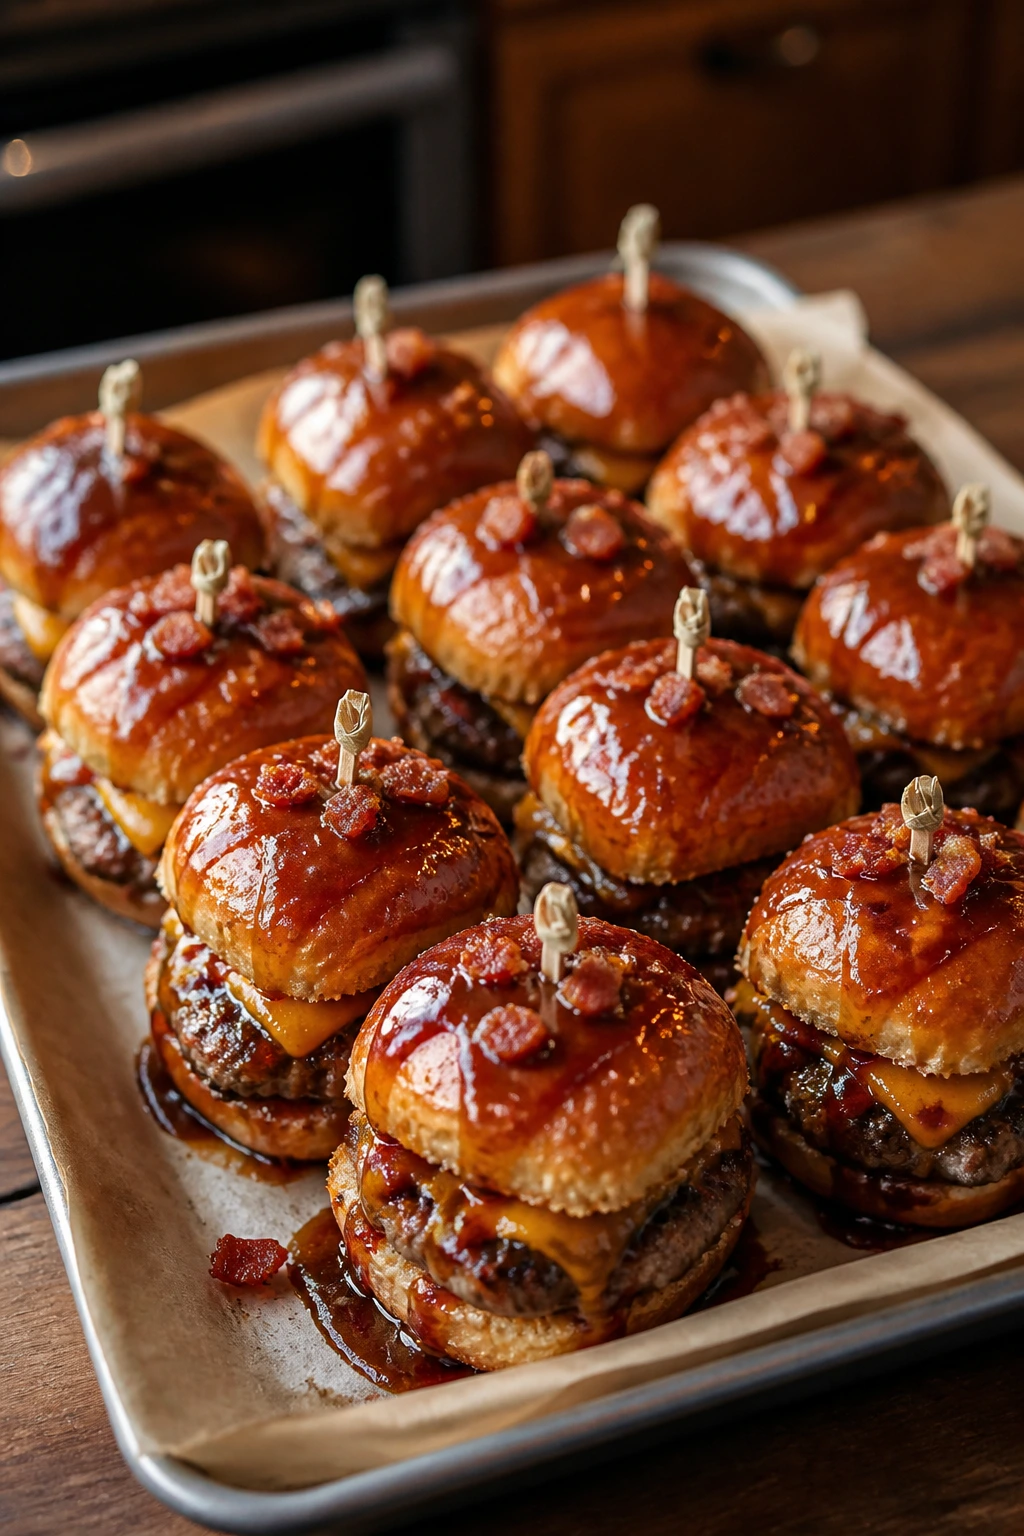
4. BBQ Bacon Cheddar Slider Burgers
These are the smoky, sticky ones that disappear fastest when people are standing around the table. BBQ bacon cheddar slider burgers have a little sweetness from the sauce, a little salt from the bacon, and enough sharp cheddar to keep them from tasting one-note. They smell like backyard cooking even if you make them in a kitchen with the windows cracked open.
Why It Works:
Barbecue sauce adds gloss and a smoky edge, but the trick is to use it as a finish rather than a marinade. That keeps the burger tasting like beef, not like bottled sauce. Bacon brings texture, cheddar brings bite, and a quick bake at the end melts everything together without drying out the patties.
Key Ingredients:
- 1½ pounds ground beef — 80/20 gives the best texture.
- 1 teaspoon kosher salt — Start light because BBQ sauce carries salt.
- 1 teaspoon black pepper — Keeps the meat savory.
- 1 teaspoon smoked paprika — Adds a grill-like note.
- 8 slices bacon, cooked crisp and crumbled — Used inside and on top.
- ½ cup BBQ sauce — Choose one that isn’t too sugary.
- 6 slices cheddar, halved — A sharp cheddar keeps the sweetness in check.
- 12 slider buns — Soft, sturdy buns are best.
- ¼ cup thinly sliced red onion — Adds crunch.
- 2 tablespoons melted butter — For the tops.
- 1 teaspoon sesame seeds — Optional, but nice.
Quick Steps:
- Preheat the oven to 375°F (190°C).
- Mix the beef with salt, pepper, and smoked paprika. Shape into 12 thin patties.
- Sear the patties in a hot skillet for 2 to 3 minutes per side.
- Brush the patties with BBQ sauce in the last minute of cooking, then top each with cheddar.
- Build the sliders with buns, patties, bacon, and red onion.
- Brush the tops with butter, sprinkle sesame seeds, and bake for 5 minutes until the cheese melts.
Equipment for This Recipe:
- Cast-iron skillet — For searing the patties.
- Baking sheet — For the finish.
- Pastry brush — For the sauce and butter.
- Small bowl — For the bacon crumbles if you want to portion them neatly.
How to Serve This Dish:
Serve these with coleslaw, baked beans, or a vinegar-heavy potato salad. The sauce is sticky, so plenty of napkins is not a joke. A little crunch on the side keeps the tray from feeling all soft and sweet.
Pro Tips for This Recipe:
- Pick a BBQ sauce with smoke or vinegar in it, not one that tastes like candy.
- Crumble the bacon into small pieces so it stays inside the burger instead of falling off.
- Brush the sauce onto the patties late; early sauce can burn and turn bitter.
- Use red onion sparingly. It should accent the burger, not bully it.
Variations on This Dish:
- Chipotle BBQ Sliders: Stir chipotle powder into the beef for gentle heat.
- Pepper Jack Version: Swap cheddar for pepper jack if you want more bite.
- Onion Ring Finish: Top each slider with a few crushed onion rings right before serving.
Common Mistakes to Avoid with This Dish:
- Using too much sauce too early: Sugar burns, and burnt BBQ sauce tastes harsh.
- Skipping the bacon crisping step: Soft bacon gets lost in the bun and turns limp.
- Choosing very sweet sauce: The slider ends up tasting like glaze instead of a burger.
5. Mushroom Swiss Slider Burgers
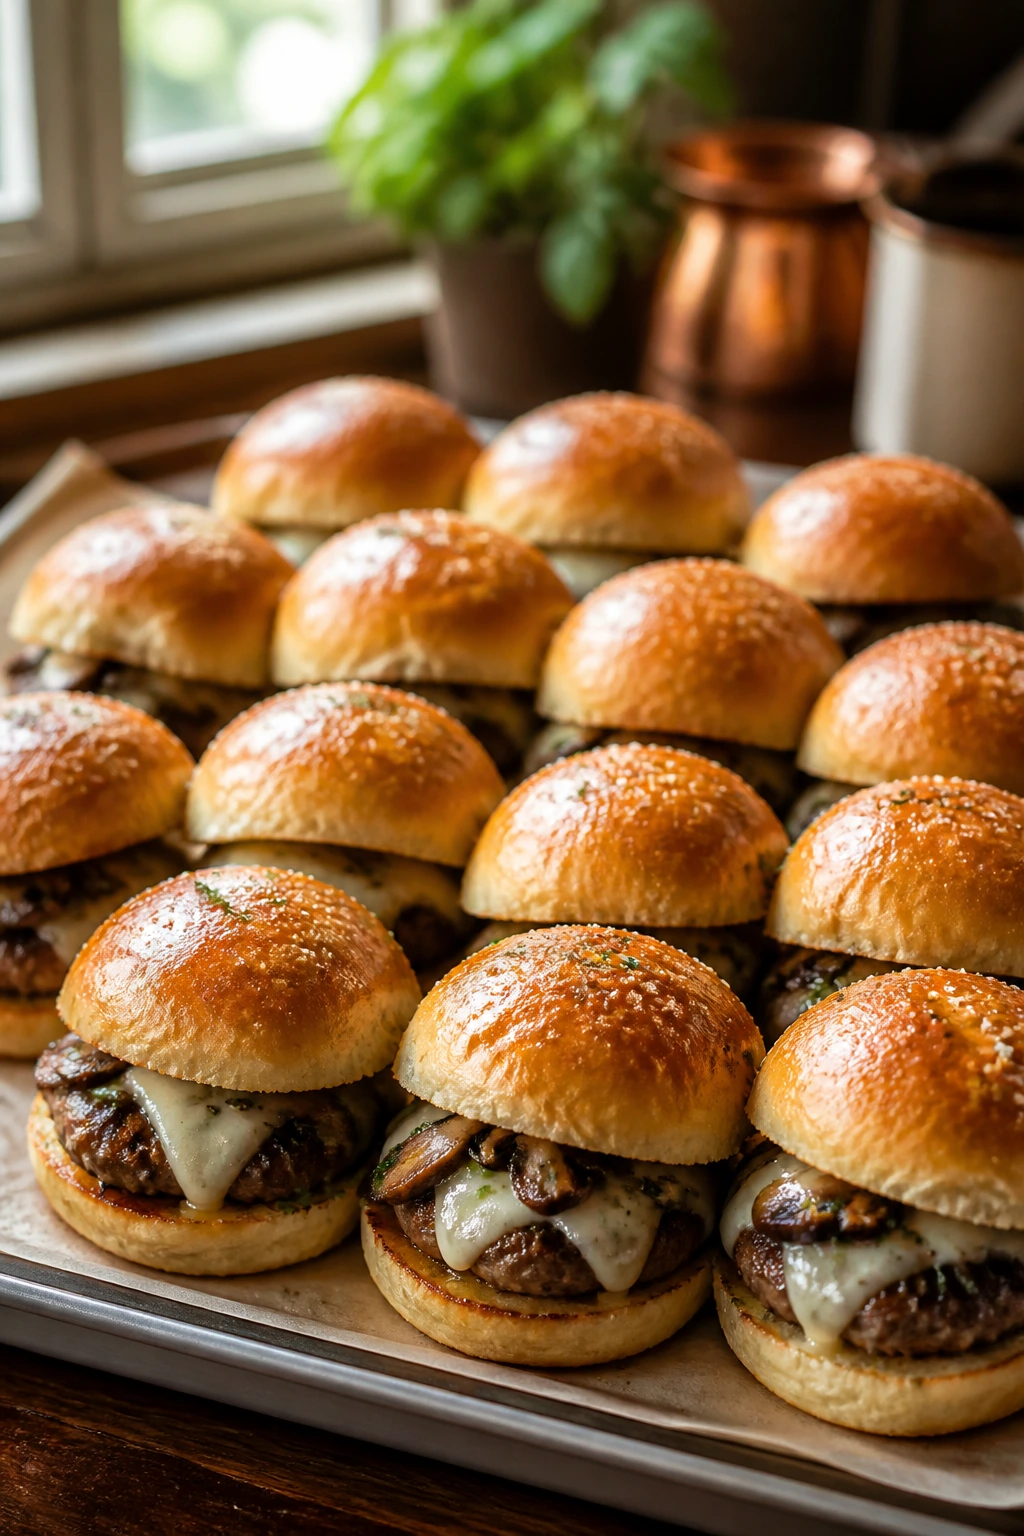
Mushroom Swiss slider burgers have a quieter kind of richness. The mushrooms soften into a glossy layer, the onions turn sweet, and the Swiss cheese melts into a pale blanket that tastes nutty instead of heavy. This is the tray for people who want something a little less loud but still unmistakably burger-shaped.
Why It Works:
Mushrooms and onions cook down with butter until they lose their water and start tasting concentrated. That matters, because watery mushrooms will flood the buns and flatten the whole bite. Swiss cheese is the right fit here because it melts into the mushroom layer without hiding it, and a little Worcestershire in the beef pushes the savory side forward.
Key Ingredients:
- 1½ pounds ground beef — Enough for 12 small patties.
- 1 teaspoon kosher salt — For the meat.
- 1 teaspoon black pepper — Keeps it clean and simple.
- 1 tablespoon Worcestershire sauce — Adds a browned, meaty note.
- 2 tablespoons butter — For the mushrooms.
- 8 ounces cremini mushrooms, sliced — Earthy and sturdy.
- 1 small yellow onion, thinly sliced — Sweetens as it cooks.
- 1 teaspoon thyme leaves — Optional, but very good here.
- 6 slices Swiss cheese, halved — Melts well and tastes nutty.
- 12 slider buns — Soft but not squishy.
- 1 tablespoon Dijon mustard — A thin layer under the patties works nicely.
Quick Steps:
- Cook the mushrooms and onions in butter over medium heat for 10 to 12 minutes, until their liquid evaporates and the edges turn golden. Stir in thyme.
- Shape the beef into 12 patties and season with salt, pepper, and Worcestershire.
- Sear the patties in a hot skillet for 2 to 3 minutes per side.
- Spread Dijon on the bun bottoms, add a patty, a spoonful of mushrooms and onions, and Swiss cheese.
- Close the sliders and bake at 375°F (190°C) for 4 to 5 minutes until the cheese melts.
Equipment for This Recipe:
- Large skillet — For the mushrooms and onions.
- Cast-iron skillet — For the patties.
- Spoon or spatula — For moving the mushroom mixture.
- Baking sheet — To finish the assembled sliders.
How to Serve This Dish:
These go well with simple greens, salted chips, or roasted potatoes. The flavor is rich but not aggressive, so a bright side like a lemony salad helps. They’re tidy enough for a buffet and still feel a little dressed up.
Pro Tips for This Recipe:
- Let the mushrooms cook all the way down; a wet mushroom layer is the fastest route to soggy buns.
- Thinly sliced onions soften faster and fold into the mushrooms instead of sitting on top.
- Dijon should be a thin smear, not a thick layer. You want brightness, not mustard burn.
- If you like a stronger Swiss flavor, use Gruyère instead.
Variations on This Dish:
- Garlic Mushroom Version: Add 1 minced clove garlic in the last minute of mushroom cooking.
- Creamy Mushroom Style: Stir in 2 tablespoons sour cream after the pan comes off the heat.
- Herb Swap: Use chopped parsley instead of thyme for a fresher finish.
Common Mistakes to Avoid with This Dish:
- Crowding the mushroom pan: They steam instead of browning. Cook in one layer.
- Leaving excess moisture in the topping: The buns get slick and fall apart.
- Overloading with Swiss: Too much cheese turns the slider rubbery instead of melty.
6. Jalapeño Popper Slider Burgers
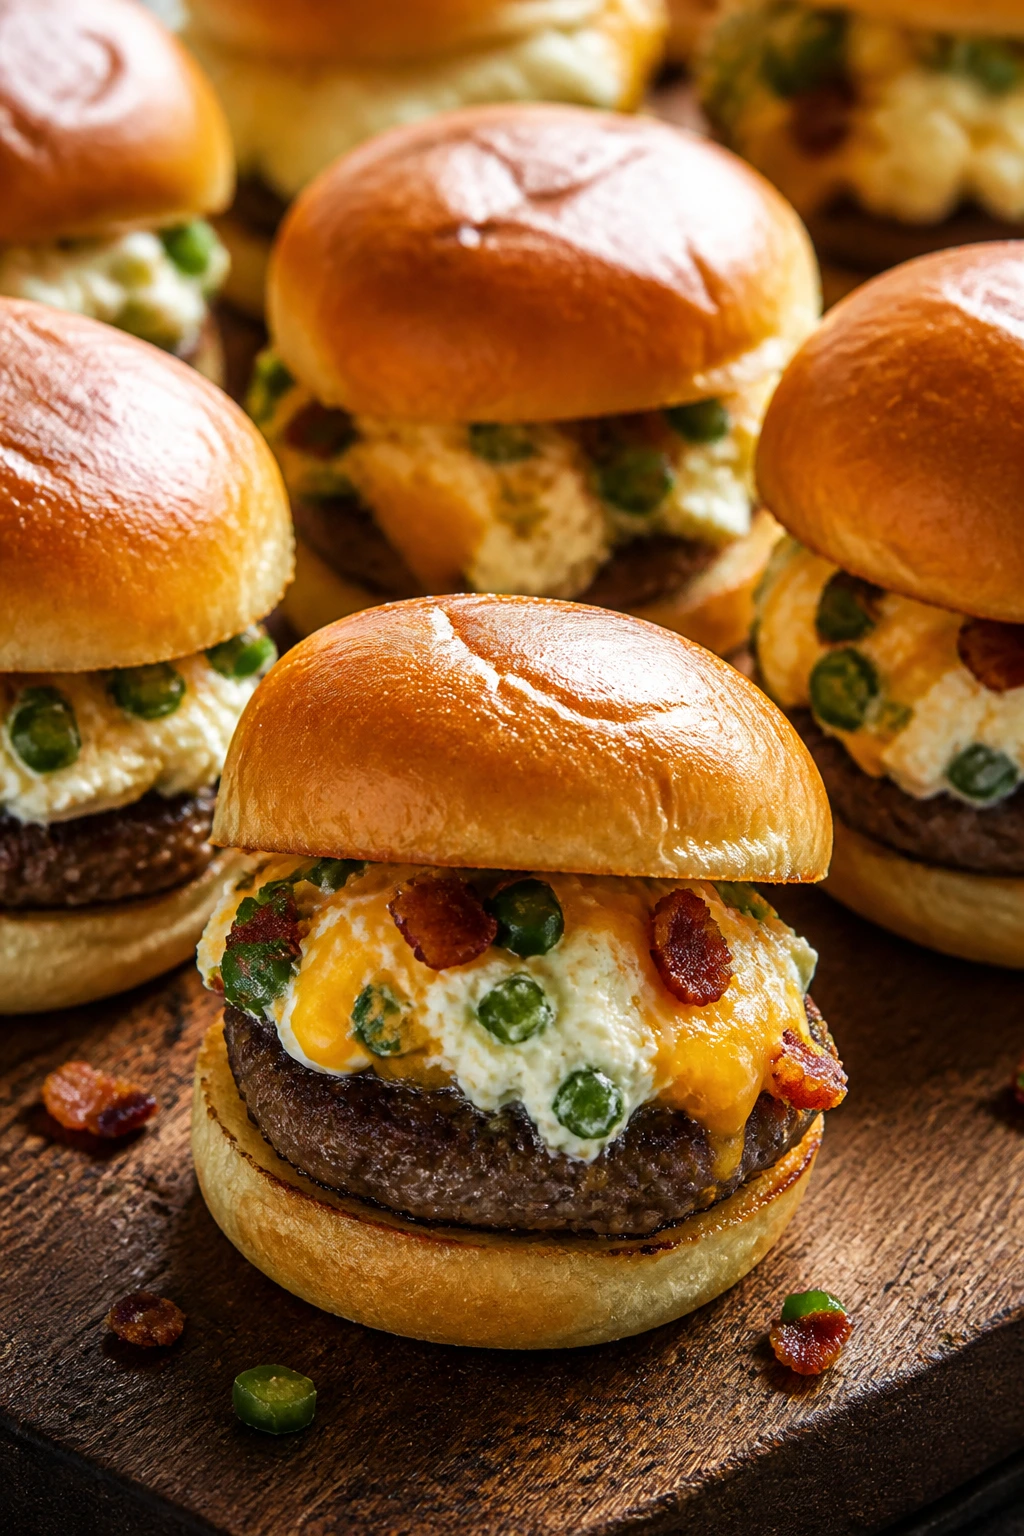
These sliders are messy in the best possible way. Jalapeño popper slider burgers bring cream cheese, cheddar, and a little pepper heat into a beef burger, so each bite hits cool, creamy, sharp, and hot all at once. They’re the first tray to vanish when the crowd likes a little edge.
Why It Works:
Cream cheese softens the heat from the jalapeños and gives the filling a rich, almost dip-like texture. Cheddar adds the familiar popper flavor, while bacon brings salt and crunch. The trick is to keep the jalapeño pieces small so they spread through the burger instead of slipping out in one aggressive chunk.
Key Ingredients:
- 1½ pounds ground beef — The base of the slider.
- 1 teaspoon kosher salt — Seasons the meat.
- 1 teaspoon black pepper — Keeps the flavor grounded.
- 4 ounces cream cheese, softened — Makes the filling creamy.
- 2 jalapeños, seeded and finely chopped — Less heat if seeded; more if you leave some ribs in.
- ½ cup shredded cheddar — Sharp enough to stand out.
- 4 slices bacon, cooked crisp and crumbled — For salt and crunch.
- 12 slider buns — Soft buns work best.
- 2 tablespoons mayonnaise — Optional, but helps keep the bun soft.
- 2 tablespoons melted butter — For brushing the tops.
Quick Steps:
- Preheat the oven to 375°F (190°C).
- Mix the cream cheese, chopped jalapeños, cheddar, and bacon in a bowl.
- Shape the beef into 12 patties, season with salt and pepper, and sear for 2 to 3 minutes per side.
- Top each patty with a spoonful of the jalapeño-popper mixture during the last minute of cooking.
- Assemble the sliders on the buns with mayonnaise if using.
- Brush with melted butter and bake for 4 to 5 minutes until the topping is hot and the buns are warm.
Equipment for This Recipe:
- Medium mixing bowl — For the filling.
- Skillet — To cook the patties.
- Baking sheet — To finish the sliders.
- Knife and cutting board — For the jalapeños.
How to Serve This Dish:
These like cold sides: celery sticks, cucumber salad, or a simple corn salad. The heat is moderate, but it builds, so a cool drink matters. Keep extra napkins nearby because the cream cheese topping doesn’t stay politely inside the bun.
Pro Tips for This Recipe:
- Seed the jalapeños if you want flavor without a full burn.
- Soften the cream cheese fully before mixing or you’ll get little cold lumps in the topping.
- Don’t add the cheese mixture too early; it can slide off if the patty is still drying out.
- A small spoon works better than a knife for placing the topping neatly.
Variations on This Dish:
- Buffalo Popper Sliders: Stir in 1 tablespoon hot sauce.
- Bacon-Lite Version: Leave out the bacon and add a pinch of smoked paprika.
- Milder Family Tray: Swap jalapeños for diced roasted green chiles.
Common Mistakes to Avoid with This Dish:
- Leaving the seeds in by accident: The tray can swing from warm to sharp fast.
- Using cream cheese straight from the fridge: It won’t blend and can tear the bun when you spread it.
- Overstuffing with filling: A little goes a long way. Too much and it oozes before the first bite.
7. French Onion Slider Burgers
French onion slider burgers are the tray that makes people pause for a second before talking. The onions need time — real time — to turn dark gold and sweet, and that patience pays off with a filling that tastes deep, beefy, and slightly brothy. Swiss cheese or provolone melts over the onions in a way that feels a little formal without being fussy.
Why It Works:
French onion flavors depend on slow onion cooking, a touch of butter, and a splash of beef broth to pull up the browned bits. That combination gives the burger a built-in gravy effect without needing a separate sauce bowl. Worcestershire in the meat reinforces the savory note, and the cheese holds the onions in place.
Key Ingredients:
- 1½ pounds ground beef — For 12 patties.
- 1 teaspoon kosher salt — Keep it moderate; broth adds salt later.
- 1 teaspoon black pepper — Essential here.
- 2 large yellow onions, thinly sliced — The heart of the topping.
- 2 tablespoons butter — For softening and browning.
- ½ cup beef broth — Deglazes the pan.
- 1 teaspoon thyme leaves — Brings the onion soup profile.
- 6 slices Swiss or provolone cheese, halved — Melty and mild.
- 12 slider buns — Preferably a little sturdy.
- 1 tablespoon Worcestershire sauce — Mixed into the beef.
- 1 tablespoon mayonnaise — Optional on the buns.
Quick Steps:
- Cook the onions in butter over medium-low heat for 20 to 25 minutes, stirring often, until deep golden. Add broth and thyme, then cook until the liquid almost disappears.
- Shape the beef into 12 patties and mix in Worcestershire, salt, and pepper.
- Sear the patties for 2 to 3 minutes per side.
- Place cheese on each patty, top with a spoonful of onions, and let the cheese soften.
- Build the sliders and bake for 3 to 4 minutes, just until the buns are warm and the cheese has settled.
Equipment for This Recipe:
- Large skillet — Needed for the onions.
- Cast-iron skillet — For the patties.
- Wooden spoon — Better than metal for stirring the onions without tearing them up.
- Baking sheet — To warm the assembled sliders.
How to Serve This Dish:
Serve these with crisp fries or a green salad with a sharp vinaigrette. They feel rich, so I like something bright and cold on the side. A bowl of pickles on the table makes the whole tray taste more complete.
Pro Tips for This Recipe:
- Keep the heat on the onions low enough that they soften instead of burning.
- Add the broth after the onions have already browned; it should loosen the fond, not steam the pan.
- Let the cheese drape over the onions before assembling if you want better hold.
- A little mayo on the bun bottom keeps the bread from drying out under the onion layer.
Variations on This Dish:
- Gruyère Upgrade: Swap Swiss for Gruyère if you want more nuttiness.
- Sherry Onion Version: Replace half the broth with a splash of dry sherry.
- Herbed Mayo Base: Mix thyme into the mayonnaise for a quieter onion-soup echo.
Common Mistakes to Avoid with This Dish:
- Rushing the onions: Pale onions do not taste like French onion anything. They need time.
- Using broth too early: You want browning first, liquid second.
- Piling on too much onion: The slider turns slippery and hard to eat.
8. Big Mac-Style Slider Burgers
These are the nostalgic, tangy ones. Big Mac-style slider burgers come with special sauce, shredded lettuce, pickles, and that sesame bun feel that makes the whole tray taste like a diner order shrunk to party size. They’re a little sweet, a little sharp, and almost impossible to stop eating once the first one is gone.
Why It Works:
The special sauce does the heavy lifting here, and it needs to be thick enough to stick to the bun without dripping everywhere. A double layer of cheese and a small pile of shredded lettuce bring the familiar Big Mac balance: creamy, crisp, tangy, and soft all at once. The beef stays simple on purpose so the sauce can stay the headline.
Key Ingredients:
- 1½ pounds ground beef — Shaped into 12 thin patties.
- 1 teaspoon kosher salt — Season the meat.
- 1 teaspoon black pepper — Keeps the patties savory.
- 6 slices American cheese, halved — Melts smoothly.
- 12 slider buns with sesame seeds — The sesame top matters here.
- 1 cup shredded iceberg lettuce — Cold crunch.
- 12 dill pickle slices — Thin and sharp.
- ¼ cup finely minced onion — A little goes a long way.
- ½ cup mayonnaise — Sauce base.
- 2 tablespoons ketchup — For sweetness.
- 2 tablespoons finely chopped dill relish — Brings the pickle note.
- 1 teaspoon white vinegar — Makes the sauce pop.
- 1 teaspoon paprika — Optional, but it helps.
Quick Steps:
- Stir the mayo, ketchup, relish, vinegar, and paprika together.
- Shape and season the beef into 12 thin patties, then sear them in a hot skillet for 2 to 3 minutes per side.
- Add cheese in the last minute and let it melt.
- Toast the buns lightly, then spread sauce on both cut sides.
- Add shredded lettuce, pickles, onion, and the cheeseburger patty.
- Close the sliders and serve right away before the lettuce wilts.
Equipment for This Recipe:
- Skillet or griddle — For the patties.
- Small mixing bowl — For the sauce.
- Sharp knife — To mince onion finely.
- Toaster or dry skillet — For the buns.
How to Serve This Dish:
Stack these on a platter with extra sauce on the side for the people who want a messier bite. They pair well with fries, onion rings, or potato chips. Cold soda or a crisp lager works better here than anything heavy.
Pro Tips for This Recipe:
- Shred the lettuce finely so it doesn’t fall out in long strands.
- Keep the sauce thick; a runny version makes the buns slide apart.
- Toast only the cut sides of the buns. The outside can stay soft.
- Finely minced onion gives the right bite without turning each slider into an onion bomb.
Variations on This Dish:
- Extra-Sauce Version: Add 1 teaspoon pickle brine to the sauce.
- Cheese-Lover Tray: Layer two half-slices of cheese on each patty.
- Spicy Special Sauce: Stir in a dash of hot sauce or cayenne.
Common Mistakes to Avoid with This Dish:
- Using wet lettuce: It turns the bun soggy fast. Dry it well.
- Overloading the sauce: The whole slider slides apart.
- Forgetting to toast the buns: The bun needs a little structure under the sauce.
9. Taco Burger Slider Burgers
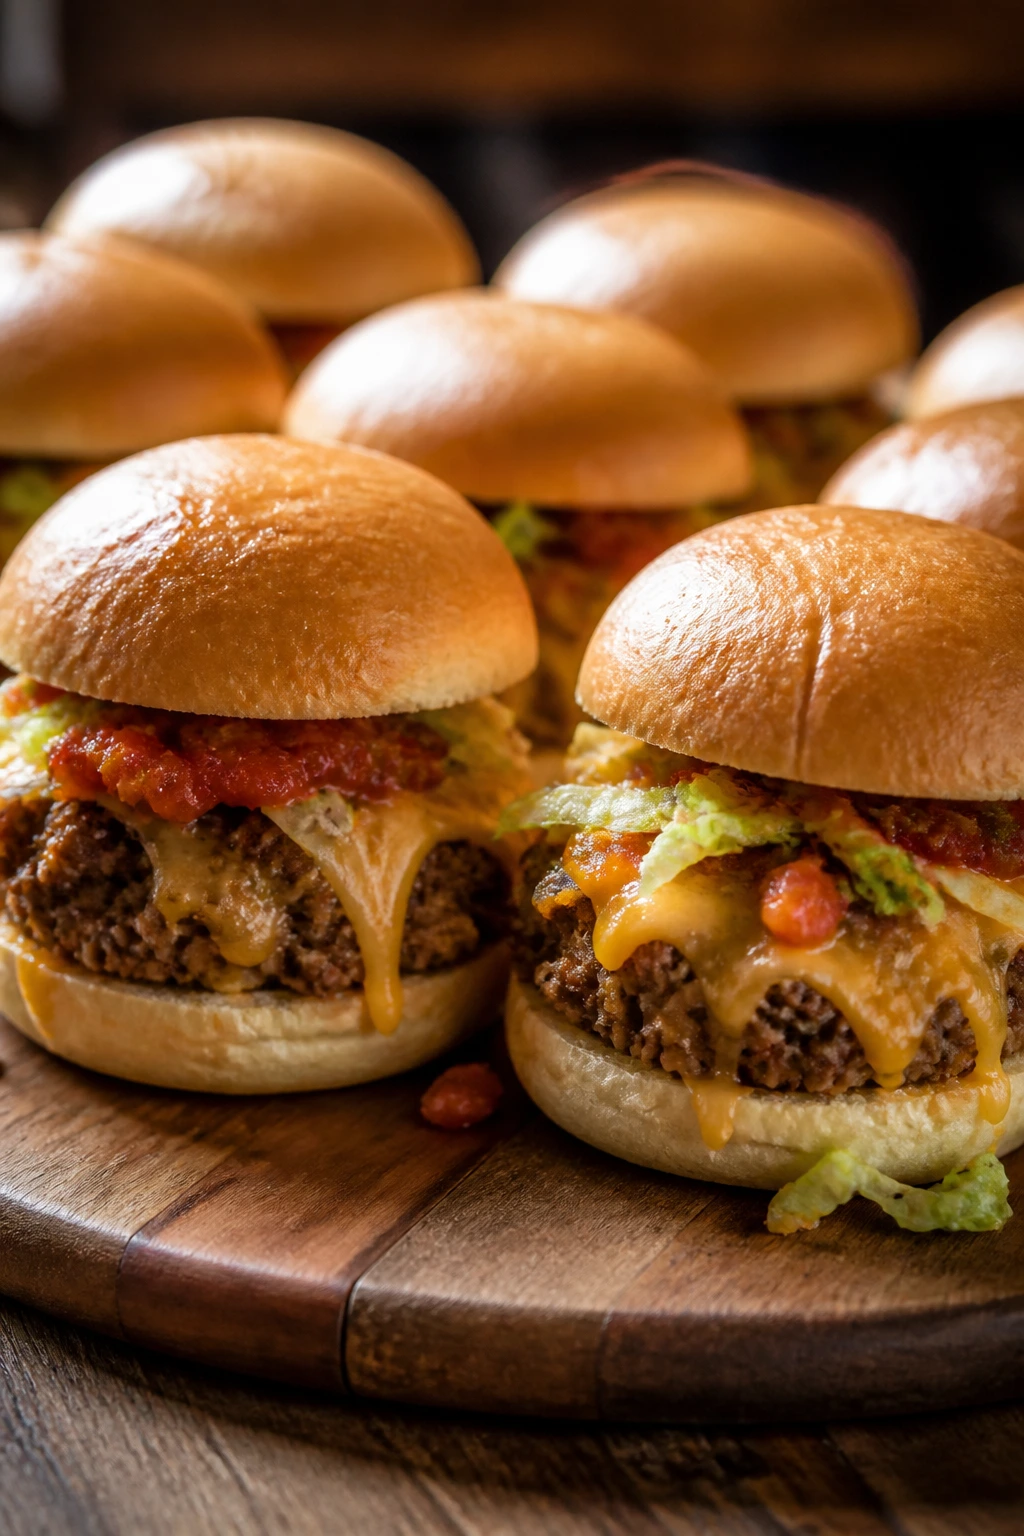
Taco burger slider burgers are loud in the best way. They bring seasoned beef, melted cheddar, a little salsa, and a crunchy finish that feels half burger, half taco night. I like these when the crowd wants something familiar but not boring, because the taco spices wake the beef up without turning the slider into a gimmick.
Why It Works:
Ground beef handles taco seasoning beautifully because the fat carries cumin, chili powder, and garlic straight through the patty. Salsa gives you moisture and acidity, while crushed tortilla chips add just enough crunch to keep the bite interesting. Cheddar or pepper jack melts cleanly and keeps the whole thing in burger territory instead of drifting fully into taco.
Key Ingredients:
- 1½ pounds ground beef — The main filling.
- 1 tablespoon taco seasoning — Enough to flavor the meat without turning it salty.
- 1 teaspoon kosher salt — Add only if your seasoning is low-salt.
- 12 slider buns — Potato buns work well.
- 6 slices cheddar or pepper jack, halved — Choose based on how much heat you want.
- ½ cup thick salsa — Drain if it’s watery.
- ½ cup shredded lettuce — For crunch.
- ¼ cup crushed tortilla chips — Adds a final crisp bite.
- 2 tablespoons sour cream — Optional but good.
- 2 tablespoons melted butter — For the buns.
Quick Steps:
- Mix the beef with taco seasoning and salt, then shape into 12 thin patties.
- Sear the patties in a skillet over medium-high heat for 2 to 3 minutes per side.
- Top with cheese in the last minute so it melts.
- Toast the buns lightly, then spread a small spoonful of salsa on the bottom halves.
- Add the patties, lettuce, sour cream if using, and crushed tortilla chips.
- Close the sliders and serve before the chips soften.
Equipment for This Recipe:
- Skillet — For the patties.
- Small bowl — For the seasoning mix.
- Baking sheet — If you want to warm the assembled sliders for 2 minutes.
- Spoon — To portion the salsa.
How to Serve This Dish:
Serve with corn salad, black beans, or a simple avocado-and-lime side. These taste best with something cool and fresh next to them. If you want to lean in, set out lime wedges and chopped cilantro.
Pro Tips for This Recipe:
- Use thick salsa, not the watery stuff from the bottom of the jar.
- Crush the tortilla chips right before serving so they stay crisp.
- Pepper jack gives a smoother heat than dumping hot sauce into the meat.
- Don’t add lettuce until the end. It should stay cold and crisp.
Variations on This Dish:
- Street Corn Style: Add cotija cheese and a touch of lime mayo.
- Nacho Tray Version: Use pickled jalapeños and extra crushed chips.
- Mild Family Version: Swap taco seasoning for a little cumin and garlic powder only.
Common Mistakes to Avoid with This Dish:
- Over-seasoning the beef: Taco seasoning can overpower the burger fast.
- Using thin salsa: The bun soaks it up and gets messy in a bad way.
- Adding chips too early: They lose their crunch in minutes.
10. Pizza Burger Slider Burgers
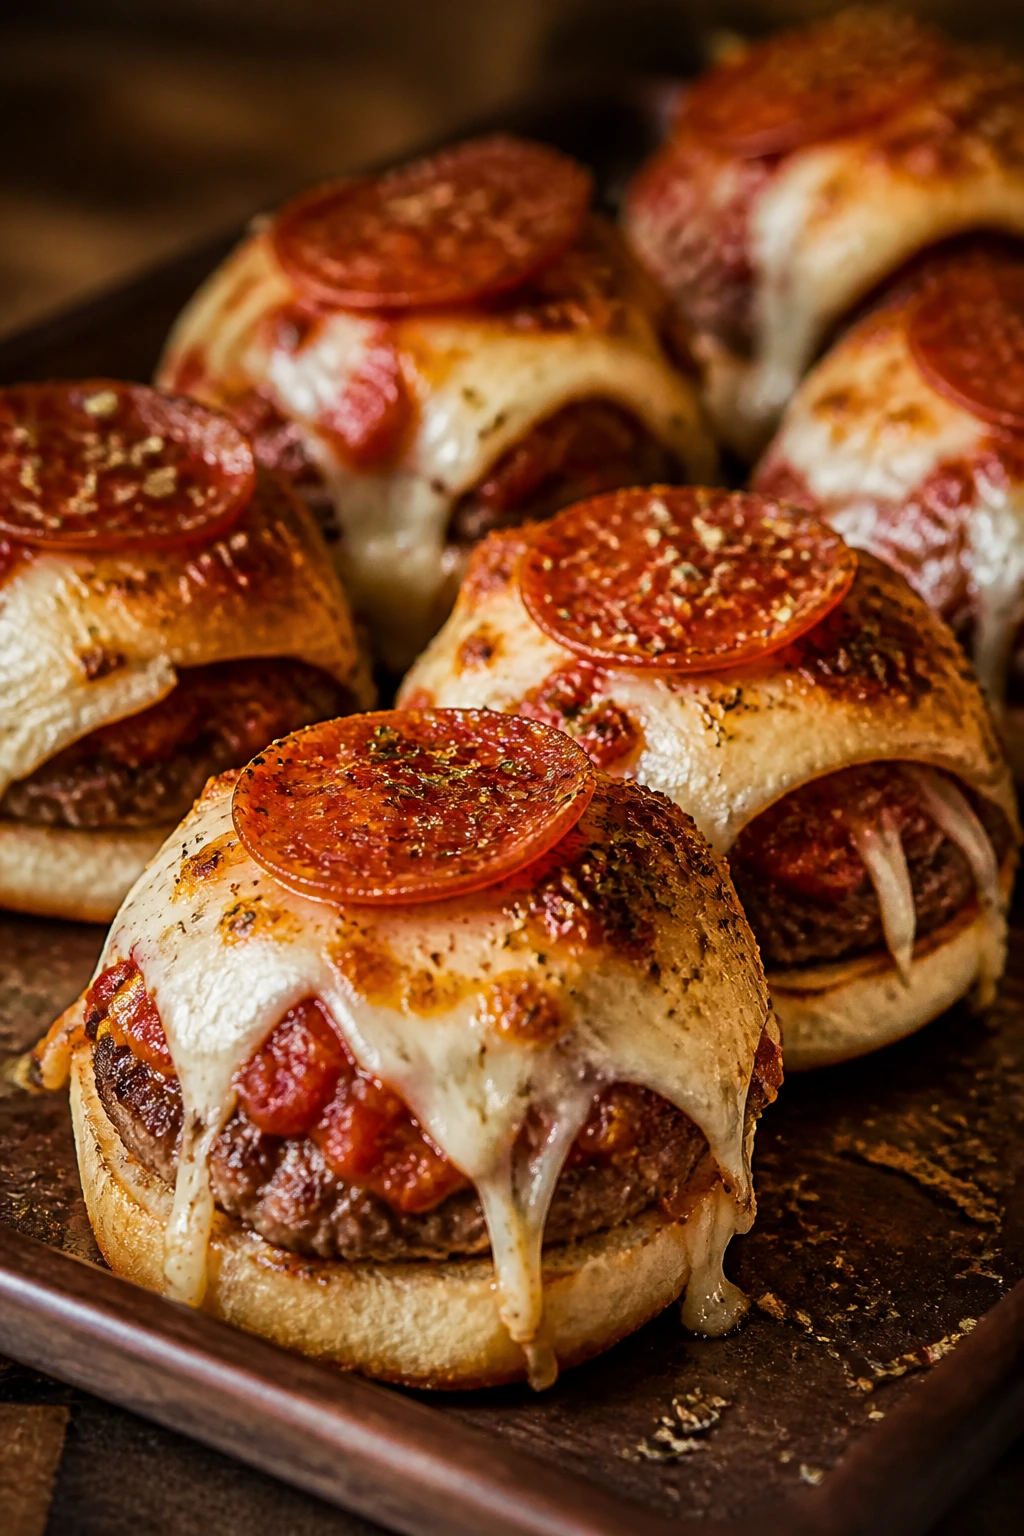
Pizza burger slider burgers are the easiest way to make a tray feel playful without turning it into a joke. The beef gets tomato, oregano, and garlic; the mozzarella melts into long, stretchy strands; and the pepperoni on top gives each slider the smell of a pizzeria when it comes out of the oven. They’re bluntly fun.
Why It Works:
Pizza flavors are built for heat and salt, which is handy when you’re feeding a group. Marinara keeps the beef moist, but it should be thick enough not to flood the buns. Mozzarella gives the stringy pull people expect, while a little Parmesan sharpens the top so the whole thing doesn’t taste soft and sweet.
Key Ingredients:
- 1½ pounds ground beef — Form into 12 thin patties.
- 1 teaspoon kosher salt — For the beef.
- 1 teaspoon black pepper — Keeps the patties savory.
- 1 teaspoon dried oregano — Puts the burger in pizza territory.
- 1 cup thick marinara sauce — Use a chunky, not watery, sauce.
- 6 slices mozzarella, halved — Melts into the burger.
- 24 pepperoni slices — Two per slider.
- 2 tablespoons grated Parmesan — For the top.
- 12 slider buns — Brioche or plain white buns both work.
- 1 tablespoon olive oil — Optional for brushing.
- 1 teaspoon garlic powder — Good in the beef.
Quick Steps:
- Season the beef with salt, pepper, oregano, and garlic powder. Shape into 12 patties.
- Sear the patties for 2 to 3 minutes per side in a skillet.
- Spoon a little marinara on each bun bottom, then add the patty and mozzarella.
- Top with pepperoni and a pinch of Parmesan.
- Bake at 375°F (190°C) for 4 to 5 minutes until the cheese melts and the buns warm through.
Equipment for This Recipe:
- Skillet — For the patties.
- Baking sheet — For the assembled sliders.
- Spoon — To portion the marinara.
- Cheese grater — For the Parmesan.
How to Serve This Dish:
Serve these with a simple Caesar salad or a bowl of marinated olives. They’re rich enough that you don’t need much beside them. If you have kids at the table, these usually disappear first.
Pro Tips for This Recipe:
- Choose a thick marinara so the buns don’t absorb too much liquid.
- Keep the pepperoni in a single layer on top of the cheese if you want it to crisp a little.
- Parmesan goes on before baking, not after, so it can toast lightly.
- Use low-moisture mozzarella if you want a cleaner melt.
Variations on This Dish:
- Sausage-Style Version: Mix a pinch of fennel seed into the beef.
- Supreme Slider Tray: Add sautéed peppers and onions.
- White Pizza Burger: Swap marinara for garlic mayo and use provolone.
Common Mistakes to Avoid with This Dish:
- Using runny sauce: It turns the bun into paste.
- Overcooking the mozzarella: It should melt, not split and grease out.
- Skipping the oregano: Without it, the sliders taste like cheeseburgers with tomato.
11. Teriyaki Pineapple Slider Burgers
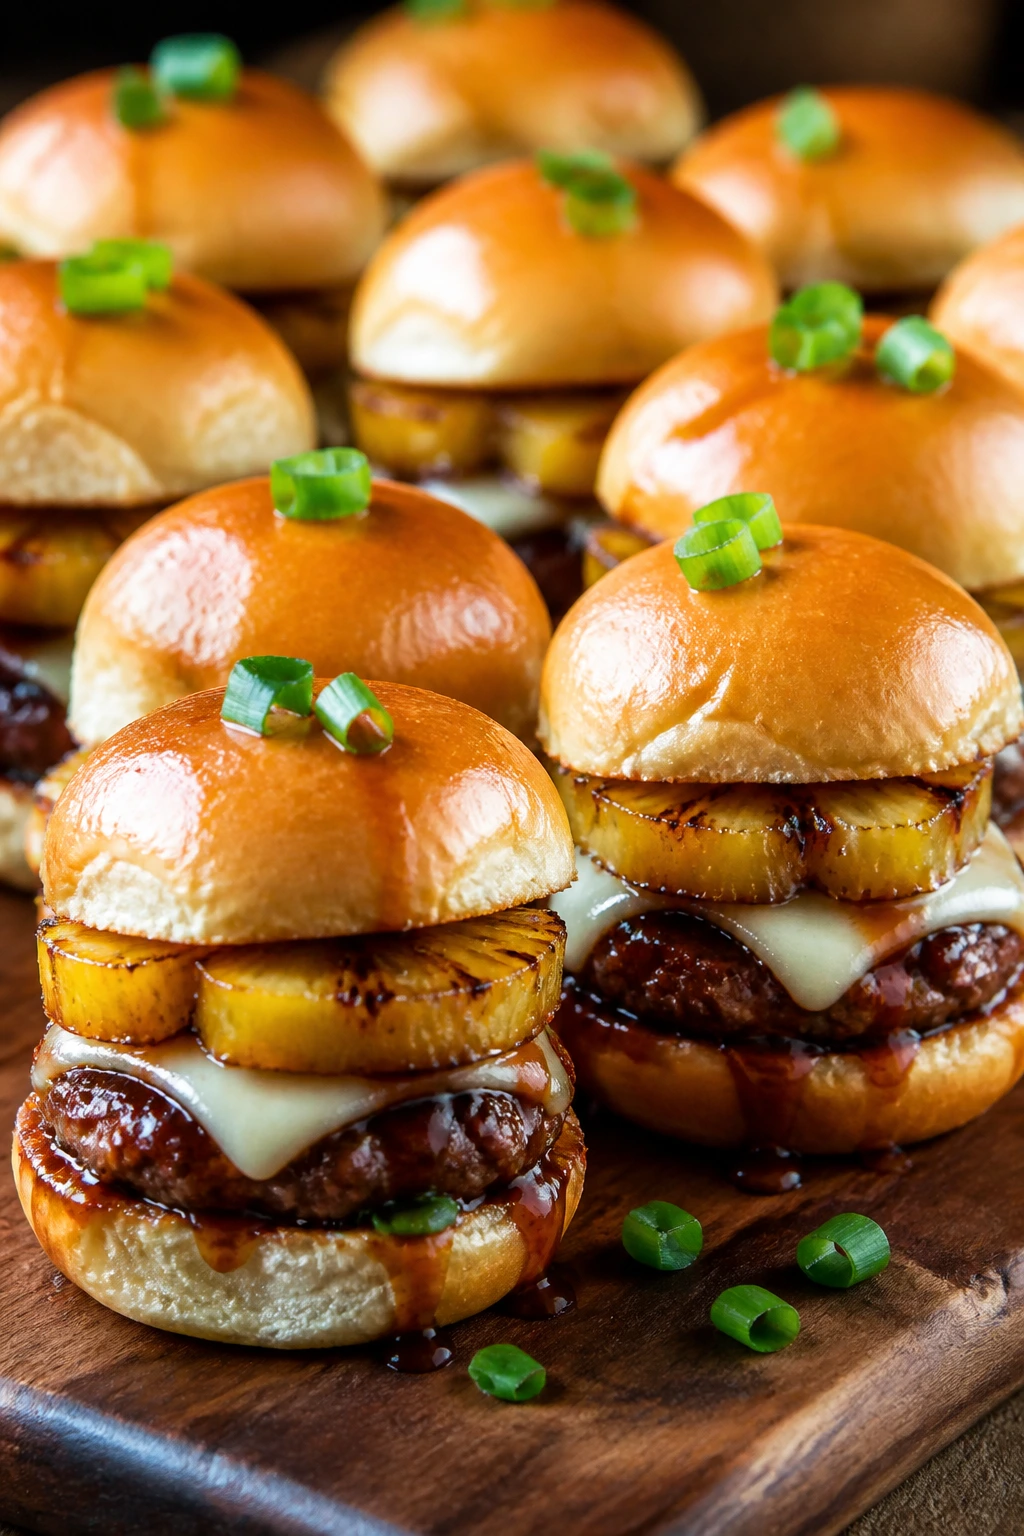
Teriyaki pineapple slider burgers bring a sweet-salty balance that feels bright on a crowded table. The pineapple should be warm and caramelized at the edges, not cold and dripping, and the teriyaki glaze gives the beef a glossy coating that catches the light on the tray. These are for people who like a little sweetness with their smoke.
Why It Works:
Teriyaki works because soy sauce, ginger, and sugar all cling to ground beef well, especially when the patties are thin. Pineapple adds acidity and a soft fruit sweetness that keeps the sliders from feeling heavy. A mild cheese like provolone or Swiss bridges the gap without competing with the glaze.
Key Ingredients:
- 1½ pounds ground beef — For 12 sliders.
- 1 tablespoon soy sauce — Adds savoriness to the beef.
- 1 teaspoon grated fresh ginger — Freshens the glaze.
- 1 teaspoon garlic powder — Keeps the burger from tasting sweet.
- ½ cup teriyaki sauce — Thick sauce is best.
- 4 pineapple rings, drained and cut into small sections — Enough for 12 sliders.
- 6 slices provolone or Swiss, halved — Mild enough for the glaze.
- 12 slider buns — Soft buns handle the sticky filling.
- 2 tablespoons sliced green onion — For garnish.
- 1 tablespoon butter — For toasting the buns.
Quick Steps:
- Mix the beef with soy sauce, ginger, and garlic powder. Shape into 12 thin patties.
- Sear the patties in a skillet for 2 to 3 minutes per side.
- Brush with teriyaki sauce in the final minute of cooking.
- Warm the pineapple sections in the same skillet for 30 to 45 seconds per side until lightly caramelized.
- Build each slider with bun, patty, cheese, pineapple, and green onion.
- Close and serve while the glaze is still shiny.
Equipment for This Recipe:
- Skillet — For the patties and pineapple.
- Pastry brush — For the teriyaki glaze.
- Baking sheet — Optional if you want to warm the sliders for 2 minutes.
- Small grater — For the ginger.
How to Serve This Dish:
These work well with cucumber salad, sesame slaw, or plain kettle chips. The sweetness likes something cool beside it. If the pineapple is very juicy, serve the sliders open-faced for a minute so the steam escapes.
Pro Tips for This Recipe:
- Drain the pineapple well before cooking so the pan can caramelize it.
- Brush the teriyaki on late, or the sugar may burn.
- Green onion is better than cilantro here; it matches the soy-ginger profile.
- If you want more depth, add a tiny splash of rice vinegar to the sauce.
Variations on This Dish:
- Spicy Teriyaki Version: Add a few drops of chili oil.
- Hawaiian Style: Use sweet rolls and extra pineapple.
- Sesame Finish: Sprinkle toasted sesame seeds over the glaze.
Common Mistakes to Avoid with This Dish:
- Using too much pineapple juice: The sliders get slippery and overly sweet.
- Saucing too early: Burnt teriyaki tastes bitter.
- Choosing a strong cheese: Sharp cheddar fights the whole flavor profile.
12. Chili Cheese Slider Burgers
Chili cheese slider burgers are the kind of thing people hover near. The chili should be thick enough to sit on top of the patty without running all over the tray, and the cheddar should melt into the hot meat instead of becoming a separate layer. These are unapologetically rich. That’s the point.
Why It Works:
A burger patty gives you structure, and a spoonful of thick chili gives you the loose, spoonable part that regular burgers don’t have. The mix of textures is the attraction here: soft bun, savory meat, creamy melted cheese, and a little bean-or-beef chili heft if you make it that way. Keep the chili thick and the bun lightly toasted, and it holds together better than people expect.
Key Ingredients:
- 1½ pounds ground beef — For the slider patties.
- 1 teaspoon kosher salt — For the beef.
- 1 teaspoon black pepper — Gives the patty a clean finish.
- 1½ cups thick chili — Homemade, leftover, or canned; just keep it dense.
- 6 slices cheddar, halved — Melts over the chili.
- 12 slider buns — Sturdy buns matter here.
- 2 tablespoons diced onion — Optional, for a little crunch.
- 2 tablespoons sliced pickled jalapeños — Optional, if you want heat.
- 1 tablespoon butter — For the bun tops.
Quick Steps:
- Heat the chili in a saucepan until hot and thick.
- Shape and season the beef into 12 patties, then sear them for 2 to 3 minutes per side.
- Place a patty on each bun bottom, top with a spoonful of chili, then add cheddar.
- Add onion or jalapeños if using.
- Bake the assembled sliders at 375°F (190°C) for 4 to 5 minutes until the cheese melts.
- Brush the tops lightly with butter before serving.
Equipment for This Recipe:
- Skillet — For the patties.
- Saucepan — For warming the chili.
- Baking sheet — For the assembled sliders.
- Spoon — To portion the chili carefully.
How to Serve This Dish:
Serve with a simple chopped salad or plain potato wedges so the plate doesn’t become too heavy. These are a little messy, so keep the napkins close. If you want a fuller spread, set out a crunchy slaw to break up the richness.
Pro Tips for This Recipe:
- Reduce any thin chili before assembling. Spoonable is good; watery is bad.
- Keep jalapeños on the side if the crowd has mixed heat tolerance.
- Cheddar works better than a very soft cheese because it supports the chili.
- Toast the buns before building if you want them to stay firm longer.
Variations on This Dish:
- Bean-Heavy Version: Use your favorite bean chili for more texture.
- Smoky Chipotle Tray: Stir chipotle powder into the chili.
- Cornbread Swap: Use mini cornbread buns if you want a sweeter base.
Common Mistakes to Avoid with This Dish:
- Using thin chili: It soaks the bun in seconds.
- Adding too much chili: The burger disappears under the topping.
- Serving too late: Chili cheese sliders are best while the cheese is still molten.
13. Blue Cheese and Caramelized Onion Slider Burgers
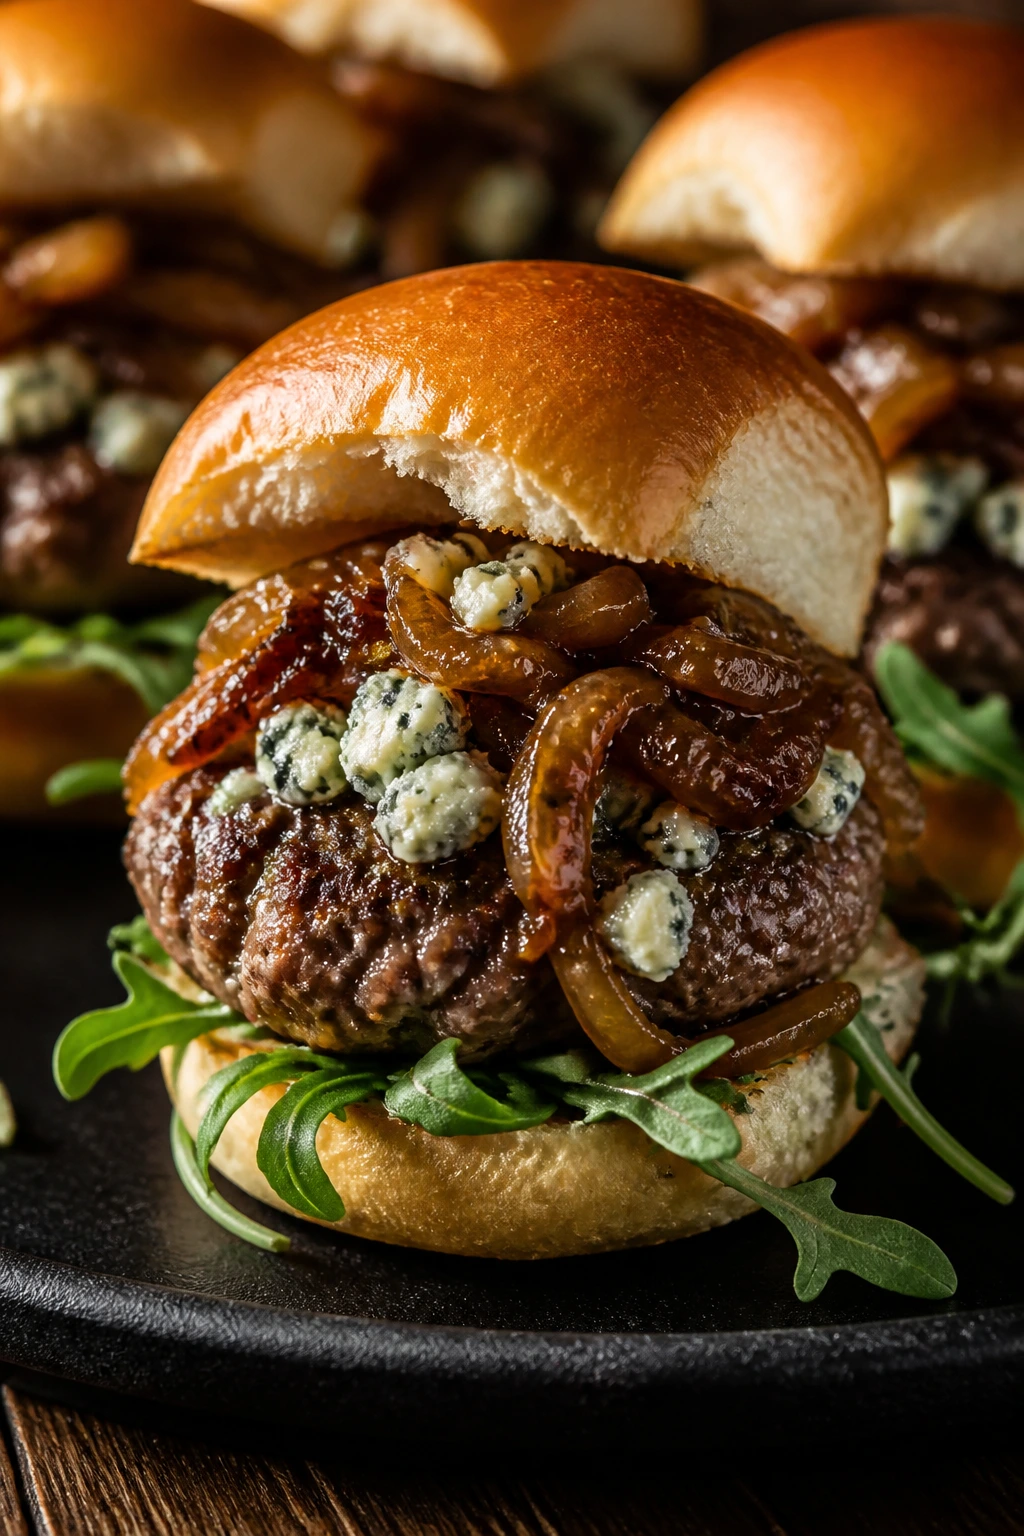
Blue cheese and caramelized onion slider burgers are not shy. They’re salty, tangy, a little funky, and deeply savory, with onions that soften into something jammy and almost sweet. If your crowd likes big flavors, this tray disappears fast. If they don’t, skip it and let the rest of us enjoy the good stuff.
Why It Works:
Blue cheese brings a sharp, creamy bite that stands up to beef without getting lost. Caramelized onions soften the intensity just enough so the sliders don’t feel aggressive from first bite to last. A little black pepper in the beef helps, and an arugula leaf gives a peppery green finish that keeps the whole thing from feeling too heavy.
Key Ingredients:
- 1½ pounds ground beef — 80/20 is ideal.
- 1 teaspoon kosher salt — For the patties.
- 1 teaspoon black pepper — Plenty here.
- 2 large yellow onions, thinly sliced — For caramelizing.
- 2 tablespoons butter — Helps the onions brown.
- 1 tablespoon balsamic vinegar — Optional, for depth.
- ½ cup blue cheese crumbles — Use good ones; cheap blue can taste flat.
- 12 slider buns — Soft and neutral.
- 1 cup baby arugula — Optional, for a peppery bite.
- 1 tablespoon mayonnaise — A thin spread on the bun helps.
- 1 teaspoon olive oil — For the onions if needed.
Quick Steps:
- Cook the onions in butter over medium-low heat for 20 minutes until deep gold. Stir in balsamic vinegar if using and cook 2 minutes more.
- Shape and season the beef into 12 thin patties.
- Sear the patties for 2 to 3 minutes per side.
- Top each patty with blue cheese while still hot so it softens.
- Build the sliders with bun, patty, onions, and arugula if using.
- Serve warm while the cheese is still creamy.
Equipment for This Recipe:
- Large skillet — For the onions.
- Cast-iron skillet — For the patties.
- Spatula — For moving the patties carefully.
- Baking sheet — Optional for holding the finished sliders warm.
How to Serve This Dish:
These fit best with roasted potatoes or a crisp salad dressed with lemon. The blue cheese does a lot, so I like a simple side and not much else. Serve them on a dark platter; the onions and cheese look best with a little contrast.
Pro Tips for This Recipe:
- Cook the onions slowly enough that they soften before they brown hard.
- Use blue cheese crumbles that smell clean, not overly sharp or ammonia-heavy.
- Arugula is optional, but it lightens the final bite.
- Don’t drown the bun in mayonnaise; a light smear is enough.
Variations on This Dish:
- Roquefort Version: Use a stronger blue cheese if your crowd likes bold flavors.
- Milder Gorgonzola Style: Choose a softer, less pungent blue.
- Balsamic Glaze Finish: Drizzle a little glaze over the onions after assembly.
Common Mistakes to Avoid with This Dish:
- Burning the onions: They should go deep gold, not black.
- Using too much cheese: The flavor gets aggressive and salty.
- Skipping the green element: A little arugula keeps the slider from feeling flat.
14. Breakfast Burger Slider Burgers
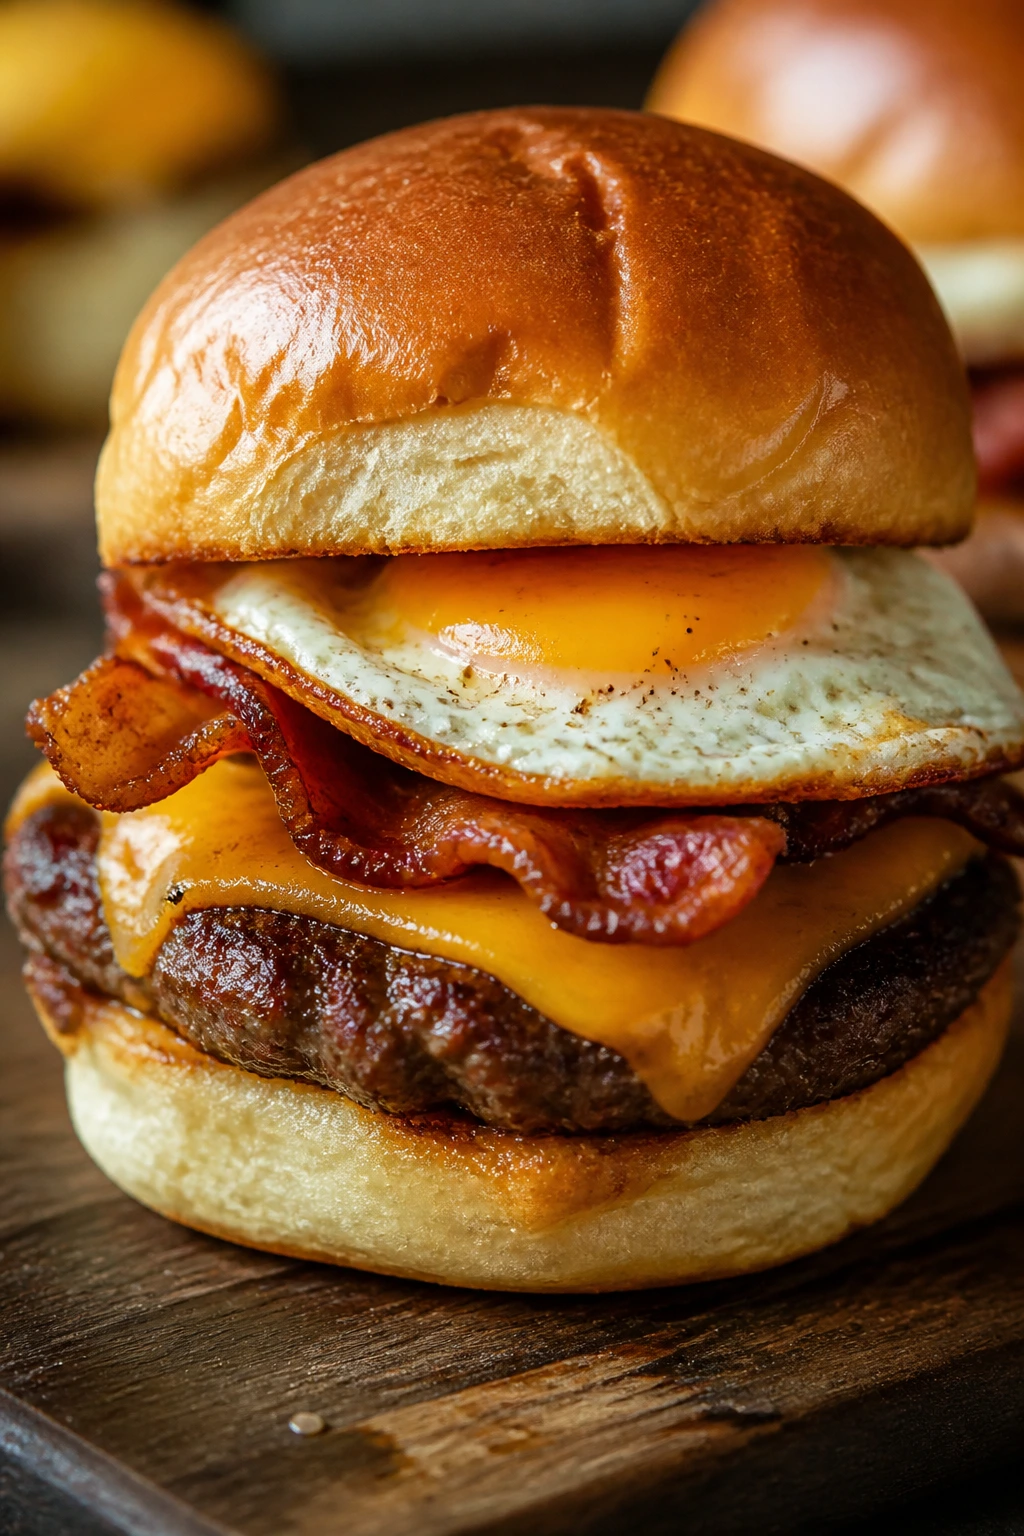
Breakfast burger slider burgers feel a little ridiculous until you bite one. Then the ridiculous part stops mattering. You get beef, bacon, egg, and cheese in a small package that eats like a diner breakfast with a better crust. These are the sliders I’d make when the crowd is hungry early and nobody wants to wait for a full breakfast spread.
Why It Works:
The egg gives the slider a soft, runny center if you cook it that way, or a set yolk if you prefer order and clean hands. Bacon adds salt and crunch, while cheddar melts over the beef and holds everything together. A tiny swipe of ketchup or hot sauce helps, but the main trick is balance: don’t make the egg so large that it swamps the bun.
Key Ingredients:
- 1½ pounds ground beef — For 12 thin patties.
- 1 teaspoon kosher salt — For the patties.
- 1 teaspoon black pepper — Keeps the flavor simple.
- 6 slices cheddar, halved — Melts over the beef.
- 6 slices bacon, cooked crisp — One half-slice per slider works well.
- 6 large eggs — Fried or cooked sunny-side up.
- 12 slider buns — Brioche is especially good here.
- 2 tablespoons ketchup or hot sauce — Optional.
- 1 tablespoon butter — For the eggs and buns.
Quick Steps:
- Cook the bacon until crisp and set it aside.
- Shape and season the beef into 12 thin patties, then sear them for 2 to 3 minutes per side.
- Add cheddar during the last minute so it melts.
- Fry the eggs in butter until the whites are set and the yolks are still a little loose, or cook them longer if that’s your preference.
- Assemble each slider with bun, patty, bacon, egg, and a small dab of ketchup or hot sauce.
- Serve immediately while the yolks are warm.
Equipment for This Recipe:
- Skillet — For patties, bacon, and eggs.
- Spatula — For flipping both meat and eggs.
- Baking sheet — To hold the sliders if you’re batching.
- Knife — For trimming bacon if needed.
How to Serve This Dish:
Serve these with hash browns, fruit, or a simple breakfast salad if you want to pretend the plate is balanced. They go quickly at brunch, especially if people can grab them with one hand. Keep napkins nearby, because a runny yolk does not care about your shirt.
Pro Tips for This Recipe:
- Keep the eggs small relative to the bun. A jumbo egg can take over the whole slider.
- Cook the bacon crisp so it doesn’t go limp under the egg.
- A little hot sauce beats a lot of ketchup if you want a sharper breakfast bite.
- Warm the buns briefly before assembly so the cheese doesn’t seize on cold bread.
Variations on This Dish:
- Sausage Swap: Use a small sausage patty instead of beef for a breakfast-diner feel.
- Egg and Cheese Only: Leave off the bacon and use a second slice of cheese.
- Hash Brown Finish: Add a crisp hash brown patty inside each slider.
Common Mistakes to Avoid with This Dish:
- Using soggy bacon: It ruins the texture and disappears under the egg.
- Overcooking the eggs: A dry yolk makes the slider feel much heavier.
- Making the patties too thick: Then the egg and bun feel cramped.
15. Mediterranean Feta Slider Burgers
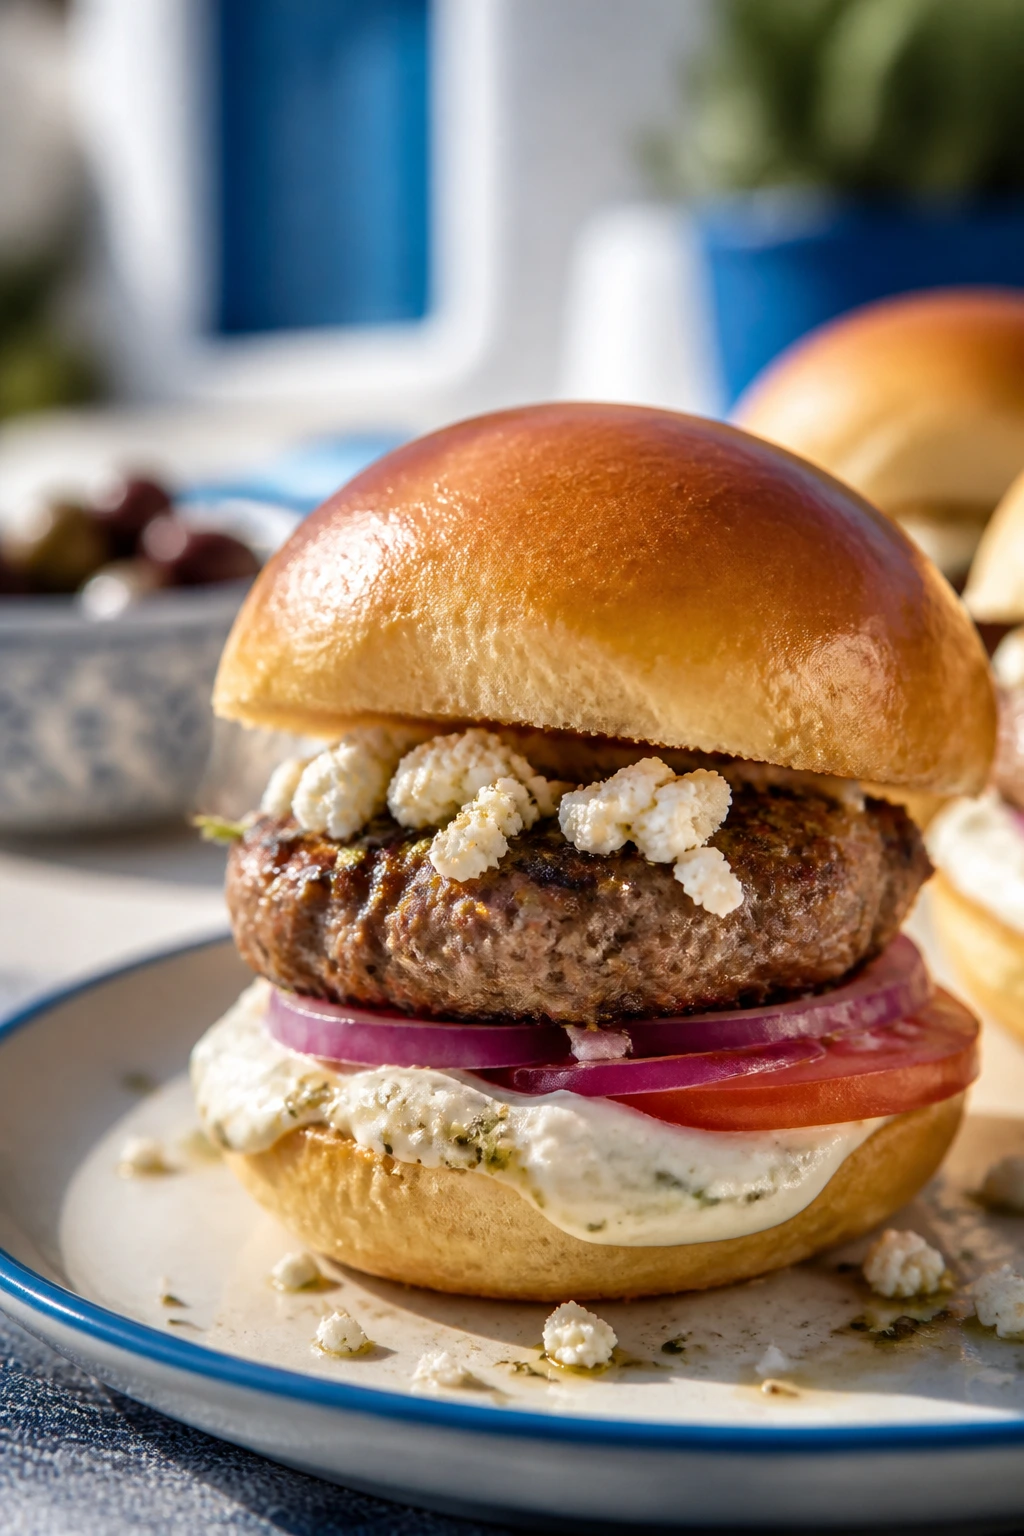
Mediterranean feta slider burgers are bright, garlicky, and a little cooler than the rest of the tray. The beef gets oregano and garlic, the feta brings salty crumbs of tang, and a quick yogurt sauce with cucumber and lemon pulls the whole thing into balance. They taste like a burger that decided to spend the afternoon outside.
Why It Works:
Feta is salty but not heavy, which makes it a smart choice with ground beef. The yogurt-cucumber sauce gives you moisture without the heaviness of mayo, and the lemon keeps the sliders lively. These are especially good when you want one burger on the tray that tastes different from the others but still belongs.
Key Ingredients:
- 1½ pounds ground beef — For 12 patties.
- 1 teaspoon kosher salt — For the meat.
- 1 teaspoon black pepper — Keeps it grounded.
- 1 teaspoon dried oregano — Gives the beef a Mediterranean edge.
- 1 clove garlic, finely minced — Mixed into the patties.
- ½ cup crumbled feta — Salty, tangy, and strong enough to show up.
- 12 slider buns — Soft rolls or potato buns.
- ½ cup plain Greek yogurt — For the sauce.
- ¼ cup grated cucumber, squeezed dry — Keeps the sauce cool.
- 1 tablespoon lemon juice — Brightens the finish.
- 1 tablespoon chopped dill or mint — Either works.
- 1 tablespoon olive oil — Optional for the sauce.
Quick Steps:
- Stir the yogurt, cucumber, lemon juice, dill or mint, and olive oil together. Chill while you cook.
- Mix the beef with salt, pepper, oregano, and garlic, then shape into 12 thin patties.
- Sear the patties in a hot skillet for 2 to 3 minutes per side.
- Top each patty with feta during the last minute of cooking.
- Build the sliders with sauce on the bun bottoms and a patty on top.
- Serve with extra lemon wedges if you like a brighter finish.
Equipment for This Recipe:
- Skillet — For the patties.
- Small bowl — For the yogurt sauce.
- Fine grater — For the cucumber.
- Paper towels — To squeeze the cucumber dry.
How to Serve This Dish:
These are strongest next to a cucumber-tomato salad, baked fries, or simple olives. They’re a nice break from the heavier flavors on the tray. If you want them to look finished, add a little chopped dill on top right before serving.
Pro Tips for This Recipe:
- Squeeze the cucumber until it’s almost dry or the sauce turns watery.
- Use feta in small crumbles so it melts a little without dissolving completely.
- Mint gives a cleaner finish than dill if the crowd likes a sharper herbal note.
- A thin swipe of sauce is enough; too much covers the beef.
Variations on This Dish:
- Tzatziki-Heavy Version: Add minced garlic and a bit more cucumber to the sauce.
- Olive Finish: Top with chopped Kalamata olives.
- Spiced Beef Style: Add a pinch of cumin to the meat for warmth.
Common Mistakes to Avoid with This Dish:
- Using wet cucumber: The sauce breaks and runs out of the bun.
- Overloading the feta: Too much salt makes the slider harsh.
- Skipping the lemon: The tray needs that bright edge to work.
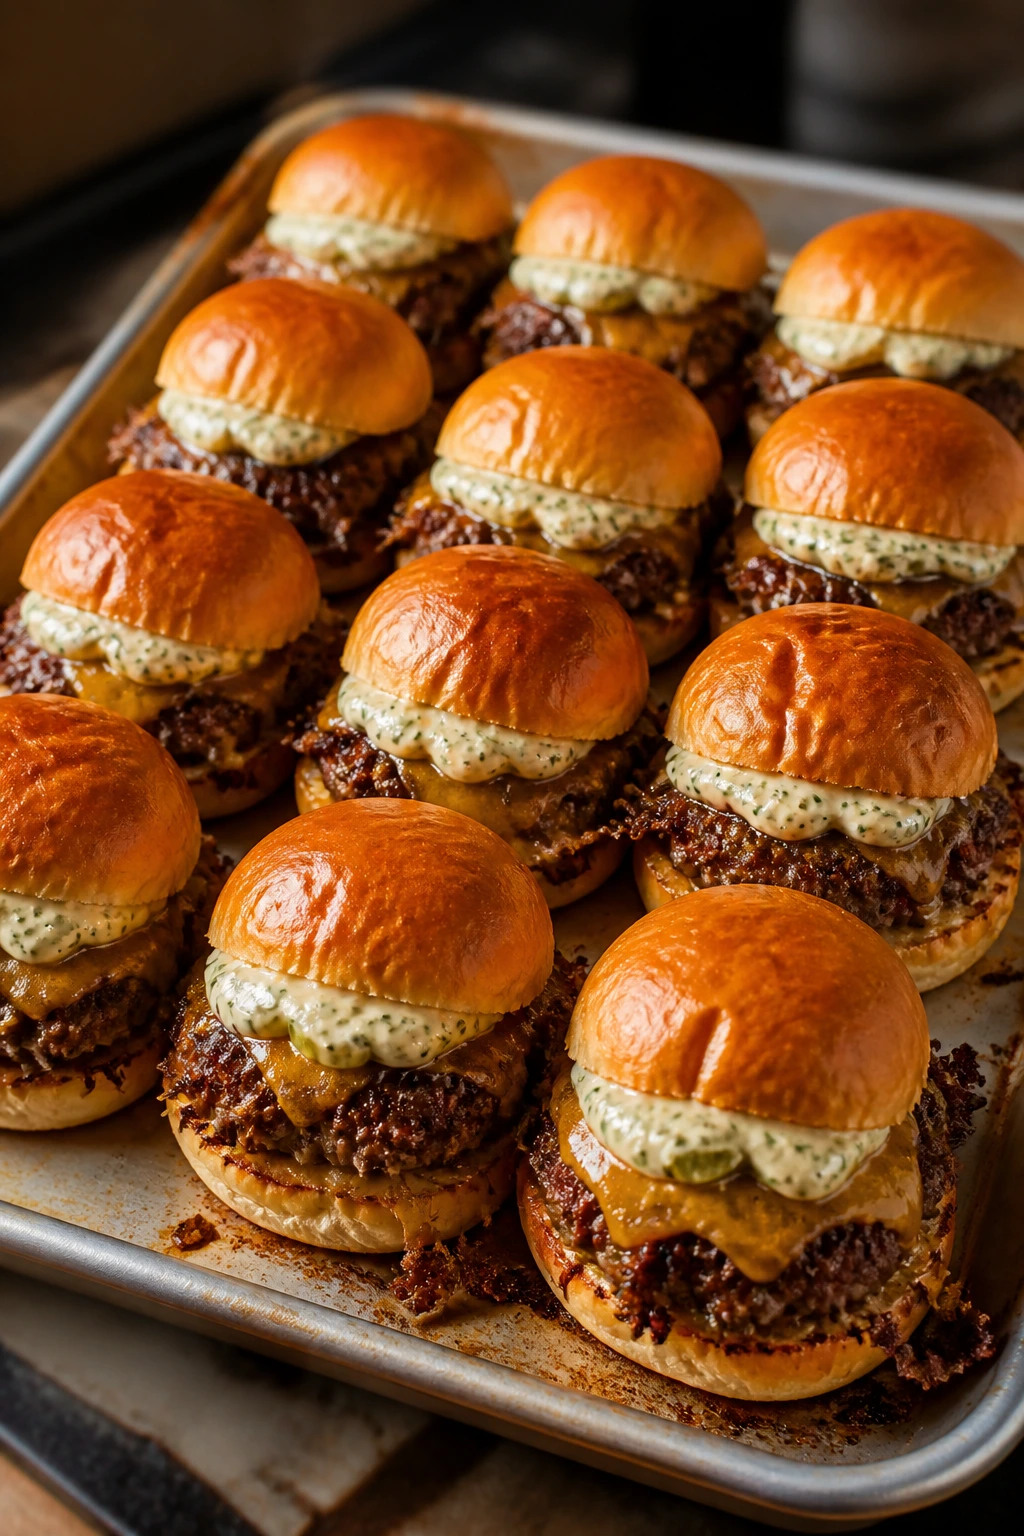
16. Patty Melt Slider Burgers
Patty melt slider burgers are what happens when a burger and grilled cheese stop arguing. Rye buns, caramelized onions, Swiss cheese, and a little Thousand Island style sauce make the whole thing taste toasty, savory, and deeply old-school. These are the sliders I’d pick if I wanted something a bit more diner than backyard.
Why It Works:
The patty melt has one job: deliver browned beef, sweet onions, and melted cheese in a format that tastes like it came off a flattop. Rye or rye-style buns give a faint caraway note that makes the sandwich taste more complete. A thin spread of sauce adds the creamy tang you expect, but the onions are what keep the tray from feeling flat.
Key Ingredients:
- 1½ pounds ground beef — For 12 small patties.
- 1 teaspoon kosher salt — For the beef.
- 1 teaspoon black pepper — Keeps the flavor sharp.
- 2 large yellow onions, thinly sliced — Caramelized until soft and sweet.
- 2 tablespoons butter — For the onions and the bun tops.
- 6 slices Swiss cheese, halved — The classic melt here.
- 12 slider buns or rye slider rolls — Rye-style is best if you can find it.
- ¼ cup Thousand Island dressing — Or a mayo-ketchup-relish mix.
- 1 teaspoon Worcestershire sauce — Mixed into the beef.
- 1 tablespoon neutral oil — For the skillet if needed.
Quick Steps:
- Cook the onions in butter over medium-low heat for 20 to 25 minutes until deeply golden and soft.
- Mix the beef with salt, pepper, and Worcestershire, then shape into 12 patties.
- Sear the patties in a hot skillet for 2 to 3 minutes per side.
- Add Swiss cheese during the last minute and let it soften.
- Spread a thin layer of Thousand Island on the buns, add the patties and onions, then close them.
- Warm the assembled sliders for 3 to 4 minutes at 375°F (190°C) so the cheese melts fully.
Equipment for This Recipe:
- Large skillet — For the onions.
- Cast-iron skillet — For the patties.
- Spatula — For flipping and assembling.
- Baking sheet — To finish the sliders in the oven.
How to Serve This Dish:
Serve these with pickles, potato chips, or a sharp coleslaw. They’re rich and toasty, so a cool crunchy side is the right move. I like them cut and stacked on a wooden board; they look like they mean business.
Pro Tips for This Recipe:
- Rye-style buns give the slider more character than plain white buns.
- Caramelize the onions fully; pale onions just make the burger taste unfinished.
- Keep the sauce thin. This is a melt, not a wet sandwich.
- Swiss cheese should go on while the patties are still hot enough to soften it quickly.
Variations on This Dish:
- American Cheese Version: Swap Swiss for American if you want a softer, creamier melt.
- Extra-Onion Style: Add raw onion rings for crunch on top of the caramelized layer.
- Garlic Rye Twist: Brush the buns with a little garlic butter before warming.
Common Mistakes to Avoid with This Dish:
- Rushing the onions: They need time to turn sweet and brown.
- Using buns that are too soft: They collapse under the cheese and onions.
- Forgetting the oven finish: The cheese should be fully melted, not just warm.
Why Small Burgers Beat the Big-Patty Rush

The whole point of slider burgers is control. A 5-ounce burger asks a lot of a grill or skillet when a crowd is waiting. A slider patty cooks faster, browns more evenly, and gives you room to build smartly instead of piling everything into one heavy stack.
There’s also the practical side nobody talks about enough. Sliders let you serve different flavors on one table without needing a separate station for each one. One tray can lean smoky, another tangy, another cheesy, and nobody has to stand around waiting for a custom order. That matters more than people admit.
I also like the way sliders invite restraint. That sounds backwards, but it’s true. Because the burger is small, you can keep the meat seasoned well, the cheese in the right amount, and the toppings from becoming a sloppy hill. Big burgers forgive excess. Sliders expose it.
Essential Equipment for These Recipes
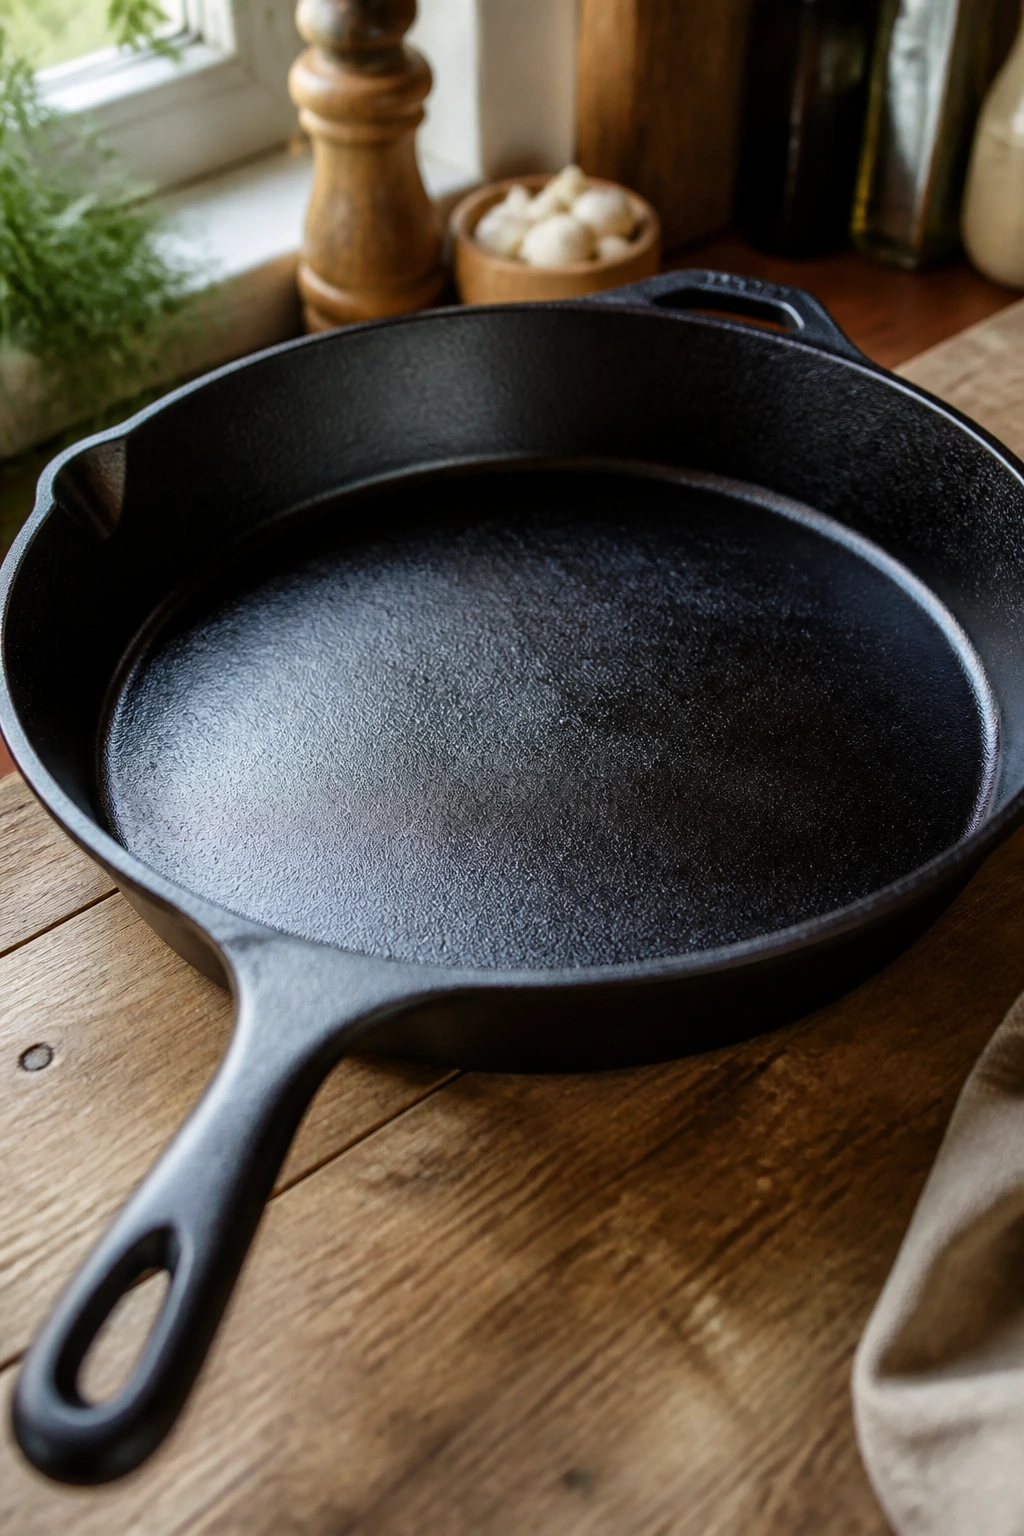
- Cast-iron skillet or flat griddle — Best for browning patties quickly and evenly.
- Rimmed baking sheet — Useful for finishing assembled sliders in the oven without spills.
- 9×13-inch baking dish — Great for tray-style builds and easy serving.
- Large mixing bowl — For gently combining ground beef with seasonings.
- Instant-read thermometer — The simplest way to confirm 160°F in ground beef.
- Pastry brush — Helps with buttering bun tops and brushing on glaze or sauce.
- Sharp chef’s knife — Needed for onions, pickles, herbs, and buns.
- Cutting board — Gives you a stable surface for prep.
- Spatula — A sturdy metal one is best for smashing or flipping patties.
- Foil — Handy for tenting sliders if the tops brown before the cheese melts.
Smart Shopping and Ingredient Tips
Start with the beef. 80/20 ground beef is the sweet spot for slider burgers because the fat keeps the patties juicy even when they’re small and cooked quickly. If you go too lean, the burgers taste tight and dry, especially once they’re tucked under cheese or a wet topping. I’ll take 85/15 in a pinch, but I would not go leaner unless you’re adding a very rich sauce or a generous onion layer.
Buns matter more than people think. Soft slider buns, potato rolls, and Hawaiian rolls all work because they’re tender, but they’re not all the same. Hawaiian rolls bring sweetness, potato buns bring a little more structure, and plain dinner rolls let the filling speak louder. If the toppings are bold — like jalapeño popper, blue cheese, or chili — I usually want a neutral bun so the flavors don’t start shouting over one another.
Cheese should match the job. American melts cleanly and gives you that classic diner pull. Cheddar gives sharper flavor, but it can sit a little looser if you pile it on. Swiss, provolone, and mozzarella each do their own work, and they’re useful when you want the other ingredients to stay in charge. For crowd cooking, I like slices over shredded cheese because slices stay neater on hot patties.
Watch your sauces. Thick ketchup, mayo, mustard, BBQ sauce, and salsa all behave better than thin versions that run into the bun. If you’re buying jarred sauce, choose one with enough body to stay on a spoon. That one detail saves more soggy sliders than almost any other move.
Onions, pickles, lettuce, and tomatoes should stay crisp unless the recipe says otherwise. A slider rarely needs a giant tomato slice. It needs something intentional. If a topping adds water without adding shape or sharpness, it probably doesn’t belong on a crowd tray.
How to Serve These Slider Burgers

Presentation:
Serve the sliders on a sheet pan, cutting board, or large platter so people can see the different toppings at once. A quick brush of melted butter on the buns makes the whole tray look finished, and a scatter of sesame seeds, chopped herbs, or sliced pickles gives it a little life. Keep the sliders close together; they look and stay warmer that way.
Accompaniments:
For a broad burger spread, I’d set out kettle chips, fries, slaw, dill pickles, and maybe one crunchy salad with vinegar in it. The richer sliders — chili cheese, BBQ bacon cheddar, blue cheese, patty melt — want something sharp or cold beside them. The brighter ones — teriyaki pineapple, Mediterranean feta, taco burger — can handle a lighter side like cucumber salad or corn salad.
Portions:
Two sliders per adult is the safest starting point when there are sides on the table. Three works when the burgers are the main event and the sides are simple. If you’re feeding a mix of ages and appetites, plan on 2 to 3 sliders per person and keep one tray back for seconds. That second tray often disappears faster than the first.
Beverage Pairing:
A crisp lager, pilsner, or cold pale ale works across most of these recipes. For non-alcoholic drinks, unsweetened iced tea, cola, or sparkling lemonade keep the palate moving between bites. Sweet tea pairs well with smoky and salty sliders; citrus soda is better with spicy or tangy ones.
Additional Tips and Flavor Boosters
Flavor Enhancement:
A brush of garlic-parsley butter on the bun tops right after baking gives almost every slider here a nicer finish. Use 2 tablespoons melted butter, ½ teaspoon garlic powder, and a pinch of chopped parsley. That tiny move makes the buns smell toasted and savory instead of just warm.
Customization:
Keep one or two toppings on the side whenever you’re serving a crowd. Pickles, sliced jalapeños, raw onion, lettuce, hot sauce, and extra sauce bowls let people tune the sliders without you building a dozen custom burgers. It also protects the buns from getting weighed down before anyone sits down to eat.
Serving Suggestions:
If the tray is going out buffet-style, slice the sliders cleanly first and then nudge them back into place so the fillings stay visible. A little garnish goes a long way: chopped chives on the patty melt, dill on the Mediterranean version, sesame seeds on the Big Mac-style tray, green onion on teriyaki. Small details matter because the burgers are small.
Make-It-Yours:
For a lower-carb version, serve the patties and toppings over lettuce cups or on a bed of shredded cabbage instead of buns. For dairy-free guests, use a plant-based slice that melts well and keep the sauce mayo-free. For extra heat, add pickled jalapeños or a pinch of cayenne to the meat rather than pouring hot sauce over the top after the fact.
Make-Ahead, Storage, and Reheating Guidance
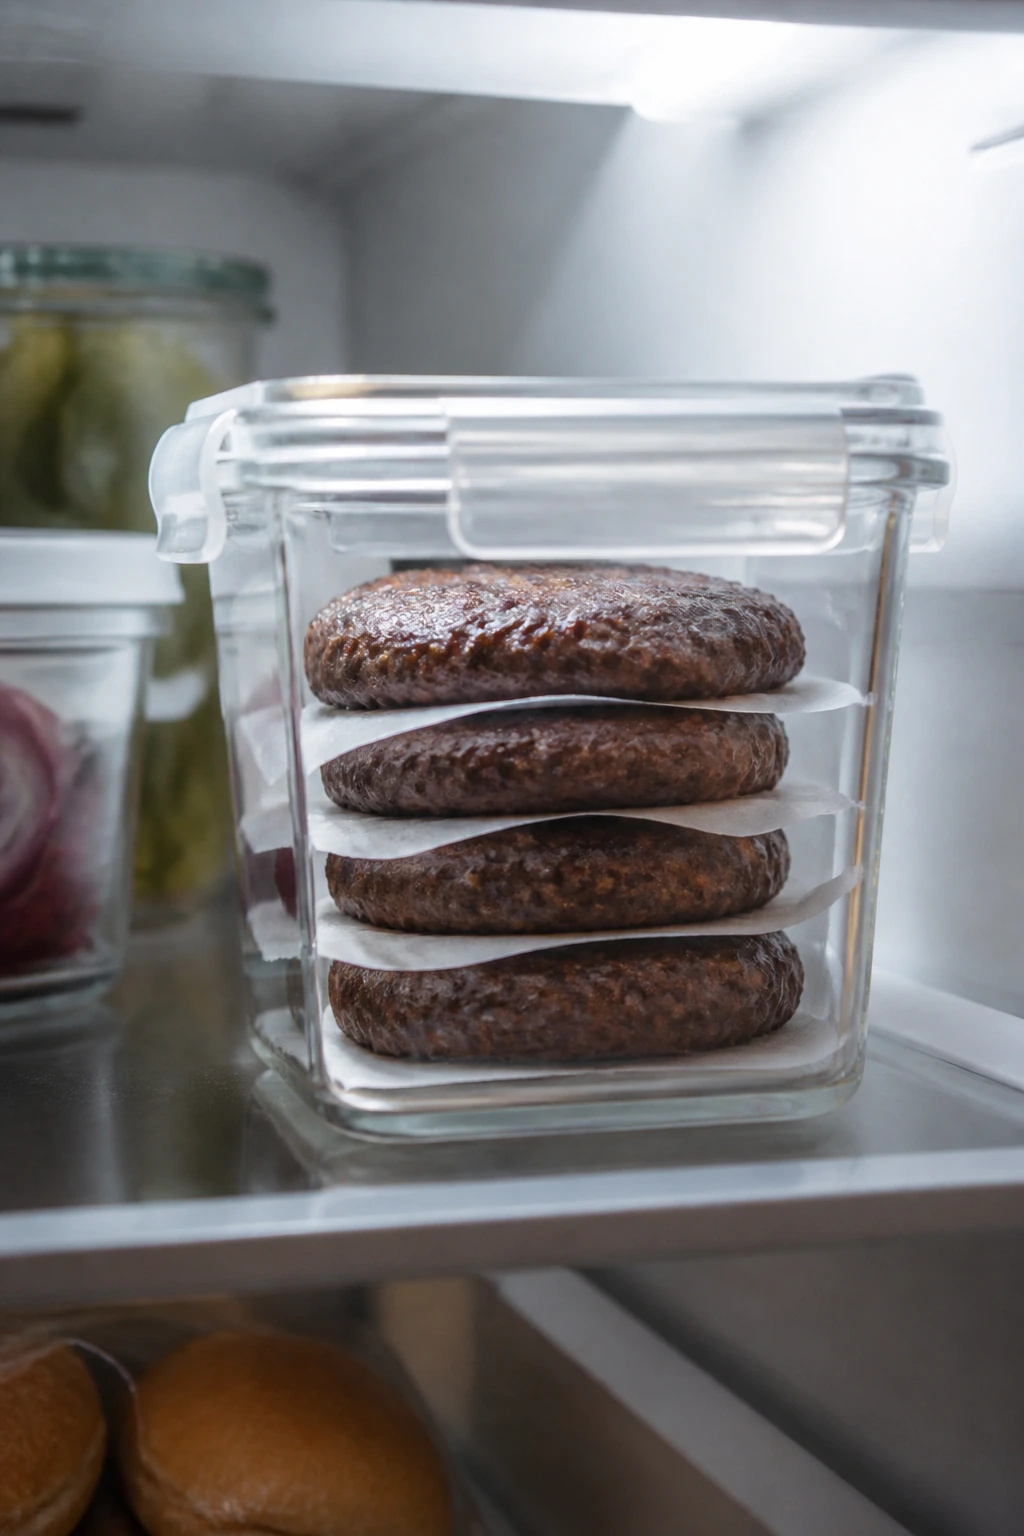
Slider burgers are one of those foods that can be prepped in parts without getting worse. The patties can be shaped up to 24 hours ahead and kept covered in the refrigerator. If you want to go farther, cook the patties, cool them completely, and freeze them for up to 2 months with parchment between layers. That gives you a lot of flexibility when the guest count keeps shifting.
Assembled sliders keep best when the wet toppings are modest. Plain cooked patties and buns hold in the fridge for 3 to 4 days, but once you add lettuce, tomato, or a loose sauce, the texture starts slipping. French onion, mushroom Swiss, BBQ, and patty melt styles reheat well because their toppings are cooked into place. Big Mac-style and breakfast sliders are better assembled fresh or only partially built ahead.
For reheating, wrap assembled sliders loosely in foil and warm them in a 325°F (165°C) oven for 10 to 12 minutes, or until the center is hot and the cheese softens again. If the tray has a wet topping like chili or onion jam, keep the foil on for most of the heating time so the buns don’t dry out. Patties alone can be reheated in a skillet over medium heat for 2 to 3 minutes per side, which keeps the crust better than the microwave ever will.
The microwave is a last resort. It works for one slider, maybe two, but the bun gets steamy and the cheese goes odd. If you must use it, heat in 15-second bursts and stop as soon as the center is warm. Cold toppings like lettuce, pickle, and sauce should be added after reheating, not before.
Variations and Adaptations to Try
Gluten-Free Tray:
Use gluten-free slider buns that are sturdy enough to hold up under sauce. Toast them lightly before assembly, because gluten-free bread tends to go soft faster than regular rolls. Keep the fillings slightly drier — especially chili, onion jam, and sauce-heavy versions — so the texture doesn’t collapse.
Dairy-Free Melt:
Pick a dairy-free slice that melts well and avoid recipes that depend on cream cheese, Swiss, or blue cheese unless you’re swapping those components too. BBQ bacon, Big Mac-style, taco burger, and classic cheeseburger sliders adapt fairly easily. The trick is to keep the seasoning strong enough that the burger doesn’t feel like it’s missing a layer.
Lower-Sodium Build:
Use unsalted butter, skip the pickled add-ons on the burger itself, and season the beef more sparingly. Then lean on onions, herbs, lemon, and vinegar for flavor instead of extra salt. Mushroom Swiss, Mediterranean feta, and teriyaki versions can all be adjusted this way without losing their shape.
Kid-Mild Version:
Use plain cheddar or American, skip the jalapeños and blue cheese, and keep the sauces simple. Classic cheeseburger, pizza burger, and breakfast sliders usually go over well because the flavors are familiar and not too sharp. If the kids are picky, serve sauces on the side instead of building them in.
Heat-Seeker Tray:
Add sliced jalapeños, hot sauce in the beef, chipotle in the BBQ sauce, or pepper jack in place of cheddar. I’d keep one mild tray and one hot tray if you’re feeding a mixed group. People who want heat usually know where to find it, and the rest of the table will be grateful.
Bunless Burger Board:
Serve the patties, cheeses, and toppings with lettuce leaves, sliced tomatoes, pickles, and a few sauces on the side. It still keeps the slider spirit — small, fast, customizable — without the bread. That version works especially well for taco, Mediterranean, and smash burger styles.
Common Mistakes to Avoid with These Slider Burgers
Using beef that’s too lean:
The burgers dry out fast, especially once they’re cut down to slider size. If the meat is 90/10 or leaner, you’ll often taste the dryness before you notice the seasoning. Stick with 80/20 when you can.
Overmixing the beef:
Once the seasonings are evenly distributed, stop. If you keep kneading the meat, the patties turn springy and dense, and that texture really shows in small burgers. Gentle mixing makes a softer bite.
Building too early:
A slider with sauce, lettuce, and hot patty can go soft in minutes if it sits. Assemble close to serving time, especially when the tray includes pickles, salsa, chili, or onion jam. The kitchen waits for no bun.
Ignoring the bun:
The bun is not packaging. It needs a little toasting or buttering or both, depending on the recipe. Soft, untreated buns soak up steam and collapse under the weight of even a modest patty.
Using toppings that are too wet:
Watery salsa, uncooked mushrooms, runny chili, and dripping tomato slices all create the same problem. They make the slider slide apart before the first bite. Cook down moisture, blot where needed, and keep the layers clean.
Serving at the wrong temperature:
If the sliders sit too long, the cheese tightens and the buns dry out. If they’re too hot, the fillings slide around. There’s a narrow and happy middle here, and it’s worth aiming for.
Frequently Asked Questions
How many slider burgers should I plan per person?
If there are sides, two sliders per adult is usually enough, and three covers bigger appetites. For a main meal with simple sides, I’d plan on the higher end. Kids often eat one to two, depending on the filling and the time of day.
Can I make slider burgers ahead of time?
Yes. Shape the patties a day ahead, keep them covered, and cook them when you’re close to serving. You can also cook the patties earlier in the day and reheat them briefly in the oven before assembly, which works especially well for classic cheeseburger, patty melt, and mushroom Swiss sliders.
What’s the best cheese for slider burgers?
American cheese melts the cleanest and gives the most classic burger texture. Cheddar brings more flavor, Swiss adds nuttiness, and provolone melts gently when you want a softer profile. Use the cheese that fits the topping instead of forcing one cheese onto every recipe.
How do I keep the buns from getting soggy?
Toast them lightly, use thick sauces, and keep wet toppings under control. If a recipe includes onions, chili, salsa, or jam, let those mixtures cook down until they’re sticky rather than loose. Building the sliders just before serving helps more than any trick.
Can I grill the patties instead of cooking them on a skillet?
Absolutely. Grill them over medium-high heat and watch closely because slider patties cook fast. For crowd work, I still like a skillet or griddle better because you can control the sear and keep the patties uniform.
What if the cheese melts before the buns brown?
Pull the tray early, brush the tops with butter, and give it another minute or two under the broiler if needed. Keep a close eye on it; slider buns can go from pale to burnt in a blink. Foil can help if the tops are browning too fast.
Can I freeze cooked slider patties?
Yes, cooked patties freeze well for up to 2 months if you layer them with parchment and seal them tightly. Reheat them in a covered skillet or in the oven, then build the sliders fresh. I would not freeze fully assembled sliders with lettuce or raw tomato.
Do I have to use slider buns from the store?
No. Dinner rolls, Hawaiian rolls, potato rolls, and rye-style mini buns all work. What matters is that the bread is soft enough to bite through but sturdy enough to hold a hot patty and a little sauce.
The Tray That Gets Emptied First
A good tray of slider burgers does more than feed people. It gives them options without forcing them to choose between a dozen separate dishes, and it does it with a kind of easy confidence that full-size burgers rarely manage at a party.
That’s why I keep coming back to them. They’re fast enough for casual cooking, sturdy enough for a buffet, and flexible enough to move from classic cheeseburger to blue cheese, taco, teriyaki, or patty melt without losing the basic point. Small doesn’t mean slight. Not here.
Put out a tray with one of these versions and watch what happens next. The buns go first, then the last pickle chips, then the empty serving board that used to look like enough food for everyone.