
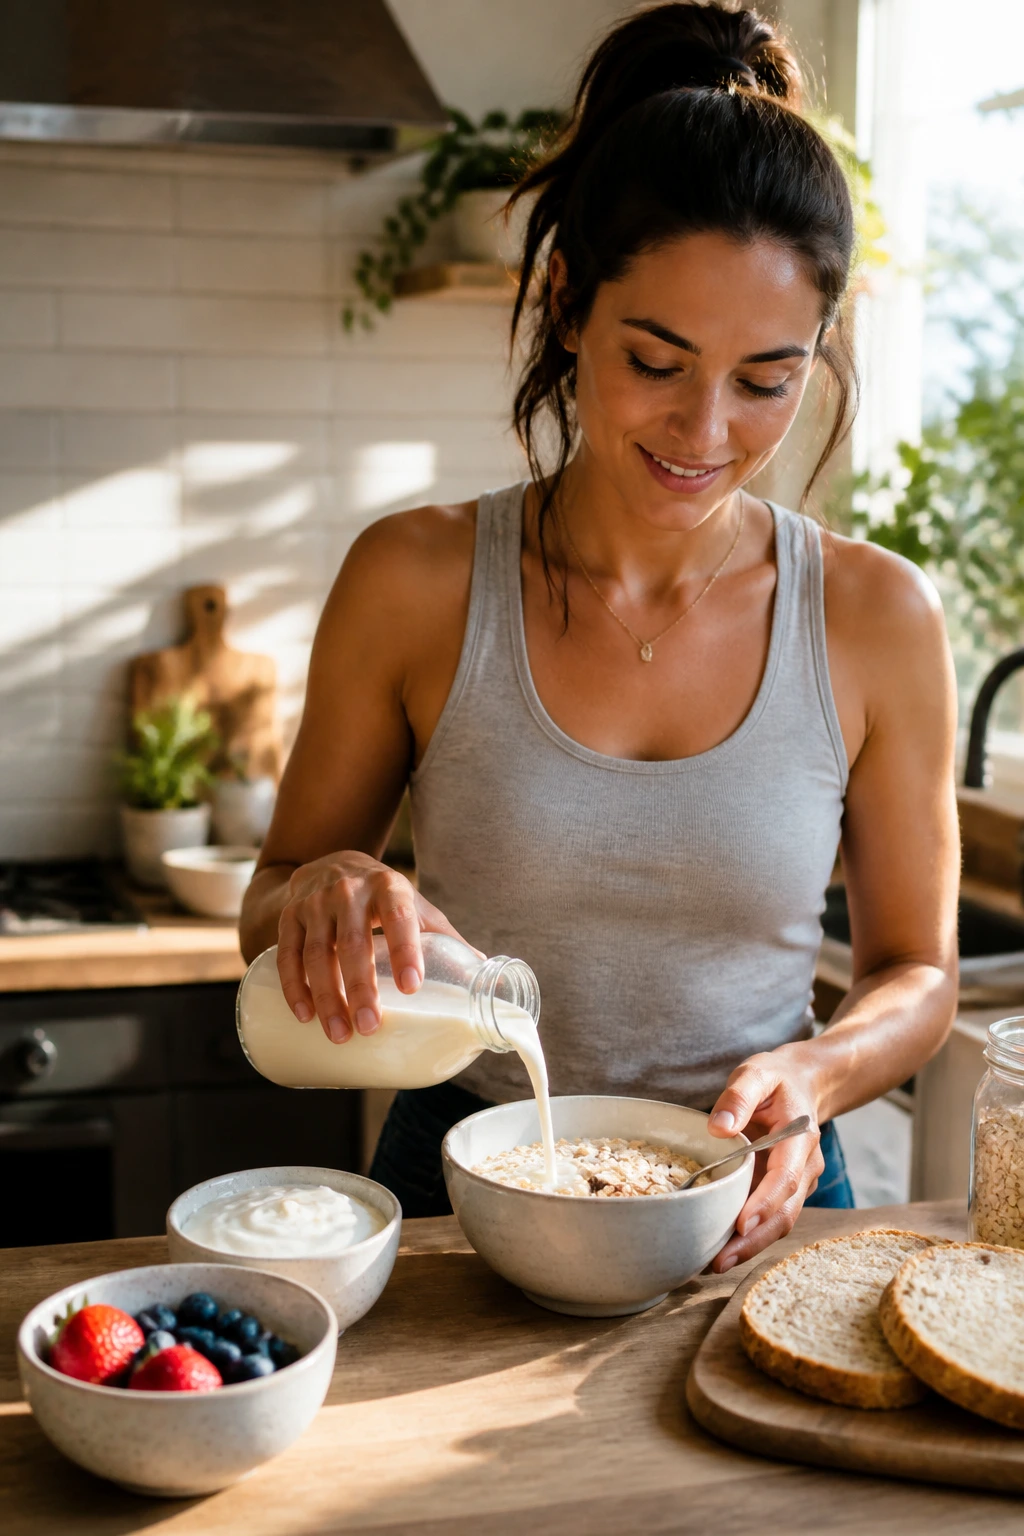
The first ten minutes of a school morning can feel louder than the whole rest of the day. Someone can’t find a sock, someone else is staring into the fridge like it owes them money, and breakfast is suddenly urgent in a way that no one planned for. That is where easy meals for busy school mornings earn their place: not fancy, not fussy, and sturdy enough to survive a house that is already moving in three different directions.
I care less about breakfast elegance at 7:00 a.m. than I do about food that can be made ahead, held in the fridge, or reheated without turning rubbery or soggy. Eggs need to stay soft, oats need to stay creamy, and anything handheld has to survive the walk from countertop to backpack without leaking all over a car seat. A breakfast that looks pretty but falls apart by the front door is a bad breakfast. Full stop.
The recipes below lean on the same practical truth over and over: if a meal can be portioned, wrapped, chilled, frozen, or assembled with one hand while the other is looking for a missing sneaker, it belongs in a school-morning rotation. Some are cold and grab-and-go. Some reheat well enough to feel warm and comforting. A few are the sort of thing you can put on the table in ten minutes and still have time to breathe.
Why These Meals Actually Work on the Clock
-
Make-Ahead Friendly: Most of these recipes can be cooked the night before, which means the morning job becomes heating, grabbing, or eating instead of full-on cooking.
-
Portable by Design: Burritos, muffins, roll-ups, and sticks all travel well in foil, parchment, or a leakproof container, which matters when breakfast has to move fast.
-
Sweet and Savory Balance: This collection covers both the cereal-adjacent crowd and the egg-and-cheese crowd, so you are not stuck with one flavor lane every single day.
-
Kid-Size or Grown-Up Size: The same recipe can be portioned as one muffin, half a wrap, one jar, or a full plate, depending on who is eating and how early they woke up.
-
Pantry-First Ingredients: Oats, tortillas, eggs, bread, yogurt, bananas, cheese, and frozen fruit are doing the heavy lifting here, which keeps shopping simple.
-
Low-Dishes Cleanup: A lot of these meals use one bowl, one skillet, or one sheet pan. That is not a small thing when the kitchen already looks like a backpack exploded.
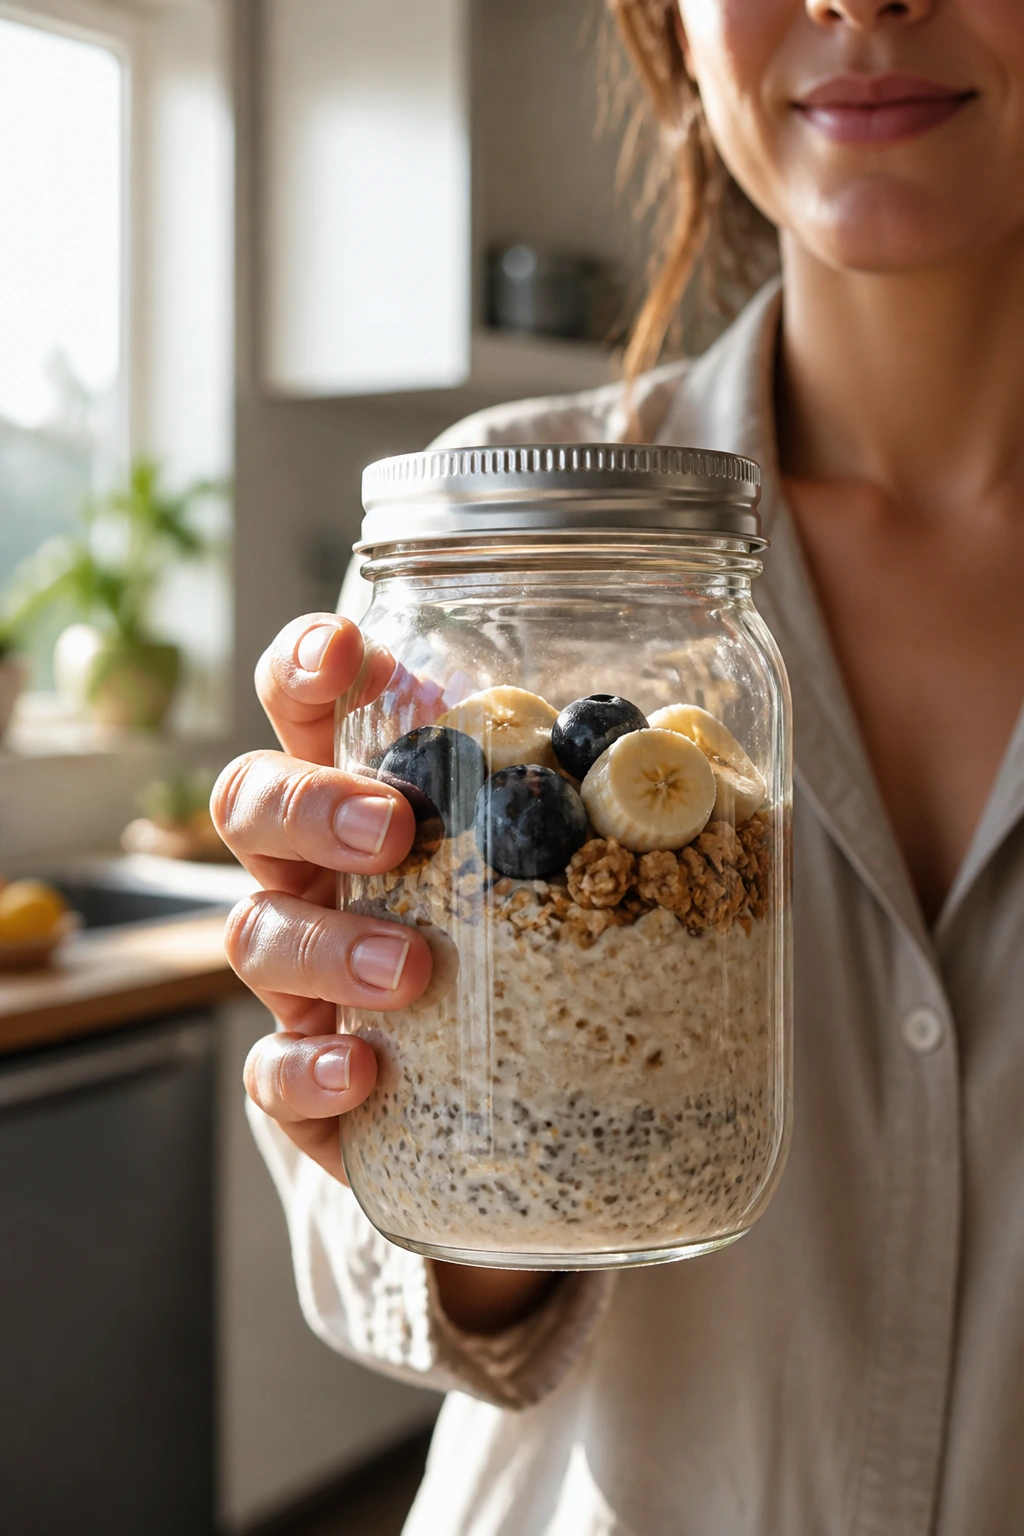
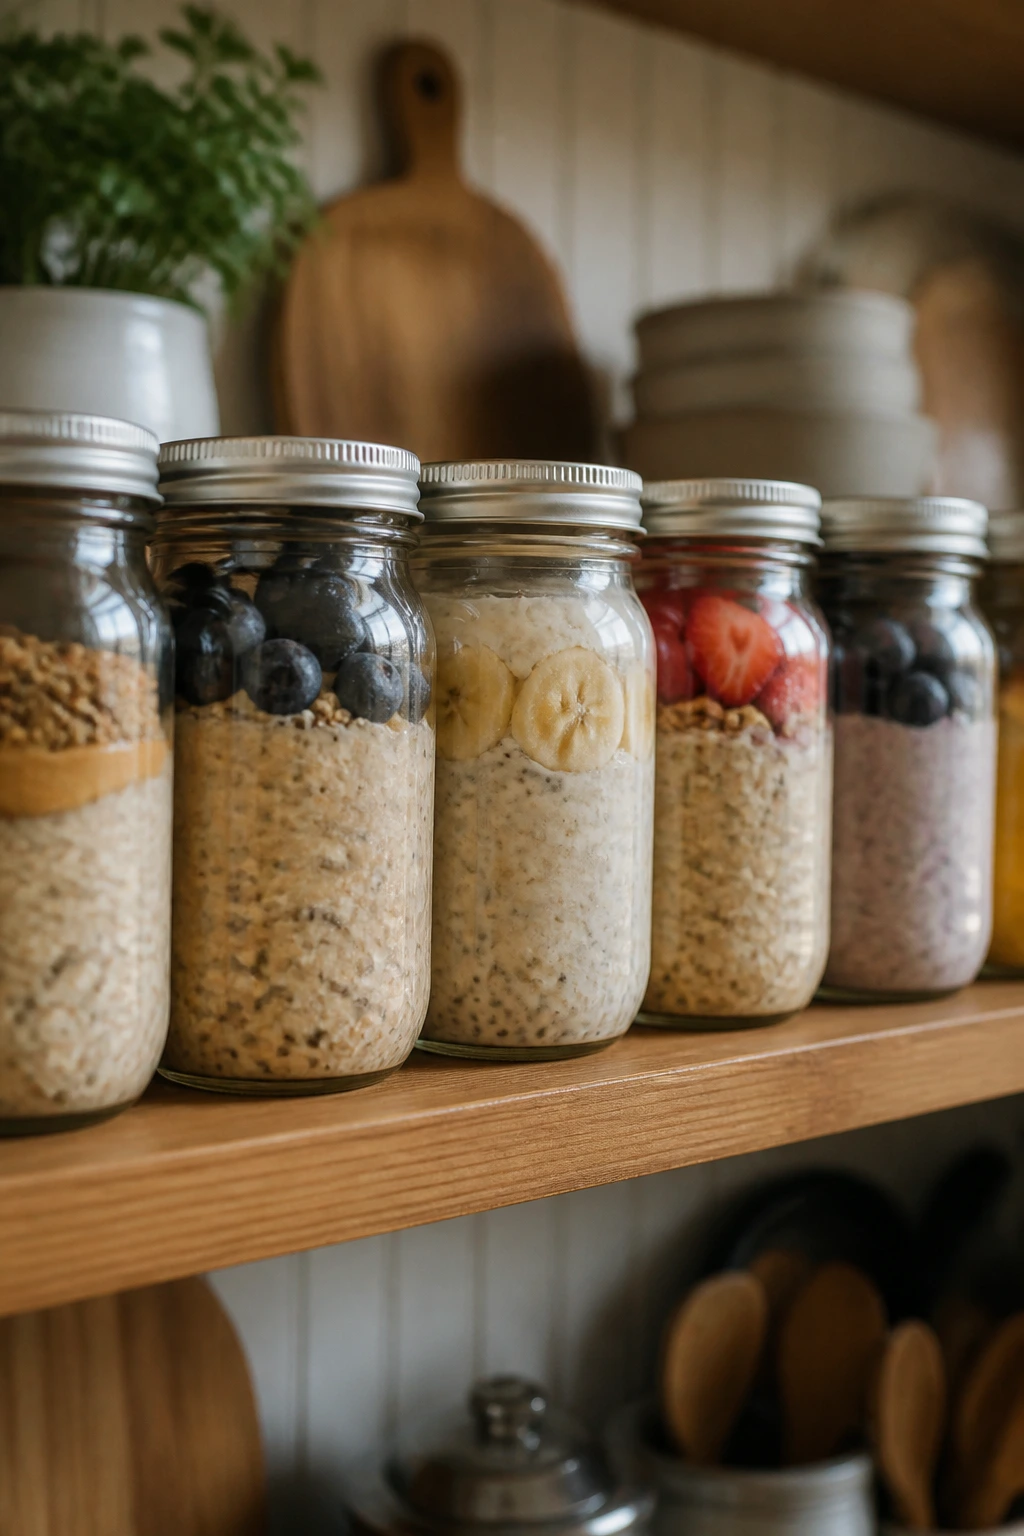
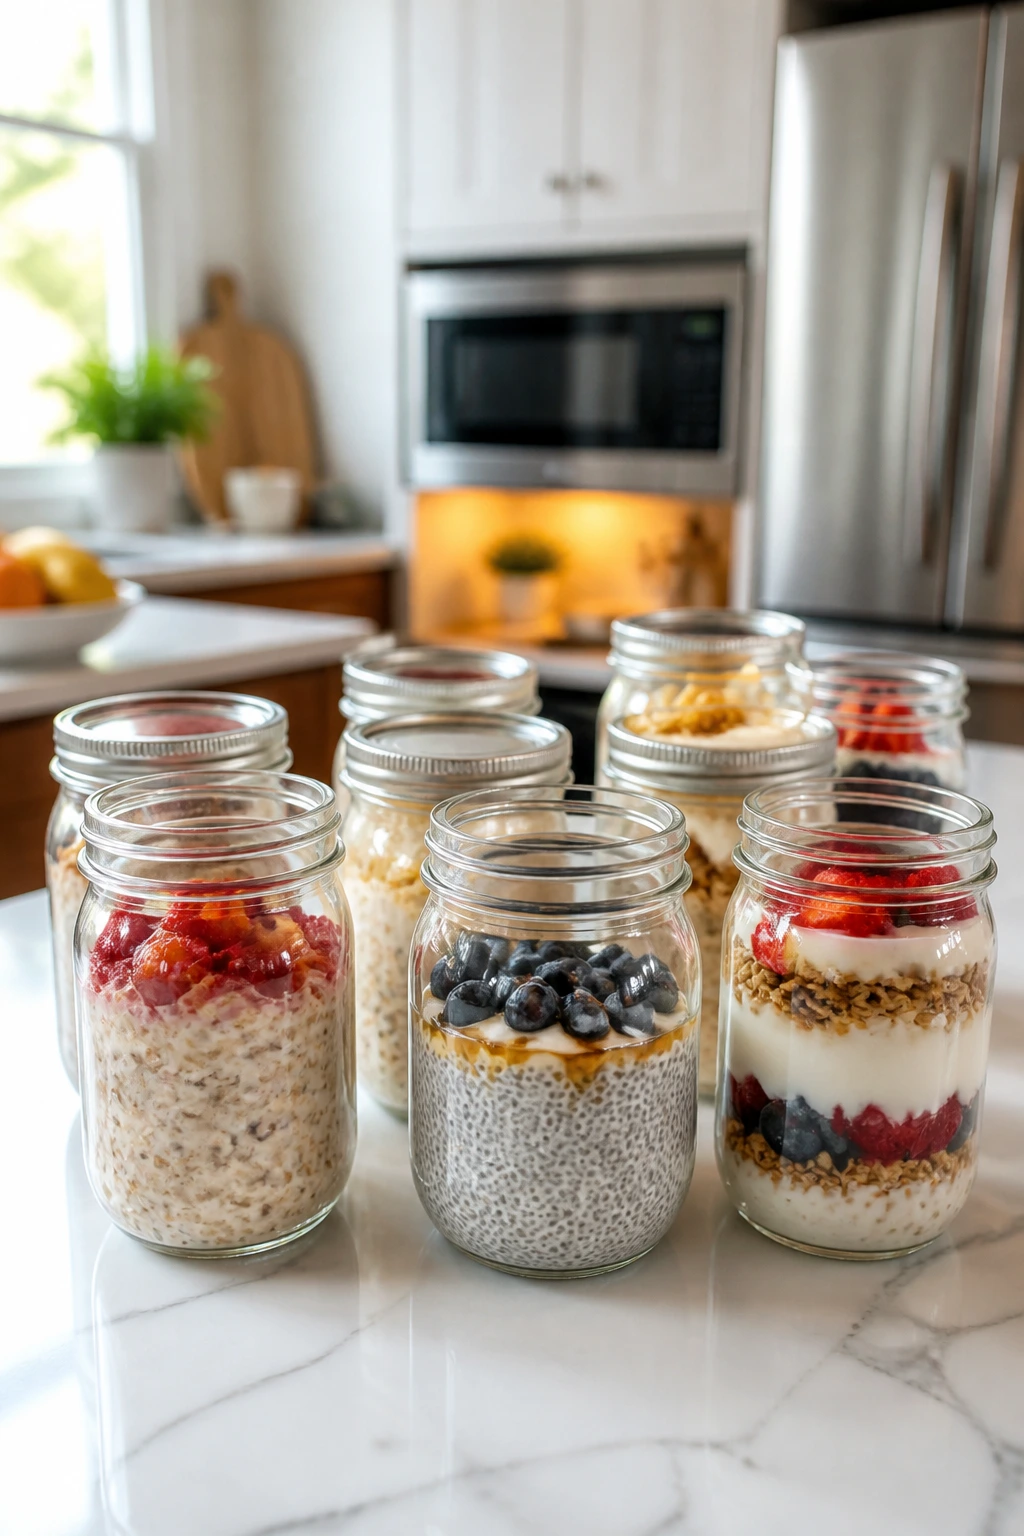
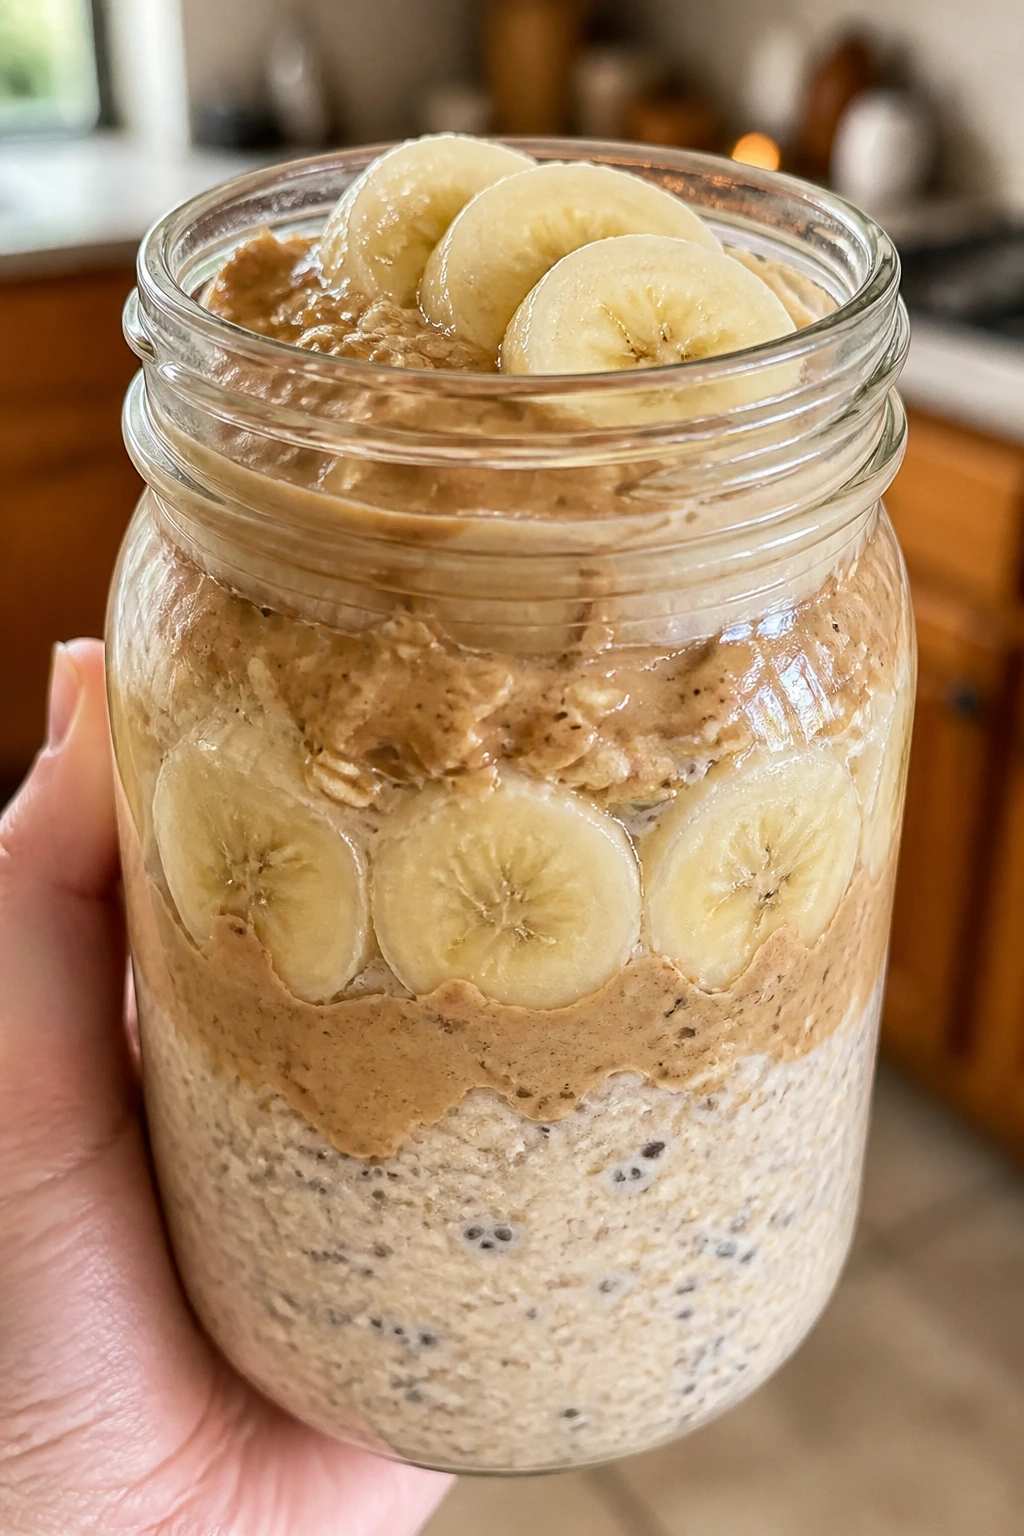
1. Peanut Butter Banana Overnight Oats
Cold jars of peanut butter banana overnight oats make the fridge look organized even when the rest of the house is not. The oats soften into a thick, spoonable texture, the banana sweetens everything without turning it sugary, and the peanut butter leaves that nutty, slightly salty finish that keeps breakfast from tasting flat.
Why It Works:
This is one of the few breakfasts that gets better after a night in the fridge. The oats absorb the liquid and the chia seeds tighten the texture, so you wake up to something creamy instead of watery. It also travels well in a jar, which matters when breakfast has to make it from kitchen counter to backpack without drama.
Key Ingredients:
- 2 cups rolled oats — Old-fashioned oats stay chewy and do not turn mushy overnight.
- 2 cups milk — Dairy or unsweetened almond milk both work.
- 1 cup plain Greek yogurt — Gives the oats a thicker, higher-protein base.
- 2 ripe bananas, mashed — Use spotted bananas for natural sweetness.
- 1/2 cup creamy peanut butter — Stir it into the liquid first so it blends cleanly.
- 3 tablespoons chia seeds — They absorb liquid and help the oats thicken.
- 2 tablespoons maple syrup — Optional, but helpful if the bananas are not very sweet.
- 1 teaspoon vanilla extract — Makes the whole bowl taste fuller.
- 1/2 teaspoon ground cinnamon — Adds a soft bakery smell.
- Pinch of fine salt — Keeps the peanut butter from tasting dull.
- Sliced banana and chopped peanuts for topping — Add these right before eating.
Quick Steps:
- Whisk the base: In a large bowl, whisk the milk, yogurt, mashed bananas, peanut butter, maple syrup, vanilla, cinnamon, and salt until mostly smooth.
- Add the dry ingredients: Stir in the oats and chia seeds, scraping the bottom of the bowl so no dry pockets hide underneath.
- Portion the jars: Divide the mixture between 4 jars or airtight containers, leaving about 1 inch of space at the top.
- Chill overnight: Cover and refrigerate for at least 4 hours, though overnight gives the best texture.
- Finish and eat: Top with sliced banana and chopped peanuts just before serving. If the oats feel too thick, stir in 1 to 2 tablespoons of milk.
Equipment for This Recipe:
- Large mixing bowl
- Whisk
- Measuring cups and spoons
- 4 jars or lidded containers
- Spoon for stirring
How to Serve This Dish:
Serve it cold straight from the jar, or let it sit for 10 minutes if you want a softer spoonful. A handful of berries on the side keeps the bowl from feeling heavy, and a spoonful of granola on top adds the crunch the oats lose overnight.
Pro Tips for This Recipe:
- Stir the peanut butter into the liquid first; if you add oats too soon, it clings to the spoon in stubborn blobs.
- Use rolled oats, not quick oats. Quick oats go soft fast and lose the chew that makes this breakfast worth making.
- Keep the banana topping separate until morning if you want the jar to look neat.
- A tiny pinch of salt matters more than people think. Without it, the whole jar tastes sleepy.
Variations on This Dish:
- Chocolate Banana Peanut Butter: Stir in 1 tablespoon cocoa powder and top with mini chocolate chips.
- Berry Peanut Butter Swirl: Replace one banana with 1 cup mashed strawberries and finish with blueberries.
- Nut-Free Sunflower Jar: Swap the peanut butter for sunflower seed butter and use pumpkin seeds instead of peanuts.
Common Mistakes to Avoid with This Dish:
- Don’t use instant oats unless you want a soft, almost pudding-like jar by morning.
- Don’t skip the extra liquid check after chilling; oats thicken unevenly, and one dry spoonful can ruin the first bite.
- Don’t pack granola into the jar the night before. It goes limp and loses the whole point.
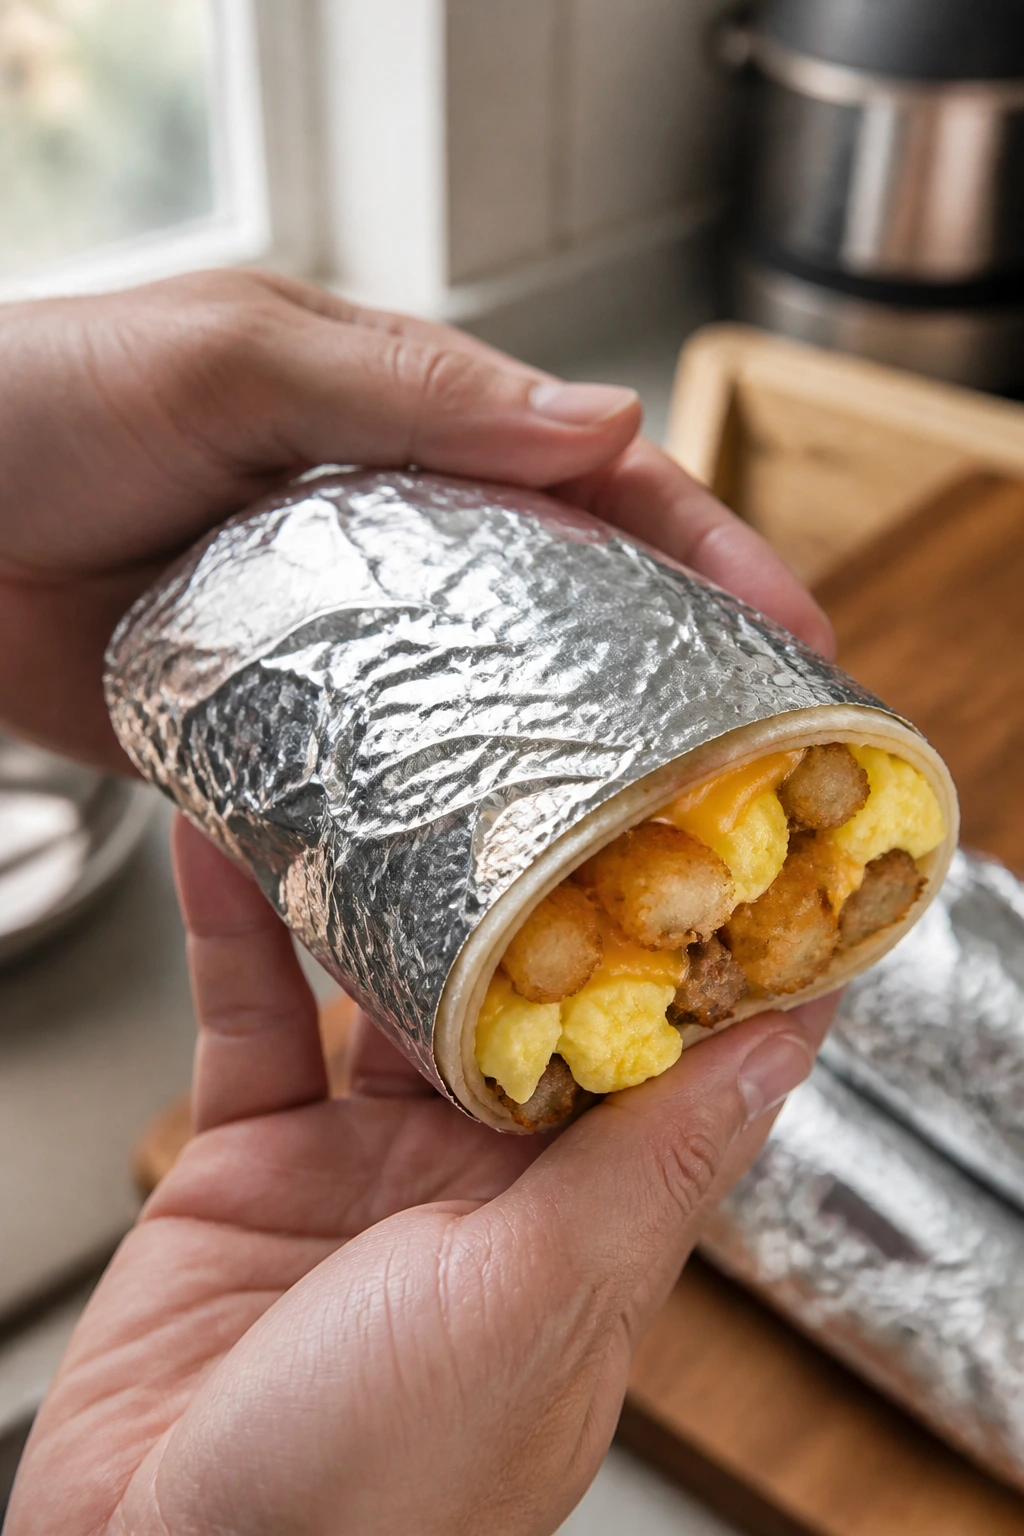
2. Freezer Breakfast Burritos
Freezer breakfast burritos are the workhorses of a school-morning kitchen. They are soft where they should be soft, a little crisp on the edges if you reheat them in a skillet, and sturdy enough to survive parchment wrap and a freezer bag without falling apart. The filling is flexible, which matters when your fridge is half full and your morning is not.
Why It Works:
A burrito solves three problems at once: it contains the mess, it holds heat well, and it can be made in a batch without much extra effort. The eggs stay tender if you cook them gently, the potatoes give the burrito some heft, and the cheese helps everything stick together. That makes it useful on days when breakfast needs to be eaten standing up.
Key Ingredients:
- 8 large eggs — Soft scrambled eggs keep the filling from drying out.
- 1/4 cup milk — Helps the eggs stay tender.
- 1 tablespoon butter — For cooking the eggs.
- 1/2 teaspoon salt — Eggs need seasoning or they taste thin.
- 1/4 teaspoon black pepper — A small amount goes a long way.
- 2 cups frozen diced hash browns — Give the burritos body and make them filling.
- 1 cup cooked breakfast sausage crumbles or black beans — Choose the version your family actually eats.
- 1 cup shredded cheddar cheese — Melts into the eggs and helps bind the filling.
- 8 flour tortillas, 8-inch size — The right size folds without tearing.
- 1/2 cup salsa for serving — Keep it on the side so the burritos stay crisp.
Quick Steps:
- Cook the potatoes: Heat a skillet over medium-high heat and cook the hash browns in a thin layer for 8 to 10 minutes, stirring once or twice, until the edges turn golden.
- Scramble the eggs: Whisk the eggs, milk, salt, and pepper, then cook them in butter over medium-low heat until just set and still soft.
- Warm the filling: Stir the sausage or beans into the potatoes and warm everything through.
- Assemble the burritos: Warm the tortillas for 15 to 20 seconds so they bend easily, then fill each one with eggs, potatoes, meat or beans, and cheese.
- Roll and cool: Fold the sides in, roll tightly, and let the burritos cool before wrapping them in parchment or foil.
- Freeze and reheat: Freeze for up to 2 months. Reheat from frozen in the microwave for 1 to 2 minutes, then crisp in a skillet or toaster oven if you want the outside a little snappier.
Equipment for This Recipe:
- Large skillet
- Spatula
- Mixing bowl
- Parchment paper or foil
- Baking sheet for freezing
How to Serve This Dish:
Serve the burritos with salsa, fruit, or a small cup of yogurt if you want the plate to feel complete. If you are packing them for the car, wrap each one in foil and cut it in half after reheating so the steam can escape instead of soaking the tortilla.
Pro Tips for This Recipe:
- Cool the filling before rolling. Warm filling creates steam, and steam turns tortillas gummy in the freezer.
- Don’t overfill the burritos. A neat, compact burrito is better than a heroic one that splits open.
- If you want a cleaner freezer stash, wrap each burrito in parchment first, then slide the whole stack into a freezer bag.
- Use mild cheese for kids and sharper cheddar for adults; both melt well, but the flavor changes the whole burrito.
Variations on This Dish:
- Southwest Burritos: Add diced green chiles, black beans, and a little cumin to the eggs.
- Sausage and Potato Burritos: Keep the potato layer generous and swap in browned breakfast sausage.
- Bean-and-Cheese Burritos: Skip the meat and add extra cheese plus a spoonful of refried beans.
Common Mistakes to Avoid with This Dish:
- Don’t wrap burritos while the filling is still hot; that trapped steam makes the tortilla soggy.
- Don’t put salsa inside the burrito unless you like a soft, leaking mess by the time you reheat it.
- Don’t microwave them too long. The eggs go bouncy fast, and no one wants a rubbery burrito.
3. Greek Yogurt Parfait Jars
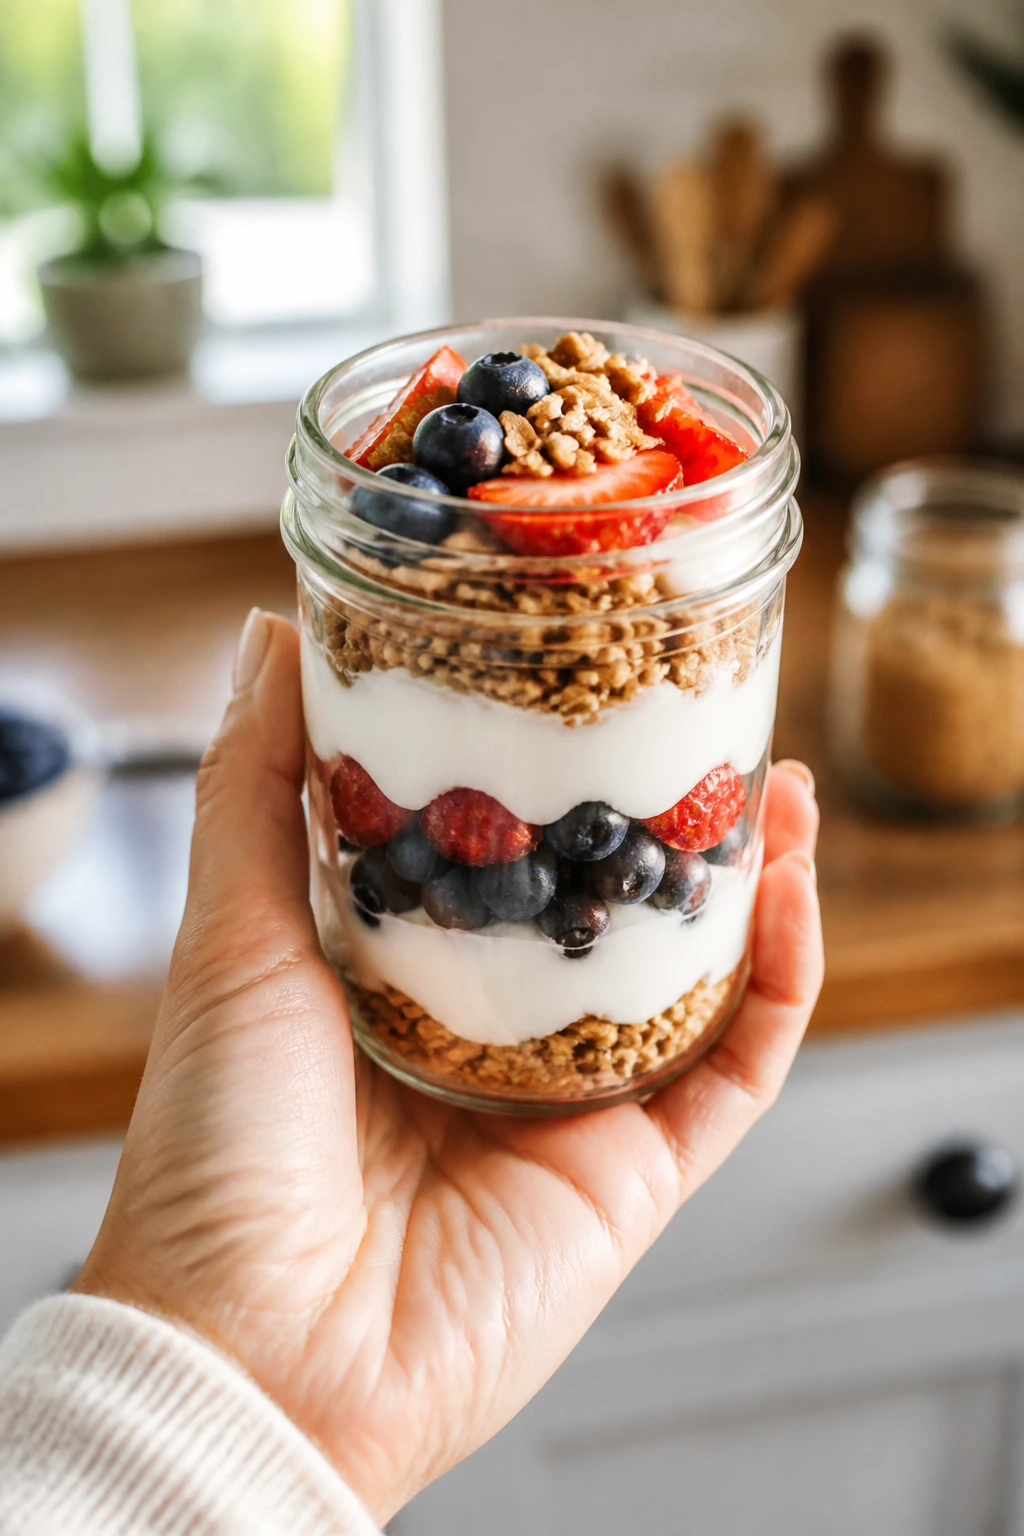
A good parfait jar needs more than pretty layers. It needs yogurt that stays thick, fruit that does not drown the granola, and enough crunch to keep the whole thing from turning into sweet mush by lunchtime. Done right, the spoon hits cold fruit, creamy yogurt, and crisp cereal in one bite.
Why It Works:
Parfaits are useful because they require almost no cooking and almost no morning brainpower. The yogurt gives protein, the fruit gives freshness, and the granola gives texture. If you prep the jars with the wet ingredients separated from the crunchy ones, they hold up for a couple of days without losing their shape.
Key Ingredients:
- 3 cups plain Greek yogurt — Thick yogurt holds the layers instead of sliding around.
- 2 tablespoons honey or maple syrup — Sweeten the yogurt lightly, not heavily.
- 1 teaspoon vanilla extract — Makes plain yogurt taste less sharp.
- 2 cups mixed berries — Fresh or thawed frozen berries both work.
- 1 1/2 cups granola — Add it close to serving time if you want crunch.
- 2 tablespoons chia seeds — They add body and a little staying power.
- 1/2 cup sliced almonds or walnuts — Optional, but nice for extra crunch.
- 1 banana, sliced just before serving — Use it only if you are eating soon.
Quick Steps:
- Sweeten the yogurt: Stir the yogurt, honey, and vanilla together in a bowl until smooth.
- Layer the jars: Spoon yogurt into the bottom of each jar, then add fruit, chia seeds, and a layer of granola.
- Repeat if needed: Build one more small layer if your jars are tall enough, but do not crowd the top.
- Store smart: Keep the jars sealed in the fridge for up to 2 days. If you want the granola crisp, pack it separately and add it in the morning.
- Serve cold: Add banana slices or nuts right before eating.
Equipment for This Recipe:
- 4 jars or containers with lids
- Mixing bowl
- Spoon
- Knife and cutting board
- Small measuring cups
How to Serve This Dish:
Parfaits are best cold and straight from the fridge, with the crunchy topping added at the last second. Pair them with a boiled egg or toast if you want to turn the jar into something that keeps a child full until lunch.
Pro Tips for This Recipe:
- Use thick yogurt. Thin yogurt turns the whole jar soupy and lets the fruit sink.
- Layer a little yogurt between fruit layers if your berries are juicy; it slows the slide.
- Keep granola out of the moisture path. A dry top layer stays crisp longest.
- If your berries are extra tart, add the honey to the yogurt instead of drizzling it on top.
Variations on This Dish:
- Tropical Jar: Use mango, pineapple, and coconut flakes instead of berries.
- Chocolate Crunch Jar: Stir cocoa powder into the yogurt and top with cacao nibs or chocolate granola.
- Nut-Free School Jar: Skip nuts and use sunflower seeds or pumpkin seeds instead.
Common Mistakes to Avoid with This Dish:
- Don’t store granola directly against wet yogurt for hours. It goes soft fast.
- Don’t overfill the jars. If the lid presses into the top layer, the whole thing gets messy.
- Don’t use flavored yogurt that is already very sweet unless you want dessert for breakfast.
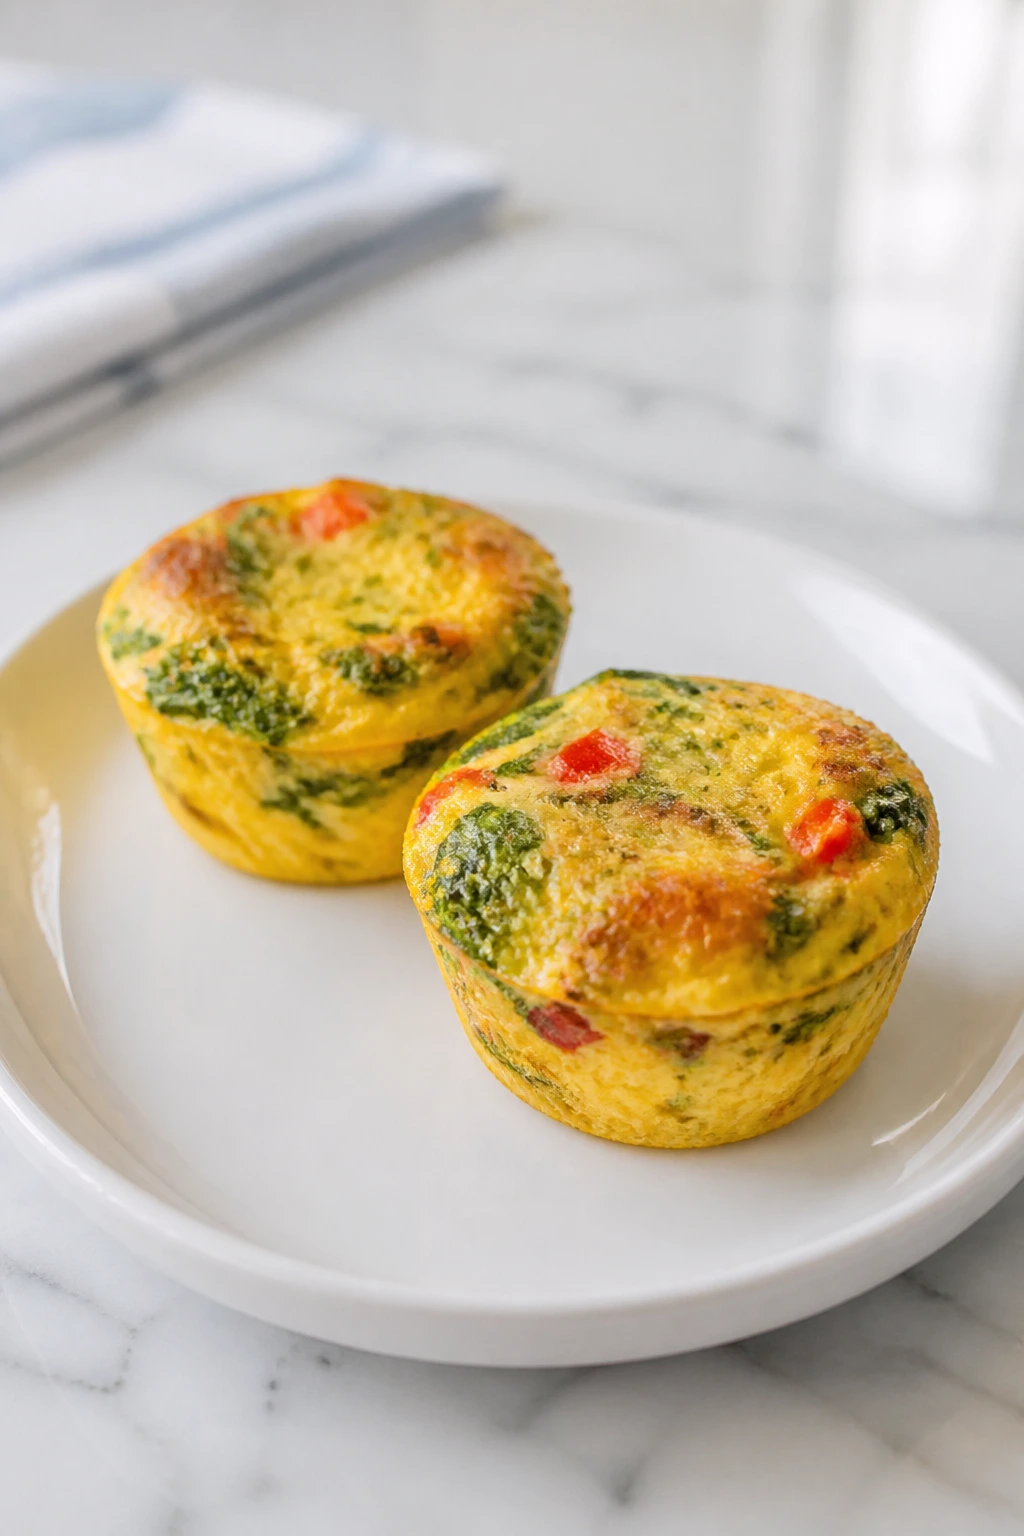
4. Veggie Egg Muffins
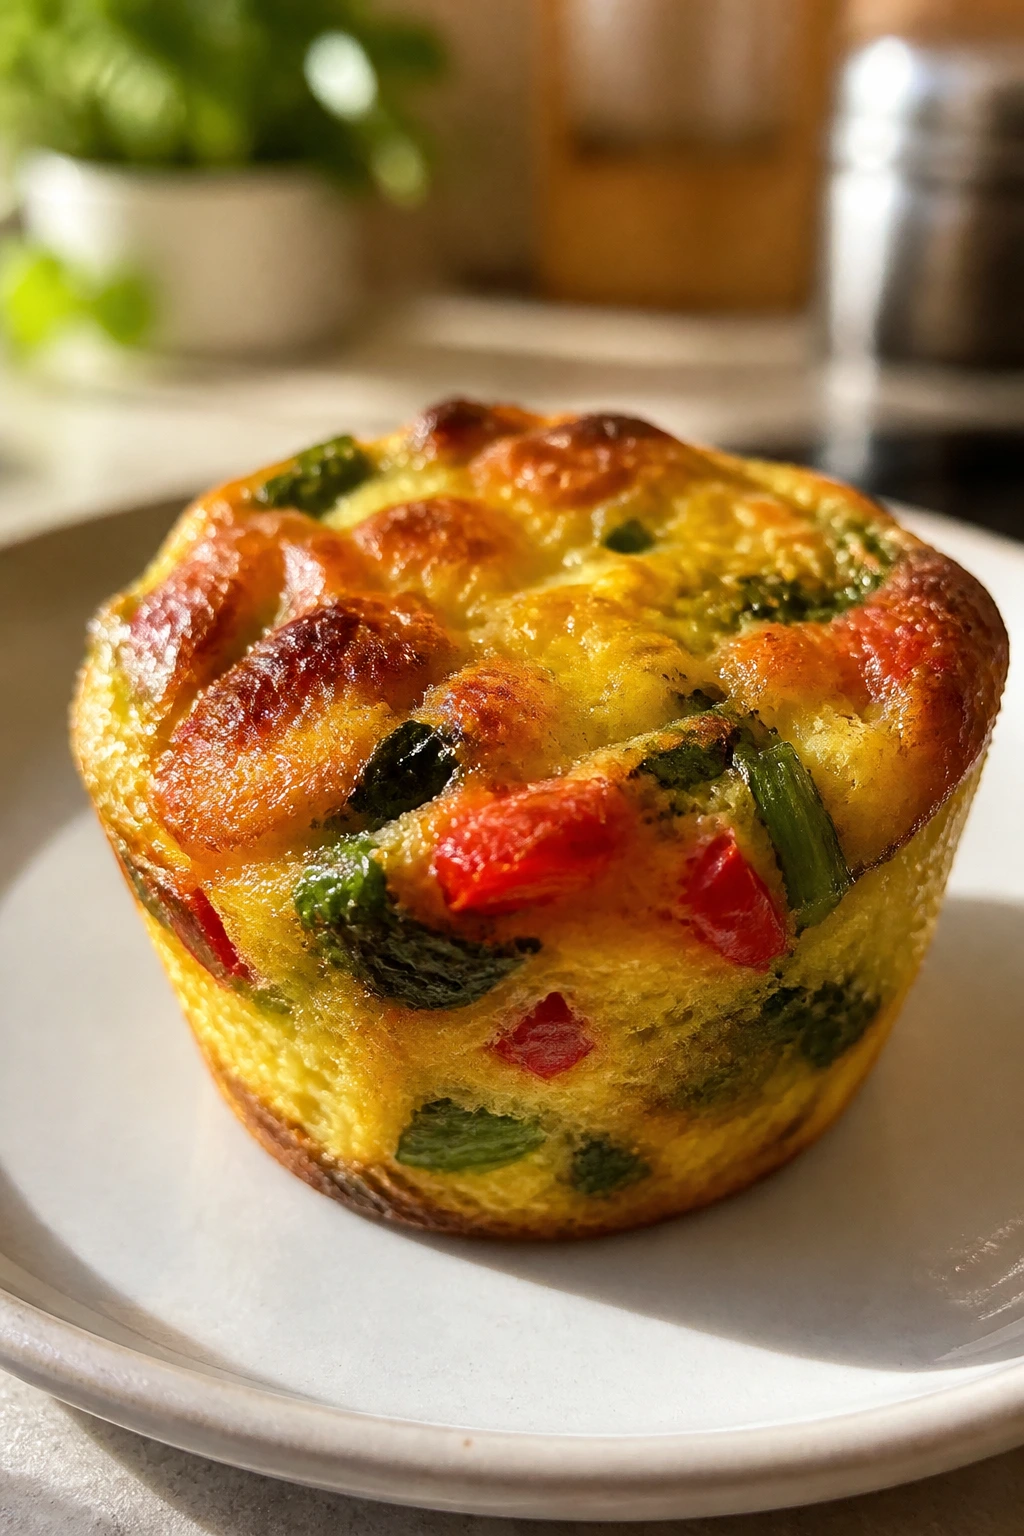
Veggie egg muffins are small, tidy, and far more useful than their size suggests. They bake into little savory puffs with browned tops and tender centers, and they taste better than they look when they are made with enough salt and a little cheese. That matters, because bland egg cups are a waste of a muffin tin.
Why It Works:
Egg muffins are one of the easiest ways to feed more than one person without standing over a skillet. The eggs set around the vegetables, the cheese helps keep them from tasting dry, and the muffin shape makes them easy to reheat one at a time. They are especially useful when one child wants breakfast now and the other one wants it later.
Key Ingredients:
- 10 large eggs — The base of the muffins.
- 1/4 cup milk — Lightens the eggs a little.
- 1 cup diced bell peppers — Add color and a bit of sweetness.
- 1/2 cup chopped spinach, squeezed dry — Too much water ruins the texture.
- 1/2 cup finely diced onion — Gives the muffins a savory backbone.
- 3/4 cup shredded cheddar — Helps the muffins hold together.
- 1/2 teaspoon salt — Eggs need this more than people expect.
- 1/4 teaspoon black pepper — Enough to wake up the flavor.
- 1 tablespoon olive oil or nonstick spray — For the muffin tin.
Quick Steps:
- Preheat and prep: Heat the oven to 350°F and grease a 12-cup muffin tin well.
- Cook the vegetables: Sauté the peppers and onion over medium heat for 2 to 3 minutes, just until the onion turns translucent.
- Mix the eggs: Whisk the eggs, milk, salt, and pepper in a bowl until the mixture looks even and a little frothy.
- Fill the cups: Divide the vegetables and cheese among the muffin cups, then pour in the egg mixture until each cup is about 3/4 full.
- Bake and cool: Bake for 18 to 22 minutes, until the centers are set and a thermometer reads 160°F in the middle. Cool for 5 minutes before loosening them from the tin.
Equipment for This Recipe:
- 12-cup muffin tin
- Whisk
- Mixing bowl
- Skillet
- Measuring cups and spoons
How to Serve This Dish:
Serve two egg muffins with toast and fruit for a small breakfast, or three with hash browns if the morning is longer than usual. They also pack well in a thermos-style lunch container if you want to send breakfast along after the bus leaves.
Pro Tips for This Recipe:
- Squeeze any leafy greens dry before adding them. Wet spinach leaks into the eggs and makes the bottom rubbery.
- Do not overbake. Egg muffins keep cooking in the hot tin, and a dry center is hard to rescue.
- Silicone liners make cleanup easier, but a well-greased metal tin browns the edges better.
- Make a double batch and freeze half. The second tray is almost no extra work.
Variations on This Dish:
- Bacon Cheddar Cups: Swap in crumbled cooked bacon and a little extra cheese.
- Mushroom Spinach Cups: Use sautéed mushrooms instead of peppers for a deeper savory taste.
- Southwest Cups: Add black beans, a pinch of cumin, and chopped jalapeño.
Common Mistakes to Avoid with This Dish:
- Don’t use raw watery vegetables straight from the fridge without cooking them first.
- Don’t fill the cups to the brim. The eggs puff while baking and spill over.
- Don’t try to pry them out hot. Let them sit for a few minutes so they release cleanly.
5. Sheet Pan Pancakes with Blueberries
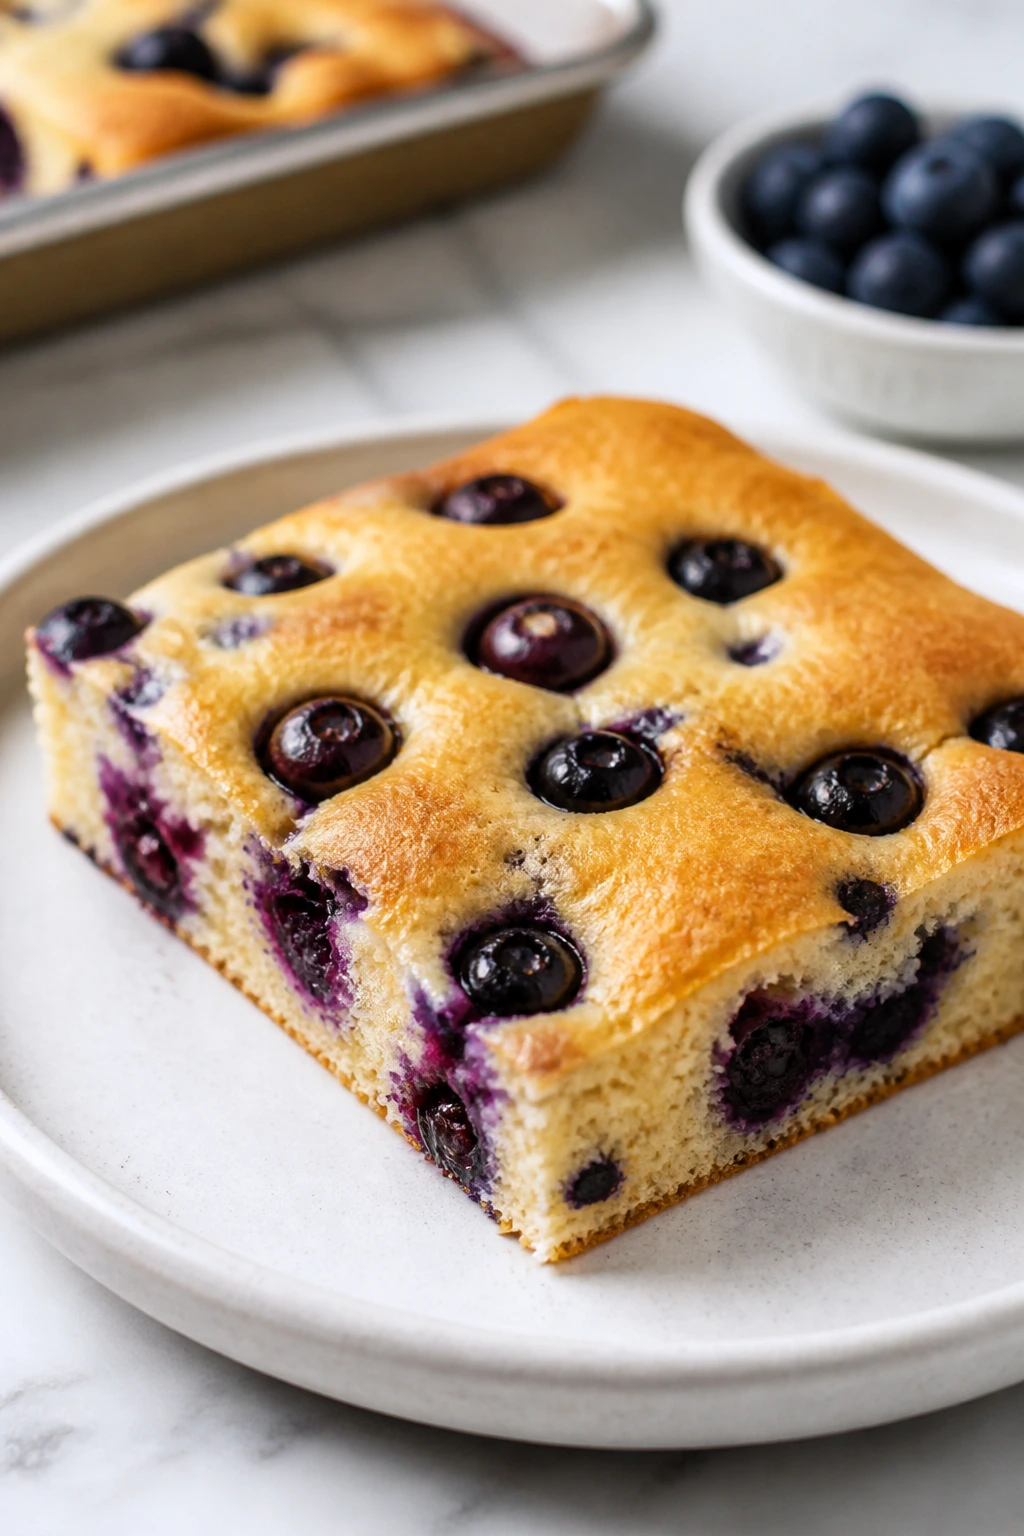
Sheet pan pancakes solve the part people dislike: standing over a stove flipping round after round while the first pancake cools on the plate. Baked on one tray, they come out soft in the middle, lightly bronzed on top, and easy to cut into squares that fit a kid’s hand better than a floppy stack ever will.
Why It Works:
This method feeds a crowd without making breakfast feel like a shift job. The batter spreads into one even layer, the blueberries stay distributed better than they do in a skillet, and the edges get just enough color to taste toasted. It is also the sort of recipe you can slice and freeze without much loss.
Key Ingredients:
- 2 cups all-purpose flour — Gives the pancakes enough structure.
- 2 tablespoons sugar — Just enough sweetness for the batter.
- 2 teaspoons baking powder — Helps the pancakes rise.
- 1/2 teaspoon baking soda — Works with the buttermilk for lift.
- 1/2 teaspoon salt — Keeps the batter from tasting dull.
- 2 large eggs — Add richness and help bind the batter.
- 2 cups buttermilk — Makes the crumb tender.
- 4 tablespoons melted butter — Adds flavor and helps the top brown.
- 1 teaspoon vanilla extract — Gives the batter a warmer smell.
- 1 cup blueberries — Fresh or frozen both work.
- Butter or spray for the pan — So the pancakes release cleanly.
Quick Steps:
- Preheat the oven: Heat it to 425°F and line a rimmed sheet pan with parchment or grease it well.
- Mix the batter: Whisk the flour, sugar, baking powder, baking soda, and salt in one bowl, and the eggs, buttermilk, butter, and vanilla in another.
- Combine gently: Stir the wet ingredients into the dry just until no streaks of flour remain; the batter should look lumpy, not smooth.
- Add the berries and bake: Spread the batter into the pan and scatter the blueberries over the top. Bake for 12 to 15 minutes, until the center springs back when touched lightly.
- Cut and serve: Let it rest for 5 minutes, then slice into squares.
Equipment for This Recipe:
- Rimmed sheet pan
- Parchment paper
- Mixing bowls
- Whisk
- Spatula or knife for cutting
How to Serve This Dish:
Serve squares with maple syrup, yogurt, or a little butter on top. For a fuller plate, add sausage links or scrambled eggs so the pancakes do not have to carry the whole breakfast alone.
Pro Tips for This Recipe:
- Do not overmix. A rough batter gives you tender pancakes; a smooth one tends to bake up tough.
- If you use frozen berries, toss them with a teaspoon of flour first so they do not sink.
- Use the full sheet pan if you want thinner squares and faster baking. A smaller pan makes thicker, softer pancakes.
- Let the pancakes cool before slicing if you want cleaner edges.
Variations on This Dish:
- Chocolate Chip Sheet Pancakes: Swap blueberries for mini chocolate chips.
- Banana Nut Sheet Pancakes: Add sliced banana and chopped walnuts before baking.
- Cinnamon Swirl Pancakes: Drizzle cinnamon sugar over the top and drag a knife through it once.
Common Mistakes to Avoid with This Dish:
- Don’t pour the batter into a pan that is too small. It bakes unevenly and turns gummy in the middle.
- Don’t chase a smooth batter. Lumps are fine and usually better.
- Don’t leave the blueberries in one corner. Scatter them so every square gets a few.
6. Cinnamon Apple Baked Oatmeal
Cinnamon apple baked oatmeal smells like a breakfast pan that has been doing a better job than the rest of the house. It bakes into something soft and sliceable, with tender oats, soft apple pieces, and just enough cinnamon to make the kitchen smell like it has its life together. I keep coming back to this one because it reheats without getting sad.
Why It Works:
Baked oatmeal sits right between a cereal bowl and a breakfast casserole. The oats soak up the milk and eggs, the apples add moisture, and the top turns a little toasty around the edges. That means you can cut it into squares, refrigerate them, and warm them without losing the texture.
Key Ingredients:
- 3 cups rolled oats — The oats need enough structure to bake into slices.
- 1 teaspoon baking powder — Helps the oatmeal rise slightly.
- 2 teaspoons ground cinnamon — The main flavor here.
- 1/2 teaspoon salt — Keeps the sweetness balanced.
- 2 cups milk — Dairy or unsweetened plant milk both work.
- 2 large eggs — Bind the bake together.
- 1/3 cup maple syrup — Sweetens without making it cloying.
- 2 apples, diced — Use a tart-sweet variety like Honeycrisp or Granny Smith.
- 2 tablespoons melted butter or coconut oil — Adds richness.
- 1 teaspoon vanilla extract — Rounds out the flavor.
- 1/3 cup chopped walnuts, optional — For crunch on top.
Quick Steps:
- Prep the dish: Heat the oven to 350°F and grease an 8×8-inch or 9×9-inch baking dish.
- Mix the dry ingredients: Stir the oats, baking powder, cinnamon, and salt in a bowl.
- Whisk the wet ingredients: In another bowl, whisk the milk, eggs, maple syrup, melted butter, and vanilla.
- Combine and bake: Fold the apples into the oat mixture, pour in the wet mixture, and stir once more. Bake for 35 to 40 minutes until the center is set and the top looks golden.
- Cool and cut: Let it rest for at least 10 minutes so the slices hold together.
Equipment for This Recipe:
- Baking dish
- Mixing bowls
- Whisk
- Knife and cutting board
- Measuring cups and spoons
How to Serve This Dish:
Serve it warm with a spoonful of yogurt, or cut it into squares for a grab-and-go breakfast. A drizzle of milk over the top makes it feel more like a bowl, while a few apple slices on the side keep the plate from feeling heavy.
Pro Tips for This Recipe:
- Dice the apples small if you want the oatmeal to slice cleanly.
- If your apples are very juicy, use a little less milk so the bake does not turn loose.
- Do not skip the rest time. Hot baked oatmeal crumbles, and that is annoying when you are trying to pack it.
- Reheat slices with a damp paper towel over them so they do not dry out.
Variations on This Dish:
- Pumpkin Spice Oatmeal: Add 1/2 cup pumpkin puree and a pinch of nutmeg.
- Berry Baked Oatmeal: Swap the apples for 2 cups mixed berries.
- Apple Cranberry Oatmeal: Add dried cranberries and a little orange zest.
Common Mistakes to Avoid with This Dish:
- Don’t use instant oats; they make the bake soft in the wrong way.
- Don’t cut into it hot. It needs a minute to set or the squares fall apart.
- Don’t overload it with fruit. Too much moisture makes the bottom soggy.
7. Breakfast Quesadillas with Eggs and Cheese

Breakfast quesadillas are the cleanest way I know to turn eggs into a handheld meal. The tortilla gets crisp in a skillet, the cheese melts into the eggs, and the whole thing slices into wedges that are easy to eat without a fork or a major cleanup. That alone earns it a place in a school-morning rotation.
Why It Works:
A quesadilla is quick, but speed is not the only reason it belongs here. The tortilla protects the filling, the cheese holds the layers together, and the eggs stay soft if you keep the heat at medium instead of blasting them. It is also one of the easiest breakfast recipes to adapt for picky eaters.
Key Ingredients:
- 4 large flour tortillas — Use the soft kind that bends without cracking.
- 6 large eggs — Enough for a filling center.
- 2 tablespoons milk — Keeps the eggs tender.
- 1 tablespoon butter — For the scramble.
- 1 cup shredded cheddar or Monterey Jack — Melts well.
- 1 cup cooked black beans or cooked breakfast sausage — Adds substance.
- 1/2 cup salsa — Serve on the side.
- 2 tablespoons chopped green onion — Optional, but good for brightness.
- 1 tablespoon oil — For crisping the tortillas.
Quick Steps:
- Scramble the eggs: Whisk the eggs and milk, then cook them slowly in butter over medium-low heat until soft and barely set.
- Warm the filling: Stir in the beans or sausage and let the mixture heat through.
- Assemble the quesadillas: Lay tortillas on a work surface, add cheese, spoon on the egg mixture, and fold each one in half.
- Crisp the tortillas: Heat oil in a skillet over medium heat and cook each quesadilla for 2 to 3 minutes per side until golden and the cheese melts.
- Rest and cut: Let them sit for 1 minute, then cut into wedges.
Equipment for This Recipe:
- Large skillet
- Spatula
- Mixing bowl
- Knife
- Cutting board
How to Serve This Dish:
Serve the wedges with salsa, sour cream, or sliced fruit. They are best hot, but they also hold well for a short car ride if you wrap them in foil and cut them after they rest for a minute.
Pro Tips for This Recipe:
- Keep the heat at medium or the tortilla browns before the cheese melts.
- Use less filling than you think you need. Quesadillas collapse when they are overstuffed.
- Dry salsa is not a thing, so keep wet condiments on the side.
- If you are packing them, let the quesadilla cool slightly before wrapping or the steam softens the shell.
Variations on This Dish:
- Bean-and-Cheese Quesadilla: Skip the meat and add extra beans.
- Turkey and Pepper Jack Quesadilla: Swap in chopped turkey and a little more spice.
- Veggie Quesadilla: Add sautéed peppers, onions, and spinach.
Common Mistakes to Avoid with This Dish:
- Don’t crank the heat to speed things up; the tortilla burns before the filling heats.
- Don’t let the eggs cook dry before they go into the quesadilla.
- Don’t add salsa inside unless you want a soggy middle.
8. Make-Ahead French Toast Sticks
French toast sticks are the rare breakfast that can feel fun without being sugary junk. Cut into neat strips, baked until golden, and dusted with cinnamon, they are easy to dip and even easier to freeze. For kids, that shape matters more than people admit.
Why It Works:
Thick bread soaks up the custard without collapsing, and baking instead of pan-frying makes it practical for larger batches. Once frozen, the sticks reheat well in a toaster oven or air fryer and keep the outside a little crisp. That is the difference between “breakfast that survived” and “breakfast that slumped.”
Key Ingredients:
- 1 loaf thick-cut brioche or challah — Sturdy bread gives the best texture.
- 4 large eggs — The custard base.
- 1 cup milk — Whole milk makes them richer.
- 1 teaspoon vanilla extract — Adds warmth.
- 1 teaspoon cinnamon — Classic French toast flavor.
- 2 tablespoons sugar — Just enough sweetness.
- Pinch of salt — Keeps the custard balanced.
- 3 tablespoons butter, melted or softened — For the pan.
- Maple syrup for serving — Keep it nearby.
Quick Steps:
- Prep the bread: Heat the oven to 375°F and cut the bread into thick sticks.
- Mix the custard: Whisk the eggs, milk, vanilla, cinnamon, sugar, and salt until smooth.
- Dip quickly: Submerge each stick for just a second or two per side so it absorbs custard without going soggy.
- Bake the sticks: Arrange them on a greased sheet pan and bake for 10 minutes, flip, then bake 5 to 7 minutes more until golden.
- Cool and freeze: Let them cool fully before freezing in a single layer. Reheat in a toaster oven or air fryer until hot.
Equipment for This Recipe:
- Sheet pan
- Parchment paper
- Mixing bowl
- Whisk
- Bread knife
How to Serve This Dish:
Serve French toast sticks with maple syrup, berries, or a little yogurt for dipping. A small pile of scrambled eggs on the side turns them into a more complete breakfast without making the plate fussy.
Pro Tips for This Recipe:
- Day-old bread works better than fresh bread because it holds the custard without falling apart.
- Do not soak the sticks too long. A quick dip is enough.
- Freeze them in a single layer before bagging so they do not fuse into one frozen clump.
- A toaster oven gives you the nicest finish, but an air fryer works too.
Variations on This Dish:
- Cinnamon-Sugar Sticks: Toss the baked sticks in cinnamon sugar while warm.
- Stuffed Sticks: Spread thin cream cheese between two slices before cutting.
- Dairy-Free Sticks: Use oat milk and brush the pan with oil instead of butter.
Common Mistakes to Avoid with This Dish:
- Don’t use thin sandwich bread. It goes limp fast.
- Don’t freeze the sticks while they are still warm.
- Don’t oversoak the bread or the centers get wet and heavy.
9. Berry Spinach Smoothie Packs
Smoothie packs are the quiet fix for mornings when chewing feels optional. The freezer bag holds the fruit and greens, the blender does the rest, and the result is cold, thick, and fast enough to drink while someone is still trying to zip a backpack. When done right, the spinach disappears and the berries do the talking.
Why It Works:
This is a prep-ahead meal with almost no morning friction. The frozen fruit chills the smoothie, the oats and yogurt give it enough substance to count as breakfast, and the spinach adds color without turning it grassy. If you portion the packs properly, you can make several in one go and stop thinking about breakfast for a few days.
Key Ingredients:
- 3 cups frozen mixed berries — The main flavor and the cold base.
- 2 ripe bananas, sliced and frozen — They sweeten and thicken.
- 2 cups baby spinach — Mild enough to vanish behind the fruit.
- 1/2 cup rolled oats — Helps the smoothie feel like a meal.
- 1 cup plain Greek yogurt — Adds protein and body.
- 1 cup milk — Add more if you want a thinner smoothie.
- 2 tablespoons peanut butter or almond butter — Optional, but useful for staying power.
- 1 tablespoon honey — Only if the berries are tart.
Quick Steps:
- Pack the freezer bags: Divide the berries, banana slices, spinach, and oats into 4 freezer bags.
- Freeze flat: Lay the bags flat so they freeze into stackable slabs instead of odd little lumps.
- Blend the smoothie: Empty one pack into a blender and add yogurt, milk, and nut butter.
- Adjust the texture: Blend until smooth, adding a splash more milk if it is too thick to move.
- Serve right away: Pour into cups with lids if you are heading out.
Equipment for This Recipe:
- Blender
- Freezer bags or containers
- Measuring cups
- Spoon
- Reusable cups with lids
How to Serve This Dish:
Pour it into a travel cup and pair it with toast, a boiled egg, or a cheese stick if you want something more substantial. Smoothies are best served immediately, since they thicken as they sit and separate if ignored.
Pro Tips for This Recipe:
- Freeze the banana slices on a tray first if they stick together in one lump.
- Put the spinach near the middle of the pack so it does not cling to the bag.
- Use frozen fruit rather than ice. Ice waters the smoothie down, while fruit keeps the flavor.
- If your blender struggles, add the liquid first so the blades catch easier.
Variations on This Dish:
- Tropical Green Smoothie: Swap berries for pineapple, mango, and a little coconut milk.
- Chocolate Peanut Butter Smoothie: Add cocoa powder and use peanut butter for a milkshake feel.
- Protein Boost Smoothie: Add an extra scoop of Greek yogurt or a spoonful of cottage cheese.
Common Mistakes to Avoid with This Dish:
- Don’t use too much spinach. A little disappears; a lot tastes like lawn clippings.
- Don’t skimp on liquid so hard that the blender stalls.
- Don’t let the smoothie sit around too long. It gets thick and loses the fresh texture fast.
10. Ham and Cheese Crescent Roll-Ups

Ham and cheese crescent roll-ups are the kind of breakfast that disappears from the tray before the oven has cooled. The dough bakes into flaky layers, the cheese melts into the ham, and the whole thing feels warm and handheld in a way that plain toast never does. They are not subtle. That is the point.
Why It Works:
Crescent dough gives you a fast pastry shell without needing any real dough work. Ham and cheese are already a familiar combo for most kids, and the shape makes it easy to hold with one hand while the other is doing something more urgent. A little mustard or seasoning gives the rolls enough bite so they do not taste flat.
Key Ingredients:
- 1 can refrigerated crescent roll dough — One standard 8-count can.
- 8 thin slices deli ham — Thin slices roll more neatly.
- 8 slices cheddar or Swiss cheese — Use slices that melt smoothly.
- 1 tablespoon Dijon mustard — Optional, but nice for adults.
- 2 tablespoons melted butter — For brushing the tops.
- 1 teaspoon everything bagel seasoning — Optional, for the outside.
Quick Steps:
- Heat the oven: Preheat to 375°F and line a baking sheet with parchment.
- Fill the rolls: Unroll the crescent dough, spread a little mustard if using, then place ham and cheese on each triangle.
- Roll tightly: Start at the wide end and roll toward the point, tucking the seam under.
- Brush and bake: Brush the tops with melted butter and sprinkle with seasoning. Bake for 12 to 15 minutes until puffed and golden.
- Cool briefly: Let them sit for 2 minutes so the cheese does not lava out on the first bite.
Equipment for This Recipe:
- Baking sheet
- Parchment paper
- Pastry brush or spoon
- Knife
- Measuring spoon
How to Serve This Dish:
Serve the roll-ups warm with fruit, apple slices, or a few pickle spears if your crowd likes a salty breakfast. They also work well split in half for younger kids who would rather not wrestle a whole pastry.
Pro Tips for This Recipe:
- Use thin deli ham. Thick slices make rolling messy and uneven.
- Keep the cheese away from the very edges or it leaks out and scorches on the pan.
- If you want a more savory shell, add everything bagel seasoning or sesame seeds on top.
- Line the tray. Melted cheese on bare metal is annoying to scrub later.
Variations on This Dish:
- Turkey and Swiss Roll-Ups: Swap the ham for turkey and use Swiss cheese.
- Spinach and Ham Roll-Ups: Add a few dry spinach leaves for a little color.
- Jalapeño Cheddar Roll-Ups: Add a small strip of jalapeño for older kids or adults.
Common Mistakes to Avoid with This Dish:
- Don’t overfill the crescents; they split open and spill cheese.
- Don’t bake them on a bare pan unless you enjoy scraping.
- Don’t let them sit too long before serving. Crescent dough is best warm.
11. Spinach Feta Breakfast Wraps
Spinach feta wraps bring a little more savory flavor than the average egg wrap. The feta gives salt and tang, the spinach softens into the eggs, and the tortilla keeps everything together without making the breakfast feel heavy. This is the one I make when I want breakfast to taste grown-up but still move fast.
Why It Works:
Eggs and spinach are a familiar combination, but feta changes the mood. It adds enough sharpness that you do not need a ton of extra seasoning, and the wraps can be cooked, rolled, and reheated without getting weird. They are especially good for mornings when you want something warm but not greasy.
Key Ingredients:
- 6 large eggs — The base of the filling.
- 1/4 cup milk — Helps the eggs stay soft.
- 1 tablespoon olive oil — For the skillet.
- 2 cups fresh spinach — Cooks down fast.
- 1/2 cup crumbled feta — Salty and bright.
- 4 large flour tortillas — Soft enough to fold without cracking.
- 1/2 cup diced roasted red peppers — Optional, but useful for sweetness.
- Salt and black pepper — Add only a little; feta is already salty.
Quick Steps:
- Wilt the spinach: Warm the olive oil in a skillet over medium heat and cook the spinach for 30 to 60 seconds, just until it collapses.
- Scramble the eggs: Whisk the eggs, milk, salt, and pepper, then cook them slowly until soft and just set.
- Combine the filling: Stir the spinach and roasted red peppers into the eggs, then fold in the feta.
- Fill and wrap: Spoon the mixture into the tortillas and roll them into tight wraps, folding the sides in first.
- Toast lightly: If you want a crisp outside, place them seam-side down in a dry skillet for 1 to 2 minutes per side.
Equipment for This Recipe:
- Skillet
- Spatula
- Mixing bowl
- Knife and cutting board
- Measuring cups and spoons
How to Serve This Dish:
Serve the wraps with cucumber slices, fruit, or a spoonful of yogurt on the side. If you are packing them, wrap them in foil so they stay warm and hold their shape until the last bite.
Pro Tips for This Recipe:
- Dry the spinach well if it was frozen or washed heavily. Water is the enemy of a good wrap.
- Warm tortillas for a few seconds before filling so they do not crack at the fold.
- Keep the eggs soft; they keep cooking in the wrap.
- Feta crumbles better when it is cold. Leave it in the fridge until the last minute.
Variations on This Dish:
- Mediterranean Wrap: Add chopped olives and a little tomato, but only if you will eat it right away.
- Egg-White Wrap: Use all egg whites and a touch more feta for a lighter version.
- Spicy Wrap: Add a pinch of chili flakes or a spoonful of hot sauce.
Common Mistakes to Avoid with This Dish:
- Don’t load the wrap with wet filling; it tears the tortilla.
- Don’t overcook the eggs before wrapping. Dry eggs make the whole thing feel dusty.
- Don’t skip the brief skillet toast if you want a wrap that stays sealed.
12. Maple Sausage Breakfast Sliders
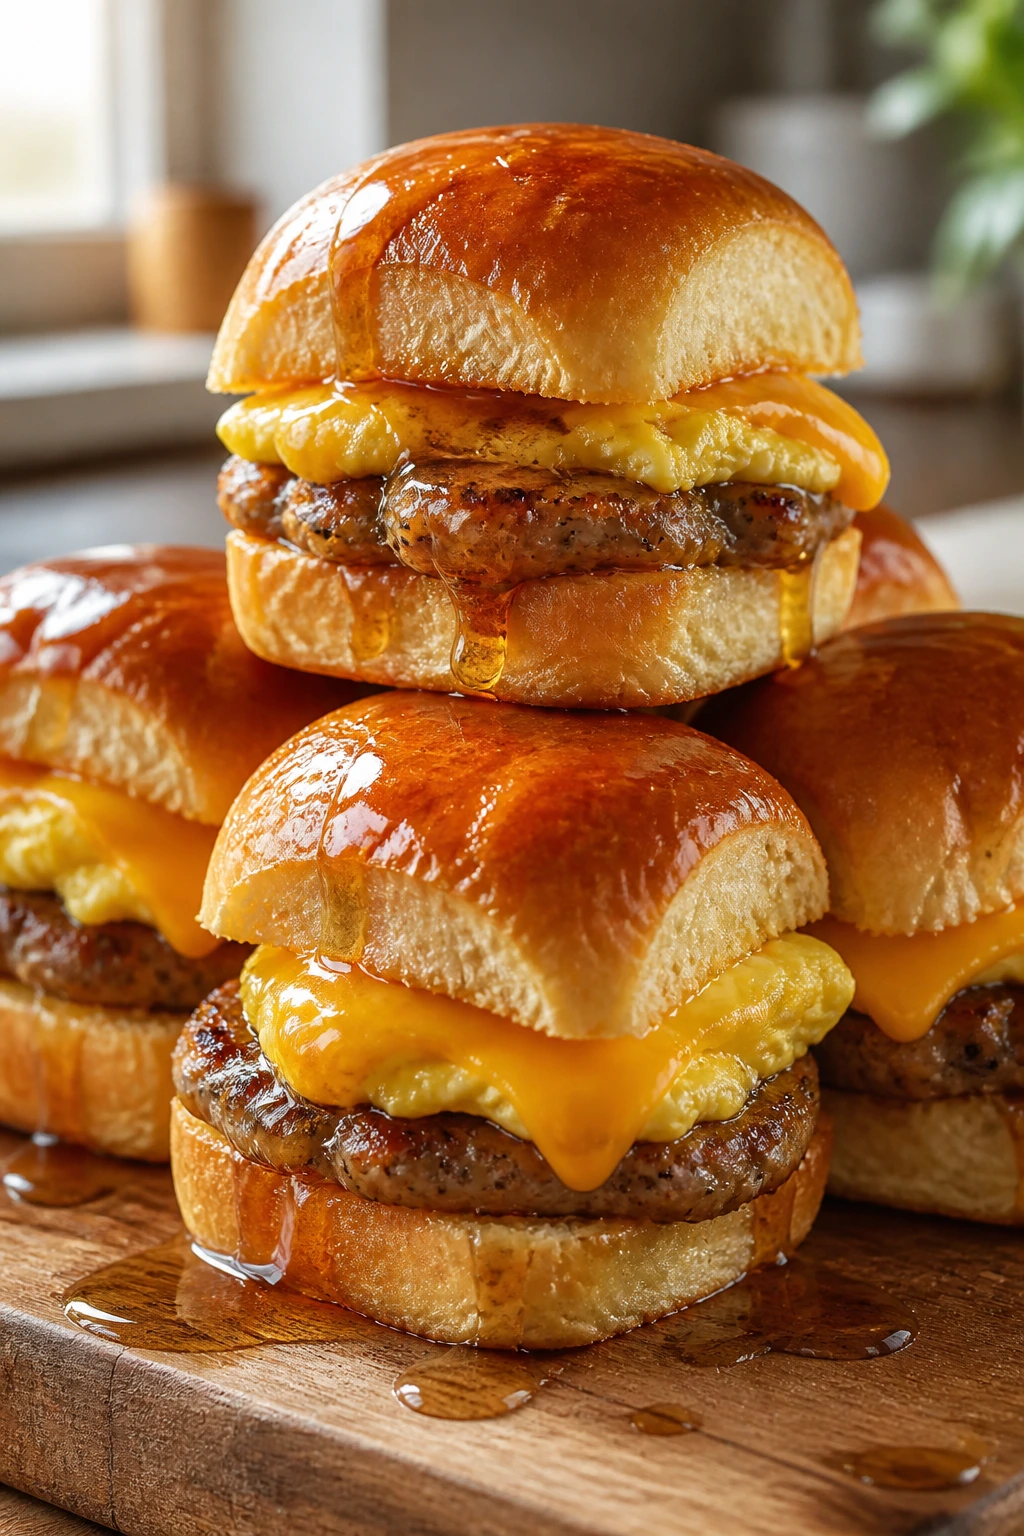
Maple sausage breakfast sliders are what happens when breakfast decides it wants to be a little louder. Soft buns, savory sausage, warm eggs, and melted cheese all stack into a neat little sandwich that feels substantial without being clumsy. The maple brush on top gives the whole thing a glossy finish and a faint sweet edge that keeps the sausage from feeling one-note.
Why It Works:
Sliders are useful because they are portioned already. No slicing, no plating puzzle, no guesswork about whether a child wants half a sandwich or three quarters of one. The buns absorb a little flavor from the butter and maple without turning soggy if you bake them just long enough.
Key Ingredients:
- 8 Hawaiian rolls or mini slider buns — Soft buns hold the filling well.
- 8 small breakfast sausage patties — Pre-cooked or cooked from raw.
- 6 large eggs — Scrambled softly.
- 1 tablespoon butter — For the eggs.
- 8 slices American or cheddar cheese — Melts neatly over the sausage.
- 2 tablespoons maple syrup — For brushing the tops.
- 2 tablespoons melted butter — Mixed with the maple syrup.
- 1 tablespoon sesame seeds or poppy seeds, optional — For a little crunch.
Quick Steps:
- Cook the sausage: Brown or heat the sausage patties until cooked through and hot.
- Scramble the eggs: Cook the eggs in butter over medium-low heat until soft and just set.
- Assemble the sliders: Split the buns, layer in sausage, eggs, and cheese, then set the tops on.
- Brush the tops: Mix the maple syrup with melted butter and brush it over the buns. Sprinkle seeds on top if you want them.
- Warm through: Bake at 350°F for 8 to 10 minutes, just until the cheese melts and the buns turn glossy.
Equipment for This Recipe:
- Skillet
- Baking dish
- Spatula
- Pastry brush
- Knife
How to Serve This Dish:
Serve the sliders warm with fruit or hash browns. They are also easy to cut in half for smaller kids, which makes them less likely to get squished in a little hand.
Pro Tips for This Recipe:
- Toast or lightly bake the buns before assembling if you want them to hold up longer.
- Use sausage patties that fit the buns. A giant patty hanging out the sides looks messy and falls apart.
- Brush the maple butter on the tops, not the filling. That keeps the bottom from getting soggy.
- If you are making them ahead, cool them before wrapping so the steam does not soften the buns.
Variations on This Dish:
- Bacon Maple Sliders: Swap the sausage patties for bacon strips or bacon patties.
- Veggie Breakfast Sliders: Use plant-based sausage and keep the cheese.
- Hot-Honey Sliders: Add a tiny drizzle of hot honey for adults who want more bite.
Common Mistakes to Avoid with This Dish:
- Don’t overdo the maple syrup. You want a hint, not dessert.
- Don’t pile too much egg into each slider or the bun slides apart.
- Don’t bake uncovered for too long or the buns dry out.
13. Cottage Cheese Pancakes
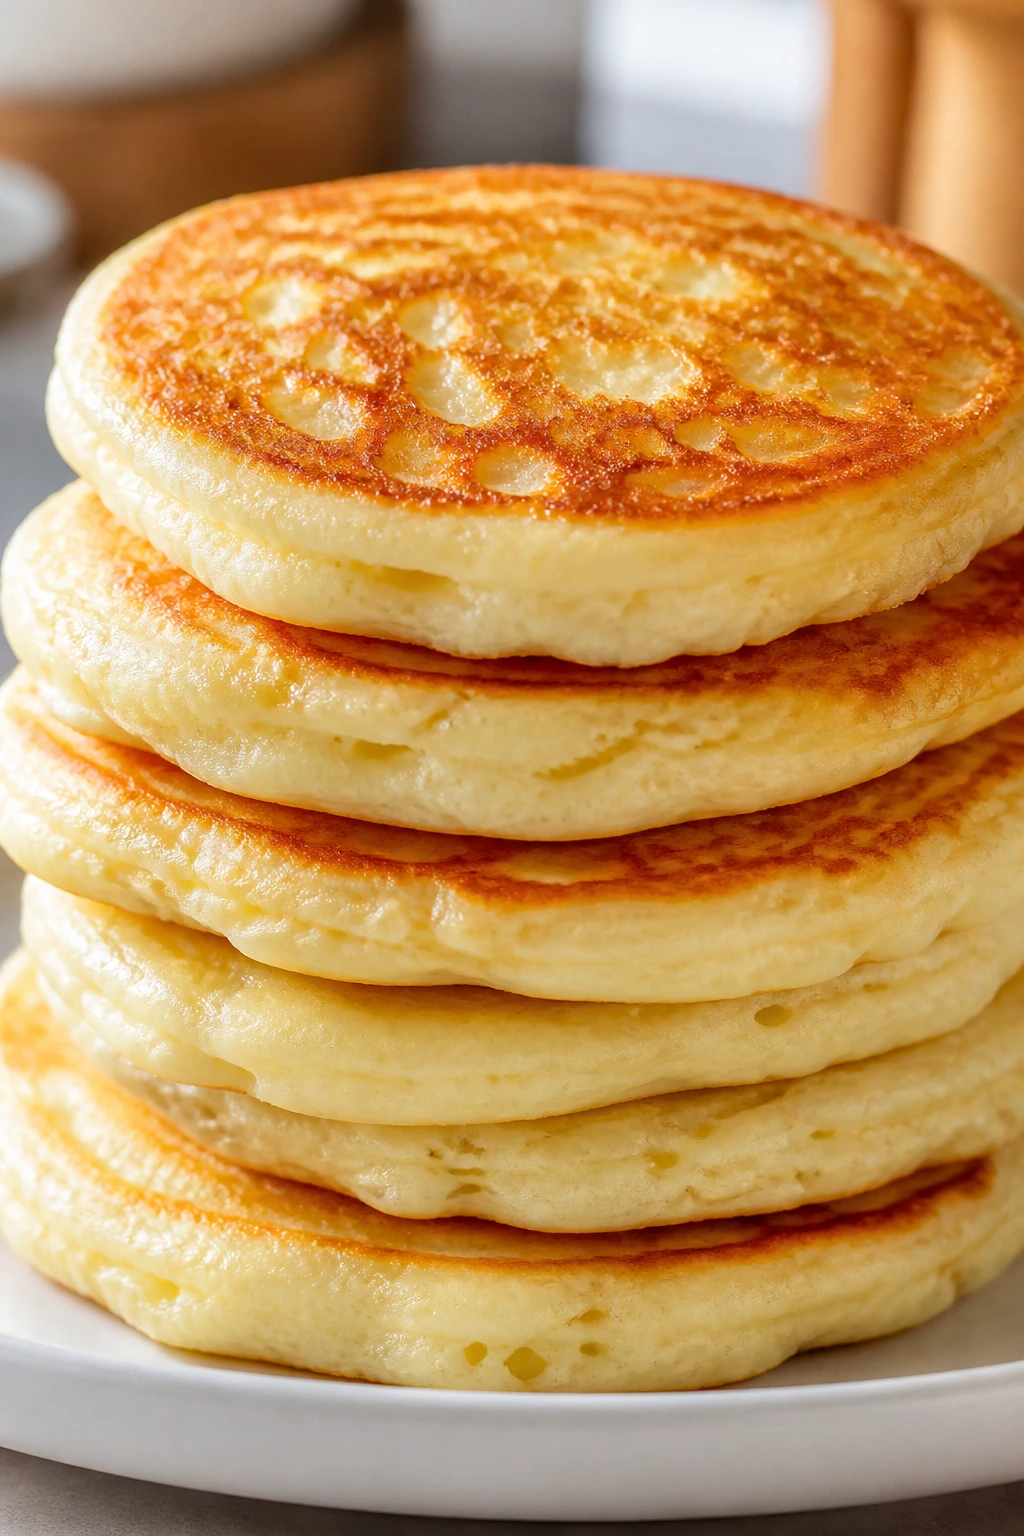
Cottage cheese pancakes are soft, pale, and a little surprising the first time you make them well. The cottage cheese disappears into the batter, the pancakes come out tender and lightly crisp at the edges, and the texture lands somewhere between a crepe and a classic pancake. They are worth making when you want breakfast to feel filling without turning heavy.
Why It Works:
Cottage cheese adds protein and moisture at the same time, which is rare and useful. Blending the batter smooth keeps the curds from showing unless you want them to, and the pancakes cook fast because they are usually smaller than standard flapjacks. They also reheat more gracefully than a lot of homemade pancakes.
Key Ingredients:
- 1 cup cottage cheese — Full-fat or low-fat both work.
- 4 large eggs — Bind the batter.
- 1 cup rolled oats or all-purpose flour — Oats make the pancakes heartier.
- 1 teaspoon baking powder — Helps them puff a little.
- 1 teaspoon vanilla extract — Useful if you want a softer flavor.
- 1 tablespoon honey or maple syrup — Optional sweetness.
- 1/2 teaspoon cinnamon — Good with fruit toppings.
- Butter or oil for the skillet — Keeps the pancakes from sticking.
Quick Steps:
- Blend the batter: Combine the cottage cheese, eggs, oats or flour, baking powder, vanilla, honey, and cinnamon in a blender until smooth.
- Rest briefly: Let the batter sit for 5 minutes so the oats thicken it a little.
- Cook small pancakes: Heat a skillet over medium-low and spoon in 2-tablespoon portions of batter.
- Flip gently: Cook until bubbles appear and the edges look set, then flip and cook the other side until golden.
- Serve warm: Keep the pancakes small; they are easier to turn and less likely to tear.
Equipment for This Recipe:
- Blender
- Skillet or griddle
- Spatula
- Measuring cups and spoons
- Ladle or spoon
How to Serve This Dish:
Serve with berries, sliced banana, or a drizzle of maple syrup. A side of yogurt makes the plate feel fuller, and the pancakes are sturdy enough to stack without collapsing into a mess.
Pro Tips for This Recipe:
- Blend until smooth if you want a classic pancake texture. Leave it a little grainy if you like visible curds.
- Keep the heat at medium-low. High heat browns the outside before the center cooks.
- Make them small. The batter is delicate, and tiny pancakes flip more cleanly.
- These freeze well, so stack them with parchment and reheat in the toaster.
Variations on This Dish:
- Lemon Cottage Cheese Pancakes: Add lemon zest and serve with berries.
- Savory Herb Pancakes: Skip the honey and cinnamon, then add chives and black pepper.
- Chocolate Chip Pancakes: Fold in mini chocolate chips at the end.
Common Mistakes to Avoid with This Dish:
- Don’t make the pancakes huge. They break when you flip them.
- Don’t use a blazing hot skillet.
- Don’t skip the rest time if your batter feels loose; it needs a minute to thicken.
14. Banana Bread Oatmeal Cups
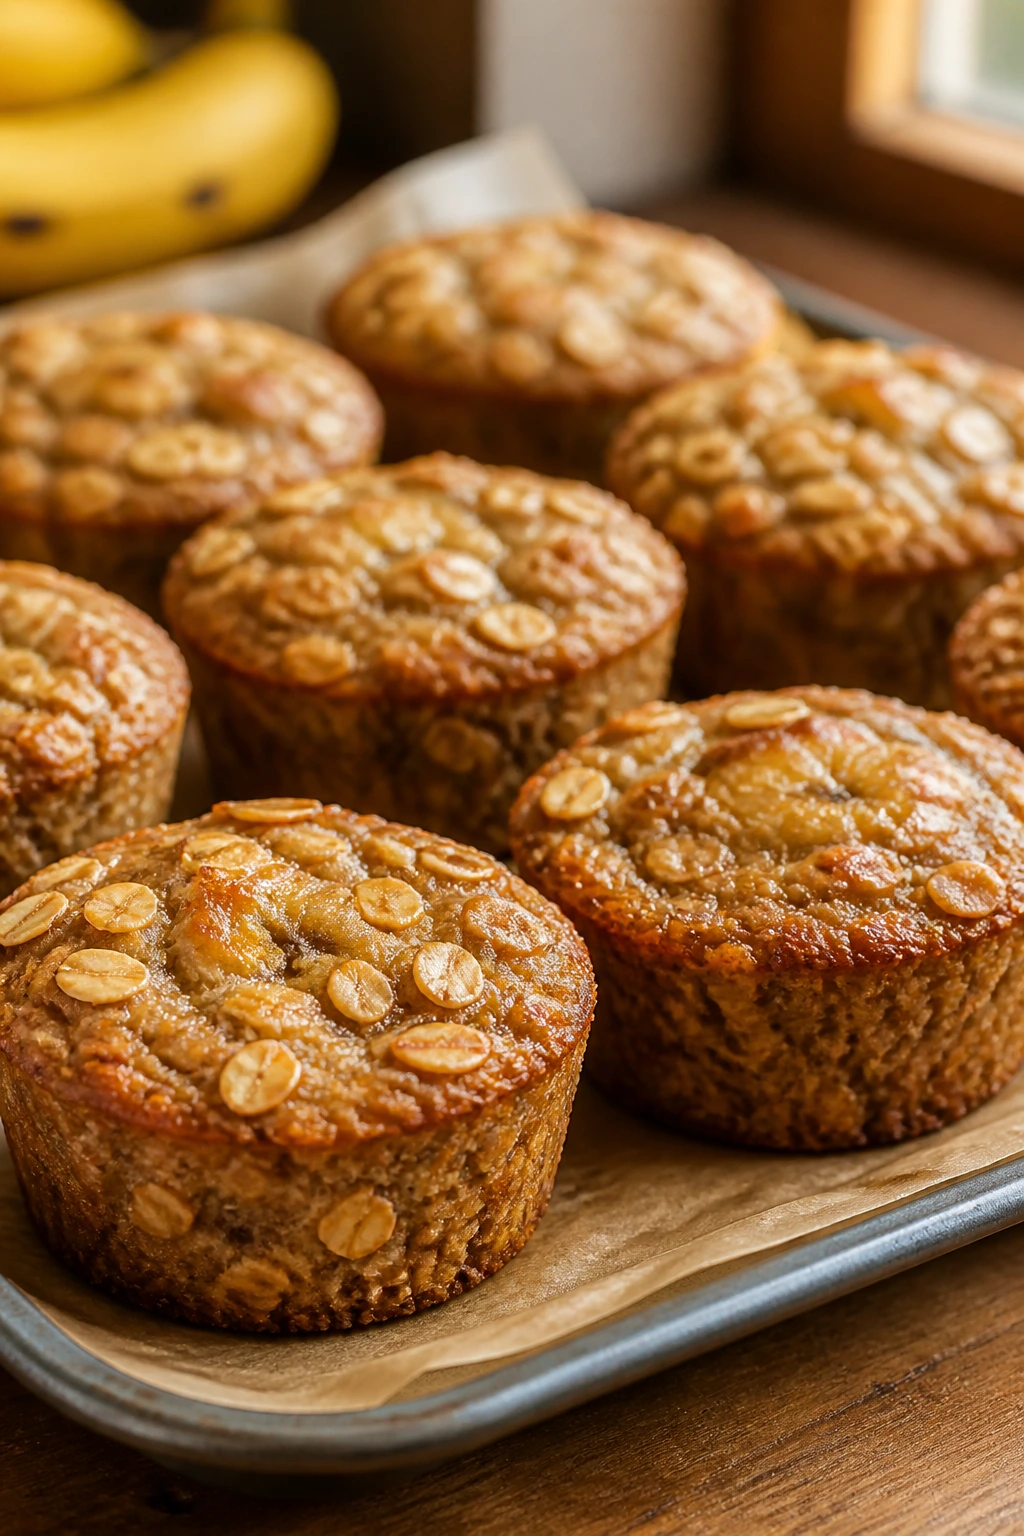
Banana bread oatmeal cups taste like the dependable cousin of banana bread. They are moist, lightly sweet, and easy to grab with one hand, but they do not require a loaf pan or a long cooling window. When a school morning is moving too fast for a slice-and-plate situation, these are the answer.
Why It Works:
The oats soak up the banana and milk, the eggs help the cups set, and the muffin shape means they freeze and reheat without much effort. They are also a practical use for overripe bananas that are too soft to slice but perfect for mashing. The little cup shape makes them portable in a way a crumbly loaf never is.
Key Ingredients:
- 3 ripe bananas, mashed — Use the speckled ones for the best flavor.
- 2 large eggs — Bind the cups.
- 2 cups rolled oats — The main structure.
- 1 cup milk — Helps the oats soften.
- 1 teaspoon baking powder — Gives the cups a little lift.
- 1 teaspoon ground cinnamon — Banana bread’s obvious friend.
- 1/4 teaspoon salt — Sharpens the sweet flavor.
- 1/2 cup chopped walnuts — Optional for crunch.
- 1/3 cup mini chocolate chips — Optional if your family likes a sweeter version.
- 1 teaspoon vanilla extract — Rounds out the flavor.
- 2 tablespoons maple syrup — Optional, depending on banana sweetness.
Quick Steps:
- Preheat and prep: Heat the oven to 350°F and line a muffin tin with paper liners.
- Mix the batter: Stir the bananas, eggs, milk, vanilla, and maple syrup together, then add the oats, baking powder, cinnamon, salt, and any mix-ins.
- Rest the batter: Let it sit for 5 minutes so the oats absorb some liquid.
- Portion and bake: Divide the mixture into the muffin cups and bake for 20 to 24 minutes until the tops look set and lightly browned.
- Cool before storing: Let the cups sit in the tin for 5 minutes, then move them to a rack.
Equipment for This Recipe:
- Muffin tin
- Mixing bowl
- Fork or whisk
- Measuring cups and spoons
- Paper liners or nonstick spray
How to Serve This Dish:
Serve one or two cups with yogurt, milk, or fruit depending on how much breakfast the morning requires. They are easy to slip into a lunchbox for later in the day if the school day starts too fast for a full sit-down meal.
Pro Tips for This Recipe:
- Use very ripe bananas. Pale bananas do not give enough flavor or sweetness.
- Line the tin so the cups release cleanly.
- Let the batter rest. The oats need a moment to soften before baking.
- These taste even better on the second day, when the banana flavor settles in.
Variations on This Dish:
- Blueberry Banana Cups: Fold in a handful of blueberries.
- Nut-Free Cups: Skip the walnuts and use sunflower seeds instead.
- Pumpkin Banana Cups: Replace 1/2 cup banana with pumpkin puree and add a little nutmeg.
Common Mistakes to Avoid with This Dish:
- Don’t underbake them. The centers should feel set, not damp.
- Don’t use bananas that are still firm and pale.
- Don’t pack too many mix-ins or the cups stop holding together.
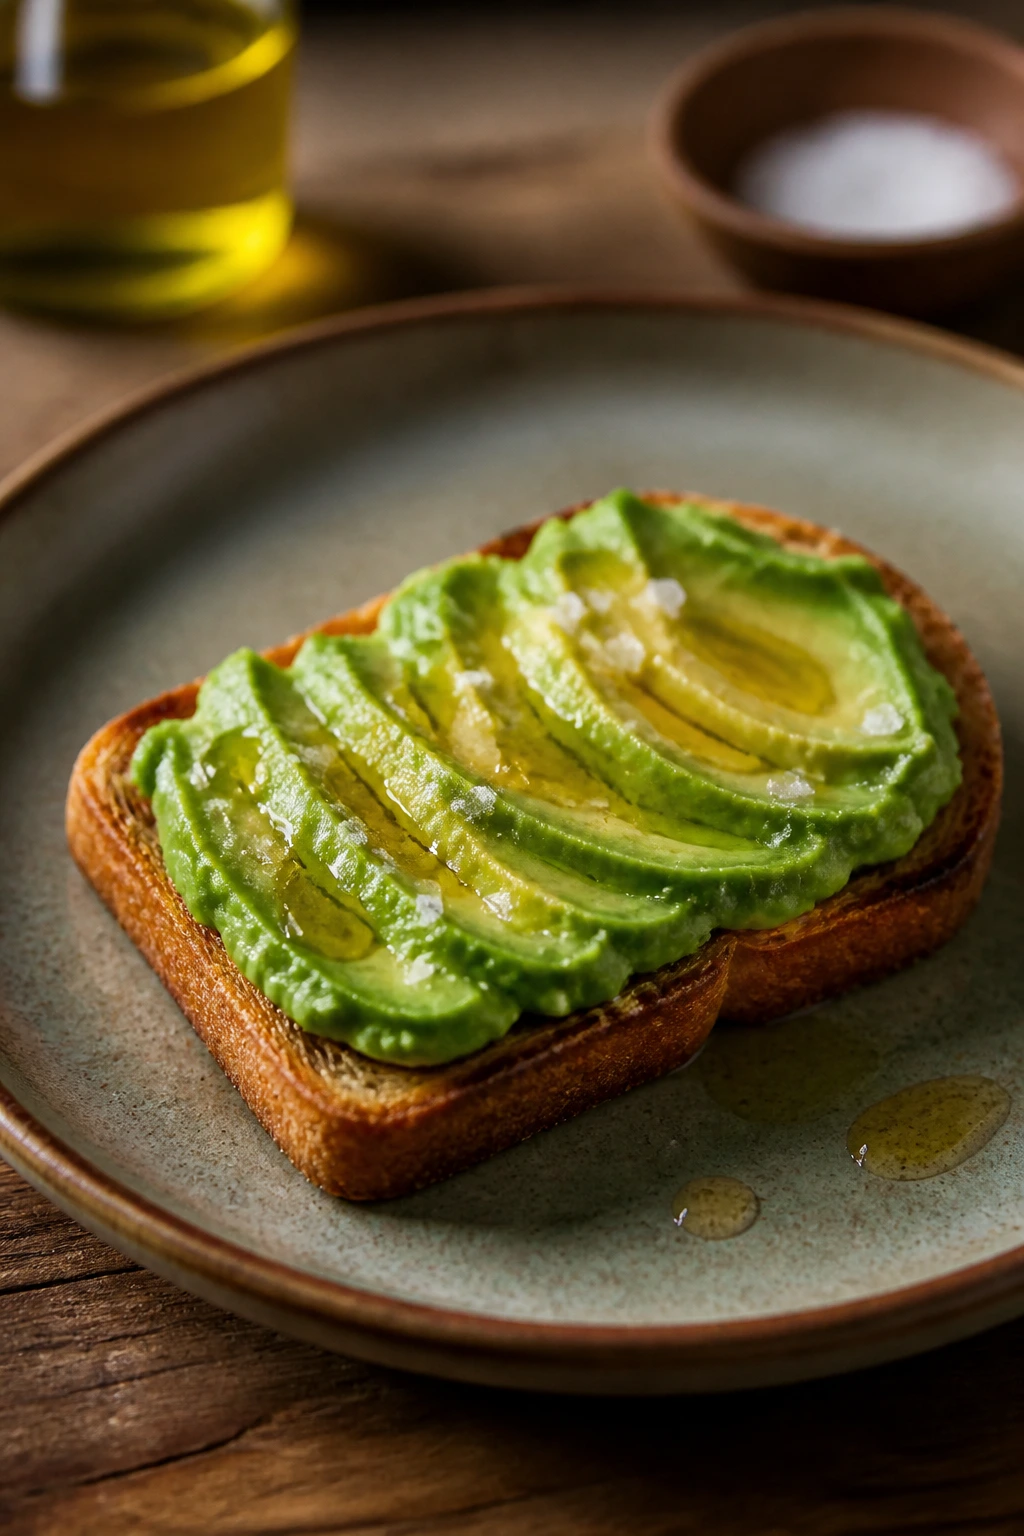
15. Avocado Egg Toast with Crispy Edges
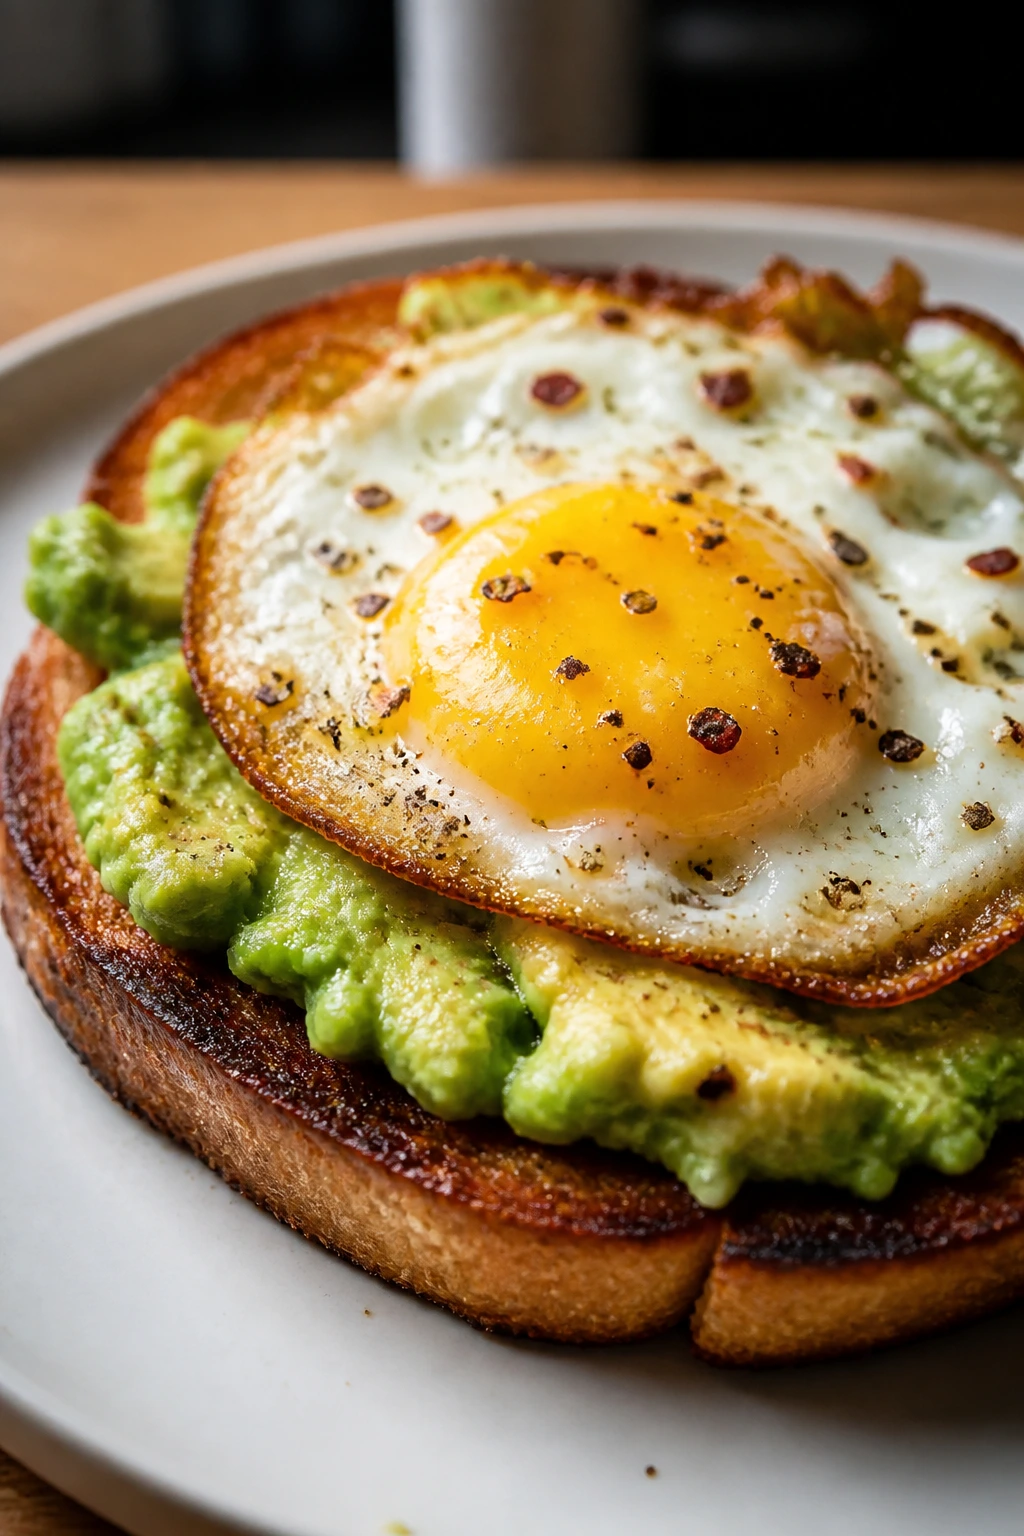
Avocado egg toast is simple, but simple is not the same thing as boring. The bread should be sturdy and well toasted, the avocado should be creamy with enough salt to wake it up, and the egg should sit on top with a yolk that does not immediately run off the plate. That is the version that earns repeat requests.
Why It Works:
This breakfast works because every part has a job. The toast gives crunch, the avocado gives fat and richness, and the egg gives protein. It is fast enough to make from scratch and still feels more deliberate than cereal or a granola bar.
Key Ingredients:
- 4 thick slices bread — Sourdough or country-style bread holds up best.
- 2 ripe avocados — Soft but not brown inside.
- 4 large eggs — One per toast.
- 1 tablespoon butter or olive oil — For frying the eggs.
- 1 lemon — A little juice keeps the avocado bright.
- 1/2 teaspoon salt — Needed for the avocado.
- 1/4 teaspoon black pepper — For the top.
- Pinch of chili flakes — Optional, but good.
- Tomato slices or microgreens for serving — Optional.
Quick Steps:
- Toast the bread: Toast the slices until they are crisp and browned around the edges.
- Mash the avocado: Scoop the avocado into a bowl, add lemon juice, salt, and pepper, then mash with a fork until chunky or smooth, whichever you prefer.
- Cook the eggs: Fry the eggs in butter or oil over medium heat until the whites are set and the yolks are cooked to your liking.
- Build the toast: Spread the avocado over the toast, then set an egg on each slice.
- Finish and eat: Add chili flakes or tomato slices if you want a little more color and bite.
Equipment for This Recipe:
- Toaster or skillet
- Small bowl
- Fork
- Frying pan
- Spatula
How to Serve This Dish:
Serve the toast open-faced with fruit or a handful of berries on the side. If you need it more filling, add a second egg or a slice of cheese under the avocado so the toast holds up to a longer morning.
Pro Tips for This Recipe:
- Salt the avocado right before serving. That keeps it from turning watery.
- Use bread thick enough to support the toppings; thin bread bends and loses the crunch.
- If you pack it for later, keep the avocado and toast separate until the last minute.
- A runny yolk is lovely on a plate and awful in a lunch bag. Choose accordingly.
Variations on This Dish:
- Tomato Basil Toast: Add sliced tomato and fresh basil.
- Black Bean Toast: Spread warm black beans under the avocado for extra heft.
- Smoked Salmon Toast: Add a few strips of smoked salmon for a more filling version.
Common Mistakes to Avoid with This Dish:
- Don’t use bread that is too soft or thin.
- Don’t mash the avocado too early unless you want it to brown.
- Don’t skip the salt. Plain avocado on toast tastes flat.
16. English Muffin Breakfast Pizzas

English muffin breakfast pizzas are mini, crisp, and a little playful, which is a useful combination before school. The muffin halves toast on the bottom, the cheese melts across the top, and the eggs and sausage make them feel like breakfast instead of a compromise. They are also easy to scale up without much extra effort.
Why It Works:
The English muffin gives you a sturdy base with built-in nooks that catch the sauce and melted cheese. Because the pizzas are small, they bake fast and cool quickly, which matters when someone is trying to eat before the bus window closes. They are also excellent for using small amounts of leftover sausage or vegetables.
Key Ingredients:
- 4 English muffins, split — The sturdy base.
- 6 large eggs — Soft scrambled eggs for the topping.
- 1 tablespoon butter — For the eggs.
- 1/2 cup marinara or pizza sauce — Use a light hand.
- 1 cup shredded mozzarella — For melt and stretch.
- 1/2 cup cooked sausage or chopped ham — Optional protein.
- 1/4 cup diced bell pepper — Optional, but useful.
- 1/2 teaspoon Italian seasoning — Gives the pizzas a pizza-like flavor.
Quick Steps:
- Toast the muffins: Preheat the oven to 400°F and lightly toast the muffin halves so they do not go soggy.
- Scramble the eggs: Cook the eggs in butter over low heat until soft and just set.
- Assemble the pizzas: Spread a thin layer of sauce on each muffin half, add eggs, meat or vegetables, cheese, and a pinch of Italian seasoning.
- Bake until melted: Bake for 8 to 10 minutes, until the cheese is melted and the edges are crisp.
- Serve warm: Let them cool for a minute before serving so the cheese settles.
Equipment for This Recipe:
- Baking sheet
- Skillet
- Spatula
- Knife
- Mixing bowl
How to Serve This Dish:
Serve the mini pizzas with fruit or cucumber slices to keep the plate balanced. They are especially good cut in half for small hands, and they pack well in foil if breakfast needs to travel.
Pro Tips for This Recipe:
- Toast the muffins first. Untoasted muffin halves soak up the sauce and go limp.
- Keep the sauce layer thin. A heavy sauce makes the base collapse.
- Scramble the eggs softly so they do not dry out in the oven.
- If you want extra browning, give them a quick minute under the broiler at the end.
Variations on This Dish:
- Pepperoni Pizza Breakfast: Add a few pepperoni slices on top.
- Veggie Supreme: Use peppers, onions, and spinach.
- White Pizza Version: Swap sauce for a thin layer of cream cheese or ricotta.
Common Mistakes to Avoid with This Dish:
- Don’t load on too much sauce.
- Don’t use cold, wet toppings straight from the fridge.
- Don’t broil too long or the cheese turns oily.
17. Chia Pudding Cups with Fruit
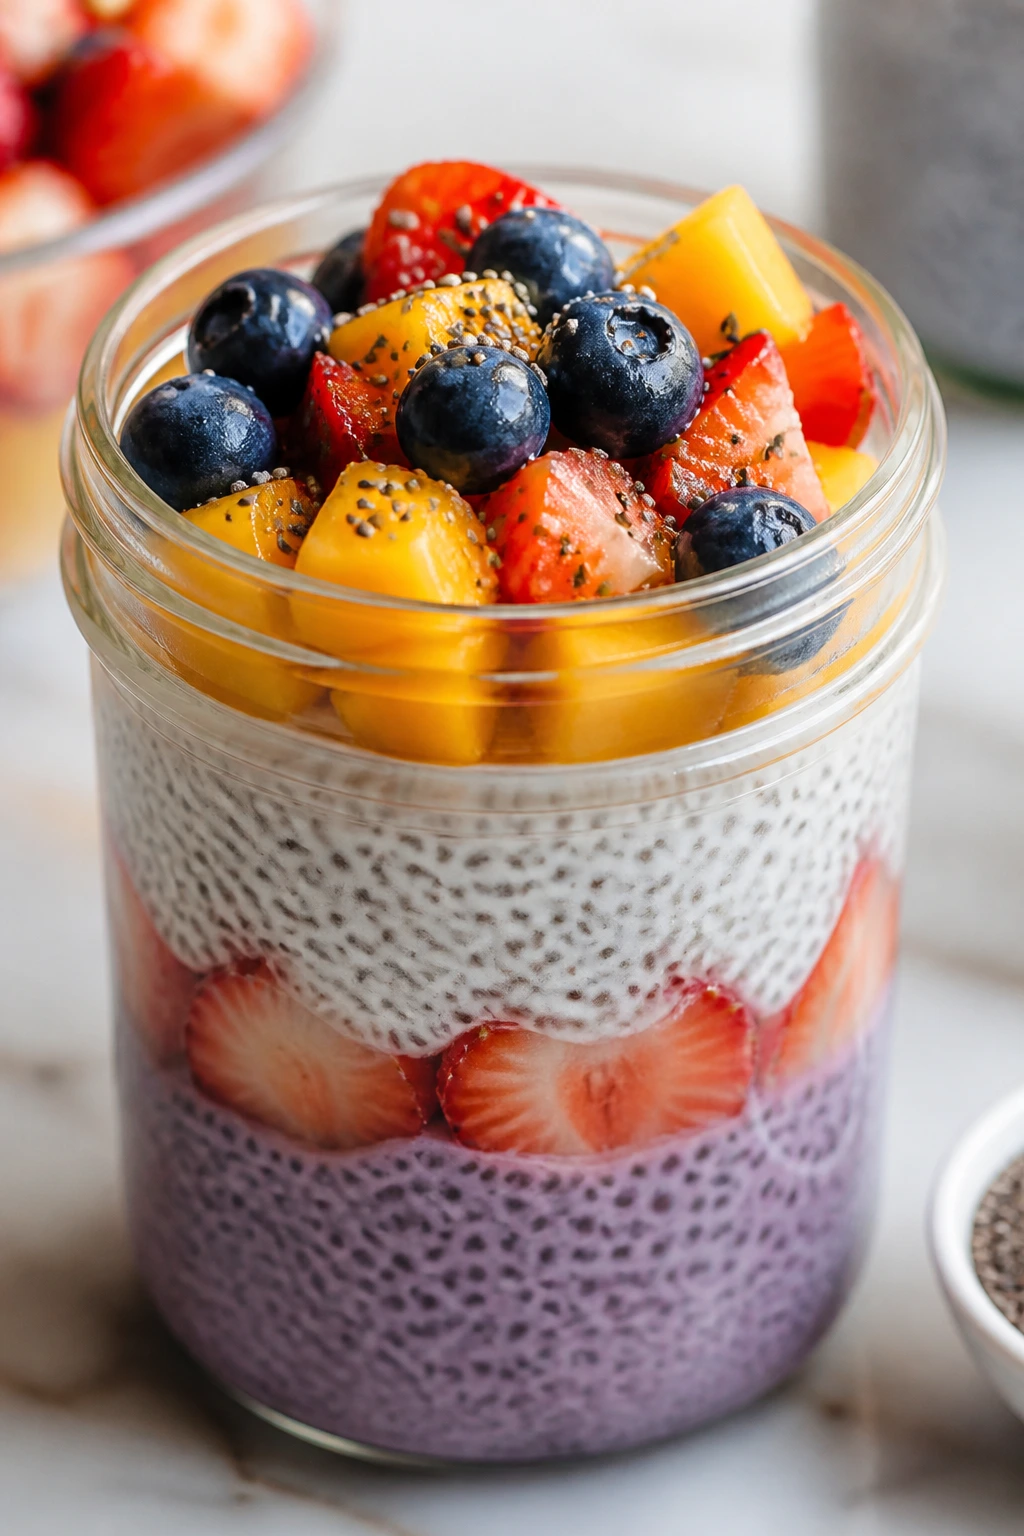
Chia pudding cups are cold, creamy, and almost annoyingly easy once you learn the ratio. The chia seeds swell in the liquid and turn into a spoonable pudding with a texture that sits somewhere between tapioca and yogurt. Add fruit and a little granola, and breakfast becomes a jar instead of a problem.
Why It Works:
Chia seeds absorb liquid and thicken on their own, so there is no stove and no oven involved. The pudding keeps well in the fridge, which makes it useful for mornings when you need breakfast waiting for you instead of asking for attention. It also gives you room to change flavors without rebuilding the recipe.
Key Ingredients:
- 1/2 cup chia seeds — The thickening ingredient.
- 2 cups milk — Dairy or unsweetened plant milk both work.
- 1 cup plain Greek yogurt — Makes the pudding creamier.
- 2 tablespoons maple syrup — Light sweetness.
- 1 teaspoon vanilla extract — For flavor.
- Pinch of salt — Keeps it from tasting flat.
- 1 cup fruit — Berries, mango, or sliced banana.
- 1/2 cup granola — Add at the end for crunch.
Quick Steps:
- Whisk the base: Combine the milk, yogurt, maple syrup, vanilla, salt, and chia seeds in a bowl or jar.
- Whisk again after 10 minutes: Stir once more so the seeds do not clump at the bottom.
- Chill until thick: Refrigerate for at least 4 hours, or overnight for the creamiest texture.
- Portion and top: Spoon into cups or jars and top with fruit and granola just before serving.
- Adjust if needed: If the pudding is too thick, stir in a splash of milk before serving.
Equipment for This Recipe:
- Bowl or large jar
- Whisk
- Measuring cups and spoons
- Spoon
- Lidded containers
How to Serve This Dish:
Serve it cold with fruit layered on top so the spoon has something bright to hit first. If you are feeding a child who needs more staying power, add a spoonful of nut butter or a boiled egg on the side.
Pro Tips for This Recipe:
- Stir twice. The second whisk after 10 minutes prevents clumps.
- Use full-fat dairy or a richer plant milk if you want a creamier cup.
- Keep the granola separate until the moment you eat it.
- Chia pudding thickens more after a full night, so plan for that when you portion it.
Variations on This Dish:
- Mango Coconut Cup: Use coconut milk and diced mango.
- Chocolate Chia Pudding: Stir in cocoa powder and top with strawberries.
- Pumpkin Pie Cup: Add pumpkin puree, cinnamon, and a little nutmeg.
Common Mistakes to Avoid with This Dish:
- Don’t skimp on stirring. Chia seeds clump if they sit untouched.
- Don’t make the pudding with too much chia or it turns paste-like.
- Don’t add crunchy toppings too early unless you enjoy soggy granola.
18. Turkey Sausage Hash Brown Skillet
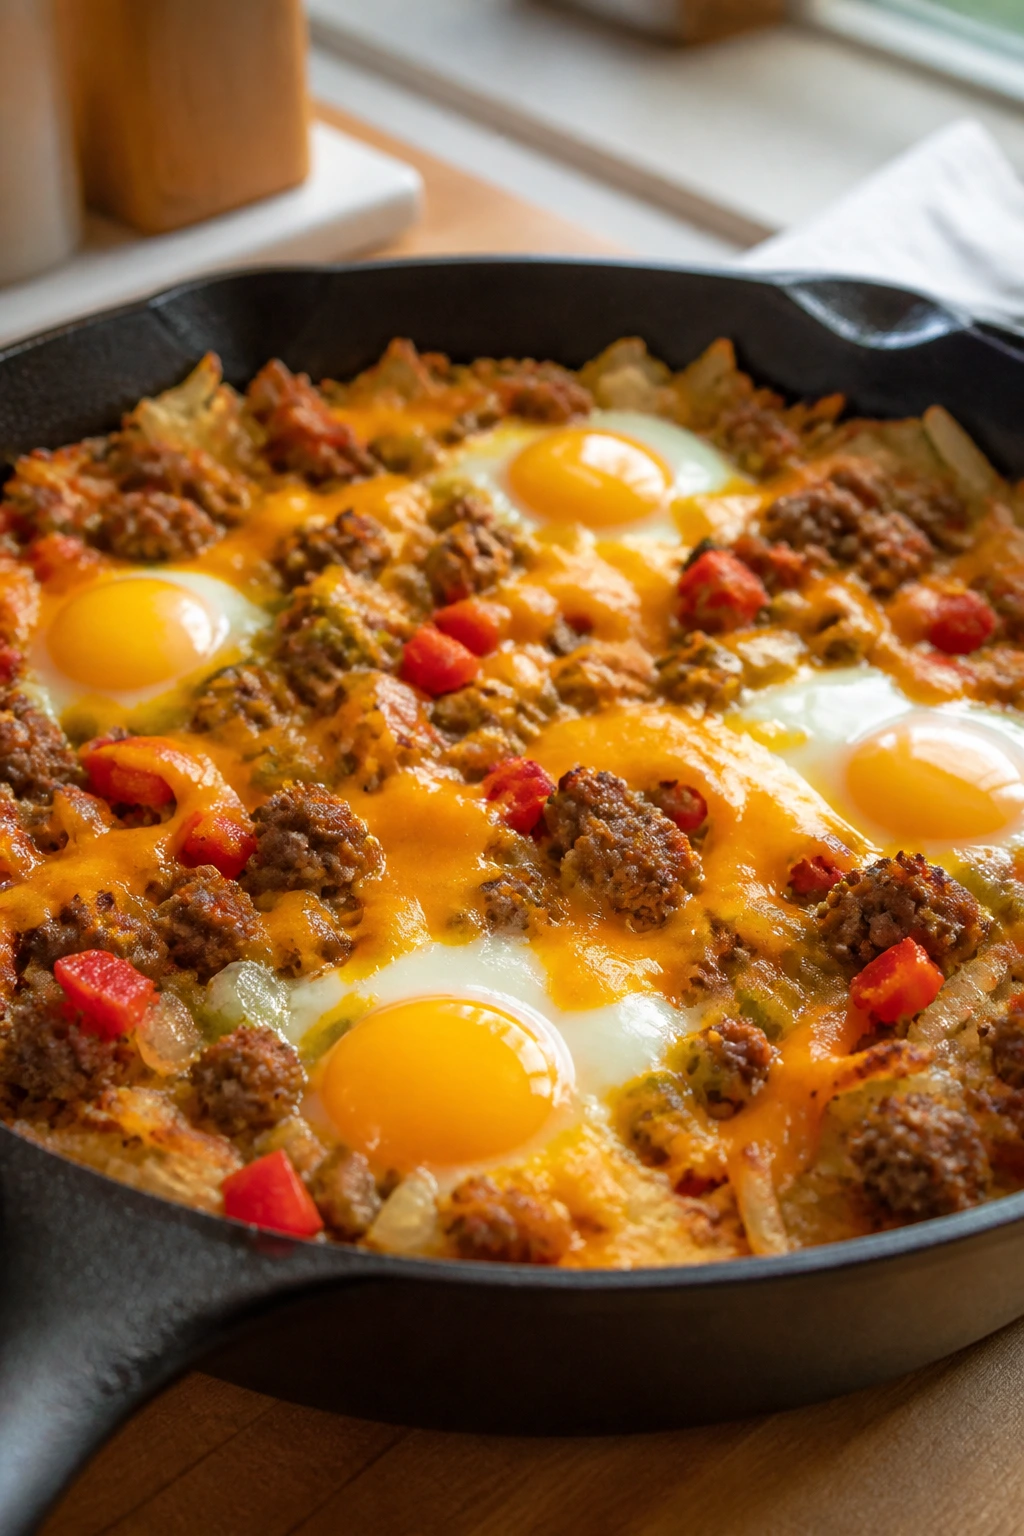
A turkey sausage hash brown skillet is the sort of breakfast that looks bigger than the effort it took. The potatoes crisp on the bottom, the sausage and vegetables build the flavor, and the eggs cook right on top so the whole pan becomes the meal. It is the closest thing this list has to a one-pan rescue mission.
Why It Works:
This skillet handles both the hot breakfast crowd and the “I need real food” crowd. The hash browns give texture, the sausage gives salt and protein, and the eggs turn the pan into something that feels finished without extra dishes. If you cover the skillet at the end, the eggs set quickly while the cheese melts across the top.
Key Ingredients:
- 1 tablespoon olive oil — Helps the potatoes crisp.
- 1 pound turkey sausage — Loose or patties, broken up.
- 1 small onion, diced — Builds flavor at the base.
- 1 bell pepper, diced — Adds color and sweetness.
- 4 cups frozen hash browns — The potato layer.
- 6 large eggs — Cracked into the skillet or lightly scrambled.
- 1 cup shredded cheddar — For the top.
- 1/2 teaspoon salt — Season the whole pan.
- 1/4 teaspoon black pepper — Enough to lift the flavor.
Quick Steps:
- Brown the sausage: Heat the oil in a large skillet over medium heat and cook the sausage with the onion and pepper until the sausage is no longer pink and the onion softens.
- Crisp the potatoes: Stir in the hash browns and press them into an even layer. Cook for 6 to 8 minutes until the underside turns golden.
- Add the eggs: Make 6 small wells in the potato mixture and crack an egg into each one, or pour in lightly beaten eggs if you want a softer finish.
- Cover and cook: Cover the skillet and cook over medium-low heat until the eggs are set to your liking.
- Finish with cheese: Sprinkle the cheddar on top, cover for 1 more minute, then serve hot.
Equipment for This Recipe:
- Large skillet with lid
- Spatula
- Knife and cutting board
- Mixing bowl, if using beaten eggs
- Measuring cups and spoons
How to Serve This Dish:
Serve the skillet family-style with toast or fruit on the side. A spoonful of salsa or hot sauce on top changes the whole pan without making any extra work, and the leftovers reheat well in a skillet the next day.
Pro Tips for This Recipe:
- Let the hash browns sit long enough to crisp before stirring them around.
- Keep the heat moderate; high heat burns the bottom before the eggs set.
- If you want the eggs smoother, beat them first and pour them over the potatoes instead of cracking them into wells.
- Use a lid. It is the fastest way to set the eggs without drying out the top.
Variations on This Dish:
- Southwest Skillet: Add black beans, cumin, and salsa.
- Veggie Skillet: Skip the sausage and use mushrooms and extra peppers.
- Cheesy Ranch Skillet: Stir in a little ranch seasoning and extra cheddar.
Common Mistakes to Avoid with This Dish:
- Don’t overcrowd the pan. If the potatoes are piled too high, they steam instead of crisp.
- Don’t move the hash browns too soon.
- Don’t walk away after cracking the eggs. They go from set to overdone faster than people expect.
Why Batch Prep Wins on School Days
There is a reason these breakfasts lean so hard on the fridge, freezer, and sheet pan. School mornings reward food that is already halfway done. A jar of oats, a tray of muffins, or a stack of wrapped burritos buys back minutes, and those minutes are the difference between eating calmly and eating in the car with one shoe missing.
Hot breakfasts and cold breakfasts each have their place. Cold jars are unbeatable when the house is already hot and loud, while baked pans, egg cups, and freezer sandwiches feel like a relief on mornings when everyone wants something warm. The smartest routine is not one perfect breakfast. It is a rotation that matches the pace of the week.
Batch prep also solves the texture problem that ruins a lot of rushed meals. Tortillas stay neat when they are rolled before the filling steams. Oats stay creamy when they are given time to soak. Hash browns crisp when they are not crowded. The trick is not more effort. It is better timing.
And there is a quieter benefit, too. A breakfast that is already waiting in the fridge removes one decision from the morning stack, and that is worth something.
Essential Equipment for These Recipes
- Rimmed sheet pans: Useful for pancakes, French toast sticks, and freezer cooling without spills.
- 12-cup muffin tin: Needed for egg muffins and oatmeal cups, and worth keeping well-greased.
- Large skillet with a lid: The workhorse for quesadillas, wraps, sausage skillets, and anything that needs both browning and a little steam.
- Mixing bowls in two sizes: One large bowl for batter and one smaller bowl for quick egg or yogurt mixes.
- Whisk: Better than a fork when you want eggs, custard, or yogurt to turn smooth.
- Spatula: A thin, flexible spatula helps with eggs, pancakes, and careful flipping.
- Blender: Handy for smoothie packs, cottage cheese pancakes, and chia pudding if you want a smoother finish.
- Airtight jars and lidded containers: The best containers for oats, parfaits, pudding, and leftover servings.
- Foil and parchment paper: Essential for burritos, roll-ups, and freezer wrapping.
- Measuring cups and spoons: Breakfast falls apart fast when you start guessing liquid amounts.
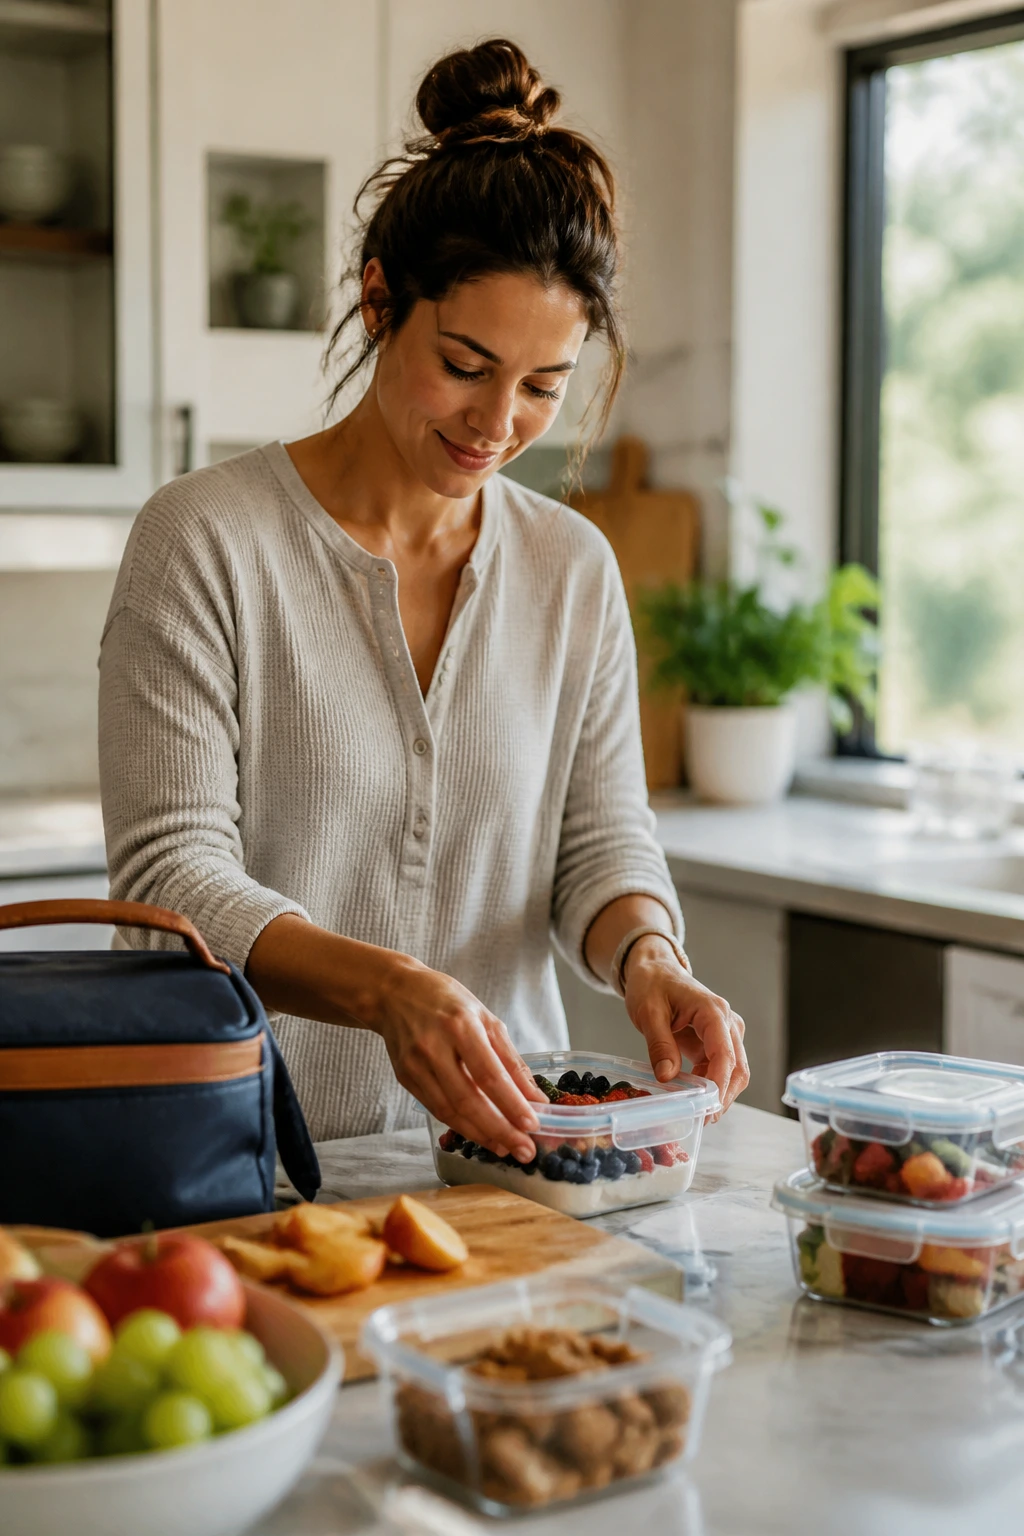
Smart Shopping for Easy Meals for Busy School Mornings
The grocery list for this kind of cooking is calmer than it looks. You do not need a specialty aisle. You need the right versions of a few ordinary things, and the details matter more than the brand name on the box.
Buy rolled oats rather than instant oats for overnight oats, baked oatmeal, and oatmeal cups. Rolled oats keep some chew, while instant oats turn soft and lose shape fast. For chia pudding and smoothies, frozen fruit is not a compromise. It is often better than fresh because it chills the mixture without watering it down.
Choose tortillas that bend. If they crack when you fold them around the package in the store, they will crack in your kitchen, too. The same rule applies to bread: thick slices hold up better for French toast and avocado toast than thin sandwich bread does. If the loaf feels flimsy in your hand, it will feel flimsy once it meets eggs.
Eggs deserve a quick note because they show up everywhere in this collection. Fresh is nice, but size and consistency matter more. Large eggs are the standard here, and if you are buying cheese, block cheese and pre-shredded both work. Block cheese melts a little smoother. Pre-shredded saves time. Pick the version that suits the morning you actually live in.
For fruit, buy bananas at two stages if you can. Use ripe, speckled bananas for baking and smoother oats, then keep a few firmer bananas for slicing on top of toast or jars. Apples with a little snap are better in baked oatmeal because they hold shape. Soft apples disappear into the pan.
How to Serve These Recipes
Presentation:
Keep the plating simple and neat. A jar with a clean lid, a burrito wrapped in parchment, or a couple of egg muffins on a small plate looks intentional without requiring a garnish budget. For hot breakfasts, a shallow bowl or small plate keeps the food from sliding around. For handheld meals, cut them in half so the filling shows and the portions feel less intimidating.
Accompaniments:
Fruit is the easiest companion across the whole collection: berries with oats, apple slices with sliders, orange wedges with wraps, and melon or grapes next to savory egg dishes. Yogurt works with pancakes, oatmeal, and French toast. If you want to round out a breakfast for older kids, add a cheese stick, a handful of nuts, or a boiled egg rather than trying to build a second whole meal.
Portions:
Younger children usually do well with one egg muffin, one slider, one small wrap half, or one jar of oats. Older kids and adults often need two muffins, a full burrito, or a more generous plate of pancakes or skillet breakfast. If the morning is long or sports practice follows school, build the portion around protein plus starch, not just one or the other.
Beverage Pairing:
Milk fits almost everything here, plain water fits the savory stuff, and coffee or tea is for the adults who need to get through car line without muttering. Smoothies do not need a drink on the side, but they pair well with something dry and crisp like toast or a muffin so the whole meal does not feel one-note.
Additional Tips and Flavor Boosters
Flavor Enhancement: A tiny finishing touch changes breakfast more than people expect. A pinch of flaky salt on avocado toast, a little cinnamon sugar on French toast sticks, or a spoonful of salsa on egg muffins gives a meal enough personality to stop tasting generic.
Customization: Keep a few add-ins on hand that can slide into multiple recipes: shredded cheese, chopped spinach, berries, sliced bananas, and cooked sausage. Those five ingredients can move from burritos to wraps to oatmeal cups without a second shopping trip.
Serving Suggestions: Use small containers, not giant ones. A little jar of oats with a berry cap looks more appealing than a huge half-empty bowl. For kids, cut everything into manageable pieces: burritos in halves, pancakes into squares, sliders into quarters if needed.
Make-It-Yours: For dairy-free breakfasts, use oat milk, plant yogurt, and olive oil or coconut oil where butter would usually go. For gluten-free versions, choose certified gluten-free oats, corn tortillas, and gluten-free bread. For lower-sugar mornings, lean on fruit and cinnamon instead of syrup, and you will not miss much.
Make-Ahead, Storage, and Reheating Guidance
Most of these breakfasts fall into a few storage categories, and once you know the pattern, the rest gets easier. Cold jars and puddings like overnight oats, chia cups, and parfaits keep well in the fridge for 2 to 4 days, though parfaits are best within 2 days if granola is involved. Keep crunchy toppings separate until serving or they will go soft.
Egg-based bakes such as egg muffins, breakfast casserole-style skillets, and baked oatmeal usually keep for 3 to 4 days in the refrigerator. They also freeze well for up to 2 months if you cool them completely first and wrap them tightly. Reheat egg muffins in the microwave for 30 to 60 seconds or in a 325°F oven for about 10 minutes. Baked oatmeal does well with a damp paper towel over the top in the microwave, which keeps the edges from drying out.
Freezer foods like burritos, French toast sticks, sliders, pancakes, and some quesadillas usually keep their best texture for about 2 months. Freeze them flat on a tray first if you can, then bag them once they are solid. That extra step saves you from a freezer brick. Reheat burritos from frozen in the microwave for 1 to 2 minutes, then finish in a skillet or toaster oven for texture. French toast sticks and pancakes are better in a toaster oven or air fryer, where the edges stay crisp.
Room temperature safety matters, too. Anything made with eggs, dairy, or meat should not sit out more than 2 hours, and if the kitchen is warm, 1 hour is a better rule. If breakfast will be eaten later, pack it cold or keep it hot in a preheated thermos-style container. For avocado toast, assemble at the last minute. Avocado browns and bread softens, and neither one waits politely.
Variations and Adaptations to Try
Dairy-Free Switchboard:
Use oat milk in the oats, coconut yogurt in parfaits, and olive oil instead of butter in the savory dishes. Most of these recipes handle that swap cleanly because the structure comes from oats, eggs, bread, or tortillas rather than dairy alone. Coconut yogurt is especially good in parfaits and chia pudding because it stays thick.
Gluten-Free Bus Line:
Certified gluten-free oats, corn tortillas, and gluten-free bread cover most of the collection without much trouble. The only real watch-out is texture: gluten-free bread can be crumbly, so toast it well before adding avocado or eggs. For burritos and wraps, use the softest tortillas you can find so they do not split.
Higher-Protein Morning:
Add Greek yogurt to smoothies and oats, lean harder on egg muffins and cottage cheese pancakes, and use sausage or beans in the savory wraps. If your family needs breakfast to last until lunch, this is the direction to take. A little protein at breakfast changes the whole shape of the morning.
Lower-Sugar Rotation:
Skip the maple syrup in the oats if the bananas are ripe enough. Use tart berries, plain yogurt, and cinnamon instead of sweet toppings. For French toast sticks, cut the sugar in the custard and lean on vanilla and cinnamon for flavor instead.
Tiny-Hand Friendly:
Mini muffins, slider halves, smaller quesadillas, and cut-up French toast sticks are easier for younger kids to handle. The food tastes the same. The mess usually does not. That matters more than people admit when there is only one napkin left on the table.
Common Mistakes That Mess Up Busy School Mornings
One mistake shows up again and again: making every breakfast from scratch in the morning. That sounds noble until the alarm goes off and the eggs, oats, and dishes all need attention at once. The fix is rotation. Pick two cold breakfasts, two freezer breakfasts, and two hot breakfasts, then keep them in regular use.
Another problem is pairing wet and crunchy ingredients too early. Granola in yogurt, toasted bread under avocado, and crispy toppings on baked oatmeal all lose their texture if they sit together too long. Keep the crunch separate until the last minute. It is a small habit that changes the whole meal.
Then there is under-seasoning savory breakfast food. Eggs, potatoes, and even oats need salt to taste like themselves. If the first bite tastes dull, the fix is usually a pinch more salt or a sharper finish like cheese, salsa, lemon, or herbs. Breakfast does not have to be bland just because it is early.
A fourth mistake is using the wrong container. Thin plastic leaks. Loose lids pop open in backpacks. Jars need headspace. Burritos need wrapping tight enough that they do not steam themselves apart. Packaging is part of the recipe, not an afterthought.
Finally, people often overstuff the handheld meals. A burrito that looks generous on the counter becomes a split tortilla in the toaster. A slider that is packed too high slides apart by the time it reaches the car. Smaller, neater portions usually eat better, and that is especially true when breakfast has to travel.
Frequently Asked Questions
Which of these meals can I make the night before?
Overnight oats, chia pudding, parfait jars, egg muffins, baked oatmeal, breakfast burritos, and French toast sticks all work well with night-before prep. The only catch is texture: crunchy toppings should stay separate, and anything meant to be crisp should be reheated in a toaster oven or skillet.
What freezes best from this collection?
Breakfast burritos, egg muffins, French toast sticks, sheet pan pancakes, banana bread oatmeal cups, and sliders all freeze well for up to 2 months. Cool them fully before freezing and wrap them tightly so they do not pick up freezer smell or ice crystals.
How do I keep breakfast from getting soggy?
Keep wet ingredients separate from crisp ones until serving. That means granola on the side, salsa in a little container, and avocado added at the last minute. It also means cooling hot food before packing it, because trapped steam turns good breakfast into limp breakfast fast.
Can I make these for picky eaters?
Yes, and the easiest path is to keep the flavor clear and the mix-ins limited. Plain egg muffins, simple burritos, banana oatmeal cups, French toast sticks, and peanut butter banana oats are usually safer starting points than heavily seasoned skillets. Picky eaters tend to do better with familiar shapes and predictable textures.
What if my child does not eat eggs?
Use overnight oats, chia pudding, parfaits, fruit smoothies, baked oatmeal, French toast sticks, or banana bread oatmeal cups. Those give you breakfast without putting eggs on the table at all. If you want a savory option, burritos can be bean-and-cheese instead of egg-based.
Can I pack hot breakfast in a thermos?
Yes. Preheat the thermos with boiling water for a few minutes, empty it, then add hot food like oatmeal, scrambled eggs, or skillet hash. That method works best when the food is piping hot to begin with, not merely warm.
How far ahead can I prep fruit?
Berries and grapes can be washed and stored for 2 to 3 days, while cut apples and bananas need more caution. Apples hold better with a little lemon juice, and bananas are usually best sliced the morning you eat them. If you want the cleanest prep, freeze fruit for smoothies and keep fresh fruit for toppings.
What if I only have five minutes in the morning?
Reach for something that is already built: a jar of oats, a smoothie pack, a burrito from the freezer, or an egg muffin from the fridge. That is the whole point of this list. The fastest breakfasts are the ones that were finished yesterday.
School Morning, Handled
A decent school breakfast does not need to be impressive. It needs to be ready, sturdy, and good enough that no one is bargaining for a snack five minutes later. That is the standard these recipes meet, and it is a much more useful standard than pretending every morning should look like a weekend brunch spread.
Pick two or three favorites, make them once, and put them on repeat. The payoff is not only a calmer table. It is one less scramble before the day even starts, and that changes the whole feel of the house.