
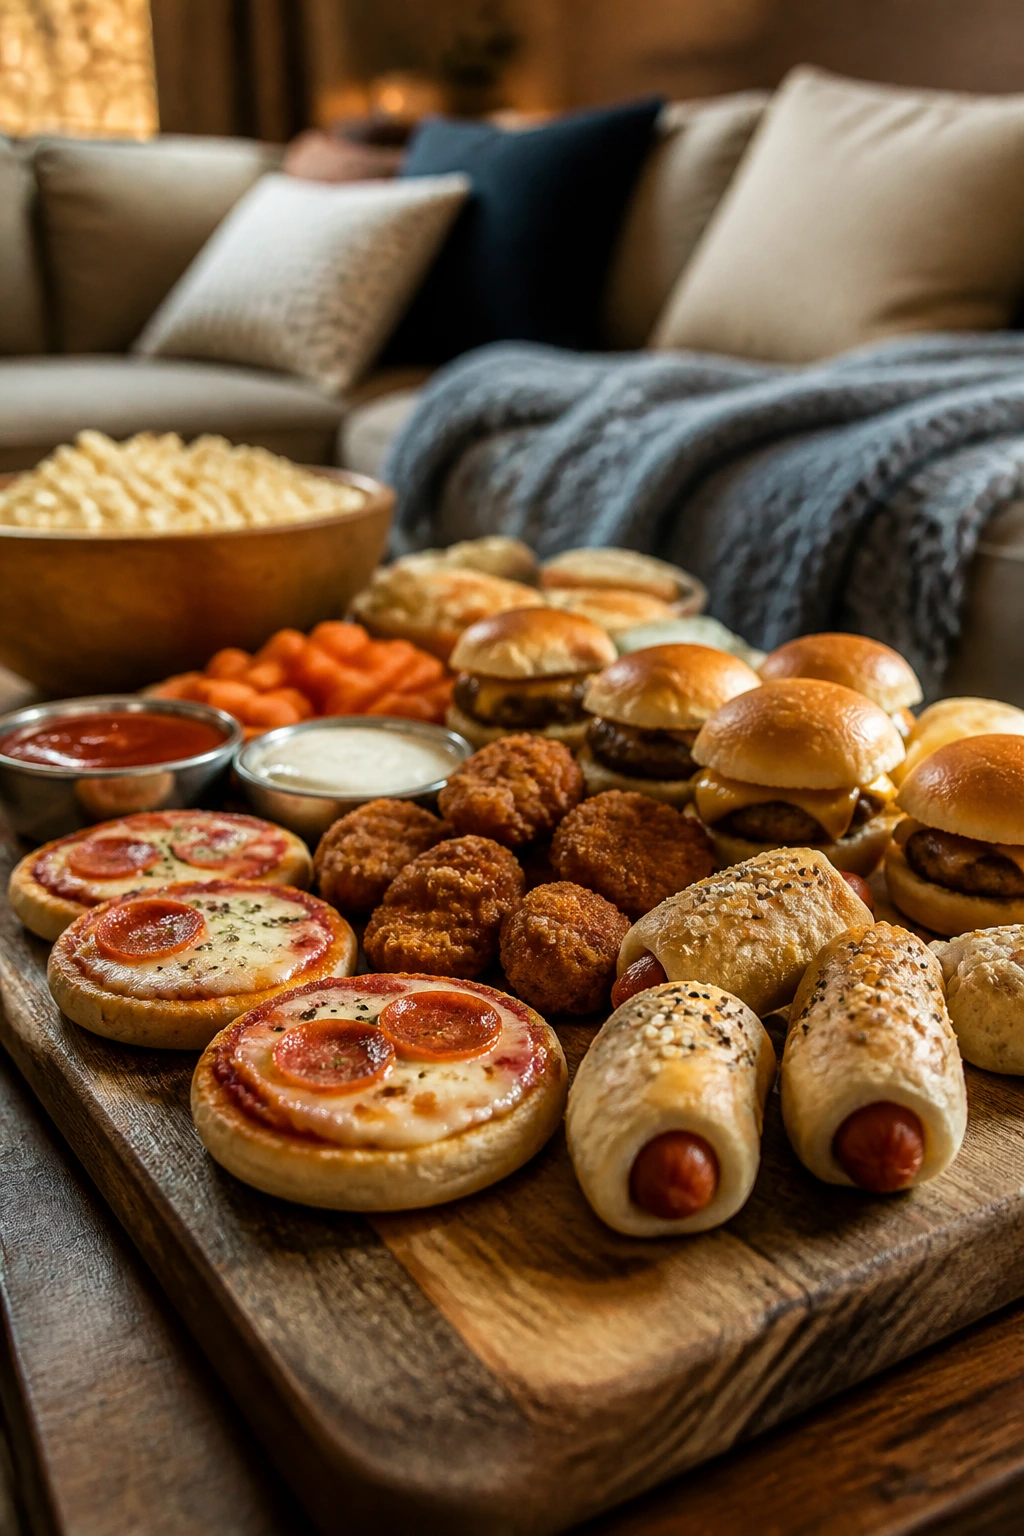
Kid recipes for family movie night need a different kind of planning than weekday dinner. You’re not feeding a polite table with forks and napkins lined up like little soldiers. You’re feeding a couch, a coffee table, and at least one child who will abandon a plate the second the opening credits start.
The best movie-night food is sturdy, dippable, and forgiving. It should survive a 10-minute pause, a sibling reaching across the bowl, and the odd decision to eat dessert before the savory stuff. I also care about the texture details that most lists skip over: the cheese has to melt into a real pull, the crust has to stay crisp long enough to matter, and anything saucy needs enough body that it doesn’t turn the paper plate into a swamp.
That’s why the smartest kid recipes for family movie night are a mix of handheld bites, tray-bake snacks, little cups, dips, and one or two sweet finishes that can sit nearby without getting fussy. A good spread feels loose and playful, but it still has structure behind it. You want foods that can be made ahead, moved around easily, and eaten with one hand while the other hand clutches a blanket.
Why These Movie-Night Recipes Earn Their Spot on the Couch
-
Handheld First: Every recipe here can be eaten in small bites, which means fewer forks lost under throw pillows and fewer plates abandoned halfway through the film.
-
Low-Mess Builds: These recipes lean on sturdy wraps, crisp edges, or thick fillings, so they hold up better than anything with a thin sauce or a delicate crumb.
-
Kid-Approved Without Being Boring: You’ll find cheese, chicken, fruit, chocolate, and cinnamon in the mix, but each recipe brings a different texture so the spread doesn’t feel one-note.
-
Make-Ahead Friendly: Several of these can be baked, cooled, and reheated in a toaster oven or air fryer right before the opening scene.
-
Easy to Share: Trays, bowls, skewers, and little cups let everyone grab what they want without turning dinner into a traffic jam.
-
Flexible for Picky Eaters: Most of these recipes can be nudged in a milder, cheesier, fruitier, or crunchier direction without wrecking the whole plan.
1. Mini Pepperoni Pizza Bagels
The charm here is in the contrast: chewy bagel, tangy sauce, bubbling mozzarella, and those little pepperoni cups that crisp at the edges. They smell like an after-school pizzeria and disappear fast.
Why It Works: Mini bagels give you a sturdy base that won’t collapse under sauce, and a quick bake at 425°F keeps the cheese molten without drying out the bread. I like these because they feel like pizza without the wait.
Key Ingredients:
- 6 mini plain bagels, split
- 1 cup pizza sauce
- 1 1/2 cups shredded low-moisture mozzarella
- 1/2 cup mini pepperoni
- 1 teaspoon dried oregano
- 1 tablespoon olive oil
Quick Steps:
- Heat the oven to 425°F and line a sheet pan with parchment.
- Brush the bagel halves with olive oil and toast for 3 minutes.
- Spread each half with 1 to 2 tablespoons sauce.
- Top with mozzarella, pepperoni, and oregano.
- Bake 6 to 8 minutes until the cheese bubbles and the edges turn golden.
Equipment for This Recipe:
- Rimmed sheet pan
- Parchment paper
- Spoon or small spatula
How to Serve This Dish: Stack them on a platter with a bowl of extra warm sauce for dipping. They work as the main snack or alongside fruit and celery sticks.
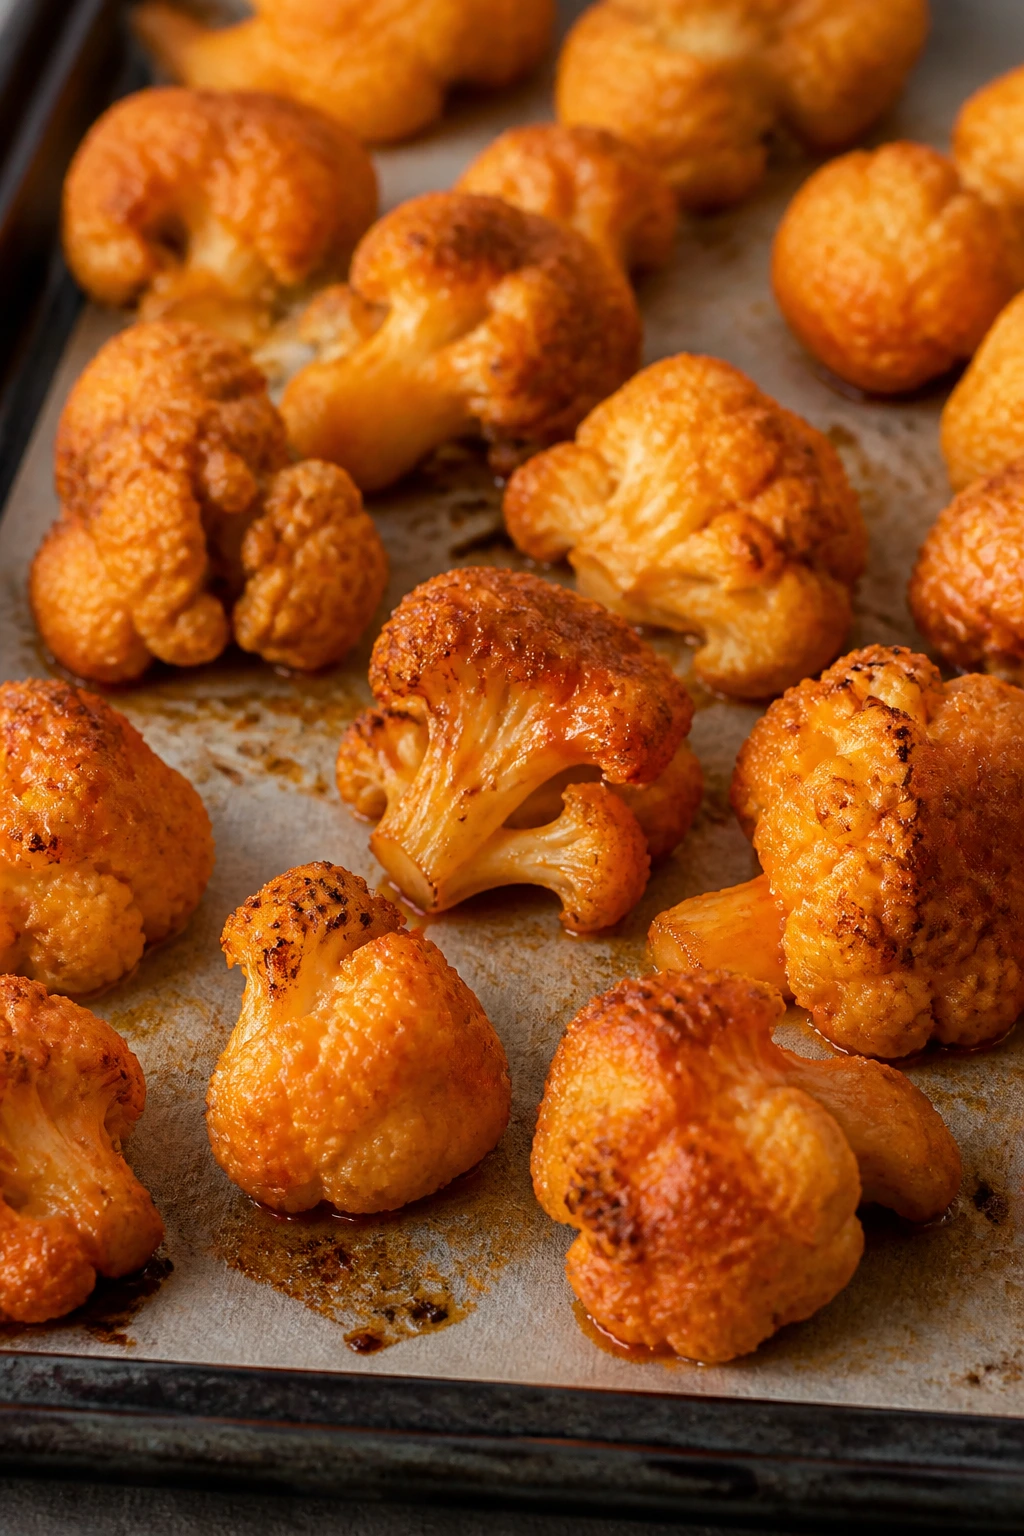
Pro Tips for This Recipe:
- Use low-moisture mozzarella; fresh mozzarella can leak too much water.
- Toast the bagels first so the bottoms stay firm.
- Slice them in halves after baking if younger kids want smaller bites.
Variations on This Dish:
- Veggie Patch: Add diced bell pepper and mushrooms.
- White Pizza Melt: Skip the sauce and use ricotta with mozzarella.
Common Mistakes to Avoid with This Dish:
- Don’t overload with sauce; the bagels get soggy fast.
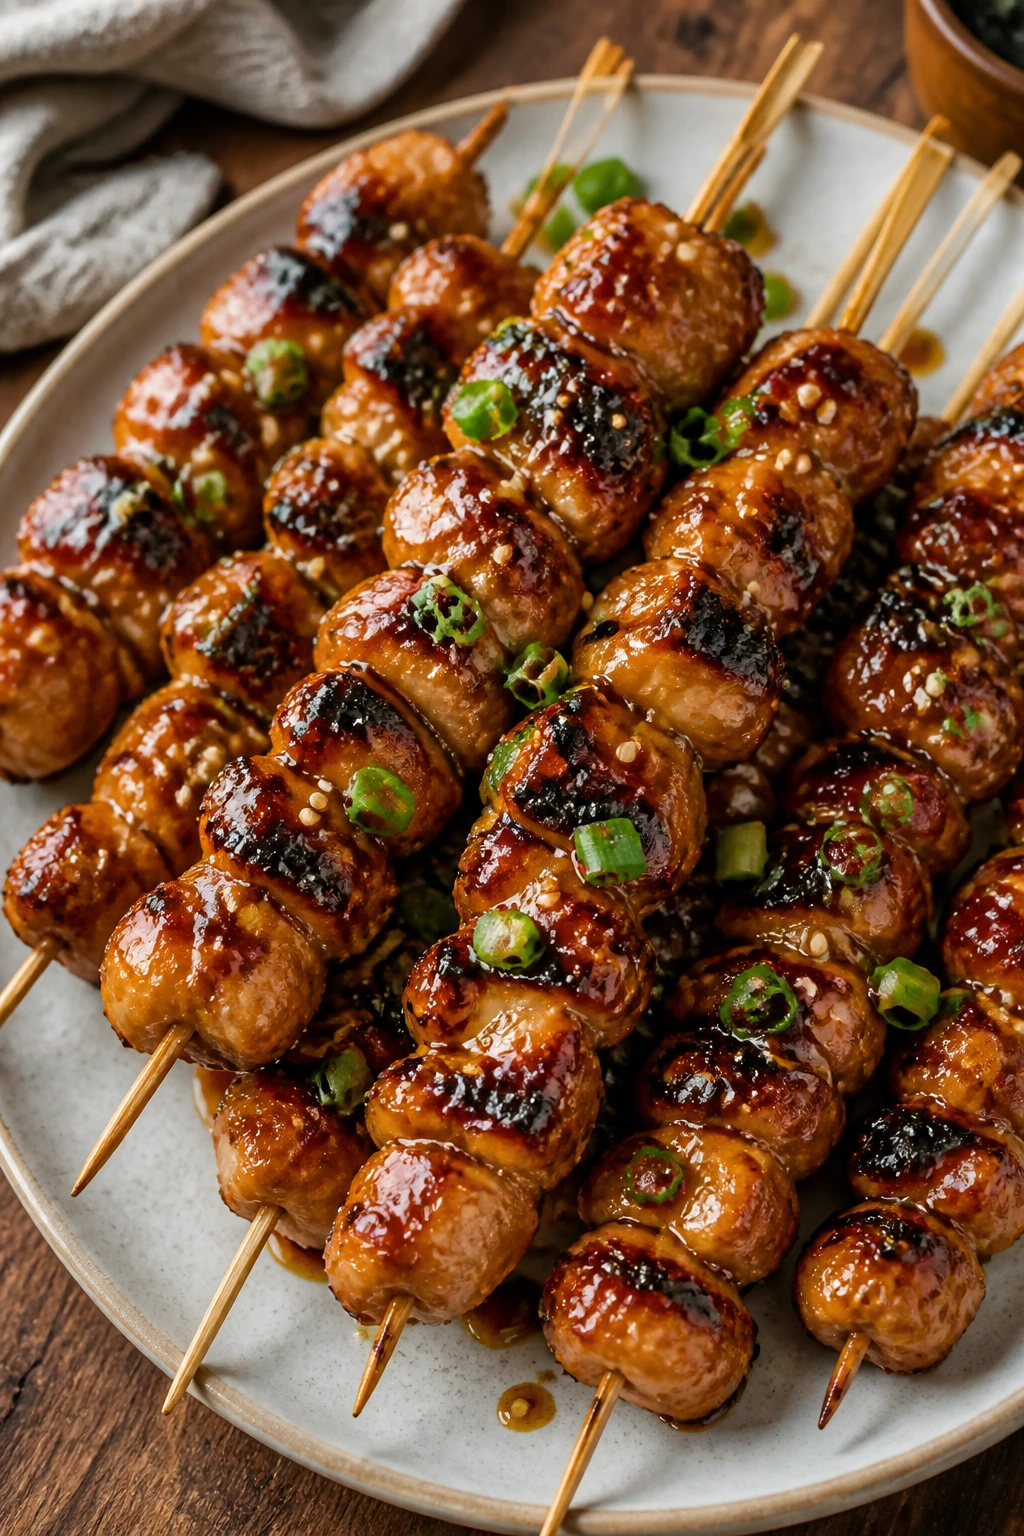
- Don’t bake until the cheese browns deeply. Once the pepperoni curls and the cheese melts, pull them.
2. Crispy Oven Chicken Nuggets
These bake up with a craggy, golden crust and a juicy middle if you keep the pieces even and don’t crowd the pan. The panko makes a louder crunch than standard breadcrumbs.
Why It Works: Panko breadcrumbs and a hot oven give you a crisp coating without deep frying. Cutting the chicken into 1-inch pieces helps them cook at the same pace, so nobody gets a dry nugget next to a raw one.
Key Ingredients:
- 1 1/2 pounds boneless chicken breasts, cut into 1-inch pieces
- 1 cup all-purpose flour
- 2 large eggs
- 2 tablespoons milk
- 2 cups panko breadcrumbs
- 1 teaspoon salt
- 1/2 teaspoon garlic powder
- 1/2 teaspoon paprika
Quick Steps:
- Heat the oven to 425°F and set a wire rack on a sheet pan.
- Set up flour, beaten eggs with milk, and seasoned panko in three bowls.
- Coat each chicken piece in flour, egg, then panko.
- Place on the rack and spray lightly with oil.
- Bake 15 to 18 minutes until golden and the centers reach 165°F.
Equipment for This Recipe:
- Rimmed sheet pan
- Wire rack
- Three shallow bowls
How to Serve This Dish: Serve with ketchup, honey mustard, or ranch in little cups. A pile of grapes or apple slices makes the plate feel less heavy.
Pro Tips for This Recipe:
- Keep the pieces similar in size so the crust finishes before the meat dries out.
- A wire rack matters; it keeps the bottoms from going soft.
- If you like extra crunch, toast the panko in a skillet first.
Variations on This Dish:
- Parmesan Crust: Mix 1/4 cup grated Parmesan into the panko.
- Spicy Honey Batch: Add pinch cayenne and serve with honey.
Common Mistakes to Avoid with This Dish:
- Don’t skip oil spray or the coating will look pale and dusty.
- Don’t stack them after baking; steam kills the crunch.
3. Cheesy Quesadilla Triangles
A good quesadilla has browned spots on the tortilla, a stretch of melted cheese, and filling that stays put when you cut it. These are best sliced into small wedges for little hands.
Why It Works: A medium skillet gives the tortilla time to crisp while the cheese melts into the gaps. Using two cheeses—one for stretch, one for flavor—makes them taste fuller than a single cheddar layer.
Key Ingredients:
- 4 flour tortillas, 8-inch
- 2 cups shredded cheddar
- 1 cup shredded Monterey Jack
- 1 cup cooked shredded chicken
- 1/2 cup finely diced bell pepper
- 1 tablespoon butter
- 1/4 teaspoon salt
Quick Steps:
- Heat a skillet over medium heat and melt half the butter.
- Lay down one tortilla, then layer cheese, chicken, pepper, and more cheese.
- Top with a second tortilla and cook 2 to 3 minutes per side.
- Press gently with a spatula until the cheese melts and the tortilla is speckled brown.
- Rest 1 minute, then cut into triangles.
Equipment for This Recipe:
- 10- or 12-inch skillet
- Spatula
- Sharp knife or pizza cutter
How to Serve This Dish: Set the triangles on a board with salsa and sour cream in small bowls. They’re easy to pass around while the movie starts.
Pro Tips for This Recipe:
- Grate the cheese yourself if you can; it melts cleaner.
- Don’t overfill or the filling escapes before the tortilla browns.
- Rest before cutting, or the cheese runs.
Variations on This Dish:
- Bean-and-Cheese Version: Swap chicken for 1 cup drained black beans.
- Breakfast-Style Slice: Add scrambled egg and skip the peppers.
Common Mistakes to Avoid with This Dish:
- Don’t crank the heat high; the tortilla burns before the center melts.
- Don’t cut too soon, or you’ll get a cheesy spill instead of neat wedges.
4. Buttered Popcorn with Parmesan
This is the bowl you keep reaching for because it’s salty, buttery, and a little sharp from the cheese. It smells like the theater, only fresher.
Why It Works: Freshly popped kernels stay crisp longer than bagged popcorn, and parmesan clings best when the butter is warm, not scorching. A pinch of fine salt gives you even seasoning instead of salty pockets.
Key Ingredients:
- 1/2 cup popcorn kernels
- 2 tablespoons neutral oil
- 3 tablespoons melted butter
- 1/3 cup finely grated Parmesan
- 1/2 teaspoon fine salt
- 1/4 teaspoon garlic powder
Quick Steps:
- Heat the oil in a large pot over medium-high heat.
- Add kernels, cover, and shake until popping slows to 2 seconds apart.
- Pour into a big bowl and drizzle with melted butter.
- Sprinkle with Parmesan, salt, and garlic powder.
- Toss while warm so the cheese sticks.
Equipment for This Recipe:
- Large lidded pot
- Big mixing bowl
- Measuring cups
How to Serve This Dish: Pour it into a wide bowl, not a deep one. A shallow mound keeps the texture crisp instead of steamy.
Pro Tips for This Recipe:
- Use finely grated Parmesan, not thick shavings.
- Toss the popcorn in stages so the seasoning spreads evenly.
- Make it right before movie time; popcorn waits for nobody.
Variations on This Dish:
- Movie-Ranch Bowl: Add 1 teaspoon ranch seasoning.
- Sweet-Salty Mix: Add 2 tablespoons mini marshmallows after cooling.
Common Mistakes to Avoid with This Dish:
- Don’t cap the pot too tightly while popping or steam softens the kernels.
- Don’t add cold butter; it won’t coat evenly.
5. Soft Pretzel Bites
These little knots come out chewy on the outside, tender inside, and best eaten warm with mustard or cheese dip. A quick baking soda bath is the trick.
Why It Works: The brief alkaline bath gives pretzels their shiny brown crust and that classic bakery flavor. Cutting the dough into small pieces keeps the centers soft instead of bready.
Key Ingredients:
- 1 pound pizza dough
- 8 cups water
- 1/4 cup baking soda
- 1 egg, beaten
- 2 tablespoons coarse salt
- 2 tablespoons melted butter
Quick Steps:
- Heat oven to 425°F and line a sheet pan with parchment.
- Cut dough into 1-inch pieces.
- Simmer water with baking soda, then dip pieces for 20 seconds.
- Brush with egg, sprinkle with salt, and bake 12 to 14 minutes.
- Brush with melted butter while warm.
Equipment for This Recipe:
- Large pot
- Slotted spoon
- Sheet pan
How to Serve This Dish: Pile them high with warm cheese dip or honey mustard. They’re the kind of snack that vanishes before the first rewind.
Pro Tips for This Recipe:
- Keep the soda bath at a gentle simmer, not a rolling boil.
- Don’t skip the butter finish; it softens the crust just enough.
- Serve warm, because pretzels lose their best texture as they cool.
Variations on This Dish:
- Cinnamon Pretzel Bites: Skip the salt and toss with cinnamon sugar.
- Stuffed Version: Wrap dough around a cube of cheese before dipping.
Common Mistakes to Avoid with This Dish:
- Don’t leave the dough in the soda bath too long or it gets metallic.
- Don’t overbake; they should be browned, not hard.
6. Mozzarella Stick Dippers
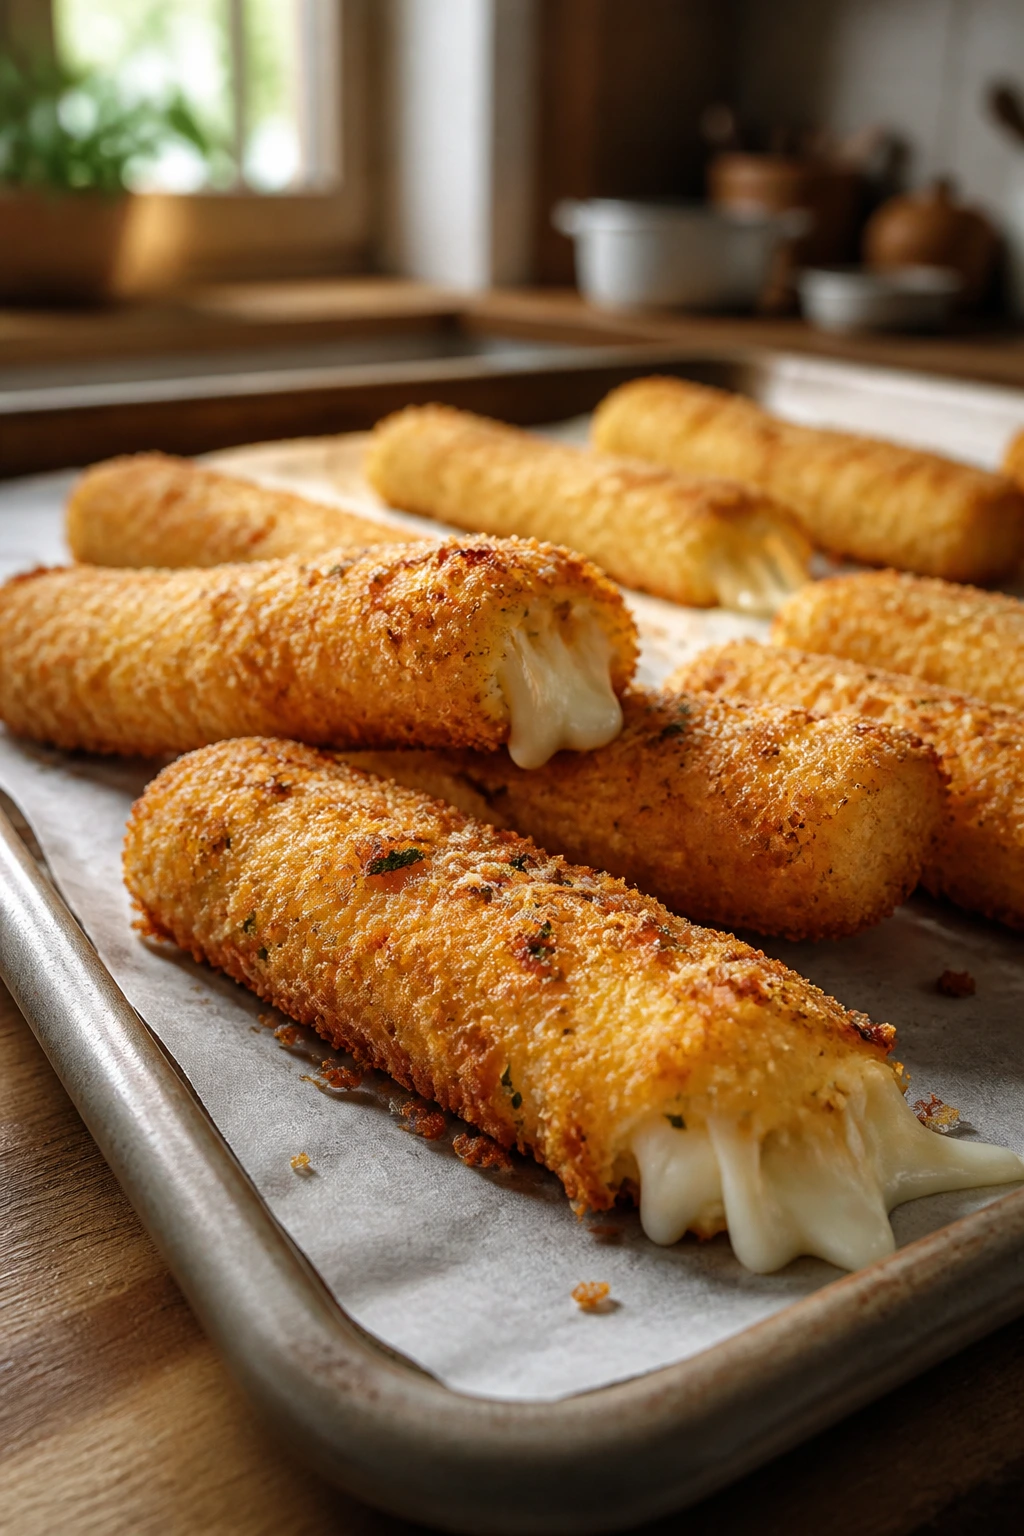
These are the civilized version of fried cheese sticks: shorter, easier to dip, and less likely to snap open on the first bite. The stretchy center is the whole point.
Why It Works: Freezing the cheese before breading keeps it from leaking too soon. A hot oven and a little oil on the breadcrumb coating give you a crisp shell without a deep fryer.
Key Ingredients:
- 12 string cheese sticks, halved
- 1/2 cup all-purpose flour
- 2 large eggs
- 1 tablespoon milk
- 1 1/2 cups Italian breadcrumbs
- 1/2 teaspoon garlic powder
- 1/2 teaspoon dried oregano
Quick Steps:
- Freeze the cheese halves for 30 minutes.
- Set up flour, egg beaten with milk, and seasoned breadcrumbs.
- Coat each piece in flour, egg, and crumbs.
- Freeze again 15 minutes.
- Bake at 425°F for 8 to 10 minutes until golden.
Equipment for This Recipe:
- Sheet pan
- Three shallow bowls
- Parchment paper
How to Serve This Dish: Serve immediately with warm marinara. Once they sit, the cheese starts to settle and the magic gets less dramatic.
Pro Tips for This Recipe:
- Double-coat if you want a thicker shell.
- Freeze before baking or the cheese leaks out too fast.
- Use marinara with a little sugar if your kids like it milder.
Variations on This Dish:
- Panko Crunch: Swap in panko for a louder crust.
- Herb Blend: Add basil and thyme to the crumbs.
Common Mistakes to Avoid with This Dish:
- Don’t skip the freezer steps.
- Don’t crowd the pan; the sticks need hot air around them.
7. Mini Mac and Cheese Cups
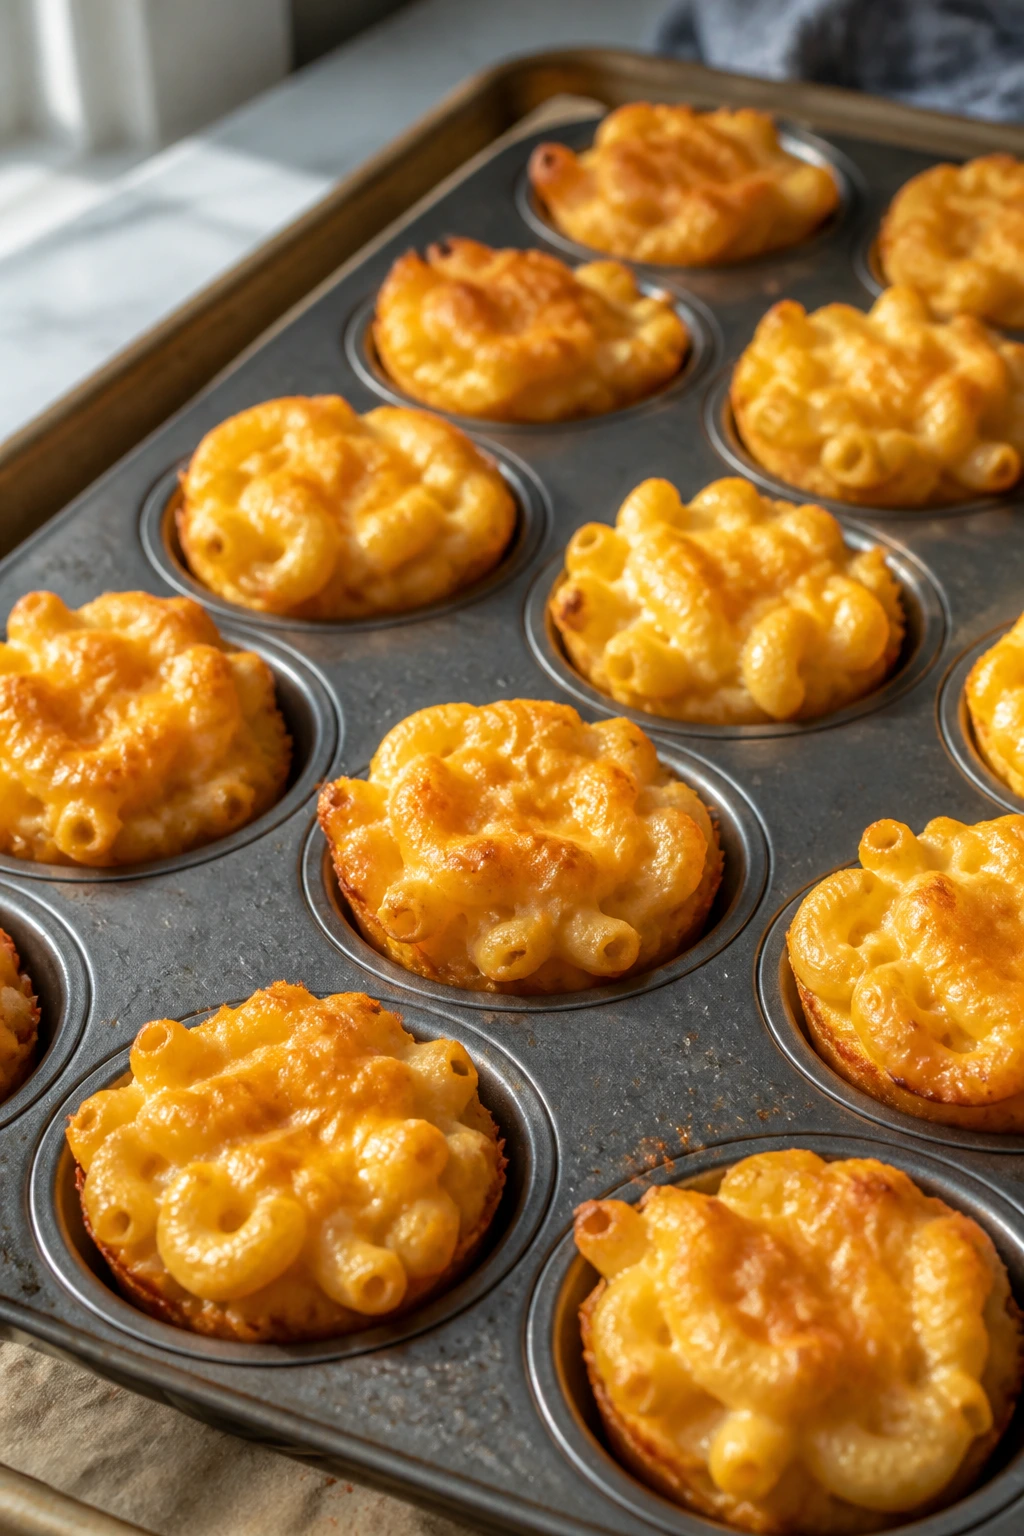
These bake into little golden portions with crisp tops and creamy centers, which is exactly the sort of thing kids grab twice. A muffin tin makes the serving problem disappear.
Why It Works: The egg helps the mac and cheese set into cups instead of sliding apart. Baking in a muffin tin gives you crunchy edges on every portion, and that edge is what people fight over.
Key Ingredients:
- 8 ounces elbow macaroni
- 2 tablespoons butter
- 2 tablespoons flour
- 1 1/2 cups milk
- 2 cups shredded cheddar
- 1/2 teaspoon salt
- 1/4 teaspoon mustard powder
- 1 large egg, beaten
Quick Steps:
- Cook macaroni until just tender and drain well.
- Make a quick cheese sauce with butter, flour, milk, and cheese.
- Stir in pasta and egg.
- Pack into greased muffin cups and bake at 375°F for 18 minutes.
- Cool 5 minutes before lifting out.
Equipment for This Recipe:
- Muffin tin
- Saucepan
- Whisk
How to Serve This Dish: Serve them on a tray with ketchup or ranch for dipping. They work as a snack or a small meal with fruit.
Pro Tips for This Recipe:
- Drain the pasta well; extra water loosens the cups.
- Grease the muffin tin generously or they stick.
- Let them cool a bit before removing, or they break apart.
Variations on This Dish:
- Bacon Cheddar Cup: Add 1/3 cup cooked crumbled bacon.
- Broccoli Cheddar Cup: Fold in 1/2 cup very small broccoli florets.
Common Mistakes to Avoid with This Dish:
- Don’t use too much milk in the sauce.
- Don’t skip the egg; it’s what helps the cups hold.
8. Sweet and Salty Snack Mix
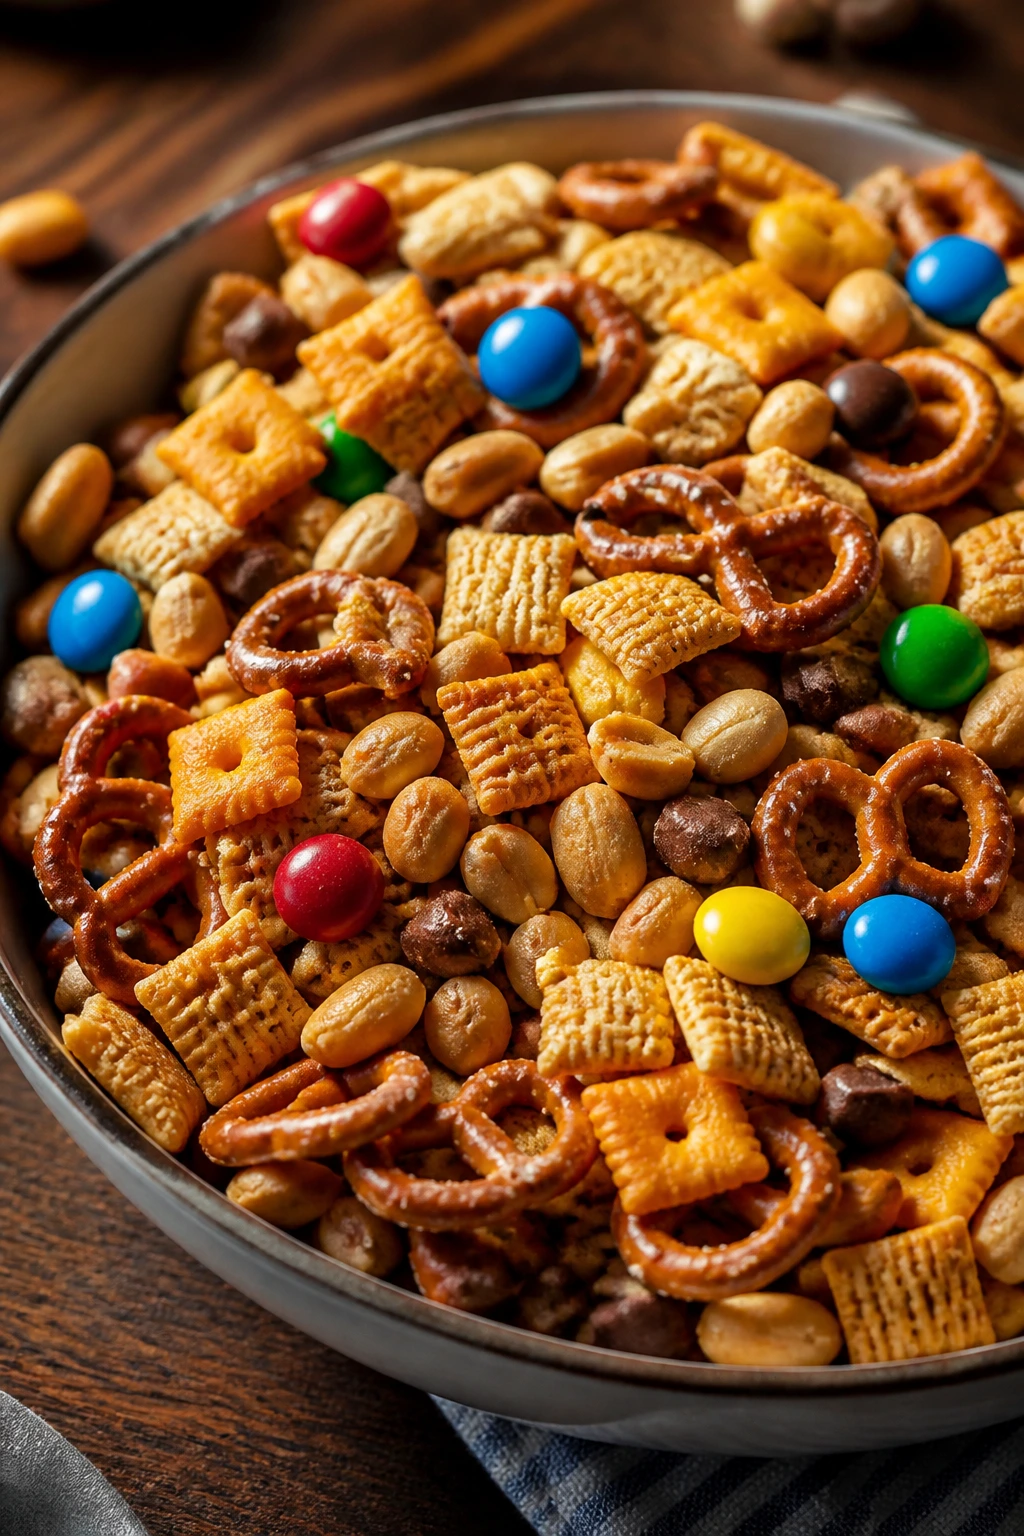
This is the bowl everyone keeps circling: crunchy cereal, pretzels, peanuts, and a little chocolate scattered through the cracks. It’s one of those movie snacks that gets better as you reach the bottom.
Why It Works: A quick toss in melted butter, honey, and seasoning helps the dry pieces cling together in the best way. Once it cools, the mix turns lightly crisp instead of sticky.
Key Ingredients:
- 3 cups rice cereal
- 2 cups mini pretzels
- 1 1/2 cups cheese crackers
- 1 cup roasted peanuts
- 1/4 cup melted butter
- 2 tablespoons honey
- 1/2 teaspoon salt
- 1/2 cup chocolate candies
Quick Steps:
- Heat oven to 300°F and line a sheet pan.
- Mix cereal, pretzels, crackers, and peanuts.
- Stir butter, honey, and salt, then toss with the dry mix.
- Bake 12 minutes, stirring once.
- Cool completely before adding chocolate candies.
Equipment for This Recipe:
- Large mixing bowl
- Sheet pan
- Wooden spoon
How to Serve This Dish: Put it in a big bowl with a scoop, because fingers disappear into this mix fast. Keep it near the center of the table and you’ll watch it vanish.
Pro Tips for This Recipe:
- Add chocolate only after cooling or it melts.
- Stir once during baking so the edges don’t overbrown.
- Swap peanuts for sunflower seeds if nuts are a problem.
Variations on This Dish:
- Cinnamon Crunch: Add 1 teaspoon cinnamon to the butter mix.
- Savory Party Mix: Skip honey and add ranch seasoning.
Common Mistakes to Avoid with This Dish:
- Don’t bake too hot or the cereal tastes scorched.
- Don’t add wet chocolate while the mix is warm.
9. BBQ Chicken Sliders
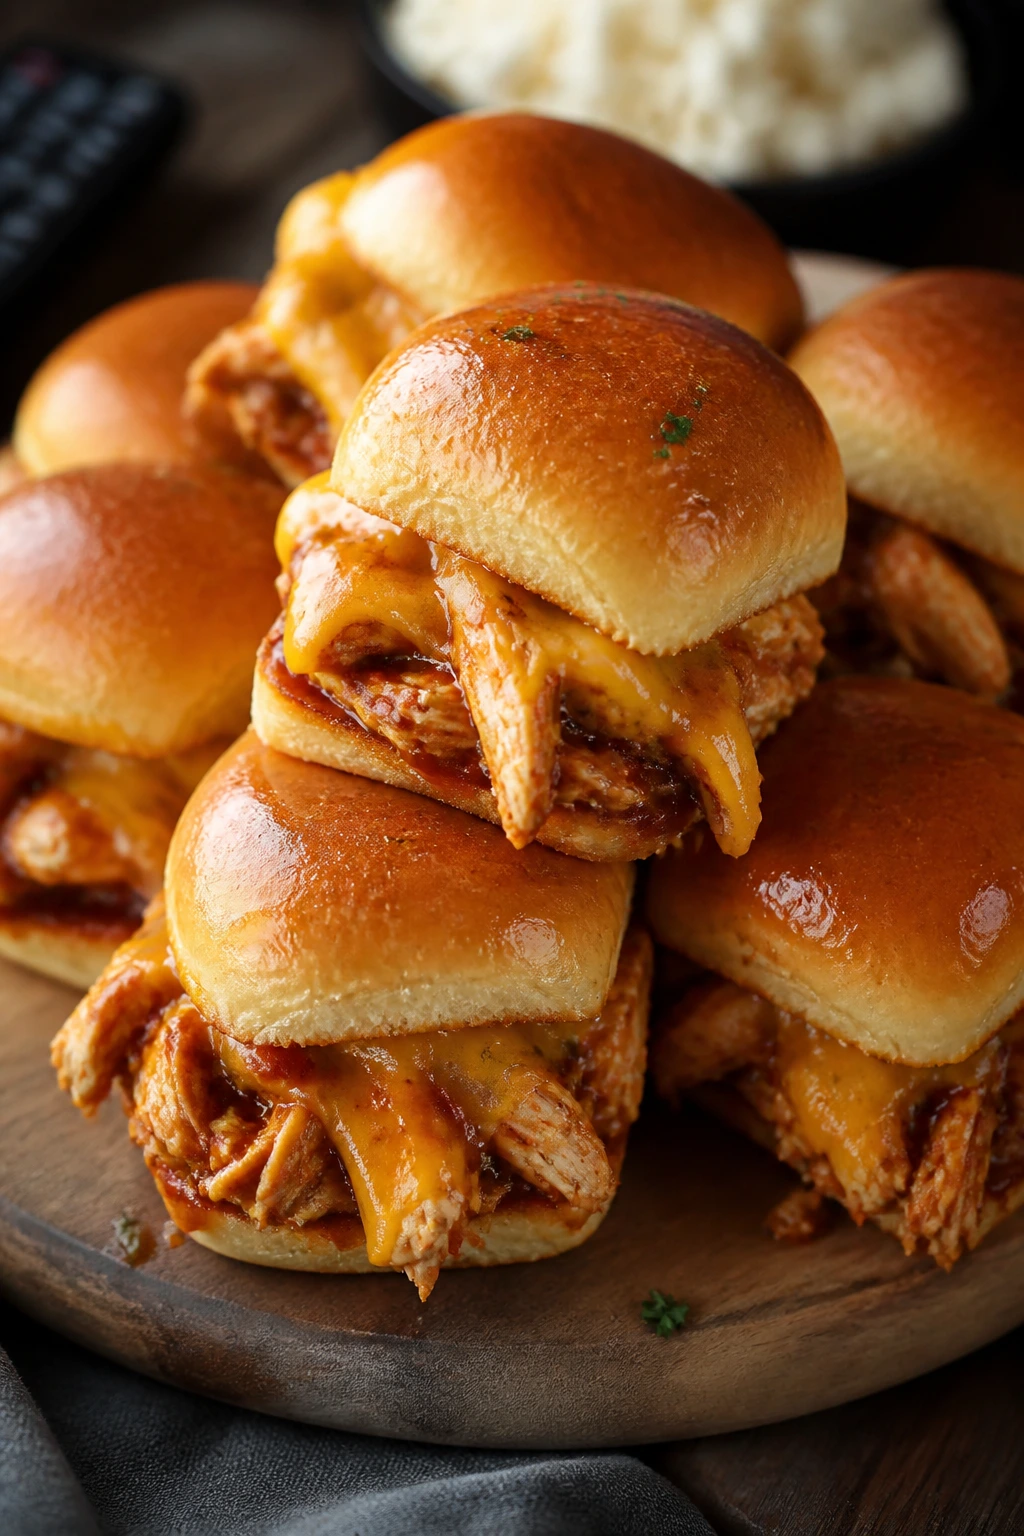
These are soft, saucy, and sturdy enough to carry through a full movie without falling apart. The trick is using enough sauce to be flavorful but not so much that the buns go limp.
Why It Works: Shredded chicken absorbs the barbecue sauce quickly, and a batch baked on slider rolls lets the cheese melt into the seams. The tops go glossy and slightly crisp if you brush them with butter.
Key Ingredients:
- 2 cups cooked shredded chicken
- 1 cup barbecue sauce
- 12 slider rolls
- 1 cup shredded cheddar
- 2 tablespoons butter, melted
- 1 tablespoon onion, finely minced
- 1 teaspoon poppy seeds
Quick Steps:
- Heat oven to 350°F.
- Mix chicken with barbecue sauce and onion.
- Split the rolls, fill with chicken and cheese, and cap.
- Brush tops with butter and sprinkle poppy seeds.
- Bake 12 to 15 minutes until the cheese melts.
Equipment for This Recipe:
- 9×13-inch baking dish
- Mixing bowl
- Pastry brush
How to Serve This Dish: Cut them apart after baking and serve warm. A crunchy slaw on the side keeps the plate from feeling too soft.
Pro Tips for This Recipe:
- Use a sauce with body; thin sauce runs out.
- Let the sliders rest 3 minutes before cutting.
- Toast the cut sides lightly if your rolls are very soft.
Variations on This Dish:
- Pulled Pork Swap: Use leftover pulled pork instead of chicken.
- Honey-Mustard Batch: Switch barbecue sauce for honey mustard.
Common Mistakes to Avoid with This Recipe:
- Don’t oversoak the buns with sauce.
- Don’t bake too long or the bottoms turn dense.
10. Fruit Pizza Cookies
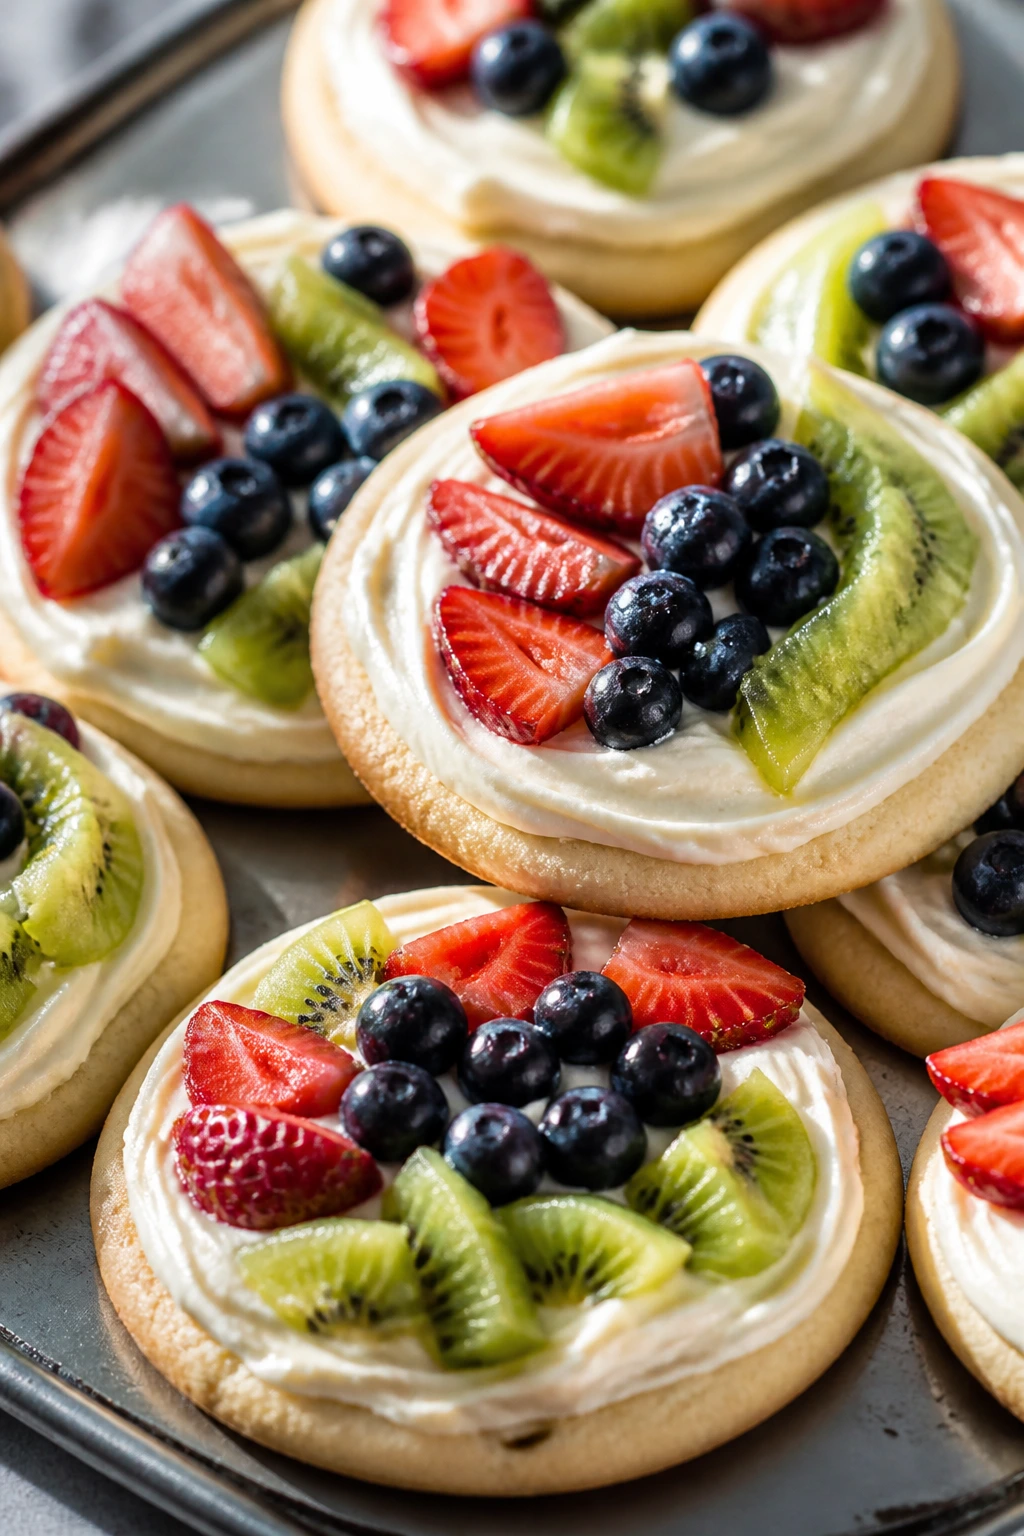
These look cheerful on a platter and taste like a sugar cookie with a cold, creamy top. The fruit gives each cookie its own little color pattern.
Why It Works: A soft sugar cookie base holds the cream cheese layer without cracking. Using fruit that’s been patted dry keeps the topping from getting watery.
Key Ingredients:
- 24 sugar cookies, baked and cooled
- 8 ounces cream cheese, softened
- 1/3 cup powdered sugar
- 1 teaspoon vanilla extract
- 1 cup sliced strawberries
- 1 cup blueberries
- 1 kiwi, peeled and diced
Quick Steps:
- Beat cream cheese, powdered sugar, and vanilla until smooth.
- Spread on each cookie.
- Top with fruit.
- Chill 15 minutes so the topping sets.
- Serve cold.
Equipment for This Recipe:
- Mixing bowl
- Hand mixer
- Spoon or offset spatula
How to Serve This Dish: Arrange them on a chilled tray so the topping stays tidy. They’re the sweet item you bring out after the salty bowls start emptying.
Pro Tips for This Recipe:
- Dry the fruit well.
- Use a thicker cookie; thin ones crumble under the topping.
- Assemble close to serving time for the neatest look.
Variations on This Dish:
- Tropical Cookie: Add pineapple and mango.
- Chocolate Base: Use chocolate sugar cookies instead of plain ones.
Common Mistakes to Avoid with This Recipe:
- Don’t use watery fruit straight from the fridge rinse.
- Don’t frost warm cookies or the topping slides off.
11. Baked Potato Skins
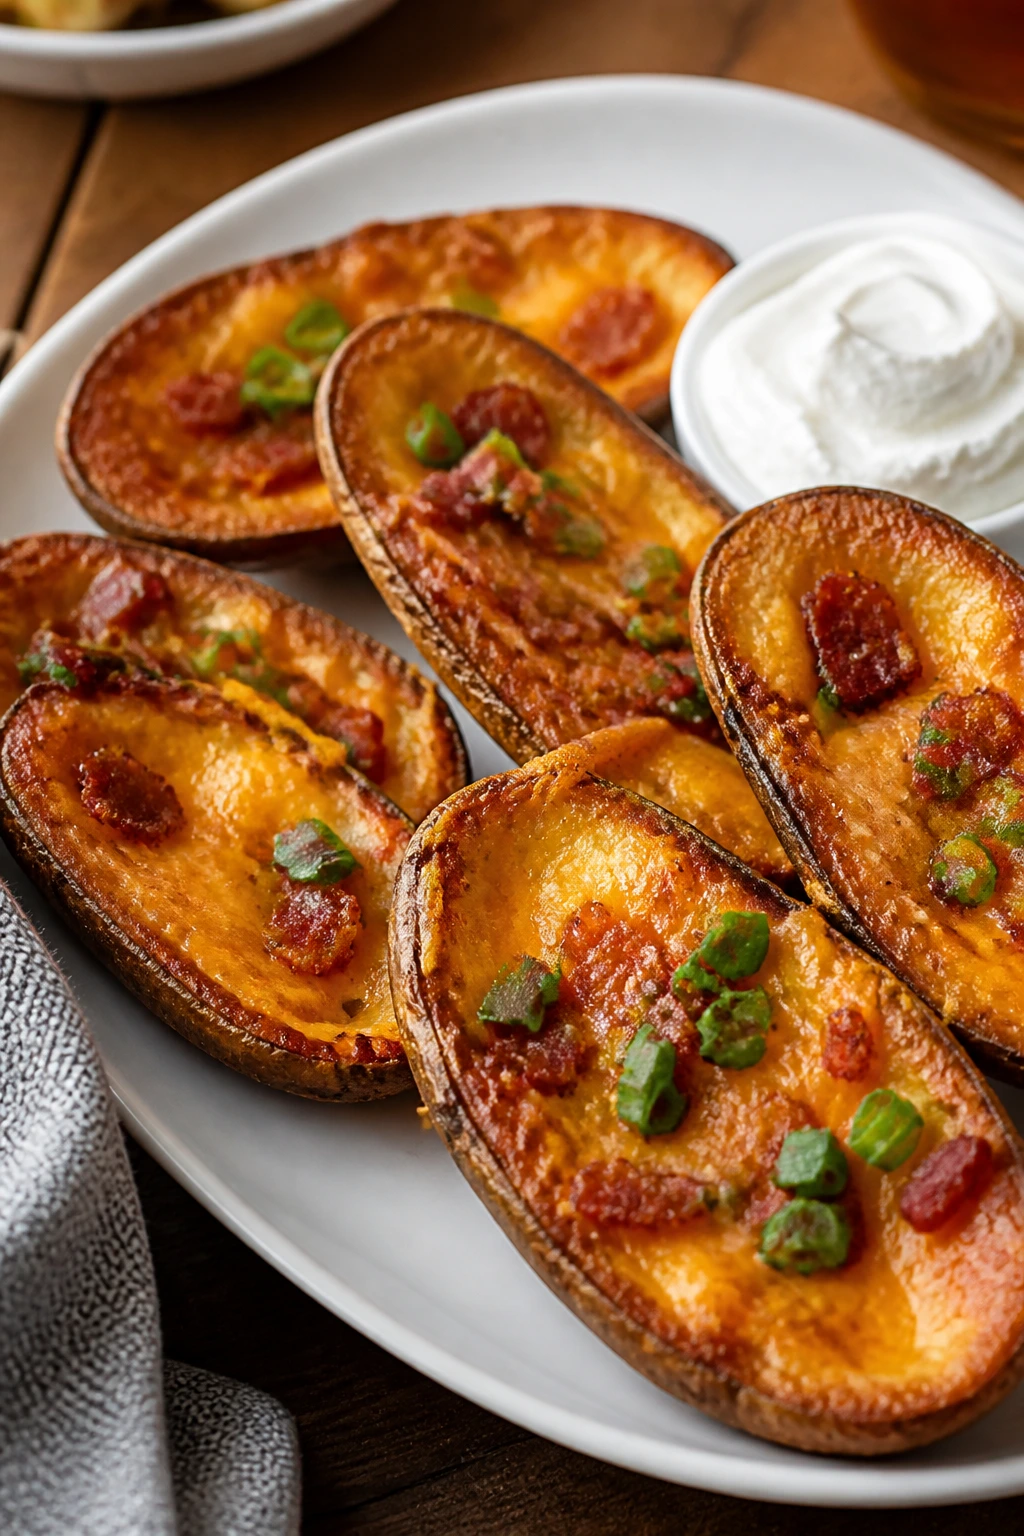
The edges get crisp, the centers stay fluffy, and the cheese melts into the bacon like it means it. These are the snack that feels like a diner order cut into movie-night portions.
Why It Works: Baking the potatoes twice gives you crisp shells and a creamy interior. Scooping out most of the filling creates room for cheese and toppings without turning them heavy.
Key Ingredients:
- 4 medium russet potatoes
- 2 tablespoons olive oil
- 1 teaspoon salt
- 1 cup shredded cheddar
- 1/2 cup cooked bacon bits
- 2 tablespoons sour cream
- 2 tablespoons sliced chives
Quick Steps:
- Bake potatoes at 400°F until tender, about 50 minutes.
- Cool slightly, halve, and scoop out most of the center.
- Brush skins with oil and salt, then bake cut-side down 10 minutes.
- Flip, fill with cheese and bacon, and bake 5 minutes more.
- Top with sour cream and chives.
Equipment for This Recipe:
- Sheet pan
- Spoon
- Pastry brush
How to Serve This Dish: Serve with extra sour cream in a little bowl. They’re rich, so a few per person goes a long way.
Pro Tips for This Recipe:
- Leave a thin layer of potato so the skins don’t tear.
- Crisp the shells before adding toppings.
- Use sharp cheddar for better flavor.
Variations on This Dish:
- Buffalo Skins: Add diced chicken and buffalo sauce.
- Veggie Skins: Use sautéed mushrooms and green onions.
Common Mistakes to Avoid with This Recipe:
- Don’t scoop too deeply.
- Don’t skip the second bake; that’s where the crispness happens.
12. Cinnamon Sugar Tortilla Chips
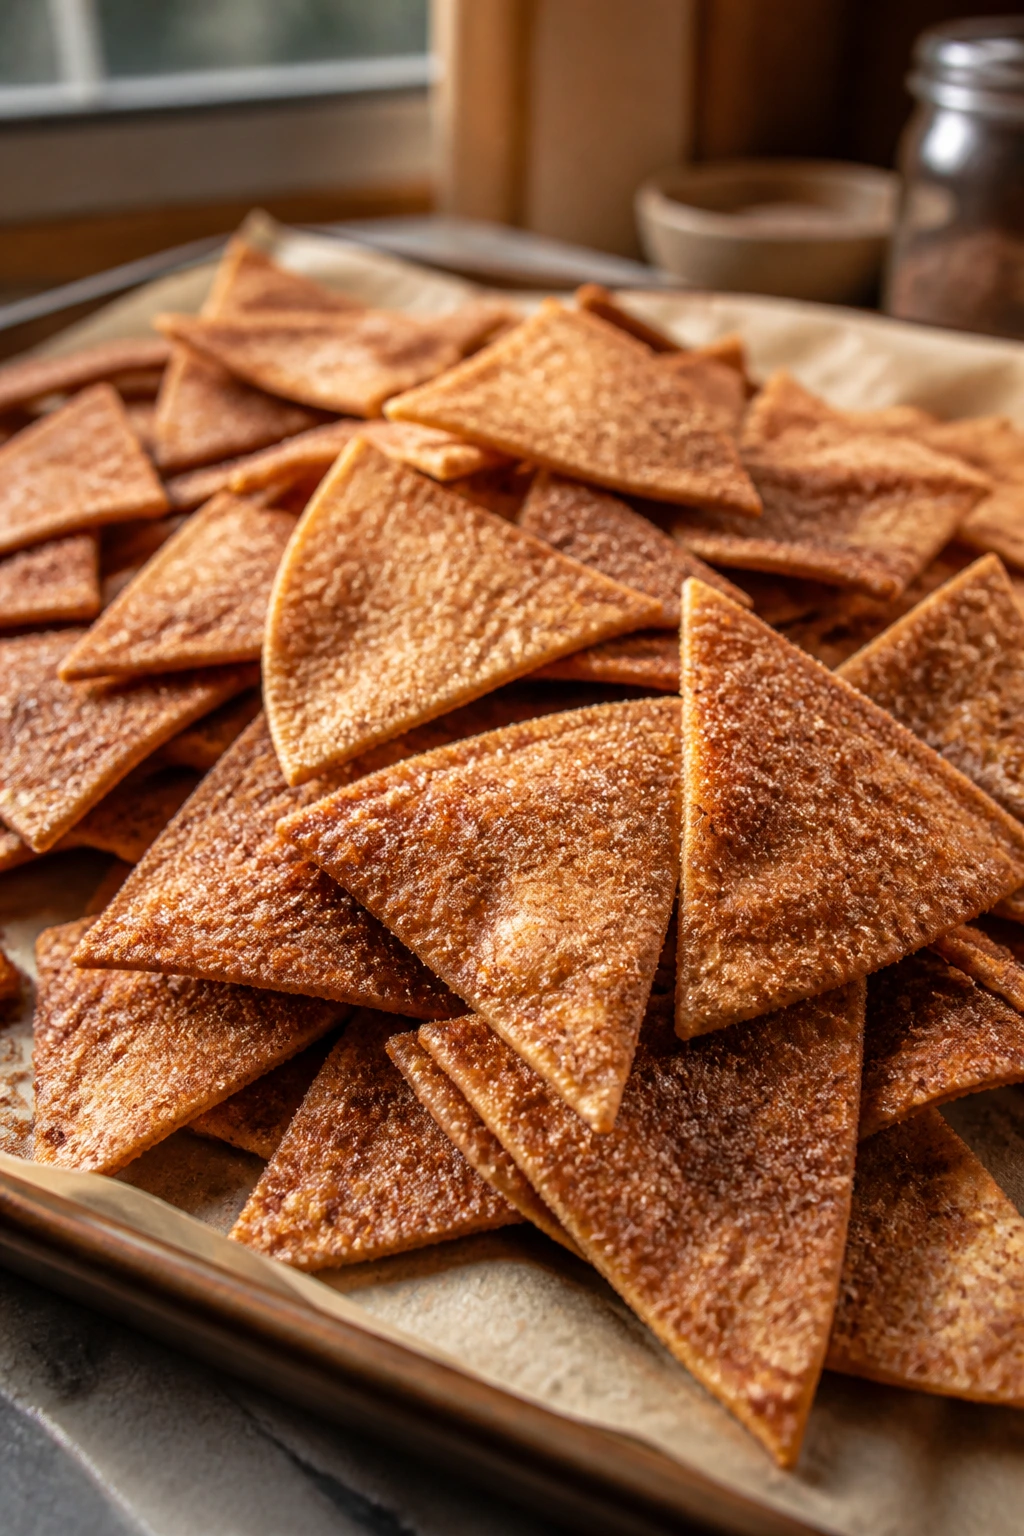
These are fragile in the best way: shattering, sweet, and impossible to leave alone. They’re made for dipping into fruit salsa, chocolate sauce, or plain whipped cream.
Why It Works: Butter helps the cinnamon sugar stick and gives the chips their toasted flavor. Cutting the tortillas into wedges before baking makes them crisp evenly.
Key Ingredients:
- 6 flour tortillas
- 3 tablespoons melted butter
- 1/4 cup sugar
- 1 teaspoon cinnamon
- Pinch of salt
Quick Steps:
- Heat oven to 375°F.
- Brush tortillas with butter.
- Mix sugar, cinnamon, and salt, then sprinkle over both sides.
- Cut into wedges and bake 8 to 10 minutes.
- Cool on the pan until crisp.
Equipment for This Recipe:
- Sheet pan
- Pastry brush
- Sharp knife or pizza cutter
How to Serve This Dish: Set them next to a bowl of strawberry salsa or whipped cream. They’re especially good when the rest of the snacks are savory and heavy.
Pro Tips for This Recipe:
- Don’t bake until dark brown; they keep crisping as they cool.
- A little salt keeps the sweetness from flattening.
- Break a test chip once it cools to check for snap.
Variations on This Dish:
- Pumpkin Spice Chips: Swap cinnamon for pumpkin spice.
- Chocolate Drizzle Version: Drizzle cooled chips with melted chocolate.
Common Mistakes to Avoid with This Recipe:
- Don’t overload with butter or they fry instead of crisp.
- Don’t stack them while warm.
13. Mini Corn Dog Muffins
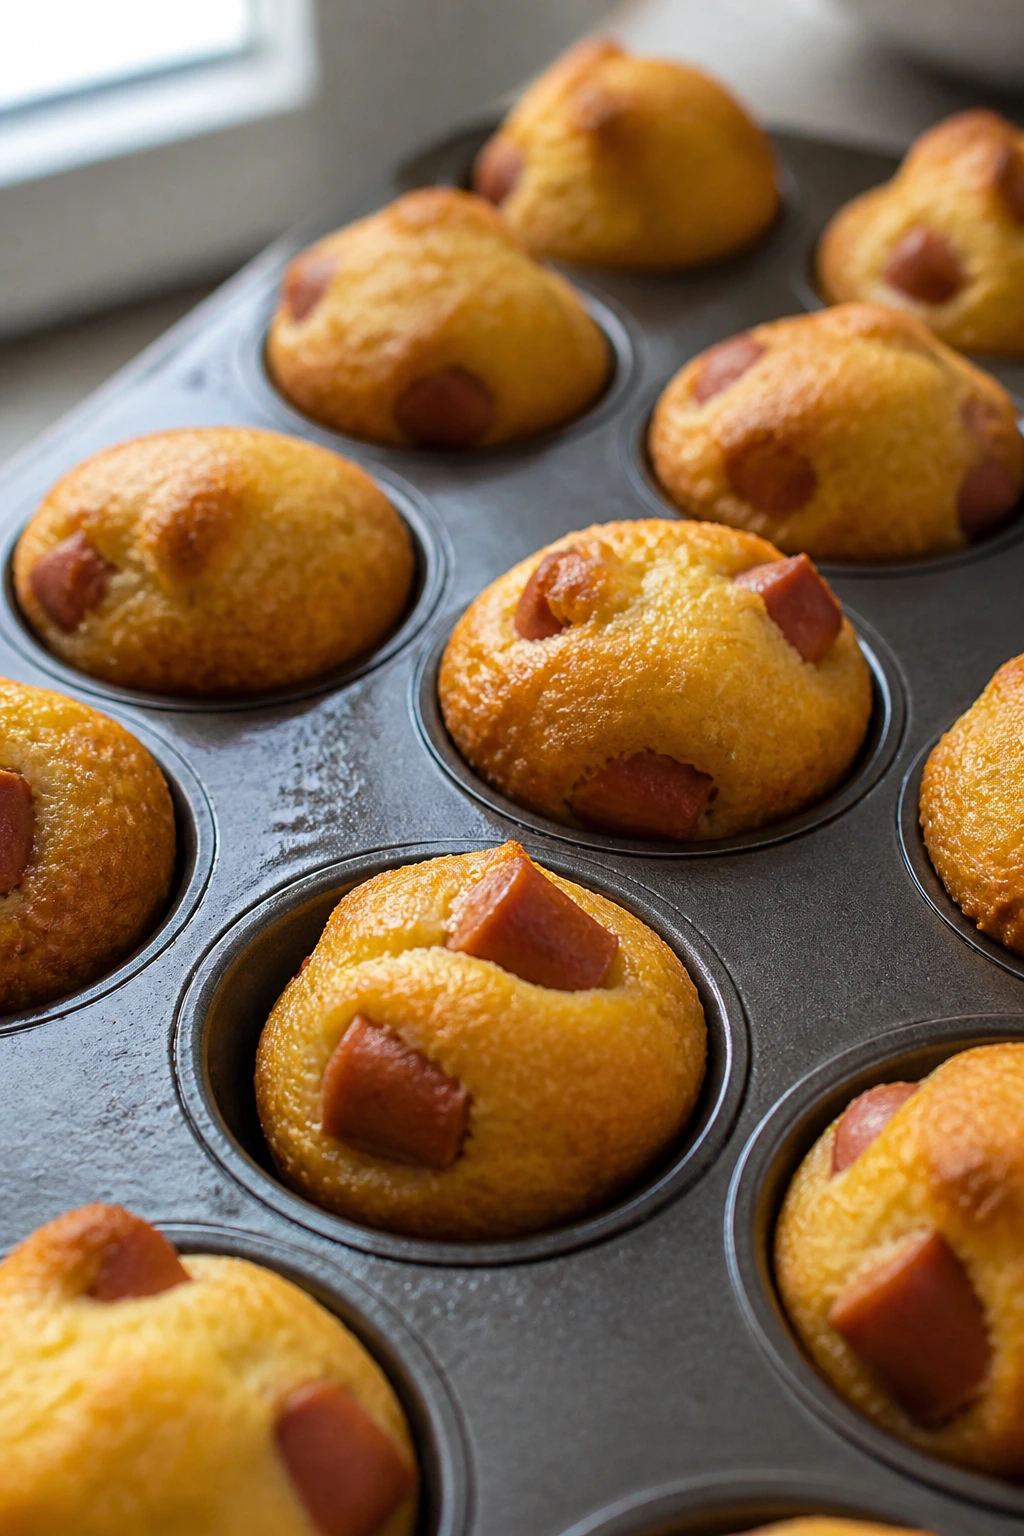
These taste like a fair food mash-up, but they’re easier to portion and less messy than full-sized corn dogs. A mini muffin pan gives you the right golden edges.
Why It Works: Cornmeal batter baked around chopped hot dogs gives you the classic corn dog flavor without a skillet of oil. The mini muffin shape makes each one a single, neat bite.
Key Ingredients:
- 1 cup cornmeal
- 1 cup all-purpose flour
- 1 tablespoon sugar
- 1 tablespoon baking powder
- 1 cup milk
- 1 large egg
- 1/4 cup melted butter
- 8 hot dogs, chopped into 1-inch pieces
Quick Steps:
- Heat oven to 400°F and grease a mini muffin tin.
- Whisk dry ingredients, then add milk, egg, and butter.
- Spoon batter into cups and press in hot dog pieces.
- Bake 12 to 14 minutes until puffed and golden.
- Serve warm with mustard or ketchup.
Equipment for This Recipe:
- Mini muffin tin
- Mixing bowl
- Whisk
How to Serve This Dish: Put them on a tray with tiny toothpicks for dipping. They’re good with apple slices when you want the plate to feel less salty.
Pro Tips for This Recipe:
- Dice the hot dogs small so every muffin gets some.
- Don’t overmix the batter or they turn tough.
- Grease the tin well; cornmeal batter sticks.
Variations on This Dish:
- Cheddar Corn Muffins: Add 1/2 cup shredded cheddar.
- Jalapeño Batch: Add a few minced pickled jalapeños for adults.
Common Mistakes to Avoid with This Dish:
- Don’t overfill the cups.
- Don’t serve straight from the pan; let them settle for 5 minutes.
14. Taco Nachos
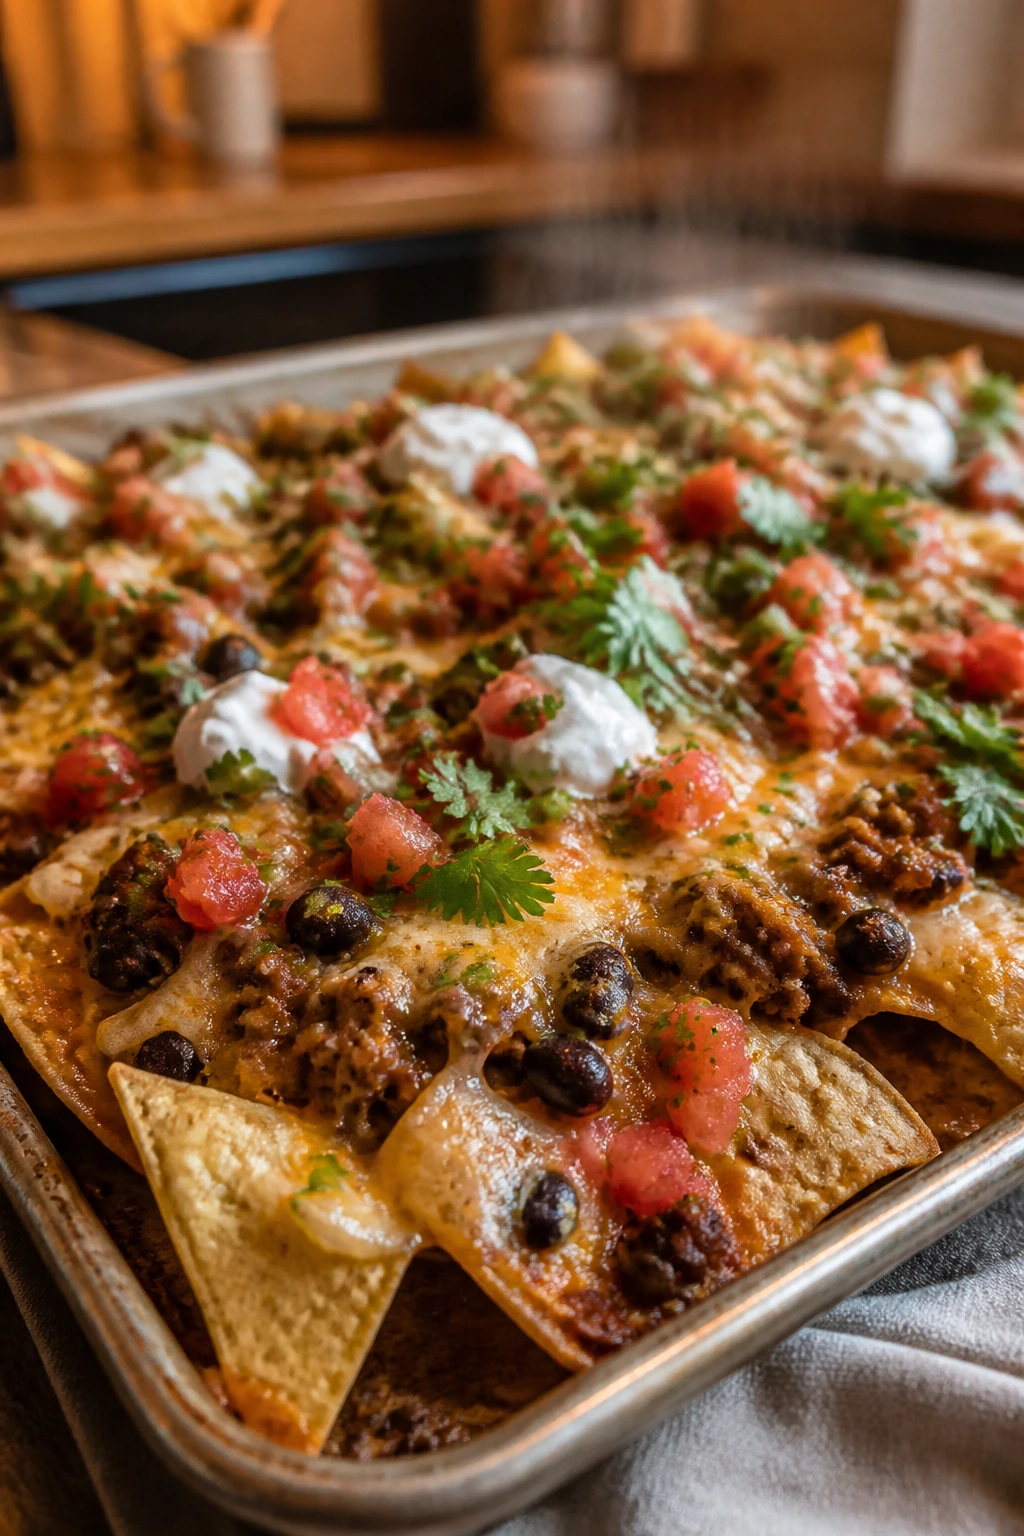
A tray of nachos is built for sharing, and this version keeps the chips sturdy under the toppings. The cheese melts into the meat, and the cold toppings go on last so the chips stay crisp.
Why It Works: Baking the chips with cheese first protects them from getting soggy. The layered build lets each chip catch some topping instead of leaving the bottom plain.
Key Ingredients:
- 8 ounces tortilla chips
- 1 pound ground beef
- 1 tablespoon taco seasoning
- 1/2 cup water
- 2 cups shredded cheddar
- 1 cup black beans, drained
- 1 cup diced tomatoes
- 1/4 cup sliced green onions
Quick Steps:
- Cook beef with taco seasoning and water until thick.
- Spread chips on a sheet pan.
- Add beef, beans, and cheese.
- Bake at 400°F for 5 to 7 minutes.
- Top with tomatoes and green onions after baking.
Equipment for This Recipe:
- Sheet pan
- Skillet
- Spoon
How to Serve This Dish: Serve with sour cream, salsa, and guacamole nearby. This one should be eaten right away while the chips still have structure.
Pro Tips for This Recipe:
- Use thick chips, not flimsy ones.
- Keep cold toppings off until the end.
- Drain the beef well so the tray doesn’t flood.
Variations on This Dish:
- Chicken Taco Tray: Use shredded chicken instead of beef.
- Bean-Only Nachos: Double the beans and skip the meat.
Common Mistakes to Avoid with This Recipe:
- Don’t pile everything in the center; spread it out.
- Don’t bake with tomatoes already on top.
15. Chocolate Banana Bites
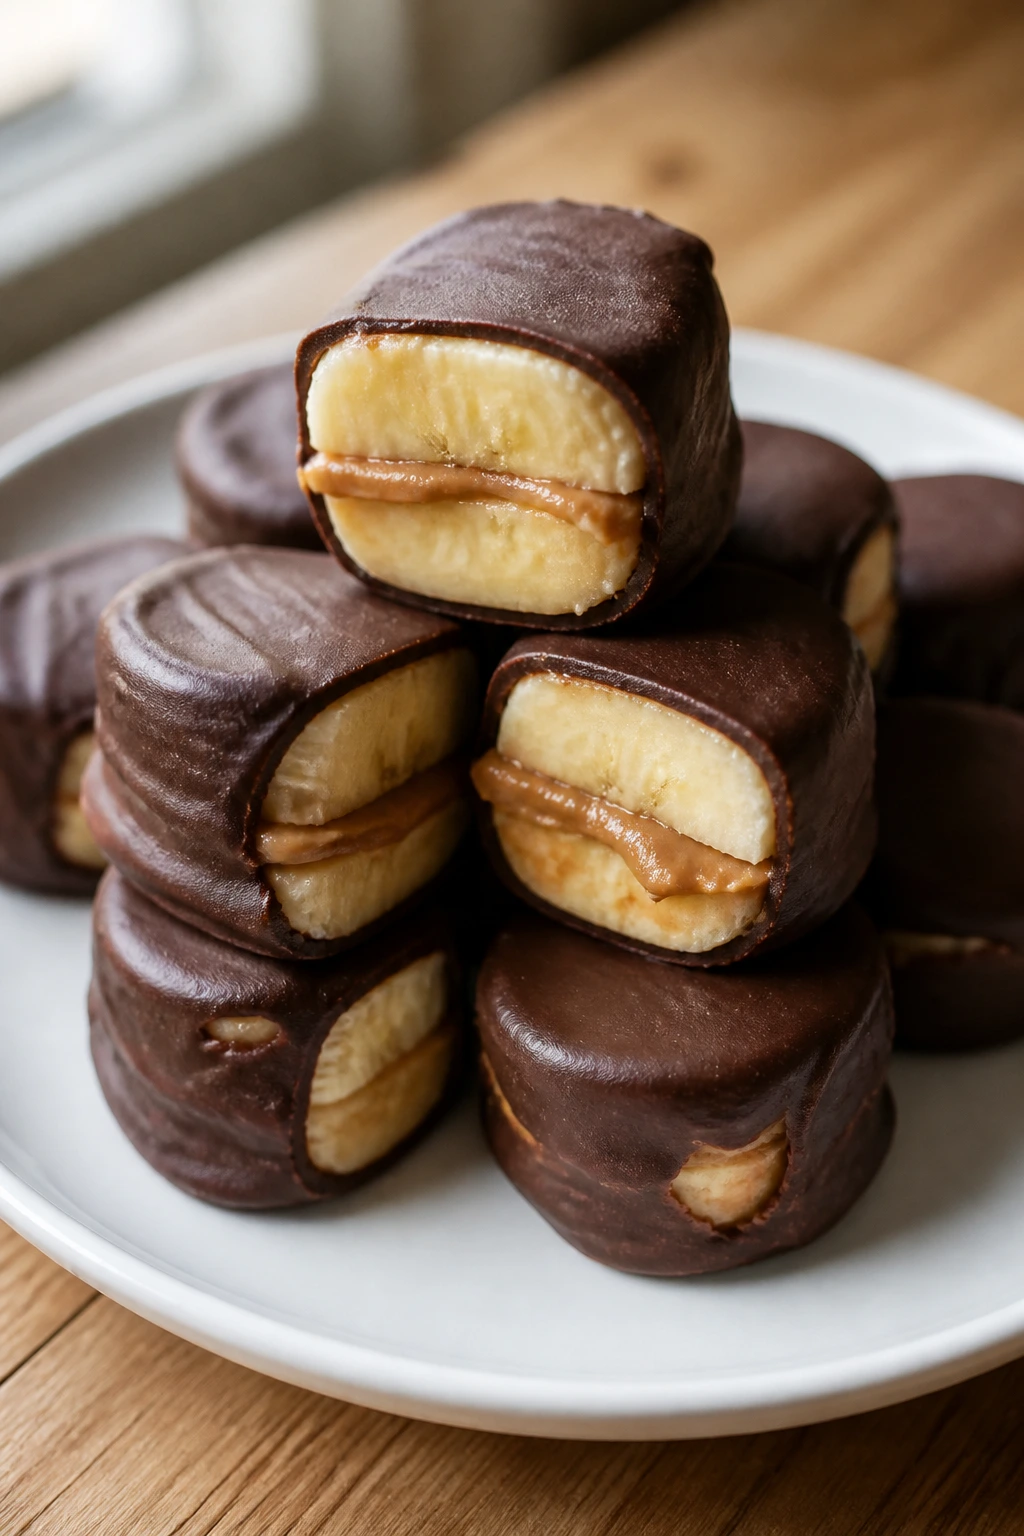
These are cold, sweet, and gone in one bite, which is exactly why they work so well on a movie tray. The banana softens the chocolate’s snap just enough.
Why It Works: Frozen banana slices give the chocolate something firm to cling to, and a little peanut butter turns them into a two-layer bite. They hold in the freezer better than most fruit snacks.
Key Ingredients:
- 2 ripe bananas, sliced into 1/2-inch rounds
- 1/2 cup peanut butter
- 1 cup chocolate chips
- 1 teaspoon coconut oil
- 2 tablespoons chopped peanuts
- Pinch of flaky salt
Quick Steps:
- Sandwich peanut butter between two banana slices.
- Freeze the bites for 20 minutes.
- Melt chocolate chips with coconut oil.
- Dip or drizzle each bite in chocolate.
- Sprinkle with peanuts and salt, then freeze until set.
Equipment for This Recipe:
- Baking sheet
- Parchment paper
- Microwave-safe bowl
How to Serve This Dish: Serve straight from the freezer in a shallow bowl. They melt fast on warm hands, so keep the tray moving.
Pro Tips for This Recipe:
- Use bananas that are ripe but not mushy.
- Freeze before dipping so the filling doesn’t squeeze out.
- Work in batches if your kitchen is warm.
Variations on This Dish:
- Sunflower Swap: Use sunflower seed butter instead of peanut butter.
- Crunch Coat: Roll the chocolate in crushed cereal.
Common Mistakes to Avoid with This Dish:
- Don’t slice bananas too thin.
- Don’t leave them on a warm counter for long.
16. Sloppy Joe Cups
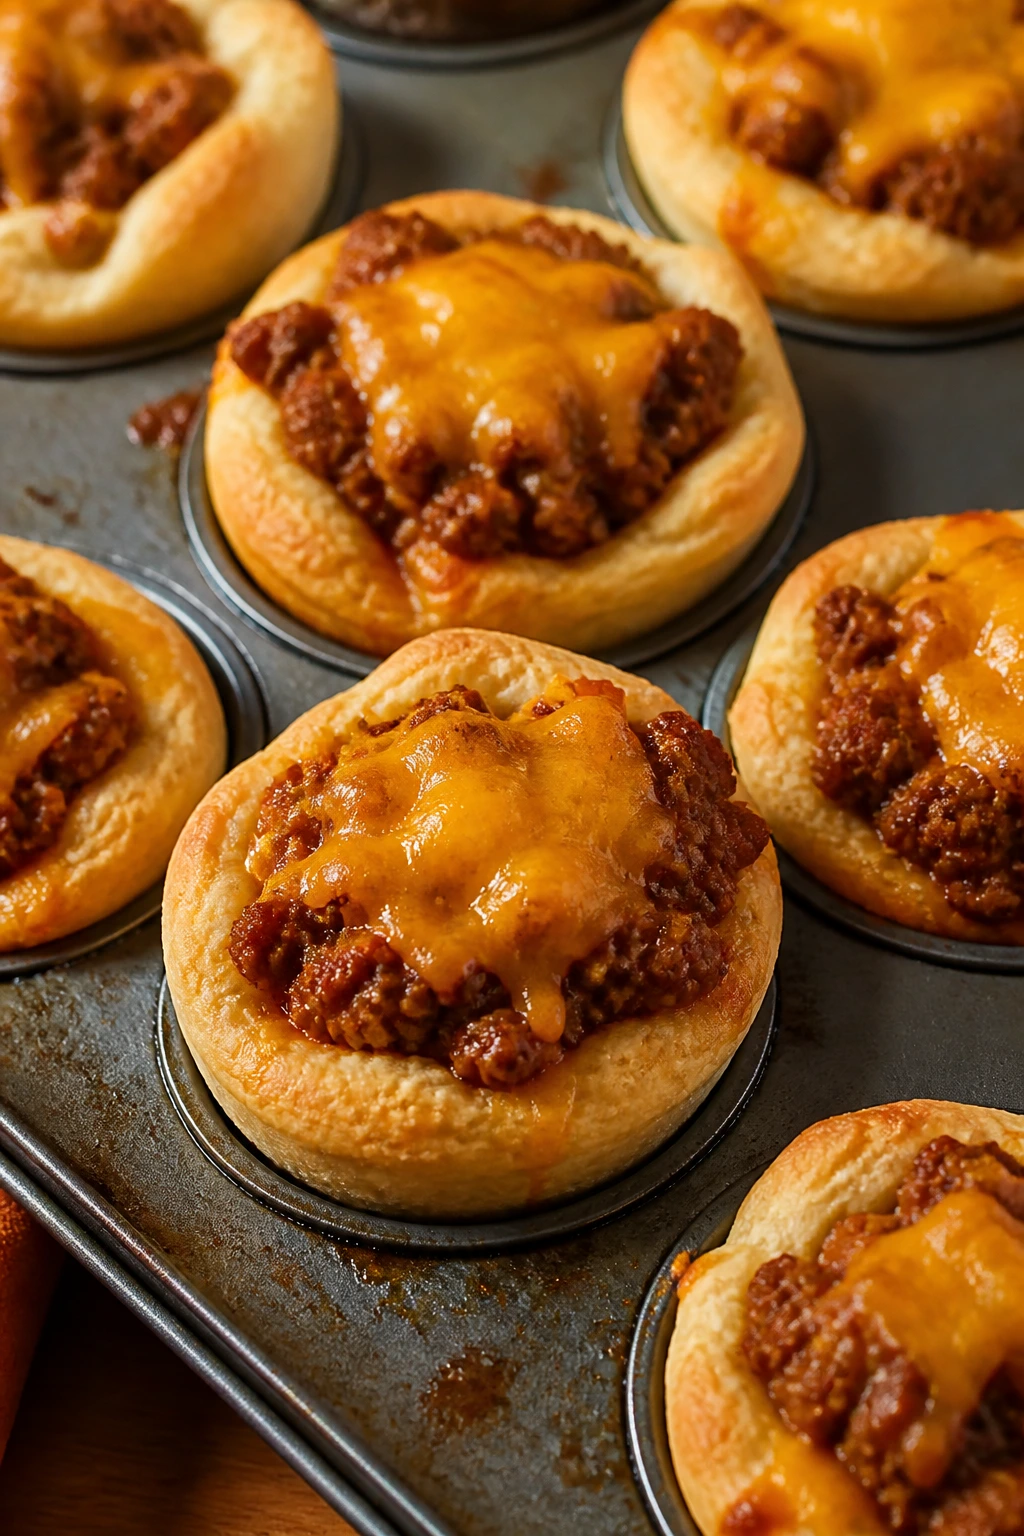
These taste like a sloppy joe without the sprawl. The biscuit cup gives you a crusty edge, and the filling stays tucked in.
Why It Works: Baking the filling inside dough turns a messy sandwich into a neat handheld snack. The edges brown first, so each cup gets a little extra chew.
Key Ingredients:
- 1 pound ground beef
- 1/2 cup onion, diced
- 3/4 cup ketchup
- 2 tablespoons tomato paste
- 1 tablespoon brown sugar
- 1 tablespoon Worcestershire sauce
- 1 can refrigerated biscuit dough
- 1 cup shredded cheddar
Quick Steps:
- Cook beef and onion until browned.
- Stir in ketchup, tomato paste, brown sugar, and Worcestershire.
- Press biscuit dough into muffin cups.
- Fill with meat and cheese.
- Bake at 375°F for 12 to 14 minutes.
Equipment for This Recipe:
- Muffin tin
- Skillet
- Spoon
How to Serve This Dish: Serve with pickle chips on the side. The tang helps cut the sweetness of the sauce.
Pro Tips for This Recipe:
- Simmer the filling until thick.
- Don’t overfill the biscuit cups.
- Let them rest before lifting out.
Variations on This Dish:
- Turkey Joe Cups: Use ground turkey.
- Pizza Joe Cups: Add oregano and mozzarella.
Common Mistakes to Avoid with This Recipe:
- Don’t leave the filling runny.
- Don’t skip greasing the muffin tin.
17. Apple Nachos
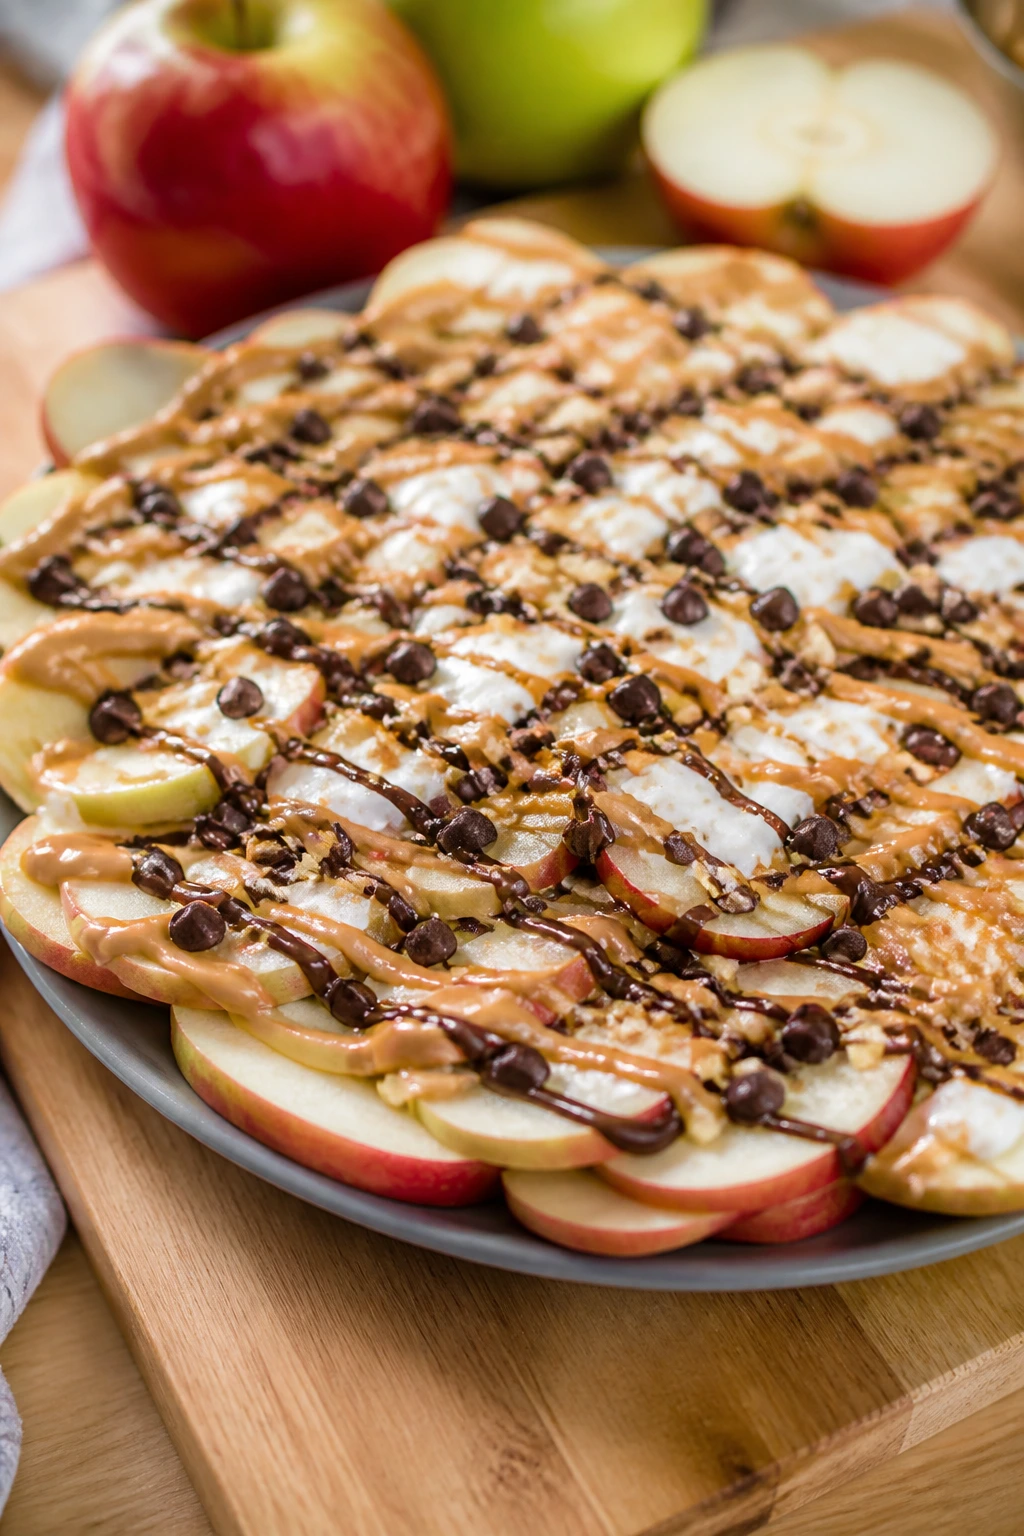
These are crisp, sweet, and fast to assemble, which makes them a nice counterweight to all the baked snacks. Thin apple slices give you the best crunch-to-topping ratio.
Why It Works: Sliced apples act like a cold, crisp base for peanut butter, yogurt, or chocolate drizzle. The toppings cling best when the apples are sliced fresh and arranged in a single layer.
Key Ingredients:
- 3 large apples, thinly sliced
- 1/3 cup peanut butter, warmed slightly
- 1/4 cup Greek yogurt
- 2 tablespoons mini chocolate chips
- 2 tablespoons granola
- 1 tablespoon chopped walnuts
- 1 teaspoon lemon juice
Quick Steps:
- Toss apple slices with lemon juice.
- Arrange on a platter.
- Drizzle with peanut butter and yogurt.
- Sprinkle with chocolate chips, granola, and walnuts.
- Serve right away.
Equipment for This Recipe:
- Cutting board
- Sharp knife
- Wide platter
How to Serve This Dish: Spread them wide on a flat plate so every slice gets topping. They work best as a sweet break between salty bites.
Pro Tips for This Recipe:
- Slice apples right before serving.
- Warm peanut butter 10 seconds so it drizzles.
- Use tart apples if you want sharper flavor.
Variations on This Dish:
- Caramel Apple Nachos: Swap yogurt for caramel sauce.
- Cinnamon Crunch: Add a dusting of cinnamon on top.
Common Mistakes to Avoid with This Recipe:
- Don’t let the apples sit too long or they brown.
- Don’t pile the toppings in one spot.
18. Turkey Meatball Subs
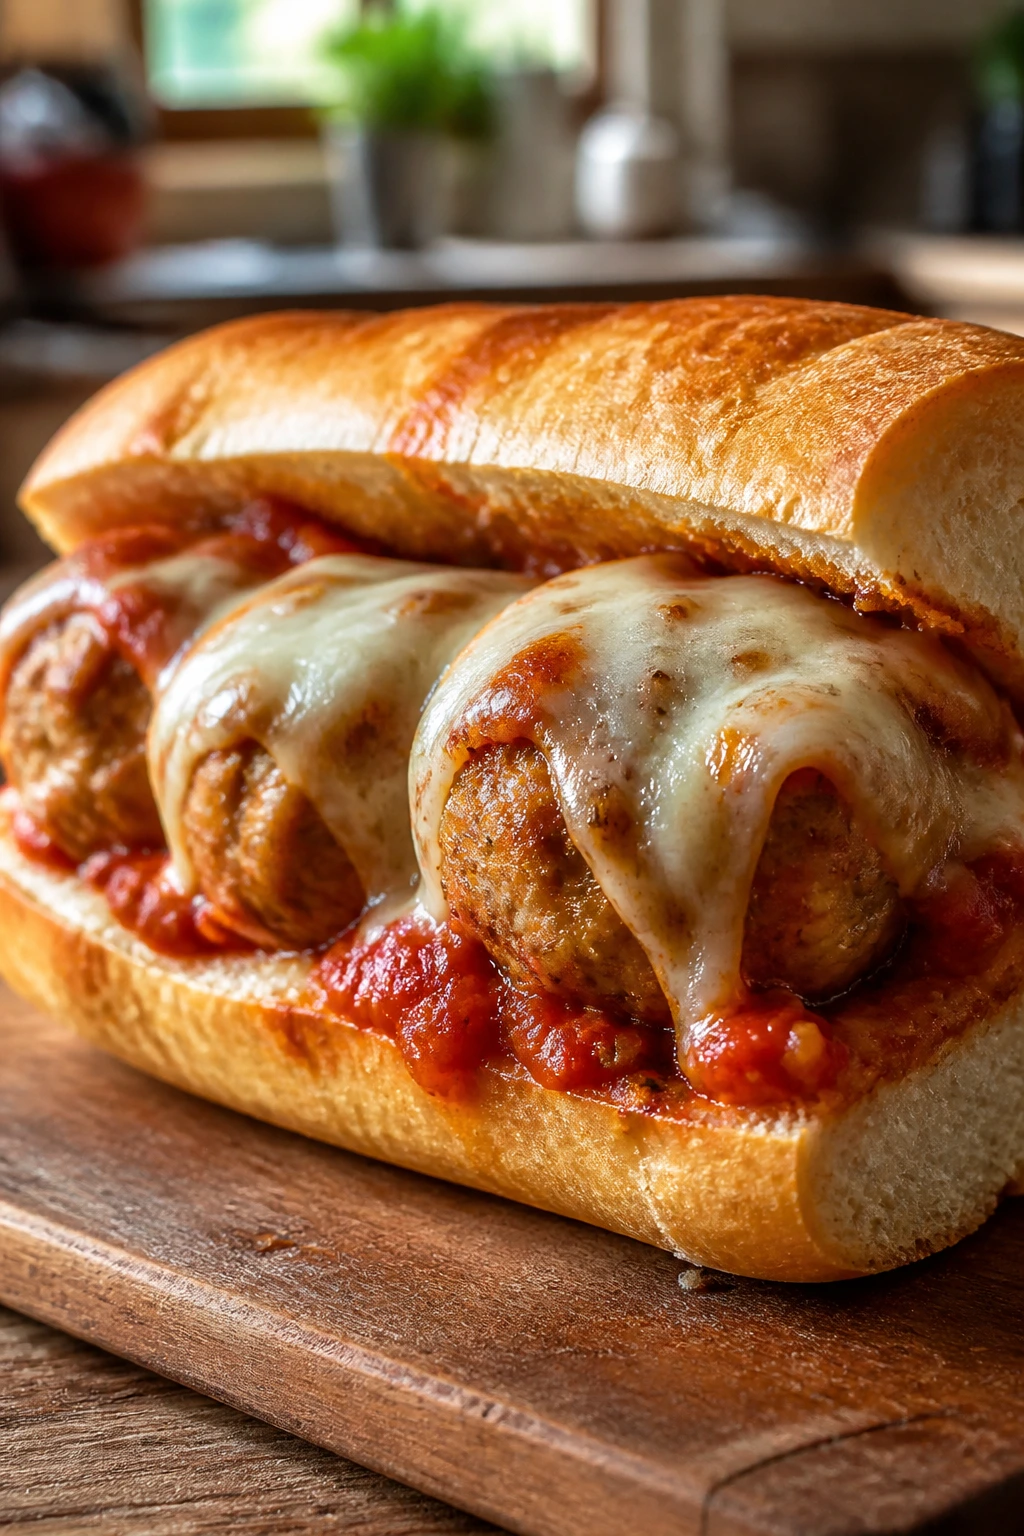
These are compact, saucy, and easier to manage than full sandwiches. The meatballs stay tender, and the roll catches the sauce without going soggy too fast.
Why It Works: Turkey meatballs stay lighter than beef, which helps when the rest of the spread is already rich. Nestling them into split rolls with a little sauce and cheese creates a self-contained snack.
Key Ingredients:
- 1 pound ground turkey
- 1/2 cup breadcrumbs
- 1 egg
- 1 teaspoon Italian seasoning
- 1 cup marinara sauce
- 6 small sub rolls
- 1 cup shredded mozzarella
Quick Steps:
- Mix turkey, breadcrumbs, egg, and seasoning.
- Form 12 small meatballs and bake at 400°F for 15 minutes.
- Warm marinara in a skillet.
- Fill rolls with meatballs, sauce, and mozzarella.
- Bake 5 minutes until the cheese melts.
Equipment for This Recipe:
- Sheet pan
- Skillet
- Mixing bowl
How to Serve This Dish: Cut the subs into thirds for easier grabbing. A few pickle spears on the side keep things bright.
Pro Tips for This Recipe:
- Keep meatballs small so they fit the roll.
- Use thick rolls; soft hot-dog buns collapse.
- Warm the sauce before assembling.
Variations on This Dish:
- Meatball Parm: Add a spoon of Parmesan to the filling.
- Mini Slider Version: Use dinner rolls instead of sub rolls.
Common Mistakes to Avoid with This Recipe:
- Don’t overmix the turkey.
- Don’t flood the rolls with sauce.
19. Garlic Bread Pizza Toast

This is the quick-answer recipe when everyone wants pizza and nobody wants a full dough situation. The edges crisp like garlic bread, while the center stays soft under the sauce.
Why It Works: Toasting the bread first keeps it from soaking up sauce too fast. Garlic butter on the base gives you flavor before the toppings even start.
Key Ingredients:
- 8 slices French bread
- 4 tablespoons butter, softened
- 1 teaspoon garlic powder
- 1 cup pizza sauce
- 2 cups shredded mozzarella
- 1/2 cup chopped pepperoni
- 1 teaspoon dried basil
Quick Steps:
- Heat oven to 425°F.
- Mix butter and garlic powder, then spread on bread.
- Toast slices for 4 minutes.
- Top with sauce, mozzarella, pepperoni, and basil.
- Bake 6 to 7 minutes until melted.
Equipment for This Recipe:
- Sheet pan
- Butter knife
- Spoon
How to Serve This Dish: Cut each slice into smaller rectangles and serve on a platter. It’s a fast fix for hungry people who don’t want to wait.
Pro Tips for This Recipe:
- Use sturdy bread, not sandwich loaf.
- Toast first so the bottom doesn’t turn limp.
- Add basil after baking for a fresher finish.
Variations on This Dish:
- White Garlic Toast: Swap sauce for ricotta.
- Veggie Toast: Add mushrooms and bell peppers.
Common Mistakes to Avoid with This Dish:
- Don’t skip the first toast.
- Don’t pile on too much sauce.
20. Ranch Roasted Chickpeas
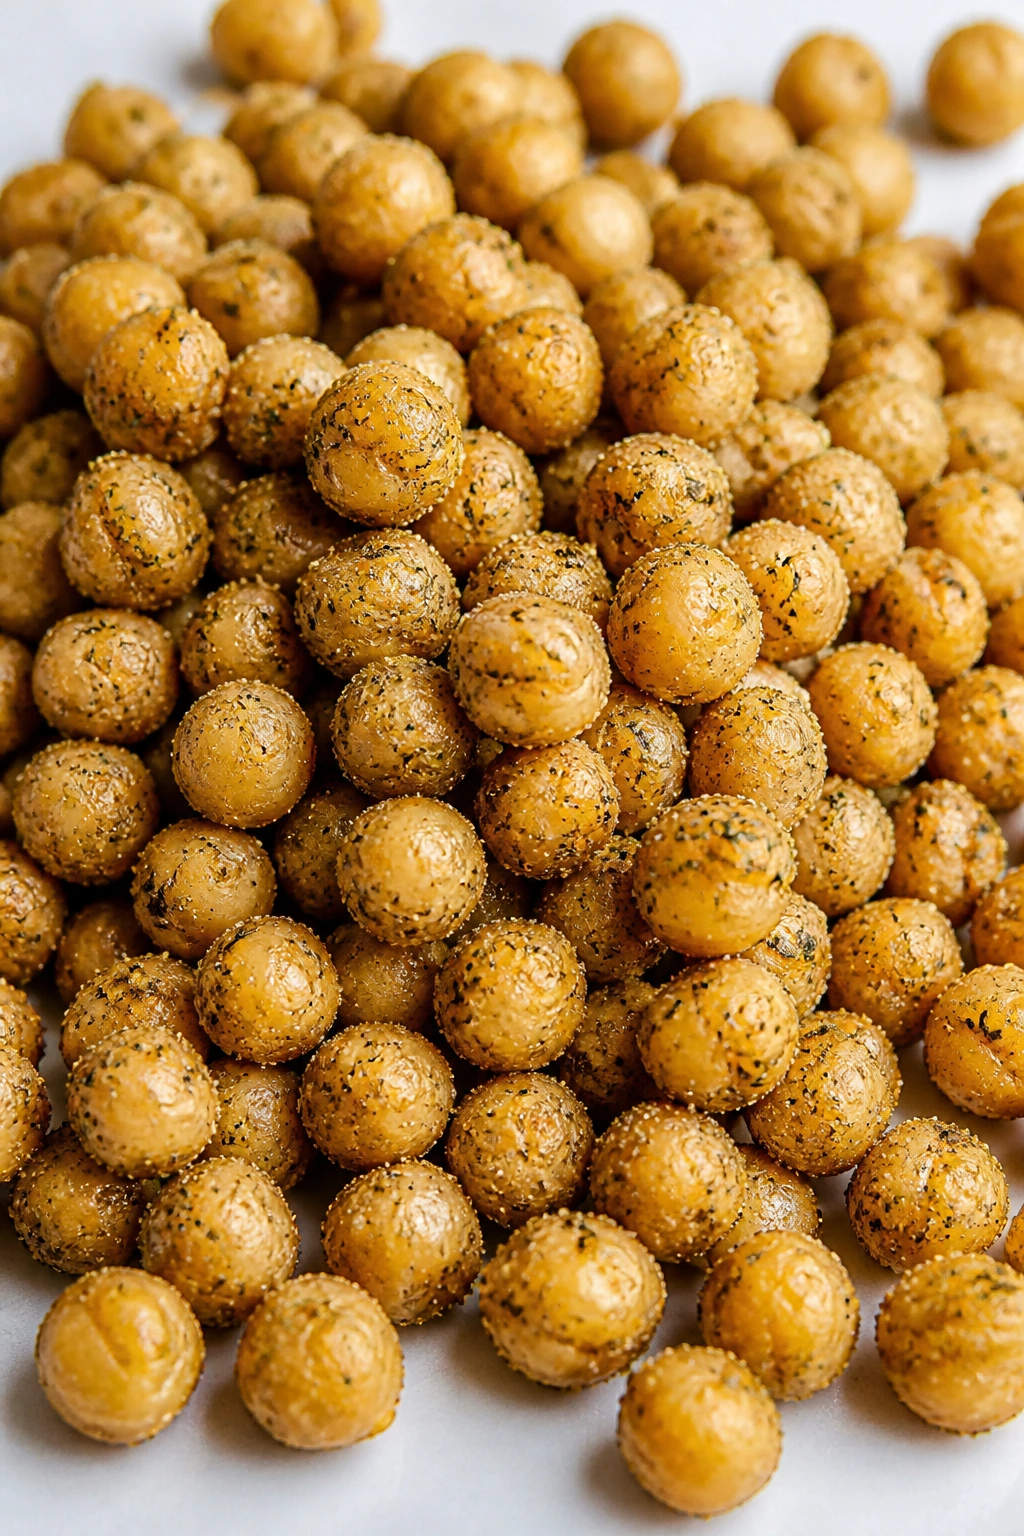
Crunchy, salty, and a little addictive. These are the snack you keep reaching for when you want something with bite that isn’t another chip.
Why It Works: Chickpeas roast into crisp little nuggets if you dry them thoroughly first. Ranch seasoning sticks to the hot beans right after baking, which is when the flavor lands best.
Key Ingredients:
- 2 cans chickpeas, drained and rinsed
- 1 tablespoon olive oil
- 1 1/2 teaspoons ranch seasoning
- 1/2 teaspoon salt
- 1/4 teaspoon garlic powder
Quick Steps:
- Dry the chickpeas well with towels.
- Toss with oil and seasonings.
- Roast at 400°F for 25 to 30 minutes, shaking once.
- Cool on the pan for extra crunch.
- Serve in a bowl once crisp.
Equipment for This Recipe:
- Sheet pan
- Clean towels
- Mixing bowl
How to Serve This Dish: Pour them into a small bowl and keep a spoon nearby. They’re a good salty break between richer snacks.
Pro Tips for This Recipe:
- Drying matters more than people think.
- Don’t roast on parchment if your oven runs cool; direct pan heat crisps better.
- Season while warm so the powder clings.
Variations on This Dish:
- Smoky Paprika: Use paprika and cumin instead of ranch.
- Honey Snack Chickpeas: Add a drizzle of honey after roasting.
Common Mistakes to Avoid with This Recipe:
- Don’t leave moisture on the beans.
- Don’t underbake; pale chickpeas stay chewy.
21. Mini Pancake Dippers
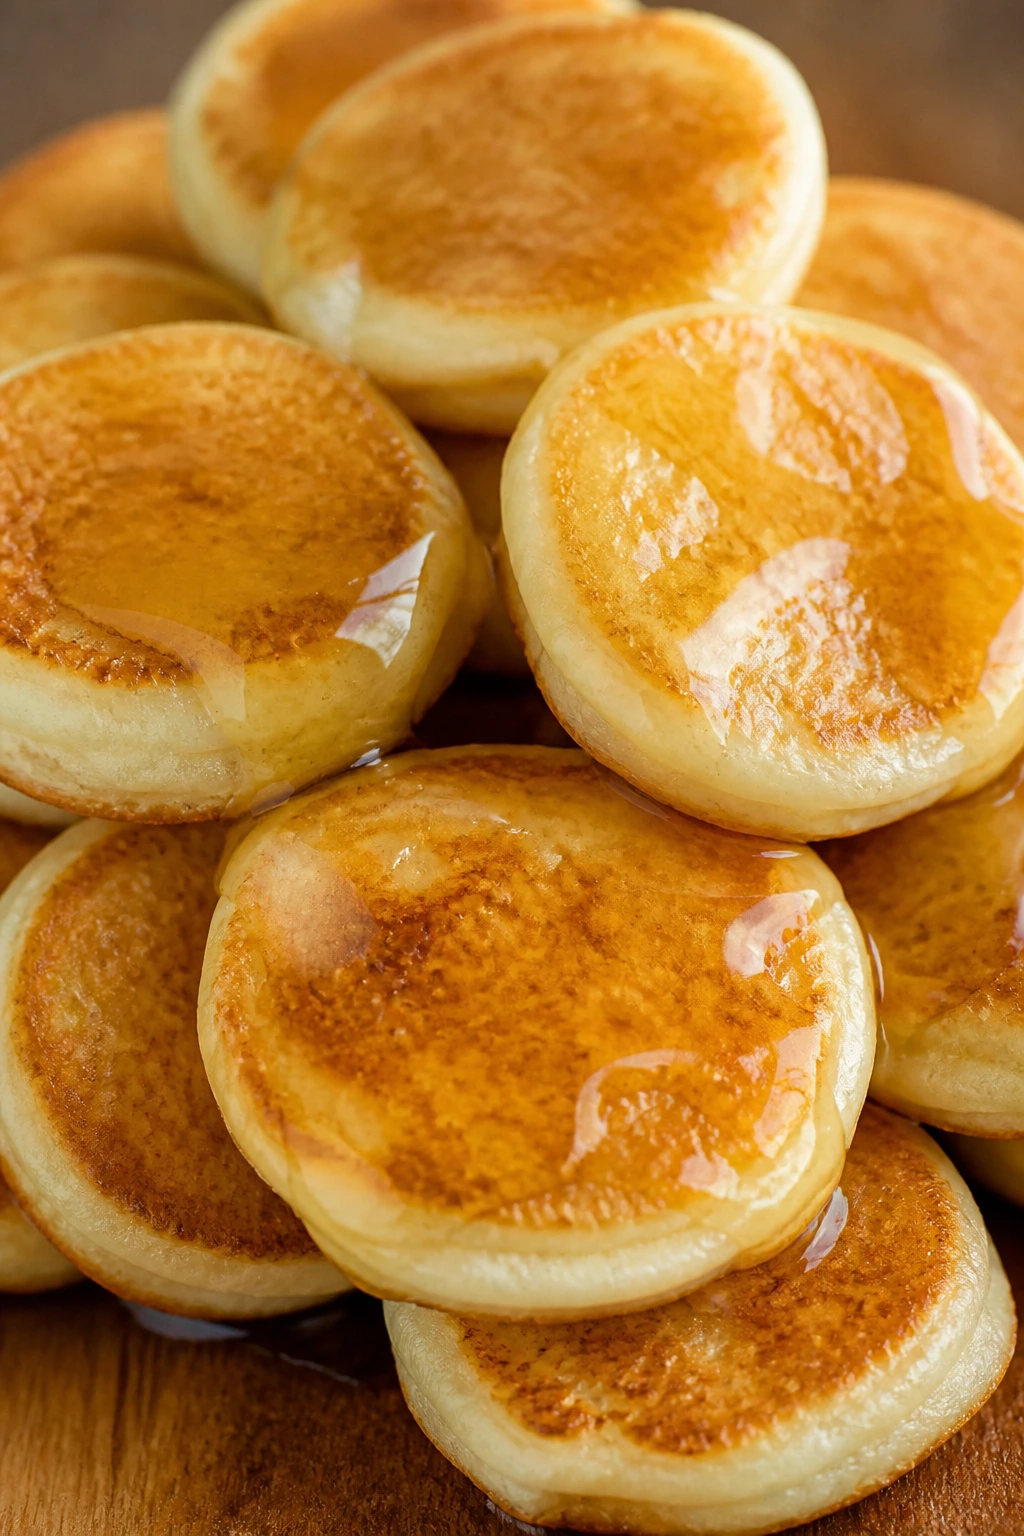
These are breakfast-for-movie-night, and that is not a bad thing. They’re soft, easy to dip, and perfect with syrup or yogurt.
Why It Works: Small pancakes cook faster and stay more tender than big ones. Their size makes them ideal for dipping, which means fewer syrup-stained fingers.
Key Ingredients:
- 1 cup pancake mix
- 3/4 cup milk
- 1 egg
- 1 tablespoon melted butter
- 1/2 teaspoon vanilla extract
- 1/2 cup fresh berries
Quick Steps:
- Whisk mix, milk, egg, butter, and vanilla.
- Cook teaspoon-sized rounds on a greased skillet over medium heat.
- Flip when bubbles form and edges look set.
- Cook 1 minute more.
- Serve warm with berries and syrup.
Equipment for This Recipe:
- Skillet
- Mixing bowl
- Spoon or squeeze bottle
How to Serve This Dish: Stack them in a bowl with toothpicks or serve them in a napkin-lined basket. They make a nice sweet side next to salty snacks.
Pro Tips for This Recipe:
- Keep the pancakes small so they stay dip-friendly.
- Wipe the skillet between batches if sugar builds up.
- Serve with warm syrup, not cold.
Variations on This Dish:
- Chocolate Chip Dippers: Fold in mini chips.
- Cinnamon Roll Style: Add cinnamon and a cream cheese dip.
Common Mistakes to Avoid with This Recipe:
- Don’t make the batter too thin.
- Don’t flip early or they tear.
22. Crescent Roll Pigs in a Blanket
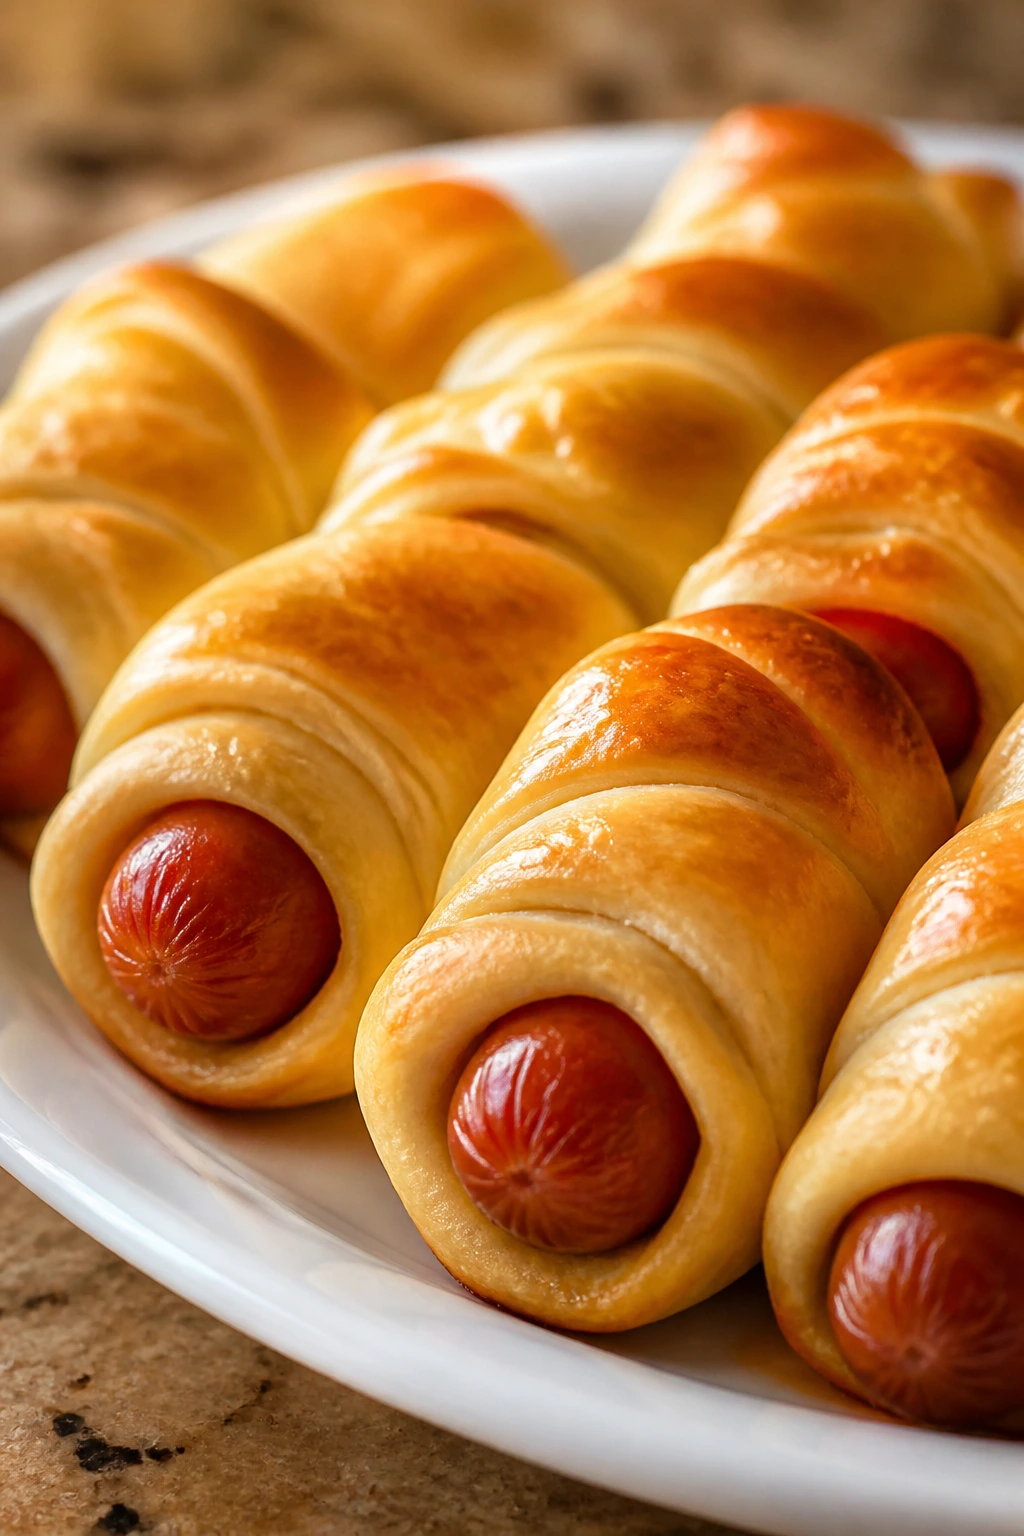
These are pure movie-night comfort: buttery dough wrapped around a savory bite, then baked until the tops are glossy and browned. The crescent dough gives you that familiar soft, flaky pull.
Why It Works: Crescent dough bakes fast and stays tender around the hot dog, so the finished bite is warm all the way through without getting chewy. A touch of egg wash helps the tops color evenly.
Key Ingredients:
- 1 can crescent roll dough
- 8 mini hot dogs
- 1 large egg, beaten
- 1 teaspoon sesame seeds
- 1 teaspoon mustard, for brushing
- 2 tablespoons shredded cheddar, optional
Quick Steps:
- Heat oven to 375°F.
- Cut dough triangles in half and wrap around each hot dog.
- Brush with egg and sprinkle sesame seeds.
- Bake 12 to 14 minutes until golden.
- Serve with mustard or ketchup.
Equipment for This Recipe:
- Sheet pan
- Pastry brush
- Parchment paper
How to Serve This Dish: Serve them on a broad plate with two dips so people can choose. They go fast, so I’d make a double batch.
Pro Tips for This Recipe:
- Dry the hot dogs first so the dough seals.
- Don’t wrap dough too thick or the centers stay doughy.
- Serve hot; the texture is best right out of the oven.
Variations on This Dish:
- Cheddar Blanket: Add a strip of cheese before rolling.
- Everything Bagel Version: Swap sesame seeds for everything seasoning.
Common Mistakes to Avoid with This Recipe:
- Don’t crowd them on the pan.
- Don’t underbake; the dough should be fully golden.
23. Baked Chicken Taquitos

These are crisp, rolled, and made for dipping. They hold together better than tacos, which matters when a child is trying to eat and watch the screen at the same time.
Why It Works: Rolling the filling tightly and baking seam-side down keeps the taquitos closed. A brush of oil on the tortillas gives the outside a fried-like crunch without a fryer.
Key Ingredients:
- 2 cups shredded cooked chicken
- 1/2 cup cream cheese, softened
- 1 cup shredded cheddar
- 1 tablespoon salsa
- 8 small flour tortillas
- 1 tablespoon oil
- 1/2 teaspoon cumin
Quick Steps:
- Mix chicken, cream cheese, cheddar, salsa, and cumin.
- Fill tortillas and roll tightly.
- Place seam-side down on a sheet pan.
- Brush with oil and bake at 425°F for 12 to 15 minutes.
- Serve with salsa or guacamole.
Equipment for This Recipe:
- Sheet pan
- Mixing bowl
- Pastry brush
How to Serve This Dish: Line them up like little logs with dipping bowls nearby. They’re sturdy enough to sit on a tray for a few minutes before serving.
Pro Tips for This Recipe:
- Warm tortillas slightly so they roll without cracking.
- Don’t overfill or they burst open.
- Bake seam-side down first.
Variations on This Dish:
- Bean Taquitos: Replace chicken with mashed black beans.
- Mild Green Chile: Add chopped green chiles for a little heat.
Common Mistakes to Avoid with This Recipe:
- Don’t use huge tortillas.
- Don’t skip the oil; the outside stays pale and soft.
24. Strawberry Yogurt Parfaits

These are the cold, creamy break in a snack spread that leans heavily on baked things. The layers look tidy, and the granola gives the needed crunch.
Why It Works: Thick yogurt holds the layers in place, and the fruit adds enough juiciness without making the cup soupy. Parfaits also buy you some cooling time while everything else finishes in the oven.
Key Ingredients:
- 2 cups plain Greek yogurt
- 2 tablespoons honey
- 1 teaspoon vanilla extract
- 2 cups sliced strawberries
- 1 cup granola
- 1/4 cup blueberries
Quick Steps:
- Stir yogurt, honey, and vanilla.
- Layer yogurt, berries, and granola in cups.
- Repeat the layers.
- Top with a few blueberries.
- Chill until serving.
Equipment for This Recipe:
- Small cups or jars
- Spoon
- Mixing bowl
How to Serve This Dish: Serve them cold with little spoons. They’re a nice palate reset between salty rounds of snacks.
Pro Tips for This Recipe:
- Add granola just before serving for more crunch.
- Use thick yogurt, not thin.
- Pat berries dry so the cups don’t get watery.
Variations on This Dish:
- Peach Parfait: Swap strawberries for peaches.
- Chocolate Crunch: Add cocoa granola.
Common Mistakes to Avoid with This Recipe:
- Don’t assemble too early if you want crisp granola.
- Don’t over-sweeten the yogurt.
25. Mini Cheeseburger Sliders
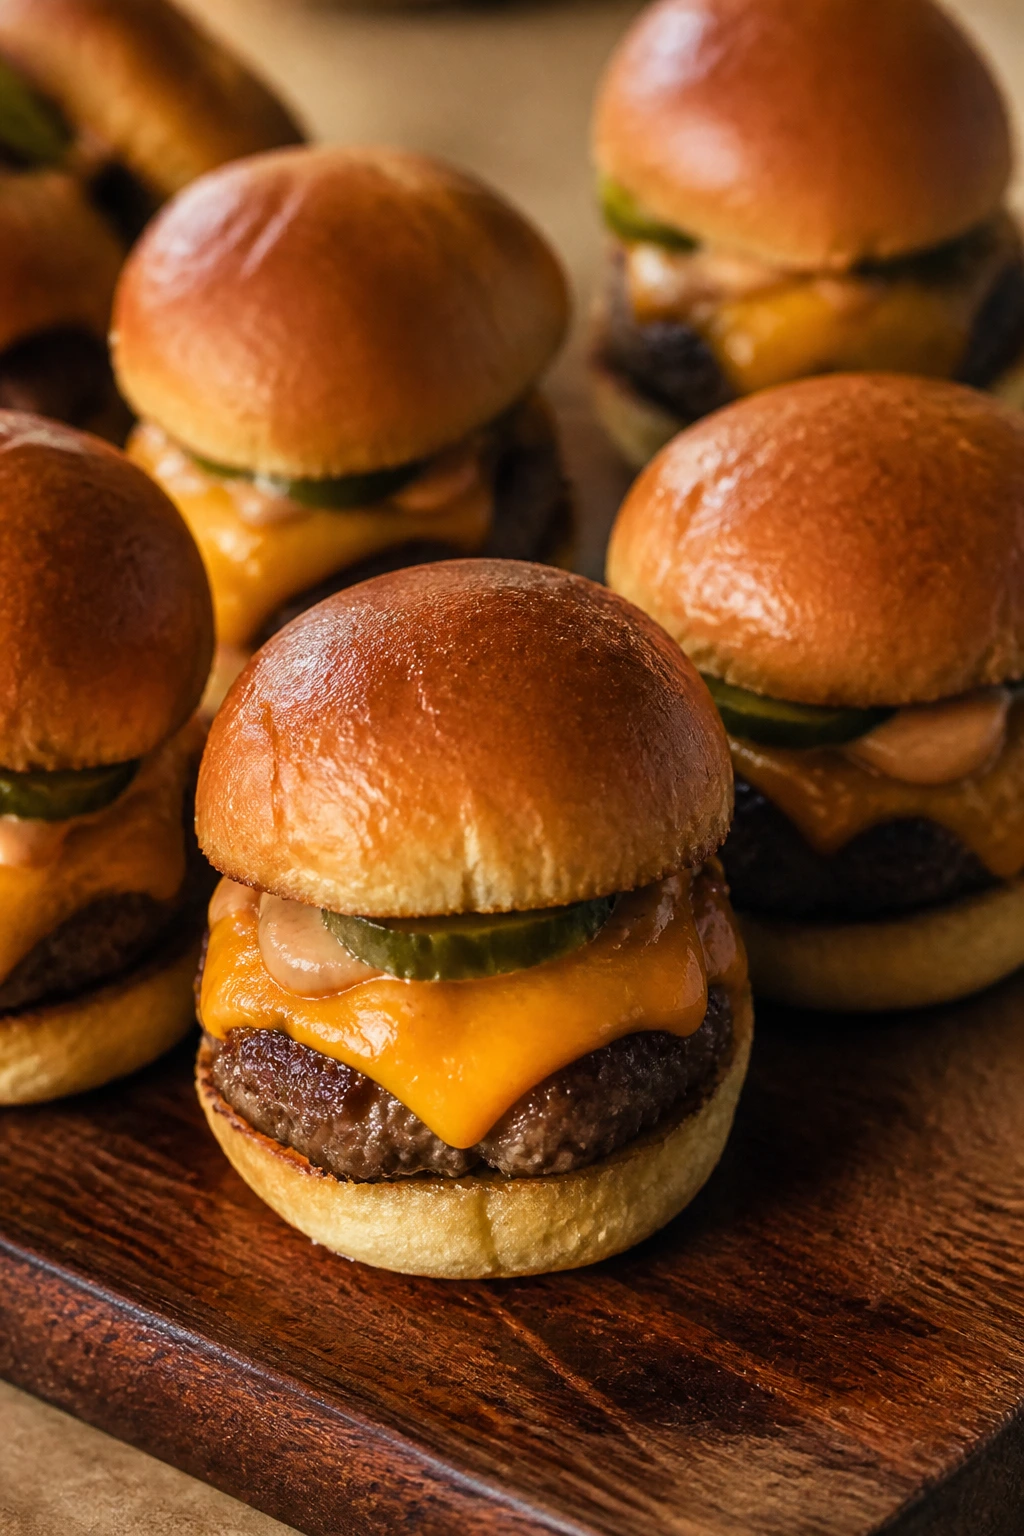
These are the kind of little burgers that make a tray look generous fast. The soft rolls, melted cheese, and beef filling give you the burger shop feeling without the juggling act.
Why It Works: Baking the burgers in one slab or filling them as sliders keeps the meat juicy and the cheese melted evenly. A thin layer of sauce inside the rolls keeps them from feeling dry.
Key Ingredients:
- 1 pound ground beef
- 1/2 teaspoon salt
- 1/4 teaspoon black pepper
- 12 slider buns
- 6 slices cheddar cheese, halved
- 2 tablespoons ketchup
- 1 tablespoon mustard
Quick Steps:
- Cook beef with salt and pepper until browned.
- Split buns and spread ketchup and mustard inside.
- Add beef and cheese.
- Bake at 350°F for 8 minutes until cheese melts.
- Serve warm.
Equipment for This Recipe:
- Skillet
- Baking dish
- Spatula
How to Serve This Dish: Serve with pickle chips and a few fries if you’re feeling ambitious. Cut through the buns in one clean slice so the sliders separate neatly.
Pro Tips for This Recipe:
- Use buns with some structure; too soft and they squash.
- Drain excess fat so the rolls don’t soak it up.
- Add cheese while the beef is still hot.
Variations on This Dish:
- BBQ Slider: Replace ketchup and mustard with barbecue sauce.
- Mushroom Burger: Add sautéed mushrooms to the filling.
Common Mistakes to Avoid with This Recipe:
- Don’t overcook the beef.
- Don’t skip the final bake; the cheese needs that heat.
26. Broccoli Cheddar Tots
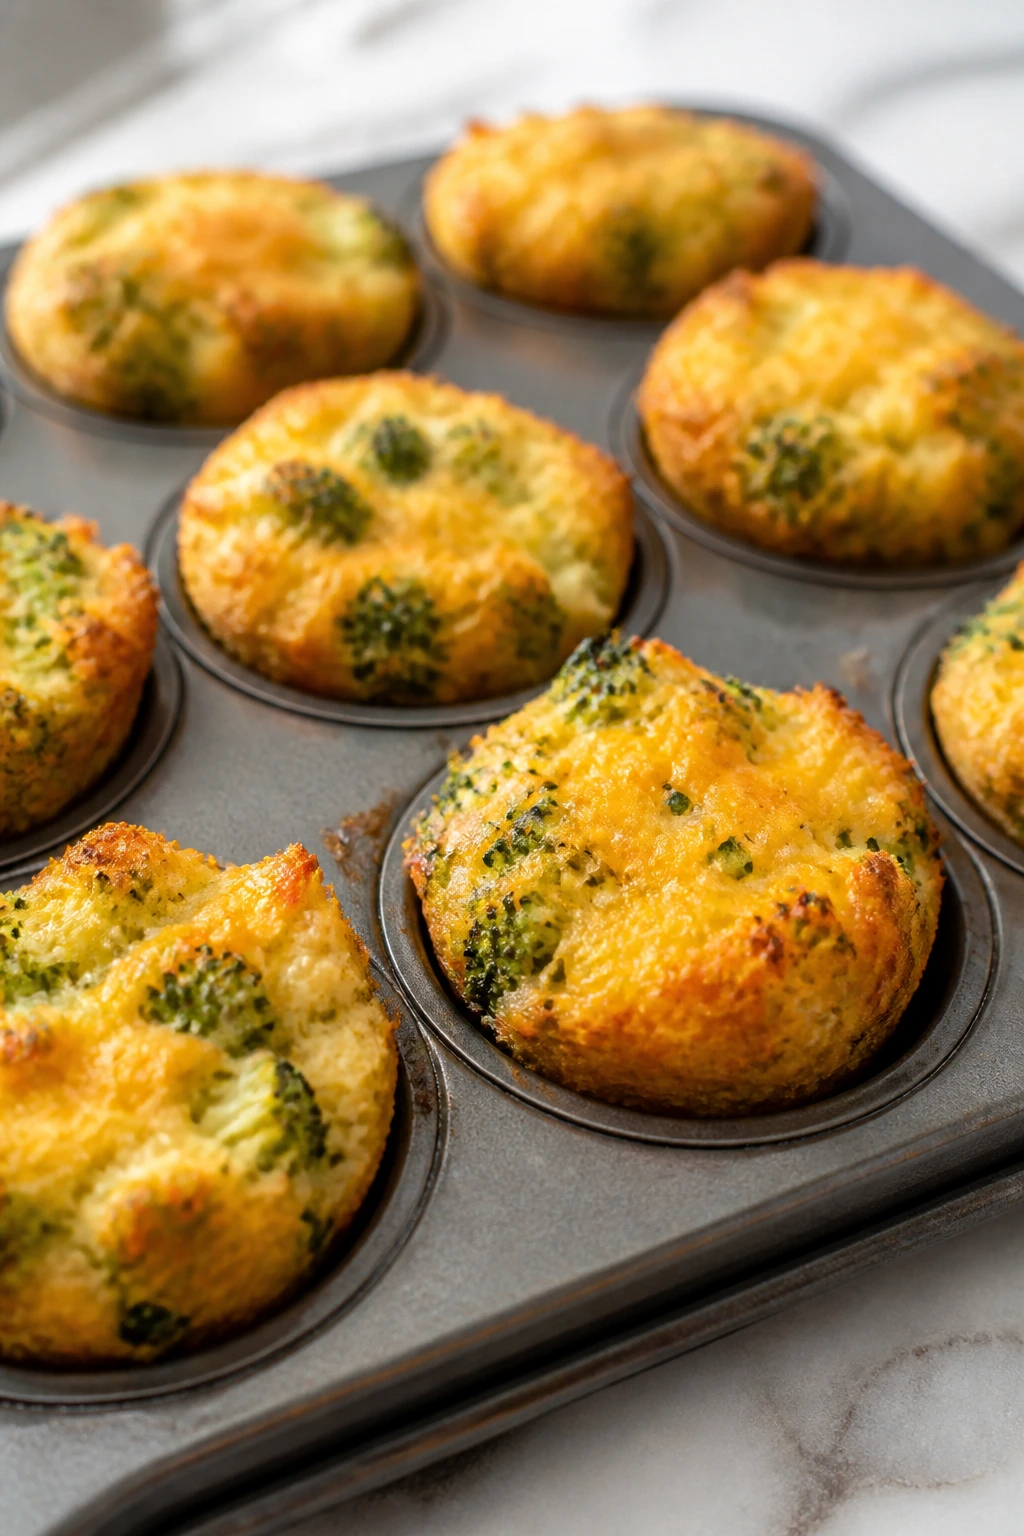
These are tiny, crisp-edged bites with a soft center, and the broccoli disappears into the cheddar in a way picky eaters often tolerate better than they expect. They work well as a sneaky vegetable snack.
Why It Works: Finely chopped broccoli blends into the potato and cheese mixture, so the flavor stays mild and the texture stays smooth. Baking in a mini muffin tin helps them hold their shape.
Key Ingredients:
- 2 cups mashed potatoes
- 1 cup finely chopped cooked broccoli
- 1 cup shredded cheddar
- 1 egg
- 1/4 cup breadcrumbs
- 1/2 teaspoon salt
Quick Steps:
- Heat oven to 400°F and grease a mini muffin tin.
- Mix potatoes, broccoli, cheese, egg, breadcrumbs, and salt.
- Pack into cups.
- Bake 18 to 20 minutes until set and browned.
- Cool 5 minutes before removing.
Equipment for This Recipe:
- Mini muffin tin
- Mixing bowl
- Spoon
How to Serve This Dish: Serve with ranch or ketchup. They’re handy beside a sandwich, but they also stand alone as a crunchy nibble.
Pro Tips for This Recipe:
- Chop the broccoli very fine.
- Use cold mashed potatoes if you have them; they shape better.
- Grease the tin generously.
Variations on This Dish:
- Cauliflower Cheddar Tots: Swap broccoli for cauliflower.
- Jalapeño Tots: Add minced pickled jalapeño for adults.
Common Mistakes to Avoid with This Recipe:
- Don’t leave the mixture loose.
- Don’t pull them too soon or they crumble.
27. Peanut Butter Oat Bars
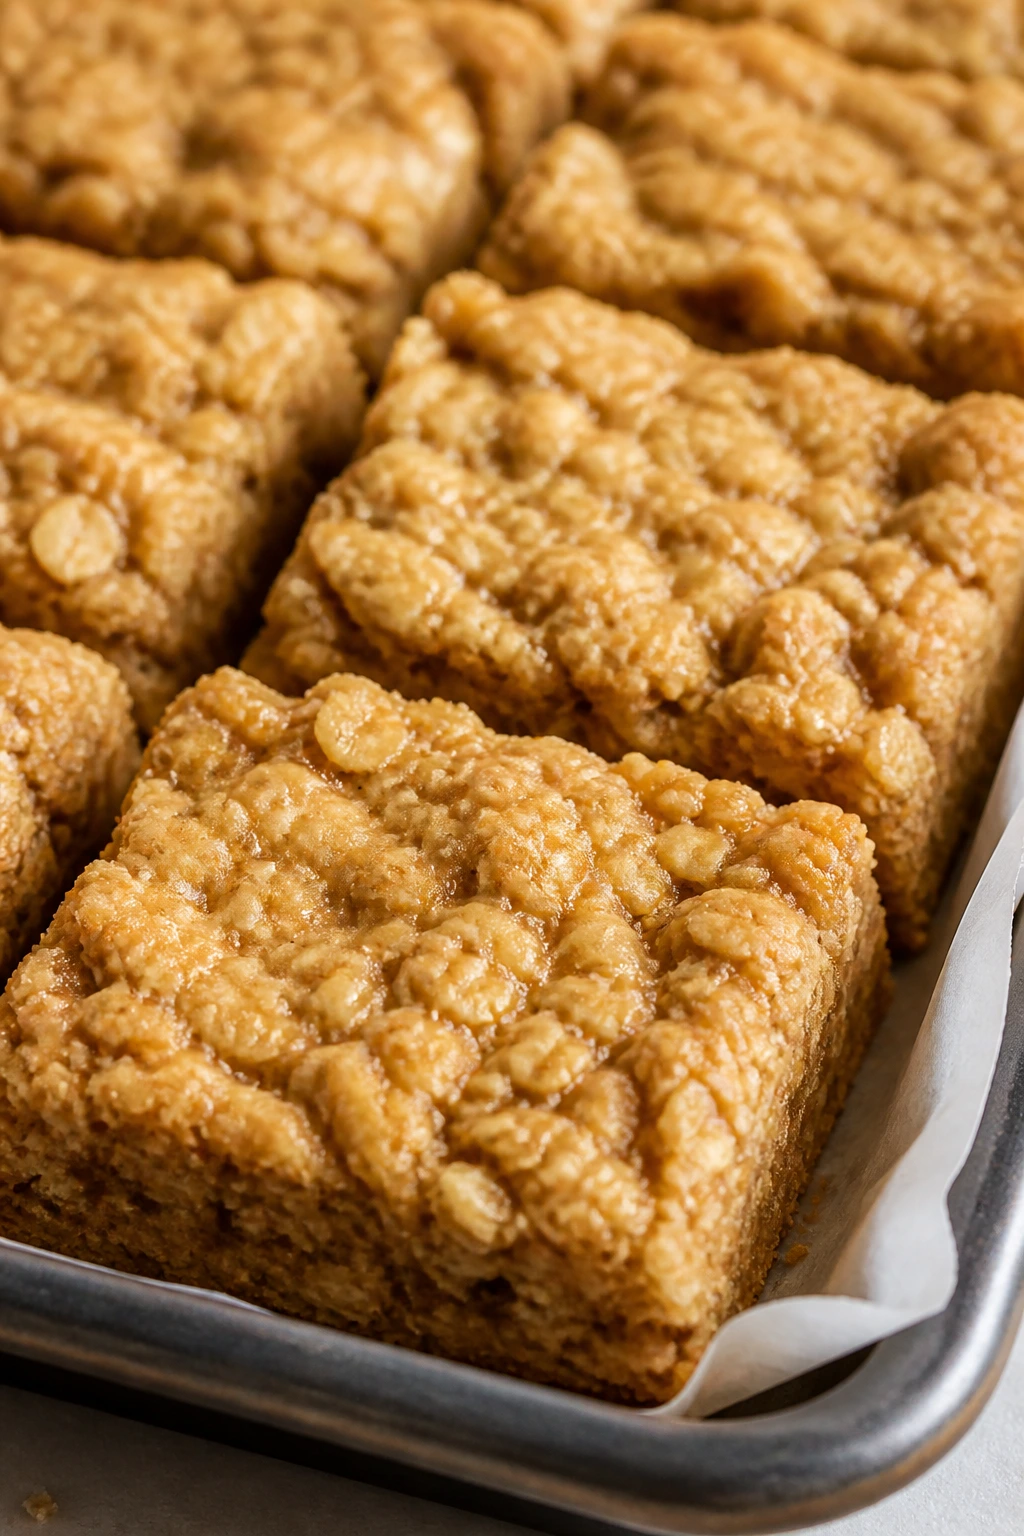
These are chewy, sturdy, and easy to cut into squares. They’re the kind of sweet snack that can sit around for a while without turning strange.
Why It Works: Peanut butter and oats make a bar with enough body to slice cleanly and enough chew to feel substantial. A little honey helps everything bind without making the bars sticky.
Key Ingredients:
- 2 cups rolled oats
- 1 cup peanut butter
- 1/3 cup honey
- 1/2 cup mini chocolate chips
- 1 teaspoon vanilla extract
- Pinch of salt
Quick Steps:
- Warm peanut butter and honey until loose.
- Stir in oats, vanilla, salt, and chocolate chips.
- Press into a lined pan.
- Chill 1 hour.
- Cut into squares.
Equipment for This Recipe:
- 8×8-inch pan
- Mixing bowl
- Spatula
How to Serve This Dish: Serve them cold or at room temperature in neat squares. They’re good for the people in the room who want something sweet but not frosted.
Pro Tips for This Recipe:
- Press the mixture very firmly.
- Line the pan so the bars lift cleanly.
- Chill before slicing for sharp edges.
Variations on This Dish:
- Sunflower Oat Bars: Swap peanut butter for sunflower butter.
- Cranberry Crunch: Add dried cranberries instead of chocolate chips.
Common Mistakes to Avoid with This Recipe:
- Don’t skimp on the pressing step.
- Don’t slice before chilling.
28. Loaded Fries
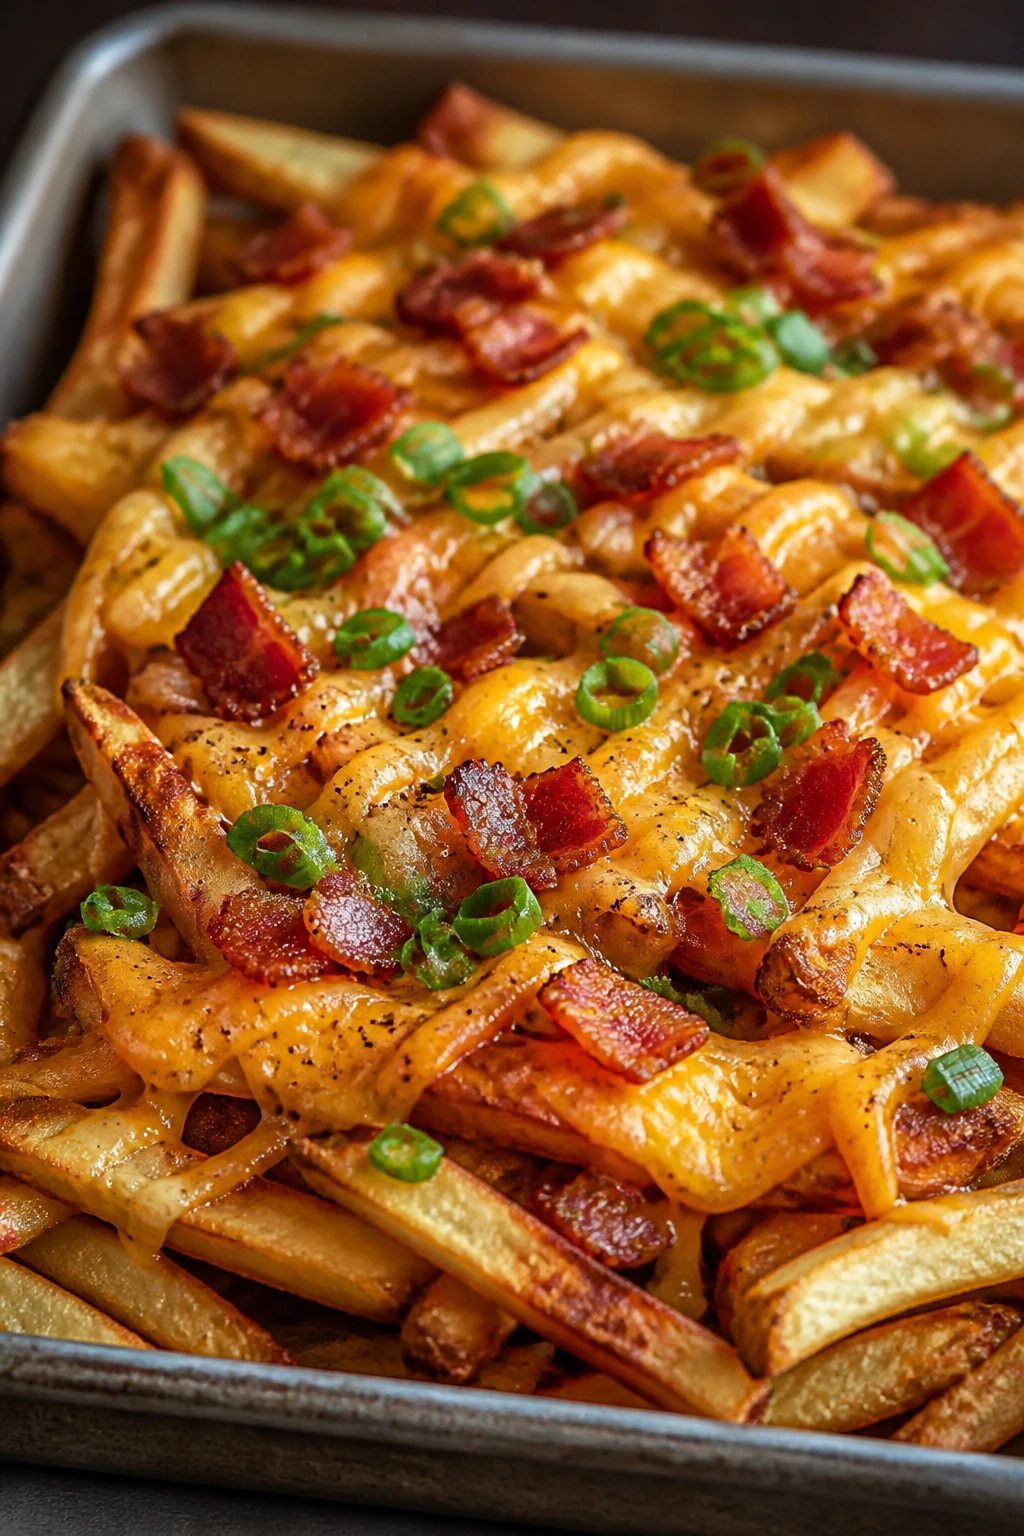
Crispy fries, melted cheese, bacon, and green onions are not subtle, and that’s the point. These are best served on a tray with plenty of napkins.
Why It Works: Baking the fries first keeps them crisp under the toppings. Adding the cheese at the end lets it melt without turning the fries into a wet pile.
Key Ingredients:
- 1 1/2 pounds frozen fries
- 1 1/2 cups shredded cheddar
- 1/2 cup cooked bacon bits
- 2 tablespoons sliced green onions
- 1/4 cup sour cream
- 1 tablespoon olive oil
Quick Steps:
- Bake fries until crisp.
- Sprinkle with cheese and bacon.
- Return to the oven for 3 minutes.
- Top with green onions and sour cream.
- Serve immediately.
Equipment for This Recipe:
- Sheet pan
- Spoon
- Small bowl for sour cream
How to Serve This Dish: Serve as a shared platter, not individual plates. The mix of hot fries and cool sour cream is what makes them work.
Pro Tips for This Recipe:
- Use straight-cut fries for easier topping.
- Don’t drown them in sour cream.
- Serve right after the cheese melts.
Variations on This Dish:
- Chili Fries: Add a spoonful of thick chili.
- Garden Fries: Swap bacon for diced tomato and jalapeño.
Common Mistakes to Avoid with This Recipe:
- Don’t overload the tray.
- Don’t add toppings before the fries crisp.
29. Mini Calzones

These are little stuffed pockets with a crisp outside and a molten center. They’re a smarter choice than full pizza slices if you want clean, hand-held pieces.
Why It Works: Sealing the edges tightly traps the cheese and sauce inside, and baking them on a hot sheet pan gives the bottoms enough structure. Smaller calzones are easier to eat without a drizzle trail down the hand.
Key Ingredients:
- 1 pound pizza dough
- 3/4 cup ricotta
- 1 cup shredded mozzarella
- 1/2 cup pizza sauce
- 1/2 cup chopped pepperoni
- 1 egg, beaten
- 1 teaspoon Italian seasoning
Quick Steps:
- Heat oven to 425°F.
- Divide dough into 8 pieces.
- Fill each with ricotta, mozzarella, sauce, pepperoni, and seasoning.
- Fold, seal, and brush with egg.
- Bake 14 to 16 minutes until golden.
Equipment for This Recipe:
- Sheet pan
- Rolling pin
- Fork
How to Serve This Dish: Serve with extra sauce in a dip cup. They’re easy to hold, which makes them ideal when the couch is crowded.
Pro Tips for This Recipe:
- Don’t overfill or the seams burst.
- Pinch edges hard and crimp with a fork.
- Let them cool a few minutes before biting in.
Variations on This Dish:
- Spinach Calzone: Add cooked spinach.
- Ham-and-Cheese Pocket: Use ham and Swiss instead of pizza fillings.
Common Mistakes to Avoid with This Recipe:
- Don’t leave the dough too thin.
- Don’t bake on a cold pan if you want a crisp bottom.
30. Cucumber Hummus Rounds
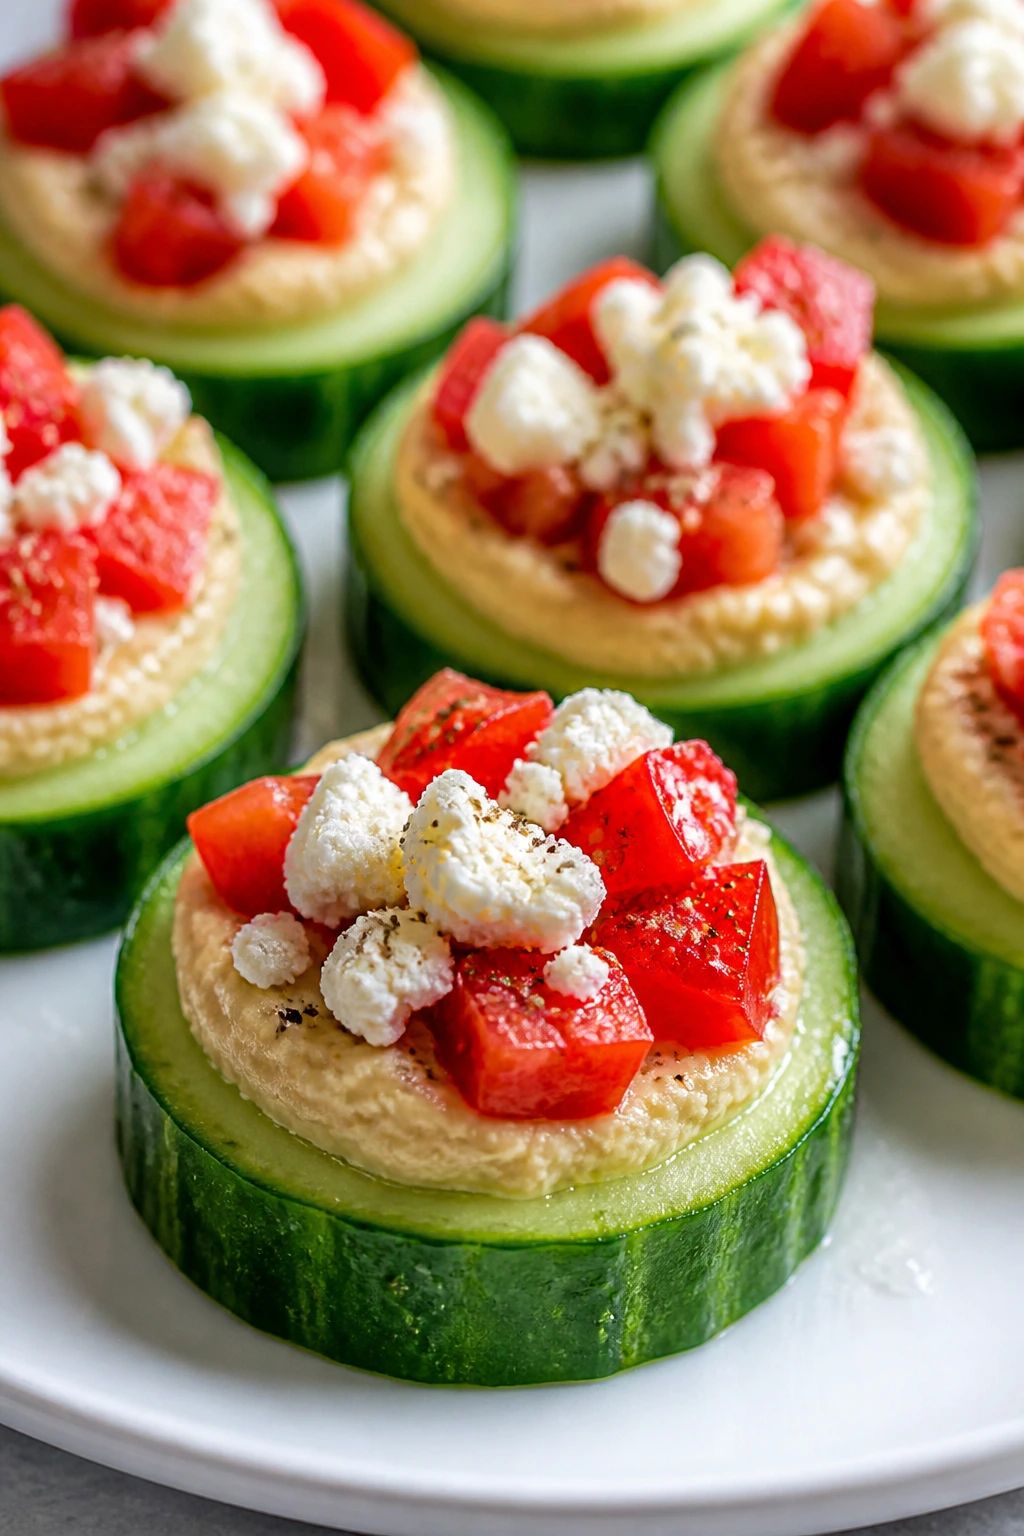
These are cool, crunchy, and more refreshing than most movie-night foods. They’re a good way to add something green without making a fuss about it.
Why It Works: Thick cucumber slices replace crackers and keep the whole bite light. Hummus clings to the cucumber if the slices are dried first.
Key Ingredients:
- 2 cucumbers, sliced into 1/2-inch rounds
- 1 cup hummus
- 1/4 cup diced cherry tomatoes
- 2 tablespoons crumbled feta
- 1 tablespoon olive oil
- Pinch of salt
Quick Steps:
- Slice cucumbers and pat them dry.
- Top each with hummus.
- Add tomato, feta, olive oil, and salt.
- Arrange on a chilled plate.
- Serve right away.
Equipment for This Recipe:
- Cutting board
- Knife
- Small spoon
How to Serve This Dish: Put them on the table near richer snacks so people can reset their palate. They’re neat enough for little snackers and light enough for adults.
Pro Tips for This Recipe:
- Use thicker cucumber slices or they bend.
- Pat them dry or the hummus slides.
- Keep them chilled until serving.
Variations on This Dish:
- Everything-Seasoned: Add everything bagel seasoning.
- Avocado Cup: Swap hummus for smashed avocado.
Common Mistakes to Avoid with This Recipe:
- Don’t slice the cucumbers too thin.
- Don’t assemble too early or they get watery.
31. Baked Zucchini Fries
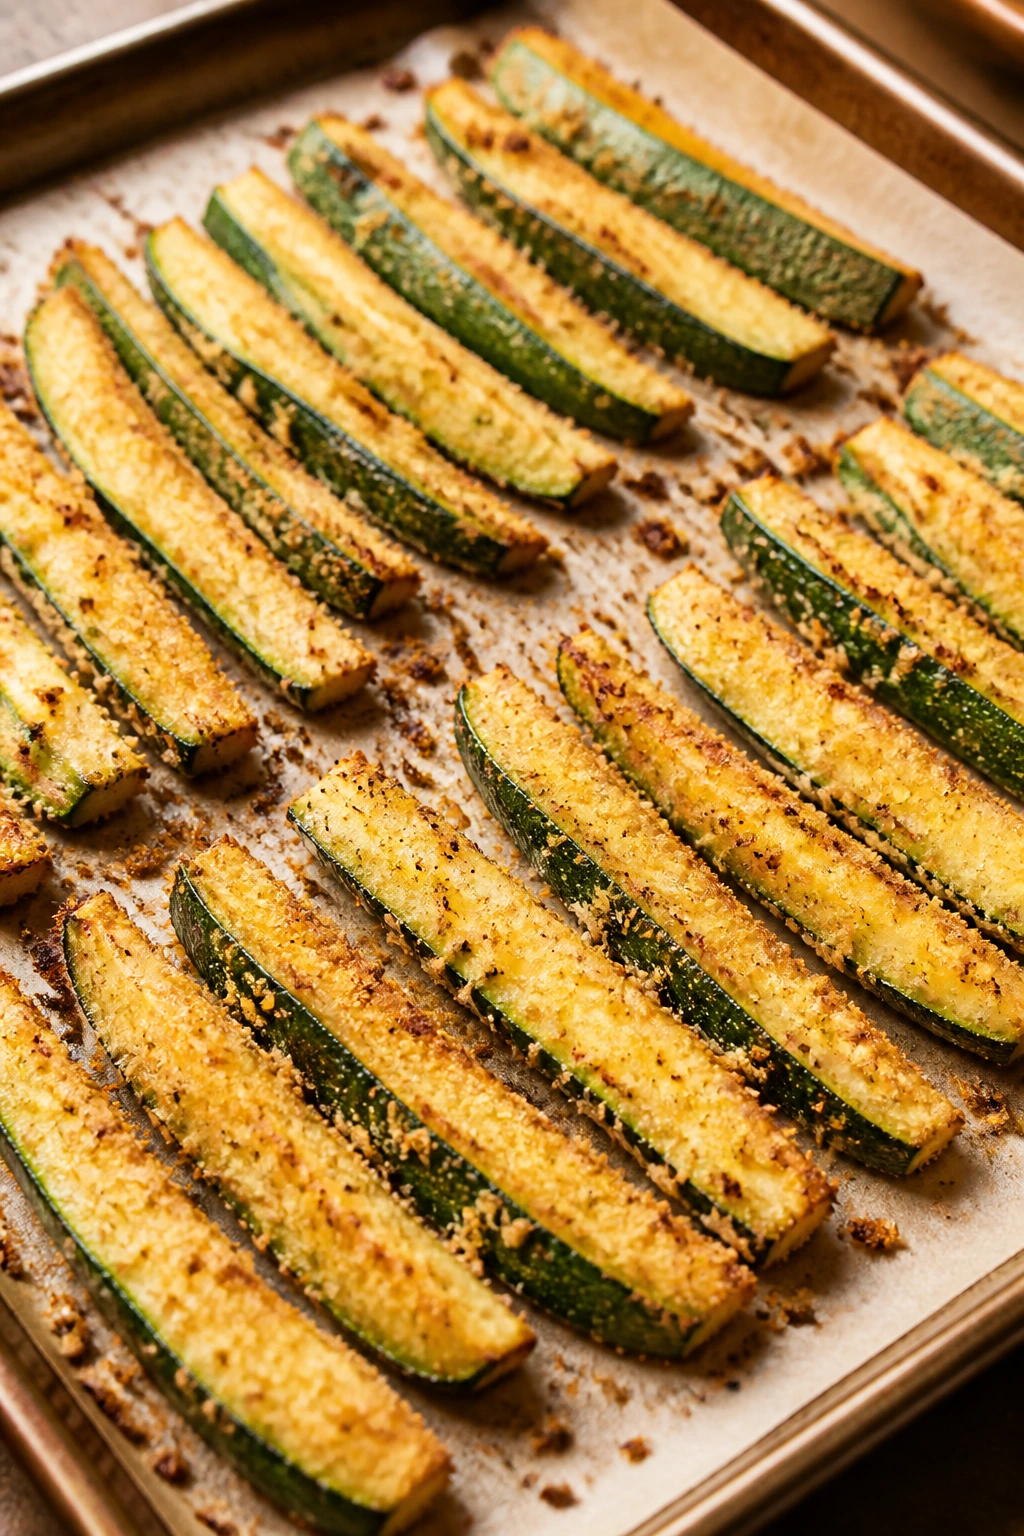
These bring a crisp, golden coating and a tender center that tastes much better than it sounds on paper. The parmesan in the crumb is doing a lot of the work here.
Why It Works: Zucchini releases moisture, so the key is salting lightly and using a dry breadcrumb coating. A hot oven helps the crust set before the vegetable turns limp.
Key Ingredients:
- 2 medium zucchini
- 1/2 cup flour
- 2 eggs
- 1 1/2 cups panko breadcrumbs
- 1/2 cup grated Parmesan
- 1 teaspoon garlic powder
- 1/2 teaspoon salt
Quick Steps:
- Cut zucchini into fry-like sticks.
- Coat in flour, egg, then panko mixed with Parmesan and seasoning.
- Arrange on a sheet pan.
- Bake at 425°F for 18 to 20 minutes, flipping once.
- Serve warm with marinara.
Equipment for This Recipe:
- Sheet pan
- Three shallow bowls
- Parchment paper
How to Serve This Dish: Put them in a tall cup or on a platter with dipping sauce. They’re best when the coating is crisp and the middle still has some bounce.
Pro Tips for This Recipe:
- Cut the fries evenly.
- Don’t skip the Parmesan.
- Bake on a rack if you want extra crunch.
Variations on This Dish:
- Spicy Version: Add paprika and cayenne.
- Italian Herb Fries: Mix dried basil into the crumbs.
Common Mistakes to Avoid with This Recipe:
- Don’t cut them too skinny.
- Don’t crowd the pan or they steam.
32. Chocolate Chip Skillet Cookie
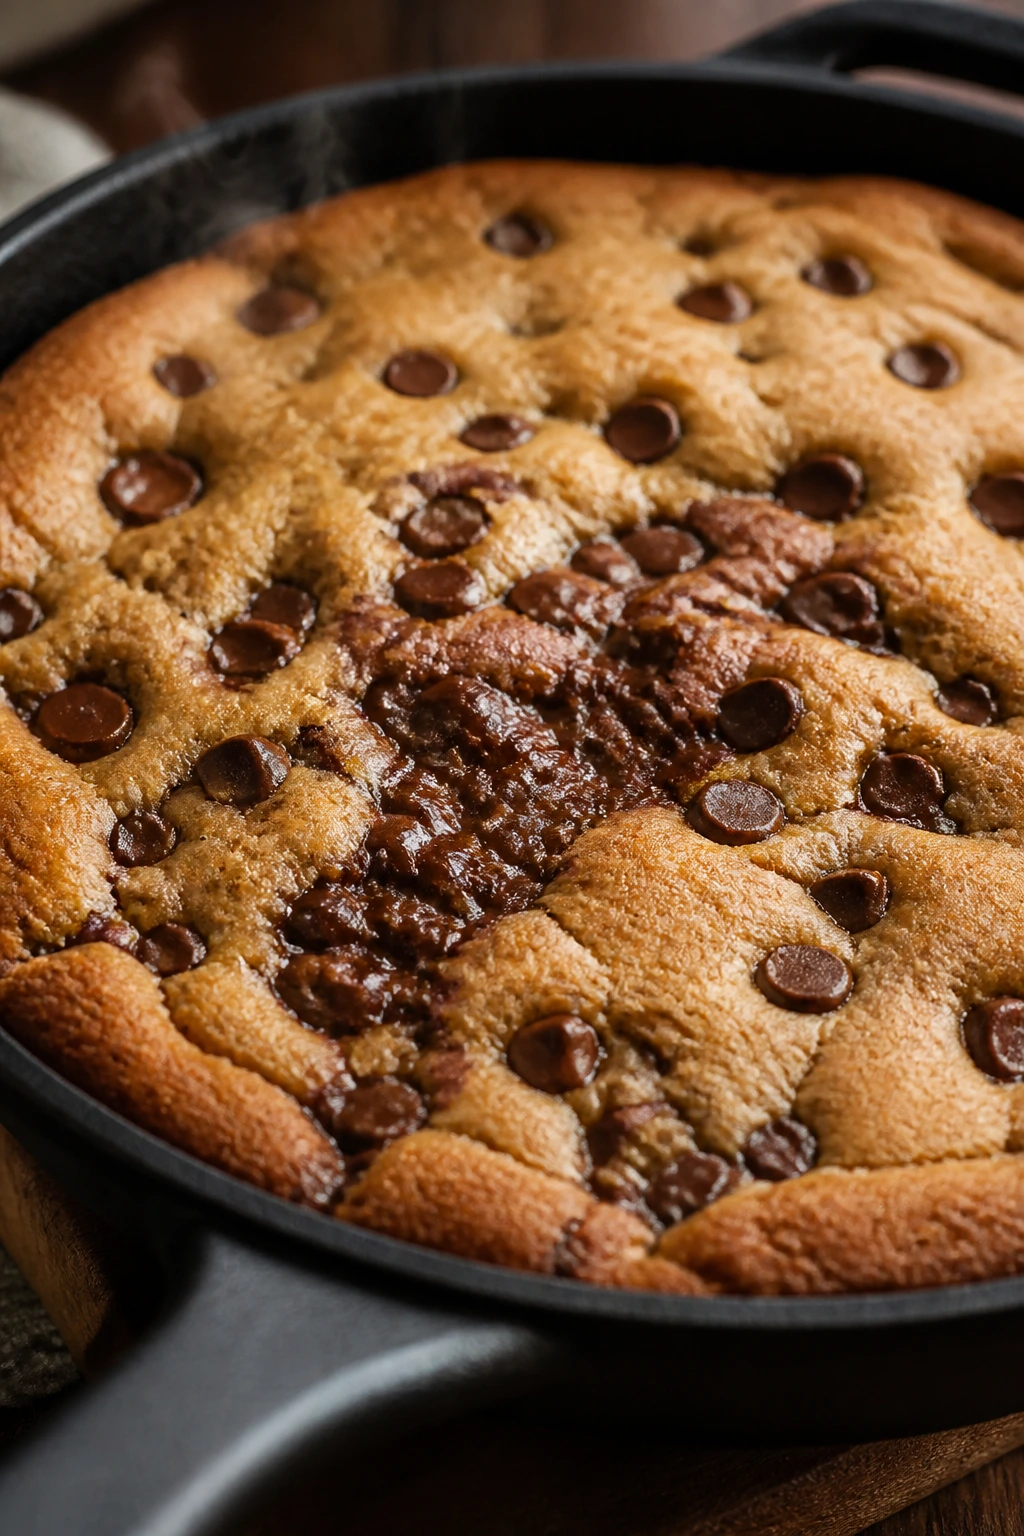
A skillet cookie is theater-level dessert without the theater price tag. The edges go crisp, the center stays soft, and everyone attacks it with a spoon.
Why It Works: Baking in a cast-iron skillet creates a browned edge and a gooey center that’s easy to scoop. A little underbaking keeps the middle soft instead of dry.
Key Ingredients:
- 1/2 cup butter, softened
- 1/2 cup brown sugar
- 1/4 cup granulated sugar
- 1 egg
- 1 teaspoon vanilla extract
- 1 1/4 cups flour
- 1/2 teaspoon baking soda
- 1 cup chocolate chips
Quick Steps:
- Cream butter and sugars.
- Mix in egg and vanilla.
- Stir in flour and baking soda, then fold in chips.
- Press into a greased skillet.
- Bake at 350°F for 18 to 20 minutes.
Equipment for This Recipe:
- Cast-iron skillet
- Mixing bowl
- Spatula
How to Serve This Dish: Serve warm with vanilla ice cream or whipped cream. Put spoons in a cup next to the skillet and call it done.
Pro Tips for This Recipe:
- Pull it when the center still looks a little soft.
- Let it rest 10 minutes before serving.
- Use a skillet at least 8 inches wide.
Variations on This Dish:
- Peanut Butter Chip: Swap half the chocolate chips for peanut butter chips.
- S’mores Skillet: Add crushed graham crackers and marshmallows.
Common Mistakes to Avoid with This Recipe:
- Don’t overbake.
- Don’t serve straight from the oven or it falls apart.
33. Chicken Parmesan Bites
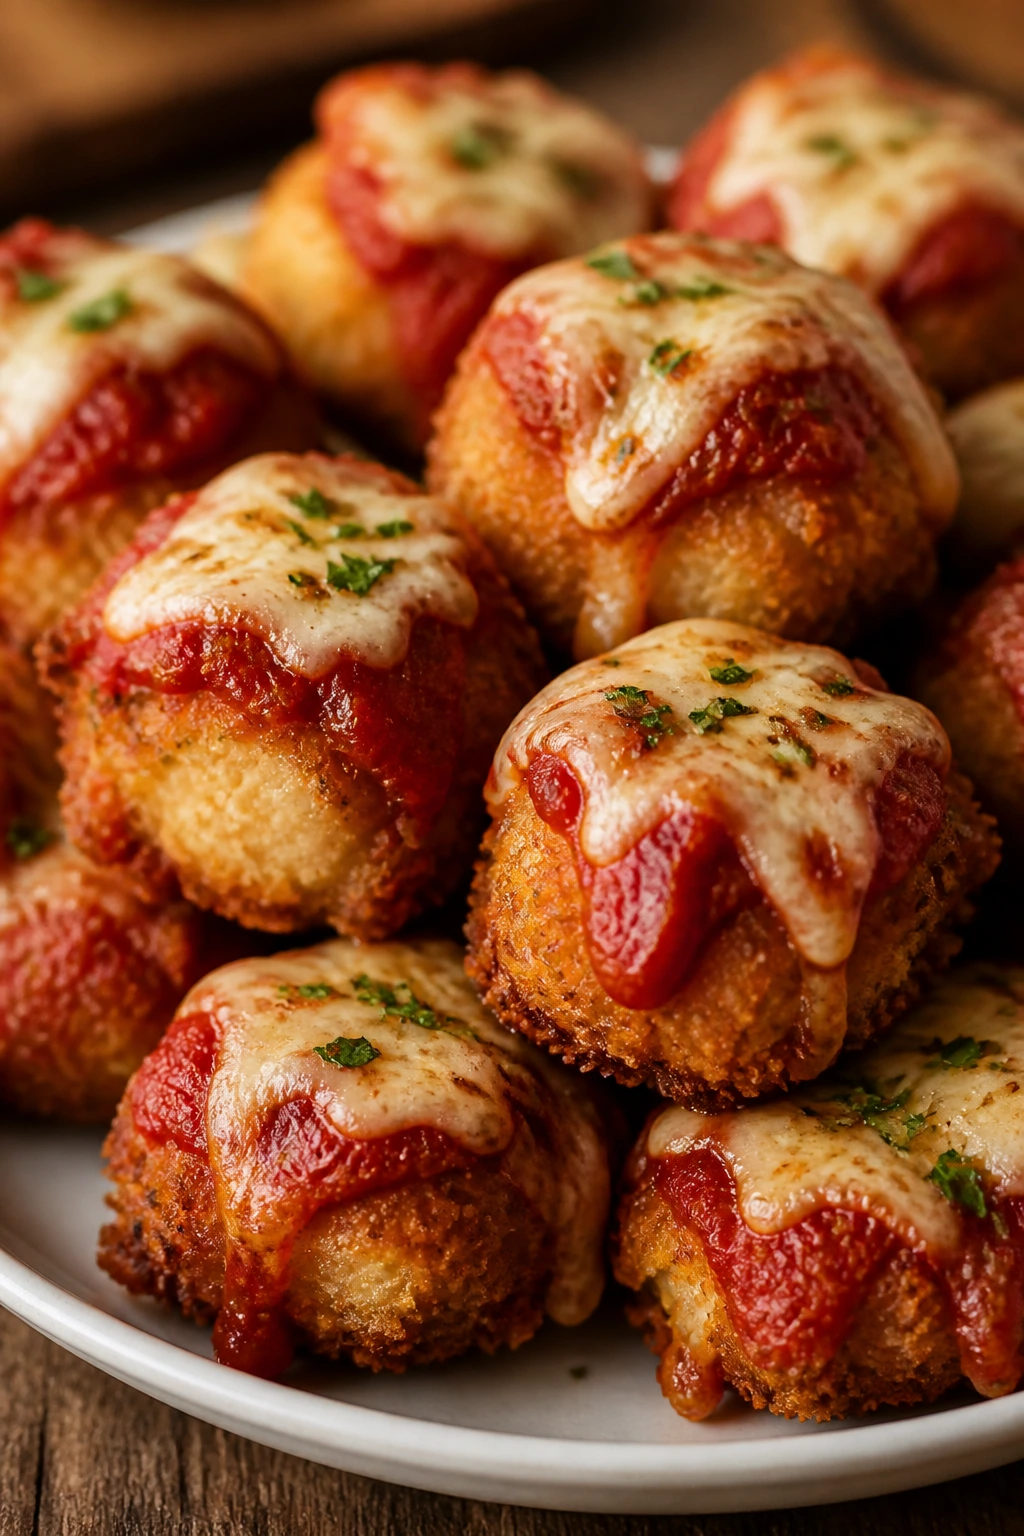
These bite-size pieces have a crisp crust, tangy sauce, and enough cheese to feel like the real dish in miniature. They’re a strong pick when you want something hot and savory without full plates.
Why It Works: Small chicken pieces cook fast and stay juicy, and adding sauce only near the end prevents the crust from turning soggy. Parmesan in the breading deepens the flavor without making it fussy.
Key Ingredients:
- 1 1/2 pounds chicken breast, cut into 1-inch cubes
- 1 cup flour
- 2 eggs
- 2 cups breadcrumbs
- 1/2 cup grated Parmesan
- 1 cup marinara sauce
- 1 cup shredded mozzarella
Quick Steps:
- Bread the chicken in flour, egg, and crumbs mixed with Parmesan.
- Bake at 425°F for 15 minutes.
- Spoon marinara over the bites.
- Top with mozzarella and bake 3 minutes more.
- Serve hot.
Equipment for This Recipe:
- Sheet pan
- Three bowls
- Parchment paper
How to Serve This Dish: Serve with toothpicks or tiny forks. A side of spaghetti is optional, but not necessary.
Pro Tips for This Recipe:
- Use evenly sized pieces.
- Add sauce late so the crust stays crisp.
- Let the chicken brown before adding cheese.
Variations on This Dish:
- Eggplant Bites: Swap in eggplant rounds.
- Spicy Parm: Add red pepper flakes to the sauce.
Common Mistakes to Avoid with This Recipe:
- Don’t sauce too early.
- Don’t cut the chicken pieces unevenly.
34. Veggie Pizza Cups
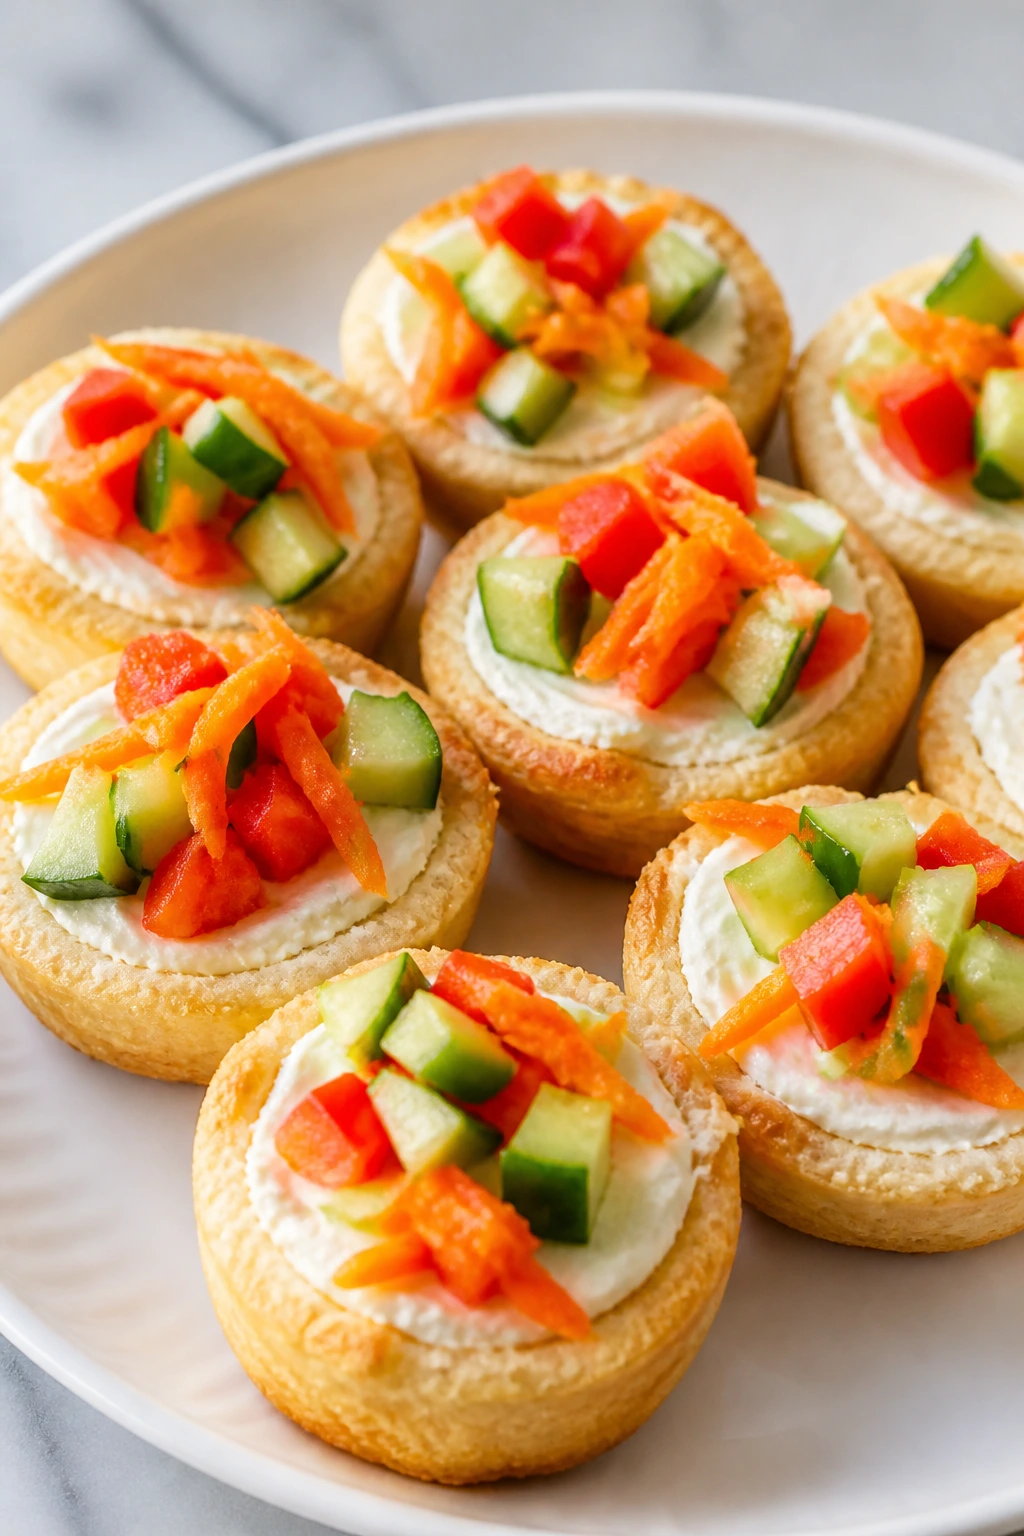
These feel playful and slightly retro, which is part of the charm. The biscuit cup holds a cool, creamy topping covered in tiny chopped vegetables.
Why It Works: A baked biscuit base gives you the right chew, and the cream cheese layer acts like glue for the vegetables. This is one of the cleaner ways to sneak in produce on movie night.
Key Ingredients:
- 1 can refrigerated biscuit dough
- 4 ounces cream cheese, softened
- 2 tablespoons sour cream
- 1 teaspoon ranch seasoning
- 1/2 cup diced cucumber
- 1/2 cup diced bell pepper
- 1/4 cup shredded carrot
Quick Steps:
- Bake biscuit dough in a mini muffin tin until lightly golden.
- Mix cream cheese, sour cream, and ranch seasoning.
- Fill the cooled cups.
- Top with chopped vegetables.
- Chill 10 minutes before serving.
Equipment for This Recipe:
- Mini muffin tin
- Mixing bowl
- Spoon
How to Serve This Dish: Put these on the table as the cold, crunchy item in the spread. They’re small enough that kids can try one without a big commitment.
Pro Tips for This Recipe:
- Cool the biscuit cups fully before filling.
- Dice the vegetables very small.
- Make them close to serving time.
Variations on This Dish:
- Pizza Cups: Use pizza sauce and mozzarella instead of ranch filling.
- Avocado Ranch: Add chopped avocado right before serving.
Common Mistakes to Avoid with This Recipe:
- Don’t fill warm cups.
- Don’t leave the vegetables wet.
35. S’mores Dip
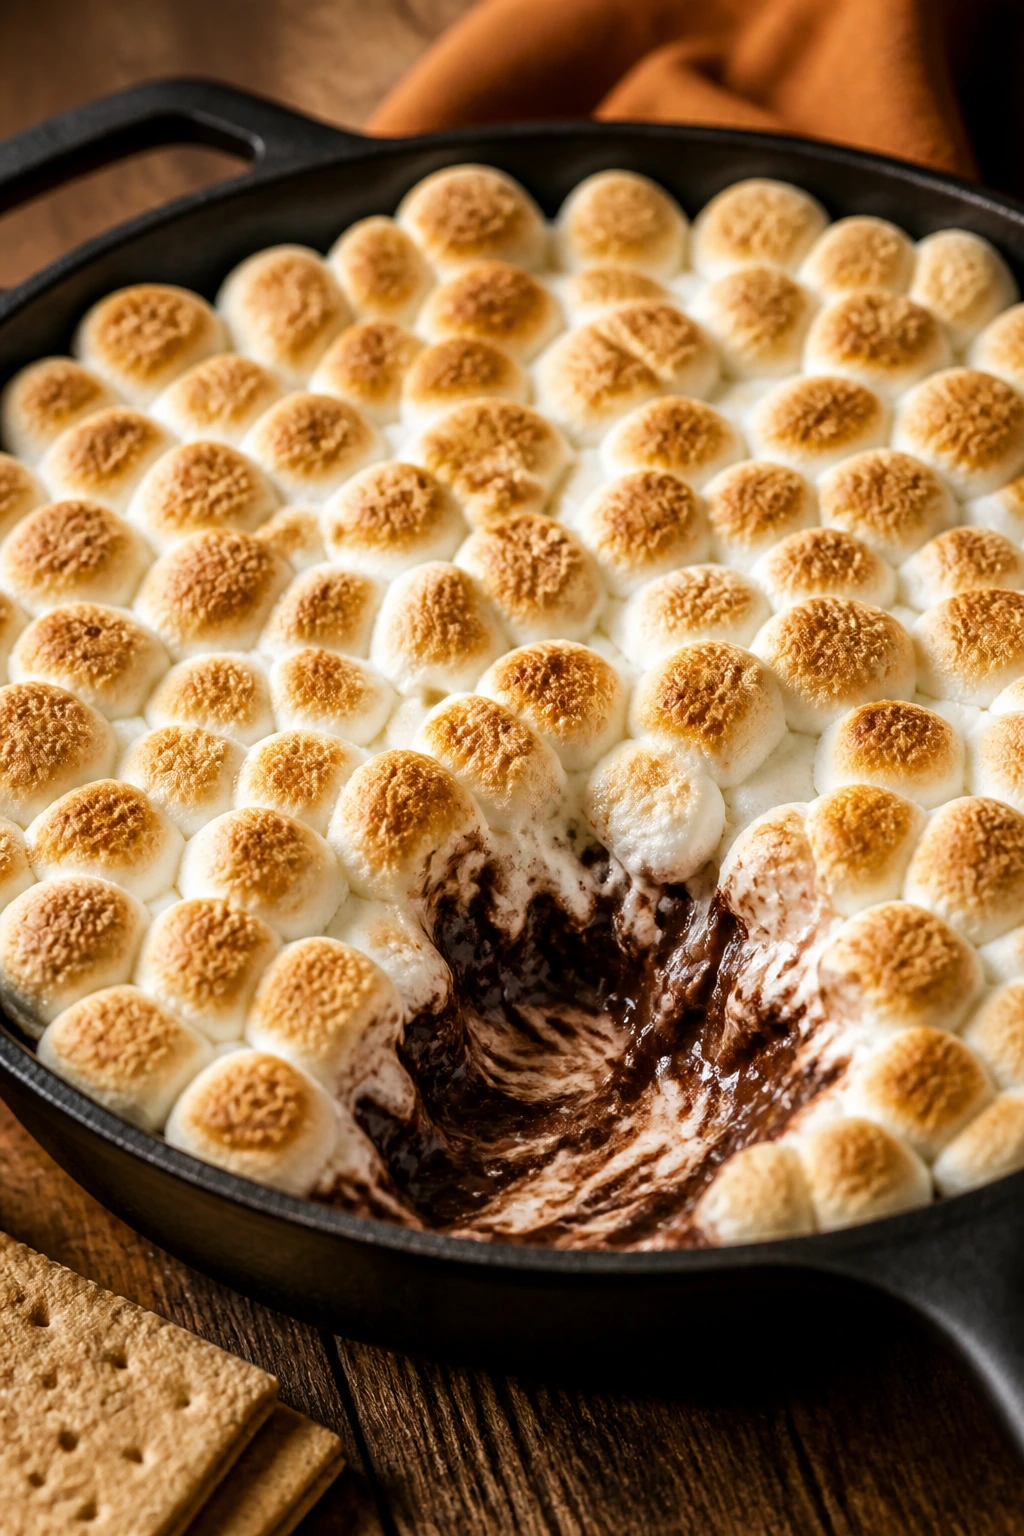
This one is pure movie-night theater: melted chocolate, toasted marshmallows, and graham crackers waiting at the edge of the pan. It feels a little ridiculous, which is exactly why kids love it.
Why It Works: The pan keeps the chocolate warm while the marshmallows brown on top under the broiler. You get the s’mores experience without dealing with a flame or skewers.
Key Ingredients:
- 1 cup chocolate chips
- 1 tablespoon heavy cream
- 2 cups mini marshmallows
- 6 graham crackers, broken
- Pinch of salt
Quick Steps:
- Heat oven to broil.
- Spread chocolate chips and cream in a small skillet.
- Top with marshmallows.
- Broil 1 to 2 minutes until browned.
- Serve immediately with graham crackers.
Equipment for This Recipe:
- Oven-safe skillet or baking dish
- Spoon
- Graham crackers
How to Serve This Dish: Put the skillet in the center and let people dip their own crackers. It’s the sort of dessert that needs no extra decoration.
Pro Tips for This Recipe:
- Watch the broiler like a hawk.
- Use mini marshmallows for even browning.
- A pinch of salt keeps it from tasting flat.
Variations on This Dish:
- Peanut Butter S’mores: Swirl peanut butter into the chocolate.
- Cookie Dip: Serve with vanilla wafers instead of grahams.
Common Mistakes to Avoid with This Recipe:
- Don’t walk away from the broiler.
- Don’t use a cold skillet if you want quick melting.
36. Mini Meatball Skewers
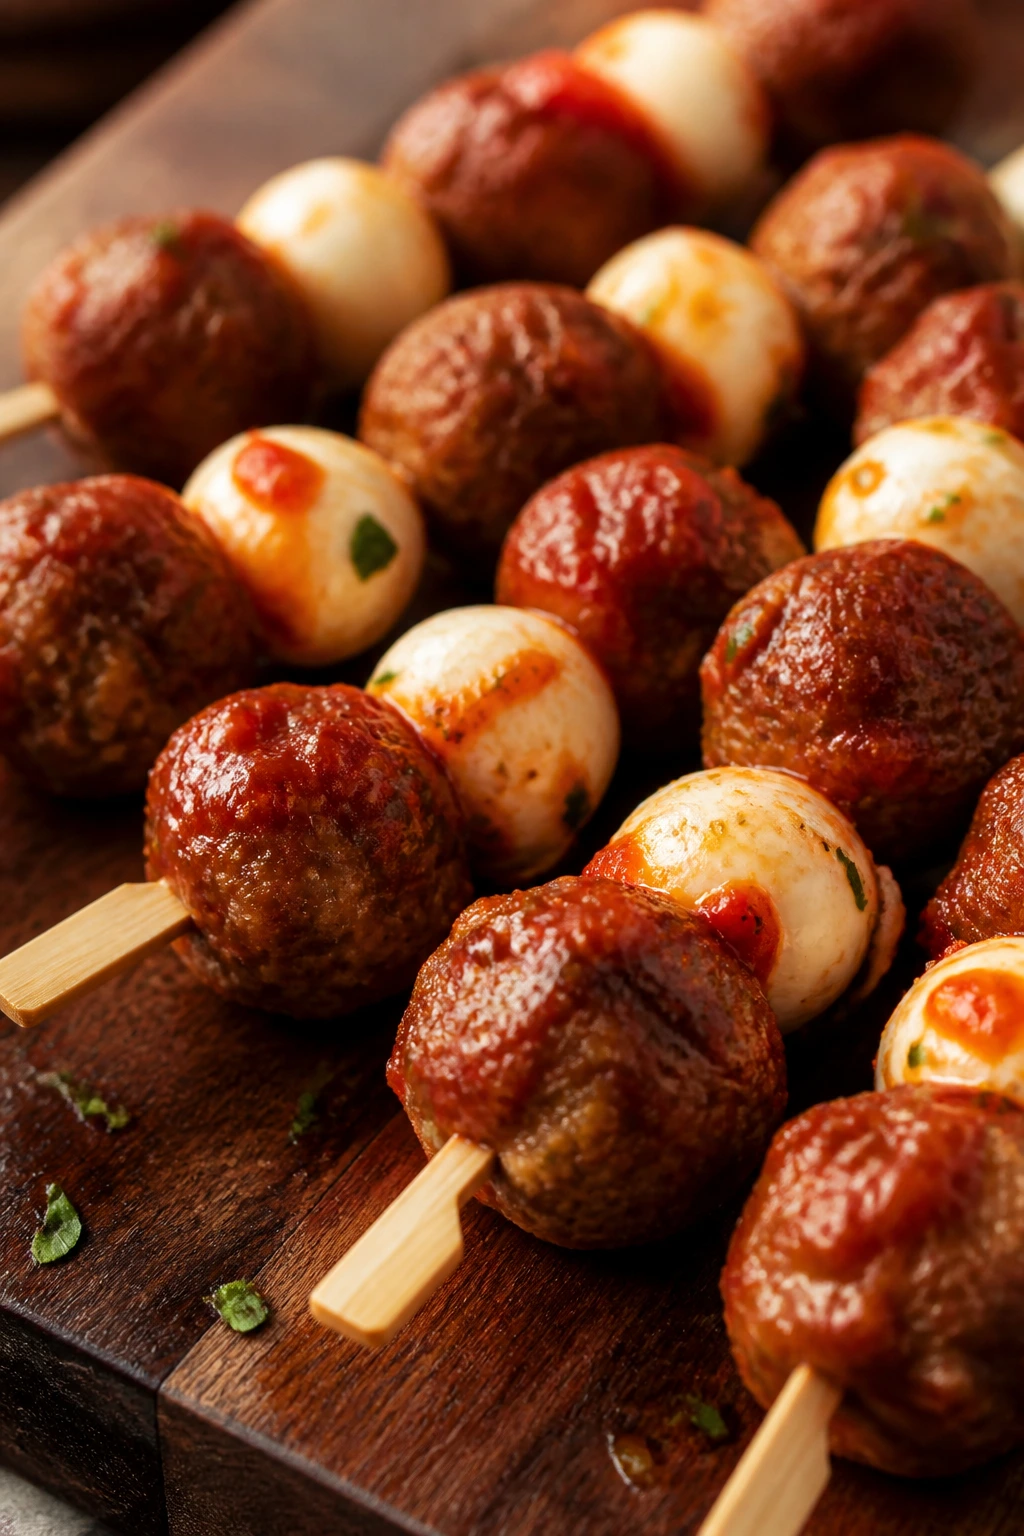
These are neat, easy to grab, and a little fancy without trying too hard. Skewers also keep the meatballs from rolling around the platter.
Why It Works: Bite-size meatballs stay juicy, and threading them with mozzarella or veggies turns them into a handheld snack. A light glaze or sauce gives them a movie-night shine.
Key Ingredients:
- 1 pound ground beef
- 1/2 cup breadcrumbs
- 1 egg
- 1 teaspoon Italian seasoning
- 1 cup marinara sauce
- 8 small wooden skewers
- 1 cup small mozzarella balls
Quick Steps:
- Mix beef, breadcrumbs, egg, and seasoning.
- Roll into 16 meatballs and bake at 400°F for 15 minutes.
- Thread meatballs and mozzarella onto skewers.
- Warm in marinara for 2 minutes.
- Serve hot.
Equipment for This Recipe:
- Sheet pan
- Mixing bowl
- Wooden skewers
How to Serve This Dish: Lay them across a platter so they’re easy to pick up. They’re a nice bridge between snack food and a real meal.
Pro Tips for This Recipe:
- Keep the meatballs small.
- Soak wooden skewers if you’re warming them under heat.
- Use a thick sauce so it coats, not drips.
Variations on This Dish:
- Pesto Skewers: Swap marinara for pesto.
- Veggie Skewers: Add roasted zucchini pieces.
Common Mistakes to Avoid with This Recipe:
- Don’t make the meatballs too large.
- Don’t overload the skewers.
37. Buffalo Cauliflower Bites
These come out crisp on the outside, tender inside, and coated in enough sauce to feel bold without being wild. They’re a smart answer when you want one spicy-ish item on the table.
Why It Works: A dry batter and hot oven keep the cauliflower from going limp. Tossing the bites in buffalo sauce after baking preserves the crunch longer.
Key Ingredients:
- 1 large head cauliflower, cut into florets
- 3/4 cup flour
- 3/4 cup milk
- 1 teaspoon garlic powder
- 1 cup buffalo sauce
- 2 tablespoons melted butter
- Pinch of salt
Quick Steps:
- Mix flour, milk, garlic powder, and salt into a batter.
- Coat cauliflower florets.
- Bake at 425°F for 20 minutes.
- Toss with buffalo sauce and butter.
- Bake 5 minutes more.
Equipment for This Recipe:
- Sheet pan
- Mixing bowl
- Tongs
How to Serve This Dish: Serve with ranch or blue cheese dressing. They work well as the spicy item next to milder snacks.
Pro Tips for This Recipe:
- Cut florets small and even.
- Don’t drown them in sauce before baking.
- Serve soon after saucing for the best crunch.
Variations on This Dish:
- Honey Buffalo: Add 1 tablespoon honey to the sauce.
- BBQ Cauliflower: Swap buffalo sauce for barbecue sauce.
Common Mistakes to Avoid with This Recipe:
- Don’t leave batter too thick.
- Don’t expect them to stay crisp for hours.
38. Cheese and Spinach Pinwheels
These look like little spirals on a plate, and the filling stays creamy with a bit of green tucked inside. Crescent dough keeps the whole thing soft but not floppy.
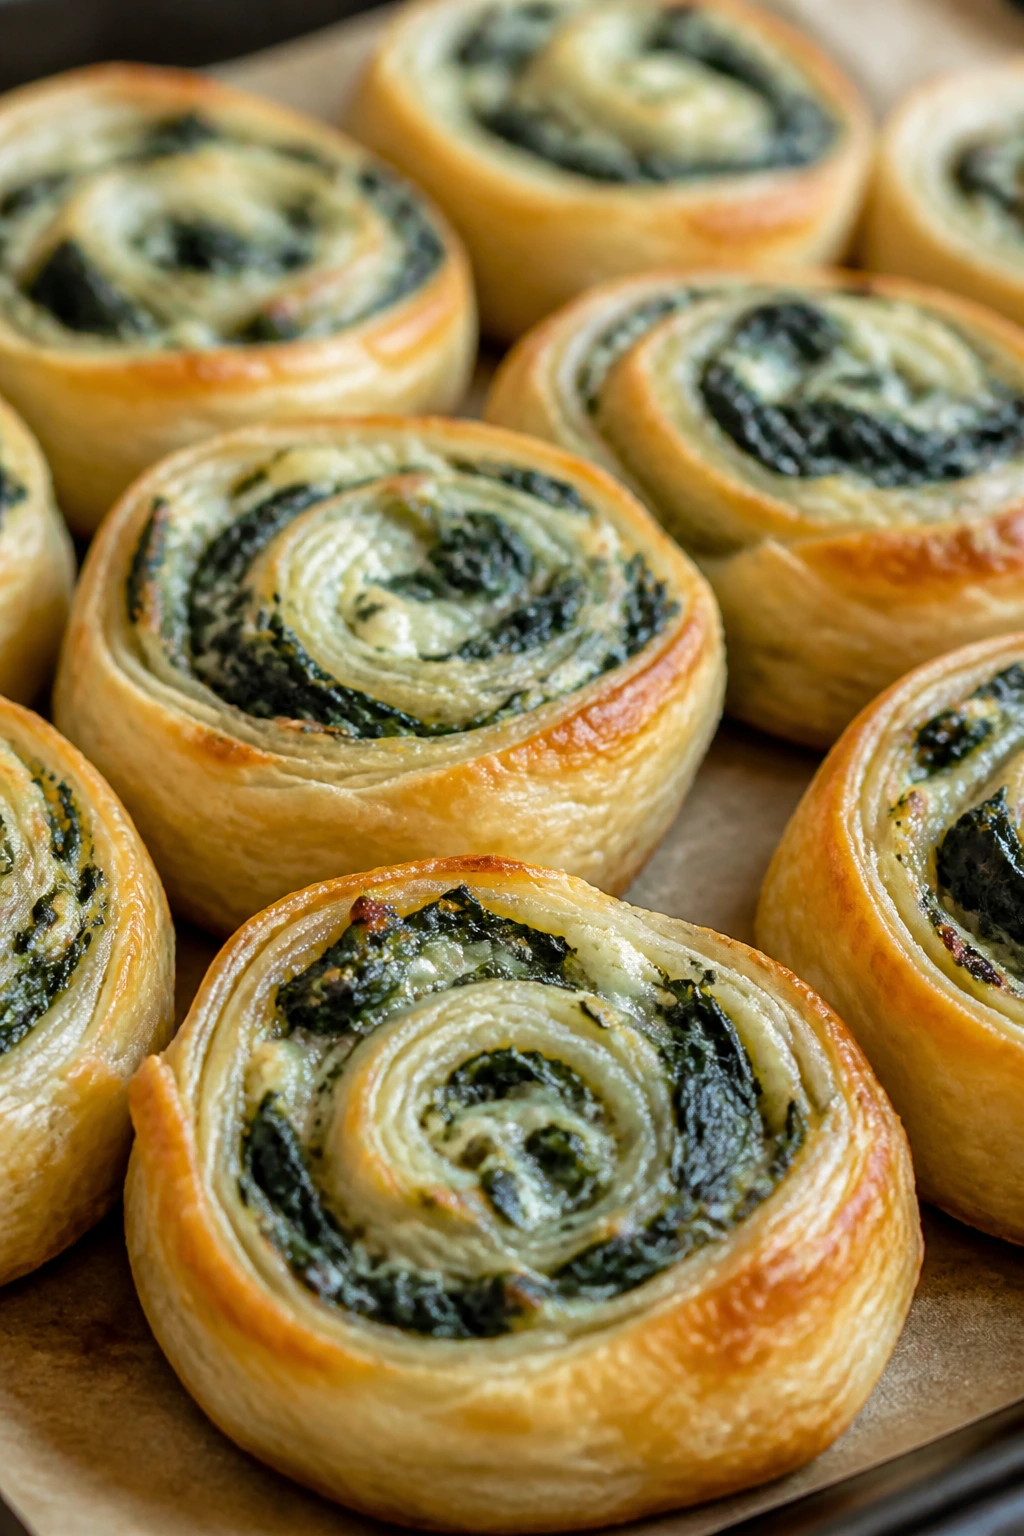
Why It Works: Spinach disappears into the cheese filling once chopped finely, which makes these a gentler vegetable bite. Rolling the dough into a log and slicing gives you neat spirals that bake evenly.
Key Ingredients:
- 1 sheet puff pastry or crescent dough
- 1 cup chopped cooked spinach, squeezed dry
- 4 ounces cream cheese
- 1 cup shredded mozzarella
- 1/4 cup grated Parmesan
- 1 teaspoon garlic powder
Quick Steps:
- Mix spinach, cream cheese, mozzarella, Parmesan, and garlic powder.
- Spread over the dough.
- Roll into a log and slice into 1-inch rounds.
- Bake at 400°F for 15 minutes.
- Cool slightly before serving.
Equipment for This Recipe:
- Sheet pan
- Sharp knife
- Mixing bowl
How to Serve This Dish: Serve warm or room temperature. They fit nicely beside tomato soup if you want to turn movie night into a softer, cozier meal.
Pro Tips for This Recipe:
- Squeeze the spinach dry.
- Chill the log before slicing if it gets soft.
- Use parchment so the bottoms don’t stick.
Variations on This Dish:
- Artichoke Spin: Add chopped artichokes.
- Pizza Pinwheels: Use pizza sauce and mozzarella.
Common Mistakes to Avoid with This Recipe:
- Don’t leave the spinach wet.
- Don’t slice with a dull knife.
39. French Toast Sticks
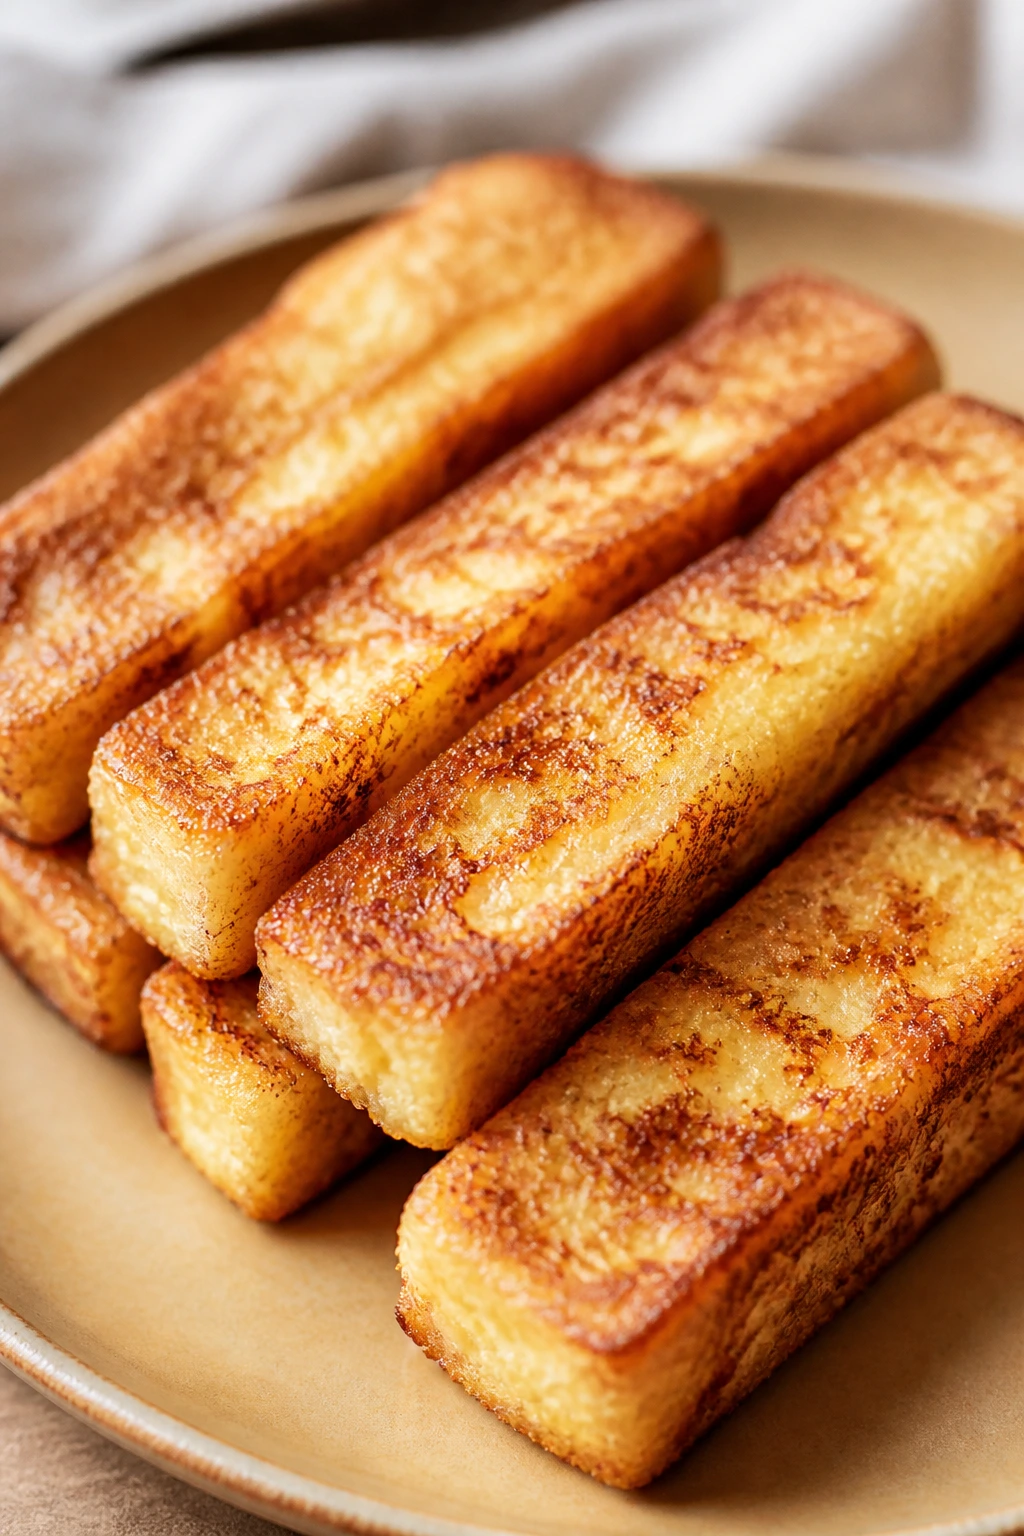
These are a little sweet, a little crisp at the edges, and built for dipping. Syrup, yogurt, or even nut butter all work here.
Why It Works: Cutting the bread into sticks before cooking gives more surface area for browning. A simple egg custard soaks in fast, which keeps the inside soft.
Key Ingredients:
- 6 slices thick bread
- 3 large eggs
- 1/2 cup milk
- 1 teaspoon cinnamon
- 1 teaspoon vanilla extract
- 2 tablespoons butter
- 2 tablespoons maple syrup
Quick Steps:
- Whisk eggs, milk, cinnamon, and vanilla.
- Cut bread into sticks.
- Dip quickly in the custard.
- Cook in butter over medium heat until golden.
- Serve with maple syrup.
Equipment for This Recipe:
- Skillet
- Shallow bowl
- Spatula
How to Serve This Dish: Stack them in a basket with a little cup of syrup. They’re especially useful when you want one sweet item that still feels like finger food.
Pro Tips for This Recipe:
- Use thick bread that won’t fall apart.
- Don’t soak too long or the sticks go soggy.
- Cook in batches so the pan stays hot.
Variations on This Dish:
- Cinnamon Sugar Sticks: Roll the cooked sticks in cinnamon sugar.
- Berry Dip: Serve with strawberry yogurt.
Common Mistakes to Avoid with This Recipe:
- Don’t use thin sandwich bread.
- Don’t fry on low heat or they dry out.
40. Taco Pizza

This one merges two favorites and behaves better than you’d expect. The crust stays crisp if you keep the toppings balanced and add the lettuce after baking.
Why It Works: A pre-baked crust gives the pizza enough strength to handle taco toppings. Layering refried beans under the meat acts like a glue layer and keeps the slice together.
Key Ingredients:
- 1 pizza crust, 12-inch
- 1/2 cup refried beans
- 1/2 pound ground beef
- 1 tablespoon taco seasoning
- 1 cup shredded cheddar
- 1 cup shredded lettuce
- 1/2 cup diced tomatoes
- 1/4 cup sour cream
Quick Steps:
- Bake the crust briefly at 425°F.
- Cook beef with taco seasoning.
- Spread beans on the crust, then add beef and cheese.
- Bake 5 minutes until melted.
- Top with lettuce, tomato, and sour cream.
Equipment for This Recipe:
- Pizza pan or sheet pan
- Skillet
- Spoon
How to Serve This Dish: Cut into small wedges so it feels snackable. The cold toppings go on after baking, which keeps the texture from getting muddy.
Pro Tips for This Recipe:
- Don’t overload with lettuce.
- Pre-bake the crust.
- Use thick beans so they spread cleanly.
Variations on This Dish:
- Chicken Taco Pizza: Use shredded chicken.
- Bean Supreme: Skip meat and add black beans.
Common Mistakes to Avoid with This Recipe:
- Don’t put lettuce on before baking.
- Don’t use a flimsy crust.
41. Apple Cinnamon Empanadas
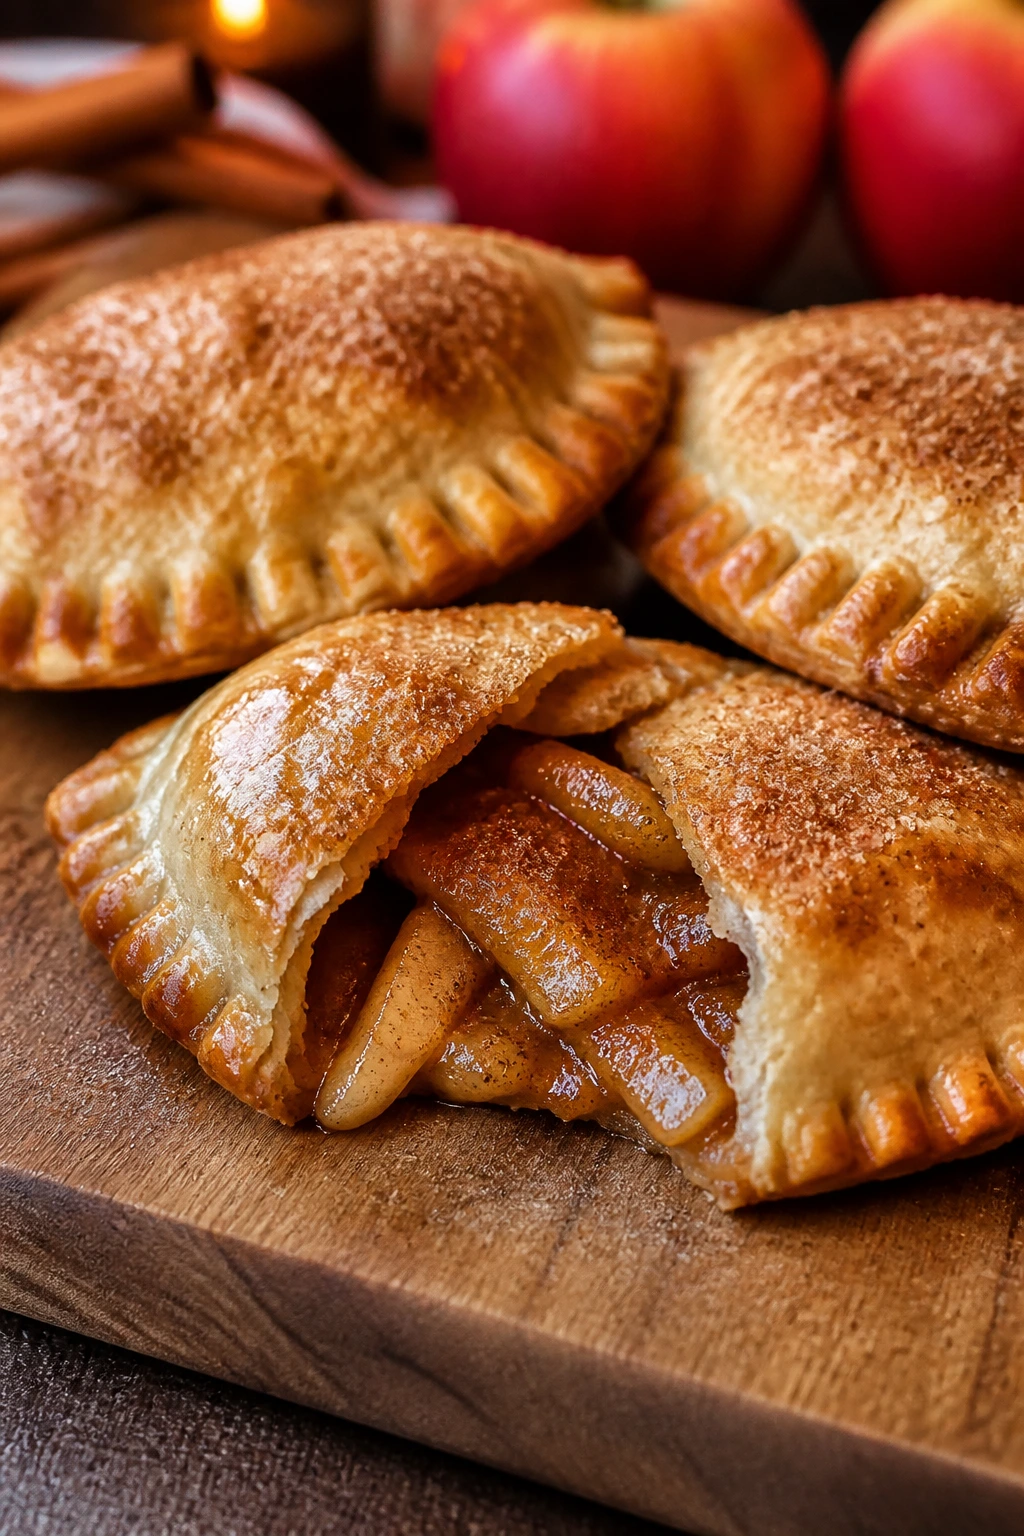
These give you apple pie energy in a smaller, easier-to-handle form. The filling gets jammy, and the pastry turns golden and crisp.
Why It Works: Cooking the apples briefly first reduces excess moisture, which keeps the pastry from blowing out. Cinnamon and a little sugar make the filling taste like pie without a long bake.
Key Ingredients:
- 2 apples, peeled and diced
- 2 tablespoons sugar
- 1 teaspoon cinnamon
- 1 tablespoon butter
- 1 package pie dough or empanada discs
- 1 egg, beaten
- 1 tablespoon coarse sugar
Quick Steps:
- Cook apples with sugar, cinnamon, and butter until softened.
- Cool filling slightly.
- Fill dough circles and seal with a fork.
- Brush with egg and sprinkle coarse sugar.
- Bake at 400°F for 15 to 18 minutes.
Equipment for This Recipe:
- Skillet
- Baking sheet
- Fork
How to Serve This Dish: Serve warm, not scorching. They’re good plain, but a little caramel dip makes them feel more like dessert dessert.
Pro Tips for This Recipe:
- Cool the filling before sealing.
- Don’t overfill.
- Vent the tops with a tiny slit so steam escapes.
Variations on This Dish:
- Berry Empanadas: Use blueberries instead of apples.
- Cream Cheese Center: Add a small spoon of cream cheese with the fruit.
Common Mistakes to Avoid with This Recipe:
- Don’t use watery filling.
- Don’t seal badly or the edges pop open.
42. Creamy Tomato Soup with Grilled Cheese Dippers
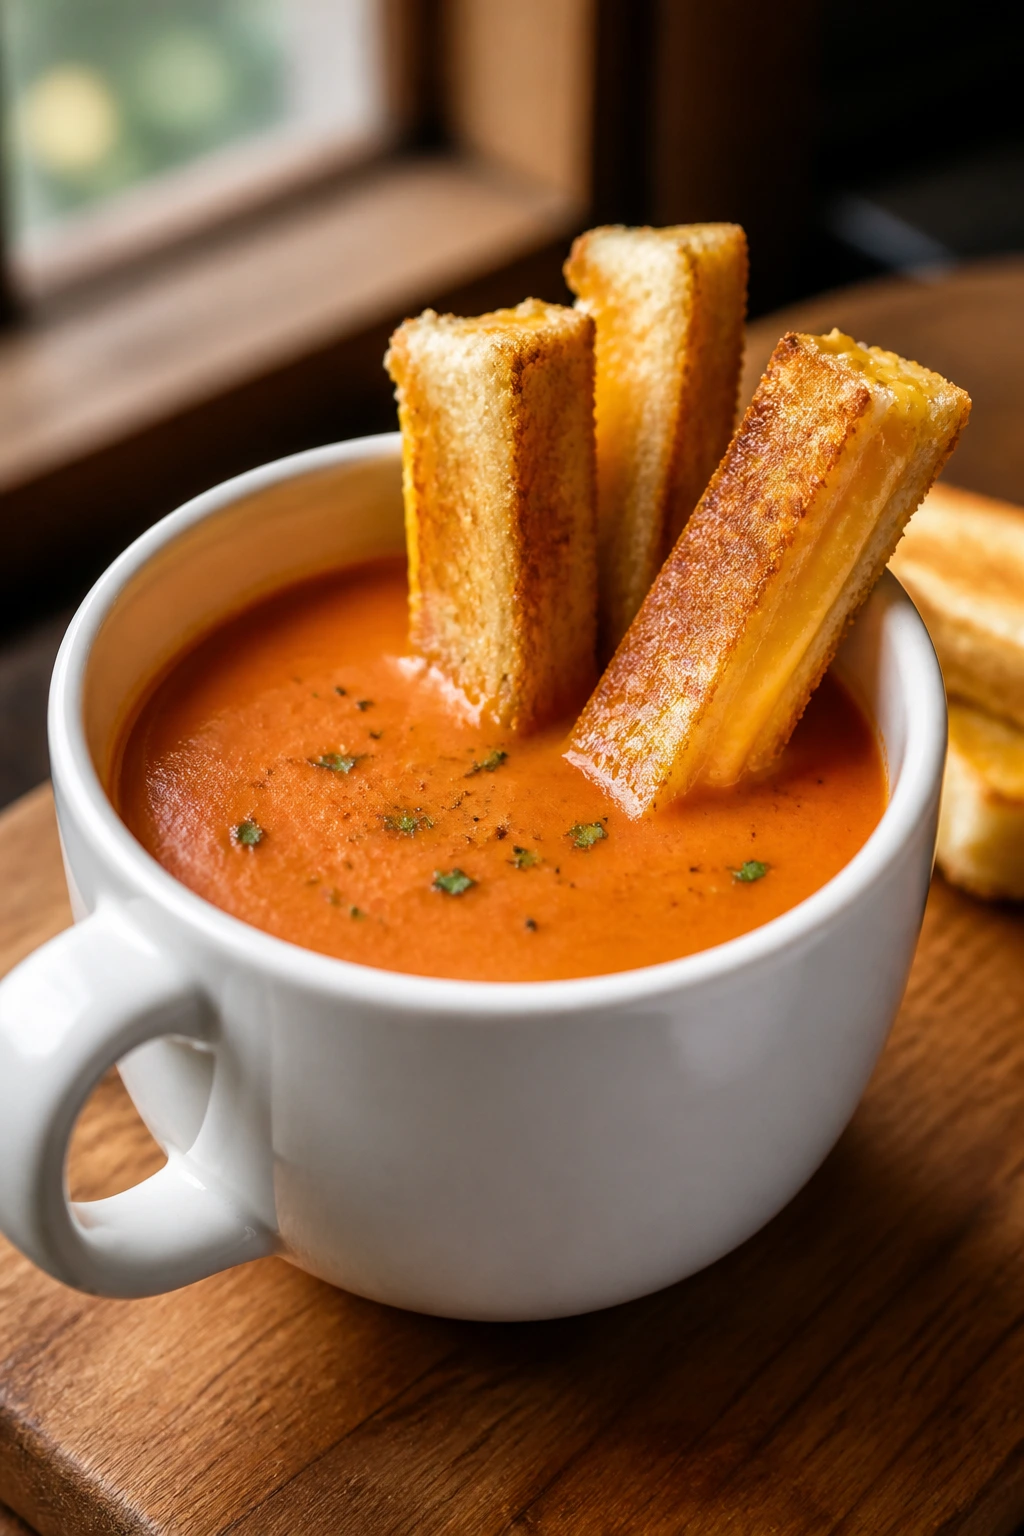
A cup of tomato soup and a strip of grilled cheese feels like a smaller, cleaner dinner that still counts as fun. The soup should be silky, not thin, so it clings to the bread.
Why It Works: A short simmer with cream or milk softens the tomato edge, and the grilled cheese strips give you a crispy, dip-able side. The two together are old-school for a reason.
Key Ingredients:
- 1 tablespoon butter
- 1 small onion, diced
- 1 can crushed tomatoes, 28 ounces
- 1 cup broth
- 1/2 cup cream or milk
- 4 slices bread
- 4 slices cheddar
- Salt and pepper
Quick Steps:
- Cook onion in butter until soft.
- Add tomatoes and broth, simmer 15 minutes.
- Stir in cream and season.
- Make grilled cheese, then cut into strips.
- Serve the strips with the soup.
Equipment for This Recipe:
- Saucepan
- Skillet
- Blender, optional
How to Serve This Dish: Serve soup in mugs or small bowls, with grilled cheese cut into fingers. It turns movie night into something a little more dinner-like without losing the fun.
Pro Tips for This Recipe:
- Blend if you want it smooth.
- Don’t boil after adding cream.
- Use sharp cheddar in the sandwich.
Variations on This Dish:
- Roasted Garlic Soup: Add roasted garlic to the soup.
- Mini Panini Dip: Use sourdough for the sandwich.
Common Mistakes to Avoid with This Recipe:
- Don’t thin the soup too much.
- Don’t burn the bread while toasting.
43. Cheesy Garlic Pull-Apart Bread
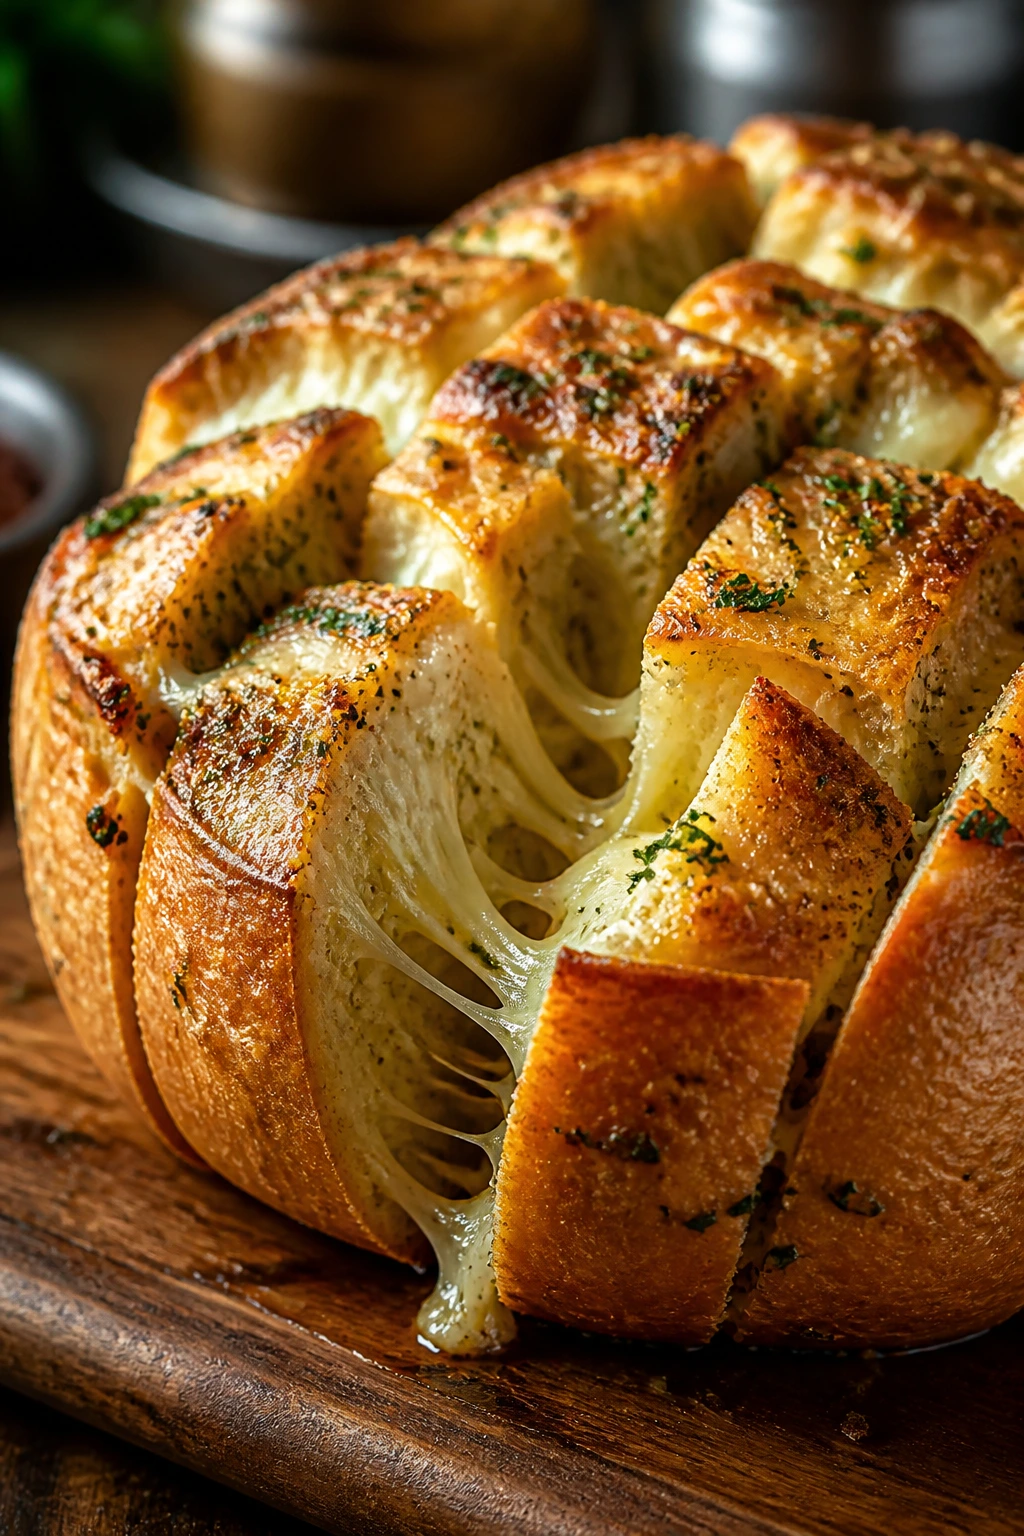
This is the loaf people keep tearing into with no plan. The garlic butter gets into the cracks, and the cheese pulls in strings that make everyone reach again.
Why It Works: Cutting the bread in a crosshatch lets the butter and cheese sink into the loaf instead of sitting on top. Baking it wrapped first, then uncovered, gives you a soft interior and a crisp top.
Key Ingredients:
- 1 round loaf sourdough or Italian bread
- 1/2 cup butter, melted
- 2 cloves garlic, minced
- 2 cups shredded mozzarella
- 1/4 cup grated Parmesan
- 2 tablespoons chopped parsley
- Pinch of salt
Quick Steps:
- Cut deep slits in the loaf without slicing through.
- Mix butter, garlic, parsley, and salt.
- Stuff with cheese and brush with butter.
- Wrap in foil and bake at 375°F for 15 minutes.
- Uncover and bake 5 minutes more.
Equipment for This Recipe:
- Bread knife
- Foil
- Baking sheet
How to Serve This Dish: Put the loaf on a board and let everyone pull pieces off. It’s a sharing food, and it behaves best when eaten warm.
Pro Tips for This Recipe:
- Don’t cut all the way through the loaf.
- Use a loaf with a sturdy crust.
- Serve immediately for the best cheese pull.
Variations on This Dish:
- Pesto Pull-Apart: Swap garlic butter for pesto.
- Jalapeño Cheese Bread: Add chopped jalapeños for heat.
Common Mistakes to Avoid with This Recipe:
- Don’t undercut the loaf.
- Don’t overbake uncovered.
44. Banana Split Bites
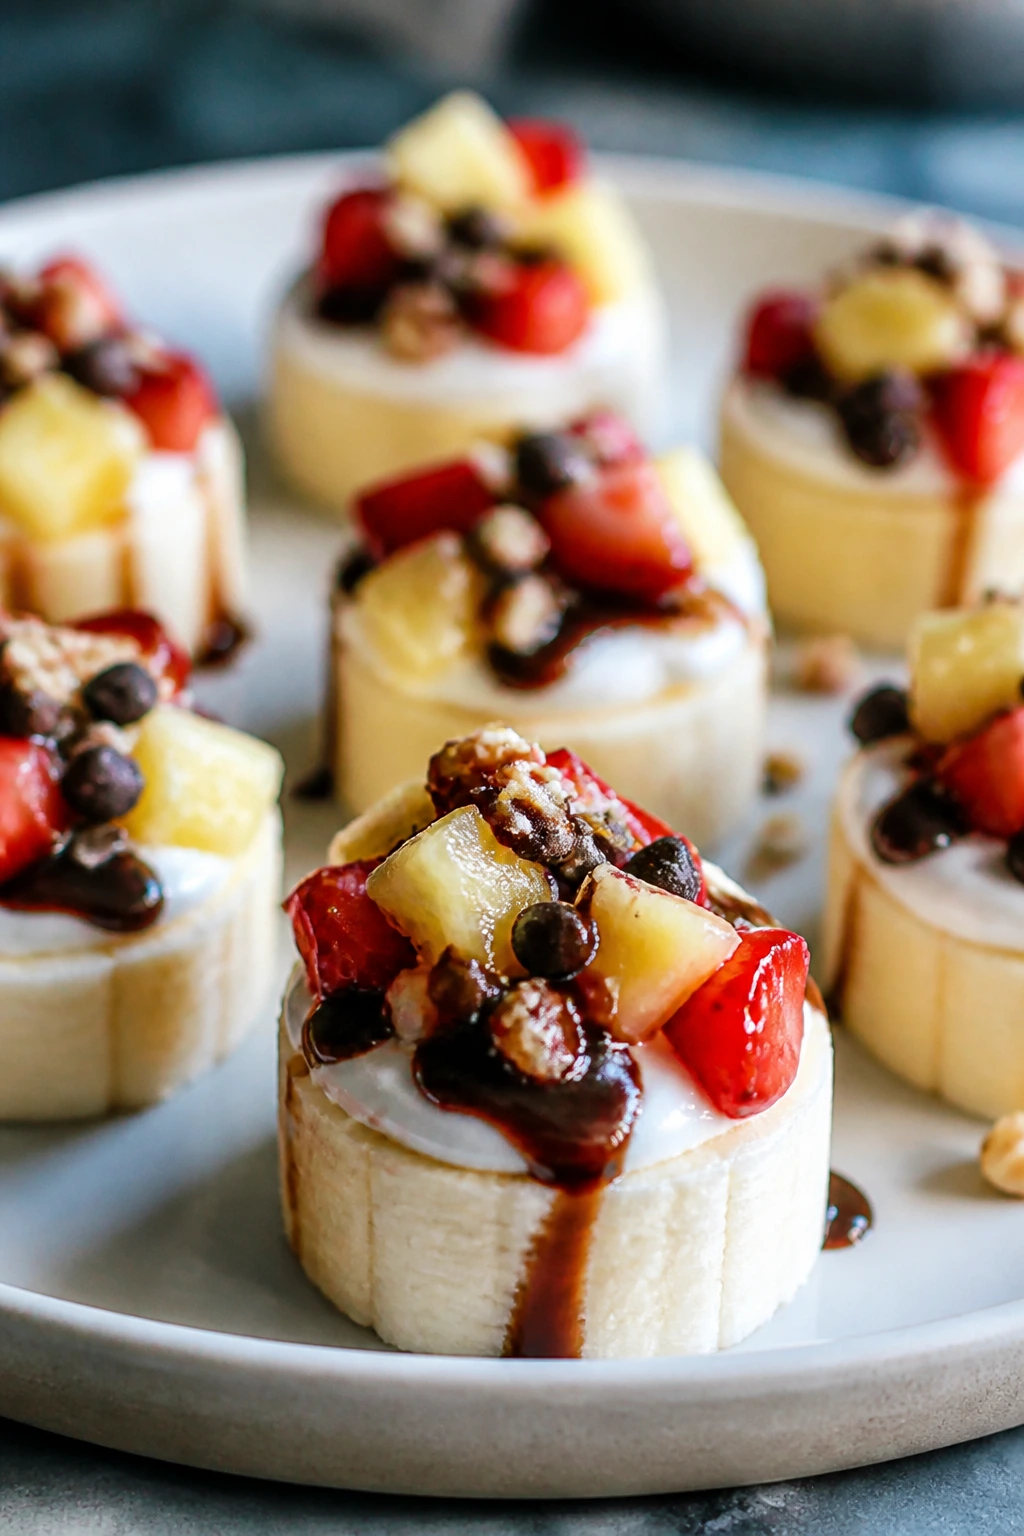
These taste like a tiny sundae without the bowl. They’re cold, creamy, and easy to assemble on a tray right before serving.
Why It Works: The banana acts as a base, while yogurt or cream cheese helps the toppings stay in place. A chilled tray keeps the bites from sliding around.
Key Ingredients:
- 2 bananas, sliced into thick rounds
- 1/2 cup Greek yogurt
- 2 tablespoons chocolate chips
- 2 tablespoons chopped strawberries
- 2 tablespoons chopped pineapple
- 1 tablespoon chopped peanuts
- 1 teaspoon honey
Quick Steps:
- Arrange banana rounds on a chilled plate.
- Top each with yogurt.
- Add fruit, chips, and peanuts.
- Drizzle with honey.
- Serve right away.
Equipment for This Recipe:
- Knife
- Spoon
- Serving plate
How to Serve This Dish: These work best as a quick dessert course after the salty snacks disappear. Keep them chilled until the last second.
Pro Tips for This Recipe:
- Use bananas that are ripe but still firm.
- Pat fruit dry.
- Make just before serving.
Variations on This Dish:
- Peanut Butter Split Bite: Add a tiny smear of peanut butter.
- Chocolate Yogurt Bite: Use chocolate yogurt instead.
Common Mistakes to Avoid with This Recipe:
- Don’t let them sit long.
- Don’t use bananas that are too soft.
45. Air-Fryer Fish Sticks
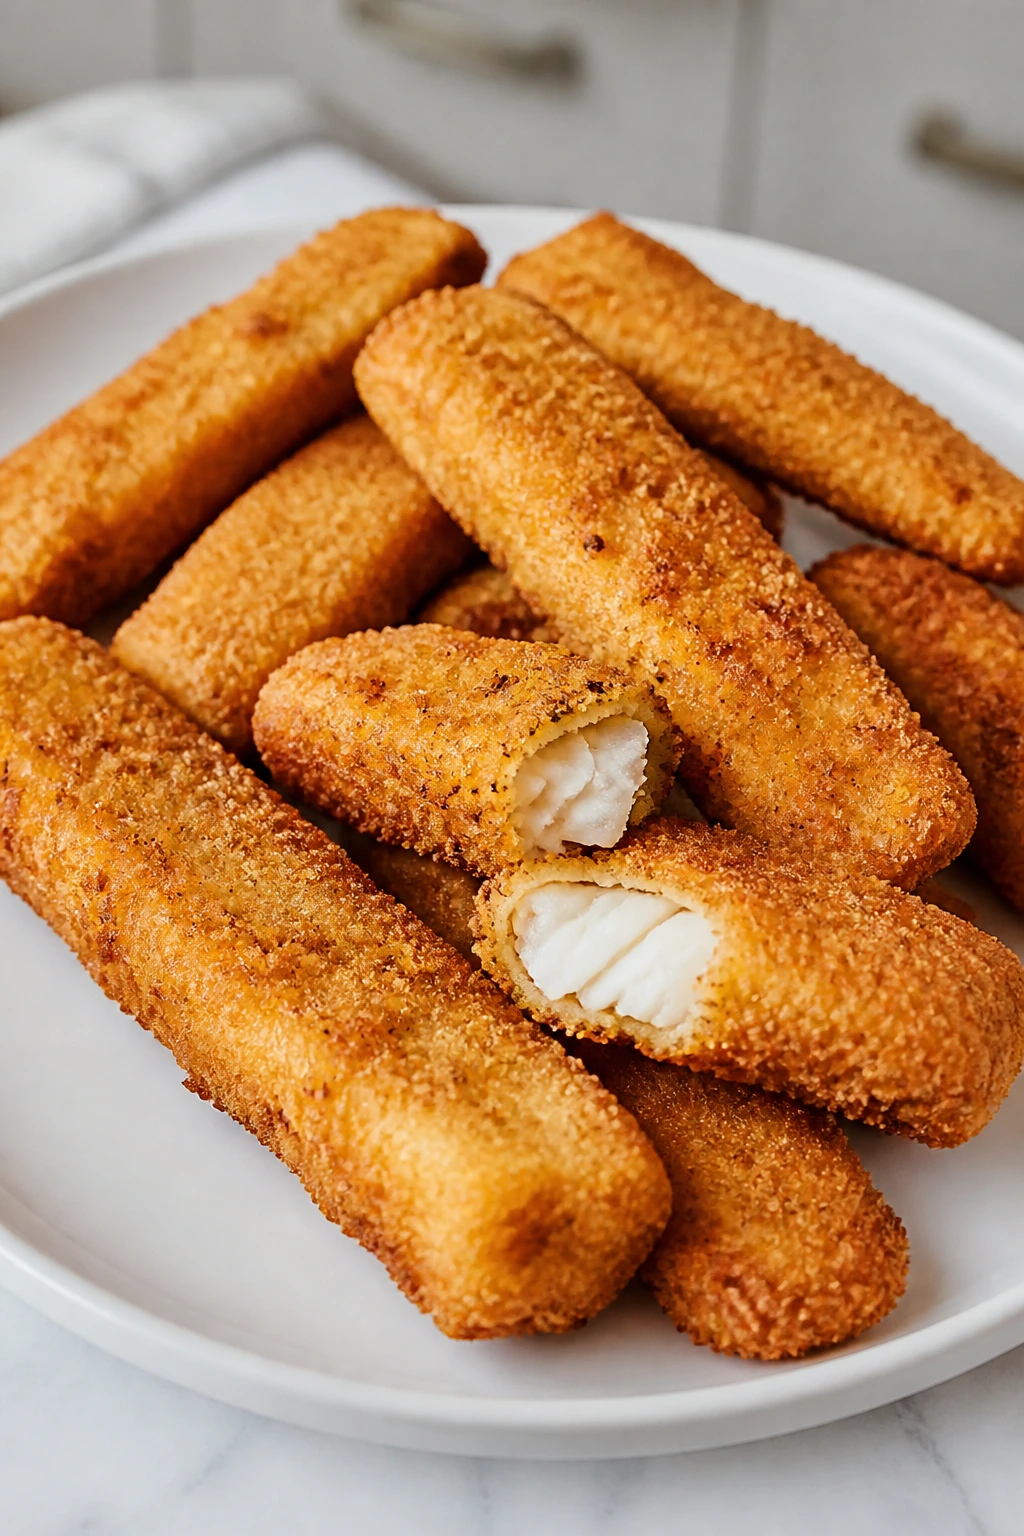
Crisp outside, flaky inside, and a little more substantial than the freezer-box version. They’re good when you want one dinner-y option that still feels snackable.
Why It Works: The air fryer gives the breading a dry, even crisp without much oil. Fish pieces cut to the same size cook fast and stay tender.
Key Ingredients:
- 1 1/2 pounds white fish fillets, cut into sticks
- 1/2 cup flour
- 2 eggs
- 1 tablespoon milk
- 1 1/2 cups panko breadcrumbs
- 1 teaspoon salt
- 1/2 teaspoon paprika
Quick Steps:
- Set up flour, egg with milk, and seasoned panko.
- Coat fish sticks.
- Arrange in the air fryer basket.
- Cook at 400°F for 8 to 10 minutes, flipping once.
- Serve with tartar sauce.
Equipment for This Recipe:
- Air fryer
- Three bowls
- Tongs
How to Serve This Dish: Serve with lemon wedges and fries or coleslaw if you want to round it out. They’re a nice break from all the cheese.
Pro Tips for This Recipe:
- Don’t crowd the basket.
- Pat the fish dry before breading.
- Serve immediately so the crust stays crisp.
Variations on This Dish:
- Cornflake Crunch: Swap panko for crushed cornflakes.
- Spiced Version: Add cayenne and garlic powder.
Common Mistakes to Avoid with This Recipe:
- Don’t overcook delicate fish.
- Don’t stack pieces in the basket.
46. Teriyaki Chicken Skewers
These are glossy, a little sweet, and easy to pass around. The skewers make them feel special, even when the ingredients are plain pantry stuff.
Why It Works: A quick teriyaki marinade coats the chicken and caramelizes under heat, giving you sticky edges. Cutting the pieces small keeps them tender and fast-cooking.
Key Ingredients:
- 1 1/2 pounds chicken thighs, cut into 1-inch pieces
- 1/3 cup teriyaki sauce
- 1 tablespoon honey
- 1 teaspoon grated ginger
- 1 tablespoon oil
- 8 small skewers
- 1 tablespoon sesame seeds
Quick Steps:
- Marinate chicken in teriyaki, honey, ginger, and oil for 20 minutes.
- Thread onto skewers.
- Bake or grill at 425°F until cooked through, about 15 minutes.
- Brush with extra sauce.
- Sprinkle sesame seeds.
Equipment for This Recipe:
- Baking sheet or grill
- Skewers
- Bowl
How to Serve This Dish: Serve with rice on the side if you want a fuller meal, or just as-is for a snackable plate. They’re especially good when you need one savory item that isn’t pizza.
Pro Tips for This Recipe:
- Use chicken thighs for juicier results.
- Don’t marinate too long in sugary sauce.
- Brush with sauce near the end so it doesn’t burn.
Variations on This Dish:
- Pineapple Teriyaki: Add a pineapple chunk between chicken pieces.
- Sesame Veggie Skewers: Add bell pepper and onion.
Common Mistakes to Avoid with This Recipe:
- Don’t cook huge chunks.
- Don’t brush sugary sauce on too early.
47. Ham and Cheese Roll-Ups
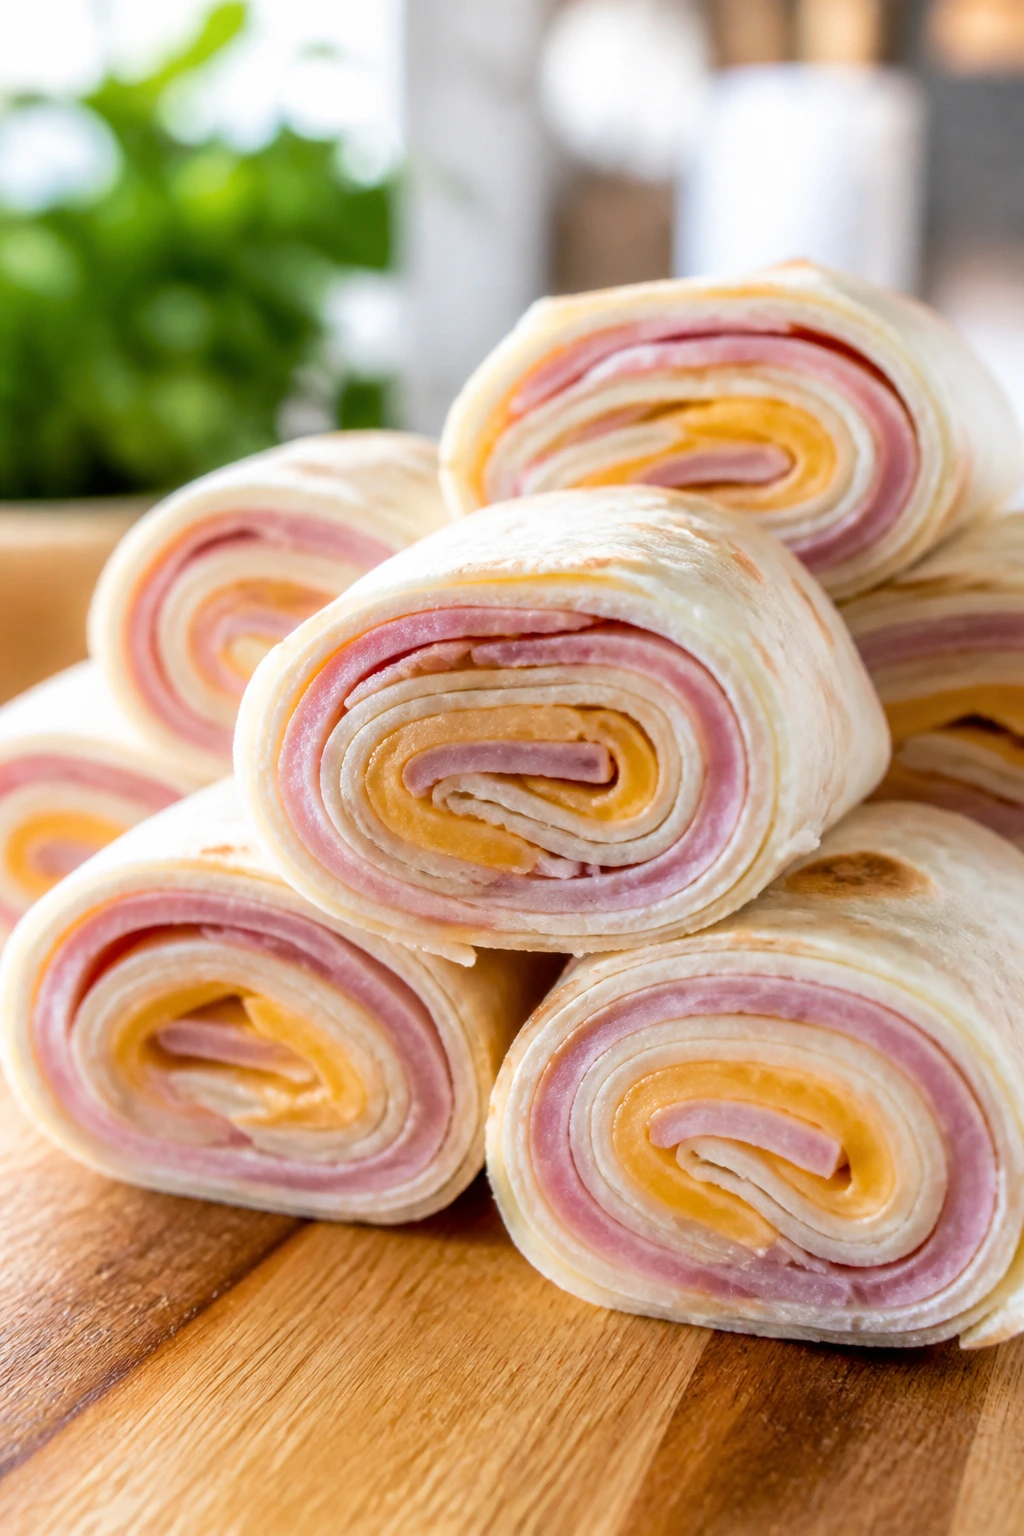
These are the low-effort snack that still feels intentional. Ham, cheese, and a soft wrap make a neat little roll that won’t fall apart on the couch.
Why It Works: A thin spread of cream cheese or mustard helps the roll hold together, and slicing after chilling gives you clean spirals. It’s one of the few recipes here that needs almost no heat.
Key Ingredients:
- 4 flour tortillas
- 8 slices deli ham
- 4 slices cheddar or Swiss
- 4 tablespoons cream cheese
- 1 teaspoon mustard
- 1 tablespoon chopped chives
Quick Steps:
- Spread tortillas with cream cheese and mustard.
- Layer on ham, cheese, and chives.
- Roll tightly.
- Chill 15 minutes.
- Slice into pinwheels.
Equipment for This Recipe:
- Cutting board
- Knife
- Plastic wrap, optional
How to Serve This Dish: Arrange the slices cut-side up on a tray. They’re a good cold bite when the oven is already busy.
Pro Tips for This Recipe:
- Roll tightly so they stay closed.
- Chill before slicing.
- Use thin deli slices for easier rolling.
Variations on This Dish:
- Turkey Ranch Roll-Up: Swap ham for turkey and add ranch.
- Italian Roll-Up: Use salami and provolone.
Common Mistakes to Avoid with This Recipe:
- Don’t overload with filling.
- Don’t slice before chilling.
48. Mini Shepherd’s Pie Cups
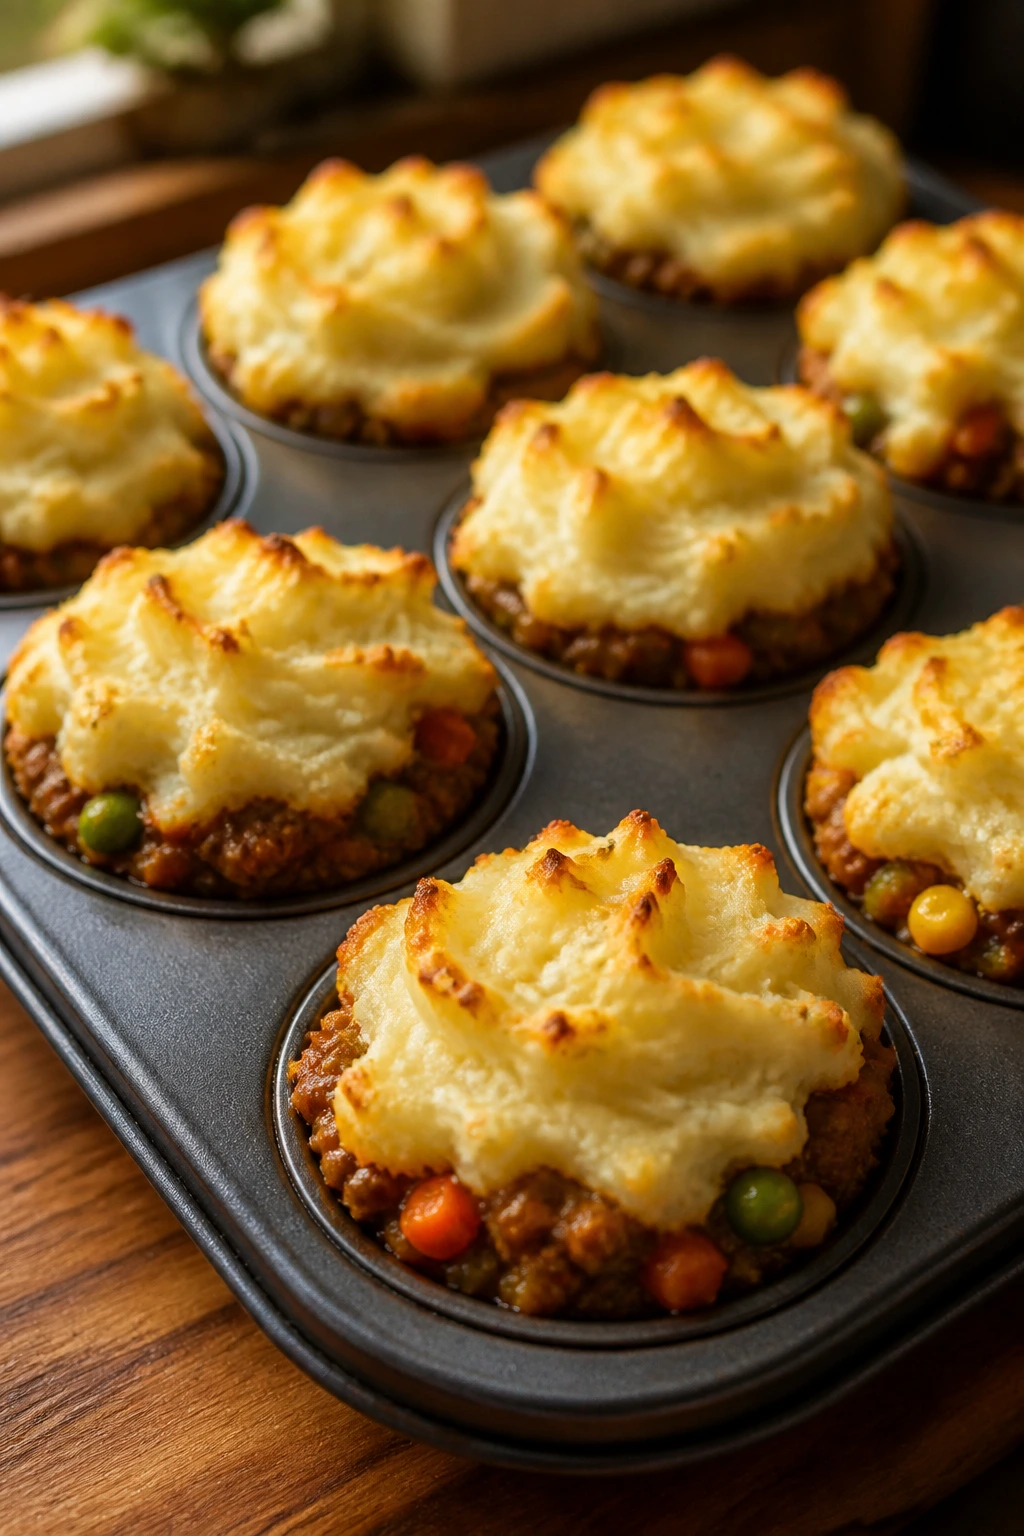
These are cozy, savory, and neatly portioned in a muffin tin. The mashed potato top browns just enough to give you a little crust.
Why It Works: Layering meat and vegetables under mashed potatoes gives you the shepherd’s pie feel in a compact shape. The muffin tin keeps each cup separate, which makes serving cleaner than a casserole dish.
Key Ingredients:
- 1 pound ground beef or lamb
- 1/2 cup onion, diced
- 1 cup frozen peas and carrots
- 1 tablespoon tomato paste
- 2 cups mashed potatoes
- 1/2 teaspoon salt
- 1/4 teaspoon black pepper
Quick Steps:
- Cook meat and onion until browned.
- Stir in peas, carrots, tomato paste, salt, and pepper.
- Spoon into muffin cups.
- Top with mashed potatoes.
- Bake at 400°F for 15 minutes.
Equipment for This Recipe:
- Muffin tin
- Skillet
- Spoon
How to Serve This Dish: Serve as a small dinner item with applesauce or fruit on the side. They’re hearty, so a few are enough.
Pro Tips for This Recipe:
- Keep the filling thick.
- Pipe or spoon potatoes on top for better browning.
- Let them cool a few minutes before removing.
Variations on This Dish:
- Turkey Pie Cups: Use ground turkey.
- Cheddar Top: Mix cheddar into the potatoes.
Common Mistakes to Avoid with This Recipe:
- Don’t leave the filling too wet.
- Don’t underbake the tops.
49. Cinnamon Roll Bites
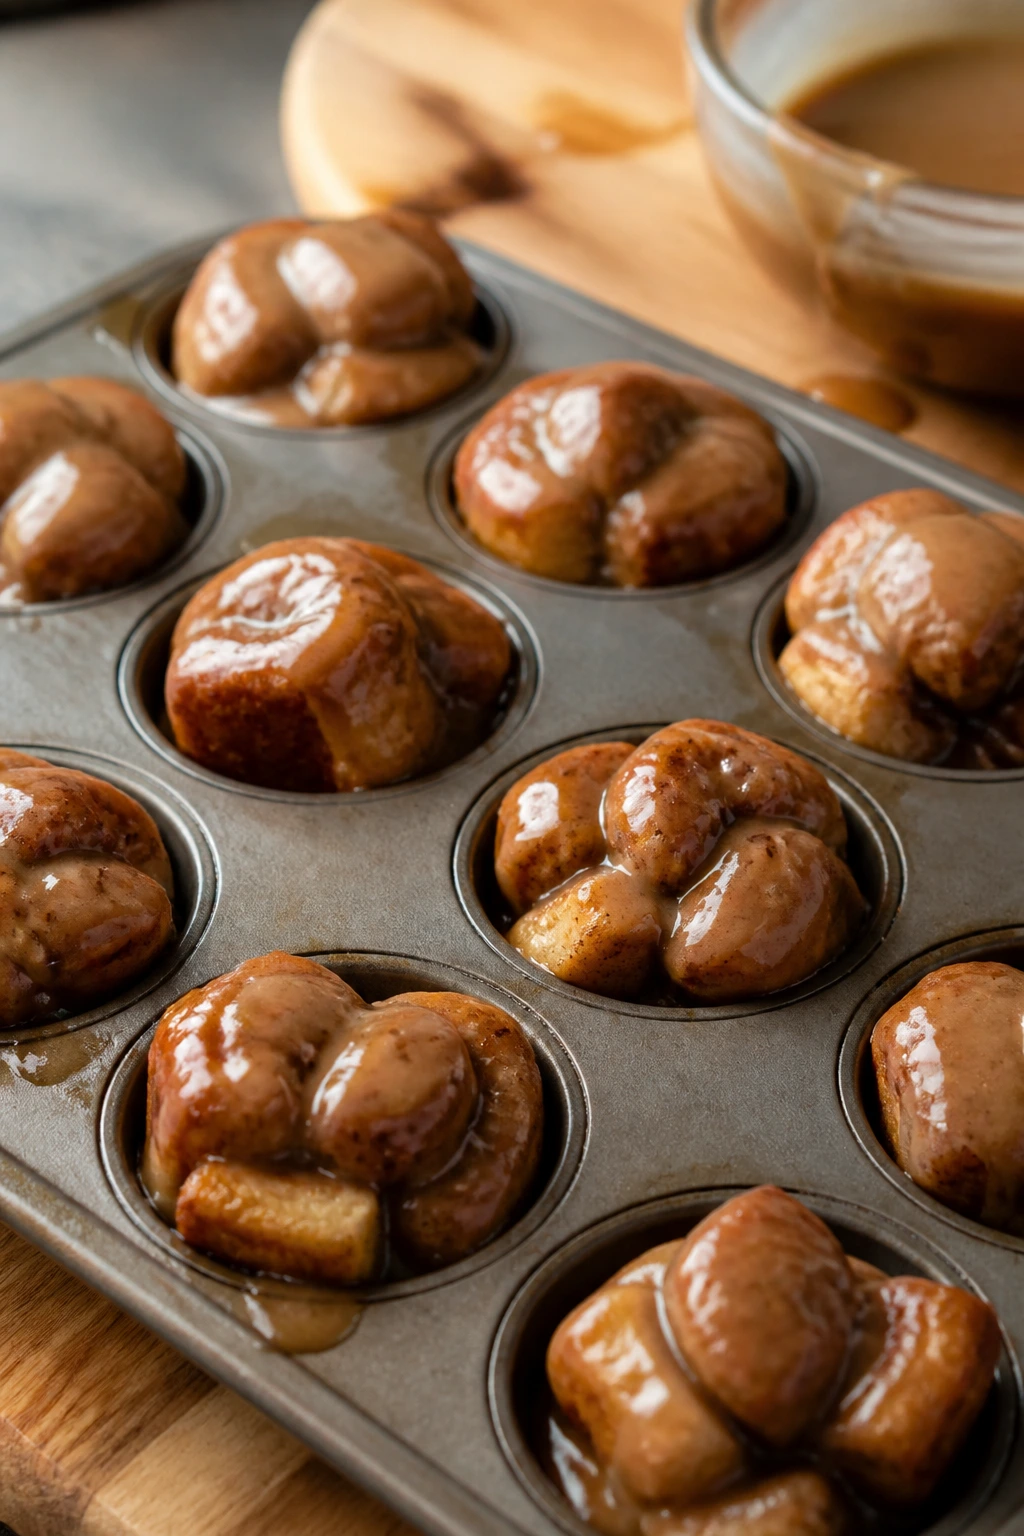
These are the dessert that makes the room smell like a bakery. They’re soft inside, glossy on top, and easier to share than a full pan of rolls.
Why It Works: Cutting rolls into bite-size pieces gives you more caramelized surface area. A quick glaze after baking adds sweetness without drowning the dough.
Key Ingredients:
- 1 can refrigerated cinnamon rolls
- 2 tablespoons butter, melted
- 1/4 cup brown sugar
- 1/2 teaspoon cinnamon
- 2 tablespoons cream cheese frosting, optional
- Pinch of salt
Quick Steps:
- Cut rolls into quarters.
- Toss with melted butter, brown sugar, cinnamon, and salt.
- Bake at 350°F for 12 to 14 minutes in a muffin tin.
- Drizzle with frosting.
- Serve warm.
Equipment for This Recipe:
- Muffin tin
- Knife
- Spoon
How to Serve This Dish: Serve in a basket or small bowl with extra frosting on the side. They’re best when the glaze is still a little warm and sticky.
Pro Tips for This Recipe:
- Don’t overbake or they dry out.
- Use a muffin tin so the bites hold shape.
- Add frosting after they cool slightly.
Variations on This Dish:
- Apple Cinnamon Bites: Tuck in a tiny diced apple.
- Orange Glaze: Mix orange zest into the frosting.
Common Mistakes to Avoid with This Recipe:
- Don’t cut the pieces too small.
- Don’t glaze while piping hot or it melts off.
50. Trail Mix Energy Balls
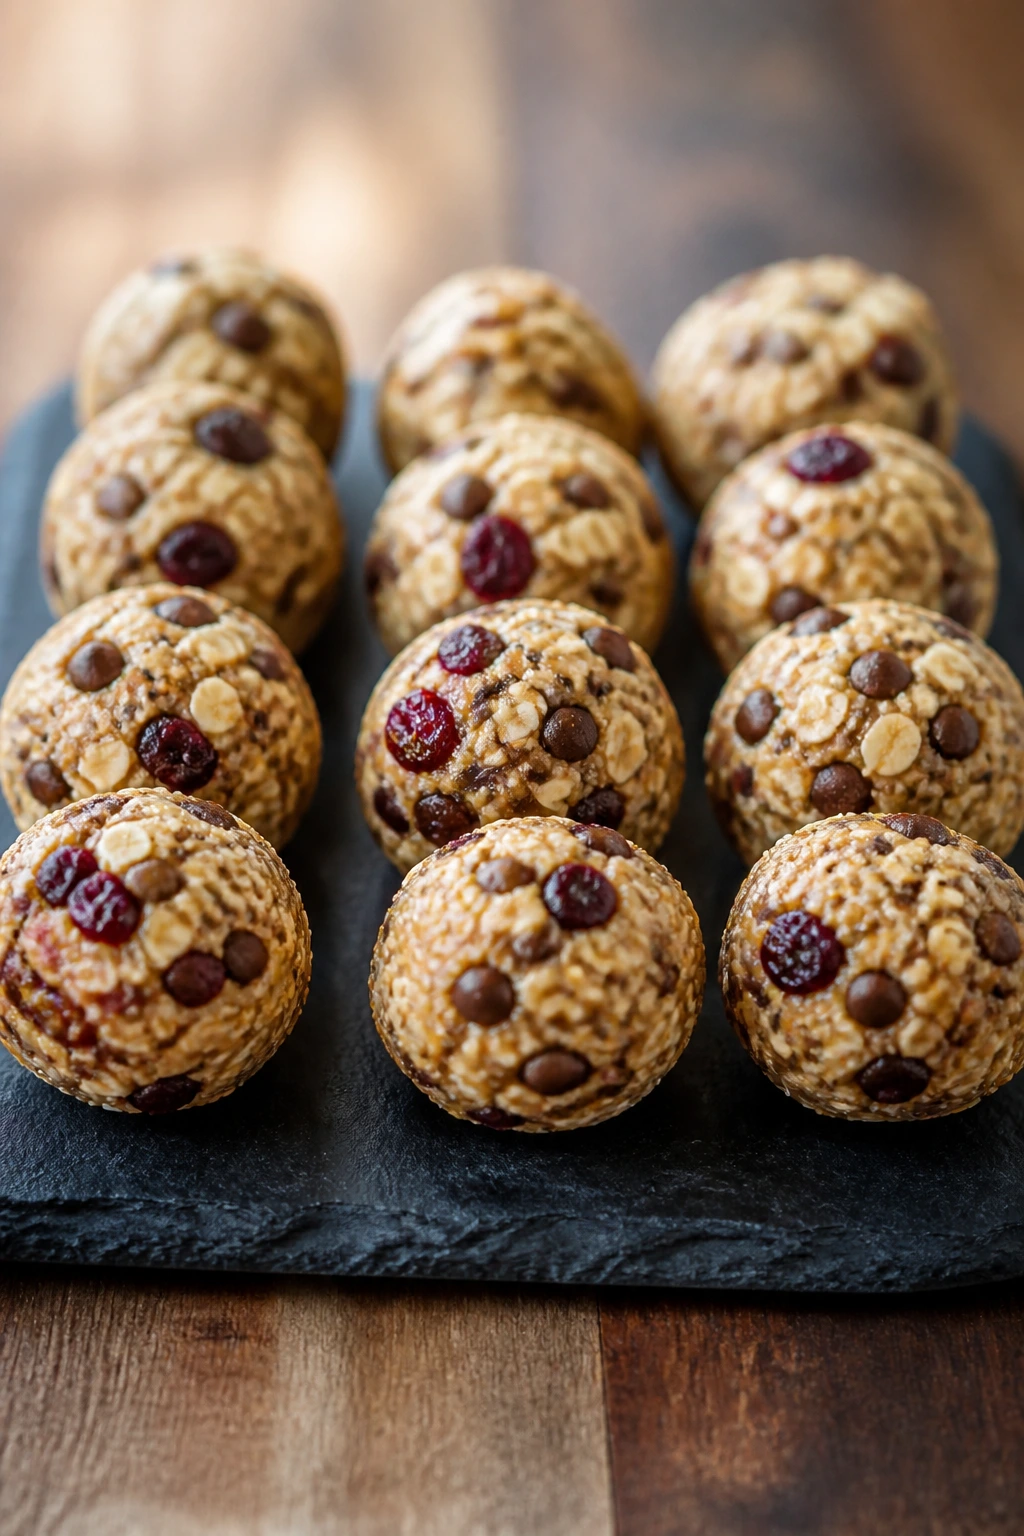
These are the no-bake snack that handles a long movie stretch better than most sweets. They’re chewy, a little nutty, and easy to pull from the fridge one by one.
Why It Works: Oats, nut butter, and honey bind the mix into a firm ball without baking. Adding chopped dried fruit and seeds gives them the trail-mix flavor kids tend to recognize fast.
Key Ingredients:
- 1 cup rolled oats
- 1/2 cup peanut butter
- 1/4 cup honey
- 1/3 cup mini chocolate chips
- 1/4 cup chopped dried cranberries
- 2 tablespoons chia seeds
- Pinch of salt
Quick Steps:
- Stir everything together in a bowl.
- Chill 20 minutes so the mixture firms up.
- Roll into 1-inch balls.
- Chill again until set.
- Store cold until serving.
Equipment for This Recipe:
- Mixing bowl
- Spoon
- Baking sheet or plate
How to Serve This Dish: Set them in a small bowl as the final nibble of the night. They also make a good grab-and-go snack for the day after.
Pro Tips for This Recipe:
- If the mix feels loose, add more oats.
- Wet your hands slightly before rolling.
- Keep them chilled so they stay firm.
Variations on This Dish:
- Sunflower Seed Version: Use sunflower butter instead of peanut butter.
- Coconut Trail Balls: Add shredded coconut for a sweeter finish.
Common Mistakes to Avoid with This Recipe:
- Don’t add too much honey or they won’t hold.
- Don’t skip the chill time.
Why a Tray-Loaded Movie Night Works Better Than One Big Meal
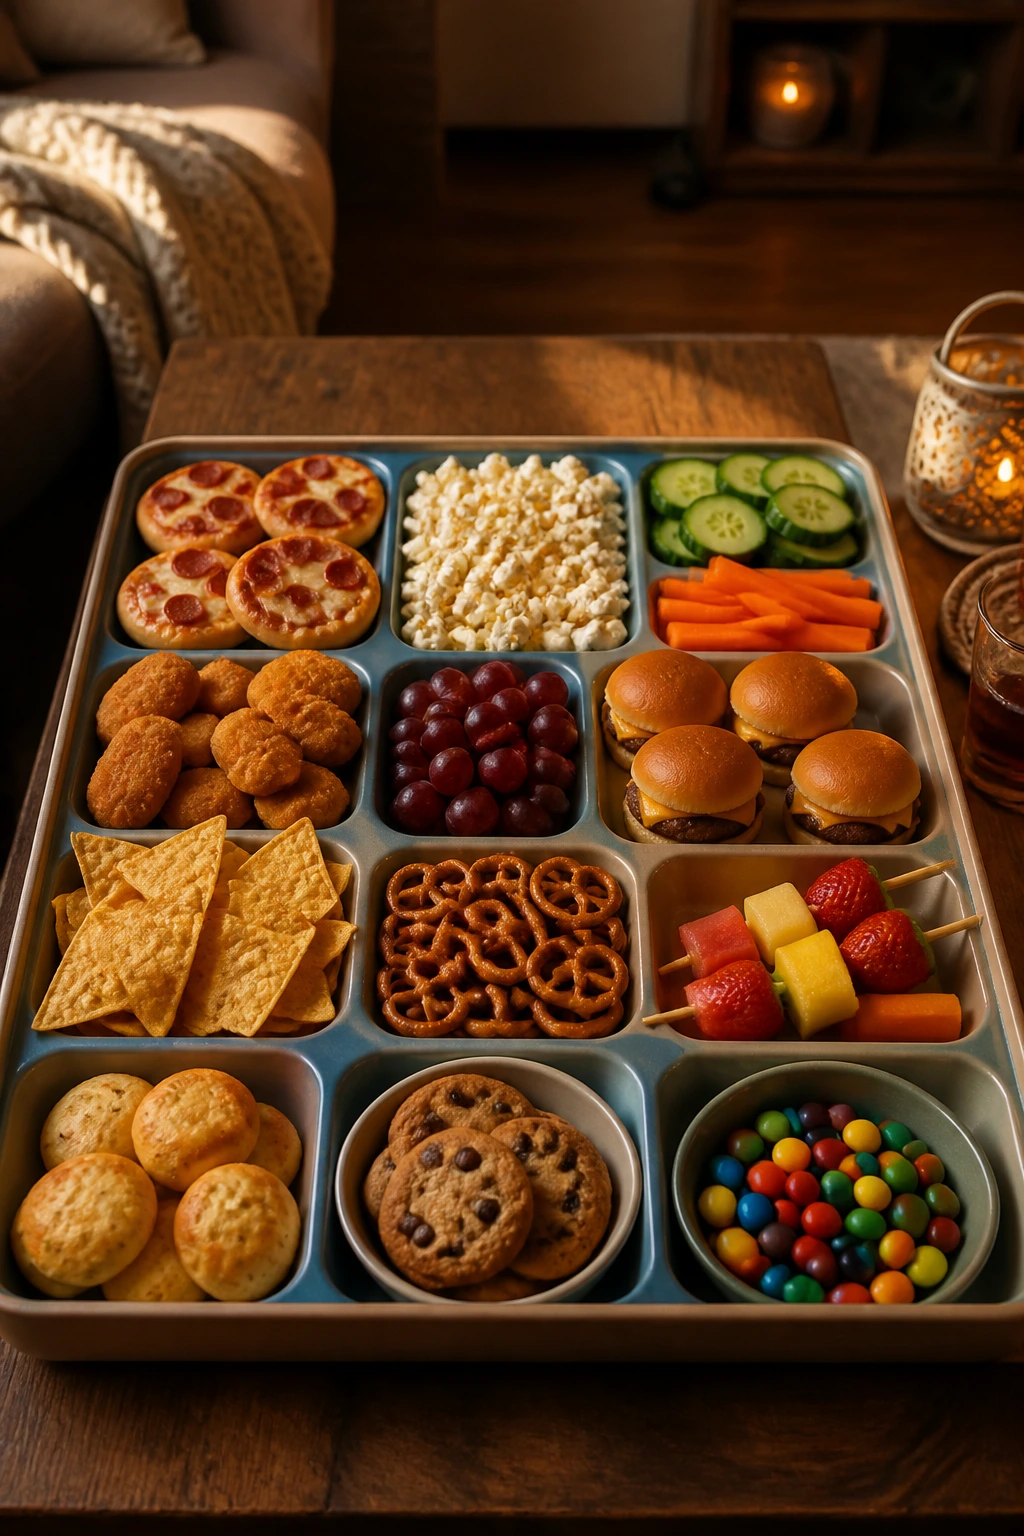
A movie-night spread does better when it behaves like a set of small, separate jobs instead of one giant dinner. Crisp things stay crisp longer when they aren’t buried under saucy things. Cold things can cool the heat from the baked items, and sweet bites can wait in the wings until someone wants a reset from the salt.
I’m also a fan of the way a mixed spread gives kids some control. One child might head straight for pizza bagels and popcorn, while another lives on fruit, pretzels, and a couple of nuggets. That’s not chaos; that’s dinner solving itself.
The practical part matters too. Tray food lets you stagger the work: bake one pan, chill one dip, warm one sauce, and build the table in layers. That’s easier than trying to time a full plated meal to the exact minute the opening scene starts.
Essential Equipment for These Recipes
- Rimmed sheet pans: The backbone of the whole spread for baking, roasting, and reheating.
- Muffin tins, regular and mini: Best for cups, bites, and anything that needs a neat shape.
- Cast-iron skillet or oven-safe pan: Useful for skillet cookies, dips, and broiled finishes.
- Mixing bowls in 2 to 3 sizes: One small bowl is never enough once you start breading or tossing.
- Parchment paper: Keeps cheese, dough, and sticky snacks from welding themselves to the pan.
- Wire rack: Helps nuggets, fries, and baked bites stay crisp underneath.
- Sharp knife and cutting board: You’ll use these more than the oven.
- Measuring cups and spoons: Especially useful for seasonings, dips, and quick batters.
- Tongs or a spatula: Handy for flipping, lifting, and turning hot pieces without scraping off the crust.
- Small bowls for dips: Marinara, ranch, sour cream, syrup, and chocolate sauce need their own landing spots.
Smart Shopping and Ingredient Tips
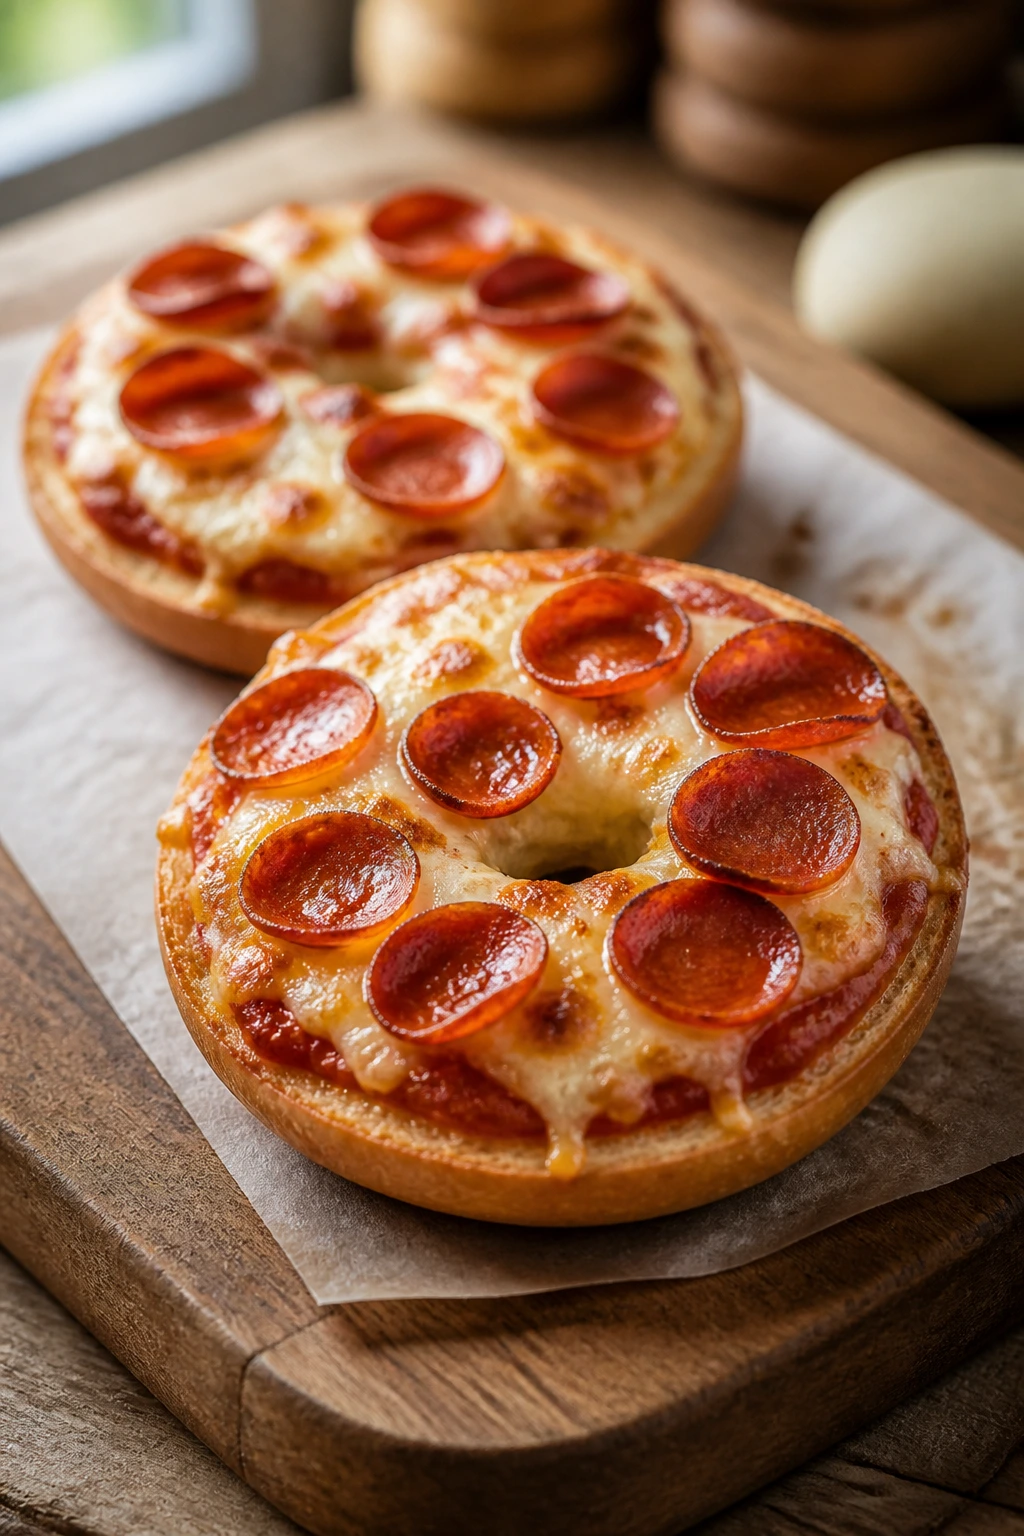
The best movie-night shopping is boring in a good way. You want ingredients that do the job without fighting the recipe. For cheese-heavy items, buy low-moisture mozzarella and sharp cheddar; they melt cleanly and don’t flood the pan the way some fresh cheeses do. For anything breaded, panko gives you a crunch that standard crumbs rarely match.
For the bread and dough section of the cart, I’d choose slider rolls, mini bagels, crescent dough, thick bread, and small flour tortillas over anything thin or brittle. Thin bread burns, cracks, or gets soggy faster, and movie night punishes all three. If you’re making quesadillas, taquitos, or roll-ups, warm the tortillas for a few seconds first so they don’t split when you fold them.
Protein choices matter too. Rotisserie chicken is a smart shortcut for sliders, taquitos, quesadilla filling, and meatball-adjacent snacks. Frozen fries, frozen fish fillets, and canned chickpeas are not shameful here; they’re the reason a spread comes together at all. For fruit-based snacks, look for firmer apples, bananas that are ripe but not mushy, and berries that are dry on the surface.
I also like keeping one salty pantry snack, one baked savory item, one cold fruit item, and one dessert in the cart. That balance is what stops movie night from turning into a sugar crash. And if your kids are small, buy the smaller version of things whenever possible: mini hot dogs, mini marshmallows, mini chocolate chips, mini bagels. Less trimming, less fuss.
How to Serve These Recipes
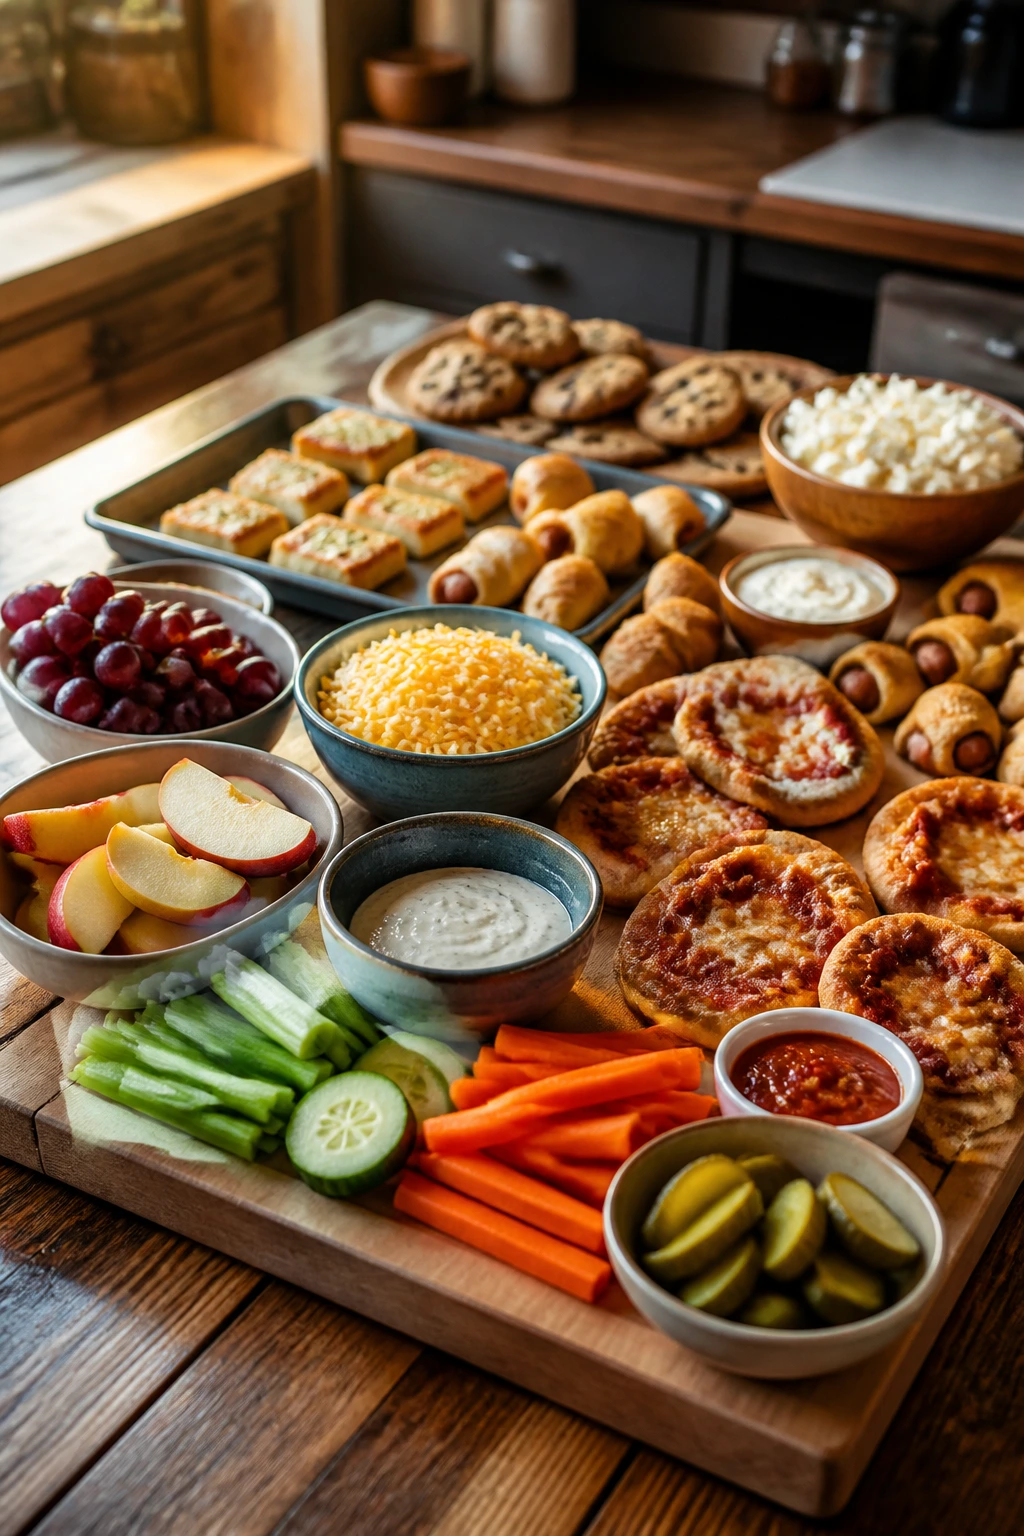
Presentation: Build the table like a low, wide snack board rather than a single center pile. Put hot foods on sheet pans or platters with some breathing room, then tuck cold items into bowls and cups so the textures stay distinct.
Accompaniments: Keep a few reliable sides in rotation: apple slices, grapes, celery sticks, dill pickles, ranch dip, marinara, salsa, sour cream, honey mustard, and a little bowl of extra shredded cheese. You don’t need all of them, but two or three cold, sharp, or crunchy sides keep the richer bites from feeling heavy.
Portions: For younger kids, plan on 3 to 5 small bites plus a fruit or veg item. Older kids and adults often eat 6 to 8 snack-sized pieces if the spread replaces dinner. If you’re serving a full movie-night menu, aim for one hearty item, two lighter snacks, one fruit or veg, and one sweet finish.
Beverage Pairing: Cold milk works with almost everything on this list, especially pizza, cookies, and cinnamon items. Lemonade, sparkling water with lime, and apple juice fit the salty-and-sweet mix well. For a warmer feel, serve cocoa with the dessert items and plain water for the cheesy ones.
Additional Tips and Flavor Boosters
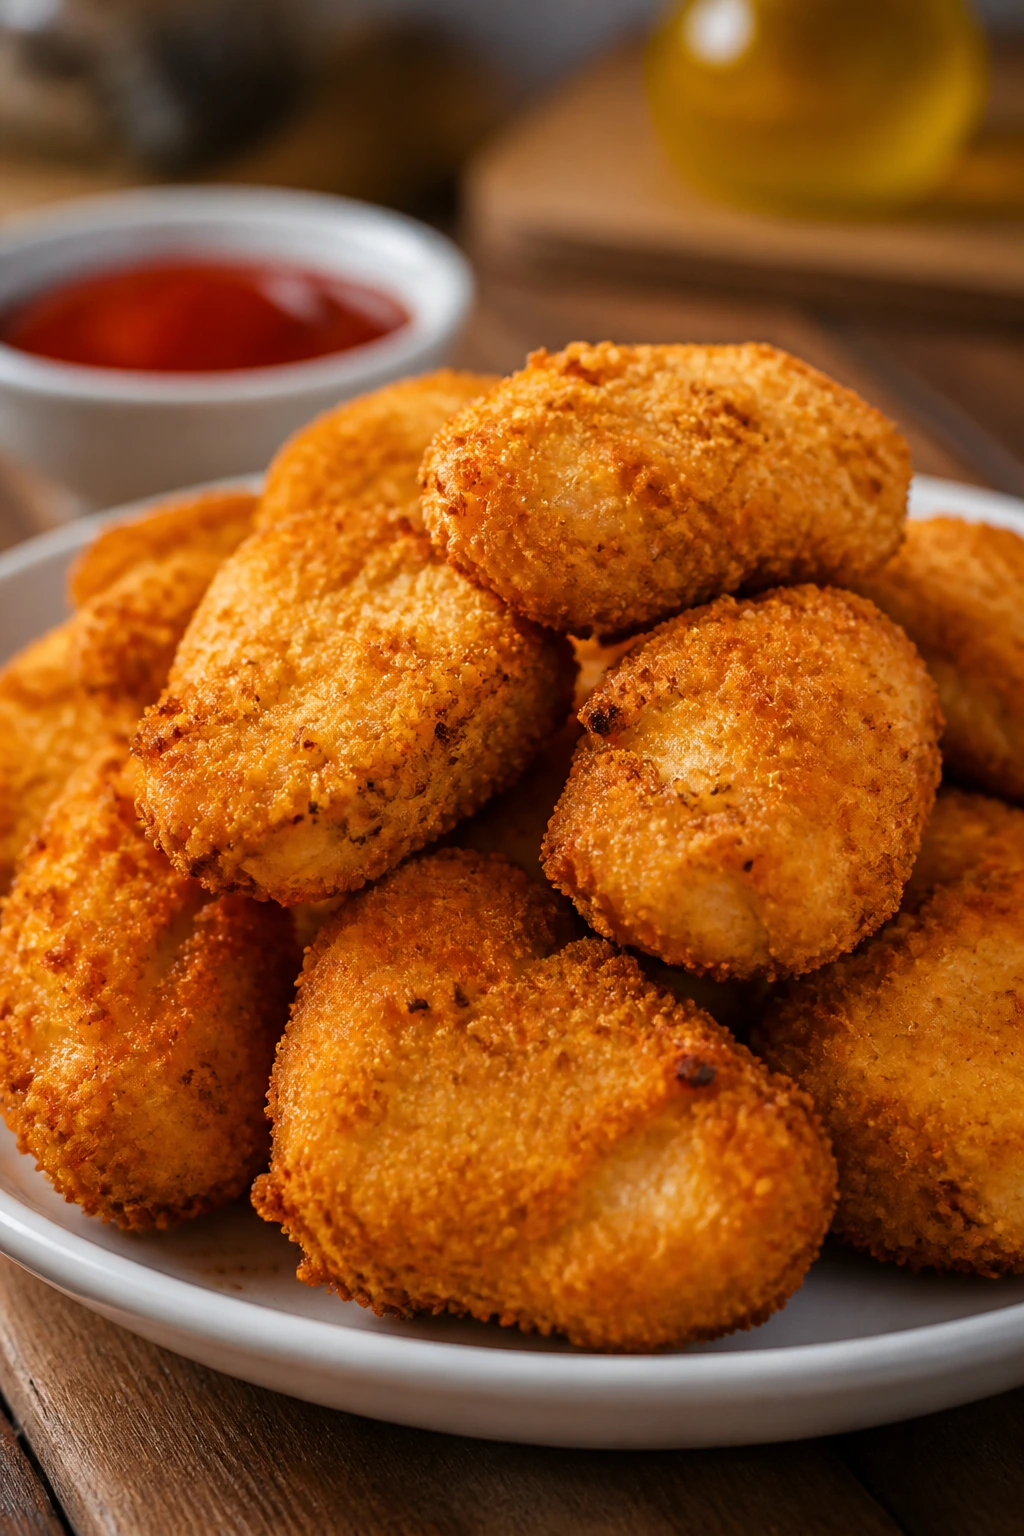
Flavor Enhancement: A small finishing touch changes more than people expect. A dusting of Parmesan on pizza bites, a pinch of flaky salt on chocolate treats, or a swipe of melted butter on pretzel bites makes the whole tray taste more finished.
Customization: Keep a mild base and add heat or herbs to only half the batch. That way the spicy adults get their punchy version, and the kids don’t treat dinner like a dare. For cheese-heavy foods, mixing cheddar with Monterey Jack gives you better melt and better flavor than either cheese alone.
Serving Suggestions: Use little bowls, ramekins, and paper liners where you can. Tiny cups make dips less messy, and parchment squares under sticky snacks keep hands cleaner than a bare plate ever will.
Make-It-Yours: For gluten-free eaters, use certified gluten-free tortillas, crumbs, or pretzels where needed. For dairy-free versions, swap in plant-based cheese on the pizza and quesadilla recipes, and use coconut yogurt or dairy-free frosting on sweet items. For higher-protein snacks, add chicken, Greek yogurt, or nut butter instead of leaning on extra crackers and bread.
Make-Ahead, Storage, and Reheating Guidance
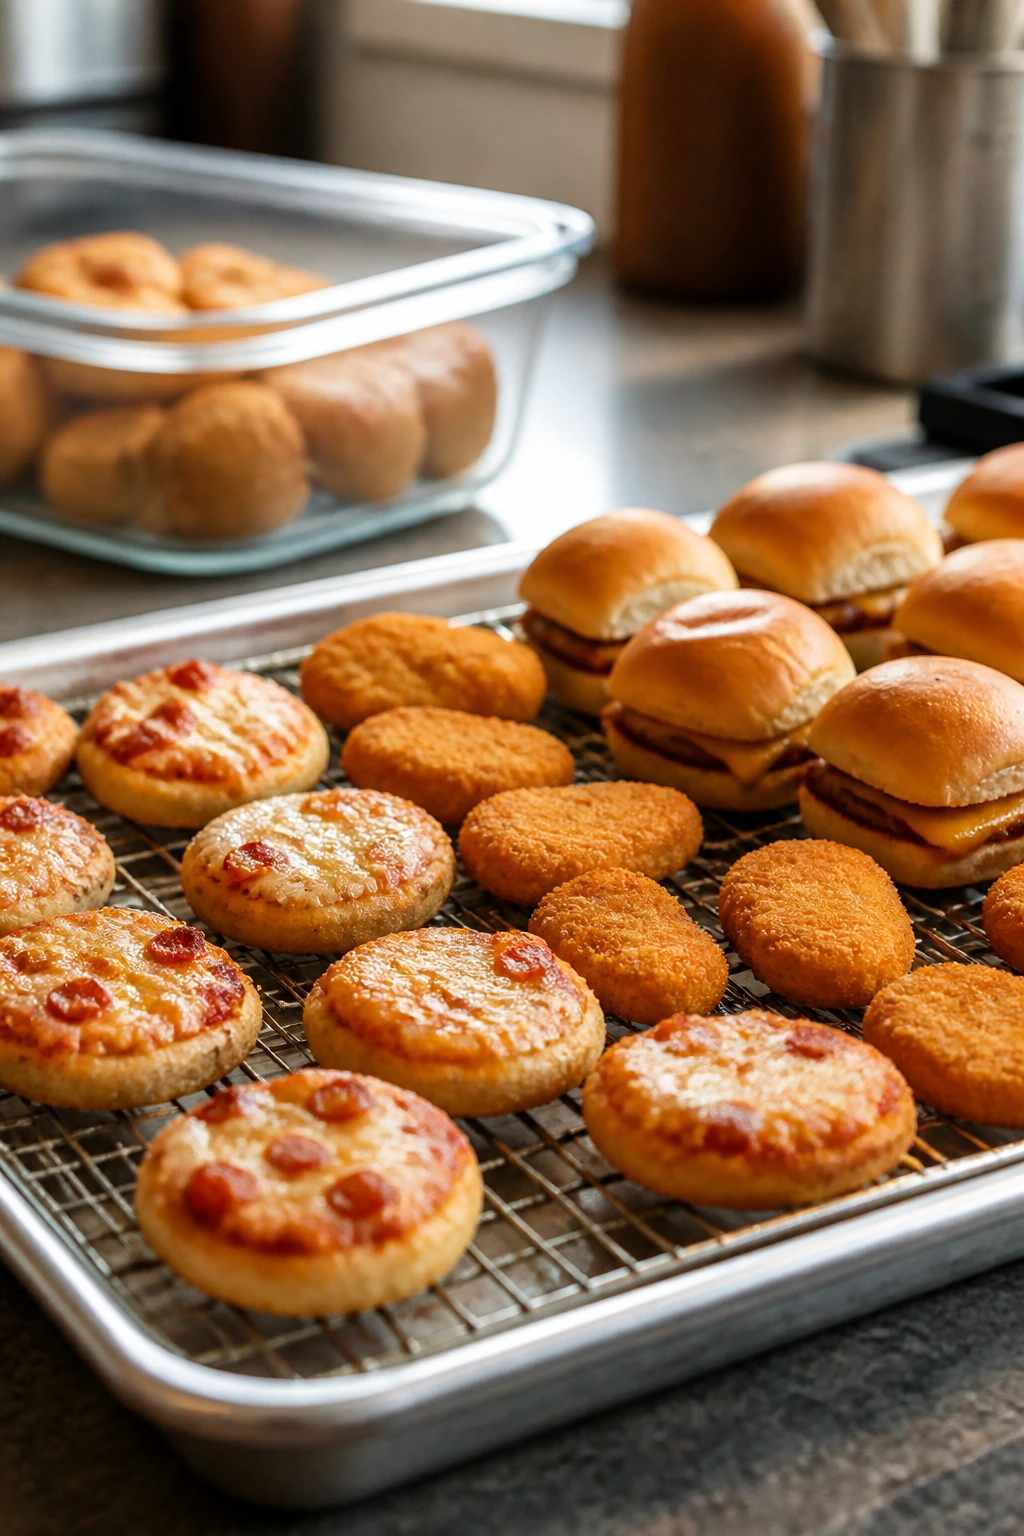
A movie-night spread gets easier when you split the work ahead of time. Most baked savory items—pizza bagels, nuggets, sliders, calzones, taquitos, pinwheels, and pretzel bites—can be made 1 day ahead, cooled completely, and stored in the fridge for 3 to 4 days. They reheat best in a 375°F oven or air fryer for 5 to 10 minutes, which brings back the crisp edges much better than the microwave.
Cold items need different handling. Fruit pizza cookies, parfaits, cucumber rounds, roll-ups, and banana bites should be assembled as close to serving as practical. If they have to sit, keep them chilled and use them within 24 hours for best texture. The banana bites and chocolate fruit snacks freeze well for up to 1 month, though the fresh fruit version is always best the first day.
Popcorn, snack mix, and chips are their own thing. Popcorn is best the day it’s made; it loses snap fast. Snack mix keeps at room temperature for 1 week in an airtight container, but add chocolate candies only after the mix cools or they melt into the cereal. Tortilla chips, roasted chickpeas, and fries should be crisped right before serving if you want them to stay lively.
For make-ahead planning, I’d assemble all dips in the morning, pre-cook any meat fillings, and bread or shape anything that can sit in the fridge without getting weird. Then the final bake becomes fast and calm instead of frantic. That alone is worth the prep.
Variations and Adaptations to Try
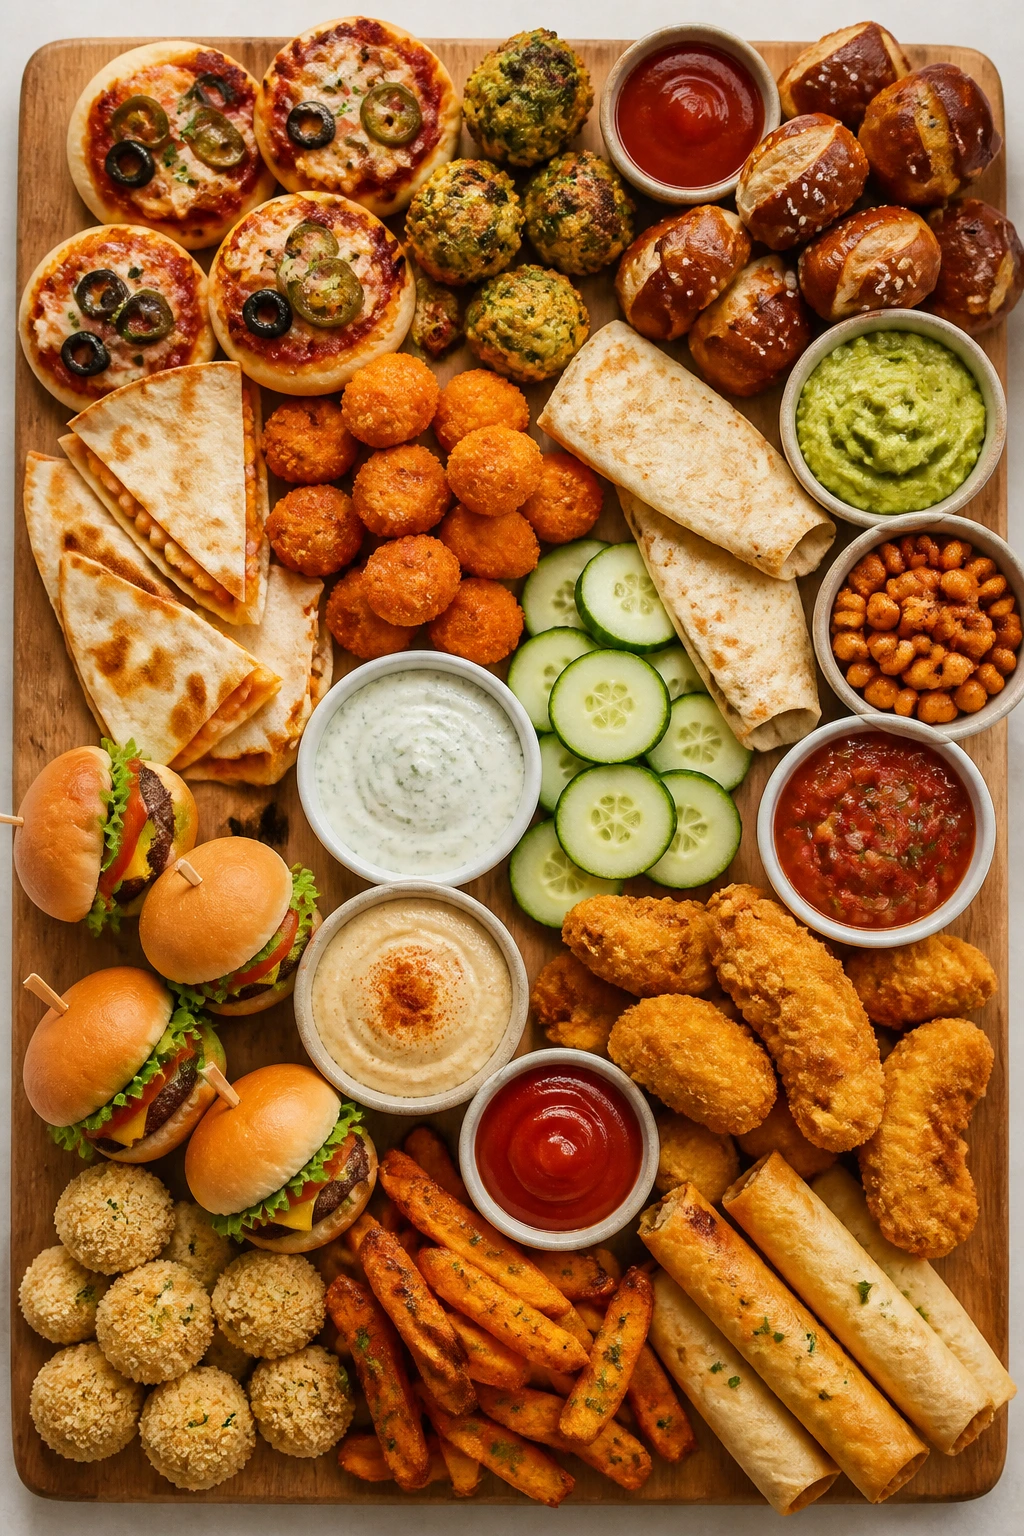
Gluten-Free Couch Night: Use gluten-free bagels, tortillas, bread crumbs, and flour blends where needed. The structure of the snacks stays the same; only the wrappers change. I’d keep an eye on bake time, because some gluten-free doughs brown faster on the edges.
Dairy-Light Snack Board: Swap in dairy-free cheese for pizza and quesadilla items, use olive oil instead of butter on breads, and lean on salsa, hummus, or guacamole for dips. You won’t get the same stretch as dairy cheese, but you can still get plenty of flavor from seasoning and a good bake.
Vegetable-Forward Mix: Add broccoli tots, cauliflower bites, cucumber rounds, veggie pizza cups, and ranch chickpeas to the table alongside the more obvious crowd-pleasers. This works best when the veggie dishes aren’t treated like punishment food; make them crisp, seasoned, and placed right next to the fun stuff.
All-Savory Spread: Build the whole night around pizza, nuggets, sliders, fries, taquitos, pretzel bites, and dips. Leave dessert for one item at the end, not three. That keeps the table from tipping into sugar overload before the movie gets interesting.
Sweet-Finish Menu: If the film night is really more of a dessert event, lean into skillet cookie, s’mores dip, cinnamon roll bites, fruit pizza cookies, banana split bites, and trail mix balls. Keep the savory side smaller and saltier, or the dessert will feel too heavy by the second round.
Common Mistakes to Avoid
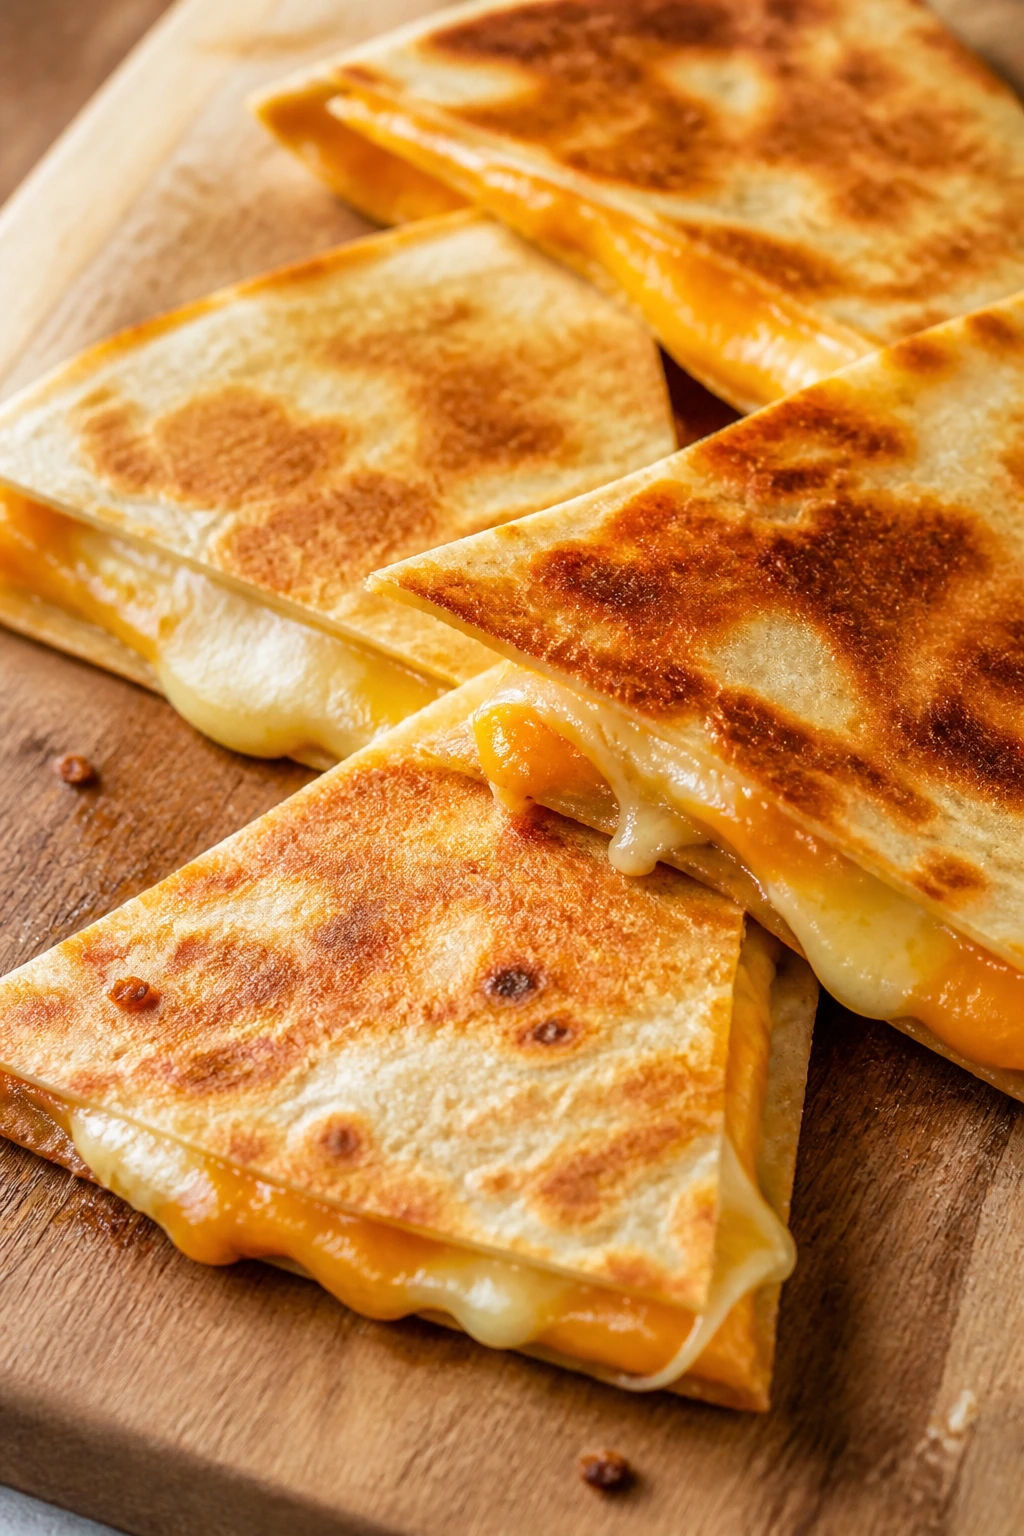
Overcrowding the pans: This is the easiest way to kill crispness. If nuggets, fries, taquitos, or chickpeas sit too close together, they steam instead of brown. Give them space, even if it means using two pans.
Mixing every sauce too early: Anything with cheese, honey, barbecue sauce, or sour cream can go wrong if it sits on the base for too long. Add wet toppings at the end whenever you want crunch to survive.
Serving only soft foods: A tray of only sliders, rolls, and dips gets heavy fast. You need contrast—something crisp, something cold, something sweet, something salty. That mix is what keeps people interested through a whole movie.
Forgetting portion size: Movie-night food disappears faster than a sit-down meal, but that does not mean bigger is better. Mini portions let kids try more than one thing without leaving half a sandwich cold on the plate.
Reheating everything the same way: Microwaves are fine for soft items, but they wreck crusts and breading. Use the oven or air fryer for anything that should be crisp, and save the microwave for soup, dip, or soft roll-ups.
Frequently Asked Questions
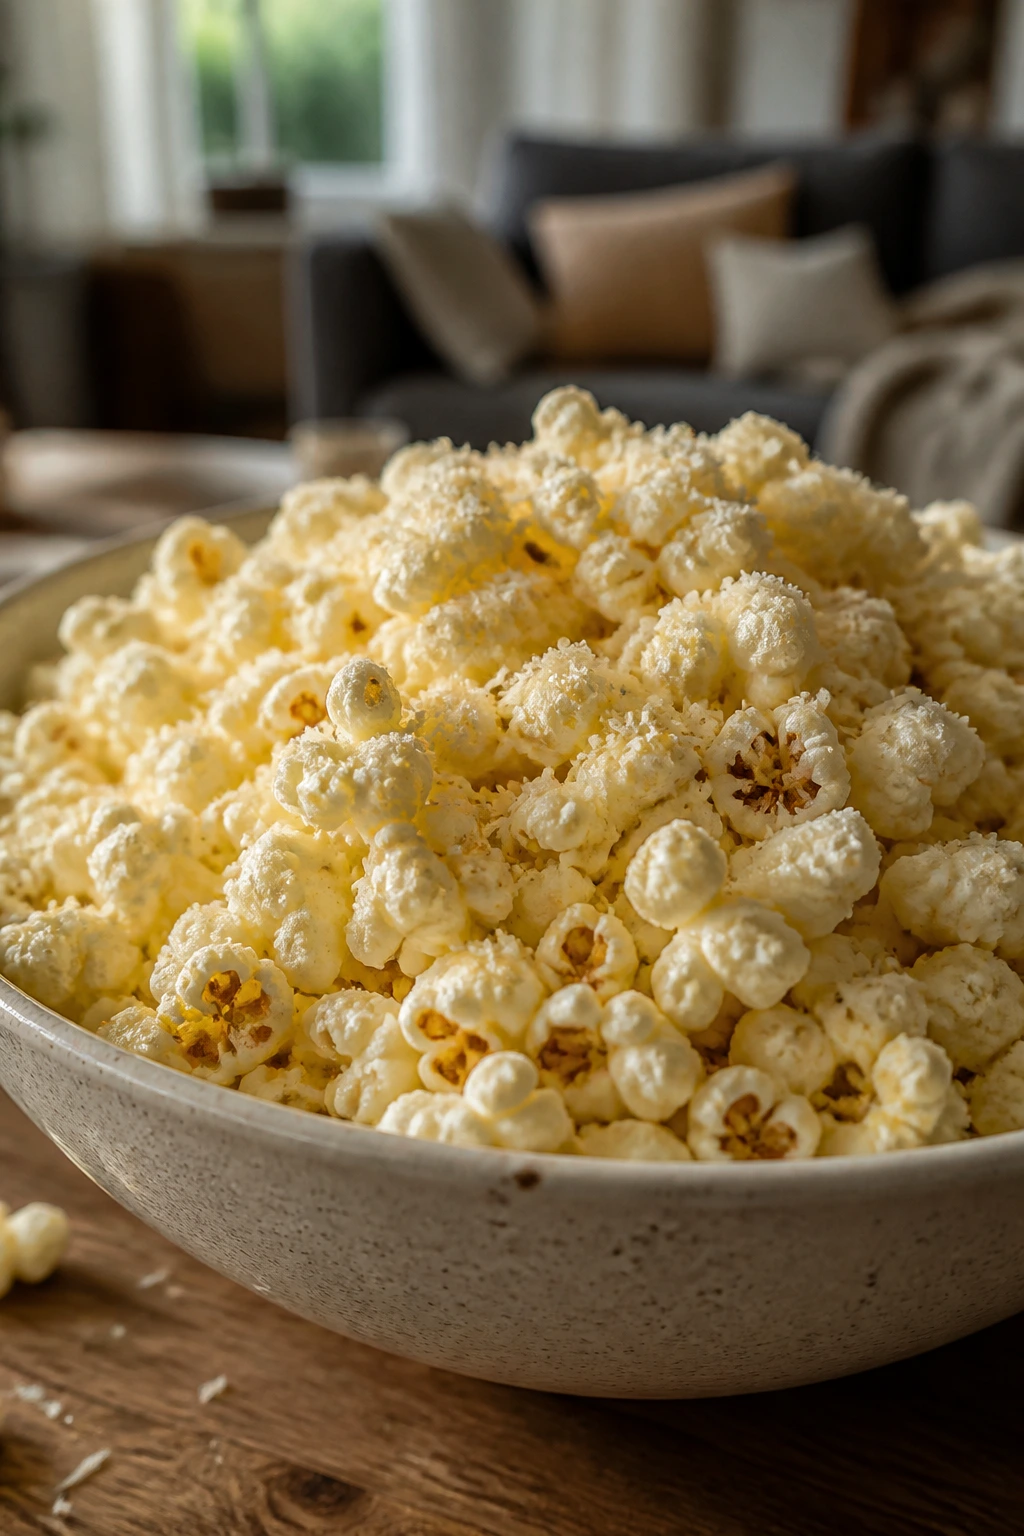
What are the best recipes to make if the movie starts late?
The best late-start options are snack mix, roll-ups, fruit pizza cookies, parfaits, cucumber rounds, and energy balls. They need little or no reheating, which means you’re not racing the clock once everyone is already seated.
Can I make most of these ahead of time?
Yes, especially the baked savory items and the no-bake sweets. Shape, bake, and chill earlier in the day, then reheat the crisp foods in an oven or air fryer right before serving.
How do I keep crunchy foods from going soft?
Use a wire rack for baked items, and don’t cover them with foil unless you like steam. Serve chips, fries, nuggets, and pretzel bites on shallow platters so air can move around them.
What if I have picky eaters who reject mixed fillings?
Keep the fillings separate or choose recipes that hide the extras well, like mac and cheese cups, mini pizza bagels, nuggets, and cinnamon roll bites. A child who hates spinach in a pinwheel may still eat broccoli tots if the broccoli is chopped fine enough.
Do I need an air fryer or can I use the oven for everything?
The oven can handle all of these recipes. An air fryer just helps with small crisp items like fish sticks, nuggets, and zucchini fries when you want fast browning, but it is not required.
Which recipes work best for a mixed-age group?
Pizza bagels, sliders, nuggets, fruit pizza cookies, pretzel bites, and popcorn are the safest bets. They’re familiar, easy to portion, and simple to dip or split up.
How do I make these recipes a little healthier without ruining them?
Swap in more fruit and vegetables, use baked rather than fried methods, and keep the cheese and sauce as accents instead of blankets. A tray with roasted chickpeas, cucumber rounds, and fruit alongside the richer snacks usually feels balanced enough.
What should I do if the baked snacks come out soggy?
Usually it means the pan was crowded, the oven was too cool, or the food sat under a wet topping too long. Reheat on a rack in a hot oven or air fryer, and keep sauces and cold toppings off until the last second.
How far in advance can I prep the ingredients?
You can chop vegetables, grate cheese, mix dips, and pre-cook meats a day ahead with no trouble. For breaded items, I’d do the breading closer to baking time so the coating stays dry and crisp.
The Snack Bowl Is the Whole Point

The nicest part of a movie-night spread is that it doesn’t ask everyone to sit still and behave like a formal dinner is happening. It lets people graze, pause, come back, and build their own plate in the order that makes sense to them. That looseness is a feature, not a mess.
If you keep the menu balanced—one or two crispy things, one warm cheesy thing, one cold fresh thing, and one sweet finish—the whole evening gets easier. The food stops competing with the movie and starts supporting it, which is exactly where it belongs.