
Family movie night changes lunch rules fast. Forks become optional, then forgotten. If the food needs a delicate plating job or a quiet, upright chair, it has already lost half the battle. The best family lunch ideas for family movie night are the ones that can sit on a tray, survive a pause while someone hunts for the remote, and still taste good after the first ten minutes of the film.
I always judge movie-night food by the napkin count. If I need three utensils and a stack of paper towels, I’m already annoyed, and the couch will be, too. The sweet spot is food with a little structure: toasted bagels, crisp tortillas, sturdy rolls, baked potato shells, and fillings thick enough to stay where you put them. That’s the difference between a relaxed family spread and a full cleanup job.
So this collection leans into things that behave. Some are hot and bubbly, some are cold and easy to assemble, and a few can be made ahead so the kitchen stays quiet when the opening credits start rolling. The common thread is simple: these dishes are built to be eaten one-handed, passed around without drama, and enjoyed without anyone missing the best part of the movie.
Why These Family Movie Night Lunches Work Better Than a Formal Dinner
One-hand friendly: Most of these recipes can be held on a small plate or napkin, which matters when someone is balancing a drink, a blanket, and a phone at the same time.
Low-mess by design: Thick fillings, toasted edges, and baked casseroles keep sauces inside the food instead of on the sofa cushion.
Easy to pace: A few dishes can be set out hot, while others can wait a little without turning limp, which keeps the table calm if the family eats in shifts.
Kid control is built in: Cheese on the side, salsa in a ramekin, pickles on a small plate — little hands can customize without turning the whole meal into a science experiment.
Make-ahead friendly: Several of these can be assembled earlier in the day, then baked or reheated right before the movie starts, which means fewer dishes when everyone is already settled.
Actual lunch, not just snacks: A few bites are nice, but these recipes bring enough protein, starch, and vegetables to feel like a real meal instead of a pre-movie nibble.
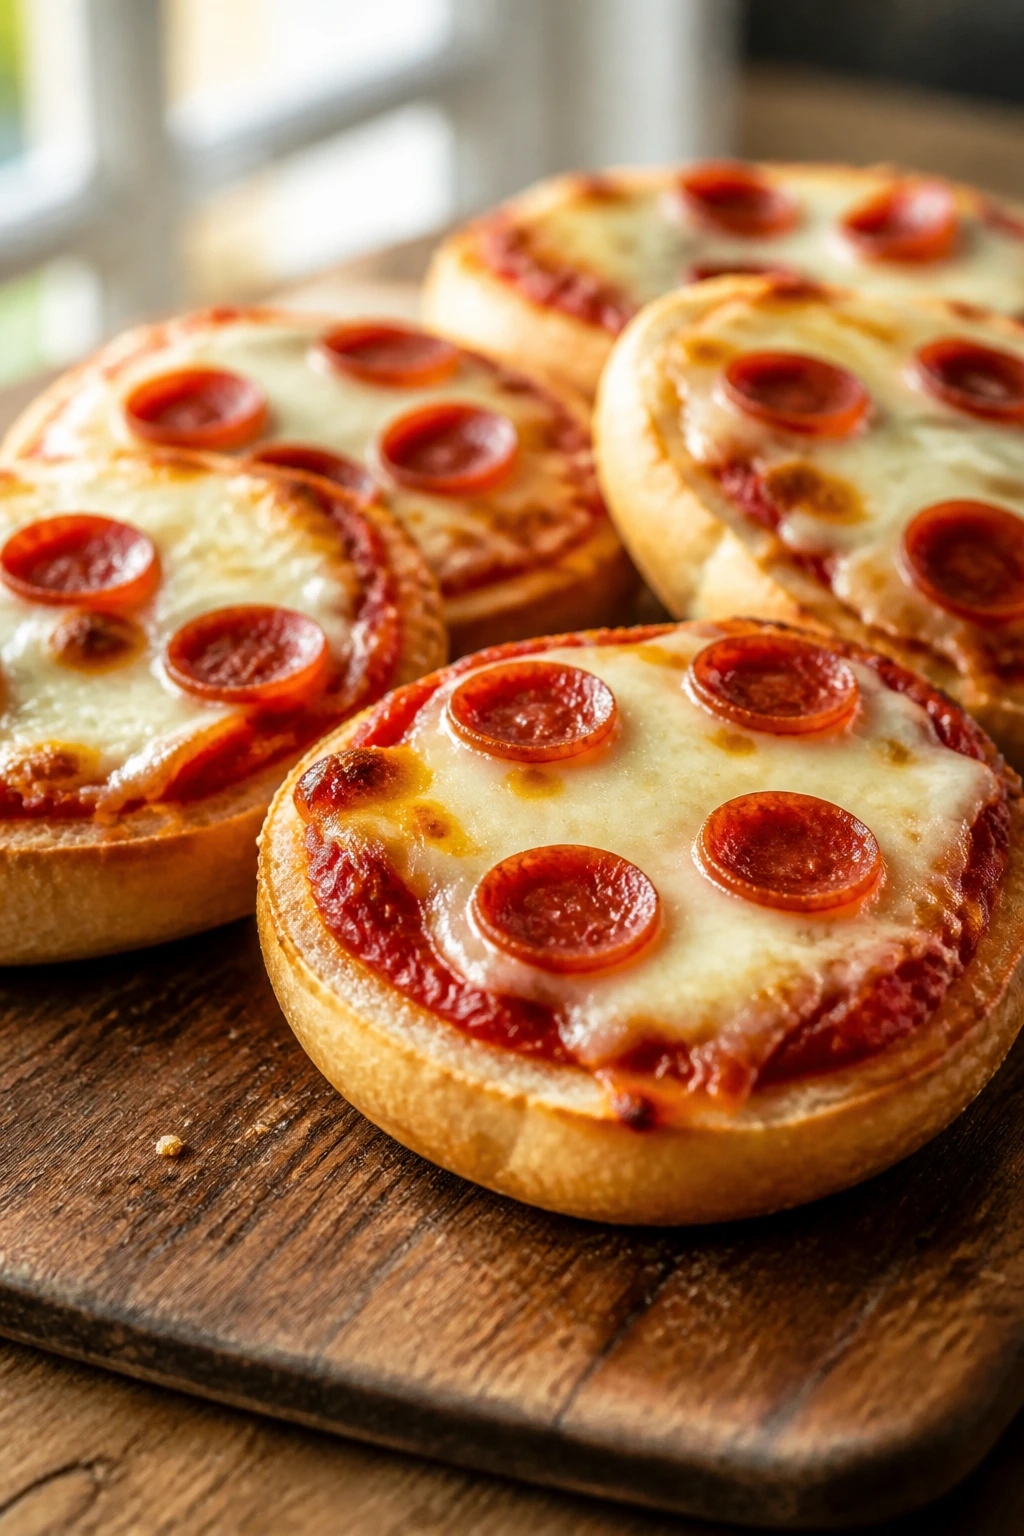
1. Mini Pizza Bagels
Mini pizza bagels are the kind of food that disappears before anyone formally announces dinner. They’re crisp at the edges, soft in the middle, and loaded with just enough sauce and cheese to feel fun without becoming sloppy. I like them because they taste like a weekend treat but take almost no negotiating.
Why It Works:
The bagel base is sturdier than sliced bread, so the sauce has nowhere to run. A quick toast before topping keeps the bottoms from getting wet, and the small size means each piece cooks evenly. They also reheat well, which is rare for anything with tomato sauce and melted cheese.
Key Ingredients:
- 6 mini bagels, split — The sturdy crumb holds sauce better than sandwich bread.
- 3/4 cup pizza sauce — Use a thick sauce so it stays put.
- 1 1/2 cups shredded low-moisture mozzarella — This melts cleanly and bubbles fast.
- 24 pepperoni slices — Stack them lightly; too many will make the tops greasy.
- 1 teaspoon dried oregano — A little extra pizza-shop flavor goes a long way.
- 2 tablespoons grated Parmesan — Adds salt and a sharper finish.
- 1 tablespoon olive oil — Helps the bagels crisp before topping.
Quick Steps:
- Preheat and toast: Set the oven to 425°F (220°C). Arrange the split bagels cut-side up on a rimmed sheet pan and toast them for 3 minutes.
- Build the base: Brush each cut side lightly with olive oil, then spread about 1 tablespoon pizza sauce over each half.
- Add the toppings: Sprinkle mozzarella over the sauce, then tuck 3 to 4 pepperoni slices onto each bagel half. Finish with oregano and Parmesan.
- Bake until bubbly: Return the pan to the oven for 8 to 10 minutes, until the cheese is melted and the edges are lightly browned.
- Rest briefly: Let them sit for 2 minutes before serving so the cheese settles instead of sliding off.
Equipment for This Recipe:
- Rimmed sheet pan — Keeps the bagels level and catches any drips.
- Pastry brush — Good for a thin layer of oil.
- Sharp knife — Useful if you want to halve larger bagels into smaller bites.
- Oven mitts — The pan gets hot fast.
How to Serve This Dish:
Serve two or three halves per person with carrot sticks, grapes, or a few cucumber spears if you want something fresh beside them. A small bowl of extra sauce for dipping works nicely, though the bagels are sturdy enough to stand on their own.
Pro Tips for This Recipe:
- Use low-moisture mozzarella, not fresh mozzarella; the fresh kind leaks water.
- Toasting the bagels first matters. Skip it and the bottom turns soft by the second bite.
- If you want a deeper flavor, add a pinch of garlic powder to the sauce instead of piling on more cheese.
Variations on This Dish:
- Supreme Mini Bagels: Add finely chopped bell pepper, sliced olives, and a few bits of cooked sausage.
- BBQ Chicken Bagels: Swap the pizza sauce for barbecue sauce and use shredded chicken instead of pepperoni.
- Veggie Garden Bagels: Use mushrooms, peppers, and red onion; pre-cook the vegetables so they do not leak water.
Common Mistakes to Avoid with This Dish:
- Don’t drown the bagels in sauce. If it pools at the edges, the base goes soggy.
- Don’t add wet toppings straight from the fridge. Pat them dry first so the cheese can melt cleanly.
- Don’t bake until the cheese browns hard. Once the top looks dry, you’ve gone too far.
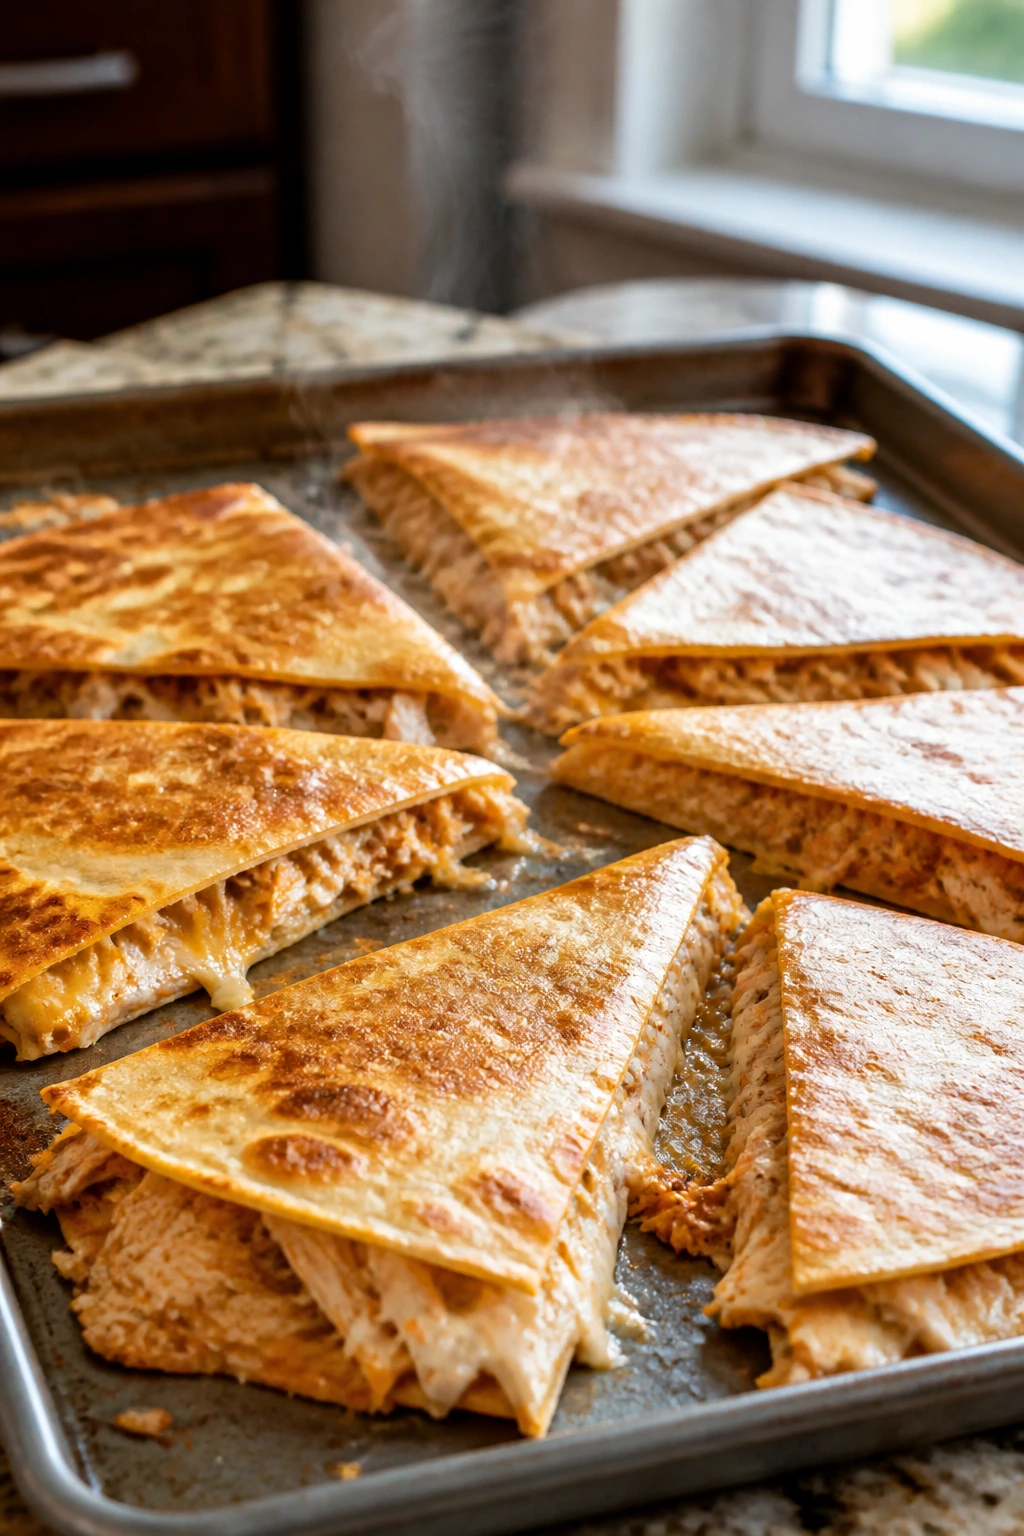
2. Sheet Pan Chicken Quesadillas
A good sheet pan quesadilla gives you crisp tortilla edges, melty cheese, and slices that stay together when you lift them. That matters on movie night. Nobody wants a floppy triangle that leaks chicken and onion onto the couch blanket.
Why It Works:
The sheet pan gives the tortilla broad contact with heat, so you get browning without standing over a skillet and flipping each piece one by one. Using cooked chicken keeps the filling fast, and the cheese acts like glue once it melts. The best version is thin, not overloaded, so it cuts into clean wedges.
Key Ingredients:
- 2 large burrito-size flour tortillas — Bigger tortillas make folding easier.
- 2 cups shredded cooked chicken — Rotisserie chicken works well here.
- 1 cup shredded cheddar — Brings sharp flavor and good melt.
- 1 cup shredded Monterey Jack — Melts smoothly and keeps the filling creamy.
- 1 small bell pepper, thinly sliced — Adds a little sweetness and color.
- 1 small onion, thinly sliced — Cook it first so it turns soft, not crunchy.
- 1 tablespoon oil — For cooking the vegetables and brushing the tortillas.
- 1 teaspoon cumin — Gives the filling a warm, taco-shop edge.
Quick Steps:
- Cook the vegetables: Heat 1 tablespoon oil in a skillet over medium heat. Add the pepper and onion with cumin and cook for 5 to 6 minutes, until softened and lightly browned.
- Preheat the oven: Set it to 425°F (220°C) and line a rimmed sheet pan with parchment.
- Assemble the quesadillas: Lay one tortilla flat, scatter half the chicken, vegetables, and cheese over one side, then fold it over into a half-moon. Repeat with the second tortilla.
- Bake and flip: Place the folded quesadillas on the sheet pan and brush the tops lightly with oil. Bake for 6 minutes, flip carefully with a wide spatula, and bake 4 to 5 minutes more until crisp.
- Slice and rest: Let them sit for 2 minutes, then cut into wedges and serve.
Equipment for This Recipe:
- Rimmed sheet pan — Needed for even baking.
- Large skillet — For softening the vegetables first.
- Wide spatula — Makes the flip less nerve-racking.
- Sharp knife or pizza cutter — Best for clean wedges.
How to Serve This Dish:
Cut each quesadilla into 3 or 4 wedges and set out salsa, sour cream, and guacamole in small bowls. If you want a fuller lunch, add corn, sliced peppers, or a simple salad on the side.
Pro Tips for This Recipe:
- Let the vegetable filling cool for a few minutes before assembling. Hot filling softens the tortilla too fast.
- Don’t pile everything to the edges. Leave a clean border or the cheese will escape before the tortilla crisps.
- If you want extra browning, brush the top with a little more oil before it goes into the oven.
Variations on This Dish:
- Buffalo Chicken Quesadillas: Swap cumin for a spoonful of buffalo sauce and add crumbled blue cheese.
- Black Bean Veggie Quesadillas: Use mashed black beans, corn, and peppers instead of chicken.
- Breakfast Quesadillas: Add scrambled eggs and cheddar, then serve with salsa.
Common Mistakes to Avoid with This Dish:
- Don’t overfill the tortilla. A stuffed quesadilla tears before the cheese binds it.
- Don’t skip the flip if the top still looks pale. You want both sides crisp, not one warm and one soggy.
- Don’t slice immediately. The filling needs a minute to settle or it spills out.
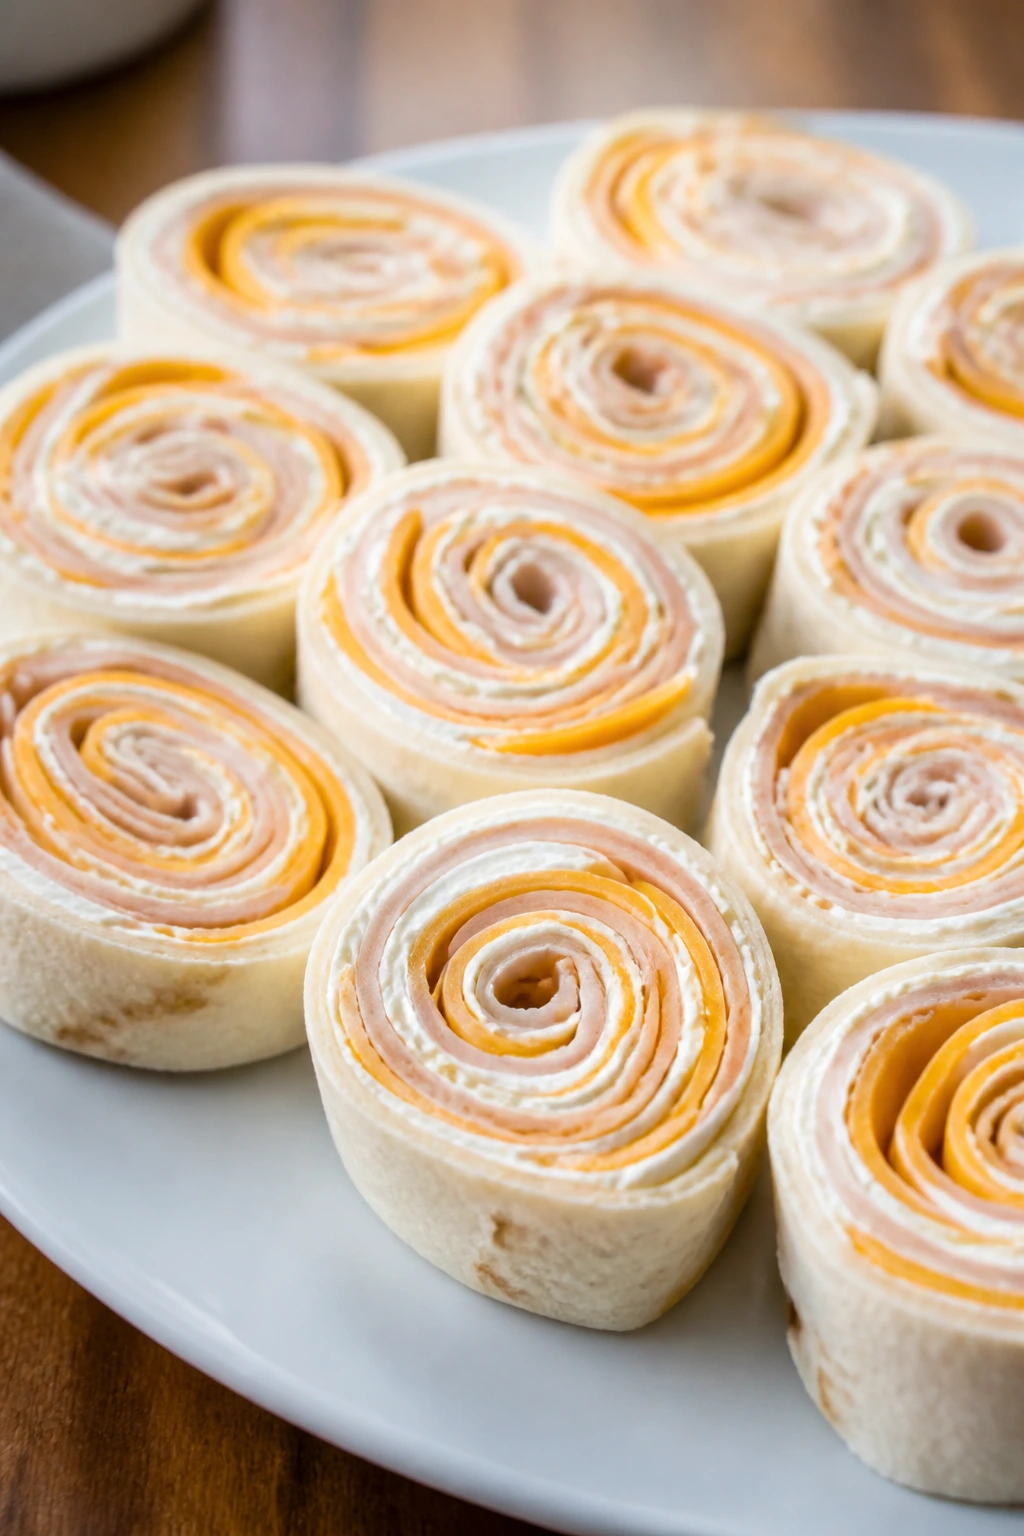
3. Turkey and Cheddar Pinwheels
Turkey pinwheels look tidy on the plate, which is half their charm. They’re cool, compact, and easy to grab with one hand while the other hand holds popcorn or a drink. I reach for these when I want something that feels snacky but still has enough protein to count as lunch.
Why It Works:
Cream cheese acts like edible cement here, holding the turkey and cheddar in a tight spiral. Rolling the tortillas snugly and chilling them before slicing gives you clean rounds instead of squashed little logs. They’re also forgiving, which is more than I can say for a lot of cold lunch food.
Key Ingredients:
- 4 large flour tortillas — Use the soft, flexible kind so they roll without cracking.
- 8 ounces cream cheese, softened — This spreads smoothly and seals the filling.
- 1 tablespoon Dijon mustard — Adds a little bite under the turkey.
- 12 ounces sliced deli turkey — Thin slices roll better than thick ones.
- 8 slices cheddar cheese — Slice it thin so the pinwheels stay neat.
- 1/2 cup finely chopped pickles or dill relish — Optional, but a sharp little crunch helps.
- Black pepper, to taste — A few shakes bring the whole thing to life.
Quick Steps:
- Mix the spread: Stir the softened cream cheese and Dijon together until smooth.
- Lay out the tortillas: Spread a thin, even layer of the cream cheese mixture over each tortilla, edge to edge.
- Build the filling: Top with turkey, cheddar, and pickles if you’re using them. Keep the filling in a thin layer; thick spots make the roll lopsided.
- Roll and chill: Roll each tortilla tightly into a log, wrap in plastic, and chill for 20 minutes.
- Slice and serve: Use a sharp serrated knife to cut each log into 1-inch pinwheels.
Equipment for This Recipe:
- Cutting board — Gives you a flat, clean work surface.
- Offset spatula or butter knife — Helps spread the cream cheese evenly.
- Plastic wrap — Keeps the rolls tight while they chill.
- Serrated knife — Slices cleanly without squashing.
How to Serve This Dish:
Pile the pinwheels on a platter with grapes, baby carrots, and a small bowl of mustard or ranch. They’re best served cold or just slightly cool, which makes them handy when the kitchen is already full of hot dishes.
Pro Tips for This Recipe:
- Dry the turkey with a paper towel if it looks damp. Extra moisture leads to slippery pinwheels.
- Chill before slicing. If you skip that step, the spirals flatten.
- Wipe the knife between cuts so the cream cheese doesn’t smear across the next slice.
Variations on This Dish:
- Ranch Turkey Pinwheels: Stir ranch seasoning into the cream cheese.
- Ham and Swiss Spirals: Swap the turkey and cheddar for ham and Swiss.
- Veggie Hummus Pinwheels: Use hummus, cucumber, spinach, and shredded carrots instead of meat.
Common Mistakes to Avoid with This Dish:
- Don’t overfill the tortilla. Thin layers roll tighter and look better on the tray.
- Don’t use crunchy lettuce inside if you’re making them far ahead; it turns limp fast.
- Don’t cut with a dull knife. It smashes the spiral instead of showing it off.
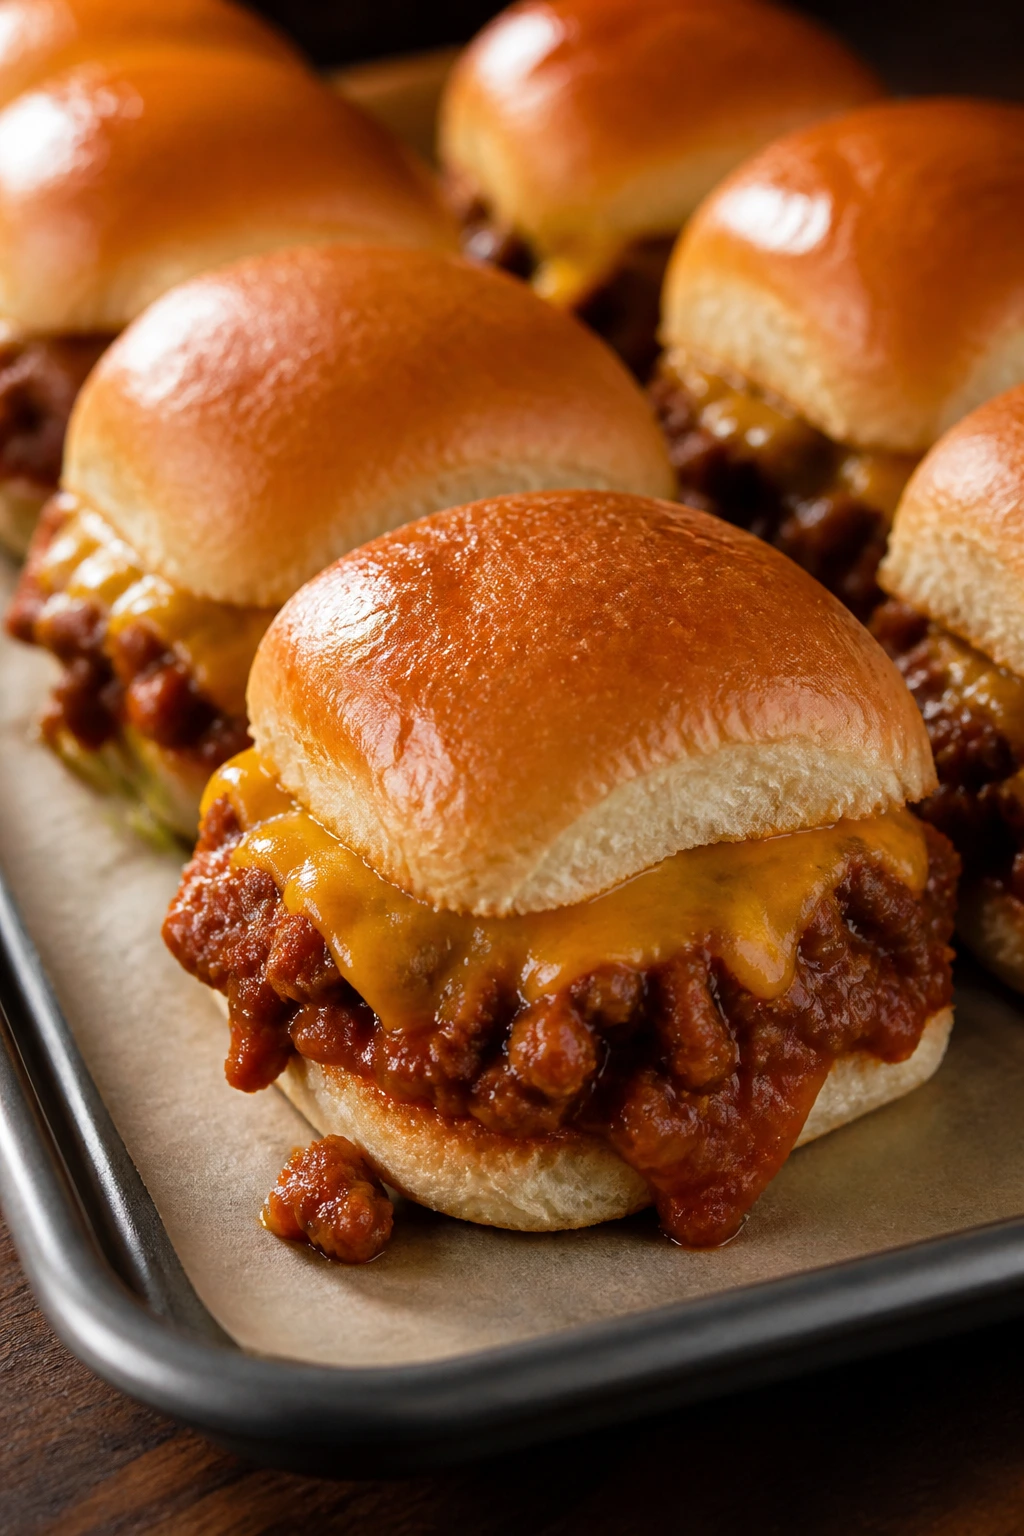
4. Sloppy Joe Sliders
Sloppy Joe sliders are messy in a controlled way, which is exactly their appeal. The filling is saucy and beefy, but the slider bun keeps it from running all over the tray. They disappear fast, and the last few usually come with people pretending they didn’t already have two.
Why It Works:
Small buns control the sauce, and baking the assembled sliders melts the cheese and lightly toasts the tops. The filling itself should be thick enough to mound, not loose enough to puddle. If it runs off the spoon, keep simmering.
Key Ingredients:
- 1 pound ground beef — The base of the filling.
- 1 small onion, finely diced — It melts into the sauce and keeps things from tasting flat.
- 2 cloves garlic, minced — A short cook time keeps the garlic sweet.
- 3/4 cup ketchup — Gives the classic tangy base.
- 2 tablespoons tomato paste — Thickens the sauce and deepens the tomato flavor.
- 1 tablespoon Worcestershire sauce — Adds a savory edge.
- 1 tablespoon brown sugar — Balances the acidity.
- 12 slider buns — Soft, sturdy buns are easiest to handle.
- 1 cup shredded cheddar — Melts over the filling and holds it together.
- 2 tablespoons butter, melted — For brushing the tops before baking.
Quick Steps:
- Cook the filling: Brown the beef and onion in a skillet over medium heat, breaking the meat into small crumbles. Drain off excess fat if needed.
- Season and simmer: Stir in garlic, ketchup, tomato paste, Worcestershire, and brown sugar. Simmer for 5 to 7 minutes until the sauce is thick and glossy.
- Preheat and prep: Heat the oven to 375°F (190°C). Split the slider buns and place the bottoms in a 9×13-inch baking dish.
- Assemble the sliders: Spoon the filling over the buns, sprinkle with cheddar, and add the tops. Brush the tops with melted butter.
- Bake and serve: Bake for 10 minutes, until the cheese melts and the buns are warm.
Equipment for This Recipe:
- Large skillet — For browning and simmering the filling.
- 9×13-inch baking dish — Holds the sliders snugly.
- Wooden spoon — Good for breaking the beef into small pieces.
- Pastry brush — For the butter on top.
How to Serve This Dish:
Serve the sliders with pickle spears, apple slices, or a handful of kettle chips. Two sliders make a normal lunch portion for most people, though some family members will treat that as a suggestion.
Pro Tips for This Recipe:
- Reduce the sauce until a spoon leaves a brief trail in the pan.
- If your buns are very soft, toast the cut sides for 2 minutes before filling them.
- Add the cheese on top of the meat, not under it. That keeps the bottom bun from getting wet.
Variations on This Dish:
- Barbecue Sliders: Swap ketchup for barbecue sauce and add a little smoked paprika.
- Turkey Sloppy Sliders: Use ground turkey and a splash more Worcestershire for depth.
- Chili Cheese Sliders: Stir a spoonful of chili powder into the filling and use pepper jack.
Common Mistakes to Avoid with This Dish:
- Don’t leave the filling too loose. Runny sauce slides out on the first bite.
- Don’t skip the butter on top. It gives the buns a better finish and helps them brown.
- Don’t overbake until the buns harden. You want warm and soft, not dry and chewy.
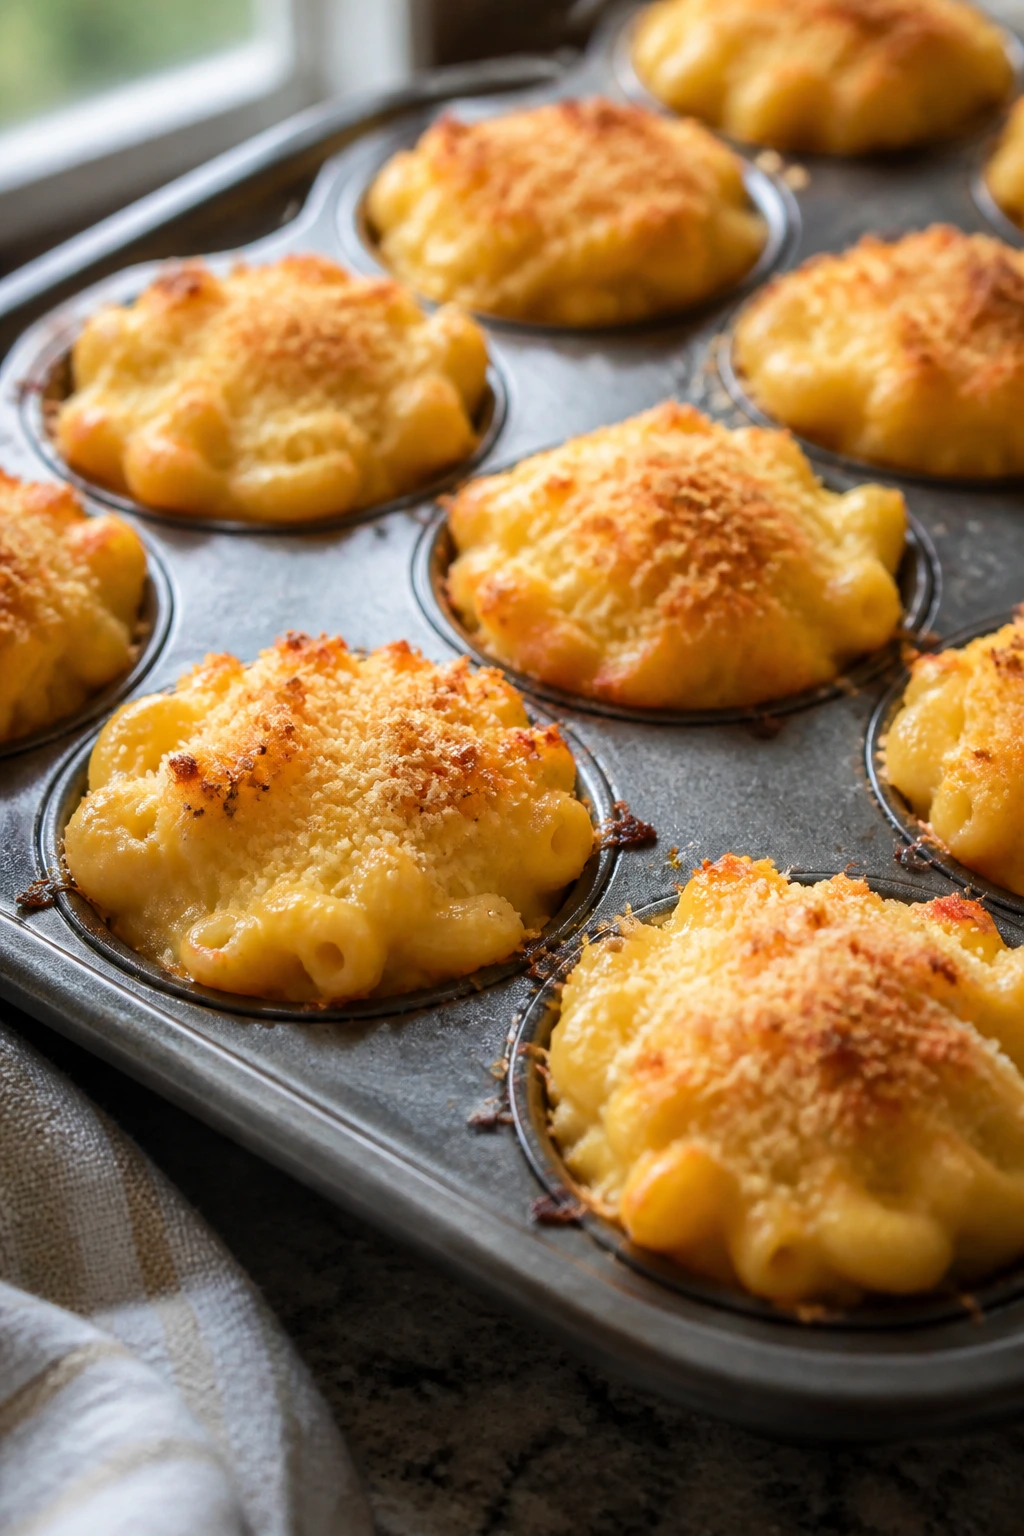
5. Mac and Cheese Cups
Mac and cheese cups are what happen when a casserole puts on a tuxedo and gets portable. The edges turn crisp, the center stays creamy, and each cup feels like it was made for movie-night eating. I like them because they’re familiar without being boring.
Why It Works:
A muffin tin gives you individual portions with more browned surface area than a single pan bake. The eggs help the cups hold shape once they’re out of the oven, and the panko topping gives you a little crunch before the cheese starts. They also reheat better than most pasta dishes.
Key Ingredients:
- 8 ounces elbow macaroni — Small pasta holds the cheese sauce well.
- 2 tablespoons butter — For the roux and a little richness.
- 2 tablespoons all-purpose flour — Thickens the sauce.
- 1 1/2 cups milk — Whole milk gives the smoothest result.
- 2 cups shredded sharp cheddar — Use a cheese with enough flavor to stand up on its own.
- 1/2 cup grated Parmesan — Adds salt and a drier, nuttier note.
- 2 large eggs — Helps the cups bake into shape.
- 1 cup panko breadcrumbs — For the top.
- 1 tablespoon melted butter — Toss with the crumbs so they brown.
- 1/2 teaspoon mustard powder — Quietly sharpens the cheese flavor.
Quick Steps:
- Cook the pasta: Boil the macaroni in salted water until just shy of al dente, then drain well.
- Make the sauce: Melt butter in a saucepan over medium heat, whisk in flour, and cook for 1 minute. Slowly add the milk and whisk until thick enough to coat a spoon.
- Add the cheese: Remove the pan from the heat and stir in cheddar, Parmesan, and mustard powder. Let it cool for 3 minutes, then whisk in the eggs.
- Fill the muffin tin: Toss the pasta with the sauce, spoon into a greased muffin tin, and top each cup with buttery panko.
- Bake and rest: Bake at 375°F (190°C) for 18 to 20 minutes, until the tops are golden and the centers are set. Rest for 5 minutes before lifting them out.
Equipment for This Recipe:
- 12-cup muffin tin — Gives the cups their shape.
- Medium saucepan — For the cheese sauce.
- Whisk — Keeps the sauce smooth.
- Large spoon — Helps pack the pasta into the cups.
How to Serve This Dish:
Serve two or three cups per person with sliced cucumbers, cherry tomatoes, or a small green salad. They’re rich enough to carry the meal, so the sides can stay light and crisp.
Pro Tips for This Recipe:
- Undercook the pasta by a minute. It finishes in the oven.
- Let the sauce cool before adding the eggs or you’ll end up with streaks of scrambled egg.
- Grease the muffin tin well. These cups are sticky at the edges if you get lazy with the pan.
Variations on This Dish:
- Bacon Mac Cups: Fold in chopped cooked bacon before baking.
- Broccoli Cheddar Cups: Add tiny broccoli florets, steamed and chopped small.
- Gluten-Free Cups: Use GF elbow pasta and a 1:1 flour blend for the sauce.
Common Mistakes to Avoid with This Dish:
- Don’t pack the pasta into the cups too loosely. The cups won’t hold together.
- Don’t overbake until the tops dry out hard. You want a soft center with crisp edges.
- Don’t skip the rest time. If you lift them immediately, they fall apart.
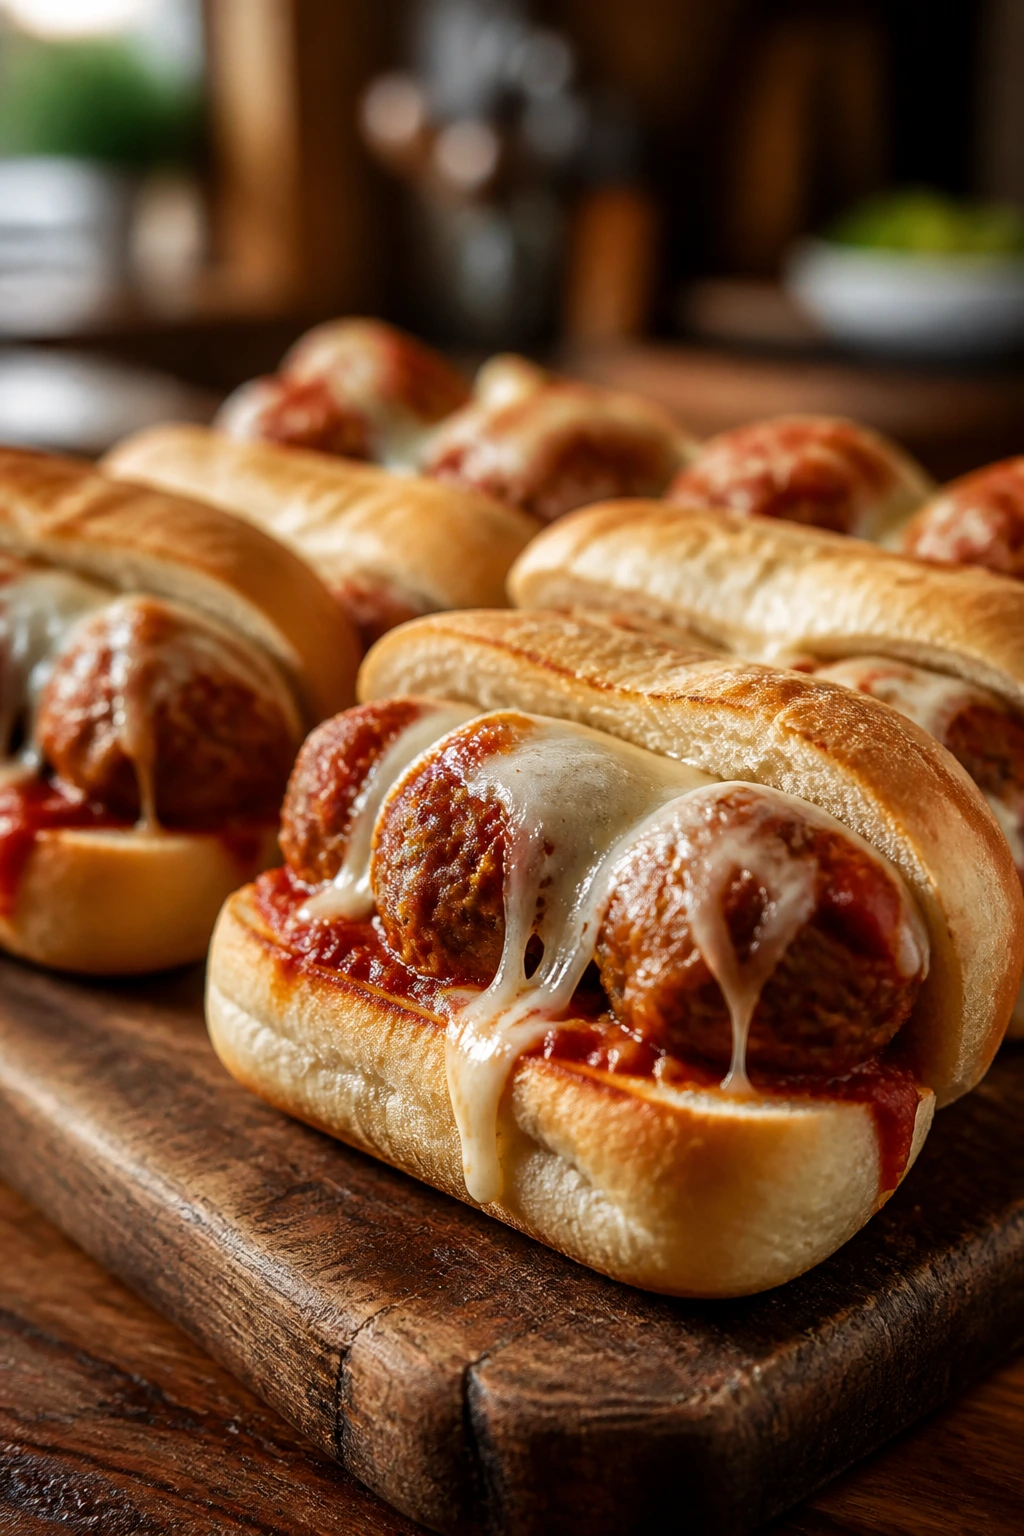
6. Mini Meatball Subs
Mini meatball subs are proof that a sandwich can feel like a proper meal without getting unwieldy. The sauce-soaked meatballs sit neatly inside a small roll, and the melted cheese pulls into those thin strings everyone pretends not to notice. They’re one of my favorite movie-night lunches because they feel big without acting messy.
Why It Works:
The meatballs bring enough heft to make the sandwich satisfying, while the roll keeps everything contained. Warming the meatballs in sauce first means the flavor goes all the way through instead of sitting only on top. A quick toast on the rolls helps them resist the sauce.
Key Ingredients:
- 24 mini meatballs — Frozen or homemade both work.
- 2 cups marinara sauce — Thick sauce keeps the rolls from soaking.
- 6 mini hoagie rolls — Small enough to handle easily.
- 1 1/2 cups shredded mozzarella — Melts over the top.
- 2 tablespoons grated Parmesan — Adds a salty finish.
- 1 tablespoon olive oil — For lightly toasting the rolls.
- Fresh basil, torn — Optional, but it wakes up the sauce.
Quick Steps:
- Warm the meatballs: Simmer the meatballs in marinara over medium-low heat for 10 minutes, until hot through.
- Toast the rolls: Split the hoagie rolls, brush the cut sides with olive oil, and toast them under the broiler for 1 to 2 minutes.
- Assemble: Place 4 meatballs in each roll, spoon over a little sauce, and top with mozzarella and Parmesan.
- Melt the cheese: Return the subs to the oven or broiler for 2 to 3 minutes, until the cheese is melted and just starting to bubble.
- Finish and serve: Add basil if you’re using it and serve right away.
Equipment for This Recipe:
- Medium skillet — For simmering the meatballs.
- Sheet pan — To toast and melt the subs.
- Tongs — Handy for moving hot rolls.
- Spoon — For the sauce.
How to Serve This Dish:
Serve the subs with a handful of kettle chips or a few pepperoncini on the side. One mini sub per kid usually works, while adults often want two, especially if the meatballs are generous.
Pro Tips for This Recipe:
- Keep the sauce thick. Thin sauce seeps through the bread fast.
- Toast the rolls before filling them. That little step makes a huge difference.
- If the meatballs are large, cut them in half so the sandwiches stay neat.
Variations on This Dish:
- Chicken Parm Subs: Swap in chicken meatballs and top with provolone.
- Spicy Arrabbiata Subs: Use a hot marinara and add red pepper flakes.
- Veggie Meatball Subs: Use plant-based meatballs and the same sauce.
Common Mistakes to Avoid with This Dish:
- Don’t pour sauce into the roll like soup. Spoon just enough to coat.
- Don’t skip the broiler finish. Cold cheese on a hot meatball is a missed opportunity.
- Don’t use rolls that are too soft and airy. They collapse under the sauce.
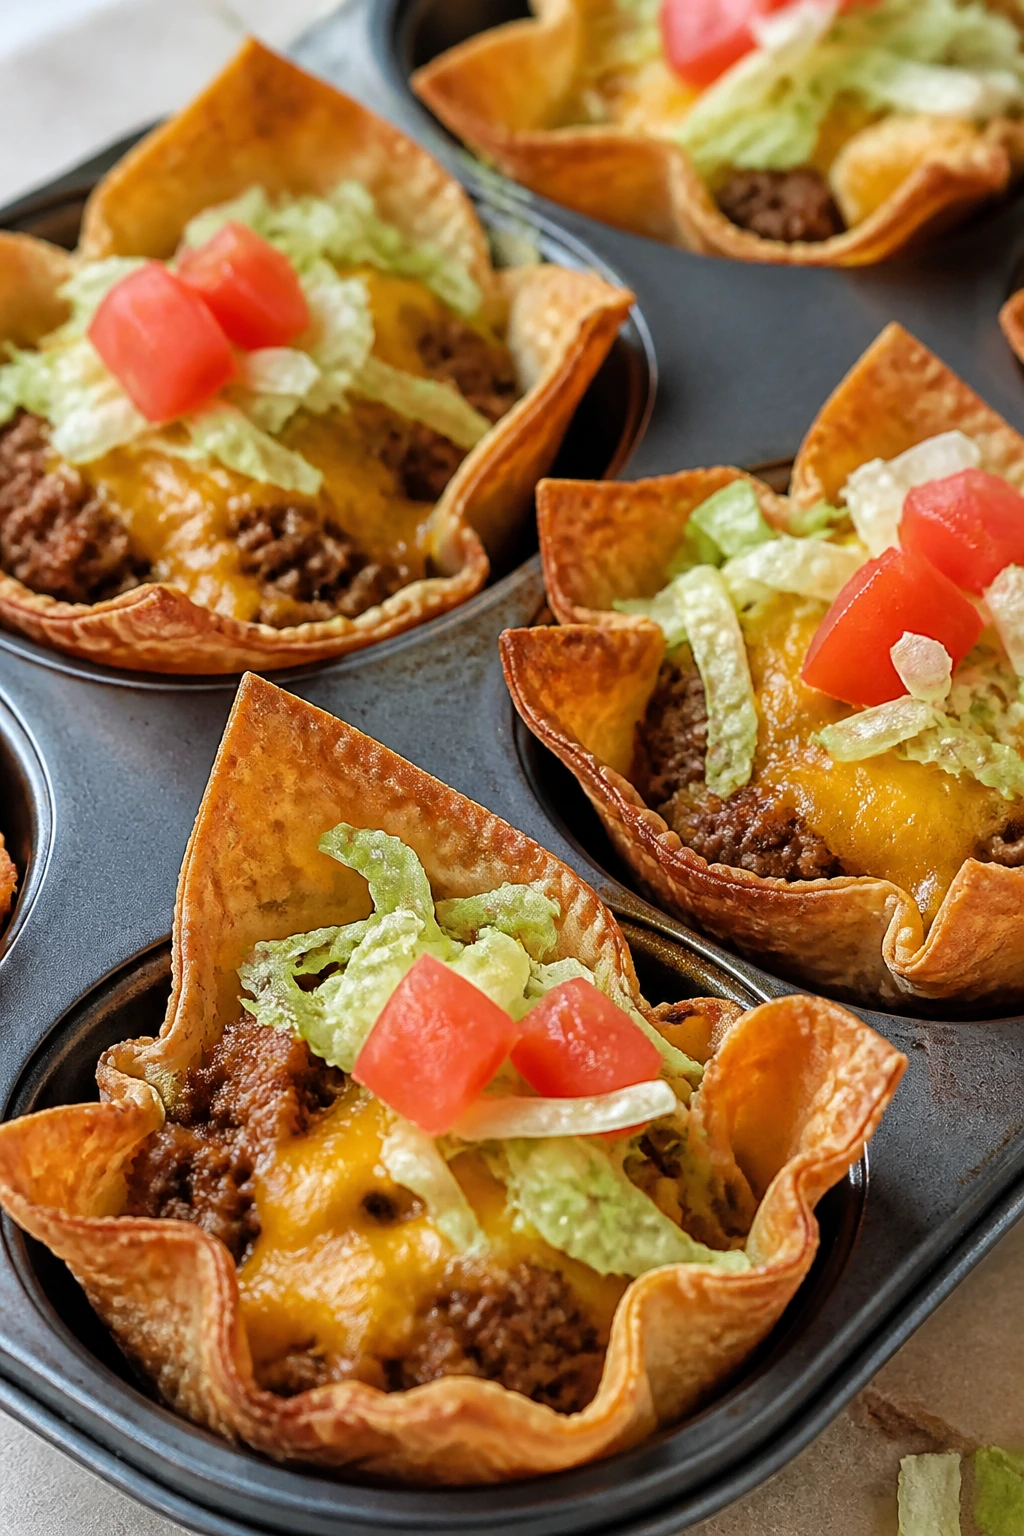
7. Taco Cups
Taco cups are built for the exact kind of chaos that happens halfway through a family film: a few kids want cheese only, one person wants salsa, and somebody else wants everything. Each cup is a little edible bowl, which keeps the mess under control and makes the table look more put together than it feels.
Why It Works:
Wonton wrappers crisp up fast in a muffin tin, creating a shell that feels sturdy rather than fragile. Because the filling is pre-cooked, the second bake only needs to melt cheese and set the cups. They’re easy to portion, and they look more deliberate than a pile of chips.
Key Ingredients:
- 12 wonton wrappers — They crisp into neat little cups.
- 1/2 pound ground beef or turkey — The filling base.
- 1 tablespoon taco seasoning — Use your favorite blend.
- 1/2 cup salsa — Adds moisture and flavor.
- 1 cup shredded cheddar — Melts on top.
- 1/2 cup shredded lettuce — Add after baking for crunch.
- 1 small tomato, diced — Brightens the finished cups.
- Sour cream, for serving — Optional, but useful.
Quick Steps:
- Cook the filling: Brown the meat in a skillet over medium heat. Stir in taco seasoning and salsa, then simmer until thick.
- Shape the shells: Press one wonton wrapper into each cup of a greased muffin tin, folding the corners gently.
- Bake the shells: Bake at 375°F (190°C) for 5 minutes, until just starting to crisp.
- Fill and finish: Spoon in the taco meat, top with cheddar, and bake 4 to 5 minutes more until the cheese melts.
- Garnish: Add lettuce, tomato, and sour cream right before serving.
Equipment for This Recipe:
- Muffin tin — The whole point of the shape.
- Skillet — For the taco filling.
- Spoon — Useful for filling the cups without overpacking.
- Pastry brush or spray oil — Helps the wrappers crisp.
How to Serve This Dish:
Serve taco cups on a tray with small bowls of salsa and sour cream. They work well as a full lunch for small eaters or as the salty, crunchy part of a bigger movie-night spread.
Pro Tips for This Recipe:
- Spray the wonton wrappers lightly with oil if you want extra crisp edges.
- Let the filling cool a bit before filling the shells. Hot filling softens them too fast.
- Keep the garnishes cold and separate until serving so the lettuce stays crisp.
Variations on This Dish:
- Black Bean Taco Cups: Use black beans and corn instead of meat.
- Chicken Taco Cups: Shredded chicken and a spoonful of enchilada sauce work well.
- Nacho Cups: Add jalapeños and a little crushed tortilla chip topping.
Common Mistakes to Avoid with This Dish:
- Don’t overfill the cups or the wrappers collapse.
- Don’t leave the meat loose and wet. It should be thick enough to sit neatly.
- Don’t garnish too early. Wet toppings turn the shells soft.
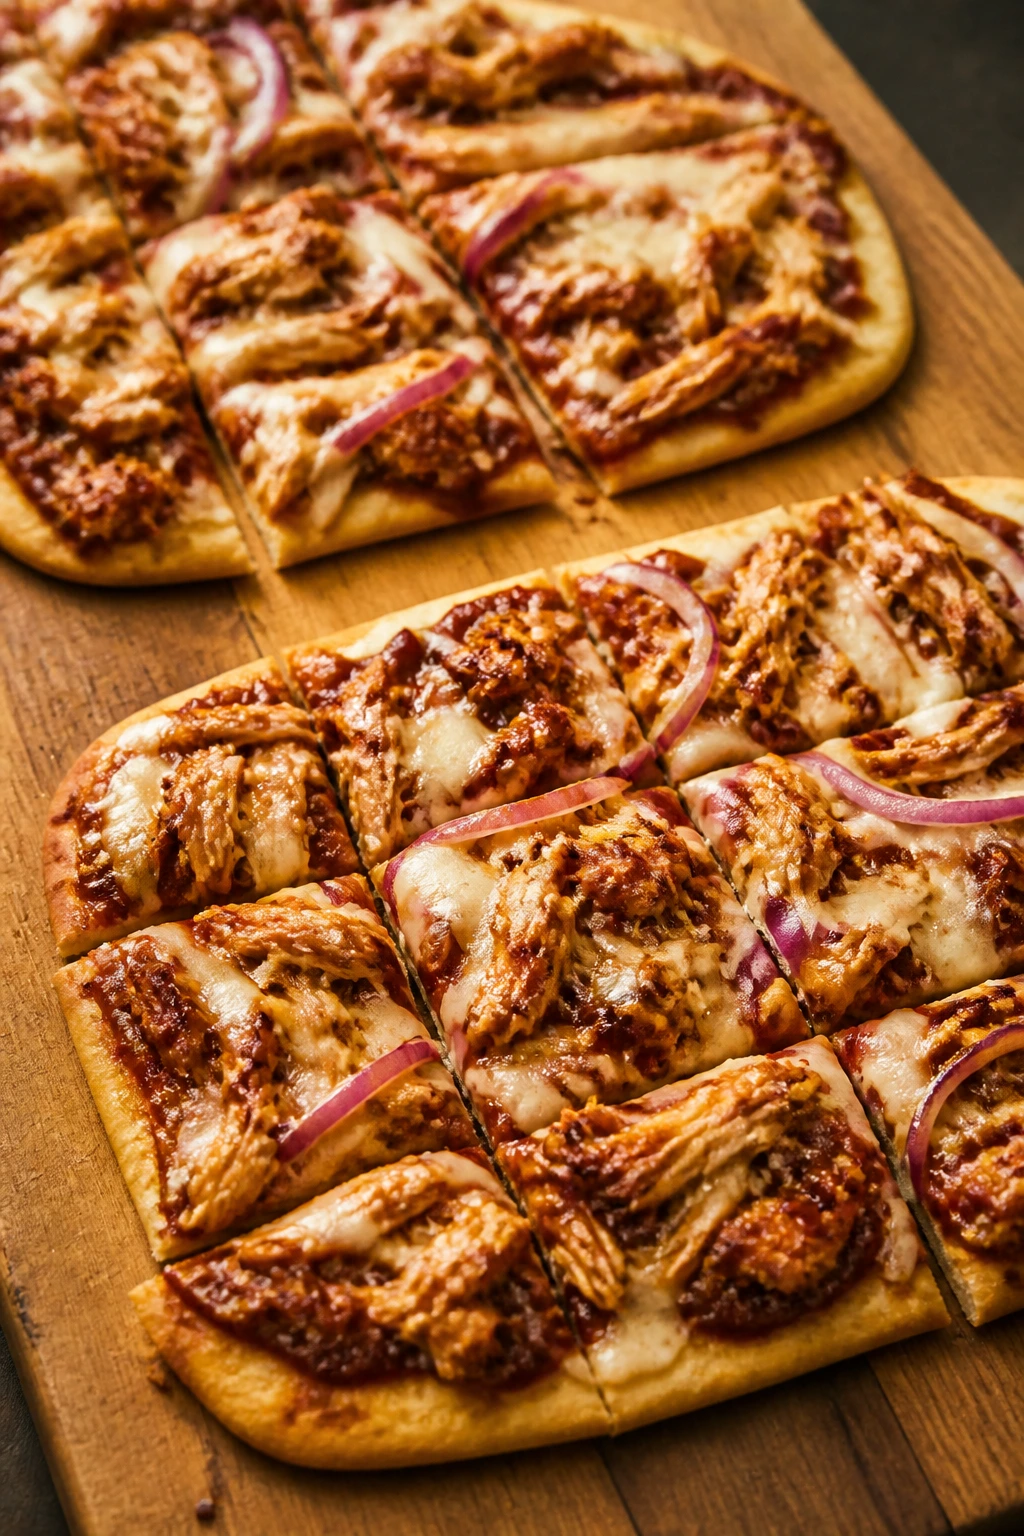
8. BBQ Chicken Flatbreads
BBQ chicken flatbreads hit that sweet spot between pizza and sandwich. They’re smoky, a little sweet, and just sturdy enough to slice into squares without losing the toppings. I like them when the family wants something warm and savory but not as formal as a full pizza night.
Why It Works:
Flatbreads or naan already have structure, so the crust stays crisp without much effort. Shredded chicken catches the sauce well, and the cheese melts around the edges instead of turning into a heavy blanket. A little red onion adds bite, which keeps the sweetness from the barbecue sauce in check.
Key Ingredients:
- 2 naan or sturdy flatbreads — Thin enough to crisp, thick enough to hold toppings.
- 2 cups shredded cooked chicken — Rotisserie chicken keeps this easy.
- 1/2 cup barbecue sauce — Choose a thick one.
- 1 1/2 cups shredded mozzarella — Melts smoothly.
- 1/2 cup thinly sliced red onion — Adds sharpness.
- 1 tablespoon olive oil — For brushing the bread.
- Fresh cilantro, chopped — For a bright finish.
Quick Steps:
- Heat the oven: Set it to 450°F (232°C) and place the rack in the upper third.
- Mix the chicken: Toss the shredded chicken with barbecue sauce until evenly coated.
- Prep the flatbreads: Brush each flatbread lightly with olive oil and set them on a sheet pan.
- Top and bake: Divide the chicken, mozzarella, and red onion between the breads. Bake for 8 to 10 minutes, until the cheese is melted and the edges are crisp.
- Finish: Scatter cilantro over the top and slice into strips or squares.
Equipment for This Recipe:
- Sheet pan — For the flatbreads.
- Mixing bowl — For the chicken and sauce.
- Sharp knife or pizza cutter — Makes clean slices.
- Pastry brush — Helps with the oil.
How to Serve This Dish:
Cut each flatbread into narrow strips so people can grab them easily. A crunchy slaw, a few pickles, or some sliced apples on the side gives the plate a nice contrast.
Pro Tips for This Recipe:
- Warm the chicken before topping the bread so the flatbread doesn’t need extra baking time.
- Don’t overdo the barbecue sauce. Too much and the crust gets sticky.
- If your flatbreads are thin, bake them on a preheated sheet pan for a crisper bottom.
Variations on This Dish:
- Pineapple BBQ Flatbreads: Add a few drained pineapple tidbits for sweetness.
- Buffalo Chicken Flatbreads: Swap barbecue sauce for buffalo sauce and add ranch.
- Veggie Flatbreads: Use sautéed mushrooms, peppers, and onions instead of chicken.
Common Mistakes to Avoid with This Dish:
- Don’t load on wet toppings. The crust will soften fast.
- Don’t bake until the cheese browns hard. Flatbread dries out quickly.
- Don’t cut while the cheese is still running everywhere. Wait a minute first.
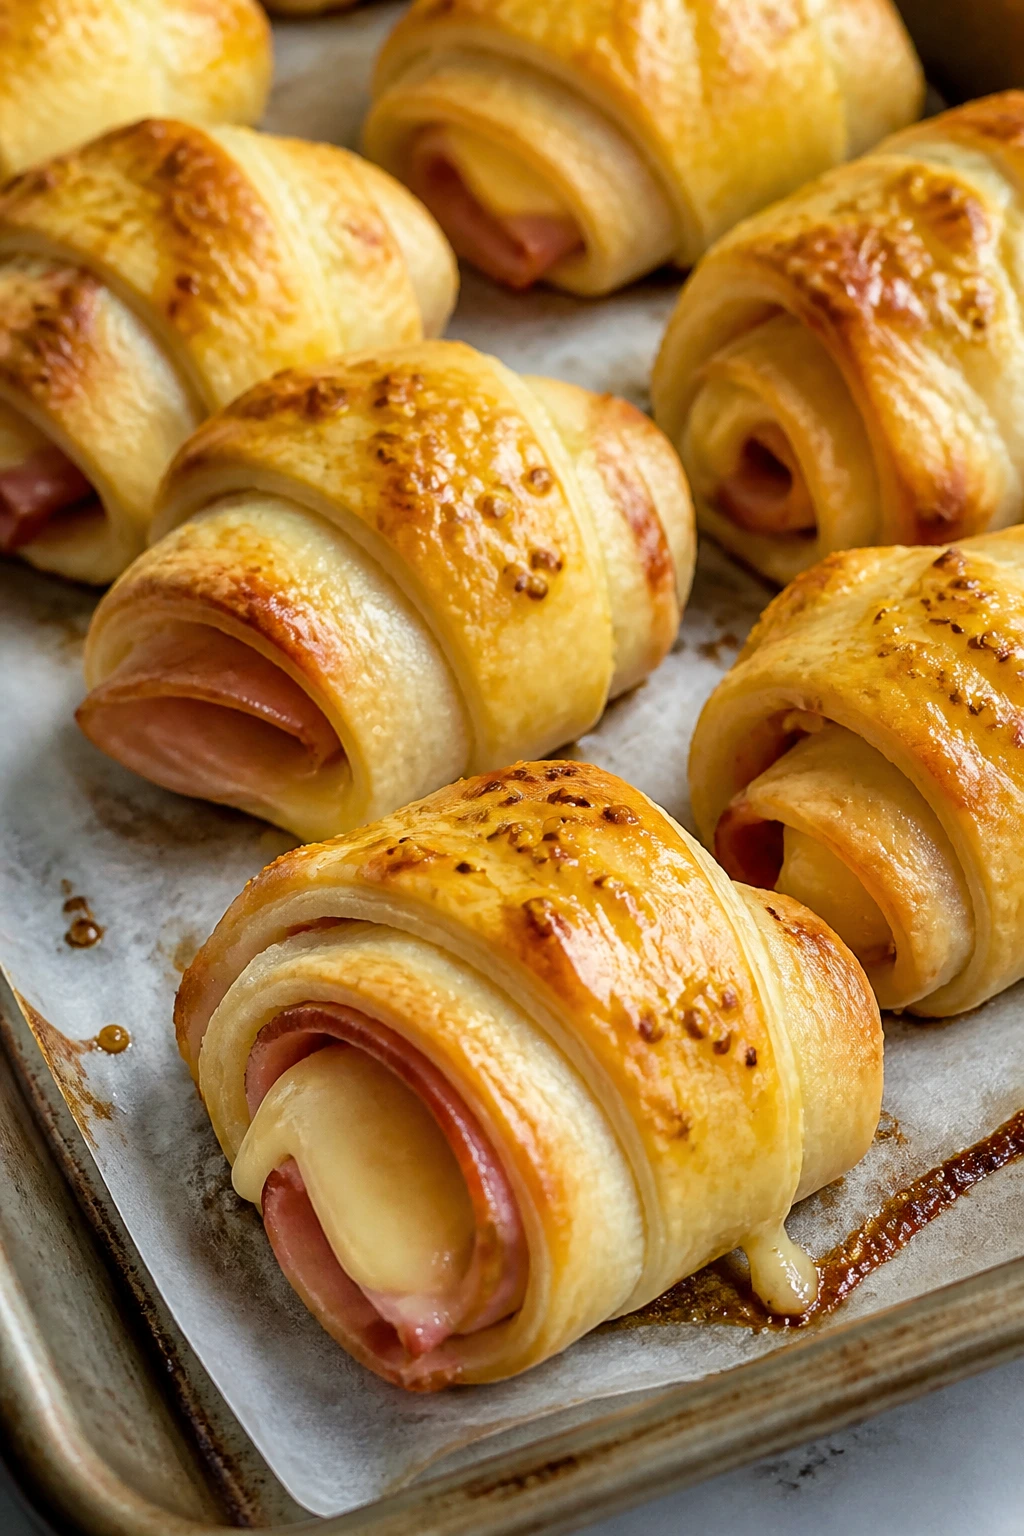
9. Ham and Swiss Crescent Roll-Ups
These little roll-ups feel almost fancy, which is funny considering how little effort they take. The crescent dough turns golden and buttery, the ham gives you salt, and the Swiss adds a mellow melt that makes the whole thing disappear in a couple of bites. They’re the kind of lunch that works when you want food on the table before someone asks for the remote again.
Why It Works:
Crescent dough bakes into a soft, flaky shell that holds the filling without falling apart. The mustard-butter glaze gives the tops color and a little tang, so the roll-ups taste fuller than they look. They also hold their shape well enough to pack into a tray or lunchbox if needed.
Key Ingredients:
- 1 can refrigerated crescent roll dough, 8-count — The flaky wrapper.
- 8 slices deli ham — Thin slices roll neatly.
- 8 slices Swiss cheese — Mild, melty, and not too salty.
- 2 tablespoons Dijon mustard — Gives the filling some bite.
- 3 tablespoons butter, melted — For the glaze.
- 1 teaspoon honey — Balances the mustard.
- 1 teaspoon poppy seeds — Optional, but pretty on top.
Quick Steps:
- Heat the oven: Preheat to 375°F (190°C) and line a baking sheet with parchment.
- Assemble the rolls: Unroll the crescent dough and separate it into triangles. Spread a thin layer of Dijon on each triangle, then top with ham and cheese.
- Roll and seal: Roll each triangle from the wide end to the point and tuck the tip underneath.
- Brush with glaze: Mix the melted butter, honey, and poppy seeds, then brush over the tops.
- Bake: Bake for 12 to 15 minutes, until puffed and golden.
Equipment for This Recipe:
- Baking sheet — For even browning.
- Parchment paper — Keeps the bottoms from sticking.
- Small bowl — For the glaze.
- Pastry brush — For the butter mixture.
How to Serve This Dish:
Serve the roll-ups warm with grapes, sliced apples, or a small bowl of mustard for dipping. Two or three roll-ups make a sensible portion, though the tray will make that look negotiable.
Pro Tips for This Recipe:
- Keep the dough cold until you’re ready to use it. Warm dough gets sticky and hard to roll.
- Thin ham slices roll more neatly than thick deli slabs.
- Put the seam side down on the tray so the rolls stay closed.
Variations on This Dish:
- Turkey Club Roll-Ups: Swap in turkey and a little bacon.
- Spinach and Swiss Roll-Ups: Add wilted spinach for a lighter version.
- Rye-Dijon Version: Dust the tops with caraway seeds for a deli-style note.
Common Mistakes to Avoid with This Dish:
- Don’t overfill the triangles. The filling squeezes out as they bake.
- Don’t bake on a dark, hot pan without lining it. The bottoms can brown too fast.
- Don’t skip the glaze. It gives the rolls their color and a lot of the flavor.
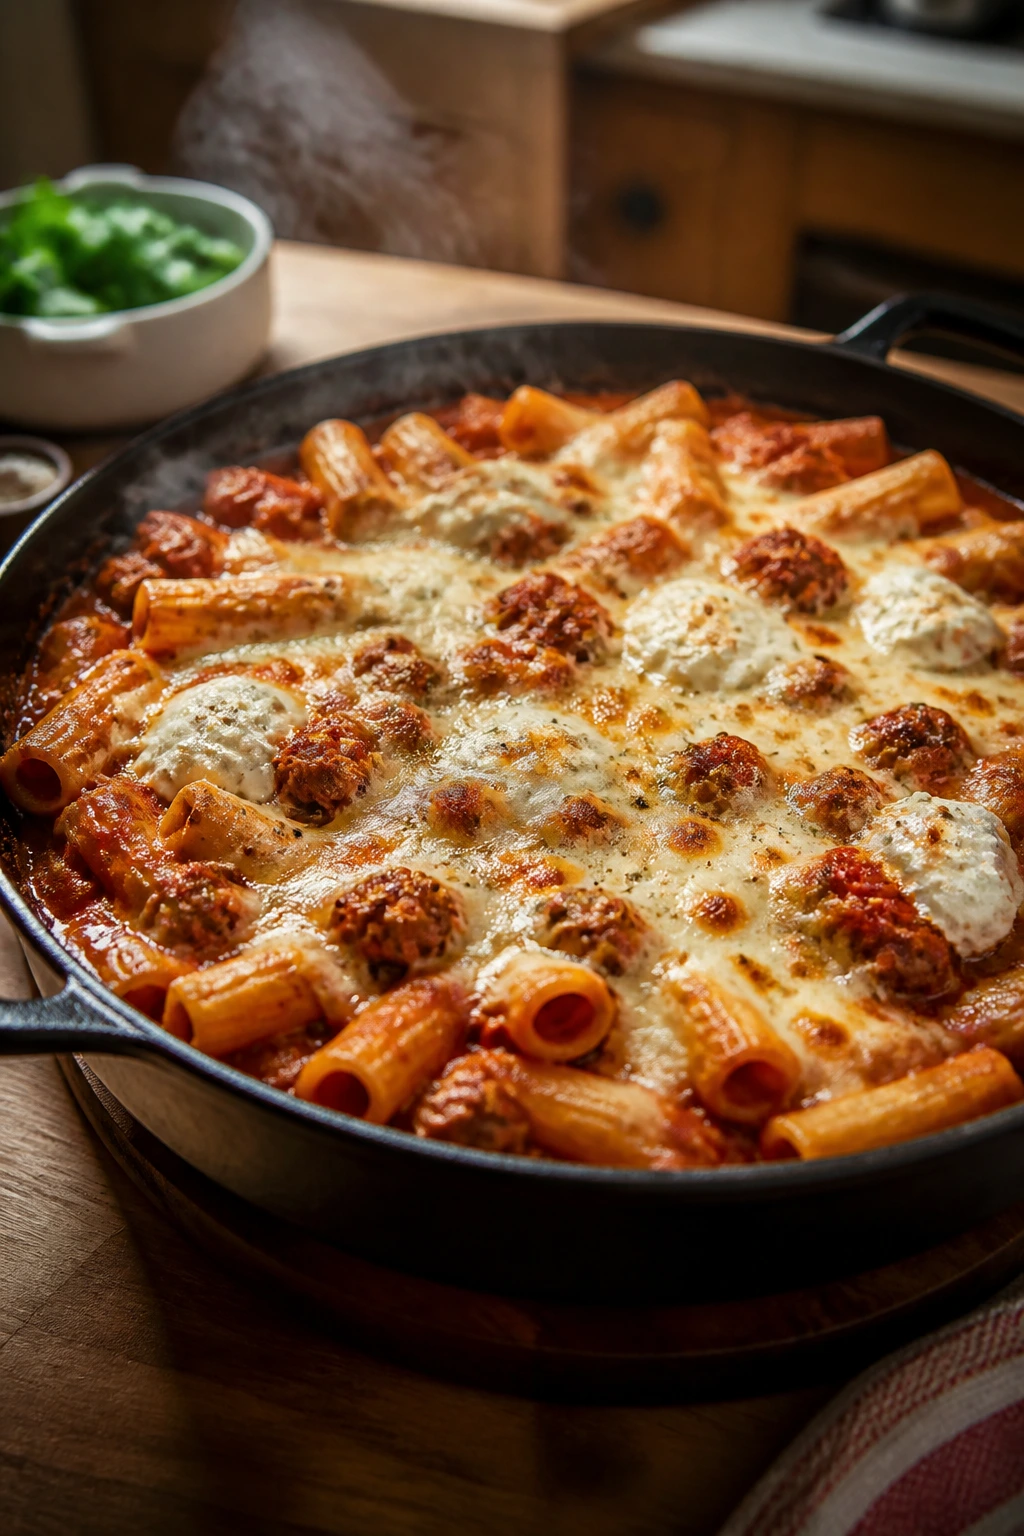
10. One-Pan Baked Ziti Skillet
Baked ziti in a skillet feels a little like cheating, but in the best way. You get the browned sausage, the saucy pasta, the ricotta pockets, and the melted cheese without dirtying three different pots. For movie night, that matters. The less cleanup, the faster everybody can sit down.
Why It Works:
Cooking the pasta right in the sauce means the noodles absorb flavor instead of sitting in bland water first. An oven-safe skillet gives you a stovetop base and a baked finish, which means the cheese melts on top without needing a separate casserole dish. The ricotta dollops stay creamy if you don’t stir them in too early.
Key Ingredients:
- 1 pound Italian sausage — Sweet or hot, depending on your crowd.
- 1 small onion, diced — Builds the savory base.
- 3 cloves garlic, minced — Adds depth fast.
- 12 ounces ziti — Holds sauce in the tubes.
- 24 ounces marinara sauce — Use a thick one.
- 3 cups water or low-sodium broth — Cooks the pasta in the pan.
- 1 cup ricotta cheese — For creamy pockets.
- 2 cups shredded mozzarella — The melt factor.
- 1/2 cup grated Parmesan — Sharpens the top.
- 1 teaspoon Italian seasoning — Keeps the sauce from tasting flat.
Quick Steps:
- Brown the sausage: Cook the sausage and onion in an oven-safe skillet over medium heat until the sausage is no longer pink and the onion softens.
- Add the garlic: Stir in the garlic and Italian seasoning for 30 seconds, just until fragrant.
- Cook the pasta in the sauce: Add the ziti, marinara, and water or broth. Bring to a simmer and cook for about 10 to 12 minutes, stirring once or twice, until the pasta is just tender and most of the liquid is absorbed.
- Finish with cheese: Drop spoonfuls of ricotta over the top, then sprinkle with mozzarella and Parmesan.
- Bake: Transfer to a 425°F (220°C) oven for 10 minutes, until the top is bubbling and lightly browned.
Equipment for This Recipe:
- Large oven-safe skillet — The whole recipe happens here.
- Wooden spoon — Useful for stirring the pasta without breaking it.
- Measuring cup — Helps keep the liquid amount accurate.
- Oven mitts — The handle stays hot.
How to Serve This Dish:
Scoop the ziti into shallow bowls and serve with garlic bread or a simple salad. It’s rich enough that a small scoop goes a long way, especially if you’ve got a few other dishes on the table.
Pro Tips for This Recipe:
- Keep the heat at a simmer, not a hard boil, or the pasta sticks before it cooks through.
- Stir once or twice while it simmers so the bottom doesn’t catch.
- If the pan looks dry before the pasta is done, add a splash more water.
Variations on This Dish:
- Veggie Skillet Ziti: Skip the sausage and add mushrooms, spinach, and zucchini.
- Turkey Ziti: Use ground turkey and a little extra Parmesan.
- Spicy Ziti: Add red pepper flakes and hot Italian sausage.
Common Mistakes to Avoid with This Dish:
- Don’t use a skillet that’s too small. The pasta needs room to move.
- Don’t overcook before the bake. The noodles should still have a little bite.
- Don’t stir in all the ricotta. Those creamy pockets are part of the fun.
11. Chicken Caesar Wraps
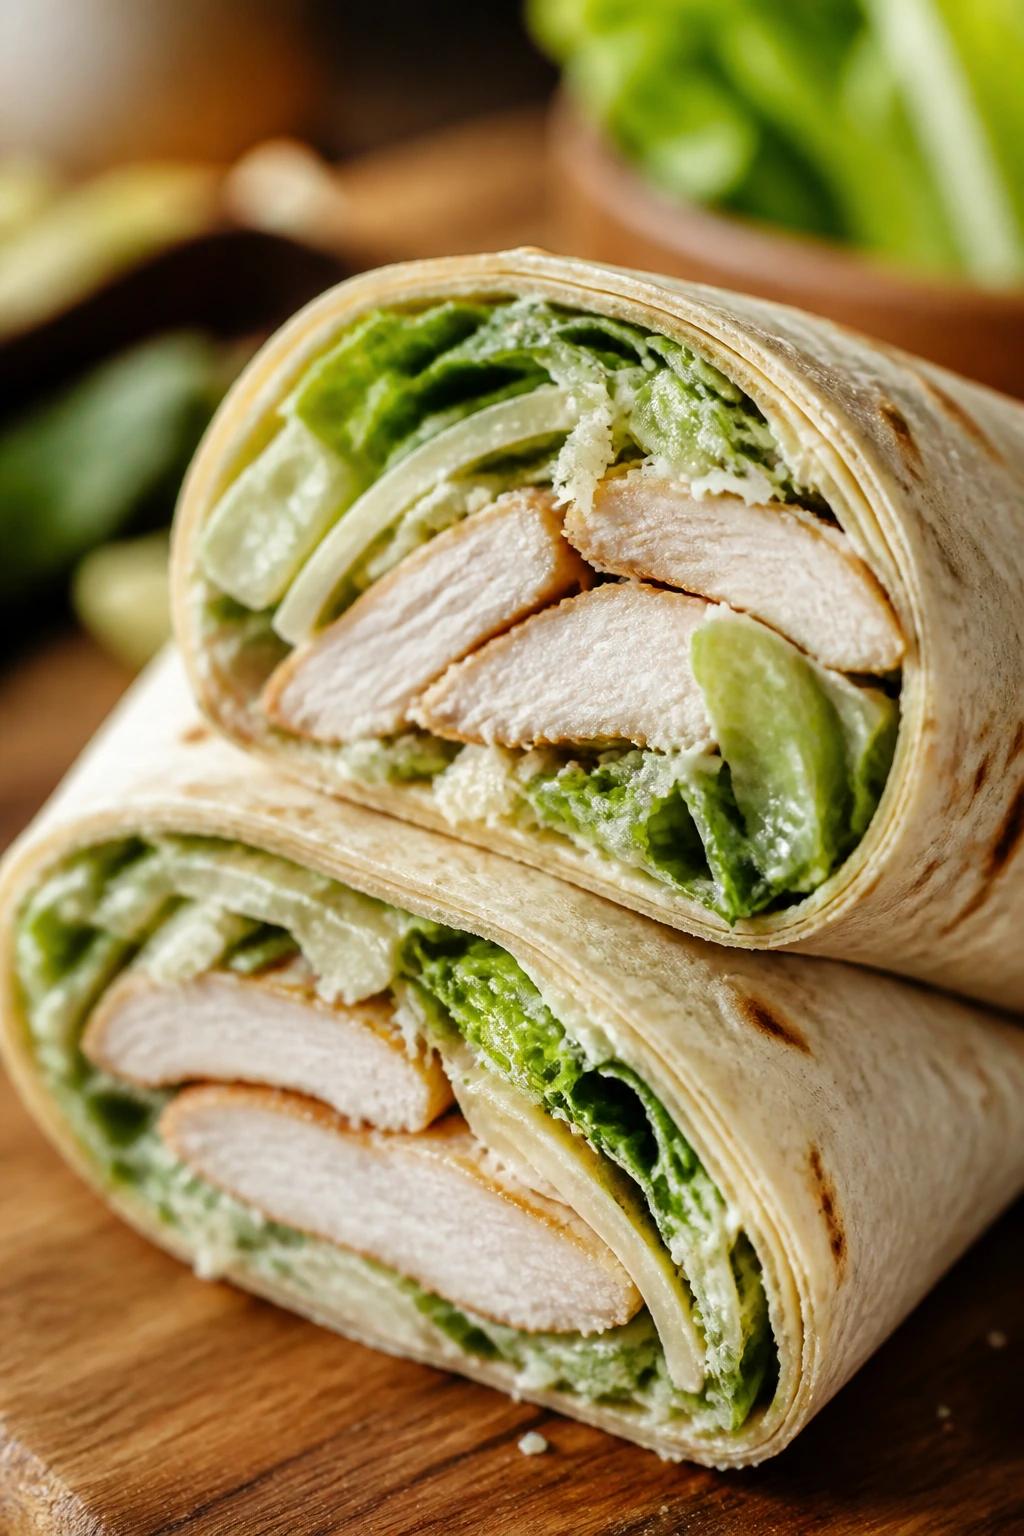
Chicken Caesar wraps are cool, crisp, and easy to eat without a plate full of runaway toppings. They’re not flashy, and that’s exactly why they work. When the movie starts, the last thing you want is a meal that requires engineering.
Why It Works:
The lettuce brings crunch, the chicken brings the substance, and the dressing ties everything together without needing heat. Wrapping the filling in a tortilla gives you a tidy package that can be sliced in half or left whole. Crushed croutons add a little surprise crunch that survives the wrap if you add them at the last moment.
Key Ingredients:
- 4 large flour tortillas — Soft and flexible enough to roll cleanly.
- 3 cups chopped romaine lettuce — Crisp leaves matter here.
- 2 cups cooked chicken, chopped or shredded — Rotisserie chicken is fine.
- 1/2 cup Caesar dressing — Use just enough to coat.
- 1/2 cup grated Parmesan — Salty and sharp.
- 1/2 cup crushed croutons — Optional, but good if you want crunch.
- Lemon wedges — For serving.
Quick Steps:
- Mix the filling: Toss the chicken, romaine, Caesar dressing, and Parmesan together in a large bowl.
- Add the crunch: Stir in the crushed croutons right before assembling.
- Warm the tortillas: Heat each tortilla for about 10 seconds in the microwave or a dry skillet so it bends without tearing.
- Roll the wraps: Spoon the filling into the center, fold in the sides, and roll tightly from the bottom up.
- Slice and serve: Cut on the diagonal if you want cleaner edges.
Equipment for This Recipe:
- Large mixing bowl — For tossing the filling.
- Cutting board — For rolling and slicing.
- Sharp knife — Makes a clean diagonal cut.
- Skillet or microwave — For warming the tortillas.
How to Serve This Dish:
Serve the wraps with grapes, cherry tomatoes, or a few thin cucumber slices. If you want them to feel more complete, add a cup of soup or a handful of kettle chips, though they’re hearty enough on their own.
Pro Tips for This Recipe:
- Dress the filling just before rolling it. If you do it too early, the lettuce softens.
- Use a light hand with the croutons. Too many and the wraps split.
- A squeeze of lemon right before serving keeps the filling bright.
Variations on This Dish:
- Bacon Caesar Wraps: Add chopped cooked bacon for a smoky note.
- Turkey Caesar Wraps: Swap the chicken for sliced turkey.
- Chickpea Caesar Wraps: Use mashed chickpeas for a vegetarian version.
Common Mistakes to Avoid with This Dish:
- Don’t overfill the tortilla. A wrap that can’t close will fall apart.
- Don’t use wet lettuce that just came from a rinse. Pat it dry first.
- Don’t let the wraps sit too long after assembling. They’re best fresh.
12. Chicken Alfredo Calzones
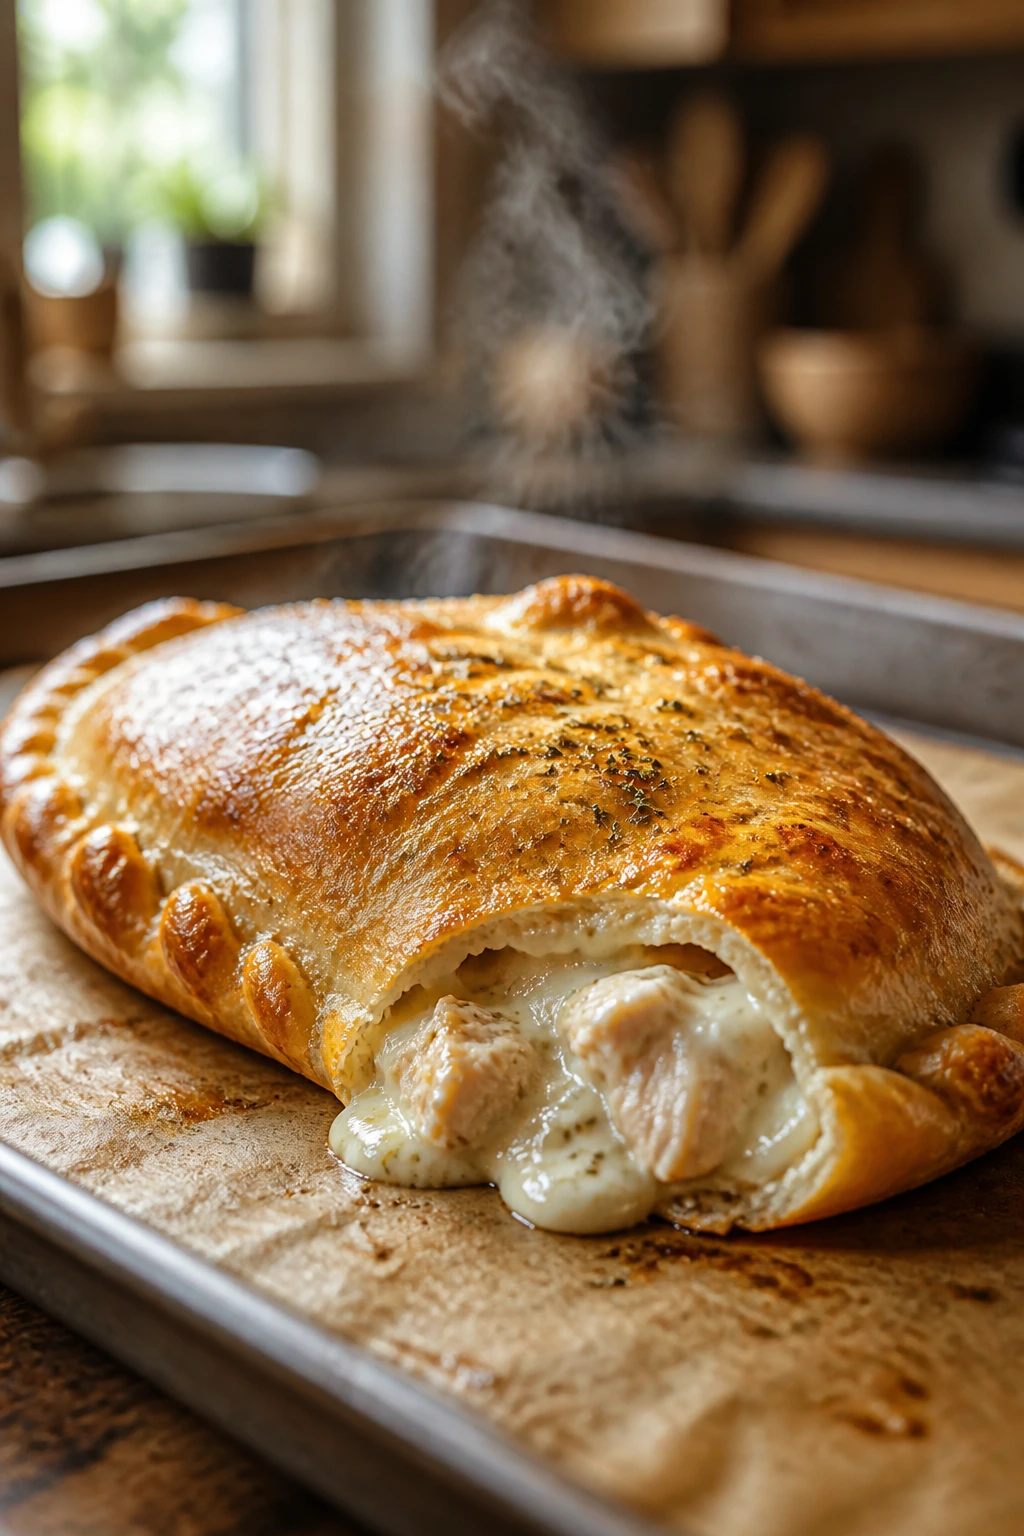
Chicken Alfredo calzones are the kind of handheld that feels a little extra without becoming fussy. The dough bakes into a golden shell, and the creamy filling stays hidden until someone tears one open and the steam comes out. That moment alone is worth making them.
Why It Works:
The sealed dough traps the creamy filling so it doesn’t spread all over a baking sheet. A thick Alfredo sauce and cooled chicken help keep the center from turning watery. Brushing the tops with egg gives you that glossy, bakery-style finish.
Key Ingredients:
- 1 pound pizza dough — Store-bought dough is perfectly fine.
- 2 cups cooked chicken, chopped — Small pieces fit the pocket better.
- 1 cup Alfredo sauce — Keep it thick.
- 1 1/2 cups shredded mozzarella — For melt.
- 1/2 cup grated Parmesan — Adds salt and depth.
- 1 cup baby spinach, chopped — Optional, but good for color.
- 1 egg, beaten — For the wash.
- Flour, for dusting — Helps the dough roll smoothly.
Quick Steps:
- Preheat and prep: Set the oven to 425°F (220°C) and line a sheet pan with parchment.
- Divide the dough: Cut the pizza dough into 4 equal pieces and roll each into a 7-inch circle.
- Fill the calzones: On one half of each circle, spoon chicken, Alfredo sauce, mozzarella, Parmesan, and spinach if using. Leave a clean border around the edge.
- Seal them well: Fold the dough over the filling, press the edges together, and crimp with a fork. Brush the tops with beaten egg.
- Bake: Bake for 15 to 18 minutes, until deep golden brown and crisp. Let them rest 3 minutes before cutting.
Equipment for This Recipe:
- Sheet pan — For baking.
- Parchment paper — Helps with cleanup.
- Rolling pin — Makes the dough even.
- Pastry brush — For the egg wash.
How to Serve This Dish:
Serve the calzones with warm marinara for dipping and a simple salad or sliced fruit on the side. One calzone usually makes a solid lunch portion, though a very hungry person may call it an appetizer and keep going.
Pro Tips for This Recipe:
- Let the chicken cool before filling the dough. Warm filling softens the dough too fast.
- Don’t add too much sauce. A calzone should be creamy, not soupy.
- Cut a small steam slit in the top if the dough puffs aggressively.
Variations on This Dish:
- Spinach Mushroom Calzones: Skip the chicken and use sautéed mushrooms and spinach.
- Buffalo Chicken Calzones: Replace the Alfredo with a thicker buffalo-ranch mix.
- Four-Cheese Calzones: Use mozzarella, Parmesan, ricotta, and provolone.
Common Mistakes to Avoid with This Dish:
- Don’t overfill the dough. It will split in the oven.
- Don’t leave the edges unsealed. The filling leaks the second it gets hot.
- Don’t cut too early. The inside needs a minute to settle or it runs out.
13. Veggie Fried Rice with Egg
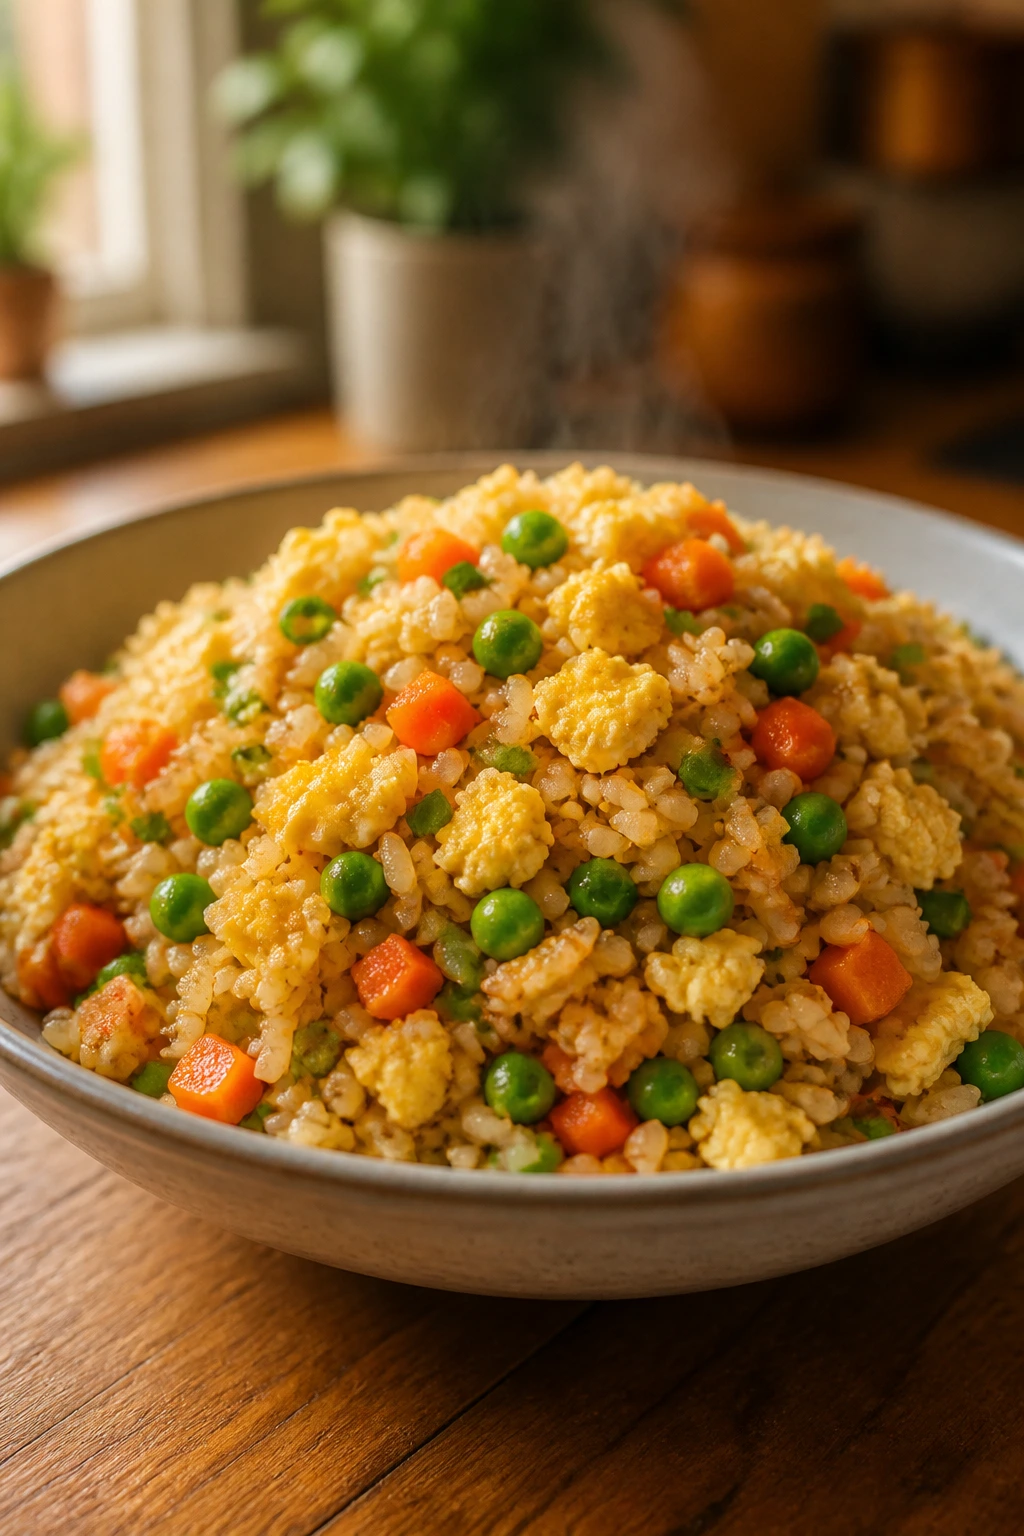
Veggie fried rice is what I make when I want something fast, hot, and not remotely fussy. The rice gets a little chewy, the vegetables stay bright, and the eggs pull the whole pan together. It’s not movie-night food in a flashy sense, but it’s dependable, which matters.
Why It Works:
Cold rice fries better than fresh rice because it’s drier and separates more easily in the pan. High heat gives you those toasted edges that make fried rice taste like it came from a wok instead of a saucepan. The egg adds protein and keeps the dish filling enough to count as lunch.
Key Ingredients:
- 3 cups cold cooked rice, preferably day-old — Fresh rice turns sticky.
- 3 large eggs — Scrambled into the rice.
- 1 cup frozen peas and carrots — Quick, colorful, and easy.
- 2 scallions, sliced — For flavor and garnish.
- 2 cloves garlic, minced — The base aroma.
- 2 tablespoons soy sauce — Start with this amount and add more only if needed.
- 1 tablespoon sesame oil — Add at the end for a nutty finish.
- 1 tablespoon butter or neutral oil — For frying.
- 1 teaspoon grated ginger — Optional, but welcome.
Quick Steps:
- Scramble the eggs: Heat 1/2 tablespoon oil in a large skillet or wok over medium-high heat. Scramble the eggs until just set, then move them to a plate.
- Cook the vegetables: Add the remaining oil and butter, then stir-fry the peas, carrots, scallions, garlic, and ginger for 2 to 3 minutes.
- Add the rice: Break up the cold rice with your hands or a spoon, then add it to the pan and stir until warmed through.
- Season: Pour in the soy sauce and sesame oil and keep stirring until the grains look evenly coated and a little glossy.
- Finish: Stir the eggs back in and serve right away.
Equipment for This Recipe:
- Large skillet or wok — Needs room for the rice to move.
- Spatula — For breaking up clumps.
- Small bowl — For the eggs.
- Cutting board and knife — For the scallions.
How to Serve This Dish:
Serve in shallow bowls with a little extra soy sauce or sweet chili sauce on the side. If you want a fuller spread, add sliced cucumbers, edamame, or leftover chicken.
Pro Tips for This Recipe:
- Use cold rice. Warm rice clumps and steams instead of frying.
- Keep the pan hot. If it starts steaming, you’ve crowded it.
- Season lightly first. Soy sauce can get away from you fast.
Variations on This Dish:
- Chicken Fried Rice: Add diced cooked chicken with the eggs.
- Shrimp Fried Rice: Stir in cooked shrimp at the end just to warm it.
- Kimchi Fried Rice: Add chopped kimchi and a little gochujang for heat.
Common Mistakes to Avoid with This Dish:
- Don’t use wet rice. It turns gummy.
- Don’t dump in too much soy sauce at once. The pan gets salty fast.
- Don’t overcrowd the pan. Fry in two batches if you need to.
14. Loaded Potato Skins
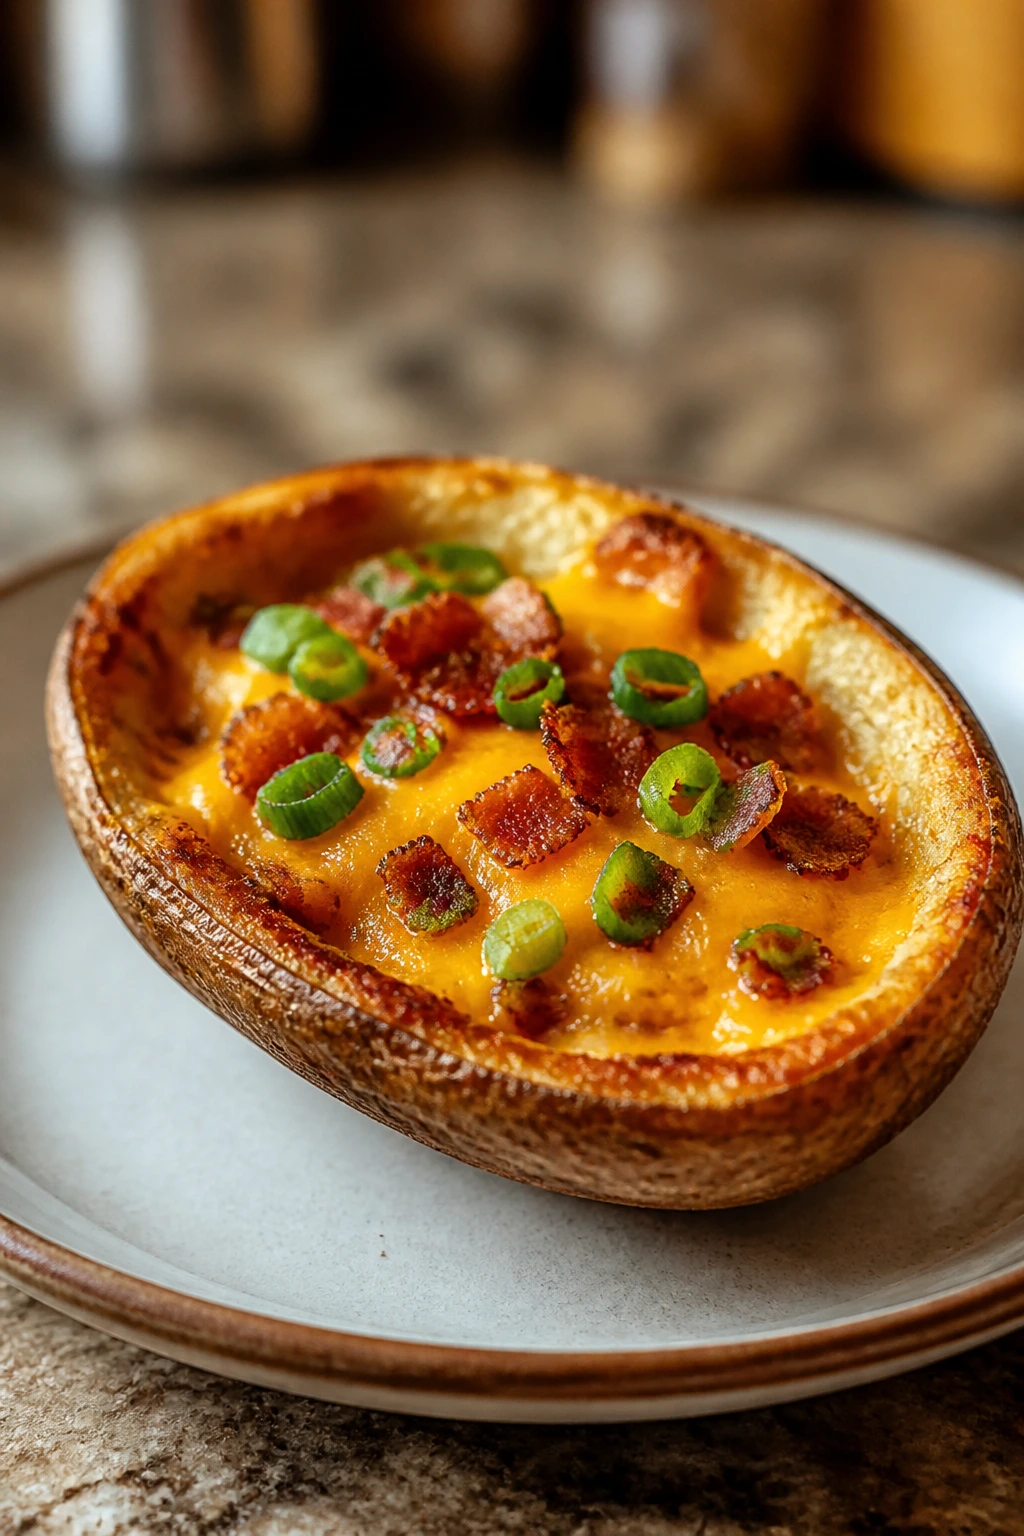
Potato skins are what happen when a baked potato gets dressed for a better night out. The shells crisp, the middle stays fluffy, and the cheese melts into the crevices around the bacon and scallions. They’re hands-on in the best way, and they always seem to vanish before I expect them to.
Why It Works:
Russet potatoes make the best skins because they bake up fluffy and dry enough to hold their shape after scooping. A second bake crisps the empty shells before the toppings go on, which keeps the bottoms from going soggy. The filling is simple, but the contrast of crisp skin and soft center does most of the work.
Key Ingredients:
- 4 large russet potatoes — Starchy potatoes crisp best.
- 8 slices bacon — Cook until crisp and chop fine.
- 2 cups shredded cheddar — For the melt.
- 1/2 cup sour cream — For serving.
- 2 scallions, thinly sliced — For freshness.
- 2 tablespoons butter — Brushed inside the shells.
- Salt and pepper — For the potato flesh and skins.
Quick Steps:
- Bake the potatoes: Prick the potatoes, rub with a little oil and salt, and bake at 425°F (220°C) for 50 to 60 minutes, until fully tender.
- Cook the bacon: While the potatoes bake, cook the bacon until crisp and drain it well.
- Scoop the shells: Let the potatoes cool enough to handle, then cut them in half lengthwise and scoop out most of the flesh, leaving about 1/4 inch of potato attached.
- Crisp the skins: Brush the inside of each shell with melted butter and bake for 10 minutes more.
- Fill and finish: Add cheddar and bacon, bake 5 minutes until melted, then top with scallions and sour cream.
Equipment for This Recipe:
- Sheet pan — For the potato halves.
- Fork — To prick the potatoes.
- Spoon — For scooping.
- Skillet or baking tray — For the bacon.
How to Serve This Dish:
Serve the skins on a platter with sour cream on the side so people can dip or dollop as they like. Two halves make a good lunch portion, especially if you set out some fruit or a simple salad beside them.
Pro Tips for This Recipe:
- Leave a little potato inside the shell so it doesn’t collapse.
- Salt the skins before the first bake for better flavor.
- Chop the bacon finely so every bite gets a little crunch.
Variations on This Dish:
- Broccoli Cheddar Skins: Add tiny steamed broccoli florets with the cheese.
- Chili Cheese Skins: Spoon chili into the shells before the cheese.
- Vegetarian Skins: Use roasted mushrooms and extra scallions instead of bacon.
Common Mistakes to Avoid with This Dish:
- Don’t scoop the potato too aggressively. Thin shells split.
- Don’t skip the second bake. The skins need that drying step.
- Don’t load them while the potatoes are too hot. The steam softens everything.
15. Mini Corn Dog Muffins
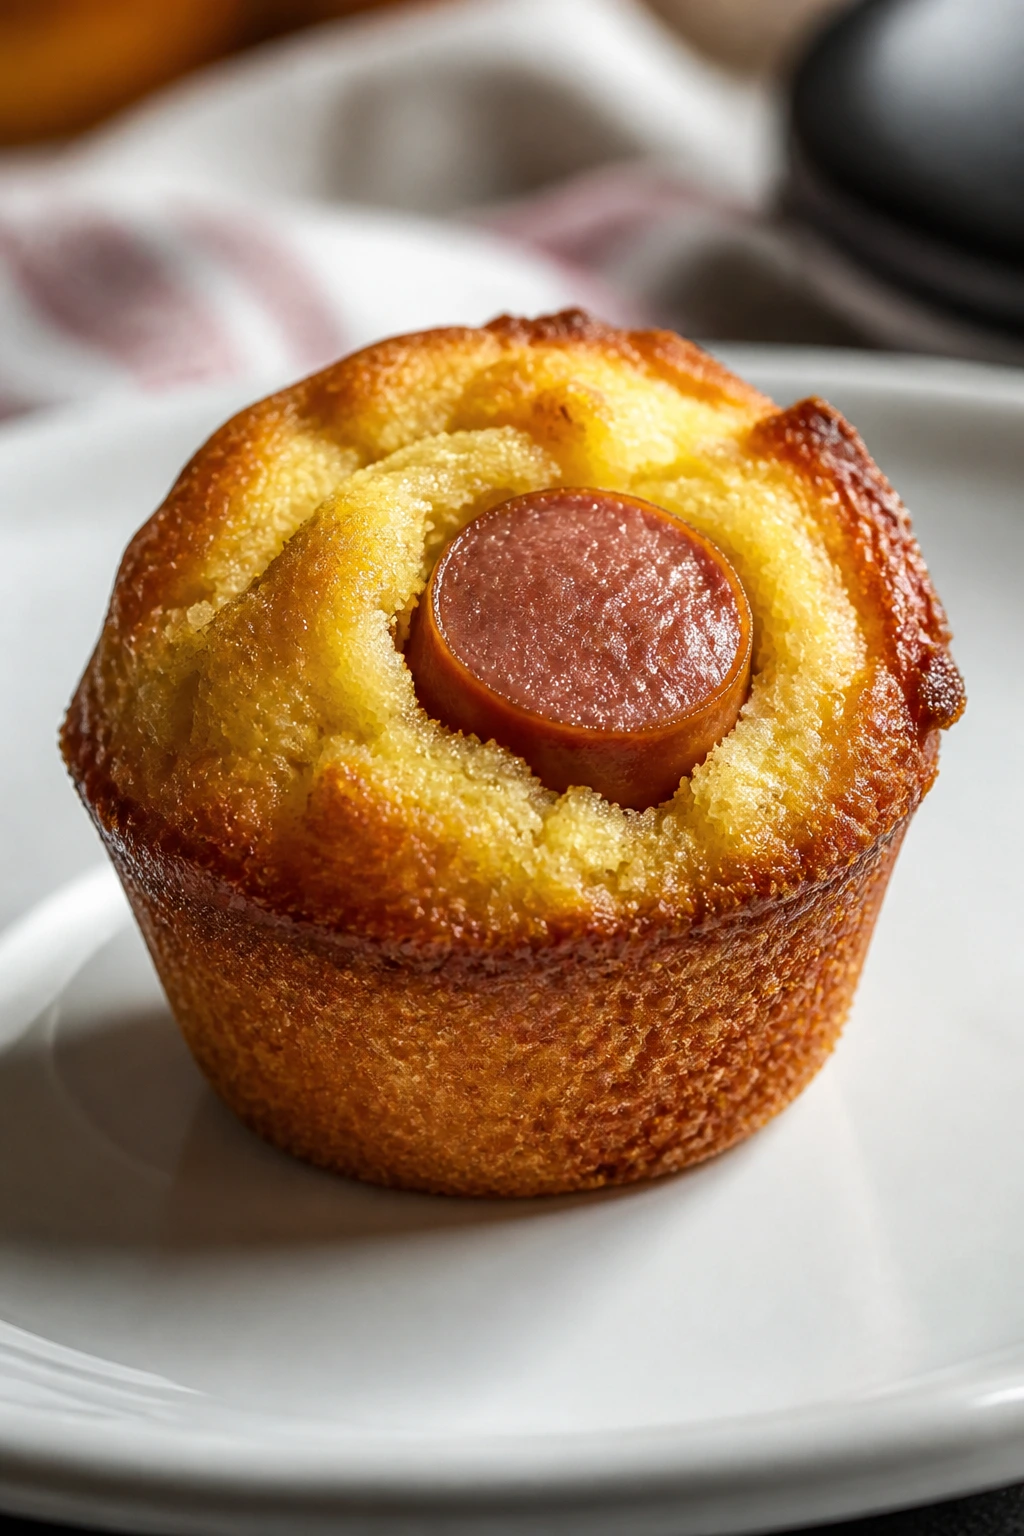
Mini corn dog muffins have a way of making everyone smile before they’ve even been served. They taste like a fairground snack with a better structure, and they’re far less awkward than actual corn dogs on a couch tray. If you have children anywhere near the room, these disappear fast.
Why It Works:
Cornmeal batter bakes around the hot dog pieces, so each muffin gets a little salty center and a soft, corny crumb. The mini muffin tin gives them bite-size shape, and the ratio of batter to hot dog stays balanced. They’re also easy to dip, which is half the fun.
Key Ingredients:
- 1 cup yellow cornmeal — Gives the muffins their classic flavor.
- 1 cup all-purpose flour — Keeps the texture tender.
- 1 tablespoon sugar — A small amount rounds out the corn flavor.
- 1 tablespoon baking powder — For lift.
- 1/2 teaspoon salt — Essential.
- 1 1/4 cups milk — Loosens the batter.
- 1 large egg — Binds it.
- 1/4 cup melted butter — Adds richness.
- 4 hot dogs, cut into 12 pieces — The center of each muffin.
- Ketchup and mustard, for serving — Optional but expected.
Quick Steps:
- Preheat and grease: Heat the oven to 400°F (205°C) and grease a mini muffin tin well.
- Mix the batter: Whisk the cornmeal, flour, sugar, baking powder, and salt in a bowl. Stir in the milk, egg, and melted butter until just combined.
- Fill the cups: Spoon batter into each mini muffin cup, filling them about two-thirds full.
- Add the hot dogs: Press one hot dog piece into the center of each cup.
- Bake: Bake for 12 to 14 minutes, until puffed and lightly golden.
Equipment for This Recipe:
- Mini muffin tin — Required for the shape.
- Mixing bowl — For the batter.
- Whisk — Helps prevent lumps.
- Small spoon — Good for portioning.
How to Serve This Dish:
Serve warm with ketchup, mustard, or both, and a few apple slices or baby carrots alongside. They make a strong lunch or snack plate, especially when you’re feeding kids who think dipping sauces are a major food group.
Pro Tips for This Recipe:
- Don’t overmix the batter. A few small lumps are fine.
- Cut the hot dogs small enough so each bite gets some batter and some filling.
- Grease the tin generously or the edges stick.
Variations on This Dish:
- Cheddar Corn Dog Muffins: Add a little shredded cheddar to the batter.
- Jalapeño Corn Dog Muffins: Stir in minced jalapeño for older kids or adults.
- Gluten-Free Corn Dog Muffins: Use a 1:1 gluten-free flour blend.
Common Mistakes to Avoid with This Dish:
- Don’t fill the cups too high. The batter rises and spills.
- Don’t use hot dogs that are too large for the mini cups. They crowd the batter.
- Don’t leave them in the tin too long after baking. They can get a little sticky.
16. Pesto Pasta Salad Cups
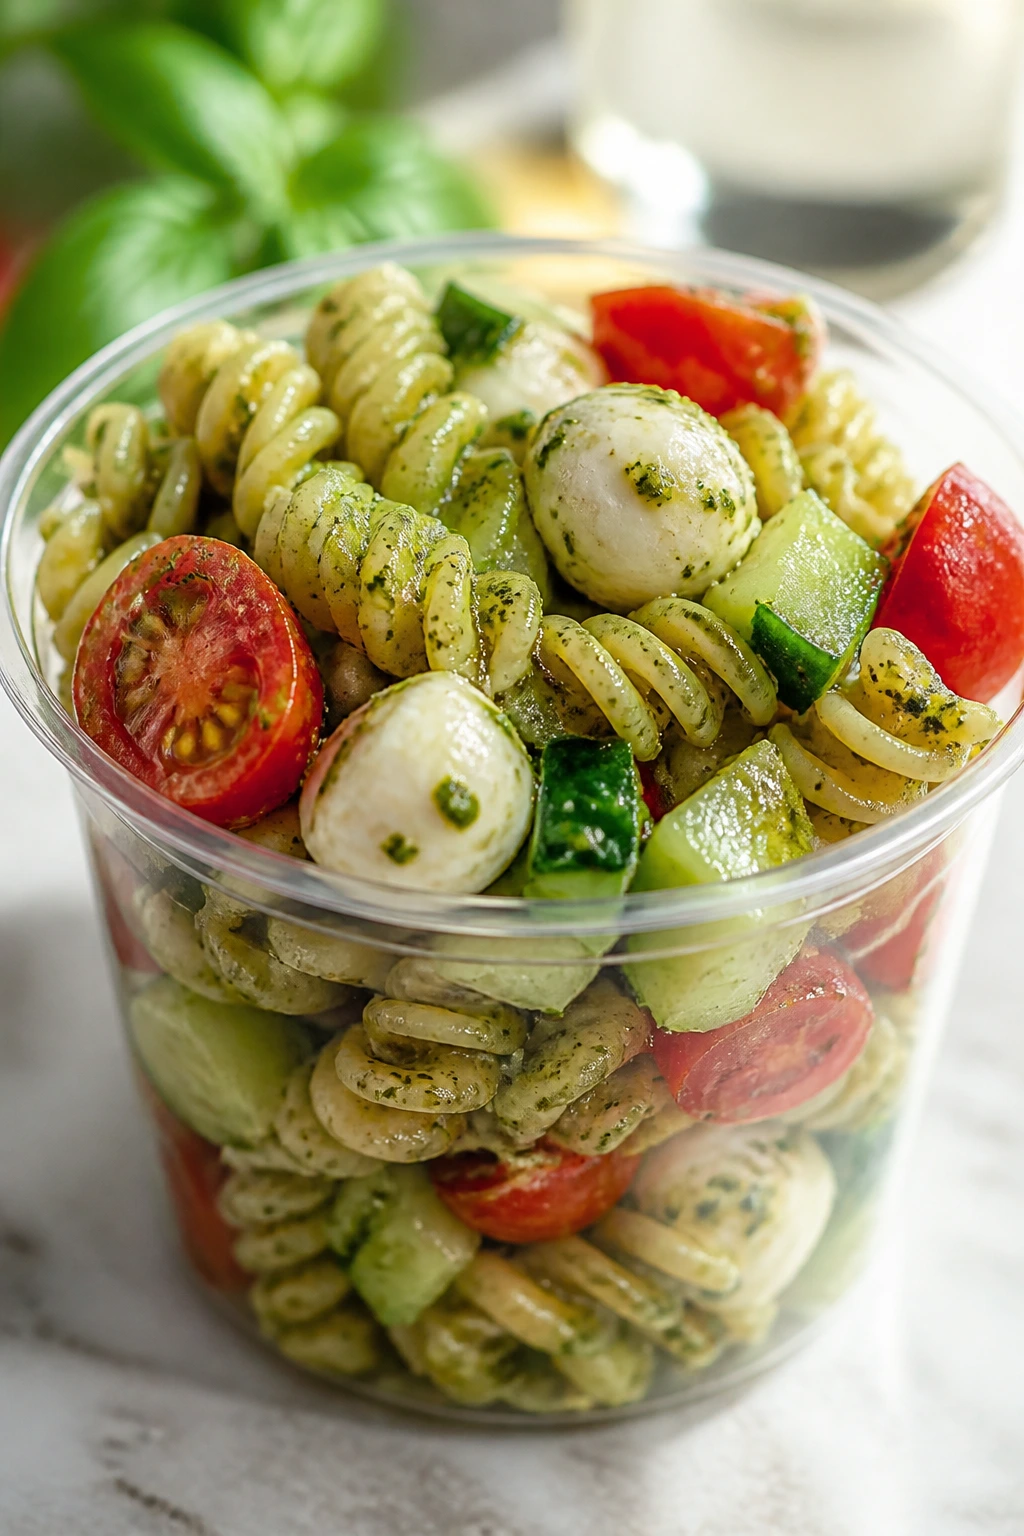
Pesto pasta salad is the cold option that never feels like an afterthought. The basil sauce clings to the pasta, the tomatoes pop, and the mozzarella gives you little creamy bites. Pack it into small cups and it suddenly becomes movie-night food instead of picnic food.
Why It Works:
Short pasta holds the pesto in its curves and ridges, which means every forkful tastes seasoned. A little acid from lemon keeps the pesto from tasting heavy, and serving it cold or cool makes it easy to prep ahead. It’s also one of the few dishes here that actually gets easier to serve when you portion it into cups.
Key Ingredients:
- 12 ounces rotini or fusilli — Twisted shapes catch the sauce.
- 1/2 cup pesto — Use enough to coat, not drown.
- 1 cup cherry tomatoes, halved — Adds juiciness and color.
- 8 ounces mozzarella pearls — Easy to scatter through the salad.
- 1 cucumber, diced — Keeps the texture crisp.
- 1 tablespoon lemon juice — Brightens the pesto.
- 1 tablespoon olive oil — Helps the pasta stay glossy.
- 1/4 cup pine nuts or sunflower seeds — Optional crunch.
- Salt, to taste — Needed after tossing.
Quick Steps:
- Cook the pasta: Boil the pasta in salted water until al dente.
- Cool it down: Drain and rinse briefly under cool water so it stops cooking, then shake off excess water well.
- Toss the salad: Mix the pasta with pesto, olive oil, and lemon juice, then fold in tomatoes, cucumber, mozzarella, and seeds.
- Taste and adjust: Add salt only if needed after the pesto is mixed in.
- Portion into cups: Chill for 20 minutes, then spoon into small paper cups or bowls.
Equipment for This Recipe:
- Large pot — For boiling the pasta.
- Colander — For draining.
- Large bowl — For tossing everything together.
- Small serving cups — Optional, but handy for movie night.
How to Serve This Dish:
Serve the cups with a fork tucked into the side and keep them chilled until people are ready. They work well beside sandwiches, sliders, or anything hot and cheesy that needs a cold partner.
Pro Tips for This Recipe:
- Salt the pasta water well. The pasta itself needs flavor.
- Add the tomatoes near the end so they don’t bruise and bleed into the pesto.
- If the salad looks dry after sitting, stir in a teaspoon more olive oil before serving.
Variations on This Dish:
- Chicken Pesto Pasta Cups: Add diced cooked chicken for a fuller lunch.
- Greek-Style Pesto Cups: Swap cucumber for olives and add feta.
- Dairy-Free Pesto Cups: Use a dairy-free pesto and skip the mozzarella.
Common Mistakes to Avoid with This Dish:
- Don’t overcook the pasta. Soft noodles turn mushy once dressed.
- Don’t use too much pesto. The pasta should be coated, not swimming.
- Don’t serve it warm if you want the fresh, bright texture. Cool is better here.
17. Crispy Chicken Tender Wraps

Chicken tender wraps are what I make when I want crunch without committing to a full fried-chicken spread. They’re hearty, portable, and easy to personalize at the table. The trick is keeping the tenders crispy until the last possible second.
Why It Works:
A tortilla gives the chicken a soft wrapper, but the tenders keep their crisp center if you assemble fast. The lettuce and pickles add sharp, cold contrast, and a modest amount of sauce ties it together without soaking through. The result is a lunch that feels familiar and easy to eat on a couch tray.
Key Ingredients:
- 1 pound crispy chicken tenders, cooked — Use baked, air-fried, or store-bought.
- 4 large flour tortillas — Flexible enough to roll without cracking.
- 1 cup shredded lettuce — Adds crunch after the chicken.
- 1 cup sliced pickles or cucumber spears, thinly sliced — Sharp and fresh.
- 1/2 cup mayo, ranch, or honey mustard — Pick one sauce and stick with it.
- 1 cup shredded cheddar, optional — For extra richness.
- 1 tablespoon butter or oil — Only if you want to toast the wraps.
Quick Steps:
- Warm the tenders: Cook or reheat the chicken tenders until hot and crisp.
- Prep the tortillas: Warm the tortillas briefly so they bend without tearing.
- Build the wraps: Spread sauce down the center of each tortilla, then add lettuce, pickles, chicken, and cheese if using.
- Roll tightly: Fold in the sides and roll from the bottom up.
- Toast if desired: Place seam-side down in a skillet for 1 to 2 minutes so the wrap seals and the outside gets lightly crisp.
Equipment for This Recipe:
- Skillet or air fryer — For crisping the chicken and optional wrap toast.
- Cutting board — For rolling.
- Sharp knife — To slice the wraps in half.
- Small bowl — For the sauce.
How to Serve This Dish:
Cut each wrap in half and serve with fruit, fries, or a handful of chips. If you want to keep things neat, wrap the lower half in parchment so the sauce doesn’t run onto hands.
Pro Tips for This Recipe:
- Keep the chicken as crisp as possible before wrapping it.
- Dry pickles or cucumber slices with a paper towel if they seem watery.
- Sauce in the center, not edge to edge, keeps the tortilla from slipping.
Variations on This Dish:
- Buffalo Chicken Wraps: Use buffalo sauce and ranch.
- Ranch Chicken Wraps: Add bacon bits and cheddar.
- Vegetarian Crunch Wraps: Use crispy tofu strips instead of chicken.
Common Mistakes to Avoid with This Dish:
- Don’t let the tenders cool too long before assembling. They lose their crunch.
- Don’t overfill the tortilla. It won’t roll cleanly.
- Don’t add too much sauce. Wet wraps fall apart fast.
18. Bean and Cheese Burrito Bake
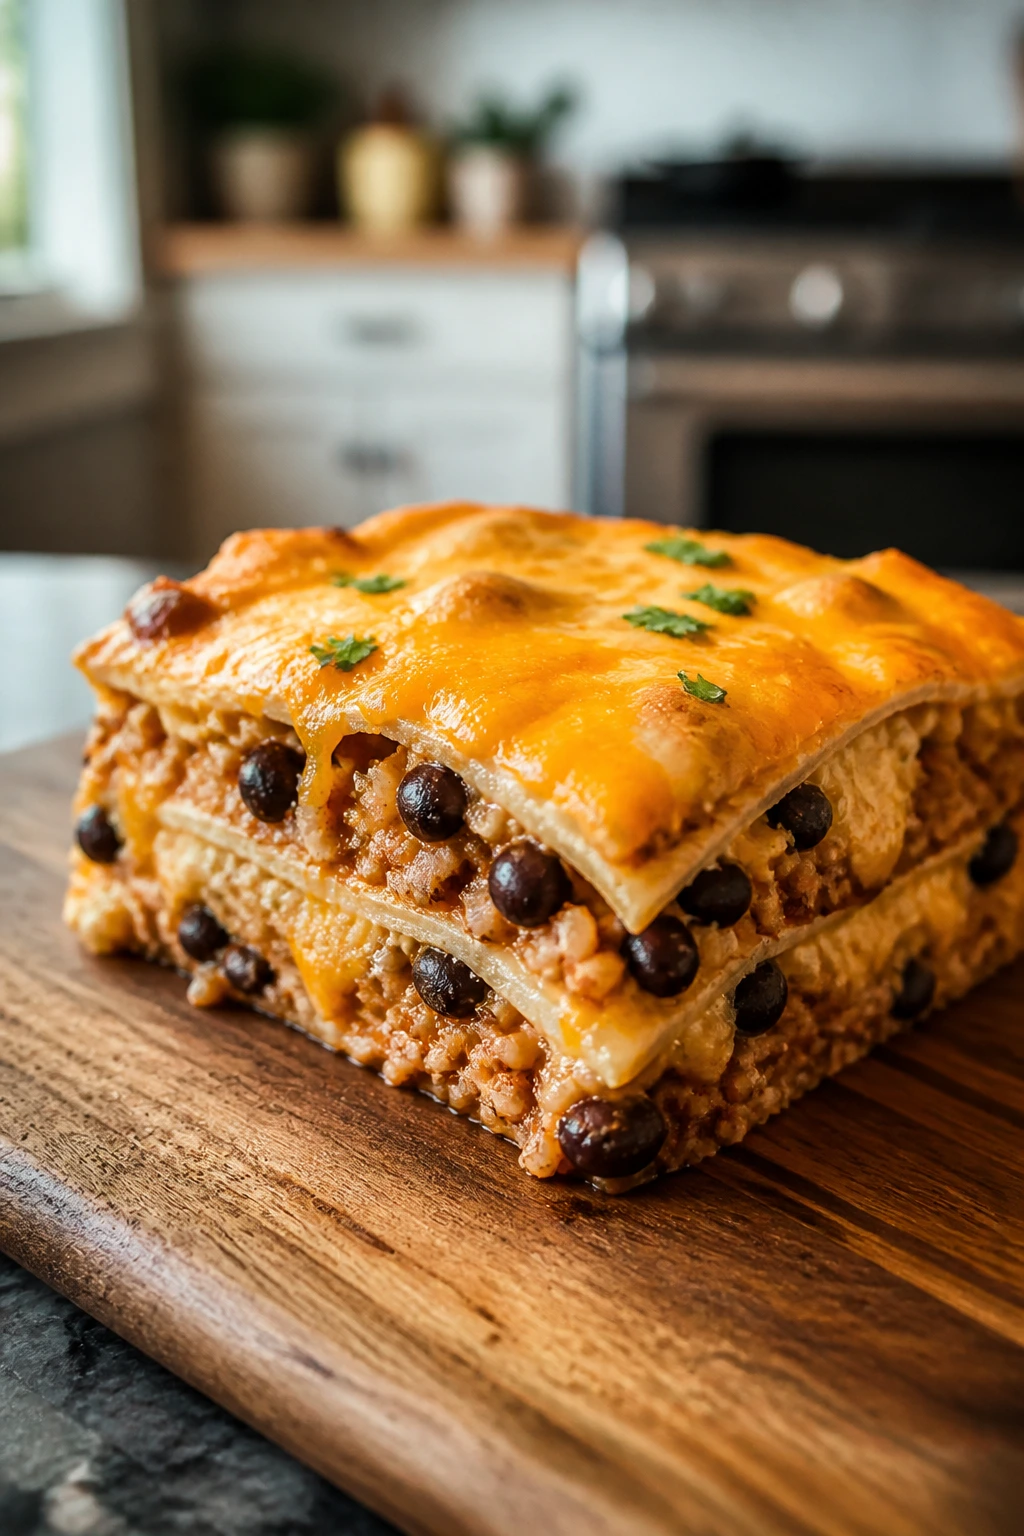
Bean and cheese burrito bake is a quiet powerhouse. It feeds a group without demanding a lot of fuss, slices into neat squares, and can be topped with whatever the family likes best. It’s the dish I’d make if I wanted to put something warm and filling on the table without spending the whole afternoon in the kitchen.
Why It Works:
Layering the filling turns individual burritos into a sliceable casserole, which is easier when people are eating on laps or near the couch. Beans, rice, and cheese hold together better than a loose filling, and the enchilada sauce keeps everything moist without making it soupy. It’s also one of the best make-ahead dishes in this collection.
Key Ingredients:
- 6 large flour tortillas — Big enough to layer neatly.
- 2 cups refried beans — The base layer.
- 1 can black beans, drained and rinsed — Adds texture.
- 1 cup cooked rice — Makes the casserole more filling.
- 2 cups enchilada sauce — Use a thick, flavorful sauce.
- 3 cups shredded cheddar or Monterey Jack — For the melt.
- 1 cup corn — Adds sweetness.
- 2 scallions, sliced — For the top.
- 1 teaspoon cumin — Helps the beans taste deeper.
Quick Steps:
- Prep the dish: Heat the oven to 375°F (190°C) and spread a little enchilada sauce in a 9×13-inch baking dish.
- Layer the filling: Lay down tortillas, then spread on refried beans, black beans, rice, corn, and cheese. Repeat the layers once more.
- Add the top: Finish with tortillas, remaining enchilada sauce, and a final layer of cheese.
- Bake: Bake for 25 to 30 minutes, until hot and bubbling around the edges.
- Rest and garnish: Let the casserole rest for 10 minutes, then top with scallions before cutting.
Equipment for This Recipe:
- 9×13-inch baking dish — Holds the layers.
- Spatula — For spreading beans.
- Foil — Useful if the top browns too quickly.
- Sharp knife — For clean squares.
How to Serve This Dish:
Serve with sour cream, salsa, and sliced avocado if you want to dress it up. A square or two makes a full lunch portion, especially with a crisp side salad or fruit.
Pro Tips for This Recipe:
- Warm the refried beans a little so they spread without tearing the tortillas.
- Let the bake rest before cutting. The layers hold together much better.
- Use sturdy tortillas that won’t break when layered.
Variations on This Dish:
- Chicken Burrito Bake: Add shredded chicken between the layers.
- Vegetable Burrito Bake: Use sautéed peppers and zucchini instead of meat.
- Mild Kid Version: Use mild sauce and keep the top plain for those who dislike heat.
Common Mistakes to Avoid with This Dish:
- Don’t make the filling too wet. It turns the casserole gummy.
- Don’t skip the rest time. Slicing too soon makes a mess.
- Don’t use too much sauce on the bottom layer. The base should support the bake, not soak it.
19. Broccoli Cheddar Baked Potatoes
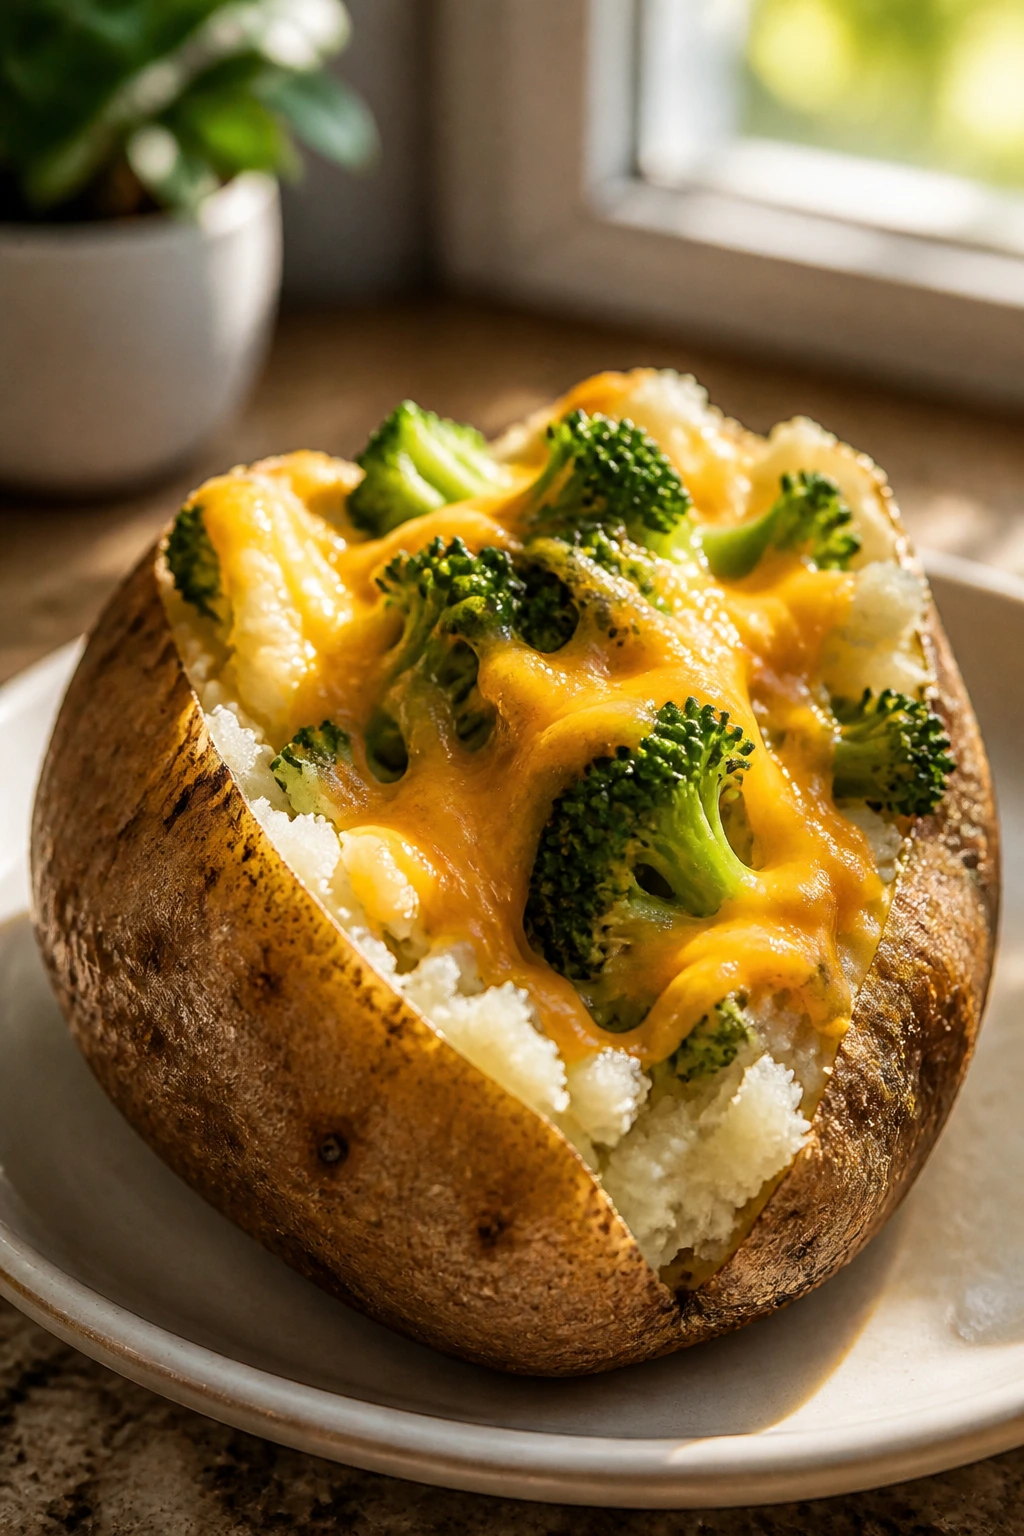
Broccoli cheddar baked potatoes sit right in the middle of comfort food and actual lunch. The skins are crisp, the centers are fluffy, and the broccoli gives the whole thing some color and bite. They’re one of the better ways to feed people who want something warm but not too heavy.
Why It Works:
Russet potatoes bake into a fluffy interior that can take a lot of topping without collapsing. Steam-scrubbed broccoli cooks fast and stays bright if you keep it in small florets. A quick cheese sauce or melt makes the whole potato feel complete instead of patched together.
Key Ingredients:
- 4 large russet potatoes — Best for fluff and sturdy skin.
- 2 cups broccoli florets, chopped small — Small pieces are easier to eat.
- 2 tablespoons butter — For the potatoes and sauce.
- 1/2 cup milk — Helps the cheese melt smoothly.
- 2 cups shredded cheddar — The star topping.
- 1/2 cup sour cream — For serving.
- Salt and pepper — Needed in both the potato and the topping.
- 4 slices bacon, cooked and crumbled, optional — If you want extra richness.
Quick Steps:
- Bake the potatoes: Prick the potatoes, rub with a little oil and salt, and bake at 425°F (220°C) for 50 to 60 minutes, until tender.
- Steam the broccoli: Steam the florets for 3 to 4 minutes, until bright green and just soft.
- Make the cheese topping: Warm the milk and butter in a small saucepan, then stir in the cheddar until melted and smooth.
- Split and fill: Cut the potatoes open, fluff the centers with a fork, and season with salt and pepper. Spoon broccoli and cheese over each one.
- Finish: Add sour cream and bacon if using, then serve hot.
Equipment for This Recipe:
- Baking sheet — For the potatoes.
- Small saucepan — For the cheese sauce.
- Fork — For fluffing the potato flesh.
- Knife — For splitting the potatoes.
How to Serve This Dish:
Serve the potatoes on shallow plates with an extra spoon of sour cream and maybe a few chopped scallions. One potato usually makes a solid lunch, though smaller potatoes can be served as a side to sliders or wraps.
Pro Tips for This Recipe:
- Chop the broccoli small so it fits neatly on the potato.
- Bake the potatoes on a rack or directly on the oven grate if you want the skin extra crisp.
- Add salt to the potato flesh before the cheese sauce goes on. The seasoning matters more than people think.
Variations on This Dish:
- Broccoli Cheddar Soup-Style Potatoes: Add a little more milk to make the cheese topping looser.
- Loaded Broccoli Potatoes: Add bacon and scallions.
- Dairy-Free Potatoes: Use olive oil, dairy-free cheese, and a spoonful of tahini for creaminess.
Common Mistakes to Avoid with This Dish:
- Don’t leave the broccoli in big chunks. It falls off the potato.
- Don’t skip piercing the potatoes before baking. They can burst.
- Don’t overload the skins with topping if you want them to stay neat.
20. Sausage and Pepper Hoagie Skillet
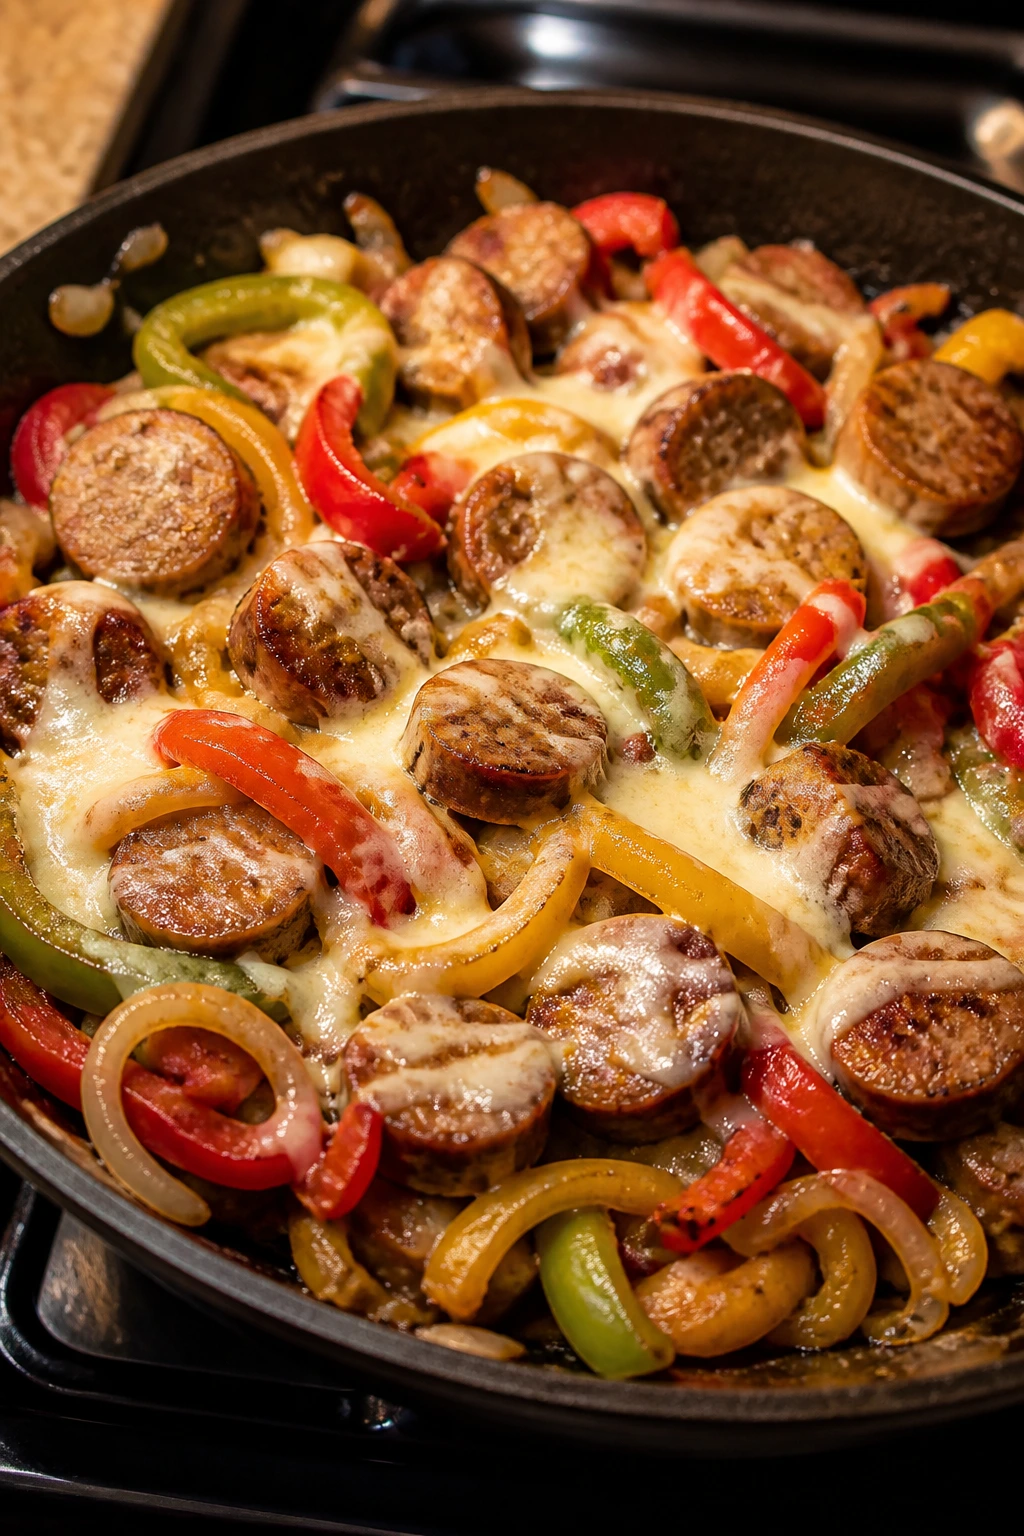
Sausage and pepper hoagies are loud in the best way. They smell like dinner before they ever hit the table, and the mix of sweet peppers, onion, and browned sausage gives you that classic sandwich-shop feel without needing to stand in line for one. It’s a strong last pick for a movie-night lunch lineup because it feels hearty and straightforward.
Why It Works:
Browning the sausage first gives you a savory base, and then the peppers and onions soak up all that flavor in the skillet. Simmering everything with a little sauce keeps the filling juicy enough for the roll but not so wet that it floods the bread. Toasted hoagie rolls hold up better than soft buns here.
Key Ingredients:
- 1 pound Italian sausage links — Sweet or hot, depending on the crowd.
- 3 bell peppers, sliced — Use a mix of colors if you like.
- 1 large onion, sliced — Cooks down sweetly.
- 3 cloves garlic, minced — A little goes a long way.
- 1 cup marinara sauce — Optional, but useful if you want extra juiciness.
- 4 hoagie rolls — Split and lightly toasted.
- 8 slices provolone — Melts well over the filling.
- 1 tablespoon olive oil — For the vegetables.
- 1 teaspoon Italian seasoning — Helps tie the flavor together.
Quick Steps:
- Brown the sausage: Cook the sausage in a large skillet over medium heat until browned on the outside and cooked through. Remove and slice.
- Cook the vegetables: Add olive oil, then sauté the peppers and onion for 8 to 10 minutes until softened and a little charred at the edges.
- Add garlic and seasoning: Stir in garlic and Italian seasoning for 30 seconds.
- Combine and simmer: Return the sausage to the skillet, add marinara if using, and simmer for 5 minutes until everything is hot and glossy.
- Assemble the hoagies: Stuff the toasted rolls, top with provolone, and let the cheese melt under the broiler for 1 to 2 minutes.
Equipment for This Recipe:
- Large skillet — For browning and simmering.
- Tongs — Handy for turning the sausage.
- Sheet pan — For toasting the rolls and melting the cheese.
- Sharp knife — For slicing the peppers and onions.
How to Serve This Dish:
Serve the hoagies with chips, pickles, or a chopped salad. One sandwich is usually enough for lunch, but the filling also stretches well if you need to make extra rolls for a bigger family.
Pro Tips for This Recipe:
- Give the peppers some color in the pan. A little char makes the filling taste deeper.
- Toast the rolls before stuffing them so they do not collapse.
- If the filling looks dry, add a splash of water or more marinara rather than piling on extra cheese.
Variations on This Dish:
- Chicken Sausage Hoagies: Swap in chicken sausage for a lighter version.
- Spicy Hoagies: Use hot sausage and add pepper flakes.
- Veggie Hoagies: Use mushrooms, peppers, onions, and provolone without the meat.
Common Mistakes to Avoid with This Dish:
- Don’t crowd the pan while browning the sausage. You want color, not steam.
- Don’t slice the peppers too thick. Thin strips cook faster and sit better in the roll.
- Don’t assemble into cold, soft rolls. Toast them first or they slump.
Why Movie-Night Lunches Need Different Rules
Movie-night food has a different job than a sit-down lunch. It needs to stay edible when someone pauses to answer a question, hand someone a blanket, or get up for more water. That means the best dishes here are built with shape in mind: toasted bread, tight rolls, crisp shells, baked edges, or thick filling that doesn’t wander.
Hot food matters, but so does timing. A casserole that sits for 10 minutes and still tastes right is more useful than one that must be served the second it leaves the oven. That is why these recipes lean on sturdy textures and sauces that cling instead of run. If a dish can be cut, lifted, and eaten with one hand, it earns a place in the rotation.
I also like this style of meal because it lets you mix temperatures without much effort. A platter of pinwheels next to a tray of sliders, or a cold pasta salad beside hot potato skins, keeps the table from feeling one-note. And when the food mix is smart, you can feed both the kid who wants “just cheese” and the adult who wants something with actual backbone.
Essential Equipment for These Recipes
- Rimmed sheet pans: Useful for bagels, flatbreads, quesadillas, calzones, and anything that needs a crisp edge without spilling.
- 9×13-inch baking dish: Best for slider bakes, burrito bakes, and other layered dishes that need to hold together.
- 12-cup muffin tin: Necessary for mac and cheese cups and taco cups, and handy for anything portioned.
- Mini muffin tin: Great for corn dog muffins and small bite-size bakes.
- Large oven-safe skillet: Perfect for one-pan ziti and any stovetop-to-oven dish.
- Large nonstick skillet: Helpful for fried rice, sausage filling, or browning meat without sticking.
- Mixing bowls: At least two medium bowls save time when you’re building more than one filling.
- Sharp chef’s knife: Saves you from mangling wraps, sandwiches, and vegetables.
- Cutting board: A large, stable board matters when you’re slicing multiple items fast.
- Pastry brush: Good for oil, butter, and egg wash on breads and rolls.
- Parchment paper: Makes cleanup easier and keeps cheesy bakes from welding themselves to the pan.
- Foil: Useful for covering dishes that brown too fast or for reheating leftovers.
- Measuring cups and spoons: Still necessary, even for recipes that look casual.
- Serving tray or lap-friendly boards: Not fancy, just practical when people eat away from the table.
Smart Shopping and Ingredient Tips
Start with the bread and cheese. Those two ingredients decide whether a movie-night lunch feels sturdy or sloppy. For melty recipes, low-moisture mozzarella and cheddar from the block give the cleanest melt, while pre-shredded cheese is a fine shortcut if you need speed and don’t mind a slightly less silky finish. For wraps and pinwheels, buy tortillas that bend without cracking; if the package says “burrito size,” that usually gives you more room to roll without tearing.
Rotisserie chicken earns its place here. So does frozen meatballs, cooked sausage, and leftover rice from the fridge. I would not waste energy trying to make every component from scratch when the point is to feed a family before the movie starts. The trick is choosing shortcuts that still taste like food, not like the package they came in.
For sauces, go thicker than you think. A thick marinara, a barbecue sauce with some body, and a pesto that clings to the pasta all behave better on couches and small trays. Watery sauce is the enemy of movie-night lunch. It leaks, drips, and keeps everyone reaching for napkins instead of enjoying the food.
Vegetables need a little care. Pick peppers that are firm, broccoli with tight florets, and onions that feel heavy for their size. If you’re buying tomatoes for topping, cherry tomatoes are easier to control than big slicing tomatoes because they release less water. For potatoes, russets are the safest bet because the skins crisp well and the centers fluff beautifully.
How to Serve These Family Lunch Ideas for Family Movie Night
Presentation: Use a mix of platters, parchment-lined boards, and shallow bowls so the food looks easy to grab. Keep sauces in ramekins or small cups, not pooled under the food, because the whole spread reads cleaner that way.
Accompaniments: Pair hot, cheesy items with something fresh and crisp: grapes, apple slices, carrot sticks, cucumber rounds, or a simple green salad. For richer dishes like sliders or ziti, a few pickles or a crunchy slaw keeps the plate from feeling heavy. If you want a true movie-night mood, a small bowl of popcorn can even sit at the edge of the spread.
Portions: For handheld items, plan on 2 sliders, 2 quesadilla wedges, 2 pinwheels, or 1 wrap per adult and slightly less for younger kids. For baked dishes like ziti, burrito bake, or potato skins, serve by the square, wedge, or half-shell rather than trying to measure exact ladles. It keeps people moving and reduces fuss.
Beverage Pairing: Sparkling water with lemon, iced tea, apple juice, and cold milk all work across this whole spread. For adults, a simple lager or a light sparkling drink fits the salty, cheesy foods without fighting them.
Additional Tips and Flavor Boosters
Flavor Enhancement: A finishing drizzle can save a meal from feeling flat. Hot honey on sliders, a little garlic butter on flatbreads, or extra Parmesan on ziti gives you a stronger finish with almost no extra work.
Customization: Set out a few small toppings and let people build their own last step. Pickles, jalapeños, chopped herbs, salsa, sour cream, and extra cheese go a long way when family members want different things from the same base dish.
Serving Suggestions: A tiny pile of something sharp on the plate changes the whole meal. Pickled onions, sliced olives, lemon wedges, or a spoon of relish can wake up otherwise soft, rich food.
Make-It-Yours: If you need a vegetarian version, lean on beans, mushrooms, broccoli, or chickpeas. For dairy-free plates, choose olive oil, dairy-free cheese, and a sauce that already has good flavor on its own. If you need more protein, add chicken, beans, or sausage to almost any recipe in this collection without breaking the structure.
Make-Ahead, Storage, and Reheating Guidance
A few of these recipes are best the minute they leave the oven, but many hold up better than you’d expect. The cold items — pinwheels, Caesar wraps, and pasta salad cups — keep well for about 1 to 2 days in the refrigerator if they’re tightly covered. For the best texture, keep lettuce, croutons, and dressing separate until the last possible minute. Once dressing meets lettuce, the clock starts ticking.
Hot baked dishes like sliders, ziti skillet, burrito bake, calzones, potato skins, and meatball subs keep for 3 to 4 days in the fridge. Cool them completely before storing so the lids don’t trap steam and turn the bottoms soft. Most of those dishes can also be frozen for up to 2 months if you wrap them tightly or portion them into freezer containers. Ziti and burrito bake freeze especially well; wraps and pinwheels do not.
Reheat baked dishes in a 350°F (175°C) oven, covered loosely with foil at first and uncovered for the last few minutes if you want the top to crisp again. Sliders and rolls do better in the oven or toaster oven than the microwave. Mac and cheese cups and potato skins can be reheated in an air fryer at 350°F for a few minutes to bring back the edges. The microwave is fine for fried rice or burrito filling, but use short bursts so the texture doesn’t turn dry on the outside and hot in the middle.
If you’re making food ahead for a movie, assemble what can be assembled, then bake or crisp it close to serving time. That tiny bit of timing makes a bigger difference than people expect. Hot, fresh edges are what keep the whole spread feeling special.
Variations and Adaptations to Try
Gluten-Free Tray Night: Use corn tortillas for taco cups and burritos, gluten-free pasta for the mac cups and pesto salad, and baked potatoes or rice bowls for the naturally gluten-free spots in the menu. The rest of the collection is easy to adapt as long as you watch the bread and pasta.
Vegetarian Mix-and-Match: Swap in black beans, chickpeas, mushrooms, roasted peppers, or plant-based meatballs wherever you want a meatless plate. Taco cups, burrito bake, fried rice, and flatbreads all take vegetarian changes without losing their shape.
Milder Kid Plate: Keep sauces on the side, use mild cheddar, skip pepper flakes, and tone down onion or mustard-heavy fillings. Kids usually eat better when the base is familiar and the “interesting” parts stay optional.
Extra-Crunch Finish: Add crushed tortilla chips to taco cups, buttery panko to mac cups, toasted breadcrumbs to ziti, or a handful of seeds to pasta salad. That little bit of crunch keeps soft food from feeling samey.
Higher-Protein Swap: Add shredded chicken to wraps, flatbreads, and pasta salad; stir beans into the burrito bake; or add extra sausage to the hoagies and sliders. If the family is hungry, protein is the easiest way to make the meal stick.
Common Mistakes to Avoid
One of the biggest mistakes is overfilling handheld food. A wrap, slider, calzone, or quesadilla that looks generous on the counter usually turns messy the second someone lifts it. The fix is simple: leave a border, use less filling than you think, and let the sauce do some of the flavor work.
Another trap is using wet ingredients without drying them first. Tomatoes, pickles, lettuce, broccoli, and even cooked vegetables can leak enough moisture to ruin the texture of a good bake. Pat things dry, cook off excess liquid, and keep fresh toppings separate until serving when possible.
People also tend to skip the resting time after baking. That sounds harmless, but the cheese, sauce, and steam need a minute to settle or the food falls apart on the first cut. A short rest turns chaos into slices. It also keeps the inside from scorching the first person who takes a bite.
Reheating crisp food in the microwave is another classic mistake. The food gets hot, sure. It also goes limp. Use the oven or air fryer for anything that should stay crisp, and save the microwave for rice, sauces, and soft baked dishes where the texture can take the hit.
Finally, don’t make the table too one-note. If everything is hot and cheesy, the meal gets heavy fast. Add a cold side, something crunchy, or something sharp so the spread keeps moving from bite to bite.
Questions People Actually Ask About Movie-Night Lunches
Can I make most of these recipes ahead of time?
Yes. Sliders, burrito bake, ziti, meatballs, calzones, and potato skins all work well when assembled earlier and baked later. Cold recipes like pinwheels and pasta salad are best when you prep the components ahead and finish them close to serving.
Which recipes hold up best on the couch?
Mini pizza bagels, sliders, pinwheels, taco cups, and corn dog muffins are especially good because they can be picked up without much balancing. A dish that can sit on a napkin or a lap tray is worth its weight in cleanup time.
What if I need to feed picky eaters?
Keep the base simple and let the toppings stay separate. Cheese, chicken, beans, plain pasta, or ham are easy starting points, and sauces like salsa, mustard, or ranch can stay on the side so people choose their own level of flavor.
Can I use store-bought shortcuts without ruining the meal?
Absolutely. Rotisserie chicken, frozen meatballs, refrigerated dough, jarred marinara, and pre-shredded cheese all have a place here. The goal is not to impress a kitchen judge; it’s to get good food on the table before the previews end.
How do I keep hot food warm if everyone eats in shifts?
Use a low oven, around 200°F (95°C), for baked items that can tolerate a little waiting. For crisp food, keep the first batch on a wire rack in the oven so it doesn’t steam under its own heat.
Can I freeze leftovers from these recipes?
Yes, but not everything freezes with equal grace. Ziti, burrito bake, meatballs, and some sliders freeze well; pinwheels, wraps, and salads usually do not. Freeze the sturdy dishes in portions so you can reheat only what you need.
What’s the easiest vegetarian option in the group?
The taco cups, burrito bake, pesto pasta salad, veggie fried rice, and broccoli cheddar potatoes are the least complicated swaps. You can still give them enough body and flavor without adding extra steps or specialty ingredients.
How do I keep tortillas from tearing when I roll them?
Warm them briefly first. Even 10 seconds in the microwave or a quick pass in a dry skillet makes them much easier to fold, which matters for wraps, pinwheels, and burritos.
A Table That Lets the Movie Start on Time
The best family movie night food does not behave like a formal dinner. It shows up with a little structure, enough flavor, and a shape that survives the trip from kitchen counter to couch tray. That’s why these family lunch ideas work so well: they’re sturdy, flexible, and easy to share without turning the room into a cleanup project.
Mix hot and cold, soft and crisp, saucy and dry. That balance keeps the table interesting and gives everyone something they’ll actually finish before the opening credits are over. Pick two or three favorites, set out the napkins early, and let the food do its job quietly while the movie takes over.