
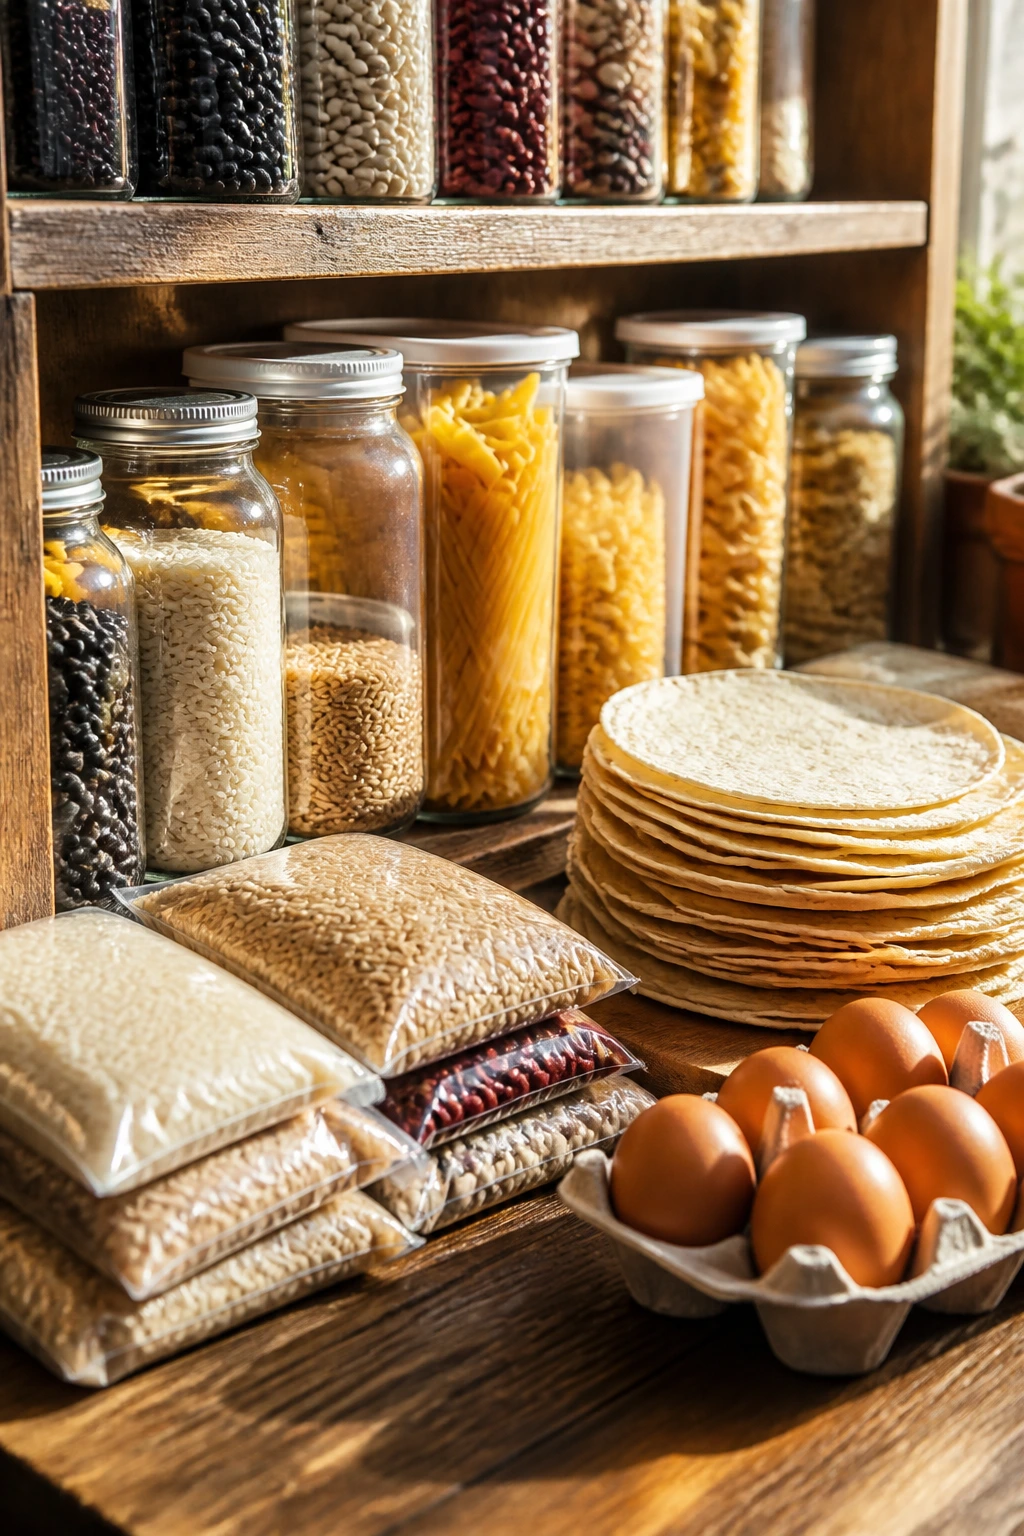
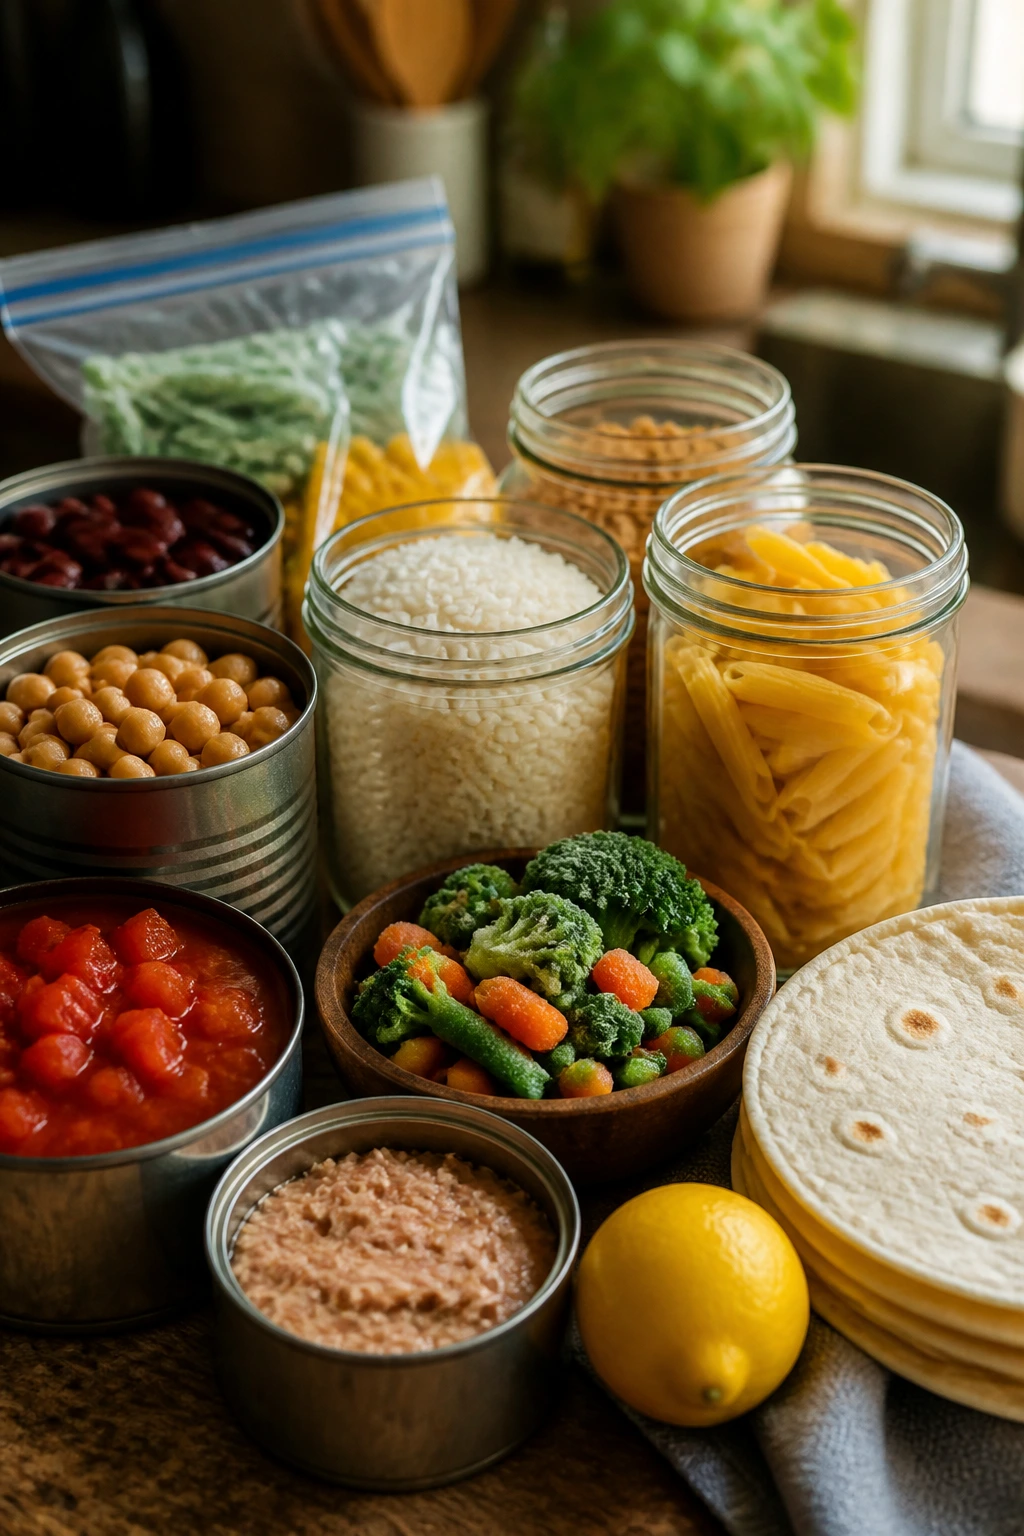
A skillet hissing on the stove beats a delivery app with a bad attitude. When dinner has to stay cheap and land on the table in 30 minutes, the trick is to lean on foods that cook fast and carry their own weight: beans, eggs, tortillas, pasta, rice, canned tomatoes, frozen vegetables, and the occasional rotisserie chicken that gets repurposed before anyone has time to complain.
Budget friendly recipes ready in 30 minutes work because they spend their money on the parts that matter most. Garlic, onion, citrus, hot sauce, broth, and a little cheese can make a pot of beans taste layered and complete. A pan of ground turkey can stretch farther than it looks once you add cabbage or rice. And a can of tomatoes, handled well, can taste like you paid more attention than you actually did.
What I like about this kind of cooking is the lack of drama. No long marinating. No obscure ingredients. No staring at a recipe wondering why it needs three kinds of vinegar and a spice you’ll never use again. These meals are built for real evenings, the ones where the sink is already full and everybody is asking what’s for dinner.
Why This Collection Earns a Spot in the Weekly Rotation
-
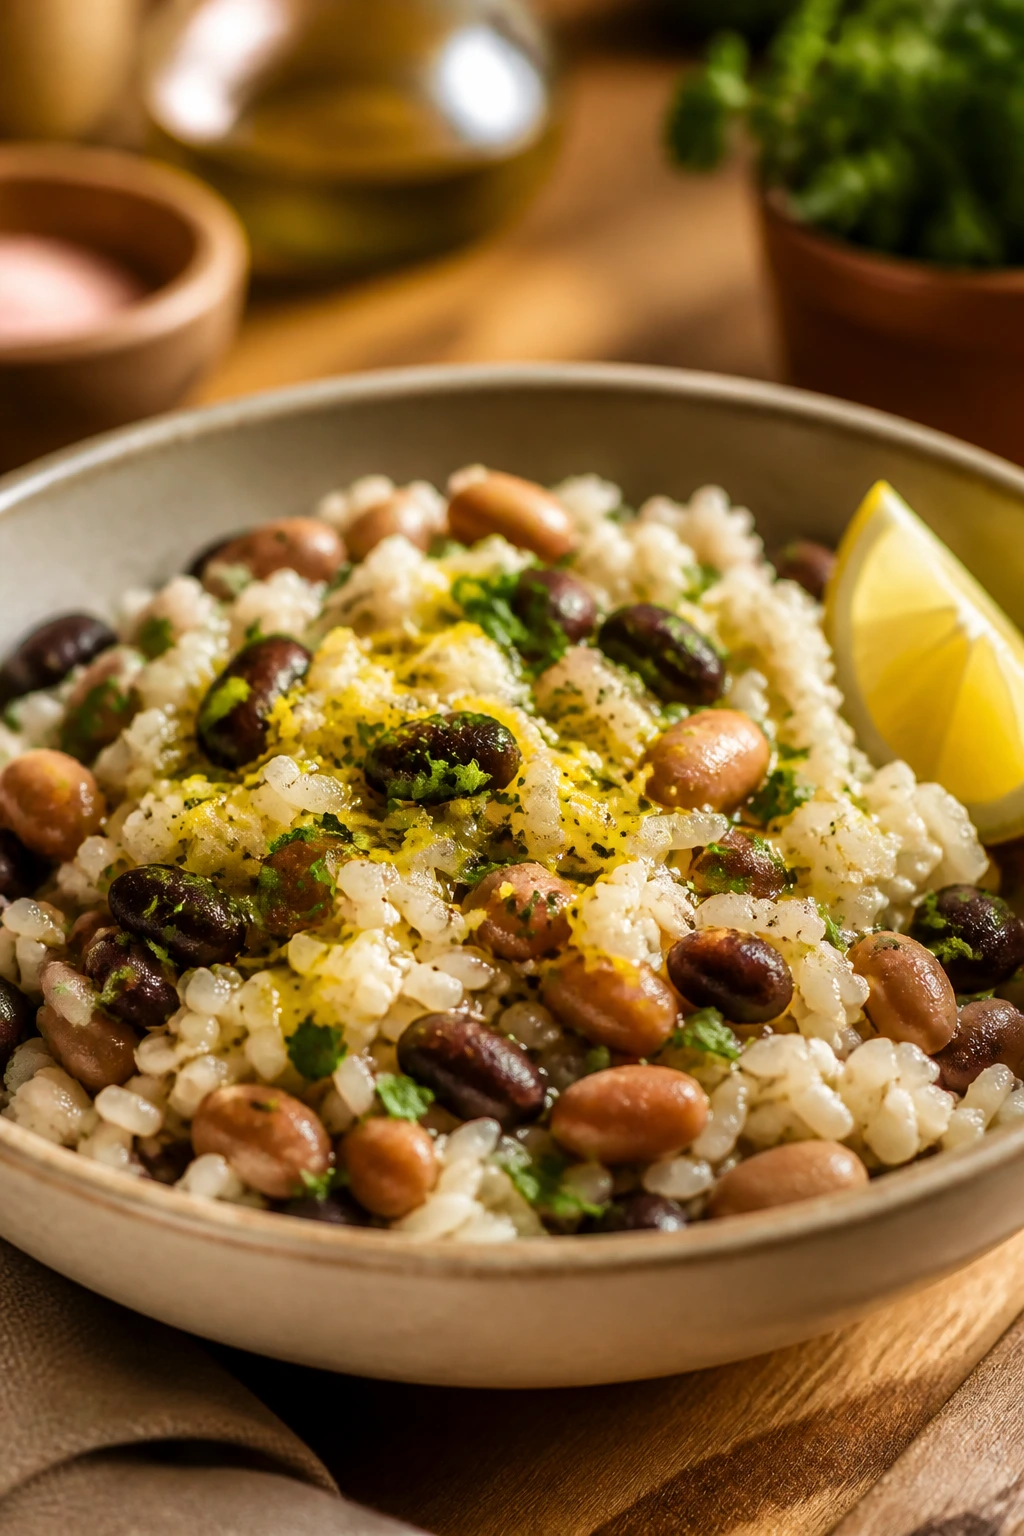
Pantry staples do the heavy lifting: Beans, rice, pasta, tortillas, eggs, and canned tomatoes show up here because they stretch a dollar without making dinner feel thin.
-
Most recipes keep cleanup small: A single skillet, saucepan, or sheet pan handles the job in many of these meals, which matters more than people admit.
-
Fast-cooking proteins show up on purpose: Ground meat, tuna, tofu, rotisserie chicken, and eggs keep the clock honest and the grocery bill from creeping up.
-
Leftovers behave well: Several of these dishes taste even better after a night in the fridge, especially the pasta, bean, and rice-based ones.
-
Heat stays adjustable: You can keep everything mild for kids, then add hot sauce, chili flakes, or a sharper cheese at the table.
-
The ingredients are flexible: If the store is out of one thing, these recipes usually survive a swap without falling apart.
Why 30-Minute Budget Meals Actually Work
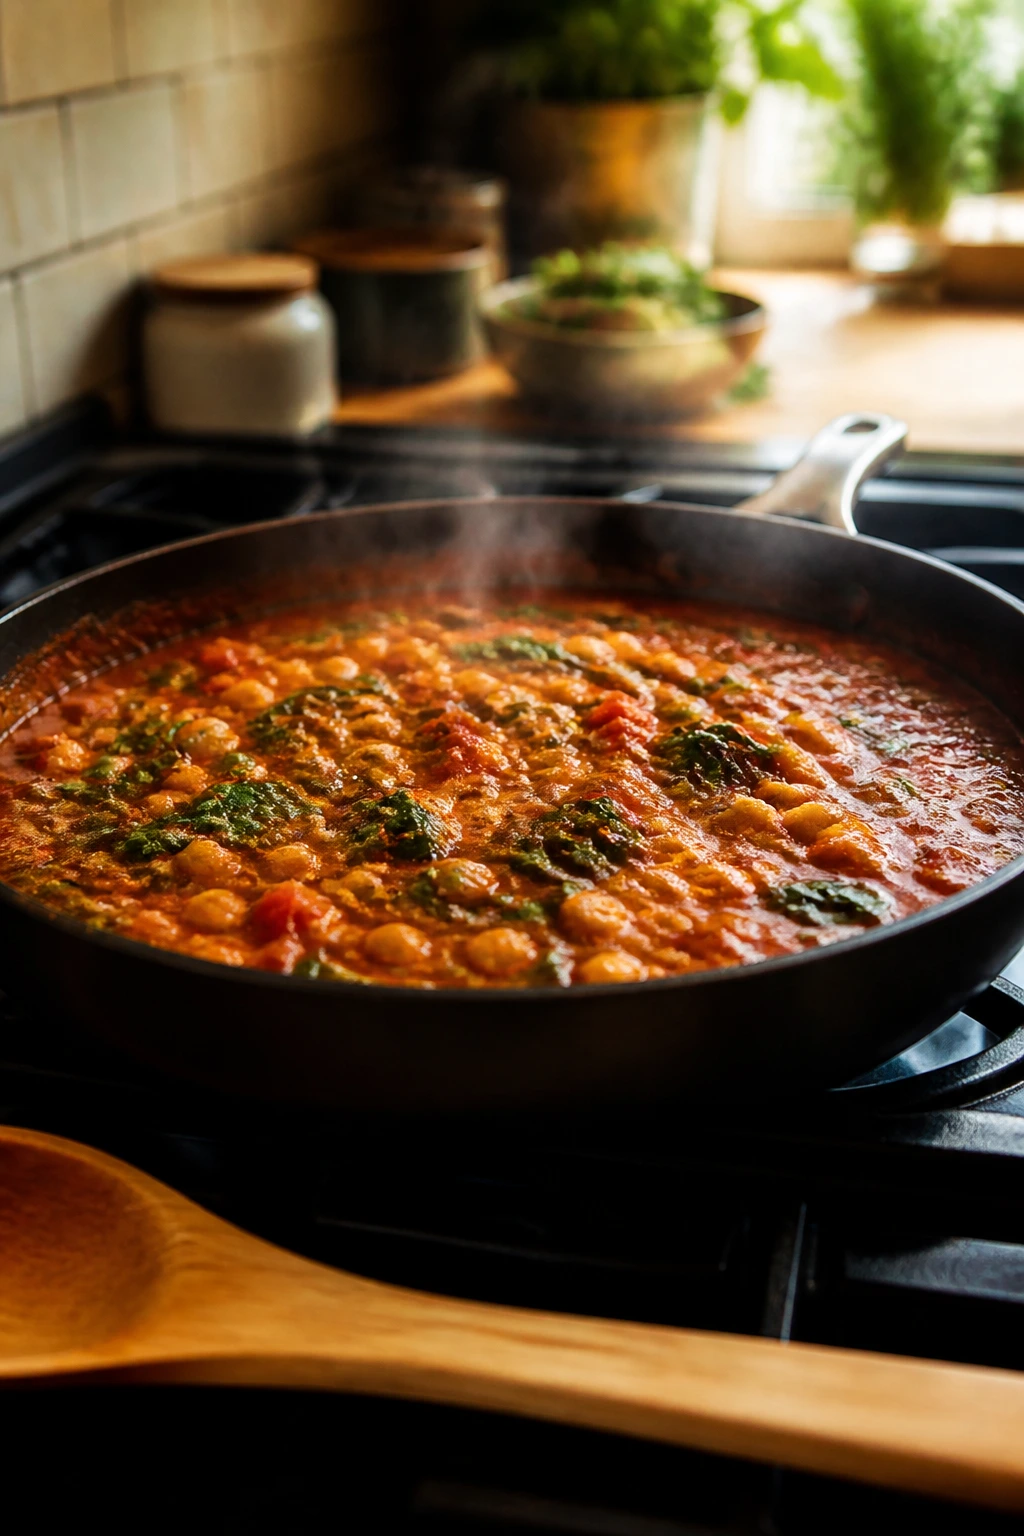
Cheap meals fail when they ask too much of one ingredient. A lonely chicken breast has to carry the whole plate, so it gets overcooked. A pile of bland vegetables gets steamed into silence. A sauce never gets the salt, acid, or fat it needs, so it tastes like a first draft.
The better approach is structural. A quick starch gives the meal volume. A salty or savory base gives it shape. A little fat carries flavor. Then a bright finish—lemon, vinegar, pickles, salsa, herbs—wakes the whole thing up at the end. That’s why a bowl of white beans, spinach, and broth can feel complete, while the same beans dumped into a bowl plain can feel like a compromise.
The other trick is choosing foods that cook on the clock you actually have. Orzo, tortellini, ramen noodles, instant rice, eggs, ground meat, tofu, and canned legumes don’t make you wait around. They brown, soften, or thicken fast enough that dinner can happen before the second round of dishes starts calling your name.
A lot of these recipes also use what I think of as “stretch ingredients.” Cabbage. Onion. Frozen peas. Corn. Potatoes. They’re inexpensive, they last, and they fill in the gaps without demanding a special trip to the store. That matters more than flashy flavor in the real world.
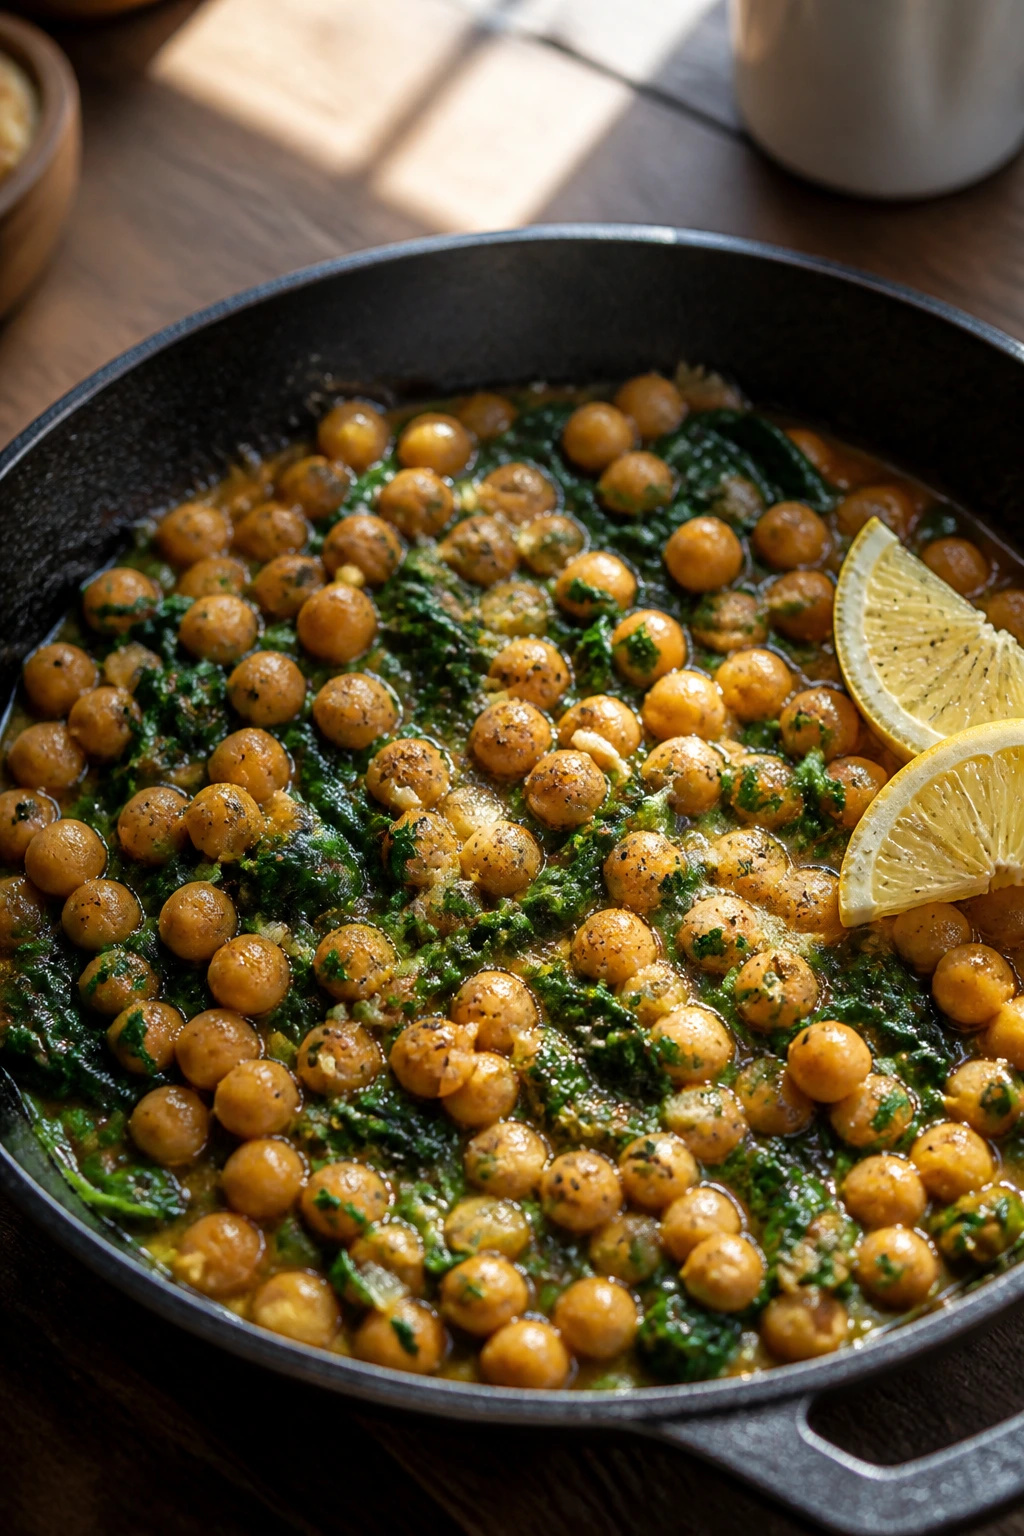
1. Garlic Butter Chickpea Skillet
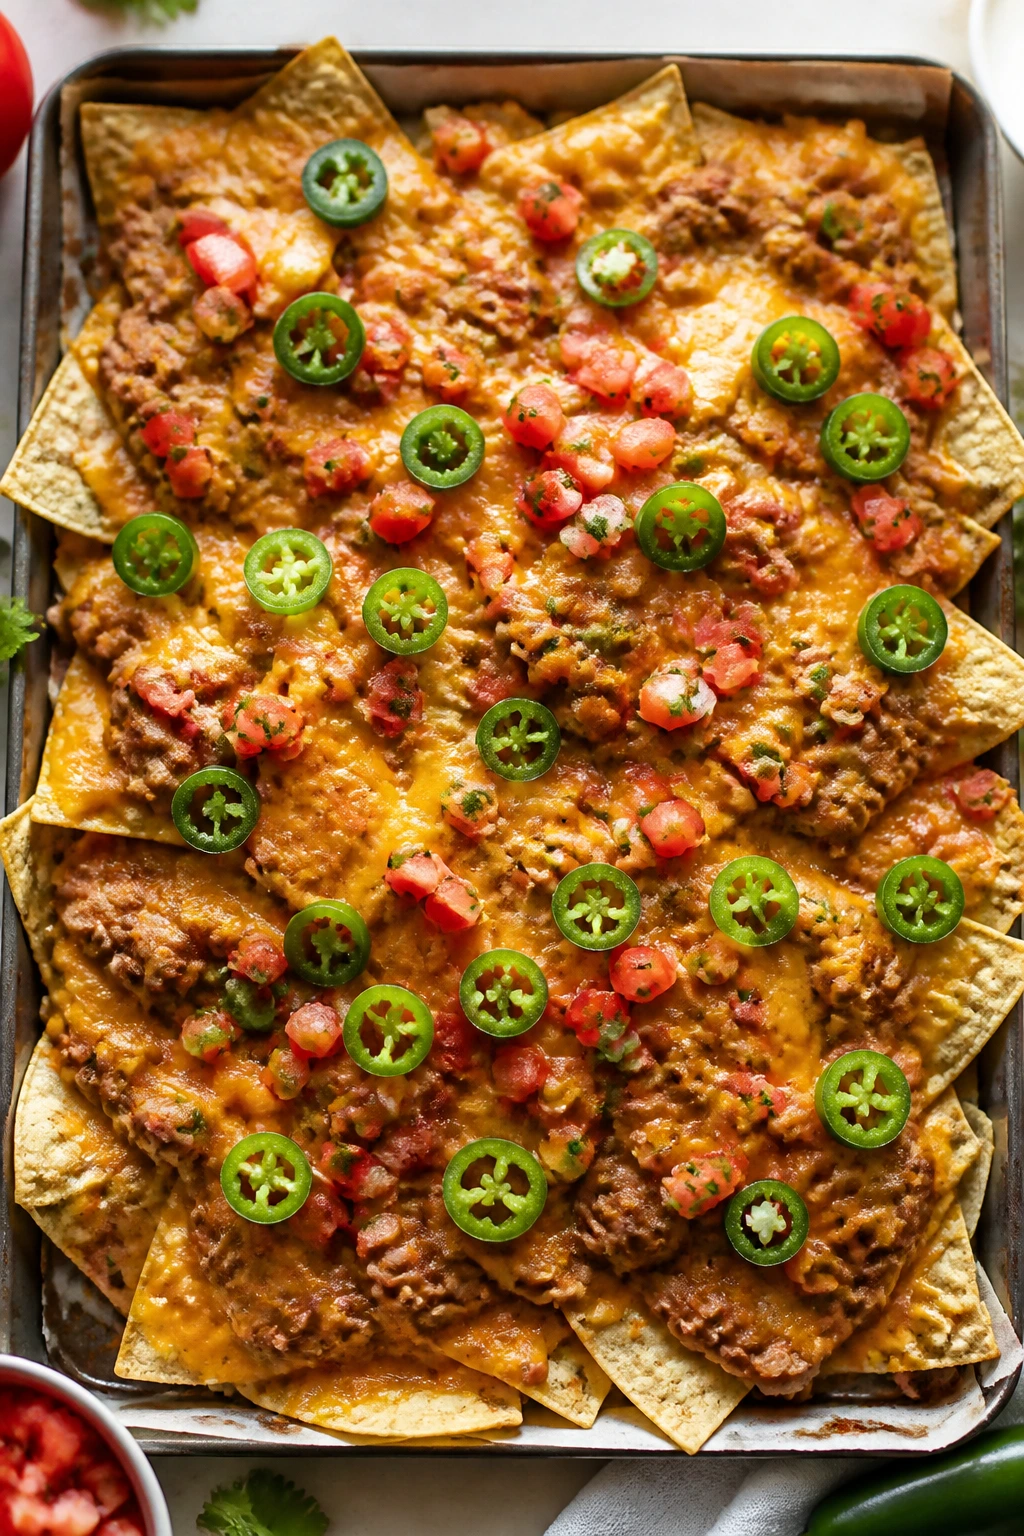
Chickpeas sound plain until you hit them with butter, garlic, lemon, and a hot pan. Then they turn nutty at the edges, the spinach collapses into silky ribbons, and the whole skillet smells like something you’d happily eat with torn bread standing over the stove. It’s fast, cheap, and blunt in the best way.
Why It Works:
This recipe leans on canned chickpeas, so there’s no soaking, no long simmer, and no guesswork. The butter and olive oil give the beans enough fat to brown instead of just warming through, and that little crust on the bottom is where half the flavor lives. A splash of broth loosens the pan juices into a light sauce, which keeps the chickpeas from feeling dry.
Key Ingredients:
- 2 tablespoons olive oil
- 3 tablespoons unsalted butter
- 1 small yellow onion, diced
- 4 garlic cloves, minced
- 2 cans chickpeas, 15 ounces each, drained and rinsed
- 1/2 teaspoon smoked paprika
- 1/2 teaspoon dried oregano
- 1/2 cup vegetable broth
- 4 cups baby spinach
- 1 lemon, cut into wedges
- Salt and black pepper to taste
- Crusty bread or pita, for serving
Quick Steps:
- Heat the olive oil and butter in a large skillet over medium-high heat. Add the onion and cook for 3 to 4 minutes, until softened and just starting to brown.
- Stir in the garlic, chickpeas, paprika, oregano, salt, and pepper. Cook for 5 to 6 minutes, stirring now and then, until the chickpeas pick up golden spots.
- Pour in the broth and scrape up any browned bits. Let it bubble for 1 to 2 minutes, until the liquid looks slightly glossy.
- Fold in the spinach and cook just until wilted. Turn off the heat, squeeze over lemon juice, and taste for salt before serving.
Equipment for This Recipe:
- Large skillet, 12-inch if you have it
- Wooden spoon or spatula
- Can opener
- Cutting board and knife
How to Serve This Dish:
Pile it into shallow bowls with bread on the side so you can scoop up the garlicky butter at the bottom. If you want a fuller meal, spoon it over rice or couscous. It looks best with a final squeeze of lemon and a little black pepper scattered over the top.
Pro Tips for This Recipe:
- Pat the chickpeas dry with a towel after rinsing them. Drier beans brown faster.
- Add lemon at the end, not during cooking. Heat dulls it.
- If your skillet is small, brown the chickpeas in two batches so they actually color.
- A spoonful of yogurt on top works if you want a creamier finish.
Variations on This Dish:
- Spicy Pantry Chickpeas: Add 1/2 teaspoon red pepper flakes with the garlic.
- Tomato Chickpea Skillet: Stir in 1 cup halved cherry tomatoes after the chickpeas brown.
- Creamy Chickpea Mash: Smash about a third of the chickpeas with the back of a spoon for a thicker, saucier pan.
Common Mistakes to Avoid with This Dish:
- Don’t skip drying the chickpeas. Wet beans steam and stay soft.
- Don’t add the spinach too early. It turns dull and swampy if it overcooks.
- Don’t forget the lemon. Without acid, the butter can flatten the whole pan.
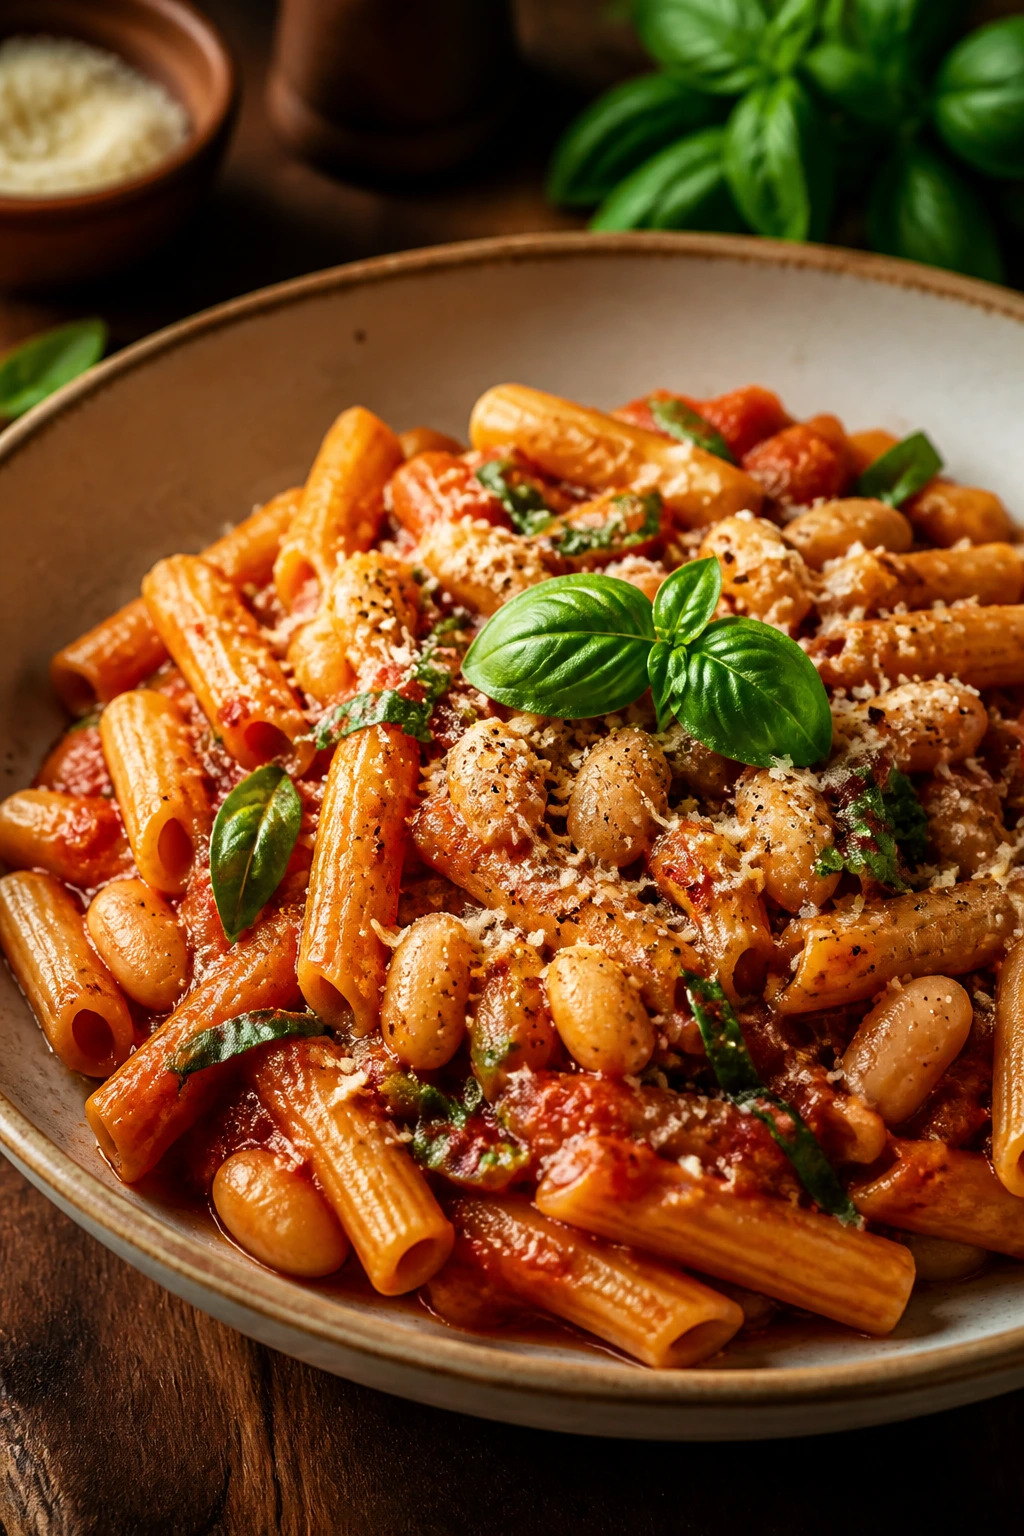
2. Tomato Basil Pasta with White Beans
This is the kind of pasta I make when the fridge looks awkward and the pantry looks fine. The sauce is tomato-rich and a little sweet, the beans make it feel more substantial, and the basil shows up like it knows exactly what it’s doing. Nothing fancy. Everything works.
Why It Works:
White beans are the quiet hero here. They take on the flavor of garlic, tomato, and basil without asking for much money or time, and they make a plain bowl of pasta feel like dinner instead of a side dish. A small hit of sugar smooths the canned tomatoes, while parmesan at the end gives the sauce enough body to cling to the noodles.
Key Ingredients:
- 12 ounces spaghetti or penne
- 2 tablespoons olive oil
- 1 small onion, finely diced
- 3 garlic cloves, minced
- 1 can crushed tomatoes, 28 ounces
- 1 can cannellini beans, 15 ounces, drained and rinsed
- 1 teaspoon dried basil or 1/4 cup chopped fresh basil
- 1/2 teaspoon sugar
- 1/2 teaspoon salt, plus more for pasta water
- 1/4 teaspoon black pepper
- 1/4 cup grated parmesan, plus more for serving
Quick Steps:
- Bring a pot of salted water to a boil and cook the pasta until just al dente. Reserve 1/2 cup pasta water before draining.
- Warm the olive oil in a large skillet over medium heat. Cook the onion for 4 minutes, then add the garlic and cook for 30 seconds.
- Stir in the tomatoes, beans, basil, sugar, salt, and pepper. Simmer for 8 to 10 minutes, stirring once or twice, until the sauce thickens a little.
- Add the pasta and a splash of reserved pasta water. Toss hard until the sauce coats the noodles, then finish with parmesan and more basil.
Equipment for This Recipe:
- Large pot
- Large skillet or sauté pan
- Colander
- Wooden spoon
How to Serve This Dish:
Serve it in wide bowls with extra parmesan and a drizzle of olive oil. A simple green salad or toasted bread is enough on the side. The sauce should cling, not pool, so if it looks tight, loosen it with another spoonful of pasta water.
Pro Tips for This Recipe:
- Salt the pasta water until it tastes like the sea. Bland water makes bland noodles.
- Keep some beans whole and let a few break apart; that mix gives the sauce texture.
- Fresh basil goes in at the end, not the start.
- If the tomatoes taste sharp, add another pinch of sugar rather than drowning them in cheese.
Variations on This Dish:
- Garlicky Red Pepper Version: Add 1/2 teaspoon red pepper flakes with the onion.
- Creamier Bean Pasta: Stir in 2 tablespoons mascarpone or cream cheese at the end.
- Tuna Pantry Pasta: Add 1 drained can tuna with the beans for a higher-protein bowl.
Common Mistakes to Avoid with This Dish:
- Don’t drain the pasta too hard. That starchy water helps the sauce cling.
- Don’t boil the sauce aggressively. A hard boil can make it taste flat.
- Don’t use too little salt early on. Tomatoes need a firm hand.
3. Egg Roll in a Bowl
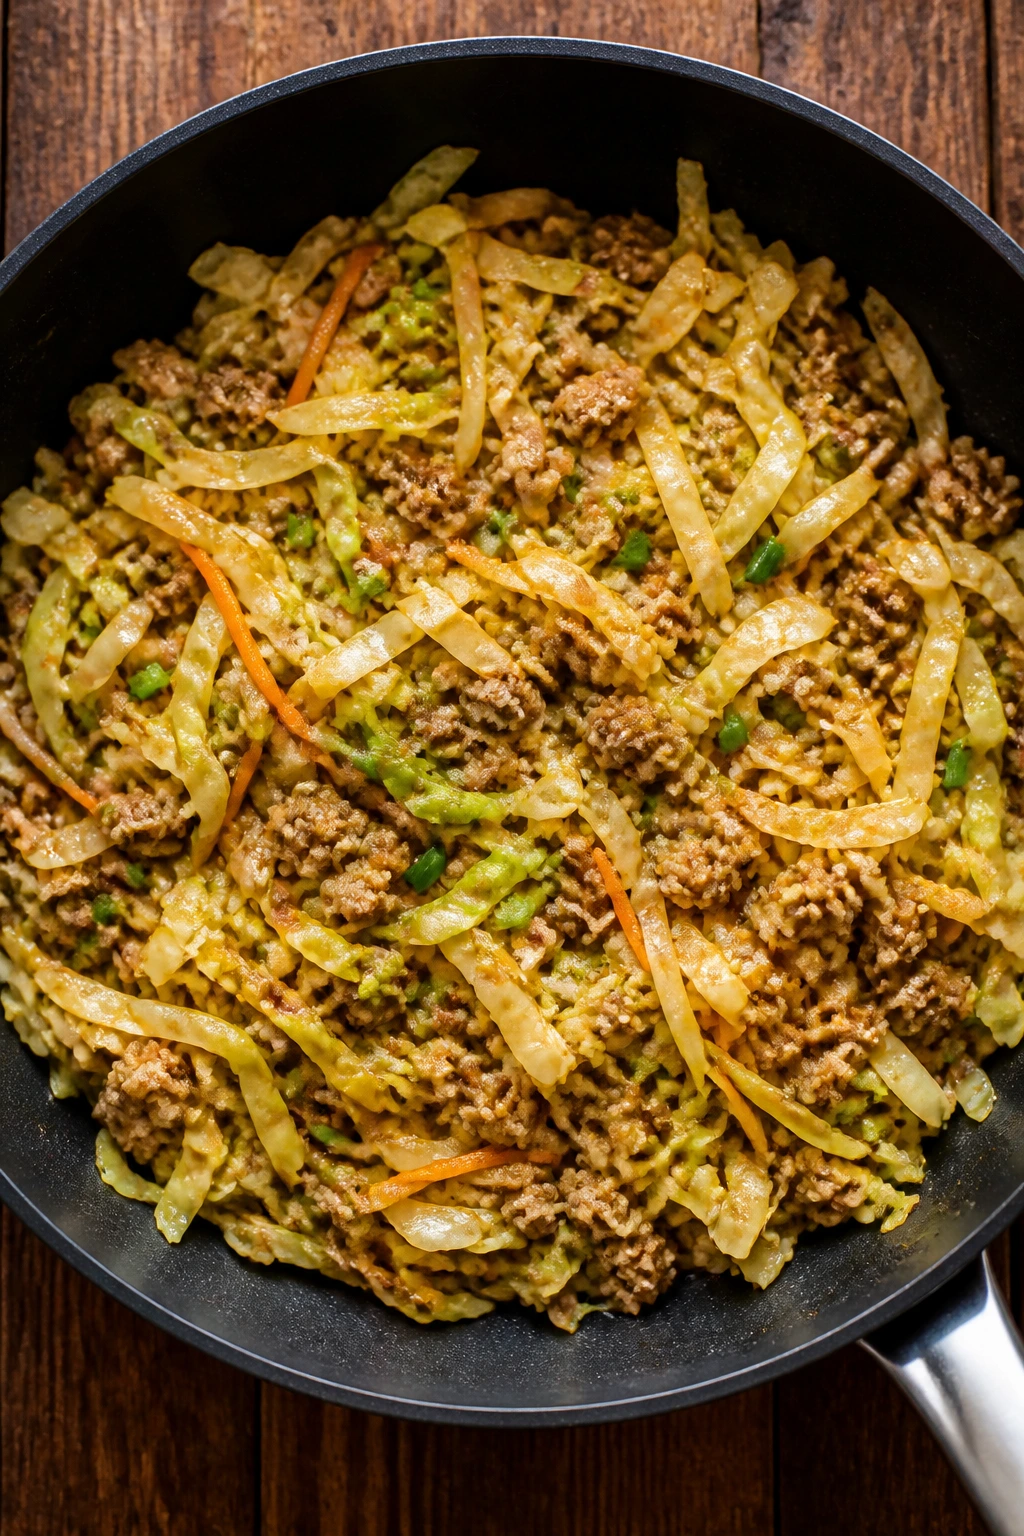
This is what I make when I want the flavor of takeout without the soggy wrapper part. The cabbage softens just enough to stay crisp-tender, the ginger and sesame oil smell sharp and warm, and the whole skillet cooks fast enough that you barely have time to set the table. It’s cheap in a way that feels smart, not stingy.
Why It Works:
Ground turkey or pork picks up flavor fast, and shredded cabbage cooks down in minutes. That means you get the savory, garlicky, slaw-like filling of an egg roll without deep frying anything. A little soy sauce and rice vinegar give the pan the salty-sour balance that keeps cabbage from tasting plain.
Key Ingredients:
- 1 pound ground turkey or ground pork
- 1 tablespoon sesame oil
- 1 small onion, diced
- 1 tablespoon grated fresh ginger
- 2 cloves garlic, minced
- 1 bag coleslaw mix, about 14 ounces
- 3 tablespoons soy sauce
- 1 tablespoon rice vinegar
- 1 teaspoon sriracha, optional
- 2 green onions, sliced
- Sesame seeds, for serving
Quick Steps:
- Heat the sesame oil in a large skillet over medium-high heat. Add the meat and onion, then cook for 5 to 6 minutes, breaking the meat up until it loses all pink color.
- Stir in the ginger and garlic and cook for 30 seconds, just until fragrant.
- Add the coleslaw mix, soy sauce, rice vinegar, and sriracha if using. Toss for 3 to 4 minutes, until the cabbage softens but still has a little crunch.
- Finish with green onions and sesame seeds. Taste before serving; if it needs more punch, add a splash more vinegar.
Equipment for This Recipe:
- Large skillet or wok
- Spatula
- Knife and cutting board
- Measuring spoons
How to Serve This Dish:
Scoop it into bowls and eat it as-is, or spoon it over rice if you want more bulk. A fried egg on top is not mandatory, but it does make the bowl feel more dinner-like. The best version has a mix of juicy meat, glossy cabbage, and a few browned bits at the bottom.
Pro Tips for This Recipe:
- Use a big skillet so the cabbage can steam off instead of crowding.
- If the pan looks wet, keep cooking. The moisture has to burn off or the flavor turns dull.
- Add the vinegar at the end if you like a brighter finish.
- Bagged slaw is fine here. No need to shred a cabbage by hand.
Variations on This Dish:
- Extra-Crunch Version: Top with chopped peanuts before serving.
- Chicken Swap: Use ground chicken if that’s cheaper or already in the fridge.
- Vegetarian Bowl: Replace the meat with crumbled tofu and 1 extra tablespoon soy sauce.
Common Mistakes to Avoid with This Dish:
- Don’t overcook the cabbage. Limp cabbage tastes tired.
- Don’t drown it in soy sauce. The pan should taste seasoned, not salty.
- Don’t skip the ginger. It gives the whole thing its takeout edge.
4. Tuna Melt Quesadillas
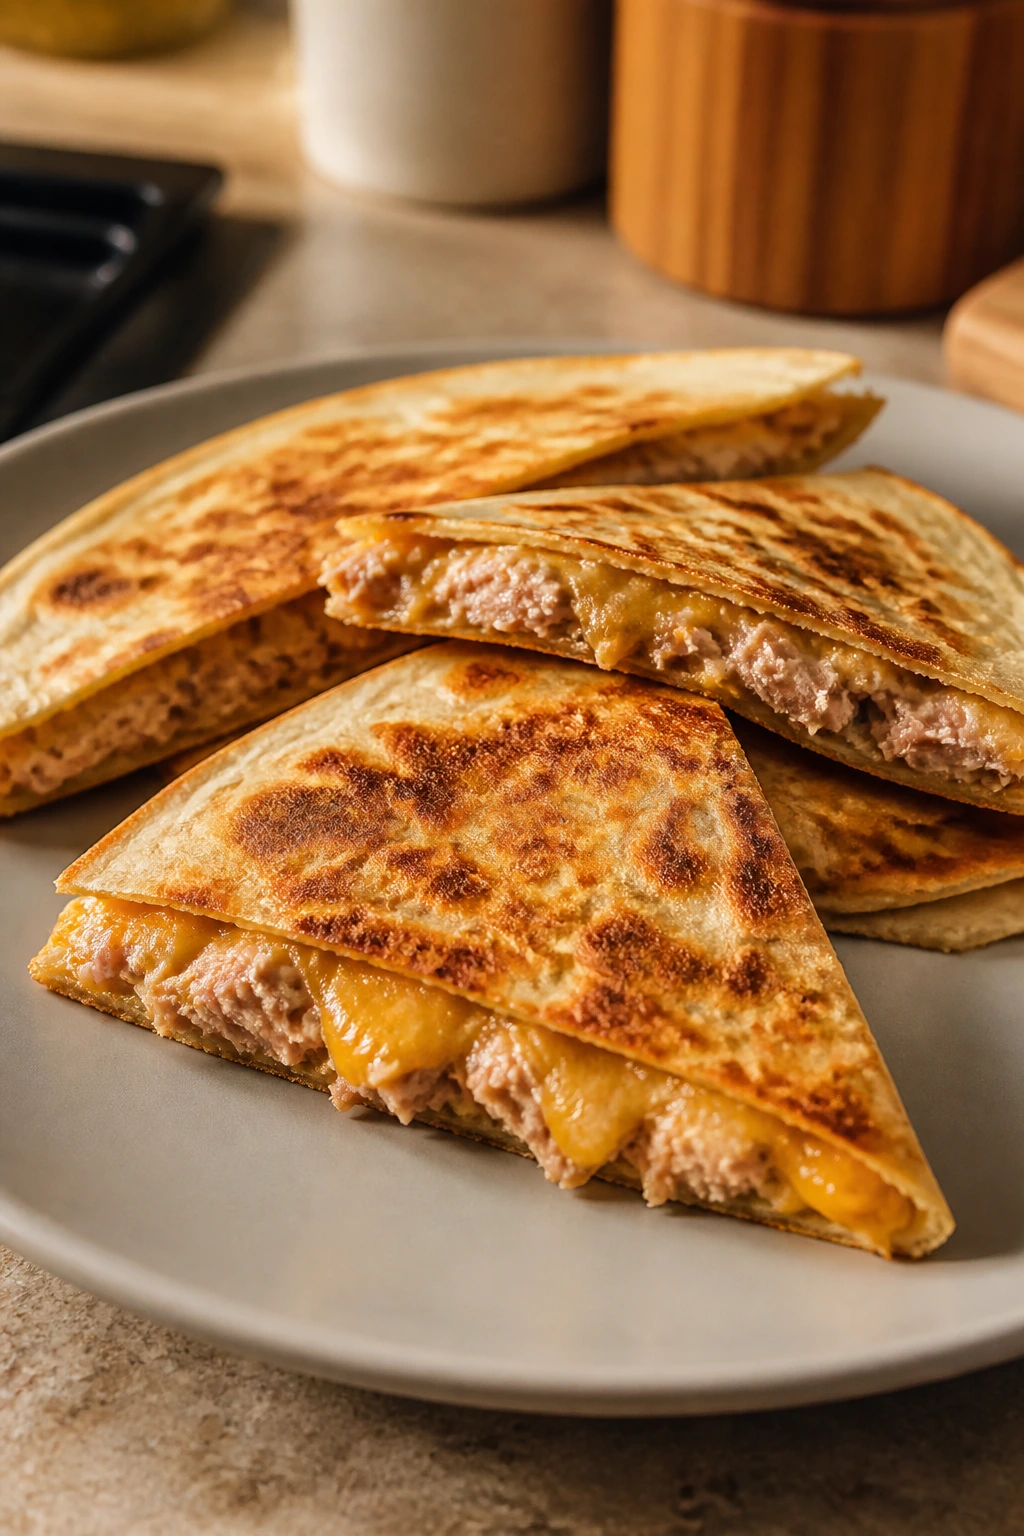
There’s something odd and satisfying about turning a can of tuna into dinner that feels hot, crisp, and a little melty at the edges. The filling is creamy and salty, the tortillas go golden in the pan, and the cheese binds everything together so you can cut it into wedges without the whole thing running away. This is pantry food with better manners.
Why It Works:
Tuna, mayo or yogurt, and a little mustard make a fast filling that doesn’t need extra cooking. The cheese melts around it in the skillet, which gives you the tuna melt part without using bread that wants to split open. Quesadillas also keep costs down because tortillas are cheap and stretch the filling farther than a sandwich would.
Key Ingredients:
- 2 cans tuna, 5 ounces each, drained
- 1/4 cup mayonnaise or plain Greek yogurt
- 1 teaspoon Dijon mustard
- 1 tablespoon chopped dill pickle or relish
- 1/4 teaspoon black pepper
- 1 cup shredded cheddar
- 4 large flour tortillas
- 1 tablespoon butter or oil
- Sliced tomato, optional
Quick Steps:
- Mix the tuna, mayo or yogurt, mustard, pickle, and pepper in a bowl until combined but not pasty.
- Heat a skillet over medium heat and melt a little butter or oil. Lay in one tortilla, sprinkle on half the cheese, spread over half the tuna filling, then add the rest of the cheese and a second tortilla.
- Cook for 2 to 3 minutes per side, pressing lightly with a spatula, until the tortillas are golden and the cheese melts fully.
- Repeat with the second quesadilla. Let each one rest for 1 minute before slicing so the filling settles.
Equipment for This Recipe:
- Large skillet
- Spatula
- Mixing bowl
- Can opener
How to Serve This Dish:
Cut the quesadillas into wedges and serve with tomato slices, pickles, or a small pile of salad greens. A cup of soup turns this from snacky to solid dinner. Crisp edges matter here, so eat them while the tortilla still has a little crunch.
Pro Tips for This Recipe:
- Drain the tuna well or the filling turns slippery.
- Use medium heat. High heat browns the tortilla before the cheese melts.
- A tiny bit of pickle or relish keeps the tuna from tasting flat.
- Shred your own cheese if you can; it melts smoother than many pre-bagged blends.
Variations on This Dish:
- Spicy Tuna Melt: Add a spoonful of hot sauce or chopped pickled jalapeños.
- Garden Tuna Quesadilla: Fold in a handful of baby spinach or thin tomato slices.
- Light Version: Swap half the mayo for Greek yogurt.
Common Mistakes to Avoid with This Dish:
- Don’t overload the tortilla. Too much filling makes the quesadilla burst.
- Don’t use cold cheese straight from the fridge if you can avoid it; it melts slower.
- Don’t skip the resting minute. Slicing too early makes the filling spill out.
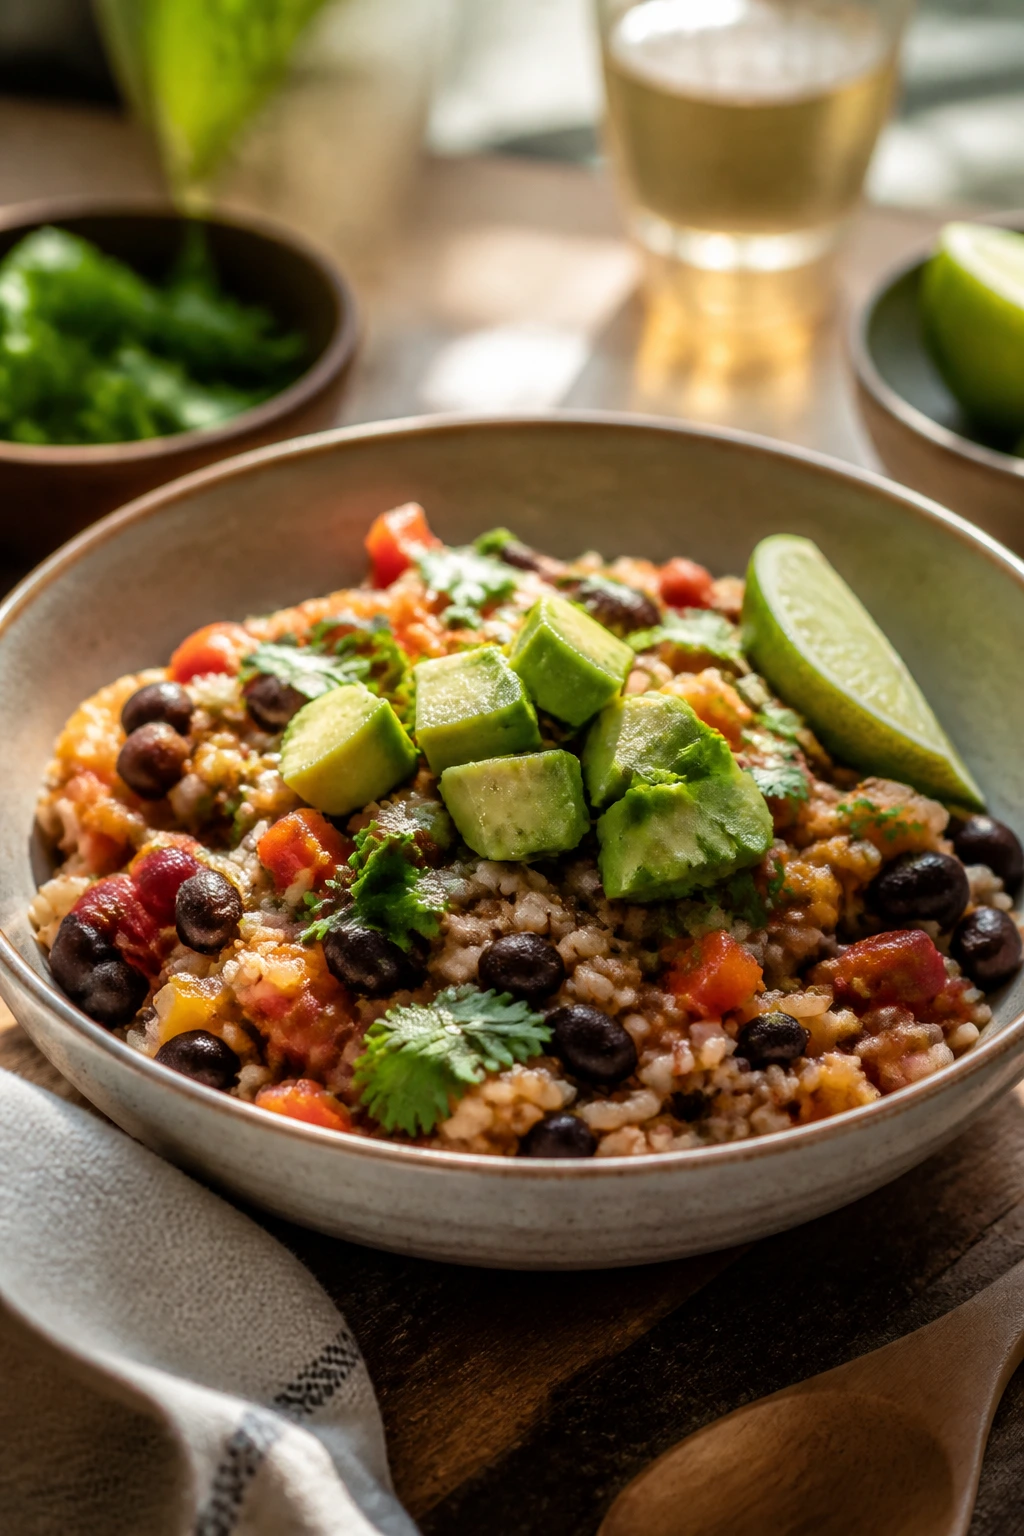
5. Black Bean Burrito Bowls
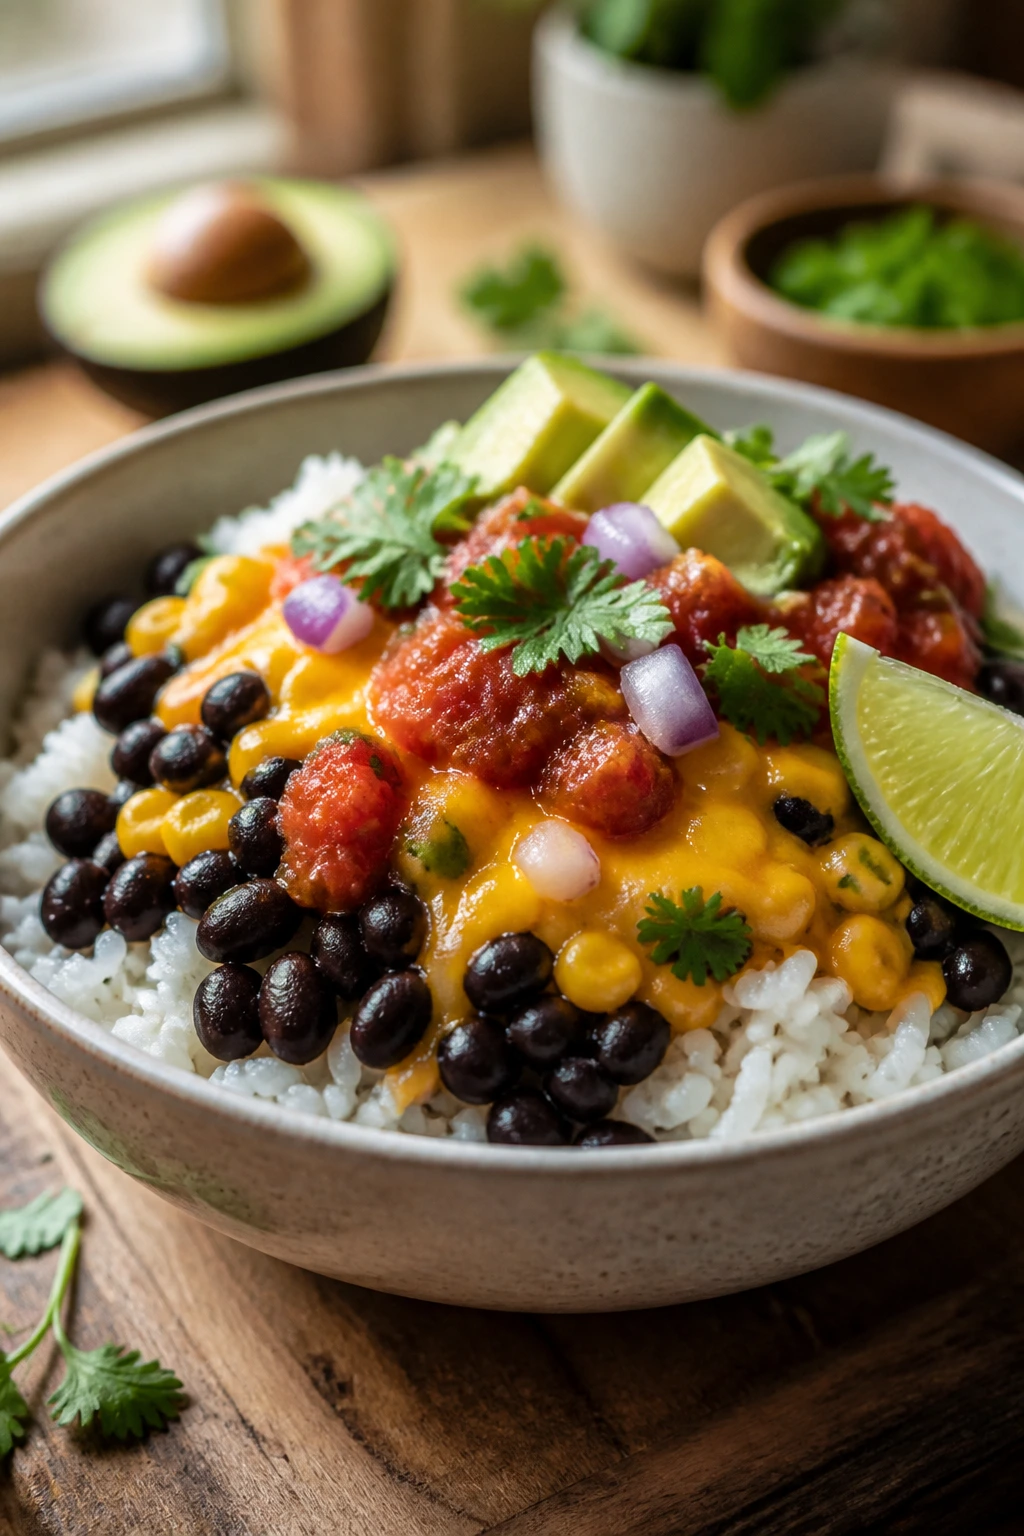
A good burrito bowl should look a little messy in the right way: rice at the bottom, beans in the middle, corn and salsa bright on top, cheese softening into everything else. This version is cheap, filling, and easy to adjust depending on what’s in your fridge. It tastes like a meal built by someone who knows how to shop once and eat twice.
Why It Works:
Black beans are sturdy, affordable, and forgiving. They give the bowl protein and body without long cooking, while salsa stands in for a sauce that would normally take more time. Rice makes the whole thing feel like dinner instead of a side dish, and lime juice at the end keeps the flavors sharp.
Key Ingredients:
- 1 cup long-grain white rice
- 2 cups water or broth
- 1 can black beans, 15 ounces, drained and rinsed
- 1 cup frozen corn
- 1 cup salsa
- 1 teaspoon chili powder
- 1/2 teaspoon ground cumin
- 1 cup shredded cheddar
- 1 lime, cut into wedges
- Chopped cilantro, optional
- Avocado, optional
Quick Steps:
- Cook the rice in water or broth according to the package. Fluff it with a fork when tender.
- Warm the black beans, corn, salsa, chili powder, and cumin in a saucepan over medium heat for 5 to 7 minutes, until steamy and thickened.
- Divide the rice into bowls. Spoon the bean mixture over the top and sprinkle with cheese.
- Finish with lime juice and cilantro or avocado if using.
Equipment for This Recipe:
- Medium saucepan with lid
- Small skillet or second saucepan
- Fork
- Serving bowls
How to Serve This Dish:
Build each bowl with rice under the beans so the salsa can soak in a little. Tortilla chips on the side make it feel more complete, and a spoonful of sour cream cools the chili powder nicely. If you’re feeding picky eaters, put the toppings on the table and let them choose.
Pro Tips for This Recipe:
- Use broth instead of water for rice if you want a deeper base flavor.
- Warm the beans long enough to thicken slightly.
- A squeeze of lime at the end makes the bowl taste fresher than extra cheese does.
- Frozen corn is cheaper than fresh here and works just as well.
Variations on This Dish:
- Chicken Bowl: Add diced rotisserie chicken with the beans.
- Veggie-Heavy Bowl: Stir in diced peppers or zucchini while the beans heat.
- Breakfast Bowl: Top with a fried egg and hot sauce.
Common Mistakes to Avoid with This Dish:
- Don’t serve the rice plain and expect the toppings to do all the work.
- Don’t forget the acid. Lime matters.
- Don’t rinse away every last bit of salsa flavor by over-mixing it into the beans.
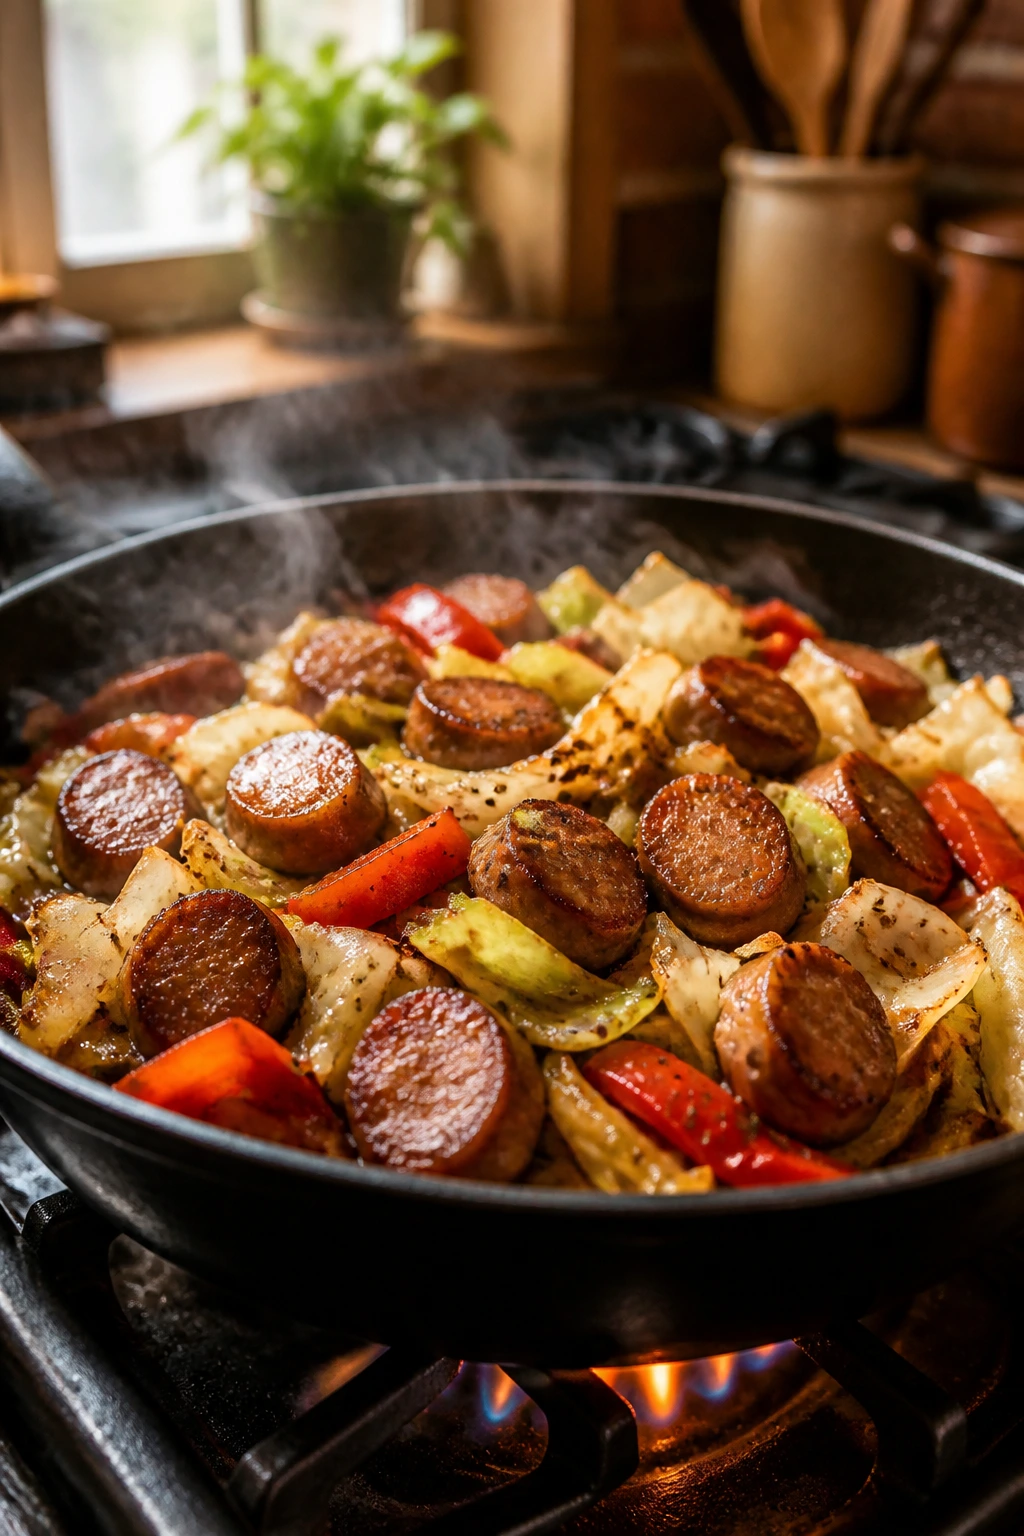
6. Sausage Cabbage Skillet
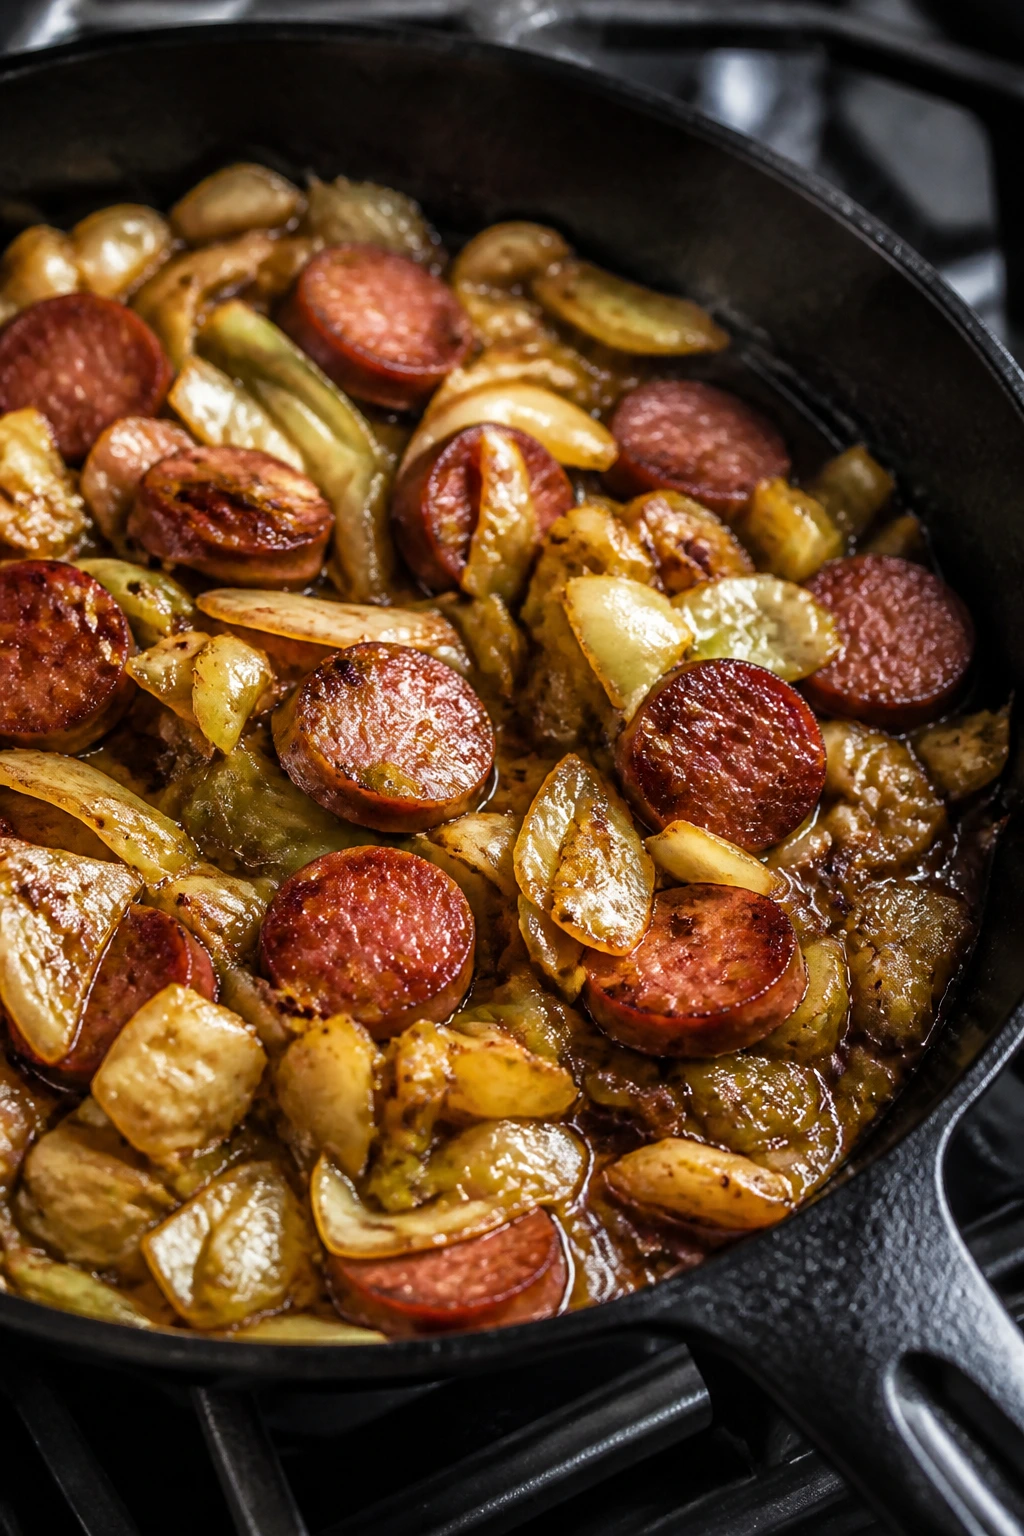
Smoked sausage and cabbage are old-school budget food for a reason: they cook fast, they’re cheap enough to keep around, and they bring a lot of flavor with very little help. The sausage browns into little edges of salt and smoke, while the cabbage softens and picks up those pan drippings. It’s blunt, hearty, and weirdly elegant when the pan is hot enough.
Why It Works:
Smoked sausage is already cooked, so your job is mostly browning and building flavor. Cabbage is one of the best low-cost vegetables for skillet cooking because it shrinks fast and takes on seasoning without turning mushy if you stop on time. A splash of broth helps deglaze the pan and keeps the cabbage from sticking.
Key Ingredients:
- 12 ounces smoked sausage, sliced into rounds
- 1 tablespoon vegetable oil
- 1 small onion, sliced
- 4 cups shredded green cabbage
- 1 teaspoon Dijon mustard
- 1/2 teaspoon paprika
- 1/4 cup chicken broth
- Salt and black pepper to taste
- Chopped parsley, optional
Quick Steps:
- Heat the oil in a large skillet over medium-high heat. Brown the sausage for 3 to 4 minutes, turning once.
- Add the onion and cook for 2 minutes, until it softens at the edges.
- Stir in the cabbage, mustard, paprika, broth, salt, and pepper. Cook for 6 to 8 minutes, stirring occasionally, until the cabbage is tender but still has a little bite.
- Taste and adjust the seasoning. Finish with parsley if you want a fresher edge.
Equipment for This Recipe:
- Large skillet
- Spatula
- Knife and cutting board
How to Serve This Dish:
Serve it in bowls with mustard on the side or over mashed potatoes if you want a bigger plate. Rye bread or a simple roll works well too. The sausage should stay juicy and the cabbage should look glossy, not watery.
Pro Tips for This Recipe:
- Get some color on the sausage first. Browned sausage means better flavor in the cabbage.
- Slice the cabbage thin so it softens before the sausage dries out.
- A spoonful of mustard at the end sharpens the pan.
- If the skillet dries out, add another splash of broth rather than more oil.
Variations on This Dish:
- Apple Cabbage Skillet: Add a sliced apple with the onion for a sweet edge.
- Spicy Sausage Version: Use hot sausage and add red pepper flakes.
- Smoky Potato Skillet: Toss in small cubes of par-cooked potato for more bulk.
Common Mistakes to Avoid with This Dish:
- Don’t crowd the pan with too much cabbage. It will steam and go limp.
- Don’t over-salt early. Sausage already brings salt.
- Don’t cook it until the cabbage collapses into mush; stop while it still has texture.
7. Veggie Fried Rice with Eggs
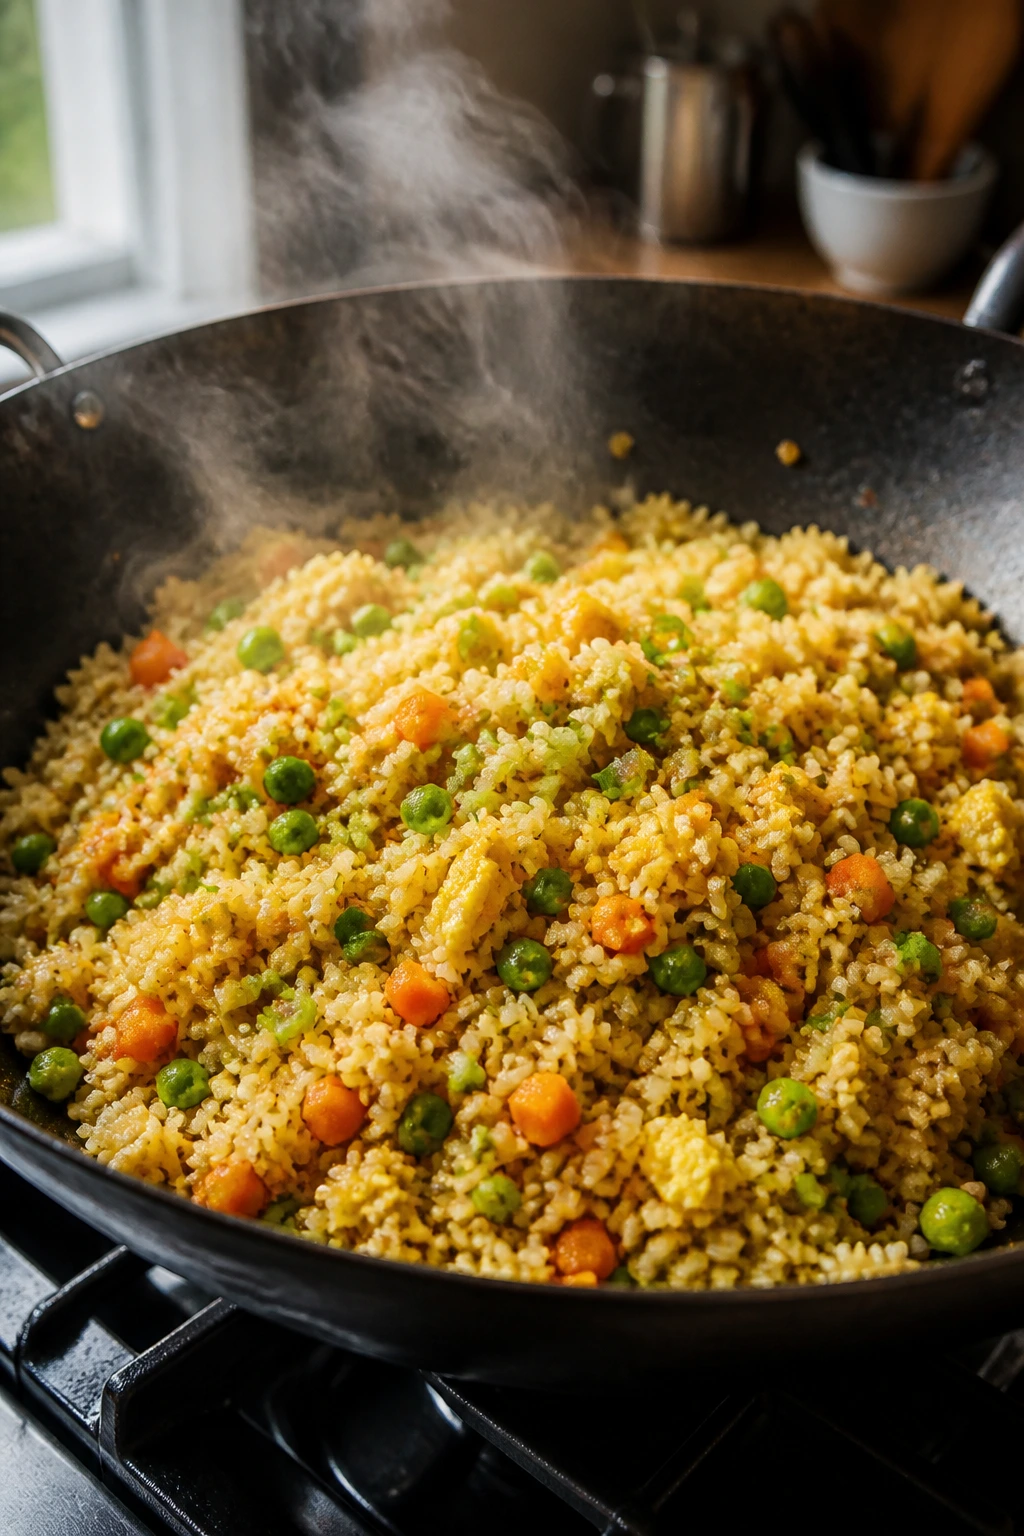
Fried rice is the kitchen version of being resourceful. Cold rice, frozen vegetables, eggs, soy sauce, and a little butter can turn into something warm and savory in ten minutes flat. The grains should stay separate, not sticky, and the pan should smell like toasted rice and scallion by the time you’re done.
Why It Works:
Day-old rice fries better because it has had time to dry out a little. That gives you individual grains instead of a clump that steams itself into glue. Eggs add richness, frozen vegetables keep the cost down, and soy sauce does the heavy lifting on salt and savoriness.
Key Ingredients:
- 3 cups cooked white rice, chilled
- 3 large eggs, beaten
- 2 tablespoons neutral oil
- 1 cup frozen peas and carrots
- 1/2 cup diced onion
- 2 garlic cloves, minced
- 3 tablespoons soy sauce
- 1 tablespoon butter
- 2 green onions, sliced
Quick Steps:
- Heat 1 tablespoon oil in a large skillet or wok over medium-high heat. Scramble the eggs until just set, then move them to a plate.
- Add the remaining oil, onion, peas, carrots, and garlic. Cook for 2 to 3 minutes, until the vegetables are hot and the onion softens.
- Add the rice and break it up with a spatula. Cook for 3 to 4 minutes, letting the rice sizzle in spots before stirring.
- Stir in the soy sauce, butter, and eggs. Finish with green onions and serve hot.
Equipment for This Recipe:
- Large skillet or wok
- Spatula
- Bowl for the eggs
- Measuring spoons
How to Serve This Dish:
It stands alone as a meal, but a fried egg on top makes it feel richer. A few cucumber slices or a quick pickle on the side gives the bowl a cold, crisp contrast. Keep it hot; fried rice loses its charm when it sits around.
Pro Tips for This Recipe:
- Use cold rice, not warm rice.
- Let the rice sit in the pan between stirs so it can dry and crisp a little.
- Add soy sauce around the edge of the pan for a more toasted flavor.
- Butter at the end gives a rounder finish than oil alone.
Variations on This Dish:
- Ham Fried Rice: Add 1/2 cup diced ham with the vegetables.
- Veg-Heavy Fried Rice: Stir in chopped cabbage or diced zucchini.
- Garlic-Chili Fried Rice: Add chili crisp or garlic chili paste at the end.
Common Mistakes to Avoid with This Dish:
- Don’t use fresh hot rice. It clumps fast.
- Don’t drown the pan in soy sauce. The rice should be seasoned, not wet.
- Don’t stir constantly. The rice needs time against the hot pan.
8. Lemon Parmesan Orzo with Peas
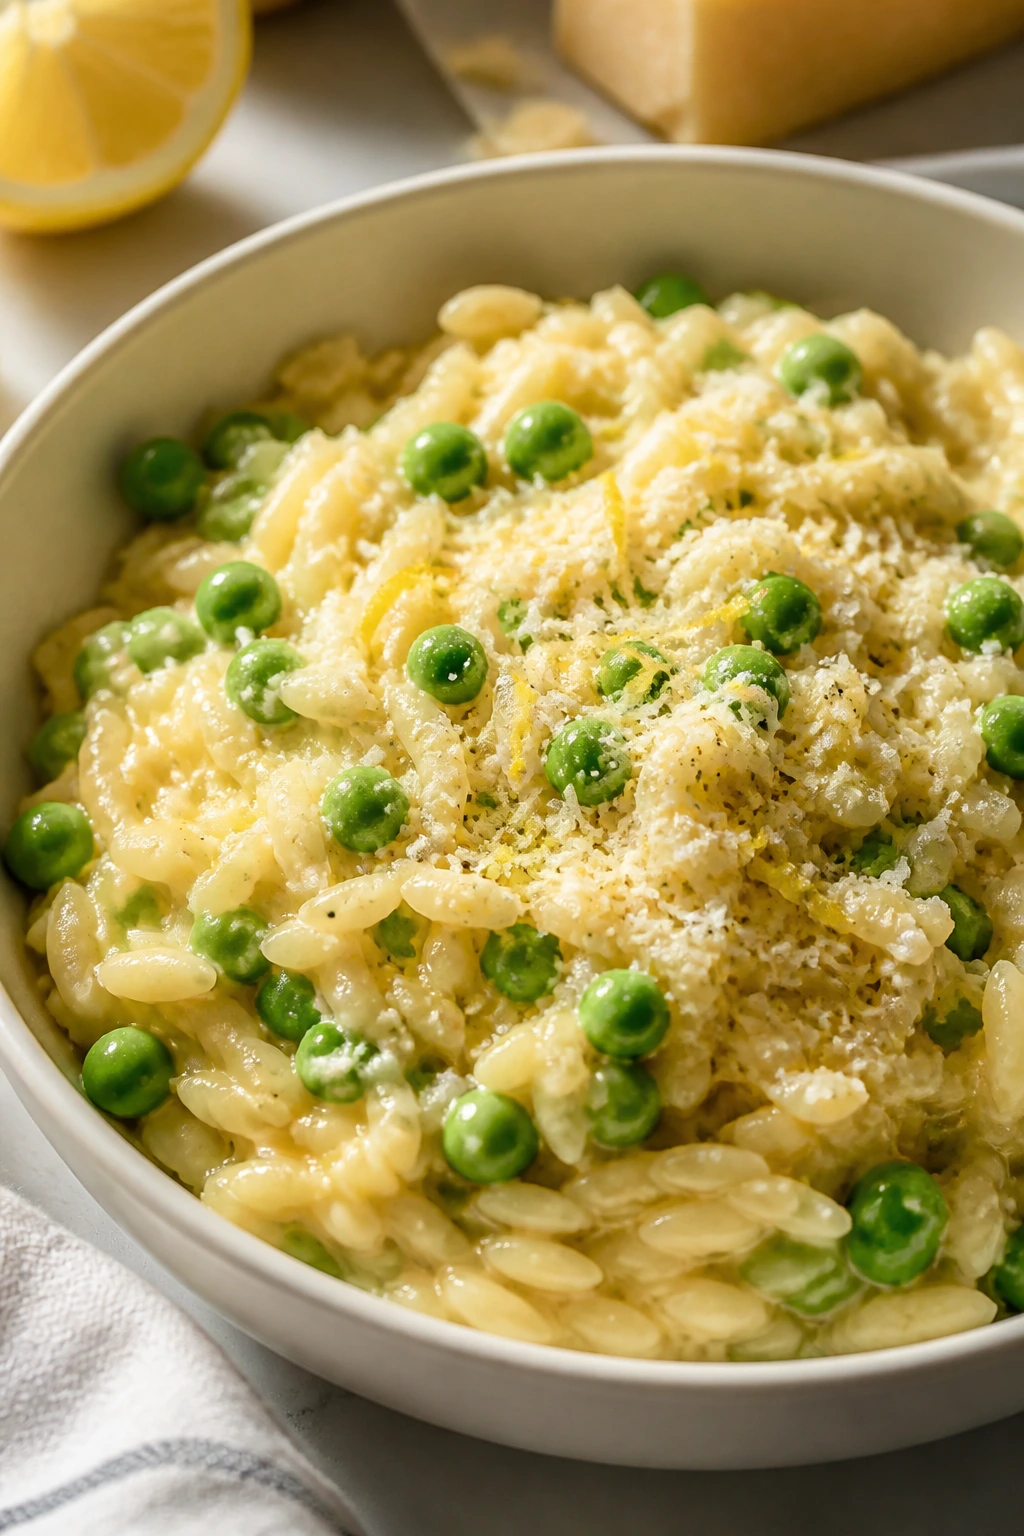
Orzo cooks like a pasta, but it eats a little like rice, which is why it works so well for fast budget meals. The peas bring sweetness, the parmesan gives it a salty edge, and lemon keeps the whole thing from tasting heavy. It’s creamy without being fussy, which is exactly the point.
Why It Works:
Orzo cooks in about the same time it takes to make the sauce, so nothing waits around getting mushy. Peas are a cheap frozen vegetable that fit this dish especially well because they stay bright and sweet. Parmesan and lemon do the same job they always do: one adds depth, the other wakes it up.
Key Ingredients:
- 1 1/2 cups orzo
- 2 tablespoons butter
- 2 garlic cloves, minced
- 2 1/2 cups chicken or vegetable broth
- 1 cup frozen peas
- 1/2 cup grated parmesan
- 1 lemon, zested and juiced
- Black pepper to taste
Quick Steps:
- Melt the butter in a saucepan over medium heat. Cook the garlic for 30 seconds, just until fragrant.
- Stir in the orzo and toast it for 1 minute, then pour in the broth.
- Simmer for 8 to 10 minutes, stirring often, until the orzo is tender and most of the liquid is absorbed.
- Add the peas, parmesan, lemon zest, lemon juice, and black pepper. Stir until the cheese melts into a loose, creamy sauce.
Equipment for This Recipe:
- Medium saucepan
- Wooden spoon
- Zester or fine grater
- Citrus juicer, optional
How to Serve This Dish:
Serve it as a light main with a salad or as a side next to chicken or sausage. It should look glossy and spoonable, not dry. A little extra parmesan at the table is worth it.
Pro Tips for This Recipe:
- Stir the orzo often so it doesn’t stick to the bottom.
- Use broth, not water, if you want more flavor for the money.
- Add the lemon after the heat drops a bit so it stays bright.
- If it thickens too much, loosen it with a splash of hot water or broth.
Variations on This Dish:
- Spinach Orzo: Stir in a few handfuls of spinach at the end.
- Tomato Orzo: Add chopped cherry tomatoes with the peas.
- Herby Orzo: Finish with dill, parsley, or basil.
Common Mistakes to Avoid with This Dish:
- Don’t walk away from the pot. Orzo goes from tender to sticky fast.
- Don’t add the parmesan to a boiling pan or it can clump.
- Don’t overdo the lemon zest. A little goes a long way.
9. Turkey Taco Rice Skillet
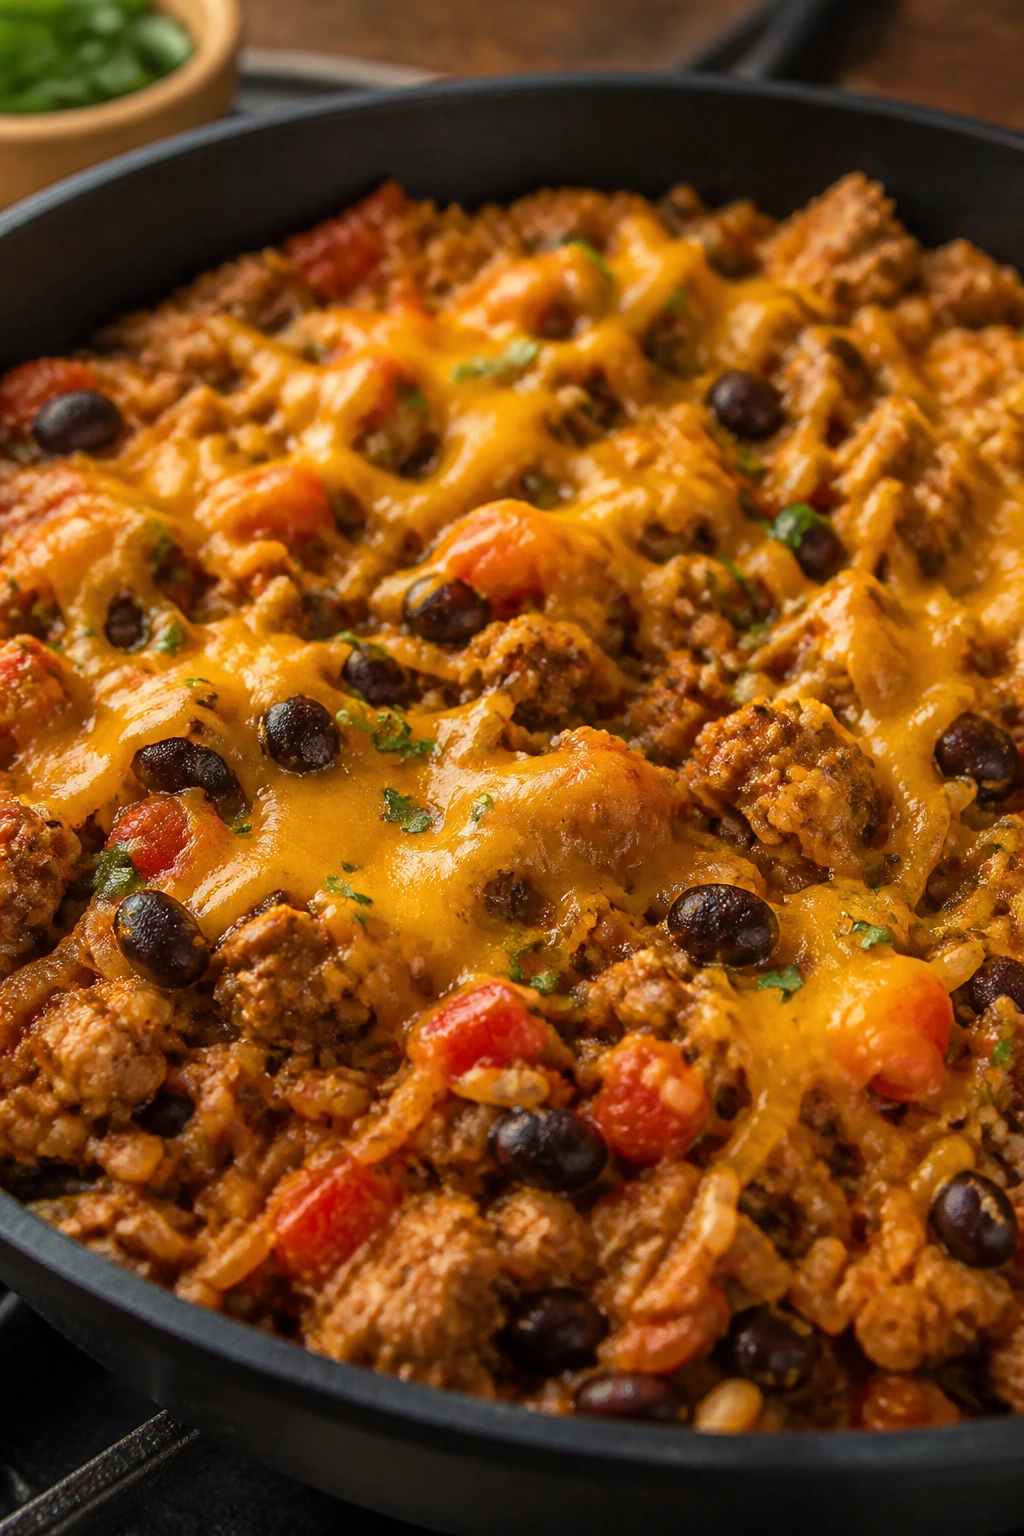
This is the pan I make when everyone wants something filling and nobody wants to wait. Ground turkey cooks fast, taco seasoning brings the flavor, and instant rice makes the whole skillet come together in a short stretch of time. It’s a full dinner in one pan, and that alone earns it respect.
Why It Works:
Ground turkey is lean and cheap enough to stretch with rice and beans. Instant rice keeps the timing within 30 minutes, which matters here more than a slow simmer ever would. Salsa stands in for tomatoes, seasoning, and sauce all at once, which saves both money and effort.
Key Ingredients:
- 1 pound ground turkey
- 1 tablespoon oil
- 1 small onion, diced
- 2 tablespoons taco seasoning
- 1 cup instant white rice
- 1 1/2 cups chicken broth
- 1 cup salsa
- 1 cup canned black beans, drained and rinsed
- 1 cup shredded cheddar
- Chopped cilantro, optional
Quick Steps:
- Heat the oil in a large skillet over medium-high heat. Cook the onion and turkey for 6 to 7 minutes, breaking up the meat until no pink remains.
- Stir in the taco seasoning, rice, broth, salsa, and black beans. Bring the mixture to a simmer.
- Cover and cook for about 5 minutes, until the rice is tender and the liquid is mostly absorbed.
- Remove from the heat, scatter over the cheese, and cover for 1 minute so it melts.
Equipment for This Recipe:
- Large skillet with lid
- Wooden spoon
- Measuring cups
- Knife and cutting board
How to Serve This Dish:
Spoon it straight from the skillet, or set out tortillas and let people scoop their own. A spoonful of sour cream or a few avocado slices makes the bowl feel fuller. The best version has a little sauciness left in the bottom.
Pro Tips for This Recipe:
- Use instant rice here. Regular rice usually won’t finish on time.
- Taste the salsa before you add it; some brands are saltier than others.
- Let the cheese melt under the lid instead of broiling it.
- If the skillet looks dry before the rice softens, add a splash more broth.
Variations on This Dish:
- Chicken Taco Skillet: Swap in shredded chicken for the turkey.
- Mild Family Version: Use plain diced tomatoes instead of salsa.
- Spicy Fiesta Version: Add chopped jalapeños and hot sauce.
Common Mistakes to Avoid with This Dish:
- Don’t use too little liquid with the instant rice.
- Don’t cook the turkey until it dries out; stop once it’s just done.
- Don’t bury the cheese in the pan. It belongs on top.
10. White Bean Spinach Soup
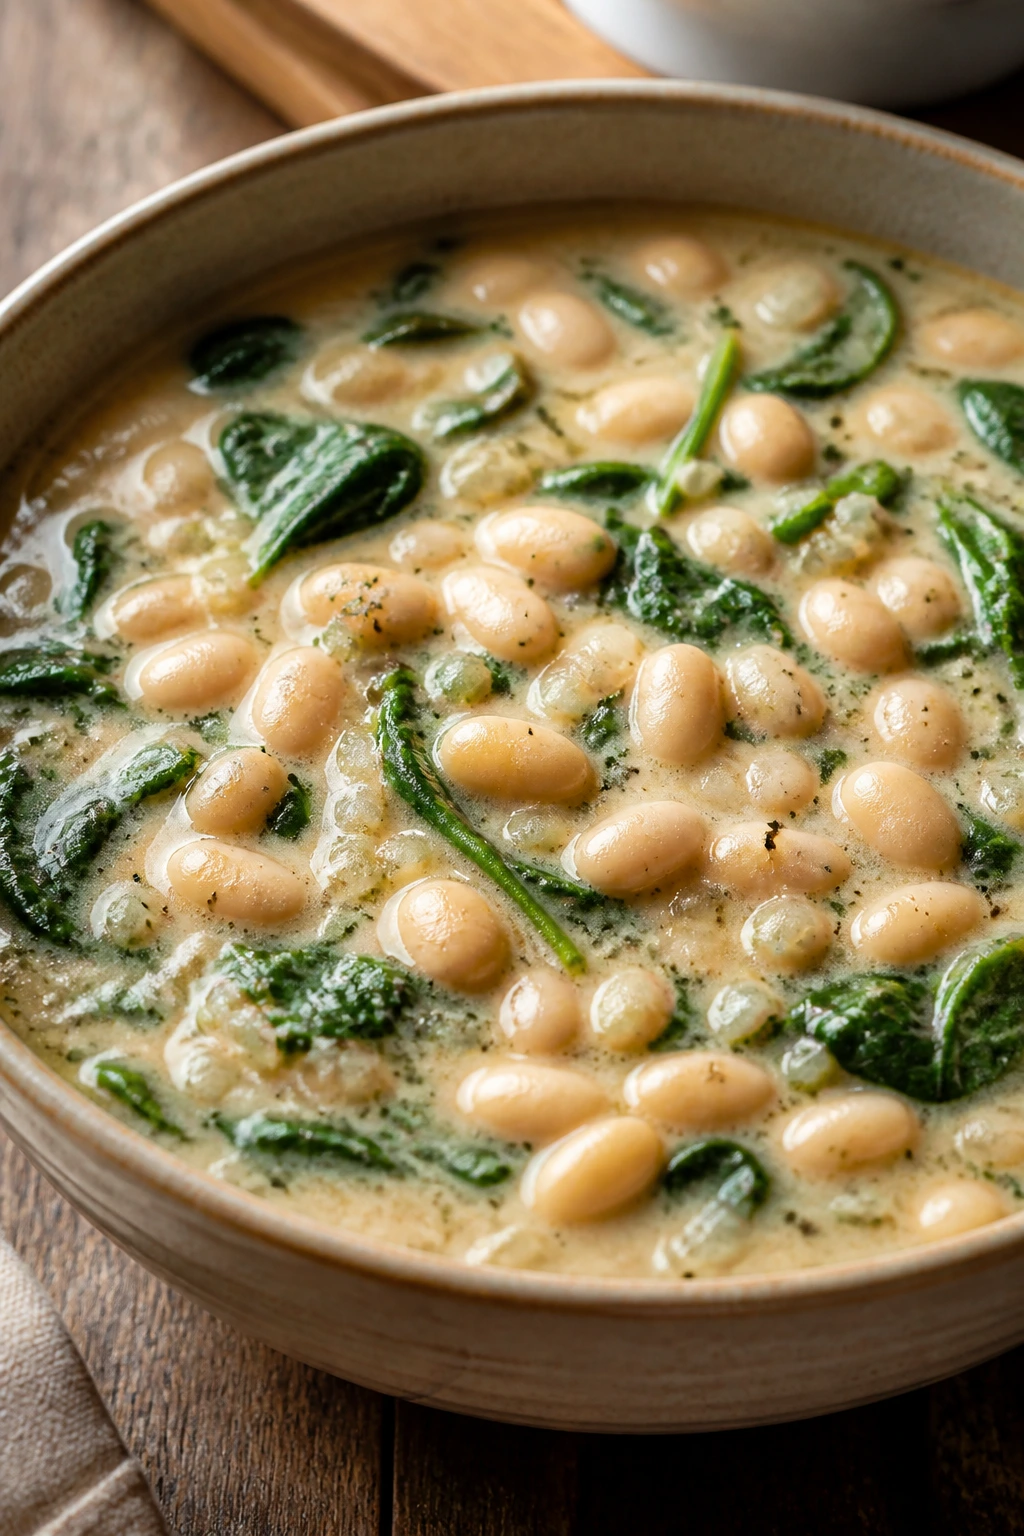
A bowl of white bean soup can taste like it simmered all afternoon when it really didn’t. The beans make it creamy without cream, the spinach melts into the broth, and the carrots and celery give it the kind of base flavor that keeps the spoon moving. It’s cheap, soothing, and honest.
Why It Works:
White beans are soft enough to thicken the soup when some of them break apart. That gives you body without flour or heavy cream. A quick sauté of onion, carrot, and celery builds a proper soup base in a few minutes, and lemon at the end keeps it from reading as dull bean water.
Key Ingredients:
- 1 tablespoon olive oil
- 1 small onion, diced
- 2 carrots, diced
- 2 celery stalks, diced
- 3 garlic cloves, minced
- 2 cans white beans, 15 ounces each, drained and rinsed
- 4 cups broth
- 1 teaspoon Italian seasoning
- 4 cups baby spinach
- 1/4 cup grated parmesan
- 1 tablespoon lemon juice
- Salt and pepper to taste
Quick Steps:
- Heat the oil in a pot over medium heat. Cook the onion, carrots, and celery for 5 minutes, until they start to soften.
- Add the garlic and cook for 30 seconds. Stir in the beans, broth, and Italian seasoning.
- Simmer for 10 to 12 minutes, mashing a few beans against the side of the pot to thicken the broth.
- Stir in the spinach, parmesan, lemon juice, salt, and pepper. Cook just until the spinach wilts.
Equipment for This Recipe:
- Medium soup pot
- Wooden spoon
- Potato masher or sturdy spoon
- Ladle
How to Serve This Dish:
Serve it with toast, crackers, or a grilled cheese if you want a fuller meal. A final drizzle of olive oil gives the soup a richer look and feel. The texture should be brothy with a little creaminess, not thick like paste.
Pro Tips for This Recipe:
- Smash only part of the beans. Whole beans give texture.
- Add the spinach at the end so it stays green.
- Use parmesan rind if you have one; it adds a deeper savory note.
- Lemon is not optional here. It keeps the soup awake.
Variations on This Dish:
- Tomato White Bean Soup: Stir in 1/2 cup crushed tomatoes with the broth.
- Sausage Version: Brown sliced sausage with the vegetables.
- Tuscan Finish: Add a pinch of red pepper flakes and extra garlic.
Common Mistakes to Avoid with This Dish:
- Don’t skip the vegetable base. Onion alone is thinner and flatter.
- Don’t boil the soup hard after adding spinach.
- Don’t forget to taste before serving; beans need salt.
11. Chicken Fajita Wraps

This is a fast dinner that tastes like it took more planning than it did. Thin strips of chicken, peppers, and onions cook in the same skillet, picking up a little char around the edges. Wrapped in warm tortillas with a dab of sour cream, it’s the kind of meal that makes a weeknight feel less pinched.
Why It Works:
Cutting the chicken into thin strips turns a cheap protein into something that cooks fast and stays tender. Peppers and onions bring sweetness and volume, which means you need less meat per person. Fajita seasoning is doing the job of a spice cabinet in one scoop, so the ingredient list stays short.
Key Ingredients:
- 1 pound boneless chicken breast or thighs, sliced thin
- 2 bell peppers, sliced
- 1 small onion, sliced
- 2 tablespoons oil
- 2 teaspoons chili powder
- 1 teaspoon cumin
- 1/2 teaspoon garlic powder
- 1/2 teaspoon salt
- 4 large flour tortillas
- Sour cream or plain yogurt
- Lime wedges
Quick Steps:
- Toss the chicken with chili powder, cumin, garlic powder, and salt.
- Heat the oil in a skillet over medium-high heat. Cook the chicken for 5 to 6 minutes, stirring until browned and cooked through.
- Add the peppers and onion. Cook for 5 to 6 minutes more, until the vegetables soften and pick up some char.
- Warm the tortillas, then fill with the chicken mixture. Finish with sour cream and lime juice.
Equipment for This Recipe:
- Large skillet
- Tongs or spatula
- Cutting board and knife
- Dry skillet or microwave for warming tortillas
How to Serve This Dish:
Serve the wraps with rice, chips, or a simple salad if you want more on the plate. I like to keep the filling loose rather than packed tight, so the tortillas stay intact. A few hot sauce splashes on the side help if the peppers are sweet.
Pro Tips for This Recipe:
- Slice the chicken thin so it finishes fast.
- Don’t crowd the skillet or the vegetables will steam.
- Warm tortillas before filling them; cold tortillas split.
- A squeeze of lime at the end gives the chicken a cleaner taste.
Variations on This Dish:
- Steak Fajita Wraps: Swap in thin-sliced flank steak.
- Bean Fajita Wraps: Replace half the chicken with black beans.
- Cheesy Version: Add shredded Monterey Jack before rolling.
Common Mistakes to Avoid with This Dish:
- Don’t overcook the chicken. Thin strips go dry fast.
- Don’t slice peppers too thick or they won’t soften on time.
- Don’t stuff the wraps too full; folding fails that way.
12. Peanut Noodles with Crunchy Veggies
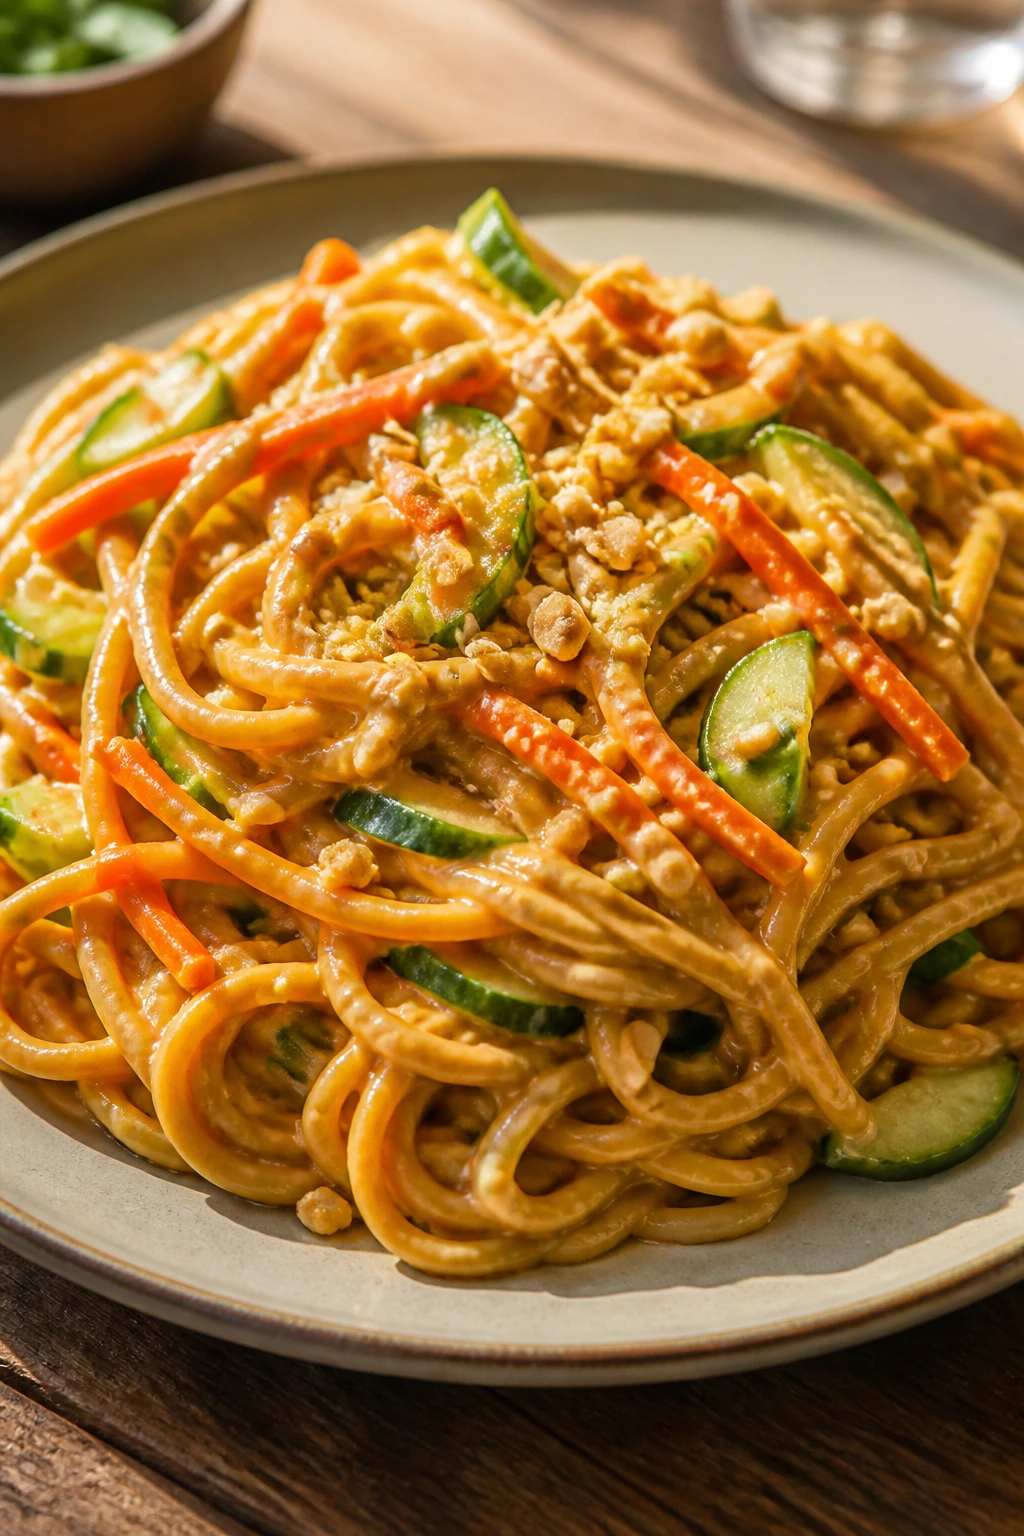
Cold or warm, these noodles have a way of disappearing fast. The sauce is creamy, salty, a little sweet, and sharp at the edges from lime. Carrots and cucumber keep the bowl from feeling heavy, which matters when the sauce is rich and the budget is tight.
Why It Works:
Peanut butter gives you body without much cost, and soy sauce plus lime makes it taste intentional instead of like a random pantry experiment. Spaghetti is cheaper than specialty noodles and works just as well. The vegetables stay crisp, which gives every bite some snap against the soft noodles.
Key Ingredients:
- 12 ounces spaghetti or noodles
- 1/3 cup creamy peanut butter
- 3 tablespoons soy sauce
- 2 tablespoons lime juice
- 1 tablespoon honey
- 1 tablespoon sesame oil
- 1 garlic clove, minced
- 1 cup shredded carrots
- 1 cup thinly sliced cucumber
- 2 green onions, sliced
- 2 tablespoons chopped peanuts, optional
Quick Steps:
- Cook the noodles until just tender, then drain and rinse briefly under cool water.
- Whisk the peanut butter, soy sauce, lime juice, honey, sesame oil, garlic, and 2 to 3 tablespoons warm water until smooth.
- Toss the noodles with the sauce, carrots, cucumber, and green onions.
- Top with peanuts and serve right away, or chill for 10 minutes if you want it colder.
Equipment for This Recipe:
- Large pot
- Mixing bowl
- Whisk or fork
- Colander
How to Serve This Dish:
Serve it as a cold lunch or a room-temperature dinner with extra lime on the side. A few cucumber ribbons or sesame seeds make the bowl feel less hasty. If the sauce tightens up in the fridge, loosen it with a teaspoon of warm water.
Pro Tips for This Recipe:
- Warm water helps the peanut sauce smooth out fast.
- Rinse the noodles just enough to stop the cooking, not until they’re icy.
- Cut the cucumber thin so it blends with the noodles instead of fighting them.
- Add chili flakes if you want the sauce to bite back a little.
Variations on This Dish:
- Chicken Peanut Noodles: Add shredded rotisserie chicken.
- Spicy Satay Version: Stir in sriracha or chili crisp.
- Sesame Cabbage Bowl: Replace cucumber with shredded cabbage.
Common Mistakes to Avoid with This Dish:
- Don’t leave the sauce thick and unmixed; it needs warm water.
- Don’t use too much honey or the sauce turns sticky-sweet.
- Don’t skip the lime. Peanut sauce needs that lift.
13. Loaded Microwave Baked Potatoes with Chili Beans
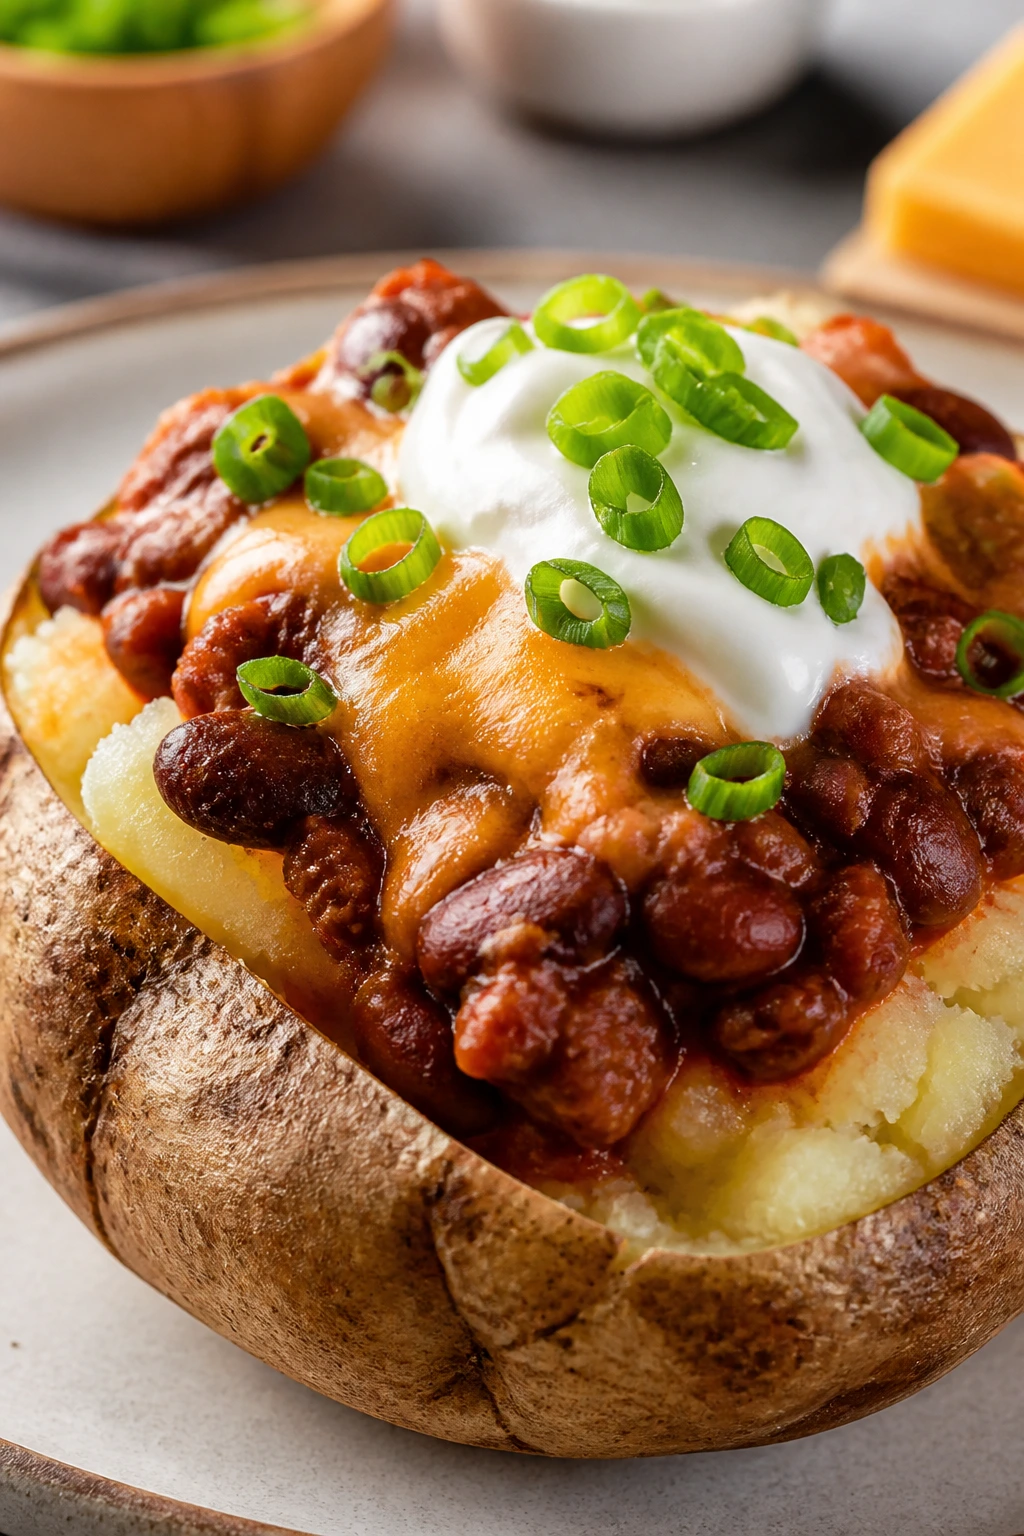
A baked potato can feel like a shortcut meal until you load it properly. The skin turns dry and a little crisp in the microwave, the inside stays fluffy, and the chili beans bring enough warmth and sauce to make the whole thing feel substantial. It’s cheap, fast, and odd in the best way.
Why It Works:
Microwaving potatoes cuts the timing way down, which is what makes this a 30-minute dinner instead of a slow-baked one. Canned chili beans or quick-seasoned beans create a thick topping without much work. Cheese and sour cream handle the rich finish, while green onions keep it from feeling heavy.
Key Ingredients:
- 4 medium russet potatoes
- 1 can chili beans or 1 can black beans with 1 tablespoon chili seasoning
- 1 cup shredded cheddar
- 1/2 cup sour cream or plain Greek yogurt
- 2 tablespoons butter
- 2 green onions, sliced
- Salt to taste
Quick Steps:
- Scrub the potatoes, prick them all over with a fork, and microwave on high for 8 to 12 minutes, turning halfway, until a knife slides in easily.
- Warm the chili beans in a small saucepan or microwave until steaming.
- Split the potatoes open and fluff the insides with a fork. Add butter and a pinch of salt.
- Spoon over the beans, top with cheddar, then finish with sour cream and green onions.
Equipment for This Recipe:
- Microwave-safe plate
- Fork
- Small saucepan or microwave-safe bowl
- Knife
How to Serve This Dish:
Serve the potatoes with a simple side salad if you want something fresh. They’re filling enough to stand alone, especially if you use all the toppings. The best bite has a soft potato center, saucy beans, and a little cold sour cream on top.
Pro Tips for This Recipe:
- Don’t skip pricking the potatoes.
- Rotate them halfway through so they cook evenly.
- Wrap them loosely in a paper towel if your microwave splatters.
- Warm the beans fully before topping or the cheese won’t melt well.
Variations on This Dish:
- Broccoli Cheese Potato: Swap the beans for steamed broccoli.
- Taco Potato: Use seasoned black beans, salsa, and jalapeños.
- Breakfast Potato: Top with scrambled eggs instead of chili beans.
Common Mistakes to Avoid with This Dish:
- Don’t undercook the potatoes. A hard center ruins the whole thing.
- Don’t overload with cold toppings before the cheese melts.
- Don’t forget salt inside the potato; the topping alone won’t fix it.
14. Breakfast Scramble Tacos
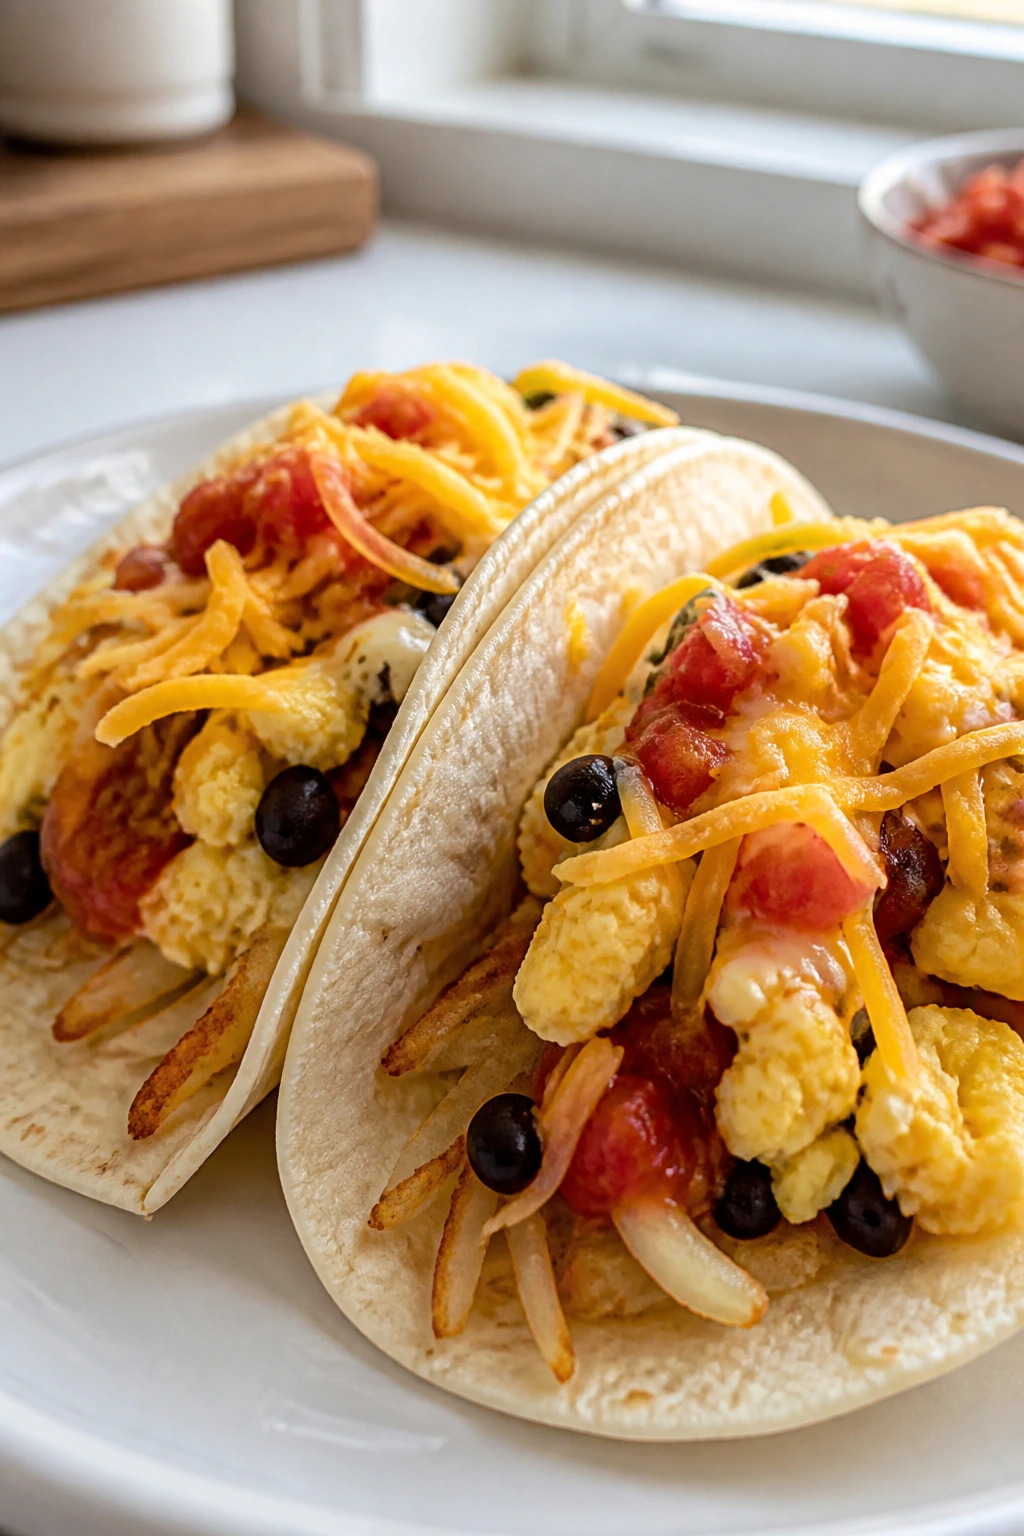
Breakfast for dinner stops feeling like a fallback when the eggs are soft, the potatoes are crisp, and the tortillas are warm. This version leans on frozen hash browns, which saves time and keeps the skillet honest. It’s cheap food that lands with enough color to look like you planned the evening.
Why It Works:
Eggs cook fast and take on whatever seasoning you give them. Frozen hash browns or diced breakfast potatoes bring texture without peeling and chopping a pile of fresh potatoes. Beans and salsa stretch the filling so you can feed more people without increasing the bill much.
Key Ingredients:
- 8 large eggs
- 1 tablespoon butter
- 2 cups frozen hash browns
- 1/2 cup diced onion
- 1 cup canned black beans, drained and rinsed
- 1 cup salsa
- 1 cup shredded cheese
- 8 small flour or corn tortillas
- Salt and pepper to taste
Quick Steps:
- Cook the hash browns and onion in butter over medium heat for 6 to 8 minutes, until browned and crisp.
- Stir in the beans and heat through for 1 minute.
- Beat the eggs with salt and pepper, then pour them into the skillet. Stir gently until softly set.
- Warm the tortillas, fill with the scramble, and top with salsa and cheese.
Equipment for This Recipe:
- Large skillet
- Bowl for eggs
- Spatula
- Microwave or dry pan for tortillas
How to Serve This Dish:
Serve the tacos with extra salsa and a few sliced scallions. A little hot sauce gives the eggs some edge without adding cost. They’re best wrapped loosely so the tortilla stays intact and the filling doesn’t slide out.
Pro Tips for This Recipe:
- Let the hash browns brown before stirring them much.
- Cook the eggs just to soft set; they keep cooking in the hot pan.
- Use small tortillas so the filling doesn’t get lost.
- A squeeze of lime over the beans helps more than you’d think.
Variations on This Dish:
- Chorizo Breakfast Tacos: Add a little crumbled chorizo with the potatoes.
- Veggie Version: Stir in spinach or diced peppers.
- Cheesy Bean Burrito: Wrap the filling in a larger tortilla and fold it like a burrito.
Common Mistakes to Avoid with This Dish:
- Don’t overcook the eggs. Dry eggs make the tacos feel flat.
- Don’t use soggy hash browns straight from the freezer bag; cook them until crisp.
- Don’t overfill small tortillas or they split.
15. Lentil Sloppy Joes
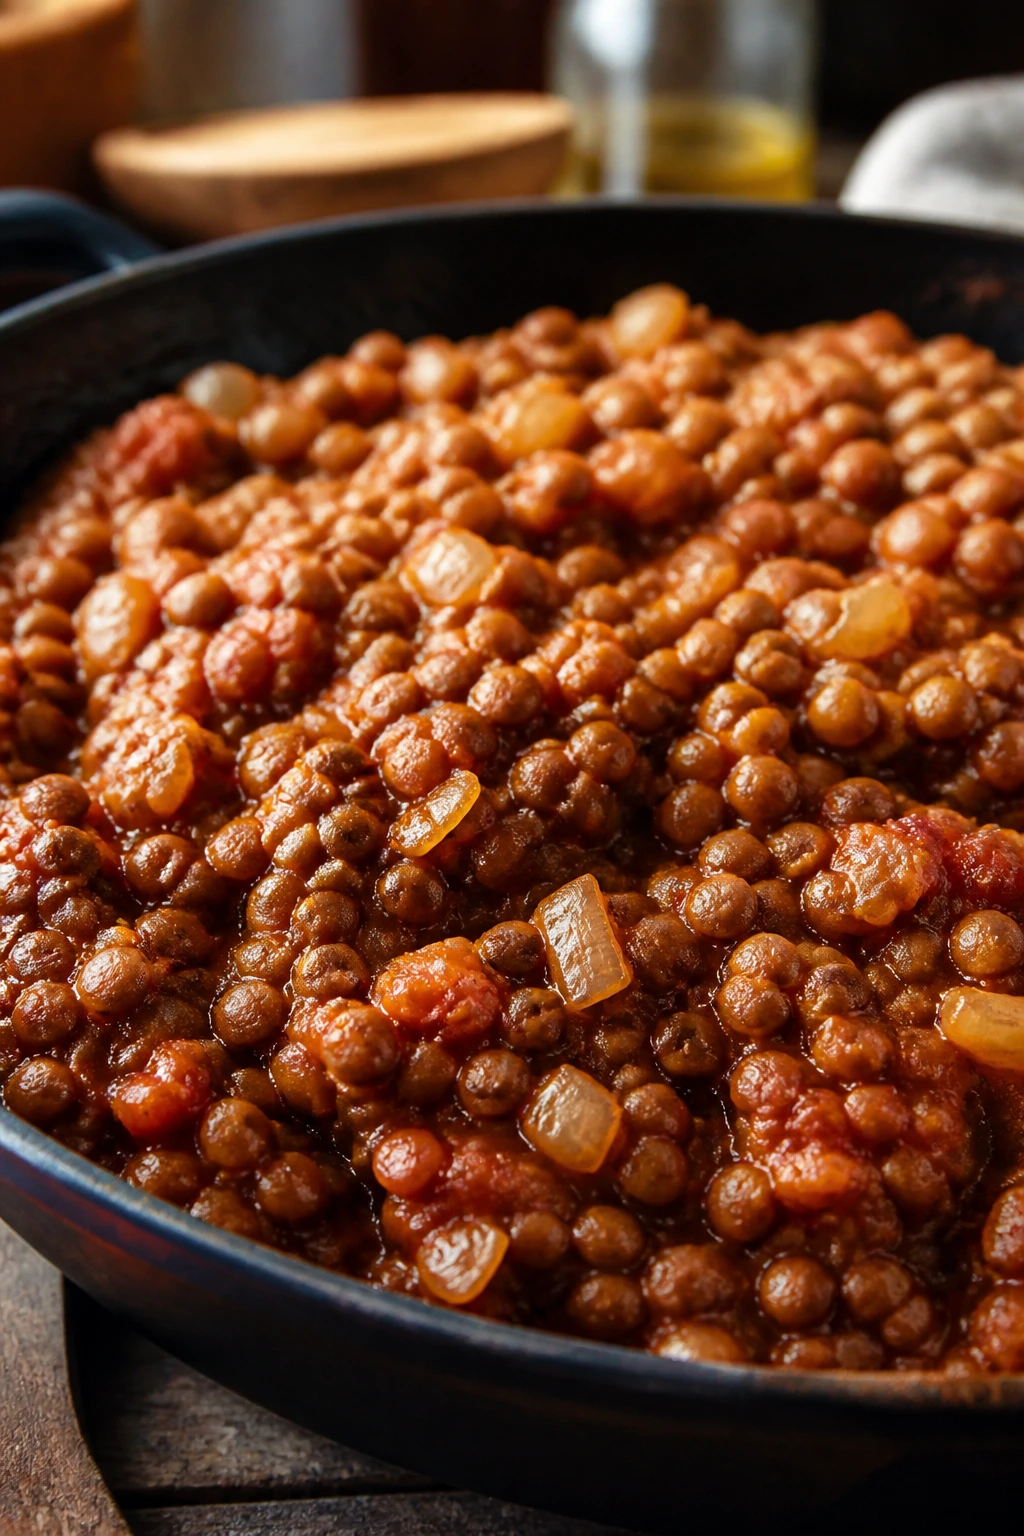
Lentils make a very good argument for dinner on a budget. They’re earthy, soft, and cheap enough that you can build a whole skillet without worrying about the register. Once they’re cooked with onion, tomato, mustard, and a little brown sugar, the mixture turns saucy and familiar in the way a sloppy joe should.
Why It Works:
Canned or cooked lentils are already tender, so they only need heating and seasoning. Tomato sauce gives the mixture body, mustard adds sharpness, and brown sugar rounds out the edge. The result tastes like the classic sandwich filling, but the ingredient list is kinder to your wallet.
Key Ingredients:
- 1 tablespoon oil
- 1 small onion, diced
- 2 garlic cloves, minced
- 1 can lentils, 15 ounces, drained and rinsed
- 1 cup tomato sauce
- 1 tablespoon tomato paste
- 1 tablespoon Worcestershire sauce or soy sauce
- 1 teaspoon yellow mustard
- 1 teaspoon brown sugar
- 4 hamburger buns
Quick Steps:
- Heat the oil in a skillet over medium heat. Cook the onion for 4 minutes, then add the garlic for 30 seconds.
- Stir in the lentils, tomato sauce, tomato paste, Worcestershire, mustard, and brown sugar.
- Simmer for 6 to 8 minutes, stirring often, until thick and spoonable. If it gets too thick, add a splash of water.
- Spoon onto buns and serve hot.
Equipment for This Recipe:
- Medium skillet
- Wooden spoon
- Can opener
- Knife and cutting board
How to Serve This Dish:
Serve the filling on toasted buns so they don’t go soggy too quickly. Pickles or coleslaw on the side sharpen the sweet tomato sauce. If you want a bigger plate, add potato chips or a simple green salad.
Pro Tips for This Recipe:
- Simmer until the mixture clings to the spoon; runny sloppy joes are just lentils in sauce.
- Toast the buns. It matters.
- If your lentils are plain, the mustard and Worcestershire need to be tasted before serving.
- A little smoked paprika works well here if you want more depth.
Variations on This Dish:
- BBQ Lentil Joes: Swap half the tomato sauce for barbecue sauce.
- Mushroom Lentil Joes: Add finely chopped mushrooms with the onion.
- Spicy Version: Stir in hot sauce or red pepper flakes.
Common Mistakes to Avoid with This Dish:
- Don’t leave the filling too loose. It should mound on a bun.
- Don’t skip the toast on the bread.
- Don’t underseason the lentils; they need a firm hand.
16. Teriyaki Tofu Broccoli Stir-Fry
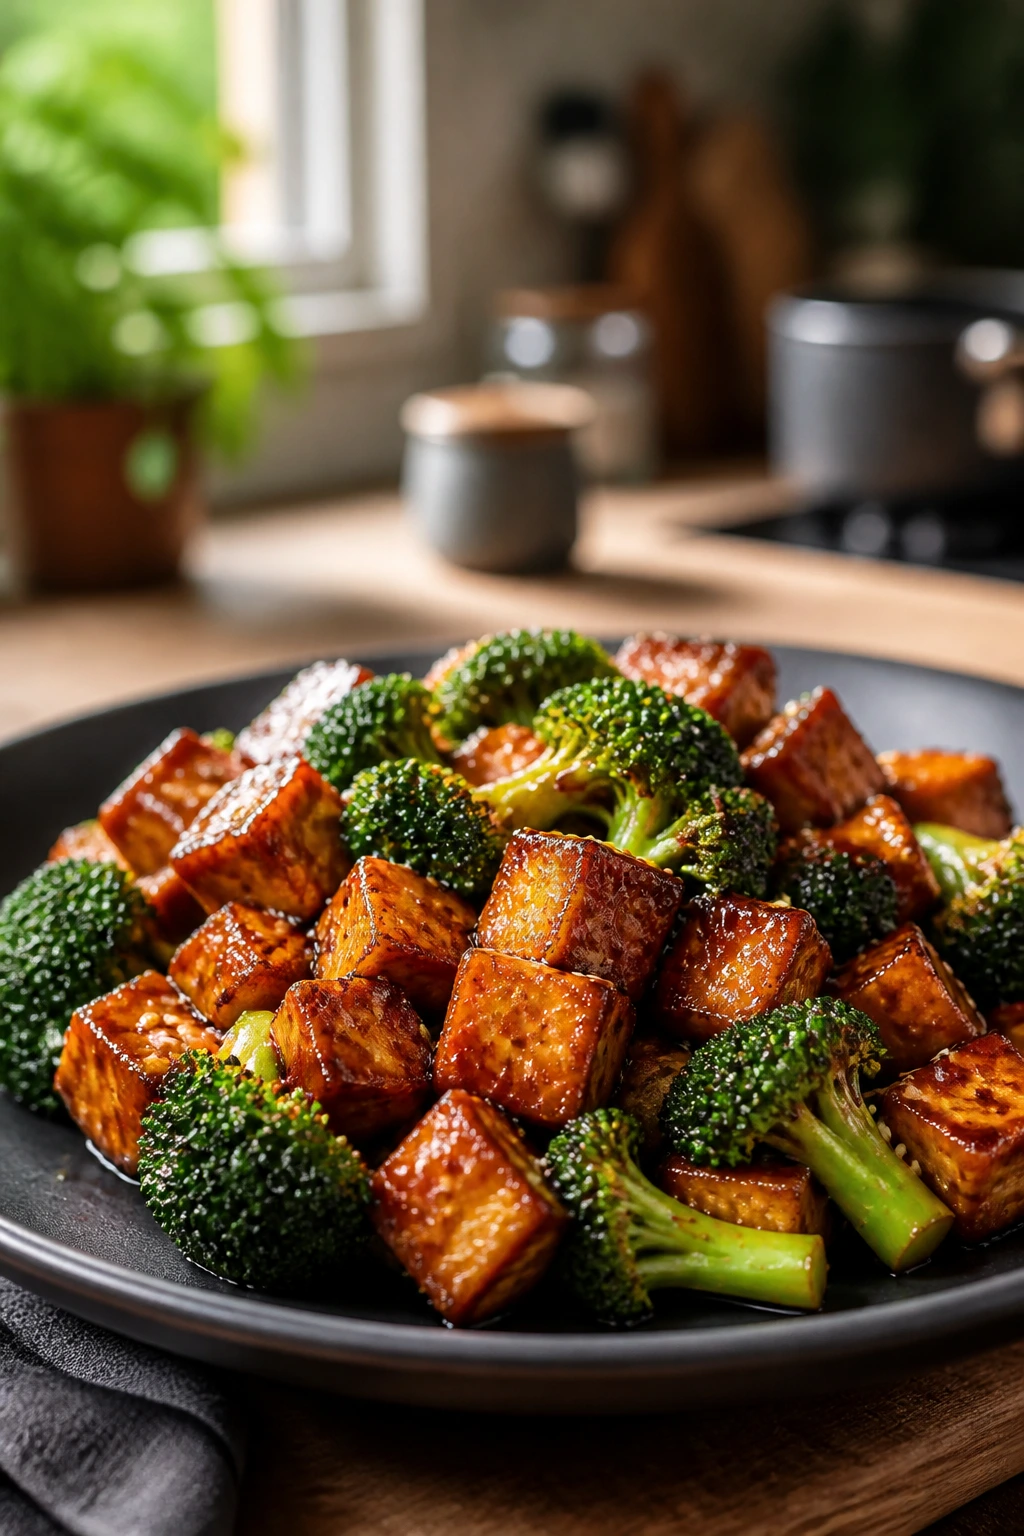
Tofu gets a bad reputation from people who don’t brown it enough. Give it a hot pan, a dusting of cornstarch, and a sticky teriyaki glaze, and it turns crisp outside while staying soft inside. Broccoli rounds it out, and the sauce comes together quickly enough to fit a weeknight without any fuss.
Why It Works:
Extra-firm tofu holds shape and absorbs sauce without falling apart. Cornstarch helps the cubes crisp before the glaze goes on, which means the texture isn’t soft and bland. Broccoli is cheap, cooks fast, and soaks up the teriyaki instead of pretending it isn’t there.
Key Ingredients:
- 14 ounces firm or extra-firm tofu, pressed and cubed
- 2 tablespoons cornstarch
- 2 tablespoons neutral oil
- 4 cups broccoli florets
- 1 bell pepper, sliced
- 2 garlic cloves, minced
- 1/4 cup soy sauce
- 2 tablespoons brown sugar or honey
- 1 tablespoon rice vinegar
- 1 teaspoon grated ginger
- 1 tablespoon water mixed with 1 teaspoon cornstarch
- Cooked rice, for serving
Quick Steps:
- Toss the tofu with cornstarch until lightly coated. Heat the oil in a skillet over medium-high heat and brown the tofu for 6 to 8 minutes, turning until crisp on several sides.
- Add the broccoli and bell pepper. Cook for 4 minutes, adding a splash of water if the pan starts to dry out.
- Stir in the garlic, soy sauce, brown sugar, vinegar, and ginger.
- Add the cornstarch slurry and cook for 1 minute, until the sauce turns glossy and clings to the tofu. Serve over rice.
Equipment for This Recipe:
- Large skillet
- Spatula
- Small bowl for the sauce
- Knife and cutting board
How to Serve This Dish:
Serve it over hot rice so the sauce has something to soak into. Sesame seeds or sliced scallions on top make the bowl look finished. A little chili crisp on the side does not hurt.
Pro Tips for This Recipe:
- Press the tofu for 5 to 10 minutes if you can.
- Don’t move it too early in the skillet; let it form a crust first.
- Keep the broccoli in pieces that are small enough to cook on time.
- Add the slurry only after the sauce is simmering.
Variations on This Dish:
- Noodle Version: Serve it over ramen or udon instead of rice.
- Sesame Mushroom Version: Add sliced mushrooms with the broccoli.
- Peanut Teriyaki Version: Stir in a tablespoon of peanut butter to the sauce.
Common Mistakes to Avoid with This Dish:
- Don’t skip the cornstarch. That crust matters.
- Don’t crowd the pan or the tofu will steam.
- Don’t let the sauce boil too long after the slurry goes in or it can turn gluey.
17. Shakshuka with Toast
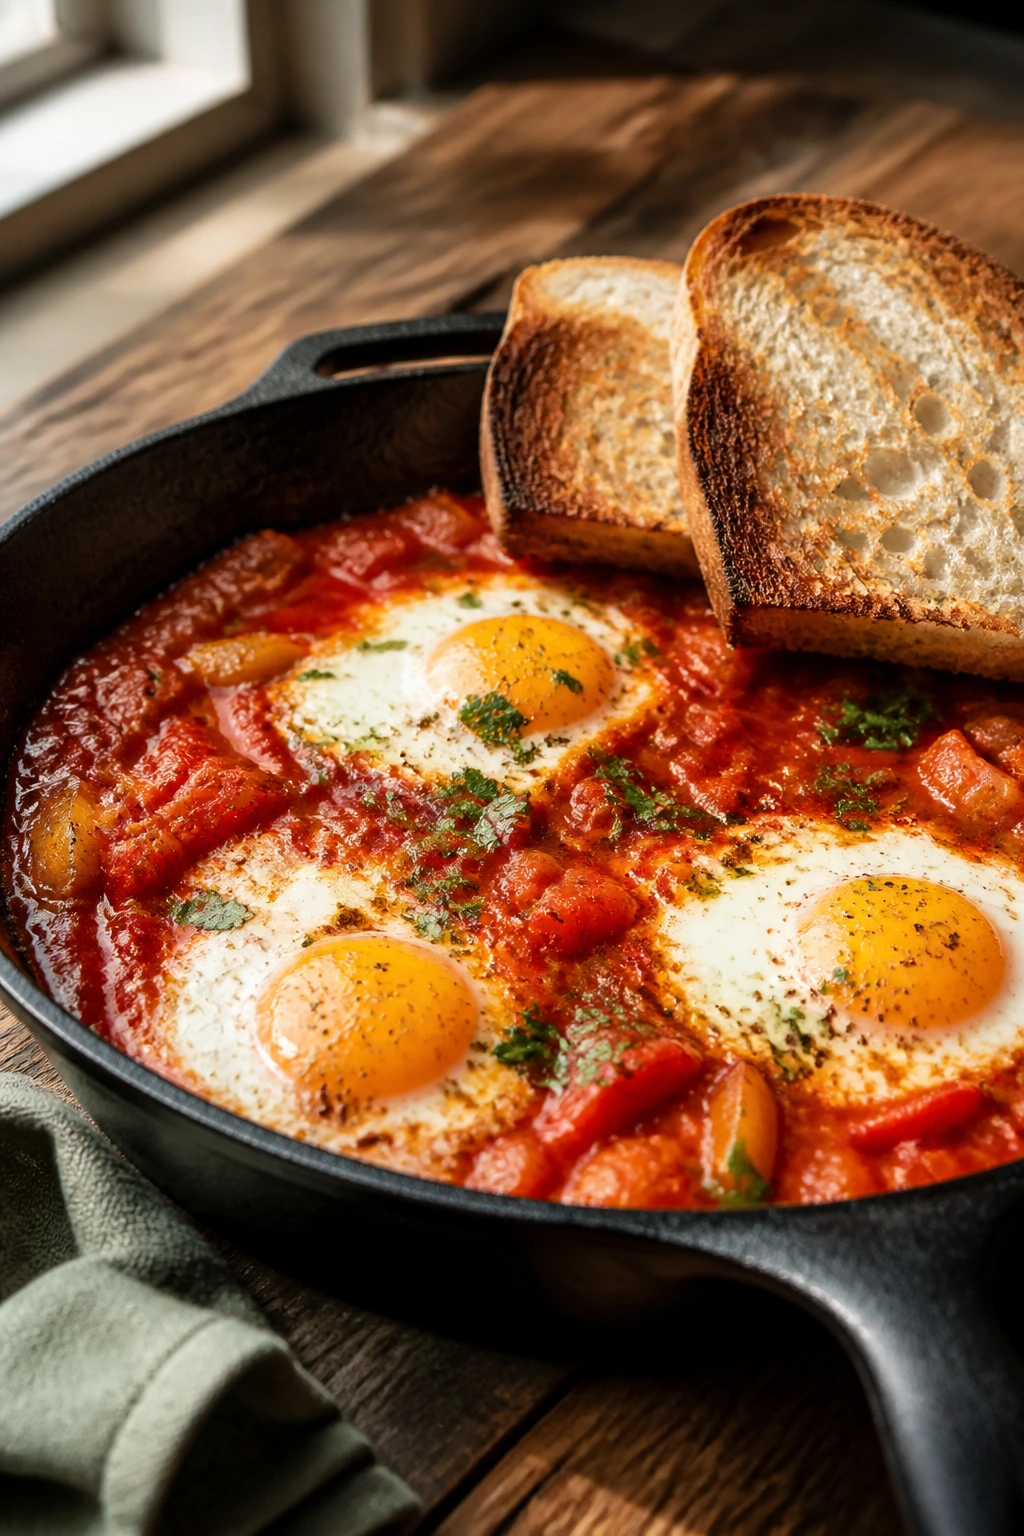
Shakshuka looks fancier than it is. Eggs poached in a tomato-pepper sauce sound like something from a brunch menu, but the whole pan comes together fast and cheaply. The yolks stay soft, the sauce gets smoky and a little sweet, and the toast is there to catch every bit of it.
Why It Works:
Canned tomatoes keep the cost low and the timing short. Onions, peppers, and garlic build the sauce, while eggs cook gently right in the pan instead of needing a second pot. A sprinkle of feta or parsley at the end gives it enough contrast that it feels complete.
Key Ingredients:
- 1 tablespoon olive oil
- 1 small onion, diced
- 1 bell pepper, diced
- 3 garlic cloves, minced
- 1 can crushed tomatoes, 28 ounces
- 1 teaspoon paprika
- 1/2 teaspoon cumin
- 1/4 teaspoon chili flakes
- 6 large eggs
- 1/4 cup feta, crumbled, optional
- Toast, for serving
Quick Steps:
- Heat the oil in a skillet over medium heat. Cook the onion and bell pepper for 5 minutes, until softened.
- Add the garlic, paprika, cumin, and chili flakes. Cook for 30 seconds.
- Stir in the tomatoes and simmer for 8 to 10 minutes, until the sauce thickens a bit.
- Make small wells in the sauce and crack in the eggs. Cover and cook for 4 to 6 minutes, until the whites are set and the yolks are still soft. Top with feta and serve with toast.
Equipment for This Recipe:
- Large skillet with lid
- Spoon
- Knife and cutting board
- Toaster or dry skillet
How to Serve This Dish:
Put the skillet on the table if you want a dramatic but inexpensive dinner. Bread is not optional; it’s part of the job. The sauce should be thick enough to hold the eggs without running everywhere.
Pro Tips for This Recipe:
- Simmer the tomato sauce before adding the eggs so it doesn’t stay watery.
- Cover the pan while the eggs cook.
- Use a spoon to nudge some sauce over the whites if needed.
- Add herbs at the end so they stay fresh.
Variations on This Dish:
- Green Shakshuka Style: Stir in spinach or kale near the end.
- Cheesy Version: Use more feta or a little mozzarella.
- Bean Shakshuka: Add white beans to the sauce for a bigger meal.
Common Mistakes to Avoid with This Dish:
- Don’t cook the eggs uncovered unless you want runny whites.
- Don’t rush the sauce reduction.
- Don’t serve it without bread unless you enjoy scraping the pan with a fork.
18. Rotisserie Chicken Enchilada Skillet
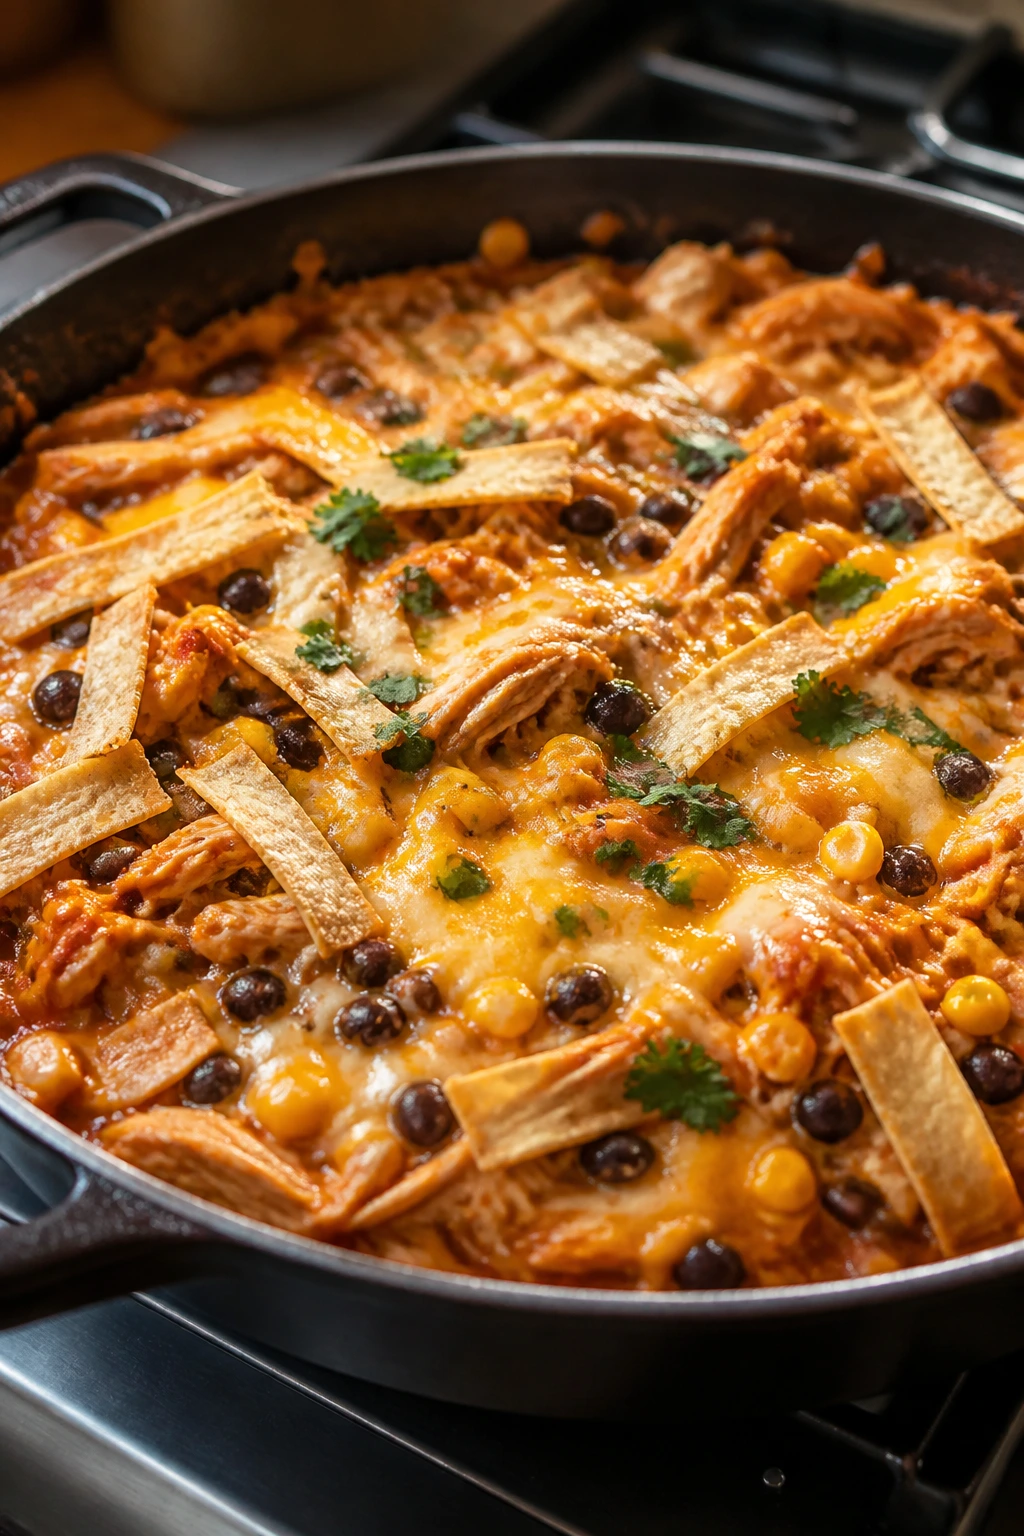
This skillet tastes like enchiladas with the hard part stripped out. Rotisserie chicken keeps it fast, tortillas soak up the sauce, and the cheese melts into the whole thing so every bite feels connected. It’s the kind of dinner that uses one store-bought shortcut and still feels like cooking.
Why It Works:
Rotisserie chicken is already seasoned and cooked, which makes it a smart budget move when time is tight. Enchilada sauce provides the flavor backbone, while beans and corn stretch the chicken without making the skillet feel bare. Cutting tortillas into strips lets them soften in the sauce the way corn tortillas do in proper enchiladas.
Key Ingredients:
- 2 cups shredded rotisserie chicken
- 1 tablespoon oil
- 1 can red enchilada sauce, about 10 ounces
- 1 can black beans, 15 ounces, drained and rinsed
- 1 cup frozen corn
- 4 corn tortillas, cut into strips
- 1 cup shredded cheese
- Chopped cilantro, optional
- Sour cream, optional
Quick Steps:
- Heat the oil in a skillet over medium heat. Stir in the enchilada sauce, beans, and corn, then simmer for 3 minutes.
- Add the chicken and tortilla strips. Stir until the tortillas start to soften and the chicken is hot, about 4 minutes.
- Sprinkle cheese over the top and cover for 1 to 2 minutes, until melted.
- Finish with cilantro and sour cream if using.
Equipment for This Recipe:
- Large skillet with lid
- Spatula
- Knife and cutting board
- Can opener
How to Serve This Dish:
Serve it in bowls with extra sauce pooled at the bottom. A few tortilla chips on top add crunch and keep the texture from going all soft. If you want a sharper finish, add pickled onions or sliced jalapeños.
Pro Tips for This Recipe:
- Use corn tortillas if you want the most enchilada-like texture.
- Don’t over-stir once the tortillas go in or they can break apart too much.
- Rotisserie chicken is fine cold from the fridge, but it heats faster if shredded loosely.
- Let the cheese melt under the lid rather than broiling the skillet.
Variations on This Dish:
- Green Enchilada Version: Use green enchilada sauce instead of red.
- Bean-Heavy Version: Add an extra can of beans and reduce the chicken a bit.
- Extra-Spicy Version: Stir in chopped jalapeños or hot sauce.
Common Mistakes to Avoid with This Dish:
- Don’t let the tortilla strips sit too long before serving or they’ll turn soggy.
- Don’t skip the lid on the cheese melt.
- Don’t use too much sauce; the skillet should be rich, not soupy.
19. Pesto Tortellini with Tomatoes and Peas
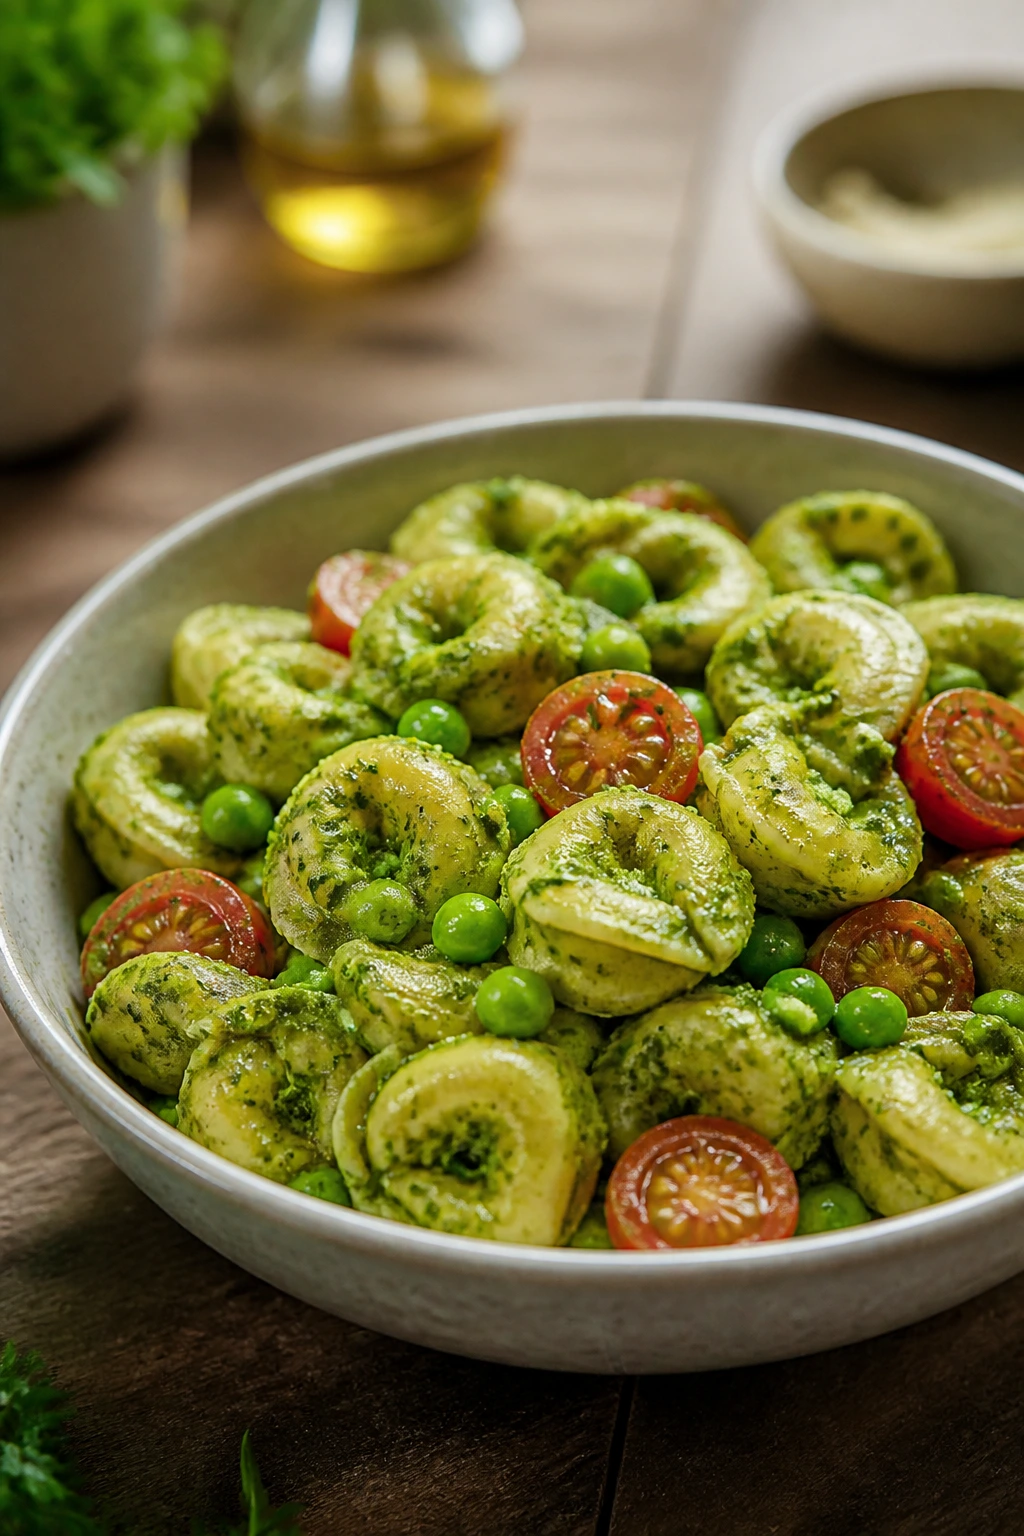
Refrigerated tortellini is a luxury only in the sense that it feels fancier than it costs. It cooks in minutes, catches pesto in all its folds, and plays well with sweet peas and burst tomatoes. The sauce barely needs help, which is exactly why this recipe earns a place in a budget meal rotation.
Why It Works:
Cheese tortellini is already filled, so it brings more flavor per bite than plain pasta. Pesto does the job of herbs, oil, garlic, and cheese in one spoonful, which keeps the ingredient list short. Peas and tomatoes add color and contrast so the bowl doesn’t taste one-note.
Key Ingredients:
- 1 pound refrigerated cheese tortellini
- 1 cup frozen peas
- 1 pint cherry tomatoes
- 1/3 cup pesto
- 1/4 cup reserved pasta water
- 2 tablespoons olive oil
- 1/4 cup grated parmesan
- Black pepper to taste
Quick Steps:
- Bring a pot of salted water to a boil and cook the tortellini according to the package, adding the peas in the last minute.
- While the pasta cooks, heat the olive oil in a skillet and toss in the cherry tomatoes. Cook for 3 to 4 minutes until they start to split.
- Add the drained tortellini, peas, pesto, and pasta water to the skillet. Toss gently until everything is coated.
- Finish with parmesan and black pepper.
Equipment for This Recipe:
- Large pot
- Skillet
- Colander
- Wooden spoon
How to Serve This Dish:
Serve it right away while the tortellini is still plump. A handful of extra parmesan on top and a little basil make the bowl look finished. It works as a main dish, but it can also sit beside chicken or sausage if needed.
Pro Tips for This Recipe:
- Save the pasta water. It loosens the pesto and helps it cling.
- Don’t crush the tortellini while tossing.
- Let the tomatoes blister a little for better flavor.
- Use store-bought pesto if that’s what fits the budget; there’s no shame in it.
Variations on This Dish:
- Spinach Pesto Version: Stir in a few handfuls of spinach at the end.
- Chicken Tortellini: Add diced rotisserie chicken.
- Sun-Dried Tomato Version: Swap some fresh tomatoes for chopped sun-dried tomatoes.
Common Mistakes to Avoid with This Dish:
- Don’t overcook the tortellini. They go from tender to bloated fast.
- Don’t add pesto to a dry pan. It needs pasta water to loosen.
- Don’t skip the black pepper; it keeps the pesto from reading heavy.
20. Ground Beef and Zucchini Skillet
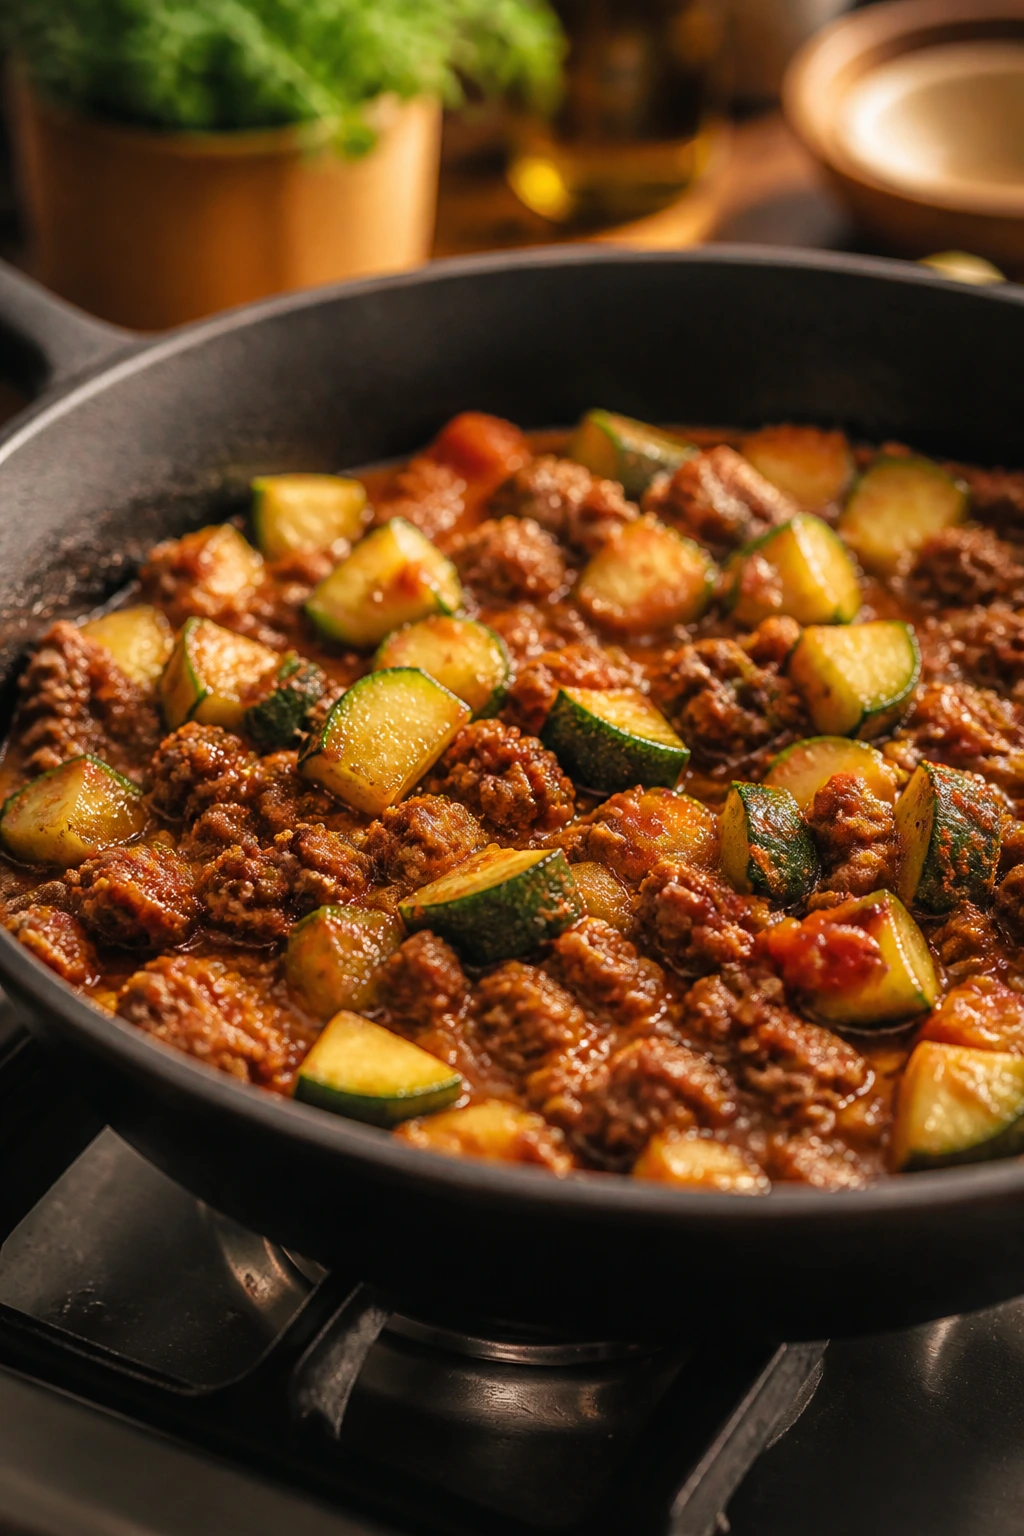
This is the sort of skillet meal that quietly solves dinner without making a scene. Ground beef brings the savory base, zucchini softens into tender pieces, and tomato paste gives the whole thing a deeper, cooked flavor in under half an hour. It’s inexpensive, filling, and not the least bit precious.
Why It Works:
Ground beef browns quickly and gives you enough fat to cook the onions and zucchini without much added oil. Zucchini is cheap when bought in season or in larger bags, and it cooks fast enough to fit a weeknight. Tomato paste is doing a lot here; once it hits the hot pan, it tastes richer than its size suggests.
Key Ingredients:
- 1 pound ground beef
- 1 tablespoon olive oil
- 1 small onion, diced
- 2 medium zucchini, diced
- 2 garlic cloves, minced
- 2 tablespoons tomato paste
- 1 cup canned diced tomatoes or beef broth
- 1 teaspoon Italian seasoning
- 1/2 cup shredded mozzarella or parmesan
- Salt and black pepper to taste
Quick Steps:
- Heat the oil in a skillet over medium-high heat. Brown the beef and onion for 5 to 6 minutes, breaking up the meat as it cooks.
- Add the zucchini and garlic. Cook for 4 minutes, until the zucchini starts to soften.
- Stir in the tomato paste, diced tomatoes or broth, Italian seasoning, salt, and pepper. Simmer for 5 minutes, until the mixture thickens.
- Top with cheese, cover, and let it melt for 1 minute before serving.
Equipment for This Recipe:
- Large skillet
- Spatula
- Knife and cutting board
- Lid or foil
How to Serve This Dish:
Serve it over rice, with bread, or tucked into tortillas. It also sits well on its own in a bowl if you keep the sauce a little loose. A little parmesan at the table sharpens the finish.
Pro Tips for This Recipe:
- Brown the beef before the zucchini so the skillet has flavor.
- Don’t dice the zucchini too small or it disappears.
- Tomato paste needs a minute in the hot pan to lose its raw edge.
- If the mixture gets dry, add broth a splash at a time.
Variations on This Dish:
- Rice Bowl Version: Serve it over white rice or couscous.
- Mushroom Version: Add sliced mushrooms with the zucchini.
- Cheesy Bake Version: Spoon it into a dish, top with more cheese, and broil briefly.
Common Mistakes to Avoid with This Dish:
- Don’t overcook the zucchini until it turns watery.
- Don’t skip seasoning the beef while it browns.
- Don’t let the tomato paste sit unmixed or it can burn.
21. Caprese Grilled Cheese
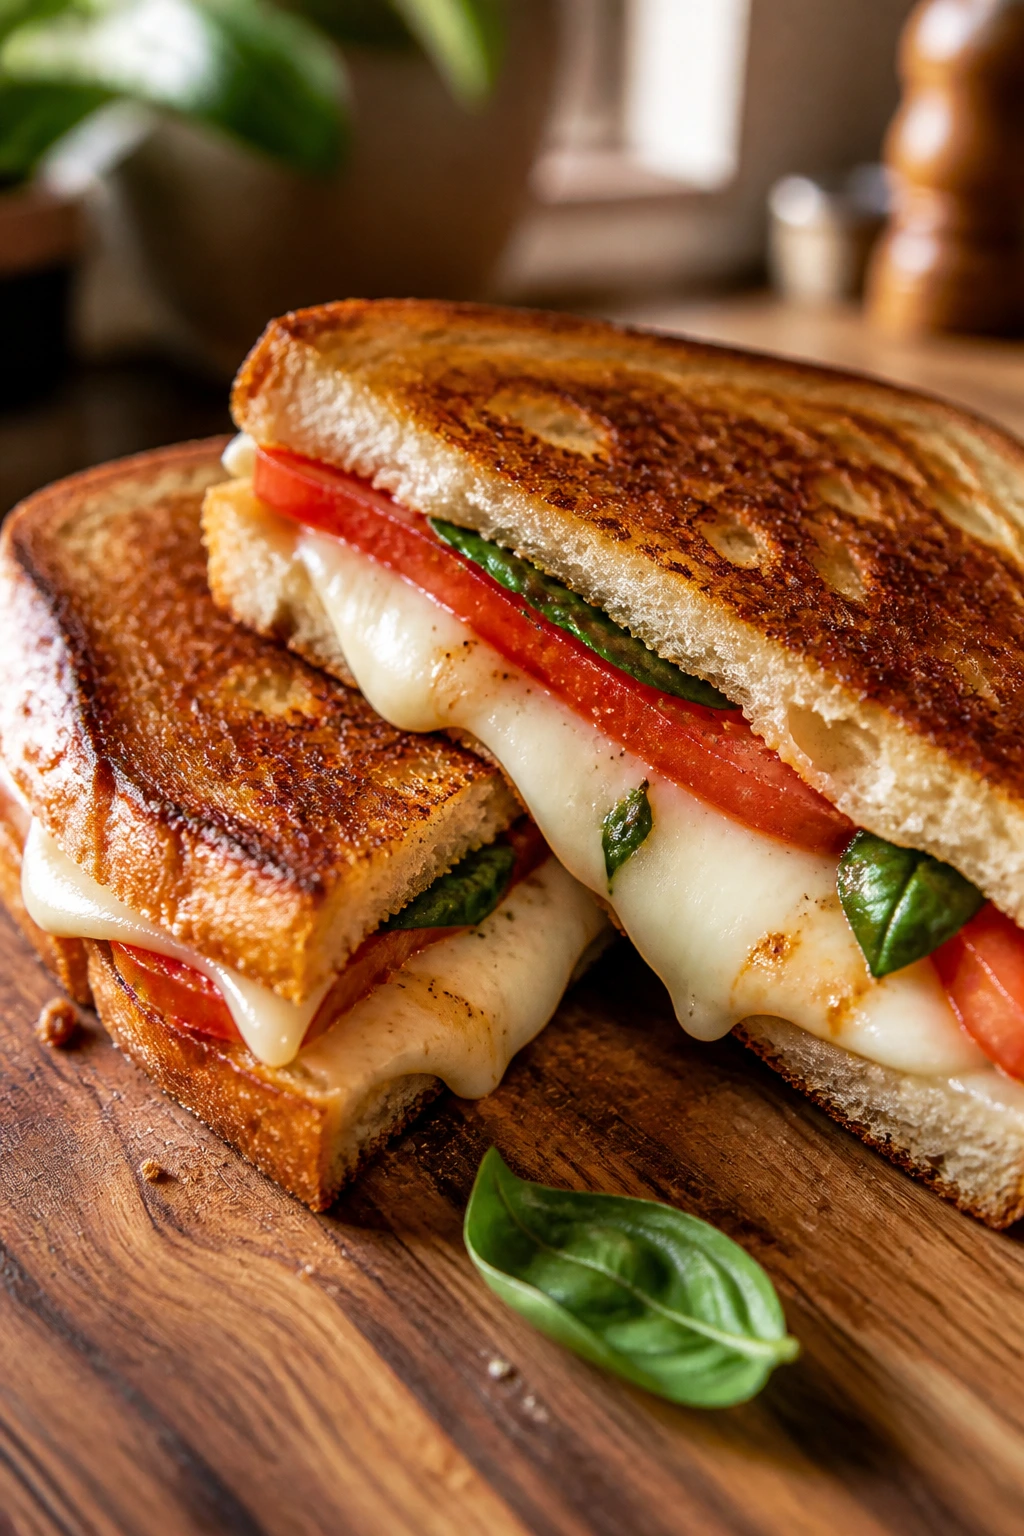
This is grilled cheese that got dressed up with tomatoes and basil but still knows it’s grilled cheese. The bread goes crisp and buttery, the mozzarella melts into long strands, and the tomato adds enough juice to keep the sandwich from feeling too heavy. Cheap? Not exactly fancy. Still one of the most satisfying quick meals around.
Why It Works:
Mozzarella melts well and stays mild, which lets the tomato and basil do some of the work. Pesto or a thin smear of mayo adds fat and flavor, helping the bread brown evenly. Because everything is sliced thin, the sandwich cooks fast without needing a long oven time.
Key Ingredients:
- 8 slices bread
- 8 ounces mozzarella, sliced or shredded
- 1 large tomato, sliced thin
- 1/4 cup fresh basil leaves
- 2 tablespoons pesto or mayonnaise
- 2 tablespoons butter, softened
Quick Steps:
- Spread pesto or mayo on the inside of each bread slice. Build sandwiches with mozzarella, tomato, and basil.
- Butter the outsides of the bread. Heat a skillet over medium heat.
- Cook each sandwich for 3 to 4 minutes per side, pressing lightly, until the bread is golden and the cheese melts.
- Rest for 1 minute before slicing so the filling stays put.
Equipment for This Recipe:
- Skillet or griddle
- Spatula
- Knife and cutting board
- Butter knife
How to Serve This Dish:
Serve it with tomato soup, chips, or a handful of arugula if you want something sharp beside it. Cutting the sandwich diagonally gives you more melty surface, which is the right move here. A little flaky salt on the tomato inside the sandwich helps too.
Pro Tips for This Recipe:
- Slice the tomato thin and blot it lightly so the bread doesn’t get soggy.
- Keep the heat medium, not high.
- Use mozzarella that melts well; overly dry cheese won’t do much.
- Basil goes under the top slice of bread so it doesn’t burn.
Variations on This Dish:
- Pesto Chicken Version: Add a little shredded chicken if you have it.
- Tomato Jam Version: Swap fresh tomato for a spoon of tomato jam or thick salsa.
- Extra-Crisp Version: Sprinkle parmesan on the buttered bread before grilling.
Common Mistakes to Avoid with This Dish:
- Don’t crank the heat. Burnt bread and unmelted cheese is a bad trade.
- Don’t use giant tomato slices.
- Don’t skip the rest after grilling; the cheese needs a minute.
22. Bean and Cheese Nachos
Nachos can be a lazy meal or a smart one. The difference is whether you warm the beans, layer the cheese properly, and stop pretending a mountain of chips counts as dinner on its own. With refried beans, plenty of cheese, and a few fresh toppings, this becomes a fast meal that still feels fun.
Why It Works:
Refried beans give the chips a base that keeps them from feeling dry. Cheese melts between the chips and beans, which helps everything stick together instead of sliding off in the first bite. A few fresh toppings at the end—tomato, jalapeño, cilantro, sour cream—keep the tray from tasting like one long note of salt.
Key Ingredients:
- 1 bag tortilla chips, about 10 ounces
- 1 can refried beans, 16 ounces
- 2 cups shredded cheddar or Mexican blend cheese
- 1 tomato, diced
- 1 jalapeño, sliced
- 1/4 cup sliced black olives, optional
- 1/4 cup sour cream or plain yogurt
- Salsa and chopped cilantro, for serving
Quick Steps:
- Heat the oven to 425°F. Warm the refried beans in a saucepan or microwave until spreadable.
- Spread the chips on a baking sheet. Dollop the beans over the chips and scatter the cheese on top.
- Bake for 6 to 8 minutes, until the cheese melts and the edges of a few chips start to brown.
- Top with tomato, jalapeño, olives, sour cream, salsa, and cilantro. Serve immediately.
Equipment for This Recipe:
- Baking sheet
- Oven
- Spoon
- Small saucepan or microwave-safe bowl
How to Serve This Dish:
Serve nachos right off the tray while the chips still have some crunch. If you want them to feel more like dinner, add a side of rice or a simple salad. The toppings should land after baking, not before, or everything gets soggy fast.
Pro Tips for This Recipe:
- Layer the beans in small dots instead of one thick smear.
- Use a sturdy chip that can handle the weight.
- Add cold toppings after baking so they stay bright.
- If you want a meatier tray, mix in a little seasoned ground beef or chicken.
Variations on This Dish:
- Breakfast Nachos: Top with scrambled eggs instead of sour cream.
- Chicken Nachos: Add shredded rotisserie chicken before baking.
- Green Nachos: Use salsa verde and sliced scallions instead of red salsa.
Common Mistakes to Avoid with This Dish:
- Don’t build a giant pile. A single layer bakes better.
- Don’t leave the tray in too long or the cheese turns greasy.
- Don’t add wet toppings before baking.
Why 30-Minute Budget Cooking Feels Better Than It Sounds
Fast, cheap food gets treated like a compromise, but that’s mostly a problem of bad building. If the pan has enough salt, fat, heat, and a bright finish at the end, a humble meal can taste sharper and more satisfying than a fancier one that took all evening. The point isn’t to make dinner look expensive. It’s to make it taste deliberate.
There’s also something practical I like about this style of cooking: it handles interruptions. If somebody comes home late, the sausage skillet is still fine. If the store ran out of spinach, cabbage can step in. If you forgot to thaw anything, beans and eggs are waiting in the cupboard and fridge, unbothered.
I keep coming back to the same idea because it matters: cheap doesn’t have to mean flat. Cheap can mean stocked. Cheap can mean flexible. Cheap can mean dinner that lands on time and leaves a little room in the grocery budget for something better later.
Essential Equipment for These Recipes

- 12-inch skillet: Big enough to brown meat, toast rice, or cook a full vegetable filling without steaming everything.
- Medium saucepan with lid: Useful for rice, orzo, soup, and quick bean sauces.
- Large pot: Needed for pasta, tortellini, and anything that wants room to boil freely.
- Baking sheet: Handy for nachos and any tray-style finish.
- Cutting board and chef’s knife: The faster you can slice onion, pepper, and cabbage, the more realistic these meals become.
- Wooden spoon or spatula: Better for scraping browned bits than a flimsy utensil.
- Colander: For pasta, tortellini, and rinsing beans.
- Can opener: Not glamorous. Essential.
- Lid or foil: Helps melt cheese and finish eggs, rice, and skillet dinners without drying them out.
Smart Shopping and Ingredient Tips
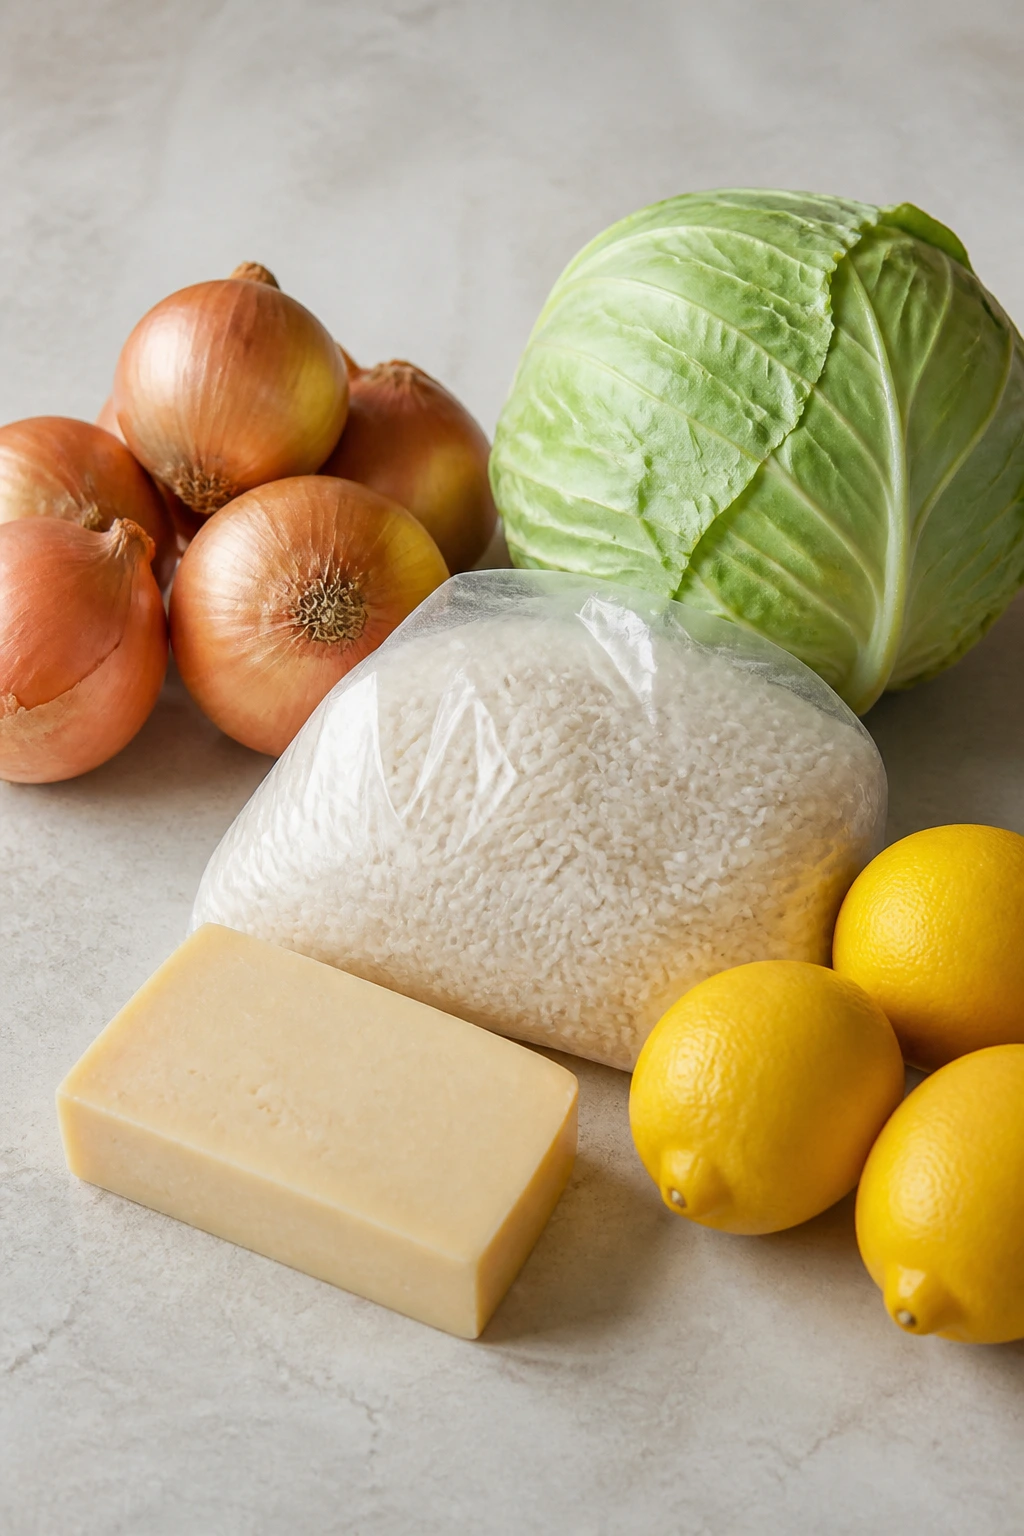
If you want these meals to stay cheap, shop like someone who plans to use the same ingredients more than once. A bag of onions, a few lemons, a head of cabbage, a sack of rice, and a block of cheese can touch several dinners across a week. That’s where the savings hide. It’s not in buying one magic ingredient on sale.
Store-brand canned beans and tomatoes are usually the easiest win. Rinse beans when the recipe calls for it, but don’t rinse every bit of flavor off them. For pasta sauces and soups, crushed tomatoes often behave better than fancy jarred sauce because you can season them yourself. Frozen peas, corn, and broccoli are worth keeping around because they don’t wilt in the drawer before you use them.
For protein, buy the cut that matches the cooking time. Ground turkey, ground beef, rotisserie chicken, tuna, eggs, and tofu all get dinner on the table faster than whole cuts that need more babysitting. If you do buy chicken breast, slice it thin and cook it hot so it doesn’t dry out before the vegetables are done.
Cheese is one place where a block often beats a bag. Pre-shredded cheese is convenient, and I use it often, but a block of cheddar or mozzarella usually melts smoother if you have the minute to grate it. Keep tortillas, buns, and bread on hand only if you know you’ll use them fast; stale bread can still become grilled cheese or toast, but tortillas crack if they sit too long.
How to Serve These Recipes
Presentation:
Skillet meals look better in shallow bowls than in deep ones, because the sauce can spread out and show the good stuff. Pasta wants a twist or mound in the center, then a little extra cheese on top. Bowls of rice, beans, or noodles benefit from one bright finish—lime, herbs, scallions, or hot sauce—so the color doesn’t sink into beige.
Accompaniments:
Most of these dishes are complete enough on their own, but a simple side can make them feel less bare. Bread works with chickpea skillet, soup, shakshuka, and pasta. Salad or sliced cucumbers fit the richer meals like fried rice, grilled cheese, and enchilada skillet. Chips, pickles, or quick slaw are good when the main dish leans soft.
Portions:
For most of these recipes, plan on one generous bowl or two stuffed tortillas per adult, then adjust based on sides. If the meal is bean- or pasta-heavy, it stretches farther. If it’s mostly vegetables and eggs, I’d lean on bread or rice to carry the plate.
Beverage Pairing:
Sparkling water with lemon works across almost all of them. For something with more body, iced tea or a light lager fits pasta, tacos, and skillet meals. Tomato-heavy dishes like shakshuka or grilled cheese with soup also like a cold cola in the old-fashioned sense of the word.
Additional Tips and Flavor Boosters
Flavor Enhancement:
A small finishing hit matters more than a fancy ingredient list. Lemon juice, lime juice, vinegar, pickled onions, hot sauce, and chopped herbs turn basic ingredients into a meal with a point of view. If something tastes flat, it usually needs salt first, then acid, then a little fat.
Customization:
Frozen peas can slip into fried rice, pasta, and orzo without changing the whole recipe. Black beans can replace lentils in sloppy joes, and rice can replace pasta in bowls that need more bulk. If you like more heat, stir chili crisp, sriracha, or red pepper flakes into the finish rather than cooking them hard from the start.
Serving Suggestions:
Toasted breadcrumbs on pasta, scallions on eggs, sesame seeds on noodles, and cilantro on tacos all do the same job: they make the bowl look finished and add a small crunch. Sour cream, yogurt, or a drizzle of olive oil can soften sharper flavors without adding much cost.
Make-It-Yours:
For gluten-free meals, lean on rice, potatoes, corn tortillas, and bean-based bowls. For dairy-free versions, use olive oil, avocado, or a spoonful of tahini instead of cheese in a few of these recipes. For higher protein, add an egg, a second can of beans, or a handful of rotisserie chicken rather than trying to reinvent the whole dish.
Make-Ahead, Storage, and Reheating Guidance
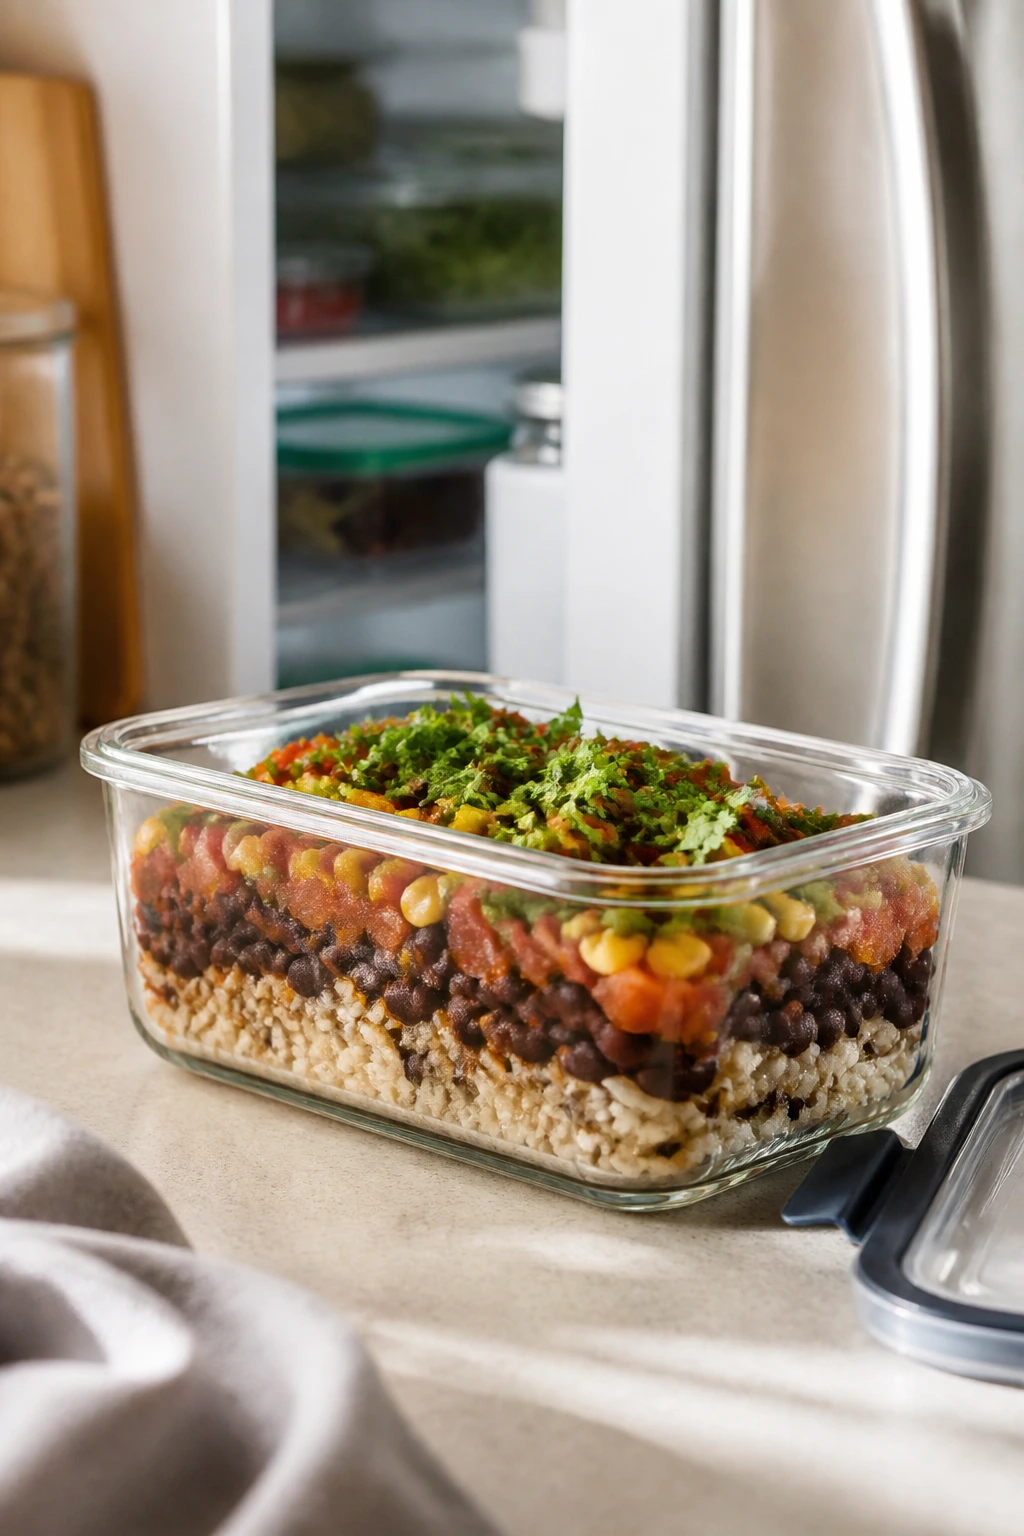
Most of these meals keep well for 3 to 4 days in the refrigerator in sealed containers. Bean stews, lentil fillings, taco skillets, and tomato-based sauces usually freeze for up to 2 months, sometimes a little longer if the container is airtight and the freezer stays cold. Pasta dishes and rice dishes freeze too, though the texture softens a bit. They still taste fine; they just stop pretending to be fresh.
Reheat skillet meals and saucy fillings on the stovetop over medium-low heat, adding a splash of water or broth if the pan looks dry. Rice bowls and fried rice reheat best in the microwave with a damp paper towel over the top, in 60-second bursts, stirring once halfway through. Soups should be heated until steaming hot all the way through, and egg dishes should be eaten sooner rather than later because the texture changes fast.
A few recipes deserve special treatment. Nachos are best the same day, because chips lose their nerve once they sit under beans and cheese. Grilled cheese is also a same-day food, though the tomato and mozzarella can be pre-sliced. Loaded baked potatoes keep for a day or two, but the skin softens, so re-crisp them in the oven if you can. No matter the dish, get leftovers into the fridge within 2 hours of cooking so they stay safe and taste decent later.
Variations and Adaptations to Try
Pantry-Only Night:
Build dinner from canned beans, pasta, rice, tomatoes, tuna, tortillas, and frozen vegetables. This approach works especially well for the chickpea skillet, bean bowls, tuna quesadillas, and tomato pasta because the recipes already lean that way. Keep a lemon or vinegar around so the meal doesn’t taste like a storage shelf.
Vegetarian Lane:
Swap ground meat for lentils, beans, tofu, or eggs. The lentil sloppy joes, black bean bowls, white bean soup, and tofu stir-fry prove you do not need meat to make the plate feel complete. The main thing to watch is seasoning; plant proteins need the salt and acid more than meat does.
Lower-Sodium Version:
Use no-salt-added beans and tomatoes where you can, then season at the table with herbs, lemon, pepper, and garlic. Store-bought sauces and broths can be the sneaky sodium source, so taste before you pour in extra. Once the pan is seasoned with acid and a little fat, you often need less salt than you expect.
Kid-Mild Mode:
Keep spice off the stove and put it on the table. That means no chili flakes in the pan, light hand on the pepper, and salsa or hot sauce on the side. Taco bowls, grilled cheese, fried rice, and enchilada skillet all adapt easily without changing the base recipe.
Higher-Protein Upgrade:
Add an egg, a second can of beans, extra chicken, or tofu instead of piling on more cheese. It keeps the meal filling without making it more expensive in a messy way. This works especially well for rice bowls, noodles, and soups where the extra protein can blend right in.
Regional Twist:
Shift the flavors around the map with one or two swaps. Use pesto and mozzarella for an Italian lean, enchilada sauce and tortillas for a Southwest feel, or soy sauce and sesame oil for a quick stir-fry direction. The bones of the recipe stay the same; the pantry accents change the mood.
Common Mistakes to Avoid
The biggest mistake is treating every quick meal like it can survive on one ingredient and hope. It can’t. Ground meat needs onion or garlic. Beans need acid. Rice needs salt. Tomatoes need time in the pan. If the recipe seems too plain, the fix is usually in the layering, not the shopping list.
Another common slip is cooking everything at the same heat. Garlic burns fast, tortillas scorch even faster, and tofu needs enough heat to brown before the sauce goes in. If the pan smells bitter or the edges go dark too soon, pull back a notch. Medium-high is useful, but it is not a religion.
People also rush the finishing step. They stop before tasting, then wonder why the skillet feels flat. A squeeze of lime, a pinch of salt, or a spoon of pesto can change the whole plate. That last minute is where budget food gets its shape.
Then there’s the soggy problem. Too much liquid, too many toppings too early, or overcrowding the pan can turn a crisp idea into mush. Keep wet toppings for the end, let sauces thicken before you serve, and give browned ingredients enough space to actually brown. Cheap ingredients punish bad technique less than expensive ones do, but they still have their limits.
Frequently Asked Questions
Can I use frozen vegetables in most of these recipes?
Yes, and in some of them I’d rather you did. Frozen peas, corn, spinach, broccoli, and mixed vegetables save money, cut prep time, and usually hold their texture better than tired produce. Add them near the end so they stay bright.
Which recipes are best for meal prep?
The bean bowls, lentil sloppy joes, chili-style skillet meals, soups, and fried rice reheat the cleanest. Pasta and tortellini also keep well for a few days, though the sauce may need a splash of water. Save crispy dishes like nachos and grilled cheese for same-day eating.
What protein gives the most food for the money?
Beans, eggs, and lentils are hard to beat. Rotisserie chicken is useful when you need speed more than raw savings, and ground turkey or beef stretches well when paired with rice, cabbage, or zucchini. Tofu can do the same job if you brown it properly.
Do canned beans need to be rinsed?
Usually, yes, unless the recipe wants that thick can liquid on purpose. Rinsing removes excess salt and the cloudy liquid that can make a sauce taste muddy. In soups, bowls, and skillet dinners, rinsed beans usually behave better.
Can I make these dairy-free?
Most of them, yes. Use olive oil instead of butter, skip the cheese or replace it with avocado or a dairy-free melt if that suits you, and lean harder on lemon, herbs, and salsa for flavor. The bean and rice dishes adapt especially well.
How do I keep rice dishes from getting mushy?
Use the right rice for the recipe and follow the timing closely. Instant rice is built for speed, while day-old rice works better for fried rice because it’s drier. If the pan looks wet, give it a minute uncovered instead of stirring constantly.
What if the sauce tastes flat at the end?
Add salt first, then a little acid. Lemon juice, lime, vinegar, or pickle brine can wake up beans, pasta, and tomato sauces fast. If it still tastes dull after that, a small knob of butter or a spoon of pesto can round it out.
Can I double these recipes for a bigger family?
Usually, yes, but do it with a bigger pan or in two batches if browning matters. Crowding a skillet steals color and turns everything pale. Soups, taco fillings, and pasta sauces scale the easiest; quesadillas and grilled cheese are better made in rounds.
Fast Meals That Pull Their Weight
Cheap dinners get a bad reputation when they’re treated like a last resort. The truth is simpler: beans, eggs, pasta, rice, tortillas, and a few good seasonings can make a dinner that’s quick, satisfying, and far less expensive than takeout. The trick is choosing the version that matches your night instead of fighting it.
Keep a few of these in your pocket, and the 30-minute scramble gets quieter. A skillet, a pot of rice, a bag of tortillas, or a can of tomatoes is often enough to get dinner moving again, which is a pretty useful thing to have in the house.