
These dinner recipes for picky eaters kids will actually eat solve a problem that has almost nothing to do with nutrition labels and everything to do with texture, color, and trust. If a plate shows up with a sauce that’s too dark, a green fleck where it doesn’t belong, or a soft, soggy topping when a child was expecting crunch, the meal can be over before anyone takes a bite. That’s the part a lot of dinner advice misses.
The trick is not fancy. Familiar shapes help. Mild flavors help. Crisp edges help more than people admit. And the best kid-friendly dinners usually give children a small sense of control: sauce on the side, cheese they can see, noodles they recognize, or a topping they can pick up with their fingers instead of a fork.
I’ve leaned into recipes that keep the flavor lane narrow and the texture predictable. No surprise heat. No mysterious “healthy swaps” that turn dinner grainy. No vegetables masquerading as another food when they should just be served in a way kids can accept. The point is to get food on the table that gets eaten, not admired from a distance.
Why These Kid-Friendly Dinners Work So Well
- Familiar shapes matter: Chicken tenders, sliders, pasta, and meatballs read as safe before the first bite ever happens, which takes some of the pressure off the table.
- Texture stays predictable: These dinners lean on crisp breading, soft noodles, tender rice, or melty cheese instead of mixed textures that can feel chaotic to picky eaters.
- Sauces are mild and familiar: Marinara, queso, butter, and light gravy show up often because they coat food without shouting over it.
- Most recipes allow a “plain” path: If one child wants noodles with cheese only and another wants meatballs with sauce, you can split the plate without cooking two dinners.
- Leftovers hold up: Pasta bakes, meatballs, sliders, and skillet meals reheat in a way that still looks like dinner, not a regretful lunchbox rescue.
- You can add vegetables without drama: The better approach is usually small dice, soft cooking, or serving them separately — not a stealth mission with a blender.
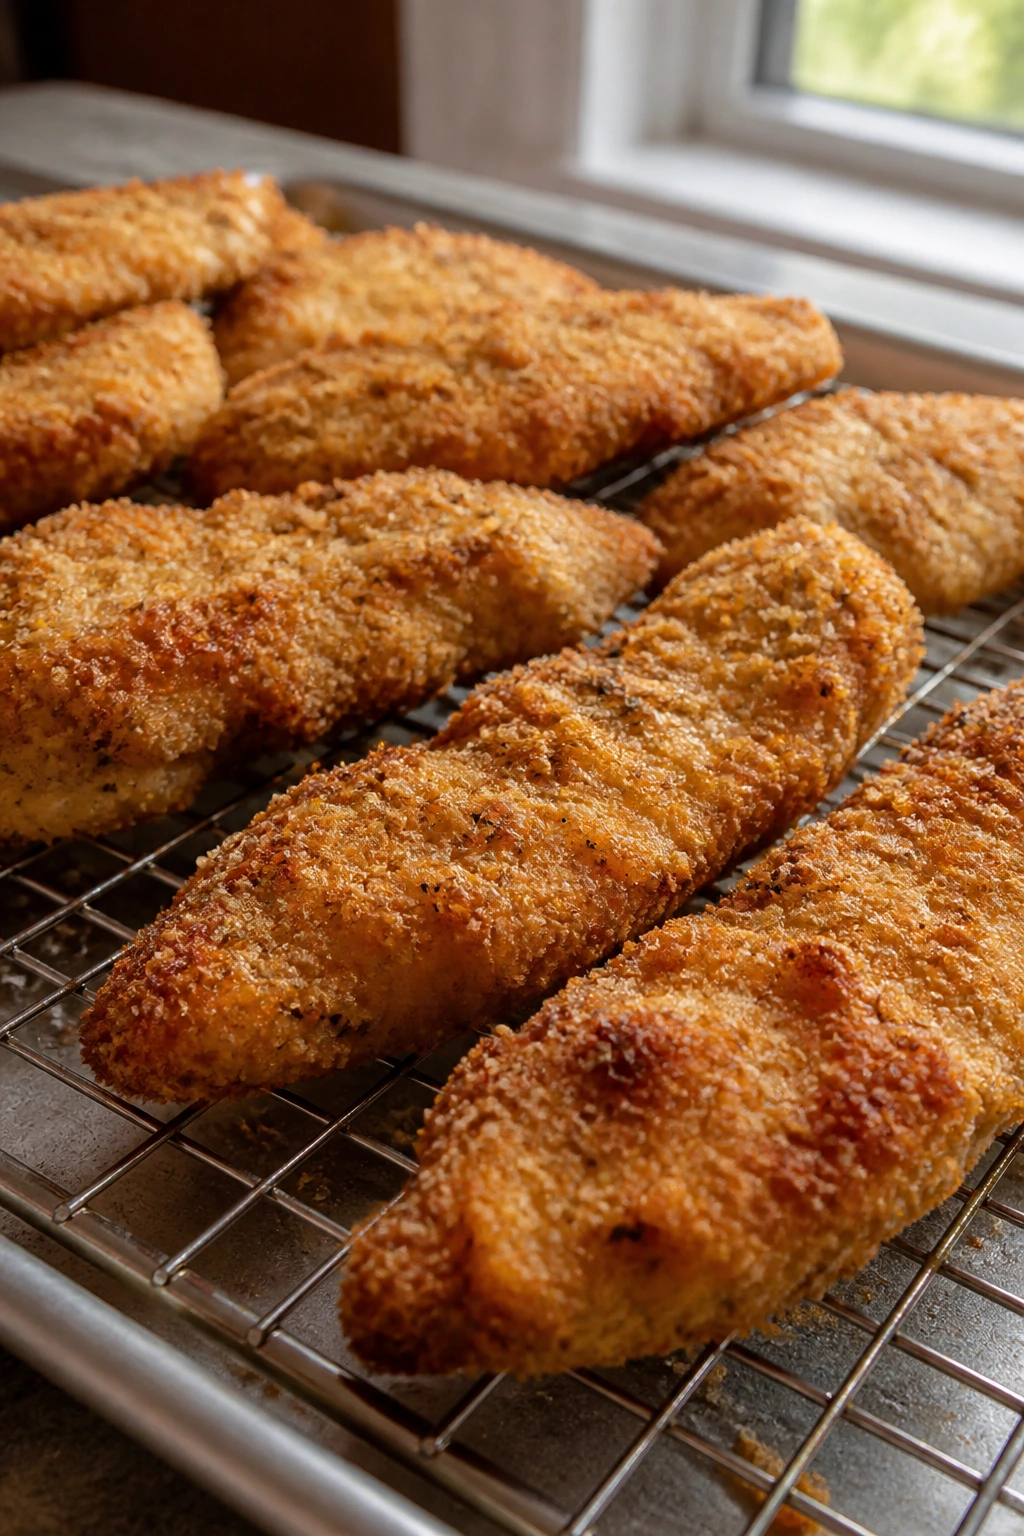
1. Crispy Baked Chicken Tenders
A good chicken tender doesn’t need a speech. It just needs to come out with a crunchy crust, juicy center, and a shape that doesn’t scare anybody. This version bakes on a rack so the coating stays crisp, which matters more than people think when you’re serving kids who notice sogginess immediately.
Why It Works: Panko gives these tenders a dry, crackly finish, and the Parmesan adds salt without making the coating heavy. Baking at 425°F gets the breading bronzed before the chicken dries out, and the rack keeps the bottoms from going soft in their own steam.
Key Ingredients:
- 1 1/2 lbs chicken tenders
- 1 cup all-purpose flour
- 2 large eggs
- 1 tablespoon milk
- 2 cups panko breadcrumbs
- 1/2 cup finely grated Parmesan cheese
- 1 teaspoon garlic powder
- 1 teaspoon paprika
- 1 teaspoon kosher salt
- 1/2 teaspoon black pepper
- Cooking spray, for the top
Quick Steps:
- Preheat the oven to 425°F and set a wire rack on a rimmed baking sheet.
- Set up three shallow bowls: flour in the first, beaten eggs with milk in the second, and panko mixed with Parmesan and seasonings in the third.
- Dredge each chicken tender in flour, dip in egg, then press firmly into the crumb mixture so the coating clings.
- Arrange the tenders on the rack, mist the tops with cooking spray, and bake for 15 to 18 minutes until golden and the chicken reaches 165°F.
- Let them rest for 3 minutes before serving so the crust settles.
Equipment for This Recipe:
- Rimmed baking sheet
- Wire rack
- Three shallow bowls
- Tongs or one dry hand / one wet hand setup
- Instant-read thermometer
How to Serve This Dish: Pile the tenders on a platter with ketchup, honey mustard, or ranch in small bowls on the side. A scoop of buttered corn and a handful of apple slices make the plate feel complete without asking much of anyone.
Pro Tips for This Recipe:
- Press the crumbs on firmly; a loose coating shakes off in the oven.
- Cut larger chicken breasts into even strips if you cannot find tenders.
- Spray the tops well. That thin mist is what helps the crust brown instead of staying pale.
- If the kids prefer plain food, hold back a few tenders before adding any dipping sauce.
Variations on This Dish:
- Parmesan Herb Tenders: Add 1 teaspoon dried parsley and 1/2 teaspoon onion powder to the crumb mix for a little more flavor.
- Cornflake Crunch Tenders: Swap the panko for crushed cornflakes for a sweeter, shatterier crust.
- Gluten-Free Version: Use gluten-free flour and gluten-free breadcrumbs, then bake the same way.
Common Mistakes to Avoid with This Dish:
- Skipping the rack: The bottoms go soft fast if the chicken sits on a flat sheet pan.
- Crowding the pan: The tenders steam instead of crisping if they touch.
- Baking until the crust is dark brown: The coating can look done before the chicken finishes; use the thermometer and stop at 165°F.
2. Buttery Parmesan Noodles with Chicken
This is the kind of dinner that disappears when everybody’s tired and nobody wants a lecture. The noodles are soft, glossy, and buttery, with just enough Parmesan to make them taste finished. Add small pieces of chicken, and you get a plate that feels plain in the best possible way.
Why It Works: Egg noodles cook quickly and stay tender without falling apart. A little reserved pasta water turns butter and cheese into a light sauce that clings to every strand instead of pooling at the bottom of the bowl.
Key Ingredients:
- 12 oz egg noodles
- 2 cups cooked chicken, shredded or chopped small
- 4 tablespoons unsalted butter
- 1 cup frozen peas
- 1/2 cup finely grated Parmesan cheese
- 1/4 cup reserved pasta water
- 1/2 teaspoon garlic powder
- 1/2 teaspoon kosher salt, plus more for the pasta water
- 1/4 teaspoon black pepper
Quick Steps:
- Bring a large pot of salted water to a boil and cook the egg noodles until just tender, about 7 to 8 minutes.
- Add the peas during the last 1 minute of cooking, then drain, reserving 1/4 cup of pasta water.
- Return the hot noodles to the pot over low heat with the butter, chicken, garlic powder, salt, and pepper.
- Stir in the Parmesan and reserved pasta water until the noodles look glossy and lightly coated.
- Taste and add a pinch more salt only if it needs it.
Equipment for This Recipe:
- Large pot
- Colander
- Wooden spoon
- Measuring cup for reserved pasta water
- Box grater or fine grater
How to Serve This Dish: Serve in shallow bowls with extra Parmesan on the table. If you want a side, keep it plain: cucumber rounds, steamed broccoli, or nothing at all. This dish can carry itself.
Pro Tips for This Recipe:
- Grate the Parmesan finely. Coarse shreds don’t melt as cleanly.
- Add the cheese off high heat so it melts into the butter instead of clumping.
- Use leftover rotisserie chicken if that’s what you have; it fits the mild flavor here.
- If the noodles sit for a few minutes and look dry, stir in another splash of pasta water.
Variations on This Dish:
- Cheesy Pea-Free Version: Skip the peas and add a little extra butter for kids who reject green bits on sight.
- Brothy Noodle Bowl: Add 1 extra cup of warm chicken broth for a looser, soupier version.
- Garlic Bread Companion: Serve with buttered toast on the side and call it dinner without apology.
Common Mistakes to Avoid with This Dish:
- Dumping in all the cheese at once over high heat: It can clump instead of melting.
- Overcooking the noodles: Soft noodles turn mushy fast once they’re tossed with butter.
- Forgetting to save pasta water: Plain butter and cheese can feel heavy without that splash of starch to loosen them.
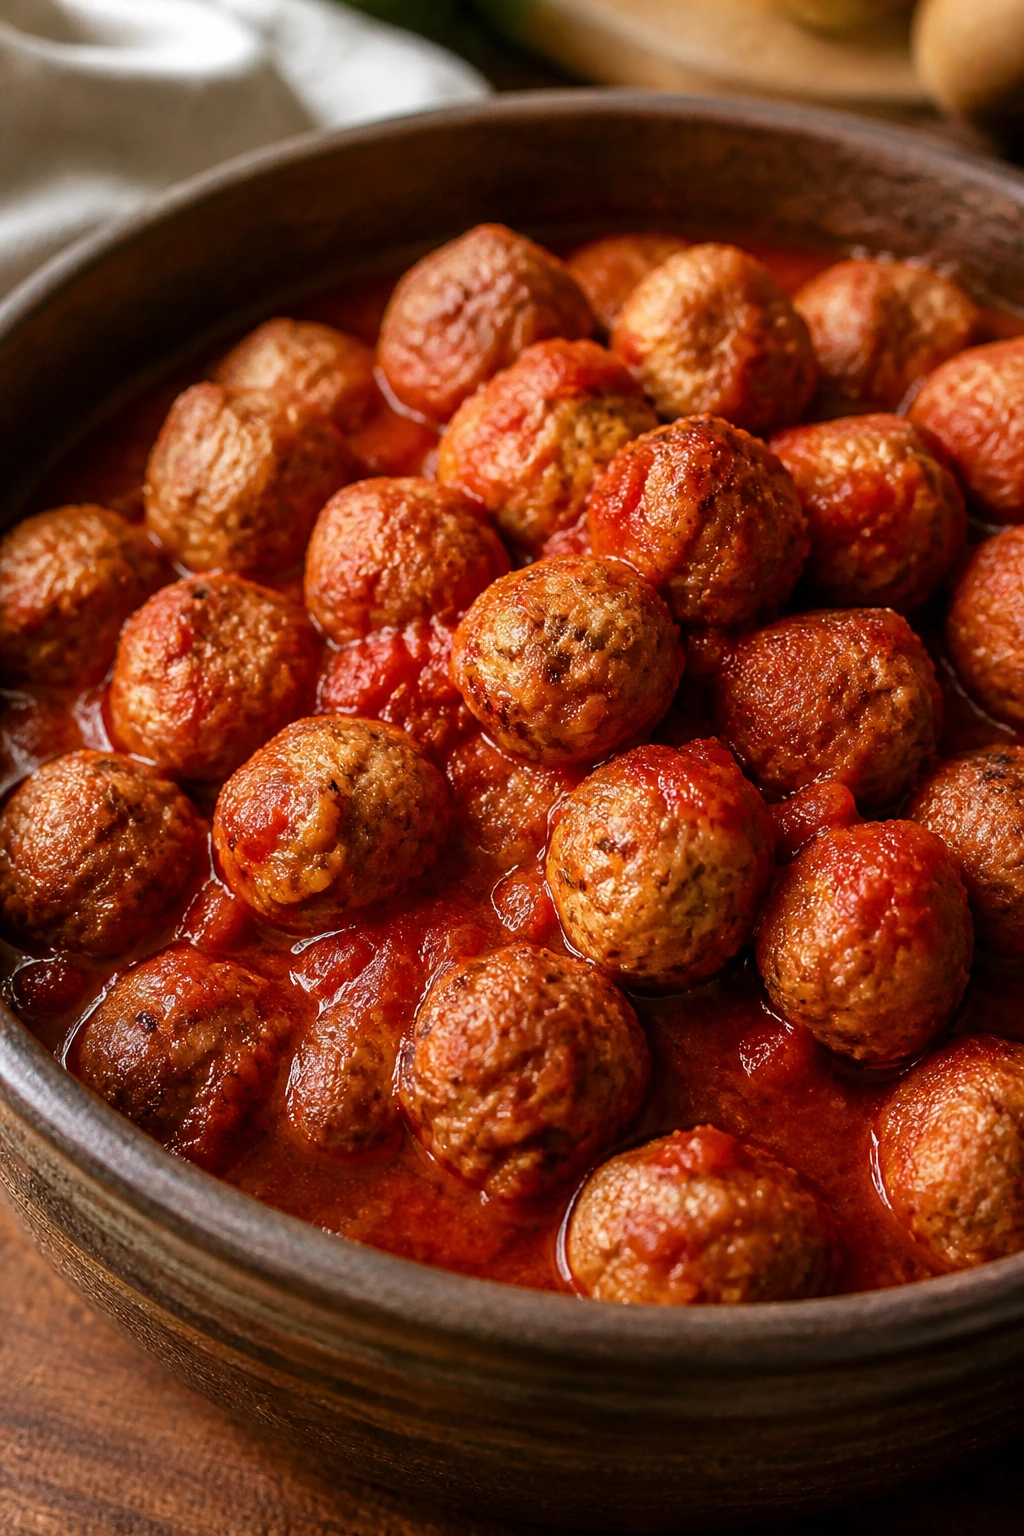
3. Tiny Turkey Meatballs in Marinara
Mini meatballs have a better acceptance rate at the table than big ones. That is not a theory; it’s a texture thing. Smaller meatballs cook faster, stay tender, and feel less intimidating when a child is deciding whether to take a bite or negotiate for crackers instead.
Why It Works: Ground turkey stays mild, and a breadcrumb-and-egg mix keeps the meatballs soft instead of bouncy. Baking them first gives you brown edges without standing over a skillet, and they finish in marinara with almost no fuss.
Key Ingredients:
- 1 lb ground turkey
- 1/2 cup plain breadcrumbs
- 1 large egg
- 1/4 cup finely grated Parmesan cheese
- 1 teaspoon garlic powder
- 1 teaspoon Italian seasoning
- 3/4 teaspoon kosher salt
- 1/4 teaspoon black pepper
- 24 oz marinara sauce
- 12 oz spaghetti or 8 oz small pasta
Quick Steps:
- Preheat the oven to 400°F and line a sheet pan with parchment.
- Mix turkey, breadcrumbs, egg, Parmesan, garlic powder, Italian seasoning, salt, and pepper until just combined.
- Roll into 1-inch meatballs and place them on the sheet pan.
- Bake for 12 to 14 minutes until cooked through, then warm them in marinara over low heat for 5 minutes.
- Serve over pasta or with bread for dipping.
Equipment for This Recipe:
- Rimmed baking sheet
- Parchment paper
- Large mixing bowl
- Small cookie scoop or tablespoon
- Large saucepan
How to Serve This Dish: Spoon the meatballs and sauce over spaghetti, or serve them with toothpicks and buttered noodles on the side if that makes the plate easier. A little extra Parmesan on top helps, but keep the parsley optional; some kids see green and stop reading the menu.
Pro Tips for This Recipe:
- Mix until just combined. Overworking ground turkey makes the meatballs dense.
- A small scoop keeps the meatballs the same size, which means they cook evenly.
- Warm the marinara gently. A hard boil makes the sauce splatter and can toughen the meatballs.
- If you want a softer texture, add 1 tablespoon milk to the meat mixture.
Variations on This Dish:
- Cheesy Center Meatballs: Press a small cube of mozzarella into the middle of each meatball before baking.
- Beef Blend Version: Use half ground beef and half turkey for a richer flavor.
- Meatball Subs: Tuck the cooked meatballs into soft rolls with a thin layer of sauce and mozzarella.
Common Mistakes to Avoid with This Dish:
- Making the meatballs too big: They take longer to cook and can dry out before the center is done.
- Skipping the bake step: Pan-frying alone makes them harder to manage and can leave the centers underdone.
- Using a thick, chunky sauce with lots of add-ins: Plain marinara is easier for picky eaters to accept.
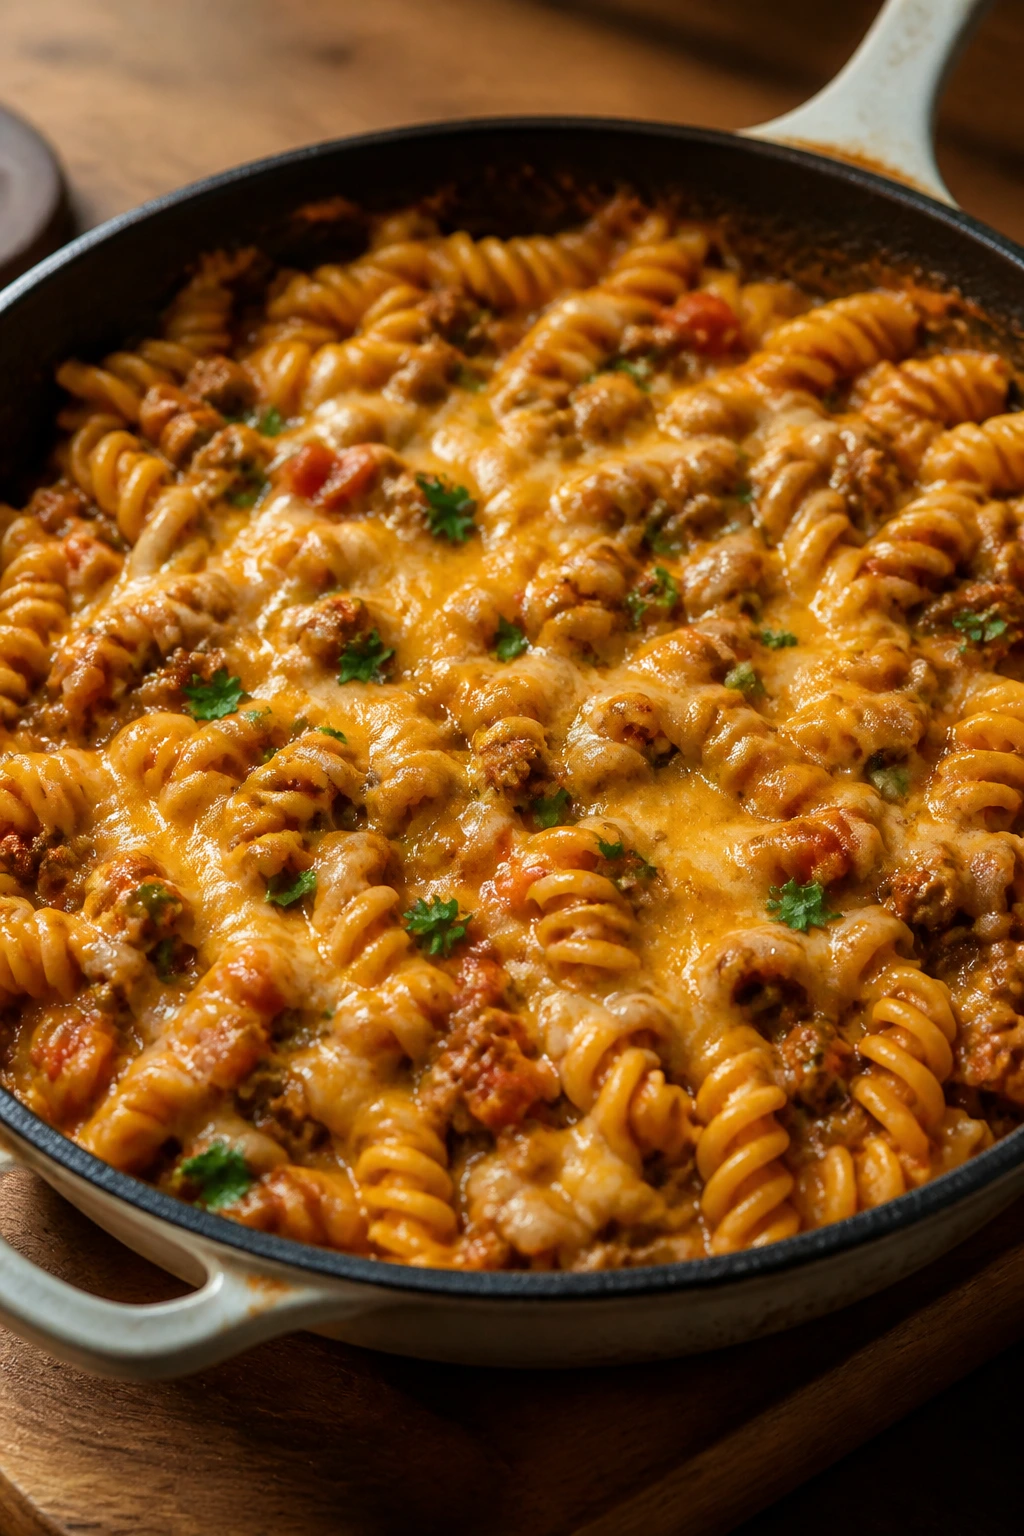
4. Cheesy Taco Pasta Skillet
This is what happens when taco night and pasta night stop arguing. The sauce is mild, the noodles are familiar, and the cheese melts into a creamy layer that clings to every spiral. Kids who reject “mixed foods” often still handle this one because each bite tastes like something they already know.
Why It Works: Pasta cooks right in the skillet, so it absorbs the broth and taco seasoning instead of getting drained and cooled off. Using mild salsa keeps the flavor round and tomato-y rather than sharp or hot.
Key Ingredients:
- 1 lb ground beef
- 12 oz rotini or shells
- 2 cups low-sodium chicken broth
- 1 cup mild salsa
- 1 packet mild taco seasoning, about 2 tablespoons
- 1 1/2 cups shredded cheddar cheese
- 1/2 cup shredded Monterey Jack cheese
- 1 tablespoon olive oil
- 1/4 cup sour cream, for serving
Quick Steps:
- Brown the beef in a large skillet over medium-high heat, then drain off excess fat.
- Stir in the taco seasoning, broth, salsa, and dry pasta.
- Bring to a simmer, cover, and cook for 10 to 12 minutes, stirring once or twice, until the pasta is tender and most of the liquid is absorbed.
- Turn the heat to low and stir in both cheeses until melted and creamy.
- Top with sour cream if you want the sauce extra soft and mild.
Equipment for This Recipe:
- Large deep skillet with a lid
- Wooden spoon
- Measuring cups
- Cheese grater
- Small bowl for sour cream
How to Serve This Dish: Serve it straight from the skillet with tortilla chips on the side if your kids like crunch. A few avocado slices can sit on the adult plates; nobody needs to make a production of them.
Pro Tips for This Recipe:
- Keep the salsa mild and smooth, not chunky.
- Stir once halfway through so the pasta doesn’t stick on the bottom.
- Shred the cheese yourself if you can; pre-shredded works, but fresh shreds melt smoother.
- If the skillet looks dry before the pasta is done, splash in 1/4 cup more broth.
Variations on This Dish:
- Chicken Taco Pasta: Swap in shredded chicken and skip the beef.
- Queso Style: Add 1/2 cup processed cheese sauce if your kids like a softer, creamier finish.
- Veggie Boost: Stir in 1 cup finely diced zucchini with the beef and cook it until soft.
Common Mistakes to Avoid with This Dish:
- Using hot salsa with heat you can taste immediately: Picky eaters will notice it.
- Letting all the liquid cook off too fast: The pasta needs some moisture to finish.
- Overloading the top with raw toppings: Keep the bowl plain unless a child asks for extras.
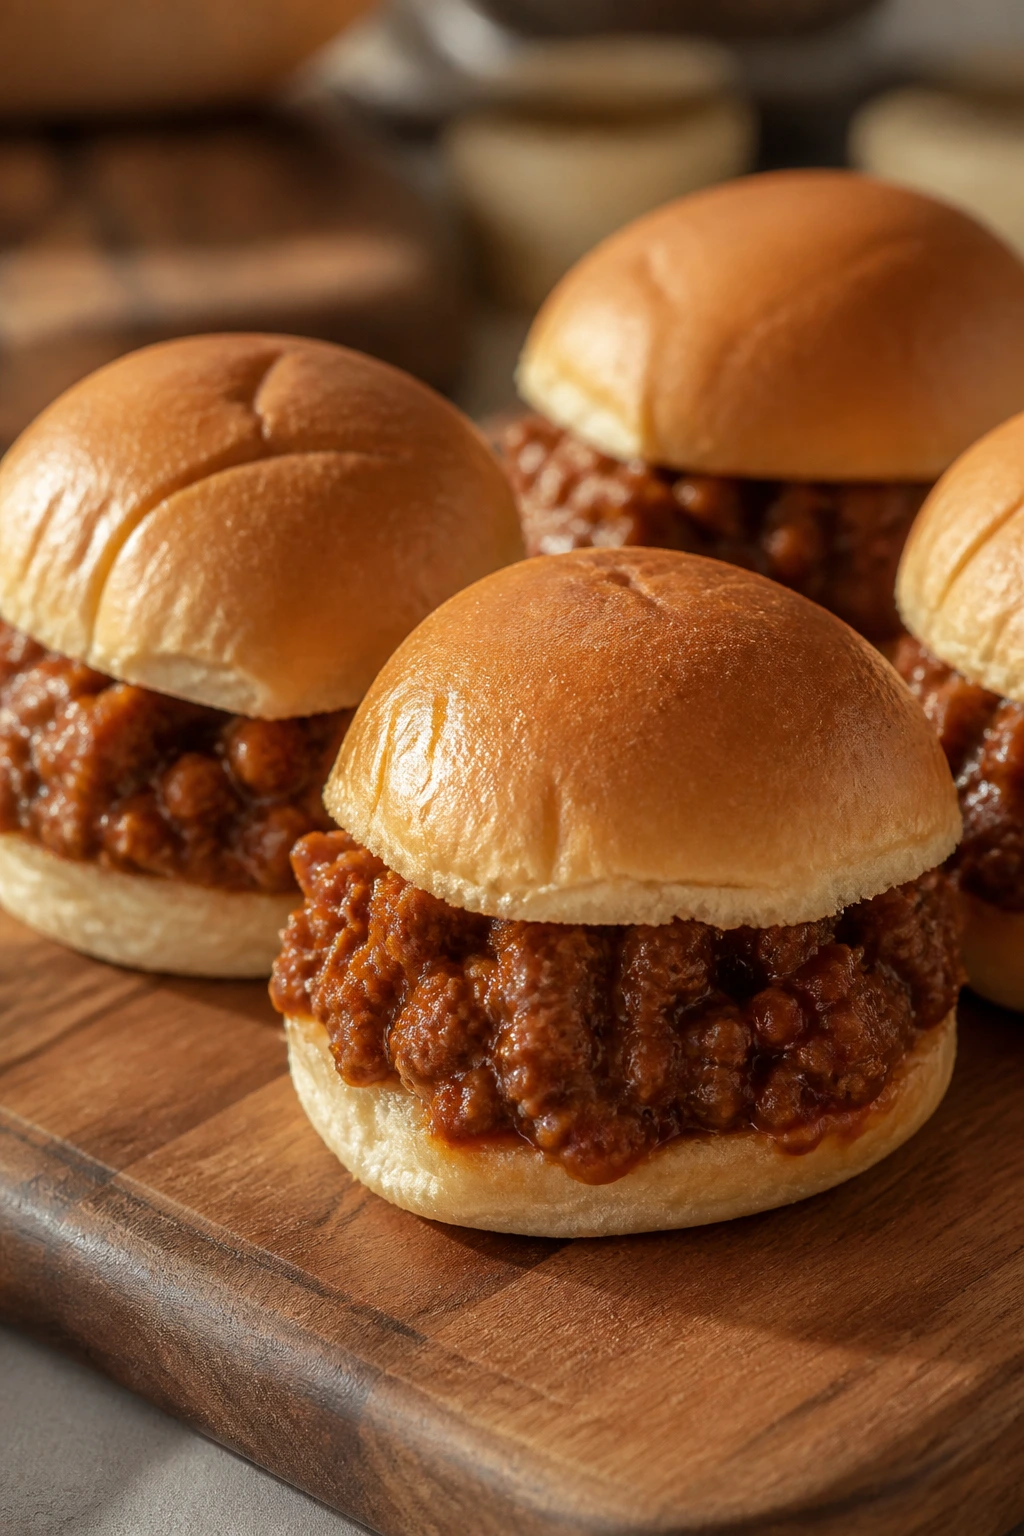
5. Sloppy Joe Sliders
Sloppy Joes live and die by balance. Too sweet, and they taste like ketchup soup. Too dry, and they turn into loose crumbles on a bun. The version here stays saucy and soft, which is exactly what a slider should be.
Why It Works: A little tomato paste deepens the flavor without making the filling sharp, and the brown sugar rounds it out just enough for kids who prefer sweet-savory food. Slider buns keep the portion small, which matters when a child wants to see the entire sandwich before committing.
Key Ingredients:
- 1 lb ground beef
- 1 tablespoon olive oil
- 1/2 small yellow onion, finely diced
- 1/2 cup ketchup
- 2 tablespoons tomato paste
- 1 tablespoon brown sugar
- 1 tablespoon Worcestershire sauce
- 1/2 teaspoon garlic powder
- 1/2 teaspoon kosher salt
- 8 slider buns
- 4 slices mild cheddar, optional
Quick Steps:
- Warm the oil in a skillet over medium heat and cook the onion until soft, about 4 minutes.
- Add the beef and cook until no pink remains, breaking it into small crumbles.
- Stir in ketchup, tomato paste, brown sugar, Worcestershire, garlic powder, and salt, then simmer for 5 to 7 minutes until thick and glossy.
- Split the buns, fill them with the meat mixture, and add cheese if using.
- Warm the sliders in a 350°F oven for 5 minutes if you want the tops a little toasty.
Equipment for This Recipe:
- Large skillet
- Wooden spoon
- Knife and cutting board
- Baking sheet for warming sliders
- Small spatula
How to Serve This Dish: Set out the sliders with pickle chips on the side rather than tucked inside. That keeps the sandwich customizable and stops the pickle juice from running into the bun before it reaches the table.
Pro Tips for This Recipe:
- Dice the onion very small so it melts into the sauce.
- Let the filling simmer until it thickens; runny sloppy joes soak the buns.
- Toasting the cut sides of the buns helps them survive the sauce.
- If your family likes less sweetness, reduce the brown sugar to 2 teaspoons.
Variations on This Dish:
- Turkey Sloppy Joes: Swap in ground turkey and add 1 teaspoon extra oil.
- Cheesy Topper: Melt provolone or cheddar over the filling before closing the buns.
- Open-Face Version: Serve the mixture over toast for older kids or adults who want less bun and more filling.
Common Mistakes to Avoid with This Dish:
- Serving the filling too wet: It will slide out of the buns in one sad heap.
- Using dark, crusty buns: Soft slider buns are the point here.
- Forgetting to taste before serving: A pinch more salt or a tiny splash of vinegar can wake up the sauce.
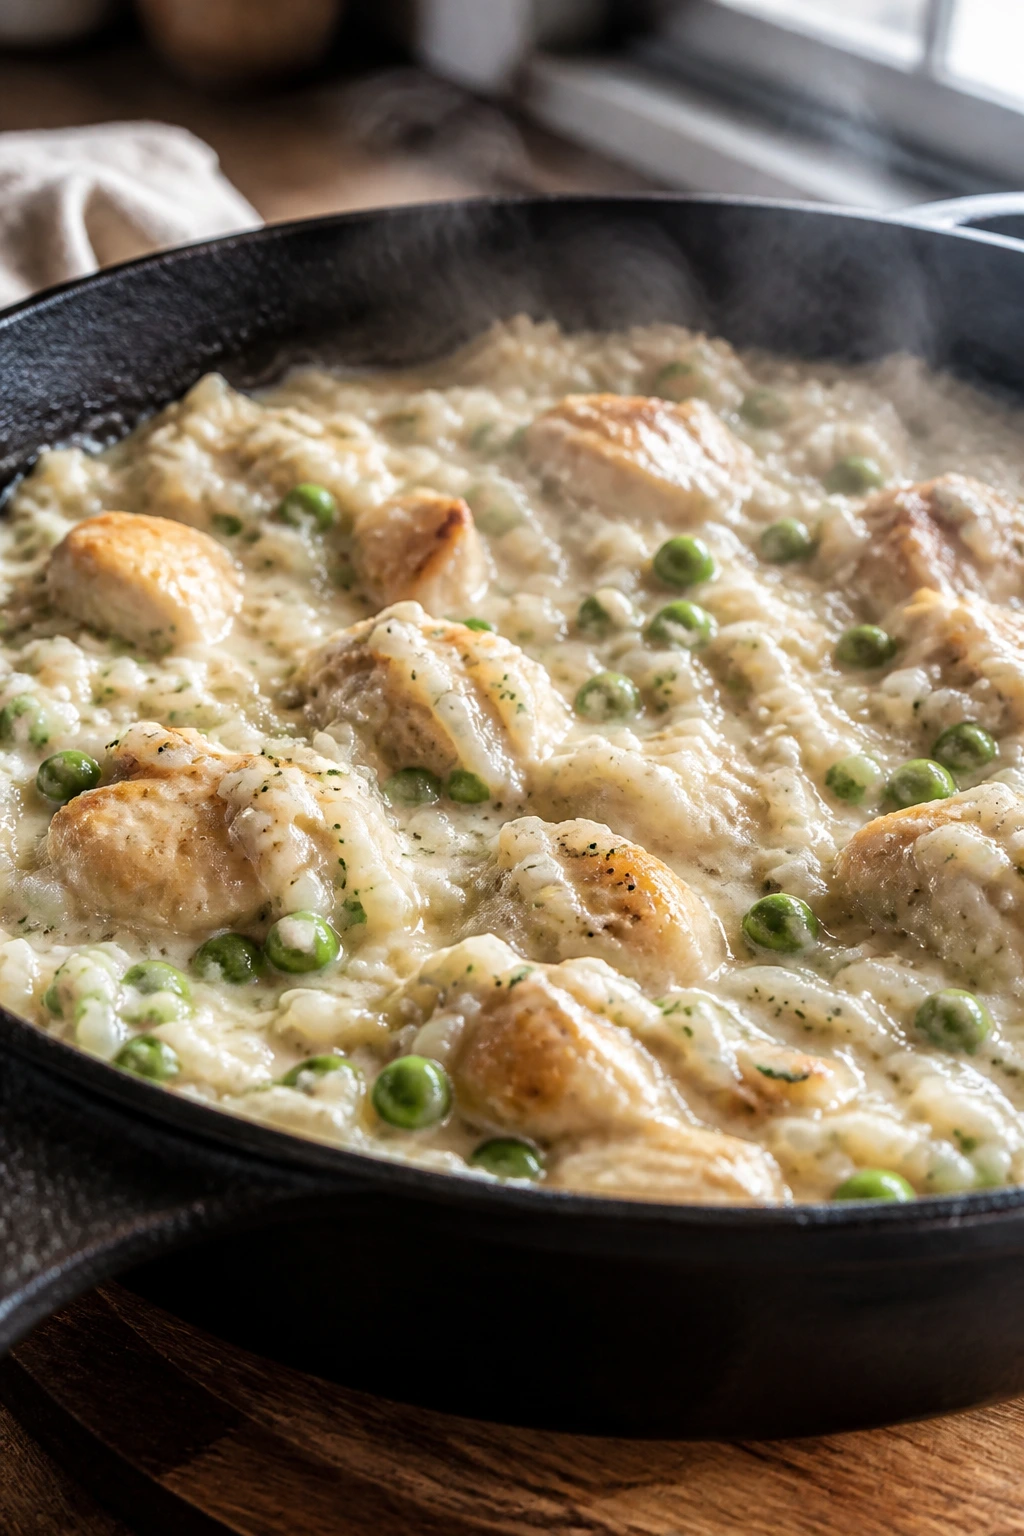
6. Creamy Chicken and Rice Skillet
Rice dinners can go wrong fast when they turn gluey or bland. This one stays soft, creamy, and calm on the palate, with chicken that feels familiar and rice that doesn’t fight back. That sounds like a low bar, but at a picky-eater table, it matters.
Why It Works: Short, gentle simmering lets the rice absorb broth without breaking down. A small amount of cream cheese gives the skillet a creamy finish that feels rich without turning heavy or greasy.
Key Ingredients:
- 1 1/2 lbs boneless, skinless chicken thighs, cut into bite-size pieces
- 1 tablespoon olive oil
- 1 small onion, finely diced
- 1 1/2 cups long-grain white rice, rinsed
- 3 cups low-sodium chicken broth
- 4 oz cream cheese, softened
- 1 cup frozen peas
- 1 teaspoon garlic powder
- 1 teaspoon kosher salt
- 1/2 teaspoon black pepper
Quick Steps:
- Brown the chicken in oil over medium-high heat until lightly golden, about 4 to 5 minutes.
- Add the onion and cook until soft, then stir in the rice, garlic powder, salt, and pepper.
- Pour in the broth, bring to a simmer, cover, and cook on low for 18 minutes.
- Stir in the cream cheese and peas, then cover for 3 more minutes until the peas are warm and the rice is tender.
- Fluff gently and serve.
Equipment for This Recipe:
- Large deep skillet with a tight lid
- Wooden spoon
- Measuring cups
- Knife and cutting board
- Small bowl for softening cream cheese
How to Serve This Dish: Spoon it into bowls while it’s still steamy and creamy. If you want a little extra color, add a few carrot coins on the side, but the skillet itself should stay simple and smooth.
Pro Tips for This Recipe:
- Rinse the rice so the grains stay separate.
- Keep the lid on while the rice cooks; peeking lets steam escape.
- Cut the chicken into small pieces so every bite has the same texture.
- If the rice seems dry at the end, add 2 tablespoons of warm broth and rest for 5 minutes.
Variations on This Dish:
- Cheddar Rice Version: Stir in 1/2 cup shredded cheddar with the cream cheese.
- Veggie-Light Swap: Replace peas with finely diced carrots or leave them out entirely.
- Rotisserie Shortcut: Use 2 cups cooked shredded chicken and skip the browning step.
Common Mistakes to Avoid with This Dish:
- Using instant rice with the same liquid amount: It can go mushy fast.
- Stirring during the simmer: That can break the rice and turn the skillet pasty.
- Cooking on too high a heat: The bottom scorches before the center is tender.
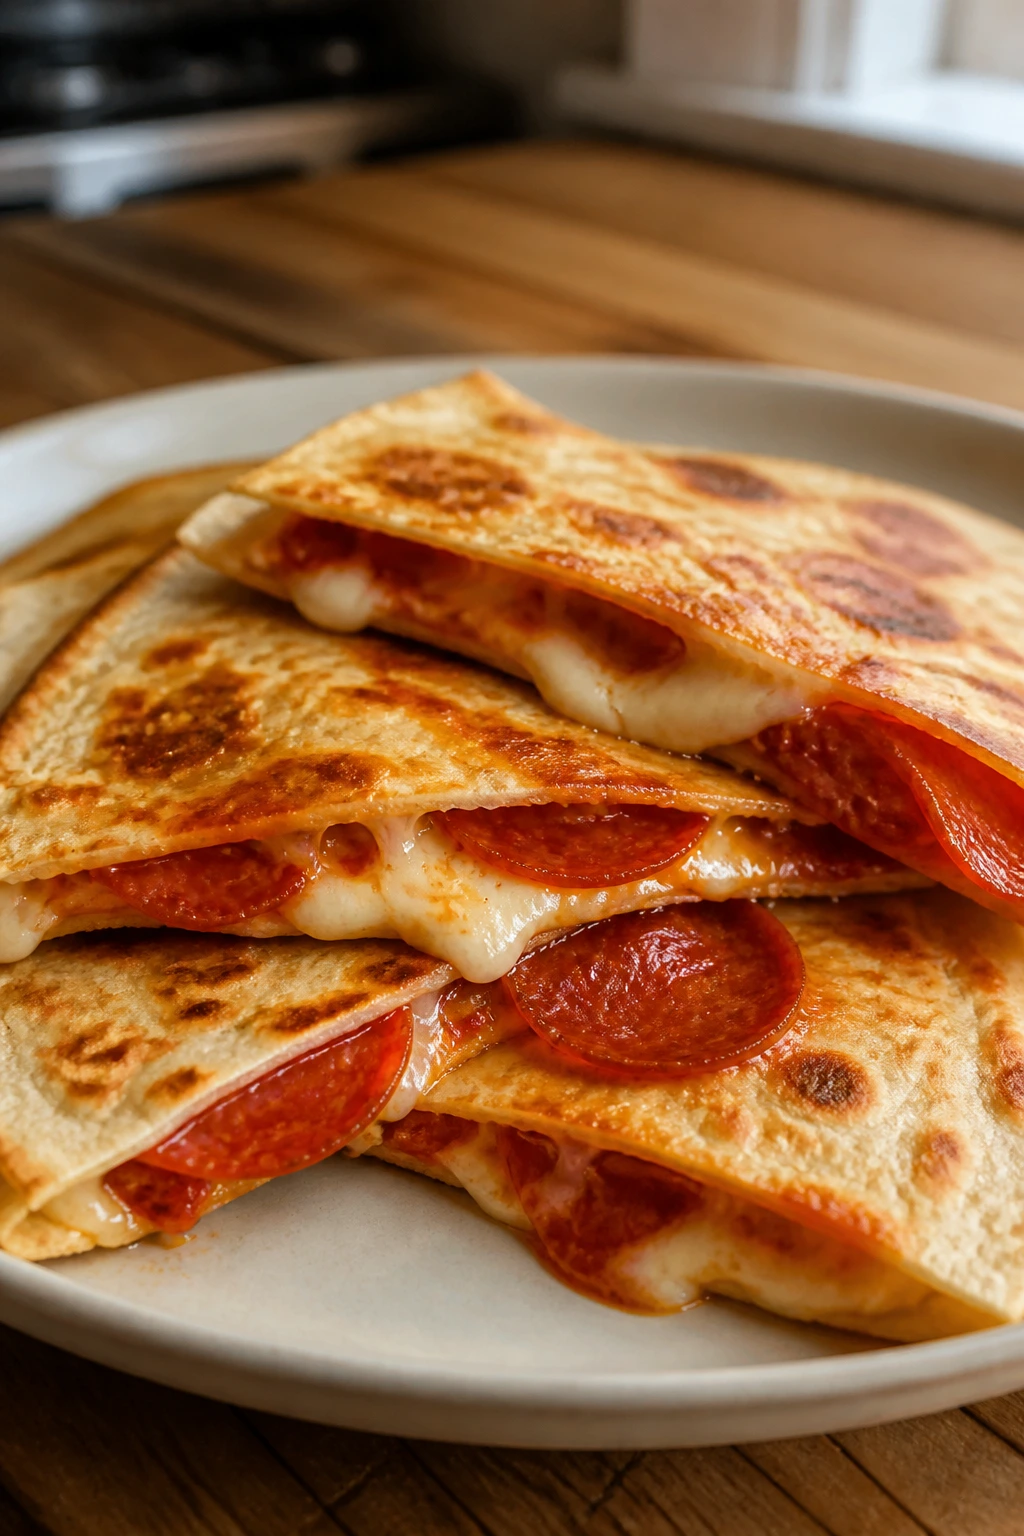
7. Pepperoni Pizza Quesadillas
Pizza quesadillas are what you make when a child wants pizza but the oven feels like too much effort. The tortillas get crisp, the cheese melts into that stretchy layer kids chase with a fork, and the pepperoni gives the whole thing just enough salt to taste like a treat.
Why It Works: The pizza sauce stays thin and concentrated, so the tortilla doesn’t go soggy before the cheese melts. Cooking over medium heat, not high, gives you browned tortillas and fully melted filling in the same minute.
Key Ingredients:
- 4 large flour tortillas
- 1 1/2 cups shredded mozzarella cheese
- 1/2 cup pepperoni slices, chopped if you want smaller pieces
- 1/2 cup pizza sauce
- 1 tablespoon butter, softened
- 1/4 teaspoon dried oregano
Quick Steps:
- Spread a thin layer of pizza sauce over half of each tortilla.
- Sprinkle mozzarella, pepperoni, and a pinch of oregano over the sauce.
- Fold the tortillas in half and butter the outside lightly.
- Cook in a skillet over medium heat for 2 to 3 minutes per side until the tortillas are golden and the cheese is melted.
- Slice into triangles and serve immediately.
Equipment for This Recipe:
- Large skillet
- Spatula
- Butter knife
- Cutting board
- Pizza cutter or sharp knife
How to Serve This Dish: Serve with extra pizza sauce for dipping and maybe a pile of grapes or a simple salad on the side. The quesadillas should be the easy part of dinner, not the only thing on the table.
Pro Tips for This Recipe:
- Keep the filling thin so the quesadilla seals properly.
- Shred your own mozzarella if you want a smoother melt.
- Let the quesadilla rest for 1 minute before cutting; the cheese settles instead of sliding out.
- If the tortillas brown too fast, lower the heat and give the cheese a little more time.
Variations on This Dish:
- Cheese-Only Version: Leave out the pepperoni for a plain, pizza-adjacent dinner.
- Ham and Pineapple Fold: Use tiny pineapple pieces and diced ham for kids who like sweet-salty pizza.
- Garlic Butter Crust: Brush the outside with garlic butter before cooking for a richer finish.
Common Mistakes to Avoid with This Dish:
- Overfilling the tortilla: That leads to leaks and burnt cheese in the pan.
- Using high heat: The tortilla browns before the cheese melts.
- Serving straight from the pan: The filling is lava-hot and will get dumped in one dramatic bite.
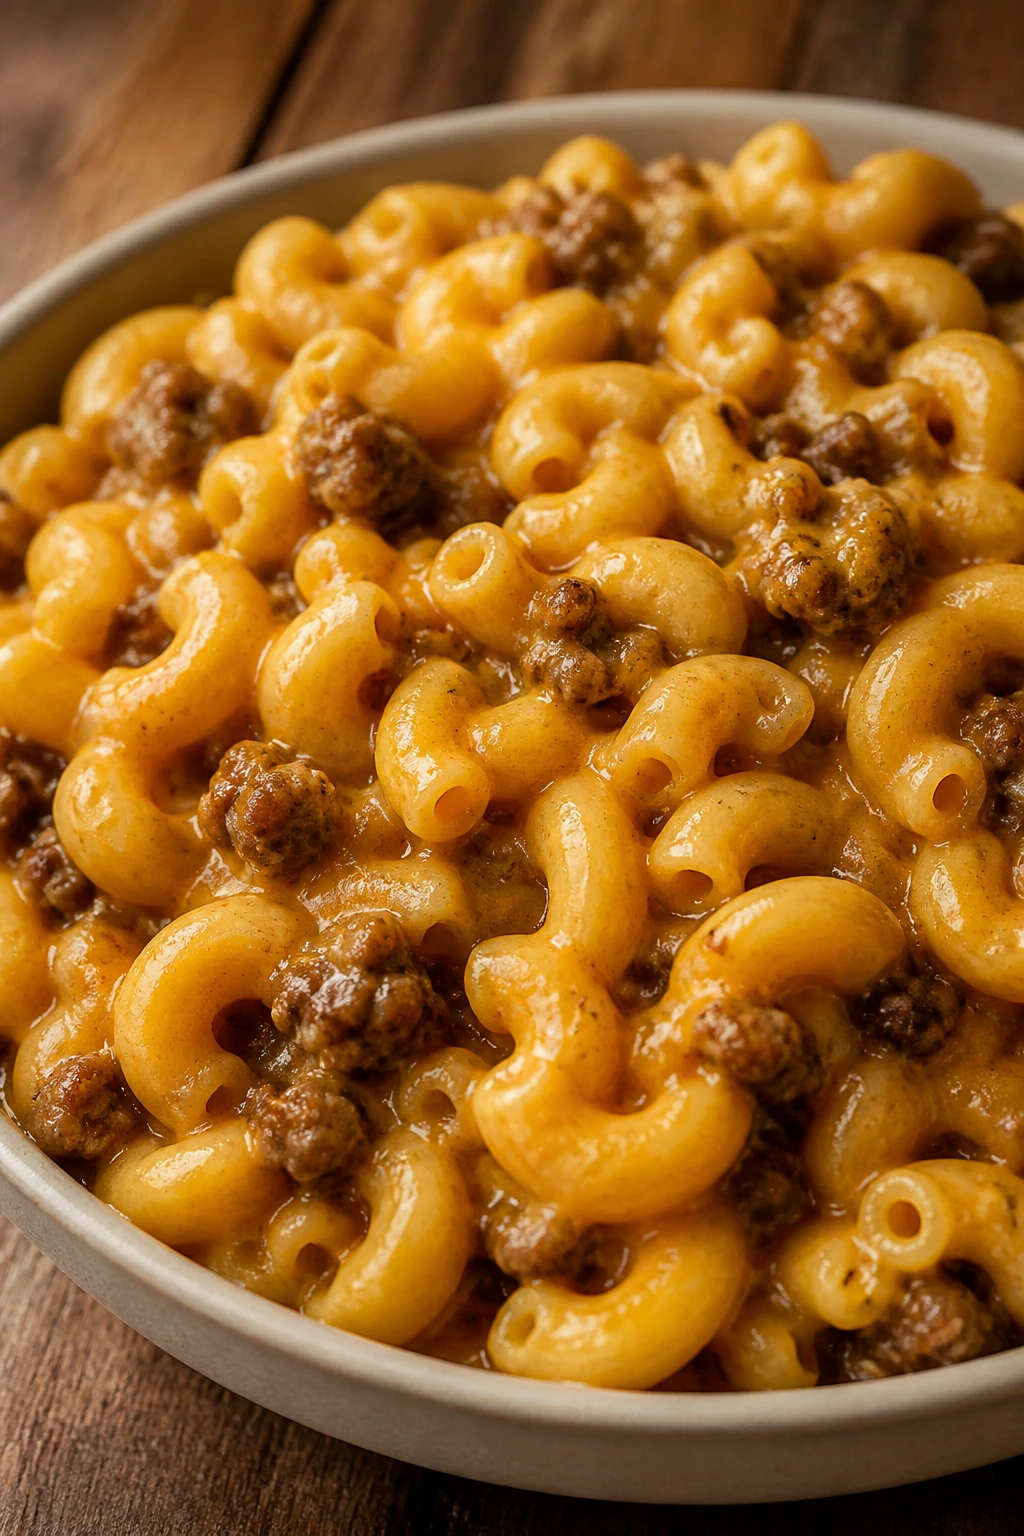
8. Cheeseburger Mac and Cheese
This one sits in the sweet spot between fast-food memory and actual dinner. The beef tastes like a cheeseburger, the pasta tastes like comfort, and the sauce lands creamy instead of gluey. Kids often go for it because it reads like mac and cheese first, dinner second.
Why It Works: The beef gets seasoned lightly and mixed into a cheese sauce that coats elbow macaroni without turning it into a brick. A little ketchup and mustard give the flavor the shape of a cheeseburger without making it taste like a condiment parade.
Key Ingredients:
- 1 lb ground beef
- 12 oz elbow macaroni
- 2 tablespoons butter
- 2 tablespoons all-purpose flour
- 2 cups milk
- 2 cups shredded cheddar cheese
- 1 tablespoon ketchup
- 1 teaspoon yellow mustard
- 1 teaspoon kosher salt
- 1/2 teaspoon black pepper
Quick Steps:
- Cook the macaroni until just tender, then drain.
- Brown the beef in a skillet and season with salt and pepper.
- In the same skillet, melt the butter, whisk in the flour, and cook for 1 minute.
- Slowly whisk in the milk and simmer until slightly thickened, then stir in cheddar, ketchup, and mustard.
- Add the pasta and beef, stir until coated, and serve warm.
Equipment for This Recipe:
- Large pot
- Large skillet
- Whisk
- Colander
- Wooden spoon
How to Serve This Dish: Serve it in bowls with pickles on the side if your kids like them, or keep the pickle jar on the table and let people choose their own adventure. A few tomato wedges on the side can work too, though nobody needs to pretend that’s the main event.
Pro Tips for This Recipe:
- Shred the cheese yourself so it melts smoothly.
- Stop cooking the pasta while it still has a little bite.
- Use yellow mustard, not a strong deli-style one.
- If the sauce thickens too much, loosen it with a splash of milk before serving.
Variations on This Dish:
- Bacon Burger Version: Stir in 1/2 cup cooked chopped bacon.
- Dill Pickle Twist: Add 2 tablespoons minced pickle to the sauce if your family likes tang.
- Baked Top: Transfer to a dish, top with more cheese, and broil until bubbly.
Common Mistakes to Avoid with This Dish:
- Using pre-shredded cheese only: It can make the sauce grainier.
- Overcooking the pasta: Soft macaroni falls apart once it sits in the sauce.
- Skipping the mustard: The dish tastes flatter without that little burger note.
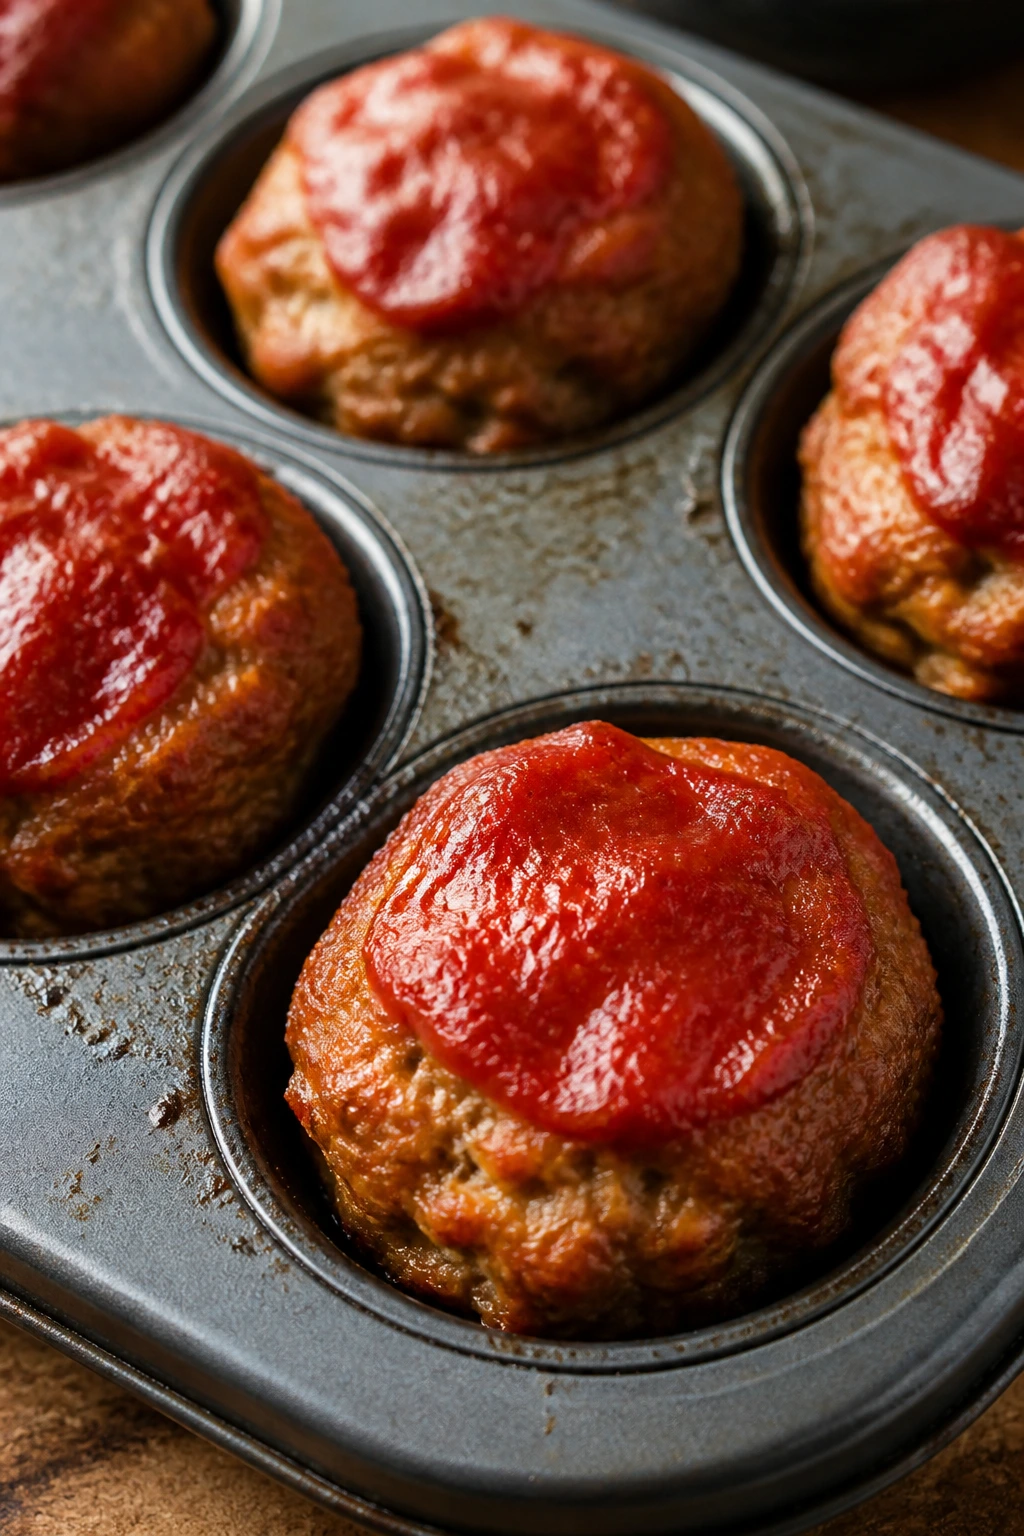
9. Turkey Meatloaf Muffins
Meatloaf gets a better reception when it comes in muffin-size portions. Smaller shapes feel less serious, cook faster, and give kids a neat little serving that doesn’t require a knife or a lot of convincing. The ketchup glaze also helps; kids know what ketchup looks like, and that matters.
Why It Works: Ground turkey stays mild, and the muffin tin creates crisp edges all around each portion. That edge-to-center ratio is part of the appeal — there’s more browned surface, less soft middle, and a familiar ketchup top.
Key Ingredients:
- 1 1/2 lbs ground turkey
- 1/2 cup breadcrumbs
- 1 large egg
- 1/4 cup milk
- 1/4 cup finely diced onion
- 1 teaspoon Worcestershire sauce
- 1 teaspoon garlic powder
- 1 teaspoon kosher salt
- 1/2 teaspoon black pepper
- 1/2 cup ketchup, divided
Quick Steps:
- Preheat the oven to 375°F and grease a muffin tin well.
- Mix turkey, breadcrumbs, egg, milk, onion, Worcestershire, garlic powder, salt, and pepper until combined.
- Divide the mixture among 10 to 12 muffin cups, then top each with a spoonful of ketchup.
- Bake for 18 to 22 minutes until the center reaches 165°F.
- Rest for 5 minutes before removing from the tin so they hold their shape.
Equipment for This Recipe:
- Standard 12-cup muffin tin
- Mixing bowl
- Spoon or scoop
- Measuring cups
- Instant-read thermometer
How to Serve This Dish: Put two muffins on each plate with mashed potatoes, buttered noodles, or roasted potato wedges. The shape does most of the work here; it looks tidy without feeling fussy.
Pro Tips for This Recipe:
- Grease the muffin tin well or line it with paper cups for easier release.
- Don’t overpack the meat mixture; gentle packing keeps them tender.
- Add a little extra ketchup on top after baking if your kids want more sauce.
- Finely dice the onion so it cooks through and disappears into the loaf.
Variations on This Dish:
- Cheese-Stuffed Muffins: Press a small cube of cheddar into the center before baking.
- BBQ Glaze: Swap the ketchup for a mild barbecue sauce.
- Beef Mix: Use half ground beef for a firmer, richer loaf.
Common Mistakes to Avoid with This Dish:
- Using a dry mix: Too many breadcrumbs make the muffins crumbly.
- Skipping the rest: They fall apart if you pry them out hot.
- Baking in a cold oven: The tops set better when the oven is fully preheated.
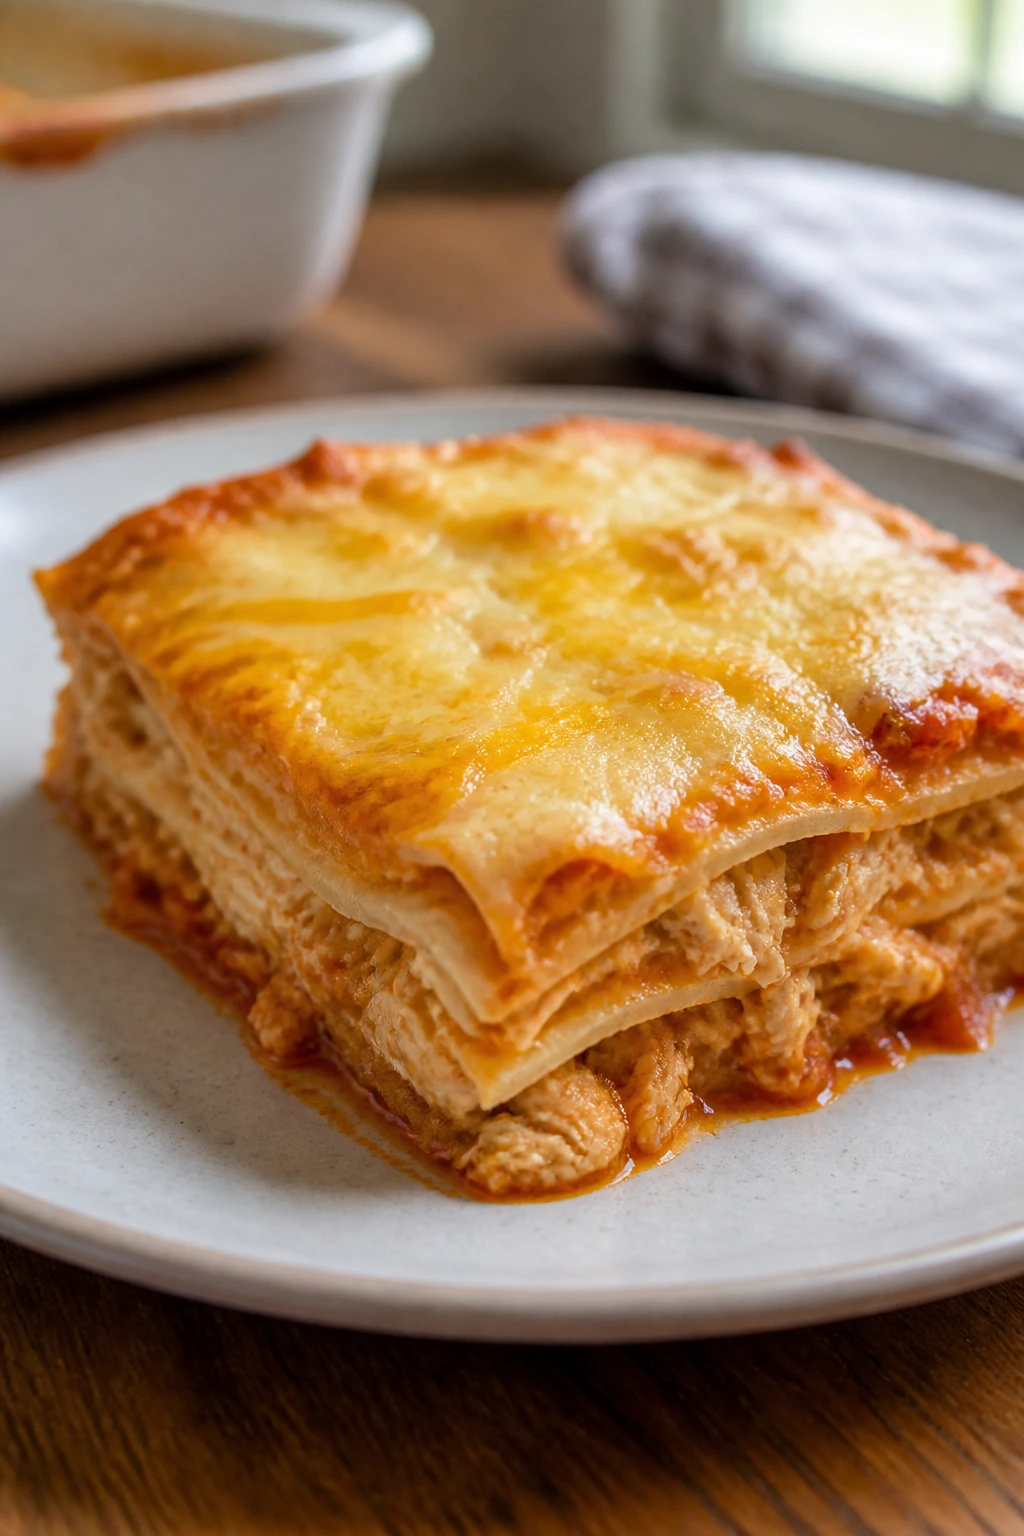
10. Mild Chicken Enchilada Casserole
Enchilada casserole sounds bolder than it is. This version stays mild, cheesy, and soft enough for kids who want flavor without heat. The layers are easy to scoop, which helps when a child does not want to fight with a rolled tortilla.
Why It Works: Shredded chicken and tortillas soak up the sauce and cheese in a way that stays cohesive after baking. Using mild enchilada sauce keeps the flavor tomato-forward instead of spicy, and the casserole slices cleanly once it rests.
Key Ingredients:
- 3 cups cooked shredded chicken
- 10 small corn tortillas, cut into strips
- 2 cups mild enchilada sauce
- 2 cups shredded Monterey Jack cheese
- 1 cup shredded cheddar cheese
- 1/2 cup sour cream
- 1 tablespoon olive oil
- 1/2 teaspoon garlic powder
- 1/2 teaspoon kosher salt
Quick Steps:
- Preheat the oven to 375°F and grease a 9×13-inch baking dish.
- Toss the chicken with garlic powder and salt.
- Layer half the tortillas, half the chicken, half the sauce, and half the cheese in the dish. Repeat the layers once more.
- Dot the top with sour cream and bake for 25 to 30 minutes until hot and bubbly.
- Rest for 10 minutes before cutting.
Equipment for This Recipe:
- 9×13-inch baking dish
- Mixing bowl
- Sharp knife
- Measuring cups
- Foil, if the top browns too fast
How to Serve This Dish: Cut it into neat squares and serve with extra sour cream on top. A bowl of corn or a few slices of avocado on the side works if the family wants something else, but the casserole does the heavy lifting.
Pro Tips for This Recipe:
- Cut the tortillas into strips so the casserole layers more evenly.
- Keep the sauce mild; a hot one can take over the whole dish.
- Let it rest before slicing so the layers don’t slide apart.
- Use rotisserie chicken when dinner needs to happen without a lot of prep.
Variations on This Dish:
- Bean Stretch: Add 1 can of drained black beans between the layers.
- White Sauce Version: Swap in salsa verde and white beans for a gentler, tangier bake.
- Extra Cheesy Finish: Add a handful of cheese during the last 5 minutes for a browned top.
Common Mistakes to Avoid with This Dish:
- Skipping the rest time: The pieces collapse if you cut too soon.
- Using too much sauce: The casserole turns soupy.
- Baking uncovered too long: The top can dry out before the center heats through.
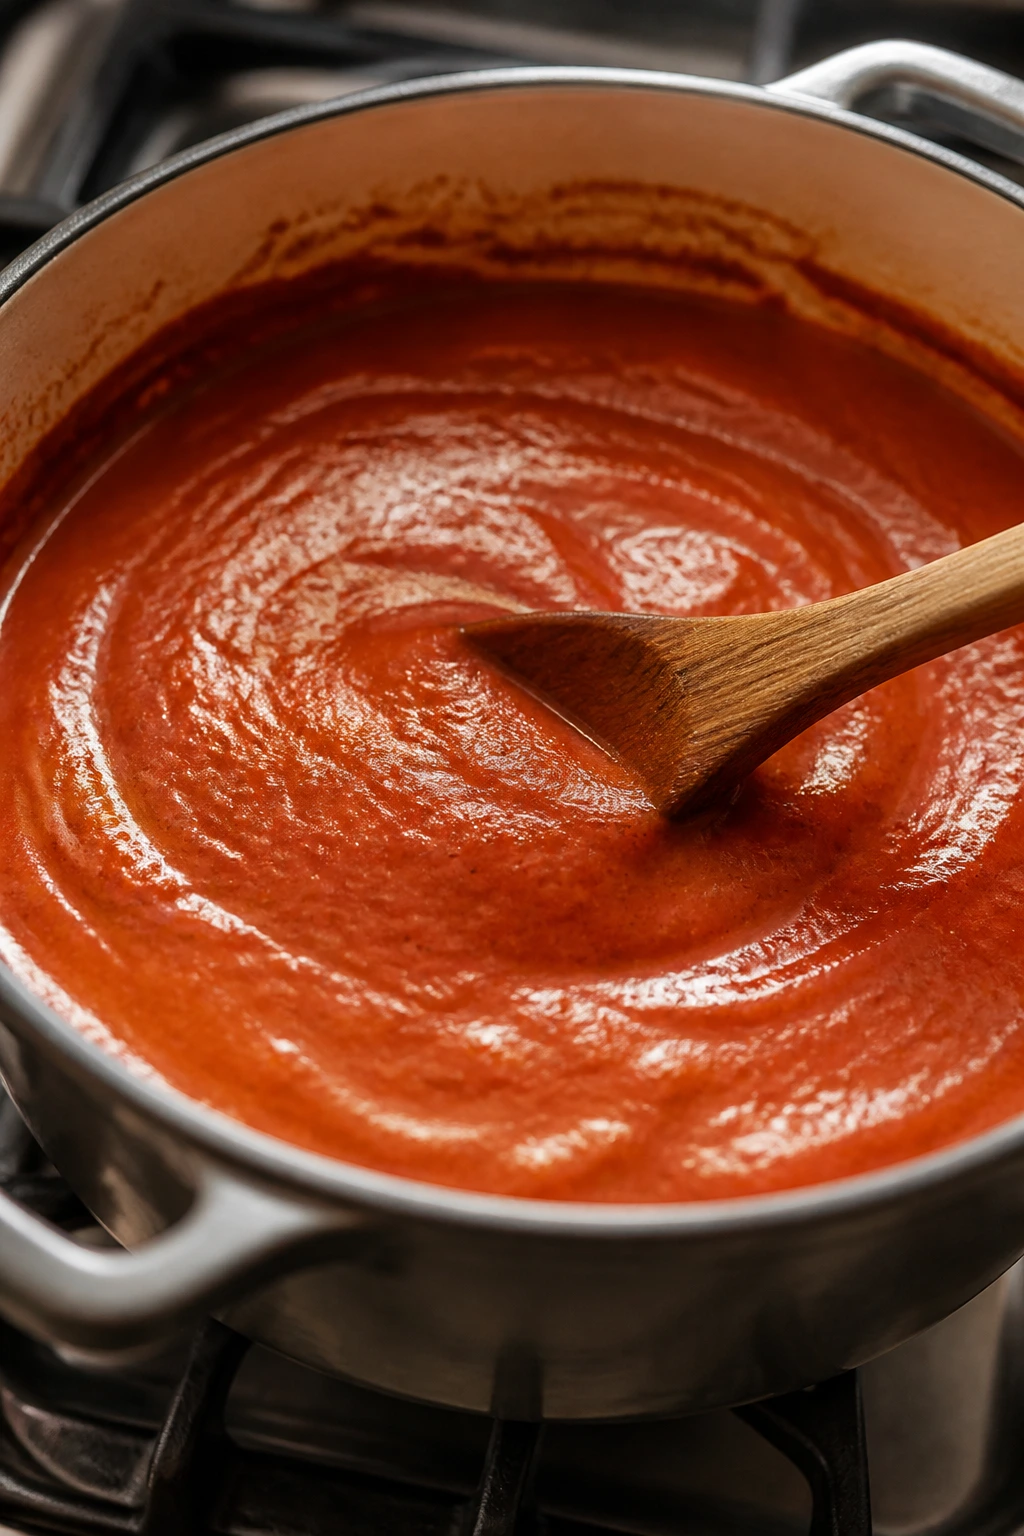
11. Hidden-Veggie Spaghetti Sauce
Some kids don’t mind vegetables. Others notice one zucchini shred and act like the pasta has been contaminated. Pureeing the vegetables into the sauce changes the game. The flavor stays red-sauce familiar, but the texture gets smoother and the pot holds more than tomatoes alone.
Why It Works: Carrots and zucchini cook down into sweetness and body without standing out. Once they’re blended into marinara, they support the sauce instead of announcing themselves, which is the point.
Key Ingredients:
- 1 lb ground beef or turkey
- 1 tablespoon olive oil
- 1 small onion, diced
- 1 medium carrot, peeled and diced
- 1 small zucchini, diced
- 3 cloves garlic, minced
- 24 oz marinara sauce
- 1/2 cup water or broth
- 1 teaspoon Italian seasoning
- 1 teaspoon kosher salt
- 12 oz spaghetti
Quick Steps:
- Cook the onion, carrot, and zucchini in oil over medium heat until soft, about 8 minutes.
- Add the garlic and cook for 30 seconds, then add the meat and brown it.
- Stir in marinara, water, Italian seasoning, and salt, then simmer for 15 minutes.
- For a smoother sauce, blend half the sauce with an immersion blender and return it to the pot.
- Serve over spaghetti.
Equipment for This Recipe:
- Large saucepan or Dutch oven
- Immersion blender, optional
- Wooden spoon
- Pot for pasta
- Colander
How to Serve This Dish: Keep the sauce on the noodles rather than serving it in a separate bowl; that makes the vegetables part of the pasta instead of a visual obstacle. A little Parmesan on top helps, but the sauce should still taste like dinner, not a health project.
Pro Tips for This Recipe:
- Dice the vegetables small so they melt into the sauce faster.
- Blend only part of the sauce if you want some texture left.
- Use a sweeter marinara if your family likes a softer tomato flavor.
- If you want to stretch the meal, add a little more pasta water at the end and toss well.
Variations on This Dish:
- All-Pureed Sauce: Blend the entire pot for a silky texture.
- Meatless Version: Skip the meat and add 1 cup white beans for body.
- Richer Finish: Stir in 2 tablespoons butter right before serving.
Common Mistakes to Avoid with This Dish:
- Leaving the vegetables chunky: Kids notice the pieces fast.
- Adding too much garlic: It can overpower the mild tomato flavor.
- Skipping the simmer: The sauce tastes thin if it doesn’t cook long enough.
12. Ham and Cheese Fried Rice
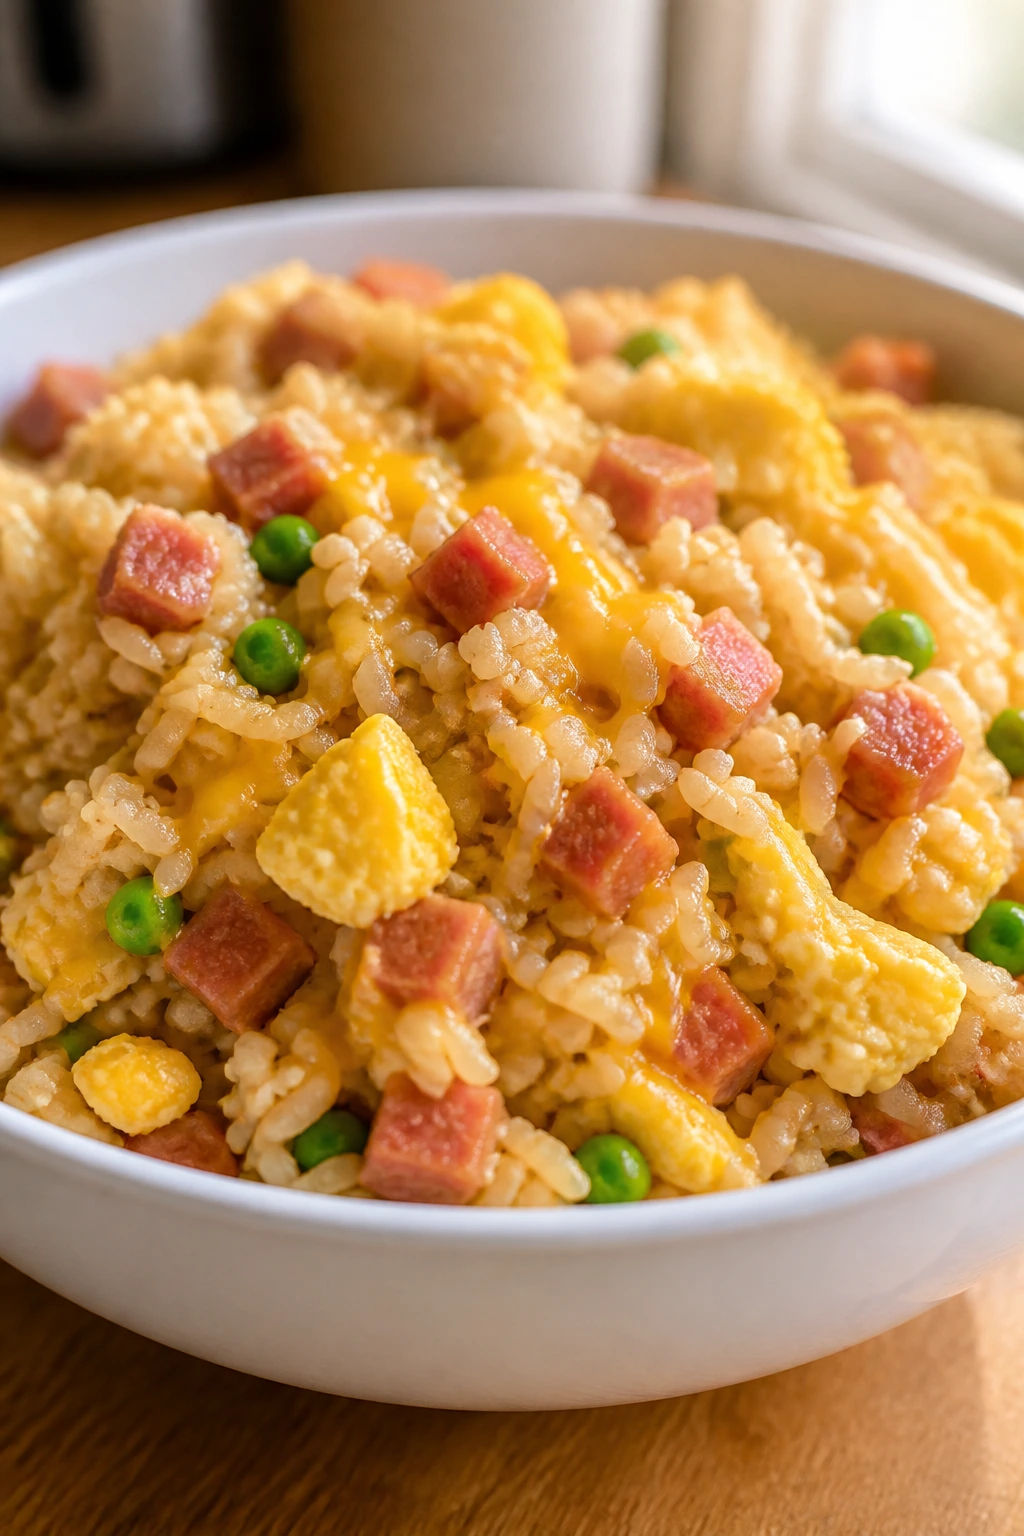
Fried rice is one of those dinners that looks like leftovers until you taste it. Then it becomes the thing kids ask for because it’s soft, salty, and full of small, familiar bits instead of big, unpredictable chunks. Ham helps here because it tastes plain in the best possible way.
Why It Works: Day-old rice fries better than fresh rice, so the grains stay separate and slightly chewy instead of clumping. Eggs and ham add protein without changing the texture too much, which keeps the bowl approachable.
Key Ingredients:
- 4 cups cooked white rice, chilled
- 1 tablespoon sesame oil or neutral oil
- 2 large eggs, beaten
- 1 cup diced ham
- 1/2 cup frozen peas and carrots
- 2 tablespoons soy sauce
- 1 tablespoon butter
- 2 green onions, thinly sliced, optional
Quick Steps:
- Heat the oil in a large skillet or wok over medium-high heat.
- Scramble the eggs in the pan, then remove them to a plate.
- Add the ham and frozen vegetables and cook for 2 to 3 minutes.
- Stir in the rice, soy sauce, butter, and eggs, then cook until hot and slightly toasted.
- Sprinkle with green onions if you’re using them.
Equipment for This Recipe:
- Large skillet or wok
- Spatula
- Small bowl for beating eggs
- Measuring spoons
- Plate for the scrambled eggs
How to Serve This Dish: Serve in wide bowls with a spoon, not chopsticks, unless someone asks for chopsticks. The dish is soft enough to pair with fruit on the side, and a few cucumber slices work if you want a cool crunch.
Pro Tips for This Recipe:
- Use chilled rice from the fridge for the best texture.
- Keep the heat high enough to toast the rice lightly.
- If soy sauce feels too salty, use low-sodium and add more to taste.
- Cut the ham into tiny cubes so it blends into the rice.
Variations on This Dish:
- Chicken Fried Rice: Swap ham for cooked chicken.
- Egg-Heavy Version: Add 1 extra egg for a softer, richer pan.
- Plain Rice Bowl: Leave out the peas and carrots if you need to keep the texture even simpler.
Common Mistakes to Avoid with This Dish:
- Using hot, fresh rice: It clumps and turns gummy.
- Overloading the pan: The rice steams instead of frying.
- Adding too much soy sauce at once: It can get dark and salty fast.
13. Baked Ziti with Ricotta
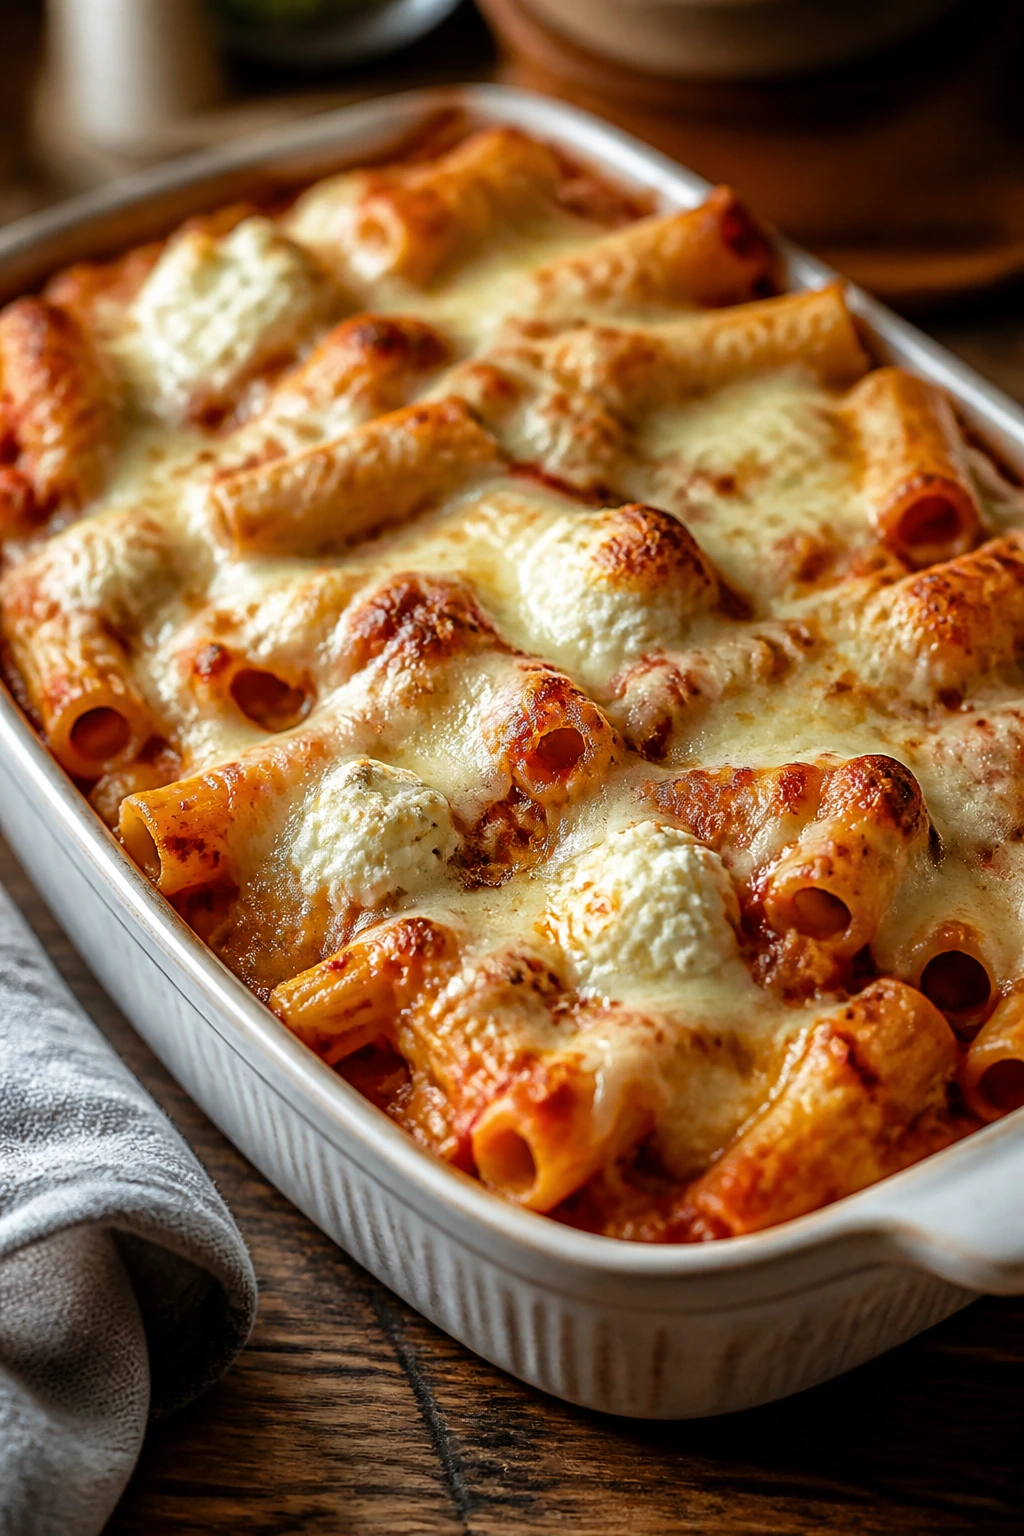
Baked ziti has an easygoing shape: tube pasta, red sauce, lots of cheese. It doesn’t ask kids to understand layers or fillings. It just shows up bubbly and soft, with enough structure to scoop but not so much that it feels like work.
Why It Works: Ziti catches sauce inside the tubes, which gives each bite a little more flavor without adding complexity. Ricotta keeps the bake creamy, and mozzarella on top gives you those browned edges that tend to vanish first.
Key Ingredients:
- 1 lb ziti
- 24 oz marinara sauce
- 15 oz ricotta cheese
- 2 cups shredded mozzarella cheese
- 1/2 cup grated Parmesan cheese
- 1 large egg
- 1 teaspoon Italian seasoning
- 1 teaspoon kosher salt
- 1/2 teaspoon black pepper
Quick Steps:
- Cook the ziti until just shy of tender, then drain.
- Mix ricotta, egg, half the Parmesan, Italian seasoning, salt, and pepper.
- Toss pasta with marinara, then spread half in a greased baking dish.
- Dollop on half the ricotta mixture, add half the mozzarella, and repeat.
- Bake at 375°F for 25 minutes until bubbling, then broil briefly for color if needed.
Equipment for This Recipe:
- Large pot
- 9×13-inch baking dish
- Mixing bowl
- Spoon or spatula
- Colander
How to Serve This Dish: Let it sit for 10 minutes before cutting into squares. A piece of garlic bread on the side works if the kids want something to hold, but the casserole itself should stay the star.
Pro Tips for This Recipe:
- Undercook the pasta slightly so it doesn’t turn mushy in the oven.
- Mix the ricotta gently; you want creamy, not paste-like.
- Add the top mozzarella in an even layer so every serving gets some browned cheese.
- If the sauce seems thick, loosen it with 1/4 cup pasta water before assembling.
Variations on This Dish:
- Meat Version: Add 1 lb browned ground beef to the sauce.
- Spinach Option: Stir in 1 cup chopped cooked spinach if your kids accept green flecks.
- Cottage Cheese Swap: Replace ricotta with cottage cheese for a lighter texture.
Common Mistakes to Avoid with This Dish:
- Using too much ricotta: It can make the bake heavy and wet.
- Skipping the rest time: The layers slide apart when cut too soon.
- Overbaking until the edges dry out: Pull it when the center is hot and the cheese is melted.
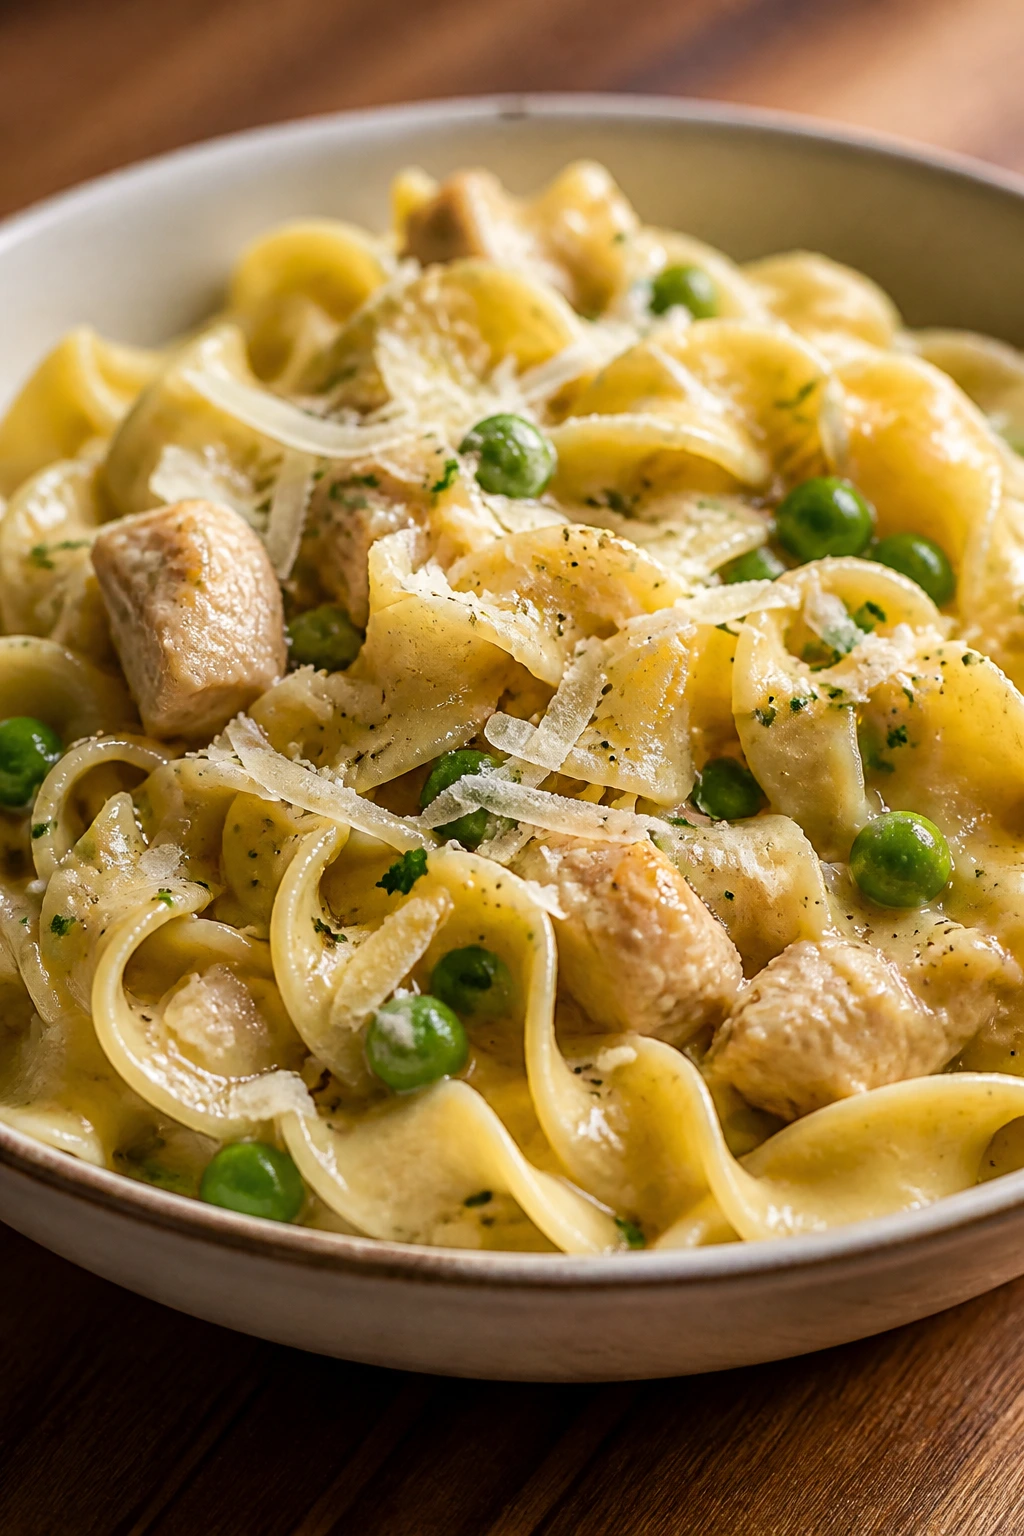
14. Creamy Tortellini with Parmesan
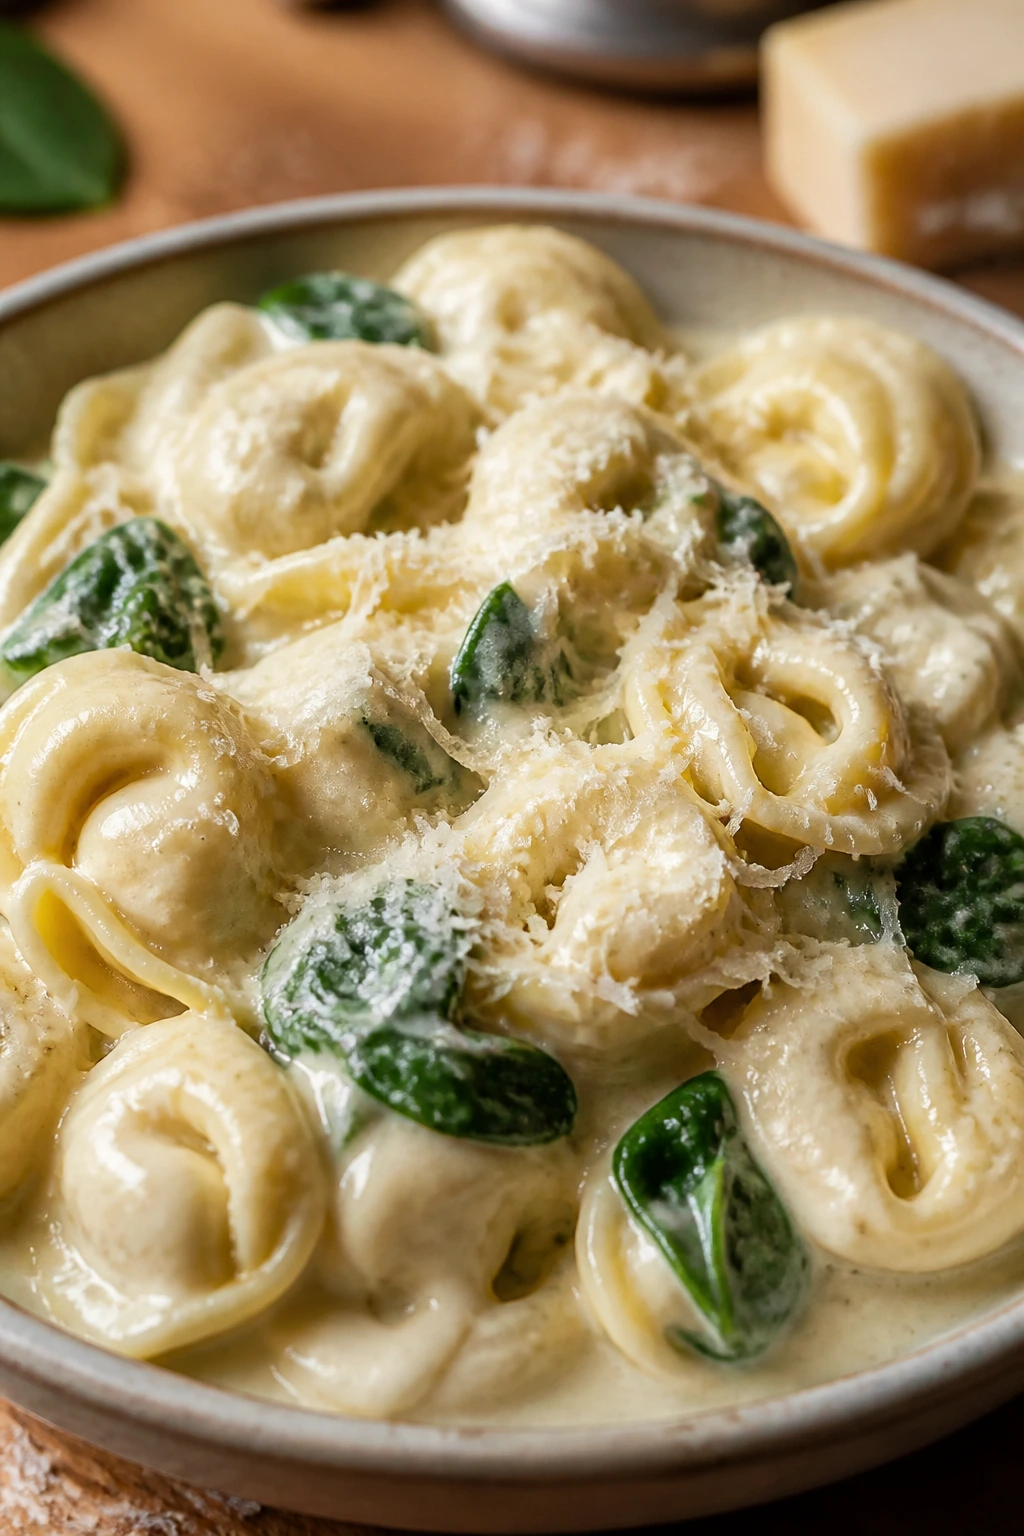
Refrigerated tortellini is one of those shortcuts that still feels like a proper dinner. The shape does a lot of the work; kids like stuffed pasta because it looks different without tasting strange. Keep the sauce pale and creamy, and the whole bowl stays calm.
Why It Works: Tortellini cooks in minutes, which means it goes from package to plate without turning mushy. A simple Parmesan cream sauce coats the pasta lightly, so every bite tastes rich without becoming heavy enough to scare off picky eaters.
Key Ingredients:
- 20 oz refrigerated cheese tortellini
- 2 tablespoons butter
- 2 cloves garlic, minced
- 1 cup heavy cream
- 1 cup grated Parmesan cheese
- 1/2 teaspoon kosher salt
- 1/4 teaspoon black pepper
- 1 cup baby spinach, optional
- 2 tablespoons pasta water, if needed
Quick Steps:
- Cook the tortellini according to the package directions, then drain.
- Melt butter in a skillet over medium heat and cook the garlic for 30 seconds.
- Add the cream, salt, and pepper, then simmer for 2 to 3 minutes.
- Stir in Parmesan until smooth, then add spinach if using and let it wilt.
- Toss in the tortellini and loosen with a spoonful of pasta water if the sauce is too thick.
Equipment for This Recipe:
- Large skillet
- Pot for boiling pasta
- Wooden spoon
- Colander
- Measuring cups
How to Serve This Dish: Spoon it into shallow bowls with extra Parmesan passed at the table. If you want to round it out, serve with soft bread and maybe a few peas on the side, not mixed in unless you know they’ll be tolerated.
Pro Tips for This Recipe:
- Keep the garlic pale; browned garlic tastes sharp.
- Use freshly grated Parmesan for the smoothest sauce.
- Add spinach only if your family already accepts it in pasta.
- Save a splash of pasta water in case the sauce tightens up.
Variations on This Dish:
- Tomato Cream Twist: Stir in 1/4 cup marinara for a blush sauce.
- Chicken Tortellini: Add 1 cup cooked chicken for more protein.
- No-Greens Version: Skip the spinach and let the sauce stay plain.
Common Mistakes to Avoid with This Dish:
- Boiling the cream hard: It can split.
- Overcooking the tortellini: The filling can burst.
- Using powdered Parmesan only: The sauce won’t melt as smoothly.
15. Chicken Parmesan Sliders
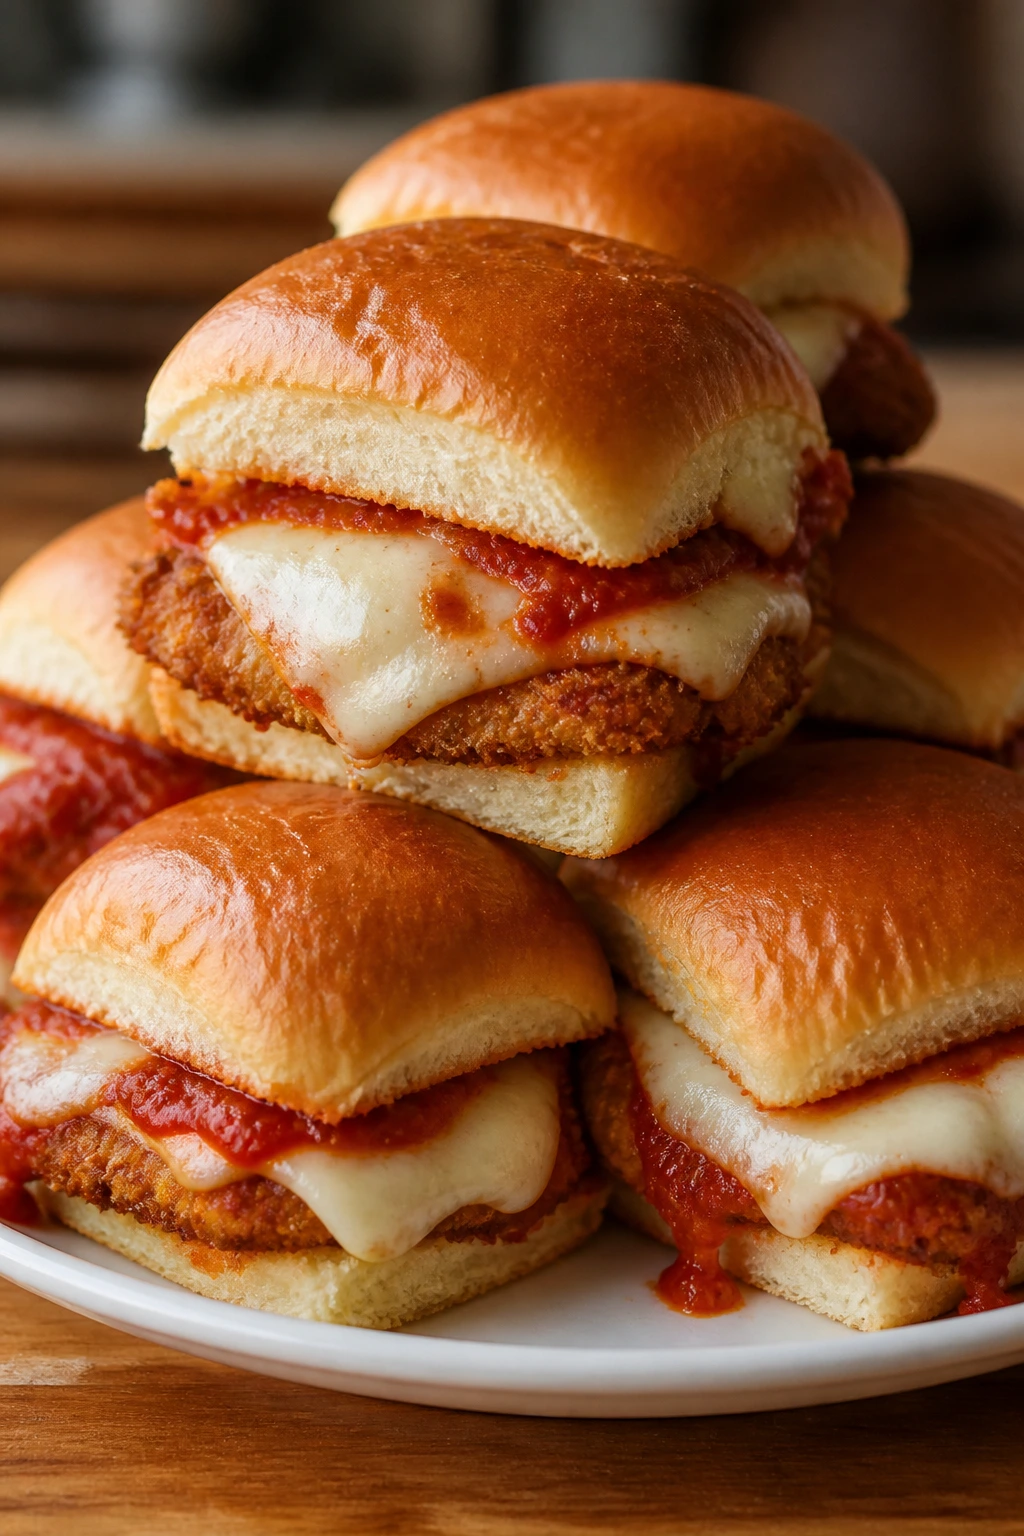
Chicken parmesan gets friendlier when it shrinks into slider form. The bread is soft, the cheese is melted, and the tomato sauce stays where it belongs instead of running all over the plate. Kids who avoid whole chicken cutlets often do better with this smaller build.
Why It Works: The slider format controls the portions and keeps the layers neat. Breaded chicken, marinara, and mozzarella are all flavors kids already know, and the bun softens the edge of the tomato sauce.
Key Ingredients:
- 8 slider buns
- 4 small breaded chicken cutlets or 2 large cutlets, cooked and sliced
- 1 cup marinara sauce
- 1 1/2 cups shredded mozzarella cheese
- 2 tablespoons grated Parmesan cheese
- 2 tablespoons melted butter
- 1/2 teaspoon garlic powder
- 1/2 teaspoon dried Italian seasoning
Quick Steps:
- Preheat the oven to 350°F.
- Split the buns and arrange the bottoms in a baking dish.
- Layer chicken, marinara, mozzarella, and Parmesan over the buns.
- Replace the tops, brush with melted butter mixed with garlic powder and Italian seasoning, then bake for 10 to 12 minutes until the cheese melts.
- Serve warm.
Equipment for This Recipe:
- 9×13-inch baking dish
- Pastry brush
- Sharp knife
- Mixing bowl for butter
- Spatula
How to Serve This Dish: Serve the sliders whole or cut in half if that makes them easier to handle. A side of plain spaghetti or roasted potato wedges fits well, though the sliders can also stand alone if the table is already crowded.
Pro Tips for This Recipe:
- Use a not-too-wet marinara so the buns don’t go soggy.
- Keep the cutlets thin enough to fit the buns cleanly.
- Brush the tops with butter before baking for a softer, more golden finish.
- If the cheese browns too fast, tent with foil.
Variations on This Dish:
- Meatball Slider Version: Swap the chicken for sliced meatballs.
- Garlic Knot Style: Use garlic rolls instead of slider buns.
- Plain Cheese Slider: Leave off the marinara for very sauce-shy kids.
Common Mistakes to Avoid with This Dish:
- Overfilling the buns: The sliders fall apart before the tray reaches the table.
- Using very crisp chicken cutlets: They can feel dry inside the soft bun.
- Skipping the butter on top: The buns lose that bakery-style finish.
16. Tater Tot Shepherd’s Pie

Tater tot shepherd’s pie wins because it has one job: be familiar. Beef on the bottom, potato on top, and a hot, crisp lid that kids can recognize from the first glance. It’s not fancy, and that’s the point.
Why It Works: The tater tots bake into a crunchy top while the filling stays soft underneath. A mild gravy base keeps the meat and vegetables bound together, so the casserole scoops cleanly without turning to slush.
Key Ingredients:
- 1 lb ground beef
- 1 small onion, diced fine
- 1 cup frozen mixed vegetables
- 2 tablespoons all-purpose flour
- 1 1/2 cups beef broth
- 1 tablespoon ketchup
- 1 teaspoon Worcestershire sauce
- 1 teaspoon kosher salt
- 1/2 teaspoon black pepper
- 28 oz frozen tater tots
- 1 cup shredded cheddar cheese, optional
Quick Steps:
- Brown the beef and onion in a skillet, then drain excess fat.
- Stir in the flour, then add broth, ketchup, Worcestershire, salt, pepper, and vegetables.
- Simmer until thickened, about 5 minutes, then spread the filling in a baking dish.
- Top with tater tots in tight rows and bake at 400°F for 30 to 35 minutes.
- Add cheddar in the last 5 minutes if you want a cheesy top.
Equipment for This Recipe:
- Large skillet
- 9×13-inch baking dish
- Wooden spoon
- Measuring cups
- Foil, if the tots brown too fast
How to Serve This Dish: Let it rest for a few minutes, then serve it in squares. The edges should be crisp, the center hot, and the filling thick enough to hold together without running.
Pro Tips for This Recipe:
- Keep the vegetables small if you want them to blend into the filling.
- Don’t thaw the tots first; they crisp better from frozen.
- Make the filling thick before it goes into the oven.
- If the tots need more color, broil for 1 to 2 minutes at the end.
Variations on This Dish:
- Chicken Version: Use shredded chicken and chicken gravy instead of beef.
- Cheddar-Heavy Top: Add more cheese under the tots for a richer casserole.
- Mini Casseroles: Bake in individual ramekins for smaller servings.
Common Mistakes to Avoid with This Dish:
- A thin filling: It makes the bottom layer soupy.
- Spacing the tots too far apart: You lose the potato cap effect.
- Baking without enough heat: The tots need a hot oven to crisp.
17. BBQ Chicken Flatbread Pizzas
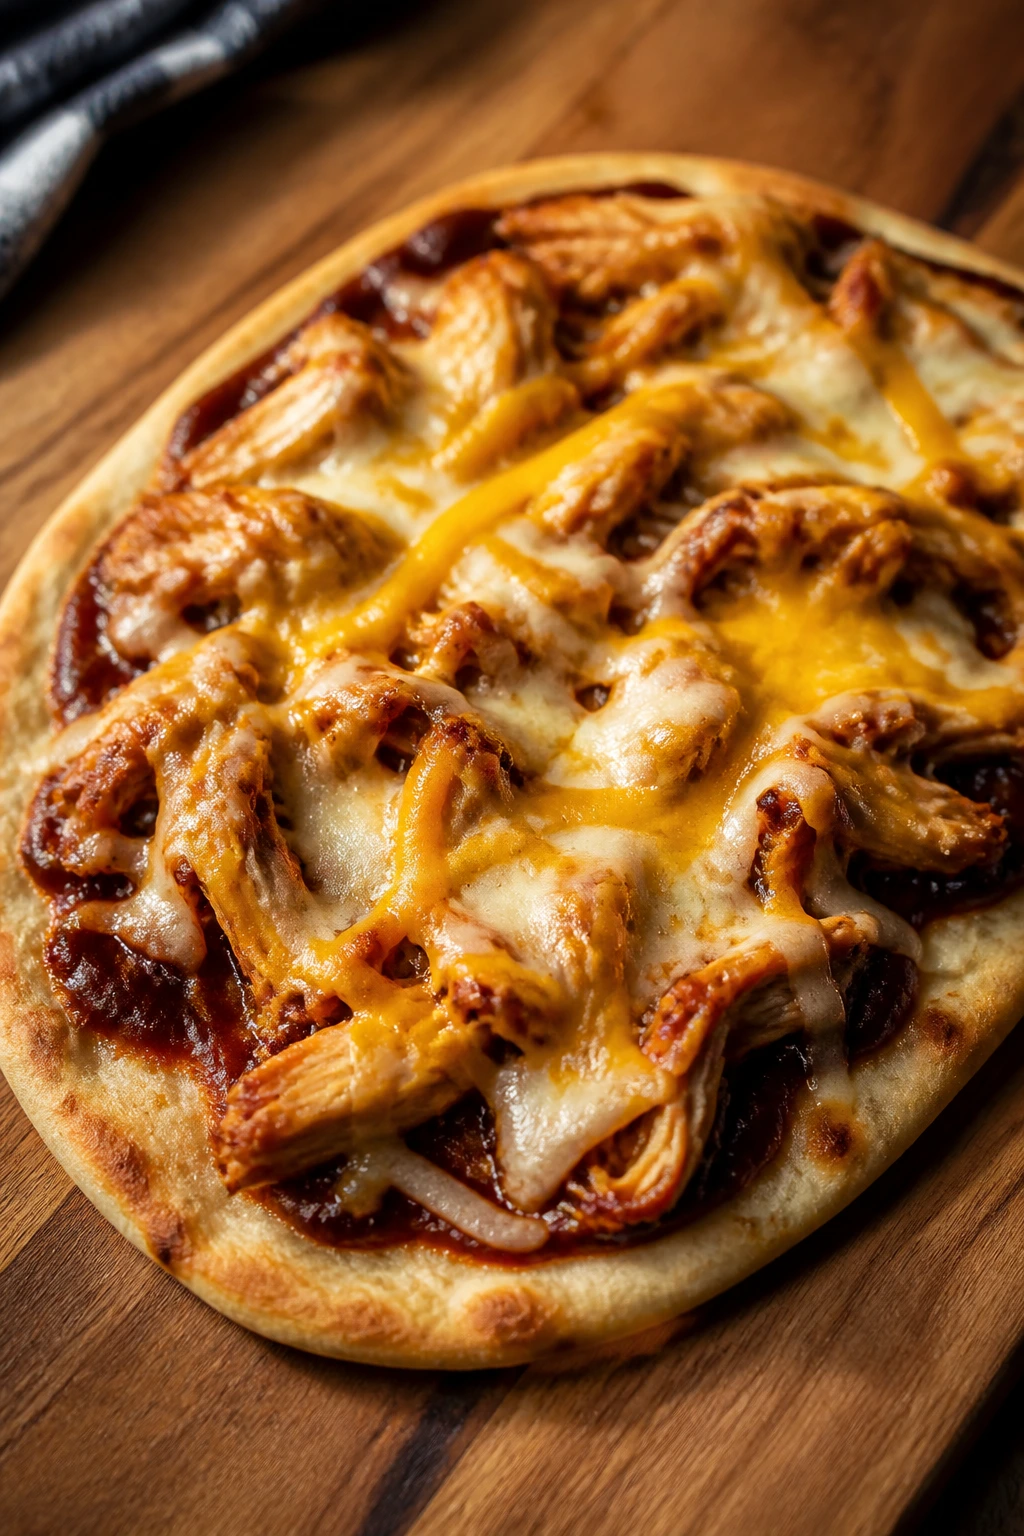
Flatbreads are useful because they feel like pizza without demanding pizza-night effort. The barbecue sauce gives just enough sweetness to make the chicken feel friendly, and the flatbread stays thin enough that kids can pick up the slices without wrestling the crust.
Why It Works: Flatbread bakes fast, so the edges get crisp before the toppings overcook. Using cooked chicken keeps the process quick, and the cheese melts into a sticky layer that holds the toppings in place.
Key Ingredients:
- 4 naan or flatbreads
- 1 1/2 cups cooked shredded chicken
- 1/2 cup mild barbecue sauce
- 2 cups shredded mozzarella cheese
- 1/4 cup shredded cheddar cheese
- 2 tablespoons finely sliced red onion, optional
- 1 tablespoon olive oil
- 1 tablespoon chopped parsley, optional
Quick Steps:
- Preheat the oven to 425°F and place the flatbreads on a sheet pan.
- Brush lightly with olive oil, then spread barbecue sauce over each one.
- Add chicken, cheese, and red onion if using.
- Bake for 8 to 10 minutes until the cheese melts and the edges crisp.
- Sprinkle with parsley if you want a little color.
Equipment for This Recipe:
- Rimmed baking sheet
- Spoon
- Pizza cutter
- Measuring cups
- Pastry brush, optional
How to Serve This Dish: Slice the flatbreads into strips or squares. They’re easier to handle that way, and the little pieces fit kid hands better than giant wedges. Add fruit on the side if you want a full plate without extra drama.
Pro Tips for This Recipe:
- Use a mild barbecue sauce rather than a smoky-hot one.
- Pre-cooked chicken saves time and keeps the topping from drying out.
- Keep the cheese layer even so the edges don’t burn before the middle melts.
- If the flatbreads are soft, bake them plain for 2 minutes first to firm them up.
Variations on This Dish:
- Bacon Ranch Version: Swap barbecue sauce for a thin layer of ranch and add bacon.
- Plain Cheese Flatbread: Leave off the chicken and onion for a very simple dinner.
- Veggie-Friendly Top: Add tiny pieces of cooked bell pepper if your kids accept them.
Common Mistakes to Avoid with This Dish:
- Using too much sauce: The flatbread gets soggy.
- Skipping the preheat: The crust won’t crisp fast enough.
- Loading on raw onions: They stay sharp and distract from the rest of the pizza.
18. Crispy Fish Sticks with Oven Fries
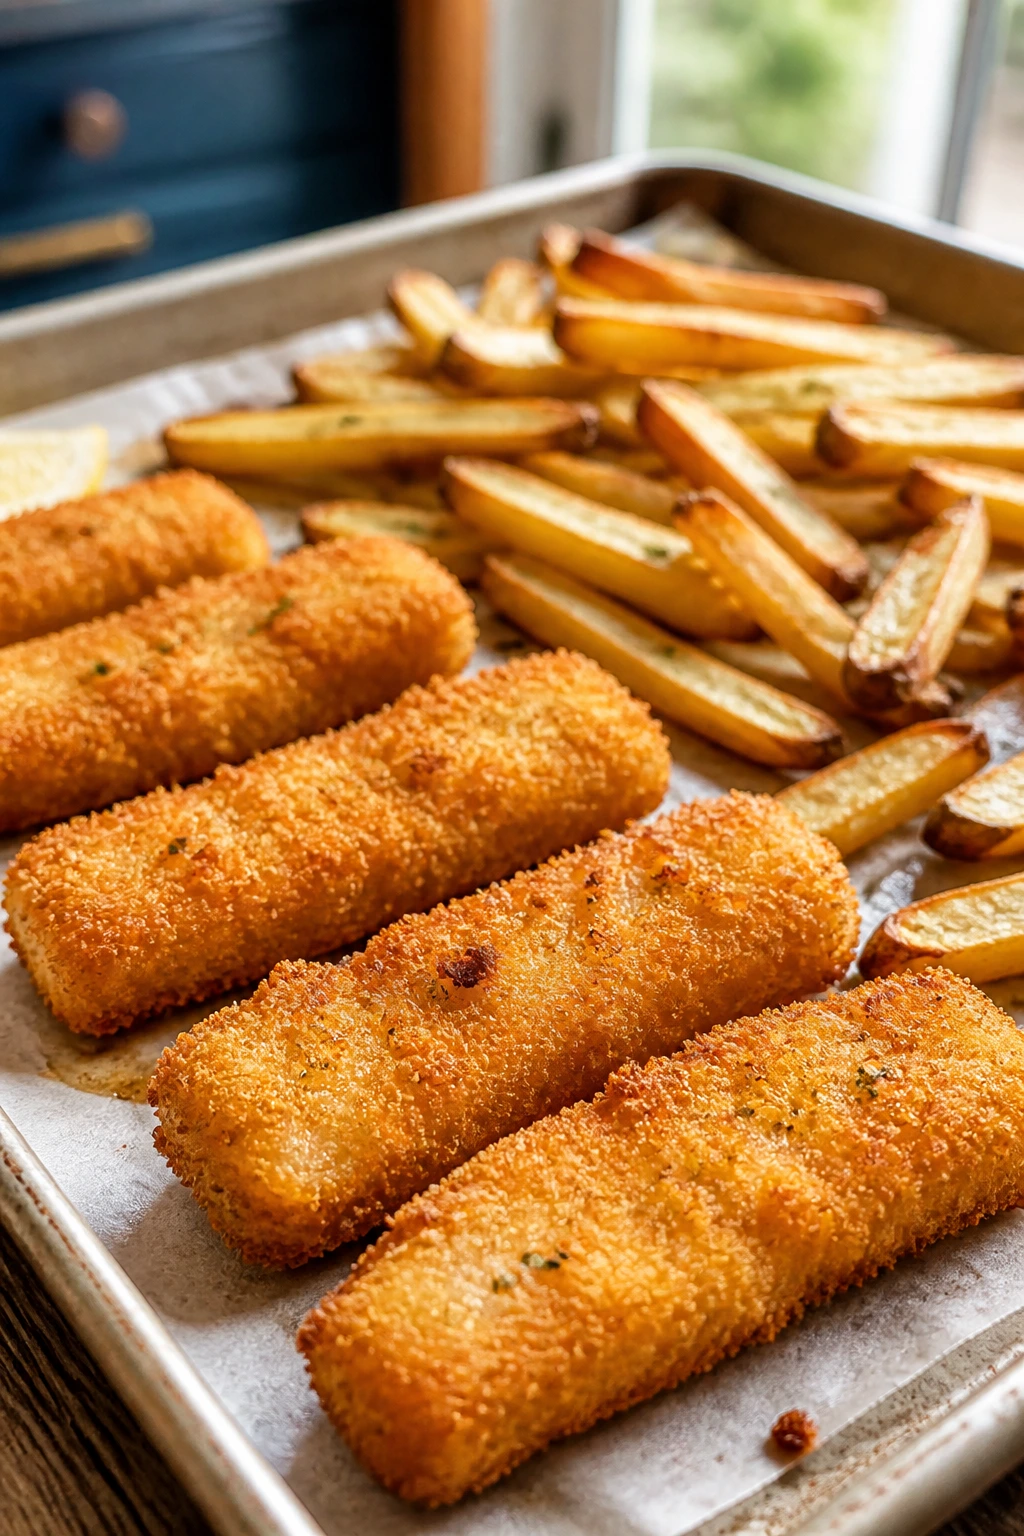
Fish sticks are one of those dinners that can either feel like a childhood memory or a cardboard mistake. The version here leans on a crisp breadcrumb coating and oven fries that finish at the same time, so the whole tray lands hot and coordinated.
Why It Works: White fish has a mild flavor and soft flakes that many picky eaters accept better than stronger seafood. Oven fries give you a familiar side without needing a second cooking method.
Key Ingredients:
- 1 1/2 lbs cod or haddock fillets, cut into sticks
- 1 cup all-purpose flour
- 2 large eggs
- 2 tablespoons milk
- 2 cups panko breadcrumbs
- 1 teaspoon salt
- 1/2 teaspoon paprika
- 1/2 teaspoon garlic powder
- 2 tablespoons olive oil
- 1 1/2 lbs russet potatoes, cut into fries
Quick Steps:
- Preheat the oven to 425°F and line two sheet pans.
- Toss the fries with oil and half the salt, then bake for 10 minutes.
- Dredge fish sticks in flour, egg wash, and panko mixed with the remaining seasonings.
- Add the fish to the second pan and bake everything for 12 to 15 minutes until the fries are crisp and the fish flakes easily.
- Serve with tartar sauce or ketchup.
Equipment for This Recipe:
- Two rimmed baking sheets
- Three shallow bowls
- Wire rack, optional
- Tongs
- Sharp knife
How to Serve This Dish: Put the fish sticks and fries on the plate side by side, not piled together. Kids usually like the two-part structure. A little ketchup or tartar sauce in a small dish on the side is enough.
Pro Tips for This Recipe:
- Pat the fish dry before breading so the coating sticks.
- Cut the fries evenly so they finish at the same time.
- Don’t overbake; fish dries out fast once it loses its shine.
- If you want extra crispness, place the fish on a rack over the pan.
Variations on This Dish:
- Lemon Version: Add a little lemon zest to the crumb coating.
- Sweet Potato Fries: Swap the russets for sweet potatoes if the family likes them.
- Air Fryer Batch: Cook the fish sticks in a single layer in the air fryer for an even crunch.
Common Mistakes to Avoid with This Dish:
- Using wet fish straight from the package: The breading slides off.
- Cutting fries different sizes: Some burn while others stay pale.
- Serving everything piled in one bowl: Steam kills the crunch.
19. Sausage and Cheddar Breakfast Casserole
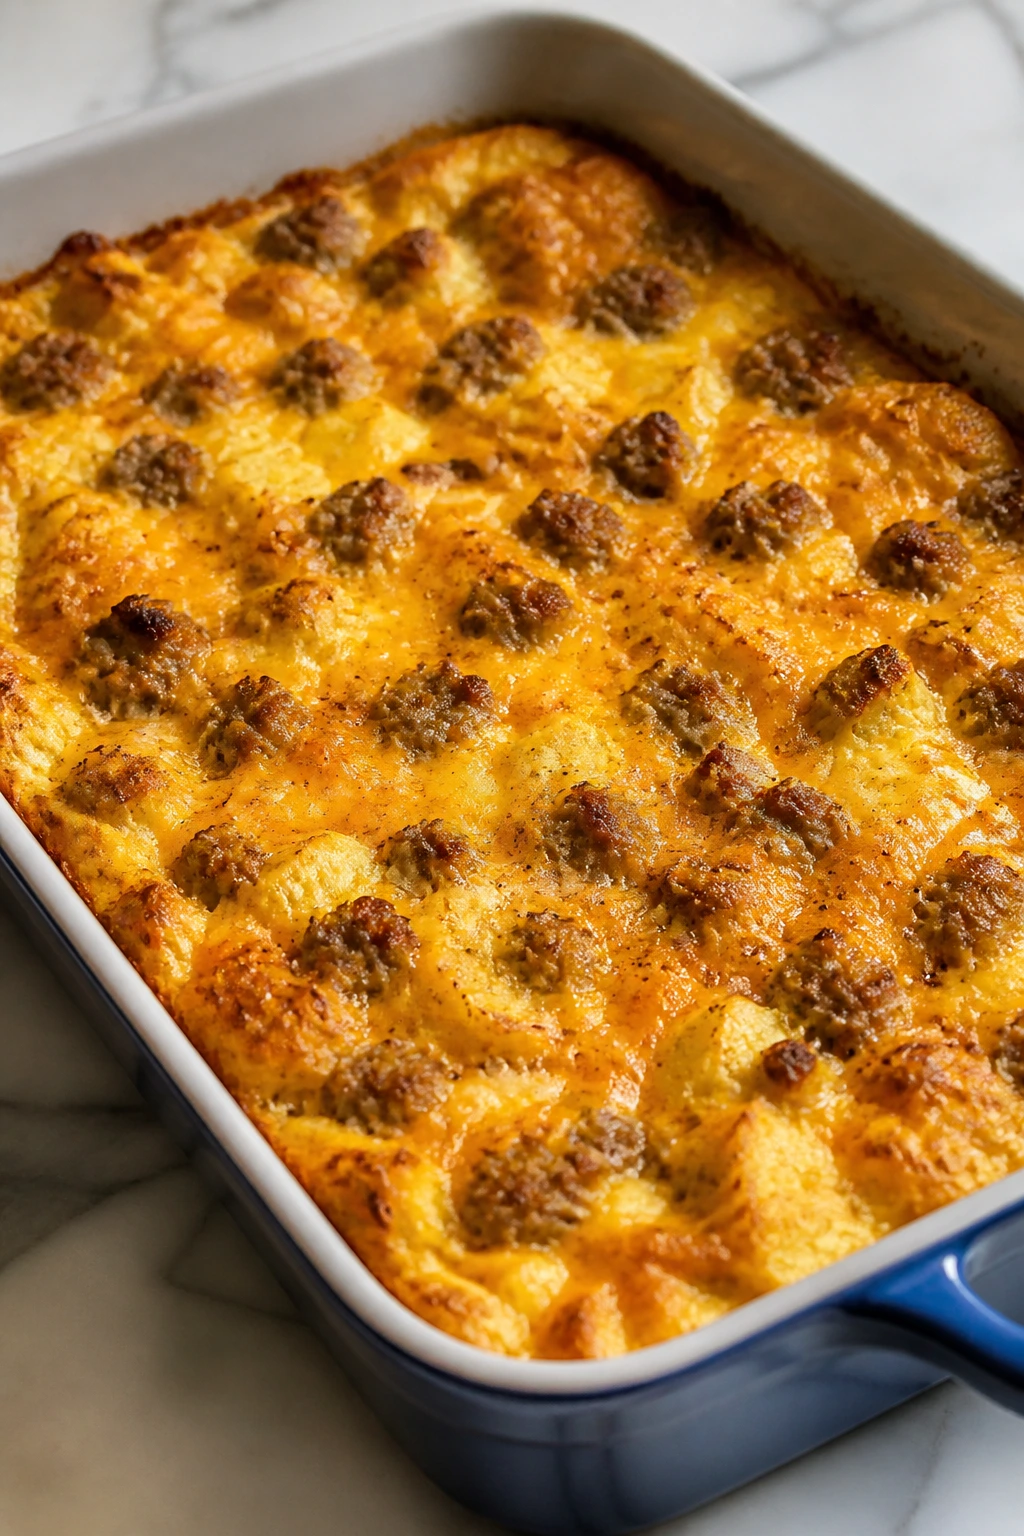
Breakfast for dinner works because it lowers the stakes. A warm egg bake with sausage and cheese feels recognizable, and kids who refuse a “real dinner” often relax when the food looks a little like morning instead of a test.
Why It Works: Cubed bread soaks up the egg mixture and bakes into a soft, custardy base. Mild sausage and cheddar carry the flavor without needing a long list of add-ins or vegetables that might trigger complaints.
Key Ingredients:
- 8 slices sandwich bread, crusts removed and cubed
- 1 lb mild breakfast sausage
- 8 large eggs
- 2 cups milk
- 2 cups shredded cheddar cheese
- 1 teaspoon kosher salt
- 1/2 teaspoon black pepper
- 1/2 teaspoon dry mustard, optional
Quick Steps:
- Brown the sausage in a skillet, then drain the fat.
- Grease a 9×13-inch dish and layer in the bread, sausage, and cheese.
- Whisk the eggs, milk, salt, pepper, and dry mustard if using.
- Pour over the casserole, press lightly, and bake at 350°F for 35 to 40 minutes until set.
- Rest for 10 minutes before cutting.
Equipment for This Recipe:
- 9×13-inch baking dish
- Skillet
- Whisk
- Mixing bowl
- Measuring cups
How to Serve This Dish: Cut into squares and serve with fruit or toast if you want more on the table. Syrup is optional if your family likes the sweet-savory route, but the casserole doesn’t need it to make sense.
Pro Tips for This Recipe:
- Let the bread sit a minute after pouring in the egg mixture so it absorbs evenly.
- Use mild sausage, not spicy, unless your kids already like heat.
- A little cheddar on top browns nicely and gives the casserole a firmer top.
- If the center still jiggles, give it 5 more minutes and check again.
Variations on This Dish:
- Hash Brown Base: Replace the bread with thawed hash browns.
- Ham and Cheese Version: Use diced ham instead of sausage.
- Mini Muffin Cups: Bake the same mixture in muffin tins for smaller portions.
Common Mistakes to Avoid with This Dish:
- Underbaking the center: It should be set, not wet.
- Using too much bread: The casserole turns dry and bready.
- Serving straight from the oven: The slices won’t hold together.
20. Chicken Alfredo Bake
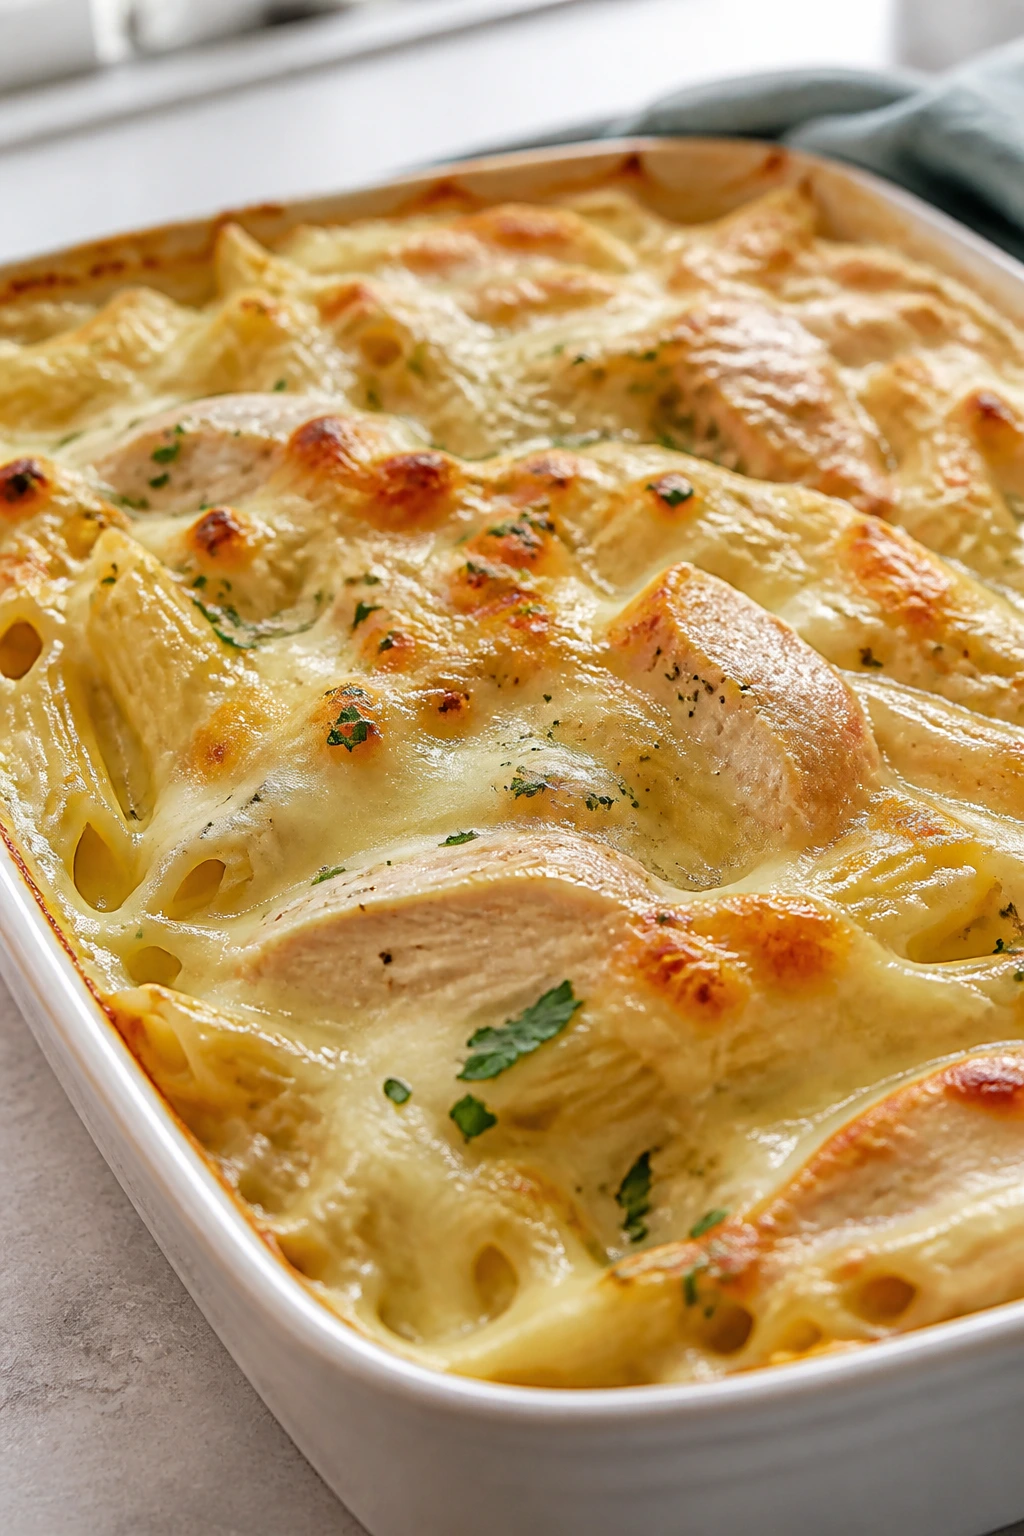
Creamy pasta bakes win with kids because the sauce clings to every bite and nothing on the plate looks scary. This one stays mild and soft, with chicken tucked into a familiar Alfredo base and a little baked cheese on top for finish.
Why It Works: Alfredo sauce gives the pasta a smooth coating that doesn’t introduce sharp tomato acidity or spicy seasoning. Baking the whole thing together lets the top brown while the center stays creamy.
Key Ingredients:
- 12 oz penne or rotini
- 2 cups cooked chicken, chopped
- 2 cups Alfredo sauce
- 1 cup milk
- 1 1/2 cups shredded mozzarella cheese
- 1/2 cup grated Parmesan cheese
- 1 teaspoon garlic powder
- 1 teaspoon kosher salt
- 1/2 teaspoon black pepper
Quick Steps:
- Cook the pasta until just shy of tender, then drain.
- Mix pasta, chicken, Alfredo sauce, milk, garlic powder, salt, and pepper in a bowl.
- Spread into a greased baking dish and top with mozzarella and Parmesan.
- Bake at 375°F for 20 to 25 minutes until bubbling and lightly golden.
- Rest for 5 minutes before scooping.
Equipment for This Recipe:
- Large pot
- Mixing bowl
- 9×13-inch baking dish
- Colander
- Spoon or spatula
How to Serve This Dish: Scoop it into bowls with a small green salad or plain steamed broccoli if the table can handle it. If not, the bake is filling enough on its own, which is often the better answer.
Pro Tips for This Recipe:
- Undercook the pasta a little; it finishes in the oven.
- Thin the sauce with milk if it feels too thick before baking.
- Use small chicken pieces so each forkful is even.
- Let the cheese bubble but not burn.
Variations on This Dish:
- Broccoli Chicken Alfredo: Add tiny broccoli florets if your family accepts them.
- Bacon Alfredo Bake: Mix in chopped cooked bacon.
- Plain Cheese Pasta: Skip the chicken and serve as a simple baked macaroni-style dinner.
Common Mistakes to Avoid with This Dish:
- Using too little sauce: The pasta bakes dry.
- Overbaking: Alfredo can separate if it goes too long.
- Dumping in cold chicken straight from the fridge: Warm it slightly first so the bake heats evenly.
21. Loaded Baked Potato Bowls with Cheddar Chicken
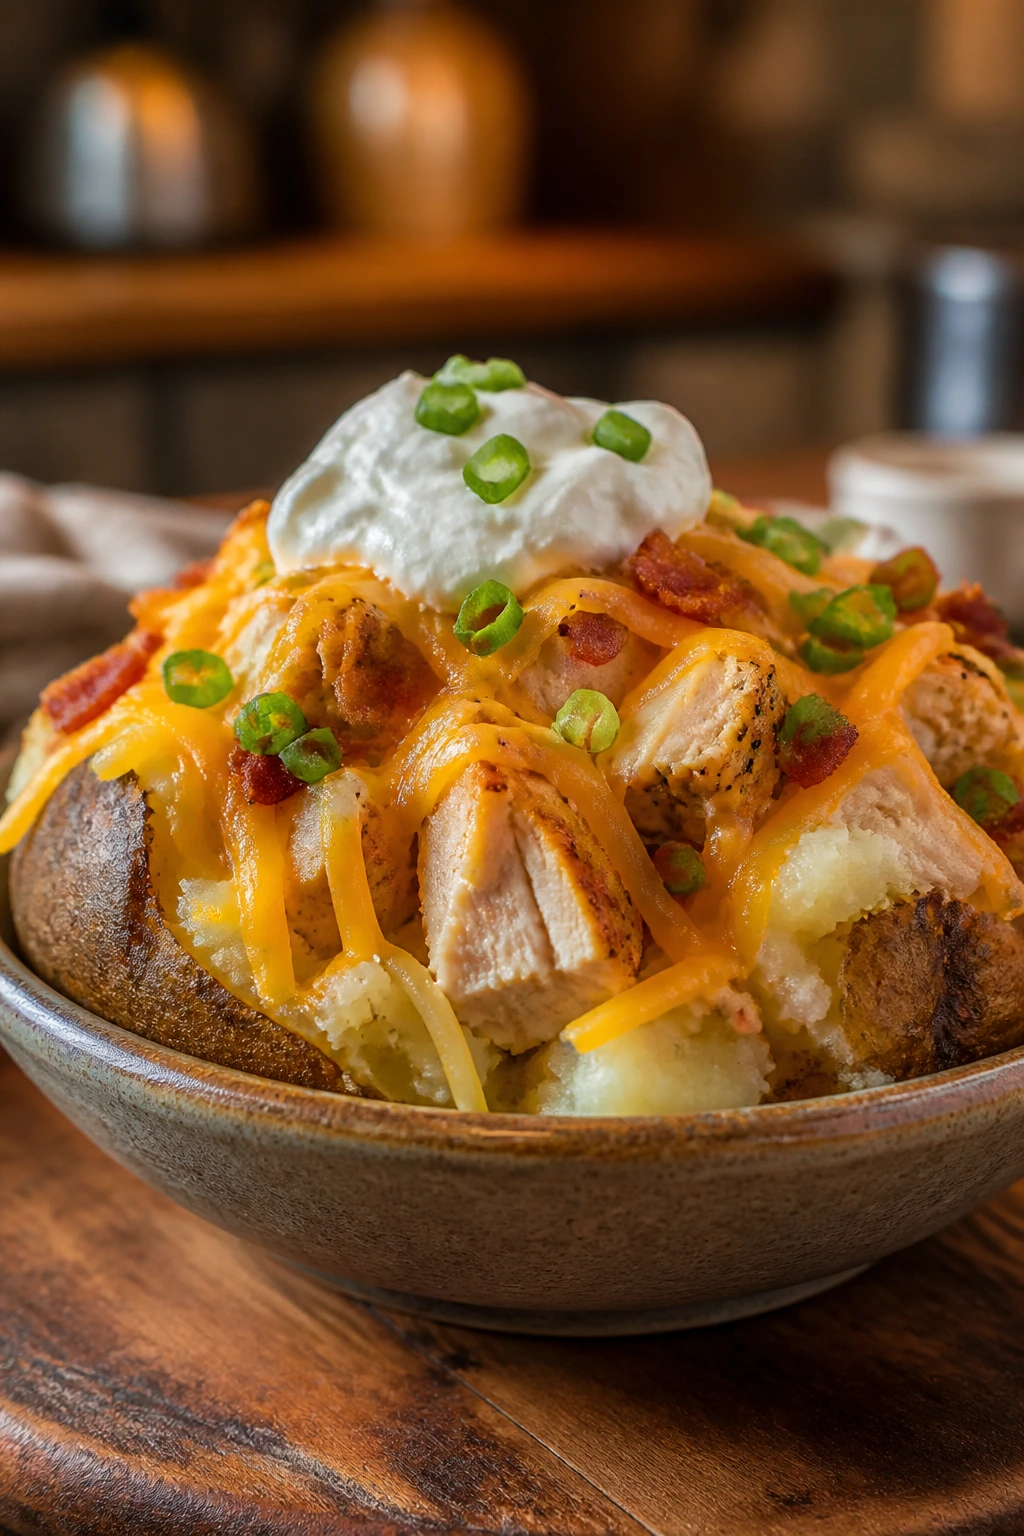
A baked potato can feel like a blank page. In bowl form, though, it becomes easier to manage: soft potato, mild chicken, cheese, and a little sour cream. Kids who dislike mixed casseroles often do better when they can see each part sitting in its own spot.
Why It Works: The potato gives a familiar, mashable base. Cheddar chicken adds enough flavor to feel like dinner, but the toppings stay optional, which helps kids who like to build their own plate.
Key Ingredients:
- 4 large russet potatoes
- 2 cups cooked chicken, chopped or shredded
- 1 1/2 cups shredded cheddar cheese
- 1/2 cup sour cream
- 2 tablespoons butter
- 1/2 teaspoon kosher salt
- 1/4 teaspoon black pepper
- 4 slices cooked bacon, crumbled, optional
- 2 tablespoons sliced chives, optional
Quick Steps:
- Bake the potatoes at 400°F for 50 to 60 minutes until soft.
- Split them open and fluff the centers with a fork.
- Mix the chicken with half the cheese, salt, and pepper.
- Fill the potatoes with butter, chicken mixture, sour cream, and the remaining cheese.
- Return to the oven for 5 minutes until the cheese melts.
Equipment for This Recipe:
- Baking sheet
- Fork
- Sharp knife
- Mixing bowl
- Small spoon for scooping
How to Serve This Dish: Set the potatoes on plates and let everyone add bacon or chives if they want them. The bowl format works well with a simple side salad or steamed green beans, but the potatoes are the main show.
Pro Tips for This Recipe:
- Choose potatoes that are similar in size so they bake evenly.
- Don’t rush the potato bake; soft centers matter.
- Warm the chicken before stuffing so the whole bowl heats through.
- Keep extra sour cream on the table for the kids who want a softer finish.
Variations on This Dish:
- Broccoli Cheddar Potato Bowls: Add very small broccoli florets.
- Pulled Pork Version: Swap the chicken for shredded pork.
- Plain Butter Potato: Leave off the toppings for the simplest possible dinner.
Common Mistakes to Avoid with This Dish:
- Undercooked potatoes: The filling won’t feel right in a hard potato.
- Overstuffing: The skin tears and the toppings slide out.
- Using too much bacon or chive garnish: Tiny kids often reject visible extras before tasting.
22. Queso Beef and Rice Skillet
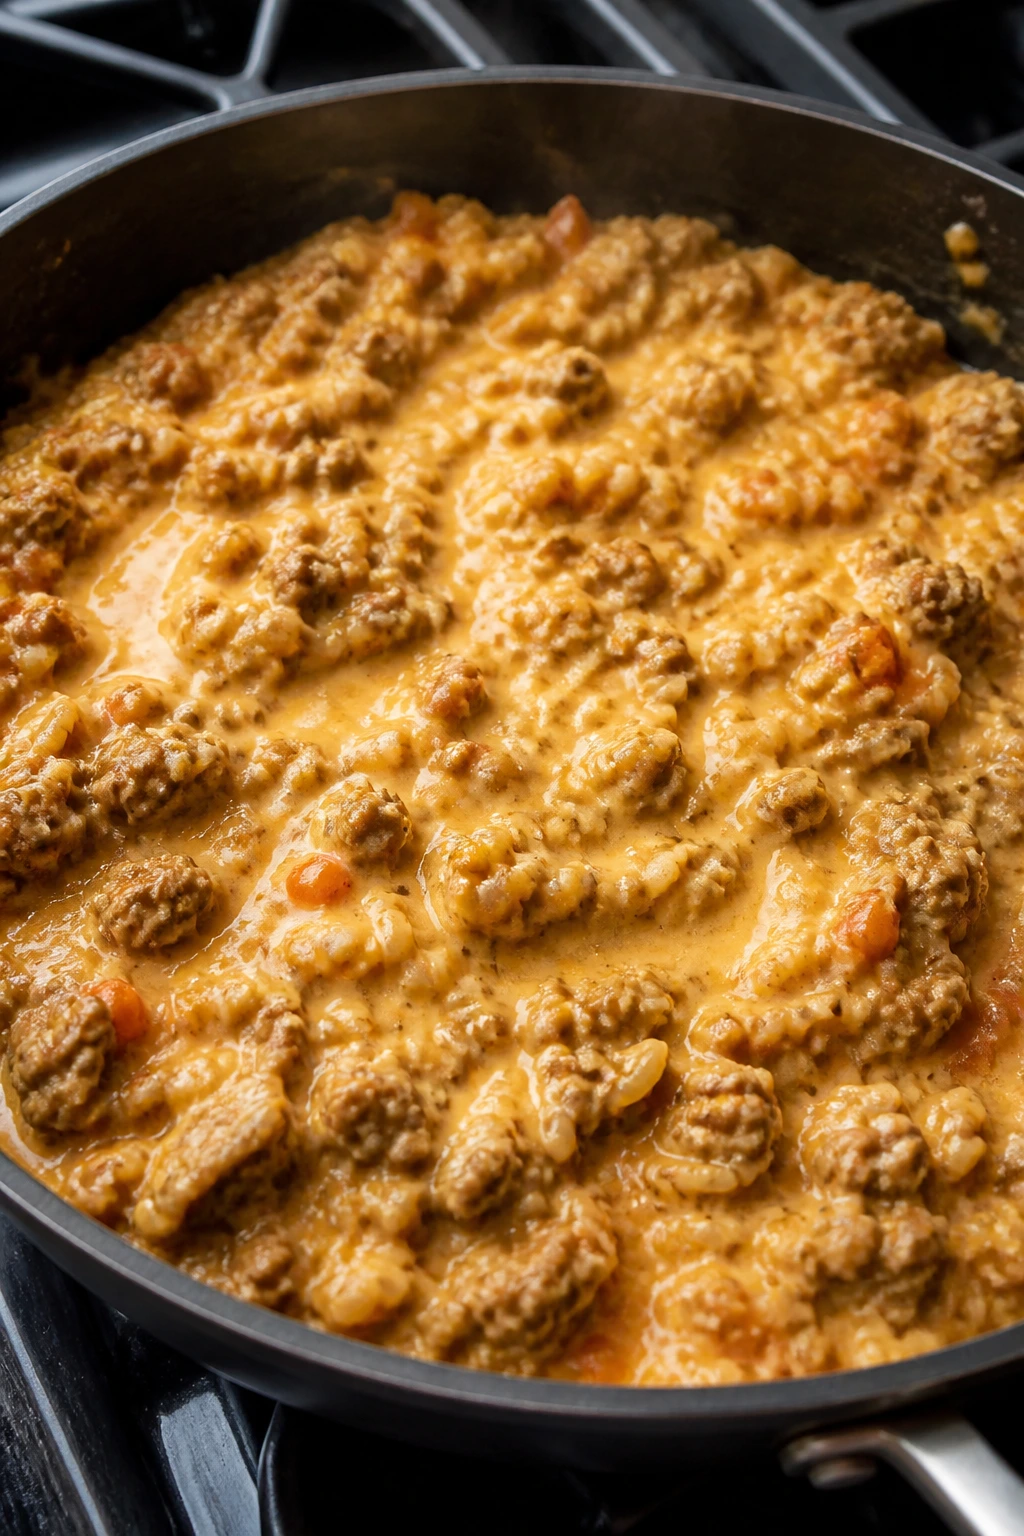
This skillet leans into what picky eaters usually accept: beef, rice, cheese, and a sauce that tastes more creamy than spicy. The queso gives the whole pan a smooth finish, and the rice keeps the dish filling without adding a weird texture curveball.
Why It Works: Cooking the rice with broth lets it absorb flavor from the start. Stirring in queso at the end keeps the sauce soft and mild, and the beef gives enough savory weight that the skillet stands on its own.
Key Ingredients:
- 1 lb ground beef
- 1 tablespoon olive oil
- 1 small onion, diced very fine
- 1 1/2 cups long-grain white rice
- 2 1/2 cups low-sodium beef broth
- 1 cup mild queso dip
- 1 teaspoon taco seasoning
- 1 teaspoon kosher salt
- 1/2 teaspoon black pepper
- 1/2 cup corn, optional
Quick Steps:
- Brown the beef with the onion in a large skillet, then drain excess fat.
- Stir in the rice, broth, taco seasoning, salt, and pepper.
- Bring to a simmer, cover, and cook on low for 18 minutes until the rice is tender.
- Stir in the queso and corn if using, then cover for 2 minutes to warm through.
- Fluff and serve hot.
Equipment for This Recipe:
- Large deep skillet with a lid
- Wooden spoon
- Measuring cups
- Knife and cutting board
- Small bowl for the queso
How to Serve This Dish: Spoon it into bowls and keep the top plain or add a little shredded cheese. A few tortilla chips on the side can give the plate some crunch, which helps kids who like a textural contrast.
Pro Tips for This Recipe:
- Dice the onion very small so it melts into the beef.
- Keep the queso mild and smooth, not chunky.
- If the skillet looks dry before the rice finishes, add 1/4 cup more broth.
- Let the pan rest for 5 minutes before serving so the rice firms up a touch.
Variations on This Dish:
- Chicken Queso Rice: Swap the beef for cooked chicken.
- Bean Stretch: Add a can of drained black beans to make it go further.
- No-Corn Version: Leave out the corn if your family prefers a smoother texture.
Common Mistakes to Avoid with This Dish:
- Using instant rice without adjusting liquid: The texture goes off fast.
- Stirring too often while the rice cooks: It can turn sticky.
- Adding too much queso before the rice is done: The skillet can get overly rich and heavy.
Why Mild, Familiar Dinners Work So Well
Picky eaters usually aren’t resisting dinner because they hate food. They’re resisting uncertainty. A plate with three different textures, two sauces, and a new smell can feel like a trap if the child already had a rough day. Mild, familiar dinners lower the stakes. They give kids a flavor they can map quickly: chicken that tastes like chicken, noodles that taste like noodles, cheese that tastes like cheese.
The other thing that helps is rhythm. A crisp outer layer, a soft inside, or a sauce they already trust makes the meal easier to approach. That’s why chicken tenders, sliders, pasta bakes, and skillet meals show up so often in family kitchens. They aren’t trying to impress anyone. They just get eaten, which is the whole point.
Essential Equipment for These Recipes
- Large rimmed baking sheets: Useful for chicken tenders, fish sticks, sliders, and flatbreads, especially when you want browning without crowding.
- 9×13-inch baking dishes: The workhorse size for casseroles, baked ziti, enchilada bakes, and breakfast casseroles.
- Large deep skillets with lids: Best for pasta skillets, rice dishes, and taco-style one-pan meals.
- Wire racks: Handy for keeping breaded foods crisp in the oven.
- Instant-read thermometer: The easiest way to stop chicken, turkey, and fish at the right point instead of guessing.
- Mixing bowls in three sizes: You’ll use them more than you think for breading, sauces, and quick assembly.
- Colander and large pot: Essential for the pasta-based dinners.
- Tongs and a spatula: Simple tools, but they make breading and flipping much easier.
- Grater: Freshly grated cheese melts better in almost every recipe here.
Smart Shopping and Ingredient Tips
Chicken tenders are worth buying when you can find them, because the size is already right for kid portions. If you only see chicken breasts, slice them into even strips so they cook in the same time. Ground turkey works best when it has at least a little fat — very lean turkey can taste dry and crumbly in meatballs or muffins.
For sauces, choose mild versions on purpose. Mild marinara, mild enchilada sauce, mild salsa, and smooth queso all give you flavor without a surprise burn at the back of the throat. That small decision matters more than fancy add-ins. Kids often reject heat before they reject the actual dish.
Cheese choices change a lot. Mozzarella melts softly and stretches, cheddar adds sharper flavor, and Monterey Jack gives you a mellow middle ground. If you want the sauce to stay smooth, grate the cheese yourself from a block. It melts cleaner than the pre-shredded stuff, which carries anti-caking powder and sometimes turns grainy in sauces.
Rice and pasta deserve a little attention too. Use long-grain white rice for skillet meals unless the recipe says otherwise; it keeps a cleaner grain. For baked pasta, pick shapes with grooves or tubes — rotini, penne, shells, ziti — because they hold sauce better than smooth noodles. That detail sounds small until you’ve watched a child fish for one bare piece of pasta from a dry casserole.
How to Serve These Recipes
Presentation: Keep the plate clean and unbusy. A scoop of pasta on one side, a few chicken tenders or meatballs on the other, and a small bowl of dipping sauce usually beats a crowded plate with six components. Kids often eat better when the food looks separable.
Accompaniments: The best sides here are plain and dependable: apple slices, cucumber rounds, steamed corn, peas, green beans, soft rolls, buttered toast, or fruit cups. If you’re serving something saucy, give it a starch or bread that can catch the spill instead of making another complicated dish.
Portions: Younger kids often do well with half an adult portion plus one “safe” side like fruit or bread. Bigger eaters can handle a full serving of pasta bake, rice skillet, or sliders. If you’re feeding mixed ages, build the main dish in a way that scales easily — sliders, muffin tins, and casseroles are all good for that.
Beverage Pairing: Cold milk, sparkling water, plain water with lemon, or a mild lemonade fit these dinners better than anything fussy. Strongly flavored drinks can compete with the food, and the point here is to keep the table calm.
Additional Tips and Flavor Boosters
Flavor Enhancement: A final sprinkle of Parmesan, cheddar, or even a small pat of butter can smooth out a dish right before serving. That last minute finish matters more than a long list of seasonings. Small, familiar richness goes further than a pile of spices.
Customization: Build a “plain first, extras second” table. Put pickles, chopped herbs, hot sauce, and extra sauce bowls off to the side so kids can ignore them without feeling watched. That setup saves more dinners than any hidden-vegetable trick.
Serving Suggestions: For saucy dishes, serve the sauce under or beside the main food rather than drowning it. For crunchy dishes, get them to the table fast and keep the pan off the plate. For casseroles, let them rest so the first scoop doesn’t turn into a landslide.
Make-It-Yours: If your child dislikes visible bits, choose smoother sauces, finely diced onions, or pureed vegetables. If they love a little crunch, keep panko, tater tots, toasted bun tops, or baked tortilla edges in the mix. If they need predictable food, lean harder into familiar shapes and keep the plate simple.
Make-Ahead, Storage, and Reheating Guidance
Most of these dinners keep well for 3 to 4 days in the refrigerator when stored in airtight containers. Meatballs, casseroles, rice skillets, and pasta bakes all do fine in the fridge, though the pasta will drink up sauce as it sits. Chicken tenders and fish sticks lose some crispness, but they still reheat better than people expect if you use the oven instead of the microwave.
For the freezer, think in terms of up to 2 months for casseroles, meatballs, sliders, and skillet fillings. Pasta with cream sauces can freeze, but the texture may be a little looser after thawing. If you want the best result, freeze the sauce or filling separately from the pasta when possible, then cook fresh noodles later.
Reheat breaded foods in a 375°F oven for 10 to 15 minutes on a rack or sheet pan so the coating firms up again. Casseroles do well covered with foil at 350°F until hot in the center. Skillet meals and rice dishes reheat best with a splash of broth or water and a covered pan over low heat so they don’t dry out. The microwave works in a pinch, but stir halfway through and add a teaspoon or two of liquid if the food looks tight.
Make-ahead works especially well for the recipes with bake time built in. Meatballs can be rolled a day ahead. Casseroles can be assembled and chilled overnight, then baked later. Sloppy Joe filling, taco pasta base, and cheeseburger mac can all be cooked early and finished with fresh cheese right before serving. That final cheese layer helps the whole thing feel like dinner instead of leftovers in disguise.
Variations and Adaptations to Try
Gluten-Free Swap: Use gluten-free pasta, breadcrumbs, and flour where needed. Chicken tenders, meatballs, and skillet dinners adapt cleanly if you keep the seasoning the same and watch the sauce thickness.
Dairy-Light Version: Skip the heavy cream in favor of a little milk, use less cheese, and lean on butter or broth for body. The dish will be a touch lighter, but still familiar enough for kids who like soft, mild flavors.
Veggie-Friendly Boost: Finely grate carrots, zucchini, or cauliflower into sauces and skillet fillings. Keep the pieces tiny and cook them until soft so they disappear into the meal instead of announcing themselves.
Mild-to-Bold Split: Make the base recipe mild, then offer hot sauce, red pepper flakes, or sliced jalapeños on the side for the adults. That way the whole table eats the same dinner without forcing one flavor level on everybody.
Slow Cooker Shortcut: Meatballs, sloppy Joe filling, and some shredded chicken dishes can move into a slow cooker if you need the stove free. Keep the liquid modest or the result will be looser than it should be.
Air Fryer Finish: Chicken tenders, fish sticks, and even some slider-style cutlets crisp well in the air fryer. Use a light spray of oil and keep the pieces in a single layer so the coating browns instead of steaming.
Common Mistakes to Avoid
One common mistake is making the food look too complicated. A plate with too many toppings, mixed textures, or a sauce that covers every inch can overwhelm a child before the first bite. Keep some components separate. Give them a choice. That little bit of control changes the mood at the table.
Another trap is chasing “hidden” vegetables too hard. If the carrot pieces are still visible or the broccoli is cut in awkward chunks, picky eaters notice the trick immediately. Grate, puree, or cook vegetables until they’re soft enough to disappear into the base, or serve them separately and let the kid decide.
Overcooking is a big one, especially with chicken, turkey, and pasta bakes. Dry chicken tenders, rubbery meatballs, and mushy noodles are exactly the kind of textures kids remember the next time dinner shows up. Use a thermometer for chicken and turkey, and pull pasta and rice a little early because they keep cooking after the heat goes off.
Too much sauce can backfire too. Sloppy Joes with runny filling, flatbreads with watery toppings, and casseroles with soupy layers all slide around on the plate and lose their shape. Thicken the filling before baking, and let casseroles rest so the slices hold together.
Skipping seasoning in the hope that kids will tolerate the meal is another quiet mistake. “Plain” should not mean flavorless. Salt, butter, Parmesan, mild garlic, and a little Worcestershire or ketchup can make a dish taste complete without pushing it into a new flavor lane.
Frequently Asked Questions
How do I know if a dinner is picky-eater friendly?
Look for a familiar shape, a mild sauce, and one obvious main flavor. Chicken tenders, sliders, noodles, and baked pasta usually do well because kids can identify them at a glance and the texture is easy to predict.
Can I hide vegetables in these recipes without ruining them?
Yes, but keep the vegetable pieces tiny or blended into the sauce. Carrots, zucchini, and cauliflower work well when they’re cooked down or pureed, while large chunks tend to get picked out right away.
What if my child hates sauce?
Serve the sauce on the side whenever possible. That works especially well for chicken tenders, sliders, meatballs, and quesadillas. A dry-but-not-boring main dish with a dipping cup gives you a lot more flexibility.
Which recipes freeze the best?
Meatballs, sloppy Joe filling, casseroles, and skillet fillings freeze better than creamy pasta or breaded items. If you freeze a pasta bake, expect to add a little moisture when reheating so it doesn’t feel tight.
Can I make these dinners ahead for a busy day?
Absolutely. Meatballs, casseroles, taco pasta filling, and rice skillet bases can all be cooked ahead or assembled the night before. Keep crunchy toppings separate until the last minute so they stay crisp.
What if the casserole comes out dry?
That usually means it baked too long or started with too little sauce. Cover it with foil and add a splash of broth, milk, or extra marinara before reheating, then let it sit a few minutes to absorb the liquid.
Is it better to serve vegetables on the side or mixed in?
For picky eaters, side dishes usually work better. Mixed-in vegetables are fine when they’re tiny, soft, or pureed, but a separate bowl of corn, peas, or cucumber slices gives kids a cleaner choice.
How can I scale these recipes for a bigger family?
Casseroles, sliders, baked pasta, and skillet meals scale well because you can simply double the pan size or make two trays. Keep an eye on bake time when you do that; a fuller pan often needs a few extra minutes in the oven.
A Dinner Table That Doesn’t Argue Back
The best part of these kid-friendly dinners isn’t that they pretend to be fancy. It’s that they don’t. They show up with familiar flavors, sensible textures, and enough flexibility that one child can eat the simple version while another adds extra cheese or sauce without making the meal feel broken.
That’s the real win with picky eaters. Not perfection. Not hidden vegetables that fool nobody. Just a table where dinner gets eaten, everyone stays calmer, and you don’t have to negotiate every single bite. Start with the recipes that match your family’s safest foods, then keep the rest in your back pocket for the next night when the answer to “what’s for dinner?” needs to be short, plain, and already solved.