
When the fridge looks empty and the grocery budget is blinking red, the pantry can still pull dinner together. The best cheap meal ideas that use pantry staples are not sad emergency food; they’re built on a few sturdy ingredients that already do half the work — pasta, rice, beans, canned tomatoes, eggs, tortillas, oats, and a couple of flavor boosters that never seem glamorous until you need them.
What makes pantry cooking worth caring about is not just the price tag. It’s the texture. A good pantry meal has something crisp on top, something silky underneath, and something sharp or salty to wake it up. Otherwise you end up with a bowl of beige mush and a sigh. I’d rather eat a can of beans with toasted breadcrumbs, garlic, and lemon than a fancier meal that forgot salt halfway through.
That’s the real trick here: cheap doesn’t have to mean flimsy. A spoonful of butter, a splash of vinegar, a little browned onion, a fried egg, or a handful of cheese can turn shelf-stable basics into dinner that feels intentional. Keep the cupboard stocked with the right building blocks and the whole week gets easier. The first few recipes below are proof.
Why You’ll Love This Collection

-
Bare-cupboard friendly: Most of these meals start with pasta, rice, beans, canned fish, oats, or tortillas, so you can cook without a special grocery run.
-
Fast on purpose: Several come together in 15 to 25 minutes because canned beans, quick-cooking grains, and pantry sauces cut out the slow parts.
-
Flexible by design: Chickpeas can stand in for white beans, tuna can swap with salmon, and spaghetti can usually step in for any long noodle.
-
Texture does the heavy lifting: Toasted breadcrumbs, crisp tortillas, fried eggs, and broiled cheese keep these meals from tasting flat.
-
Built for leftovers: Soups, rice bowls, and saucy pasta dishes often taste better the next day after the seasoning settles in.
-
Cheap without feeling stingy: A little acid, a little heat, and a little fat go a long way here, which is why these recipes taste finished instead of thin.
1. Garlic Butter Spaghetti with Toasted Breadcrumbs
The smell of garlic hitting butter in a skillet can rescue an otherwise tired evening. This spaghetti is the kind of cheap pantry dinner I keep coming back to because it feels complete with almost no moving parts, and the crunchy breadcrumb topping gives every bite a little snap. It’s salty, glossy, and a lot less plain than people expect from a box of pasta and a few scraps from the cupboard.
Why It Works: Butter and olive oil coat the pasta without making it greasy, and the starchy pasta water turns the whole thing into a light sauce. Toasted breadcrumbs bring the kind of crunch that cheap pasta usually lacks. Parmesan adds salt and body, so the dish tastes finished even if the ingredient list is short.
Key Ingredients:
- 12 oz spaghetti — any long pasta works if that’s what you have.
- 3 tbsp unsalted butter — gives the sauce a soft, round flavor.
- 2 tbsp olive oil — keeps the butter from browning too fast.
- 4 garlic cloves, thinly sliced — slices cook gently and stay sweet.
- 1/2 cup panko breadcrumbs — or crushed crackers for a thriftier swap.
- 1/2 cup grated Parmesan — finely grated melts and clings best.
- 1/2 tsp red pepper flakes — optional, but it keeps the pasta awake.
- 2 tbsp chopped parsley — dried parsley works in a pinch.
- 1/2 tsp kosher salt and black pepper — season the pasta water and the final toss.
Quick Steps:
- Toast the crumbs: Heat 1 tbsp butter in a skillet over medium heat. Add the breadcrumbs and cook for 3 to 4 minutes, stirring often, until they turn golden and smell nutty. Scrape them into a bowl.
- Cook the pasta: Boil the spaghetti in well-salted water for 8 to 10 minutes, until just al dente. Reserve 1 cup of the pasta water before draining.
- Build the base: Put the skillet back over medium-low heat. Add the olive oil, the remaining butter, and the garlic. Cook for 30 to 45 seconds, just until the garlic smells sweet and turns pale gold. Do not let it brown hard.
- Toss the spaghetti: Add the drained pasta, 1/2 cup pasta water, and the red pepper flakes. Stir for 1 to 2 minutes until the noodles look glossy and lightly sauced.
- Finish and serve: Stir in the Parmesan and parsley. Add more pasta water if the skillet looks dry, then pile on the toasted crumbs and a crack of black pepper.
Equipment for This Recipe:
- Large pot — for boiling the pasta.
- Large skillet — wide enough to toss the noodles.
- Colander — for draining.
- Wooden spoon or tongs — easier for tossing.
- Microplane or box grater — for the Parmesan.
How to Serve This Dish:
Serve it in shallow bowls with extra crumbs on top so the crunch doesn’t disappear under the noodles. A simple side of canned beans dressed with olive oil and vinegar works better than you’d think. This is a 4-person meal if you add bread and a salad; by itself, it feeds 2 to 3 with decent portions.
Pro Tips for This Recipe:
- Save more pasta water than you think you need. A quarter cup can vanish in one stir.
- Slice the garlic instead of mincing it if you want a gentler flavor.
- Crush stale crackers if you’re out of breadcrumbs; they toast fast and bring more salt.
- Add a squeeze of lemon at the end if the pasta tastes heavy.
Variations on This Dish:
- Lemon Pepper Twist: Add 1 tsp lemon zest and a bigger pinch of black pepper for a sharper finish.
- Anchovy Garlic Version: Melt 2 chopped anchovies into the butter before the garlic if you want deeper savoriness.
- Dairy-Free Pantry Pasta: Skip the Parmesan and finish with extra olive oil, pepper, and a spoonful of nutritional yeast.
Common Mistakes to Avoid with This Dish:
- Burning the garlic: If it goes deep brown, the pasta will taste bitter. Lower the heat and pull the pan early.
- Skipping the pasta water: Dry spaghetti won’t coat properly. Save the starchy water and add it a splash at a time.
- Adding crumbs too soon: They soften if they sit in the sauce. Scatter them on top right before serving.
2. Tomato Rice with Fried Eggs
This is the kind of dish that looks plain in the pan and eats like comfort food with a backbone. Tomato rice gets its cheap-meal magic from one can, one pot, and a little patience, while the fried eggs on top bring richness and make the bowl feel much bigger than it is. The yolk does half the sauce work for you.
Why It Works: Rice soaks up tomato, onion, and paprika while it simmers, which gives every grain a little color and flavor. The egg adds fat and protein, so you’re not just eating seasoned rice. A quick rest after cooking keeps the pot from turning wet or sticky.
Key Ingredients:
- 1 cup long-grain rice — basmati or plain white rice both work.
- 1 tbsp olive oil — for softening the onion.
- 1 small onion, diced — cooks down into the base.
- 2 garlic cloves, minced — adds sharpness and depth.
- 1 tbsp tomato paste — optional, but it deepens the flavor fast.
- 1 can (14.5 oz) diced tomatoes — use the juice and all.
- 1 3/4 cups water or broth — broth gives the rice more body.
- 1 tsp paprika — sweet or smoked both fit.
- 4 eggs — fried separately for the best texture.
- 1/2 tsp salt and black pepper — season at the start and the end.
Quick Steps:
- Soften the onion: Heat the oil in a medium pot over medium heat. Cook the onion for 4 to 5 minutes, until it turns translucent and starts to look glossy.
- Wake up the tomato base: Add the garlic and tomato paste. Stir for 30 seconds, then add the paprika. The paste should darken slightly and smell less raw.
- Cook the rice: Stir in the rice, diced tomatoes, water or broth, salt, and pepper. Bring it to a simmer, cover, and cook on low for 18 minutes.
- Rest the pot: Turn off the heat and leave the lid on for 5 minutes. Do not stir right away or the grains can break and go sticky.
- Fry the eggs: Cook the eggs in a little oil over medium heat for 3 to 4 minutes, until the edges are crisp and the whites are set.
- Serve: Fluff the rice, divide it into bowls, and set a fried egg on top. A little hot sauce makes the whole thing wake up.
Equipment for This Recipe:
- Medium pot with lid — the rice needs even steam.
- Skillet — for the eggs.
- Wooden spoon — to keep the onion from scorching.
- Measuring cup — for the rice and liquid.
- Fork — for fluffing the finished rice.
How to Serve This Dish:
Serve it in a wide bowl so the egg yolk runs into the rice instead of disappearing. Pickles, hot sauce, or a spoonful of plain yogurt all work on the side if you want contrast. It’s a solid 2-person dinner as written, or 4 as a side dish.
Pro Tips for This Recipe:
- Rinse the rice if it tends to clump; that keeps the texture more separate.
- If your canned tomatoes taste sharp, add a pinch of sugar.
- Use a nonstick skillet for the eggs if you want clean, intact yolks.
- A little butter stirred into the rice at the end gives it a softer finish.
Variations on This Dish:
- Spanish-Style Rice: Add 1/2 tsp cumin and 1/2 tsp smoked paprika for a warmer, earthier bowl.
- Bean-and-Rice Bowl: Stir in 1 drained can of black beans at the end for more heft.
- Cheesy Tomato Rice: Fold in 1/2 cup shredded cheddar right before serving.
Common Mistakes to Avoid with This Dish:
- Using too much liquid: The rice should be tender, not soupy. Measure the water carefully.
- Skipping the rest time: The last 5 minutes finish the grains. Pulling the lid too early leaves the center undercooked.
- Overcooking the eggs: Crispy edges are fine. Rubber yolks are not.
3. Tuna Melt Quesadillas
Tuna and cheese can be a little clumsy if you treat them like a sandwich filler and call it a day. Put them in a skillet with a tortilla, though, and they become crisp-edged, salty, and warm in a way that feels much smarter than the pantry ingredients suggest. I like this one because it doesn’t pretend tuna is something it isn’t; it just gives it a better stage.
Why It Works: The tortilla seals in the tuna filling and browns in a hot skillet, so you get crunch outside and a creamy center. Mayo keeps the tuna from drying out, while mustard adds the sharp bite that canned fish needs. Cheese holds everything together once it melts.
Key Ingredients:
- 2 cans tuna, 5 oz each, drained well — water-packed or oil-packed both work.
- 1/4 cup mayonnaise — binds the filling.
- 1 tsp yellow mustard — gives the tuna some edge.
- 2 tbsp finely chopped onion or relish — adds crunch and brightness.
- 1 1/2 cups shredded cheddar — melts smoothly.
- 4 flour tortillas — the larger size folds easiest.
- 1 tbsp butter or neutral oil — for browning the tortillas.
- Black pepper — tuna likes a little bite.
Quick Steps:
- Mix the filling: Stir together the tuna, mayo, mustard, onion or relish, and black pepper in a bowl until the mixture looks creamy, not dry.
- Build the quesadillas: Lay 2 tortillas flat. Divide the tuna mixture between them, then top with the cheese and the remaining tortillas.
- Brown the first side: Heat the butter or oil in a skillet over medium heat. Cook each quesadilla for 2 to 3 minutes, until the bottom is deep golden and crisp.
- Flip carefully: Turn the quesadilla and cook the second side for another 2 minutes, until the cheese is melted and the center feels warm.
- Slice and serve: Let them sit for 1 minute, then cut into wedges. Cutting too soon lets the filling spill out.
Equipment for This Recipe:
- Medium skillet — a nonstick pan makes flipping easier.
- Mixing bowl — for the tuna filling.
- Spatula — wide is better for a clean flip.
- Knife — to slice the finished quesadillas.
- Cutting board — so the cheese stays where it belongs.
How to Serve This Dish:
Serve these with pickles, salsa, or a simple tomato soup if you want the plate to feel fuller. Two wedges are enough for a light lunch; four wedges with a side makes dinner for 2. They’re best eaten hot, when the tortilla still crackles.
Pro Tips for This Recipe:
- Drain the tuna thoroughly. Wet tuna makes the tortilla soggy from the inside.
- Cook over medium heat, not high heat. The cheese needs time to melt before the tortilla burns.
- If the filling feels too loose, add 1 tbsp breadcrumbs or crushed crackers.
- A little chopped pickle is better here than a lot. You want a spark, not a deli salad.
Variations on This Dish:
- Spicy Pantry Melt: Add chopped jalapeños or a pinch of cayenne to the tuna mix.
- Corned Tuna Version: Stir in 2 tbsp canned corn for a sweeter, fuller filling.
- Open-Face Melt: Toast one tortilla per serving and broil it with the tuna and cheese on top for 1 to 2 minutes.
Common Mistakes to Avoid with This Dish:
- Too much filling: Overstuffed quesadillas leak and tear. Keep the layer thin.
- High heat: The tortilla blacks before the cheese melts. Medium heat is safer.
- Skipping the rest time: Letting it sit for a minute keeps the slice neat.
4. Chickpea Curry over Rice
Chickpea curry is one of those pantry meals that tastes like it took more effort than it did. The coconut milk softens the spices, the tomatoes give the sauce some backbone, and the chickpeas stay pleasantly firm instead of falling apart. Serve it over rice and you’ve got a cheap dinner that doesn’t feel like a compromise.
Why It Works: Curry powder blooms in oil, which wakes up the spice before the liquid goes in. Coconut milk brings body, while tomatoes cut the richness so the sauce doesn’t taste flat. Chickpeas are sturdy enough to hold their texture during a short simmer.
Key Ingredients:
- 1 cup long-grain rice — for serving.
- 1 tbsp oil — any neutral oil works.
- 1 onion, diced — builds the sauce.
- 3 garlic cloves, minced — adds depth.
- 2 tbsp curry powder — the flavor driver here.
- 2 cans chickpeas, drained and rinsed — the main protein.
- 1 can (13.5 oz) coconut milk — gives the curry its body.
- 1 can (14.5 oz) crushed tomatoes — balances the coconut.
- 1 tsp salt — more if your curry powder is mild.
- 1/2 tsp black pepper — optional, but useful.
Quick Steps:
- Start the rice: Cook the rice in a separate pot so it’s ready when the curry finishes.
- Cook the onion: Heat the oil in a skillet or saucepan over medium heat. Stir in the onion and cook for 5 minutes, until soft and lightly golden.
- Bloom the curry: Add the garlic and curry powder. Stir for 30 seconds until the spices smell toasted and the pan looks fragrant.
- Simmer the sauce: Add the chickpeas, coconut milk, tomatoes, salt, and pepper. Bring to a low simmer and cook for 12 to 15 minutes, stirring now and then, until the sauce thickens a little.
- Serve: Spoon the curry over rice. If it tastes flat, add a splash of vinegar or a squeeze of lemon.
Equipment for This Recipe:
- Medium saucepan or deep skillet — for the curry.
- Small pot with lid — for the rice.
- Wooden spoon — to keep the spices from sticking.
- Measuring cups — for the rice and liquid.
- Ladle — handy if you like neat portions.
How to Serve This Dish:
Serve it in a bowl with the rice underneath so the sauce pools around the edges. Flatbread, naan, or even plain toast works on the side if rice isn’t your thing. This makes about 4 modest servings and stretches farther if you add a cucumber salad or a fried egg.
Pro Tips for This Recipe:
- Rinse canned chickpeas well to wash off the canning liquid and some of the salt.
- If you want a thicker curry, mash a few chickpeas against the side of the pan.
- Use full-fat coconut milk if you can; the sauce clings better.
- A pinch of sugar can smooth out sharp canned tomatoes.
Variations on This Dish:
- Tomato-Forward Curry: Use an extra half can of tomatoes and reduce the coconut milk slightly for a sharper sauce.
- Peanut Chickpea Curry: Stir in 2 tbsp peanut butter for a richer, nuttier finish.
- Greens Added at the End: Fold in a few handfuls of spinach or frozen peas during the last 2 minutes.
Common Mistakes to Avoid with This Dish:
- Dumping in the spices cold: Curry powder needs oil to bloom. Skip that step and the flavor stays dusty.
- Boiling too hard: A hard boil can split the coconut milk. Keep the simmer gentle.
- Serving before tasting: Chickpeas need salt. Taste the sauce before you call it done.
5. Black Bean Burrito Bowls
A burrito bowl is just a smart way to build a meal from bits and pieces the pantry already knows how to store. Black beans, rice, salsa, and a little cheese create a bowl with enough contrast to keep every bite interesting. It’s one of the easiest cheap dinners to scale up when you need extra portions.
Why It Works: Rice gives you the base, beans give you protein and bulk, and salsa supplies acid and seasoning in one spoonful. Warming the beans with cumin keeps them from tasting like they came straight from the can. The chips on top are not decoration; they give the bowl some crunch.
Key Ingredients:
- 1 1/2 cups uncooked rice — white or brown, depending on what you keep.
- 2 cans black beans, drained and rinsed — the main body of the bowl.
- 1 cup salsa — any jarred salsa works here.
- 1 tsp cumin — makes the beans taste cooked, not canned.
- 1 tsp chili powder — adds warmth.
- 1 cup canned corn, drained — brings sweetness and texture.
- 1 cup shredded cheddar or Monterey Jack — optional, but useful.
- 1 cup tortilla chips — crushed lightly on top.
- 2 tbsp oil — for warming the beans if needed.
- Salt — only after tasting, since salsa can be salty.
Quick Steps:
- Cook the rice: Make the rice according to the package directions and keep it covered while you prep the rest.
- Warm the beans: Heat the oil in a skillet over medium heat. Add the beans, cumin, chili powder, and salsa. Cook for 5 to 7 minutes, until the mixture is hot and lightly thickened.
- Warm the corn: Stir the corn into the bean mixture for the last minute, just until heated through.
- Assemble the bowls: Spoon rice into bowls, then top with the bean mixture, cheese, and tortilla chips.
- Finish and serve: Taste for salt and add hot sauce if you want more heat.
Equipment for This Recipe:
- Saucepan with lid — for the rice.
- Skillet — for the beans.
- Spoon or spatula — for stirring.
- Measuring cups — for the rice.
- Serving bowls — deep bowls keep the toppings in place.
How to Serve This Dish:
Pile the ingredients into wide bowls so the rice doesn’t disappear under the beans. A spoonful of sour cream or plain yogurt makes the bowl feel richer if you have it. This feeds 4 people easily and can stretch to 5 if you add extra rice.
Pro Tips for This Recipe:
- Don’t rinse the beans too hard if you want a thicker bowl; a little bean starch helps.
- Keep the chips separate until the last second so they stay crisp.
- A splash of vinegar can brighten jarred salsa that tastes dull.
- If you like heat, add canned jalapeños instead of relying on more chili powder.
Variations on This Dish:
- Breakfast Bowl: Add a fried egg on top and use salsa verde for a sharper finish.
- Smoky Bean Bowl: Swap the chili powder for smoked paprika and add a few drops of hot sauce.
- Extra-Cheesy Bowl: Melt the cheese directly over the hot beans before you spoon them over the rice.
Common Mistakes to Avoid with This Dish:
- Beans straight from the can: They taste flat and a little tinny. Warm them with spices.
- Wet rice: If the rice is soggy, the whole bowl turns heavy. Fluff it before serving.
- Overloading the toppings: Too many extras bury the beans and rice. Keep the bowl layered, not cluttered.
6. Lentil Soup with Lemon and Toast
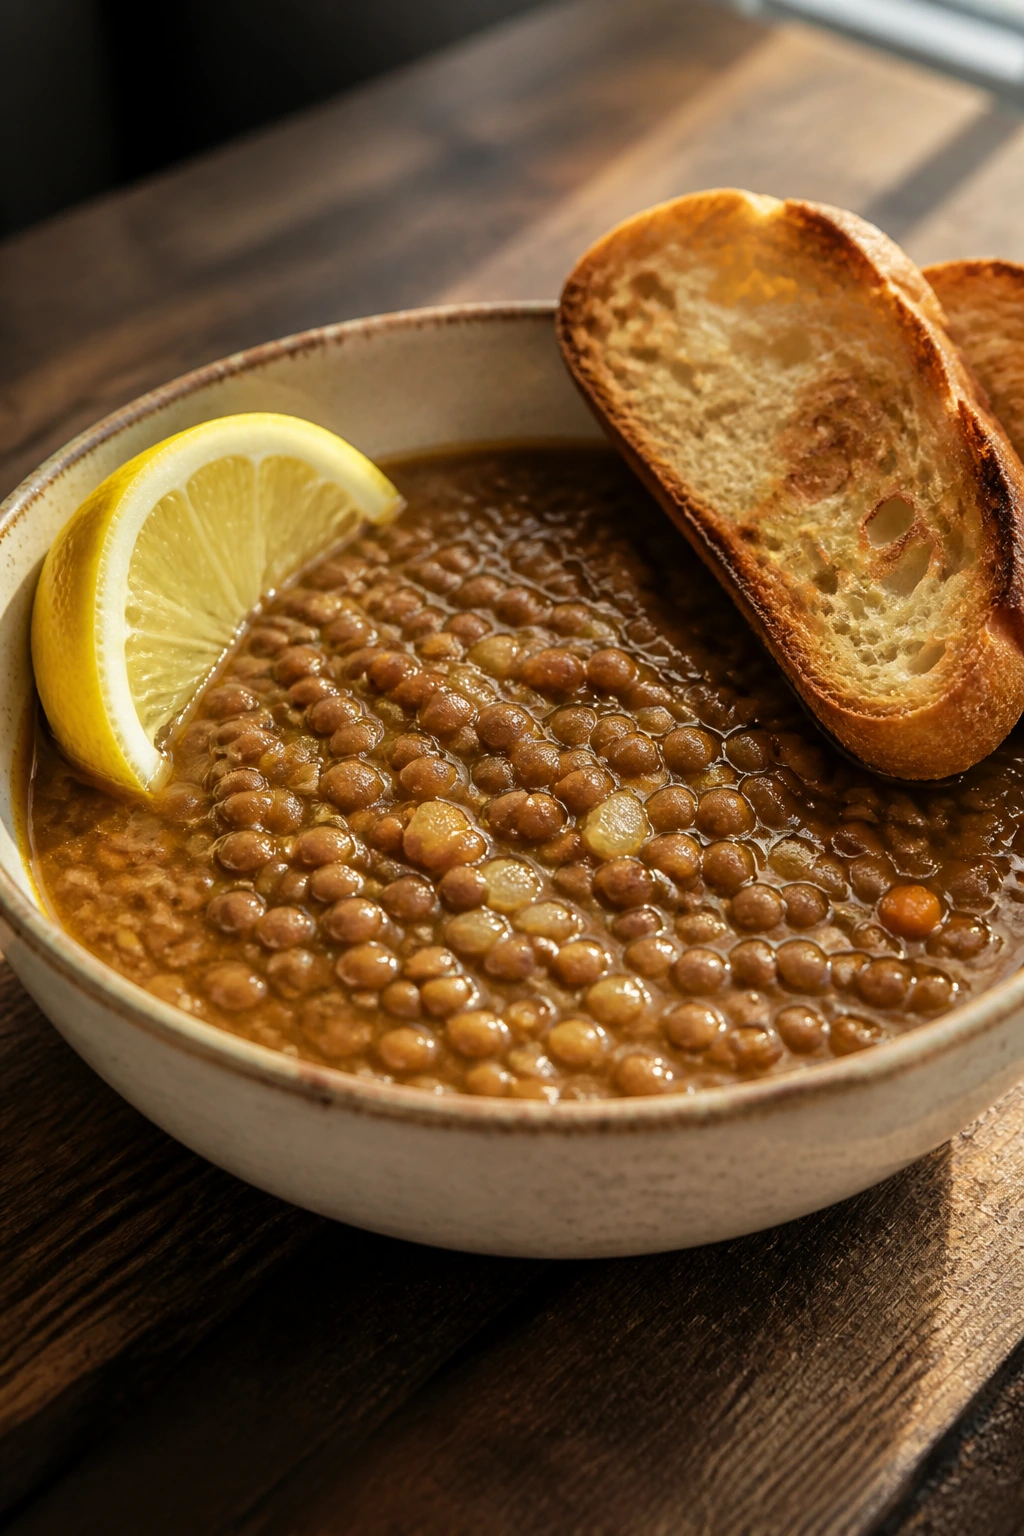
Lentil soup is cheap in a way that feels almost unfair, because a cup of lentils turns into a full pot without much coaxing. The lemon at the end matters more than people expect; it cuts through the earthy lentils and makes the soup taste brighter, not heavier. If you have stale bread, even better. It becomes useful again.
Why It Works: Lentils cook fast compared with most dried beans, which makes them one of the best pantry staples for a quick pot of soup. Onion, carrot, and garlic build a base without much cost. Lemon or vinegar at the end sharpens the whole pot and keeps it from tasting muddy.
Key Ingredients:
- 1 cup brown or green lentils — they hold their shape best.
- 1 tbsp olive oil — for the vegetables.
- 1 onion, diced — the main flavor base.
- 2 carrots, diced — optional, but worth it.
- 3 garlic cloves, minced — adds warmth.
- 1 can diced tomatoes, 14.5 oz — brings body and acidity.
- 6 cups water or broth with bouillon — enough for a roomy soup.
- 1 bay leaf — a small thing that makes a difference.
- 1 lemon — the finishing lift.
- 4 slices bread — for toasting or buttering.
Quick Steps:
- Cook the vegetables: Heat the oil in a soup pot over medium heat. Add the onion and carrots and cook for 5 to 6 minutes, until the onion softens.
- Add the garlic: Stir in the garlic and cook for 30 seconds, just until fragrant.
- Simmer the lentils: Add the lentils, tomatoes, broth, and bay leaf. Bring to a boil, then lower to a simmer and cook for 25 to 30 minutes.
- Check the texture: The lentils should be tender but not falling apart completely. If the soup looks too thick, add another splash of water.
- Finish: Remove the bay leaf, stir in lemon juice, and season with salt and pepper. Serve with toast.
Equipment for This Recipe:
- Soup pot or Dutch oven — holds the full batch comfortably.
- Wooden spoon — for stirring the bottom.
- Cutting board and knife — for the vegetables.
- Ladle — for serving.
- Toaster or skillet — for the bread.
How to Serve This Dish:
Serve it with thick toast or bread rubbed with garlic if you have an extra clove. A spoonful of yogurt or a drizzle of olive oil on top makes the bowl feel less sparse. This is a 4 to 6 serving pot depending on how hungry everyone is.
Pro Tips for This Recipe:
- Brown or green lentils work best here; red lentils turn softer and make a different soup.
- Salt at the end if your broth is salty already.
- If the soup tastes heavy, add a little more lemon, not more salt.
- Let it sit 10 minutes before serving if you want the flavors to settle together.
Variations on This Dish:
- Smoky Lentil Soup: Add 1/2 tsp smoked paprika with the garlic.
- Chunky Pantry Stew: Stir in 1 can of white beans for a bigger, thicker pot.
- Tomato-Free Version: Skip the canned tomatoes and add an extra carrot plus 1 tbsp vinegar at the end.
Common Mistakes to Avoid with This Dish:
- Undercooking the lentils: They should be tender all the way through. Taste a few before turning off the heat.
- Adding the lemon too early: Acid can keep the soup from tasting balanced. Put it in at the end.
- Skimping on seasoning: Lentils are mild. They need salt, pepper, and a little brightness.
7. Peanut Noodles with Sesame
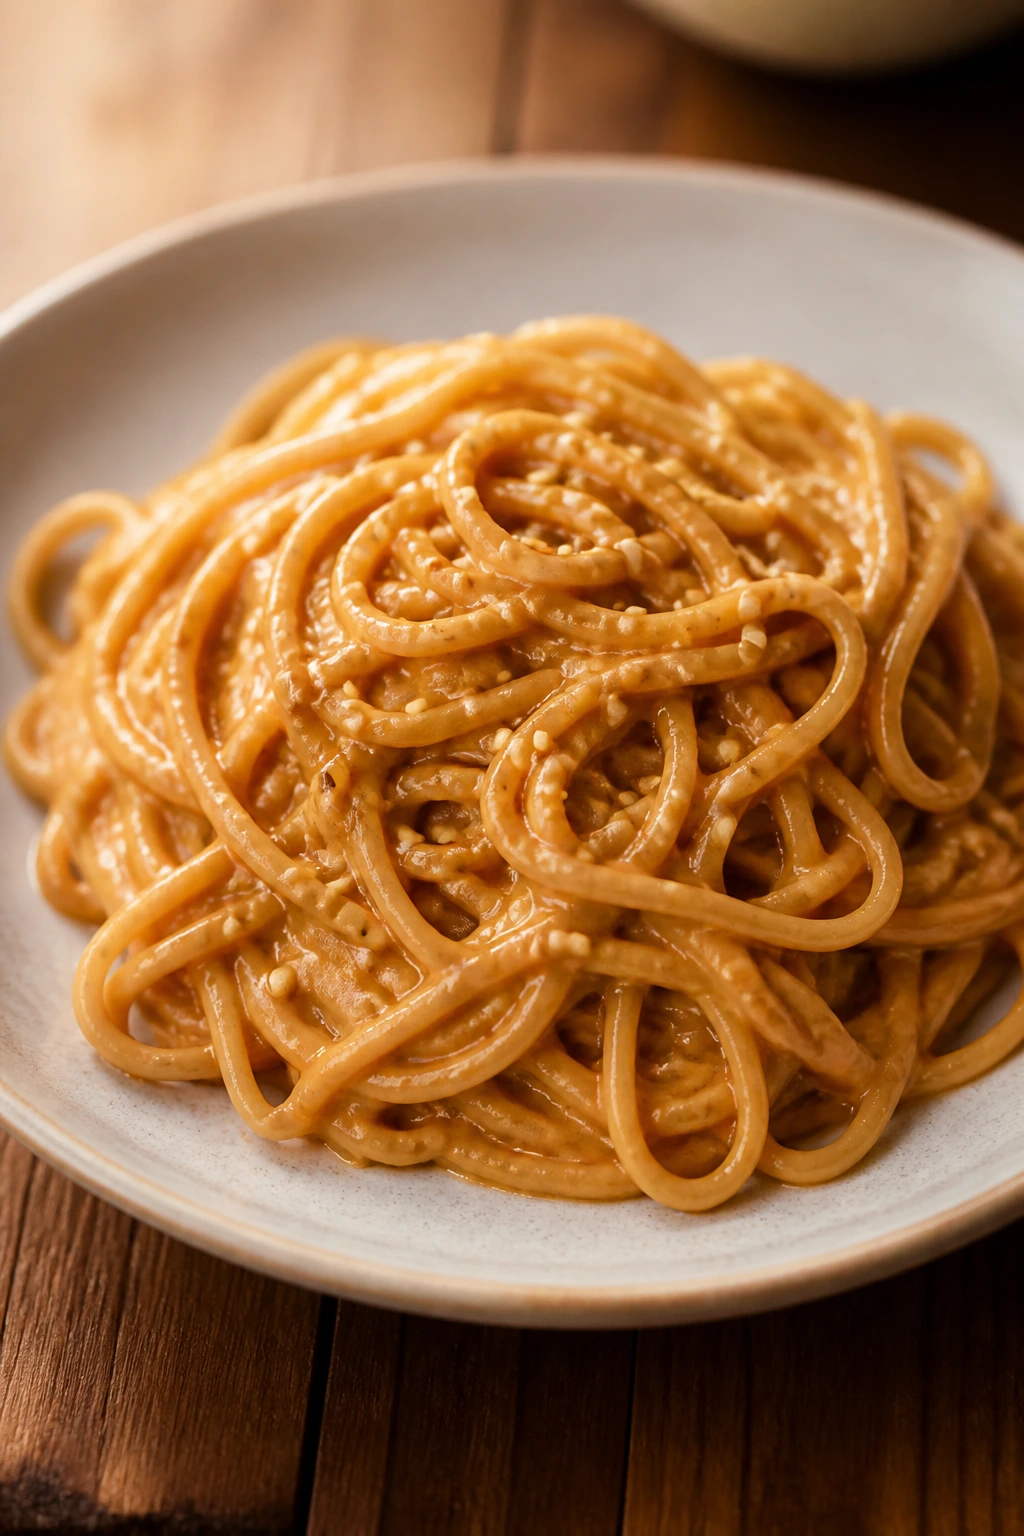
This is the sort of pantry meal that feels a little suspicious until you taste it. Peanut butter, soy sauce, and vinegar make a sauce that clings to noodles in a glossy, salty-sweet layer, and the whole bowl comes together faster than a delivery order. I like it cold or warm, which means leftovers are not a problem.
Why It Works: Peanut butter gives the sauce body without cream, and hot water loosens it into something that coats noodles instead of sticking in clumps. Soy sauce adds salt and depth, while vinegar gives the whole bowl a clean edge. A little sesame oil makes the dish smell like you spent more money than you did.
Key Ingredients:
- 12 oz spaghetti, ramen noodles, or linguine — any long noodle works.
- 1/3 cup peanut butter — smooth is easiest to whisk.
- 3 tbsp soy sauce — low-sodium is fine.
- 2 tbsp rice vinegar or white vinegar — keeps the sauce from feeling heavy.
- 1 tbsp sugar or honey — balances the salt.
- 1 garlic clove, finely grated — or 1/2 tsp garlic powder.
- 1/3 cup hot water — loosens the sauce.
- 1 tsp sesame oil — optional, but useful.
- 1/2 tsp red pepper flakes — for heat.
- Chopped peanuts or sesame seeds — optional topping.
Quick Steps:
- Cook the noodles: Boil the noodles in salted water until just tender, then drain and save 1/2 cup of the cooking water.
- Make the sauce: Whisk the peanut butter, soy sauce, vinegar, sugar, garlic, hot water, sesame oil, and red pepper flakes in a bowl until smooth.
- Toss: Add the hot noodles to the sauce and toss for 1 to 2 minutes. Add a splash of noodle water if the sauce looks thick or sticky.
- Taste and adjust: Add more vinegar if it needs brightness or more soy sauce if it needs salt.
- Finish: Scatter chopped peanuts or sesame seeds on top if you have them.
Equipment for This Recipe:
- Medium pot — for the noodles.
- Mixing bowl — for the sauce.
- Whisk — helps the peanut butter break down fast.
- Tongs — for tossing.
- Colander — for draining.
How to Serve This Dish:
Serve it warm or chilled in a shallow bowl, because the sauce clings better that way. A few cucumber slices or canned corn on the side make the plate feel fresher. It serves 3 modest portions or 2 generous ones.
Pro Tips for This Recipe:
- Warm the peanut butter slightly if it’s stiff; it whisks more easily.
- Start with less water than you think. You can loosen the sauce, but you can’t thicken it back easily.
- A squeeze of lemon can stand in for vinegar if that’s what you have.
- Leftovers tighten up in the fridge, so save a spoonful of water for reheating.
Variations on This Dish:
- Spicy Sesame Noodles: Add 1 tbsp chili crisp or a squirt of sriracha.
- Tahini Swap: Use tahini instead of peanut butter for a deeper, earthier sauce.
- Crunchy Veg Version: Toss in shredded cabbage or carrots if you have them.
Common Mistakes to Avoid with This Dish:
- A sauce that’s too thick: It will seize on the noodles. Loosen it with noodle water.
- Too much soy sauce at once: The bowl can turn salty fast. Taste before adding more.
- Serving it dry: Peanut noodles need a little gloss to feel right.
8. White Bean and Tomato Skillet
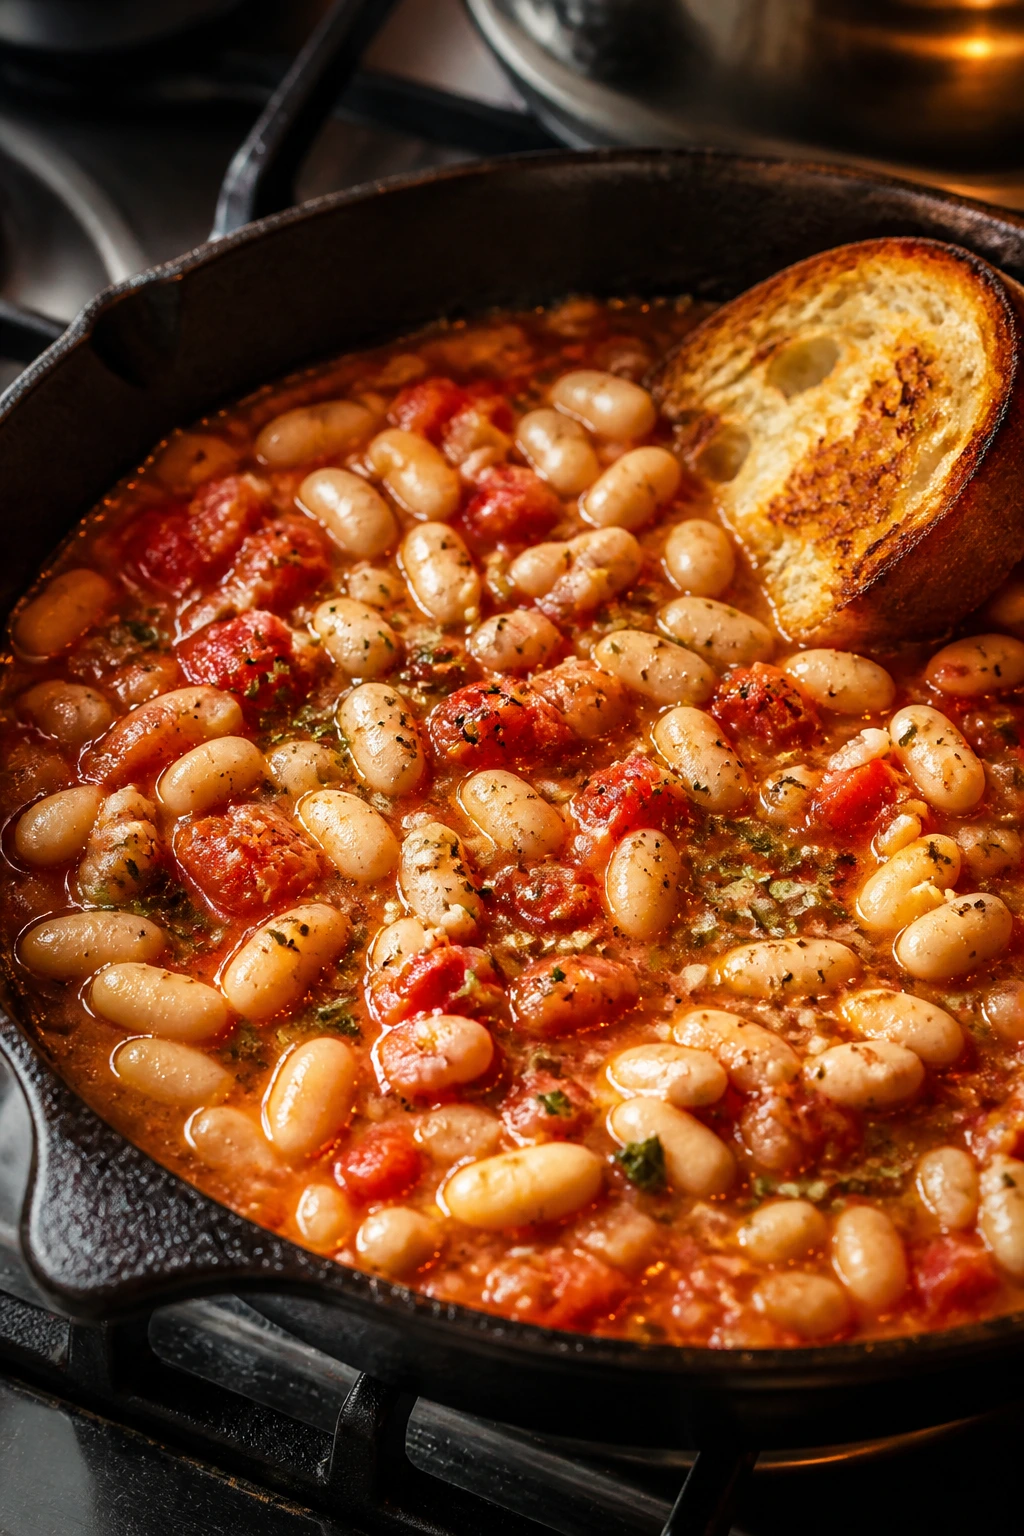
White beans and canned tomatoes are one of those quietly reliable pairings that never gets enough credit. The beans turn creamy without falling apart, the tomatoes bring acid, and a little garlic and oregano make the skillet smell like dinner instead of survival. Spoon it onto bread, and it becomes the sort of cheap meal that seems to stretch farther than it should.
Why It Works: Canned beans already have the soft, starchy texture this dish needs, so they don’t require long cooking. Tomatoes reduce into a quick sauce that coats them instead of drowning them. Toast or bread underneath catches every bit of the juices.
Key Ingredients:
- 2 cans cannellini or great northern beans, drained — creamy and sturdy.
- 1 tbsp olive oil — for the base.
- 1 onion, finely chopped — softens into the sauce.
- 3 garlic cloves, minced — gives the skillet its backbone.
- 1 can diced tomatoes, 14.5 oz — the saucy part.
- 1 tsp dried oregano — a little goes a long way.
- 1/2 tsp red pepper flakes — optional, but helpful.
- 1/4 cup grated Parmesan — for the finish.
- 4 slices bread — for serving.
Quick Steps:
- Soften the onion: Heat the oil in a skillet over medium heat. Cook the onion for 5 minutes, until it turns translucent and soft.
- Add garlic and seasoning: Stir in the garlic, oregano, and red pepper flakes. Cook for 30 seconds, just until fragrant.
- Build the sauce: Add the tomatoes and beans. Simmer for 10 to 12 minutes, stirring once or twice, until the sauce thickens and the beans taste seasoned through.
- Finish: Stir in the Parmesan and black pepper. If the skillet looks too dry, add a splash of water.
- Serve: Spoon the mixture over toast or with bread on the side.
Equipment for This Recipe:
- Large skillet — wide enough for the beans to simmer.
- Wooden spoon — for gentle stirring.
- Knife and cutting board — for the onion and garlic.
- Toaster or skillet — for the bread.
- Measuring spoons — for the oregano and pepper flakes.
How to Serve This Dish:
Pile it onto thick toast so the bread catches the tomato juices. A handful of chopped parsley or a drizzle of olive oil makes the plate look less bare. It feeds 3 to 4 people as a meal, especially if you add a salad.
Pro Tips for This Recipe:
- Smash a few beans against the skillet if you want a thicker sauce.
- Don’t rush the onion. That first 5 minutes gives the whole dish its sweetness.
- Parmesan brings salt, so taste before adding extra.
- Stale bread is actually useful here; it holds up better under the sauce.
Variations on This Dish:
- Garlic Bread Bowl: Serve the beans over garlic toast instead of plain bread.
- Tomato Basil Version: Stir in 1 tbsp dried basil or a handful of fresh basil if you have it.
- Egg-Topped Skillet: Crack 2 eggs into the pan and cover until the whites set.
Common Mistakes to Avoid with This Dish:
- Not draining the beans: Too much canning liquid makes the skillet watery.
- Cooking over high heat: The tomatoes can spit and stick. Keep the simmer gentle.
- Forgetting the bread: Without it, the dish loses half its charm.
9. Pantry Fried Rice with Egg
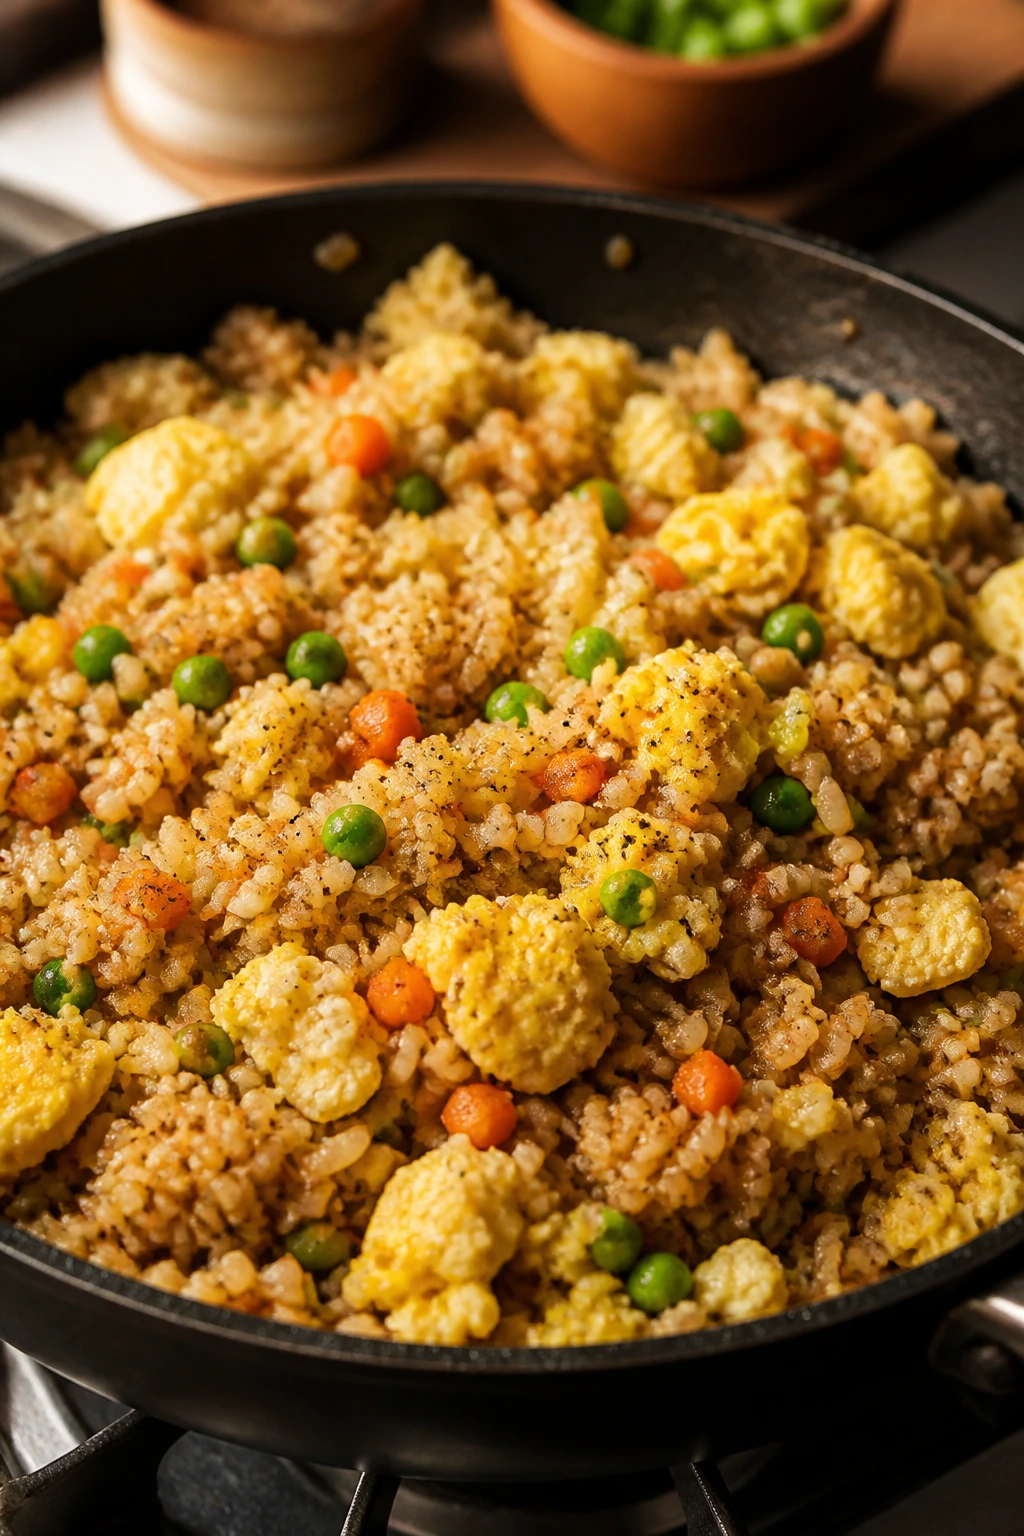
Fried rice is one of the best arguments for keeping leftover rice around. Cold rice fries up with a little oil, soy sauce, and egg into a meal that has crisp bits, soft bits, and enough salt to keep your fork moving. This is the dish I make when the cupboard looks weirdly full but nothing seems like a meal on its own.
Why It Works: Cold rice is drier than fresh rice, which helps it fry instead of steam. Eggs add protein and richness in a few quick stirs. Soy sauce seasons the whole pan, and a handful of frozen vegetables gives color without much effort.
Key Ingredients:
- 3 cups cooked, cold rice — day-old rice works best.
- 3 eggs — lightly beaten.
- 1 tbsp oil — use a neutral oil with a high smoke point.
- 1 cup frozen peas and carrots — no need to thaw.
- 2 tbsp soy sauce — more to taste.
- 2 cloves garlic, minced — optional, but useful.
- 1 tsp sesame oil — a small finish that adds aroma.
- 2 scallions, sliced — optional.
- Black pepper — for the final shake.
Quick Steps:
- Scramble the eggs: Heat 1/2 tbsp oil in a large skillet or wok over medium-high heat. Add the eggs and stir just until softly set. Move them to a plate.
- Cook the vegetables: Add the rest of the oil, then the frozen peas and carrots. Cook for 2 minutes, until the ice is gone and the vegetables look hot.
- Fry the rice: Add the cold rice and garlic. Press and stir it around the pan for 3 to 4 minutes, breaking up clumps as you go.
- Season: Add the soy sauce, sesame oil, and black pepper. Toss until the rice turns evenly colored.
- Finish: Stir the eggs back in and cook for 30 seconds more. Top with scallions if you have them.
Equipment for This Recipe:
- Large skillet or wok — gives the rice room to fry.
- Spatula — for breaking up clumps.
- Bowl — for beating the eggs.
- Measuring spoons — for the soy sauce and sesame oil.
- Plate — to hold the cooked eggs.
How to Serve This Dish:
Serve it hot from the pan with chili sauce or pickled vegetables on the side. A fried egg on top makes it feel fuller if you want to stretch the meal. This serves 3 as written, or 2 with larger portions.
Pro Tips for This Recipe:
- Use cold rice. Warm rice tends to clump and steam.
- Keep the pan hot enough to hear a steady sizzle.
- Don’t overload the skillet with vegetables or the rice will turn soft.
- If the soy sauce darkens the rice too much, finish with a tiny splash of water and more oil.
Variations on This Dish:
- Egg and Spam Fried Rice: Dice and crisp 1/2 cup canned meat if you keep it around.
- Kimchi Pantry Rice: Stir in chopped kimchi for a tangy, spicy edge.
- Peanut Fried Rice: Add 1 tbsp peanut butter to the soy sauce for a richer finish.
Common Mistakes to Avoid with This Dish:
- Fresh rice straight from the pot: It steams instead of frying. Chill it first.
- Too much soy sauce: The rice can turn wet and dark. Add it in stages.
- A crowded pan: Fry in batches if needed so the grains stay separate.
10. Pasta e Ceci
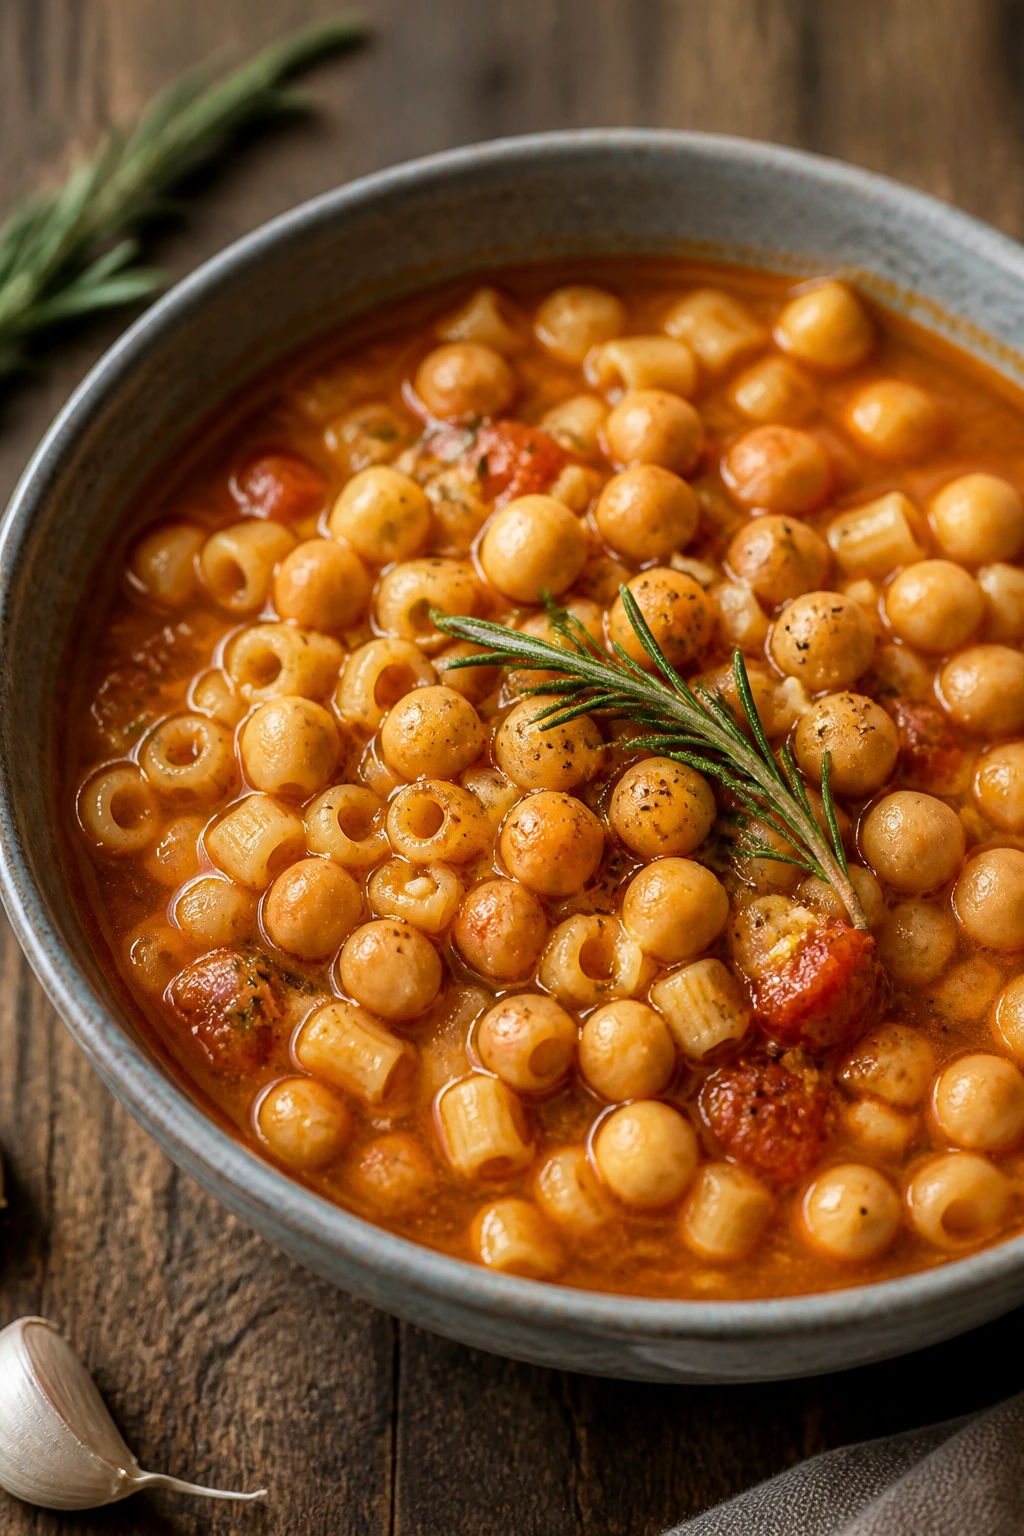
Pasta e ceci is one of those old, sturdy dishes that makes sense the moment you taste it. Chickpeas and pasta end up in the same bowl, but they play different roles: the pasta gives shape, the chickpeas give creaminess, and the tomato base pulls it all together. It’s pantry cooking with a little history behind it, which I always appreciate.
Why It Works: A few chickpeas mashed into the pot thicken the broth without flour or cream. Pasta cooks in the sauce or near the sauce, so it absorbs flavor instead of tasting boiled and separate. Rosemary and garlic are enough to push the dish from plain to deeply savory.
Key Ingredients:
- 8 oz small pasta such as ditalini or elbow macaroni — anything short and sturdy.
- 2 cans chickpeas, drained — one can can be partially mashed.
- 1 tbsp olive oil — for the onion.
- 1 onion, diced — the base.
- 3 garlic cloves, minced — gives the pot body.
- 1 can crushed tomatoes, 14.5 oz — the sauce.
- 4 cups broth or water with bouillon — enough for a brothy stew.
- 1 tsp dried rosemary — or thyme if that’s what’s in the cupboard.
- 1/2 cup Parmesan — for serving.
- Salt and pepper — to sharpen the final bowl.
Quick Steps:
- Start the base: Heat the oil in a pot over medium heat. Cook the onion for 5 minutes until soft, then add the garlic and rosemary for 30 seconds.
- Add the chickpeas and tomatoes: Stir in the chickpeas and crushed tomatoes. Mash about 1 cup of the chickpeas lightly against the side of the pot.
- Pour in the liquid: Add the broth or water and bring the pot to a simmer.
- Cook the pasta: Stir in the pasta and cook for 8 to 10 minutes, stirring often, until the pasta is tender and the broth has thickened.
- Finish: Taste for salt and pepper, then serve with Parmesan on top.
Equipment for This Recipe:
- Dutch oven or soup pot — roomy enough for pasta and broth.
- Wooden spoon — for mashing and stirring.
- Measuring cups — for the broth.
- Ladle — useful for serving.
- Box grater — for the cheese.
How to Serve This Dish:
Serve it as a thick soup or a loose pasta stew, depending on how much liquid you leave in the pot. A drizzle of olive oil on top makes it richer, and crusty bread helps clean the bowl. It feeds 4 people comfortably.
Pro Tips for This Recipe:
- Mash some chickpeas, not all. You want body, not puree.
- Stir the pasta often so it doesn’t stick to the bottom.
- If the pot tightens up too much, add warm water a splash at a time.
- Parmesan rinds are worth saving here if you have them.
Variations on This Dish:
- Garlicky White Version: Skip the tomatoes and add extra broth plus more rosemary.
- Spicy Pantry Ceci: Add red pepper flakes with the garlic for a little heat.
- Tomato and Spinach Finish: Stir in a handful of spinach at the end if you have it.
Common Mistakes to Avoid with This Dish:
- Letting the pasta go too far: It keeps cooking in the broth. Stop at tender.
- Too little liquid: The dish should be thick, not dry like a casserole.
- Underseasoned broth: Beans and pasta need enough salt to taste alive.
11. Beans on Toast with Chili and Cheese
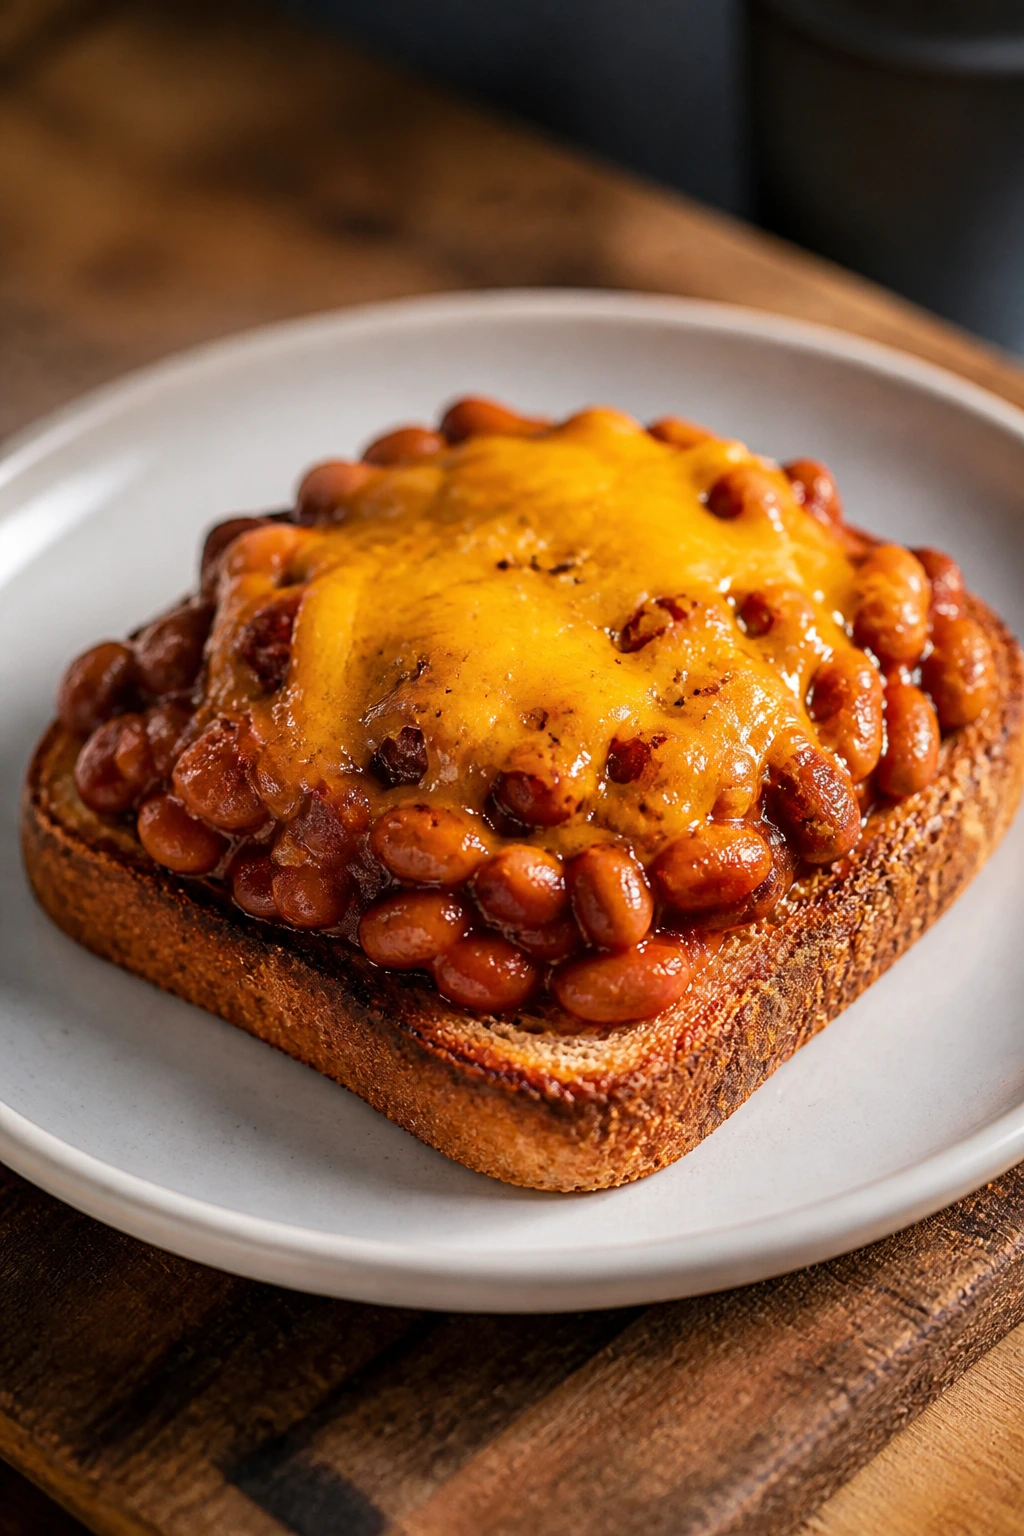
Beans on toast sounds almost too simple until you make it properly. The beans need a little seasoning and a short simmer, the toast needs to be crisp enough to hold the topping, and the cheese needs to melt into the whole thing instead of sitting there like an apology. This is one of those cheap meals that works because each part is doing a job.
Why It Works: Warm beans become richer when you season them in a pan instead of spooning them straight from the can. Toast gives the plate structure, and cheese on top seals the edges. A little mustard in the beans keeps the flavor from going stale.
Key Ingredients:
- 2 cans navy beans or pinto beans, drained — mild beans hold seasoning well.
- 1 tbsp butter or oil — for the onion.
- 1 small onion, finely chopped — adds sweetness.
- 1 tsp chili powder — keeps the beans from tasting flat.
- 1 tsp mustard — sharpens the flavor.
- 4 slices bread — sturdy sandwich bread works best.
- 1 cup shredded cheddar — melts across the beans.
- Salt and pepper — to finish.
- Optional hot sauce — for the table.
Quick Steps:
- Cook the onion: Heat the butter or oil in a skillet over medium heat. Add the onion and cook for 4 to 5 minutes until soft.
- Warm the beans: Stir in the beans, chili powder, mustard, and 1/4 cup water. Simmer for 5 minutes, stirring now and then, until the beans look glossy and heated through.
- Toast the bread: Toast the slices until they’re deep golden and firm.
- Assemble: Spoon the beans over the toast and scatter the cheese on top while the beans are still hot.
- Serve: Add black pepper and hot sauce if you want more punch.
Equipment for This Recipe:
- Skillet — for the beans.
- Toaster or dry skillet — for the bread.
- Wooden spoon — for stirring.
- Small bowl — useful if you want to mix the seasoning first.
- Knife — for chopping the onion.
How to Serve This Dish:
Serve it open-faced so the toast stays crisp around the edges and soft underneath. A side of pickles or sliced tomatoes adds contrast if you have them. Two slices make a solid lunch; four slices can stretch into dinner for 2.
Pro Tips for This Recipe:
- Don’t skip the onion if you have one. It makes canned beans taste homemade.
- Add the cheese right at the end while the beans are hot enough to melt it.
- If the beans seem too loose, simmer a minute longer.
- Stale bread holds up better than fresh, soft bread here.
Variations on This Dish:
- Tomato Beans on Toast: Stir in 1/4 cup tomato sauce for a saucier topping.
- Melted Bean Bake: Put the toast and beans under the broiler for 1 minute with cheese on top.
- Herby Version: Add dried thyme or parsley for a gentler finish.
Common Mistakes to Avoid with This Dish:
- Beans from the can with no seasoning: They taste dull. Warm them with chili powder and mustard.
- Soggy bread: Toast it darker than you think you should.
- Waiting too long to serve: The toast softens fast once the beans go on.
12. Ramen Egg Drop Soup
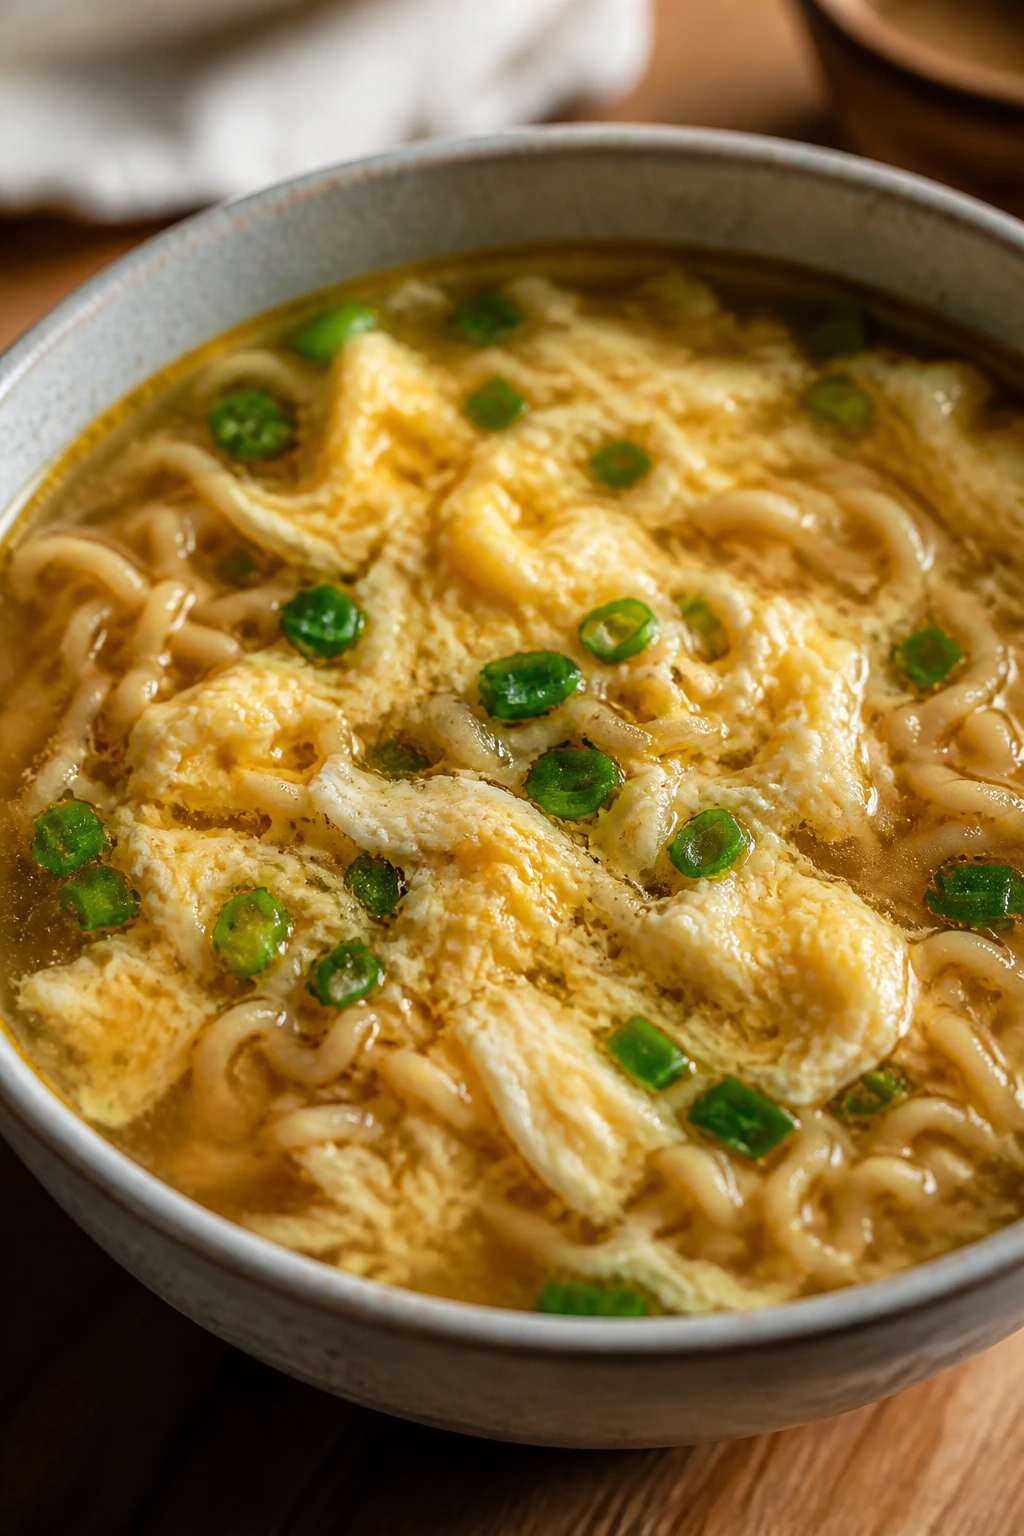
A ramen packet can do more than make you sad at midnight. With broth, an egg, and a few pantry extras, it turns into a fast soup with noodle body and that silky egg ribbon you usually only get from takeout. It’s cheap, fast, and better than the package on its own by a wide margin.
Why It Works: The ramen noodles cook in minutes and release enough starch to give the broth body. Beating the egg into a thin stream creates tender ribbons instead of scrambled chunks. Soy sauce and sesame oil give the broth a deeper, more finished taste.
Key Ingredients:
- 2 packs ramen noodles — discard or use only part of the seasoning packets.
- 4 cups broth or water with bouillon — broth gives better depth.
- 2 eggs — for the egg ribbons.
- 1 tbsp soy sauce — adds salt and color.
- 1/2 tsp garlic powder or 1 minced garlic clove — one is pantry-easier.
- 1 tsp sesame oil — for aroma.
- 1 tsp rice vinegar or a squeeze of lemon — for brightness.
- Hot sauce — optional.
Quick Steps:
- Heat the broth: Bring the broth or water to a simmer in a saucepan over medium heat. Stir in the soy sauce, garlic, and sesame oil.
- Cook the noodles: Add the ramen blocks and cook for 2 minutes, just until they start to loosen.
- Add the eggs: Beat the eggs in a small bowl. Stir the soup in one direction to make a gentle whirlpool, then drizzle the eggs in slowly.
- Finish cooking: Let the eggs set for 30 to 45 seconds. The broth should look silky, not cloudy.
- Serve: Add vinegar or lemon juice and hot sauce at the table.
Equipment for This Recipe:
- Medium saucepan — enough room for broth and noodles.
- Fork or whisk — for beating the eggs.
- Small bowl — to hold the eggs.
- Ladle — for serving.
- Chopsticks or tongs — useful for lifting the noodles.
How to Serve This Dish:
Serve it immediately while the noodles are springy and the egg is tender. A few scallions or canned corn on top make the bowl look and taste fuller. One pot makes 2 generous bowls.
Pro Tips for This Recipe:
- Go easy on the seasoning packet. It’s salty fast.
- Drizzle the eggs slowly so they set in ribbons.
- A splash of vinegar at the end keeps the broth from tasting flat.
- If you want a bigger meal, add a handful of frozen peas.
Variations on This Dish:
- Spicy Miso-ish Bowl: Stir in 1 tsp miso paste if you keep it, plus chili oil.
- Peanut Ramen Soup: Whisk in 1 tbsp peanut butter for a richer broth.
- Vegetable Noodle Bowl: Add frozen mixed vegetables in the last 2 minutes.
Common Mistakes to Avoid with This Dish:
- Boiling the eggs hard: That gives you egg shreds, not ribbons. Keep the broth at a simmer.
- Using too much seasoning packet: The soup turns salty and one-note.
- Letting the noodles sit too long: They keep softening in the bowl.
13. Sardine Pasta with Garlic and Parsley
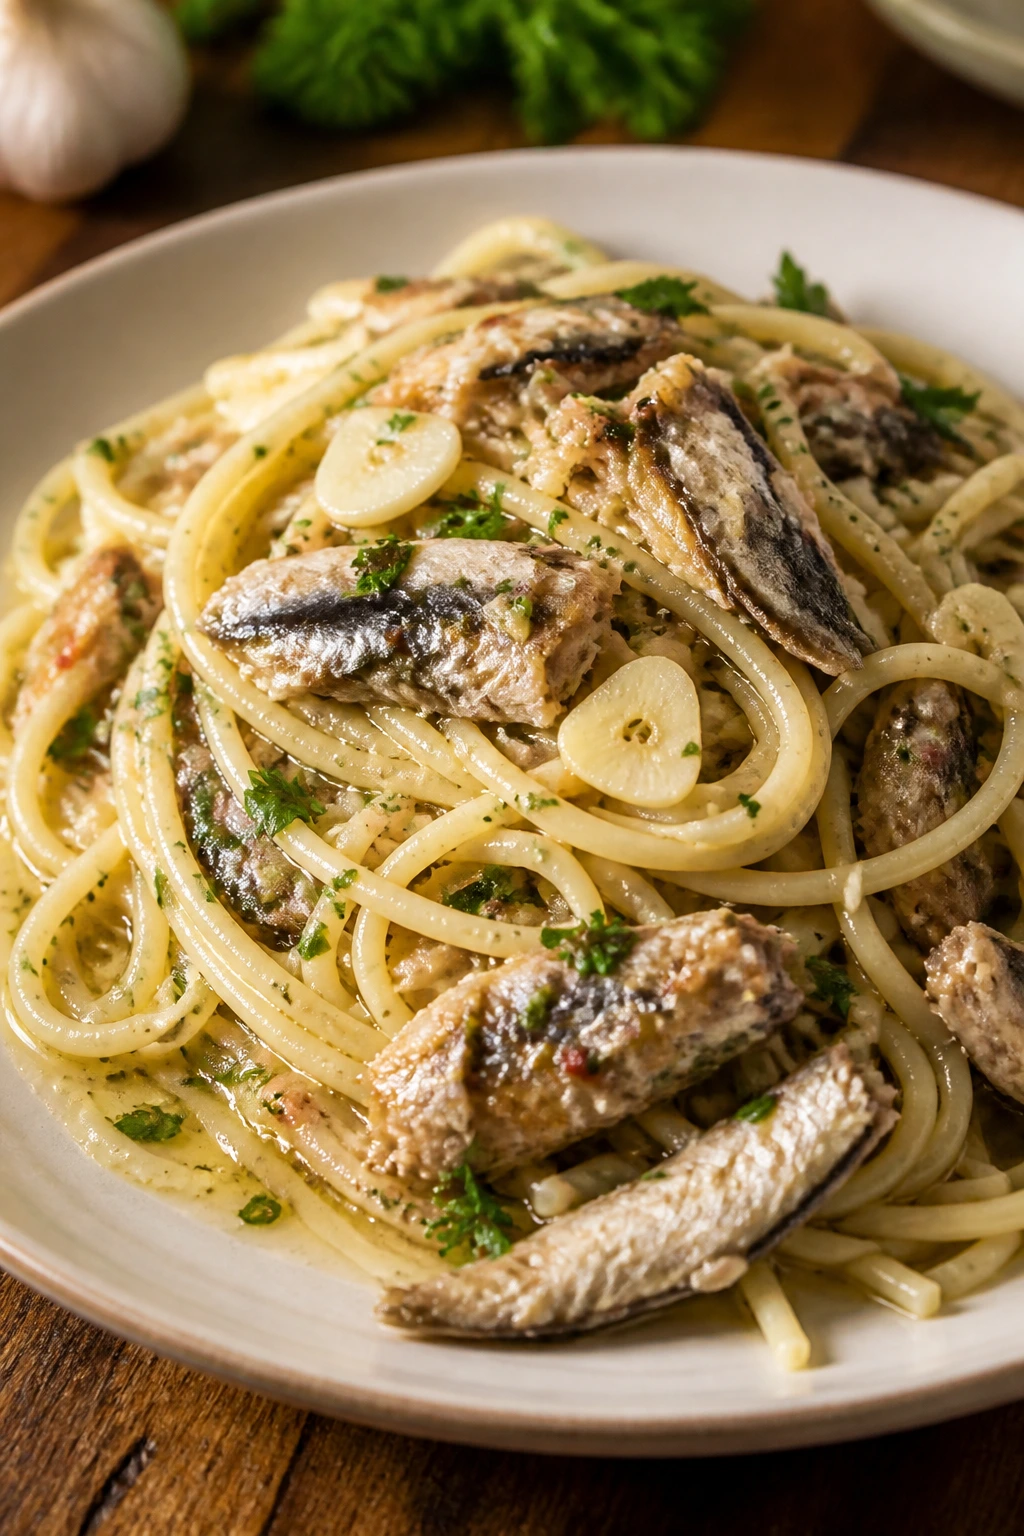
Sardines are one of the cheapest ways to get a strong, savory pasta that doesn’t taste like a compromise. Their oil mixes with garlic and pasta water into a sauce that clings to every strand, and lemon or vinegar cuts the richness before it gets heavy. If you’ve been hesitant about sardines, this is the dish that usually changes the conversation.
Why It Works: Canned sardines bring built-in salt, fat, and depth, so they don’t need much help. Garlic and chili flakes wake up the oil, and a little acid keeps the fish from tasting dull. Breadcrumbs on top add the crunch this pasta really needs.
Key Ingredients:
- 12 oz spaghetti or linguine — long noodles work best.
- 2 cans sardines in olive oil, lightly drained — keep a little oil.
- 4 garlic cloves, thinly sliced — slices soften without burning as fast.
- 1/2 tsp red pepper flakes — optional, but recommended.
- 2 tbsp olive oil — only if the cans are very lean.
- 2 tbsp lemon juice or white vinegar — for brightness.
- 1/4 cup chopped parsley — fresh or dried.
- 1/3 cup breadcrumbs — optional, for a crunchy finish.
- Salt and pepper — taste before salting hard.
Quick Steps:
- Toast the crumbs: If using breadcrumbs, toast them in a dry skillet over medium heat for 2 to 3 minutes until golden. Set aside.
- Cook the pasta: Boil the pasta in salted water until al dente. Reserve 1 cup of the cooking water.
- Build the sauce: In a skillet, heat the sardine oil and olive oil over medium-low heat. Add the garlic and chili flakes and cook for 30 to 45 seconds until fragrant.
- Add the sardines: Break the sardines gently into chunks and stir them into the pan. Add 1/2 cup pasta water and lemon juice, then toss with the pasta for 1 minute.
- Finish: Stir in the parsley and top with breadcrumbs before serving.
Equipment for This Recipe:
- Large pot — for the pasta.
- Skillet — for the sauce.
- Tongs — for tossing.
- Colander — for draining.
- Small bowl — for the toasted crumbs.
How to Serve This Dish:
Serve it hot with the breadcrumbs scattered on top so they stay crisp. A simple green salad or even plain tomatoes on the side gives the plate some lift. This makes 3 servings, maybe 2 if everyone is hungry.
Pro Tips for This Recipe:
- Use sardines packed in olive oil if you can; the sauce tastes fuller.
- Leave the fish in larger flakes unless you want a more spread-out texture.
- Lemon works better than extra salt here.
- A little chopped parsley or dried dill softens the fish flavor.
Variations on This Dish:
- Tomato Sardine Pasta: Add 1/2 cup canned tomatoes and simmer for a minute before tossing.
- Garlic-Chili Crumbs: Mix the breadcrumbs with the chili flakes before toasting.
- Capers and Lemon: Add 1 tbsp capers if you want more brine and bite.
Common Mistakes to Avoid with This Dish:
- Over-breaking the sardines: Tiny bits disappear. Keep some texture.
- Skipping the acid: Without lemon or vinegar, the fish can taste heavy.
- Burning the garlic: Low heat keeps it sweet and soft.
14. Shakshuka with Canned Tomatoes and Eggs
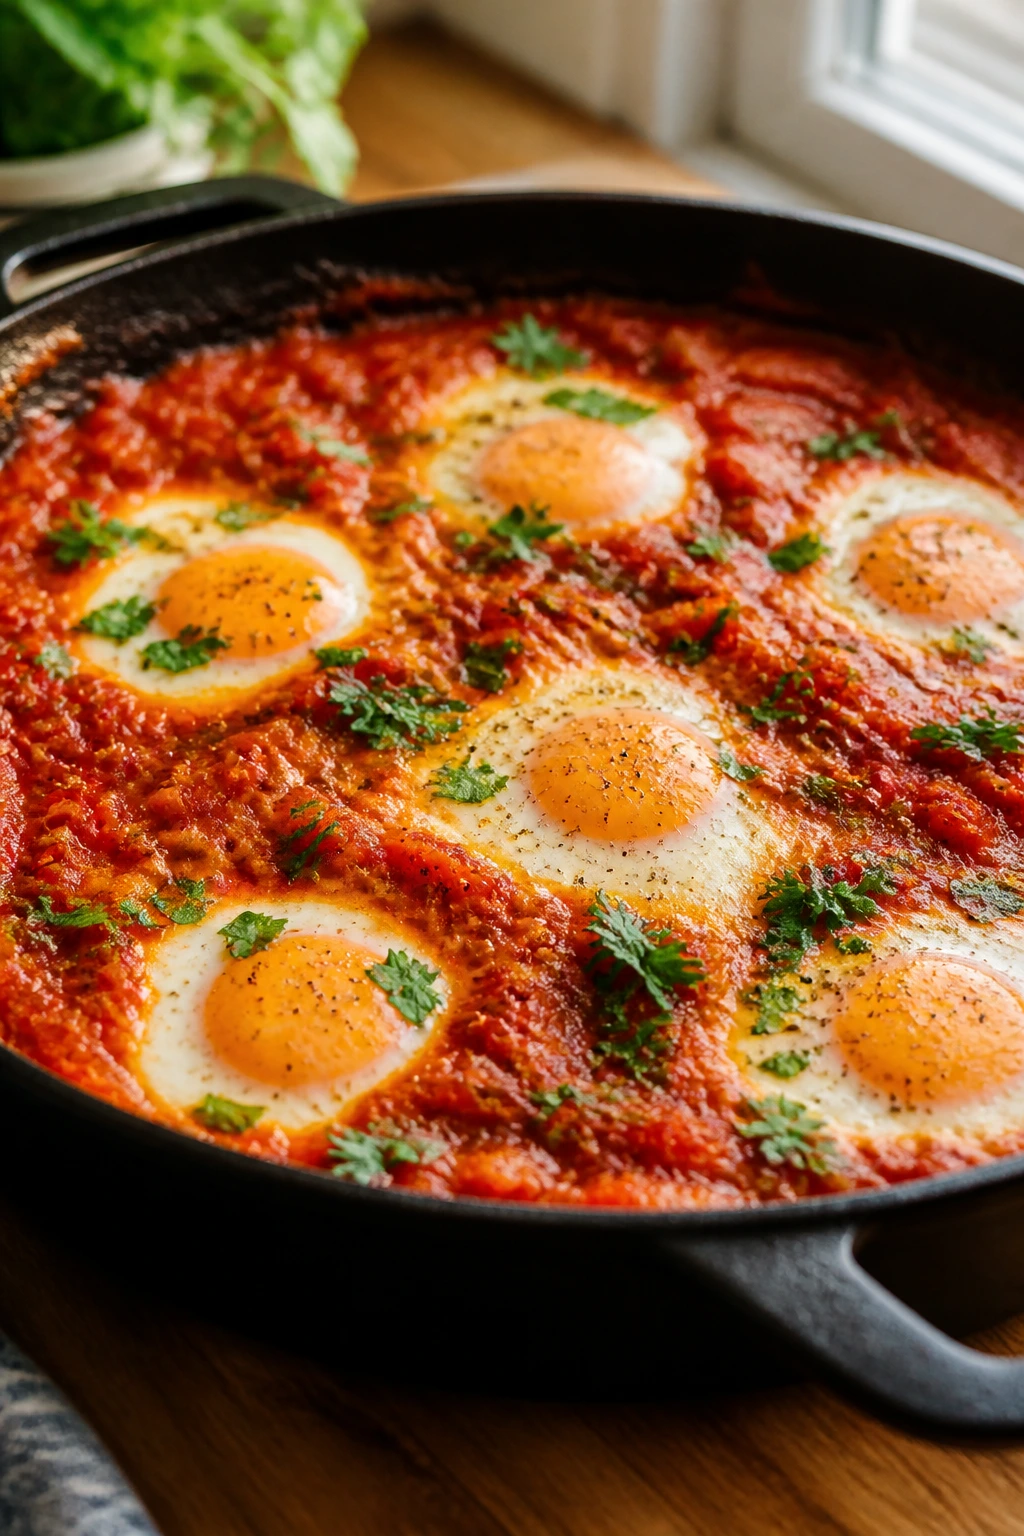
Shakshuka looks fancy enough to make people assume you had more time than you did. Really, it’s just tomatoes, onions, spices, and eggs cooked in one skillet, which is exactly why it belongs in a pantry meal roundup. The yolks act like sauce, and a torn piece of bread does the rest.
Why It Works: Canned tomatoes reduce into a thick, spiced base that cradles the eggs. Onion, garlic, cumin, and paprika create the kind of background flavor that makes the dish taste layered without adding cost. Covering the skillet lets the eggs set on top without drying out.
Key Ingredients:
- 1 tbsp olive oil — for the base.
- 1 onion, sliced or diced — softens into the sauce.
- 1 bell pepper, diced — optional, but classic.
- 3 garlic cloves, minced — builds flavor fast.
- 1 can crushed tomatoes, 28 oz or 2 smaller cans — the sauce.
- 1 tsp paprika — sweet or smoked.
- 1 tsp cumin — gives the sauce warmth.
- 1/2 tsp red pepper flakes — optional heat.
- 4 to 6 eggs — depending on skillet size.
- Bread — for serving.
Quick Steps:
- Cook the vegetables: Heat the oil in a large skillet over medium heat. Add the onion and bell pepper and cook for 6 to 8 minutes until soft.
- Add garlic and spices: Stir in the garlic, paprika, cumin, and red pepper flakes. Cook for 30 seconds.
- Simmer the sauce: Pour in the tomatoes and simmer for 10 to 12 minutes, until thick and spoonable.
- Add the eggs: Make small wells in the sauce and crack in the eggs. Cover the skillet and cook for 5 to 7 minutes, until the whites are set but the yolks are still soft.
- Serve: Season with salt and pepper and bring bread to the table.
Equipment for This Recipe:
- Large skillet with lid — the lid helps the eggs set.
- Wooden spoon — for the sauce.
- Knife and cutting board — for the onion and pepper.
- Spoon — to make egg wells.
- Bread knife — for serving bread if needed.
How to Serve This Dish:
Serve it straight from the skillet with bread tucked around the edges for scooping. A little feta or parsley on top is nice if you have it, but not required. It’s usually 3 to 4 servings, depending on how much bread is involved.
Pro Tips for This Recipe:
- Let the tomato sauce reduce enough before adding eggs. Thin sauce makes runny shakshuka.
- Crack each egg into a small cup first so you can place it cleanly.
- If the tops are still loose, slide the skillet under a broiler for 1 minute.
- A pinch of sugar helps if the canned tomatoes taste sharp.
Variations on This Dish:
- Harissa Version: Stir 1 to 2 tsp harissa into the sauce for more heat and depth.
- Chickpea Shakshuka: Add 1 can chickpeas to the tomato base before the eggs.
- Cheesy Skillet: Crumble feta or sprinkle cheddar over the sauce before adding the eggs.
Common Mistakes to Avoid with This Dish:
- A watery sauce: The eggs need a thicker base to sit in.
- Overcooking the yolks: Pull the skillet when the whites are set and the yolks still jiggle.
- Too much heat under the pan: The bottom can scorch before the top sets.
15. Chili Mac
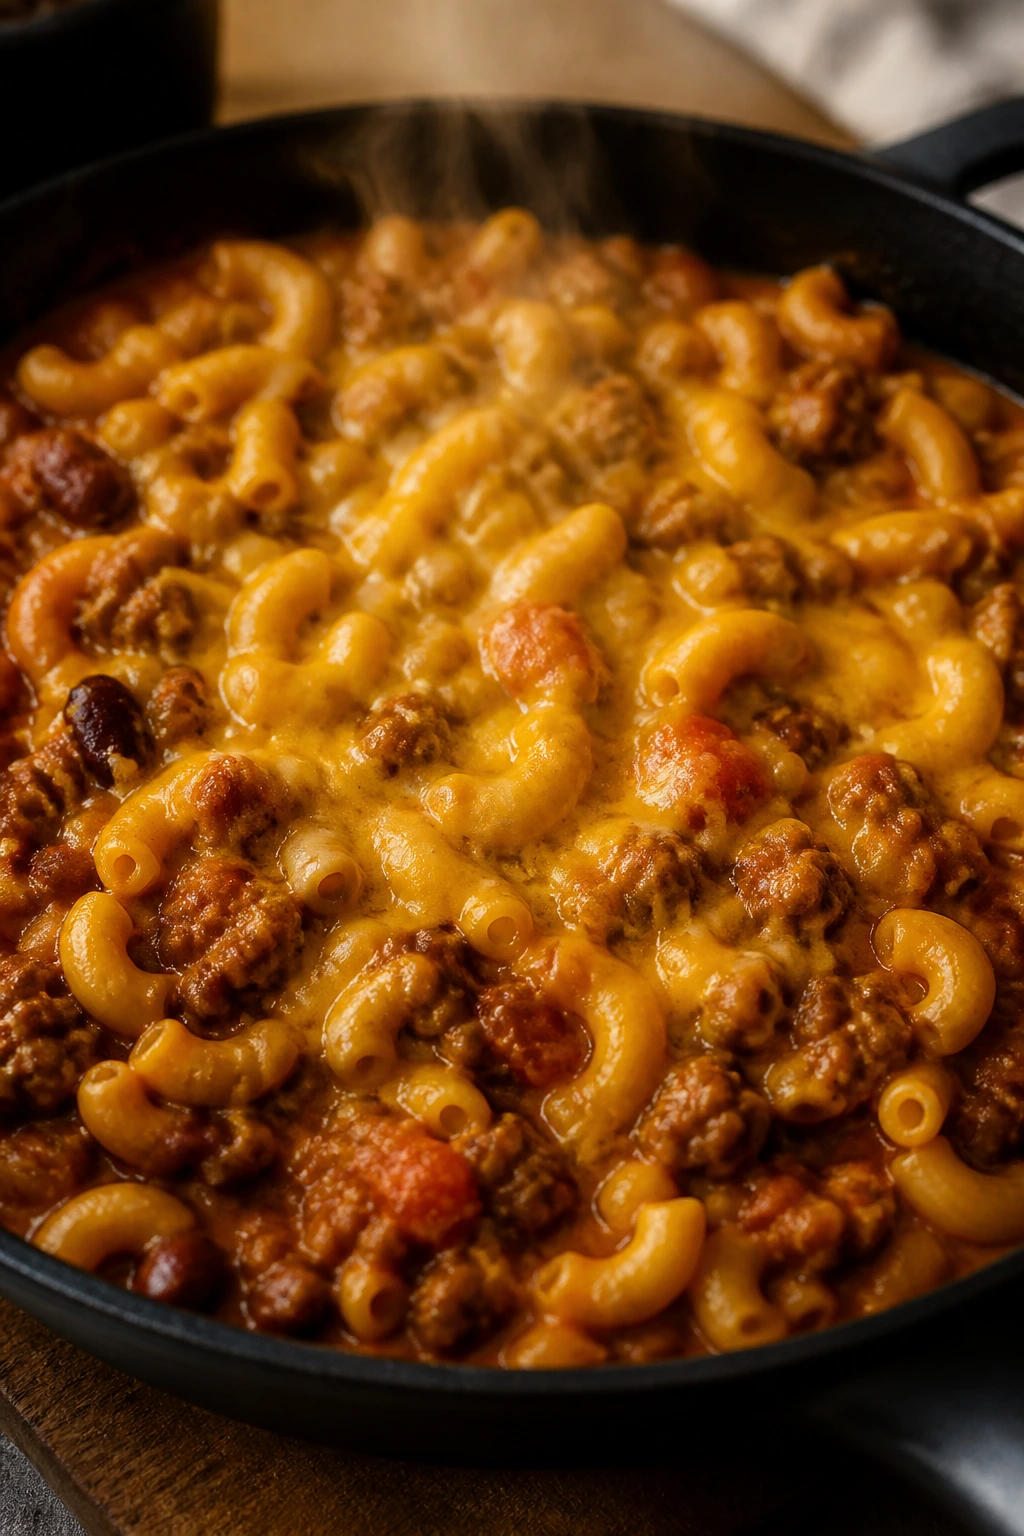
Chili mac is what happens when two budget staples stop arguing and decide to become dinner. Pasta softens the chili, cheese smooths the edges, and the whole skillet becomes the kind of meal that disappears fast because nobody wants to leave a bite behind. It’s not subtle. That’s the point.
Why It Works: Macaroni catches chili in its curves, which means every forkful carries sauce. Cheese melts into the hot pot and turns the texture creamy instead of loose. A little pasta water or plain water helps the sauce coat the noodles instead of pooling.
Key Ingredients:
- 12 oz elbow macaroni — the classic shape for this.
- 1 can chili or 2 cups leftover chili — bean or beef both work.
- 1 tbsp butter — for the richness.
- 2 cups shredded cheddar — more if you want it extra creamy.
- 1 tsp chili powder — optional if your chili needs a push.
- 1/2 tsp onion powder — adds a little depth.
- 1 cup water — only if the chili is thick.
- Salt and pepper — taste before adding much salt.
Quick Steps:
- Cook the pasta: Boil the macaroni in salted water until just tender, then drain.
- Warm the chili: Put the chili in a large skillet or pot over medium heat. Add the butter and water if needed, then stir until hot.
- Combine: Stir in the pasta and mix until every piece looks coated.
- Add the cheese: Turn the heat low and add the cheddar in handfuls, stirring until melted and creamy.
- Serve: Taste and season, then serve right away while the cheese is still loose.
Equipment for This Recipe:
- Large pot — for the pasta.
- Large skillet or deep saucepan — for the chili mixture.
- Colander — for draining.
- Wooden spoon — for stirring the cheese in.
- Measuring cup — for the water if needed.
How to Serve This Dish:
Serve it in bowls with a little extra cheese and black pepper on top. A side of canned green beans or a plain salad keeps the plate from feeling too heavy. It makes 4 solid servings.
Pro Tips for This Recipe:
- Don’t rinse the pasta; the starch helps the chili cling.
- If your chili is thin, let it simmer a few extra minutes before adding the pasta.
- Add cheese off the heat if the pot is scorching hot, or it can turn grainy.
- Leftover chili mac thickens fast, so keep a splash of water for reheating.
Variations on This Dish:
- Bean-Heavy Version: Use vegetarian chili and add extra black beans.
- Southwest Chili Mac: Stir in canned corn and a pinch of cumin.
- Baked Chili Mac: Put the finished skillet in a baking dish, top with more cheese, and broil until bubbly.
Common Mistakes to Avoid with This Dish:
- Dry pasta in the pot: It needs enough sauce to stay creamy.
- Overheating the cheese: High heat makes it oily and clumpy.
- Underseasoning the base: Chili mac tastes flat if the chili itself is bland.
16. Split Pea Soup with Croutons
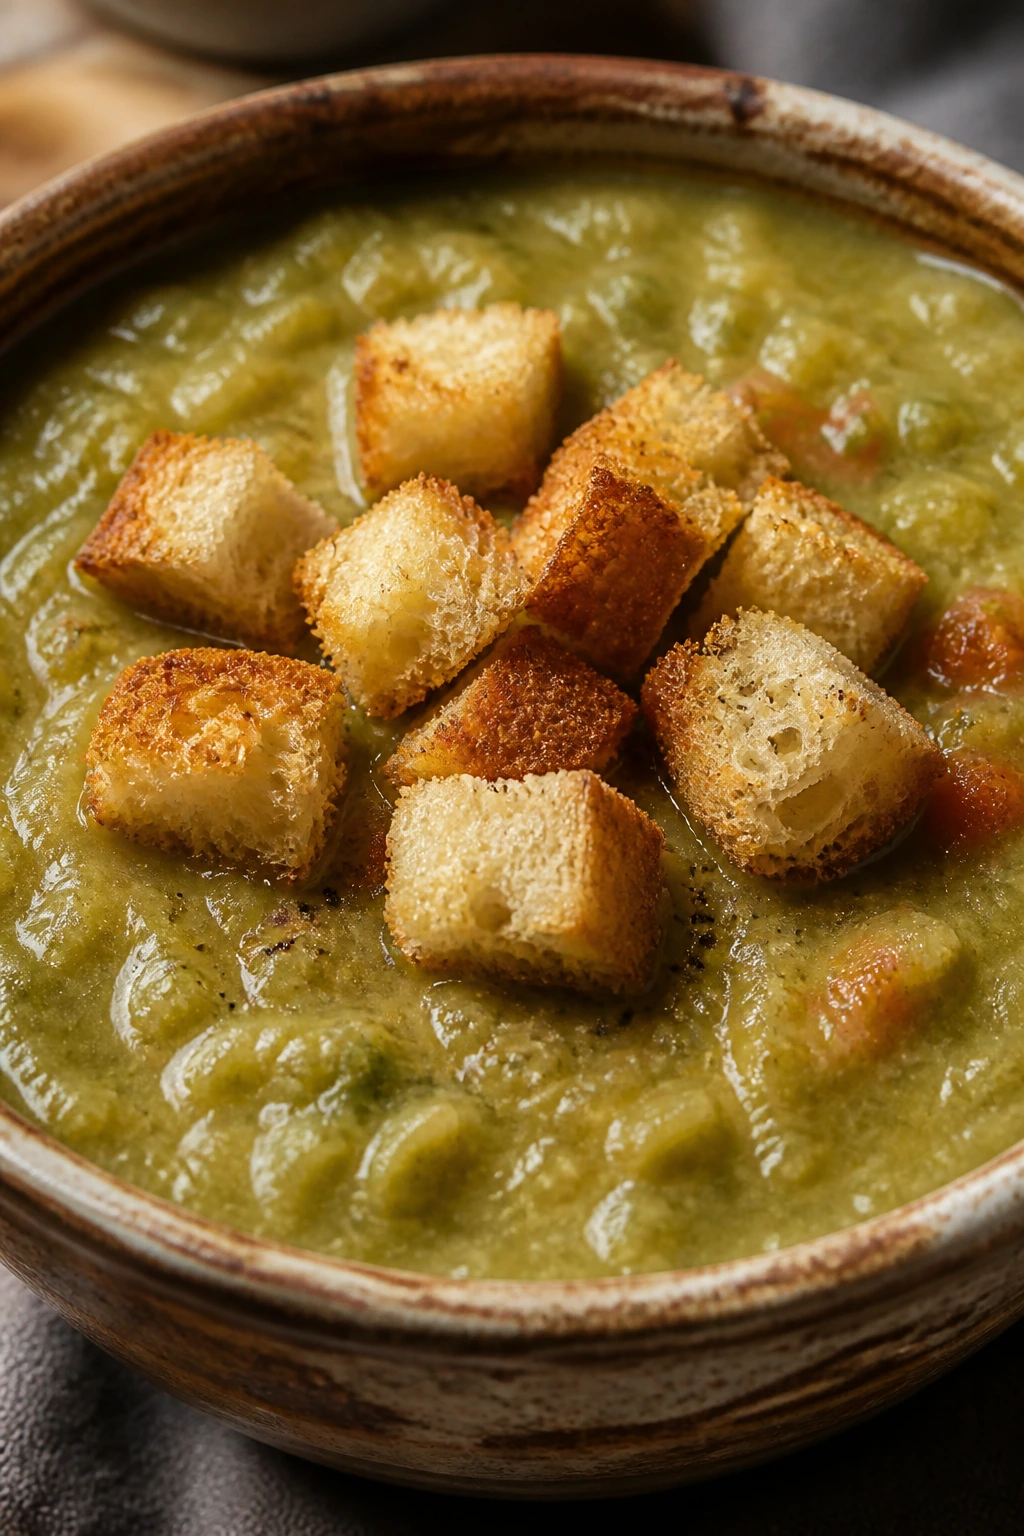
Split pea soup is old-school pantry cooking in the best sense. It starts looking humble and ends up thick, smoky, and almost velvety without needing cream. Croutons on top are not a garnish here; they’re the thing that keeps each spoonful from feeling too uniform.
Why It Works: Split peas break down on their own as they simmer, so they naturally thicken the soup. Onion, carrot, garlic, and thyme build the background, and a long simmer turns everything soft and cohesive. Croutons add the crunch the soup itself can’t provide.
Key Ingredients:
- 1 lb dried split peas — green or yellow both work.
- 1 tbsp olive oil or butter — for the vegetables.
- 1 onion, diced — the flavor base.
- 2 carrots, diced — for sweetness and body.
- 3 garlic cloves, minced — adds depth.
- 6 cups water or broth — enough for a thick soup.
- 1 bay leaf — helps the pot taste rounder.
- 1 tsp dried thyme — optional, but useful.
- 4 slices bread, cubed — for croutons.
- Salt and pepper — to finish.
Quick Steps:
- Cook the vegetables: Heat the oil or butter in a soup pot over medium heat. Add the onion and carrots and cook for 5 to 6 minutes until softened.
- Add garlic and peas: Stir in the garlic, thyme, split peas, water or broth, and bay leaf.
- Simmer: Bring the pot to a boil, then reduce to a low simmer. Cook for 45 to 55 minutes, stirring now and then, until the peas are soft and breaking apart.
- Make the croutons: While the soup simmers, toast the bread cubes in a skillet with a little oil or butter until crisp and golden.
- Finish and serve: Remove the bay leaf, season with salt and pepper, and top with croutons.
Equipment for This Recipe:
- Large soup pot — split peas expand as they cook.
- Wooden spoon — for stirring the bottom.
- Knife and cutting board — for the vegetables.
- Skillet — for the croutons.
- Ladle — for serving.
How to Serve This Dish:
Serve it in deep bowls with the croutons on top at the last second so they stay crunchy. A little black pepper or a drizzle of olive oil finishes it nicely. This makes 6 modest servings or 4 very generous ones.
Pro Tips for This Recipe:
- Rinse split peas before cooking to remove dust and tiny bits.
- Stir more often near the end, when the soup thickens and can catch on the bottom.
- Add water as needed if the pot gets too dense.
- A spoonful of vinegar at the end makes the flavor brighter.
Variations on This Dish:
- Smoky Split Pea Soup: Add smoked paprika or a few drops of liquid smoke.
- Chunkier Bowl: Stir in extra diced carrots or a can of potatoes.
- Herb Finish: Use parsley or dill at the end if thyme feels too heavy.
Common Mistakes to Avoid with This Dish:
- Leaving the soup too thin: Split peas need time to break down.
- Burning the bottom: The thickening soup can stick, so stir more near the end.
- Skipping the seasoning at the end: Split pea soup needs salt after it’s cooked, not just before.
17. Spanish Rice and Beans
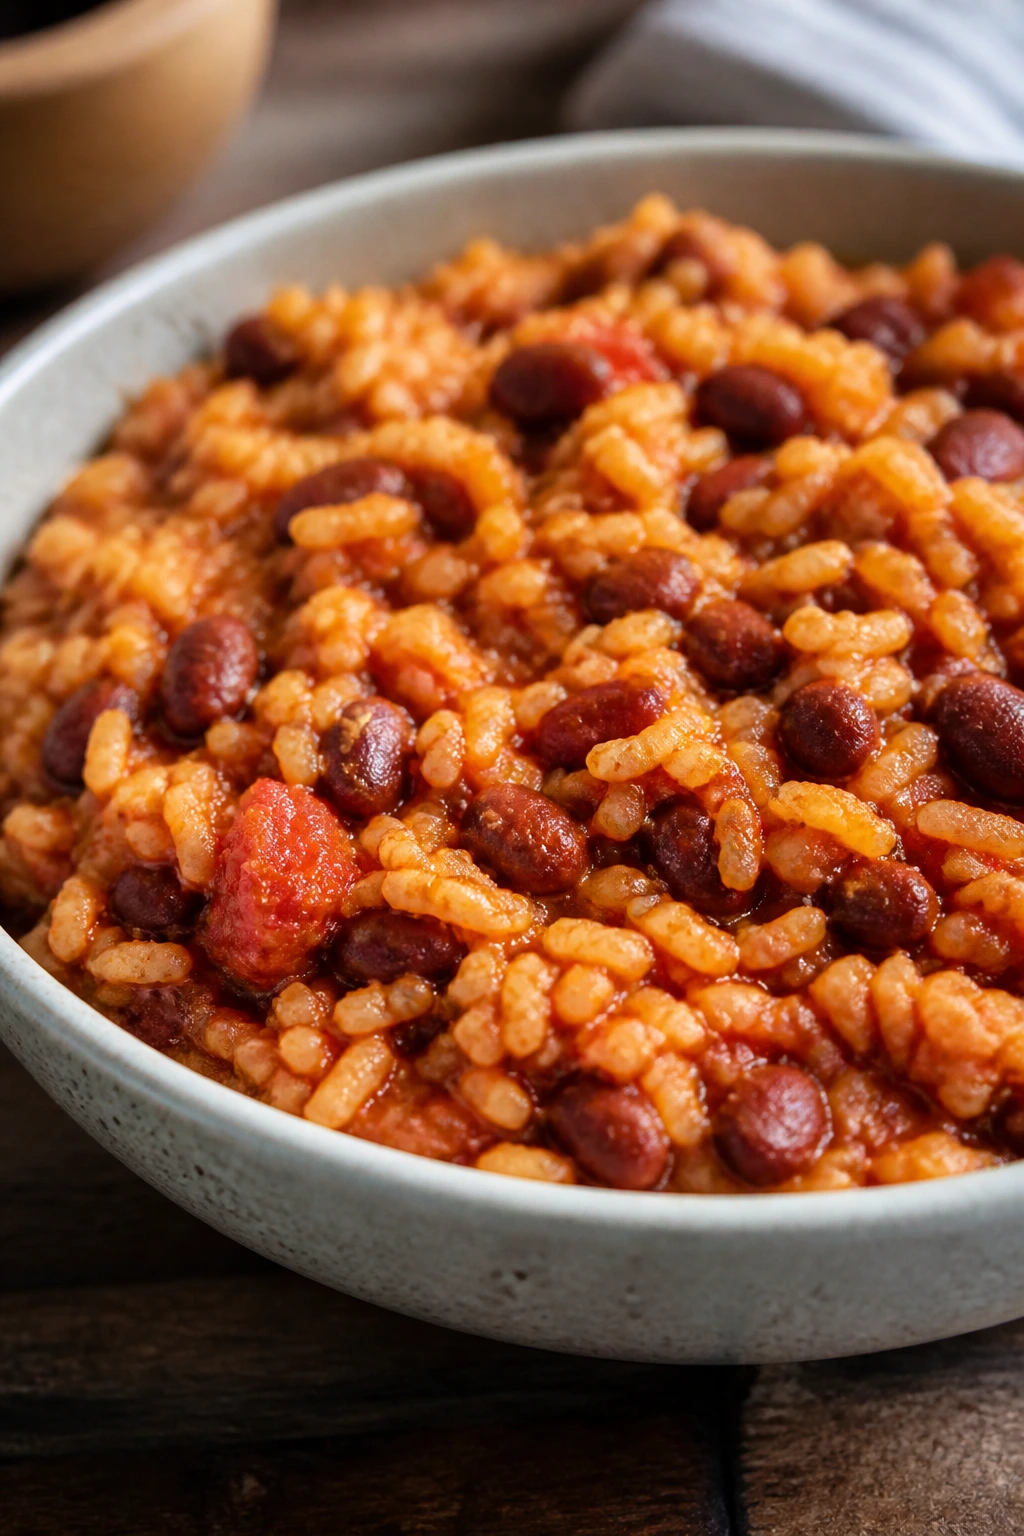
Spanish rice and beans is one of those meals that looks plain until you taste the tomatoes, cumin, and toasted rice working together. The rice soaks up the sauce, the beans bring the heft, and the whole pan feels like a complete meal without asking for side dishes. It’s cheap, filling, and the leftovers reheat well.
Why It Works: Toasting the rice in oil before adding liquid gives it a nuttier taste and better texture. Tomato sauce seasons the grains as they cook, while beans make the dish heartier without much extra cost. Cumin and smoked paprika give the bowl warmth without needing a dozen spices.
Key Ingredients:
- 1 cup long-grain rice — plain white rice works well.
- 1 tbsp oil — for toasting the rice.
- 1 onion, diced — builds the base.
- 2 garlic cloves, minced — adds depth.
- 1/2 cup tomato sauce — or crushed tomatoes, thinned a little.
- 1 can pinto beans, drained — black beans also work.
- 2 cups broth or water — use broth if you want more flavor.
- 1 tsp cumin — classic here.
- 1 tsp smoked paprika — gives the rice color and body.
- Salt and pepper — to finish.
Quick Steps:
- Toast the rice: Heat the oil in a saucepan over medium heat. Add the rice and stir for 2 minutes until it smells nutty and looks a little translucent around the edges.
- Cook the onion: Add the onion and cook for 3 minutes, then stir in the garlic for 30 seconds.
- Add the liquid: Stir in the tomato sauce, broth, cumin, paprika, salt, and pepper. Bring to a simmer.
- Simmer covered: Cover and cook on low for 18 minutes, then stir in the beans and cook for 5 minutes more until the liquid is absorbed.
- Rest and serve: Let the pot sit off the heat for 5 minutes before fluffing.
Equipment for This Recipe:
- Saucepan with lid — for the rice.
- Wooden spoon — for stirring.
- Measuring cup — for the liquid.
- Knife and cutting board — for the onion.
- Fork — for fluffing.
How to Serve This Dish:
Serve it as a bowl meal with hot sauce or a spoonful of salsa on top. A fried egg turns it into a fuller plate if you have one. It feeds 4 people comfortably.
Pro Tips for This Recipe:
- Toast the rice; don’t skip that step.
- Use broth if your tomato sauce is mild.
- If the rice sticks, let it steam off the heat before you scrape.
- A squeeze of lime or a little vinegar at the end brightens the whole pot.
Variations on This Dish:
- Garlic Rice and Pinto Beans: Add extra garlic and keep the seasoning simple.
- Corn and Bean Version: Stir in 1 cup canned corn with the beans.
- Cheesy Spanish Rice: Sprinkle cheese over the hot rice and cover for 1 minute.
Common Mistakes to Avoid with This Dish:
- Using too much liquid: The rice should absorb it, not swim in it.
- Stirring constantly: That breaks the grains and makes the rice gummy.
- Skipping the rest: The last 5 minutes off heat matter more than people think.
18. Baked Potato Bar with Chili Beans

A baked potato bar is the budget meal equivalent of giving everyone their own little project. Potatoes are cheap, filling, and happy to wear whatever toppings you have sitting around, which makes this one feel generous even when the pantry is thin. Chili beans and cheese do most of the heavy lifting.
Why It Works: Potatoes have enough starch to carry a meal without much help. The skins crisp up, the insides go fluffy, and the toppings soak into all those cracks. Chili beans bring protein and seasoning in one can.
Key Ingredients:
- 4 russet potatoes — the fluffiest choice.
- 1 tbsp oil — for the skins.
- 1 can chili beans or kidney beans — drained if needed.
- 1 cup shredded cheese — cheddar melts well.
- 1/2 cup sour cream or plain yogurt — optional, but useful.
- 2 tbsp butter — for the potatoes.
- 2 scallions, sliced — optional.
- Salt and pepper — to finish.
- Hot sauce — optional.
Quick Steps:
- Prep the potatoes: Scrub the potatoes, prick them with a fork, rub with oil, and salt the skins.
- Cook them: Bake at 425°F for 45 to 60 minutes, or microwave each potato for 7 to 10 minutes until a knife slides in easily. If you want crisp skins, give them 5 more minutes in a hot oven.
- Warm the beans: Heat the chili beans in a small pot or skillet until hot.
- Split and fluff: Cut each potato open, fluff the insides with a fork, and add butter.
- Top and serve: Spoon on the beans, cheese, and sour cream or yogurt. Finish with scallions and hot sauce if you want it.
Equipment for This Recipe:
- Oven or microwave — depending on your time.
- Baking sheet — for oven potatoes.
- Fork — for pricking and fluffing.
- Small pot — to warm the beans.
- Sharp knife — for splitting the potatoes.
How to Serve This Dish:
Serve the potatoes on plates, not in bowls, so the toppings can spill where they want. A simple side salad or canned fruit can balance the richness. One potato is a full meal for one person.
Pro Tips for This Recipe:
- Choose potatoes that are close in size so they cook evenly.
- Salt the skins before baking; they taste better and crisp more.
- If the potato feels heavy, it probably needs more time.
- Put cheese on while the beans are hot so it melts properly.
Variations on This Dish:
- Taco Potato: Add salsa and cumin to the beans for a stronger taco feel.
- Loaded Breakfast Potato: Top with an egg instead of beans.
- Broccoli-and-Cheese Version: Use canned or frozen broccoli if you want a different topping.
Common Mistakes to Avoid with This Dish:
- Undercooked centers: A knife should slide in without resistance.
- Skipping the skin oil: Dry skins stay leathery instead of crisp.
- Toppings piled on cold potatoes: Warm the filling first so the potato melts into it.
19. Savory Oatmeal with Egg and Soy Sauce
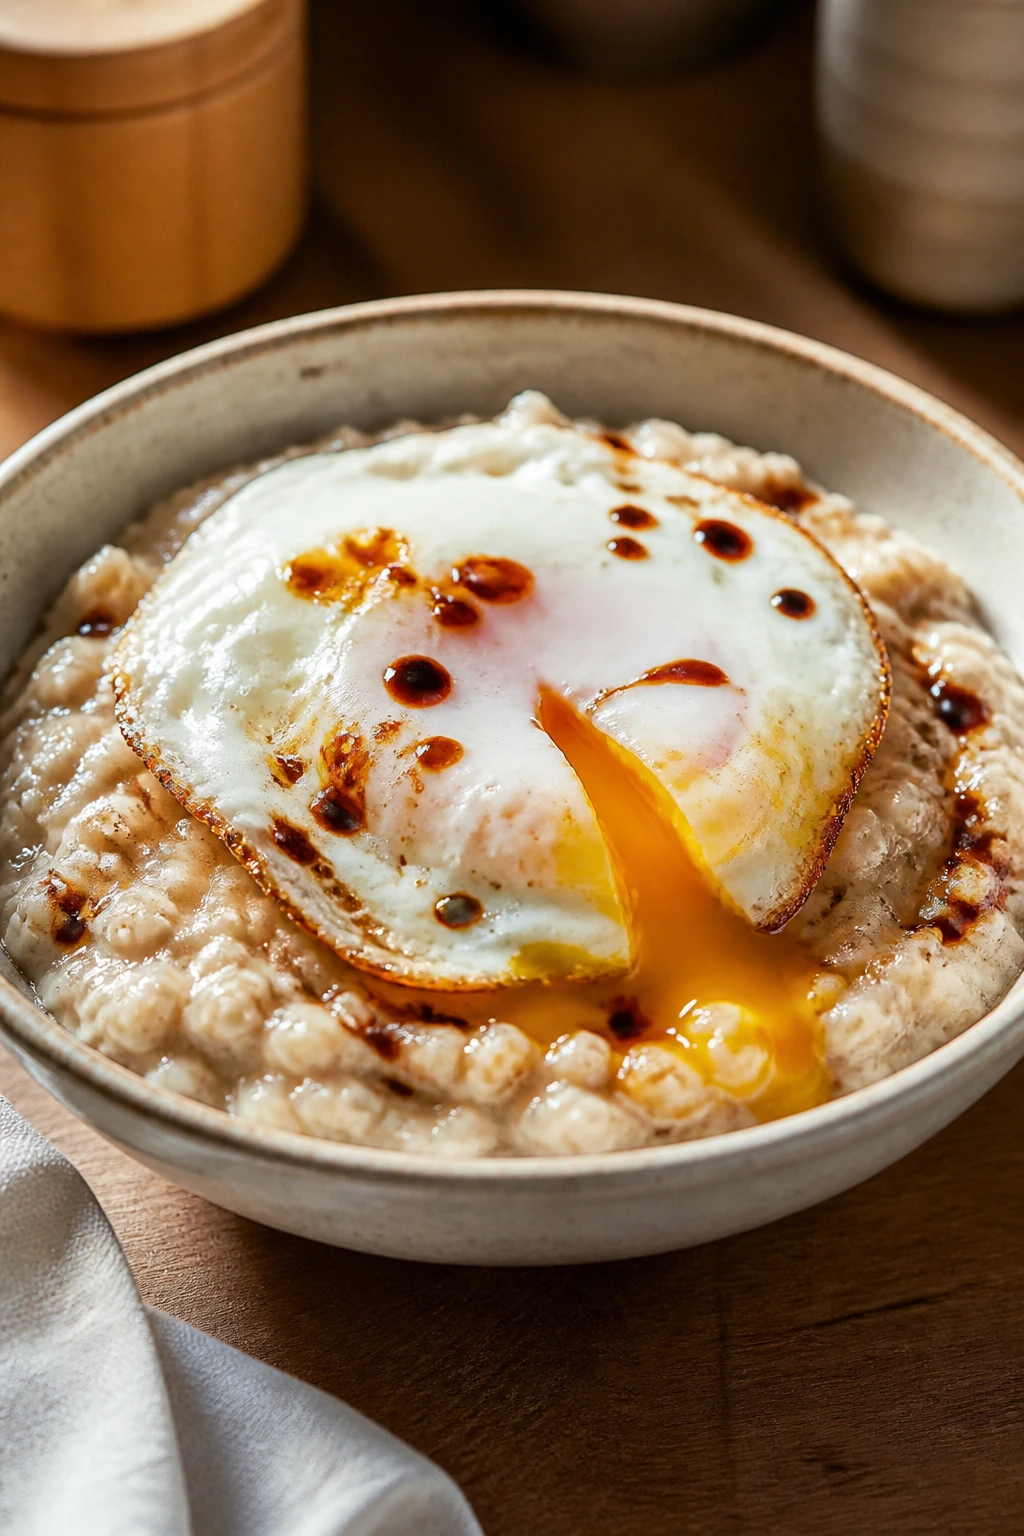
Savory oatmeal sounds odd until you actually eat it. Then it makes sense: oats are just a blank, creamy base that takes salt, soy sauce, and a runny egg beautifully. It’s cheap, quick, and more satisfying than the sweet breakfast version when you want something that feels like lunch in a bowl.
Why It Works: Rolled oats cook in minutes and thicken into a porridge-like base that holds toppings well. Soy sauce and sesame oil give them a savory backbone. The egg adds richness and makes the bowl feel larger without much extra cost.
Key Ingredients:
- 1 cup rolled oats — not instant, if you can help it.
- 2 cups water or broth — broth gives more flavor.
- 1 egg or 2 eggs — fried, poached, or soft-boiled.
- 1 tbsp soy sauce — the main seasoning.
- 1 tsp sesame oil — optional, but useful.
- 1/4 tsp black pepper — enough to wake it up.
- Chili crisp or hot sauce — optional topping.
- Sliced scallions — optional.
Quick Steps:
- Cook the oats: Bring the water or broth to a simmer in a small saucepan. Stir in the oats and cook for 4 to 5 minutes, until thick and creamy.
- Season: Stir in the soy sauce, sesame oil, and black pepper. Taste before adding more salt.
- Cook the egg: Fry or poach the egg while the oats cook, until the yolk is still soft.
- Assemble: Spoon the oats into a bowl and set the egg on top.
- Finish: Add chili crisp or scallions if you have them.
Equipment for This Recipe:
- Small saucepan — for the oats.
- Skillet or small pot — for the egg.
- Spoon — for stirring.
- Bowl — for serving.
- Measuring cup — for the liquid.
How to Serve This Dish:
Serve it while the oats are still hot and loose enough to cradle the egg yolk. A few sesame seeds or scallions make the bowl look finished, but they’re optional. This is a 1-person meal unless you scale it up.
Pro Tips for This Recipe:
- Use broth instead of water if your oats taste too plain.
- Don’t overcook the oats; they should still have a little texture.
- A tiny splash of vinegar can sharpen the whole bowl.
- If you want more protein, add a second egg rather than extra oats.
Variations on This Dish:
- Miso Oat Bowl: Stir in 1 tsp miso paste if you have it.
- Peanut-Soy Oats: Add 1 tbsp peanut butter for a richer base.
- Vegetable Oats: Fold in frozen peas or corn at the end.
Common Mistakes to Avoid with This Dish:
- Cooking the oats to glue: Stop when they’re creamy, not stiff.
- Too much soy sauce: It can take over fast. Add it gradually.
- Skipping the egg: The bowl is good without it, but the egg makes it feel like a meal.
20. Bean and Cheese Enchilada Casserole

This casserole is what happens when tortillas, beans, sauce, and cheese stop pretending they need to be separate. It bakes into a layered, soft-edged dish that cuts neatly and feeds a crowd without needing a lot of money. It’s pantry cooking with a hot oven and a little attitude.
Why It Works: Tortillas absorb enchilada sauce without falling apart completely, which gives the casserole its layered texture. Refried beans add creaminess and protein. Cheese ties everything together and browns on top into a salty crust.
Key Ingredients:
- 8 corn or flour tortillas — cut if needed to fit the dish.
- 2 cups refried beans — canned or homemade.
- 2 cups enchilada sauce — red or green.
- 2 cups shredded cheese — cheddar, Monterey Jack, or both.
- 1 small onion, diced — optional, but helpful.
- 1 can green chiles, 4 oz — optional.
- 1 tbsp oil — for the onion if using.
- Salsa or hot sauce — for serving.
Quick Steps:
- Prep the oven: Heat the oven to 375°F and lightly oil a baking dish.
- Cook the onion: If using onion, soften it in oil for 4 minutes until translucent.
- Layer the casserole: Spread a thin layer of enchilada sauce on the bottom, then add tortillas, beans, onion, chiles, sauce, and cheese. Repeat until the dish is full, ending with cheese.
- Bake: Cover with foil and bake for 15 minutes, then uncover and bake for 10 more minutes until bubbly and lightly browned.
- Rest and serve: Let it sit for 10 minutes before slicing so it holds together.
Equipment for This Recipe:
- 8×8- or 9×13-inch baking dish — depending on how many layers you want.
- Foil — for the first part of baking.
- Skillet — for the onion, if using.
- Spoon or spatula — for layering.
- Oven mitts — the dish gets hot fast.
How to Serve This Dish:
Serve the squares with salsa and a little extra cheese on top. A spoonful of sour cream or plain yogurt adds a cool note if you have it. This serves 4 to 6, depending on the size of the slices.
Pro Tips for This Recipe:
- Don’t overfill the layers or the casserole will collapse when sliced.
- If your sauce is thin, simmer it a few minutes first.
- Let the casserole rest before cutting; the layers need to settle.
- Use slightly stale tortillas if you can. They hold up better.
Variations on This Dish:
- Black Bean Enchilada Bake: Swap refried beans for black beans and mash half of them.
- Corn and Bean Version: Add canned corn between layers.
- Breakfast Enchiladas: Add scrambled eggs and breakfast sausage if you want a morning version.
Common Mistakes to Avoid with This Dish:
- Dry tortillas: They crack instead of layering. Spoon enough sauce to soften them.
- Cutting too soon: The filling will slide apart. Give it the 10-minute rest.
- Too much cheese on top only: Layering cheese through the middle makes the casserole taste better.
21. Coconut Lentil Dal
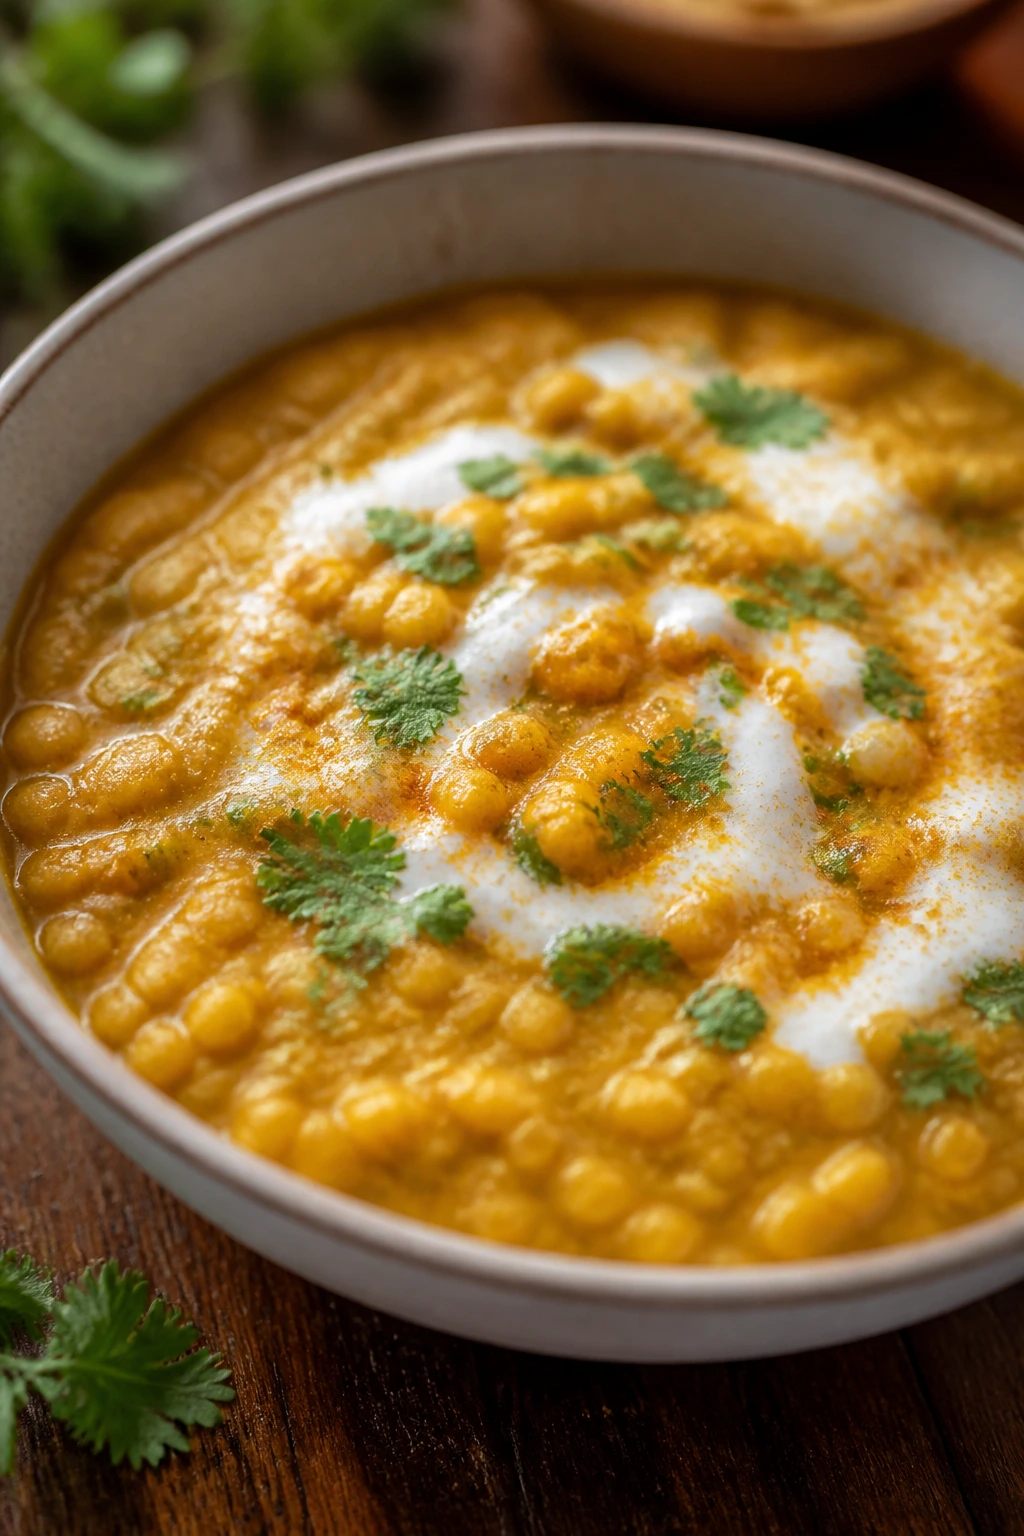
Dal is one of the smartest things you can make from a bag of lentils and a can of coconut milk. It cooks down into a creamy, spiced pot that feels much richer than the ingredient list suggests, and the rice underneath gives it structure. This is pantry food with a soft edge.
Why It Works: Red lentils break down quickly and turn almost silky without needing any flour or cream. Coconut milk gives the dal body, while onion, garlic, and curry powder provide the savory backbone. It’s fast enough to count as a weeknight dinner and cheap enough to make again tomorrow.
Key Ingredients:
- 1 cup red lentils — rinse them first.
- 1 tbsp oil — for the onion.
- 1 onion, diced — the base of the dal.
- 3 garlic cloves, minced — adds depth.
- 1 tbsp curry powder — or a mix of turmeric and cumin.
- 1 can coconut milk, 13.5 oz — the creamy part.
- 2 1/2 cups water or broth — to cook the lentils.
- 1 tsp salt — more to taste.
- Rice — for serving.
Quick Steps:
- Cook the onion: Heat the oil in a saucepan over medium heat. Cook the onion for 5 minutes until soft.
- Add garlic and curry powder: Stir in the garlic and curry powder for 30 seconds until fragrant.
- Simmer the lentils: Add the lentils, coconut milk, water or broth, and salt. Bring to a simmer and cook for 15 to 20 minutes, stirring often, until the lentils are soft and creamy.
- Adjust texture: Add a splash of water if the dal gets too thick. It should spoon, not stand.
- Serve: Spoon over rice and finish with black pepper or a little hot sauce.
Equipment for This Recipe:
- Medium saucepan — for the dal.
- Wooden spoon — for stirring.
- Measuring cups — for the liquid.
- Rice pot — if you’re making rice too.
- Ladle — handy for serving.
How to Serve This Dish:
Serve it over plain rice so the dal can soak into the grains. A spoonful of yogurt or a few drops of chili oil makes a strong final touch. This recipe makes 4 servings.
Pro Tips for This Recipe:
- Red lentils cook fast; check them early.
- Stir often near the end because the thick dal can catch.
- If the coconut milk is separated in the can, shake it first.
- A squeeze of lime or lemon at the end brightens the whole bowl.
Variations on This Dish:
- Tomato Dal: Stir in 1/2 cup canned tomatoes for a sharper flavor.
- Green Dal: Add frozen peas in the last 2 minutes.
- Thicker Curry Dal: Reduce the water slightly and serve with flatbread instead of rice.
Common Mistakes to Avoid with This Dish:
- Using too much liquid: Red lentils can turn soupy fast. Add water only as needed.
- Not stirring: The thickened bottom can stick.
- Skipping the acid: Coconut milk needs a bright finish to keep it from feeling heavy.
22. Couscous with Chickpeas and Raisins
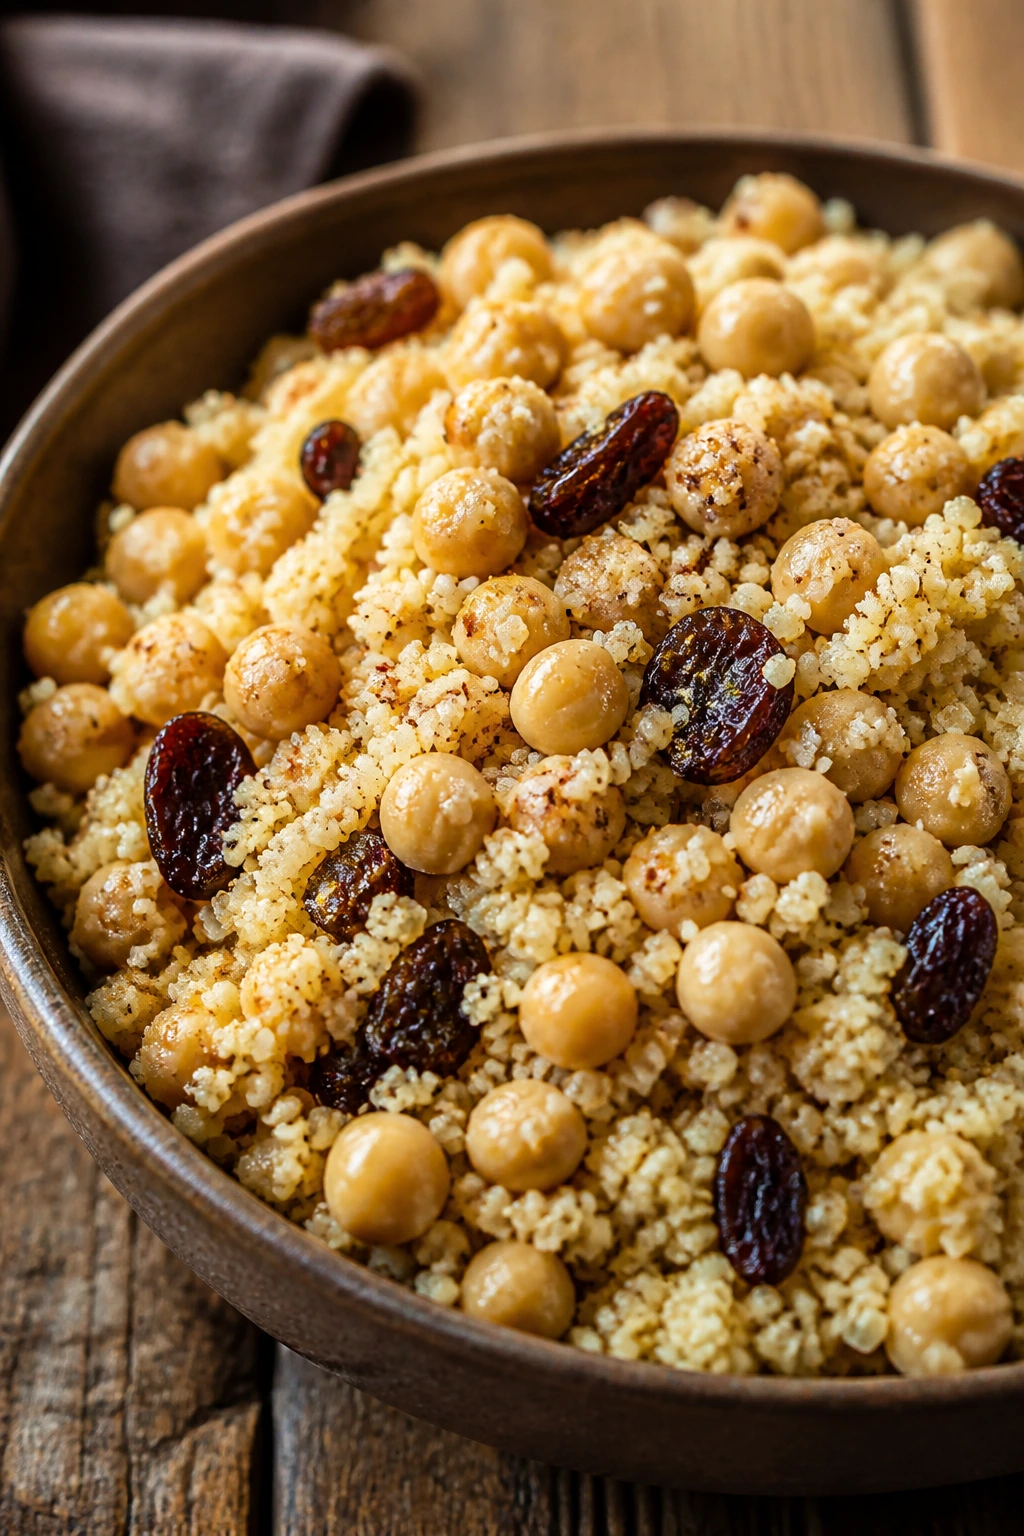
Couscous is one of the quickest pantry starches to cook, which makes it perfect for nights when you need dinner before you start bargaining with yourself. Chickpeas give the bowl heft, raisins add a little sweetness, and cumin plus lemon keep the whole thing from tasting bland. It’s fast, but it doesn’t feel rushed.
Why It Works: Couscous soaks up hot liquid in minutes, so it behaves almost like instant dinner. Chickpeas add protein and a soft bite, while raisins give tiny bursts of sweetness that keep the bowl lively. Lemon or vinegar keeps the flavors from settling into one flat note.
Key Ingredients:
- 1 1/2 cups couscous — plain, quick-cooking couscous.
- 1 can chickpeas, drained — the main body.
- 1/3 cup raisins — or chopped dried apricots.
- 1 1/2 cups broth or water — bring it to a boil first.
- 1 tsp cumin — gives the dish warmth.
- 1 tbsp olive oil — for richness.
- 1 tbsp lemon juice or vinegar — for balance.
- Salt and pepper — to taste.
- 2 tbsp chopped almonds or sunflower seeds — optional crunch.
Quick Steps:
- Heat the liquid: Bring the broth or water to a boil in a saucepan. Stir in the cumin, salt, and olive oil.
- Add the couscous: Pour in the couscous, raisins, and chickpeas. Remove the pan from the heat, cover, and let it sit for 5 minutes.
- Fluff: Use a fork to separate the grains until the couscous looks light and even.
- Finish: Stir in the lemon juice or vinegar and black pepper. Add nuts or seeds if using.
- Serve: Taste and add more salt only if needed.
Equipment for This Recipe:
- Small saucepan — for the couscous.
- Fork — for fluffing.
- Measuring cups — for the liquid and grains.
- Spoon — for stirring in the chickpeas.
- Bowl — for serving.
How to Serve This Dish:
Serve it warm or at room temperature, either as a main bowl or a side under roasted vegetables. A spoonful of yogurt or a handful of chopped herbs makes it feel more polished if you have them. It serves 4 as a side or 2 to 3 as a light meal.
Pro Tips for This Recipe:
- Don’t boil the couscous once it’s covered. Steam does the job.
- Use broth if you want the grains to taste less plain.
- A little extra lemon keeps the raisins from tasting too sweet.
- If the bowl feels dry, drizzle on another teaspoon of olive oil.
Variations on This Dish:
- North African-Style Bowl: Add cinnamon and a pinch of coriander.
- Savory Herb Couscous: Skip the raisins and stir in parsley and dill.
- Crunchy Chickpea Bowl: Toast the chickpeas in a skillet first if you want more texture.
Common Mistakes to Avoid with This Dish:
- Too much liquid: Couscous turns mushy fast.
- Skipping the fluffing: It will clump into little bricks.
- Underseasoning: Couscous needs salt and acid or it tastes flat.
23. Mac and Cheese with Evaporated Milk
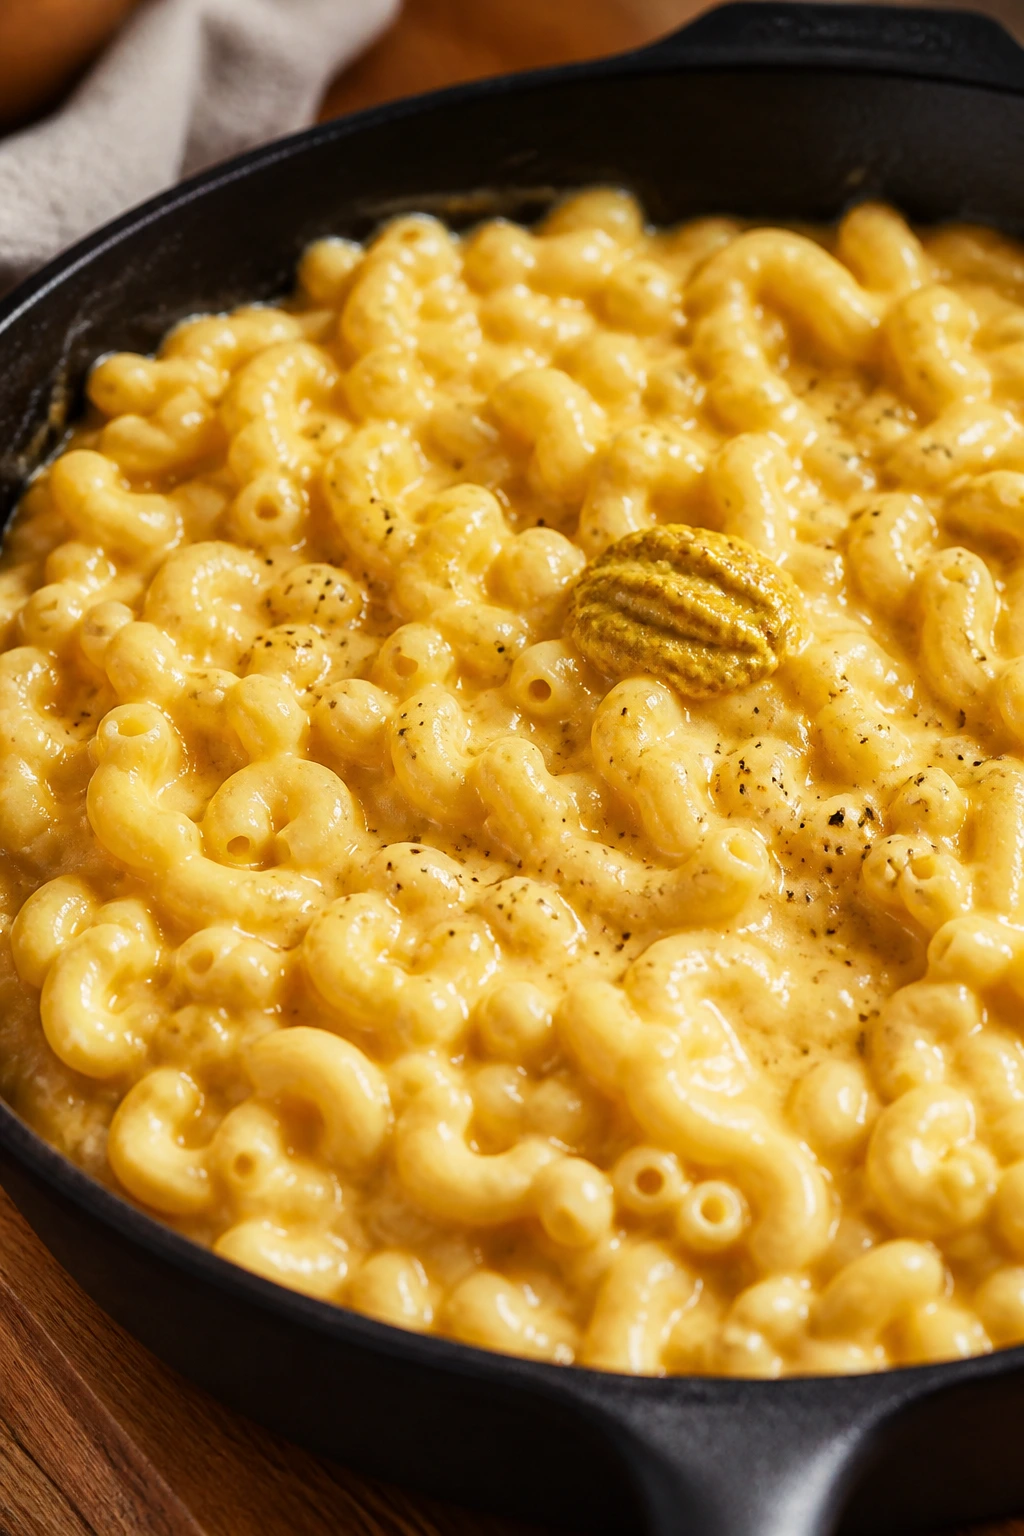
This is the pantry mac and cheese I trust when I want something creamy without opening a full carton of milk. Evaporated milk gives the sauce a deeper, slightly cooked flavor, and a simple roux keeps the cheese from separating into oil and grain. It’s cheap, yes, but it also knows what it’s doing.
Why It Works: Evaporated milk is concentrated, so it brings richness without needing much else. A butter-and-flour roux thickens the sauce before the cheese goes in, which keeps the texture smooth. Mustard sharpens the flavor just enough to stop the cheese from tasting one-note.
Key Ingredients:
- 12 oz elbow macaroni — or another small pasta.
- 3 tbsp butter — for the roux.
- 3 tbsp all-purpose flour — thickens the sauce.
- 1 can evaporated milk, 12 oz — the creamy base.
- 1 cup water — helps the sauce move.
- 2 cups shredded cheddar — freshly grated melts best.
- 1 tsp mustard — yellow or Dijon both work.
- 1/2 tsp salt and pepper — adjust to taste.
- 1/3 cup breadcrumbs — optional for topping.
Quick Steps:
- Cook the pasta: Boil the macaroni in salted water until just tender, then drain.
- Make the roux: Melt the butter in a saucepan over medium heat. Whisk in the flour and cook for 1 minute until it smells a little nutty.
- Build the sauce: Slowly whisk in the evaporated milk and water. Cook for 2 to 3 minutes until the sauce thickens enough to coat a spoon.
- Add cheese: Lower the heat and stir in the cheddar and mustard until smooth. Do not let the sauce boil once the cheese is in.
- Combine: Fold in the pasta and top with breadcrumbs if using. Serve hot.
Equipment for This Recipe:
- Medium saucepan — for the sauce.
- Large pot — for the pasta.
- Whisk — keeps the roux smooth.
- Colander — for draining.
- Baking dish — only if you want to broil the top.
How to Serve This Dish:
Serve it right away while the sauce is still loose and glossy. A little black pepper or a pinch of paprika on top makes the bowl look and taste better. It serves 4 as a main dish, or 6 as a side.
Pro Tips for This Recipe:
- Grate the cheese yourself if you can; pre-shredded cheese sometimes melts a little less smoothly.
- Add the cheese off the heat to avoid graininess.
- If the sauce gets too thick, loosen it with a splash of warm water.
- A tiny bit of mustard makes the cheese taste sharper without turning the dish into mustard mac.
Variations on This Dish:
- Stovetop Breadcrumb Bake: Put the finished mac under the broiler with crumbs on top for 1 to 2 minutes.
- Smoky Mac: Add smoked paprika and a little hot sauce.
- Tuna Mac: Fold in a drained can of tuna for more protein.
Common Mistakes to Avoid with This Dish:
- Boiling the cheese sauce: That’s how it turns grainy. Keep the heat low.
- Skipping the roux: The sauce won’t cling properly.
- Overcooking the pasta: It should stay a little firm so it holds the sauce.
24. Tomato Polenta with Parmesan
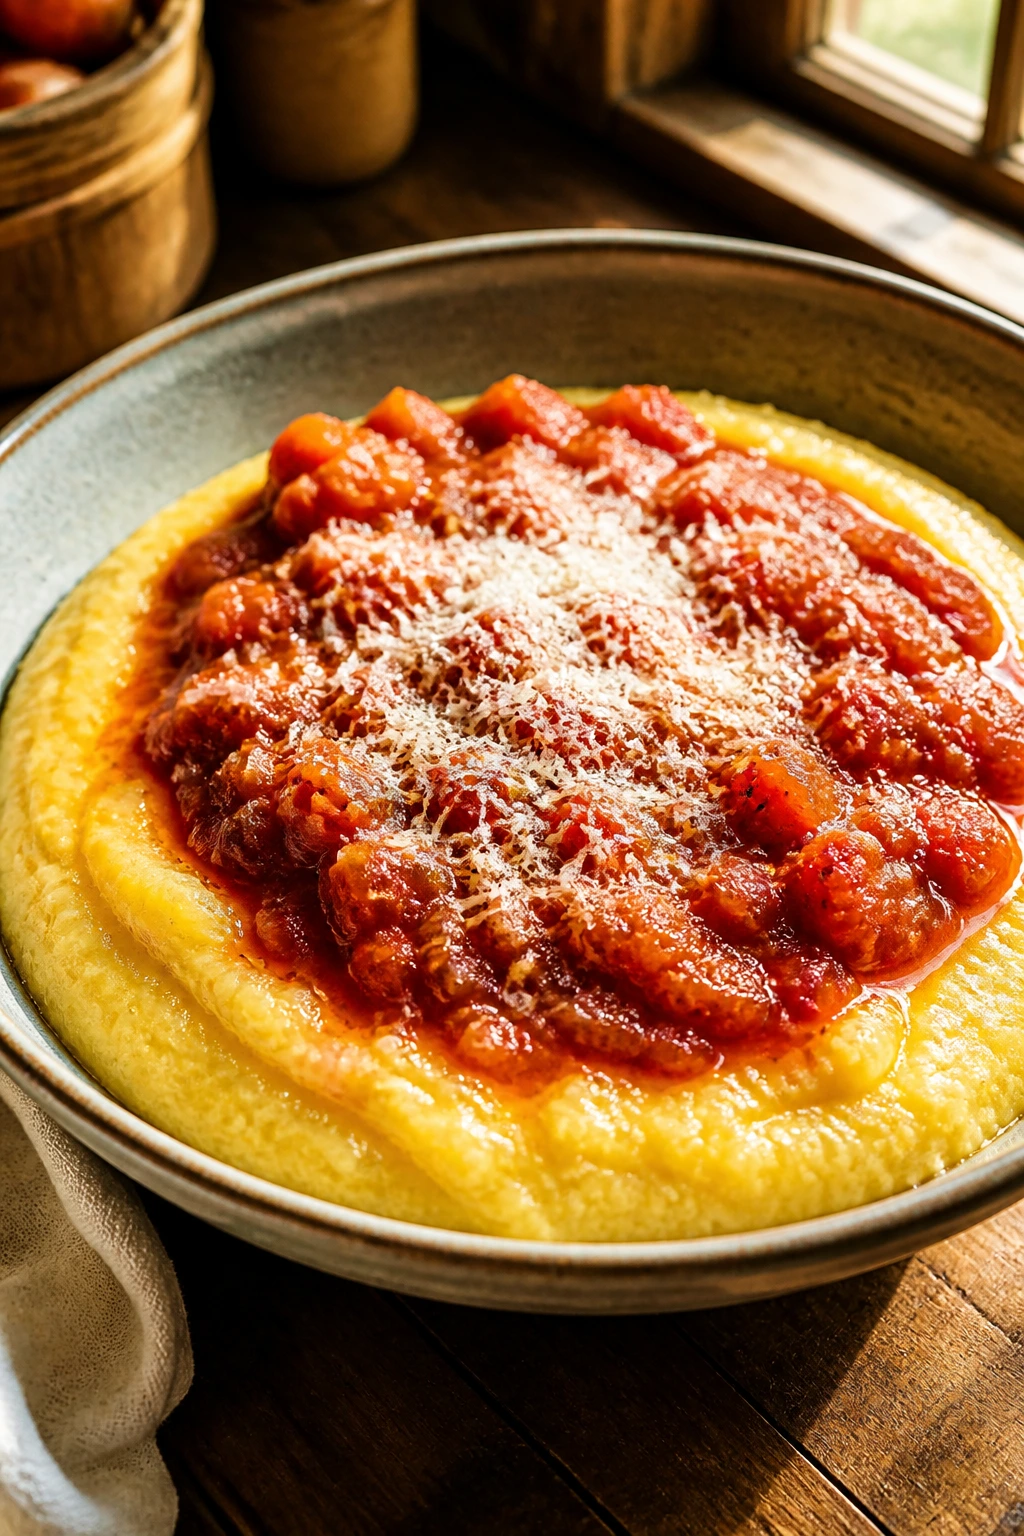
Polenta is one of those pantry staples that looks humble in the bag and then turns creamy and comforting once it hits hot liquid. Spoon canned tomatoes and garlic over the top, add Parmesan, and you’ve got a meal that feels more deliberate than its price suggests. It’s soft, savory, and a little elegant in a scruffy way.
Why It Works: Polenta thickens as it cooks, which gives you a smooth base for tomato sauce. Garlic and canned tomatoes keep the topping bright and simple. Parmesan adds salt and a nutty finish, so the bowl doesn’t taste empty.
Key Ingredients:
- 1 cup polenta — regular, not instant if possible.
- 4 cups water or broth — for cooking the polenta.
- 1 tbsp olive oil — for the tomato topping.
- 3 garlic cloves, minced — flavor for the sauce.
- 1 can diced or crushed tomatoes, 14.5 oz — the topping.
- 1 tsp dried oregano — or Italian seasoning.
- 2 tbsp butter — stirred into the polenta.
- 1/2 cup Parmesan — for finishing.
- Salt and pepper — to taste.
Quick Steps:
- Start the tomatoes: Heat the oil in a skillet over medium heat. Cook the garlic for 30 seconds, then add the tomatoes and oregano. Simmer for 10 minutes until slightly thickened.
- Cook the polenta: Bring the water or broth to a boil in a saucepan. Whisk in the polenta slowly, then lower the heat.
- Stir often: Cook for 20 to 25 minutes, stirring now and then, until the polenta is thick and creamy and no longer grainy.
- Finish the base: Stir in the butter and half the Parmesan. Taste for salt.
- Serve: Spoon the tomato topping over the polenta and finish with the remaining cheese.
Equipment for This Recipe:
- Saucepan — for the polenta.
- Skillet — for the tomatoes.
- Whisk — keeps lumps away at the start.
- Wooden spoon — for stirring once it thickens.
- Ladle — for serving.
How to Serve This Dish:
Serve it in a bowl so the tomato sauce can pool into the center. A little olive oil or chili flakes on top gives it more edge. It feeds 4 as a main if you add bread.
Pro Tips for This Recipe:
- Whisk the polenta in slowly to keep it smooth.
- Keep stirring once it thickens or it can spit and stick.
- Add broth instead of water if you want more flavor.
- If the polenta firms up too much, loosen it with warm water.
Variations on This Dish:
- Garlic-Butter Polenta: Skip the tomato topping and double the butter and cheese.
- Bean Tomato Polenta: Spoon white beans into the tomato sauce before serving.
- Basil Version: Stir dried basil into the tomatoes if oregano feels too heavy.
Common Mistakes to Avoid with This Dish:
- Lumpy polenta: Add the grain slowly and whisk at the start.
- Not stirring enough: It can stick and scorch near the bottom.
- Serving it too firm: Polenta should be creamy enough to spoon, not slice.
25. Black-Eyed Pea Stew
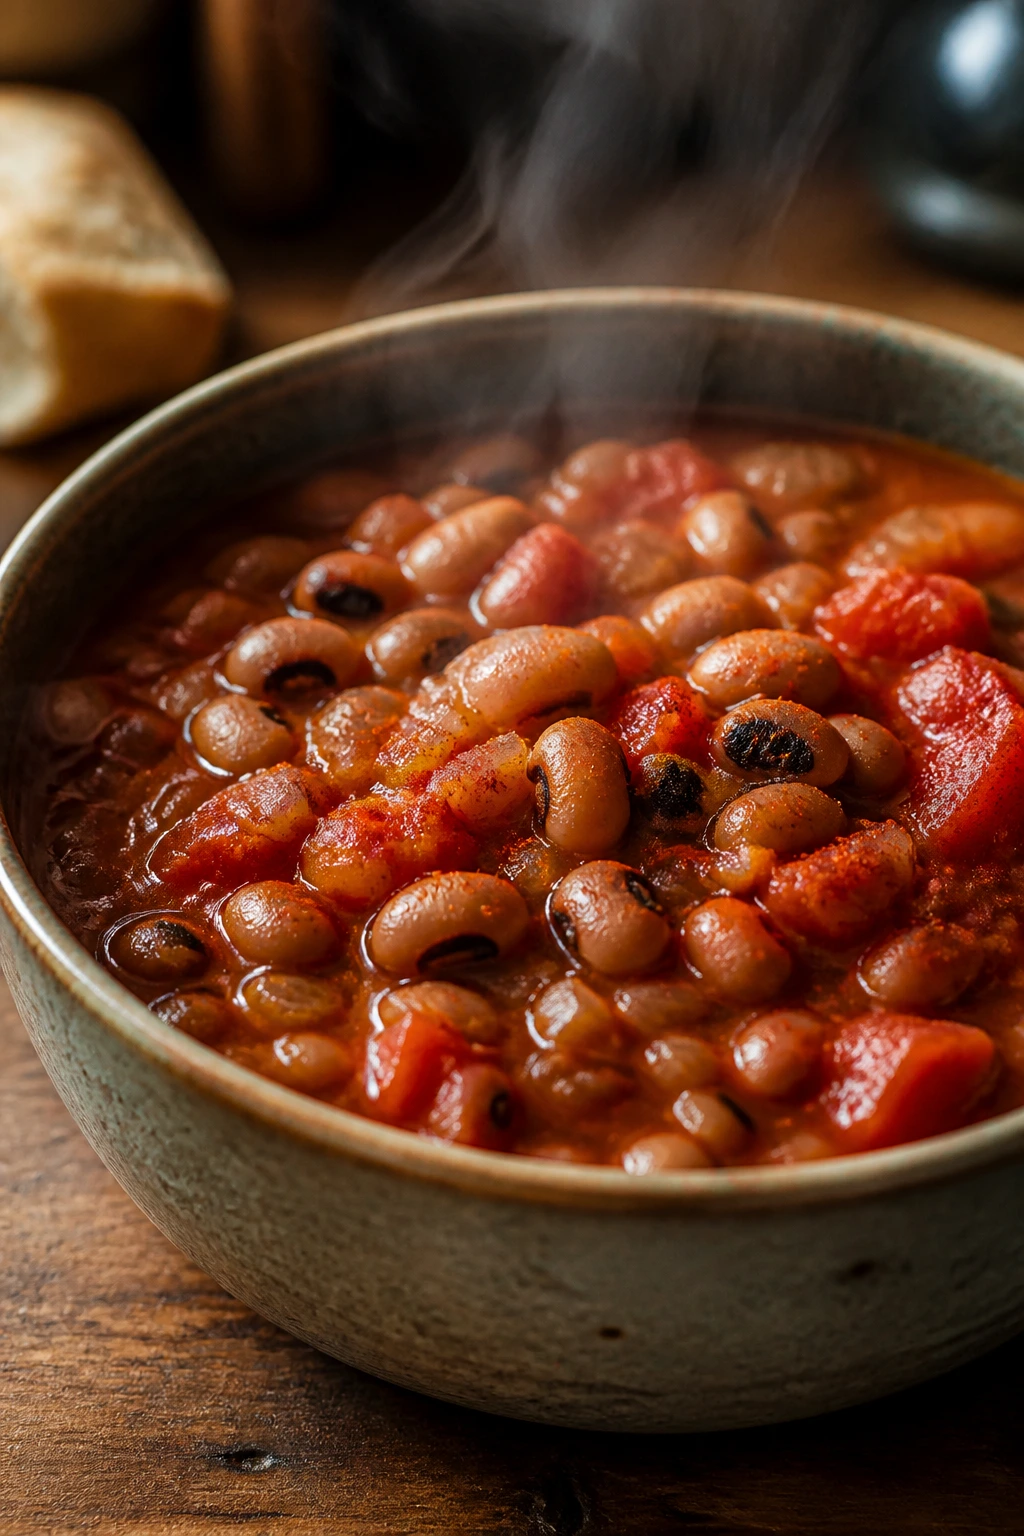
Black-eyed peas are one of those shelf-stable ingredients that can go from overlooked to excellent with a few good seasonings. In stew form, they become tender, smoky, and filling, with tomatoes and paprika giving the whole pot a deeper flavor than you’d expect from a can. Serve it with rice and it becomes a full meal.
Why It Works: Black-eyed peas are soft enough to absorb the stew flavor quickly but sturdy enough to keep their shape. Tomatoes add body, paprika adds warmth, and onion and garlic make the pot taste like it had more time than it did. Rice on the side soaks up the broth.
Key Ingredients:
- 2 cans black-eyed peas, drained — or cooked dried peas if you have them.
- 1 tbsp oil — for the onion.
- 1 onion, diced — the flavor base.
- 3 garlic cloves, minced — gives the stew depth.
- 1 can diced tomatoes, 14.5 oz — for the broth.
- 1 tsp smoked paprika — gives it a smoky edge.
- 1 bay leaf — optional, but helpful.
- 4 cups broth or water — enough to make it stew-like.
- Rice — for serving.
- Salt and pepper — to finish.
Quick Steps:
- Cook the onion: Heat the oil in a pot over medium heat. Cook the onion for 5 minutes until soft.
- Add garlic and spices: Stir in the garlic and smoked paprika for 30 seconds.
- Build the stew: Add the black-eyed peas, tomatoes, broth, and bay leaf. Bring to a simmer and cook for 15 to 20 minutes.
- Check texture: Some peas should stay whole while a few break down and thicken the broth.
- Serve: Remove the bay leaf, season to taste, and ladle over rice.
Equipment for This Recipe:
- Pot or Dutch oven — for the stew.
- Wooden spoon — for stirring.
- Measuring cups — for the broth.
- Rice pot — if you’re making rice.
- Ladle — for serving.
How to Serve This Dish:
Serve it over plain rice or with cornbread if you keep that in the cupboard. A splash of vinegar or hot sauce at the table sharpens the flavor. It makes 4 generous servings.
Pro Tips for This Recipe:
- Rinse the peas well to keep the broth from tasting canned.
- Let the stew simmer long enough for the tomatoes to mellow.
- A spoonful of tomato paste deepens the broth if you have it.
- If it tastes thin, mash a few peas against the side of the pot.
Variations on This Dish:
- Greens and Peas: Add spinach or kale near the end if you have it.
- Spicy Stew: Add cayenne or hot sauce for more heat.
- Smoky Tomato Stew: Double the smoked paprika and serve with toast.
Common Mistakes to Avoid with This Dish:
- Stopping too early: The stew needs time for the flavors to settle.
- Too much broth: It should be hearty, not watery.
- Underseasoning canned peas: They need salt and acid to wake up.
26. Chickpea Smash Wraps
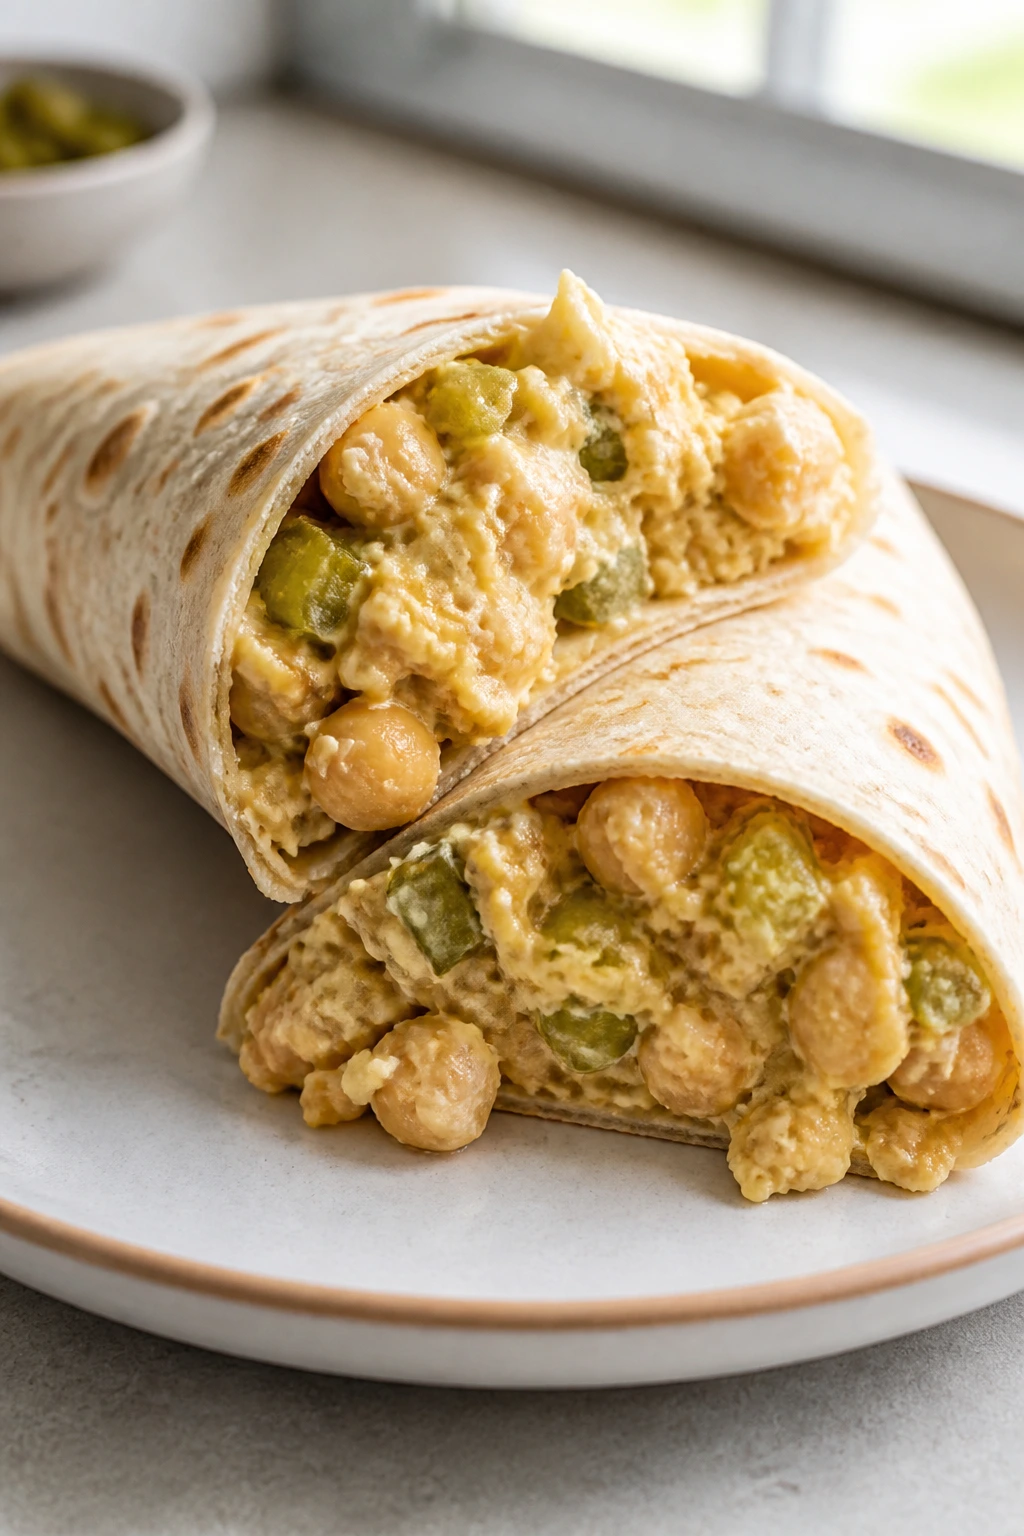
If you keep a can of chickpeas and a few condiments around, lunch stops being a project. Mash the chickpeas, stir in something creamy, add a little mustard or relish, and wrap it up. It’s cheap, fast, and surprisingly satisfying when the filling is seasoned well.
Why It Works: Chickpeas mash into a filling with enough texture to feel substantial without turning into paste. Mayo or yogurt adds creaminess, while mustard and pickles bring the sharpness that keeps the wrap from tasting dull. Tortillas make the whole thing portable.
Key Ingredients:
- 1 can chickpeas, drained and rinsed — the main filling.
- 3 tbsp mayonnaise or plain yogurt — for creaminess.
- 1 tsp mustard — sharpens the flavor.
- 2 tbsp chopped pickles or relish — brings crunch and tang.
- 1/2 tsp paprika — optional, but helpful.
- 4 tortillas — flour or whole wheat.
- Lettuce or canned spinach, drained well — optional.
- Salt and pepper — to taste.
Quick Steps:
- Mash the chickpeas: Put the chickpeas in a bowl and mash them with a fork until some are broken and some still hold shape.
- Mix the filling: Stir in the mayo or yogurt, mustard, pickles or relish, paprika, salt, and pepper.
- Warm the tortillas: Heat them in a dry skillet for 15 seconds per side so they fold without cracking.
- Assemble: Spoon the filling onto each tortilla and add lettuce if using.
- Wrap and serve: Roll them tightly and cut in half.
Equipment for This Recipe:
- Mixing bowl — for the filling.
- Fork or potato masher — for mashing.
- Skillet — to warm the tortillas.
- Knife — for slicing the wraps.
- Cutting board — for rolling and cutting.
How to Serve This Dish:
Serve the wraps cut on the diagonal with chips or pickles on the side. They’re good cold, which makes them handy for packed lunches. Two wraps usually make one solid meal.
Pro Tips for This Recipe:
- Don’t mash every chickpea into paste; texture matters here.
- Drain the chickpeas well or the filling gets loose.
- If you want more flavor, add a pinch of garlic powder.
- A splash of vinegar can replace the pickle brine if needed.
Variations on This Dish:
- Curried Chickpea Wrap: Add curry powder and dried raisins for a sweeter, spiced version.
- Smoky Chickpea Smash: Use smoked paprika and chopped onions.
- Crunch Wrap: Add crushed crackers or sunflower seeds for extra texture.
Common Mistakes to Avoid with This Dish:
- Too much mayo: The filling turns slippery. Start small.
- Wet chickpeas: Drain them well first.
- Cold, stiff tortillas: Warm them briefly so they roll cleanly.
27. Pantry Minestrone

Minestrone is a good reminder that soup doesn’t need a long list to feel generous. Beans, pasta, tomatoes, and a handful of vegetables create a pot with enough color and texture to keep each spoonful changing. It’s the sort of meal that quietly uses up what you have before anything goes bad.
Why It Works: The broth carries the vegetables and beans, while the pasta thickens the pot just enough to feel substantial. Tomatoes bring acid, beans bring body, and Italian seasoning gives the soup a familiar, comforting shape. It’s one of the most adaptable pantry meals in the bunch.
Key Ingredients:
- 1 tbsp olive oil — for the vegetables.
- 1 onion, diced — the base.
- 2 carrots, diced — optional, but traditional.
- 3 garlic cloves, minced — for depth.
- 1 can diced tomatoes, 14.5 oz — the soup’s backbone.
- 1 can kidney beans, drained — hearty and sturdy.
- 1 can white beans, drained — for softness.
- 1 cup small pasta — ditalini, elbows, or shells.
- 6 cups broth or water with bouillon — the soup base.
- 1 tsp Italian seasoning — the easy spice mix.
Quick Steps:
- Cook the vegetables: Heat the oil in a soup pot over medium heat. Add the onion and carrots and cook for 5 minutes until softened.
- Add garlic and tomatoes: Stir in the garlic and cook for 30 seconds, then add the tomatoes, beans, broth, and seasoning.
- Simmer: Bring the pot to a boil, then lower to a simmer for 10 minutes.
- Add the pasta: Stir in the small pasta and cook for 8 to 10 minutes until tender.
- Serve: Taste for salt and pepper, then ladle into bowls with bread.
Equipment for This Recipe:
- Soup pot — needs enough room for pasta.
- Wooden spoon — for stirring.
- Knife and cutting board — for the vegetables.
- Ladle — for serving.
- Measuring cups — for the broth and pasta.
How to Serve This Dish:
Serve it with toasted bread or crackers so the soup has a little crunch beside it. A sprinkle of Parmesan or a drizzle of olive oil makes the bowl feel more finished. This makes 6 bowls if portions are moderate.
Pro Tips for This Recipe:
- Add the pasta near the end so it doesn’t go mushy.
- If the soup thickens overnight, loosen it with water when reheating.
- A bay leaf helps if you have one.
- Don’t skip the final tasting; soup like this needs the last adjustment.
Variations on This Dish:
- Pesto Minestrone: Stir in a spoonful of pesto at the end if it’s in the fridge.
- Lemon Minestrone: Add lemon juice before serving for brightness.
- Bean-Heavy Version: Use extra beans and less pasta if you want it more filling.
Common Mistakes to Avoid with This Dish:
- Overcooked pasta: It falls apart in the broth. Add it late.
- Thin, bland broth: Taste and season before serving.
- Too many vegetables at once: Keep the pot balanced so the beans still matter.
28. Canned Salmon Cakes with Crackers

Salmon cakes are one of the smartest ways to make a can of fish feel like an actual meal. Crackers hold the patties together, the egg keeps them tender, and a hot skillet gives you a browned crust that makes them worth repeating. They’re cheap, sturdy, and better with lemon than they have any right to be.
Why It Works: Canned salmon already brings salt and flavor, so the job is mostly texture management. Crackers absorb moisture and help the cakes hold their shape, while mayo and mustard keep the inside soft. A quick pan-fry gives you a crisp outside that hides the can-dinner origins nicely.
Key Ingredients:
- 2 cans salmon, about 14 to 15 oz total, drained — bones are fine if they’re soft.
- 1 cup crushed saltines or plain crackers — the binder.
- 1 egg — holds the mixture together.
- 2 tbsp mayonnaise — adds moisture.
- 1 tsp mustard — sharpens the flavor.
- 1 tbsp lemon juice — brightens the fish.
- 2 tbsp chopped parsley — optional, but useful.
- 2 tbsp oil — for frying.
- Black pepper — the salmon likes it.
Quick Steps:
- Mix the cakes: Stir together the salmon, crackers, egg, mayo, mustard, lemon juice, parsley, and pepper. The mixture should hold when pressed, not slosh.
- Shape: Form 4 small patties and press them lightly so they’re compact.
- Chill briefly: If you have 10 minutes, chill them so they firm up. This helps them fry cleanly.
- Fry: Heat the oil in a skillet over medium heat. Cook the cakes for 3 to 4 minutes per side, until golden brown and hot through.
- Serve: Drain briefly on paper towels and serve with lemon wedges if available.
Equipment for This Recipe:
- Mixing bowl — for the salmon mixture.
- Fork — for breaking up the fish.
- Skillet — for frying.
- Spatula — to flip the cakes.
- Plate or paper towels — for draining.
How to Serve This Dish:
Serve the cakes with rice, toast, or canned peas if that’s what the pantry has. A spoonful of tartar sauce or plain yogurt on the side works well. This recipe makes 4 patties, or 2 hearty servings.
Pro Tips for This Recipe:
- Drain the salmon well so the cakes hold together.
- If the mixture feels loose, add another tablespoon of crushed crackers.
- Let the skillet get hot before the cakes go in; that crust matters.
- A squeeze of lemon at the table makes canned salmon taste brighter.
Variations on This Dish:
- Dijon Salmon Cakes: Use extra mustard and a pinch of dill if you keep it.
- Spicy Salmon Patties: Add cayenne or hot sauce to the mix.
- Salmon Cake Sandwiches: Serve them on toast or buns with pickles.
Common Mistakes to Avoid with This Dish:
- Too much liquid: The cakes fall apart. Add more cracker crumbs if needed.
- Flipping too early: Let the first side brown fully before turning.
- Cooking over high heat: The outside burns before the center heats through.
Why Pantry Staples Turn Cheap Meal Ideas Into Real Dinner
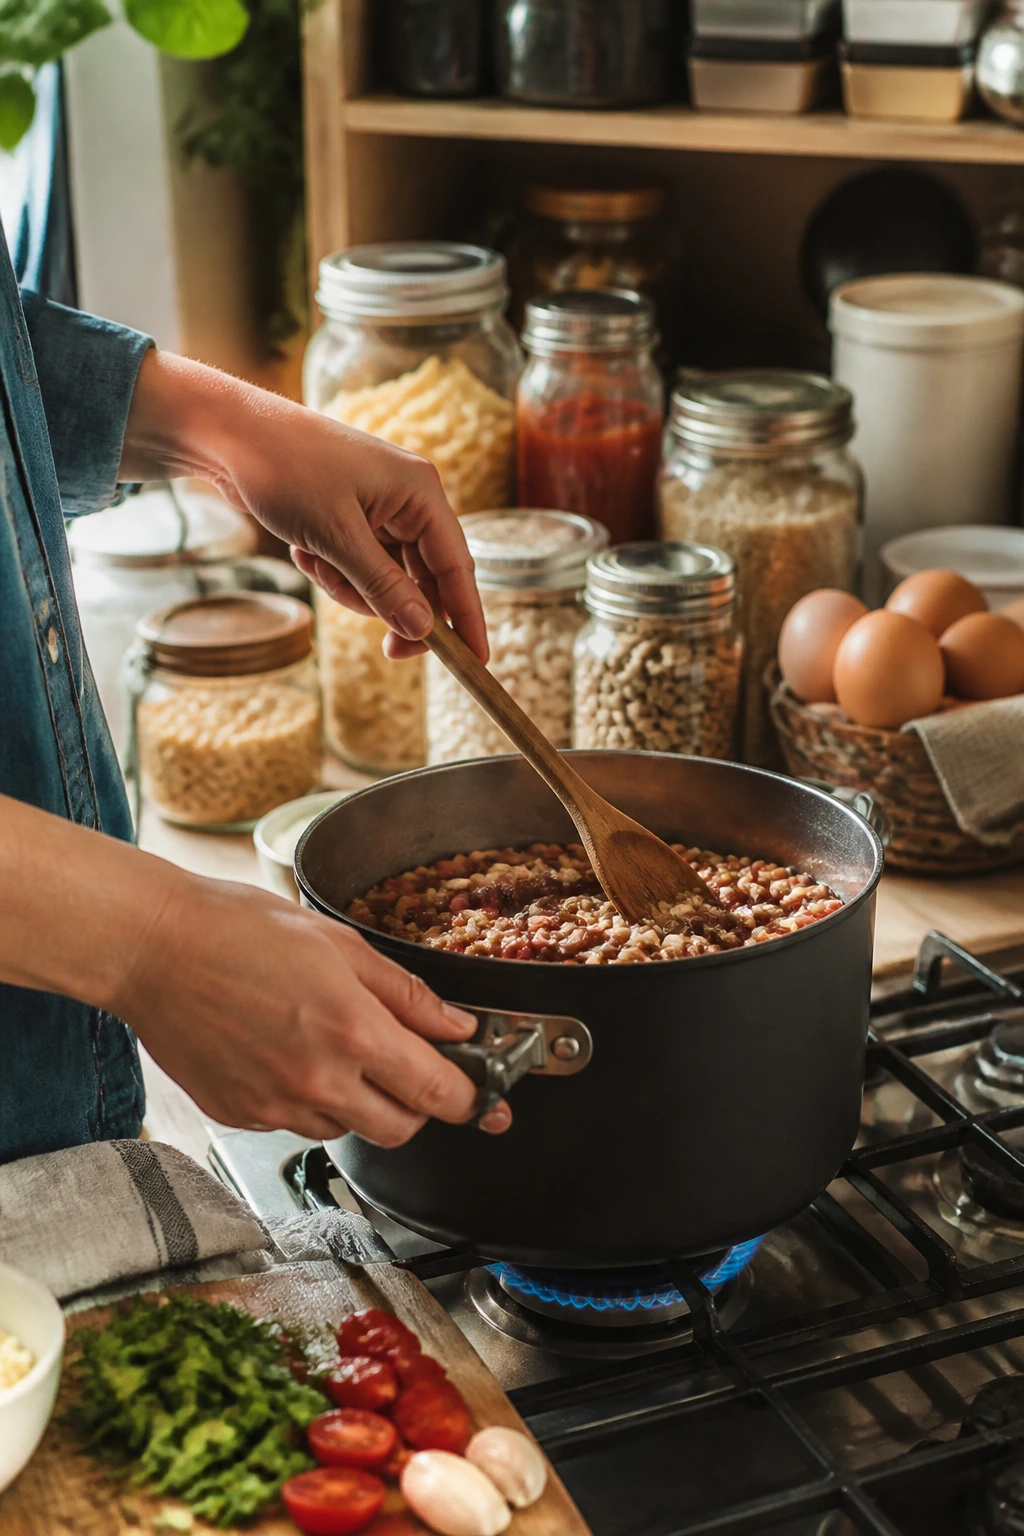
The reason pantry meals work is not magic. It’s structure. Dry pasta, rice, couscous, oats, and polenta all soak up flavored liquid and carry sauce better than a random pile of ingredients ever could. Beans and lentils bring protein and a soft, filling texture; canned tomatoes bring acid; eggs and cheese add richness; oil and butter keep everything from tasting lean and unfinished.
There’s also a little cooking science at play that home cooks use all the time without naming it. Starchy water helps sauce cling. Browning onion or garlic builds sweetness you can’t get from a can alone. A spoonful of vinegar, lemon juice, or even pickle brine wakes up beans and soups that have gone flat. Those tiny finishing moves are why a cheap meal can still taste like dinner you meant to make.
I’ve always thought pantry cooking rewards honesty. If you only have one can of beans and a little rice, don’t pretend it’s a feast. Dress it properly. Toast something. Add salt with a steady hand. Use the cheese, but use it where it counts. The less you have, the more the details matter.
And the details are cheap.
Essential Equipment for Pantry Cooking
-
Large pot with a lid: Useful for pasta, rice, soup, and anything that needs a simmer.
-
Deep skillet or sauté pan: Best for beans, sauces, fried rice, and quick skillet dinners.
-
Dutch oven: Handy when you want one pot to do everything without crowding.
-
Colander: Saves time when you’re draining pasta, beans, or canned vegetables.
-
Wooden spoon or heatproof spatula: Better than a fork for stirring thick sauces and rice.
-
Sharp chef’s knife: Makes onion, garlic, and canned-vegetable prep much faster.
-
Cutting board: A roomy board keeps prep from feeling messy and cramped.
-
Measuring cups and spoons: Pantry meals still need exact liquid and spice amounts.
-
Can opener: Not glamorous. Absolutely necessary.
-
Box grater or microplane: Useful for cheese, garlic, and lemon zest.
-
Storage containers with tight lids: Important for leftover rice, soup, pasta, and beans.
-
Sheet pan: Worth keeping around for toasting crumbs, roasting potatoes, or broiling cheese.
Smart Shopping for Pantry Staples
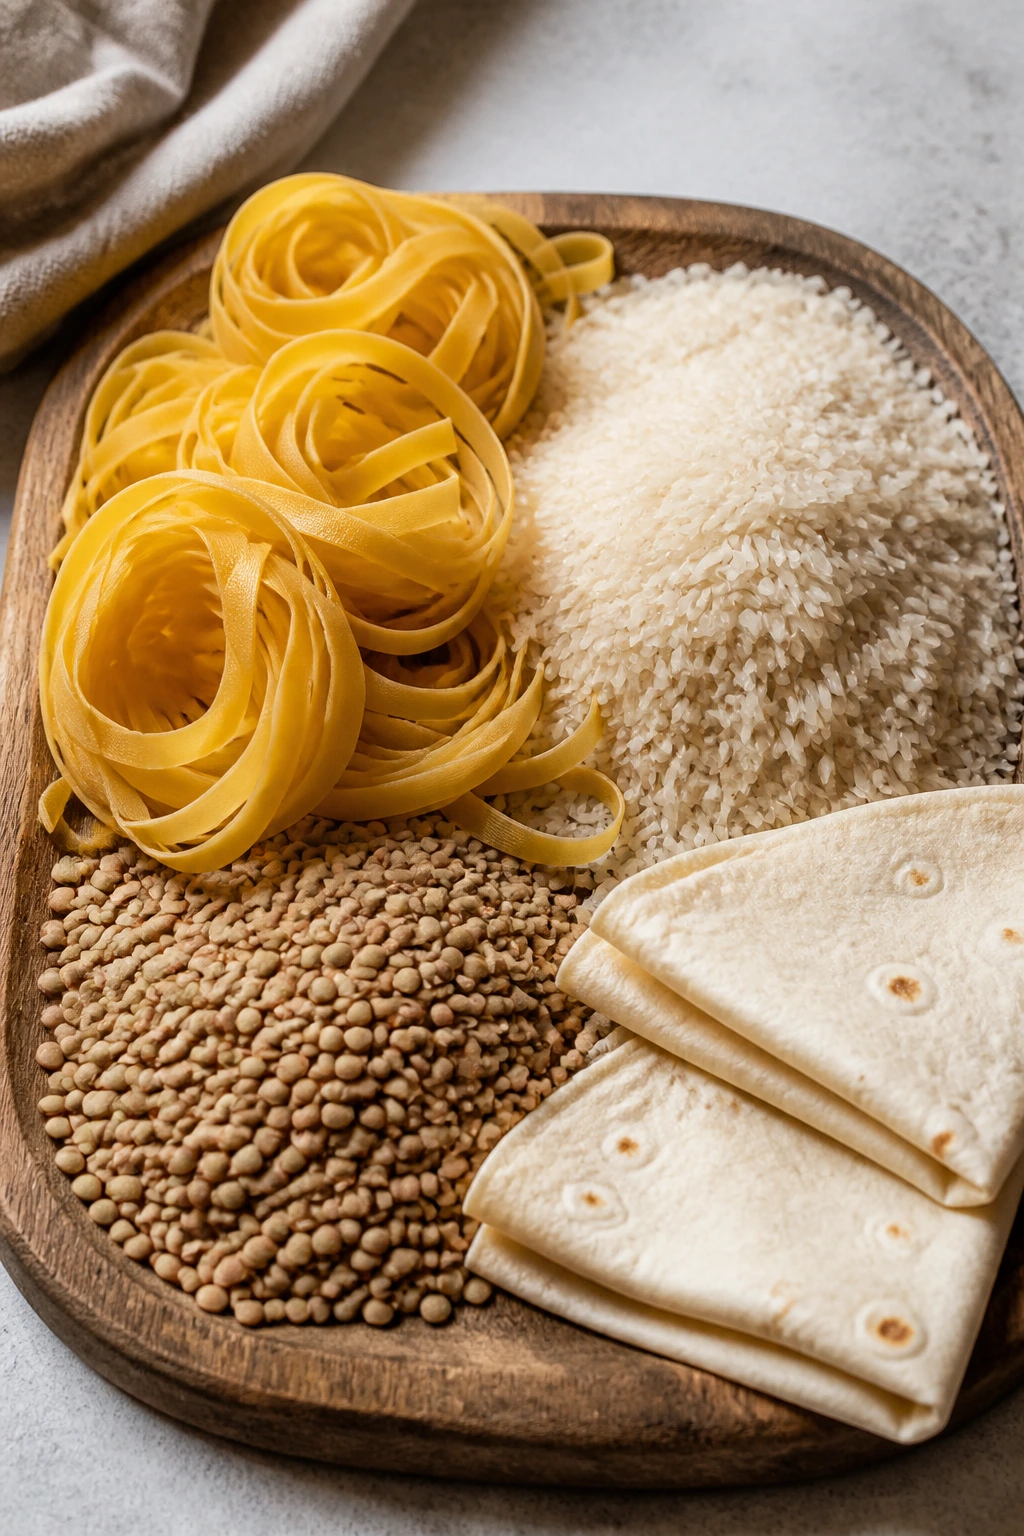
The cheapest pantry ingredients are usually the ones that can become three or four different dinners without complaining. That means dried pasta, rice, oats, couscous, lentils, canned beans, canned tomatoes, broth cubes, peanut butter, tortillas, and one or two canned fish options. If you keep those in rotation, you can build meals instead of shopping from scratch every time.
Canned tomatoes are worth a little attention. Diced tomatoes keep their shape, crushed tomatoes make a smoother sauce, and tomato paste is the secret weapon when a dish needs depth fast. Beans are similar: low-sodium beans give you more control, and if you only find regular canned beans, rinse them before cooking and season them yourself.
For proteins, canned tuna, sardines, and salmon are the pantry items that actually pull their weight. Tuna gives you mild, familiar flavor; sardines bring stronger savoriness and more oil; salmon makes cakes and patties that hold together well. Buy the one you know you’ll use, not the one that sounds impressive on a label.
Then there are the little things that make budget food taste less bare. Onions, garlic, lemons, vinegar, mustard, and hot sauce do not seem exciting in the store. They are exciting when dinner tastes flat. A jar of pickles, a block of cheese, and a box of crackers can stretch a cupboard farther than another random snack bag ever will.
How to Serve These Cheap Pantry Meals
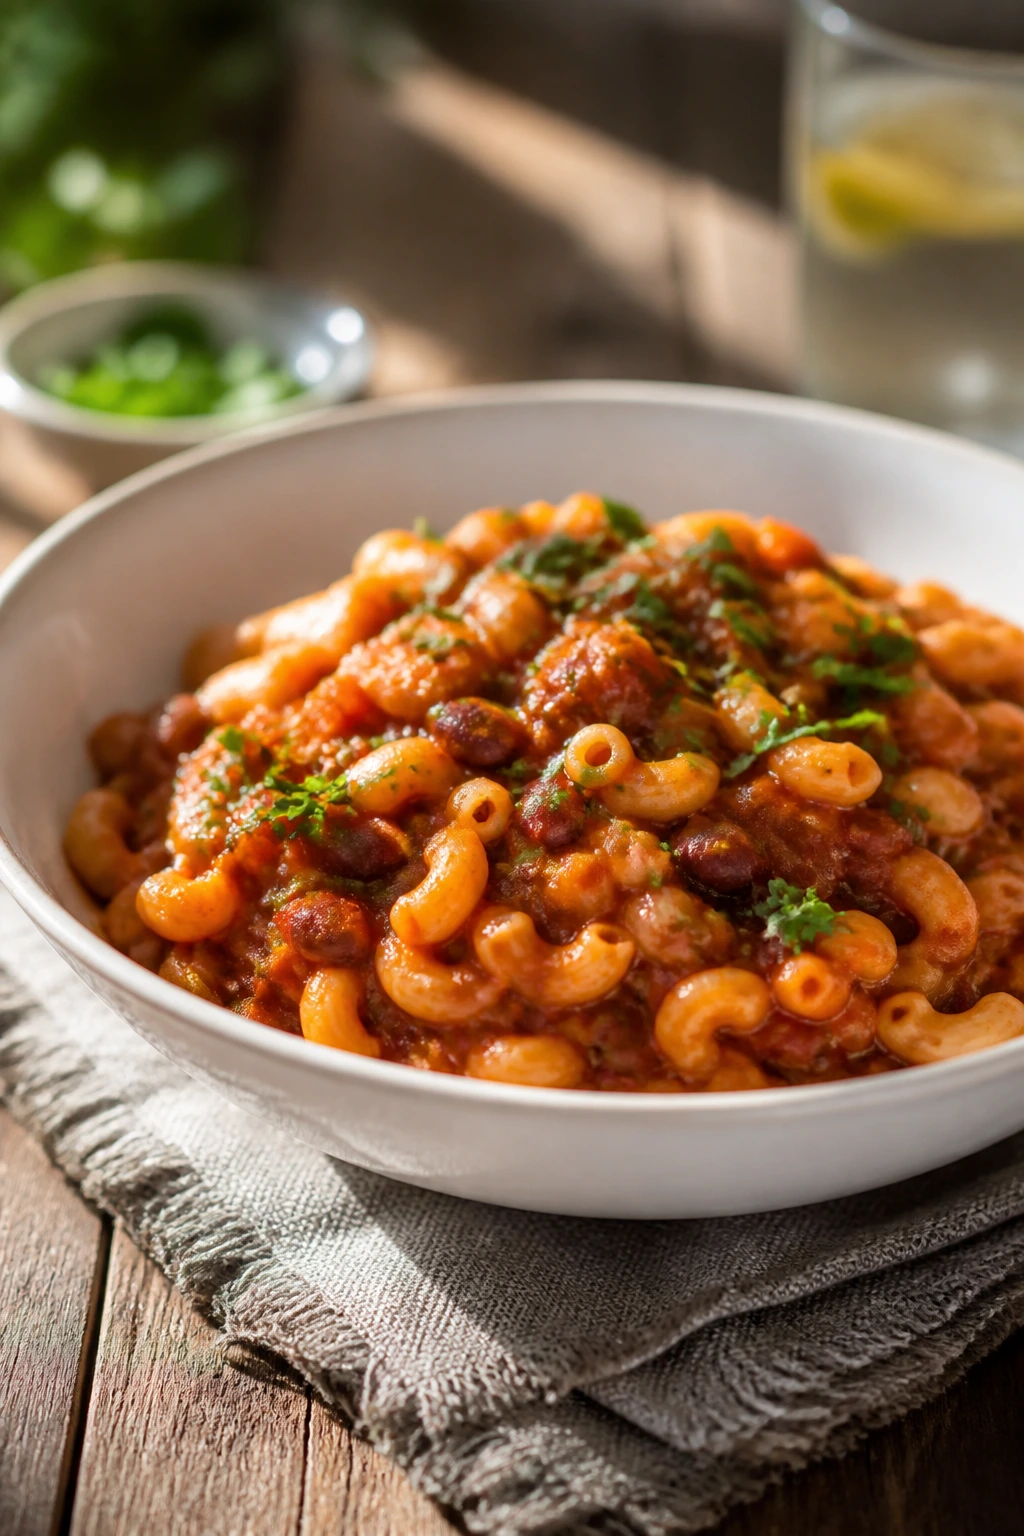
Presentation:
Use shallow bowls for saucy dishes and wide plates for toast, quesadillas, or salmon cakes. A final scatter of cheese, breadcrumbs, parsley, or scallions makes the food look more finished, and it keeps the toppings from sinking into the base.
Accompaniments:
Bread is the obvious side for soups and bean dishes, but crackers, rice, tortillas, and simple salads work just as well. Pickles, hot sauce, sliced tomatoes, canned fruit, or plain yogurt can add the sharpness and coolness these meals sometimes need.
Portions:
Most of these recipes serve 2 to 4 as a main dish, though soups and rice bowls can stretch farther if you include bread or a side. When you want to feed more people, increase the starch first, then the beans or eggs, because those are the ingredients that make a cheap meal feel full.
Beverage Pairing:
Sparkling water with lemon works with nearly everything here. Iced tea is a good match for bean bowls, tomato dishes, and fried rice. If you want something richer, a light beer or a dry white wine goes well with tomato-based pasta and sardine dishes.
Additional Tips and Flavor Boosters

Flavor Enhancement:
A small hit of acid at the end — lemon juice, vinegar, pickle brine, or even a little salsa — keeps beans, rice, and lentils from tasting flat. If a pot tastes dull, reach for acid before adding more salt.
Customization:
Frozen peas, corn, spinach, and chopped carrots slip into a lot of these recipes without changing the budget much. Extra eggs, cheese, or canned fish can raise the protein level when you need a meal to last longer.
Serving Suggestions:
Crispy breadcrumbs, crushed tortilla chips, toasted seeds, or a drizzle of chili oil can rescue a soft dish from feeling one-note. I like to think of them as the last 10 percent that makes the meal feel deliberate.
Make-It-Yours:
For gluten-free versions, use rice, polenta, corn tortillas, or gluten-free pasta, and check the soy sauce label. For dairy-free versions, lean on olive oil, tahini, or coconut milk instead of cream and cheese. For lower-sodium cooking, rinse canned beans and taste at the end instead of salting early.
Make-Ahead, Storage, and Reheating Guidance

Soups and stews with beans, lentils, or tomatoes keep well in the fridge for 3 to 4 days in airtight containers. Rice dishes and pasta meals also hold for 3 to 4 days, though they may need a splash of water when reheated. Baked casseroles such as enchilada casserole usually stay good for 3 days and reheat best in a covered oven dish at 350°F until hot through.
Cooked rice and pasta should cool quickly and get into the fridge within 2 hours. Spread rice in a shallow container if it’s steaming hot, because that helps it cool faster and keeps the texture better. Soup can go straight into smaller containers once it stops steaming hard.
Freezer life depends on the dish. Lentil soup, split pea soup, chili, black bean stew, and many tomato-based pots freeze well for up to 2 to 3 months. Creamy cheese sauces, egg dishes, and crispy tortilla recipes don’t freeze nearly as well, so keep those for the fridge instead.
Reheat soups on the stove over medium-low heat until steaming, adding water if needed. For rice and pasta, a skillet with a tablespoon or two of water often works better than the microwave because it brings back a little moisture without turning the dish gluey. Egg-topped dishes are best made fresh, but the bases can still be cooked ahead.
Variations and Adaptations to Try
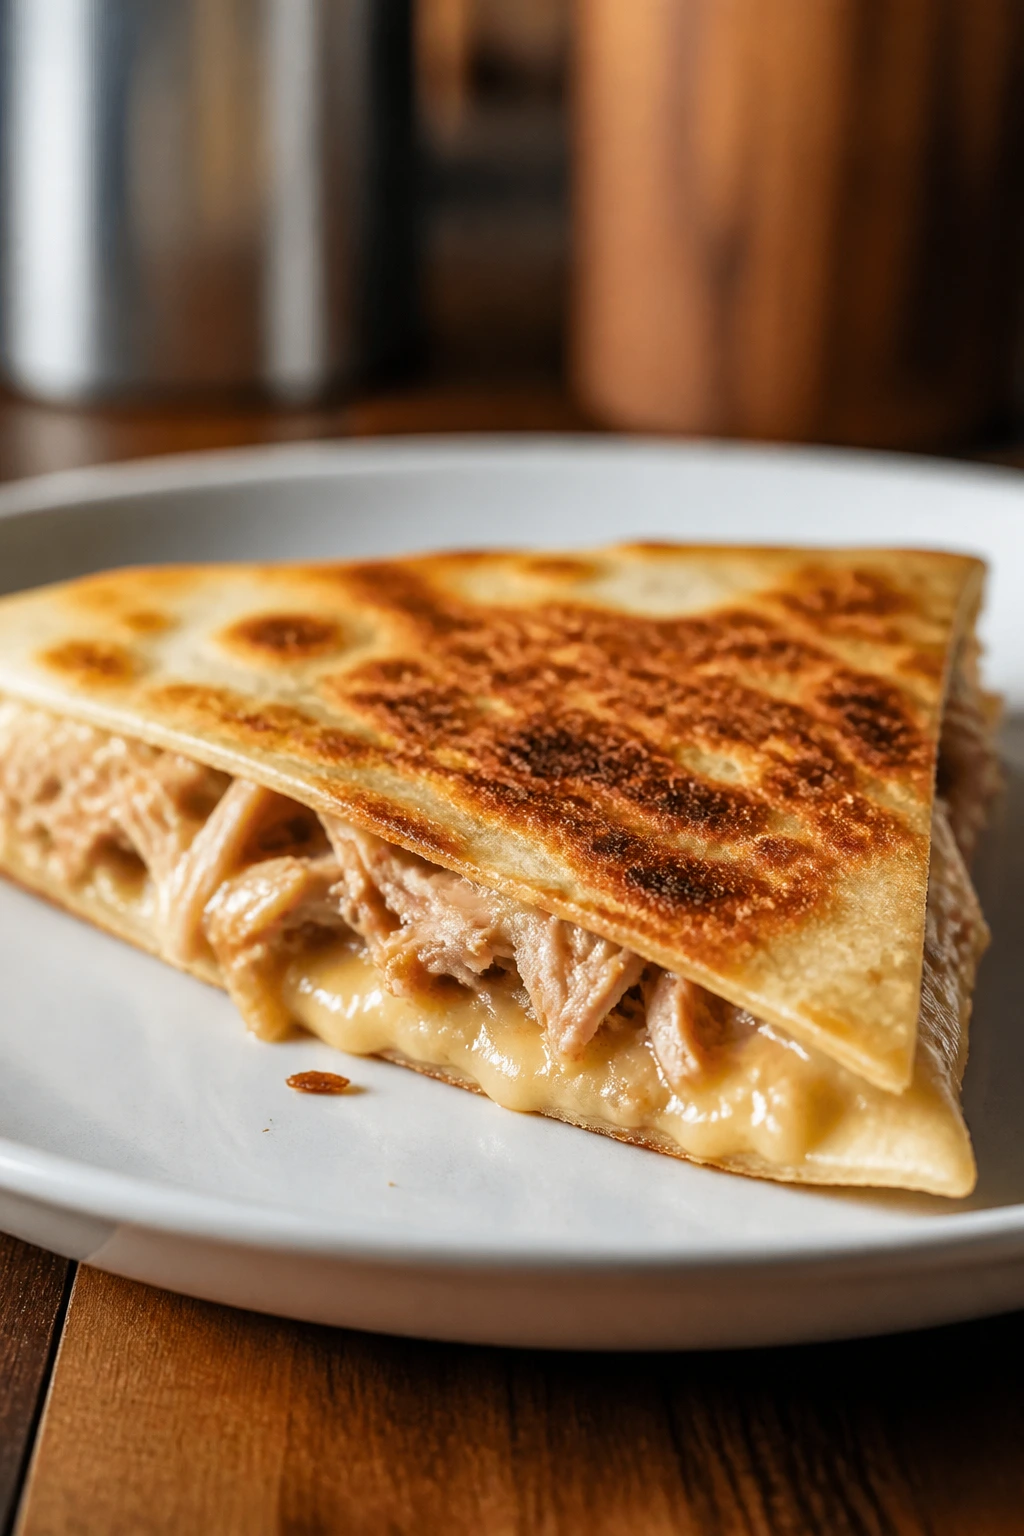
Gluten-Free Pantry Swap:
Use rice, polenta, potatoes, corn tortillas, or gluten-free pasta wherever wheat shows up. Check soy sauce and seasoning packets carefully, since those are common places for hidden gluten.
Dairy-Light Pantry Cooking:
Lean on olive oil, canned coconut milk, tahini, or a bit of nut butter instead of cheese-heavy finishes. A squeeze of lemon and a spoonful of mustard can replace some of the richness that dairy normally brings.
Low-Sodium Cupboard:
Choose low-sodium beans, unsalted tomatoes, and plain broth or water with bouillon. Rinse canned ingredients, then season at the end so you can control how salty the finished dish tastes.
Kid-Friendly Mild Version:
Leave out red pepper flakes, hot sauce, and extra garlic if the table likes things gentler. Cheese, butter, and a little tomato sauce usually get a better response than anything spicy.
Protein-Boosted Budget Plates:
Add eggs, extra beans, canned tuna, canned salmon, or a little peanut butter when you want a meal to stick longer. Pantry dinners don’t need to be meat-heavy to feel filling.
Regional Pantry Twist:
Use what your pantry already leans toward: curry powder for the lentils, oregano for tomato beans, cumin for rice bowls, or sesame oil and soy sauce for noodles. One different spice path can make the same cupboard feel fresh again.
Common Mistakes to Avoid
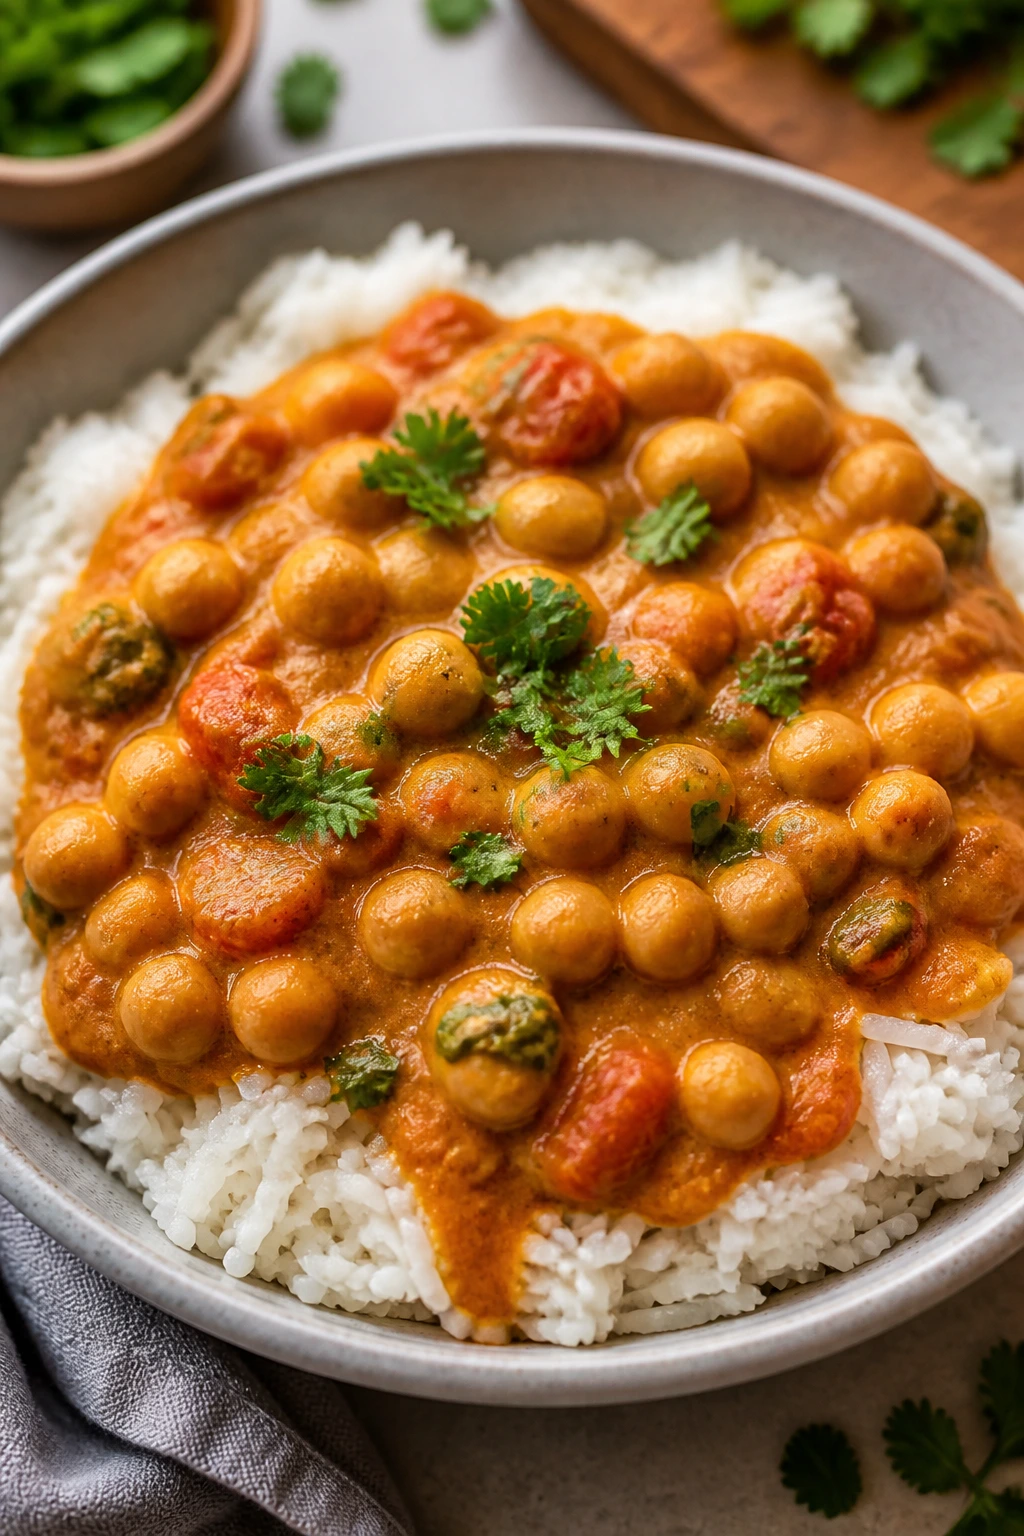
The biggest mistake in pantry cooking is treating the ingredients like they don’t need help. Beans from a can still need salt, acid, and heat. Rice still needs the right liquid ratio. Pasta still benefits from a sauce that clings instead of one that just sits there.
Another common slip is forgetting texture. A bowl of soft food gets boring fast if nothing crunches. Toasted breadcrumbs, croutons, chips, fried tortilla strips, or a crisp potato skin all do real work, and they usually cost almost nothing.
People also under-season the base. A good pantry meal needs flavor in more than the final sprinkle. Cook the onion, bloom the spices, and taste before serving. If the dish tastes fine but not memorable, it probably needs lemon, vinegar, mustard, or more salt — not another random herb dump.
The last trap is overcooking starches. Rice turns gluey, pasta goes mushy, couscous clumps, and oatmeal becomes paste if you walk away at the wrong moment. Keep the heat honest and stop cooking when the texture still has a little life.
Frequently Asked Questions
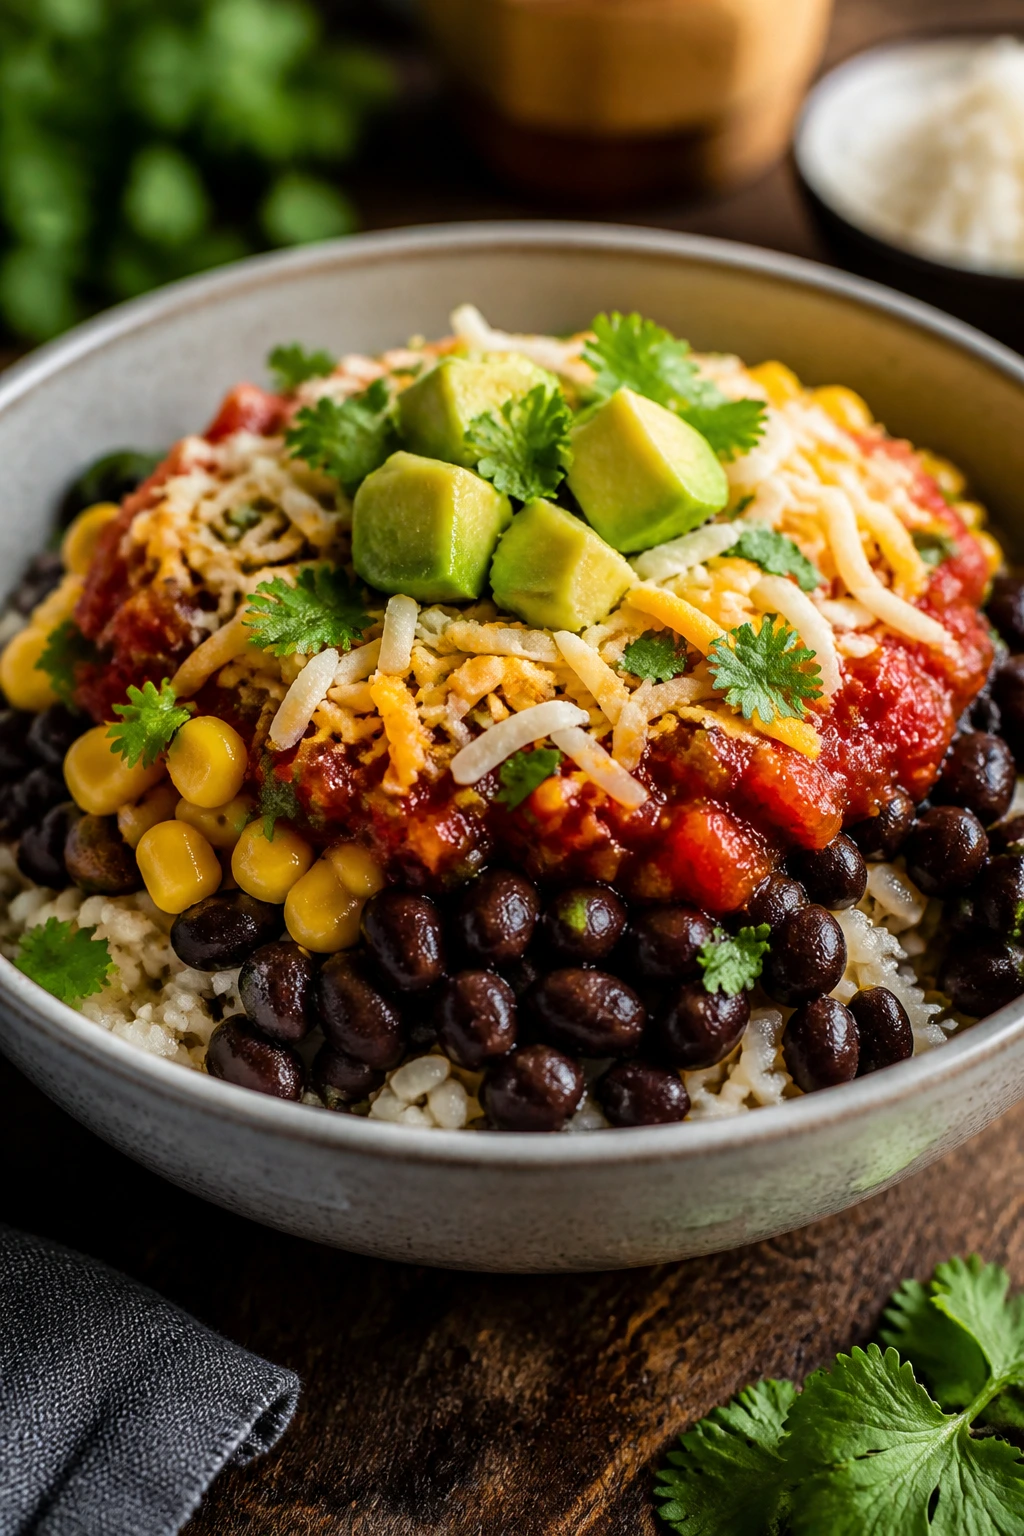
What pantry staples give the most mileage for cheap meals?
Rice, pasta, canned beans, canned tomatoes, oats, tortillas, and eggs are the core group I’d buy first. They can turn into breakfast, lunch, or dinner without asking for much help.
Can dried beans replace canned beans in these recipes?
Yes, but only if you have the time to soak and cook them first. Dried beans are cheaper per serving, yet canned beans win on speed, which matters more for quick meals.
How do I make pantry meals taste less bland?
Use a real finishing move: lemon, vinegar, hot sauce, mustard, herbs, or a little Parmesan. Bland food usually needs acid or salt in the right place, not a whole new recipe.
What if I only have rice and one can of tomatoes?
You still have dinner. Cook the rice, warm the tomatoes with onion or garlic if you have them, and finish with butter, oil, or an egg if any are around.
Which recipes in this collection freeze best?
Soups, stews, dal, chili, and tomato-based bean pots freeze the best for up to 2 to 3 months. Pasta with a cheese sauce and anything egg-based is better fresh or refrigerated for a few days.
Do canned fish and beans need to be rinsed?
Beans usually do, unless the recipe depends on their thick canning liquid. Canned fish usually does not; in fact, you often want to keep a little of the oil for flavor.
How can I keep cheap meals filling without meat?
Use a starch plus a legume, then add fat and acid. Rice with beans, pasta with chickpeas, oats with eggs, or potatoes with chili beans all carry more staying power than a lone bowl of something soft.
Can I scale these recipes up for a crowd?
Yes, but the pot or skillet size matters. When you double soups, rice, or pasta dishes, use a bigger vessel so the ingredients can move and simmer instead of steaming into a heavy mass.
What’s the easiest way to reheat leftover rice or pasta?
A skillet with a splash of water or broth is usually better than the microwave. Cover the pan for a minute or two, then stir once the steam has softened the grains or noodles.
A Better Kind of Bare-Cupboard Dinner

Pantry cooking gets treated like a fallback, but a good shelf-stable meal has its own kind of confidence. It knows where it came from. It doesn’t need a long ingredient list to taste finished, and it doesn’t apologize for using beans, rice, tomatoes, or eggs in the exact ways they were meant to work.
If you keep a few of these recipes in your back pocket, the grocery store stops being the only answer when dinner is due. A can, a pot, a little heat, and one sharp finishing move can still get you there. That’s the part I like best.
Keep the cupboard stocked with the basics, and the next cheap dinner won’t feel like a scramble at all.