
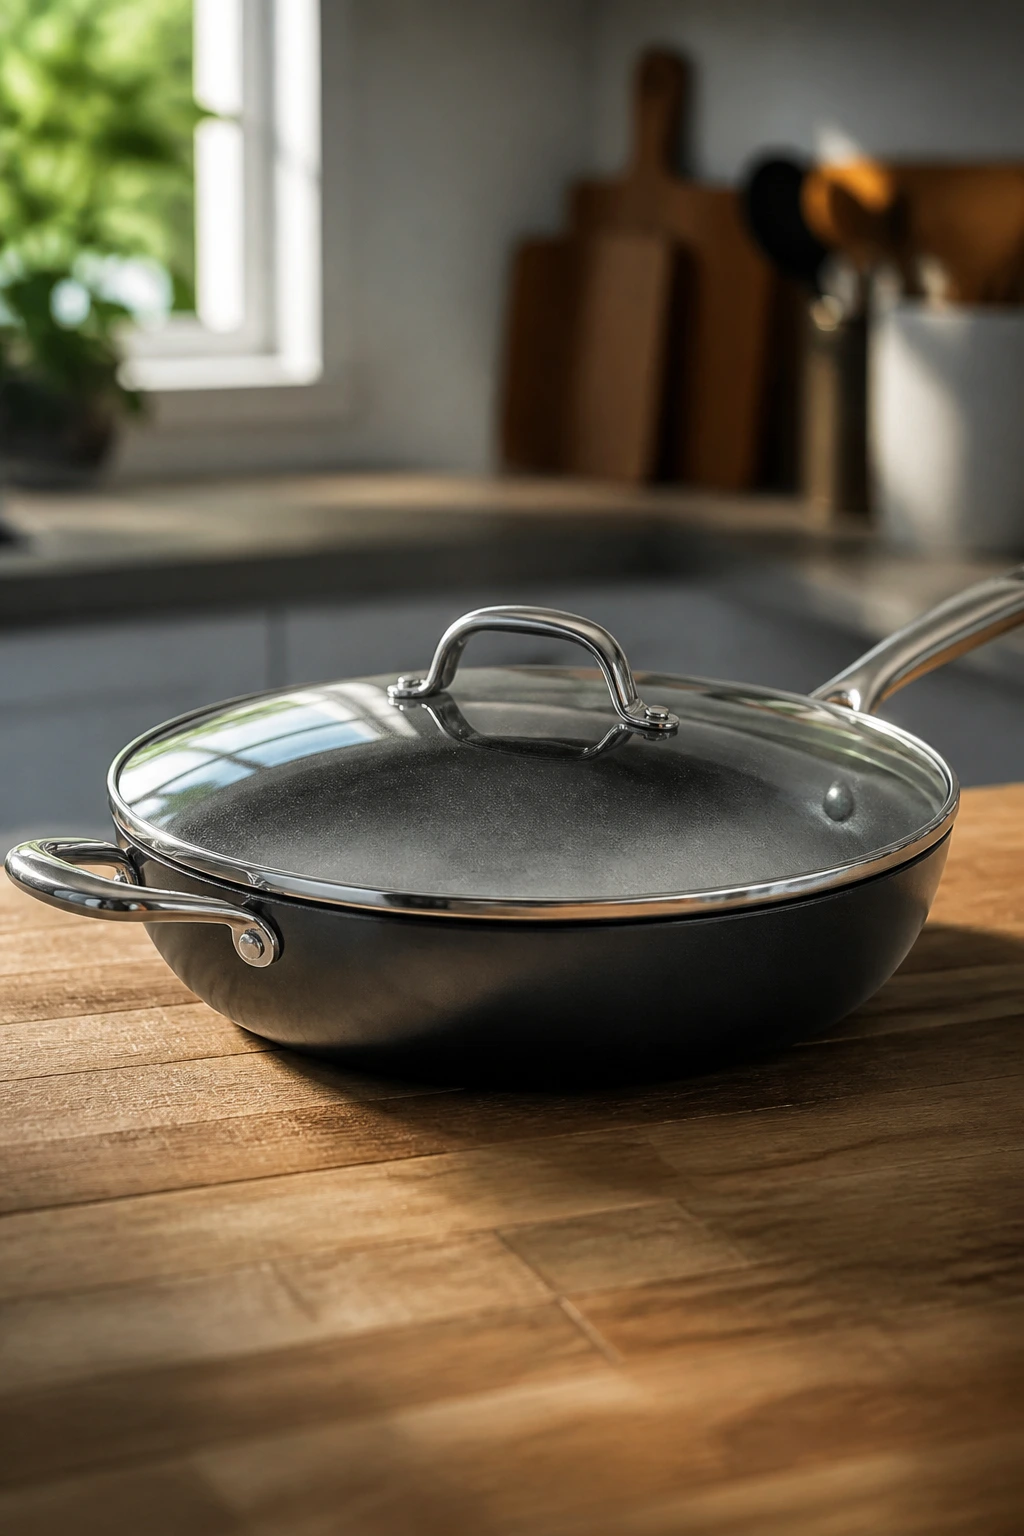
A tight grocery budget changes the way dinner behaves. Suddenly, the recipe has to earn its keep. No waste. No long simmer. No strange half-bottle of sauce that will sit in the fridge until it turns into a science experiment. The good news is that 30 minute meals on a tight grocery budget can taste like a deliberate choice instead of a compromise, if you lean on the right mix of starch, salt, acid, and one or two smart pantry staples.
The meals that actually pull this off share a pattern I keep coming back to: a cheap base, a fast-cooking protein or bean, and one sharp finish that wakes everything up. Garlic does a lot of heavy lifting. So do lemons, vinegar, salsa, mustard, and the salty edge of cheese used sparingly instead of dumped by the handful. That’s the trick. Not more ingredients. Better ones, used with a little discipline.
And because budget cooking falls apart fast when the method gets fussy, every recipe below is built to move from cutting board to plate in half an hour or less, with a grocery bill that stays on the ground instead of taking flight. Some are pantry dinners. Some are fridge clean-outs. Some use eggs, beans, or canned fish because those are the quiet heroes of weeknight cooking. All of them are practical enough to repeat.
Why These Meals Earn a Spot in the Rotation
-
Pantry-first savings: Most of these dinners start with pasta, rice, beans, eggs, or tortillas, which means the expensive part of the meal stays small and controlled.
-
Fast without shortcuts that taste cheap: The recipes rely on smart timing—like toasting breadcrumbs, blooming spices, or crisping onions—so the food tastes cooked, not rushed.
-
Flexible by design: If you have cabbage instead of broccoli, or black beans instead of chickpeas, these meals can usually absorb the swap without falling apart.
-
Good use of leftovers: Several of these dishes get better when you have leftover rice, cooked lentils, or a half bag of frozen peas hanging around.
-
Low waste, high payoff: Each recipe is built around ingredients that show up often in a budget kitchen, so the same bag of onions or block of cheese keeps doing work.
-
Feeding real people: These are not tiny, artsy plates. They’re actual dinners that leave the table looking like dinner happened.
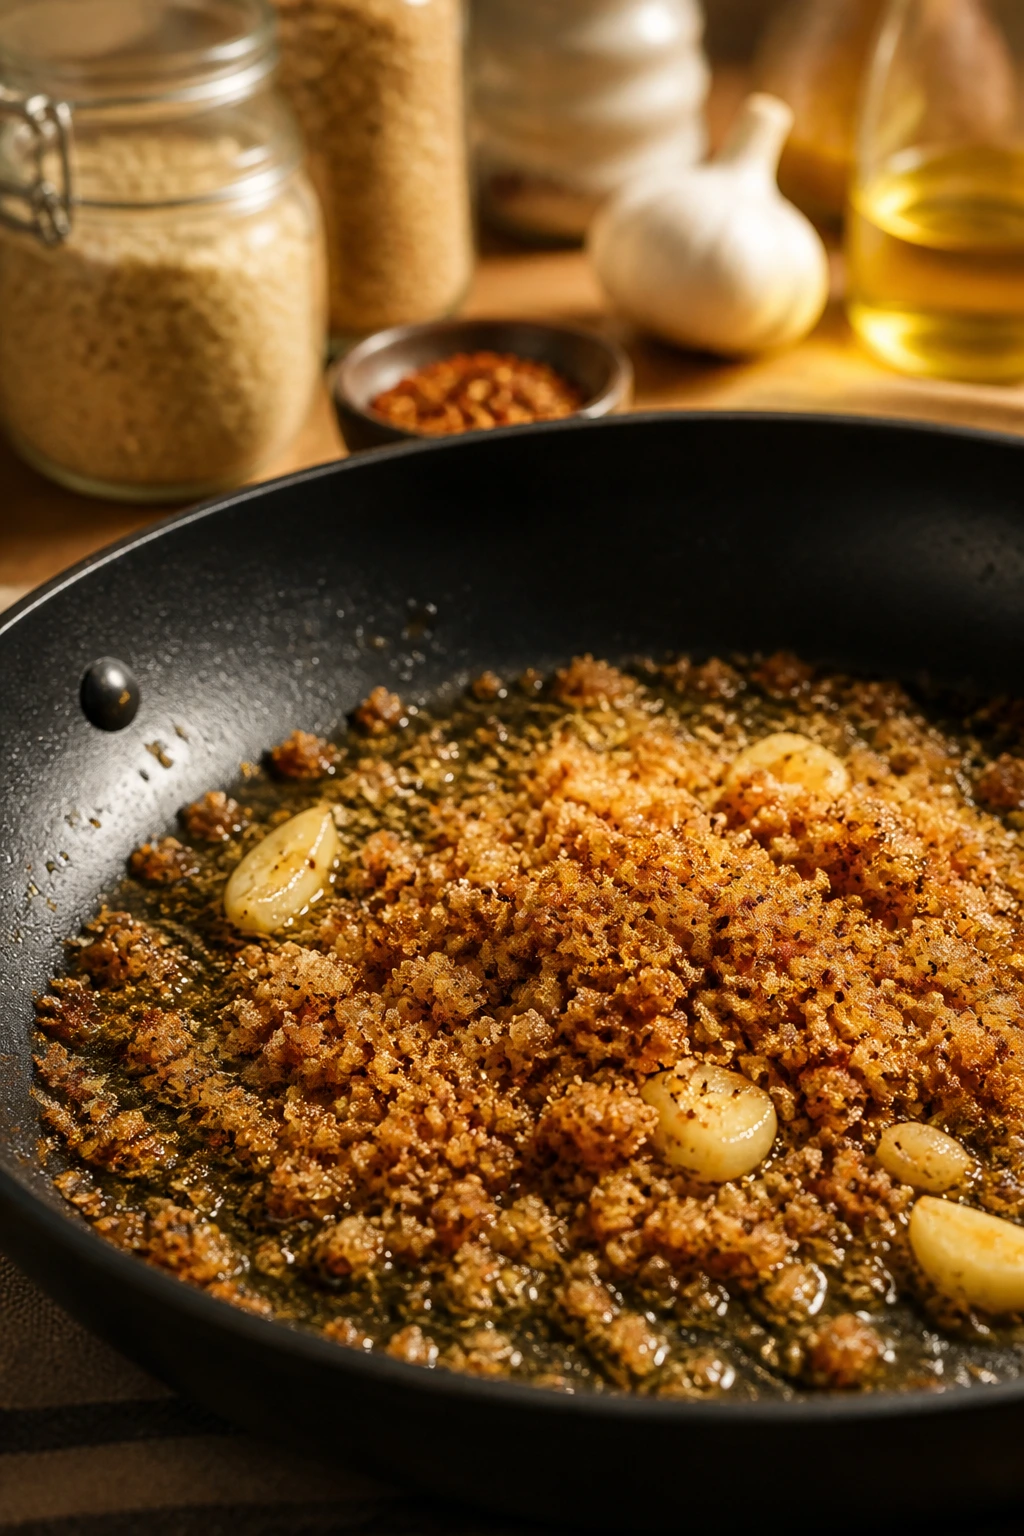
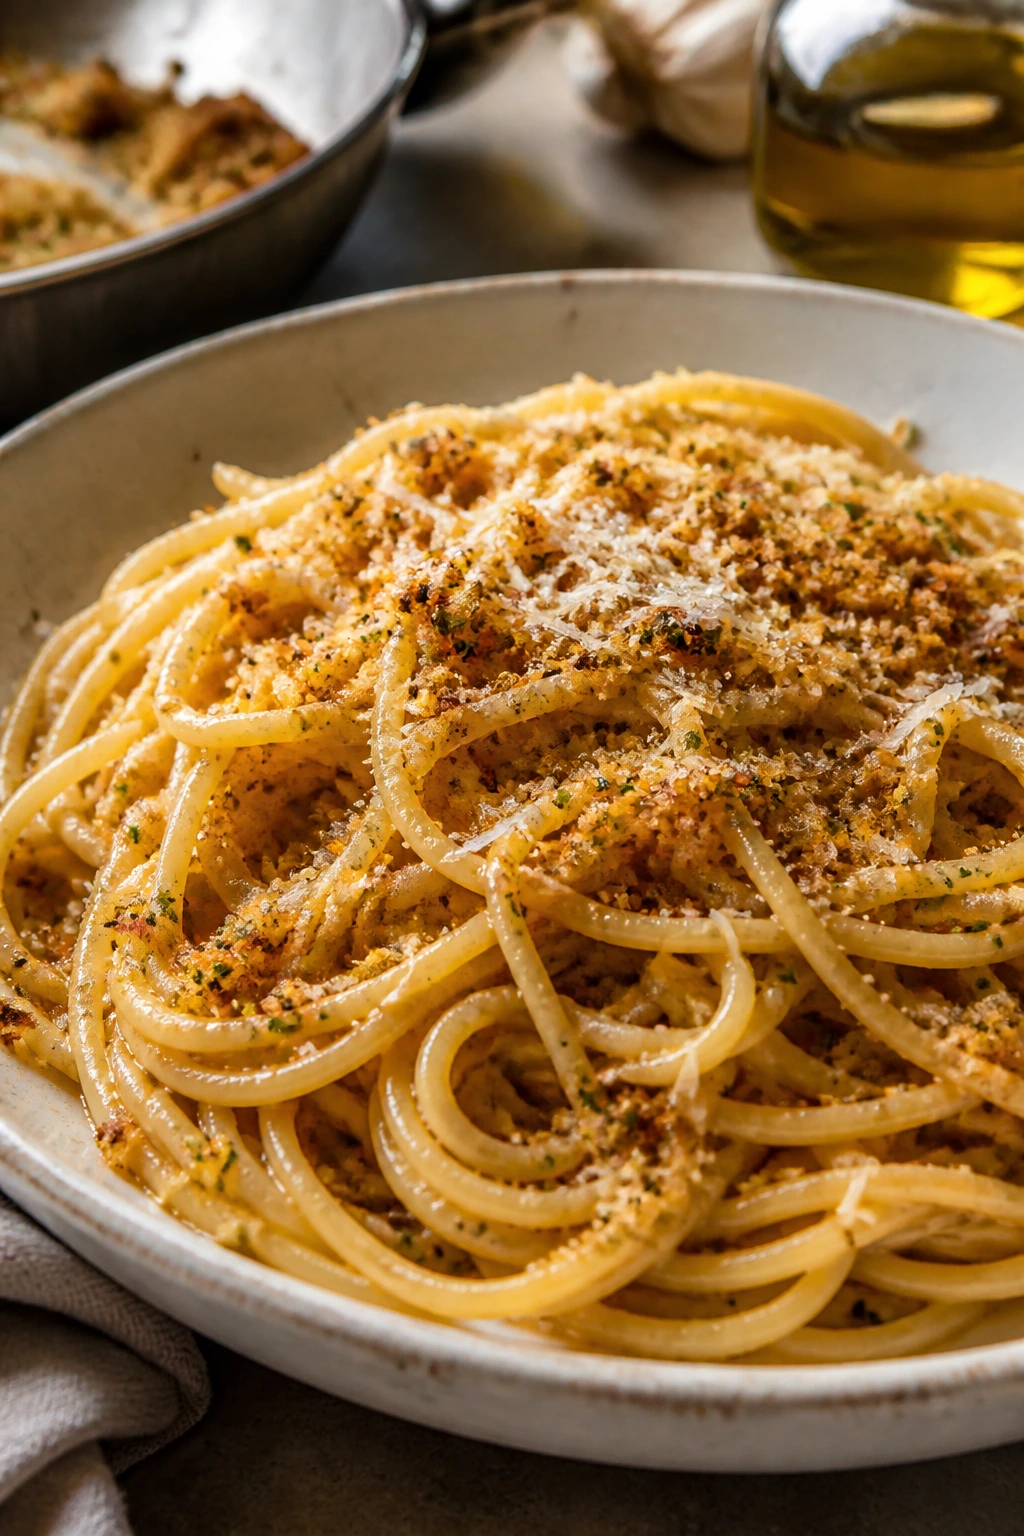
1. Garlic Spaghetti with Toasted Breadcrumbs
Intro:
This is the kind of pasta I make when the fridge looks bare and I still want dinner to feel intentional. The garlic goes sweet and golden, the breadcrumbs bring crunch, and the whole bowl smells like someone paid attention. It’s sparse in the best way.
Why It Works:
Cheap pasta stretches far, and the toasted crumbs make the dish feel finished without needing a heavy sauce. A little pasta water ties everything together, so the oil coats the spaghetti instead of slipping off it. The Parmesan is optional in theory, but a small amount changes the whole bowl.
Key Ingredients:
- 12 ounces spaghetti
- 3 tablespoons olive oil
- 4 garlic cloves, thinly sliced or minced
- 1/2 teaspoon red pepper flakes
- 1 cup plain breadcrumbs
- 1/3 cup grated Parmesan
- 1/4 cup chopped parsley
- Salt and black pepper
- 1 cup reserved pasta water
Quick Steps:
- Toast the crumbs: Heat 1 tablespoon olive oil in a skillet over medium heat. Add the breadcrumbs and cook for 3 to 4 minutes, stirring often, until they turn deep golden and smell nutty.
- Cook the pasta: Boil the spaghetti in salted water until just al dente, about 8 to 10 minutes. Reserve 1 cup of the cooking water before draining.
- Build the garlic oil: Warm the remaining 2 tablespoons olive oil in the skillet over medium-low heat. Add the garlic and red pepper flakes and cook for 30 to 45 seconds, just until the garlic turns fragrant and pale gold.
- Toss it all together: Add the drained pasta, 1/2 cup pasta water, Parmesan, parsley, salt, and pepper. Toss until glossy and loose, adding more pasta water if needed.
- Finish with crunch: Top with the toasted breadcrumbs and serve right away.
Equipment for This Recipe:
- Large pot
- 10- to 12-inch skillet
- Colander
- Wooden spoon
- Tongs
How to Serve This Dish:
Pile it into shallow bowls so the crumbs stay on top instead of sliding off. A chopped tomato salad or a few crisp cucumbers on the side keeps the meal from feeling too spare.
Pro Tips for This Recipe:
- Save more pasta water than you think you need; the starchy water is what gives the sauce body.
- Slice the garlic thin if you want gentle sweetness, or mince it if you want stronger punch.
- If your breadcrumbs brown fast, pull them early. They keep cooking off the heat.
- A squeeze of lemon at the end is sharp and cheap in the best possible way.
Variations on This Dish:
- Anchovy Pantry Version: Mash 2 anchovy fillets into the oil with the garlic for a salty, savory edge.
- Tomato Breadcrumb Pasta: Stir in 1/2 cup canned crushed tomatoes for a looser, redder sauce.
Common Mistakes to Avoid with This Dish:
- Burning the garlic: If it turns brown, it gets bitter fast. Keep the heat low and stay near the pan.
- Skipping the pasta water: Dry oil-coated spaghetti tastes thin. The water helps the sauce cling.
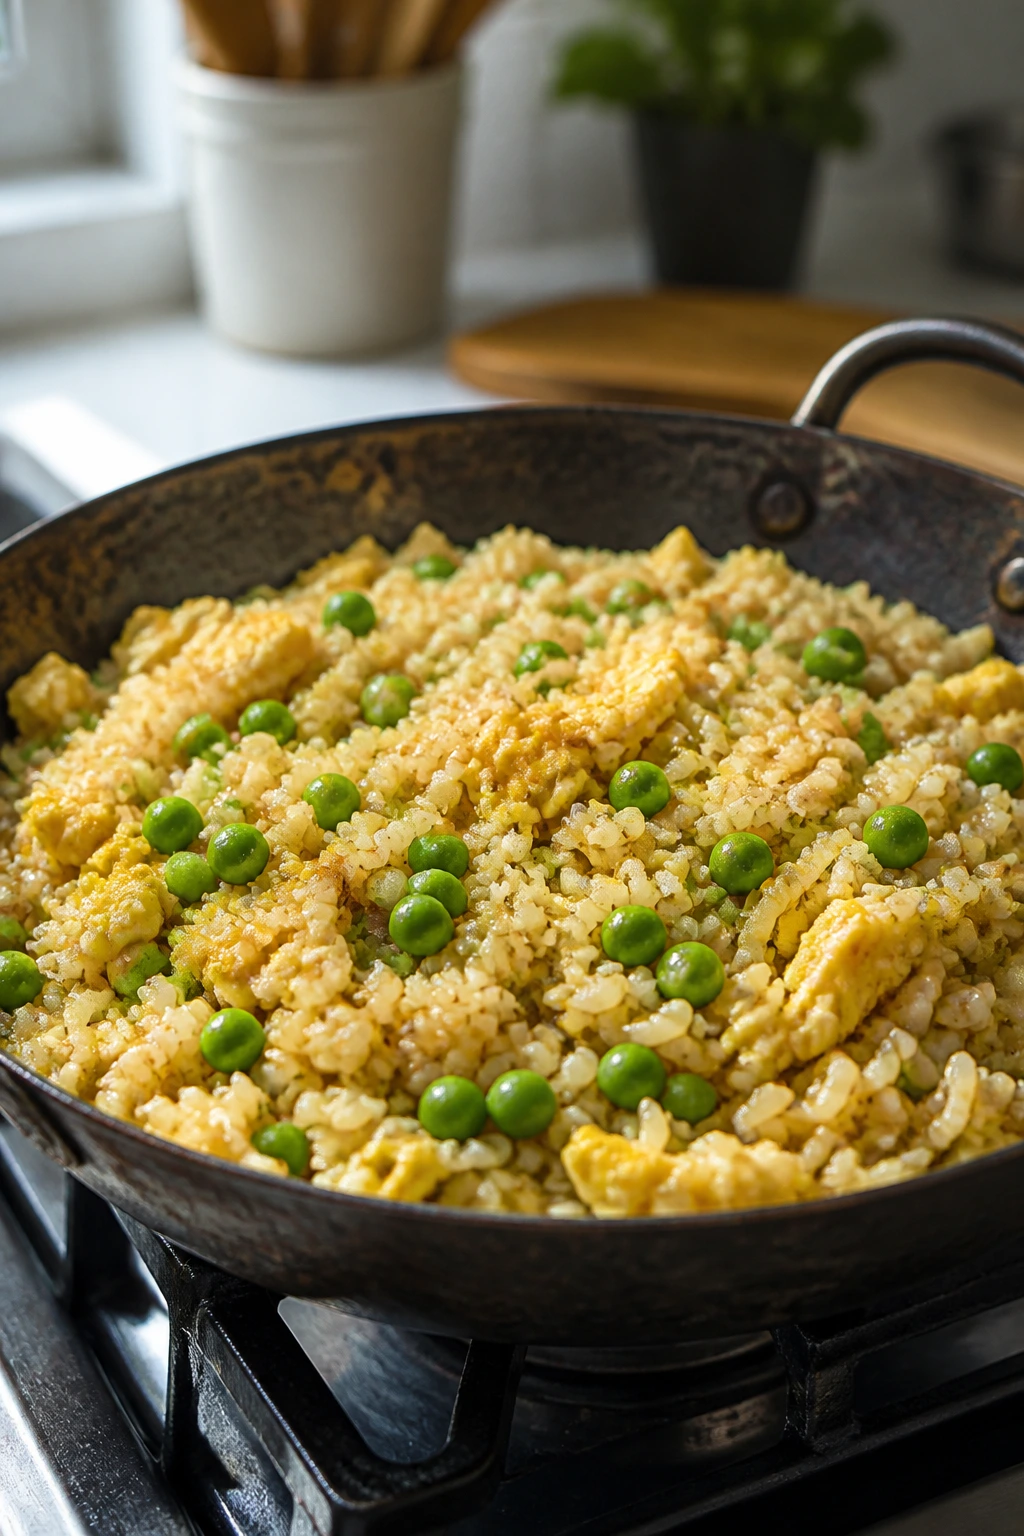
2. Egg Fried Rice with Frozen Peas
Intro:
Fried rice is one of the few dinners that can be cheaper than takeout and better than takeout. Cold rice, frozen vegetables, eggs, and soy sauce turn into a full plate with almost no drama. It’s fast, salty, and just a little smoky if you let the rice sit in the pan long enough.
Why It Works:
Day-old rice dries out enough to fry instead of turning mushy. Eggs add protein without raising the cost much, and frozen peas or mixed vegetables bring color and texture with no chopping marathon. A hot skillet gives you those browned rice bits that make the whole thing taste like more than its parts.
Key Ingredients:
- 3 cups cold cooked white rice
- 3 large eggs, beaten
- 1 1/2 cups frozen peas and carrots
- 2 tablespoons neutral oil
- 2 tablespoons soy sauce
- 2 scallions, sliced, or 1/2 small onion, diced
- 1 teaspoon sesame oil, optional
- Black pepper
Quick Steps:
- Scramble the eggs: Heat 1 tablespoon oil in a large skillet or wok over medium-high heat. Add the eggs and cook for about 1 minute, stirring until soft curds form. Transfer to a plate.
- Soften the vegetables: Add the remaining 1 tablespoon oil and the onion or scallions. Cook for 2 minutes, then stir in the frozen peas and carrots and cook for another 2 minutes.
- Fry the rice: Add the rice, breaking up clumps with your spoon. Cook for 4 to 5 minutes, letting some grains sit still long enough to brown lightly.
- Season and finish: Stir in the soy sauce, sesame oil if using, eggs, and black pepper. Cook for 1 minute more until everything is hot and evenly coated.
- Serve hot: Eat it straight from the skillet while the rice still has a little bite.
Equipment for This Recipe:
- Large skillet or wok
- Spatula
- Small bowl
- Knife and cutting board
How to Serve This Dish:
Serve it in a bowl with hot sauce on the side. If you want to stretch it, a fried egg on top makes the meal feel larger without making the grocery list uglier.
Pro Tips for This Recipe:
- Use cold rice. Fresh rice clumps and goes soft.
- If you only have warm rice, spread it on a tray for 10 minutes to dry a little.
- Don’t flood the pan with soy sauce; too much makes the rice soggy and dark.
Variations on This Dish:
- Peanut Fried Rice: Stir in 1 tablespoon peanut butter with the soy sauce for a richer, nuttier finish.
- Chicken-Style Shortcut: Add 1 cup chopped leftover rotisserie chicken if you happen to have it.
Common Mistakes to Avoid with This Dish:
- Crowding the pan: A packed skillet steams the rice instead of frying it. Use your biggest pan.
- Adding soy sauce too early: It can soak the rice before it browns. Add it near the end.
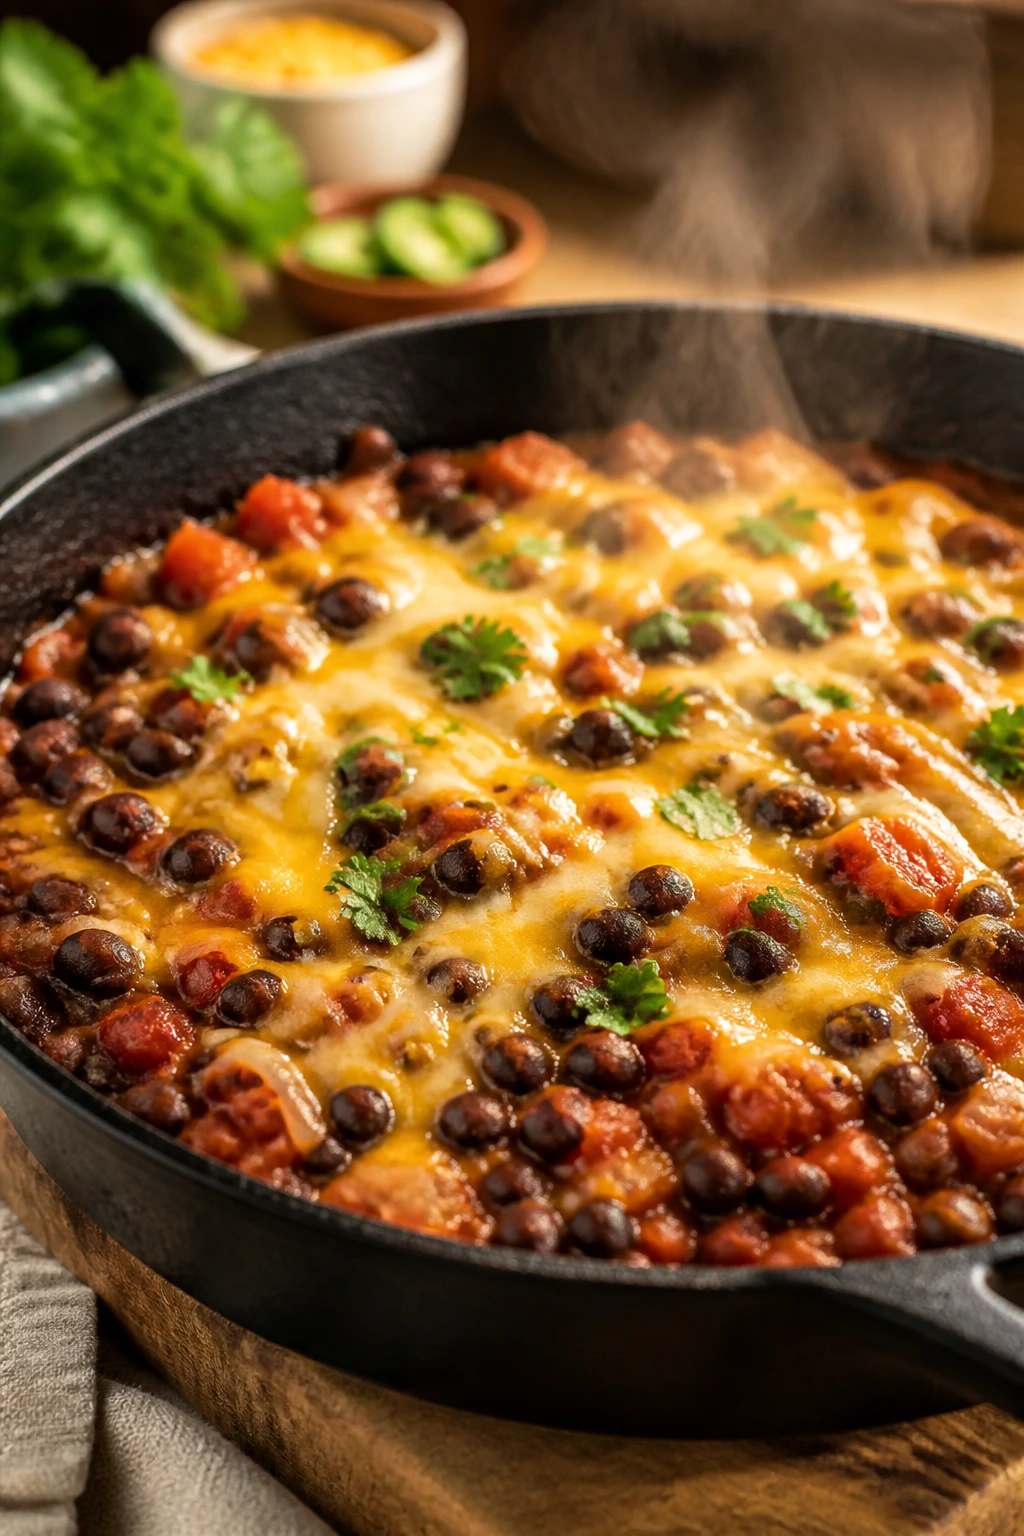
3. Black Bean Taco Skillet
Intro:
This one tastes like taco night without the grocery bill that usually comes with taco night. Beans, salsa, cheese, and tortillas are enough to make dinner feel complete, and the skillet method keeps cleanup down to one pan and a spoon.
Why It Works:
Black beans are dense, filling, and cheap enough to keep around all the time. Salsa carries the seasoning, so you don’t need a long list of spices, and the melted cheese gives the skillet a stretchy, saucy finish that makes the whole thing feel larger than it is.
Key Ingredients:
- 1 tablespoon oil
- 1 small onion, diced
- 2 garlic cloves, minced
- 2 cans black beans, drained and rinsed
- 1 cup salsa
- 1 teaspoon chili powder
- 1/2 teaspoon ground cumin
- 1/2 cup water
- 1 cup shredded cheese
- 6 small tortillas, warmed, or tortilla chips
Quick Steps:
- Cook the onion: Heat the oil in a large skillet over medium heat. Add the onion and cook for 3 to 4 minutes until soft and translucent.
- Add the garlic and spices: Stir in the garlic, chili powder, and cumin and cook for 30 seconds until fragrant.
- Simmer the beans: Add the black beans, salsa, and water. Cook for 5 to 7 minutes, stirring now and then, until the beans are hot and the mixture looks thick and spoonable.
- Melt the cheese: Sprinkle the cheese over the top, cover the skillet for 1 to 2 minutes, and let it melt.
- Serve with tortillas: Spoon into tortillas or scoop with chips.
Equipment for This Recipe:
- Large skillet with a lid
- Wooden spoon
- Can opener
- Knife and cutting board
How to Serve This Dish:
Warm tortillas on a dry skillet first so they don’t crack. Add sliced onions, a spoon of yogurt, or a few pickled jalapeños if you want more bite.
Pro Tips for This Recipe:
- Rinse the beans well if your salsa is salty; the skillet can tip into oversalted fast.
- Let the filling simmer long enough to thicken or the tortillas will go soggy.
- Use a sharp salsa, not a sweet one, or the whole dish gets flat.
Variations on This Dish:
- Corn-Stuffed Version: Stir in 1 cup frozen corn with the beans for a sweeter, fuller filling.
- Breakfast Taco Skillet: Crack 4 eggs over the beans and cover until the whites set.
Common Mistakes to Avoid with This Dish:
- Using too much salsa: The skillet turns runny and hard to wrap. Start with 1 cup and add only if needed.
- Forgetting to warm the tortillas: Cold tortillas split and make the whole thing awkward.
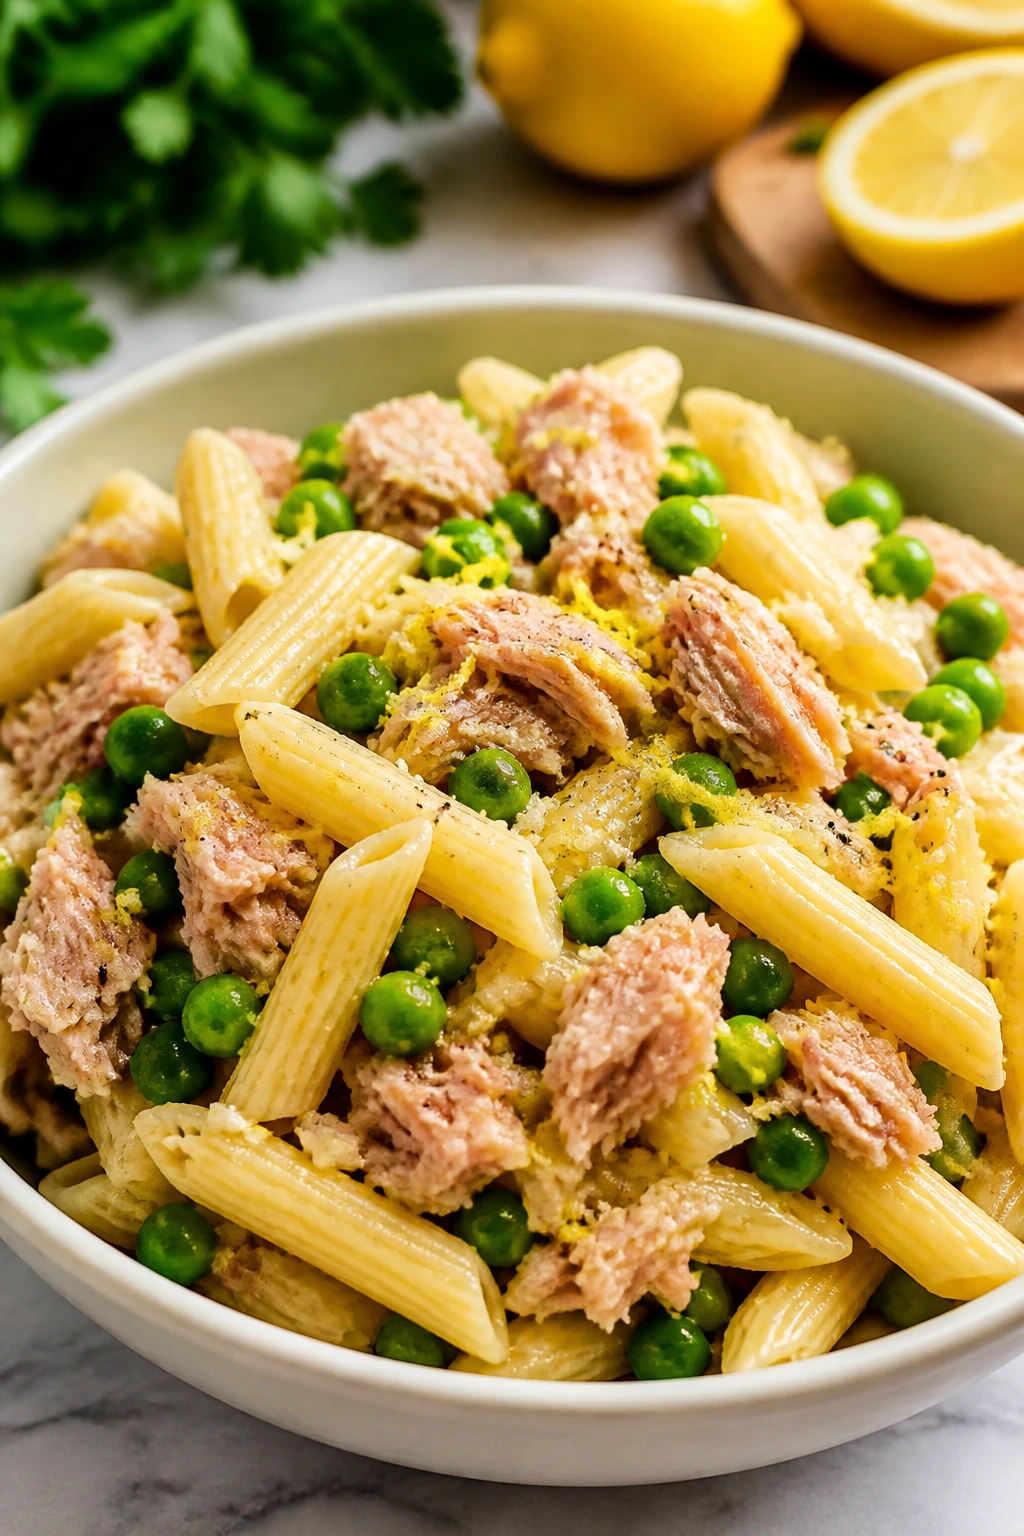
4. Tuna Pasta with Peas and Lemon
Intro:
Canned tuna gets a bad reputation from bad lunches, which is unfair. In pasta, with butter, garlic, peas, and lemon, it turns into a clean, salty dinner that feels grown-up without acting expensive. It’s one of my favorite “nothing in the fridge” meals.
Why It Works:
Tuna brings protein and briny flavor for almost no effort. Peas cook in the pasta water, so you don’t need a second pot, and lemon cuts through the butter so the dish stays bright instead of heavy. The result is cheap, fast, and a little more polished than it sounds.
Key Ingredients:
- 12 ounces penne or rotini
- 2 cans tuna in water, drained
- 1 cup frozen peas
- 2 tablespoons butter
- 2 garlic cloves, minced
- 1 lemon, zested and juiced
- 1/4 cup grated Parmesan
- Salt and black pepper
Quick Steps:
- Cook the pasta and peas: Boil the pasta in salted water. Add the peas during the last 2 minutes of cooking, then reserve 1 cup of the water and drain.
- Start the garlic butter: Melt the butter in a large skillet over medium-low heat. Add the garlic and cook for 30 seconds, just until fragrant.
- Build the sauce: Add the tuna, lemon zest, lemon juice, and 1/2 cup pasta water. Stir gently so the tuna stays in flakes rather than disappearing.
- Toss in the pasta: Add the drained pasta and peas. Stir in Parmesan, salt, and pepper until the sauce looks silky.
- Adjust and serve: Add more pasta water if the sauce feels dry.
Equipment for This Recipe:
- Large pot
- Skillet
- Colander
- Microplane or fine grater, optional
How to Serve This Dish:
Serve it with black pepper over the top and a little extra lemon on the table. A side of sliced cucumbers or toast is enough; this dish doesn’t ask for much.
Pro Tips for This Recipe:
- Tuna packed in water keeps the dish light; oil-packed tuna makes it richer but also heavier.
- Don’t overmix once the tuna is in the pan or it will shred into mush.
- If you have parsley, add it at the end. It gives the whole bowl a cleaner smell.
Variations on This Dish:
- Creamy Tuna Pasta: Stir in 2 tablespoons cream cheese or plain yogurt off the heat for a softer sauce.
- Capers and Chili Flakes: Add 1 tablespoon capers and 1/2 teaspoon chili flakes for a sharper, saltier version.
Common Mistakes to Avoid with This Dish:
- Skipping the pasta water: Without it, the sauce clumps instead of coating.
- Using too much lemon juice at once: Start small. You want brightness, not a sour bowl.
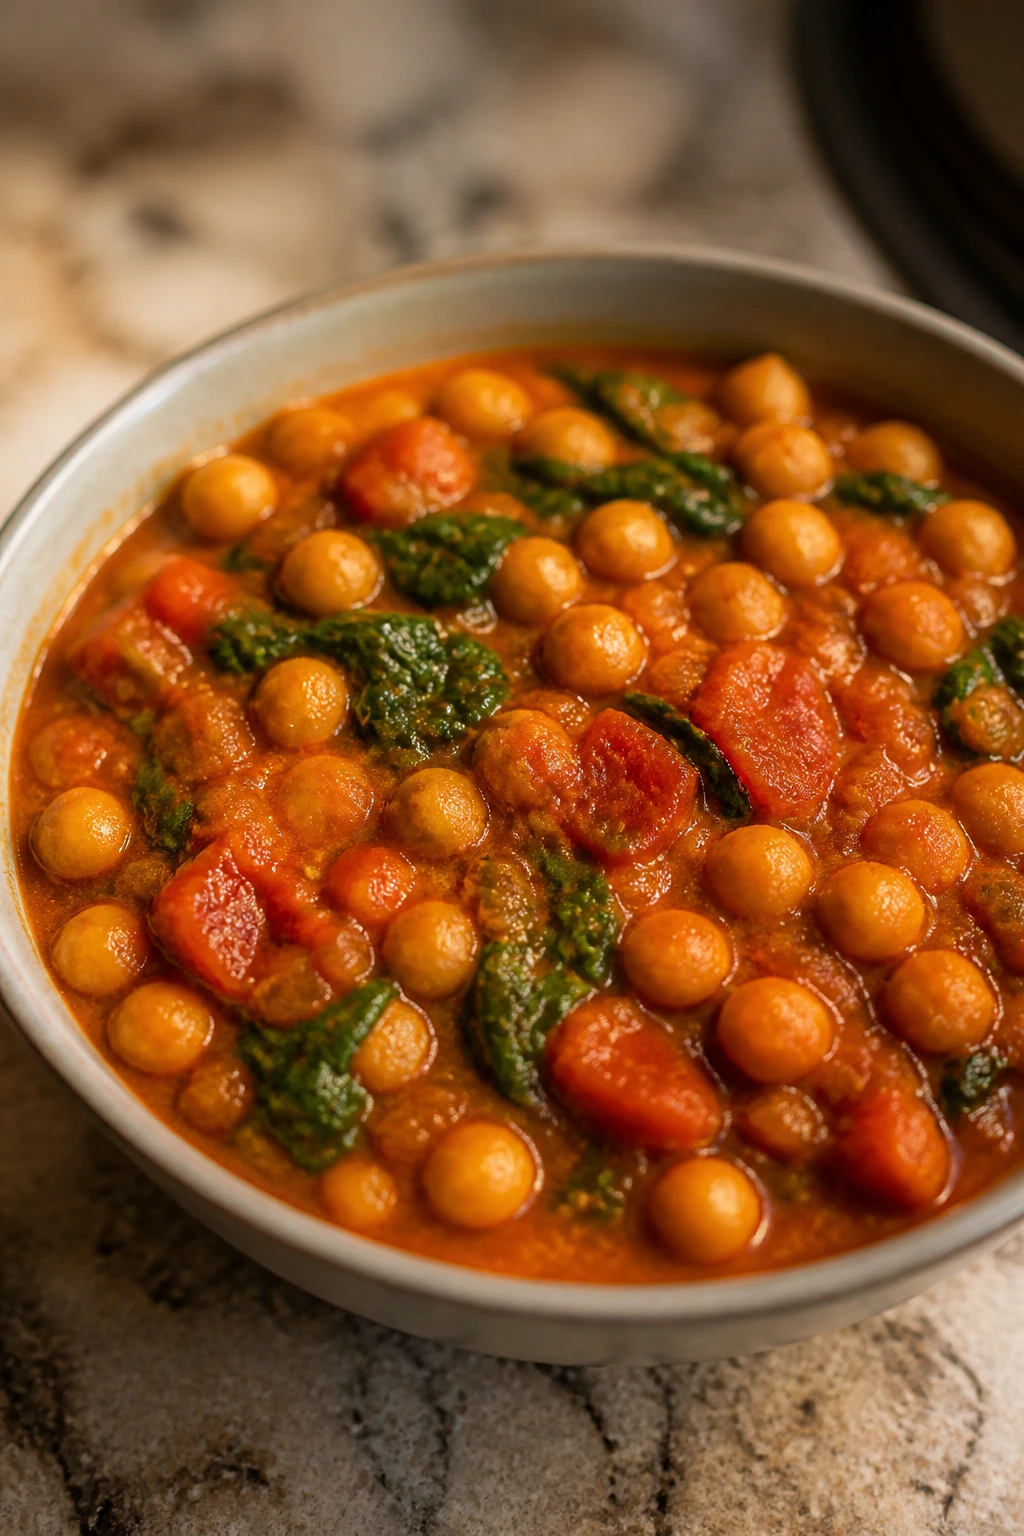
5. Chickpea Tomato Curry
Intro:
This is a pantry curry, the kind that proves you do not need twenty ingredients to get something warm and layered on the table. Chickpeas bring the body, tomatoes bring acidity, and curry powder does the heavy lifting. It smells much fancier than the shopping list suggests.
Why It Works:
Canned chickpeas are sturdy enough to sit in a simmer without falling apart. Tomatoes give the sauce enough liquid and sharpness to keep the curry from tasting dusty, which can happen with spice-heavy dishes that don’t have enough acid. Serve it with couscous and you’ve got a full meal in one pan and one pot.
Key Ingredients:
- 1 tablespoon oil
- 1 medium onion, diced
- 3 garlic cloves, minced
- 1 tablespoon curry powder
- 1/2 teaspoon turmeric, optional
- 2 cans chickpeas, drained and rinsed
- 1 can diced tomatoes
- 1 can light coconut milk
- 2 cups baby spinach
- 1 cup couscous
- 1 1/4 cups hot water or broth
- Salt
Quick Steps:
- Cook the onion: Heat the oil over medium heat in a deep skillet. Add the onion and cook for 4 minutes until soft.
- Bloom the spices: Stir in the garlic, curry powder, and turmeric. Cook for 30 seconds so the spices lose their raw edge.
- Simmer the curry: Add the chickpeas, tomatoes, coconut milk, and a pinch of salt. Simmer for 10 minutes, stirring now and then, until the sauce thickens slightly.
- Wilt the spinach: Stir in the spinach and cook for 1 minute until it turns dark green and collapses.
- Make the couscous: Put the couscous in a bowl, pour over the hot water or broth, cover, and let it sit for 5 minutes. Fluff with a fork and serve under the curry.
Equipment for This Recipe:
- Large skillet or sauté pan
- Small saucepan or kettle
- Bowl with a lid or plate
- Spoon
How to Serve This Dish:
Spoon the curry over couscous so the grains soak up the sauce. If you have plain yogurt, a spoonful on top cools the curry nicely and costs almost nothing per serving.
Pro Tips for This Recipe:
- If your curry powder tastes dusty, add a squeeze of lemon at the end to wake it up.
- Let the sauce simmer uncovered for the last few minutes if it seems thin.
- Don’t overdo the coconut milk; too much makes the dish dull and heavy.
Variations on This Dish:
- Potato Chickpea Curry: Add 1 cup tiny diced potatoes and simmer them in the sauce until tender.
- Tomato-Only Version: Skip coconut milk and add 1/2 cup water for a lighter, sharper curry.
Common Mistakes to Avoid with This Dish:
- Adding spinach too early: It will turn limp and dark. Toss it in at the end.
- Serving before the sauce thickens: Thin curry slides right off the couscous.
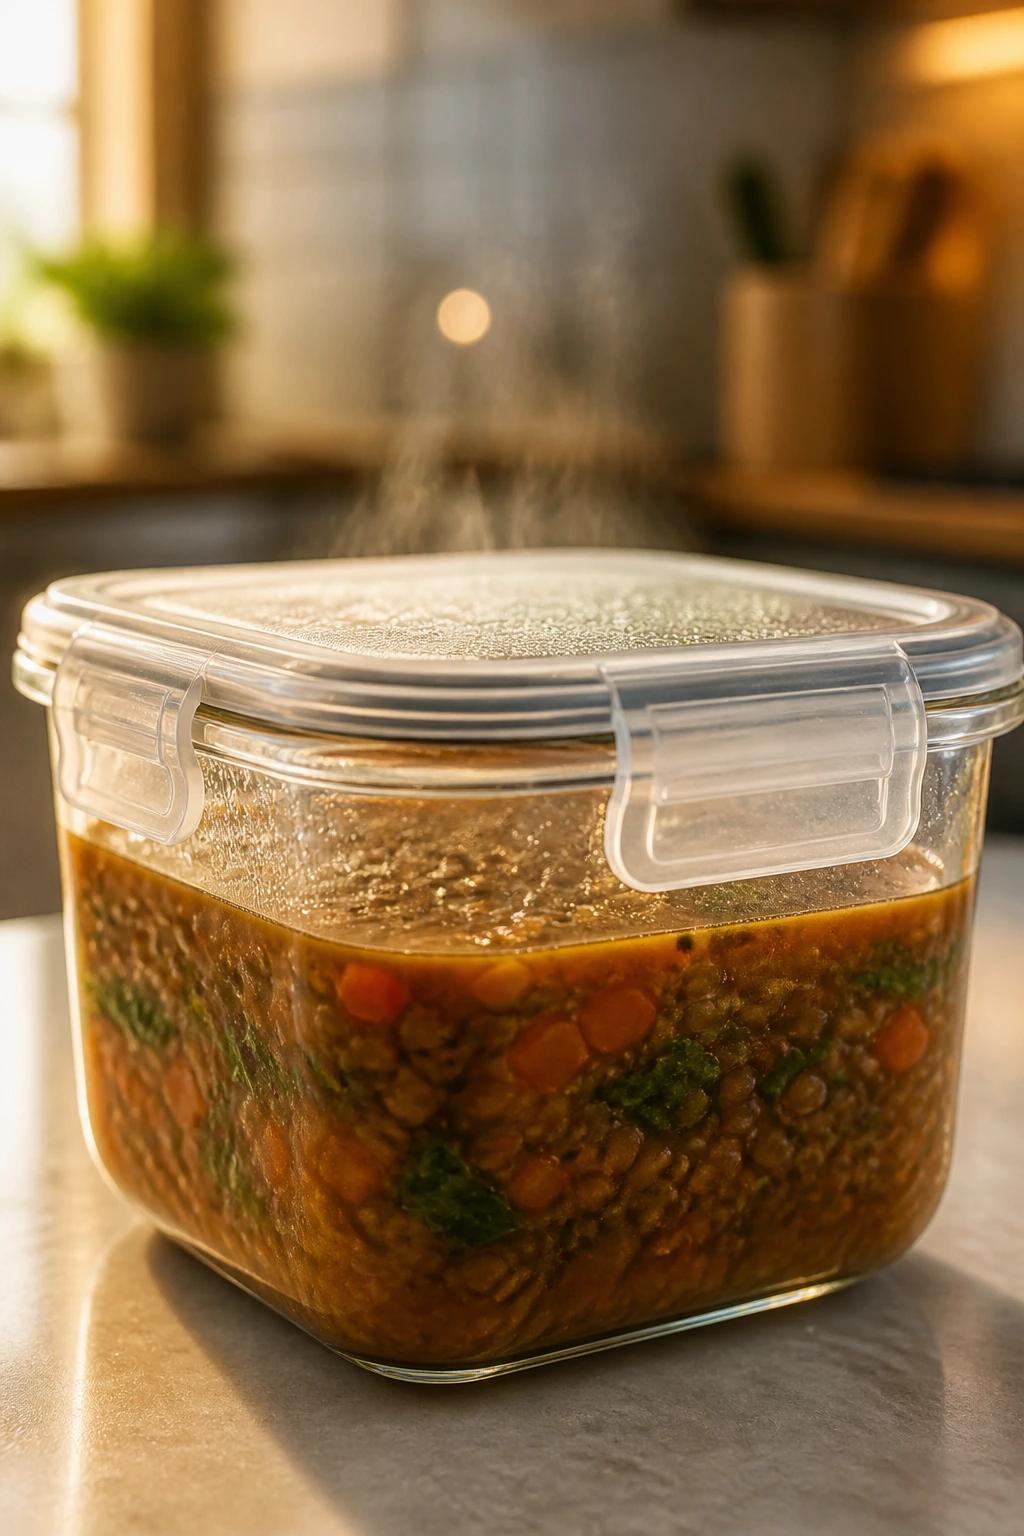
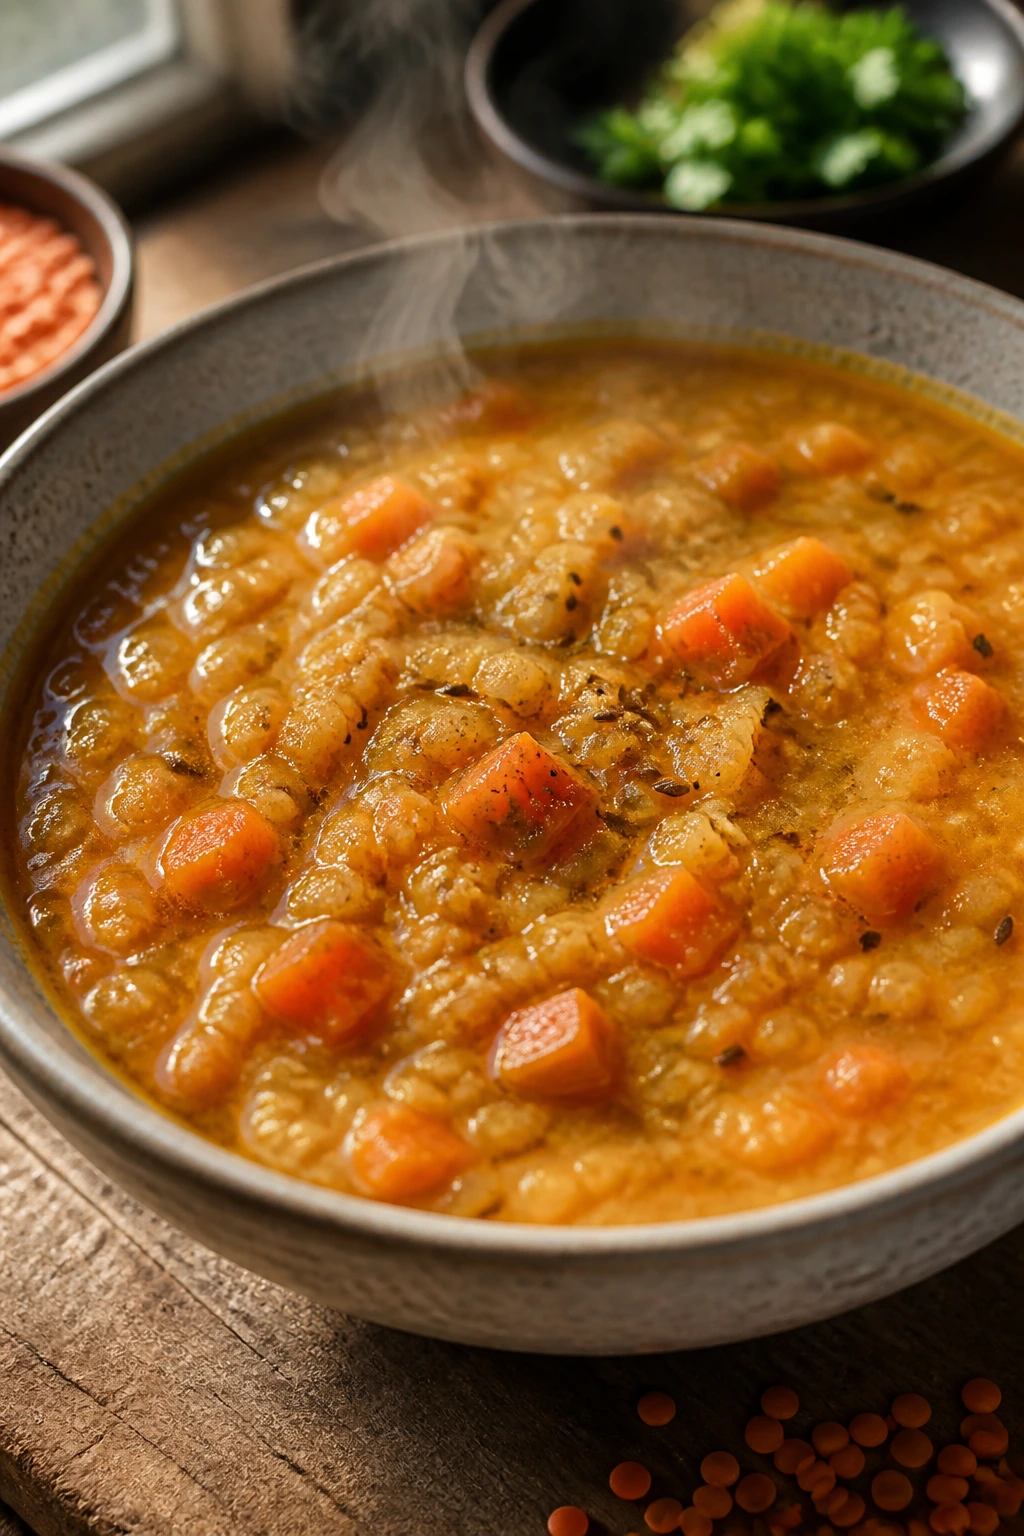
6. Red Lentil Soup with Carrots and Cumin
Intro:
Red lentils are one of the best bargains in the store. They cook fast, break down into a soft, body-building soup, and don’t need soaking or babysitting. Add carrots and cumin and you’ve got a bowl that tastes like it simmered longer than it did.
Why It Works:
Red lentils dissolve just enough to make the soup creamy without actual cream. The carrots and onion build sweetness while the cumin gives the broth a warm, savory backbone. A squeeze of lemon at the end keeps it from tasting like school cafeteria soup.
Key Ingredients:
- 1 tablespoon olive oil
- 1 medium onion, chopped
- 2 carrots, diced
- 3 garlic cloves, minced
- 1 cup red lentils, rinsed
- 6 cups vegetable broth or water
- 1 teaspoon ground cumin
- 1/2 teaspoon smoked paprika
- 1 tablespoon lemon juice
- Salt and pepper
Quick Steps:
- Soften the vegetables: Warm the oil in a saucepan over medium heat. Add the onion and carrots and cook for 5 minutes until the onion softens.
- Add garlic and spice: Stir in the garlic, cumin, and paprika and cook for 30 seconds.
- Simmer the lentils: Add the lentils and broth. Bring to a boil, then lower to a gentle simmer for 15 to 18 minutes, stirring occasionally.
- Check the texture: The lentils should be soft and partially broken down. If you want it smoother, mash a few spoonfuls against the side of the pot.
- Finish with acid: Stir in lemon juice, salt, and pepper. Serve hot.
Equipment for This Recipe:
- Medium saucepan
- Wooden spoon
- Measuring cups
- Ladle
How to Serve This Dish:
A slice of toast or a piece of flatbread is enough to make it a full dinner. If you want texture, add croutons or a spoon of yogurt.
Pro Tips for This Recipe:
- Rinse the lentils so the soup doesn’t taste dusty.
- Keep the simmer gentle or the lentils can stick to the bottom.
- If the soup thickens as it sits, add a splash of water before serving.
Variations on This Dish:
- Tomato Lentil Soup: Stir in 1 cup canned crushed tomatoes with the broth.
- Spicy Carrot Lentils: Add 1/4 teaspoon cayenne or a chopped chili with the onion.
Common Mistakes to Avoid with This Dish:
- Using brown lentils: They hold their shape and won’t give you that creamy texture as fast.
- Forgetting salt until the end: Lentils need seasoning through the whole pot.
7. Sausage, Cabbage, and Potatoes Skillet
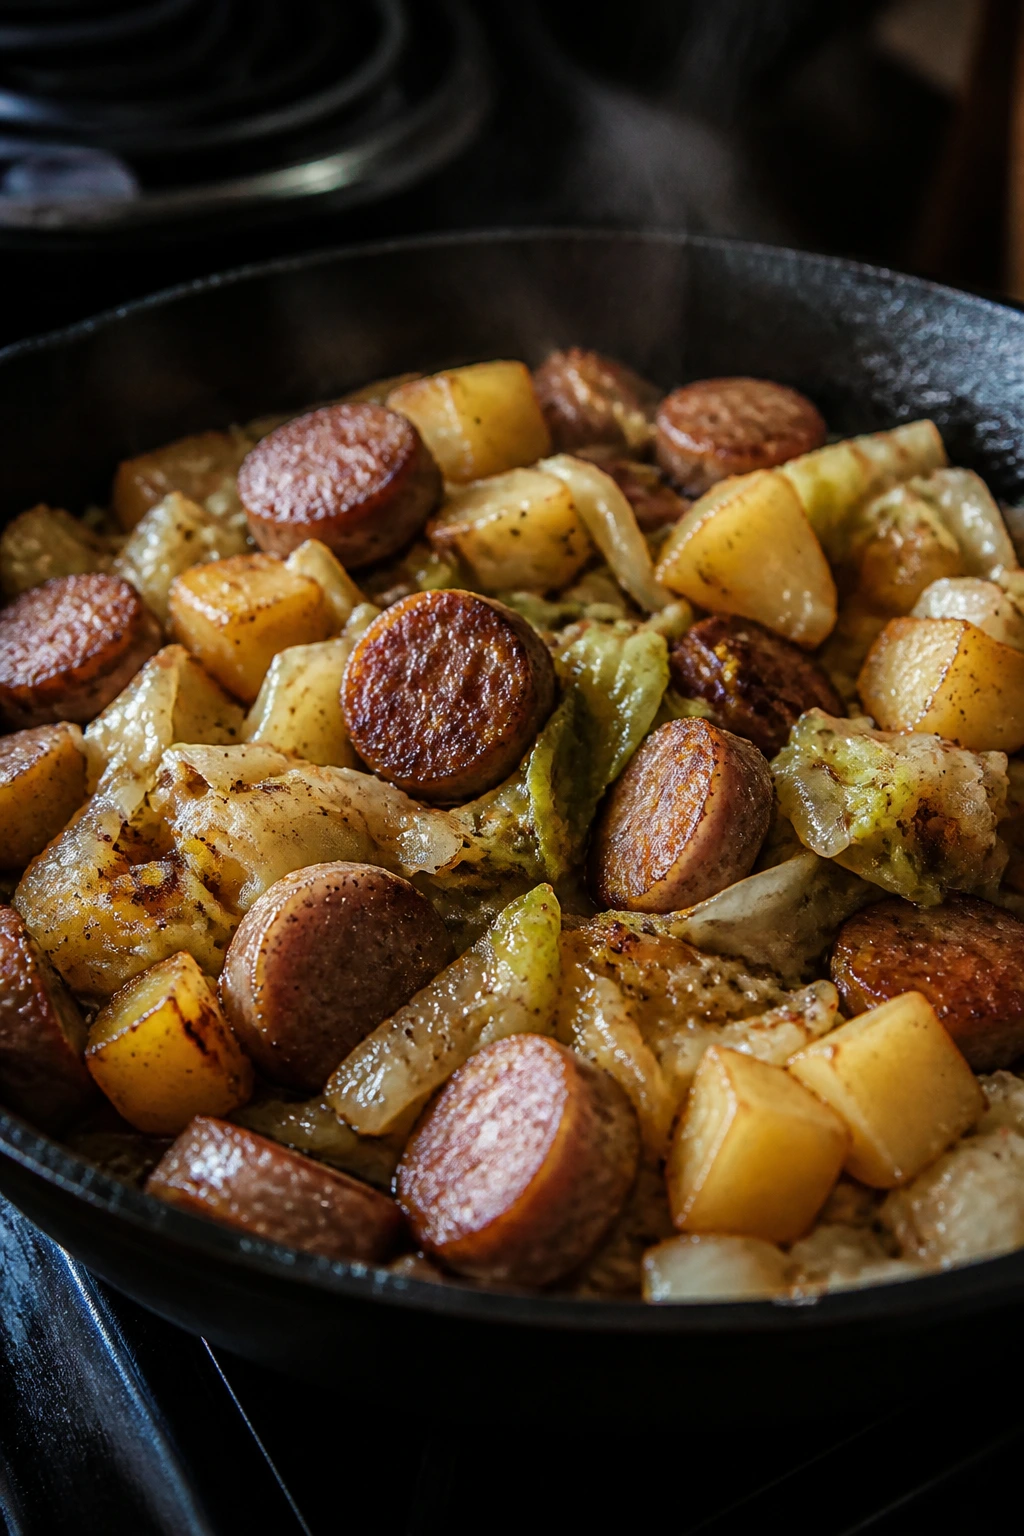
Intro:
This is the sort of skillet dinner that used to show up in farmhouse kitchens for a reason: it feeds people without fuss. The potatoes go crisp, the cabbage softens into sweetness, and the sausage perfumes the whole pan. Cheap? Yes. Boring? Not if you brown it properly.
Why It Works:
Cabbage is one of the cheapest vegetables that still feels like a real side dish, and it cooks down fast. Small-diced potatoes get tender in under 20 minutes if you cover the pan partway through. The sausage carries the salt, so you don’t need much else.
Key Ingredients:
- 12 ounces smoked sausage, sliced
- 1 pound Yukon Gold potatoes, diced small
- 1/2 head green cabbage, shredded
- 1 medium onion, sliced
- 2 tablespoons oil
- 1 teaspoon paprika
- 1 tablespoon mustard or apple cider vinegar
- Salt and pepper
Quick Steps:
- Brown the sausage: Heat 1 tablespoon oil in a large skillet over medium-high heat. Cook the sausage for 3 to 4 minutes until browned on the edges. Remove to a plate.
- Start the potatoes: Add the remaining oil, potatoes, and onion. Cook for 5 minutes, stirring sometimes.
- Cover to soften: Add 1/4 cup water, cover, and cook for 8 to 10 minutes until the potatoes are nearly tender.
- Add cabbage and seasoning: Stir in the cabbage, paprika, salt, and pepper. Cook uncovered for 5 minutes until the cabbage wilts and the potatoes finish.
- Return the sausage: Toss it back in with the mustard or vinegar and cook for 1 minute more.
Equipment for This Recipe:
- Large skillet with lid
- Spatula
- Knife and cutting board
How to Serve This Dish:
Serve it straight from the skillet with mustard on the side. If you have bread, use it to chase the browned bits at the bottom of the pan.
Pro Tips for This Recipe:
- Cut the potatoes small or they’ll still be firm when the cabbage is done.
- A splash of vinegar at the end sharpens the whole skillet.
- If the pan looks dry, add another tablespoon of water instead of more oil.
Variations on This Dish:
- Smoked Paprika Version: Add another 1/2 teaspoon paprika and a pinch of chili flakes.
- Sausage-Free Skillet: Use 1 can white beans instead of sausage and add them at the end.
Common Mistakes to Avoid with This Dish:
- High heat the whole time: The potatoes brown outside and stay hard inside. Covering the pan solves that.
- Over-salting early: Sausage brings salt, so taste before adding more.
8. Shakshuka with Bread

Intro:
Shakshuka looks like a restaurant breakfast and eats like a budget dinner. Eggs poached in spiced tomato sauce are simple on paper, but when the tomatoes reduce and the yolks stay soft, the pan turns into something much better than scrambled eggs and toast.
Why It Works:
Canned tomatoes give you a cheap sauce base all year. Eggs cook directly in the sauce, which means one pan does the job of both sauce and protein. Bread soaks up the runny yolk, which is half the pleasure here.
Key Ingredients:
- 1 tablespoon olive oil
- 1 small onion, diced
- 1 bell pepper, diced
- 3 garlic cloves, minced
- 1 28-ounce can crushed tomatoes
- 1 teaspoon paprika
- 1/2 teaspoon ground cumin
- 6 large eggs
- 4 slices bread
- Salt and pepper
Quick Steps:
- Cook the vegetables: Heat the oil in a wide skillet over medium heat. Add the onion and pepper and cook for 5 minutes until soft.
- Add garlic and spices: Stir in the garlic, paprika, and cumin for 30 seconds.
- Simmer the sauce: Pour in the tomatoes and a pinch of salt. Cook for 8 to 10 minutes until the sauce thickens and looks glossy.
- Add the eggs: Make 6 small wells with the back of a spoon and crack an egg into each. Cover and cook for 5 to 7 minutes until the whites are set and the yolks are still soft.
- Serve with bread: Toast or warm the bread and serve immediately.
Equipment for This Recipe:
- Wide skillet with lid
- Spoon
- Toaster or dry skillet
- Knife and cutting board
How to Serve This Dish:
Bring the skillet to the table if you want it to feel abundant. Add a spoon of yogurt or a sprinkle of feta if you have it.
Pro Tips for This Recipe:
- Use a wide pan so the eggs have room to set evenly.
- If the sauce is watery, simmer it a few extra minutes before adding eggs.
- Don’t overcook the yolks; that’s the whole point.
Variations on This Dish:
- Feta Shakshuka: Crumble 1/4 cup feta over the sauce before covering.
- Spicy Pantry Shakshuka: Add 1/2 teaspoon chili flakes with the spices.
Common Mistakes to Avoid with This Dish:
- Cracking eggs into boiling sauce: The whites break apart. Keep the sauce at a gentle simmer.
- Skipping the reduction: Thin sauce makes the eggs float around instead of nestling in.
9. Bean and Cheese Quesadillas
Intro:
Quesadillas are one of the few meals that can rescue a near-empty kitchen with dignity intact. Beans bring the body, cheese brings the melt, and tortillas turn everything into something crisp at the edges and soft in the middle. They also disappear fast, which is usually a sign you did it right.
Why It Works:
Beans make the filling cheap and substantial. Cheese binds the quesadilla together, but you do not need much—too much turns the filling greasy. A hot skillet gives you the browned tortilla that makes this feel like more than folded bread.
Key Ingredients:
- 8 flour tortillas
- 1 can refried beans or 1 can black beans, mashed
- 2 cups shredded cheese
- 1/2 small onion, finely diced
- 1/2 cup salsa
- 1 tablespoon butter or oil
Quick Steps:
- Prep the filling: Stir the onion into the beans. If using black beans, mash them with a fork until thick and spreadable.
- Heat the skillet: Warm a large skillet over medium heat and add a little butter or oil.
- Assemble: Spread beans on one half of each tortilla, sprinkle with cheese, and fold over.
- Cook until crisp: Cook 2 to 3 minutes per side until the tortilla is golden and the cheese is melted.
- Slice and serve: Cut into wedges and serve with salsa.
Equipment for This Recipe:
- Large skillet
- Spatula
- Fork
- Knife
How to Serve This Dish:
Serve with salsa, sour cream, or a quick pile of lettuce if you want something fresh on the plate. Two quesadillas usually feed one very hungry adult or two lighter eaters.
Pro Tips for This Recipe:
- Keep the heat medium, not high, or the tortilla browns before the cheese melts.
- Mash the beans well so the filling doesn’t spill out.
- Let the quesadilla rest for 1 minute before cutting; the cheese stays put better.
Variations on This Dish:
- Green Quesadilla: Add chopped spinach or leftover greens to the filling.
- Breakfast Quesadilla: Add scrambled eggs and skip the salsa inside.
Common Mistakes to Avoid with This Dish:
- Overfilling: The tortilla tears and the filling leaks. Less is better here.
- Using cold cheese straight from the fridge in a thick layer: It melts slowly and can leave the tortilla overbrowned.
10. Sesame Peanut Noodles with Cabbage
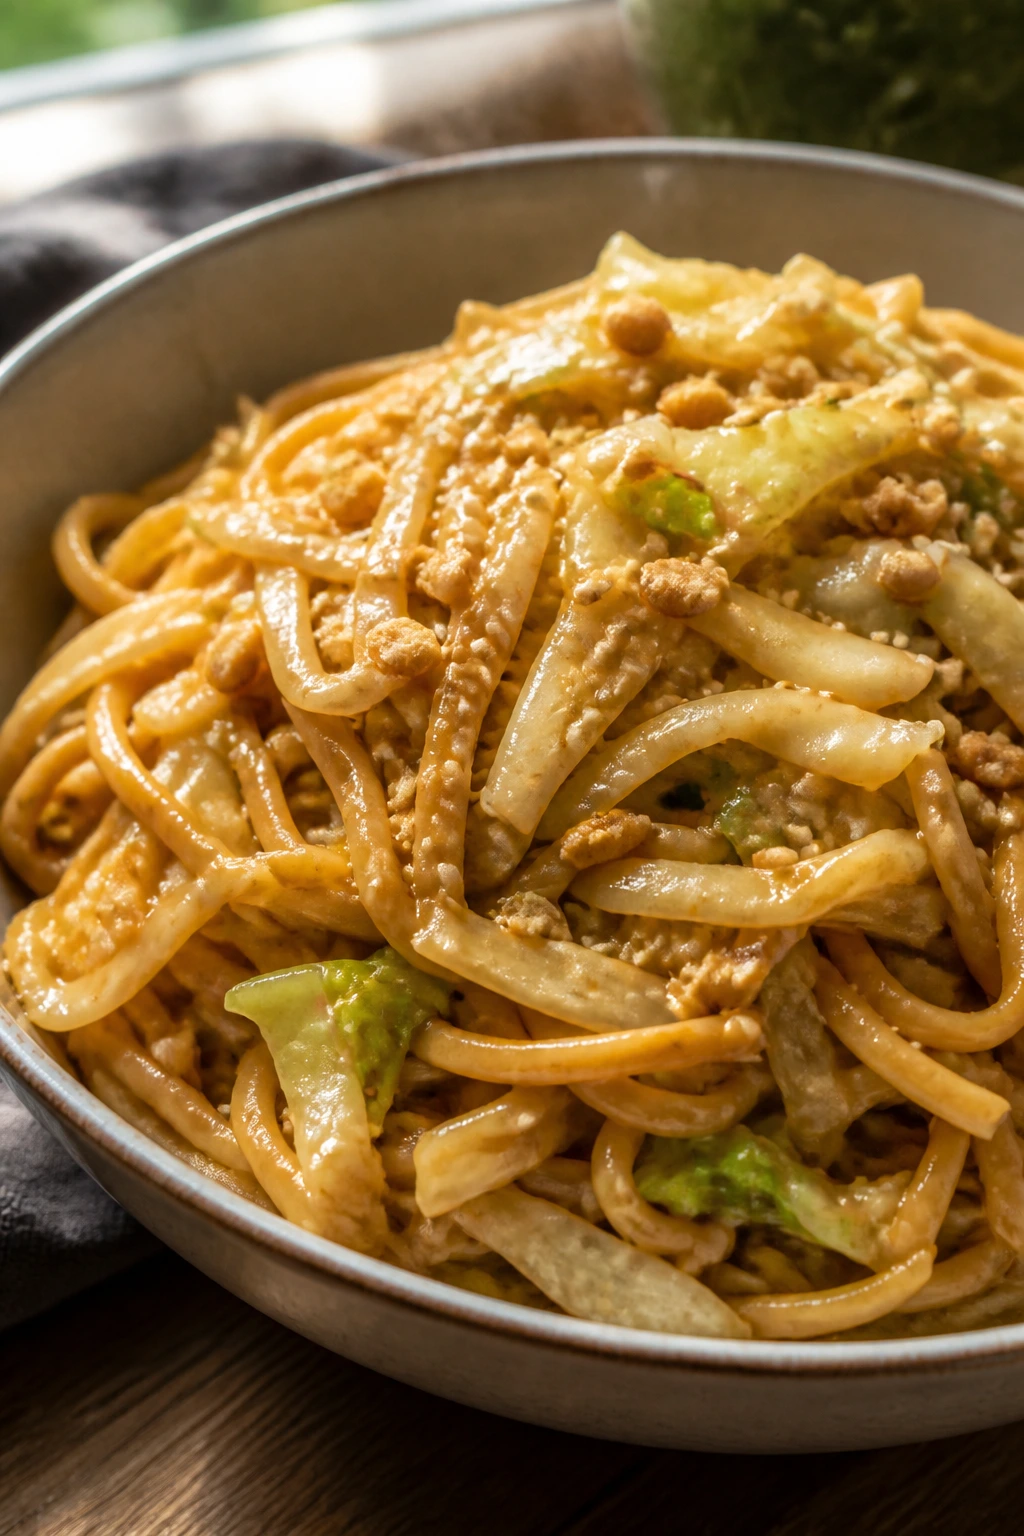
Intro:
Peanut noodles are the sort of dinner that feels like a smart trick. You boil cheap noodles, whisk a sauce from pantry stuff, and toss in cabbage for crunch. It tastes like something you ordered after a long day, only it cost a lot less.
Why It Works:
Peanut butter gives the sauce body without needing cream. Soy sauce, vinegar, and a little sugar create that salty-sour-sweet balance people usually chase in takeaway noodles. Cabbage stands up to the sauce and stays crisp enough to keep the bowl from going soft.
Key Ingredients:
- 12 ounces spaghetti or ramen noodles
- 1/4 cup peanut butter
- 2 tablespoons soy sauce
- 1 tablespoon rice vinegar or white vinegar
- 1 tablespoon sugar
- 2 garlic cloves, grated or minced
- 3 cups shredded cabbage
- 1 teaspoon sesame oil, optional
- Crushed red pepper, optional
Quick Steps:
- Make the sauce: Whisk peanut butter, soy sauce, vinegar, sugar, garlic, and 3 tablespoons hot water in a bowl until smooth.
- Cook the noodles: Boil the noodles until just tender, then reserve 1/2 cup of the water and drain.
- Toss with cabbage: Put the hot noodles back in the pot with the cabbage and sauce. Stir until the cabbage starts to soften.
- Loosen the bowl: Add a splash of reserved noodle water until the sauce coats everything cleanly.
- Finish and serve: Add sesame oil and red pepper if using.
Equipment for This Recipe:
- Pot
- Bowl for sauce
- Whisk or fork
- Tongs
How to Serve This Dish:
Eat it warm or at room temperature. A few chopped peanuts or sesame seeds are nice, but they are optional—not a shopping requirement.
Pro Tips for This Recipe:
- Warm water helps the peanut butter smooth out; cold water makes it clump.
- Shred the cabbage thin so it softens just enough from the hot noodles.
- If the sauce tastes flat, add a tiny extra splash of vinegar.
Variations on This Dish:
- Spicy Chili Noodles: Add 1 teaspoon chili crisp or hot sauce to the sauce bowl.
- Veg-Heavy Version: Add shredded carrots or snap peas if they need using up.
Common Mistakes to Avoid with This Dish:
- Sauce too thick: It will stick in clumps. Reserve noodle water and loosen it slowly.
- Too much sugar: The bowl starts tasting like dessert. Keep it restrained.
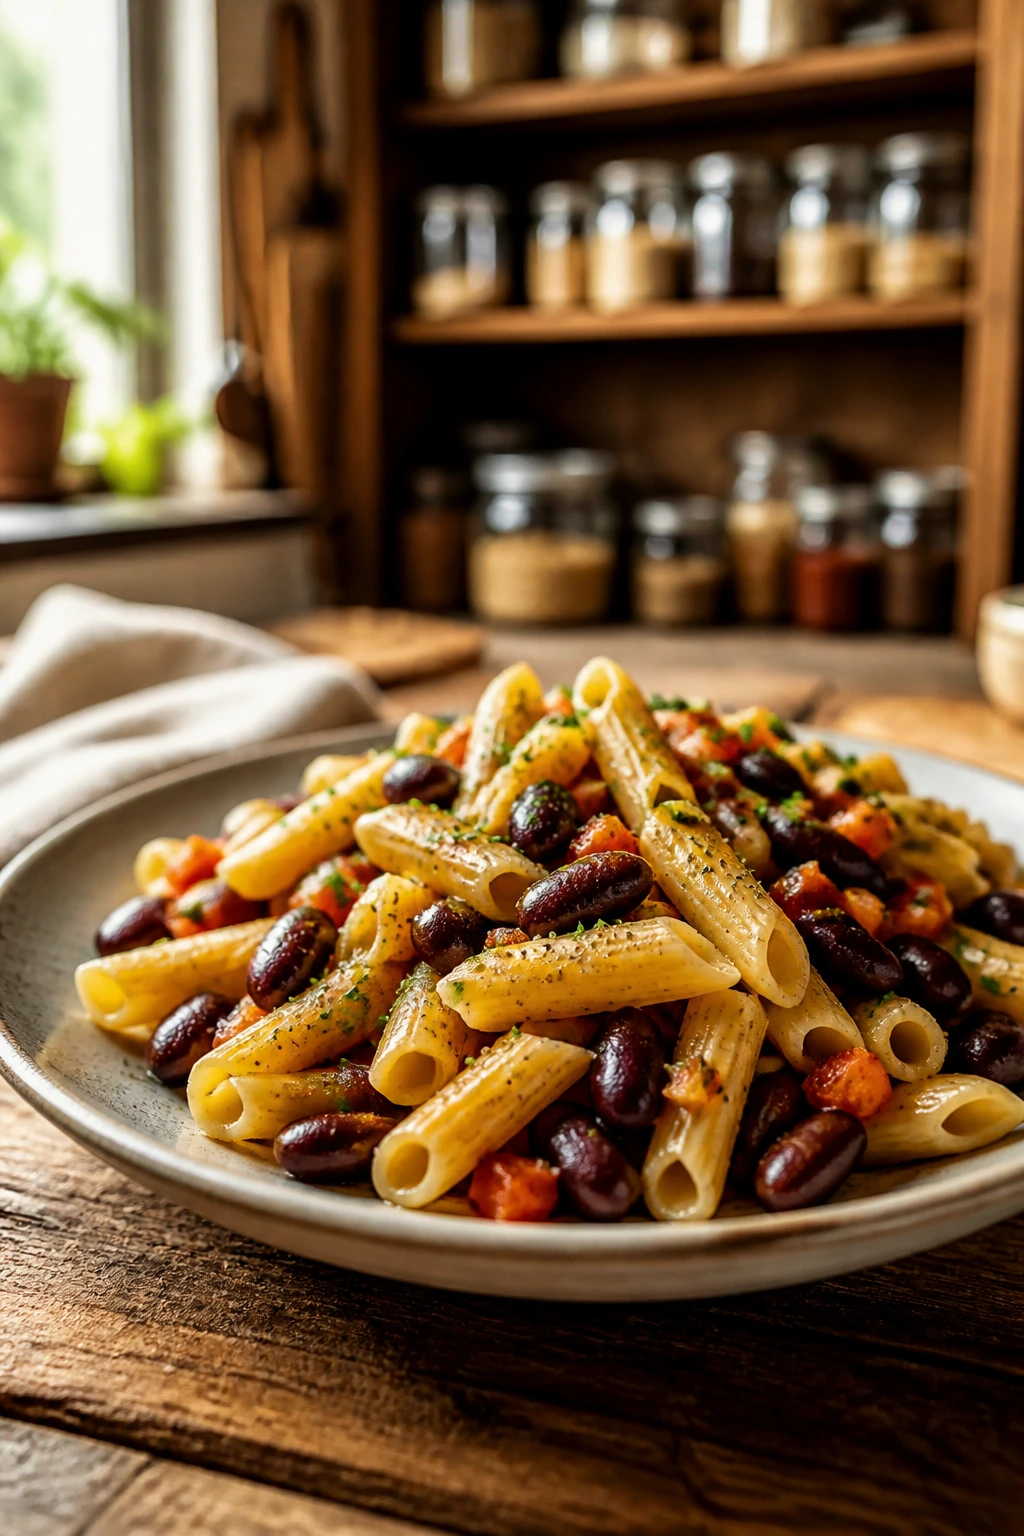
11. Chili Mac
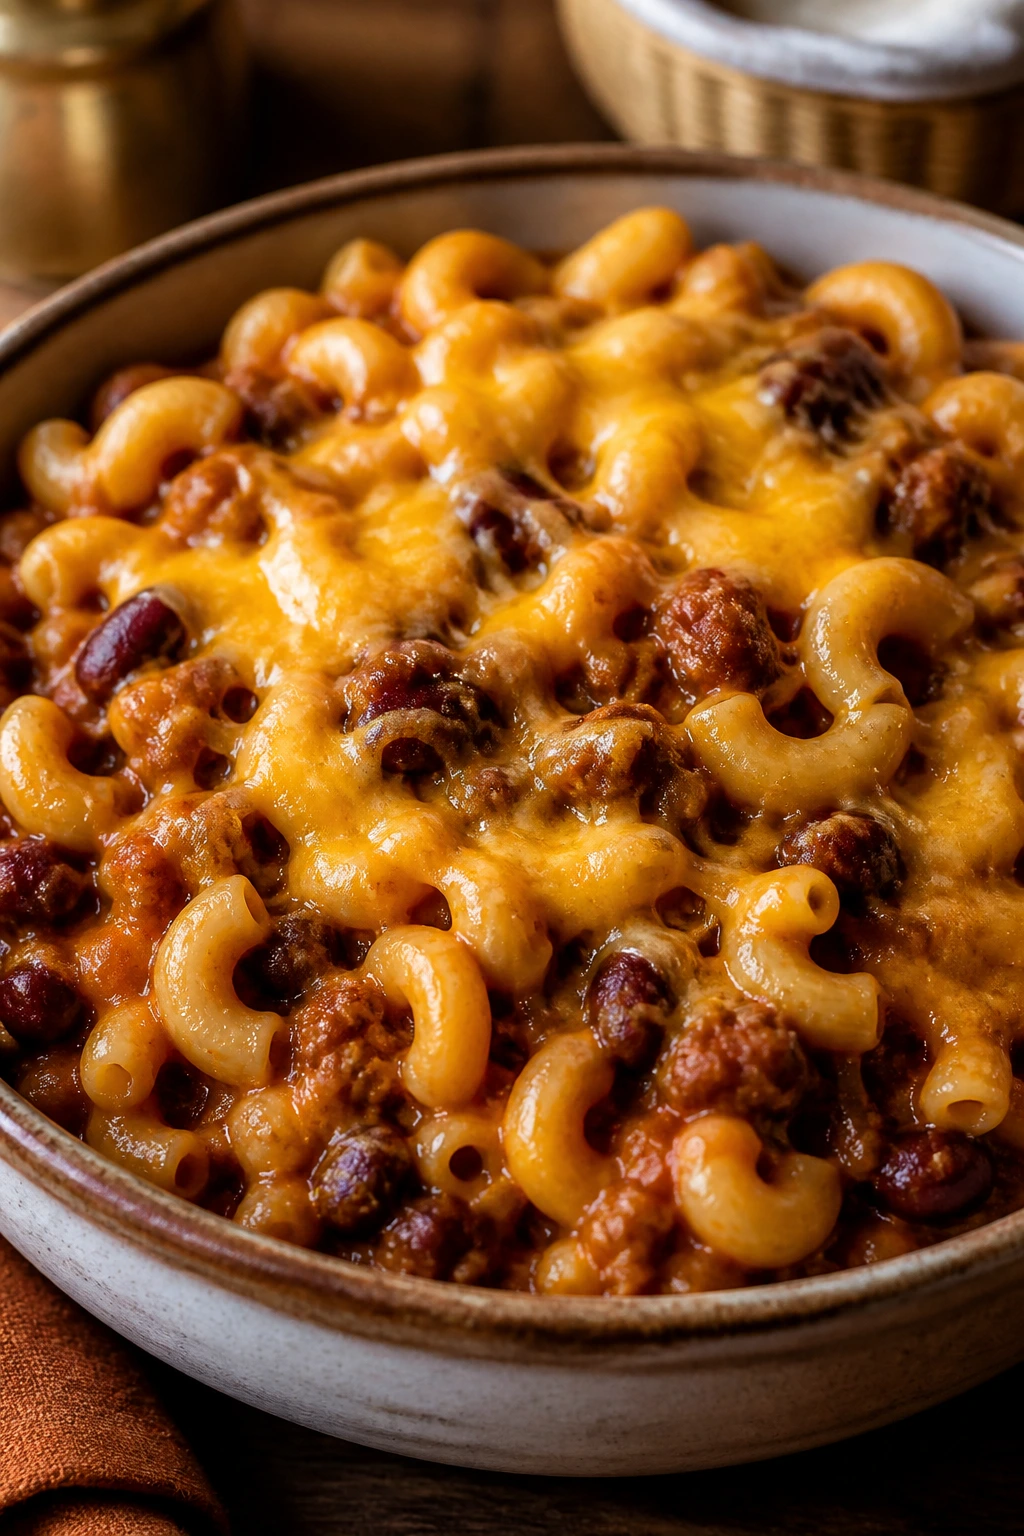
Intro:
Chili mac is the kind of meal that feels like it came from a church basement in the best possible way. It’s soft, saucy, cheesy, and built to feed people without asking much from the pantry. If you have pasta, beans, and a can of tomatoes, you’re already most of the way there.
Why It Works:
Pasta stretches the chili and makes the dish more filling without much cost. Beans add protein and texture, while chili powder and tomato sauce keep the flavor from tasting like plain red noodles. Cheese on top seals the deal.
Key Ingredients:
- 12 ounces elbow macaroni
- 1 tablespoon oil
- 1 small onion, diced
- 1 can kidney beans, drained and rinsed
- 1 15-ounce can tomato sauce
- 1 1/2 tablespoons chili powder
- 1 cup water
- 1 cup shredded cheddar
- Salt and pepper
Quick Steps:
- Cook the pasta: Boil the macaroni in salted water until al dente, about 8 minutes. Drain.
- Start the chili base: Heat the oil in a skillet over medium heat. Cook the onion for 4 minutes until soft.
- Add beans and sauce: Stir in the beans, tomato sauce, chili powder, water, salt, and pepper. Simmer for 5 minutes until slightly thickened.
- Combine: Stir in the macaroni and cook for 1 to 2 minutes until the pasta is coated.
- Finish with cheese: Sprinkle cheddar over the top, cover for 1 minute, and let it melt.
Equipment for This Recipe:
- Pot
- Large skillet
- Colander
- Spoon
How to Serve This Dish:
Serve it in bowls with a few sliced scallions or a spoon of sour cream if you have it. It’s thick enough to stand on its own.
Pro Tips for This Recipe:
- Don’t overcook the pasta; it will soften a little more in the chili.
- If the sauce seems thin, simmer it uncovered for another 2 minutes.
- A spoon of mustard sounds odd, but it sharpens the tomato base.
Variations on This Dish:
- Bean and Corn Chili Mac: Add 1 cup frozen corn with the beans.
- Smoky Chili Mac: Use smoked paprika along with the chili powder.
Common Mistakes to Avoid with This Dish:
- Making it too soupy: Chili mac should be spoonable, not watery.
- Using sweet tomato sauce: It can make the dish taste flat and clingy.
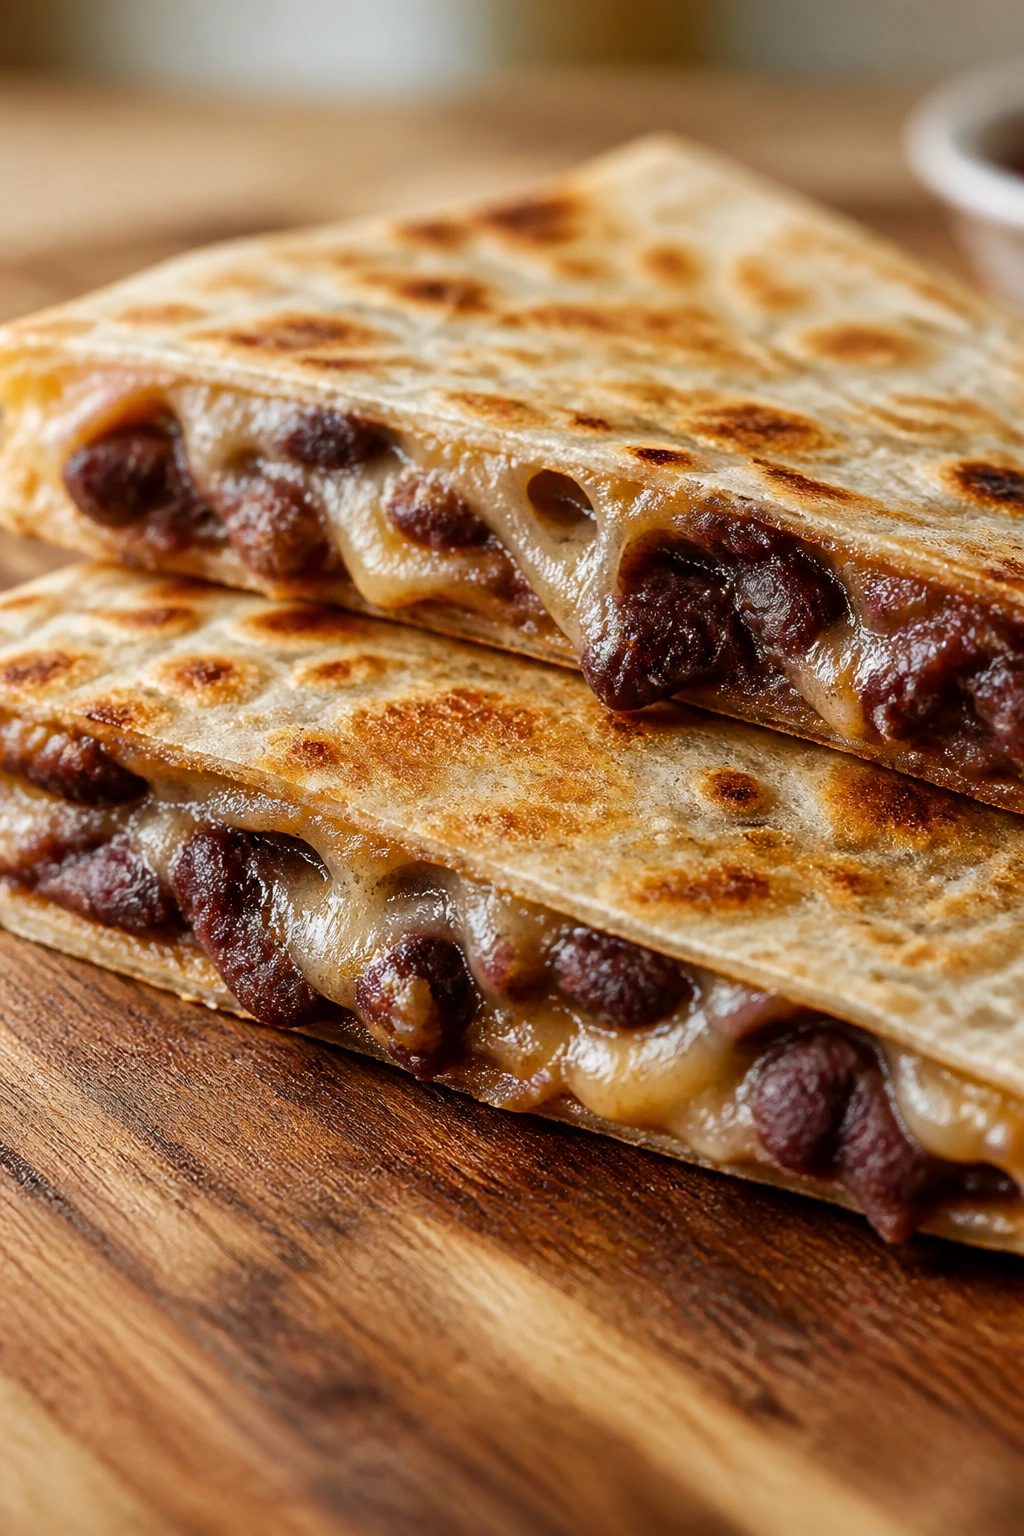
12. Lentil Sloppy Joes
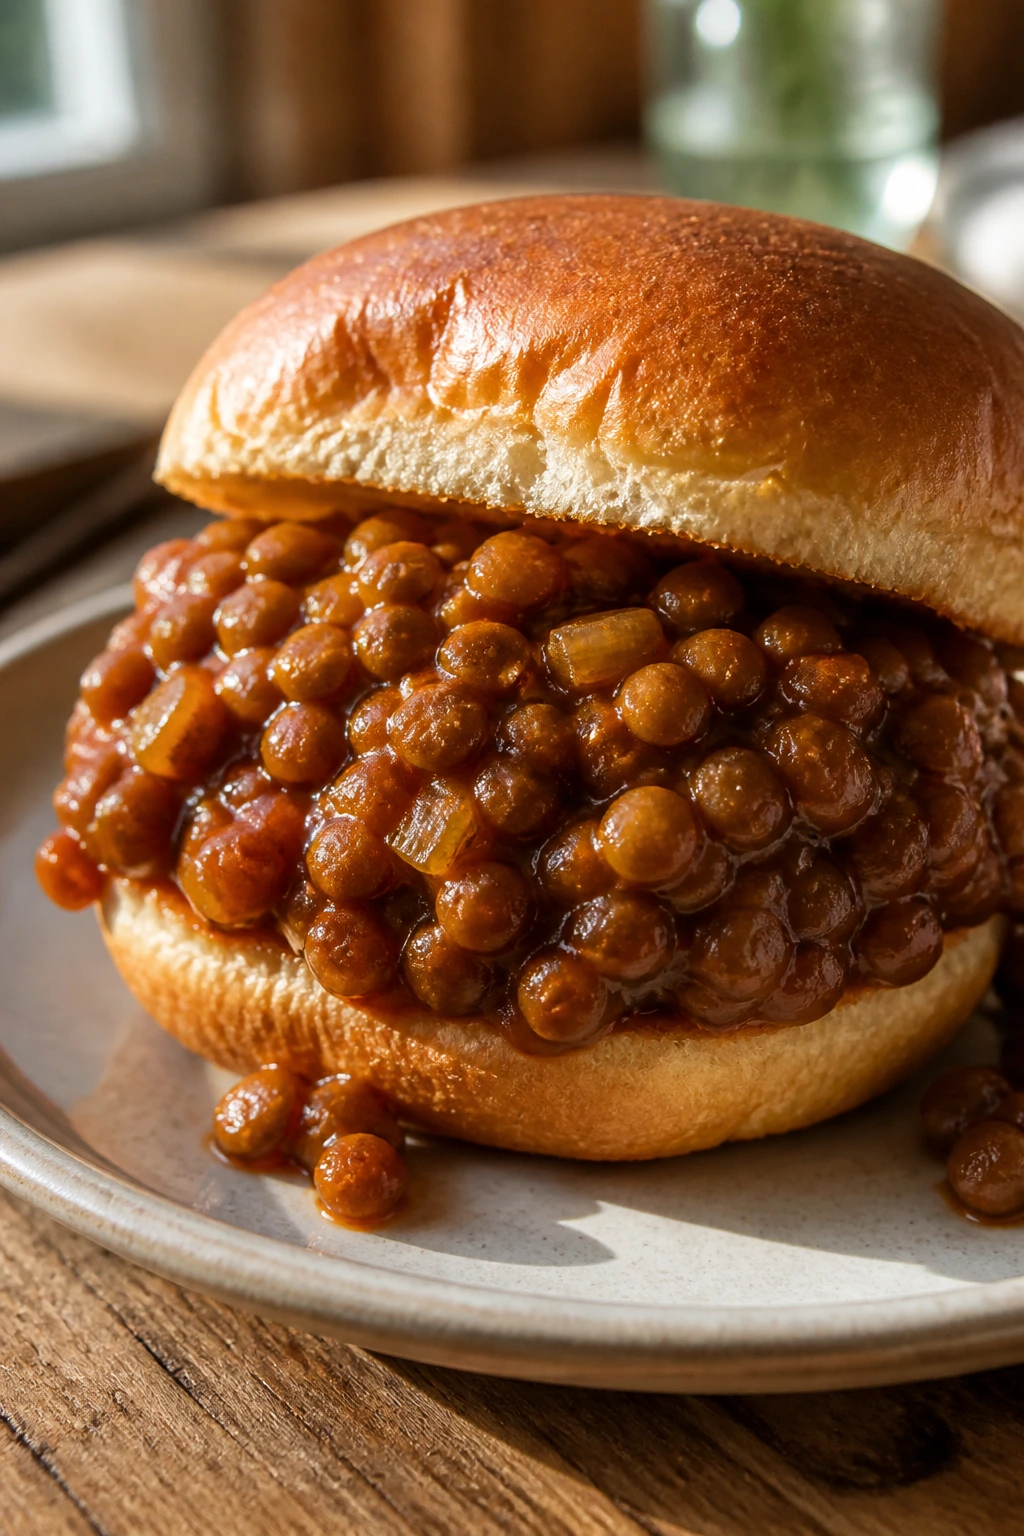
Intro:
Sloppy Joes were built for speed, and lentils make them cheaper without turning them sad. The filling gets sticky, tangy, and a little sweet, which is the whole point. The bun matters too; soft bread catches the sauce before it runs everywhere.
Why It Works:
Cooked lentils have enough bite to mimic the texture of ground meat without the price tag. Ketchup, mustard, and Worcestershire sauce create the familiar sloppy Joe flavor fast. You’re mostly heating and reducing, not building a sauce from scratch the hard way.
Key Ingredients:
- 2 cups cooked lentils, or 2 cans lentils, drained
- 1 tablespoon oil
- 1 small onion, diced
- 1 tablespoon tomato paste
- 1/4 cup ketchup
- 1 tablespoon mustard
- 1 tablespoon Worcestershire sauce
- 4 sandwich buns
- 1/2 teaspoon paprika
Quick Steps:
- Cook the onion: Heat the oil in a skillet over medium heat. Add the onion and cook for 4 minutes until soft.
- Build the sauce: Stir in tomato paste, ketchup, mustard, Worcestershire, and paprika. Cook for 1 minute.
- Add the lentils: Stir in the lentils and 1/4 cup water. Simmer for 5 to 7 minutes until thick and sticky.
- Toast the buns: Split and lightly toast the buns.
- Assemble: Spoon the filling onto the buns and serve.
Equipment for This Recipe:
- Skillet
- Spoon
- Toaster or dry pan
- Can opener, if needed
How to Serve This Dish:
Serve with carrot sticks or a simple cabbage slaw if you want crunch. The filling is bold enough that the plate does not need much else.
Pro Tips for This Recipe:
- Reduce the filling until it clings to the spoon; loose filling makes a soaked bun.
- A little pickle juice can sharpen the sauce if it tastes too sweet.
- Use brown or green lentils, not red, or the filling gets mushy.
Variations on This Dish:
- BBQ Lentil Joes: Swap ketchup for BBQ sauce for a smokier version.
- Spicy Joe Filling: Add hot sauce and a pinch of cayenne.
Common Mistakes to Avoid with This Dish:
- Skipping the toast: Untoasted buns turn soggy fast.
- Too much water: The filling should be thick enough to mound.
13. Teriyaki Tofu and Broccoli Stir-Fry
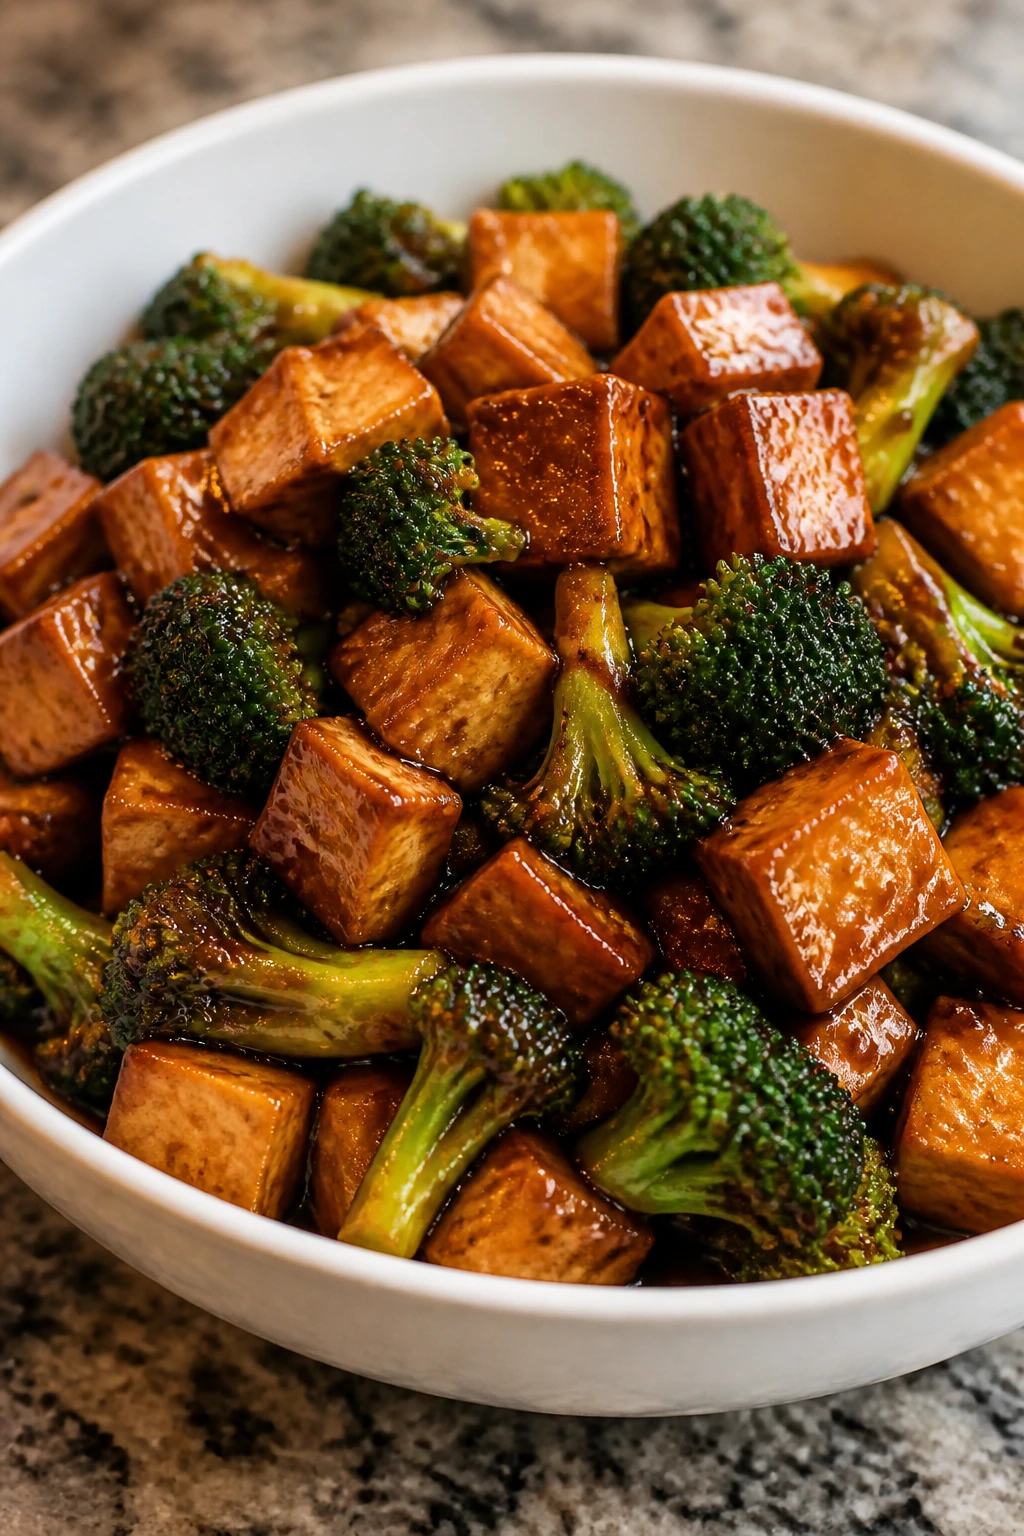
Intro:
Tofu gets a bad rap from people who undercook it. Give it a hot pan, a little sauce, and some broccoli, and it becomes crisp-edged, sticky, and much more satisfying than the takeout version that arrives limp. This is also one of the cheaper ways to make tofu feel like dinner.
Why It Works:
Tofu soaks up sauce, but only after its surface gets some browning. Broccoli adds bulk and still tastes fresh after a quick stir-fry. The teriyaki sauce thickens in the pan, so you don’t need bottled sauce or a long simmer.
Key Ingredients:
- 14-ounce block firm tofu, pressed and cubed
- 1 head broccoli, cut into small florets
- 2 tablespoons soy sauce
- 1 tablespoon brown sugar
- 1 tablespoon rice vinegar or white vinegar
- 2 garlic cloves, minced
- 1 teaspoon cornstarch
- 3/4 cup water
- 1 tablespoon oil
- 6 ounces ramen noodles, cooked and drained
Quick Steps:
- Make the sauce: Stir soy sauce, brown sugar, vinegar, garlic, cornstarch, and water together in a bowl.
- Brown the tofu: Heat the oil in a large skillet over medium-high heat. Cook the tofu for 6 to 7 minutes, turning once or twice, until the edges are golden.
- Add the broccoli: Stir in the broccoli and 2 tablespoons water. Cover for 3 minutes to steam it slightly.
- Pour in the sauce: Add the sauce and cook for 2 to 3 minutes until glossy and thick.
- Toss with noodles: Add the noodles and stir until coated.
Equipment for This Recipe:
- Large skillet
- Bowl for sauce
- Spatula
- Pot for noodles
How to Serve This Dish:
Serve it in a bowl with the crispy tofu on top. If you have sesame seeds or scallions, sprinkle them over; if you don’t, the dish still stands up.
Pro Tips for This Recipe:
- Press the tofu for at least 10 minutes if you can; dry tofu browns faster.
- Cut the broccoli small so it cooks before the sauce overreduces.
- The sauce should look shiny, not gluey.
Variations on This Dish:
- Peanut Teriyaki: Stir 1 tablespoon peanut butter into the sauce.
- Veg-Only Stir-Fry: Swap tofu for more broccoli, carrots, and cabbage.
Common Mistakes to Avoid with This Dish:
- Moving the tofu too soon: Let it sit and brown or it will stick and tear.
- Using low heat: The broccoli goes soft and the sauce never tightens.
14. Tomato Couscous with Chickpeas
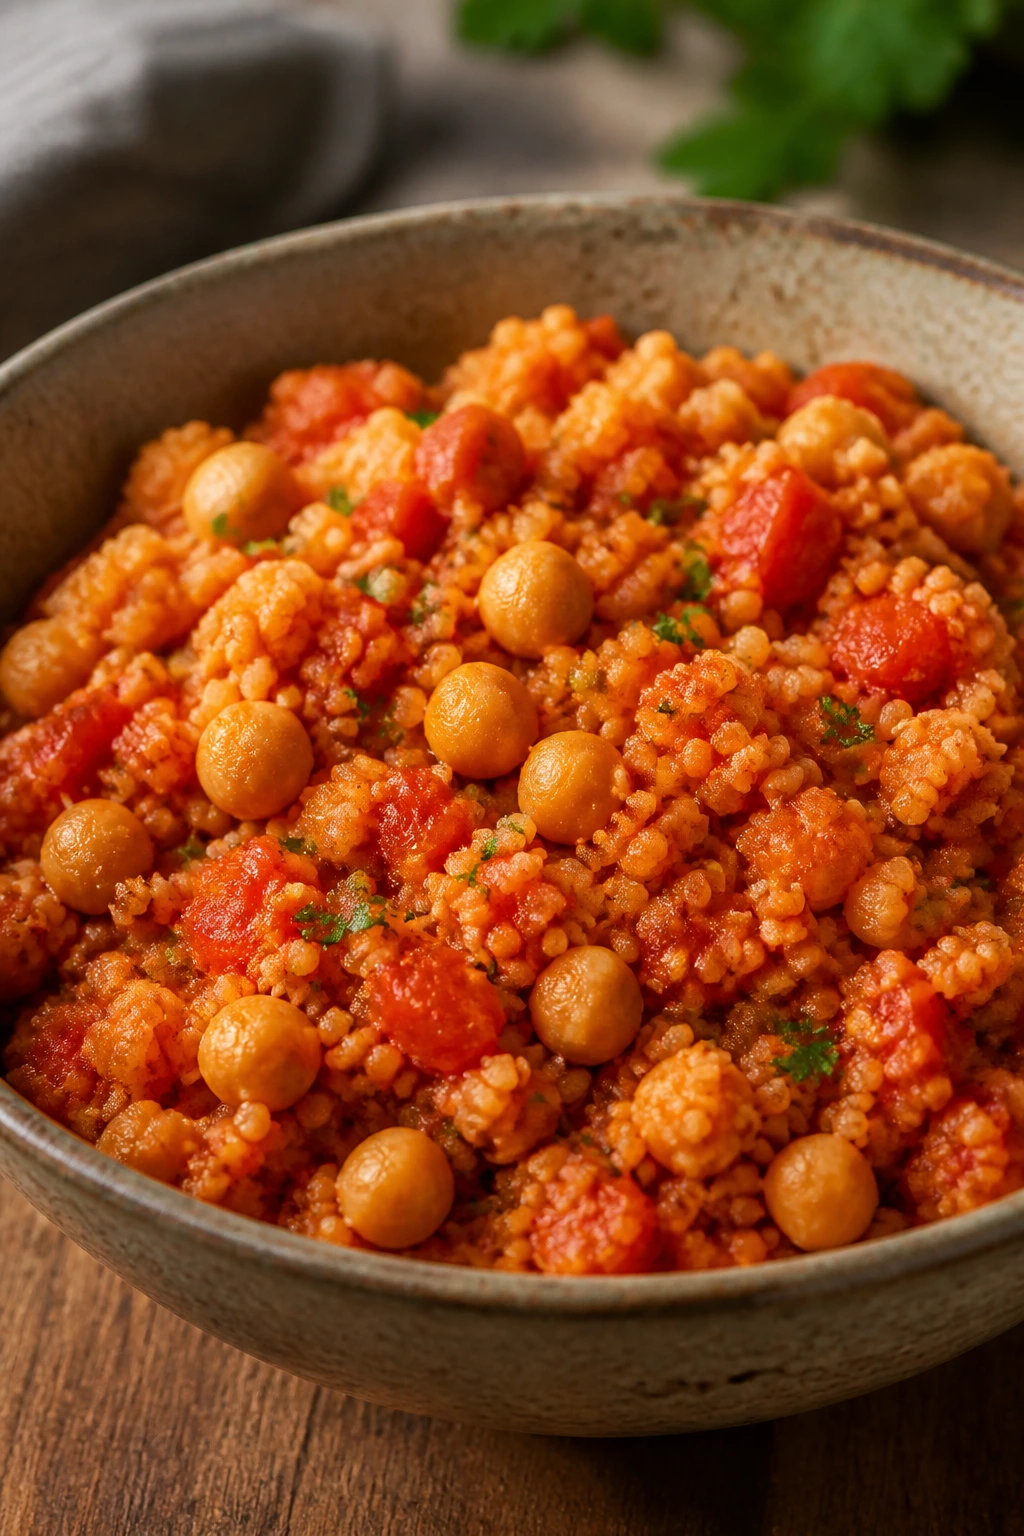
Intro:
Couscous is one of those pantry items that feels like cheating, except in a good way. It drinks up hot liquid in minutes, which makes it ideal when you want a real dinner and not a pot that hogs the stove all night. Chickpeas and tomatoes give the whole thing shape.
Why It Works:
Couscous cooks by steaming, so it saves time and energy. Chickpeas add heft, and canned tomatoes bring sauce without needing a second simmer pot. A little feta, if you have it, gives the dish a salty edge that makes the bowl feel finished.
Key Ingredients:
- 1 cup couscous
- 1 1/4 cups hot water or broth
- 1 tablespoon olive oil
- 1 small onion, diced
- 2 garlic cloves, minced
- 1 can chickpeas, drained
- 1 can diced tomatoes
- 1/4 cup crumbled feta, optional
- 2 tablespoons chopped parsley or basil
- Salt and pepper
Quick Steps:
- Make the couscous: Put couscous in a bowl with a pinch of salt. Pour over the hot water or broth, cover, and let it sit for 5 minutes. Fluff with a fork.
- Cook the onion: Warm the oil in a skillet over medium heat. Add the onion and cook for 4 minutes.
- Add garlic and chickpeas: Stir in garlic and chickpeas for 1 minute.
- Warm the tomatoes: Add the diced tomatoes, salt, and pepper. Simmer for 5 minutes until the sauce thickens a little.
- Combine and finish: Fold the tomato mixture into the couscous and top with feta and herbs.
Equipment for This Recipe:
- Skillet
- Bowl with lid or plate
- Fork
- Spoon
How to Serve This Dish:
Serve warm with a squeeze of lemon if you have one. It also works well as a side for anything roasted, though it’s perfectly fine on its own.
Pro Tips for This Recipe:
- Use broth if you have it; couscous tastes bland with plain water unless you season the tomatoes well.
- Let the couscous steam fully before fluffing or it clumps.
- Don’t drown it in tomatoes. The grain should stay distinct.
Variations on This Dish:
- Mediterranean Couscous Bowl: Add chopped cucumber and olives.
- Spiced Couscous: Stir in cumin and paprika with the onion.
Common Mistakes to Avoid with This Dish:
- Overstirring the couscous: It can turn paste-like if you mash it.
- Too little salt: Couscous needs seasoning more than people think.
15. White Bean and Spinach Gnocchi
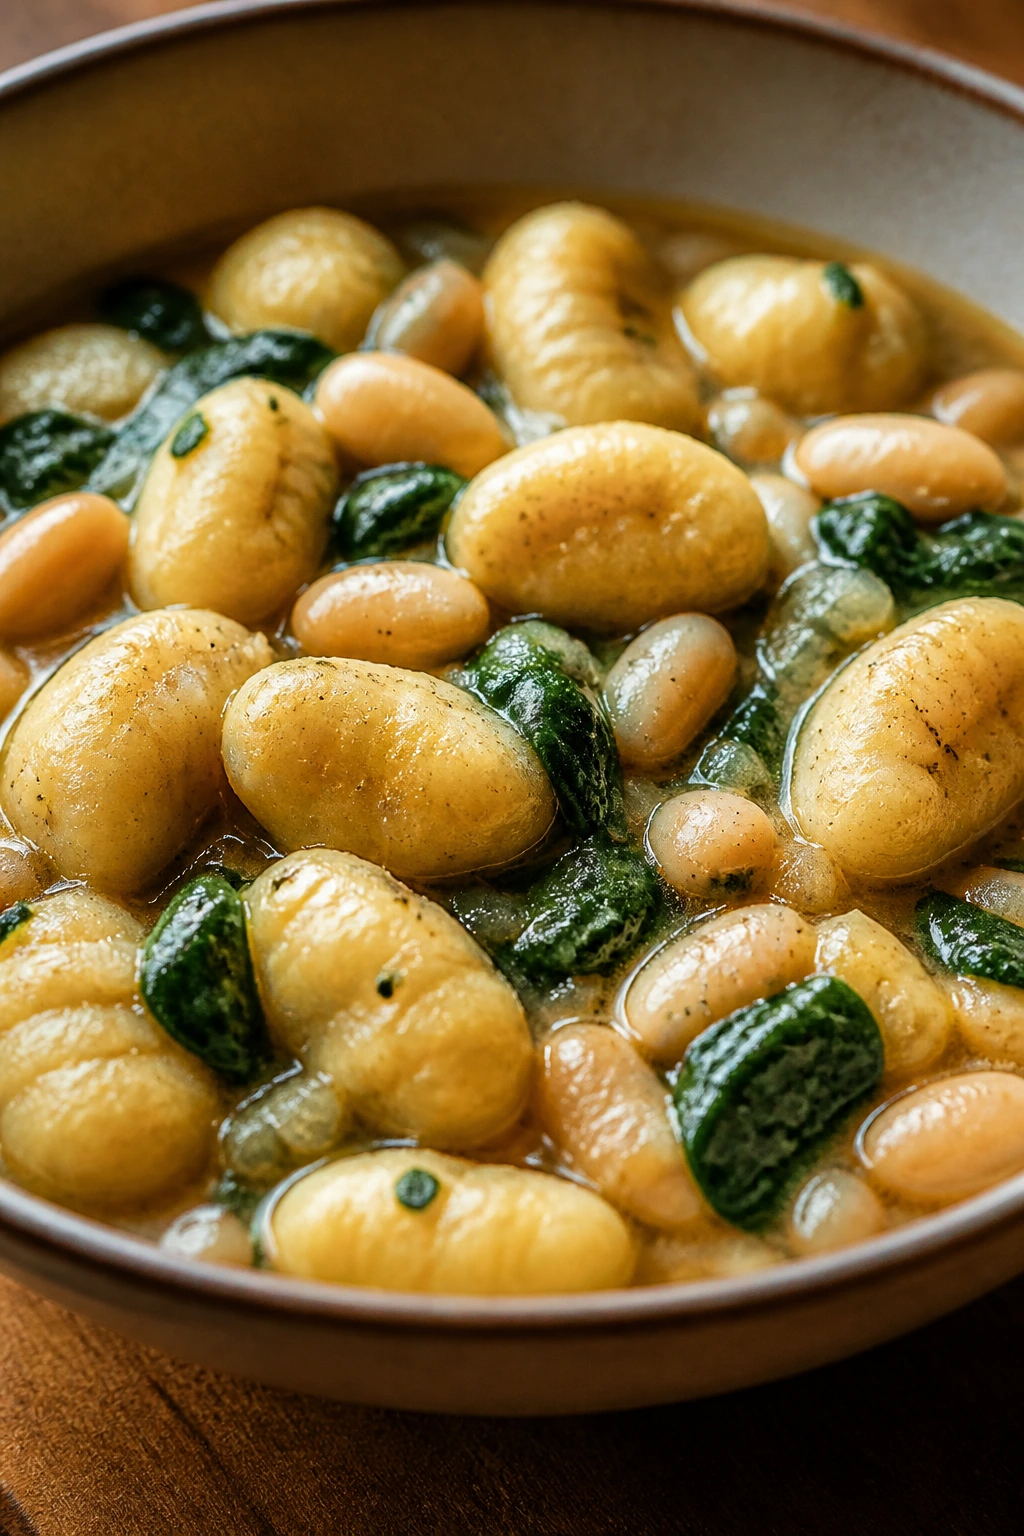
Intro:
Shelf-stable gnocchi is one of those cheap ingredients that feels more expensive than it is. It cooks in minutes, gets pillowy in a pan, and can carry a sauce made from broth, garlic, beans, and spinach without needing cream. This is weeknight comfort with a short receipt.
Why It Works:
Gnocchi brings soft starch fast, which means no long boiling or special technique. White beans add protein, spinach melts into the sauce, and a little Parmesan gives the whole dish a salty finish. The broth turns into a light coating rather than a heavy cream sauce.
Key Ingredients:
- 1 pound shelf-stable gnocchi
- 1 tablespoon butter or olive oil
- 3 garlic cloves, minced
- 1 can white beans, drained
- 1 1/2 cups vegetable broth
- 2 cups baby spinach
- 1/4 cup grated Parmesan
- Salt and pepper
Quick Steps:
- Brown the gnocchi: Heat the butter or oil in a large skillet over medium-high heat. Add the gnocchi and cook for 4 to 5 minutes, stirring occasionally, until lightly golden.
- Add garlic and beans: Stir in the garlic and beans for 30 seconds.
- Build the sauce: Pour in the broth and simmer for 3 to 4 minutes until it reduces slightly.
- Wilt the spinach: Add the spinach and stir until it collapses.
- Finish: Add Parmesan, salt, and pepper, and stir until glossy.
Equipment for This Recipe:
- Large skillet
- Spoon or spatula
- Measuring cup
- Grater, optional
How to Serve This Dish:
Serve it in shallow bowls so the sauce pools around the gnocchi. Extra black pepper on top helps more than another handful of cheese.
Pro Tips for This Recipe:
- Browning the gnocchi gives it a better texture than simply boiling it.
- If the pan dries out before the broth reduces, add a splash of water.
- Chop the spinach if the leaves are large; it blends in more evenly.
Variations on This Dish:
- Tomato Gnocchi: Add 1/2 cup canned crushed tomatoes with the broth.
- Lemon Gnocchi: Finish with 1 teaspoon lemon zest for a sharper bowl.
Common Mistakes to Avoid with This Dish:
- Adding too much broth: The sauce gets thin and slippery.
- Overcooking the spinach: It should wilt, not disappear into green threads.
16. Breakfast Hash with Eggs and Potatoes
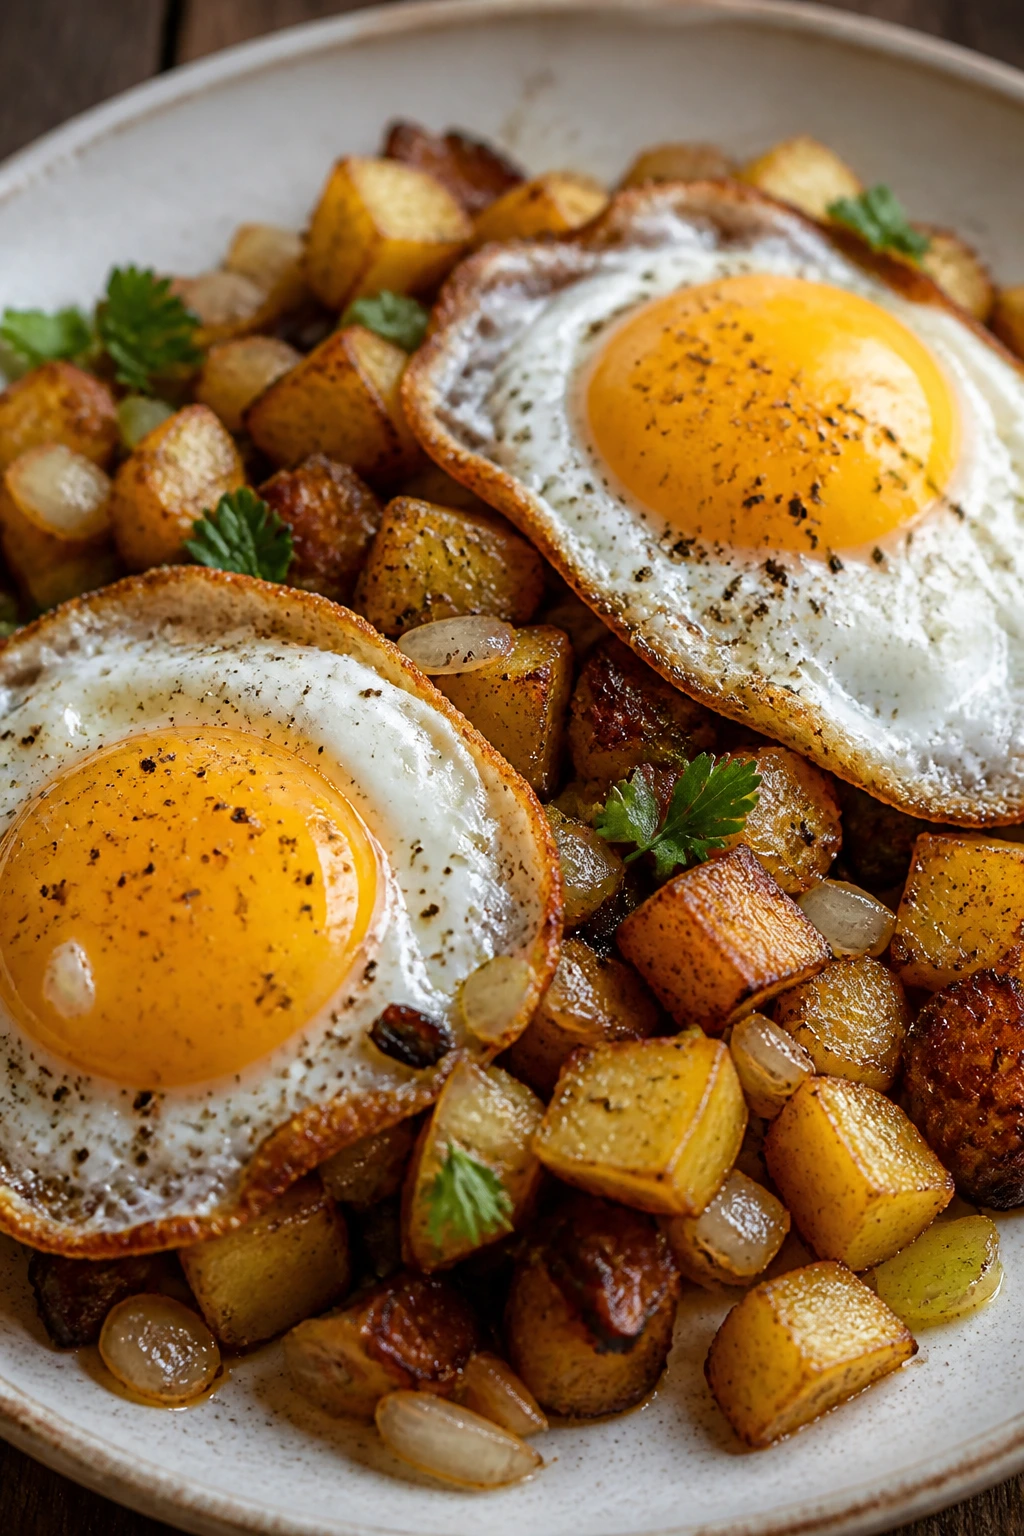
Intro:
Breakfast for dinner is less of a gimmick when the hash is this good. Potatoes get crisp, onions go sweet, and the eggs settle into the pan like they belong there. It’s cheap, filling, and one of the best ways to make a small pile of ingredients look like a real meal.
Why It Works:
Potatoes are the budget anchor, and eggs carry the protein at a low cost. Cooking the potatoes first gives them that crisp edge, while the eggs finish the pan without needing a separate skillet. A little paprika makes the whole thing taste more deliberate.
Key Ingredients:
- 1 pound potatoes, diced into 1/2-inch cubes
- 1 small onion, diced
- 1 bell pepper, diced, optional
- 4 large eggs
- 2 tablespoons oil
- 1 teaspoon paprika
- Salt and pepper
- Hot sauce, optional
Quick Steps:
- Start the potatoes: Heat the oil in a large skillet over medium heat. Add the potatoes, salt, and paprika. Cook for 10 minutes, stirring now and then.
- Add onion and pepper: Stir in the onion and pepper and cook for 5 more minutes until the vegetables soften and the potatoes brown.
- Make space for the eggs: Push the hash to the sides and crack the eggs into the center, or fry them separately in the same pan.
- Cover briefly: Cook until the whites set and the yolks are how you like them, usually 3 to 5 minutes.
- Serve hot: Season with pepper and hot sauce.
Equipment for This Recipe:
- Large skillet
- Spatula
- Knife and cutting board
How to Serve This Dish:
Serve straight from the pan with toast or fruit if you have it. The yolks act like sauce, so don’t overthink the plate.
Pro Tips for This Recipe:
- Dice the potatoes small so they cook within the half hour.
- Covering the pan for a minute helps the potatoes soften before crisping.
- If you have leftover cooked potatoes, this meal gets even faster.
Variations on This Dish:
- Southwest Hash: Add black beans and a spoon of salsa.
- Cheesy Hash: Sprinkle cheese over the potatoes before adding eggs.
Common Mistakes to Avoid with This Dish:
- Large potato chunks: They won’t finish in time.
- Too much stirring: Let the potatoes sit long enough to brown.
17. Broccoli Cheddar Rice
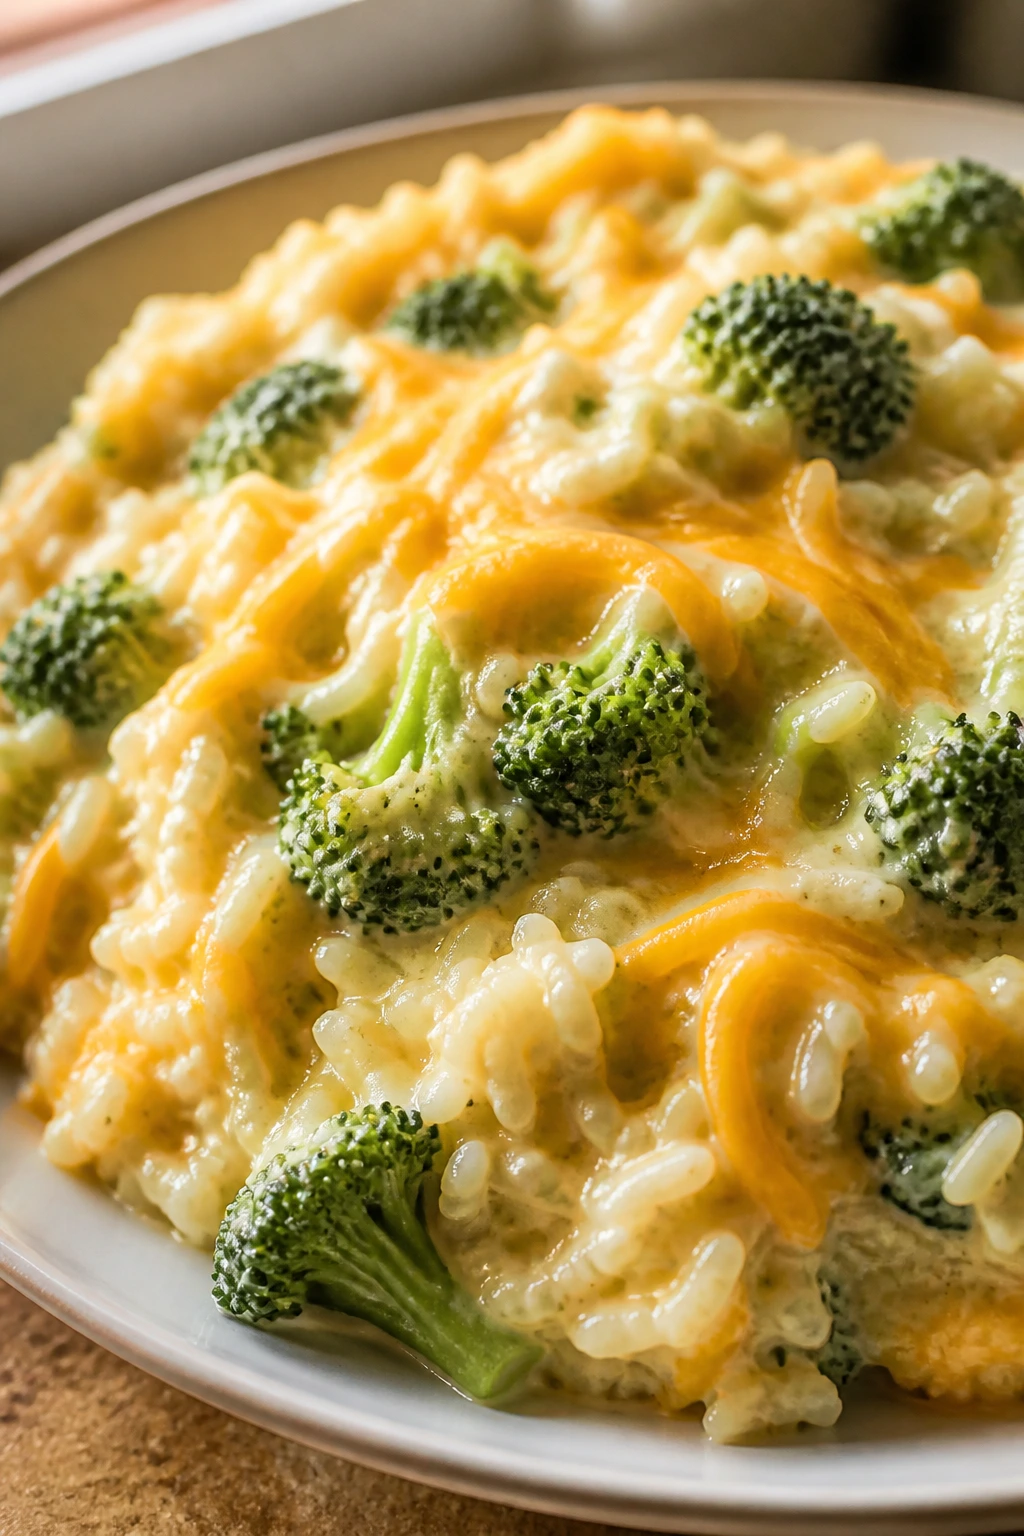
Intro:
This is comfort food made from ordinary parts: rice, broccoli, milk, and cheddar. It’s creamy without being fussy, and the broccoli keeps the whole pot from feeling like it was built entirely out of starch. Good cheddar matters here, but you don’t need much of it.
Why It Works:
Rice gives the dish its body, while a simple flour-and-milk sauce makes it creamy fast. Broccoli adds color and a little bite, and cheddar brings the flavor that makes people go back for a second bowl. It’s a smart way to stretch a small amount of cheese across several servings.
Key Ingredients:
- 1 1/2 cups cooked rice
- 3 cups broccoli florets, chopped small
- 1 small onion, diced
- 1 tablespoon butter
- 1 tablespoon flour
- 1 cup milk
- 1 1/2 cups shredded cheddar
- Salt and pepper
Quick Steps:
- Cook the onion: Melt the butter in a skillet over medium heat. Add the onion and cook for 4 minutes until soft.
- Make the sauce base: Stir in the flour and cook for 1 minute. Slowly whisk in the milk until smooth.
- Add broccoli: Stir in the broccoli and simmer for 4 to 5 minutes until tender-crisp.
- Melt the cheese: Add cheddar and stir until melted.
- Finish with rice: Fold in the rice, season with salt and pepper, and heat through.
Equipment for This Recipe:
- Skillet or saucepan
- Whisk
- Spoon
How to Serve This Dish:
Serve in bowls with extra black pepper. A spoon of hot sauce or a handful of chopped tomato on top adds contrast.
Pro Tips for This Recipe:
- Chop the broccoli small so it cooks quickly.
- Add the cheese off the hottest part of the flame if your stove runs hot.
- Leftover rice works better than just-cooked rice here.
Variations on This Dish:
- Broccoli Cheddar Bake Bowl: Transfer to a small dish and broil for 2 minutes if you want a browned top.
- Hamless “Loaded” Version: Add frozen peas or corn for extra bulk.
Common Mistakes to Avoid with This Dish:
- Dumping in all the milk at once: You get lumps. Add it slowly.
- Overcooking the broccoli: It turns dull and soft.
18. Open-Faced Tuna Melts
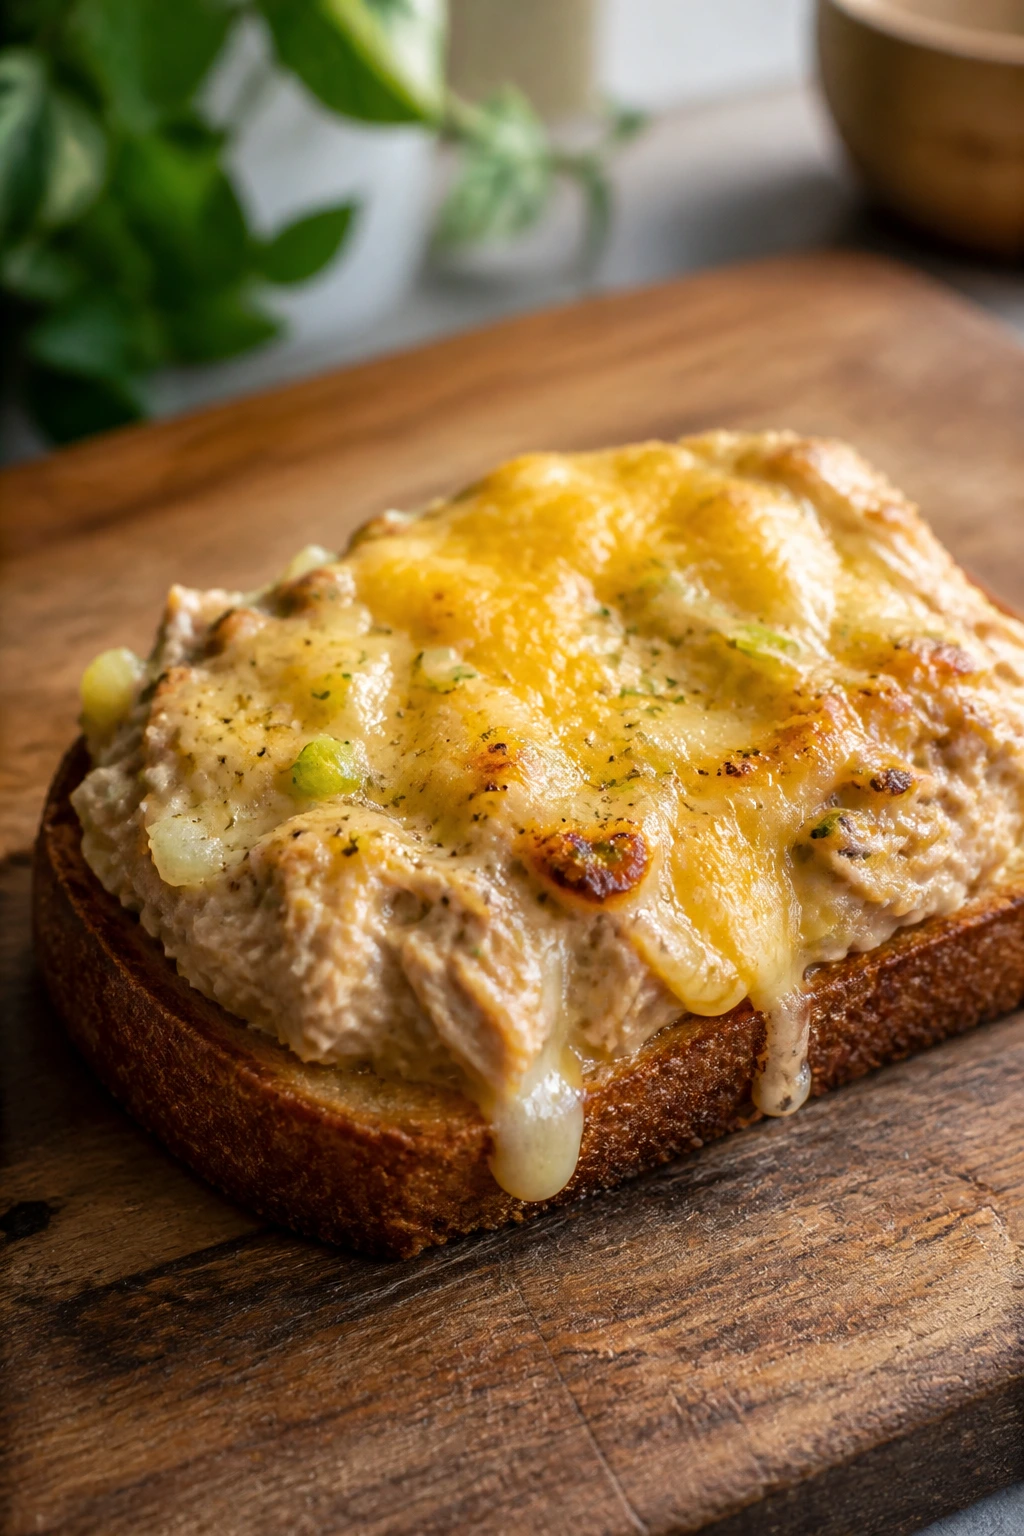
Intro:
A tuna melt can feel almost fancy if the bread is toasted and the cheese melts all the way to the edges. It’s cheap, salty, warm, and fast enough to make when the clock is running you instead of the other way around. Open-faced keeps the bread crisp.
Why It Works:
Mixing the tuna with just enough mayo and mustard makes a spread that stays put. Toasted bread holds the filling better than cold bread, and the broiler finishes the cheese in a minute or two. You get that hot-cold contrast that makes simple food feel complete.
Key Ingredients:
- 4 slices sturdy bread
- 2 cans tuna, drained
- 1/4 cup mayonnaise
- 1 teaspoon mustard
- 1 tablespoon finely chopped onion or pickle
- 4 slices cheese
- Salt and pepper
Quick Steps:
- Make the tuna mix: Stir tuna, mayo, mustard, onion or pickle, salt, and pepper together in a bowl.
- Toast the bread: Toast the bread lightly so it can support the topping.
- Pile on the filling: Divide the tuna mix over the bread and top each slice with cheese.
- Broil: Put the slices under the broiler for 2 to 4 minutes until the cheese melts and blisters at the edges.
- Serve hot: Eat immediately.
Equipment for This Recipe:
- Broiler-safe tray
- Fork
- Bowl
- Toaster or skillet
How to Serve This Dish:
Pair it with tomato slices, a few dill pickles, or a handful of chips. Open-faced means no wrestling with a sandwich that wants to fall apart.
Pro Tips for This Recipe:
- Watch the broiler closely; it burns in a blink.
- Use thicker bread if your tuna mix is loose.
- A pinch of celery seed gives the filling a deli-style note.
Variations on This Dish:
- Pickle-Brined Melt: Add extra chopped pickles and a little brine for sharper flavor.
- Tomato Melt: Place a tomato slice under the cheese for a juicier sandwich.
Common Mistakes to Avoid with This Dish:
- Too much mayo: The topping slides off and makes the bread soggy.
- Walking away from the broiler: It goes from melted to burnt fast.
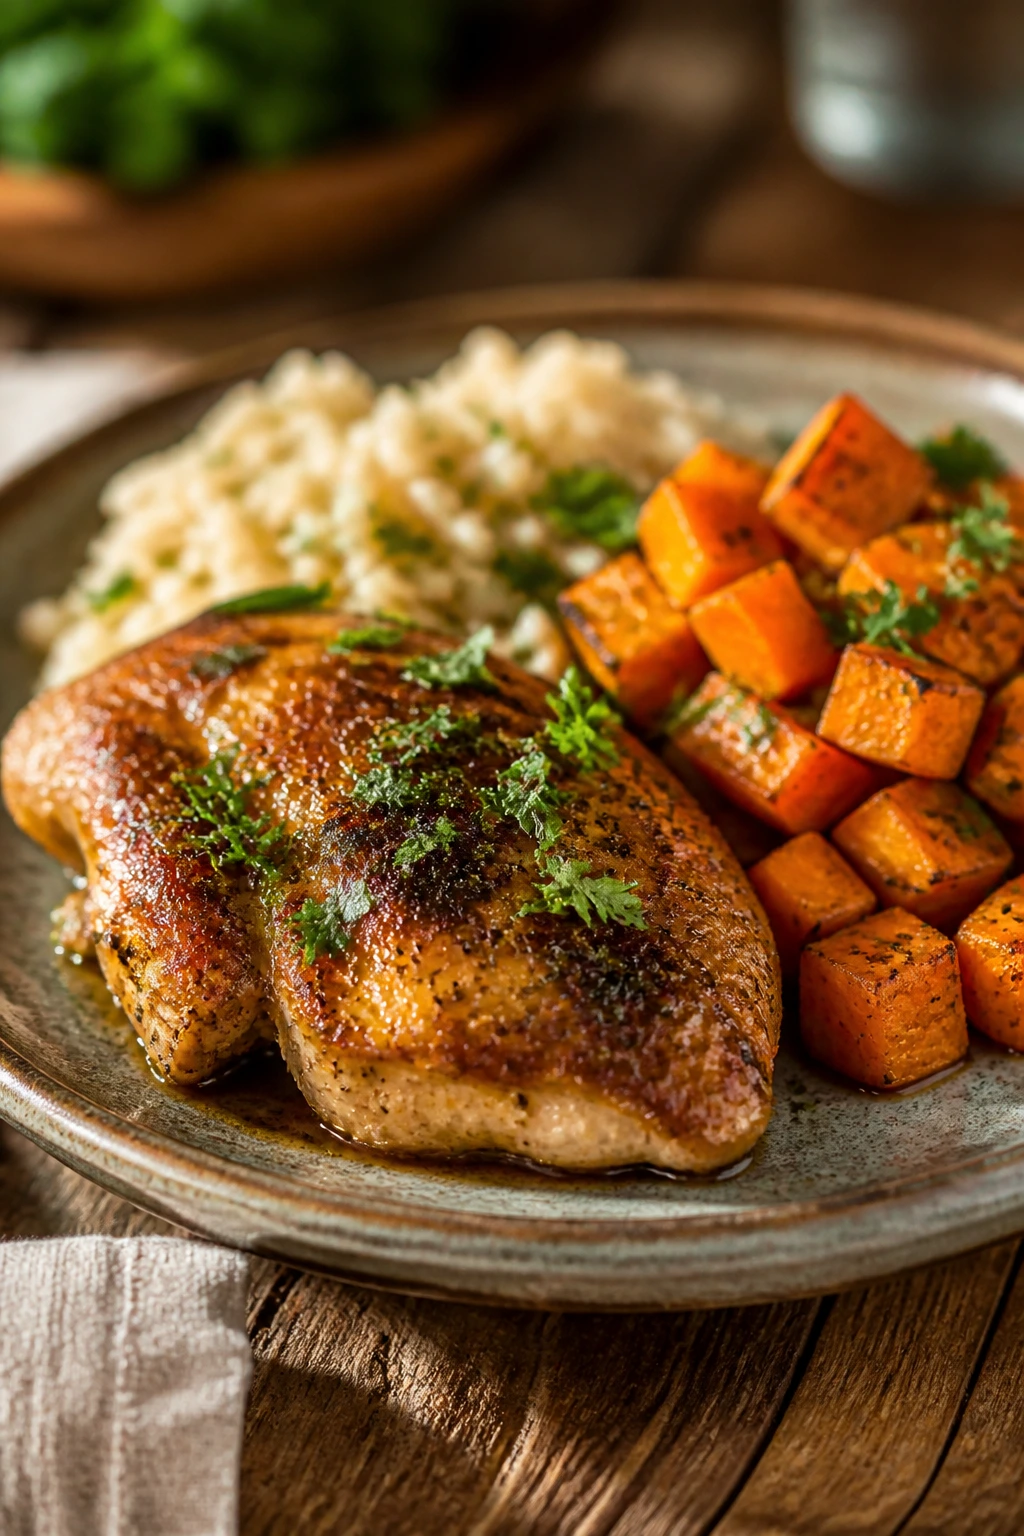
19. Paprika Chicken and Rice Skillet
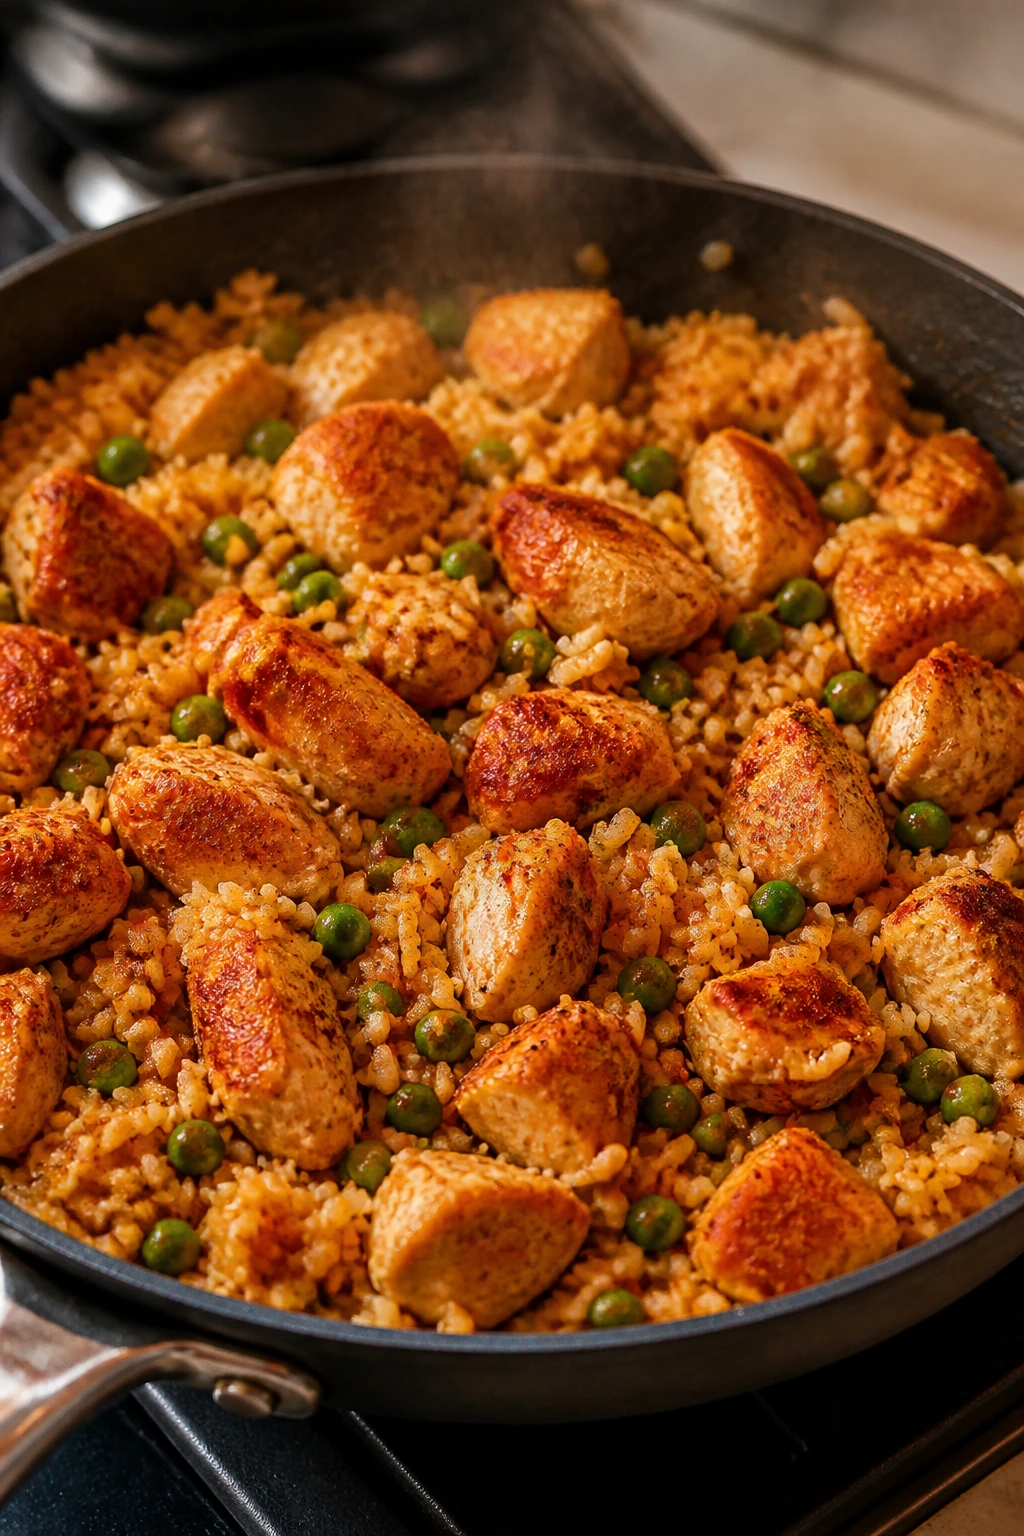
Intro:
Chicken can still belong in budget cooking if you keep the cut simple and the method fast. Bite-size pieces cook quickly, paprika gives them color, and rice stretches the pan into real dinner territory. The key is keeping the heat steady and the pan crowded just enough, not too much.
Why It Works:
Boneless chicken thighs stay juicy in a short skillet cook, and quick-cooking rice absorbs the seasoned broth while the chicken finishes. Frozen peas add color and a little sweetness. It’s a one-pan meal that tastes like more work than it is.
Key Ingredients:
- 1 pound boneless skinless chicken thighs, cut into bite-size pieces
- 1 tablespoon oil
- 1 small onion, diced
- 1 teaspoon paprika
- 1 cup quick-cooking rice
- 1 1/2 cups chicken broth
- 1 cup frozen peas
- Salt and pepper
Quick Steps:
- Brown the chicken: Heat the oil in a deep skillet over medium-high heat. Season the chicken with salt, pepper, and paprika, then cook for 5 to 6 minutes until browned.
- Cook the onion: Add the onion and cook for 2 minutes.
- Add rice and broth: Stir in the rice and broth, bring to a simmer, then lower the heat and cover for 10 minutes.
- Finish with peas: Stir in the peas, cover again, and cook for 3 minutes until the rice is tender and the peas are hot.
- Fluff and serve: Let it rest for 2 minutes, then fluff with a fork.
Equipment for This Recipe:
- Deep skillet with lid
- Spoon
- Knife and cutting board
How to Serve This Dish:
Serve it in bowls with extra pepper. If you have a lemon, a squeeze over the top sharpens the rice and keeps the chicken from tasting flat.
Pro Tips for This Recipe:
- Cut the chicken evenly so the pieces finish together.
- Don’t stir the rice once it starts simmering; let it steam.
- Quick-cooking rice is the trick that keeps this under 30 minutes.
Variations on This Dish:
- Garlic Rice Version: Add 2 minced garlic cloves with the onion.
- Tomato Chicken Skillet: Stir in 1/2 cup canned diced tomatoes with the broth.
Common Mistakes to Avoid with This Dish:
- Using raw rice that needs 40 minutes: It will not finish on time.
- Undercooking the chicken: Cut a piece open; there should be no pink in the center.
20. Ramen with Egg and Veg
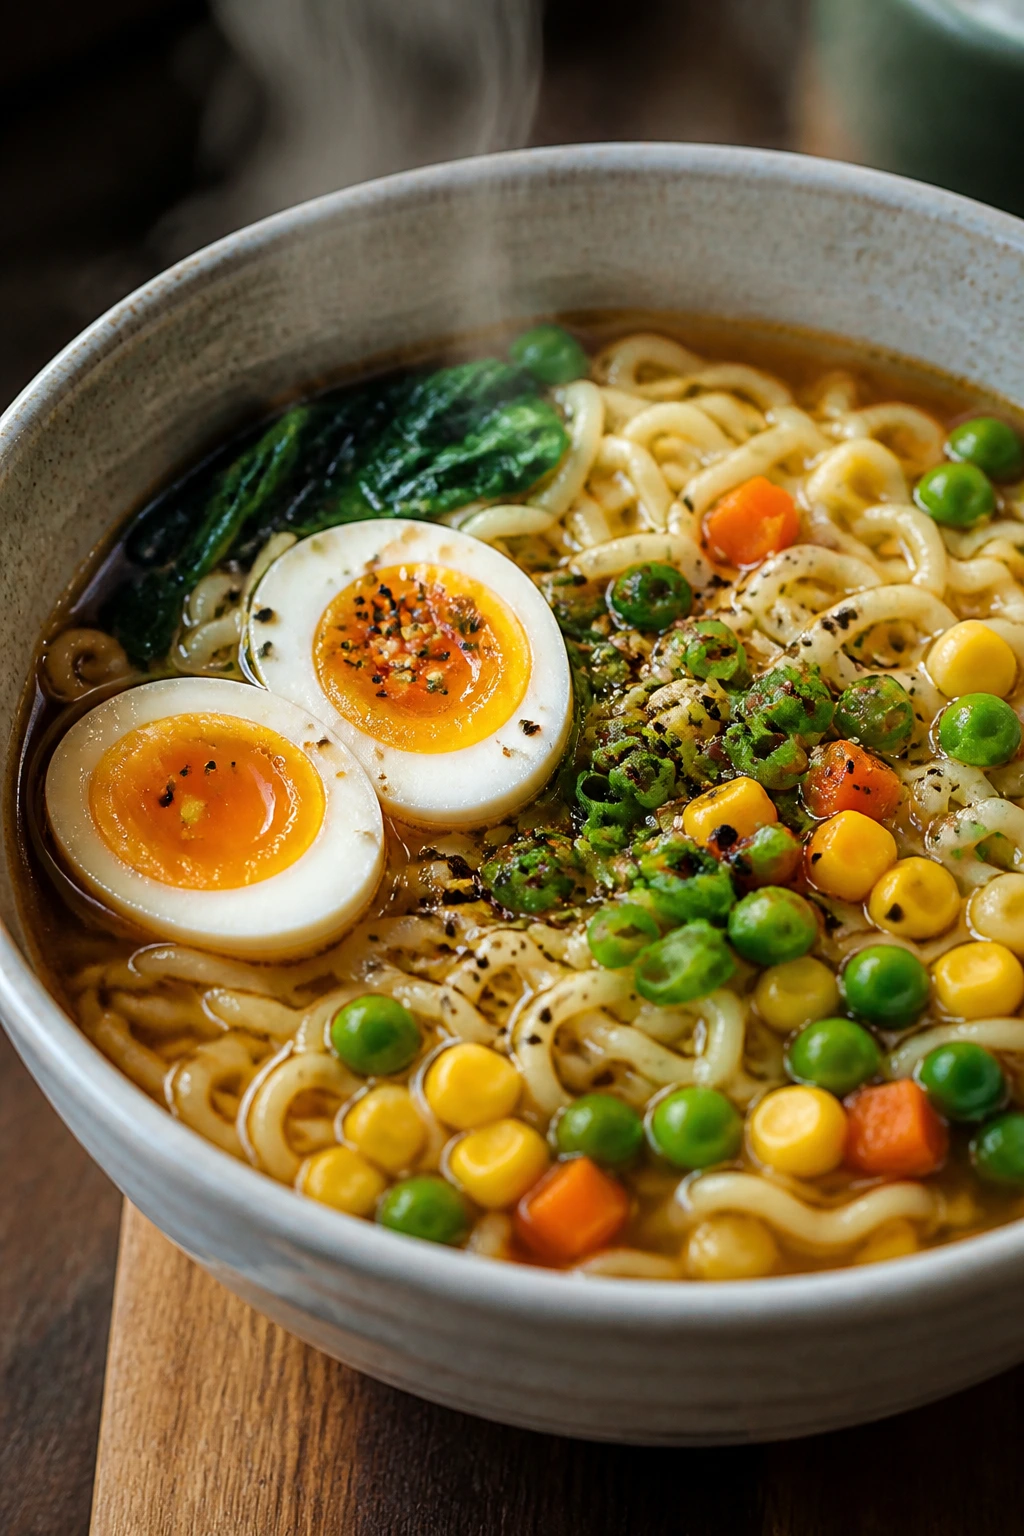
Intro:
Instant ramen becomes a real meal the second you stop treating the packet like the whole idea. Add an egg, a handful of frozen vegetables, and a little extra seasoning, and the bowl stops being emergency food and starts being dinner with a pulse.
Why It Works:
Ramen noodles cook in minutes, which makes them ideal for a very tight clock. Eggs create richness without much cost, and frozen vegetables bulk up the bowl for pennies. The seasoning packet is salty enough, so the extra soy sauce should stay small.
Key Ingredients:
- 2 packages instant ramen, seasoning packets included
- 4 cups water
- 2 large eggs
- 1 cup frozen mixed vegetables
- 2 teaspoons soy sauce
- 1 teaspoon sesame oil or butter
- 2 scallions, sliced, optional
Quick Steps:
- Start the broth: Bring the water to a boil in a medium saucepan. Stir in the ramen seasoning and soy sauce.
- Add vegetables: Drop in the frozen vegetables and simmer for 2 minutes.
- Cook the noodles: Add the ramen noodles and cook for 2 minutes, stirring once.
- Poach or swirl in eggs: Crack in the eggs and cover for 2 minutes, or whisk the eggs and drizzle them in slowly for ribbon-like strands.
- Finish: Stir in sesame oil and scallions, then serve immediately.
Equipment for This Recipe:
- Medium saucepan
- Chopsticks or fork
- Small bowl, optional
How to Serve This Dish:
Serve it in a deep bowl so the broth doesn’t splash out. If you have chili oil, a small spoon on top changes the whole mood.
Pro Tips for This Recipe:
- Don’t over-season; the packet already carries a lot of salt.
- Use frozen vegetables straight from the bag.
- If you want firmer eggs, simmer them a bit longer after adding.
Variations on This Dish:
- Peanut Ramen: Stir in 1 tablespoon peanut butter for a richer broth.
- Egg Drop Style: Whisk the eggs first and drizzle them into the simmering soup.
Common Mistakes to Avoid with This Dish:
- Cooking the noodles too long: They turn mushy fast.
- Dumping in the seasoning packet plus extra salt: The bowl gets harsh and overdone.
21. Greek White Bean Pita Pockets
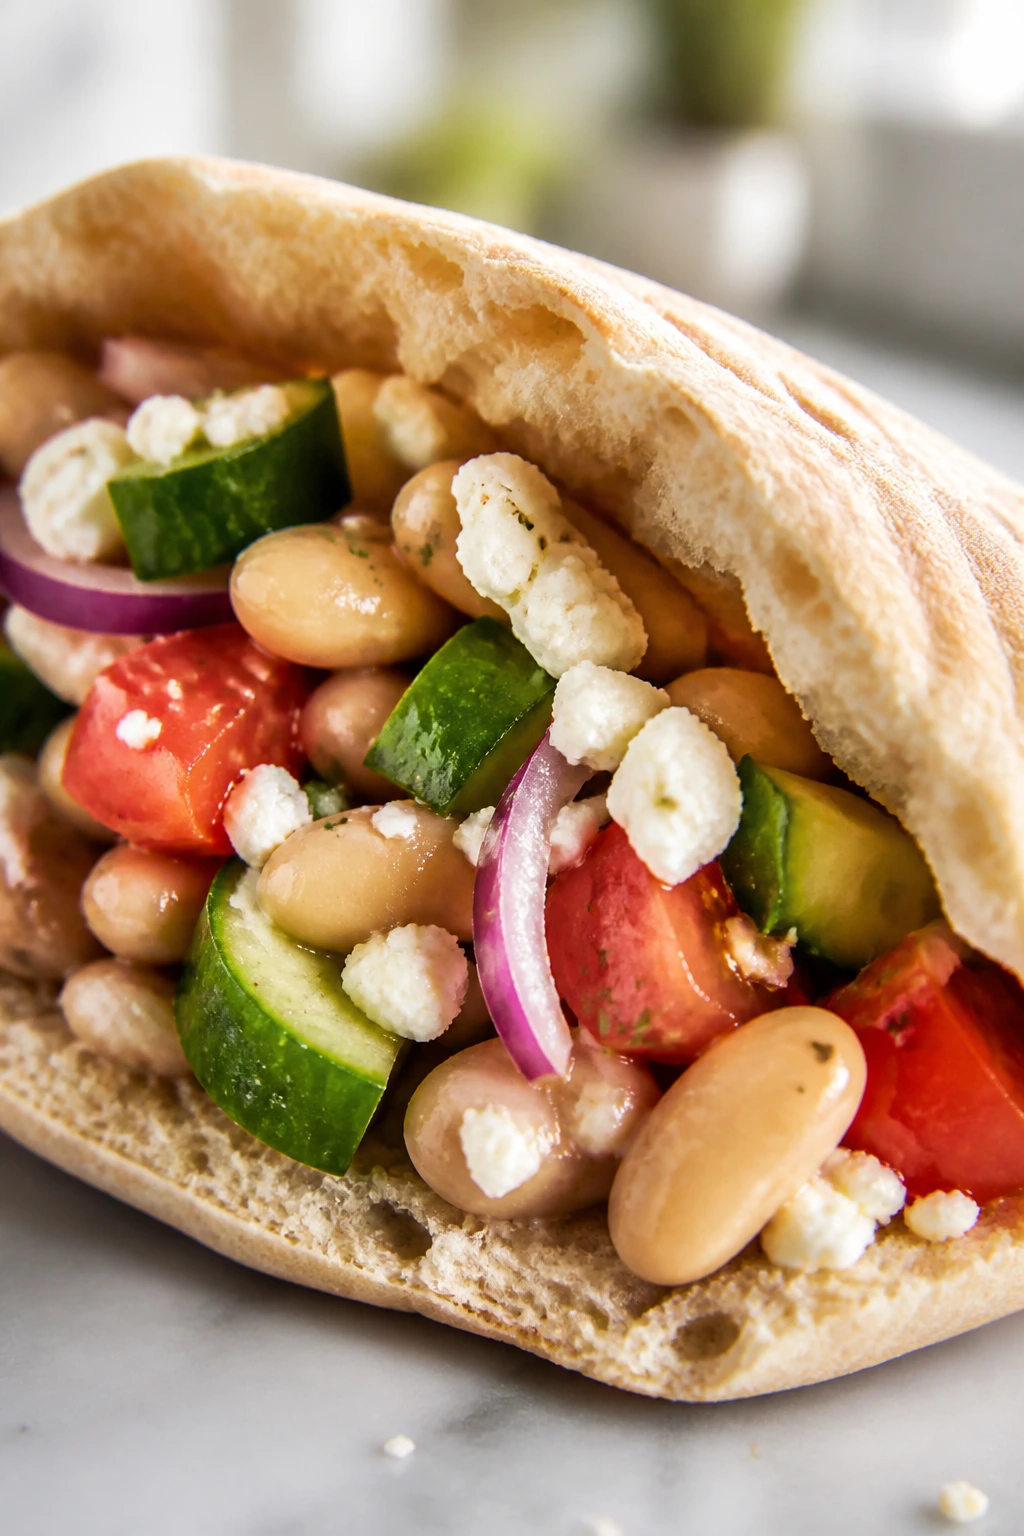
Intro:
No stove, no problem. White beans, cucumber, tomato, lemon, and feta make a cold lunch or light dinner that feels fresh without being expensive or fussy. Pita pockets are the part that keeps it from feeling like a salad that gave up.
Why It Works:
Beans bring protein and creaminess, while cucumber and tomato add crunch and juiciness. Lemon and olive oil act like a fast dressing, and pita holds the filling in a tidy package. This is one of those meals that tastes more expensive than it is because the ingredients are allowed to stay simple.
Key Ingredients:
- 2 cans white beans, drained and rinsed
- 1 cucumber, diced
- 2 tomatoes, diced
- 1/2 red onion, thinly sliced
- 2 tablespoons lemon juice
- 2 tablespoons olive oil
- 1/4 cup crumbled feta
- 4 pita breads
- Salt and pepper
Quick Steps:
- Mix the filling: Combine beans, cucumber, tomatoes, onion, lemon juice, olive oil, feta, salt, and pepper in a bowl.
- Taste and adjust: Add a little more lemon or salt if it needs sharpening.
- Warm the pita: Warm the pita briefly in a dry skillet or microwave so it opens easily.
- Fill the pockets: Spoon the bean mixture into each pita.
- Serve right away: Eat while the pita is still soft.
Equipment for This Recipe:
- Mixing bowl
- Knife and cutting board
- Spoon
- Skillet or microwave, optional
How to Serve This Dish:
Serve with olives or chips if you want more on the plate. The pockets are easy to pack for lunch, too.
Pro Tips for This Recipe:
- Salt the tomatoes lightly before mixing if they taste bland.
- If your pita tears, just serve the filling over toasted bread.
- Drain the beans well or the pockets will puddle.
Variations on This Dish:
- Herby Version: Add dill or parsley if you have it.
- Tahini Pita: Drizzle with a spoon of tahini thinned with water and lemon.
Common Mistakes to Avoid with This Dish:
- Overstuffing the pita: It splits and turns messy fast.
- Using cold, stiff pita: Warm it first or it cracks.
22. Corn and Bean Enchilada Skillet
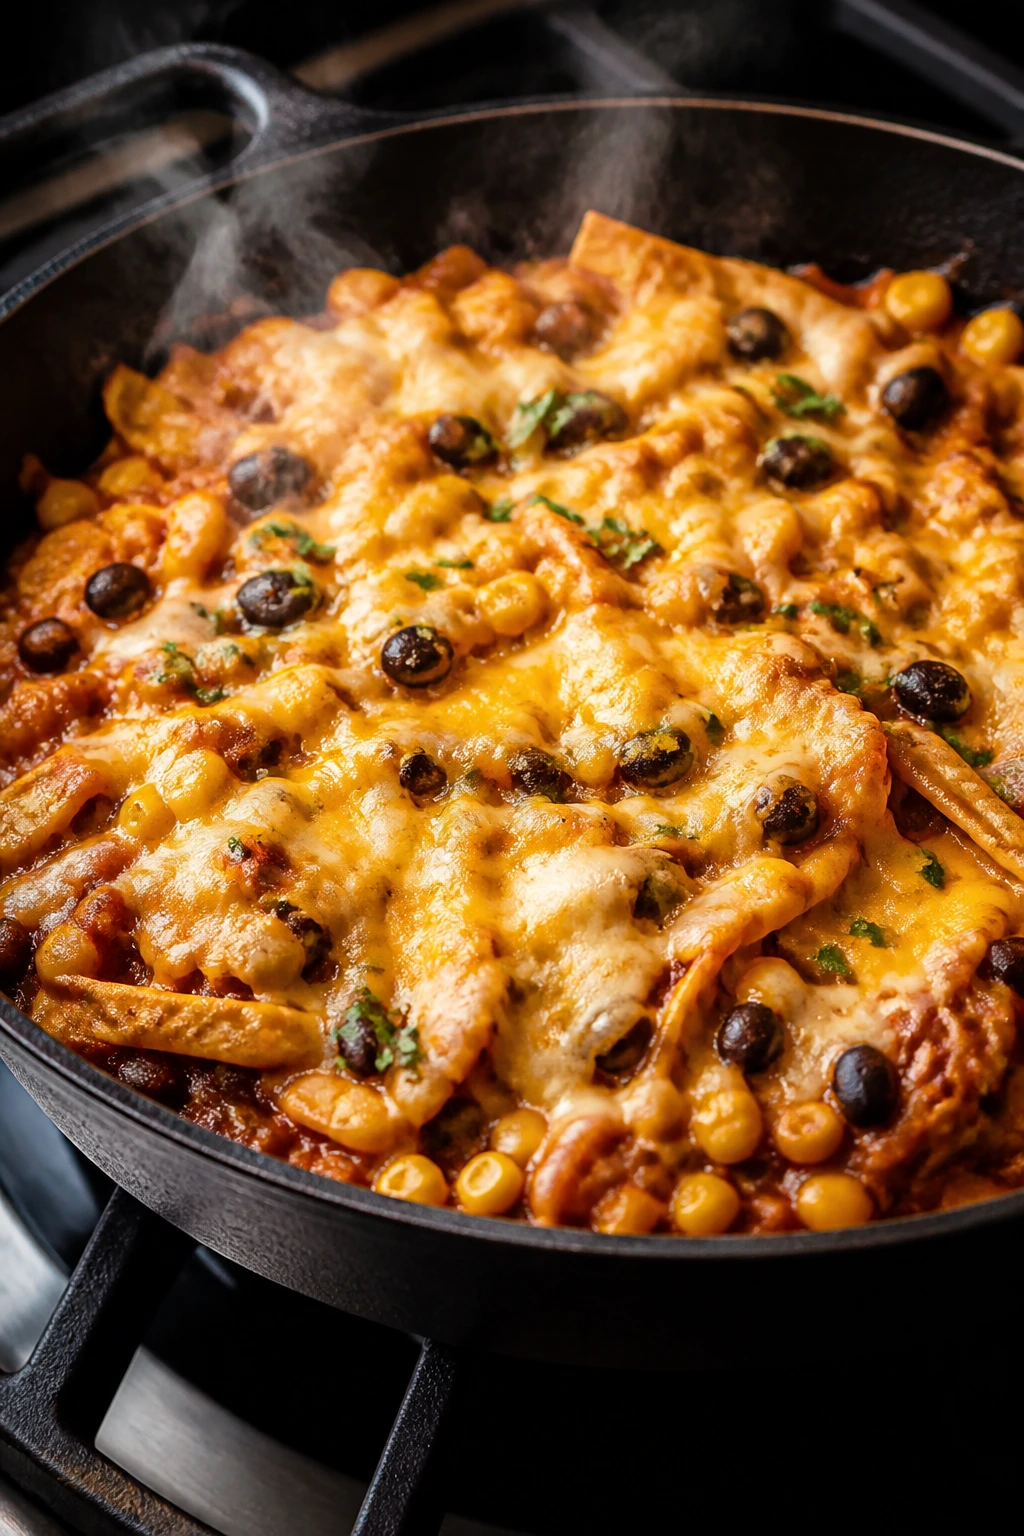
Intro:
This is the kind of skillet that looks like casserole but behaves like a weeknight meal. Tortillas soften in enchilada sauce, beans bring heft, and corn adds sweet little pops that keep each bite from flattening out. It’s messy, but the good kind.
Why It Works:
Enchilada sauce does the seasoning for you. Beans and corn are cheap, filling, and easy to keep stocked, and tortilla pieces thicken the skillet as they soak up the sauce. Cheese on top gives you that broiled, melty finish without making extra work.
Key Ingredients:
- 1 tablespoon oil
- 1 small onion, diced
- 2 cans black beans, drained
- 1 can corn, drained
- 1 1/2 cups enchilada sauce
- 6 corn tortillas, cut into strips
- 1 cup shredded cheese
- Salt
Quick Steps:
- Cook the onion: Heat the oil in a large skillet over medium heat. Add the onion and cook for 3 minutes.
- Add the filling: Stir in the beans, corn, enchilada sauce, and a pinch of salt. Simmer for 3 minutes.
- Stir in tortillas: Add the tortilla strips and cook for 2 minutes, letting them soften but not disappear.
- Top with cheese: Sprinkle cheese over the skillet and cover for 2 minutes until melted.
- Serve hot: Spoon into bowls.
Equipment for This Recipe:
- Large skillet with lid
- Knife and cutting board
- Spoon
How to Serve This Dish:
Serve with a little sour cream, chopped onion, or sliced avocado if you have it. It’s filling enough to stand alone, which is the whole point.
Pro Tips for This Recipe:
- Cut the tortillas before they hit the pan; it’s easier than tearing them mid-cook.
- If the sauce seems thin, let it reduce before adding tortillas.
- Use corn tortillas for the right texture.
Variations on This Dish:
- Green Enchilada Version: Swap in green enchilada sauce for a tangier skillet.
- Egg-Topped Skillet: Crack eggs over the top and cover until set.
Common Mistakes to Avoid with This Dish:
- Cooking the tortillas too long: They turn into mush.
- Adding cheese before the sauce thickens: The skillet gets sloppy in the wrong way.
23. Mushroom and Onion Gravy Toast
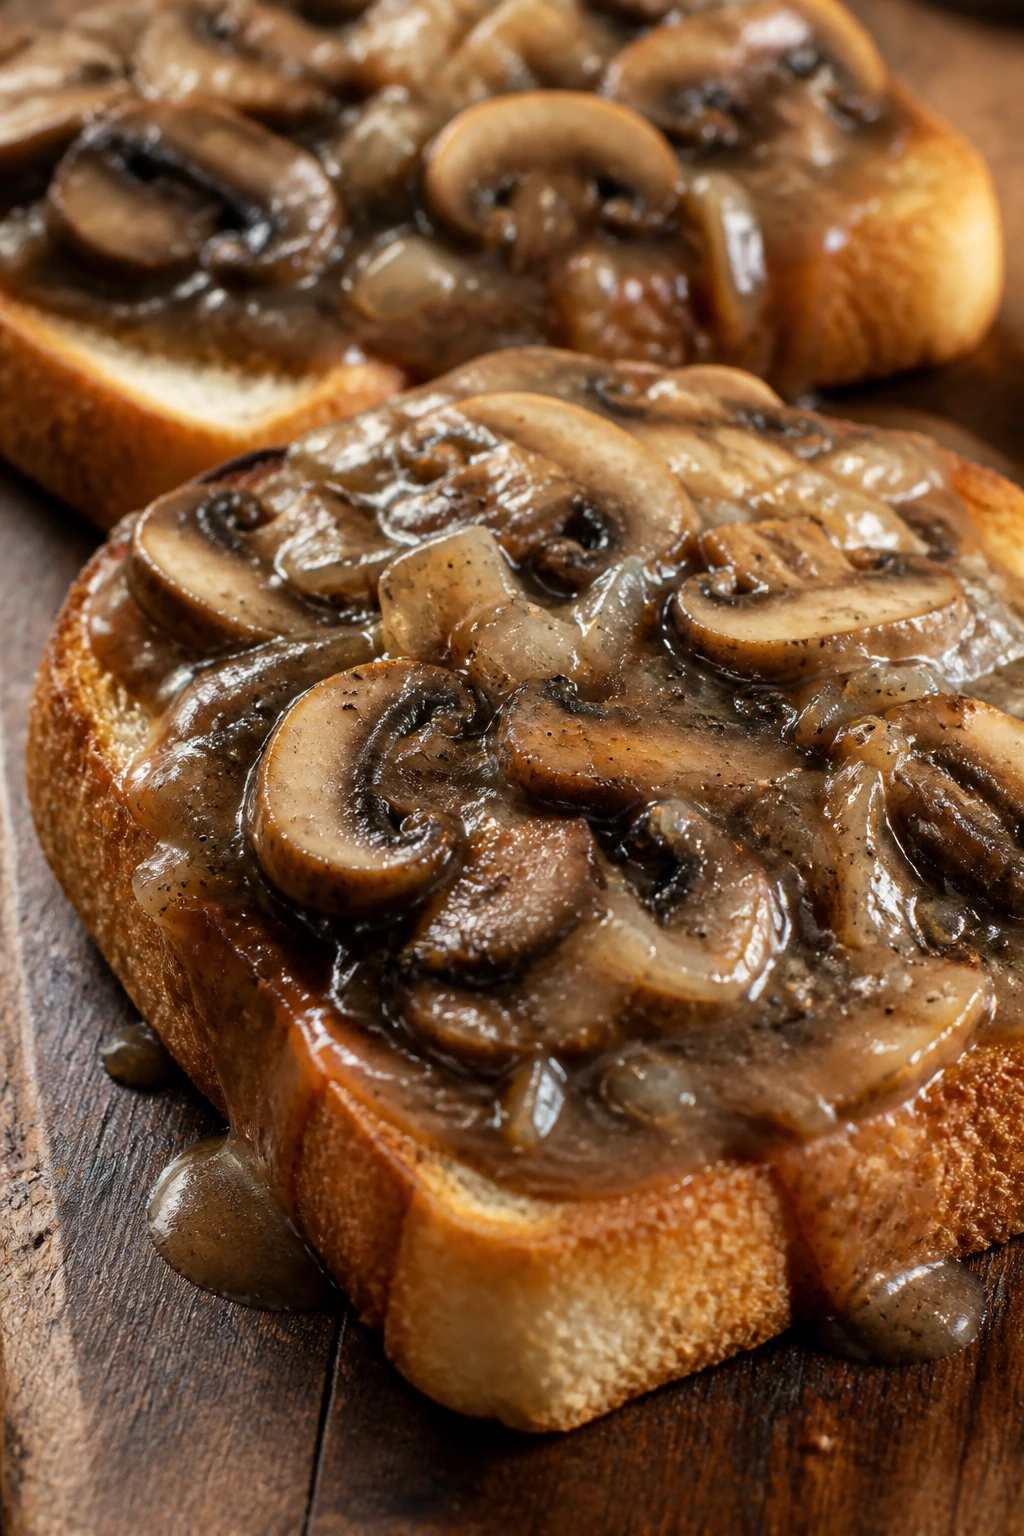
Intro:
This is diner food stripped down to the useful parts. Mushrooms and onions make a dark, savory gravy that tastes like it took more than 20 minutes, and toast gives the whole thing something sturdy to sit on. If you want cheap comfort, this is it.
Why It Works:
Mushrooms bring umami, onions bring sweetness, and a quick flour-thickened broth becomes gravy without needing meat. Toast catches the sauce and keeps the meal from turning into soup. It’s one of the best examples of inexpensive ingredients sounding like more than they are.
Key Ingredients:
- 12 ounces mushrooms, sliced
- 1 medium onion, thinly sliced
- 2 tablespoons butter
- 2 tablespoons flour
- 2 cups broth
- 1 teaspoon dried thyme
- 4 slices toast
- Salt and pepper
Quick Steps:
- Brown the mushrooms: Melt the butter in a skillet over medium-high heat. Add the mushrooms and cook for 5 minutes until they release liquid and start browning.
- Add the onion: Stir in the onion and cook for 4 minutes until soft.
- Make the gravy: Sprinkle in the flour and stir for 1 minute. Slowly pour in the broth while stirring until smooth.
- Simmer: Add thyme, salt, and pepper. Cook for 3 to 4 minutes until the gravy thickens.
- Serve over toast: Spoon onto hot toast.
Equipment for This Recipe:
- Skillet
- Whisk or spoon
- Toaster or dry pan
- Knife and cutting board
How to Serve This Dish:
Serve it as open-faced toast, or put an egg on top if you need more protein. A little chopped parsley makes it look less bare.
Pro Tips for This Recipe:
- Let the mushrooms brown instead of steaming; that’s where the flavor comes from.
- Add broth slowly so the gravy stays smooth.
- If it gets too thick, loosen it with a splash of water.
Variations on This Dish:
- Egg Gravy Toast: Top each slice with a fried egg.
- Creamed Version: Stir in 2 tablespoons milk at the end for a softer gravy.
Common Mistakes to Avoid with This Dish:
- Crowding the mushrooms: They steam and go rubbery.
- Skipping the flour step: The gravy stays thin and drippy.
24. Tomato Rice with Fried Eggs
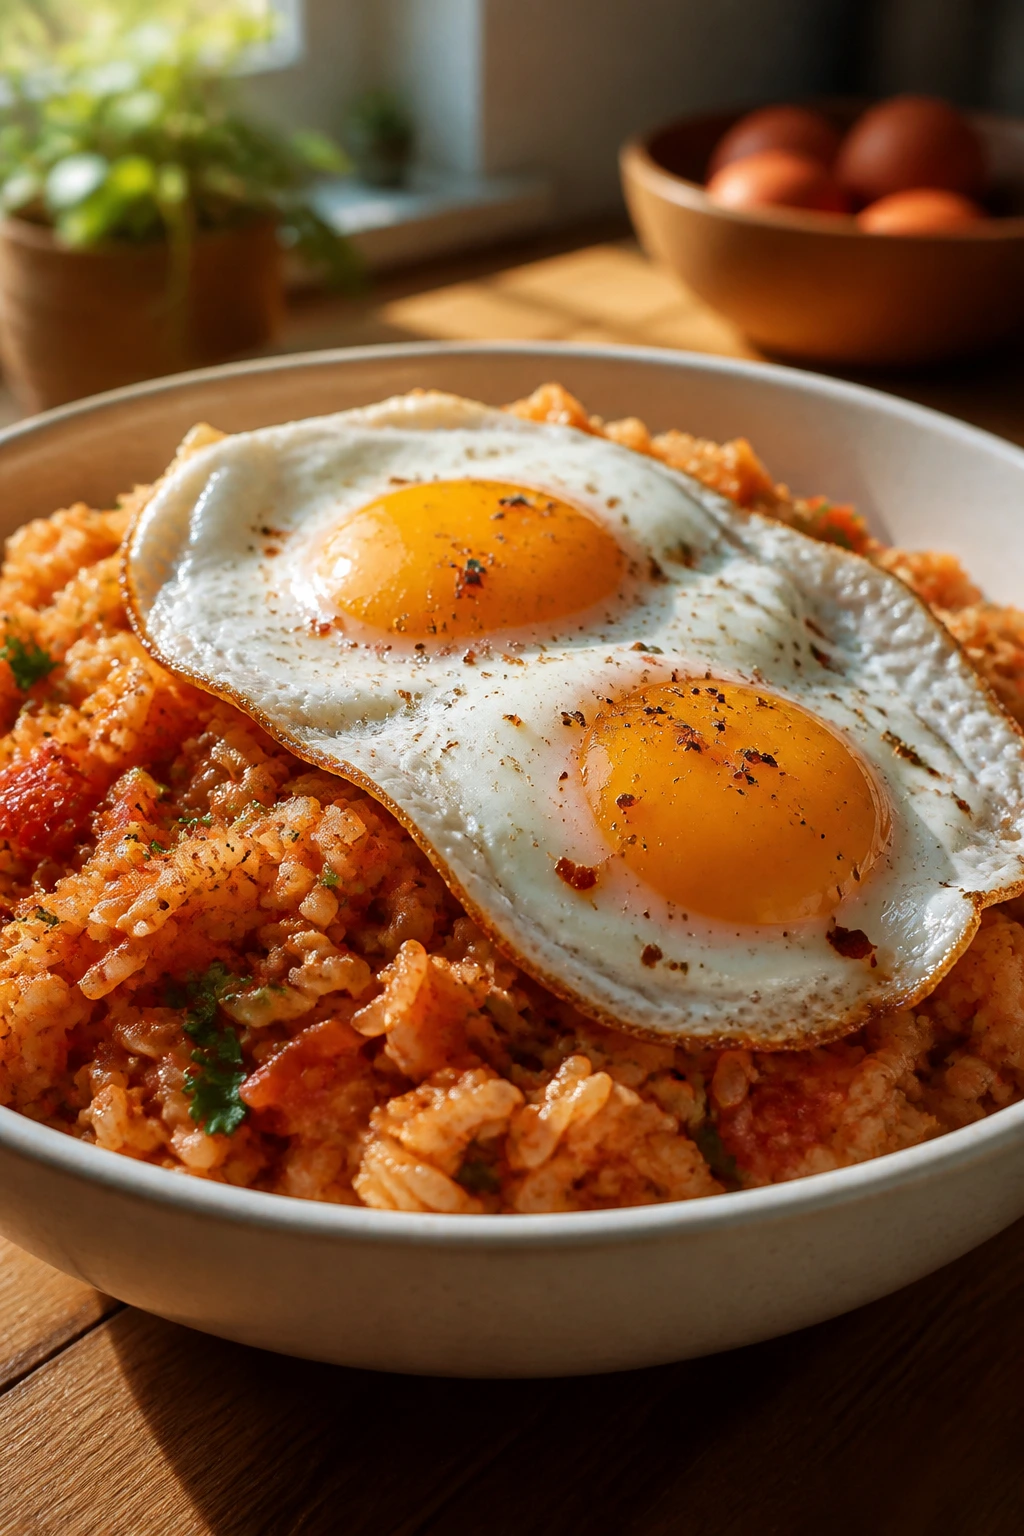
Intro:
Tomato rice is one of those meals that feels quietly global and deeply practical at the same time. Rice cooks in tomato broth, so the grain picks up color and flavor without a long sauce situation, and fried eggs on top make the whole bowl feel complete. Cheap? Yes. Flat? Not if you season it.
Why It Works:
Tomatoes bring acidity and body, and quick-cooking rice keeps the whole meal under 30 minutes. Eggs add fat and protein, which stops the dish from feeling too lean. A little paprika or chili powder gives the tomato base a warmer note.
Key Ingredients:
- 1 cup quick-cooking white rice
- 1 tablespoon oil
- 1 small onion, diced
- 2 garlic cloves, minced
- 1 14-ounce can diced tomatoes
- 2 cups broth or water
- 4 large eggs
- 1 teaspoon paprika
- Salt and pepper
Quick Steps:
- Cook the onion: Heat the oil in a saucepan or deep skillet over medium heat. Add the onion and cook for 3 minutes.
- Add garlic and tomato: Stir in garlic, tomatoes, paprika, salt, and pepper. Cook for 2 minutes.
- Add rice and liquid: Stir in the rice and broth. Bring to a boil, then cover and reduce to low for 10 minutes, or until the rice is tender.
- Fry the eggs: While the rice cooks, fry the eggs in a separate skillet until the whites set and the yolks stay soft.
- Serve together: Spoon the tomato rice into bowls and top with eggs.
Equipment for This Recipe:
- Saucepan or deep skillet
- Small skillet for eggs
- Spoon
- Lid
How to Serve This Dish:
The yolk should run into the rice. That’s the point. Add hot sauce or a few herbs if you want a brighter finish.
Pro Tips for This Recipe:
- Use quick-cooking rice so you stay inside the time limit.
- If the rice seems dry before it’s tender, add 2 tablespoons more water.
- Don’t skip the salt; tomato rice tastes flat when underseasoned.
Variations on This Dish:
- Smoky Tomato Rice: Add smoked paprika instead of regular paprika.
- Vegetable Version: Stir in frozen peas during the last 2 minutes.
Common Mistakes to Avoid with This Dish:
- Using long-grain rice that takes too long: It can blow past the 30-minute mark.
- Not covering the pot: The rice won’t steam properly.
25. Loaded Sweet Potatoes with Black Beans and Yogurt
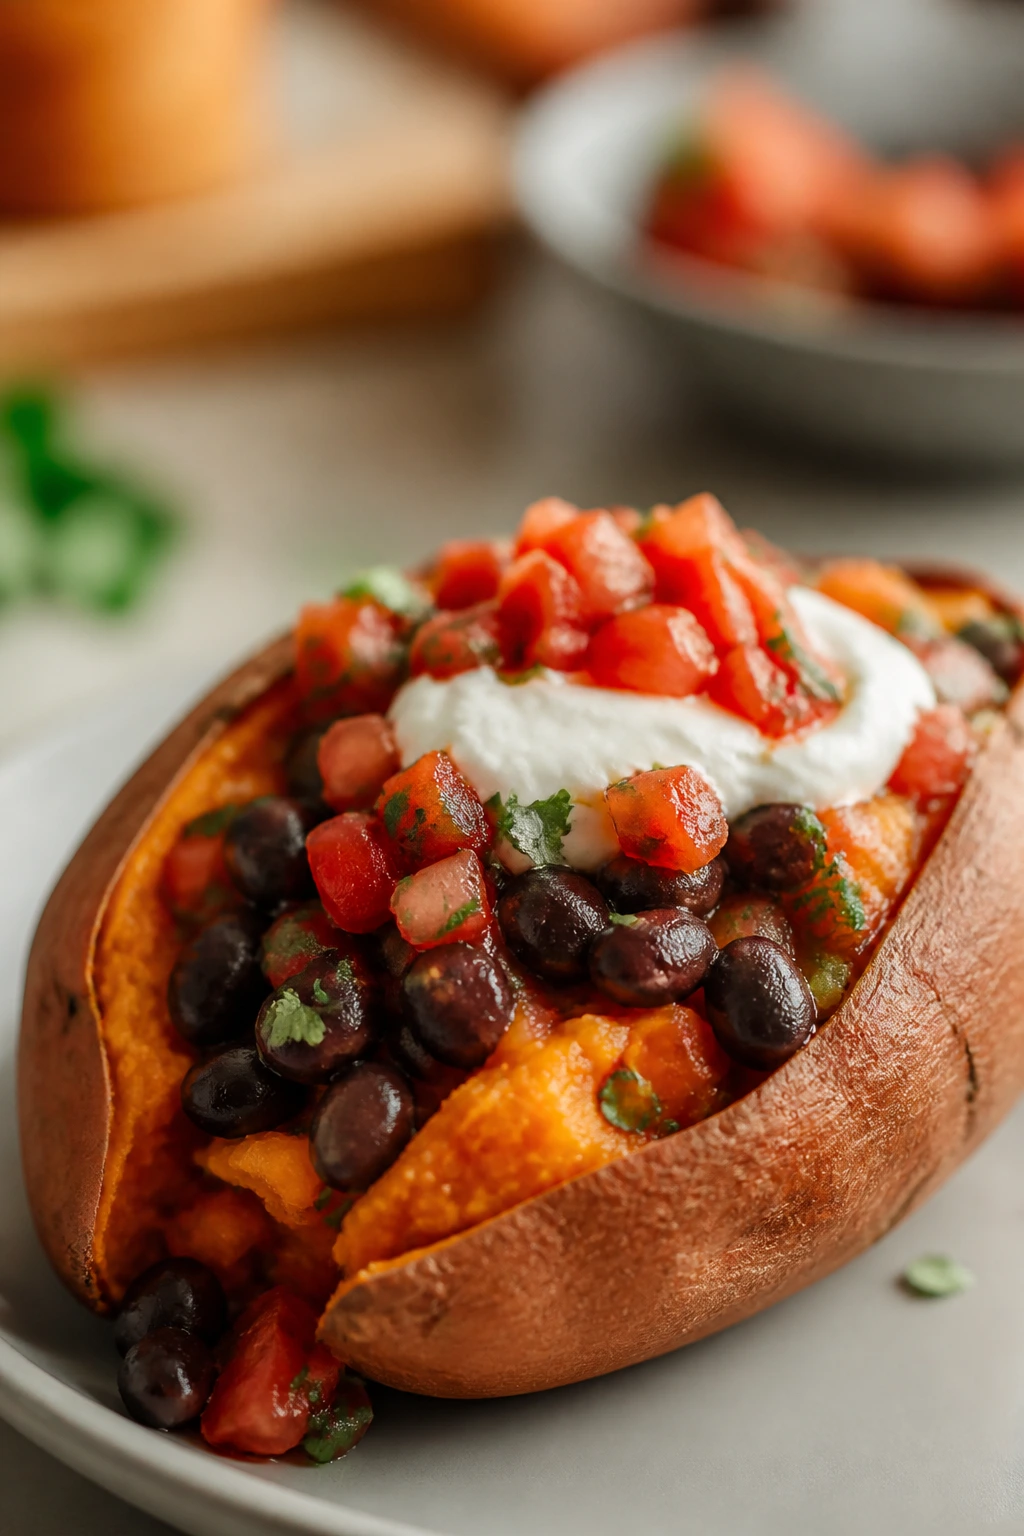
Intro:
Sweet potatoes are one of the easiest ways to make dinner feel bigger than it is. Microwave them until soft, split them open, then pile on beans, salsa, and yogurt. The contrast between sweet flesh and salty toppings is the whole show.
Why It Works:
Microwaving saves the time that oven-baking would steal. Black beans give the dish actual staying power, salsa adds acid and salt, and yogurt cools everything down. You get a full meal with almost no chopping.
Key Ingredients:
- 4 medium sweet potatoes
- 1 can black beans, drained and rinsed
- 1 cup salsa
- 1/2 cup plain yogurt or sour cream
- 1 teaspoon ground cumin
- 1 lime, cut into wedges
- Salt
- Chopped scallions or cilantro, optional
Quick Steps:
- Cook the potatoes: Pierce the sweet potatoes with a fork and microwave them on high for 8 to 12 minutes, turning once halfway through, until soft all the way through.
- Warm the beans: Heat the black beans with cumin and a pinch of salt in a small saucepan or microwave until hot.
- Split and fluff: Cut each potato open and fluff the centers with a fork.
- Top generously: Spoon on beans, salsa, and yogurt.
- Finish: Add lime juice and scallions or cilantro if using.
Equipment for This Recipe:
- Microwave
- Fork
- Small saucepan or bowl
- Knife
How to Serve This Dish:
Serve the potatoes on plates with the skins open and the toppings tumbling down the sides. They’re filling enough that a small side salad is optional, not required.
Pro Tips for This Recipe:
- Choose medium potatoes, not giant ones, or they’ll take longer to cook.
- If the skins feel firm after microwaving, give them another 2 minutes.
- A little lime juice keeps the sweet potato from tasting one-note.
Variations on This Dish:
- Cheesy Loaded Potatoes: Add a small handful of shredded cheddar.
- Chipotle Version: Stir a little chipotle sauce into the beans for smoke and heat.
Common Mistakes to Avoid with This Dish:
- Under-microwaving the potatoes: Hard centers ruin the texture.
- Overloading with cold toppings: Warm potatoes need only a small cool contrast, not a refrigerator dump.
Why Cheap, Fast Meals Work When the Pantry Is Doing the Heavy Lifting
The best budget dinners do not act like “budget food.” They use a few cheap anchors—pasta, rice, beans, eggs, cabbage, canned tomatoes, frozen vegetables—and then concentrate flavor in the pan. That’s why a skillet of garlic oil and breadcrumbs can feel more satisfying than a plate full of random expensive groceries. The technique matters more than the receipt total.
You can also see the pattern in the recipes above: one starch, one protein or bean, one vegetable, one sharp finish. It’s a simple formula, but it keeps the food from tasting flat. A squeeze of lemon, a spoon of salsa, a little vinegar, or even mustard is often what makes the difference between “edible” and “I’d make that again.”
The other quiet advantage is waste. Cheap ingredients are usually repeat players. A bag of onions helps three dinners. A block of cheese can cover quesadillas, rice, and a skillet. Once your kitchen starts thinking this way, the grocery list gets smaller and the dinners get steadier.
Essential Equipment for Fast Budget Dinners
- Large skillet with a lid: This is the workhorse for egg dishes, skillet dinners, and anything that needs a quick steam.
- Medium saucepan: Useful for pasta, rice, soup, and sauces that need a little simmer time.
- Pot with a wide mouth: Better for pasta and fried rice because it gives you room to toss.
- Sharp knife: Budget meals still need clean chopping; a dull knife wastes time.
- Cutting board: A stable board makes fast prep safer and less annoying.
- Colander: Pasta and beans need proper draining, not shaky lid tricks.
- Wooden spoon or spatula: Good for scraping browned bits without tearing soft ingredients.
- Measuring cups and spoons: Fast food still needs actual measurements if you want the sauce to work.
- Bowl for mixing sauces: Peanut sauce, curry sauce, and quick dressings all go smoother with one dedicated bowl.
- Microwave-safe dish: Handy for sweet potatoes, leftover rice, and a few faster reheats.
Smart Shopping for Cheap Weeknight Ingredients
Start with the ingredients that stretch: dried pasta, rice, couscous, oats, tortillas, beans, lentils, eggs. Those are the things that turn one shopping trip into several meals. Then build around store-brand canned tomatoes, frozen peas, frozen mixed vegetables, and a couple of onions. That combination can carry a surprising number of dinners.
Cabbage deserves more respect than it gets. It’s cheap, keeps well, and can be sliced into stir-fries, skillet dinners, slaws, and noodle bowls without much waste. Same for carrots and potatoes. They sit around patiently, which is more than can be said for a lot of vegetables that look glamorous in the produce aisle and then spoil before you’re ready.
Buy cheese in blocks when you can. Pre-shredded works in a pinch, but blocks often cost less per ounce and melt better in simple dishes like quesadillas or rice skillets. For canned beans, store brands are usually fine. Rinse them well, especially if they’re going into a recipe with salsa, soy sauce, or enchilada sauce. You’re trying to control salt, not surrender to it.
Frozen vegetables are not a backup plan here. They’re part of the plan. They cook quickly, reduce waste, and usually cost less than fresh produce that was shipped too far and handled too much. Keep peas, broccoli, corn, and mixed vegetables in the freezer, and half the problem disappears before dinner even starts.
How to Serve These Meals Without Spending More
Presentation:
You do not need restaurant plates. Use shallow bowls for saucy meals, plates for crisp items like quesadillas and melts, and wide mugs or soup bowls for brothy dishes. A little color on top—parsley, scallions, black pepper, hot sauce—goes farther than people expect.
Accompaniments:
Keep sides cheap and simple. Toast, cucumbers, a plain salad, carrot sticks, fruit, or a handful of chips can round out the meal without turning dinner into a second grocery run. For skillet dinners, bread is often enough to catch the juices.
Portions:
Most of these recipes serve 2 to 4 people, depending on appetite and whether you’re adding bread, rice, or a side salad. If you need to feed more people, increase the starch first. Pasta, rice, tortillas, and beans stretch more cheaply than extra cheese or meat.
Beverage Pairing:
Water with lemon covers almost everything. For something with more character, iced tea works well with spicy or tomato-heavy meals, while sparkling water suits the lighter bowls and pita dinners.
Additional Tips and Flavor Boosters
Flavor Enhancement: A small squeeze of lemon or a spoon of vinegar at the end fixes a lot of budget food that tastes sleepy. Acid is cheap, and it makes tomatoes, beans, and eggs wake up.
Customization: Keep a few add-ins around: frozen peas, cabbage, onions, canned corn, hot sauce, mustard, and plain yogurt. These are the ingredients that let one base recipe become three different dinners without a second trip to the store.
Serving Suggestions: A sprinkle of herbs, a few sliced scallions, or extra black pepper can make a bowl look and taste more finished. Use what you have; just don’t bury the food under a mountain of garnish.
Make-It-Yours: For a vegetarian table, swap meat for beans or tofu and increase the seasoning a touch. For a dairy-free version, use oil instead of butter and skip the cheese, then lean harder on lemon, vinegar, or salsa for finish. For gluten-free meals, rice bowls, potato dishes, and corn tortilla recipes are the easiest places to live.
Make-Ahead, Storage, and Reheating Guidance
Most of these meals keep 3 to 4 days in the refrigerator in a sealed container. Soups, curries, chili mac, lentil fillings, and skillet bean dishes freeze well for up to 2 months, though pasta can soften a bit after thawing. If you know you’ll freeze something, stop cooking it a minute early so it doesn’t go mushy later.
Reheat pasta and rice dishes with a splash of water in a skillet or covered bowl. That little bit of moisture helps the starch loosen instead of drying into a brick. Soups and curries reheat best on the stovetop over medium-low heat, stirred often. Egg dishes are the exception; shakshuka and fried eggs are best fresh, though the sauce underneath can be made ahead and reheated.
For tortilla-based meals, store the filling separately from the tortillas if you can. It keeps the tortillas from turning soft and strange. Quesadillas reheat best in a dry skillet, not a microwave, because the skillet brings the crisp back.
Some dishes improve overnight. Lentil sloppy Joe filling, chili mac, and tomato-based soups usually taste even better the next day after the seasonings settle in. Others, like open-faced tuna melts and egg-fried dishes, lose their texture fast, so make those when you’re ready to eat, not before.
Variations and Adaptations to Try
The Pantry Swap:
If one bean runs out, use another. Black beans, chickpeas, kidney beans, and white beans can often stand in for one another in skillet dinners, soups, and wraps. Keep the seasoning in the same lane and the dish usually holds together.
The Dairy-Light Route:
Skip cheese and butter where you need to, then replace richness with olive oil, mustard, lemon juice, or a spoon of yogurt. The food will taste cleaner, and you won’t lose the meal’s structure.
The Gluten-Free Table:
Rice bowls, potato skillets, chickpea curries, tomato rice, and loaded sweet potatoes are the easiest fits. For pasta dishes, use gluten-free pasta, but cook it carefully; it goes from firm to fragile faster than regular pasta.
The Kid-Friendly Soft Landing:
Keep the heat down and the spice simple. Quesadillas, tomato rice, fried rice, and cheesy potato dishes usually land well if you set hot sauce aside and let each person decide at the table.
The Spicy Pantry Turn:
A little chili flakes, hot sauce, or chopped jalapeño changes the feel of a budget meal fast. Add heat at the end when possible so you can control the burn instead of guessing.
The Protein Boost:
If a meal feels too light, add eggs, extra beans, tofu, or a little leftover chicken. It’s cheaper to boost a meal with an egg than to rebuild it around more meat.
Mistakes That Waste Time and Money
The first big mistake is shopping for too many special ingredients. A bottle of sauce you only use once is not a savings move. Neither is a spice blend that costs more than the vegetables it seasons. Budget cooking gets easier when you reuse the same core items across several meals.
Another common problem is underseasoning bean, rice, and pasta dishes. Cheap ingredients need salt, acid, and sometimes heat to stop tasting blank. People often throw them together and expect the food to “come alive” on its own. It usually won’t. Taste as you go, and season in layers.
Overcooking is another one. Pasta, eggs, tofu, rice, and frozen vegetables can all turn mushy fast if the heat stays too high or the pan gets neglected. The fix is not more stirring. The fix is better timing and a little attention when the texture starts changing.
A fourth mistake is buying the wrong cut or form for the clock. Regular rice is not always a 30-minute ingredient. Big potato chunks are not a 30-minute ingredient. Dense chicken pieces are not a 30-minute ingredient unless you cut them small and cook them smart. If the title says 30 minutes, the ingredients need to behave like they believe it.
Questions People Ask About Budget Meals
Can I make these meals with mostly pantry food?
Yes. Pasta, rice, beans, canned tomatoes, tuna, couscous, tortillas, and ramen are the backbone here. Use fresh vegetables when you have them, but frozen and canned items carry a lot of the load.
What’s the cheapest protein to keep around?
Eggs, beans, lentils, tofu, and canned tuna usually give the best value for fast dinners. They cook quickly and work in very different kinds of meals.
Do I need fancy seasonings for these recipes to taste good?
No. Salt, pepper, garlic, onion, paprika, cumin, chili powder, mustard, soy sauce, lemon, and vinegar cover a huge amount of ground. The trick is using them in the right amount, not buying thirty spices.
How do I keep rice and pasta from going bland?
Salt the cooking water, then finish the dish with something sharp—lemon, vinegar, salsa, hot sauce, or a salty cheese. Plain starch needs contrast or it tastes sleepy.
Can I double these recipes for meal prep?
Most of the stews, curries, lentil dishes, and chili-style meals double well. Fried rice, quesadillas, and tuna melts are better cooked fresh or in smaller batches.
What if my budget ingredients taste flat?
Add acid first. A little lemon juice, vinegar, or pickle brine often fixes a dull dish faster than more salt. If it still tastes weak, check whether the pan was crowded or the sauce was watered down too much.
Are frozen vegetables okay in all of these meals?
Absolutely. Frozen peas, broccoli, corn, and mixed vegetables are some of the best tools in cheap fast cooking. They’re already prepped and don’t have the spoilage problem fresh vegetables do.
A Smarter Weeknight Habit
The real win with 30 minute meals on a tight grocery budget is not one brilliant recipe. It’s the habit that forms when you start keeping a few cheap, sturdy ingredients on hand and using them with a little more confidence. Pasta, beans, eggs, cabbage, rice, tortillas, and canned tomatoes can cover a lot of ground if you treat them like building blocks instead of filler.
That’s why these meals stay useful. They’re fast, yes, but they also behave well under pressure. They don’t demand a specialty grocery trip. They don’t need a pile of dishes. And they don’t ask you to pretend dinner is easy when it isn’t. They just make it work, which is the better promise anyway.