
A house that runs on backpacks, lunchboxes, permission slips, and one missing shoe does not need dinner to be a drama. It needs dinner to behave. It needs recipes that can start before the school bell, or at least not punish you when the afternoon disappears faster than expected. That is the whole idea here: meals that can be chopped early, simmered in one pot, roasted on a sheet pan, or tucked into a slow cooker before the day gets loud.
I keep coming back to dinners like these because they make room for the messy parts of family life. One pan. One bowl. Sometimes two if the recipe really earns it. The trick is not cleverness; it is choosing meals that forgive a late start, a forgotten thaw, or a kitchen counter that looks like a backpack exploded on it.
These recipes lean on familiar flavors—garlic, tomatoes, cheese, rice, chicken, beans, pasta—because familiar food usually gets eaten without a speech. They also lean on leftovers that reheat without sulking, which matters when the next day brings another round of school-morning chaos and nobody has patience for a brand-new plan.
Why These Recipes Work on School-Morning Days
-
Short prep windows: Most of these can be chopped, mixed, or loaded into a pan before the first rush out the door, which means dinner can be halfway done before noon.
-
Simple flavor builds: These recipes use sauces, cheese, or a strong seasoning base so you are not standing over the stove adding six tiny spices one at a time.
-
Leftovers that hold up: Pasta bakes, chili, meatballs, and rice bowls usually taste even better the next day, and that helps when lunchboxes need filling too.
-
One main pan, one main job: Sheet pans, skillets, slow cookers, and casseroles keep cleanup from turning into a second shift.
-
Pantry and freezer overlap: Beans, rice, broth, frozen vegetables, tortillas, and canned tomatoes show up a lot because they save a trip and still make dinner feel like dinner.
1. Sheet-Pan Chicken Fajitas
The peppers blister, the onion softens at the edges, and the chicken picks up those little browned spots that smell like a restaurant kitchen. This is the kind of dinner I make when I want the oven to do the heavy lifting and I want the table to fill up fast.
Why It Works:
Everything cooks at the same high temperature, so you get dinner in one shot instead of babysitting separate pans. The lime at the end keeps the chicken bright, and the roasted onions bring enough sweetness to balance the chile spices. If you slice the chicken and vegetables evenly, 425°F gives you tender meat and just-charred edges in about 20 minutes.
Key Ingredients:
- 1½ lbs boneless skinless chicken breasts, sliced into ½-inch strips — thin, even pieces cook fast and stay juicy.
- 3 bell peppers, sliced — use mixed colors for sweetness and a little visual contrast.
- 1 large yellow onion, sliced — it softens and turns faintly sweet in the oven.
- 2 tbsp olive oil — helps the spices stick and keeps the pan from drying out.
- 2 tsp chili powder — this gives the fajitas their warm, familiar base.
- 1 tsp ground cumin — a little goes a long way.
- 1 tsp smoked paprika — adds a deeper roasted note.
- 2 tbsp lime juice — squeeze it on at the end for brightness.
- 8 small flour tortillas — warm them before serving so they bend instead of cracking.
Quick Steps:
- Preheat the oven to 425°F and line a rimmed sheet pan with parchment.
- Toss the chicken, peppers, onion, oil, spices, salt, pepper, and lime juice in a large bowl.
- Spread everything on the pan in a single layer. Do not pile it high or the vegetables will steam.
- Roast for 18 to 20 minutes, until the chicken reaches 165°F and the peppers have browned edges.
- Warm the tortillas, pile in the filling, and finish with cilantro, cheese, or sour cream if you want them.
Equipment for This Recipe:
- Rimmed sheet pan — a crowded baking tray is the enemy here.
- Large mixing bowl — for coating the chicken evenly.
- Tongs — easiest way to toss and serve the hot filling.
- Instant-read thermometer — the surest way to avoid dry chicken.
How to Serve This Dish:
Load the fajitas into warm tortillas and pass them family-style so people can build their own. I like to set out shredded cheese, salsa, sliced avocado, and a bowl of black beans on the side. Two tortillas plus a scoop of filling makes a solid dinner portion.
Pro Tips for This Recipe:
- Slice the peppers a little thicker than the chicken so they keep some bite.
- If your pan looks crowded, split it across two trays.
- Warm tortillas in a dry skillet for 20 seconds per side; they taste better than microwaved ones.
Variations on This Dish:
- Chipotle Heat: Add 1 teaspoon chipotle powder or a spoonful of chopped chipotle in adobo for a smokier finish.
- Veggie Fajitas: Swap the chicken for 2 sliced zucchini and 8 ounces sliced mushrooms; roast them for the same time and serve with beans.
Common Mistakes to Avoid with This Dish:
- Overcrowding the pan: Everything turns soft instead of browned. Use a second pan if needed.
- Cutting the chicken too thick: Thick pieces lag behind the vegetables. Keep them close in size.
- Skipping the lime: The dish tastes flat without that last hit of acid.
2. One-Pot Spaghetti and Meat Sauce
The sauce clings to the noodles, the onion melts into the tomato, and the whole pot smells like a weeknight that got rescued. I love this one because it gives you that classic red-sauce dinner without a second pot of boiling water.
Why It Works:
Cooking the pasta in the sauce means the starch thickens everything naturally, so you get a glossy, clingy finish instead of watery marinara with noodles floating around in it. A little tomato paste deepens the flavor fast, which matters when the clock is rude. The best part is that the pasta finishes in the sauce, so it tastes like it was cooked there from the start.
Key Ingredients:
- 1 lb ground beef — use 85/15 for enough flavor without a greasy pool.
- 1 small yellow onion, finely diced — it softens into the sauce instead of staying sharp.
- 3 garlic cloves, minced — add them after the beef browns so they do not burn.
- 2 tbsp tomato paste — this gives the sauce body and a cooked tomato taste.
- 1 jar (24 oz) marinara sauce — choose one with a simple ingredient list.
- 4 cups low-sodium beef broth — the pasta needs enough liquid to cook.
- 12 oz spaghetti, broken in half — shorter strands fit the pot better.
- 1 tsp Italian seasoning — keeps the sauce from tasting one-note.
- ½ cup grated parmesan — stir it in at the end for a salty finish.
Quick Steps:
- Brown the beef and onion in a large Dutch oven over medium-high heat for 6 to 8 minutes.
- Stir in the garlic and tomato paste for 1 minute until the paste darkens slightly.
- Add the marinara, broth, spaghetti, Italian seasoning, salt, and pepper.
- Bring it to a boil, then reduce to a steady simmer and cook 10 to 12 minutes, stirring often, until the pasta is tender and the liquid is mostly absorbed.
- Stir in parmesan and let it sit for 2 minutes before serving.
Equipment for This Recipe:
- Large Dutch oven or heavy pot — enough room for pasta and sauce together.
- Wooden spoon — useful for breaking up the beef.
- Measuring cup — helps you keep the broth amount honest.
How to Serve This Dish:
Serve it in shallow bowls with extra parmesan and a little black pepper on top. A crisp green salad or sliced cucumbers give the plate some freshness, and garlic bread never hurts. This feeds four hungry people easily.
Pro Tips for This Recipe:
- Stir more than you think you need to while the pasta cooks.
- Keep the heat at a gentle simmer; a hard boil makes the sauce spit and the pasta stick.
- If the sauce thickens too fast, splash in ¼ cup water and keep going.
Variations on This Dish:
- Turkey Red-Sauce Pot: Use ground turkey instead of beef and add 1 tablespoon olive oil for richness.
- Hidden Greens Version: Stir in 2 cups baby spinach during the last minute; it disappears into the sauce.
Common Mistakes to Avoid with This Dish:
- Too little liquid: The pasta will stay stiff in the middle. Add broth, not plain water, if it dries out.
- Walking away while it simmers: One-pot pasta asks for attention. Stir every minute or so.
- Adding cheese while boiling: Parmesan can clump. Pull the pot off the heat first.
3. Baked Ziti with Ricotta and Spinach
This is the casserole that arrives at the table bubbling at the edges and browned just enough on top to make everyone wander into the kitchen early. The ricotta makes the middle creamy, and the spinach disappears into the sauce without turning the pan into a vegetable lecture.
Why It Works:
Baked ziti holds heat well, which makes it a smart choice when dinner time gets pushed around. The pasta goes in slightly undercooked so it can finish in the oven without turning mushy. I like this version because ricotta gives you soft pockets in the middle, while mozzarella on top gives you the stretchy, browned lid people actually fight over.
Key Ingredients:
- 1 lb ziti — ridged pasta clings to sauce better than smooth tubes.
- 1 jar (24 oz) marinara sauce — a plain jar keeps the flavor clean.
- 15 oz ricotta — this is what gives the filling its creamy body.
- 2 cups shredded mozzarella — use some in the middle and some on top.
- ½ cup grated parmesan — adds a salty edge.
- 5 oz baby spinach — chopped roughly so it blends in easily.
- 1 egg — helps the ricotta hold together.
- 2 cloves garlic, minced — a small amount lifts the whole pan.
- 1 tsp Italian seasoning — gives the sauce a little extra backbone.
Quick Steps:
- Boil the ziti in salted water until just shy of al dente, about 2 minutes less than the package says.
- Mix the ricotta, egg, spinach, garlic, half the parmesan, salt, and pepper in a bowl.
- Stir the pasta with the marinara, then fold in the ricotta mixture and half the mozzarella.
- Spread into a greased 9×13-inch dish, top with the remaining mozzarella and parmesan, and bake at 375°F for 25 to 30 minutes.
- Rest for 10 minutes before cutting.
Equipment for This Recipe:
- 9×13-inch baking dish — the right size for even baking.
- Large pot — for the pasta.
- Mixing bowl — for the ricotta filling.
- Colander — to drain the pasta fast.
How to Serve This Dish:
Cut it into squares and serve it with a spoonful of sauce from the bottom of the pan. Garlic bread and a sharp salad are the obvious sides, and I would not argue with either. It feeds six with room for leftovers.
Pro Tips for This Recipe:
- Undercook the pasta slightly; the oven will finish the job.
- Let the casserole rest before serving or the first cut collapses.
- If the top browns too fast, lay a loose sheet of foil over it for the last 10 minutes.
Variations on This Dish:
- Sausage Ziti: Brown 1 lb Italian sausage with the sauce for a meatier version.
- Broccoli Baked Ziti: Fold in 2 cups small broccoli florets, blanched for 2 minutes, for a firmer vegetable bite.
Common Mistakes to Avoid with This Dish:
- Using too much spinach water: Squeeze thawed spinach dry if you swap it in.
- Skipping the rest time: Hot ziti falls apart the second it leaves the oven.
- Overfilling the dish: If the pan is packed to the brim, the center heats unevenly.
4. Slow Cooker BBQ Pulled Pork Sandwiches
The pork turns silky enough to shred with a fork, and the kitchen smells like brown sugar, vinegar, and smoke by the time you come back. This is the dinner I trust when the day starts with school drop-off and ends with a clock that somehow lost an hour.
Why It Works:
A pork shoulder has enough fat and connective tissue to stay tender through a long cook, which is why the slow cooker earns its keep here. The vinegar keeps the BBQ sauce from turning sticky-sweet, and the onions melt into the juices underneath. By dinnertime, the pork can be shredded straight in the pot, which means fewer dishes and less chance of losing half the sauce.
Key Ingredients:
- 3 lb pork shoulder — choose a well-marbled cut for shreddable texture.
- 1 large onion, sliced — it softens into the cooking liquid.
- 1 cup BBQ sauce — pick one you already like on a burger.
- ½ cup apple cider vinegar — sharpens the sauce and keeps it lively.
- ½ cup low-sodium chicken broth — gives the slow cooker enough liquid to work with.
- 2 tbsp brown sugar — rounds out the tang.
- 1 tbsp smoked paprika — deepens the barbecue note.
- 1 tsp garlic powder — easy background flavor.
- 8 hamburger buns — toast them so they do not collapse.
Quick Steps:
- Set the onion in the bottom of the slow cooker.
- Rub the pork with salt, pepper, paprika, and garlic powder, then place it on the onions.
- Pour in the BBQ sauce, vinegar, and broth.
- Cook on low for 8 hours or high for 5 to 6 hours, until the pork pulls apart with little resistance.
- Shred the meat, stir it back into the juices, and pile onto toasted buns.
Equipment for This Recipe:
- 6-quart slow cooker — gives the pork room without crowding.
- Two forks — the easiest way to shred.
- Tongs — useful for moving the hot pork out if you need to drain liquid.
How to Serve This Dish:
Serve the pork on toasted buns with coleslaw and dill pickles. I like a scoop of extra sauce on the side because some people want a drippy sandwich and some do not. It also makes strong leftovers for lunches.
Pro Tips for This Recipe:
- Trim only the thickest fat cap; leave the marbling alone.
- Toast the buns. Seriously. It keeps them from turning soggy.
- If the sauce looks thin after shredding, simmer it uncovered for 10 minutes before serving.
Variations on This Dish:
- Spicy Smokehouse: Add 1 teaspoon chipotle powder or a chopped chipotle pepper in adobo.
- Pineapple BBQ: Stir in ½ cup crushed pineapple for a sweeter, tropical angle.
Common Mistakes to Avoid with This Dish:
- Using pork loin: It dries out too fast. Shoulder is the right cut.
- Drowning the meat in sauce before cooking: A heavy pour can mute the spices.
- Shredding too early: The pork should pull apart easily; if it resists, keep cooking.
5. Turkey Taco Rice Bowls
The spices hit the pan fast, the beans and corn give the bowl some texture, and the rice underneath soaks up every bit of sauce. This one feels like a clean-out-the-fridge dinner, but it still lands like an actual meal.
Why It Works:
Ground turkey cooks quickly, which makes it a good fit for nights that start with a school-pickup scramble. Salsa does half the work by seasoning and moistening the meat at the same time. The rice gives you a base that stretches the meal without making it taste thin, and the toppings can be as simple or loaded as you want.
Key Ingredients:
- 1 lb ground turkey — lean, quick-cooking, and easy to season.
- 1 tbsp olive oil — keeps the turkey from sticking.
- 1 small onion, diced — gives the filling a little sweetness.
- 2 tbsp taco seasoning — use a low-sodium blend if you want more control.
- 1 cup salsa — this adds moisture and flavor in one move.
- 1 can black beans, drained and rinsed — they bulk up the bowl.
- 1 cup frozen corn — no need to thaw first.
- 2 cups cooked rice — day-old rice works well here.
- 1 cup shredded cheddar — melts into the warm filling.
- 1 avocado and 1 lime — for serving.
Quick Steps:
- Heat the oil in a skillet and cook the onion for 3 minutes.
- Add the turkey and cook until no pink remains, breaking it up with a spoon.
- Stir in taco seasoning, salsa, beans, and corn, then simmer for 5 minutes until thick.
- Spoon the filling over warm rice and finish with cheese, avocado, and lime juice.
Equipment for This Recipe:
- Large skillet — enough room to stir without spilling.
- Rice cooker or saucepan — for the rice base.
- Lime juicer or fork — not essential, but handy.
How to Serve This Dish:
Build the bowls at the table and let everyone choose toppings. Tortilla chips on the side give a little crunch, and shredded lettuce makes the bowl feel fresher. Two generous scoops of filling over rice is the sweet spot for most adults.
Pro Tips for This Recipe:
- If the salsa is thin, simmer a minute or two longer before serving.
- Use cold rice and reheat it with a tablespoon of water so it loosens up.
- Add the avocado at the end so it stays bright and green.
Variations on This Dish:
- Bean-Heavy Budget Bowl: Use 2 cans beans and cut the turkey to ¾ lb.
- Cauliflower Rice Version: Swap in cauliflower rice and serve it with extra salsa for moisture.
Common Mistakes to Avoid with This Dish:
- Using watery salsa: The filling turns soupy. Pick a thicker jar.
- Skipping the rinse on the beans: The liquid can make the bowl taste muddy.
- Forgetting a fresh topping: Lime or avocado wakes the whole dish up.
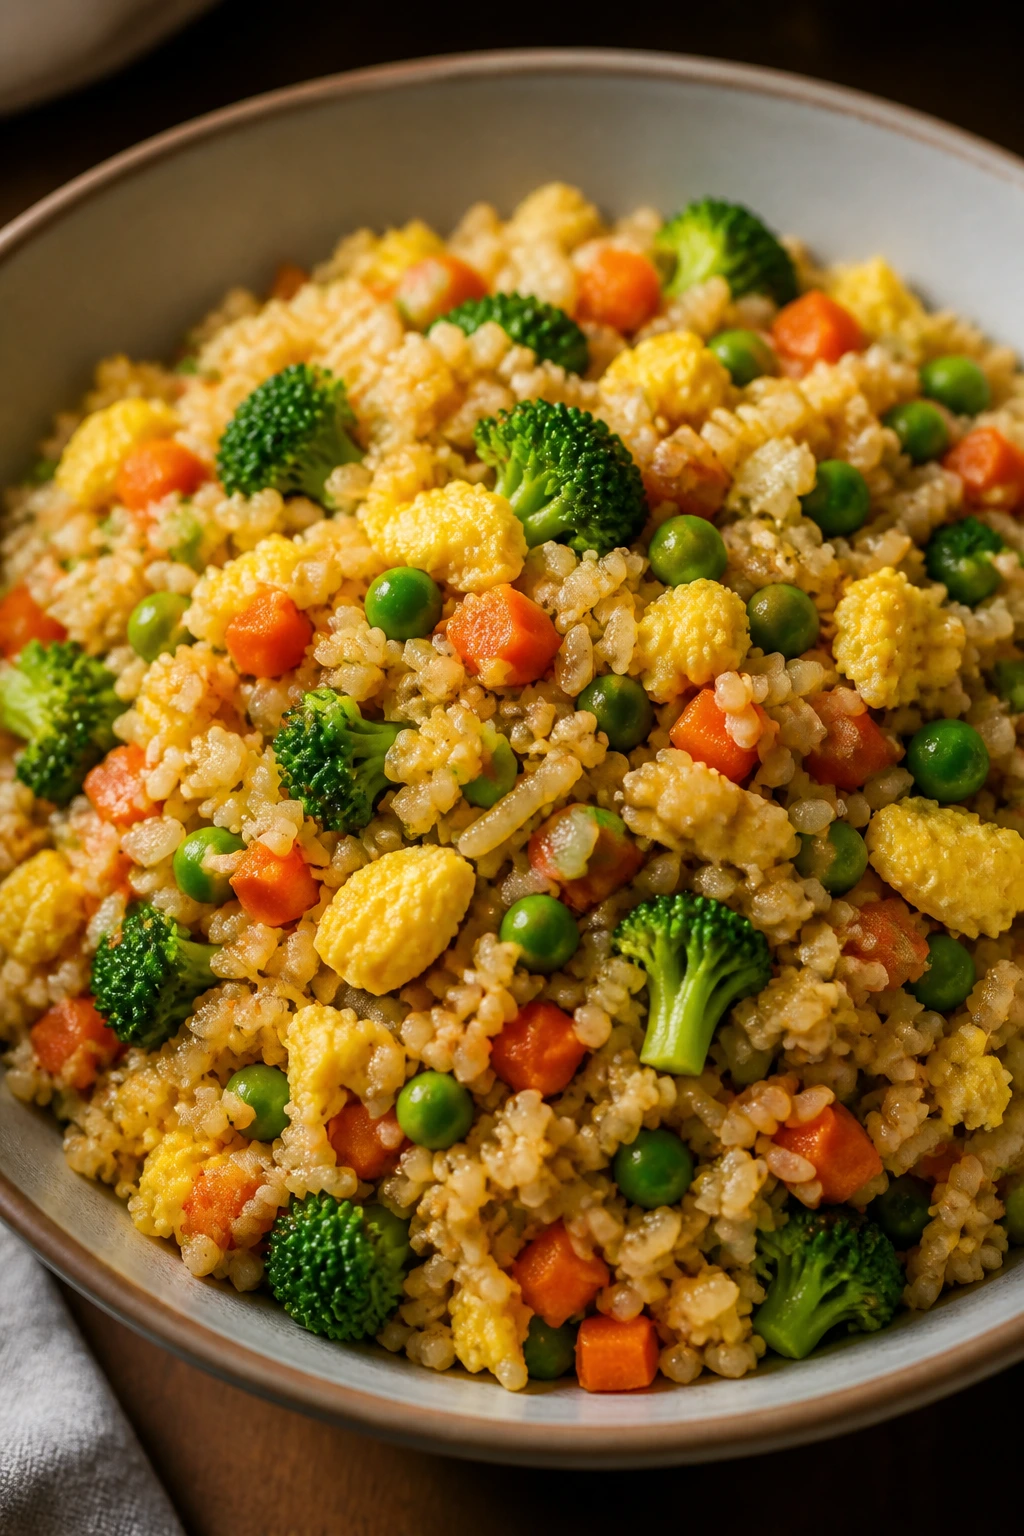
6. Teriyaki Chicken and Broccoli Bowls
The sauce turns shiny and thick, the broccoli keeps a little bite, and the chicken gets coated in a glaze that tastes like takeout without the wait. I like this because it scratches the “ordering in” itch but keeps the pan in your own kitchen.
Why It Works:
Chicken thighs stay juicier than breasts in a hot skillet, especially once the sauce starts bubbling. A quick teriyaki glaze made from soy sauce, honey, vinegar, and ginger coats the chicken in under 10 minutes. Broccoli goes in near the end so it softens without losing its green color and snap.
Key Ingredients:
- 1½ lbs boneless skinless chicken thighs, cut into bite-size pieces — thighs stay tender through the glaze.
- 4 cups broccoli florets — cut small so they cook at the same pace as the chicken.
- 3 cloves garlic, minced — sharpens the sauce.
- 1 tbsp fresh ginger, grated — gives the dish its bright edge.
- ⅓ cup soy sauce — the salty base.
- ¼ cup honey — balances the soy sauce.
- 2 tbsp rice vinegar — keeps the sauce from tasting heavy.
- 1 tsp sesame oil — use at the end for aroma.
- 3 cups cooked rice — for serving.
Quick Steps:
- Whisk the soy sauce, honey, vinegar, garlic, ginger, and sesame oil in a bowl.
- Sear the chicken in a hot skillet with a little oil for 5 to 6 minutes until browned.
- Add the broccoli and 2 tablespoons water, then cover for 3 minutes.
- Pour in the sauce and cook 2 to 3 minutes until it turns glossy and coats the spoon.
- Serve over rice with sesame seeds.
Equipment for This Recipe:
- Large skillet with lid — useful for the broccoli steam step.
- Microplane or small grater — for the ginger.
- Rice pot or rice cooker — for the base.
How to Serve This Dish:
Pile the chicken and broccoli over rice and spoon extra sauce over the top. A few sesame seeds and sliced scallions make the bowl look finished without extra effort. This also works tucked into lunch containers the next day.
Pro Tips for This Recipe:
- Cut the broccoli into small, even florets so it cooks fast.
- Keep the heat moderate once the sauce goes in; high heat can scorch the honey.
- If you want more sauce, double the glaze but keep the same chicken amount.
Variations on This Dish:
- Pineapple Teriyaki: Add ½ cup pineapple chunks in the last 2 minutes.
- Tofu Bowl: Swap in extra-firm tofu, pressed and cubed, and sear it until crisp on the edges.
Common Mistakes to Avoid with This Dish:
- Using wet chicken straight from the package: Pat it dry first or it will steam.
- Overcooking the broccoli: Three minutes under the lid is enough.
- Letting the sauce burn: Once honey is in the pan, keep an eye on it.
7. One-Skillet Cheeseburger Pasta
This tastes like a diner order met a weeknight and agreed to move faster. The pasta gets coated in a beefy, cheesy sauce that clings to every noodle, and the ketchup-mustard note makes it land squarely in comfort-food territory.
Why It Works:
Ground beef gives you a fast, savory base, and the pasta cooks right in the skillet, which saves a pot and a step. A splash of broth and milk builds a sauce that tastes richer than the ingredient list looks on paper. The ketchup and mustard are not there for novelty; they give the dish the recognizable cheeseburger flavor people catch on the first bite.
Key Ingredients:
- 1 lb ground beef — enough fat for flavor without going overboard.
- 1 small onion, diced — it melts into the sauce.
- 2 cloves garlic, minced — add after the beef browns.
- 2 tbsp tomato paste — gives the sauce depth.
- 2 cups beef broth — helps cook the pasta.
- 2 cups milk — makes the sauce creamy.
- 8 oz elbow macaroni — the curves catch the cheese sauce well.
- 1 cup shredded cheddar — stir it in off the heat.
- 2 tbsp ketchup and 1 tsp yellow mustard — the cheeseburger part of the equation.
Quick Steps:
- Brown the beef and onion in a deep skillet over medium-high heat.
- Stir in garlic and tomato paste for 1 minute.
- Add broth, milk, macaroni, ketchup, mustard, salt, and pepper.
- Simmer 10 to 12 minutes, stirring often, until the pasta is tender and the sauce thickens.
- Turn off the heat, stir in cheddar, and let it sit for 2 minutes.
Equipment for This Recipe:
- Deep 12-inch skillet with lid — one pan, enough depth.
- Wooden spoon — for stirring the pasta.
- Box grater — if you want smoother melting from block cheese.
How to Serve This Dish:
Serve it hot in bowls with chopped pickles or tomato slices on the side. A green salad cuts through the richness, and some people like a spoonful of extra mustard on top. It feeds four with generous portions.
Pro Tips for This Recipe:
- Use a skillet with real depth; shallow pans spill pasta water everywhere.
- Stir often so the macaroni cooks evenly and does not stick.
- Pull the pan off the heat before adding cheese or it can get grainy.
Variations on This Dish:
- Bacon Burger Pasta: Stir in 4 slices cooked bacon at the end.
- Turkey Burger Version: Swap in ground turkey and add 1 tablespoon olive oil for a little extra richness.
Common Mistakes to Avoid with This Dish:
- Boiling it too hard: The milk can separate. Keep it at a steady simmer.
- Using pre-shredded cheese if you want a super-smooth sauce: It works, but block cheese melts better.
- Leaving the pasta uncovered the whole time: A lid helps the noodles cook through.
8. Lemon Garlic Salmon with Roasted Potatoes and Asparagus
The potatoes get golden and crisp at the edges, the salmon flakes into thick, silky pieces, and the lemon cuts through the richness at the end. I like this one when I want dinner to feel clean and sharp, not heavy.
Why It Works:
Potatoes need more time than salmon, so they go in first and get a head start in the oven. Asparagus joins later because it cooks quickly and stays bright instead of wrinkling into sadness. The lemon-garlic butter finish gives you a sauce in one spoonful, which is plenty because salmon already brings its own richness.
Key Ingredients:
- 1½ lbs salmon fillet, skin on or off — a single large fillet is easier than individual pieces.
- 1½ lbs baby potatoes, halved — small potatoes roast more evenly.
- 1 bunch asparagus, trimmed — add it near the end so it stays crisp-tender.
- 2 tbsp olive oil — for roasting the vegetables.
- 3 tbsp butter, melted — mixed with lemon and garlic for the fish.
- 3 cloves garlic, minced — keep it fine so it spreads.
- 1 lemon, zested and juiced — the whole point of the sauce.
- 1 tsp salt and ½ tsp black pepper — season the potatoes and salmon.
- 1 tsp chopped dill or parsley — for the finish.
Quick Steps:
- Preheat the oven to 425°F and roast the potatoes with oil, salt, and pepper for 15 minutes.
- Push the potatoes to one side, add the salmon and asparagus, and brush the salmon with butter, garlic, lemon, salt, and pepper.
- Roast for 10 to 12 minutes, until the salmon flakes and the asparagus is just tender.
- Finish with herbs and extra lemon juice.
Equipment for This Recipe:
- Rimmed sheet pan — the potatoes need space to brown.
- Small bowl — for the lemon-butter mixture.
- Fish spatula — helpful, but a wide spatula works too.
How to Serve This Dish:
Serve the salmon with the potatoes and asparagus right from the pan, then pass extra lemon wedges. Rice or crusty bread works if you want a starch on the side, but the sheet pan is already a full meal for four. Keep the plating simple.
Pro Tips for This Recipe:
- Dry the salmon with paper towels before seasoning; wet fish steams instead of roasting.
- Cut the potatoes to the same size so they finish together.
- Do not overbake salmon. Pull it when the center still looks slightly translucent.
Variations on This Dish:
- Dijon Lemon Salmon: Add 1 teaspoon Dijon mustard to the butter mixture.
- Herb-Potato Version: Toss the potatoes with rosemary instead of dill for a woodsy finish.
Common Mistakes to Avoid with This Dish:
- Starting the salmon too early: It will dry out before the potatoes finish.
- Crowding the asparagus: It should roast, not steam.
- Skipping the lemon zest: Juice gives brightness, but zest gives aroma.
9. Creamy Tuscan Chicken Thighs
The sauce turns silky, the tomatoes burst, and the spinach wilts into green ribbons around the chicken. This is rich enough to feel like a treat, but it still moves fast enough for a Tuesday.
Why It Works:
Chicken thighs are forgiving in a creamy sauce because they stay juicy even if dinner gets delayed by ten minutes. A hot sear builds browned bits in the pan, and those browned bits are what make the sauce taste like it took longer than it did. Cherry tomatoes bring acidity, spinach brings color, and parmesan pulls the sauce together without making it gluey.
Key Ingredients:
- 2 lbs boneless skinless chicken thighs — better than breasts here because they stay tender.
- 1 tbsp olive oil — for searing.
- 3 cloves garlic, minced — the backbone of the sauce.
- 1 cup chicken broth — loosens the browned bits from the pan.
- 1 cup heavy cream — makes the sauce rich and smooth.
- ½ cup grated parmesan — thickens and seasons the sauce.
- 1 cup cherry tomatoes — they burst and add acidity.
- 2 cups baby spinach — stir in at the end so it wilts cleanly.
- 1 tsp Italian seasoning — ties the sauce together.
Quick Steps:
- Season the chicken with salt and pepper, then sear it in olive oil over medium-high heat for 5 minutes per side.
- Add garlic and cook 30 seconds, then pour in broth and scrape the pan.
- Stir in cream, parmesan, and Italian seasoning, then simmer until the sauce lightly coats a spoon.
- Add tomatoes and spinach, return the chicken, and simmer 3 to 4 minutes more.
- Serve immediately.
Equipment for This Recipe:
- Large skillet with lid — helps the chicken finish gently.
- Tongs — easy for searing and turning.
- Microplane — useful if you want to grate parmesan finely.
How to Serve This Dish:
Ladle the chicken and sauce over pasta, mashed potatoes, or rice. A slice of bread is useful for the sauce that clings to the bottom of the plate, which is usually the best part. This feeds four to six depending on the side.
Pro Tips for This Recipe:
- Sear in batches if needed so the chicken browns instead of steaming.
- Keep the cream at a gentle simmer; a hard boil can make it split.
- Use freshly grated parmesan if you want the sauce extra smooth.
Variations on This Dish:
- Mushroom Tuscan Chicken: Add 8 ounces sliced mushrooms with the garlic.
- Lighter Cream Sauce: Use half-and-half instead of cream and simmer a little longer.
Common Mistakes to Avoid with This Dish:
- Crowding the skillet: The chicken needs direct contact with the pan.
- Boiling the cream: That is how you get a broken sauce.
- Skipping the pan scrape: Those browned bits are flavor, not mess.
10. Sausage, Peppers, and Onions Hoagies
The sausages turn glossy, the peppers soften into sweet strands, and the onions take on a deep caramel note. This is the sort of sandwich dinner that looks like it took more effort than it did, which I always appreciate.
Why It Works:
Italian sausage brings built-in seasoning, so the rest of the skillet mostly has to behave and not get in the way. Searing the sausages first gives you browned flavor, while the peppers and onions cook in the same fat and pick it up. A little marinara in the pan keeps the filling saucy enough for hoagies without turning it into soup.
Key Ingredients:
- 1½ lbs Italian sausage links — sweet or hot, depending on your crowd.
- 3 bell peppers, sliced — a mix of colors makes the pan look lively.
- 1 large onion, sliced — becomes soft and sweet.
- 2 tbsp olive oil — only if the sausage is lean.
- 1 cup marinara sauce — just enough to bind the filling.
- 4 hoagie rolls — sturdy rolls hold the juices best.
- 4 to 6 slices provolone — melts nicely over the top.
- 1 tsp dried oregano — for a little extra Italian flavor.
Quick Steps:
- Brown the sausage in a large skillet over medium heat for 6 to 8 minutes, then remove it.
- Cook the peppers and onion in the same pan until soft and lightly browned.
- Add marinara and oregano, then return the sausage and simmer 5 minutes until cooked through.
- Split the rolls, fill them, top with provolone, and broil until the cheese melts.
Equipment for This Recipe:
- Large skillet with lid — for the vegetable cook-down.
- Sheet pan — if you want to broil the sandwiches separately.
- Tongs — helpful for turning the sausage.
How to Serve This Dish:
Serve the hoagies hot with potato chips or a chopped salad. I like to put a little extra sauce in a bowl for the people who want a messier sandwich. One hoagie is a solid serving.
Pro Tips for This Recipe:
- Slice the peppers and onions evenly so they soften at the same pace.
- Toast the rolls for 2 minutes before filling if you want better structure.
- If the sausage is fully cooked before the vegetables are soft, keep it warm and finish the pan.
Variations on This Dish:
- Chicken Sausage Swap: Use chicken sausage links for a lighter filling.
- Hoagie Bowl: Serve the sausage and peppers over rice instead of in rolls.
Common Mistakes to Avoid with This Dish:
- Undercooking the onions: They should be soft enough to bend, not crunch.
- Skipping the broiler: Melting the cheese on top finishes the sandwich.
- Choosing flimsy rolls: Soft sandwich bread falls apart fast.
11. Beef and Broccoli Stir-Fry
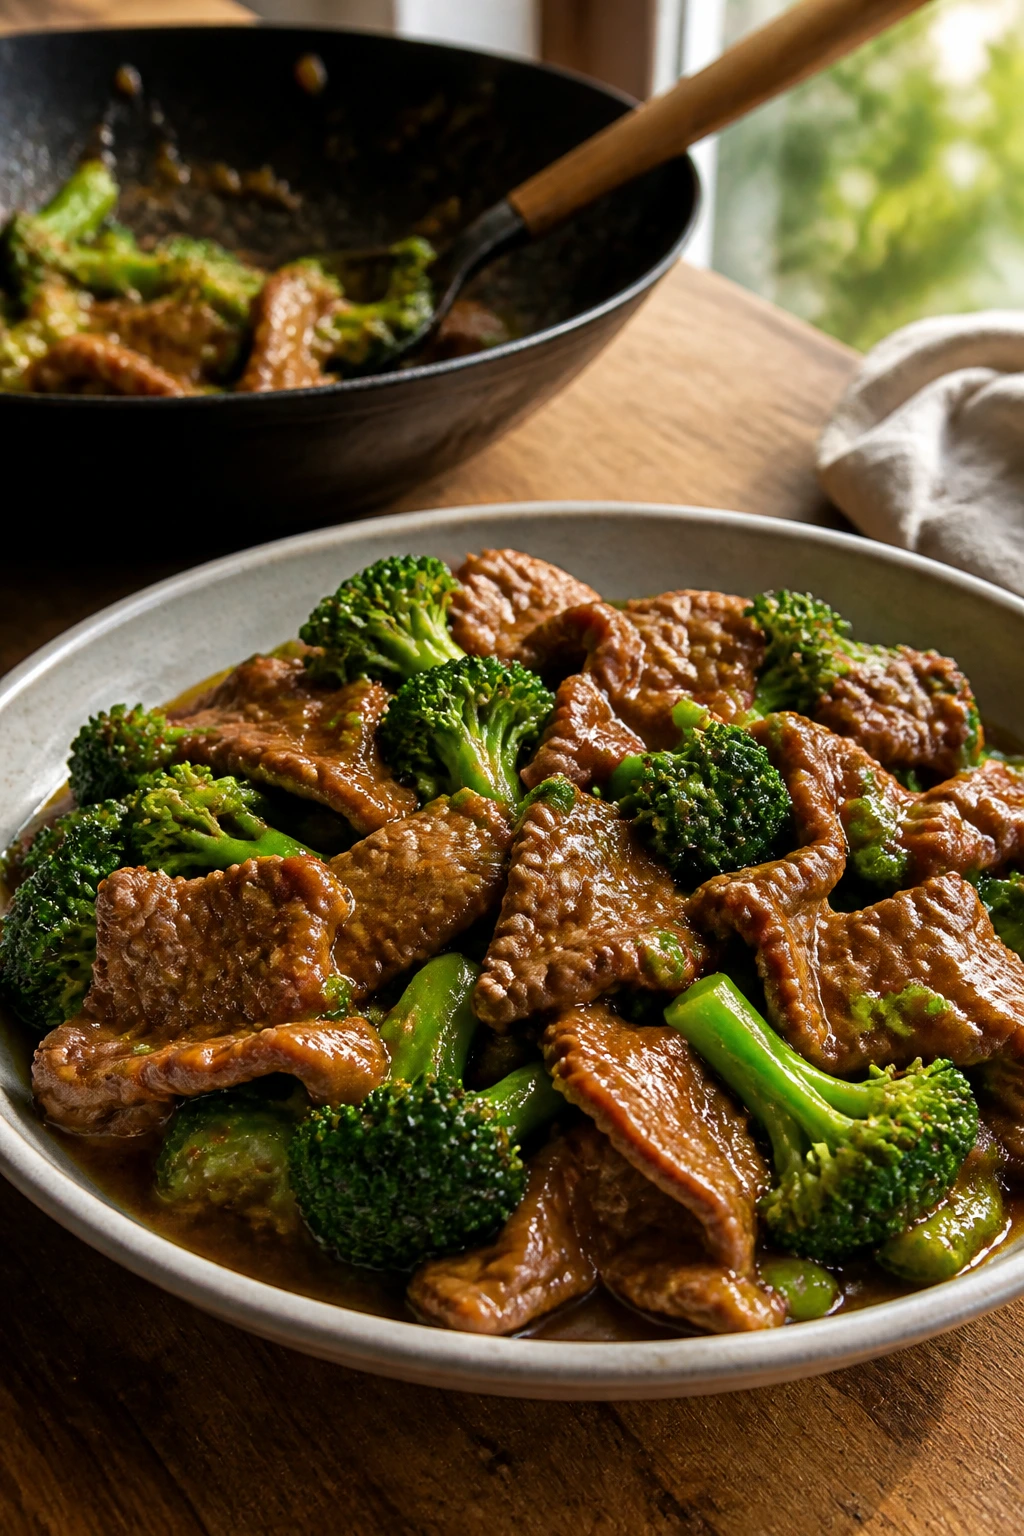
The beef gets seared at the edges, the broccoli stays bright green, and the sauce thickens just enough to coat everything in a sheen. This is one of those dinners that makes the stove feel faster than takeout.
Why It Works:
Thin-sliced beef cooks in minutes, which is the whole point here. A quick sauce made with soy, garlic, ginger, and a little sugar clings to the meat once cornstarch thickens it. Broccoli cooks in the same pan, but it needs only a quick stir-fry so it stays crisp and does not go dull and watery.
Key Ingredients:
- 1½ lbs flank steak or sirloin, thinly sliced against the grain — this keeps the meat tender.
- 4 cups broccoli florets — cut small enough to cook quickly.
- 3 cloves garlic, minced — the sauce needs it.
- 1 tbsp fresh ginger, grated — brightens the whole pan.
- ⅓ cup soy sauce — the salty base.
- ¼ cup beef broth or water — keeps the sauce from getting too salty.
- 2 tbsp brown sugar — balances the soy.
- 2 tbsp cornstarch — thickens the sauce.
- 2 tbsp neutral oil — for high-heat searing.
Quick Steps:
- Whisk the soy sauce, broth, brown sugar, garlic, ginger, and cornstarch in a bowl.
- Heat oil in a large skillet or wok and sear the beef in batches for 1 to 2 minutes per side.
- Stir-fry the broccoli for 3 minutes with a splash of water.
- Return the beef, pour in the sauce, and cook 1 to 2 minutes until glossy and thick.
- Serve over rice.
Equipment for This Recipe:
- Wok or large skillet — high sides help with quick tossing.
- Sharp knife — for thin slicing the beef.
- Cutting board with a damp towel under it — keeps it from sliding.
How to Serve This Dish:
Serve it over white rice, brown rice, or noodles. A few sesame seeds and sliced scallions make the bowl look finished, and steamed edamame works well on the side. It feeds four with rice.
Pro Tips for This Recipe:
- Freeze the beef for 15 minutes before slicing; it cuts more cleanly.
- Cook in batches if your pan is small.
- Stir the sauce again before pouring so the cornstarch does not settle.
Variations on This Dish:
- Chicken Broccoli Stir-Fry: Use boneless chicken thighs and follow the same method.
- Spicy Version: Add 1 teaspoon chili paste or sriracha to the sauce.
Common Mistakes to Avoid with This Dish:
- Slicing with the grain: The beef will chew tough.
- Overcooking the broccoli: It should stay a little snappy.
- Dumping all the meat in at once: The pan temperature falls and the beef steams.
12. Chicken Parmesan Sliders
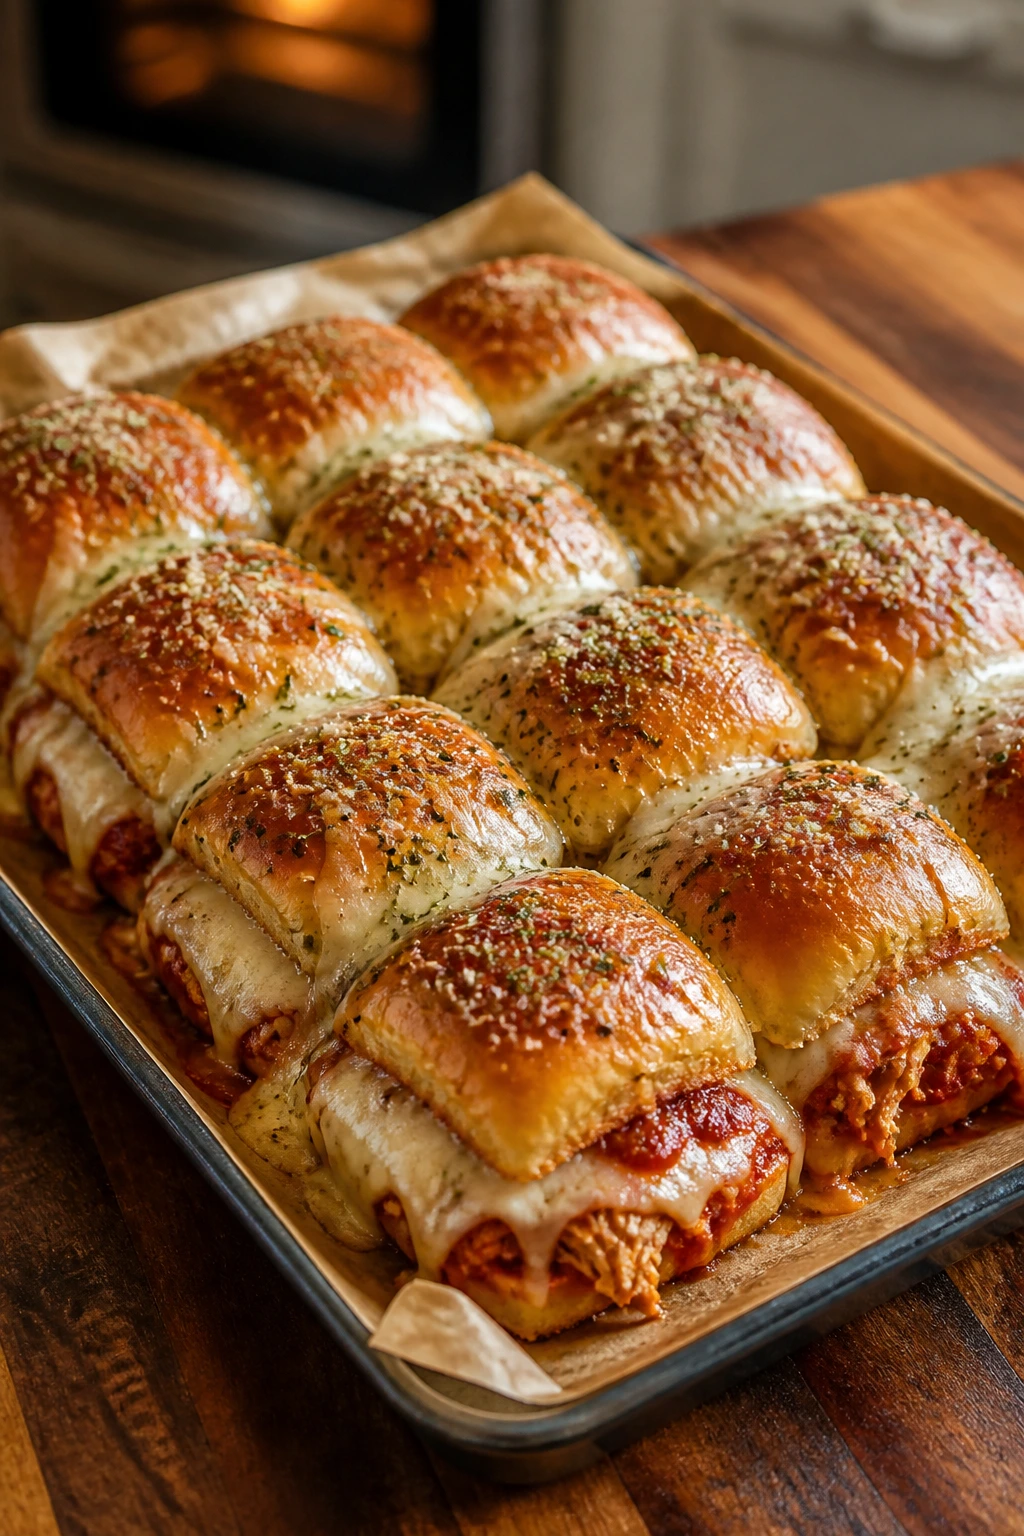
These are small, messy, and gone fast. The chicken stays saucy, the cheese melts into the buns, and the whole tray smells like a pizza shop in the best possible way.
Why It Works:
Using cooked chicken keeps the prep short, which matters when the day is already packed. Marinara and mozzarella give you the familiar chicken parm flavor without having to bread and fry anything. Slider buns turn it into a tray dinner that can be sliced and served in minutes.
Key Ingredients:
- 3 cups cooked shredded chicken — rotisserie chicken is fine here.
- 1 cup marinara sauce — enough to moisten without soaking the buns.
- 8 slider buns — soft but sturdy.
- 1½ cups shredded mozzarella — the melt matters.
- ¼ cup grated parmesan — adds a salty top note.
- 2 tbsp melted butter — brushed on top for color.
- 1 tsp garlic powder — mixed into the butter.
- 1 tsp Italian seasoning — keeps the sliders tasting like chicken parm.
Quick Steps:
- Preheat the oven to 375°F and line a baking dish with parchment if you want easy cleanup.
- Mix the chicken with marinara and spoon it onto the bottom buns.
- Top with mozzarella, close the buns, and brush the tops with butter, garlic powder, and Italian seasoning.
- Sprinkle parmesan on top and bake for 15 minutes until the cheese melts and the tops are golden.
- Slice and serve warm.
Equipment for This Recipe:
- 9×13-inch baking dish — keeps the sliders together.
- Pastry brush — useful for the butter topping.
- Mixing bowl — for the chicken and sauce.
How to Serve This Dish:
Serve with a big salad or roasted vegetables so the plate does not feel like all bread and cheese. I like these with extra marinara for dipping. Three sliders make a good dinner for most adults; two may be enough for younger kids.
Pro Tips for This Recipe:
- Use thick buns if you can find them.
- Do not over-sauce the chicken or the bottoms go soggy.
- Let the tray rest for 5 minutes before cutting so the cheese settles.
Variations on This Dish:
- Meatball Sliders: Swap the chicken for sliced meatballs and keep everything else the same.
- Spicy Parm Sliders: Add red pepper flakes to the marinara and a few sliced pepperoncini.
Common Mistakes to Avoid with This Dish:
- Using dry chicken: Rotisserie or leftover roasted chicken works best.
- Skipping the butter top: It gives the buns color and flavor.
- Pulling them apart too soon: The cheese needs a minute to set.
13. White Chicken Chili
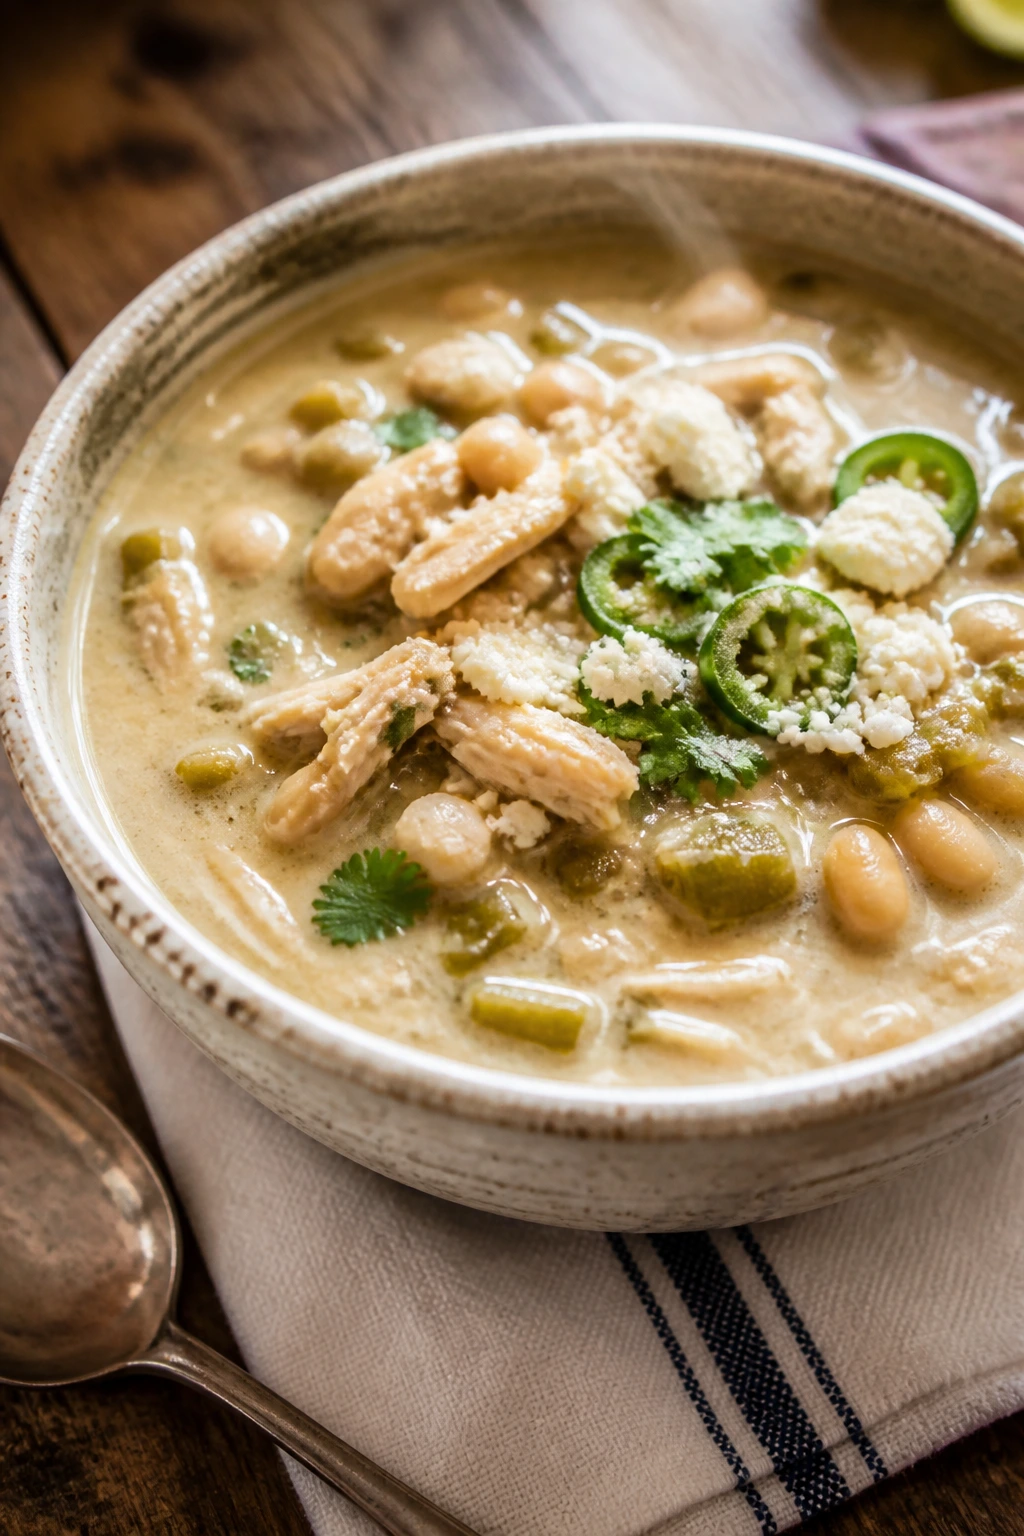
This chili is pale, creamy, and full of green chile heat rather than tomato tang. It feels lighter than red chili, but it still eats like a full dinner when the weather or the schedule gets stubborn.
Why It Works:
Cannellini beans thicken the broth when you mash some of them against the pot, so you get body without flour. Cream cheese melts into the broth and makes the soup feel rich without much work. The lime at the end matters here; it keeps the chili from tasting too soft and milky.
Key Ingredients:
- 1 tbsp olive oil — for the onion.
- 1 medium onion, diced — gives the chili a savory base.
- 2 cloves garlic, minced — add after the onion softens.
- 2 cans cannellini beans, drained and rinsed — one can can be mashed for thickness.
- 1 can diced green chiles — brings mild heat and flavor.
- 4 cups low-sodium chicken broth — the main liquid.
- 2 cups shredded cooked chicken — rotisserie chicken is perfect.
- 1 tsp cumin — gives the chili its shape.
- 4 oz cream cheese, cubed — melts into the broth.
- 1 lime — for finishing.
Quick Steps:
- Sauté the onion in oil for 4 minutes, then add garlic for 30 seconds.
- Stir in beans, green chiles, broth, cumin, salt, and pepper.
- Mash some beans against the side of the pot and simmer for 15 minutes.
- Stir in chicken and cream cheese until melted and smooth.
- Finish with lime juice and cilantro.
Equipment for This Recipe:
- Dutch oven or soup pot — for even simmering.
- Potato masher or spoon — to mash some beans.
- Ladle — because soup deserves one.
How to Serve This Dish:
Ladle it into bowls and top with cilantro, shredded cheese, and crushed tortilla chips. Cornbread or warm tortillas make a good side if you want something more substantial. This serves four to six depending on bowl size.
Pro Tips for This Recipe:
- Mash only part of the beans; leave some whole for texture.
- Keep the heat low when the cream cheese goes in.
- Add extra broth if the chili thickens too much after standing.
Variations on This Dish:
- Turkey Chili: Use shredded turkey or ground turkey instead of chicken.
- Extra-Heat Version: Add jalapeños or a spoon of salsa verde.
Common Mistakes to Avoid with This Dish:
- Boiling the cream cheese hard: It can turn grainy.
- Skipping the lime: The chili tastes flatter without acid.
- Using too much broth at the start: It is easier to thin than to fix a watery pot.
14. Tortellini with Peas and Ham
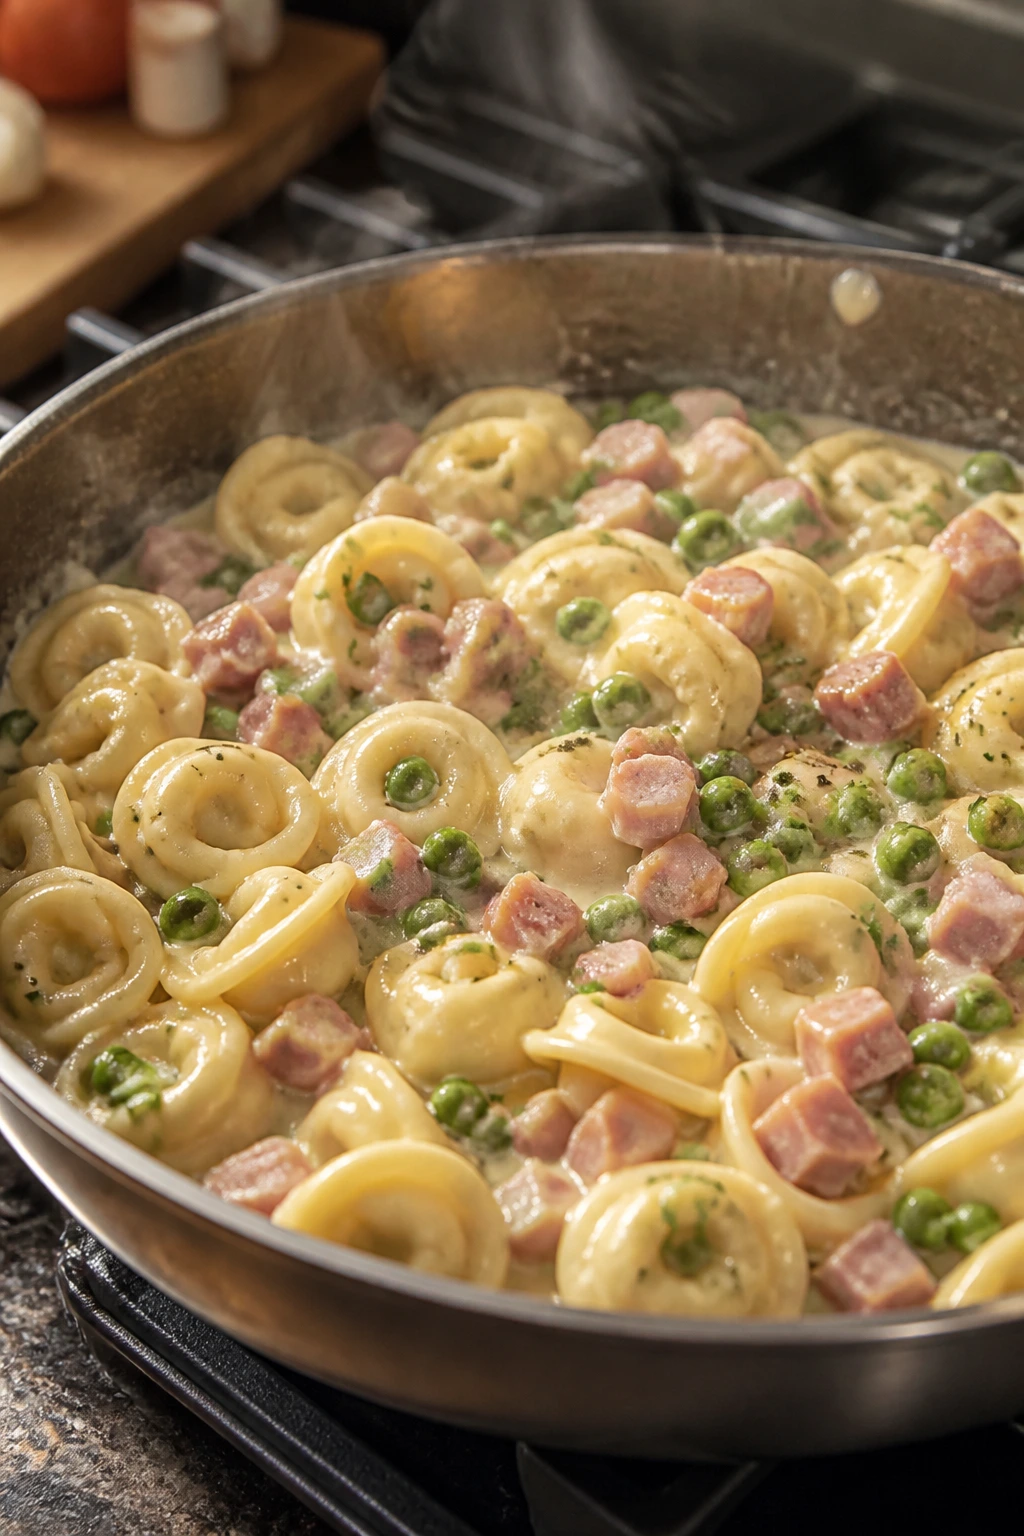
The tortellini go soft and plush, the peas pop with sweetness, and the ham gives the whole bowl a salty edge. This is the sort of dinner that feels calm even when the day was not.
Why It Works:
Refrigerated tortellini cook in minutes, which makes them a smart short-cut base. Ham adds seasoning without a separate sauce, and frozen peas can go straight into the pot with almost no prep. A little cream and parmesan turn the whole thing into a silky skillet meal instead of a loose pasta toss.
Key Ingredients:
- 20 oz refrigerated cheese tortellini — the filling adds enough richness on its own.
- 2 tbsp butter — for the pan and flavor.
- 1 cup diced ham — use leftover ham or deli ham cut into cubes.
- 1 cup frozen peas — no thawing needed.
- 1 cup heavy cream — makes the sauce cling.
- ½ cup grated parmesan — for salt and body.
- 2 cloves garlic, minced — a small amount goes a long way.
- Black pepper — ham is salty, so pepper matters.
Quick Steps:
- Boil the tortellini according to package directions, usually 3 to 4 minutes.
- Melt butter in a skillet and sauté the ham and garlic for 2 minutes.
- Add cream and peas and simmer for 2 minutes.
- Toss in the tortellini and parmesan, then stir until coated.
- Serve immediately with black pepper on top.
Equipment for This Recipe:
- Large pot — for the tortellini.
- Skillet — for the sauce and ham.
- Slotted spoon — handy for moving pasta into the pan.
How to Serve This Dish:
Serve it in bowls with a little extra parmesan and cracked pepper. A simple salad or sliced tomatoes keep the plate from feeling too rich. It is a good one-bowl dinner for four.
Pro Tips for This Recipe:
- Add the peas in the last minute so they stay bright.
- Use unsalted butter because the ham and parmesan already bring salt.
- Reserve ¼ cup pasta water in case the sauce needs loosening.
Variations on This Dish:
- Bacon-and-Pea Version: Swap ham for crisp bacon and cut the salt back a little.
- Pesto Cream Tortellini: Stir in 2 tablespoons pesto at the end.
Common Mistakes to Avoid with This Dish:
- Overcooking tortellini: They get mushy fast.
- Salting too early: Taste after the ham and parmesan go in.
- Boiling the cream hard: Keep the sauce at a gentle simmer.
15. Turkey Meatballs with Marinara
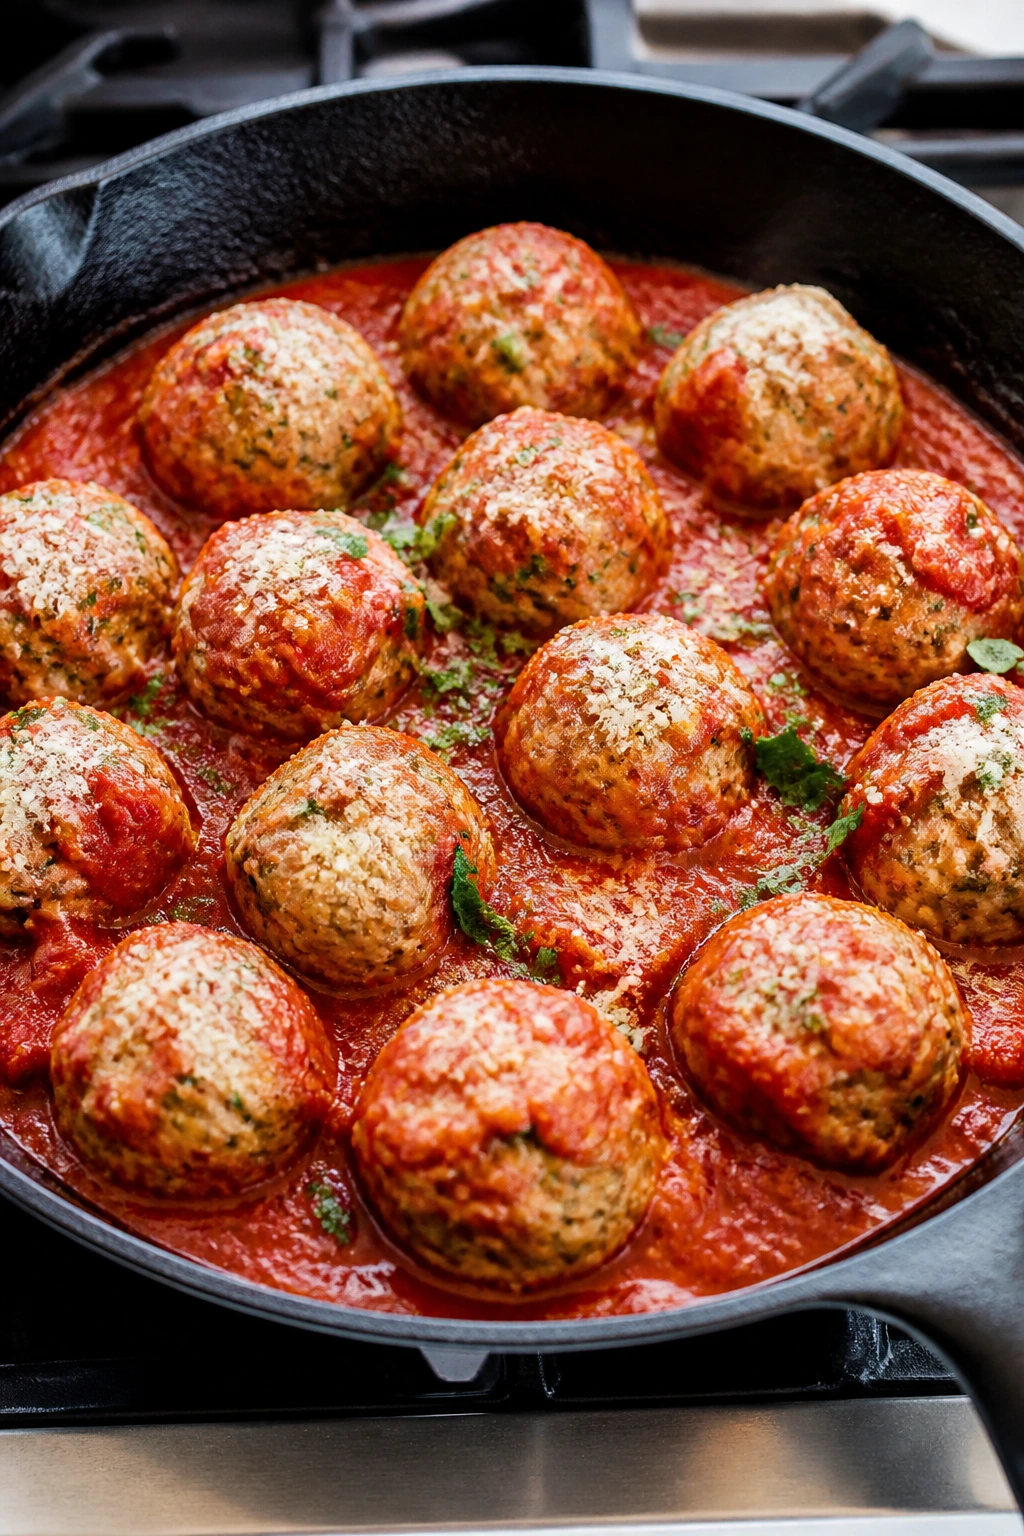
These meatballs stay tender if you do not overwork them, and the sauce keeps them juicy while they finish. They are neat enough for pasta, casual enough for sandwiches, and reliable enough to repeat without thinking hard.
Why It Works:
Ground turkey can dry out, so the breadcrumb-and-egg mix is doing real work here. Browning the meatballs before they simmer gives them better flavor and keeps them from tasting steamed. Marinara finishes the job, and a short simmer lets the flavors settle together.
Key Ingredients:
- 1 lb ground turkey — choose 93% lean for enough moisture.
- 1 egg — binds the meatballs.
- ½ cup breadcrumbs — keeps the texture tender.
- ¼ cup grated parmesan — seasons the mixture.
- 2 cloves garlic, minced — for flavor.
- 1 tsp Italian seasoning — an easy herb blend.
- 2 tbsp olive oil — for browning.
- 24 oz marinara sauce — the cooking liquid.
Quick Steps:
- Mix turkey, egg, breadcrumbs, parmesan, garlic, seasoning, salt, and pepper in a bowl until just combined.
- Roll into 16 meatballs.
- Brown them in olive oil over medium heat for 5 to 6 minutes, turning gently.
- Add marinara, cover, and simmer for 10 minutes until the meatballs reach 165°F.
- Serve over pasta or in rolls.
Equipment for This Recipe:
- Large skillet with lid — for browning and simmering.
- Mixing bowl — keep it cold if you can.
- Cookie scoop — optional, but it helps portion evenly.
How to Serve This Dish:
Serve over spaghetti, tucked into sub rolls, or alongside roasted vegetables and bread. I like a final shower of parmesan and chopped basil. Four to six meatballs per adult is a good range.
Pro Tips for This Recipe:
- Mix gently; packing the meat makes the meatballs dense.
- Wet your hands lightly before rolling.
- If the pan is crowded, brown in two batches.
Variations on This Dish:
- Chicken Meatballs: Ground chicken works the same way, though it needs the full simmer time.
- Baked Version: Bake at 400°F for 15 minutes, then finish in the sauce.
Common Mistakes to Avoid with This Dish:
- Overmixing the meat: It turns the texture rubbery.
- Skipping the browning: The flavor is flatter without it.
- Letting the sauce boil hard: Gentle simmer only.
16. Loaded Baked Potato Soup
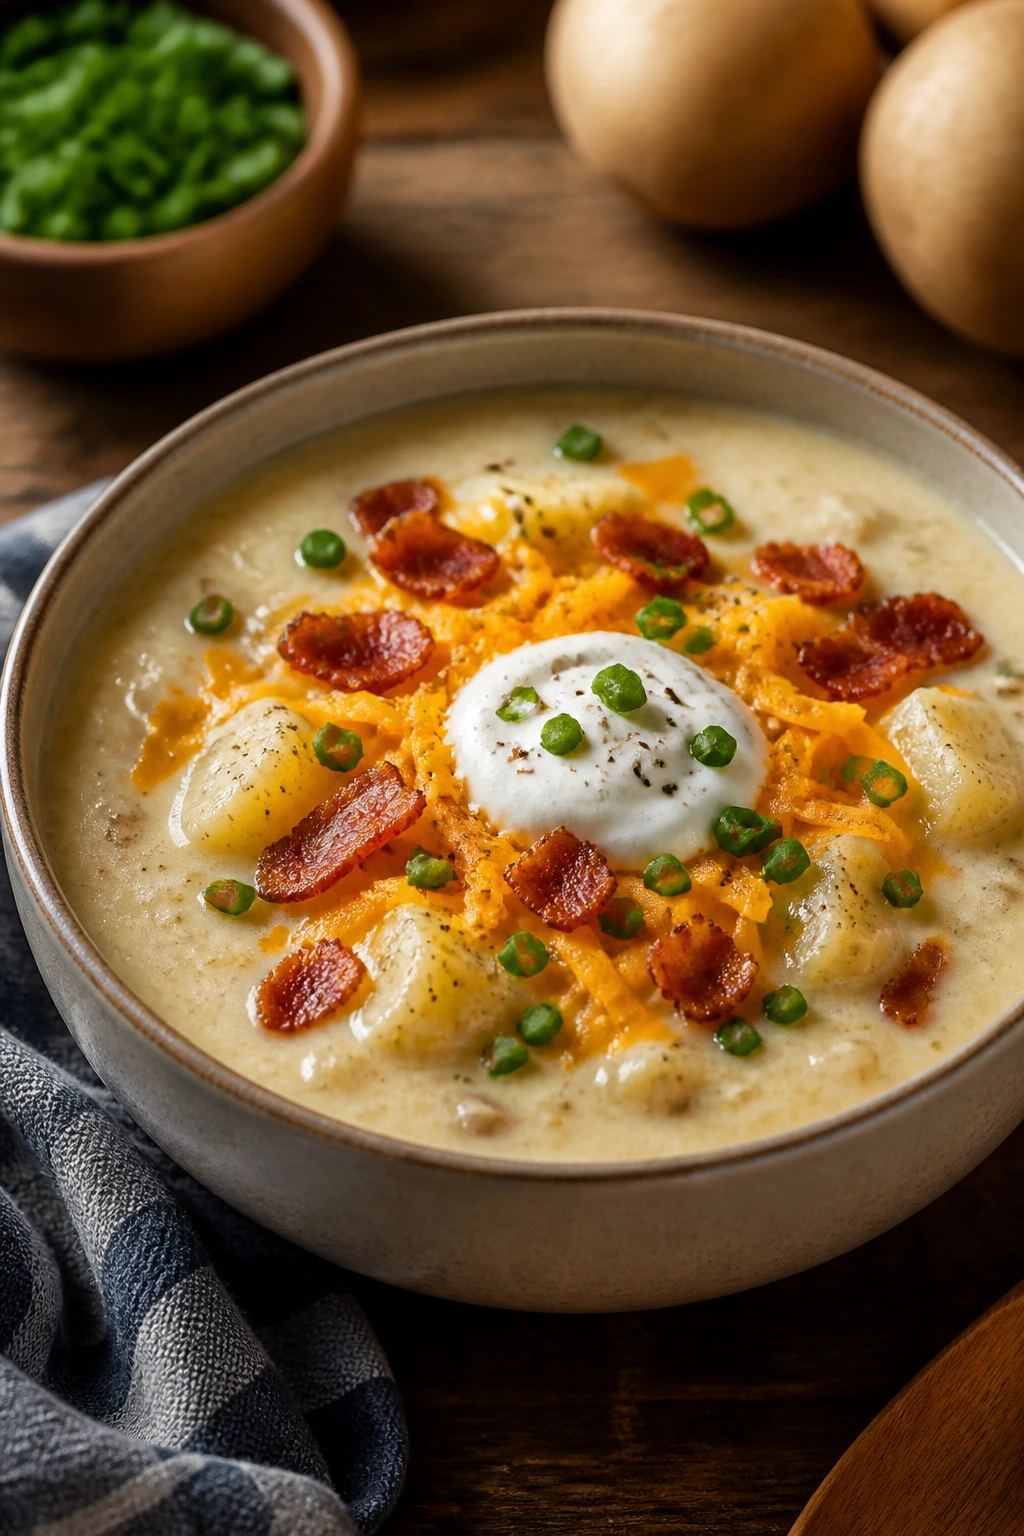
This soup tastes like a baked potato got a proper finish: bacon, cheddar, sour cream, and chives. It is thick, spoon-coating, and exactly the kind of dinner that helps after a day of permission slips, sports gear, and general noise.
Why It Works:
Russet potatoes break down into a creamy base when they simmer, which means you do not need a flour-heavy roux to get body. The bacon gives the soup a smoky backbone, and cream cheese helps it feel velvety rather than thin. I like to leave some potato chunks intact so the texture stays interesting.
Key Ingredients:
- 2 lbs russet potatoes, peeled and diced — they soften and thicken the soup well.
- 4 slices bacon, chopped — use the fat to cook the onion.
- 1 medium onion, diced — softens into the base.
- 3 cups low-sodium chicken broth — enough liquid to simmer the potatoes.
- 2 cups milk — adds creaminess.
- 4 oz cream cheese, cubed — melts into the soup.
- 1 cup shredded cheddar — for the finish.
- Sour cream and chives — for serving.
Quick Steps:
- Cook the bacon in a soup pot until crisp, then remove it and leave a little fat in the pot.
- Sauté the onion in the bacon fat for 4 minutes.
- Add potatoes and broth, then simmer for 15 to 18 minutes until the potatoes are tender.
- Mash some potatoes against the side of the pot, then stir in milk and cream cheese over low heat.
- Add cheddar and serve with bacon, sour cream, and chives.
Equipment for This Recipe:
- Large soup pot — room matters here.
- Potato masher — for texture control.
- Ladle — because thick soup still needs one.
How to Serve This Dish:
Serve it in deep bowls with extra cheddar and chives on top. Crusty bread or a half grilled cheese sandwich makes the meal feel complete. The soup is rich, so smaller bowls are fine.
Pro Tips for This Recipe:
- Cut the potatoes evenly so they cook at the same pace.
- Warm the milk before adding it if your stove runs cool.
- Use full-fat dairy if you want the soup to stay smooth.
Variations on This Dish:
- Vegetarian Potato Soup: Skip the bacon and use butter with vegetable broth.
- Extra-Chunky Version: Leave more potato pieces intact and mash less of the pot.
Common Mistakes to Avoid with This Dish:
- Boiling milk hard: That can make it split.
- Underseasoning the potatoes: They need salt, not just the bacon.
- Using waxy potatoes: Russets give the best texture here.
17. Honey Garlic Meatballs and Rice
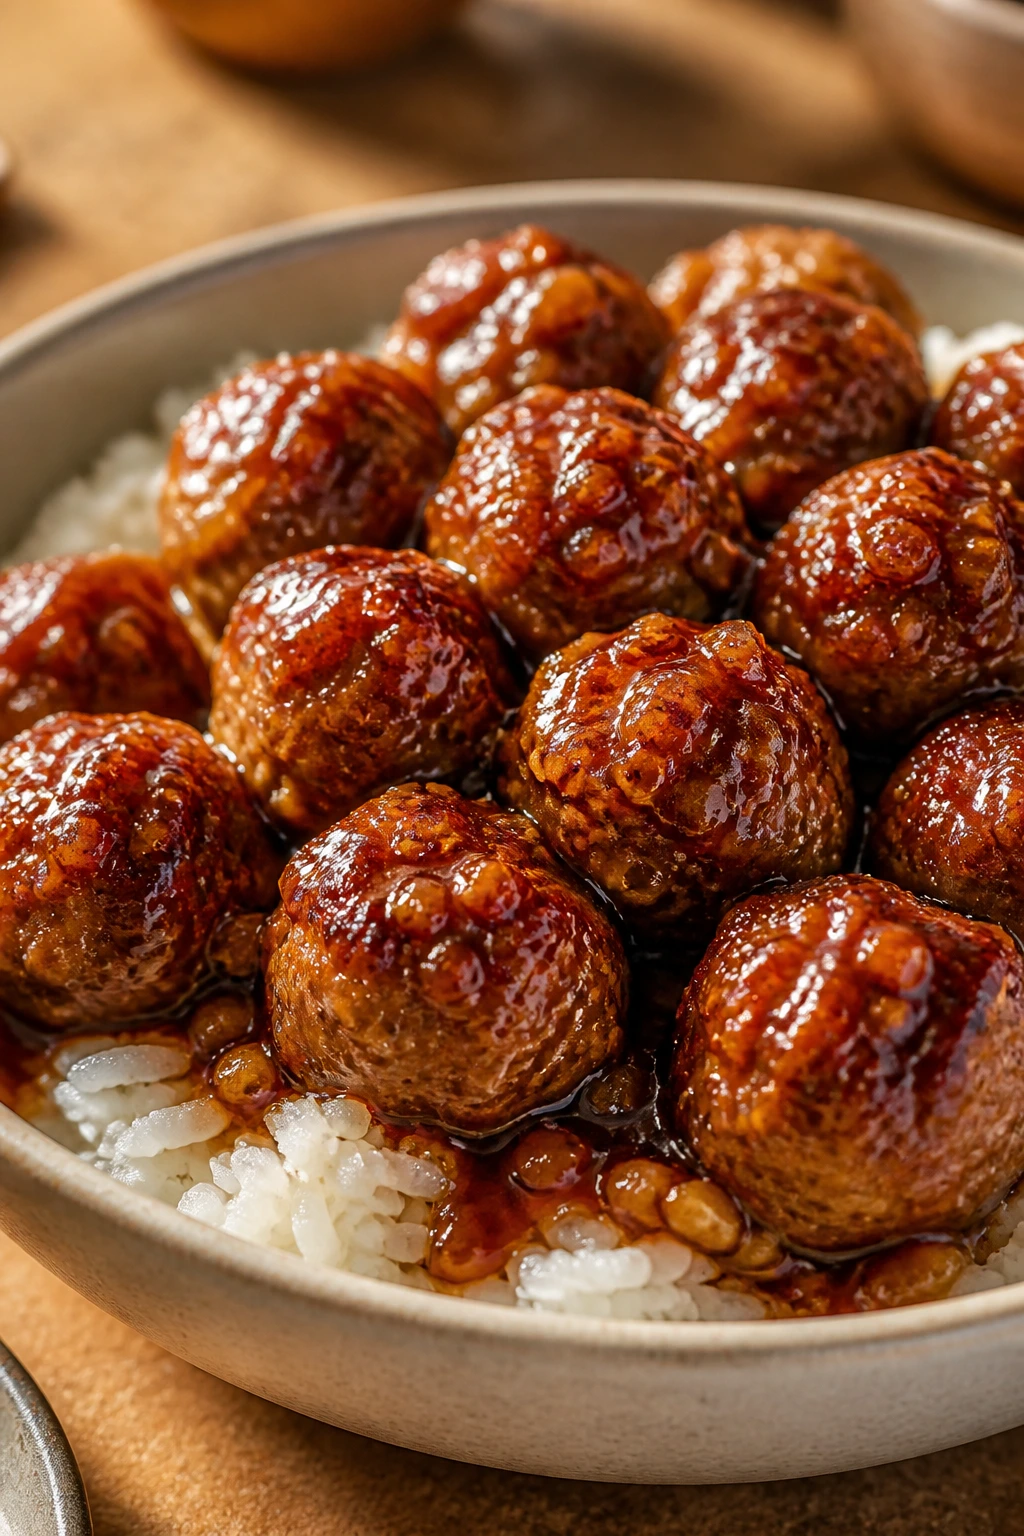
The sauce is sticky, sweet, and sharp enough to keep you coming back for another bite. These meatballs are one of those dinners that feel tidy on the plate and fast in the kitchen, which is a useful combination.
Why It Works:
Meatballs cook quickly in a skillet, and the honey-garlic sauce thickens in minutes with a cornstarch slurry. The soy sauce keeps the sweetness in check, while vinegar gives the sauce some lift. Served over rice, the whole dish becomes a bowl dinner that feels more deliberate than the effort it actually took.
Key Ingredients:
- 1 lb ground beef or turkey — both work, though beef tastes richer.
- 1 egg — to bind the meatballs.
- ⅓ cup breadcrumbs — keeps them tender.
- 2 cloves garlic, minced — mixed into the meatballs and sauce.
- 1 tsp salt — enough to season the meat.
- 2 tbsp oil — for browning.
- ⅓ cup honey — the main sweetness.
- ¼ cup soy sauce — for salt and depth.
- 2 tbsp ketchup — adds body and a little tang.
- 2 tsp cornstarch mixed with 2 tbsp water — thickens the sauce.
Quick Steps:
- Mix the meatball ingredients and roll into 16 small balls.
- Brown them in oil over medium heat for 6 to 8 minutes, turning gently.
- Whisk honey, soy sauce, ketchup, garlic, vinegar, and the cornstarch slurry in a bowl.
- Pour the sauce into the skillet and simmer until thick and glossy, about 3 minutes.
- Serve over rice with scallions.
Equipment for This Recipe:
- Large skillet — enough to brown and sauce the meatballs in one pan.
- Mixing bowl — for the meatball mix.
- Whisk — for the sauce.
How to Serve This Dish:
Spoon the meatballs and sauce over rice and finish with sesame seeds or sliced scallions. Steamed broccoli or snap peas make the bowl feel more balanced. Four meatballs plus rice is a reasonable serving for most adults.
Pro Tips for This Recipe:
- Make the meatballs on the smaller side so they cook through fast.
- Stir the sauce constantly once the slurry goes in.
- If it gets too thick, add a tablespoon of water.
Variations on This Dish:
- Ginger Honey Meatballs: Add 1 teaspoon grated ginger to the sauce.
- Spicy Sweet Version: Add chili flakes or sriracha to taste.
Common Mistakes to Avoid with This Dish:
- Too much honey: The sauce turns cloying. Keep the balance with soy and vinegar.
- Crowding the pan: The meatballs need room to brown.
- Skipping the rice rest: Hot sauce soaks in better over warm rice, not cold.
18. Chicken and Rice Casserole
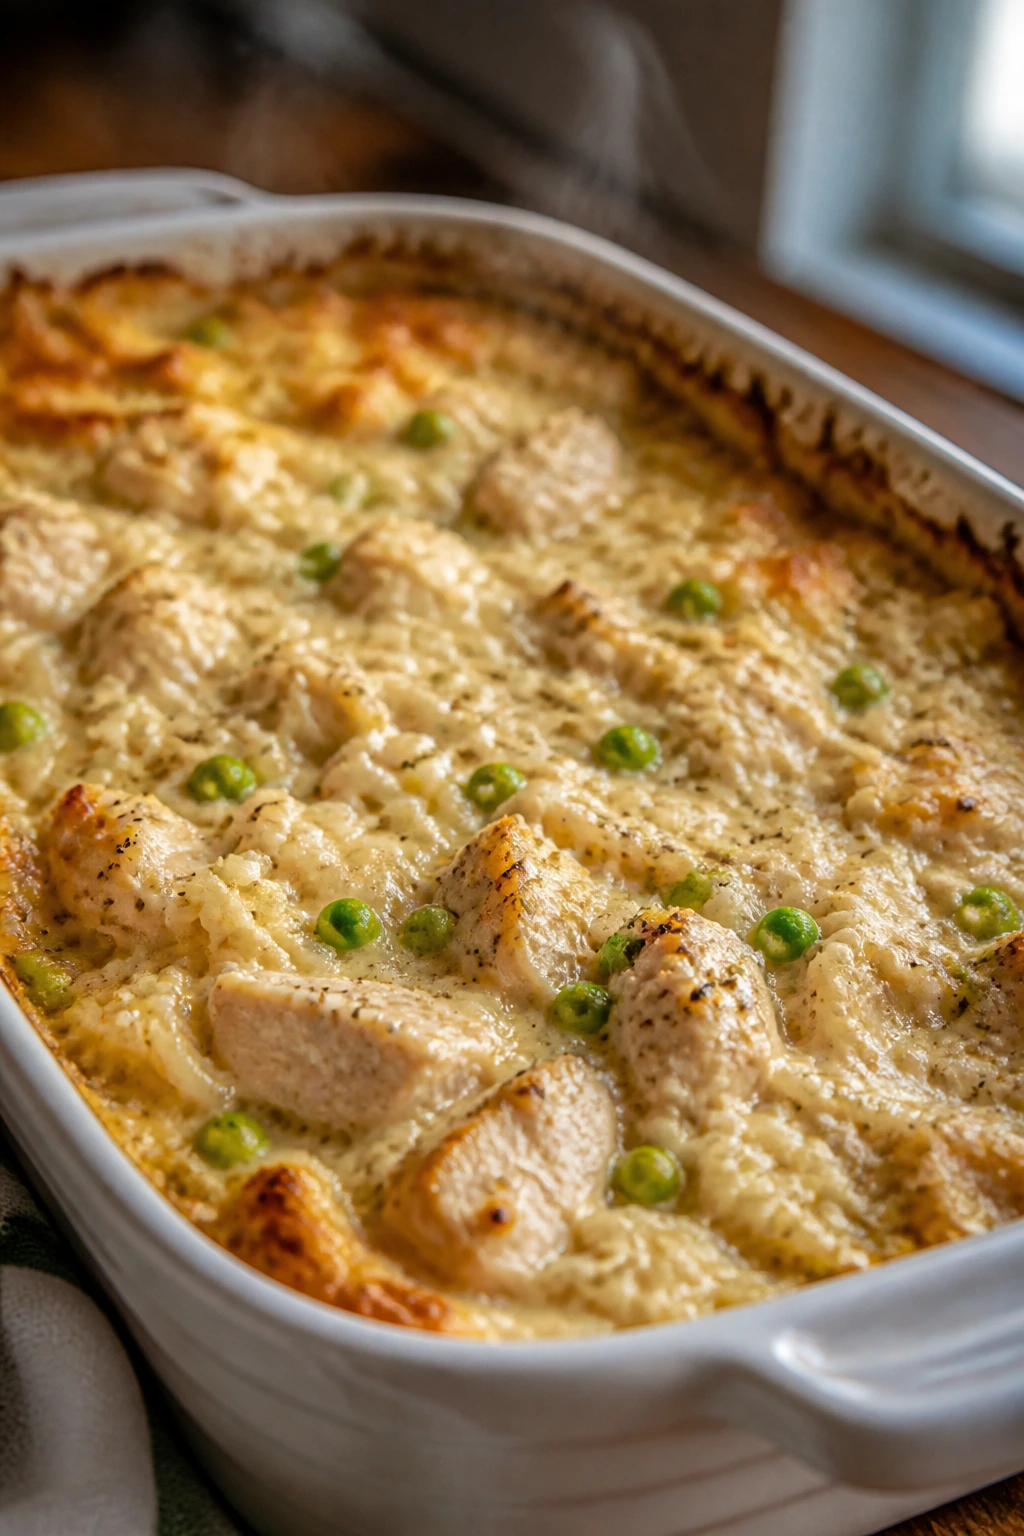
This is plain in the best way: creamy rice, tender chicken, and vegetables all baked in one dish until the top sets and the edges bubble. It is a back-pocket casserole, the sort you make when the day has taken enough from you.
Why It Works:
Uncooked rice bakes directly in the broth and sauce, so the casserole becomes self-contained instead of requiring a separate pot. Chicken thighs stay moister than breasts over a long bake, which matters here because the rice needs time to finish. Frozen peas go in near the end so they stay green and do not turn to mush.
Key Ingredients:
- 1½ lbs boneless skinless chicken thighs or breasts — thighs are safer, breasts are leaner.
- 1½ cups long-grain white rice, uncooked — do not use instant rice.
- 1 small onion, diced — gives the base flavor.
- 3 cups low-sodium chicken broth — the rice needs this much liquid.
- 1 can condensed cream of chicken soup — keeps the casserole creamy.
- 1 cup milk — loosens the sauce.
- 1 cup frozen peas — stirred in near the end.
- 1 tsp garlic powder — easy seasoning.
- 1 tsp paprika — adds color and a little warmth.
Quick Steps:
- Preheat the oven to 375°F and grease a 9×13-inch dish.
- Stir the rice, onion, broth, soup, milk, garlic powder, paprika, salt, and pepper in the dish.
- Nestle the chicken on top, cover tightly with foil, and bake for 45 minutes.
- Remove the foil, add peas, and bake 10 to 15 minutes more until the rice is tender and the chicken reaches 165°F.
- Rest for 10 minutes before serving.
Equipment for This Recipe:
- 9×13-inch baking dish — for even rice cooking.
- Heavy-duty foil — the seal matters.
- Instant-read thermometer — for the chicken.
How to Serve This Dish:
Serve it straight from the pan with a green salad or steamed broccoli. It scoops well, so a wide spoon or spatula helps keep the servings neat. It makes a full family dinner with leftovers.
Pro Tips for This Recipe:
- Cover the dish tightly; loose foil lets steam escape and the rice stays hard.
- Add a splash of broth if the rice is close but still firm.
- Let the casserole sit before serving so it sets up.
Variations on This Dish:
- Broccoli Chicken Rice: Swap peas for small broccoli florets.
- Mushroom Version: Add sliced mushrooms with the onion for deeper flavor.
Common Mistakes to Avoid with This Dish:
- Using instant rice: It turns too soft.
- Leaving the dish uncovered: The rice will dry out before it finishes.
- Pulling it straight from the oven: The casserole needs a short rest to settle.
19. Sloppy Joe Stuffed Sweet Potatoes
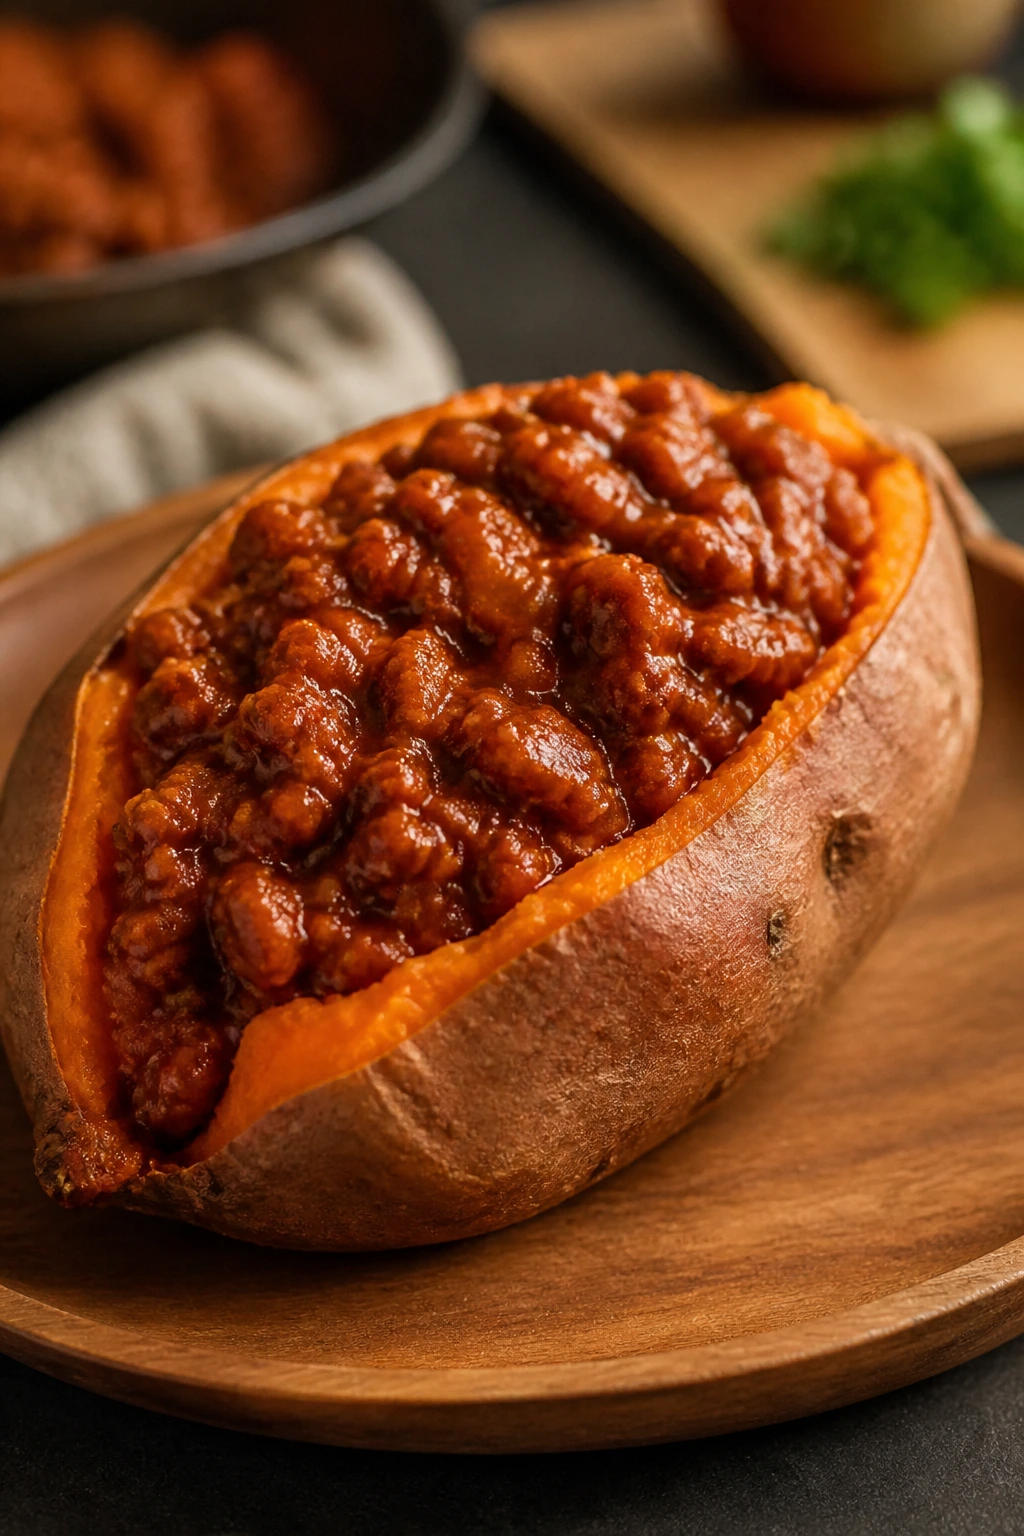
Sweet potatoes bring a soft, earthy base, and the sloppy joe filling lands on top like it belongs there. This is messy food made a little tidier, which is not a bad trick on a packed school-night.
Why It Works:
Sweet potatoes roast or microwave into a creamy base that stands up to saucy beef without getting lost. The filling uses the usual sloppy joe flavors—tomato, mustard, Worcestershire, a little brown sugar—but the sweet potato keeps the dish from feeling too loose. It is a one-plate dinner with enough fiber and heft to hold its own.
Key Ingredients:
- 4 medium sweet potatoes — choose ones close in size so they cook evenly.
- 1 lb ground beef or turkey — both work well.
- 1 small onion, diced — gives the filling structure.
- 1 cup ketchup — the main sauce.
- 2 tbsp tomato paste — thickens and deepens the sauce.
- 1 tbsp Worcestershire sauce — adds savory depth.
- 1 tbsp brown sugar — balances the acidity.
- 1 tsp mustard — gives the filling a little bite.
- 1 tsp smoked paprika — for warmth.
Quick Steps:
- Bake the sweet potatoes at 400°F for 45 minutes or microwave them until soft.
- Brown the meat and onion in a skillet.
- Stir in ketchup, tomato paste, Worcestershire, brown sugar, mustard, paprika, salt, and pepper.
- Simmer for 5 to 7 minutes until thick.
- Split the sweet potatoes, fluff the centers, and pile the filling on top.
Equipment for This Recipe:
- Baking sheet or microwave-safe plate — for the sweet potatoes.
- Skillet — for the filling.
- Fork — to fluff the potatoes.
How to Serve This Dish:
Serve with a crisp slaw or a simple salad to cut the sweetness. A spoonful of plain yogurt or sour cream on top works too. One stuffed potato makes a full dinner for most people.
Pro Tips for This Recipe:
- Prick the potatoes before baking so steam escapes.
- Let the filling thicken enough to mound, not run off the sides.
- If the potatoes are huge, split them lengthwise and call it a meal.
Variations on This Dish:
- BBQ Sloppy Joes: Replace half the ketchup with BBQ sauce.
- Lentil Version: Use cooked brown lentils instead of meat for a vegetarian take.
Common Mistakes to Avoid with This Dish:
- Undercooking the sweet potatoes: They should yield easily to a fork.
- Making the filling too wet: It will slide right off.
- Skipping salt: Sweet potatoes need more seasoning than people expect.
20. Greek Chicken Pita Pockets
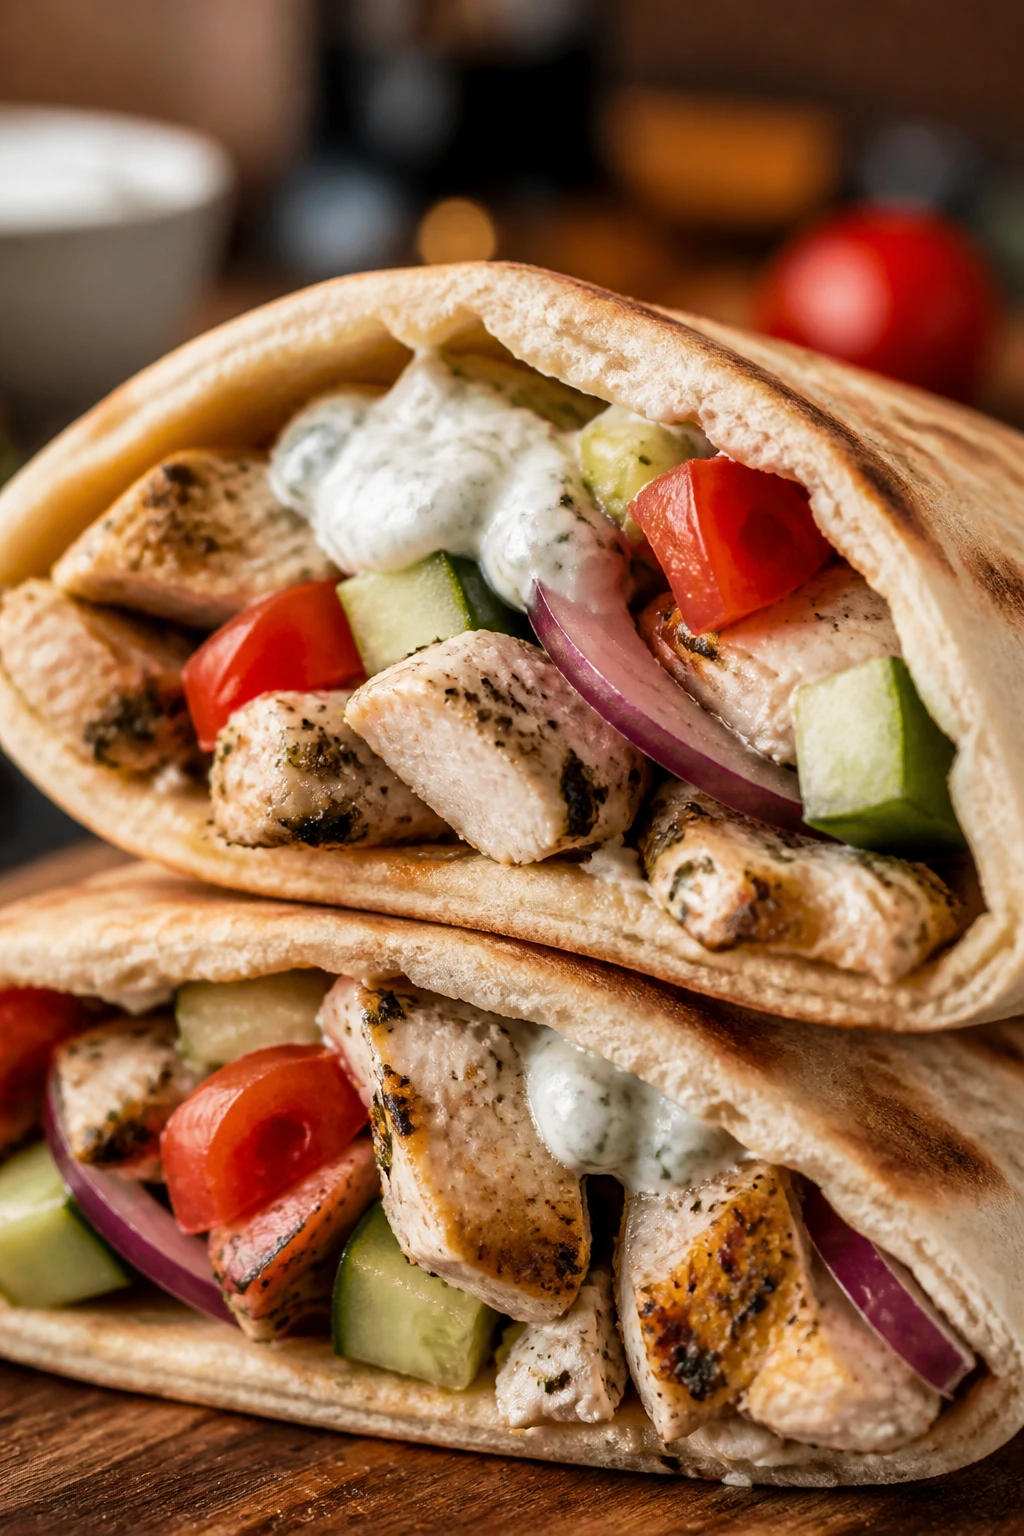
The chicken is lemony and herb-scented, the cucumbers stay cold, and the yogurt sauce cools everything down. This one feels light on the hand but still fills the plate.
Why It Works:
A quick marinade of lemon, oregano, garlic, and olive oil gives the chicken a bright, salty flavor fast. Pitas are useful here because they turn dinner into a hand-held meal that kids and adults both understand immediately. The vegetables stay raw, so there is no extra cooking once the chicken is done.
Key Ingredients:
- 1½ lbs boneless skinless chicken breasts, sliced thin — thinner pieces cook faster and fit pitas better.
- 2 tbsp olive oil — for the marinade and skillet.
- 1 lemon, juiced — gives the chicken its tang.
- 2 tsp dried oregano — the signature herb.
- 1 tsp garlic powder — easy flavor without mincing.
- 4 pita breads — warm them so they do not crack.
- 1 cucumber, diced — cool, crunchy, and fresh.
- 1 cup diced tomato — adds juiciness.
- ¼ red onion, thinly sliced — sharp and crisp.
- 1 cup tzatziki or plain Greek yogurt — for serving.
Quick Steps:
- Toss the chicken with olive oil, lemon juice, oregano, garlic powder, salt, and pepper.
- Sear in a hot skillet for 4 to 5 minutes per side until cooked through.
- Rest for 5 minutes, then slice.
- Warm the pitas and stuff them with chicken, cucumber, tomato, onion, and tzatziki.
Equipment for This Recipe:
- Large skillet — for quick searing.
- Cutting board and sharp knife — for slicing the chicken and vegetables.
- Foil or clean towel — to keep the pitas warm.
How to Serve This Dish:
Serve the pita pockets with lemon wedges and a bowl of olives if you want to lean into the Greek feel. A chopped salad or oven fries work as easy sides. Two stuffed pitas make a good dinner for most adults.
Pro Tips for This Recipe:
- Warm the pitas right before serving so they stay flexible.
- Slice the chicken across the grain for a softer bite.
- Keep the vegetables cold so the contrast stays sharp.
Variations on This Dish:
- Chicken Bowl: Serve the same filling over rice or lettuce instead of in pita.
- Chickpea Pita: Swap the chicken for roasted chickpeas and add feta if you want dairy.
Common Mistakes to Avoid with This Dish:
- Overstuffing the pita: It tears fast.
- Skipping the rest on the chicken: The juices need a minute to settle.
- Using dry pita straight from the package: Warm it first or it cracks.
21. Tuna Melt Pasta Bake
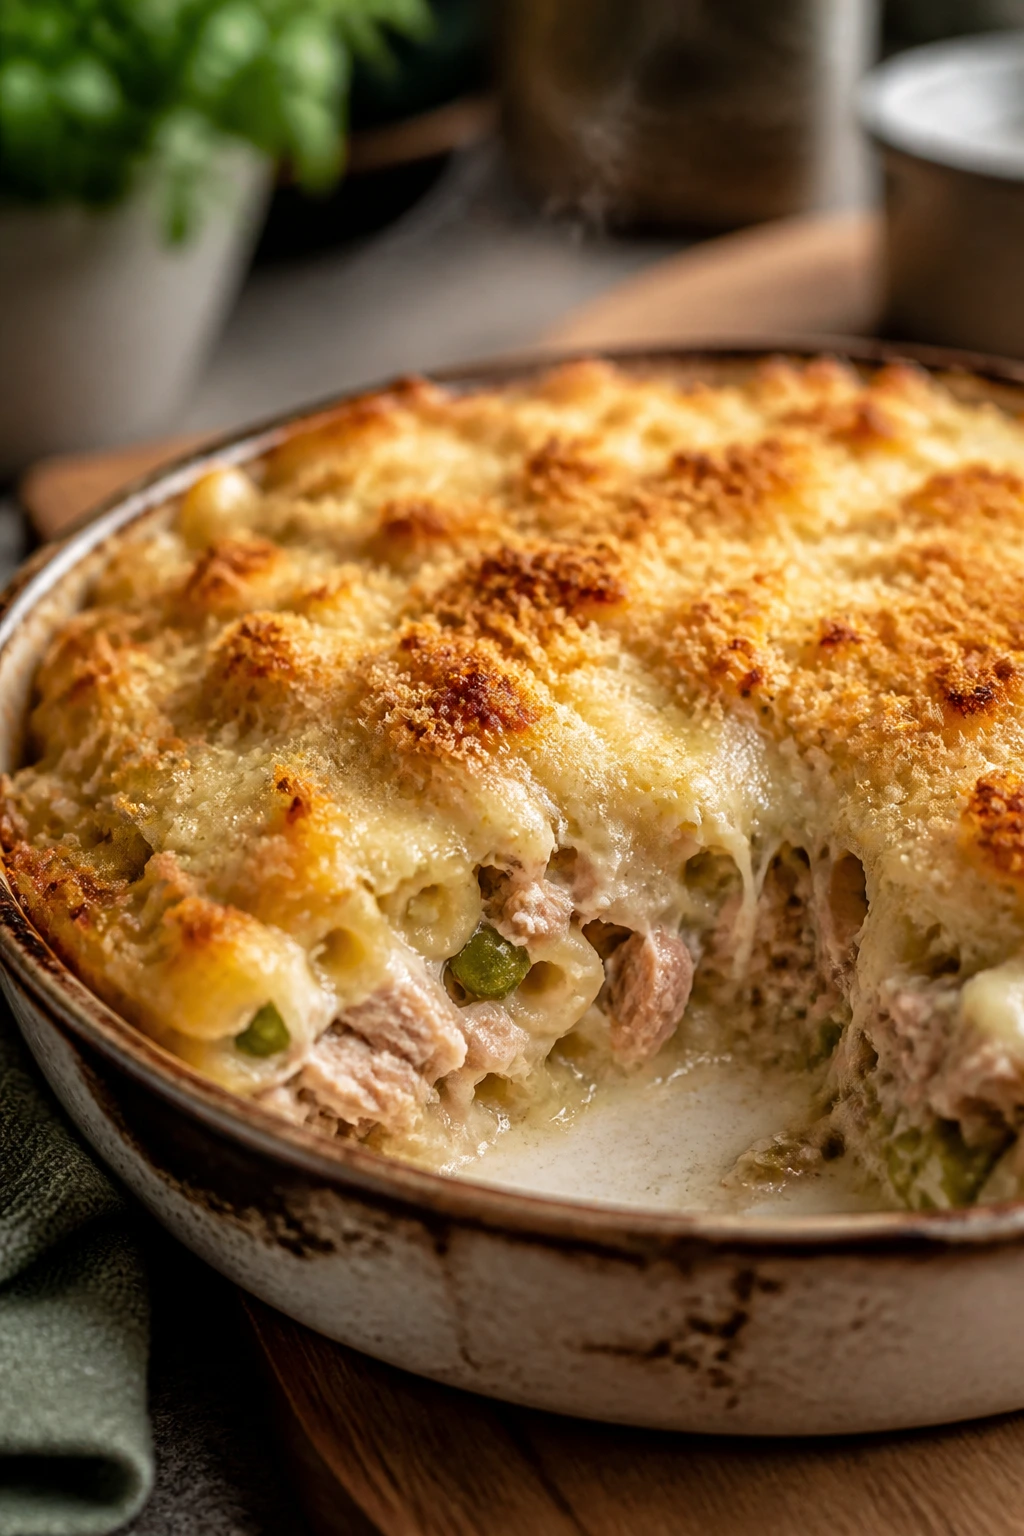
This is pantry food that gets dressed up enough to feel intentional. The tuna stays savory, the pasta catches the creamy sauce, and the breadcrumb top gives the whole thing a sharp little crunch.
Why It Works:
Tuna casserole gets a better reputation when the sauce is made with a quick white sauce instead of going straight from can to dish. That extra minute gives you a richer texture and less of the canned taste people complain about. The baked crumb topping brings back the “melt” part of a tuna melt, which is the detail I care about most.
Key Ingredients:
- 12 oz short pasta — elbows, shells, or rotini all work.
- 2 cans tuna, drained — packed in water or oil, your call.
- 1 cup frozen peas — stir them in without thawing.
- 3 tbsp butter — for the sauce.
- 3 tbsp flour — thickens the sauce.
- 3 cups milk — the base of the sauce.
- 1 cup shredded cheddar — gives the melt flavor.
- ½ cup breadcrumbs — for the crunchy top.
- 1 tsp Dijon mustard — sharpens the sauce.
- 1 stalk celery, diced — adds a little bite.
Quick Steps:
- Cook the pasta until just shy of al dente.
- Make a quick sauce by whisking butter, flour, and milk in a saucepan until smooth and thick.
- Stir in cheddar, mustard, tuna, peas, celery, salt, and pepper.
- Fold in the pasta, top with breadcrumbs, and bake at 375°F for 20 minutes until golden.
- Rest 5 minutes before serving.
Equipment for This Recipe:
- Saucepan — for the cheese sauce.
- Casserole dish — for baking.
- Whisk — keeps the sauce smooth.
How to Serve This Dish:
Serve with dill pickles, tomato slices, or a simple green salad. The dish is rich, so a clean side helps. Four moderate servings come out of one casserole.
Pro Tips for This Recipe:
- Drain the tuna well or the sauce gets loose.
- Use a sharp cheddar if you want the tuna flavor to stand up.
- If you like more crunch, toast the breadcrumbs in butter first.
Variations on This Dish:
- Tuna-Pickle Melt: Stir in 2 tablespoons chopped pickles for a more classic deli flavor.
- No-Bake Version: Skip the oven and serve the sauced pasta straight from the pot.
Common Mistakes to Avoid with This Dish:
- Overcooking the pasta: It keeps cooking in the oven.
- Too much milk at once: Add gradually so the sauce thickens properly.
- Skipping the Dijon: The sauce needs that sharp edge.
22. Shrimp Fried Rice
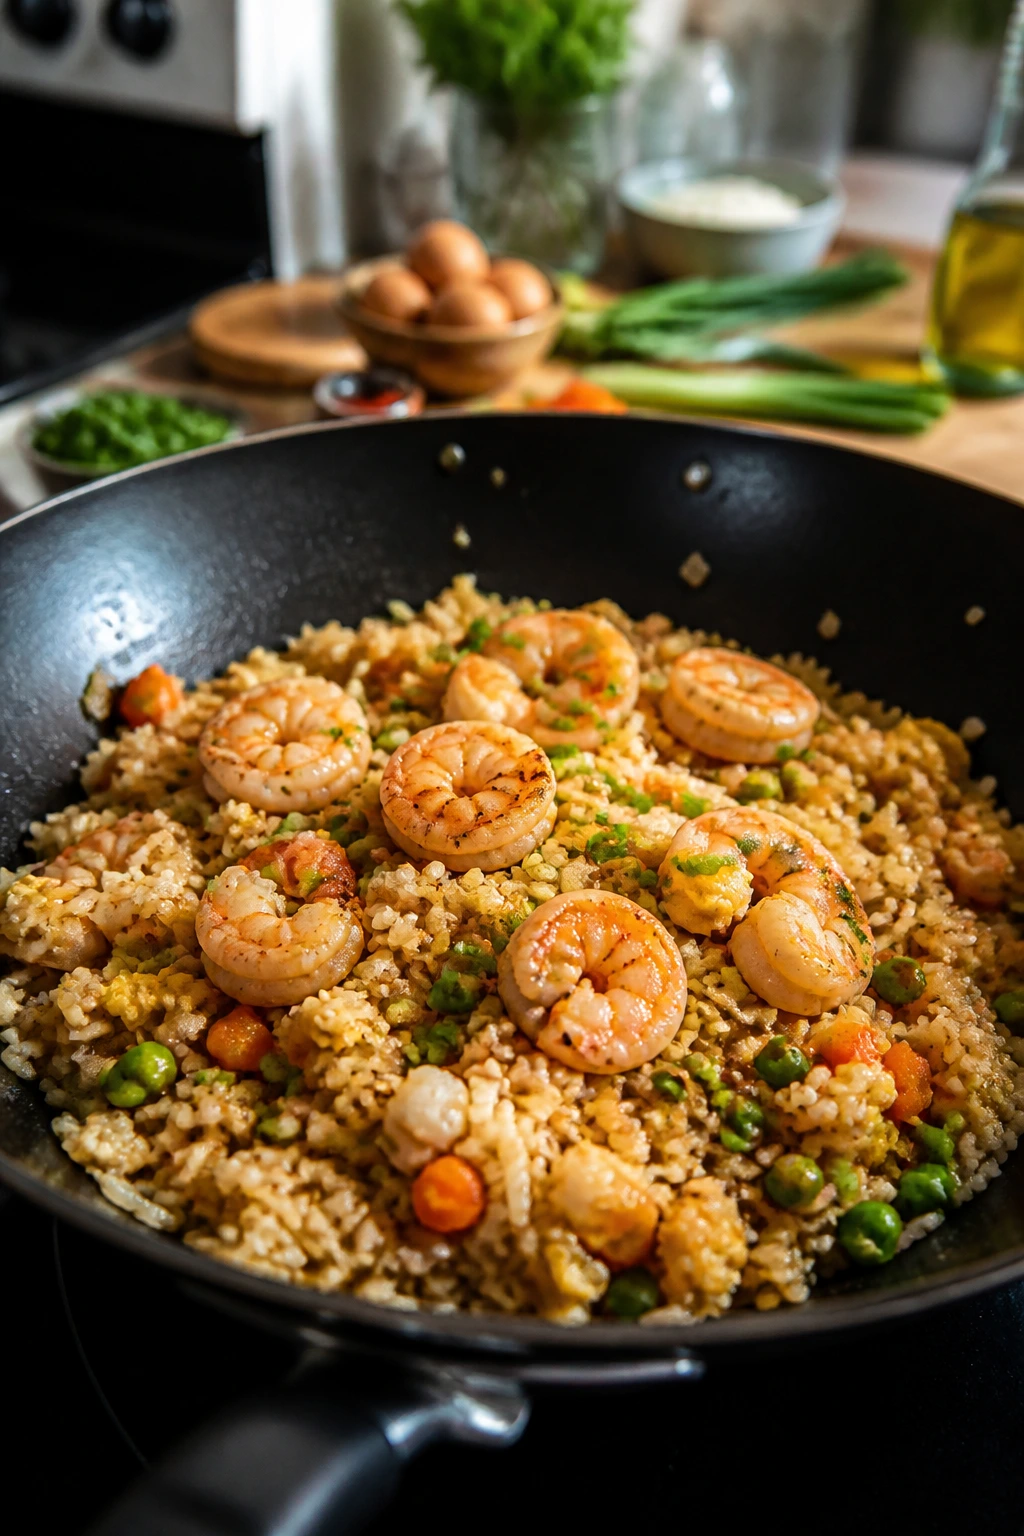
The rice gets a little crisp at the bottom, the shrimp stay sweet, and the eggs thread through the pan in soft bits. This is one of the fastest dinners on the list, which makes it useful when the schedule has already won the day.
Why It Works:
Cold rice fries better than fresh rice because the grains dry out a bit and separate in the pan. Shrimp cooks in minutes, so it is worth adding late to avoid rubbery edges. A wok or hot skillet lets you move fast enough to get fried rice flavor instead of steamed rice with things mixed in.
Key Ingredients:
- 1 lb shrimp, peeled and deveined — medium shrimp cook evenly and fast.
- 4 cups cold cooked rice — leftover rice is ideal.
- 2 eggs, beaten — for richness and texture.
- 1 cup frozen peas and carrots — no prep required.
- 2 cloves garlic, minced — for the base flavor.
- 2 tbsp soy sauce — enough to season without drowning the rice.
- 1 tbsp sesame oil — for aroma at the end.
- 2 scallions, sliced — add freshness.
- 2 tbsp neutral oil — for the pan.
Quick Steps:
- Heat oil in a large skillet or wok and cook the shrimp for 1 to 2 minutes per side until pink; remove them.
- Scramble the eggs in the same pan and break them into small pieces.
- Add garlic, peas, carrots, and rice, then stir-fry over high heat for 3 to 4 minutes.
- Stir in soy sauce and sesame oil, then fold the shrimp back in.
- Finish with scallions.
Equipment for This Recipe:
- Large skillet or wok — the rice needs room to move.
- Spatula — for breaking up clumps.
- Small bowl — for beating the eggs.
How to Serve This Dish:
Serve hot in bowls with extra scallions or a spoonful of chili crisp if your crowd likes heat. Cucumber slices or steamed edamame make easy sides. This feeds four if rice is the main event.
Pro Tips for This Recipe:
- Pat the shrimp dry before cooking so they sear.
- Break up rice clumps with your fingers before it hits the pan.
- Keep the heat high and keep moving.
Variations on This Dish:
- Chicken Fried Rice: Swap shrimp for diced cooked chicken.
- Pineapple Fried Rice: Add ½ cup diced pineapple for a sweet-salty contrast.
Common Mistakes to Avoid with This Dish:
- Using hot rice: It steams instead of frying.
- Overcrowding the pan: The grains go soft.
- Adding too much soy sauce: The rice turns dark and wet.
23. Veggie Fried Rice with Egg
This is the fridge-cleanout version that still tastes planned. The egg gives it staying power, the vegetables bring color and crunch, and the rice gets those toasty edges that make fried rice worth making at home.
Why It Works:
A good veggie fried rice depends more on heat and timing than on a long ingredient list. Cold rice gives you separate grains, and a quick scramble of eggs adds protein without needing meat. This is also one of the best “use what you have” dinners, which is why I keep it around.
Key Ingredients:
- 4 cups cold cooked rice — chilled rice is the whole trick.
- 3 eggs — scramble them first.
- 1 cup diced carrots — small dice cook faster.
- 1 cup peas — frozen is fine.
- 1 cup chopped broccoli or cabbage — gives more body than a token vegetable.
- 2 scallions, sliced — fresh finish.
- 2 tbsp soy sauce — to season the rice.
- 1 tbsp butter or oil — butter gives a richer flavor.
- 1 tsp sesame oil — add at the end.
- 1 clove garlic, minced — optional, but useful.
Quick Steps:
- Scramble the eggs in a hot skillet and set them aside.
- Sauté the carrots and broccoli or cabbage until just softened.
- Add garlic and rice, then break up the clumps with a spatula.
- Stir in soy sauce, peas, sesame oil, and the eggs, cooking until the rice is hot and slightly crisp.
- Finish with scallions.
Equipment for This Recipe:
- Large skillet or wok — the rice needs room.
- Spatula — for stirring and scraping.
- Bowl — for the eggs.
How to Serve This Dish:
Serve it with a squeeze of lime or a dab of chili sauce if you want some brightness. It works as a stand-alone dinner, but dumplings or spring rolls on the side are a nice extra if you already have them. Four modest servings from one skillet.
Pro Tips for This Recipe:
- Use vegetables cut into small pieces so they cook before the rice dries out.
- Add soy sauce around the edge of the pan so it hits the heat and sizzles.
- Day-old rice really is better here.
Variations on This Dish:
- Tofu Fried Rice: Add crispy cubed tofu instead of eggs if you want it vegan.
- Kimchi Version: Stir in chopped kimchi at the end for tang and heat.
Common Mistakes to Avoid with This Dish:
- Starting with wet rice: It clumps and steams.
- Too many vegetables at once: The pan cools down and nothing browns.
- Forgetting the sesame oil: It gives the dish its fried-rice aroma.
24. Black Bean Enchilada Skillet
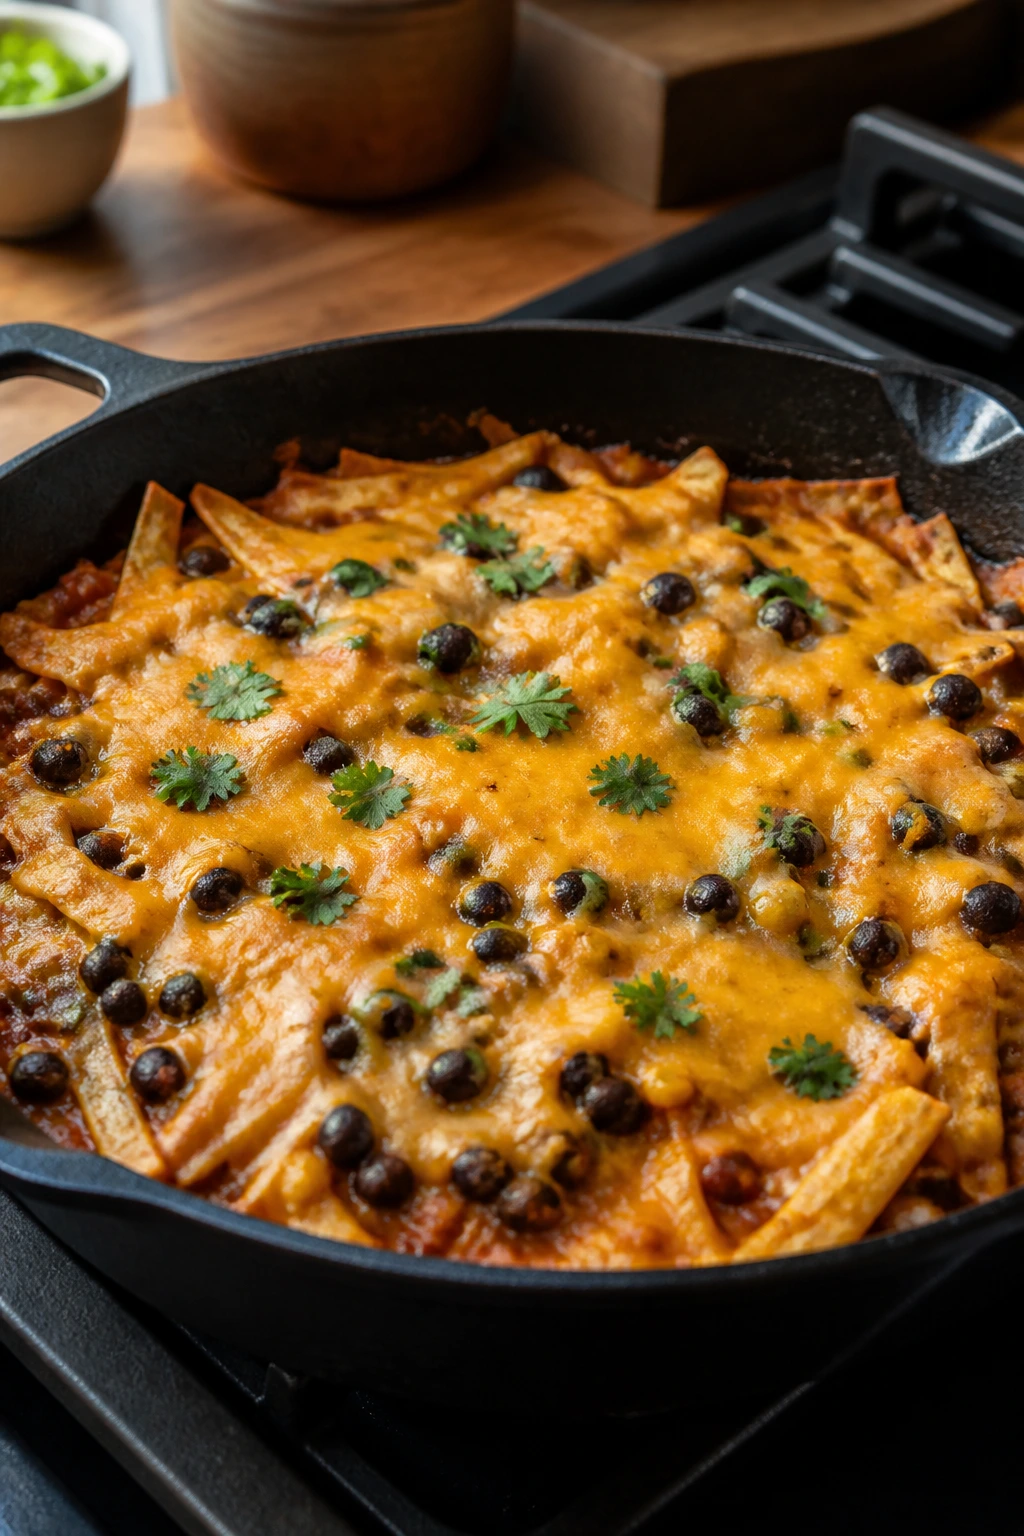
The tortillas soften around the edges, the enchilada sauce gets a little thicker, and the whole skillet smells like something you would order at a table, not throw together in 20 minutes. This is one of my favorite meatless dinners because it does not feel like a compromise.
Why It Works:
Black beans carry enough protein and texture to make the skillet feel complete. Cutting the tortillas into strips lets them absorb the sauce without vanishing completely, so you get layers instead of mush. The cheese on top seals the whole thing together and gives you that oven-melt finish without a long bake.
Key Ingredients:
- 1 tbsp oil — for the onion.
- 1 medium onion, diced — gives the skillet depth.
- 2 cloves garlic, minced — add after the onion softens.
- 2 cans black beans, drained and rinsed — the main filling.
- 1 can corn, drained — adds sweetness.
- 2 cups enchilada sauce — the flavor base.
- 8 corn tortillas, cut into strips — they soak up the sauce.
- 1 cup shredded cheddar or Monterey Jack — for melting.
- Cilantro, avocado, and sour cream — for finishing.
Quick Steps:
- Sauté onion in oil for 4 minutes, then add garlic for 30 seconds.
- Stir in black beans, corn, and enchilada sauce.
- Fold in tortilla strips and cook for 2 minutes so they start to soften.
- Sprinkle cheese on top, cover, and cook until melted.
- Finish with cilantro and avocado.
Equipment for This Recipe:
- Large skillet with lid — crucial for the melt.
- Knife and cutting board — for the tortillas and onion.
- Spatula — to fold the tortillas gently.
How to Serve This Dish:
Serve it straight from the skillet with rice or a green salad if you want to stretch it further. A little sour cream and sliced avocado keep the sauce from feeling too heavy. Four generous servings from one pan.
Pro Tips for This Recipe:
- Cut the tortillas into strips, not squares; they hold together better.
- If the sauce is thin, simmer before adding the tortillas.
- Use fire-roasted corn if you want a deeper flavor.
Variations on This Dish:
- Chicken Enchilada Skillet: Add 2 cups shredded chicken.
- Vegan Version: Use plant-based cheese or skip the cheese and finish with avocado.
Common Mistakes to Avoid with This Dish:
- Letting the tortillas soak too long: They can turn mushy.
- Using too little sauce: The skillet needs enough liquid to bind.
- Skipping a fresh topping: Avocado or cilantro gives the dish lift.
25. Pork Chops with Green Beans and Apples
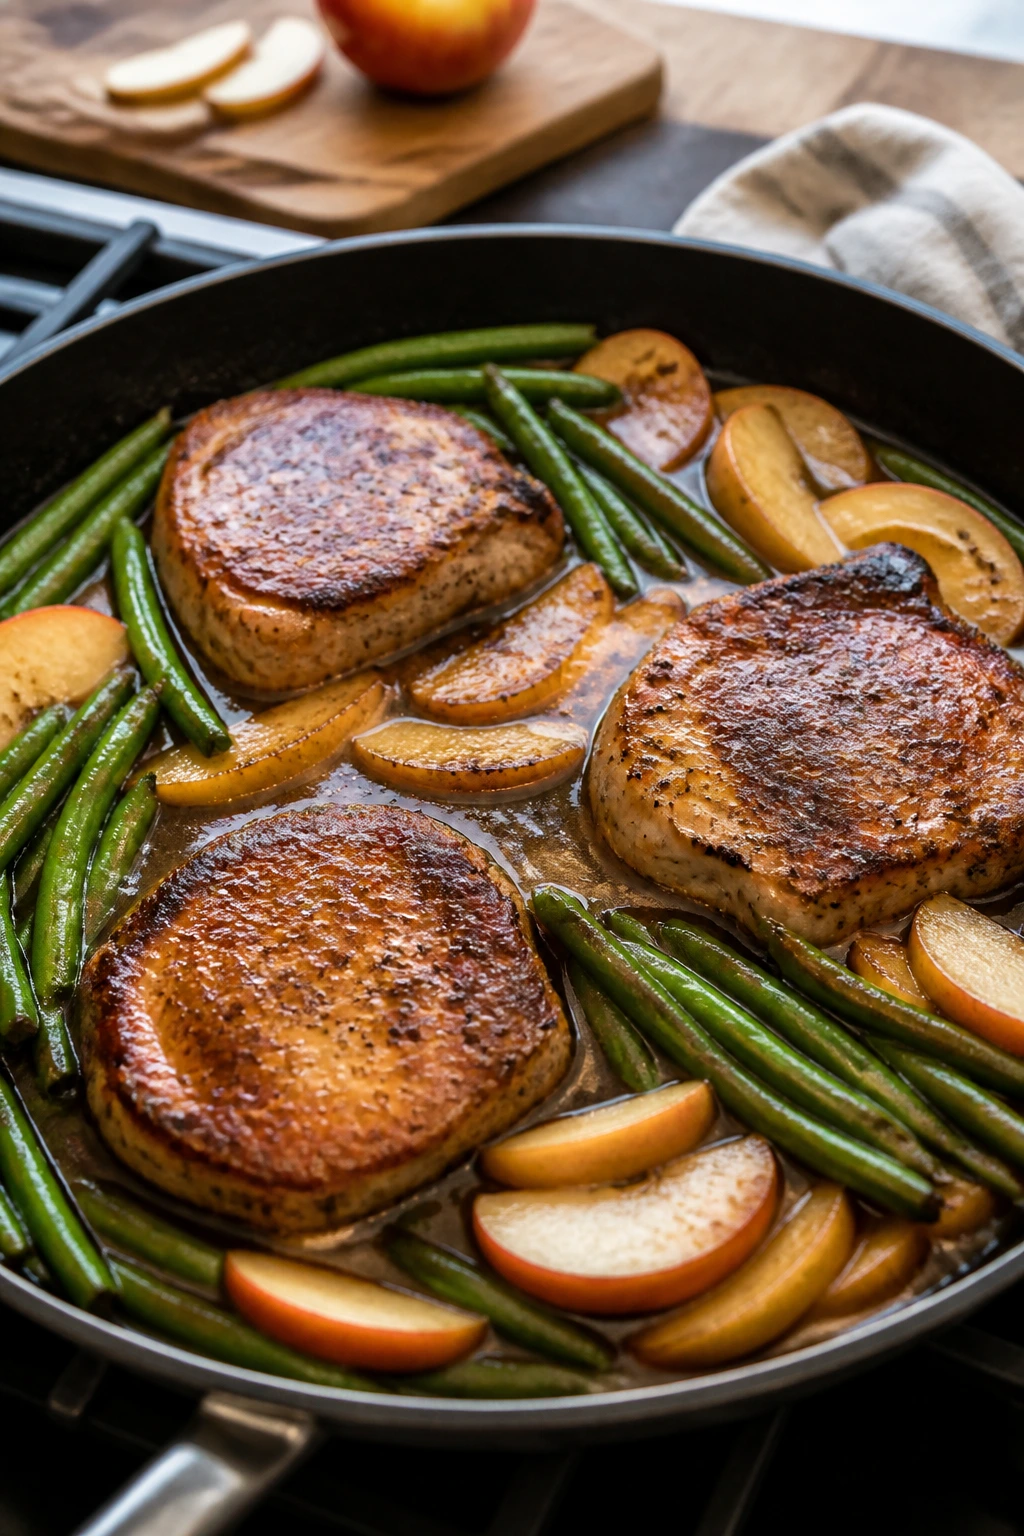
The pork sears quickly, the apples soften into the pan juices, and the green beans pick up a little butter and thyme. This is the kind of skillet dinner that looks a bit fancier than it is, which is fine by me.
Why It Works:
Pork chops cook fast, especially if you use the right thickness and dry them well first. Apples and green beans share the skillet so you get a sweet-savory side without opening another bag of vegetables. A quick pan sauce with cider or broth keeps the chop from drying out.
Key Ingredients:
- 4 pork chops, about 1 inch thick — thicker chops are easier to keep juicy.
- 1 lb green beans, trimmed — fresh beans hold up best.
- 2 apples, sliced — firm apples keep their shape.
- 2 tbsp olive oil — for searing.
- 1 tbsp butter — for the apples and beans.
- 1 tsp salt and ½ tsp black pepper — for the chops.
- 1 tsp thyme — matches the pork.
- ¼ cup apple cider or broth — for the pan sauce.
- 1 tbsp Dijon mustard — sharpens the sauce.
Quick Steps:
- Pat the pork chops dry and season them well.
- Sear in oil over medium-high heat for 3 to 4 minutes per side, then remove.
- Add butter, apples, green beans, thyme, and a splash of cider; cook until the beans are crisp-tender.
- Stir in mustard, return the chops, and cook 2 to 3 minutes more until the pork reaches 145°F.
- Rest 5 minutes before serving.
Equipment for This Recipe:
- Large skillet with lid — for one-pan cooking.
- Tongs — for turning the chops.
- Instant-read thermometer — pork should not be guessed at.
How to Serve This Dish:
Serve it with mashed potatoes, rice, or crusty bread to catch the pan juices. The skillet already carries a built-in side, so you do not need much else. One chop per person is a standard serving.
Pro Tips for This Recipe:
- Dry the chops before seasoning so they sear instead of steam.
- Use firm apples like Honeycrisp or Gala so they do not collapse.
- Pull the pork at 145°F and let it rest.
Variations on This Dish:
- Chicken Cutlet Swap: Use thin chicken cutlets instead of pork chops.
- Rosemary Version: Swap thyme for rosemary if you want a woodsy note.
Common Mistakes to Avoid with This Dish:
- Overcooking the pork: It goes dry fast.
- Using soft apples: They melt into sauce too quickly.
- Skipping the rest: The juices need a minute to settle.
26. Mac and Cheese with Broccoli and Ham

The sauce is creamy, the broccoli brings a little green, and the ham makes the bowl feel like it has enough substance to count as dinner. It is familiar in the best way, which is often what the table wants.
Why It Works:
Mac and cheese becomes more balanced when you add broccoli and ham, because the vegetables keep it from feeling like pure starch. A simple roux-based sauce gives you control over the texture, and cheddar does the heavy lifting on flavor. I like baking it briefly at the end for a top that is lightly browned and not too dry.
Key Ingredients:
- 12 oz elbow macaroni — classic shape, easy to scoop.
- 2 cups small broccoli florets — cut small so they cook through.
- 2 cups diced ham — salty, savory, and quick.
- 3 tbsp butter — for the sauce.
- 3 tbsp flour — thickens the cheese sauce.
- 3 cups milk — the base of the sauce.
- 2 cups shredded cheddar — the main cheese.
- 1 tsp Dijon mustard — helps the sauce taste sharper.
- ½ tsp paprika — adds color and warmth.
Quick Steps:
- Cook the macaroni and broccoli together until the pasta is just shy of done.
- Make a roux with butter and flour in a saucepan, then whisk in milk until thick.
- Stir in cheddar, mustard, paprika, salt, and pepper until smooth.
- Fold in macaroni, broccoli, and ham, then bake at 375°F for 15 minutes.
- Rest for 5 minutes before serving.
Equipment for This Recipe:
- Saucepan — for the cheese sauce.
- Casserole dish — for baking.
- Whisk — to keep the sauce smooth.
How to Serve This Dish:
Serve it in bowls with cracked black pepper on top. A simple salad or sliced tomatoes keeps the meal from feeling too heavy. It works well for four to six depending on the portion size.
Pro Tips for This Recipe:
- Chop the broccoli small so it cooks with the pasta.
- Use sharp cheddar if you want the cheese flavor to stand out.
- Keep the sauce over low heat once the cheese goes in.
Variations on This Dish:
- Bacon Mac: Replace ham with chopped cooked bacon.
- No-Bake Version: Skip the oven and serve it straight from the stovetop.
Common Mistakes to Avoid with This Dish:
- Overcooking the broccoli: It should still have some bite.
- Grainy cheese sauce: That happens when the heat is too high.
- Too much ham: It can make the dish salty fast.
27. Red Lentil Curry with Rice
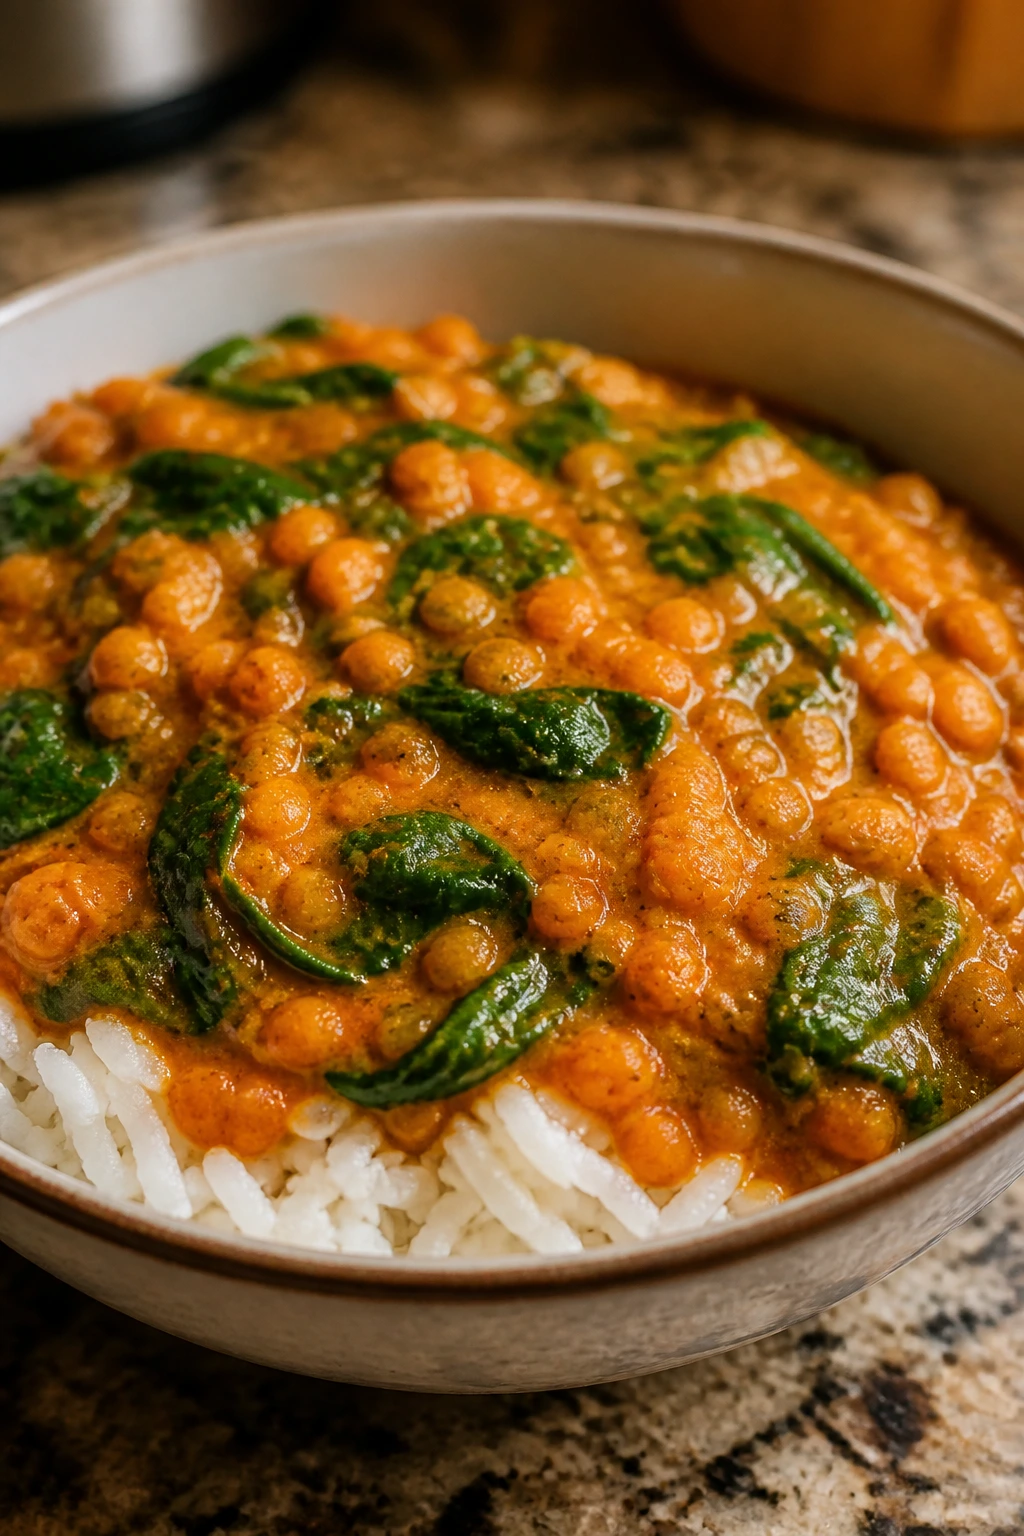
The curry turns thick and orange, the lentils break down into a silky base, and the spinach folds in at the end like it was always meant to be there. This is one of the least fussy dinners in the group, which earns it a permanent place.
Why It Works:
Red lentils cook quickly and soften enough to thicken the curry without extra cream or flour. Coconut milk gives the sauce a round, rich feel, while canned tomatoes keep the flavor bright. The whole pot is forgiving, which is useful when the morning was chaos and the evening is not much calmer.
Key Ingredients:
- 1 tbsp oil — for the onion.
- 1 medium onion, diced — builds the flavor base.
- 3 cloves garlic, minced — add after the onion softens.
- 1 tbsp fresh ginger, grated — gives the curry heat and lift.
- 2 tbsp curry powder — the main seasoning.
- 1 cup red lentils, rinsed — they cook fast and thicken the sauce.
- 1 can coconut milk — brings richness.
- 2 cups low-sodium broth — for simmering.
- 1 can diced tomatoes — adds acidity.
- 2 cups baby spinach — stirred in at the end.
- Rice for serving — the natural base.
Quick Steps:
- Sauté onion in oil for 4 minutes, then add garlic and ginger for 30 seconds.
- Stir in curry powder, lentils, coconut milk, broth, tomatoes, salt, and pepper.
- Simmer uncovered for 20 minutes, stirring often, until the lentils are soft and the curry thickens.
- Stir in spinach until wilted.
- Serve over rice.
Equipment for This Recipe:
- Medium saucepan or Dutch oven — for the curry.
- Wooden spoon — to prevent sticking.
- Rice pot — for the base.
How to Serve This Dish:
Serve it over rice with a squeeze of lime or a spoonful of yogurt if you want to cool it down. Warm naan on the side is useful for scooping. Four hearty bowls from one pot.
Pro Tips for This Recipe:
- Rinse the lentils so they cook cleanly.
- Stir often; red lentils can catch on the bottom.
- Add extra broth if you want it looser.
Variations on This Dish:
- Chickpea Curry: Swap half the lentils for chickpeas if you want more bite.
- Lime Finish: Add lime juice right before serving for a brighter edge.
Common Mistakes to Avoid with This Dish:
- Not stirring enough: The lentils settle and stick.
- Using green or brown lentils: They do not break down the same way.
- Forgetting salt: Coconut milk softens flavors, so seasoning matters.
28. Korean-Style Beef Bowls

The beef turns glossy and savory, the rice absorbs the sauce, and the sesame oil gives the whole bowl a toasty finish. It tastes like something you would want to eat straight from the pan, which is often the best test.
Why It Works:
Ground beef cooks fast and takes on flavor quickly, so it is ideal for a sauce-heavy bowl dinner. Brown sugar, soy sauce, garlic, ginger, and sesame oil give you the sweet-salty profile people usually chase in a takeout box. A few sliced cucumbers or scallions on top make the bowl feel fresh instead of dense.
Key Ingredients:
- 1¼ lbs ground beef — lean enough to avoid greasiness.
- 3 cloves garlic, minced — the beef needs it.
- 1 tbsp fresh ginger, grated — adds sharpness.
- ¼ cup soy sauce — the main seasoning.
- 2 tbsp brown sugar or honey — balances the salt.
- 1 tbsp sesame oil — for flavor at the end.
- 1 tbsp rice vinegar — gives the sauce lift.
- 1 tsp red pepper flakes — optional heat.
- 3 cups cooked rice — the base.
- Sliced cucumber, scallions, and sesame seeds — for topping.
Quick Steps:
- Brown the beef in a skillet and drain excess fat if needed.
- Add garlic and ginger and cook for 30 seconds.
- Stir in soy sauce, brown sugar, sesame oil, rice vinegar, and pepper flakes.
- Simmer for 2 to 3 minutes until the sauce thickens and clings to the beef.
- Serve over rice with cucumber, scallions, and sesame seeds.
Equipment for This Recipe:
- Large skillet — for browning and saucing.
- Small bowl — if you want to mix the sauce first.
- Rice cooker or saucepan — for the rice.
How to Serve This Dish:
Serve the beef over rice with crunchy cucumber on top and a few sesame seeds. Kimchi or quick-pickled carrots make a strong side if you already have them. Four bowls from one pound of beef.
Pro Tips for This Recipe:
- Drain excess fat if the beef is greasy.
- Let the sauce simmer long enough to cling, not pool.
- Add the scallions after cooking so they stay fresh.
Variations on This Dish:
- Turkey Bowl: Swap ground beef for turkey and add a little more sesame oil.
- Lettuce Wraps: Spoon the beef into romaine leaves for a lighter version.
Common Mistakes to Avoid with This Dish:
- Too much sugar: It can overpower the soy sauce.
- Skipping the vinegar: The bowl needs acid.
- Using watery rice: Warm, fluffy rice is the right base.
29. Biscuit-Topped Chicken Pot Pie Skillet
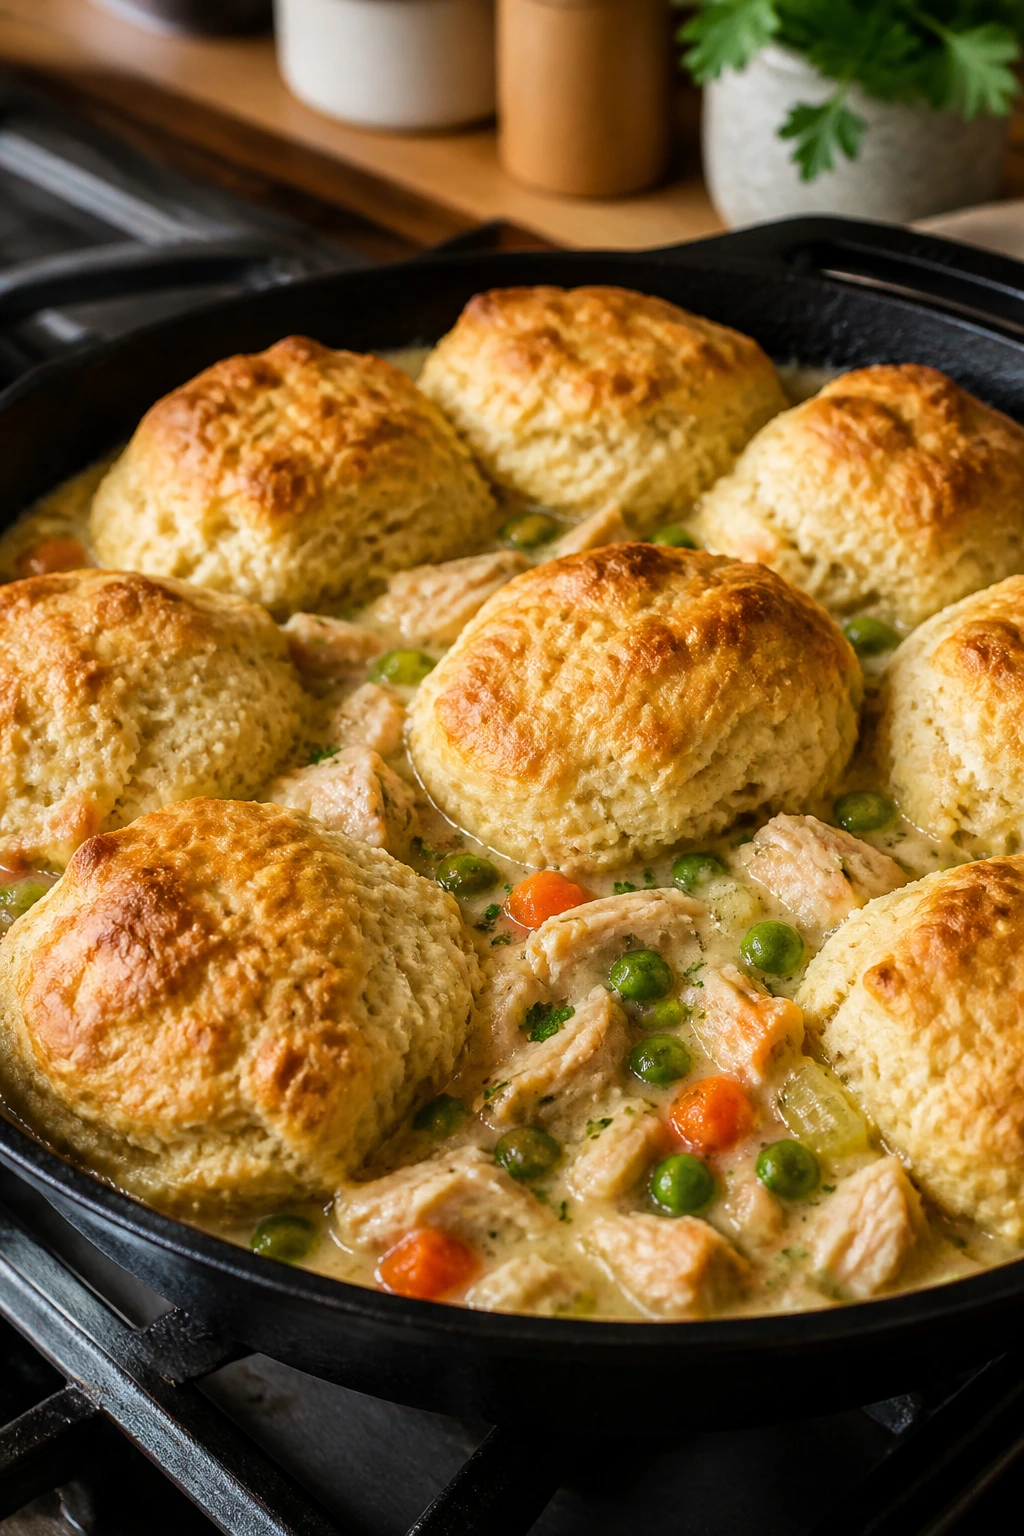
The filling turns creamy and savory, the biscuits bake golden on top, and the whole skillet smells like comfort without the pie crust project. I like this because it gives the pot pie idea to a weeknight schedule and does not ask for heroics.
Why It Works:
Using cooked chicken and refrigerated biscuits cuts the labor down to the useful parts. A simple gravy with broth, milk, and flour coats the vegetables and chicken, so the filling tastes cohesive instead of loose. The biscuit top bakes directly on the filling, which means you get a tender bottom edge and a browned top in one pan.
Key Ingredients:
- 2 tbsp butter — for the vegetables.
- 1 onion, diced — the flavor base.
- 2 carrots, diced — add sweetness.
- 2 celery stalks, diced — for classic pot pie flavor.
- 3 cups cooked chicken, chopped — rotisserie chicken works well.
- 3 cups chicken broth — for the gravy.
- ½ cup milk — makes the filling creamy.
- 3 tbsp flour — thickens the sauce.
- 1 cup peas — stir in at the end.
- 1 can refrigerated biscuits, 8 count — the easy top.
Quick Steps:
- Sauté onion, carrots, and celery in butter for 6 minutes.
- Sprinkle in flour, then whisk in broth and milk until thick.
- Stir in chicken, peas, salt, pepper, and thyme.
- Top with biscuits and bake at 400°F for 15 to 18 minutes until the biscuits are golden and cooked through.
- Rest 5 minutes before serving.
Equipment for This Recipe:
- Oven-safe skillet — the filling and biscuits bake in one pan.
- Whisk — for the gravy.
- Spatula — for stirring the vegetables.
How to Serve This Dish:
Serve it from the skillet with a spoon, making sure everyone gets some biscuit and some filling. A simple green salad is enough alongside it. Four to six servings depending on biscuit size.
Pro Tips for This Recipe:
- Cut the biscuits in half if they are large and you want more even baking.
- Keep the filling thick before adding the biscuits.
- If the tops brown too fast, lay foil loosely over the skillet.
Variations on This Dish:
- Turkey Pot Pie: Swap cooked turkey for the chicken.
- Drop Biscuit Version: Spoon biscuit dough over the filling instead of using canned rounds.
Common Mistakes to Avoid with This Dish:
- Watery filling: The biscuits go soggy. Let the gravy thicken first.
- Undercooked biscuit bottoms: Bake until the centers are done, not just the tops.
- Overfilling the skillet: Leave room for the biscuits to rise.
30. Garlic Butter Steak and Potatoes
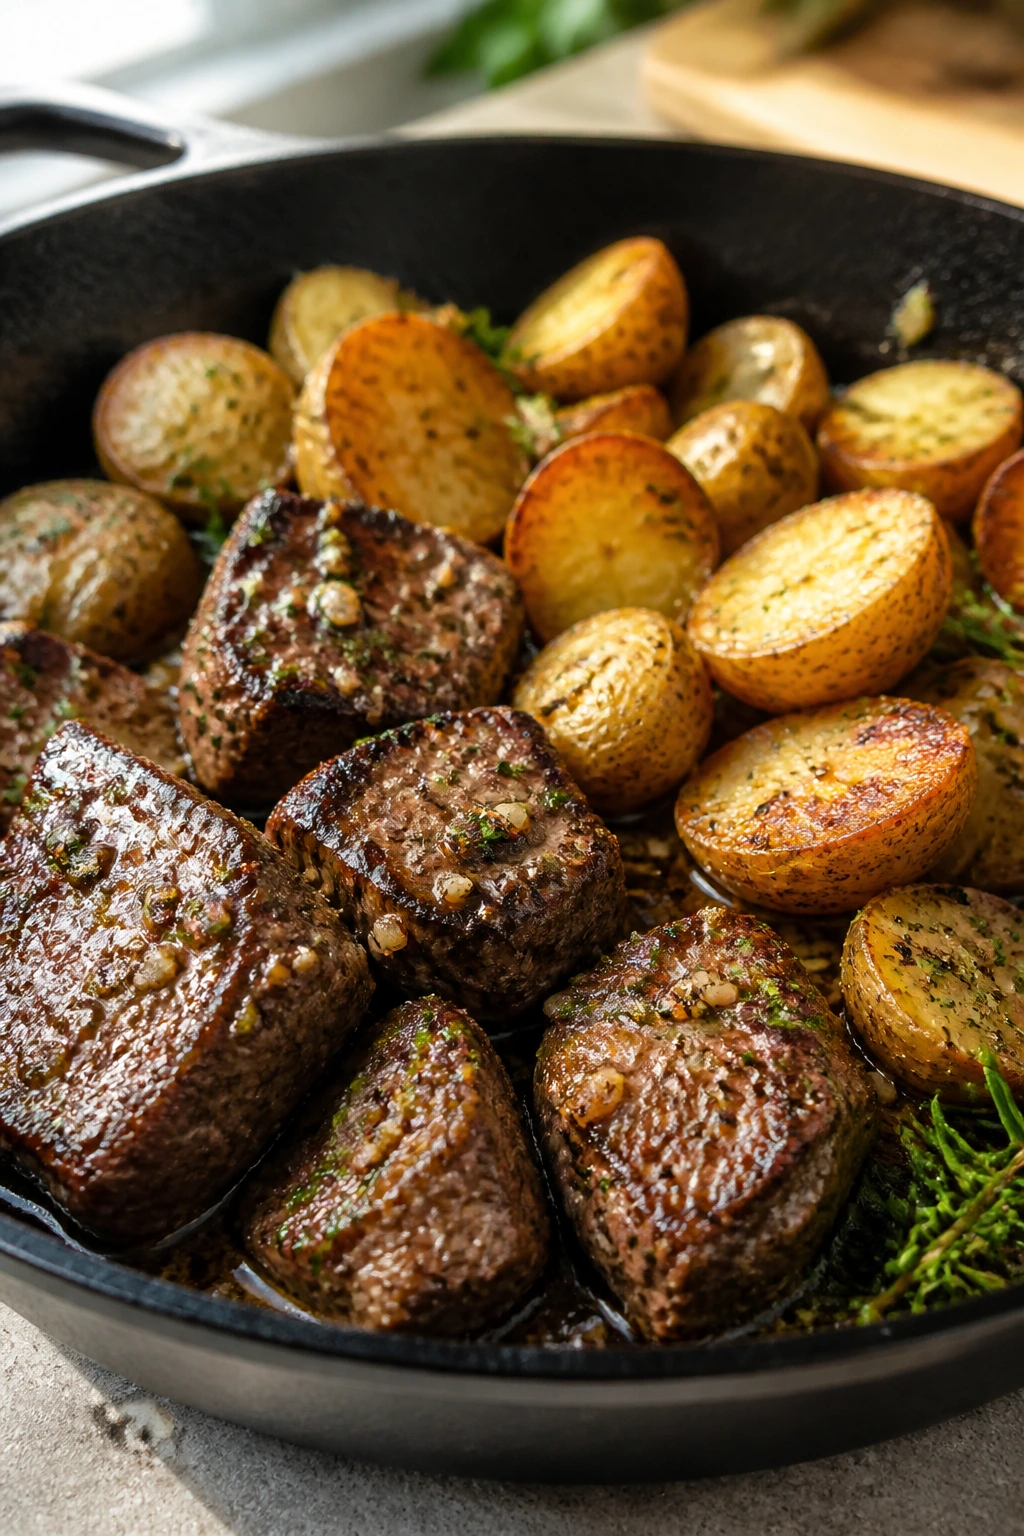
The potatoes get crisp, the steak stays juicy, and the butter pulls garlic and herbs into every bite. This is the one I make when I want a dinner that feels substantial without needing a side of effort.
Why It Works:
Steak and potatoes want similar treatment: strong heat, enough fat, and enough space in the pan. Par-cooking the potatoes first means they can crisp in the skillet without forcing the steak to overcook. A quick garlic butter finish gives you a sauce without dirtying another saucepan.
Key Ingredients:
- 1½ lbs sirloin steak, cut into strips or cubes — sirloin stays tender and cooks quickly.
- 1½ lbs baby potatoes, halved — the small size keeps the cook time manageable.
- 2 tbsp olive oil — for the potatoes and steak.
- 3 tbsp butter — the finishing fat.
- 4 cloves garlic, minced — stir in at the end so it does not burn.
- 1 tsp salt and ½ tsp black pepper — season both parts well.
- 1 tsp rosemary or parsley — for the finish.
- 1 cup green beans or asparagus, optional — if you want a vegetable in the pan.
Quick Steps:
- Microwave or parboil the potatoes until almost tender, about 6 to 8 minutes.
- Sear the potatoes in a large skillet with oil until browned and crisp on the cut sides.
- Push the potatoes aside, add the steak, and cook 2 to 3 minutes per side for medium-rare or a little longer if you want it more done.
- Add butter, garlic, and herbs, then toss everything together for 30 seconds.
- Serve immediately.
Equipment for This Recipe:
- Large cast-iron or heavy skillet — the heat retention helps browning.
- Pot or microwave dish — for pre-cooking the potatoes.
- Tongs — for turning the steak and potatoes.
How to Serve This Dish:
Serve it straight from the skillet with a simple salad or roasted green beans if you did not cook them in the pan. The potatoes soak up the butter, so make sure they get onto the plates. This feeds four depending on appetite.
Pro Tips for This Recipe:
- Dry the steak before it hits the pan.
- Do not crowd the skillet; brown in batches if needed.
- Let the steak rest for 5 minutes before serving so the juices stay inside.
Variations on This Dish:
- Mushroom Butter Version: Add sliced mushrooms with the potatoes and finish with parsley.
- Chicken Swap: Use chicken thighs cut into pieces and cook them through before the garlic butter goes in.
Common Mistakes to Avoid with This Dish:
- Starting raw potatoes in the same pan as the steak: They will not finish in time.
- Burning the garlic: Add it only after the heat lowers.
- Cutting the steak right away: The juices spill out onto the cutting board.
Why a School-Morning Dinner Routine Works Better Than Scrambling Later
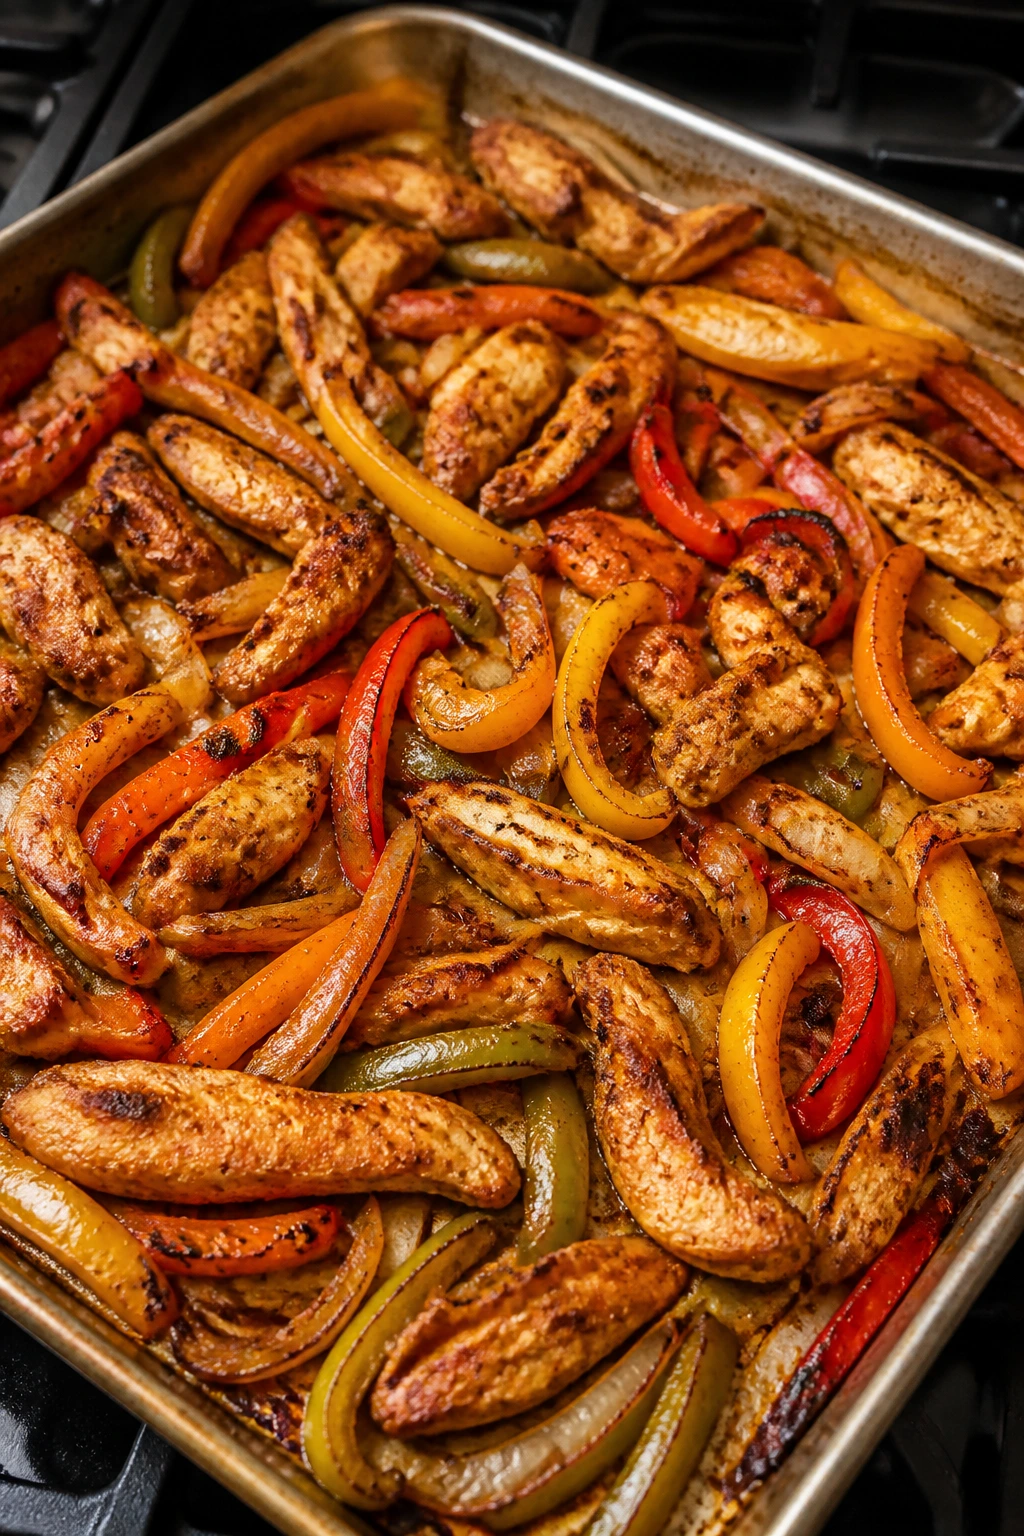
A dinner plan that fits school-morning chaos is not really about mornings. It is about reducing decision fatigue before the day starts asking for everything else. When the ingredient list is short, the method is familiar, and the cleanup stays contained, dinner stops being another problem to solve at six o’clock.
That is why I like this mix of sheet-pan meals, skillet dinners, casseroles, slow-cooker recipes, and a few fast bowl setups. They give you options for different kinds of days. Some start before school drop-off, some land after work, and some save the evening with leftovers that reheat without turning into a different meal entirely.
Essential Equipment for These Recipes
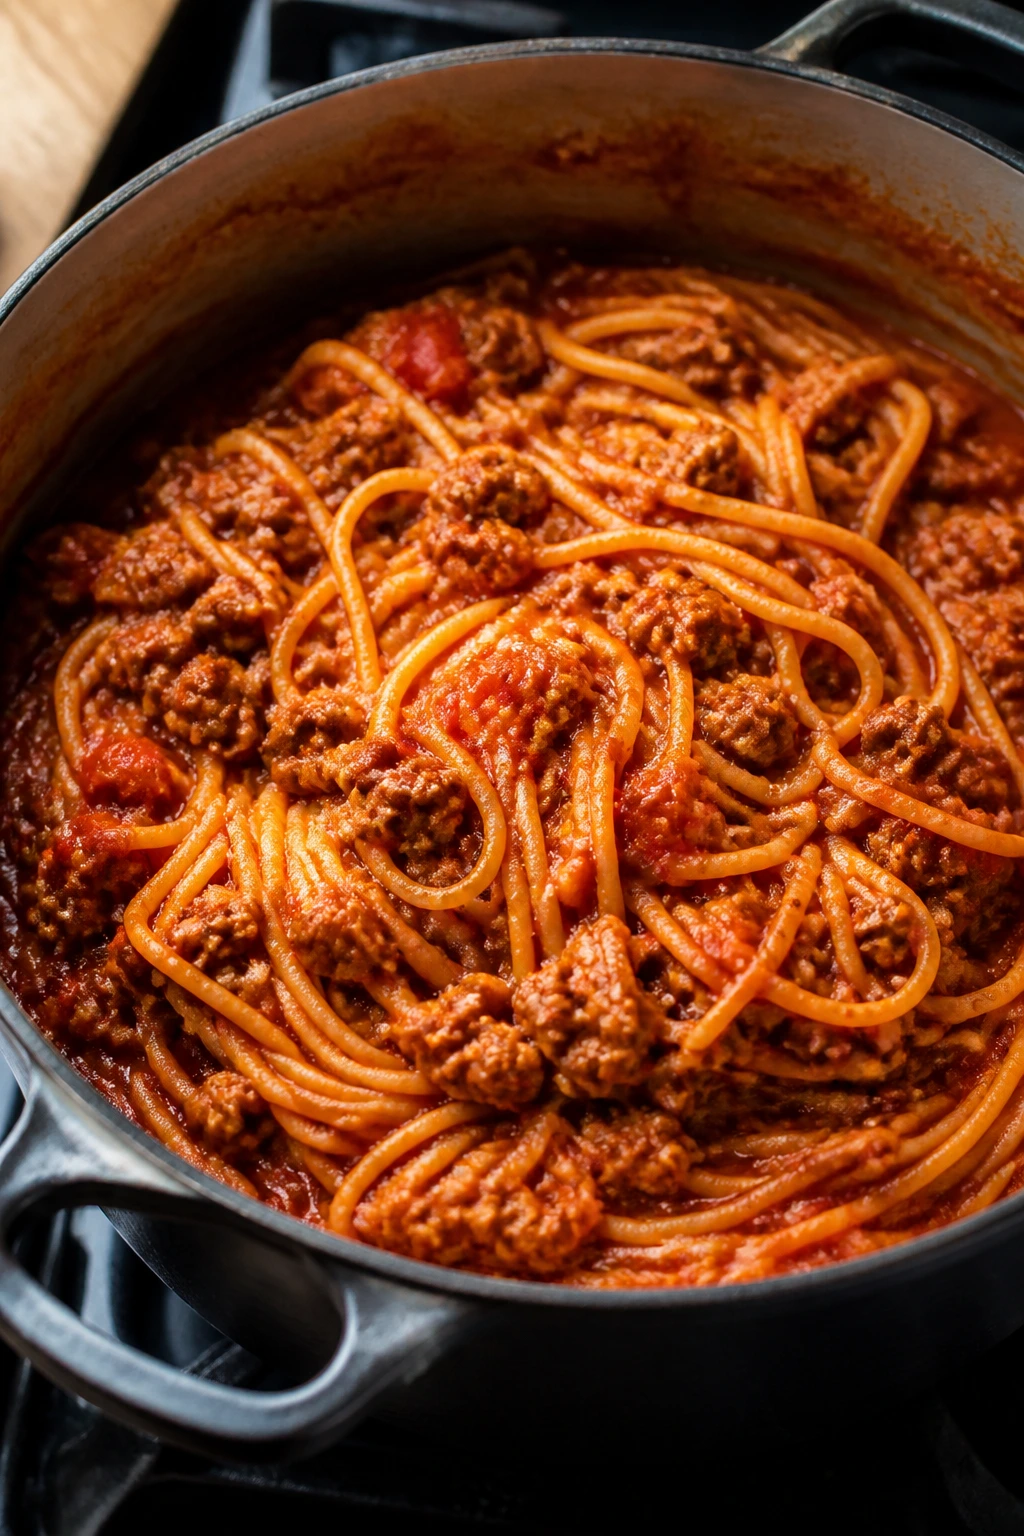
- Rimmed sheet pans — useful for fajitas, salmon, potatoes, and any dinner that likes high heat and space.
- 12-inch skillet with a lid — the workhorse for stir-fries, creamy chicken, pasta, and skillet casseroles.
- Dutch oven or heavy soup pot — best for chili, soup, one-pot pasta, and lentils because it holds heat evenly.
- 9×13-inch baking dish — the right size for baked ziti, pot pie fillings, casserole dinners, and slider bakes.
- Slow cooker, 6-quart — excellent for pulled pork and any meal that needs to happen while you are elsewhere.
- Chef’s knife and a stable cutting board — onions, peppers, potatoes, and chicken all go faster when you are not fighting your board.
- Instant-read thermometer — the easiest way to keep chicken, salmon, and pork from drying out.
- Wooden spoon and tongs — the pair I use most; one stirs, one flips, and neither scratches the pan.
- Box grater — better than pre-shredded cheese when you want a smoother melt.
- Measuring cups and spoons — not glamorous, but sauce ratios depend on them.
Smart Shopping and Ingredient Tips for Dinner Recipes for Busy School Mornings
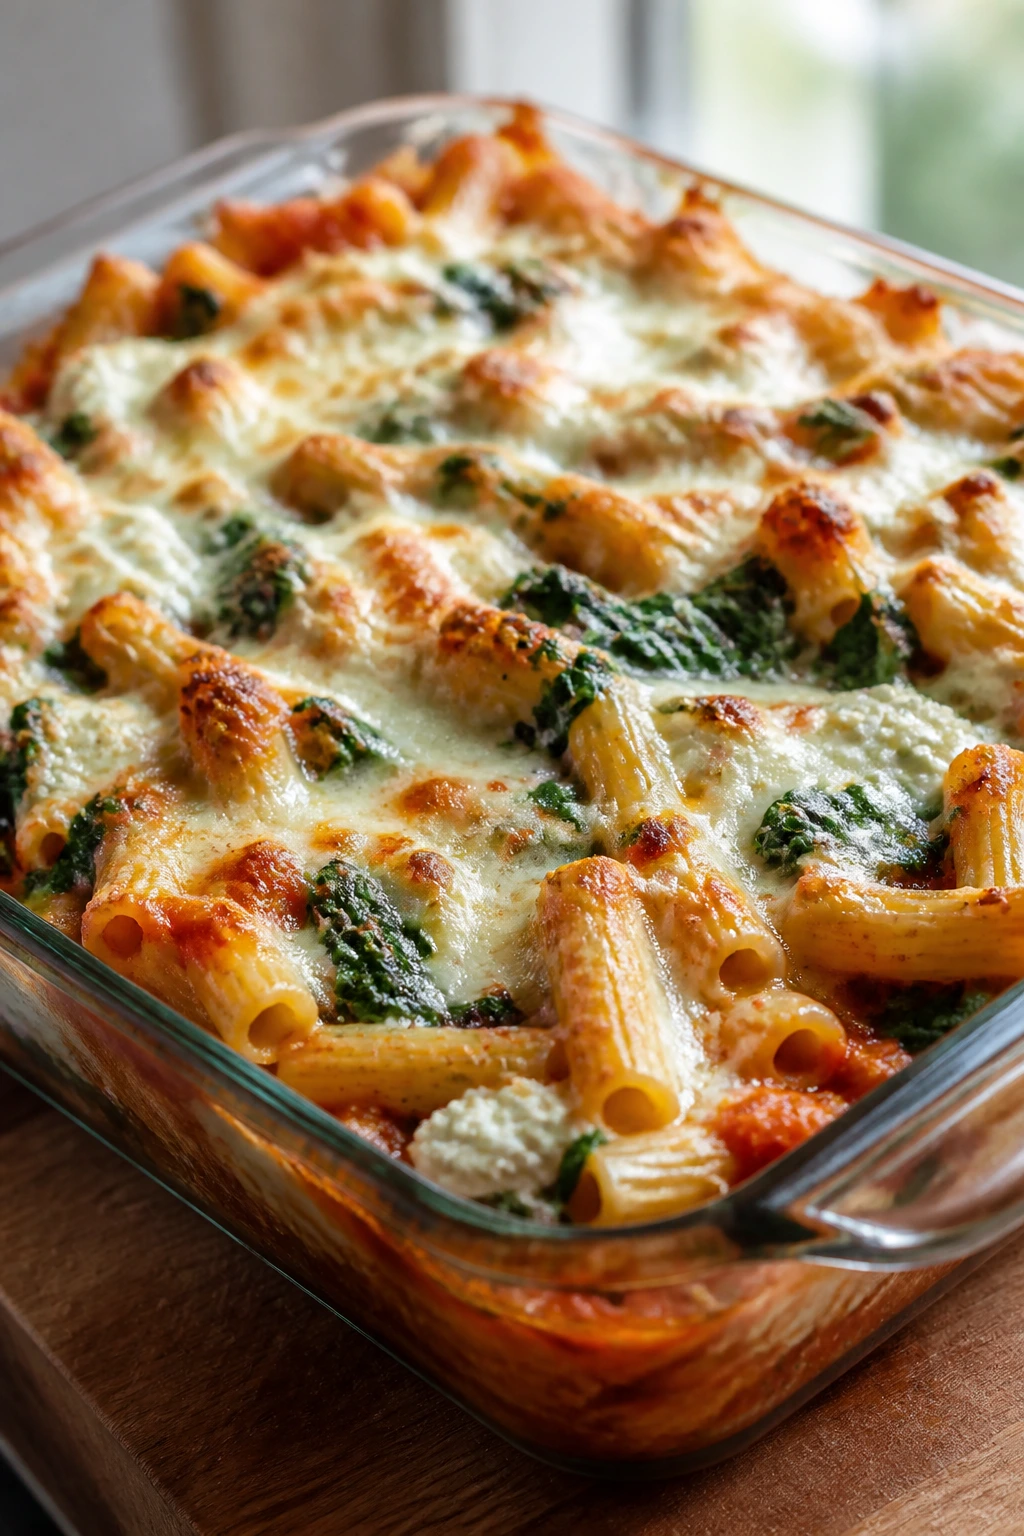
Buy chicken thighs when you want margin for error, and chicken breasts when you need something lean and quick. Thighs handle heat better; breasts reward careful timing. That simple choice saves more dry dinners than any clever sauce ever will.
Keep a few pantry items on standby: rice, short pasta, black beans, broth, canned tomatoes, tortillas, tuna, and marinara. Those are the backbone of half this collection. Frozen broccoli, peas, corn, and shrimp are worth buying too, because they skip trimming and still behave well in the pan.
A block of cheddar or parmesan melts smoother than a bag of pre-shredded cheese. I still use pre-shredded when speed matters, but for sauces and casseroles, the block is the better buy. The same logic applies to herbs: fresh parsley or cilantro is worth it when you want a bright finish, but dried oregano, thyme, and rosemary are fine as pantry staples.
Watch size, not just price. Small potatoes roast more evenly than giant ones. Thin-sliced beef cooks faster than thick strips. Even the onions matter: one large onion sliced evenly gives you sweeter, softer results than three random chunks thrown in the pan.
How to Serve These Recipes
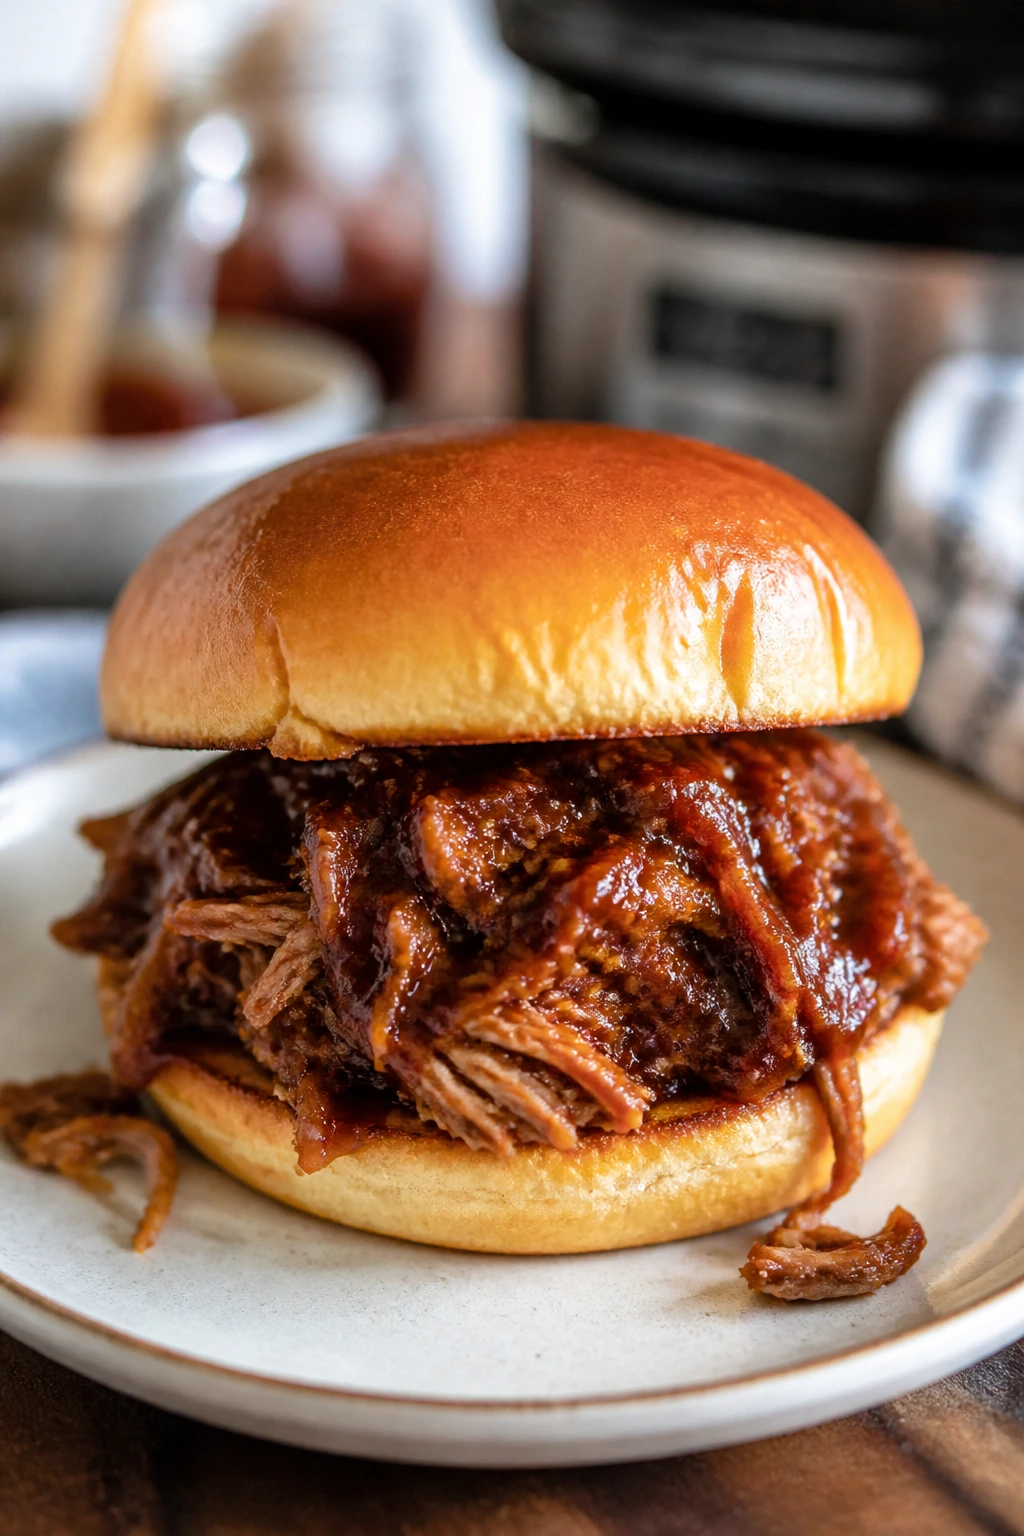
Presentation:
Serve skillet dinners right from the pan when it makes sense; it keeps the food hot and saves dishes. For casseroles and pasta bakes, scoop with a wide spoon so the layers hold together. Bright finishing touches—scallions, herbs, lime wedges, chopped parsley—do more than make the plate look finished; they keep rich dinners from feeling heavy.
Accompaniments:
For the pasta, chili, and casserole dishes, a simple green salad is enough. For fajitas, taco bowls, and enchilada skillet meals, set out tortilla chips, rice, avocado, and salsa. Salmon and pork pair well with roasted vegetables or potatoes, while soups and stews want crusty bread or grilled cheese alongside them.
Portions:
Most of these recipes serve 4 to 6 people, with bowls and pasta leaning toward 4 and sheet-pan meals stretching to 6 if you add a side. As a rule, plan on 1½ cups of soup or chili, 2 cups of pasta, or 1 cup of rice with ¾ to 1 cup of filling per adult. For kids, smaller portions are usually fine as long as the toppings are nearby.
Beverage Pairing:
Sparkling water with lemon fits almost all of them. Unsweetened iced tea works especially well with barbecue, tacos, and sandwiches. For an adult table, a crisp white wine suits salmon and chicken dishes, while a light lager works with fajitas or pulled pork.
Additional Tips and Flavor Boosters
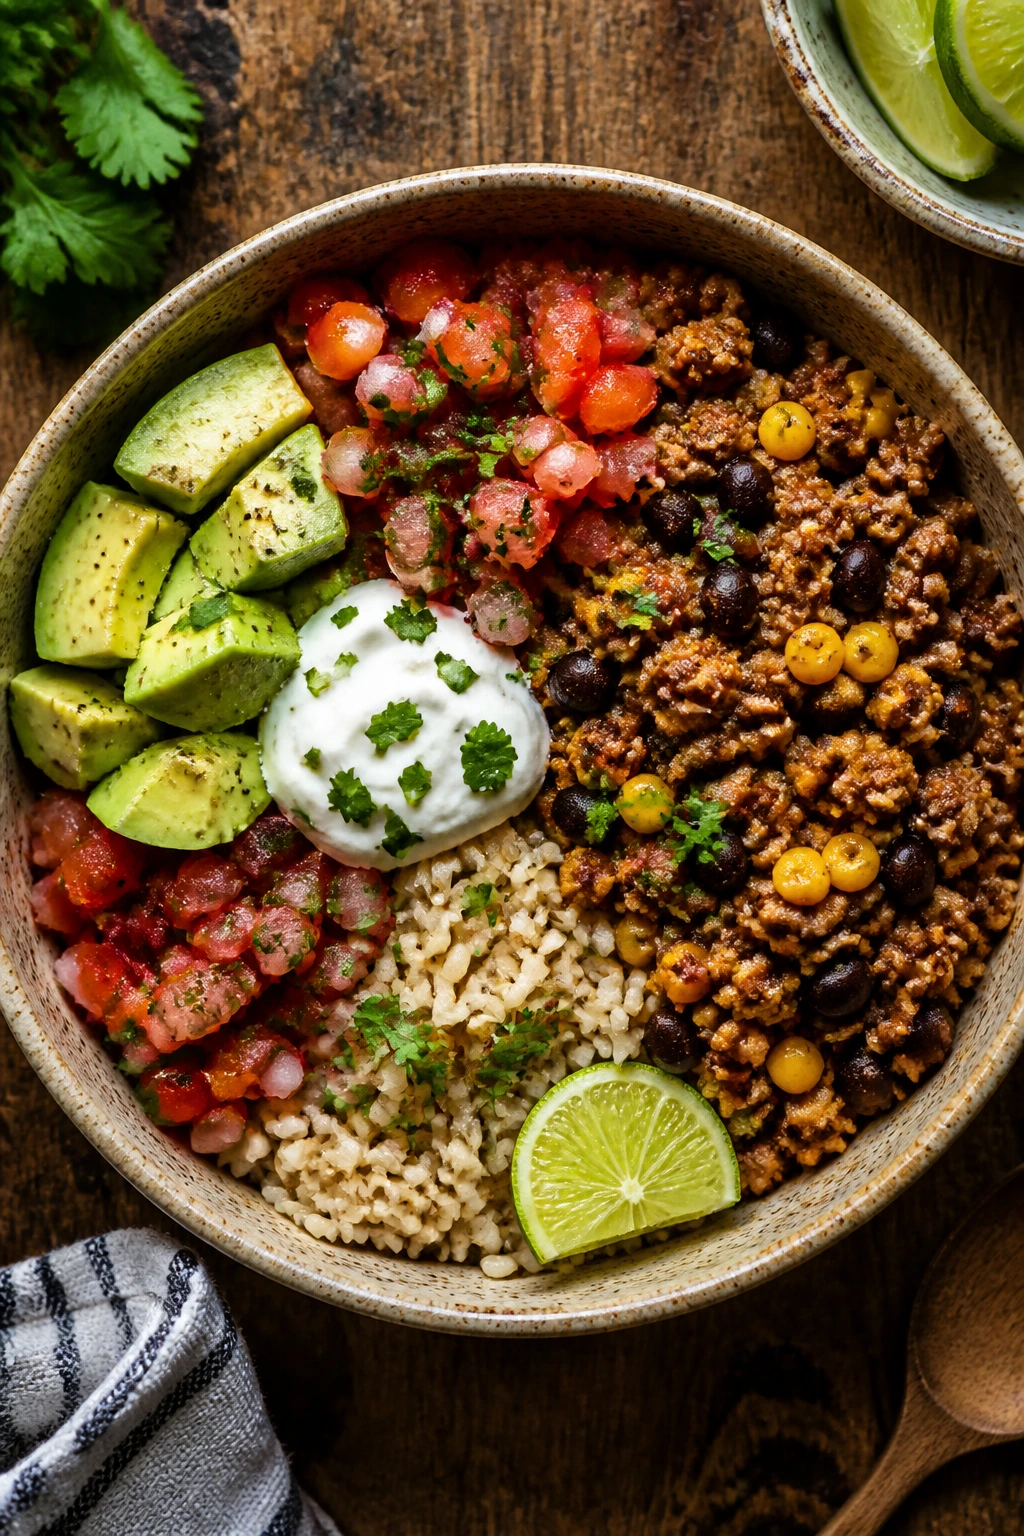
Flavor Enhancement:
Finish rich dishes with something sharp: lemon on salmon, lime on taco bowls, vinegar on pulled pork, Dijon in the pork chop pan sauce. Acid is what keeps a family dinner from feeling flat by the third bite. A tiny hit of chili crisp, hot sauce, or pickled jalapeños can do the same job for bowls and pasta.
Customization:
Almost every recipe here can become a bowl, wrap, or baked dish. Leftover pulled pork turns into quesadillas. Chicken fajita filling can become a rice bowl. Meatballs and marinara slide into subs, and the turkey taco filling makes a fine stuffed pepper base if you have peppers to spare.
Serving Suggestions:
Fresh herbs at the end matter more than people think. Parsley on creamy dishes, cilantro on Mexican-style meals, scallions on rice bowls, dill on salmon. Toasted breadcrumbs or sesame seeds add texture where the dish needs one more layer.
Make-It-Yours:
For gluten-free cooking, use corn tortillas, rice, potatoes, gluten-free pasta, or cornstarch-thickened sauces. For dairy-free versions, lean on olive oil, broth, coconut milk, or a little extra tomato sauce. For vegetarian dinners, beans, lentils, tofu, and mushrooms are the easiest swaps that still feel like real dinner.
Make-Ahead, Storage, and Reheating Guidance
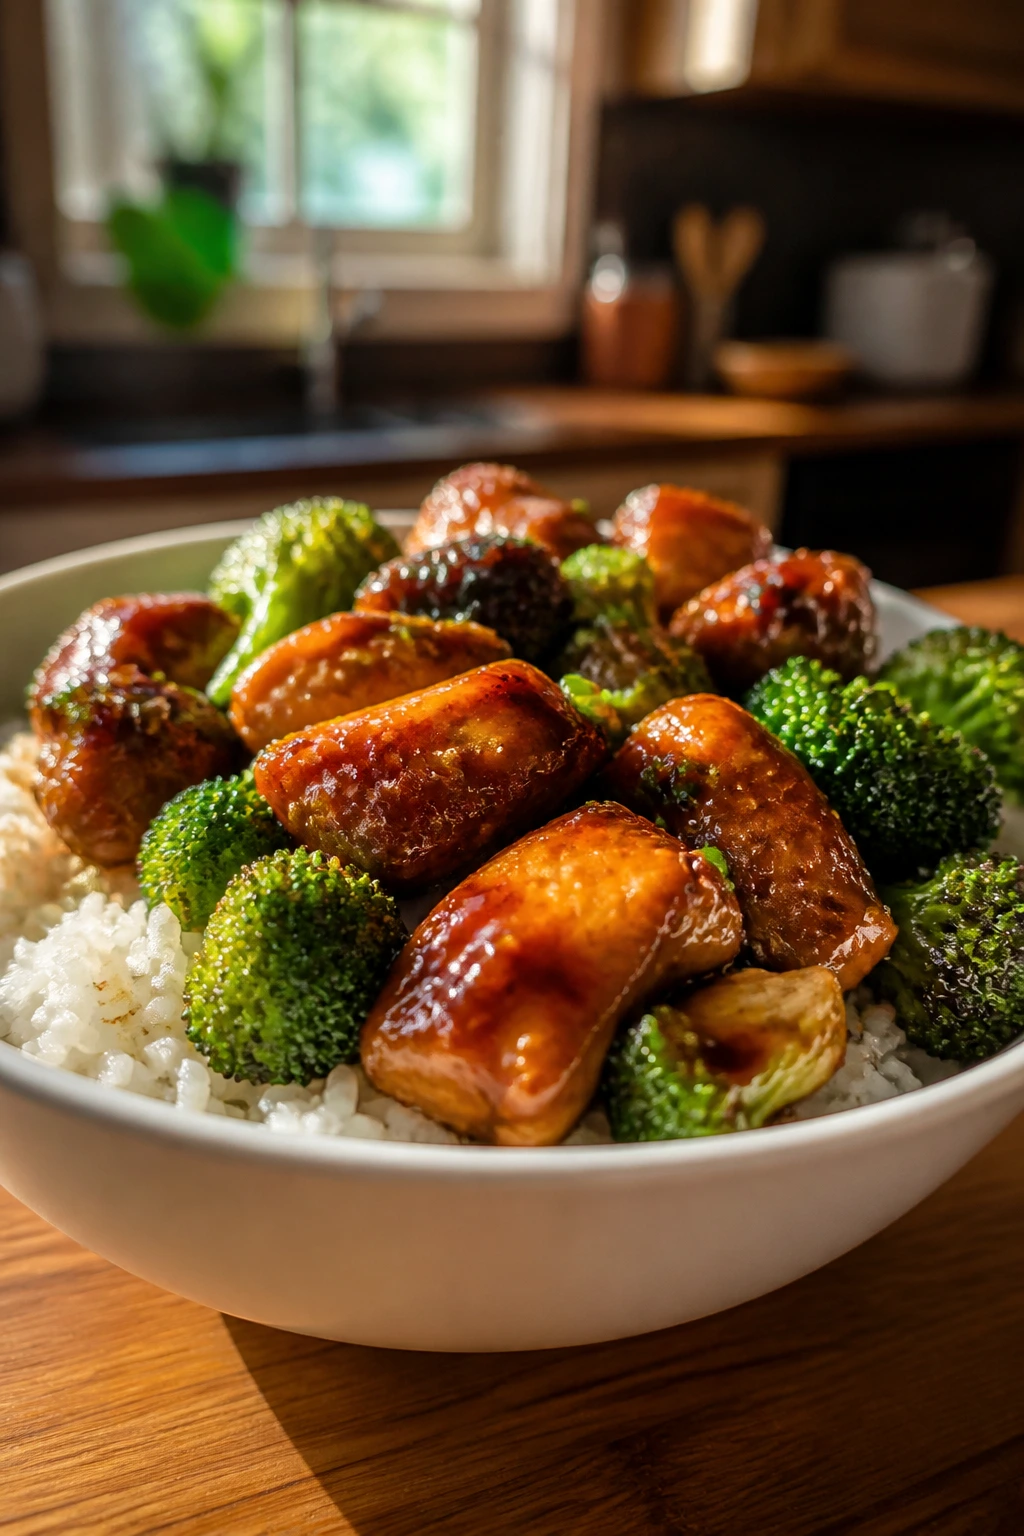
Most of these meals keep well for 3 to 4 days in the refrigerator in airtight containers. That includes pasta bakes, casseroles, chili, meatballs, rice bowls, and most skillet dinners. Seafood is the exception; salmon and shrimp are best within 2 days, because reheated fish can get dry fast.
Freezer storage depends on the recipe. Pulled pork, chili, meatballs in sauce, lentil curry, and casserole-style dishes freeze well for 2 to 3 months. Pasta dishes freeze less gracefully, though baked ziti and tuna pasta bake still work if you reheat them slowly and add a splash of sauce or milk.
Reheat saucy dishes on the stovetop over low heat with a spoonful or two of broth, water, or milk, depending on the recipe. Casseroles and baked pasta do better in the oven at 350°F, covered with foil, for 15 to 20 minutes. Rice dishes and fried rice usually come back best in the microwave with a damp paper towel over the top and a tablespoon of water stirred in first.
If you want to prep ahead in the morning, chop vegetables, mix spice blends, and whisk sauces into small containers. Marinate chicken for up to 12 hours in the fridge. Cooked rice can be made a day ahead and chilled, which helps for fried rice and bowls. Many of these dishes taste better after a short rest, but seafood and crispy-topped casseroles are best eaten close to the finish line.
Variations and Adaptations to Try
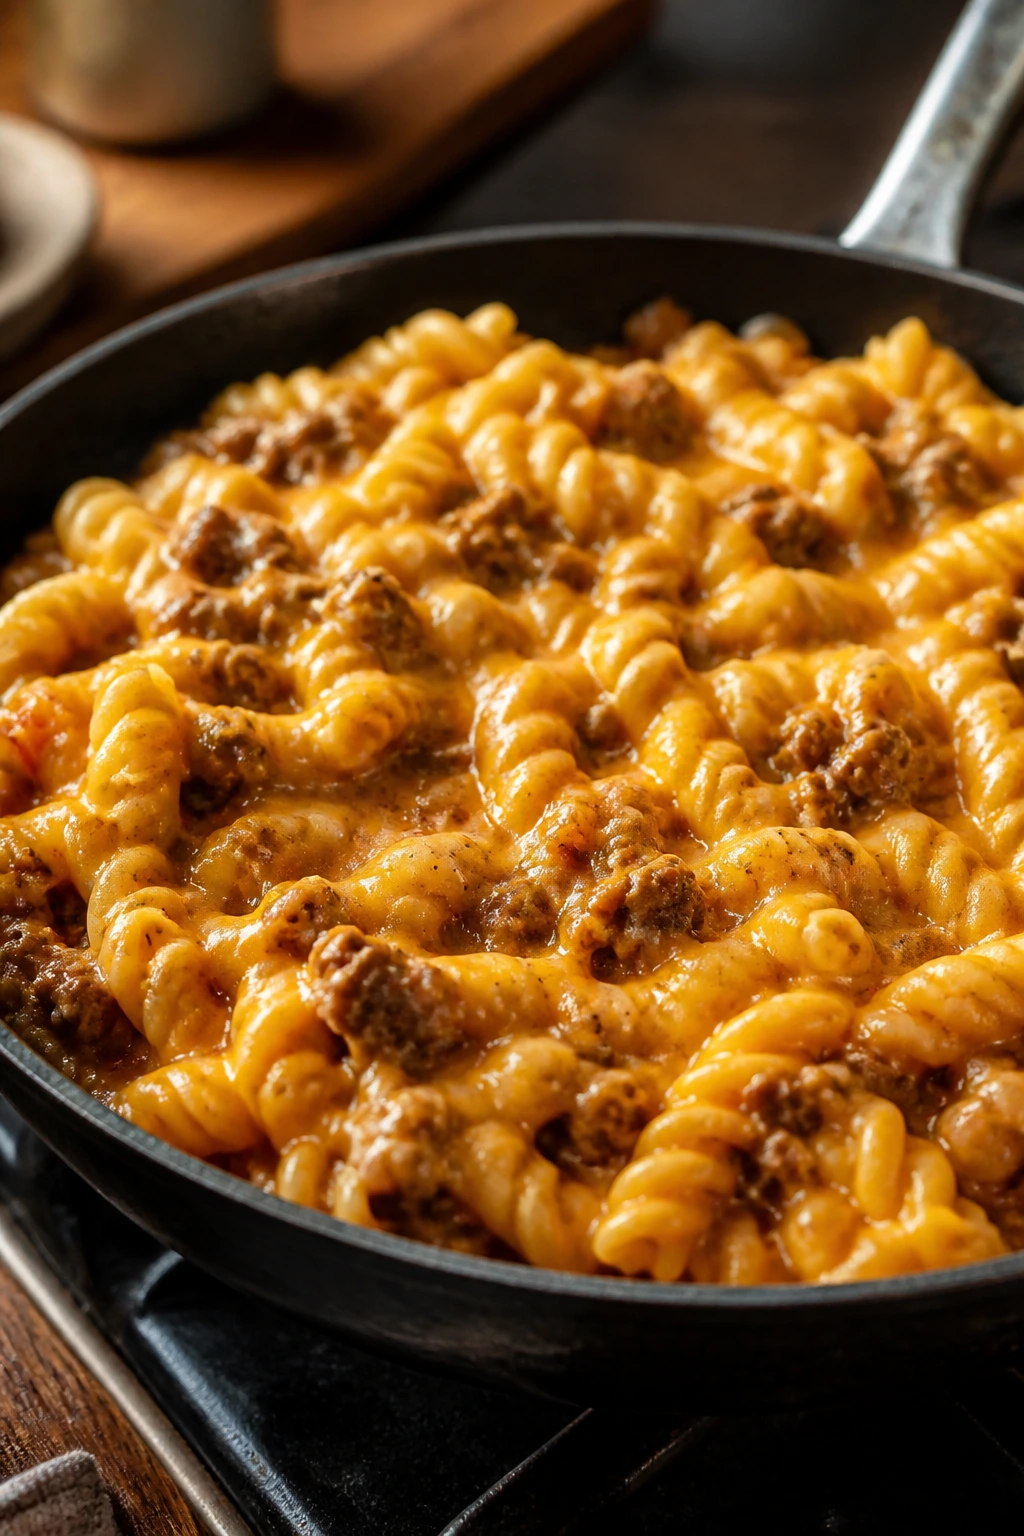
The Gluten-Free Pantry Swap
Use rice, potatoes, corn tortillas, or gluten-free pasta anywhere the menu needs a swap. Cornstarch thickens sauces cleanly, and most of the skillet meals adapt without much fuss. The only real rule is to watch pasta and tortillas more closely, because texture changes faster when you change the base.
The Dairy-Light Route
Olive oil, broth, coconut milk, and tomato sauce carry a lot of these dinners without heavy cream or cheese. Salmon, fajitas, taco bowls, lentil curry, and stir-fries barely need any adjustment. For casseroles and baked dishes, use a smaller amount of cheese as a finish instead of building the whole dish around it.
The Plant-Forward Edit
Beans, lentils, tofu, mushrooms, and extra vegetables can step in for meat more often than people expect. Black bean enchilada skillet, red lentil curry, veggie fried rice, and Greek pita pockets already live in that lane. For other recipes, think about texture first: something soft like lentils or beans needs a little crunch from cucumber, onion, or toasted crumbs.
The Lower-Sodium Fix
Low-sodium broth, rinsed beans, and reduced-salt soy sauce make a real difference here. Add acid and herbs to keep the flavor from getting dull: lemon, lime, vinegar, parsley, cilantro, and scallions all help. Pull back on the cheese a bit if the dish already has ham, sausage, or canned sauce.
The Spice-Forward Finish
A lot of these recipes can take heat at the table even if the base recipe stays mild. Chili crisp on rice bowls, sriracha in meatball sauce, pepper flakes in tomato dishes, and pickled jalapeños on tacos are all easy ways to let different people customize their own plate. I prefer this to making the whole pan hot by force.
The Leftover-First Plan
Cook a double batch of pulled pork, chili, meatballs, or rice and use the second half for lunches or a second dinner. That is where the real time savings show up. One smart batch can become sandwiches, bowls, stuffed potatoes, or pasta the next day without feeling repetitive.
Common Mistakes to Avoid
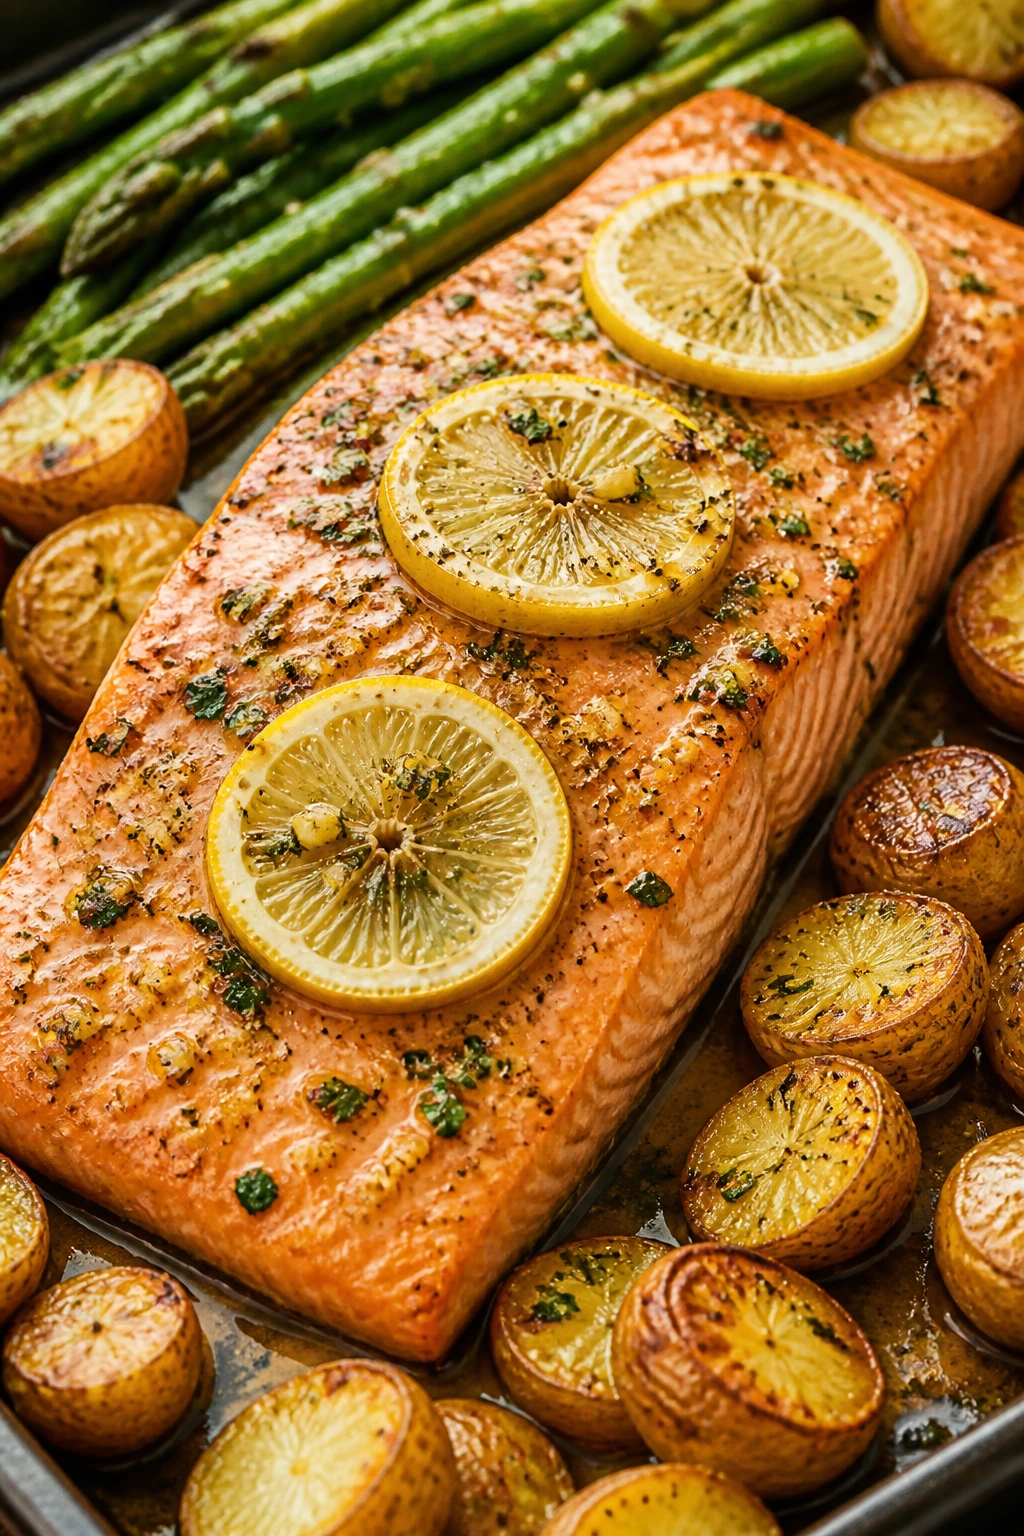
-
Treating every recipe like it wants the same heat: Salmon, steak, stir-fry, and casseroles all behave differently. High heat helps some dishes and ruins others.
-
Crowding pans until nothing browns: If the ingredients are stacked, they steam. Use a second pan or cook in batches and the flavor improves immediately.
-
Underseasoning early and overcompensating late: Salt the meat, beans, or vegetables at the start, then taste again at the end. A late flood of salt or sauce is harder to fix.
-
Ignoring texture changes after storage: Rice dries out, pasta thickens, and soups tighten in the fridge. Save a little broth, milk, or sauce so reheating does not turn into rescue work.
-
Skipping the thermometer on meat: Chicken and pork are not guesses. An instant-read thermometer keeps dinner juicy and safe.
-
Adding delicate ingredients too soon: Spinach, herbs, avocado, and peas should usually go in near the end. They lose color and shape if they sit around too long.
Frequently Asked Questions
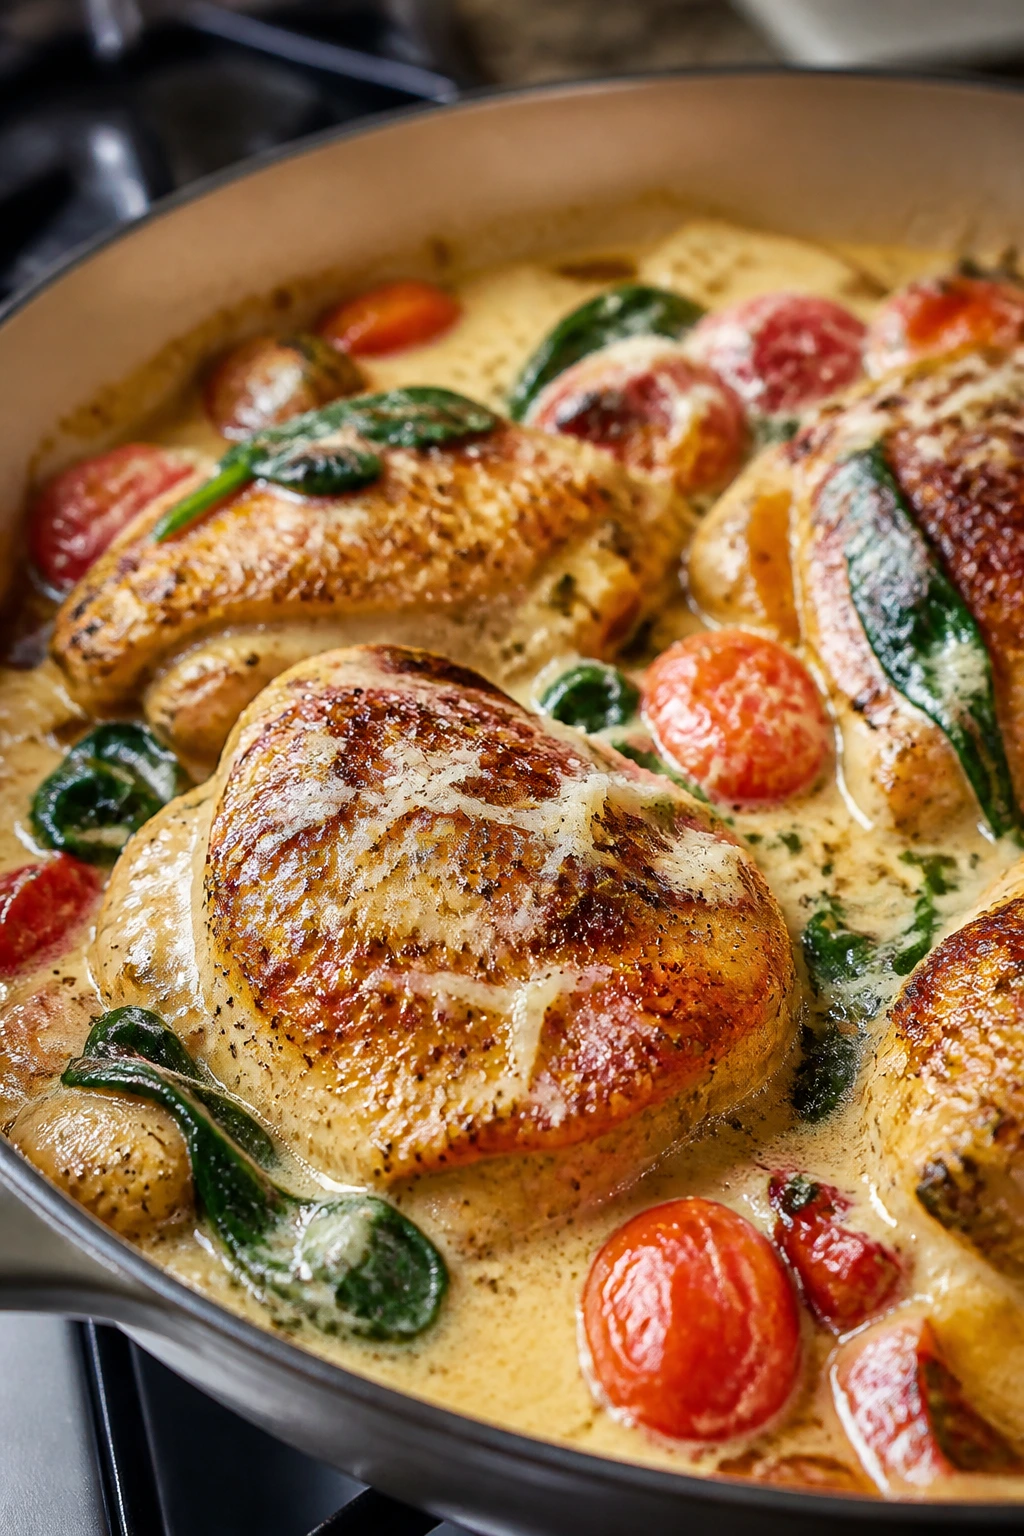
Can I prep these dinners in the morning and cook them later?
Yes, and that is one of the best ways to use this collection. Chop the vegetables, mix sauces, and season the meat in the morning, then refrigerate everything separately or assemble the dish if it is a casserole or slow-cooker meal.
Which recipes freeze the best?
Pulled pork, chili, meatballs in sauce, lentil curry, and chicken pot pie filling freeze very well. Pasta bakes also freeze, though they need a little extra sauce when reheated so the noodles do not dry out.
What should I make if my family hates peppers or onions?
Start with baked ziti, chicken and rice casserole, mac and cheese with broccoli and ham, or the tuna melt pasta bake. Those recipes do not rely on peppers and onions to carry the flavor, so you can skip them without breaking the dish.
How do I keep chicken from drying out?
Use chicken thighs when possible, cut breasts evenly, and pull them from the heat as soon as they hit 165°F. Saucy dishes and casseroles are more forgiving than dry-heat recipes, but an instant-read thermometer still matters.
Can I use rotisserie chicken in these recipes?
Absolutely. It fits especially well in sliders, white chicken chili, pot pie skillet, chicken pasta bakes, and taco bowls. I would not bother roasting fresh chicken for those unless you already had it planned.
What if I only have 20 minutes?
Go for turkey taco rice bowls, shrimp fried rice, Korean-style beef bowls, veggie fried rice, or sausage and peppers if the sausage is pre-cooked. Those are the quickest dinners here, and most of the work is chopping or reheating rice.
Can I double these recipes for a bigger crowd?
Usually yes, but use a wider pan or two pans instead of squeezing everything into one. Casseroles, chili, pulled pork, and meatballs scale especially well; sheet-pan meals and stir-fries need more surface area, not just more ingredients.
What is the best way to add vegetables without making the meal watery?
Use vegetables that can cook quickly or hold their shape: broccoli florets, peas, carrots, green beans, spinach, and cabbage. If you add mushrooms or zucchini, cook off some of their moisture first so they do not water down the sauce.
Do these recipes work for picky eaters?
Yes, because most of them are built on familiar food shapes: bowls, pasta, sandwiches, sliders, and casseroles. Keep the toppings on the side and let people choose what goes on top. That small detail saves arguments.
A Softer Dinner Rhythm
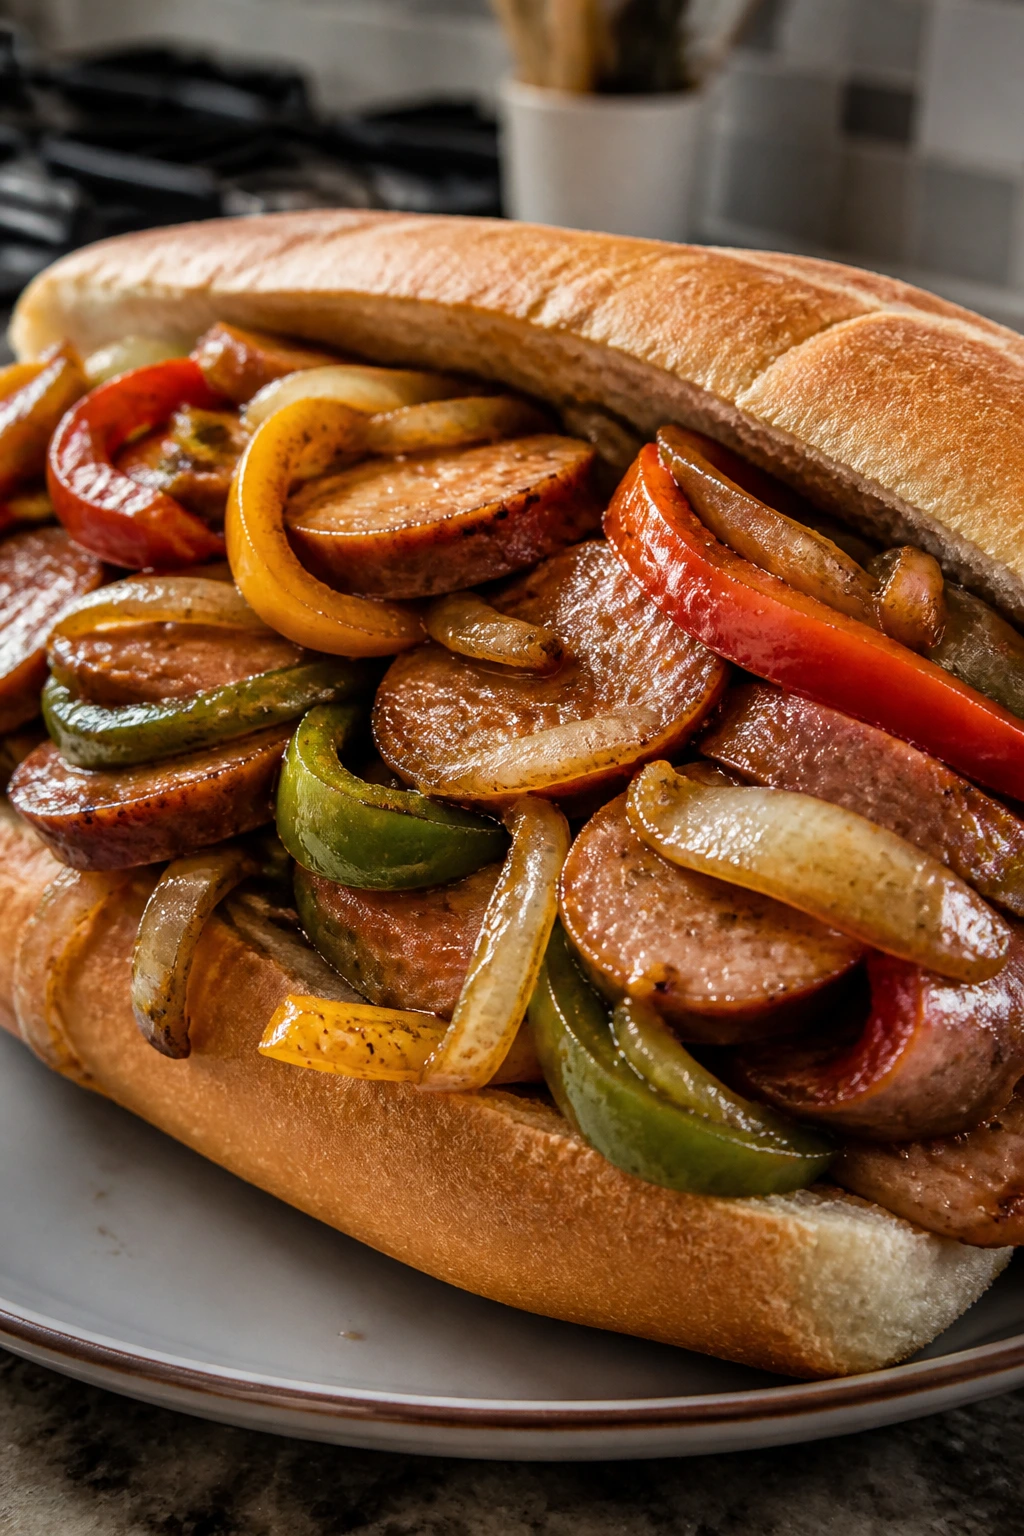
A good dinner plan does not erase school-morning chaos. It just stops that chaos from following you all the way to the stove. These recipes do that well because they lean on repeatable moves: roast, simmer, stir, bake, or pile into a bowl and call it done.
Pick a few that match your actual life, not your ideal one. Keep the ingredients around. Make the one-pan meals on the nights when the sink is already full, and save the slow cooker or casserole for the mornings when you know the afternoon will be a sprint.
Dinner gets easier when it stops asking for a performance. Keep one sheet pan, one skillet, and one slow cooker in rotation, and the rest of the week starts to feel more manageable.