
By the time backpacks hit the floor, nobody wants a dinner that behaves like a homework assignment. They want food that comes together fast, lands on the table hot, and somehow tastes like it took more effort than it did. That’s the sweet spot here: meals that feel a little snacky, a little casual, and very forgiving when the afternoon has already gone sideways.
I’ve always had a soft spot for these after-school dinners because they solve the exact hour when hunger gets loud and patience gets thin. A tortilla turns into supper. A bagel becomes pizza. Leftover rice, a can of beans, a handful of cheese, and a hot skillet can rescue a whole evening. And if you’ve ever tried to negotiate vegetables with a tired kid at 5:30, you already know why that matters.
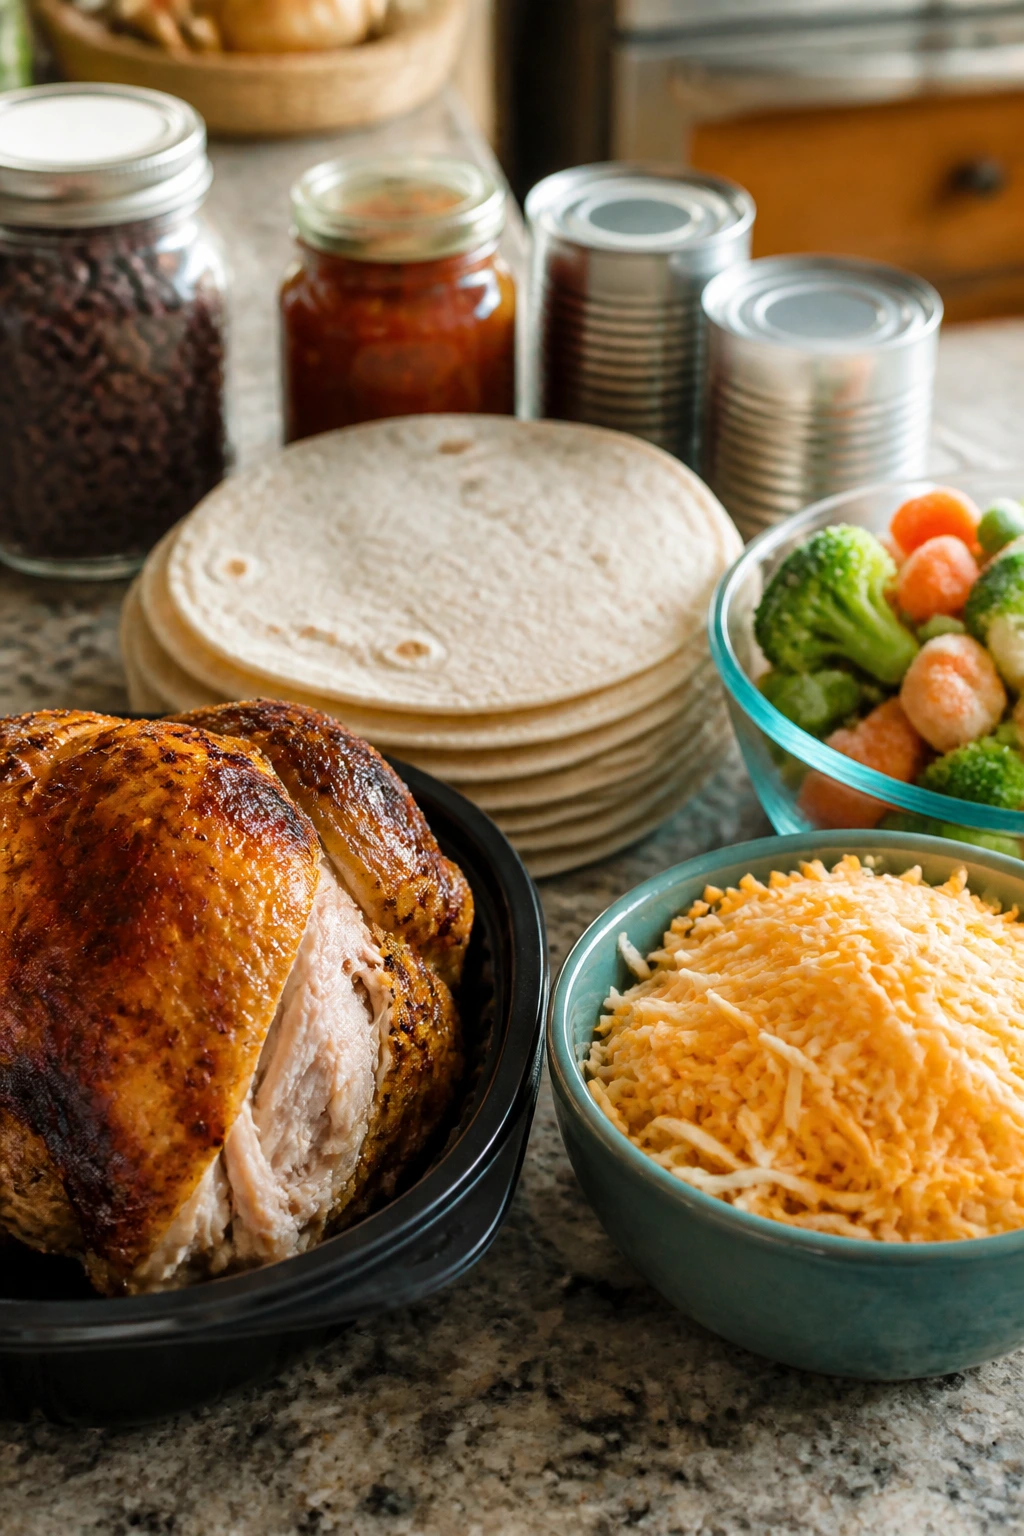
The trick is not making “fancy” food. It’s making food with enough crunch, cheese, sauce, and finger-friendly pieces that it feels like a treat while still counting as dinner. That means short cook times, reliable ingredients, and a few smart shortcuts—rotisserie chicken, frozen veg, canned beans, ready-made dough, thin-cut meats, sturdy bread. Chicken and turkey still need to hit 165°F in the center, but the rest of the night can stay beautifully low-drama.
Why You’ll Love This Collection
- Fast Enough for the Backpack Hour: Most of these come together in 15 to 25 minutes, which is the difference between a calm kitchen and a full-scale snack raid.
- Built From Real Pantry Food: Tortillas, pasta, rice, canned beans, frozen vegetables, deli meat, and shredded cheese do most of the heavy lifting here.
- Kid Hands Can Help: Several of these are easy enough for children to assemble, top, or layer without wrecking the whole plan.
- Flexible When the Fridge Looks Bare: Most of these recipes welcome leftover chicken, half a bell pepper, the last cup of rice, or the end of a bag of shredded mozzarella.
- Dinner That Feels Like a Snack Tray: The shapes are friendly—triangles, dippers, sliders, bowls, pockets, boards—which makes the whole thing feel less formal and more approachable.
- Good Leftovers, Too: A few of these are even better the next day, especially the pasta, rice, soup, and meatball recipes.
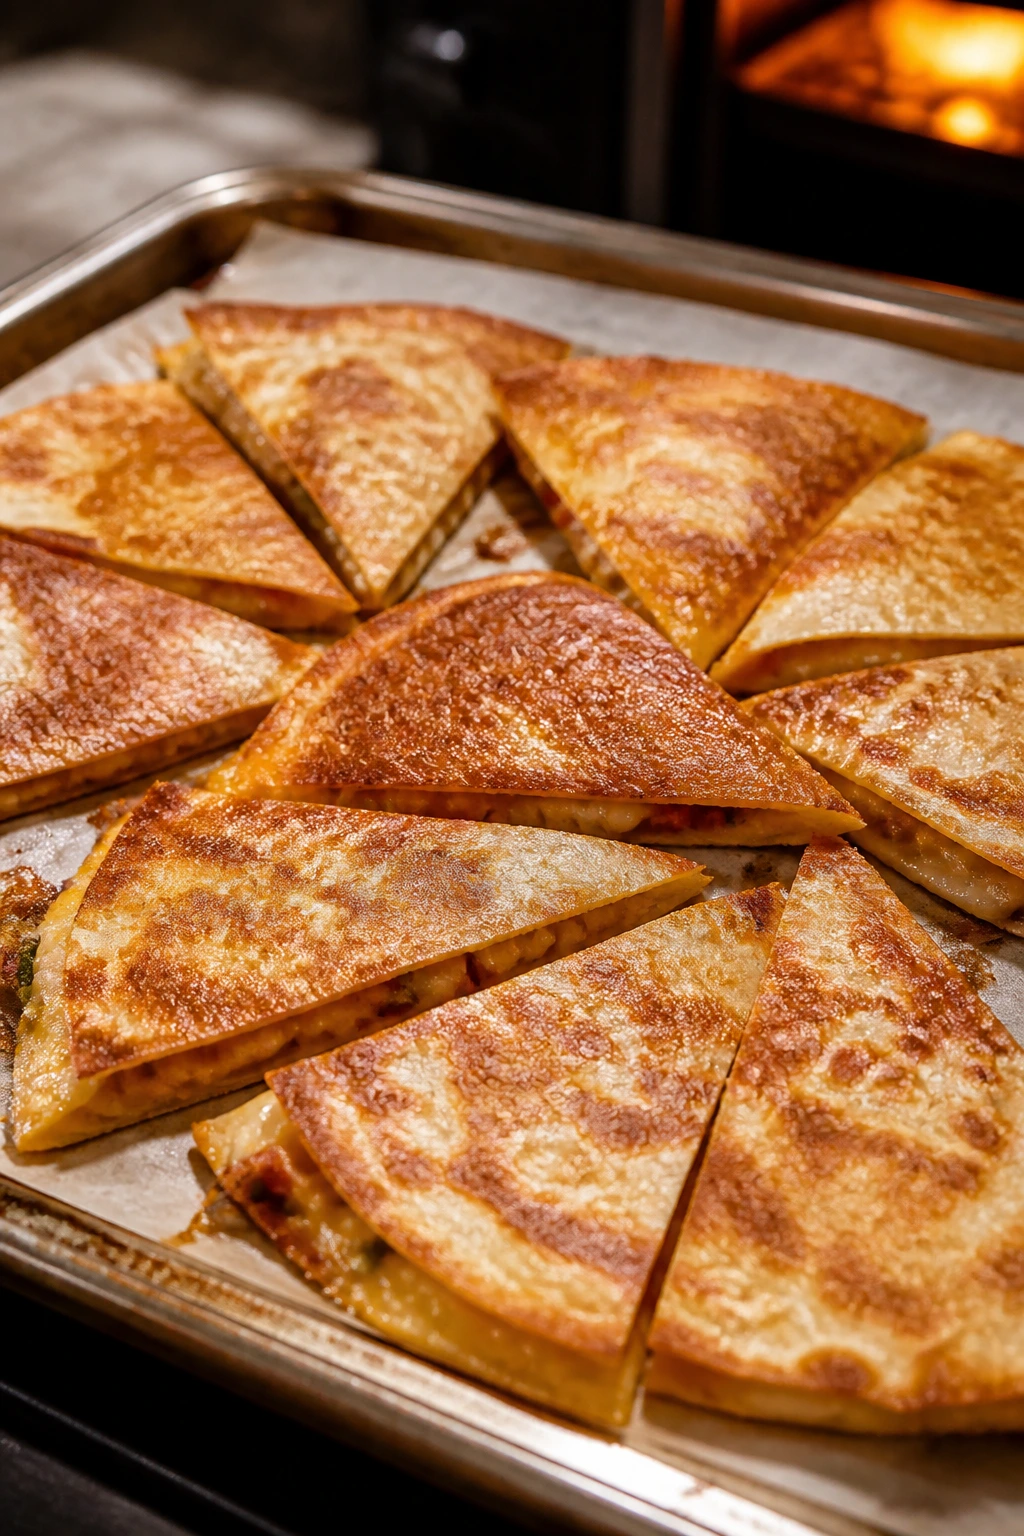
1. Sheet Pan Quesadilla Triangles
A quesadilla sliced into neat triangles has a kind of built-in charm. The tortilla crisps at the edges, the cheese goes stretchy in the middle, and the whole pan disappears faster than you expect once it hits the table. I like this version because it feels like snack food, but it eats like a proper dinner.
Why It Works:
A sheet pan makes the quesadilla crisp on both sides without standing over a skillet. Using two tortillas keeps the filling tucked in, which matters when kids start pulling pieces apart with their hands. The heat from the oven melts the cheese evenly, and a short rest before slicing keeps the filling from sliding out in one sad heap.
Key Ingredients:
- 4 large flour tortillas
- 2 cups shredded Mexican-blend cheese
- 1 cup cooked shredded chicken or drained black beans
- 1/2 cup salsa, well drained
- 1/2 cup finely diced bell pepper
- 2 tablespoons melted butter or olive oil
- 2 tablespoons sliced green onions
Quick Steps:
- Preheat the oven to 425°F and line a rimmed sheet pan with parchment.
- Brush one tortilla lightly with butter and lay it on the pan.
- Scatter the cheese, chicken or beans, salsa, peppers, and green onions over the tortilla.
- Cover with the second tortilla, brush the top with more butter, and bake for 8 to 10 minutes until the bottom is golden and the cheese is fully melted.
- Rest for 2 minutes, then slice into triangles with a pizza cutter.
Equipment for This Recipe:
- Rimmed sheet pan
- Parchment paper
- Pizza cutter or sharp knife
How to Serve This Dish:
Pile the triangles on a cutting board with sour cream, guacamole, or extra salsa in small bowls. A handful of apple slices or cucumber coins on the side keeps the plate from feeling too heavy.
Pro Tips for This Recipe:
- Drain wet salsa first or the tortilla softens before it crisps.
- Pre-shredded cheese melts fine here and usually behaves better than a block cut too thick.
- Let it rest before cutting. Two minutes helps the filling set.
Variations on This Dish:
- Breakfast Quesadilla: Add scrambled eggs and crumbled breakfast sausage.
- Bean-and-Corn Version: Skip the chicken and add 1/2 cup corn plus more beans.
- Spicy Jalapeño Pan: Add sliced pickled jalapeños and a pinch of chili powder.
Common Mistakes to Avoid with This Dish:
- Overfilling the tortilla: Too much filling leaks out and steams the bottom instead of crisping it.
- Cutting too soon: The cheese runs everywhere. Wait a couple minutes.
- Using a soggy salsa: Thick salsa keeps the center from getting wet and floppy.
2. Pepperoni English Muffin Pizzas
This is the kind of dinner that makes a kitchen smell like pizza night in about ten minutes flat. The English muffins get crunchy on the edges, the sauce bubbles at the top, and the pepperoni curls into those little greasy cups kids always seem to love.
Why It Works:
English muffins have the right nooks and crannies to catch sauce without getting mushy if you toast them first. They’re also sturdy enough to hold up under cheese, which is more important than it sounds when little hands start lifting slices before they cool. This is one of the easiest ways to turn a snack food into a real plate of food.
Key Ingredients:
- 4 English muffins, split
- 1 cup pizza sauce
- 2 cups shredded mozzarella
- 1/2 cup pepperoni slices
- 1/4 cup sliced olives or mushrooms
- 1 teaspoon dried oregano
- 1 tablespoon olive oil
Quick Steps:
- Preheat the oven to 425°F.
- Split the English muffins and place them cut-side up on a baking sheet.
- Toast them in the oven for 2 minutes so the surface dries out a little.
- Spoon sauce over each half, top with mozzarella, pepperoni, and any extra toppings, then dust with oregano.
- Bake for 6 to 8 minutes until the cheese melts and the edges are browned.
Equipment for This Recipe:
- Baking sheet
- Spoon
- Oven mitts
How to Serve This Dish:
Serve the muffins hot with carrot sticks and a few grapes. Cut them in half again if you want more little pieces and fewer fights over the biggest one.
Pro Tips for This Recipe:
- Toast the muffins first. That one step keeps the bottoms from turning soft.
- Use a thicker pizza sauce; watery sauce makes the bread soggy.
- Don’t pile toppings too high or the muffins collapse under the weight.
Variations on This Dish:
- Hawaiian-Style: Add small pineapple bits and diced ham.
- Veggie Patch: Use chopped spinach, olives, and mushrooms.
- Spicy Slice: Add crushed red pepper and sliced banana peppers.
Common Mistakes to Avoid with This Dish:
- Skipping the toast step: The muffins stay too soft underneath.
- Using too much sauce: A thin layer is enough.
- Overbaking the cheese: Leave when it’s melted and just starting to spot brown.
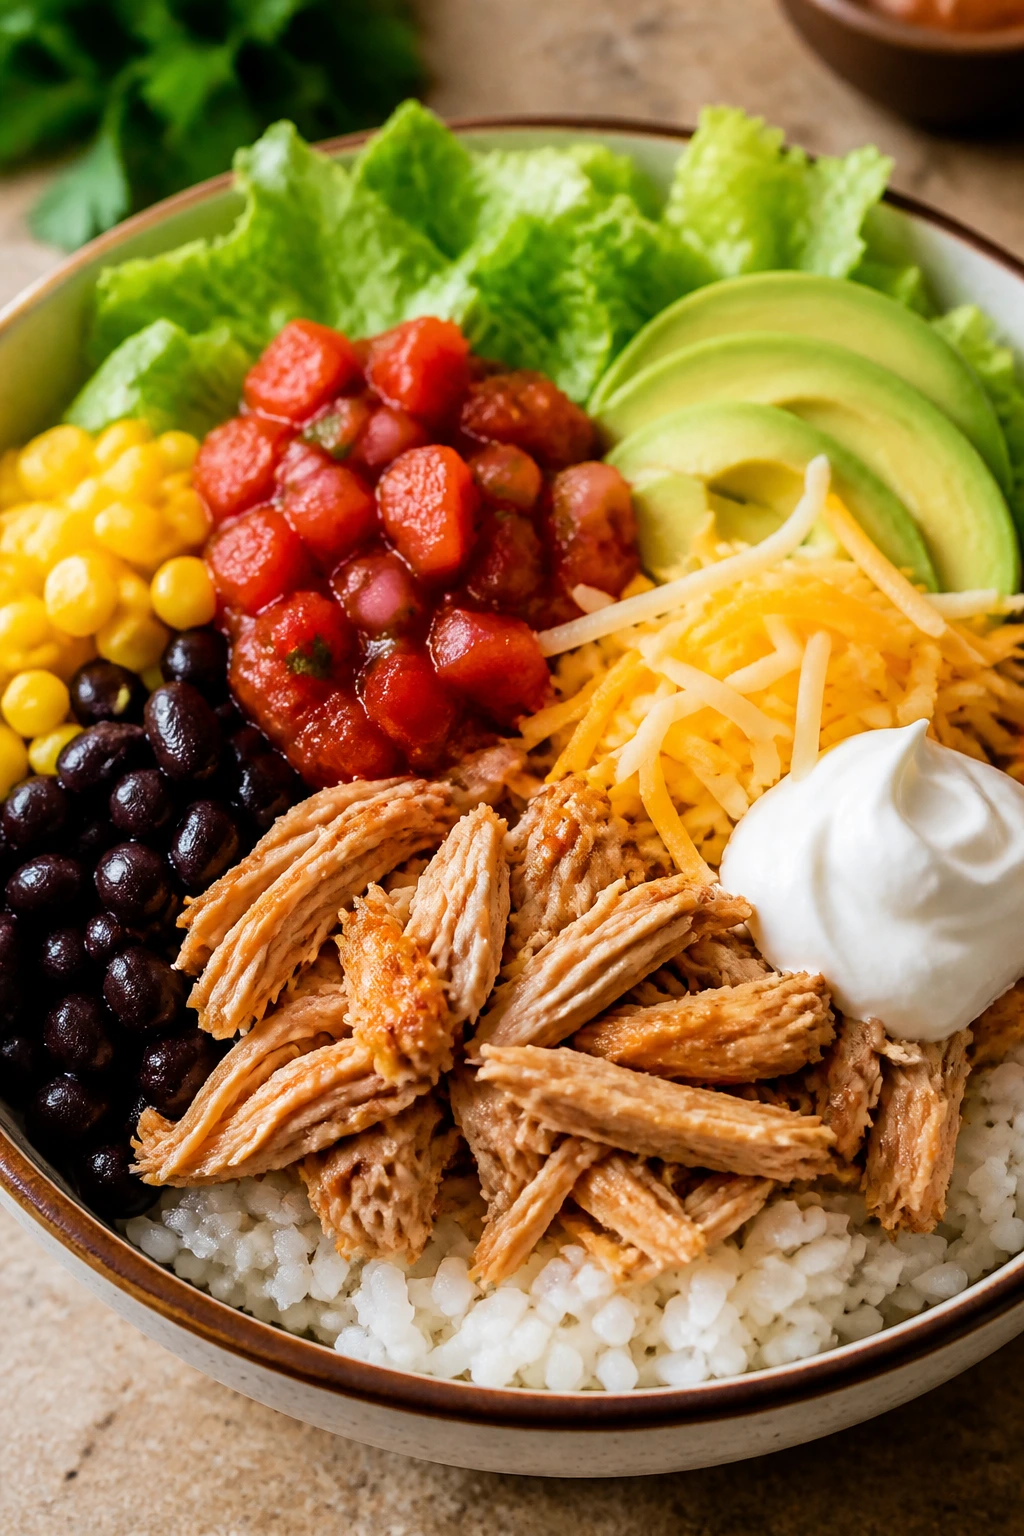
3. Rotisserie Chicken Taco Bowls
A taco bowl is what happens when dinner stops pretending to be formal. There’s rice, chicken, beans, corn, salsa, and all the cold crunchy things you want on top. It looks casual on the plate, and that’s part of the appeal.
Why It Works:
Rotisserie chicken buys back time without tasting like a shortcut. Warm rice anchors the bowl, beans and corn bring bulk, and the toppings give you temperature contrast: hot underneath, cool and crisp on top. It’s one of those dinners that can be partially assembled ahead and finished in minutes when everyone is already hungry.
Key Ingredients:
- 3 cups cooked rice
- 2 cups shredded rotisserie chicken
- 1 can black beans, rinsed and drained
- 1 cup corn kernels, frozen or canned
- 1 cup salsa
- 1 cup shredded lettuce
- 1 avocado, sliced
- 1 cup shredded cheddar or Monterey Jack
Quick Steps:
- Warm the rice in a saucepan or microwave until steaming.
- Heat the chicken, beans, corn, and 2 tablespoons of salsa in a skillet over medium heat for 4 to 5 minutes.
- Divide the rice among four bowls.
- Top with the warm chicken mixture, lettuce, avocado, cheese, and more salsa.
- Finish with lime juice if you have it.
Equipment for This Recipe:
- Large skillet
- Saucepan or microwave-safe bowl
- Serving bowls
How to Serve This Dish:
Put the toppings in small bowls and let everyone build their own. It’s messy in the good way, and nobody has to eat avocado if they don’t want to.
Pro Tips for This Recipe:
- Warm the beans with the chicken so the whole bowl stays hot longer.
- Keep the lettuce and avocado separate until the last minute.
- A squeeze of lime wakes up the whole bowl.
Variations on This Dish:
- Rice-Free Bowl: Use shredded lettuce as the base and add extra beans.
- Mild Kid Bowl: Skip salsa in the hot pan and serve it on the side.
- Chip Crunch Bowl: Add crushed tortilla chips on top right before serving.
Common Mistakes to Avoid with This Dish:
- Cold rice straight from the fridge: It clumps; warm it first.
- Adding avocado too early: It browns and softens.
- Skipping seasoning: Even rotisserie chicken needs salsa or lime to taste like a full meal.
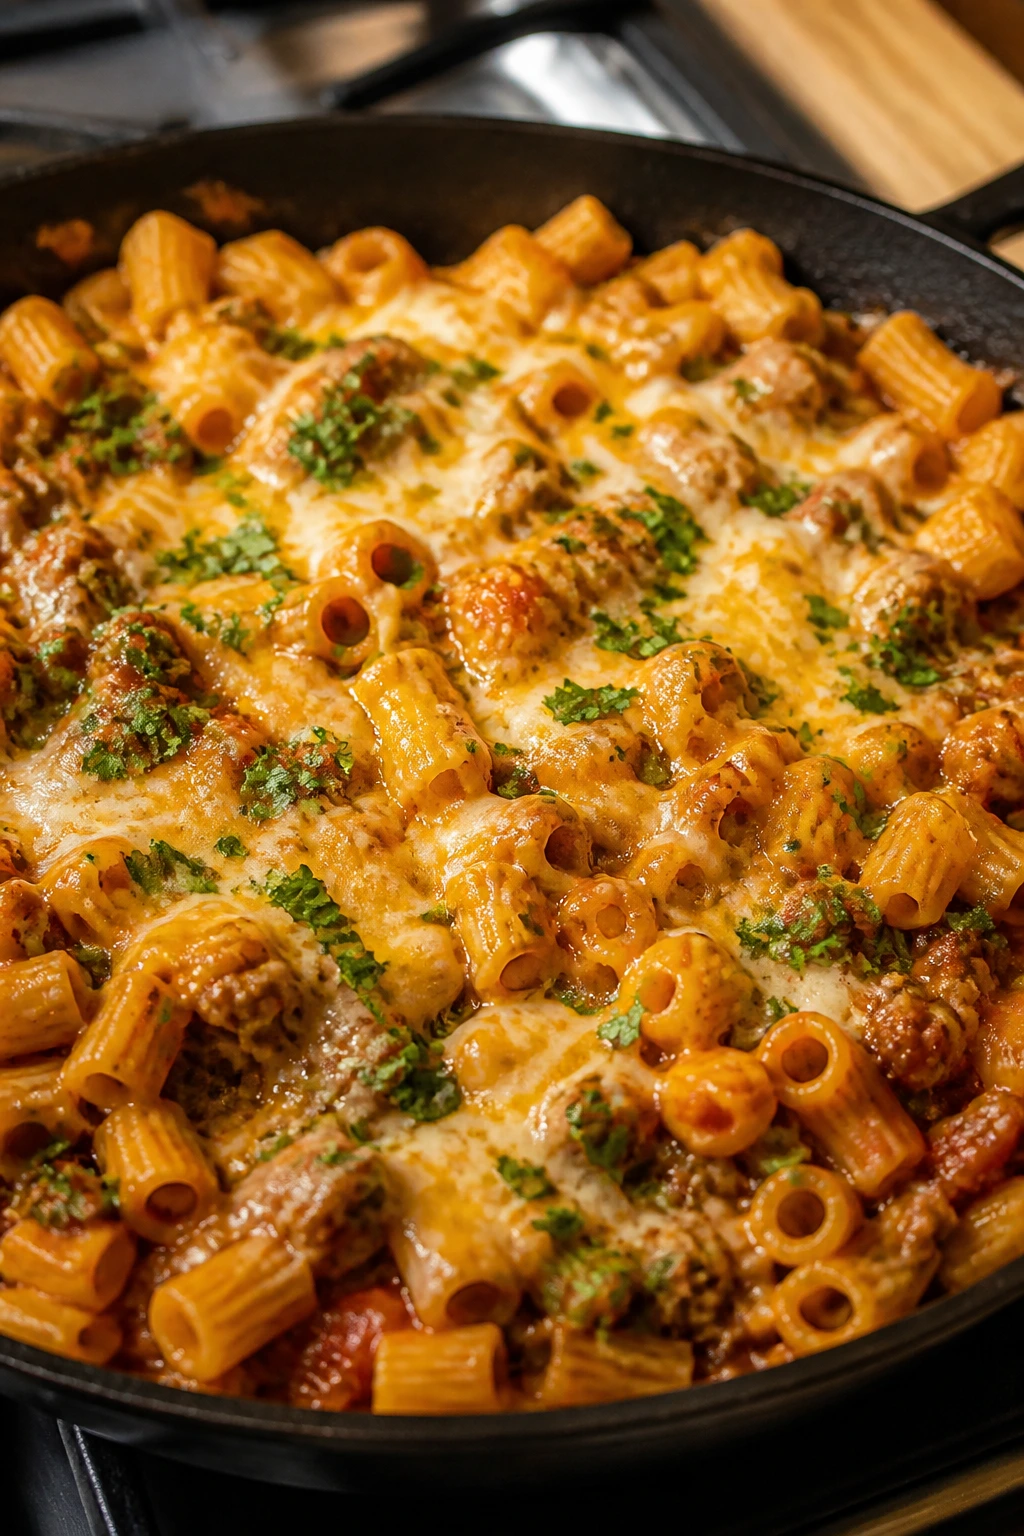
4. One-Pan Taco Pasta
This one tastes like tacos and pasta had the same busy night and decided to work together. The sauce clings to the noodles, the cheese makes everything glossy, and the whole skillet can go from burner to table without a parade of extra dishes.
Why It Works:
Short pasta cooks in the same pan as the sauce, so the starch in the noodles helps thicken everything. Ground turkey or beef gives the dish body, and salsa adds instant flavor without making you chop half the spice cabinet. It’s fast, filling, and the texture stays soft enough for younger kids without turning mushy.
Key Ingredients:
- 1 pound ground turkey or beef
- 1 small onion, diced
- 2 cloves garlic, minced
- 1 tablespoon taco seasoning
- 12 ounces short pasta
- 2 cups chicken broth
- 1 cup salsa
- 1 cup corn kernels
- 1 1/2 cups shredded cheese
Quick Steps:
- Brown the meat and onion in a large skillet over medium-high heat for 6 to 7 minutes.
- Stir in the garlic and taco seasoning for 30 seconds.
- Add the pasta, broth, and salsa, then bring to a boil.
- Reduce to a simmer and cook uncovered for 10 to 12 minutes, stirring often, until the pasta is tender and most of the liquid is absorbed.
- Stir in corn and cheese until melted.
Equipment for This Recipe:
- Large deep skillet or sauté pan
- Wooden spoon
- Lid, loosely fitted or optional
How to Serve This Dish:
Spoon it into shallow bowls and top with chopped cilantro, extra cheese, or a few crushed tortilla chips. A simple side of sliced oranges works better than it should here.
Pro Tips for This Recipe:
- Stir often so the pasta doesn’t catch on the bottom.
- Use salsa with some body, not a watery one.
- If the pan dries out before the pasta is tender, add 1/4 cup hot broth.
Variations on This Dish:
- Creamy Taco Pasta: Stir in 2 ounces cream cheese at the end.
- Bean Swap: Replace half the meat with black beans.
- Bolder Version: Add diced jalapeño with the onion.
Common Mistakes to Avoid with This Dish:
- Walking away while the pasta cooks: It needs regular stirring.
- Using too little liquid: The noodles can’t finish properly.
- Adding cheese while the skillet is boiling hard: Lower the heat first so it melts smooth.
5. Turkey and Cheese Sliders
Warm sliders have a way of making an ordinary night feel a little more orderly. The rolls get soft underneath and lightly crisp on top, the cheese melts into the turkey, and the whole pan can be pulled apart at the table with almost no argument.
Why It Works:
Slider rolls are small enough to feel snacky and filling enough to count as dinner when you serve them with something crunchy on the side. A buttery topping soaks into the tops, and a short bake time warms the turkey without drying it out. This is one of the best uses for deli meat when you need a hot meal and do not feel like cooking from scratch.
Key Ingredients:
- 12 Hawaiian-style slider rolls
- 1 pound sliced deli turkey
- 8 slices provolone or cheddar
- 3 tablespoons melted butter
- 1 tablespoon Dijon mustard
- 1 tablespoon honey
- 1 teaspoon sesame seeds or poppy seeds
Quick Steps:
- Preheat the oven to 350°F.
- Split the rolls in half without separating them and place the bottoms in a baking dish.
- Layer the turkey and cheese over the rolls, then set the tops back on.
- Mix the butter, mustard, honey, and seeds, then brush it over the tops.
- Bake for 12 to 15 minutes until the cheese melts and the tops turn golden.
Equipment for This Recipe:
- 9×13-inch baking dish
- Pastry brush
- Sharp serrated knife
How to Serve This Dish:
Cut the sliders apart and serve them with pickle spears and a pile of baby carrots. They also sit nicely beside tomato soup if you want the full cafeteria-meets-comfort effect.
Pro Tips for This Recipe:
- Keep the rolls attached when slicing so the filling stays even.
- Don’t overbake or the bread gets dry around the edges.
- If the tops brown too fast, tent loosely with foil.
Variations on This Dish:
- Ham and Swiss Sliders: Swap the turkey for ham and the cheese for Swiss.
- Italian Slider: Use salami, provolone, and a spoonful of pesto.
- Spicy Honey Version: Add a pinch of chili flakes to the butter topping.
Common Mistakes to Avoid with This Dish:
- Separating the rolls too early: The filling slides around.
- Using too much honey butter: The bottoms can turn soggy.
- Skipping the foil cover if needed: The tops can brown before the center heats through.
6. Veggie Fried Rice with Egg Ribbons
Fried rice is what I make when the rice container is full and the produce drawer is giving up. The eggs curl into soft ribbons, the peas and carrots add little sweet pops, and the soy-sesame smell fills the kitchen before anyone has time to complain.
Why It Works:
Day-old rice is drier and fries better than fresh rice, which is why this dish takes leftover rice and turns it into a win. Eggs add protein and a soft texture that kids usually accept more easily than chunks of meat. The whole thing is fast because the pan does the work; you’re mostly heating, stirring, and seasoning.
Key Ingredients:
- 3 cups cooked rice, chilled
- 3 large eggs
- 1 cup frozen peas and carrots
- 2 tablespoons soy sauce
- 1 tablespoon sesame oil
- 2 tablespoons butter or neutral oil
- 2 sliced scallions
Quick Steps:
- Scramble the eggs in a large skillet over medium heat, then move them to a plate.
- Add butter or oil and the peas and carrots; cook for 2 to 3 minutes.
- Add the rice and break up clumps with a spatula.
- Stir in soy sauce and sesame oil and cook for 4 to 5 minutes until the rice is hot and lightly crisp in spots.
- Fold the eggs back in and finish with scallions.
Equipment for This Recipe:
- Large skillet or wok
- Spatula
- Small bowl for the eggs
How to Serve This Dish:
Serve in wide bowls with extra soy sauce on the side. A few cucumber slices or edamame keep it from feeling too heavy.
Pro Tips for This Recipe:
- Chill the rice first; warm rice turns sticky instead of fried.
- Push the rice into the hot pan and let it sit for a moment so some bits crisp.
- A little sesame oil goes far. Too much tastes heavy.
Variations on This Dish:
- Chicken Fried Rice: Add 1 cup chopped cooked chicken.
- Egg-Free Version: Skip the eggs and add diced tofu.
- Fried Rice With Heat: Stir in chili crisp or sriracha at the end.
Common Mistakes to Avoid with This Dish:
- Using fresh, wet rice: It clumps and steams.
- Overloading the pan: The rice needs contact with the hot surface.
- Pouring in too much soy sauce: Start small; you can always add more.
7. Cheesy Bean and Corn Nachos
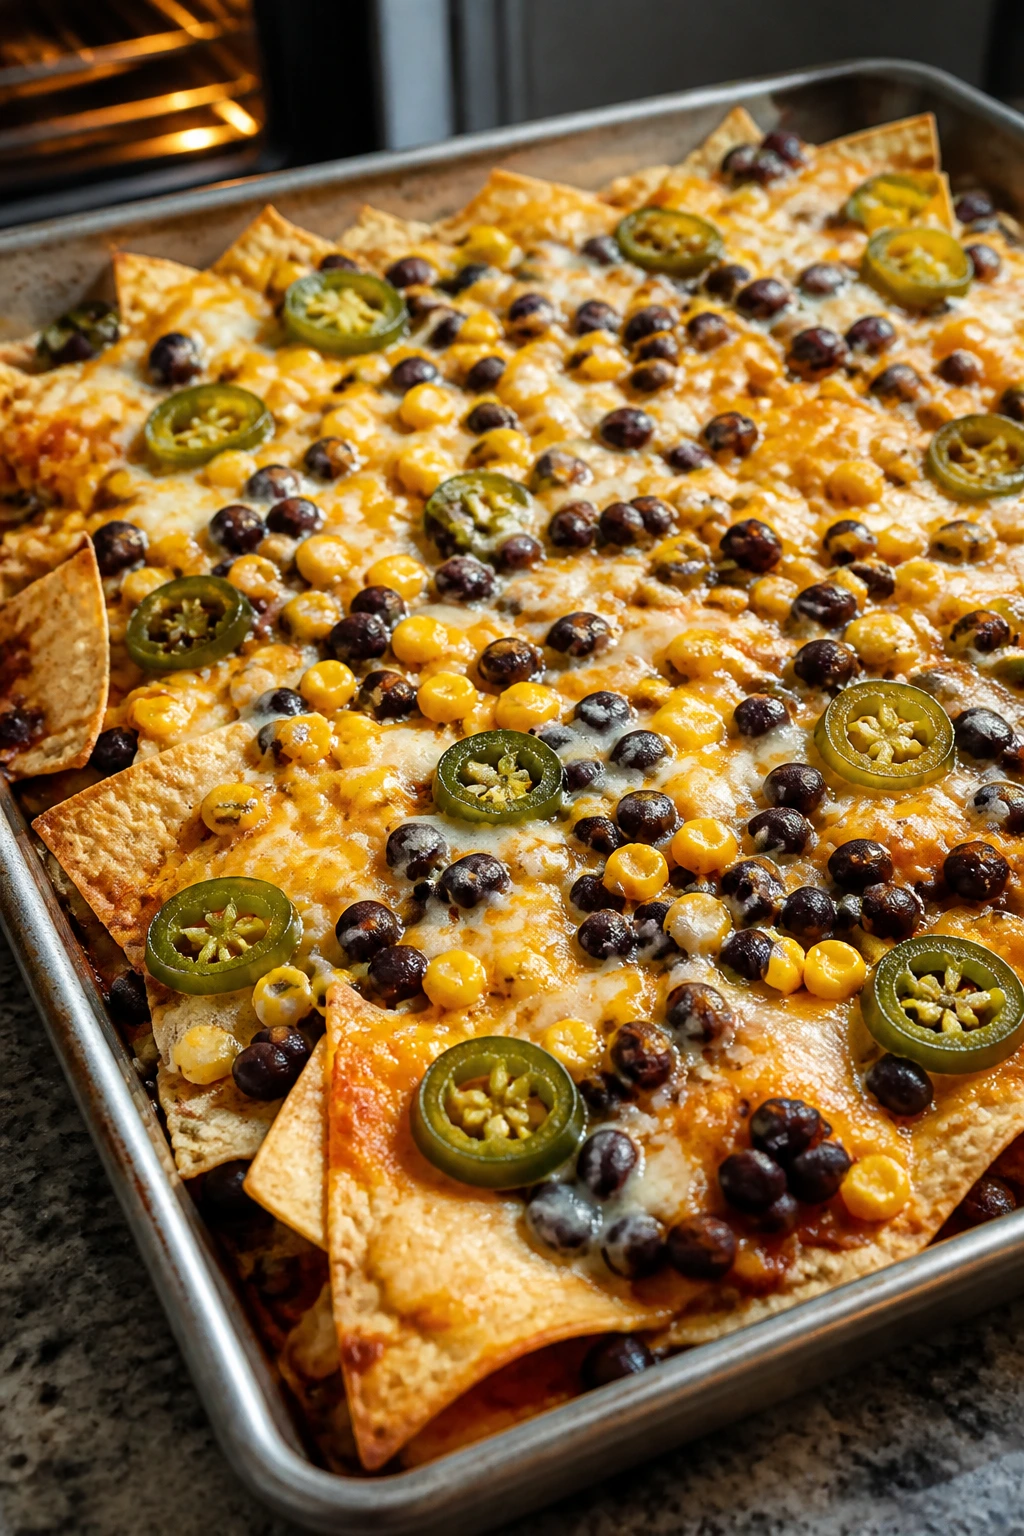
Nachos are one of those rare dinners that make children feel like they’re getting away with something. The chips stay crunchy around the edges, the cheese melts into the beans, and the corn adds sweet little bites that keep the whole tray from tasting flat.
Why It Works:
A shallow layer on a sheet pan means the chips get hot without being buried under too much topping. Beans add heft, cheese binds everything together, and corn brings enough texture that the nachos feel more like a meal than a snack tray. It’s also the kind of dish where everyone can add what they like without asking you to cook a second dinner.
Key Ingredients:
- 8 cups tortilla chips
- 1 can black beans, rinsed and drained
- 1 cup corn kernels
- 2 cups shredded cheddar or Monterey Jack
- 1 cup salsa
- 1/4 cup sliced jalapeños
- Sour cream, diced avocado, and chopped cilantro for serving
Quick Steps:
- Preheat the oven to 425°F.
- Spread the chips in a single layer on a rimmed baking sheet.
- Scatter the beans, corn, jalapeños, and cheese over the chips.
- Bake for 4 to 6 minutes until the cheese is melted and bubbling.
- Spoon salsa over the top and finish with sour cream and avocado.
Equipment for This Recipe:
- Rimmed baking sheet
- Oven
- Spatula for serving
How to Serve This Dish:
Put the pan in the middle of the table and let everyone grab. Add orange wedges or a simple slaw if you want something fresh on the plate.
Pro Tips for This Recipe:
- Use a pan with space around the chips so they crisp instead of steaming.
- Keep salsa for the top, not under the cheese.
- Warm the beans first if you want the tray to stay hot longer.
Variations on This Dish:
- Chicken Nachos: Add shredded rotisserie chicken.
- Breakfast Nachos: Top with scrambled eggs and breakfast sausage.
- Lime-and-Cotija Version: Finish with lime juice and crumbled cotija.
Common Mistakes to Avoid with This Dish:
- Piling the chips too deep: The bottom layer gets soggy.
- Adding watery toppings before baking: Save them for the end.
- Baking too long: The cheese should melt, not dry out and harden.
8. Garlic Butter Tortellini with Spinach
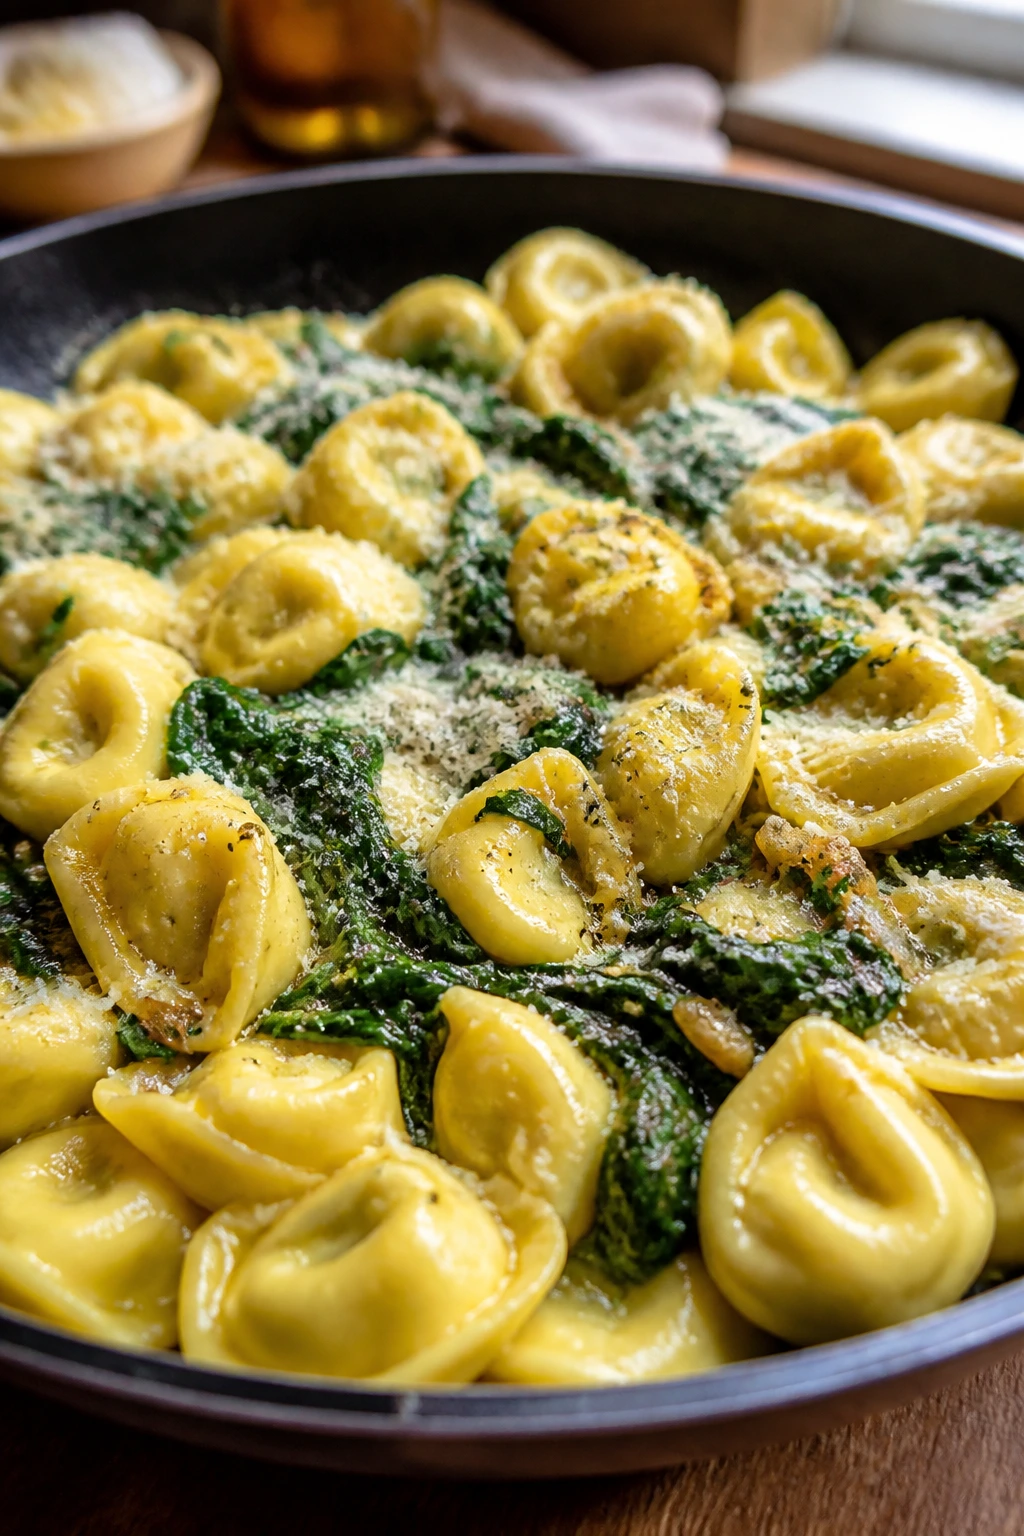
This is one of those dinners that looks richer than the work it takes. The tortellini swells and softens, the garlic turns sweet in butter, and the spinach collapses into the sauce like it was meant to be there all along.
Why It Works:
Refrigerated tortellini cooks fast and carries flavor well because the filling gives you a built-in creamy center. Garlic butter coats the pasta without needing a separate sauce pan full of drama, and spinach wilts in under a minute. It’s warm, soft, and easy to eat with a fork while somebody is still talking about school pickup.
Key Ingredients:
- 20 ounces refrigerated cheese tortellini
- 3 tablespoons butter
- 3 cloves garlic, minced
- 5 ounces fresh spinach
- 1/2 cup grated Parmesan
- 1/2 cup milk or cream
- 1 teaspoon lemon zest
Quick Steps:
- Cook the tortellini in salted boiling water according to the package, then reserve 1/2 cup pasta water.
- Melt the butter in a large skillet over medium heat and cook the garlic for 30 seconds.
- Add the spinach and stir until wilted.
- Stir in the milk or cream, Parmesan, and lemon zest.
- Add the tortellini and a splash of pasta water, then toss until glossy.
Equipment for This Recipe:
- Large pot
- Large skillet
- Colander
How to Serve This Dish:
Serve in shallow bowls with extra Parmesan and black pepper. A few cherry tomatoes on the side give the plate some freshness.
Pro Tips for This Recipe:
- Salt the pasta water well so the tortellini tastes seasoned from the inside.
- Add pasta water slowly; you want a light sauce, not soup.
- Use baby spinach so it wilts fast and evenly.
Variations on This Dish:
- Pesto Tortellini: Stir in 2 tablespoons pesto at the end.
- Sausage Version: Add browned Italian sausage to make it heartier.
- Lemon-Pepper Finish: Skip the cream and add extra lemon with cracked pepper.
Common Mistakes to Avoid with This Dish:
- Boiling the sauce hard after the cheese goes in: It can turn grainy.
- Forgetting to reserve pasta water: That little bit helps the sauce cling.
- Overcooking the tortellini: It gets soft fast.
9. Mini Meatball Subs
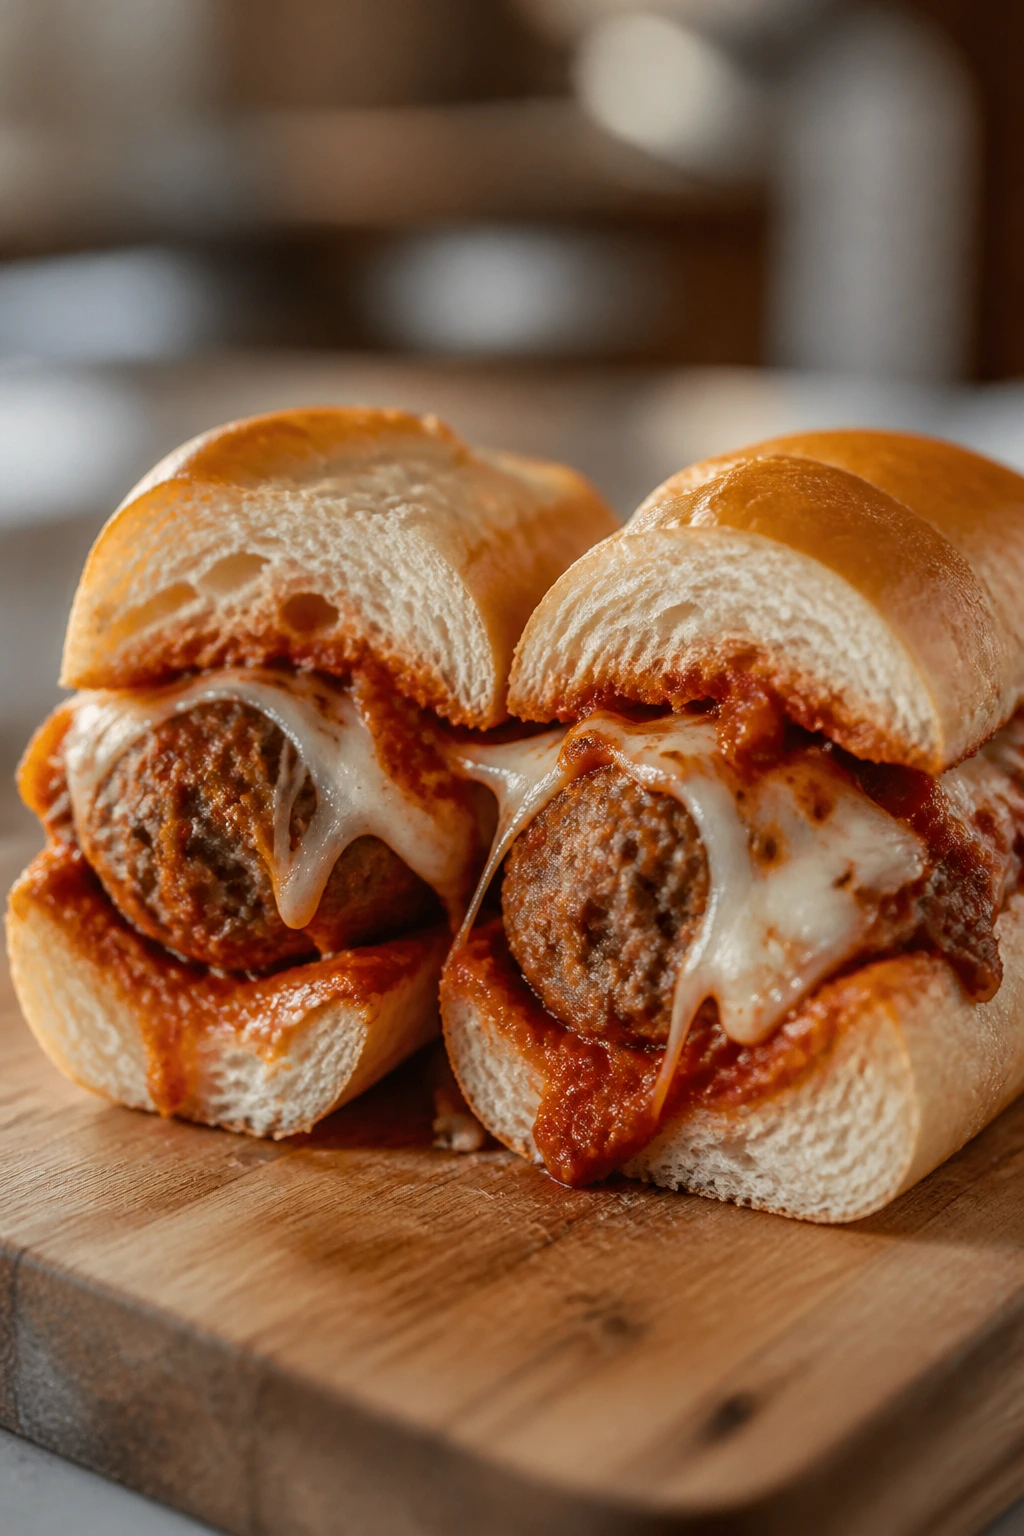
Mini meatball subs have a way of making a weeknight feel a little more fun than it had any right to be. The sauce soaks into the rolls, the cheese melts into the meatballs, and the whole thing eats like a tiny, messy victory.
Why It Works:
Frozen meatballs are a legitimate time-saver here, especially when they simmer in marinara long enough to take on flavor. Small rolls keep the portions manageable, which matters when you’re serving kids who want one full sandwich and then a second “just to check.” The bread gets warm and chewy, but not so soft that it falls apart in your hand.
Key Ingredients:
- 24 frozen meatballs
- 2 cups marinara sauce
- 4 small sub rolls or hoagie rolls
- 8 slices provolone
- 2 tablespoons grated Parmesan
- 1 tablespoon chopped parsley
Quick Steps:
- Simmer the meatballs in marinara over medium heat for 10 to 12 minutes until hot through.
- Split the rolls and place them on a baking sheet.
- Spoon 3 to 4 meatballs and a little sauce into each roll.
- Top with provolone and Parmesan.
- Broil for 1 to 2 minutes until the cheese melts and bubbles.
Equipment for This Recipe:
- Saucepan or deep skillet
- Baking sheet
- Broiler-safe oven
How to Serve This Dish:
Set each sub on a plate with a dill pickle and a few carrot sticks. If you’re feeding a crowd, cut the rolls in half so people can mix and match with other dishes.
Pro Tips for This Recipe:
- Spoon a little sauce into the bread before adding meatballs to keep every bite juicy.
- Watch the broiler closely; cheese goes from melted to scorched fast.
- Use sturdy rolls, not soft sandwich bread.
Variations on This Dish:
- Turkey Meatball Subs: Use turkey meatballs and a lighter sauce.
- Pizza Sub: Add pepperoni and mozzarella instead of provolone.
- Garlic Herb Version: Brush the rolls with garlic butter before broiling.
Common Mistakes to Avoid with This Dish:
- Using too much sauce: The bread turns soggy.
- Leaving the broiler unattended: Cheese burns quickly.
- Skipping the warm bread step: Cold rolls make the whole sub feel flat.
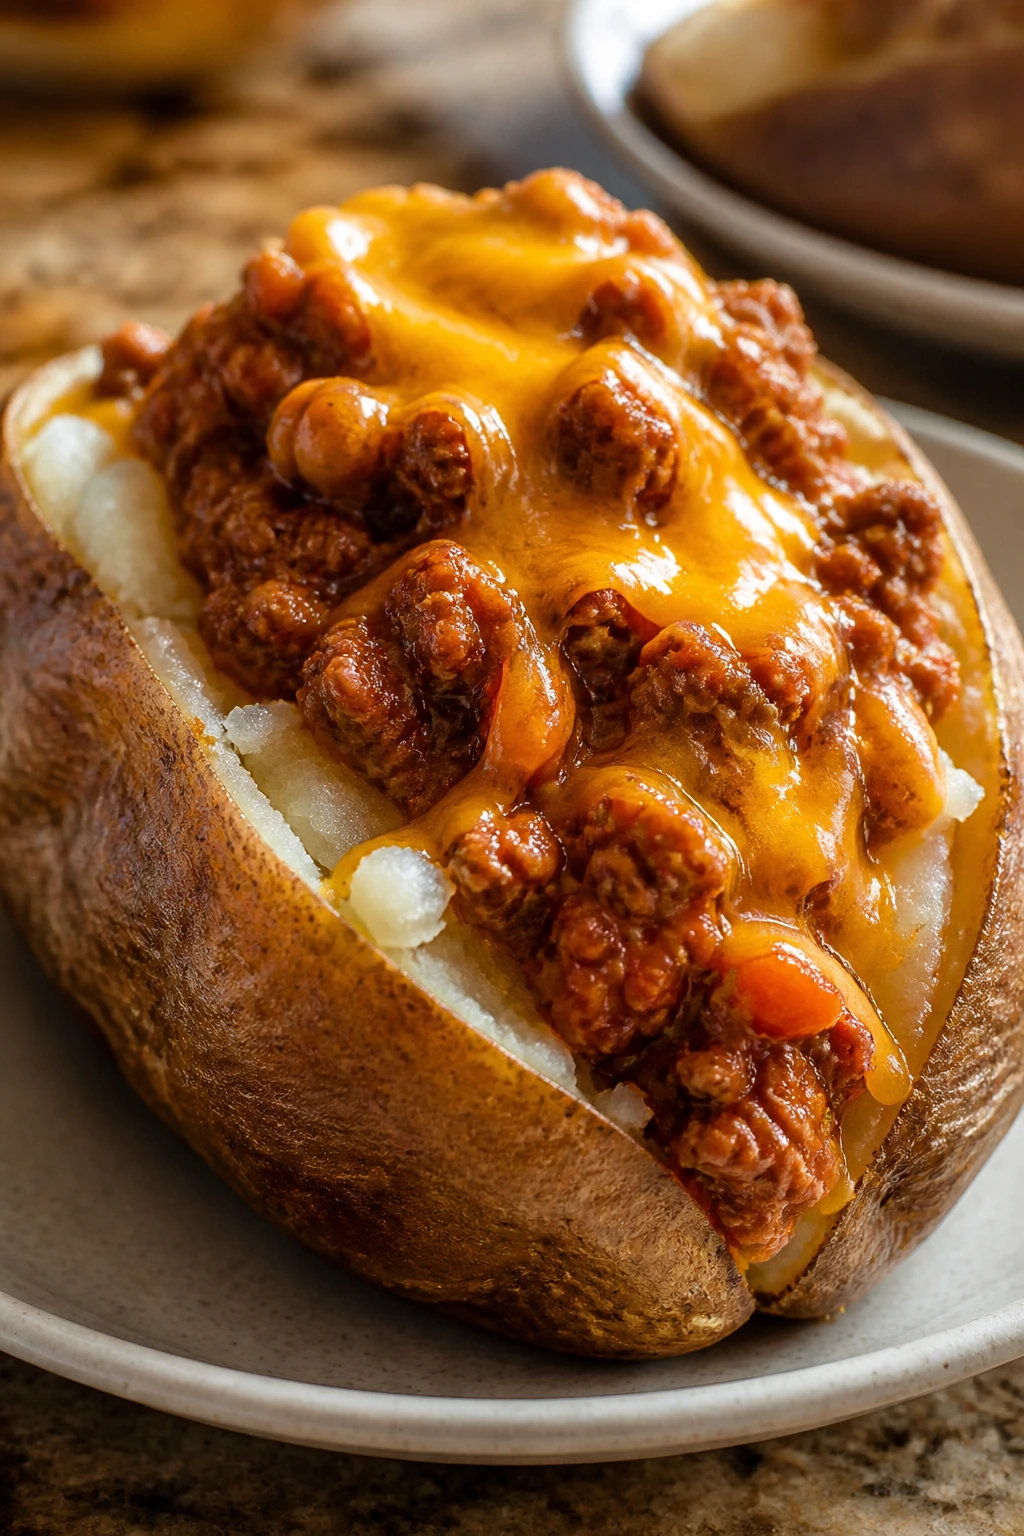
10. Baked Potato Bar with Broccoli and Bacon
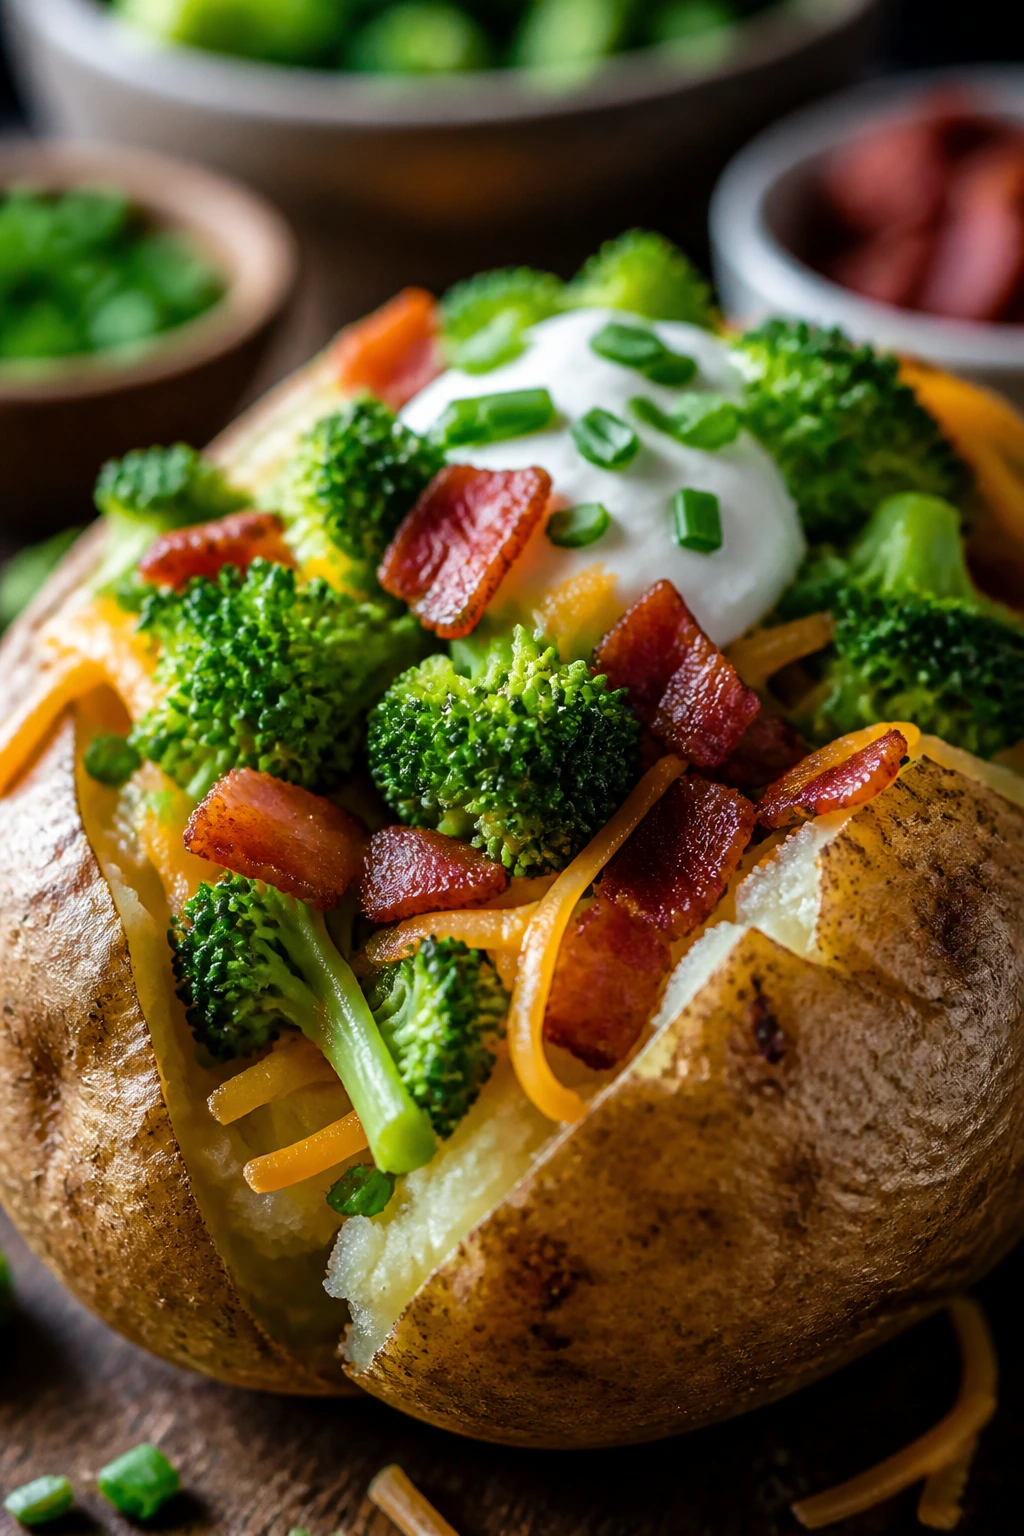
A baked potato bar is dinner with a built-in argument solver. Put the potatoes, broccoli, bacon, cheese, and sour cream on the table, and suddenly everybody has a version they’ll eat. It feels like a restaurant spread, but the actual work is far lighter than that.
Why It Works:
Microwaving the potatoes first turns a long-bake recipe into a quick one, and finishing them under the broiler gives the skin a little snap. Broccoli adds a fresh note, bacon brings salt, and the toppings let picky eaters customize without side-eyeing the whole meal. The whole thing is especially good when the fridge has random toppings that need a home.
Key Ingredients:
- 4 large russet potatoes
- 2 cups small broccoli florets
- 6 slices bacon, cooked and crumbled
- 1 cup shredded cheddar
- 1/2 cup sour cream
- 2 tablespoons butter
- 2 tablespoons chopped chives
Quick Steps:
- Scrub the potatoes, pierce them with a fork, and microwave on high for 8 to 10 minutes, turning halfway through.
- Steam or microwave the broccoli until just tender, about 3 minutes.
- Split the potatoes open and fluff the insides with a fork.
- Top with butter, broccoli, cheese, bacon, sour cream, and chives.
- If you want crispier skins, broil for 2 to 3 minutes before topping.
Equipment for This Recipe:
- Microwave
- Fork
- Baking sheet, optional for broiling
How to Serve This Dish:
Set out the toppings in little bowls and let everyone build their own. A simple green salad or a bowl of fruit is enough beside it.
Pro Tips for This Recipe:
- Choose potatoes that are similar in size so they microwave evenly.
- Don’t wrap them in foil before microwaving; the skins need direct heat.
- Steam the broccoli just until bright green so it keeps some bite.
Variations on This Dish:
- Chili Potato Bar: Spoon chili over the potatoes instead of bacon.
- Loaded Veggie Version: Use black beans, salsa, and avocado.
- Cheddar Broccoli Potato: Skip the bacon and double the broccoli.
Common Mistakes to Avoid with This Dish:
- Undercooked potatoes: If they resist the fork, give them another minute or two.
- Oversteamed broccoli: Mushy broccoli disappears into the potato.
- Too many toppings stacked in one pile: Spread them so every bite has balance.
11. Ham, Egg, and Cheese Roll-Ups
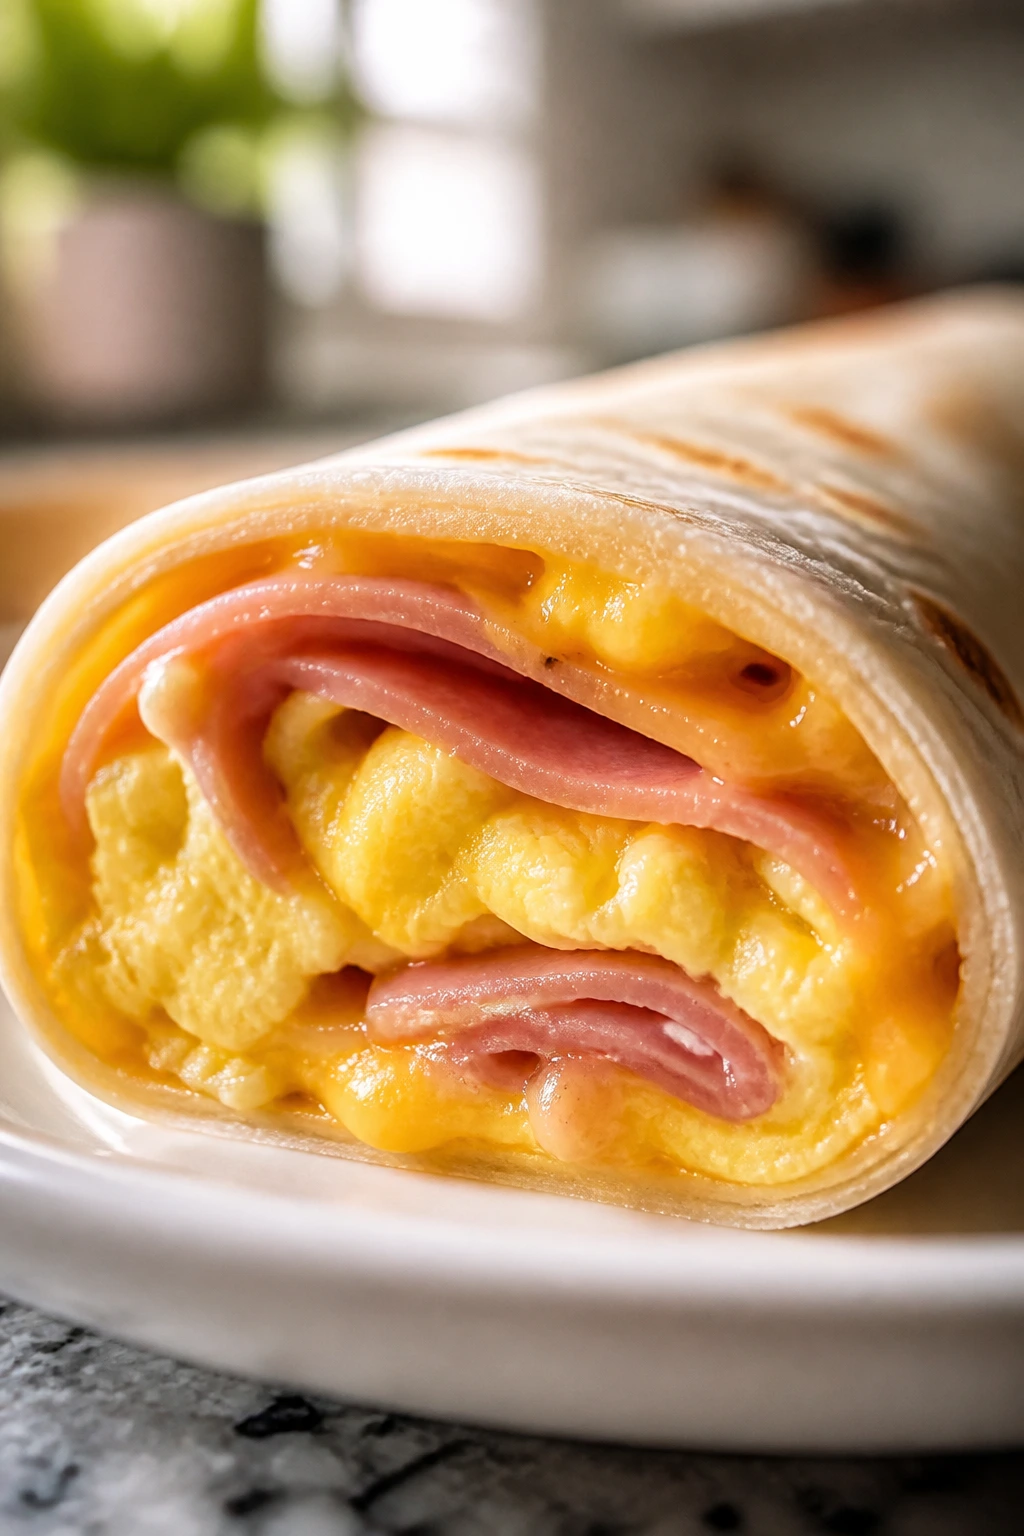
These roll-ups have the energy of a breakfast sandwich and the speed of a snack plate. The eggs stay soft, the ham adds salt, and the cheese melts into the tortilla so each bite holds together without much effort.
Why It Works:
You’re building a handheld dinner from things that cook fast and taste good warm. Eggs give the dish substance, tortillas keep it portable, and ham means you’re not waiting on a long meat cook time. This is a smart fallback when the evening has already turned into a race.
Key Ingredients:
- 6 large eggs
- 1 tablespoon butter
- 4 flour tortillas
- 8 slices deli ham
- 1 cup shredded cheddar
- Salt and black pepper
- Salsa for serving
Quick Steps:
- Whisk the eggs with a pinch of salt and pepper.
- Melt butter in a skillet over medium-low heat and cook the eggs gently for 3 to 4 minutes until softly set.
- Warm the tortillas for 15 seconds in the microwave or a dry skillet.
- Fill each tortilla with ham, eggs, and cheese, then roll tightly.
- Toast seam-side down in a skillet for 1 minute per side if you want a crisp outside.
Equipment for This Recipe:
- Nonstick skillet
- Whisk
- Spatula
How to Serve This Dish:
Cut the roll-ups in half and serve with salsa or hot sauce for dipping. A handful of cherry tomatoes or fruit on the side keeps it bright.
Pro Tips for This Recipe:
- Cook the eggs softly so they stay tender inside the wrap.
- Warm the tortillas first or they crack when you roll them.
- Don’t overfill; a neat roll is easier to eat.
Variations on This Dish:
- Sausage Roll-Ups: Swap ham for cooked breakfast sausage.
- Veggie Version: Add sautéed peppers and spinach.
- Southwest Roll-Up: Stir a spoonful of salsa into the eggs before cooking.
Common Mistakes to Avoid with This Dish:
- Cooking the eggs too hard: They turn dry inside the tortilla.
- Rolling cold tortillas: They split.
- Skipping the seam-side toast: The wrap can unravel mid-bite.
12. Chicken Caesar Pita Pockets
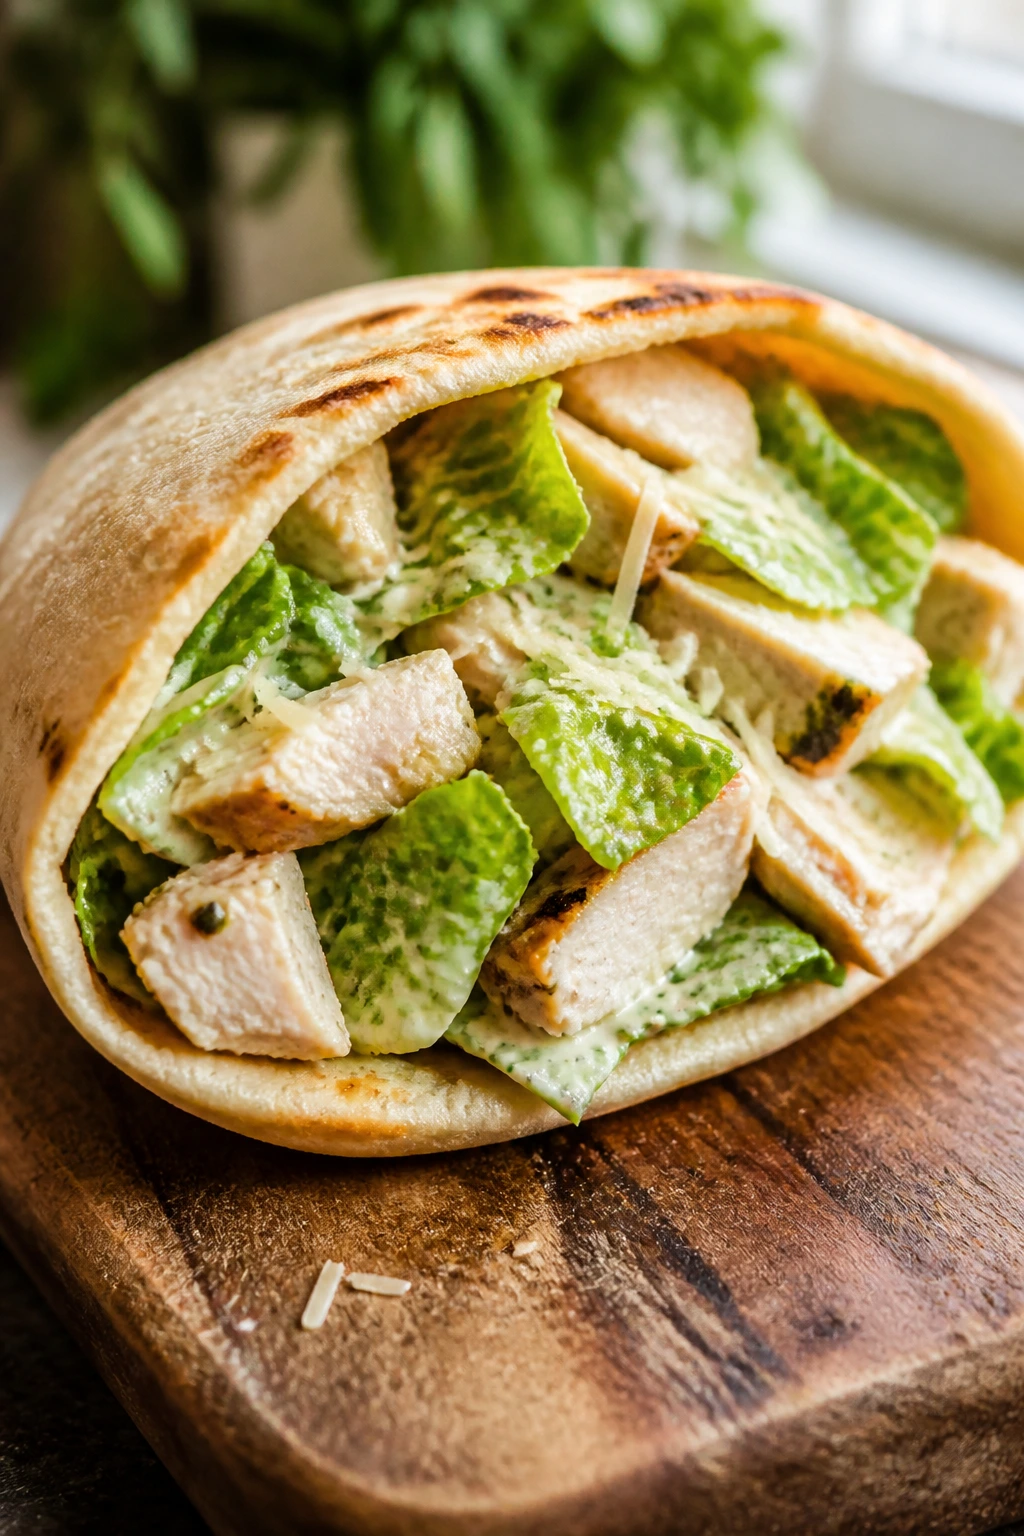
Pita pockets are one of those quiet fixes that feel almost too simple to count as dinner, until you bite into one. The romaine stays crisp, the chicken is cool and savory, and the Parmesan and Caesar dressing do the heavy flavor work without any cooking except perhaps warming the chicken first.
Why It Works:
The pita acts like an edible bowl, which keeps the filling contained and the plate less chaotic. Caesar dressing already carries salt, garlic, and a little tang, so you don’t need to build a sauce from scratch. When the clock is tight, this is the kind of meal that feels assembled on purpose rather than thrown together.
Key Ingredients:
- 2 cups cooked chicken, chopped
- 1/2 cup Caesar dressing
- 4 pita rounds
- 4 cups chopped romaine
- 1/4 cup grated Parmesan
- 1/2 cup croutons, lightly crushed
- Black pepper
Quick Steps:
- Toss the chicken with Caesar dressing.
- Warm the pitas for 30 seconds in the microwave or a dry skillet.
- Open each pita pocket carefully and fill with romaine, chicken, Parmesan, and a few crushed croutons.
- Finish with black pepper and serve right away.
Equipment for This Recipe:
- Mixing bowl
- Knife
- Skillet or microwave, optional for warming
How to Serve This Dish:
Serve with celery sticks and a few grapes for a plate that feels balanced without much effort. If the pitas are small, cut them in half and treat them like finger food.
Pro Tips for This Recipe:
- Don’t drown the chicken in dressing; a light coating keeps the pita from softening.
- Fill right before serving so the lettuce stays crisp.
- Warm the pitas just enough to bend; too much heat makes them dry.
Variations on This Dish:
- Bacon Caesar Pita: Add crumbled bacon.
- Turkey Caesar Pocket: Swap in sliced turkey.
- Extra Crunch Version: Add thin cucumber slices with the lettuce.
Common Mistakes to Avoid with This Dish:
- Overstuffing the pita: It tears before you reach the table.
- Using very wet dressing: The pocket softens fast.
- Letting the chicken sit warm for too long: Keep it chilled or gently warm, not hot and dry.
13. Sweet Potato and Black Bean Tacos
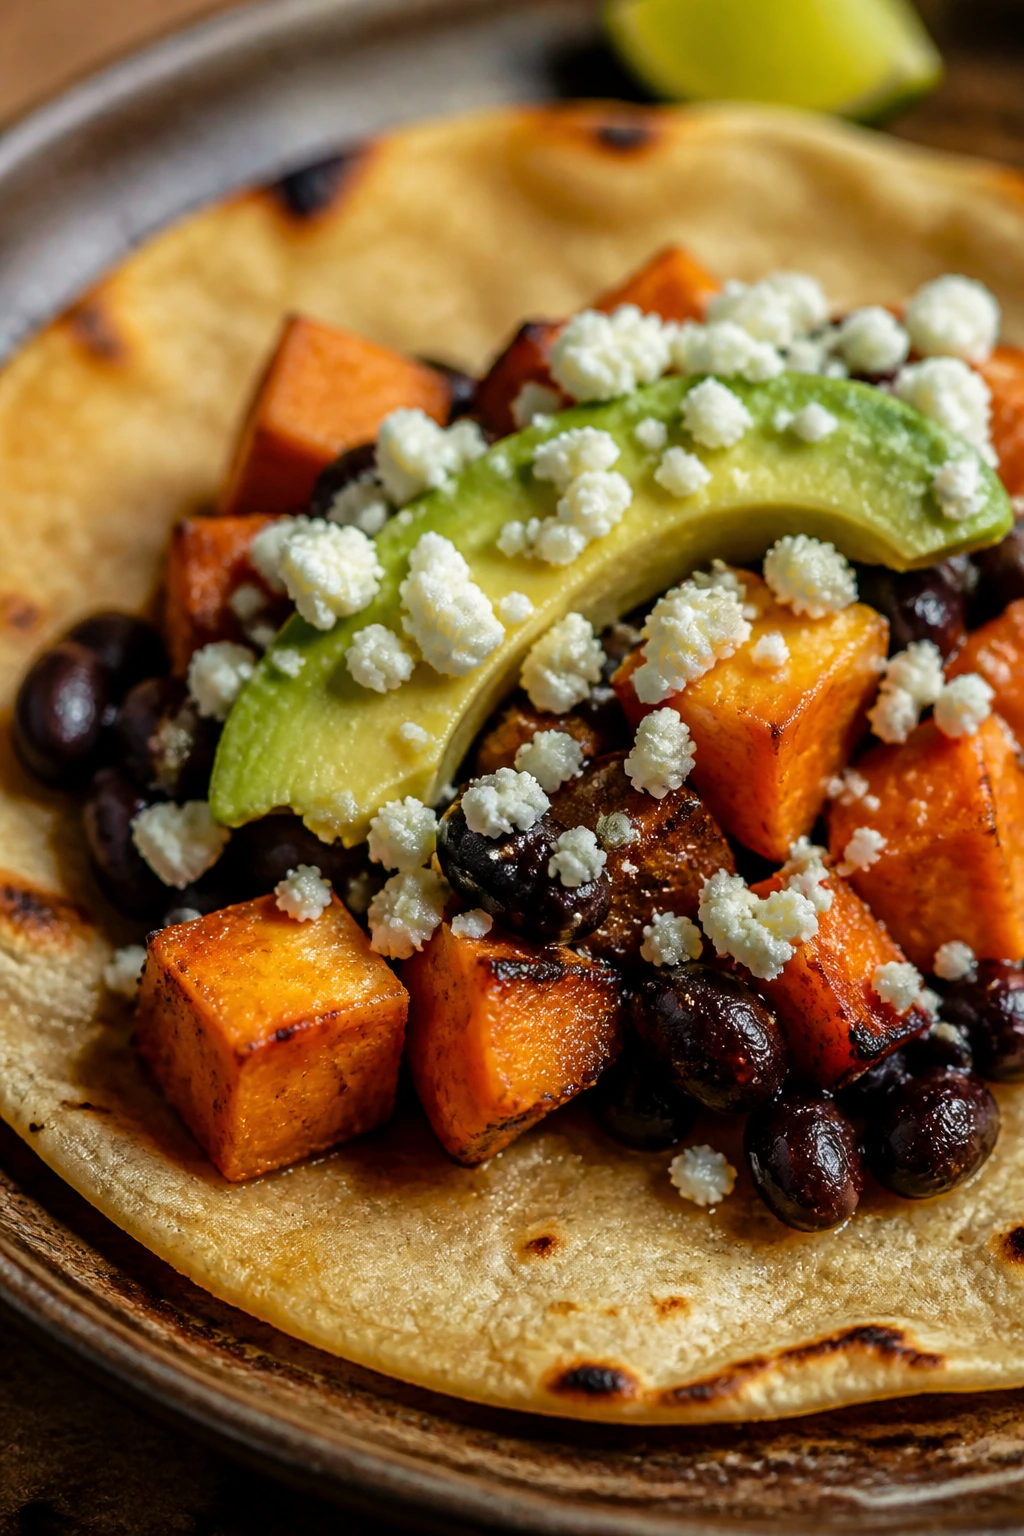
These tacos are a little sweet, a little smoky, and satisfyingly soft with a crisp tortilla shell if you toast them right. The sweet potato gives you body, the beans add heft, and the lime at the end keeps the whole thing from feeling heavy.
Why It Works:
Sweet potatoes cook fast when you dice them small, especially if you give them a short microwave head start. Black beans bring protein and fiber, and tacos are one of the few formats where vegetables often get more enthusiasm than they would in a bowl. The contrast between the creamy inside and the warm tortilla is what makes these feel finished.
Key Ingredients:
- 2 medium sweet potatoes, peeled and diced small
- 1 tablespoon olive oil
- 1 teaspoon cumin
- 1 can black beans, rinsed and drained
- 8 small corn tortillas
- 1 avocado, sliced
- 1/4 cup crumbled cotija or feta
- Lime wedges
Quick Steps:
- Microwave the diced sweet potatoes with a splash of water, covered, for 4 to 5 minutes to soften.
- Toss them in oil and cumin, then cook in a skillet for 5 to 6 minutes until browned at the edges.
- Warm the beans in a second pan or the microwave.
- Heat the tortillas in a dry skillet for 20 seconds per side.
- Fill with sweet potato, beans, avocado, cheese, and lime.
Equipment for This Recipe:
- Skillet
- Microwave-safe bowl with lid or plate
- Dry pan for tortillas
How to Serve This Dish:
Serve with salsa and maybe a spoonful of yogurt or sour cream. A bowl of melon or orange segments is a good fit beside the tacos.
Pro Tips for This Recipe:
- Dice the sweet potato small so it cooks quickly and evenly.
- Warm the tortillas one at a time so they stay flexible.
- Lime at the end matters. It sharpens the sweetness of the potatoes.
Variations on This Dish:
- Spicy Bean Taco: Add chipotle powder or hot sauce.
- Cheesy Version: Melt a little cheddar into the beans.
- Add Greens: Tuck in shredded cabbage for crunch.
Common Mistakes to Avoid with This Dish:
- Cutting the potato too large: It takes too long and stays hard.
- Skipping the tortilla warm-up: Corn tortillas crack.
- Forgetting acid: Lime or salsa keeps the filling from tasting flat.
14. Tuna Melt Toasts
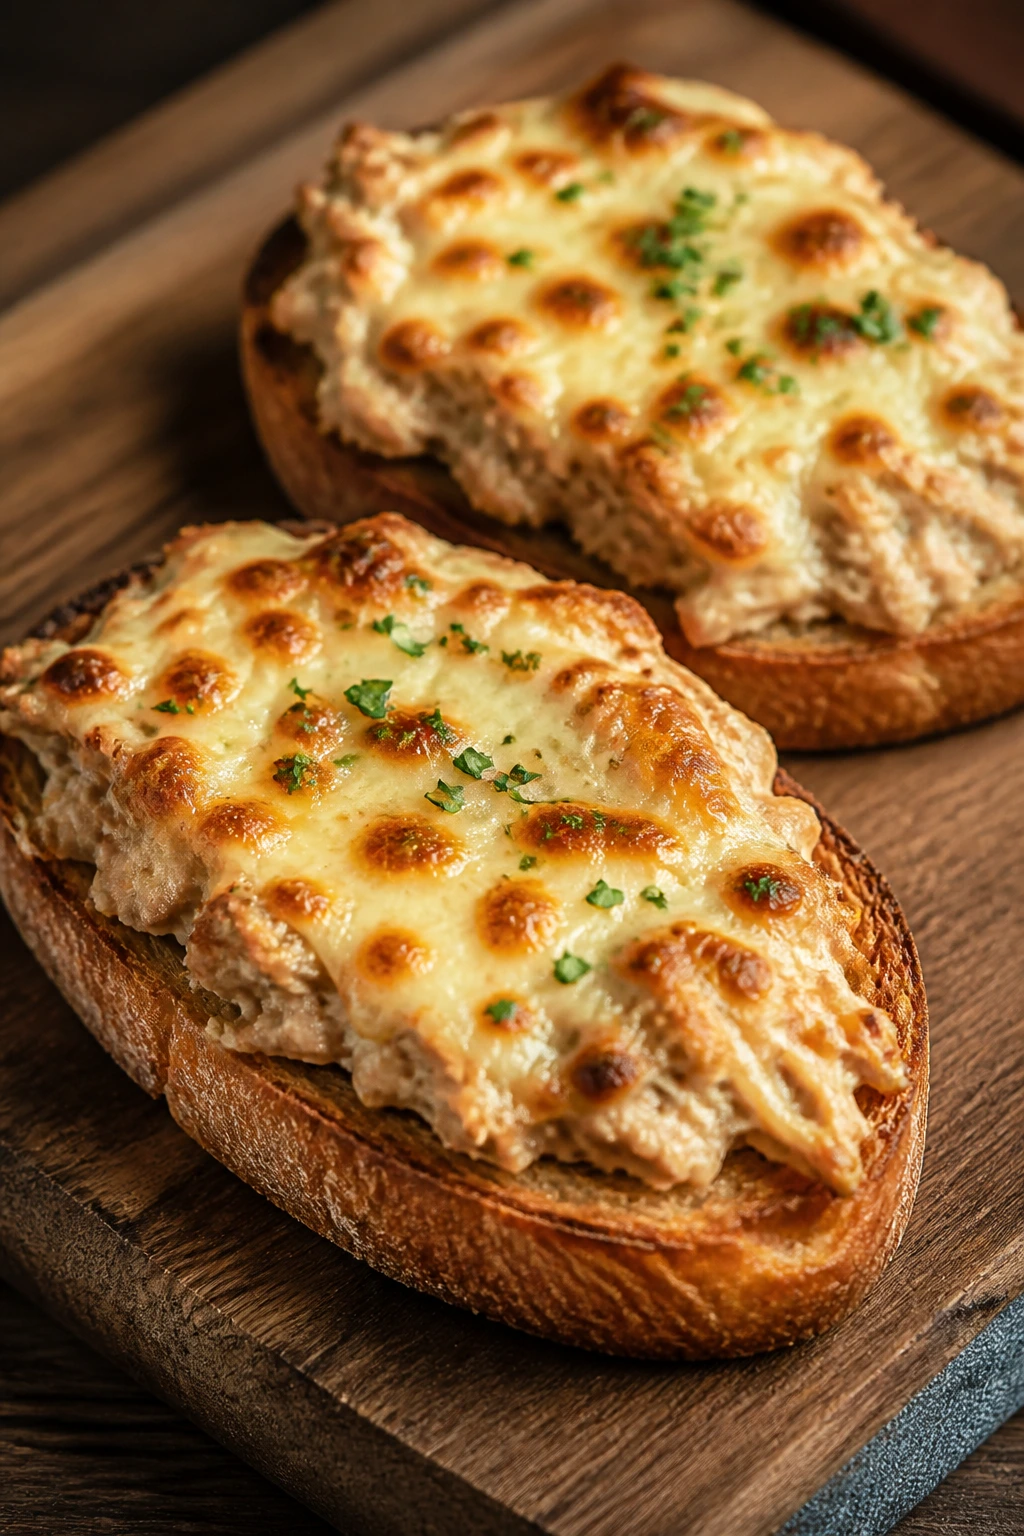
Tuna melts are old-school in the best way. The toast crunches underneath, the tuna filling gets warm and creamy, and the cheese blisters just enough at the top to make the whole thing feel like diner food without leaving the house.
Why It Works:
Canned tuna is fast, cheap, and already cooked, which makes this a strong choice when the fridge looks rough. Toast gives the structure, and broiling the cheese makes the top taste more interesting than a plain sandwich. It’s a good dinner when you want something hot but don’t want to use the stove for long.
Key Ingredients:
- 2 cans tuna, drained
- 1/4 cup mayonnaise
- 1 tablespoon relish or finely chopped celery
- 8 slices sturdy bread
- 4 slices cheddar or 1 cup shredded cheese
- 1 tablespoon butter
- Tomato slices, optional
Quick Steps:
- Mix the tuna, mayonnaise, and relish in a bowl.
- Toast the bread lightly.
- Spread the tuna mixture over 4 slices, add cheese, and cover with the remaining bread or leave open-faced.
- Broil for 1 to 2 minutes until the cheese melts.
- Add tomato slices if you like.
Equipment for This Recipe:
- Baking sheet
- Bowl
- Broiler or toaster oven
How to Serve This Dish:
Cut the toasts into halves or quarters and serve with dill pickles and carrot sticks. If you make open-faced melts, a knife and fork are handy.
Pro Tips for This Recipe:
- Drain the tuna well so the filling doesn’t turn watery.
- Use bread that can hold up under heat; sandwich bread gets flimsy.
- Watch the broiler the whole time. It goes fast.
Variations on This Dish:
- Pickle Tuna Melt: Add chopped pickles instead of relish.
- Apple Tuna Melt: Mix in a little grated apple for sweetness.
- Spicy Melt: Stir in mustard and a pinch of cayenne.
Common Mistakes to Avoid with This Dish:
- Too much mayonnaise: The filling slides.
- Skipping the toast step: The bread gets soggy.
- Walking away from the broiler: Cheese burns in seconds.
15. Skillet Gnocchi with Sausage and Peppers
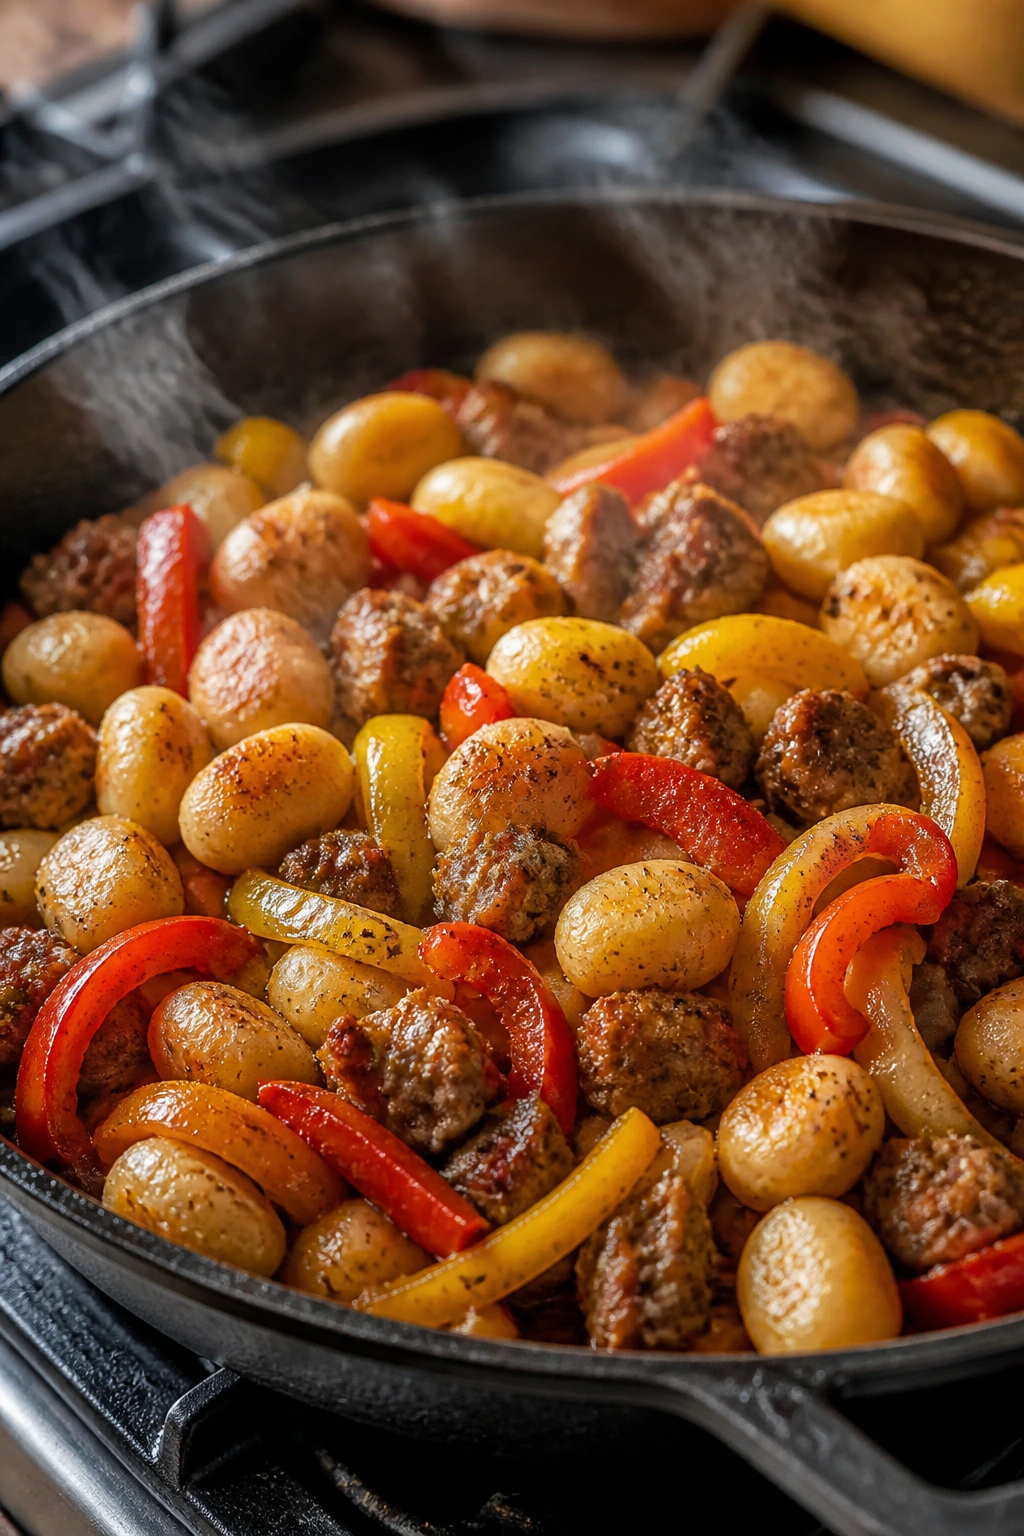
Gnocchi in a skillet gets a little chewy in the best way, especially when the edges brown and the sausage drips flavor into the pan. Add peppers and onions, and the whole thing smells like dinner has been working harder than it actually has.
Why It Works:
Shelf-stable or refrigerated gnocchi cooks quickly and doesn’t need a separate pot if you choose the skillet route. Sausage gives you seasoning and fat all in one shot, which helps the peppers soften and the sauce cling. This is a strong choice when you want something filling without standing over a stove for half an hour.
Key Ingredients:
- 1 pound Italian sausage
- 1 bell pepper, sliced
- 1 small onion, sliced
- 1 pound shelf-stable or refrigerated gnocchi
- 1 cup marinara or 1/2 cup cream
- 2 cups spinach
- 1/4 cup grated Parmesan
Quick Steps:
- Brown the sausage in a large skillet over medium heat for 5 to 6 minutes.
- Add the peppers and onion and cook for 4 minutes until softened.
- Stir in the gnocchi and cook until lightly browned.
- Add marinara or cream and simmer for 2 to 3 minutes.
- Fold in spinach and Parmesan.
Equipment for This Recipe:
- Large skillet
- Wooden spoon
- Knife and cutting board
How to Serve This Dish:
Serve in shallow bowls with extra Parmesan and black pepper. A simple side salad or sliced cucumbers keeps the plate from feeling heavy.
Pro Tips for This Recipe:
- Brown the gnocchi a little; that texture is the best part.
- If the pan looks dry, add a splash of water.
- Use sweet or mild sausage if you want a gentler flavor.
Variations on This Dish:
- Creamy Gnocchi: Use cream and Parmesan instead of marinara.
- Tomato Version: Add extra marinara and red pepper flakes.
- Chicken Sausage Swap: Lighter sausage works well here.
Common Mistakes to Avoid with This Dish:
- Crowding the pan: The gnocchi won’t brown.
- Undercooking the peppers: They need time to soften.
- Adding too much sauce at once: Start small and finish with a splash if needed.
16. Buttered Noodles with Peas and Parmesan
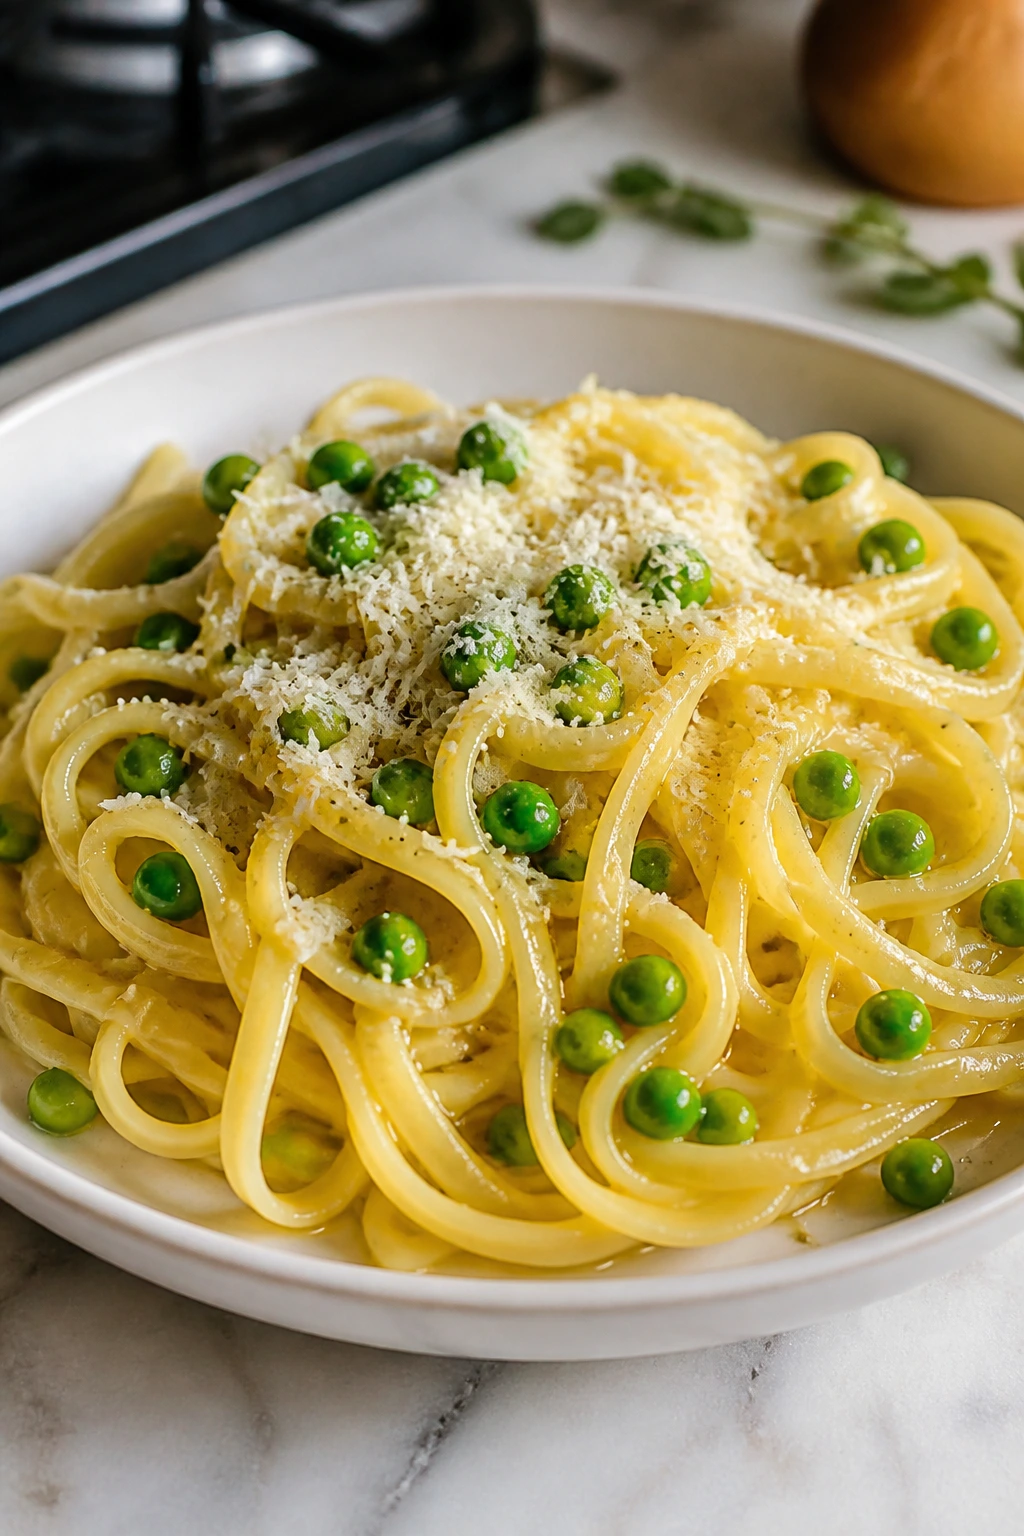
Sometimes dinner needs to be the simplest thing on the table and still feel cared for. Buttered noodles with peas do that job with almost no resistance. The pasta turns glossy, the peas add color and a little sweetness, and the Parmesan pulls it back from feeling too plain.
Why It Works:
This is a classic fallback because the ingredients are gentle and the timing is easy to manage. Frozen peas cook in the hot pasta water or the hot noodles themselves, so you barely need another pan. A little butter and cheese go a long way when the goal is getting food on the table without a fuss.
Key Ingredients:
- 12 ounces egg noodles or rotini
- 1 1/2 cups frozen peas
- 3 tablespoons butter
- 1/2 cup grated Parmesan
- 1 teaspoon lemon zest
- Black pepper
- Salt for the pasta water
Quick Steps:
- Boil the pasta in salted water until tender, then add the peas during the last 1 minute.
- Drain, reserving 1/2 cup pasta water.
- Return the pasta and peas to the pot with butter, Parmesan, lemon zest, and a splash of pasta water.
- Stir until glossy and warm.
- Finish with black pepper.
Equipment for This Recipe:
- Large pot
- Colander
- Wooden spoon
How to Serve This Dish:
Serve as a main with a side of sliced tomatoes or a few strips of rotisserie chicken. A sprinkle of extra Parmesan on top makes it feel more finished.
Pro Tips for This Recipe:
- Salt the pasta water well; this dish depends on it.
- Save a little pasta water so the sauce coats instead of clumps.
- Lemon zest wakes up the butter and keeps the noodles from tasting flat.
Variations on This Dish:
- Garlic Butter Noodles: Add minced garlic to the butter.
- Cheesy Broccoli Noodles: Swap peas for broccoli florets.
- Ham Noodles: Toss in diced ham for extra protein.
Common Mistakes to Avoid with This Dish:
- Rinsing the pasta: You wash away the starch that helps the sauce cling.
- Adding cheese to dry noodles: Use a splash of pasta water.
- Overcooking the peas: They only need a brief hit of heat.
17. Pizza Stuffed Bagels

Bagels already have the shape of a small meal, and pizza toppings make them feel even more mischievous. The crust gets crisp around the edges, the cheese melts down into the holes, and every bite tastes like a shortcut that actually works.
Why It Works:
Bagels are sturdy enough to hold sauce and cheese without collapsing, which matters if dinner is being eaten in shifts between homework and a soccer bag. They toast quickly and offer a chewy base that feels more substantial than plain bread. This is also a good “use what you have” recipe because almost any pizza topping can slide on top.
Key Ingredients:
- 4 bagels, split
- 1 cup pizza sauce
- 2 cups shredded mozzarella
- 1/2 cup mini pepperoni or chopped toppings
- 1 teaspoon Italian seasoning
- 1 tablespoon olive oil
Quick Steps:
- Preheat the oven to 400°F.
- Split the bagels and place them cut-side up on a baking sheet.
- Spoon sauce over each half, then add mozzarella, toppings, and Italian seasoning.
- Bake for 8 to 10 minutes until the cheese melts and the bagels crisp.
- Let them cool for 1 minute before serving.
Equipment for This Recipe:
- Baking sheet
- Spoon
- Oven
How to Serve This Dish:
Cut the bagels into quarters and serve with celery sticks or fruit. They’re easiest to eat when they’re still warm and the cheese is stretchy.
Pro Tips for This Recipe:
- Toast the bagels first if they’re very soft.
- Use a thick sauce so the bagels don’t go soggy.
- Keep toppings small so the halves stay balanced.
Variations on This Dish:
- Veggie Bagels: Add mushrooms, peppers, or spinach.
- Breakfast Pizza Bagels: Top with cooked sausage and scrambled eggs.
- White Pizza Version: Use ricotta and mozzarella instead of red sauce.
Common Mistakes to Avoid with This Dish:
- Using too much sauce: It leaks into the bagel.
- Adding large topping chunks: The bagels get awkward to eat.
- Overbaking: The cheese should melt before the bagels dry out.
18. Creamy Tomato Soup with Grilled Cheese Dippers
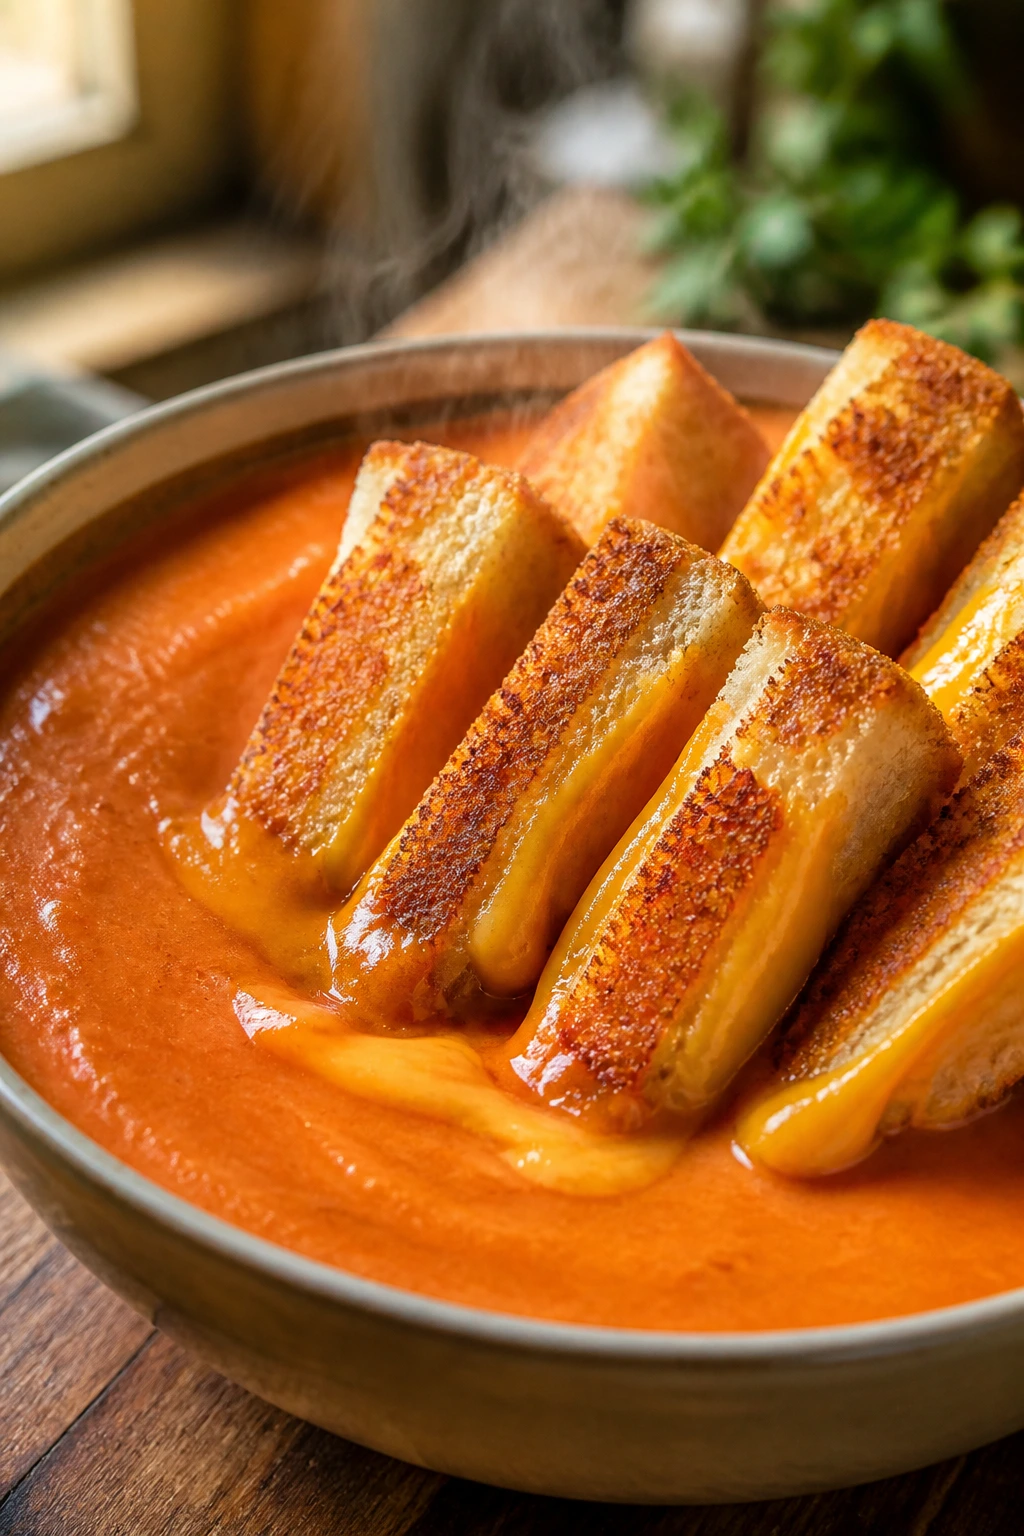
Tomato soup and grilled cheese still work because the contrast is so good. The soup is smooth and tangy, the sandwich is buttery and crisp, and cutting the toast into dippers turns the whole thing into a meal kids usually don’t fight.
Why It Works:
A quick tomato soup can be built from canned tomatoes, broth, and a little cream without tasting thin or canned. Grilled cheese strips are easier for smaller hands than whole sandwiches, and they stay crisp enough to dip if you serve fast. It’s a warm dinner that feels comforting without being heavy.
Key Ingredients:
- 1 tablespoon butter
- 1 small onion, diced
- 2 cloves garlic, minced
- 2 cans crushed tomatoes
- 2 cups chicken or vegetable broth
- 1/2 cup cream or milk
- 1 teaspoon sugar
- 8 slices bread
- 8 slices cheese
- Butter for grilling
Quick Steps:
- Cook the onion in butter over medium heat for 4 to 5 minutes.
- Add garlic for 30 seconds, then stir in tomatoes, broth, and sugar.
- Simmer for 10 minutes, then stir in cream.
- Make grilled cheese sandwiches in a skillet, about 2 to 3 minutes per side.
- Cut the sandwiches into strips and serve with the soup.
Equipment for This Recipe:
- Saucepan
- Skillet
- Immersion blender, optional
How to Serve This Dish:
Serve the soup in mugs or bowls with the grilled cheese standing upright on the side. A few crackers or a sliced pear are enough to round it out.
Pro Tips for This Recipe:
- Blend the soup if you want it smoother, but it’s not required.
- Add cream after the simmer, not before, so it stays silky.
- Use a cheese that melts well, like cheddar or American.
Variations on This Dish:
- Roasted Garlic Soup: Use roasted garlic if you have it.
- Herby Version: Add basil or oregano.
- Spicy Tomato Soup: Stir in red pepper flakes.
Common Mistakes to Avoid with This Dish:
- Boiling after adding cream: It can separate.
- Using flimsy bread: The sandwiches fall apart when dipped.
- Skipping the sugar: Tomato soup can taste flat without a little balance.
19. Teriyaki Chicken Rice Bowls
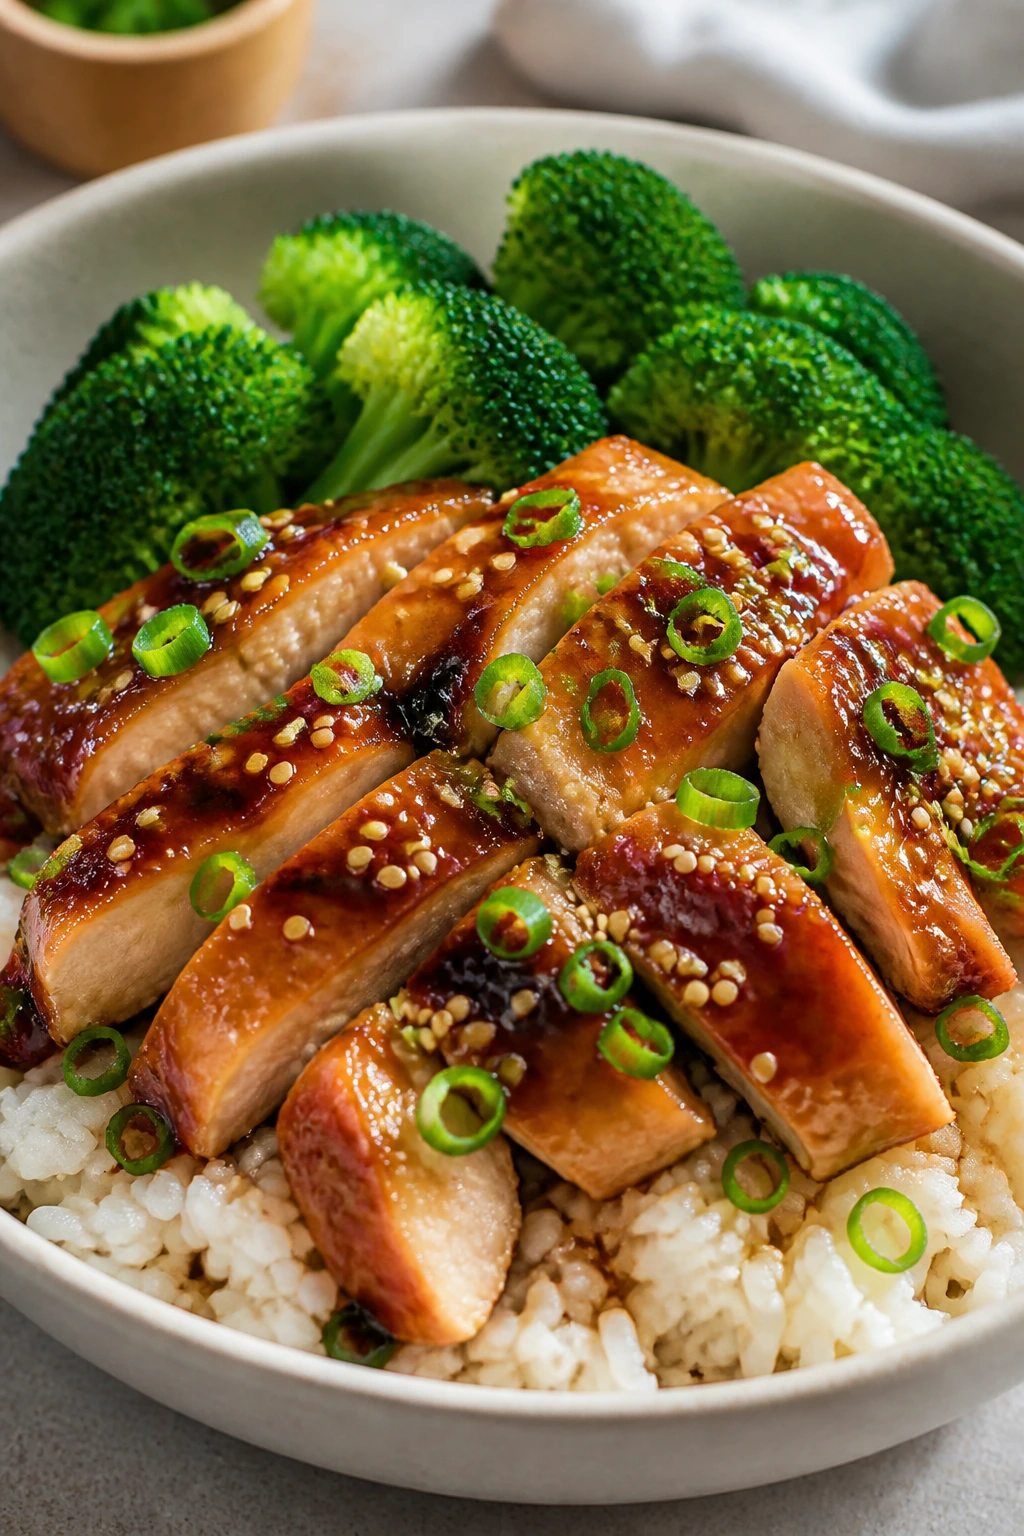
These bowls taste cleaner and brighter than the cheesier items in the list, which is useful when the afternoon snack pile has already gone too far. The chicken gets sticky with sauce, the rice catches the drips, and the broccoli gives the bowl some crunch and color.
Why It Works:
Thin chicken pieces cook fast, and teriyaki sauce handles a lot of the flavor work for you. Rice makes the bowl filling, broccoli brings a fresher note, and the whole thing can be assembled in layers so it feels complete instead of random. If you need a meal that looks pulled together without being fussy, this is a smart move.
Key Ingredients:
- 1 1/2 pounds boneless chicken thighs or thin chicken breasts
- 1 cup teriyaki sauce
- 3 cups cooked rice
- 2 cups broccoli florets
- 1 tablespoon neutral oil
- 1 tablespoon sesame seeds
- 2 sliced scallions
Quick Steps:
- Heat oil in a skillet over medium-high heat and cook the chicken for 4 to 5 minutes per side until it reaches 165°F.
- Pour in the teriyaki sauce and simmer for 1 to 2 minutes until glossy.
- Steam or microwave the broccoli until bright green and just tender.
- Divide rice into bowls and top with chicken, broccoli, sesame seeds, and scallions.
- Spoon extra sauce over the top.
Equipment for This Recipe:
- Large skillet
- Instant-read thermometer
- Serving bowls
How to Serve This Dish:
Serve with chopsticks if your crowd likes the novelty, or with forks if you need speed. A few mandarin orange segments beside the bowl fit the sweet-salty balance nicely.
Pro Tips for This Recipe:
- Thin chicken cooks faster and stays juicier.
- Don’t drown the pan in sauce until the chicken is cooked; let it sear first.
- Sesame seeds and scallions do a lot of visual work for almost no effort.
Variations on This Dish:
- Beef Teriyaki Bowl: Use thin-sliced beef instead of chicken.
- Veggie Bowl: Swap chicken for tofu or extra broccoli.
- Pineapple Version: Add small pineapple chunks for sweetness.
Common Mistakes to Avoid with This Dish:
- Overcrowding the pan: The chicken steams instead of browns.
- Cooking the broccoli until soft: Leave some bite.
- Adding sauce too early: It can burn before the chicken finishes.
20. Crispy Fish Stick Tacos
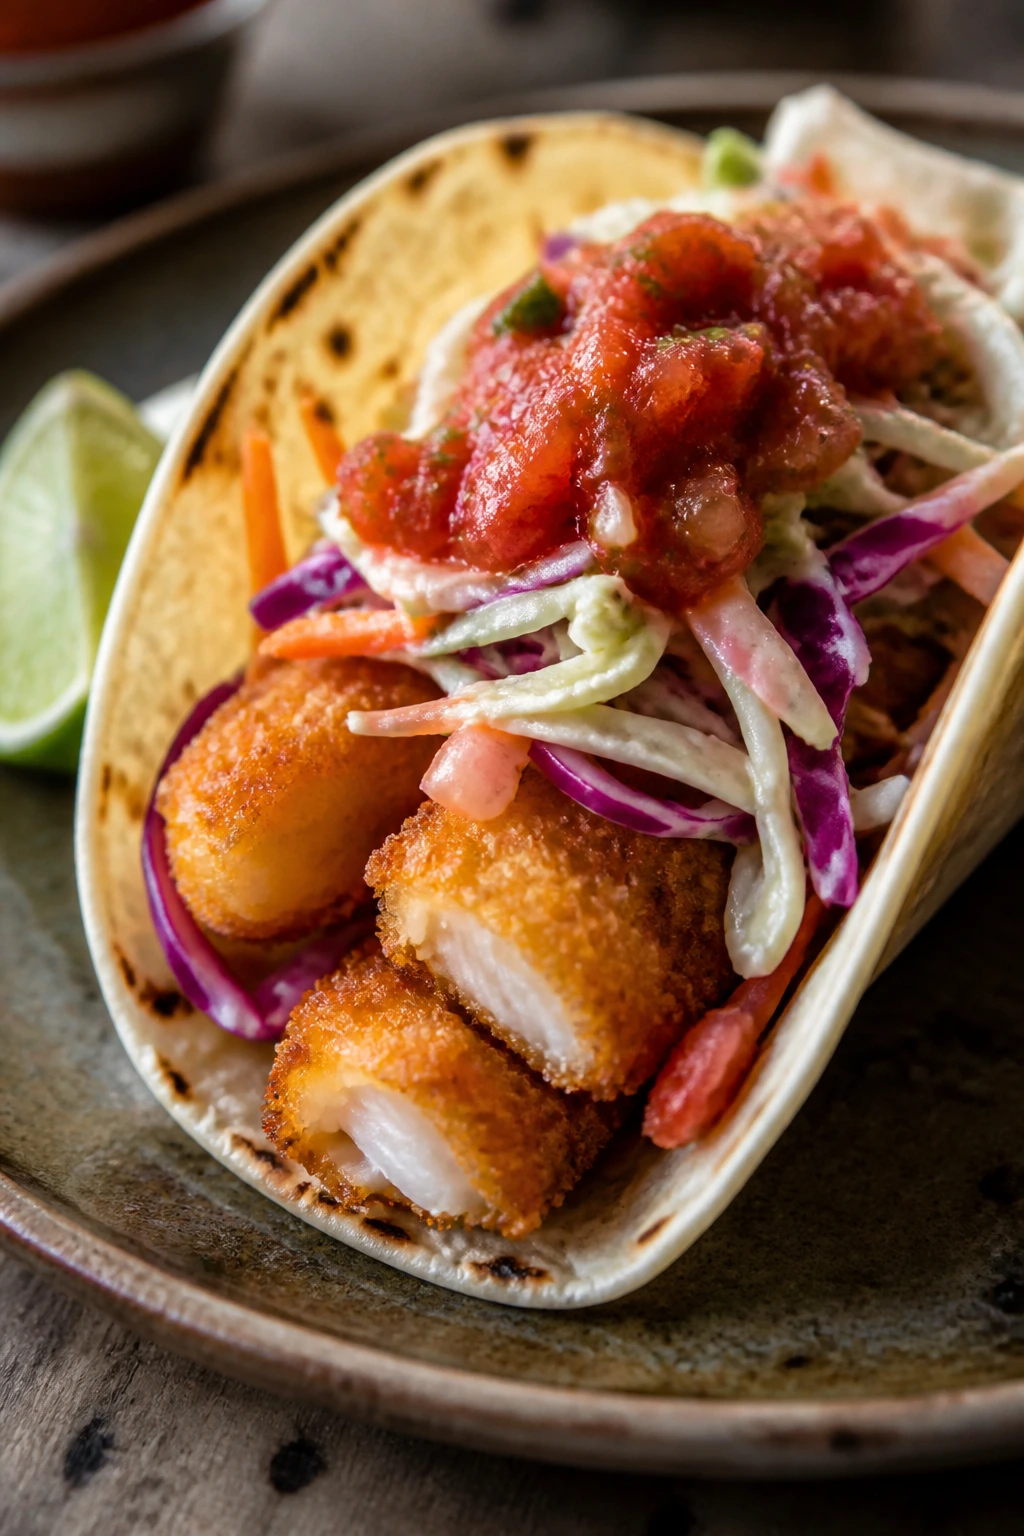
Fish stick tacos sound almost too simple until you eat one. The fish gets crunchy in the oven, the slaw cools everything down, and a little salsa or lime pulls the whole taco into place. It’s a cheerful dinner, which is not something every weeknight can say.
Why It Works:
Fish sticks are already breaded and portioned, so they cook quickly and give you crisp texture with almost no prep. Soft tortillas contrast with the crunch, and slaw keeps the tacos from tasting too heavy. For a family with mixed opinions about fish, this format usually goes over better than a plain fillet.
Key Ingredients:
- 12 frozen fish sticks
- 8 small tortillas
- 2 cups coleslaw mix
- 1/2 cup plain yogurt or mayo
- 1 tablespoon lime juice
- 1/2 cup salsa
- 1 avocado, sliced
Quick Steps:
- Bake the fish sticks according to the package until crisp and hot.
- Toss the coleslaw mix with yogurt or mayo and lime juice.
- Warm the tortillas in a dry skillet.
- Fill each tortilla with slaw, 1 to 2 fish sticks, salsa, and avocado.
- Serve right away.
Equipment for This Recipe:
- Baking sheet
- Mixing bowl
- Dry skillet
How to Serve This Dish:
Serve with extra lime wedges and maybe a few tortilla chips if you want more crunch. These work well as an assembly-at-the-table dinner so the slaw stays crisp.
Pro Tips for This Recipe:
- Don’t overload the tortilla; one or two fish sticks per taco is enough.
- Warm tortillas are less likely to crack.
- Lime in the slaw keeps the tacos tasting fresh.
Variations on This Dish:
- Spicy Taco: Add hot sauce or chipotle mayo.
- Crunchy Cabbage Version: Use shredded cabbage and carrots in the slaw.
- Creamy Sauce Swap: Skip salsa and use a quick yogurt sauce.
Common Mistakes to Avoid with This Dish:
- Letting the fish sticks sit too long: They lose crunch.
- Using cold tortillas: They split.
- Adding too much slaw: The taco falls apart before the first bite.
21. Breakfast-for-Dinner Burrito Wraps
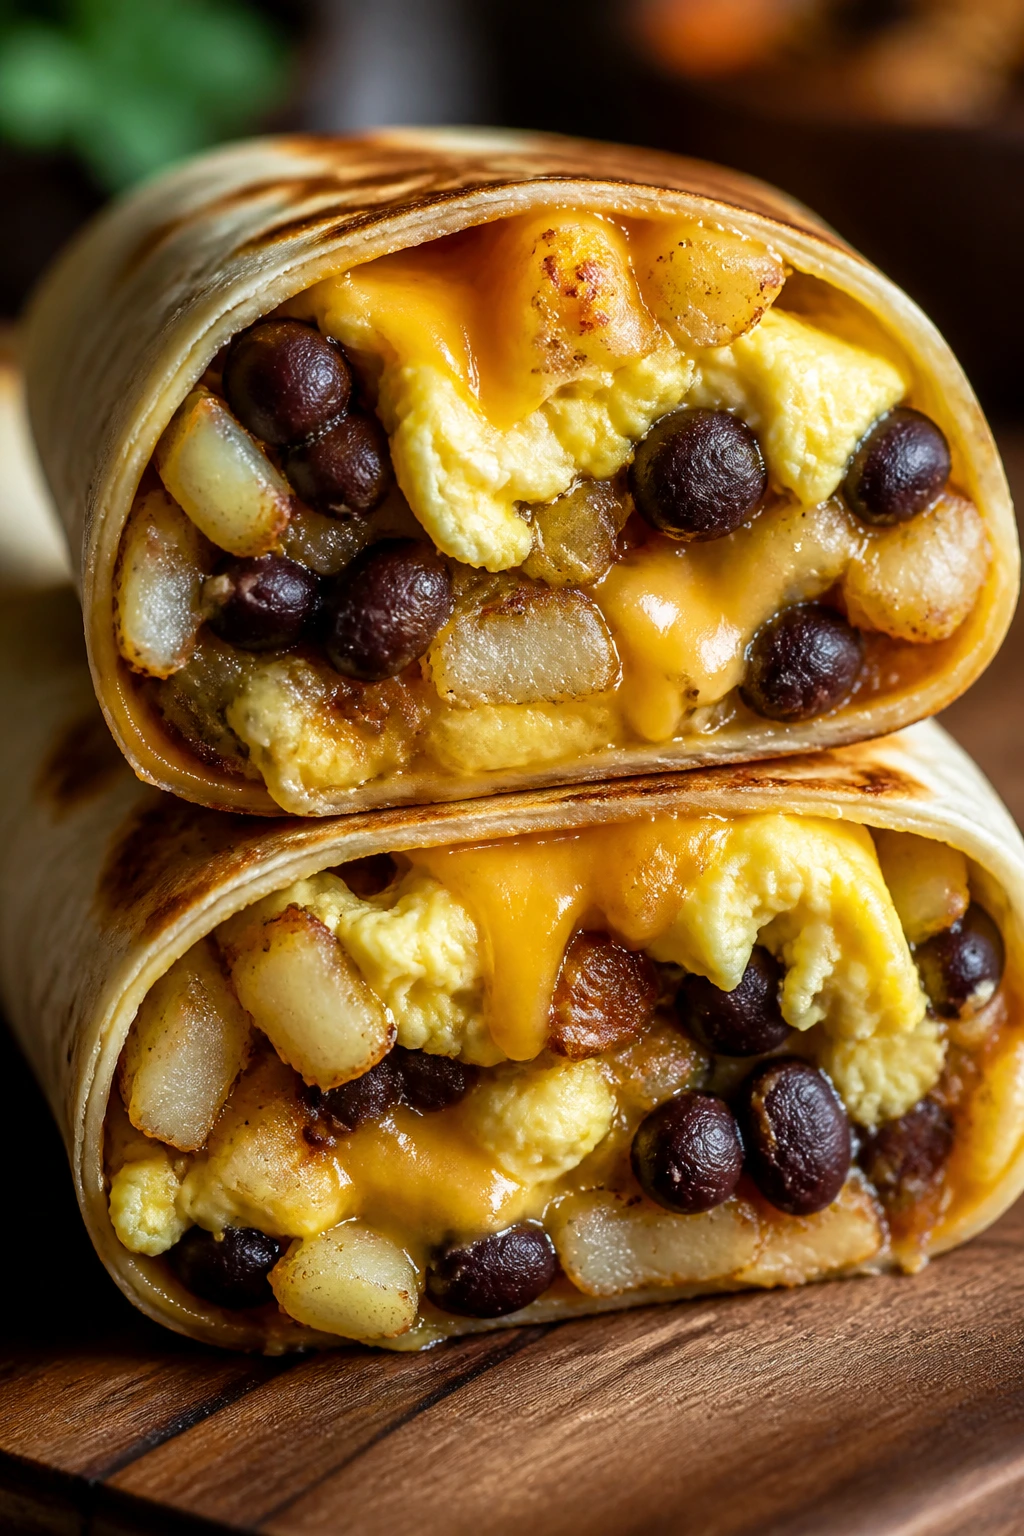
Breakfast for dinner has no business being this useful, but here we are. Scrambled eggs, potatoes, beans, cheese, and salsa bundled into a tortilla make a meal that feels filling without requiring much more than one skillet and some folding.
Why It Works:
Eggs cook fast and take on any seasoning you give them. Hash browns or small potato pieces add heft, beans bring protein, and the tortilla keeps the whole thing easy to hold. This is a strong answer when you need something warm, familiar, and fast enough to beat the late-evening snack spiral.
Key Ingredients:
- 8 large eggs
- 1 tablespoon butter
- 1 cup cooked hash browns or small cooked potato cubes
- 1 cup black beans, rinsed and drained
- 1 cup shredded cheese
- 4 large flour tortillas
- 1/2 cup salsa
Quick Steps:
- Scramble the eggs in butter over medium-low heat until soft but set.
- Warm the hash browns and beans in the same skillet or a second pan.
- Heat the tortillas until flexible.
- Fill each tortilla with eggs, potatoes, beans, cheese, and salsa.
- Roll tightly and toast seam-side down for 1 minute per side if you want a crisp finish.
Equipment for This Recipe:
- Nonstick skillet
- Spatula
- Plate or tray for assembling
How to Serve This Dish:
Serve wrapped or cut in half with extra salsa for dipping. A bowl of fruit or a few cucumber spears keeps the meal from feeling too dense.
Pro Tips for This Recipe:
- Keep the eggs tender; dry eggs make a dull burrito.
- Warm tortillas before rolling or they crack.
- If the filling seems loose, add a little more cheese to bind it.
Variations on This Dish:
- Chorizo Burrito: Add cooked chorizo or sausage.
- Veggie Burrito: Use peppers and spinach instead of potatoes.
- Cheesy Bean Burrito: Double the beans and skip the potatoes.
Common Mistakes to Avoid with This Dish:
- Filling the wrap too much: It tears before you roll it.
- Using cold ingredients straight from the fridge: The burrito gets lukewarm fast.
- Skipping the seam-side toast: The wrap can open up.
22. Pesto Chicken Flatbreads
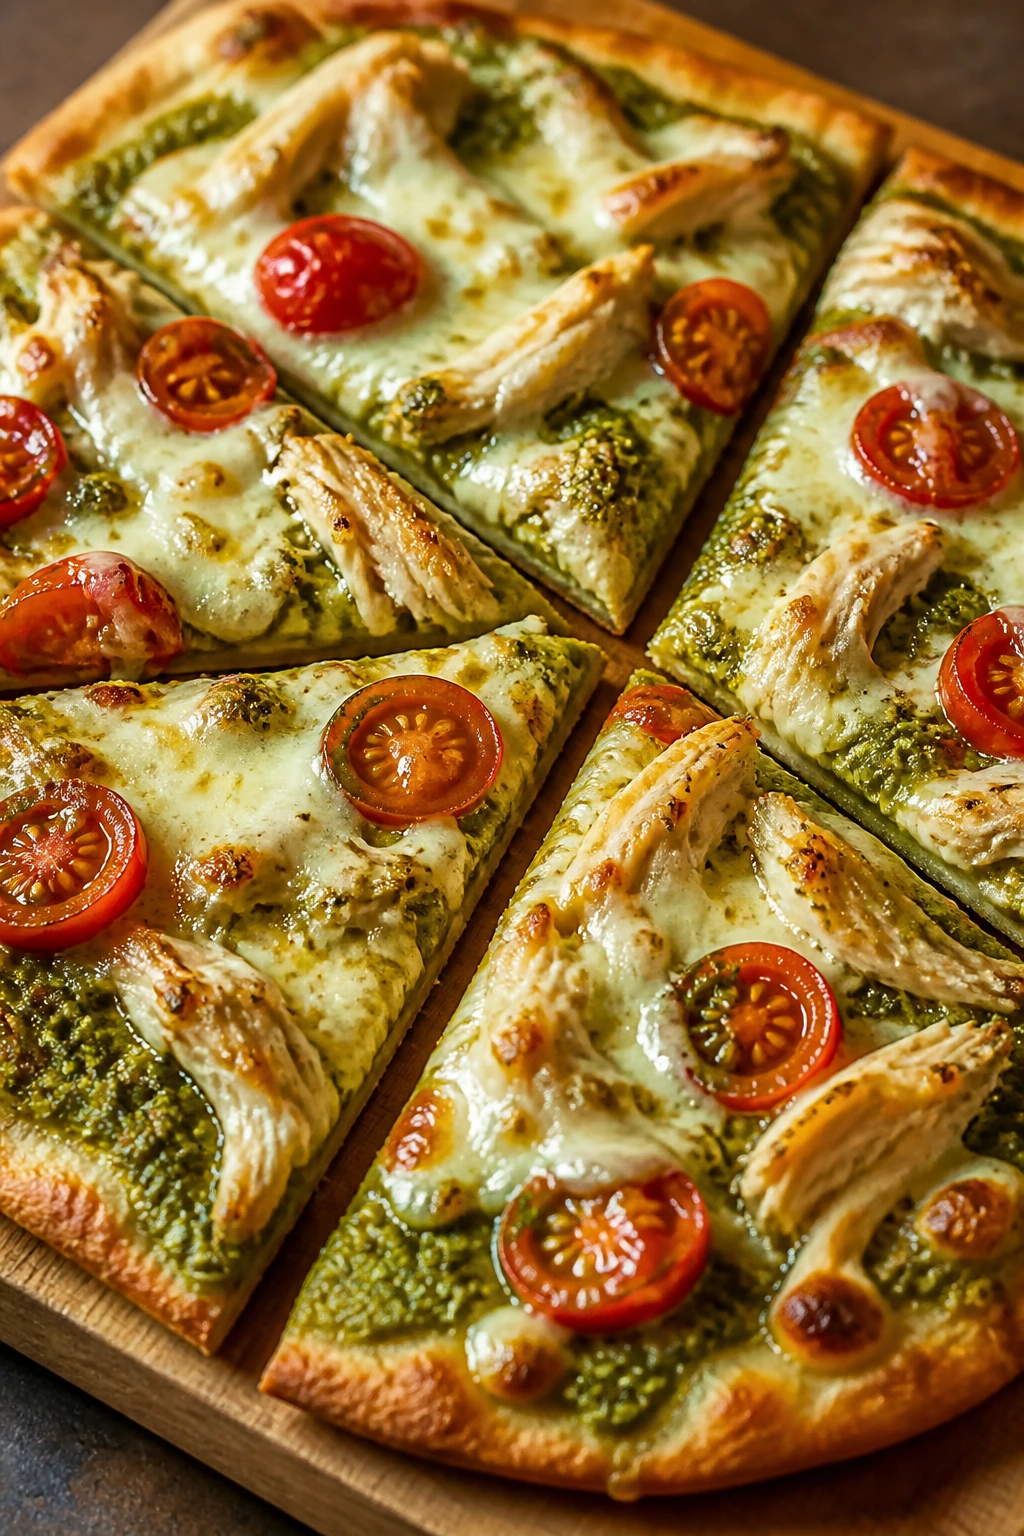
Flatbreads are pizza’s easier cousin. The pesto brings herb flavor without a long sauce simmer, the chicken makes it feel like dinner, and the thin crust gets crisp around the edges while the cheese melts into the middle.
Why It Works:
Flatbreads cook fast because they start thin, which makes them a strong fit for an after-school window. Pesto gives you garlic, basil, and oil in one spoonful, and cooked chicken turns it from a side dish into a meal. It’s also a good way to use leftover chicken that needs a new personality.
Key Ingredients:
- 4 flatbreads or naan rounds
- 1/2 cup pesto
- 2 cups cooked chicken, chopped
- 2 cups shredded mozzarella
- 1 cup halved cherry tomatoes
- 1 cup baby arugula
- 1 tablespoon olive oil
Quick Steps:
- Preheat the oven to 425°F.
- Place the flatbreads on a baking sheet and brush lightly with olive oil.
- Spread pesto over each one, then top with chicken, mozzarella, and cherry tomatoes.
- Bake for 8 to 10 minutes until the cheese melts and the edges crisp.
- Top with arugula after baking.
Equipment for This Recipe:
- Baking sheet
- Spoon or spatula
- Oven
How to Serve This Dish:
Slice the flatbreads into strips or squares and serve with a green salad or cucumber slices. The arugula on top gives it a fresh finish that makes the plate look more awake.
Pro Tips for This Recipe:
- Add arugula after baking so it stays peppery and bright.
- Don’t overload with pesto; too much oil softens the crust.
- Use small tomato halves so they don’t flood the flatbread.
Variations on This Dish:
- Veggie Flatbread: Skip the chicken and add mushrooms or zucchini.
- White Pesto Version: Use a layer of ricotta under the pesto.
- Sun-Dried Tomato Twist: Add chopped sun-dried tomatoes for extra punch.
Common Mistakes to Avoid with This Dish:
- Using a wet topping pile: It turns the crust soft.
- Baking too long: Thin flatbreads dry out fast.
- Adding arugula before baking: It wilts into nothing.
23. Sloppy Joe Stuffed Baked Potatoes
A baked potato stuffed with sloppy joe filling is pure comfort with a little edge. The potato soaks up the sauce, the meat gives you that sweet-savory bite, and the cheese on top turns a weeknight into something more playful than expected.
Why It Works:
Sloppy joe filling is saucy by design, which makes it ideal for spooning into a potato that can hold on to all that moisture. Microwaving the potatoes first makes this weeknight-friendly, and the stuffed format keeps the dinner self-contained. It’s a neat fix when bread feels too soft and pasta feels too familiar.
Key Ingredients:
- 4 russet potatoes
- 1 pound ground beef or turkey
- 1 small onion, diced
- 1 cup ketchup
- 2 tablespoons tomato paste
- 1 tablespoon Worcestershire sauce
- 1 tablespoon brown sugar
- 1 cup shredded cheddar
Quick Steps:
- Microwave the potatoes for 8 to 10 minutes until tender.
- Brown the ground meat and onion in a skillet over medium heat for 6 to 7 minutes.
- Stir in ketchup, tomato paste, Worcestershire, brown sugar, and a splash of water.
- Simmer for 3 to 4 minutes until thickened.
- Split the potatoes, fill with sloppy joe mixture, and top with cheddar.
Equipment for This Recipe:
- Microwave
- Skillet
- Fork and knife
How to Serve This Dish:
Serve with a simple side salad or sliced cucumbers. A few dill pickles on the plate make sense here.
Pro Tips for This Recipe:
- Pierce the potatoes well before microwaving so they don’t burst.
- Let the sauce simmer long enough to thicken, or it slides off the potato.
- Shred the cheese fresh if you want a stronger melt.
Variations on This Dish:
- BBQ Potato: Swap ketchup for barbecue sauce.
- Chili Potato: Use chili instead of sloppy joe filling.
- Veggie Version: Replace the meat with lentils.
Common Mistakes to Avoid with This Dish:
- Undercooking the potatoes: They need to be soft enough to fluff.
- Sauce that’s too thin: It runs everywhere.
- Forgetting a salty topping: Pickles or cheese help balance the sweetness.
24. Lemon Broccoli Mac and Cheese
Mac and cheese with broccoli is one of those dinners that feels familiar enough to settle people down and bright enough to keep it from dragging. The lemon keeps the cheese from tasting heavy, and the broccoli gives the bowl some color and texture instead of leaving everything soft.
Why It Works:
A quick cheese sauce coats the pasta better than a dry sprinkle of cheese, and broccoli cooks in the same pot during the last few minutes. Lemon zest cuts through the richness in a way that’s subtle but noticeable. It’s a smart family meal because it still tastes like mac and cheese, just with a little more going on.
Key Ingredients:
- 12 ounces elbow macaroni
- 3 cups small broccoli florets
- 3 tablespoons butter
- 3 tablespoons flour
- 2 cups milk
- 2 cups shredded cheddar
- 1/2 cup grated Parmesan
- 1 teaspoon lemon zest
Quick Steps:
- Boil the macaroni in salted water.
- Add the broccoli during the last 2 minutes of cooking, then drain.
- Melt butter in the pot, whisk in flour for 1 minute, then slowly whisk in milk.
- Stir in cheddar, Parmesan, and lemon zest until smooth.
- Add pasta and broccoli back to the pot and toss until coated.
Equipment for This Recipe:
- Large pot
- Whisk
- Colander
How to Serve This Dish:
Serve in bowls with extra black pepper and maybe a few breadcrumbs on top if you want crunch. Sliced cherry tomatoes or a crisp apple finish the plate well.
Pro Tips for This Recipe:
- Whisk the milk in gradually so the sauce stays smooth.
- Use small broccoli florets so they cook at the same pace as the pasta.
- Add lemon zest off the heat for a brighter finish.
Variations on This Dish:
- Bacon Mac: Stir in crumbled bacon.
- Cauliflower Swap: Use cauliflower instead of broccoli.
- Hot Sauce Version: Add a little hot sauce to the cheese sauce.
Common Mistakes to Avoid with This Dish:
- Using pre-shredded cheese in a sauce that’s too hot: It can get grainy.
- Overcooking the broccoli: It goes dull and soft.
- Skipping the seasoning: Cheese sauce still needs salt and pepper.
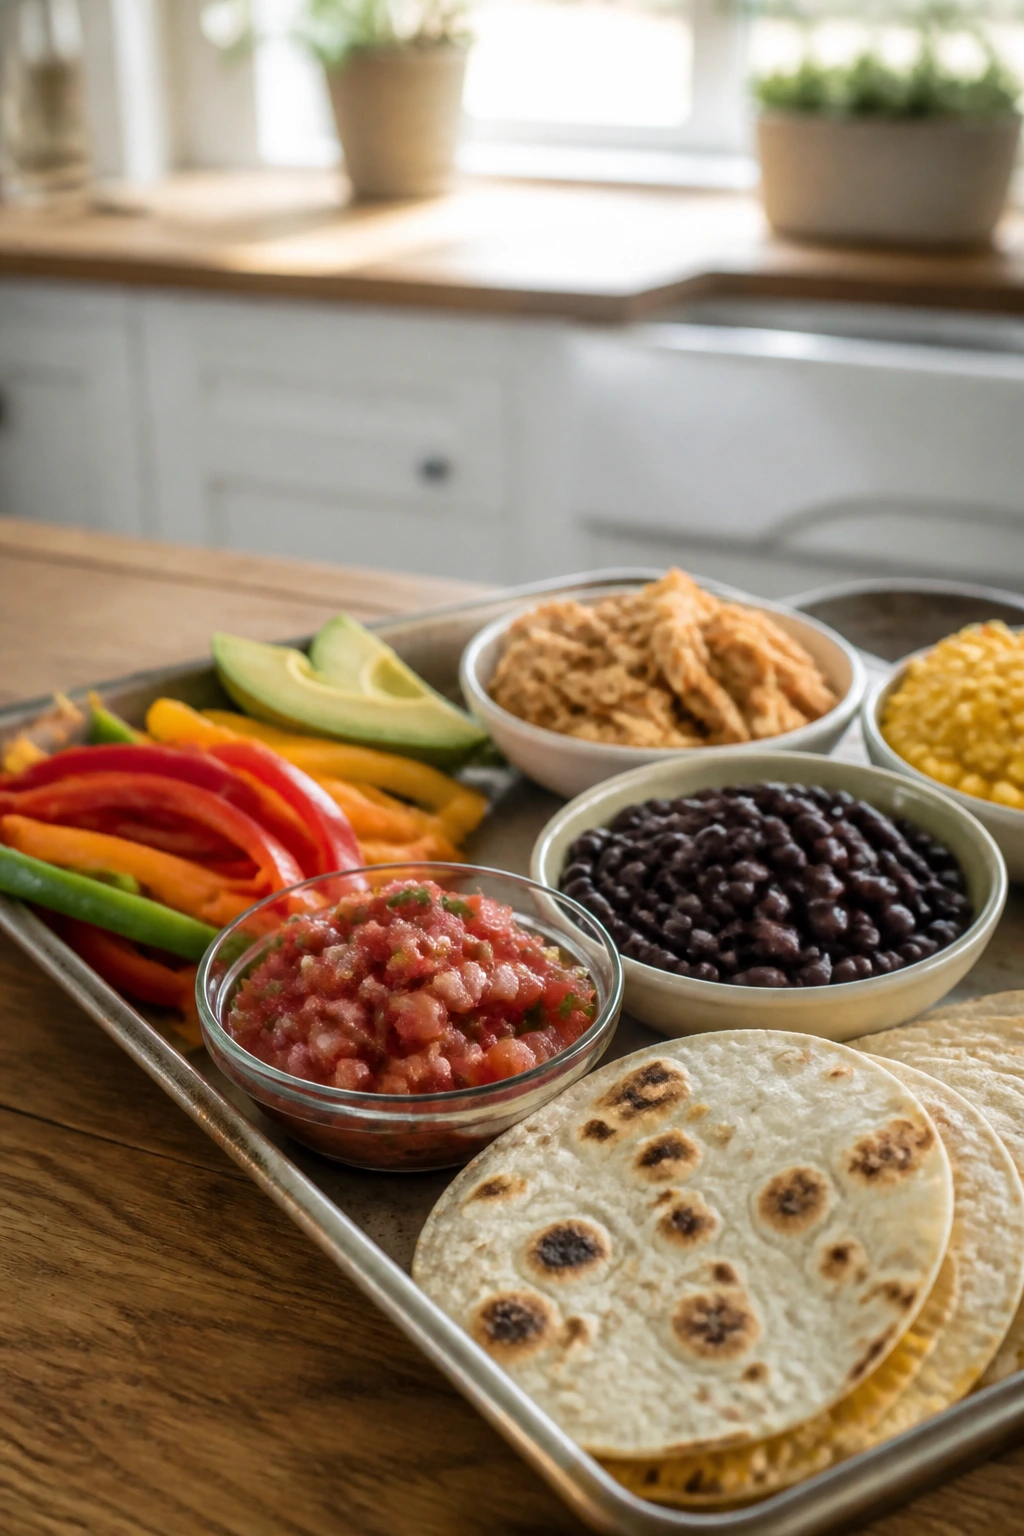
25. Build-Your-Own Snack-Plate Dinners
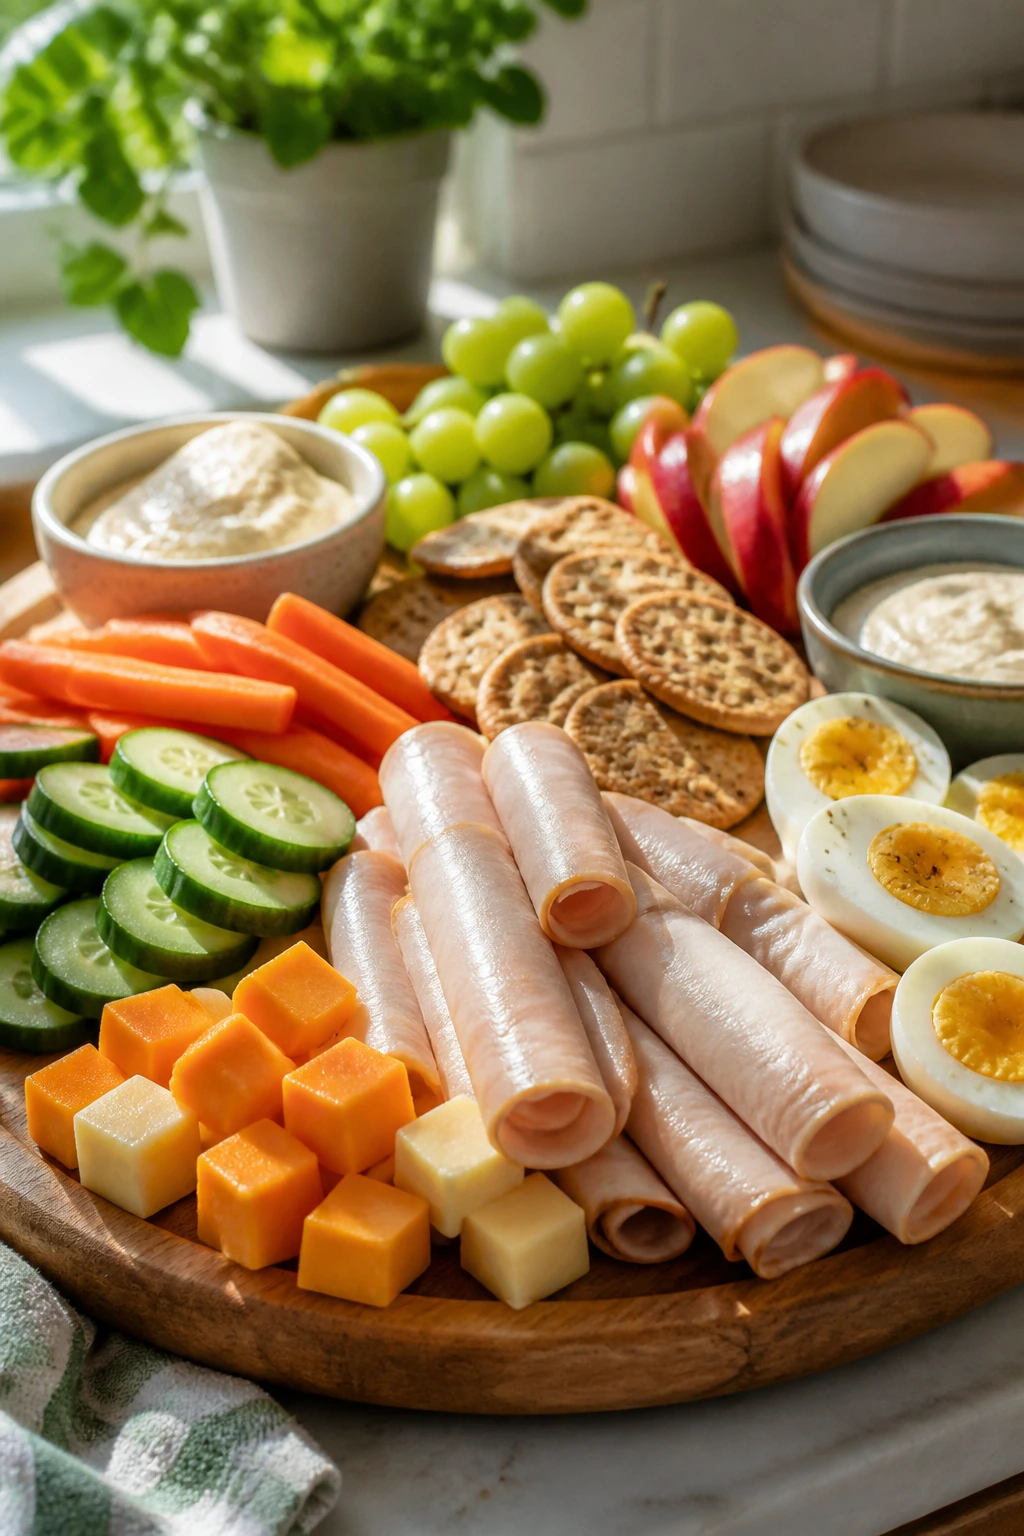
A snack-plate dinner works because it respects the mood of the hour. Nobody wants a rigid plate when the afternoon has been long. So you set out small piles of cheese, fruit, vegetables, crackers, protein, and something creamy, and let the table do the assembling.
Why It Works:
There’s almost no cooking, which is the point on nights when the house already feels busy. The mix of cold, crunchy, salty, and sweet keeps kids interested longer than a plain sandwich ever will. And because the portions are modular, you can use what you actually have instead of trying to force a neat recipe out of a half-empty fridge.
Key Ingredients:
- 8 ounces sliced deli turkey or cooked chicken
- 8 ounces cheese cubes or slices
- 2 cups cucumber and carrot sticks
- 2 apples, sliced
- 1 cup hummus or ranch dip
- 1 cup crackers or pretzels
- 4 hard-boiled eggs
- 1 cup grapes
Quick Steps:
- Hard-boil the eggs if needed, then cool and peel them.
- Slice the fruit and vegetables into snack-size pieces.
- Arrange the turkey, cheese, eggs, produce, crackers, and dip on a large board or several plates.
- Fill gaps with grapes or extra crackers so the board looks full.
- Serve right away while the cold items are crisp.
Equipment for This Recipe:
- Cutting board or large serving board
- Knife
- Small bowls for dip
How to Serve This Dish:
This is the rare meal that wants to look a little messy and abundant. Pile everything loosely rather than in perfect lines, and let each person build a plate or eat straight from the board.
Pro Tips for This Recipe:
- Put wet items like dip in small bowls so they don’t spread onto everything else.
- Cut fruit at the last minute to keep apples from browning.
- Add one “fun” item—pretzels, mini peppers, or olives—so the board feels less like a lunchbox.
Variations on This Dish:
- Mediterranean Board: Swap in hummus, olives, pita, and cucumber.
- Breakfast Board: Use yogurt, berries, boiled eggs, and toast.
- Protein-Heavy Board: Add more turkey, cheese, and eggs for hungrier eaters.
Common Mistakes to Avoid with This Dish:
- Making the board too sparse: It should look full enough to feel generous.
- Using only soft textures: You need crunch for interest.
- Slicing everything too early: Apples and some vegetables go limp if they sit too long.
The Case for Snack-Style Dinners

The best thing about these dinners is that they don’t fight the clock. They work with it. A hot pan, a sheet of tortillas, a bowl of pasta, a board of leftovers, a bag of frozen vegetables—you can get from that pile of ingredients to a real meal without turning the kitchen into a test of endurance.
I also like how forgiving this style of cooking is. If one child wants plain cheese and another wants hot sauce, nobody has to lose. If there’s leftover chicken, it gets used. If the bread is nearly stale, it becomes toast or dippers. That kind of flexibility matters more than polished technique on school nights.
The Tools That Make These Dinners Easier
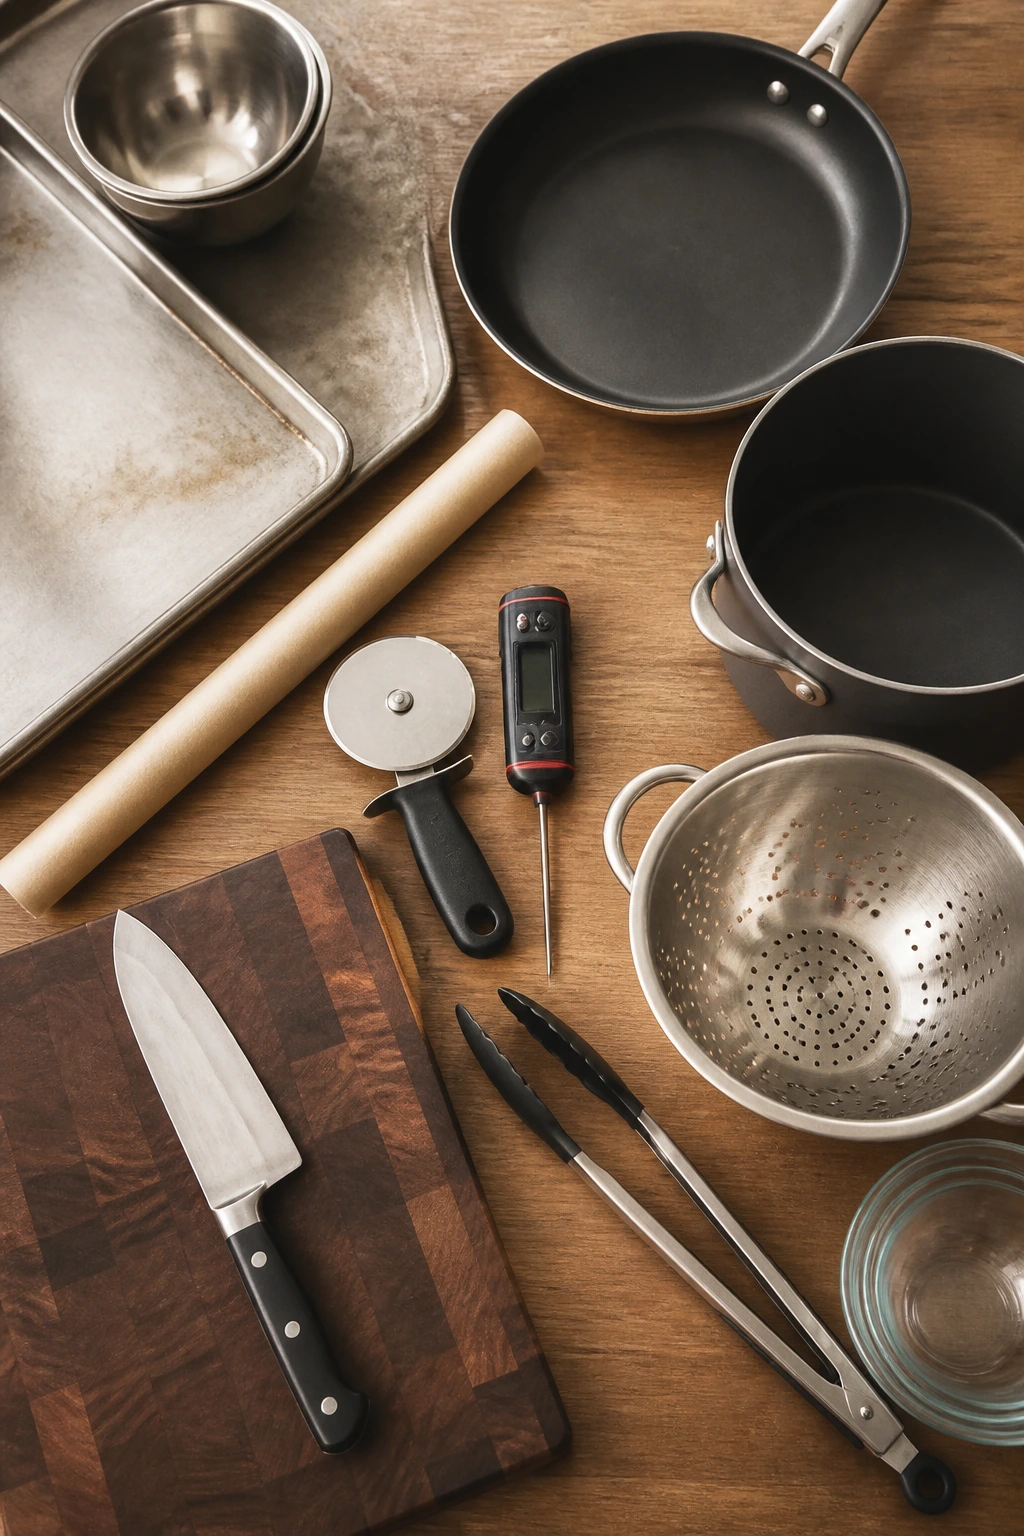
- Rimmed sheet pans: They keep melted cheese, sauce, and crumbs from sliding all over the oven.
- A large nonstick skillet: Useful for fried rice, taco pasta, gnocchi, eggs, and anything that needs quick browning.
- A deep saucepan or medium pot: Good for soups, boiling pasta, and heating sauces without splatter.
- Pizza cutter: Faster and cleaner than a knife for quesadillas, flatbreads, and pizza bagels.
- Instant-read thermometer: Handy for chicken and turkey, especially when you’re moving fast and don’t want to guess.
- Colander: Needed for pasta, tortellini, and anything you’re pulling from boiling water.
- Tongs or a sturdy spatula: Better control means fewer broken tortillas and fewer torn sandwiches.
- Cutting board and sharp knife: Most of these recipes depend on fast, clean chopping.
- Mixing bowls in two sizes: One small bowl for sauces and one larger one for tossing fillings makes prep smoother.
- A sheet of parchment or foil: Useful for easy cleanup on the baked items.
Smart Shopping and Ingredient Tips
The fastest family dinners usually come down to buying the right shortcuts on purpose. Rotisserie chicken is one of the best of them because it works in taco bowls, Caesar pockets, sliders, flatbreads, and quesadillas. The same goes for shredded cheese: buy the bag when speed matters, even if you prefer grating from a block on slower nights.
Tortillas should bend without cracking when you warm them, so check the package if they’ve been sitting around too long. For rice dishes, use day-old rice when you can; fresh rice tends to clump and steam instead of fry. Short pasta shapes like rotini, elbows, and shells hold sauce better than long noodles in the skillet meals, which makes them more forgiving when kids take their time eating.
Frozen vegetables are worth keeping around for exactly this kind of cooking. Peas, corn, broccoli florets, and peas-and-carrots mixes usually go straight from freezer to pan or pot without losing their shape. Canned beans should be rinsed unless you want a very salty result, and canned tomatoes work best when the sauce is going to simmer for at least 10 minutes.
One more thing: use sturdy bread when the recipe asks for toasting or broiling. English muffins, bagels, slider rolls, and split sub rolls hold heat and moisture better than soft sandwich bread. That tiny choice can mean the difference between a crisp edge and a soggy middle.
How to Serve These Recipes
Presentation:
Keep the plating casual but not careless. Quesadillas look best cut into triangles and stacked slightly askew, sliders want to be pulled apart in the pan, and bowls should be finished with one bright thing on top—scallions, cilantro, lemon zest, or avocado. For board-style dinners, leave some breathing room so the food looks abundant instead of crammed.
Accompaniments:
Fresh fruit works across almost every recipe here: apples, grapes, orange segments, melon, and berries all behave well beside hot, cheesy food. Crunchy vegetables—carrots, cucumber, celery, bell pepper strips—help balance the softer dishes. For the more filling meals, I like pickle spears, slaw, or a fast green salad because they cut through the richness without adding much work.
Portions:
Most of these recipes serve 4 people as a main meal, though the board dinner may stretch farther if you put out enough crackers, eggs, and produce. If your crowd includes older kids or very hungry adults, plan on one extra tortilla, one extra roll, or a little more rice than you think you need. The snack-style format makes seconds easy, which is nice until you run out too soon.
Beverage Pairing:
Milk still makes perfect sense with pizza bagels, quesadillas, and grilled cheese dinners. Sparkling water with lime suits the bowls and tacos nicely, while unsweetened iced tea works across the pasta, sliders, and meatball subs. If you keep fruit on the table, a simple cold drink is usually enough.
Additional Tips and Flavor Boosters

Flavor Enhancement:
Keep a jar of pickled jalapeños, a lemon, and a block of Parmesan around. Those three things change a lot of these dinners from flat to lively in one move. A squeeze of citrus or a small hit of brine can do more than another handful of cheese.
Customization:
The easiest way to keep these meals from getting repetitive is to swap the protein or the crunch. Use beans instead of chicken, turkey instead of beef, fish sticks instead of fish fillets, pita instead of wraps, or flatbread instead of pizza dough. Small swaps keep the structure intact while changing the flavor enough that nobody gets bored.
Serving Suggestions:
Cutting matters. Pizza bagels become easier for smaller kids when you quarter them. Quesadillas taste better when sliced on a board with a tiny bowl of salsa. Taco bowls feel more fun when the toppings are separated instead of dumped. That little bit of presentation gives the meal a sense of order.
Make-It-Yours:
For dairy-free eaters, use olive oil instead of butter, skip the cheese where you can, and rely on salsa, herbs, or broth for flavor. For gluten-free households, lean on corn tortillas, rice bowls, baked potatoes, and snack boards. And if you need higher protein, the easiest fix is usually eggs, beans, chicken, turkey, tuna, or Greek yogurt as a dip.
Make-Ahead, Storage, and Reheating Guidance

Most of these dinners keep well for 3 to 4 days in the refrigerator if you store them in airtight containers and cool them within 2 hours of cooking. Rice-based dishes should be cooled a little faster and refrigerated promptly so they don’t sit warm for long stretches. Food safety matters more than convenience here, especially with chicken, turkey, and eggs: reheat those to 165°F in the center.
The freezer works best for the fillings and sauces, not the crunchy final assembly. Taco meat, sloppy joe filling, meatballs in sauce, soup, teriyaki chicken, and cooked rice freeze well for up to 2 months in tightly sealed containers. Quesadillas, pizza bagels, grilled cheese, and snack boards do not freeze with grace; they turn limp or weird, and there’s no reason to pretend otherwise.
For reheating, use the method that protects the texture. Quesadillas, sliders, flatbreads, and grilled cheese dippers do best in a 350°F to 375°F oven or a dry skillet so the bread or tortilla crisps again. Pasta, fried rice, and bowls can be reheated in the microwave with a small splash of water or broth, covered loosely so they don’t dry out. Soup should be reheated on the stove until steaming hot, and meatballs or chicken should be warmed gently so they don’t turn rubbery.
A few of these recipes can be partially prepped ahead without hurting the result. Chop vegetables a day or two in advance, mix sauces ahead, and cook rice or meat earlier in the day if needed. But keep wet ingredients, crunchy toppings, and toasted bread separate until the final minute. That one habit saves more dinners than any fancy trick.
Variations and Adaptations to Try
The Gluten-Free Switch:
Use corn tortillas, baked potatoes, rice bowls, corn chips, and gluten-free pasta where they fit. The structure of the meal stays the same, but the base changes cleanly without making the dinner feel like a compromise. This works especially well for tacos, bowls, nachos, and stuffed potatoes.
The Dairy-Light Version:
Lean on olive oil, salsa, pesto, broth, hummus, and avocado when you want less cheese. You can still keep the meals warm and satisfying by using herbs and seasoning a little more boldly. The flatbreads, rice bowls, snack boards, and taco fillings handle this swap with the least trouble.
The Higher-Protein Night:
Add eggs, beans, chicken, turkey, tuna, sausage, or Greek yogurt dip. This is the easiest way to make the snack-style meals hold through practice, homework, and the long stretch before bedtime. The taco bowls, burritos, fried rice, sliders, and boards are especially easy to reinforce.
The Vegetable-First Rewrite:
Double the peppers, broccoli, spinach, slaw, or cucumber and use the protein as support instead of the main event. That works best in fried rice, pasta, flatbreads, pita pockets, and bowls, where the vegetables can take on more flavor without becoming the whole story.
The Mild-to-Spicy Dial:
Keep the base recipe the same and put hot sauce, jalapeños, chili flakes, or chipotle mayo on the table. This is the simplest way to keep one dinner working for a wide range of taste buds. The tacos, bowls, nachos, and sliders take heat especially well.
Common Mistakes to Avoid
The most common mistake with these dinners is treating every ingredient like it needs the same amount of heat. Cheese melts fast. Tortillas brown fast. Fish sticks, meatballs, and chicken need longer. If you stack everything into the pan at once without thinking about timing, something ends up overcooked while something else stays cold.
Another trap is moisture. Soggy salsa, wet vegetables, un-drained beans, and hot fillings sitting inside soft bread can turn a crisp meal limp in minutes. Drain what needs draining, toast what needs toasting, and keep wet toppings for the end when possible. It’s a small detail, but it changes the texture of the whole plate.
A third mistake is under-seasoning the filling because the cheese looks strong. Cheese helps, but it does not rescue bland rice, pale chicken, or plain pasta. Salt the water, season the meat, and give bowls a squeeze of lime or lemon at the end. That last hit of acid makes the food taste awake.
The fourth problem is trying to make snack-style dinners too neat. These meals work because they’re informal. A slightly messy quesadilla, a board with open space, or a bowl with toppings piled high is part of the appeal. If you spend ten extra minutes trying to make every edge perfect, you’re usually missing the whole point.
Frequently Asked Questions

Can I make these dinners with leftovers from the fridge?
Absolutely. Leftover chicken, rice, roasted vegetables, taco meat, and pasta sauce all fit well into this style of cooking. Just reheat them thoroughly and match the texture to the recipe—leftover roast chicken works in bowls and pitas, while leftover rice is better in fried rice than in soup.
What’s the fastest recipe in this collection?
The snack-board dinner and the tuna melt toasts are the quickest if the ingredients are already in the kitchen. If you want something hot with almost no waiting, English muffin pizzas and quesadilla triangles are close behind. They’re the kind of meals that reward having a few pantry basics on hand.
How do I keep quesadillas, sliders, and pizza bagels from getting soggy?
Use dry fillings, toast the bread or tortilla first when possible, and wait to add wet toppings until the end. A short rest after baking helps too. If the recipe includes salsa or sauce, keep it thick and modest in amount.
Can I use frozen vegetables instead of fresh ones?
Yes, and in several of these recipes I’d actually prefer them. Frozen peas, corn, broccoli, and mixed vegetables are often better than limp fresh produce that’s been hanging around. Add them straight to the pan or pot, but give them enough heat to lose the icy edge.
What if my kids don’t like visible vegetables?
Hide them where the texture is softer: stir spinach into tortellini, tuck broccoli into mac and cheese, blend tomato soup, or chop peppers very fine in taco pasta. You can also move vegetables to the side in a snack-board meal so they feel optional instead of forced.
Are these recipes good for making ahead in the morning?
Some are, some are not. Bowls, pasta, soups, meatballs, sloppy joe filling, and fried rice hold up well. Anything meant to stay crisp—fish stick tacos, quesadillas, grilled cheese, toast, and flatbreads—is better assembled close to serving.
What’s the best way to scale these up for a bigger family?
Double the protein and base first, then adjust the cheese and sauce a little at a time. Sheet-pan items and skillet meals usually scale best if you use a second pan instead of crowding one. Crowding slows browning, and that’s where a lot of the flavor lives.
Can I make these without an oven?
Yes. Fried rice, taco pasta, soup, bowls, burritos, snack boards, and sliders can all work without baking. For the recipes that normally need an oven, a toaster oven or air fryer can cover a lot of the same ground if you adjust the time and keep an eye on the top.
How do I know when chicken or turkey is cooked through?
Use an instant-read thermometer and aim for 165°F in the thickest part. That’s especially useful in bowls, teriyaki chicken, meatball subs, and taco pasta. If you don’t have a thermometer, cut into the thickest piece and look for no pink and clear juices, but the thermometer is the better habit.
The After-School Dinner Window

There’s a particular hour when everyone comes home hungry, a little noisy, and not especially patient. These dinners are built for that hour. They’re fast enough to beat the meltdown, flexible enough to use what you’ve got, and casual enough that nobody has to behave like a white-tablecloth guest.
I keep coming back to snack-style meals for families because they solve a real problem: people want dinner, but they also want it to feel easy to approach. Crisp edges, soft centers, dip-friendly bites, and plenty of room for swaps—that’s the formula. Use it often, and the 4 p.m. hunger wave gets a lot less dramatic.