
Family dinners for picky eaters live or die on texture. If the chicken is soggy, the sauce is too loud, or the vegetables show up in big, suspicious chunks, the whole table can go sideways before anyone takes a second bite. The best family dinners for picky eaters don’t try to bully the room into liking dinner; they make the plate feel familiar first, then quietly add enough flavor to keep adults happy too.
That usually means crisp edges, mild seasoning, soft pasta, rice that stays fluffy, and sauces you can serve on the side instead of pouring over everything like a dare. It also means a little respect for the way kids eat: one will only touch plain noodles, one will eat any cheese in sight, and one will happily devour a meatloaf muffin but reject the same meatloaf in a loaf pan. Weird? Sure. Predictable? Also yes.
What follows is a set of dinners built for that reality. Not fancy. Not fussy. Just plates that get cleared more often than they get negotiated over, with enough room for swaps that let you work around one child’s tomato issue, another child’s aversion to “green bits,” and the parent who wants something that tastes like an actual meal.
Why These Dinners Work on Real Family Nights
- Familiar shapes calm things down: Chicken tenders, sliders, pasta, meatballs, and biscuit-topped casseroles look like food people already trust before they’ve tasted a bite.
- Texture stays in charge: Crisp chicken, soft noodles, fluffy rice, and creamy sauces give picky eaters one clear thing to focus on instead of three competing textures on one fork.
- Sauces can stay optional: Several of these dishes work better when ketchup, ranch, BBQ sauce, or sour cream sits next to the plate instead of soaking into everything.
- The ingredients are easy to recognize: Chicken, beef, cheese, pasta, potatoes, rice, and biscuits show up in plain sight, which matters more than most cooks admit.
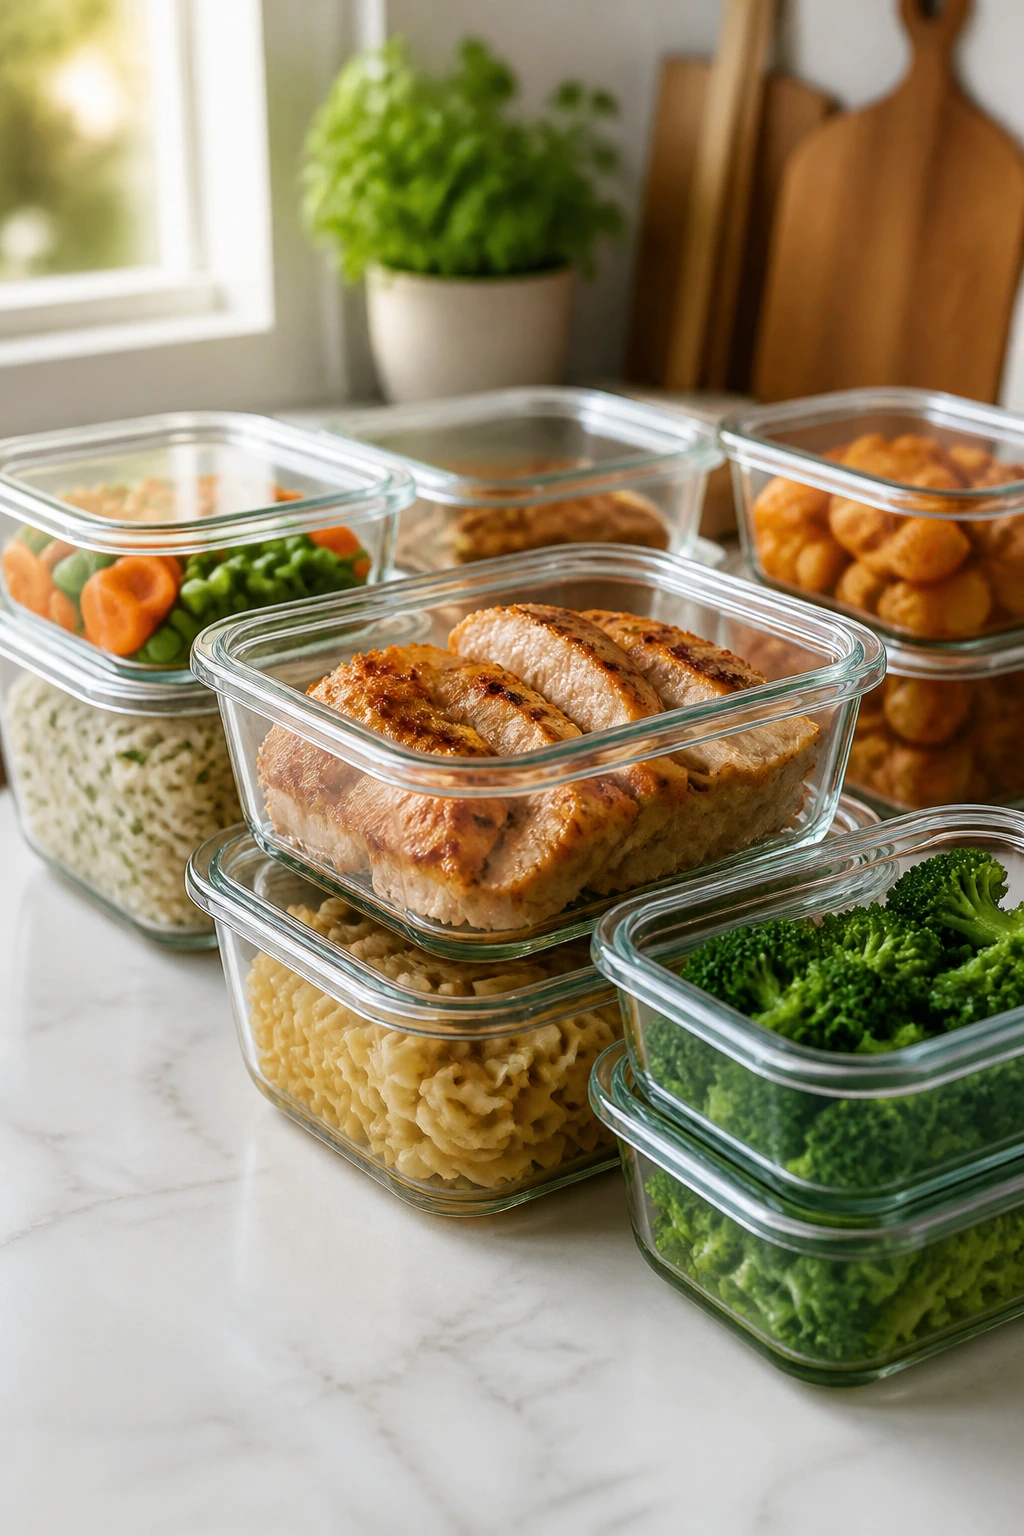
- Leftovers hold up: Meatloaf muffins, baked ziti, taco rice, and pot pie bake reheat without turning into sad mush, so tomorrow’s lunch doesn’t feel like punishment.
- There’s room to hide the vegetables: Carrots, zucchini, cauliflower, peas, and corn can be cut small enough to disappear into the dish instead of taking over the plate.
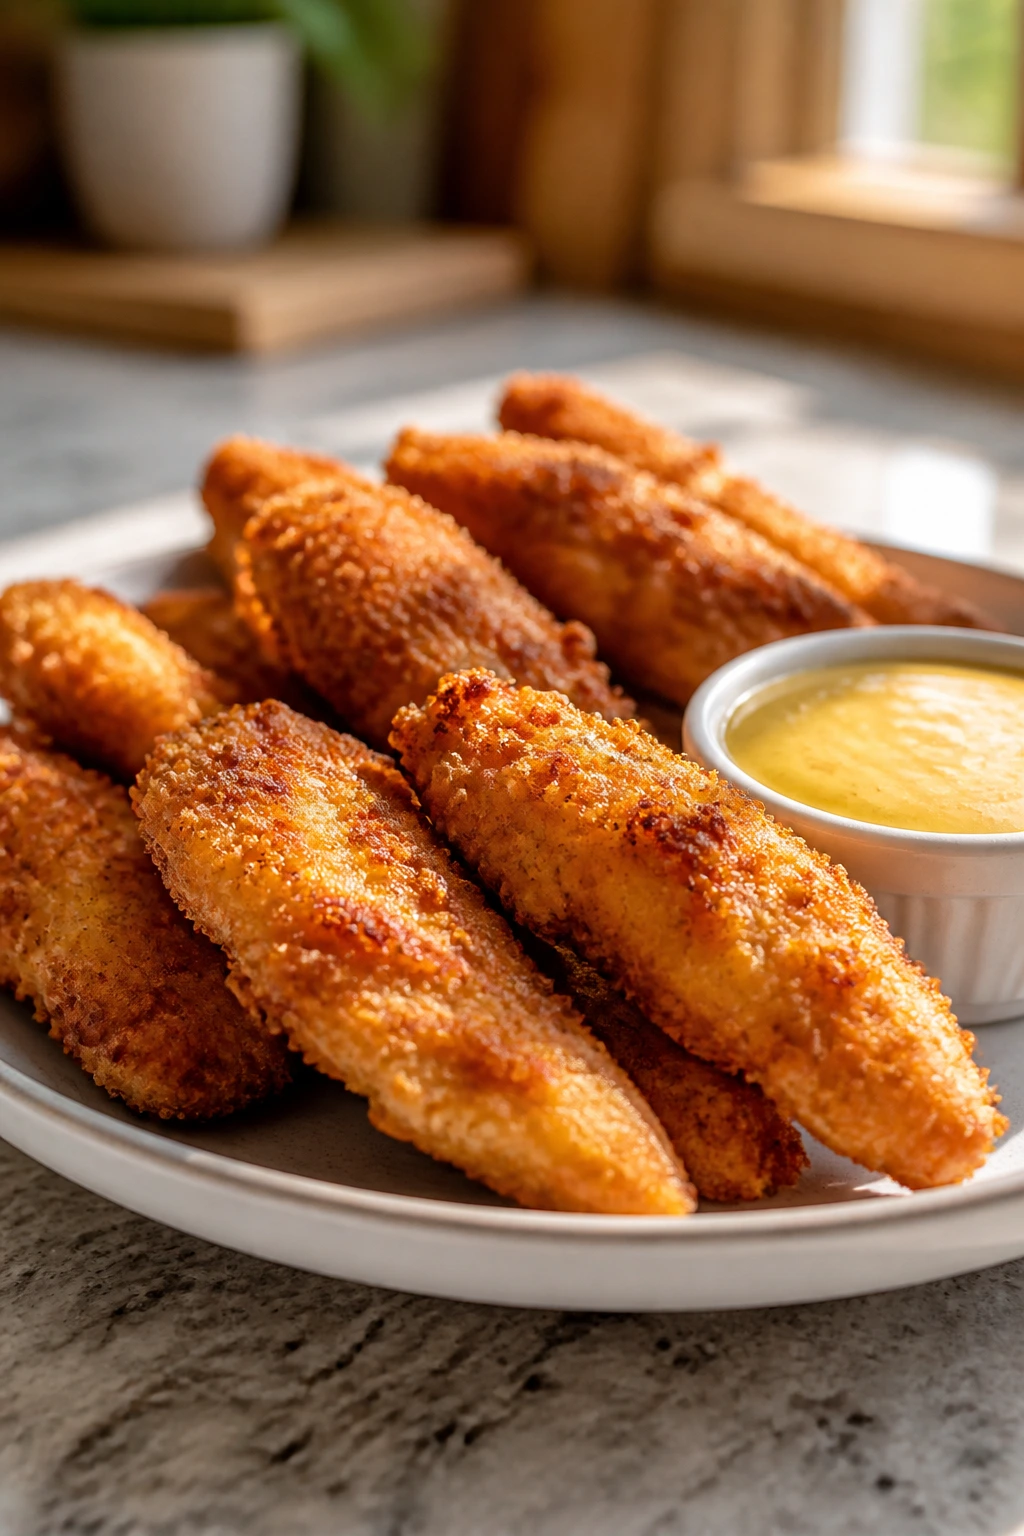
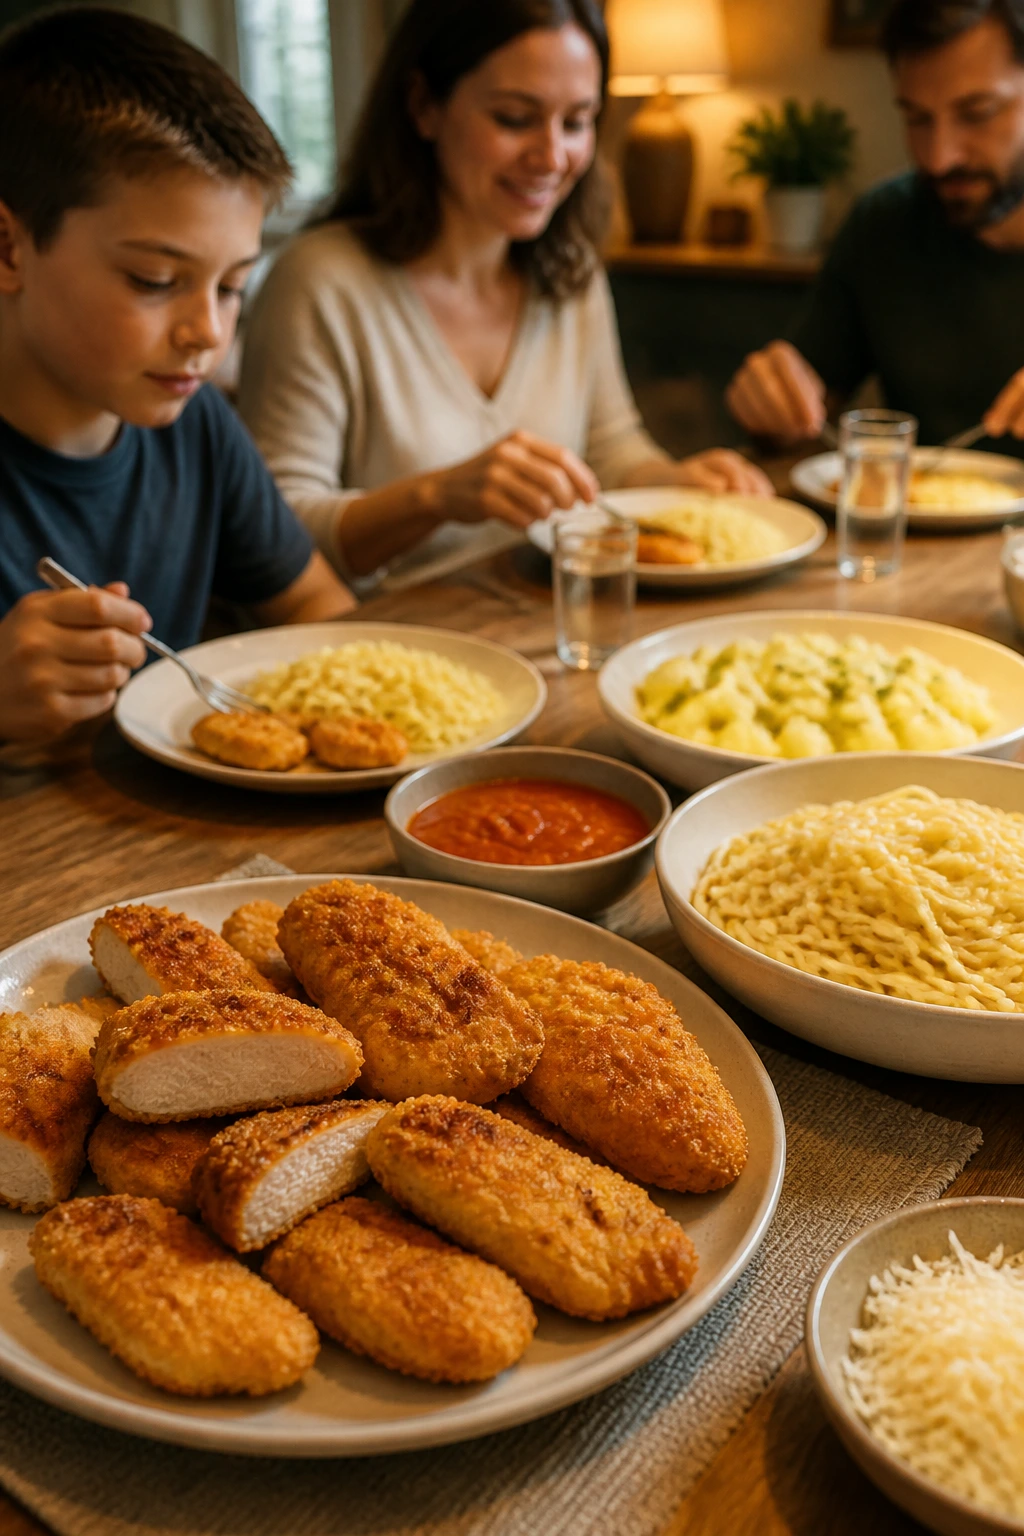
1. Crispy Oven Chicken Tenders with Honey Mustard
The first thing you notice is the crunch. Not a heavy fried crunch, either—more like a thin, crisp shell that snaps a little when you bite through it and then gets out of the way so the chicken stays juicy. These tenders are the kind of dinner that can rescue a weeknight because they look simple, taste familiar, and don’t ask anyone to be brave.
Why It Works:
Chicken tenders are already the right size for small hands and easy dipping, which takes half the tension out of dinner. Panko gives you a lighter, sharper crust than fine breadcrumbs, and a little Parmesan in the coating adds salt without making the flavor complicated. Baking at 425°F keeps the outside crisp while the inside stays moist, and a wire rack stops the bottoms from getting soft. That detail matters more than people think.
Key Ingredients:
- 2 pounds chicken tenders
- 1 cup all-purpose flour
- 1 1/2 teaspoons kosher salt
- 1 teaspoon garlic powder
- 1 teaspoon paprika
- 1/2 teaspoon black pepper
- 2 large eggs
- 2 tablespoons milk
- 2 cups panko breadcrumbs
- 1 cup finely grated Parmesan cheese
- 2 tablespoons neutral oil or cooking spray
- 1/2 cup honey mustard or ketchup, for serving
Quick Steps:
- Preheat and prep: Heat the oven to 425°F and set a wire rack inside a rimmed sheet pan. Line the pan with foil first if you want the cleanup to be easier.
- Set up the breading station: In one shallow bowl, mix the flour, salt, garlic powder, paprika, and black pepper. In a second bowl, whisk the eggs with the milk. In a third bowl, combine the panko and Parmesan.
- Coat the chicken: Dredge each tender in the flour mixture, shake off the extra, dip it in the egg, then press it into the panko-Parmesan mixture until the surface looks fully coated.
- Arrange on the rack: Set the tenders in a single layer with space between them. Spray the tops lightly with oil. Do not crowd the pan or the breading will steam instead of crisping.
- Bake: Cook for 18 to 20 minutes, flipping once at about the 12-minute mark, until the coating is golden and the chicken reaches 165°F in the thickest part.
- Rest and serve: Let the tenders sit for 3 minutes before serving so the crust settles and the juices stay put.
Equipment for This Recipe:
- Rimmed sheet pan
- Wire rack
- 3 shallow bowls or pie plates
- Tongs or one dry hand and one wet hand
- Instant-read thermometer
How to Serve This Dish:
Pile the tenders onto a warm platter with a small bowl of honey mustard in the center and keep the ketchup nearby for the people who will not be persuaded otherwise. I like them with oven fries and cucumber sticks, because that gives you crunch without turning dinner into a debate. Two or three tenders per child is usually enough; adults often want four.
Pro Tips for This Recipe:
- Press the panko on firmly with your fingertips. Loose crumbs fall off in the oven.
- If the breadcrumbs look pale at the 15-minute mark, give them another 2 to 3 minutes instead of turning the heat up.
- Finely grated Parmesan works better than shaggy shreds here because it clings to the crumb coating.
- These freeze well after breading. Freeze them on a tray until firm, then bag them for a fast bake later.
Variations on This Dish:
- Garlic Butter Tenders: Brush the baked tenders with 2 tablespoons melted butter mixed with 1 minced garlic clove and 1 teaspoon parsley.
- Cornflake Crunch Tenders: Swap the panko for crushed cornflakes if you want a sweeter, extra-crisp crust.
- Gluten-Free Version: Use gluten-free flour and gluten-free breadcrumbs or crushed rice cereal, then bake the same way.
Common Mistakes to Avoid with This Dish:
- Skipping the rack: The bottoms turn soft on a flat pan. The rack keeps hot air moving.
- Over-salting the coating: Parmesan already brings salt, so don’t go heavy-handed.
- Cutting into the chicken too soon: Give it those 3 minutes to rest or the juices run out onto the tray.
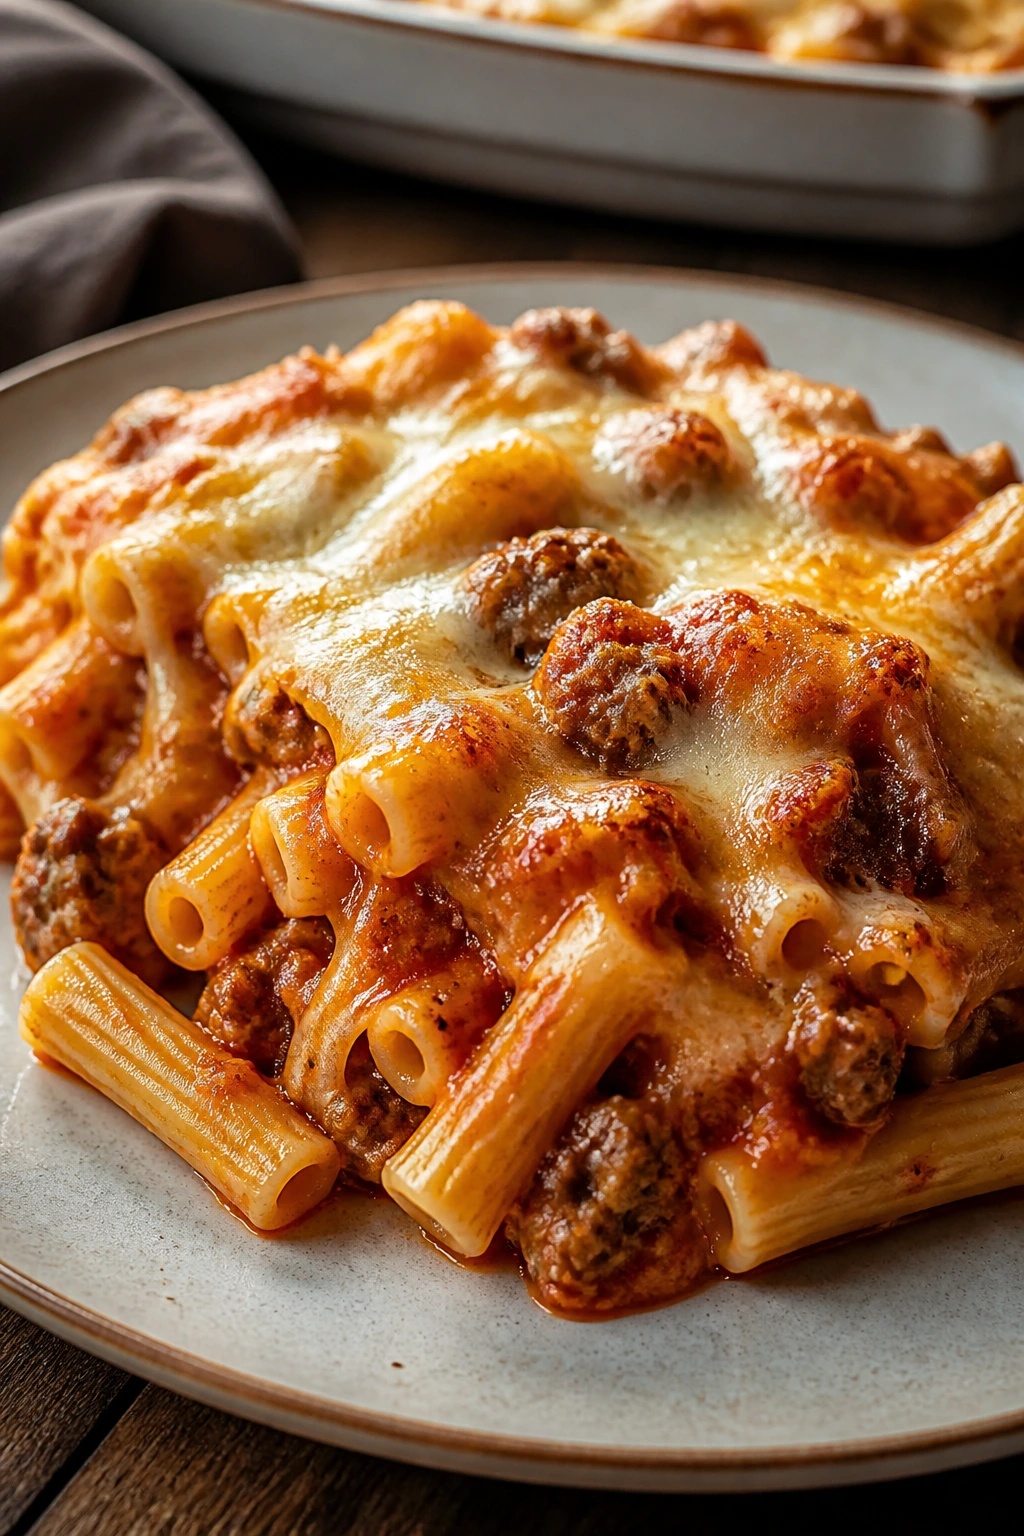
2. Cheesy Baked Ziti with Mild Sausage
This is the pasta bake that usually disappears first because it smells like browned sausage, tomato sauce, and melted cheese all at once. The surface turns bronzed and a little blistered at the corners, while the middle stays soft and saucy. It’s the kind of baked ziti that makes picky eaters feel safe because the pasta shape is familiar and the flavor never gets sharp or weird.
Why It Works:
Ziti has enough structure to hold sauce without collapsing into mush, which is why it does better in the oven than smaller, softer pasta shapes. Mild sausage brings flavor without heat, and ricotta mixed with egg creates little creamy pockets instead of one heavy layer. Baking the dish with a mound of mozzarella on top gives you stretchy cheese without drying out the pasta underneath. If you let it rest after baking, the slices stay put instead of slumping into a soupy mess.
Key Ingredients:
- 1 pound ziti
- 1 pound mild Italian sausage or ground turkey
- 1 tablespoon olive oil
- 1 small onion, finely diced
- 3 garlic cloves, minced
- 24 ounces marinara sauce
- 1 teaspoon Italian seasoning
- 1/2 teaspoon kosher salt
- 1/4 teaspoon black pepper
- 1 cup ricotta cheese
- 1 large egg
- 2 cups shredded mozzarella cheese
- 1/2 cup grated Parmesan cheese
- 2 tablespoons chopped basil, optional
Quick Steps:
- Preheat and boil: Heat the oven to 375°F. Bring a large pot of salted water to a boil and cook the ziti until it is 2 minutes shy of al dente.
- Brown the sausage: Heat the olive oil in a large skillet over medium heat. Add the sausage and onion and cook for 6 to 8 minutes, breaking the meat into small pieces, until the sausage is no longer pink and the onion looks soft.
- Add garlic and sauce: Stir in the garlic for 30 seconds, then pour in the marinara, Italian seasoning, salt, and pepper. Simmer for 5 minutes so the sauce tastes a little deeper.
- Mix the ricotta layer: In a bowl, stir together the ricotta, egg, and half of the Parmesan.
- Combine and assemble: Drain the pasta and toss it with about two-thirds of the sauce. Spread half into a greased 9×13-inch baking dish, dollop on the ricotta mixture, then add the rest of the pasta and sauce. Top with mozzarella and the remaining Parmesan.
- Bake: Cover with foil and bake for 20 minutes. Remove the foil and bake 10 more minutes until the cheese is melted and speckled with gold.
- Rest: Let the pan sit for 10 to 15 minutes before serving. That rest time is what keeps the slices neat.
Equipment for This Recipe:
- 9×13-inch baking dish
- Large pot
- Large skillet
- Mixing bowl
- Wooden spoon or spatula
How to Serve This Dish:
Serve baked ziti with garlic bread and a simple green salad, or keep it even calmer with roasted carrots and apple slices. I like to cut it into thick squares and let the cheese pull a little before the first scoop hits the plate. One square is a child-sized portion; adults usually want two if there’s no salad involved.
Pro Tips for This Recipe:
- Pull the pasta from the water early. It finishes cooking in the oven.
- Use a sauce that’s thick, not watery. Thin marinara makes the whole pan slide around.
- If ricotta is not a hit in your house, swap it for cottage cheese that you blend smooth first.
- Bake it on a sheet pan if your oven runs hot and the bottom of the dish tends to scorch.
Variations on This Dish:
- Vegetable-Quiet Ziti: Stir 1 cup very finely chopped spinach or grated zucchini into the sauce after cooking.
- Turkey Ziti: Use ground turkey instead of sausage and add an extra 1/2 teaspoon salt to make up for the leaner meat.
- No-Ricotta Bake: Replace the ricotta layer with 1 1/2 cups shredded mozzarella scattered through the middle.
Common Mistakes to Avoid with This Dish:
- Overcooking the pasta: Mushy ziti turns the bake heavy. Stop early.
- Using thin sauce: If the sauce pours like soup, simmer it longer before assembling.
- Serving it hot from the oven: The slices will slump. Let the pan rest.
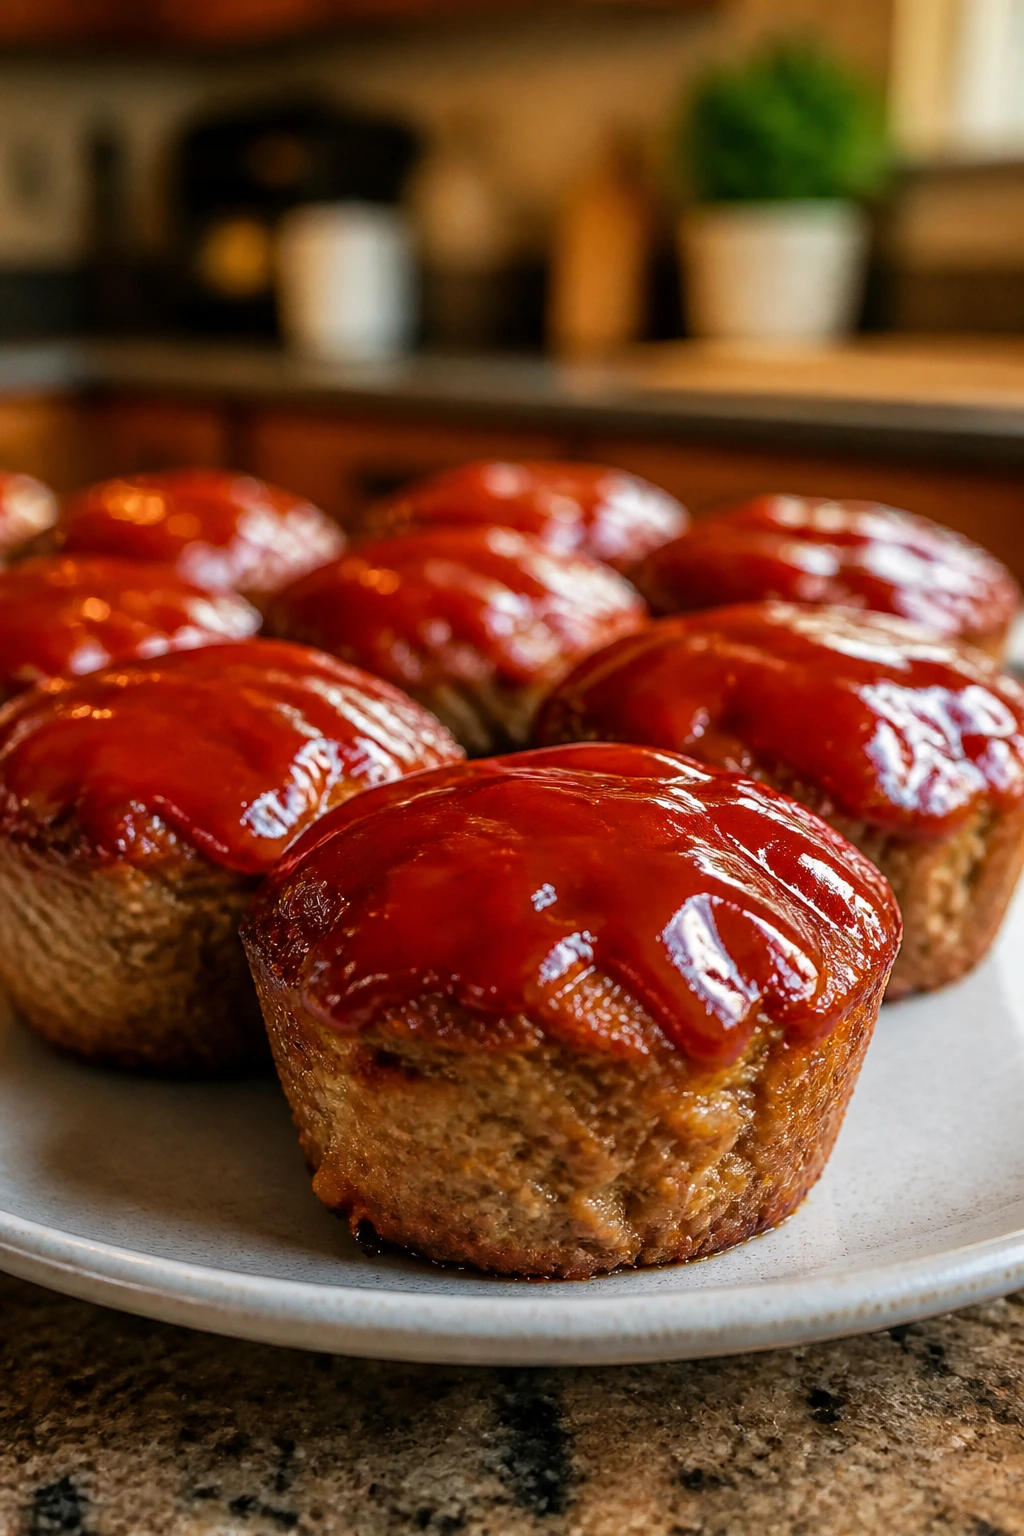
3. Mini Meatloaf Muffins with Ketchup Glaze
Mini meatloaf muffins solve the two things that usually annoy picky eaters about meatloaf: the shape and the waiting. A muffin tin gives you neat little portions with caramelized edges, and the ketchup glaze turns sticky and glossy on top instead of disappearing into a loaf pan. They smell like a diner in the best possible way.
Why It Works:
Small portions cook faster, which keeps the centers tender and the edges browned. The muffin shape also makes the meatloaf feel less like a mystery block and more like something you can point to, cut up, or eat with a fork without a scene. A little milk and breadcrumb mixture keeps the beef soft, while the glaze adds the sweet-savory finish people expect from meatloaf. I prefer this version over a big loaf on busy nights because it’s easier to portion and reheat.
Key Ingredients:
- 2 pounds ground beef
- 1 cup plain breadcrumbs
- 2 large eggs
- 1/2 cup milk
- 1 small onion, grated
- 2 tablespoons ketchup
- 1 tablespoon Worcestershire sauce
- 1 teaspoon kosher salt
- 1/2 teaspoon black pepper
- 1 teaspoon garlic powder
For the Glaze:
- 1/2 cup ketchup
- 2 tablespoons brown sugar
- 1 tablespoon apple cider vinegar
Quick Steps:
- Preheat and prep: Heat the oven to 400°F. Grease a 12-cup muffin tin well with butter or cooking spray.
- Mix the meatloaf: In a large bowl, combine the beef, breadcrumbs, eggs, milk, grated onion, ketchup, Worcestershire, salt, pepper, and garlic powder. Mix with your hands until just combined. Do not knead it like bread; that makes it dense.
- Fill the tin: Spoon the mixture into the muffin cups, mounding each one slightly above the rim.
- Bake briefly: Bake for 10 minutes, just until the tops begin to set.
- Glaze and finish: Stir together the glaze ingredients and spoon a little over each muffin. Return the tin to the oven for 8 to 10 minutes, until the centers hit 160°F.
- Rest and release: Let the muffins cool for 5 minutes before lifting them out with a spoon.
Equipment for This Recipe:
- 12-cup muffin tin
- Large mixing bowl
- Measuring cups and spoons
- Small bowl for the glaze
- Spoon or small scoop
How to Serve This Dish:
These belong with mashed potatoes and green beans, plain and simple. If you want an easy plate that looks done without much fuss, set two meatloaf muffins beside a pile of potatoes and let a spoonful of extra glaze run down the side. Two muffins per adult is a fair serving; kids often do well with one or two.
Pro Tips for This Recipe:
- Grating the onion makes the texture disappear into the meat.
- If the tops brown too fast, lay a loose piece of foil over the pan for the last 5 minutes.
- Let the glaze go on after the first bake so it stays shiny instead of burning.
- These freeze well after baking. Wrap them individually if you want lunch-sized portions.
Variations on This Dish:
- BBQ Meatloaf Muffins: Swap the glaze for barbecue sauce mixed with 1 tablespoon brown sugar.
- Turkey Meatloaf Muffins: Use ground turkey and add 1 tablespoon olive oil to keep them from feeling dry.
- Cheesy Center Muffins: Press a cube of cheddar into the middle of each one before baking.
Common Mistakes to Avoid with This Dish:
- Packing the meat too tightly: You’ll get dry little bricks. Spoon it in loosely.
- Skipping the glaze: The top can taste flat without it.
- Using lean beef with no fat: Very lean meat dries out faster in muffin form.
4. Hidden-Veggie Spaghetti with Beef Sauce
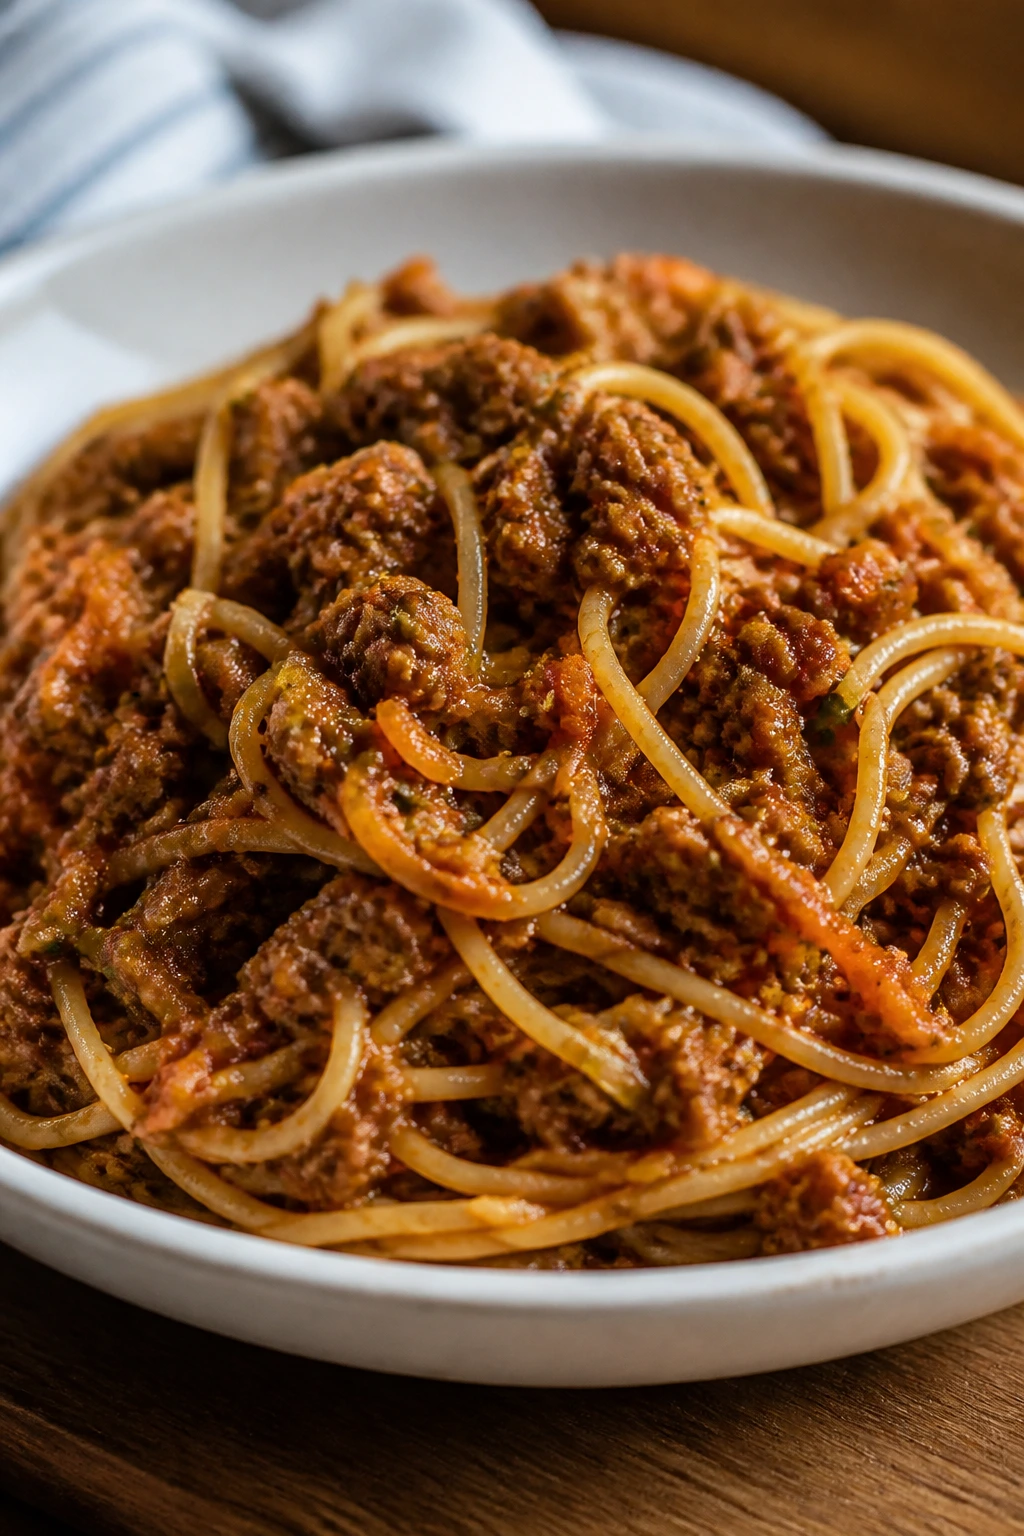
The trick here is not deception, exactly. It’s texture management. Grated carrots and zucchini melt into the sauce so completely that the noodles still taste like the spaghetti people expect, just a little sweeter and a little fuller. The sauce clings to the strands instead of sitting in a watery puddle at the bottom of the bowl, which is half the battle.
Why It Works:
Spaghetti is already familiar, so the vegetables can ride along without causing alarm. Carrot adds gentle sweetness, zucchini disappears almost completely when grated fine, and the beef gives the sauce enough body to feel like a proper dinner. A tablespoon of tomato paste deepens the flavor so you don’t need a long list of seasonings. The sauce also reheats well, which is useful when someone inevitably wants a second bowl later.
Key Ingredients:
- 1 pound spaghetti
- 1 pound ground beef
- 1 tablespoon olive oil
- 1 medium carrot, grated
- 1 medium zucchini, grated and squeezed dry
- 1 small onion, finely diced
- 3 garlic cloves, minced
- 1 tablespoon tomato paste
- 24 ounces marinara sauce
- 1 teaspoon Italian seasoning
- 1/2 teaspoon kosher salt
- 1/4 teaspoon black pepper
- 1 teaspoon sugar, optional
- 1/2 cup grated Parmesan cheese
Quick Steps:
- Boil the pasta: Cook the spaghetti in salted water until al dente, then reserve 1 cup of the cooking water and drain the pasta.
- Brown the beef: Heat the olive oil in a large skillet over medium-high heat. Add the beef and onion and cook for 6 to 7 minutes, breaking the meat apart until it loses its pink color.
- Build the vegetable base: Stir in the carrot and zucchini and cook for 3 to 4 minutes until they soften and the pan smells sweet, not raw.
- Deepen the sauce: Add the garlic and tomato paste and cook for 1 minute. Pour in the marinara, Italian seasoning, salt, pepper, and sugar if needed. Simmer for 10 minutes.
- Combine: Toss the spaghetti with the sauce. Add a splash of reserved pasta water if you want the sauce a little looser and silkier.
- Finish: Serve with Parmesan over the top.
Equipment for This Recipe:
- Large pot
- Colander
- Large skillet
- Box grater
- Wooden spoon
How to Serve This Dish:
A thick slice of garlic bread works well here, and so does a simple salad with cucumber and shredded carrots if your table allows greens at all. I like to keep extra Parmesan in a bowl at the center and let everyone decide how much to add. A standard dinner portion is about 2 cups per person, but children usually need less than they think they do.
Pro Tips for This Recipe:
- Squeeze the zucchini hard in a clean kitchen towel. Wet zucchini makes the sauce thin.
- Grate the carrot finely so it cooks down fast and doesn’t stay crunchy.
- If the sauce tastes flat, add another pinch of salt before reaching for sugar.
- A splash of the pasta water helps the sauce cling to the noodles instead of sliding off.
Variations on This Dish:
- Turkey Spaghetti: Use ground turkey and add 1 tablespoon olive oil when browning to keep the pan from drying out.
- Meatless Version: Replace the beef with 1 1/2 cups cooked lentils and a little extra tomato paste.
- Creamy Red Sauce: Stir in 1/4 cup cream cheese at the end for a softer, richer sauce.
Common Mistakes to Avoid with This Dish:
- Not squeezing the zucchini: The sauce turns loose and watery.
- Overcooking the spaghetti: Mushy noodles make the whole dinner feel tired.
- Leaving the vegetables in big chunks: The whole point is for them to disappear into the sauce.
5. One-Pan Taco Rice Skillet
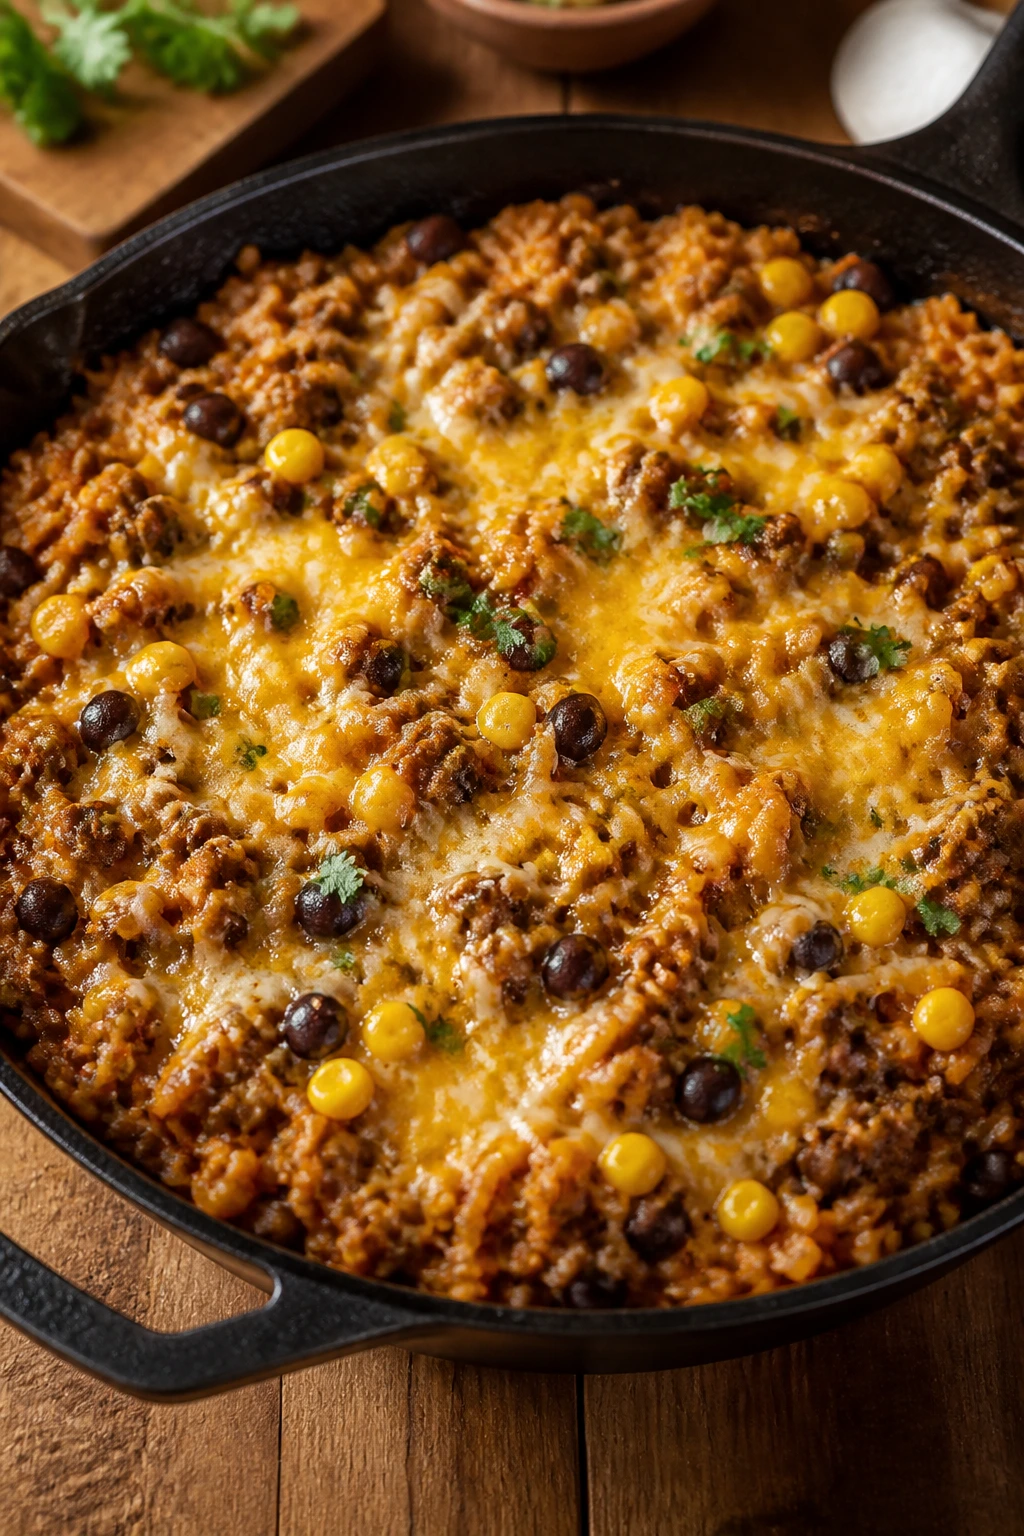
This is the dinner I make when the group wants tacos, but I want one pan and one lid and fewer scattered toppings. The rice soaks up the tomato, broth, and seasoning until it tastes like taco filling wearing a softer coat. Add cheese at the end, and the whole skillet turns into a melted, scoopable middle ground between taco night and casserole night.
Why It Works:
Long-grain white rice stays separate and fluffy, which matters in a skillet where everything shares the same liquid. Mild taco seasoning gives you the familiar flavor without turning the pan aggressively spicy, and corn adds little pops of sweetness that picky eaters often accept more easily than peppers. Keeping the toppings outside the skillet—sour cream, chips, lettuce, avocado—gives everyone a way to customize without making the base complicated. That’s the move.
Key Ingredients:
- 1 pound ground beef or ground turkey
- 1 small onion, diced
- 1 1/2 cups long-grain white rice, rinsed
- 1 tablespoon mild taco seasoning
- 1 14.5-ounce can diced tomatoes
- 2 cups chicken broth
- 1 cup frozen corn
- 1 cup black beans, drained and rinsed, optional
- 1 cup shredded cheddar cheese
- 2 tablespoons sour cream, for serving
- Tortilla chips, lettuce, or avocado, for serving
Quick Steps:
- Brown the meat: Heat a large deep skillet over medium heat. Cook the beef and onion for 6 to 8 minutes until the meat is browned and the onion is soft.
- Season and stir in rice: Add the taco seasoning and rice, stirring for 1 minute so the grains pick up a little flavor.
- Add liquid: Pour in the diced tomatoes and chicken broth. Bring the mixture to a simmer.
- Cover and cook: Lower the heat to medium-low, cover the skillet, and cook for 18 minutes. Do not keep lifting the lid or the rice will steam unevenly.
- Finish the mix-ins: Stir in the corn and black beans, if using, then cook covered for 2 more minutes until the rice is tender and the liquid is absorbed.
- Melt the cheese: Scatter the cheddar over the top, cover again, and let it sit for 2 minutes until the cheese melts.
- Serve: Spoon onto plates and finish with sour cream or chips on the side.
Equipment for This Recipe:
- Large deep skillet with a lid
- Wooden spoon
- Measuring cups
- Small bowl for toppings
- Fine-mesh sieve for rinsing rice
How to Serve This Dish:
Put the skillet in the middle of the table and let people build their own bowls with sour cream, crushed tortilla chips, lettuce, or avocado. The base works best with a spoon, not a fork. A child-sized serving is usually around 3/4 cup; adults often want 1 1/2 cups.
Pro Tips for This Recipe:
- Rinse the rice until the water runs mostly clear. That keeps the grains from getting gluey.
- Use a skillet that’s wide enough for the rice to spread out in an even layer.
- If the rice is done but the liquid is still pooling, cook uncovered for 2 to 3 minutes.
- A squeeze of lime at the end brightens the pan without making it spicy.
Variations on This Dish:
- Bean-Heavy Taco Skillet: Double the black beans and use less meat if you want a cheaper, softer pan.
- Cheesy Enchilada Skillet: Swap the tomatoes for mild enchilada sauce and add extra cheddar.
- No-Bean Version: Leave the beans out completely and add a little more corn for sweetness.
Common Mistakes to Avoid with This Dish:
- Using instant rice: The timing changes completely and the texture goes soft.
- Adding too much broth: The skillet turns soupy.
- Skipping the rest time: The rice needs a few minutes off the heat to settle.
6. Baked Turkey Cheeseburger Sliders
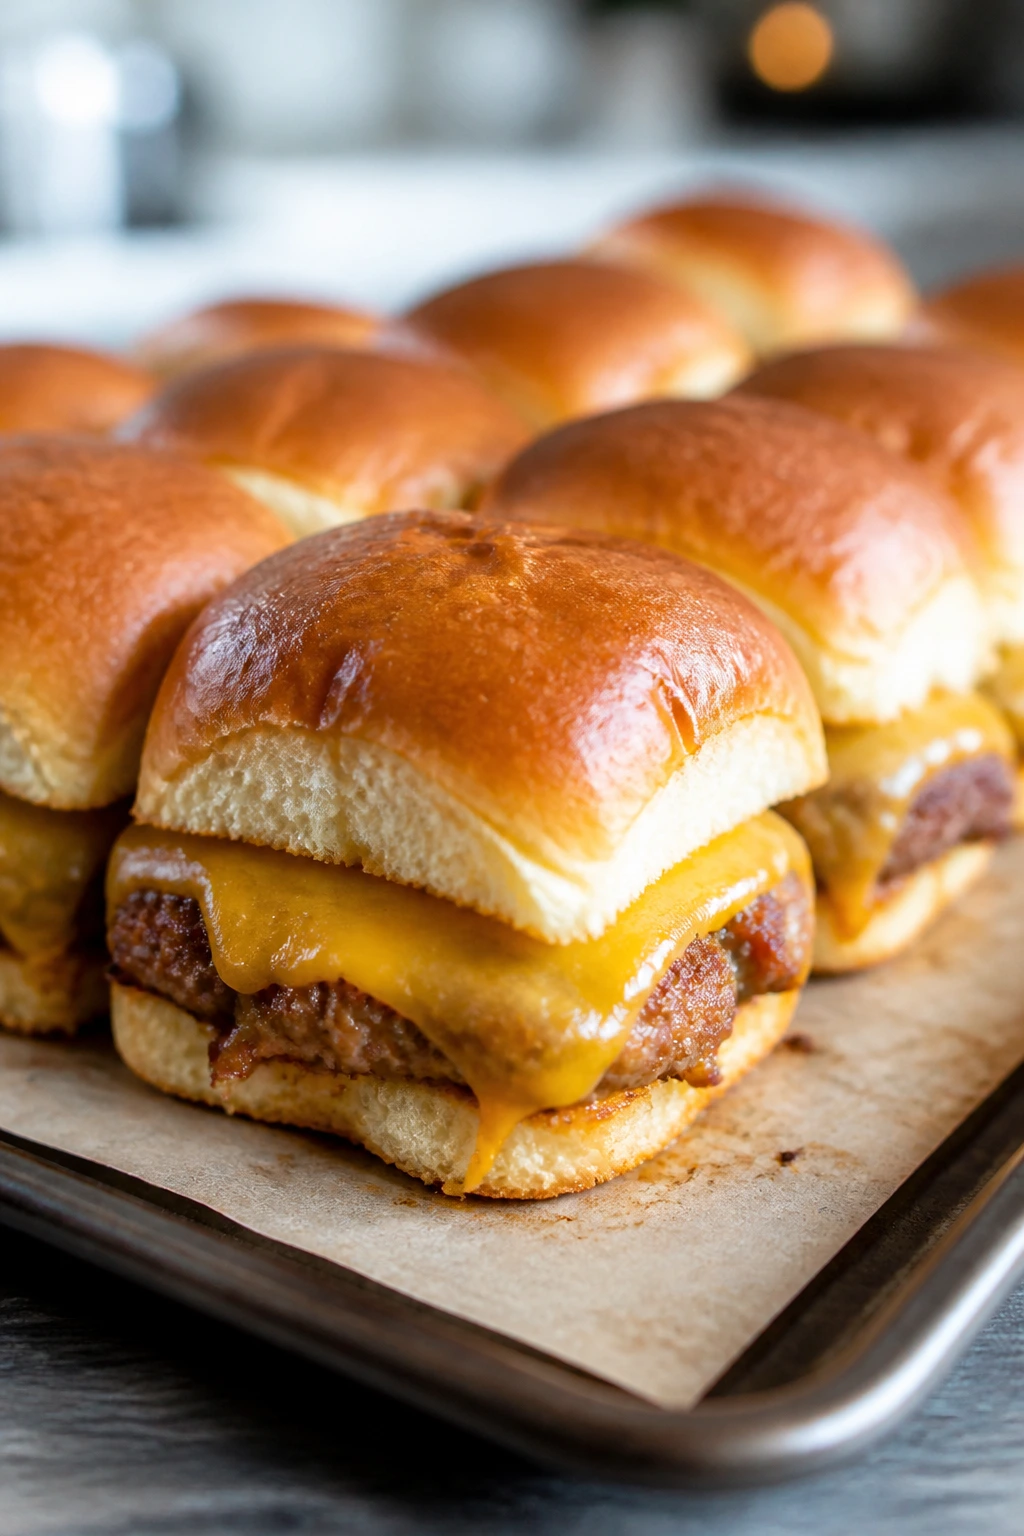
These are the kind of sliders that disappear fast because they feel like a burger, only less messy and easier to hold. The turkey stays juicy if you don’t overwork it, the cheese melts into the patties, and the buns warm up just enough to smell toasty. I like this dinner for nights when the table wants something handheld and nobody wants a knife.
Why It Works:
Turkey is milder than beef, which makes it a good fit for picky eaters who like the idea of a cheeseburger but not a strong meat flavor. Baking the patties on a sheet pan keeps the process fast, and the slider size gives you good crust without the risk of a thick, dry center. A quick butter wash on the buns adds a soft, bakery smell that somehow convinces everyone dinner is fun, even if it’s still just Tuesday. The cheese seals the deal.
Key Ingredients:
- 1 1/2 pounds ground turkey
- 1 large egg
- 1/3 cup plain breadcrumbs
- 1 tablespoon ketchup
- 1 teaspoon kosher salt
- 1/2 teaspoon black pepper
- 1 teaspoon garlic powder
- 12 slider buns
- 8 slices mild cheddar cheese
- 2 tablespoons melted butter
- 1 tablespoon sesame seeds
- Lettuce or pickles, optional
Quick Steps:
- Preheat and line up the pan: Heat the oven to 400°F and line a sheet pan with parchment paper.
- Mix the patties: In a bowl, gently combine the turkey, egg, breadcrumbs, ketchup, salt, pepper, and garlic powder. Mix only until the ingredients disappear into one another.
- Shape the sliders: Form the mixture into 12 thin patties, about the size of your buns. Make a small thumbprint in the center of each one so they cook evenly.
- Bake: Arrange the patties on the pan and bake for 10 minutes. Flip if your patties are thick; otherwise, just keep going.
- Add cheese: Top each patty with a half slice of cheddar and bake 2 more minutes, until the cheese softens and the turkey reaches 165°F.
- Assemble: Place the patties on the buns, brush the tops with melted butter, sprinkle with sesame seeds, and return the tray to the oven for 3 minutes to warm through.
Equipment for This Recipe:
- Rimmed sheet pan
- Parchment paper
- Mixing bowl
- Spatula
- Instant-read thermometer
How to Serve This Dish:
Serve the sliders with oven fries, raw carrot sticks, or pickles on the side. They look best stacked in a line on a wooden board, with lettuce tucked under a few buns for color. Two sliders is a normal adult portion, though bigger appetites may want three.
Pro Tips for This Recipe:
- Grate a tiny bit of onion into the turkey if your family tolerates it. The flavor blends in.
- Don’t smash the patties while they bake. Turkey dries out fast when you press it.
- If the buns are very soft, toast the cut sides for 1 to 2 minutes before assembling.
- Use cheese with a mild flavor. Sharp cheddar can overpower the turkey.
Variations on This Dish:
- Bacon Burger Sliders: Add cooked crumbled bacon to the patties for a smokier version.
- No-Bun Bowl: Serve the patties over rice with cheese and ketchup on the side.
- Ranch Slider Version: Mix 1 teaspoon ranch seasoning into the turkey for a more savory bite.
Common Mistakes to Avoid with This Dish:
- Overmixing the turkey: The patties get tight and bouncy.
- Making them too thick: Thick patties need longer in the oven and dry out faster.
- Skipping the thermometer: Ground turkey should hit 165°F, no guessing.
7. Creamy Butter Noodles with Ham and Peas
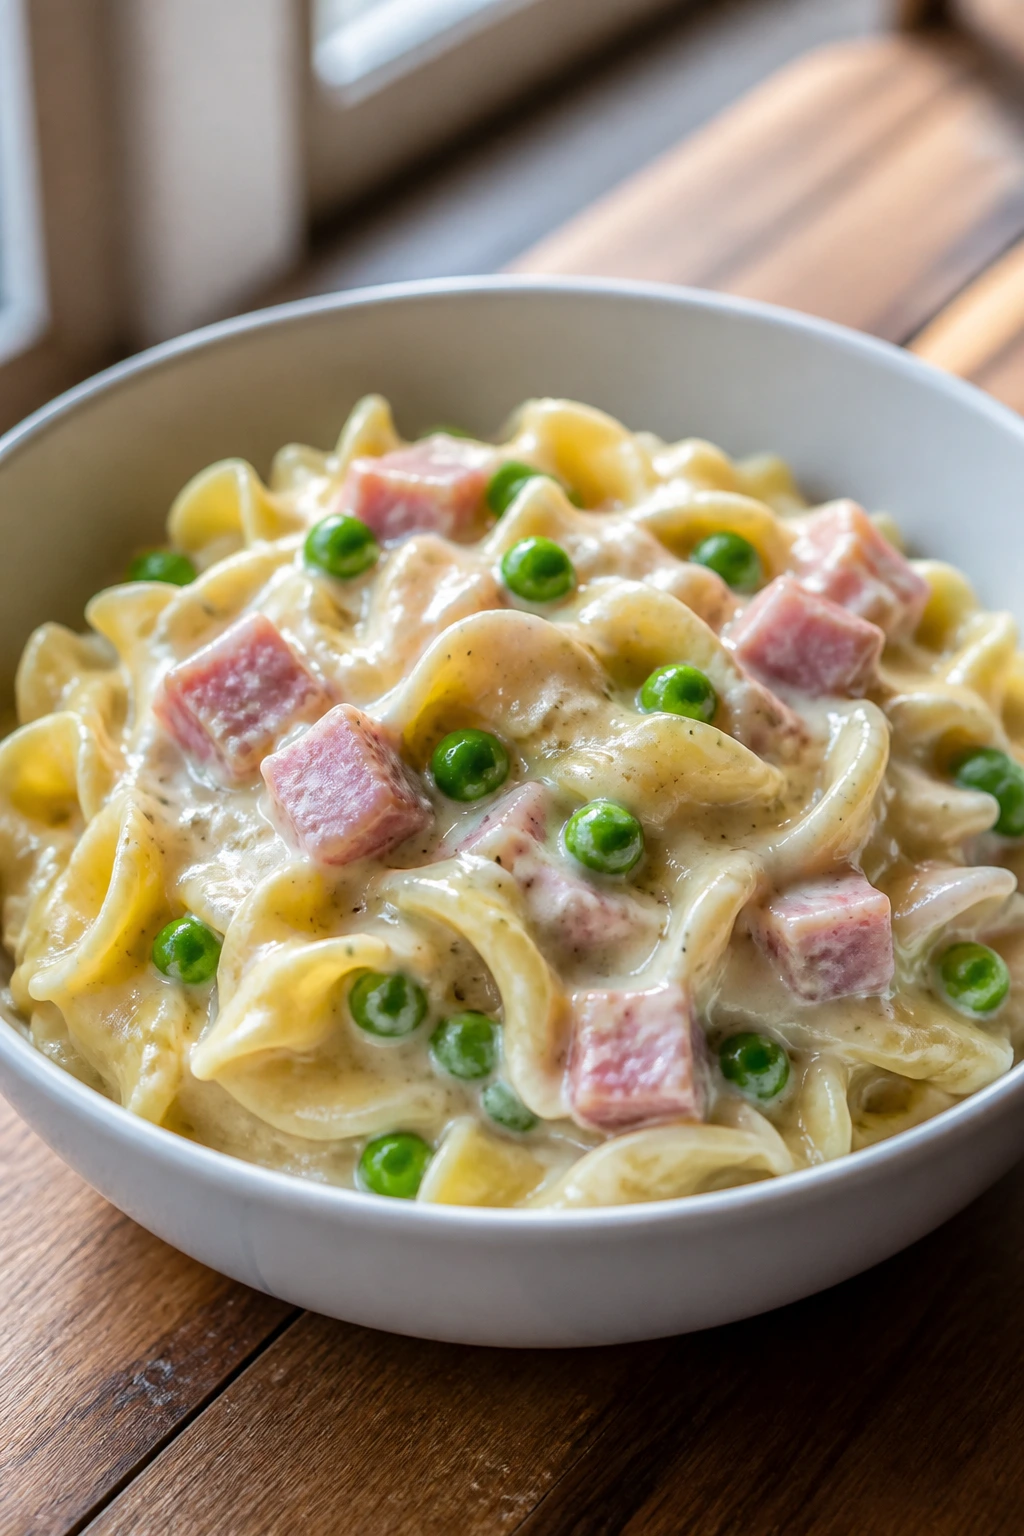
This is a quiet dinner in the best way. Nothing shouts. The noodles are slick with butter and milk sauce, the ham brings salt and a little chew, and the peas add tiny sweet bites that don’t take over the bowl. If your house has one person who only wants plain noodles, this is the recipe that meets them halfway.
Why It Works:
Egg noodles cook fast and stay soft without falling apart, which makes them a good base for a mild cream sauce. A simple roux—just butter and flour—keeps the sauce from breaking, and ham gives enough flavor that you don’t need a long spice list. Frozen peas work here because they stay sweet and bright after a brief simmer. This dish is also one of the easiest in the bunch to rescue if it thickens too much; a splash of milk fixes it.
Key Ingredients:
- 12 ounces egg noodles
- 2 tablespoons butter
- 2 tablespoons all-purpose flour
- 2 cups milk
- 1 teaspoon kosher salt
- 1/2 teaspoon black pepper
- 1/4 teaspoon garlic powder
- 2 cups diced cooked ham
- 1 1/2 cups frozen peas
- 1 cup shredded mild cheddar cheese or 3/4 cup Parmesan
- 2 tablespoons chopped parsley, optional
Quick Steps:
- Cook the noodles: Boil the egg noodles in salted water until just tender, then drain them.
- Make the roux: In the same pot or a wide skillet, melt the butter over medium heat. Whisk in the flour and cook for 1 minute until it smells a little nutty and looks pale blond.
- Add the milk: Whisk in the milk slowly so the sauce stays smooth. Cook for 3 to 4 minutes, stirring often, until it thickens enough to coat a spoon.
- Season and add the filling: Stir in the salt, pepper, garlic powder, ham, and peas. Cook for 2 to 3 minutes until the peas are hot and bright green.
- Finish with cheese: Stir in the cheese until melted and glossy.
- Toss with noodles: Fold in the noodles and coat them evenly. If the sauce looks too tight, add a splash of milk.
Equipment for This Recipe:
- Large pot or deep skillet
- Whisk
- Colander
- Wooden spoon
- Measuring cups
How to Serve This Dish:
Set this beside buttered carrots, sliced apples, or a simple cucumber salad if you want something fresh on the plate. I like to keep the parsley optional and add it only to the adults’ bowls, because some kids spot green before they smell dinner. A bowlful is usually enough for dinner on its own.
Pro Tips for This Recipe:
- Don’t let the milk sauce boil hard or it can turn grainy.
- If you use Parmesan, grate it fine so it melts smoothly.
- Dice the ham small. Big chunks make the pasta harder to eat cleanly.
- Frozen peas can go straight in from the freezer. No thawing needed.
Variations on This Dish:
- Chicken Noodle Version: Swap the ham for diced cooked chicken.
- Bacon Pea Noodles: Use crumbled bacon instead of ham for a smokier flavor.
- Plain Butter Noodles: Leave out the ham and peas entirely and finish with Parmesan for the simplest possible plate.
Common Mistakes to Avoid with This Dish:
- Making the sauce too thick before the noodles go in: It thickens more as it sits.
- Using too much heat: Milk sauces can go lumpy fast.
- Cutting the ham in big cubes: Small pieces blend into the noodles better.
8. Sheet Pan BBQ Chicken with Potatoes and Corn
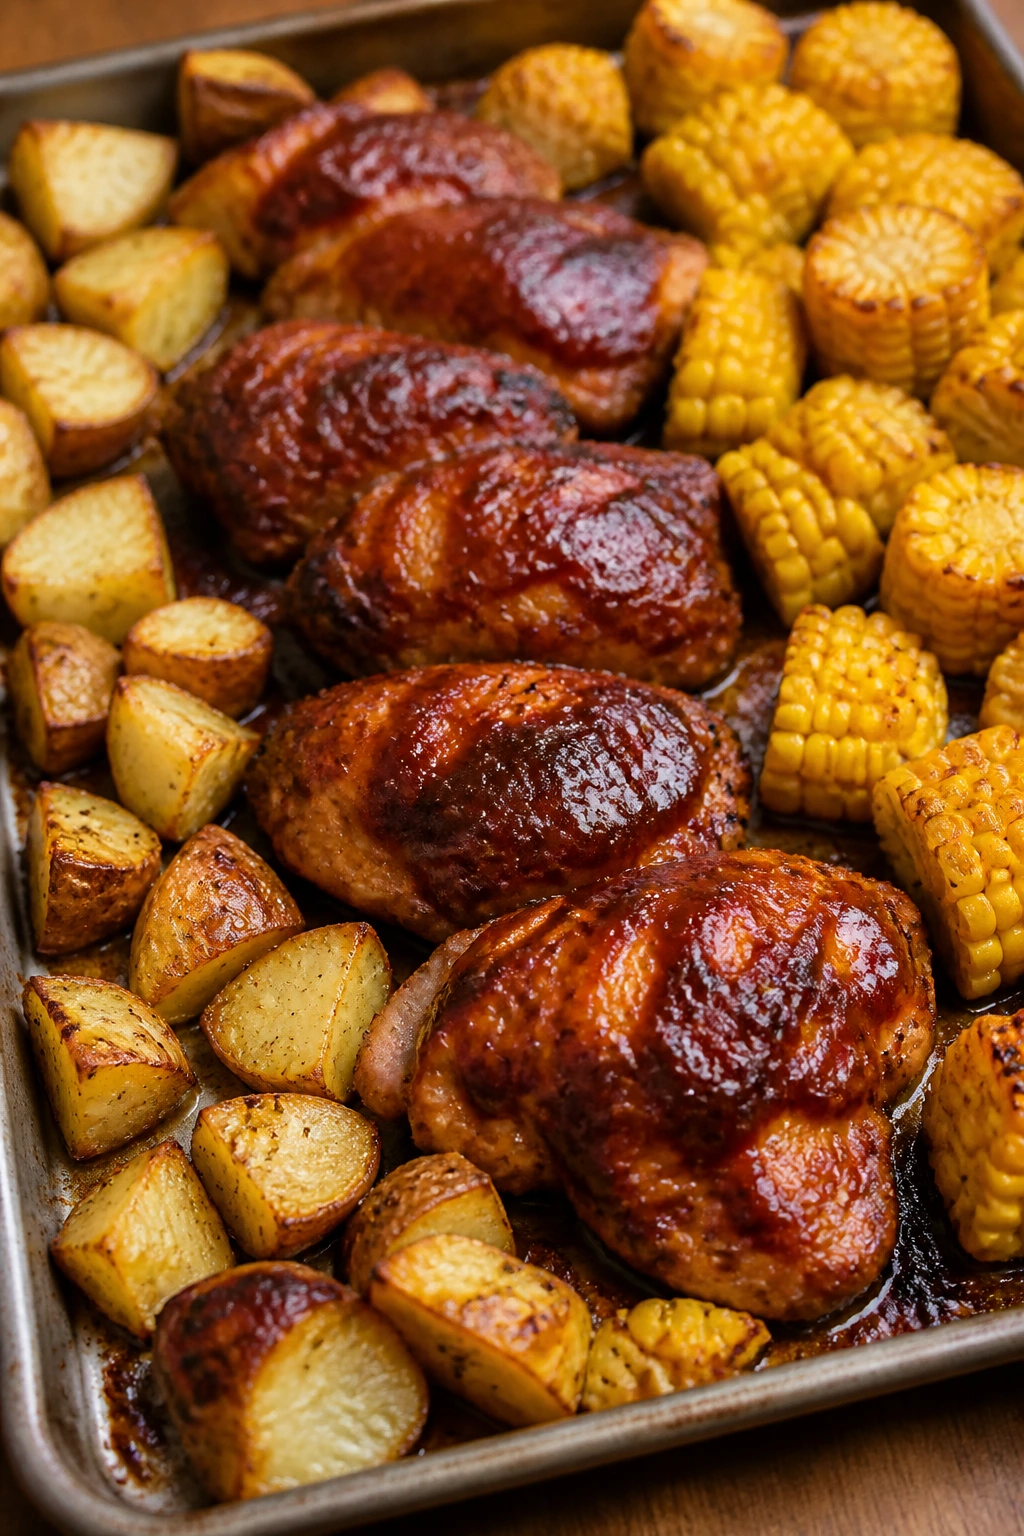
The smell of this dinner is half the appeal: roasted potatoes, hot corn, and BBQ sauce caramelizing at the edges of the chicken. It lands on the table looking like something more organized than it felt to make, which is a useful trick on a busy night. The potatoes get crisp, the chicken stays saucy, and the corn gives the whole tray a sweet finish.
Why It Works:
The potatoes start first because they need the longest time in the oven. Chicken goes on later so it doesn’t dry out while the starch catches up, and corn joins near the end so it stays sweet instead of wrinkling into a sad yellow husk. BBQ sauce works best when it’s brushed on late; if you paint it on too early, the sugar burns before the chicken reaches temperature. The result is sticky in the right places and tender everywhere else.
Key Ingredients:
- 2 pounds boneless, skinless chicken thighs or breasts
- 1 1/2 pounds baby potatoes, halved
- 2 ears corn, cut into thirds, or 2 cups frozen corn
- 2 tablespoons olive oil
- 1 teaspoon kosher salt
- 1/2 teaspoon black pepper
- 1 teaspoon paprika
- 1 teaspoon garlic powder
- 1 cup BBQ sauce
Quick Steps:
- Start the potatoes: Heat the oven to 425°F. Toss the potatoes with 1 tablespoon of olive oil, half the salt, half the pepper, and half the paprika. Spread them on a sheet pan and roast for 15 minutes.
- Season the chicken: While the potatoes roast, rub the chicken with the remaining oil, salt, pepper, paprika, and garlic powder.
- Add the chicken and corn: Pull the pan out, push the potatoes to one side, and add the chicken and corn.
- Brush with BBQ sauce: Spoon or brush about half the BBQ sauce over the chicken.
- Finish roasting: Roast for 20 to 25 minutes more, brushing with the remaining sauce during the last 8 minutes, until the chicken reaches 165°F and the potatoes are tender.
- Rest: Let everything sit for 5 minutes before serving so the juices settle.
Equipment for This Recipe:
- Rimmed sheet pan
- Tongs
- Small bowl for the sauce
- Pastry brush or spoon
- Instant-read thermometer
How to Serve This Dish:
This tray feels complete with a little coleslaw or a simple green salad on the side. If you want it to look more deliberate, slice the chicken and fan it over the potatoes before spooning a little extra sauce over the top. One chicken thigh plus a scoop of potatoes and corn is usually a solid serving.
Pro Tips for This Recipe:
- Cut the potatoes evenly so they finish at the same time.
- Use a BBQ sauce that tastes sweet first, smoky second. Heavy smoke can turn kids off fast.
- Chicken thighs stay juicier than breasts, especially if they’re on the thicker side.
- If the potatoes aren’t brown enough, broil for 1 to 2 minutes at the end.
Variations on This Dish:
- Honey Mustard Chicken Tray: Swap BBQ sauce for honey mustard and keep the potatoes plain or add a little thyme.
- Ranch Potato Version: Toss the potatoes with ranch seasoning instead of paprika.
- Spicy Adult Finish: Drizzle hot sauce only over the grown-up portions after plating.
Common Mistakes to Avoid with This Dish:
- Saucing too early: The sugar burns.
- Crowding the pan: The potatoes steam instead of roast.
- Using thick chicken breasts without checking temperature: Cut the largest piece to make sure the center is done.
9. Beef and Cheese Quesadillas

Quesadillas are the kind of dinner that feel like a favor to everyone at the table. The tortilla crisps in the skillet, the cheese melts into the beef, and each wedge comes out with a golden crust that sounds good when you cut it. They’re easy to divide, easy to dip, and easy to keep mild.
Why It Works:
The tortilla gives picky eaters a familiar shape, and the filling stays simple enough that no one has to play detective at the table. Seasoned beef brings the taco flavor in a soft, controlled way, while melted cheese acts like glue for the whole thing. Cooking the quesadillas in a skillet, not the oven, gives you a crisp exterior fast before the cheese leaks out. That crisp edge is usually what makes the second wedge disappear.
Key Ingredients:
- 1 pound ground beef
- 1 tablespoon olive oil
- 1 small onion, finely diced, optional
- 1 tablespoon mild taco seasoning
- 1/4 cup water
- 8 flour tortillas
- 2 cups shredded cheddar or Monterey Jack cheese
- 1 cup refried beans, optional
- 1 cup salsa, for serving
- Sour cream, for serving
Quick Steps:
- Cook the beef: Heat the oil in a skillet over medium heat. Add the beef and onion, if using, and cook for 6 to 7 minutes until browned.
- Season it: Stir in the taco seasoning and water. Cook for 2 minutes until the liquid reduces and the beef looks thick, not soupy.
- Fill the tortillas: Lay four tortillas on a counter. Divide the cheese, beef, and beans, if using, over half of each tortilla. Fold them closed.
- Crisp the quesadillas: Cook in a dry skillet over medium heat for 2 to 3 minutes per side until golden and the cheese melts. Keep the heat moderate or the tortilla will brown before the cheese softens.
- Slice and serve: Cut into wedges and serve with salsa and sour cream.
Equipment for This Recipe:
- Large skillet
- Spatula
- Cutting board
- Sharp knife or pizza cutter
- Measuring cups
How to Serve This Dish:
Serve the wedges with small bowls of salsa, sour cream, or even plain avocado slices. I like to stack the triangles on a plate in a fan shape, because it makes the dinner look intentional even if you made it in twelve minutes. Two small quesadillas usually feed a child; adults may want three or four wedges with a side.
Pro Tips for This Recipe:
- Shred the cheese yourself if you want the smoothest melt.
- Don’t overfill the tortillas. That’s how you get a greasy mess on the pan.
- Let the beef mixture cool for a minute before assembling so the tortillas don’t steam.
- If the tortillas are dry, warm them for 10 seconds first so they fold without cracking.
Variations on This Dish:
- Chicken Quesadillas: Swap the beef for shredded cooked chicken.
- Bean-and-Cheese Version: Leave out the meat and use extra refried beans for a softer filling.
- Breakfast Quesadillas: Fill with scrambled eggs and cheese instead of beef for a morning-for-dinner switch.
Common Mistakes to Avoid with This Dish:
- Filling them too full: The cheese spills out and burns.
- Cooking on high heat: The tortilla darkens before the middle melts.
- Serving them right off the pan: A minute of rest keeps the filling from sliding out.
10. Baked Mac and Cheese with Cauliflower
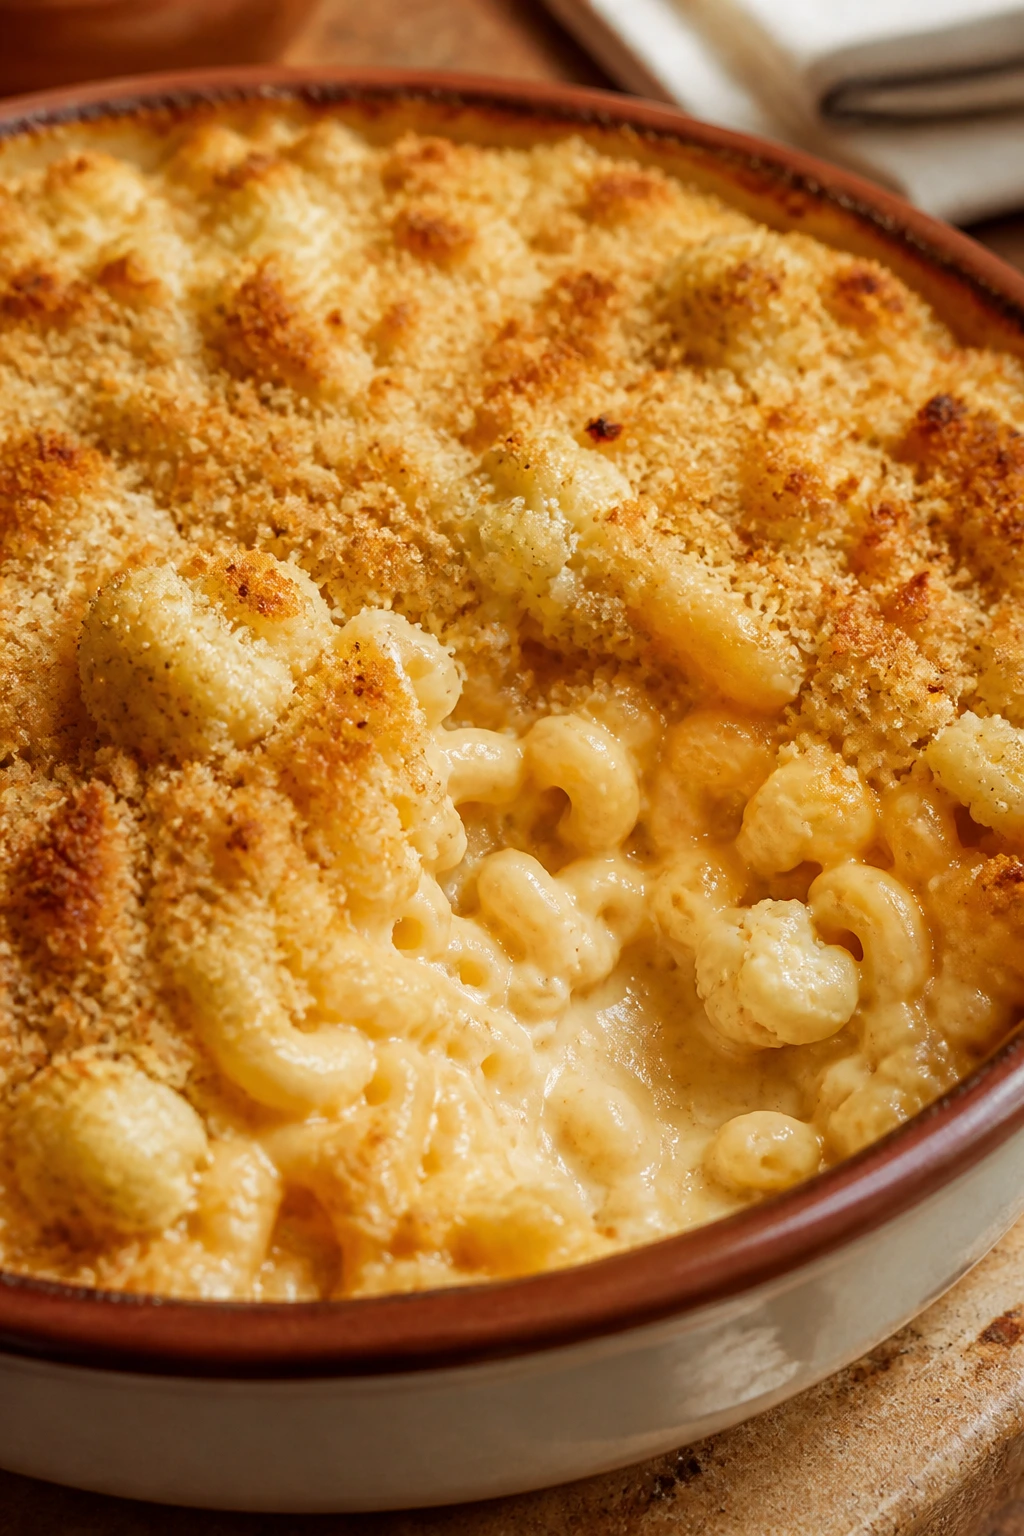
This is the mac and cheese that leans on cauliflower without making a big speech about it. The florets get tender, shrink into the sauce, and settle into the pasta so the whole dish still tastes like mac and cheese first. The top turns crunchy with buttery crumbs while the inside stays creamy enough to make a spoon feel necessary.
Why It Works:
Cauliflower takes on cheese well because it doesn’t fight the sauce the way some stronger vegetables do. Cutting it small gives you a softer texture that blends into the macaroni instead of announcing itself in big white chunks. A flour-butter-milk sauce keeps the cheese from separating, and baking the casserole at the end adds that browned lid people expect from homemade mac. It’s not subtle in a bad way. It’s stealthy in a useful way.
Key Ingredients:
- 1 pound elbow macaroni
- 1 small head cauliflower, cut into very small florets
- 4 tablespoons butter
- 4 tablespoons all-purpose flour
- 3 cups milk
- 1 teaspoon kosher salt
- 1/2 teaspoon black pepper
- 1 teaspoon mustard powder
- 3 cups shredded sharp cheddar
- 1 cup shredded mozzarella or mild cheddar
- 1 cup breadcrumbs
- 1 tablespoon melted butter
Quick Steps:
- Cook the pasta and cauliflower: Boil the macaroni until just shy of done. Steam or boil the cauliflower until tender, then drain well.
- Make the sauce base: Melt the butter in a saucepan over medium heat. Whisk in the flour and cook for 1 minute.
- Add milk and seasonings: Whisk in the milk slowly, then cook for 4 to 5 minutes until the sauce thickens enough to coat a spoon. Stir in the salt, pepper, and mustard powder.
- Add cheese: Remove from the heat and stir in the cheeses until smooth.
- Combine: Fold in the pasta and cauliflower. Transfer to a greased 9×13-inch baking dish.
- Top and bake: Mix the breadcrumbs with the melted butter and scatter over the top. Bake at 375°F for 20 minutes until bubbly and golden.
- Rest: Give the casserole 10 minutes before scooping.
Equipment for This Recipe:
- Large pot
- Saucepan
- Whisk
- 9×13-inch baking dish
- Steamer basket or colander
How to Serve This Dish:
A scoop of this with apple slices on the side is a very normal dinner for a picky household, and I mean that as a compliment. If you want a little green on the plate, add roasted broccoli or peas, but keep them separate so no one feels cornered. A half-cup to one-cup scoop usually works for children, and adults will often go back for more than they planned.
Pro Tips for This Recipe:
- Cut the cauliflower smaller than you think you need to. Big florets are the giveaway.
- Drain the cauliflower well or the sauce will loosen up.
- Grating the cheddar from a block gives the smoothest melt.
- If the top browns too quickly, cover loosely with foil for the last 5 minutes.
Variations on This Dish:
- Broccoli Mac: Swap the cauliflower for very small broccoli florets.
- Plain Baked Mac: Leave out the vegetables entirely and keep the same sauce.
- Bacon Mac: Stir in cooked crumbled bacon for a saltier, smokier version.
Common Mistakes to Avoid with This Dish:
- Using too much cauliflower: The dish stops tasting like mac and cheese.
- Overbaking: The sauce thickens too much and goes dry.
- Skipping the rest time: The sauce needs a few minutes to settle.
11. Teriyaki Chicken Meatballs
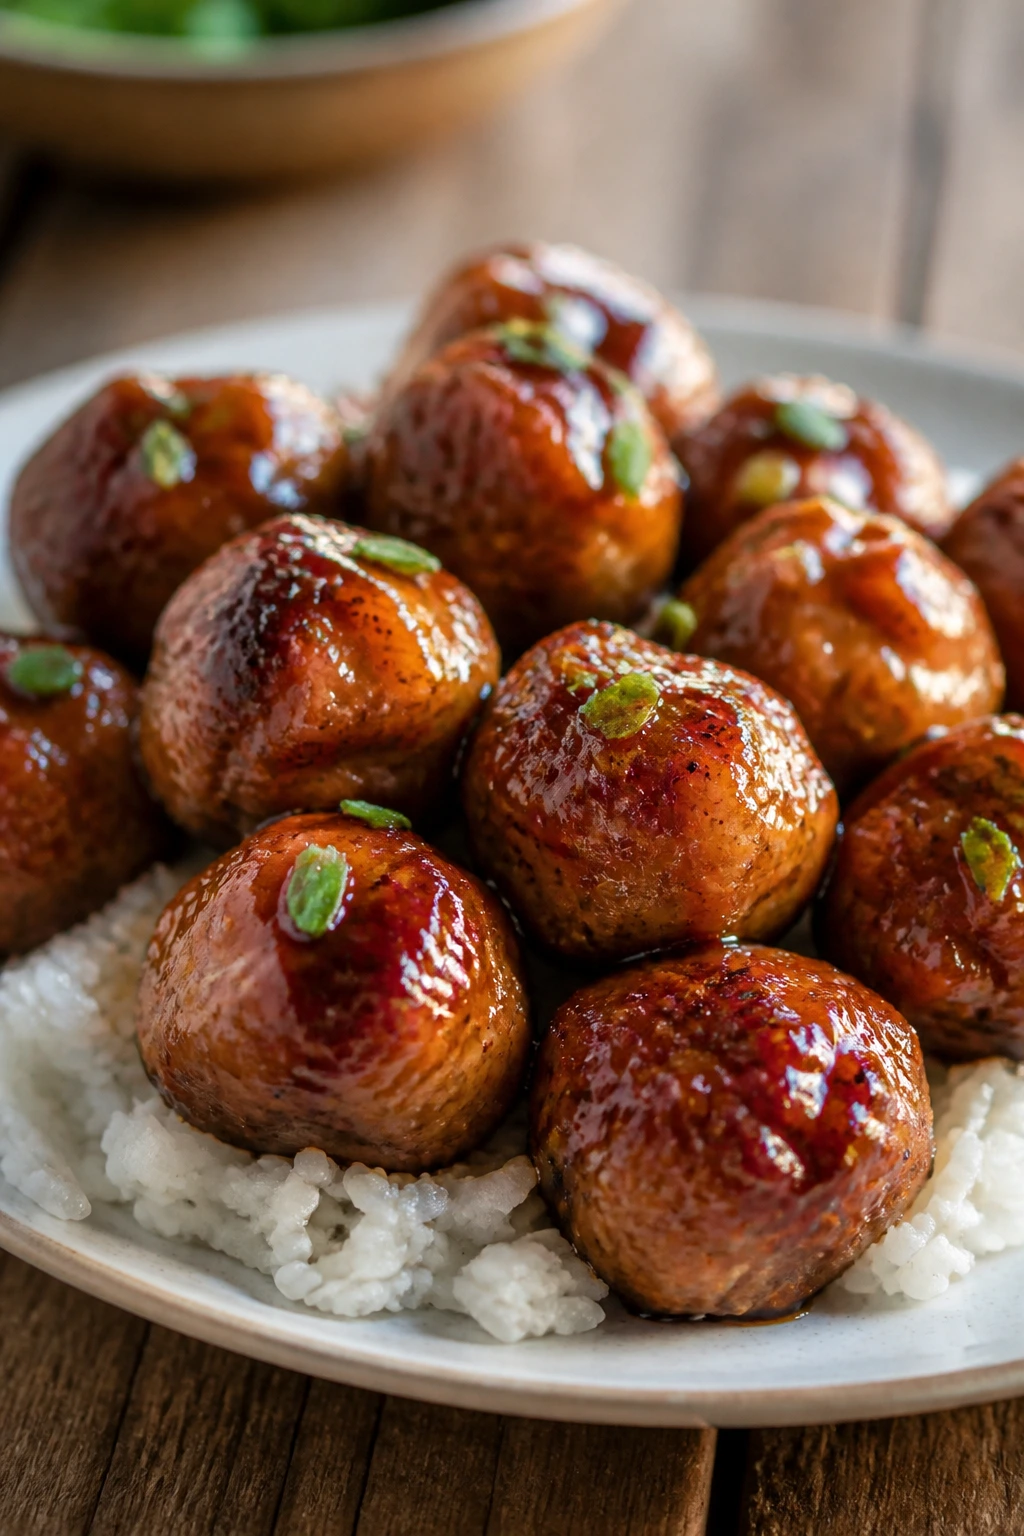
Sweet-savory chicken meatballs are one of those dishes that get eaten because they’re small, glossy, and easy to spear with a fork or toothpick. The sauce has a gentle soy sweetness instead of a sharp, salty edge, and the meatballs bake up tender instead of dense. Put them over rice and you’ve got a dinner that looks calmer than takeout and usually tastes fresher.
Why It Works:
Ground chicken is mild enough to carry a sweeter sauce, and the panko keeps the meatballs soft without turning them crumbly. Baking them first sets the shape without requiring constant pan-frying, which is a mercy on weeknights. The teriyaki sauce thickens with cornstarch at the end and clings to the meatballs in a shiny coat instead of pooling underneath them. A little pineapple juice gives the sauce a roundness that picky eaters usually accept faster than a heavy ginger bite.
Key Ingredients:
- 2 pounds ground chicken
- 1 large egg
- 1/2 cup panko breadcrumbs
- 2 tablespoons soy sauce
- 1 teaspoon garlic powder
- 1 teaspoon grated fresh ginger or 1/2 teaspoon ground ginger
- 1/4 teaspoon black pepper
For the Sauce:
- 1/2 cup soy sauce
- 1/2 cup pineapple juice
- 1/4 cup brown sugar
- 2 tablespoons honey
- 2 tablespoons rice vinegar
- 1 tablespoon cornstarch
- 1/4 cup water
To Serve:
- Cooked white rice
- Steamed broccoli or snap peas
Quick Steps:
- Preheat and line the pan: Heat the oven to 400°F and line a sheet pan with parchment.
- Mix the meatballs: Combine the ground chicken, egg, panko, soy sauce, garlic powder, ginger, and pepper in a bowl. Mix just until combined.
- Shape and bake: Roll into 1 1/2-inch meatballs and arrange on the pan. Bake for 15 minutes, until they’re cooked through and lightly browned.
- Make the sauce: Whisk the soy sauce, pineapple juice, brown sugar, honey, and rice vinegar in a saucepan. Bring it to a simmer. Stir the cornstarch and water together in a small cup, then whisk it into the sauce and cook for 1 to 2 minutes until glossy.
- Toss: Add the baked meatballs to the pan or a bowl and coat them with sauce.
- Serve: Spoon over rice.
Equipment for This Recipe:
- Rimmed sheet pan
- Parchment paper
- Mixing bowl
- Small saucepan
- Small whisk or fork
How to Serve This Dish:
These work well over a bed of white rice with broccoli on the side, but you can also serve them as toothpick snacks with rice in a separate bowl for the people who want control over every bite. I like to drizzle a little extra sauce over the rice and keep the meatballs mostly coated, not swimming. A child portion is usually 4 to 5 meatballs.
Pro Tips for This Recipe:
- Wet your hands slightly when rolling the meatballs so the mixture doesn’t stick.
- Don’t overbake them. Chicken goes dry faster than beef.
- Mix the cornstarch with water before adding it to the sauce or you’ll get little lumps.
- If the sauce tastes too salty, add another splash of pineapple juice.
Variations on This Dish:
- Orange Chicken Meatballs: Use orange juice instead of pineapple juice for a brighter sauce.
- Sesame Version: Sprinkle toasted sesame seeds over the finished pan.
- Gluten-Free Version: Use gluten-free panko and tamari instead of soy sauce.
Common Mistakes to Avoid with This Dish:
- Overmixing the meatball mixture: That gives you bouncy meatballs.
- Saucing them before they’re cooked: The glaze can burn.
- Skipping the rice: The sauce needs a soft base underneath it.
12. Sloppy Joe Stuffed Baked Potatoes
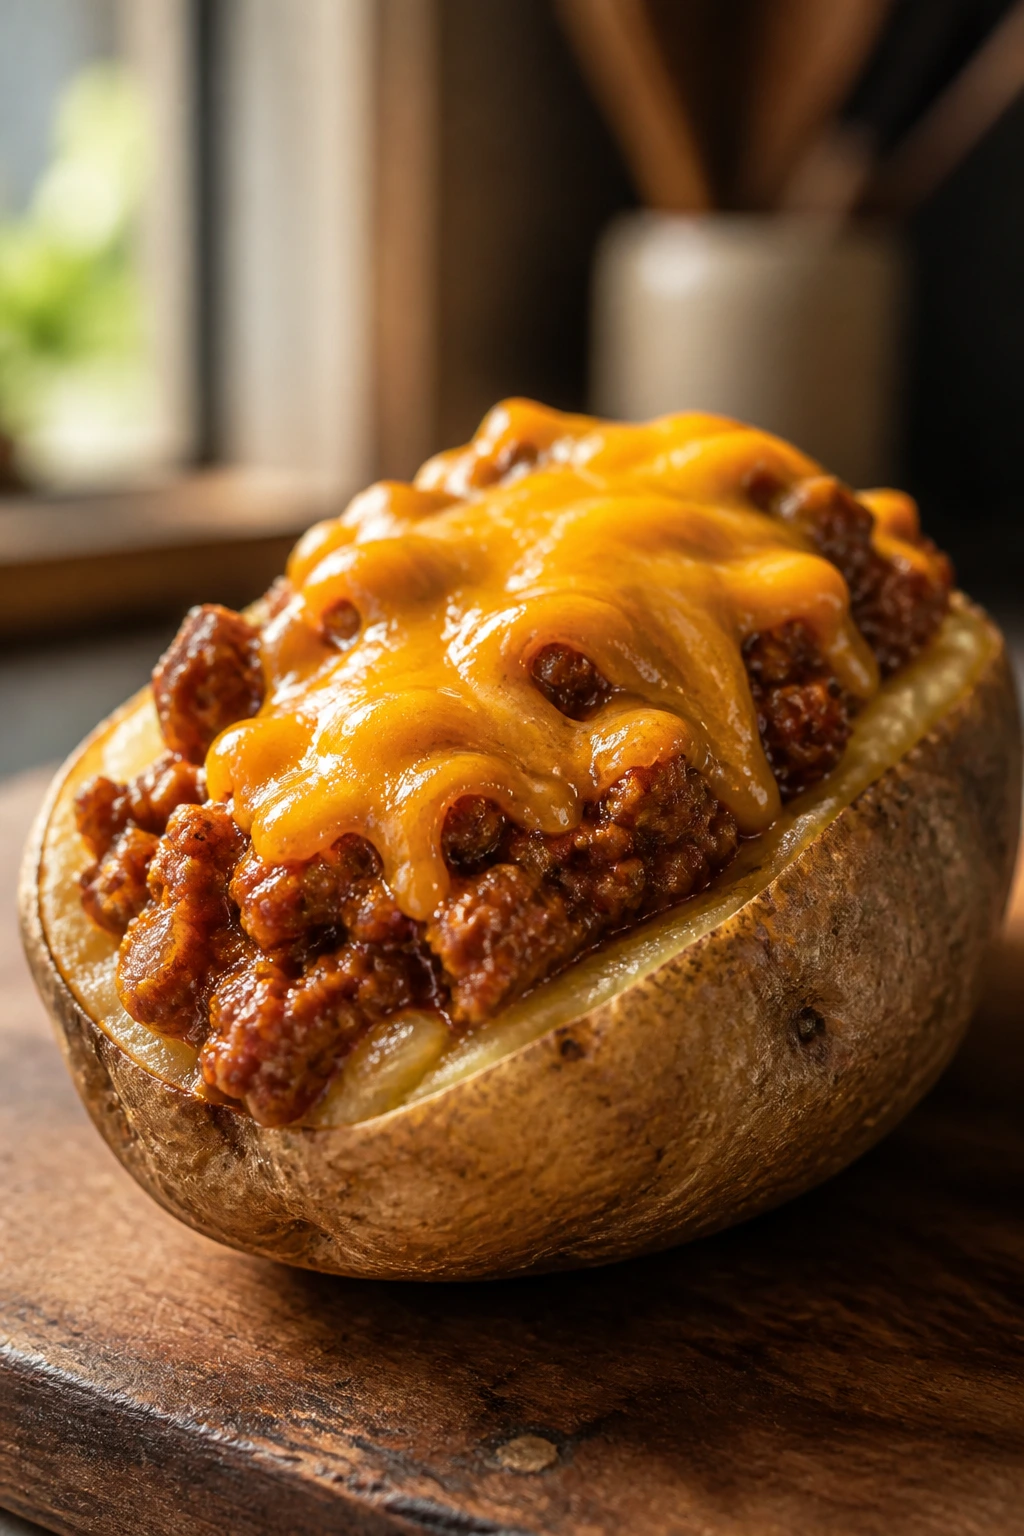
A baked potato can rescue dinner when everyone wants something different because it already gives people a built-in container. Add a sweet, saucy sloppy joe filling and some cheddar, and suddenly the potato feels like its own complete meal instead of a side dish in disguise. It’s hearty, soft, and familiar—the kind of thing that gets eaten with a fork and a little relief.
Why It Works:
Russet potatoes have a fluffy center that holds up under a saucy topping without turning to paste. The sloppy joe filling is thick enough to sit on the potato instead of running everywhere, and the sweetness from ketchup plus brown sugar gives you the classic flavor kids usually know. Baking the potatoes gives the skin a little chew, which helps the whole thing feel more substantial. It also keeps the dish flexible, since picky eaters can eat just the potato and meat or just the potato with cheese.
Key Ingredients:
- 6 russet potatoes
- 1 tablespoon olive oil
- 1 teaspoon kosher salt, for the skins
- 1 1/2 pounds ground beef
- 1 small onion, diced
- 1 tablespoon tomato paste
- 1 cup ketchup
- 1 tablespoon Worcestershire sauce
- 1 tablespoon brown sugar
- 1 teaspoon yellow mustard
- 1/2 teaspoon salt
- 1/4 teaspoon black pepper
- 1 cup shredded cheddar cheese
Quick Steps:
- Bake the potatoes: Heat the oven to 425°F. Rub the potatoes with olive oil and salt, prick them with a fork, and bake for 50 to 60 minutes until the skins are crisp and a knife slides into the center easily.
- Cook the filling: While the potatoes bake, brown the beef and onion in a skillet over medium heat for 6 to 8 minutes. Drain excess fat if needed.
- Build the sloppy joe mixture: Stir in the tomato paste, ketchup, Worcestershire, brown sugar, mustard, salt, and pepper. Simmer for 5 to 7 minutes until the mixture thickens enough to mound on a spoon.
- Split the potatoes: Cut each potato open and fluff the centers with a fork.
- Fill and top: Spoon in the sloppy joe mixture and sprinkle with cheddar.
- Melt the cheese: Return the potatoes to the oven for 3 to 4 minutes, just until the cheese softens.
Equipment for This Recipe:
- Rimmed baking sheet
- Large skillet
- Fork
- Sharp knife
- Spoon or scoop
How to Serve This Dish:
Set the potatoes on plates with a little side salad or a few pickle spears, which is about the only thing that cuts through the sweet beef cleanly. If you want the plate to look fuller, add steamed green beans or a few apple slices. One potato per adult is a normal serving; children often do well with half a potato plus a scoop of filling.
Pro Tips for This Recipe:
- Bake the potatoes all the way through. Underdone russets feel heavy and mealy.
- Make the filling thick. Thin sloppy joe sauce runs off the potato.
- Split the potato with a knife, then fluff with a fork, so it opens instead of collapsing.
- If you want a softer skin, wrap the potatoes in foil; if you want crisp skin, leave them bare.
Variations on This Dish:
- Turkey Joe Potatoes: Use ground turkey and add a tablespoon of olive oil for moisture.
- BBQ Joe Version: Replace half the ketchup with BBQ sauce.
- Loaded Potato Style: Add a spoonful of sour cream and chopped chives on top.
Common Mistakes to Avoid with This Dish:
- Using watery filling: It soaks the potato and makes dinner messy.
- Undercooking the potatoes: They should be fluffy, not firm in the middle.
- Overstuffing the skins: The filling spills over and gets hard to eat.
13. Sausage and Cheddar Pancake Bake
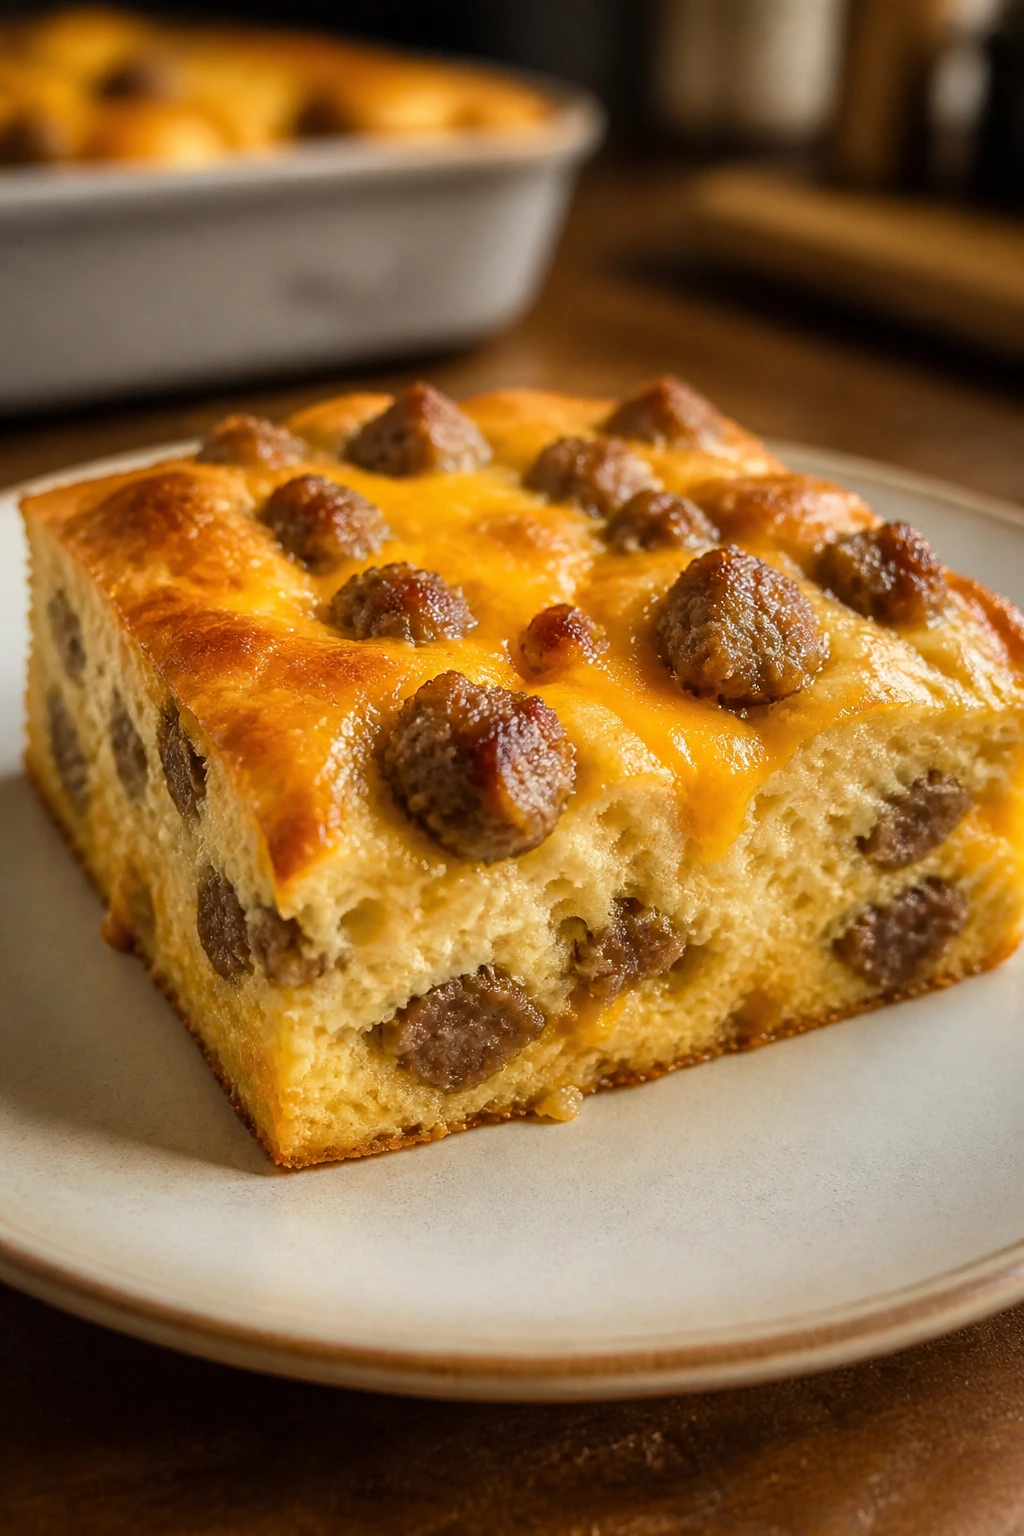
Breakfast for dinner is already a peace treaty; turning it into a casserole makes it easier to serve. The sausage settles into the pancake batter, the cheddar melts into the edges, and the whole pan comes out smelling like maple and browned breakfast meat. It’s sweet, salty, and soft enough for the people who prefer their dinner to require very little explaining.
Why It Works:
Pancake batter bakes into a fluffy base that feels familiar even when it’s cut into dinner squares. Breakfast sausage brings enough seasoning that you don’t need much else, and cheddar melts in a way that helps the whole pan hold together. A casserole format also gives you one neat dish instead of a stovetop stack of pancakes that cools at different rates. That matters on nights when the table doesn’t sit still.
Key Ingredients:
- 2 cups pancake mix
- 1 3/4 cups milk
- 2 large eggs
- 1 pound breakfast sausage
- 1 1/2 cups shredded cheddar cheese
- 2 tablespoons maple syrup, plus more for serving
- 1 tablespoon melted butter, for the pan
Quick Steps:
- Preheat and prep: Heat the oven to 375°F. Grease a 9×13-inch baking dish with the melted butter.
- Cook the sausage: Brown the sausage in a skillet over medium heat until no pink remains, then drain the fat.
- Mix the batter: Whisk together the pancake mix, milk, eggs, and maple syrup until just combined. A few small lumps are fine.
- Assemble: Spread half the batter in the baking dish. Scatter on the sausage and half the cheese, then pour the rest of the batter over the top. Finish with the remaining cheese.
- Bake: Cook for 20 to 25 minutes until the center is set and the top looks lightly golden.
- Rest and slice: Let it sit for 5 minutes before cutting into squares.
Equipment for This Recipe:
- 9×13-inch baking dish
- Skillet
- Mixing bowl
- Whisk
- Spatula
How to Serve This Dish:
Serve the squares with maple syrup on the side and fruit if you want to keep the plate from feeling too heavy. Apples, strawberries, or a bowl of blueberries make sense here. One square is a child portion; two squares are usually enough for most adults, especially if you add fruit.
Pro Tips for This Recipe:
- Drain the sausage well or the casserole can turn greasy.
- Don’t overmix the batter. Pancake mix likes to stay a little rough.
- Cut clean squares by letting the bake rest for a few minutes first.
- If you want a firmer top, broil for 1 minute at the end, but watch it closely.
Variations on This Dish:
- Bacon Pancake Bake: Use cooked crumbled bacon instead of sausage.
- Apple Sausage Version: Fold in 1 cup finely diced apple for a sweet-savory mix.
- Gluten-Free Version: Use a gluten-free pancake mix and check that the sausage is gluten-free too.
Common Mistakes to Avoid with This Dish:
- Pouring in the batter too thin: Follow the package ratio closely or the bake may feel wet.
- Leaving the sausage greasy: Drain it before layering.
- Cutting too soon: The slices need a few minutes to settle.
14. Chicken Tortellini Alfredo
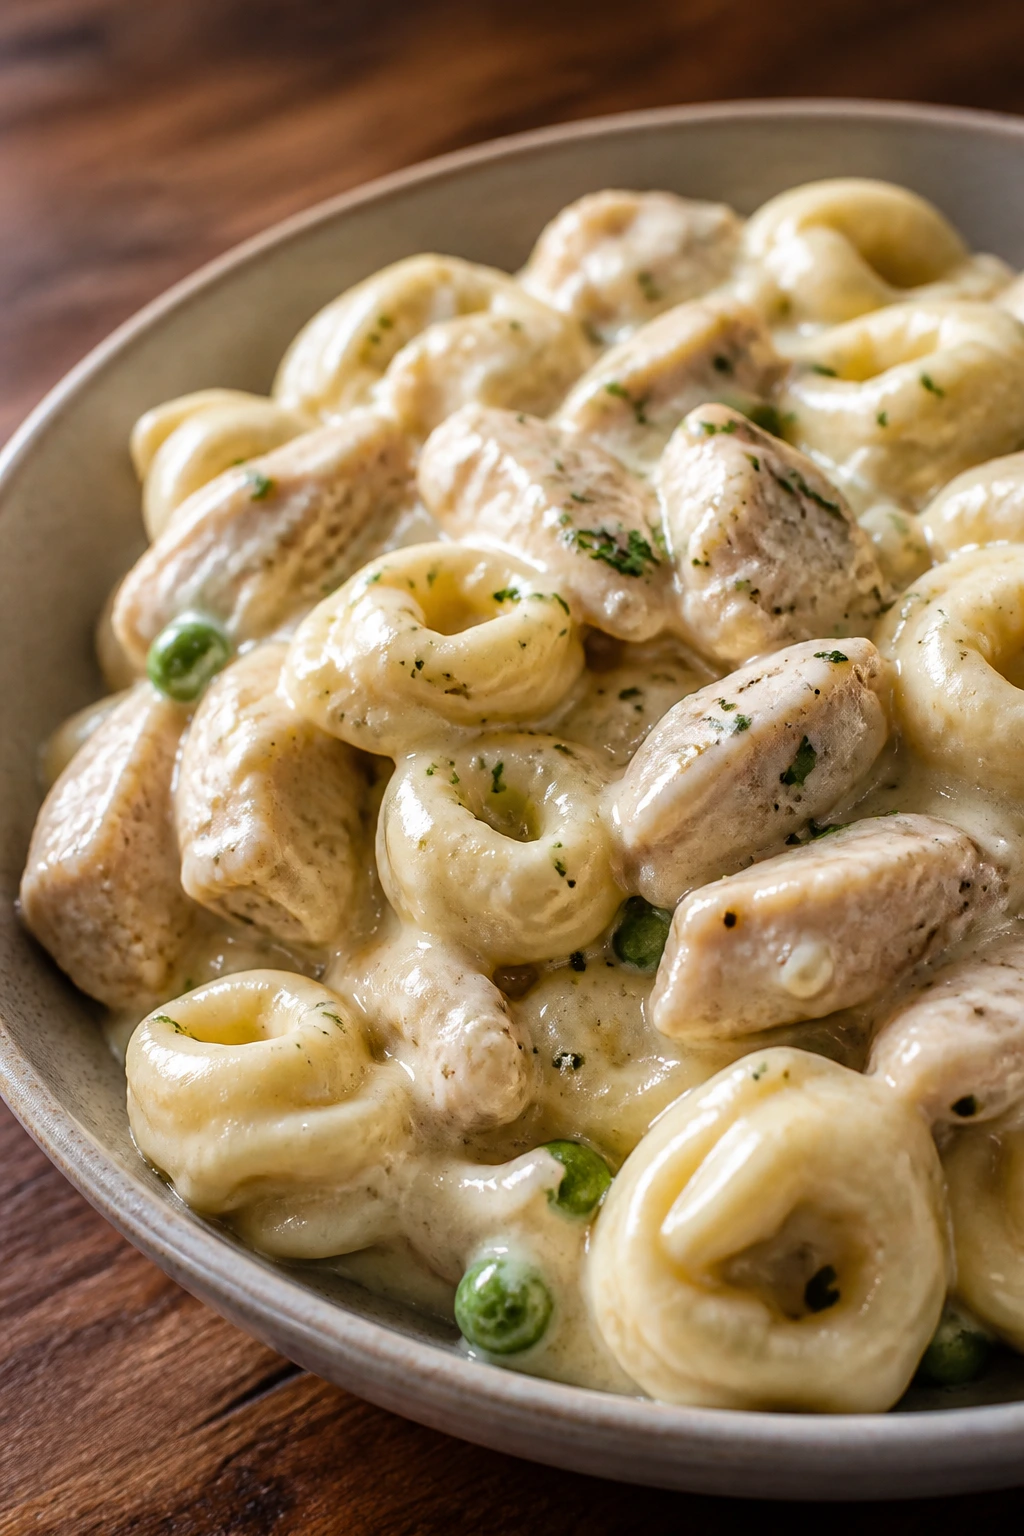
Creamy pasta with chicken is almost unfair on a picky table because it looks rich, smells comforting, and stays familiar from the first forkful to the last. The tortellini adds little pockets of cheese, the chicken brings enough substance to make it dinner, and the sauce coats everything in a soft, glossy layer. This is the dish I’d serve when I want something calm but not plain.
Why It Works:
Cheese tortellini already has flavor inside it, so the sauce doesn’t need to do all the heavy lifting. A simple Alfredo built from butter, garlic, cream, and Parmesan clings to the pasta without any sharp edges, which is a good thing in this particular kitchen category. Seared chicken gives you browned bits for flavor, but the final dish still tastes mild and creamy instead of garlicky or heavy. A few peas can go in if your crowd accepts them, but they’re optional for a reason.
Key Ingredients:
- 1 1/2 pounds chicken breast or thighs
- 1 tablespoon olive oil
- 1 teaspoon kosher salt
- 1/2 teaspoon black pepper
- 1 teaspoon garlic powder
- 1 pound cheese tortellini
- 3 tablespoons butter
- 3 garlic cloves, minced
- 2 cups heavy cream
- 1 1/2 cups grated Parmesan cheese
- 1/4 teaspoon nutmeg, optional
- 1 cup frozen peas, optional
Quick Steps:
- Season and sear the chicken: Rub the chicken with olive oil, salt, pepper, and garlic powder. Cook in a large skillet over medium-high heat for 5 to 7 minutes per side, until browned and cooked through. Set aside to rest.
- Cook the tortellini: Boil according to package directions until tender, then drain.
- Start the sauce: In the same skillet, melt the butter over medium heat. Add the garlic and cook for 30 seconds until fragrant.
- Add cream and cheese: Pour in the heavy cream and bring it to a gentle simmer. Stir in the Parmesan a handful at a time until the sauce turns smooth and thick enough to coat a spoon. Do not boil it hard or the sauce can split.
- Finish the pan: Slice the chicken and add it back to the skillet with the tortellini and peas, if using. Toss everything together until coated.
- Serve: Spoon into bowls while the sauce is still glossy.
Equipment for This Recipe:
- Large skillet
- Large pot
- Colander
- Tongs
- Cutting board and knife
How to Serve This Dish:
This feels complete with a simple salad or a plate of steamed broccoli on the side. If you want the meal to look a little more composed, tuck the sliced chicken over the tortellini and shower the top with a little extra Parmesan. A bowlful is usually enough for dinner, though the sauce has a way of making people go back for more.
Pro Tips for This Recipe:
- Grate the Parmesan finely so it melts instead of clumping.
- Keep the heat low once the cream goes in.
- If the sauce thickens too much, loosen it with a splash of pasta water.
- Rotisserie chicken works here if you want to save time.
Variations on This Dish:
- Broccoli Alfredo: Stir in small steamed broccoli florets at the end.
- Rotisserie Shortcut: Skip the searing step and use shredded cooked chicken.
- Lighter Sauce: Use half cream and half milk, though the sauce will be thinner.
Common Mistakes to Avoid with This Dish:
- Boiling the sauce too hard: That can make it grainy.
- Using big chunks of chicken: Thin slices coat better and feel easier to eat.
- Adding too much garlic: Keep this sauce soft and mild.
15. Chicken Pot Pie Biscuit Bake
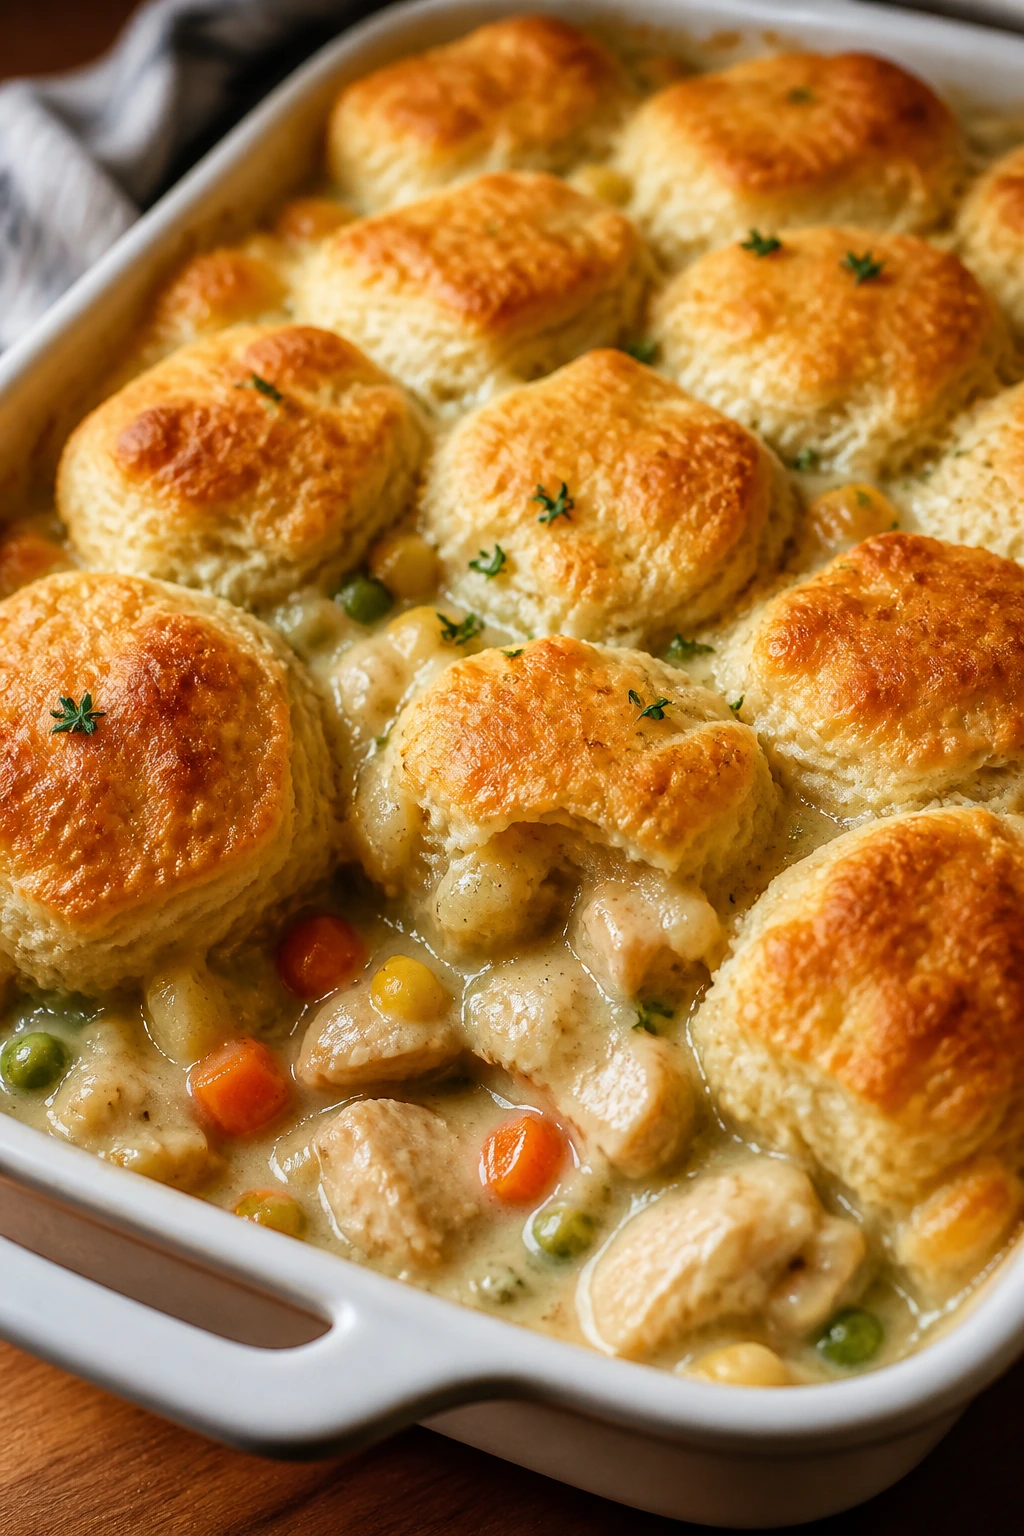
This is the dinner that tastes like it took a lot more work than it did. The filling is creamy and full of chicken and vegetables, the biscuits brown on top, and every spoonful gets a little bit of crust, a little sauce, and a little filling. It’s the kind of comfort food that can calm down a picky table because nobody has to wrestle with pastry.
Why It Works:
Classic pot pie flavor is hard to beat because it combines chicken, gravy, and soft vegetables in one familiar package. Using biscuit dough instead of a bottom crust means less fuss and a more forgiving bake, especially for kids who don’t love a heavy pastry layer. The filling should be thick enough to mound, not pour, so the biscuits don’t sink into it. That thickness is what makes the bake feel like dinner instead of soup with a lid.
Key Ingredients:
- 2 pounds cooked chicken, shredded or chopped
- 1/2 cup butter
- 1 small onion, diced
- 2 carrots, diced small
- 2 celery stalks, diced small, optional
- 1/3 cup all-purpose flour
- 2 cups chicken broth
- 1 cup milk
- 2 cups frozen peas and carrots
- 1 teaspoon kosher salt
- 1/2 teaspoon black pepper
- 1 teaspoon dried thyme
- 1 can refrigerated biscuits
Quick Steps:
- Preheat and cook the vegetables: Heat the oven to 400°F. Melt the butter in a large skillet over medium heat. Add the onion, carrots, and celery, if using, and cook for 5 to 6 minutes until softened.
- Build the gravy: Stir in the flour and cook for 1 minute. Slowly whisk in the broth and milk. Cook for 3 to 4 minutes until thick and smooth.
- Add the filling: Stir in the chicken, peas and carrots, salt, pepper, and thyme. Cook until the mixture is hot and thick enough to hold its shape on a spoon.
- Transfer to the baking dish: Spoon the filling into a greased 9×13-inch dish.
- Top with biscuits: Cut the biscuits into halves or quarters and place them over the filling, leaving a little space so steam can move.
- Bake: Cook for 20 to 25 minutes until the biscuits are golden and the filling bubbles at the edges. If the biscuits brown before the centers are done, cover loosely with foil.
- Rest briefly: Let it sit for 5 to 10 minutes before serving.
Equipment for This Recipe:
- Large skillet or Dutch oven
- Whisk
- 9×13-inch baking dish
- Knife and cutting board
- Spoon or ladle
How to Serve This Dish:
Serve it in deep bowls so the gravy stays where it belongs. I like this with a plain salad or a few slices of cucumber because the plate is already rich and soft, and a crisp side helps. Adults usually want a heaping scoop; kids often do better with one biscuit top and a smaller spoonful of filling underneath.
Pro Tips for This Recipe:
- Dice the carrots small so they cook through and don’t stand out.
- Keep the filling thick before it goes into the dish.
- Quarter the biscuits if you want more browned edges and better coverage.
- Rotisserie chicken makes this even easier on nights when the clock is rude.
Variations on This Dish:
- Turkey Pot Pie Bake: Use leftover turkey instead of chicken.
- Corn Swap: Replace the celery with corn if your table prefers sweeter vegetables.
- Creamier Filling: Stir in 2 tablespoons cream cheese at the end for a richer gravy.
Common Mistakes to Avoid with This Dish:
- Thin filling: The biscuits sink and the bake turns soggy.
- Big vegetable chunks: They stay crunchy in a dish that should be soft.
- Skipping the rest: The filling needs a few minutes to settle before you scoop it.
Why Mild, Familiar Dinners Usually Get Eaten
The reason these family dinners for picky eaters work is not magic, and it isn’t bribery with cheese, either. They lean on shapes and textures that already feel safe—tenders, noodles, sliders, skillet rice, muffins, biscuits, baked potatoes. Once the food looks familiar, the pressure drops. That’s half the battle.
Crisp edges matter. So does sauce control. So does keeping vegetables small enough to disappear when you need them to, or separate enough to be ignored when the night calls for that. A dinner that lets one person take a plain bite, another person pile on salsa, and a third person eat only the chicken and potatoes is usually the dinner that gets finished.
The Texture Rule That Saves Dinner
A picky eater can forgive a lot if the texture is right. Crispy chicken, fluffy rice, soft pasta, creamy sauce, and browned cheese all have a place on the plate because they don’t fight each other. But a wet casserole with three soft textures in one forkful? That’s where complaints begin.
Sauce Works Better on the Side
There’s a reason ketchup, sour cream, honey mustard, and BBQ sauce keep showing up in these meals. They give control back to the person eating. Some people want a dunk. Some want a drizzle. Some want none at all. Good family dinner cooking leaves room for all three.
Mild Does Not Mean Boring
Salt, garlic powder, butter, Parmesan, tomato sauce, and a little browning do enough work to keep these dinners from tasting flat. You do not need a long spice cabinet to make food worth eating. You need balance, a little fat, and a few smart shortcuts that keep dinner moving.
Essential Equipment for These Recipes
- Rimmed sheet pans: Chicken tenders, sliders, BBQ chicken, meatballs, and pot pie biscuits all cook more evenly on a sturdy tray.
- 9×13-inch baking dishes: Baked ziti, mac and cheese, pancake bake, and pot pie casserole need the room.
- Large deep skillet with a lid: Taco rice and some pasta sauces cook best in one pan that can handle liquid and heat.
- Large skillet: Quesadillas, sloppy joe filling, burger patties, and sausage all need a pan with enough surface area to brown instead of steam.
- Large pot: You’ll need one for spaghetti, macaroni, noodles, and tortellini.
- Wire rack: Useful for chicken tenders and anything breaded that should stay crisp underneath.
- Muffin tin: Meatloaf muffins depend on it, and a greased tin also helps with bite-size breakfasts.
- Whisk: Cheese sauces and gravies depend on a good whisk more than people admit.
- Box grater: It handles cheese, carrots, zucchini, and onion when you want the vegetables to melt into the dish.
- Instant-read thermometer: Ground turkey, chicken, and meatloaf are easier when you can check doneness instead of guessing.
Smart Shopping for Kid-Friendly Ingredients
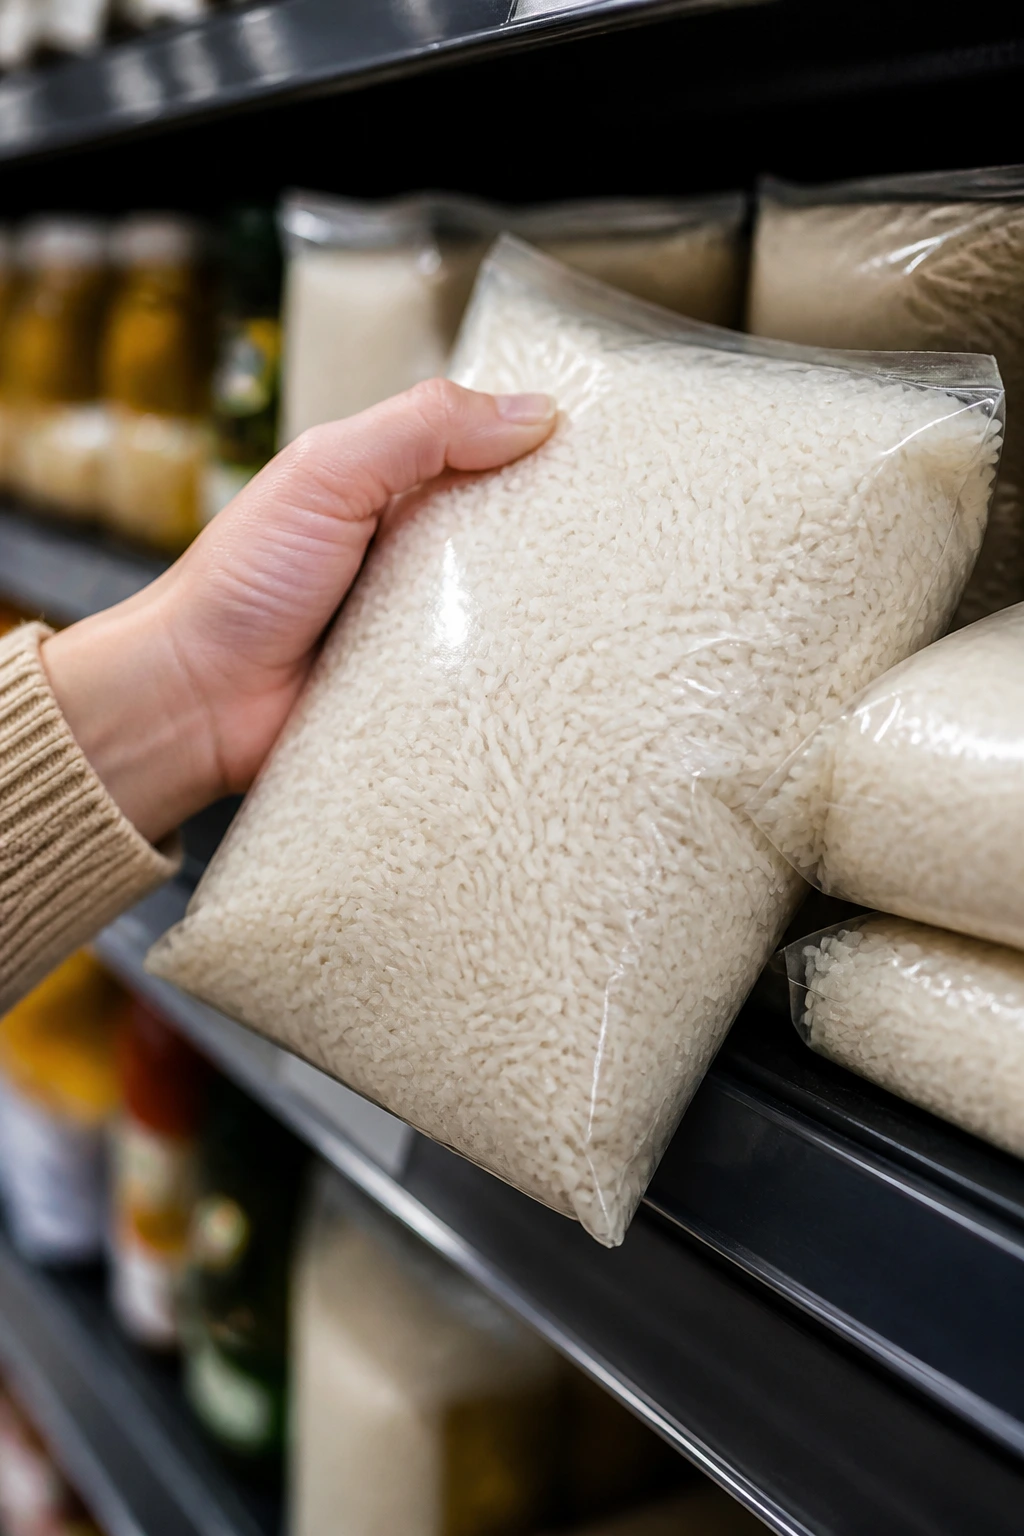
A mild grocery list is usually a smart one. Buy long-grain white rice for skillet dinners because it stays fluffy and doesn’t clump the way short-grain rice can. Choose panko breadcrumbs for anything that should stay crisp; they make a lighter crust than fine crumbs, which matters on chicken tenders and baked toppings.
For cheese, I’m going to say the thing a lot of cooks already know but don’t always follow: block cheese melts better in sauces. Pre-shredded cheese is fine for topping casseroles and quesadillas, but if you want a smooth Alfredo or mac and cheese, grating it yourself gives you a cleaner finish. It’s one of those small annoyances that pays you back at the stove.
Look for ground turkey that isn’t too lean. Around 93% lean works well for burgers, sliders, and meatballs because it still has enough fat to stay tender. For beef dishes like meatloaf or sloppy joes, a little fat keeps the flavor round and the texture soft. If you buy ultra-lean meat, be ready to add a spoonful of oil or a little extra sauce.
Pick marinara and BBQ sauce with short ingredient lists and flavors that lean mild rather than smoky or aggressively spiced. Big herb chunks, heavy smoke, and chili heat are the kinds of things picky eaters notice immediately. Frozen peas, corn, and mixed vegetables are excellent here because they stay sweet and easy to blend into casseroles and sauces without turning limp in the fridge.
How to Serve These Recipes

Presentation:
Keep the plate tidy. Separate components when you can—chicken tenders on one side, fries on the other, dip in a little bowl. For pasta bakes and pot pie casseroles, a deep bowl works better than a flat plate because the sauce stays where it belongs and the meal feels less scattered.
Accompaniments:
The safest sides are the plain ones: cucumber sticks, apple slices, buttered peas, green beans, roasted carrots, coleslaw, and simple salad. Garlic bread fits the pasta dishes, tortilla chips fit taco rice and quesadillas, and mashed potatoes pair naturally with meatloaf muffins and sloppy joe potatoes. I also like fruit on the side when the main dish is rich.
Portions:
Most of these dinners land well when you serve a modest first portion and leave seconds nearby. For younger children, think in small, obvious pieces: 1 to 2 tenders, 1 slider, 1 meatloaf muffin, 1 cup pasta, or half a baked potato. Adults usually want slightly more protein or a bigger scoop of the casserole, especially if the side dish is light.
Beverage Pairing:
Milk goes with the cheesy dinners. Lemonade works with BBQ chicken, sliders, and taco rice. Sparkling water with a slice of lime keeps the richer pasta bakes from feeling too heavy. If you want one drink that fits most of the table, cold unsweetened iced tea is steady and unobtrusive.
Additional Tips and Flavor Boosters
Flavor Enhancement:
A small finish goes a long way. A dusting of Parmesan over spaghetti, a squeeze of lime over taco rice, or a little butter brushed over biscuit tops changes the whole impression of a dish without making it louder. Adults often notice that kind of thing even if the kids ignore it.
Customization:
Keep add-ons in tiny bowls instead of built into the main pan. Pickles, chopped parsley, sour cream, salsa, shredded lettuce, and hot sauce can all sit off to the side. That lets picky eaters keep their plate plain while everyone else builds more flavor.
Serving Suggestions:
If a child likes dipping, lean into it. Small ramekins of honey mustard, ketchup, ranch, or BBQ sauce make the meal feel more playful and less forced. For casseroles, a spoon of extra cheese on top at the table can make a second helping look fresher than the first.
Make-It-Yours:
Swap proteins when needed. Ground turkey stands in for beef in meatloaf muffins, sliders, taco rice, and sloppy joes. Rotisserie chicken speeds up the pot pie, ziti, and Alfredo. If you need a vegetable shift, choose the mild ones first: peas, corn, grated carrot, and cauliflower are easier to tuck into familiar food than broccoli florets with attitude.
Make-Ahead, Storage, and Reheating Guidance
A few of these dinners are best the moment they hit the table. Chicken tenders and quesadillas fall in that camp. Their crisp edges are the whole point, and reheating them in the microwave is a fast way to kill the texture. If you do need to reheat them, use a 375°F oven or a dry skillet so the outside wakes back up.
Baked pasta, meatloaf muffins, sloppy joe filling, taco rice, mac and cheese, and pot pie bake keep well in the fridge for 3 to 4 days in airtight containers. Most freeze for up to 2 months, though the creamiest dishes—like Alfredo and mac and cheese—do best when you reheat them gently with a splash of milk or cream. Meatloaf muffins and meatballs are especially freezer-friendly because their shape helps them reheat evenly.
For saucy dishes, reheat in a covered skillet over medium-low heat with a spoonful or two of broth, milk, or water. That keeps the sauce from tightening up into a paste. For casseroles, cover with foil and warm at 325°F until the center is hot. If you’re reheating rice, add a little broth and cover it tightly so the grains soften instead of drying out.
You can also prep pieces ahead. Bread the chicken tenders and freeze them raw. Mix the meatloaf muffins and shape them a day ahead. Cook the sloppy joe filling or taco meat in advance and keep it chilled until dinner. Pot pie filling can be made earlier in the day and baked with fresh biscuits right before serving, which is a nice compromise between make-ahead and fresh.
Variations and Adaptations to Try
Gluten-Free Pantry Night:
Use gluten-free pasta in the baked ziti or mac and cheese, gluten-free breadcrumbs for the chicken tenders and meatloaf muffins, and a gluten-free flour blend for the cream sauces. The texture will shift a little, but the meals still land in the same comfort zone. Check the sausage, Worcestershire sauce, and BBQ sauce labels too.
Dairy-Light Versions:
Choose olive oil, broth, and a dairy-free milk for the rice skillet or sloppy joe potatoes, where the sauce can handle the swap. For dishes that rely on cheese—like mac and cheese or Alfredo—you’ll need a dairy-free cheese that melts decently, and not every brand does. A casserole with tomato sauce or beef filling is usually the easier place to make this change.
Vegetable-Hiding Playbook:
Grate zucchini into spaghetti sauce, pulse cauliflower into mac and cheese, mash carrots into pot pie filling, or shred onion so fine it vanishes into meatloaf. The key is size. Small is your friend. Big chunks usually announce themselves and start arguments you never wanted.
Mild-Only Menu:
Skip black pepper, cut taco seasoning in half, choose plain cheddar over sharp, and keep all sauces on the side. This version is not bland if you still brown the meat well and salt each pan properly. It just gives you fewer sharp edges to negotiate over.
Short-Order Supper:
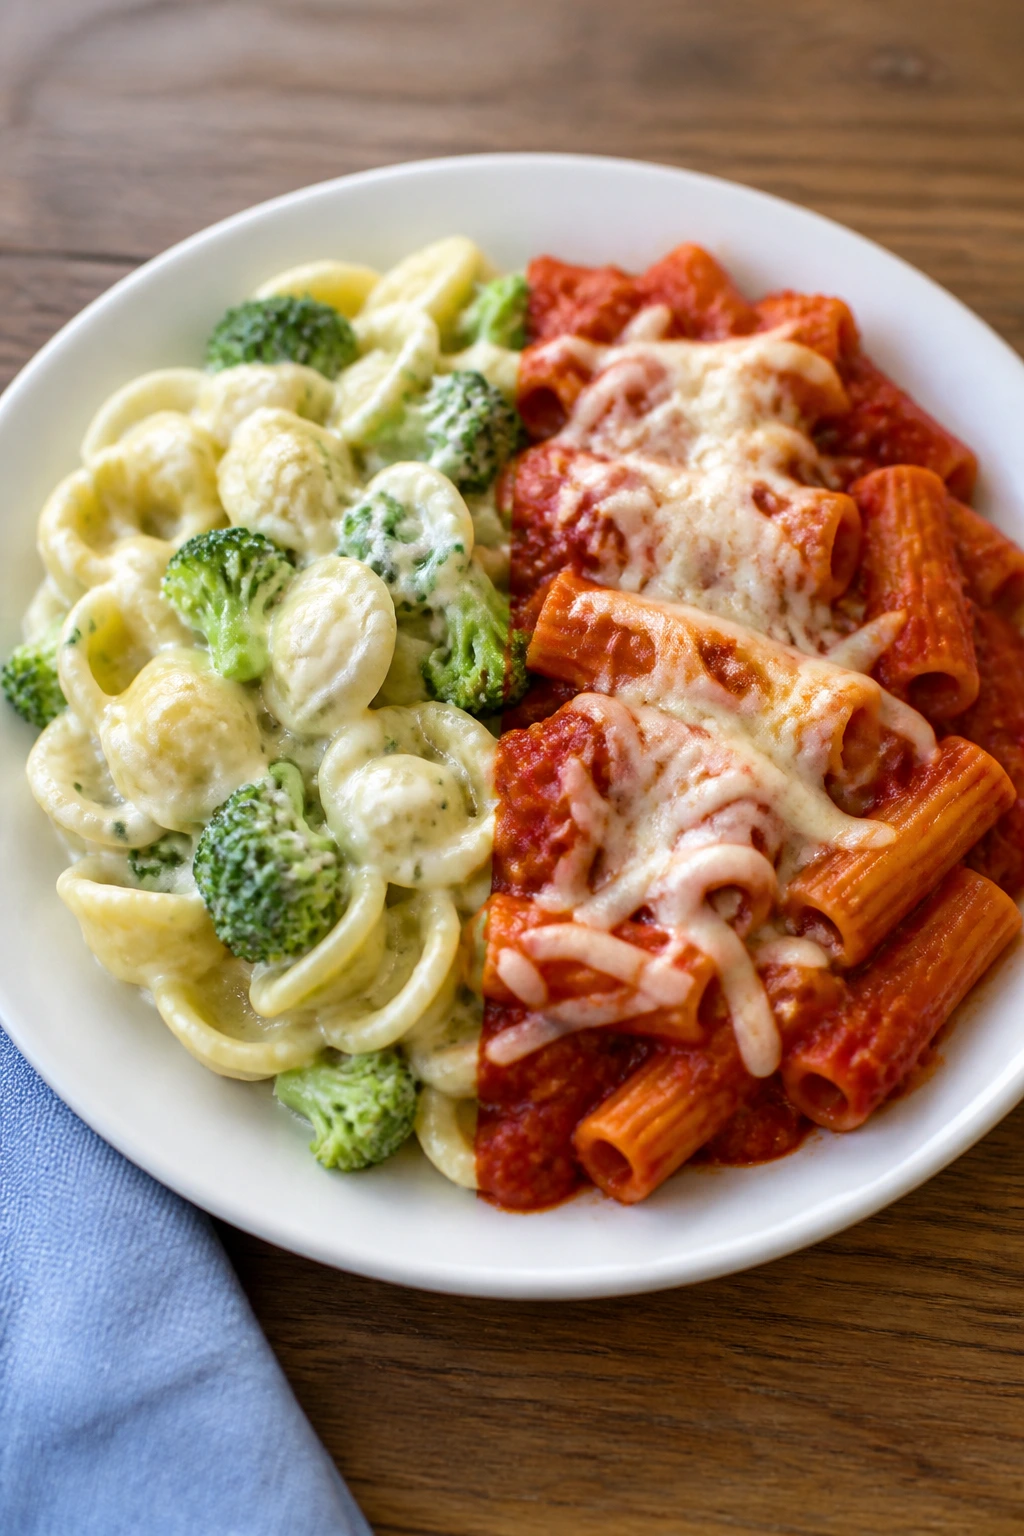
If one person in the house eats separate food, split the dinner before the sauce goes in. Pull aside plain chicken, plain noodles, or a clean baked potato, then finish the rest for everyone else. It feels a little extra at the stove, but it saves you from cooking two entirely separate meals.
Common Mistakes to Avoid
One of the easiest ways to lose a picky eater is to drown the plate. A casserole buried in sauce, a potato drenched in gravy, or chicken coated in too much glaze can feel mushy before the first bite. The fix is simple: keep some sauce on the side, or add it in stages so the food still has shape.
Another problem is using vegetables that are too big or too obvious. A carrot cube the size of a die will be noticed immediately, and probably rejected on sight. Grate, mince, or cook those vegetables down until they blend into the dish. The goal is not deception for its own sake; it’s a texture that doesn’t trigger the table.
Crowding pans is another classic mistake. Chicken tenders, quesadillas, BBQ chicken, and sliders all need room for heat to move around them. If they’re packed together, they steam, and steam is the enemy of crisp food. Give the pan breathing room or use two trays.
Cheese sauces also go wrong when the heat is too high. Alfredo can break, mac and cheese can get grainy, and cheddar sauces can clump if they’re rushed. Lower heat, steady whisking, and freshly grated cheese solve a lot of that.
And finally, don’t under-season the base just because the dish is meant to be mild. Mild is not the same thing as flat. Salt, browning, butter, garlic powder, and a little acid—tomato, vinegar, lemon, or mustard—make the difference between “kids will eat this” and “everyone will actually ask for seconds.”
Frequently Asked Questions
Can I swap ground turkey for beef in most of these dinners?
Yes, and it works especially well in meatloaf muffins, sliders, taco rice, and sloppy joes. Use a little extra oil or sauce if the turkey is very lean, because lean turkey dries out faster than beef.
What if my child hates mixed dishes?
Serve the components separately. Put rice in one section, chicken in another, and sauce in a cup. Several of these recipes already support that style, and it usually lowers the resistance without changing the cooking.
Which of these recipes freeze the best?
Meatloaf muffins, taco rice filling, sloppy joe mixture, chicken pot pie filling, and baked ziti all freeze well for up to 2 months. Chicken tenders and quesadillas are better fresh, because crisp food loses a lot in the freezer.
How do I keep baked pasta from drying out?
Undercook the pasta slightly before baking, keep the sauce thick but not dry, and cover the dish for part of the bake if the top is browning too quickly. A 10-minute rest after baking also helps the sauce settle instead of evaporating.
Can I use rotisserie chicken in these recipes?
Absolutely. It works well in the baked ziti, chicken tortellini Alfredo, and chicken pot pie bake. It also saves time on nights when you need dinner to happen without a lot of stove work.
What should I do if the cheese sauce turns grainy?
Pull it off the heat and whisk in a splash of milk or cream right away. Next time, lower the heat before adding the cheese and grate the cheese yourself instead of using a coarse pre-shredded blend.
Do frozen vegetables work as well as fresh ones?
Yes, and in some of these recipes they’re the better choice. Frozen peas and corn are sweet, convenient, and easy to stir into sauce or casseroles without extra prep. They’re especially handy in pasta bakes, pot pie, and noodle dishes.
How can I make these dinners more filling without making them fussy?
Add potatoes, rice, pasta, or biscuits rather than piling on extra ingredients. The more recognizable the carb, the calmer the plate tends to feel. A side of fruit or plain vegetables can round out the meal without changing the main dish.
A Quieter Dinner Table
The nicest thing about cooking for picky eaters is not tricking anybody. It’s building dinner with enough structure that people can trust it before the first bite. Crispy chicken, soft noodles, mild sauce, buttery potatoes, and a little cheese on top go a long way when the table is tense.
Pick one of these the next time you want dinner to feel steadier and less theatrical. Keep the flavors familiar, give the vegetables a lower profile, and let the sauces behave themselves. That combination has a way of making even a difficult evening feel manageable, which is worth more than a flashy recipe ever is.