
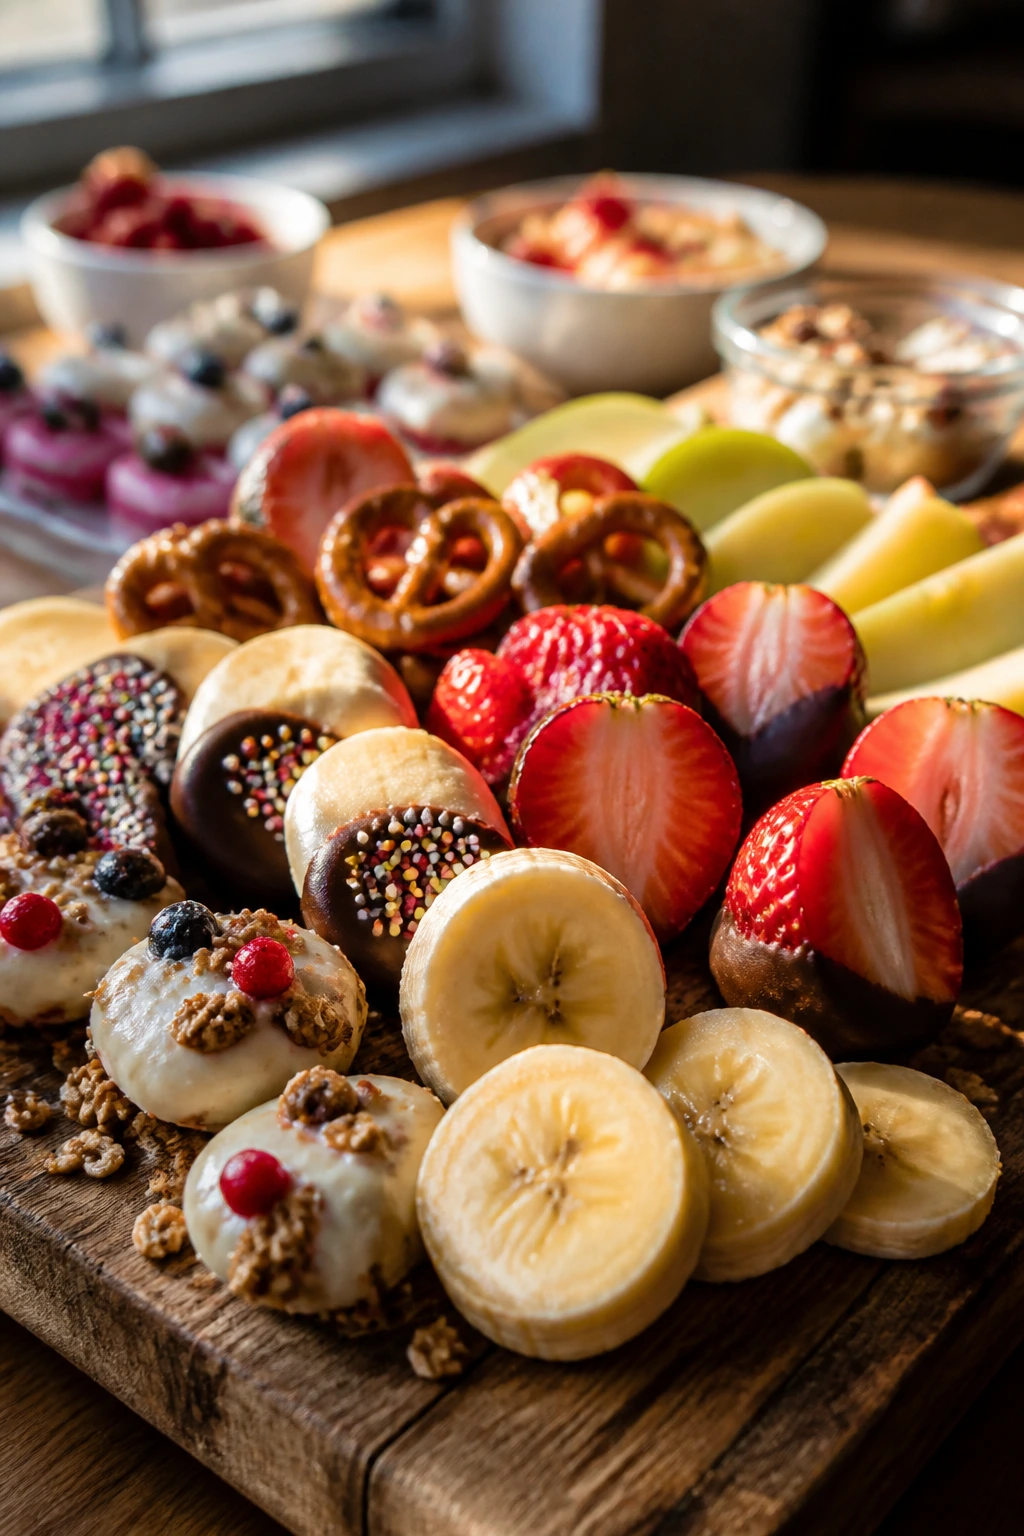
Picky eaters rarely fall for a speech. They fall for a strawberry on a stick, a banana slice dipped in chocolate, or a tray of yogurt bark crackling under a spoon. These fun treats to make with kids for picky eaters work because they start with familiar flavors, then wrap them in shapes, colors, and textures that feel like play instead of pressure.
That matters more than most people admit. When a child gets to stir, sprinkle, stack, or dip, the whole snack stops being “something new” and starts being their thing. You can see it on the counter: fruit that might be rejected on a plate suddenly disappears from a skewer, and plain yogurt becomes a frozen bark with a little crunch from cereal or a few chocolate chips. No drama. No bargaining. Just small, hands-on wins.
I’ve always liked treats that leave room for imperfection. A crooked fruit face, a pretzel rod with too much drizzle, a muffin top that’s a little lopsided because a small hand filled the pan too full — those are the ones kids remember. And they’re the ones that keep showing up in lunchboxes and after-school snack rotations, which is the whole point.
Why This Batch of Kid-Made Treats Actually Works
-
Familiar flavors first: Banana, apple, strawberry, chocolate, yogurt, and pretzels show up again and again here, because picky eaters are far more likely to try a new shape than a new flavor.
-
Small jobs for small hands: Stirring, dipping, threading, and sprinkling are built into these recipes, so kids can help without turning the kitchen into a hazard zone.
-
Mix of no-bake and quick-bake options: Some treats need a freezer, some need a 10-minute oven, and some need nothing but a knife and a bowl. That keeps kids interested.
-
Easy to scale up or down: Most of these recipes can be made as two-serving snacks or doubled for a birthday tray without changing the method much.
-
Less waste, more buy-in: When children help assemble the food, they’re less likely to push it aside after one look. The snack becomes a project, and the project usually gets eaten.
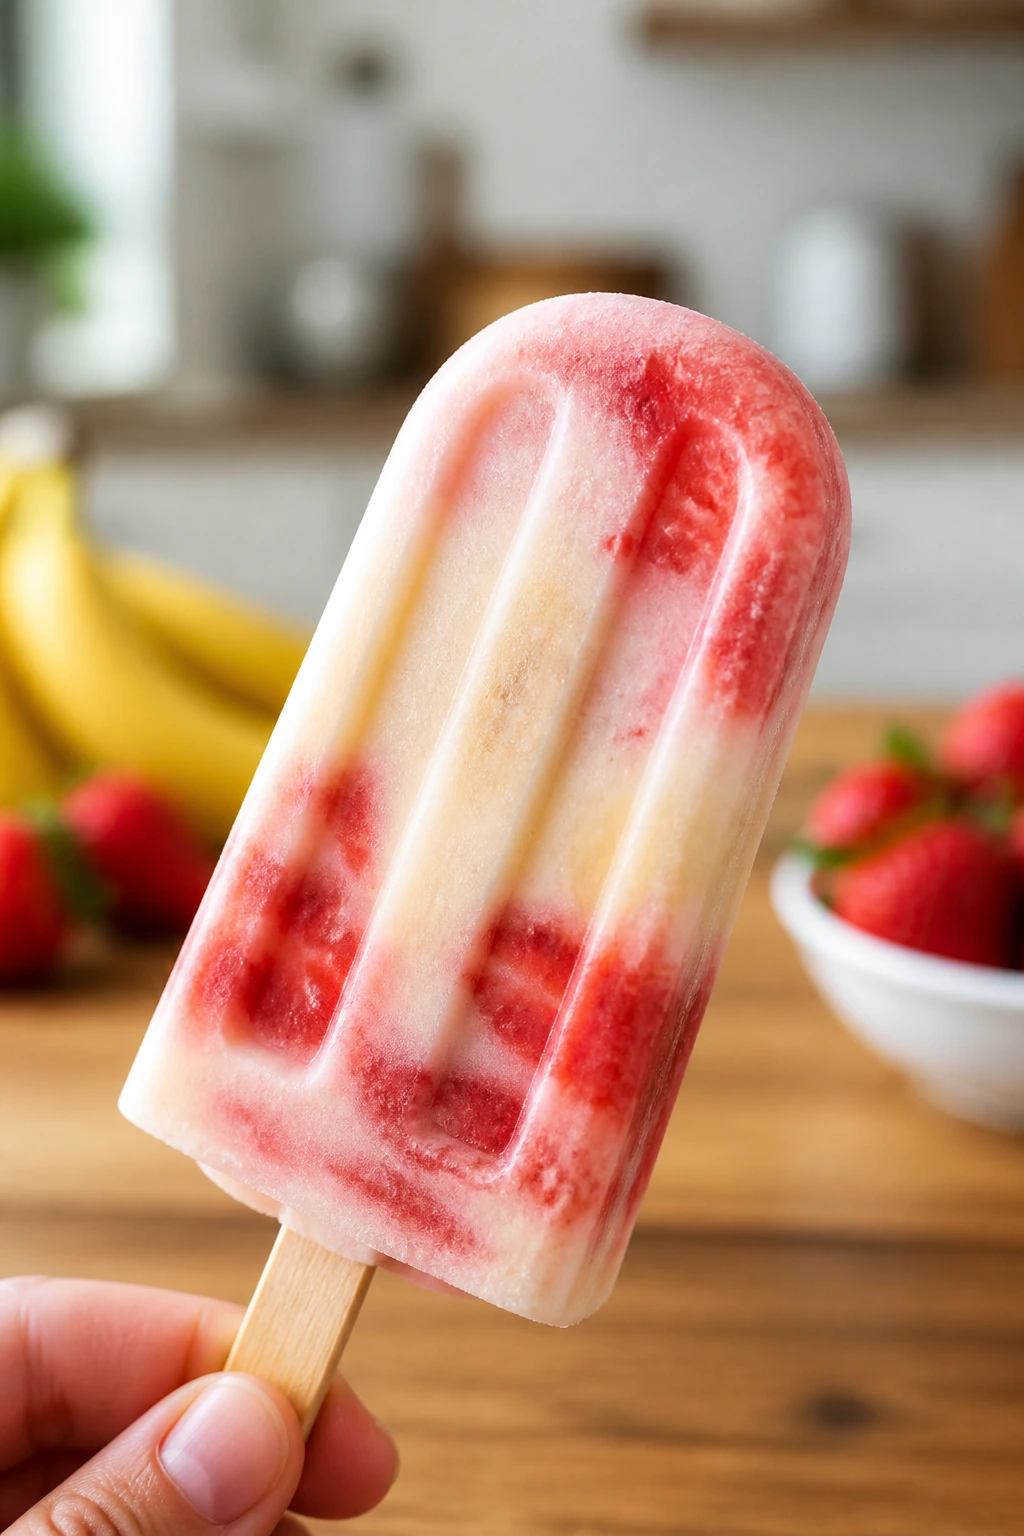
1. Strawberry Banana Yogurt Pops
Cold, creamy, and just sweet enough, these pops taste like a frozen smoothie on a stick. The strawberries bring a bright red swirl, the banana softens the tang of the yogurt, and the whole thing freezes into something that crackles a little at the edges before it melts on the tongue.
Why It Works:
The flavor is plain in the best way: banana, strawberry, yogurt, honey, and vanilla. That makes it friendly for picky eaters, but the texture keeps it from feeling boring. A little fruit gives the pops color without making them icy, and the yogurt base freezes into a smooth bite if you don’t overload it with water-heavy fruit.
Key Ingredients:
- 2 ripe bananas, mashed
- 1 cup strawberries, diced small
- 2 cups plain or vanilla Greek yogurt
- 2 tablespoons honey
- 1 teaspoon vanilla extract
- Pinch of fine salt
- 6 popsicle sticks
Quick Steps:
- Mash the bananas in a bowl until mostly smooth, with a few soft lumps left for texture.
- Stir in the yogurt, honey, vanilla, and salt until evenly blended.
- Fold in the diced strawberries, or swirl them in if you want streaks instead of a full mix.
- Spoon the mixture into popsicle molds and tap the mold on the counter to release air pockets.
- Insert sticks and freeze for 4 to 6 hours, until solid all the way through.
Equipment for This Recipe:
- Mixing bowl
- Silicone spatula
- Popsicle mold
- Measuring cups and spoons
How to Serve This Dish:
Run the mold under warm water for 10 to 15 seconds, then pull the pops free and serve them on a small tray lined with parchment. They’re best with a napkin nearby, because the first glossy melt starts fast. Two pops make a good after-school portion for older kids; one is usually enough for toddlers.
Pro Tips for This Recipe:
- Use thick yogurt, not the thin drinkable kind, or the pops freeze a little icy.
- Dice the strawberries small so they don’t jam up the mold.
- If your bananas are very large, use one and a half instead of two full fruit-heavy bananas.
- Freeze the molds on a flat shelf so the sticks don’t lean.
Variations on This Dish:
- Peachy Cream Pops: Swap the strawberries for finely diced peaches and use vanilla yogurt for a softer flavor.
- Berry Swirl Pops: Use half strawberries and half blueberries for a deeper color and a slightly tarter finish.
- Dairy-Free Pops: Replace the Greek yogurt with thick coconut yogurt and add a squeeze of lemon for brightness.
Common Mistakes to Avoid with This Dish:
- Using watery fruit: Very juicy berries make ice crystals. Pat fruit dry after washing.
- Overfilling the mold: The mixture expands a bit as it freezes, and messy overflow makes stick removal awkward.
- Pulling them too soon: If the center still bends, give them another hour. Soft middles fall apart fast.
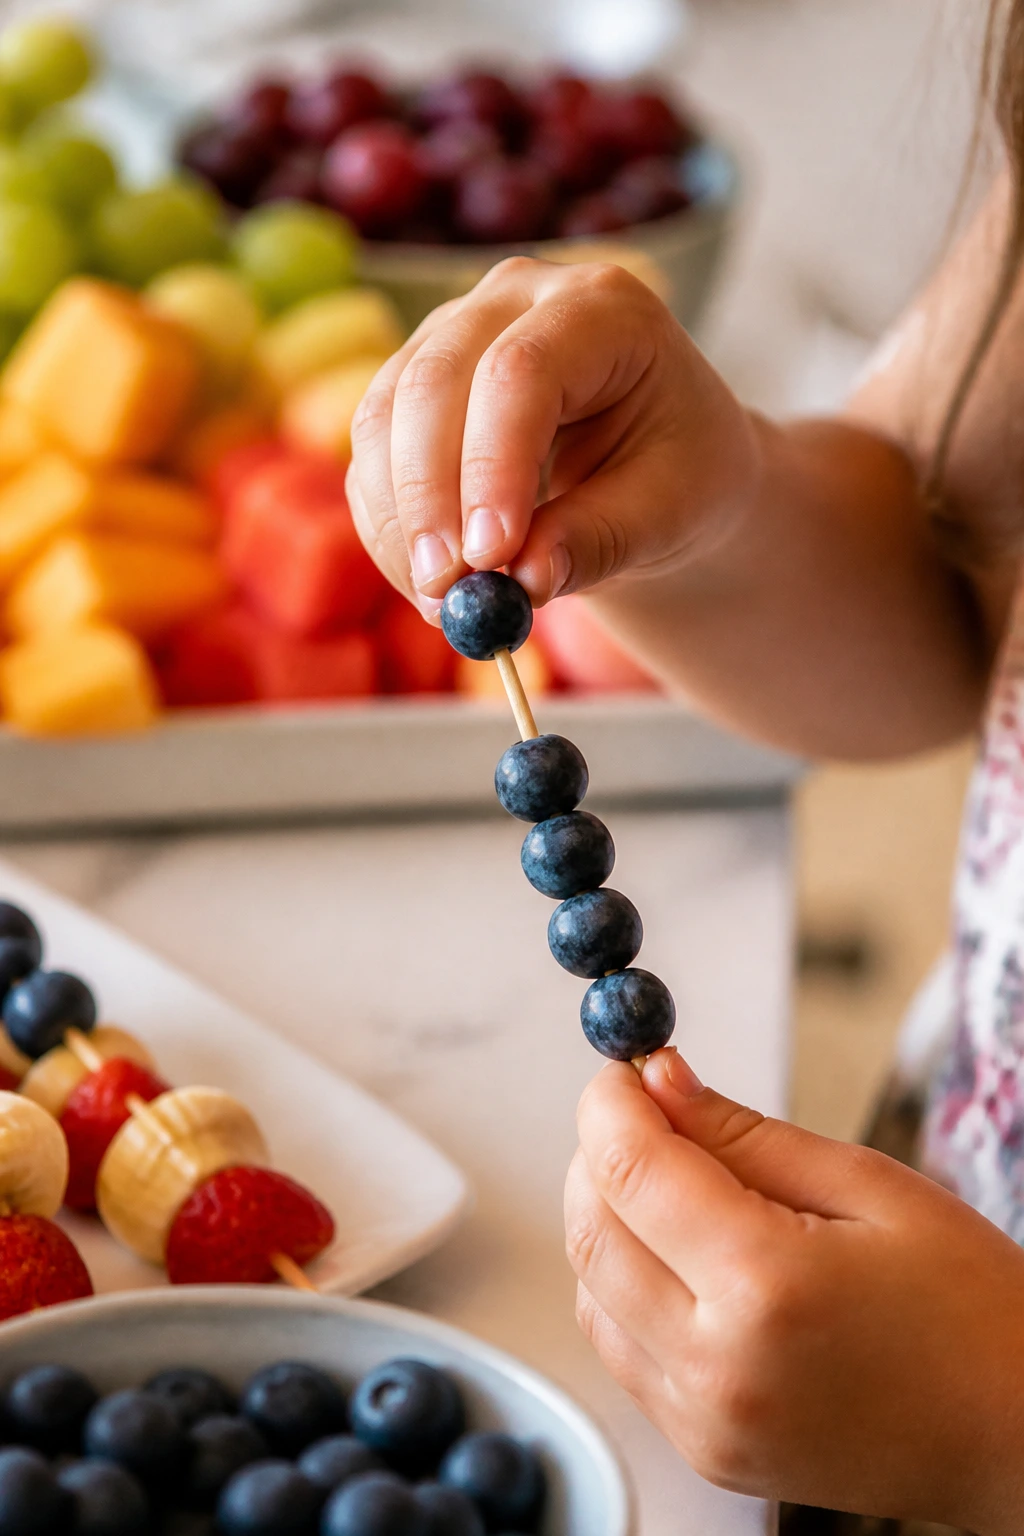
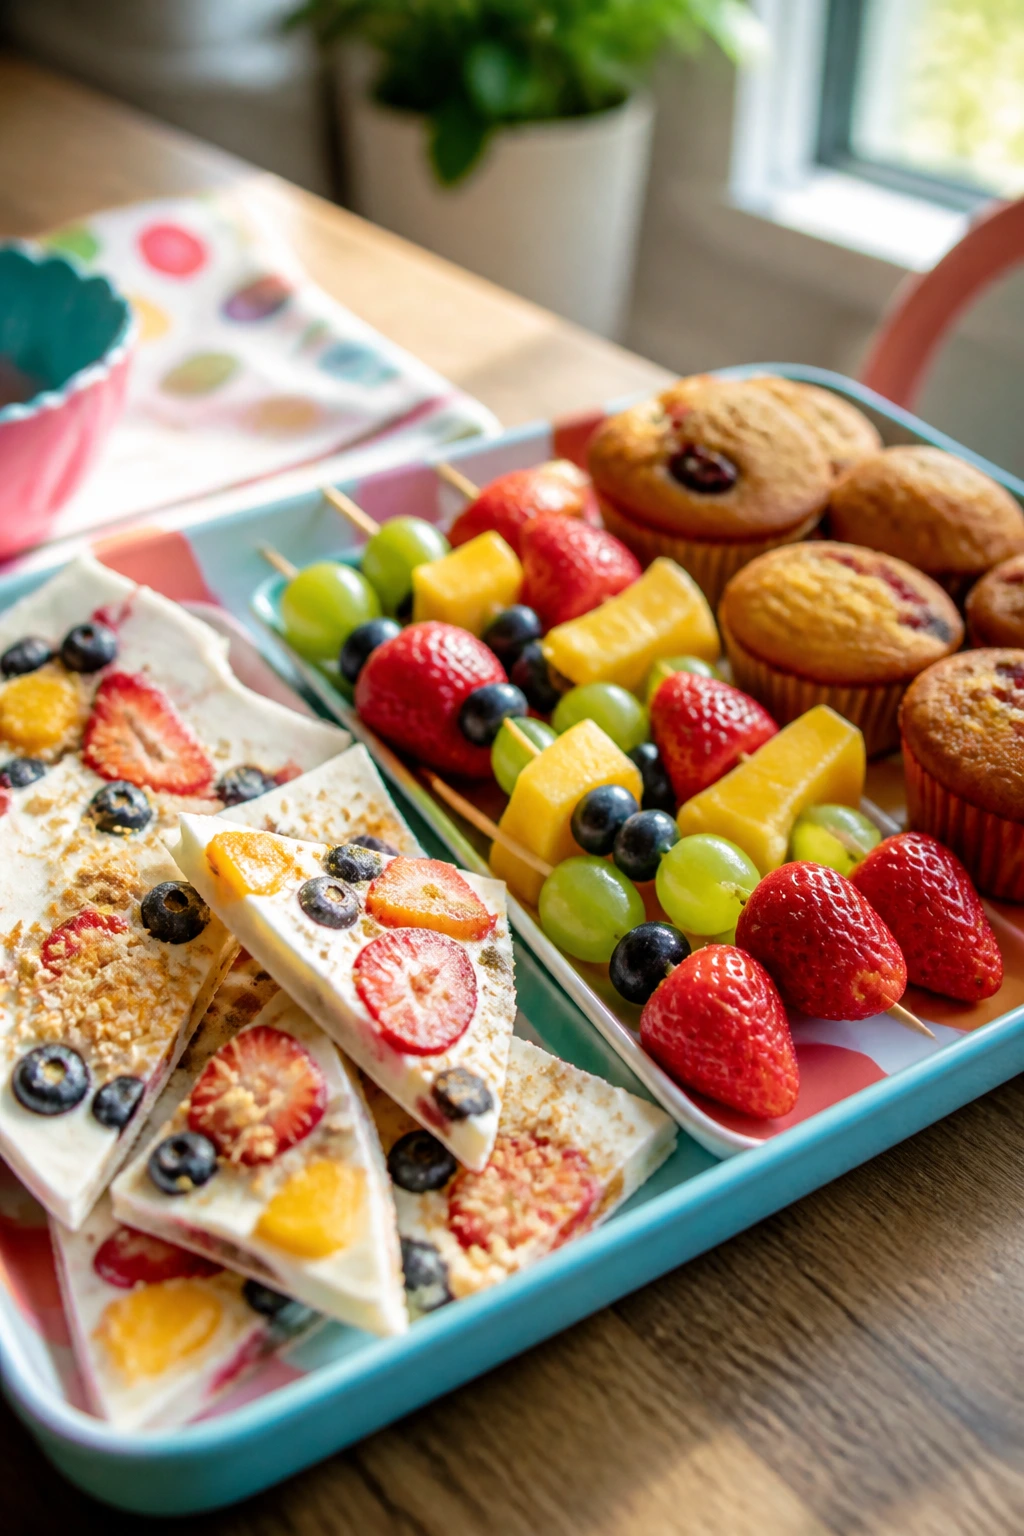
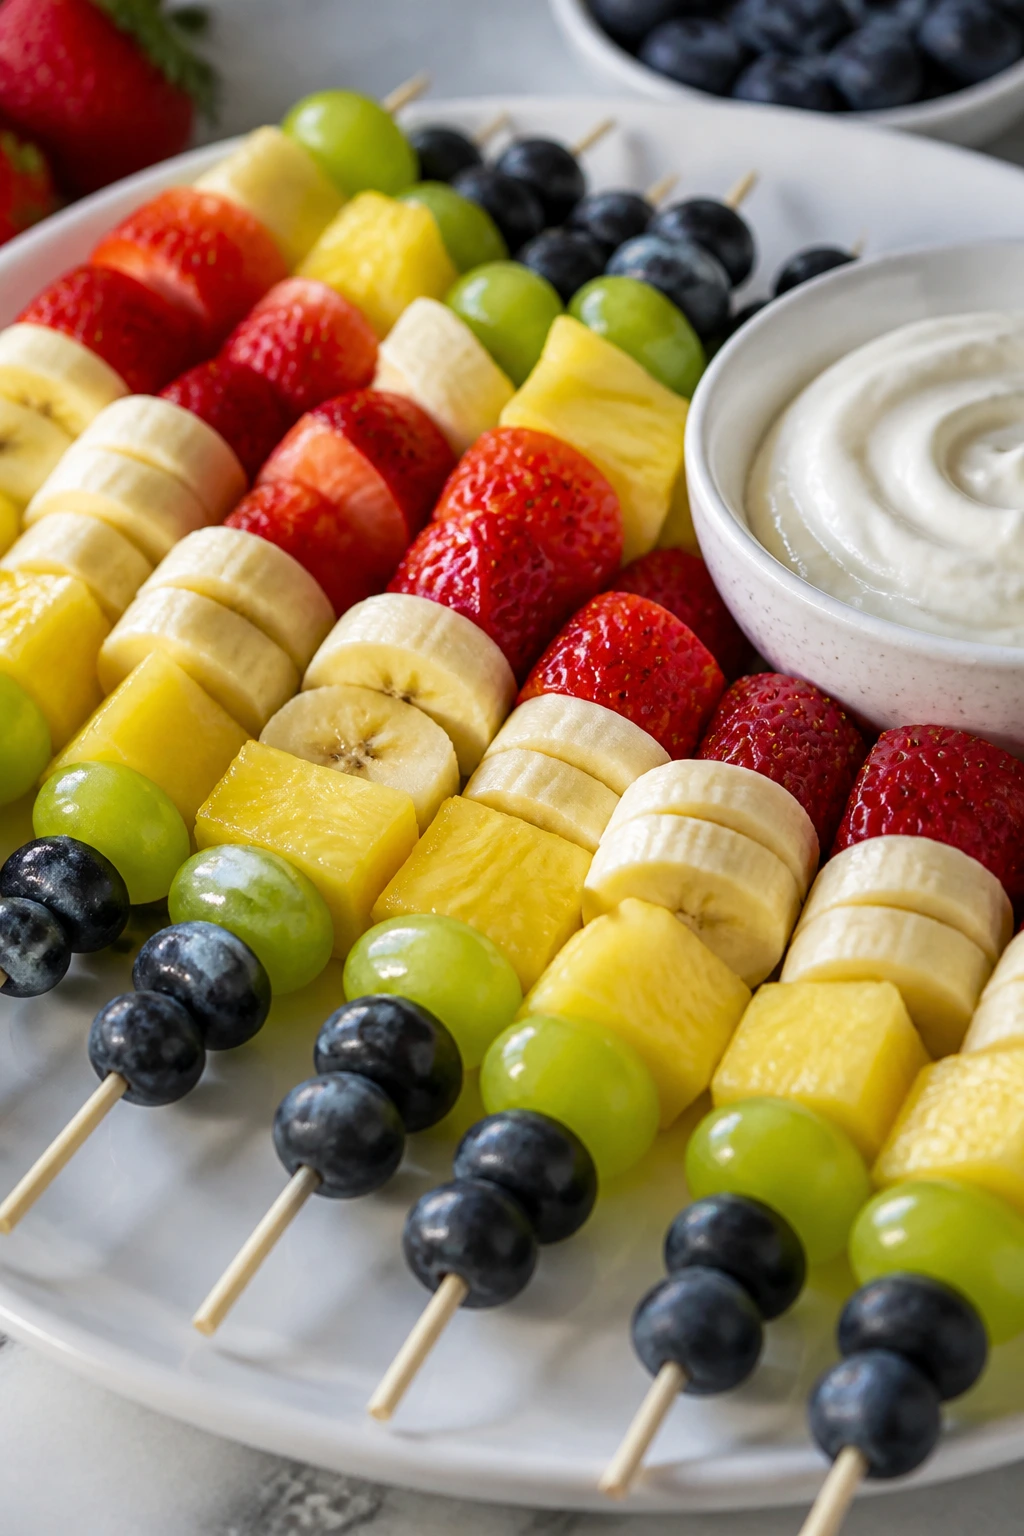
2. Rainbow Fruit Kabobs with Vanilla Dip
Threaded fruit looks cheerful before anyone takes a bite, which is part of the appeal. The colors do the work here: strawberries, bananas, pineapple, grapes, and blueberries create a bright line on the stick, and the vanilla dip gives even the cautious nibblers a familiar landing spot.
Why It Works:
Fruit on a stick changes the whole mood. It feels like a party snack, not a lecture about vitamins. The dip matters too, because a little vanilla yogurt or cream cheese dip gives hesitant kids a place to start instead of asking them to commit to a whole bowl of fruit at once.
Key Ingredients:
- 8 strawberries, hulled and halved
- 1 banana, cut into thick coins
- 1 cup pineapple chunks
- 1 cup green grapes
- 1 cup blueberries
- 1 cup vanilla Greek yogurt
- 1 teaspoon honey
- 1/2 teaspoon vanilla extract
- 8 short skewers or lollipop sticks
Quick Steps:
- Wash and dry all the fruit so the skewers don’t slip.
- Cut the banana right before assembling so it stays pale.
- Thread the fruit onto the sticks in repeating colors, leaving a little space at each end.
- Stir the yogurt, honey, and vanilla together in a small bowl.
- Serve the kabobs cold with the dip on the side.
Equipment for This Recipe:
- Cutting board
- Paring knife
- Small mixing bowl
- Skewers or sturdy sticks
How to Serve This Dish:
Pile the kabobs on a platter with the dip in a bowl at the center. For smaller children, cut the skewers in half and use shorter sticks with blunt ends. They work well as a snack plate centerpiece or a side dish for pancakes and muffins.
Pro Tips for This Recipe:
- Choose seedless grapes and halve larger ones for younger kids.
- Dry the fruit after washing so the yogurt dip stays put.
- If the banana starts to brown, brush the cut pieces with a little lemon juice.
- Keep the kabobs chilled until the last minute; warm fruit gets slippery.
Variations on This Dish:
- Strawberry-Only Skewers: Use just strawberries and banana coins for kids who dislike mixed fruit.
- Tropical Kabobs: Swap grapes for mango cubes and add a few tiny marshmallows between pieces.
- No-Dip Version: Sprinkle the fruit with a pinch of cinnamon sugar and skip the sauce entirely.
Common Mistakes to Avoid with This Dish:
- Packing the fruit too tight: Leave a little room so the sticks don’t split the fruit.
- Using a soft banana first: Overripe bananas fall apart on the skewer.
- Forgetting age-appropriate sticks: Sharp wooden skewers are not worth the risk for little helpers.
3. Apple Nachos with Peanut Butter Drizzle
This is the snack that makes apple slices look like dessert. Thin wedges of crisp apple get covered with warm peanut butter, chopped granola, mini chocolate chips, and a little coconut or cinnamon if you want it. It’s messy in a controlled way, which kids tend to love.
Why It Works:
The structure is simple: crunchy fruit, sticky drizzle, and a few small toppings that cling to the peanut butter. Because every bite has the same familiar apple-and-nut-butter base, picky eaters usually relax after the first forkful. It also moves quickly, which matters when a child is hungry and losing patience.
Key Ingredients:
- 2 large apples, thinly sliced
- 1/3 cup creamy peanut butter
- 1 tablespoon honey
- 2 tablespoons granola
- 2 tablespoons mini chocolate chips
- 1 tablespoon shredded coconut, optional
- 1 teaspoon lemon juice
Quick Steps:
- Toss the apple slices with lemon juice so they stay bright.
- Arrange the slices on a plate or shallow tray in overlapping rows.
- Warm the peanut butter for 15 to 20 seconds in the microwave, then stir in the honey.
- Drizzle the peanut butter over the apples in thin lines.
- Scatter the granola, chocolate chips, and coconut on top right away.
Equipment for This Recipe:
- Sharp knife
- Cutting board
- Microwave-safe bowl
- Spoon
How to Serve This Dish:
Serve it immediately, while the peanut butter is still soft and the apples are crisp. A wide plate is better than a bowl, because the toppings stay visible instead of sinking into a pile. It makes a solid after-school snack for two kids or a shareable treat for one very hungry one.
Pro Tips for This Recipe:
- Slice the apples thin enough to bite through cleanly.
- Use creamy peanut butter; crunchy peanut butter doesn’t drizzle well.
- Add the toppings right after the drizzle so they stick.
- If nut allergies are a concern, sunflower seed butter works the same way.
Variations on This Dish:
- Caramel Apple Nachos: Swap the peanut butter for warm caramel sauce and use crushed graham crackers.
- Chocolate Crunch Version: Add cocoa powder to the peanut butter for a brownie-like flavor.
- Apple Pie Nachos: Dust the apples with cinnamon and top with crushed vanilla wafers.
Common Mistakes to Avoid with This Dish:
- Cutting apples too thick: Thick slices are awkward for small mouths and slide around.
- Waiting too long to serve: Apples soften and the drizzle thickens as it cools.
- Overloading the toppings: Too many add-ins bury the fruit and make the snack hard to eat.
4. Peanut Butter Banana Sushi Rolls
Sushi-shaped food always gets attention, even when it has nothing to do with fish. Here, a tortilla gets spread with peanut butter, layered with a banana, rolled tight, and sliced into little pinwheels that look neat and tidy on the plate.
Why It Works:
The shape does half the job. Kids who refuse “a banana” often change their mind when the banana is hidden inside a swirl. Add a little cinnamon or mini chocolate chips, and the bite tastes like a soft snack cake without any baking.
Key Ingredients:
- 2 flour tortillas, 8-inch size
- 1/2 cup creamy peanut butter
- 2 ripe bananas
- 1 tablespoon mini chocolate chips
- 1/2 teaspoon cinnamon
- 1 teaspoon honey, optional
Quick Steps:
- Lay the tortillas flat and spread peanut butter almost to the edges.
- Sprinkle cinnamon and mini chocolate chips over the peanut butter.
- Place one banana near the bottom edge of each tortilla.
- Roll tightly, seam-side down, then slice each roll into 1-inch pieces.
- Chill the slices for 10 minutes if you want cleaner cuts.
Equipment for This Recipe:
- Cutting board
- Butter knife or spatula
- Sharp knife
- Small plate
How to Serve This Dish:
Arrange the pinwheels cut-side up on a small platter so the spiral shows. They pack well in lunchboxes, but they’re best the same day because the banana softens the tortilla over time. For a party tray, serve them with a little cup of yogurt or honey for dipping.
Pro Tips for This Recipe:
- Use soft, fresh tortillas so they roll without cracking.
- Don’t overfill the center or the sushi rolls burst when sliced.
- Chill the roll for a few minutes before cutting if your knife squishes the banana.
- A tiny smear of honey helps the banana stick to the peanut butter.
Variations on This Dish:
- Jam Swirl Sushi: Replace half the peanut butter with strawberry jam for a sweeter filling.
- Sunbutter Roll-Ups: Use sunflower butter for a nut-free version.
- Chocolate Banana Sushi: Add a dusting of cocoa powder and skip the cinnamon.
Common Mistakes to Avoid with This Dish:
- Using stale tortillas: Dry tortillas split right where the banana sits.
- Slicing too soon: Warm rolls smear instead of making tidy pinwheels.
- Adding too much peanut butter: A thin layer is enough; a thick layer squeezes out.
5. Chocolate-Dipped Pretzel Rods

Salty, crunchy, and shamelessly sticky, these pretzel rods feel like a treat without asking much from the cook. Dip them in melted chocolate, then hand over a bowl of sprinkles, crushed cereal, or chopped peanuts if your crowd can handle them.
Why It Works:
The contrast is the whole trick. The pretzel gives the snap, the chocolate gives the soft coating, and the toppings add just enough noise and color to make the snack feel finished. Kids can make their own versions, which is one of the easiest ways to reduce complaints at snack time.
Key Ingredients:
- 12 pretzel rods
- 1 cup semisweet chocolate chips
- 1 teaspoon coconut oil or neutral oil
- 2 tablespoons rainbow sprinkles
- 2 tablespoons crushed cereal
- 1 tablespoon mini chocolate chips
Quick Steps:
- Line a baking sheet with parchment paper.
- Melt the chocolate chips with the oil in short 20-second bursts, stirring until smooth.
- Dip each pretzel rod about halfway into the chocolate.
- Roll or sprinkle on toppings while the coating is still soft.
- Set the rods on the parchment and let them harden for 20 to 30 minutes.
Equipment for This Recipe:
- Baking sheet
- Parchment paper
- Microwave-safe bowl
- Spoon or spatula
How to Serve This Dish:
Stand the rods upright in a jar or lay them in a single layer on a tray. They make a good party snack, but they also slide neatly into cellophane bags for gifts or lunchbox treats. Break a rod in half for younger kids; full-length sticks can be a little much.
Pro Tips for This Recipe:
- Make sure the bowl and spoon are dry before melting chocolate.
- Use fine toppings for better coverage; giant candy pieces fall off.
- Work in batches so the chocolate doesn’t harden before the sprinkles go on.
- A little oil keeps the coating smooth and easier to dip.
Variations on This Dish:
- White Chocolate Confetti Rods: Use white chocolate and pastel sprinkles for a sweeter, softer flavor.
- Cookies-and-Crunch Rods: Roll the dipped pretzels in crushed sandwich cookies.
- Peppermint Rods: Add crushed candy canes for a cool, sharp finish.
Common Mistakes to Avoid with This Dish:
- Overheating the chocolate: It turns grainy fast. Melt in short bursts.
- Using wet pretzels: Moisture makes the coating slide off.
- Skipping parchment: Chocolate sticks to everything else.
6. Berry Sprinkle Yogurt Bark
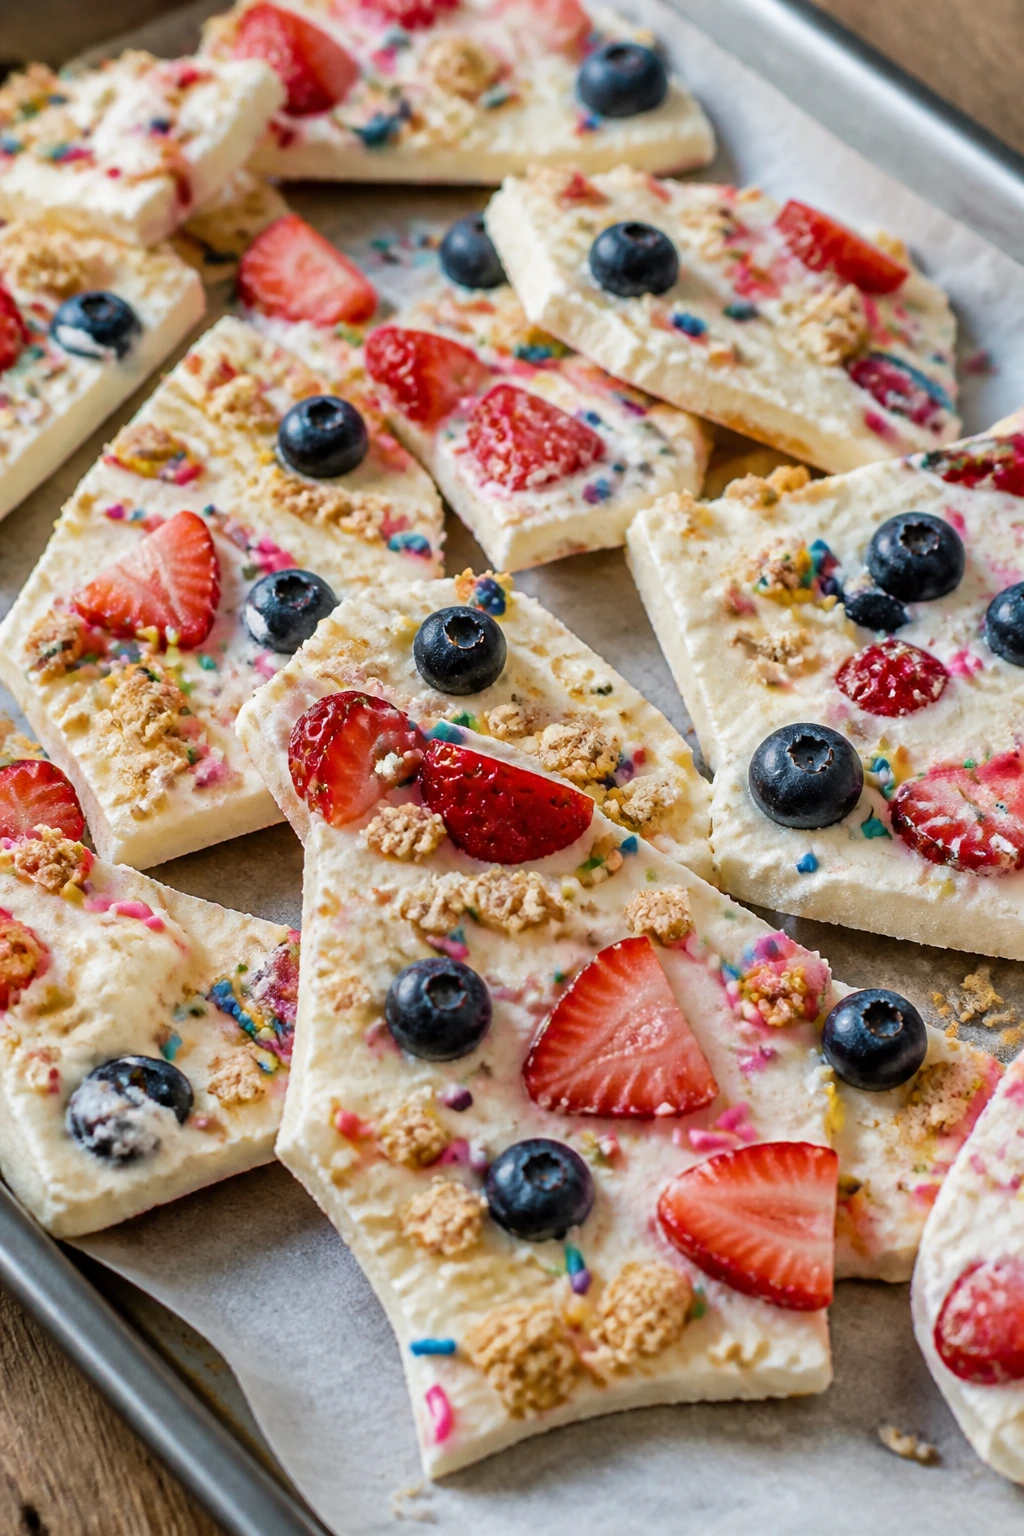
This is the freezer snack that breaks with a satisfying snap. Thick yogurt gets spread in a sheet, dotted with berries, and showered with sprinkles or cereal, then frozen until you can crack it into irregular shards.
Why It Works:
Picky eaters often do better with a cold snack that looks like candy but tastes mostly like yogurt and fruit. The bark format also gives you an easy place to stop and start, which helps if you’re making it with kids who want to decorate one square at a time.
Key Ingredients:
- 2 cups thick Greek yogurt
- 2 tablespoons honey
- 1 teaspoon vanilla extract
- 1/2 cup strawberries, chopped
- 1/2 cup blueberries
- 2 tablespoons rainbow sprinkles
- 2 tablespoons crushed cereal, optional
Quick Steps:
- Line a baking sheet with parchment paper.
- Stir the yogurt, honey, and vanilla together.
- Spread the yogurt into a 1/4-inch thick layer.
- Scatter the berries, sprinkles, and cereal over the surface.
- Freeze for 3 to 4 hours, then break into pieces.
Equipment for This Recipe:
- Baking sheet
- Parchment paper
- Mixing bowl
- Spatula
How to Serve This Dish:
Serve the bark straight from the freezer in a shallow bowl so it doesn’t melt into a sticky pile. It works best as a snack the moment it’s broken, when the edges are still crisp. For younger kids, make smaller shards instead of giant sheets.
Pro Tips for This Recipe:
- Use very thick yogurt or the bark turns icy and brittle.
- Pat the berries dry before adding them.
- Freeze on a flat shelf so the layer sets evenly.
- Break the bark right before serving, not hours ahead.
Variations on This Dish:
- Chocolate Swirl Bark: Drop in a few ribbons of melted chocolate before freezing.
- Tropical Bark: Use diced mango and pineapple with toasted coconut.
- Cereal-Only Bark: Skip the fruit and use just sprinkles and crushed cereal for a simpler version.
Common Mistakes to Avoid with This Dish:
- Spreading it too thin: Thin bark cracks into dust.
- Using juicy fruit: Wet fruit can make soft pockets in the yogurt.
- Storing it uncovered: Freezer burn gives bark a chalky edge.
7. Mini Pancake Dippers
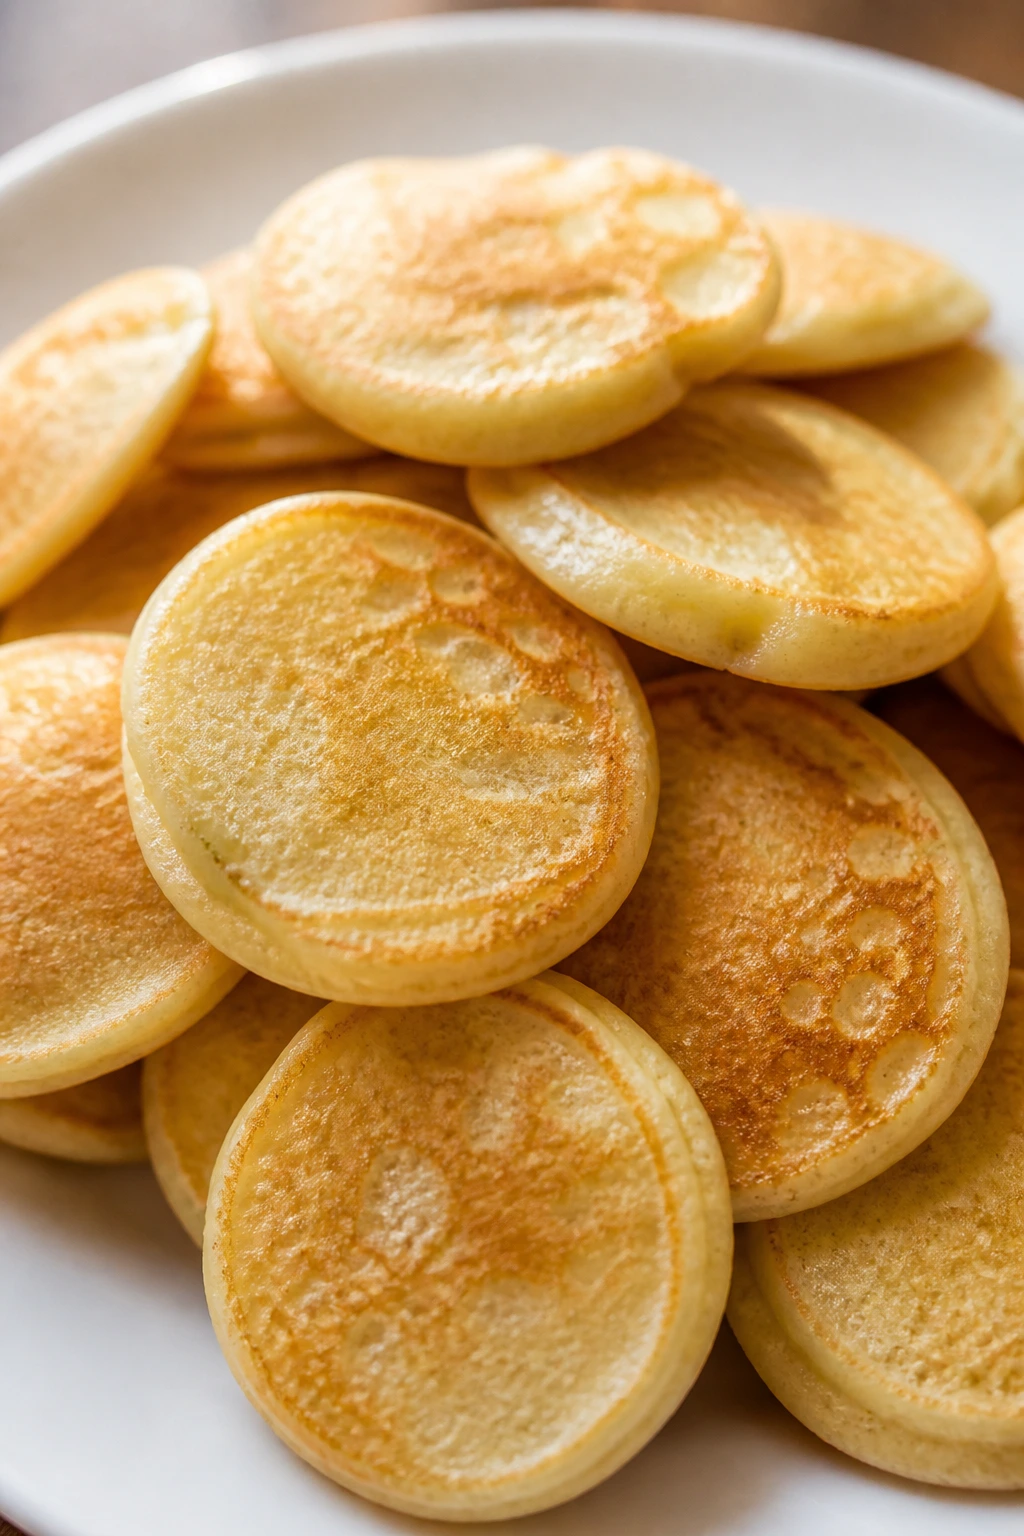
Tiny pancakes have a way of making breakfast feel like a snack tray. These silver-dollar pancakes are soft in the middle, lightly golden on the outside, and easy for small hands to dunk into syrup, yogurt, or fruit puree.
Why It Works:
The size matters. Mini pancakes are less intimidating than full ones, and dipping gives kids some control over how sweet each bite becomes. They also reheat well, which is useful because no one wants to stand at the stove making one pancake at a time while the first batch gets cold.
Key Ingredients:
- 1 1/2 cups pancake mix
- 1 cup milk
- 1 large egg
- 2 tablespoons melted butter
- 1 teaspoon vanilla extract
- Butter or oil for the pan
Quick Steps:
- Whisk the pancake mix, milk, egg, melted butter, and vanilla until just combined.
- Heat a lightly greased skillet over medium heat.
- Spoon small rounds, about 1 tablespoon each, onto the pan.
- Cook for 1 to 2 minutes per side, until the edges look set and the bottoms are golden.
- Cool slightly and serve with dipping cups.
Equipment for This Recipe:
- Mixing bowl
- Whisk
- Nonstick skillet or griddle
- Small spoon or cookie scoop
How to Serve This Dish:
Stack the pancakes in short towers with fruit and a little syrup on the side. They’re ideal for a breakfast snack plate, but they also work as an after-school treat with yogurt dip and sliced bananas. For toddlers, cut the pancakes into quarters before serving.
Pro Tips for This Recipe:
- Keep the batter a little thick so the pancakes stay round.
- Use a cookie scoop for even sizes.
- Don’t press the pancakes with a spatula; that squeezes out the fluff.
- Cook one test pancake first to check the heat.
Variations on This Dish:
- Blueberry Dot Dippers: Fold in 1/2 cup blueberries, but keep them small.
- Chocolate Chip Dippers: Add mini chips for a dessert-style version.
- Cinnamon Roll Dippers: Add cinnamon and a light glaze after cooking.
Common Mistakes to Avoid with This Dish:
- Making them too large: Big pancakes lose the “dip” charm.
- Cooking on high heat: The outside browns before the center sets.
- Overmixing the batter: A few lumps are fine; a smooth, beaten batter usually makes tough pancakes.
8. Frozen Grape Bites
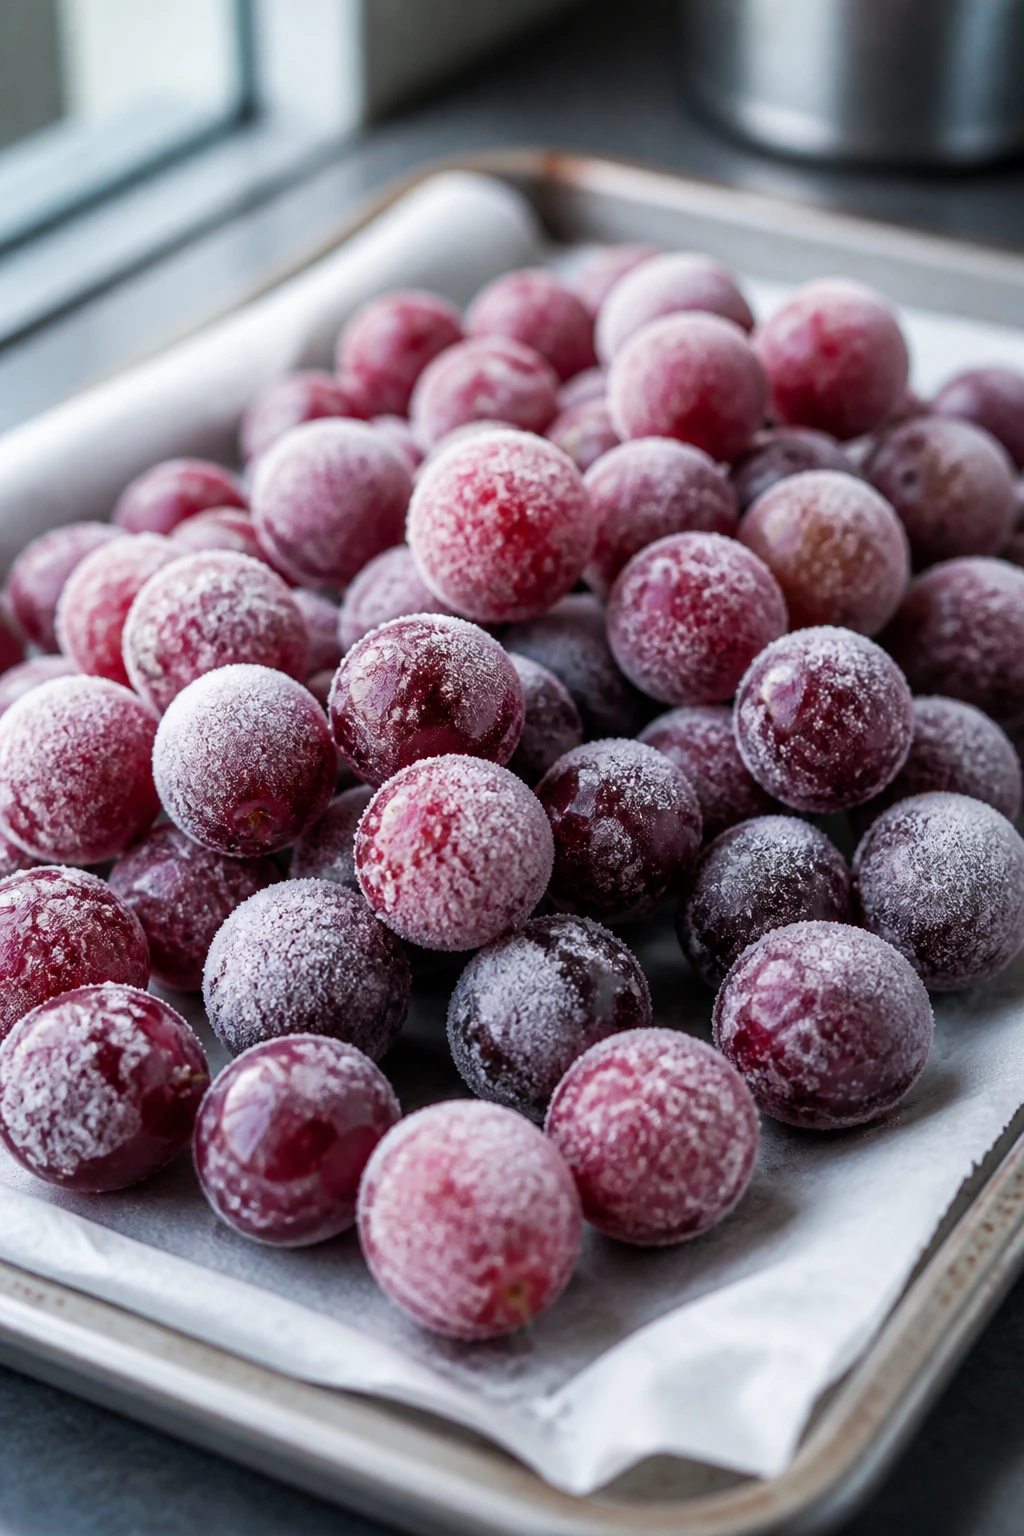
These are the simplest treat on the list, and I love them for that. A bunch of cold grapes turns into tiny freezer candy once they’ve been chilled long enough to get crisp and juicy at the same time.
Why It Works:
Some kids want the candy feeling without an actual candy bomb. Frozen grapes give you that sweet, snappy bite, and the hands-on step is easy enough for a preschool helper. A little lemon or lime juice can perk them up, but plain frozen grapes are already doing most of the work.
Key Ingredients:
- 3 cups seedless grapes
- 1 tablespoon lemon juice
- 1 teaspoon sugar, optional
- Pinch of salt, optional
Quick Steps:
- Wash the grapes and dry them well.
- Toss them with lemon juice, sugar, and salt if using.
- Spread them on a parchment-lined tray in a single layer.
- Freeze for 2 to 3 hours, until firm and cold through the center.
- Serve straight from the freezer.
Equipment for This Recipe:
- Colander
- Paper towels
- Baking sheet
- Parchment paper
How to Serve This Dish:
Pile the grapes into small bowls and serve immediately, because they soften quickly on warm hands. They’re best as a hot-afternoon snack or a lunchbox item tucked into a freezer pack. For little kids, slice the grapes in half lengthwise before freezing.
Pro Tips for This Recipe:
- Dry the grapes thoroughly so they don’t freeze in clumps.
- Buy seedless grapes only; seeded grapes are a hassle here.
- If you want extra sweetness, roll them in a pinch of powdered drink mix.
- Freeze in a single layer so they don’t stick together.
Variations on This Dish:
- Lime Spark Grapes: Swap lemon for lime juice and a tiny bit of zest.
- Sugar-Coated Grapes: Toss in superfine sugar before freezing for a frosted look.
- Mixed Berry Freeze: Freeze grapes with halved strawberries and blueberries.
Common Mistakes to Avoid with This Dish:
- Freezing wet grapes: They turn into a sticky clump.
- Serving too many at once to very young kids: Frozen fruit can be hard on little teeth.
- Skipping the dry time: Wet skins prevent a crisp freeze.
9. Marshmallow Popcorn Balls
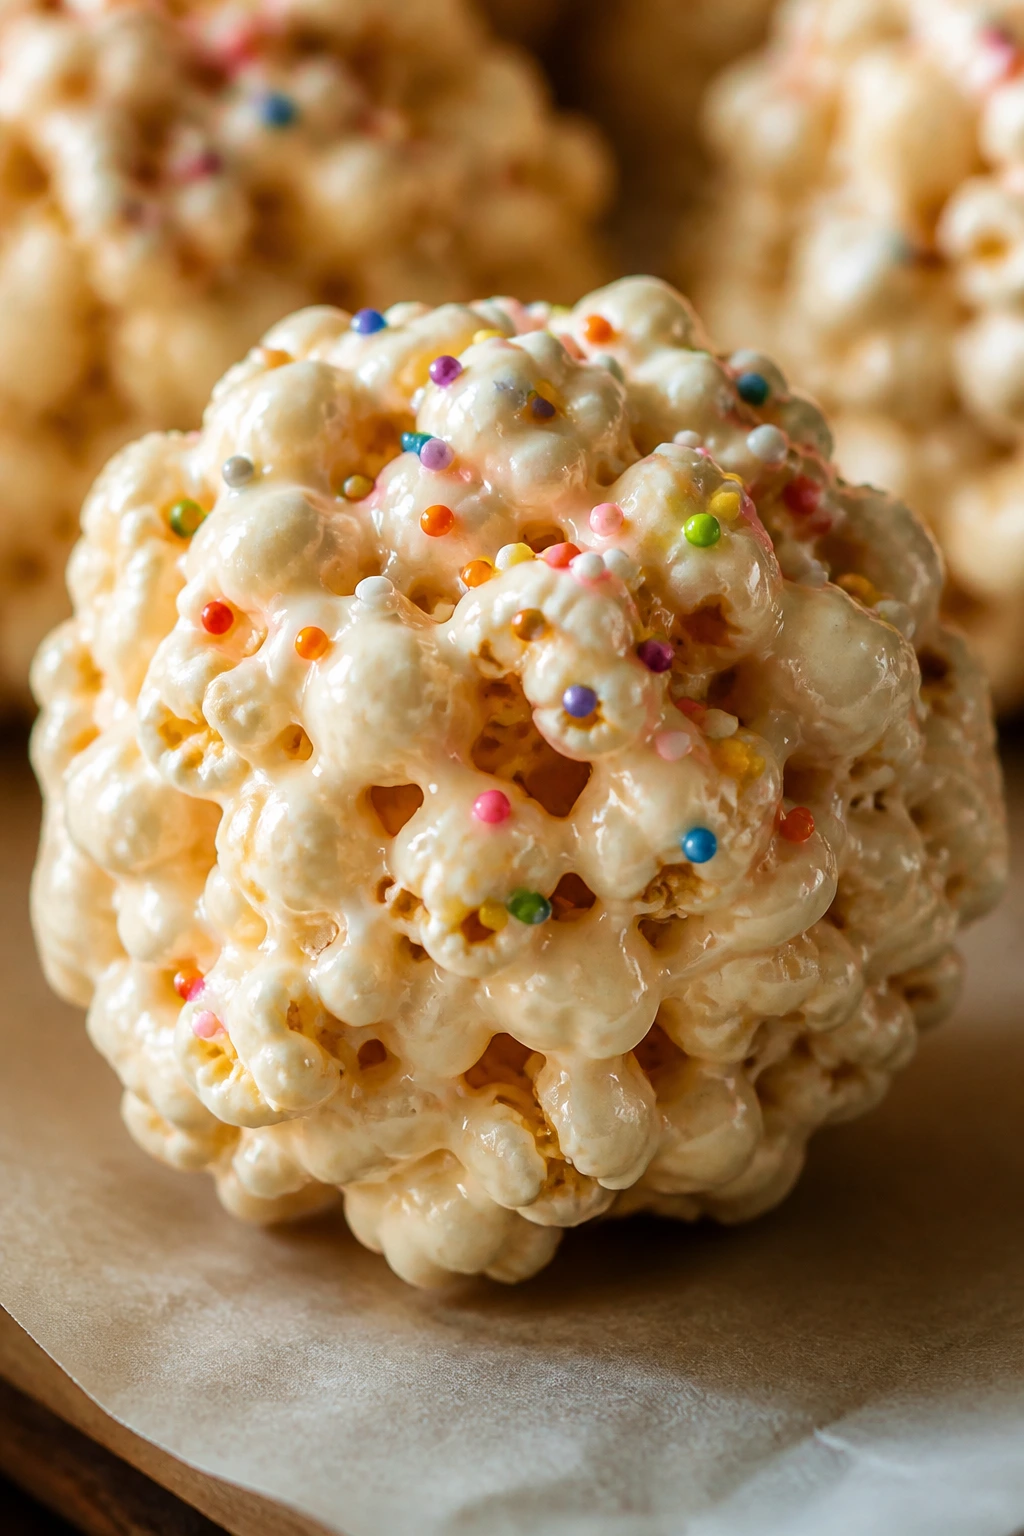
Sticky in the best possible way, these popcorn balls are soft, chewy, and easy to shape with buttered hands. Kids usually love helping press the warm mixture together, and the final result looks like a homemade carnival snack.
Why It Works:
Popcorn already has crunch and salt, so the marshmallow binder only needs to add sweetness and hold. That balance keeps the treat from feeling heavy. Sprinkles or mini chocolate chips can go on the outside if you want a little extra color without changing the base recipe much.
Key Ingredients:
- 8 cups popped popcorn
- 2 tablespoons unsalted butter
- 4 cups mini marshmallows
- 1/2 teaspoon vanilla extract
- 1/4 teaspoon fine salt
- 2 tablespoons sprinkles, optional
Quick Steps:
- Line a baking sheet with parchment and butter your hands lightly.
- Melt the butter in a large pot over low heat.
- Add the marshmallows and stir until smooth and glossy.
- Stir in the vanilla, salt, and popcorn.
- Shape the warm mixture into balls and let them cool for 15 minutes.
Equipment for This Recipe:
- Large pot
- Wooden spoon
- Baking sheet
- Parchment paper
How to Serve This Dish:
Wrap each ball in wax paper for a lunchbox treat or stack them on a plate for a party table. One ball is usually enough for a younger child; older kids may inhale two without blinking. They’re best at room temperature, not chilled.
Pro Tips for This Recipe:
- Use fresh popcorn so the texture stays crisp.
- Butter your hands twice if the mixture is warm and sticky.
- Press just enough to hold the shape; packing too tightly makes them dense.
- Add sprinkles before the balls cool if you want them to stick.
Variations on This Dish:
- Birthday Cake Balls: Mix in rainbow sprinkles and a drop of vanilla frosting flavor.
- Chocolate Drizzle Balls: Drizzle cooled balls with melted chocolate.
- Peanut Butter Popcorn Balls: Stir in 1/4 cup peanut butter with the marshmallows.
Common Mistakes to Avoid with This Dish:
- Using burnt popcorn: Even a small bitter note shows up in the final snack.
- Cooking the marshmallows too hot: High heat makes them stiff instead of stretchy.
- Waiting too long to shape them: The mixture firms up fast.
10. Edible Cookie Dough Bites
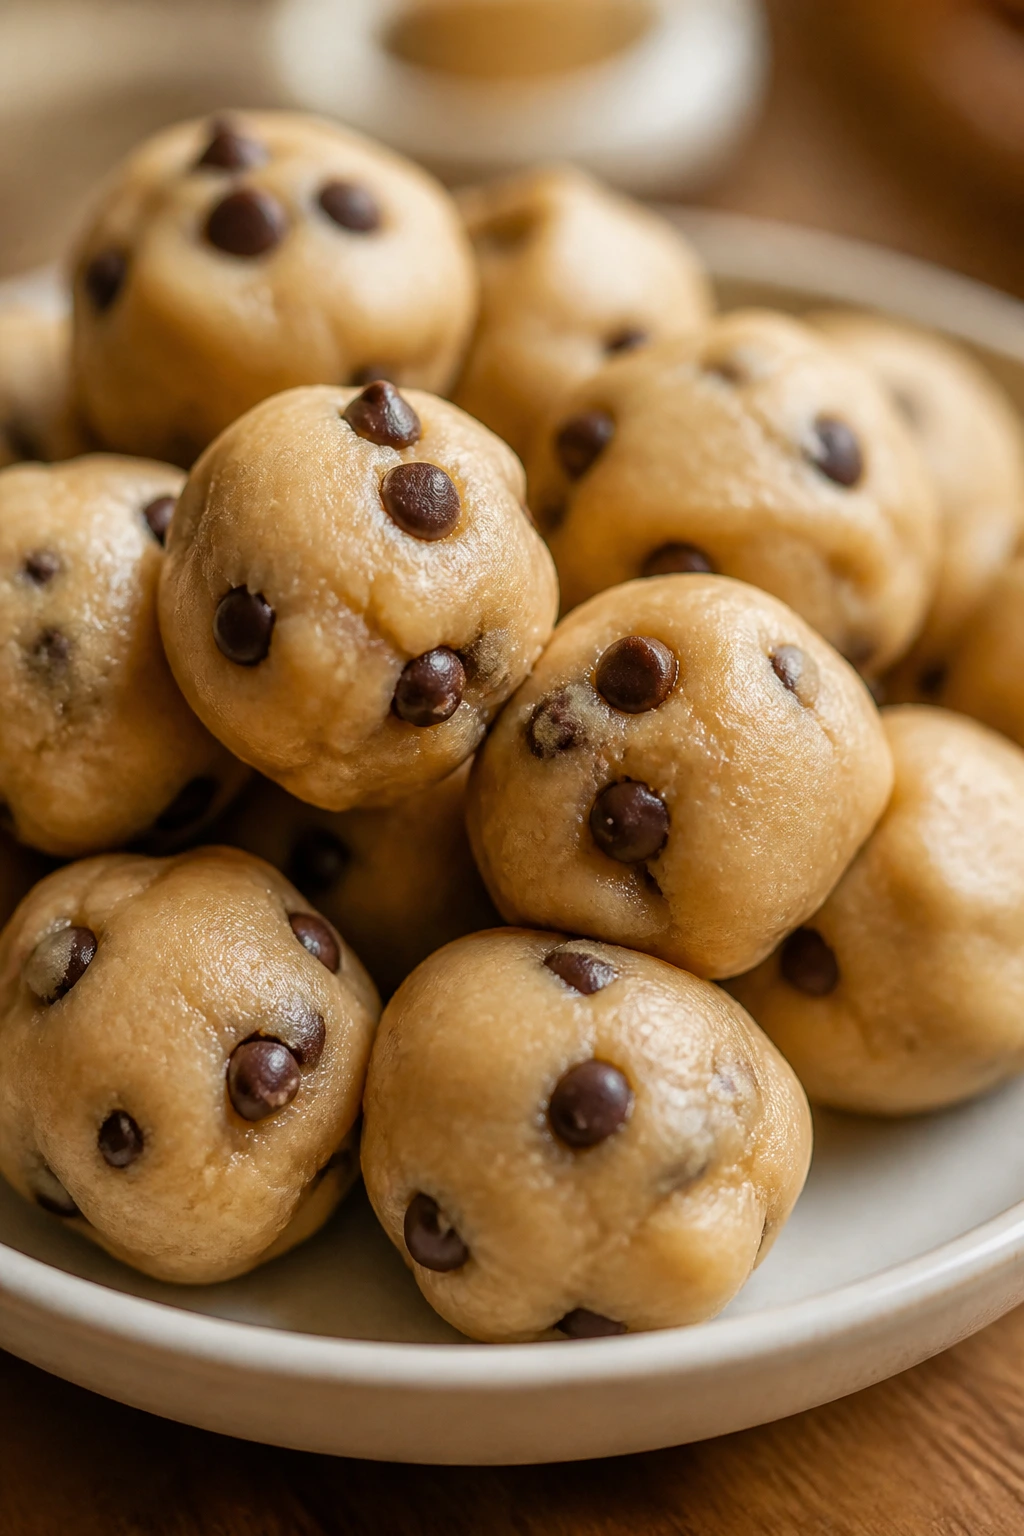
This is the one kids usually ask for again. It tastes like the dough from a bowl in the middle of baking day, but it uses heat-treated flour and no raw eggs, so you can hand over the spoon with less anxiety.
Why It Works:
The flavor is built from brown sugar, butter, vanilla, and mini chocolate chips, which is about as friendly as dessert gets. The texture is soft and scoopable, and rolling it into bites makes portioning easier than pretending anyone will stop after one spoonful.
Key Ingredients:
- 1 cup all-purpose flour, heat-treated
- 1/2 cup unsalted butter, softened
- 1/2 cup packed brown sugar
- 2 tablespoons milk
- 1 teaspoon vanilla extract
- 1/2 cup mini chocolate chips
- Pinch of salt
Quick Steps:
- Heat-treat the flour by baking it at 350°F for 5 minutes, then let it cool.
- Beat the butter and brown sugar until creamy.
- Mix in the milk, vanilla, salt, and cooled flour.
- Fold in the mini chocolate chips.
- Chill for 20 minutes, then roll into 1-inch bites.
Equipment for This Recipe:
- Mixing bowl
- Hand mixer or sturdy spoon
- Baking sheet
- Parchment paper
How to Serve This Dish:
Serve the bites cold or at cool room temperature in mini paper cups. They’re rich, so a couple goes a long way, especially for younger kids. I like them beside apple slices or pretzel sticks because the salty crunch keeps the sweetness from feeling too heavy.
Pro Tips for This Recipe:
- Heat-treat the flour every time; don’t skip it.
- Let the flour cool fully before mixing, or the butter softens too much.
- Use mini chips so every bite gets a few specks of chocolate.
- Chill before rolling if the dough feels sticky.
Variations on This Dish:
- Double Chocolate Dough: Add 2 tablespoons cocoa powder.
- Birthday Sprinkle Dough: Swap the chips for rainbow sprinkles.
- Oat Cookie Dough: Add 1/4 cup quick oats for a chewier bite.
Common Mistakes to Avoid with This Dish:
- Using raw flour straight from the bag: That’s the one safety step worth slowing down for.
- Adding too much milk: The dough turns loose and greasy.
- Rolling while warm: Warm dough sticks to fingers and loses its shape.
11. Banana Oat Muffin Tops
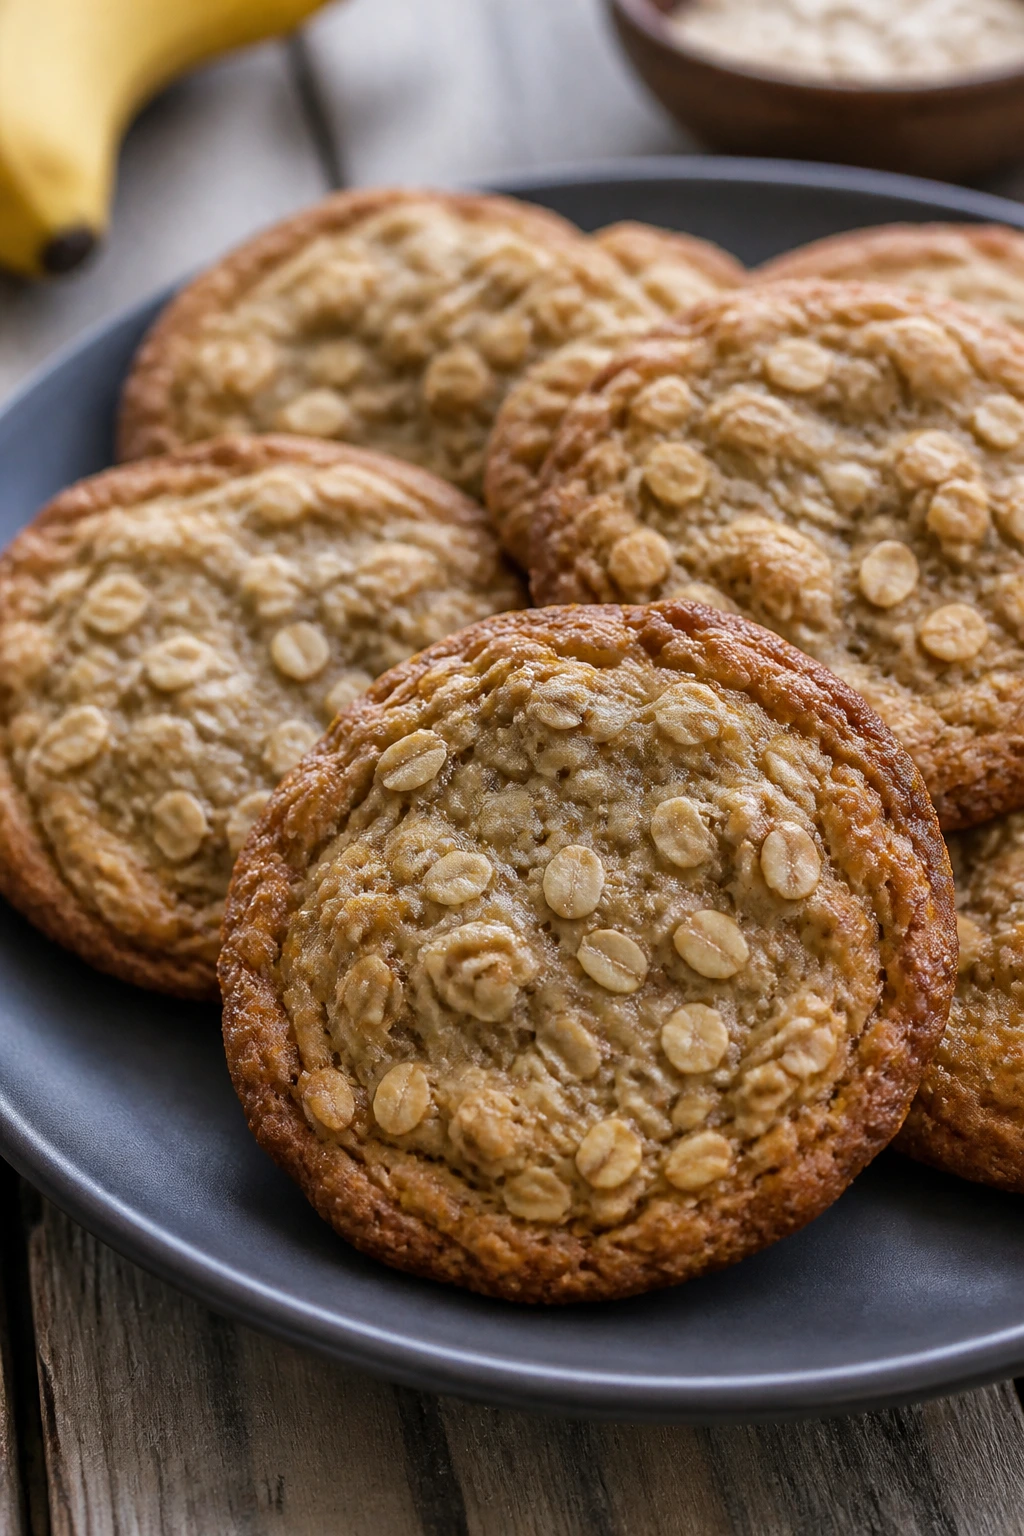
These muffin tops come out with a chewy edge and a soft banana center, which is a nice balance for kids who don’t want a dry muffin. They’re sturdy enough for small hands and plain enough to pass the picky-eater test.
Why It Works:
Banana, oats, and cinnamon make the flavor gentle, not flashy. The tops bake faster than full muffins, which gives you a little more browning on the edges and less chance of a dry middle. That texture shift matters more than people think.
Key Ingredients:
- 2 ripe bananas, mashed
- 1 cup old-fashioned oats
- 3/4 cup all-purpose flour
- 1/3 cup brown sugar
- 1 large egg
- 1/4 cup melted butter
- 1 teaspoon baking powder
- 1 teaspoon cinnamon
Quick Steps:
- Heat the oven to 375°F and line a baking sheet with parchment.
- Stir the mashed bananas, egg, melted butter, and brown sugar together.
- Mix in the oats, flour, baking powder, cinnamon, and a pinch of salt.
- Scoop mounds onto the tray and flatten them slightly.
- Bake for 12 to 14 minutes, until the edges are golden and the centers spring back.
Equipment for This Recipe:
- Mixing bowl
- Spoon or scoop
- Baking sheet
- Parchment paper
How to Serve This Dish:
Serve warm with a little butter, or pack them plain for snacks and lunchboxes. Two muffin tops make a solid snack portion for school-age kids. They also work beside yogurt or apple slices if you want a more balanced plate.
Pro Tips for This Recipe:
- Use bananas with brown spots for the strongest banana flavor.
- Don’t overmix once the flour goes in.
- Flatten the mounds a bit so they bake into tops, not domes.
- Cool on the tray for 5 minutes before moving them.
Variations on This Dish:
- Blueberry Banana Tops: Fold in 1/2 cup blueberries.
- Chocolate Chip Tops: Add mini chocolate chips for a dessert lean.
- Apple Cinnamon Tops: Swap half the banana for grated apple.
Common Mistakes to Avoid with This Dish:
- Using too much flour: Spoon and level the flour instead of packing it.
- Overbaking: These dry out fast if they stay in too long.
- Skipping the salt: Even a small pinch keeps the banana flavor from tasting flat.
12. Cinnamon-Sugar Tortilla Chips with Apple Salsa
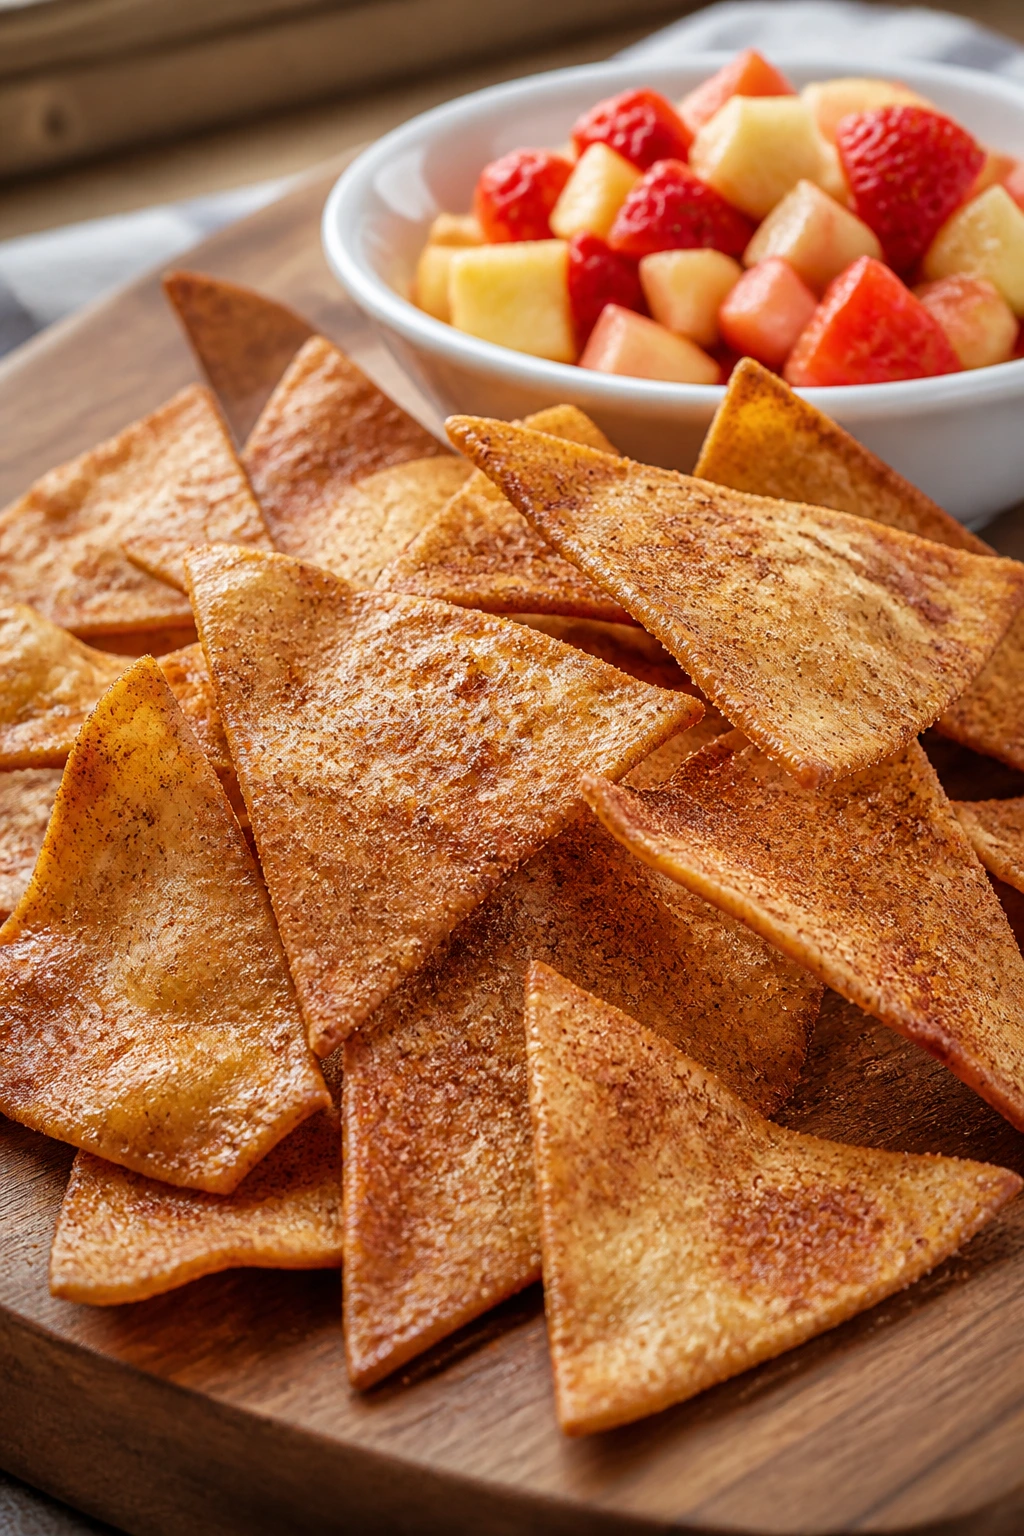
This is dessert pretending to be chips and dip. The tortillas bake into crisp triangles with a sugary crust, and the apple salsa brings the cool, juicy contrast that keeps the whole plate from getting one-note.
Why It Works:
The crunch is what gets kids to keep reaching. The chip flavor feels familiar, and the salsa is sweet enough that it doesn’t read like “fruit on the side.” If your kid already likes cinnamon toast, this is the same neighborhood.
Key Ingredients:
- 4 flour tortillas
- 2 tablespoons melted butter
- 2 tablespoons granulated sugar
- 1 teaspoon cinnamon
- 2 apples, finely diced
- 1/2 cup strawberries, diced
- 1 tablespoon honey
- 1 teaspoon lemon juice
Quick Steps:
- Cut the tortillas into wedges and brush with melted butter.
- Mix the sugar and cinnamon, then sprinkle it over the wedges.
- Bake at 375°F for 8 to 10 minutes, until crisp and lightly golden.
- Stir the apples, strawberries, honey, and lemon juice together.
- Cool the chips for a few minutes, then serve with the salsa.
Equipment for This Recipe:
- Baking sheet
- Knife
- Mixing bowl
- Pastry brush
How to Serve This Dish:
Serve the chips in a bowl with the salsa in a separate cup so the crunch stays intact. Kids like to scoop the fruit themselves, which makes this feel more like a snack game than a dessert. It’s a good after-school plate when you want something a little more playful than plain toast.
Pro Tips for This Recipe:
- Cut the wedges evenly so they bake at the same pace.
- Dice the fruit very small for easier scooping.
- Don’t skip the cooling step; hot chips taste softer than they should.
- If the salsa gets watery, drain off a spoonful before serving.
Variations on This Dish:
- Peach Salsa Chips: Swap the strawberries for ripe peaches.
- Berry Burst Chips: Use blueberries and raspberries instead of apples.
- Creamy Dip Version: Serve the chips with vanilla yogurt instead of salsa.
Common Mistakes to Avoid with This Dish:
- Using too much butter: The chips turn greasy instead of crisp.
- Cutting the fruit too large: Big chunks fall off the chip.
- Serving the salsa too early: It gets watery if it sits too long.
13. Graham Cracker S’mores Cups

All the flavor of a campfire s’more, none of the sticky collapsing mess. These little cups bake in a mini muffin tin and come out with a crunchy bottom, melted chocolate center, and toasted marshmallow top.
Why It Works:
The graham base gives a familiar crumb, and the mini size makes the whole thing feel contained. Kids can help press the crust, drop in the chocolate, and place the marshmallows on top, which means most of the fun happens before the oven even turns on.
Key Ingredients:
- 1 1/2 cups graham cracker crumbs
- 1/4 cup melted butter
- 2 tablespoons sugar
- 1/2 cup milk chocolate chips
- 1 cup mini marshmallows
- Pinch of salt
Quick Steps:
- Mix the crumbs, melted butter, sugar, and salt until the texture feels like damp sand.
- Press the mixture into a greased mini muffin tin.
- Bake at 350°F for 5 minutes, then add chocolate chips.
- Top with marshmallows and bake 3 to 4 minutes more, until puffed and lightly golden.
- Cool for 10 minutes before lifting out.
Equipment for This Recipe:
- Mini muffin tin
- Mixing bowl
- Measuring cups
- Spoon or tart press
How to Serve This Dish:
Serve them warm, when the chocolate is still soft and the marshmallows have that gooey center. They work best on a platter lined with parchment, because the bottoms can stick if you rush them. One or two cups is plenty for a small child.
Pro Tips for This Recipe:
- Grease the tin well or use liners made for mini pans.
- Press the crust firmly so it doesn’t crumble.
- Don’t walk away during the marshmallow bake; they can go from puffed to scorched fast.
- Let them cool before removing, or the crust breaks apart.
Variations on This Dish:
- Peanut Butter S’mores Cups: Add a teaspoon of peanut butter under the chocolate.
- Cookie Crumb Cups: Use crushed chocolate sandwich cookies instead of grahams.
- White Chocolate Version: Swap in white chocolate chips and a few crushed strawberries.
Common Mistakes to Avoid with This Dish:
- Overbaking the marshmallows: They should be toasted, not burnt.
- Under-pressing the crust: Loose crumbs fall out as soon as you bite in.
- Removing them too early: The cups need a short cool-down to set.
14. PB&J Roll-Ups
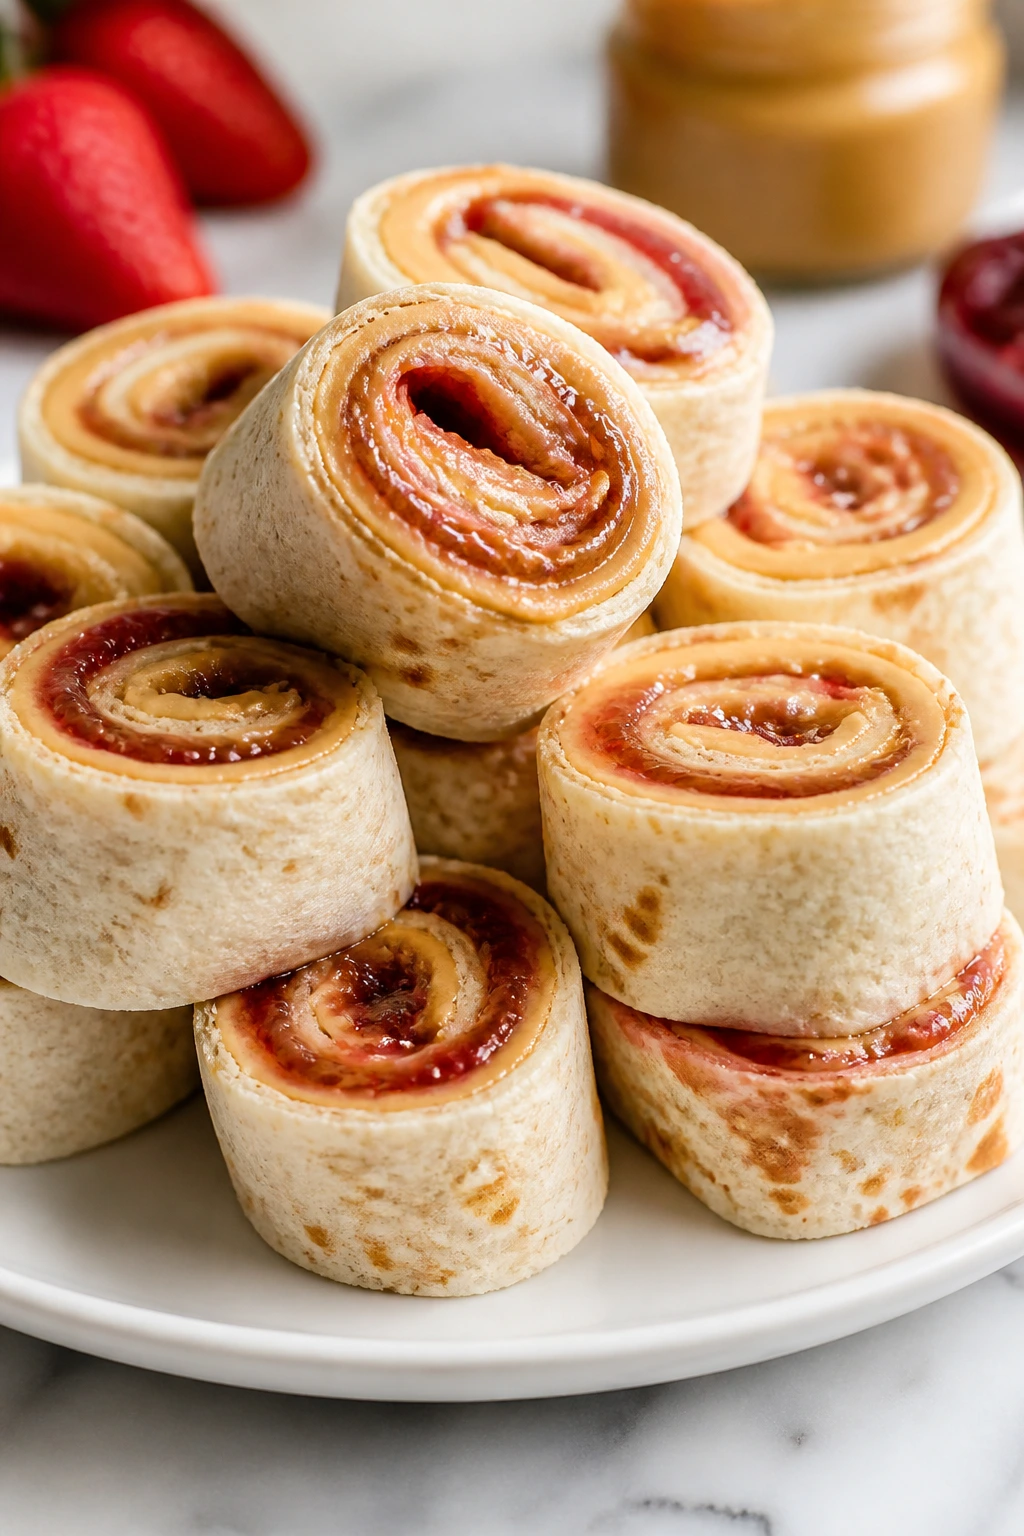
A lunchbox favorite turned snack, these roll-ups are soft, neat, and easy to hold. The peanut butter keeps the tortilla from feeling dry, and the jam gives every slice a sweet streak that picky eaters recognize immediately.
Why It Works:
It’s the same sandwich profile children already know, just rearranged into pinwheels. That change in shape makes it feel new without asking for new flavors. A chilled roll slices cleanly, so the final result looks tidy instead of slumped and smashed.
Key Ingredients:
- 2 flour tortillas
- 1/2 cup creamy peanut butter
- 1/4 cup strawberry jam
- 1 banana, thinly sliced, optional
- 1 teaspoon honey, optional
Quick Steps:
- Spread peanut butter over each tortilla, leaving a small border.
- Add jam in a thin layer, and lay banana slices down the center if using.
- Roll tightly and place seam-side down.
- Chill for 10 minutes if you want easier slicing.
- Cut into 1-inch rounds and serve.
Equipment for This Recipe:
- Butter knife
- Cutting board
- Sharp knife
- Small plate
How to Serve This Dish:
Serve the pinwheels cut-side up on a lunch tray or snack plate. They hold together best when fresh, though they can be packed a few hours ahead if wrapped snugly. I like them with apple slices on the side, because that gives the plate a little crunch.
Pro Tips for This Recipe:
- Use soft tortillas so they roll without cracking.
- Don’t spread the jam too thick or the centers slip.
- Chill before cutting for cleaner spirals.
- A banana adds sweetness, but leave it out if your kid gets suspicious of mixed textures.
Variations on This Dish:
- Grape Jelly Roll-Ups: Use grape jelly for a more classic flavor.
- Honey Peanut Roll-Ups: Skip the jam and drizzle with honey.
- Nut-Free Roll-Ups: Swap peanut butter for sunflower seed butter.
Common Mistakes to Avoid with This Dish:
- Using too much filling: The roll won’t close.
- Cutting with a dull knife: You’ll squash the spirals.
- Leaving them unwrapped too long: The tortilla dries out and tears.
15. Watermelon Pizza Slices

Watermelon pizza is one of those ideas that sounds silly until you watch a kid grin at it. A round watermelon slice becomes the “crust,” then yogurt, berries, and a few small toppings turn it into a cold, bright dessert that gets eaten faster than you’d expect.
Why It Works:
The joke is the point. Kids understand the shape right away, and the topping setup makes them feel like they’re assembling their own food. Because the base is already sweet and juicy, you only need a light layer of yogurt or cream cheese to hold the toppings in place.
Key Ingredients:
- 1 round watermelon slice, about 1 inch thick
- 1/2 cup vanilla Greek yogurt
- 1/4 cup strawberries, sliced
- 1/4 cup blueberries
- 2 tablespoons mini chocolate chips
- 1 tablespoon shredded coconut, optional
Quick Steps:
- Slice the watermelon into a round or large wedge and pat the surface dry.
- Spread the yogurt thinly over the top.
- Add strawberries, blueberries, chocolate chips, and coconut.
- Cut into wedges like pizza.
- Serve immediately while cold and crisp.
Equipment for This Recipe:
- Large knife
- Cutting board
- Spoon
- Small bowl
How to Serve This Dish:
Serve the wedges on a chilled plate, because the watermelon gives up juice fast. This is a good snack for hot afternoons or birthday tables where you want something bright but not heavy. One wedge makes a nice portion for a younger child; two is more realistic for older kids.
Pro Tips for This Recipe:
- Pat the watermelon dry before adding the yogurt.
- Keep the toppings small so they stay on the slice.
- Use a sharp knife to cut clean wedges.
- Add the topping right before serving, not an hour ahead.
Variations on This Dish:
- Tropical Pizza: Use mango, pineapple, and coconut.
- Berry Cheesecake Pizza: Spread sweetened cream cheese instead of yogurt.
- Banana Split Pizza: Add banana slices and a few chopped cherries.
Common Mistakes to Avoid with This Dish:
- Using a wet watermelon surface: The yogurt slides off.
- Adding heavy toppings: Big chunks tumble off the wedge.
- Letting it sit too long: Watermelon starts to puddle on the plate.
16. Mini Cheese Quesadilla Stars
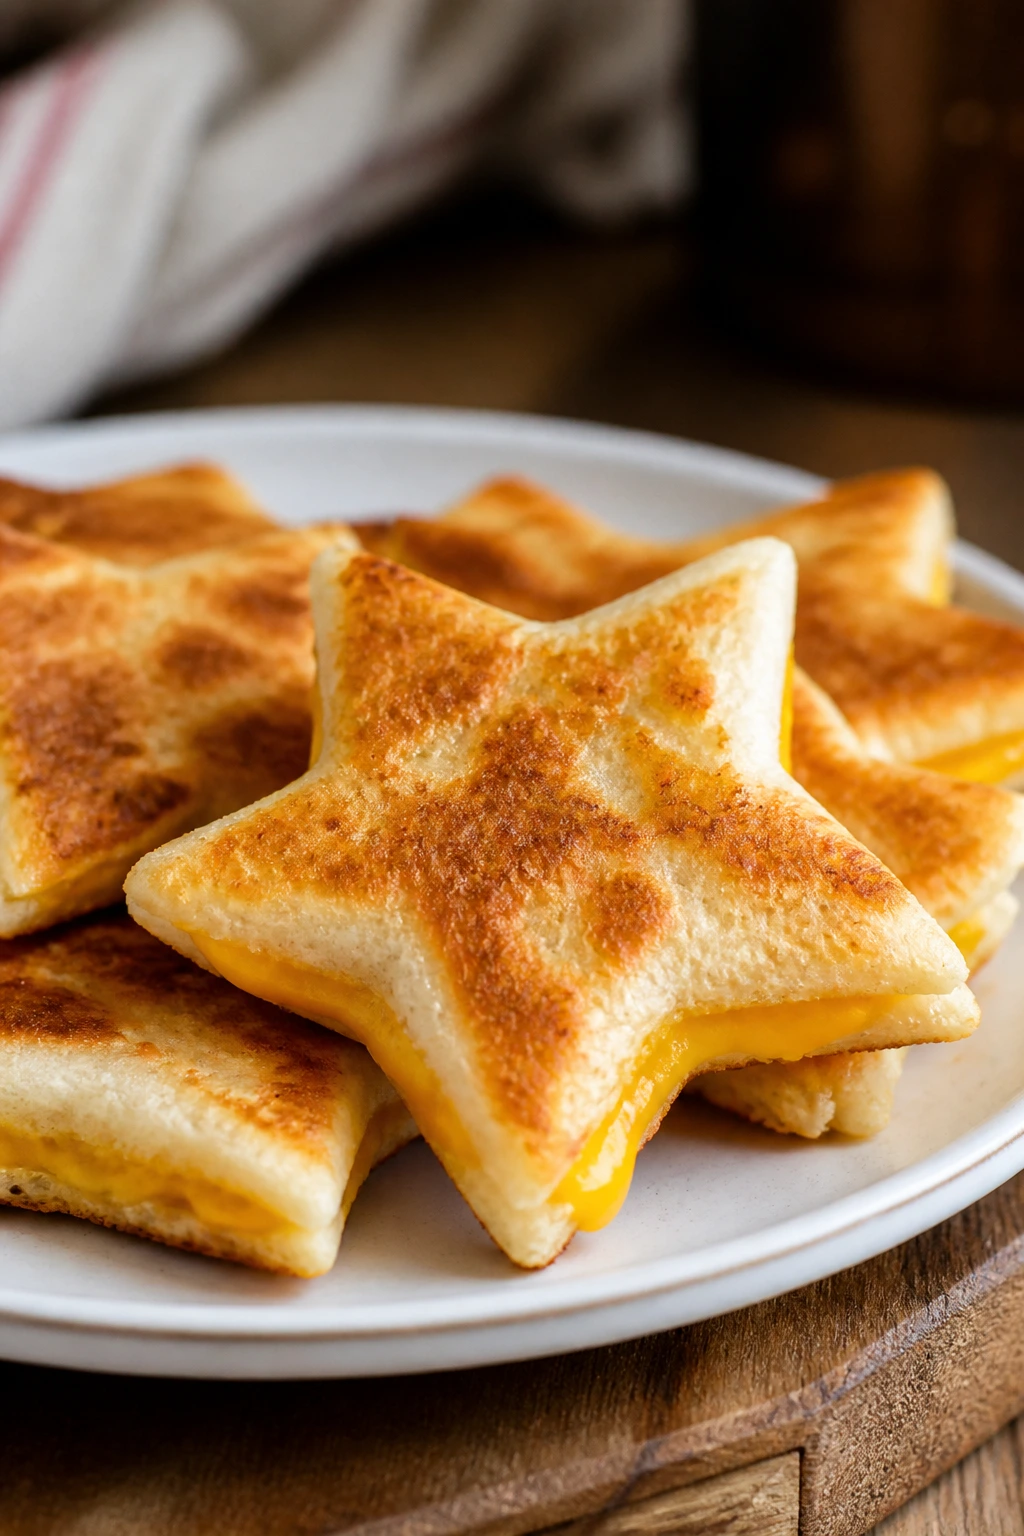
Not every treat has to be sweet. These little quesadilla stars are warm, mild, and easy to cut into shapes that make cheese feel a bit more fun than usual. They disappear quickly because the flavor is familiar and the edges get crisp without becoming hard.
Why It Works:
Mild cheddar or Monterey Jack is a safe choice for picky eaters, especially when the filling is tucked between soft tortillas and cut into shapes. The small size keeps the portions under control, and the star or circle shape gives the snack a playful look without changing the taste.
Key Ingredients:
- 4 small flour tortillas
- 1 1/2 cups shredded mild cheddar or Monterey Jack
- 1 tablespoon butter
- 1/4 teaspoon garlic powder, optional
- Salsa or sour cream for dipping, optional
Quick Steps:
- Sprinkle cheese over half the tortillas and add garlic powder if using.
- Fold the tortillas over the filling.
- Cook in a buttered skillet over medium heat for 2 to 3 minutes per side, until golden and melted.
- Let them cool for 1 minute, then cut with a star or cookie cutter if you want fun shapes.
- Serve with dip on the side.
Equipment for This Recipe:
- Skillet
- Spatula
- Cookie cutter
- Knife or pizza wheel
How to Serve This Dish:
Serve the quesadillas warm, cut into small shapes that fit little hands. They’re good as an afternoon snack or a side on a kid-friendly party tray. For toddlers, skip the cutter and cut the quesadilla into small triangles instead.
Pro Tips for This Recipe:
- Use shredded cheese, not slices, so it melts evenly.
- Keep the heat at medium; high heat burns the tortilla before the cheese melts.
- Let the quesadilla rest for a minute before cutting.
- Don’t overfill, or the cheese leaks out and burns on the pan.
Variations on This Dish:
- Pizza Quesadilla Stars: Add a spoonful of marinara and a few tiny pepperoni pieces.
- Bean-and-Cheese Version: Mix in a thin layer of mashed refried beans.
- Three-Cheese Treat: Use cheddar, mozzarella, and Monterey Jack together.
Common Mistakes to Avoid with This Dish:
- Cooking too fast: The tortilla browns before the cheese softens.
- Adding too much filling: It spills out and makes a mess.
- Using cheese that won’t melt well: Very dry cheese leaves a gritty texture.
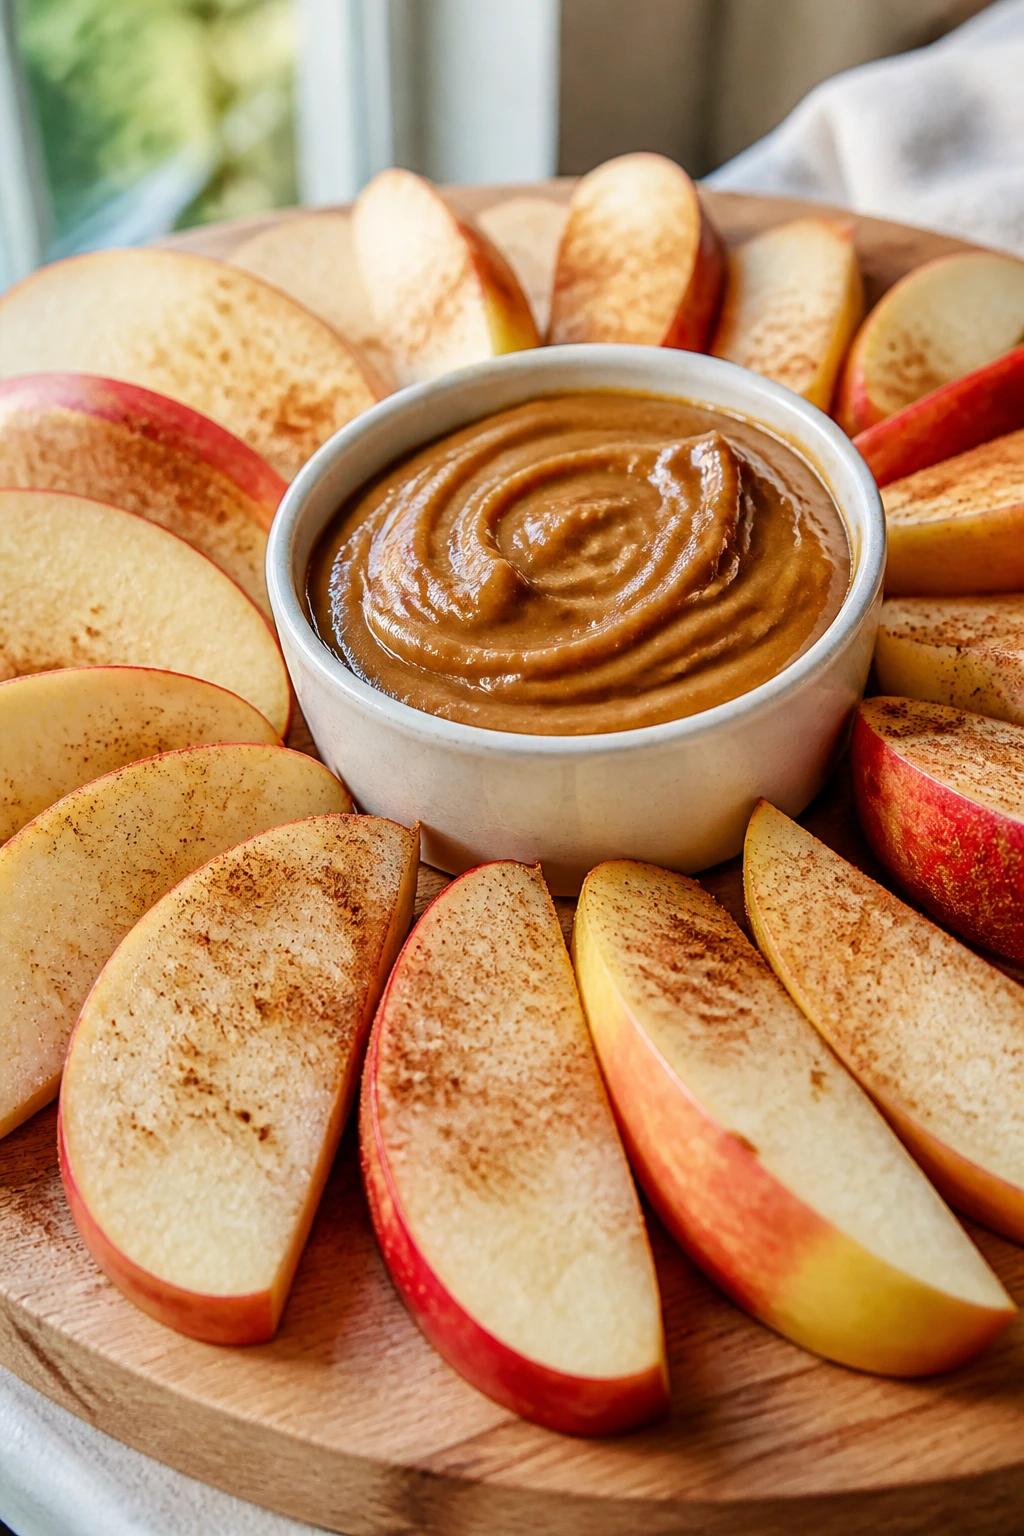
17. Caramel Apple Dip Cups
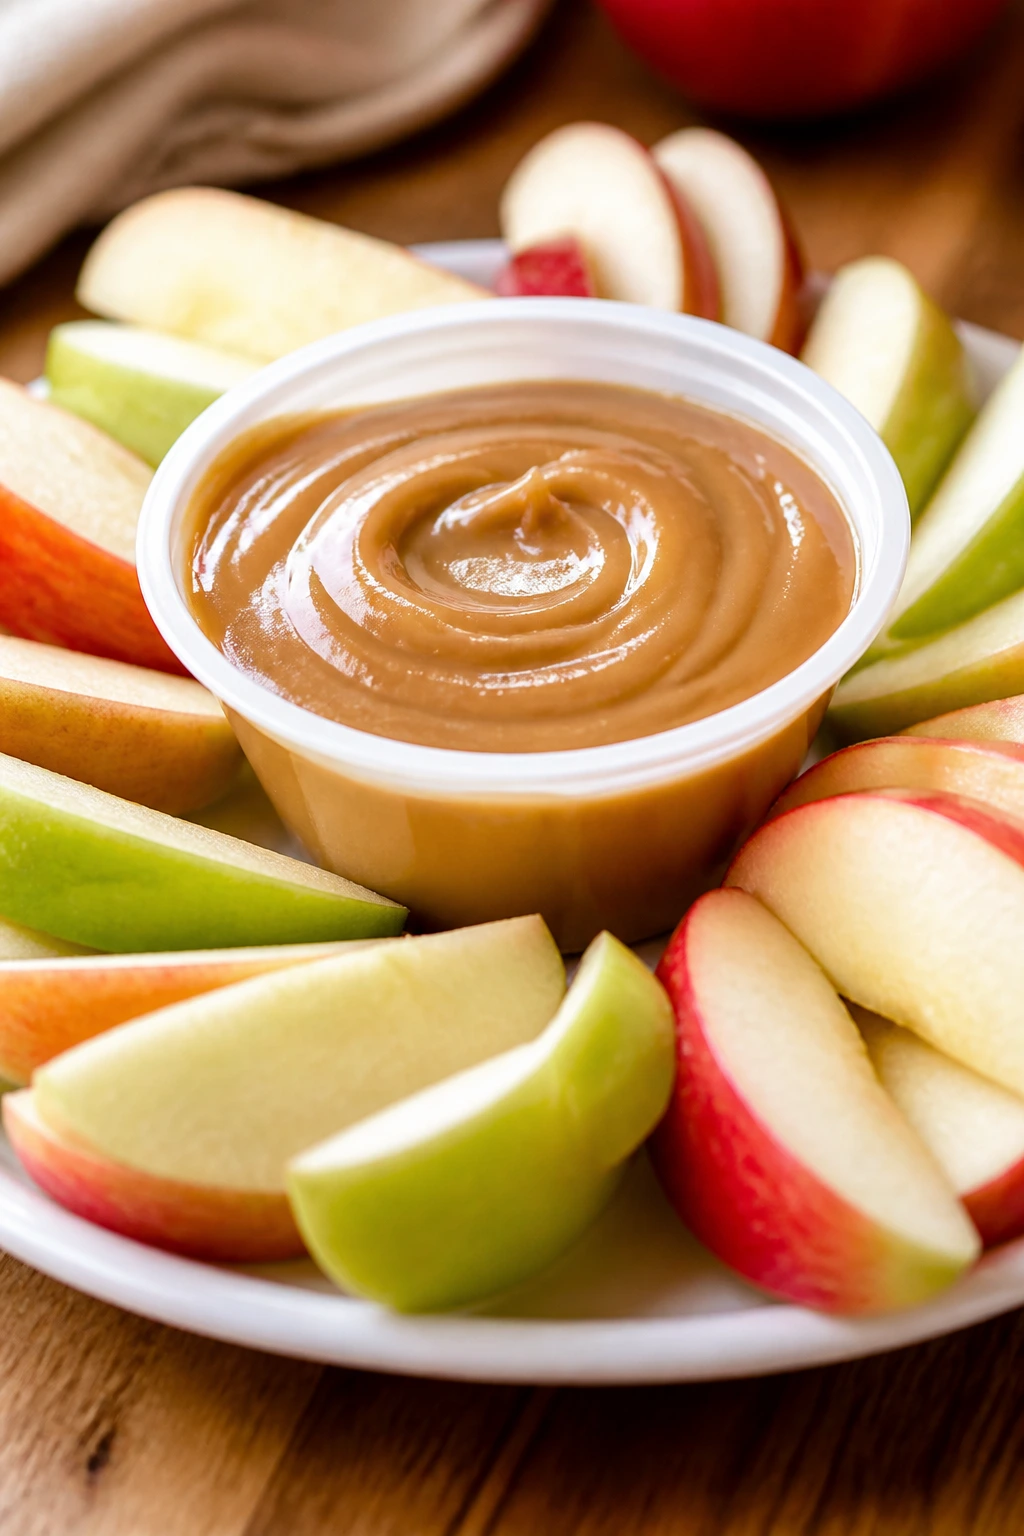
Here’s the snack that makes apple slices vanish. A creamy dip gets swirled with caramel, then paired with crisp apples and a little crunch from granola or crushed cookies if you want to push it into full treat territory.
Why It Works:
Apple slices can feel plain to a child who’s already decided plain equals boring. Dip changes that fast. The texture is soft and sweet enough to feel indulgent, but the apple stays front and center, which is handy when you want something more snack than candy.
Key Ingredients:
- 2 apples, sliced
- 4 ounces cream cheese, softened
- 2 tablespoons brown sugar
- 1/4 cup caramel sauce
- 1/2 teaspoon vanilla extract
- 2 tablespoons granola, optional
Quick Steps:
- Beat the cream cheese, brown sugar, and vanilla together until smooth.
- Spoon the mixture into a small bowl and swirl the caramel on top.
- Slice the apples and arrange them around the dip.
- Sprinkle granola over the top if using.
- Serve chilled.
Equipment for This Recipe:
- Mixing bowl
- Hand mixer or spoon
- Knife
- Serving bowl
How to Serve This Dish:
Set the dip in the center of a plate and fan the apple slices around it. The contrast of cold apples and creamy dip is the whole selling point, so keep everything chilled until serving. A small portion goes a long way here because the dip is rich.
Pro Tips for This Recipe:
- Use tart apples if you want the dip to taste less sweet.
- Cut apples right before serving or toss them with a little lemon juice.
- Soften the cream cheese fully or the dip stays lumpy.
- If the caramel is thick, warm it for a few seconds so it swirls smoothly.
Variations on This Dish:
- Peanut Butter Caramel Dip: Replace half the cream cheese with peanut butter.
- Chocolate Caramel Dip: Add a spoonful of cocoa powder to the dip.
- Cinnamon Cheesecake Dip: Add extra cinnamon and crushed graham crackers.
Common Mistakes to Avoid with This Dish:
- Using cold cream cheese: The dip turns grainy.
- Slicing apples too early: They brown and lose the fresh look.
- Over-swirling the caramel: You want stripes, not a muddy brown bowl.
18. Homemade Fruit Leather Roll-Ups
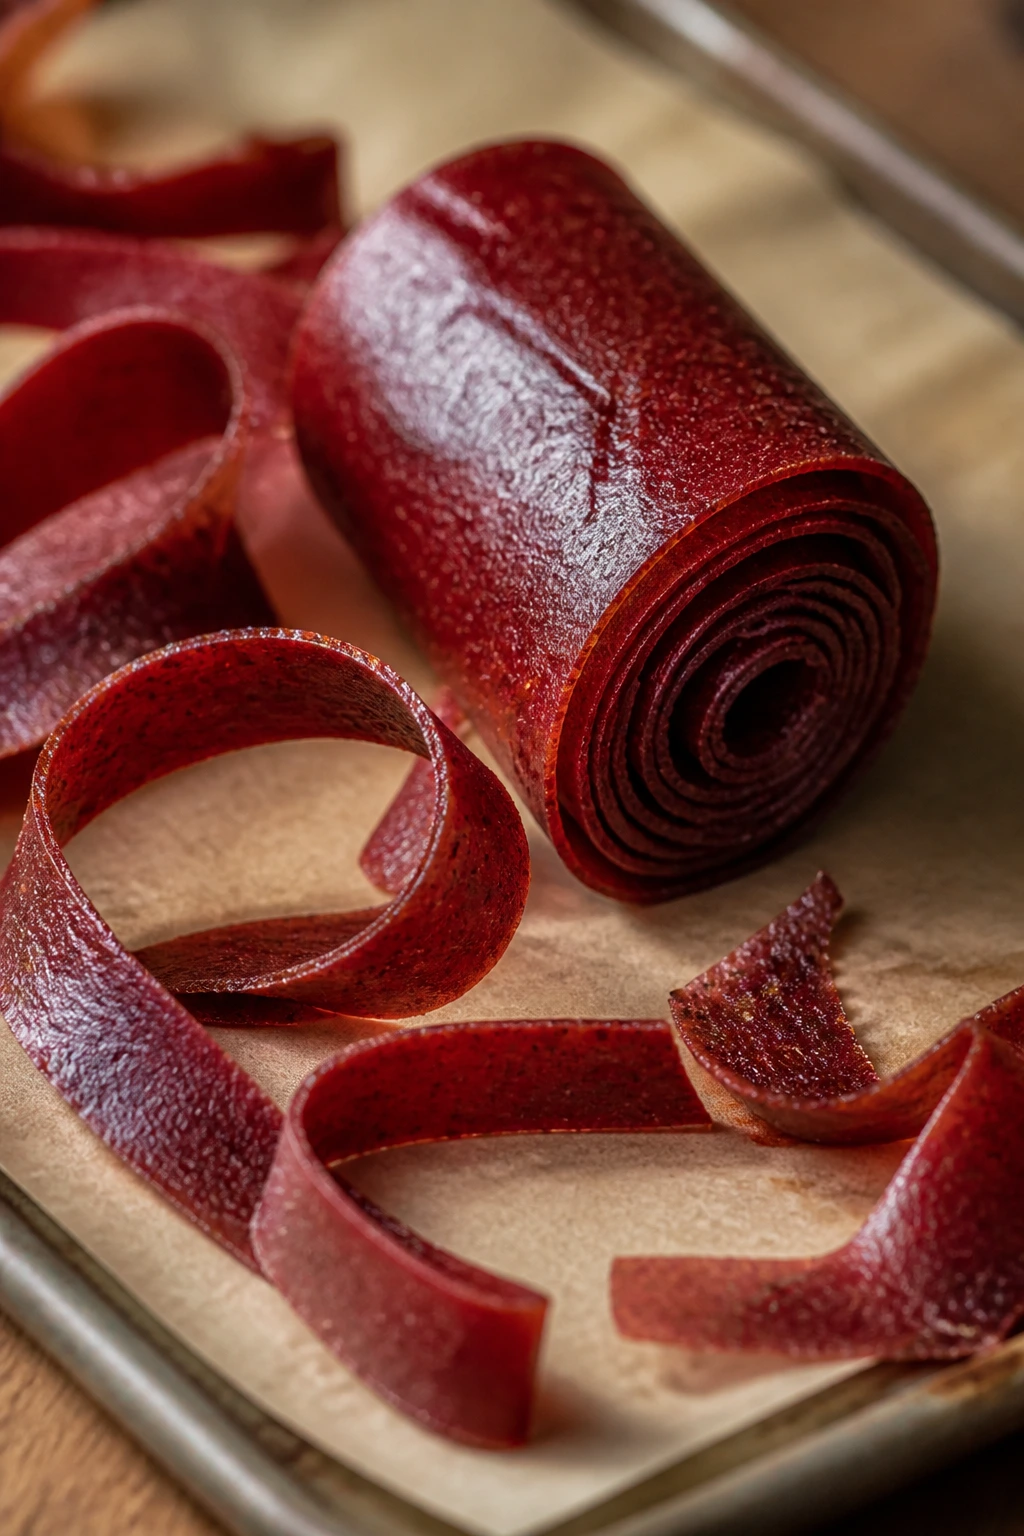
Fruit leather feels a little old-school in the best possible way. It’s chewy, sweet, and easy to tear into strips, which gives kids that candy-like pull without a bag of mystery ingredients.
Why It Works:
You control the fruit and the sweetness. Apple sauce makes the base smooth, berries add color, and a little honey keeps the flavor bright. The low oven or dehydrator method dries the mixture into a flexible sheet instead of a brittle chip, which is what you want.
Key Ingredients:
- 2 cups applesauce
- 1 cup strawberries, pureed
- 2 tablespoons honey
- 1 teaspoon lemon juice
- Pinch of salt
Quick Steps:
- Stir the applesauce, strawberry puree, honey, lemon juice, and salt together.
- Spread the mixture thinly on a parchment-lined baking sheet.
- Bake at 170°F to 180°F for 4 to 6 hours, until tacky but not wet.
- Cool completely, then peel and cut into strips.
- Roll the strips into spirals.
Equipment for This Recipe:
- Blender or food processor
- Baking sheet
- Parchment paper
- Offset spatula
How to Serve This Dish:
Serve rolled into spirals or cut into snack-size strips. It packs neatly into lunch boxes, though a parchment wrapper helps keep the sticky edges from clinging to everything. This is one of those treats that makes a lunch feel special without needing a sugar glaze.
Pro Tips for This Recipe:
- Spread the puree evenly so the edges don’t dry out before the center.
- Use unsweetened applesauce if your fruit is already sweet.
- Bake low and slow; high heat makes leather crack.
- Check the center first, because that’s the last spot to dry.
Variations on This Dish:
- Mango Strawberry Leather: Swap half the strawberries for mango puree.
- Peach Vanilla Leather: Add a little vanilla and use peeled peaches.
- Mixed Berry Leather: Use blueberries and raspberries for deeper color.
Common Mistakes to Avoid with This Dish:
- Spreading it too thick: The center stays sticky.
- Overbaking: Fruit leather gets brittle instead of chewy.
- Peeling it while warm: It tears before it’s fully set.
19. Banana Split Bites
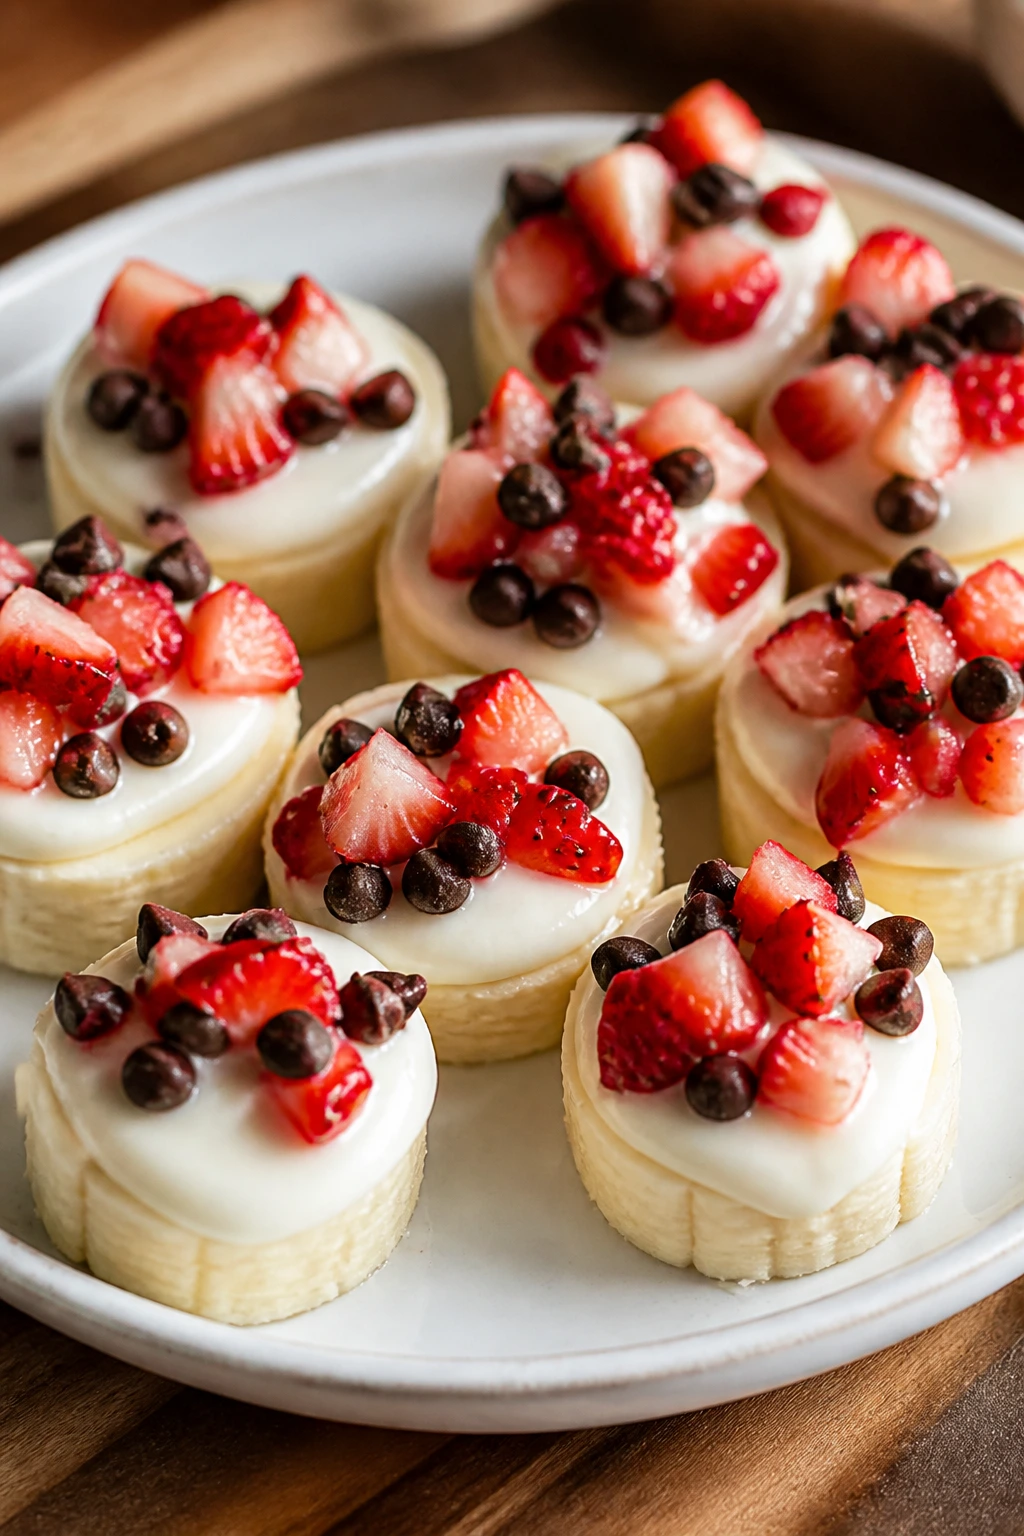
Banana split flavors in tiny form are hard to argue with. These little bites use banana rounds, yogurt or melted chocolate, and a few sprinkles or crumbs to echo the classic dessert without the giant bowl of ice cream.
Why It Works:
The flavor profile is instantly recognizable: banana, chocolate, strawberry, and a little crunch. Because the pieces are small, kids can grab one or two without committing to a whole dessert plate. Freezing the banana slices also makes them feel like a candy-chilled snack.
Key Ingredients:
- 2 bananas, sliced into thick rounds
- 1 cup vanilla Greek yogurt
- 1/4 cup strawberries, finely chopped
- 2 tablespoons mini chocolate chips
- 2 tablespoons crushed nuts or granola, optional
- 1 teaspoon honey
Quick Steps:
- Line a tray with parchment.
- Spoon or pipe small dots of yogurt onto banana slices.
- Add chopped strawberries, chocolate chips, and granola.
- Freeze for 30 to 45 minutes, until set enough to handle.
- Serve cold.
Equipment for This Recipe:
- Baking sheet or tray
- Parchment paper
- Small spoon
- Knife
How to Serve This Dish:
Serve on a chilled plate, because the banana softens quickly once it warms up. They’re best eaten soon after freezing, when the toppings stay in place. For a party, arrange them in rows so they look like tiny dessert coins.
Pro Tips for This Recipe:
- Slice the bananas thick enough to hold toppings.
- Work fast so the yogurt doesn’t slide off.
- Keep the fruit chopped very small.
- If using nuts, check for allergy concerns before serving.
Variations on This Dish:
- Chocolate Banana Split Bites: Use melted chocolate instead of yogurt.
- PB Banana Split Bites: Add a tiny dab of peanut butter under the toppings.
- Caramel Crunch Bites: Drizzle with caramel and top with crushed cookies.
Common Mistakes to Avoid with This Dish:
- Using thin banana slices: They collapse under the toppings.
- Adding too much yogurt: The bites turn sloppy.
- Waiting too long to freeze: The toppings don’t set well.
20. No-Bake Cereal Clusters
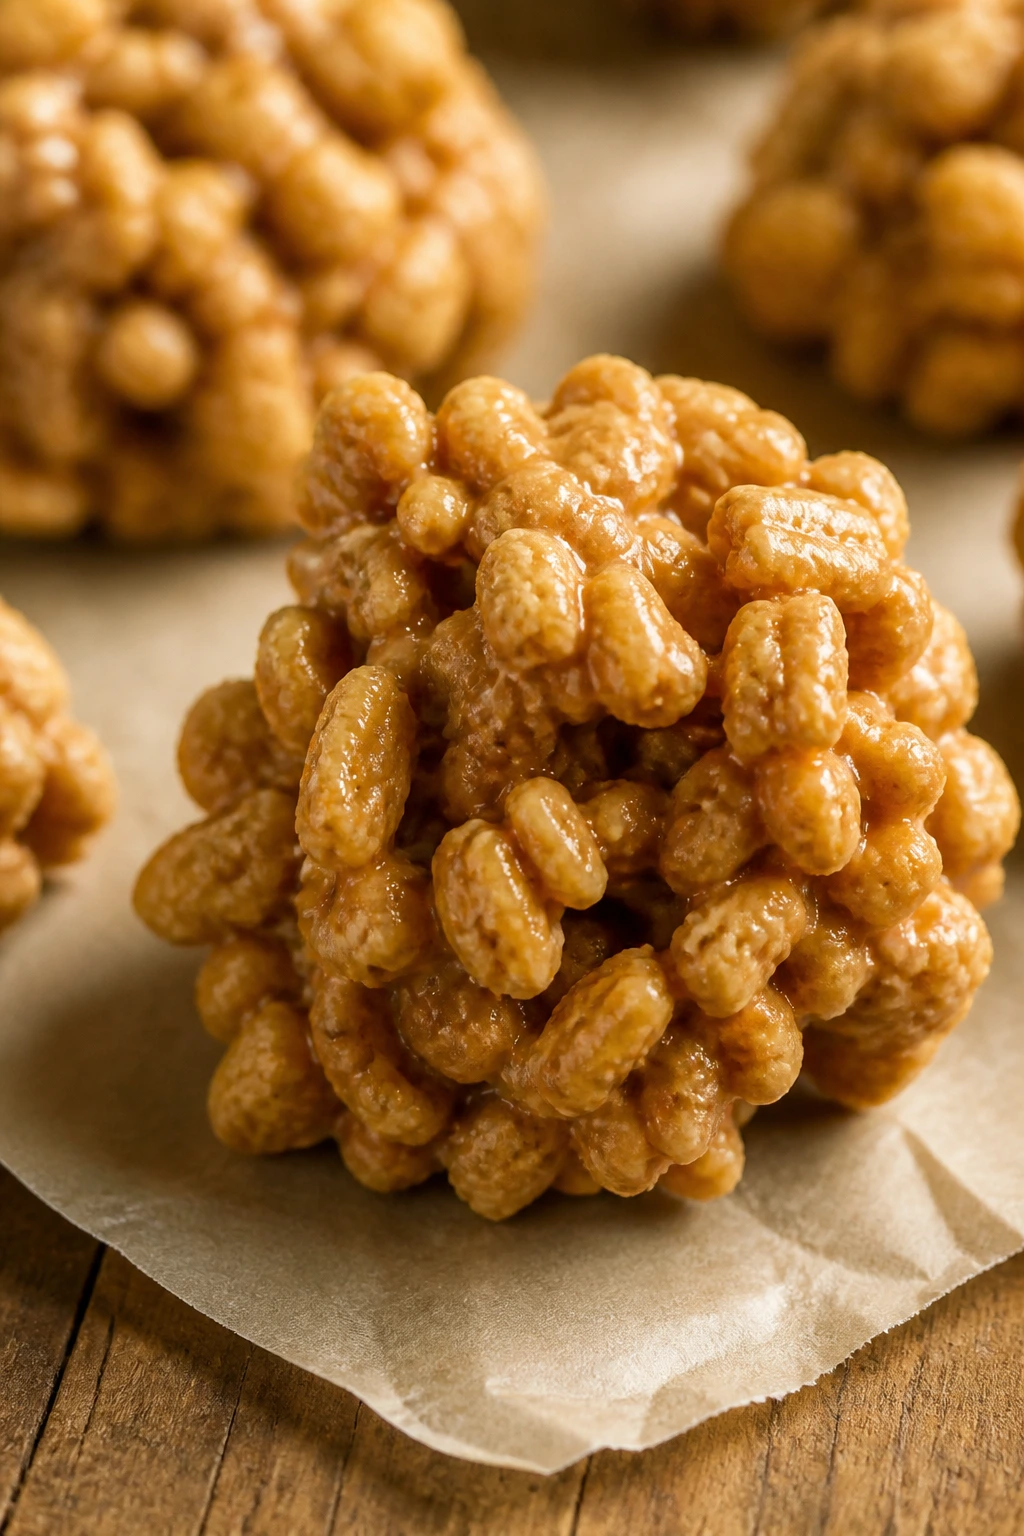
These clusters are crunchy, sweet, and easy to portion into little handfuls. They taste a bit like a rice cereal bar that never got pressed flat, which gives them a loose, snacky feel kids tend to like.
Why It Works:
The no-bake method keeps things fast, and the cereal gives the treat its shape without requiring a mixer or oven. Peanut butter and honey pull the pieces together, while mini marshmallows or chocolate chips make the clusters feel more like dessert than lunchbox filler.
Key Ingredients:
- 4 cups crispy cereal
- 1/2 cup creamy peanut butter
- 1/3 cup honey
- 1 cup mini marshmallows
- 1/2 cup mini chocolate chips
- 1 teaspoon vanilla extract
Quick Steps:
- Warm the peanut butter and honey in a saucepan over low heat.
- Stir in the vanilla and mini marshmallows until melted.
- Fold in the cereal until evenly coated.
- Scoop mounds onto parchment paper.
- Let them set for 20 to 30 minutes.
Equipment for This Recipe:
- Saucepan
- Wooden spoon
- Baking sheet
- Parchment paper
How to Serve This Dish:
Serve the clusters in paper cups or small bowls so the loose pieces stay together. They’re easy to pack, but they do best at room temperature. A few clusters next to fruit make a simple snack plate with enough texture to keep kids interested.
Pro Tips for This Recipe:
- Use crisp cereal so the clusters don’t turn soft.
- Stir gently once the cereal is in, or the pieces break.
- Work quickly before the mixture starts to firm up.
- Let the clusters cool fully before stacking them.
Variations on This Dish:
- Chocolate Cluster Version: Add cocoa powder to the peanut butter mixture.
- Peanut-Free Clusters: Use sunflower seed butter instead.
- Birthday Cluster Bites: Add rainbow sprinkles after scooping.
Common Mistakes to Avoid with This Dish:
- Using too little binder: The clusters fall apart.
- Overheating the mixture: Marshmallows can turn stiff and stringy.
- Packing them too tightly: They lose the airy crunch.
21. Jam Thumbprint Oat Bars
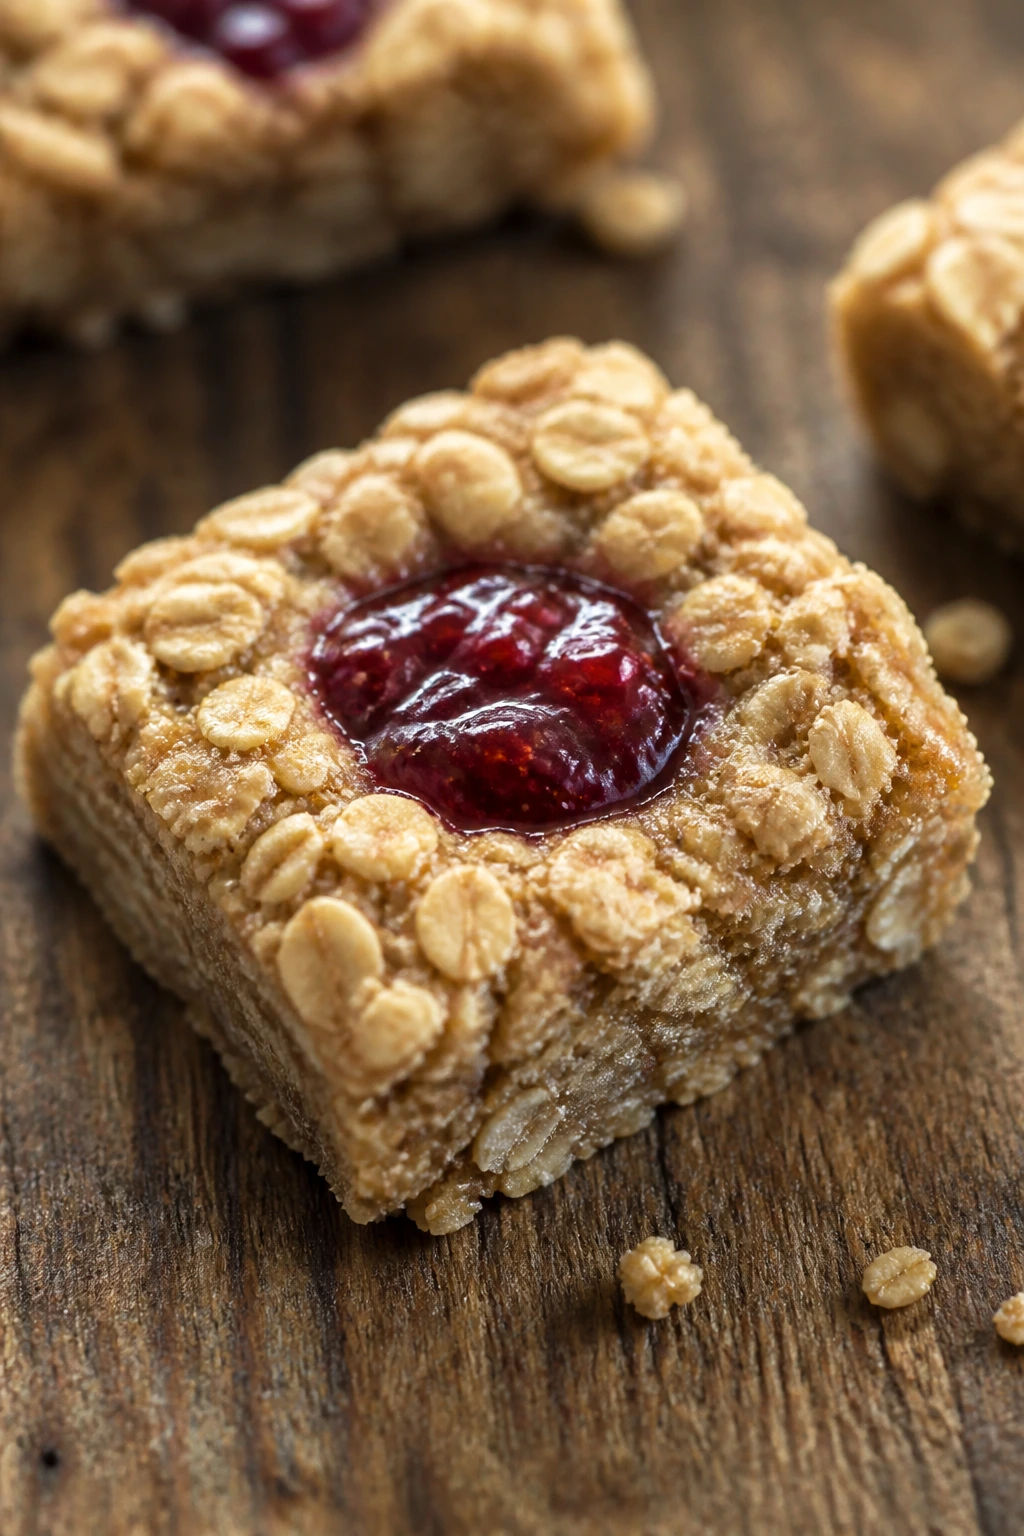
These bars taste like oatmeal cookies with a bright jam center. The oat base gives them a pleasant chew, and the jam keeps the middle soft so they don’t read as plain or dry.
Why It Works:
Jam is familiar, especially strawberry or raspberry. Pair it with oats and a buttery crust, and you get a treat that feels homemade without being fussy. The bars slice neatly once cooled, which helps a lot when you’re feeding kids who want “the square one.”
Key Ingredients:
- 1 1/2 cups old-fashioned oats
- 1 cup all-purpose flour
- 3/4 cup brown sugar
- 1/2 cup unsalted butter, melted
- 1/2 cup strawberry or raspberry jam
- 1 teaspoon vanilla extract
- 1/2 teaspoon cinnamon
Quick Steps:
- Mix the oats, flour, sugar, cinnamon, and salt in a bowl.
- Stir in the melted butter and vanilla until crumbly.
- Press two-thirds of the mixture into an 8-inch square pan.
- Spread the jam over the crust and sprinkle the rest of the crumbs on top.
- Bake at 350°F for 25 to 28 minutes, until golden at the edges.
Equipment for This Recipe:
- 8-inch square pan
- Mixing bowl
- Spoon
- Parchment paper
How to Serve This Dish:
Let the bars cool fully before cutting, or the jam will smear. They’re good at room temperature and also pack well in lunchboxes. For a snack plate, serve with a few grapes or apple slices to balance the sweetness.
Pro Tips for This Recipe:
- Line the pan with parchment for easy lifting.
- Use thick jam so the center stays put.
- Press the base firmly or it crumbles when sliced.
- Let the pan cool completely before cutting neat squares.
Variations on This Dish:
- Apricot Oat Bars: Use apricot jam for a milder flavor.
- Chocolate Raspberry Bars: Add mini chips to the crumb topping.
- Apple Butter Bars: Swap jam for apple butter and add extra cinnamon.
Common Mistakes to Avoid with This Dish:
- Using too much jam: The bars get soggy.
- Cutting while warm: The squares fall apart.
- Leaving the topping too loose: It won’t cling to the jam layer.
22. Chocolate Chip Skillet Cookie
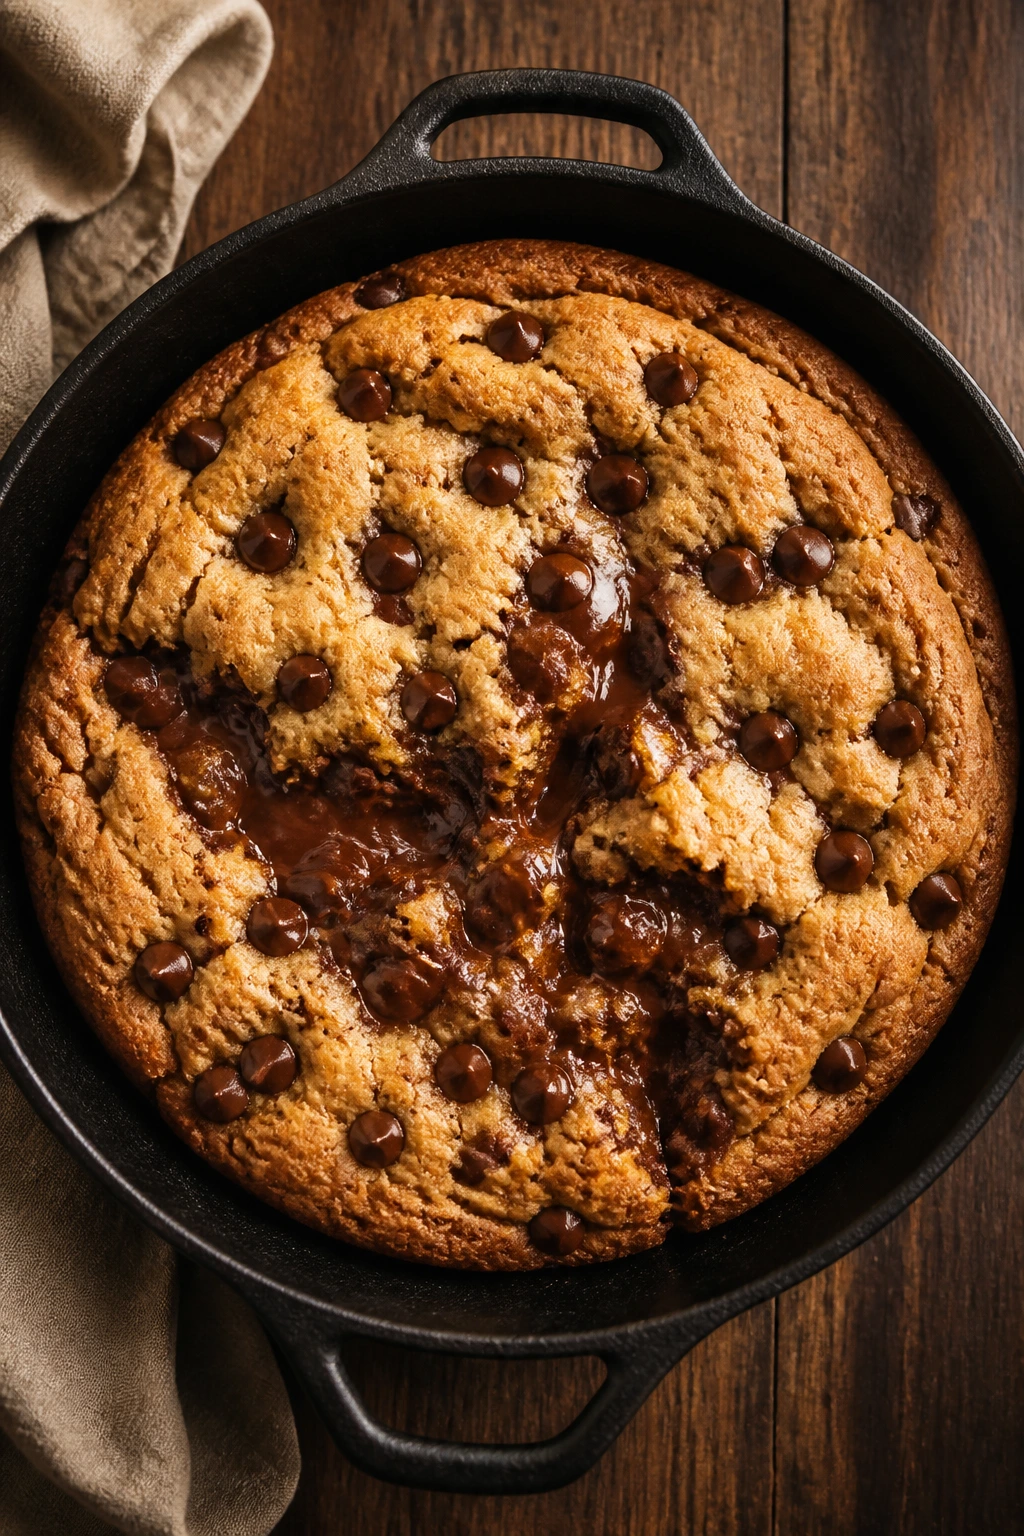
A skillet cookie has a little drama built in. The center stays soft and gooey, the edges turn crisp, and each slice feels like a giant warm cookie made for sharing instead of arguing over the last one.
Why It Works:
Kids usually trust chocolate chip cookies before anything else, which is a strong place to start. Baking it in a skillet gives you a chewy center and a browned edge in one pan, and there’s no need to scoop individual dough balls. That simplicity matters on a busy afternoon.
Key Ingredients:
- 1/2 cup unsalted butter, softened
- 1/2 cup brown sugar
- 1/4 cup granulated sugar
- 1 large egg
- 1 teaspoon vanilla extract
- 1 1/2 cups all-purpose flour
- 1/2 teaspoon baking soda
- 3/4 cup chocolate chips
Quick Steps:
- Heat the oven to 350°F and grease an 8-inch oven-safe skillet.
- Cream the butter and sugars until fluffy.
- Beat in the egg and vanilla.
- Stir in the flour, baking soda, and salt, then fold in the chocolate chips.
- Press the dough into the skillet and bake for 18 to 22 minutes, until the center looks set but still soft.
Equipment for This Recipe:
- 8-inch cast-iron or oven-safe skillet
- Mixing bowl
- Wooden spoon or hand mixer
- Spatula
How to Serve This Dish:
Serve it warm, straight from the skillet, with spoons or cut into wedges. A scoop of vanilla ice cream turns it into a real dessert, but it also works plain with a glass of milk. For children, let it rest at least 10 minutes so the chocolate doesn’t burn tiny mouths.
Pro Tips for This Recipe:
- Don’t overbake; the center keeps setting after it comes out.
- Use softened butter, not melted, for the best texture.
- Sprinkle a few chips on top before baking for a nicer finish.
- If the skillet is very dark, check early so the edges don’t get too brown.
Variations on This Dish:
- Peanut Butter Skillet Cookie: Replace 1/4 cup butter with peanut butter.
- Double Chip Cookie: Use half milk chocolate, half semisweet chips.
- Oat Cookie Skillet: Add 1/2 cup oats for extra chew.
Common Mistakes to Avoid with This Dish:
- Using a skillet that isn’t oven-safe: That one’s not worth guessing at.
- Baking until the center is dry: A skillet cookie should still look a bit soft.
- Serving immediately: Give it a short rest so it slices cleanly.
23. Sunbutter Rice Cake Faces
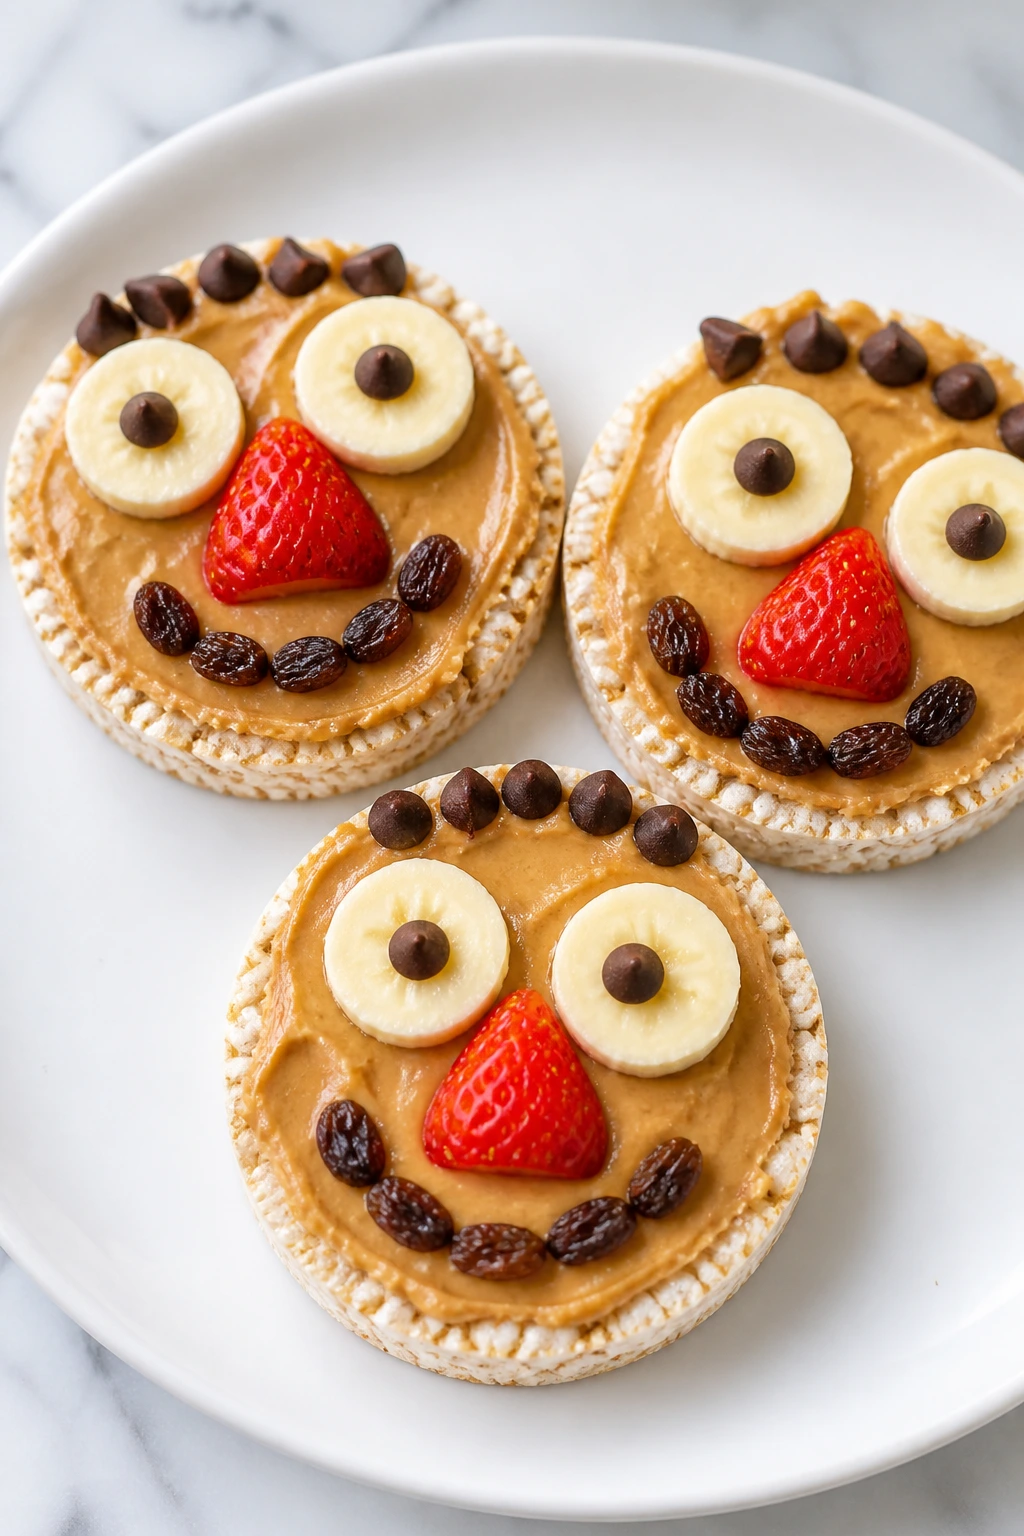
These little faces are more craft project than snack, and that’s part of the charm. Rice cakes get spread with sunflower butter, then decorated with fruit, raisins, and a few mini chocolate chips until they look like cheerful, edible doodles.
Why It Works:
The base is plain, so the toppings do the personality work. That matters for picky eaters, because a child who refuses a “sandwich” may happily eat a “face” they built themselves. The texture mix — crisp rice cake, creamy spread, soft fruit — keeps each bite interesting.
Key Ingredients:
- 4 plain rice cakes
- 1/2 cup sunflower seed butter
- 1 banana, sliced
- 1/2 cup strawberries, thinly sliced
- 2 tablespoons raisins
- 2 tablespoons mini chocolate chips
Quick Steps:
- Spread sunflower butter over each rice cake.
- Arrange banana slices, strawberries, raisins, and chocolate chips into face shapes.
- Press the pieces lightly so they stick.
- Serve immediately so the rice cakes stay crisp.
Equipment for This Recipe:
- Spoon or butter knife
- Small knife
- Plate
- Cutting board
How to Serve This Dish:
Serve the faces on a plate as soon as they’re built. They don’t need much else, though a side of yogurt makes the snack feel more filling. Kids usually enjoy building one and then immediately eating the parts they “gave hair” or “made into eyes,” which is half the fun.
Pro Tips for This Recipe:
- Use thicker rice cakes so they don’t crack under the spread.
- Slice fruit thinly for easier decorating.
- Keep the chocolate chips small; oversized pieces slide off.
- Make the faces right before serving so the rice cake stays crunchy.
Variations on This Dish:
- Apple Face Version: Use thin apple slices instead of banana.
- Berry Smile Faces: Build the faces with strawberries and blueberries.
- Cookie Butter Faces: Swap sunflower butter for cookie butter if allergies allow.
Common Mistakes to Avoid with This Dish:
- Spreading too much nut or seed butter: The cake gets soggy.
- Using wet fruit: Moisture makes the toppings slip.
- Letting them sit too long: Rice cakes lose their crisp edge fast.
24. Berry Smoothie Pops
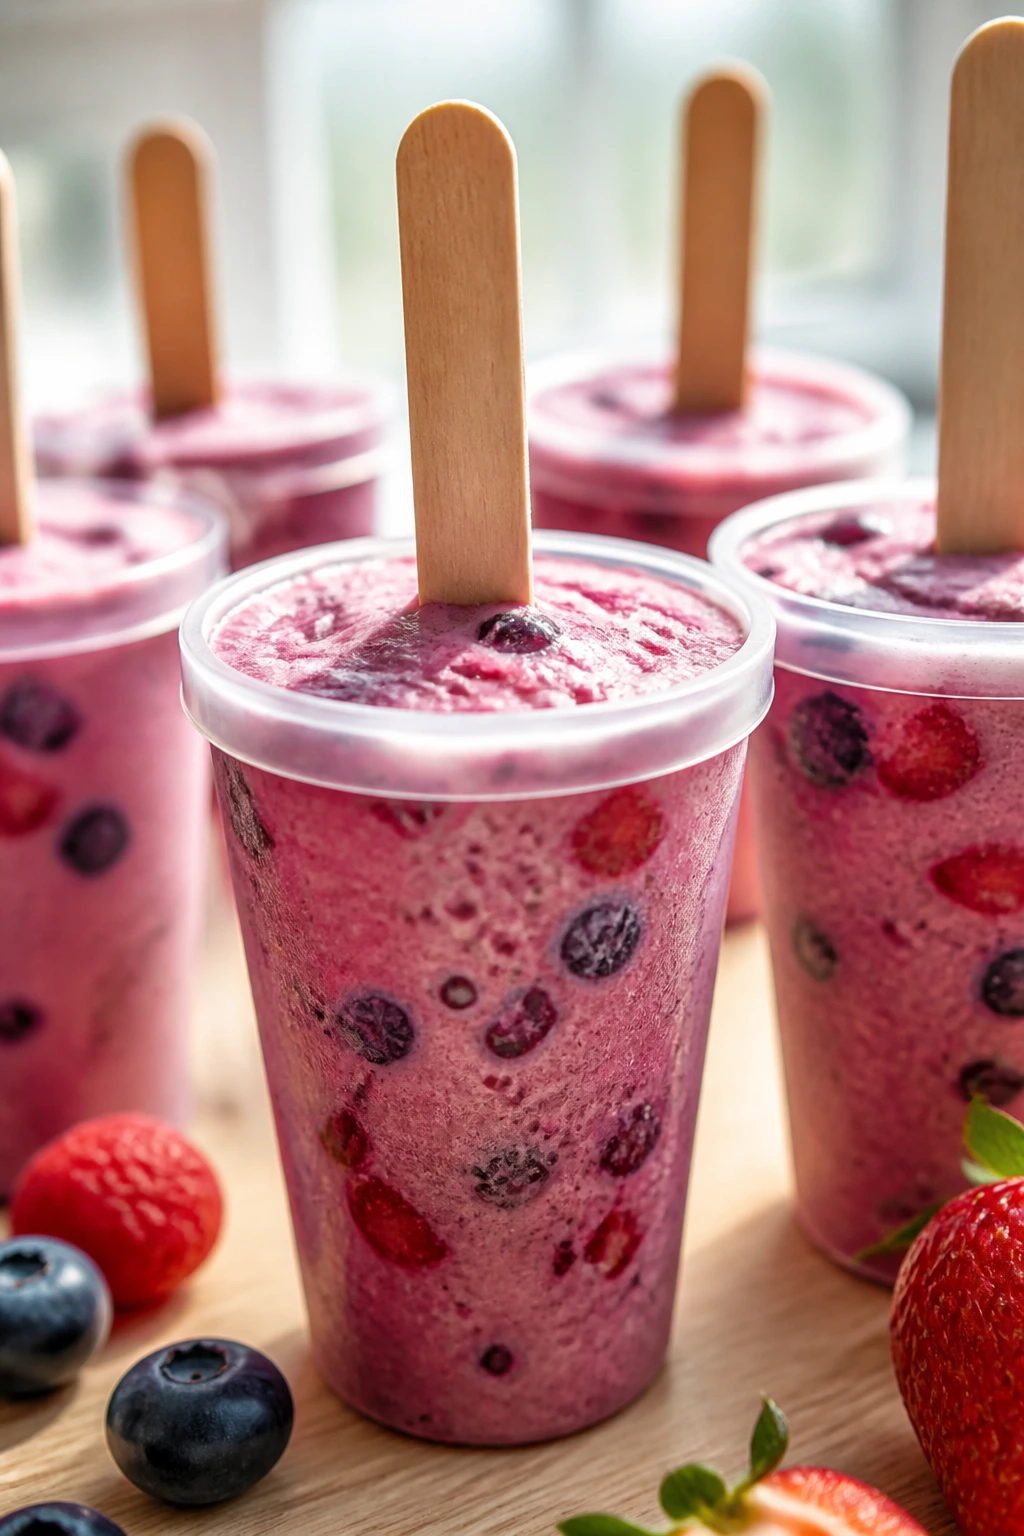
Smoothie pops are what happen when breakfast and dessert get along. They freeze into creamy, fruity pops that taste bright and cold, with enough banana or yogurt to keep the texture from turning icy.
Why It Works:
The banana adds body, the berries add color, and the yogurt keeps the pops creamy. That combination is forgiving, which is useful if you’re making them with a kid who wants to pour things in every direction except the cup. They also work well with frozen fruit, so you don’t need perfect produce.
Key Ingredients:
- 1 banana
- 1 cup mixed berries, fresh or frozen
- 1 cup vanilla yogurt
- 1/2 cup milk
- 1 tablespoon honey
- 6 popsicle molds or paper cups
Quick Steps:
- Blend the banana, berries, yogurt, milk, and honey until smooth.
- Taste and add a little more honey if needed.
- Pour into molds and tap them gently to remove bubbles.
- Insert sticks and freeze for 4 to 6 hours.
- Unmold and serve cold.
Equipment for This Recipe:
- Blender
- Popsicle molds
- Measuring cups
- Spoon
How to Serve This Dish:
Serve these straight from the freezer, preferably with a small towel underneath because the drips start quickly. They’re good for summer snacking, but they also work as an after-dinner sweet when you want something lighter than cake. For smaller kids, halve the pops after unmolding.
Pro Tips for This Recipe:
- Use frozen berries if your fresh ones are bland.
- Blend until fully smooth, or the pops freeze with icy bits.
- Don’t overfill the molds; liquid expands.
- If you want a softer pop, add a little more yogurt than milk.
Variations on This Dish:
- Strawberry Banana Pops: Use just strawberries and banana for a simpler flavor.
- Blueberry Lemon Pops: Add a teaspoon of lemon zest.
- Green Sneaky Pops: Blend in a handful of spinach if your kids won’t notice the color change.
Common Mistakes to Avoid with This Dish:
- Using too much liquid: The pops freeze thin and icy.
- Skipping the taste test: Frozen fruit can be less sweet than you expect.
- Pulling them too soon: A partly frozen pop snaps off the stick.
25. Mini Apple Hand Pies
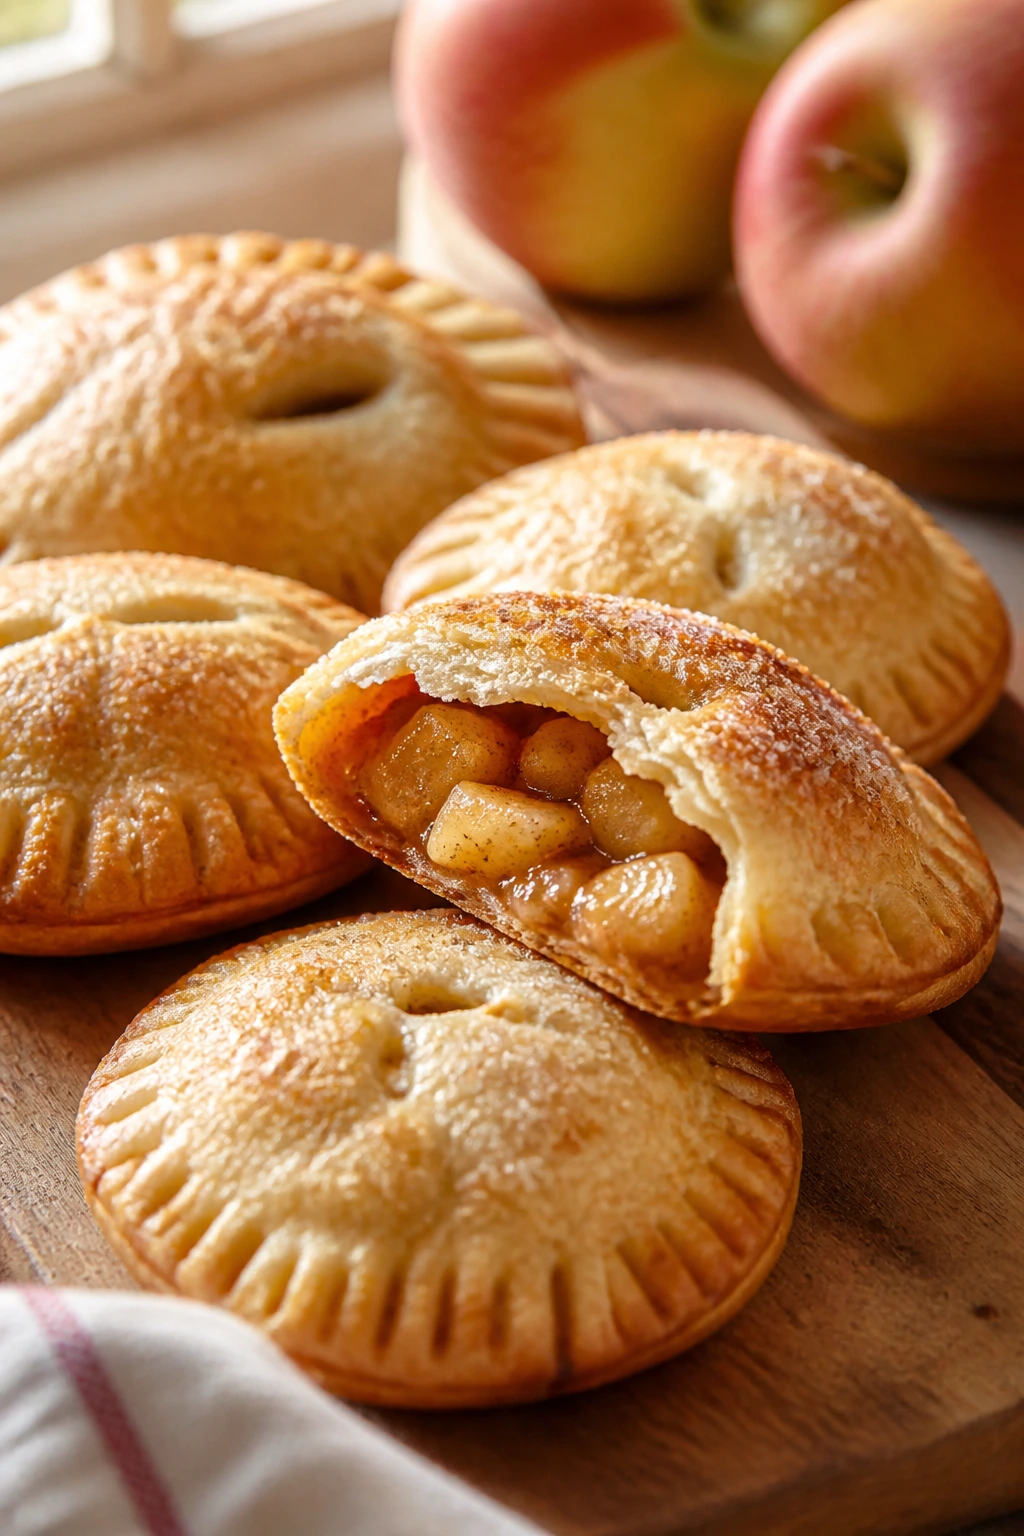
Little hand pies feel like bakery treats, especially when they come out with a golden crust and a soft cinnamon apple filling. They’re a nice change from bars or cookies because they give you a flaky bite with a warm center.
Why It Works:
Apple and cinnamon are already familiar to most picky eaters. Wrapping the filling in pastry makes the fruit feel more like dessert and less like a fruit cup, which is a useful switch. The small size also helps the pies bake quickly and cool faster than a full pie.
Key Ingredients:
- 1 sheet refrigerated pie crust
- 2 apples, peeled and finely diced
- 2 tablespoons sugar
- 1 teaspoon cinnamon
- 1 tablespoon butter
- 1 egg, beaten, for egg wash
- 1 teaspoon flour, for dusting
Quick Steps:
- Cook the apples with sugar, cinnamon, and butter over medium heat for 5 to 7 minutes, until slightly soft.
- Roll out the pie crust and cut into small circles or squares.
- Add a spoonful of filling to half the pieces, then seal with the remaining crust.
- Brush with egg wash and cut a tiny vent in the top.
- Bake at 400°F for 12 to 15 minutes, until golden.
Equipment for This Recipe:
- Baking sheet
- Parchment paper
- Rolling pin
- Fork or crimping tool
How to Serve This Dish:
Serve warm or at room temperature, with powdered sugar if you want them to look extra bakery-like. They’re good on their own, but a tiny bowl of yogurt or caramel dip doesn’t hurt. For lunchboxes, make sure they cool completely before packing so the crust doesn’t steam.
Pro Tips for This Recipe:
- Dice the apples small so they soften fast.
- Seal the edges firmly or the filling leaks.
- Cut a vent so steam escapes.
- Let them cool on a rack so the bottoms stay crisp.
Variations on This Dish:
- Berry Hand Pies: Use chopped strawberries and blueberries instead of apples.
- Peach Pie Bites: Swap in diced peaches with a pinch of ginger.
- Cinnamon Sugar Tops: Skip the egg wash and brush with butter after baking, then dust with cinnamon sugar.
Common Mistakes to Avoid with This Dish:
- Overfilling the pies: They burst in the oven.
- Using large apple chunks: The filling stays crunchy.
- Sealing with wet edges: The crust pops open.
26. Cookie Butter Apple Dippers
Cookie butter has a way of making plain apple slices feel like a special dessert tray. The spread is smooth, spiced, and sweet enough to please kids who would rather eat crackers than fruit.
Why It Works:
The flavor is recognizable even when kids have never named it before. It tastes like a cookie in spread form, which makes apples feel more like a vehicle than a lecture. A little yogurt or cream cheese mixed in can soften the sweetness if you want the dip to be less intense.
Key Ingredients:
- 2 apples, sliced
- 1/2 cup cookie butter
- 2 tablespoons plain yogurt or cream cheese
- 1/2 teaspoon cinnamon
- 2 tablespoons crushed graham crackers, optional
Quick Steps:
- Stir the cookie butter, yogurt, and cinnamon until smooth.
- Slice the apples and arrange them on a plate.
- Sprinkle crushed graham crackers over the dip if using.
- Serve immediately.
Equipment for This Recipe:
- Small bowl
- Spoon
- Knife
- Cutting board
How to Serve This Dish:
Serve the dip in a little bowl with the apples fanned around it. If you’re packing it ahead, keep the apples and dip separate until eating time. It makes a fast snack plate when the kitchen needs to feel calmer than the rest of the house.
Pro Tips for This Recipe:
- Thin the cookie butter if it’s too stiff to dip into.
- Use crisp apples so the sweetness doesn’t get cloying.
- A small pinch of salt in the dip can make the flavor pop.
- Keep the apple slices dry so the dip doesn’t slide off.
Variations on This Dish:
- Maple Cookie Dip: Stir in a teaspoon of maple syrup.
- Chocolate Cookie Butter Dip: Add cocoa powder for a deeper flavor.
- Caramel Cookie Dip: Swirl in caramel sauce instead of yogurt.
Common Mistakes to Avoid with This Dish:
- Using a dip that’s too thick: It won’t cling to the apple.
- Slicing apples too far ahead: They brown and soften.
- Adding too many extras: The whole snack gets heavy fast.
27. Trail Mix Snack Cups
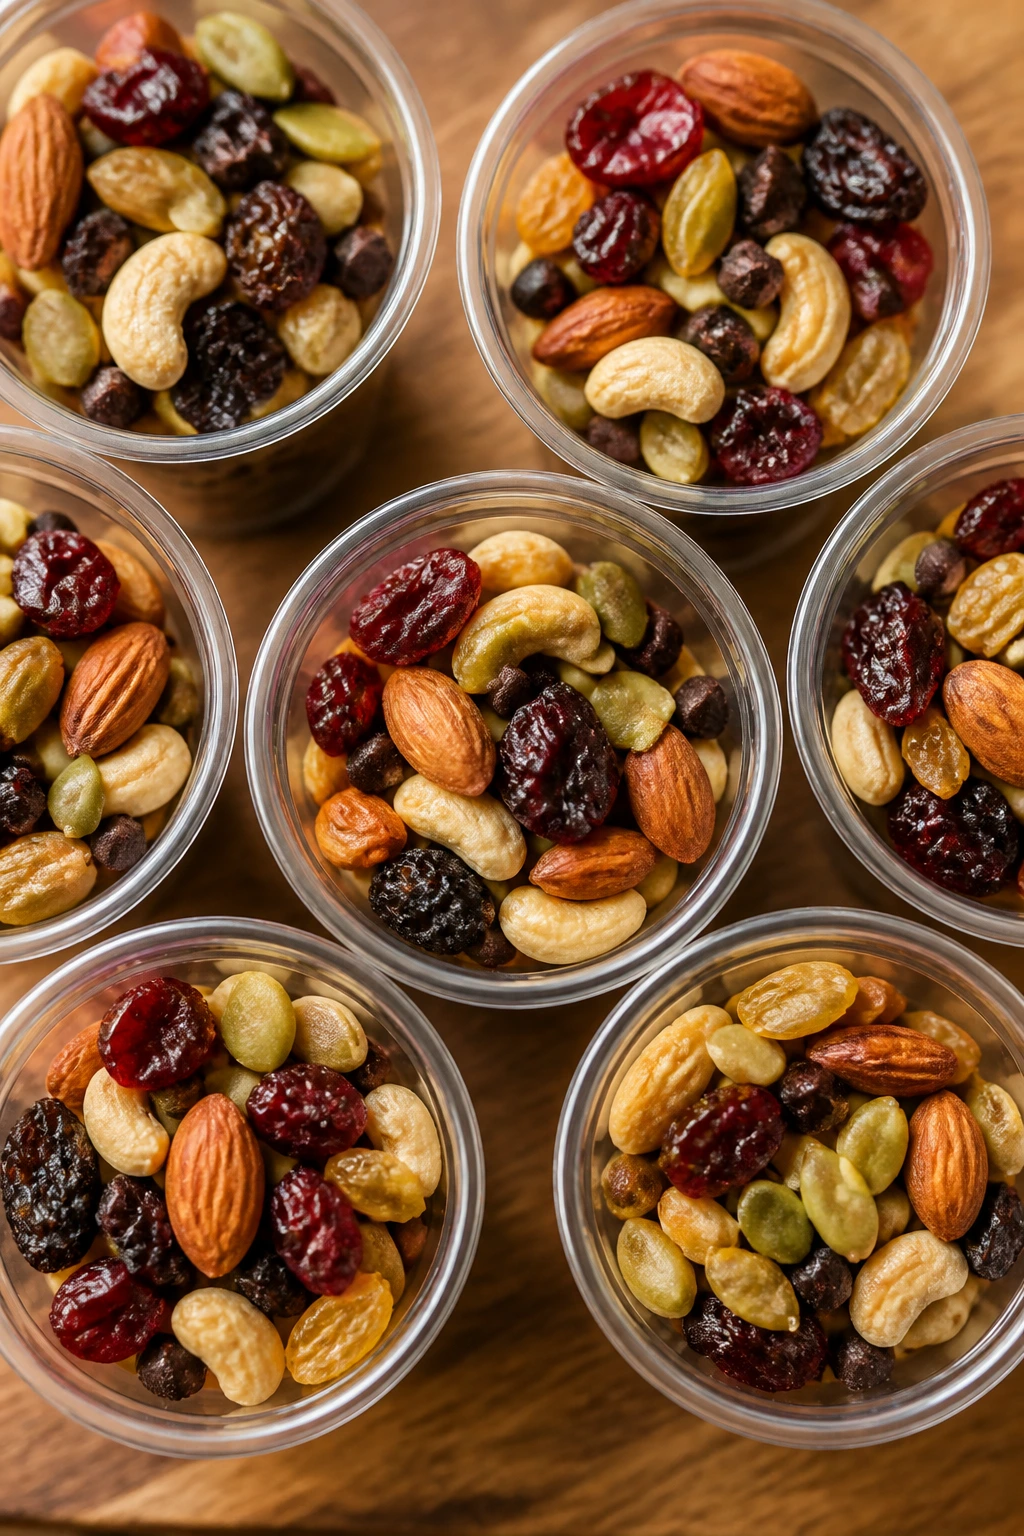
Trail mix doesn’t have to be adventurous. Keep it simple, keep it sweet-salty, and portion it into little cups so the mix feels like a snack instead of a bag of random odds and ends.
Why It Works:
Picky eaters usually do better when the mix is predictable. That means a few crunchy parts, a few sweet parts, and nothing too spicy or strange. Small cups also help with portion control, which is useful because trail mix disappears quickly once kids start picking out favorite pieces.
Key Ingredients:
- 2 cups cheerios or plain cereal
- 1 cup pretzel pieces
- 1/2 cup raisins or dried cranberries
- 1/2 cup mini chocolate chips
- 1/2 cup pumpkin seeds or sunflower seeds
- 1/2 cup small marshmallows, optional
Quick Steps:
- Combine all the ingredients in a large bowl.
- Stir gently so the chocolate chips stay intact.
- Spoon into small snack cups.
- Serve at room temperature.
Equipment for This Recipe:
- Large mixing bowl
- Spoon
- Measuring cups
- Small paper cups
How to Serve This Dish:
Serve the cups as a grab-and-go snack or set them on a party table with fruit. They’re easiest to manage when pre-portioned, because kids otherwise tunnel straight to the chocolate chips and leave the rest behind. This is also one of the better options for car rides.
Pro Tips for This Recipe:
- Keep the pieces bite-sized.
- Choose mild add-ins if your kids are sensitive to texture.
- Make a nut-free version for schools and playdates.
- Store the mix in a sealed container so the cereal stays crisp.
Variations on This Dish:
- Breakfast Trail Mix: Add freeze-dried fruit and a few oat clusters.
- Chocolate Lover’s Mix: Use chocolate cereal and extra chips.
- Fruit-Forward Mix: Increase the raisins and dried apples, then cut back the pretzels.
Common Mistakes to Avoid with This Dish:
- Adding sticky dried fruit in huge pieces: It grabs the other ingredients into clumps.
- Making the mix too sweet: Then nobody finishes it.
- Storing it open: The crunch disappears fast.
28. Mini Cheesecake Parfaits
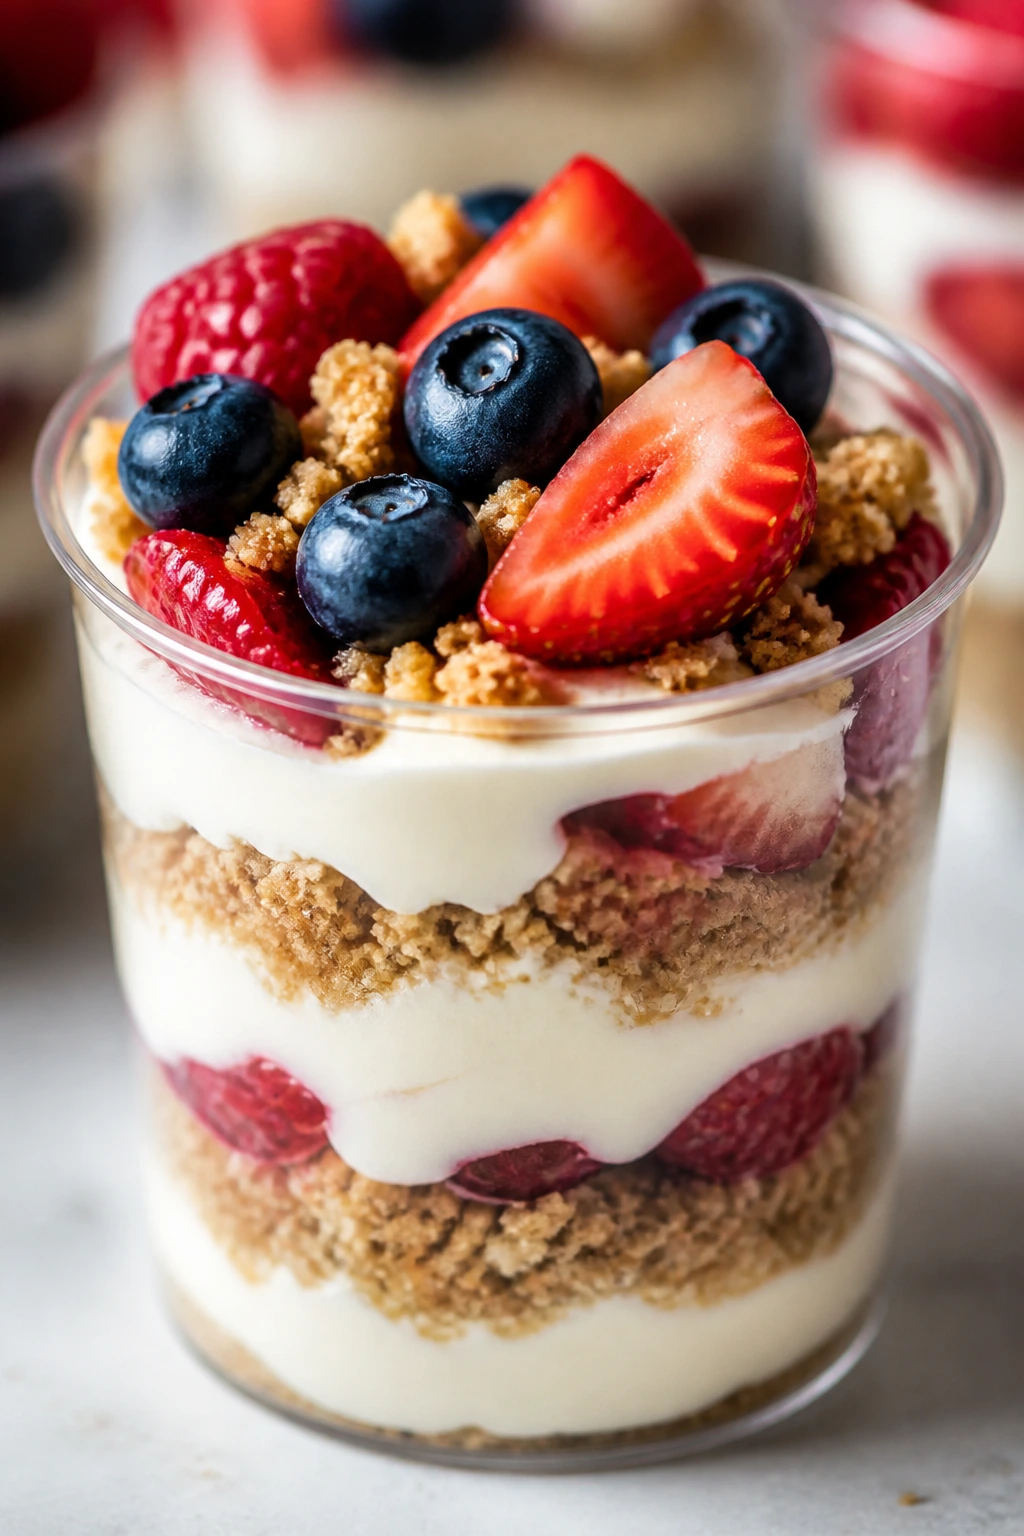
These parfaits look fancier than they are. A graham crumb layer, a sweetened cream cheese filling, and a few berries stacked in a cup give you a dessert that feels assembled, not baked, which is a nice break when the oven’s already busy.
Why It Works:
Cheesecake flavor is familiar even to skeptical eaters, and serving it in a cup lowers the intimidation factor. Kids can add their own layers, which makes the snack feel customizable without becoming chaotic. The textures — crumbly, creamy, and juicy — keep it from tasting flat.
Key Ingredients:
- 1 cup graham cracker crumbs
- 3 tablespoons melted butter
- 8 ounces cream cheese, softened
- 1/4 cup powdered sugar
- 1/2 teaspoon vanilla extract
- 1 cup berries
Quick Steps:
- Mix the crumbs and melted butter, then divide into cups.
- Beat the cream cheese, powdered sugar, and vanilla until smooth.
- Spoon the filling over the crumbs.
- Add berries on top.
- Chill for 20 minutes before serving.
Equipment for This Recipe:
- Mixing bowl
- Hand mixer or spoon
- Small cups or jars
- Measuring cups
How to Serve This Dish:
Serve in clear cups so the layers show through. They make a nice dessert for little hands that want something neat and self-contained. For a party tray, add a tiny spoon and a berry on top of each cup.
Pro Tips for This Recipe:
- Let the cream cheese soften fully so the filling turns silky.
- Press the crumb layer lightly, not hard.
- Chill before serving for the cleanest texture.
- Use smaller berries or chop larger ones.
Variations on This Dish:
- Chocolate Cheesecake Cups: Add a spoonful of cocoa powder.
- Strawberry Swirl Cups: Stir a little strawberry jam into the filling.
- Lemon Cheesecake Cups: Add lemon zest for a brighter finish.
Common Mistakes to Avoid with This Dish:
- Using cold cream cheese: Lumps show up fast.
- Making the crumb layer too thick: The dessert gets dry.
- Skipping the chill time: The layers slide around.
29. Strawberry Shortcake Skewers
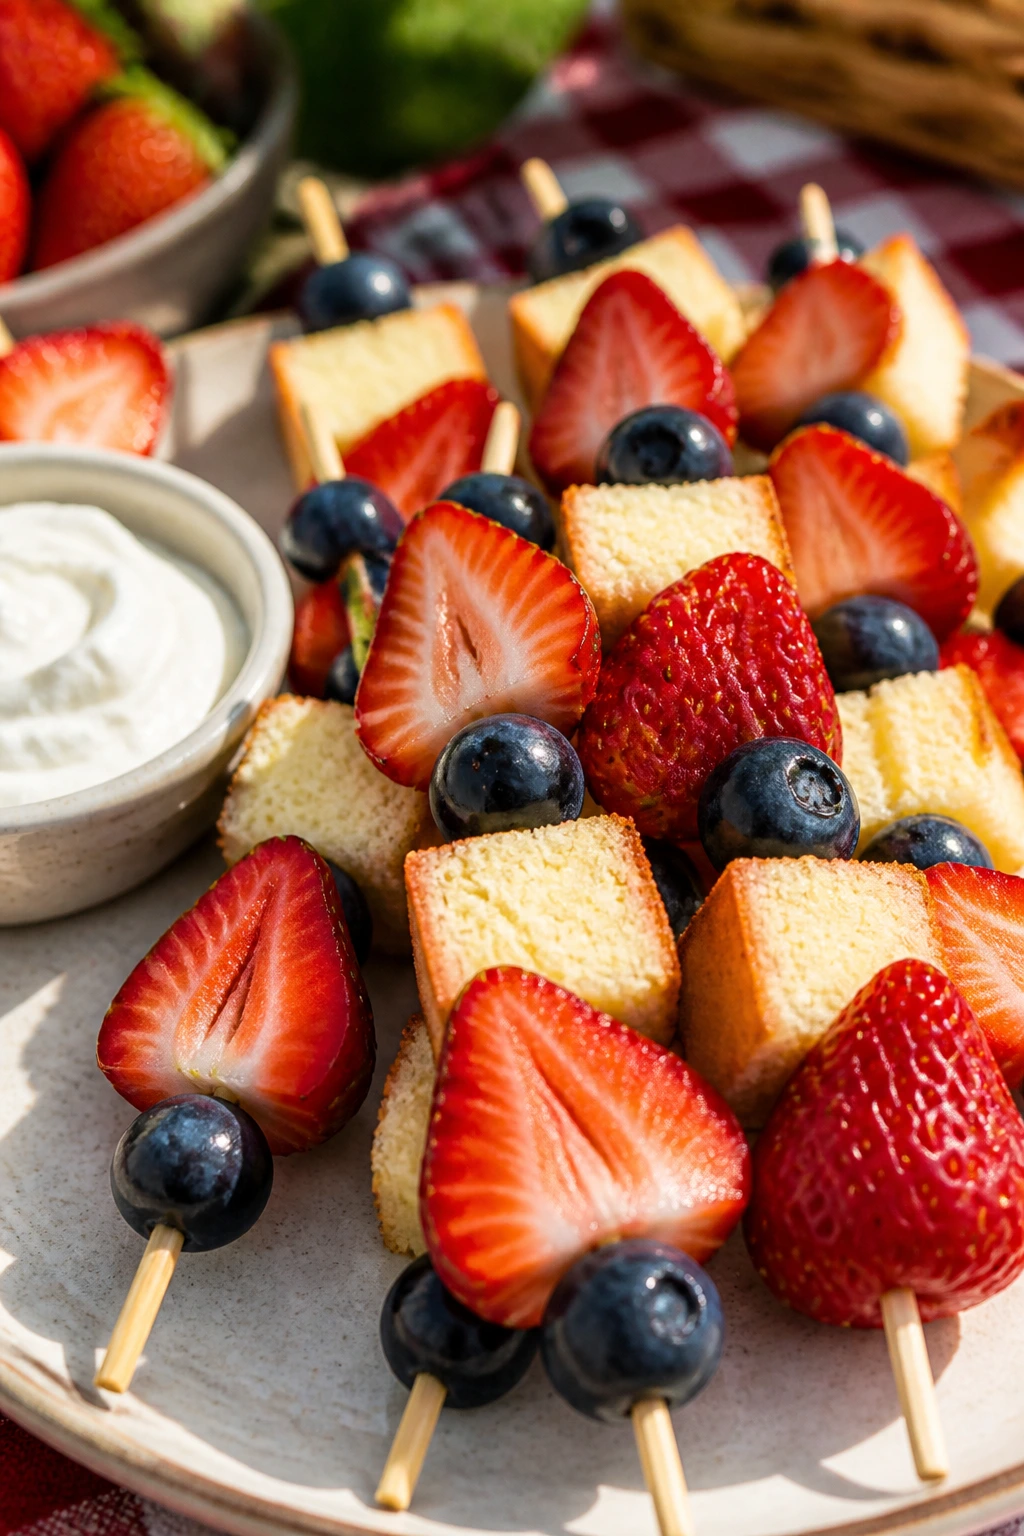
Strawberry shortcake gets a playful remix here. Cubes of pound cake, strawberry halves, and a dollop of whipped cream or yogurt turn into skewers that taste familiar but look like they were meant for a picnic.
Why It Works:
The ingredients are all easy to recognize, which helps picky eaters feel safe. The skewer format also gives you built-in portions and a chance to keep the cake to fruit ratio exactly where you want it. That means no giant dry slice of cake and no fruit left behind.
Key Ingredients:
- 1 cup pound cake cubes
- 1 cup strawberries, hulled and halved
- 1 cup blueberries, optional
- 1/2 cup whipped cream or vanilla yogurt
- 6 short skewers
Quick Steps:
- Cut the cake into 1-inch cubes.
- Thread cake and strawberries onto the skewers.
- Add blueberries if using.
- Serve with whipped cream or yogurt for dipping.
- Chill until ready to eat.
Equipment for This Recipe:
- Cutting board
- Sharp knife
- Short skewers
- Small bowl for dip
How to Serve This Dish:
Lay the skewers across a tray and tuck the dip into a bowl at one end. They’re easiest to eat when the cake is slightly chilled but not cold enough to turn firm. For very young children, cut the pieces off the skewers before serving.
Pro Tips for This Recipe:
- Use firm cake so it doesn’t crumble when threaded.
- Dry the strawberries after washing.
- Keep the pieces roughly the same size.
- Assemble close to serving time for the freshest look.
Variations on This Dish:
- Chocolate Shortcake Skewers: Use chocolate pound cake.
- Peach Shortcake Skewers: Swap strawberries for sliced peaches.
- Yogurt-Dipped Version: Brush the cake with yogurt instead of serving a separate dip.
Common Mistakes to Avoid with This Dish:
- Using very soft cake: It falls apart on the stick.
- Making fruit pieces too large: The skewer tips over.
- Assembling too early: The cake dries out and the fruit softens.
30. Mini Cinnamon-Sugar Donut Muffins

These little muffins taste like donut holes without the fryer. They bake into soft, tender rounds with a cinnamon-sugar coat that cracks a little when you bite into it, which is exactly the sort of texture kids remember.
Why It Works:
The flavor is straightforward: cinnamon, vanilla, butter, and sugar. That means no surprise ingredients to scare off cautious eaters. Baked in a mini muffin tin, they cook fast and come out with just enough browning to make the sugar coating cling.
Key Ingredients:
- 1 1/2 cups all-purpose flour
- 1/2 cup granulated sugar
- 1 1/2 teaspoons baking powder
- 1/2 teaspoon cinnamon
- 1/2 cup milk
- 1 large egg
- 1/4 cup melted butter
- 2 tablespoons melted butter for coating
- 1/4 cup cinnamon sugar for rolling
Quick Steps:
- Heat the oven to 375°F and grease a mini muffin tin.
- Stir the flour, sugar, baking powder, cinnamon, and salt together.
- Whisk the milk, egg, and melted butter in a second bowl.
- Combine the wet and dry ingredients, then divide into the muffin tin.
- Bake for 10 to 12 minutes, dip in melted butter, and roll in cinnamon sugar.
Equipment for This Recipe:
- Mini muffin tin
- Two mixing bowls
- Whisk
- Cooling rack
How to Serve This Dish:
Serve warm while the sugar coating is still fragrant and a little sandy. They fit nicely on a snack plate with fruit or milk, and they’re one of the few treats on this list that can double as breakfast without anyone raising an eyebrow. Three to four mini muffins is a reasonable serving for most kids.
Pro Tips for This Recipe:
- Fill the muffin cups only about two-thirds full.
- Don’t overmix the batter; a few small lumps are fine.
- Roll them in cinnamon sugar while still warm so the coating sticks.
- Let them cool for a few minutes or the sugar melts into a sticky shell.
Variations on This Dish:
- Apple Cinnamon Muffins: Fold in finely grated apple.
- Pumpkin Spice Muffins: Swap in pumpkin puree and pumpkin spice.
- Chocolate Sugar Muffins: Add mini chocolate chips and skip the cinnamon.
Common Mistakes to Avoid with This Dish:
- Overfilling the pan: The tops spread into each other.
- Skipping the butter coating: The cinnamon sugar won’t cling well.
- Baking until dry: Mini muffins go from tender to dry fast.
Why Little Kitchen Projects Win Over Picky Eaters
The nicest thing about making treats with kids is that the food isn’t the only win. There’s the quiet focus of slicing bananas, the little hand that insists on placing every blueberry one by one, the kid who swore they hated yogurt and then licked the spoon after swirling in honey. Those moments matter because they lower the temperature in the kitchen. Food becomes part snack, part project, part peace offering.
I also like how flexible this kind of cooking is. One child might live for sprinkles and another may only want fruit on a skewer. Fine. Start there. A tray of fruit kabobs and yogurt bark can sit beside skillet cookies and cheese quesadilla stars without anyone needing a grand philosophy about eating. The setup handles the differences for you.
Essential Equipment for These Recipes
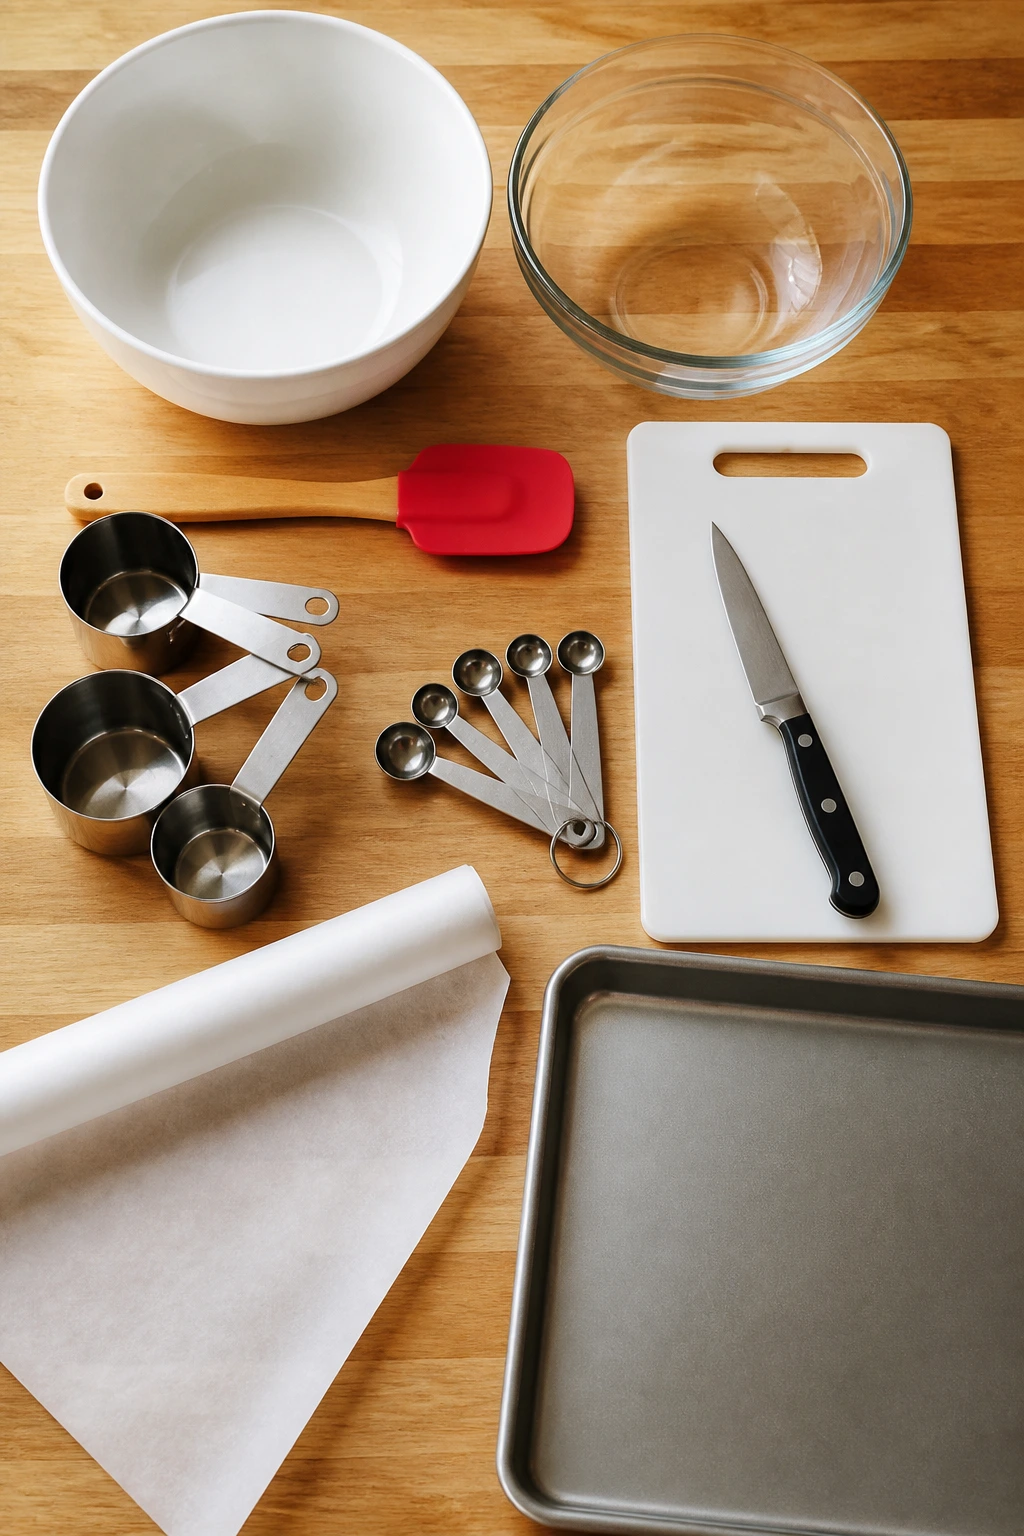
- Mixing bowls in at least two sizes: One small bowl gets lost fast in a kid kitchen, so keep a big one for stirring and a small one for dips.
- Silicone spatula: Useful for yogurt bark, cookie dough, and any sticky mixture that clings to a spoon.
- Measuring cups and spoons: Kids love scooping, and it keeps the quantities steady enough for repeat success.
- Cutting board and a sharp paring knife: Needed for fruit, bars, and small squares; just keep the knife work adult-led.
- Baking sheets: A rimmed sheet helps with bark, pretzel rods, and hand pies.
- Parchment paper: Worth it for almost everything here. It cuts cleanup and helps sticky snacks release.
- Mini muffin tin: Useful for s’mores cups, donut muffins, and tiny portions that bake quickly.
- Skewers or lollipop sticks: Handy for fruit kabobs, pops, and any snack that benefits from a handle.
- Popsicle molds: Not mandatory, but they make frozen treats look neat and hold their shape.
- Microwave-safe bowl or saucepan: Needed for chocolate, marshmallows, caramel, and other meltable parts.
Smart Shopping and Ingredient Tips
The smartest thing you can do for this kind of cooking is buy ingredients that behave well when handled by kids. That means firm fruit, thick yogurt, soft tortillas, and smooth nut or seed butter. Apples should feel crisp and dense in the hand, not soft near the stem. Bananas can be ripe for mashing in pops or bars, but they should still hold their shape if you’re slicing them for sushi rolls or skewers.
For yogurt treats, go with the thickest yogurt you can find. Greek yogurt usually freezes better, spreads cleaner on bark, and makes a better dip because it doesn’t run off the fruit. If you’re using frozen fruit, keep it to recipes where the blender or the freezer is doing the heavy lifting. Frozen berries are fine for smoothie pops; they’re a mess in fruit skewers.
Chocolate chips matter more than people expect. Mini chips stick better to bark, cookie dough, and banana bites, while standard chips are fine for skillet cookies and s’mores cups. If you’re shopping for a class or party, nut-free seed butter and sunflower butter are worth having on hand because they widen the number of children who can actually eat what you make.
A final practical note: buy a couple of extra bananas and apples. Kids peel, slice, and sample while you cook, and there’s always one piece that disappears into the sink, the floor, or a tiny mouth before it makes it into the bowl.
How to Serve These Recipes
Presentation:
Serve the treats in small clusters instead of one crowded pile. A tray with little bowls, parchment squares, or paper cupcake liners feels more manageable for kids and keeps sticky snacks from merging into one big patch.
Accompaniments:
Pair sweet treats with plain milk, yogurt dips, apple slices, or a few crackers so the plate doesn’t lean entirely into sugar. The cheese quesadilla stars, trail mix cups, and popcorn balls also sit nicely beside fruit or a simple smoothie.
Portions:
For younger kids, start with one to two small pieces or a half-cup serving. Older children usually do better with a snack plate that includes one fruit-based item, one crunchy item, and one small sweet piece. That mix keeps the food from feeling like a sugar blast.
Beverage Pairing:
Cold milk is the easiest match for chocolate, cookie dough, and skillet cookie. For fruit-heavy snacks, water with a splash of lemon or a mild smoothie works well and keeps the palate from getting overloaded.
Additional Tips and Flavor Boosters
Flavor Enhancement: A tiny pinch of salt does more than people think. It wakes up yogurt, caramel, chocolate, and fruit fillings without making the treats taste salty.
Customization: Keep toppings in separate bowls — sprinkles, coconut, mini chips, granola, crushed cereal — and let kids build their own version. That one move can turn a maybe into a yes.
Serving Suggestions: Use cookie cutters for tortillas, cheese sandwiches, and soft bars when you want a snack to feel special. A star, heart, or circle changes the vibe faster than adding another sweet drizzle.
Make-It-Yours: For dairy-free kids, use coconut yogurt, dairy-free chocolate, and plant butter. For nut-free households, sunflower seed butter and cookie butter cover a lot of ground without making the snack feel stripped down.
Make-Ahead, Storage, and Reheating Guidance
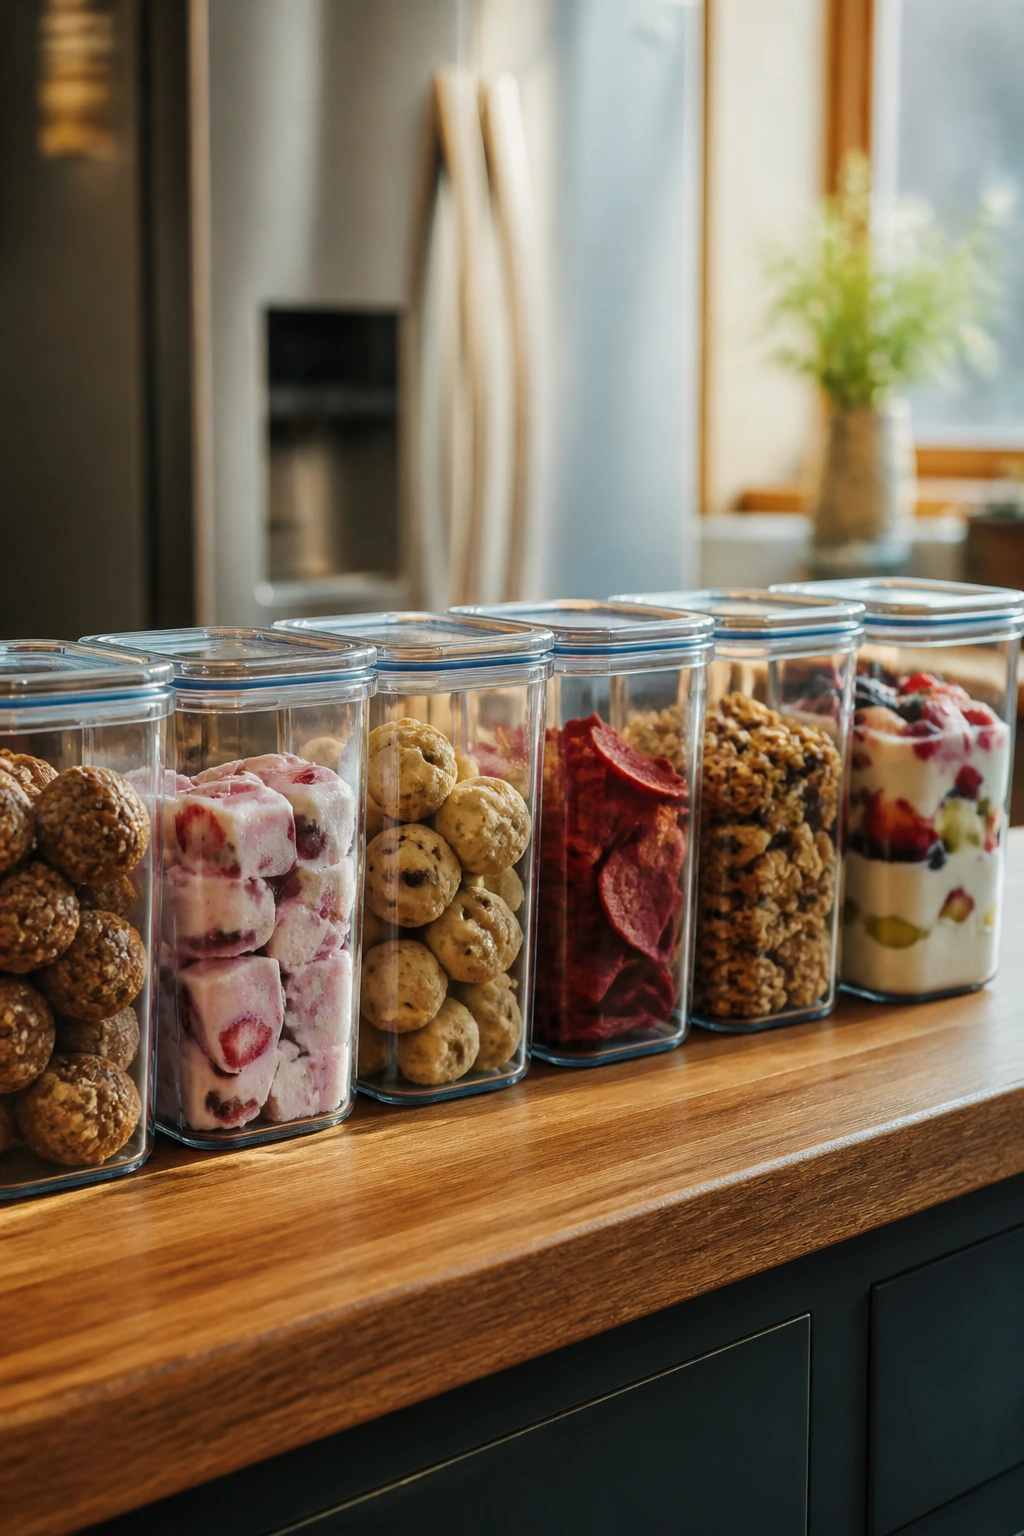
A few of these treats are best the minute they’re made. Fruit kabobs, apple nachos, and rice cake faces fall into that category because the crisp textures start fading as soon as they sit. Make those right before serving if you can. No drama. Just timing.
The freezer-friendly recipes hold up well. Yogurt bark, smoothie pops, fruit pops, banana split bites, and frozen grapes can stay in the freezer for up to 2 months if they’re wrapped or stored in airtight containers. Fruit leather keeps at room temperature for about 1 week in a sealed container, while popcorn balls and cereal clusters do well for 3 to 4 days in an airtight box at room temperature, away from heat.
Baked treats are more forgiving. Muffin tops, mini donut muffins, thumbprint oat bars, and hand pies keep at room temperature for 1 to 2 days, then in the refrigerator for up to 4 days. They also freeze well for up to 2 months if you wrap them individually. Reheat baked snacks in a 300°F oven for 6 to 10 minutes or in an air fryer at 325°F for 2 to 4 minutes, just until warmed through. That keeps the edges from drying out.
For chocolate-dipped pretzels, skillet cookie wedges, and s’mores cups, store them in a cool room rather than the fridge if you want the texture to stay crisp. Fridge air can make chocolate bloom and graham crusts stale-looking. If you must refrigerate, let the treats come back to room temperature before serving.
Variations and Adaptations to Try
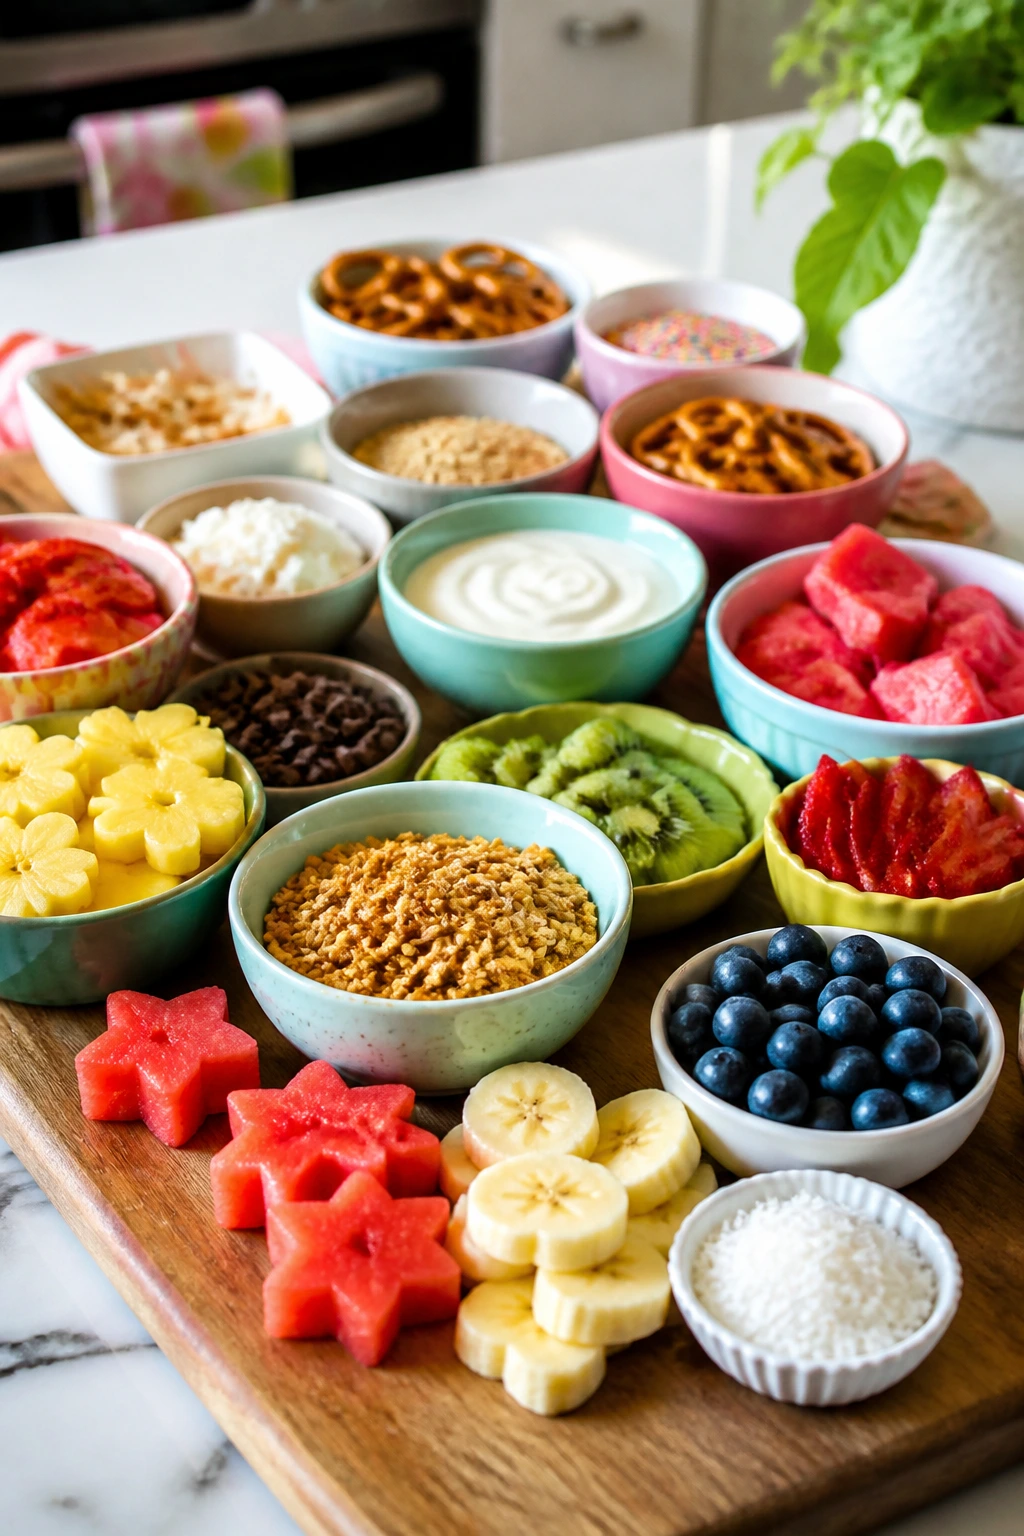
The No-Nut Route:
Use sunflower seed butter, cookie butter, or cream cheese in place of peanut butter in almost every snack here. It keeps the recipes friendly for school lunches and allergy-aware playdates. You can also swap nut toppings for crushed cereal or seeds.
The Lower-Sugar Tray:
Lean on banana, apples, berries, and vanilla yogurt instead of chocolate and caramel. Skip the extra drizzle on yogurt bark, fruit pizza, and parfaits, then let the fruit carry the sweetness. Kids usually accept this better than adults expect if the shapes stay fun.
The Dairy-Free Basket:
Coconut yogurt, dairy-free chocolate, and plant butter work well in pops, bark, parfaits, and frozen bites. The one thing to watch is texture; some dairy-free yogurts are thinner, so choose a thick one if you’re freezing it.
The Extra-Crunch Version:
Add crushed pretzels, toasted coconut, cereal, or granola to fruit bark, banana bites, and parfaits. That extra crunch often wins over kids who like a snack to sound as good as it tastes. Keep the pieces small so the toppings stay attached.
The Tiny-Hands Adjustment:
For toddlers, cut everything smaller than you think you need. Halve grapes lengthwise, slice skewers short, use mini muffin tins, and make fruit pieces flat enough to chew safely. That one adjustment changes the whole experience.
Common Mistakes to Avoid
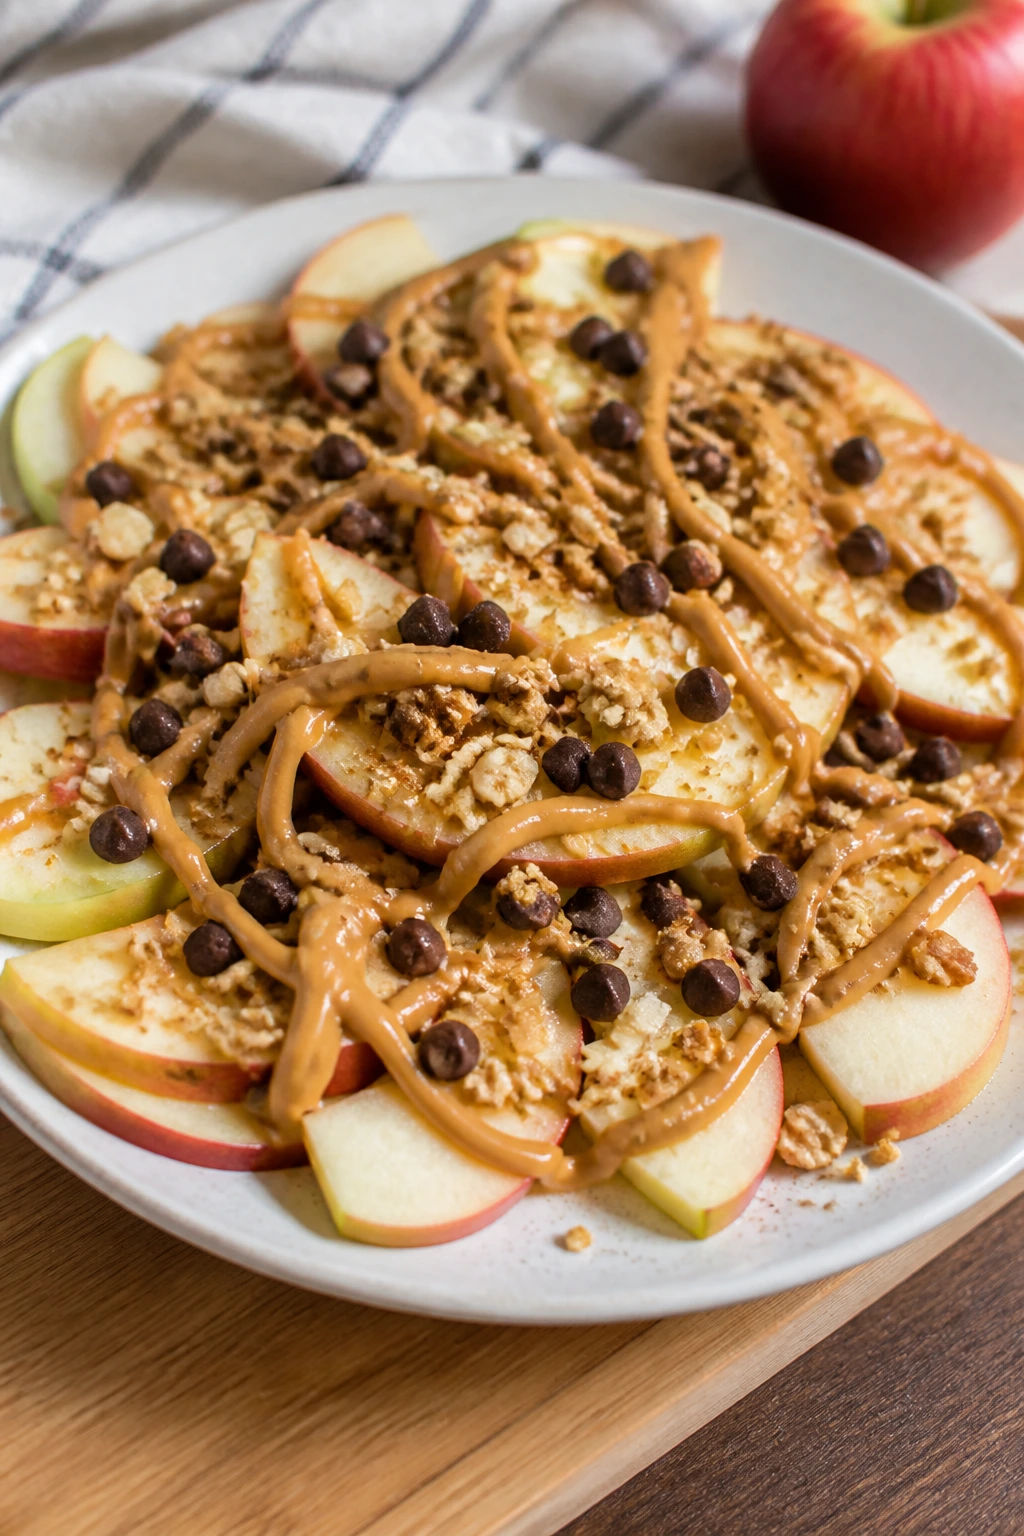
The biggest mistake is making the snack look more complicated than it needs to be. A picky eater can smell a trap. If a recipe has six toppings, three dips, and a drizzle pattern that requires a piping bag, you’ve probably lost the room before anyone takes a bite.
Another one: using fruit that’s too wet or too ripe for the job. Soggy berries ruin bark, mushy bananas collapse on skewers, and wet apples slide right off a dip. Pat fruit dry after washing, choose bananas with some firmness for slicing recipes, and save the bruised fruit for mashing, smoothies, or muffin batter.
Heat is a common trouble spot. Chocolate burns, marshmallows scorch, and tortillas go from pale to brittle fast. Keep melted ingredients on low heat and use short microwave bursts, especially when kids are waiting and asking whether it’s ready every twelve seconds.
Portion size trips people up too. Kids do better with little pieces they can finish. Giant hand pies, thick apple wedges, and overloaded roll-ups often get half-eaten because they’re too much work. Smaller shapes almost always do better.
Finally, don’t forget the allergy check. Nut butter, seeds, dairy, and gluten show up across this collection. A quick label scan and one substitution can mean the difference between a snack everyone can eat and a tray that gets passed over.
Frequently Asked Questions
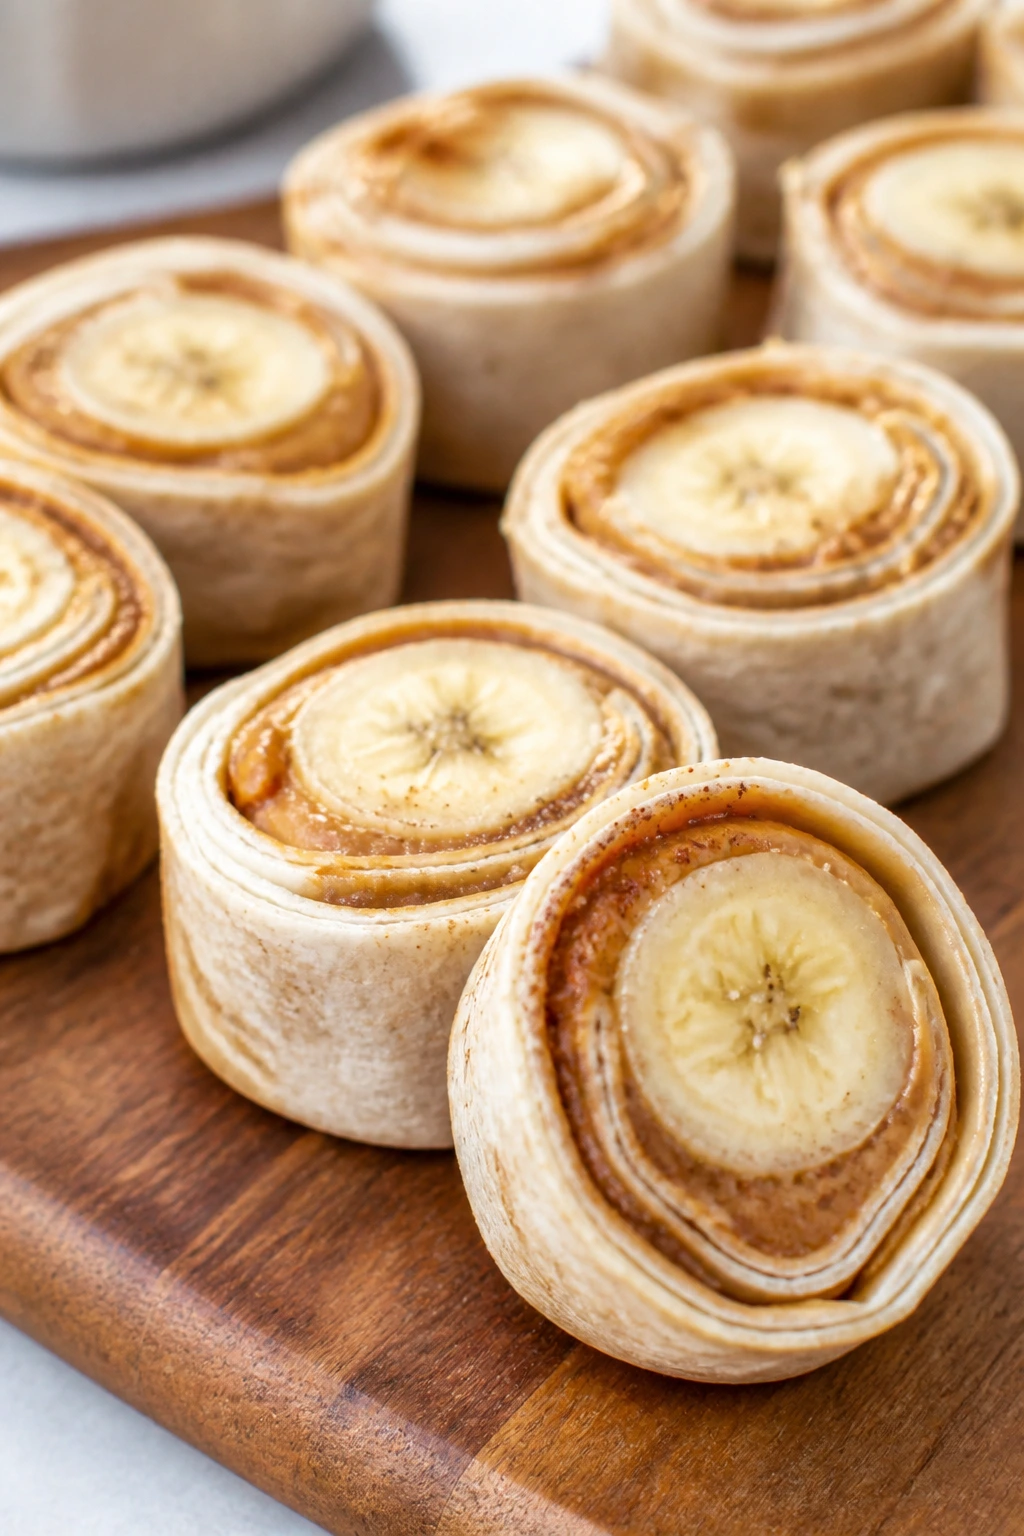
Can I make these treats without a lot of kitchen tools?
Yes. Many of them only need a bowl, a spoon, a knife, and a baking sheet. If you can’t find popsicle molds or a mini muffin tin, paper cups and a regular tray can stand in for several recipes.
What if my child only eats one or two fruits?
Start with those. Strawberry-banana pops, apple nachos, and banana sushi work because the fruit stays familiar even when the shape changes. You do not need to force variety inside the same snack.
How do I keep kids safe while helping?
Give them jobs that match their age: stirring, sprinkling, spreading, and arranging fruit are safe and useful. Adults should handle knives, hot pans, melted chocolate, and anything coming out of the oven or freezer.
Can I use frozen fruit in these recipes?
Absolutely, but mostly in blended or frozen recipes. Frozen berries work well in smoothie pops and bark if they’re chopped small, while thawed frozen fruit usually gets too wet for skewers or fresh fruit pizza.
What’s the easiest treat on this list for a first-time helper?
Apple nachos, fruit kabobs, and yogurt bark are probably the easiest starting points. They don’t need exact shaping, and kids can help with nearly every step without wrecking the result.
How do I make these less sweet without making them boring?
Lean on plain yogurt, less chocolate, and fruit that tastes bright on its own, like strawberries, apples, and grapes. A pinch of salt, cinnamon, or vanilla can keep the flavor interesting without adding more sugar.
Can I prep any of these the night before?
Yes. Bars, muffin tops, fruit leather, popcorn balls, and trail mix cups all hold well overnight. For fresh fruit treats, prep the parts separately and assemble just before serving.
What should I do if melted chocolate seizes or gets grainy?
Stop heating it right away and stir in a tiny bit of neutral oil or a teaspoon of warm cream if the recipe allows it. Sometimes it can be rescued, but prevention is easier: dry bowl, low heat, short bursts.
A Snack Tray Worth Repeating
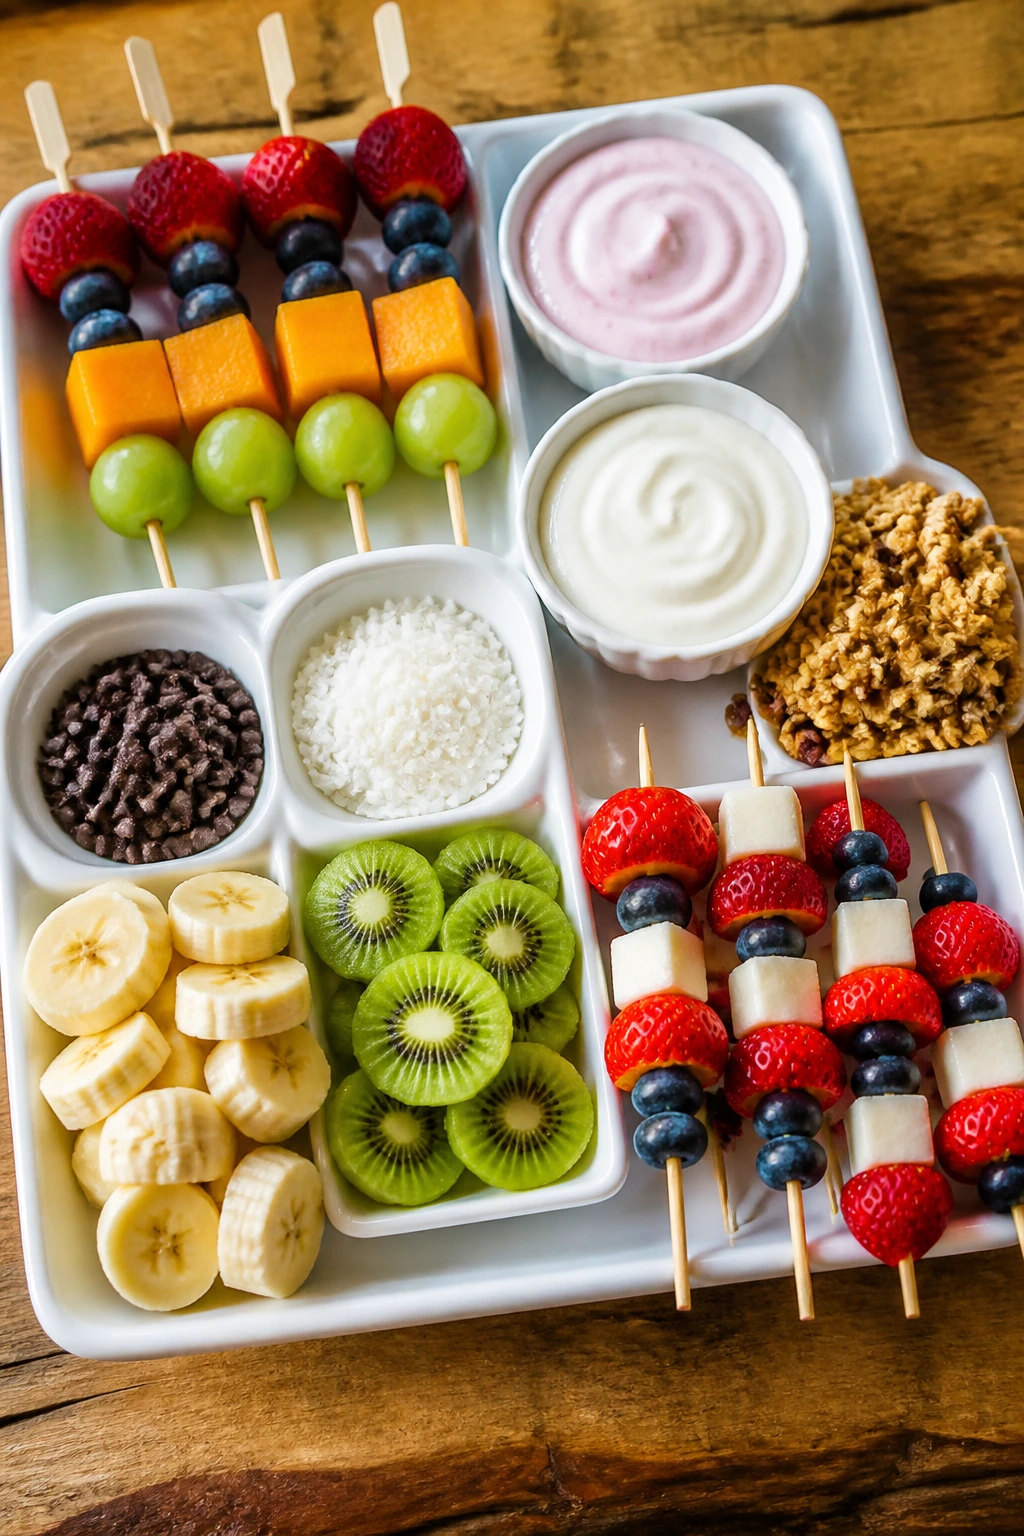
The nicest thing about these kid-made treats is that they don’t ask for perfect behavior or perfect decorating. A crooked fruit kabob still disappears. A lopsided muffin top still gets eaten. And the kid who only touched three blueberries may come back next time asking to do the dipping.
That’s the real win here. You get snacks that are simple enough to survive a busy kitchen, but playful enough to make picky eaters lean in instead of back away. Start with one or two favorites, keep the toppings in small bowls, and let the tray get a little messy. The mess is part of the point.