
Picky eaters are not usually rejecting dessert; they’re rejecting surprises. A grape hidden in the wrong place, a seed in a soft bite, a crunchy edge where they expected something smooth — done. That’s why the best kid-friendly treats for picky eaters are small, familiar, and almost stubbornly predictable.
The smartest treats don’t try to win arguments. They keep the flavor clear, the texture obvious, and the portion small enough that a cautious kid can take one bite without feeling trapped by a giant slice of anything. Mini muffins beat oversized wedges. Frozen pops beat complicated parfaits. A tray of neat, tidy little sweets goes a lot further than a “fun” dessert that turns into a negotiation.
I’ve leaned hard on recipes that use pantry staples, short ingredient lists, and a lot of one-bowl mixing. Some are baked. Some are frozen. A few take less time than it takes to find the lost shoe, which is about the right standard for family snack food anyway.
Why You’ll Love This Collection
- Tiny Portions: Every recipe is built in bite-size or hand-held form, which makes cautious kids more likely to try one piece without staring down a full plate.
- Familiar Flavors: Banana, chocolate chip, cinnamon sugar, strawberries, graham crackers, vanilla, apple — nothing here asks a wary eater to make peace with weird textures or loud flavors.
- Low-Stress Prep: Most of these use one bowl, one pan, or one tray, so dessert doesn’t turn into a cleanup project that outlasts the snack.
- Easy Swaps: Several recipes work with dairy-free yogurt, sunflower butter, gluten-free cereal, or store-bought dough without falling apart.
- Lunchbox Friendly: A good chunk of these hold up in a lunch container or on a snack plate, which matters when the goal is fewer arguments and fewer half-eaten leftovers.
- Big-Kid and Little-Kid Friendly: The same tray can please a toddler who wants one strawberry and a bigger kid who wants three cookies and no explanation.
Why Familiar Shapes Win Over Fancy Desserts When You’re Feeding Picky Eaters

Picky eaters often decide in the first two seconds. That means shape matters more than most people think. A small cookie, a neat skewer, a frozen pop, or a dip with clear edges feels safer than a mixed-up bowl of “stuff.”
The other trick is texture. One bite should feel like one thing. Soft and chewy. Cold and creamy. Crisp and sweet. When a recipe mixes too many textures at once, kids tend to pick through it like detectives. And then the treat sits there, slightly offended.
I also like that these recipes give kids a little control. They can dip, stack, sprinkle, or skip the toppings. That tiny bit of choice cuts way down on the usual snack-time standoff.
The Gear That Actually Shows Up on the Counter
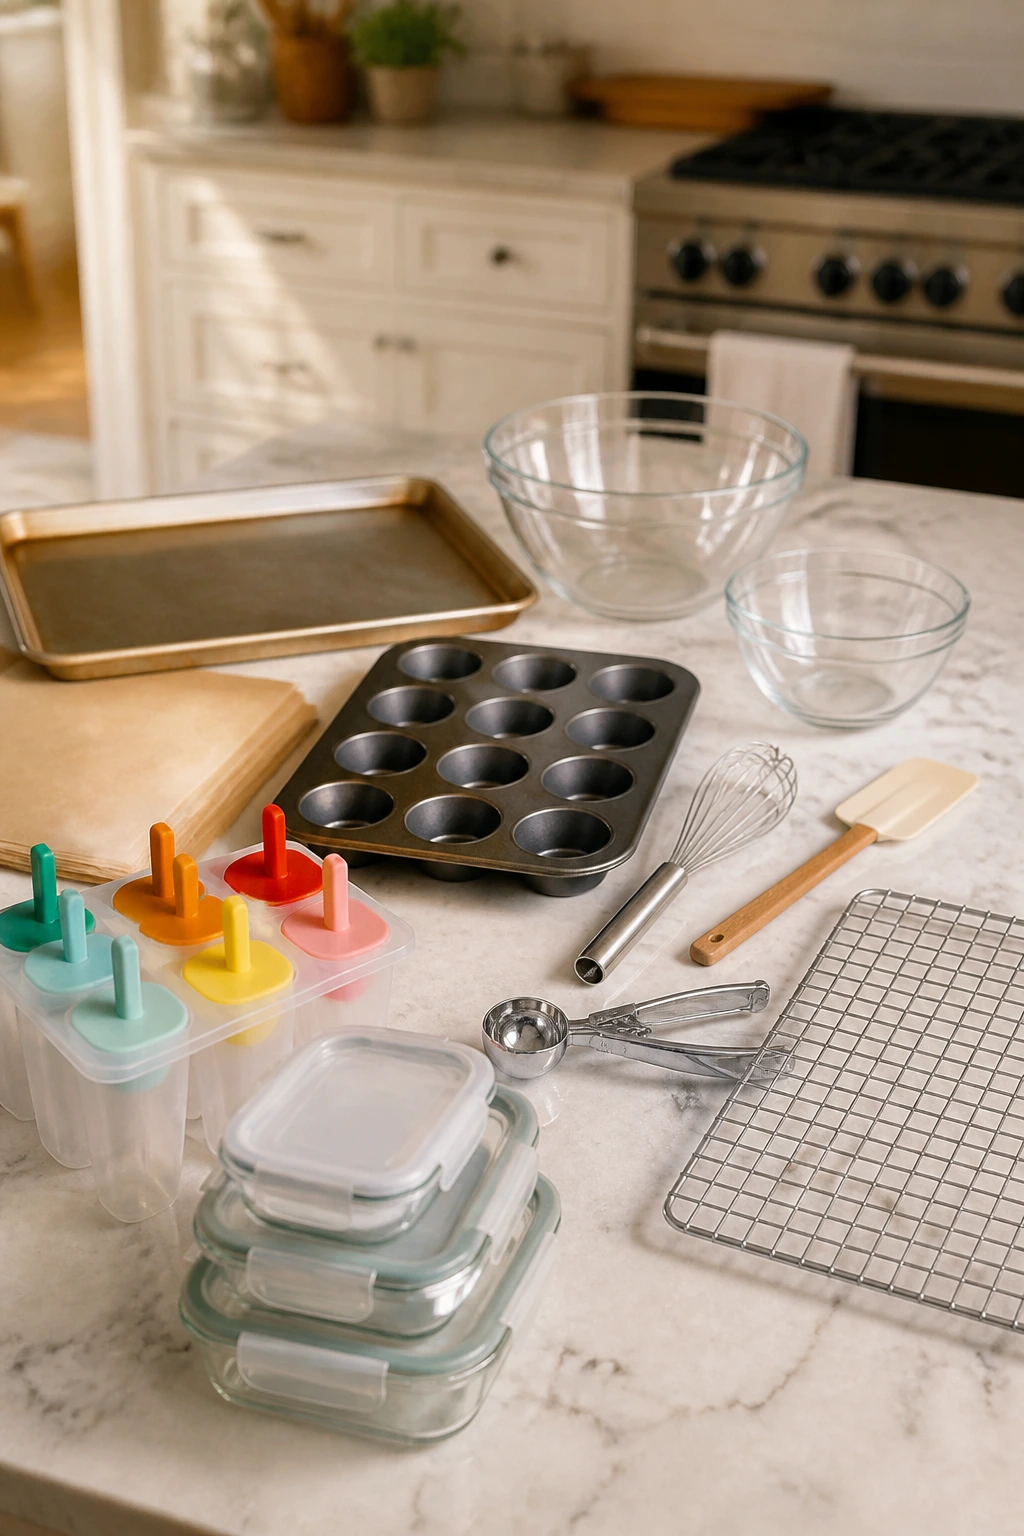
You do not need a pile of specialty tools for these. You need the few pieces that show up over and over, hold up well, and don’t make cleanup annoying.
- Rimmed baking sheets — Good for cookies, bark, pretzels, fruit leather, and anything that needs a flat surface.
- Parchment paper — Keeps sticky treats from welding themselves to the pan.
- Mini muffin pan — Useful for bite-size muffins, brownie bites, and donut holes.
- Mixing bowls in two sizes — One for wet ingredients, one for dry, and a spare when the first bowl gets coated in marshmallow.
- Rubber spatula — Better than a spoon for scraping every bit of batter or melted marshmallow.
- Whisk — Helps with pudding cups, dips, and anything that needs a smooth finish.
- Cookie scoop or tablespoon scoop — Makes small, even portions, which is half the battle with picky eaters.
- Cooling rack — Keeps baked treats from steaming into softness on the bottom.
- Popsicle molds and sticks — Handy for yogurt pops, smoothie pops, and frozen fruit treats.
- Airtight containers and freezer bags — Needed if you want anything to stay crisp, chewy, or not smell like the freezer shelf next to it.
A sheet pan and a scoop can solve an embarrassing number of snack problems. So can parchment. Don’t skip that part.
Smart Shopping for Kid-Friendly Treat Ingredients
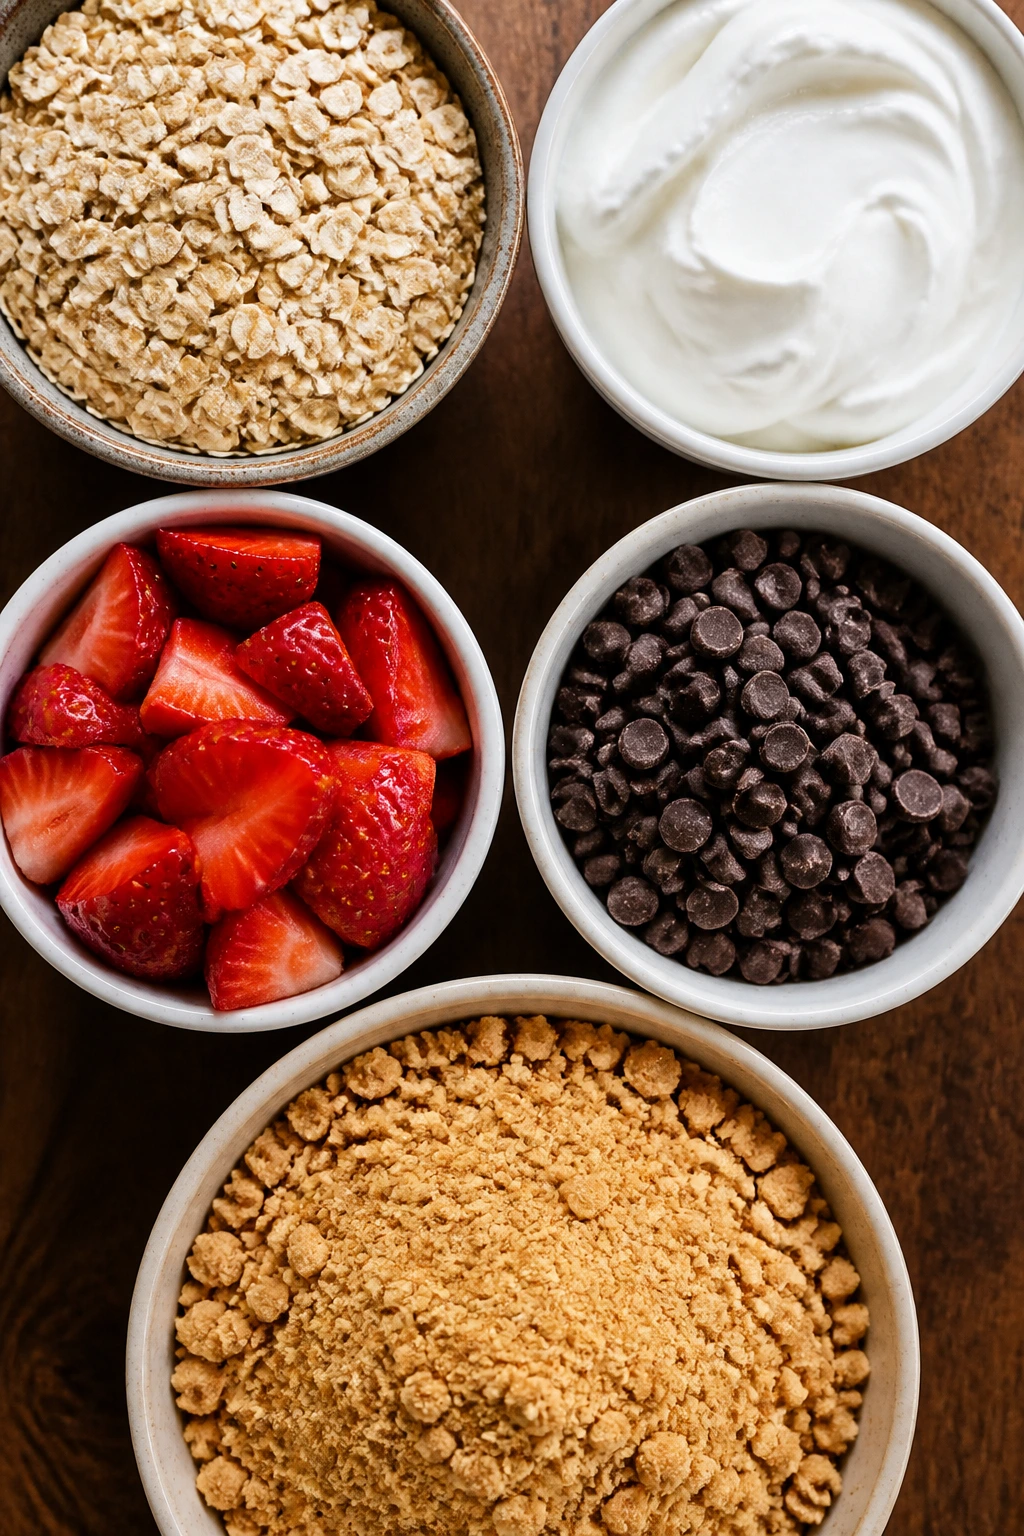
The ingredient list gets easier when you stop buying “baking” versions of things you already keep at home. Regular oats work. Plain Greek yogurt works. Simple cereal works. You usually do not need the expensive version, just the one with the right texture.
Fruit matters more than people expect. Bananas should be spotted, not green. Strawberries need to smell like strawberries. Apples should be crisp enough to snap when you bite them, not soft around the edges. If the fruit is bland, the finished treat will be bland, too.
Mini chocolate chips are worth buying. They spread through small cookies, yogurt bark, and muffin batter much better than full-size chips, which can feel like surprise lumps in a bite-size treat. Same with crushed graham crackers: they give you a mild sweetness and a little crunch without stealing the whole show.
For dairy, choose yogurt with a flavor kids already know. Vanilla is the safest bet. If you want to use plain yogurt, sweeten it with honey or maple syrup and add a splash of vanilla so it doesn’t taste sharp. For peanut butter and other spreads, check the texture. The runny stuff can leak out of sandwiches and banana bites faster than kids can get them to a napkin.
If you’re baking, keep a box of all-purpose flour, old-fashioned oats, brown sugar, baking powder, baking soda, and vanilla extract on hand. That group carries a ridiculous amount of these recipes. You’ll notice that most of the treats lean on the same pantry core and then shift shape, which is exactly why they work so well in real life.
1. Banana Oat Cookies
A soft banana cookie is the kind of treat that disappears fast because it never looks threatening. These bake up with chewy edges, a tender middle, and little melted flecks of chocolate that keep the flavor familiar without turning the cookie into a candy bar.
Why It Works:
Mashed banana gives the cookies sweetness and moisture, so you don’t need a long ingredient list. Oats bring enough structure to keep them from falling apart, but they still stay soft enough for small teeth and cautious bites. The portion size does the rest. Kids can take one cookie, finish it in three bites, and decide from there.
Key Ingredients:
- 2 very ripe bananas, mashed — they bind the dough and keep the cookies soft.
- 1 1/2 cups old-fashioned oats — they give the cookies a chewy, hearty texture.
- 1/3 cup mini chocolate chips — small chips melt into the dough instead of dominating it.
- 1 teaspoon vanilla extract — rounds out the banana flavor.
- 1/2 teaspoon cinnamon — adds warmth without making the cookies taste spicy.
- 1/4 teaspoon fine salt — keeps the sweetness from going flat.
Quick Steps:
- Heat the oven to 350°F (175°C) and line a baking sheet with parchment paper.
- Mash the bananas in a medium bowl until they look mostly smooth with a few small lumps.
- Stir in the oats, chocolate chips, vanilla, cinnamon, and salt until the mixture looks thick and evenly mixed.
- Scoop 1 1/2 tablespoon portions onto the sheet pan and flatten them slightly with the back of a spoon.
- Bake for 12 to 14 minutes until the edges look set and the tops are no longer wet. Cool for 10 minutes before moving them.
Equipment for This Recipe:
- Medium mixing bowl
- Fork or potato masher
- Rimmed baking sheet
- Parchment paper
- Cookie scoop or tablespoon
How to Serve This Dish:
Serve these warm with cold milk or stack them on a lunch plate beside apple slices. They’re best in twos or threes, not as a giant pile, because the charm is in the small size and soft texture.
Pro Tips for This Recipe:
- Use bananas with lots of brown spots. Pale bananas make a bland cookie.
- If the dough seems loose, add 2 more tablespoons oats and let it sit for 5 minutes.
- Pull them from the oven before they look browned. They finish setting as they cool.
Variations on This Dish:
- Peanut Butter Swirl: Stir 2 tablespoons peanut butter into the mashed banana before adding the oats.
- Raisin Cookie Version: Swap the chocolate chips for 1/4 cup raisins if your kid likes a softer, fruitier bite.
- Cinnamon Toast Finish: Sprinkle the tops with a pinch of cinnamon sugar before baking.
Common Mistakes to Avoid with This Dish:
- Using under-ripe bananas: The cookies come out dry and flat-tasting. Wait for spotty bananas.
- Overbaking: If the edges turn dark brown, the cookies will lose their soft center. Bake until just set.
2. Mini Chocolate Chip Muffins
Mini muffins are one of the easiest wins in the picky-eater category. They’re familiar, small enough to feel manageable, and they bake into tidy little domes that look less like “health food” and more like a snack you’d actually choose.
Why It Works:
Chocolate chips keep the flavor familiar, but the mini size changes the whole mood. Kids who refuse a full slice of cake will often accept a two-bite muffin without a second thought. A mini muffin pan also gives you more edges per serving, which means more of that tender, lightly browned muffin top kids tend to grab first.
Key Ingredients:
- 1 1/2 cups all-purpose flour — the base that keeps the crumb soft.
- 1/2 cup granulated sugar — sweet enough to feel like a treat.
- 2 teaspoons baking powder — helps the muffins rise quickly.
- 1/2 teaspoon fine salt — keeps the sweetness balanced.
- 1/2 cup milk — adds moisture and keeps the batter smooth.
- 1 large egg — gives structure.
- 1/4 cup melted butter — adds richness and a soft crumb.
- 1/2 teaspoon vanilla extract — makes the chocolate flavor taste rounder.
- 3/4 cup mini chocolate chips — small enough to spread through every bite.
Quick Steps:
- Preheat the oven to 375°F (190°C) and grease a 24-cup mini muffin pan.
- Whisk the flour, sugar, baking powder, and salt in a large bowl.
- Whisk the milk, egg, melted butter, and vanilla in a second bowl until smooth.
- Stir the wet ingredients into the dry ingredients just until no dry streaks remain, then fold in the mini chocolate chips.
- Divide the batter among the muffin cups, filling each about 3/4 full, and bake for 10 to 12 minutes until the tops spring back when touched. Cool for 5 minutes before removing.
Equipment for This Recipe:
- 24-cup mini muffin pan
- Two mixing bowls
- Whisk
- Rubber spatula
- Wire rack
How to Serve This Dish:
Pile them in a shallow bowl for after-school snacking or tuck two into a lunchbox with strawberries. They’re easiest to eat warm or at room temperature, when the crumb is soft and the chips are still a little melty.
Pro Tips for This Recipe:
- Don’t overmix the batter. A few small lumps are better than tough muffins.
- Use mini chips, not standard chocolate chips. Bigger chips sink and make the muffins feel lopsided.
- Grease the pan well. Mini muffins stick more than full-size ones.
Variations on This Dish:
- Banana-Chip Muffins: Replace 1/4 cup milk with 1/4 cup mashed banana for a softer, fruitier flavor.
- Cinnamon Sugar Tops: Sprinkle the batter with cinnamon sugar before baking.
- Dairy-Free Batch: Swap the milk for oat milk and the butter for melted coconut oil.
Common Mistakes to Avoid with This Dish:
- Filling the cups too high: The muffins mushroom over and bake unevenly. Stick to 3/4 full.
- Using full-size chips: They create heavy pockets that can make the muffins look messy and taste less balanced.
3. Yogurt Bark with Strawberries and Cereal
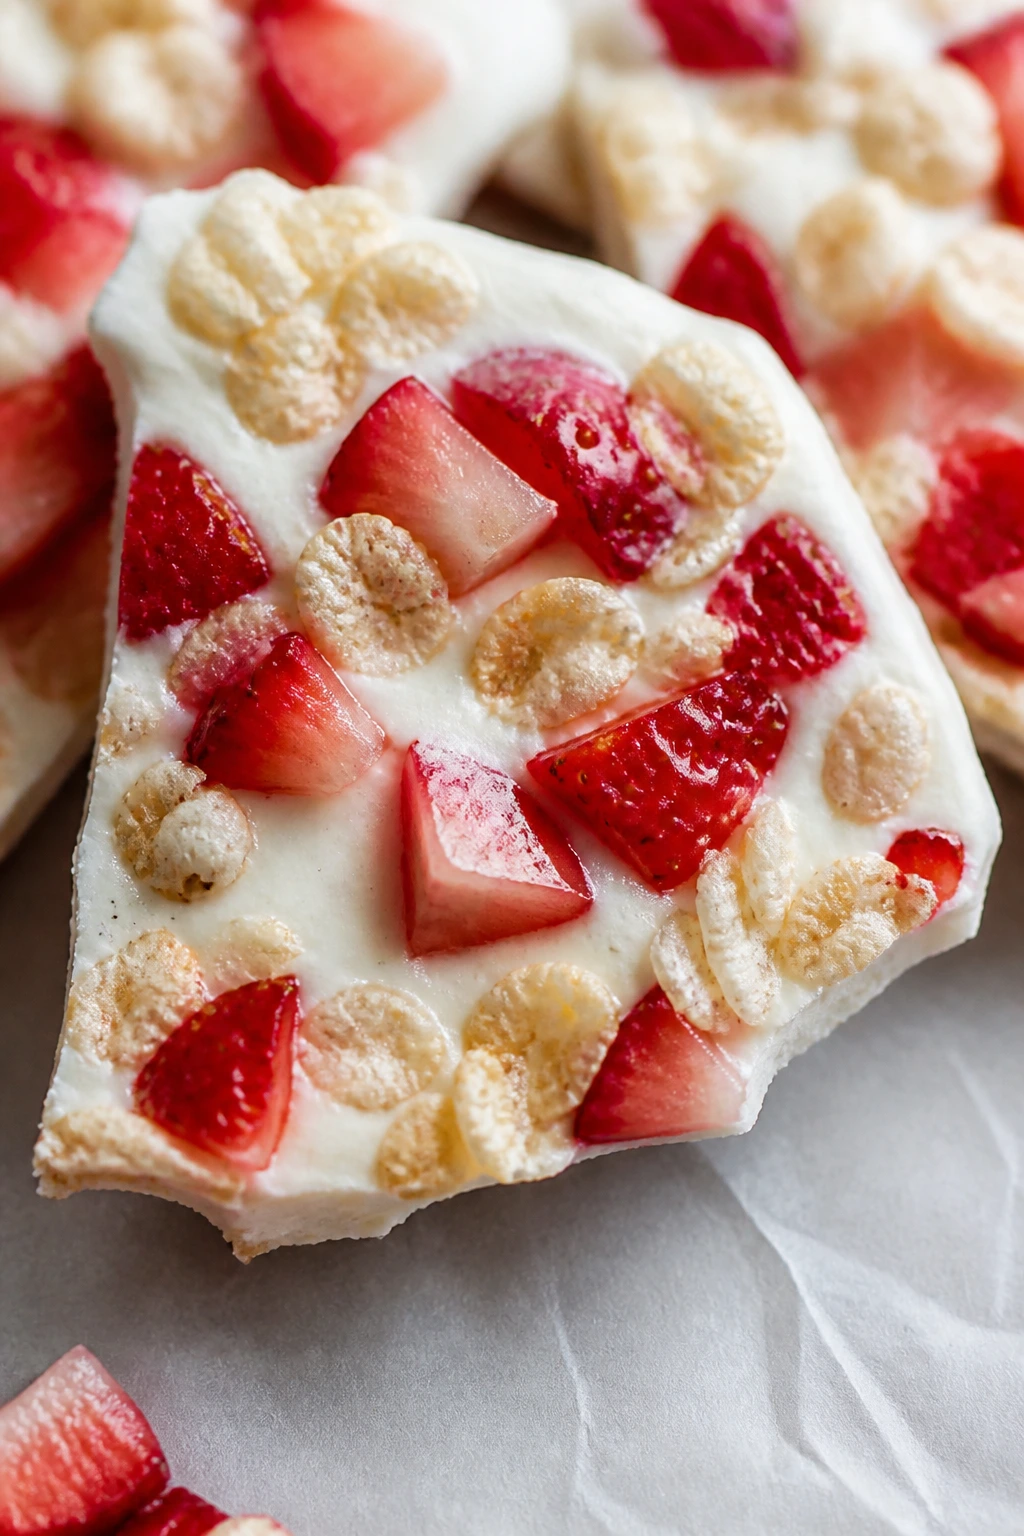
This is the frozen snack I reach for when I want something cold, sweet, and slightly messy in the good way. It cracks into little shards, the berries stay bright, and the cereal keeps the whole thing from feeling like a brick of yogurt.
Why It Works:
Yogurt bark gives picky eaters a dessert that feels playful without asking for much. You spread it, sprinkle it, freeze it, and break it apart. The cereal adds crunch, the strawberries give a familiar fruit note, and the mini chips keep the flavor in dessert territory rather than snack-bar territory.
Key Ingredients:
- 3 cups vanilla Greek yogurt — thick enough to freeze into clean pieces.
- 2 tablespoons honey — softens the tang.
- 1 teaspoon vanilla extract — rounds out the flavor.
- 1 cup strawberries, diced small — small pieces freeze better and stay easy to bite.
- 1 cup crispy rice cereal — gives the bark crunch.
- 2 tablespoons mini chocolate chips — a small sweet finish.
- Pinch of fine salt — keeps the yogurt from tasting flat.
Quick Steps:
- Line a rimmed baking sheet with parchment paper.
- Stir the yogurt, honey, vanilla, and salt in a bowl until smooth.
- Spread the yogurt into a layer about 1/4 inch thick on the sheet.
- Scatter the strawberries, cereal, and chocolate chips over the top, pressing them lightly into the yogurt.
- Freeze for 3 to 4 hours until firm, then break into pieces and store in the freezer.
Equipment for This Recipe:
- Rimmed baking sheet
- Parchment paper
- Mixing bowl
- Rubber spatula
- Freezer-safe container
How to Serve This Dish:
Serve it straight from the freezer, on a chilled plate if you want the pieces to stay crisp longer. A few shards beside apple slices or banana coins make a nice snack plate without much fuss.
Pro Tips for This Recipe:
- Keep the yogurt layer thin. Thick bark takes forever to freeze and breaks in bulky chunks.
- Pat the strawberries dry before adding them. Extra moisture makes icy patches.
- Break it with your hands, not a knife. You want uneven, kid-size pieces.
Variations on This Dish:
- Blueberry Crunch Bark: Swap the strawberries for blueberries and use crushed plain cereal.
- Granola Bark: Replace the crisp rice with a low-sugar granola for a heartier crunch.
- Dairy-Free Version: Use thick coconut yogurt and freeze it on the thinner side.
Common Mistakes to Avoid with This Dish:
- Adding wet fruit: It creates icy spots and weakens the bark. Dry the berries well.
- Freezing in a thick slab: The center stays soft while the edges harden. Keep the layer thin.
4. Apple Cinnamon Dip Cups
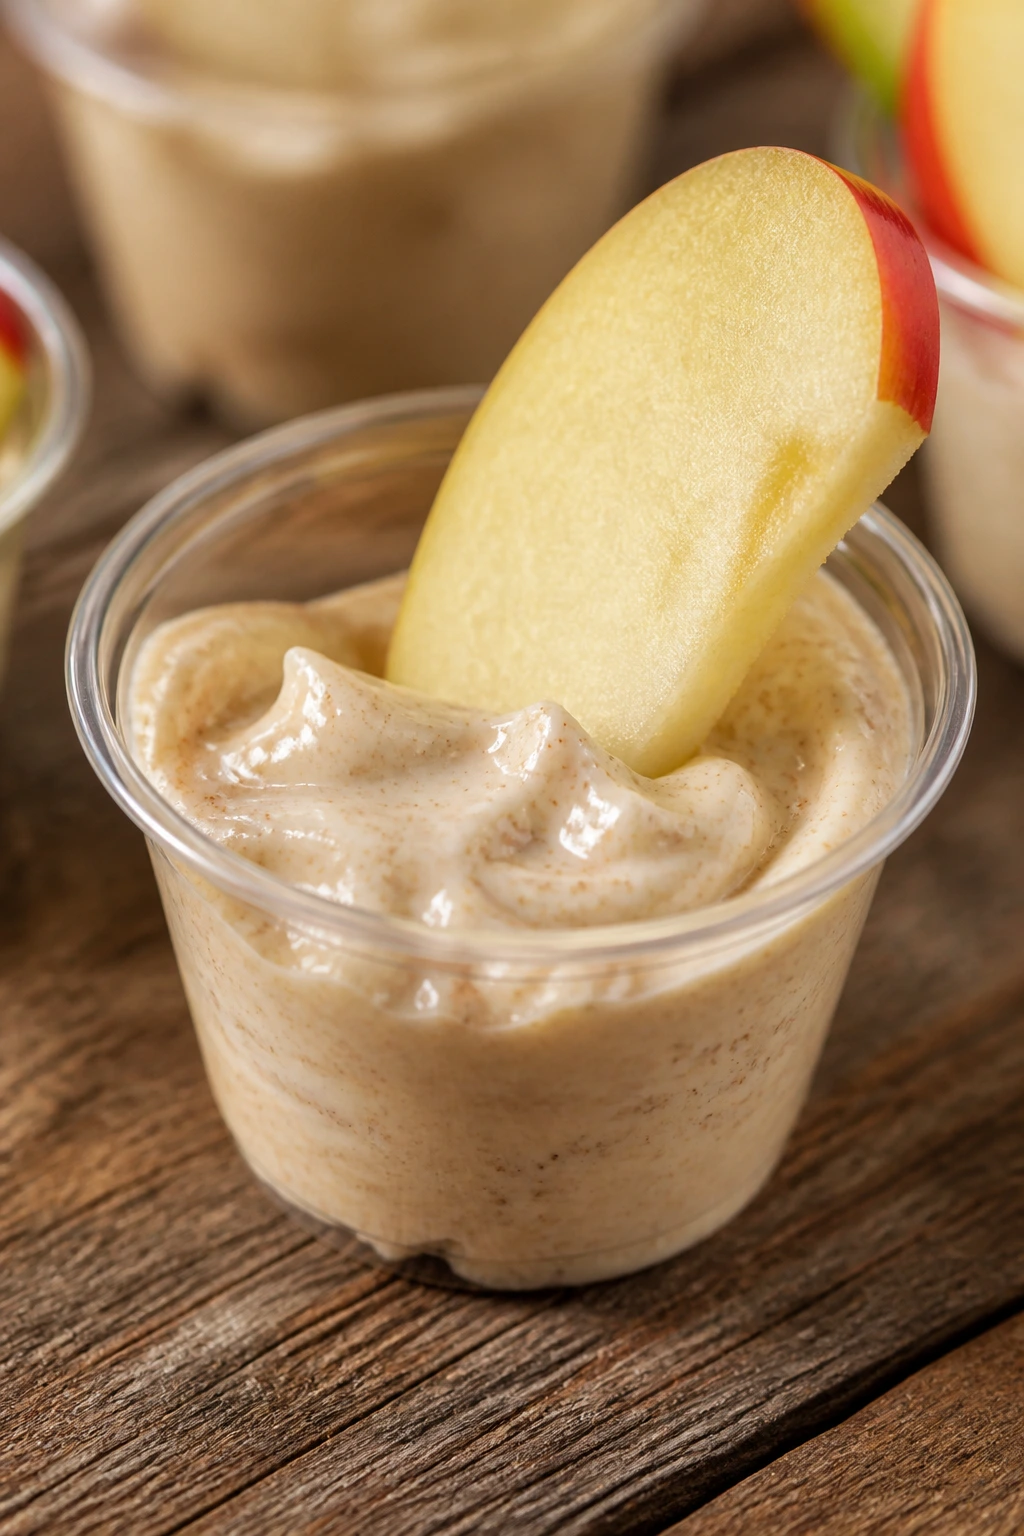
Apple slices feel more like a treat when there’s a creamy dip waiting nearby. These cups give kids a job — dunk the apple, scoop the dip, repeat — and that little bit of control often matters more than the ingredients themselves.
Why It Works:
The apples stay crisp, the dip tastes like a mild cheesecake, and the whole snack looks neat in a cup or small bowl. That matters. Picky eaters often back away from anything that looks mixed, soggy, or complicated. Here, everything stays separate until the fork or apple slice brings it together.
Key Ingredients:
- 2 large apples, sliced thin — crisp apples hold their shape and feel clean to bite.
- 4 ounces cream cheese, softened — gives the dip body.
- 1/2 cup plain or vanilla Greek yogurt — lightens the dip and keeps it smooth.
- 2 tablespoons honey — adds sweetness.
- 1 teaspoon cinnamon — leans the flavor toward apple pie.
- 1 teaspoon lemon juice — keeps the apples from browning.
Quick Steps:
- Beat the cream cheese, yogurt, honey, cinnamon, and lemon juice in a bowl until smooth.
- Slice the apples into thin wedges and toss them lightly with a few drops more lemon juice if needed.
- Spoon the dip into small cups or bowls.
- Arrange the apple slices beside or around the dip so the pieces stay crisp.
- Serve right away or chill for up to 2 hours before serving.
Equipment for This Recipe:
- Small mixing bowl
- Hand mixer or sturdy whisk
- Cutting board
- Sharp knife
- Small cups or ramekins
How to Serve This Dish:
Put the dip in the center of a plate and fan the apples around it, or pack both into a lunchbox with a little lid for the dip. A few graham crackers on the side turn this into a more dessert-like snack.
Pro Tips for This Recipe:
- Slice the apples at the last minute if you can. They stay crisper and look better.
- Use soft cream cheese. Cold cream cheese leaves little lumps.
- If the dip tastes sharp, add another teaspoon of honey before serving.
Variations on This Dish:
- Caramel Apple Dip: Swirl 1 tablespoon caramel sauce into the dip.
- Peanut Butter Apple Dip: Replace half the cream cheese with peanut butter for a richer flavor.
- Vanilla Dip Cups: Skip the cinnamon and add extra vanilla for the most basic, kid-safe version.
Common Mistakes to Avoid with This Dish:
- Leaving the apples too thick: Thick wedges feel clunky and are harder for small hands. Go thin.
- Making the dip too tangy: Too much yogurt can make it taste like breakfast instead of dessert.
5. Peanut Butter Banana Bites
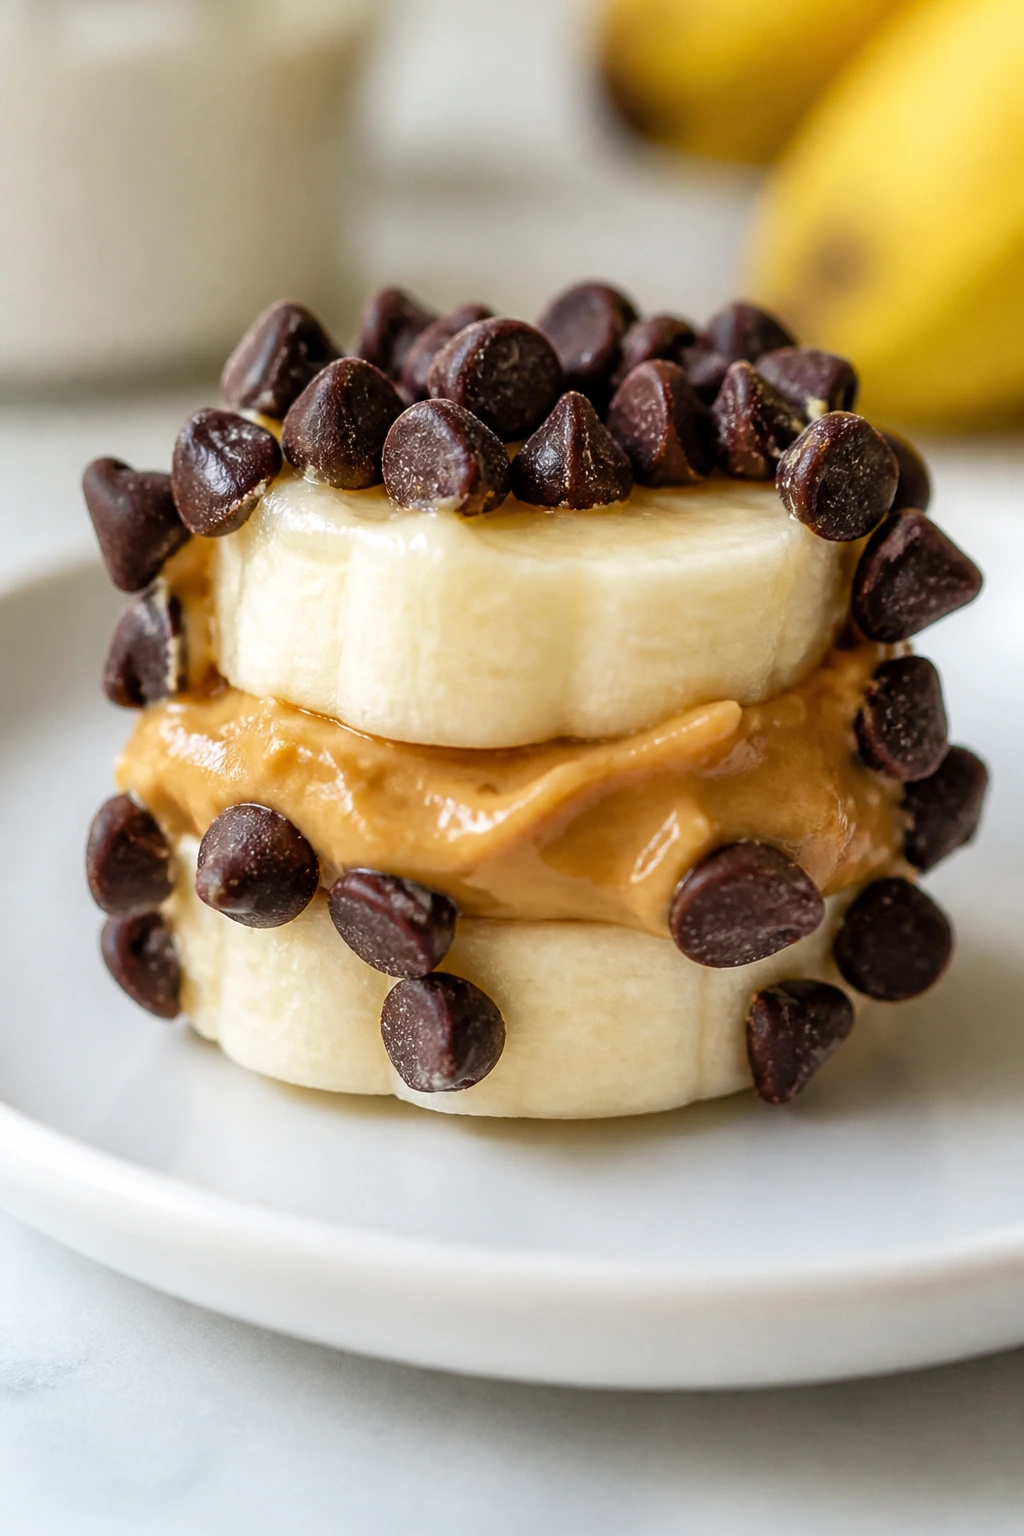
These are the kind of snack that vanishes before it reaches the table. Sweet banana, smooth peanut butter, and a thin crunchy coating make each bite feel familiar and tidy, which is a very good thing when the audience is suspicious.
Why It Works:
The flavor is almost impossible to argue with. Banana and peanut butter already belong together, and the tiny size removes the drama of a sandwich or a full banana split. Chilling the bites gives them a little firmness, so they hold together better than a loose snack plate ever would.
Key Ingredients:
- 2 ripe bananas — firm enough to slice cleanly.
- 1/3 cup creamy peanut butter — the filling that holds the bites together.
- 2 tablespoons mini chocolate chips — adds a kid-friendly finish.
- 1/4 cup crushed crispy cereal — gives the edges a light crunch.
- 1 teaspoon honey — helps the peanut butter feel softer and sweeter.
- Pinch of salt — keeps the filling from tasting flat.
Quick Steps:
- Slice the bananas into 1/2-inch rounds.
- Spread a thin layer of peanut butter on half the slices, then top with the remaining banana slices to make little sandwiches.
- Roll the edges in mini chocolate chips or crushed cereal.
- Arrange the bites on a tray and chill for 20 to 30 minutes so they firm up.
- Serve cold or keep refrigerated until snack time.
Equipment for This Recipe:
- Cutting board
- Butter knife
- Small bowl
- Tray or plate
- Refrigerator-safe container
How to Serve This Dish:
Serve them on a chilled plate with grapes or pretzel sticks. They’re best eaten soon after chilling, when the banana is still firm and the peanut butter stays put instead of sliding out the sides.
Pro Tips for This Recipe:
- Pick bananas that are ripe but not mushy. Soft bananas collapse when you press the sandwiches together.
- If the peanut butter is stiff, warm it for 10 seconds in the microwave.
- Roll the edges lightly. A thick coating of chips makes them hard to bite.
Variations on This Dish:
- Sunflower Butter Swap: Use sunflower seed butter for a nut-free version.
- Chocolate Banana Bites: Add a tiny dab of melted chocolate inside each sandwich.
- Cinnamon Version: Dust the banana slices with cinnamon before assembling.
Common Mistakes to Avoid with This Dish:
- Using overripe bananas: They turn the bites slimy and hard to handle.
- Overfilling with peanut butter: The filling squishes out and makes a mess.
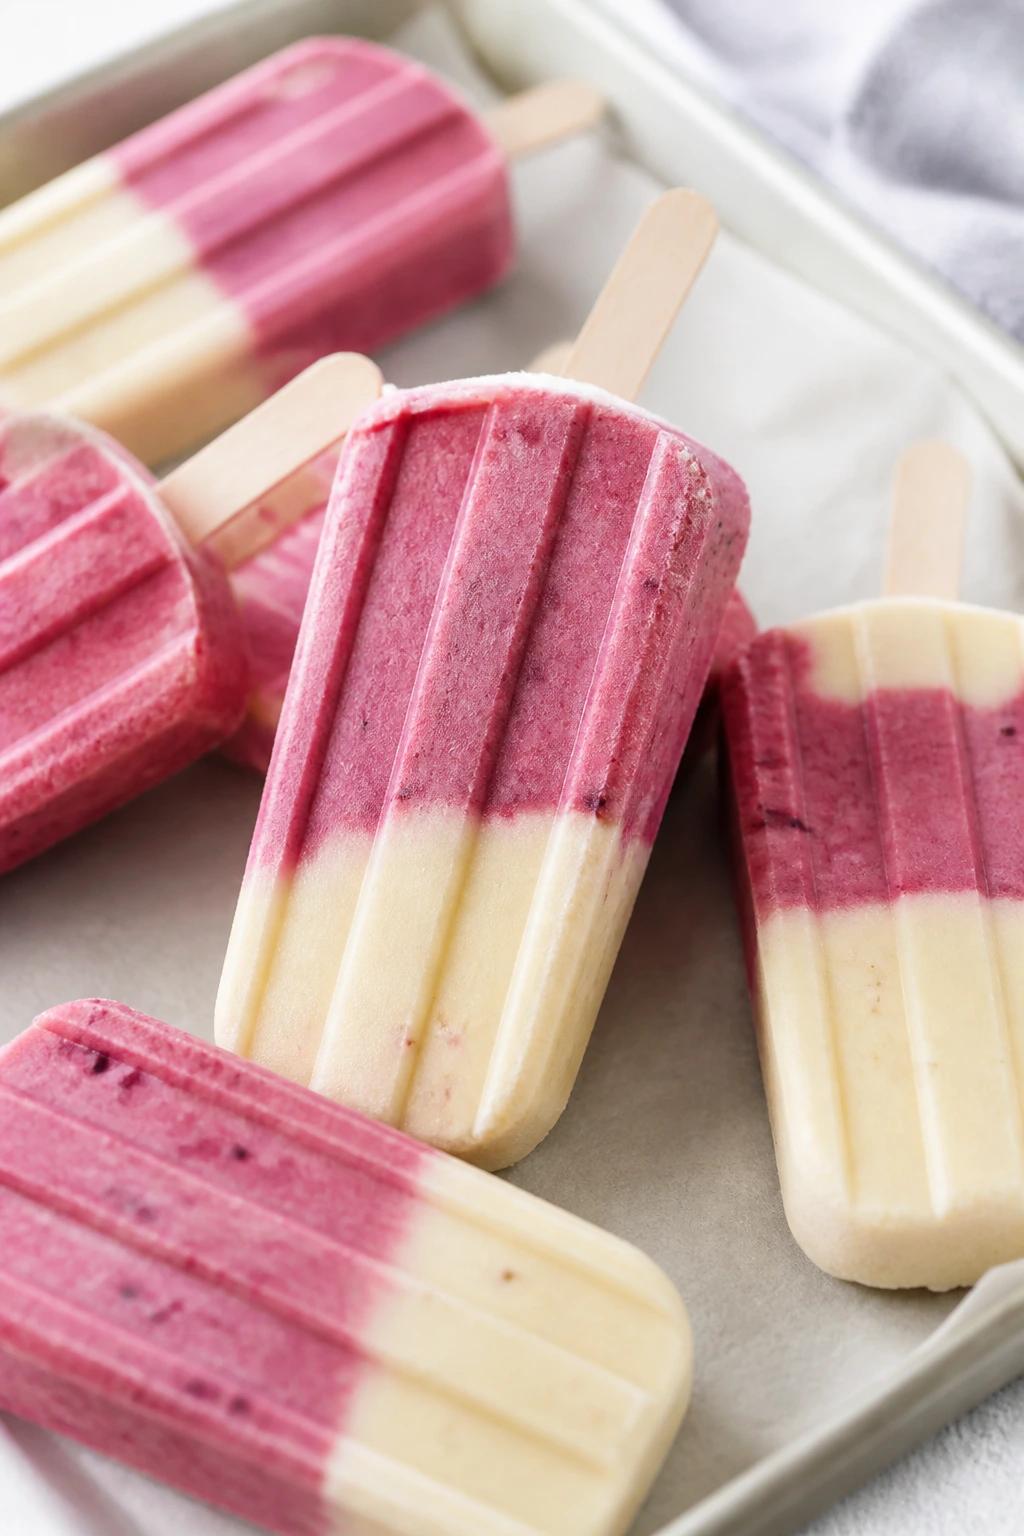
6. Strawberry Yogurt Pops
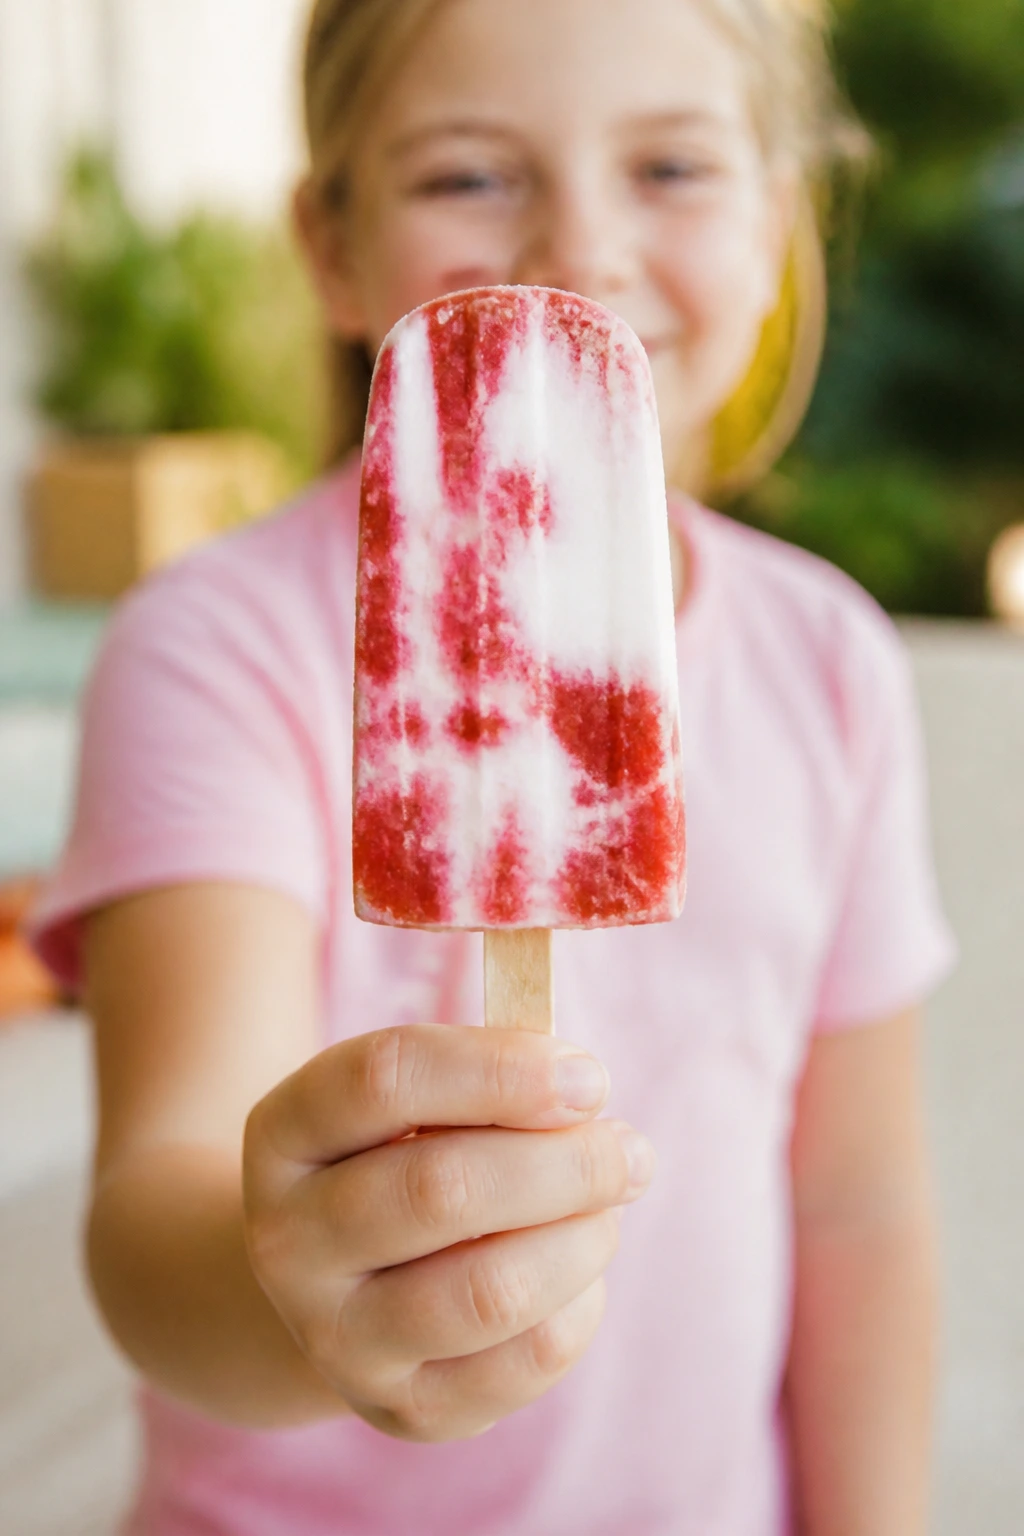
Frozen pops solve a lot of snack-time complaints. They’re cold, colorful, and easy to hold. These lean on strawberries and vanilla yogurt, which keeps the flavor soft and familiar instead of sharp or too tart.
Why It Works:
Popsicles are already fun, so the recipe doesn’t need to be clever. The strawberry flavor reads instantly, the yogurt makes them creamy, and the sweetness stays gentle. Kids who usually reject smoothies in a cup often accept the same flavors on a stick.
Key Ingredients:
- 2 cups strawberries, hulled and chopped — the main fruit flavor.
- 1 1/2 cups vanilla yogurt — gives the pops a creamy texture.
- 1/2 cup milk — helps the mixture blend smoothly.
- 2 tablespoons honey — sweetens the pops without making them icy.
- 1 teaspoon vanilla extract — keeps the flavor round.
- 1 tablespoon lemon juice — brightens the fruit.
Quick Steps:
- Blend the strawberries, yogurt, milk, honey, vanilla, and lemon juice until smooth.
- Taste the mixture and add another teaspoon of honey if the berries are tart.
- Pour into popsicle molds, leaving a little room at the top for expansion.
- Insert sticks and freeze for 4 to 6 hours until solid.
- Run the molds under warm water for a few seconds to release the pops cleanly.
Equipment for This Recipe:
- Blender
- Popsicle molds
- Popsicle sticks
- Measuring cups
- Freezer
How to Serve This Dish:
Serve the pops straight from the mold, or set them on a parchment-lined tray for a party. They pair nicely with a few plain crackers if you’re trying to slow the sugar rush without making a scene about it.
Pro Tips for This Recipe:
- Chop the strawberries small so the mixture blends cleanly.
- Don’t overfill the molds. Frozen yogurt expands a little.
- If you want a smoother pop, strain out the seeds after blending.
Variations on This Dish:
- Mixed Berry Pops: Swap half the strawberries for blueberries or raspberries.
- Creamier Pops: Replace 1/4 cup milk with extra yogurt.
- Dairy-Free Pops: Use coconut yogurt and almond milk.
Common Mistakes to Avoid with This Dish:
- Freezing them too briefly: Soft centers make a mess the second they’re removed.
- Using too much milk: The pops freeze icier and less creamy.
7. Graham Cracker Pudding Cups
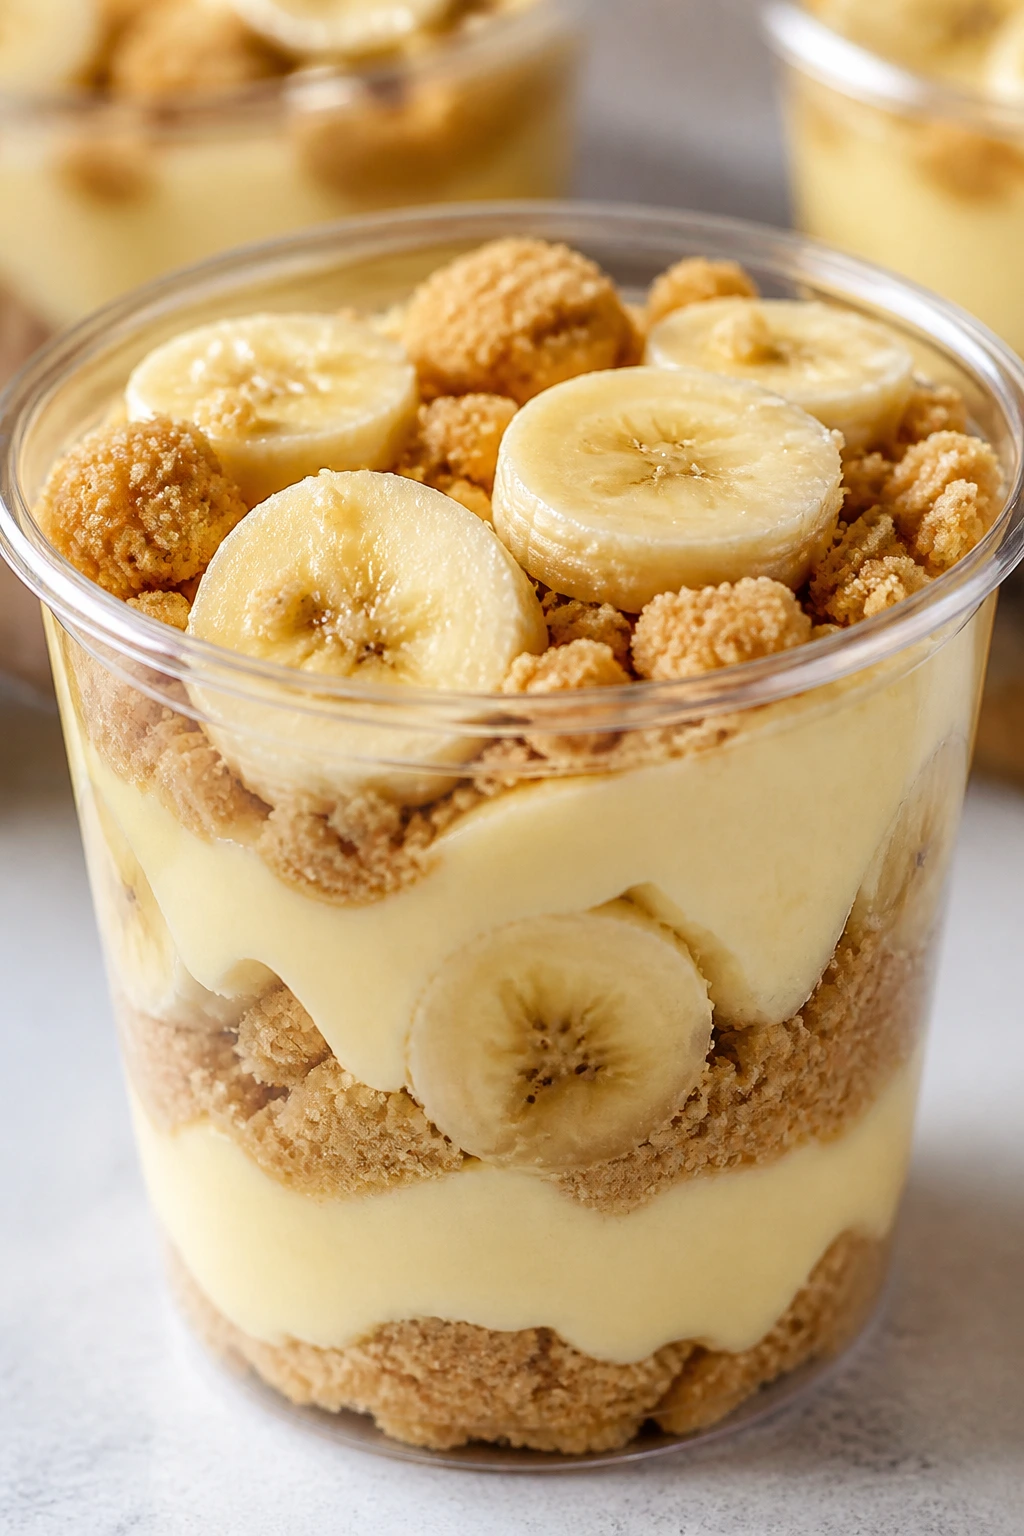
This is the treat I’d make if I wanted dessert to look calm and familiar. Layers of pudding, graham crackers, and banana slices feel tidy in a cup, and nobody has to wrestle a fork through a slippery mess on a plate.
Why It Works:
Pudding is soft enough for almost any kid, but the graham crackers give it some structure. The banana slices add a familiar fruit note without making the cup look like a fruit salad. If you want to hand a picky eater a dessert that looks “safe,” this is the one.
Key Ingredients:
- 1 box instant vanilla pudding mix, 3.4 ounces — gives the cups their creamy base.
- 2 cups cold milk — needed to set the pudding.
- 1 cup whipped topping — makes the texture lighter.
- 1 1/2 cups graham cracker crumbs — the soft crunchy layer.
- 2 bananas, sliced — the fruit layer.
- 1 teaspoon vanilla extract — helps the pudding taste homemade.
Quick Steps:
- Whisk the pudding mix and milk for 2 minutes until thick.
- Fold in the whipped topping and vanilla until smooth.
- Layer graham cracker crumbs, pudding, and banana slices in small cups or jars.
- Repeat the layers once more, finishing with a few crumbs on top.
- Chill for 30 minutes before serving so the crumbs soften slightly.
Equipment for This Recipe:
- Medium mixing bowl
- Whisk
- Measuring cups
- Small cups or jars
- Spoon
How to Serve This Dish:
Serve with a tiny spoon and keep the cups cold until the last minute. These work well for birthday tables, after-school snack trays, or as a dessert that feels more composed than a bowl of ice cream with a spoon sticking out of it.
Pro Tips for This Recipe:
- Add the banana right before serving if you want the slices extra fresh.
- Crush the grahams finely if your kid dislikes bigger crumbs.
- Make the pudding a little firmer than you think you need. It loosens once the whipped topping goes in.
Variations on This Dish:
- Chocolate Pudding Cups: Use chocolate pudding and keep the banana layer.
- Strawberry Short Version: Swap bananas for chopped strawberries.
- Cracker-Free Cup: Use crushed vanilla wafers instead of graham crackers.
Common Mistakes to Avoid with This Dish:
- Using warm milk: The pudding won’t set properly. It needs cold milk.
- Assembling too early with bananas: They brown and turn mushy after a while.
8. Soft Oatmeal Raisin Cookies
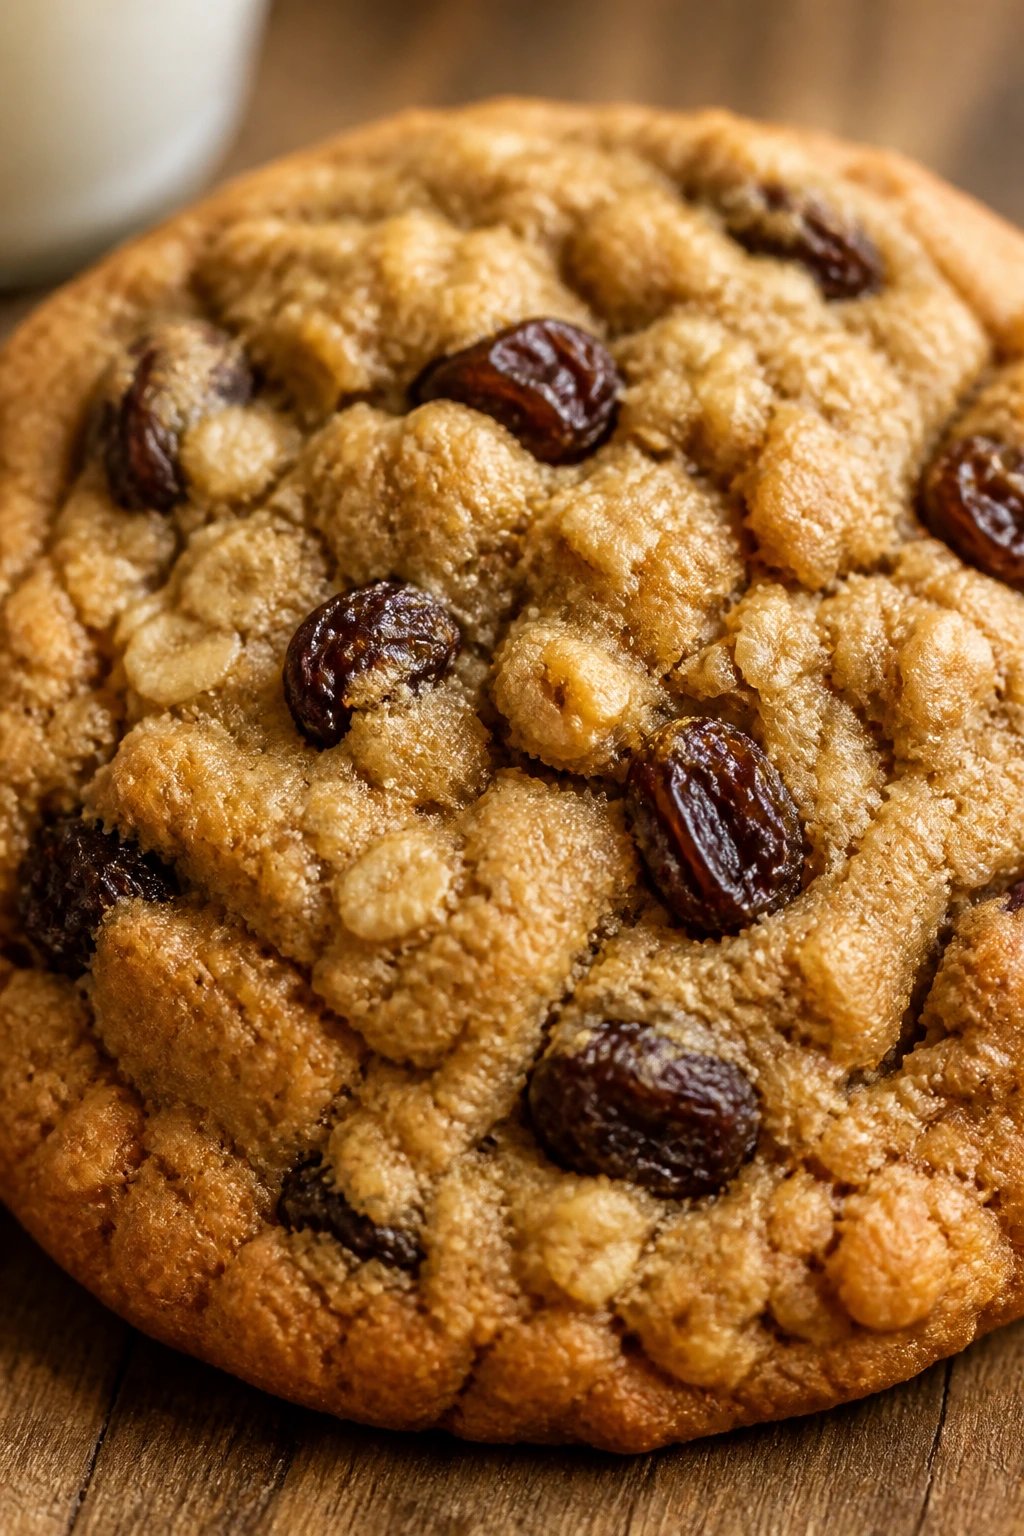
This is the cookie for kids who like their treats mild and a little chewy. The raisins soften in the heat, the oats give the cookie a pleasant bite, and the cinnamon makes the whole thing smell like someone actually baked, not just heated sugar.
Why It Works:
Soft oatmeal raisin cookies sit in the middle ground between snack and dessert. They’re sweet, but not loud. They’re chewy, but not sticky. That balance matters when a picky eater likes the idea of a cookie but not a cookie that snaps apart or crumbles all over the car seat.
Key Ingredients:
- 1 cup unsalted butter, softened — gives the cookies richness.
- 1 cup packed brown sugar — keeps them soft and caramel-like.
- 1/2 cup granulated sugar — adds sweetness and helps with browning.
- 2 large eggs — provide structure.
- 1 teaspoon vanilla extract — deepens the flavor.
- 1 1/2 cups all-purpose flour — the base.
- 2 cups old-fashioned oats — the chewy backbone.
- 1 teaspoon cinnamon — gives the familiar oatmeal-cookie smell.
- 1/2 teaspoon baking soda — helps the cookies spread just enough.
- 1 cup raisins — the sweet little pockets inside.
Quick Steps:
- Heat the oven to 350°F (175°C) and line two baking sheets with parchment.
- Cream the butter and sugars until fluffy, about 2 minutes.
- Beat in the eggs and vanilla, scraping the bowl once.
- Mix in the flour, oats, cinnamon, baking soda, and raisins until just combined.
- Scoop the dough into 2-tablespoon mounds and bake for 10 to 12 minutes until the edges are set and the centers still look soft.
Equipment for This Recipe:
- Stand mixer or hand mixer
- Two baking sheets
- Parchment paper
- Cookie scoop
- Cooling rack
How to Serve This Dish:
Stack them on a plate with apple slices or pack them in wax paper for a snack box. They’re best once they’ve cooled long enough to set, but still tender in the middle.
Pro Tips for This Recipe:
- Soak the raisins in hot water for 5 minutes if you want them extra plump.
- Take the cookies out while the centers still look slightly underdone.
- Use old-fashioned oats, not instant. Instant oats make the texture too soft and pasty.
Variations on This Dish:
- Chocolate Chip Oatmeal Cookies: Replace the raisins with mini chips.
- Apple Oat Cookies: Add 1/4 cup finely diced dried apple.
- Walnut-Free Trail Version: Keep the raisins and add 2 tablespoons sunflower seeds if your kid accepts crunch.
Common Mistakes to Avoid with This Dish:
- Overbaking until crisp: The soft chew is the point.
- Using instant oats: They break down too much and muddy the texture.
9. Cinnamon Sugar Tortilla Chips
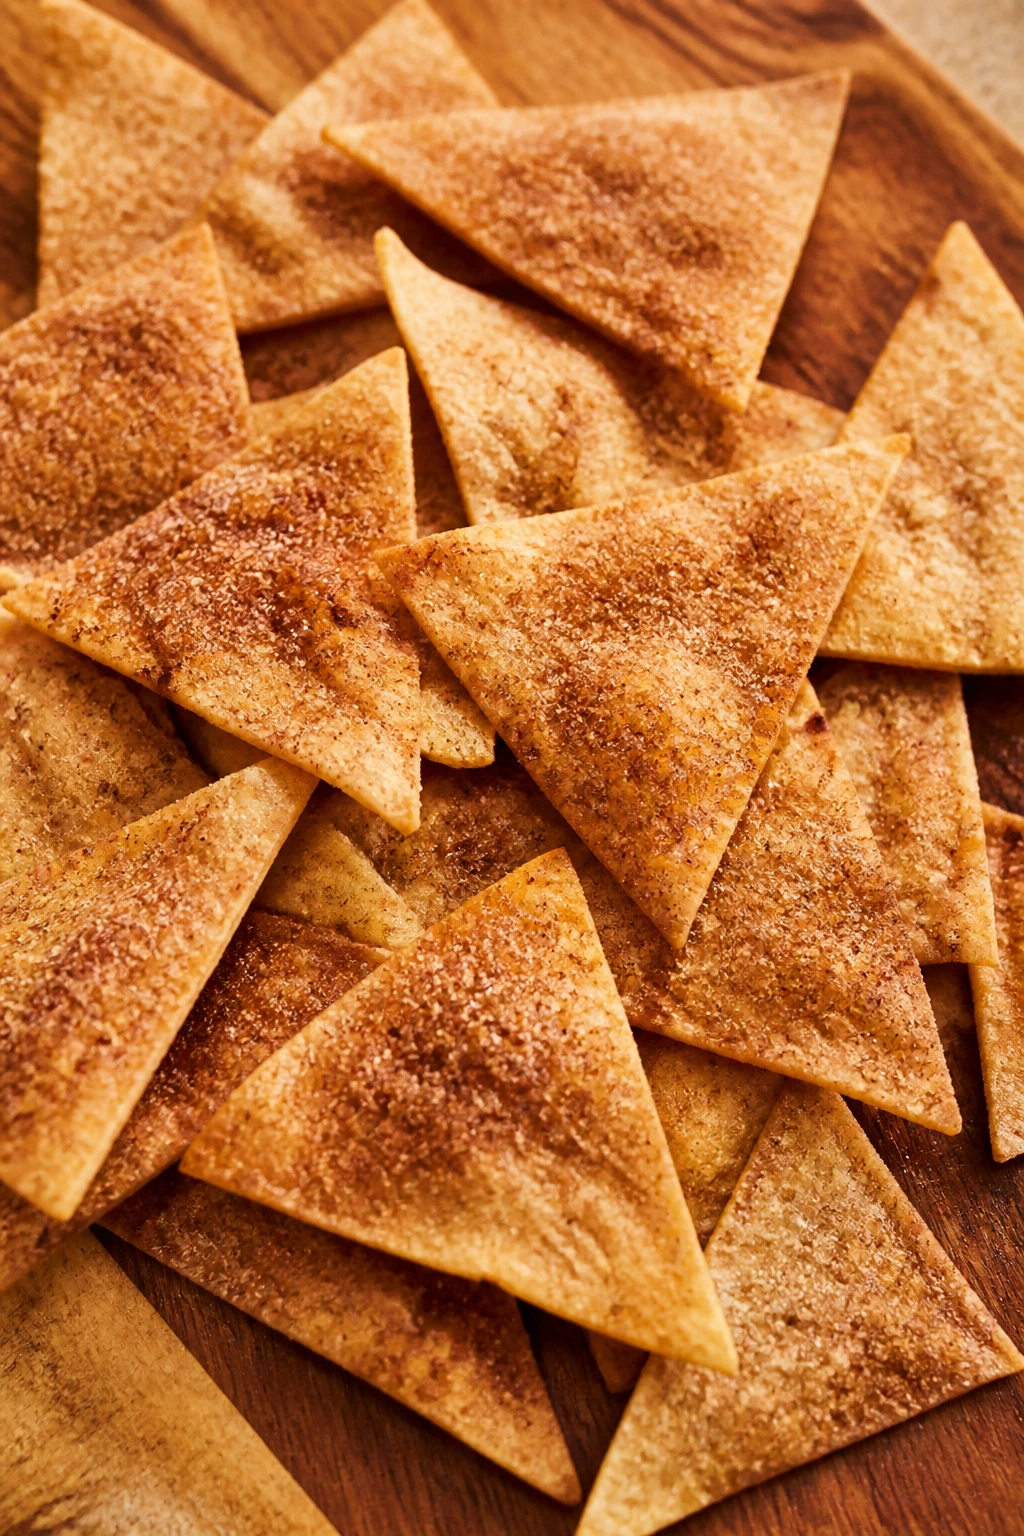
Sometimes the best treat is the cheapest one. These crisp little chips taste like a dessert version of a familiar snack, and they give kids something fun to dunk without handing them a giant frosted pastry.
Why It Works:
Tortillas are mild, pliable, and already familiar to most kids. Once they’re brushed with butter and baked with cinnamon sugar, they turn into a crunchy snack that feels special but never weird. You can also cut them into triangles, which somehow makes them taste more official.
Key Ingredients:
- 6 small flour tortillas — soft enough to cut into clean wedges.
- 3 tablespoons melted butter — helps the sugar stick.
- 1/3 cup granulated sugar — gives the sweet crunch.
- 1 teaspoon cinnamon — the whole flavor profile.
- 1/4 teaspoon fine salt — keeps the sweetness from becoming flat.
- 1 teaspoon vanilla extract — optional, but nice in the butter.
Quick Steps:
- Heat the oven to 375°F (190°C) and line two baking sheets with parchment.
- Mix the sugar, cinnamon, and salt in a small bowl.
- Brush the tortillas lightly with melted butter and cut each one into 8 wedges.
- Sprinkle the cinnamon sugar over both sides of the wedges, then arrange them in a single layer.
- Bake for 8 to 10 minutes, flipping once, until crisp and lightly golden.
Equipment for This Recipe:
- Sharp knife or pizza cutter
- Baking sheets
- Pastry brush
- Small bowl
- Parchment paper
How to Serve This Dish:
Serve them with vanilla yogurt dip, fruit salsa, or melted chocolate on the side. They’re best eaten the same day, when they still crack lightly instead of bending.
Pro Tips for This Recipe:
- Brush the butter thinly. Too much butter makes the chips greasy.
- Keep the wedges in one layer. Overlapping softens the edges.
- Bake until they look barely colored. Dark chips taste bitter.
Variations on This Dish:
- Apple Pie Chips: Add a pinch of apple pie spice to the sugar.
- Chocolate Cinnamon Chips: Dust the baked chips with cocoa-sugar.
- Air-Fryer Batch: Cook in a single layer at 350°F for 4 to 5 minutes.
Common Mistakes to Avoid with This Dish:
- Using too much butter: The chips come out oily instead of crisp.
- Leaving them on the pan too long: Residual heat can push them from golden to bitter.
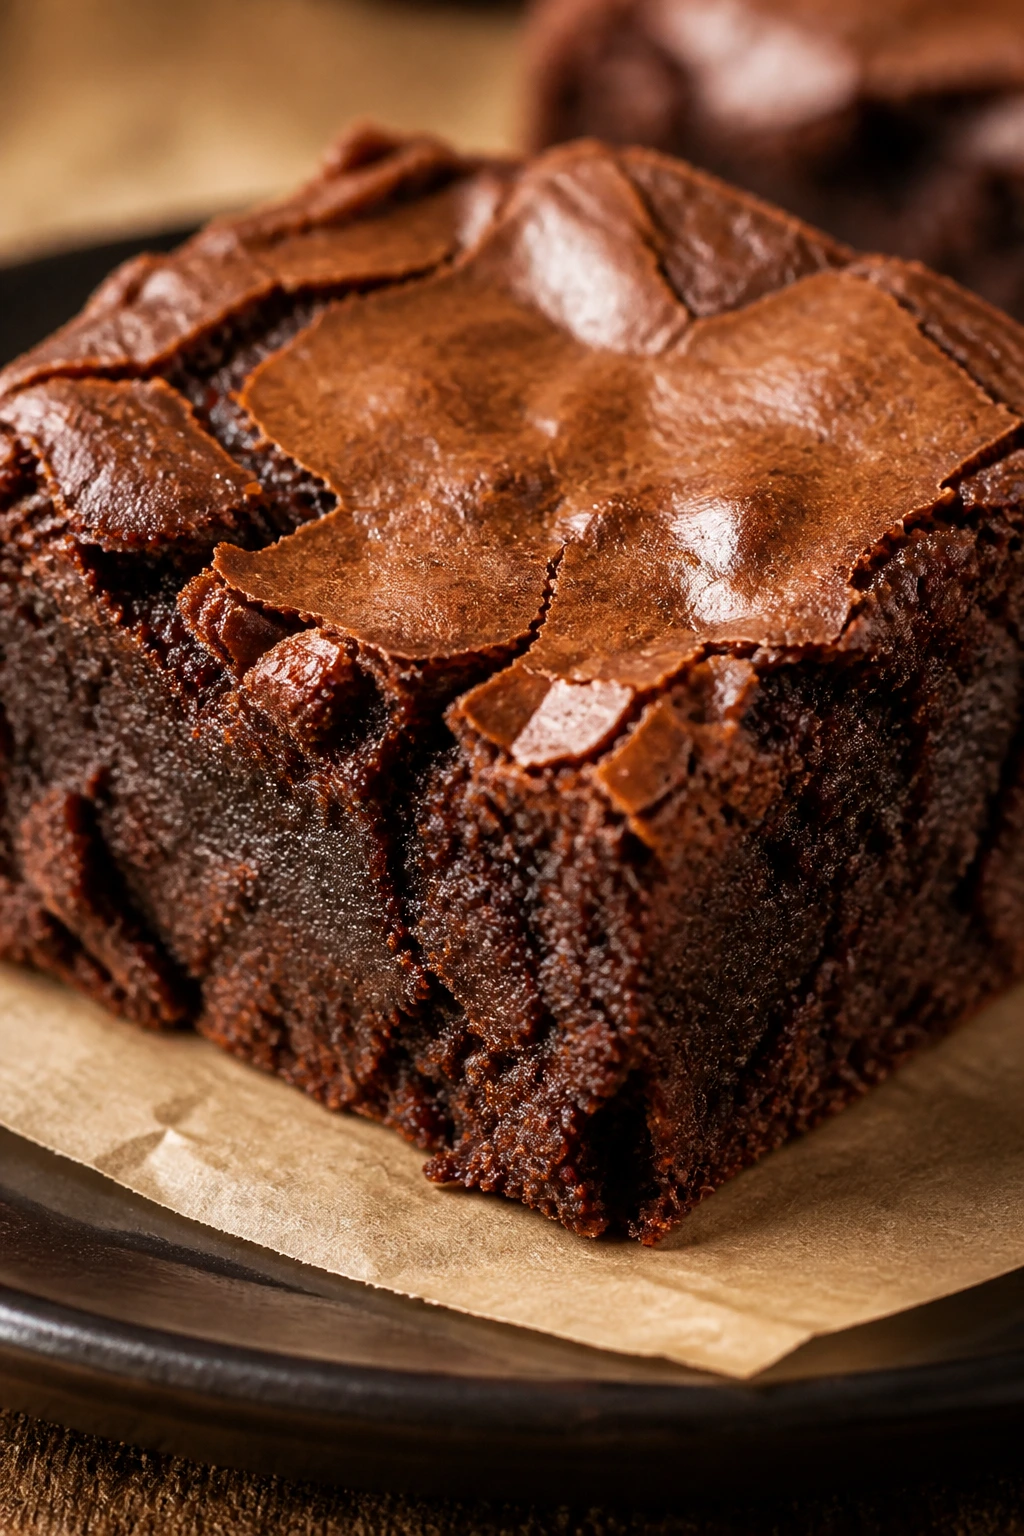
10. Fudgy Brownie Bites
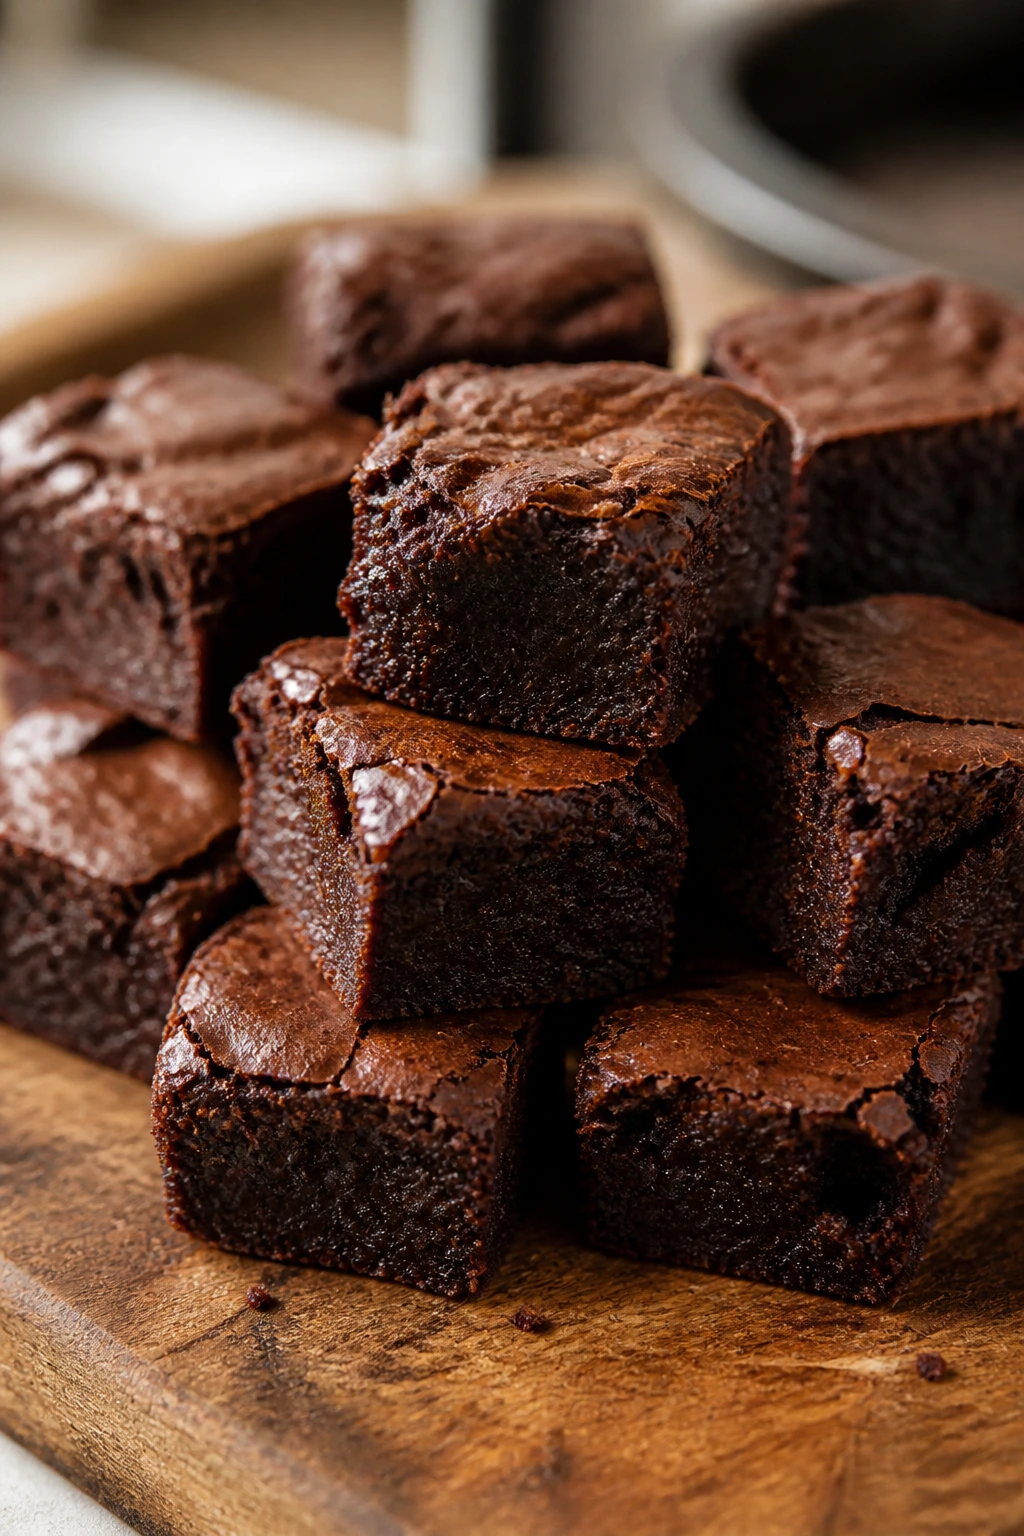
Brownie bites are one of those treats that wins quietly. No frosting. No layer cake. Just a dense, chocolatey little square or dome that feels like the exact right size for a cautious kid who still wants dessert.
Why It Works:
The mini format keeps the brownie from feeling too rich or too serious. A brownie bite can be eaten in two quick nibbles, which lowers the pressure and lets the chocolate flavor do the talking. Baking them in a mini muffin pan also gives you those slightly crisp edges kids often chase first.
Key Ingredients:
- 1/2 cup unsalted butter, melted — gives the brownies richness.
- 1 cup granulated sugar — sweetens the batter.
- 2 large eggs — create the fudgy texture.
- 1 teaspoon vanilla extract — rounds the chocolate.
- 1/3 cup unsweetened cocoa powder — the main chocolate flavor.
- 1/2 cup all-purpose flour — enough structure to hold the bite together.
- 1/4 teaspoon fine salt — balances the sweetness.
- 1/2 cup chocolate chips — extra chocolate pockets.
Quick Steps:
- Preheat the oven to 350°F (175°C) and grease a mini muffin pan well.
- Whisk the melted butter and sugar until glossy, then whisk in the eggs and vanilla.
- Stir in the cocoa powder, flour, and salt until just combined, then fold in the chocolate chips.
- Divide the batter among the mini muffin cups, filling each about 3/4 full.
- Bake for 12 to 14 minutes until the tops look set but the centers still feel soft when touched lightly.
Equipment for This Recipe:
- Mini muffin pan
- Mixing bowl
- Whisk
- Rubber spatula
- Cooling rack
How to Serve This Dish:
Serve warm with a few strawberries on the side or let them cool and stack them on a dessert tray. They taste richer after a short rest, when the center settles into that dense, brownie-like chew.
Pro Tips for This Recipe:
- Don’t beat the batter too long after adding flour. Tough brownies are a letdown.
- Pull them early. Overbaked brownie bites lose the fudgy middle.
- Grease the pan thoroughly or use mini liners. Brownie batter loves sticking.
Variations on This Dish:
- Marshmallow Top: Press a mini marshmallow into each bite halfway through baking.
- Peanut Butter Swirl: Add a tiny dab of peanut butter on top before baking.
- Dairy-Free Batch: Use coconut oil instead of butter.
Common Mistakes to Avoid with This Dish:
- Baking until fully firm: That gives you dry cake, not brownie bites.
- Skipping the pan grease: Mini brownie batter sticks like glue.
11. Rainbow Fruit Kabobs with Yogurt Dip
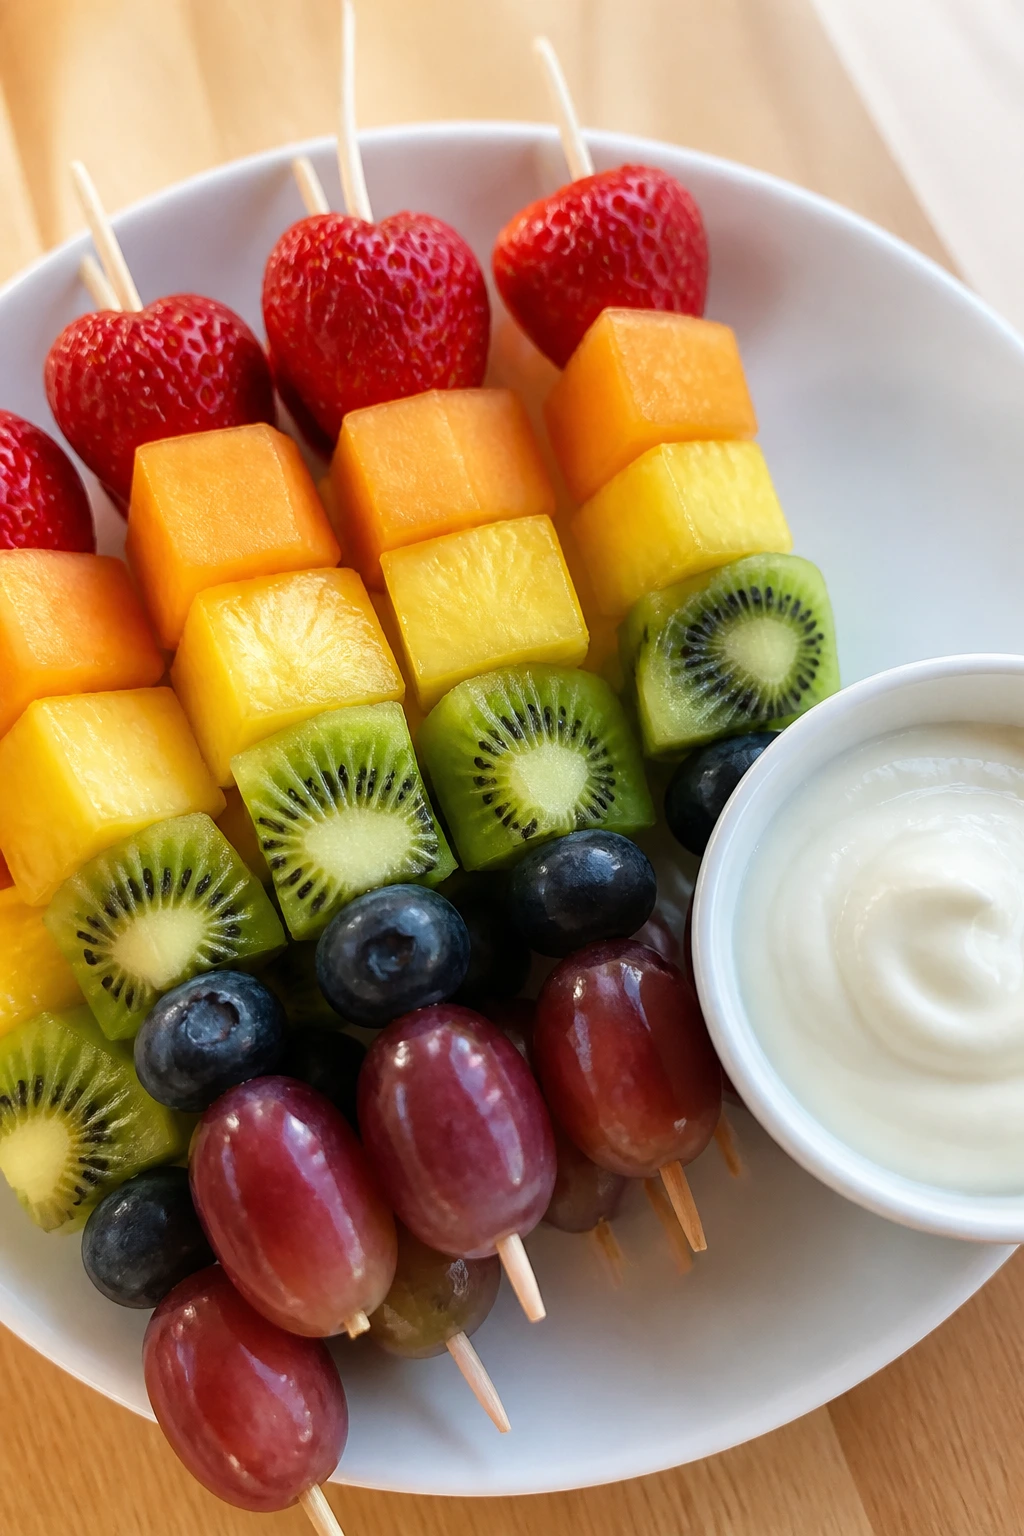
A fruit skewer changes the whole mood of snack time. The pieces look organized, the colors stay separate, and kids can eat one fruit at a time instead of facing a whole mixed bowl that feels like a dare.
Why It Works:
Picky eaters often do better with fruit when each item keeps its own identity. A strawberry is a strawberry. A grape is a grape. There’s no mystery sauce, no mushy mix, no surprise ingredient hiding at the bottom. The yogurt dip adds a familiar sweet creaminess that softens the fruit without burying it.
Key Ingredients:
- 1 cup strawberries, hulled and halved — the red anchor of the skewer.
- 1 cup green grapes — crisp and easy to thread.
- 1 cup pineapple chunks — sweet, soft, and bright.
- 2 bananas, cut into thick coins — mild and familiar.
- 1 cup blueberries — small enough to tuck between bigger pieces.
- 1 cup vanilla yogurt — the dip that makes the fruit feel more like dessert.
- 1 tablespoon honey — sweetens the dip.
- 1/2 teaspoon vanilla extract — gives the dip more dessert flavor.
Quick Steps:
- Whisk the yogurt, honey, and vanilla into a smooth dip and chill it while you assemble the kabobs.
- Thread the fruit onto short skewers in alternating colors and shapes.
- Arrange the skewers on a platter or in a lidded container.
- Serve with the yogurt dip on the side.
- Chill for up to 2 hours if you want a colder snack, but don’t leave the bananas too long or they soften.
Equipment for This Recipe:
- Short wooden skewers
- Cutting board
- Paring knife
- Small bowl
- Serving platter
How to Serve This Dish:
Use short skewers for little hands and set the dip in the center of the tray. These work best as a snack board piece or a party plate, where the colors can stay bright and separate.
Pro Tips for This Recipe:
- Keep the banana pieces thick enough that they don’t split on the skewer.
- Pat the pineapple dry if it’s especially juicy.
- Use short skewers for kids under 6. Long sticks are awkward and can feel like a project.
Variations on This Dish:
- Marshmallow-Fruit Mix: Slip a mini marshmallow between fruit pieces for a sweeter version.
- All-Berry Skewers: Use strawberries, blueberries, and raspberries only.
- Dairy-Free Dip: Swap the yogurt for coconut yogurt.
Common Mistakes to Avoid with This Dish:
- Cutting the fruit too small: Tiny pieces slide and fall apart.
- Assembling too far ahead: Bananas brown and grapes sweat.
12. No-Bake Cornflake Clusters
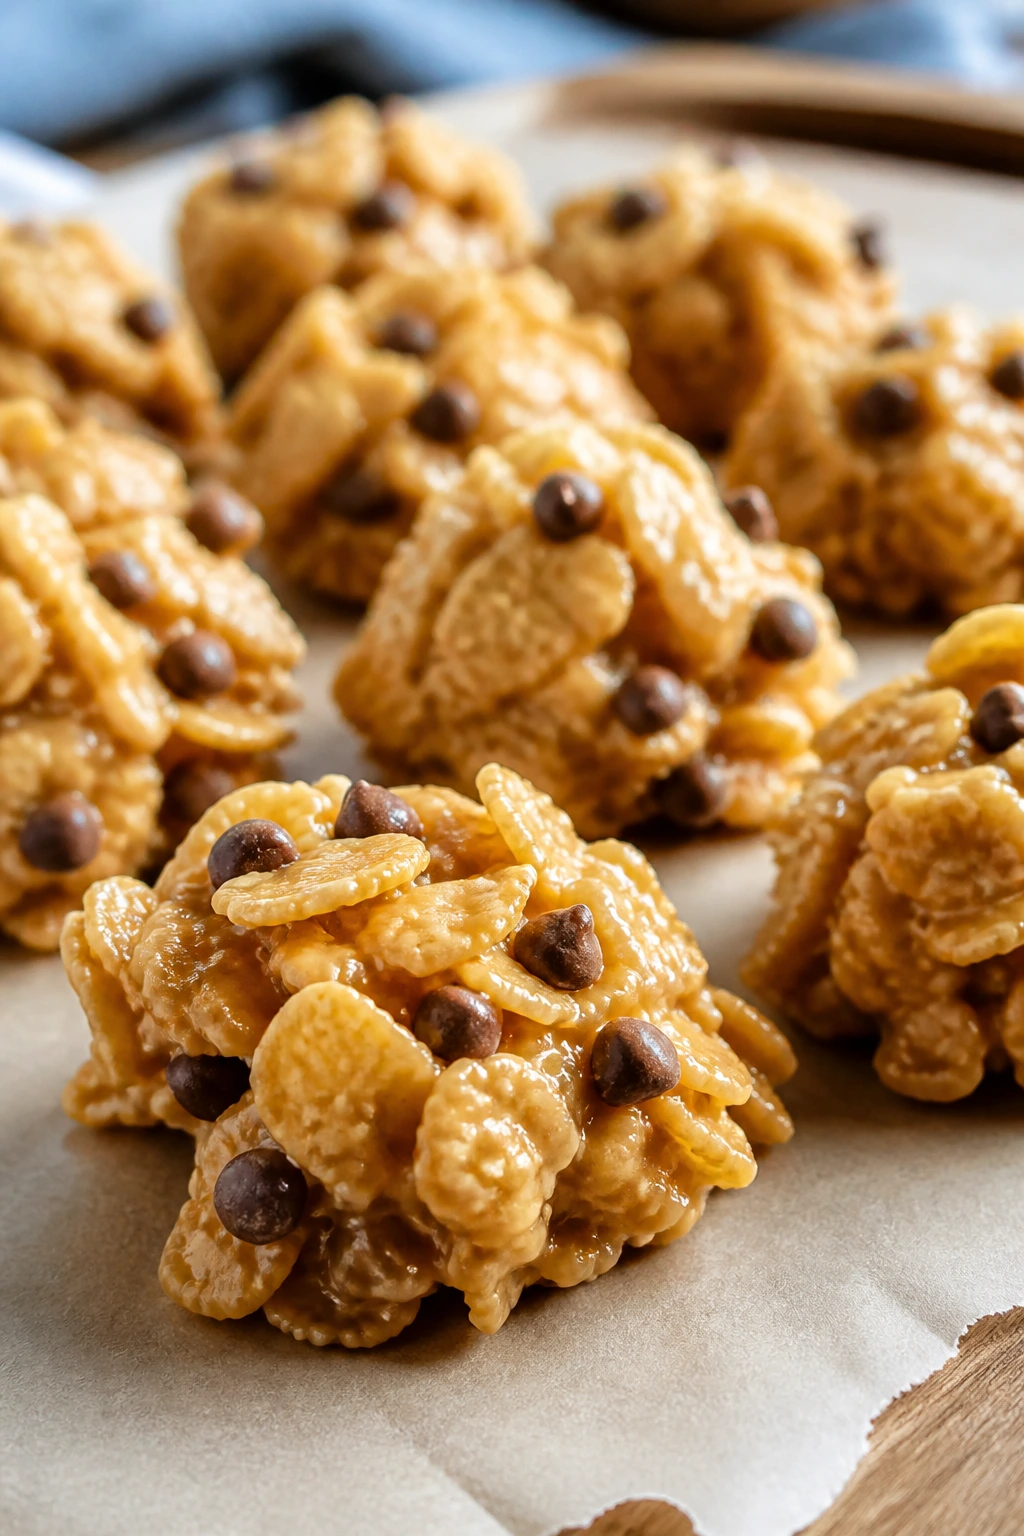
These are plain-looking in the best possible way. A crunchy cluster with a chocolate chip or two inside feels snackable, not fancy, and that matters when the child across the table is already suspicious of anything colorful.
Why It Works:
Cornflakes give the cluster a light crunch that doesn’t fight with the sweet binder. Peanut butter and honey hold everything together without making the texture gooey. Since the pieces are small and irregular, nobody expects a perfect cookie. The bar is low, and that helps.
Key Ingredients:
- 3 cups cornflakes cereal — the crisp base.
- 1/2 cup creamy peanut butter — the binder.
- 1/3 cup honey — sweetens and holds the mixture.
- 1 tablespoon unsalted butter — helps the binder melt smoothly.
- 1/2 teaspoon vanilla extract — softens the peanut butter flavor.
- 1/4 cup mini chocolate chips — tucked in after mixing.
Quick Steps:
- Line a baking sheet with parchment paper.
- Warm the peanut butter, honey, and butter in a small saucepan over low heat until smooth.
- Stir in the vanilla, then pour the mixture over the cornflakes.
- Fold gently until the cereal is coated, then stir in the mini chips.
- Scoop clusters onto the sheet and chill for 20 to 30 minutes until set.
Equipment for This Recipe:
- Small saucepan
- Mixing bowl
- Parchment-lined sheet
- Spoon or scoop
- Refrigerator
How to Serve This Dish:
Serve them in little paper cups or pile them in a bowl next to sliced fruit. They’re a good back-pocket snack for school pickups because they don’t need a fork, a plate, or a speech.
Pro Tips for This Recipe:
- Let the binder cool for 1 minute before adding the cereal so the chips don’t melt.
- Work quickly once the cereal is coated. The mixture sets fast.
- Use a shallow scoop for smaller clusters; they’re easier for kids to handle.
Variations on This Dish:
- Sunflower Butter Clusters: Use sunflower butter for a nut-free version.
- Cinnamon Chip Version: Swap the mini chips for cinnamon chips if you like a warmer flavor.
- Rice Cereal Clusters: Use crispy rice cereal for a lighter crunch.
Common Mistakes to Avoid with This Dish:
- Overstirring: The cereal breaks and turns the mixture dusty.
- Letting the binder get too hot: The peanut butter can seize and thicken oddly.
13. Homemade Fruit Leather
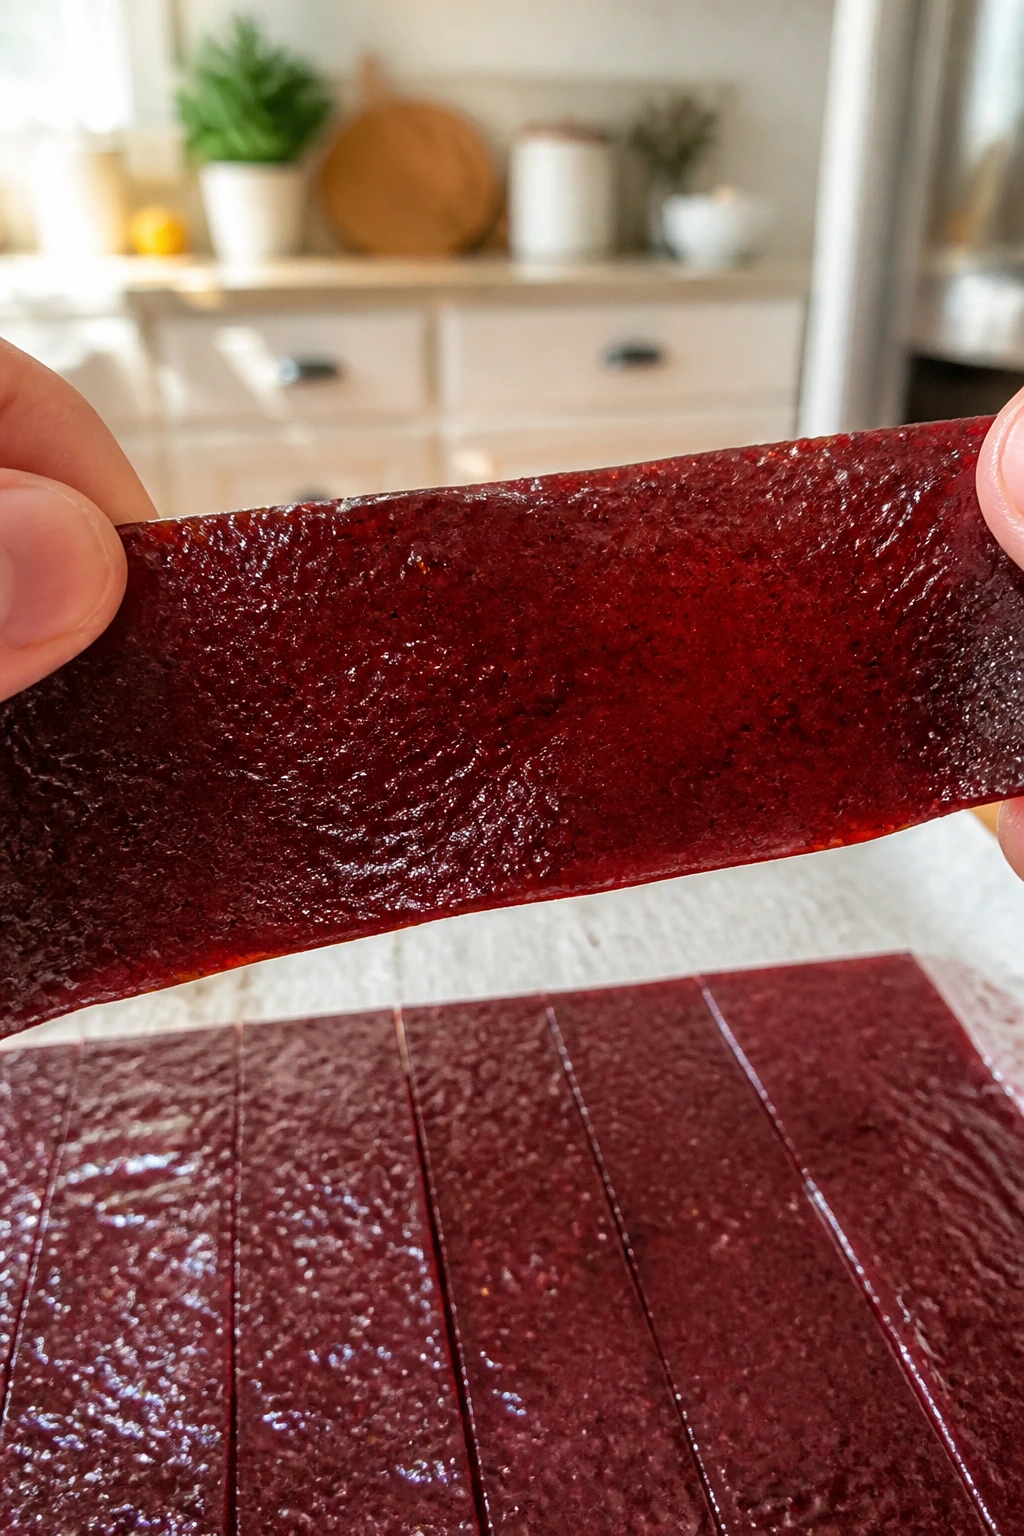
Fruit leather sounds fancier than it is. At heart, it’s just fruit puree dried into a chewy strip, which makes it one of the best ways to hand a picky eater something sweet that doesn’t feel too sticky or too weird.
Why It Works:
The texture is the draw here. Fruit leather gives you a chewy candy-like strip without the hard edge of a dried fruit snack bag. It also concentrates the fruit flavor without adding much that children might argue with — no seeds, no chunks, no mysterious extras.
Key Ingredients:
- 2 cups strawberries — the main fruit flavor.
- 2 cups unsweetened applesauce — helps the puree spread smoothly.
- 2 tablespoons honey — sweetens the mixture.
- 1 tablespoon lemon juice — brightens the fruit.
- 1 teaspoon vanilla extract — softens the flavor.
- Pinch of fine salt — keeps it from tasting flat.
Quick Steps:
- Blend all ingredients until completely smooth.
- Spread the puree on a parchment-lined rimmed baking sheet into a thin rectangle about 1/8 inch thick.
- Bake at 170°F (75°C) for 3 to 4 hours until the surface is dry and no longer sticky when touched.
- Cool completely, then peel the leather from the parchment.
- Cut into strips and roll them in parchment for storage.
Equipment for This Recipe:
- Blender or food processor
- Rimmed baking sheet
- Parchment paper
- Offset spatula
- Sharp knife or kitchen scissors
How to Serve This Dish:
Roll the strips and tuck them into lunchboxes or snack jars. They’re best served at room temperature, where the chew stays pleasant instead of stiff.
Pro Tips for This Recipe:
- Spread the puree evenly. Thick edges dry too fast while the center stays sticky.
- Check the leather toward the end and peel up a corner to test dryness.
- Don’t use a dark baking sheet if your oven runs hot; the edges can over-dry.
Variations on This Dish:
- Apple Berry Leather: Swap half the strawberries for blueberries.
- Mango-Peach Leather: Use canned peaches, well drained, for a softer flavor.
- Strawberry-Banana Roll-Ups: Replace some applesauce with mashed banana.
Common Mistakes to Avoid with This Dish:
- Making the puree too thick: It dries unevenly and cracks.
- Packing it up before fully cool: Condensation softens the leather again.
14. Classic Rice Krispie Treat Squares
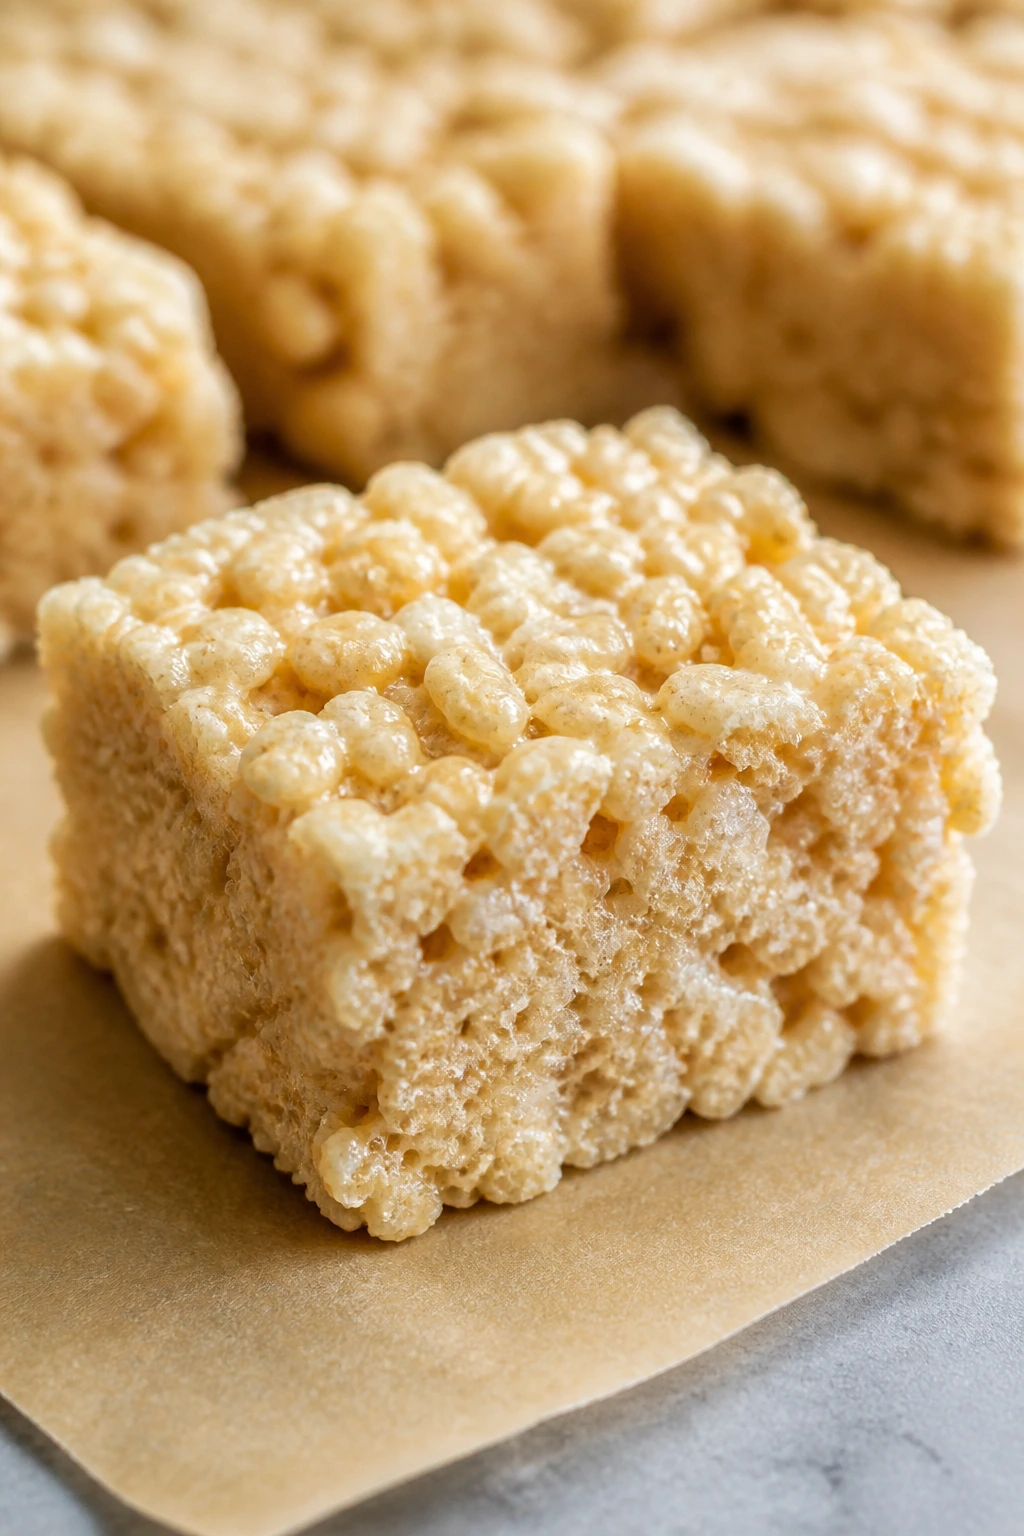
There’s a reason this one never leaves the rotation. Rice Krispie treats are crisp, sweet, and completely recognizable. For a picky eater, that kind of certainty is a gift.
Why It Works:
The marshmallow binder gives you chew without heaviness. The cereal keeps the texture light and familiar. The whole thing is sweet, but not so rich that a child feels stuck after one square. And when you cut them small, they disappear almost suspiciously fast.
Key Ingredients:
- 4 tablespoons unsalted butter — keeps the marshmallow from sticking too hard.
- 1 package mini marshmallows, 10 ounces — the binder and sweetness.
- 1/4 teaspoon fine salt — sharpens the flavor.
- 1 teaspoon vanilla extract — makes the treats taste less one-note.
- 6 cups crispy rice cereal — the crunchy base.
- 2 tablespoons sprinkles, optional — for a festive finish.
Quick Steps:
- Grease an 8×8-inch pan or line it with parchment.
- Melt the butter in a large pot over low heat, then add the marshmallows and salt.
- Stir until smooth, then take the pot off the heat and stir in the vanilla.
- Add the cereal and sprinkles and fold until evenly coated.
- Press the mixture into the pan with a buttered spatula and cool for 30 minutes before cutting.
Equipment for This Recipe:
- Large pot
- 8×8-inch pan
- Rubber spatula
- Parchment paper
- Buttered spoon or spatula for pressing
How to Serve This Dish:
Cut them into small squares and serve at room temperature. A square next to grapes or apple slices makes a good after-school plate without overdoing it.
Pro Tips for This Recipe:
- Use low heat. High heat makes the marshmallow stiff and the treats hard.
- Press gently when packing the pan. Crushing the cereal makes them dense.
- Add sprinkles at the end, not before. They stay brighter that way.
Variations on This Dish:
- Chocolate Drizzle Squares: Drizzle melted chocolate over the cooled treats.
- Peanut Butter Krispies: Stir in 1/4 cup peanut butter with the butter.
- Cinnamon Sugar Version: Mix 1 teaspoon cinnamon into the marshmallow.
Common Mistakes to Avoid with This Dish:
- Pressing too hard: The treats become brick-like.
- Letting the marshmallow boil: That makes the final square tough.
15. Mini Pancake Dippers
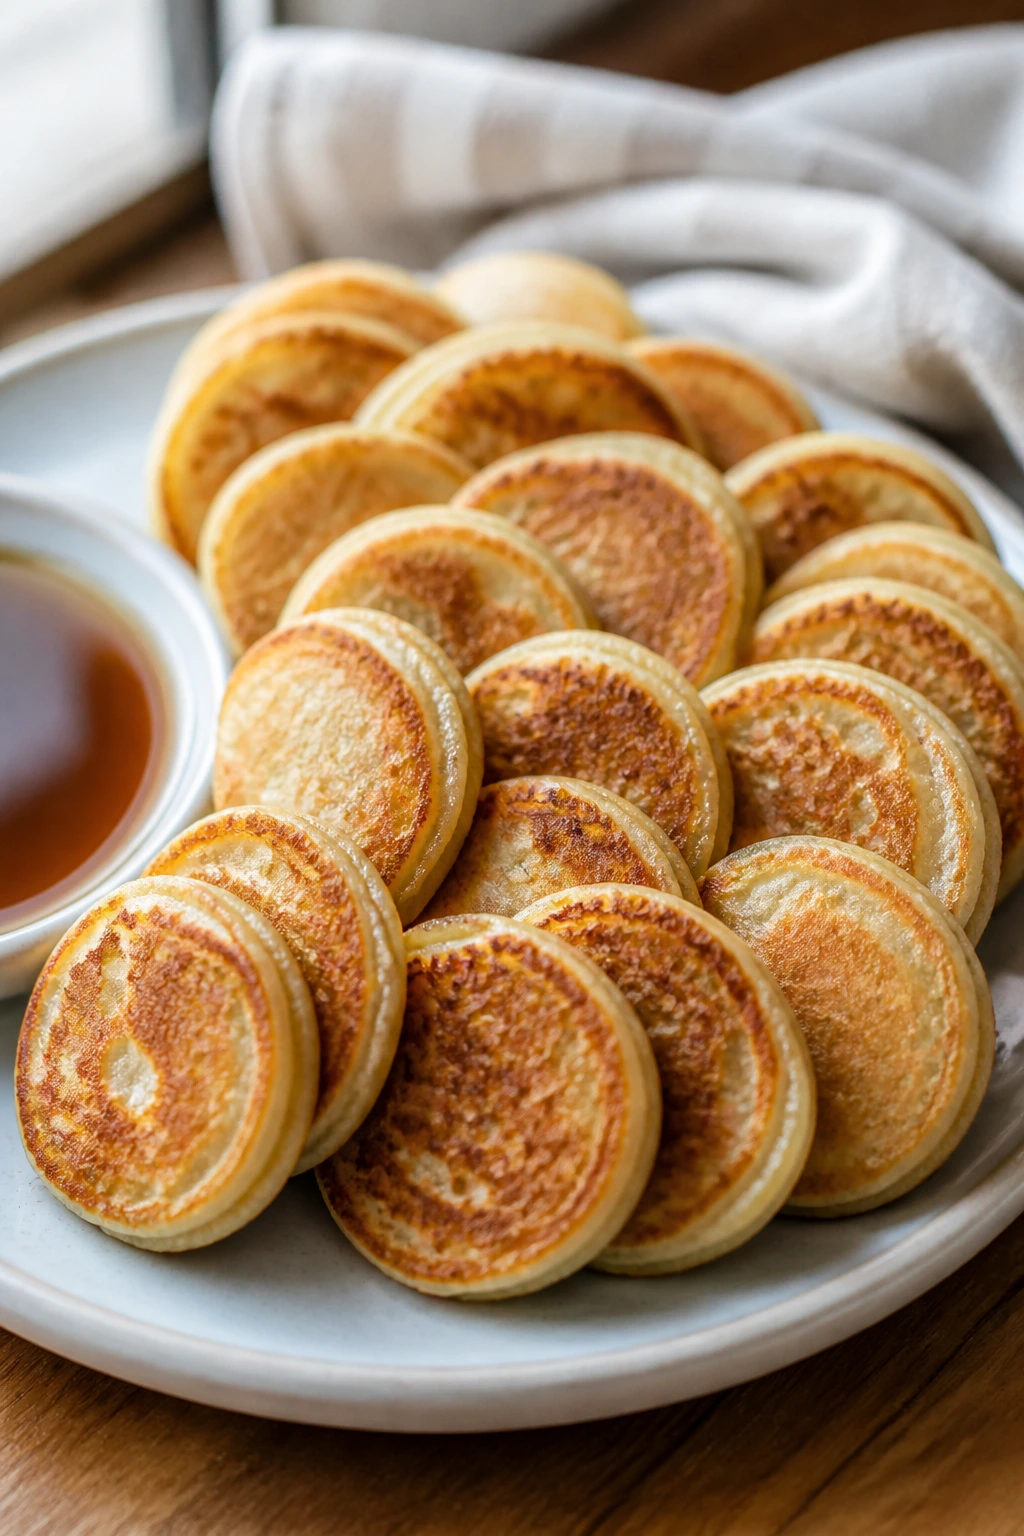
Pancakes are already familiar. Turning them into little dippers makes them feel new without making them scary. That’s a useful trick, and honestly, a very practical one.
Why It Works:
Mini pancakes are naturally portioned and easy to handle. A child can dip one into syrup, yogurt, or fruit sauce without having to commit to a whole stack. The smaller size also gives you more toasted edges, which are usually the part kids grab first.
Key Ingredients:
- 1 cup all-purpose flour — the base of the batter.
- 1 tablespoon sugar — adds just enough sweetness.
- 1 teaspoon baking powder — helps the pancakes rise.
- 1/4 teaspoon fine salt — keeps the flavor balanced.
- 1 cup milk — makes the batter pourable.
- 1 large egg — adds structure.
- 2 tablespoons melted butter — keeps the pancakes tender.
- 1 teaspoon vanilla extract — rounds out the flavor.
- 1/4 cup mini chocolate chips, optional — a kid-friendly add-in.
Quick Steps:
- Whisk the flour, sugar, baking powder, and salt in a bowl.
- Whisk the milk, egg, melted butter, and vanilla in a second bowl.
- Stir the wet ingredients into the dry until just combined, then fold in chocolate chips if using.
- Cook tablespoon-size rounds on a lightly greased skillet over medium heat for 1 to 2 minutes per side, until the tops bubble and the bottoms turn golden.
- Serve warm with syrup, yogurt, or fruit dip.
Equipment for This Recipe:
- Mixing bowls
- Whisk
- Nonstick skillet or griddle
- Spatula
- Measuring spoons
How to Serve This Dish:
Stack the dippers in a small basket with a cup of syrup or yogurt for dunking. They’re best warm, when the centers are soft and the edges still have a little color.
Pro Tips for This Recipe:
- Keep the batter slightly thick. Thin batter spreads too much.
- Wipe the pan between batches if the butter starts to brown.
- Use a small spoon so the pancakes stay bite-size.
Variations on This Dish:
- Blueberry Dippers: Drop a few blueberries into each pancake after pouring.
- Cinnamon Pancake Bites: Add 1/2 teaspoon cinnamon to the batter.
- Savory-Sweet Swap: Skip the sugar and serve with maple yogurt.
Common Mistakes to Avoid with This Dish:
- Cooking too hot: The outside browns before the center sets.
- Making them too large: Kids lose interest when they feel like full pancakes.
16. Chocolate-Dipped Pretzel Rods

Sweet, salty, crisp, and tidy. Pretzel rods are one of the rare treats that feel playful without requiring a recipe explanation longer than the snack itself.
Why It Works:
The salty pretzel gives the chocolate something to cling to, and the rod shape is easy for little hands to manage. You can dip half or all of the rod, then add sprinkles or crushed cereal to make it look festive without changing the flavor too much. Picky eaters usually understand this one instantly.
Key Ingredients:
- 12 pretzel rods — the base.
- 1 cup milk chocolate chips — the main coating.
- 1/2 cup white chocolate chips — for drizzling.
- 1 teaspoon coconut oil — helps the chocolate melt smoothly.
- 2 tablespoons sprinkles — a kid-friendly finish.
- 2 tablespoons crushed cereal — optional crunch on the coating.
Quick Steps:
- Line a sheet pan with parchment paper.
- Melt the milk chocolate chips with the coconut oil in a microwave-safe bowl in 20-second bursts, stirring between each one.
- Dip each pretzel rod halfway into the chocolate, letting the excess drip off.
- Scatter sprinkles or crushed cereal over the wet chocolate and set the rods on the parchment.
- Melt the white chocolate and drizzle it over the set rods after 20 minutes, then let them harden fully.
Equipment for This Recipe:
- Microwave-safe bowl
- Parchment-lined sheet pan
- Spoon or fork for drizzling
- Small spatula
- Cooling space
How to Serve This Dish:
Stand them upright in a glass or lay them in a neat row on a tray. They work well as a party snack or a lunchbox treat if you break them in half before packing.
Pro Tips for This Recipe:
- Dry the pretzels well if they’ve been opened a while; humidity makes the chocolate seize.
- Don’t overheat the chocolate. Stir often and stop when a few chips still remain.
- Use mini sprinkles. Large ones slide off more easily.
Variations on This Dish:
- Cookies-and-Cream Rods: Dip in white chocolate and roll in crushed sandwich cookies.
- Rainbow Sprinkle Rods: Use a mix of small sprinkles for a birthday feel.
- Peppermint Version: Add crushed peppermint candies if the kid likes mint.
Common Mistakes to Avoid with This Dish:
- Dipping wet pretzels: Moisture ruins the chocolate.
- Adding toppings too late: They won’t stick once the coating begins to set.
17. Baked Cinnamon Apples

A warm baked apple is one of the gentlest desserts you can put in front of a suspicious kid. It smells like pie, tastes familiar, and doesn’t come with a crust or a fork battle.
Why It Works:
Baking softens the apple without turning it into mush. Cinnamon and brown sugar make the whole thing taste like a sweeter version of breakfast. When you keep the pieces or halves intact, the fruit still looks recognizable, which helps kids trust it.
Key Ingredients:
- 4 medium apples — firm varieties hold up best.
- 2 tablespoons butter, cut into bits — adds richness.
- 3 tablespoons brown sugar — sweetens the apples.
- 1 teaspoon cinnamon — the classic warm spice.
- 1/4 cup old-fashioned oats — optional for a little texture.
- 1 tablespoon lemon juice — keeps the apples bright.
Quick Steps:
- Heat the oven to 375°F (190°C) and grease a small baking dish.
- Core the apples and slice them into thick wedges or halve them if you want a more dramatic look.
- Toss the apples with lemon juice, brown sugar, and cinnamon, then arrange them in the dish.
- Dot with butter and sprinkle oats over the top if using.
- Bake for 25 to 30 minutes until the apples are tender and the syrup in the dish looks glossy.
Equipment for This Recipe:
- Sharp knife
- Cutting board
- Baking dish
- Spoon
- Foil, optional
How to Serve This Dish:
Serve warm with a spoonful of yogurt or a scoop of vanilla ice cream. If you’re keeping it more snack-like, let the apples cool until they’re just warm and serve them in small bowls.
Pro Tips for This Recipe:
- Use apples that keep their shape, like Honeycrisp or Gala.
- If the fruit gets soft too fast, cover loosely with foil halfway through.
- A pinch of salt makes the syrup taste more like dessert and less like boiled fruit.
Variations on This Dish:
- Apple Crisp Cups: Top the apples with extra oats and crushed graham crackers.
- Caramel Apple Style: Add a spoonful of caramel after baking.
- Pear Version: Swap in firm pears for a softer flavor.
Common Mistakes to Avoid with This Dish:
- Using mealy apples: They turn to mush before the sugar melts.
- Overbaking: You want tender slices, not collapsed fruit.
18. Frozen Banana Pops
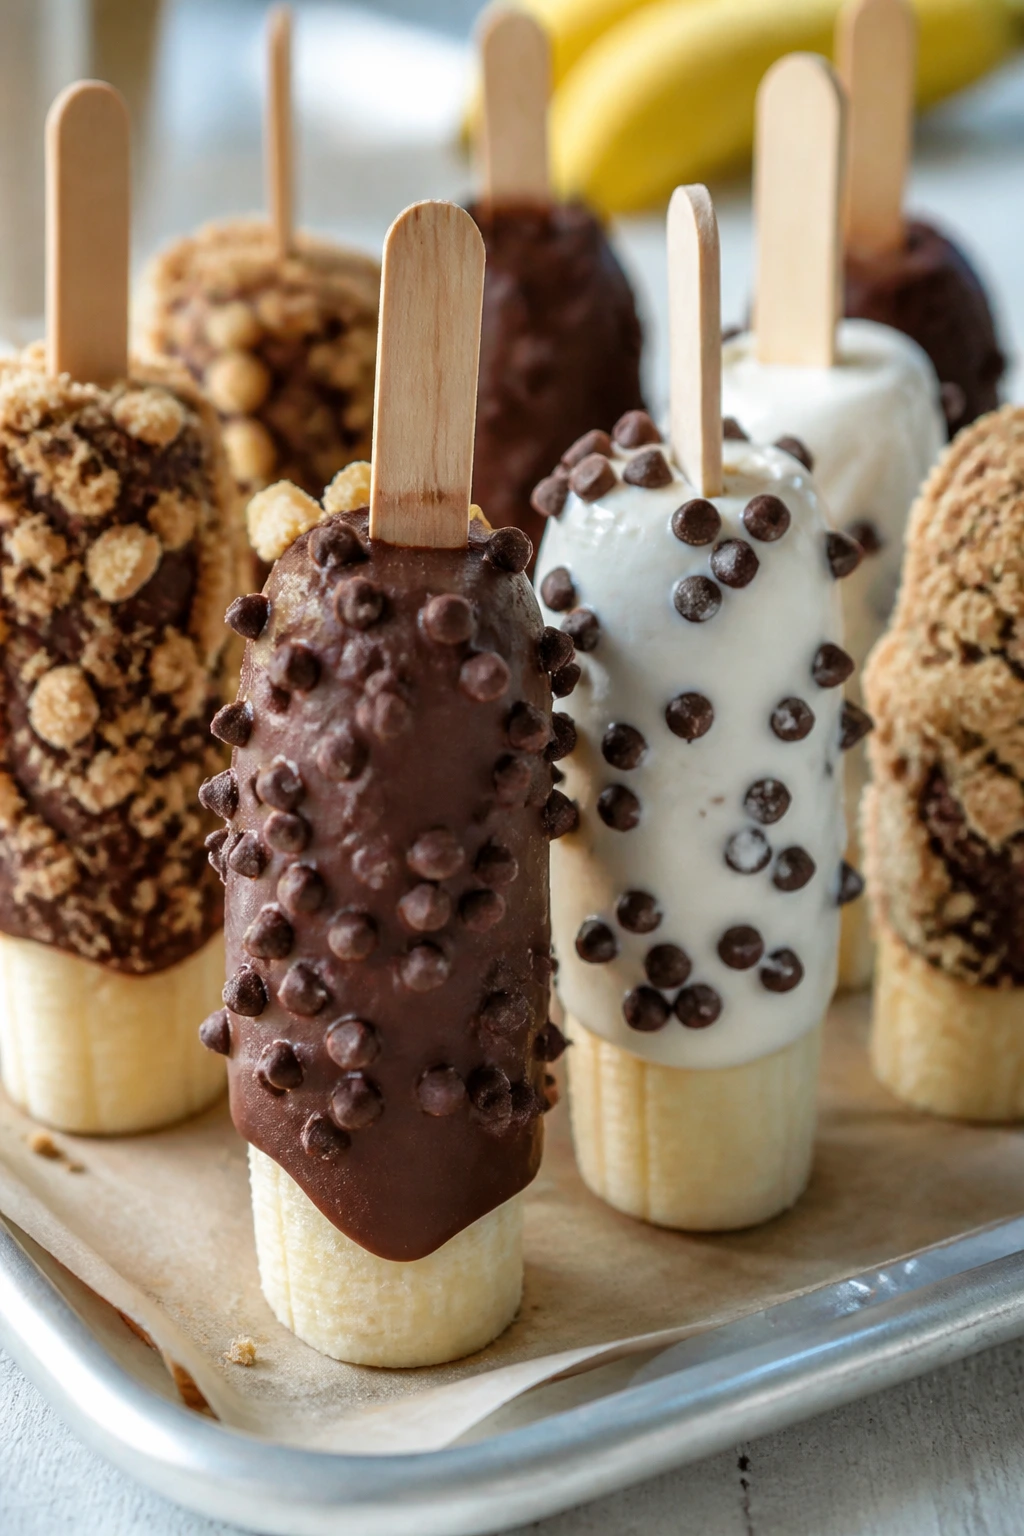
Frozen banana pops are one of those treats that feels a little silly in the best way. The banana stays recognizable, the coating adds the fun, and the stick makes the whole thing feel like a summer-only event even if you’re making it indoors.
Why It Works:
Bananas go sweet and creamy when frozen, which makes them a natural base for chocolate or yogurt coatings. The toppings let you keep the flavor familiar — mini chips, graham crumbs, sprinkles — instead of piling on the kind of mix-ins picky eaters will dig out and abandon on the plate.
Key Ingredients:
- 3 ripe bananas — firm enough to slice and freeze.
- 1 1/2 cups vanilla yogurt or melted chocolate — the coating.
- 1/4 cup mini chocolate chips — topping.
- 1/4 cup crushed graham crackers — extra crunch.
- 2 tablespoons sprinkles — playful finish.
- 1 tablespoon honey — optional if using plain yogurt.
Quick Steps:
- Peel and cut the bananas in half, then insert a stick into each piece.
- Freeze the bananas for 30 minutes so they firm up before dipping.
- Dip each banana half into yogurt or melted chocolate, letting the excess drip off.
- Roll in toppings immediately and lay on a parchment-lined tray.
- Freeze for 1 to 2 hours until solid.
Equipment for This Recipe:
- Popsicle sticks
- Parchment-lined sheet pan
- Microwave-safe bowl if using chocolate
- Small bowls for toppings
- Freezer-safe container
How to Serve This Dish:
Serve them straight from the freezer on a tray lined with parchment. They’re best eaten outside the kitchen, honestly, because they melt fast and kids do not like sticky fingers on important surfaces.
Pro Tips for This Recipe:
- Freeze the banana before dipping. Warm bananas fall off the stick.
- Work in small batches so the coating stays wet enough for toppings.
- If you use yogurt, choose thick yogurt so the coating doesn’t slide.
Variations on This Dish:
- Peanut Butter Banana Pops: Add a thin peanut butter layer under the coating.
- Chocolate-Only Pops: Dip in chocolate and skip the toppings.
- Berry Banana Pops: Roll the wet coating in finely crushed freeze-dried berries.
Common Mistakes to Avoid with This Dish:
- Skipping the pre-freeze: The bananas get soft and slippery during dipping.
- Using a thin coating: It freezes patchy and cracks badly.
19. Pumpkin Mini Muffins
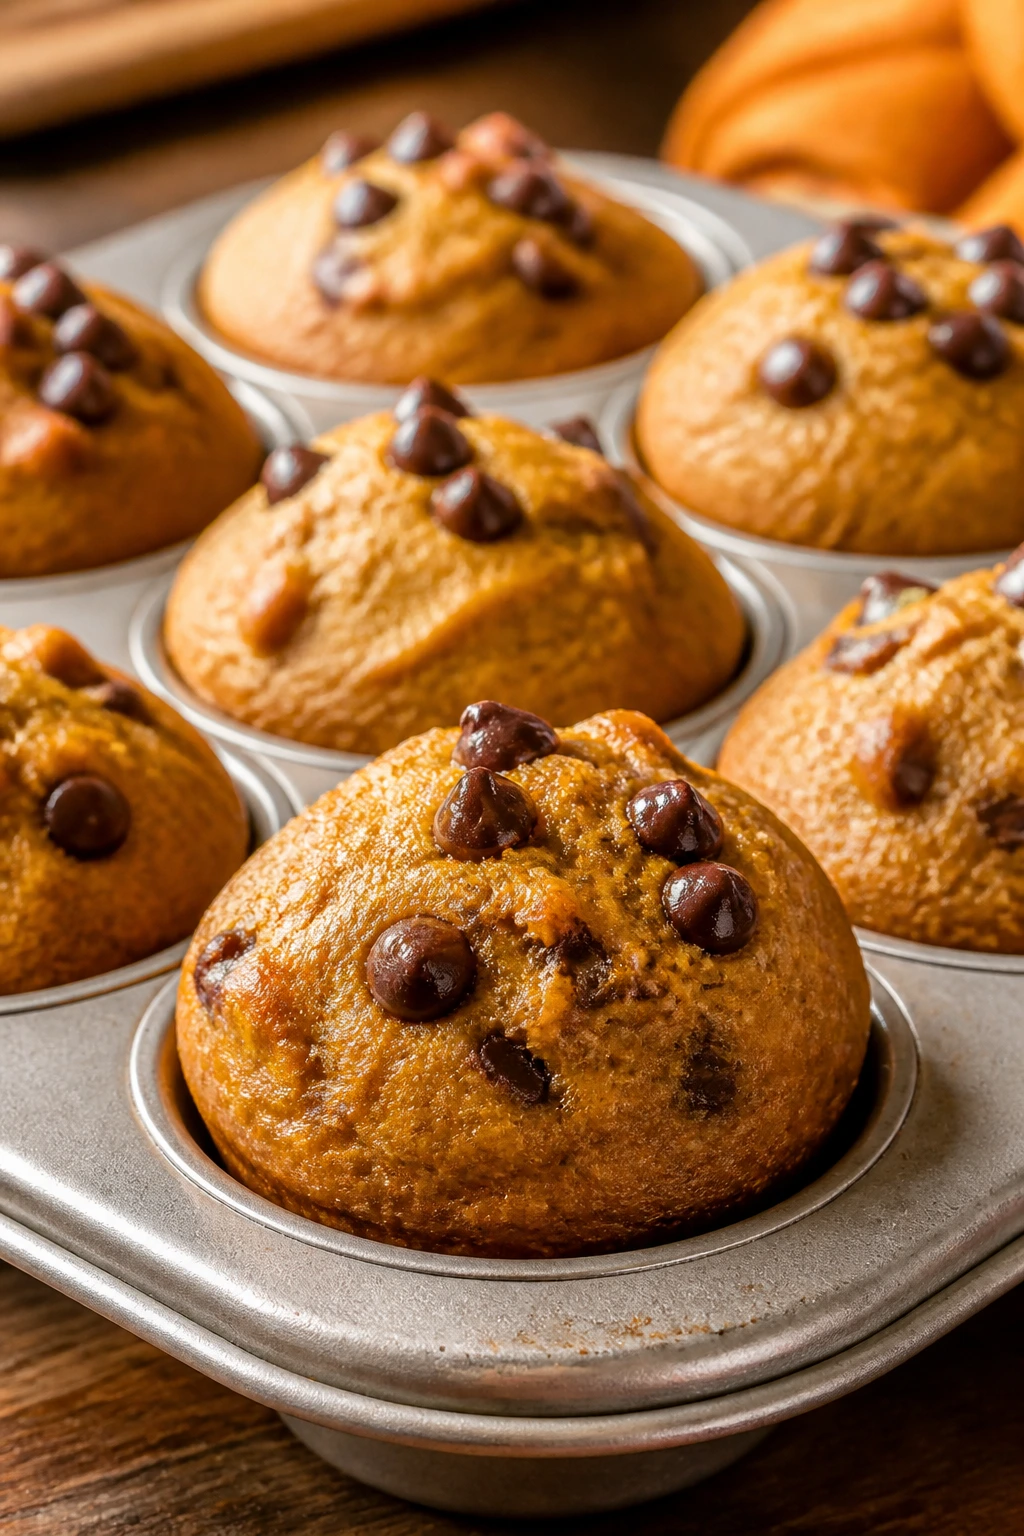
Pumpkin mini muffins are soft, mellow, and easy to like. They’re not trying to be dramatic. That’s part of the charm. The flavor is cozy, the crumb is tender, and the size makes them feel like a snack instead of a statement.
Why It Works:
Pumpkin adds moisture without making the muffins heavy, which is useful when you want something that tastes like a treat but still feels light enough for a snack plate. The mini size keeps the spice level from overwhelming sensitive kids. A few chocolate chips on top can tip the whole thing toward dessert without changing the recipe much.
Key Ingredients:
- 1 cup pumpkin puree — the moist base.
- 1 1/2 cups all-purpose flour — structure for the muffins.
- 1/2 cup granulated sugar — sweetens the batter.
- 1 large egg — binds everything.
- 1/3 cup neutral oil — keeps the crumb soft.
- 1 teaspoon baking powder — helps the muffins rise.
- 1/2 teaspoon baking soda — gives extra lift.
- 1 teaspoon cinnamon — the main spice.
- 1/4 teaspoon salt — keeps the flavor balanced.
- 1/2 cup mini chocolate chips, optional — a kid-friendly finish.
Quick Steps:
- Preheat the oven to 350°F (175°C) and grease a mini muffin pan.
- Whisk the pumpkin, sugar, egg, and oil until smooth.
- Stir in the flour, baking powder, baking soda, cinnamon, and salt until just combined.
- Fold in chocolate chips if using, then divide the batter among the muffin cups.
- Bake for 12 to 14 minutes until the tops spring back lightly and a toothpick comes out with a few crumbs.
Equipment for This Recipe:
- Mini muffin pan
- Mixing bowl
- Whisk
- Spatula
- Cooling rack
How to Serve This Dish:
Serve them warm with apple slices or a little yogurt on the side. They’re good at breakfast, but they also work as a dessert because the mini chips give them that small, sweet wink.
Pro Tips for This Recipe:
- Use pure pumpkin puree, not pie filling.
- Don’t overmix once the flour goes in.
- Let them cool for 5 minutes before removing or they can split.
Variations on This Dish:
- Maple Pumpkin Muffins: Replace 2 tablespoons sugar with maple syrup.
- Plain Pumpkin Spice: Skip the chips if the child prefers a bare-bones muffin.
- Dairy-Free Option: Use oil instead of butter, which the recipe already does.
Common Mistakes to Avoid with This Dish:
- Using too much spice: It can overwhelm kids who already distrust pumpkin.
- Underbaking the centers: Mini muffins look done before they actually are.
20. Berry Banana Smoothie Pops
Smoothie pops are what happen when a breakfast smoothie learns to behave. They’re cold, fruity, and sweet, but the stick and the mold make them feel like dessert instead of something a parent is trying to pass off as “healthy.”
Why It Works:
Banana adds sweetness and creaminess, which means you don’t need much sugar at all. Berries bring color and a familiar fruity flavor, and yogurt keeps the pop from freezing into a hard ice cube. That creamy middle is what gets kids to come back for another one.
Key Ingredients:
- 2 ripe bananas — natural sweetness and body.
- 1 cup strawberries — the main berry flavor.
- 1 cup vanilla yogurt — makes the pops creamy.
- 1/2 cup milk — helps the mixture blend.
- 2 tablespoons honey — optional, for extra sweetness.
- 1 teaspoon vanilla extract — softens the berry flavor.
Quick Steps:
- Blend the bananas, strawberries, yogurt, milk, honey, and vanilla until smooth.
- Taste the mixture and add a touch more honey if the berries are tart.
- Pour into molds and tap the molds gently on the counter to release air bubbles.
- Freeze for 4 to 6 hours until fully set.
- Unmold the pops by running the outside under warm water for a few seconds.
Equipment for This Recipe:
- Blender
- Popsicle molds
- Popsicle sticks
- Measuring cups
- Freezer
How to Serve This Dish:
Serve the pops straight from the freezer, with a napkin nearby because they melt faster than kids can decide which one looks best. They’re a good choice after a hot afternoon or as a low-drama dessert after dinner.
Pro Tips for This Recipe:
- Use ripe bananas for sweetness and smoother texture.
- Blend long enough that no berry bits remain if your kid dislikes seeds.
- Freeze them on a flat shelf so the molds stay level.
Variations on This Dish:
- Mango Banana Pops: Swap strawberries for mango.
- Chocolate Berry Pops: Add 2 tablespoons cocoa powder to the blender.
- Dairy-Free Pops: Use coconut yogurt and almond milk.
Common Mistakes to Avoid with This Dish:
- Too much liquid: The pops turn icy instead of creamy.
- Trying to unmold too early: They break at the stick and make everybody annoyed.
21. Cheesecake Yogurt Dip
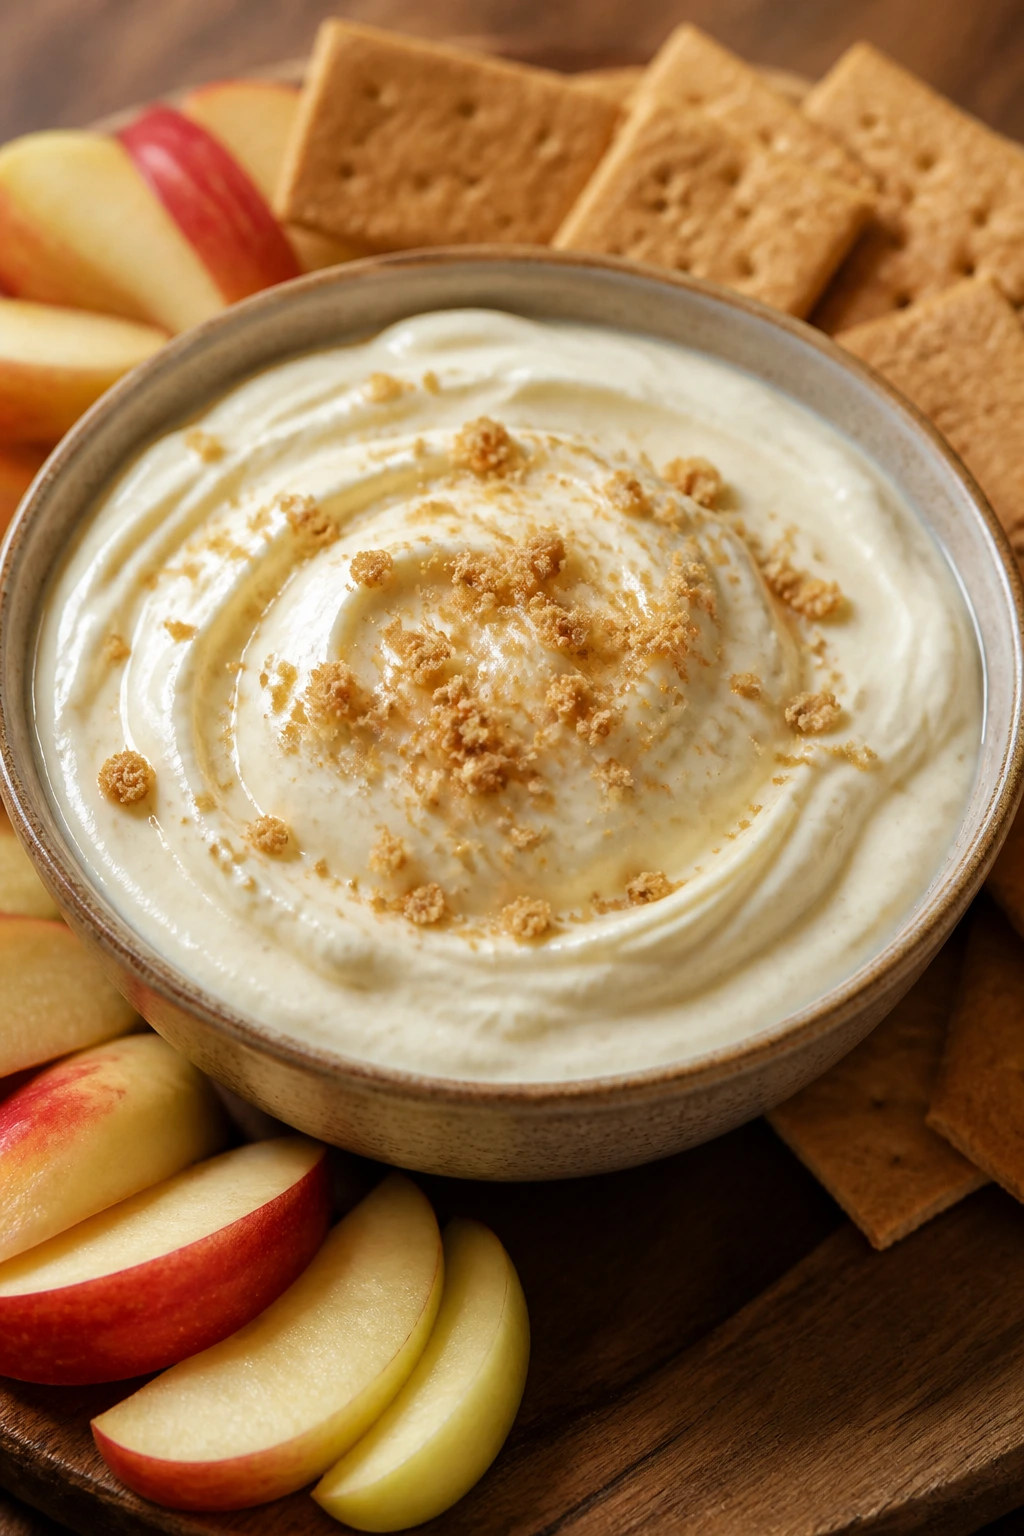
This dip tastes like dessert but behaves like a snack. Creamy, lightly sweet, and soft enough to spread on anything from graham crackers to apple slices, it solves the “I want something sweet, but not too sweet” problem neatly.
Why It Works:
Cream cheese gives the dip that cheesecake-like body, while yogurt keeps it lighter and easier to scoop. The vanilla and lemon zest make the flavor pop without pushing it into actual cheesecake territory, which is handy when kids like the idea more than the full commitment.
Key Ingredients:
- 8 ounces cream cheese, softened — the thick base.
- 1 cup plain or vanilla Greek yogurt — lightens the texture.
- 1/3 cup powdered sugar — sweetens without grit.
- 1 teaspoon vanilla extract — the dessert note.
- 1 teaspoon lemon zest — brightens the flavor.
- Pinch of salt — keeps it from tasting flat.
Quick Steps:
- Beat the cream cheese until smooth.
- Add the yogurt, powdered sugar, vanilla, lemon zest, and salt and beat again until fluffy.
- Chill for 15 to 20 minutes so it thickens a little.
- Serve in a small bowl with dippers on the side.
Equipment for This Recipe:
- Mixing bowl
- Hand mixer or whisk
- Zester or microplane
- Serving bowl
- Spoon
How to Serve This Dish:
Set it on a snack tray with graham crackers, strawberries, pretzels, and apple slices. It plays well with almost anything crisp or mildly sweet, which is why it earns its keep.
Pro Tips for This Recipe:
- Soften the cream cheese fully or you’ll chase lumps for longer than you want.
- Chill the dip before serving if you want it thicker.
- Use a tiny bit of lemon zest. Too much makes it sharp.
Variations on This Dish:
- Chocolate Cheesecake Dip: Stir in 2 tablespoons cocoa powder.
- Strawberry Cheesecake Dip: Fold in 2 tablespoons strawberry jam.
- Dairy-Free Version: Use dairy-free cream cheese and coconut yogurt.
Common Mistakes to Avoid with This Dish:
- Serving it too cold from the fridge: It can taste stiff and bland.
- Over-sweetening: Then it stops tasting like cheesecake and starts tasting like frosting.
22. Mini Blueberry Hand Pies
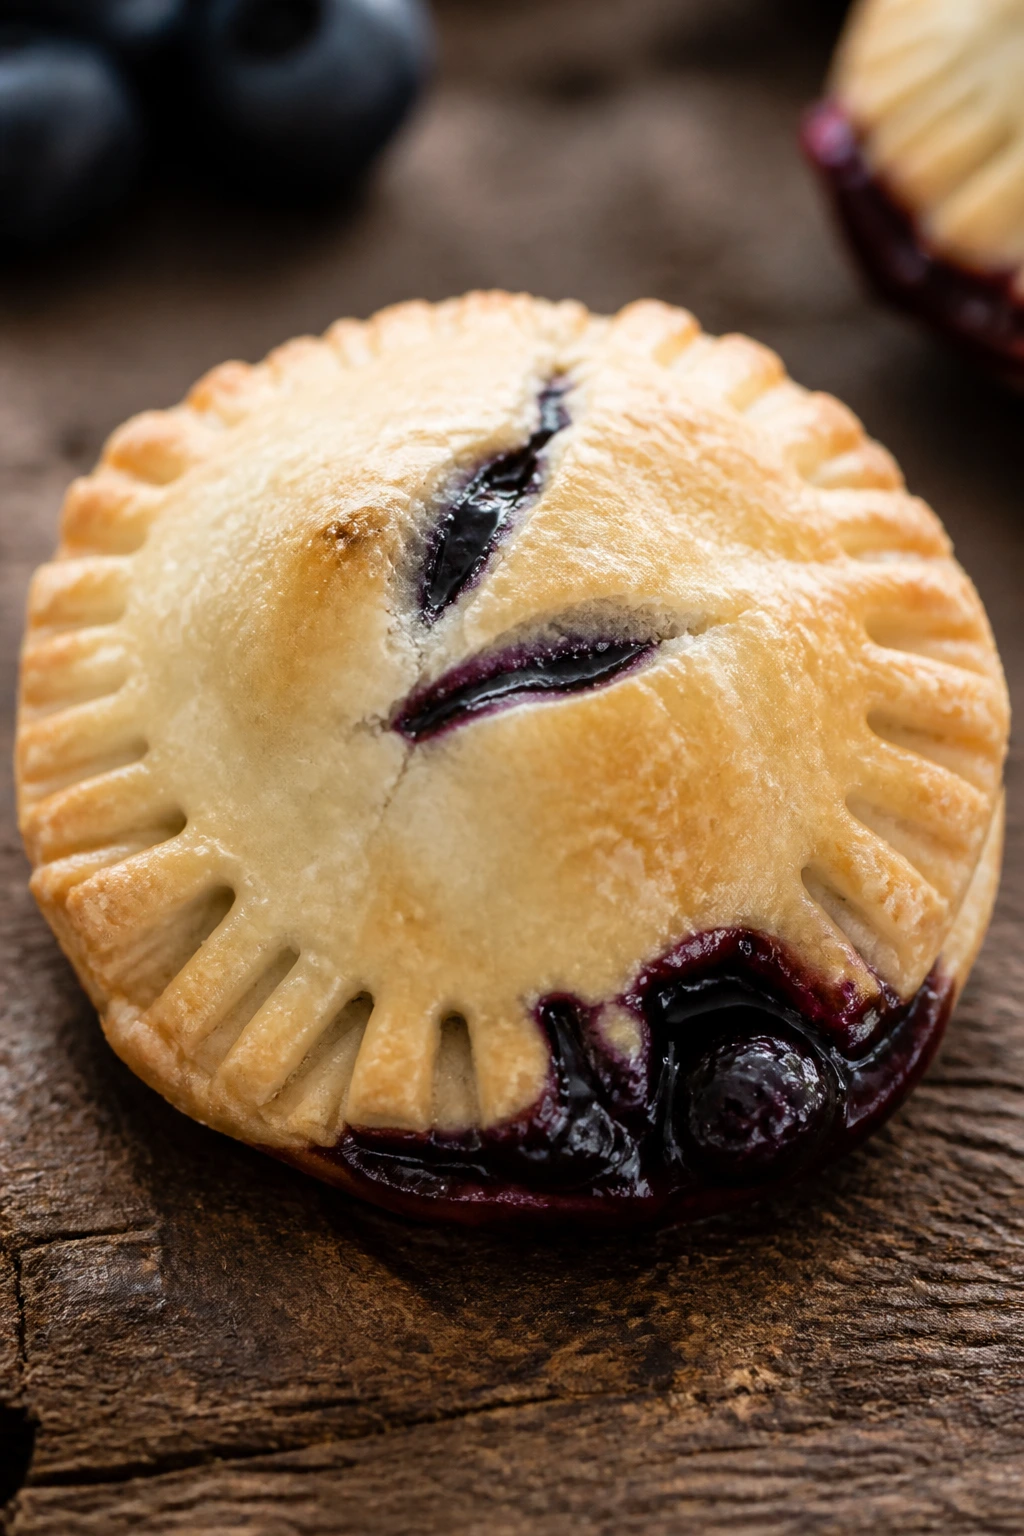
Hand pies give you all the comfort of pie without the fuss of slicing. They’re sealed, tidy, and small enough that a picky eater can hold one like it’s an ordinary cookie with a secret inside.
Why It Works:
The filling stays tucked away, so kids don’t have to see a big heap of fruit before they agree to try it. Blueberries soften into a jammy center, and the crust turns golden and crisp. A small pie feels like a controlled amount of dessert, which matters more than people admit.
Key Ingredients:
- 1 package refrigerated pie crusts, 2 crusts — easy wrapper for the filling.
- 1 1/2 cups blueberries — the filling.
- 2 tablespoons granulated sugar — sweetens the fruit.
- 1 tablespoon cornstarch — thickens the juice.
- 1 teaspoon lemon juice — brightens the berries.
- 1 large egg, beaten — for the egg wash.
- 1 tablespoon coarse sugar — for the tops.
Quick Steps:
- Heat the oven to 400°F (200°C) and line a baking sheet with parchment.
- Mix the blueberries, sugar, cornstarch, and lemon juice in a bowl.
- Roll and cut the pie crust into small rounds or squares, then spoon a little filling into the center of each piece.
- Fold, crimp, and brush with egg wash, then sprinkle with coarse sugar.
- Bake for 15 to 18 minutes until golden and bubbling.
Equipment for This Recipe:
- Rolling pin
- Baking sheet
- Parchment paper
- Pastry brush
- Fork for crimping
How to Serve This Dish:
Let them cool until the filling thickens, then serve warm or room temperature. They’re easier for kids to handle if you make them small — palm-size is plenty.
Pro Tips for This Recipe:
- Cut small vents in the top crust so steam escapes.
- Don’t overfill. Fruit juice leaks and scorches on the pan.
- Chill the assembled pies for 10 minutes before baking if the dough feels soft.
Variations on This Dish:
- Strawberry Hand Pies: Swap the blueberries for chopped strawberries and add a bit more cornstarch.
- Apple Pie Bites: Use finely diced apples with cinnamon.
- Glaze Finish: Brush cooled pies with a light powdered sugar glaze.
Common Mistakes to Avoid with This Dish:
- Overfilling the crust: That’s how you get leaks.
- Skipping the vent holes: The pies can burst at the seams.
23. Coconut Macaroons
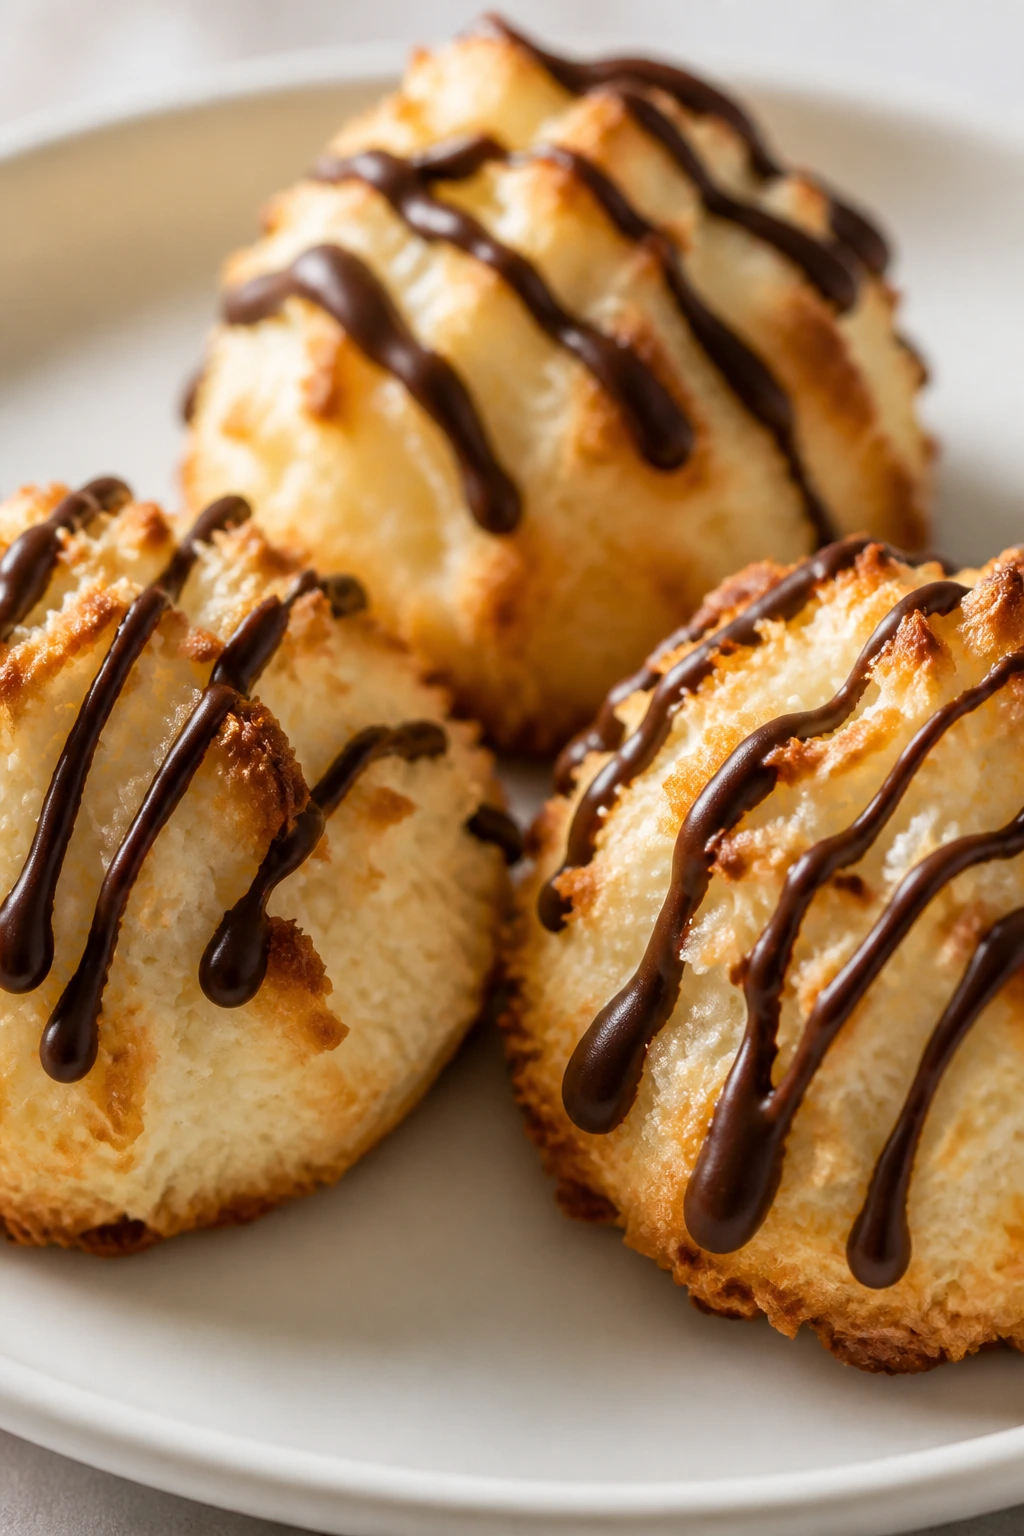
Coconut macaroons are the sort of treat that looks fancy enough for a tray but behaves simply enough for a weekday. They’re sweet, chewy, and lightly crisp at the edges, which is a nice change from all the soft snacks in rotation.
Why It Works:
Sweetened coconut bakes into a chewy mound that keeps its shape without much help. A little vanilla and sugar make the flavor approachable. If you add a chocolate drizzle, it becomes a treat that still feels familiar even if the coconut texture is new to the child at the table.
Key Ingredients:
- 3 cups sweetened shredded coconut — the main structure.
- 2 large egg whites — hold the cookies together.
- 1/2 cup granulated sugar — sweetens the mixture.
- 1 teaspoon vanilla extract — smooths the flavor.
- 1/4 teaspoon fine salt — balances the sweetness.
- 4 ounces melted chocolate, optional — for drizzling.
Quick Steps:
- Heat the oven to 325°F (165°C) and line a baking sheet with parchment.
- Stir the coconut, egg whites, sugar, vanilla, and salt in a bowl until well coated.
- Scoop small mounds onto the baking sheet, packing them lightly so they hold together.
- Bake for 18 to 20 minutes until the edges turn golden.
- Drizzle with melted chocolate after cooling, if using.
Equipment for This Recipe:
- Mixing bowl
- Baking sheet
- Parchment paper
- Cookie scoop or spoon
- Small bowl for chocolate
How to Serve This Dish:
Serve them at room temperature with milk or tuck one into a lunchbox as a small finish. They’re rich enough that one or two is enough, which is part of their charm.
Pro Tips for This Recipe:
- Make the mounds compact so they don’t spread.
- Watch the last 2 minutes closely; coconut can go from golden to dark fast.
- Let them cool fully before moving them or they may fall apart.
Variations on This Dish:
- Chocolate-Dipped Bottoms: Dip the base of each macaroon into melted chocolate.
- Almond Extract Twist: Add 1/4 teaspoon almond extract if the child likes marzipan-like flavors.
- Lemon Coconut Macaroons: Add a little lemon zest for brightness.
Common Mistakes to Avoid with This Dish:
- Using unsweetened coconut: The texture dries out faster and tastes less dessert-like.
- Pulling them too early: They need enough color to set properly.
24. Marshmallow Popcorn Balls
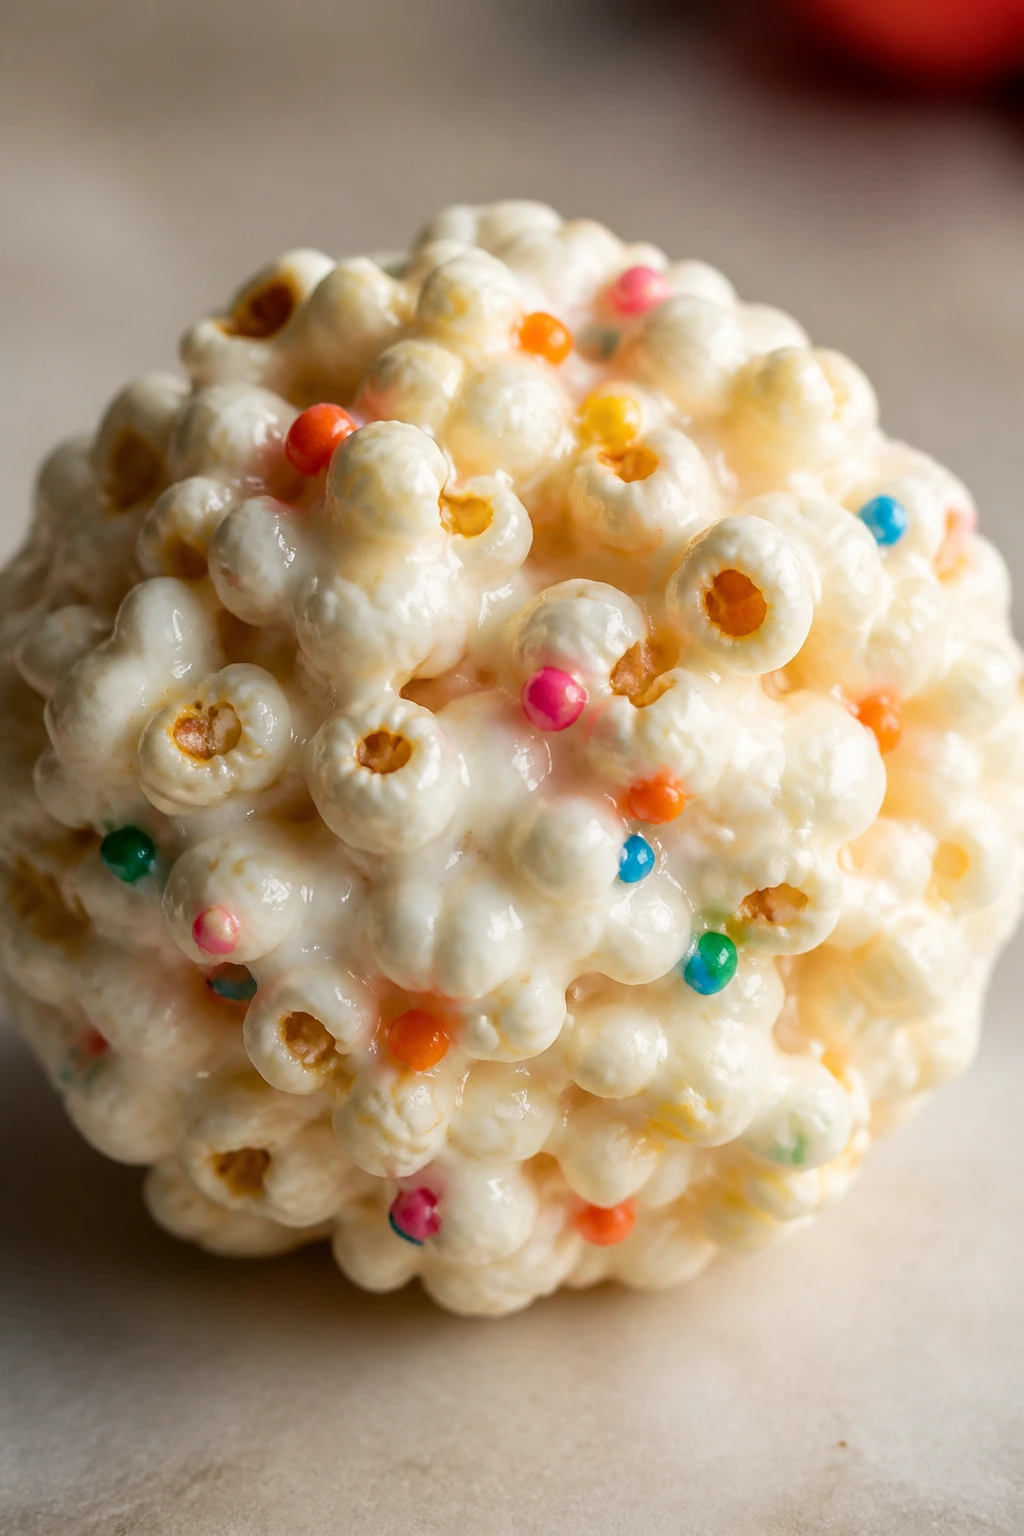
Popcorn balls are messy in the old-fashioned, sticky-sweet way that kids often find hilarious. They’re crunchy, chewy, and shaped like a handheld snack instead of a loose bowl that ends up everywhere.
Why It Works:
Marshmallow acts like edible glue, but it also keeps the popcorn from turning hard. The balls are compact enough to hold, and you can make them small, which helps if the eater likes a few bites at a time rather than a giant handful of anything. Sprinkles make them feel like a celebration, even when you’re not celebrating much.
Key Ingredients:
- 10 cups popped popcorn — the base.
- 4 tablespoons unsalted butter — helps melt the marshmallows.
- 10 ounces mini marshmallows — the binder.
- 1 teaspoon vanilla extract — makes the flavor softer.
- 1/2 teaspoon fine salt — keeps the sweetness in check.
- 1/4 cup sprinkles — optional, for a colorful finish.
Quick Steps:
- Place the popcorn in a very large bowl and remove any unpopped kernels.
- Melt the butter and marshmallows in a saucepan over low heat until smooth, then stir in vanilla and salt.
- Pour the mixture over the popcorn and fold gently until evenly coated.
- Let it cool for 1 to 2 minutes, then lightly butter your hands and shape into balls.
- Set on parchment and cool completely.
Equipment for This Recipe:
- Very large mixing bowl
- Medium saucepan
- Parchment paper
- Buttered hands or gloves
- Spoon
How to Serve This Dish:
Wrap each ball in parchment or set them in cupcake liners. They’re good for parties and movie nights, though I’d keep napkins nearby because this is a sticky treat by nature.
Pro Tips for This Recipe:
- Work with slightly cooled mixture so it doesn’t burn your hands.
- Butter your hands generously before shaping.
- Use plain popcorn without extra butter if you want the balls to hold together better.
Variations on This Dish:
- Chocolate Popcorn Balls: Stir in a handful of mini chocolate chips once the mixture cools slightly.
- Cinnamon Sugar Version: Add 1 teaspoon cinnamon to the marshmallow mix.
- Birthday Sprinkle Balls: Use rainbow sprinkles and a drop of vanilla bean paste.
Common Mistakes to Avoid with This Dish:
- Using too much marshmallow: The balls get sticky and collapse.
- Shaping while the mix is too hot: You’ll end up with a sticky mess and uneven balls.
25. Sweet Potato Brownies
These are for the kid who wants a brownie but notices everything suspiciously. Sweet potato keeps the texture moist and dense, and the chocolate covers the vegetable note enough that the brownie still tastes like dessert.
Why It Works:
Sweet potato adds body and a soft, almost fudgy texture without needing a lot of extra fat. That means the brownies stay tender even after they cool. The chocolate flavor comes first, which is exactly what you want when you’re trying to win over a kid who has opinions about orange vegetables.
Key Ingredients:
- 1 cup cooked sweet potato, mashed smooth — the hidden-softening ingredient.
- 1/2 cup melted unsalted butter or coconut oil — adds richness.
- 1 cup granulated sugar — keeps the brownies sweet.
- 2 large eggs — bind the batter.
- 1 teaspoon vanilla extract — rounds the flavor.
- 1/2 cup unsweetened cocoa powder — the chocolate base.
- 3/4 cup all-purpose flour — enough structure to hold the brownies.
- 1/2 teaspoon fine salt — balances the sweetness.
Quick Steps:
- Heat the oven to 350°F (175°C) and line an 8×8-inch pan with parchment.
- Mix the sweet potato, melted butter, sugar, eggs, and vanilla until smooth.
- Stir in the cocoa powder, flour, and salt until no dry streaks remain.
- Spread the batter into the pan and smooth the top.
- Bake for 25 to 30 minutes until the center is just set and a toothpick comes out with moist crumbs.
Equipment for This Recipe:
- 8×8-inch baking pan
- Parchment paper
- Mixing bowl
- Spatula
- Cooling rack
How to Serve This Dish:
Cut them into small squares and serve with milk or sliced strawberries. They’re richest once cooled, which makes them a nice make-ahead dessert.
Pro Tips for This Recipe:
- Mash the sweet potato until completely smooth.
- Don’t overbake or the brownies lose the fudgy middle.
- Let them cool before cutting so the squares don’t crumble.
Variations on This Dish:
- Mini Chip Brownies: Fold in 1/3 cup chocolate chips.
- Peanut Butter Swirl: Drop spoonfuls of peanut butter on top and swirl lightly.
- Cocoa-Dusted Top: Sprinkle a little cocoa sugar over the batter before baking.
Common Mistakes to Avoid with This Dish:
- Leaving sweet potato chunks in the batter: They show up in the finished brownie and change the texture.
- Cutting too soon: Warm brownies look underdone and tear apart.
26. Mini Donut Holes
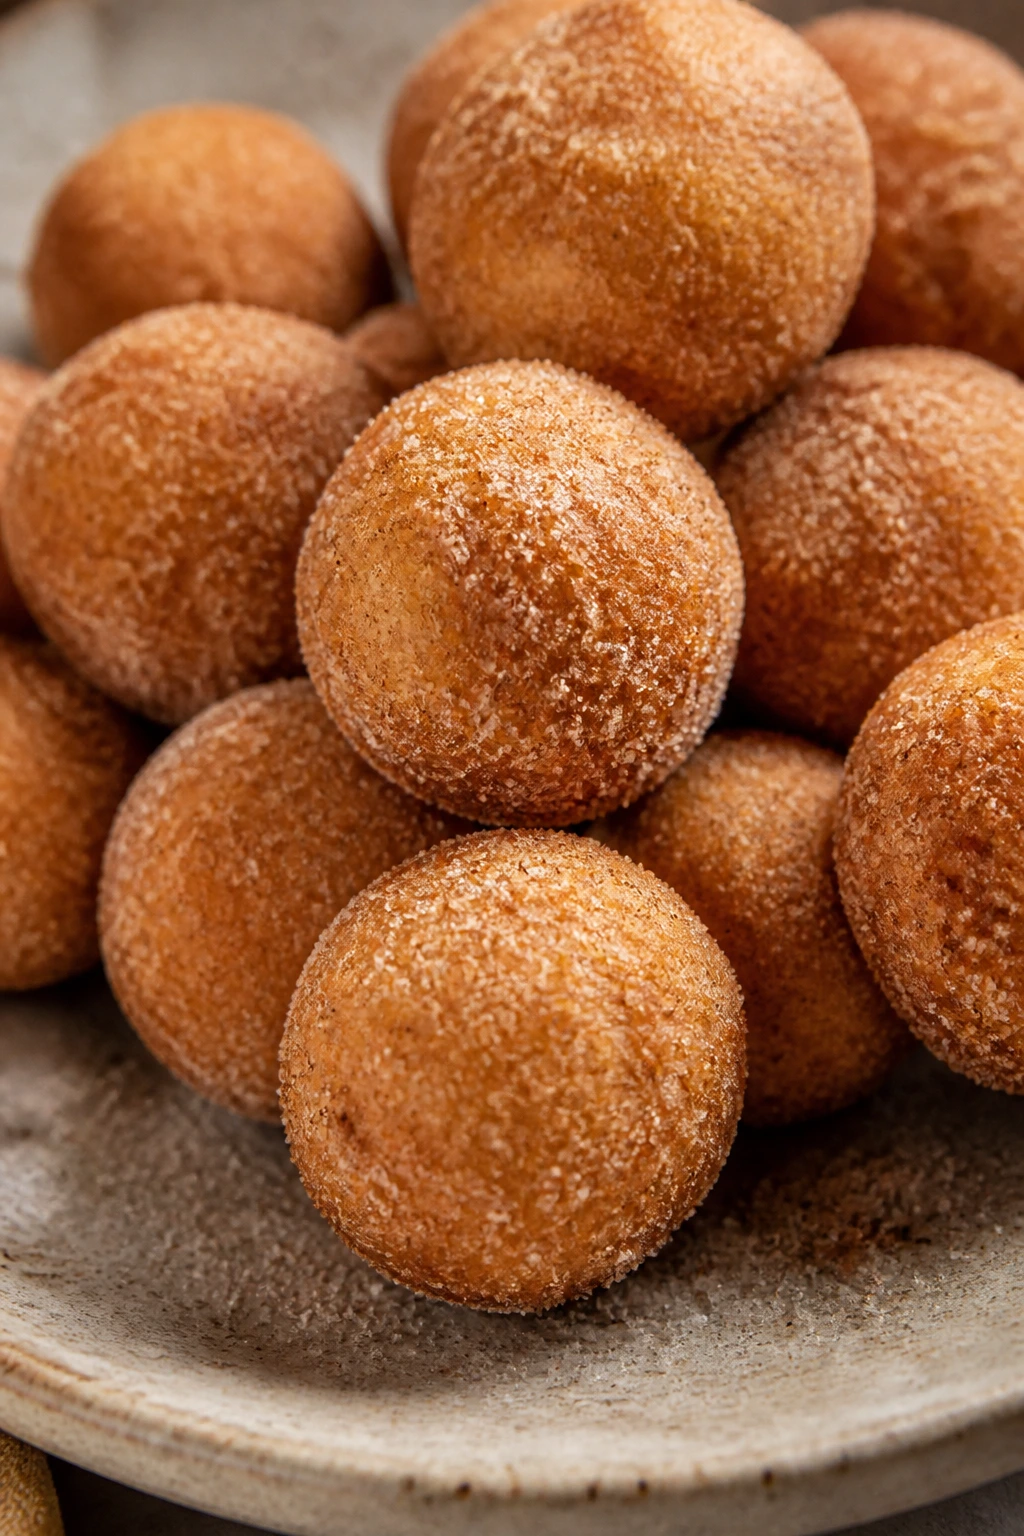
Baked donut holes hit that sweet spot between bakery treat and weekend project. They’re small, round, and coated in cinnamon sugar, which is enough to make them feel special without turning the kitchen into a fryer.
Why It Works:
The donut hole shape makes the portion feel manageable. The cinnamon sugar outside gives you a little crackle, and the inside stays soft. This is one of those treats that can look homemade in the best way — not perfect, but warm and inviting.
Key Ingredients:
- 1 can refrigerated biscuit dough, 8 biscuits — the shortcut base.
- 3 tablespoons melted butter — helps the coating stick.
- 1/3 cup granulated sugar — the sweet coating.
- 1 teaspoon cinnamon — the main flavor.
- 1/2 teaspoon vanilla extract — optional, but nice in the butter.
- Pinch of salt — keeps the coating from tasting flat.
Quick Steps:
- Heat the oven to 375°F (190°C) and grease a mini muffin pan.
- Cut each biscuit into quarters and roll the pieces lightly into balls.
- Place one dough ball in each mini muffin cup and bake for 10 to 12 minutes until golden.
- Mix the sugar, cinnamon, and salt in a bowl.
- Brush the warm donut holes with melted butter and roll in the cinnamon sugar.
Equipment for This Recipe:
- Mini muffin pan
- Sharp knife or kitchen scissors
- Small bowl
- Pastry brush
- Cooling rack
How to Serve This Dish:
Serve them warm in a bowl or paper napkin cone. They’re the sort of treat that disappears fastest when the room smells like cinnamon and nobody is trying too hard.
Pro Tips for This Recipe:
- Roll the dough pieces into even balls so they bake at the same speed.
- Coat them while warm so the sugar sticks.
- Don’t crowd the muffin pan; the rounds need room to puff.
Variations on This Dish:
- Maple Sugar Holes: Swap the cinnamon sugar for maple sugar.
- Powdered Sugar Version: Toss warm donut holes in powdered sugar instead.
- Chocolate Dip: Serve with melted chocolate on the side for dunking.
Common Mistakes to Avoid with This Dish:
- Overbaking the dough: They turn dry and bready instead of tender.
- Waiting too long to coat them: The butter won’t grip as well once they cool.
27. Watermelon Pizza Slices
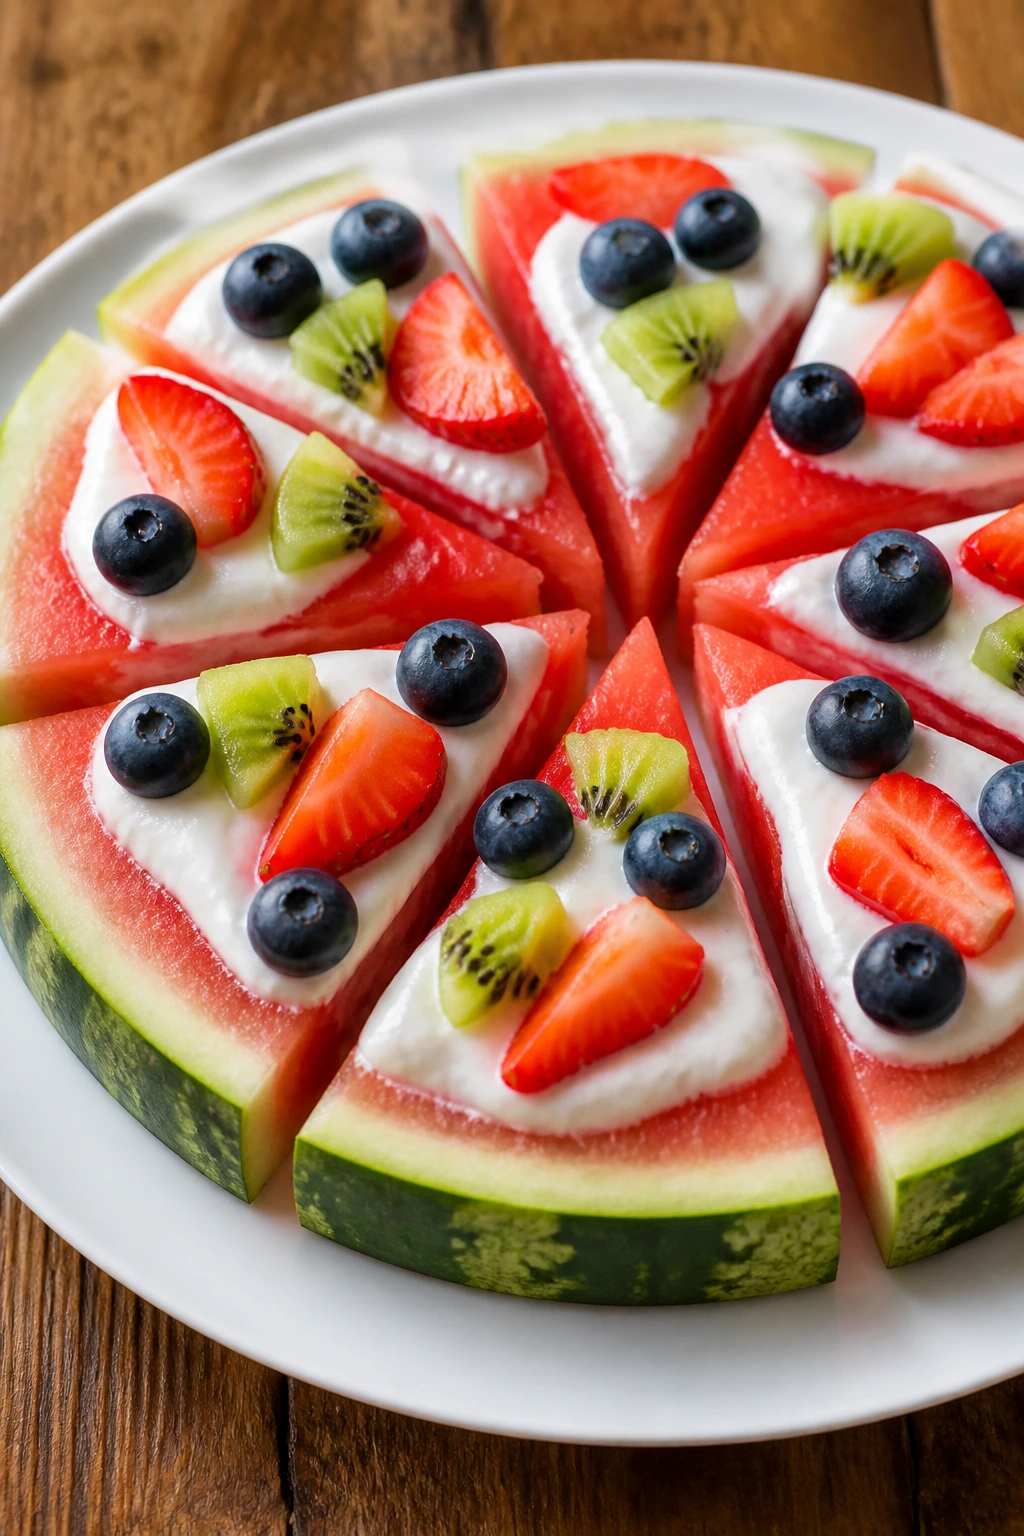
Watermelon pizza sounds like a joke until you put it on a plate. Then it’s bright, cold, and easy to nibble, which is often all a picky eater wants from a fruit dessert.
Why It Works:
Watermelon already comes in slices, so it feels familiar. Add a thin layer of yogurt and a few pieces of fruit on top, and you’ve got something that looks playful without becoming too messy. The trick is to keep the topping light so the watermelon still tastes like watermelon, not like a giant salad.
Key Ingredients:
- 1 round seedless watermelon — the “crust.”
- 1 cup vanilla yogurt — the “sauce.”
- 1 cup strawberries, sliced — the red topping.
- 1 kiwi, peeled and sliced thin — a bright green topping.
- 1/4 cup blueberries — for color and size contrast.
- 2 tablespoons mini chocolate chips or granola — optional finishing touch.
Quick Steps:
- Slice the watermelon into 1-inch thick rounds, then cut each round into wedges.
- Pat the slices dry with paper towels.
- Spread a thin layer of yogurt over each slice.
- Top with strawberries, kiwi, blueberries, and chips or granola.
- Serve immediately before the watermelon releases too much juice.
Equipment for This Recipe:
- Large knife
- Cutting board
- Paper towels
- Small spoon or spatula
- Serving platter
How to Serve This Dish:
Serve the wedges on a cold platter and let kids eat them with their hands. They work best for parties or warm afternoons, when nobody wants a heavy dessert.
Pro Tips for This Recipe:
- Dry the watermelon well so the yogurt doesn’t slide off.
- Use a thin yogurt layer. Thick topping gets messy fast.
- Keep the fruit pieces small and evenly scattered.
Variations on This Dish:
- Berry Pizza: Use only strawberries and blueberries.
- Banana Split Style: Add banana slices and a few chopped nuts on the side for kids who want them.
- No-Yogurt Version: Brush with a little honey and top with fruit only.
Common Mistakes to Avoid with This Dish:
- Adding too much yogurt: The “pizza” turns slippery and hard to eat.
- Making it ahead too early: Watermelon leaks and softens the toppings.
28. Oatmeal Energy Bites
These are the snack that acts like a treat but fits neatly in a lunchbox. Oats, peanut butter, honey, and mini chips make a small bite that tastes familiar enough for picky eaters and sturdy enough for busy hands.
Why It Works:
The texture is soft but not mushy, and the bites are small enough to feel noncommittal. They also hold together well in the fridge, which makes them useful when you need something that can be made ahead and handed out without ceremony. A lot of snack problems disappear when the food can be rolled into a ball.
Key Ingredients:
- 1 1/2 cups old-fashioned oats — the main structure.
- 1/2 cup creamy peanut butter — the binder.
- 1/3 cup honey — sweetness and stickiness.
- 1/4 cup mini chocolate chips — dessert appeal.
- 1 teaspoon vanilla extract — smooths the flavor.
- 1 tablespoon ground flaxseed — optional, for a little extra body.
- Pinch of salt — keeps the sweetness in check.
Quick Steps:
- Stir all ingredients in a bowl until evenly mixed.
- Chill the mixture for 15 minutes if it feels too sticky to roll.
- Roll into 1-inch balls with lightly damp hands.
- Place on a tray and chill for another 20 minutes to firm up.
- Store cold until ready to serve.
Equipment for This Recipe:
- Mixing bowl
- Spoon or spatula
- Tray or plate
- Refrigerator
- Airtight container
How to Serve This Dish:
Serve two or three at a time, not a whole pile. They’re best as a quick snack, especially when paired with fruit or a cheese stick to balance the sweetness.
Pro Tips for This Recipe:
- Chill before rolling if the mixture clings to your hands.
- Use mini chips so each bite tastes evenly sweet.
- If the mixture crumbles, add another teaspoon of honey or peanut butter.
Variations on This Dish:
- Sunflower Butter Bites: Make them nut-free with sunflower butter.
- Cinnamon Roll Version: Add cinnamon and a pinch of extra vanilla.
- Coconut Chip Bites: Swap the chips for unsweetened shredded coconut if your child likes it.
Common Mistakes to Avoid with This Dish:
- Using quick oats: The bites get pasty and less textured.
- Skipping the chill time: They fall apart before reaching the plate.
29. Strawberry Shortcake Skewers
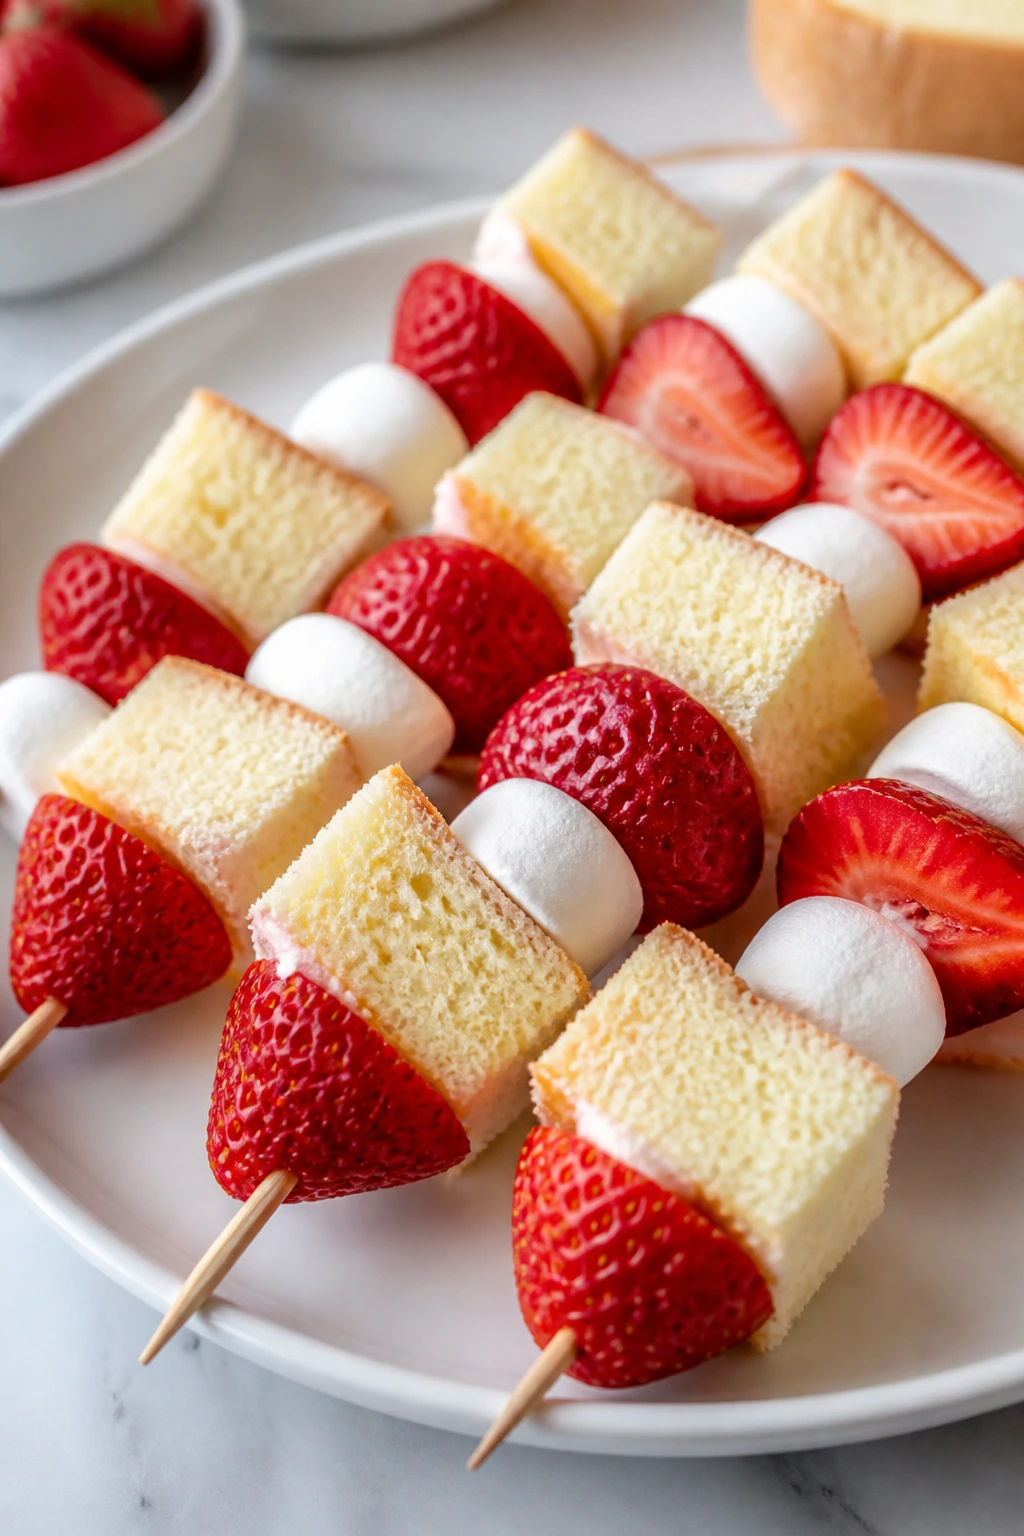
Strawberry shortcake on a stick feels a little silly, which is exactly why it works. It gives kids the dessert flavors they already know without handing them a slice that might collapse halfway through eating.
Why It Works:
The cake, berries, and cream are all familiar on their own. Threaded onto a skewer, they stay separate enough for picky eaters to trust them. The result is soft, sweet, and easy to manage, especially if you keep the pieces small and the fruit dry.
Key Ingredients:
- 2 cups pound cake, cut into 1-inch cubes — the soft base.
- 2 cups strawberries, hulled and halved — the fruit.
- 1 cup mini marshmallows — the sweet filler.
- 1 cup whipped topping — the dip or drizzle.
- 2 tablespoons powdered sugar — sweetens the dip if needed.
- 1 teaspoon vanilla extract — gives the dip more dessert flavor.
Quick Steps:
- Whisk the whipped topping, powdered sugar, and vanilla in a small bowl.
- Thread pound cake, strawberries, and marshmallows onto short skewers.
- Arrange on a platter and chill for 10 minutes if you want the cake a little firmer.
- Serve with the dip on the side or drizzle lightly over the top.
Equipment for This Recipe:
- Short skewers
- Cutting board
- Sharp knife
- Mixing bowl
- Serving platter
How to Serve This Dish:
Use short skewers and keep the pieces small. They’re good for birthday tables, after-dinner plates, or snack trays when you want a dessert that looks a little more put together than a bowl of fruit.
Pro Tips for This Recipe:
- Pat the strawberries dry so the cake doesn’t get soggy.
- Use firm pound cake, not a very soft sponge.
- Cut the cake into even cubes so the skewers balance better.
Variations on This Dish:
- Chocolate Shortcake Skewers: Swap the pound cake for brownie cubes.
- Banana Berry Version: Add banana coins between the berries.
- No-Marshmallow Style: Leave out the marshmallows and use extra cake instead.
Common Mistakes to Avoid with This Dish:
- Using wet berries: They soak the cake fast.
- Cutting the cake too large: The skewer becomes awkward to eat.
30. Individual S’mores Dip Cups
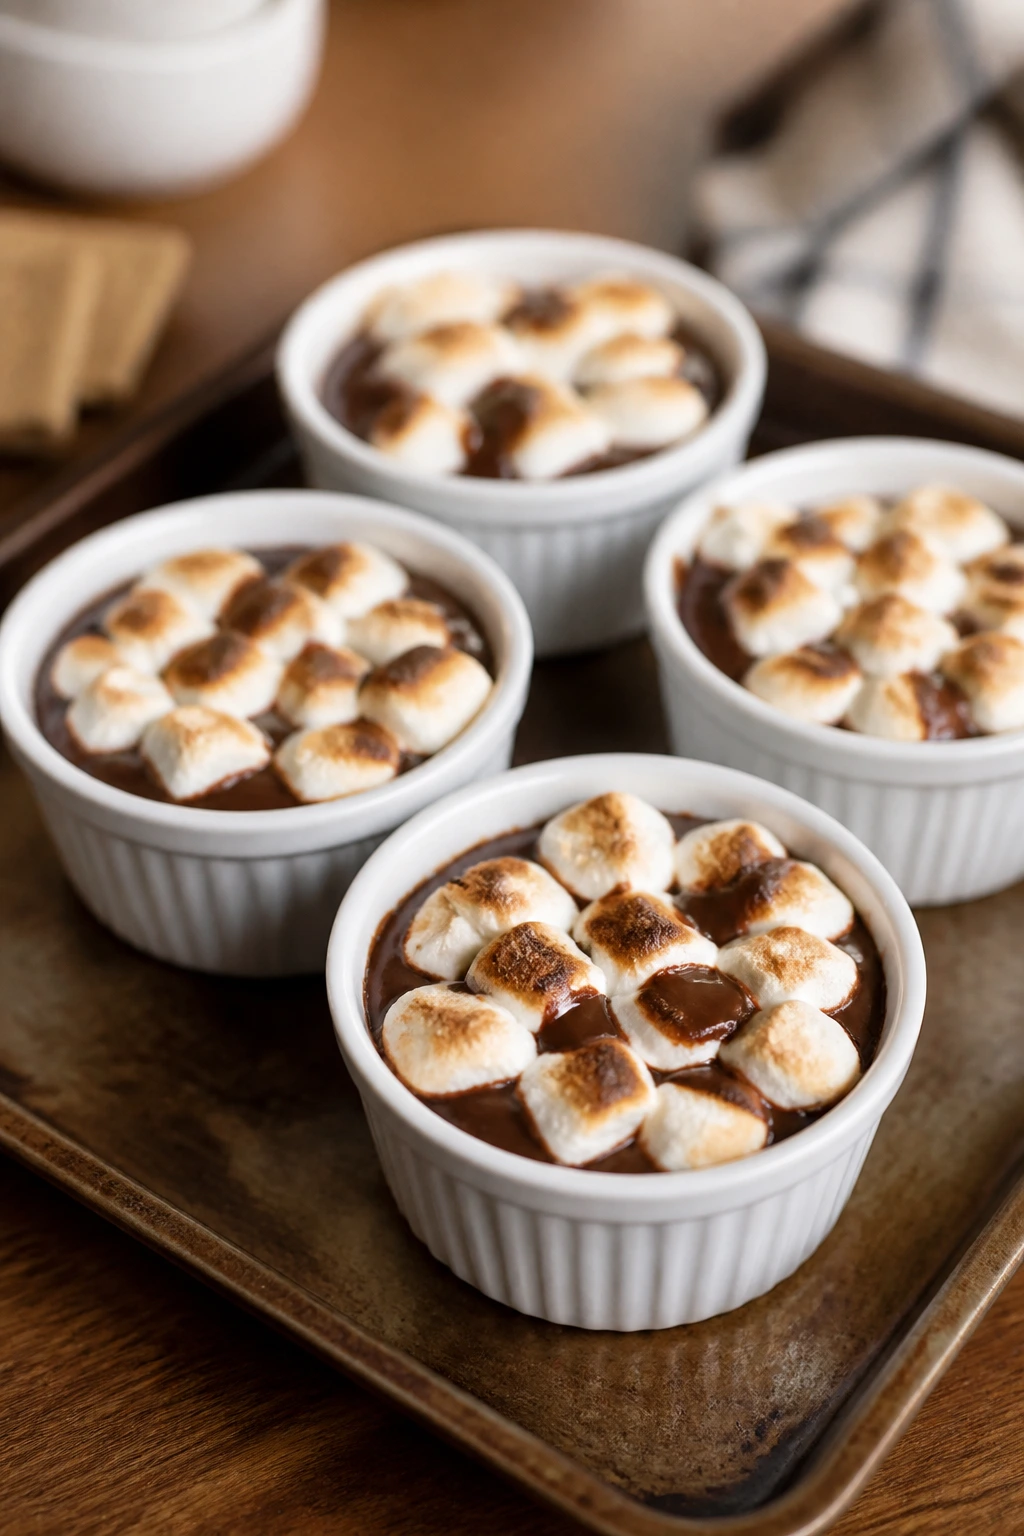
This is the campfire favorite turned into a smaller, calmer dessert. One little cup, a few graham crackers, and a scoop of chocolate under marshmallow is enough to feel like a treat without turning dinner into a sticky event.
Why It Works:
S’mores are already one of the most familiar kid desserts on the planet. Turning them into individual cups removes the fire, the drift of melted chocolate, and the uneven mess that comes with trying to assemble one at a time. A warm cup with crisp dippers on the side is the safer, cleaner version of the classic.
Key Ingredients:
- 1 cup semisweet chocolate chips — the base layer.
- 2 tablespoons heavy cream — helps the chocolate soften.
- 1 cup mini marshmallows — the top layer.
- 6 graham crackers, broken into pieces — for dipping.
- 1 tablespoon unsalted butter — optional, for a silkier base.
- Pinch of fine salt — keeps the chocolate from tasting flat.
Quick Steps:
- Heat the oven to 350°F (175°C) and place 4 to 6 small ramekins on a baking sheet.
- Divide the chocolate chips, cream, butter, and salt among the cups.
- Top each cup with marshmallows and bake for 6 to 8 minutes until the marshmallows puff and toast lightly.
- Serve immediately with graham crackers for dipping.
- Let the cups cool slightly before handing them to kids, because the centers stay hot.
Equipment for This Recipe:
- Small ramekins
- Baking sheet
- Spoon
- Oven mitts
- Graham crackers for serving
How to Serve This Dish:
Serve the cups warm right from the oven with a neat stack of graham crackers. They’re best as a special dessert, not a wandering snack, because the chocolate stays soft and the marshmallow gets gloriously gooey.
Pro Tips for This Recipe:
- Keep the cups small so the marshmallows toast evenly.
- Don’t overbake. You want puffed, not burnt.
- A pinch of salt on the chocolate makes the whole thing taste more like real s’mores.
Variations on This Dish:
- Peanut Butter S’mores Cups: Add a teaspoon of peanut butter under the chocolate.
- White Chocolate Version: Use white chips for a sweeter, milder flavor.
- Berry S’mores Dip: Add a few sliced strawberries on top after baking.
Common Mistakes to Avoid with This Dish:
- Using large ramekins: The middle stays cool while the edges overcook.
- Serving too late: The marshmallows collapse and the dip loses its charm.
Why Familiar Flavors Keep the Peace
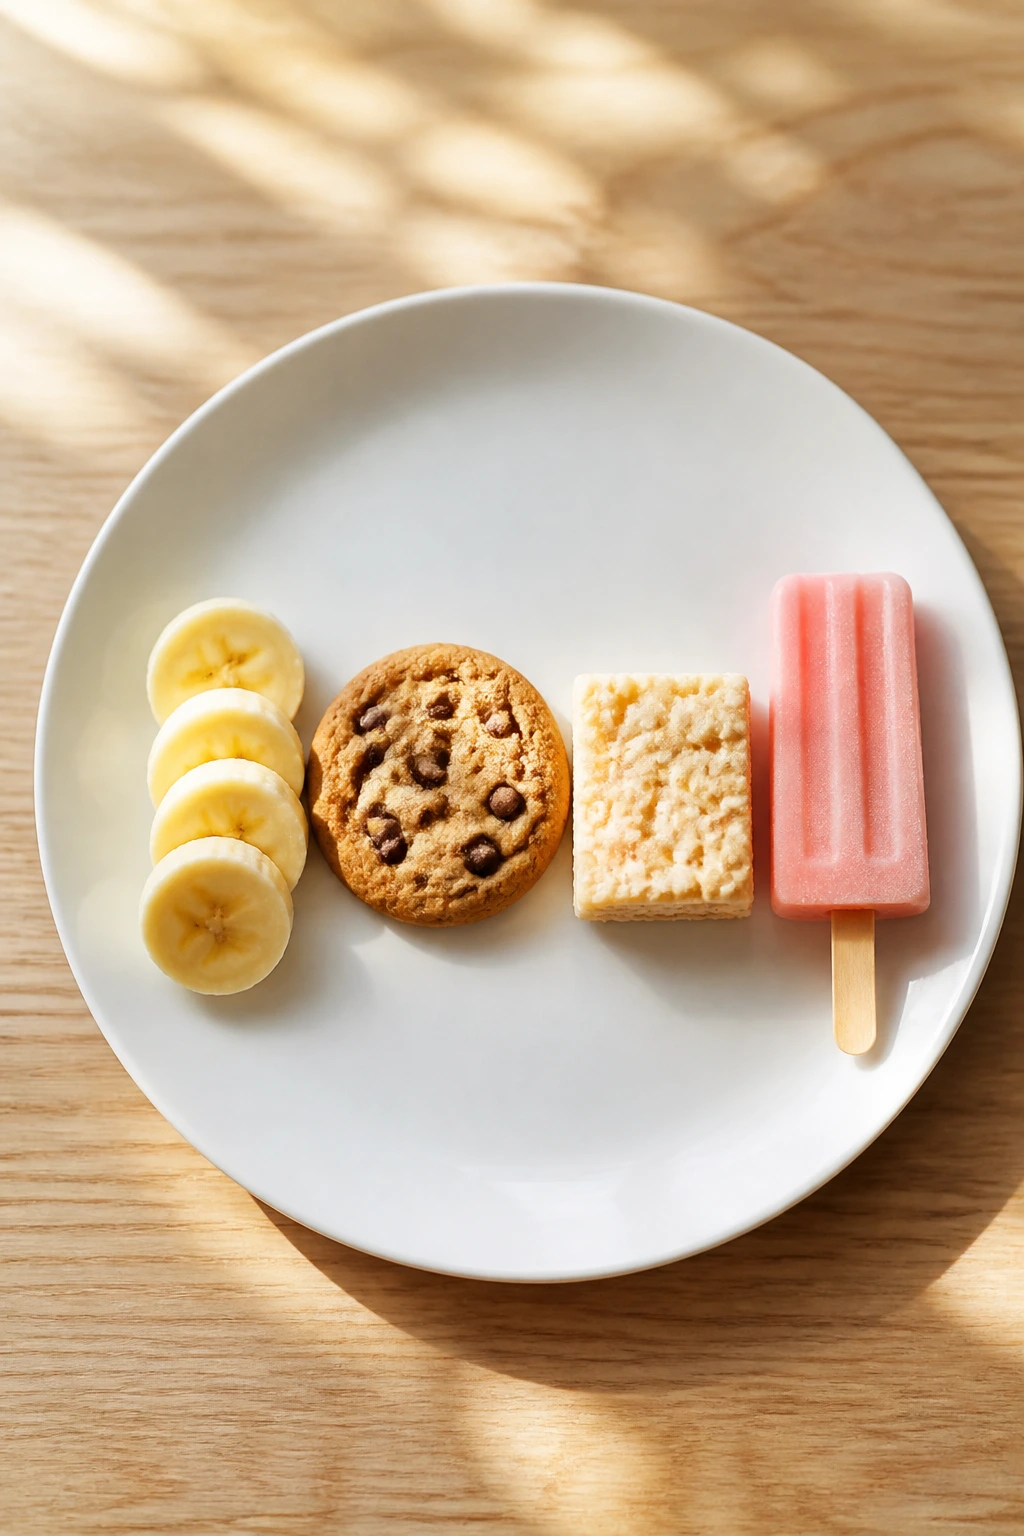
A lot of people try to make snacks more exciting than they need to be. That usually backfires. Picky eaters do better when a dessert looks like something they’ve already agreed to trust: a banana, a cookie, a square, a pop, a skewer.
That doesn’t mean boring. It means clear. Clear shape, clear texture, clear flavor. The second kids can predict what the bite will feel like, they stop guarding the plate like it’s a science experiment.
Essential Equipment for These Recipes

- Baking sheets — Needed for cookies, bark, pretzels, hand pies, and anything that needs a flat, lined surface.
- Parchment paper — Saves you from sticky marshmallow, chocolate, and fruit leather disasters.
- Mini muffin pan — Comes up again and again for muffin bites, brownie bites, and donut holes.
- Mixing bowls — At least two sizes make life easier when you’re mixing wet and dry ingredients separately.
- Whisk — Best for pudding, dips, batter, and anything that needs to go smooth without lumps.
- Rubber spatula — Better than a spoon for getting every last bit of batter, marshmallow, or yogurt mixture.
- Cookie scoop or tablespoon scoop — Helps keep portions small and consistent.
- Blender or food processor — Needed for pops, fruit leather, and any smooth puree.
- Popsicle molds — Required for the frozen treats, and worth owning if you make them more than once.
- Wire cooling rack — Keeps baked snacks from steaming on the bottom.
- Small ramekins or cups — Useful for pudding cups, yogurt dips, and s’mores cups.
- Airtight containers — The difference between crisp and stale, especially for bark, cookies, and cereal treats.
Smart Shopping and Ingredient Tips
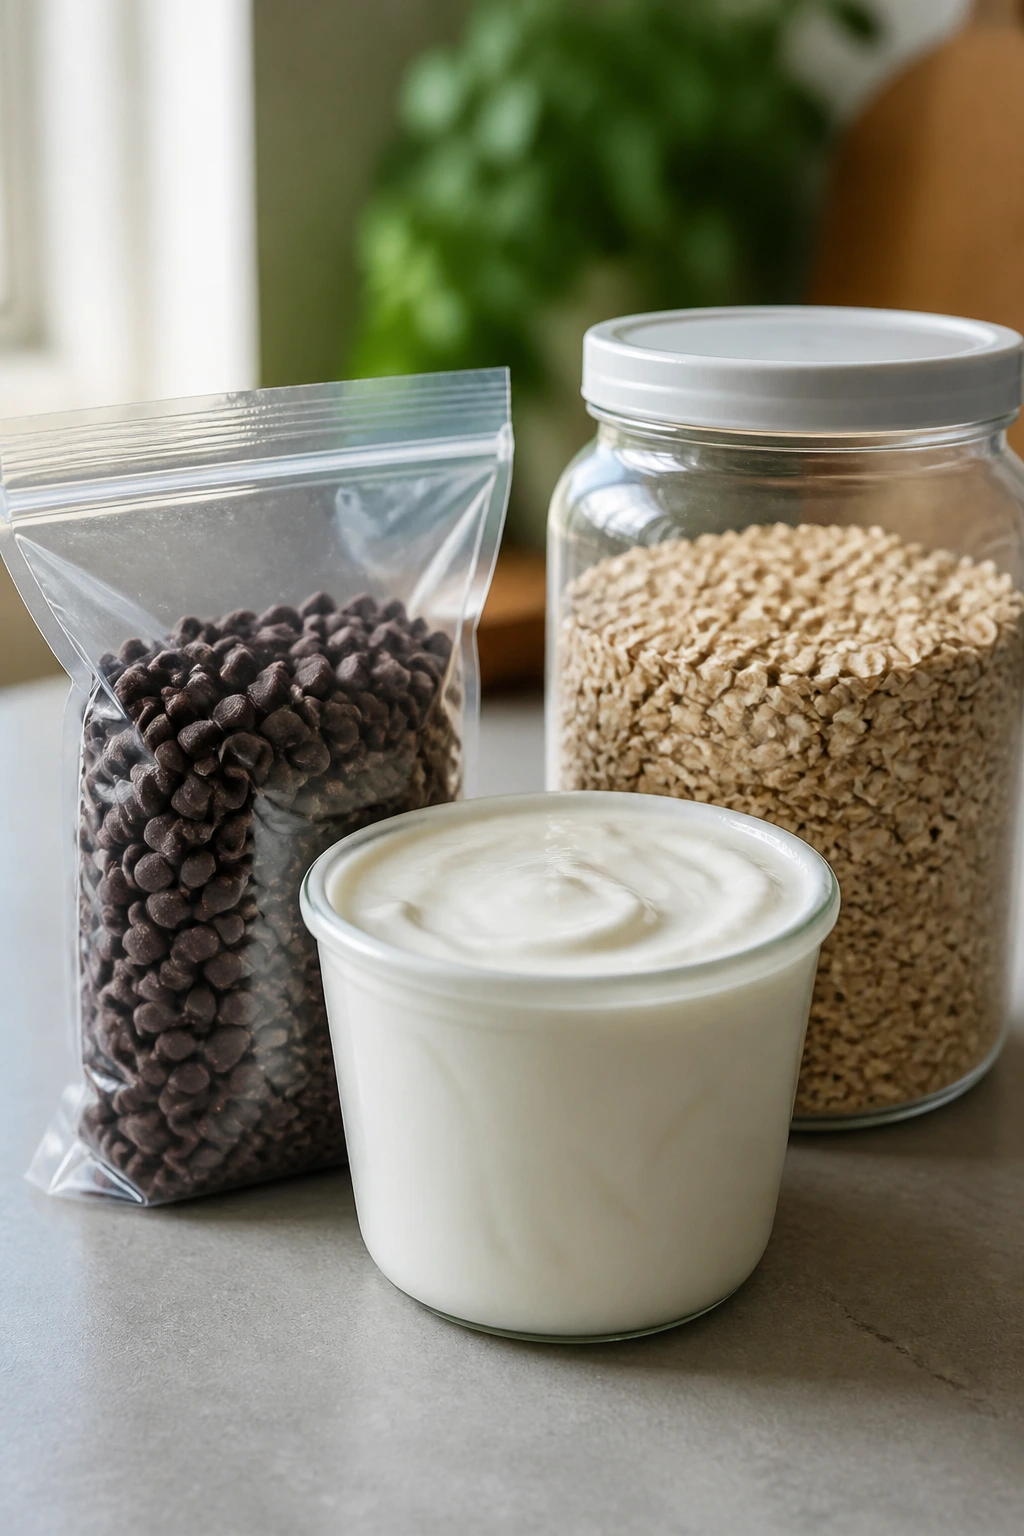
Buy fruit with the recipe in mind. Bananas should be speckled, apples should snap, strawberries should smell sweet at the stem, and watermelon should feel heavy for its size. That’s not food-snob talk; it’s the difference between a treat that tastes bright and one that tastes like it came out of a sad fridge drawer.
Mini chips are worth the shelf space. They distribute better in bite-size treats, especially muffins, cookies, bark, and energy bites. Full-size chocolate chips can overwhelm a small square or leave one bite absurdly loaded while the next one is empty.
For yogurt-based recipes, pick a thick yogurt. Greek yogurt gives bark, pops, and dips better structure, and it freezes with less icy bite. If you’re using plain yogurt, sweeten it lightly and add vanilla so it doesn’t taste tart in a way children tend to notice immediately.
If you keep a pantry for picky-eater snacks, stock old-fashioned oats, graham crackers, crispy rice cereal, flour tortillas, vanilla extract, marshmallows, honey, brown sugar, and a decent cocoa powder. That handful of ingredients can take you through cookies, bars, frozen snacks, and quick dips without a separate grocery run for every recipe.
And one more thing. Buy small dippers. Mini pretzels, short skewers, mini muffin liners, small crackers — the size of the serving matters as much as the flavor when you’re working with wary eaters.
How to Serve These Treats Without a Meltdown
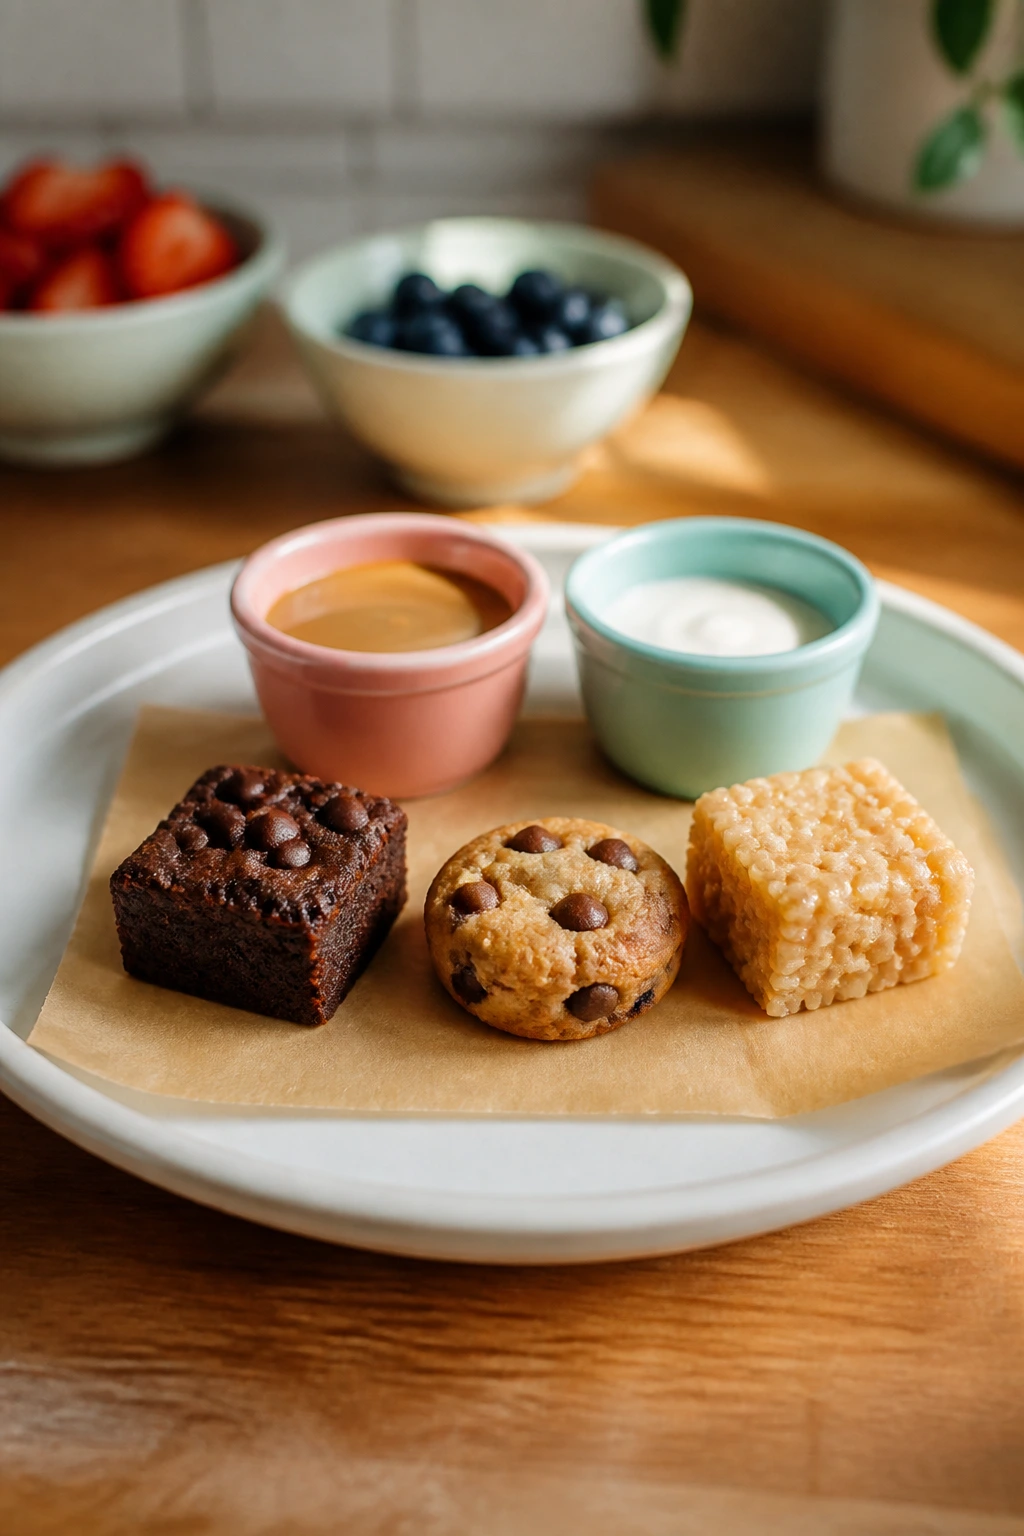
Presentation: Keep the setup tidy and low-pressure. Small plates, shallow bowls, parchment liners, and little cups make the food look manageable instead of piled high. If you’re serving at a party, cut everything smaller than you think you need.
Accompaniments: Pair richer treats like brownie bites, s’mores cups, and coconut macaroons with fruit or plain milk. Lighter treats like fruit kabobs, watermelon pizza, and yogurt bark go well with crackers, pretzels, or a simple dip.
Portions: One or two mini treats often works better than a big dessert plate. For younger kids, think in terms of three or four bites, not a full serving the way an adult would picture it. If the snack is a buffet-style tray, leave room between items so the plate doesn’t read as crowded.
Beverage Pairing: Cold milk is the obvious answer for cookies, muffins, and brownie bites, and I’m not going to pretend otherwise. For fruit treats, water with a little lemon or plain sparkling water keeps things from feeling too sweet.
Little Tweaks That Make These Treats Easier to Love
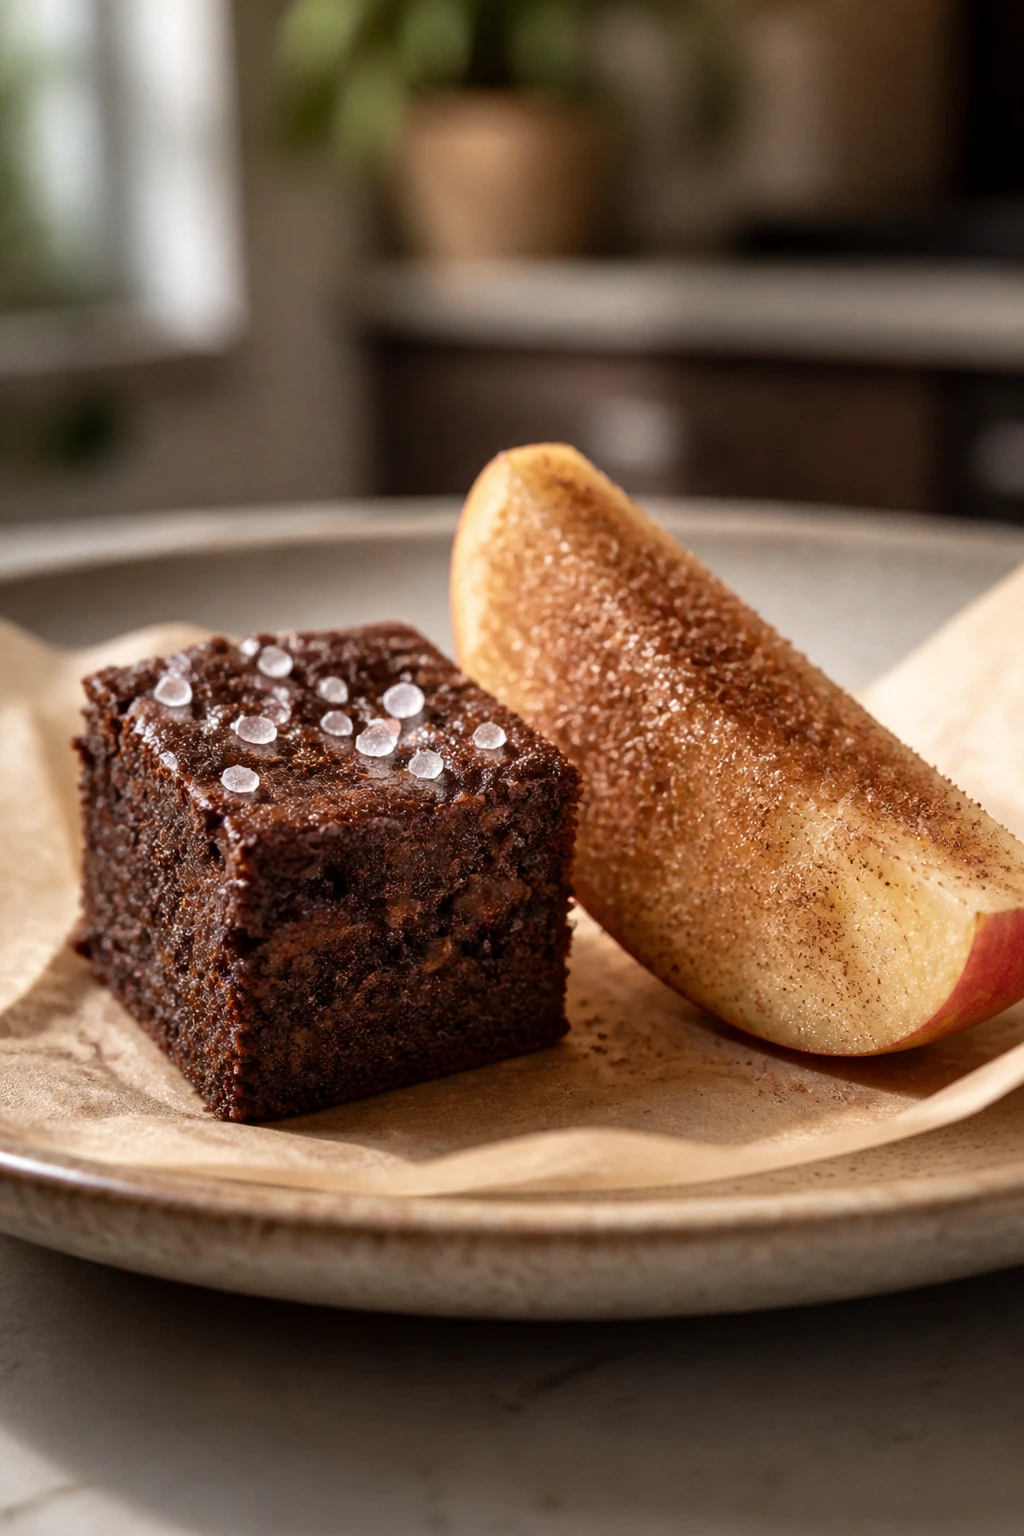
Flavor Enhancement: A pinch of salt on chocolate treats changes more than people expect. It sharpens the chocolate in brownie bites, s’mores cups, pretzel rods, and pudding cups without making the dessert taste salty. A little cinnamon sugar over apples, tortilla chips, or donut holes does the same job from the warm-spice side.
Customization: If your kid only eats one fruit, lean hard into that. Strawberries can carry pops, bark, skewers, and dip cups almost by themselves. Bananas do the same in cookies, bites, and pops. The smartest version of these recipes is not the one with the most ingredients; it’s the one that clears the plate.
Serving Suggestions: A tiny bowl of dip, a stack of napkins, and one decorative but not fussy garnish are enough. Crushed graham crackers, sprinkles, a chocolate drizzle, or a little powdered sugar dusting can make a plain snack feel finished without confusing the texture.
Make-It-Yours: For nut-free homes, sunflower butter replaces peanut butter in several recipes with almost no drama. For dairy-free versions, coconut yogurt and oat milk show up in the frozen snacks, pops, and dips. For gluten-free versions, use certified gluten-free oats, cereal, or graham-style crackers where needed.
Storing, Freezing, and Reheating the Sweet Stuff
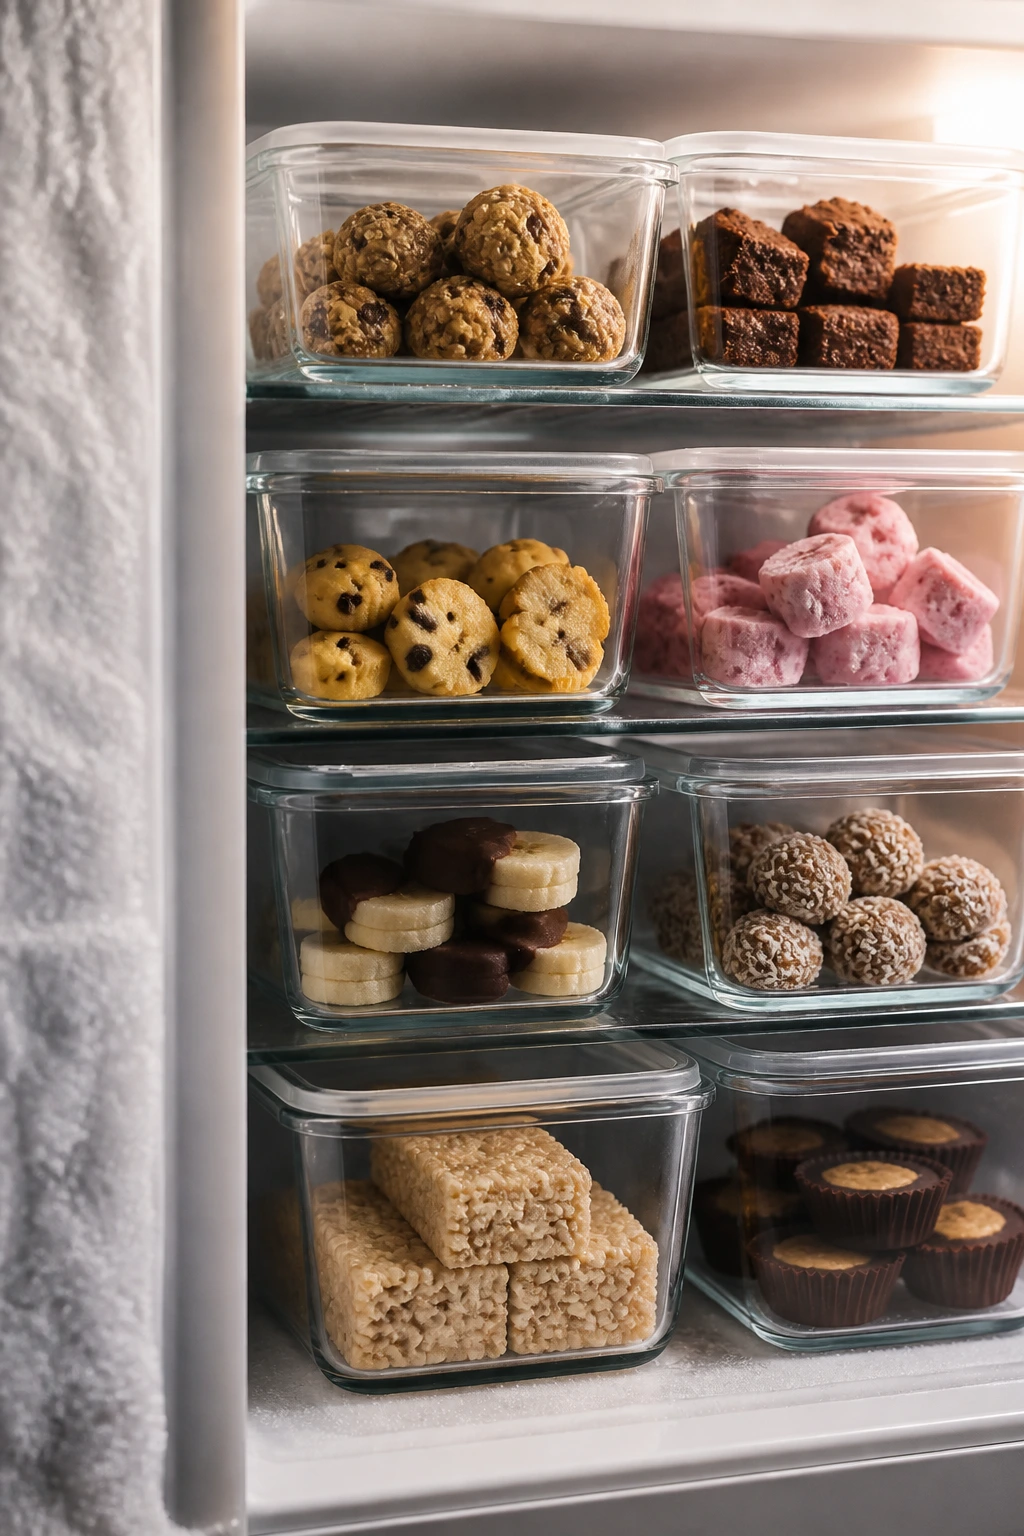
The storage rules depend on the texture. Crisp snacks hate the fridge. Creamy treats hate warm counters. And fruit-based snacks will punish you for ignoring moisture.
Cookies, muffins, brownie bites, hand pies, macaroons, and donut holes usually keep 2 to 3 days at room temperature in airtight containers. If the kitchen runs warm or humid, move them to the fridge after a day. Most of these freeze well for up to 2 months; thaw at room temperature and, if you want the fresh-baked feel back, warm them in a 300°F oven for 5 to 8 minutes.
Yogurt bark, fruit pops, smoothie pops, banana pops, and pudding cups belong in the fridge or freezer. Bark stays best in the freezer for up to 2 weeks in a sealed container with parchment between layers. Pops are best frozen solid and eaten within 1 month for the cleanest texture. Pudding cups and dips keep 3 to 4 days in the fridge, but bananas and apples should be added close to serving time so they don’t turn soft or brown.
Popcorn balls, pretzel rods, tortilla chips, and fruit leather need dry storage. Keep them at room temperature in airtight containers for 3 to 5 days, and keep the container away from steam, the fridge door, or anywhere else moisture can sneak in. If they soften, the fix is usually a few minutes in a low oven or simply a fresh batch. Once the crunch is gone, the charm goes with it.
Easy Swaps and Adaptations That Still Taste Like a Treat
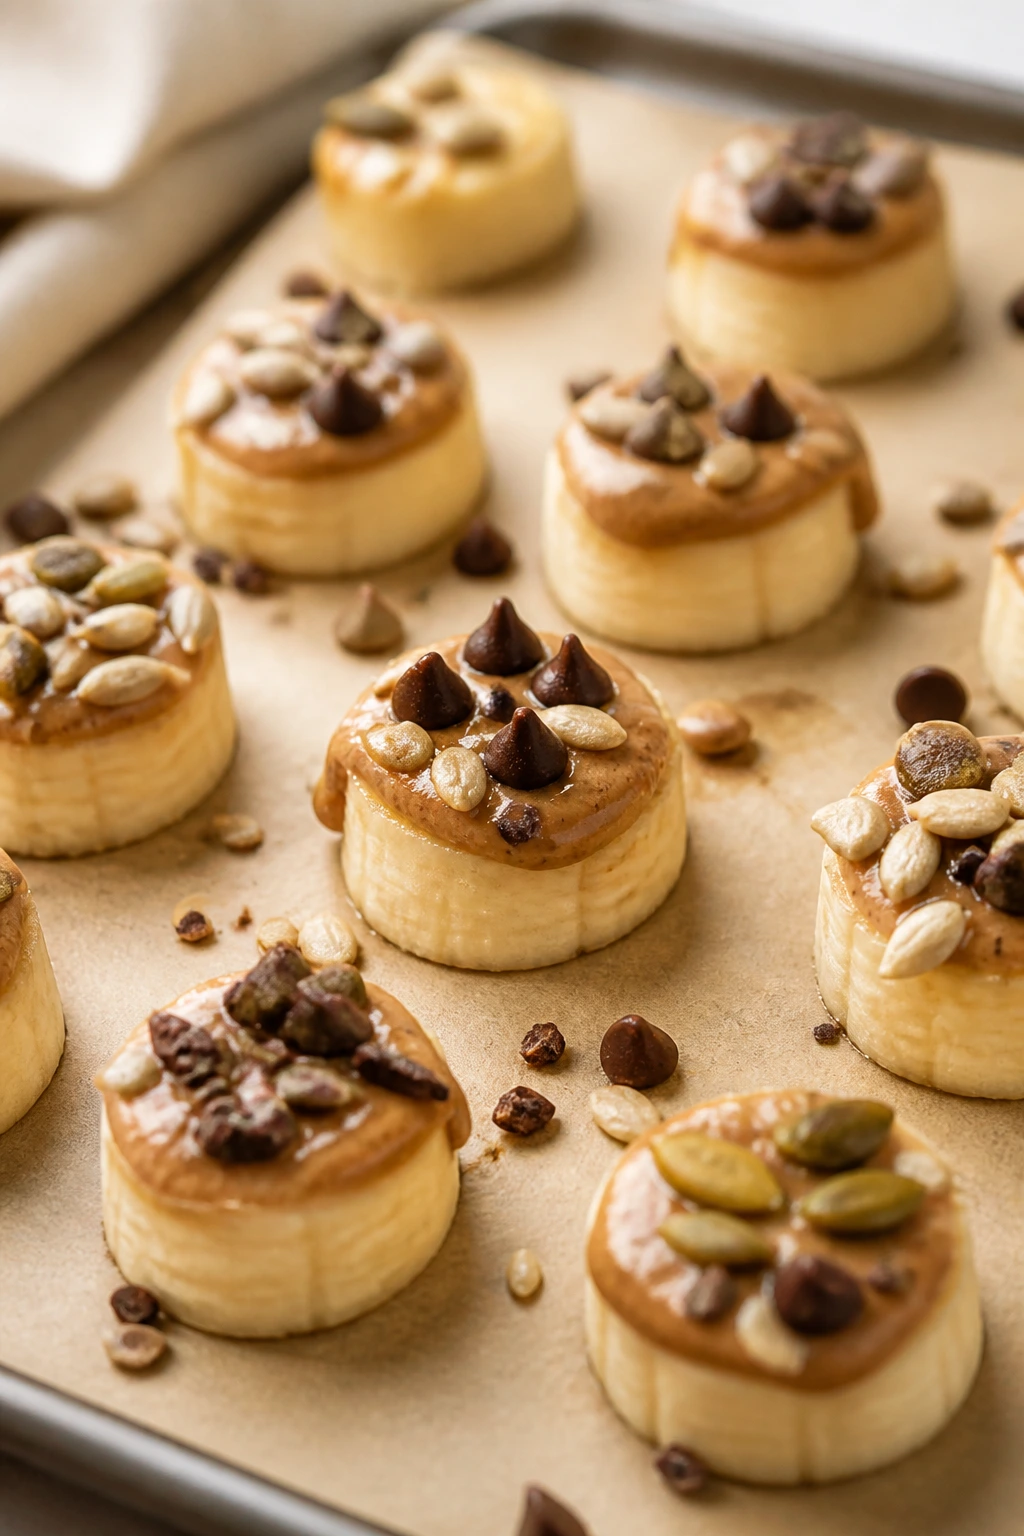
- Nut-Free Lunchbox Version: Use sunflower butter in the banana bites, energy bites, and cornflake clusters. The flavor changes a little, but the shape and sweetness stay the same.
- Dairy-Light Swap: Coconut yogurt works in pops, bark, and dips if you choose a thick one. The texture is a little different, though still soft and sweet enough for most kids.
- Gluten-Free Pantry Version: Certified gluten-free oats, gluten-free cereal, and gluten-free graham-style crackers open up a surprising number of these recipes without changing the look much.
- Lower-Sugar Tray: Lean on banana pops, fruit kabobs, watermelon pizza, and baked apples. Use less chocolate, more fruit, and a little vanilla to keep the flavor kid-friendly without making everything syrupy.
- Texture-Shy Kid Version: Keep toppings minimal. Choose plain mini muffins, smooth pudding cups, simple brownie bites, and bark without crunchy extras. Some kids like a treat that never surprises them halfway through the bite.
- Party-Board Version: Mix three or four of these into one tray — one baked, one frozen, one fruity, one chocolate. The variety matters less than the bite size and the familiar flavors.
Mistakes That Make Picky Eaters Walk Away
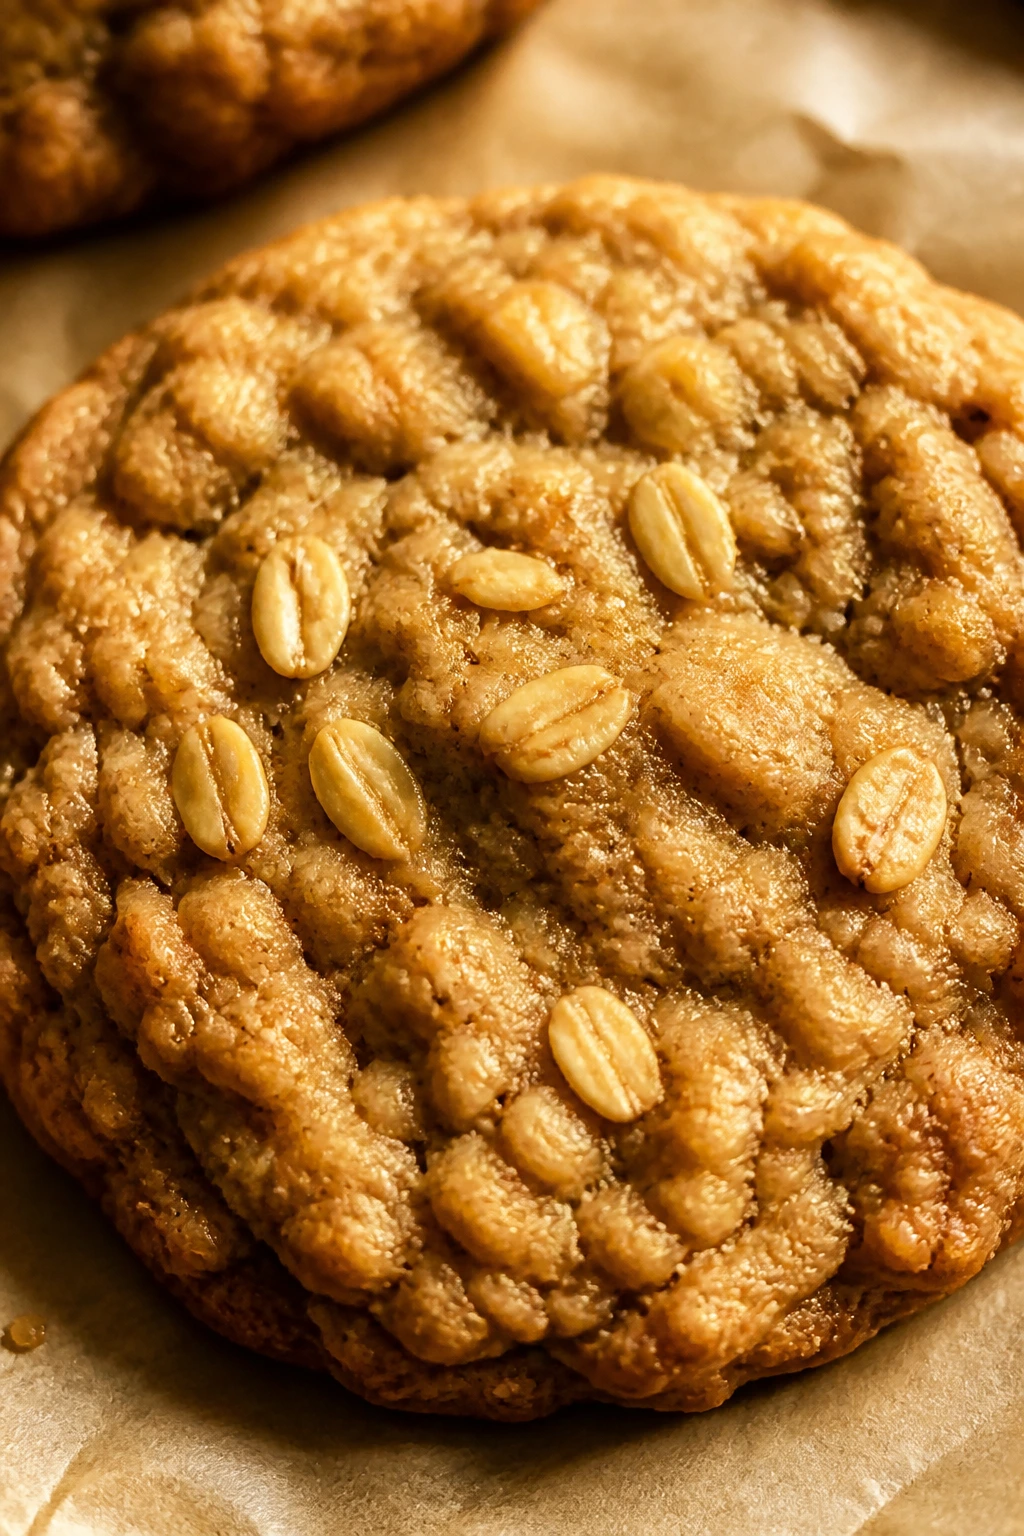
The first mistake is making treats too busy. A dessert covered in seeds, nuts, drizzles, and three kinds of sprinkles can look exciting to adults and exhausting to kids. Keep one main texture and one or two accents. That’s enough.
The second mistake is serving the wrong temperature. Warm yogurt bark is a mess. Rock-hard frozen pops are a challenge. Soft cookies that should have cooled are flimsy and frustrating. Temperature changes the whole experience, and picky eaters are usually more sensitive to that than grown-ups want to admit.
The third mistake is making everything too big. Giant muffins, huge skewers, thick brownie slabs — all of them raise the stakes. Small portions feel safer, and safe is what gets the first bite.
The fourth mistake is mixing wet and dry too early. Pretzels go soggy. Graham crackers turn to mush. Cereal loses its crunch. If a recipe has a wet component and a crisp component, keep them apart until the last possible minute.
The fifth mistake is assuming a “kid-friendly” treat can’t be picky about quality. It can. Brown bananas work for cookies and bites, but they’re useless for skewers. Thin yogurt works in a dip, but not in bark. The ingredients matter even when the recipe itself is simple.
Questions Parents Ask Before Making These Treats
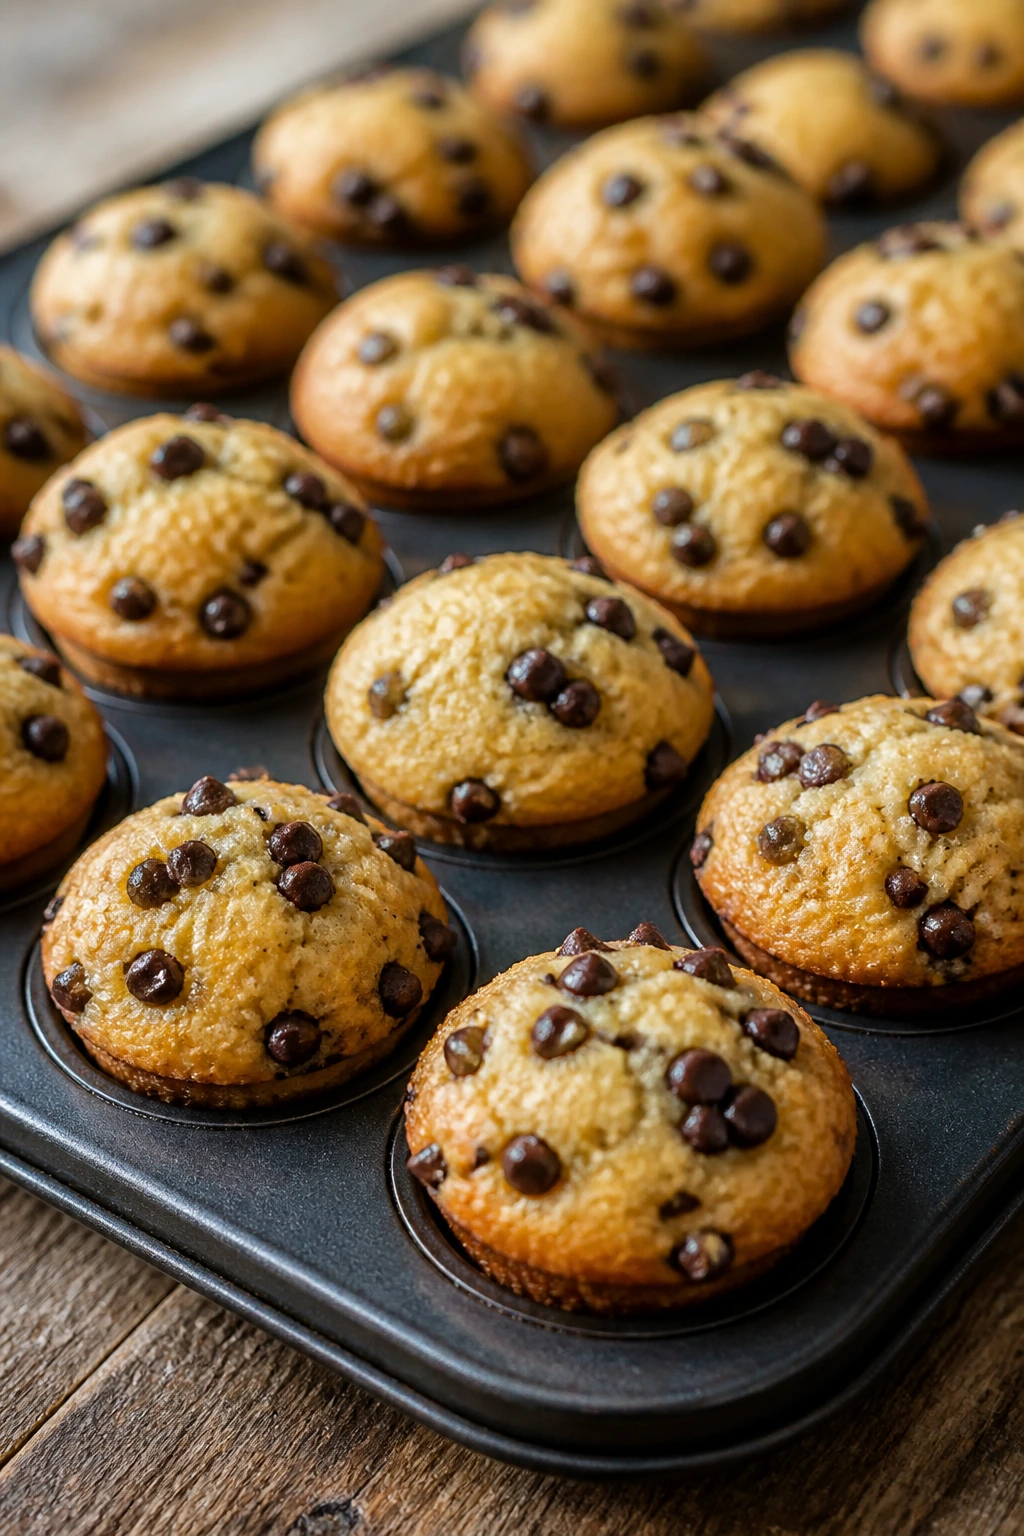
Which of these treats travel best in a lunchbox?
Mini muffins, oatmeal cookies, energy bites, Rice Krispie treats, and pretzel rods hold up well in a lunchbox if you keep them dry. Add a small ice pack for anything with yogurt, fruit, or cream cheese.
How do I make these nut-free?
Use sunflower butter wherever peanut butter appears, and check labels on cereal, graham crackers, and chocolate chips for shared equipment warnings. That swap works in banana bites, energy bites, and cornflake clusters without changing the shape of the snack.
Can I prep these the night before?
Yes, with some common sense. Cookies, muffins, bars, and dips can be made ahead, but fruit-heavy treats should wait until closer to serving. Anything with bananas or apples needs a little timing discipline or it goes brown and soft.
What if my kid only likes plain flavors?
Start with banana oat cookies, mini muffins, plain pudding cups, watermelon pizza, or simple fruit kabobs. Keep the toppings off the plate, serve the dip on the side, and let the child decide whether to use it.
How do I keep yogurt treats from turning icy?
Use thick yogurt, keep the layer thin, and sweeten it lightly with honey. That reduces ice crystals and gives bark and pops a smoother texture.
Which recipes freeze the best?
Yogurt bark, banana pops, smoothie pops, cookie dough-style energy bites, and baked brownie bites freeze well. Fruit-heavy open-face snacks like watermelon pizza do not. They turn watery and lose shape.
What if the baked treats come out dry?
Most likely they stayed in the oven too long or the batter was overmixed. Next time, pull them the moment the centers look set and keep an eye on the last 2 minutes. Dry mini muffins and cookie bites are usually a timing issue, not a hopeless recipe problem.
Can I use store-bought mix or dough and still keep the recipe reliable?
Absolutely. Biscuit dough for donut holes, instant pudding for cups, and refrigerated pie crust for hand pies are smart shortcuts. The key is to keep the other ingredients simple so the final snack still tastes intentional, not assembled from leftovers.
The Sweet Spot for Family Snack Time
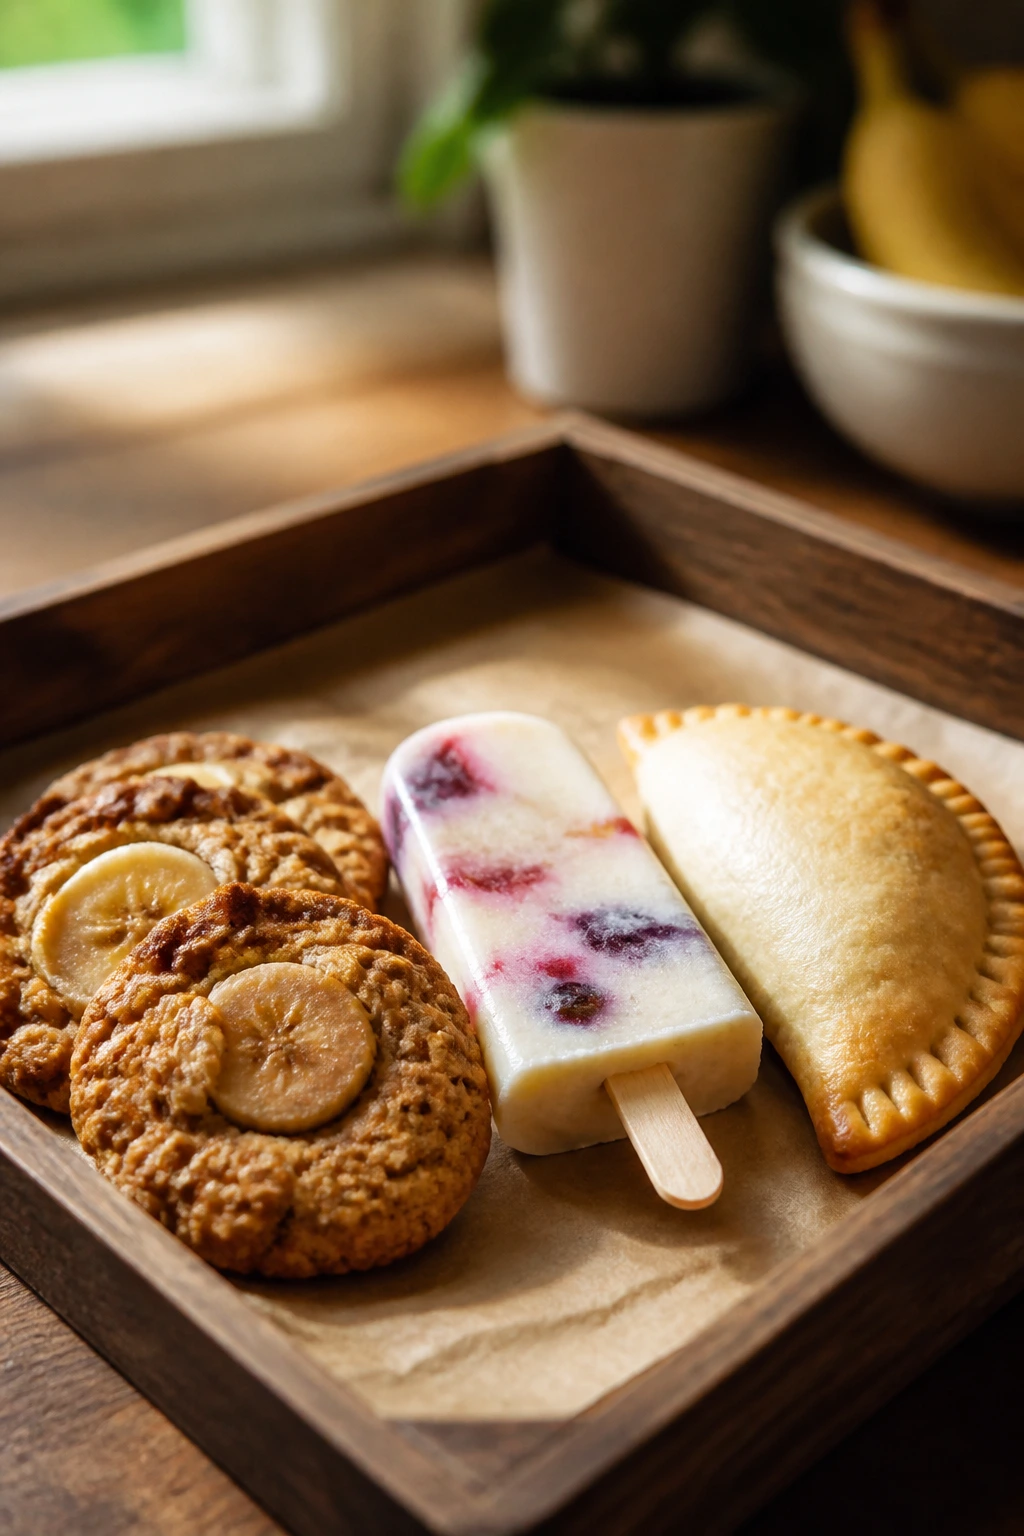
The best treats for picky eaters don’t shout. They keep their shape, hold their texture, and stay honest about what they are. A banana cookie should taste like banana and oats. A yogurt pop should taste like fruit and cream. A hand pie should taste like fruit wrapped in pastry, not like a mystery project.
That’s the whole trick. Clear flavors, small portions, and enough variety that nobody feels stuck eating the same thing every week. Once you lean into that approach, dessert gets easier to manage and a lot less dramatic.
And honestly, that’s the real win here: a tray of sweet things that gets eaten instead of negotiated over.