
A lunchbox meal lives or dies on tiny details. The bread has to stay flexible. The cheese has to taste clean after a few hours, not greasy. Wet fillings need a barrier, or they turn tortillas into paste and crack crackers into rubble by noon.
That’s why easy meals for lunchboxes are less about novelty and more about packing food that knows how to behave. A good lunchbox recipe can be eaten cold, or from a thermos, or at that awkward lukewarm middle ground where school lunch, office lunch, and field-trip lunch all end up. It should hold shape, travel well, and still feel like something someone actually wants to open.
I’ve leaned hard on the kinds of foods that survive backpacks, desk drawers, car rides, and the bottom of a tote bag: sturdy wraps, pasta salads with a little olive oil, mini bakes that reheat cleanly, and snack-box lunches that build themselves around texture. Some are built for kids. Some are better for grown-up appetites. All of them earn their spot because they still taste like lunch after they’ve been packed, stacked, and carried around.
Why These Lunchbox Meals Earn a Spot in the Bag
- Pack-and-go friendly: These lunches use tortillas, pita, pasta, rice, and sturdy breads that don’t fall apart the minute they meet a zipper.
- Kid-approved flavors: Ham and cheese, pizza, peanut butter, chicken salad, and pasta show up here because familiar flavors get eaten instead of returned untouched.
- Cold or warm works: Some recipes are meant to be eaten cold, while others are built for a thermos or a quick reheat.
- Make-ahead friendly: A lot of the components can be cooked the night before, then assembled in five minutes while the lunchbox is still open on the counter.
- Budget-smart shopping: Eggs, beans, pasta, tortillas, and rotisserie chicken keep several of these ideas cheap without making lunch feel skimpy.
- Easy to swap: If a kid hates cucumbers or a sandwich gets rejected, most of these meals can be tweaked without starting over.
1. Turkey, Cheddar, and Pickle Pinwheels
A tight swirl of turkey, cheddar, and a salty pickle spear tastes like deli lunch in miniature. The tortilla stays soft, the center stays tidy, and every slice gives you the same bite: creamy, sharp, briny, and a little crunchy.
Why It Works:
These pinwheels hold together because the filling is dry enough to stay put and the tortilla wraps snugly around it. The pickle slices cut through the cheese and turkey, so the whole thing doesn’t taste flat after a few hours in the box.
Key Ingredients:
- 2 large flour tortillas
- 4 oz cream cheese, softened
- 6 slices deli turkey
- 4 slices cheddar cheese
- 4 dill pickle spears, patted dry and sliced lengthwise
- 1 teaspoon Dijon mustard
- Pinch of black pepper
Quick Steps:
- Spread each tortilla with half the cream cheese and a thin swipe of Dijon.
- Layer turkey, cheddar, and pickle slices across the lower half of each tortilla.
- Roll tightly, pressing as you go, then chill 10 minutes if you have time.
- Slice into 1-inch pinwheels with a sharp knife, wiping the blade between cuts.
Equipment for This Recipe:
- Cutting board
- Sharp knife
- Small spatula or butter knife
How to Serve This Dish:
Pack with apple slices and pretzels. Four to six pinwheels make a solid kid lunch, and eight can work for an adult if you add fruit and a yogurt.
Pro Tips for This Recipe:
- Dry the pickles well or the tortilla gets slick.
- Chill before slicing if you want clean edges.
- Use deli cheese, not thick blocks, because thin slices roll more neatly.
Variations on This Dish:
- Ranch Turkey Roll-Up: Swap Dijon for ranch spread and add shredded lettuce just before packing.
- Ham and Swiss Spiral: Use ham, Swiss, and a thin layer of honey mustard for a sweeter edge.
Common Mistakes to Avoid with This Dish:
- Overfilling the tortilla: The roll bursts open and slices smear. Keep the layer thin.
- Skipping the paper towel on pickles: Extra moisture leaks into the wrap.
- Using cold cream cheese straight from the fridge: It tears the tortilla. Let it soften first.
2. Hummus, Cucumber, and Roasted Red Pepper Pita Pockets
This one tastes cool and clean, with a soft pita edge and a little smoky sweetness from the peppers. It’s the lunchbox version of a crisp kitchen counter lunch, and it stays pleasant even when nobody has time to reheat anything.
Why It Works:
Hummus acts like glue and moisture barrier at the same time. Cucumbers bring crunch, roasted peppers bring color and a little sweetness, and pita keeps the filling contained without turning soggy in the first hour.
Key Ingredients:
- 2 round pita breads
- 1 cup hummus
- 1 cucumber, seeded and thinly sliced
- 1/2 cup roasted red peppers, patted dry and sliced
- 1/4 cup crumbled feta
- 1 tablespoon olive oil
- Pinch of salt and pepper
Quick Steps:
- Cut each pita in half to make pockets.
- Spread hummus inside each pocket, pushing it toward the bottom edge.
- Layer cucumber, roasted peppers, and feta.
- Drizzle lightly with olive oil and season with salt and pepper.
- Pack upright so the filling doesn’t slide out.
Equipment for This Recipe:
- Paring knife
- Spoon
- Small container or parchment wrap
How to Serve This Dish:
Add grapes, carrot sticks, or a few olives on the side. One pita half is a light lunch; two halves with fruit make a fuller box.
Pro Tips for This Recipe:
- Seed the cucumber so the pockets don’t fill with water.
- Pat the peppers dry before they go in.
- Pack feta separately if the lunch will sit for a long stretch.
Variations on This Dish:
- Mediterranean Crunch: Add shredded carrot and a few chopped Kalamata olives.
- White Bean Spread Swap: Use mashed white beans plus lemon for a cheaper, creamier filling.
Common Mistakes to Avoid with This Dish:
- Stuffing the pita too full: It splits at the seam.
- Using watery cucumbers: The pita softens fast.
- Forgetting salt: Hummus and vegetables need a little seasoning to wake up.
3. Chicken Salad Apple Sandwiches
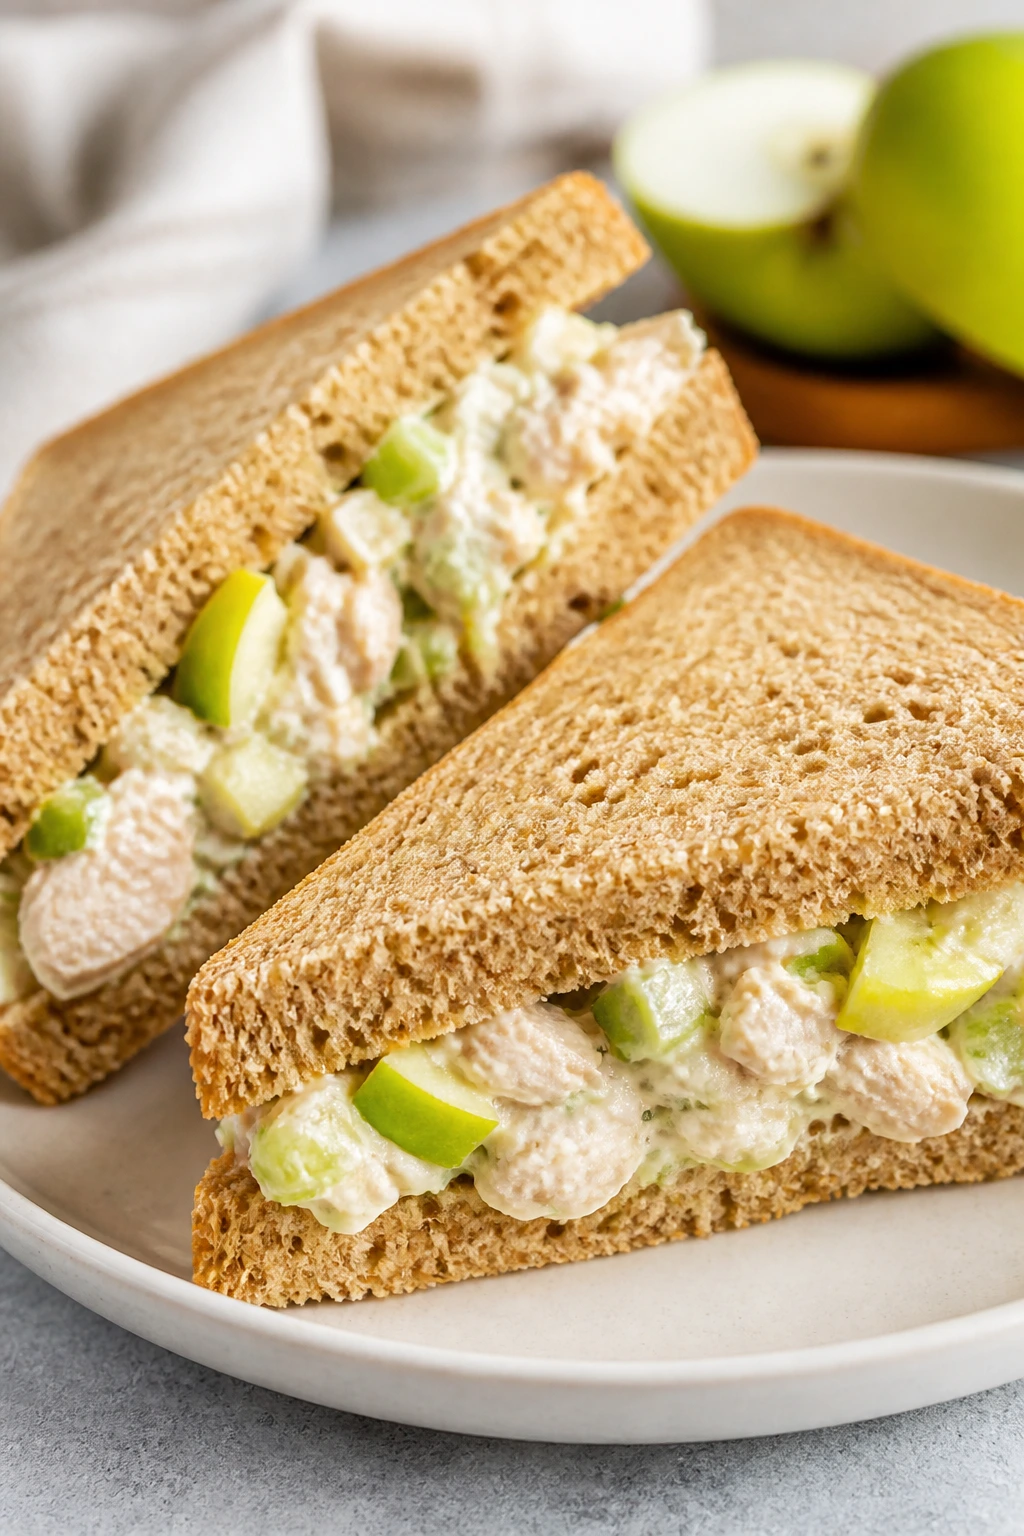
Chicken salad with diced apple sounds small until you bite into it. The sweet crunch from the apple keeps the mayo from tasting heavy, and the sandwich stays bright instead of turning into that sad, gray lunchbox thing nobody finishes.
Why It Works:
Cooked chicken, a little yogurt or mayo, and crisp apple dice make a filling that spreads well and doesn’t leak. Whole-grain bread gives it enough structure to survive packing, especially if you butter the bread lightly first.
Key Ingredients:
- 2 cups cooked chicken, chopped
- 1/3 cup mayonnaise
- 2 tablespoons plain Greek yogurt
- 1 small apple, diced small
- 1 celery stalk, finely chopped
- 1 teaspoon lemon juice
- 4 slices whole-grain bread
- Salt and pepper
Quick Steps:
- Mix chicken, mayo, yogurt, apple, celery, and lemon juice in a bowl.
- Season with salt and pepper, then taste and adjust.
- Butter the bread very lightly if you want extra moisture protection.
- Spoon the salad between two slices, then cut into triangles or strips.
Equipment for This Recipe:
- Mixing bowl
- Spoon
- Sharp knife
How to Serve This Dish:
Pack with cucumber rounds or baked chips. Two small sandwiches make a full lunch for a child; one large sandwich plus fruit is usually enough for an adult.
Pro Tips for This Recipe:
- Dice the apple small so every bite gets crunch without pushing the filling out.
- Use cold chicken, not warm, or the mayo thins out.
- Toast the bread lightly if you need a sturdier sandwich.
Variations on This Dish:
- Curry Chicken Salad: Add a pinch of curry powder and chopped raisins.
- Grape Chicken Salad: Swap the apple for halved red grapes if you want a softer sweet bite.
Common Mistakes to Avoid with This Dish:
- Too much mayo: The filling slides out. Start with less and add only if needed.
- Big apple chunks: They break the sandwich apart.
- Packing it on very soft bread: It goes squashed by lunchtime.
4. Mini Pepperoni Pizza Muffins

These smell like pizza shop heat the moment they come out of the oven. They’re soft in the middle, brown at the edges, and sturdy enough to eat with one hand, which matters more than people admit.
Why It Works:
Pizza flavors translate cleanly into lunchbox food because they taste fine warm, room temperature, or lightly reheated. The muffin format gives you portion control and a crusty edge that doesn’t go limp as fast as a slice.
Key Ingredients:
- 2 cups biscuit mix or self-rising flour blend
- 1 cup shredded mozzarella
- 1/2 cup mini pepperoni, chopped
- 3/4 cup milk
- 1 large egg
- 1/2 cup marinara sauce, plus more for dipping
- 1 teaspoon Italian seasoning
Quick Steps:
- Heat the oven to 375°F. Grease a 12-cup muffin tin.
- Stir the biscuit mix, mozzarella, pepperoni, and Italian seasoning together.
- Whisk milk, egg, and marinara, then fold into the dry ingredients.
- Scoop into muffin cups and bake 18 to 22 minutes, until golden and springy.
- Cool before packing.
Equipment for This Recipe:
- Muffin tin
- Mixing bowl
- Whisk and spoon
How to Serve This Dish:
Pack two muffins with fruit and a little dip cup of marinara. They’re also good with celery sticks if you want to cut the pizza richness.
Pro Tips for This Recipe:
- Don’t overmix or the muffins turn dense.
- Cool completely before sealing them up.
- Use mini pepperoni so the bites stay even.
Variations on This Dish:
- Veggie Pizza Muffins: Swap pepperoni for diced bell pepper and olives.
- Cheese-Only Batch: Skip the meat and add a little extra mozzarella for kids who want plain pizza flavor.
Common Mistakes to Avoid with This Dish:
- Using too much sauce: The batter gets gummy.
- Packing while warm: Steam softens the tops.
- Underbaking the center: It looks done before it actually is.
5. Pasta Salad with Peas and Mozzarella
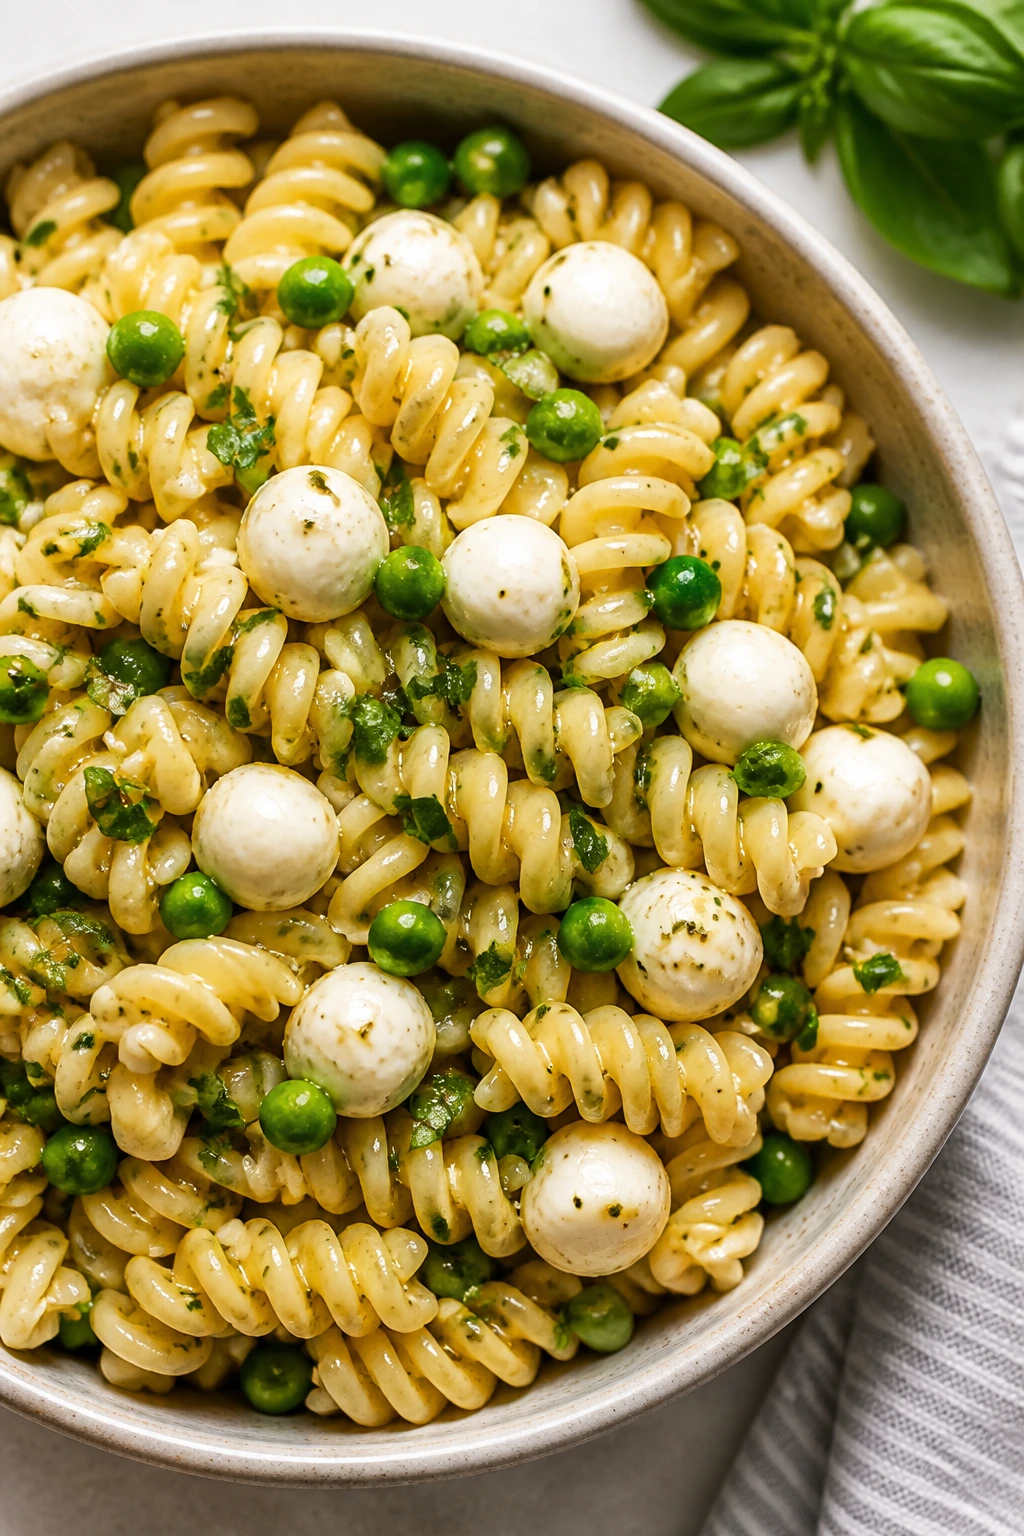
Cold pasta salad has a bad reputation when it’s plain and dry. Give it olive oil, peas, mozzarella pearls, and a sharp little hit of vinegar, and it turns into the kind of lunch that still tastes awake after sitting in a lunch bag.
Why It Works:
Short pasta grips dressing better than long noodles, and peas add sweetness without extra chopping. Mozzarella pearls stay soft and mild, so the salad feels full enough to count as lunch, not side dish territory.
Key Ingredients:
- 8 oz rotini or penne
- 1 cup frozen peas
- 1 cup mozzarella pearls
- 1/4 cup olive oil
- 2 tablespoons red wine vinegar
- 1 tablespoon grated Parmesan
- 1/2 teaspoon dried oregano
- Salt and pepper
Quick Steps:
- Cook the pasta until just tender, then drain and cool under cold water.
- Blanch the peas for 1 minute if you want them brighter, or thaw them under running water.
- Toss pasta, peas, mozzarella, olive oil, vinegar, Parmesan, and oregano.
- Season well, then chill at least 20 minutes before packing.
Equipment for This Recipe:
- Pot
- Colander
- Large bowl
How to Serve This Dish:
Add cherry tomatoes and a piece of fruit for a balanced box. It works as a main lunch or a side next to a sandwich.
Pro Tips for This Recipe:
- Salt the pasta water well or the salad tastes flat.
- Dress while the pasta is still slightly warm so it drinks in flavor.
- Hold back a spoonful of oil to refresh leftovers.
Variations on This Dish:
- Italian Deli Version: Add chopped salami and black olives.
- Creamy Pasta Salad: Stir in a spoonful of mayo or Greek yogurt for a softer dressing.
Common Mistakes to Avoid with This Dish:
- Rinsing off all the starch and forgetting salt: The pasta loses flavor.
- Overcooking the noodles: They turn mushy in the box.
- Adding wet tomatoes too early: They puddle at the bottom.
6. Taco Rice Bowls with Ground Beef
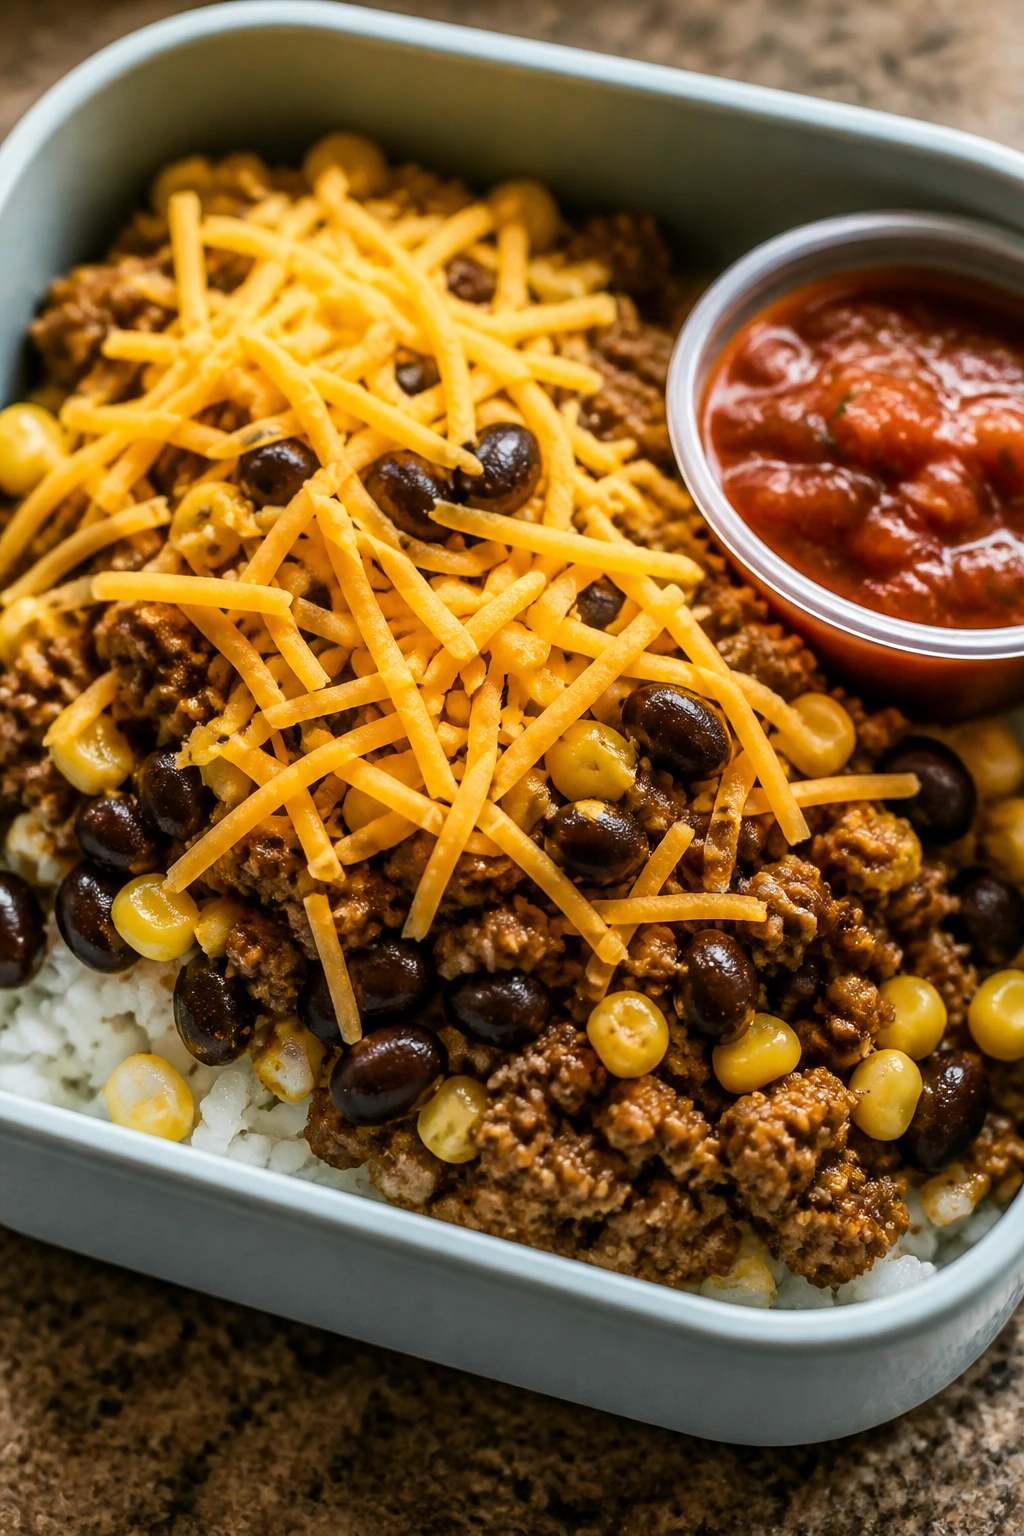
This is lunchbox food with a little backbone. Warm rice, seasoned beef, corn, beans, and a spoonful of salsa make a bowl that feels more like dinner leftovers in a good way, which is half the charm.
Why It Works:
Rice holds heat well, beans make the bowl filling, and taco seasoning gives the whole thing enough punch to taste finished even after a short reheat. Pack the salsa separately if you want the texture to stay sharp.
Key Ingredients:
- 1 cup uncooked rice
- 1 lb ground beef
- 1 packet taco seasoning
- 1/2 cup canned black beans, rinsed
- 1/2 cup corn kernels
- 1/2 cup shredded cheddar
- 1/2 cup salsa
- Optional: sliced avocado
Quick Steps:
- Cook the rice and keep it fluffy.
- Brown the beef in a skillet, then drain if needed.
- Stir in taco seasoning with a splash of water and cook until saucy.
- Layer rice, beef, beans, corn, and cheese in containers.
- Pack salsa and avocado separately.
Equipment for This Recipe:
- Skillet
- Pot with lid
- Small containers
How to Serve This Dish:
Serve with tortilla chips for scooping. One bowl can stretch for a teen-sized lunch if you add fruit and yogurt on the side.
Pro Tips for This Recipe:
- Let the beef cool before sealing or the rice gets sticky.
- Use a shallow container so it reheats evenly.
- Add avocado at the end so it stays green.
Variations on This Dish:
- Chicken Taco Bowl: Use shredded chicken instead of beef.
- Vegetarian Taco Bowl: Replace meat with extra beans and roasted sweet potato.
Common Mistakes to Avoid with This Dish:
- Packing salsa directly on the rice too early: The rice turns wet.
- Using underseasoned beef: The bowl tastes like plain meat and rice.
- Skipping the cheese: It helps tie the bowl together.
7. Ham, Swiss, and Pretzel Slider Bites

Soft pretzel buns have a salty chew that regular bread can’t match. Add ham and Swiss, and you get a lunchbox slider that feels snacky but still eats like a real meal.
Why It Works:
Pretzel rolls stay springy when packed, and Swiss melts into the ham without turning greasy. A thin spread of mustard keeps the flavor sharp, so the sandwich doesn’t taste heavy by the second bite.
Key Ingredients:
- 6 mini pretzel rolls or slider buns
- 6 slices ham
- 6 slices Swiss cheese
- 2 tablespoons Dijon mustard
- 1 tablespoon butter, melted
- Optional: pickle slices
Quick Steps:
- Split the rolls and spread mustard on the cut sides.
- Layer ham and Swiss on each slider.
- Brush the tops with melted butter if you want a softer finish.
- Close, wrap, and pack with a cold side.
Equipment for This Recipe:
- Serrated knife
- Baking tray if warming
- Pastry brush
How to Serve This Dish:
Pair with grapes and baby carrots. Two sliders make a kid lunch; three or four work better for older eaters.
Pro Tips for This Recipe:
- Warm the rolls briefly if you want the cheese to settle into the bread.
- Use thin ham slices so the sliders close cleanly.
- Keep pickles separate if crunch matters.
Variations on This Dish:
- Turkey Pretzel Slider: Swap the ham for turkey and add honey mustard.
- Hot Ham and Cheese: Bake the assembled sliders at 350°F for 8 minutes, then cool before packing.
Common Mistakes to Avoid with This Dish:
- Too much mustard: It leaks into the bun.
- Thick cheese slices: The slider won’t close.
- Packing while warm: Steam softens the pretzel crust fast.
8. Egg Salad Toast Fingers
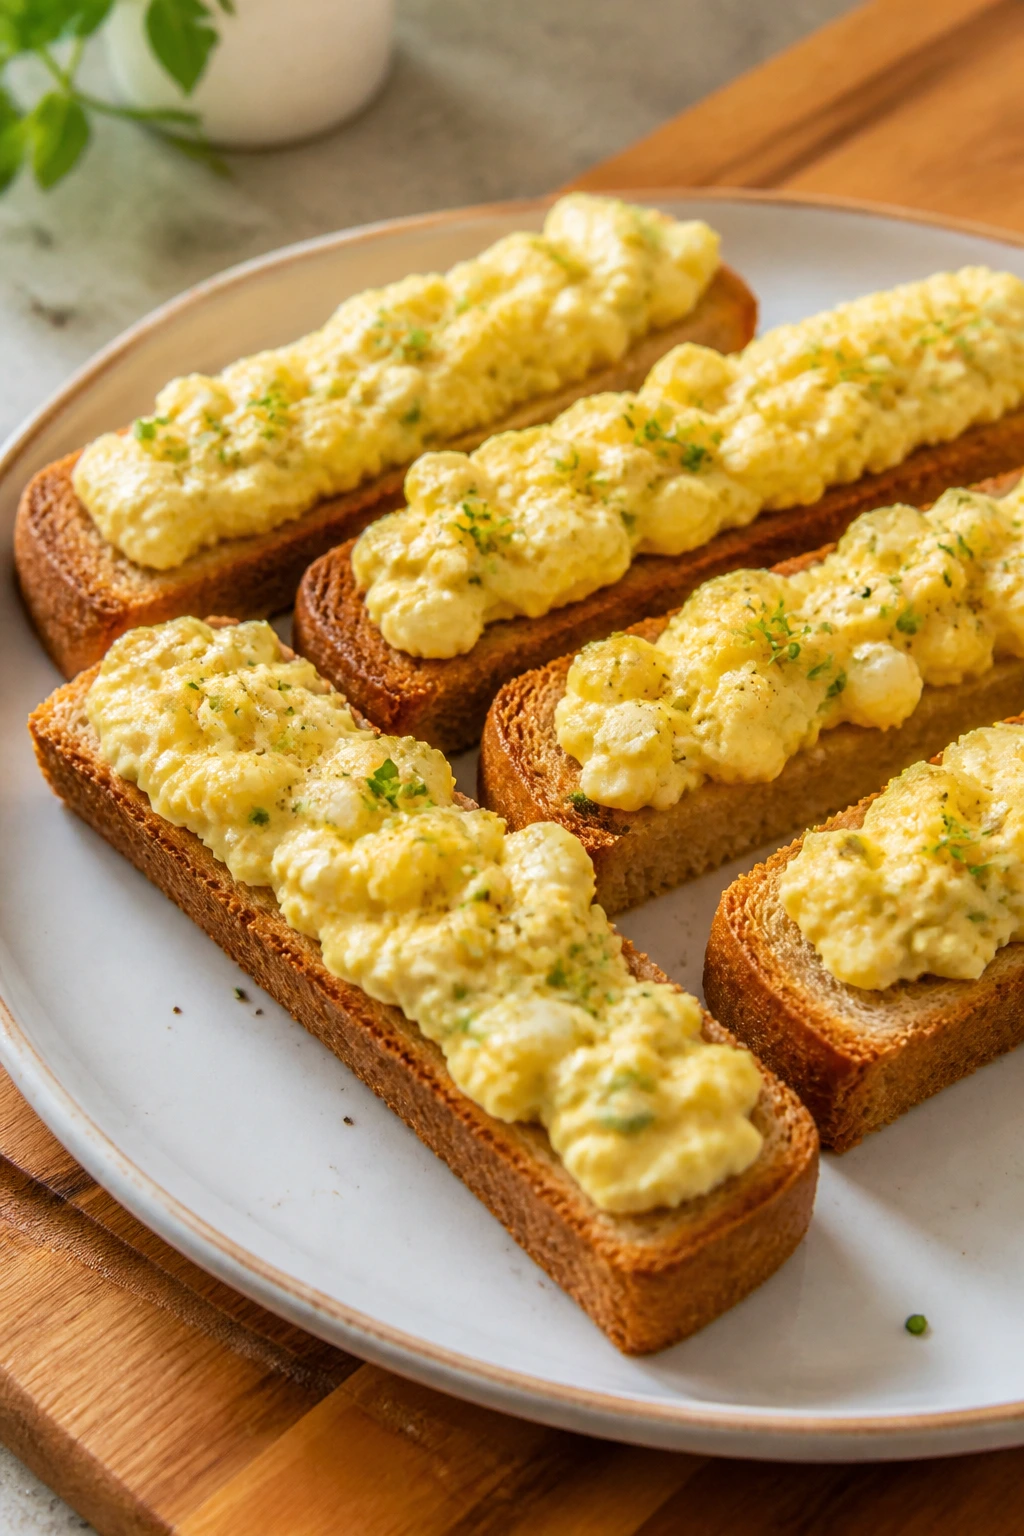
Egg salad can get dull fast if it’s too wet or too sweet. Keep it simple, pile it onto toasted bread, and cut it into fingers that are easy to grab without dragging a whole sandwich apart.
Why It Works:
The toast creates a dry base, which matters because egg salad needs moisture from the filling, not the bread. A little mustard and celery keep the salad lively, and the finger shape makes it less messy than a full sandwich.
Key Ingredients:
- 4 hard-boiled eggs
- 2 tablespoons mayonnaise
- 1 teaspoon mustard
- 1 celery stalk, finely chopped
- Salt and pepper
- 4 slices sturdy bread, toasted
Quick Steps:
- Chop the eggs and mix with mayo, mustard, celery, salt, and pepper.
- Taste and adjust the seasoning.
- Toast the bread until lightly crisp.
- Spread the egg salad on top and cut each slice into fingers.
Equipment for This Recipe:
- Small bowl
- Fork
- Toaster or skillet
How to Serve This Dish:
Pack with cherry tomatoes or cucumber spears. The toast fingers are best eaten the same day, but the egg salad itself keeps well.
Pro Tips for This Recipe:
- Dry the eggs after peeling so the salad isn’t watery.
- Toast both sides lightly for better structure.
- Add chives if you want a fresher edge.
Variations on This Dish:
- Curried Egg Salad: Add a pinch of curry powder and minced raisins.
- Avocado Egg Salad: Replace half the mayo with mashed avocado.
Common Mistakes to Avoid with This Dish:
- Too much mayo: The filling spreads and slides.
- Packing on soft bread: It compresses into a wet layer.
- Skipping seasoning: Egg salad needs salt more than people think.
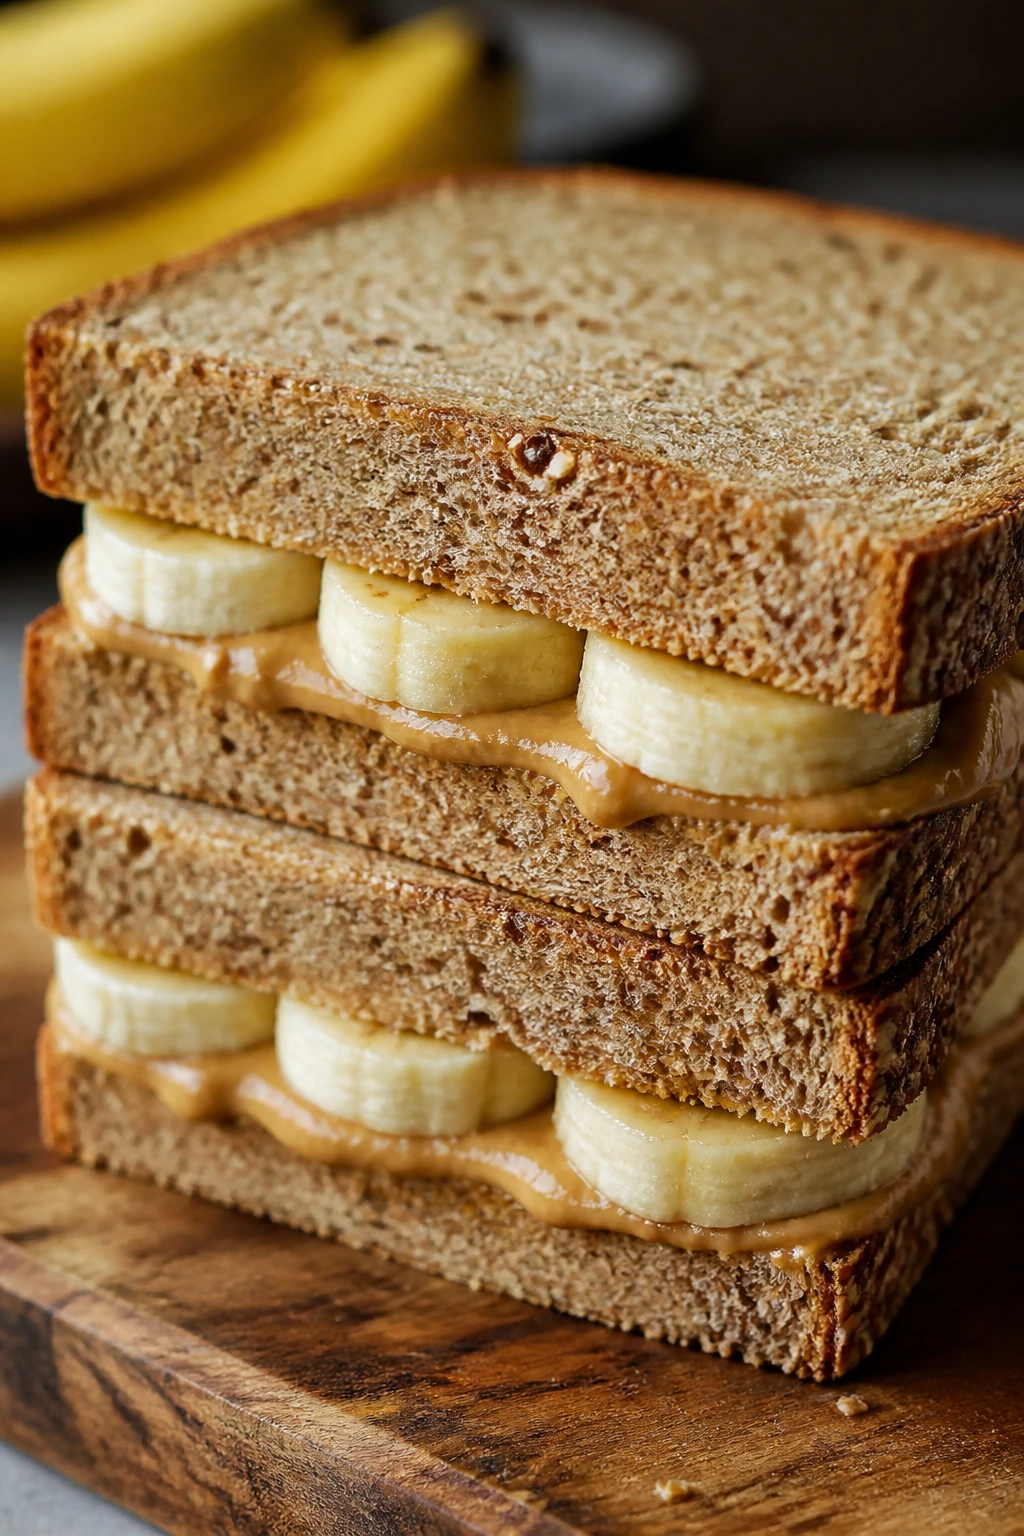
9. PB&J Tortilla Roll-Ups with Banana
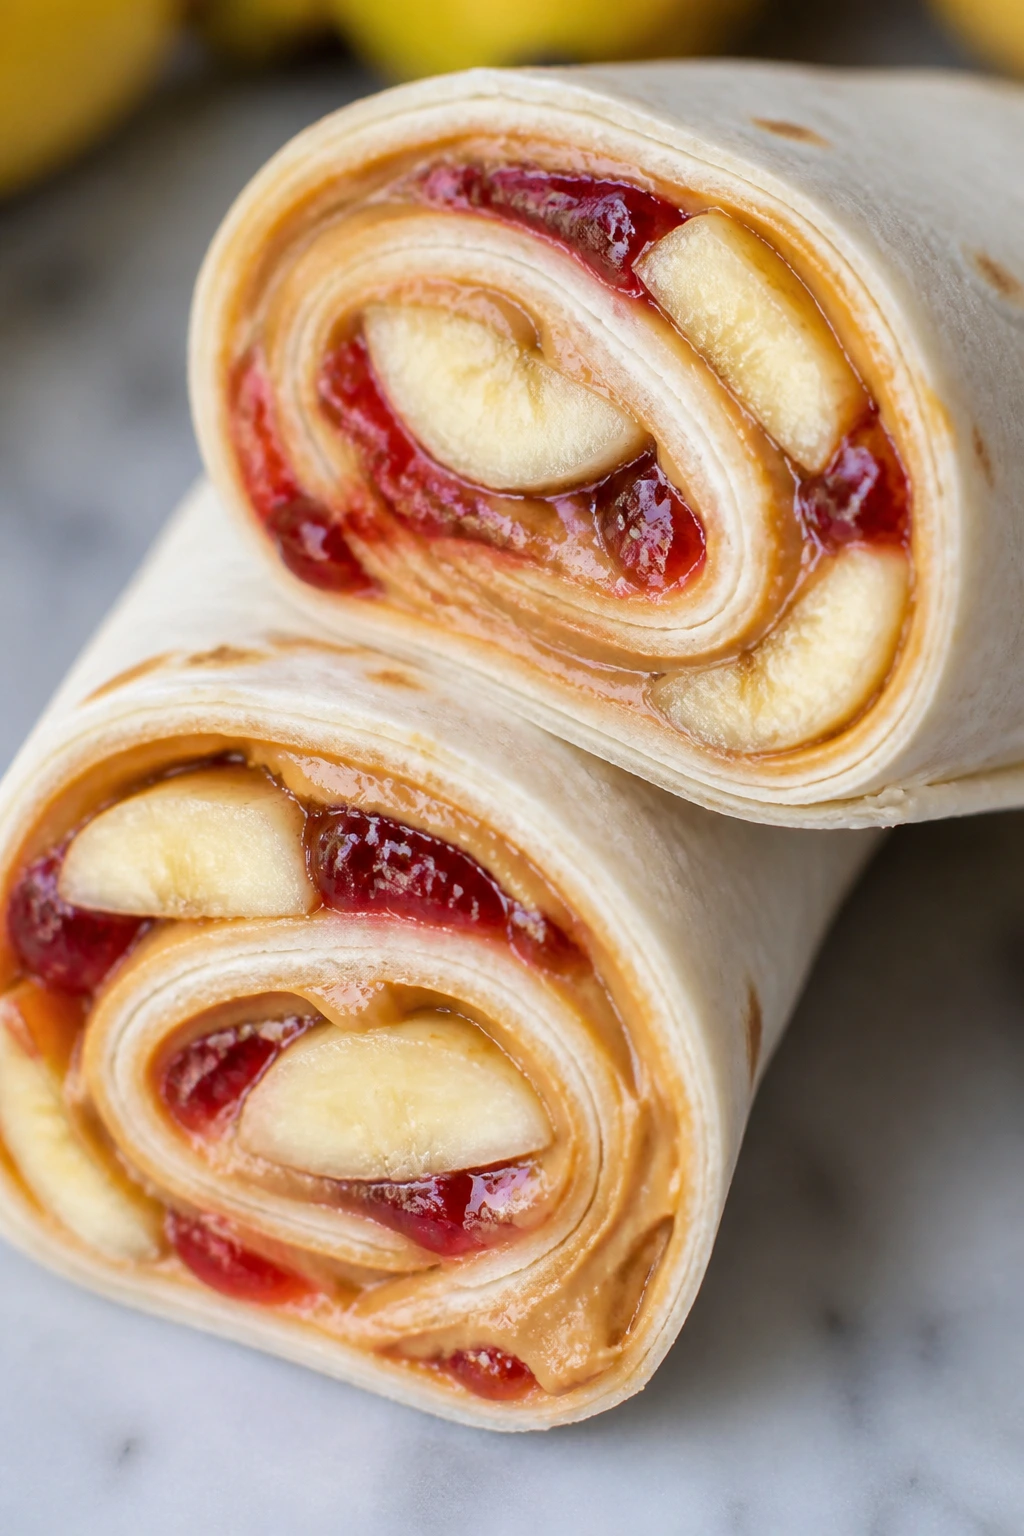
It’s the lunchbox version of a peanut butter sandwich, but neater. The tortilla keeps the filling tight, banana adds softness, and the jelly gives you that sticky-sweet center without soaking the whole thing through.
Why It Works:
Tortillas roll cleaner than sliced bread, especially for small hands. Peanut butter creates a barrier, so the jam doesn’t immediately soak in, and the banana adds a fresh, creamy bite that keeps the whole roll from tasting one-note.
Key Ingredients:
- 2 large flour tortillas
- 4 tablespoons peanut butter
- 4 tablespoons strawberry jam or jelly
- 1 banana, thinly sliced
- Optional: cinnamon
Quick Steps:
- Spread peanut butter across each tortilla, leaving a border.
- Spoon jam over the peanut butter and add banana slices.
- Roll tightly, then cut into thick spirals or leave whole.
- Wrap well for packing.
Equipment for This Recipe:
- Knife
- Cutting board
- Paring knife or spreader
How to Serve This Dish:
Pair with milk, apple slices, or a handful of pretzels. One roll is enough for a light lunch; two can stand in for a fuller meal.
Pro Tips for This Recipe:
- Use thick peanut butter so the roll doesn’t slip.
- Pat the banana slices dry if they’re very ripe.
- Cut only when needed if you want the spirals to stay neat.
Variations on This Dish:
- Sunflower Butter Swap: Use sunflower seed butter for nut-free lunches.
- Honey Banana Roll-Up: Replace jelly with a drizzle of honey and a pinch of cinnamon.
Common Mistakes to Avoid with This Dish:
- Too much jelly: It leaks out the ends.
- Thin tortillas: They tear during rolling.
- Using a banana that’s too ripe: It turns mushy fast.
10. Greek Chicken Orzo Salad
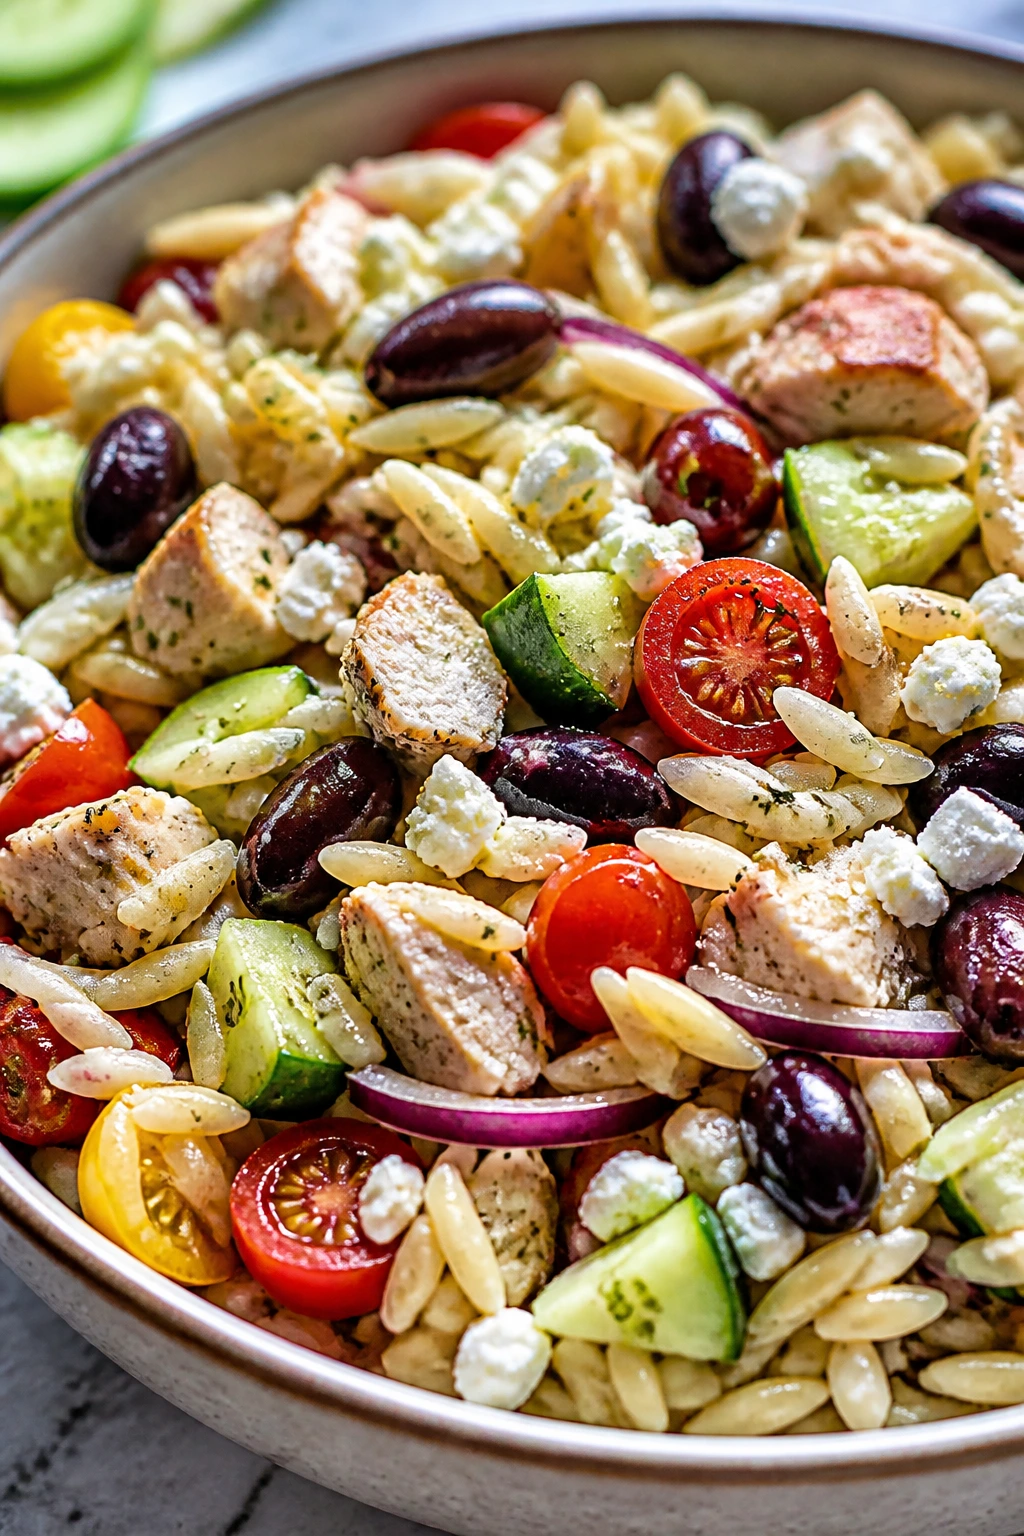
Orzo gives lunchbox salad a nicer chew than standard pasta. Add chicken, cucumber, olives, and feta, and you get something cool, salty, and sturdy enough to sit in the fridge without turning tired.
Why It Works:
The tiny pasta catches dressing well, and the olive-feta-cucumber mix keeps the flavor bright. It’s the kind of lunch that tastes even better after the grains and dressing sit together for a few hours.
Key Ingredients:
- 1 cup dry orzo
- 2 cups cooked chicken, chopped
- 1 cucumber, diced
- 1/2 cup cherry tomatoes, halved
- 1/3 cup feta
- 1/4 cup sliced olives
- 3 tablespoons olive oil
- 2 tablespoons lemon juice
Quick Steps:
- Cook the orzo until tender, then drain and cool.
- Toss with chicken, cucumber, tomatoes, feta, and olives.
- Whisk oil and lemon juice together, then stir it through.
- Chill before packing so the flavor settles.
Equipment for This Recipe:
- Pot
- Colander
- Mixing bowl
How to Serve This Dish:
Pack with pita chips or a soft roll. It works cold and doesn’t need reheating, which makes it a nice break from heavier lunchbox food.
Pro Tips for This Recipe:
- Salt the pasta water generously or the salad tastes flat.
- Dice the cucumber small so each bite stays balanced.
- Hold back a little feta to sprinkle on top right before serving.
Variations on This Dish:
- Tuna Orzo Salad: Swap the chicken for drained tuna.
- Roasted Veggie Version: Add roasted zucchini or peppers for a sweeter, softer bowl.
Common Mistakes to Avoid with This Dish:
- Overcooking the orzo: It clumps when chilled.
- Using too much lemon: The salad turns sharp instead of fresh.
- Packing with wet tomatoes unseeded: The dressing gets diluted.
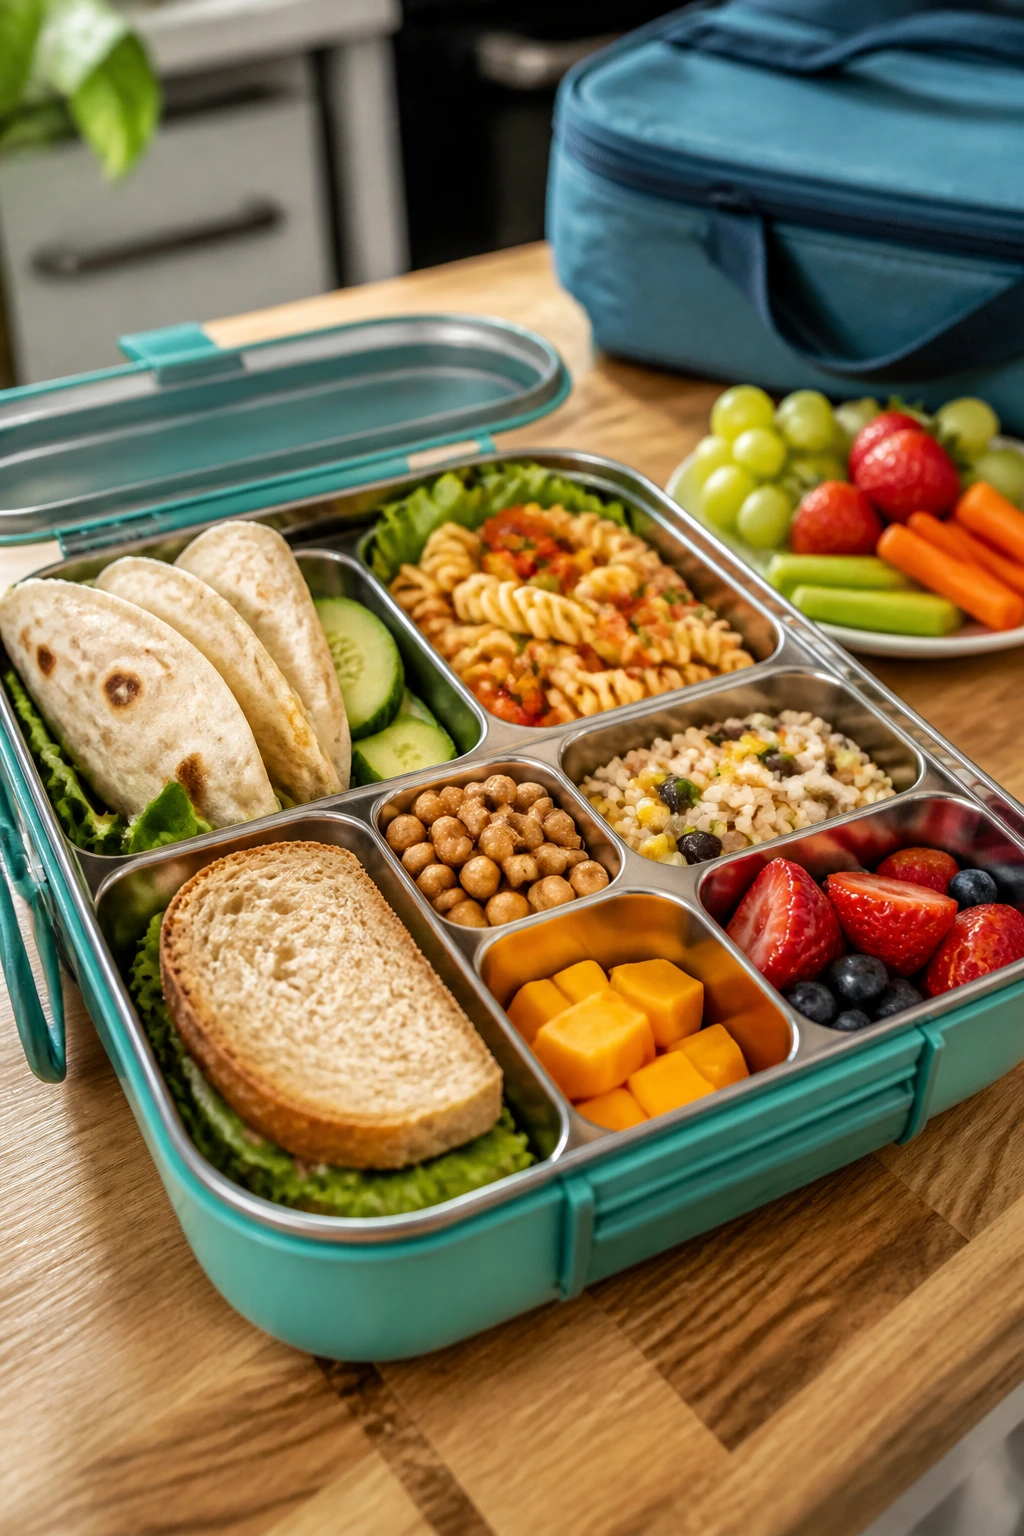
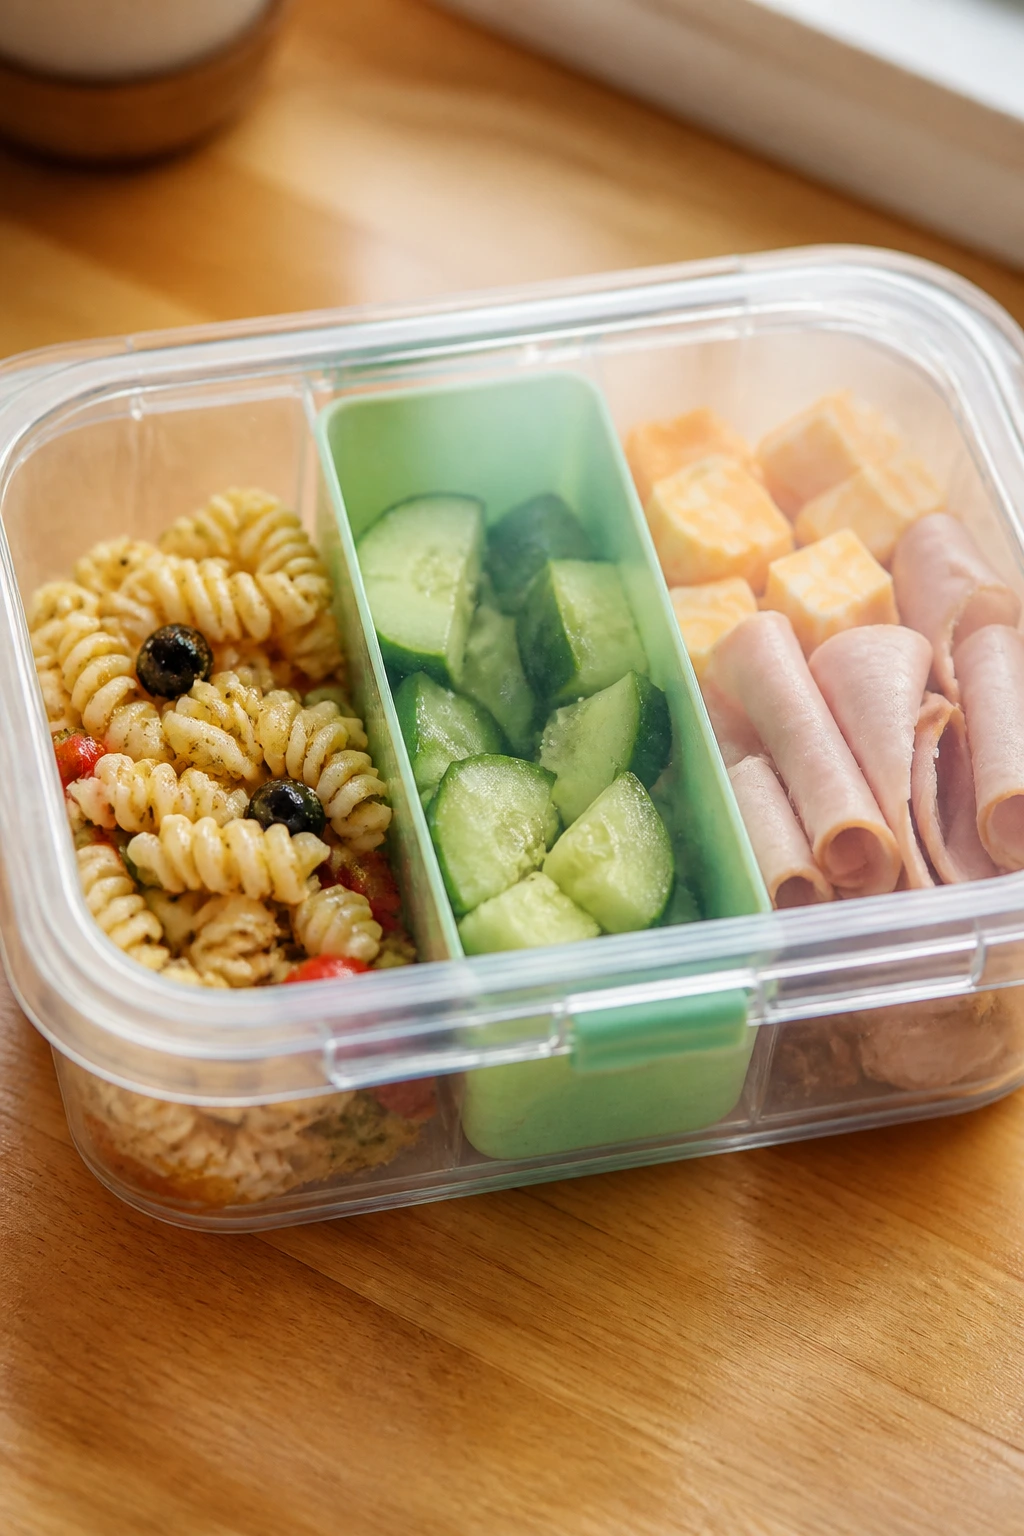
11. Classic Bento Box Snack Lunch
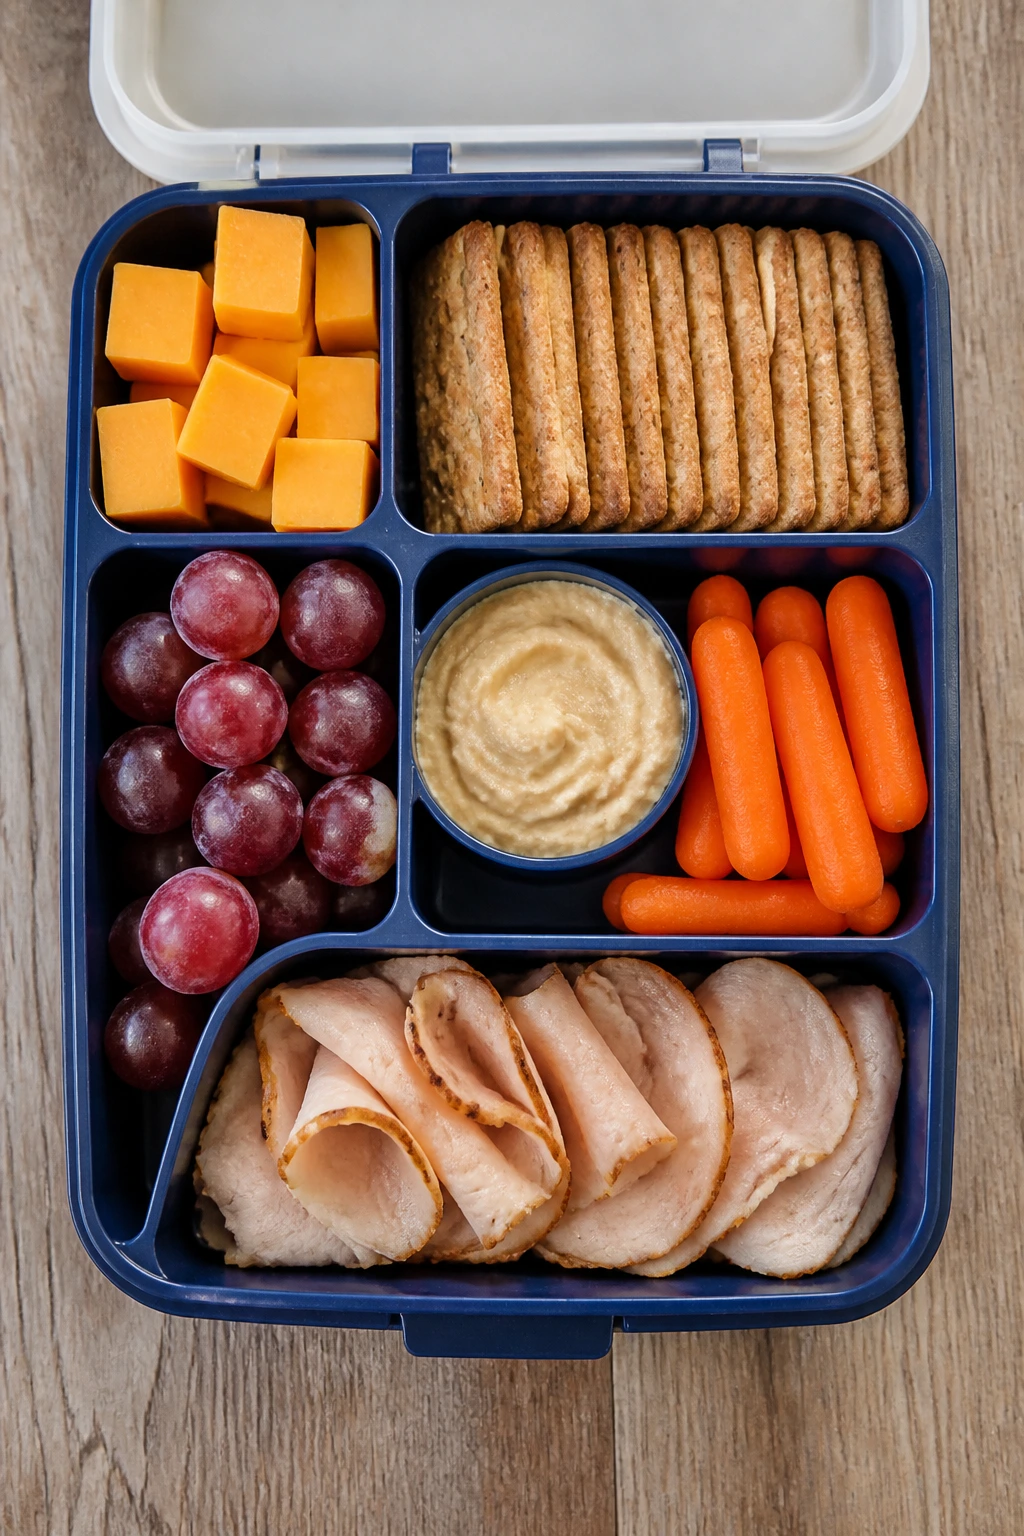
This is not a single recipe so much as a smart lunch layout. Cheese, crackers, fruit, protein, and something crunchy make a box that feels complete without any cooking drama.
Why It Works:
Bento-style lunchboxes solve the “I don’t want a sandwich” problem without requiring a hot meal. The trick is contrast: soft fruit, salty cheese, crisp crackers, and one protein item keep the box from feeling random.
Key Ingredients:
- 4 oz cheddar, cubed
- 8 whole-grain crackers
- 1 hard-boiled egg, peeled
- 1/2 cup grapes
- 1/2 cup baby carrots
- 2 tablespoons hummus
- 4 slices salami or turkey rolls
Quick Steps:
- Wash and dry the fruit and carrots.
- Cut cheese into cubes and peel the egg.
- Arrange each item in a compartment or silicone cup.
- Pack hummus in a small leakproof container.
Equipment for This Recipe:
- Compartment lunchbox
- Small leakproof cup
- Knife and cutting board
How to Serve This Dish:
This works best as a snacky lunch or a lighter school-day box. Add a granola bar or yogurt if the eater needs more calories.
Pro Tips for This Recipe:
- Keep wet foods in their own cup so crackers stay crisp.
- Use firm fruit like grapes, strawberries, or apple wedges.
- Add one “favorite” item so the box gets eaten, not picked at.
Variations on This Dish:
- Mediterranean Bento: Use hummus, cucumber, olives, and pita chips.
- Breakfast Bento: Pack hard-boiled eggs, cheese cubes, and a mini muffin.
Common Mistakes to Avoid with This Dish:
- Mixing wet and dry items together: Everything softens.
- Too many tiny bites of the same thing: The box feels unfinished.
- Packing fruit with no barrier: Juices run into the crackers.
12. Teriyaki Chicken Meatballs with Rice
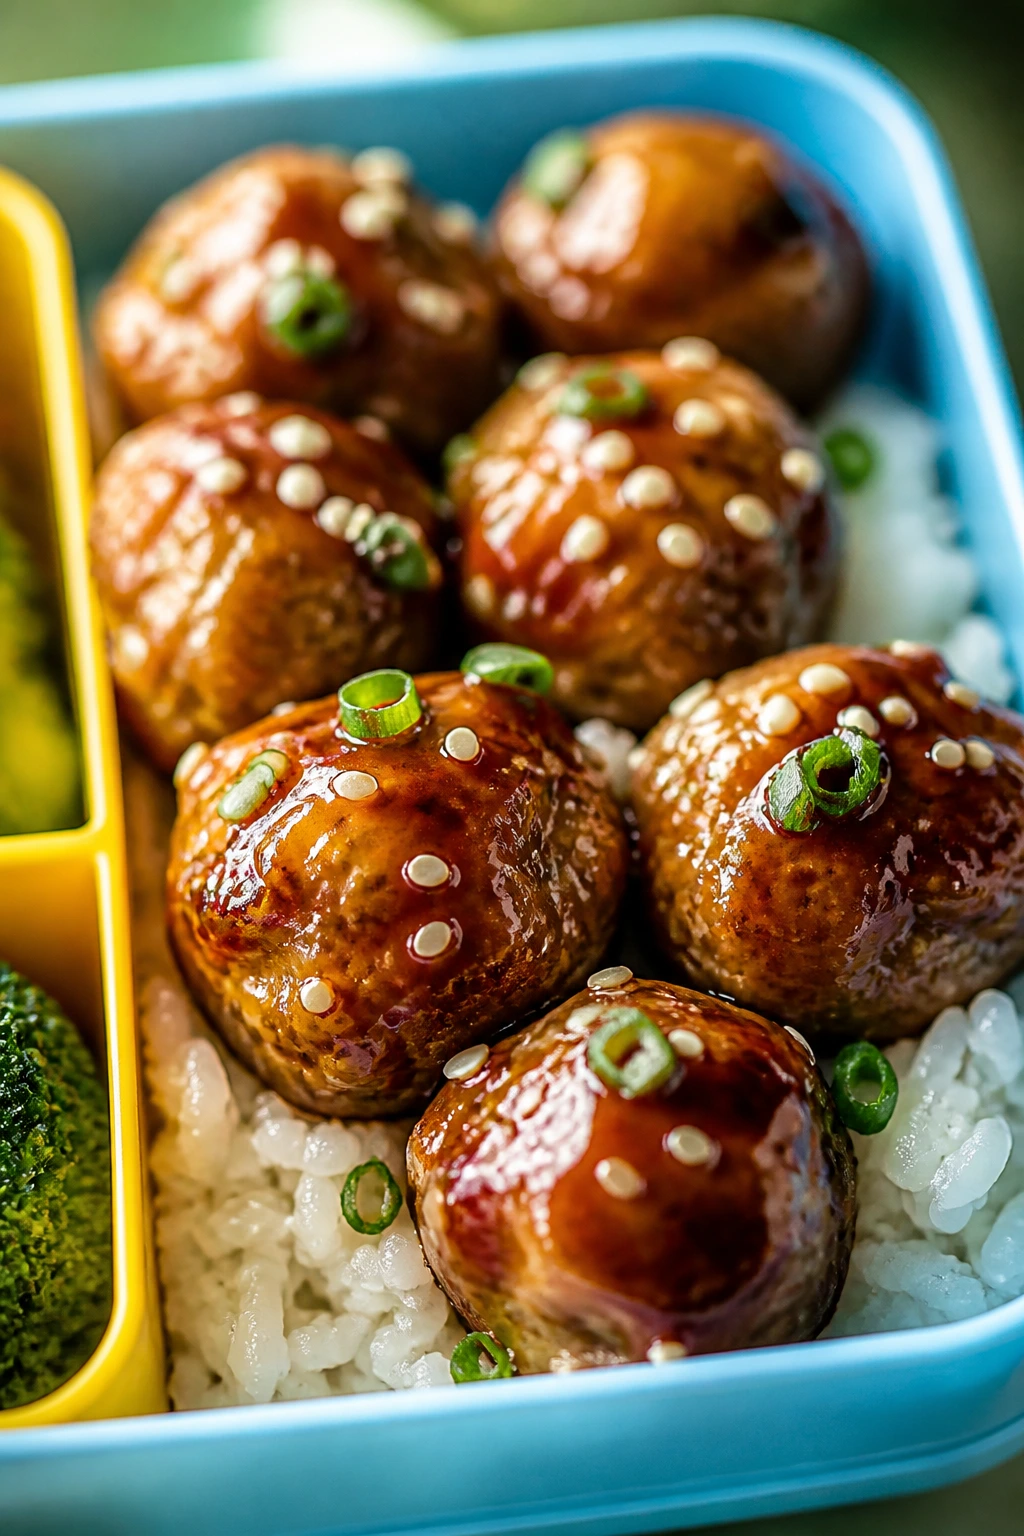
Sticky, glossy meatballs over rice make a lunchbox smell like takeout in the best way. The sauce clings to each meatball, and the rice underneath catches the extra glaze instead of letting it pool.
Why It Works:
Meatballs reheat cleanly and hold shape better than plain chicken pieces. A thick teriyaki sauce coats the outside, and rice gives the lunch something absorbent so it doesn’t feel greasy.
Key Ingredients:
- 1 lb ground chicken
- 1 egg
- 1/3 cup breadcrumbs
- 2 tablespoons soy sauce
- 1 cup cooked rice
- 1/3 cup teriyaki sauce
- 1 teaspoon grated ginger
- 1 teaspoon sesame seeds
Quick Steps:
- Mix chicken, egg, breadcrumbs, soy sauce, and ginger.
- Shape into small meatballs and bake at 400°F for 15 minutes.
- Warm the teriyaki sauce in a pan or microwave.
- Toss the meatballs in sauce and spoon over rice.
- Sprinkle sesame seeds on top.
Equipment for This Recipe:
- Baking sheet
- Bowl
- Small saucepan or microwave-safe cup
How to Serve This Dish:
Add steamed broccoli or edamame in the same box. It’s one of the better thermos-free warm lunches if you reheat it and pack it hot.
Pro Tips for This Recipe:
- Make the meatballs small so they heat evenly.
- Use a thick sauce or it runs into the rice.
- Cool the rice in a thin layer before packing if you’re eating it cold.
Variations on This Dish:
- Turkey Meatballs: Swap ground turkey for chicken.
- Pineapple Teriyaki Bowl: Add pineapple chunks for a sweeter lunch.
Common Mistakes to Avoid with This Dish:
- Overmixing the meat: The meatballs turn tough.
- Sauce that’s too thin: It slides to the bottom of the box.
- Packing rice too wet: It turns clumpy and heavy.
13. Tuna Melt Quesadilla Wedges
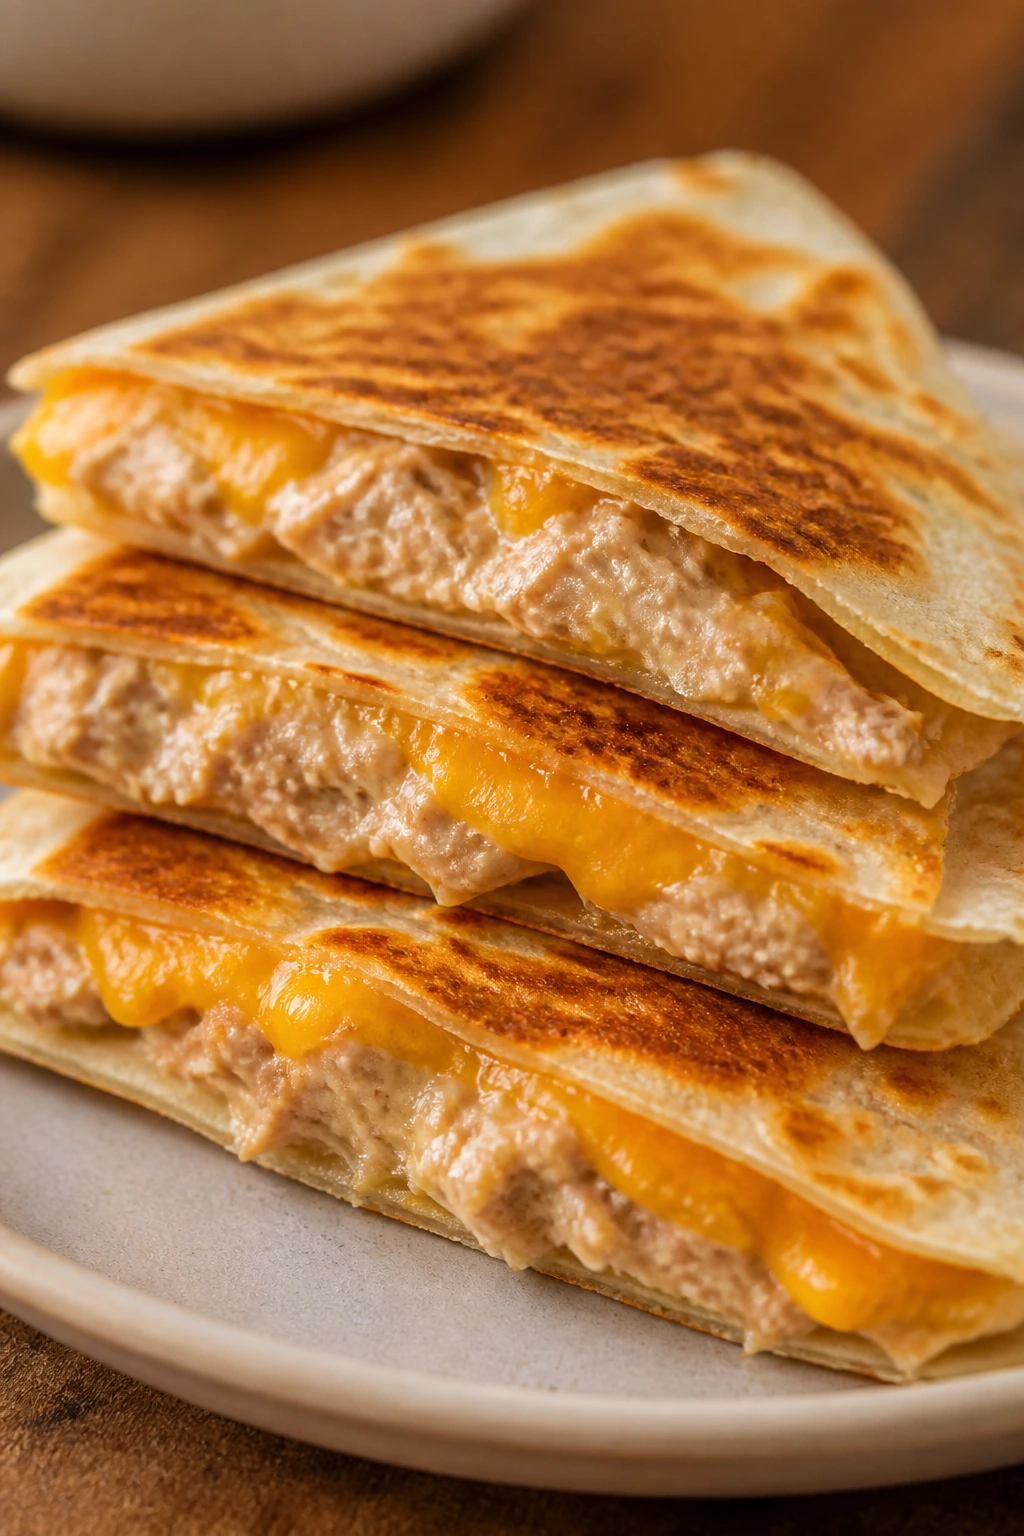
A tuna melt doesn’t always need bread. Fold it into a quesadilla and you get crisp edges, a soft center, and a lunch that actually keeps its shape after it’s cut into wedges.
Why It Works:
The skillet toast on the tortilla gives the tuna mixture a shell, and the cheese melts into the filling so it doesn’t crumble out. It’s a useful trick for kids who like tuna but not a soggy sandwich.
Key Ingredients:
- 1 can tuna, drained
- 2 tablespoons mayonnaise
- 1 teaspoon mustard
- 1/3 cup shredded cheddar
- 2 large flour tortillas
- 1 tablespoon butter
- Optional: chopped celery
Quick Steps:
- Mix tuna, mayo, mustard, and celery if using.
- Spread filling over one tortilla, then top with cheese and the second tortilla.
- Cook in butter over medium heat for 2 to 3 minutes per side.
- Cool briefly, then cut into wedges.
Equipment for This Recipe:
- Skillet
- Spatula
- Knife or pizza cutter
How to Serve This Dish:
Pack with carrot sticks and a few grapes. It tastes best warm, but it still works at room temperature if the tortilla stays crisp.
Pro Tips for This Recipe:
- Drain the tuna well or the center gets sloppy.
- Use medium heat so the tortilla browns without burning.
- Let it rest before cutting or the filling spills out.
Variations on This Dish:
- Tuna and Pickle Melt: Add chopped pickles for tang.
- Mild Cheddar Version: Use all cheddar and skip the mustard for picky eaters.
Common Mistakes to Avoid with This Dish:
- Overstuffing the quesadilla: It won’t flip cleanly.
- High heat: The tortilla browns before the cheese melts.
- Cutting too soon: The filling slides out.
14. Spinach-Feta Mini Frittatas

These bake into little savory egg cups with browned edges and a tender middle. They’re handy because they can be eaten cold, warmed, or tucked next to fruit without needing bread at all.
Why It Works:
Eggs set cleanly in a muffin tin, which makes portioning painless. Spinach and feta give the cups enough flavor that they don’t taste like plain eggs, and the shape makes them easy to hold.
Key Ingredients:
- 8 large eggs
- 1/4 cup milk
- 1 cup chopped spinach, squeezed dry
- 1/3 cup crumbled feta
- 1/4 cup diced onion
- Salt and pepper
- 1 tablespoon oil for the tin
Quick Steps:
- Heat the oven to 350°F and grease a muffin tin.
- Whisk eggs, milk, salt, and pepper.
- Stir in spinach, feta, and onion.
- Pour into muffin cups and bake 16 to 20 minutes until set.
- Cool before removing.
Equipment for This Recipe:
- Muffin tin
- Whisk
- Mixing bowl
How to Serve This Dish:
Pack with fruit, crackers, or cherry tomatoes. Two mini frittatas work for a younger child; three or four make a fuller lunch.
Pro Tips for This Recipe:
- Squeeze the spinach dry or the cups get watery.
- Don’t overbake or the eggs get rubbery.
- Use silicone cups if your muffin tin sticks.
Variations on This Dish:
- Ham and Cheddar Cups: Swap the feta and spinach for diced ham and cheddar.
- Broccoli Frittatas: Use very small broccoli florets, steamed and chopped.
Common Mistakes to Avoid with This Dish:
- Too much filling: The egg won’t set cleanly.
- Skipping the grease: The cups stick.
- Packing them hot: Condensation softens the tops.
15. Bean and Cheese Burritos

A bean burrito is one of those lunches that should never be overcomplicated. Warm beans, melted cheese, and a soft tortilla do the job, and the whole thing reheats better than most packed sandwiches.
Why It Works:
Beans are cheap, filling, and easy to season. The tortilla acts like a wrapper and a plate, and cheese helps hold the filling together so it doesn’t spill out after the first bite.
Key Ingredients:
- 4 flour tortillas
- 1 can refried beans
- 1 cup shredded cheddar
- 1/2 teaspoon cumin
- 1/4 teaspoon garlic powder
- Salsa for dipping
- Optional: chopped green onion
Quick Steps:
- Warm the beans with cumin and garlic powder.
- Spread beans down the center of each tortilla.
- Add cheese and green onion if using.
- Roll tightly, folding in the sides.
- Toast in a skillet if you want a crisp exterior, then cool and pack.
Equipment for This Recipe:
- Skillet
- Spoon
- Foil or parchment wrap
How to Serve This Dish:
Pack with salsa and a fruit cup. One burrito usually handles a kid lunch; two are better for older eaters.
Pro Tips for This Recipe:
- Use thick beans so the burrito doesn’t leak.
- Let the beans cool slightly before wrapping to avoid steam.
- Wrap tightly in foil if you want the shape to hold.
Variations on This Dish:
- Chicken Burrito: Add shredded chicken and a little salsa.
- Breakfast Burrito: Mix in scrambled eggs and a spoonful of potatoes.
Common Mistakes to Avoid with This Dish:
- Too much filling: The tortilla tears.
- Saucy beans: They soak through the wrap.
- Packing before cooling: The tortilla turns gummy.
16. Chicken Caesar Wraps
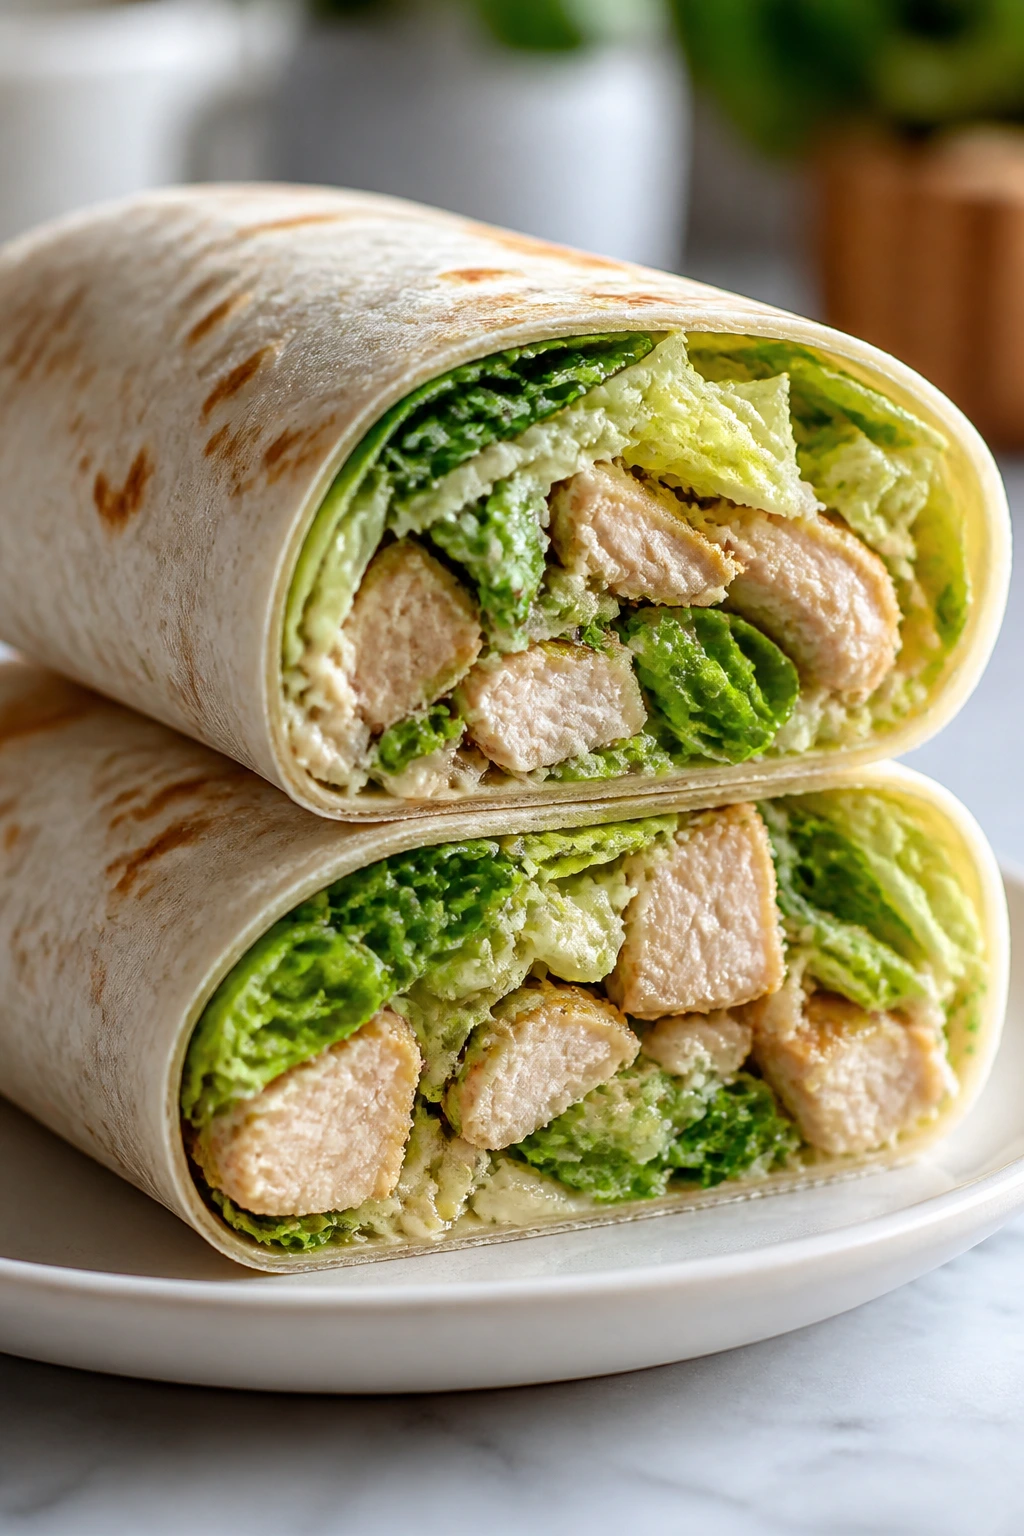
Caesar dressing, romaine, chicken, and Parmesan have a classic crunch-and-cream balance that works especially well in a wrap. The trick is keeping the lettuce crisp and the dressing restrained.
Why It Works:
A wrap keeps the Caesar flavor concentrated, and chopped chicken makes every bite even. Because the dressing is strong, you don’t need much, which helps keep the tortilla from turning mushy.
Key Ingredients:
- 2 large tortillas
- 2 cups cooked chicken, chopped
- 2 cups romaine, chopped and dried well
- 1/4 cup Caesar dressing
- 1/4 cup grated Parmesan
- Black pepper
- Optional: croutons packed separately
Quick Steps:
- Toss chicken with a small amount of dressing.
- Add romaine and Parmesan, then mix gently.
- Spoon onto tortillas and roll snugly.
- Pack croutons separately if using.
Equipment for This Recipe:
- Large bowl
- Knife
- Wrap paper or foil
How to Serve This Dish:
Serve with an orange or grapes. It works best when eaten the same day, while the lettuce still has some snap.
Pro Tips for This Recipe:
- Dry the romaine thoroughly or the wrap gets watery.
- Use dressing sparingly and serve extra on the side.
- Chop the chicken small so the wrap rolls neatly.
Variations on This Dish:
- Bacon Caesar: Add a little cooked bacon for more bite.
- Turkey Caesar Wrap: Swap chicken for sliced turkey breast.
Common Mistakes to Avoid with This Dish:
- Too much dressing: The tortilla softens fast.
- Wet lettuce: It turns the wrap limp.
- Rolling too loosely: The filling falls out when sliced.
17. Sesame Noodle Lunch Boxes
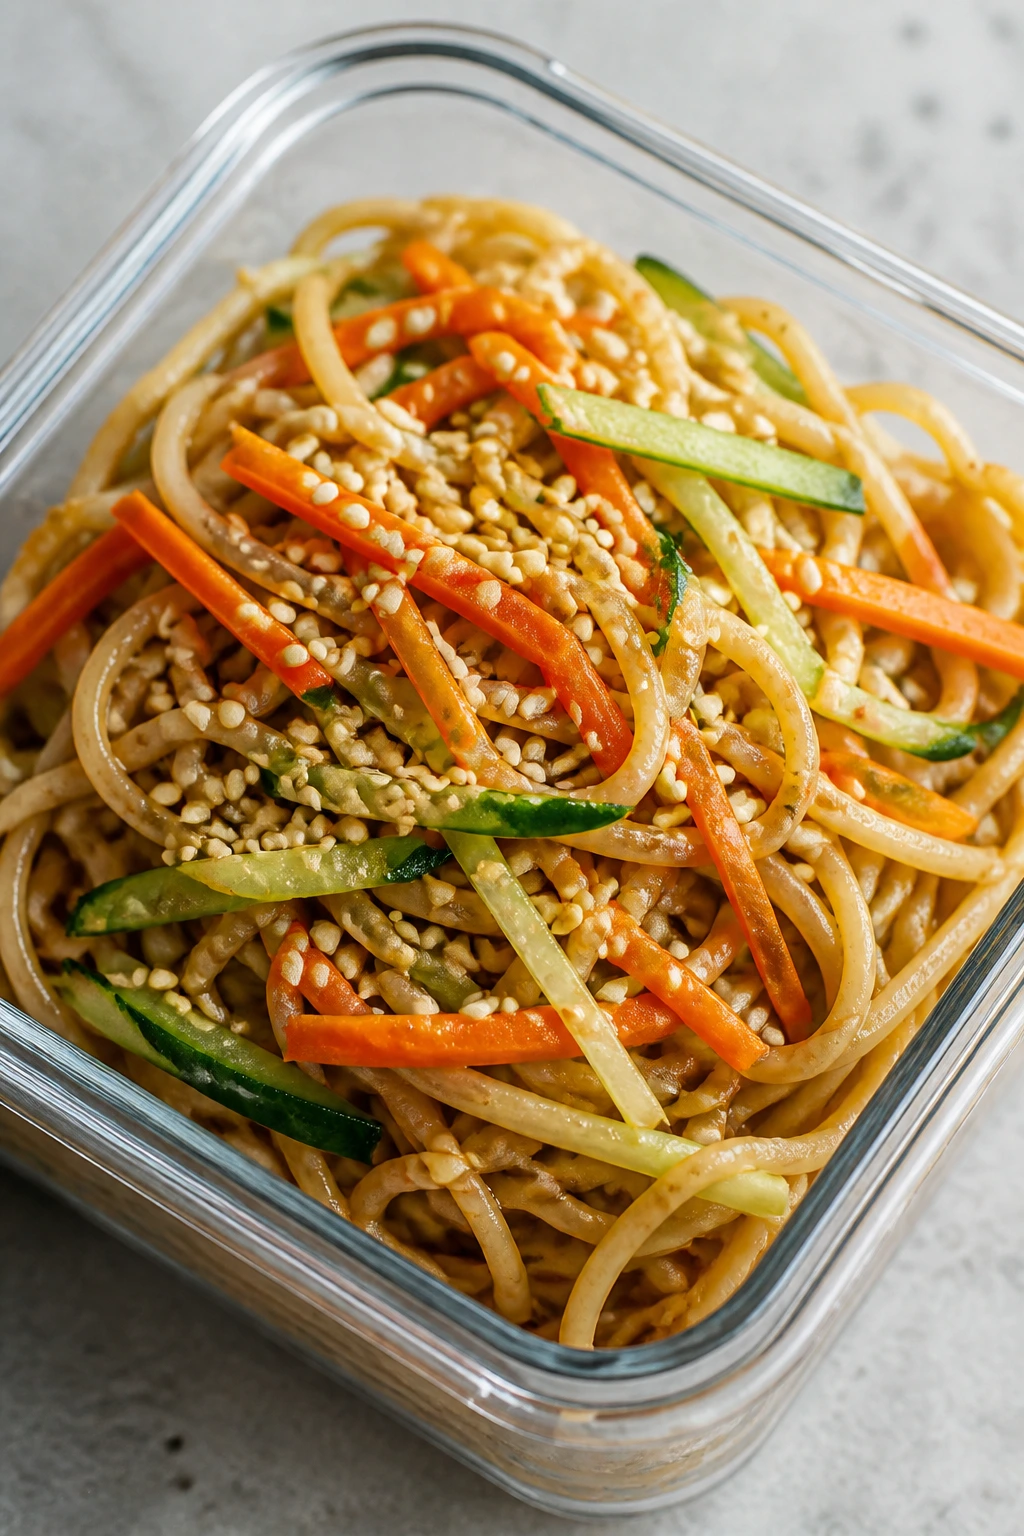
Cold noodles with sesame sauce have a habit of disappearing fast, which is a nice problem to have. They’re slick, savory, and easy to dress up with cucumber or shredded carrots if you want more crunch.
Why It Works:
Noodles hold onto sauce better than rice does, and sesame oil gives the whole box a strong aroma even when it’s eaten cold. It’s a lunch that feels deliberate without requiring much effort.
Key Ingredients:
- 8 oz spaghetti or ramen noodles
- 2 tablespoons sesame oil
- 1 tablespoon soy sauce
- 1 tablespoon rice vinegar
- 1 teaspoon honey
- 1 cucumber, julienned
- 1 carrot, shredded
- 1 tablespoon sesame seeds
Quick Steps:
- Cook the noodles, then rinse under cold water and drain well.
- Whisk sesame oil, soy sauce, vinegar, and honey.
- Toss noodles with sauce, cucumber, and carrot.
- Sprinkle with sesame seeds and chill.
Equipment for This Recipe:
- Pot
- Colander
- Bowl with lid
How to Serve This Dish:
Add edamame or sliced chicken if you want more protein. It’s one of the best cold lunches for warm days because it stays firm and clean.
Pro Tips for This Recipe:
- Drain the noodles very well or the sauce slides off.
- Use a little extra sesame oil if the noodles feel dry after chilling.
- Cut the vegetables thin so they mix into each forkful.
Variations on This Dish:
- Peanut Noodle Version: Add peanut butter to the sauce.
- Spicy Sesame Noodles: Stir in a little chili paste for older eaters.
Common Mistakes to Avoid with This Dish:
- Overcooking the noodles: They get sticky when chilled.
- Too much sauce at once: The noodles puddle.
- Skipping the cold rinse: They clump together.
18. Mini Meatloaf Muffins
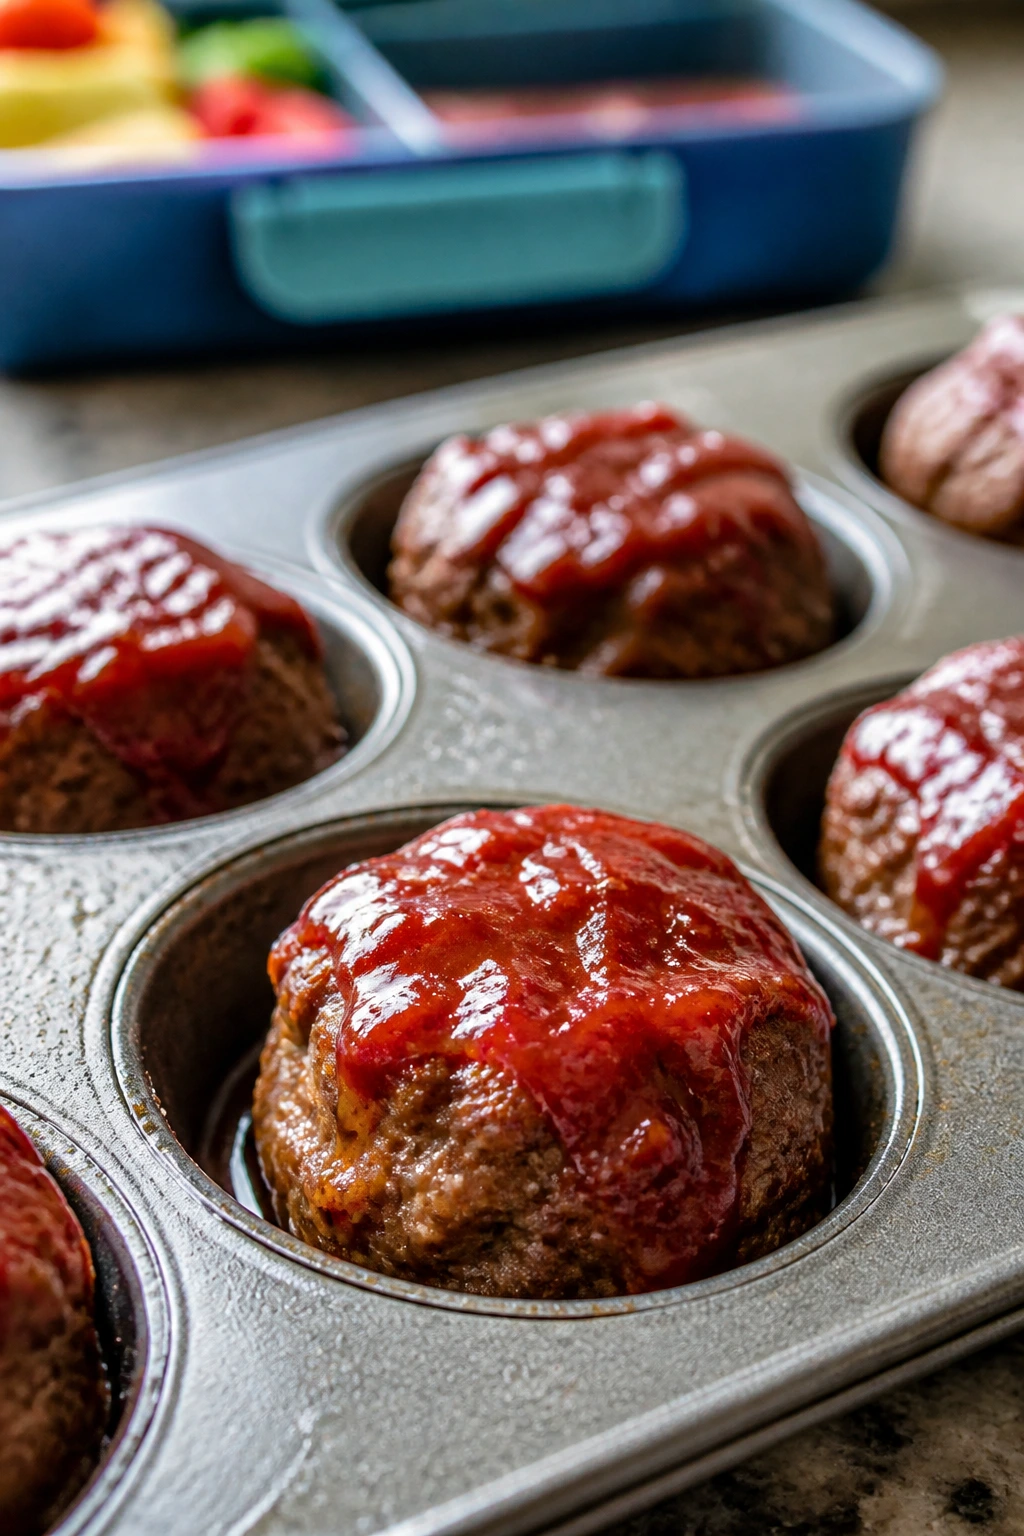
Meatloaf muffins sound plain until you realize how well they pack. They’re compact, easy to reheat, and far less messy than a big slice of meatloaf sliding around next to mashed potatoes.
Why It Works:
The muffin shape cooks fast and keeps portions neat. A little ketchup or glaze on top adds sweetness, and the smaller size means you can cool and pack them without the usual heavy slicing.
Key Ingredients:
- 1 lb ground beef
- 1 egg
- 1/2 cup breadcrumbs
- 1/4 cup milk
- 2 tablespoons ketchup
- 1 tablespoon Worcestershire sauce
- Salt and pepper
Quick Steps:
- Heat the oven to 375°F and grease a muffin tin.
- Mix beef, egg, breadcrumbs, milk, ketchup, Worcestershire, salt, and pepper.
- Pack into muffin cups and top with a little extra ketchup.
- Bake 20 to 25 minutes until cooked through.
- Cool before removing.
Equipment for This Recipe:
- Muffin tin
- Mixing bowl
- Measuring cups
How to Serve This Dish:
Pack with mashed potatoes in a separate compartment or some roasted carrots. Two muffins usually make a good lunch portion with sides.
Pro Tips for This Recipe:
- Don’t pack the meat too tightly or it gets dense.
- Use a spoon to drain any grease from the tin after baking.
- Cool fully before boxing so the glaze sets.
Variations on This Dish:
- Turkey Meatloaf Muffins: Use ground turkey and add a little extra milk.
- BBQ Muffins: Swap ketchup glaze for barbecue sauce.
Common Mistakes to Avoid with This Dish:
- Overmixing: The muffins turn bouncy and dry.
- Skipping the glaze: The tops taste flat.
- Undercooking the center: Muffins need a full bake.
19. Falafel Pita Pockets with Tzatziki
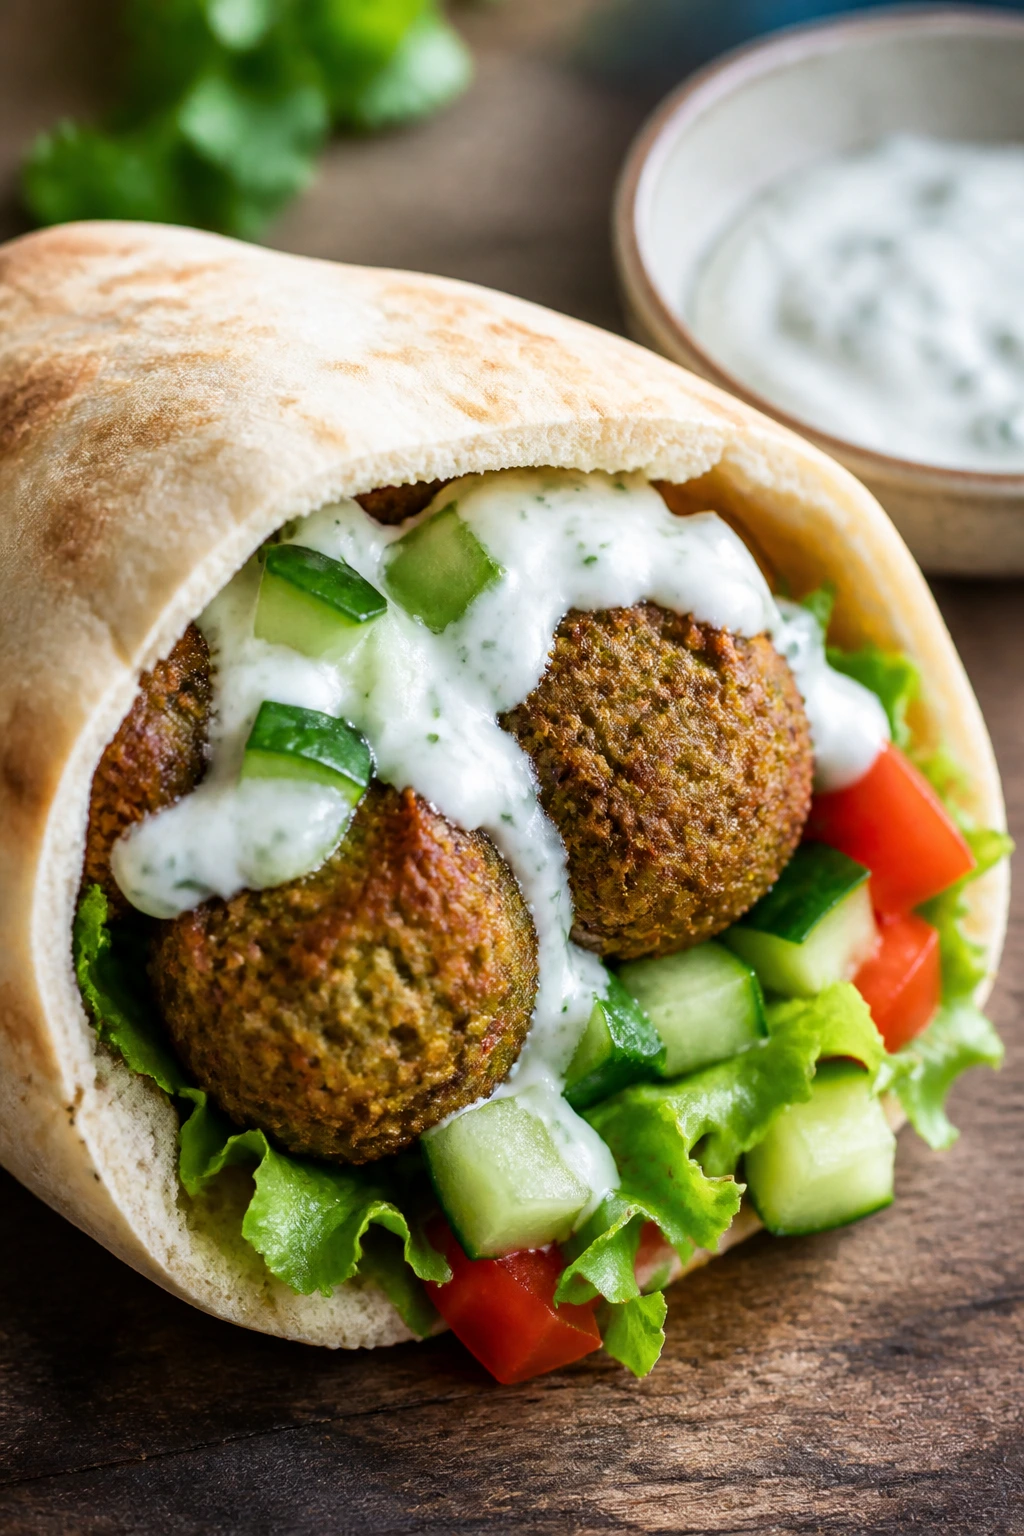
Falafel brings crunch, herbs, and enough heft to make a vegetarian lunch feel solid. Tucked into pita with cucumber and yogurt sauce, it’s cool on the inside and a little crisp around the edges.
Why It Works:
Falafel stays firm enough to travel, especially if you tuck the sauce in a separate cup. The pita acts like a pocket and the cucumber adds freshness so the whole thing doesn’t taste dry.
Key Ingredients:
- 6 falafel patties or balls
- 2 pita breads
- 1/2 cup tzatziki
- 1 cucumber, sliced
- 1/2 cup shredded lettuce
- 1 tomato, diced
- Optional: feta
Quick Steps:
- Cook or reheat the falafel until crisp.
- Cut pitas in half and open the pockets.
- Add lettuce, cucumber, tomato, and falafel.
- Spoon tzatziki in or pack it separately.
Equipment for This Recipe:
- Skillet or oven
- Knife
- Spoon
How to Serve This Dish:
Add grapes or a handful of olives. One pita half can be a snacky lunch; two halves make a full meal.
Pro Tips for This Recipe:
- Keep sauce separate if you want the pita to stay firm.
- Warm the falafel briefly before packing for better texture.
- Use seeded cucumber so the filling doesn’t get watery.
Variations on This Dish:
- Falafel Salad Box: Skip the pita and pack everything over greens.
- Spicy Falafel: Add chili flakes or hot sauce to the sauce cup.
Common Mistakes to Avoid with This Dish:
- Soggy pita: Sauce went in too early.
- Overstuffing: The pocket splits.
- Cold, dry falafel: Reheat until the outside firms up again.
20. Mac and Cheese Thermos Cups
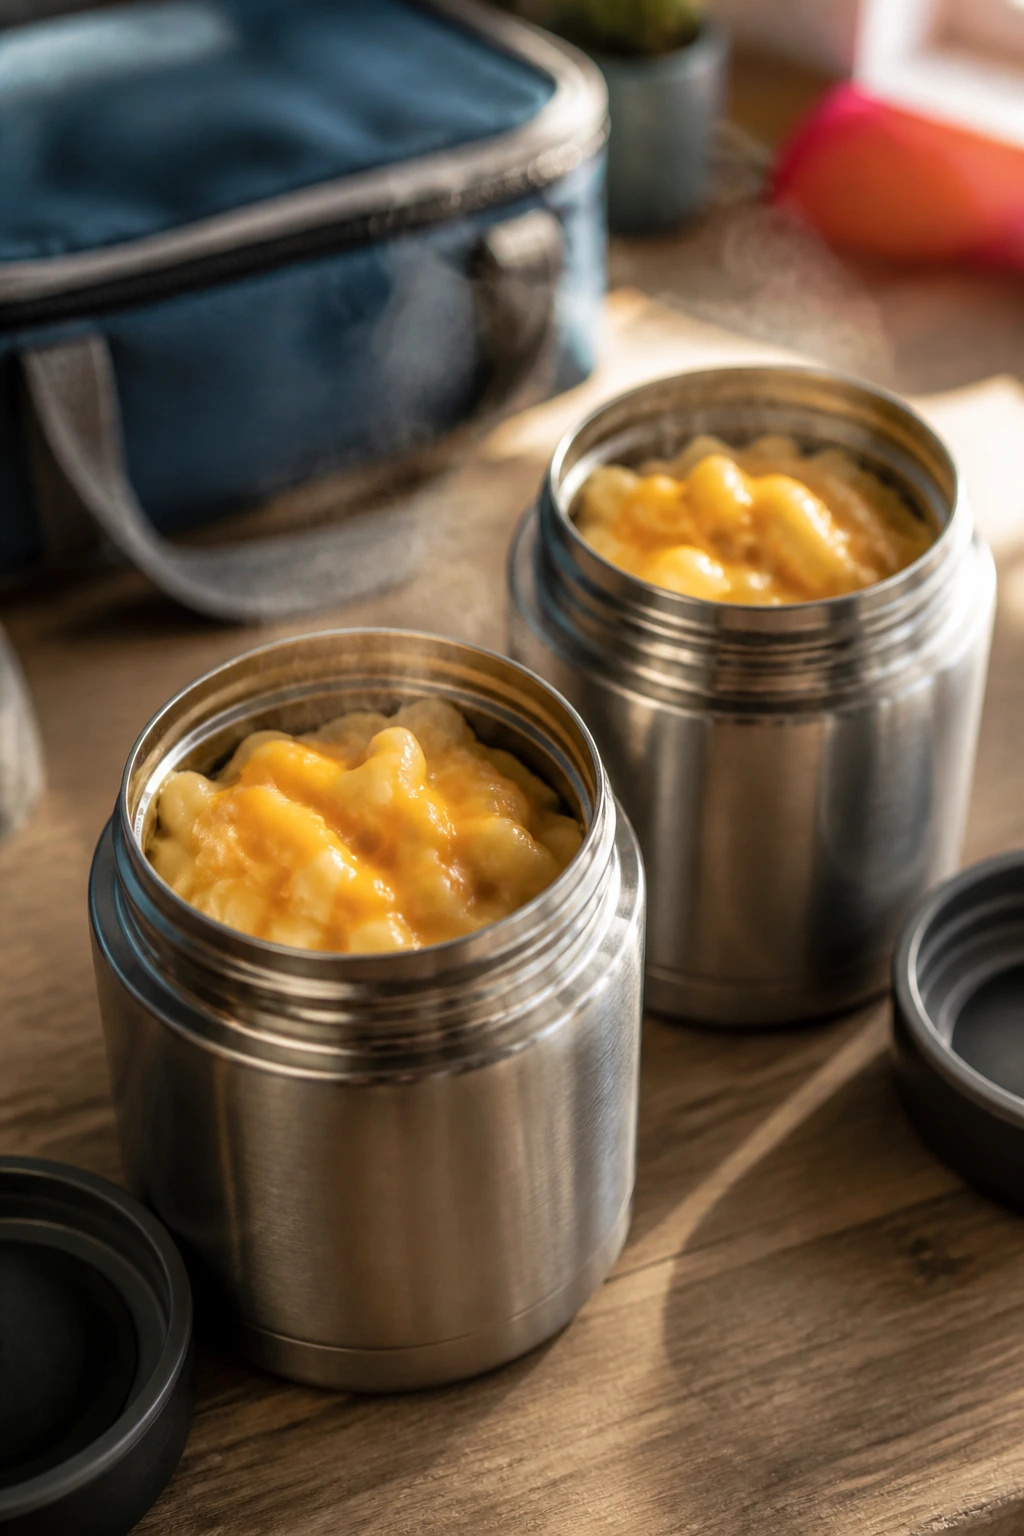
Mac and cheese belongs in a lunchbox if you keep it hot. A thermos turns it into a real meal instead of a sad, congealed side dish, and peas or ham can make it feel more complete.
Why It Works:
Pasta with a creamy sauce stays satisfying if it’s held in a preheated thermos. Short noodles trap the cheese sauce well, and the hot hold keeps the texture close to dinner.
Key Ingredients:
- 8 oz elbow macaroni
- 2 tablespoons butter
- 2 tablespoons flour
- 1 cup milk
- 1 1/2 cups shredded cheddar
- Salt and pepper
- Optional: 1/2 cup peas or diced ham
Quick Steps:
- Cook the macaroni until just tender.
- Make a simple cheese sauce with butter, flour, milk, and cheddar.
- Stir in pasta and optional peas or ham.
- Heat the thermos with boiling water for 5 minutes, then empty it.
- Pack the mac and cheese piping hot.
Equipment for This Recipe:
- Pot
- Saucepan
- Insulated thermos
How to Serve This Dish:
Send with fruit or a few cucumber spears. It’s the warm lunch answer for kids who won’t eat sandwiches three days in a row.
Pro Tips for This Recipe:
- Preheat the thermos or the mac cools too fast.
- Use a thick sauce so it stays creamy.
- Pack it hot, not lukewarm for food safety and better texture.
Variations on This Dish:
- Broccoli Mac: Stir in tiny broccoli florets.
- Bacon Mac: Add crisp bacon bits for a smoky bite.
Common Mistakes to Avoid with This Dish:
- Thin sauce: It turns watery in the thermos.
- Packing cold: The pasta gets gluey.
- Overcooked noodles: They go soft fast.
21. Salami and Provolone Roll-Ups
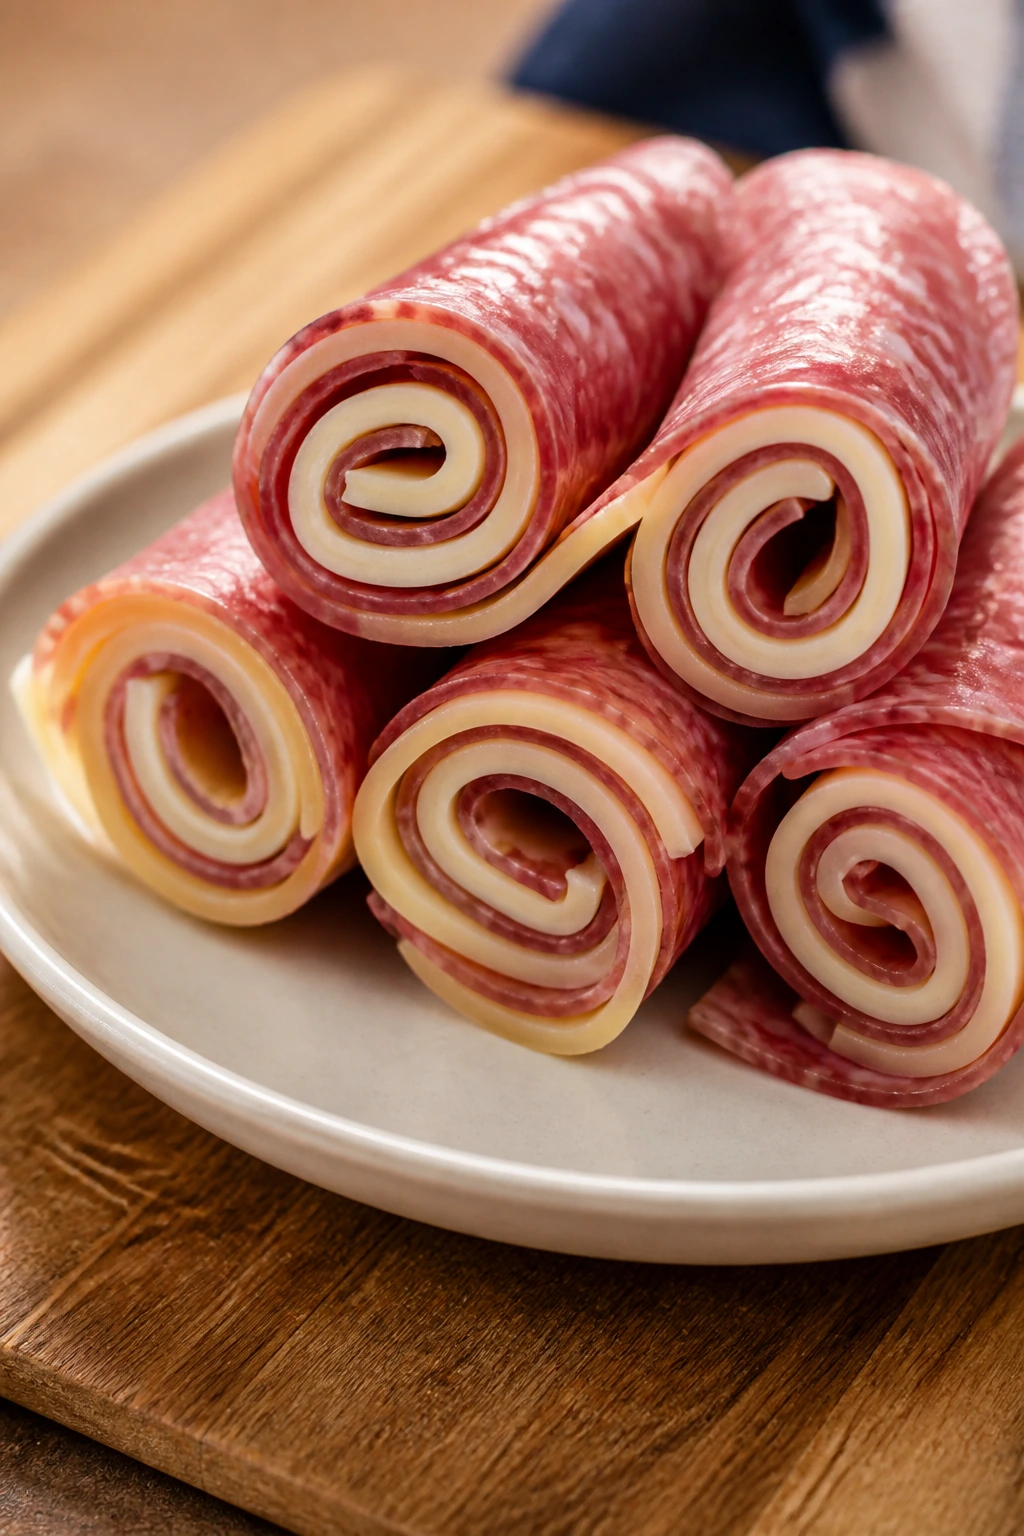
These are almost too easy, which is part of the appeal. Salami, provolone, and a little mustard rolled together make a low-effort lunch that still tastes salty and finished.
Why It Works:
The roll-up format keeps the meat and cheese tidy without bread getting involved. It’s a useful lunch when you want protein and fat without having to assemble a full sandwich.
Key Ingredients:
- 8 slices salami
- 4 slices provolone
- 1 tablespoon Dijon mustard
- 1 small pickle, sliced thin
- Optional: lettuce leaves
Quick Steps:
- Lay out salami in overlapping rows.
- Place provolone on top and spread with a little mustard.
- Add pickle or lettuce if using.
- Roll tightly and cut in half.
Equipment for This Recipe:
- Cutting board
- Knife
- Small spreader
How to Serve This Dish:
Pack with crackers and fruit. Four to six roll-ups make a snacky lunch; add a side salad if you need more volume.
Pro Tips for This Recipe:
- Dry the pickle slices or the roll-up slips apart.
- Use thin salami so it rolls without cracking.
- Chill briefly before slicing for cleaner spirals.
Variations on This Dish:
- Turkey and Provolone: Lighter, but still sturdy.
- Italian Deli Roll-Ups: Add roasted peppers and basil leaves.
Common Mistakes to Avoid with This Dish:
- Too much mustard: It escapes at the seam.
- Thick cheese slices: The roll won’t close.
- Packing loose in the box: They unfurl.
22. Turkey, Apple, and Cheddar Sandwiches
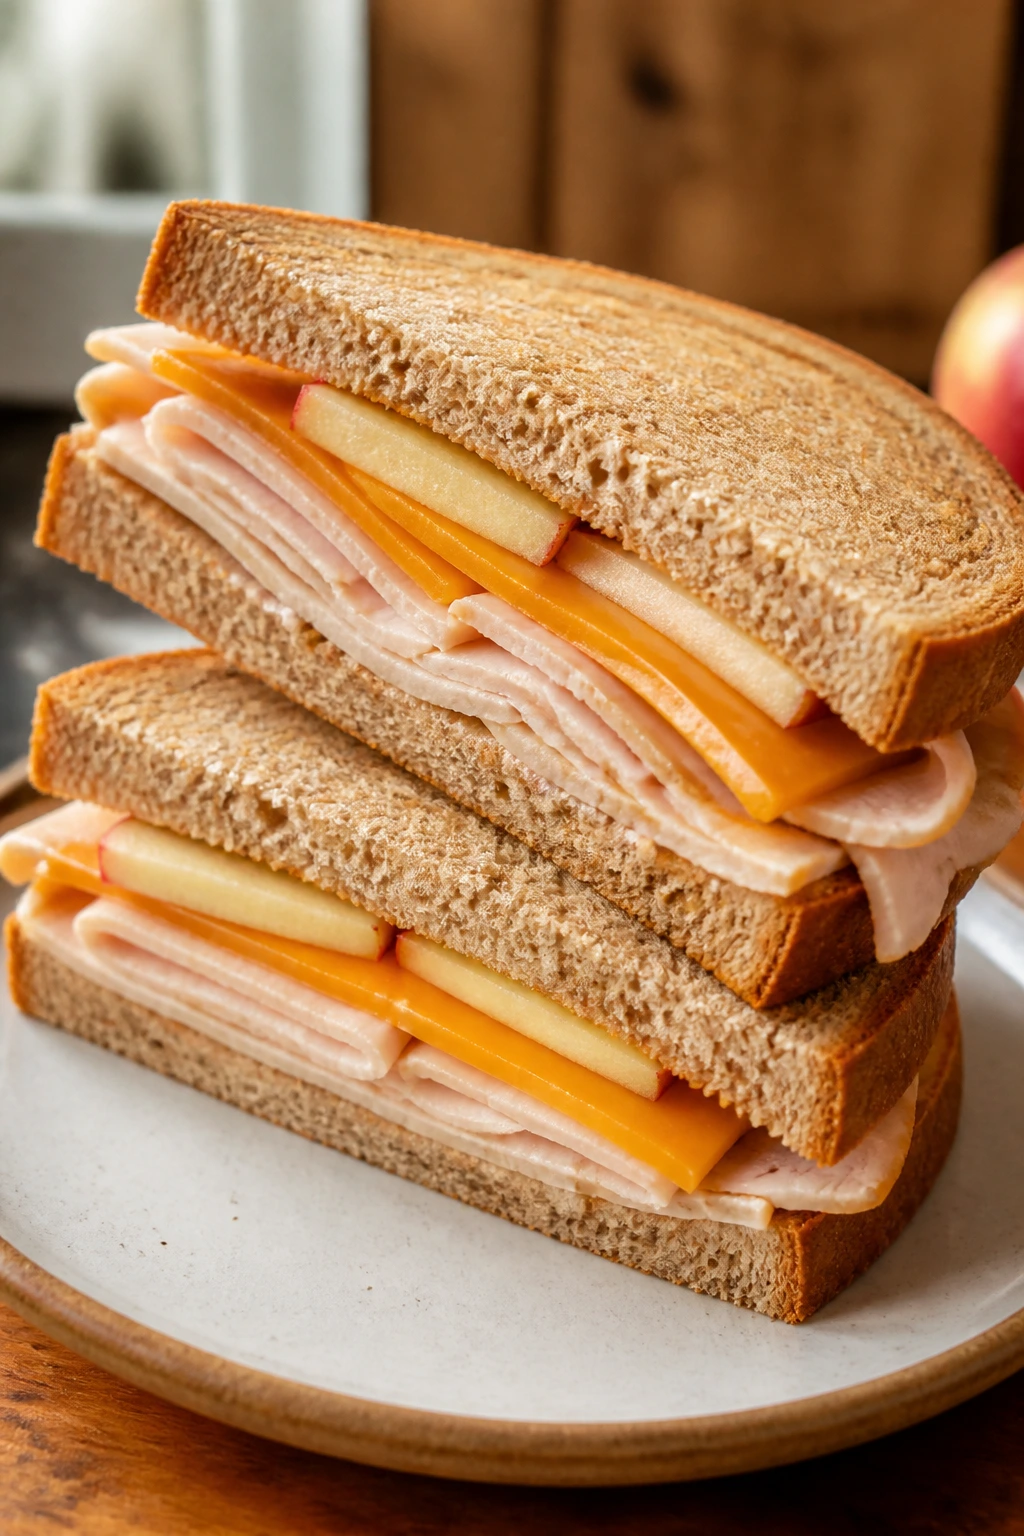
Turkey, apple, and cheddar is one of those combinations that sounds almost too simple, then works because each part pulls a different direction. You get sweet, sharp, savory, and a little crunch in one neat sandwich.
Why It Works:
The apple keeps the sandwich from tasting dry, cheddar gives it bite, and turkey brings the protein. Use a sturdy bread and the whole thing stays good enough to pack the night before.
Key Ingredients:
- 4 slices hearty bread
- 6 slices deli turkey
- 4 slices cheddar
- 1 small apple, thinly sliced
- 1 tablespoon mayonnaise or mustard
- Optional: lettuce
Quick Steps:
- Spread bread with mayo or mustard.
- Layer turkey, cheddar, and apple slices.
- Add lettuce if using.
- Close and cut into halves or strips.
Equipment for This Recipe:
- Knife
- Cutting board
- Small brush or spreader
How to Serve This Dish:
Pair with pretzels or carrots. It holds up best when the apple slices are tucked between turkey and cheese, not directly against the bread.
Pro Tips for This Recipe:
- Slice the apple thin so the sandwich closes neatly.
- Choose a firm apple like Honeycrisp or Fuji.
- Butter the bread lightly if you want extra moisture protection.
Variations on This Dish:
- Turkey Club Version: Add bacon and lettuce.
- Cranberry Turkey Sandwich: Replace apple with a thin spread of cranberry sauce.
Common Mistakes to Avoid with This Dish:
- Very thick apple slices: They make the sandwich slide apart.
- Soft sandwich bread: It compresses too fast.
- Too much spread: The bread gets soggy before lunch.
23. Veggie Fried Rice Boxes
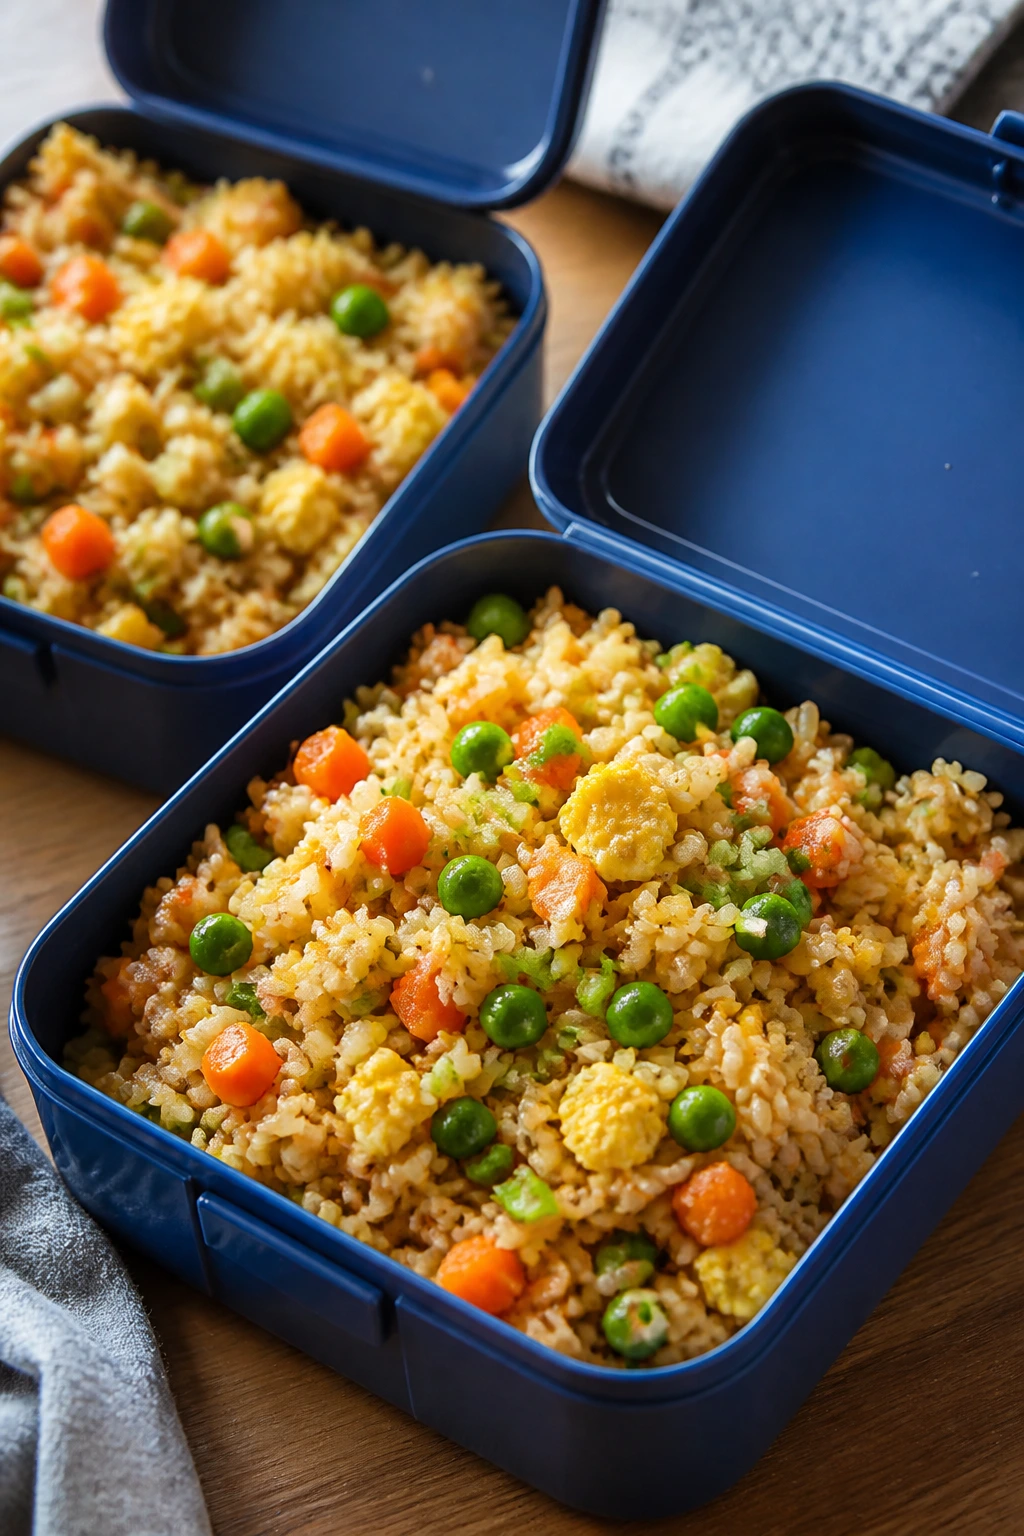
Fried rice is one of the easiest ways to turn leftover rice into lunch. Add egg, peas, carrots, and soy sauce, and you get a box that reheats well and doesn’t need any extra explanation.
Why It Works:
Day-old rice fries better than fresh rice because it stays separate instead of clumping. The egg and vegetables give the rice enough body to stand alone, and a little soy sauce keeps it savory.
Key Ingredients:
- 2 cups cooked, chilled rice
- 2 eggs, beaten
- 1/2 cup frozen peas and carrots
- 2 tablespoons soy sauce
- 1 tablespoon oil
- 1 green onion, sliced
- Optional: diced ham
Quick Steps:
- Heat oil in a skillet and scramble the eggs.
- Add peas and carrots and cook until hot.
- Stir in rice and soy sauce.
- Toss until the rice is hot and lightly toasted.
- Finish with green onion.
Equipment for This Recipe:
- Skillet
- Spatula
- Container with lid
How to Serve This Dish:
Pack hot in a thermos or cold in a lunchbox with fruit. It’s especially handy when there’s leftover rice sitting in the fridge.
Pro Tips for This Recipe:
- Use chilled rice or the grains smear together.
- Cook on medium-high heat for better texture.
- Add soy sauce in small splashes so it doesn’t go wet.
Variations on This Dish:
- Chicken Fried Rice: Add leftover chicken.
- Sesame Fried Rice: Finish with a few drops of sesame oil.
Common Mistakes to Avoid with This Dish:
- Fresh hot rice: It clumps.
- Too much sauce: The box gets sticky.
- Crowding the pan: The rice steams instead of frying.
24. Mini Bagel Pizzas
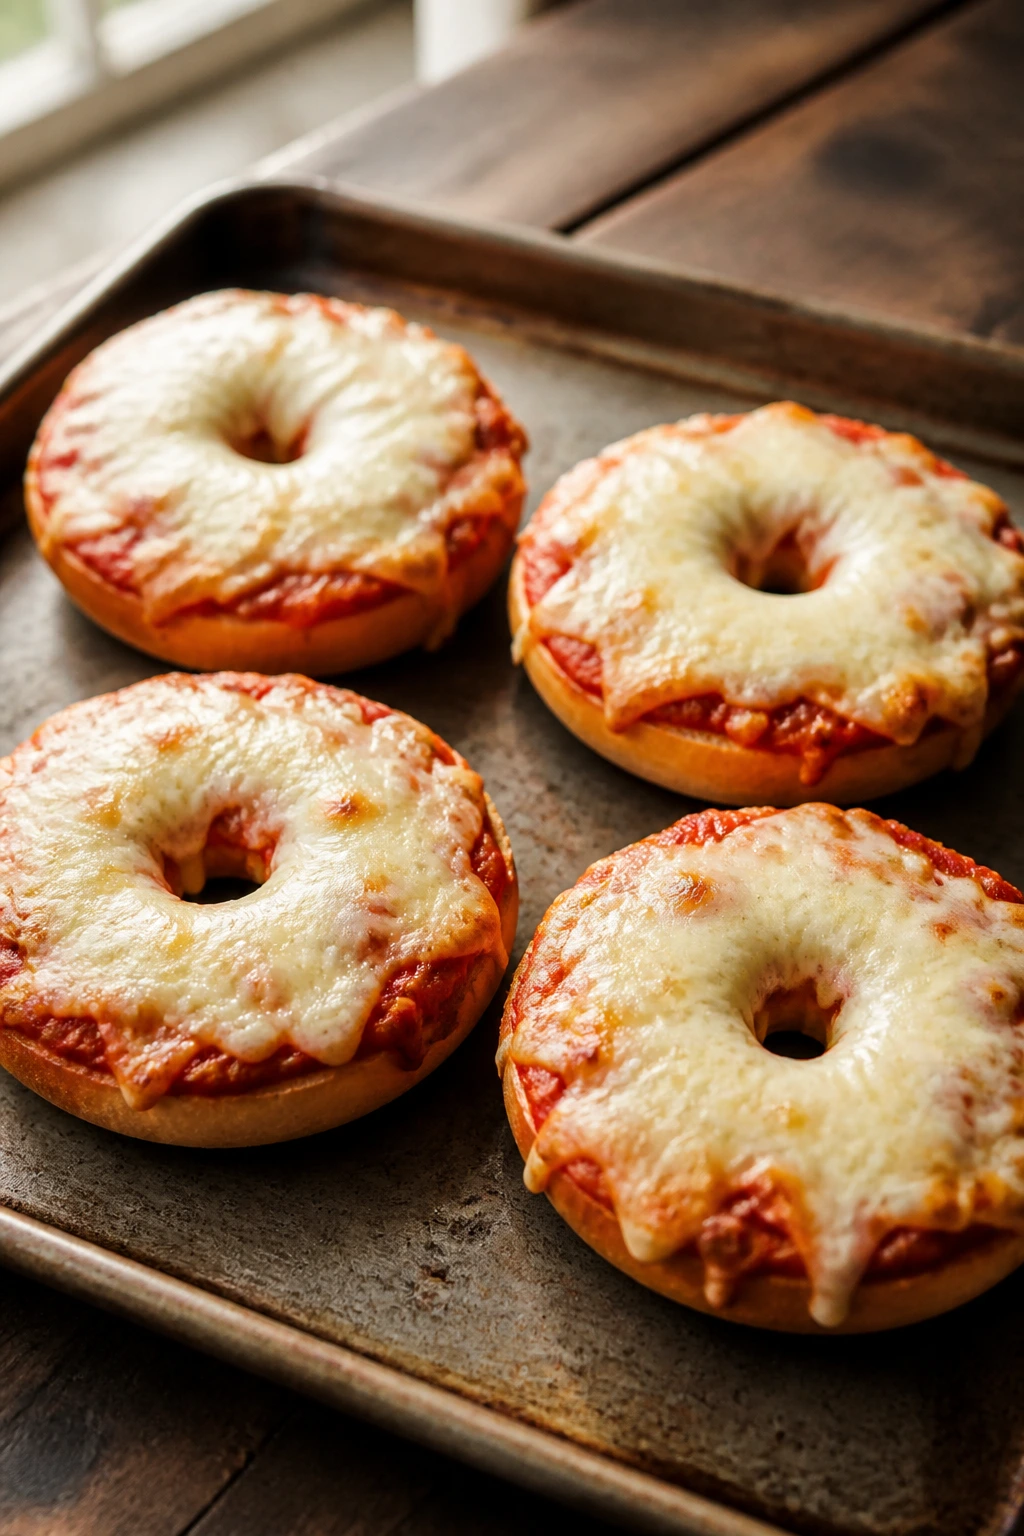
Mini bagel pizzas are lunchbox gold because they feel like pizza but behave like a sandwich. The bagel base stays chewy, the cheese melts into the sauce, and the whole thing can be eaten warm or room temperature.
Why It Works:
Bagels give you a sturdy, built-in crust. They’re less likely than sliced bread to collapse under sauce, which makes them one of the safest lunchbox pizza options.
Key Ingredients:
- 4 mini bagels
- 1/2 cup marinara sauce
- 1 cup shredded mozzarella
- 1/4 cup mini pepperoni or diced vegetables
- 1/2 teaspoon Italian seasoning
Quick Steps:
- Split the bagels and toast them lightly.
- Spread with marinara.
- Add mozzarella, pepperoni, and seasoning.
- Bake at 400°F for 8 to 10 minutes until melted.
- Cool before boxing.
Equipment for This Recipe:
- Baking sheet
- Knife
- Oven or toaster oven
How to Serve This Dish:
Pack with carrot sticks or grapes. Two mini bagels usually make a good lunch portion for a child; three or four work for an older eater.
Pro Tips for This Recipe:
- Toast before topping so the bagel doesn’t go soggy.
- Use a light hand with sauce or it spills over the edges.
- Cool on a rack before packing so the bottoms stay firm.
Variations on This Dish:
- Veggie Bagel Pizzas: Add chopped peppers and olives.
- Breakfast Bagel Pizza: Top with scrambled egg and a little bacon.
Common Mistakes to Avoid with This Dish:
- Too much sauce: It leaks into the crumb.
- Skipping the toast: The bagel softens too fast.
- Packing hot: Steam ruins the crust.
25. Sunflower Butter and Banana Sandwiches
This is the nut-free answer when peanut butter can’t go in the bag. Sunflower butter has that same rich spreadiness, banana adds creaminess, and the sandwich stays simple enough for even picky eaters to accept it.
Why It Works:
Sunflower butter gives fat and protein, which helps the sandwich feel like lunch instead of dessert. Banana slices add softness, and whole-grain bread keeps the texture from sliding into mush.
Key Ingredients:
- 4 slices whole-grain bread
- 4 tablespoons sunflower butter
- 1 banana, sliced
- Optional: honey
- Optional: cinnamon
Quick Steps:
- Spread sunflower butter on the bread.
- Add banana slices in a single layer.
- Drizzle lightly with honey if desired.
- Close, cut, and wrap.
Equipment for This Recipe:
- Knife
- Cutting board
- Spreader
How to Serve This Dish:
Add apple slices or pretzels for crunch. It works well as a school-safe sandwich when peanut butter is off the table.
Pro Tips for This Recipe:
- Use firm bananas so the sandwich doesn’t smear.
- Add honey sparingly or the bread gets tacky.
- Press the sandwich gently before cutting to keep the slices together.
Variations on This Dish:
- Cinnamon Banana Sandwich: Add a dusting of cinnamon.
- Chocolate Drizzle Version: Use a thin spread of chocolate-hazelnut style sunflower butter if allowed.
Common Mistakes to Avoid with This Dish:
- Overripe banana: It turns the sandwich wet.
- Too much sunflower butter: The sandwich becomes slippery.
- Packing against juicy fruit: The bread softens fast.
26. Chicken Noodle Soup Thermos Lunches
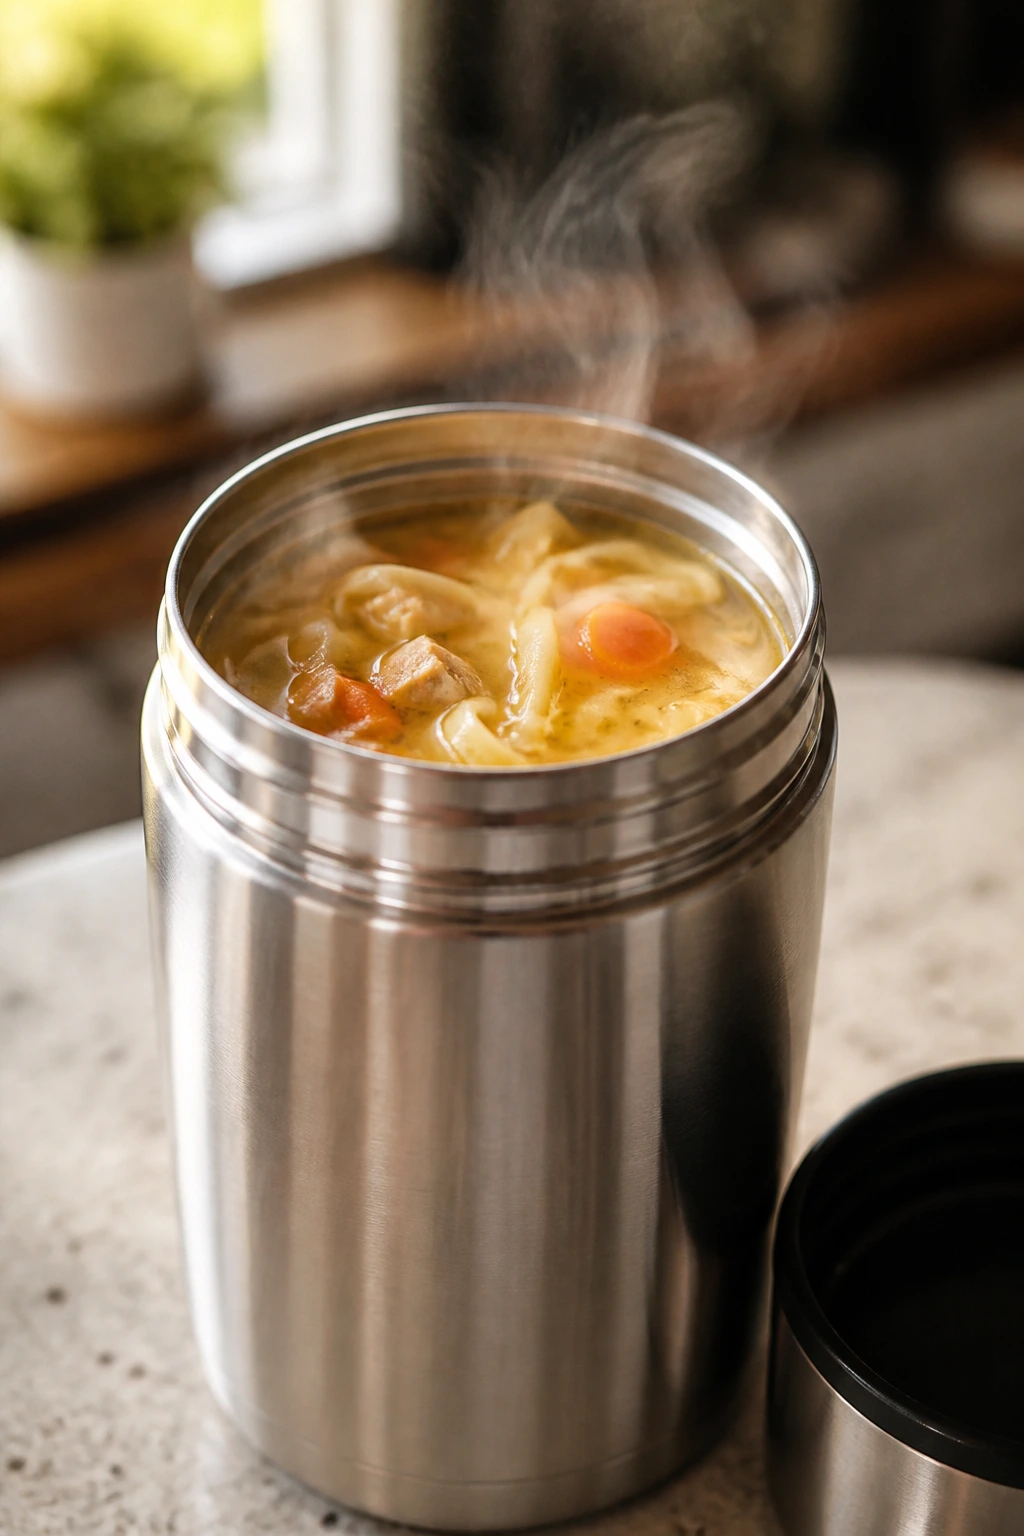
Soup in a lunchbox only works if the thermos does its job. Chicken noodle soup is worth the effort because it tastes comforting, fills a thermos well, and still feels like a real lunch instead of a warmed-up snack.
Why It Works:
Broth-based soups hold heat if the thermos is preheated, and noodles plus chicken make the soup substantial. Keep the noodles slightly underdone so they don’t turn to mush while sitting.
Key Ingredients:
- 2 cups chicken broth
- 1 cup cooked chicken, shredded
- 1 cup egg noodles
- 1 carrot, diced small
- 1 celery stalk, diced small
- Salt and pepper
- Optional: parsley
Quick Steps:
- Simmer broth with carrot and celery until tender.
- Add noodles and cook until almost done.
- Stir in chicken and season.
- Preheat the thermos with boiling water, then empty it.
- Fill with hot soup and seal.
Equipment for This Recipe:
- Pot
- Thermos
- Ladle
How to Serve This Dish:
Send with crackers or a soft roll in a separate bag. One thermos usually handles a child portion; a larger thermos works better for teens or adults.
Pro Tips for This Recipe:
- Undercook noodles slightly so they keep their bite.
- Heat the soup fully before packing so it stays safe and warm.
- Use a wide-mouth thermos if the noodles are chunky.
Variations on This Dish:
- Alphabet Soup Version: Use tiny pasta letters for younger kids.
- Lemon Chicken Soup: Add a little lemon juice at the end for brightness.
Common Mistakes to Avoid with This Dish:
- Cold thermos: The soup cools too fast.
- Overcooked noodles: They disintegrate.
- Packing too much broth and too little solid food: It feels thin.
27. Cucumber and Cream Cheese Tea Sandwiches
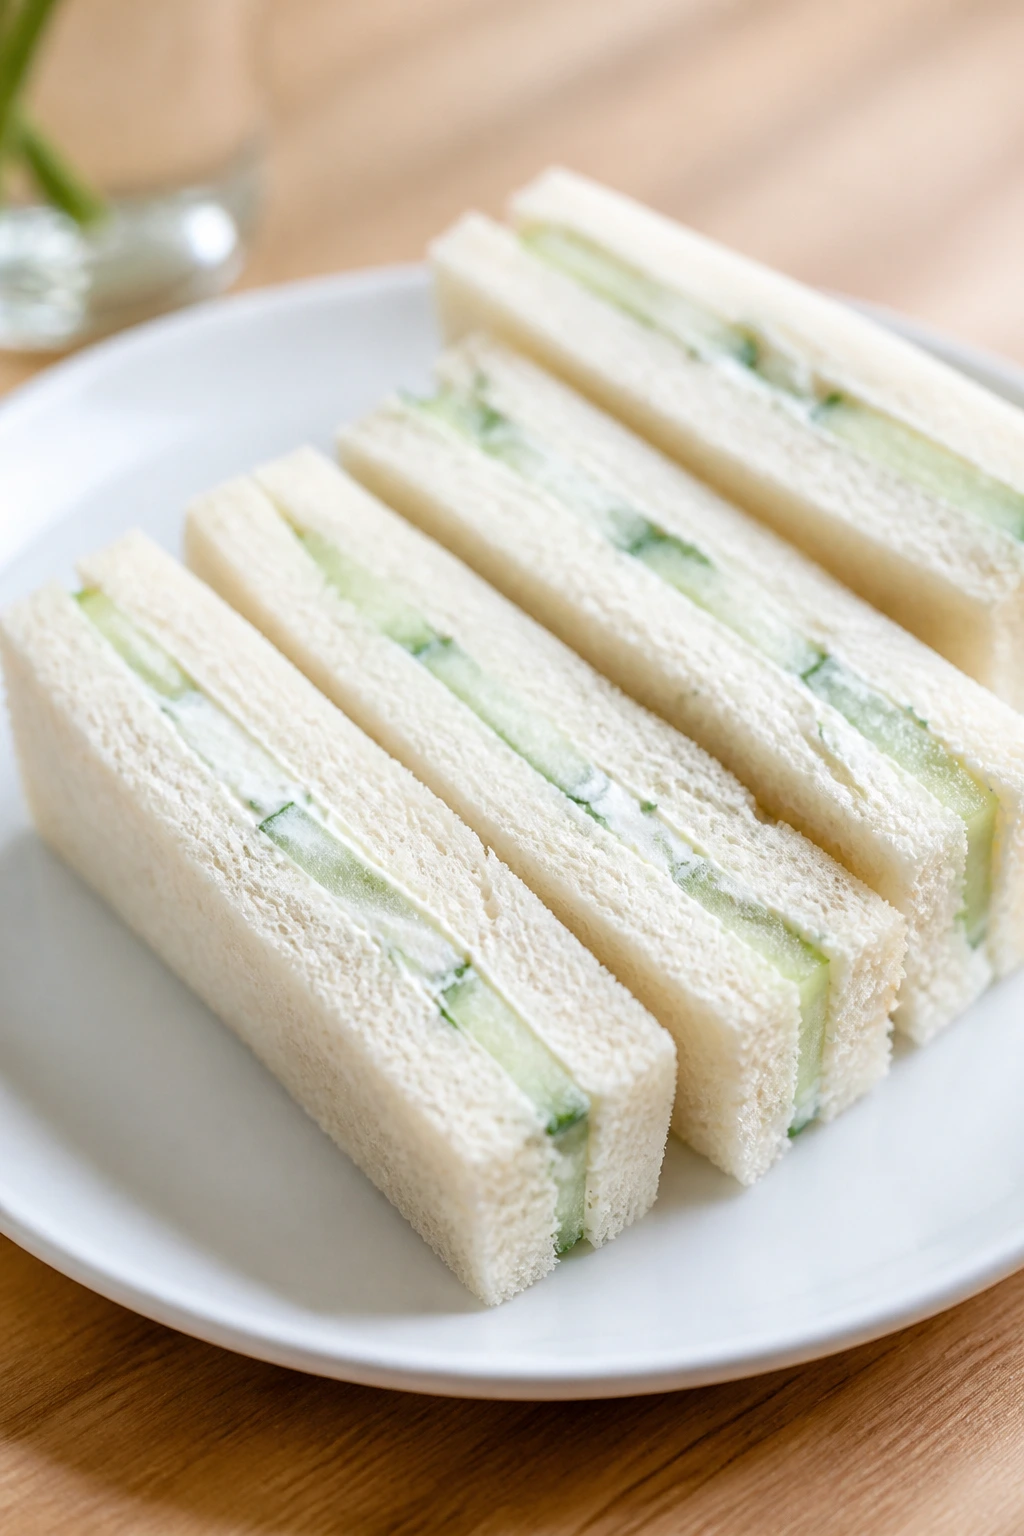
These taste delicate, but they’re built on a very practical idea: cool cucumber, thick cream cheese, and bread sliced thin enough to stay neat. It’s a lunchbox sandwich that feels a little polished without requiring much work.
Why It Works:
Cream cheese blocks moisture from the cucumber, and thin bread keeps the sandwich light. Slice the cucumbers very thin and you get crunch without the sandwich bulging open.
Key Ingredients:
- 8 slices soft sandwich bread, crusts removed if desired
- 4 oz cream cheese, softened
- 1 cucumber, very thinly sliced
- 1 teaspoon dill
- Salt and pepper
- Optional: lemon zest
Quick Steps:
- Mix cream cheese with dill, salt, pepper, and lemon zest if using.
- Spread on bread.
- Layer cucumber slices thinly and close the sandwiches.
- Cut into fingers or triangles.
Equipment for This Recipe:
- Sharp knife
- Mixing bowl
- Spreader
How to Serve This Dish:
Pack with grapes and carrot sticks. These work best as a lighter lunch or part of a snacky bento box.
Pro Tips for This Recipe:
- Dry the cucumber slices so they don’t water the filling.
- Use soft, fresh bread for a clean cut.
- Chill before slicing if you want tidy edges.
Variations on This Dish:
- Herbed Cheese Sandwich: Add chives and parsley.
- Cucumber and Turkey Tea Sandwich: Add a thin layer of turkey for more protein.
Common Mistakes to Avoid with This Dish:
- Thick cucumber slices: They push the sandwich open.
- Skipping the seasoning: Cream cheese needs salt.
- Cutting with a dull knife: The bread smears.
28. Pesto Chicken Pasta
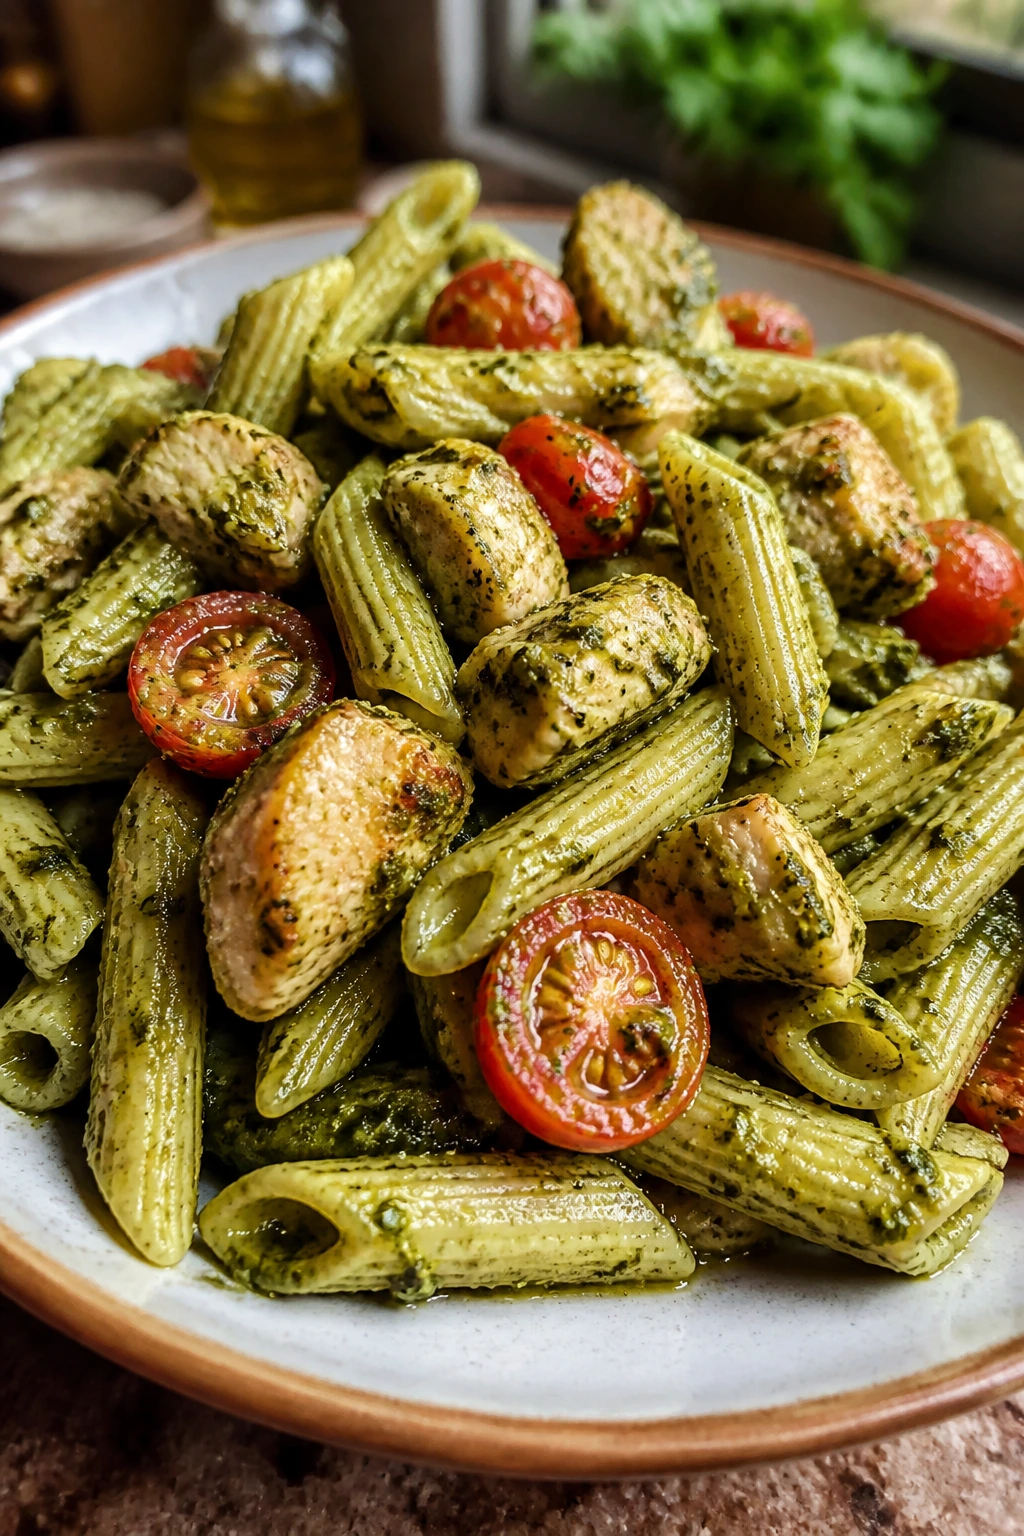
Pesto gives pasta an instant green-herb smell that carries well in a lunchbox. Add chicken and cherry tomatoes, and you’ve got a meal that feels bigger than the ingredients list suggests.
Why It Works:
Pesto coats pasta without much liquid, so it stays clingy instead of soupy. Chicken turns it into a full lunch, and the tomatoes add bursts of acid that keep the basil flavor from going dull.
Key Ingredients:
- 8 oz rotini or bow-tie pasta
- 2 cups cooked chicken, chopped
- 1/3 cup pesto
- 1/2 cup cherry tomatoes, halved
- 2 tablespoons Parmesan
- Salt and pepper
Quick Steps:
- Cook pasta until tender, then cool slightly.
- Toss with pesto while the pasta is still warm.
- Add chicken, tomatoes, and Parmesan.
- Season and chill or pack warm.
Equipment for This Recipe:
- Pot
- Bowl
- Spoon
How to Serve This Dish:
Pack with cucumber slices or breadsticks. It works warm, room temperature, or cold, which makes it one of the easier lunchbox choices.
Pro Tips for This Recipe:
- Add pesto while pasta is warm so it coats better.
- Use less pesto than you think and add more if needed.
- Halve tomatoes carefully so they don’t water the pasta down.
Variations on This Dish:
- Pesto Tuna Pasta: Swap chicken for tuna.
- Spinach Pesto Pasta: Toss in baby spinach that wilts from the warm noodles.
Common Mistakes to Avoid with This Dish:
- Too much pesto: The pasta turns oily.
- Watery tomatoes: They dilute the sauce.
- Skipping salt: Pesto still needs seasoning.
29. Black Bean and Corn Quesadillas
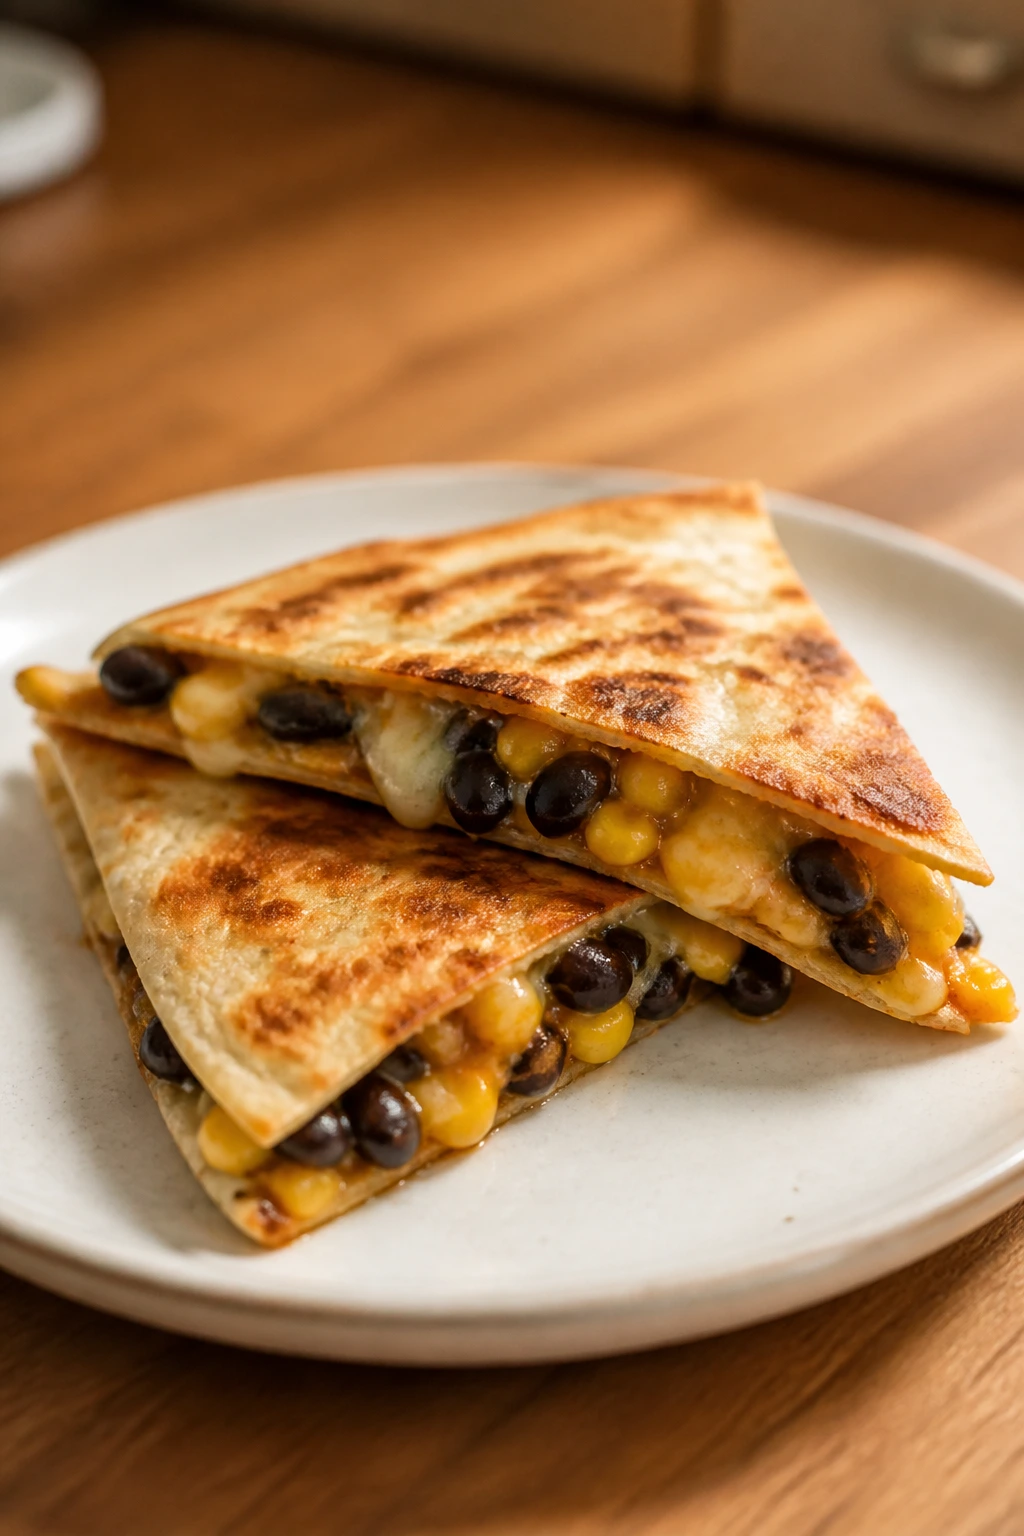
Black beans and corn make a sturdy, cheap filling that tastes good hot or cold. The tortilla browns around the edges, the cheese holds the center together, and lunch feels more like a real plate than a pile of odds and ends.
Why It Works:
Beans bring protein and fiber, corn adds sweetness, and melted cheese acts as the binder. Quesadillas also cut neatly into wedges, which makes them easier to box and easier to eat.
Key Ingredients:
- 4 flour tortillas
- 1 can black beans, rinsed and drained
- 1 cup corn kernels
- 1 cup shredded Monterey Jack or cheddar
- 1 teaspoon cumin
- 1 tablespoon oil
- Salsa for dipping
Quick Steps:
- Mix beans, corn, cumin, and a pinch of salt.
- Fill tortillas with the mixture and cheese.
- Cook in a skillet with oil until golden on both sides.
- Rest briefly, then cut into wedges.
Equipment for This Recipe:
- Skillet
- Spatula
- Knife or pizza cutter
How to Serve This Dish:
Pack with salsa and fruit. One quesadilla is a light lunch; two wedges plus sides is usually enough for a younger child.
Pro Tips for This Recipe:
- Drain the beans well so the tortilla stays crisp.
- Cook over medium heat for even browning.
- Let it rest before cutting or the filling spills.
Variations on This Dish:
- Chicken Quesadilla: Add chopped cooked chicken.
- Pepper Jack Version: Use pepper Jack for a little heat.
Common Mistakes to Avoid with This Dish:
- Wet filling: The tortilla goes soggy.
- Heat too high: The outside burns before the cheese melts.
- Overstuffing: The wedge falls apart.
30. Salmon Salad Crackers

Salmon salad on crackers sounds old-school until you make it with enough lemon and crunch. The crackers stay crisp longer if you pack the salad separately, and the salmon gives you a protein-heavy lunch that doesn’t need bread.
Why It Works:
Canned salmon is soft, rich, and easy to mix with a little mayo and lemon. Served with sturdy crackers, it feels like a clean, salty lunch instead of a random snack tray.
Key Ingredients:
- 1 can salmon, drained and flaked
- 2 tablespoons mayonnaise
- 1 teaspoon lemon juice
- 1 celery stalk, finely chopped
- 1 tablespoon dill or parsley
- Salt and pepper
- Sturdy crackers for serving
Quick Steps:
- Mix salmon, mayo, lemon, celery, and herbs.
- Season to taste.
- Pack crackers separately.
- Spoon salad onto crackers at lunch.
Equipment for This Recipe:
- Bowl
- Fork
- Small sealed container
How to Serve This Dish:
Add sliced cucumbers and apple wedges. This is a good lighter lunch when you want protein without reheating anything.
Pro Tips for This Recipe:
- Drain the salmon well or the salad loosens.
- Use sturdy crackers that won’t snap under the spread.
- Keep crackers separate until eating time.
Variations on This Dish:
- Tuna Salad Swap: Use tuna instead of salmon.
- Dill Pickle Salmon Salad: Add chopped pickles for more bite.
Common Mistakes to Avoid with This Dish:
- Packing crackers with salad already on top: They soften.
- Too much mayo: The mixture runs.
- Skipping lemon: The salmon tastes flat.
31. Breakfast-for-Lunch Muffin Box
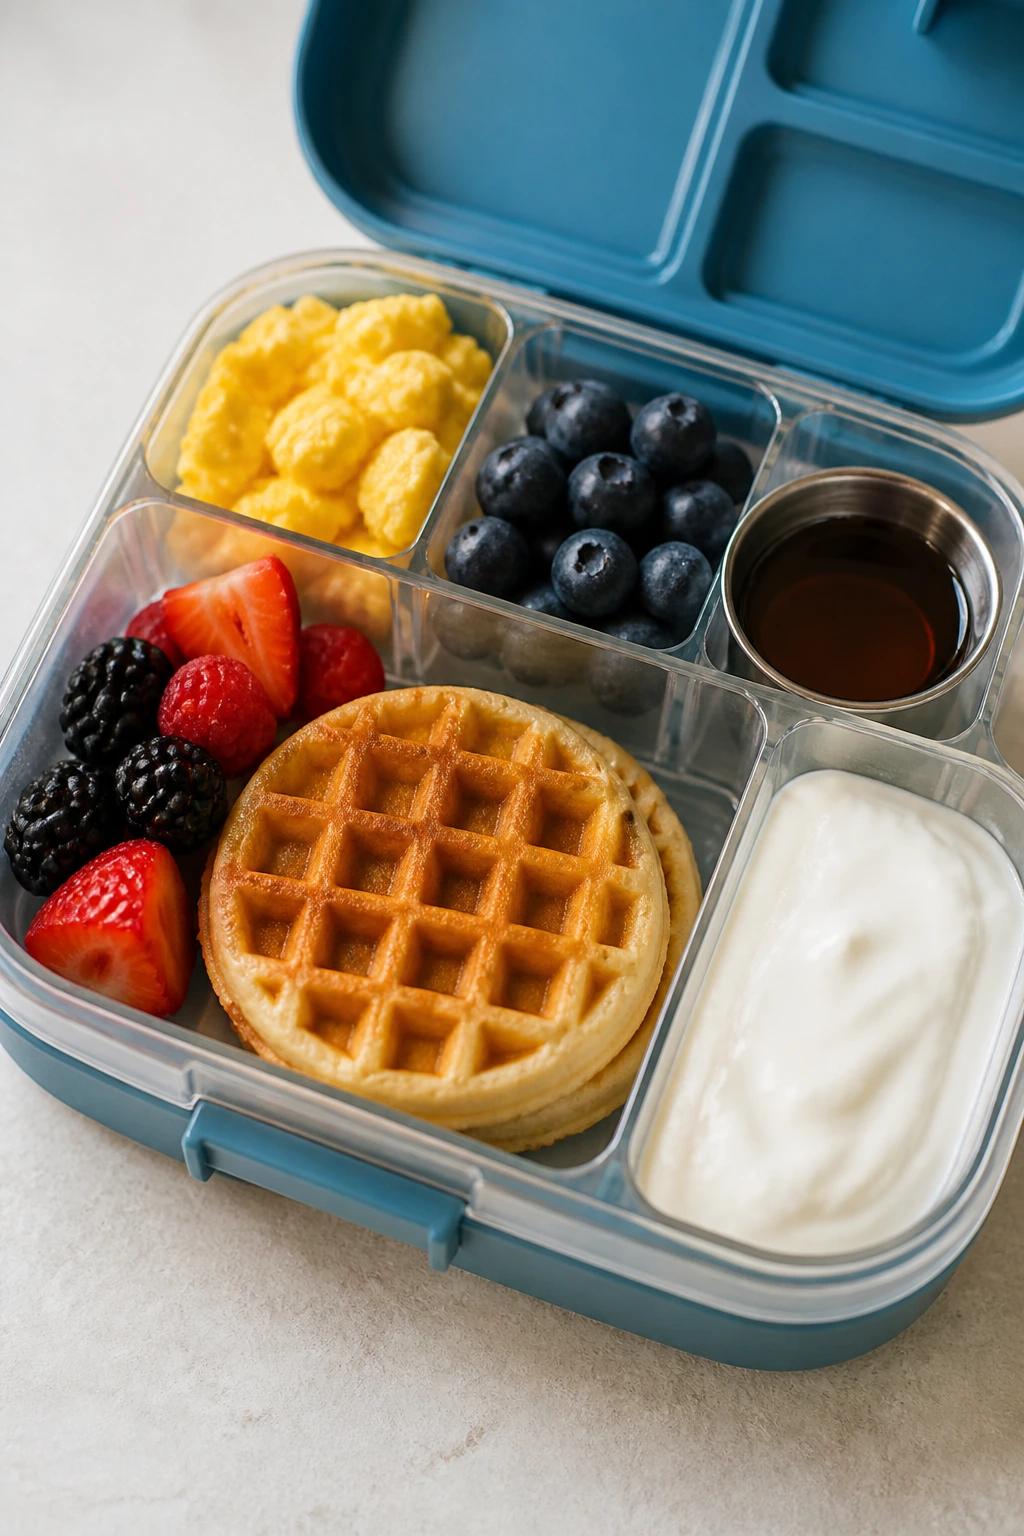
Sometimes lunch needs to look like breakfast to get eaten. Mini waffles, hard-boiled eggs, berries, and a little yogurt make a box that feels cheerful and doesn’t ask for a stove at noon.
Why It Works:
This kind of box gives you several textures at once, which helps with picky eaters. The food is all easy to portion, and almost everything can be cooked ahead and grabbed cold.
Key Ingredients:
- 4 mini waffles or 2 sliced waffles
- 2 hard-boiled eggs
- 1/2 cup berries
- 1/2 cup yogurt
- 1 tablespoon maple syrup
- Optional: mini sausage links
Quick Steps:
- Cook or reheat waffles and cool them.
- Peel the eggs and slice if desired.
- Pack berries and yogurt in separate compartments.
- Add syrup in a tiny cup if using.
Equipment for This Recipe:
- Compartment box
- Small cup
- Knife
How to Serve This Dish:
This works well for younger kids who like breakfast food all day. Add a cheese stick if you want to make it more filling.
Pro Tips for This Recipe:
- Cool waffles fully so they don’t steam-soften the box.
- Use thick yogurt so it stays neat.
- Choose firm berries like blueberries or halved strawberries.
Variations on This Dish:
- Savory Breakfast Box: Swap waffles for mini frittatas.
- French Toast Box: Use thick slices of French toast cut into sticks.
Common Mistakes to Avoid with This Dish:
- Packing syrup loose: It spills.
- Using very soft fruit: It bruises fast.
- Mixing hot waffles with cold berries: Condensation softens everything.
32. Rice Paper Veggie Rolls
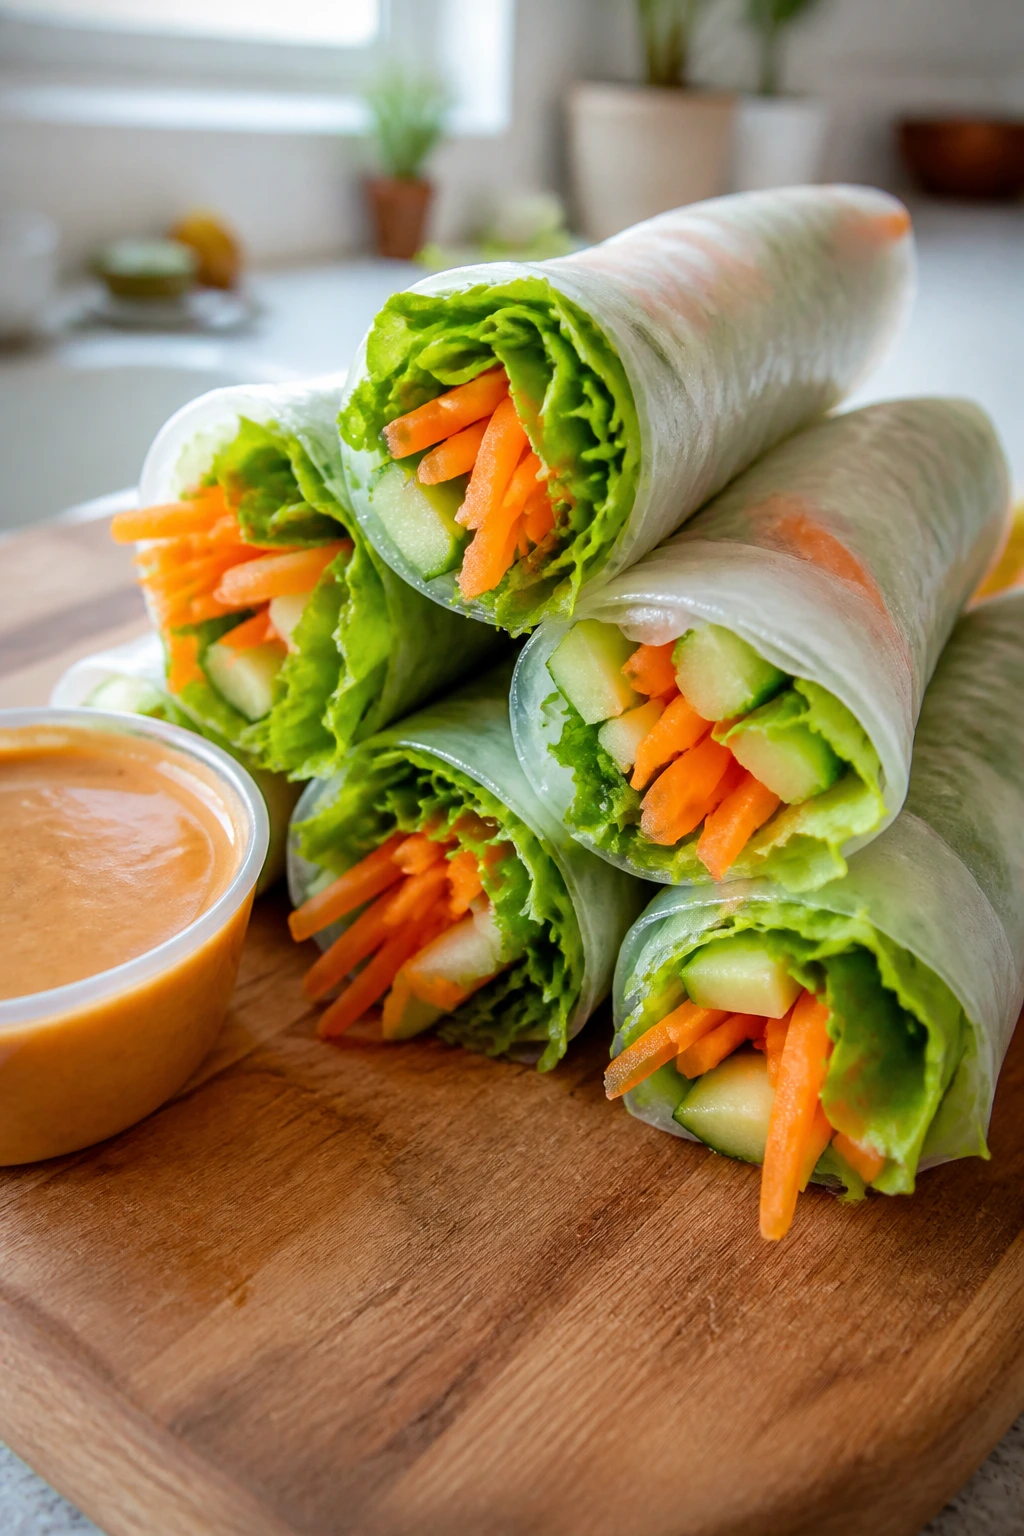
These look fussy and are actually pretty forgiving once you’ve rolled one or two. Crisp vegetables, noodles, and a dipping sauce make them feel fresh and light, which is useful when the lunchbox is full of heavier foods elsewhere.
Why It Works:
Rice paper wraps hold together best when the filling is thin and dry-ish. The rolls stay neat if you don’t overstuff them, and a peanut or sesame dip gives them enough flavor to stand alone.
Key Ingredients:
- 8 rice paper wrappers
- 1 cup shredded carrots
- 1 cucumber, julienned
- 1 cup rice noodles, cooked and cooled
- 1 cup lettuce or herbs
- 1/4 cup peanut sauce or sesame dipping sauce
Quick Steps:
- Soak one rice paper wrapper in warm water until flexible.
- Lay it flat and add a small line of vegetables and noodles.
- Fold in the sides and roll tightly.
- Repeat, then pack with sauce in a separate cup.
Equipment for This Recipe:
- Shallow dish of warm water
- Cutting board
- Small containers
How to Serve This Dish:
Pack with fruit and extra sauce. Two or three rolls usually make a light lunch, so add something savory on the side if needed.
Pro Tips for This Recipe:
- Use thin fillings or the wrapper tears.
- Roll on a damp board to prevent sticking.
- Keep finished rolls from touching until they set.
Variations on This Dish:
- Chicken Rice Paper Rolls: Add cooked chicken strips.
- Shrimp Version: Use halved cooked shrimp and mint.
Common Mistakes to Avoid with This Dish:
- Over-soaking wrappers: They get fragile.
- Overfilling: The rolls split.
- Packing sauce inside: It softens the wrapper.
33. Sloppy Joe Roll-Ups
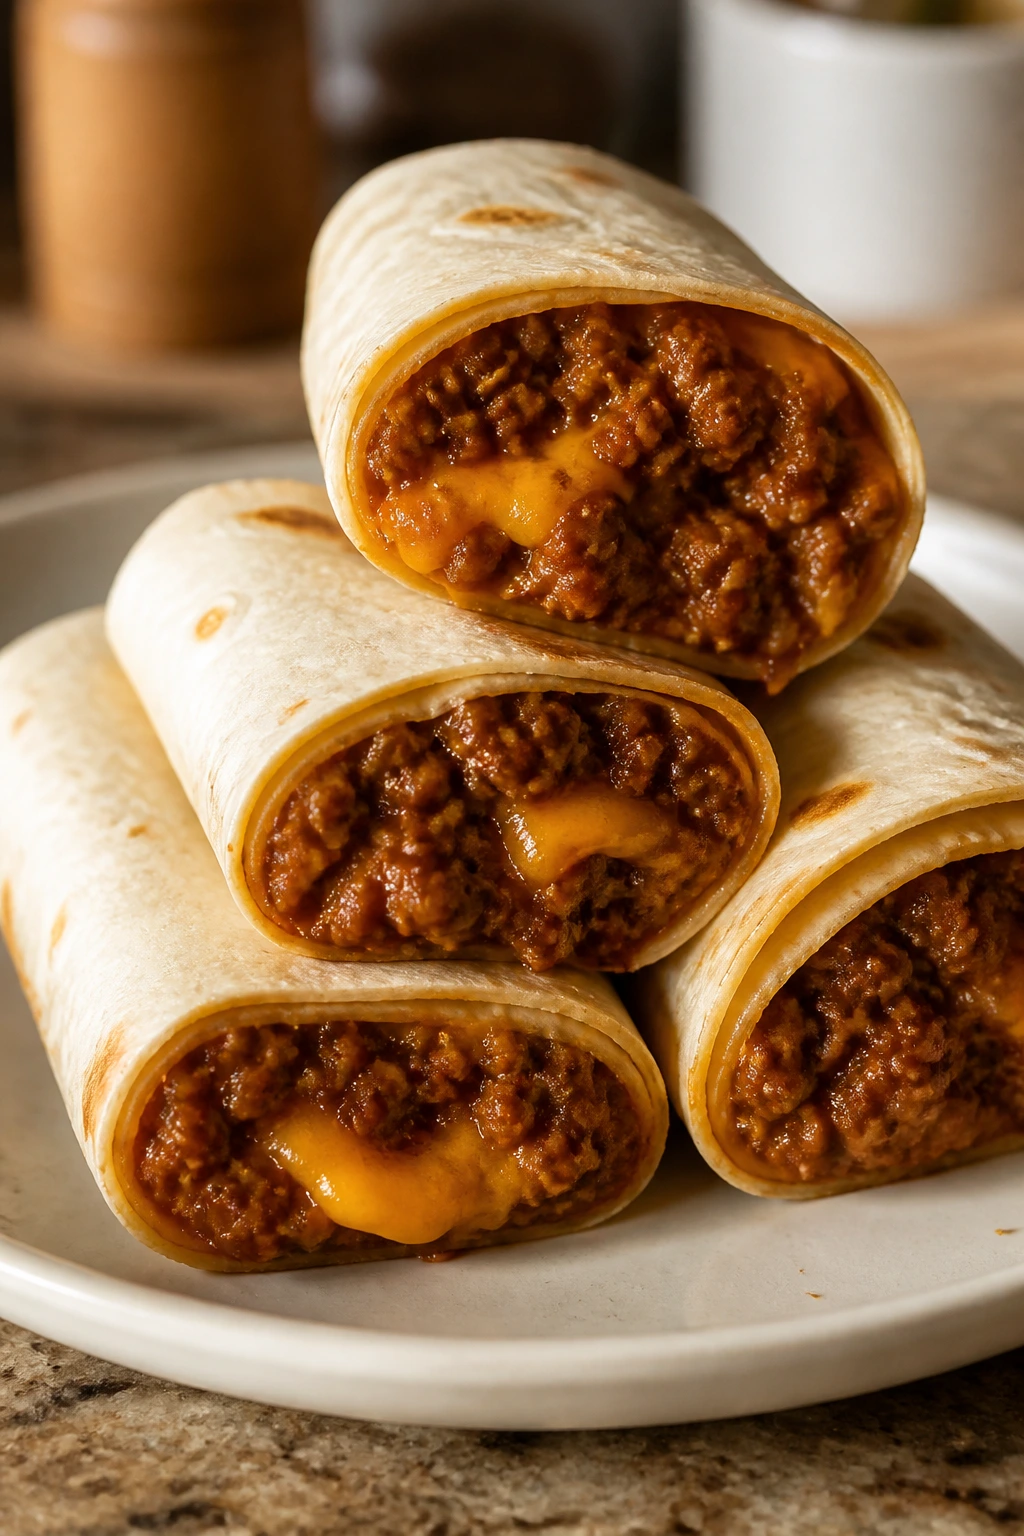
This is the neat little cousin of the loose, messy sandwich. Spoon the thick meat filling into a tortilla, roll it up, and you get the same sweet-tangy flavor without tomato sauce running down every finger.
Why It Works:
Sloppy Joe filling is already soft, so a wrap gives it structure. Using a thicker filling rather than a runny one is the whole trick; once you do that, the lunchbox version is easy.
Key Ingredients:
- 1 lb ground beef
- 1/2 cup ketchup
- 1 tablespoon Worcestershire sauce
- 1 teaspoon brown sugar
- 4 large tortillas
- 1 cup shredded cheddar
- Optional: diced onion
Quick Steps:
- Brown the beef and drain any grease.
- Stir in ketchup, Worcestershire, brown sugar, and onion if using.
- Simmer until thick, not watery.
- Spoon onto tortillas, add cheese, and roll.
- Cool slightly before packing.
Equipment for This Recipe:
- Skillet
- Spoon
- Tortilla warmer or foil
How to Serve This Dish:
Serve with apple slices and a few baby carrots. One roll-up is enough for a young child; two makes a fuller lunch.
Pro Tips for This Recipe:
- Cook the filling down until thick or the wrap leaks.
- Let it cool a bit so the cheese doesn’t fully melt and slide.
- Wrap tightly in parchment for better shape.
Variations on This Dish:
- Turkey Sloppy Joe Roll-Ups: Use ground turkey for a lighter filling.
- BBQ Sloppy Wraps: Swap some ketchup for barbecue sauce.
Common Mistakes to Avoid with This Dish:
- Runny filling: It soaks through the tortilla.
- Too much cheese: The wrap slips.
- Packing before cooling: Steam makes the tortilla gummy.
34. Cottage Cheese and Fruit Boxes
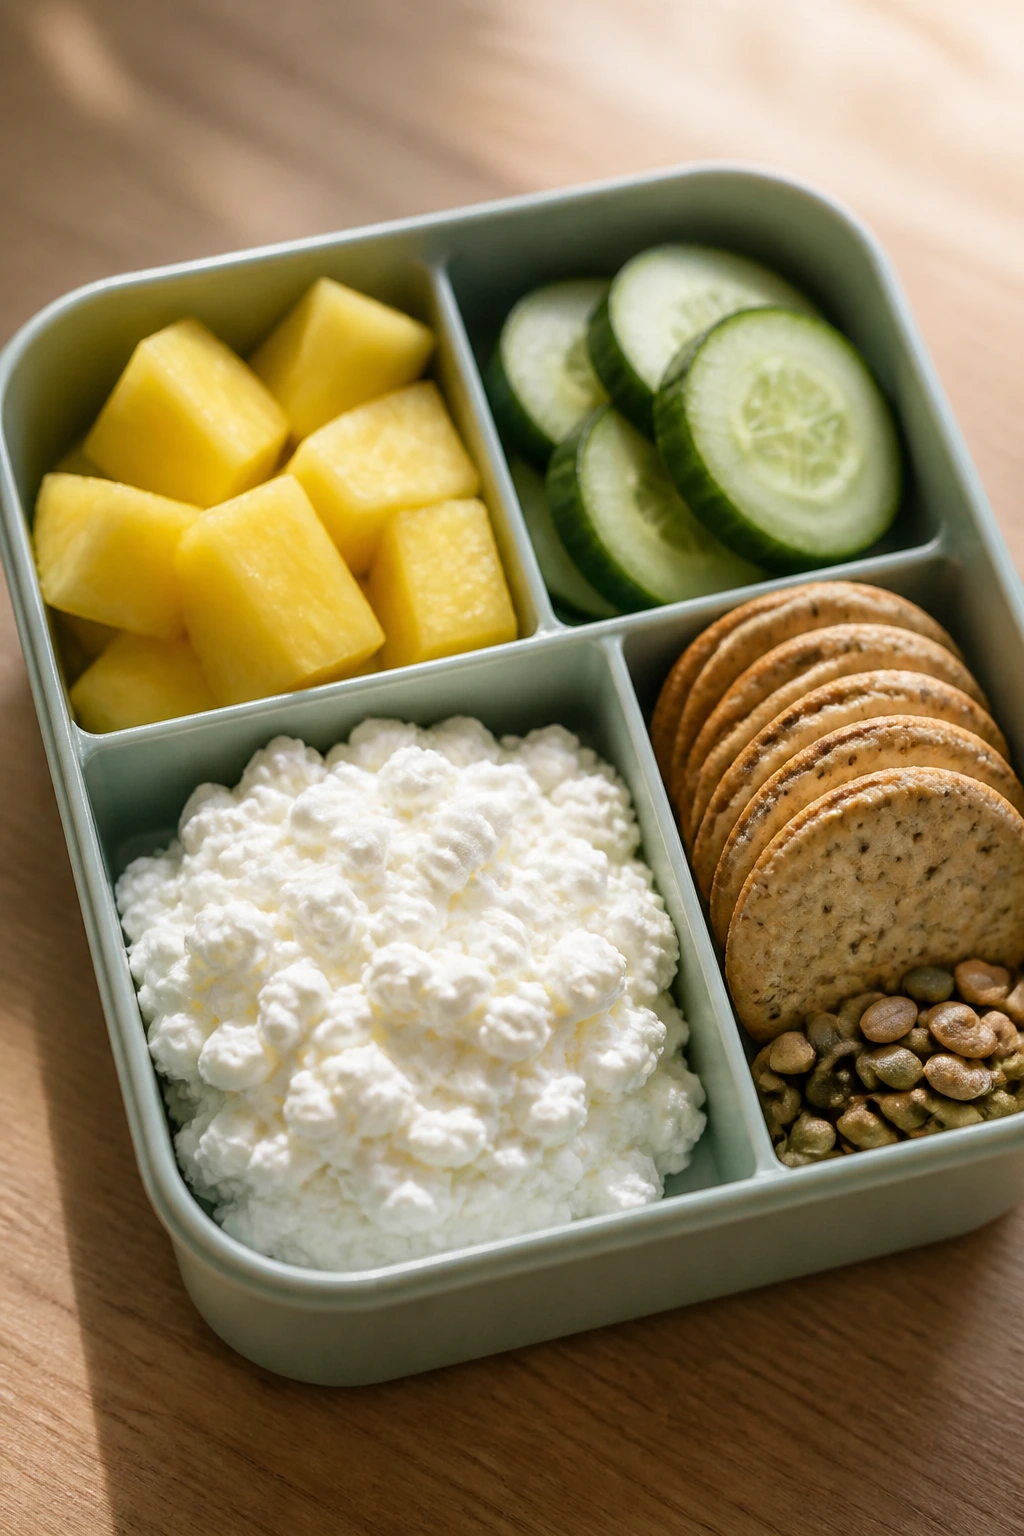
A cottage cheese box sounds plain until you build it with the right fruit, a little crunch, and maybe a handful of crackers. Then it becomes a cold lunch that’s fast, high in protein, and surprisingly satisfying.
Why It Works:
Cottage cheese is the anchor. Fruit gives sweetness and juice, while crackers or granola bring texture. It’s a no-cook lunch that still feels complete when the compartments are balanced.
Key Ingredients:
- 1 cup cottage cheese
- 1/2 cup pineapple chunks or berries
- 1/2 cup cucumber slices or cherry tomatoes
- 8 crackers
- 1 tablespoon sunflower seeds or granola
- Optional: drizzle of honey
Quick Steps:
- Spoon cottage cheese into one compartment.
- Add fruit to another and crunchy items to a third.
- Keep juicy fruit separate from crackers.
- Add seeds or honey just before eating if desired.
Equipment for This Recipe:
- Compartment lunchbox
- Small spoon
- Leakproof cups if needed
How to Serve This Dish:
This works as a light lunch, especially when paired with an extra piece of fruit or a sandwich half. It’s also a useful backup lunch when the fridge is bare.
Pro Tips for This Recipe:
- Choose thick cottage cheese so it doesn’t flood the box.
- Use dry toppings like seeds or crackers to add bite.
- Pack fruit separately if it’s very juicy.
Variations on This Dish:
- Savory Box: Use tomatoes, cucumbers, and a sprinkle of salt and pepper.
- Sweet Box: Use berries, melon, and a little cinnamon.
Common Mistakes to Avoid with This Dish:
- Juicy fruit touching crackers: They soften fast.
- Too much honey: It makes the box slippery.
- Packing cottage cheese without a tight lid: It leaks.
35. Mini Sausage and Pepper Subs

These taste like a tiny fairground sandwich, but less greasy and a lot easier to pack. The peppers bring sweetness, the sausage brings heft, and the roll keeps everything from scattering across the lunchbox.
Why It Works:
Sausage and peppers hold up well because the filling is dense and not too wet. Mini rolls make the sandwich feel substantial without becoming too big to manage in a school or work lunch.
Key Ingredients:
- 4 small sub rolls
- 8 small sausage links or 2 larger sausages, sliced
- 1 bell pepper, sliced
- 1/2 onion, sliced
- 1 tablespoon oil
- 1/2 cup shredded mozzarella
- Optional: mustard or marinara
Quick Steps:
- Sauté onion and pepper in oil until soft and lightly browned.
- Cook sausage until done through and browned.
- Fill each roll with sausage, peppers, and mozzarella.
- Add mustard or marinara if using.
- Wrap and pack after cooling slightly.
Equipment for This Recipe:
- Skillet
- Knife
- Baking sheet if toasting rolls
How to Serve This Dish:
Pack with fruit and a crisp vegetable side. Two mini subs make a hearty lunch, especially if you want something warm rather than snacky.
Pro Tips for This Recipe:
- Cook the peppers until they soften or they fight the bread.
- Use small rolls so the filling doesn’t spill.
- Let the filling cool a bit before assembling to avoid soggy bread.
Variations on This Dish:
- Chicken Sausage Subs: Use chicken sausage for a lighter version.
- Marinara Sub: Spoon in a little marinara for more of a pizza-shop feel.
Common Mistakes to Avoid with This Dish:
- Too much sauce: It leaks into the roll.
- Big sausage slices: They make the sub hard to bite.
- Packing while steaming hot: The bread softens and collapses.
What Makes a Lunchbox Meal Hold Up by Noon
A lunchbox meal has one job: still taste like itself after it has spent a few hours in a bag. That means texture matters more than most people admit. Soft bread needs a barrier, crisp vegetables need to stay dry, and saucy fillings need either a thermos or a container with a lid that actually seals.
Cold lunches do best when they use ingredients that don’t panic in the fridge. Pasta, beans, chicken salad, roll-ups, pinwheels, and snack boxes all handle chill well. Hot lunches need more planning. Preheat the thermos, pack the food piping hot, and keep the noodles or rice a touch firmer than you would for dinner.
The boring little details make the lunch. Thick bread beats flimsy sandwich bread. Sturdy crackers beat delicate ones. A dry cucumber slice beats a wet one. And if you’ve ever opened a lunchbox to find one corner of the food has turned into a swamp, you already know why that matters.
Essential Equipment for These Recipes

- Compartment lunchboxes: These keep wet and dry foods from touching until lunch.
- Leakproof little cups: Useful for salsa, dressing, hummus, yogurt, and dip.
- Insulated thermos: The only reliable way to keep soup, mac and cheese, or fried rice hot.
- Sheet pans: Handy for muffins, meatballs, frittatas, and pizza bites.
- Skillet or nonstick pan: Needed for quesadillas, fried rice, sliders, and quick reheats.
- Sharp knife: Makes sandwiches, pinwheels, fruit, and vegetables look cleaner and pack better.
- Cutting board: A sturdy one keeps rolling, slicing, and dicing sane.
- Mixing bowls: You’ll use them for chicken salad, pasta salad, sauce, and egg mixes.
- Measuring cups and spoons: Lunchbox recipes lean on small amounts, especially dressings and spreads.
- Parchment paper or foil: Great for wraps, subs, sliders, and anything you want to hold its shape.
- Muffin tin: Essential for pizza muffins, frittatas, and meatloaf muffins.
- Ice packs: Non-negotiable for cold food that needs to stay safe until lunchtime.
Smart Shopping and Ingredient Tips
The best lunchbox food starts in the grocery aisle with a few practical choices. Buy bread with some backbone. Thick-sliced sandwich bread, tortillas that bend without cracking, pita that opens cleanly, and mini rolls with a little chew all beat ultra-soft bakery bread for packed lunches. If you can press it and it springs back, it’s probably the right pick.
Cheese matters more than people think. Sliced cheddar, Swiss, provolone, Monterey Jack, and mozzarella all pack well because they stay sliceable and don’t collapse into oil when cold. For salads and sauces, choose a thicker mayonnaise or Greek yogurt so the filling doesn’t get runny by lunch. With deli meat, thinner slices usually roll and stack better than thick-cut ones.
Produce should be chosen for crunch and low water content. Grapes, apples, cucumbers that have been seeded, carrots, snap peas, and cherry tomatoes all travel better than soft fruit or watery greens. If a vegetable gives off a lot of juice, salt it lightly only right before packing, or keep it separate until the last minute.
Pantry ingredients deserve the same attention. Short pasta shapes hold dressing better than spaghetti in a lunch box. Canned beans should be rinsed so they don’t taste metallic. Rice for lunchboxes works best when it’s cooled, then tucked into a thermos or tossed with a little oil if it’s going to be eaten cold.
How to Serve These Recipes
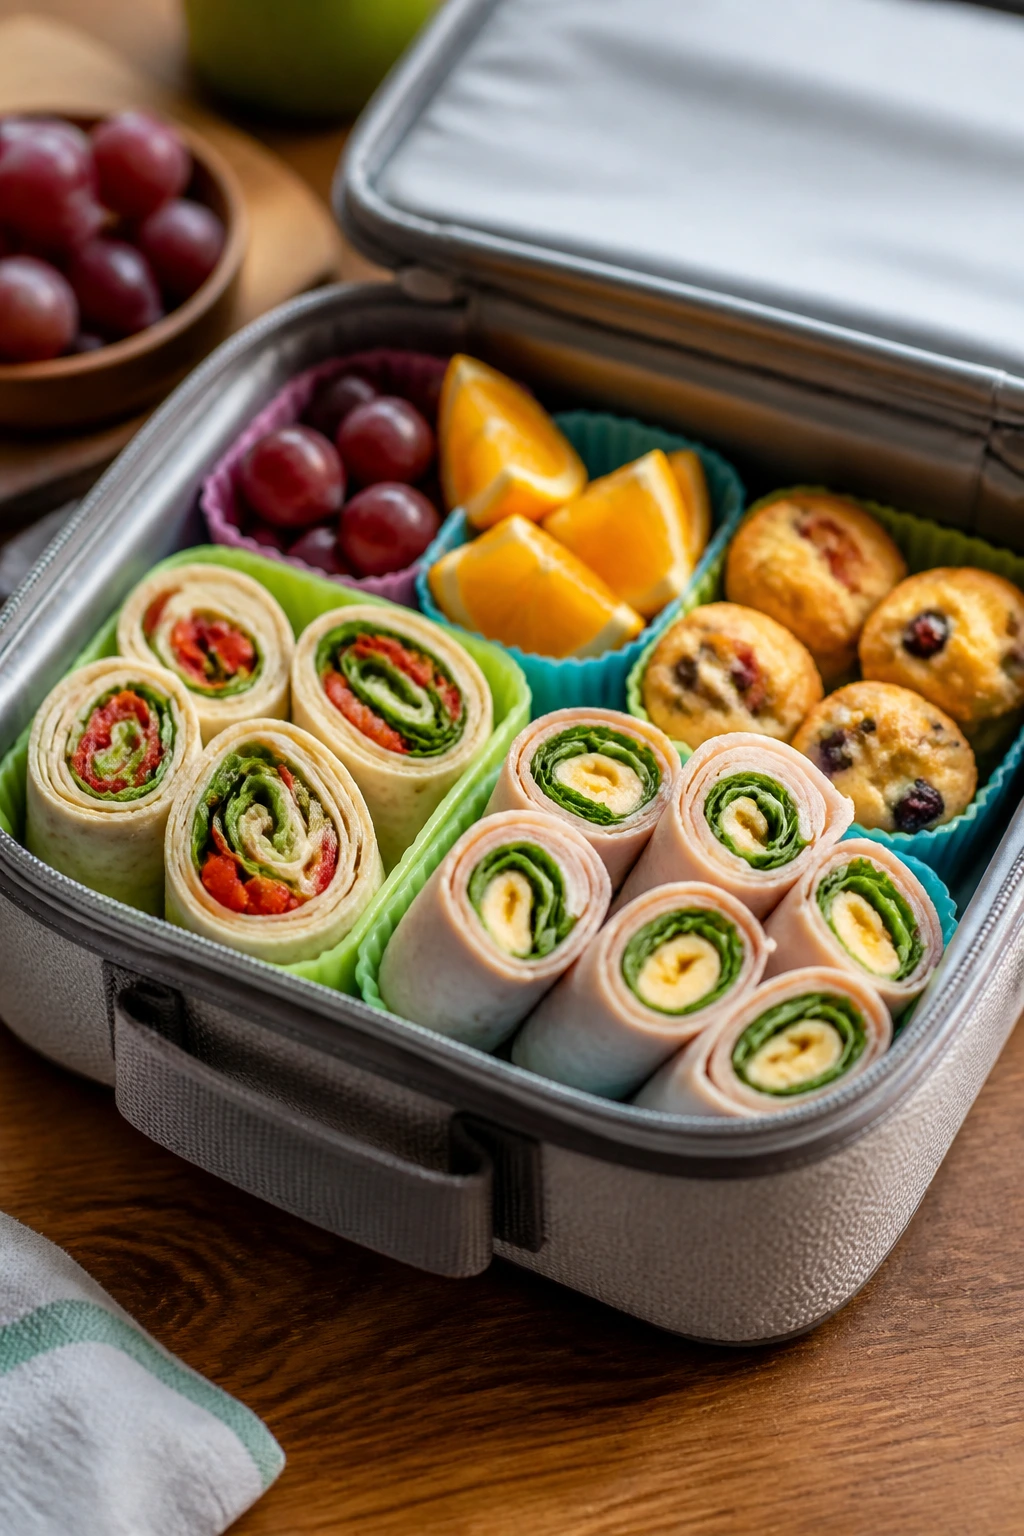
Presentation: Put the lunch where the eye lands first. Pinwheels, wedges, roll-ups, and mini muffins look better when you alternate colors in the box—orange carrots next to green grapes, pale cheese beside darker meat, red berries beside crackers. A lunchbox doesn’t need to be fancy, but it does need to look sorted. Chaos reads as leftovers.
Accompaniments: Most of these lunches want one crunchy side and one fresh side. Think apple slices, grapes, cucumbers, carrot sticks, pretzels, crackers, or a small yogurt cup. Warm mains like burritos, meatballs, mac and cheese, and soup benefit from something crisp on the side so the lunch doesn’t feel heavy.
Portions: For younger kids, one main item plus two sides is often enough: a wrap half, a few pinwheels, or a mini muffin tray lunch. Teens and adults usually need a fuller box—two wraps, a bigger pasta salad, or a thermos plus fruit and crackers. If a lunch looks small, add a protein side before adding more bread.
Beverage Pairing: Water is the default because it doesn’t compete with the food. Milk fits pizza muffins, PB&J roll-ups, and breakfast boxes. Unsweetened iced tea or diluted fruit water works well for older eaters who want something not too sweet.
Additional Tips and Flavor Boosters

Flavor Enhancement: A sharp little finish changes a lunchbox meal more than extra ingredients do. Lemon juice on chicken salad, mustard on turkey pinwheels, sesame seeds on rice, or a small drizzle of olive oil over pasta salad can wake up a box that would otherwise taste flat by lunchtime.
Customization: Keep one or two “swap lanes” in mind. Tortillas can become roll-ups, wraps, or quesadillas. Rice can become bowls or thermos lunches. Chicken can move from sandwich filling to pasta salad to Caesar wrap without making the grocery list explode.
Serving Suggestions: Pack dips in tiny cups and keep garnishes separate until the last minute. Croutons stay crisp if they’re not buried in dressing. Apples stay brighter if you toss them with a little lemon juice. Even a pinch of Parmesan on pasta salad or sesame seeds on noodles makes the lunch feel finished.
Make-It-Yours: For gluten-free lunches, use rice, corn tortillas, lettuce wraps, or gluten-free bread that toasts well. For dairy-free boxes, choose hummus, olive-oil pasta, bean burritos, or sunflower butter sandwiches. For extra protein, add eggs, beans, chicken, tuna, or cheese cubes rather than making everything bigger.
Make-Ahead, Storage, and Reheating Guidance
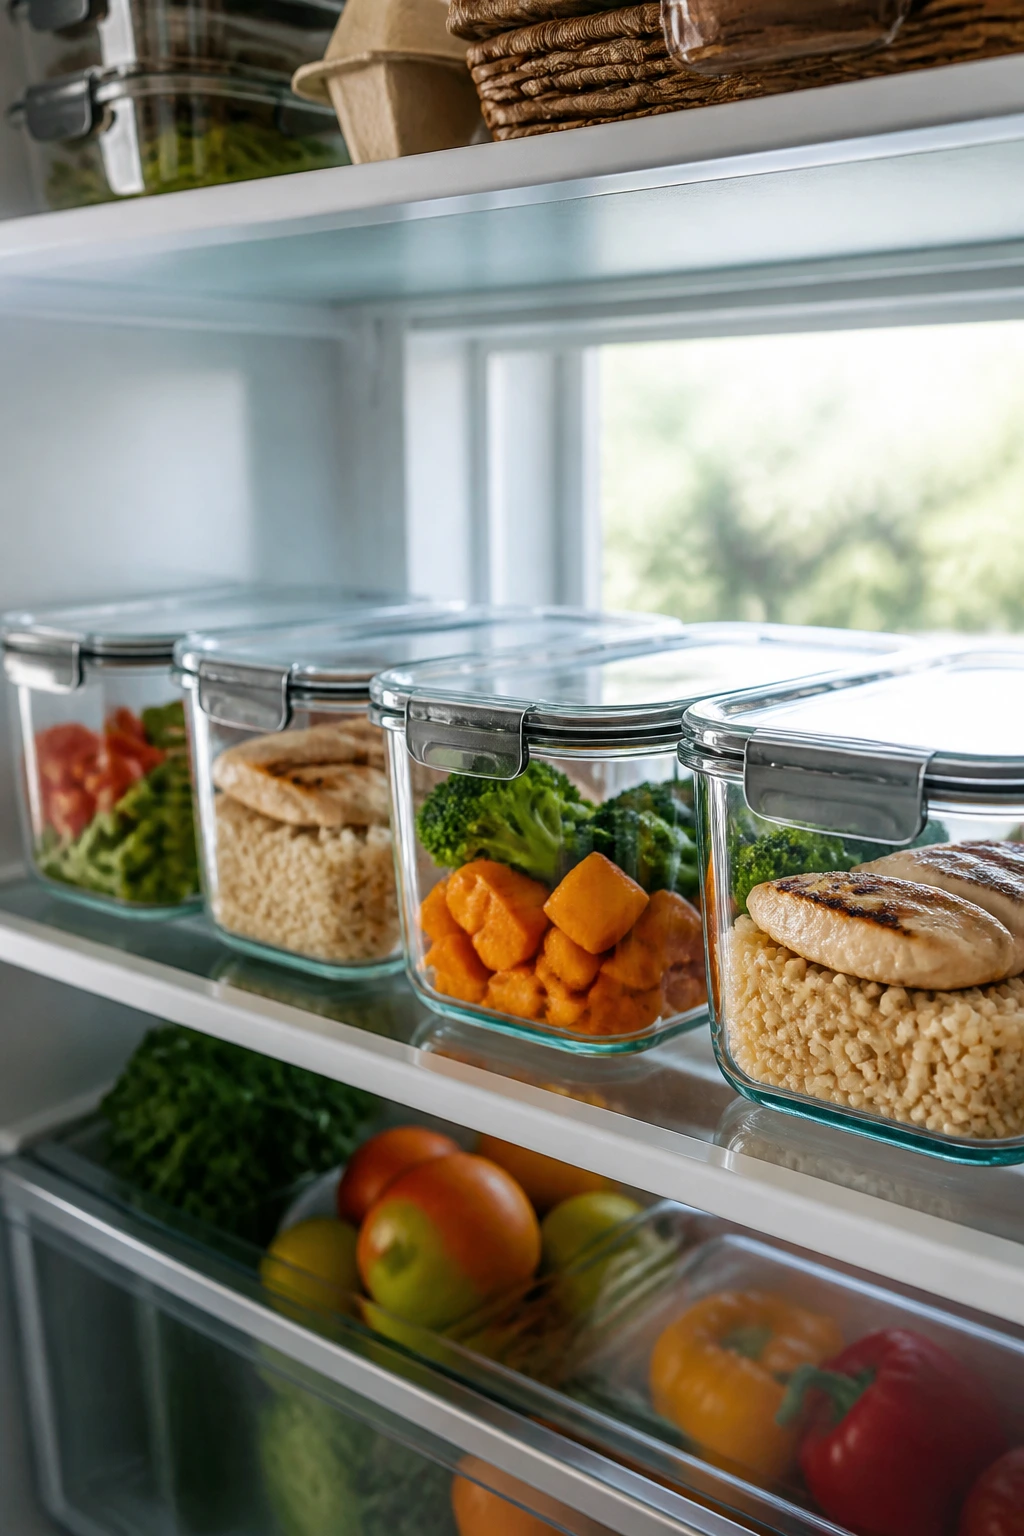
A lot of these lunches can be made ahead without losing their shape. Chicken salad, pasta salad, egg salad, burrito filling, meatballs, and fried rice keep in the fridge for 3 to 4 days when stored in airtight containers. Cooked chicken, rice, and pasta fillings should cool quickly before they’re sealed up; spreading them in a shallow layer helps them drop temperature faster.
Cold sandwiches and wraps are best assembled the night before or the morning of, depending on how wet the filling is. Pinwheels, quesadillas, and roll-ups usually hold fine overnight if the ingredients are dry and tightly wrapped. For anything with cucumber, tomato, or dressing, consider packing the wet parts separately and combining them at lunch.
Freezer-friendly options include mini pizza muffins, meatloaf muffins, burritos, meatballs, and some frittatas. They’ll keep for up to 2 months frozen in a sealed bag or container. Reheat muffins and burritos in the microwave for 45 to 90 seconds, or in a toaster oven until hot in the center. Meatballs and rice can be warmed in 1-minute bursts with a splash of water to keep the rice from drying out.
Hot lunches need a little discipline. Soup, mac and cheese, and fried rice should go into a preheated thermos while piping hot, not lukewarm. If food sits at room temperature for more than 2 hours, it should be treated as unsafe to keep packing around. That’s not dramatic. It’s just the rule that keeps a lunchbox from turning into regret.
Variations and Adaptations to Try
Nut-Free School Box: Use sunflower butter instead of peanut butter, and choose hummus, cheese, eggs, or deli meat as the main protein. It’s the easiest swap because most of the recipes here already work without nuts. Just check labels on pesto, sauces, and packaged snacks if the lunch has to stay strictly nut-free.
Gluten-Free Lunchbox Swap: Rice bowls, salad boxes, egg cups, lettuce wraps, and rice paper rolls all fit naturally here. For wraps and sandwiches, use gluten-free tortillas or bread that toasts well and isn’t crumbly. Corn tortillas can also stand in for many quesadilla-style lunches if you warm them gently first.
Dairy-Free Pack List: Lean on bean burritos, hummus pita pockets, rice bowls, sesame noodles, and fruit-and-protein boxes. Ditch cheese and swap in avocado, olive oil, tahini, or a dairy-free spread where needed. Some lunches, like pesto pasta or Caesar wraps, can be adjusted, but they’re easier to rebuild than to force.
Thermos Lunch Week: Build a run of hot lunches with soup, mac and cheese, fried rice, and meatballs over rice. Batch-cook the base once, then change the flavor with seasoning, herbs, or a different sauce so the lunch doesn’t feel repeated. The thermos does the heavy lifting; you just need a different container of the same idea.
Picky-Eater Simplifier: Strip the lunches back to two or three familiar parts. Plain turkey and cheese pinwheels, cheese crackers with grapes, mild pasta salad, pizza muffins, or banana sandwiches are easier sells than anything with too many visible bits. Keep sauces on the side and cut food into squares, strips, or spirals so it feels less intimidating.
Common Mistakes to Avoid with Lunchbox Meals
The fastest way to wreck a lunch is to mix wet and dry food too early. Tomatoes against bread, dressing on crackers, salsa on quesadillas, or warm pasta sealed into a container will all create the same problem: soft, soggy, blunt-flavored food. Keep moisture in a separate cup or use a barrier like cheese, hummus, or buttered bread.
Another common miss is packing hot food while it’s still steaming. That steam condenses inside the container and turns the top layer gummy. Let cooked food cool enough that the steam calms down before sealing, unless it’s going into a preheated thermos right away. That part is different.
People also use breads and wraps that are too soft for the job. Fluffy white bread, flimsy tortillas, and thin crackers can work for the first bite, then collapse. If the filling is even slightly wet, choose a sturdier base. Pretzel buns, pita, whole-grain bread, and toasted bagels hold their shape better.
Underseasoning is sneaky. Cold food tastes less salty and less bright than warm food, so a lunch that seems fine in the kitchen can taste flat at noon. A little lemon, mustard, vinegar, Parmesan, pickles, or herbs usually fixes that. Not a lot. Just enough to keep the food from feeling sleepy.
Finally, don’t ignore the way things are cut. Thin apple slices, seeded cucumbers, chopped chicken, small pasta shapes, and bite-size meatballs make lunch easier to eat and easier to pack. Large, awkward pieces slow everything down and push fillings out of sandwiches.
Frequently Asked Questions
How do I keep sandwiches from getting soggy?
Use a moisture barrier first: butter, cream cheese, cheese, hummus, or mustard between the bread and the wetter filling. Then keep tomatoes, pickles, and dressed vegetables separate when you can. Sturdier bread also matters a lot more than people think.
What lunchbox meals work best without reheating?
Pinwheels, pasta salad, bento boxes, chicken salad sandwiches, egg salad toast fingers, hummus pita pockets, and sesame noodles all work cold. They hold texture well and don’t depend on temperature to taste finished.
Can I send these lunches to school if the classroom is nut-free?
Yes, but check labels carefully. Sunflower butter, cheese, eggs, hummus, turkey, chicken, beans, and yogurt all work well in nut-free lunches. Watch for hidden nuts in pesto, granola, bakery bread, and packaged snacks.
How long can lunch sit out before it needs to be cold or hot?
Food should not sit at room temperature for more than about 2 hours, and less if the day is warm. Cold food needs ice packs, and hot food needs to stay hot in a thermos. That rule matters more than the recipe itself.
What’s the best bread for lunchbox sandwiches?
Bread with structure. Whole-grain sandwich bread, pretzel rolls, pita, mini bagels, and toasted sourdough all hold up better than airy white bread. If the filling is especially wet, toast the bread first or build a barrier inside the sandwich.
Can I use leftovers for these lunches?
Absolutely. Leftover rice becomes fried rice, leftover chicken becomes salad, and leftover meatballs become thermos lunches or subs. Lunchboxes are one of the best uses for small portions sitting in the fridge.
What if my kid refuses cold food?
Lean on thermos lunches: mac and cheese, soup, fried rice, meatballs, and even burritos can go in hot. If hot food is a hard sell, use room-temperature foods like pizza muffins, pinwheels, or sliders so the texture stays familiar.
How do I keep fruit from browning or getting mushy?
Slice apples right before packing if you can, or toss them lightly with lemon juice. Choose firmer fruits like grapes, blueberries, mandarins, strawberries, and crisp pears. Soft bananas and cut melon need to be eaten sooner, not packed too far ahead.
The Lunchbox Habit That Actually Sticks
The best lunchbox routine is the one that doesn’t fight you every morning. A few dependable wraps, a couple of thermos lunches, a pasta salad you can make once and eat twice, and a snack box or two for the days when everything feels rushed—that’s enough to cover most weeks without turning lunch into a project.
And the nice part? Once the basics are in place, the rest gets easy. You stop scrambling for ideas, you stop packing food that comes home untouched, and the lunchbox starts doing what it should have done from the beginning: feeding people with less drama and better food.