
Fast family dinners have a peculiar job. They need to taste like dinner, move like a snack, and survive the half-hour when shoes are kicked off, backpacks are dumped, and somebody is already asking, “What’s to eat?”
That’s why after-school snacks and weeknight dinner often blur together in my kitchen. A good plate at that hour is warm, salty, easy to hold, and ready before hunger turns loud. Tortillas, pita, naan, English muffins, noodles, potatoes, rice, and a few smart shortcuts can carry the whole thing without making you cook like you’ve got a free evening and a spotless sink.
The recipes below lean into that exact window between school and bedtime. Some are handheld. Some are scoopable. Some are messy in the right way. All of them are built around ingredients that cook fast, reheat well, and don’t punish you for using the freezer, the rotisserie chicken, or the bag of shredded cheese you already bought last week.
Why These Snacky Dinners Work on the School Pickup Clock
Handheld wins: Wedges, pockets, melts, and roll-ups are easier to eat when one child is standing, one is talking, and one is “not that hungry” until the food lands in front of them.
Short cook times matter: Most of these recipes use cooked chicken, canned beans, frozen meatballs, microwave potatoes, or leftover rice, which keeps active time around 10 to 20 minutes.
Leftovers don’t feel sad: These dishes reheat without turning into mush if you keep the components in the right order and don’t drown everything in sauce.
Picky eaters can split the plate: A quesadilla, a rice bowl, or a baked potato boat lets you put the spicy stuff on one side and the plain stuff on the other.
Pantry and freezer staples carry the load: Tortillas, bread, cheese, pasta, and frozen vegetables do most of the heavy lifting here, which is exactly what you want when the clock is loud.
Dinner can still look fun: A plate of toasted wedges, saucy meatballs, or loaded potato halves feels more like an event than a chore, even if you made it in 15 minutes.
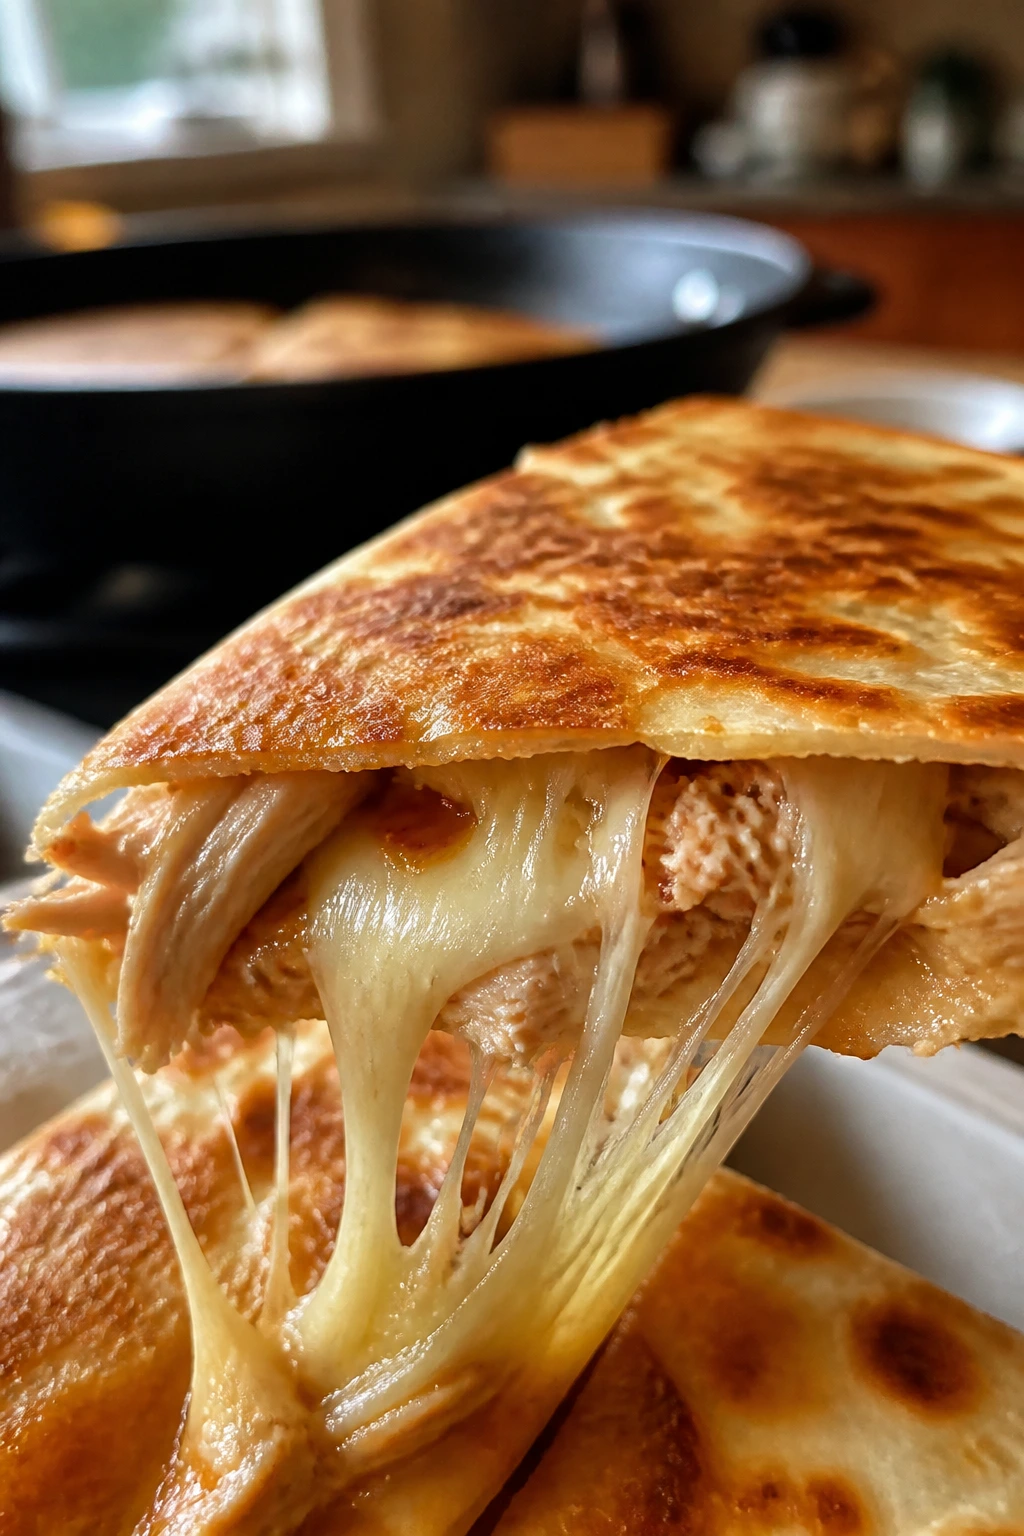
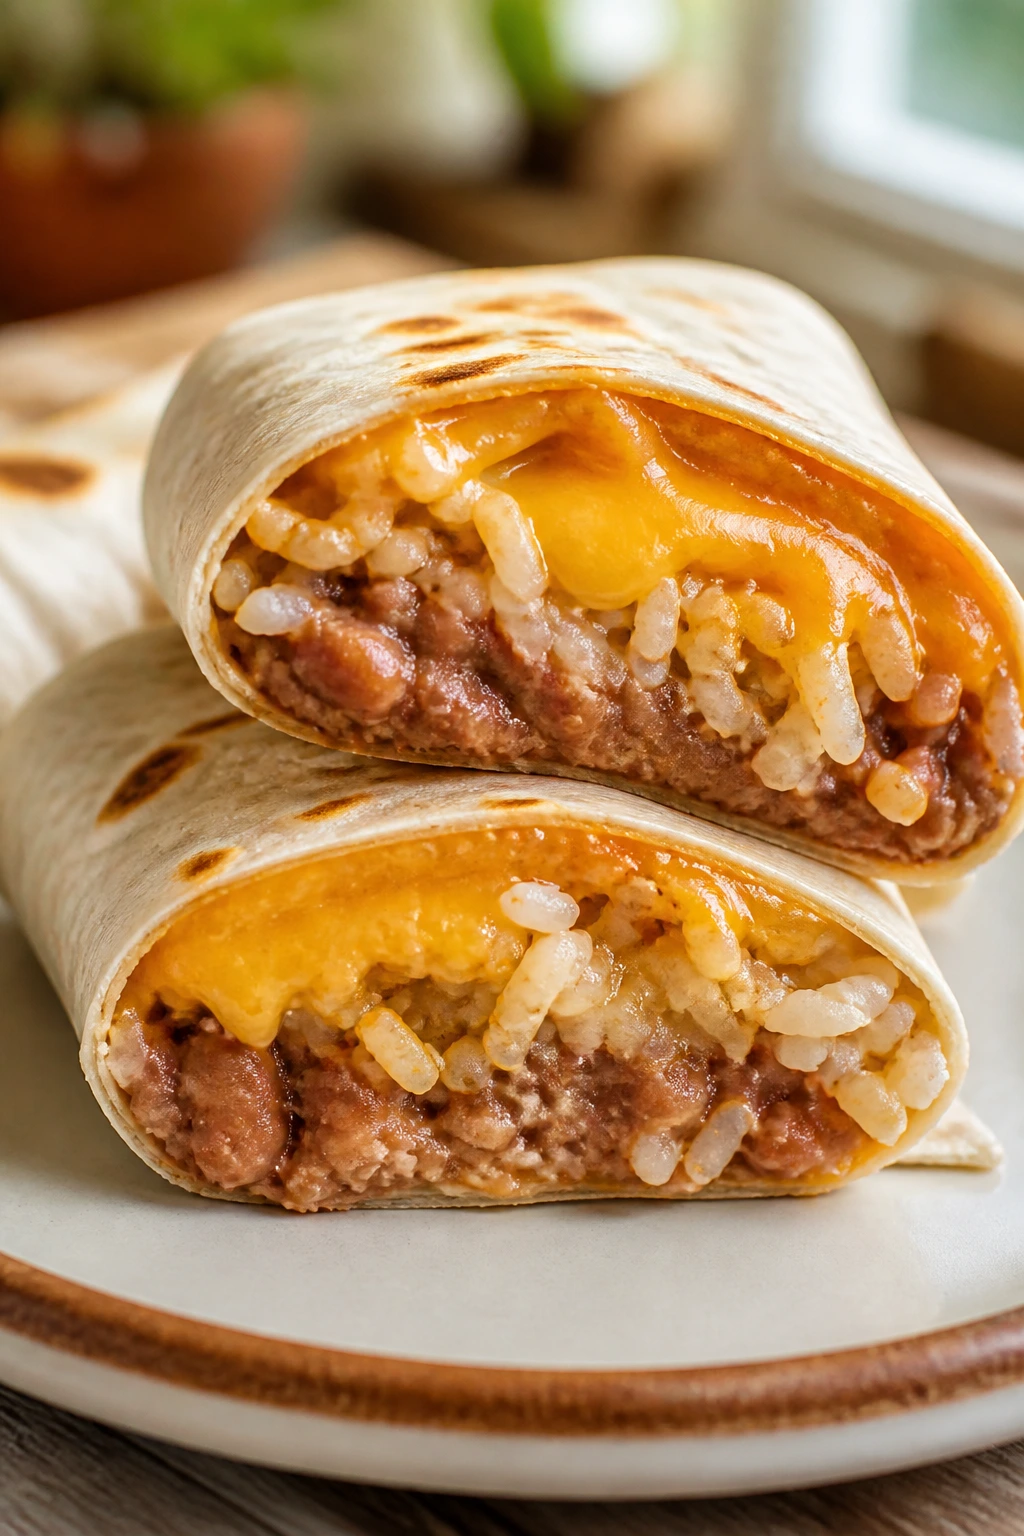
1. Cheesy Chicken Quesadilla Wedges
The edges get crisp, the center goes stretchy, and the whole thing tastes like the after-school version of a hot skillet meal. I like this one because it feels generous without asking for much: cooked chicken, good cheese, and one pan.
Why It Works: The filling is already cooked, so the skillet only has to melt, toast, and fuse. Salsa adds moisture without making the tortilla soggy, and two cheeses give you both smooth melt and a little sharper flavor. If you keep the heat at medium, the tortilla browns before the cheese leaks out.
Key Ingredients:
- 4 large flour tortillas — 8-inch or 10-inch both work; use the size that fits your skillet.
- 2 cups shredded rotisserie chicken — pull it into small strands so it spreads evenly.
- 1 1/2 cups shredded Monterey Jack — the melt is soft and clean.
- 1 cup shredded cheddar — adds a saltier bite.
- 1/2 cup salsa — choose a thicker salsa so the filling stays put.
- 1 tablespoon butter or neutral oil — for the skillet.
- 1/4 cup sliced green onions — optional, but they cut the richness.
- Sour cream for serving — cools the hot filling fast.
Quick Steps:
- Heat a 12-inch skillet over medium and add the butter or oil.
- Lay one tortilla in the skillet and sprinkle half of it with chicken, cheeses, salsa, and green onions.
- Fold the tortilla over and cook for 2 to 3 minutes per side, until golden and the cheese is fully melted.
- Transfer to a cutting board and let it sit for 1 minute so the cheese settles.
- Slice into wedges and serve with sour cream or more salsa.
Equipment for This Recipe:
- 12-inch skillet — a wide pan keeps the quesadilla flat.
- Spatula — for flipping without tearing.
- Cutting board — gives you clean wedges.
- Sharp knife or pizza cutter — easiest way to slice.
How to Serve This Dish: Stack the wedges on a plate and tuck a bowl of salsa beside them. I like serving this with apple slices or carrot sticks so the plate feels complete without turning into a full production.
Pro Tips for This Recipe:
- Keep the filling in one thin layer; a thick pile leaks before it melts.
- Use pre-cooked chicken that isn’t swimming in sauce.
- If the tortilla browns too fast, lower the heat before flipping.
- Let it rest for 60 seconds before cutting, or the cheese will run.
Variations on This Dish:
- Bean-and-Cheese Version: Skip the chicken and add 1 cup refried beans for a meatless option.
- Buffalo Chicken Quesadilla: Mix the chicken with 2 tablespoons buffalo sauce and use blue cheese crumbles sparingly.
- Breakfast-for-Dinner Quesadilla: Add scrambled eggs and a few diced breakfast potatoes for a late-day twist.
Common Mistakes to Avoid with This Dish:
- Don’t use too much salsa; the tortilla gets soft and weak.
- Don’t cook on high heat; the outside burns before the cheese melts.
- Don’t slice immediately; the filling spills out like lava.
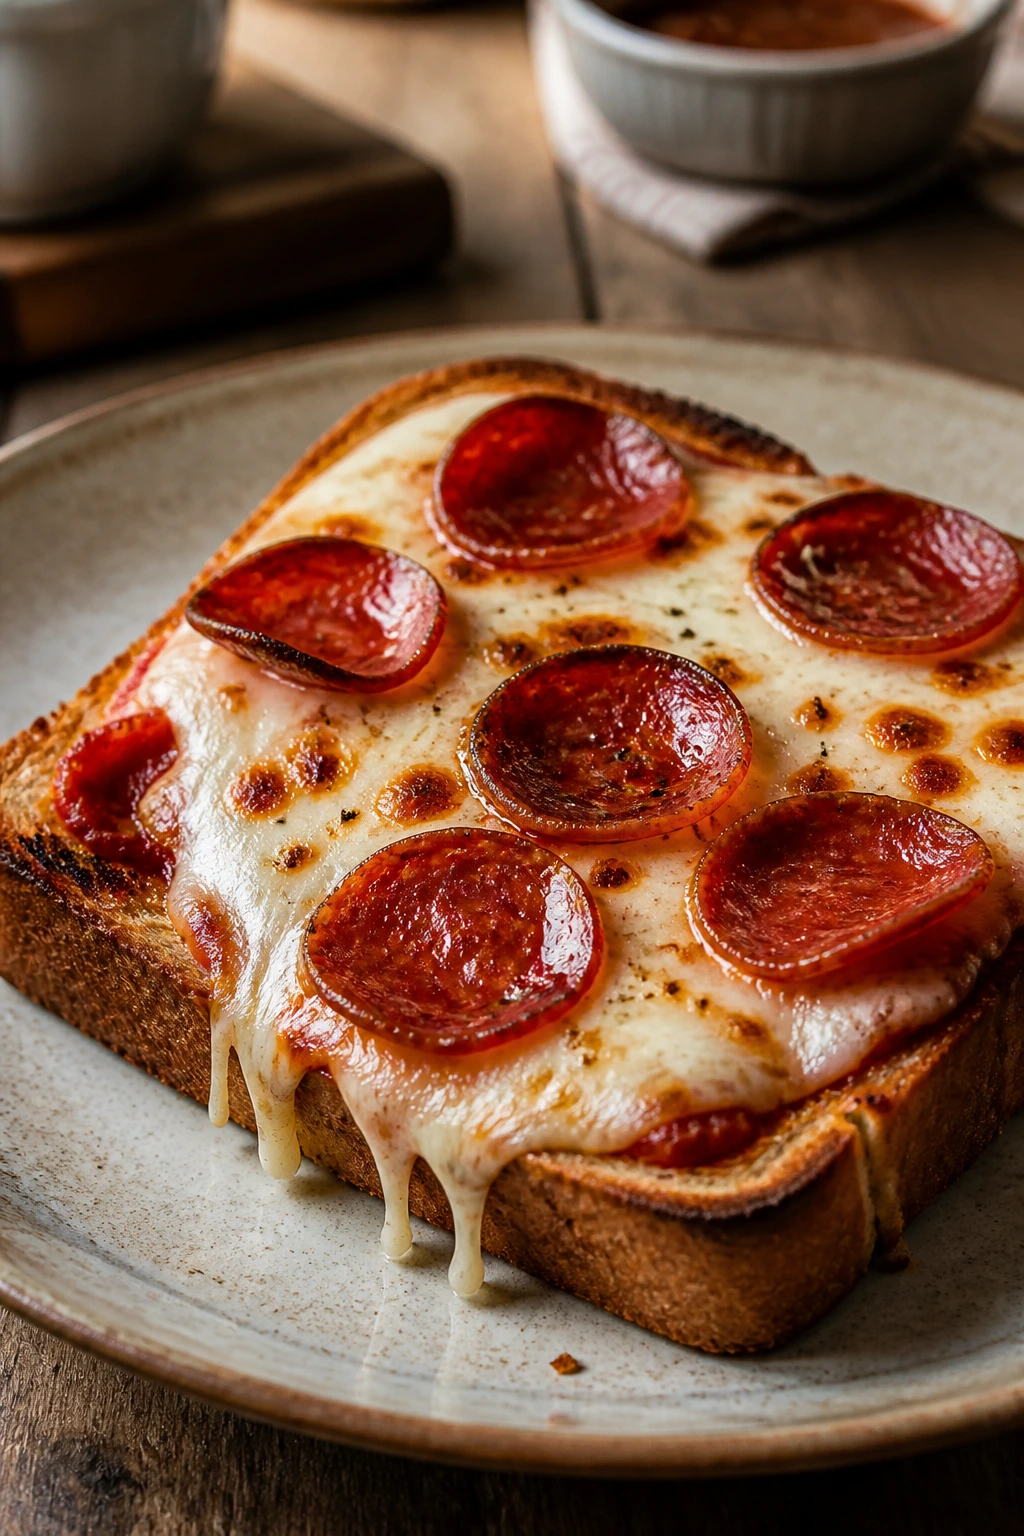
2. Pepperoni Pizza Toast
Pizza toast is what happens when grilled cheese decides to wear a red sauce coat. It’s fast, salty, and exactly the kind of thing that makes a hungry kid stop asking questions.
Why It Works: Thick bread gives you a sturdy base that can handle sauce and cheese without collapsing. Broiling at the end gives you the browned top you want in minutes, and pepperoni adds enough fat and salt that the whole thing tastes like a real snack-dinner, not just bread with toppings.
Key Ingredients:
- 6 slices thick sandwich bread or Texas toast — stale bread toasts even better.
- 1 cup pizza sauce — use a thick jarred sauce.
- 2 cups shredded mozzarella — the melt matters here.
- 24 slices pepperoni — enough to cover each piece.
- 1 teaspoon Italian seasoning — optional, but it wakes up the sauce.
- 1 tablespoon olive oil — for brushing the bread.
- Fresh basil for serving — nice, but not required.
Quick Steps:
- Heat the broiler and set the oven rack about 6 inches from the heat.
- Brush the bread lightly with olive oil and toast it for 2 minutes per side or until lightly crisp.
- Spread pizza sauce over each slice, then pile on mozzarella and pepperoni.
- Broil for 1 to 3 minutes, watching closely, until the cheese bubbles and spots brown.
- Slice and serve while the cheese is still stretchy.
Equipment for This Recipe:
- Baking sheet — line it if you want easier cleanup.
- Broiler-safe oven rack — keep the bread close to the heat.
- Spoon — for spreading sauce.
- Knife — for slicing basil or cutting the toast.
How to Serve This Dish: Cut each slice into two or three strips and serve them like fingers. A small bowl of warm marinara on the side makes it feel more like a meal and less like emergency toast.
Pro Tips for This Recipe:
- Toast the bread first; it slows down sogginess.
- Use shredded mozzarella, not fresh balls, unless you want puddles.
- Broilers vary wildly, so stay by the oven.
- A little Parmesan on top gives you browned spots faster.
Variations on This Dish:
- Veggie Pizza Toast: Use chopped mushrooms, olives, and bell peppers instead of pepperoni.
- White Pizza Toast: Replace sauce with ricotta mixed with garlic and top with mozzarella.
- Spicy Slice: Add red pepper flakes and hot pepperoni for older kids or adults.
Common Mistakes to Avoid with This Dish:
- Don’t skip pre-toasting the bread; soft bread turns limp fast.
- Don’t walk away from the broiler; it can go from golden to burnt in seconds.
- Don’t pile toppings too thickly; pizza toast should be crisp, not floppy.
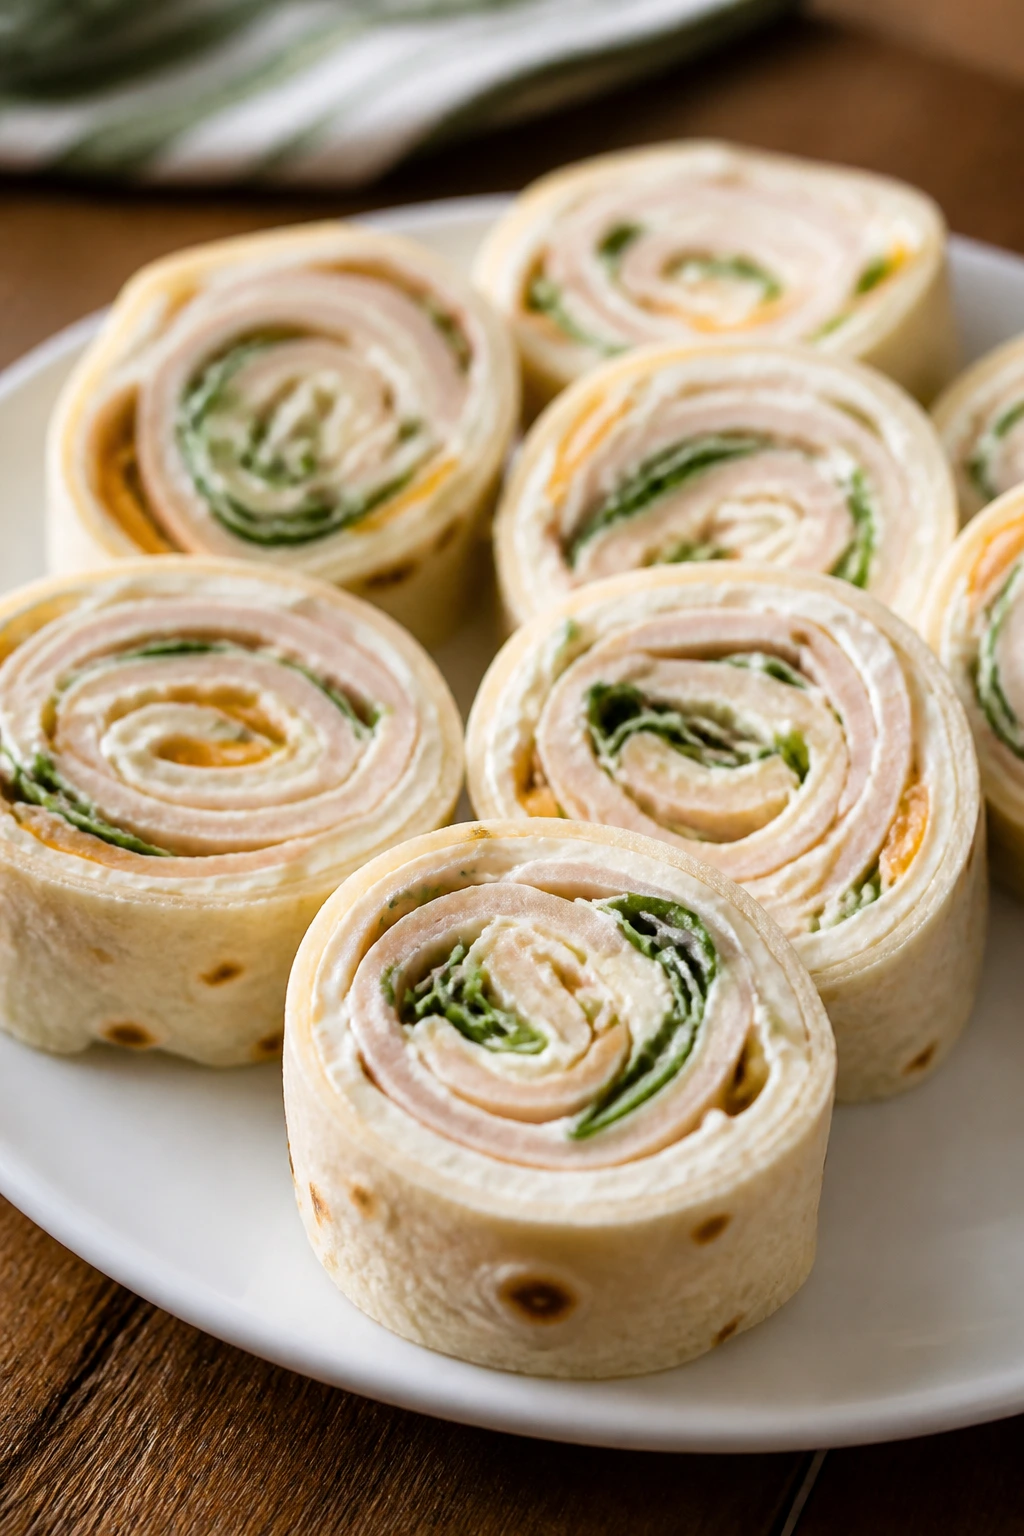
3. Turkey Pinwheel Wraps
These feel a little like lunchbox food that wandered into dinner and got upgraded. The cream cheese keeps the tortilla soft, the turkey gives it structure, and the crunch from the vegetables keeps it from tasting flat.
Why It Works: Pinwheels are built for speed because there’s no real cooking beyond a few minutes of chilling. The cream cheese acts like glue, which matters when you slice the roll into neat spirals. You also get built-in portion control, which is handy when everyone wants “just a snack” that turns into three wraps.
Key Ingredients:
- 4 large flour tortillas — room temperature tortillas roll cleaner.
- 8 ounces cream cheese, softened — spreadable and not icy.
- 8 ounces sliced turkey — thin deli slices roll best.
- 1 cup shredded lettuce — pat it dry first.
- 1 cup shredded carrot or cucumber matchsticks — for crunch.
- 1/2 cup shredded cheddar — optional but satisfying.
- 2 tablespoons ranch or mustard — adds a little punch.
Quick Steps:
- Stir the cream cheese with ranch or mustard until smooth.
- Spread the mixture over each tortilla in a thin layer.
- Layer turkey, lettuce, carrot, and cheddar over the cream cheese.
- Roll each tortilla tightly, then wrap it in plastic and chill for 10 minutes.
- Slice into 1-inch pinwheels and serve.
Equipment for This Recipe:
- Cutting board — for rolling and slicing.
- Sharp knife — a serrated knife cuts cleaner pinwheels.
- Small bowl — for mixing the spread.
- Plastic wrap — helps the roll hold its shape.
How to Serve This Dish: Arrange the pinwheels in a tight circle on a plate and put a few cherry tomatoes or grapes in the center. They also work well with crackers and a handful of baby carrots if you want a tray-style dinner.
Pro Tips for This Recipe:
- Dry the lettuce well, or the wraps slip apart.
- Chill the roll before slicing; otherwise the spirals flatten.
- Don’t overfill. Really. Keep it thin.
- Use flavored cream cheese if you want more zip without extra work.
Variations on This Dish:
- Ham and Swiss Swirl: Swap turkey for ham and cheddar for Swiss.
- Cranberry Turkey Roll-Up: Add 2 tablespoons cranberry sauce for a sweet-salty finish.
- Veggie Cream Cheese Pinwheels: Skip the meat and use thin cucumber, peppers, and shredded spinach.
Common Mistakes to Avoid with This Dish:
- Don’t use wet vegetables straight from the rinse water.
- Don’t slice before chilling, or the wraps smear.
- Don’t use a thick layer of cream cheese; it pushes the filling out.
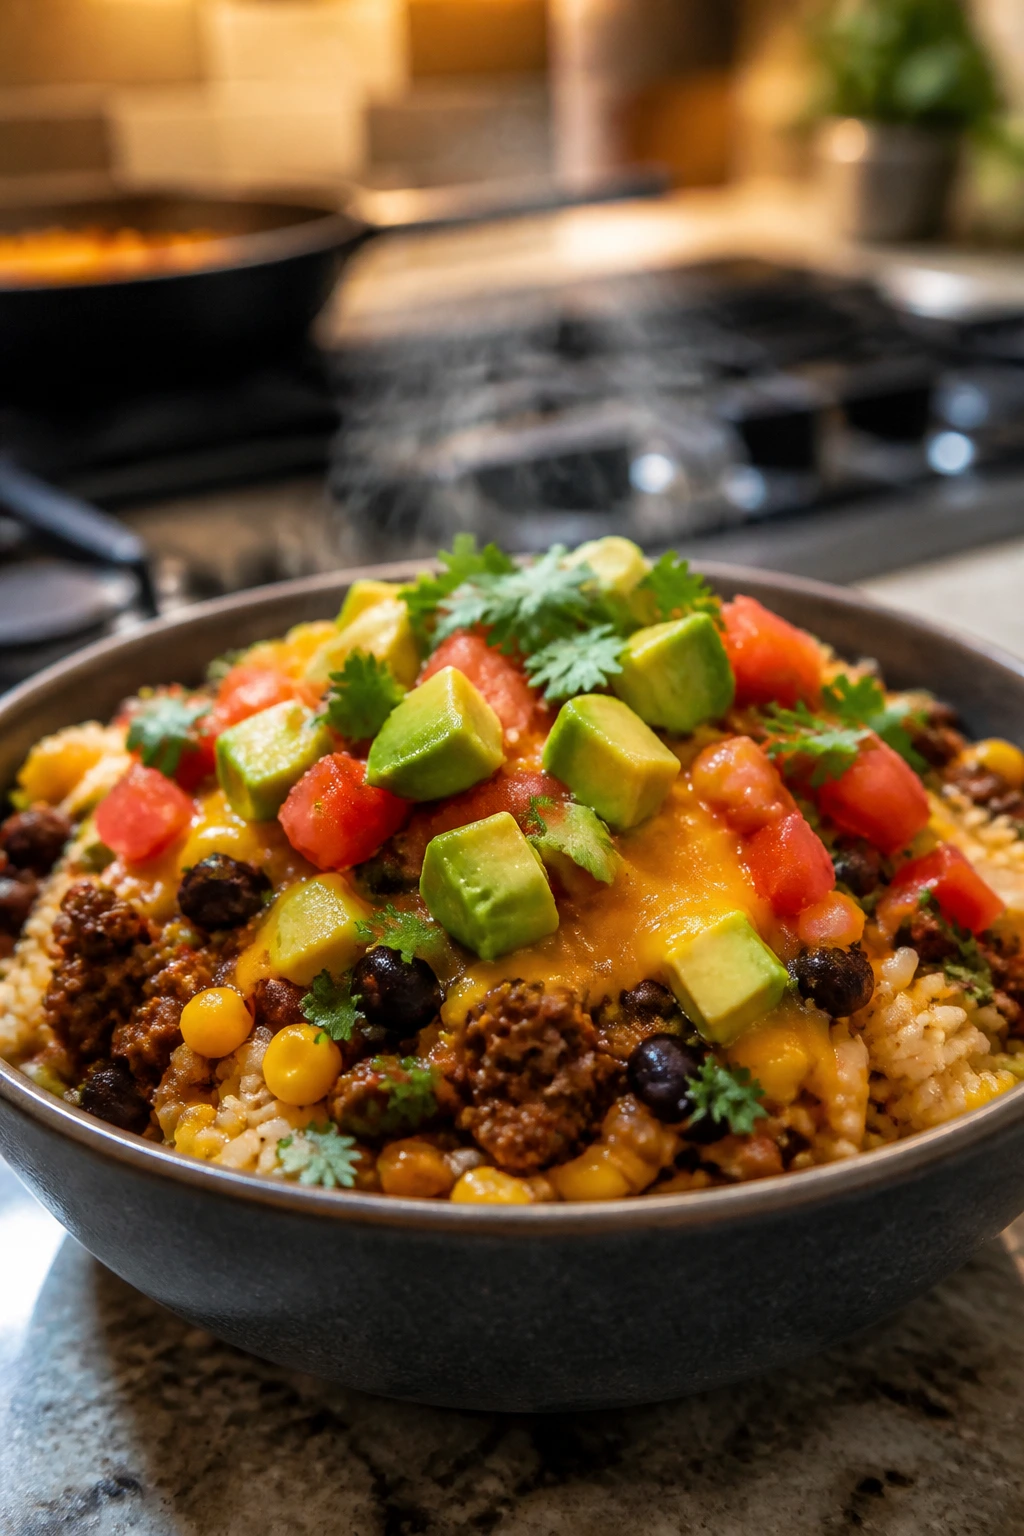
4. Skillet Taco Rice Bowls
This is the dinner I make when everyone wants taco flavor but not taco assembly. It’s savory, a little smoky, and fast enough to hit the table before the post-practice mood crash gets ugly.
Why It Works: The meat browns quickly, the rice is already cooked, and salsa pulls the whole pan together without a long simmer. Black beans and corn add body, so the bowls feel full, not like a tiny scoop of meat over rice. The final cheese melt gives you the comfort factor people actually want at 5:30.
Key Ingredients:
- 1 pound ground beef or turkey — 85/15 beef gives good flavor.
- 1 packet taco seasoning — or 2 tablespoons homemade blend.
- 3 cups cooked rice — cold rice works best.
- 1 cup salsa — medium-thick salsa keeps the pan from getting watery.
- 1 cup black beans, drained and rinsed — adds heft.
- 1 cup corn, frozen or canned — sweet and quick.
- 1 cup shredded cheese — cheddar or Monterey Jack.
- 1/4 cup chopped cilantro and lime wedges — for finishing.
Quick Steps:
- Brown the meat in a large skillet over medium-high heat, breaking it up well.
- Stir in taco seasoning, salsa, beans, and corn; cook for 2 minutes.
- Add the rice and toss until everything is hot and evenly coated.
- Sprinkle cheese over the top, cover, and let it melt for 1 minute.
- Finish with cilantro and lime, then spoon into bowls.
Equipment for This Recipe:
- Large skillet — 12-inch gives room for stirring.
- Wooden spoon or spatula — for breaking up the meat.
- Measuring cups — helpful if the rice is leftover.
- Citrus juicer or fork — for the lime.
How to Serve This Dish: Serve it in shallow bowls with crushed tortilla chips on the side for scooping. If the table is full of kids, set out lettuce, diced tomatoes, and sour cream so everyone can build their own version.
Pro Tips for This Recipe:
- Cold rice separates better and doesn’t turn sticky.
- Drain excess fat if the beef releases a lot.
- Use mild salsa if your crowd is sensitive to heat.
- A squeeze of lime at the end keeps the rice from tasting heavy.
Variations on This Dish:
- Chicken Taco Bowl: Swap ground meat for shredded chicken and reduce the simmer time.
- Vegetarian Bean Bowl: Double the beans and use vegetable broth if the rice needs moisture.
- Street Corn Style: Add 2 tablespoons mayo and a pinch of chili powder for a creamy finish.
Common Mistakes to Avoid with This Dish:
- Don’t add too much salsa or the rice gets soggy.
- Don’t skip the rest time after adding cheese; it helps it melt instead of clump.
- Don’t use hot, freshly cooked rice unless you cool it for a few minutes first.
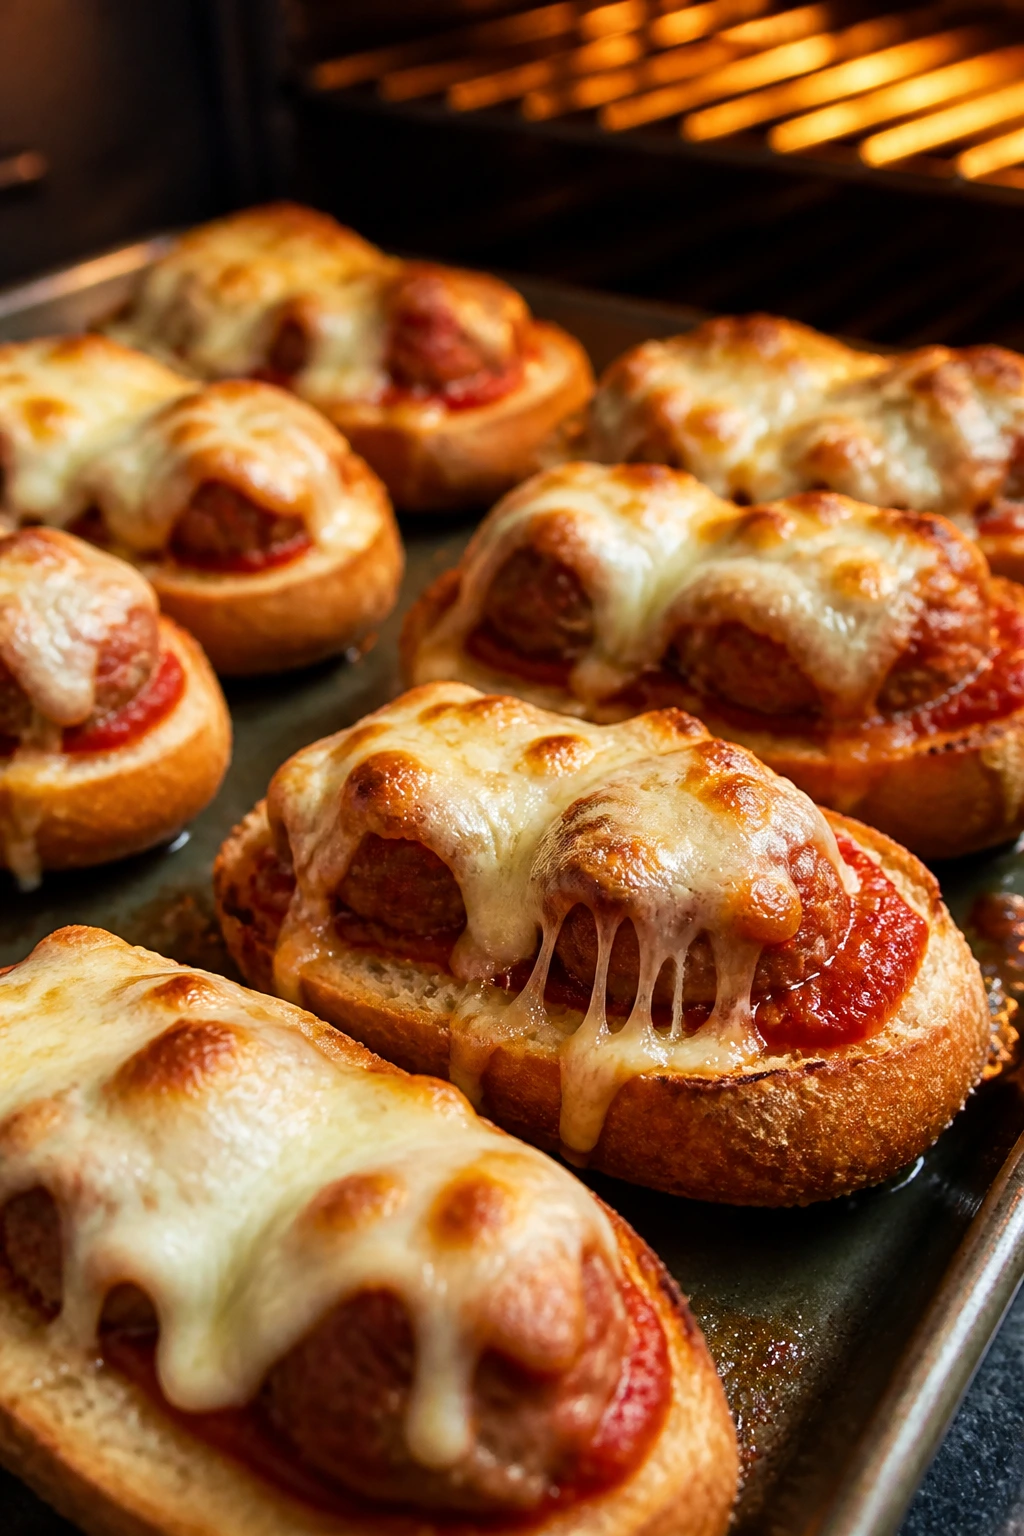
5. Mini Meatball Sub Melts
These are the kind of sandwiches that smell like an old-school pizza shop the second the marinara hits the pan. They’re saucy, cheesy, and sturdy enough to count as dinner without pretending to be neat.
Why It Works: Frozen meatballs save the time you’d spend rolling and browning from scratch. The marinara simmers them until they’re hot through, and the broiler finishes the rolls with melted cheese and a little crisp edge. You get real sub energy in under 20 minutes.
Key Ingredients:
- 24 frozen meatballs or 1 pound homemade cooked meatballs — small ones heat fastest.
- 1 1/2 cups marinara sauce — choose a sauce with body, not a thin one.
- 6 sub rolls or hoagie buns — split but not sliced through.
- 1 1/2 cups shredded mozzarella — for a stretchy top.
- 2 tablespoons grated Parmesan — adds a salty finish.
- 1 tablespoon butter — optional for brushing the rolls.
- 1 teaspoon garlic powder — if you want the bread to taste toasted, not plain.
Quick Steps:
- Simmer the meatballs and marinara in a skillet over medium heat for 8 to 10 minutes.
- Open the rolls and place them on a baking sheet.
- Spoon meatballs and sauce into each roll.
- Top with mozzarella and Parmesan, then broil for 1 to 2 minutes until bubbling.
- Let cool for a minute before serving.
Equipment for This Recipe:
- Large skillet — for warming the meatballs.
- Sheet pan — to hold the filled rolls.
- Spoon or ladle — for saucing without flooding.
- Broiler-safe oven — to melt the cheese fast.
How to Serve This Dish: Cut each sub in half and serve with pickle spears or cucumber slices. A handful of potato chips on the side makes it feel like a diner-style dinner without extra effort.
Pro Tips for This Recipe:
- Don’t use too much sauce in the roll; it drips everywhere.
- Toast the rolls slightly before filling if they’re very soft.
- Keep the broiler close and brief.
- Fresh basil at the end makes the whole thing smell brighter.
Variations on This Dish:
- Spicy Arrabbiata Melt: Use a spicy marinara and add red pepper flakes.
- Chicken Parm Sub: Replace meatballs with breaded chicken tenders and extra sauce.
- Mini Slider Version: Use dinner rolls for a smaller party plate.
Common Mistakes to Avoid with This Dish:
- Don’t overstuff the rolls; they split.
- Don’t broil too long or the cheese turns greasy.
- Don’t use raw frozen meatballs unless the package says they’re pre-cooked.
6. Bean and Cheese Burritos
This is one of those meals that looks simple and still wins. The beans are creamy, the cheese melts into the warm tortilla, and the rice gives the burrito enough shape to hold together in small hands.
Why It Works: Refried beans spread easily, so the filling stays even from end to end. Rice keeps the burrito from tasting flat, and a quick toast in the skillet gives you a sealed seam and a little crunch. They also hold up well if somebody eats one standing up.
Key Ingredients:
- 6 flour tortillas — burrito size if you want fewer spills.
- 2 cups refried beans — warmed so they spread smoothly.
- 1 cup cooked rice — white or brown both work.
- 1 cup shredded cheddar or Mexican blend — for melting.
- 1/2 cup salsa — thick, not watery.
- 1 teaspoon ground cumin — adds warmth.
- 1 tablespoon oil — for the skillet.
- Avocado or sour cream for serving — optional.
Quick Steps:
- Warm the beans with cumin in a small saucepan or microwave-safe bowl.
- Lay a tortilla flat and spread beans down the center.
- Add rice, cheese, and a spoonful of salsa.
- Fold the sides in, roll tightly, and place seam-side down in a skillet with oil.
- Cook over medium heat for 2 minutes per side until golden and sealed.
Equipment for This Recipe:
- Small saucepan or microwave bowl — for warming beans.
- 12-inch skillet — to toast the burritos.
- Spatula — for flipping cleanly.
- Spoon — for portioning the filling.
How to Serve This Dish: Serve the burritos whole or sliced on the bias, with sour cream and salsa in small bowls. They’re good with a simple side of sliced oranges or a cucumber salad.
Pro Tips for This Recipe:
- Don’t overfill the tortillas; the fold won’t hold.
- Warm the tortillas for 15 seconds so they bend without cracking.
- Toast seam-side down first.
- If the beans seem stiff, stir in 1 tablespoon water.
Variations on This Dish:
- Breakfast Burrito: Add scrambled eggs and a little salsa.
- Spicy Bean Burrito: Stir chopped jalapeños into the beans.
- Freezer Burrito: Wrap tightly in foil and freeze before toasting.
Common Mistakes to Avoid with This Dish:
- Don’t use cold, stiff tortillas straight from the package.
- Don’t add wet salsa inside unless it’s thick.
- Don’t skip the skillet step; it keeps the burrito sealed.
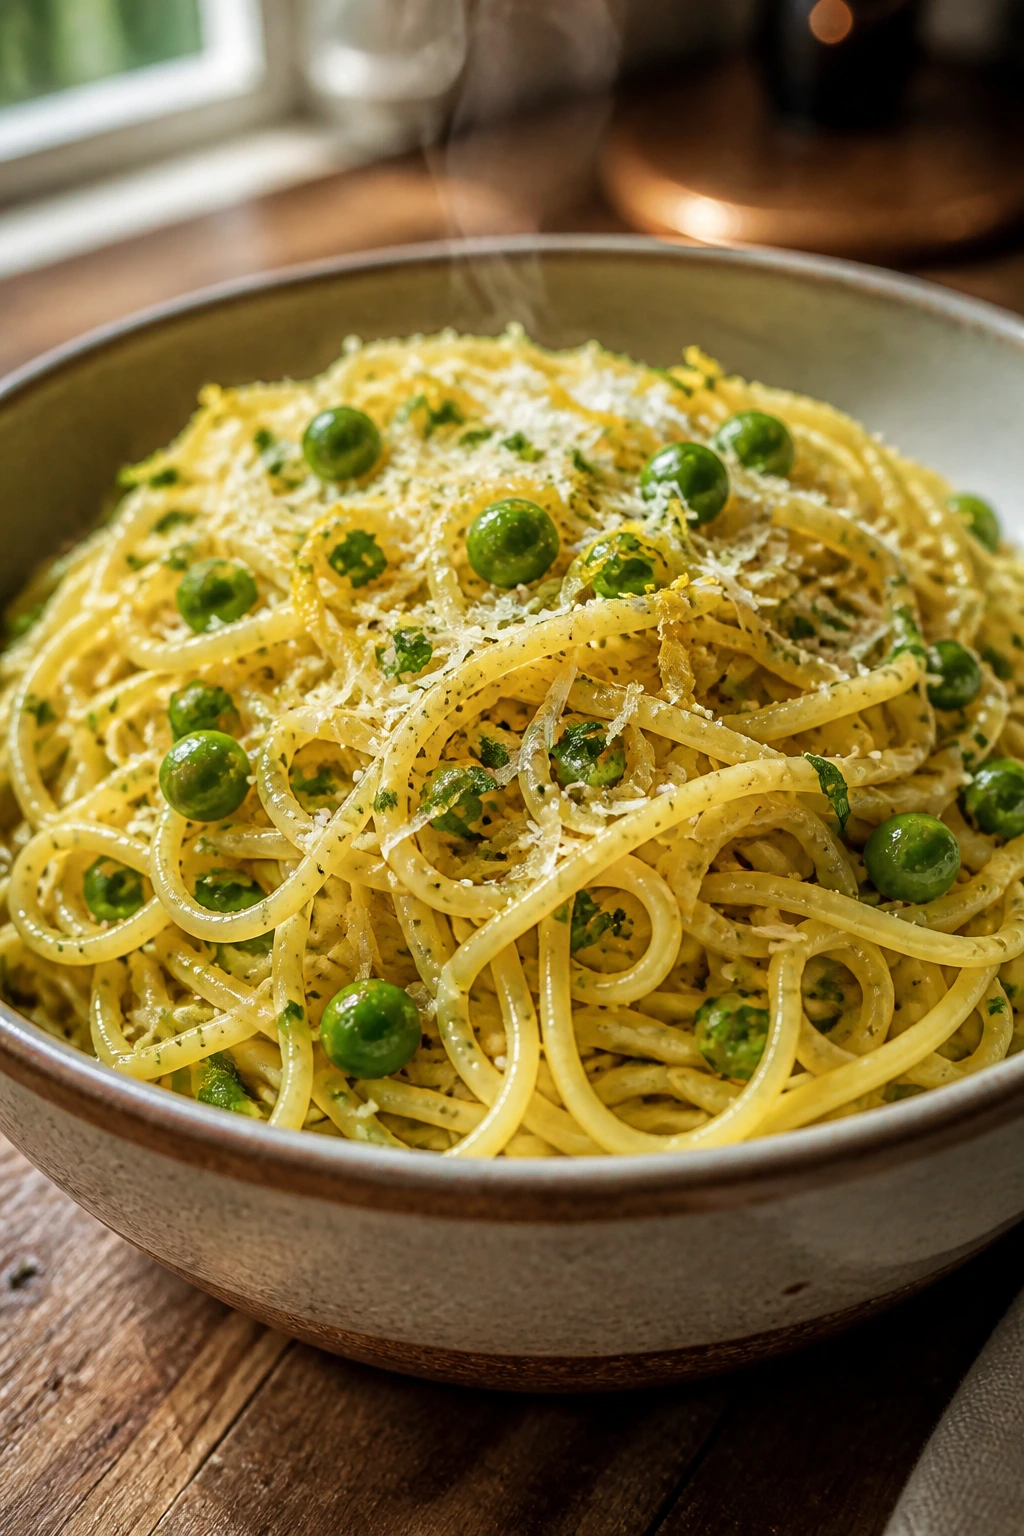
7. Garlic Butter Noodle Bowls
When the day has been too long for a complicated meal, noodles are a hard sell to beat. These are buttery, garlicky, and soft in the center with just enough Parmesan to make the bowl feel finished.
Why It Works: Pasta cooks fast, and the sauce is built in the same pan with butter, garlic, and a splash of starchy pasta water. Frozen peas add color and a little sweetness without needing a separate pot. It’s a dinner that feels calm when the rest of the house does not.
Key Ingredients:
- 12 ounces spaghetti or linguine — long noodles catch the butter well.
- 4 tablespoons butter — unsalted is easiest to manage.
- 3 garlic cloves, minced — fresh garlic matters here.
- 1 cup frozen peas — no thawing needed.
- 1/2 cup grated Parmesan — from a block if you can.
- 1/2 cup reserved pasta water — helps the sauce cling.
- 1 tablespoon chopped parsley — optional.
- Lemon zest or black pepper — for finishing.
Quick Steps:
- Boil the pasta in salted water until just al dente, then reserve 1/2 cup pasta water.
- Melt the butter in a large skillet over medium heat and cook the garlic for 30 seconds.
- Add the peas and drained pasta, tossing with a splash of pasta water.
- Stir in Parmesan until the noodles look glossy and lightly coated.
- Finish with parsley, pepper, or lemon zest and serve right away.
Equipment for This Recipe:
- Large pot — for boiling pasta.
- Large skillet or sauté pan — for finishing the noodles.
- Colander — to drain the pasta.
- Microplane or grater — for cheese and lemon zest.
How to Serve This Dish: Twirl the noodles into shallow bowls and top with extra Parmesan. A side of toast or a few sliced tomatoes is enough if you want to keep the meal simple.
Pro Tips for This Recipe:
- Save the pasta water before draining.
- Pull the noodles when they still have a little bite; they finish in the pan.
- Add the cheese off the direct heat if you want a smoother sauce.
- A squeeze of lemon wakes up the butter fast.
Variations on This Dish:
- Mushroom Butter Noodles: Sauté sliced mushrooms before adding the garlic.
- Chicken Noodle Bowl: Add shredded chicken and a little extra pasta water.
- Lemony Herb Noodles: Use dill or parsley and a bigger hit of lemon.
Common Mistakes to Avoid with This Dish:
- Don’t rinse the pasta; the starch helps the sauce stick.
- Don’t burn the garlic; it goes bitter in seconds.
- Don’t use too little salt in the pasta water.
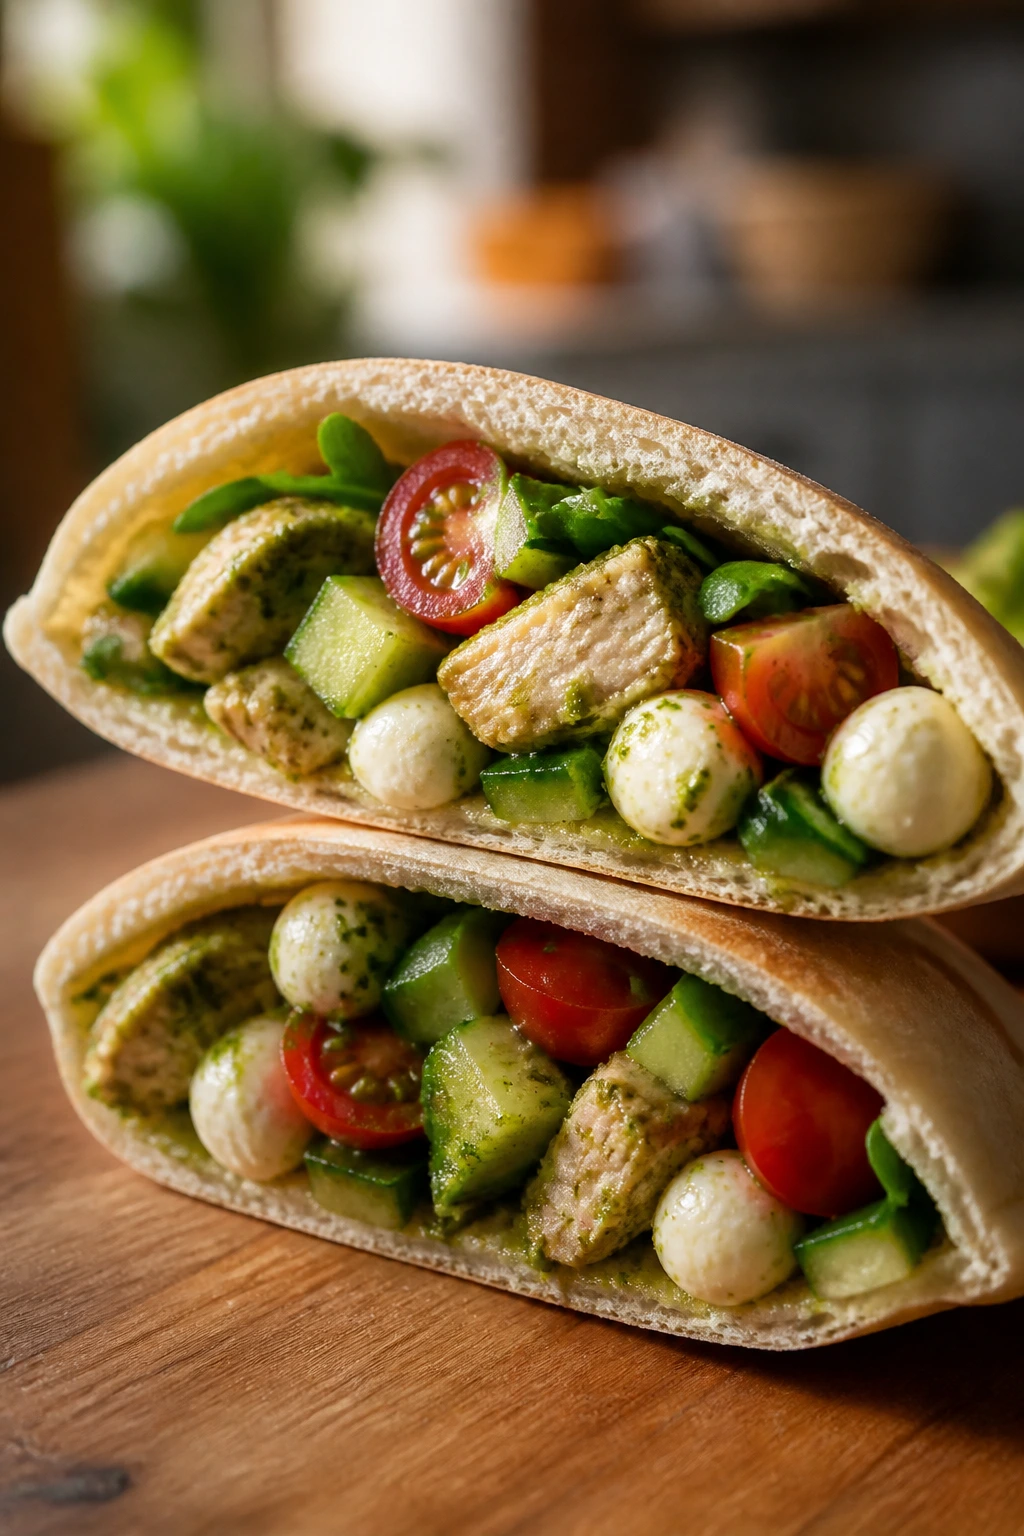
8. Pesto Chicken Pita Pockets
These pockets feel fresh without being fussy. The pesto coats the chicken, the tomatoes pop when you bite them, and the warm pita keeps everything soft enough to fold around.
Why It Works: Pita makes a neat pocket that holds fillings better than a loose sandwich. Pesto carries a lot of flavor fast, so you don’t need long marinating time. The mix of cool vegetables and warm chicken gives the sandwich enough contrast to feel like more than a lunchbox repeat.
Key Ingredients:
- 3 pita rounds — pocket-style pita, not the super-thin kind.
- 2 cups cooked chicken, chopped — rotisserie works well.
- 1/3 cup basil pesto — jarred or homemade.
- 1 cup cherry tomatoes, halved — juicy but not wet.
- 1 cucumber, diced — remove seeds if it’s watery.
- 1/2 cup mozzarella pearls or crumbled feta — both work.
- 1 cup shredded lettuce or spinach — for bulk.
Quick Steps:
- Warm the pita for 30 seconds in the microwave or a dry skillet.
- Toss the chicken with pesto until coated.
- Fill each pita with chicken, tomatoes, cucumber, greens, and cheese.
- Slice in half and serve immediately.
Equipment for This Recipe:
- Skillet or microwave — to warm the pita.
- Mixing bowl — for the chicken.
- Spoon — for stuffing the pockets.
- Knife — for chopping vegetables.
How to Serve This Dish: Serve the pita halves standing up in a glass or lined up on a board with olives and carrot sticks. It looks casual in the best way, like food people can grab and keep moving.
Pro Tips for This Recipe:
- Don’t overstuff the pita or it splits at the seam.
- Pat the cucumber dry so the pesto doesn’t slide off.
- Warm the pita first; cold pita cracks.
- A little lemon juice keeps the pesto from tasting heavy.
Variations on This Dish:
- Mediterranean Pita: Add chopped olives and a spoonful of hummus.
- Pesto Turkey Pocket: Swap chicken for deli turkey.
- Sun-Dried Tomato Version: Mix chopped sun-dried tomatoes into the pesto.
Common Mistakes to Avoid with This Dish:
- Don’t use soggy lettuce.
- Don’t fill the pita from one end only; spread the filling out.
- Don’t skip warming the pita if it feels stiff.
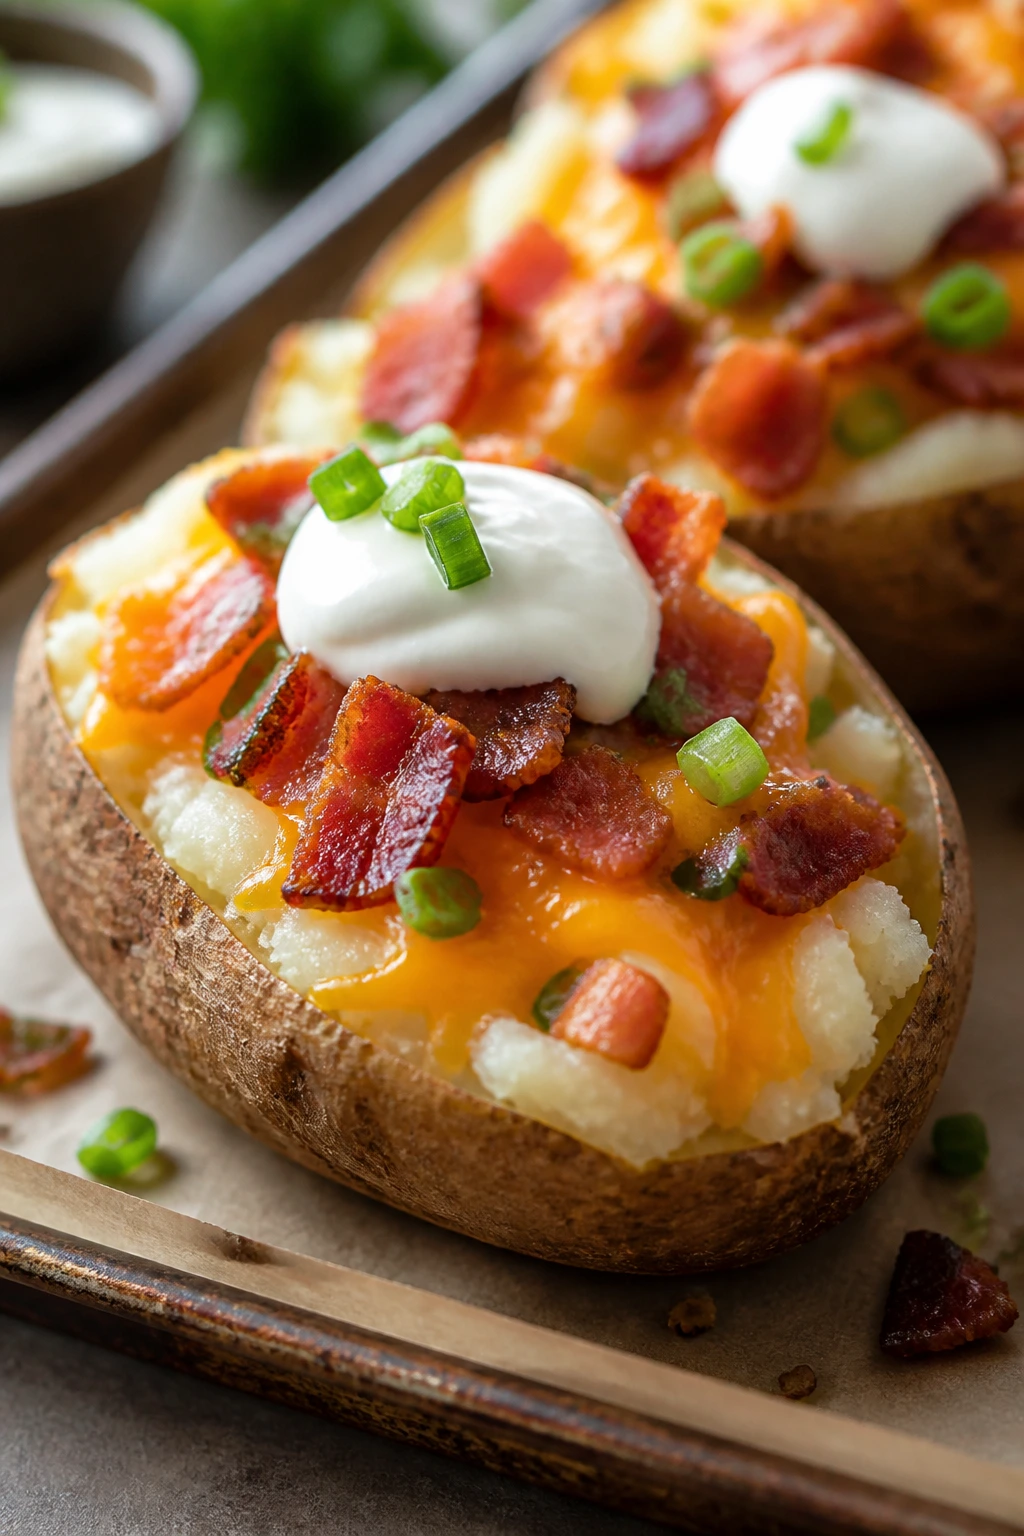
9. Loaded Baked Potato Boats
A baked potato is already a snacky dinner if you stop pretending it has to be elegant. Split it open, load it with cheese and bacon, and suddenly you’ve got something hot, salty, and easy to eat with a fork.
Why It Works: Microwaving the potatoes first cuts the cook time way down. The broiler at the end melts the cheese and crisps the toppings, so you get the baked-potato texture without waiting around for an hour. Sour cream keeps the center creamy, which matters once you pile on salty toppings.
Key Ingredients:
- 4 medium russet potatoes — scrubbed and patted dry.
- 1 cup shredded cheddar — sharp cheddar gives the best bite.
- 6 slices cooked bacon or 1 cup diced ham — crumbled or chopped.
- 1 cup sour cream or Greek yogurt — for the filling.
- 2 green onions, sliced — for freshness.
- 1 tablespoon butter — for the potato flesh.
- Salt and black pepper — don’t skip the salt.
Quick Steps:
- Pierce the potatoes with a fork and microwave them 8 to 12 minutes, turning once, until tender.
- Slice each potato open lengthwise and fluff the inside with a fork.
- Add butter, salt, and a spoonful of sour cream.
- Top with cheese and bacon, then broil for 1 to 2 minutes until melted.
- Finish with green onions and more sour cream if you want.
Equipment for This Recipe:
- Microwave-safe plate — for cooking the potatoes.
- Sheet pan — if you want to broil all four at once.
- Fork — for fluffing the inside.
- Knife — for splitting the potatoes.
How to Serve This Dish: Serve the potato halves with a crisp side salad or steamed broccoli. If you want the meal to lean snacky, add pickles and apple slices and let everyone pick at the plate.
Pro Tips for This Recipe:
- Use russets, not waxy potatoes; they fluff better.
- Don’t skip piercing the skin, or they can burst.
- Broil only until the cheese melts.
- A sprinkle of paprika on top adds color fast.
Variations on This Dish:
- Broccoli Cheddar Boat: Add chopped steamed broccoli under the cheese.
- Chili Potato Boat: Spoon chili over the potato before the cheese.
- All-White Potato Boat: Use shredded chicken, mozzarella, and scallions.
Common Mistakes to Avoid with This Dish:
- Don’t undercook the potato; the center should feel soft when squeezed.
- Don’t overload the skin or it tears.
- Don’t forget the butter inside; it keeps the mash from tasting dry.
10. Ham and Pea Fried Rice
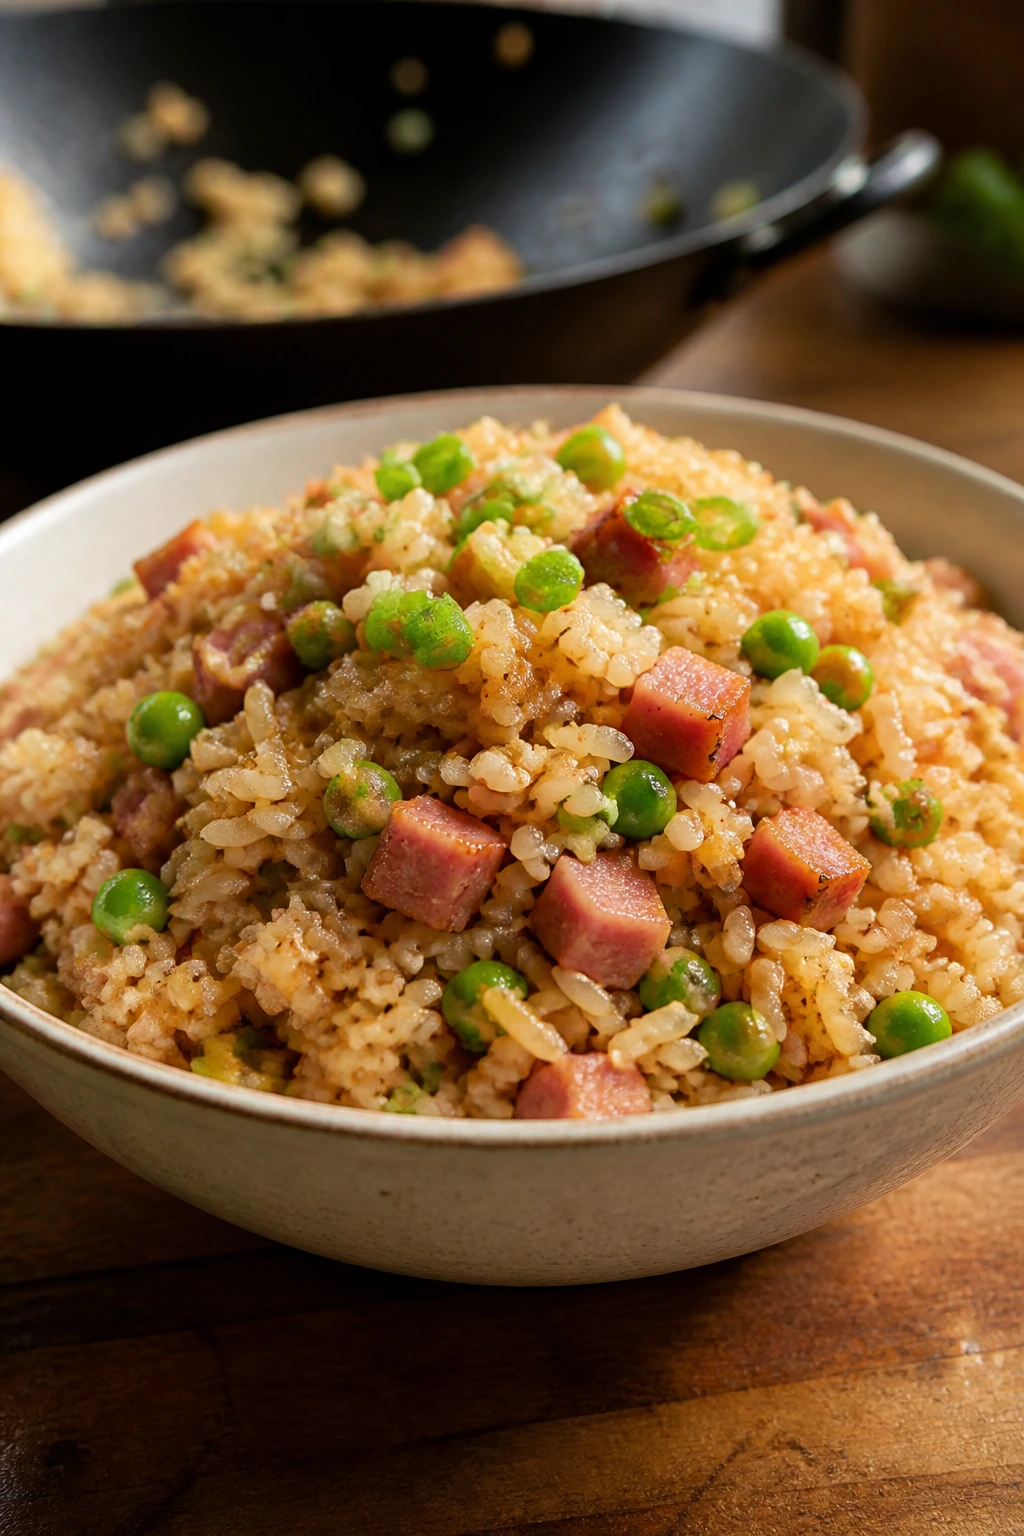
Fried rice is one of those dishes that looks like leftovers until you make it well. Then it turns into a smoky, savory bowl with little pops of sweet peas and salty ham in every bite.
Why It Works: Cold rice fries instead of steaming, which gives you separate grains. Eggs scramble into the pan fast, and the ham only needs to warm through, so the whole thing moves quickly. A little sesame oil at the end makes the kitchen smell like takeout in a good way.
Key Ingredients:
- 3 cups cold cooked rice — day-old rice is best.
- 2 eggs, beaten — for richness.
- 1 cup diced ham — cooked ham works best.
- 1 cup frozen peas and carrots — no thawing needed.
- 2 tablespoons soy sauce — start small and add more if needed.
- 1 tablespoon sesame oil — finishing flavor.
- 2 green onions, sliced — freshness and crunch.
Quick Steps:
- Heat a large skillet or wok over medium-high heat with a little oil.
- Scramble the eggs in the pan, then set them aside.
- Add ham, peas, carrots, and rice; stir-fry for 3 to 4 minutes.
- Return the eggs, add soy sauce and sesame oil, and toss until hot.
- Top with green onions and serve immediately.
Equipment for This Recipe:
- Large skillet or wok — room for tossing.
- Spatula — to break up rice clumps.
- Bowl — for beaten eggs.
- Measuring spoons — for soy sauce and sesame oil.
How to Serve This Dish: Spoon it into bowls and add cucumber slices or edamame on the side. A fried egg on top turns it from “snack dinner” into full dinner without much extra work.
Pro Tips for This Recipe:
- Use rice that’s cold and dry, not steaming.
- Don’t crowd the pan; rice fries better with room.
- Taste before adding more soy sauce.
- Add sesame oil at the end so it stays fragrant.
Variations on This Dish:
- Chicken Fried Rice: Swap ham for diced chicken.
- Veggie Fried Rice: Use extra peas, diced carrots, and chopped mushrooms.
- Spicy Fried Rice: Add chili crisp or a drizzle of sriracha.
Common Mistakes to Avoid with This Dish:
- Don’t use freshly cooked wet rice.
- Don’t drown the rice in soy sauce.
- Don’t skip the high heat; that’s what gives it the fried rice feel.
11. Broccoli Ham Mac and Cheese
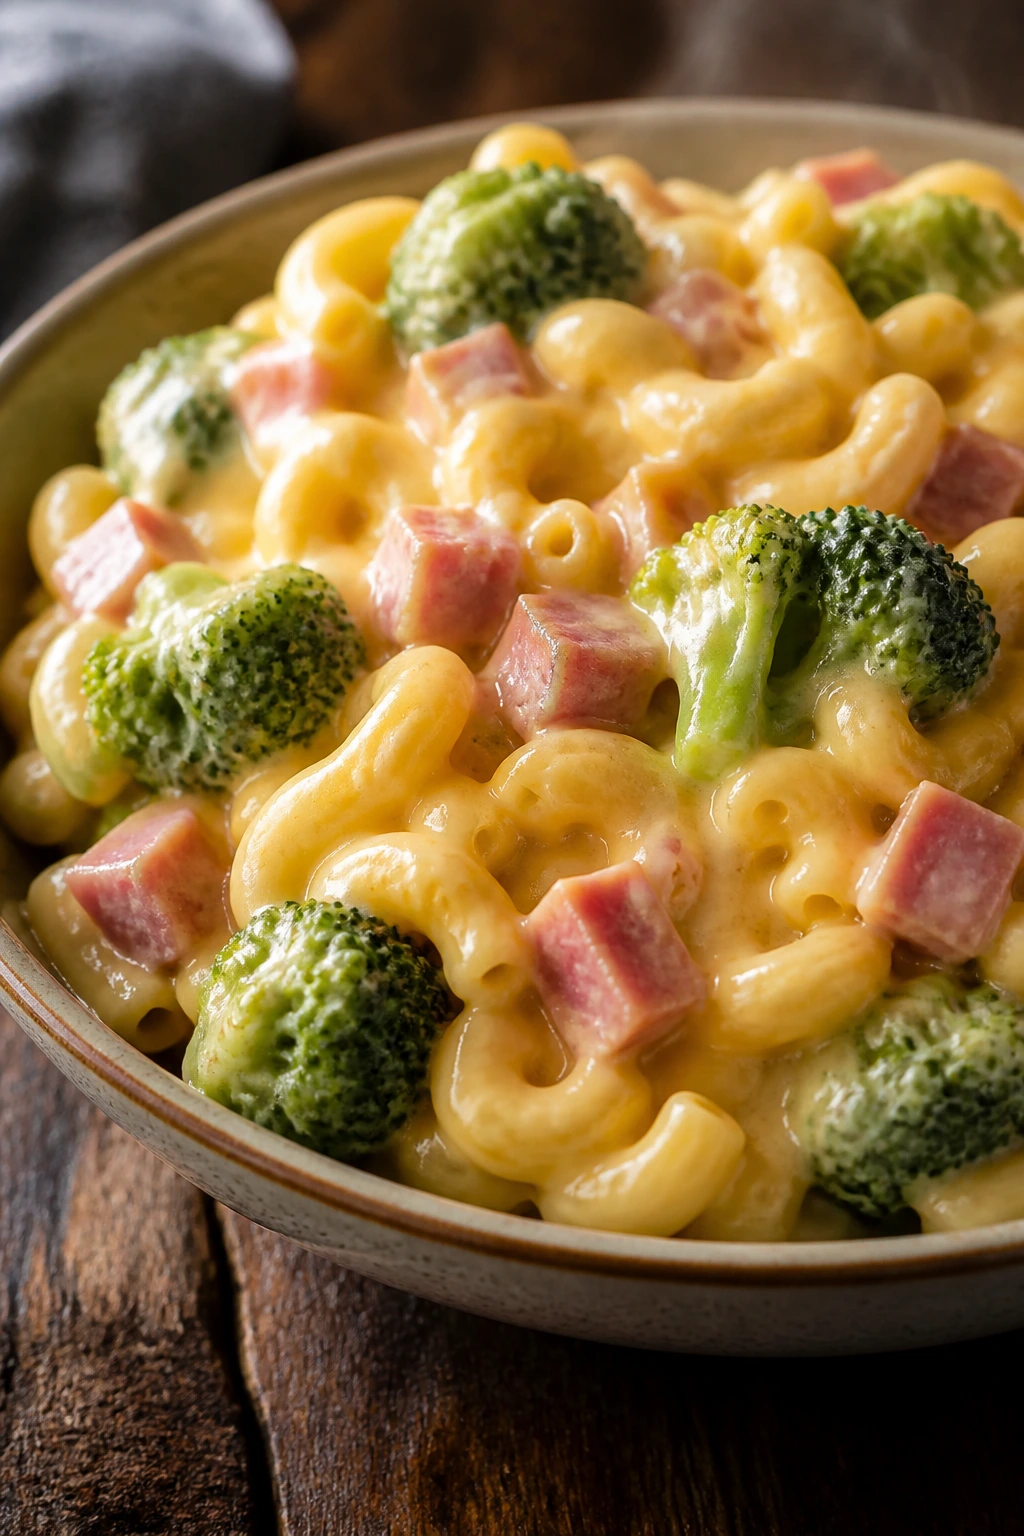
This is the skillet dinner that disappears fastest in my house because it feels like mac and cheese but eats like a real meal. The broccoli softens just enough to blend in, and the ham gives it a salty backbone.
Why It Works: You get one pot for the pasta and one sauce pan for the cheese, which keeps the texture creamy instead of gluey. Broccoli cooks in the pasta water for the last couple of minutes, so it stays bright and tender. Ham brings enough protein that nobody starts hunting for a second dinner an hour later.
Key Ingredients:
- 12 ounces elbow macaroni — short pasta holds sauce well.
- 2 cups broccoli florets — cut small so they cook fast.
- 2 cups diced ham — bite-size pieces.
- 2 tablespoons butter — for the sauce base.
- 2 tablespoons flour — to thicken.
- 2 cups milk — whole milk makes the sauce smoother.
- 2 cups shredded cheddar — sharp is best.
- 1/2 teaspoon mustard powder — optional, but it sharpens the cheese flavor.
Quick Steps:
- Boil the pasta; add broccoli for the last 2 minutes, then drain.
- Melt butter in a saucepan and whisk in flour for 1 minute.
- Slowly whisk in milk and cook until slightly thickened.
- Stir in cheddar and mustard powder until smooth.
- Fold in pasta, broccoli, and ham, then serve hot.
Equipment for This Recipe:
- Pot for pasta — use a roomy one.
- Saucepan — for the cheese sauce.
- Whisk — smooths the roux.
- Colander — for draining.
How to Serve This Dish: Scoop it into bowls and finish with black pepper or a dusting of Parmesan. It’s good with tomato slices or a simple green salad if you want something crisp on the plate.
Pro Tips for This Recipe:
- Shred your own cheese if you can; it melts cleaner.
- Keep the sauce at a gentle simmer, not a boil.
- Add the cheese off the hottest flame.
- Cut the broccoli small so kids don’t fish it out.
Variations on This Dish:
- Chicken Broccoli Mac: Swap ham for diced chicken.
- Extra-Cheesy Version: Mix in 1/2 cup mozzarella for stretch.
- Smoky Mac: Use smoked ham or a pinch of smoked paprika.
Common Mistakes to Avoid with This Dish:
- Don’t overcook the pasta; it keeps cooking in the sauce.
- Don’t boil the cheese sauce hard or it can turn grainy.
- Don’t use huge broccoli florets that need extra cooking.
12. BBQ Chicken Flatbread
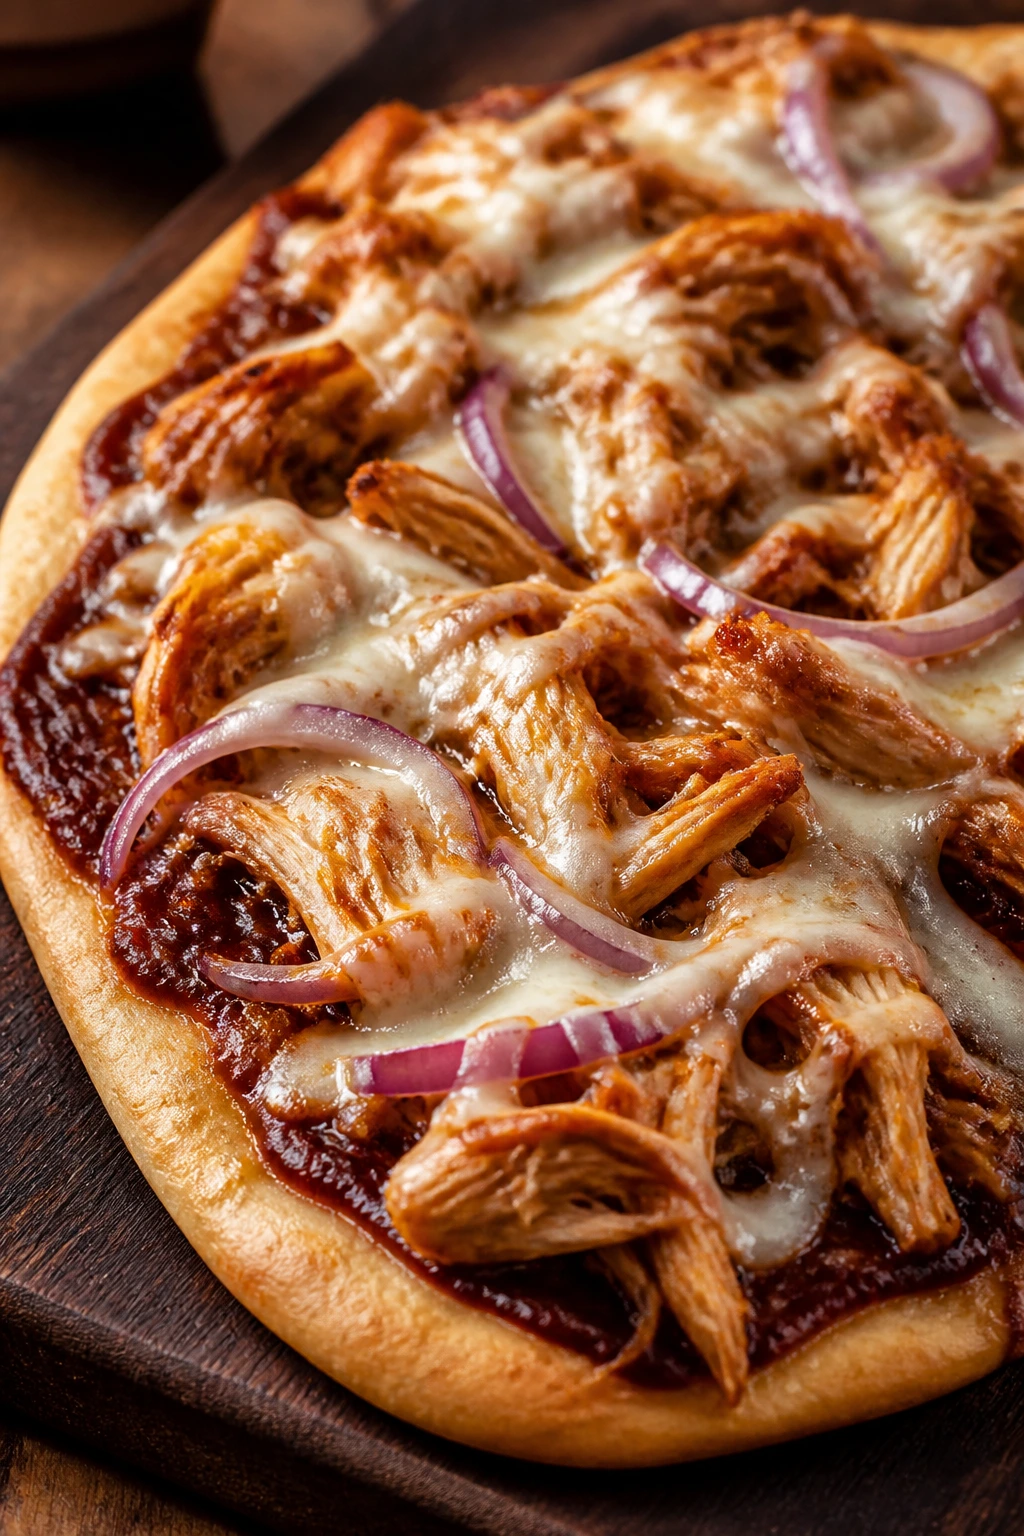
Flatbread is what you make when you want pizza energy without fussing over dough. Sweet BBQ sauce, chicken, and melted cheese give you a sticky, smoky slice that feels like game-night food even on a plain Tuesday.
Why It Works: The flatbread bakes quickly because it starts thin. BBQ sauce adds flavor fast, so you don’t need a long topping list. A short bake keeps the bread crisp while the cheese melts, which is the whole point here.
Key Ingredients:
- 2 naan or flatbreads — sturdy enough to hold toppings.
- 2 cups shredded cooked chicken — rotisserie is the fastest path.
- 1/2 cup BBQ sauce — use your favorite bottle.
- 1 1/2 cups shredded mozzarella — melts evenly.
- 1/2 red onion, thinly sliced — a little bite helps.
- 2 tablespoons chopped cilantro — optional.
- Olive oil for brushing — a light coat helps the crust crisp.
Quick Steps:
- Heat the oven to 425°F and place a sheet pan inside if you want extra crispness.
- Brush the flatbreads lightly with oil and spread BBQ sauce over them.
- Top with chicken, mozzarella, and red onion.
- Bake for 8 to 10 minutes until the cheese bubbles and the edges brown.
- Slice and finish with cilantro.
Equipment for This Recipe:
- Sheet pan — a hot pan helps the bottom crisp.
- Oven — for a quick bake.
- Knife — for slicing.
- Brush or spoon — for the sauce and oil.
How to Serve This Dish: Slice it into strips and serve with celery sticks or a pile of coleslaw. A little ranch on the side works if the BBQ sauce is on the sweeter side.
Pro Tips for This Recipe:
- Don’t overload the sauce; flatbread gets soft fast.
- Use finely shredded cheese for quicker melting.
- Bake on a preheated pan if you like a firmer base.
- Slice after resting for a minute so the toppings stay put.
Variations on This Dish:
- Buffalo Chicken Flatbread: Swap BBQ sauce for buffalo sauce and add a little blue cheese.
- Pineapple BBQ Flatbread: Add thin pineapple tidbits if your crew likes sweet-savory.
- Veggie Flatbread: Use onions, peppers, and mushrooms instead of chicken.
Common Mistakes to Avoid with This Dish:
- Don’t use too much sauce under the cheese.
- Don’t bake it too long or the flatbread turns brittle.
- Don’t skip the quick rest before slicing.
13. Tuna Melt English Muffins
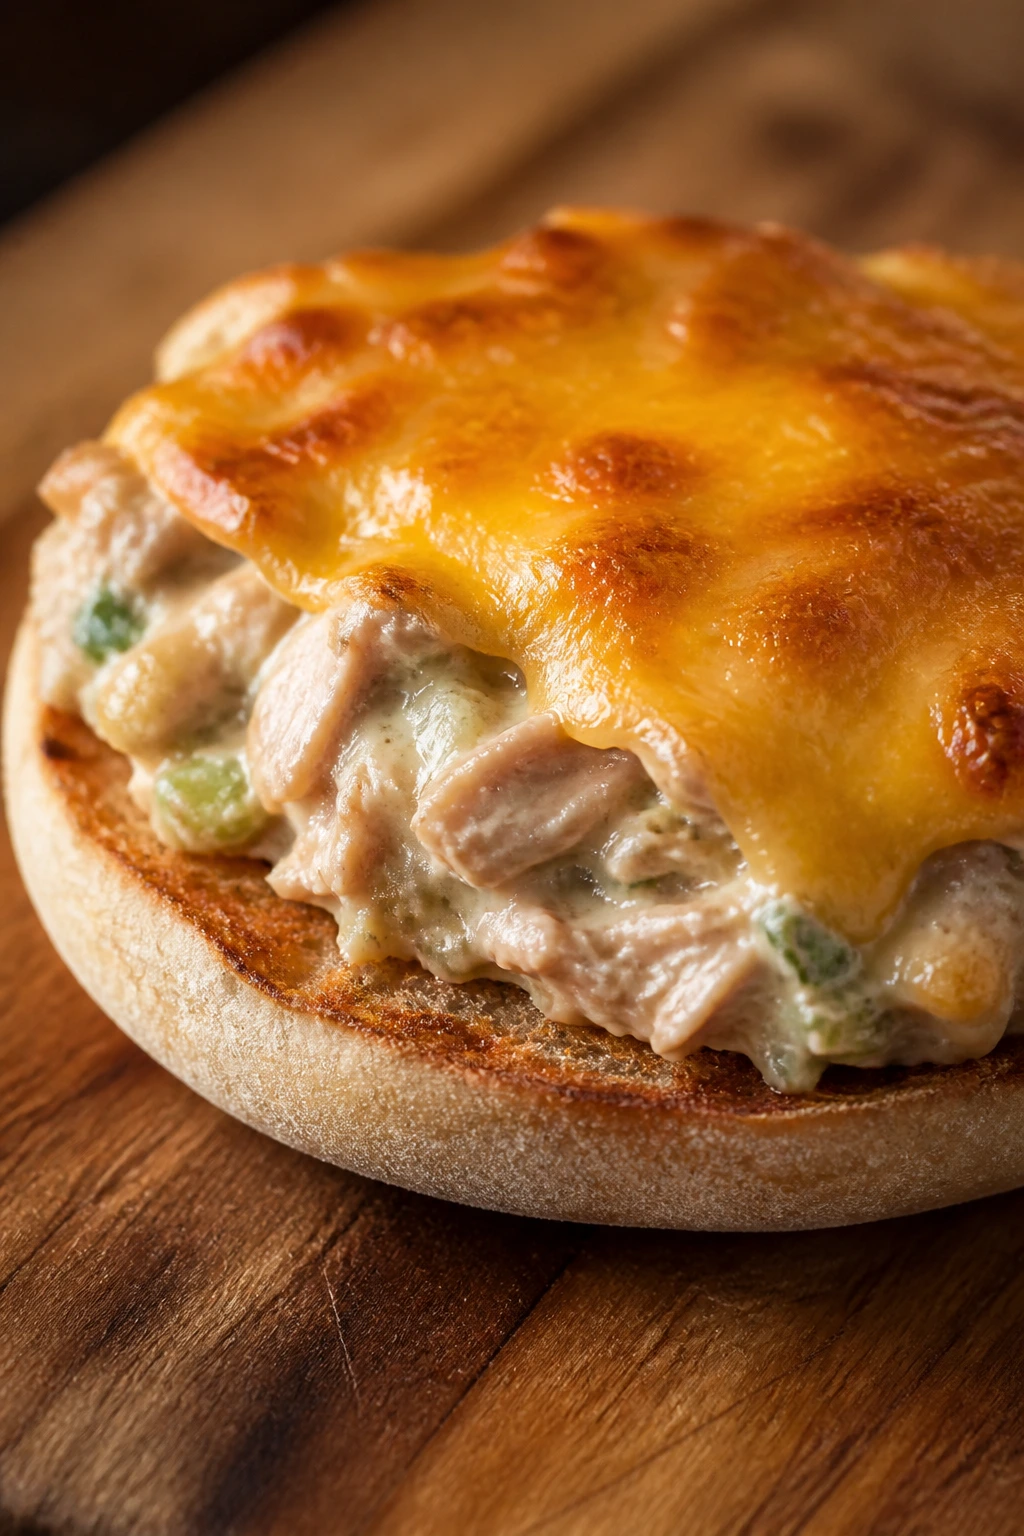
Tuna melts on English muffins have that diner feel, only faster and cheaper. The split muffin gets crisp on the edges, the tuna salad stays creamy, and the cheese melts over the top in a way that makes the whole thing feel more deliberate than it is.
Why It Works: English muffins toast from the middle out, so they hold up under the tuna without going limp. A little relish or celery gives the filling texture, and cheddar melts quickly under the broiler. It’s one of the few dinner-ish things that still tastes good after a few bites.
Key Ingredients:
- 2 cans tuna, drained — chunk light or solid white both work.
- 1/3 cup mayonnaise — enough to bind, not swamp.
- 1 tablespoon relish — or finely chopped pickles.
- 6 English muffin halves — split and lightly toasted.
- 6 slices cheddar — one slice per half.
- 1 celery stalk, finely diced — optional crunch.
- Black pepper — a few good grinds.
Quick Steps:
- Mix tuna, mayo, relish, celery, and pepper in a bowl.
- Toast the English muffin halves until lightly crisp.
- Spread tuna salad over each half and top with cheddar.
- Broil for 1 to 2 minutes until the cheese bubbles.
- Serve warm before the muffins soften.
Equipment for This Recipe:
- Baking sheet — for broiling.
- Mixing bowl — for the tuna salad.
- Fork — to break up the tuna.
- Knife — for celery or slicing.
How to Serve This Dish: Plate the muffins open-faced with tomato slices or a handful of baby greens. If you want a fuller plate, add a cup of tomato soup and call it done.
Pro Tips for This Recipe:
- Drain the tuna well so the muffins don’t get soggy.
- Toast before topping; don’t skip that part.
- Broil only until the cheese melts.
- A squeeze of lemon brightens the filling if it tastes flat.
Variations on This Dish:
- Tuna Melt Slider: Use mini buns for a party-style tray.
- Spicy Tuna Melt: Add a teaspoon of sriracha or hot sauce.
- Corn Tuna Melt: Stir in 1/4 cup sweet corn for extra texture.
Common Mistakes to Avoid with This Dish:
- Don’t use wet tuna straight from the can.
- Don’t overload the muffins or they slide apart.
- Don’t broil too long or the muffin edges get hard.
14. Sausage and Pepper Subs
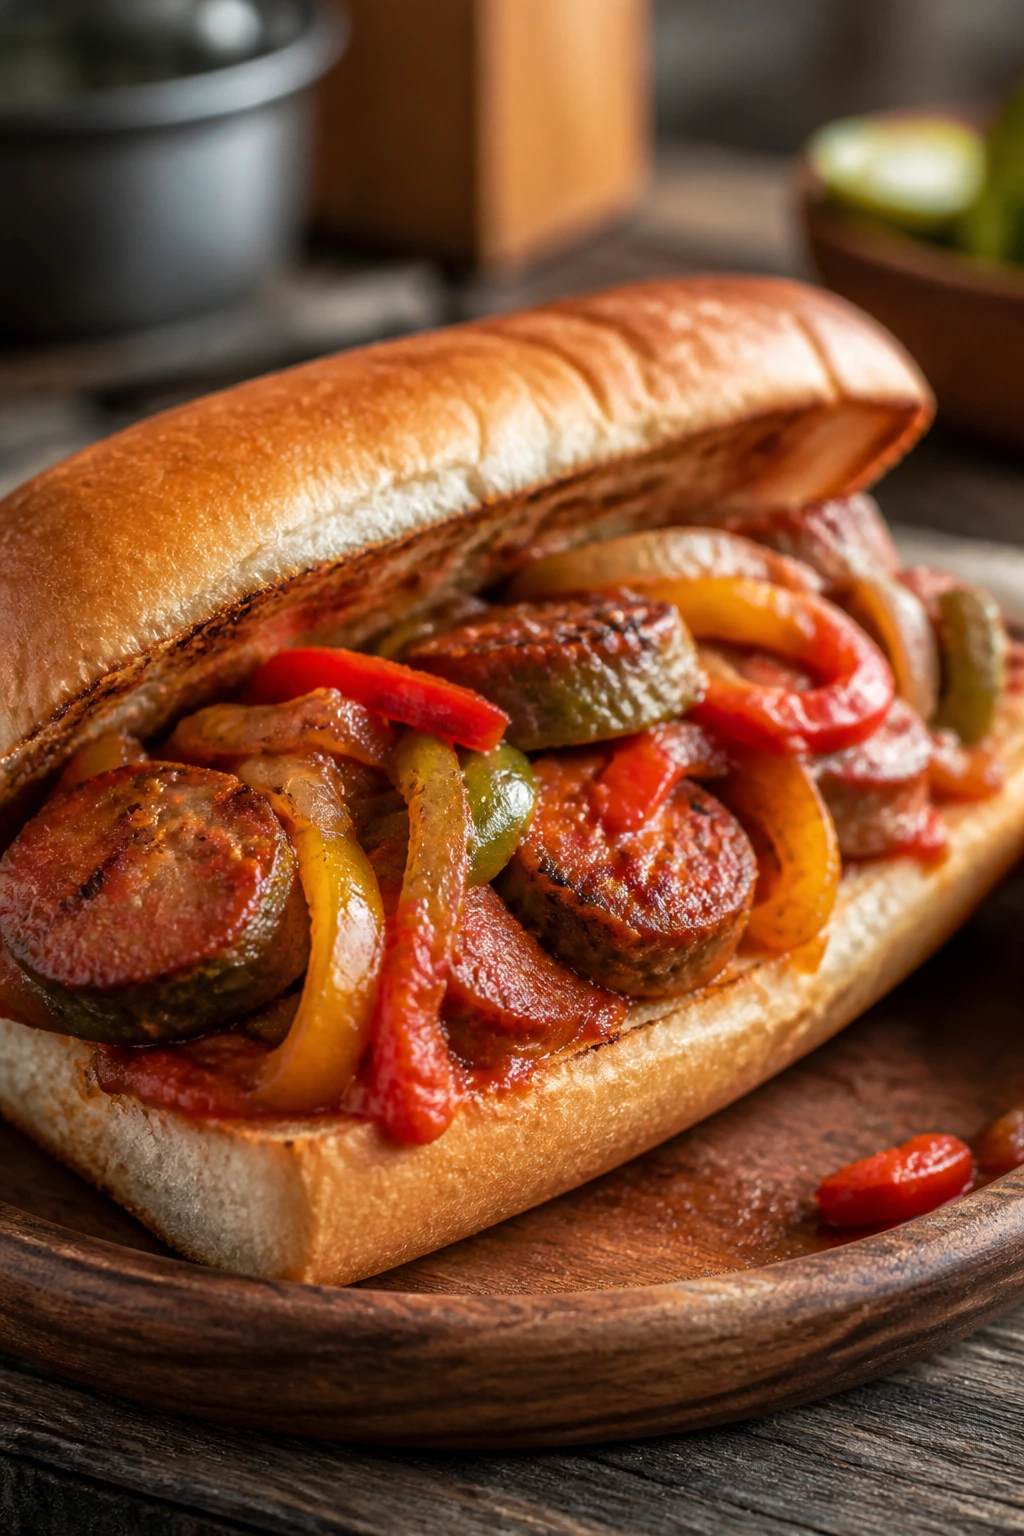
The smell of onions and peppers in a hot pan does half the job here. Add juicy sausage, tuck it into a roll, and you’ve got dinner that feels bigger than the work it took.
Why It Works: Sausage browns fast and releases enough flavor to season the peppers and onions in the same pan. A little marinara pulls the filling together, so each bite tastes saucy instead of dry. The sub roll catches the juices without falling apart if you toast it first.
Key Ingredients:
- 1 pound Italian sausage — links or loose sausage both work.
- 1 red bell pepper, sliced — sweet and sturdy.
- 1 yellow bell pepper, sliced — for color and softness.
- 1 onion, sliced — cooks down into the sauce.
- 1 cup marinara — enough to glaze, not flood.
- 4 sub rolls — split and lightly toasted.
- 4 slices provolone — optional, but worth it.
Quick Steps:
- Brown the sausage in a skillet over medium heat, then remove it.
- Sauté the peppers and onion in the same pan until soft and lightly browned.
- Slice the sausage and return it to the pan with marinara.
- Simmer for 2 minutes, then spoon the filling into toasted rolls.
- Top with provolone if using and serve hot.
Equipment for This Recipe:
- Large skillet — for browning and sautéing.
- Tongs — useful for turning sausage links.
- Knife and cutting board — for the vegetables.
- Sheet pan — to toast the rolls if you want.
How to Serve This Dish: Wrap each sub in parchment for easy handing, then add a side of chips or sliced cucumbers. If you’re feeding a mixed-age crowd, keep extra marinara on the side for dipping.
Pro Tips for This Recipe:
- Don’t crowd the sausage, or it steams instead of browning.
- Slice peppers evenly so they soften at the same rate.
- Toast the rolls lightly so they don’t collapse.
- Use a thick sauce so the bread stays dry enough to grip.
Variations on This Dish:
- Chicken Sausage Sub: Swap in chicken sausage for a lighter version.
- Provolone Melt: Add cheese and broil for a minute before serving.
- Spicy Hoagie: Use hot Italian sausage and extra red pepper flakes.
Common Mistakes to Avoid with This Dish:
- Don’t skip browning the sausage.
- Don’t use a watery sauce.
- Don’t stuff the rolls while the filling is still dripping hot oil.
15. Spinach Ricotta Ravioli Skillet
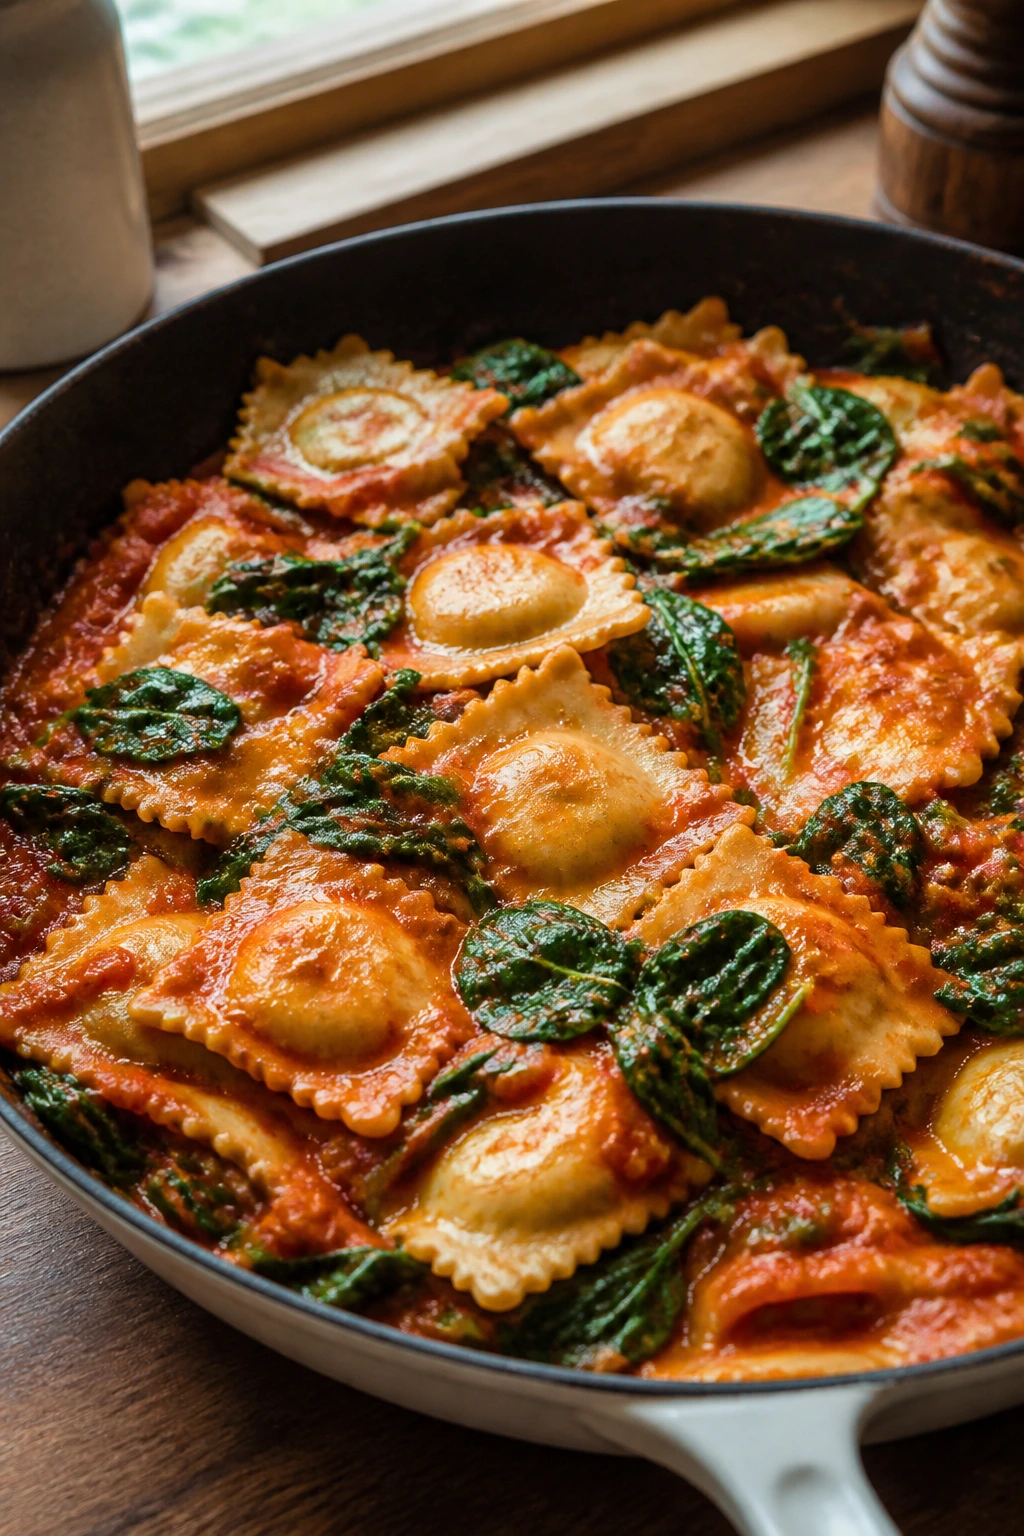
Fresh ravioli is one of the easiest ways to make dinner feel more polished than it is. The sauce clings to the pasta, the ricotta gives you creamy pockets, and the spinach melts into the pan without making anybody complain.
Why It Works: Fresh or refrigerated ravioli cooks in a few minutes, which keeps the whole dish fast. Ricotta loosens the sauce into a creamy layer without needing a long simmer, and spinach wilts directly into the pan. It’s soft, filling, and still easy to scoop fast.
Key Ingredients:
- 1 pound fresh or refrigerated spinach ricotta ravioli — frozen works too.
- 2 tablespoons olive oil — for the skillet.
- 1 jar marinara, about 24 ounces — a smooth sauce works best.
- 1 cup ricotta — stirred in or dolloped on top.
- 2 cups spinach — packed loosely.
- 1/2 cup grated Parmesan — for finishing.
- 2 garlic cloves, minced — optional but useful.
Quick Steps:
- Bring a pot of salted water to a boil and cook the ravioli according to the package.
- Heat olive oil in a skillet and cook the garlic for 30 seconds if using.
- Add marinara and spinach, then simmer until the spinach wilts.
- Fold in the cooked ravioli and spoon ricotta over the top.
- Finish with Parmesan and serve immediately.
Equipment for This Recipe:
- Pot — for boiling ravioli.
- Skillet — for the sauce.
- Slotted spoon — helpful for moving the ravioli.
- Spoon — for the ricotta.
How to Serve This Dish: Scoop the ravioli into shallow bowls and add extra Parmesan on the table. A slice of garlic bread makes sense here, but a simple green salad works too if you want the plate to feel lighter.
Pro Tips for This Recipe:
- Don’t overboil the ravioli; it tears fast.
- Warm the sauce before adding the pasta so nothing shocks the pan.
- Add ricotta at the end for creamier pockets.
- Use baby spinach; thick stems take longer to wilt.
Variations on This Dish:
- Meat Ravioli Skillet: Use cheese-and-meat ravioli with the same sauce.
- Creamy Rosa Version: Stir 1/4 cup cream into the marinara.
- Pesto Ravioli: Swap marinara for pesto and a squeeze of lemon.
Common Mistakes to Avoid with This Dish:
- Don’t stir the ravioli too aggressively; it splits.
- Don’t use too little sauce, or the dish feels dry.
- Don’t let the ricotta boil hard or it turns grainy.
16. Cheddar Spinach Frittata Cups

These are the kind of little egg cups that make dinner feel calm. They bake in a muffin tin, which means no flipping, no babysitting, and no argument over who got the bigger slice.
Why It Works: Eggs set quickly in a muffin tin, and the cheese keeps the texture tender. Spinach disappears into the eggs instead of sitting on the side like a punishment. You can eat them warm, room temperature, or tucked into a napkin on the way to the table.
Key Ingredients:
- 8 large eggs — whisked until smooth.
- 1/4 cup milk — helps keep the eggs soft.
- 1 cup chopped spinach — squeezed dry if needed.
- 1/2 cup shredded cheddar — sharp or mild.
- 1/2 cup diced ham or mushrooms — optional add-in.
- 1/4 teaspoon salt — more if your ham is low-sodium.
- 1/4 teaspoon black pepper — for balance.
- Butter or oil for the muffin tin — keeps them from sticking.
Quick Steps:
- Heat the oven to 375°F and grease a muffin tin well.
- Whisk eggs, milk, salt, and pepper in a bowl.
- Stir in spinach, cheese, and ham or mushrooms.
- Pour into the muffin cups, filling each about 3/4 full.
- Bake for 16 to 18 minutes, until set and lightly puffed.
Equipment for This Recipe:
- 12-cup muffin tin — a nonstick one helps.
- Mixing bowl — for the egg mixture.
- Whisk — keeps the eggs airy.
- Measuring cup or ladle — for portioning.
How to Serve This Dish: Serve two or three cups per person with toast points or fruit on the side. They also tuck nicely into lunch boxes if a few survive dinner.
Pro Tips for This Recipe:
- Squeeze excess water from spinach.
- Don’t overfill the cups, or they spill over.
- Let them rest for 5 minutes before lifting out.
- A pinch of nutmeg gives the eggs a warmer flavor if you like that note.
Variations on This Dish:
- Bacon Cheddar Cups: Use chopped cooked bacon instead of ham.
- Veggie Frittata Cups: Add diced bell pepper and mushrooms.
- Pizza Egg Cups: Mix in a spoonful of marinara and chopped pepperoni.
Common Mistakes to Avoid with This Dish:
- Don’t pour watery vegetables into the eggs.
- Don’t bake until browned all over; that dries them out.
- Don’t skip greasing the tin, even if it says nonstick.
17. Sloppy Joe Nachos

This is messy food with a point. The chips stay crunchy under the meat, the cheese melts into the crags, and every bite tastes like a sloppy joe took a shortcut through snack night.
Why It Works: Sloppy joe filling is already saucy, so it spreads well over chips without needing a separate binder. Baking the chips briefly after adding cheese warms everything through and keeps the meat from tasting cold on top of hot chips. Pickles at the end give the whole tray a sharp, tangy edge.
Key Ingredients:
- 1 pound ground beef or turkey — lean but not dry.
- 1 small onion, diced — cooks right into the meat.
- 3/4 cup ketchup — the main sauce base.
- 2 tablespoons tomato paste — adds depth fast.
- 1 tablespoon Worcestershire sauce — for savory bite.
- 8 cups tortilla chips — sturdy restaurant-style chips work best.
- 2 cups shredded cheddar — enough to blanket the tray.
- Pickle slices — for topping.
Quick Steps:
- Brown the meat and onion in a skillet, then drain excess fat.
- Stir in ketchup, tomato paste, and Worcestershire; simmer for 3 minutes.
- Spread chips on a sheet pan and spoon the meat over them.
- Scatter cheese on top and bake at 400°F for 5 minutes.
- Finish with pickles and serve immediately.
Equipment for This Recipe:
- Large skillet — for the filling.
- Sheet pan — for building the nachos.
- Spoon — for spreading the meat.
- Oven — for melting the cheese.
How to Serve This Dish: Put the sheet pan in the middle of the table and let people grab with forks or just commit to the mess. A bowl of shredded lettuce or diced tomatoes on the side keeps the tray from feeling too heavy.
Pro Tips for This Recipe:
- Use thick chips or they break under the filling.
- Simmer the meat until the sauce clings, not runs.
- Add cheese only after the meat goes on the chips.
- Pickles matter here; they cut the sweet sauce.
Variations on This Dish:
- Spicy Sloppy Joe Nachos: Add hot sauce or diced jalapeños.
- Corn Chip Version: Use corn chips for a stronger crunch.
- Bean Boost: Add drained black beans to the meat mixture.
Common Mistakes to Avoid with This Dish:
- Don’t use thin chips that collapse.
- Don’t let the meat stay loose and watery.
- Don’t bake too long or the chips dry out.
18. Teriyaki Meatball Rice Bowls
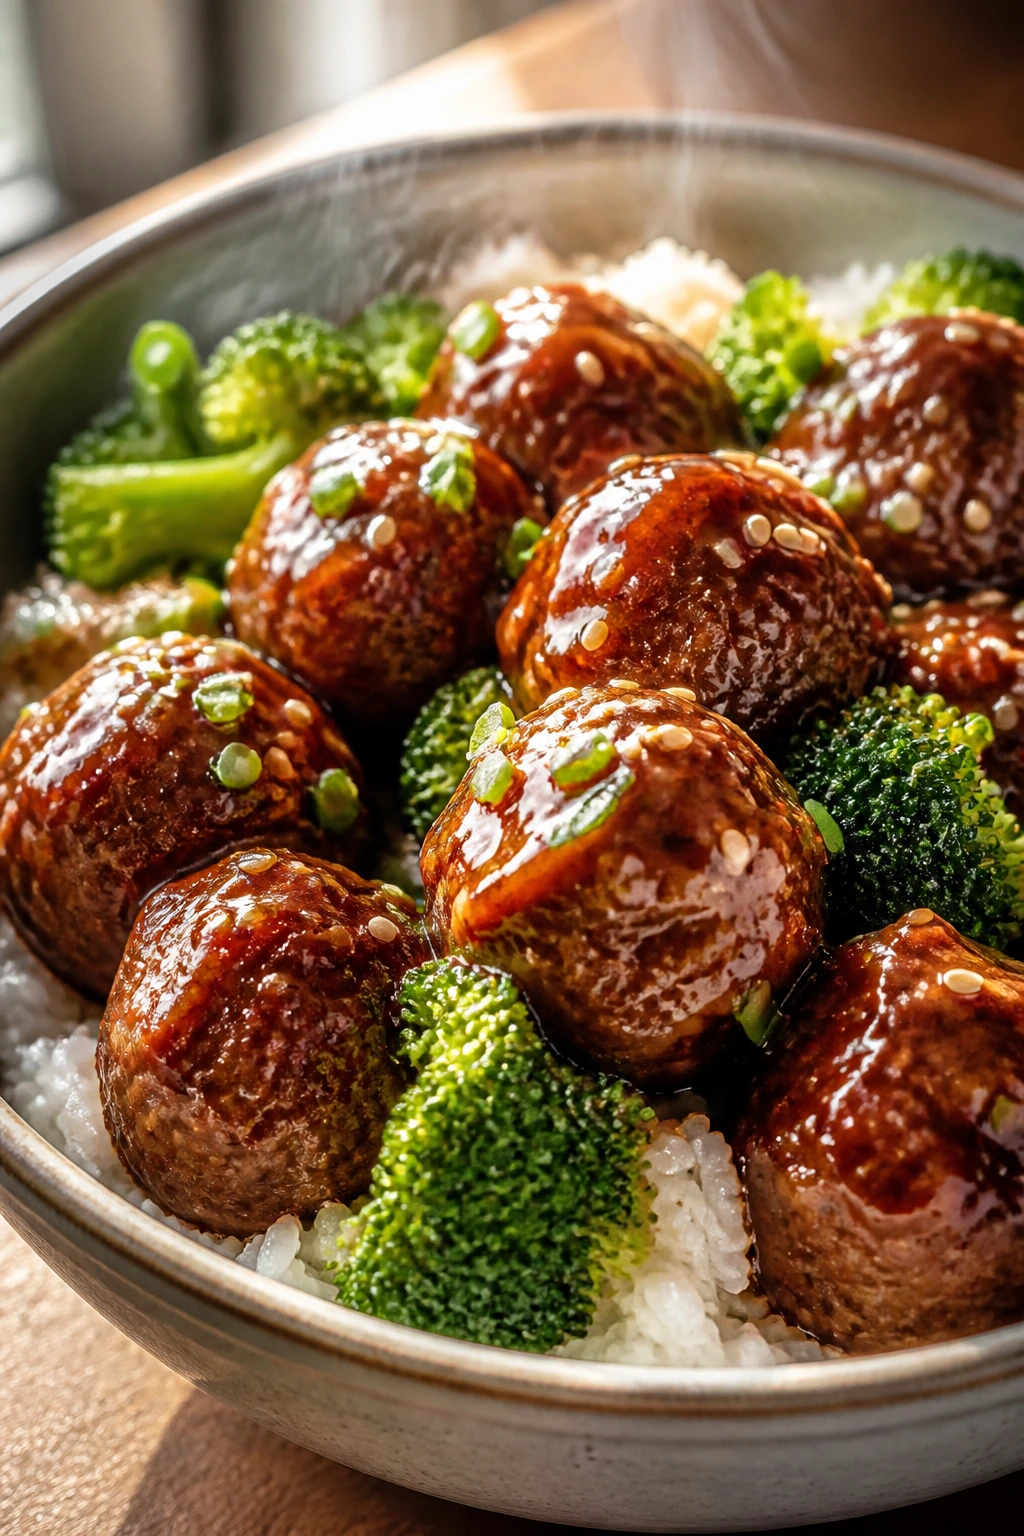
Sweet-savory meatballs over rice hit that fast-dinner sweet spot hard. The sauce glazes the meat, the rice catches the extra bits, and the broccoli adds a little crunch so the bowl doesn’t feel one-note.
Why It Works: Frozen meatballs are already portioned and shaped, which makes timing easy. Teriyaki sauce thickens in the skillet and coats the rice instead of pooling at the bottom. Broccoli slaw or quick-cooking vegetables give you color and texture without a second pan full of work.
Key Ingredients:
- 24 frozen meatballs — pre-cooked for speed.
- 1/2 cup teriyaki sauce — enough to glaze.
- 3 cups cooked rice — warm or leftover.
- 2 cups broccoli slaw or stir-fry vegetables — quick-cooking.
- 1 tablespoon sesame seeds — for finishing.
- 2 scallions, sliced — for freshness.
- 1 teaspoon oil — if your pan needs it.
Quick Steps:
- Warm the meatballs in a skillet with the teriyaki sauce over medium heat.
- Stir in the broccoli slaw or vegetables and cook until crisp-tender.
- Spoon the rice into bowls.
- Top with the saucy meatballs and vegetables.
- Finish with sesame seeds and scallions.
Equipment for This Recipe:
- Skillet — for the glaze and meatballs.
- Rice cooker or pot — if the rice isn’t already cooked.
- Serving bowls — shallow ones work best.
- Spoon or tongs — for plating.
How to Serve This Dish: Serve the bowls with cucumber coins or a few orange wedges on the side. If the sauce is on the sweet side, a drizzle of chili sauce on top gives it a better snap.
Pro Tips for This Recipe:
- Don’t boil the sauce hard; it can get sticky fast.
- Warm the rice before assembling so the bowl feels cohesive.
- Add vegetables late so they stay crisp.
- A splash of water helps if the sauce reduces too much.
Variations on This Dish:
- Pineapple Teriyaki Bowls: Add pineapple chunks at the end.
- Chicken Meatball Bowls: Use chicken meatballs with the same sauce.
- Garlic-Sesame Version: Add minced garlic and a touch of sesame oil.
Common Mistakes to Avoid with This Dish:
- Don’t let the sauce scorch.
- Don’t overcook the vegetables.
- Don’t use dry rice straight from the fridge without warming it first.
19. Creamy Tomato Tortellini
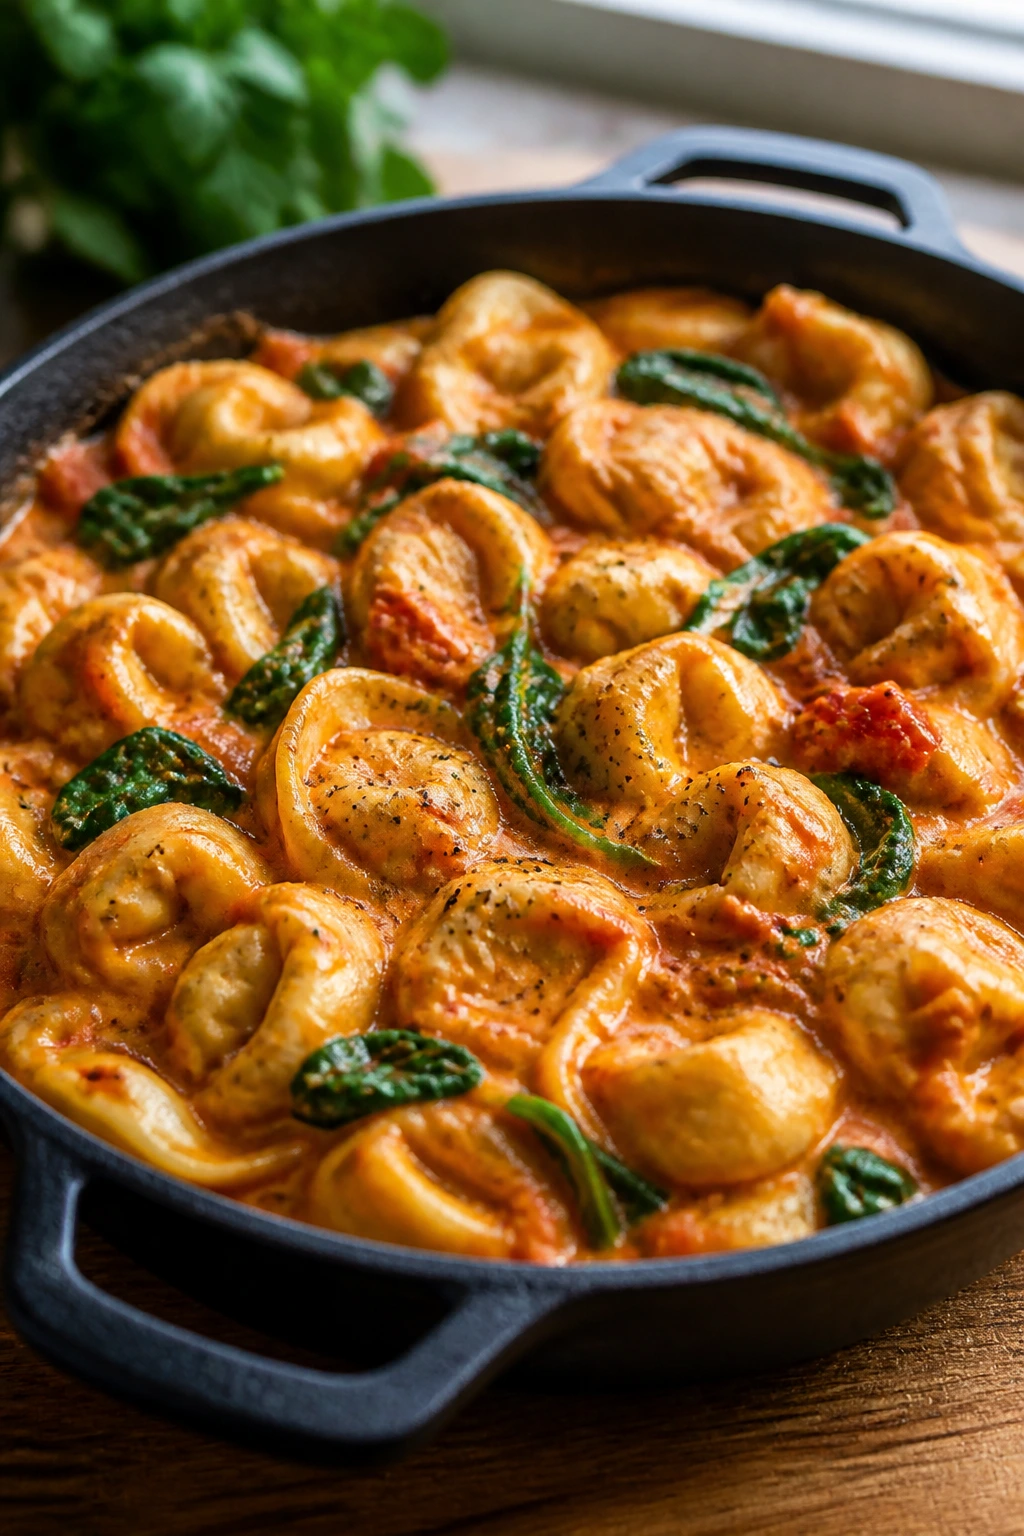
Tortellini in a creamy tomato sauce feels like something that should take much longer than it does. The pasta is already filled, the sauce clings fast, and the spinach softens into the pan without needing any pep talk.
Why It Works: Cheese tortellini gives you built-in richness, so the sauce doesn’t need to do all the work. Tomato and cream balance each other, which keeps the dish from tasting either sharp or flat. A handful of spinach melts in at the end and gives the bowl a softer, greener finish.
Key Ingredients:
- 20 ounces cheese tortellini — fresh or refrigerated cooks fastest.
- 2 tablespoons butter — for the base.
- 2 garlic cloves, minced — or 1 teaspoon garlic paste.
- 1 1/2 cups crushed tomatoes or marinara — both work.
- 1/2 cup cream — heavy cream or half-and-half.
- 2 cups spinach — packed lightly.
- 1/2 cup grated Parmesan — for finishing.
- Salt and black pepper — to taste.
Quick Steps:
- Cook the tortellini according to package directions and drain.
- Melt the butter in a skillet and cook the garlic for 30 seconds.
- Stir in tomatoes and cream, then simmer for 3 minutes.
- Add spinach and tortellini, tossing until coated and hot.
- Finish with Parmesan and black pepper.
Equipment for This Recipe:
- Pot — for boiling tortellini.
- Skillet — for the sauce.
- Wooden spoon — for stirring gently.
- Colander — for draining.
How to Serve This Dish: Spoon it into bowls and top with extra Parmesan. Garlic bread works if you want a bigger meal, but a simple cucumber salad keeps it from feeling too heavy.
Pro Tips for This Recipe:
- Don’t boil the cream sauce hard; keep it at a gentle simmer.
- Fresh tortellini cooks faster than frozen.
- Add spinach after the sauce thickens.
- A pinch of red pepper flakes keeps it from tasting too sweet.
Variations on This Dish:
- Sausage Tortellini: Brown sliced sausage before making the sauce.
- Roasted Red Pepper Version: Use part roasted red pepper sauce with the tomato.
- Dairy-Light Version: Use evaporated milk or a lighter cream.
Common Mistakes to Avoid with This Dish:
- Don’t overcook the tortellini.
- Don’t let the sauce break by boiling too hard.
- Don’t add too much spinach at once or it mats together.
20. Ham and Swiss Crescent Roll Bake

This is a tidy little tray bake with all the salty, buttery energy of a deli sandwich. Crescent dough bakes up flaky, the ham and Swiss melt together, and the Dijon keeps the whole thing from tasting bland.
Why It Works: Crescent dough bakes fast and seals around the filling without much effort. Ham and Swiss are a classic pair because the cheese melts cleanly while the ham stays savory. A butter brush on top gives you that glossy, browned finish people notice before the first bite.
Key Ingredients:
- 2 cans crescent roll dough — unrolled into triangles.
- 8 slices deli ham — thin slices fold easily.
- 8 slices Swiss cheese — or shredded Swiss if that’s what you have.
- 2 tablespoons Dijon mustard — gives the filling some bite.
- 1 tablespoon butter, melted — for the top.
- 1 teaspoon poppy seeds — optional.
- Black pepper — optional.
Quick Steps:
- Heat the oven to 375°F and line a baking sheet.
- Lay ham and Swiss on each crescent triangle with a little Dijon.
- Roll from the wide end to the point and place seam-side down.
- Brush with melted butter and sprinkle with poppy seeds.
- Bake for 12 to 15 minutes until golden and puffed.
Equipment for This Recipe:
- Baking sheet — lined for easier cleanup.
- Pastry brush — for butter.
- Knife — if you need to trim the rolls.
- Small bowl — for the Dijon.
How to Serve This Dish: Serve the rolls warm with dill pickles and sliced apples. If you want a fuller plate, add a bowl of tomato soup or a simple lettuce salad.
Pro Tips for This Recipe:
- Keep the dough cold until you’re ready to fill it.
- Don’t overstuff or the rolls split open.
- Bake until the bottoms are browned, not just the tops.
- A little honey mustard on the side works well for dipping.
Variations on This Dish:
- Turkey and Cheddar Roll-Up: Swap the deli fillings.
- Everything Bagel Top: Use everything seasoning instead of poppy seeds.
- Spinach Ham Bake: Add a few spinach leaves under the ham.
Common Mistakes to Avoid with This Dish:
- Don’t let the dough get too warm before baking.
- Don’t skip the butter brush; it helps the crust brown.
- Don’t use thick ham slices that prevent rolling.
21. Greek Chicken Couscous Bowls
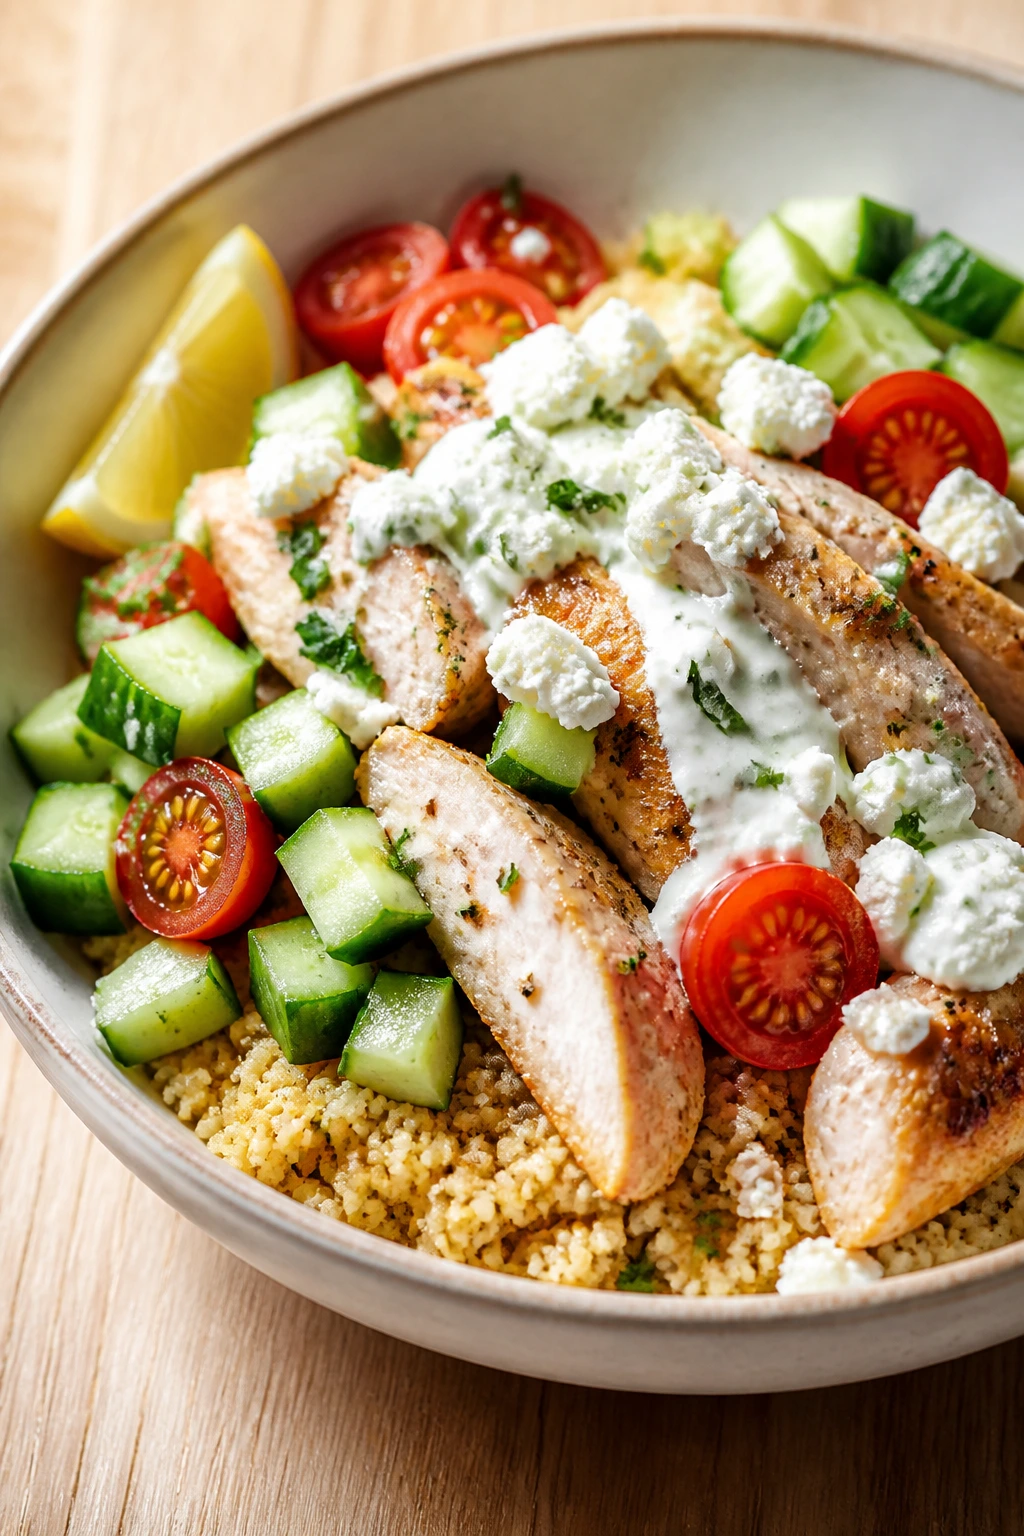
Couscous is the quiet shortcut that makes dinner feel organized. It soaks up lemon and olive oil quickly, the chicken stays juicy, and the cucumber-tomato mix gives the bowl a cold crunch against the warm grain.
Why It Works: Couscous cooks in minutes with boiling liquid, so the base is ready almost before the toppings are chopped. The chicken can be leftover or rotisserie, which means the bowl comes together with little heat. Feta and tzatziki add enough salt and tang that you don’t need a heavy sauce.
Key Ingredients:
- 1 cup couscous — plain or whole-wheat.
- 1 1/2 cups boiling water or broth — broth adds more flavor.
- 2 cups cooked chicken, chopped — rotisserie is fine.
- 1 cucumber, diced — seed it if it’s very watery.
- 1 cup cherry tomatoes, halved — for sweetness.
- 1/2 cup feta — crumbled.
- 1/4 cup tzatziki or lemon yogurt — for finishing.
- 1 tablespoon olive oil and 1 lemon — for the couscous.
Quick Steps:
- Pour boiling water or broth over the couscous, cover, and let sit for 5 minutes.
- Fluff with a fork and stir in olive oil and lemon juice.
- Toss the chicken with a little salt and pepper if needed.
- Assemble bowls with couscous, chicken, cucumber, tomatoes, and feta.
- Spoon tzatziki over the top and serve.
Equipment for This Recipe:
- Heatproof bowl — for the couscous.
- Fork — to fluff the grains.
- Knife and cutting board — for the vegetables.
- Serving bowls — shallow ones work best.
How to Serve This Dish: Serve with pita chips or warm pita wedges on the side. If you want it more substantial, add hummus and a few olives so the bowl eats like a small platter.
Pro Tips for This Recipe:
- Use broth if the couscous needs more flavor fast.
- Don’t overwater the couscous or it turns gummy.
- Keep the vegetables cold for a better temperature contrast.
- A pinch of oregano makes the bowl taste more complete.
Variations on This Dish:
- Falafel Couscous Bowl: Swap chicken for store-bought falafel.
- Mediterranean Tuna Bowl: Use tuna instead of chicken for another fast option.
- Roasted Veggie Version: Add roasted zucchini or peppers if you have leftovers.
Common Mistakes to Avoid with This Dish:
- Don’t let the cucumber sit wet in the bowl.
- Don’t skip the lemon; it wakes up the whole plate.
- Don’t pack the couscous too tightly.
22. Chili Stuffed Sweet Potatoes
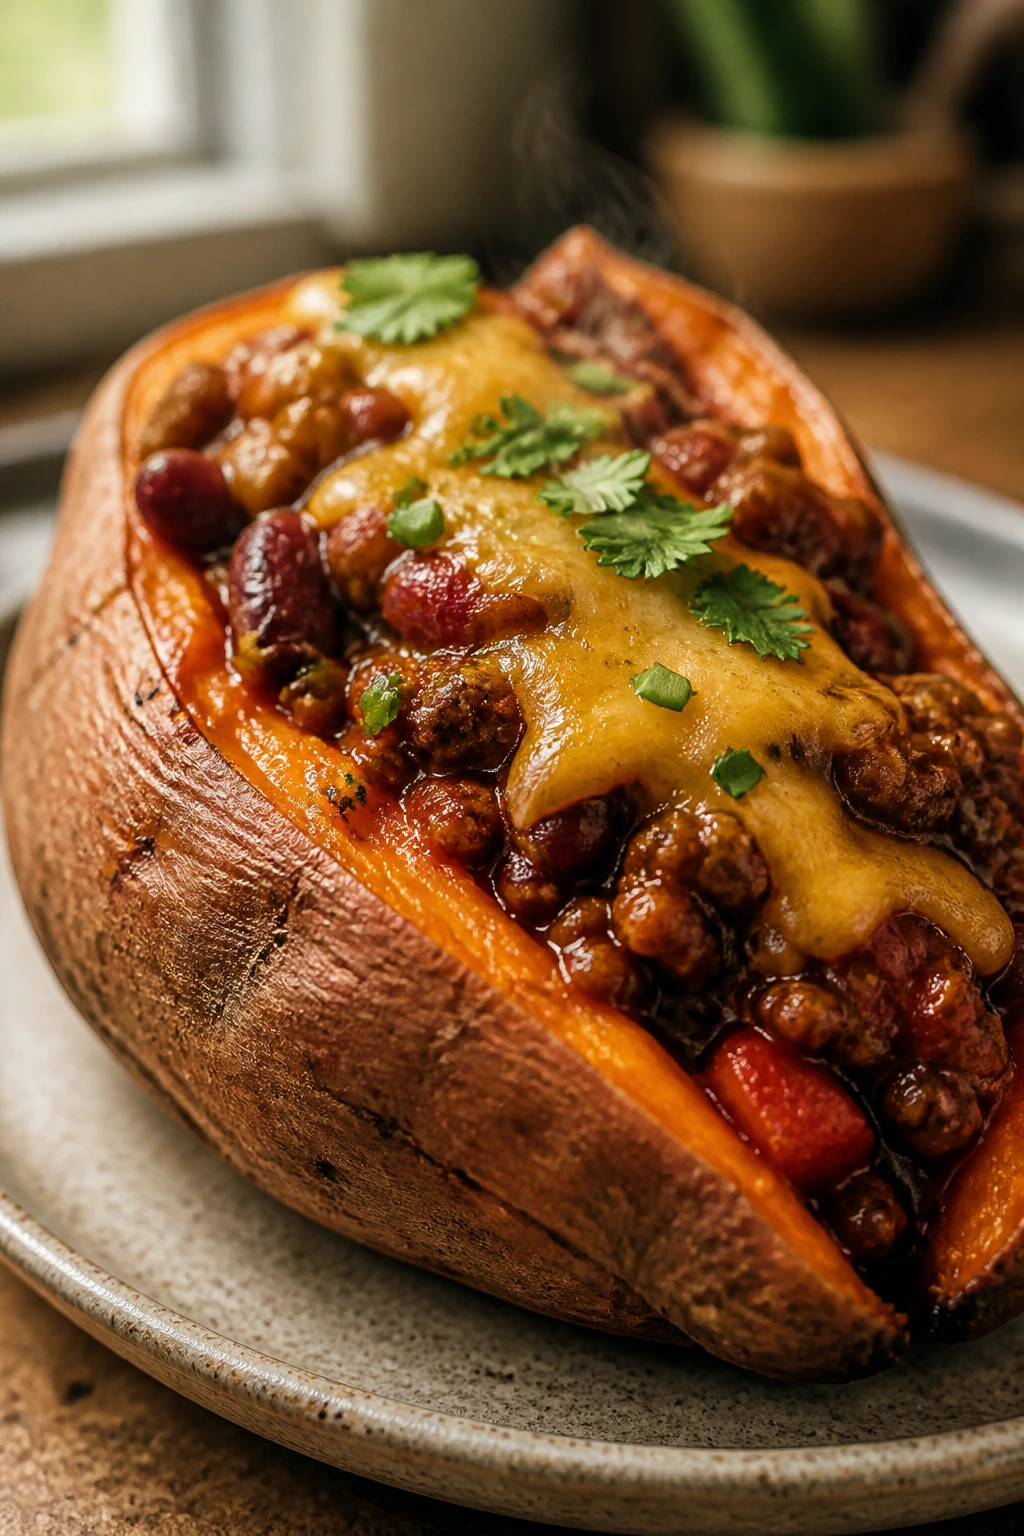
This is dinner with a built-in serving bowl, which is always useful on a busy afternoon. The sweet potato turns soft and caramel-like, the chili adds heat and heft, and the cheese melts into the middle so every bite feels full.
Why It Works: Sweet potatoes cook quickly in the microwave and get tender enough to split open without much effort. Chili is already seasoned, so you only need to heat it through. The sweet-salty contrast keeps the dish interesting, which matters when you want something more than plain leftovers.
Key Ingredients:
- 4 medium sweet potatoes — scrubbed and pierced.
- 2 cups chili — homemade or canned, thick is better.
- 1 cup shredded cheddar — melts over the top.
- 1/2 cup sour cream — for cooling the chili.
- 1 avocado, sliced — optional.
- 2 scallions, sliced — for freshness.
- Salt and pepper — to finish the potato if needed.
Quick Steps:
- Microwave the sweet potatoes for 8 to 12 minutes, turning once, until soft.
- Heat the chili in a saucepan or microwave until steaming.
- Split the potatoes open and fluff the centers with a fork.
- Spoon chili over each potato and top with cheese.
- Add sour cream, avocado, and scallions before serving.
Equipment for This Recipe:
- Microwave-safe plate — for the potatoes.
- Small saucepan or microwave bowl — for the chili.
- Fork — to fluff the potato.
- Knife — for splitting and topping.
How to Serve This Dish: Serve the potatoes on a plate with a green salad or steamed corn on the side. If the chili is spicy, a spoonful of sour cream on top cools the heat in a way kids usually accept without a speech.
Pro Tips for This Recipe:
- Choose medium potatoes so they cook evenly.
- Use thick chili; watery chili slips off.
- Let the potatoes rest for 2 minutes after microwaving.
- A squeeze of lime over the chili makes the flavors pop.
Variations on This Dish:
- Turkey Chili Potatoes: Use turkey chili for a lighter version.
- Black Bean Sweet Potato: Swap chili for seasoned black beans and corn.
- Loaded Bakehouse Version: Add bacon and extra cheddar for a richer plate.
Common Mistakes to Avoid with This Dish:
- Don’t undercook the potatoes; they should mash easily inside.
- Don’t use thin chili that runs off the edges.
- Don’t skip the salt on the potato if it tastes flat.
Why This Kind of Dinner Wins When the Day Runs Long
The trick here is not pretending that after-school dinner has to be elaborate. It needs to be fast, warm, and flexible enough to handle a kid who wants cheese only and another who wants everything in a bowl with sauce on the side.
That is the real strength of this kind of cooking. A quesadilla, a rice bowl, a pita pocket, or a baked potato boat can absorb whatever the fridge is offering and still land on the table looking intentional. Keep a few of these in your back pocket, and the hour between backpacks and bedtime gets a lot less chaotic.
Essential Equipment for These Recipes
- 12-inch skillet: Big enough for quesadillas, taco bowls, sausage, noodles, and fried rice without crowding the pan.
- Sheet pans: Useful for flatbreads, melts, nachos, subs, and anything that needs a quick broil.
- Large pot: Needed for pasta, tortellini, and any noodle recipe that still deserves a proper boil.
- Saucepan: Handy for cheese sauce, sloppy joe filling, chili, and quick simmered sauces.
- Muffin tin: Needed for the frittata cups and useful for portioned baked snacks.
- Cutting board and sharp knife: You’ll use these for everything from peppers to pinwheels to scallions.
- Mixing bowls: One medium bowl for sauces, one larger bowl for tossing fillings.
- Spatula and tongs: The spatula flips quesadillas and flatbreads; tongs help with meatballs and sausage.
- Colander: A basic need for pasta, tortellini, and noodle bowls.
- Broiler-safe pan or rack: Essential for pizza toast, tuna melts, and the cheesy finish on several recipes.
- Airtight containers: Best for leftover fillings, cooked rice, and components you want to reheat cleanly.
Smart Shopping and Ingredient Tips
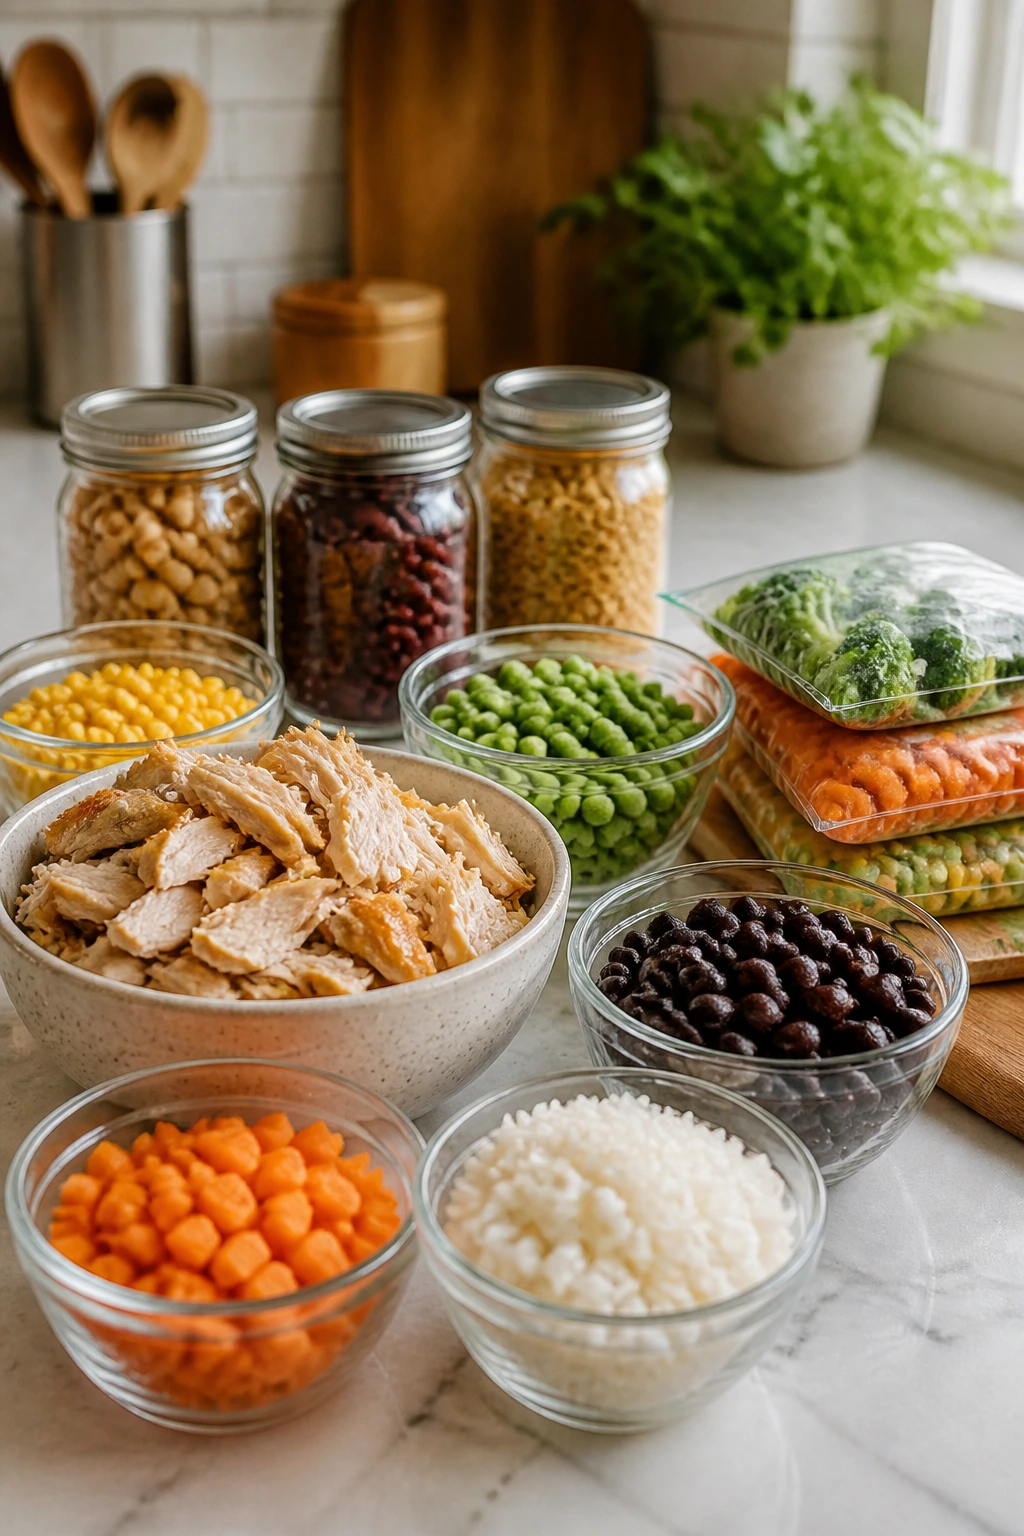
The fastest family dinners usually look expensive on the plate because the shopping was smart, not because the cooking was fancy. Rotisserie chicken, frozen meatballs, refrigerated dough, canned beans, and cooked rice are the shortcuts that make sense here. They’re not cheats. They’re the point.
For cheese, I’ll say the unpopular thing: pre-shredded cheese is fine in a lot of these recipes. It melts a little less smoothly than block cheese, but when you’re trying to get dinner on the table before a meltdown, that convenience matters. Save the block cheese for sauces and places where you want a silkier finish, like mac and cheese or creamy tomato tortellini.
Bread matters more than people think. Thick sandwich bread, English muffins, naan, and sub rolls hold up better than flimsy slices or soft white buns. If the recipe needs broiling or saucing, choose the sturdier option. It’s the difference between a crisp top and a collapsed middle.
Frozen vegetables are a quiet gift here. Peas, corn, broccoli slaw, mixed stir-fry vegetables, and spinach can all step in without making the recipe taste frozen. Use them straight from the freezer when the dish is meant to be hot and saucy. For raw toppings like cucumber or lettuce, dry them well so they don’t turn the meal watery.
A final note on sauces: pick ones with body. Thick salsa, dense marinara, and a BBQ sauce that clings to the spoon make life easier than thin, runny versions. If a sauce pours like water, the bread, rice, or tortilla underneath pays the price.
How to Serve These Recipes
Presentation: Keep the food simple and clean on the plate. Wedges can fan out, pinwheels can stack in a ring, bowls can get a final sprinkle of herbs or sesame seeds, and sandwich-style recipes look best when cut once and set on a board rather than buried in a pile.
Accompaniments: The best sides are crisp or cold. Think apple slices, carrot sticks, cucumber rounds, bagged salad, pickles, grapes, or a little bowl of chips. For the heartier recipes, soup or slaw works well. For the lighter ones, fruit often does enough.
Portions: Most of these recipes land in the “one substantial plate” range for adults and “two smaller pieces” for kids. For bigger appetites, add bread, fruit, or a second scoop of rice or pasta. For smaller eaters, cut the handheld recipes into strips or halves so the plate feels easier to tackle.
Beverage Pairing: Milk is still the obvious winner with quesadillas, pizza toast, and mac and cheese. For older kids and adults, sparkling water with lime, unsweetened iced tea, or lemonade cuts through cheese, sauce, and fried edges nicely.
Additional Tips and Flavor Boosters
Flavor Enhancement: Finish warm, rich dishes with something bright. A squeeze of lemon over noodles, lime over taco bowls, or a little vinegar in a slaw changes the whole plate without adding real work.
Customization: Keep a few mix-ins on the table: chopped pickles for sloppy joe nachos, hot sauce for rice bowls, extra herbs for pita pockets, and sliced jalapeños for anyone who wants heat. Small changes like that let one dinner work for everyone.
Serving Suggestions: Use crunchy toppings on soft food. Sesame seeds on meatball bowls, scallions on potato boats, Parmesan on ravioli, or crushed chips on taco bowls give the food a better finish and stop every bite from feeling same-y.
Make-It-Yours: Gluten-free tortillas, gluten-free pasta, dairy-free cheese, and vegetarian proteins all fit into this collection if you match the swap to the right recipe. A bean burrito or couscous bowl adapts especially well; a melted flatbread needs a little more care, but it still works with the right base.
Make-Ahead, Storage, and Reheating Guidance
Most of these recipes keep well for 3 to 4 days in the refrigerator when stored in airtight containers. Cooked rice, meatball fillings, taco meat, pasta sauces, and chili stuffings are the best leftovers in the group. The recipes with toasted bread, crescent dough, or crispy tortillas are better stored as components and assembled fresh, because the crust softens quickly.
For the freezer, think in terms of the filling, not the finished sandwich. Meatballs in sauce, taco meat, chili, sloppy joe filling, and some burrito fillings freeze well for up to 2 months. Wrap burritos tightly in foil and then freeze them in a bag. Rice bowls freeze best when the rice is plain and the sauce gets added after reheating. Flatbreads, pizza toast, and English muffin melts are poor freezer candidates once assembled; the bread texture goes downhill.
Reheating depends on the shape of the food. Quesadilla wedges and flatbread slices do better in a skillet or toaster oven than in the microwave, because the edges can crisp again. Rice bowls and noodle bowls reheat well with a splash of water in a covered pan over medium heat. Burritos and pinwheels are fine in the microwave for short bursts, but wrap burritos in a damp paper towel so the tortilla doesn’t go leathery. Meat sauces, sloppy joe filling, and chili should be warmed slowly so they don’t scorch on the bottom of the pan.
A lot of these recipes improve overnight in the fridge if they’re saucy. Chili potatoes, taco rice, sloppy joe filling, and meatball subs all taste deeper the next day. Bread-based recipes do not share that advantage, so keep those as close to serving time as you can.
Variations and Adaptations to Try
Vegetarian Weeknight Swap: Replace chicken, turkey, sausage, or ham with black beans, chickpeas, lentils, or meatless crumbles in the taco bowls, burritos, nachos, and rice bowls. The key is to season the replacement well so it tastes deliberate, not like the meat disappeared by accident.
Gluten-Free Plan: Use corn tortillas, gluten-free bread, gluten-free pasta, or a potato base where the recipe allows it. Quesadilla wedges, taco bowls, potato boats, fried rice, and stuffed sweet potatoes are the easiest places to start because the swap doesn’t change the whole shape of the dish.
Dairy-Free Route: Choose dairy-free shredded cheese that melts well, or build around saucy, non-cheesy recipes like fried rice, teriyaki bowls, and sausage-and-pepper subs. A lot of these dinners only need one creamy ingredient, so removing it doesn’t wreck the meal if you replace the richness with olive oil, avocado, or a little extra sauce.
Extra-Veggie Rescue: Fold spinach into tortellini, broccoli into mac and cheese, peppers into sausage subs, and cucumbers or tomatoes into pita pockets. This is the easiest way to stretch a meal without making it feel like a salad trying to pass as dinner.
Lower-Sodium Cleanup: Use low-sodium beans, broth, soy sauce, and canned tomatoes where possible. Then lean on garlic, lemon, herbs, and pepper so the food still tastes lively. If you remove salt without replacing the flavor, these dinners can go dull fast.
Heat-It-Up Version: Add hot sauce, chili flakes, pepper jack, or diced jalapeños to the recipes that can handle it. Quesadillas, taco bowls, sloppy joe nachos, and teriyaki meatballs take heat well; the creamier recipes need a lighter touch.
Common Mistakes to Avoid
Making everything wet at once: The fastest route to limp bread and soggy tortillas is piling in too much sauce or watery vegetables. Drain tuna, dry lettuce, pat cucumbers, and keep salsa or marinara thick enough to cling.
Cooking every recipe on high heat: Fast does not mean reckless. Broilers, quesadillas, and flatbreads burn quickly, while cheese sauces and cream-based dishes break if they boil hard. Medium heat is often the sweet spot.
Using soft bread for saucy fillings: Thin bread, weak rolls, and floppy tortillas collapse under meat sauce or melted cheese. Pick sturdier bread, toast it first, or keep the wetter filling inside a shell that can take it.
Forgetting to rest hot food for a minute: Quesadillas, subs, burritos, and flatbreads hold together better after a short pause. Slice too early and the filling escapes onto the board instead of staying where it belongs.
Undercooking the starch: Rice that is too wet, potatoes that are still firm, or pasta that needs another minute will throw off the whole plate. These dishes depend on the base being done before the toppings go on.
Overloading the pan or tray: Crowd the skillet and the food steams. Crowd the sheet pan and the bread softens. Give the food room to brown, because browning is where a lot of the flavor lives.
Frequently Asked Questions
Can I make these dinner ideas ahead of time before school pickup?
Yes, but not all in the same way. Saucy fillings, cooked rice, chopped vegetables, and shredded chicken can be made earlier in the day, while toasted bread, quesadillas, and flatbreads are better assembled at the last minute.
What’s the best recipe in this collection for very picky eaters?
Cheesy chicken quesadillas, pizza toast, bean burritos, and loaded potato boats usually give the most control because kids can see the parts and leave off what they do not want. The trick is to keep the fillings simple and let the toppings sit on the side.
Which recipes reheat the best the next day?
Taco rice bowls, fried rice, sloppy joe filling, meatball sauce, chili stuffed potato filling, and mac and cheese all reheat well. Recipes built around crisp bread or broiled tops are better fresh.
Can I use leftover rotisserie chicken in more than one of these?
Absolutely. It fits quesadillas, flatbreads, pita pockets, taco bowls, tortellini if you want extra protein, and Greek couscous bowls. Shred it small so it blends into the filling instead of sitting in big dry chunks.
How do I keep tortillas from tearing when I roll them?
Warm them for 10 to 15 seconds first so they bend instead of cracking. Also keep the filling in a thin strip down the center and avoid cold, stiff tortillas straight from the fridge.
Is it okay to use frozen vegetables straight from the bag?
Yes, in recipes that are cooked hot and fast, like fried rice, noodle bowls, taco bowls, and meatball rice bowls. For cold fillings like pinwheels or pita pockets, thaw and drain them first so they do not leak water into the sandwich.
What if I don’t have time to cook rice from scratch?
Use leftover rice, microwave rice, or even couscous in some of the bowls. The whole point of these dinners is speed, and there is no prize for making the starch the hard part.
Can I make these without an oven?
Several of them work fully on the stovetop: quesadillas, taco bowls, fried rice, noodles, potato boats in the microwave, and sausage subs. The oven is mostly for toasting, melting, and finishing, not for the whole job.
How do I make these meals a little healthier without ruining them?
Use more vegetables, choose leaner proteins, and keep the cheese or sauce in a supporting role instead of a flood. A broccoli side, fruit, cucumber salad, or extra spinach makes a bigger difference than trimming every bit of fat from the recipe.
The Hour Between Backpack and Bedtime
The best fast family dinners do not act like special occasions. They step in quietly, feed everybody, and leave a little room in the evening for homework, baths, and a slower landing.
That’s why these after-school snacks-turned-dinners work so well: they’re flexible, they’re quick, and they don’t punish you for using smart shortcuts. Keep a few tortillas, a bag of rice, some cheese, and one or two cooked proteins in rotation, and the whole stretch from the front door to the dinner table gets easier to live with.