
Mini burgers have a way of pretending they’re snack food until you make them properly. Put them in a hot skillet, use 80/20 ground beef, and stop fussing with the meat the second it comes together, and suddenly you’ve got dinner that feels a lot bigger than the bun suggests.
What matters here is heat and restraint. Cold beef, a short mix, a shallow dimple in each patty, and buns toasted in the same pan are the little moves that keep these burgers juicy instead of crumbly. You can taste the difference in the first bite: browned crust, soft bread, pickles snapping at the edge, sauce catching in the folds.
I like this style of dinner because it’s flexible without being fussy. Set out tomatoes, onions, lettuce, pickles, and sauce, then let everyone build their own stack; or plate them neatly and call it done. Either way, you end up with mini burgers that eat like real food, not a concession-stand afterthought.
Why Mini Burgers Feel Like a Real Dinner
-
Fast skillet cooking: Eight small patties cook in about 5 to 7 minutes total, which means you can get dinner on the table without turning on the oven for a long stretch.
-
Juicy by design: A higher-fat grind, a short mix, and a quick sear keep the centers tender while the outside picks up that browned crust people actually want on a burger.
-
Easy to customize: One tray can hold pickles, onions, lettuce, tomato, cheese, and sauce, so picky eaters and “put everything on mine” people can both win.
-
Built for leftovers: The patties reheat better than a lot of ground beef dinners, especially if you store the buns and toppings separately.
-
Hearty without being clumsy: Two mini burgers with a side of fries or slaw feel like a proper meal, not a compromise.
-
Friendly to busy cooks: The whole thing uses basic supermarket ingredients, and the pan does most of the work.
Dinner Timing and Yield at a Glance
Yield: 8 mini burgers, serves 4 as a main dish
Prep Time: 20 minutes
Cook Time: 15 minutes
Total Time: 35 minutes
Difficulty: Beginner-Intermediate — the method is straightforward, but the skillet timing and gentle handling matter.
Chill/Rest Time: 10 minutes for the shaped patties
Best Served: Right after assembly, while the cheese is still soft and the buns are warm
What Goes Into Juicy Mini Burgers
For the Burger Patties:
- 1½ lb ground beef, 80/20, very cold
- 1 small yellow onion, finely grated and lightly squeezed dry
- 1 tsp kosher salt
- 1 tsp Worcestershire sauce
- 1 tsp Dijon mustard
- 1 tsp garlic powder
- ½ tsp black pepper
- ½ tsp smoked paprika
For the Buns and Toppings:
- 8 slider buns or mini brioche buns, split
- 2 tbsp unsalted butter, melted
- 8 slices American cheese
- 1 cup shredded iceberg lettuce
- 1 large tomato, sliced into 8 thin rounds
- 16 dill pickle chips
- ½ small red onion, very thinly sliced
For the Burger Sauce:
- ¼ cup mayonnaise
- 2 tbsp ketchup
- 1 tbsp dill pickle relish
- 1 tsp Dijon mustard
- 1 tsp pickle brine
- ¼ tsp smoked paprika
Why the Ingredients Work Together
Ground Beef and Seasoning
What to use: 1½ lb of 80/20 ground beef, plus a small grated yellow onion, salt, Worcestershire, Dijon, garlic powder, black pepper, and smoked paprika.
Preparation: Keep the beef cold until the moment you mix it. Grate the onion on the fine side of a box grater, then squeeze it lightly in your hand so it doesn’t dump extra liquid into the meat.
Substitutions: 85/15 beef works if that’s what you have, though the burgers will be a little less rich. Ground turkey can stand in, but it needs a gentler hand and a slightly shorter cook.
Tips: The meat should look just barely combined when you’re done. If it turns smooth and paste-like, you’ve gone too far and the patties will eat dense instead of tender.
Slider Buns and Cheese
What to use: 8 soft slider buns or mini brioche buns, 2 tbsp melted butter, and 8 slices American cheese.
Preparation: Split the buns cleanly so the cut side can toast in the skillet. If the cheese slices are large, cut them in half so they fit the patties without hanging over in messy curls.
Substitutions: Potato rolls are excellent here because they toast well and hold their shape. Cheddar works, but it melts slower and needs the lid on the skillet for a full melt.
Tips: American cheese earns its place. I know it gets treated like a cheap option, but for mini burgers it melts in a thin, even layer that clings to the meat instead of sliding off in oily patches.
Fresh Toppings
What to use: Shredded iceberg lettuce, thin tomato slices, dill pickle chips, and thinly sliced red onion.
Preparation: Dry the lettuce after washing, slice the tomato thin, and cut the onion as thin as you can manage so it doesn’t bully the rest of the burger.
Substitutions: Roma tomato is less watery than a big slicing tomato. If raw onion feels too sharp, soak the slices in cold water for 10 minutes and drain well.
Tips: Moisture is the enemy of a soft bun. Dry toppings matter more than people think, especially once sauce gets involved.
Burger Sauce and Butter
What to use: Mayonnaise, ketchup, dill pickle relish, Dijon mustard, pickle brine, smoked paprika, and melted butter for the buns.
Preparation: Whisk the sauce in a small bowl until smooth. Brush the butter on the buns just before they go into the skillet so the edges crisp instead of soaking up the fat.
Substitutions: Sour cream can replace part of the mayonnaise if you want a tangier sauce. For a dairy-free version, use a good plant-based mayo and olive oil instead of butter.
Tips: Let the sauce sit for a few minutes before serving. The relish and paprika settle into the mayo, and the whole thing tastes more blended and less slapdash.
The Tools That Make Slider Night Easier
-
12-inch cast-iron skillet or heavy stainless skillet: You need even heat and enough surface space to sear several patties without crowding them.
-
Thin metal spatula: A small, sturdy spatula slides under mini patties more cleanly than a big floppy one.
-
Instant-read thermometer: Ground beef should hit 160°F in the center, and this is the easiest way to stop guessing.
-
Mixing bowl: Use one medium bowl for the sauce and a second one only if you want to keep the meat prep separate.
-
Fine grater or box grater: This is the easiest way to get the onion small enough to disappear into the beef.
-
Small pastry brush: Helpful for buttering the buns evenly, though the back of a spoon will work in a pinch.
-
Lid or sheet of foil: Handy for melting the cheese quickly once the burgers flip.
Forming the Patties So They Stay Juicy
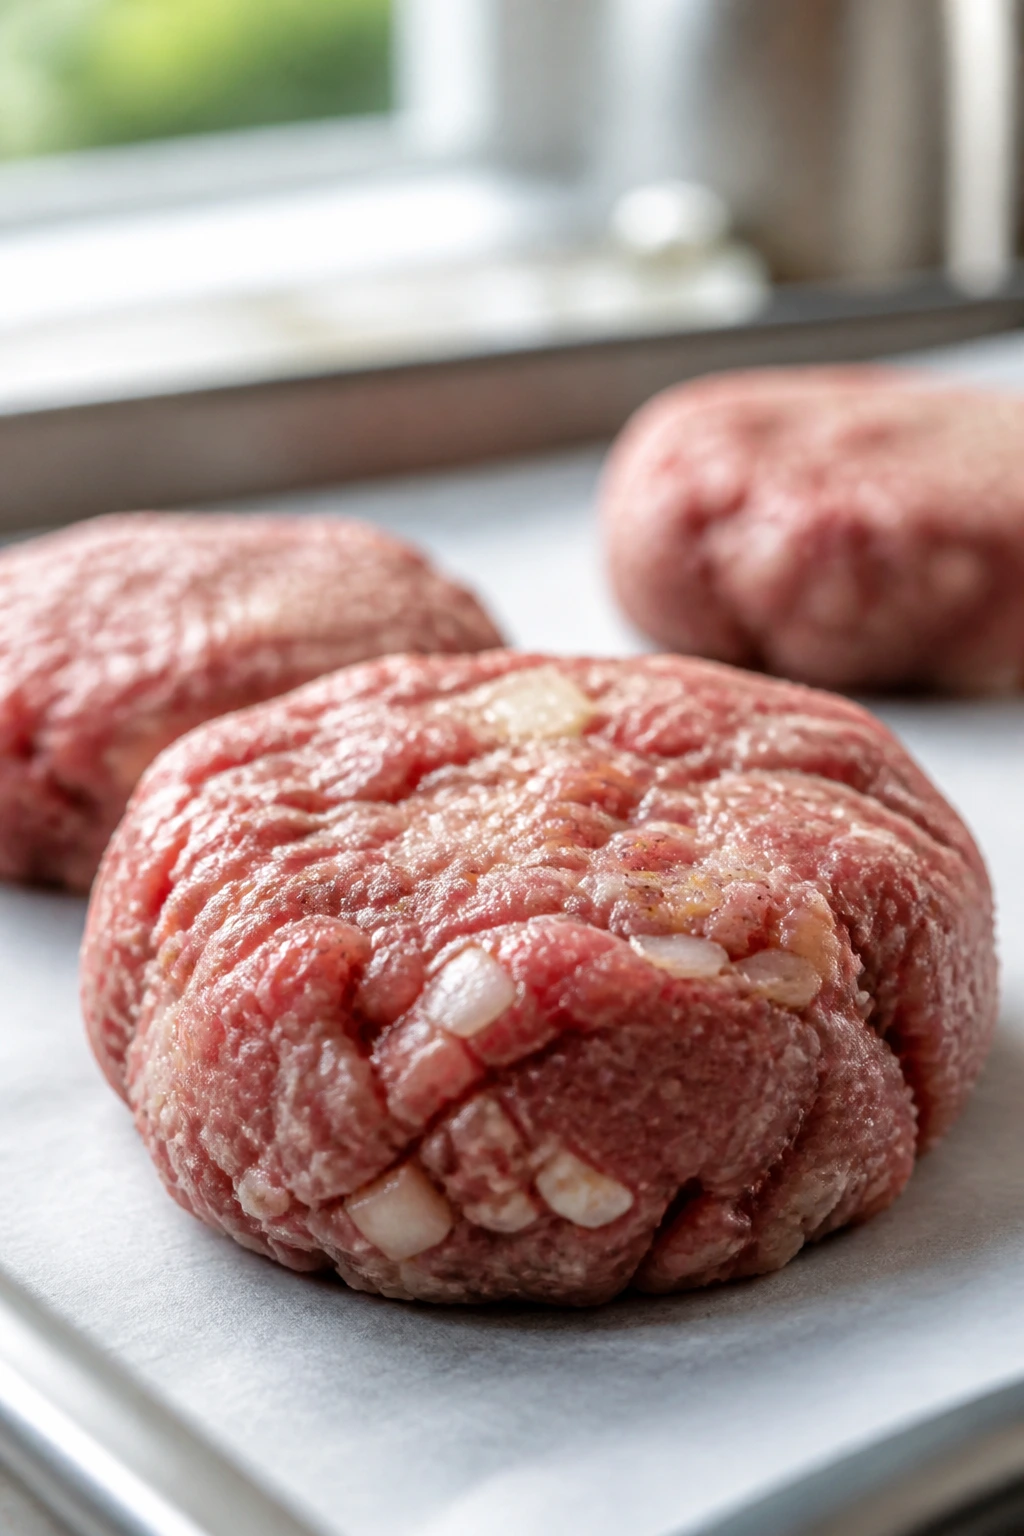
Cold beef matters. Keep the ground beef in the fridge until the moment you shape it. Warm meat smears under your hands, and once it starts turning sticky, you lose that loose texture that makes a burger tender.
The onion goes into the mix for moisture and flavor, but only if you treat it like a seasoning, not a filling. Grate it fine, squeeze it lightly, and fold it in with the salt, Worcestershire, Dijon, garlic powder, pepper, and smoked paprika using your fingertips. Hands work better than a spoon here because you can stop the second the mixture looks evenly speckled.
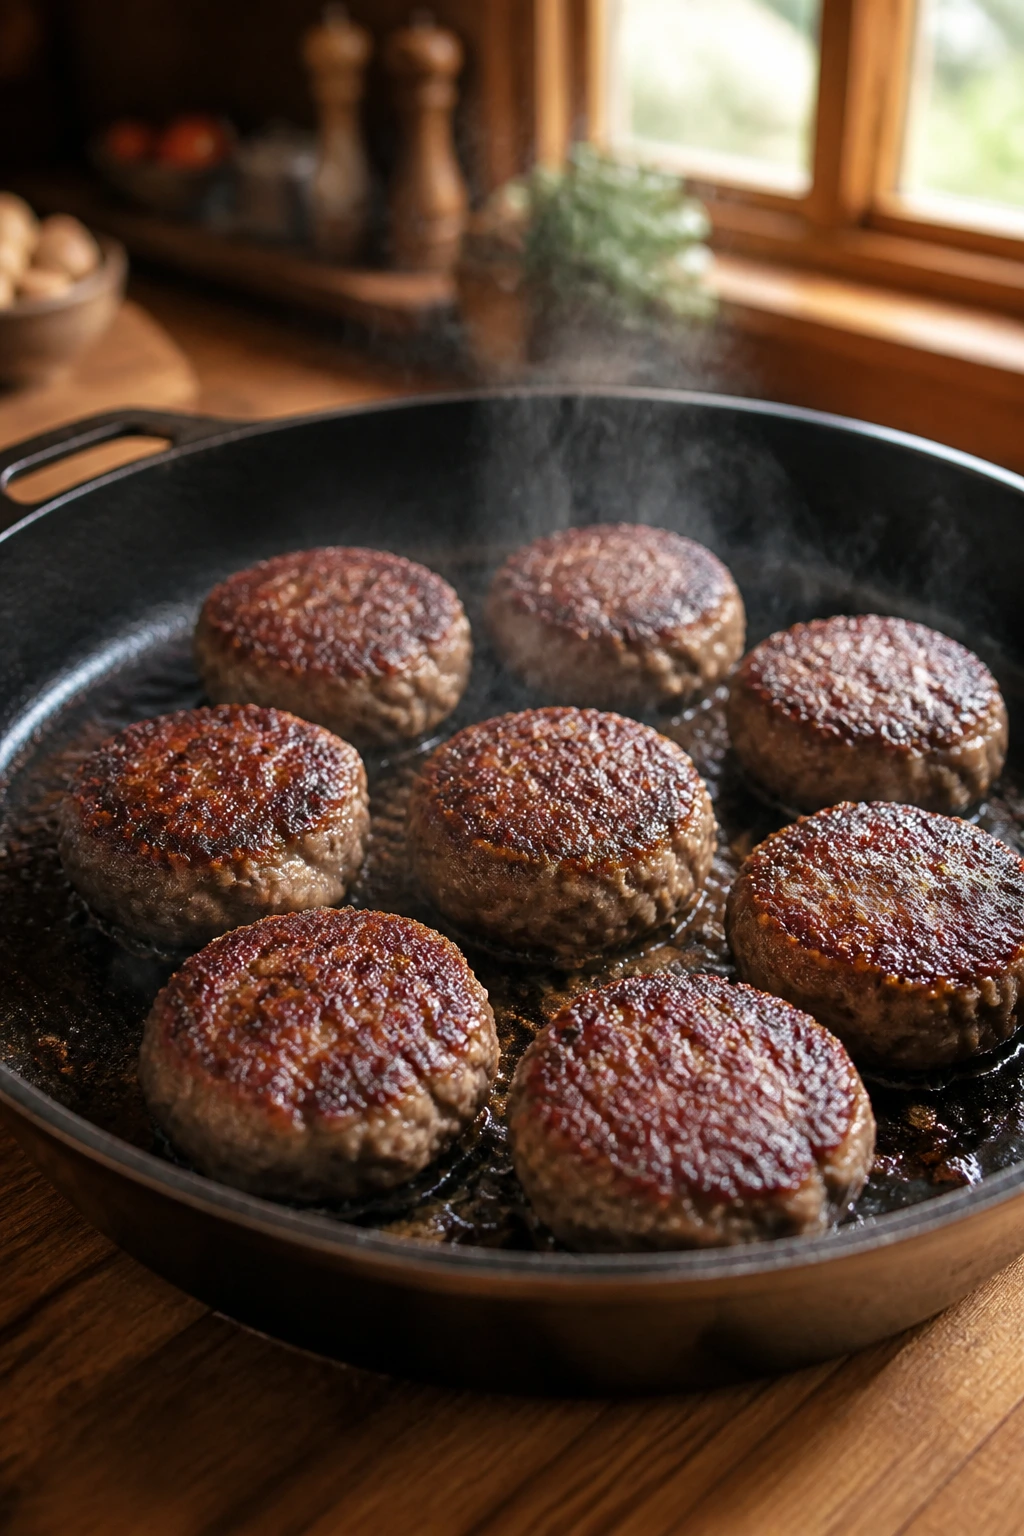
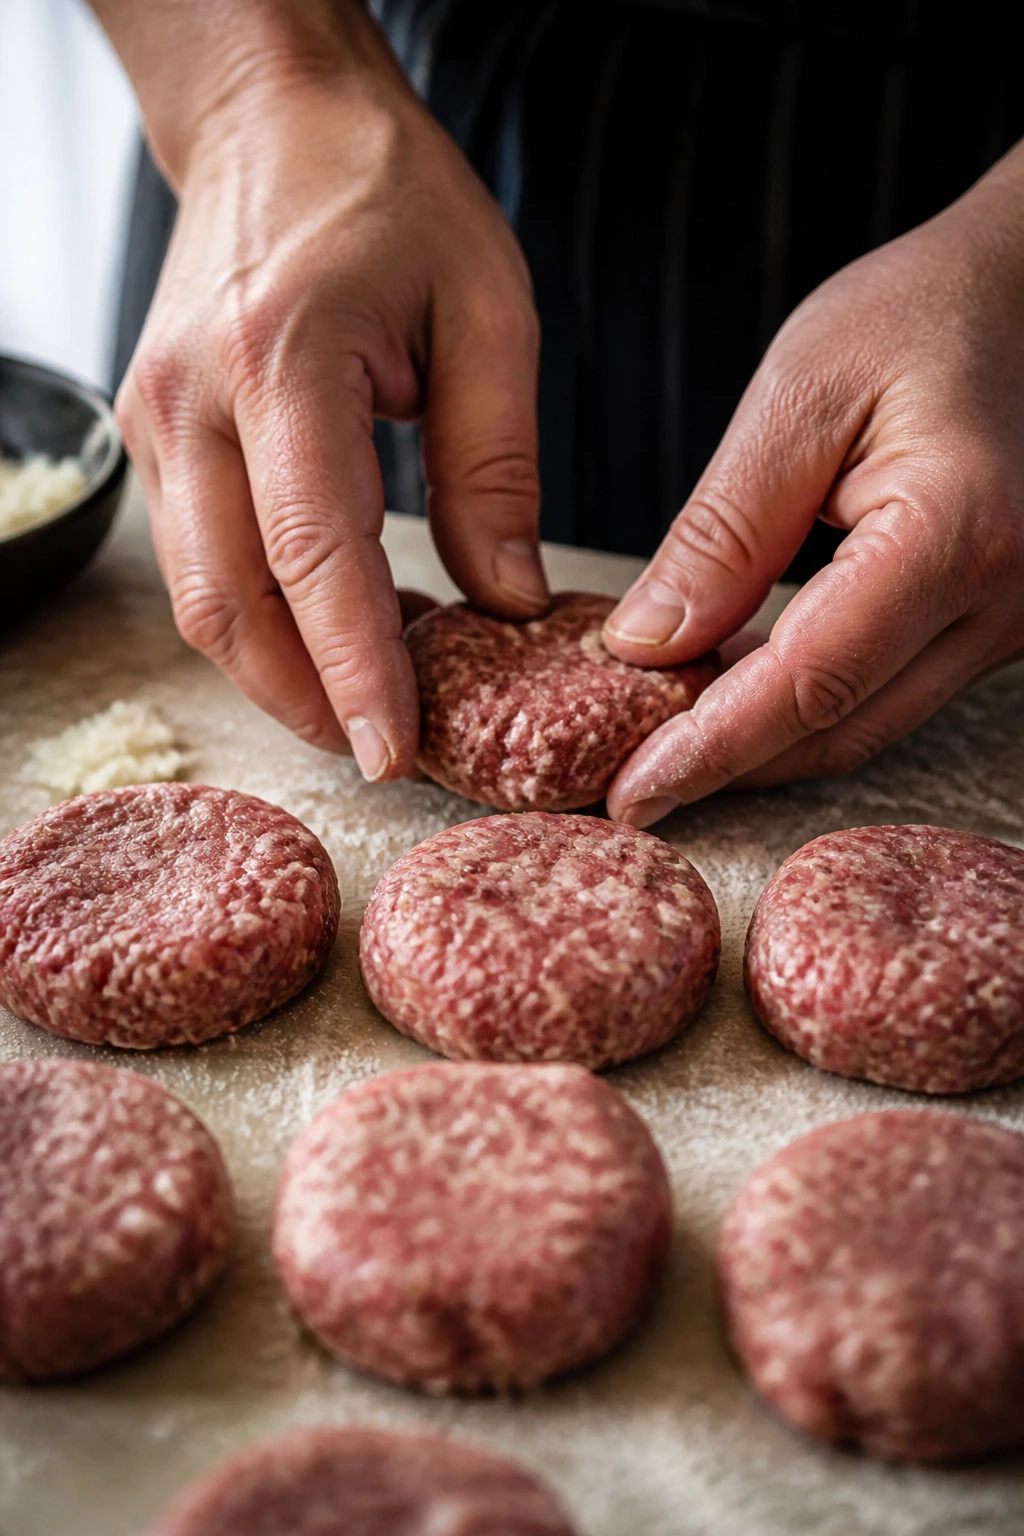
Shape the patties into 8 even rounds, about 3 ounces each. Make them a touch wider than the buns, because they will shrink in the pan, and press a shallow dimple in the center with your thumb. That little dent looks tiny before cooking and matters a lot after; it keeps the middle from puffing up into a dome.
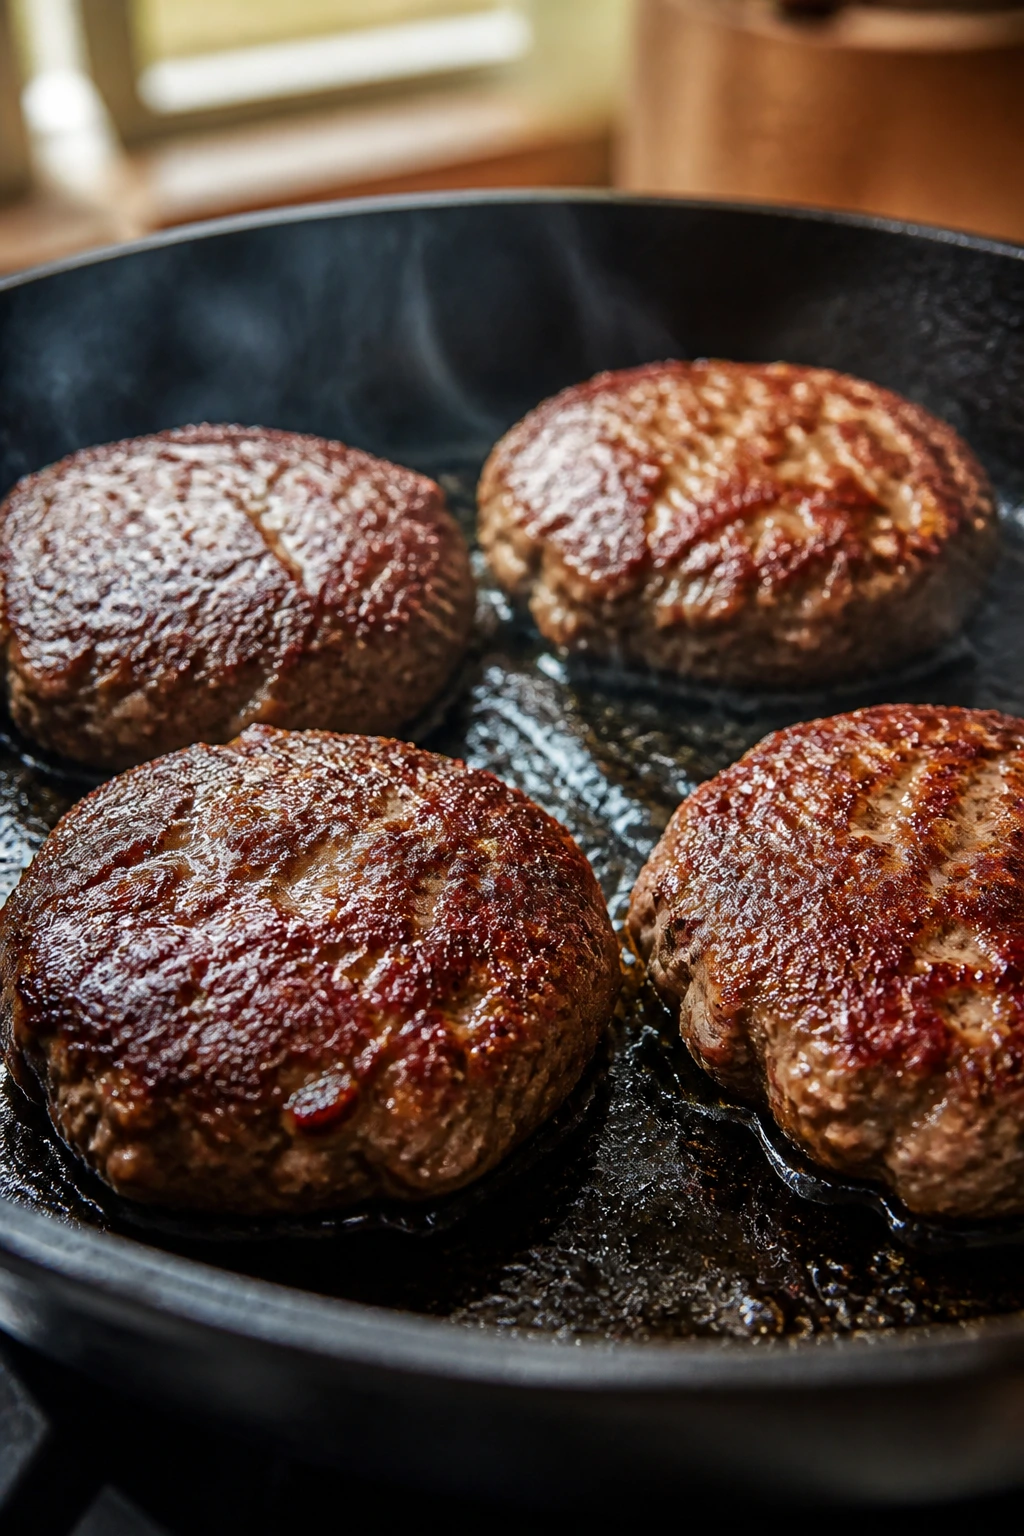
Do not press the patties flat once they hit the pan. That old habit squeezes out the juices and leaves you with a dry burger and a very hot spatula. Leave them alone unless you’re flipping them.
Searing, Melting, and Toasting Everything Properly
Make the sauce and prep the toppings:
- In a small bowl, whisk together the mayonnaise, ketchup, relish, Dijon mustard, pickle brine, and smoked paprika until smooth. Taste it and add a pinch of salt only if it needs it.
- Cover the bowl and set it aside while you prep the rest. A few minutes of resting helps the sauce settle into a thicker, more unified texture.
Shape the patties: 3. In a medium bowl, combine the cold ground beef, grated onion, salt, Worcestershire sauce, Dijon mustard, garlic powder, black pepper, and smoked paprika. Mix with your fingertips only until the seasonings disappear into the meat. Stop as soon as it looks even. 4. Divide the meat into 8 equal portions, about 3 ounces each, then shape each one into a patty just a little wider than the buns. Press a shallow dimple into the center of each patty and place them on a plate. 5. Chill the patties for 10 minutes if you have time. This step helps them hold their shape in the skillet and keeps the fat from melting too soon.
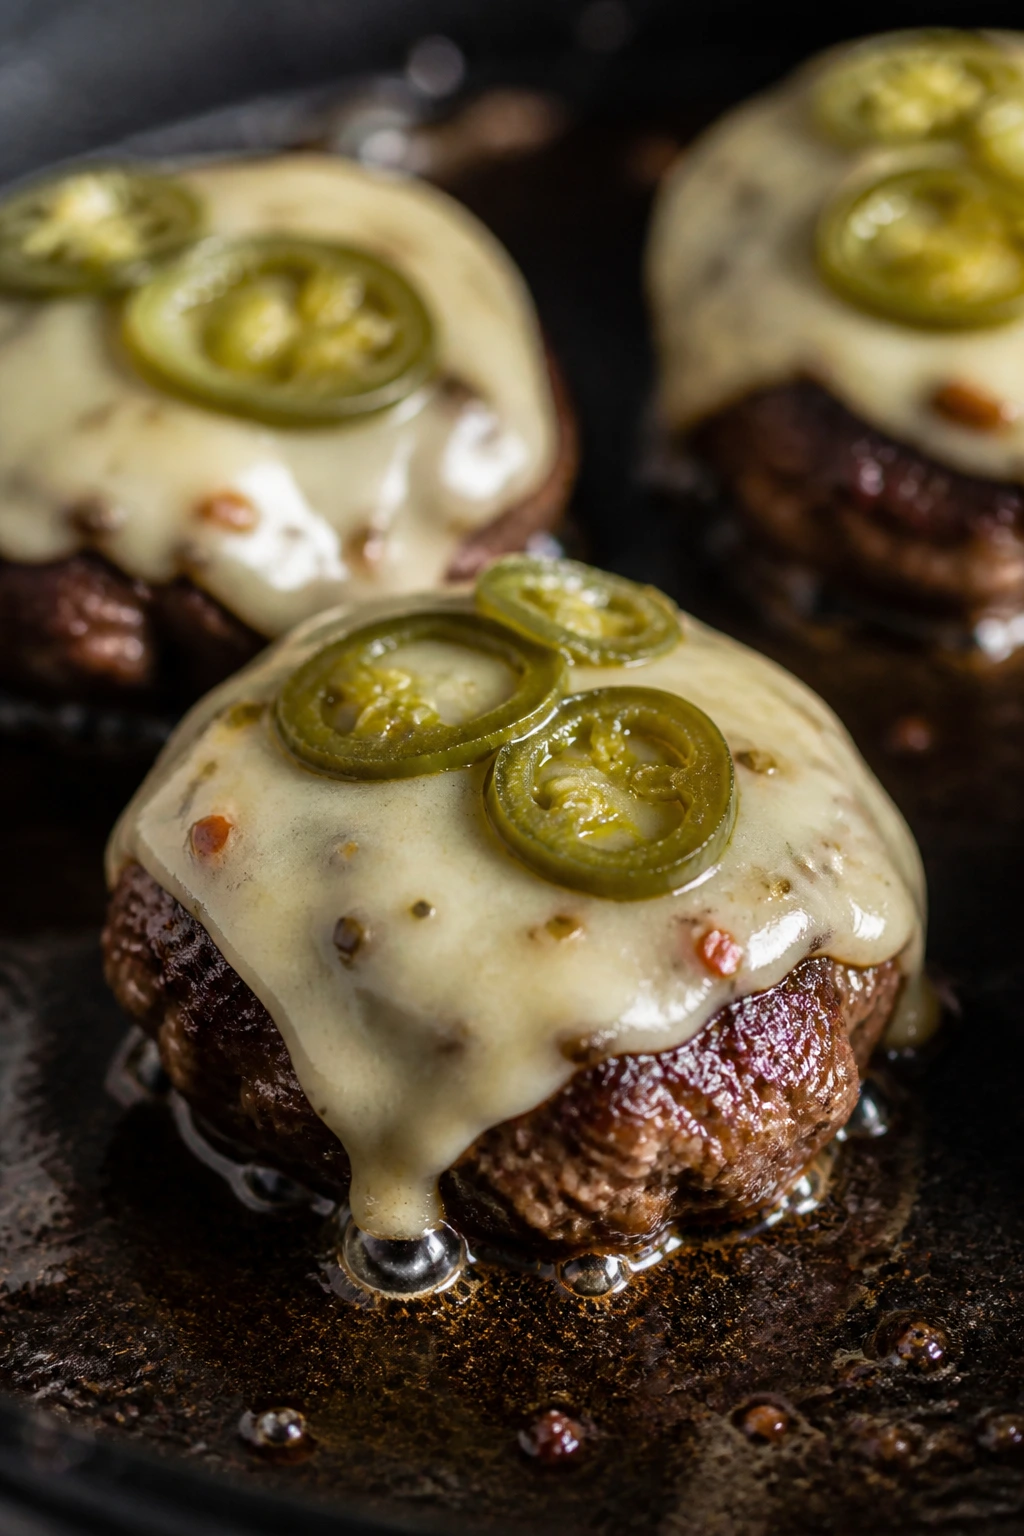
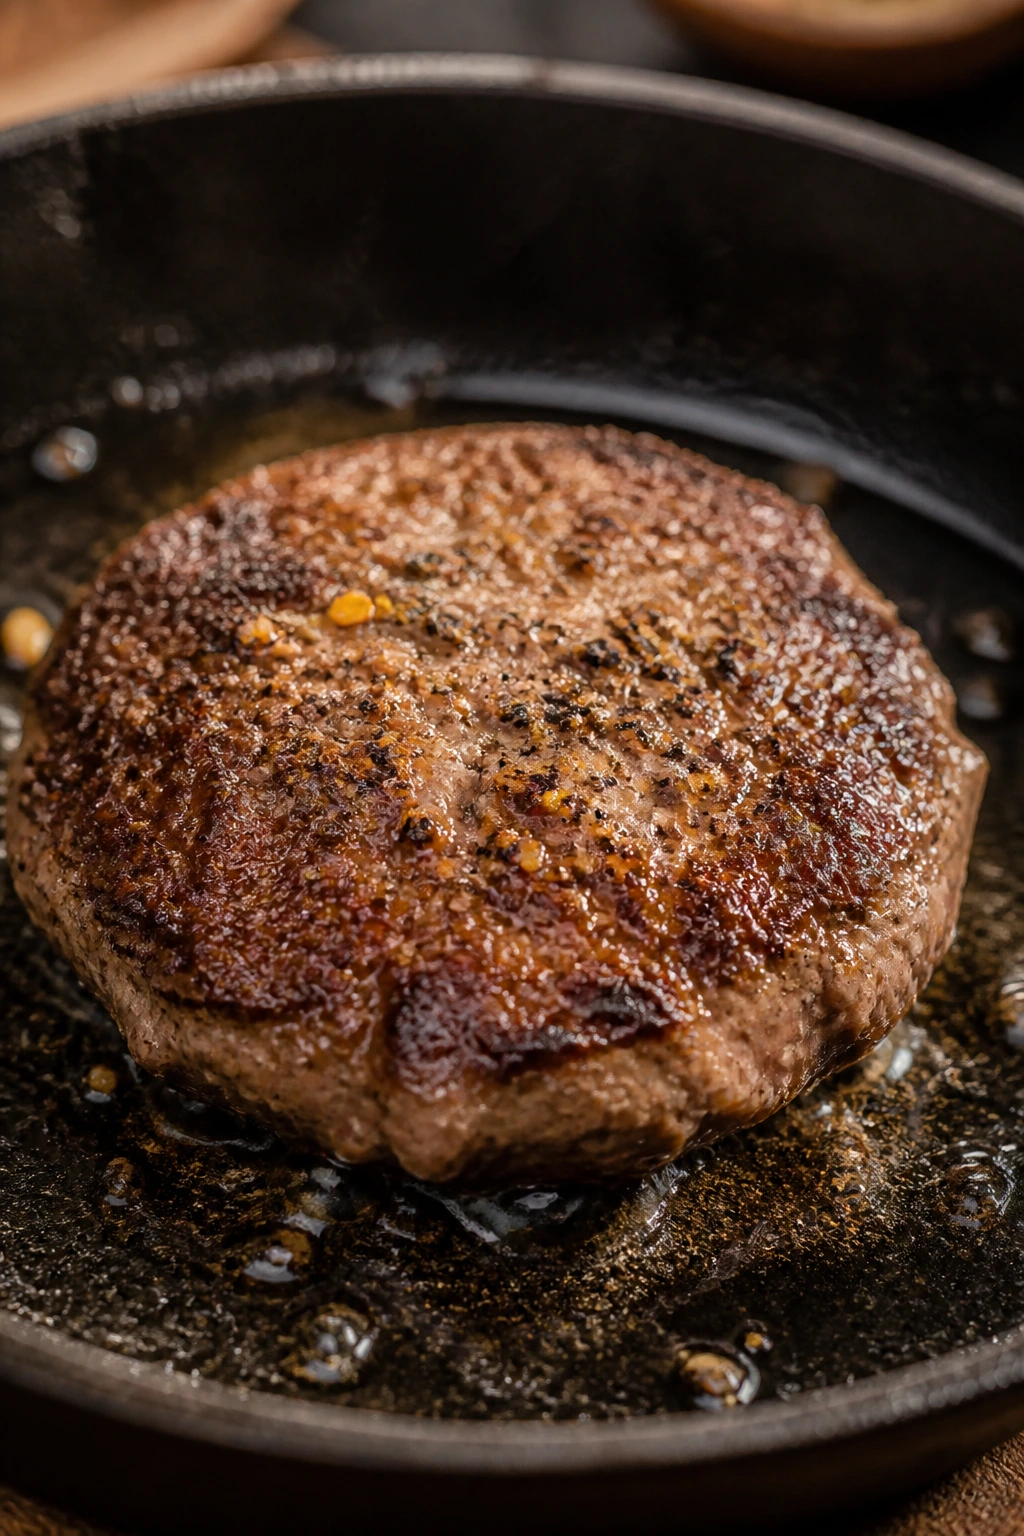
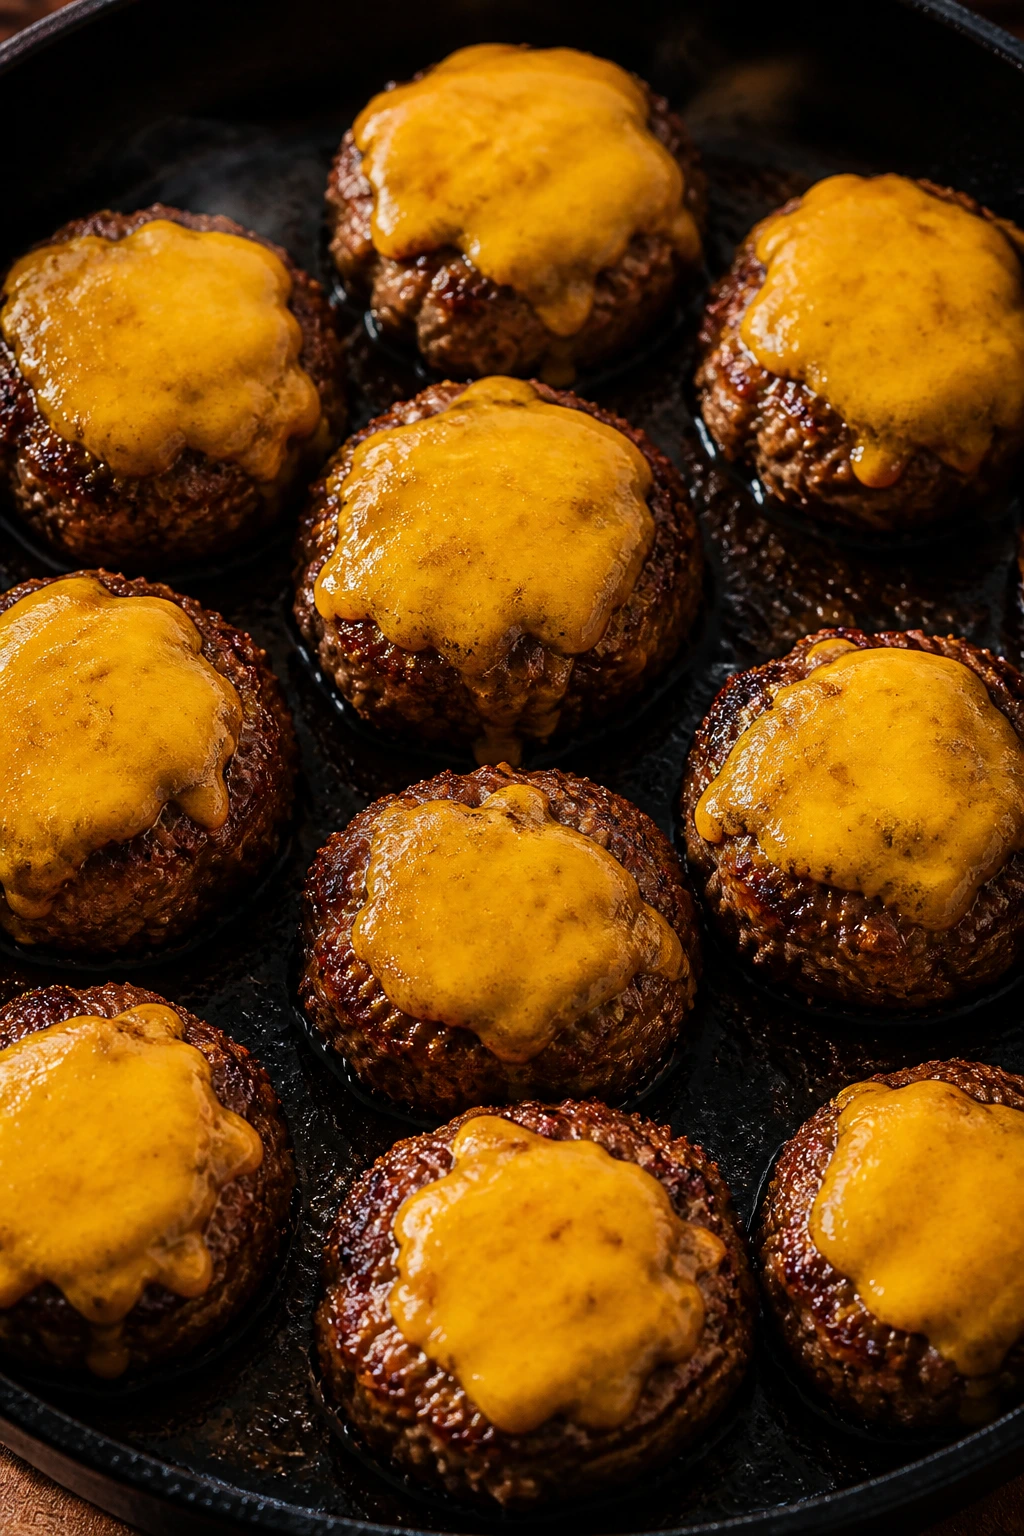
Cook the burgers: 6. Set a large skillet over medium-high heat and let it preheat for 2 to 3 minutes. Add 1 tablespoon neutral oil and swirl it across the pan. The oil should shimmer, not smoke. 7. Lay the patties in the skillet with a little space between them. Sear for 2 to 3 minutes on the first side, until the bottoms are deeply browned and the edges look set. 8. Flip the patties, top each one with a slice of American cheese, and cook for another 1 to 2 minutes. Cover the skillet with a lid or foil for 30 to 60 seconds so the cheese melts. Ground beef should reach 160°F in the center. 9. Transfer the finished patties to a plate and let them rest for 2 minutes. That brief pause keeps the juices from running all over the board the second you cut in.
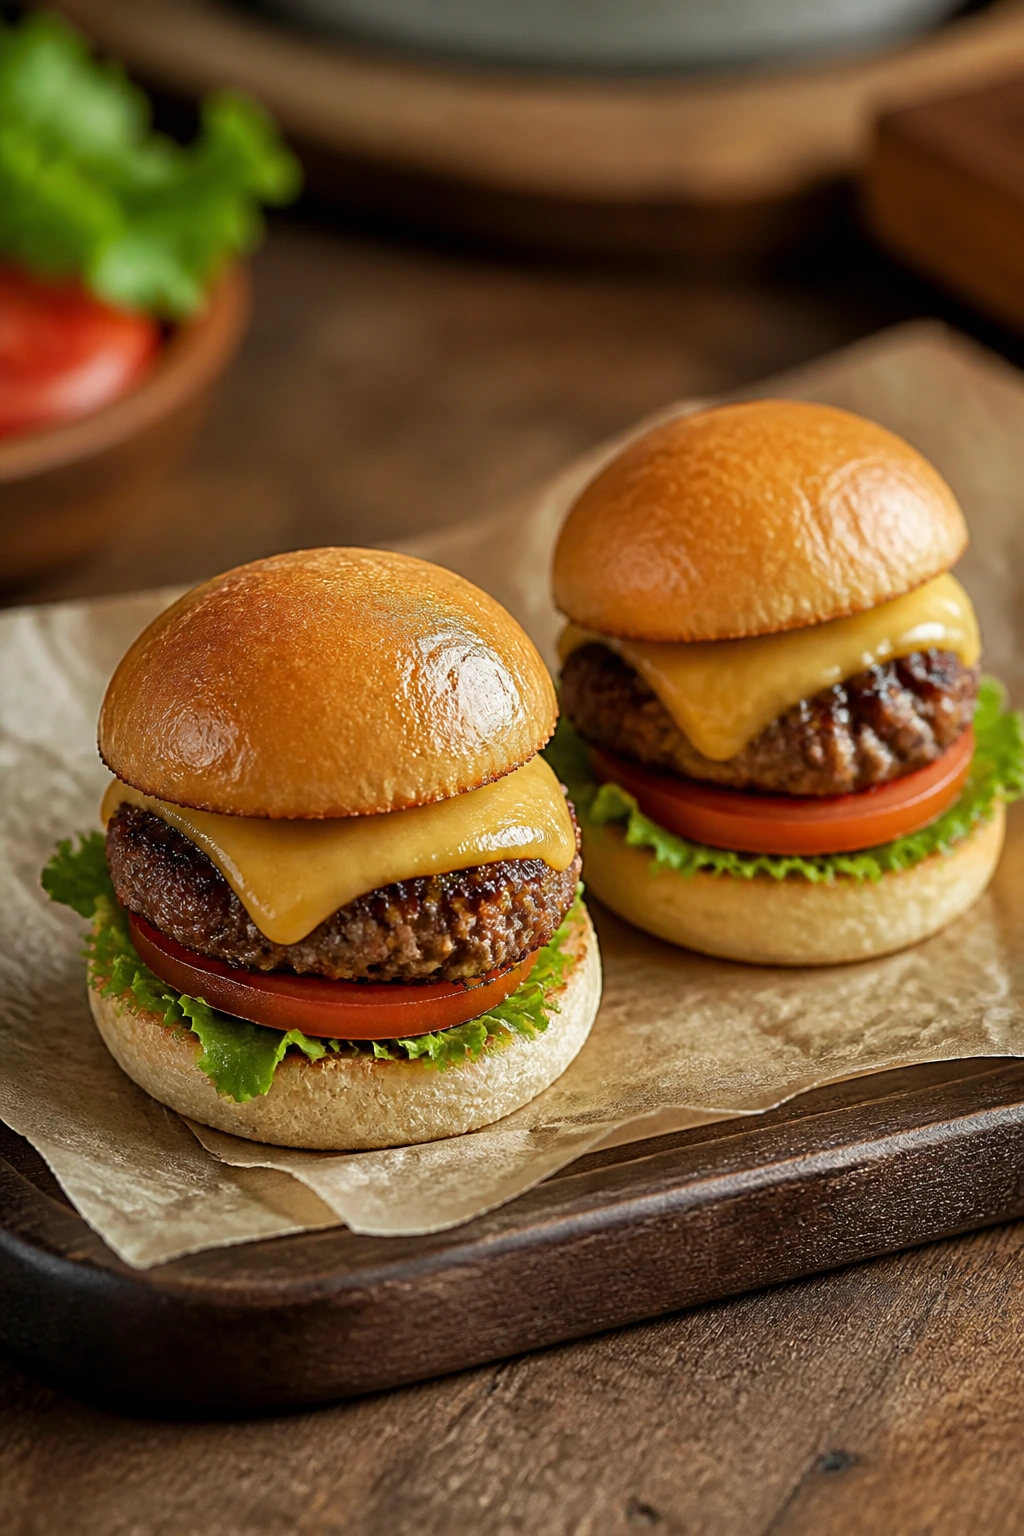
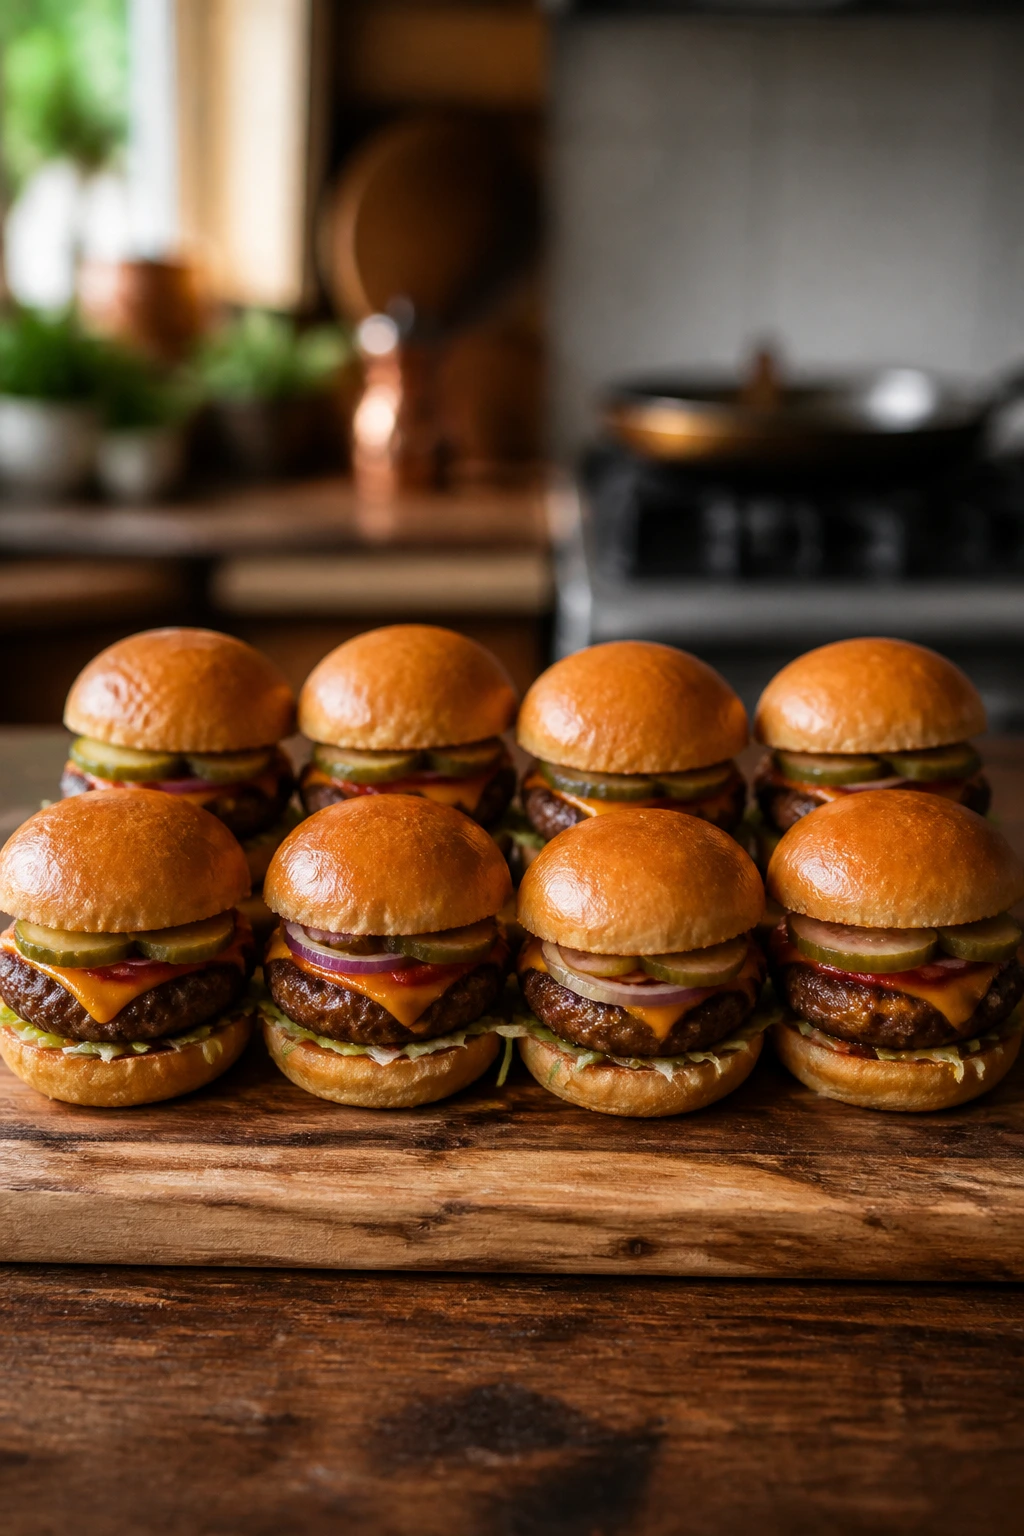
Toast the buns and assemble: 10. Brush the cut sides of the buns with melted butter. Toast them cut-side down in the same skillet for 30 to 45 seconds, just until golden and lightly crisp. 11. Spread burger sauce on the bottom buns, add lettuce, a cheeseburger patty, tomato, pickles, and red onion. Cap with the top buns and serve immediately.
How to Build and Serve Them Without Soggy Buns
Presentation: Serve the mini burgers on a large platter lined with parchment or a tray with a little lip, because the sauce and pickle brine will wander if you let them. I like to stack the assembled burgers in two neat rows, then tuck extra pickles and a spoonful of sauce on the side.
Accompaniments: Oven fries, kettle chips, coleslaw, and a sharp cucumber salad all make sense here. If you want the plate to feel even heartier, add baked beans or a simple green salad with vinegar dressing so the meal doesn’t tilt too far into richness.
Portions: Two mini burgers per adult is the sweet spot when you’re serving fries or another side. For smaller appetites, one burger with a pile of slaw is enough, and for bigger eaters, plan on three patties if the buns are soft and the sauce is generous.
Beverage Pairing: Iced tea cuts through the richness without fighting it. A cold lager or a plain cola does the same job if you want something a little more classic.
Do not sauce the top bun first and then wonder why the whole thing slides apart. Keep the sauce on the bottom, put the lettuce next, and let the patty sit on top of that little barrier. It sounds fussy. It isn’t. It’s the difference between a neat burger and a napkin emergency.
Practical Tips That Pay Off
Flavor Enhancement: Add a tiny pinch of smoked paprika to the butter before toasting the buns, and the edges pick up a deeper, almost grilled flavor even if you’re cooking indoors. If you like pickles, add one extra chip under the cheese so the hot fat and cold brine meet in the middle.
Time-Saver: Shape the patties up to 24 hours ahead and store them between sheets of parchment in the fridge. When dinner time comes, you’re only heating the skillet and toasting buns, which is where the speed lives.
Cost-Saver: Store-brand slider buns are fine as long as they’re soft and intact. Spend the money on the beef, not the bread box; 80/20 ground beef is doing most of the heavy lifting in flavor and juiciness.
Texture Trick: Dry the lettuce and tomatoes better than you think you need to. A paper towel or clean kitchen towel makes the difference between a crisp bite and a bun that starts going limp halfway through the plate.
Make-It-Yours: If you want these a little lighter, use one slice of cheese per two burgers and load up on lettuce, onion, and tomato. If you want them richer, brush the buns with extra butter and add a spoonful of caramelized onion under the patty.
Common Mistakes That Dry Out Mini Burgers
Overmixing the beef: The mistake shows up as patties that feel springy and eat like meatloaf. Fix it by mixing with your fingertips and stopping the second the seasoning disappears into the meat.
Using a cool skillet: If the pan isn’t hot enough, the burgers pale out and start steaming before they brown. Preheat for a full 2 to 3 minutes, then look for shimmer in the oil and a firm sizzle the second the meat lands.
Skipping the dimple: Flat patties often balloon in the middle, which makes the burger slide around inside the bun. Press a shallow thumbprint into the center before cooking and the top stays much flatter.
Cooking too long because they’re small: Mini burgers can fool you into thinking they need more time than a regular patty. They don’t. Use an instant-read thermometer and pull them at 160°F; if you wait for them to “look done,” they’ll usually be dry.
Assembling too early: Once sauce, tomato, and warm patties meet a soft bun, moisture starts moving fast. Assemble right before serving and keep the buns toasted so they can handle the heat.
Crowding the skillet: Too many patties in the pan drop the temperature and rob you of browning. Cook in batches if you need to. A single extra minute is better than four pale, greasy burgers.
Flavor Swaps and Easy Variations
Smoky Bacon Diner Sliders: Crisp 4 to 6 strips of bacon and crumble them over the sauce or tuck a strip under each patty. A little bacon fat in the skillet adds a deeper, saltier crust that feels straight out of a diner griddle.
Pepper Jack Heat Wave: Swap the American cheese for pepper jack and mix 1 tablespoon finely chopped pickled jalapeños into the burger sauce. This version stays juicy, but it brings a sharper bite that works well if your crowd likes a little heat.
Mushroom-Swiss Pan Burgers: Sauté 8 ounces of sliced mushrooms in the skillet after the patties come out, then pile them onto the burgers with Swiss cheese instead of American. It tastes meatier and earthier, and I reach for it when I want the burger to feel a little more dinner-party than drive-thru.
Turkey Slider Swap: Use 1½ lb ground turkey, add 1 tablespoon mayonnaise to the meat, and keep the cooking time tight so it doesn’t dry out. Turkey needs a lighter hand than beef, but the same sauce and bun setup still works.
Gluten-Free Plate: Use gluten-free slider buns or serve the patties over lettuce with the sauce on the side. Toast the buns carefully, because some gluten-free breads brown quickly on the outside before they warm through.
Open-Face Party Style: Skip the top buns and serve the burgers as open-faced sliders with extra pickles and sauce on top. It looks sharp on a platter and makes the patties feel a little larger without changing the meat ratio.
Make-Ahead, Storage, and Reheating
The patties hold up better than the finished burgers, so store the parts separately whenever you can. Cooked patties keep in an airtight container in the refrigerator for 3 to 4 days, and the sauce keeps for 4 to 5 days if you cover it tightly. I would not assemble the burgers ahead of time unless you enjoy soggy bread and soft pickles.
Raw shaped patties can sit in the fridge for up to 24 hours, layered with parchment. Freeze them for up to 2 months if you want a true grab-and-cook shortcut; freeze them on a tray first so they don’t glue themselves together, then move them to a freezer bag. Cooked patties also freeze well, though the texture is a touch better if you reheat them gently rather than blasting them in the microwave.
To reheat, set the patties in a skillet over medium-low heat with 1 tablespoon water, cover, and warm for 2 to 3 minutes until heated through. That little bit of steam keeps the beef from drying out. If you’re in a hurry, microwave the patty at 50% power in 20-second bursts, then toast the bun in a skillet so the whole thing doesn’t turn rubbery.
Buns are best at room temperature on the day you buy them, but they can be frozen for about 1 month if they’re wrapped well. Thaw them at room temperature, then toast before serving. The lettuce, tomato, and pickles should be sliced fresh whenever possible; once they sit overnight, the burger starts tasting like a lunchbox version of itself.
Mini Burger Questions People Ask
Can I use 90/10 beef instead of 80/20?
Yes, but the burgers will be leaner and less forgiving. If that’s the beef you have, keep the patties a little thicker, shorten the cook time, and use the sauce and buttered buns to bring back some richness.
Do I really need a thermometer?
You can cook by touch if you’ve made burgers for years, but an instant-read thermometer removes the guesswork. For ground beef, 160°F is the safe target, and mini patties can overcook faster than you expect.
Can I grill these instead of using a skillet?
Absolutely. Preheat the grill, oil the grates, and cook over medium-high heat for about 2 to 3 minutes per side, adding the cheese during the last minute. The flavor shifts a little toward smoke, which is a good thing if the weather and setup cooperate.
How do I keep the buns from getting soggy?
Toast them, sauce the bottom bun, and dry the lettuce and tomato well. If your tomatoes are extra juicy, seed them first or use thinner slices so they don’t dump liquid onto the bread.
Can I make the patties ahead of time?
Yes. Shape them up to a day ahead and keep them chilled between sheets of parchment. That actually helps the burgers hold together better once they hit the pan.
What cheese melts best on mini burgers?
American cheese melts the smoothest and fastest, which is why it works so well here. Cheddar has more bite, but it needs a lid on the pan and a little more patience to melt evenly.
What if the patties shrink too much?
Make them slightly wider than the buns before cooking, and use the center dimple so they don’t puff upward. If they still shrink a little, treat it as a feature and add a second pickle or more lettuce rather than stretching the meat.
A Burger Night Worth Repeating
There’s a reason mini burgers keep showing up on dinner tables long after the novelty wears off. They cook fast, they take toppings well, and they let ground beef taste like something deliberate instead of something patched together at 6:30.
The part I keep coming back to is the texture: hot crust on the outside, soft bread underneath, a little cold crunch from the pickles and lettuce, and a sauce that turns the whole thing into one balanced bite. Keep the patties cold, the skillet hot, and the buns toasted, and the rest falls into place with almost suspicious ease.
Juicy Mini Burgers for a Hearty Dinner — Recipe Card

Recipe Name: Juicy Mini Burgers for a Hearty Dinner
Description: Juicy mini beef burgers with melted American cheese, toasted slider buns, and a tangy burger sauce. They’re quick to cook, easy to customize, and sturdy enough to count as a real dinner.
Prep Time: 20 minutes
Cook Time: 15 minutes
Total Time: 35 minutes
Course: Dinner, Main Course
Cuisine: American
Servings: 4 servings
Calories: About 820 kcal per serving
Ingredients
For the Burger Patties:
- 1½ lb ground beef, 80/20, very cold
- 1 small yellow onion, finely grated and lightly squeezed dry
- 1 tsp kosher salt
- 1 tsp Worcestershire sauce
- 1 tsp Dijon mustard
- 1 tsp garlic powder
- ½ tsp black pepper
- ½ tsp smoked paprika
For the Buns and Toppings:
- 8 slider buns or mini brioche buns, split
- 2 tbsp unsalted butter, melted
- 8 slices American cheese
- 1 cup shredded iceberg lettuce
- 1 large tomato, sliced into 8 thin rounds
- 16 dill pickle chips
- ½ small red onion, very thinly sliced
For the Burger Sauce:
- ¼ cup mayonnaise
- 2 tbsp ketchup
- 1 tbsp dill pickle relish
- 1 tsp Dijon mustard
- 1 tsp pickle brine
- ¼ tsp smoked paprika
Instructions
Make the Sauce and Prep the Toppings:
- Whisk together the mayonnaise, ketchup, relish, Dijon mustard, pickle brine, and smoked paprika. Set aside.
- Slice the tomato and red onion, dry the lettuce, and split the buns.
Shape the Patties: 3. Gently mix the ground beef, grated onion, salt, Worcestershire sauce, Dijon mustard, garlic powder, black pepper, and smoked paprika until just combined. 4. Divide into 8 portions and shape into patties slightly wider than the buns. Press a shallow dimple into the center of each patty. 5. Chill the patties for 10 minutes if possible.
Cook the Burgers: 6. Heat a skillet over medium-high heat for 2 to 3 minutes and add the oil. 7. Sear the patties for 2 to 3 minutes on the first side, until deeply browned. 8. Flip, top with cheese, cook 1 to 2 minutes more, and cover briefly until melted. Cook to 160°F in the center. 9. Transfer the patties to a plate and rest for 2 minutes.
Toast and Assemble: 10. Brush the buns with melted butter and toast cut-side down for 30 to 45 seconds. 11. Spread sauce on the bottom buns, add lettuce, burgers, tomato, pickles, and onion, then finish with the top buns.
Notes: Keep the patties cold, do not overmix the beef, and toast the buns right before serving. American cheese melts the cleanest here, but cheddar or Swiss works if you want a different finish.