
The best date night dinner ideas at home do not need a reservation, a linen tablecloth, or a giant grocery bill. They need a little theater: a hot skillet, a glossy sauce, something crisp on the side, and a plate that makes the two of you pause before the first bite. That pause matters. It’s the difference between “we made dinner” and “we made an evening.”
Home is better for this than most people admit. You can pace the meal the way you want, keep the music low, pour a second glass without flagging down a server, and lean into dishes that taste generous without being fussy. A steak with pan sauce. Shrimp with garlic and lemon. Risotto that turns creamy under a wooden spoon. Short ribs that perfume the whole place while they braise. These aren’t party tricks. They’re just smart cooking.
What I like most about date-night cooking is how honest it is. You don’t need twelve garnishes and a torch. You need good timing, a few sharp flavors, and the nerve to let a pan get properly hot. That’s where the magic lives — in the sizzle, the reduction, the browned bits at the bottom of the pan that become sauce if you treat them right.
Why These Date Night Dinner Ideas at Home Feel Special
-
Low-fuss, high-reward: Every recipe here gives you a noticeable payoff for the time you spend, whether that’s a red wine pan sauce, a bronzed salmon glaze, or a pile of creamy polenta under short ribs.
-
Built for two, easy to scale: Most of these dishes serve two with enough flexibility to stretch to four, which means you can keep the meal intimate or invite another couple without rewriting the whole plan.
-
Restaurant energy without the reservation: A hot cast-iron skillet, a squeeze of lemon, and a finished sauce do more for the mood than a complicated centerpiece ever will.
-
Flexible with the pantry: A few of these dishes use staple ingredients — pasta, rice, potatoes, onions, garlic, butter, broth — so the shopping list stays sane.
-
Enough variety to match the mood: Some nights call for steak and potatoes. Some want seafood, some want something creamy, and some want a vegetarian plate that doesn’t feel like a compromise.
-
Leftovers that still feel useful: A braise, a pasta, or a chicken dish can turn into lunch the next day without tasting like punishment.
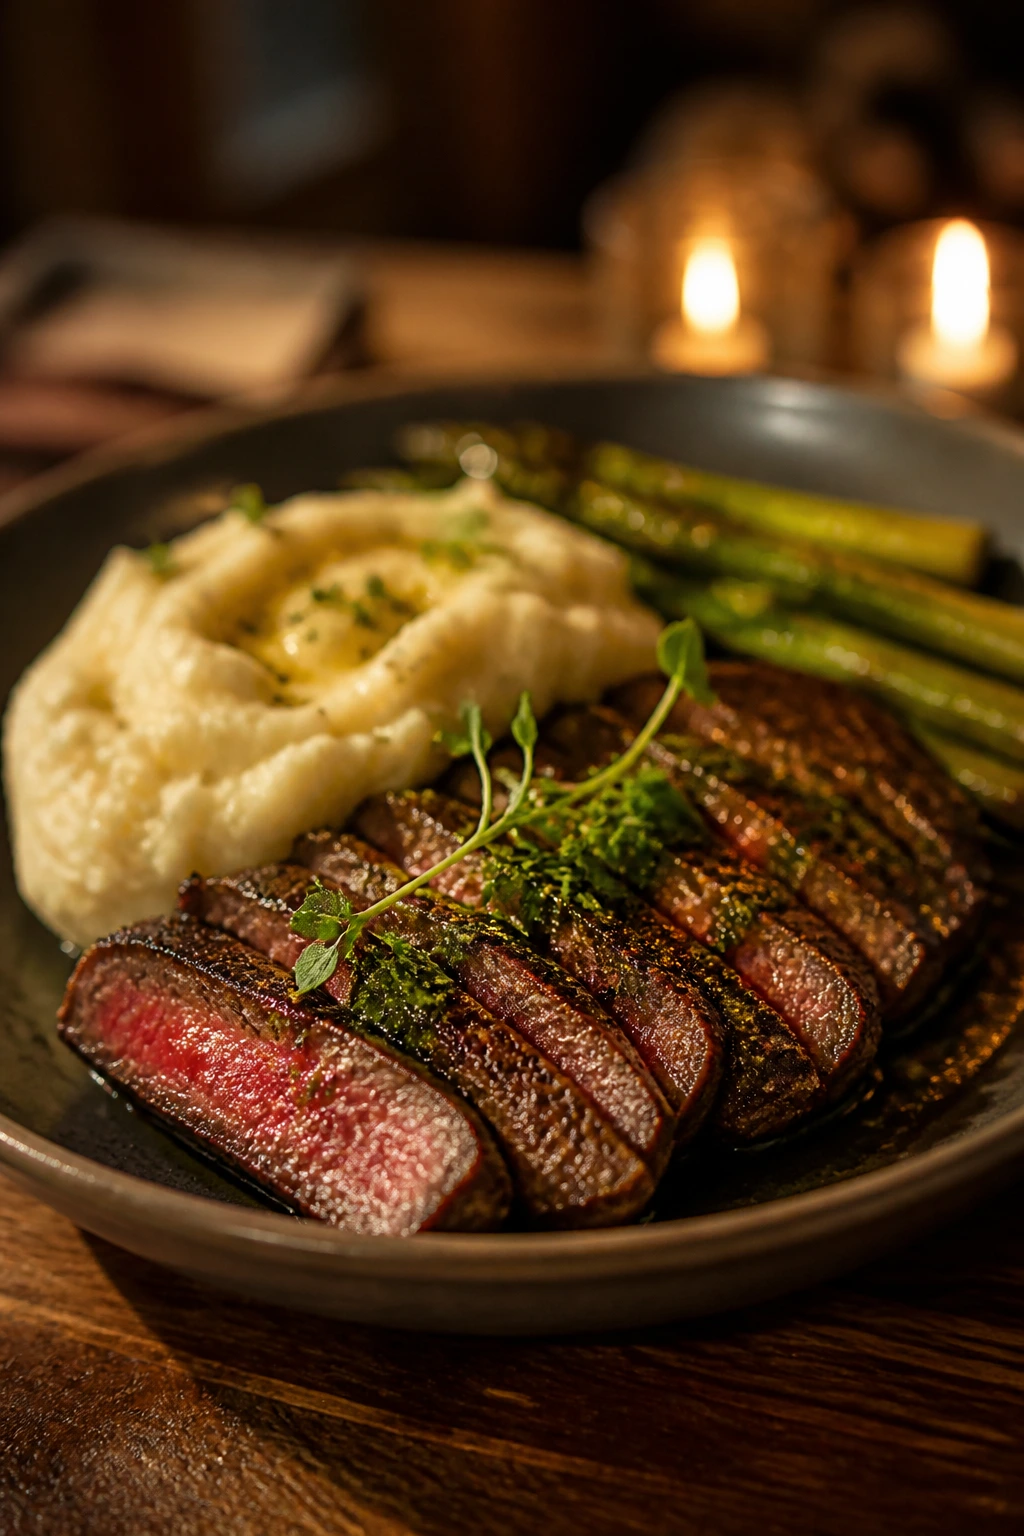
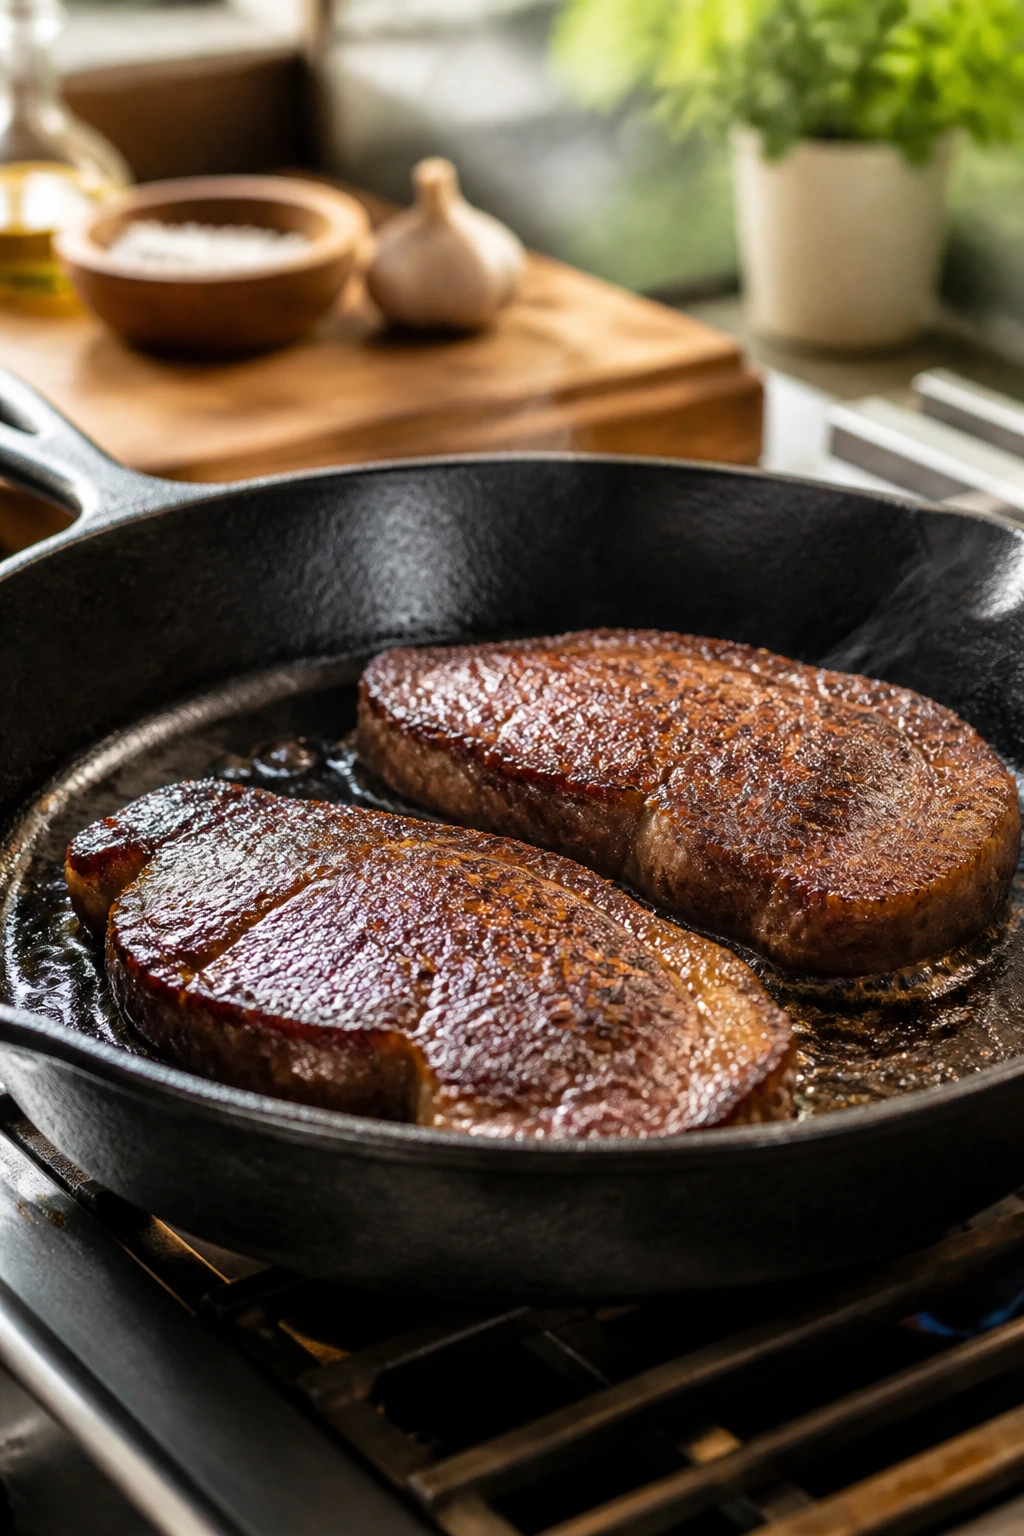
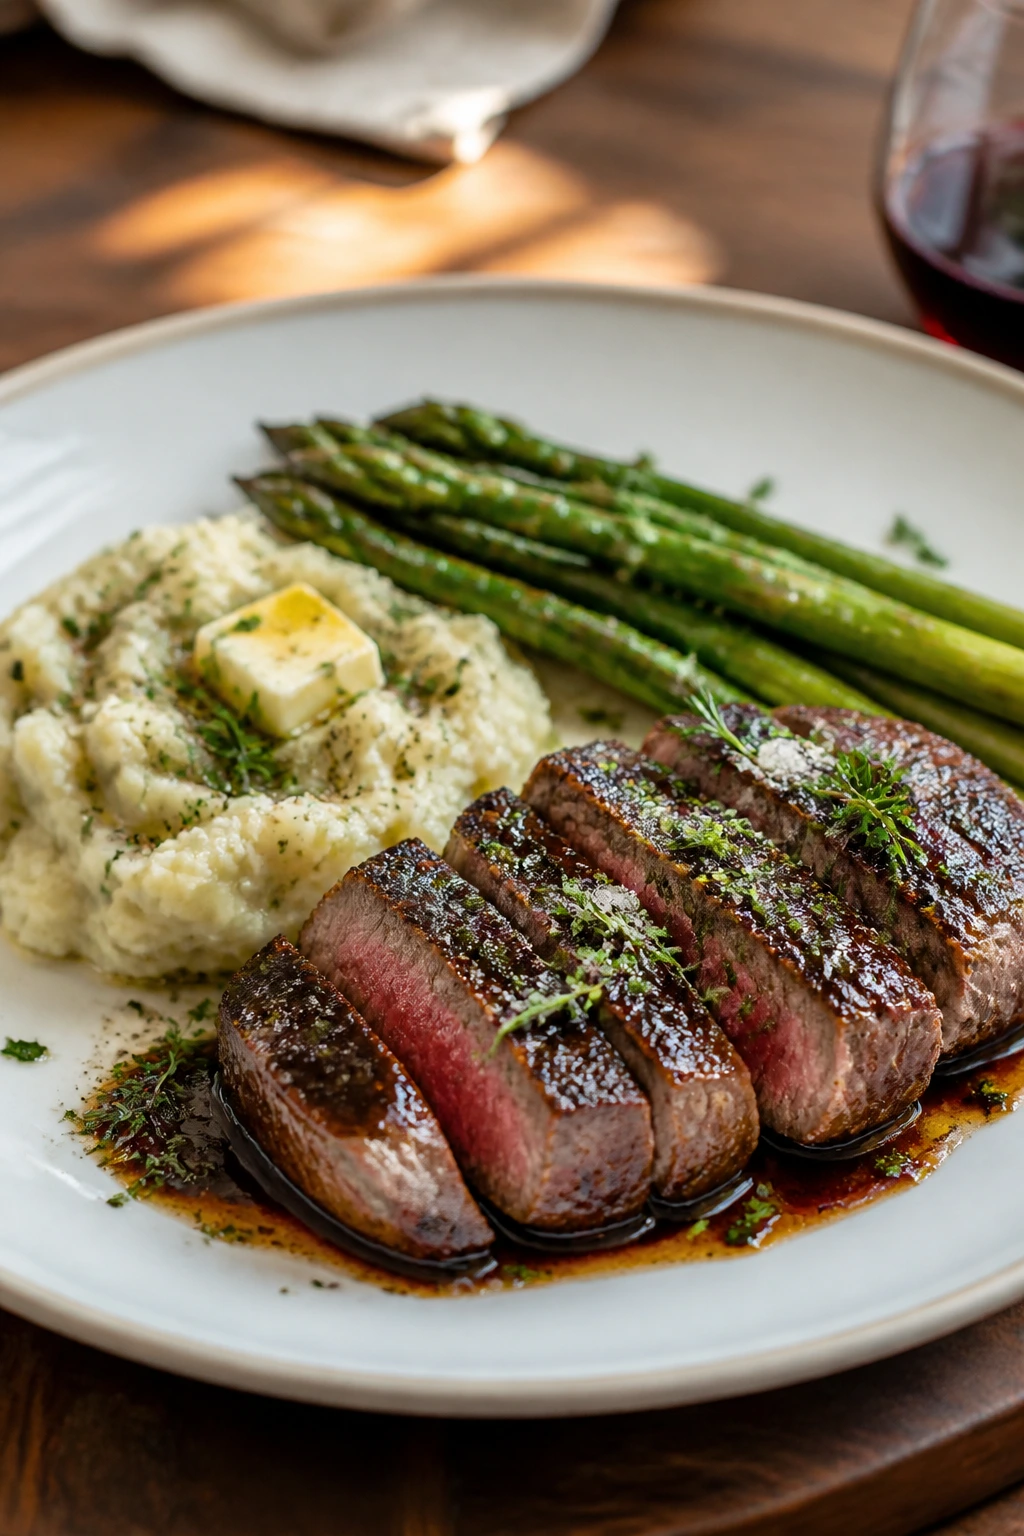
1. Cast-Iron Ribeye with Red Wine Pan Sauce
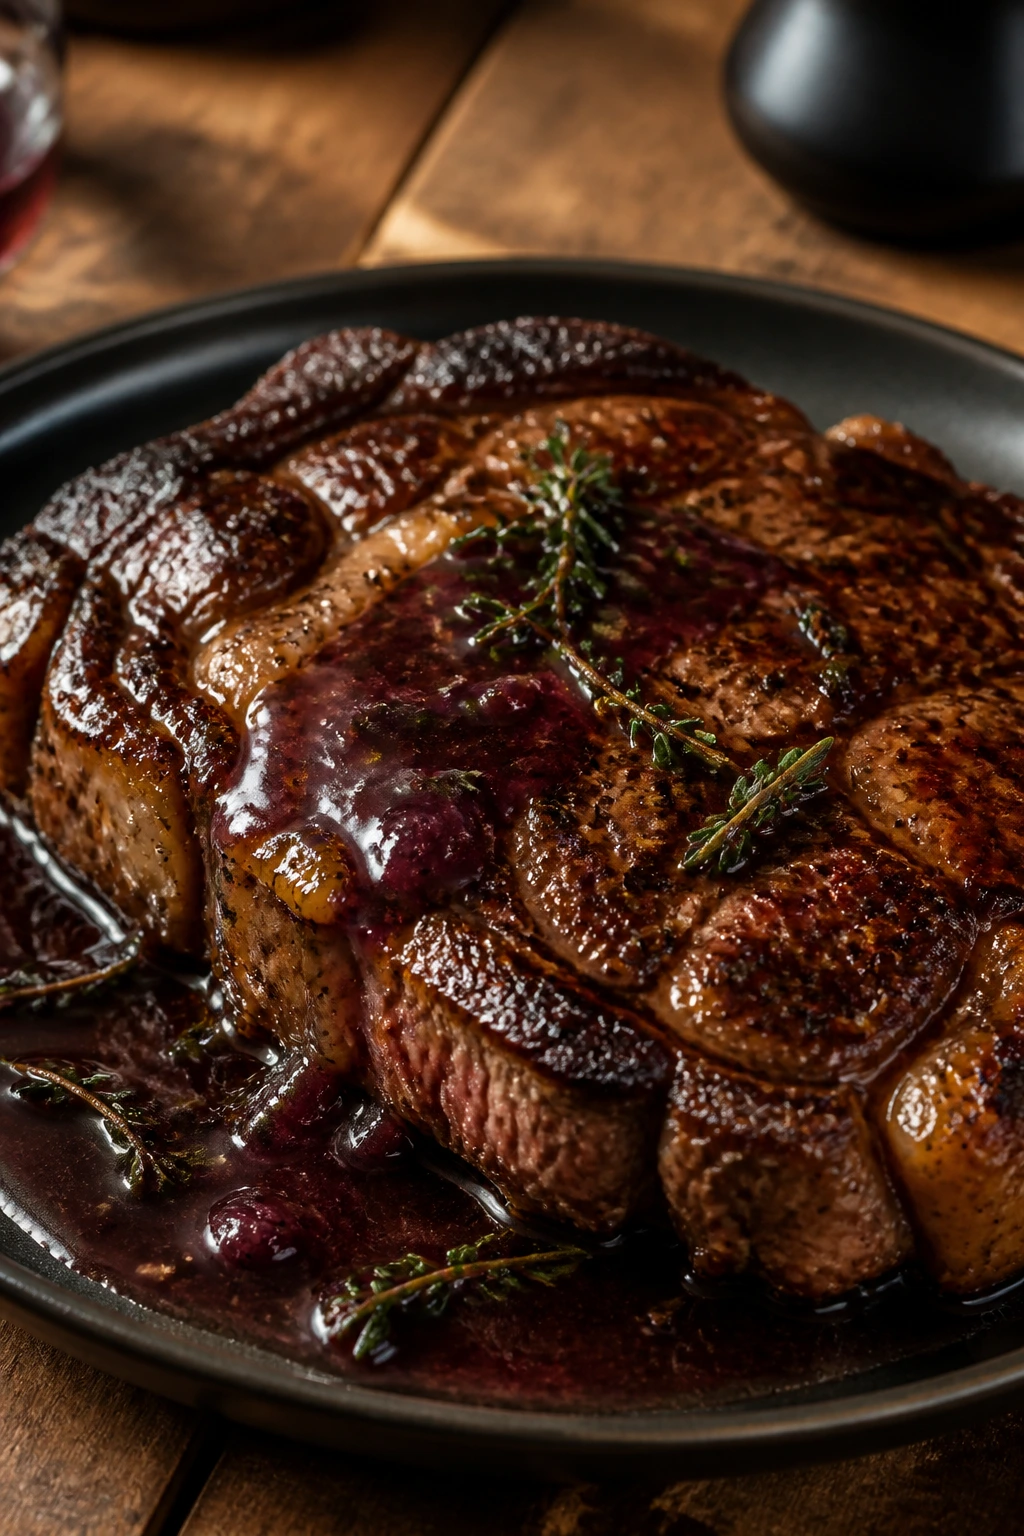
A ribeye cooked in a screaming-hot skillet has a way of making the whole room feel warmer. The fat melts, the edges darken, and the pan starts to smell like butter, pepper, and something you’d pay too much for at a steakhouse. Add crisp fingerlings and a sharp little salad, and the plate stops looking like dinner and starts looking like a plan.
Why It Works
Ribeye is the steak for people who want flavor first. The marbling keeps the meat juicy, and a cast-iron skillet gives you the kind of crust that only happens when the pan stays hot and the steak stays dry. The red wine pan sauce uses the browned bits stuck to the skillet — the part most people leave behind — and turns them into something glossy and deep. Roast the potatoes at 425°F so they crisp while the steak rests, and you’ve got texture on every forkful. For medium-rare, pull the steak at about 125°F to 130°F; after resting, it climbs a little more.
Key Ingredients
- 2 ribeye steaks, 1 to 1½ inches thick, 10 to 12 ounces each — Thicker cuts hold onto moisture better and give you more room for a good crust.
- 1½ pounds fingerling potatoes, halved lengthwise — Small potatoes crisp faster and look tidy on the plate.
- 2 tablespoons olive oil — Helps the potatoes brown and gives the steak a thin coating before searing.
- 2 teaspoons kosher salt and 1 teaspoon black pepper — Ribeye can take a firm hand with seasoning.
- 2 tablespoons unsalted butter — Used for basting and for finishing the sauce.
- 1 small shallot, minced — Brings sweetness to the pan sauce.
- ¾ cup dry red wine — Choose something you’d drink; it does matter here.
- ¾ cup beef stock — Builds the sauce without making it heavy.
- 1 teaspoon Dijon mustard — A small spoonful sharpens the whole pan sauce.
- 3 thyme sprigs — They perfume the butter and make the kitchen smell expensive.
Quick Steps
-
Roast the potatoes: Heat the oven to 425°F. Toss the fingerlings with olive oil, 1 teaspoon salt, and ½ teaspoon pepper, then spread them cut-side down on a baking sheet. Roast for 25 to 30 minutes, until the cut sides are deeply golden and the centers are tender.
-
Season the steaks: Pat the ribeyes dry with paper towels. Season both sides with the remaining salt and pepper, and let them sit while the oven works. Dry surface, hot pan. That’s the whole game.
-
Sear hard: Heat a cast-iron skillet over medium-high until it is very hot. Add the steaks and cook for 3 to 4 minutes per side, until a dark crust forms. Do not move them around or you’ll lose the crust before it gets started.
-
Baste with butter: Add the butter, thyme, and a smashed garlic clove if you want one, then tilt the pan and spoon the melted butter over the steaks for 30 to 45 seconds.
-
Rest the meat: Transfer the steaks to a board and rest for 8 to 10 minutes. The juices settle back in. Skip this, and the first slice bleeds onto the cutting board.
-
Build the sauce: Lower the heat to medium. Add the shallot and cook for 1 minute, then pour in the red wine and simmer for 2 to 3 minutes, scraping the browned bits loose. Add the beef stock and Dijon, then reduce until the sauce lightly coats a spoon. Swirl in the last bit of butter and spoon it over the sliced steak.
Tips and Variations
- Swap the cut: Strip steak works well if you want a slightly leaner bite with a similar crust.
- Add brightness: A handful of arugula with lemon juice and olive oil keeps the plate from feeling too heavy.
- Use the drippings well: If the pan sauce gets too sharp, a splash of stock or a small knob of butter softens it fast.
2. Lemon Garlic Shrimp Scampi with Linguine
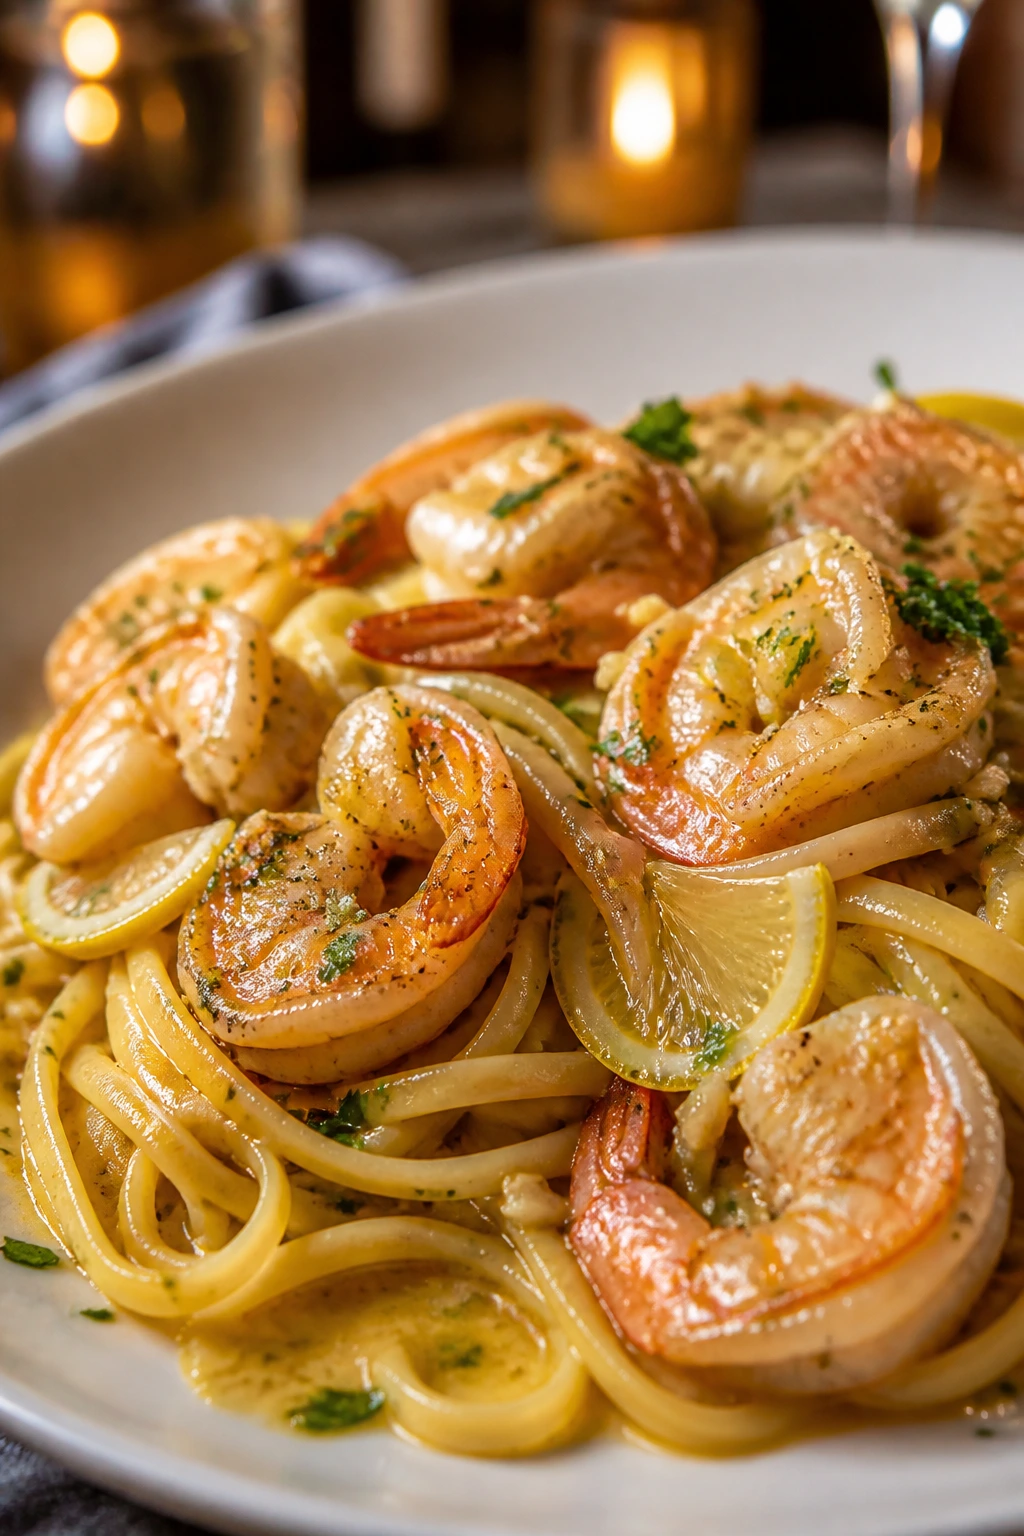
Shrimp scampi has a sharp kind of charm. It’s bright, buttery, and quick enough that you’re not trapped at the stove while the evening slips away. The lemon wakes everything up, the garlic turns sweet in the pan, and the linguine catches every bit of sauce like it was made for this job.
Why It Works
Shrimp cooks in minutes, which is why scampi is such a useful date-night move. The sauce is built in the same pan the shrimp were cooked in, so you get the flavor from the sear instead of trying to fake it later. Pasta water helps the butter and lemon cling to the noodles, and a handful of toasted panko gives the dish a crisp finish that keeps it from feeling soft all the way through. Use shrimp that are peeled and deveined, and cook them only until pink and just opaque — usually 2 to 3 minutes total, depending on size. Shrimp left in the pan too long turn rubbery in a hurry.
Key Ingredients
- 12 ounces linguine — Long pasta holds the sauce well without fighting the shrimp.
- 1½ pounds large shrimp, peeled and deveined — Look for 21/25 count or something close.
- 4 tablespoons unsalted butter — The base of the sauce and the finishing gloss.
- 2 tablespoons olive oil — Helps keep the butter from browning too fast.
- 5 garlic cloves, thinly sliced — Sliced garlic cooks evenly and gives little sweet bites in the sauce.
- 2 lemons, zested and juiced — You want both parts: aroma from the zest, bite from the juice.
- ½ cup dry white wine or seafood stock — Wine adds lift; stock works if that’s what you have.
- ¼ teaspoon red pepper flakes — Just enough warmth to keep the dish from tasting flat.
- ½ cup chopped parsley — Freshens the whole pan right at the end.
- ½ cup panko breadcrumbs and 2 tablespoons Parmesan — For a crisp topping if you want more texture.
Quick Steps
-
Toast the crumbs: Warm 1 tablespoon butter in a small skillet over medium heat. Add the panko and toast for 3 to 4 minutes, stirring often, until golden. Stir in the Parmesan and set aside.
-
Cook the pasta: Boil the linguine in well-salted water until just shy of al dente. Reserve 1 cup of pasta water before draining.
-
Sear the shrimp: Pat the shrimp dry and season them lightly with salt and pepper. Heat olive oil and 2 tablespoons butter in a large skillet over medium-high heat, then cook the shrimp for 1 to 2 minutes per side until pink. Remove them immediately.
-
Build the sauce: Lower the heat to medium. Add the garlic and red pepper flakes and cook for 30 seconds, just until fragrant, then pour in the wine or stock and scrape up the browned bits.
-
Finish the pan: Add the lemon juice, zest, remaining butter, and a splash of pasta water. Toss in the pasta, then the shrimp, and stir until the sauce coats the noodles. Add more pasta water if it looks tight.
-
Serve hot: Scatter parsley and the toasted panko over the top. The dish should look glossy, not soupy.
Tips and Variations
- Make it greener: Toss in asparagus tips or a handful of baby spinach during the last minute.
- Use fresh pasta if you like: It cooks fast, so watch it closely and pull it early.
- Go lighter: Use all olive oil instead of part butter, though you will lose some of the lushness.
3. Creamy Tuscan Chicken with Sun-Dried Tomatoes
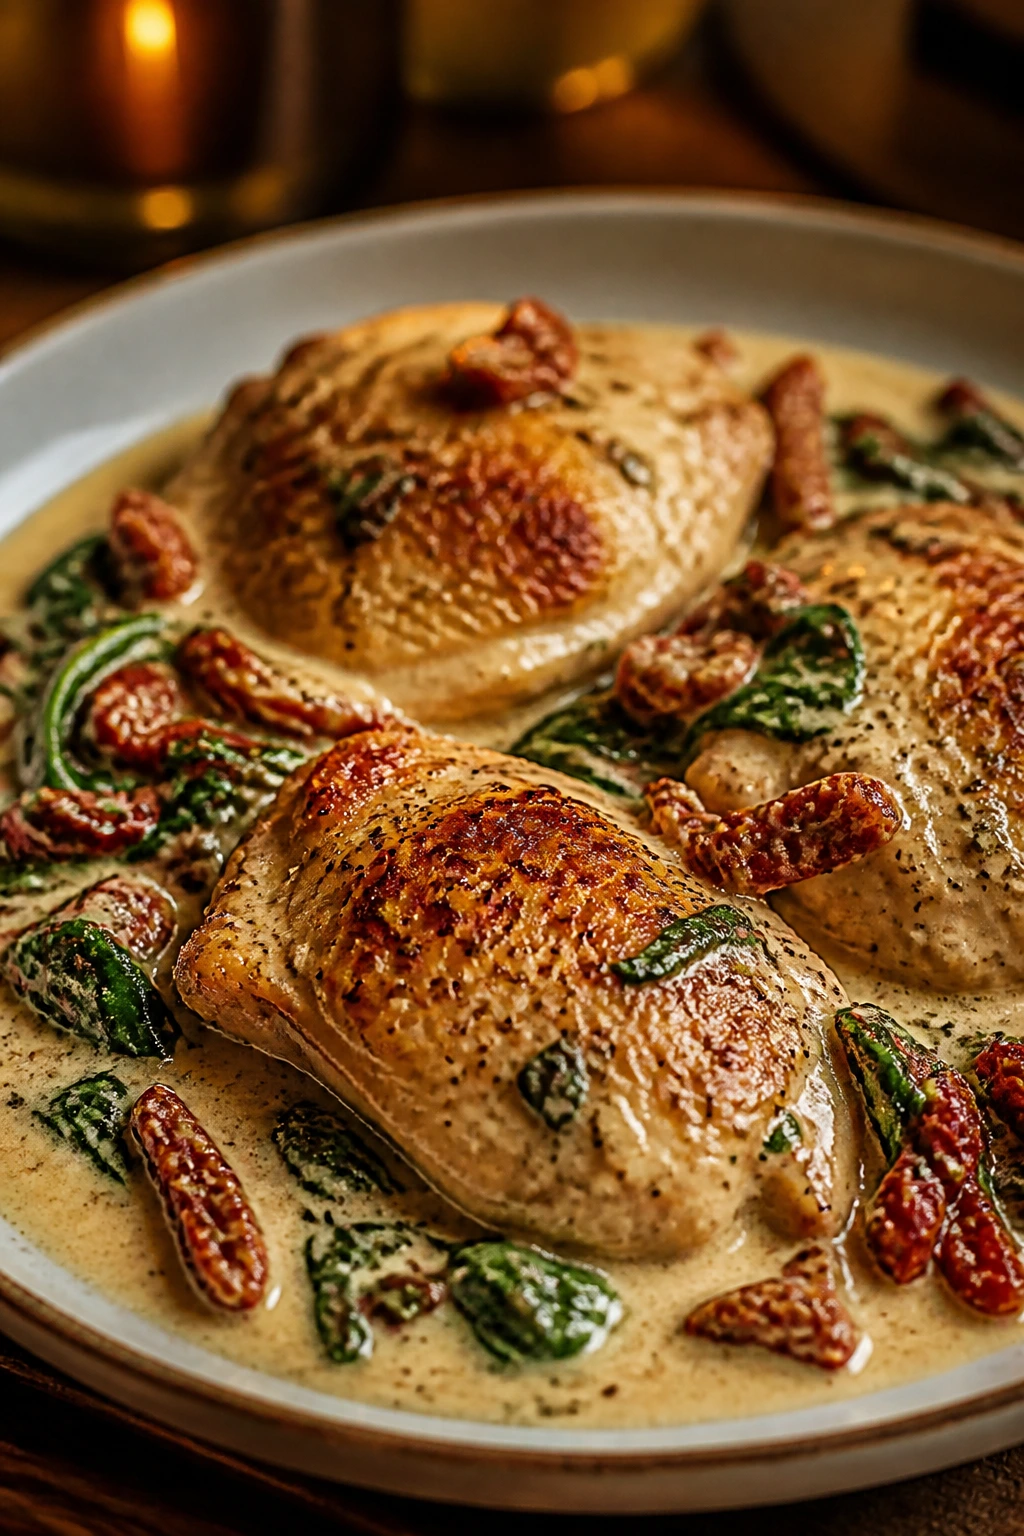
Creamy chicken can go wrong fast. Too thick, too beige, too forgettable. This one avoids all of that. The sun-dried tomatoes bring sweet chew, the spinach cuts through the richness, and the sauce clings to the chicken in a way that makes it feel like you planned the whole thing.
Why It Works
Chicken thighs stay juicy even after a good sear, which matters when you’re making a cream sauce and don’t want to babysit the pan. The flavor starts with browned chicken, then moves through garlic, shallot, and the oil from the sun-dried tomatoes before the cream and stock go in. That sequence matters because it builds layers instead of just dumping dairy in a skillet and hoping for the best. The sauce should simmer gently for about 3 to 5 minutes, long enough to thicken a little but not long enough to split. If you want the dish to feel more dinner-party than weeknight, serve it over buttered pasta or soft polenta.
Key Ingredients
- 6 boneless, skinless chicken thighs — Thighs stay tender and taste fuller than breasts here.
- 1 teaspoon kosher salt and ½ teaspoon black pepper — Season both the chicken and the sauce.
- ⅓ cup all-purpose flour — For a light coating that helps browning and thickens the sauce.
- 2 tablespoons olive oil — For searing.
- 1 tablespoon butter — Adds a rounder flavor to the pan.
- 1 small shallot, minced — Sweeter than a full onion and less bulky in the sauce.
- 3 garlic cloves, minced — Enough to taste it without turning bitter.
- ½ cup sun-dried tomatoes, sliced — Use oil-packed tomatoes for the best texture.
- 1 cup chicken broth — Lifts the sauce and keeps it from becoming too heavy.
- ¾ cup heavy cream — Gives the sauce body.
- 4 ounces baby spinach — Wilts quickly and balances the richness.
- ½ cup grated Parmesan — Salty, nutty, and very helpful.
Quick Steps
-
Season and coat: Pat the chicken thighs dry. Season with salt and pepper, then dust lightly with flour, shaking off the excess.
-
Sear the chicken: Heat olive oil and butter in a large skillet over medium-high heat. Cook the chicken for 4 to 5 minutes per side, until well browned and nearly cooked through. Transfer to a plate.
-
Cook the aromatics: Lower the heat to medium. Add the shallot and cook for 2 minutes, then add the garlic and sun-dried tomatoes and stir for 30 seconds.
-
Make the sauce: Pour in the chicken broth and scrape the bottom of the skillet clean. Stir in the cream and Parmesan, then simmer for 3 to 5 minutes until the sauce thickens enough to coat a spoon.
-
Finish the chicken: Return the chicken to the pan and simmer gently for 3 to 4 minutes, until the chicken reaches 165°F at the thickest point.
-
Wilt the spinach: Stir in the spinach and cook just until it collapses. Serve while the sauce is still silky.
Tips and Variations
- Breast option: Chicken breasts work if you pound them to even thickness, but they need a little more attention.
- Add pasta water: If you’re serving this over pasta, a splash of starchy water helps the sauce cling.
- Brighten at the end: A squeeze of lemon makes the cream taste cleaner.
4. Wild Mushroom Risotto with Parmesan and Thyme

Risotto has a reputation for being fussy. It isn’t, really. It just asks for attention. Stirring warm broth into rice while mushrooms brown in another pan creates a bowl that tastes far more polished than the work it actually asks of you.
Why It Works
Arborio rice is built for this dish because the grains release starch as they cook, which is what makes risotto creamy without needing a mountain of cream. Mushrooms bring deep, earthy flavor, and if you brown them separately before they go near the rice, they keep their edges and don’t steam into gray mush. Warm broth matters more than people think; cold liquid slows the cooking and keeps the rice from moving toward that satin texture. The risotto is ready when the grains are tender but still carry a little bite in the center, and the whole pan moves like loose lava when you tilt it. That’s the look.
Key Ingredients
- 1½ cups arborio rice — The classic rice for risotto.
- 1 pound mixed mushrooms, sliced — Cremini, shiitake, oyster, or whatever looks good and firm.
- 1 shallot, finely minced — A gentle onion base.
- 2 garlic cloves, minced — Keep it subtle.
- ½ cup dry white wine — Adds a little acidity and depth.
- 5 cups warm chicken or vegetable broth — Keep it simmering in a separate pot.
- 3 tablespoons unsalted butter — Used in stages for richness.
- 2 tablespoons olive oil — Helps brown the mushrooms and shallot.
- ¾ cup grated Parmesan — Finishes the rice.
- 1 tablespoon fresh thyme leaves — Earthy and floral.
- Salt and black pepper to taste — Add at the end after the Parmesan goes in.
Quick Steps
-
Warm the broth: Bring the broth to a gentle simmer in a saucepan, then keep it warm over low heat.
-
Brown the mushrooms: Heat olive oil in a wide skillet over medium-high heat. Add the mushrooms in a single layer and cook without stirring for 2 to 3 minutes, then stir and cook until browned and their liquid has evaporated.
-
Start the risotto base: Add 1 tablespoon butter and the shallot to the skillet. Cook for 2 minutes, then add the garlic and rice. Stir for 1 to 2 minutes until the rice edges look glossy.
-
Add the wine: Pour in the wine and stir until it’s almost gone. The pan should smell sharp and warm, not boozy.
-
Ladle in broth: Add warm broth ½ cup at a time, stirring often and waiting for most of the liquid to absorb before the next addition. Keep going for 18 to 22 minutes.
-
Finish with butter and cheese: Stir in the remaining butter, Parmesan, thyme, and a few grinds of black pepper. The risotto should spread slowly on the plate, not hold a stiff mound.
Tips and Variations
- Mix the mushrooms: A blend of cheap cremini and one fancier mushroom gives you depth without blowing the budget.
- Use stock carefully: Vegetable broth works fine, but taste it first; some brands run salty.
- Don’t rush the stirring: You do not need to stir every second, but you do need to keep the rice moving often enough to prevent sticking.
5. Miso-Glazed Salmon with Sesame Broccolini
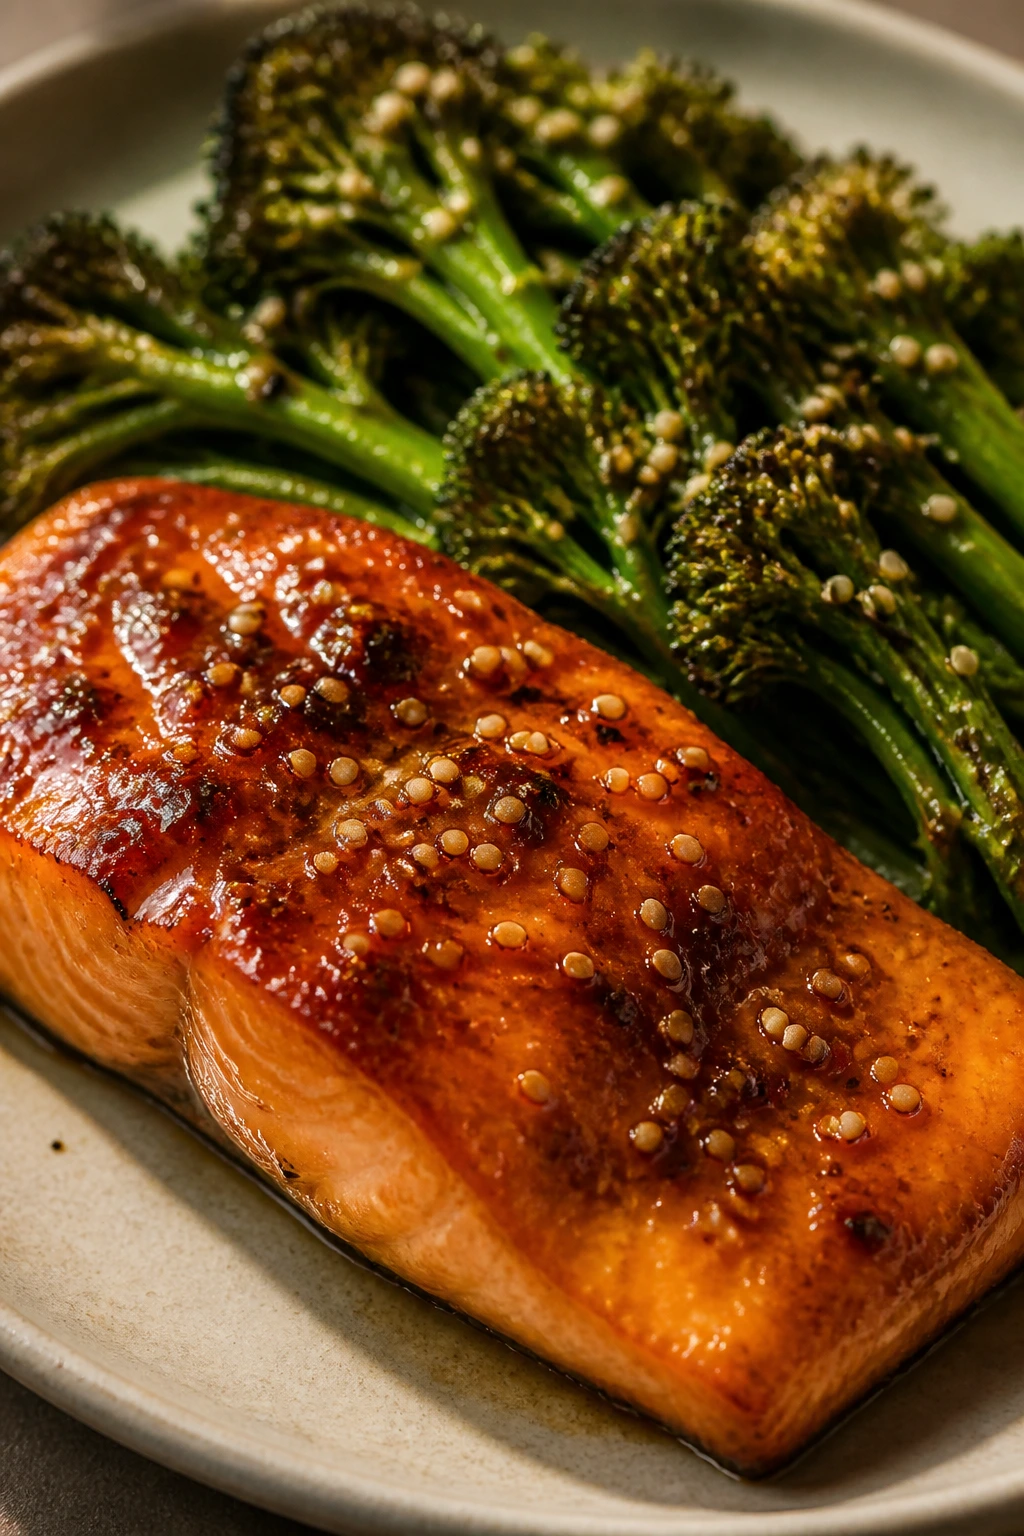
This is the fish dish I make when I want dinner to feel calm and polished. The miso glaze turns sticky and bronzed, the broccolini softens at the stems and chars at the tips, and the rice underneath catches every drop of sauce. It’s clean, savory, and a little bit luxurious without trying too hard.
Why It Works
Miso brings salt, funk, and a little sweetness, which means you can build a big-tasting glaze from a small list of ingredients. Honey helps it caramelize, soy sauce adds depth, and a touch of rice vinegar keeps the glaze from tasting flat. Salmon takes that glaze well because its natural richness stands up to the saltiness without getting buried. Roasting the broccolini on the same sheet pan saves time, but the fish should go in later so it doesn’t dry out. Salmon is best when the thickest part reaches about 125°F to 130°F for a soft center, though some people prefer it more done.
Key Ingredients
- 4 salmon fillets, about 6 ounces each — Skin-on fillets hold together better.
- 3 tablespoons white miso paste — Mild, sweet, and easy to glaze with.
- 2 tablespoons soy sauce — Brings salt and depth.
- 1½ tablespoons honey — Helps the glaze cling and brown.
- 1 tablespoon rice vinegar — Keeps the glaze bright.
- 1 teaspoon grated fresh ginger — A small amount goes a long way.
- 1 garlic clove, grated or minced — For a little sharpness.
- 1 teaspoon sesame oil — Adds aroma.
- 1 pound broccolini — Trim the ends so it roasts evenly.
- 1 cup jasmine rice — Steamy, fragrant, and good under saucy fish.
- 1 tablespoon sesame seeds and sliced scallions — For finishing.
Quick Steps
-
Start the rice: Cook the jasmine rice according to the package directions so it’s ready when the fish comes out.
-
Whisk the glaze: Combine miso, soy sauce, honey, rice vinegar, ginger, garlic, and sesame oil in a small bowl until smooth.
-
Prep the broccolini: Toss the broccolini with a little oil, salt, and pepper. Spread it on a sheet pan and roast at 425°F for 8 minutes.
-
Glaze the salmon: Pat the salmon dry and brush the tops generously with the miso mixture. Add the fillets to the pan with the broccolini and roast for 8 to 10 minutes more, until the salmon flakes at the edge but still looks slightly translucent in the center.
-
Finish the pan: If you want a darker glaze, broil for 30 to 60 seconds at the end, watching closely. The sugars in the glaze can go from caramelized to burnt fast.
-
Serve immediately: Spoon rice onto plates, top with salmon and broccolini, and finish with sesame seeds and scallions.
Tips and Variations
- Swap the veg: Asparagus or green beans work if broccolini is hard to find.
- Make it sharper: A few drops of lime juice at the end brighten the glaze nicely.
- Use parchment: It makes cleanup painless and keeps the glaze from welding itself to the pan.
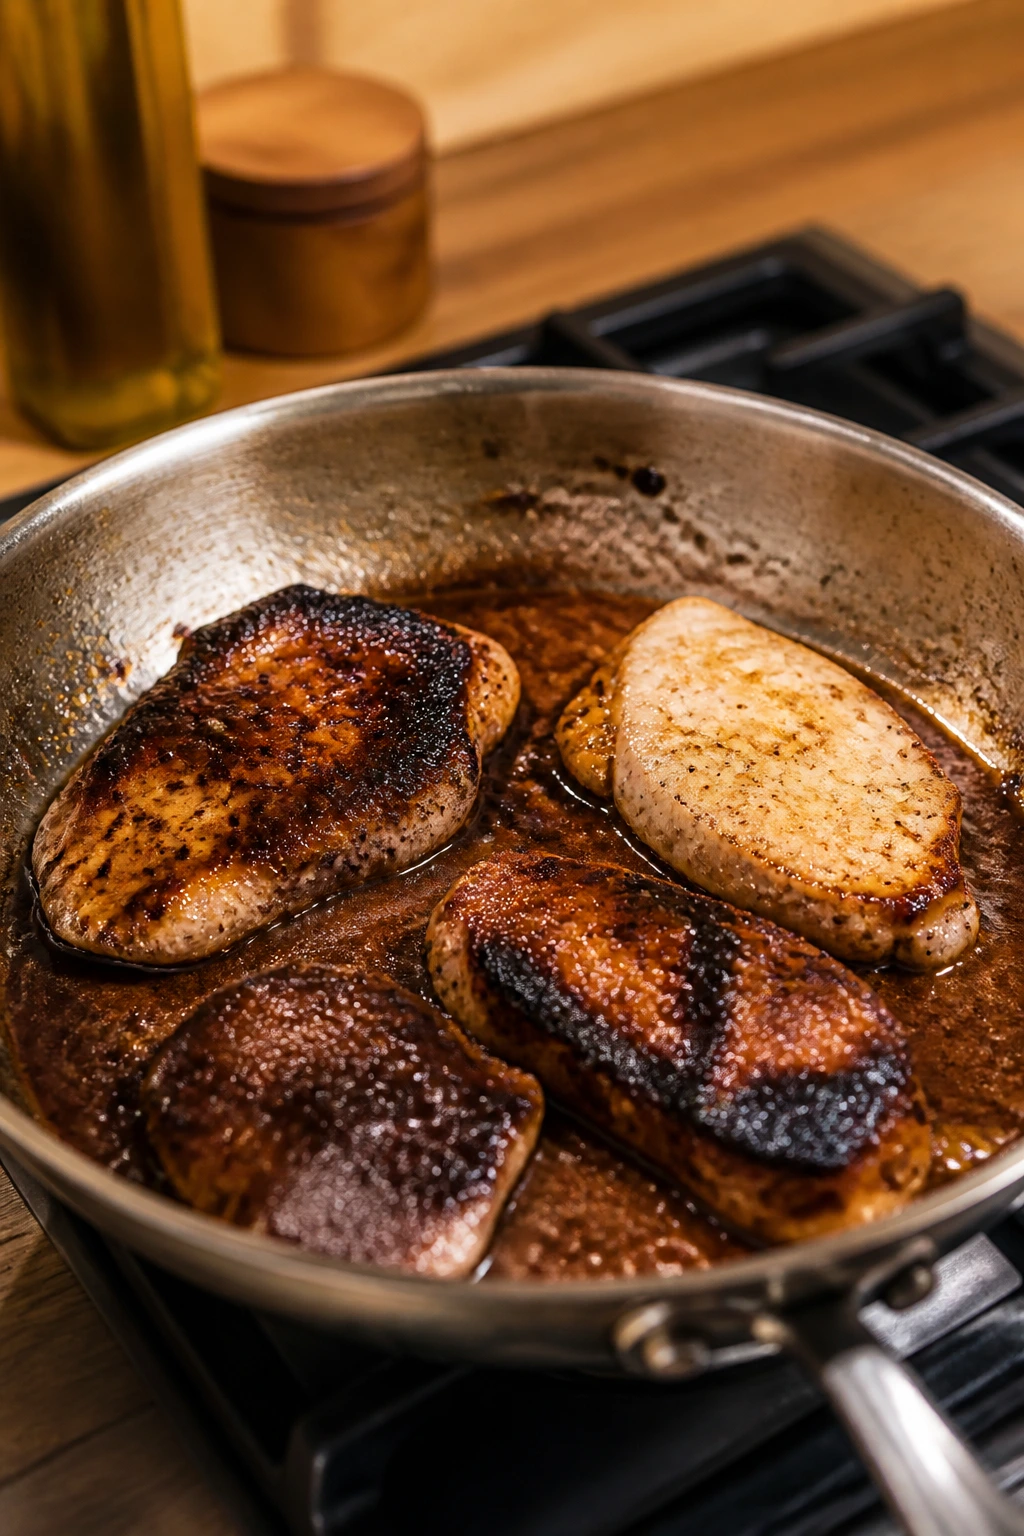
6. Chicken Marsala with Mushrooms and Herbs
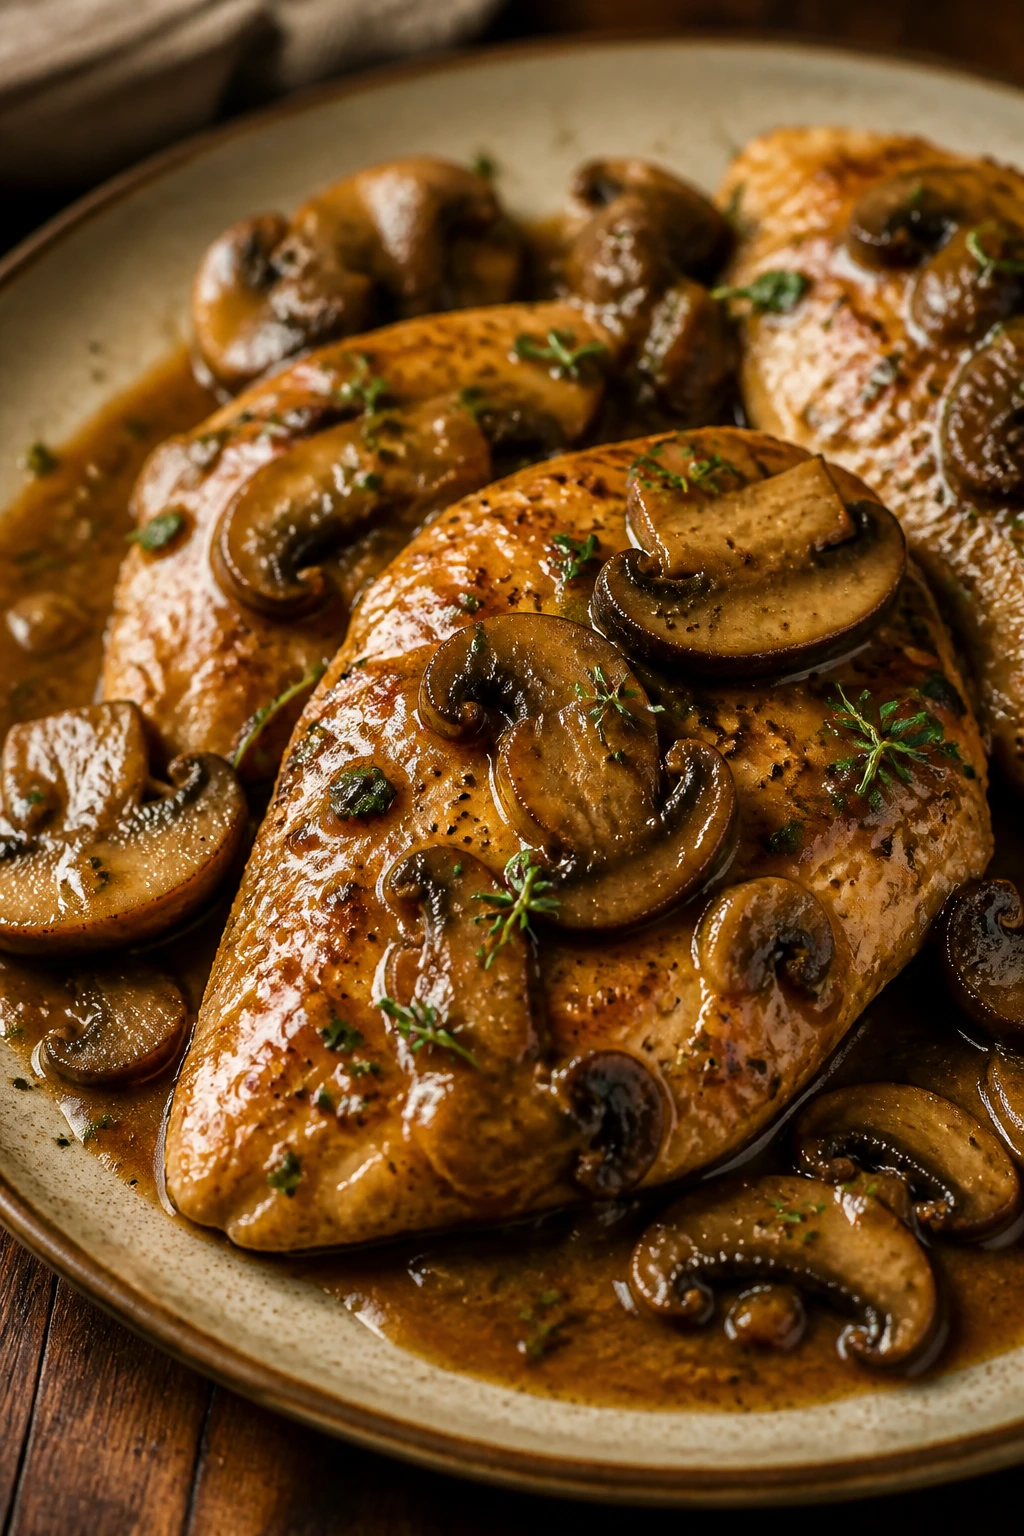
Chicken Marsala belongs to a certain kind of date night: the kind that wants comfort, not fuss. It tastes familiar in the best way, with browned chicken, mushrooms, and a sauce that’s rich but not cloying. Serve it with mashed potatoes and it feels old-school, in the best sense of that phrase.
Why It Works
Marsala wine gives the sauce its signature sweet-savory flavor, and the mushrooms soak it up like little sponges. Dredging thin chicken cutlets in flour helps them brown quickly and gives the sauce a little body without making it heavy. The real trick is not crowding the pan; if the chicken steams, the whole dish loses the clean, golden edge that makes Marsala worth cooking. A dry Marsala is usually the better choice here because sweet Marsala can make the sauce taste syrupy. You want the sauce to coat the chicken, not glaze it like candy.
Key Ingredients
- 1½ pounds boneless, skinless chicken breasts or cutlets — Pounded thin, they cook fast and evenly.
- ½ cup all-purpose flour — For dredging.
- 1 teaspoon kosher salt and ½ teaspoon black pepper — Season the flour and the chicken.
- 2 tablespoons olive oil — For browning.
- 2 tablespoons unsalted butter — Adds richness to the sauce.
- 8 ounces cremini mushrooms, sliced — They hold up well and taste meaty.
- 1 small shallot, minced — A lighter base than onion.
- 2 garlic cloves, minced — Keep them from burning.
- 1 cup dry Marsala wine — The flavor backbone of the sauce.
- 1 cup chicken broth — Loosens the sauce and keeps it balanced.
- 2 tablespoons chopped parsley — A fresh finish at the end.
Quick Steps
-
Prepare the chicken: Slice the breasts into cutlets if needed, then pound them to an even ½-inch thickness. Season the flour with salt and pepper, then dredge the chicken lightly.
-
Brown the cutlets: Heat olive oil and 1 tablespoon butter in a large skillet over medium-high heat. Cook the chicken for 3 to 4 minutes per side until golden and just cooked through, then move it to a plate.
-
Cook the mushrooms: Add the mushrooms to the skillet and let them sit for a minute before stirring. Cook until browned and the moisture has cooked off, about 5 to 6 minutes.
-
Build the sauce: Add the shallot and garlic and cook for 30 seconds. Pour in the Marsala and broth, scraping the skillet well. Simmer for 6 to 8 minutes until the sauce reduces and turns glossy.
-
Return the chicken: Add the chicken back to the pan and simmer for 2 to 3 minutes so it picks up the sauce and finishes cooking.
-
Finish with herbs: Stir in the remaining butter and parsley right before serving. The sauce should look smooth and smell sweet, savory, and a little nutty.
Tips and Variations
- Don’t use sweet Marsala: It can make the sauce clumsy and overly sugary.
- Serve it over something soft: Mashed potatoes, polenta, or buttered noodles all work.
- Make the cutlets even: Uneven chicken gives you one dry piece and one underdone piece. Nobody wants that.
7. Brown Butter Gnocchi with Crispy Sage and Pancetta
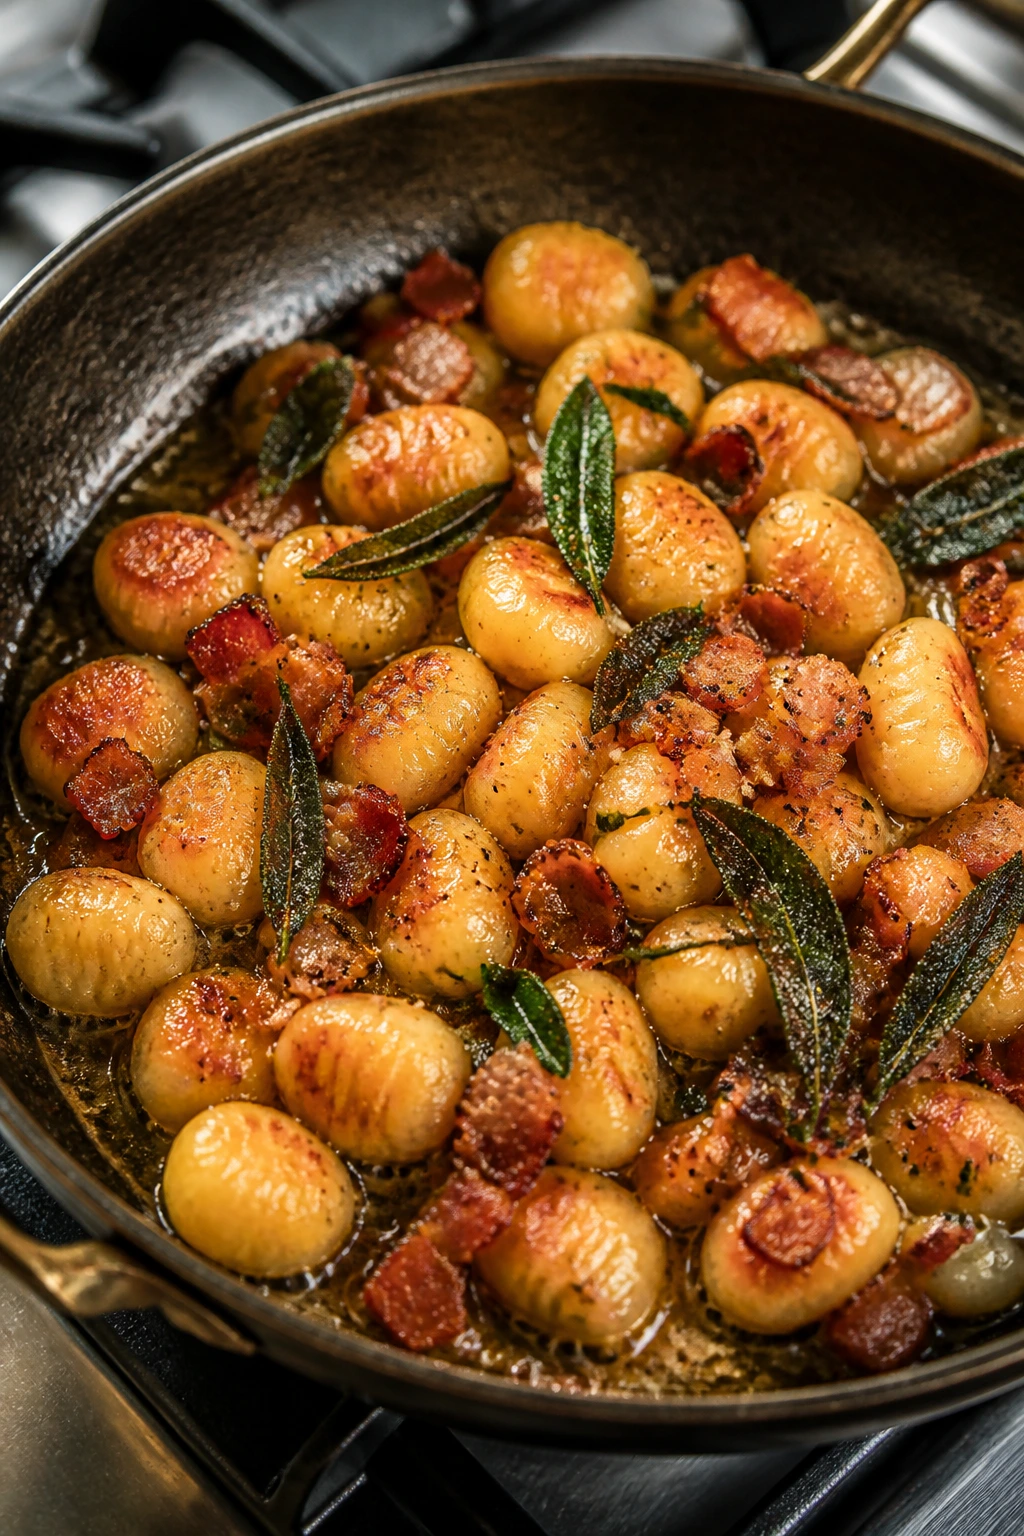
Gnocchi is date-night comfort with a playful side. It’s soft, chewy, and fast, which means you can focus on the person across the table instead of a complicated timeline. Brown butter, sage, and pancetta make the whole thing taste like you put in more effort than you did.
Why It Works
Potato gnocchi is forgiving, and that’s part of its charm. Once it hits hot butter, the outside takes on a little crust while the inside stays pillowy, which gives the dish contrast without needing a sauce that simmers forever. Brown butter brings nutty depth, crispy sage gives you a crackly herbal note, and pancetta adds salt and texture. The key is watching the butter closely: the milk solids go from pale to golden to burnt in a blink. When it smells like toasted nuts and looks like a caramel-colored foam, it’s ready.
Key Ingredients
- 1½ pounds potato gnocchi — Shelf-stable or fresh both work.
- 4 ounces pancetta, diced — Gives the dish a salty, meaty crunch.
- 6 tablespoons unsalted butter — For browning.
- 12 sage leaves — They crisp in the butter and look good on the plate.
- 2 garlic cloves, thinly sliced — Just enough to scent the pan.
- 2 cups baby spinach — Optional, but it softens the richness.
- ½ cup grated Parmesan — Salty finish.
- ½ teaspoon black pepper — Keeps the butter from tasting flat.
- Zest of 1 lemon — A little brightness makes the dish feel lighter.
Quick Steps
-
Crisp the pancetta: Cook the pancetta in a large skillet over medium heat until browned and crisp, about 5 to 6 minutes. Transfer to a plate, leaving the fat in the pan.
-
Brown the butter: Add the butter and sage leaves to the skillet. Cook over medium heat, swirling often, until the butter smells nutty and turns a medium amber color.
-
Add the garlic: Stir in the garlic for 20 to 30 seconds. Keep it moving so it doesn’t burn.
-
Cook the gnocchi: Add the gnocchi straight to the skillet and cook, stirring gently, until browned in spots and heated through. Fresh gnocchi may need only 4 to 5 minutes; shelf-stable can take a little longer.
-
Wilt the spinach: If using spinach, add it now and stir until it collapses.
-
Finish the dish: Add the pancetta back, then sprinkle with Parmesan, black pepper, and lemon zest. Serve while the butter is still glossy.
Tips and Variations
- Use a wide skillet: Crowding the gnocchi makes it soft instead of crisp.
- Add peas: A handful of frozen peas gives a sweet pop and takes almost no effort.
- Skip the pancetta: Mushrooms can step in if you want a vegetarian plate.
8. Seared Scallops with Cauliflower Purée
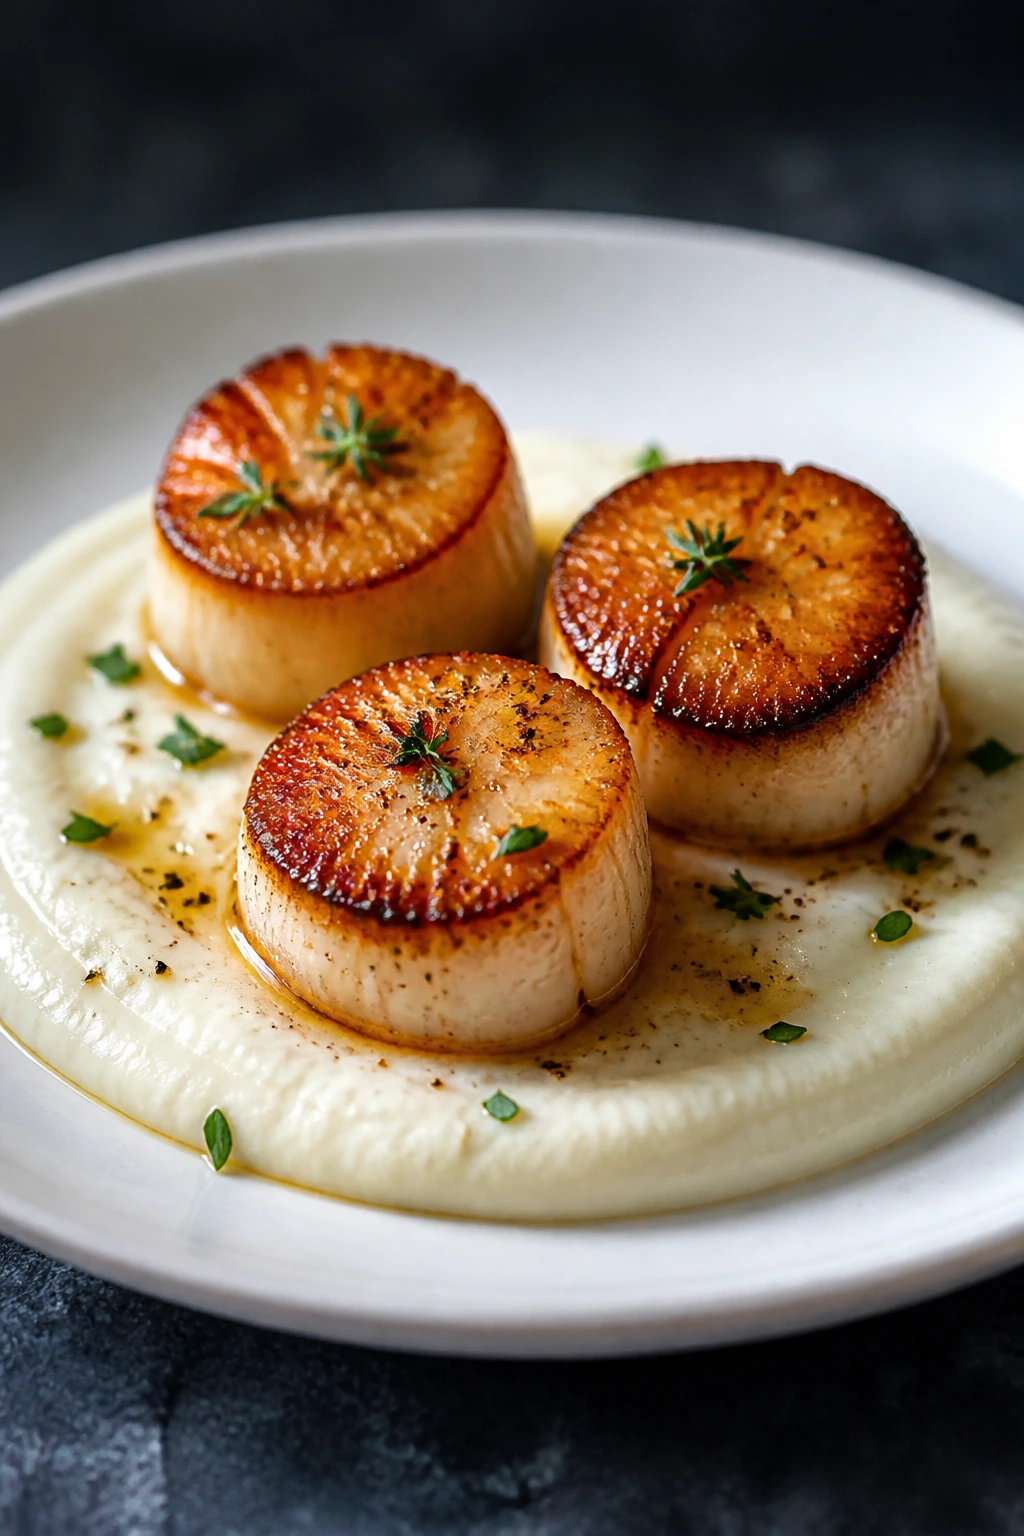
Scallops have a reputation for being precious. They aren’t, unless you overthink them. Treat them like a very expensive piece of toast: dry them well, give them heat, and leave them alone until they’re ready to release. The cauliflower purée underneath keeps the whole plate soft and elegant.
Why It Works
Dry-packed scallops sear better than wet-packed ones because they don’t carry extra brine that steams in the pan. That dry surface is what gives you the caramelized crust, which is the whole point of cooking scallops at home. Cauliflower purée is smart here because it tastes mild, rich, and a little sweet, which lets the scallops stay center stage. The trick is to cook the purée until the cauliflower is very tender, then blend it until it’s smooth enough to spread with a spoon. Scallops need only about 1½ to 2 minutes per side in a very hot pan, maybe a little more for jumbo ones.
Key Ingredients
- 1½ pounds dry-packed sea scallops — Remove the small side muscle if it’s attached.
- 1 large head cauliflower, cut into florets — The purée base.
- ½ cup heavy cream — Makes the purée silky.
- 3 tablespoons unsalted butter — Used in the purée and for finishing.
- 2 garlic cloves, smashed — A mild background note.
- 1 tablespoon olive oil — For searing the scallops.
- 1 lemon — Zest and juice for brightness.
- 2 tablespoons chopped chives or green onion — For garnish.
- 1 cup pea shoots or microgreens — Optional, but they add freshness.
Quick Steps
-
Cook the cauliflower: Simmer the cauliflower florets in salted water with the garlic until very tender, about 10 to 12 minutes. Drain well.
-
Blend the purée: Blend the cauliflower with cream, 2 tablespoons butter, and a pinch of salt until very smooth. Add a splash of cooking water if it seems too thick.
-
Dry the scallops: Pat the scallops dry on all sides with paper towels. This step is non-negotiable if you want a crust.
-
Sear hard: Heat olive oil in a large skillet over medium-high heat until shimmering. Add the scallops in a single layer and cook without moving them for 1½ to 2 minutes, until deeply golden. Flip and cook another 1 to 1½ minutes.
-
Finish the pan: Add the remaining butter and a squeeze of lemon to the skillet. Spoon it over the scallops for a few seconds.
-
Plate neatly: Spread the purée on plates, set the scallops on top, and finish with chives, lemon zest, and pea shoots.
Tips and Variations
- Buy dry-packed scallops: Wet-packed scallops give off too much liquid and refuse to brown well.
- Don’t overcrowd the pan: Scallops need space or they steam.
- Swap the purée: Celery root or parsnip works if you want a more aromatic base.
9. Braised Short Ribs with Creamy Polenta
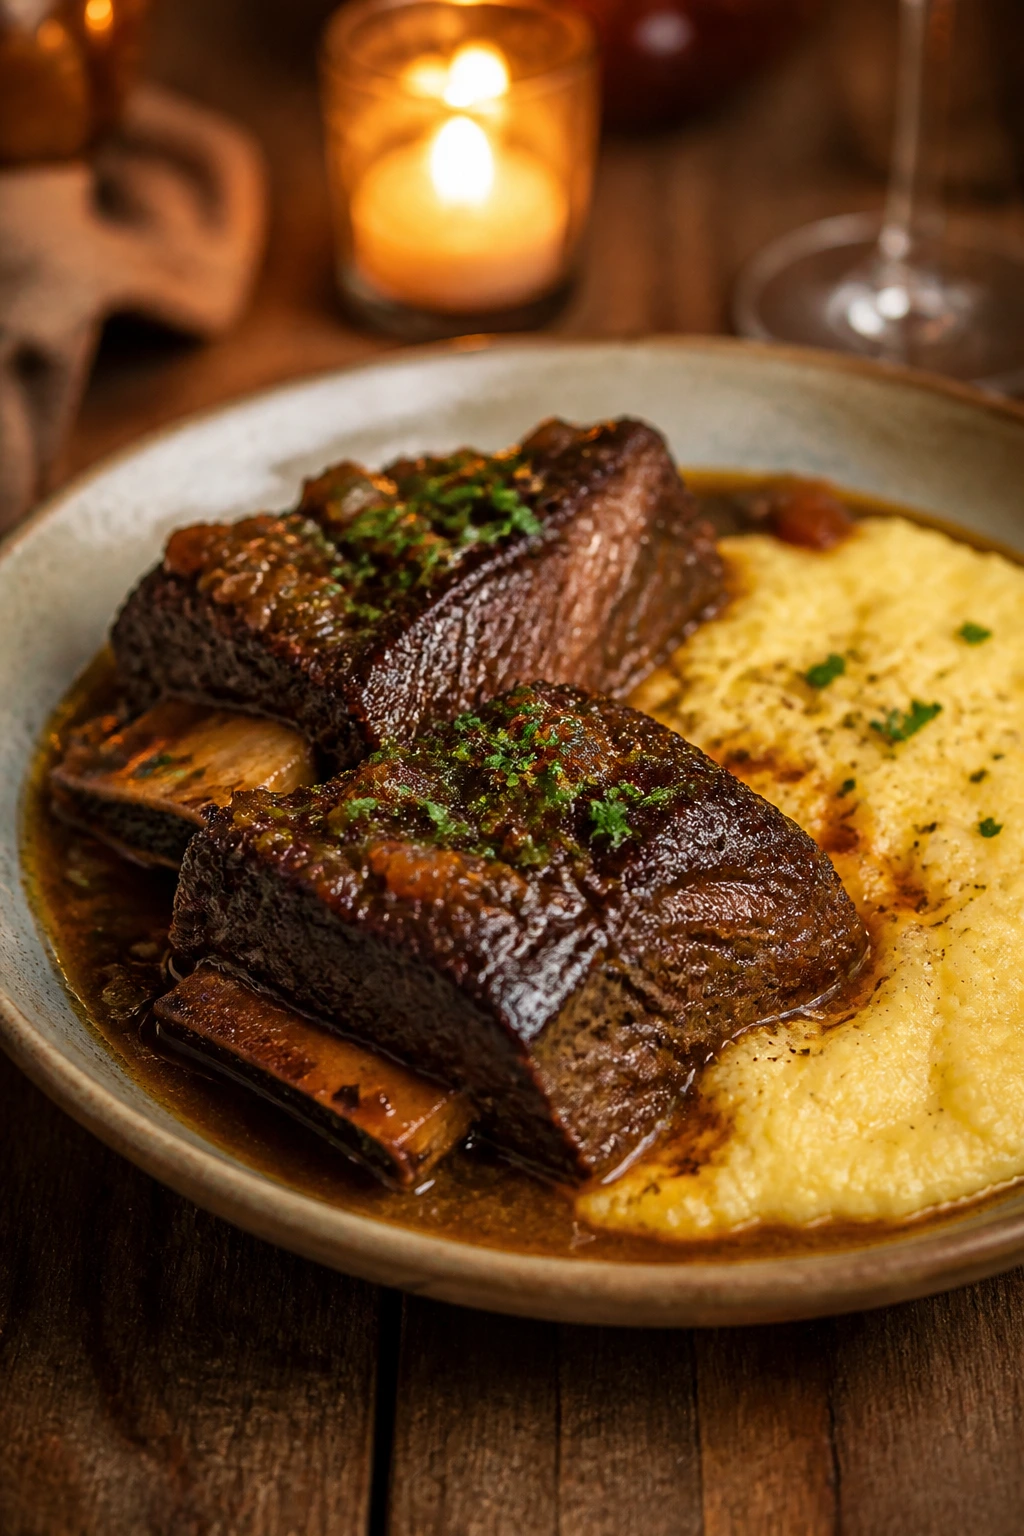
Short ribs are what you make when you want the kitchen to smell like red wine, rosemary, and patience. They take time, yes, but the kind of time that mostly belongs to the oven. By the end, the meat slides apart under a fork, and the sauce feels deep enough to stand on its own.
Why It Works
Short ribs are loaded with connective tissue, which sounds technical but really just means they need time and low heat to become tender. A hard sear builds flavor first, then the wine and stock do their work in the oven while the collagen slowly breaks down into silk. A braise like this improves if it rests for a while, and it’s even better the next day because the fat settles and the sauce tastes more unified. Polenta is a smart partner because it absorbs the sauce without fighting it. Keep the braise at a gentle simmer in the oven, around 325°F, and the meat will stay supple instead of stringy.
Key Ingredients
- 3 pounds bone-in beef short ribs — Look for pieces with good meat coverage.
- 2 teaspoons kosher salt and 1 teaspoon black pepper — Season generously.
- 2 tablespoons vegetable oil — For searing.
- 2 onions, chopped — The braise’s foundation.
- 2 carrots, chopped — Add sweetness.
- 2 celery stalks, chopped — Classic braising flavor.
- 6 garlic cloves, smashed — They melt into the sauce.
- 2 tablespoons tomato paste — Deepens the color and taste.
- 1½ cups dry red wine — For the braising liquid.
- 3 cups beef stock — Keeps everything saucy.
- 2 rosemary sprigs and 2 bay leaves — For aroma.
- 1 cup polenta — The creamy base for serving.
- 1 cup whole milk and 2 tablespoons butter — For the polenta.
- ½ cup grated Parmesan — Optional, but very good.
Quick Steps
-
Season and sear: Pat the short ribs dry and season them well. Heat oil in a Dutch oven over medium-high heat and sear the ribs on all sides until dark brown, about 8 to 10 minutes total. Move them to a plate.
-
Cook the vegetables: Add the onions, carrots, and celery to the pot. Cook for 6 to 8 minutes until softened and lightly browned, then add the garlic and tomato paste and stir for 1 minute.
-
Deglaze: Pour in the red wine and scrape up the browned bits from the bottom. Let it simmer for 3 to 4 minutes.
-
Braise: Add the stock, rosemary, bay leaves, and short ribs. The liquid should come about halfway up the meat. Cover and bake at 325°F for 2½ to 3 hours, until the meat is fork-tender.
-
Cook the polenta: Near the end, simmer the polenta in salted water or stock according to the package, then stir in milk, butter, and Parmesan until creamy.
-
Finish the sauce: Skim excess fat from the braising liquid if needed. Spoon the ribs and sauce over the polenta and serve while hot.
Tips and Variations
- Make it ahead: Short ribs taste even better after a night in the fridge.
- Skim the fat: A spoon makes a difference here; the sauce tastes cleaner.
- Serve with greens: Garlicky spinach or roasted broccolini keeps the plate from feeling too heavy.
10. Margherita Pizza with Burrata and Hot Honey
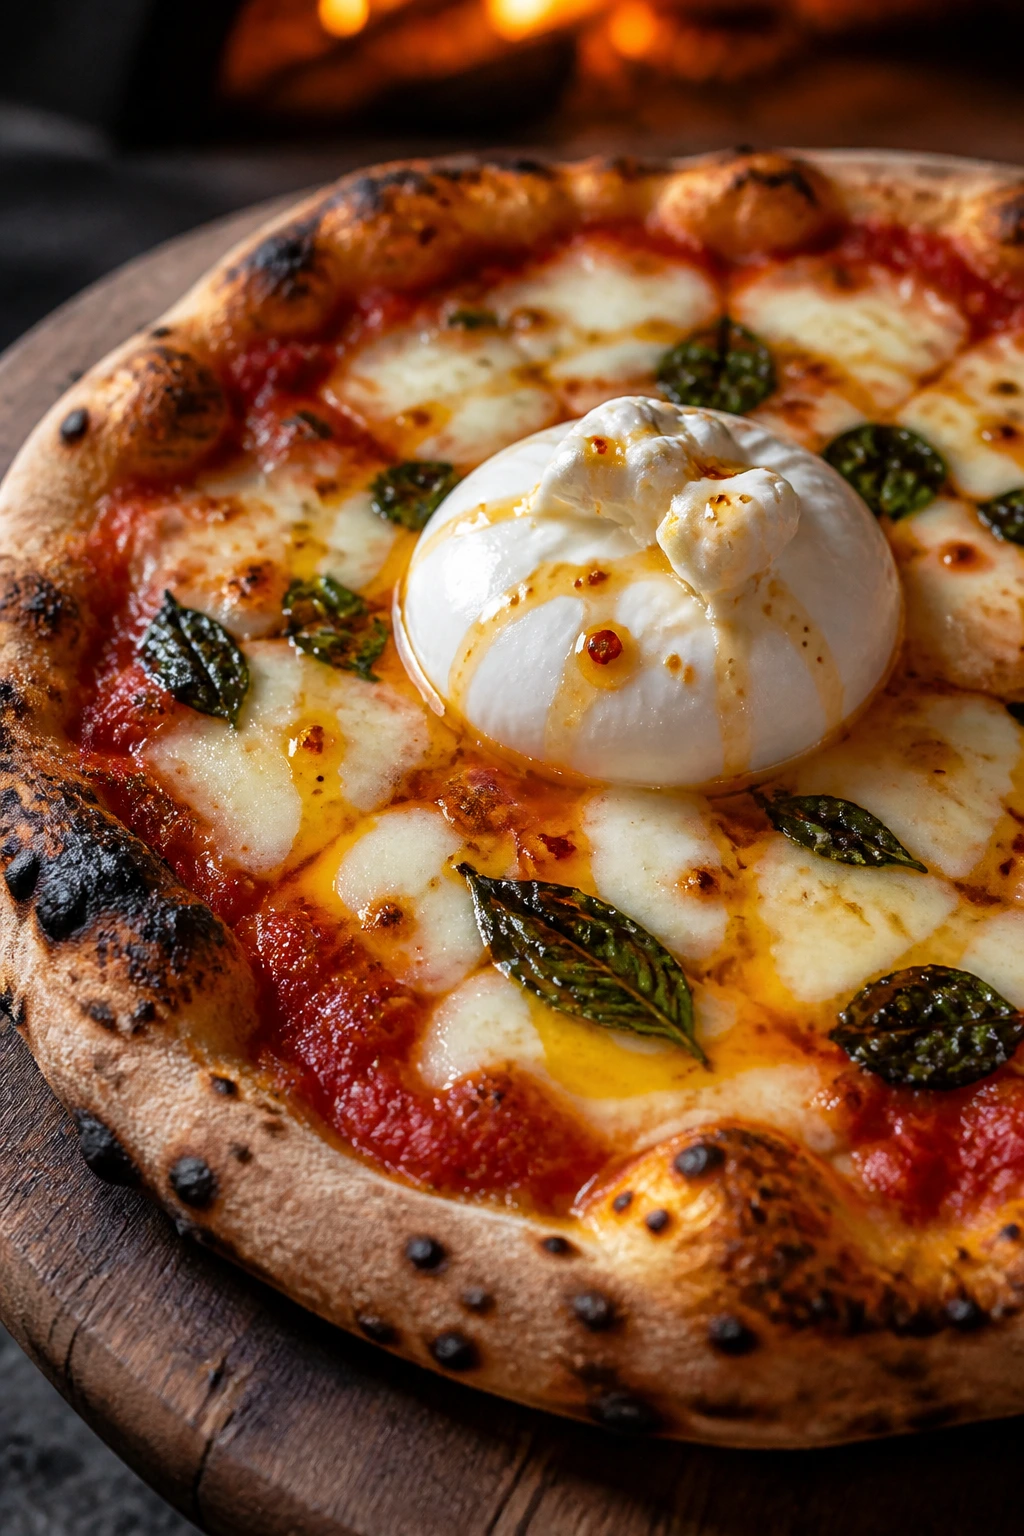
A homemade pizza night changes the shape of the evening. You’re not just cooking; you’re stretching dough, talking over the oven, tearing basil by hand, and eating with a little more looseness than usual. Margherita is the classic move, but burrata and hot honey give it a small, playful edge.
Why It Works
Pizza works as date-night food because it invites participation. One person stretches the dough while the other tops it, and the timing naturally slows down in the best way. Margherita gives you a simple base — tomato sauce, mozzarella, basil — which means every ingredient matters more. Burrata added after baking brings cool creaminess that melts into the hot cheese beneath it, and hot honey adds a sweet burn that wakes up the tomatoes. A very hot oven, ideally 500°F or more, is what gives you a crisp bottom and blistered edges instead of a pale bread disk.
Key Ingredients
- 1 pound pizza dough — Store-bought or homemade both work.
- ¾ cup tomato sauce or crushed tomatoes — Use one with a bright, clean taste.
- 8 ounces low-moisture mozzarella, shredded — Melts cleanly and keeps the crust from getting soggy.
- 8 ounces burrata — Added after baking for creaminess.
- 1 tablespoon olive oil — For the dough and the finish.
- 1 small garlic clove, grated — Optional, but good in the sauce.
- A handful of fresh basil leaves — Tear them by hand.
- 2 tablespoons hot honey — Store-bought or homemade.
- Flour or semolina, for dusting — Keeps the dough from sticking.
Quick Steps
-
Heat the oven hard: Put a pizza stone or inverted baking sheet in the oven and heat to 500°F for at least 30 minutes.
-
Prepare the dough: Let the dough sit at room temperature for 30 to 45 minutes if it’s cold. Stretch it into a 12- to 14-inch round on a floured surface.
-
Add the toppings: Brush the dough lightly with olive oil, spread a thin layer of sauce, then scatter on the mozzarella. Keep the center lighter than you think; too much sauce makes the crust limp.
-
Bake: Slide the pizza onto the hot stone or sheet and bake for 10 to 12 minutes, until the crust is blistered and the cheese is bubbling.
-
Finish with burrata: Tear the burrata over the hot pizza, then add basil leaves and a drizzle of hot honey.
-
Slice and serve: Let it rest for 1 minute before cutting so the cheese settles a little.
Tips and Variations
- Use less sauce than you want: Pizza fails more from excess moisture than from lack of topping.
- Add prosciutto after baking: It stays silky that way.
- Bake on a sheet if needed: A preheated sheet works fine if you don’t have a stone.
11. Stuffed Portobello Mushrooms with Goat Cheese and Farro
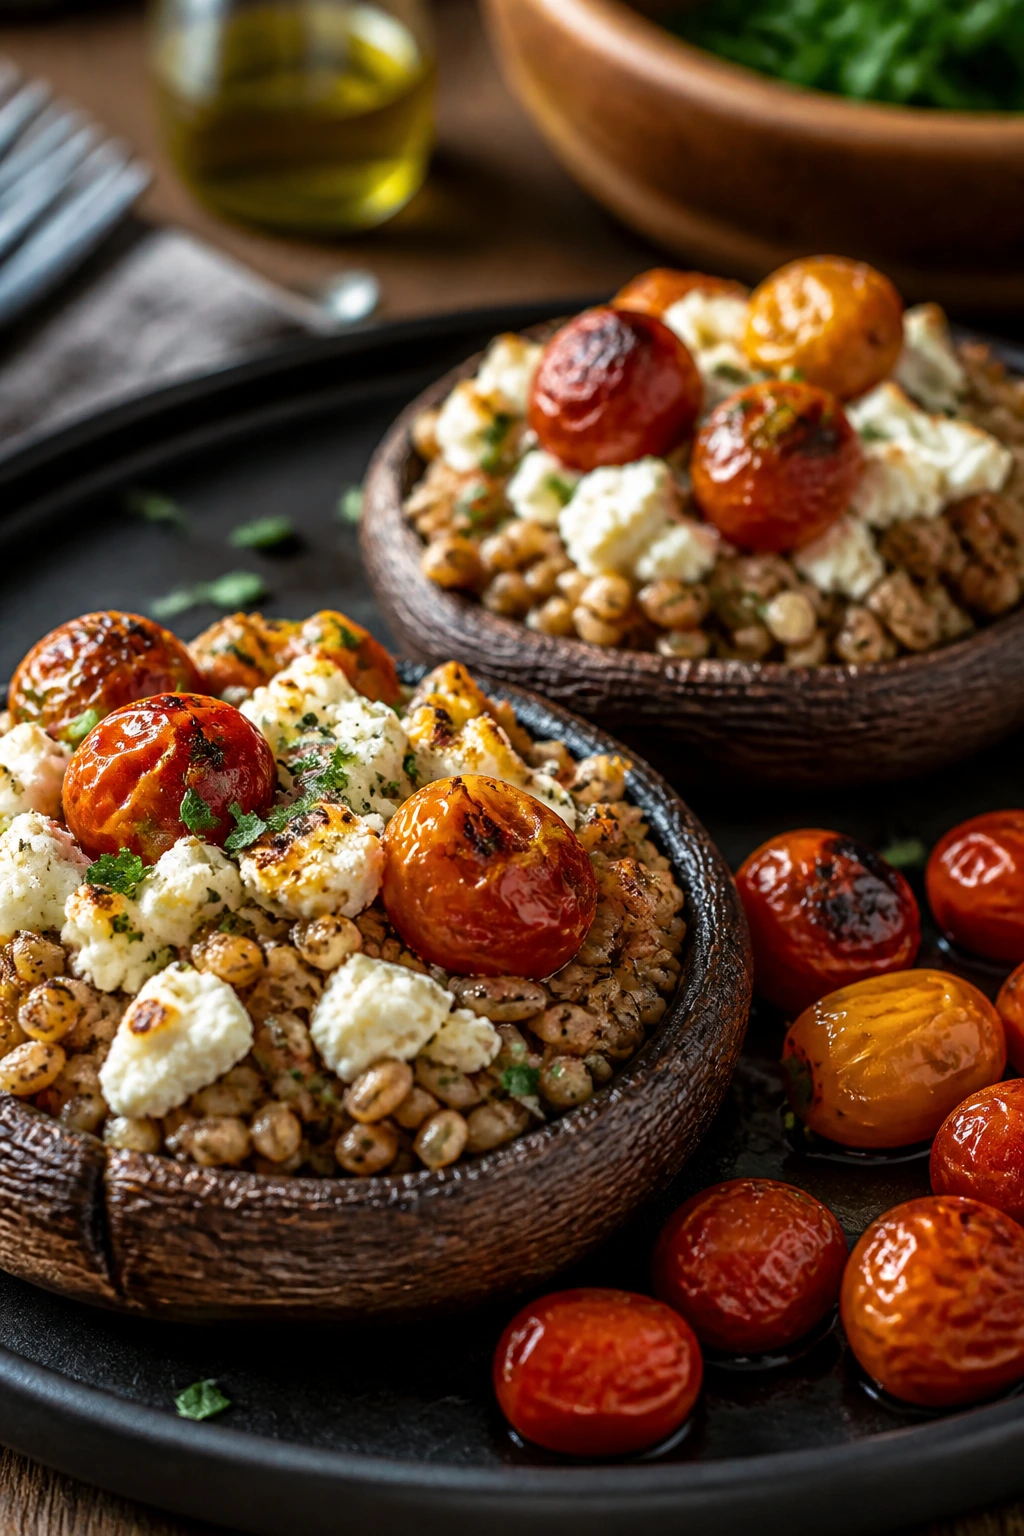
Vegetarian date night food should not feel like an apology. These portobellos have weight, chew, and enough flavor to carry a plate on their own. Farro gives them substance, goat cheese brings tang, and roasted tomatoes turn everything glossy and a little sweet.
Why It Works
Portobello caps act like edible bowls, which makes them useful and a little dramatic in the best way. Roasting them first keeps the filling from getting watery, and cooking the farro until tender but still chewy gives the dish some backbone. Goat cheese melts into the grains and spinach, while roasted tomatoes add enough acidity to keep the whole thing from tasting heavy. Farro has a pleasantly nutty bite, and it holds up better than rice if you want a stuffed mushroom that still has texture after baking. This is the kind of dish that tastes intentional without asking you to stand over the stove for an hour.
Key Ingredients
- 4 large portobello mushroom caps — Remove the stems and scrape out the gills if they look messy.
- 1 cup farro — Rinse it before cooking.
- 2 cups cherry tomatoes — Roast them until they burst.
- 6 ounces goat cheese — Soft and tangy.
- 4 cups baby spinach — Wilts into the filling quickly.
- 1 shallot, minced — For the farro mixture.
- 2 garlic cloves, minced — Builds flavor in the filling.
- 2 tablespoons olive oil — For roasting and sautéing.
- 1 tablespoon balsamic vinegar — For the tomatoes or the filling.
- ¼ cup grated Parmesan — Optional, for a salty edge.
Quick Steps
-
Cook the farro: Simmer the farro in salted water until tender but chewy, about 20 to 25 minutes. Drain well.
-
Roast the tomatoes: Toss the cherry tomatoes with olive oil, salt, and pepper. Roast at 425°F for 15 to 20 minutes, until wrinkled and juicy.
-
Prep the mushrooms: Brush the portobellos with olive oil and roast them gill-side up for 8 minutes so some of the moisture cooks out.
-
Build the filling: Sauté the shallot and garlic in a skillet with a little oil. Add the spinach and cook until wilted, then stir in the farro, roasted tomatoes, goat cheese, balsamic vinegar, and Parmesan if using.
-
Stuff and bake: Divide the filling among the mushroom caps and return them to the oven for 8 to 10 minutes, until hot and lightly browned on top.
-
Serve warm: A few basil leaves or a drizzle of olive oil make them feel finished.
Tips and Variations
- Dry the mushrooms well: Water is the enemy here.
- Add pine nuts: A tablespoon or two gives the filling a little crunch.
- Swap the grain: Quinoa works, though it’s a bit lighter and less chewy.
12. Creamy Cajun Pasta with Blackened Shrimp and Peppers
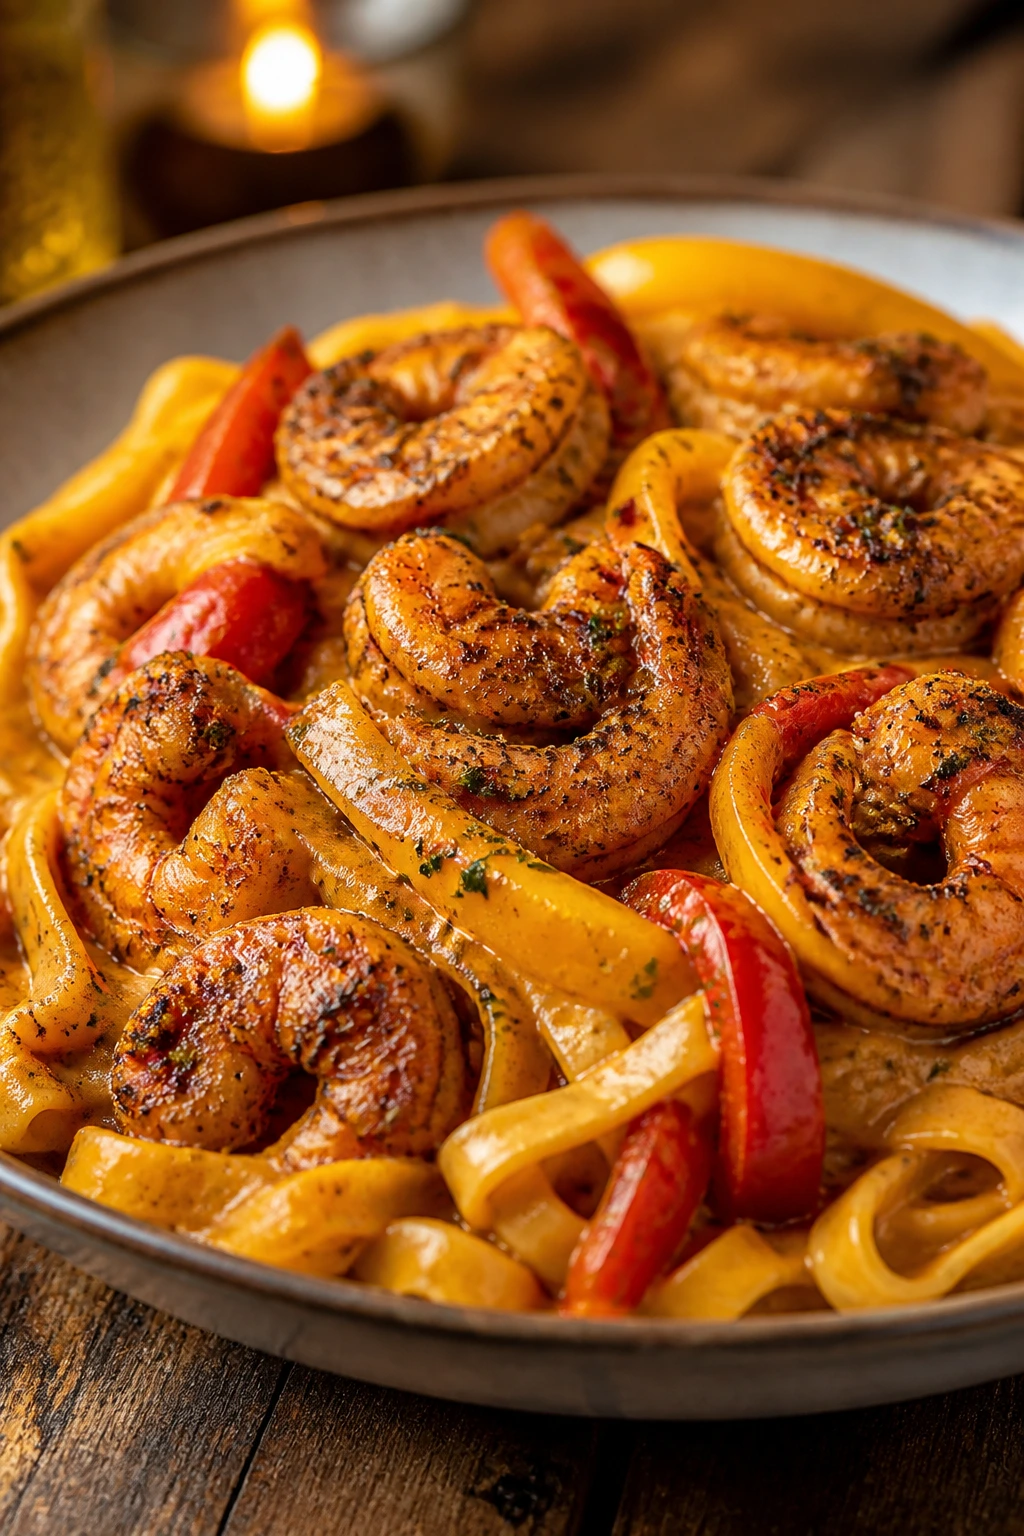
This is the bolder sibling in the group. It’s spicy, creamy, and a little loud in the way date-night food sometimes should be. The shrimp get a dark, seasoned crust, the peppers soften into the sauce, and the cream rounds out the heat just enough to make you go back for another forkful.
Why It Works
Cajun seasoning gives you a ready-made balance of paprika, garlic, onion, thyme, and heat, which is why it works so well on shrimp. Shrimp needs only a short sear, and once it’s done, you can use the same skillet for the peppers, onion, and cream sauce. That keeps the flavor concentrated and the cleanup reasonable. The sauce gets body from cream and Parmesan, while a splash of pasta water helps it cling to the noodles instead of pooling at the bottom of the bowl. If you want the heat dialed back, reduce the Cajun seasoning a little and let black pepper do some of the work.
Key Ingredients
- 12 ounces fettuccine or linguine — A wider noodle stands up well to the sauce.
- 1½ pounds large shrimp, peeled and deveined — Pat them dry before seasoning.
- 2 tablespoons Cajun seasoning — Use one with ingredients you can recognize.
- 2 bell peppers, sliced — Any color works.
- 1 small onion, sliced — Sweetens as it softens.
- 4 garlic cloves, minced — Add after the vegetables start to soften.
- 1 cup heavy cream — Makes the sauce rich and smooth.
- ½ cup chicken broth — Lightens the cream enough to keep it from feeling heavy.
- ¾ cup grated Parmesan — Thickens and seasons the sauce.
- 2 tablespoons butter — Helps the sauce gloss over the pasta.
- 1 tablespoon olive oil — For the shrimp and vegetables.
- 1 tablespoon lemon juice — Brightens the finish.
Quick Steps
-
Cook the pasta: Boil the fettuccine in salted water until al dente. Reserve 1 cup of pasta water before draining.
-
Season the shrimp: Toss the shrimp with Cajun seasoning until coated on all sides.
-
Sear the shrimp: Heat olive oil in a large skillet over medium-high heat. Cook the shrimp for 1 to 2 minutes per side, just until blackened in spots and opaque. Remove them immediately.
-
Cook the vegetables: Add the onion and peppers to the skillet and cook for 5 to 6 minutes, until softened and lightly browned. Add the garlic and stir for 30 seconds.
-
Build the sauce: Pour in the broth and cream, then stir in the Parmesan and butter. Simmer for 3 to 4 minutes, until the sauce thickens enough to coat the back of a spoon.
-
Combine: Add the pasta and shrimp back to the skillet with a splash of pasta water and lemon juice. Toss until everything is coated and glossy.
Tips and Variations
- Use less seasoning if needed: Cajun blends vary a lot in heat and salt.
- Add spinach: Toss it in at the end for a little green and a little relief.
- Do not overcook the shrimp: Once they curl into tight little C-shapes, they’re done.
Why These Dinners Work So Well at Home

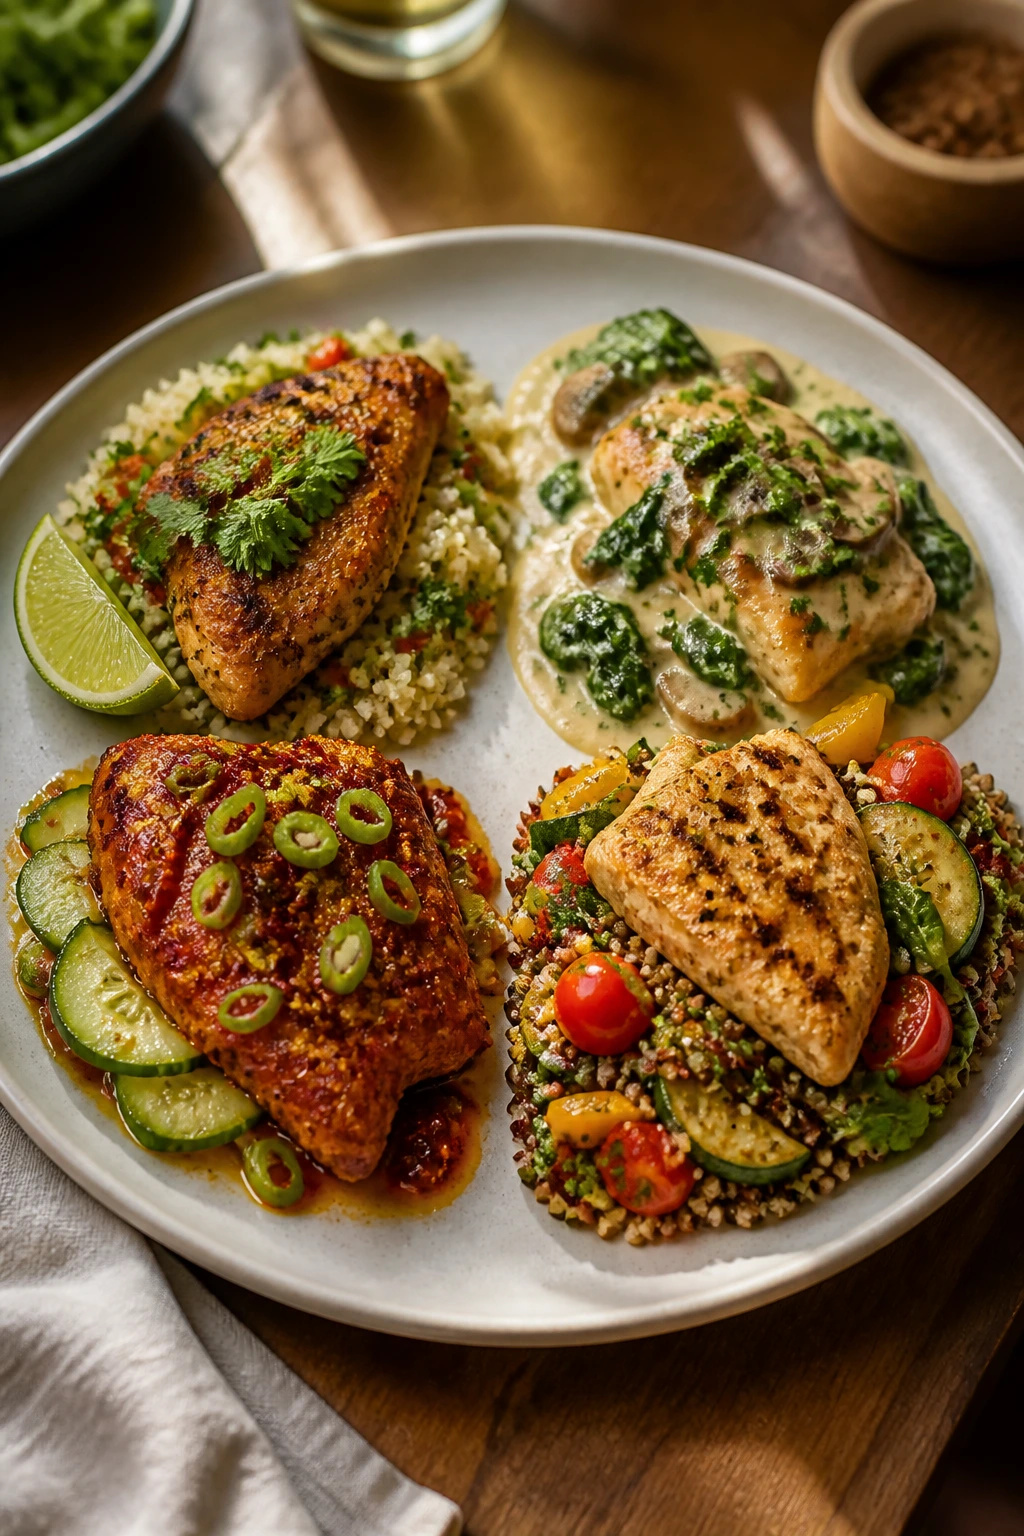
A good date-night dinner at home usually leans on one of three moves: a fast sear, a slow braise, or a sauce that turns ordinary ingredients into something more polished. That’s the thread running through this whole collection. You get skillet food, oven food, pasta food, and one or two dishes that ask you to slow down a little. Good range. No filler.
The other thing these recipes share is timing. Steak gets its rest while the potatoes finish. Risotto takes attention, but not chaos. Salmon and broccolini can share a sheet pan if you stagger them correctly. Short ribs take a long time, which is actually a gift because the oven does most of the work. Date night should feel like you are choosing the pace, not fighting it.
Essential Equipment for These Recipes
- Cast-iron skillet — Best for steak, scallops, and anything you want to brown hard.
- Large sauté pan or skillet — Useful for shrimp, chicken, gnocchi, and pasta sauces.
- Dutch oven or heavy braising pot — Needed for short ribs and useful for anything long-cooked.
- Rimmed baking sheets — Good for potatoes, broccolini, salmon, tomatoes, and pizza support.
- Medium saucepan — For broth, polenta, and risotto liquid.
- Large pot — For pasta, farro, and boiling potatoes if you go that route.
- Instant-read thermometer — The fastest way to avoid overcooked steak, chicken, and salmon.
- Tongs — Easier and cleaner than chasing food around with a spatula.
- Wooden spoon or silicone spatula — Good for scraping up fond and stirring sauces.
- Microplane or fine grater — Helpful for lemon zest, garlic, and Parmesan.
- Cutting board and sharp chef’s knife — Not glamorous, but half the night depends on them.
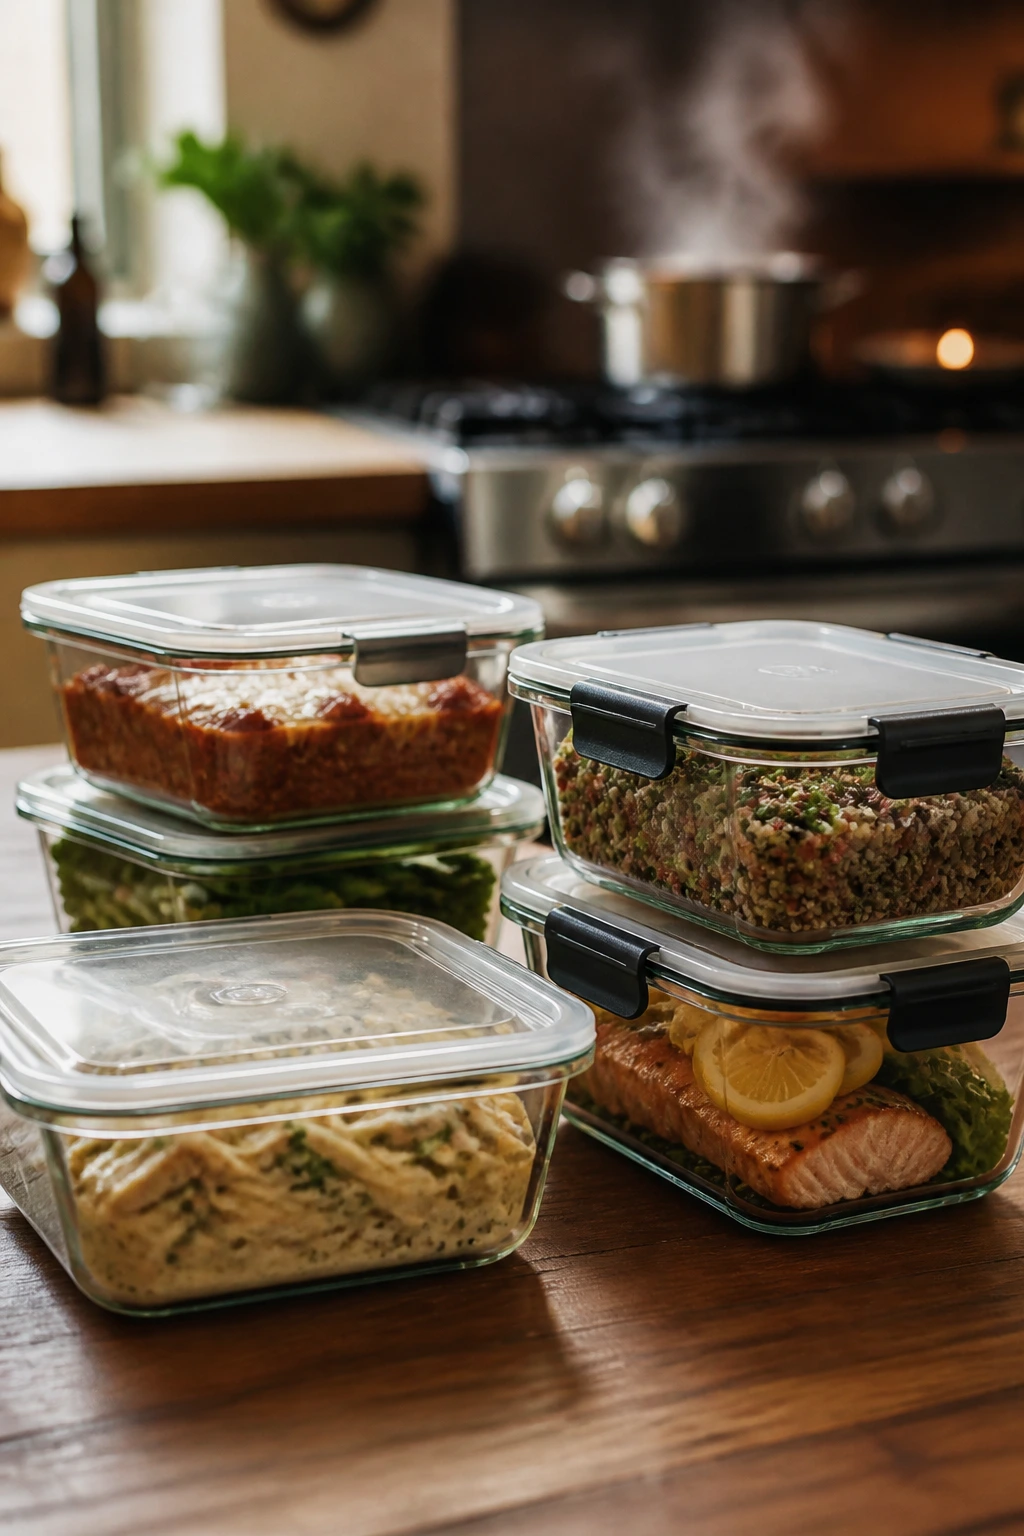
- Airtight storage containers — Important for leftovers and make-ahead parts.
Smart Shopping and Ingredient Tips
Buy the cut that matches the job. Ribeye and short ribs give you richness; chicken thighs stay forgiving; scallops should be dry-packed, not sitting in extra liquid; shrimp should smell clean, not fishy. If the seafood counter can’t tell you whether scallops are dry-packed, that’s already a clue.
Wine matters more in the dishes where it becomes sauce. For Marsala, use dry Marsala unless you want a dessert-y finish. For pan sauces and risotto, pick a white or red you’d actually drink, though it doesn’t need to be expensive. A sharp bottle that tastes harsh in a glass will taste harsher after reduction.
Fresh herbs are worth buying if a recipe leans on them at the end. Basil, parsley, thyme, sage, and rosemary do real work here, not just decoration. On the other hand, pantry items like arborio rice, farro, panko, and polenta are fine to keep on hand and pull out when the mood lands on a recipe you haven’t made in a while.
Cheese should be chosen with the final texture in mind. Parmesan is for salt and depth, not just sprinkling. Goat cheese should be soft enough to melt into the filling. Burrata should be added after baking, when the heat can soften it without turning it into soup.
How to Serve These Recipes
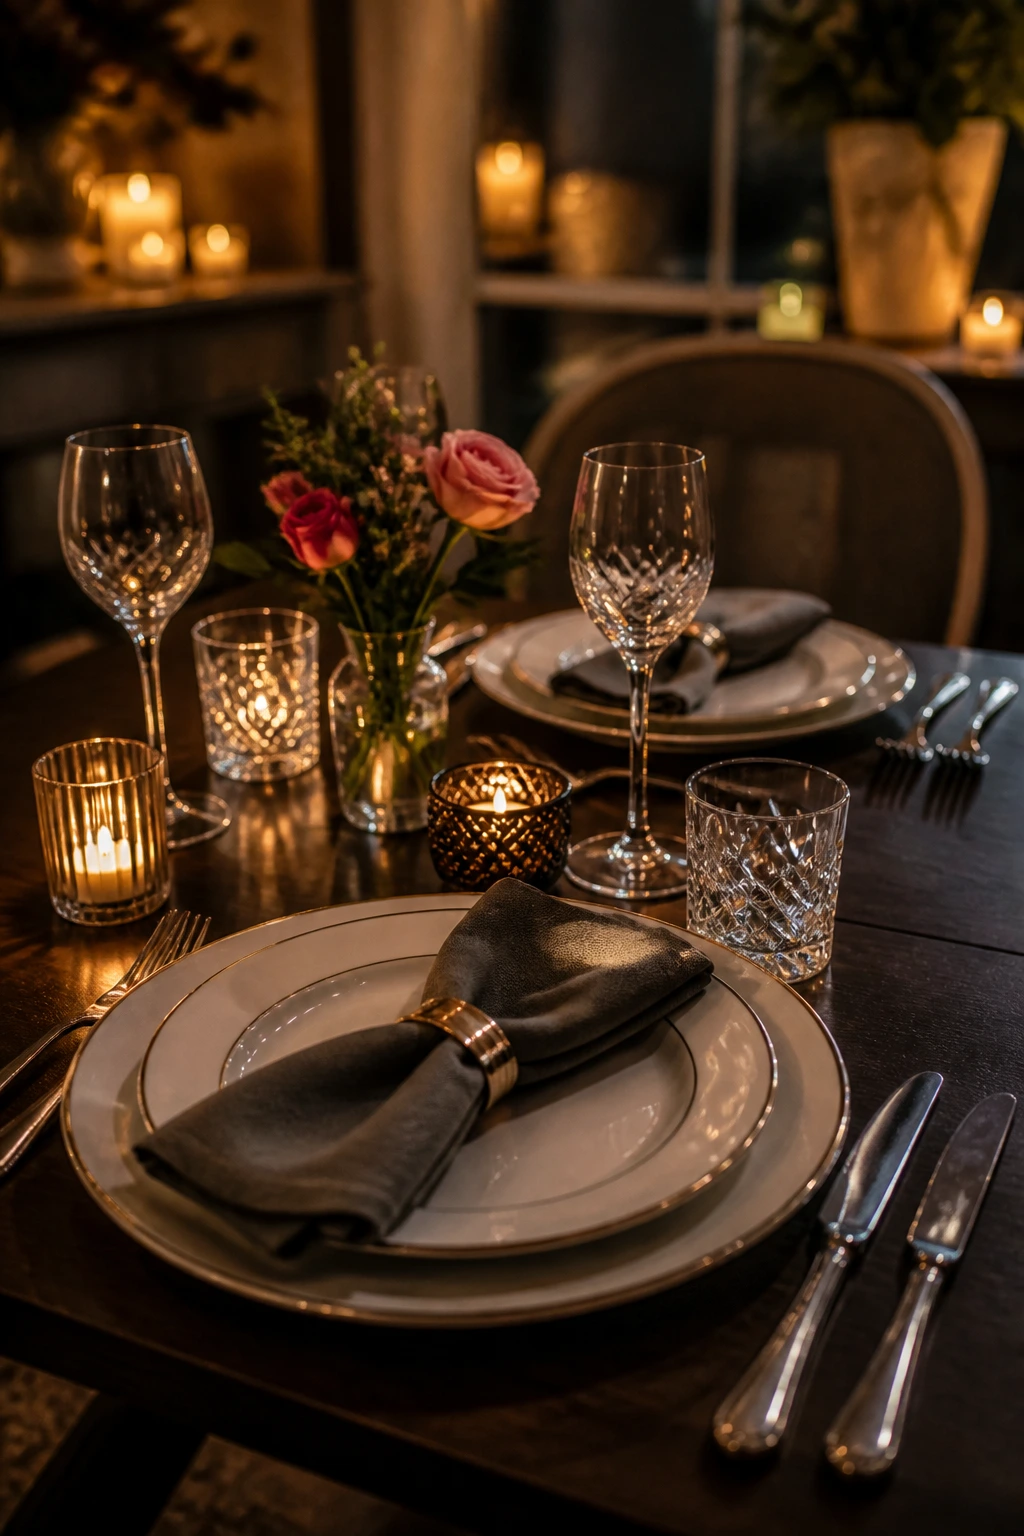
Presentation: Keep the plates warm if you can. Steak sliced on a diagonal, salmon set over rice, or short ribs over polenta all look better when the main item has room to breathe on the plate instead of being buried under sides. A final sprinkle of herbs, lemon zest, or flaky salt makes the dish look finished.
Accompaniments: A simple green salad, roasted asparagus, garlicky broccolini, crusty bread, or buttered potatoes are the safest companions across this group. For richer dishes like short ribs or Chicken Marsala, something green and a little sharp works better than another creamy side. For pasta, keep the extra side small or the whole meal starts feeling heavy.
Portions: Most of these recipes serve two to four. For a bigger table, double the vegetables before doubling the protein — it keeps the meal balanced and stretches the budget in a way that still feels generous. For a very intimate dinner, one rich main and one side is usually enough.
Beverage Pairing: Steak likes a dry red. Shrimp and salmon are happier with crisp white wine, sparkling water with lemon, or a dry rosé. Short ribs can take a bolder red, while pizza and gnocchi pair nicely with a light beer or a bright, tart spritz if that’s more your speed.
Additional Tips and Flavor Boosters
Flavor Enhancement: Keep one bright finishing element on hand for almost every dish: lemon juice, sherry vinegar, balsamic, or a splash of hot honey. A rich plate with no edge gets dull halfway through. One small finishing note changes that fast.
Customization: If you want the menu to feel more personal, build a tiny theme. Add mushrooms to the chicken, swap broccolini for asparagus, use burrata on the pizza, or finish the risotto with a handful of peas. Small swaps matter more than dramatic reinventions.
Serving Suggestions: A soft napkin, a simple candle, and one bowl of something extra — olives, marinated tomatoes, toasted nuts — do more for the mood than a complicated table setting. I’d rather eat a beautiful bowl of risotto with one good bread basket than stare at six decorative items nobody touches.
Make-It-Yours: For a gluten-free evening, use polenta, rice, or gluten-free pasta and dust chicken with cornstarch instead of flour. For dairy-light cooking, lean harder on olive oil, broth, and herbs, then finish with lemon instead of cream where it makes sense. For spice lovers, keep chili oil or crushed red pepper on the table and let each plate go its own way.
Make-Ahead, Storage, and Reheating Guidance
A few of these dishes are best cooked and eaten right away, which is part of their appeal. Steak, scallops, and shrimp lose their charm when they sit too long, so those are the dishes to make when everyone is ready to sit down. Others — especially short ribs, Chicken Marsala, and the mushroom farro filling — hold beautifully and can be made a day ahead.
Cooked chicken, pasta sauces, risotto, and stuffed mushroom fillings usually keep 3 to 4 days in the refrigerator in airtight containers. Braised short ribs keep that long too, and the flavor deepens after a rest. Shrimp and scallops are better within 1 to 2 days, and I’d rather call them lunch than pretend they reheat like new. Frozen storage works best for braises, chicken sauce, and some pasta fillings; keep them up to 2 months frozen in tightly sealed containers, then thaw overnight in the fridge.
Reheat steak gently in a low oven, then sear the slices for just a minute if you want the surface warm again. Short ribs and Chicken Marsala reheat well in a covered skillet over low heat with a splash of broth. Pasta can be revived with a spoonful of water or cream in a skillet rather than the microwave, which tends to dry the edges. Risotto is the one dish that often needs a little extra broth on reheating; stir patiently and it comes back to life better than you’d expect.
For make-ahead planning, chop vegetables, mix sauces, and measure spices earlier in the day. You can also roast tomatoes, cook farro, or make polenta base a few hours ahead. Just keep the final sear, glaze, or toss for the last moment.
Variations and Adaptations to Try
The Gluten-Free Table: Swap in rice, polenta, potatoes, or gluten-free pasta wherever the menu calls for bread or wheat noodles. For the chicken dredge, cornstarch gives a crisp edge and keeps the pan sauce clean. Pizza still works too if you buy or make a gluten-free dough that can take a hot oven.
The Dairy-Light Version: Use olive oil instead of part of the butter in the shrimp, salmon, and vegetable dishes, then finish with lemon, herbs, or a small spoonful of pesto. The sauce will feel less plush, but it can still taste complete. Braises and tomato-based recipes handle this style better than cream sauces do.
The Bold-and-Spicy Menu: Add red pepper flakes to the scampi, more Cajun seasoning to the pasta, and a little hot honey to the pizza. Keep a bowl of cooling yogurt or a crisp salad nearby if one of you likes heat and the other doesn’t. Spice is easiest to add at the table.
The Vegetarian Romance Menu: Use the stuffed portobellos, mushroom risotto, brown butter gnocchi without pancetta, and pizza as the backbone. If you want a stronger protein feel, add white beans to the farro filling or extra Parmesan to the risotto. The meal won’t feel like a compromise if you build in texture.
The Low-Effort, High-Drama Menu: Choose dishes that look more difficult than they are: scallops, salmon, steak, and shrimp scampi. These recipes reward good timing and don’t trap you in the kitchen for hours. If the goal is to spend more time talking than chopping, this is the lane.
The Big Comfort Night: Short ribs, Chicken Marsala, and creamy Tuscan chicken all sit comfortably in the same broad mood. Pair them with potatoes, polenta, or bread and keep the salad sharply dressed. Heavy can still feel elegant if the seasoning is tight.
Common Mistakes to Avoid
The biggest mistake is building a menu that asks too much of one person. Two long-cook mains plus a complicated side turns date night into a shift. Pick one showpiece, then let the rest of the plate be easy.
Another common one: not using enough heat. Steak, shrimp, scallops, and even gnocchi want a properly hot pan if you expect color. A timid skillet gives you gray food and watery sauce, and nobody feels romantic about watery sauce.
Crowding is its own trap. Too many mushrooms, too much chicken, or a pan full of scallops lowers the temperature of the skillet and steams everything. Cook in batches if you have to. It is slower by a minute and better by a mile.
A softer problem is forgetting contrast. Creamy dishes need lemon or herbs. Rich dishes need something crisp. Pasta needs a little brightness or it starts to feel flat halfway through. That contrast can be a salad, vinegar, parsley, basil, or even a few capers. One sharp note changes the whole plate.
Then there’s the temperature issue. Overcooked seafood is the fastest way to ruin an otherwise lovely dinner. Shrimp curl hard when they’re overdone, scallops lose their sweetness, and salmon goes chalky. Use your eyes, not the clock alone.
Finally, do not skip the rest on steak or the reduction on pan sauce. Those pauses are part of the recipe. Rushing through them costs more flavor than people realize.
Frequently Asked Questions

What is the easiest date night dinner to start with?
Shrimp scampi or gnocchi are the least stressful entry points. Both cook quickly, use a small number of ingredients, and give you a visible payoff without asking for a long stove watch.
Can I make a full menu from this list if I only have one skillet?
Yes, but choose recipes that finish well in sequence. Steak, chicken Marsala, and scampi all work in one skillet if you clean it between steps. Scallops and steak need the pan to stay hot and dry, so plan those carefully.
Which of these dishes can be mostly made ahead?
Short ribs, Chicken Marsala, the mushroom farro filling, and the risotto base can all be started early. Pizza dough, sauce, and chopped toppings can also be prepped ahead so the last few minutes feel relaxed instead of frantic.
How do I pick a menu if one person wants meat and the other doesn’t?
Pick a centerpiece that can be served alongside a second element instead of replacing it. Pizza, risotto, and stuffed portobellos let you keep the meal unified while adding chicken, shrimp, or steak on the side for the other plate.
What wine works with most of these dinners?
A dry white, a medium-bodied red, and sparkling water with citrus cover a surprising amount of ground. Pinot Noir handles salmon and chicken well, while Sauvignon Blanc or a dry Riesling is good with shrimp, scallops, and bright sauces.
Can I substitute another grain for the risotto or farro?
You can, but the texture changes. Arborio rice gives risotto its creaminess because of the starch it releases, and farro keeps its chew in stuffed mushrooms. If you swap, expect a different bite rather than an identical result.
How do I keep seafood from overcooking?
Dry the seafood well, use a hot pan, and pull it early. Shrimp should turn pink and opaque, scallops should release after a crust forms, and salmon should flake at the edge while still looking a little translucent in the center.
What if my sauce turns too thick?
Add a spoonful of stock, pasta water, or even plain water and stir over low heat. Cream sauces and pan sauces tighten fast as they sit, so a small amount of liquid usually fixes the texture right away.
Can I serve all of these with the same side dish?
A crisp green salad and good bread work with most of them. Roasted vegetables, potatoes, or rice can be rotated around the menu, but the more delicate seafood dishes do better with lighter sides than with another heavy starch.
A Table Worth Setting
The nicest part of cooking at home for two is that the evening can be shaped around the food instead of the other way around. A good date-night dish doesn’t need to be complicated. It needs a little care, a little timing, and a plate that makes sense from the first bite to the last.
Pick the style that fits the mood, not the one that looks most impressive on paper. Some nights call for steak and a dark sauce. Some call for lemon, shrimp, and a bowl of pasta. The right recipe is the one that leaves you with enough energy to stay at the table a while longer.