
Some nights, dinner has to come from the part of the pantry you’ve been ignoring: the back shelf with lentils, beans, rice, pasta, and that one can of tomatoes you bought because it was on sale. That’s where easy weeknight dinner ideas on a tight grocery budget stop being a nice concept and start being the thing that gets food on the table without turning the receipt into a regret.
The trick isn’t to make meals feel smaller. It’s to build them smarter. Cabbage can carry a skillet. Eggs can turn rice into dinner. Beans can do a lot more than sit in a chili pot. And when you start leaning on ingredients that are cheap, filling, and flexible, the whole week gets easier in a way that fancy meal plans never quite manage.
I’ve put the emphasis here on dinners that use overlapping ingredients, cook fast, and still taste like a real meal when you sit down with a fork in your hand. No novelty for novelty’s sake. No ingredient lists that require three specialty stores and a prayer. Just food that works when the budget is tight and the clock is rude.
Why These Dinners Earn Their Place
-
Overlap saves money: Onion, garlic, rice, pasta, canned tomatoes, beans, tortillas, and cabbage show up again and again, so one shopping trip covers multiple meals.
-
Cheap proteins do the heavy lifting: Eggs, lentils, beans, tuna, and modest amounts of chicken or sausage stretch farther than a big expensive cut ever will.
-
Fast cooking matters: Most of these dinners land somewhere between 20 and 40 minutes, which is the sweet spot for a weeknight when people are hungry and patience is thin.
-
Leftovers keep their shape: Soup, baked pasta, taco fillings, fried rice, and bean-based dinners usually reheat better than a delicate cream sauce or a fried cutlet.
-
Store brands fit right in: A good canned tomato, a decent tortilla, and an ordinary block of cheese do the job here. There’s no reason to overpay.
-
Nothing depends on a perfect grocery run: Frozen vegetables, canned beans, and pantry pasta all slot in cleanly when fresh produce is running low or the produce drawer looks like a science experiment.
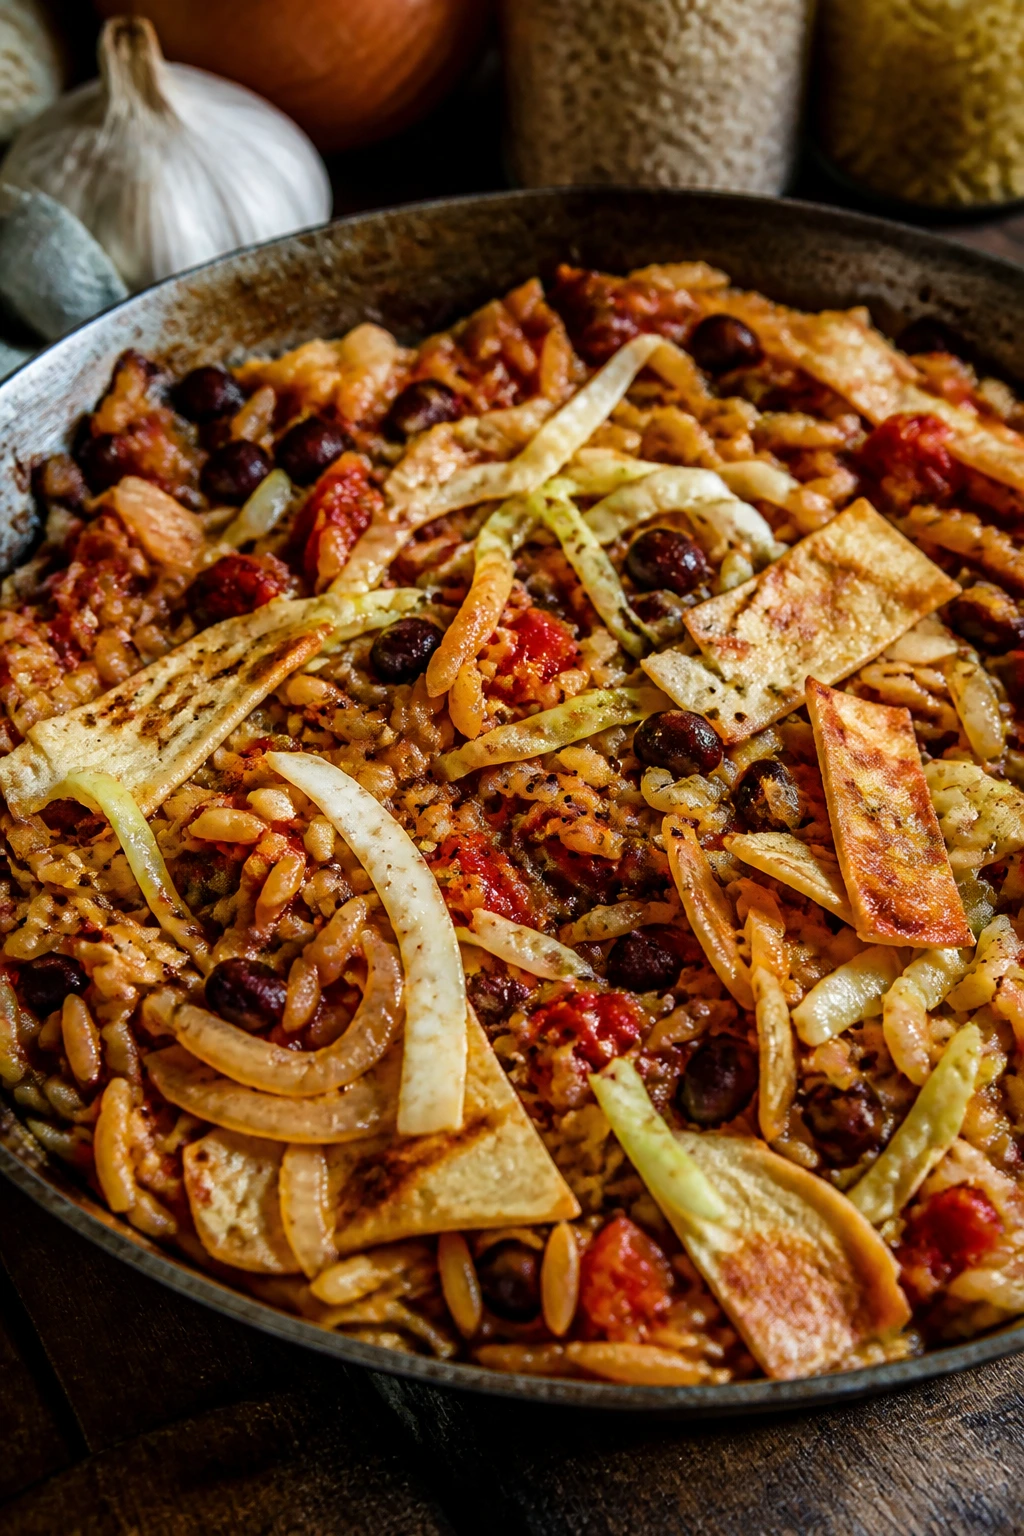
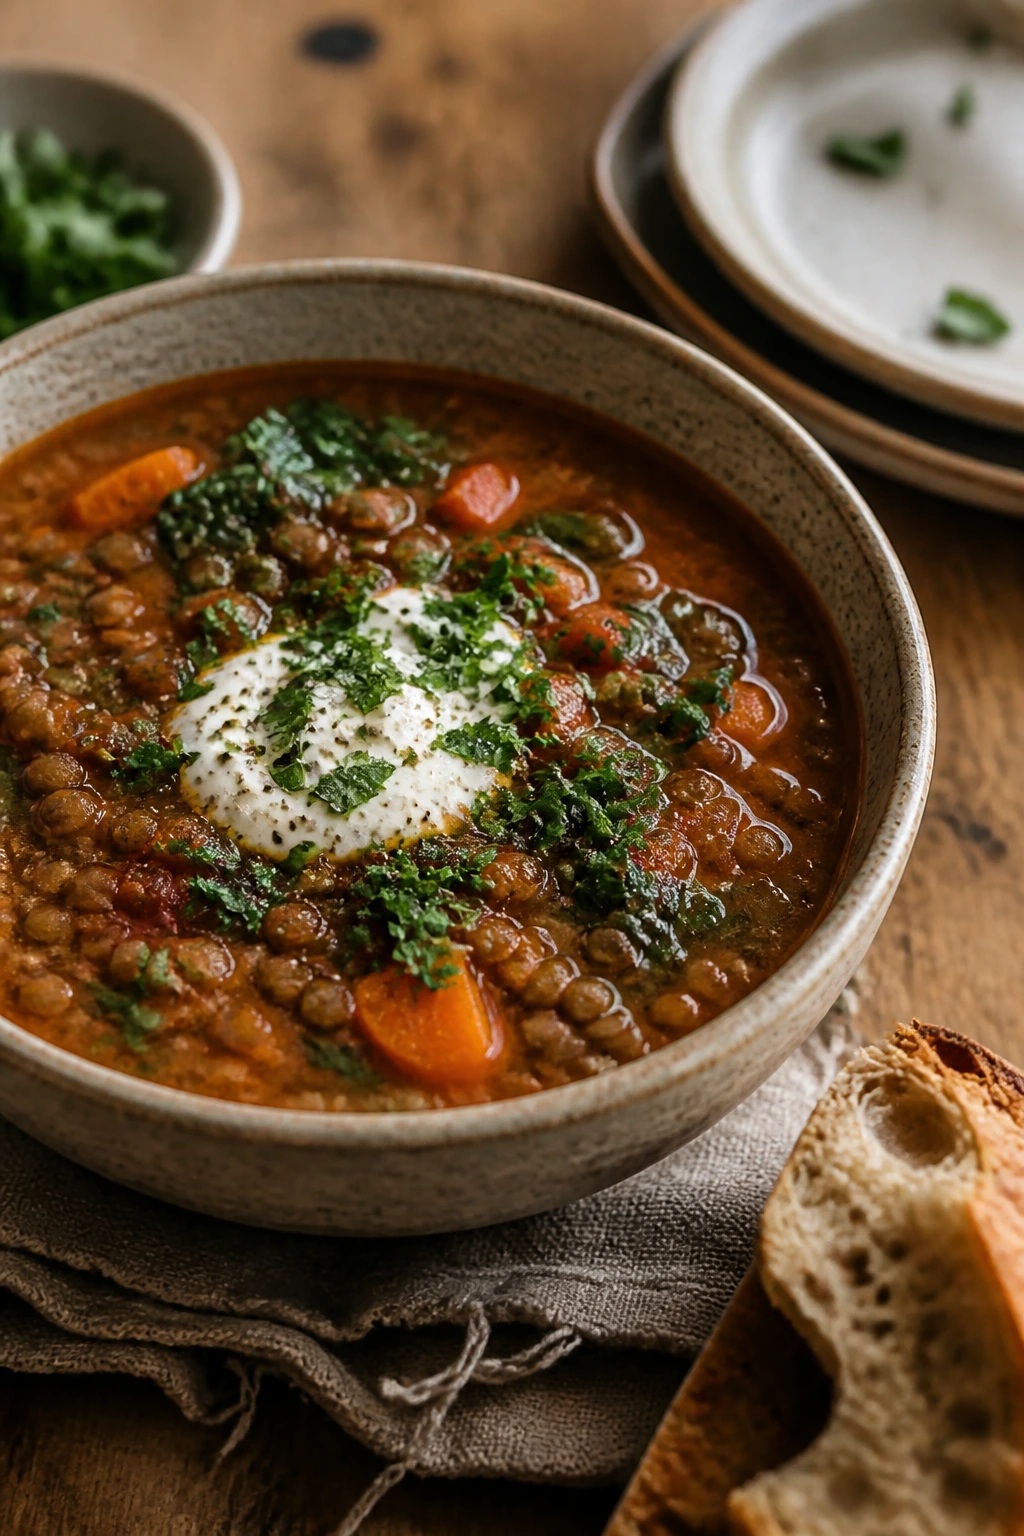
1. Red Lentil Taco Skillet
This is the sort of dinner that looks modest in the pan and then surprises you at the table. Red lentils break down into a thick, spiced filling with a little body left behind, so you get something between taco meat and a hearty chili. It smells like onions, cumin, and tomato first, which is usually the right order for a cheap dinner to take itself seriously.
Why It Works
Red lentils cook fast. That matters. They soften in about 15 to 18 minutes, which means you get a filling meal without soaking, long simmering, or a pile of dishes. The tomato and taco seasoning give them enough punch to stand in for meat, and the frozen corn adds sweetness that keeps the skillet from tasting flat.
Key Ingredients
- 1 tablespoon olive oil
- 1 small yellow onion, diced
- 2 garlic cloves, minced
- 1 cup red lentils, rinsed
- 1 can diced tomatoes, 14.5 ounces
- 2 1/2 cups water or low-sodium broth
- 2 tablespoons taco seasoning
- 1 cup frozen corn
- 1 cup shredded cheddar or Monterey Jack
- 8 small tortillas or 3 cups cooked rice, for serving
Quick Steps
- Heat the oil in a large skillet over medium heat. Add the onion and cook for 4 to 5 minutes, until soft and a little translucent.
- Stir in the garlic and cook for 30 seconds, just until fragrant. Do not let it brown.
- Add the lentils, tomatoes, water, and taco seasoning. Bring everything to a boil, then lower the heat to a steady simmer.
- Cook for 15 to 18 minutes, stirring once or twice, until the lentils are tender and the mixture looks thick and scoopable.
- Stir in the frozen corn and cook for 2 minutes more, just until the kernels are hot.
- Turn off the heat, scatter the cheese over the top, and cover the skillet for 1 minute so it melts.
Equipment for This Recipe
- Large 12-inch skillet
- Wooden spoon or silicone spatula
- Measuring cups and spoons
- Cutting board and sharp knife
How to Serve This Dish
Spoon it into warm tortillas for taco night, or heap it over rice if you want the filling to stretch farther. A spoonful of plain yogurt or sour cream, a squeeze of lime, and a few chopped scallions make the whole thing feel finished.
Pro Tips for This Recipe
- Rinse red lentils in a fine-mesh strainer so the simmer stays clean, not dusty.
- If the mixture looks too loose after 18 minutes, keep cooking for 2 to 3 minutes uncovered.
- A teaspoon of vinegar or lime juice at the end sharpens the tomato and wakes up the cumin.
- Leftovers thicken overnight; loosen them with a splash of water when reheating.
Variations on This Dish
- Smoky Chipotle Lentils: Stir in 1 minced chipotle in adobo for a deeper, smoky heat.
- Bean Blend Skillet: Replace half the lentils with 1 can drained black beans for a chunkier texture.
- Cheese-Free Pantry Bowl: Skip the cheese and finish with cilantro, diced onion, and hot sauce.
Common Mistakes to Avoid with This Dish
- Overcooking into paste: If the lentils collapse too far, the texture turns muddy. Pull the pan off the heat as soon as they’re tender and thick.
- Underseasoning the liquid: The broth should taste a little bold before the lentils finish. If it tastes flat early, it’ll stay flat later.
- Skipping the final acid: Without lime or vinegar, the skillet can feel heavy. That small sour hit makes a real difference.
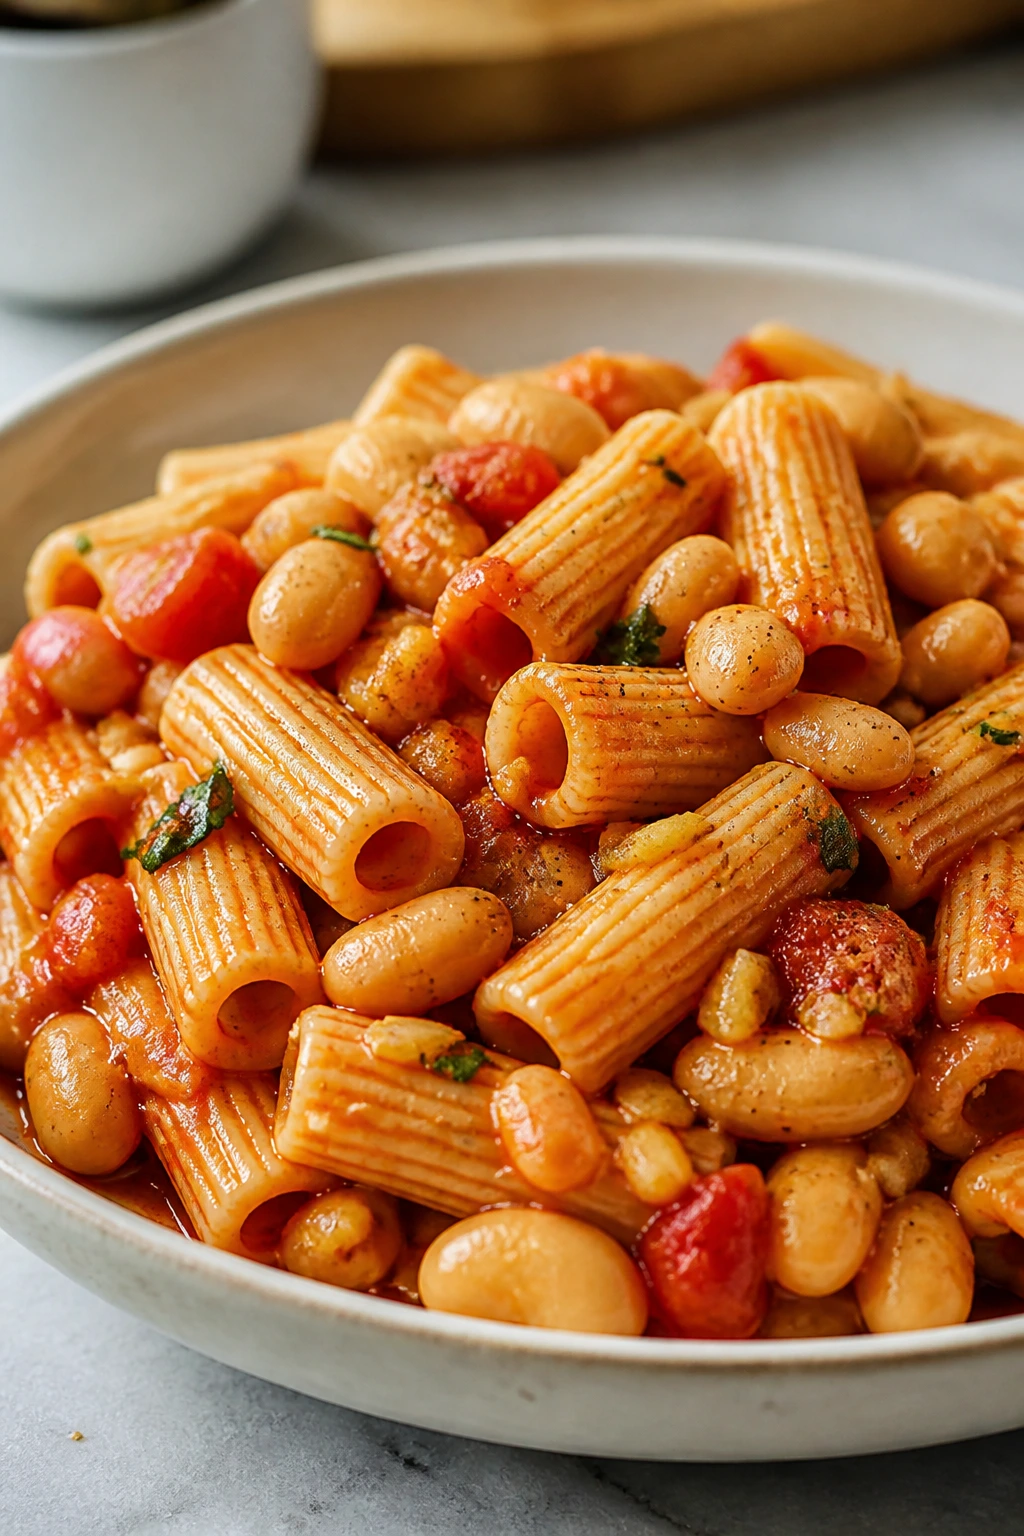
2. Pantry Pasta with Garlic, Tomatoes, and White Beans
This is one of those pasta dinners that tastes like it came from a much better stocked kitchen than the one that made it. The sauce is glossy, lightly garlicky, and full of tomato, but the beans give it enough bulk that nobody at the table will ask where the rest of dinner went. It’s fast, cheap, and not shy about being practical.
Why It Works
A can of white beans turns a basic tomato pasta into something with staying power. Their creamy center softens the sharp edge of canned tomatoes, and the pasta water helps everything cling to the noodles. You get a sauce that feels intentional, not improvised.
Key Ingredients
- 12 ounces spaghetti, penne, or rigatoni
- 2 tablespoons olive oil
- 4 garlic cloves, thinly sliced
- 1/2 teaspoon red pepper flakes
- 1 can crushed tomatoes, 15 ounces
- 1 can cannellini beans, 15 ounces, drained and rinsed
- 1/2 cup reserved pasta water
- 1/2 teaspoon salt, plus more for pasta water
- 1/4 teaspoon black pepper
- 1/3 cup grated Parmesan
- 2 tablespoons chopped parsley or basil, optional
Quick Steps
- Bring a large pot of salted water to a boil and cook the pasta until just shy of al dente, usually 1 minute less than the package says.
- While the pasta cooks, heat the oil in a deep skillet over medium heat. Add the garlic and red pepper flakes and cook for 30 to 45 seconds, until fragrant.
- Pour in the crushed tomatoes, beans, salt, and pepper. Simmer for 5 to 7 minutes so the sauce thickens slightly.
- Scoop out 1/2 cup pasta water, then drain the pasta.
- Add the pasta to the skillet with the sauce and splash in enough pasta water to loosen and gloss the noodles.
- Stir in the Parmesan and herbs, then serve immediately.
Equipment for This Recipe
- Large pot
- Deep skillet or sauté pan
- Colander
- Wooden spoon
How to Serve This Dish
Pile it into shallow bowls and finish with extra Parmesan and a few grinds of black pepper. A simple green salad or a piece of toast rubbed with garlic is plenty beside it.
Pro Tips for This Recipe
- Slice the garlic instead of mincing it if you want a gentler, sweeter flavor.
- Keep at least 1/2 cup pasta water. It’s the difference between sauce that slides off and sauce that hugs the noodles.
- Use a bean with a soft, creamy texture like cannellini or Great Northern.
- If the tomatoes taste sharp, simmer them an extra 2 minutes before adding the pasta.
Variations on This Dish
- Tuna Pantry Pasta: Add 1 drained can of tuna at the end for a more protein-heavy version.
- Puttanesca Lean-In: Stir in chopped olives and 1 tablespoon capers if you want a brinier edge.
- Creamy Bean Pasta: Mash a few of the beans against the side of the pan to make the sauce thicker.
Common Mistakes to Avoid with This Dish
- Using too little salt in the pasta water: Bland pasta drags the whole dish down. The water should taste seasoned, not like pool water.
- Draining all the pasta water away: You need that starchy liquid to bind the sauce.
- Boiling the sauce hard: A hard boil can make the garlic bitter. Keep it at a gentle simmer.
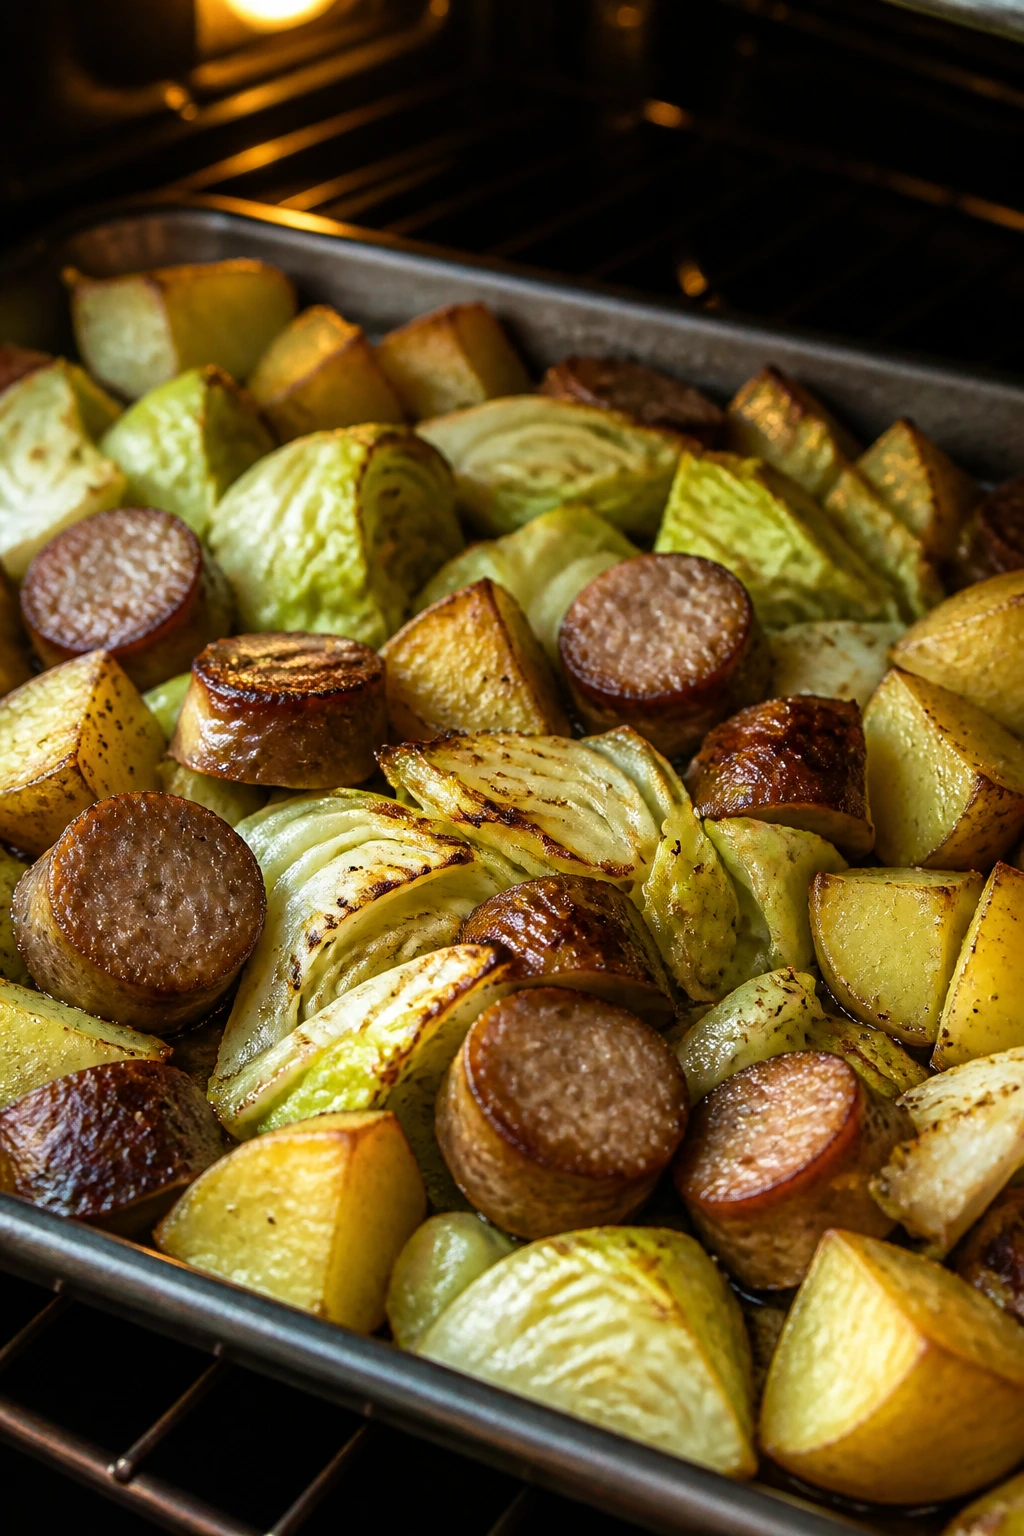
3. Sheet Pan Sausage, Potatoes, and Cabbage
There’s something deeply satisfying about dinner that goes onto one pan and comes off with browned edges and almost no cleanup. This one gives you smoky sausage, crisped potato corners, and cabbage that turns sweet around the edges instead of limp. It feels old-fashioned in the best possible way.
Why It Works
Cabbage is a budget hero because it gets sweeter in high heat and carries seasoning well. Potatoes soak up the sausage drippings, and the sausage itself brings enough salt and fat that you don’t need to build a separate sauce. Sheet pan dinners like this one win because the oven does the work while you ignore the stove.
Key Ingredients
- 1 pound smoked sausage, sliced into 1/2-inch rounds
- 1 1/2 pounds Yukon Gold or red potatoes, cut into 1-inch chunks
- 1/2 small green cabbage, cut into 1-inch wedges
- 1 small yellow onion, sliced
- 2 tablespoons olive oil
- 1 teaspoon paprika
- 1/2 teaspoon garlic powder
- 1/2 teaspoon salt
- 1/4 teaspoon black pepper
- 1 tablespoon Dijon mustard, optional
Quick Steps
- Heat the oven to 425°F and line a rimmed sheet pan with parchment.
- Toss the potatoes and onion with 1 tablespoon oil, paprika, garlic powder, salt, and pepper. Spread them out and roast for 15 minutes.
- Toss the sausage and cabbage with the remaining oil and the Dijon mustard if using.
- Add the sausage and cabbage to the pan, turning the potatoes once so they brown evenly. Roast for 15 to 20 minutes more.
- Stir once halfway through so the cabbage doesn’t scorch on one side.
- Pull the pan when the potatoes are tender and the cabbage has browned edges.
Equipment for This Recipe
- Rimmed sheet pan
- Large mixing bowl
- Sharp knife
- Parchment paper
How to Serve This Dish
Serve it straight from the pan with mustard on the side or a spoonful of sour cream. A slice of rye bread or a pile of applesauce is a surprisingly good match here.
Pro Tips for This Recipe
- Cut the potatoes small enough that they finish with the cabbage, not before it.
- Don’t crowd the pan. If everything piles up, it steams instead of browning.
- Toss the cabbage in oil only after the potatoes have started roasting; it softens faster.
- A spoonful of mustard at the end cuts through the sausage fat nicely.
Variations on This Dish
- Smoked Kielbasa Version: Use kielbasa instead of standard smoked sausage for a sweeter, deeper flavor.
- Mustard and Apple Tray Bake: Add thick apple wedges in the last 10 minutes for a sharper-sweeter finish.
- Spicy Chorizo Swap: Swap in sliced chorizo and a pinch of chili flakes for more heat.
Common Mistakes to Avoid with This Dish
- Cutting the potatoes too large: Big chunks stay firm while the cabbage collapses. Keep them around 1 inch.
- Adding cabbage too early: It’ll turn soft and watery. Give the potatoes a head start.
- Using a tiny pan: Overcrowding kills the browning, and browning is half the point.
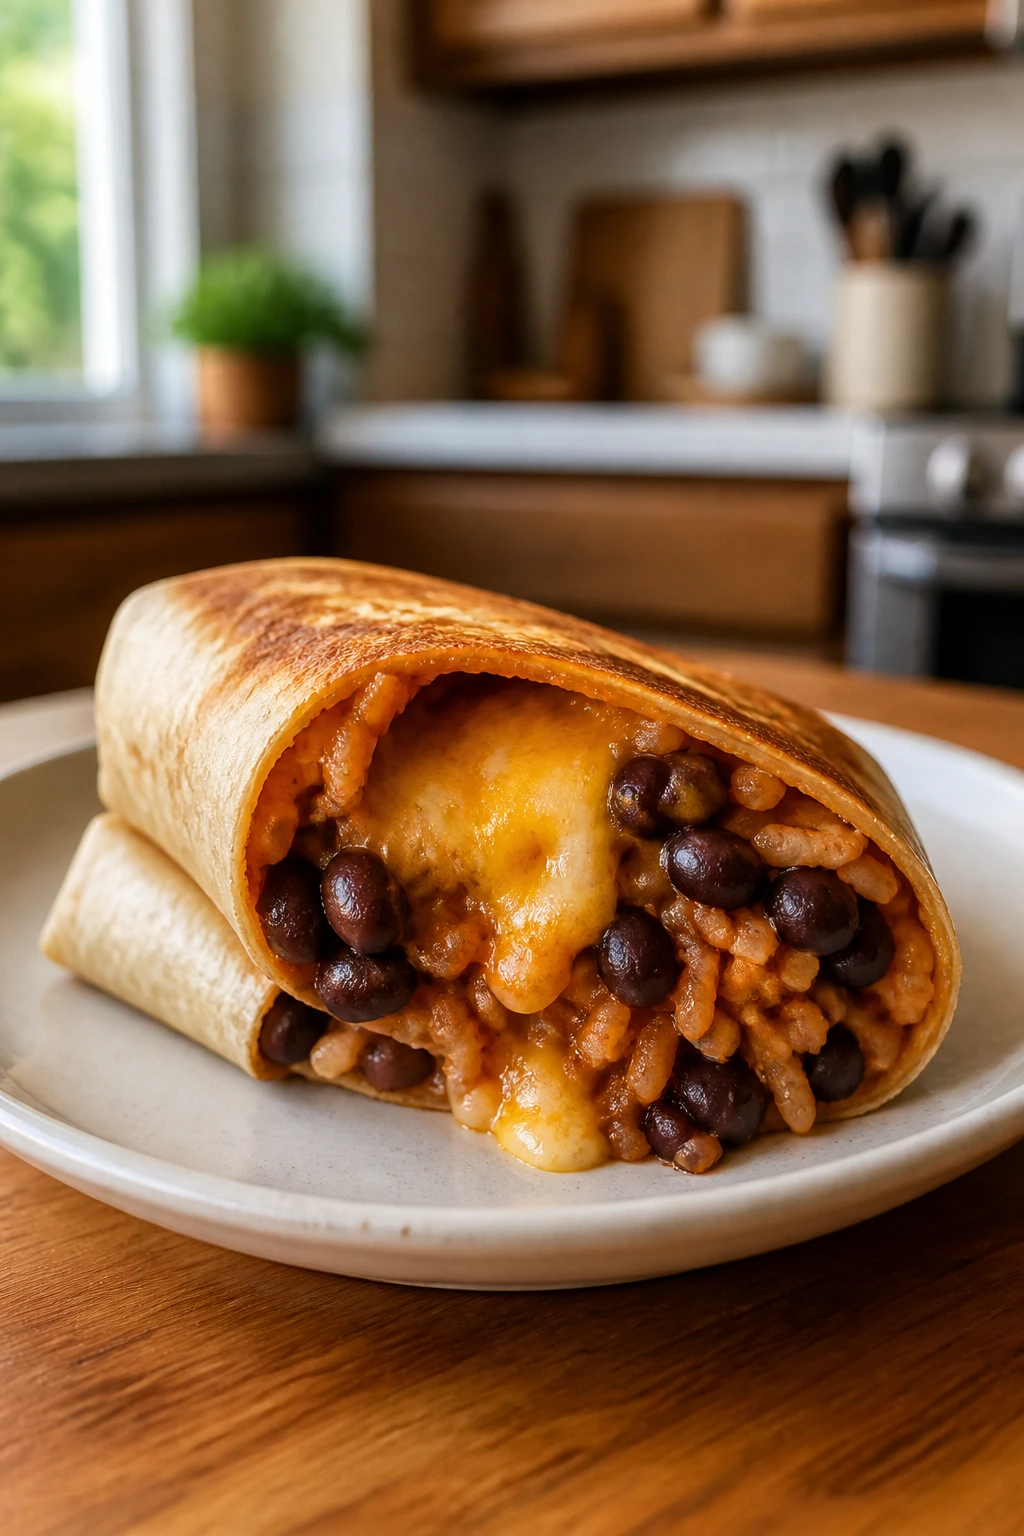
4. Cheesy Bean and Rice Burritos
These burritos are the kind of dinner that solves a problem before it gets dramatic. The filling is warm, soft, and a little smoky from cumin and salsa, then the tortilla gets crisped in a skillet so the whole thing feels more finished than a microwave meal ever could. Cheap? Yes. Sloppy? Only if you rush it.
Why It Works
Rice and beans already like each other; burritos just give them a job. Salsa acts as seasoning and moisture at the same time, which saves you from making a separate sauce. Toasting the burritos in a skillet melts the cheese and keeps the tortillas from going limp.
Key Ingredients
- 1 1/2 cups cooked rice
- 1 can black beans, 15 ounces, drained and rinsed
- 1/2 cup salsa
- 1 teaspoon ground cumin
- 1/2 teaspoon garlic powder
- 1 cup shredded cheddar or Mexican blend cheese
- 6 large flour tortillas
- 2 tablespoons chopped cilantro, optional
- 1 tablespoon oil, for toasting
Quick Steps
- Warm the rice, beans, salsa, cumin, and garlic powder together in a skillet over medium heat for 4 to 5 minutes.
- Stir in half the cheese and let it melt into the filling.
- Warm the tortillas for 15 seconds in the microwave or in a dry skillet so they fold without tearing.
- Divide the filling among the tortillas, then add the cilantro if using.
- Fold in the sides and roll tightly.
- Heat the oil in a clean skillet over medium heat and toast each burrito for 1 to 2 minutes per side, until golden and crisp.
Equipment for This Recipe
- Large skillet
- Second skillet for toasting
- Spoon or small ladle
- Microwave-safe plate, optional
How to Serve This Dish
Cut the burritos in half and serve them with extra salsa, sour cream, or shredded lettuce. If you want to stretch the meal, add a bowl of tomato soup or a simple cabbage slaw.
Pro Tips for This Recipe
- Use rice that’s dry enough to fluff. Wet rice makes the burritos tear.
- Don’t overfill them. A tight burrito is easier to toast and easier to eat.
- Toast seam-side down first so the roll stays closed.
- If the tortillas crack, warm them a little longer before rolling.
Variations on This Dish
- Breakfast Burritos: Add scrambled eggs and skip the cumin for a morning-style version.
- Spicy Bean Wraps: Mix in pickled jalapeños or hot salsa for more heat.
- Veggie-Loaded Burritos: Stir in sautéed peppers or frozen corn to bulk up the filling.
Common Mistakes to Avoid with This Dish
- Using cold tortillas: They split at the first fold. Warm them first.
- Putting too much salsa in the filling: The burrito turns soggy. Keep the filling thick.
- Skipping the skillet toast: A soft burrito is fine, but a crisp burrito is better.
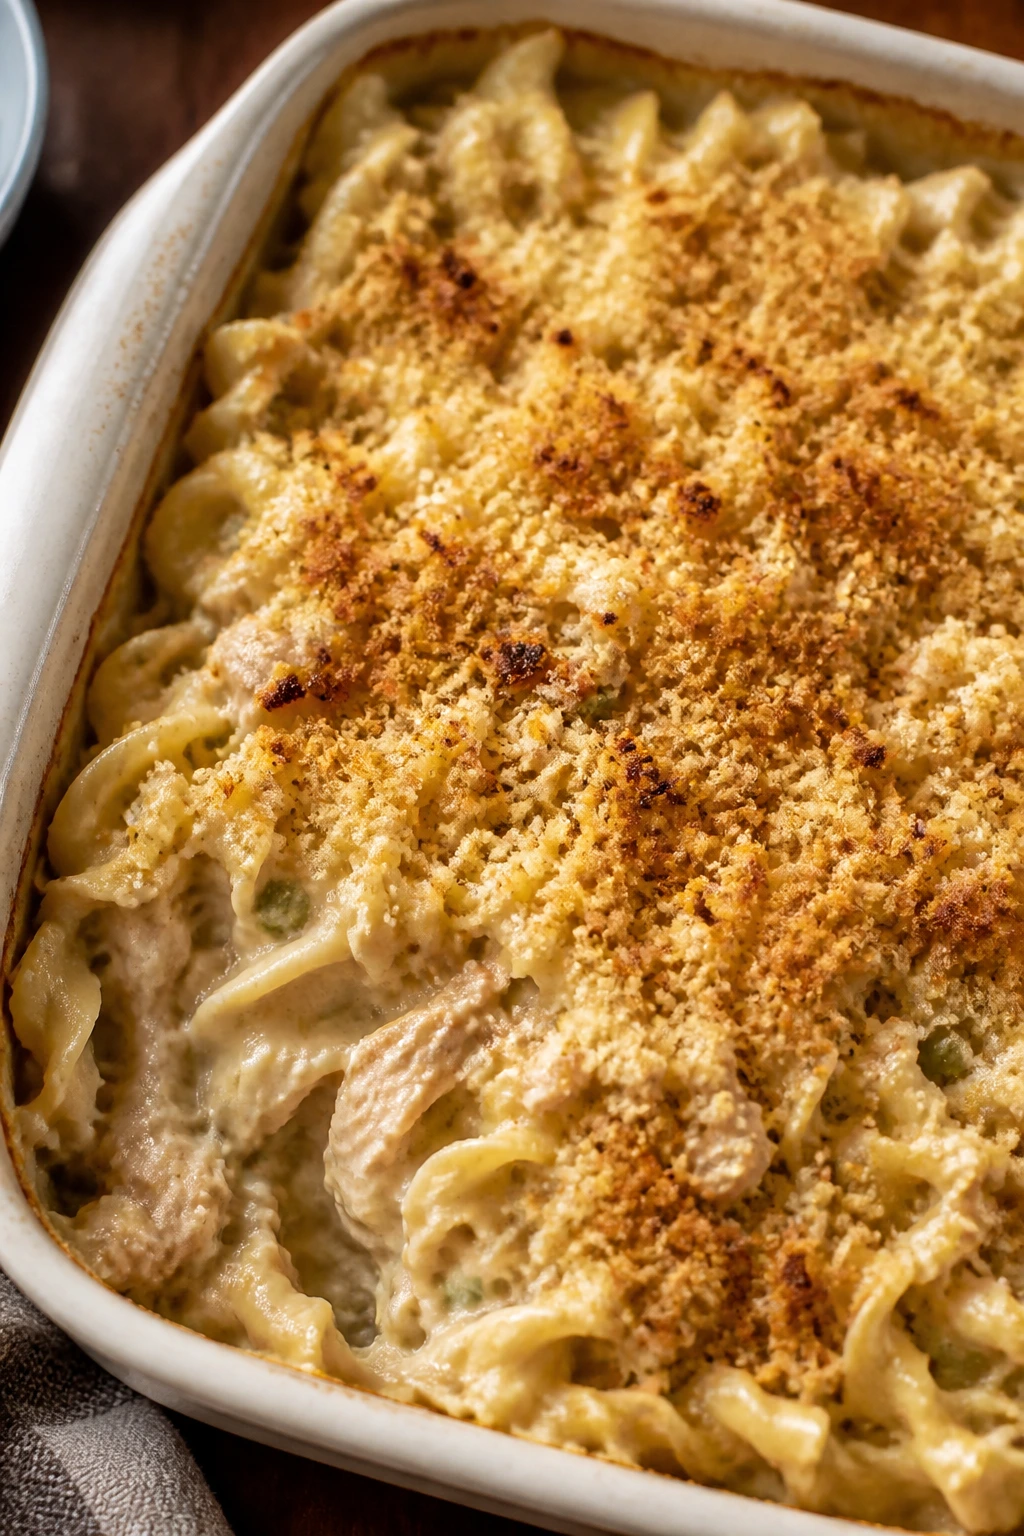
5. Tuna Noodle Casserole
This casserole earns its place by doing exactly what you need it to do: feed people with pantry ingredients and come out of the oven with a browned top and a creamy middle. The peas add little pops of sweetness, the tuna brings salt and depth, and the noodles hold onto the sauce in a way that feels more comforting than fancy. No one is pretending this is complicated.
Why It Works
Canned tuna is one of the cheapest proteins that still tastes like dinner when mixed well. The sauce gets its body from milk and a little flour, or from a can of cream soup if that’s what you keep around. Baking it for just 20 minutes gives the top enough color to feel finished without drying out the noodles.
Key Ingredients
- 12 ounces egg noodles
- 2 cans tuna in water, 5 ounces each, drained
- 1 cup frozen peas
- 2 tablespoons butter
- 2 tablespoons all-purpose flour
- 1 1/2 cups milk
- 1 cup shredded cheddar
- 1/2 teaspoon salt
- 1/4 teaspoon black pepper
- 1 cup breadcrumbs or crushed crackers
- 1 tablespoon melted butter, for the topping
Quick Steps
- Heat the oven to 375°F and grease an 8×8-inch or 9×9-inch baking dish.
- Cook the noodles until just al dente, then drain.
- Melt the butter in a saucepan over medium heat, whisk in the flour, and cook for 1 minute.
- Slowly whisk in the milk and cook for 3 to 4 minutes, until the sauce thickens enough to coat a spoon.
- Stir in the tuna, peas, cheese, salt, pepper, and noodles.
- Spoon the mixture into the baking dish, top with breadcrumbs mixed with melted butter, and bake for 20 to 25 minutes, until bubbling and lightly browned.
Equipment for This Recipe
- Medium saucepan
- Whisk
- Baking dish
- Pot for noodles
How to Serve This Dish
Let it sit for 5 minutes after baking so the sauce settles. A crisp salad or a few slices of tomatoes on the side keep the plate from feeling too heavy.
Pro Tips for This Recipe
- Keep the noodles slightly firm before baking; they keep absorbing liquid in the oven.
- Drain the tuna well so the casserole doesn’t go watery.
- Crushed saltines make a more delicate topping than breadcrumbs.
- A small splash of lemon juice sharpens the tuna without making it taste fishy.
Variations on This Dish
- Mushroom Tuna Bake: Add 1 cup sautéed mushrooms for a deeper, earthier flavor.
- Corn-and-Tuna Casserole: Swap the peas for corn if that’s what’s in the freezer.
- Cheddar-Heavy Version: Add an extra 1/2 cup cheese on top and skip the breadcrumbs.
Common Mistakes to Avoid with This Dish
- Overbaking the casserole: It dries out fast. Pull it when it’s bubbling at the edges.
- Using too much sauce: The noodles should be coated, not swimming.
- Forgetting to season the sauce: Tuna and noodles need salt, pepper, and a little extra help.
6. Egg Fried Rice with Frozen Veggies
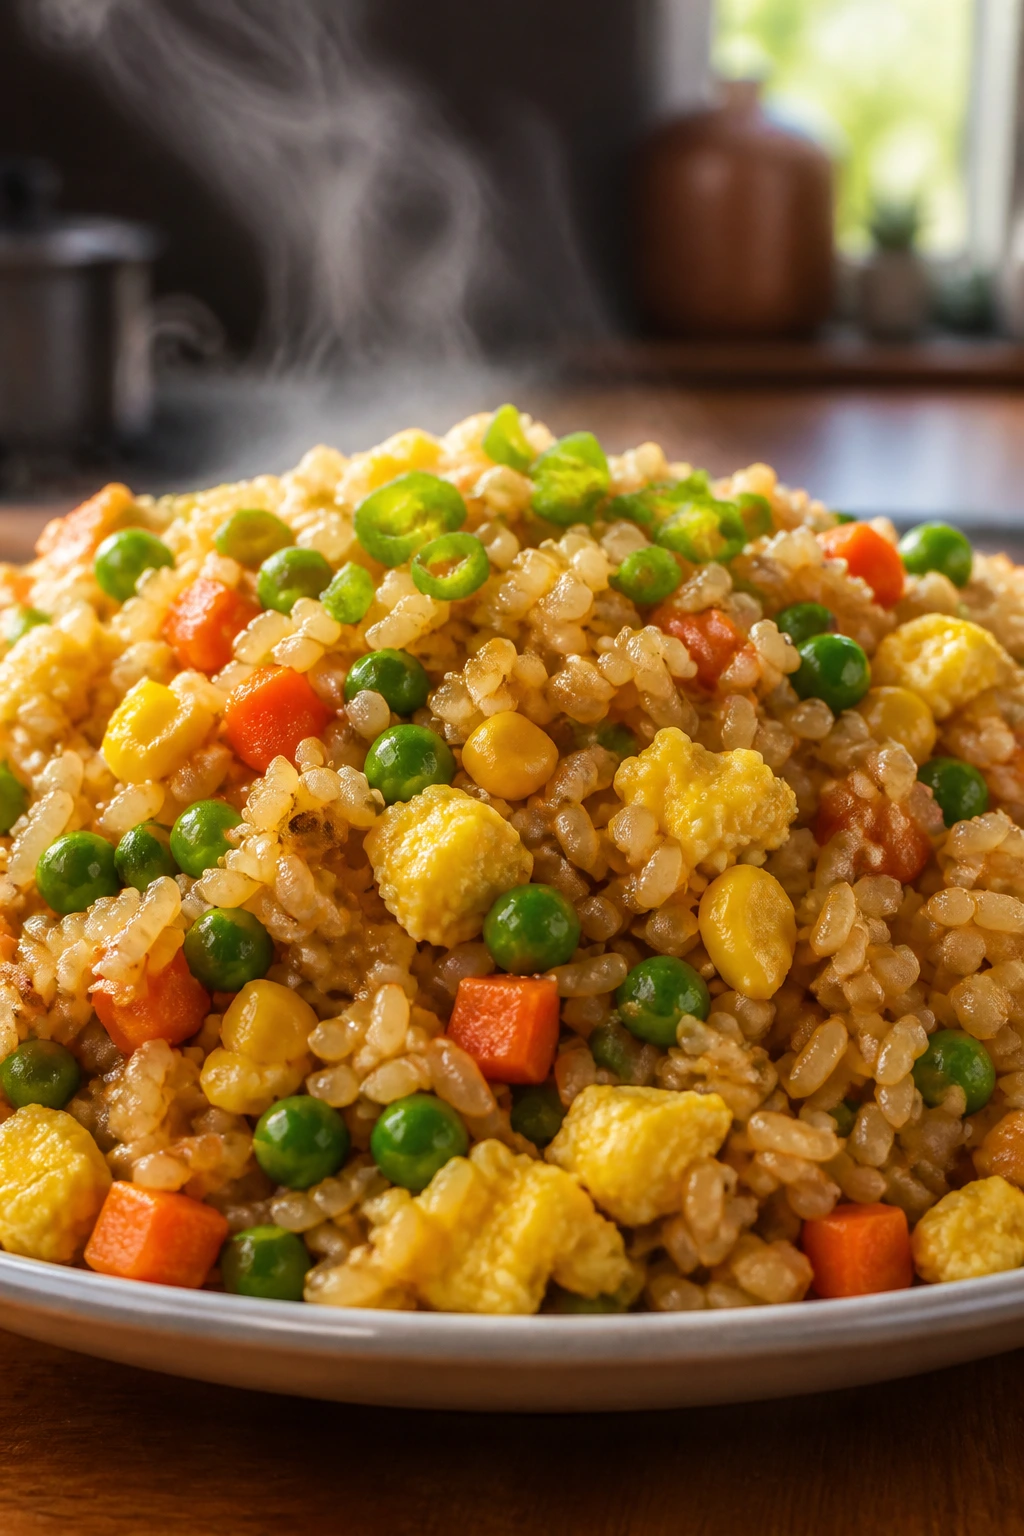
If you keep leftover rice in the fridge, this dinner is almost unfair in how much it gives back for so little effort. The rice gets lightly crisp in spots, the eggs turn soft and savory, and the frozen vegetables save you from chopping a whole produce drawer. It’s fast, cheap, and better than takeout when you season it properly.
Why It Works
Cold rice fries instead of turning mushy. That’s the whole trick. Eggs coat the grains, frozen vegetables bring color and a little sweetness, and soy sauce gives the dish its familiar salty edge without a long ingredient list.
Key Ingredients
- 3 cups cooked rice, cold
- 4 large eggs
- 2 cups frozen mixed vegetables
- 2 tablespoons neutral oil
- 2 scallions, sliced
- 2 tablespoons soy sauce
- 1 teaspoon sesame oil, optional
- 2 cloves garlic, minced
- 1/4 teaspoon black pepper
Quick Steps
- Beat the eggs in a bowl with a pinch of black pepper.
- Heat 1 tablespoon oil in a large skillet or wok over medium-high heat and scramble the eggs until just set. Remove them to a plate.
- Add the remaining oil, then cook the garlic and frozen vegetables for 3 to 4 minutes, until the vegetables are hot and no longer icy.
- Stir in the rice and break up any clumps with a spatula.
- Add the soy sauce and sesame oil, then fry for 3 to 5 minutes until the rice starts to crisp in spots.
- Fold the eggs back in and finish with scallions.
Equipment for This Recipe
- Large skillet or wok
- Spatula
- Mixing bowl
- Measuring spoons
How to Serve This Dish
Serve it in shallow bowls with extra scallions or a drizzle of chili oil. If you want to make it feel like a real spread, add sliced cucumbers or a fried egg on top.
Pro Tips for This Recipe
- Use rice that’s been chilled at least a few hours. Warm rice gets gummy.
- Keep the pan hot enough to fry, not steam.
- Soy sauce goes farther when the rice is dry and separated.
- A little butter at the end gives the rice a softer, rounder flavor.
Variations on This Dish
- Chicken Fried Rice: Add 1 cup diced cooked chicken if you have leftovers.
- Kimchi Fried Rice: Stir in 1/2 cup chopped kimchi for sharp heat.
- Peanut Fried Rice: Add 1 tablespoon peanut butter and a squeeze of lime for a richer version.
Common Mistakes to Avoid with This Recipe
- Using fresh, wet rice: It clumps and steams. Chill it first.
- Adding too much soy sauce at once: The rice gets dark and salty fast. Start with less.
- Crowding the pan: Fry in batches if your skillet is small.
7. Chickpea Coconut Curry
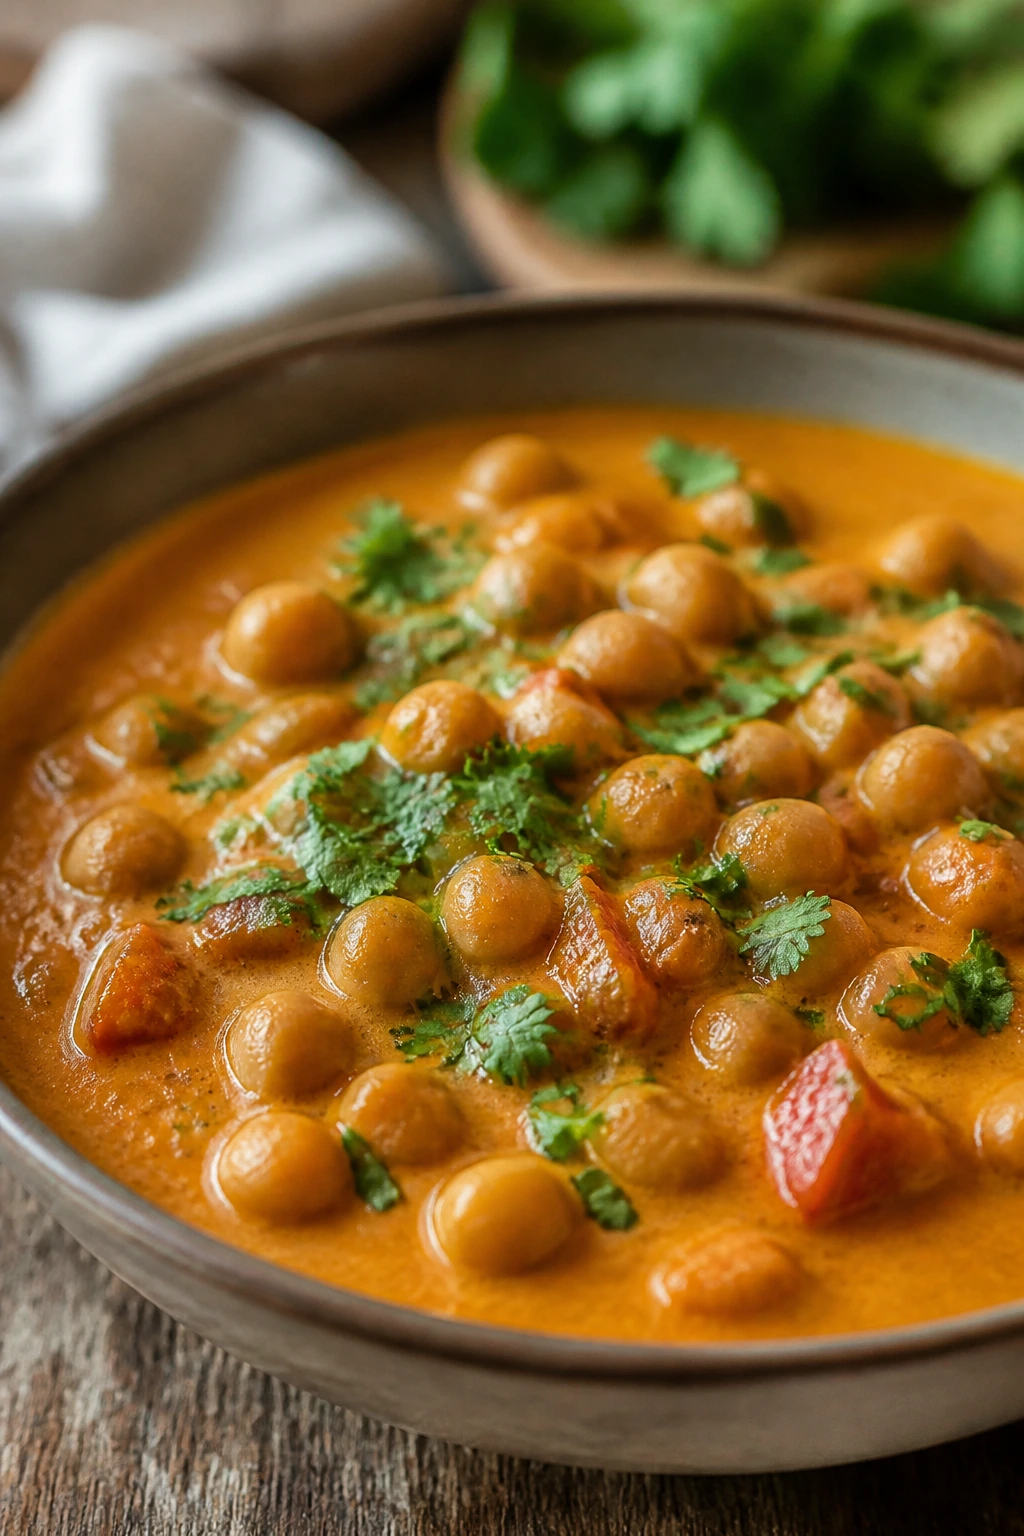
This curry tastes like it took a lot more effort than it did. The coconut milk gives it a soft, creamy body, while chickpeas keep the cost down and the protein up. Tomato, curry powder, and onion do most of the flavor work, which is exactly what a smart weeknight dinner should do.
Why It Works
Chickpeas are sturdy enough to simmer without falling apart, and they pick up spice well. Coconut milk gives the sauce body without requiring cream or a long reduction. A short simmer is enough to pull the curry powder into the tomatoes and make the whole pot taste cohesive.
Key Ingredients
- 1 tablespoon oil
- 1 medium yellow onion, diced
- 2 garlic cloves, minced
- 1 tablespoon grated fresh ginger or 1 teaspoon ground ginger
- 2 tablespoons curry powder
- 2 cans chickpeas, 15 ounces each, drained and rinsed
- 1 can coconut milk, 13.5 ounces
- 1 can diced tomatoes, 14.5 ounces
- 1/2 cup water
- 1 teaspoon salt
- 2 cups cooked rice, for serving
- 2 tablespoons chopped cilantro, optional
Quick Steps
- Heat the oil in a saucepan over medium heat. Cook the onion for 5 minutes until soft.
- Add the garlic and ginger, then stir in the curry powder for 30 seconds so it blooms in the oil.
- Add the chickpeas, coconut milk, tomatoes, water, and salt.
- Bring the pot to a gentle simmer and cook for 15 minutes, stirring once or twice.
- Taste and add more salt if needed, then let it thicken for 3 to 5 minutes if you want a denser sauce.
- Serve over rice and finish with cilantro.
Equipment for This Recipe
- Medium saucepan or Dutch oven
- Wooden spoon
- Measuring cups
- Knife and cutting board
How to Serve This Dish
Spoon it over rice so the sauce has something to soak into. Flatbread, naan, or even a piece of toasted sandwich bread works well beside it.
Pro Tips for This Recipe
- Bloom the curry powder in the oil. That short step keeps it from tasting dusty.
- If your coconut milk separates in the can, stir it before measuring.
- A squeeze of lime at the end makes the sauce brighter.
- Leftovers taste even better the next day once the spices settle in.
Variations on This Dish
- Spinach Chickpea Curry: Stir in 3 packed cups of spinach at the end.
- Sweet Potato Curry: Add 1 diced sweet potato with the onions and simmer until tender.
- Red Curry Shortcut: Replace curry powder with 2 tablespoons red curry paste for a sharper version.
Common Mistakes to Avoid with This Dish
- Boiling the coconut milk hard: It can split. Keep the heat gentle.
- Using too little salt: Chickpeas soak up flavor and need seasoning.
- Skipping the rice or bread: The sauce is the best part; give it something to cling to.
8. Chicken and Cabbage Stir-Fry
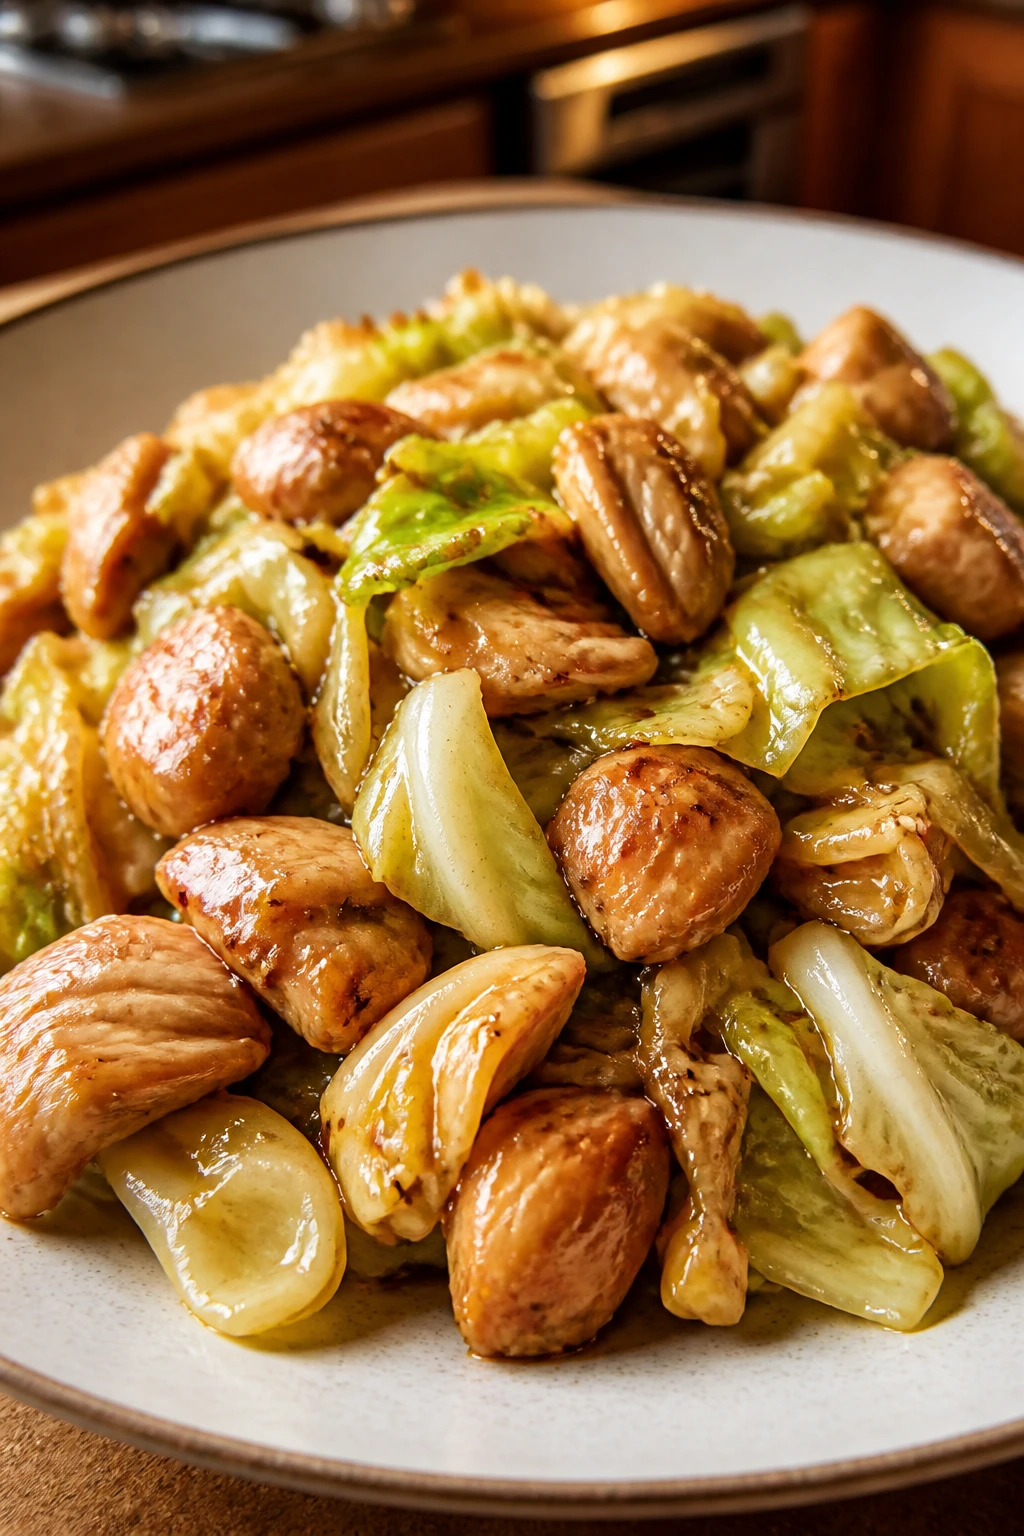
Chicken thighs and cabbage belong together in a way that feels almost too sensible. The thighs stay juicy, the cabbage softens without turning mushy, and the whole thing picks up a savory glaze that tastes bigger than the ingredient list suggests. This is a budget dinner that still feels like a proper stir-fry, not a compromise.
Why It Works
Chicken thighs cost less than many lean cuts and stay tender even if you cook them a minute too long. Cabbage is cheap, sturdy, and mild enough to carry garlic, soy sauce, and vinegar. The quick sauce gives you enough shine without needing sugar-heavy bottled stir-fry sauce.
Key Ingredients
- 1 1/4 pounds boneless, skinless chicken thighs, cut into bite-size pieces
- 4 cups shredded green cabbage
- 1 medium carrot, julienned or thinly sliced
- 2 tablespoons oil
- 3 garlic cloves, minced
- 3 tablespoons soy sauce
- 1 tablespoon rice vinegar or apple cider vinegar
- 1 teaspoon cornstarch
- 1/4 cup water
- 2 scallions, sliced
- Cooked rice, for serving
Quick Steps
- Mix the soy sauce, vinegar, cornstarch, and water in a small bowl.
- Heat 1 tablespoon oil in a large skillet over medium-high heat and cook the chicken for 5 to 6 minutes, until browned and cooked through. Remove it to a plate.
- Add the remaining oil, then cook the cabbage and carrot for 3 to 4 minutes until they start to soften but still have crunch.
- Stir in the garlic and cook for 30 seconds.
- Return the chicken to the pan, pour in the sauce, and toss for 1 to 2 minutes until glossy and thickened.
- Finish with scallions and serve over rice.
Equipment for This Recipe
- Large skillet or wok
- Small bowl for the sauce
- Wooden spoon or spatula
- Knife and cutting board
How to Serve This Dish
Serve it over rice or noodles and spoon any extra sauce over the top. A few sesame seeds or a splash of chili oil can make the plate look finished with almost no extra work.
Pro Tips for This Recipe
- Slice the chicken evenly so it cooks at the same pace.
- Don’t overcook the cabbage. Some bite keeps the dish lively.
- Mix the cornstarch into cold liquid before it hits the pan.
- If the pan looks dry, add 1 tablespoon water instead of more oil.
Variations on This Dish
- Pork and Cabbage Stir-Fry: Swap the chicken for sliced pork shoulder or pork loin.
- Vegetarian Cabbage Bowl: Use cubed tofu and add an extra teaspoon of soy sauce.
- Peanut-Style Version: Stir 1 tablespoon peanut butter into the sauce for a richer finish.
Common Mistakes to Avoid with This Dish
- Overcrowding the skillet: The chicken will steam instead of browning. Cook in two batches if needed.
- Cutting the cabbage too fine: It disappears before the sauce finishes. Thin shreds are enough.
- Adding the sauce too early: The cabbage needs a head start so it doesn’t turn watery.
9. Baked Ziti with Cottage Cheese

Baked pasta is one of the few budget dinners that can feel a little celebratory without demanding much from you. This version uses cottage cheese instead of a pricier ricotta, which gives the filling a creamy, lightly tangy body that melts into the sauce. It’s rich enough to satisfy, but not so heavy that it sits like a brick.
Why It Works
Pasta bakes thrive on repetition: sauce, cheese, noodles, repeat. Cottage cheese brings protein and creaminess for less money than many fresh cheeses, and it blends well once baked. The mozzarella on top browns into those stretchy, browned spots people always go after first.
Key Ingredients
- 12 ounces ziti or penne
- 1 pound ground turkey or ground beef
- 1 tablespoon olive oil
- 1 small onion, diced
- 2 garlic cloves, minced
- 1 jar marinara sauce, about 24 ounces
- 1 cup cottage cheese
- 1 egg
- 2 cups shredded mozzarella
- 1/4 cup grated Parmesan
- 1 teaspoon Italian seasoning
- 1/2 teaspoon salt
Quick Steps
- Heat the oven to 375°F and grease a 9×13-inch baking dish.
- Cook the pasta until just shy of al dente, then drain.
- Brown the ground meat in the olive oil with the onion for 6 to 8 minutes. Stir in the garlic for 30 seconds.
- Add the marinara, Italian seasoning, salt, and pasta. Stir in half the mozzarella.
- Mix the cottage cheese and egg in a bowl, then fold it into the pasta or layer it through the casserole.
- Top with the remaining mozzarella and Parmesan, then bake for 20 to 25 minutes until bubbling and browned.
Equipment for This Recipe
- Large pot
- Skillet
- 9×13-inch baking dish
- Mixing bowl
How to Serve This Dish
Let it rest for 10 minutes so it slices cleanly. A green salad or steamed broccoli gives the plate some contrast, and garlic bread is never a bad idea if you already have the oven on.
Pro Tips for This Recipe
- Slightly undercook the pasta so it doesn’t go soft in the oven.
- Cottage cheese mixes better if you stir it with the egg first.
- Use a marinara that already tastes decent from the jar. You’re not fixing bad sauce here.
- Let the top get some color. Pale cheese is a missed opportunity.
Variations on This Dish
- Spinach Ziti: Stir in 2 packed cups of thawed, squeezed-dry spinach.
- Sausage Ziti: Swap the ground meat for crumbled Italian sausage.
- No-Boil Shortcut: Use a little extra sauce and bake covered for the first 20 minutes.
Common Mistakes to Avoid with This Dish
- Using too little sauce: Dry baked ziti is sad. The pasta should look saucy before it goes in the oven.
- Skipping the rest time: Cut too early and everything slides apart.
- Overbrowning the top: Nice color is good. Burnt cheese is not.
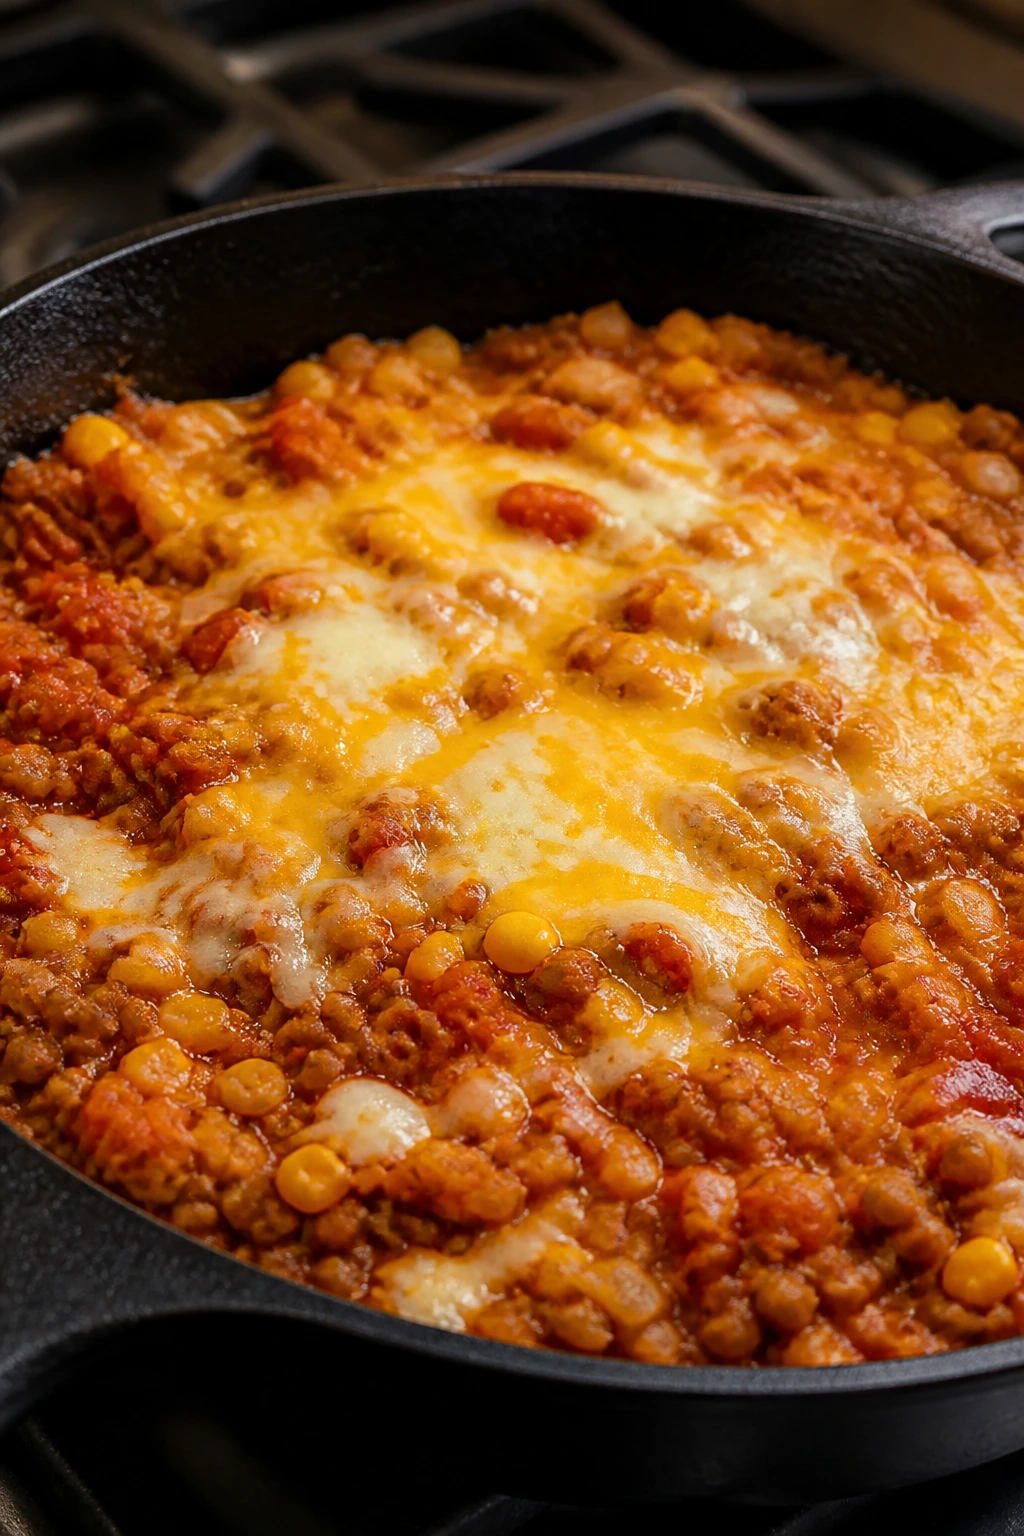
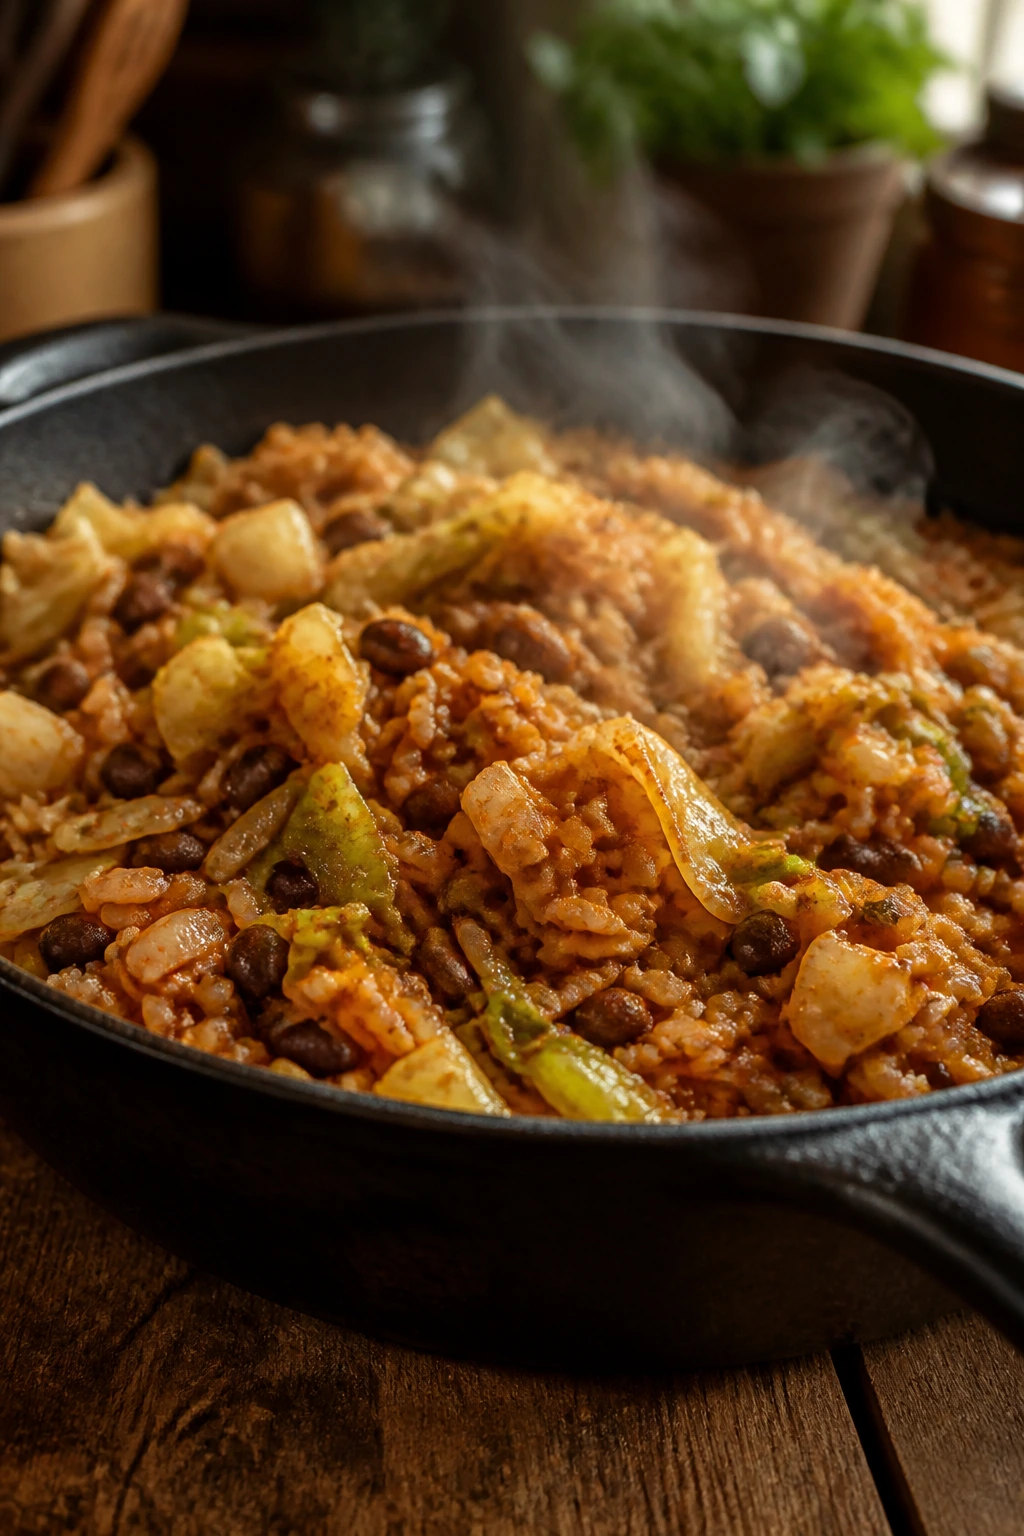
10. Black Bean Sweet Potato Skillet
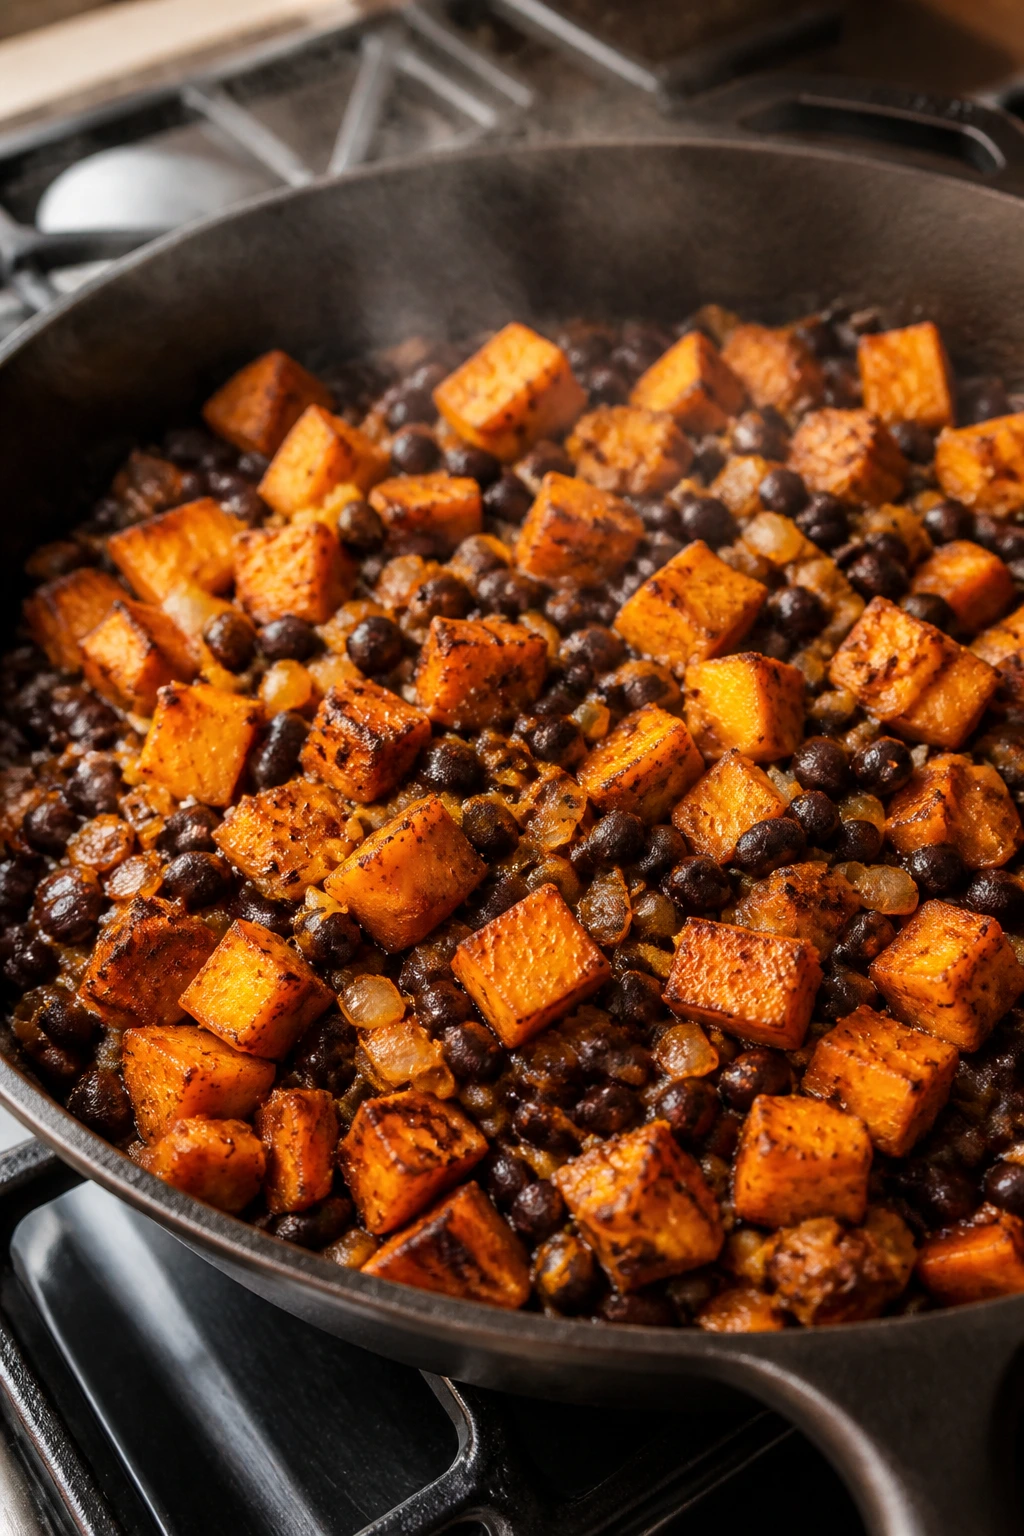
Sweet potatoes do a lot of work for very little money. They get creamy on the inside, caramelized at the edges, and they play well with black beans and taco seasoning without needing much else. This skillet tastes like something built with intention, even if it came together from a few inexpensive things you already had.
Why It Works
Sweet potatoes add bulk, color, and a soft, almost buttery texture that balances the earthiness of black beans. The skillet method means the potatoes get browned before the beans go in, which keeps the whole dish from turning mushy. A little cheese on top gives it a melted finish, but the dinner works even without it.
Key Ingredients
- 2 medium sweet potatoes, peeled and diced into 1/2-inch cubes
- 1 tablespoon oil
- 1 small onion, diced
- 1 red bell pepper, chopped
- 1 can black beans, 15 ounces, drained and rinsed
- 2 teaspoons taco seasoning
- 1/2 cup salsa
- 1 cup shredded cheddar, optional
- 2 tablespoons chopped cilantro or green onions
- 1 avocado, sliced, optional
Quick Steps
- Heat the oil in a large skillet over medium heat and cook the sweet potatoes for 8 to 10 minutes, stirring often.
- Add 2 tablespoons water and cover the skillet for 3 minutes so the cubes soften in the center.
- Stir in the onion and bell pepper and cook for 4 minutes.
- Add the black beans, taco seasoning, and salsa. Cook for 3 to 4 minutes until everything is hot and coated.
- Sprinkle on the cheese if using, cover for 1 minute to melt, then finish with cilantro or green onions.
- Serve with avocado on top if you want a little extra richness.
Equipment for This Recipe
- Large skillet with lid
- Cutting board and knife
- Wooden spoon
- Measuring spoons
How to Serve This Dish
Serve it as a bowl with avocado and a squeeze of lime, or tuck it into tortillas for fast tacos. It also works beside rice if you need to feed more people without stretching the skillet.
Pro Tips for This Recipe
- Cut the sweet potatoes small and even so they soften at the same pace.
- Use salsa with a little thickness; watery salsa makes the skillet loose.
- A squeeze of lime at the end keeps the sweet potato from feeling heavy.
- If you like more browning, let the cubes sit undisturbed for a minute before stirring again.
Variations on This Dish
- Breakfast Skillet: Add fried eggs on top and serve it early in the day.
- Corn and Bean Version: Stir in 1 cup frozen corn with the beans.
- Smoky Paprika Swap: Add 1/2 teaspoon smoked paprika for a deeper flavor.
Common Mistakes to Avoid with This Dish
- Leaving the sweet potatoes too big: They’ll stay hard in the center. Keep them small.
- Adding the beans before the potatoes soften: The beans are already cooked; they just need warming.
- Skipping acid at the end: Lime or salsa gives the skillet a needed lift.
11. Lentil Sloppy Joes
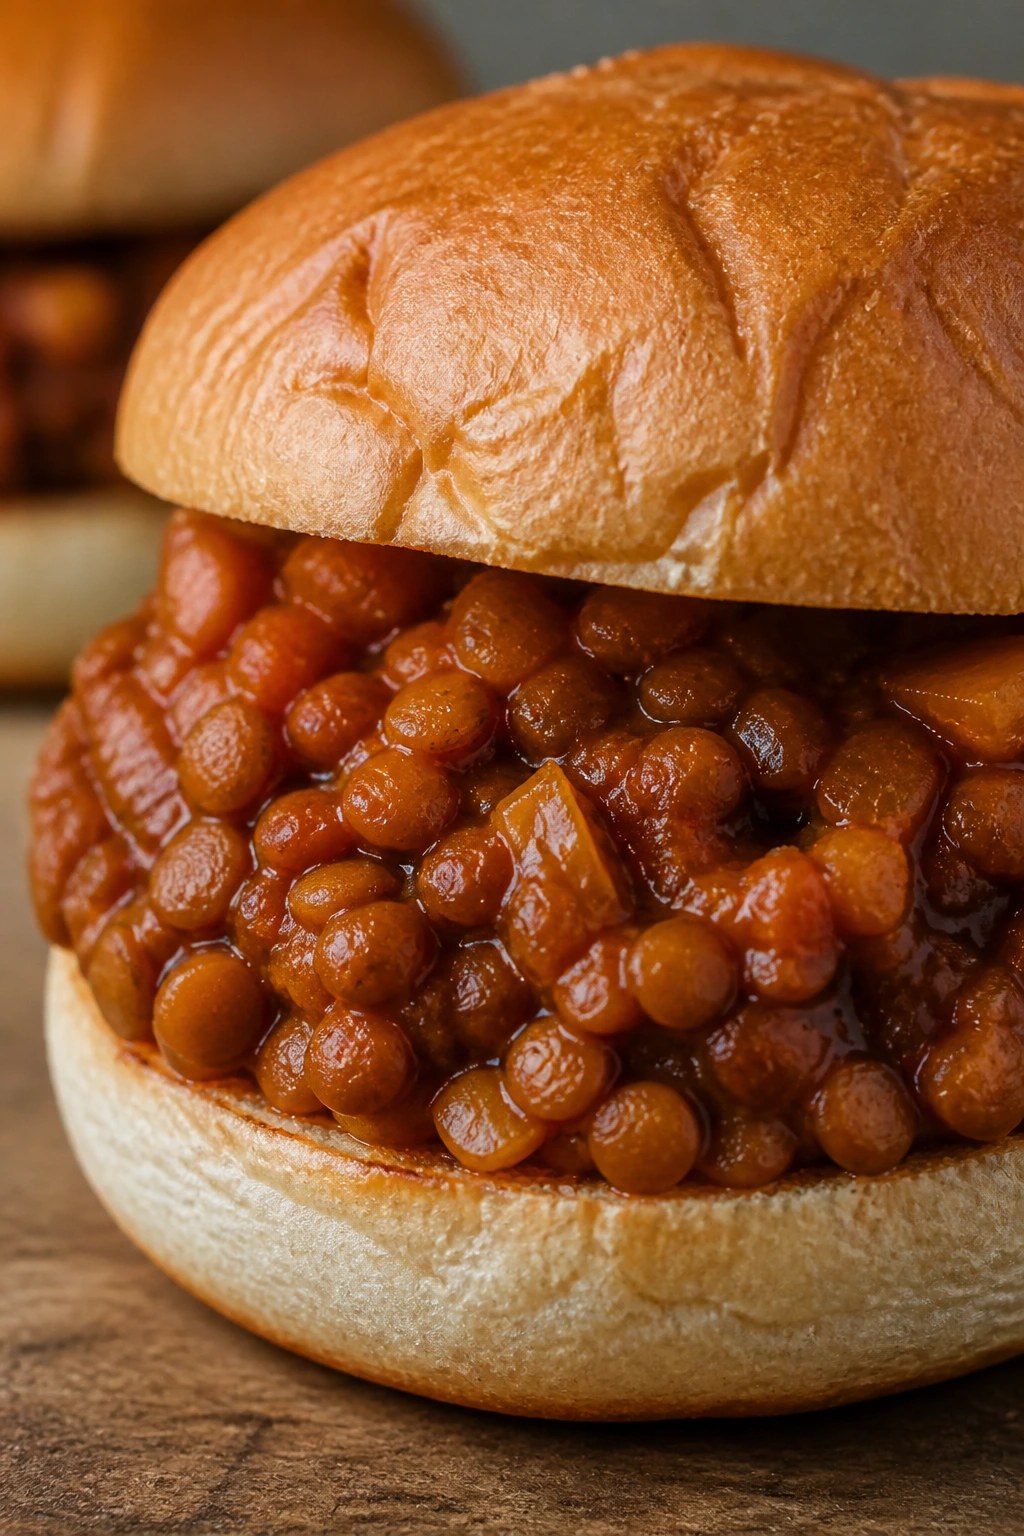
Lentil sloppy joes have that slightly messy, saucy charm that makes weeknight dinner feel informal in the best way. The filling is sweet, tangy, and thick enough to hold together on a bun without pouring out everywhere. It’s inexpensive, filling, and one of those recipes that makes lentils feel like a feature instead of a backup plan.
Why It Works
Brown or green lentils keep their shape, which is exactly what sloppy joes need. They give you the hearty bite of ground meat without the cost. Tomato paste, ketchup, mustard, and a little Worcestershire build the familiar sweet-sour flavor people expect from the sandwich.
Key Ingredients
- 1 cup dry brown or green lentils, rinsed
- 3 cups water or low-sodium broth
- 1 tablespoon oil
- 1 small onion, diced
- 1 small green bell pepper, diced
- 2 tablespoons tomato paste
- 1/2 cup ketchup
- 1 tablespoon mustard
- 1 tablespoon Worcestershire sauce
- 1 teaspoon brown sugar
- 6 hamburger buns
Quick Steps
- Simmer the lentils in water or broth for 20 to 25 minutes until tender but not falling apart. Drain any excess liquid.
- Heat the oil in a skillet and cook the onion and bell pepper for 5 minutes.
- Stir in the tomato paste and cook for 1 minute to remove the raw edge.
- Add the lentils, ketchup, mustard, Worcestershire, and brown sugar.
- Simmer for 5 to 7 minutes until thick and glossy.
- Spoon onto buns and serve hot.
Equipment for This Recipe
- Medium saucepan
- Skillet
- Colander
- Wooden spoon
How to Serve This Dish
Serve it on toasted buns so the bottom doesn’t go soggy. A pickle spear, potato chips, or a simple slaw gives the plate a little crunch.
Pro Tips for This Recipe
- Don’t overcook the lentils. They should stay tender and distinct.
- If the filling looks dry, add 2 to 3 tablespoons water while simmering.
- Toast the buns. Seriously. It makes a cheap sandwich feel like dinner.
- A splash of vinegar at the end tightens the flavor if it tastes too sweet.
Variations on This Dish
- Spicy Joe Filling: Add hot sauce or a pinch of cayenne.
- Mushroom Lentil Mix: Stir in 1 cup chopped mushrooms with the onion and pepper.
- BBQ Lentils: Replace half the ketchup with barbecue sauce.
Common Mistakes to Avoid with This Dish
- Using mushy lentils: They turn the filling into a paste. Keep them intact.
- Too much ketchup without balance: The sandwich gets cloying. Mustard and vinegar keep it in line.
- Skipping the toast on the buns: Soft bread falls apart fast under this filling.
12. Broccoli Cheddar Soup with Toast
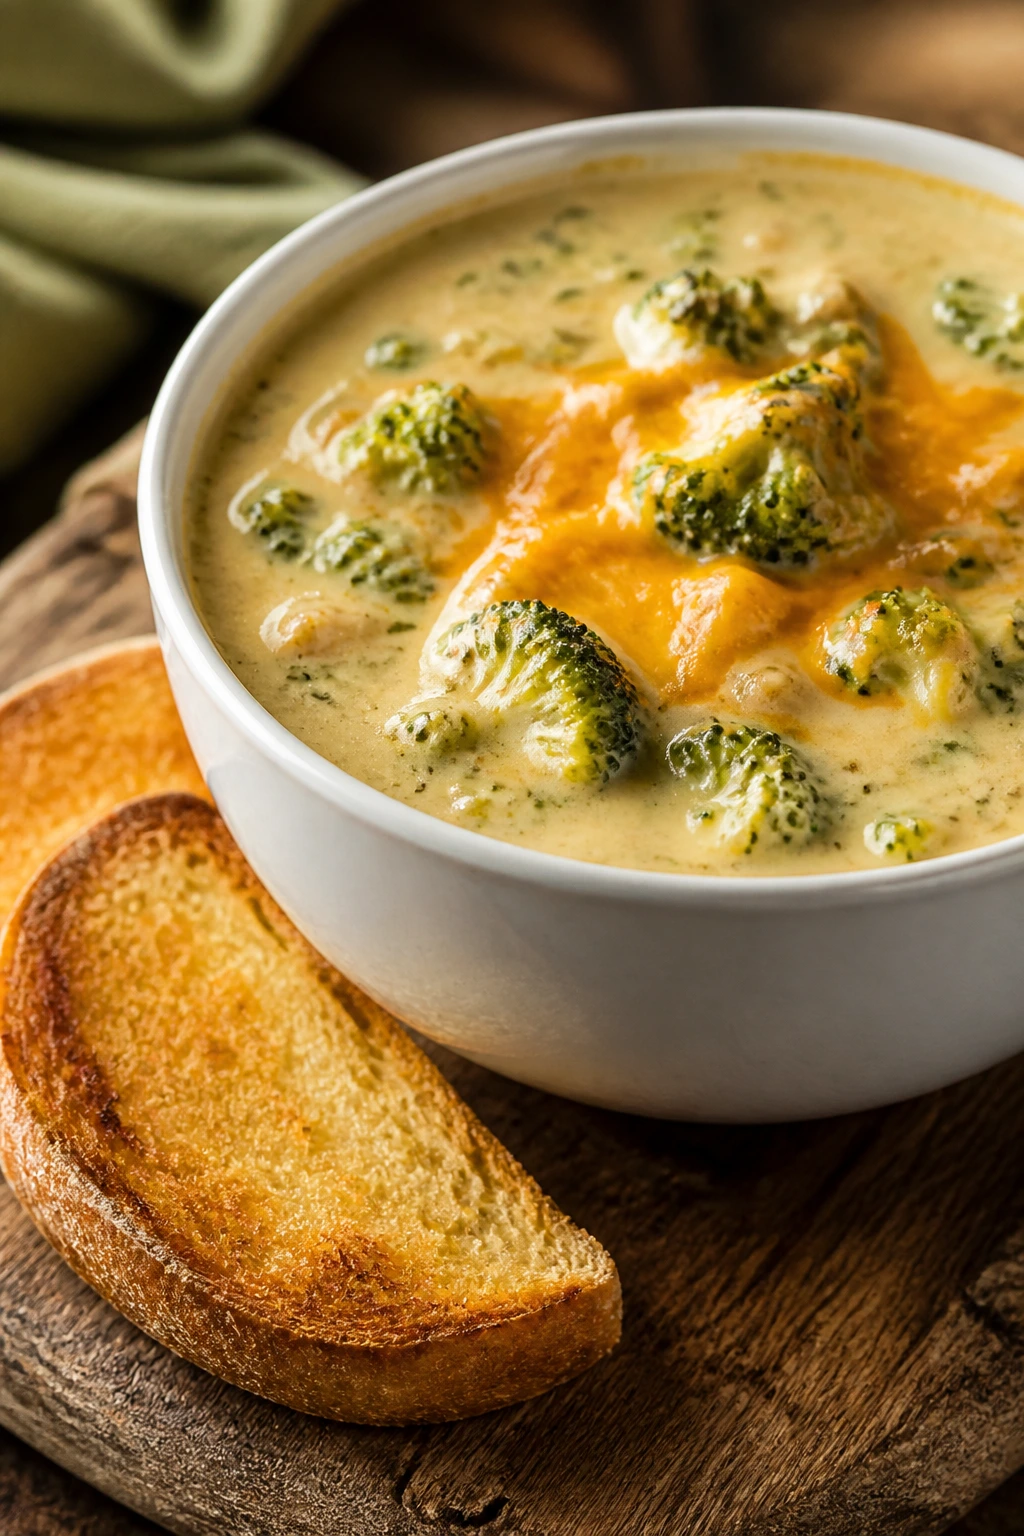
This soup is cheap in the way the best soups are cheap: built from vegetables, milk, a little flour, and a pile of cheddar that melts into the pot. It’s thick enough to feel like dinner, not a starter, and the broccoli gives it texture so every spoonful has something to bite into. I like it with toasted bread that soaks up the last of the bowl.
Why It Works
Broccoli and cheddar already know how to get along. The roux thickens the soup without a long simmer, and using some of the broccoli stems keeps waste down. A balanced soup like this tastes richer than the ingredient list suggests because milk, butter, and cheese do a lot with very little.
Key Ingredients
- 4 cups broccoli florets and chopped stems
- 1 small onion, diced
- 2 tablespoons butter
- 2 tablespoons all-purpose flour
- 2 cups milk
- 2 cups low-sodium broth
- 1 1/2 cups shredded cheddar
- 1/2 teaspoon salt
- 1/4 teaspoon black pepper
- 4 slices bread, toasted, for serving
Quick Steps
- Melt the butter in a soup pot over medium heat and cook the onion for 4 minutes.
- Stir in the flour and cook for 1 minute to form a pale roux.
- Slowly whisk in the milk and broth, then bring the pot to a gentle simmer.
- Add the broccoli and cook for 10 to 12 minutes until tender.
- Stir in the cheese off the heat so it melts smoothly. Do not boil after adding cheese or it can turn grainy.
- Taste and adjust salt, then serve with toast.
Equipment for This Recipe
- Soup pot or Dutch oven
- Whisk
- Wooden spoon
- Immersion blender, optional
How to Serve This Dish
Ladle it into bowls with toast leaning against the side or torn into chunks on top. If you want a little extra texture, save a few florets before blending and drop them back in at the end.
Pro Tips for This Recipe
- Grate the cheese yourself if you can. Pre-shredded works, but freshly grated melts smoother.
- If you like a smoother soup, blend half of it with an immersion blender.
- Broccoli stems are useful. Peel the tough outside and chop them small.
- Add cheese off the heat for a silky finish.
Variations on This Dish
- Potato Broccoli Cheddar Soup: Add 1 diced potato with the broth for more body.
- Cauliflower Swap: Replace half the broccoli with cauliflower.
- Ham-and-Broccoli Version: Stir in 1 cup diced ham if you have leftovers.
Common Mistakes to Avoid with This Dish
- Boiling after the cheese goes in: The soup can split or turn grainy.
- Undercooking the onion: Raw onion flavor stands out in a simple soup.
- Using too little salt: Cheddar needs seasoning help to taste full.
13. Quesadilla Dinner with Refried Beans and Corn

Quesadillas are one of the easiest ways to turn a few scraps into an actual dinner. The refried beans bring creaminess, the corn adds little sweet pops, and the tortilla crisps up into a browned shell that makes the whole plate feel intentional. It’s simple food, but it doesn’t have to taste simple.
Why It Works
Refried beans act like the glue, keeping the filling from sliding around. Corn brings a little sweetness and texture, which keeps the quesadilla from feeling one-note. Once the tortilla hits the skillet, cheese does what cheese is supposed to do: hold the whole thing together.
Key Ingredients
- 4 large flour tortillas
- 1 can refried beans, about 16 ounces
- 1 cup shredded cheddar or Monterey Jack
- 1 cup frozen corn, thawed
- 1/2 teaspoon cumin
- 1/4 teaspoon garlic powder
- 1 tablespoon oil or butter, for the skillet
- Salsa, for serving
- Sour cream, optional
Quick Steps
- Mix the refried beans with cumin and garlic powder in a bowl.
- Warm the tortillas for 10 to 15 seconds so they bend without cracking.
- Spread bean mixture over half of each tortilla, then top with cheese and corn.
- Fold the tortillas closed.
- Heat the oil or butter in a skillet over medium heat and cook each quesadilla for 2 to 3 minutes per side, until browned and the cheese melts.
- Let them rest for 1 minute before slicing so the filling settles.
Equipment for This Recipe
- Large skillet
- Spatula
- Mixing bowl
- Knife or pizza cutter
How to Serve This Dish
Cut the quesadillas into wedges and serve with salsa and sour cream. A handful of shredded lettuce or a few tomato slices on the side keeps the plate from feeling bare.
Pro Tips for This Recipe
- Keep the filling thin. Heavy quesadillas spill out.
- Use medium heat so the tortilla browns at the same pace the cheese melts.
- Let them rest briefly before cutting or the filling runs out.
- A pinch of chili powder in the beans adds more flavor than you’d think.
Variations on This Dish
- Chicken Quesadillas: Add 1 cup cooked shredded chicken if you have it.
- Spinach and Bean Version: Fold in a handful of thawed, squeezed-dry spinach.
- Pepper Jack Heat: Swap in pepper jack for a spicier finish.
Common Mistakes to Avoid with This Dish
- Overfilling the tortilla: The filling spills out before the cheese melts.
- Using high heat: The outside burns before the inside warms.
- Cutting too soon: Give the cheese a minute to set.
14. One-Pot Tomato Rice with Eggs
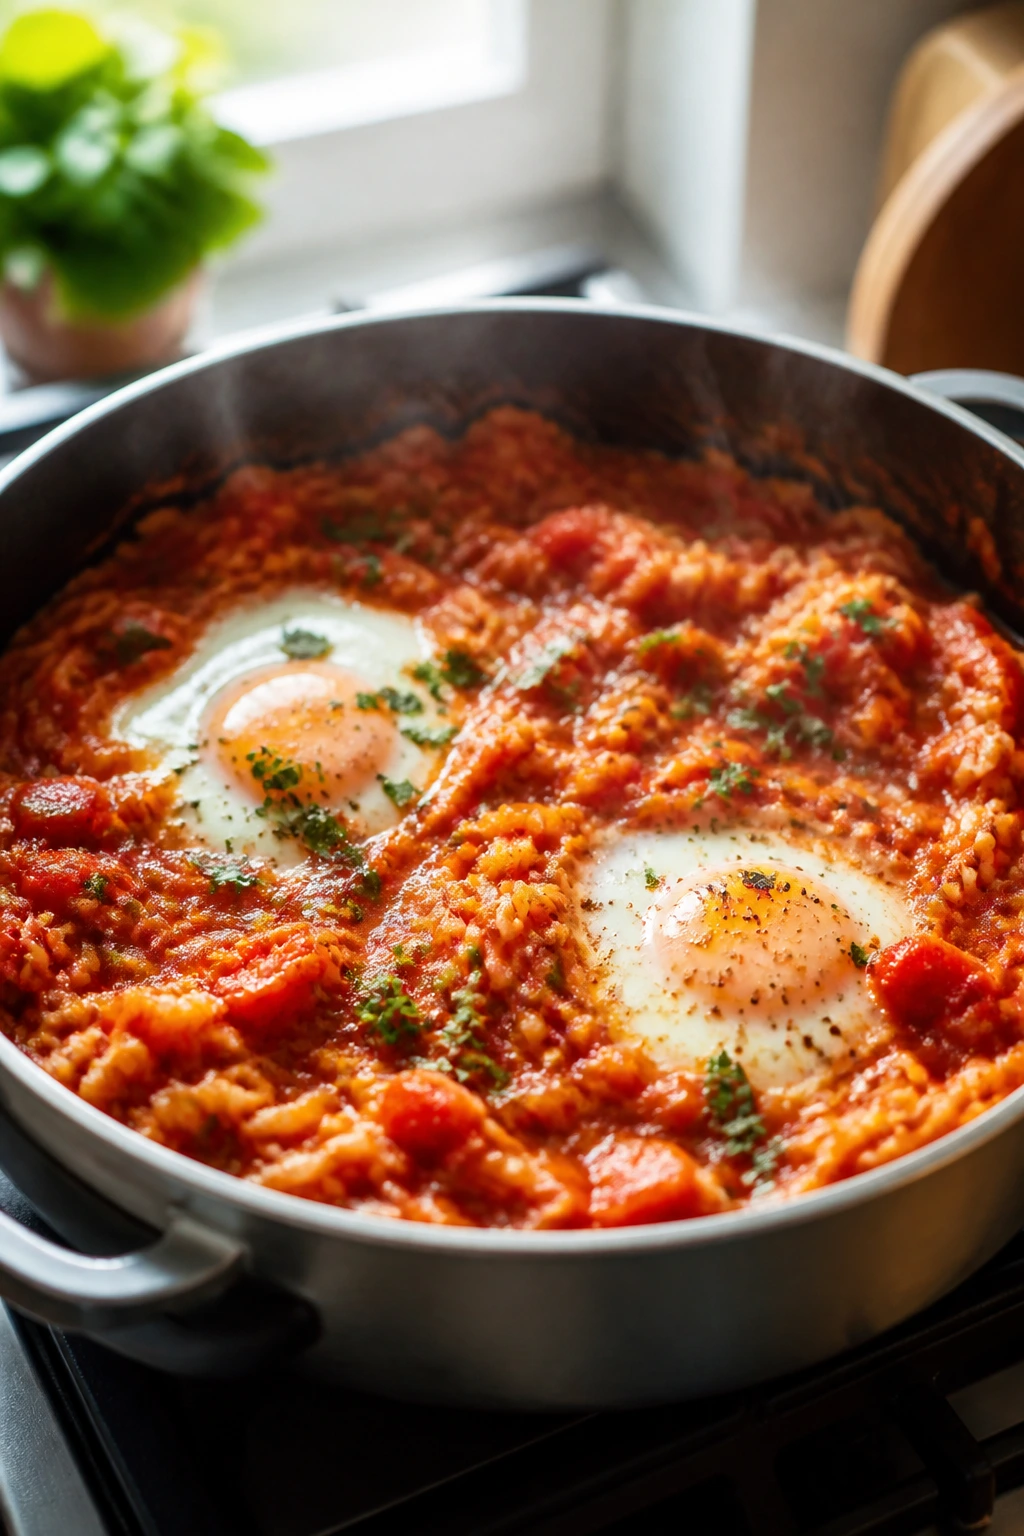
Tomato rice with eggs lands somewhere between comfort food and a smart pantry rescue. The rice cooks in tomato broth, so every grain picks up color and flavor instead of sitting plain on the plate. Then the eggs cook right on top, which makes the whole pot feel like more than the sum of its parts.
Why It Works
Rice is cheap, reliable, and happy to absorb flavor from the pot. Tomato paste or canned tomatoes give it a deep red base, and eggs add protein without needing another pan. It’s the sort of dinner that looks humble until you break into the yolk.
Key Ingredients
- 1 tablespoon olive oil
- 1 small onion, diced
- 2 garlic cloves, minced
- 1 tablespoon tomato paste
- 1 1/2 cups long-grain rice, rinsed
- 2 1/2 cups broth or water
- 1 can diced tomatoes, 14.5 ounces
- 1/2 teaspoon salt
- 1/2 teaspoon paprika
- 4 large eggs
- 2 cups spinach, optional
Quick Steps
- Heat the oil in a wide pot over medium heat and cook the onion for 4 minutes.
- Add the garlic and tomato paste and stir for 1 minute until the paste darkens a shade.
- Stir in the rice, broth, diced tomatoes, salt, and paprika.
- Bring to a boil, then lower to a gentle simmer, cover, and cook for 15 minutes.
- Nestle the eggs into small wells in the rice, add the spinach if using, and cover again for 5 to 7 minutes until the eggs are set to your liking.
- Rest off the heat for 5 minutes before serving.
Equipment for This Recipe
- Wide pot with lid
- Wooden spoon
- Measuring cups
- Spoon for making wells
How to Serve This Dish
Serve it straight from the pot with the eggs intact or broken over the rice at the table. A spoonful of yogurt or a little hot sauce gives the dish a sharp edge that works well with the tomato base.
Pro Tips for This Recipe
- Rinse the rice so the grains stay separate.
- Use a wide pot so the rice cooks evenly.
- If the eggs need more time, keep the lid on and check every minute.
- A little parsley or dill at the end gives the pot a fresher finish.
Variations on This Dish
- Feta Tomato Rice: Crumble feta over the top instead of using eggs.
- Chickpea Rice Pot: Stir in 1 can chickpeas before the eggs go in.
- Spiced Rice Version: Add a pinch of cumin and chili flakes for more depth.
Common Mistakes to Avoid with This Dish
- Lifting the lid too often: The rice won’t steam properly. Keep it covered.
- Using too much liquid: The grains go soft. Measure carefully.
- Adding eggs too early: The whites can overcook while the rice still needs time.
15. Vegetable and Bean Minestrone
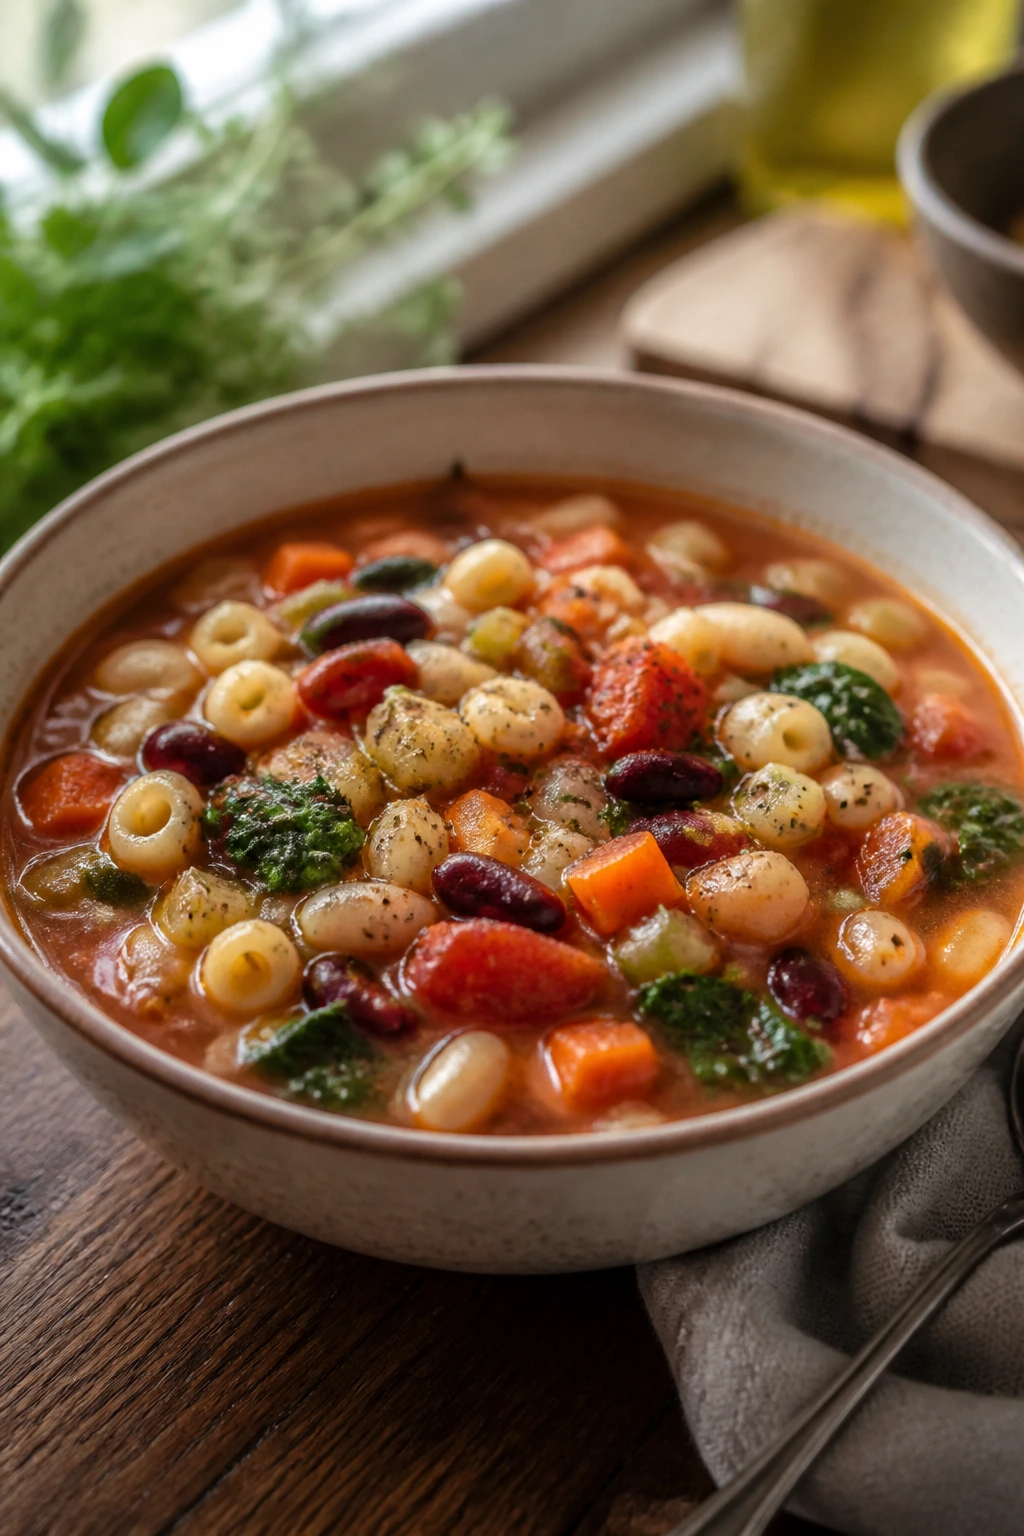
Minestrone is one of those soups that makes a small amount of food stretch in a way that feels almost unfair. Beans, pasta, vegetables, and broth all show up in the same bowl, and somehow it still tastes light enough for a weeknight. I like that it can handle whatever vegetables are hanging around without acting precious about it.
Why It Works
The soup is built from inexpensive parts that each do a job. Beans add body, pasta makes it feel like a meal, and the vegetables bring enough sweetness and texture to keep the broth from tasting thin. It’s also one of the best places to use the odds and ends that would otherwise sink in the crisper drawer.
Key Ingredients
- 1 tablespoon olive oil
- 1 small onion, diced
- 2 carrots, diced
- 2 celery stalks, diced
- 2 garlic cloves, minced
- 1 zucchini, diced
- 1 can diced tomatoes, 14.5 ounces
- 4 cups broth
- 1 can cannellini beans, 15 ounces, drained and rinsed
- 3/4 cup small pasta, such as ditalini or elbows
- 2 cups spinach or chopped kale
- 1 teaspoon Italian seasoning
- 1/2 teaspoon salt
Quick Steps
- Heat the oil in a soup pot over medium heat and cook the onion, carrots, and celery for 6 minutes.
- Stir in the garlic and zucchini, then cook for 2 minutes.
- Add the tomatoes, broth, beans, Italian seasoning, and salt.
- Bring to a boil, then simmer for 10 minutes.
- Stir in the pasta and cook until tender, usually 8 to 10 minutes.
- Add the spinach or kale at the end and cook for 1 minute, just until wilted.
Equipment for This Recipe
- Soup pot or Dutch oven
- Wooden spoon
- Cutting board and knife
- Ladle
How to Serve This Dish
Serve it with crusty bread or toast if you have it, but the soup is filling enough to stand alone. A little grated Parmesan on top gives it a salty finish that makes the bowl feel complete.
Pro Tips for This Recipe
- Keep the vegetable dice small so they cook in the time it takes the soup to simmer.
- If you expect leftovers, cook the pasta separately and add it to each bowl. Otherwise it soaks up broth overnight.
- Taste the broth before serving. A pinch more salt often wakes it up.
- Frozen spinach can stand in for fresh if that’s what you have.
Variations on This Dish
- Bean-Heavy Minestrone: Use two cans of beans for a thicker, more filling soup.
- Pesto Finish: Stir 1 teaspoon pesto into each bowl before serving.
- Tomato Basil Version: Add extra basil near the end for a brighter flavor.
Common Mistakes to Avoid with This Dish
- Overcooking the pasta in the pot: It turns soft fast in broth. Pull it when it still has some bite.
- Leaving the soup underseasoned: Beans and vegetables need salt more than people think.
- Using giant vegetable pieces: They’ll stay crunchy while everything else is done.
Why Pantry Staples Carry So Much Weight
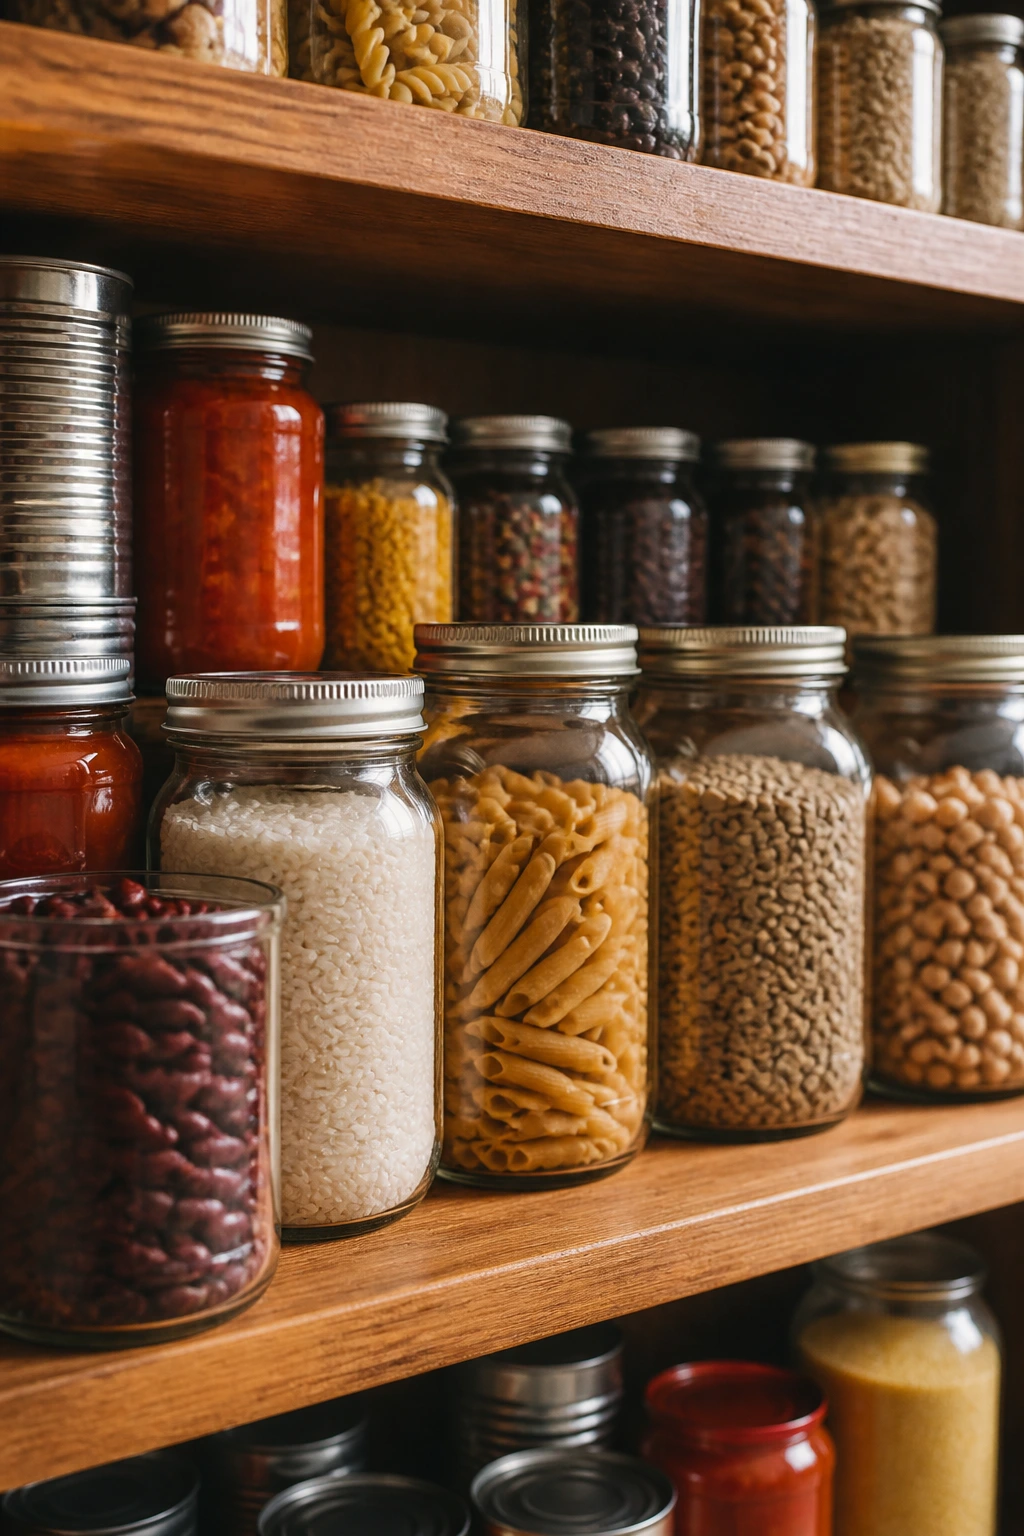
A tight grocery budget rewards ingredients that can play more than one role. Beans can be the protein, the bulk, and the texture in the same meal. Rice can be a base, a filler, or the thing that soaks up a sauce that would otherwise be wasted. Cabbage can go into a skillet, a soup, a stir-fry, or a sheet pan and still taste like you meant to use it that way.
That’s the real logic behind these dinners. They don’t depend on novelty. They depend on ingredients with long shelf lives, decent flavor, and enough structure to survive a fast cook without going limp. If you keep a few of those on hand, dinner stops being a nightly emergency and starts looking like a short list of options.
Essential Equipment for These Recipes
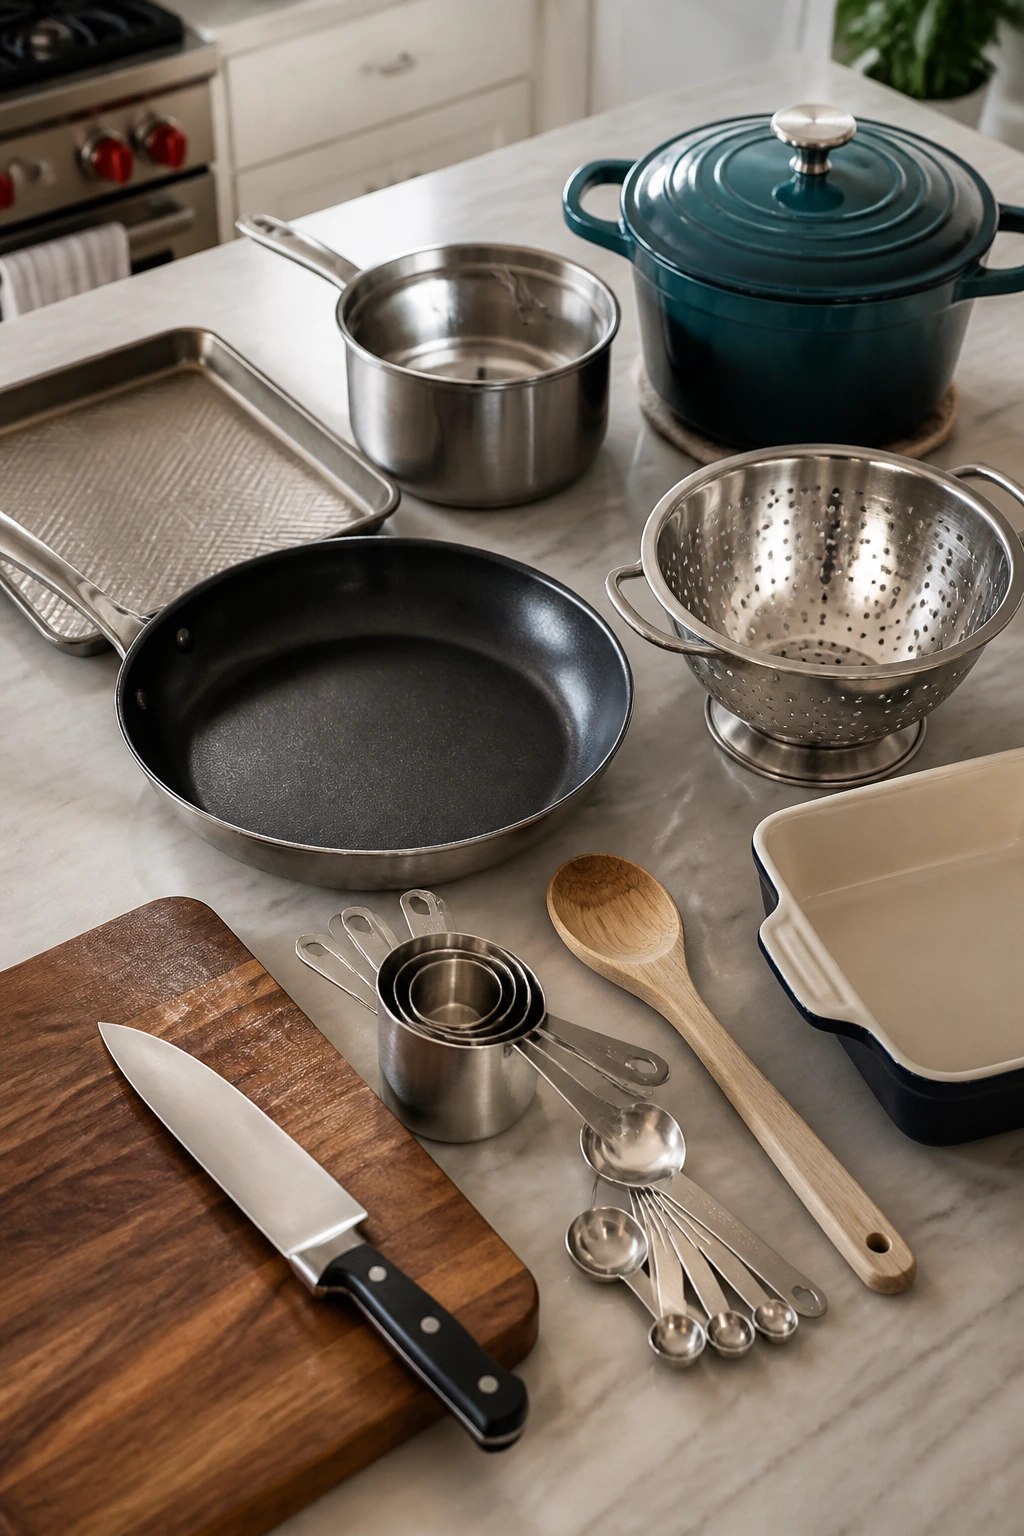
-
Large skillet, 12-inch or wider: Useful for stir-fries, lentil fillings, fried rice, and anything that needs room to brown instead of steam.
-
Rimmed sheet pan: Needed for sausage, potatoes, and cabbage, and handy for any roast-and-done dinner.
-
Medium saucepan or soup pot: A basic pot handles curry, soups, rice dishes, and pasta sauces without fuss.
-
Dutch oven, optional but useful: Nice for minestrone, broccoli cheddar soup, and any recipe that needs even heat and a little depth.
-
Colander: Required for pasta, noodles, and rinsing beans and lentils.
-
Sharp chef’s knife: A budget dinner falls apart fast if the onion and cabbage prep is miserable.
-
Cutting board: Wood or plastic, just give yourself enough space to chop without chasing ingredients around.
-
Measuring cups and spoons: Important for rice, pasta water, spices, and liquid ratios. Guessing is where cheap meals get expensive in the form of wasted food.
-
Wooden spoon or silicone spatula: Good for scraping the bottom of pans, stirring thick fillings, and folding sauces into grains.
-
Baking dish, 8×8-inch or 9×13-inch: Needed for the casserole, and useful any time you want a browned top on a budget meal.
-
Mixing bowls: Handy for burrito fillings, sauce mixes, and tossing vegetables before they hit the pan.
-
Fine-mesh strainer, optional: Especially useful for lentils and beans when you want a cleaner rinse and less grit.
Smart Shopping and Ingredient Tips
The first rule of budget cooking is boring, and I mean that as a compliment: buy ingredients that work in more than one dinner. A bag of rice can become fried rice, tomato rice, or a side for curry. A can of beans can slide into burritos, pasta, soup, or a skillet. One head of cabbage can show up in a sheet pan dinner, a stir-fry, or a soup without feeling repetitive if you season it differently.
Frozen vegetables are your friend here. They’re picked and packed at a useful point, they keep for ages, and they save you from paying produce prices for vegetables that are going to be cooked anyway. Frozen corn, spinach, peas, and mixed vegetables all behave well in these recipes. I’d reach for fresh broccoli or cabbage when the price is right, but frozen is not a downgrade in a dish that ends up in a skillet or pot.
Canned tomatoes matter more than people admit. A can that tastes flat can drag down a pasta sauce or soup, while a decent brand gives you the base you need without extra sugar or fuss. Diced tomatoes are good for rice, curry, and soups. Crushed tomatoes are better when you want a smoother sauce. If the can tastes sharp, a pinch of sugar or a little longer simmer fixes more than people expect.
Dry lentils and beans are cheaper than canned, but they ask for planning. Red lentils cook fast enough for weeknight use, while brown and green lentils need more time. Canned beans win on convenience and still keep the price low enough for most dinners here. If you buy dried beans, cook a big batch and freeze them in 1 1/2-cup portions so they’re ready when you are.
On meat, go where the flavor and fat are. Chicken thighs, smoked sausage, and small amounts of ground meat stretch farther than expensive lean cuts. If the grocery total is the thing that makes you nervous, use meat as a seasoning instead of the main event. That’s not a compromise. That’s a plan.
How to Serve These Recipes
Presentation: Keep the serving style simple and intentional. Bowls work for soups, curry, tomato rice, and lentil fillings. Plates work for sheet pan dinners and quesadillas. A little chopped herb, a spoonful of sour cream, or a dusting of cheese goes further than people think.
Accompaniments: Bread is the cheapest side that makes a dinner feel fuller, especially with soup, curry, or pasta. Rice fits burrito bowls, skillet meals, and stir-fries. A quick cabbage slaw, sliced cucumbers, or a basic green salad gives richer dinners a crisp edge.
Portions: Most of these recipes feed 4, though the bean-and-grain dishes can stretch to 5 or 6 if the sides are solid. If you’re feeding bigger appetites, add bread, rice, or a simple vegetable side instead of trying to double the protein every time. That’s where the grocery budget tends to leak.
Beverage Pairing: Cold water with lemon works across almost everything here. For something with a little more personality, unsweetened iced tea or sparkling water with lime keeps the plate from feeling heavy. Tomato-based dinners also take nicely to a plain, cold soda if that’s what your table likes.
Additional Tips and Flavor Boosters
Flavor Enhancement: A small splash of acid at the end changes a budget dinner more than most people expect. Vinegar, lemon juice, or lime juice wakes up beans, lentils, rice, and cabbage without adding much cost. Keep one bottle of vinegar and one citrus fruit around; they punch above their weight.
Customization: Keep a few cheap add-ins on standby: frozen corn, canned olives, chopped pickles, hot sauce, Dijon mustard, and scallions. These are the things that make the same base recipe taste different the second or third time you make it. Repeat dinners get easier when the finish changes.
Serving Suggestions: Toasted breadcrumbs on soup, extra cheese on pasta, cilantro on beans, and a handful of shredded lettuce in burritos all add texture. Texture matters. A dinner that has only soft pieces can feel flatter than it should, even if the flavor is fine.
Make-It-Yours: For dairy-free meals, use olive oil, skip the cheese, and lean harder on herbs and acid. For gluten-free plates, serve the skillet meals over rice, use gluten-free pasta, and choose corn tortillas instead of flour. For extra protein without much cost, add eggs, beans, or lentils before you reach for pricier meat.
Make-Ahead, Storage, and Reheating Guidance
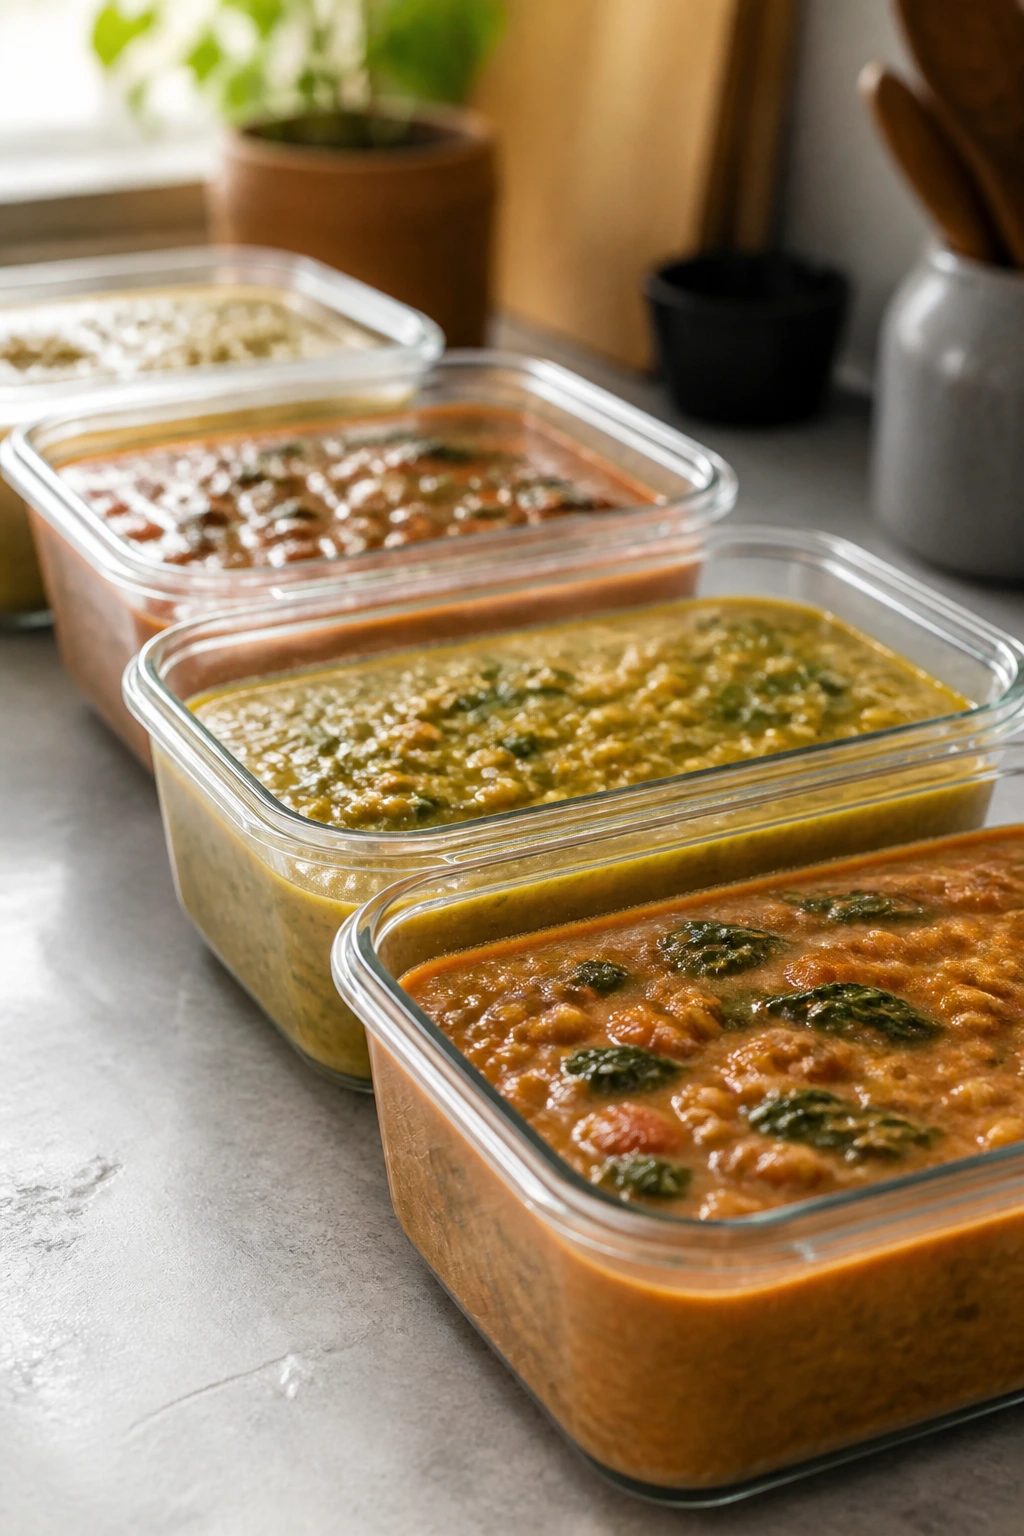
Most of these recipes keep well for 3 to 4 days in the refrigerator when stored in airtight containers. Soups, curries, lentil fillings, and tomato-based sauces usually improve after a night in the fridge because the seasoning settles in and stops tasting separate. Baked pasta and casseroles hold up well, though the top softens a bit after day one. That’s normal.
For the freezer, think in terms of up to 2 months for soups, lentil dishes, chickpea curry, sloppy joe filling, tomato rice, and taco fillings. Freeze them flat in zip-top bags or in shallow containers so they chill and thaw faster. Pasta bakes and casseroles can also be frozen, but the texture is best if you slightly undercook the pasta before baking and cool the dish fully before wrapping it tight.
Reheat soups, curries, and skillet fillings in a saucepan over medium-low heat with a splash of water or broth. Stir often and stop when they’re hot all the way through. Rice dishes and fried rice reheat best in a skillet with 1 to 2 teaspoons of water and a lid for a minute or two; that keeps the grains from drying out. Burritos and quesadillas do best in a dry skillet or toaster oven, not the microwave, which turns the tortilla rubbery fast.
If you’re meal prepping, make the filling first and hold off on the final crisping or fresh garnish until serving. Burritos, quesadillas, and fried rice taste better when the last step happens right before dinner. Minestrone and curry are the exceptions that keep giving all week.
Variations and Adaptations to Try
-
Gluten-Free Pantry Swap: Use rice, corn tortillas, gluten-free pasta, or potatoes as the base. The bean, lentil, curry, and sheet pan recipes need almost no changes beyond that, which makes this an easy collection to adapt without buying specialty ingredients everywhere.
-
Dairy-Free Rotation: Skip the cheese in the burritos, skillet dishes, and casseroles, then add more flavor through salsa, mustard, herbs, and a little extra oil or avocado. Coconut milk already handles the creamy job in the curry, so that one barely notices the change.
-
Lower-Sodium Version: Choose low-sodium broth, rinse canned beans well, and season with garlic, onion, vinegar, lemon, and spices instead of relying on salt alone. Smoked sausage and canned soup are naturally saltier, so balance them with vegetables and acid on the plate.
-
Kid-Friendly Mild Set: Pull back on chili flakes, hot sauce, and strong mustard, then let the toppings do the talking. Cheddar, sour cream, corn, rice, and toasted tortillas usually win over younger eaters even when the base is simple.
-
Meat-Optional Upgrade: Add 1 pound of chicken thighs, ground turkey, or sausage only to the dinners that truly need it. The lentil, bean, egg, and pasta dishes are already full enough on their own, so you can choose where the meat money goes instead of spending it everywhere.
-
Produce-Box Rescue: If your fridge is full of small leftovers, slide them into the minestrone, fried rice, curry, and skillet dinners. A few extra carrots, a handful of spinach, or a half bell pepper rarely hurt these recipes, which is exactly why they’re useful.
Common Mistakes to Avoid
-
Chasing too many special ingredients: A budget dinner gets expensive when you buy a bottle, a sauce, and a spice blend for every single recipe. Keep the seasoning base simple and reuse it.
-
Cooking everything on high heat: High heat burns garlic, tightens chicken, and skips the slow browning that gives cheap ingredients better flavor. Medium and medium-high are doing more work here than you might expect.
-
Adding too much liquid too early: Lentils, rice, and pasta all behave differently once they’re cooked. If the pan looks loose, wait a few minutes before adding more water. The ingredients often tighten up on their own.
-
Underseasoning beans and grains: Beans and rice are cheap, not flavorless. Salt them, acid them, and finish them with herbs or hot sauce so they taste like dinner instead of filler.
-
Ignoring texture: A plate full of soft food gets dull fast. Toast the tortilla, brown the sausage, crisp the rice, leave a few browned edges on the potatoes. That little bit of texture is what keeps these meals from tasting flat.
-
Making leftovers without a reheating plan: Some meals need a splash of water, some need a skillet, and some need a fresh garnish after warming. If you skip that step, yesterday’s dinner will taste like yesterday’s dinner.
Frequently Asked Questions
Can I make most of these dinners with store-brand ingredients?
Yes, and in several cases that’s the smarter choice. Store-brand beans, pasta, rice, canned tomatoes, tortillas, and frozen vegetables usually perform just fine in cooked dishes, especially when they’re seasoned well and not served raw.
Which recipes are best if I need leftovers for lunch?
The soups, curry, lentil sloppy joe filling, tomato rice, tuna noodle casserole, and baked ziti hold up especially well. They reheat predictably and don’t get weird after a day or two in the fridge. Fried rice is good too, as long as you reheat it in a skillet.
What’s the cheapest protein in this whole group?
Lentils, eggs, beans, and canned tuna usually cost the least per serving. Chicken thighs and sausage give you more richness, but the vegetarian meals tend to stretch a grocery bill the farthest.
Can I use dried beans instead of canned beans?
You can, but you’ll need to cook them ahead of time. A big batch of dried beans works well for chili-style fillings, soup, curry, and pasta sauce, and you can freeze portions so they’re ready later.
What if I only have one pan or one pot?
Start with the sheet pan dinner, skillet meals, fried rice, chickpea curry, tomato rice, or the bean skillet recipes. Those are built for exactly that kind of setup, which is why they’re so useful on busy nights.
How do I keep cheap dinners from tasting flat?
Use onion, garlic, salt, acid, and one fresh finish like herbs or scallions. A squeeze of lime, a spoonful of mustard, or a splash of vinegar can do a lot more than another teaspoon of dried spice.
Can I freeze the casseroles and skillet fillings?
Yes, most of the bean-based fillings, soups, and tomato sauces freeze well for up to 2 months. The pasta bakes freeze fine too, though the texture is best when you undercook the pasta a touch before baking.
Is it worth buying frozen vegetables for these recipes?
Absolutely. Frozen corn, peas, mixed vegetables, spinach, and broccoli are often cheaper than fresh and less likely to go bad before you use them. They’re especially good in soups, fried rice, curries, and casseroles.
What should I cook first if my budget is tight for the whole week?
Start with the recipes that share the most ingredients: onion, garlic, rice, beans, pasta, tortillas, and cabbage. That way one grocery trip covers several dinners, and the odds of waste go down fast.
Dinner That Stretches Further
A tight grocery budget does not have to mean repetitive, limp, or half-hearted food. It just means paying closer attention to what ingredients can do the most work: beans that thicken a skillet, cabbage that browns in the oven, rice that becomes dinner instead of a side, and eggs that rescue a fridge with almost nothing in it.
The recipes here are built to be forgiving. They take substitutions without falling apart, and they keep their shape when you make them on a Tuesday with a noisy kitchen and a long day behind you. That’s the kind of reliability weeknight cooking needs.
Keep a few of these in rotation, and the grocery bill starts feeling less like a surprise and more like a system.