
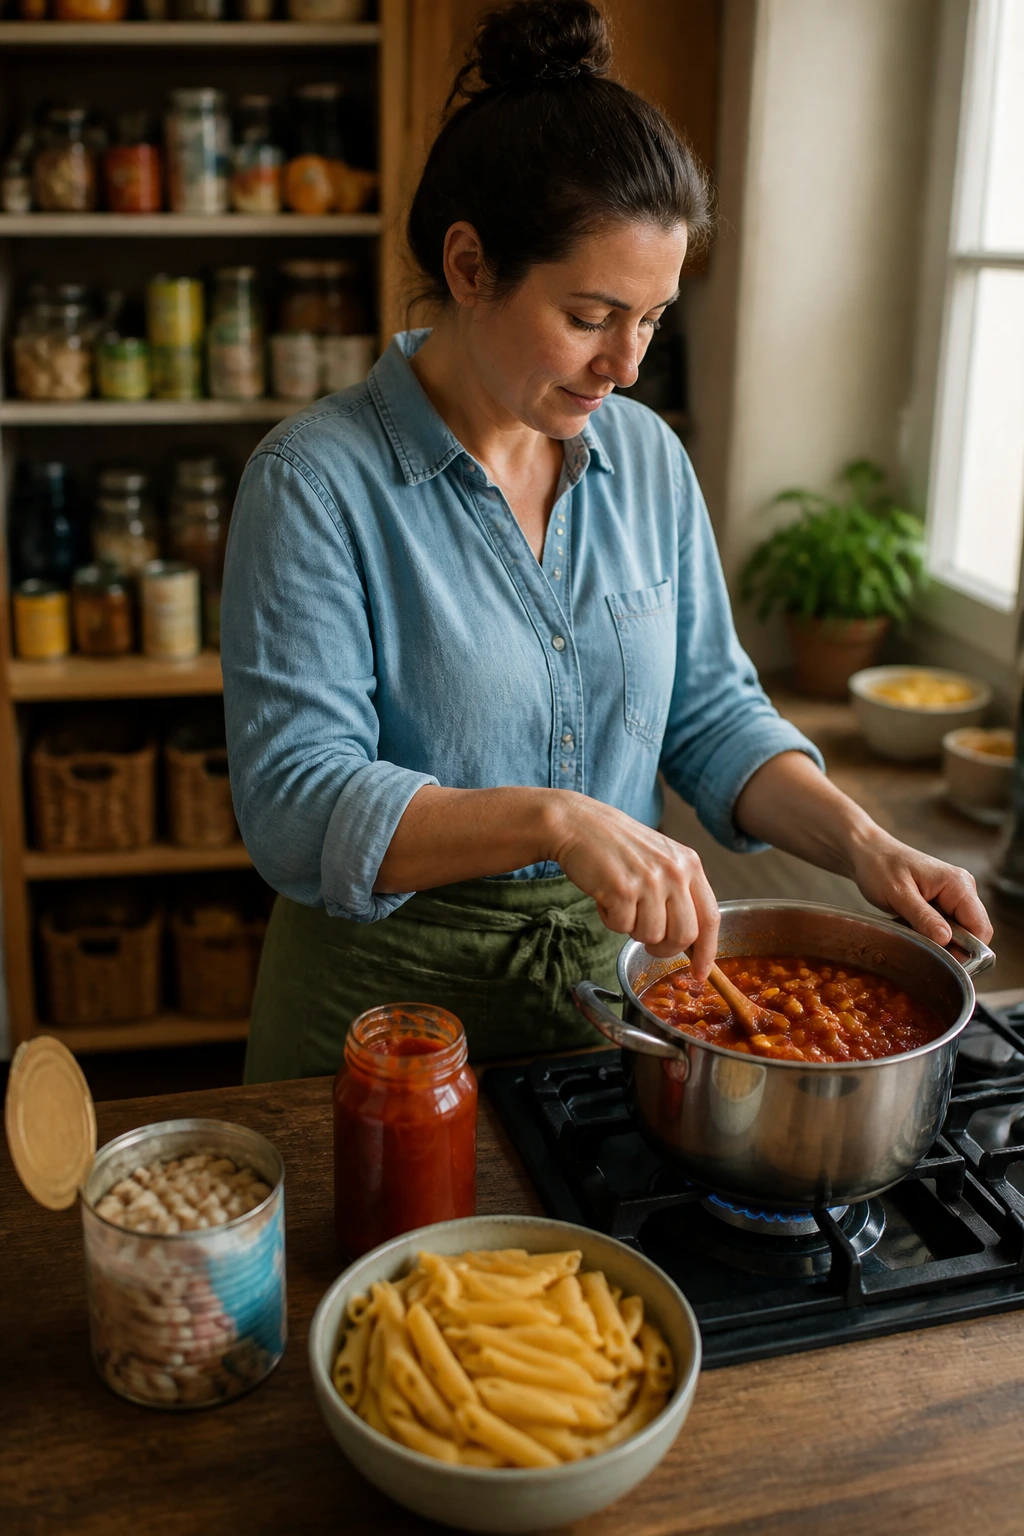
A can of beans, a box of pasta, and a jar of tomato sauce can rescue dinner faster than a grocery run ever will. These quick simple meals that use pantry staples are the ones I keep coming back to when the fridge looks bare and the clock is being rude. They are not apology food. Done right, they have salt, acid, crunch, and enough body to feel like you meant to cook, even if you started with four shelf-stable things and a half-cold onion.
That’s the real charm here. Pantry cooking is not about settling. It’s about knowing that a can of tuna can turn into a glossy pasta, that chickpeas can collapse into a rich skillet sauce, and that a handful of breadcrumbs can make a plain bowl taste finished instead of thrown together. The best pantry meals have a kind of low-drama confidence. They do not ask for much, and they still show up.
A good pantry meal also buys you freedom. You can skip the store, work around a broken fridge shelf, stretch a tight budget, or cook with the ingredients that survive the weird middle of the week. And because these meals lean on exact timing, a hot pan, and a few bold seasonings, they reward the cook who pays attention for ten minutes. That’s the trade. Small effort, real dinner.
Why These Pantry Meals Pull Their Weight on Busy Nights
-
They start with shelf-stable basics: Pasta, rice, canned beans, tuna, tomatoes, and tortillas can sit around waiting for the moment you need them, which means dinner stops depending on a fresh grocery run.
-
They build flavor in layers: A tablespoon of oil, a clove of garlic, and a pinch of cumin can change canned ingredients from flat to full-bodied in under 5 minutes.
-
They stretch without tasting thin: Beans, lentils, eggs, and grains make these meals filling enough for dinner, not just a snack dressed up as dinner.
-
They stay flexible: If you have spinach, cheese, herbs, or an onion, great. If you don’t, the recipe still works because the pantry ingredients carry the structure.
-
They save cleanup: A lot of these recipes live in one skillet, one pot, or one sheet pan, which matters more than people admit when the sink is already crowded.
-
They handle budget pressure well: The ingredients are inexpensive, but the finished dishes do not feel cheap when you season them properly and finish with something sharp, salty, or crunchy.
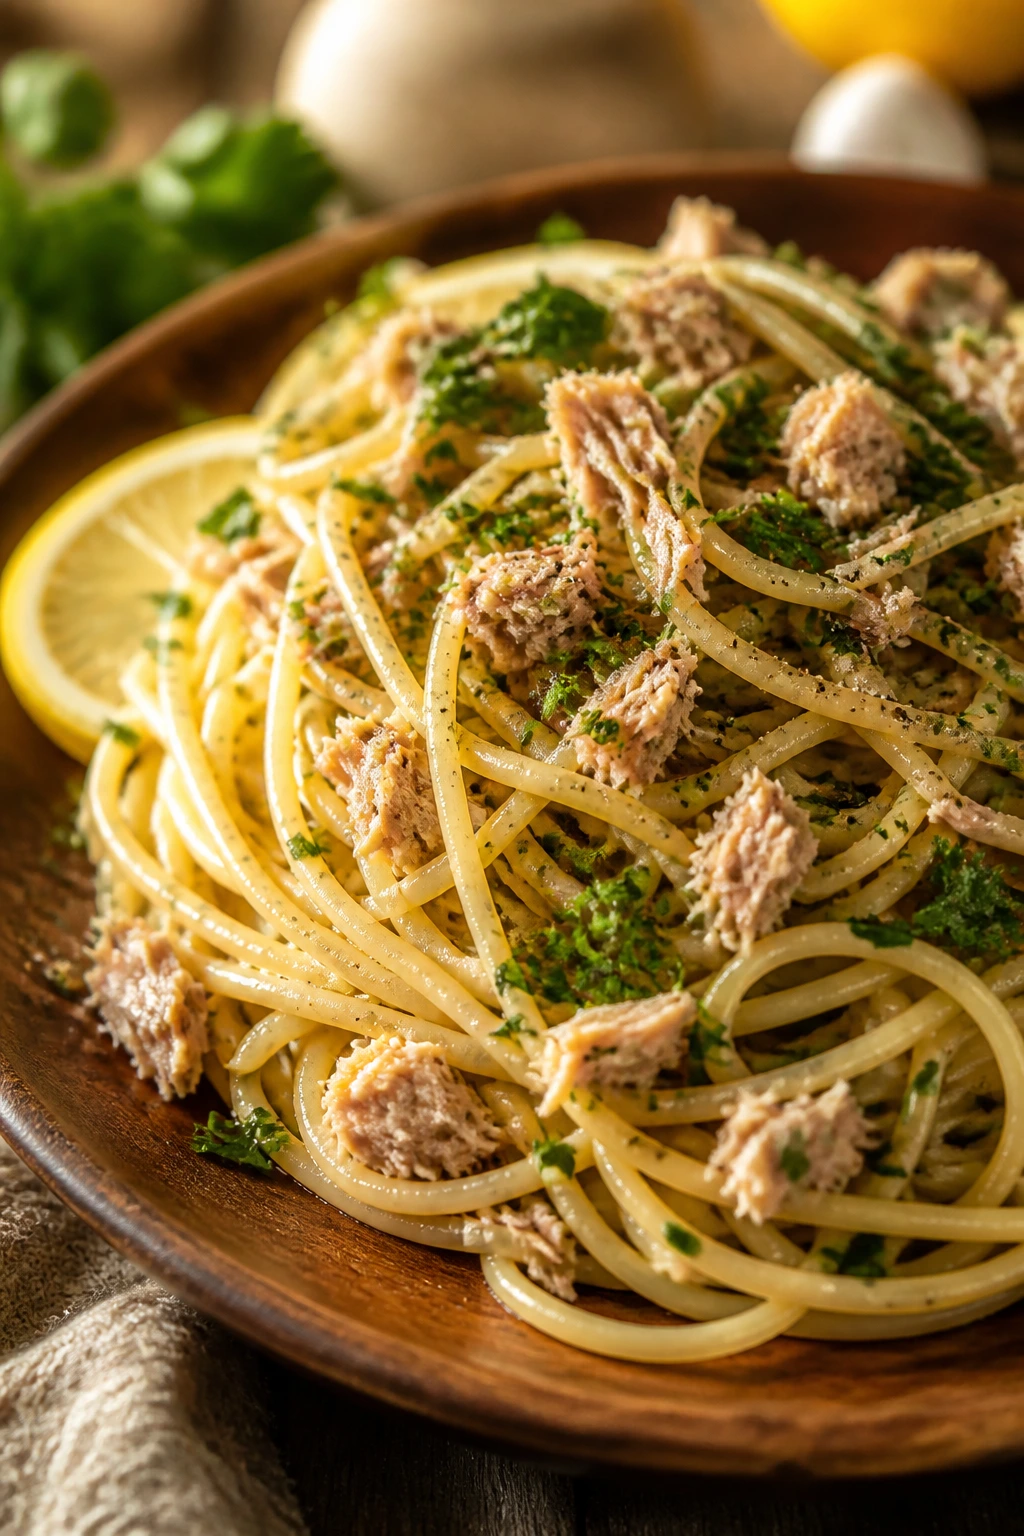
1. Garlic Butter Tuna Spaghetti
A can of tuna turns into a proper dinner the second it meets hot butter, garlic, and a little lemon. This version lands somewhere between a pantry pasta and the kind of fast meal that makes you wonder why you ever bothered with a jarred sauce.
Why It Works:
Tuna gives the pasta body, while butter and olive oil coat every strand so the sauce clings instead of sliding off. Lemon brightens the whole bowl, and a splash of pasta water makes the sauce glossy in about 30 seconds. The key is treating the tuna as a savory ingredient, not a last-minute add-on.
Key Ingredients:
- 8 ounces spaghetti
- 2 tablespoons olive oil
- 3 tablespoons unsalted butter
- 4 garlic cloves, thinly sliced
- 2 cans tuna in oil or water, drained
- 1/2 teaspoon red pepper flakes
- 1/2 cup reserved pasta water
- 2 tablespoons lemon juice
- 1/4 cup chopped parsley
- 1/3 cup grated Parmesan, optional
Quick Steps:
- Bring a large pot of salted water to a boil and cook the spaghetti until al dente, about 9 to 11 minutes.
- Reserve 1 cup of pasta water before draining.
- Warm the olive oil and butter in a large skillet over medium heat, then add the garlic and red pepper flakes and cook for 30 to 45 seconds, until fragrant.
- Stir in the tuna and break it into chunks. Add 1/2 cup pasta water and the lemon juice, then simmer for 1 minute.
- Toss in the spaghetti, parsley, and Parmesan if using. Add more pasta water if the sauce looks dry, then serve immediately.
Equipment for This Recipe:
- Large pot
- Large skillet
- Colander
- Tongs
- Measuring cups
How to Serve This Dish:
Pile it into warm bowls and finish with black pepper and a little more lemon zest. A simple green salad or a handful of frozen peas stirred into the pasta at the end keeps the plate from feeling too one-note.
Pro Tips for This Recipe:
- Oil-packed tuna tastes richer here, but drained tuna in water works if you add the full butter amount.
- Do not let the garlic brown. Pale gold is the goal; bitter garlic ruins the whole pan.
- If the pasta looks tight, add pasta water in 2-tablespoon splashes until the sauce turns silky.
Variations on This Dish:
- Caper-Lemon Version: Add 1 tablespoon drained capers with the tuna for briny pops.
- Tomato Tuna Pasta: Stir in 1/2 cup jarred marinara or crushed tomatoes for a rosier sauce.
- Spicy Pantry Pasta: Add 1 teaspoon chili crisp at the end for heat and a little crunch.
Common Mistakes to Avoid with This Dish:
- Skipping the pasta water: The sauce turns greasy instead of glossy. Reserve at least 1 cup.
- Using high heat on the garlic: Burnt garlic tastes harsh. Keep the skillet at medium.
- Under-seasoning the pasta water: Bland spaghetti makes the whole bowl taste thin. Salt the water until it tastes briny.
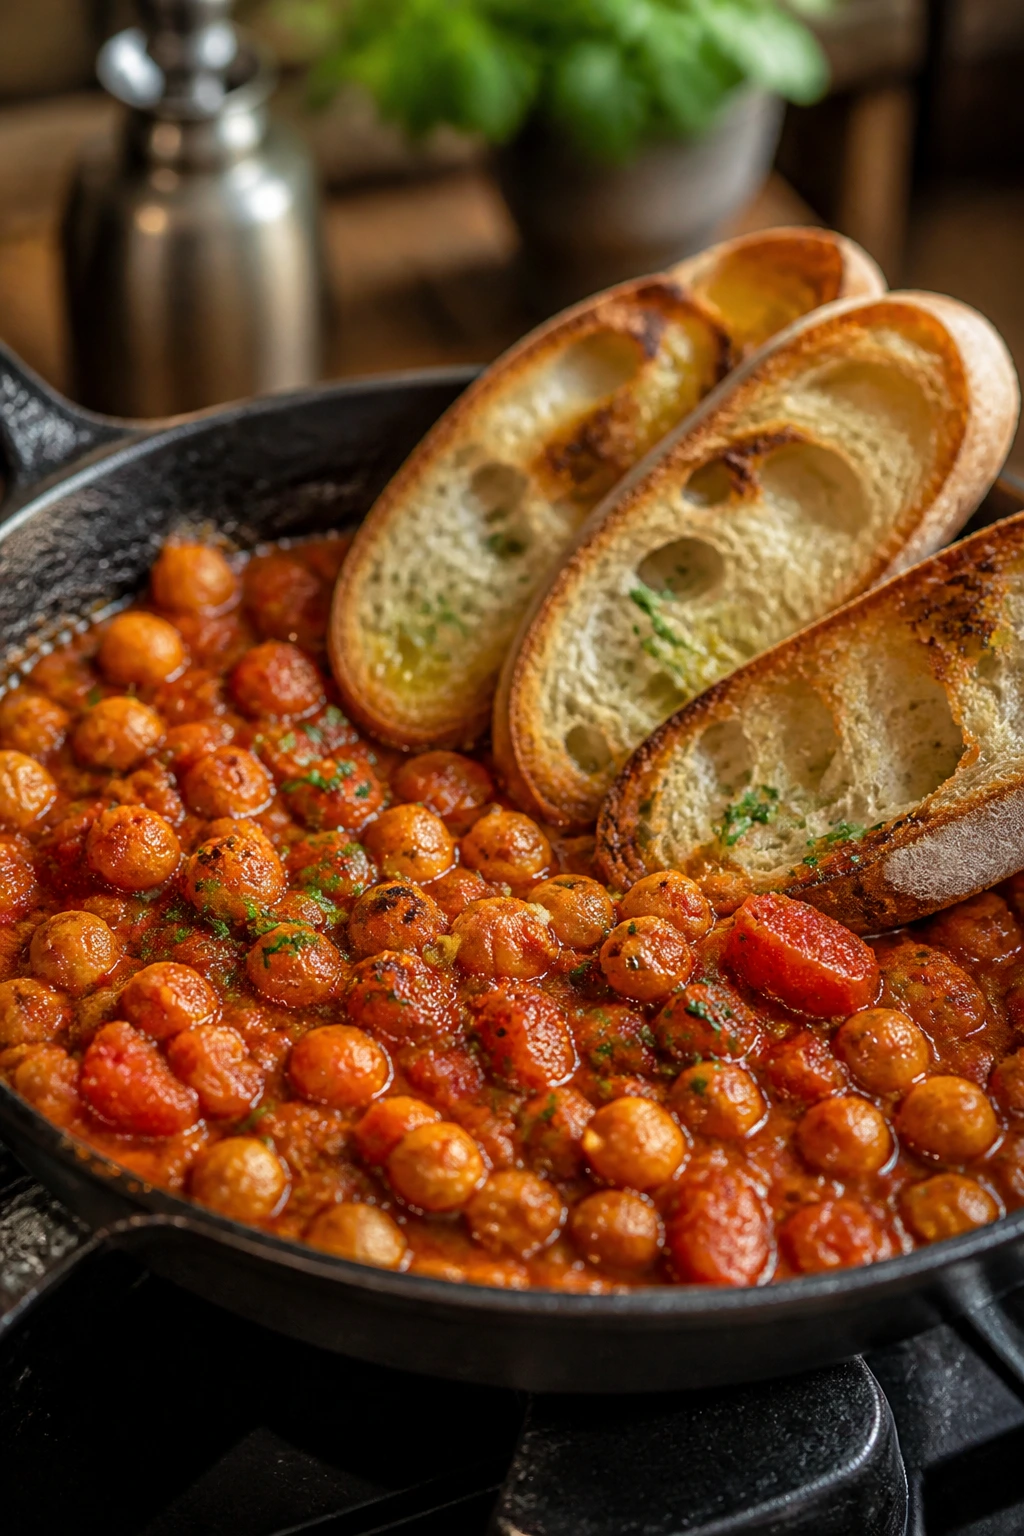
2. Chickpea Tomato Skillet Toasts
This is what happens when chickpeas and canned tomatoes stop being backup ingredients and start acting like dinner. The sauce is thick, spoonable, and perfect for stabbing with toast.
Why It Works:
Chickpeas hold their shape, but they also soften at the edges as they simmer in tomatoes, which gives the sauce a little creaminess without cream. Cumin and smoked paprika do the heavy lifting here. The toast matters, too. Without it, the dish loses the best part: the crunch against the saucy middle.
Key Ingredients:
- 2 tablespoons olive oil
- 1 small onion, finely diced
- 3 garlic cloves, minced
- 2 cans chickpeas, drained and rinsed
- 1 can crushed tomatoes, 28 ounces
- 1 teaspoon ground cumin
- 1 teaspoon smoked paprika
- 1/2 teaspoon salt, plus more to taste
- 4 thick slices bread
- 2 tablespoons crumbled feta, optional
Quick Steps:
- Toast the bread until deeply golden and crisp.
- Warm the olive oil in a skillet over medium heat. Add the onion and cook for 4 to 5 minutes, until soft.
- Stir in the garlic, cumin, and smoked paprika. Cook for 30 seconds, just until the pan smells warm and earthy.
- Add the chickpeas, tomatoes, and salt. Simmer for 10 to 12 minutes, stirring now and then, until thick and spoonable.
- Spoon the mixture over the toast and finish with feta if using.
Equipment for This Recipe:
- Large skillet
- Toaster or oven broiler
- Wooden spoon
- Can opener
- Knife and cutting board
How to Serve This Dish:
Serve two toasts per person with the chickpea mixture piled high in the center. If you want a fuller meal, add a fried egg on top or serve it with a chopped cucumber salad.
Pro Tips for This Recipe:
- Mash a small spoonful of chickpeas against the pan before simmering. It thickens the sauce without turning it into paste.
- Use sturdy bread. Thin sandwich slices go soft too fast.
- A splash of vinegar at the end wakes the tomatoes up if they taste flat.
Variations on This Dish:
- Harissa Heat: Add 1 tablespoon harissa paste with the spices for a smoky, sharper version.
- Italian Pantry Toasts: Swap cumin and paprika for 1 teaspoon dried oregano and a pinch of chili flakes.
- Creamy Finish: Add 2 tablespoons plain yogurt or tahini right before serving.
Common Mistakes to Avoid with This Dish:
- Serving it too wet: The toast collapses. Simmer until the sauce mounds on a spoon.
- Forgetting to rinse the chickpeas: Extra can liquid can make the sauce dull and cloudy.
- Using weak seasoning: Chickpeas need salt and spice. Taste before serving.
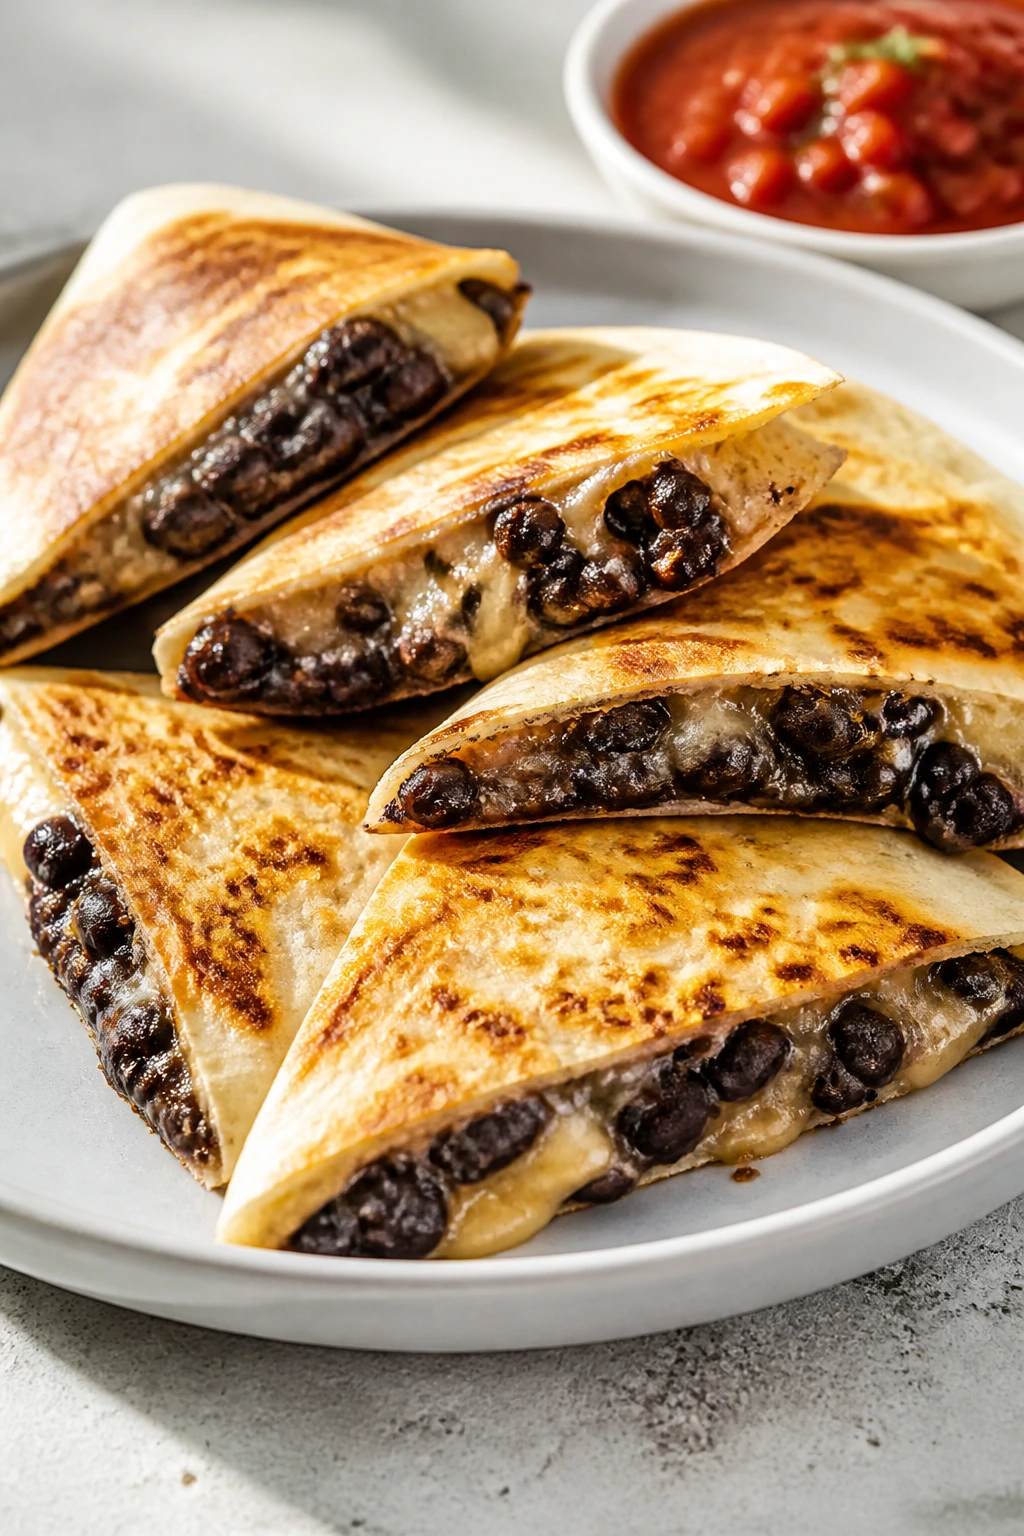
3. Black Bean Quesadillas
A good quesadilla should snap a little when you cut it and spill just enough bean filling to look generous, not sloppy. This one does that job with almost no fuss.
Why It Works:
Mashed black beans spread well, which means every bite gets filling instead of a dry tortilla edge. Cheese acts as glue and adds the browned, salty bits that make quesadillas hard to stop eating. Salsa on the side keeps the whole thing from tasting heavy.
Key Ingredients:
- 4 flour tortillas, 8-inch
- 1 can black beans, drained and rinsed
- 1 teaspoon ground cumin
- 1/2 teaspoon garlic powder
- 1 cup shredded cheddar or Monterey Jack
- 2 tablespoons oil or butter
- 1/2 cup salsa, for serving
- Sour cream or plain yogurt, optional
Quick Steps:
- Mash the black beans in a bowl with cumin and garlic powder until about half smooth and half chunky.
- Heat a skillet over medium heat and brush one side of each tortilla lightly with oil or butter.
- Place one tortilla, oiled side down, in the skillet. Scatter half the cheese over one half, add half the beans, then top with a little more cheese.
- Fold the tortilla over and cook for 2 to 3 minutes per side, pressing gently, until the outside is crisp and the cheese melts.
- Repeat with the second quesadilla, then slice and serve with salsa.
Equipment for This Recipe:
- Nonstick or cast-iron skillet
- Mixing bowl
- Fork or potato masher
- Spatula
- Knife
How to Serve This Dish:
Cut each quesadilla into wedges and serve them hot, before the tortilla softens. A spoonful of salsa and a little sour cream on the side is enough, though a fried egg turns this into a better-than-it-should-be lunch.
Pro Tips for This Recipe:
- Dry beans grill better. Pat them with a paper towel if they’re very wet.
- Keep the heat at medium. High heat burns tortillas before the cheese melts.
- A little cheese on both sides of the beans helps the quesadilla seal and hold together.
Variations on This Dish:
- Breakfast Version: Add scrambled eggs and a spoonful of salsa verde.
- Corn and Bean Quesadilla: Stir 1/2 cup canned or frozen corn into the beans.
- Spicy Chipotle Style: Mix 1 teaspoon chipotle in adobo into the bean mash.
Common Mistakes to Avoid with This Dish:
- Overfilling the tortilla: It breaks when you flip it. Use a thin, even layer.
- Cooking on high heat: The outside darkens too fast. Medium heat gives you melted cheese and a crisp shell.
- Skipping the drain: Wet beans make the filling slippery and messy.
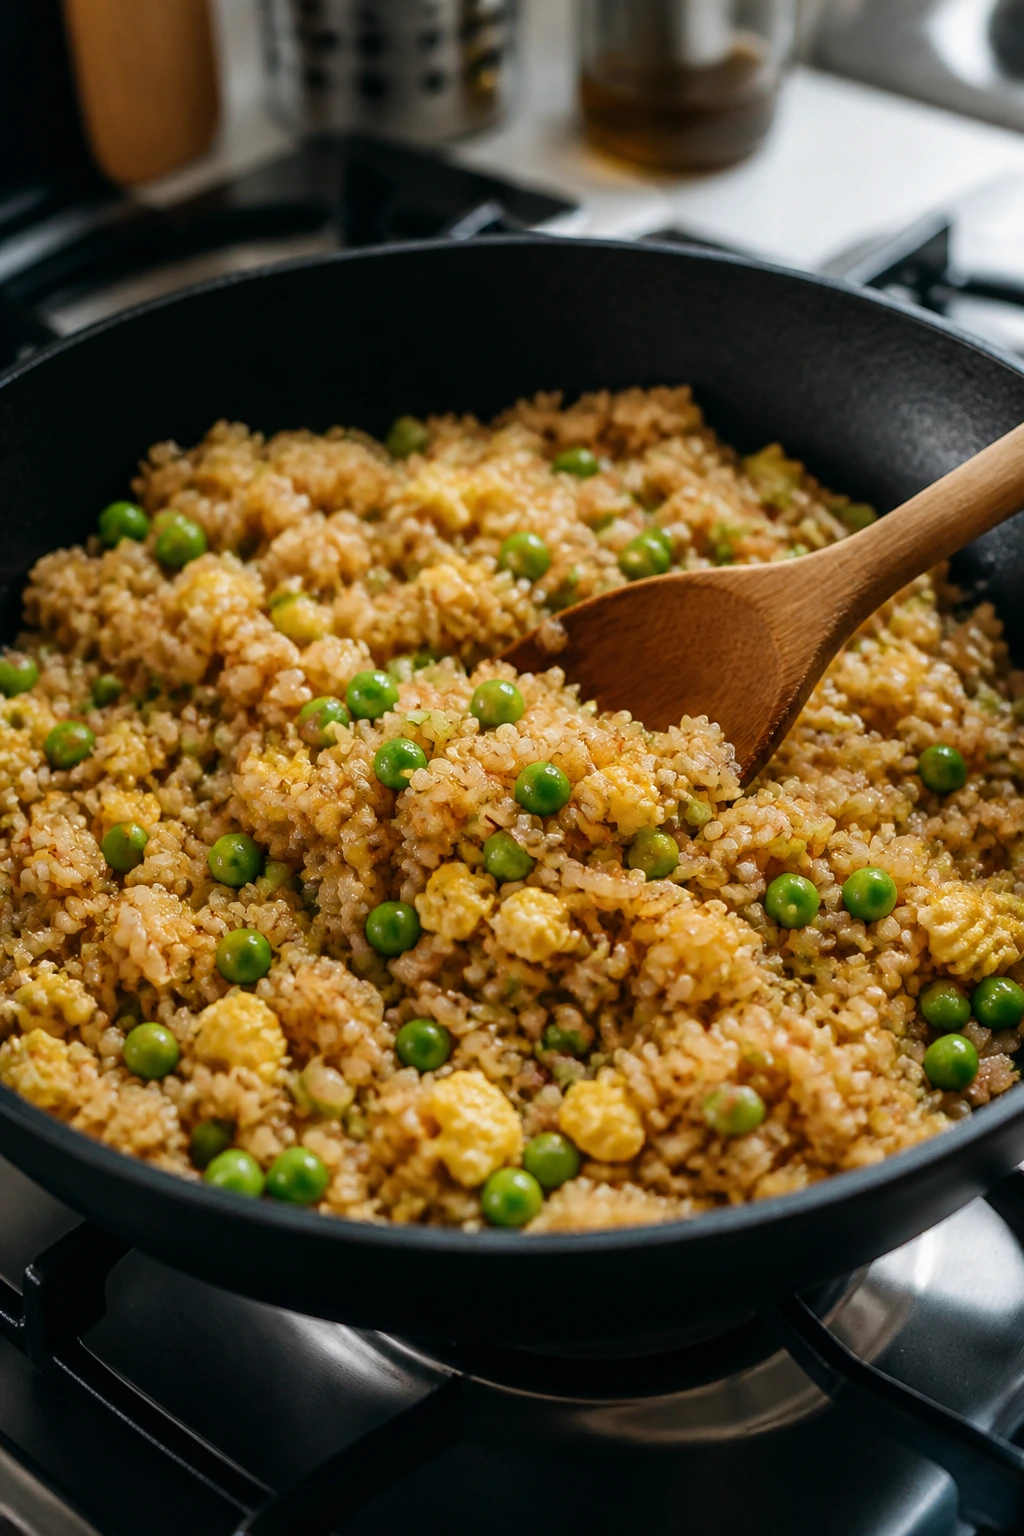
4. Egg Fried Rice with Frozen Peas
Cold rice is the secret here. Fresh rice tends to clump, but day-old rice fries up into separate grains that soak up soy sauce and oil in the best way.
Why It Works:
Eggs coat the rice and add richness, while frozen peas bring sweetness and a little color without any extra chopping. Because everything cooks fast, the order matters more than the ingredient list. Get the pan hot, keep the rice cold, and you get fried rice instead of sticky rice with attitude.
Key Ingredients:
- 3 cups cooked cold white rice
- 3 large eggs, beaten
- 2 tablespoons neutral oil
- 1 cup frozen peas and carrots
- 3 tablespoons soy sauce
- 1 teaspoon sesame oil, optional
- 2 scallions, sliced, optional
- 1/4 teaspoon white pepper or black pepper
Quick Steps:
- Heat 1 tablespoon oil in a large skillet or wok over medium-high heat.
- Add the eggs and stir just until softly scrambled. Transfer them to a plate.
- Add the remaining oil, then cook the peas and carrots for 1 to 2 minutes.
- Stir in the cold rice and break up any clumps with a spatula. Cook for 3 to 4 minutes, until the grains start to sizzle.
- Add soy sauce, pepper, and sesame oil if using. Fold in the eggs and scallions, then serve hot.
Equipment for This Recipe:
- Large skillet or wok
- Spatula
- Mixing bowl
- Measuring spoons
- Plate for the eggs
How to Serve This Dish:
Serve it as-is or top it with a fried egg if you want the yolk to run into the rice. A drizzle of chili oil or a spoonful of pickled vegetables sharpens the bowl fast.
Pro Tips for This Recipe:
- Break up cold rice with your hands before it hits the pan. It saves time and prevents clumps.
- Do not drown the rice in soy sauce at once. Start with 2 tablespoons, taste, then add more.
- If the pan starts steaming, it is too crowded. Cook in two batches if needed.
Variations on This Dish:
- Garlic Fried Rice: Add 2 minced garlic cloves with the vegetables.
- Chicken Pantry Bowl: Stir in 1 cup shredded rotisserie chicken or canned chicken.
- Kimchi-Style: Add 1/2 cup chopped kimchi with the rice for heat and tang.
Common Mistakes to Avoid with This Dish:
- Using warm rice: It clumps and turns gummy. Chill it first if possible.
- Overcrowding the skillet: The rice steams instead of fries. Use a big pan.
- Adding too much soy sauce early: The rice turns dark and salty before you can fix it.
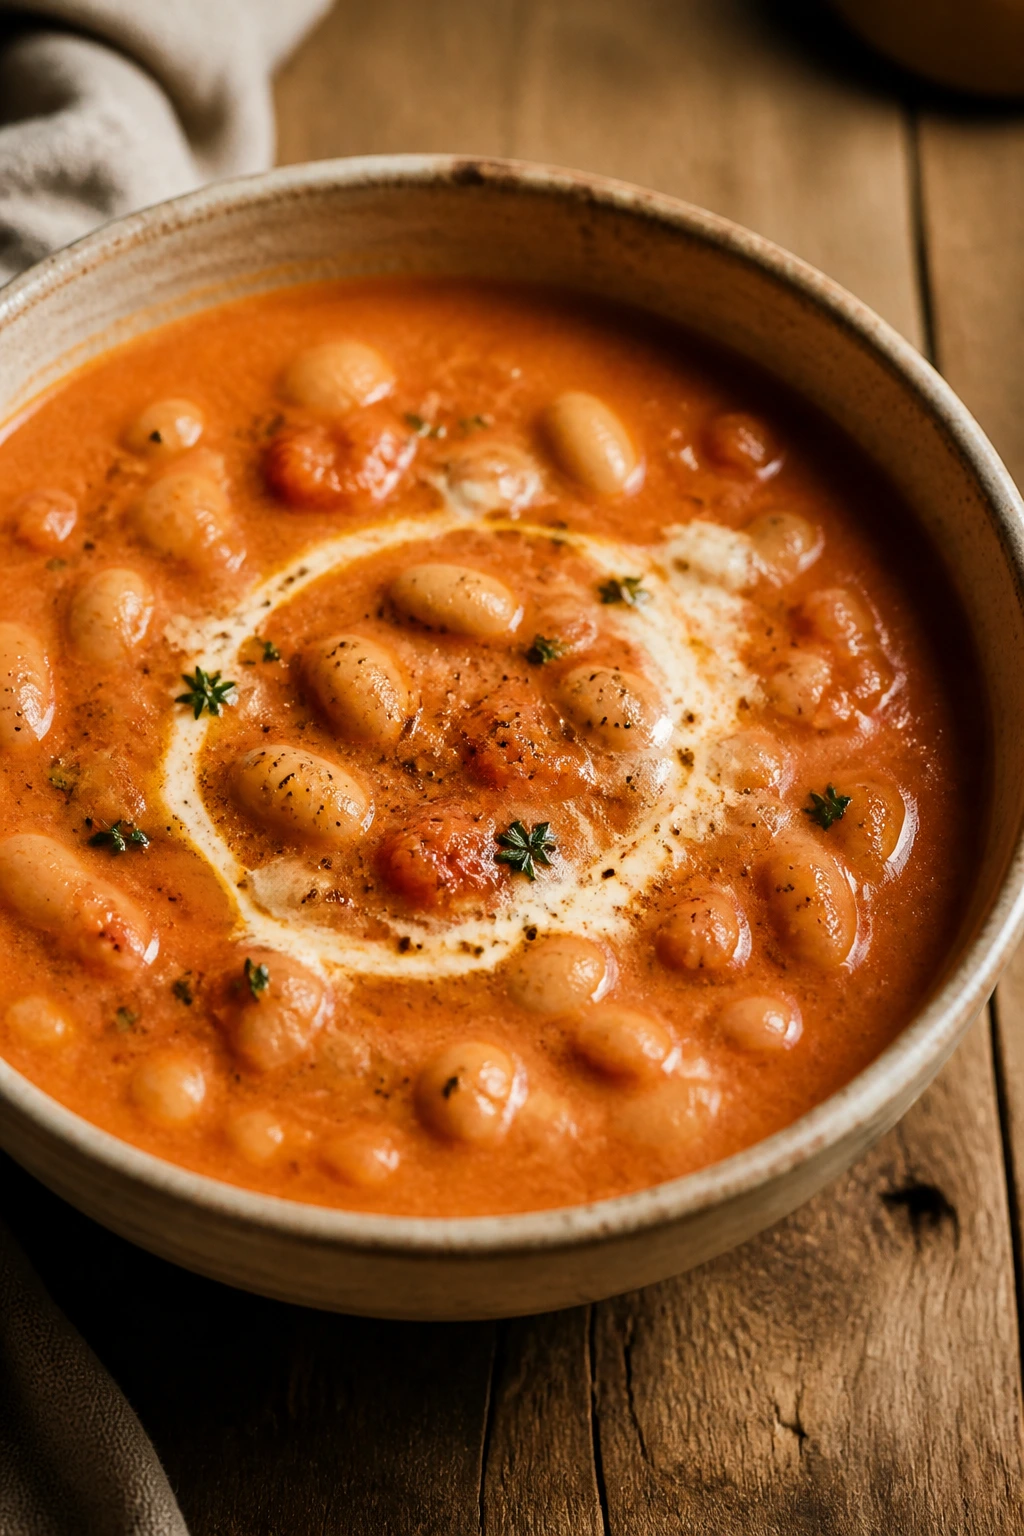
5. Creamy White Bean Tomato Soup
This soup tastes like it took longer than it did, which is the best compliment pantry cooking can get. The white beans make it feel thick and plush without a cream-heavy finish.
Why It Works:
Canned tomatoes bring acid and depth, while white beans blur into the broth and give the soup a soft, velvety texture. A quick simmer is enough to knit everything together. If you want it smoother, blend a portion. If you want it rustic, leave the beans whole. Both ways work.
Key Ingredients:
- 2 tablespoons olive oil
- 1 small onion, chopped
- 2 garlic cloves, minced
- 1 can crushed tomatoes, 28 ounces
- 2 cans cannellini beans, drained and rinsed
- 2 cups vegetable or chicken broth
- 1 teaspoon dried oregano
- 1/2 teaspoon salt, plus more to taste
- 1/2 cup milk, cream, or unsweetened oat milk, optional
- Toast or crackers, for serving
Quick Steps:
- Warm the olive oil in a pot over medium heat. Add the onion and cook for 5 minutes, until soft and translucent.
- Stir in the garlic and oregano for 30 seconds.
- Add the tomatoes, beans, broth, and salt. Bring to a simmer and cook for 15 minutes.
- Blend about 2 cups of the soup with an immersion blender, or mash some beans in the pot for a thicker texture.
- Stir in the milk or cream if using. Taste and adjust salt before serving.
Equipment for This Recipe:
- Medium or large pot
- Immersion blender or potato masher
- Wooden spoon
- Ladle
- Measuring cups
How to Serve This Dish:
Ladle it into bowls and finish with olive oil or black pepper. A grilled cheese sandwich, buttered toast, or salted crackers gives you the crunchy side the soup wants.
Pro Tips for This Recipe:
- Use low-sodium broth if your tomatoes are salty. It gives you more control.
- A pinch of sugar can help if the canned tomatoes taste sharp.
- Blend only part of the soup if you want body without losing texture.
Variations on This Dish:
- Herbed Version: Stir in dried basil or thyme near the end.
- Spicy Tomato Soup: Add red pepper flakes with the garlic.
- Creamier Bowl: Blend all of it and finish with a spoonful of cream.
Common Mistakes to Avoid with This Dish:
- Boiling after adding dairy: It can split. Keep it at a gentle simmer.
- Leaving the soup unseasoned: Beans need salt. Taste at the end.
- Blending everything to glue: Some texture is better. Puree part, not all.
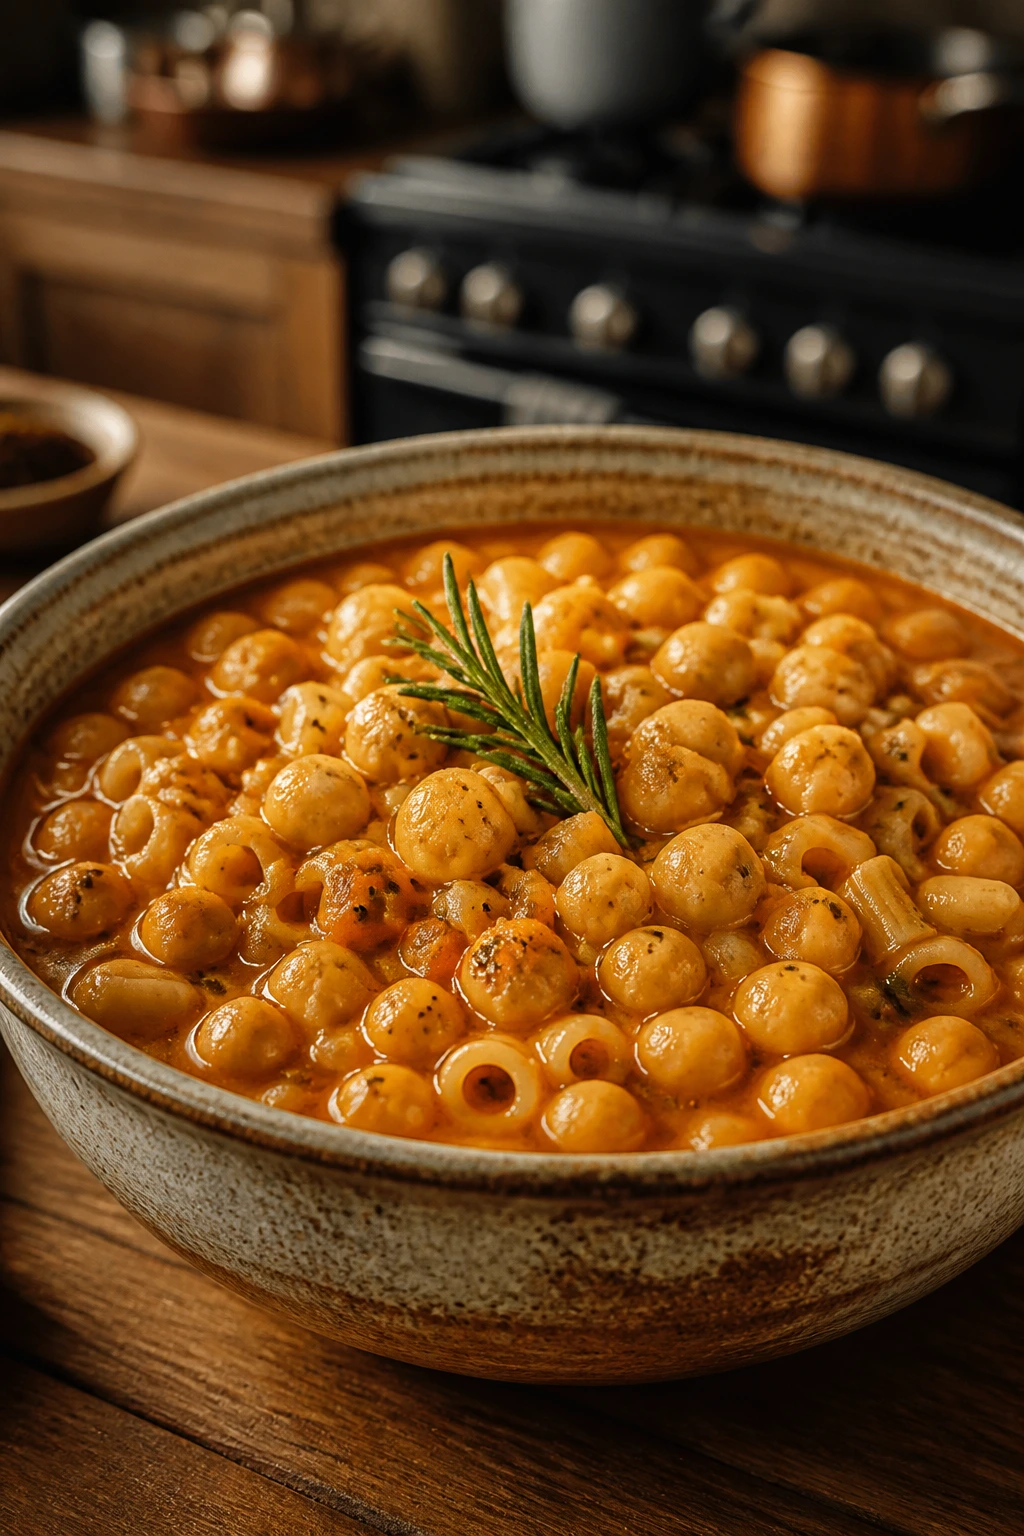
6. Pasta e Ceci
Pasta e ceci is the kind of pantry meal that feels older than any recipe blog, because it is. Chickpeas, pasta, garlic, and broth make a bowl that is humble in the best way.
Why It Works:
The pasta cooks right in the chickpea broth, which means it picks up flavor instead of being boiled separately and tossed together at the end. A little tomato paste adds color and a deeper, almost roasted note. Mash a few chickpeas and the broth turns creamy without a drop of cream.
Key Ingredients:
- 2 tablespoons olive oil
- 3 garlic cloves, minced
- 2 tablespoons tomato paste
- 2 cans chickpeas, drained and rinsed
- 4 cups vegetable or chicken broth
- 8 ounces ditalini or small pasta
- 1 teaspoon chopped rosemary or 1/2 teaspoon dried rosemary
- 1/2 teaspoon salt
- Black pepper, to taste
- Grated Parmesan, for serving
Quick Steps:
- Warm the olive oil in a pot over medium heat. Add the garlic and cook for 30 seconds.
- Stir in the tomato paste and rosemary. Cook for 1 minute until the paste darkens slightly.
- Add the chickpeas, broth, salt, and a few grinds of pepper. Simmer for 8 minutes.
- Add the pasta and cook, stirring often, until tender and the broth thickens, about 8 to 10 minutes.
- Mash a few chickpeas against the side of the pot, then serve with Parmesan.
Equipment for This Recipe:
- Medium pot
- Wooden spoon
- Measuring cups
- Can opener
- Ladle
How to Serve This Dish:
Serve it in shallow bowls with a final drizzle of olive oil. A hunk of crusty bread is not optional in my kitchen; the broth is too good to leave behind.
Pro Tips for This Recipe:
- Stir often once the pasta goes in. Small shapes love to stick to the bottom.
- If the broth thickens too fast, add hot water in 1/4-cup splashes.
- A rosemary sprig is strong; if you use dried rosemary, keep it modest.
Variations on This Dish:
- Lemony Version: Add 1 tablespoon lemon juice at the end.
- Greens and Beans: Stir in a handful of spinach during the last minute.
- Anchovy Depth: Melt 2 anchovy fillets with the garlic for a deeper savory base.
Common Mistakes to Avoid with This Dish:
- Cooking the pasta in too little liquid: It grabs the bottom of the pot. Keep extra water nearby.
- Skipping the tomato paste step: That quick toast in oil adds a lot of flavor.
- Adding too much rosemary: It can take over the pot. Use a light hand.
7. Peanut Sesame Noodles

This is the dinner I make when the pantry is small and the appetite is not. The sauce is salty, nutty, and sharp enough to wake up plain noodles in a minute flat.
Why It Works:
Peanut butter gives the sauce body, soy sauce brings salt, and vinegar or lemon cuts the richness so the noodles do not taste heavy. A little hot water turns the sauce from paste to silk. It is one of those recipes that looks plain before you toss it and suddenly seems much smarter.
Key Ingredients:
- 8 ounces spaghetti, linguine, or ramen noodles
- 1/4 cup creamy peanut butter
- 2 tablespoons soy sauce
- 1 tablespoon rice vinegar or lemon juice
- 1 tablespoon honey or brown sugar
- 1 garlic clove, grated
- 1 teaspoon grated fresh ginger or 1/4 teaspoon ground ginger
- 2 to 4 tablespoons hot water
- Red pepper flakes and sesame seeds, for serving
Quick Steps:
- Cook the noodles according to the package directions. Reserve 1/2 cup cooking water, then drain.
- Whisk the peanut butter, soy sauce, vinegar, honey, garlic, ginger, and 2 tablespoons hot water in a bowl.
- Toss the hot noodles with the sauce. Add more water a tablespoon at a time until the sauce coats the noodles instead of clinging in clumps.
- Finish with red pepper flakes and sesame seeds.
Equipment for This Recipe:
- Medium pot
- Mixing bowl
- Whisk or fork
- Colander
- Tongs
How to Serve This Dish:
Serve it warm or cold. A handful of sliced scallions, shredded carrot, or cucumber makes it feel more finished, but the noodles hold up on their own with a few peanuts on top.
Pro Tips for This Recipe:
- Use hot noodle water to loosen the sauce. Cold water makes the peanut butter seize.
- Taste before adding extra soy sauce. Some brands are saltier than others.
- A little sesame oil is nice, but it is optional, not mandatory.
Variations on This Dish:
- Tuna Peanut Noodles: Add one drained can of tuna for more protein.
- Spicy Chili Version: Stir in 1 teaspoon chili crisp or sriracha.
- Tahini Swap: Replace the peanut butter with tahini for a deeper, more bitter finish.
Common Mistakes to Avoid with This Dish:
- Making the sauce too thick: It should coat, not paste over, the noodles.
- Over-salting too early: Soy sauce varies a lot. Add slowly.
- Serving the noodles dry: Toss with sauce while hot so the coating goes on evenly.
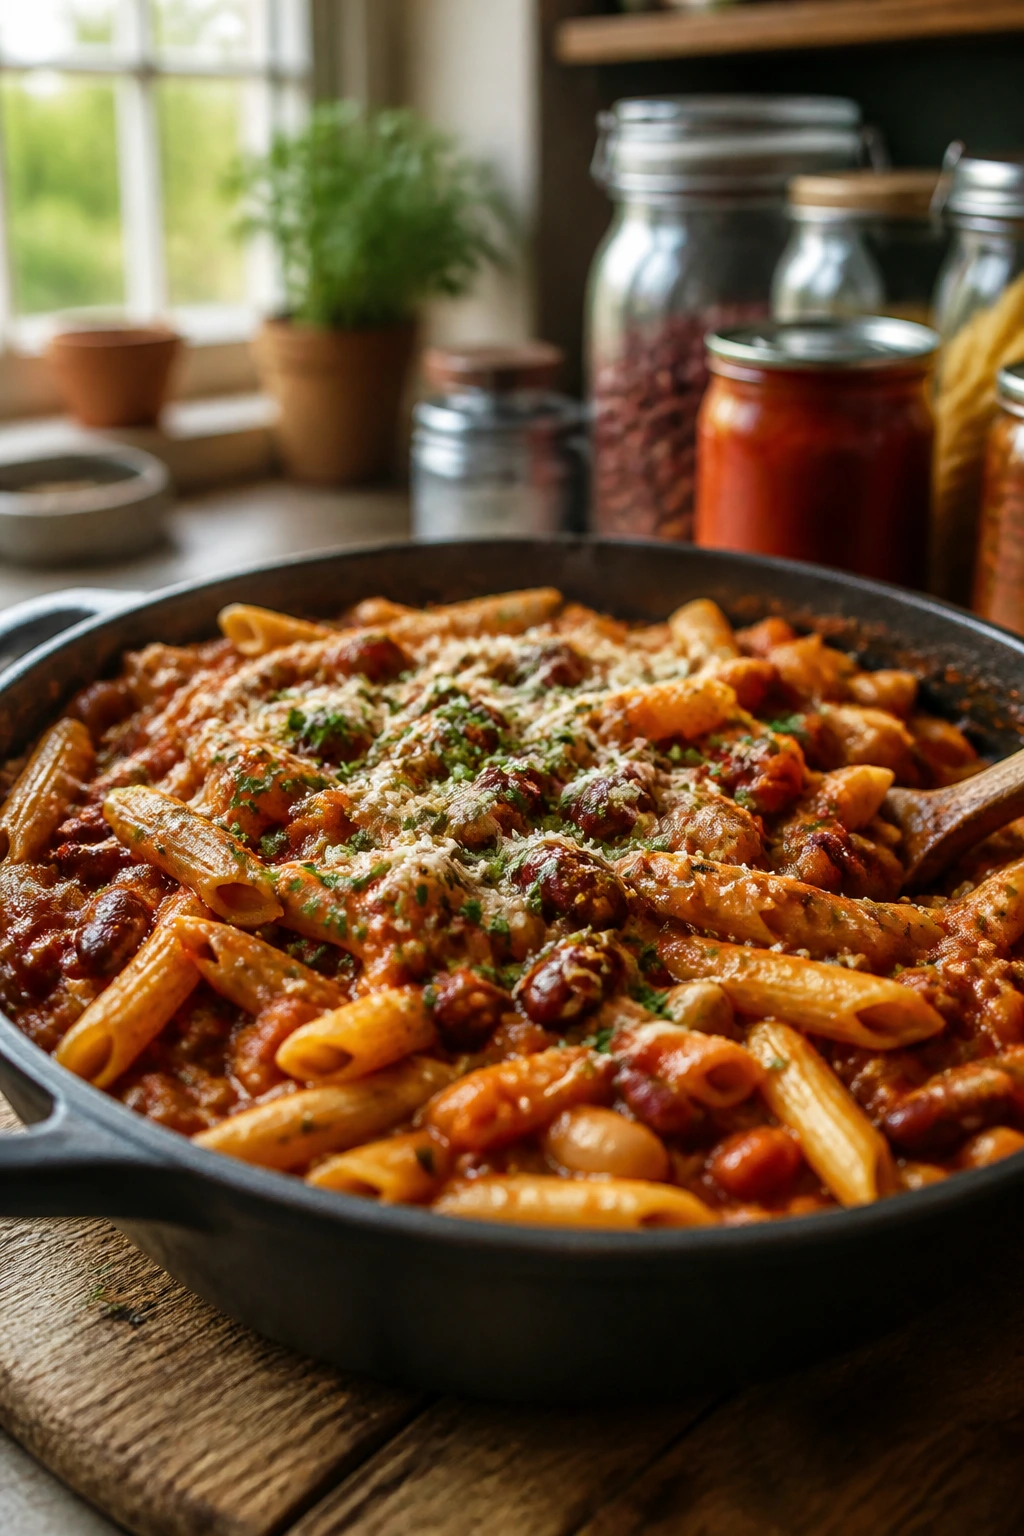
8. Lentil Sloppy Joes
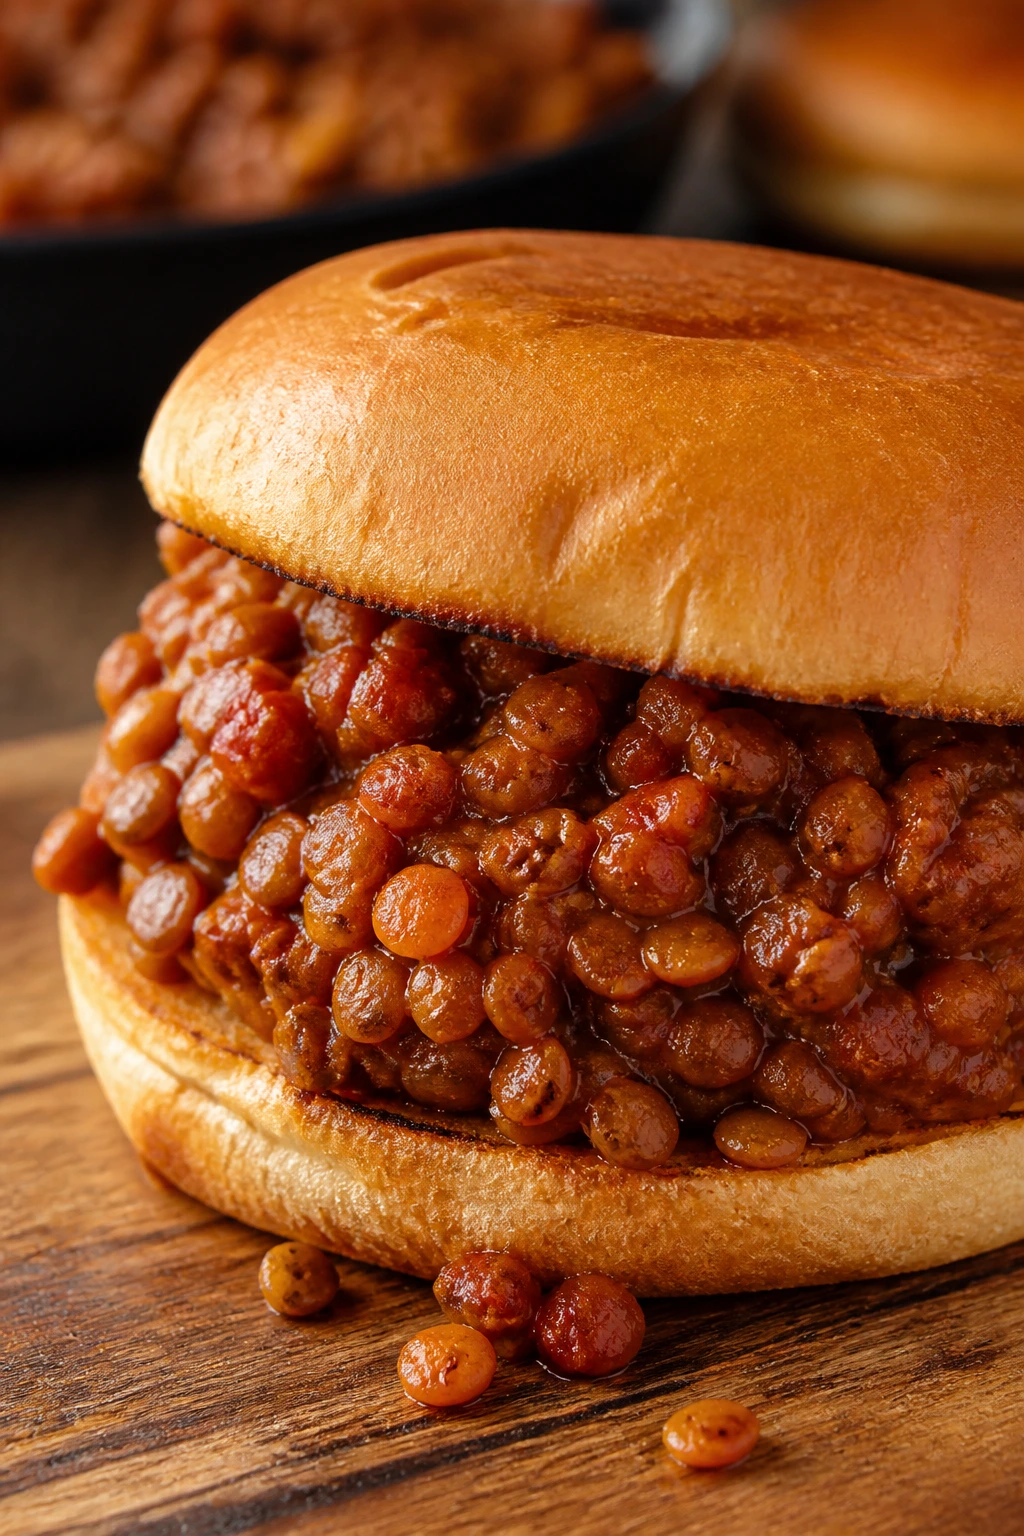
Lentils have no business being this good on a bun, and yet here we are. They soak up a tangy tomato sauce and eat like the classic sandwich’s thriftier, sturdier cousin.
Why It Works:
Brown or green lentils keep their shape, so the filling stays toothsome instead of turning mushy. Ketchup, mustard, and a little brown sugar give you the sweet-tangy sloppy joe flavor people expect. The whole thing simmers fast enough for a weeknight and reheats without getting strange.
Key Ingredients:
- 1 tablespoon oil
- 1 small onion, diced
- 2 garlic cloves, minced
- 1 cup brown or green lentils, rinsed
- 2 1/2 cups water or broth
- 1 can tomato sauce, 15 ounces
- 2 tablespoons ketchup
- 1 tablespoon yellow mustard
- 1 tablespoon brown sugar
- 4 sandwich buns
Quick Steps:
- Heat the oil in a saucepan over medium heat. Cook the onion for 4 minutes until soft.
- Add the garlic and lentils, then stir in the water or broth. Bring to a boil, reduce to a simmer, and cook uncovered for 20 to 25 minutes until the lentils are tender.
- Stir in the tomato sauce, ketchup, mustard, and brown sugar. Simmer for 5 to 7 minutes until thick.
- Spoon onto buns and serve immediately.
Equipment for This Recipe:
- Medium saucepan or deep skillet
- Wooden spoon
- Measuring cups
- Can opener
- Ladle
How to Serve This Dish:
Pile the filling high on toasted buns so the bread can handle the sauce. Pickles or a sharp coleslaw cut the sweetness and keep the sandwich from feeling too soft.
Pro Tips for This Recipe:
- Brown or green lentils hold up best. Red lentils turn to puree.
- If the filling looks loose, simmer it a few minutes longer before adding the buns.
- Toast the buns. It matters more than it should.
Variations on This Dish:
- BBQ Lentil Joes: Swap ketchup for barbecue sauce.
- Spicy Mustard Version: Add hot sauce or a spoonful of chili paste.
- Open-Faced Style: Spoon the lentils over toasted bread and top with cheese.
Common Mistakes to Avoid with This Dish:
- Using the wrong lentil: Red lentils break down too much here.
- Under-simmering the lentils: They need to be tender before the sauce goes in.
- Serving on soft buns straight from the bag: Toast them or the sandwich gets soggy fast.
9. Shakshuka with Canned Tomatoes
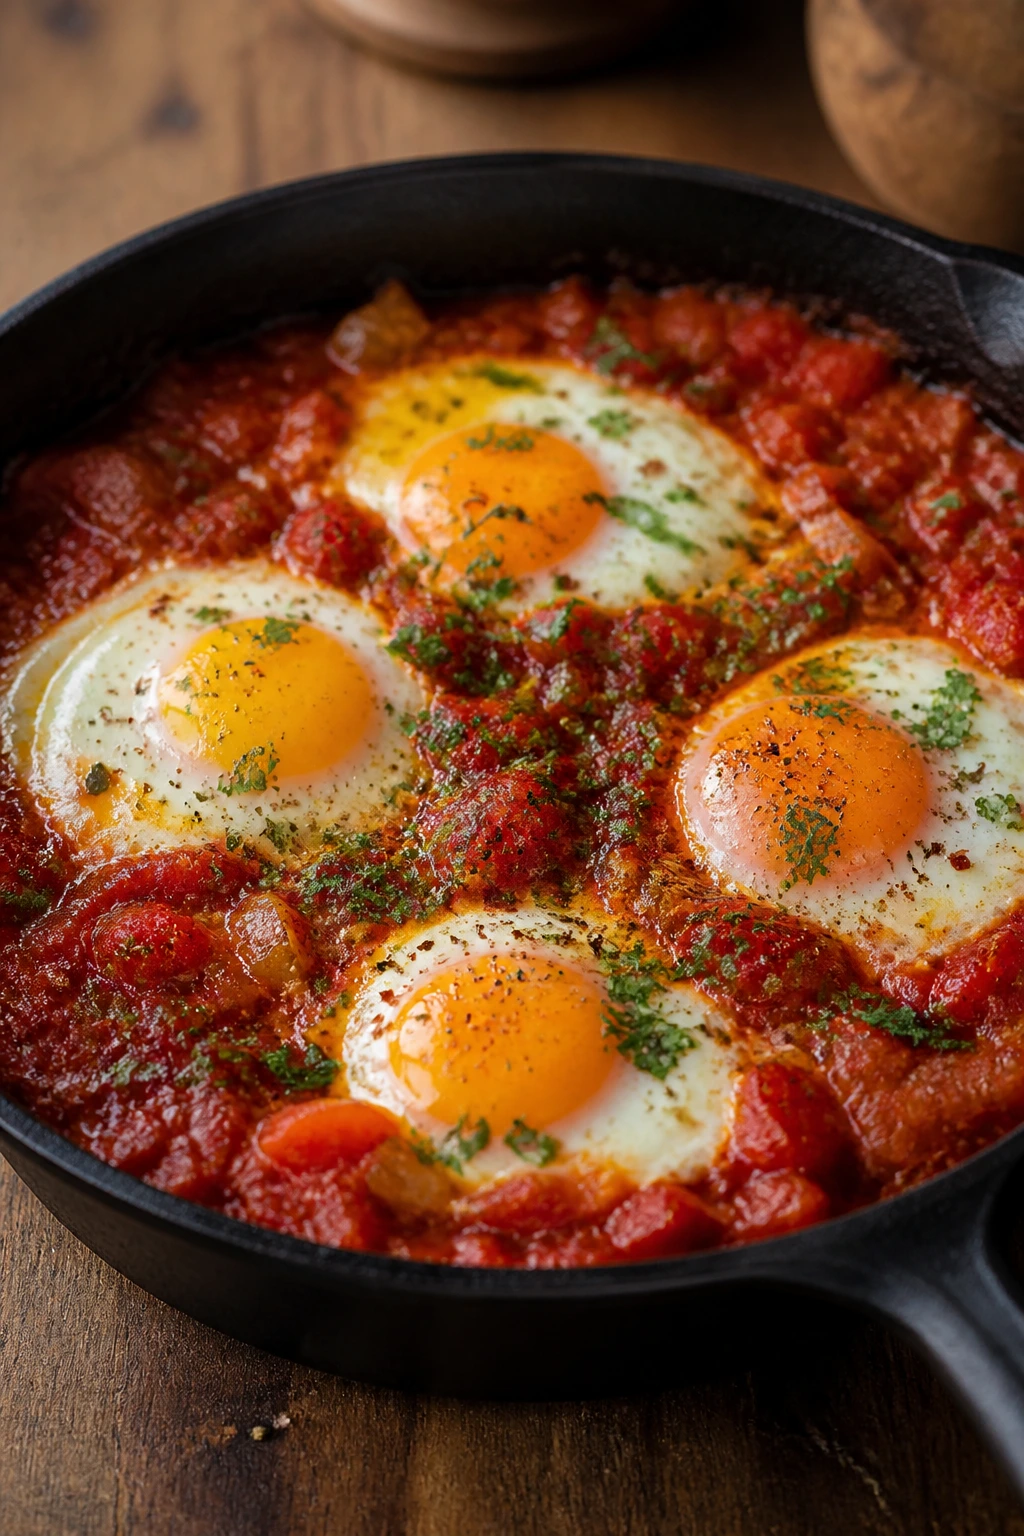
Shakshuka is what happens when a can of tomatoes and a few eggs decide to carry dinner by themselves. The sauce should be thick enough to cradle the eggs, not soup-like.
Why It Works:
Tomatoes simmer down with onion, garlic, cumin, and paprika into a sauce that tastes like far more than the ingredients suggest. The eggs cook gently in the same pan, so the whites set while the yolks stay soft. Bread does the rest. It is a simple formula, and it works because nothing is fighting for space.
Key Ingredients:
- 2 tablespoons olive oil
- 1 small onion, sliced
- 1 bell pepper, sliced, optional but helpful
- 3 garlic cloves, minced
- 1 can crushed tomatoes, 28 ounces
- 1 teaspoon ground cumin
- 1 teaspoon paprika
- 1/2 teaspoon salt
- 4 to 6 large eggs
- Crusty bread, for serving
Quick Steps:
- Heat the olive oil in a skillet over medium heat. Cook the onion and bell pepper for 5 to 6 minutes.
- Add the garlic, cumin, paprika, and salt. Stir for 30 seconds.
- Pour in the tomatoes and simmer for 10 minutes until the sauce thickens.
- Make small wells in the sauce and crack in the eggs. Cover the skillet and cook for 5 to 7 minutes, until the whites are set but the yolks are still soft.
- Serve with bread for scooping.
Equipment for This Recipe:
- Large skillet with lid
- Wooden spoon
- Knife and cutting board
- Can opener
- Bread knife, if needed
How to Serve This Dish:
Serve the skillet at the table if you like a little drama, then spoon eggs and sauce onto plates with bread. A handful of parsley, feta, or hot sauce on top changes the finish in a good way.
Pro Tips for This Recipe:
- If the tomatoes taste sharp, simmer them 3 to 5 minutes longer.
- Keep the heat low once the eggs go in. Fast heat gives you rubbery whites.
- Use a skillet with a lid that fits well so the tops of the eggs cook evenly.
Variations on This Dish:
- Chickpea Shakshuka: Stir in 1 cup chickpeas before adding the eggs.
- Feta Finish: Crumble 1/3 cup feta over the top after cooking.
- Green Shakshuka Shortcut: Add a handful of spinach near the end and cut back the tomatoes slightly.
Common Mistakes to Avoid with This Dish:
- Sauce too thin: The eggs slide around. Simmer until thick before cracking them in.
- Overcooked yolks: Pull the pan as soon as the whites are set.
- Using too small a skillet: The eggs crowd each other and cook unevenly.
10. Sardine Toast with Lemon and Capers
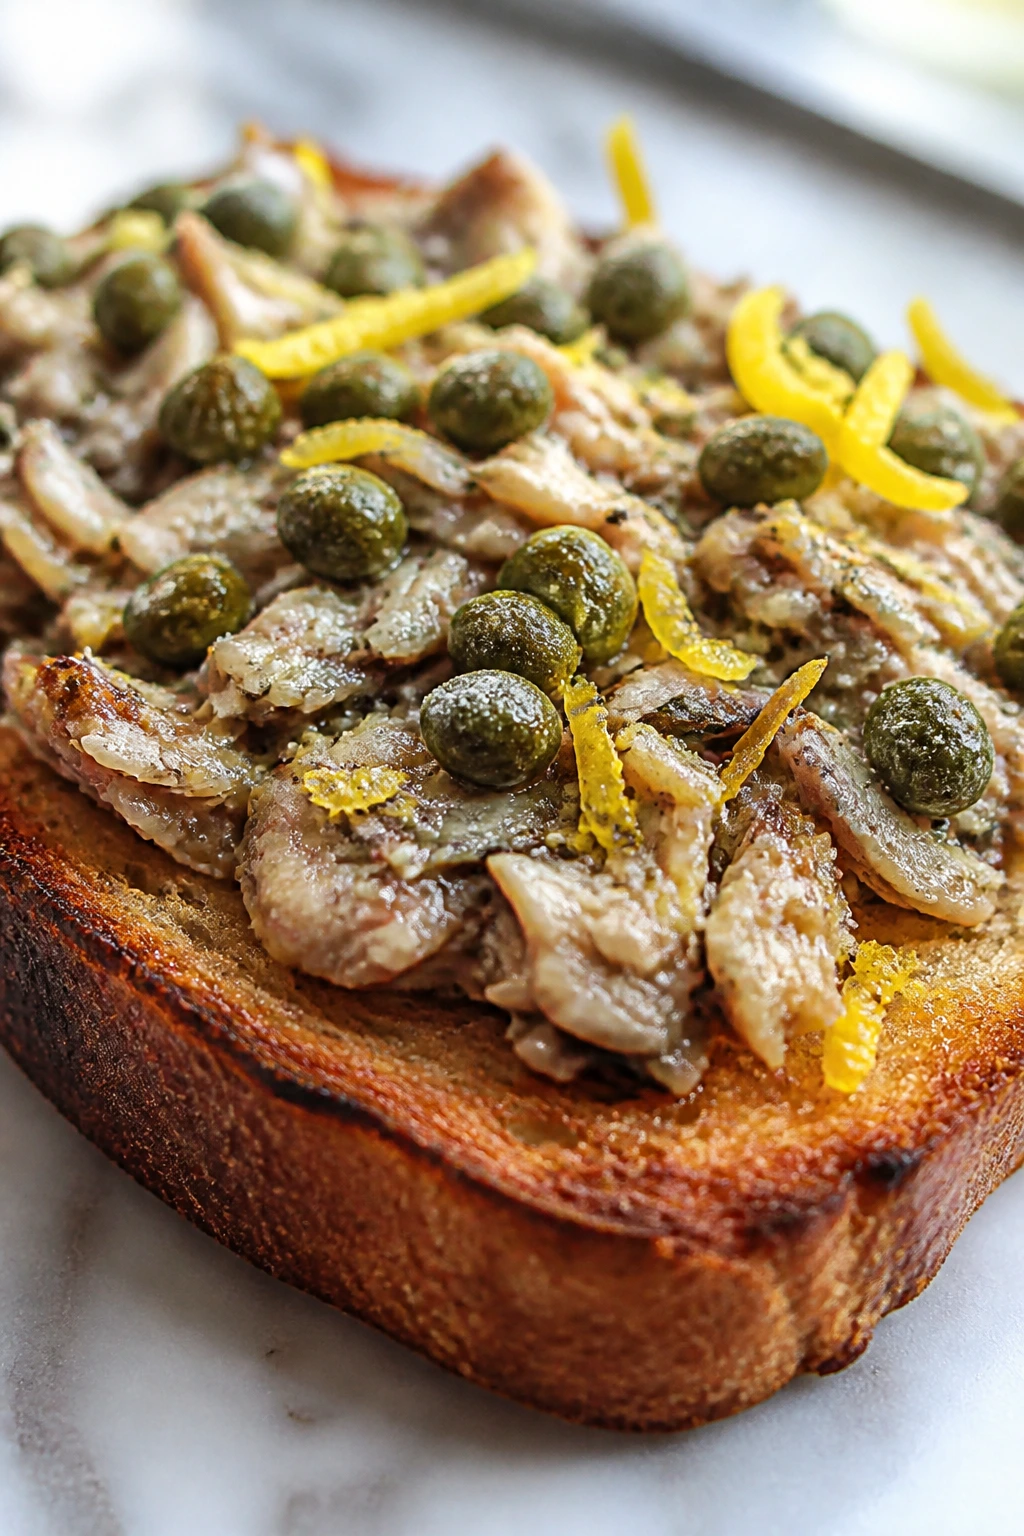
Sardines are one of those pantry foods people ignore until they need dinner in ten minutes. Then they remember how rich, salty, and useful they really are.
Why It Works:
Sardines bring oil, salt, and a strong savory backbone, so you barely need to add anything else. Lemon keeps the fish from tasting heavy, and capers add a briny pop that wakes up the toast. This is fast food, but it has bones.
Key Ingredients:
- 2 cans sardines, drained
- 4 slices sturdy bread
- 2 tablespoons mayonnaise or olive oil
- 1 tablespoon lemon juice
- 1 teaspoon lemon zest
- 1 tablespoon capers, drained
- Black pepper, to taste
- Chopped parsley, optional
Quick Steps:
- Toast the bread until crisp and deeply golden.
- Mix the sardines gently with mayonnaise or olive oil, lemon juice, lemon zest, and black pepper.
- Spread the mixture over the toast.
- Top with capers and parsley, then serve right away.
Equipment for This Recipe:
- Toaster or skillet
- Small bowl
- Fork
- Knife
- Measuring spoons
How to Serve This Dish:
Serve one toast per person as a snacky meal, or pair two toasts with sliced tomatoes or a quick cucumber salad. If you want more heft, add a soft-boiled egg alongside.
Pro Tips for This Recipe:
- Use sturdy bread. Thin toast breaks under the sardines.
- If you do not love fishy flavors, lemon zest matters more than you think.
- Mix the sardines gently so they stay in tender pieces instead of becoming mush.
Variations on This Dish:
- Tomato Sardine Toast: Add a thin spread of tomato paste under the fish.
- Spicy Version: Stir in a little chili oil or crushed red pepper.
- Mustard Toast: Swap the mayonnaise for a thin layer of Dijon.
Common Mistakes to Avoid with This Dish:
- Overloading the toast: It becomes hard to eat. Keep the layer modest.
- Skipping acid: Sardines need lemon or vinegar to taste balanced.
- Using flimsy bread: The toast turns soggy and collapses.
11. Rice and Beans Burrito Bowls
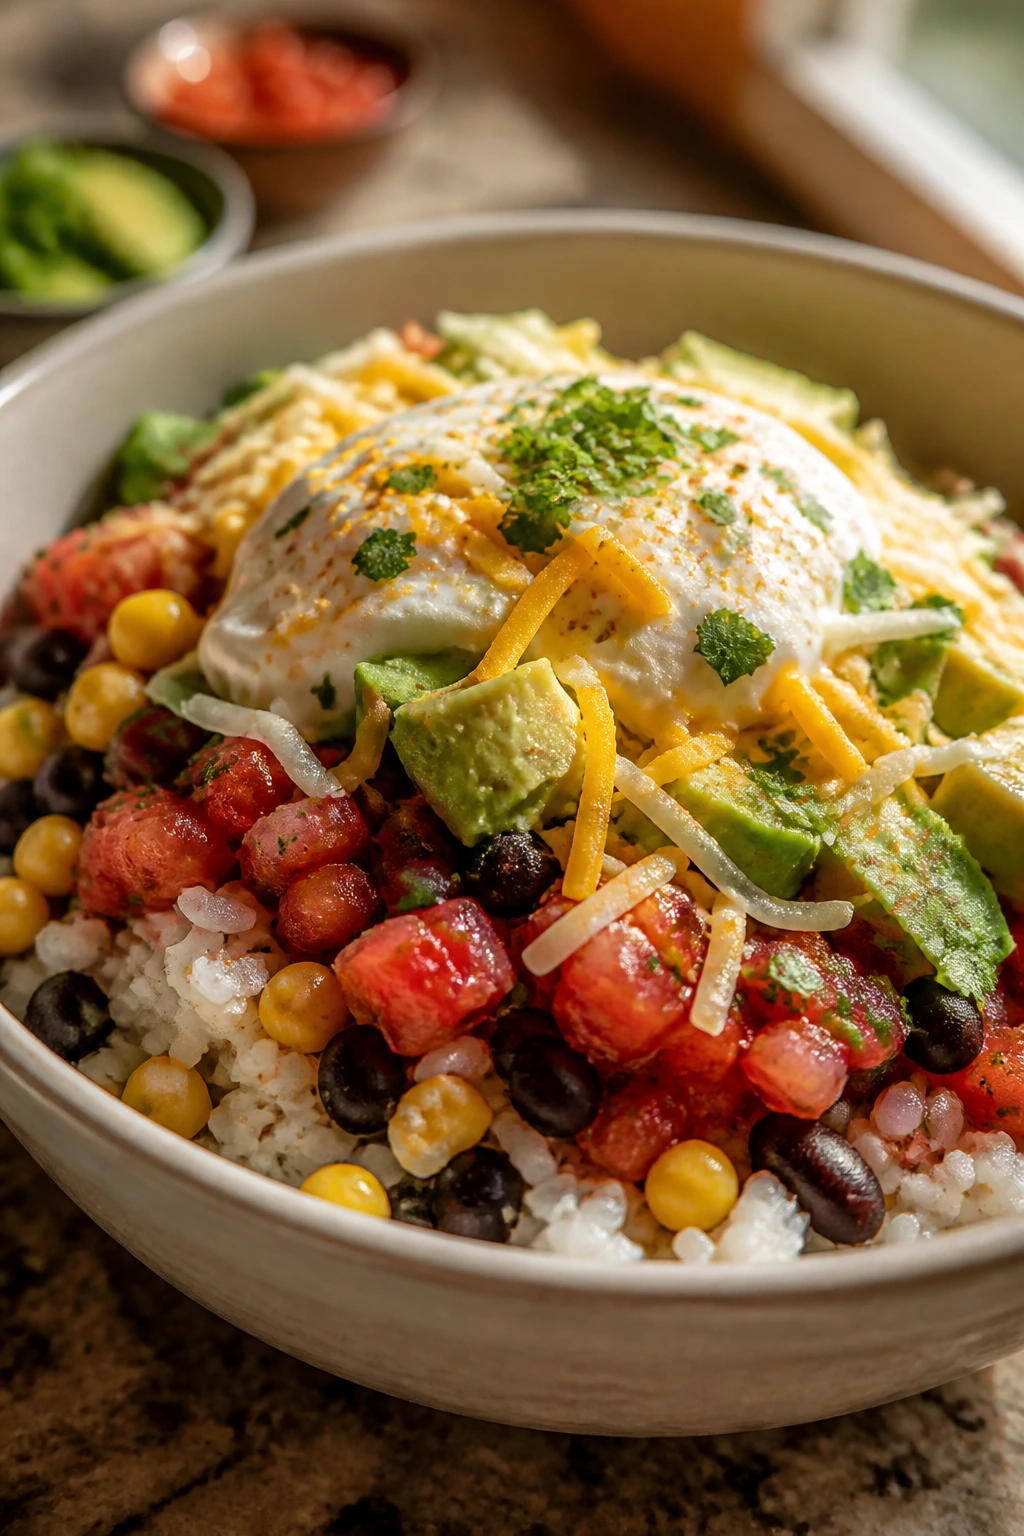
This bowl is what I make when I want dinner that tastes assembled, not improvised, even though it absolutely is. Rice, beans, salsa, and whatever toppings are around can become a proper meal with almost no drama.
Why It Works:
Rice gives you bulk, beans give you protein and fiber, and salsa handles seasoning in one move. Warmed beans feel richer than cold ones, and a little cumin makes the whole bowl taste like it came from an actual plan. The final texture mix matters most: soft rice, saucy beans, and something crunchy on top.
Key Ingredients:
- 2 cups cooked rice
- 1 can black or pinto beans, drained and rinsed
- 1 cup corn, canned or frozen
- 1 tablespoon oil
- 1 teaspoon cumin
- 1/2 teaspoon salt
- 1 cup salsa
- Shredded cheese, avocado, or chopped onion, optional
Quick Steps:
- Warm the oil in a skillet over medium heat. Add the beans, corn, cumin, and salt.
- Cook for 4 to 5 minutes until the beans are hot and the corn is tender.
- Divide the rice between bowls.
- Spoon the bean mixture over the rice and top with salsa and any extras you have.
Equipment for This Recipe:
- Skillet
- Saucepan or microwave-safe bowl for the rice
- Spoon
- Can opener
- Serving bowls
How to Serve This Dish:
Build the bowls in layers so the rice can soak up the salsa without turning soggy. Tortilla chips on the side add crunch, and a squeeze of lime changes the whole bowl in about five seconds.
Pro Tips for This Recipe:
- Warm the beans before serving. Cold canned beans make the whole bowl feel flat.
- If you have leftover rice, sprinkle it with a teaspoon of water before reheating.
- A fried egg on top is not fancy, but it does make the bowl feel complete.
Variations on This Dish:
- Breakfast Bowl: Top with eggs instead of cheese.
- Spicy Chipotle Bowl: Stir chipotle sauce or hot sauce into the beans.
- Lime Rice Version: Mix lime juice and cilantro into the rice if you have them.
Common Mistakes to Avoid with This Dish:
- Leaving the beans unseasoned: A pinch of cumin and salt changes everything.
- Using dry rice straight from the fridge: Reheat it with a little moisture.
- Skipping the crunchy topping: The bowl needs contrast.
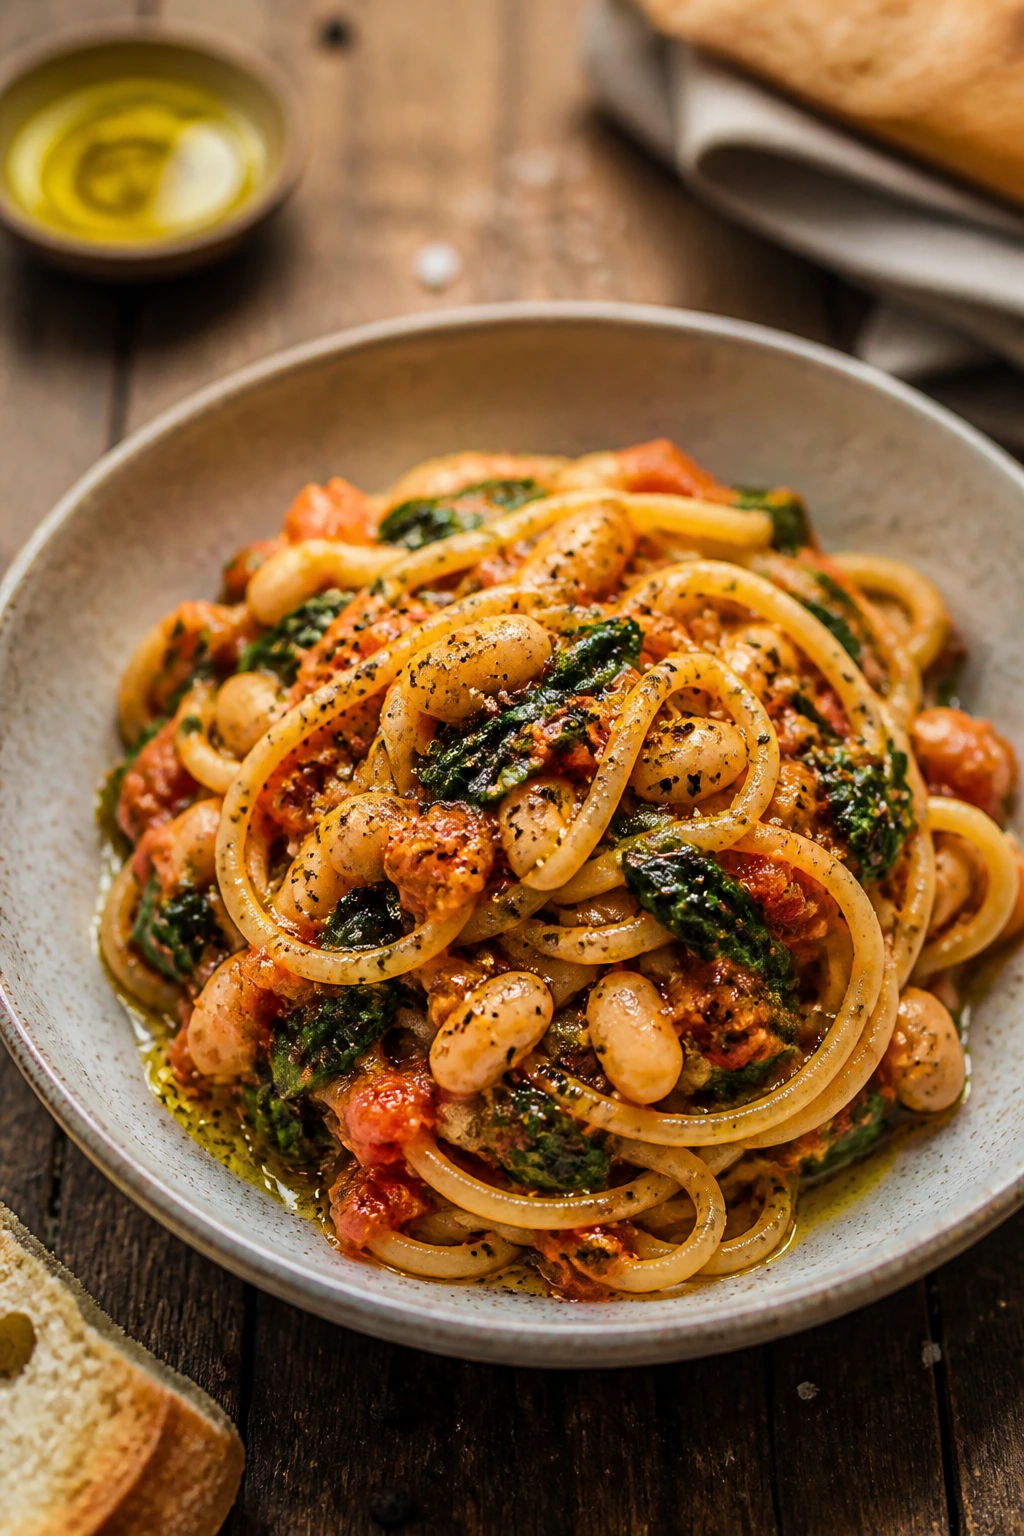
12. Crispy Gnocchi with Tomato and Spinach
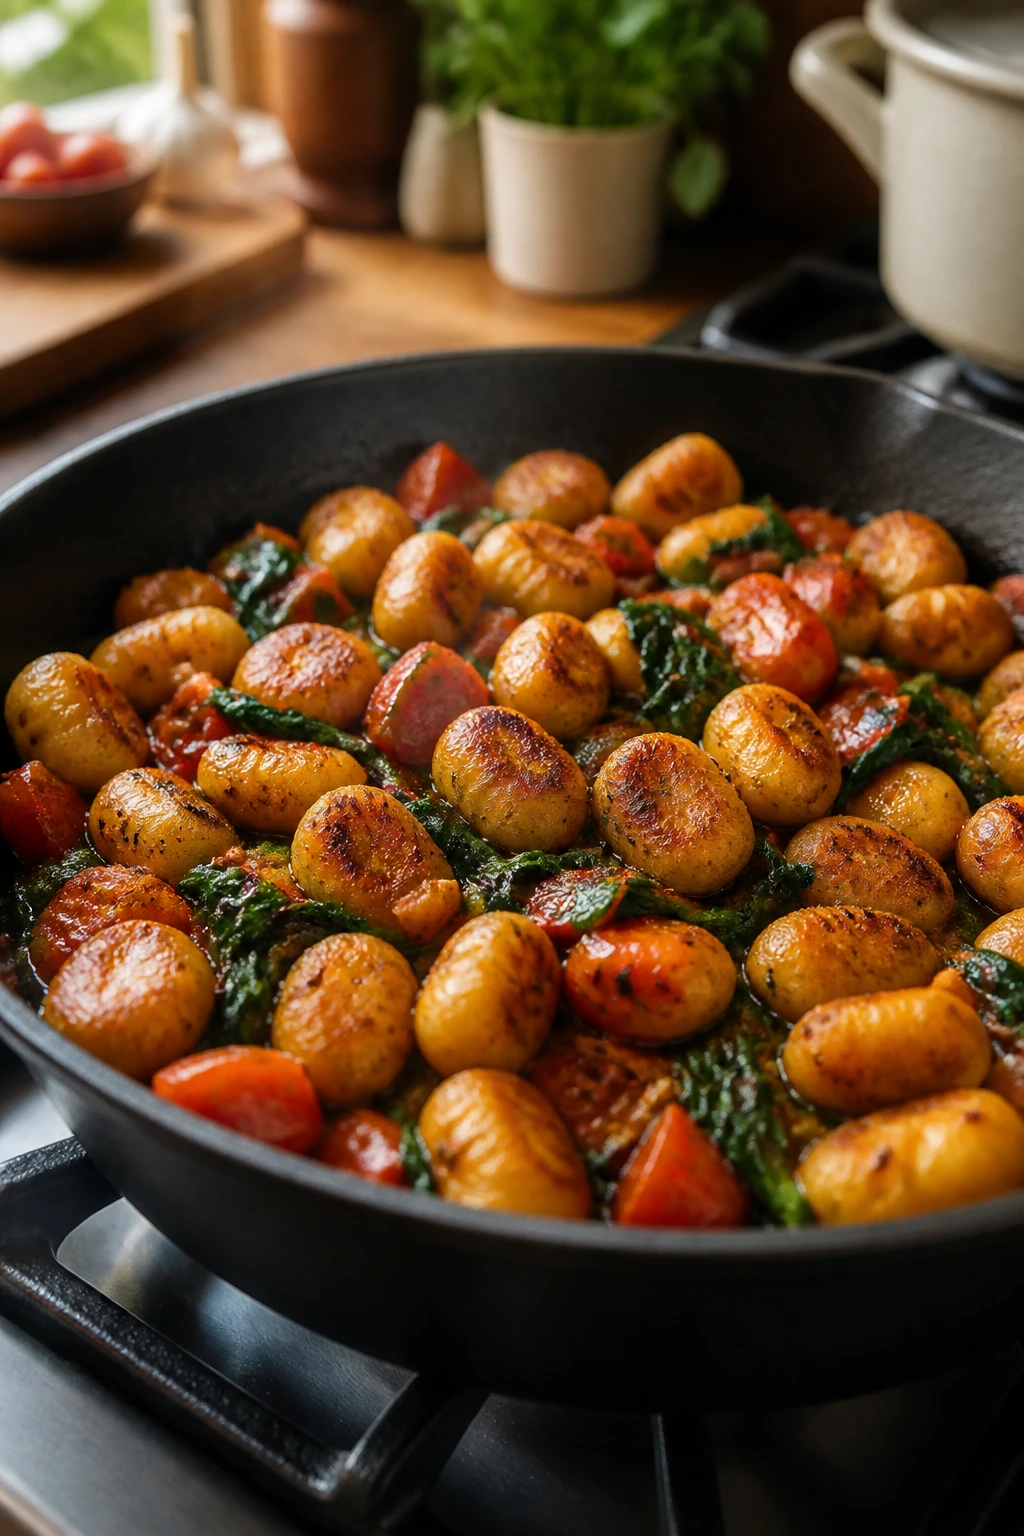
Shelf-stable gnocchi looks plain in the package, then turns into a crisp-edged skillet dinner that eats like more work than it is. The trick is browning it first so it gets those little toasted ridges.
Why It Works:
Pan-crisped gnocchi develops a chewy outside and soft middle, which gives the dish more texture than boiled pasta would. Canned tomatoes build the sauce, and frozen spinach slips in without stealing time. It is one of the easiest ways to make a pantry meal feel layered.
Key Ingredients:
- 1 pound shelf-stable gnocchi
- 2 tablespoons olive oil
- 3 garlic cloves, minced
- 1 can diced tomatoes, 14.5 ounces
- 2 cups frozen spinach, thawed and squeezed dry
- 1/2 teaspoon red pepper flakes
- 1/2 teaspoon salt
- 1/4 cup grated Parmesan, optional
Quick Steps:
- Heat the olive oil in a large skillet over medium-high heat.
- Add the gnocchi in a single layer and cook for 5 to 7 minutes, stirring once or twice, until golden in spots.
- Add the garlic and red pepper flakes and cook for 30 seconds.
- Stir in the tomatoes, spinach, and salt. Simmer for 4 to 5 minutes until the sauce clings to the gnocchi.
- Finish with Parmesan and serve hot.
Equipment for This Recipe:
- Large skillet
- Spatula
- Spoon
- Measuring cups
- Paper towel for the spinach
How to Serve This Dish:
Serve it straight from the skillet with Parmesan and black pepper. A slice of garlic toast or a simple side salad keeps it from feeling too soft all the way through.
Pro Tips for This Recipe:
- Dry the spinach well. Wet spinach waters down the sauce fast.
- Leave the gnocchi alone for the first few minutes so it can brown.
- If the sauce gets too thick, add 2 tablespoons water or broth.
Variations on This Dish:
- Creamy Gnocchi: Add 1/4 cup cream or ricotta at the end.
- Sausage Version: Brown sliced sausage before the gnocchi.
- Vegan Version: Skip the Parmesan and finish with olive oil.
Common Mistakes to Avoid with This Dish:
- Boiling the gnocchi first: You lose the crisping step.
- Crowding the pan: The gnocchi steams instead of browning.
- Using watery spinach: It thins the sauce and muddies the flavor.
13. Chili Garlic Ramen with Soft-Boiled Egg
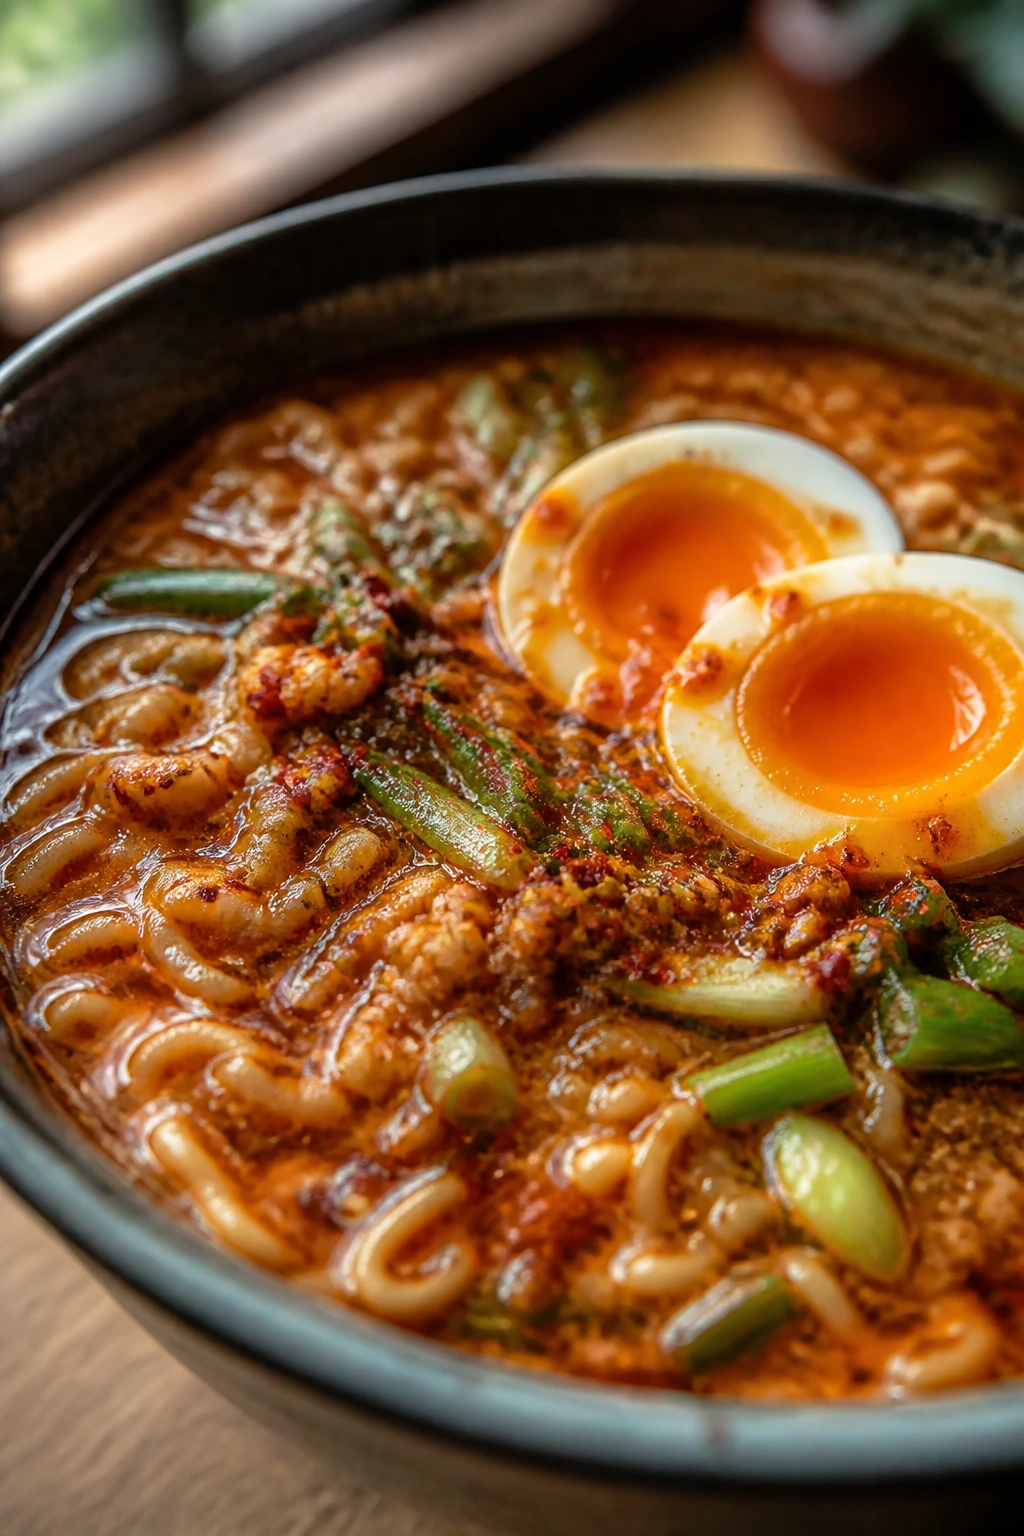
Instant ramen gets a bad reputation because people stop too soon. Give it garlic, chili, and a soft egg, and it turns into a bowl that feels like a deliberate lunch.
Why It Works:
The noodle packet is only the skeleton. Garlic cooked in oil adds sweetness, chili brings heat, and the egg adds richness that rounds out the salty broth. The noodles cook fast, which is useful when your patience is somewhere else entirely.
Key Ingredients:
- 2 packs instant ramen noodles
- 1 tablespoon neutral oil
- 2 garlic cloves, minced
- 1 tablespoon chili crisp or 1 teaspoon red pepper flakes
- 2 tablespoons soy sauce
- 4 cups water or broth
- 2 large eggs
- Sliced scallions, optional
Quick Steps:
- Bring a small pot of water to a boil. Soft-boil the eggs for 6 1/2 minutes, then cool and peel them.
- In another pot, heat the oil over medium heat. Add the garlic and chili crisp and cook for 30 seconds.
- Pour in the water or broth and bring to a simmer. Add the ramen noodles and cook until just tender, about 2 minutes.
- Stir in the soy sauce. Transfer to bowls and top with halved eggs and scallions.
Equipment for This Recipe:
- Small pot
- Medium pot
- Slotted spoon
- Knife
- Measuring spoons
How to Serve This Dish:
Serve it immediately while the broth is hot and the yolks are still soft. If you have sesame seeds, nori, or leftover vegetables, scatter them on top. It changes the bowl without asking much.
Pro Tips for This Recipe:
- If you use the seasoning packet, start with half. Soy sauce and the packet together can get salty fast.
- Peel the eggs while they’re still a little warm; the shells come off more cleanly.
- Garlic burns quickly in chili oil, so keep the heat gentle.
Variations on This Dish:
- Peanut Ramen: Stir in 1 tablespoon peanut butter for a creamier broth.
- Miso Style: Add 1 teaspoon miso paste to the broth off the heat.
- Veggie Bowl: Add frozen peas or spinach in the last minute.
Common Mistakes to Avoid with This Dish:
- Boiling the noodles too long: Instant ramen goes from tender to mushy fast.
- Burning the garlic: It turns the broth bitter.
- Using too much seasoning packet: The broth gets harsh instead of savory.
14. Sheet Pan Chickpea Fajitas
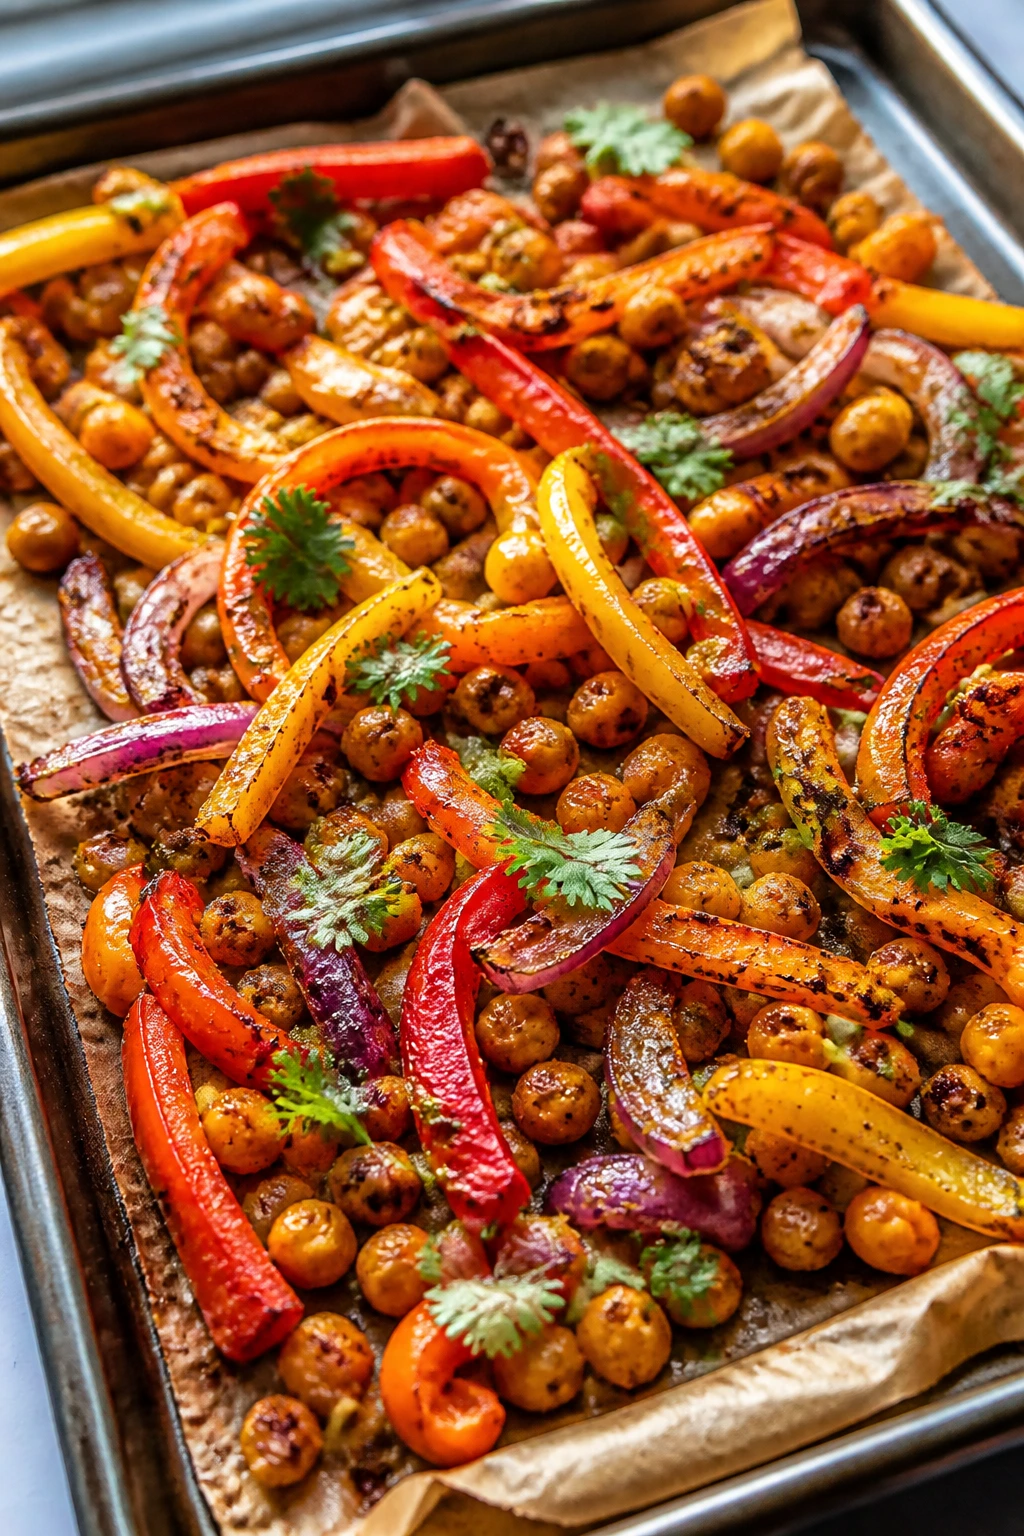
This is the rare sheet pan meal that actually tastes like it deserves the pan. Chickpeas roast until they pick up color, while the peppers and onions soften just enough to stay sweet.
Why It Works:
Roasting at a high temperature gives you browned edges and a little char, which is what keeps fajitas from tasting boiled. Chickpeas soak up the spice mix, so every bite feels seasoned. Warm tortillas pull it all together, and dinner is done before the kitchen gets hot enough to complain.
Key Ingredients:
- 2 cans chickpeas, drained and rinsed
- 2 bell peppers, sliced
- 1 large onion, sliced
- 2 tablespoons olive oil
- 2 teaspoons chili powder
- 1 teaspoon cumin
- 1/2 teaspoon salt
- 8 small tortillas
- Salsa, for serving
Quick Steps:
- Heat the oven to 425°F and line a sheet pan with parchment.
- Toss the chickpeas, peppers, and onion with olive oil, chili powder, cumin, and salt.
- Spread everything in a single layer and roast for 18 to 22 minutes, stirring once halfway through, until the edges are browned.
- Warm the tortillas and fill them with the roasted mixture.
- Serve with salsa.
Equipment for This Recipe:
- Sheet pan
- Parchment paper
- Large bowl
- Spoon or spatula
- Oven mitts
How to Serve This Dish:
Pile the fajita filling into tortillas and keep the salsa on the side so people can control the moisture. If you have sour cream, shredded cheese, or lime, they belong here.
Pro Tips for This Recipe:
- Dry the chickpeas well before tossing them with oil. Drier chickpeas brown better.
- Do not crowd the pan. Space is what gives you roasted edges.
- Warm tortillas in a dry skillet or directly over a flame for better flavor.
Variations on This Dish:
- Fajita Bowl: Serve over rice instead of in tortillas.
- Smoky Version: Add 1/2 teaspoon smoked paprika.
- Breakfast Fajitas: Top with fried eggs.
Common Mistakes to Avoid with This Dish:
- Using a low oven: The vegetables soften but never brown.
- Skipping the stir: The onions can scorch on one side.
- Adding too much oil: The pan gets greasy instead of roasted.
15. Salmon Patties with Crackers
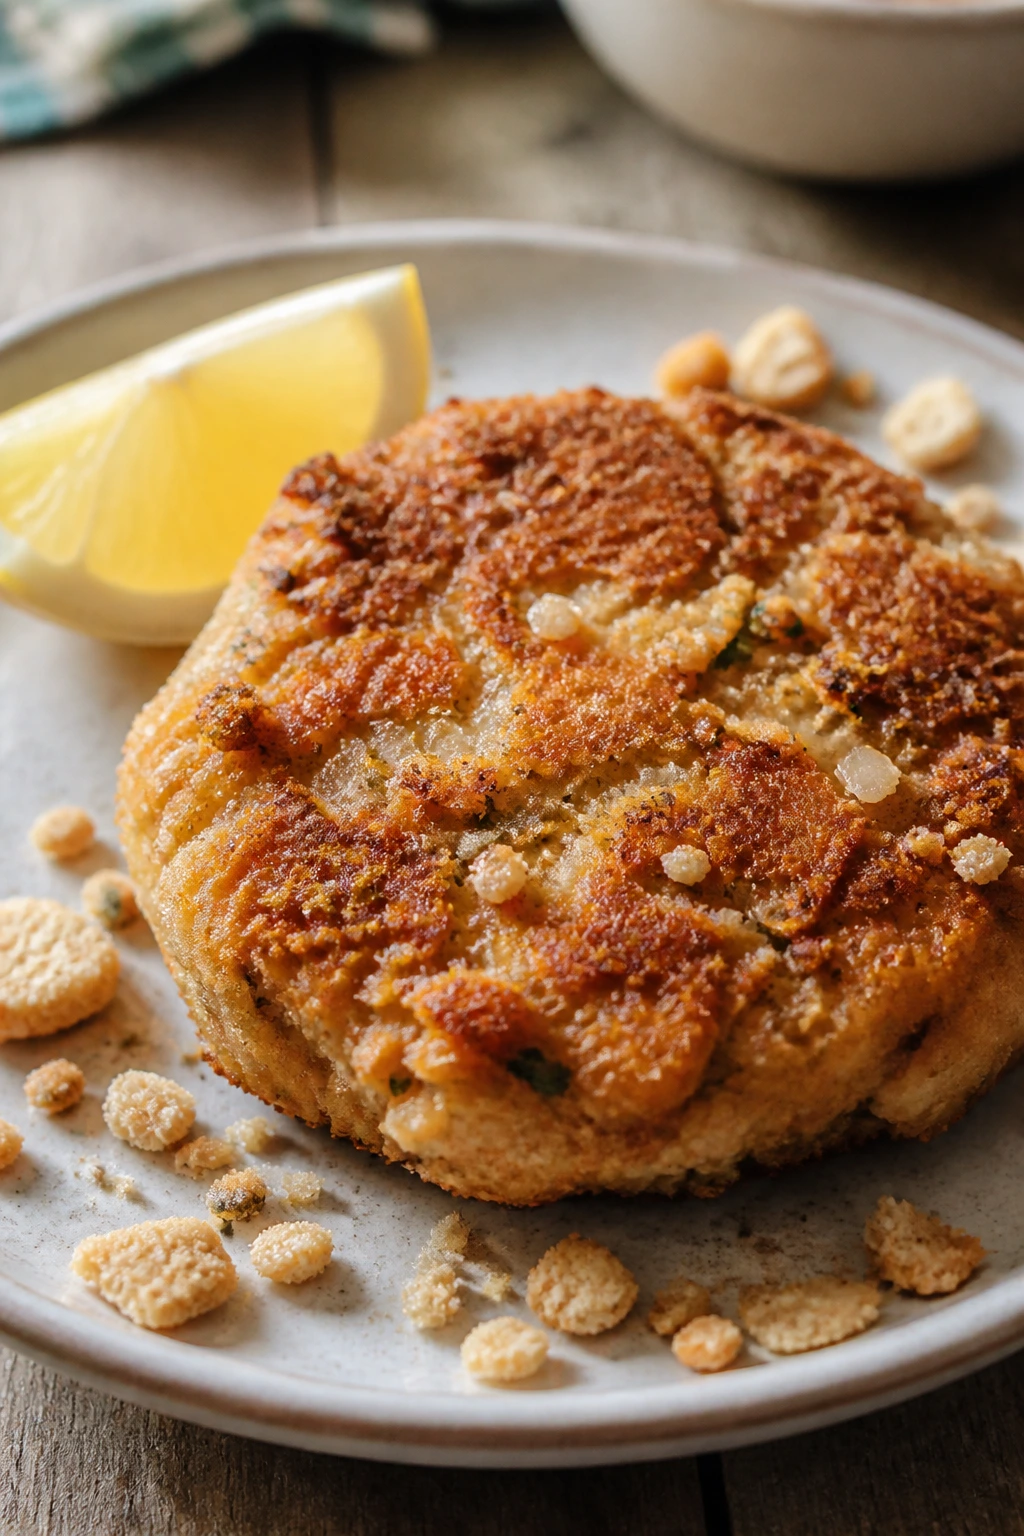
Canned salmon is one of the most practical pantry proteins around, and these patties prove it. They crisp up in a skillet and taste far fresher than the ingredient list suggests.
Why It Works:
Crushed crackers hold the mixture together and make the patties tender instead of dense. Egg and mayonnaise add moisture, while lemon keeps the salmon from tasting heavy. Pan-frying gives you the crust that makes them worth eating.
Key Ingredients:
- 2 cans salmon, drained and flaked
- 1 cup crushed saltines or breadcrumbs
- 1 large egg
- 2 tablespoons mayonnaise
- 1 tablespoon lemon juice
- 1 tablespoon finely chopped onion
- 1/2 teaspoon black pepper
- 2 tablespoons oil, for frying
Quick Steps:
- Mix the salmon, crackers, egg, mayonnaise, lemon juice, onion, and pepper in a bowl until just combined.
- Form into 4 patties.
- Heat the oil in a skillet over medium heat.
- Cook the patties for 3 to 4 minutes per side, until deeply golden and heated through.
- Serve hot.
Equipment for This Recipe:
- Mixing bowl
- Skillet
- Spatula
- Measuring cups
- Fork
How to Serve This Dish:
Serve them with tartar sauce, mustard, or a simple squeeze of lemon. A green salad, potato salad, or even a buttered roll turns them into a full meal.
Pro Tips for This Recipe:
- Let the mixture rest for 5 minutes before shaping if it feels loose. The crackers hydrate and help bind.
- Do not press the patties too hard in the pan; they’ll compact.
- Oil should shimmer, not smoke, before the patties go in.
Variations on This Dish:
- Dill Salmon Patties: Add 1 tablespoon dried dill.
- Spicy Version: Stir in a little hot sauce or cayenne.
- Mustard Patties: Replace half the mayo with Dijon.
Common Mistakes to Avoid with This Dish:
- Overmixing the batter: The patties get pasty.
- Flipping too early: You need a crust first or they break.
- Using too little binder: The mixture falls apart in the pan.
16. Coconut Chickpea Curry
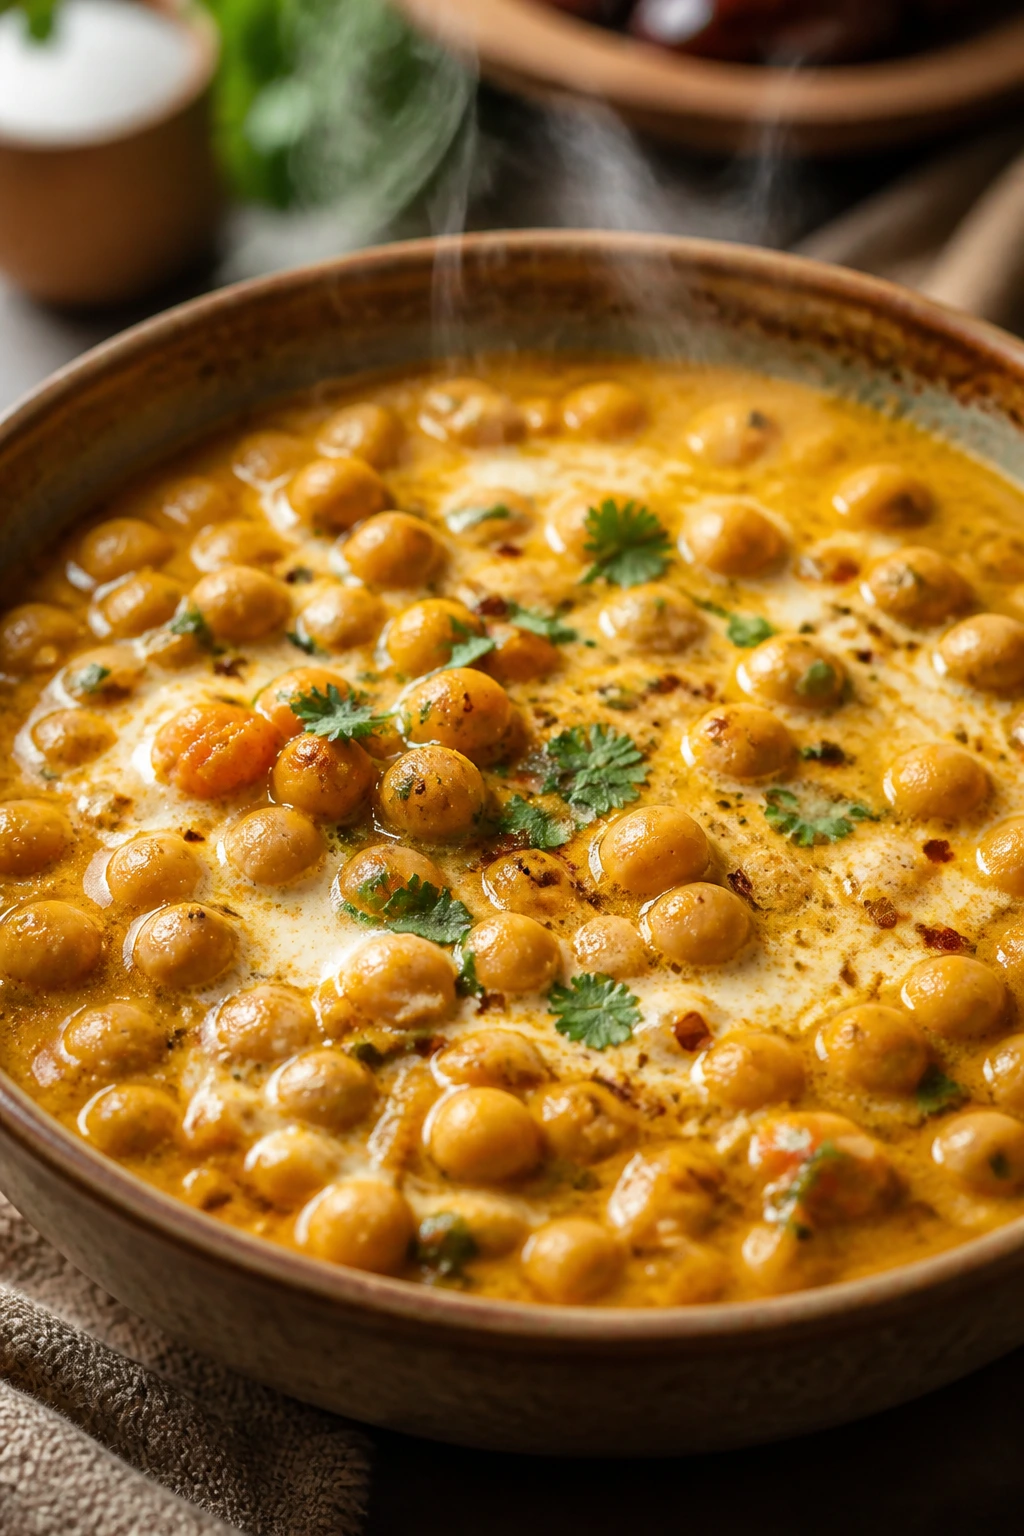
This is the pantry curry I make when I want a pot to taste like it simmered longer than it did. Coconut milk smooths the edges, and chickpeas soak up every bit of sauce.
Why It Works:
Curry powder blooms in oil, which makes the spices taste fuller and less dusty. Coconut milk gives the sauce richness without dairy, and canned tomatoes add enough acid to keep the curry from feeling heavy. Chickpeas make it hearty enough to serve over rice without extra work.
Key Ingredients:
- 2 tablespoons oil
- 1 small onion, chopped
- 3 garlic cloves, minced
- 1 tablespoon grated ginger
- 2 tablespoons curry powder
- 2 cans chickpeas, drained and rinsed
- 1 can coconut milk, 13.5 ounces
- 1 can diced tomatoes, 14.5 ounces
- 1/2 teaspoon salt
- Cooked rice, for serving
Quick Steps:
- Heat the oil in a pot over medium heat. Cook the onion for 4 to 5 minutes until soft.
- Add the garlic and ginger, then stir in the curry powder for 30 seconds.
- Add the chickpeas, coconut milk, tomatoes, and salt.
- Simmer for 15 minutes, stirring now and then, until the sauce thickens slightly.
- Taste and adjust salt, then serve over rice.
Equipment for This Recipe:
- Medium pot
- Wooden spoon
- Measuring cups
- Can opener
- Rice cooker or saucepan, optional
How to Serve This Dish:
Spoon it over rice and finish with chopped cilantro if you have it. Toasted naan or flatbread helps scoop up the sauce, and a spoonful of yogurt cools the edges if you want less heat.
Pro Tips for This Recipe:
- Bloom the curry powder in oil before adding liquids. It deepens the flavor fast.
- If the curry tastes flat, add a squeeze of lime or a pinch more salt.
- Shake the coconut milk can before opening if it has separated.
Variations on This Dish:
- Spinach Curry: Stir in frozen spinach during the last 2 minutes.
- Peanut Curry: Add 2 tablespoons peanut butter with the coconut milk.
- Hot Curry: Add chili flakes or cayenne with the spices.
Common Mistakes to Avoid with This Dish:
- Not blooming the spices: The curry tastes thin. Give them 30 seconds in oil.
- Boiling the coconut milk hard: Keep it at a simmer so it stays smooth.
- Under-salting: Coconut milk softens flavor. Salt matters here.
17. Couscous with Chickpeas and Raisins
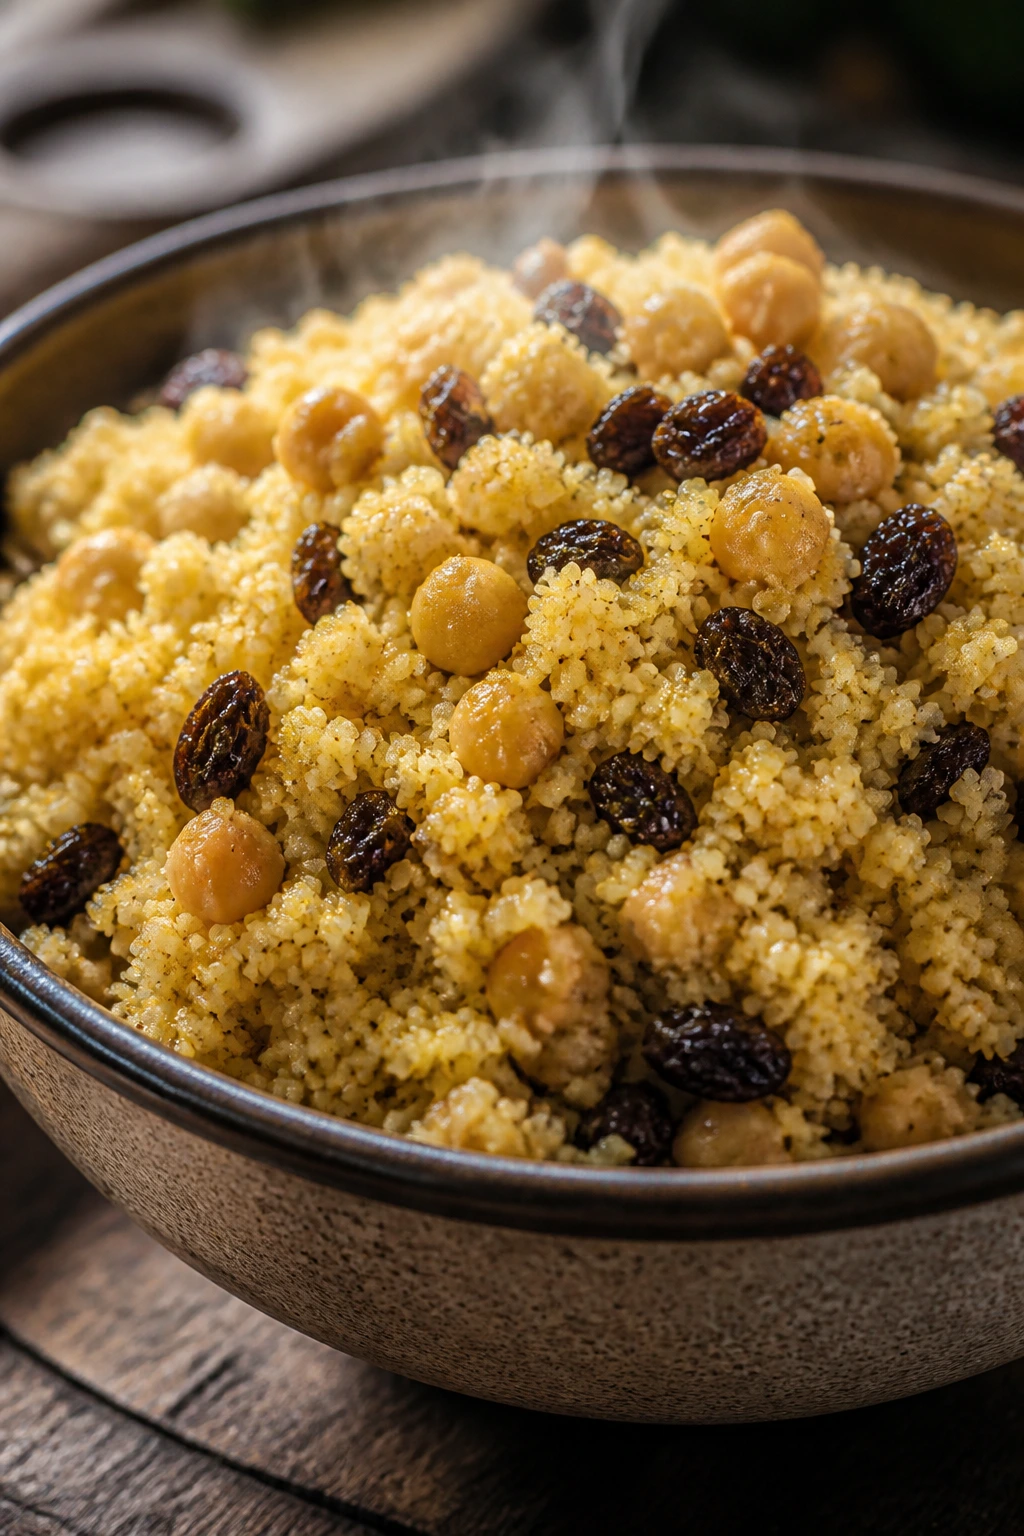
Couscous is pantry gold because it cooks in minutes and still feels like a grain bowl with intent. The raisins give you sweet pops, and the chickpeas keep it from reading like a side dish.
Why It Works:
Couscous soaks up hot liquid almost instantly, which makes it ideal for fast meals. Chickpeas add chew, raisins add contrast, and cumin ties everything together with a warm, savory note. A little lemon at the end keeps the bowl lively.
Key Ingredients:
- 1 1/2 cups couscous
- 1 1/2 cups boiling water or broth
- 1 can chickpeas, drained and rinsed
- 2 tablespoons olive oil
- 1/4 cup raisins
- 1 teaspoon ground cumin
- 1/2 teaspoon salt
- 1 tablespoon lemon juice
- Slivered almonds, optional
Quick Steps:
- Put the couscous in a bowl with the salt.
- Pour the boiling water or broth over it, cover, and let it sit for 5 minutes.
- Fluff with a fork, then stir in the chickpeas, olive oil, raisins, cumin, and lemon juice.
- Top with almonds if using and serve warm or at room temperature.
Equipment for This Recipe:
- Medium bowl with lid or plate
- Fork
- Kettle or saucepan
- Measuring cups
- Spoon
How to Serve This Dish:
Serve it as a main with yogurt on the side or as a base under roasted vegetables. It also packs well, which is handy because the flavors settle in a pleasant way after an hour or two.
Pro Tips for This Recipe:
- Use broth instead of water if you want a deeper base.
- Fluff the couscous before adding the chickpeas so it doesn’t clump.
- A drizzle of olive oil at the end keeps the grains from drying out.
Variations on This Dish:
- Tomato Couscous: Stir in chopped canned tomatoes and a little basil.
- Mediterranean Style: Add olives and a crumble of feta.
- Warm Spice Version: Add cinnamon and coriander for a softer flavor profile.
Common Mistakes to Avoid with This Dish:
- Using too much liquid: Couscous turns gummy fast.
- Skipping the fluffing step: You’ll get clumps instead of grains.
- Forgetting acid: Lemon keeps the raisins from making it taste flat.
18. Anchovy Breadcrumb Pasta
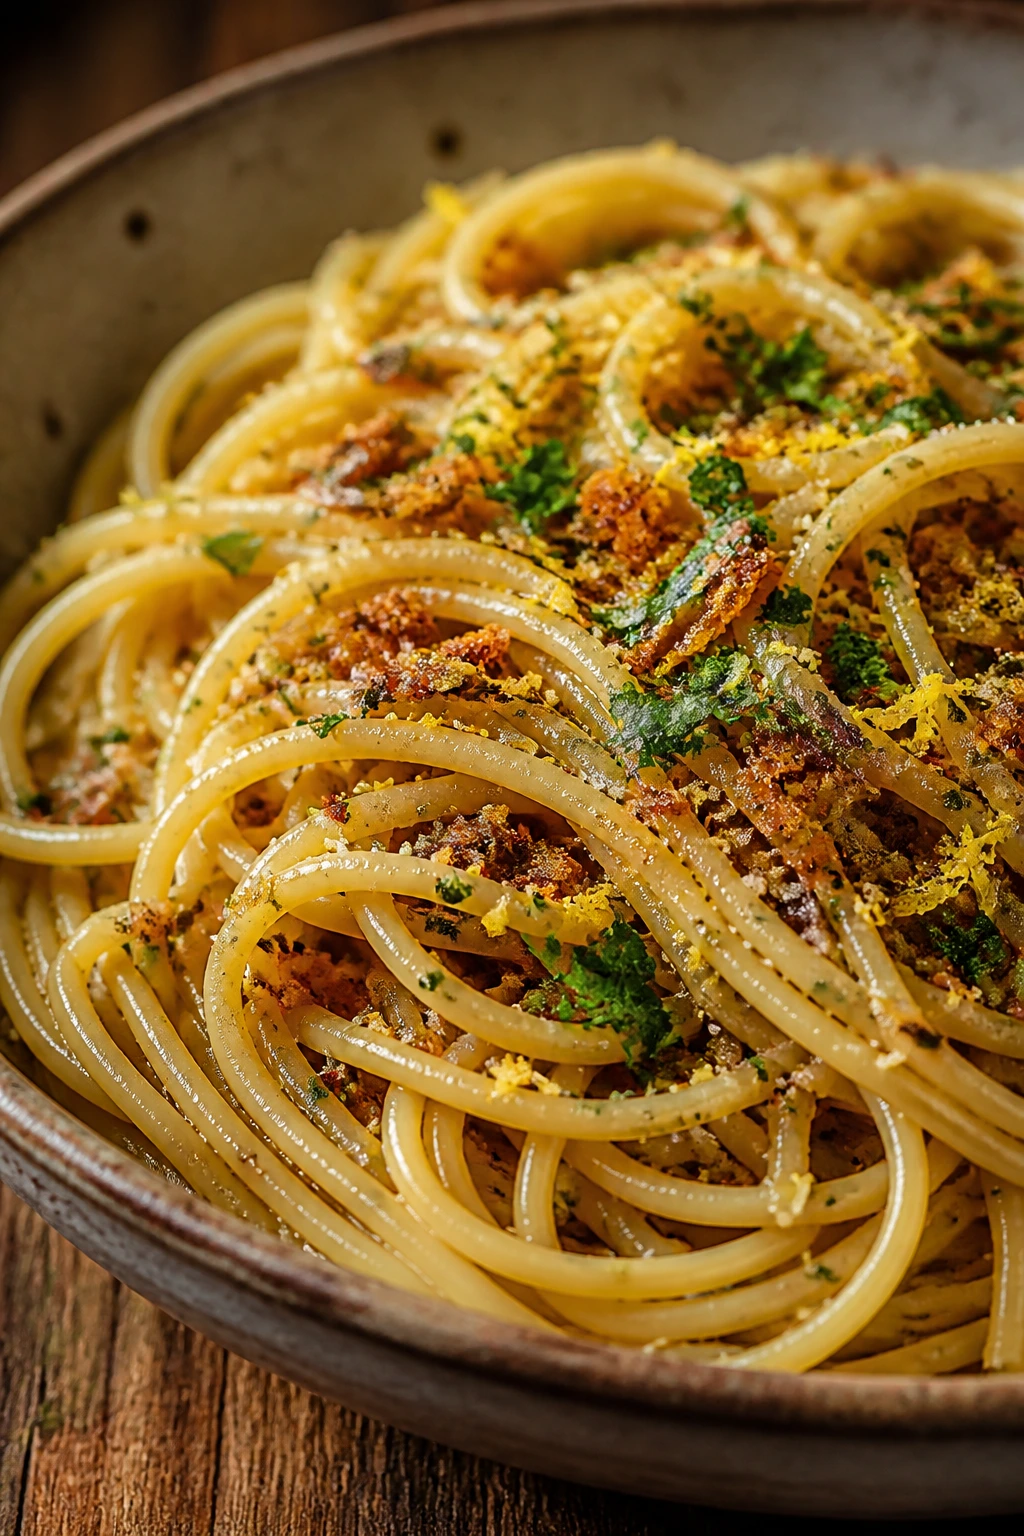
Anchovies make people nervous until they melt into hot oil and vanish into the sauce. What’s left is a deep savory base and a bowl of pasta with the kind of salty backbone cheap canned food dreams about.
Why It Works:
Anchovies dissolve into the oil, which means you get umami without fish chunks. Toasted breadcrumbs add crunch, and lemon zest keeps the whole dish from feeling heavy. It is one of the sharpest pantry meals on the list, in the best sense.
Key Ingredients:
- 8 ounces spaghetti
- 3 tablespoons olive oil
- 4 anchovy fillets
- 3 garlic cloves, sliced
- 1/2 cup breadcrumbs
- 1/2 teaspoon red pepper flakes
- 1 teaspoon lemon zest
- 2 tablespoons chopped parsley
- Reserved pasta water, as needed
Quick Steps:
- Cook the pasta in salted water until al dente, then reserve 1 cup of pasta water.
- Heat 1 tablespoon olive oil in a small skillet and toast the breadcrumbs until golden. Set aside.
- Warm the remaining oil in a large skillet over medium heat. Add the anchovies and garlic and stir until the anchovies break down.
- Add the red pepper flakes and cooked pasta with a splash of pasta water. Toss until coated.
- Finish with lemon zest, parsley, and the toasted breadcrumbs.
Equipment for This Recipe:
- Large pot
- Large skillet
- Small skillet
- Tongs
- Microplane or fine grater, optional
How to Serve This Dish:
Serve in shallow bowls so the breadcrumbs stay on top. A side of bitter greens, or even just a lemon wedge, cuts the richness in a useful way.
Pro Tips for This Recipe:
- Toast the breadcrumbs separately. They stay crisp longer that way.
- Let the anchovies melt fully before adding the pasta.
- Save more pasta water than you think you need.
Variations on This Dish:
- Caper Pasta: Add 1 tablespoon capers with the anchovies.
- Tomato Breadcrumb Pasta: Stir in 2 tablespoons tomato paste.
- Tuna Version: Replace anchovies with one can tuna for a milder bowl.
Common Mistakes to Avoid with This Dish:
- Burning the breadcrumbs: Golden is enough. Dark brown tastes bitter.
- Leaving anchovies in chunks: They should dissolve.
- Skipping the pasta water: The sauce needs that starch to cling.
19. Smoky Potato and Bean Skillet
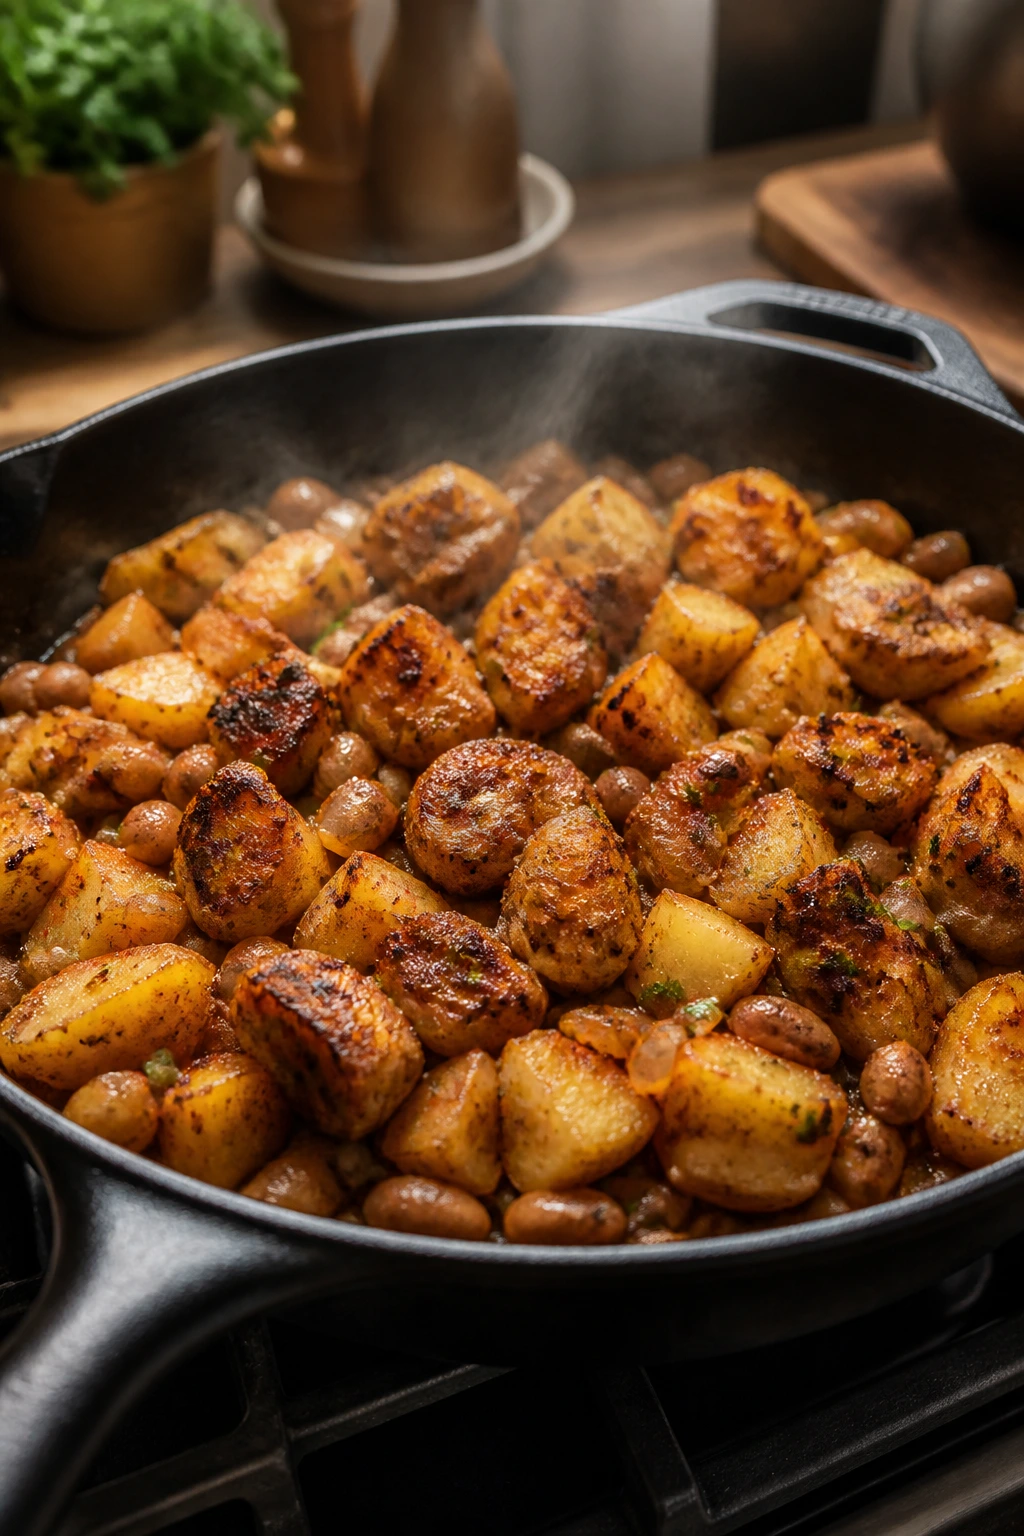
Potatoes and beans are old friends, but they need a hot skillet and a little smoke to stop feeling plain. This one leans breakfast or dinner, depending on what time you are when you make it.
Why It Works:
Potatoes bring crisp edges and heft, beans add softness and protein, and smoked paprika gives the whole pan a roasted flavor even if you used a microwave to help the potatoes along. Top it with eggs and you have a meal that holds together from first bite to last.
Key Ingredients:
- 1 1/2 pounds Yukon Gold or red potatoes, diced small
- 2 tablespoons oil
- 1 small onion, diced
- 1 can pinto or cannellini beans, drained and rinsed
- 1 teaspoon smoked paprika
- 1 teaspoon garlic powder
- 1/2 teaspoon salt
- 4 eggs, optional
- Hot sauce, for serving
Quick Steps:
- Microwave the diced potatoes with 2 tablespoons water for 4 minutes, or parboil them for 6 minutes, until just barely tender.
- Heat the oil in a skillet over medium-high heat. Add the potatoes and onion and cook for 8 to 10 minutes until browned in spots.
- Stir in the beans, smoked paprika, garlic powder, and salt. Cook for 3 to 4 minutes until hot.
- If using eggs, crack them into the skillet and cook covered until the whites set.
- Serve with hot sauce.
Equipment for This Recipe:
- Large skillet
- Microwave-safe bowl or small pot
- Spatula
- Knife and cutting board
- Lid, if cooking eggs
How to Serve This Dish:
Serve it straight from the skillet with a spoonful of hot sauce and maybe a bit of toast. If you want a sharper edge, add chopped pickles or a splash of vinegar right before serving.
Pro Tips for This Recipe:
- Cut the potatoes small so they cook fast and crisp evenly.
- Pre-cooking the potatoes is worth it. Raw potatoes take too long and brown badly.
- Add the beans late so they keep their shape.
Variations on This Dish:
- Breakfast Hash: Serve with eggs and toast.
- Spanish-Style Pan: Add a little onion, garlic, and paprika, then finish with parsley.
- Vegan Bowl: Skip the eggs and top with avocado or salsa.
Common Mistakes to Avoid with This Dish:
- Starting with raw potatoes: They either burn or stay hard.
- Crowding the skillet: Crisping disappears when the pan is packed.
- Under-seasoning after the beans go in: Taste again before serving.
20. Bean and Egg Tostadas
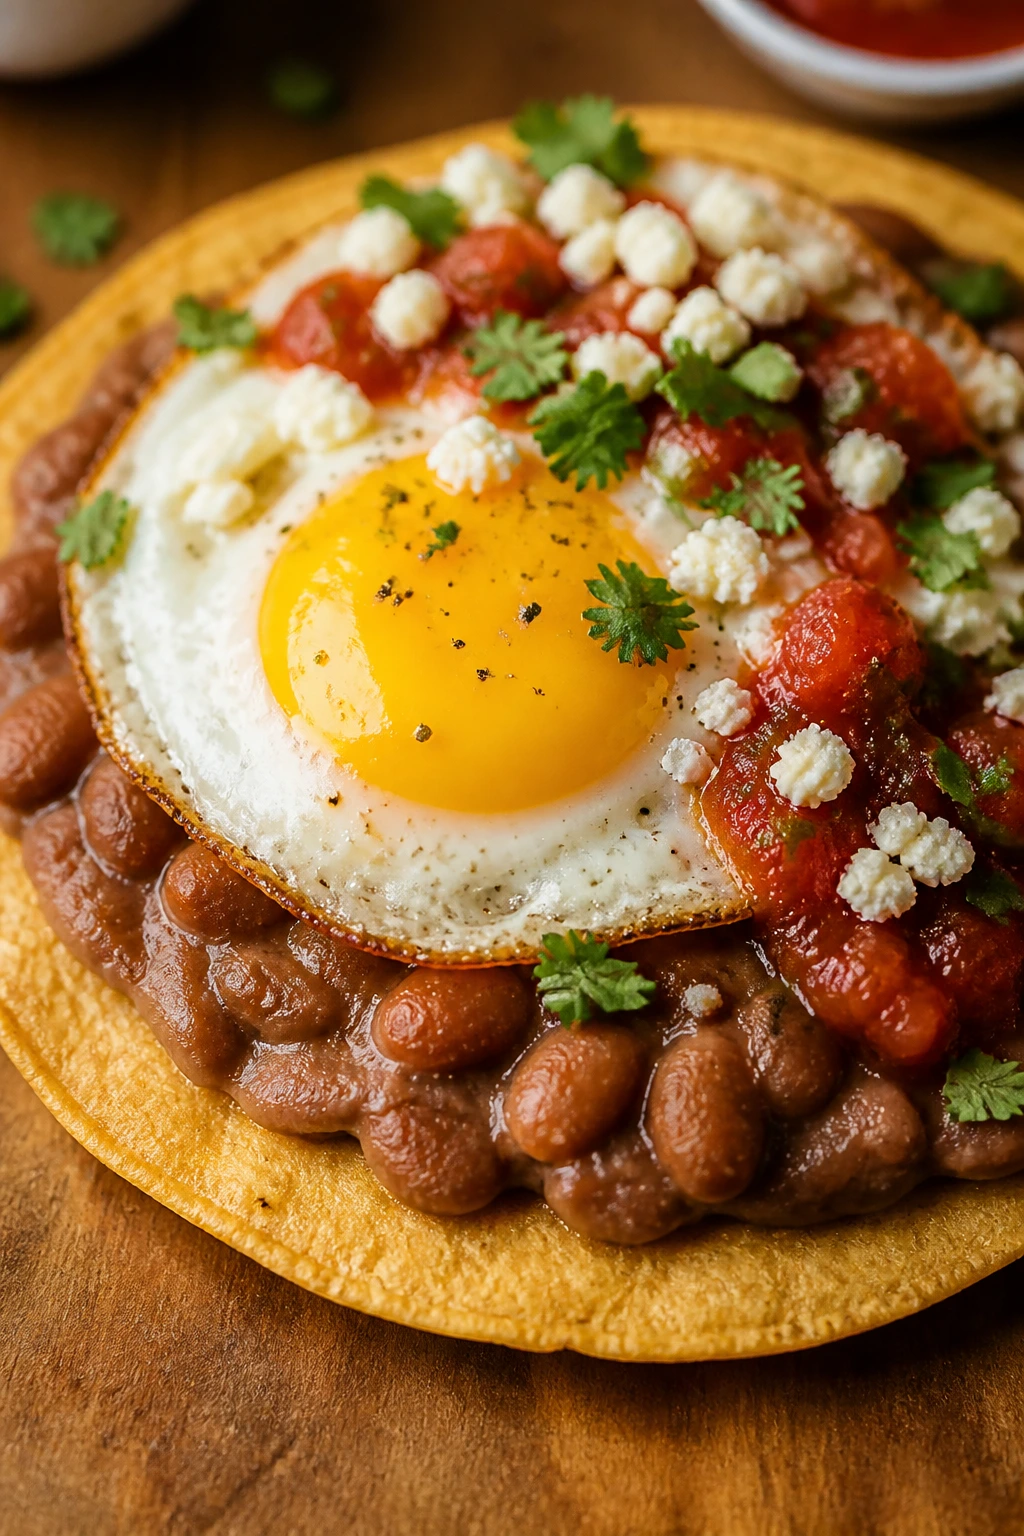
Tostadas make pantry food look more intentional than it has any right to be. Crunchy tortillas, creamy beans, and a fried egg on top is a very strong use of basic ingredients.
Why It Works:
Crisping the tortillas gives you a sturdy base that stays crunchy under warm beans and eggs. Beans bring the body, eggs bring richness, and salsa handles the seasoning in one shot. It is breakfast, lunch, or dinner with very little argument.
Key Ingredients:
- 6 corn tortillas
- 1 tablespoon oil
- 1 can refried beans or black beans
- 4 large eggs
- 1/2 cup salsa
- 1/2 cup shredded cheese, optional
- Salt, to taste
Quick Steps:
- Heat the oven to 425°F, or warm a skillet over medium-high heat.
- Brush the tortillas lightly with oil and crisp them in the oven for 5 to 7 minutes, flipping once, or in the skillet for 1 to 2 minutes per side.
- Warm the beans in a small saucepan or microwave, adding a splash of water if needed.
- Fry the eggs in a skillet until the whites are set and the yolks are still soft.
- Spread beans over each tostada, top with eggs, salsa, and cheese if using.
Equipment for This Recipe:
- Oven or skillet
- Sheet pan, if baking
- Small saucepan or microwave-safe bowl
- Frying pan
- Spatula
How to Serve This Dish:
Serve the tostadas right after assembling so the shells keep their crunch. A spoonful of sour cream, chopped onion, or cilantro works well if you have it, but the core version is already solid.
Pro Tips for This Recipe:
- Crisp the tortillas fully. Pale tostadas go soft fast.
- Warm the beans enough to spread easily.
- Fry the eggs last so they land hot on the tostadas.
Variations on This Dish:
- Spicy Breakfast Tostadas: Add hot sauce and sliced jalapeños.
- Bean and Avocado Version: Add avocado if you have it.
- Oven-Baked Style: Brush tortillas lightly with oil and bake all six at once.
Common Mistakes to Avoid with This Dish:
- Putting beans on soft tortillas: They collapse under the topping.
- Overcooking the eggs: The yolk is part of the sauce here.
- Skipping salt in the beans: Plain beans make the whole tostada dull.
Why Pantry Staples Make Fast Meals Less Fussy
Pantry cooking works because the ingredients are already doing part of the job before you even turn on the stove. Dried pasta, rice, couscous, noodles, crackers, canned beans, and tomatoes all come with built-in structure. They do not need babysitting the way a bunch of delicate produce does, and that means you can spend your attention on the part that changes the meal most: heat, salt, fat, and acid.
There’s also a practical truth people sometimes ignore. Shelf-stable food is forgiving. A can of chickpeas can become soup, toast topping, curry, or a roasted sheet-pan filling. A box of pasta can shift from tuna sauce to anchovy crumbs to bean-based broth. That kind of flexibility matters when the fridge is down to a lemon, a jar of mustard, and not much else.
Pantry meals are at their best when you stop treating them like emergency food and start seasoning them like dinner. That means blooming spices in oil, salting the water, adding lemon at the end, and using texture on purpose. Crunch, creaminess, and sharpness are what keep a pantry meal from tasting flat. The ingredients are basic. The finish should not be.
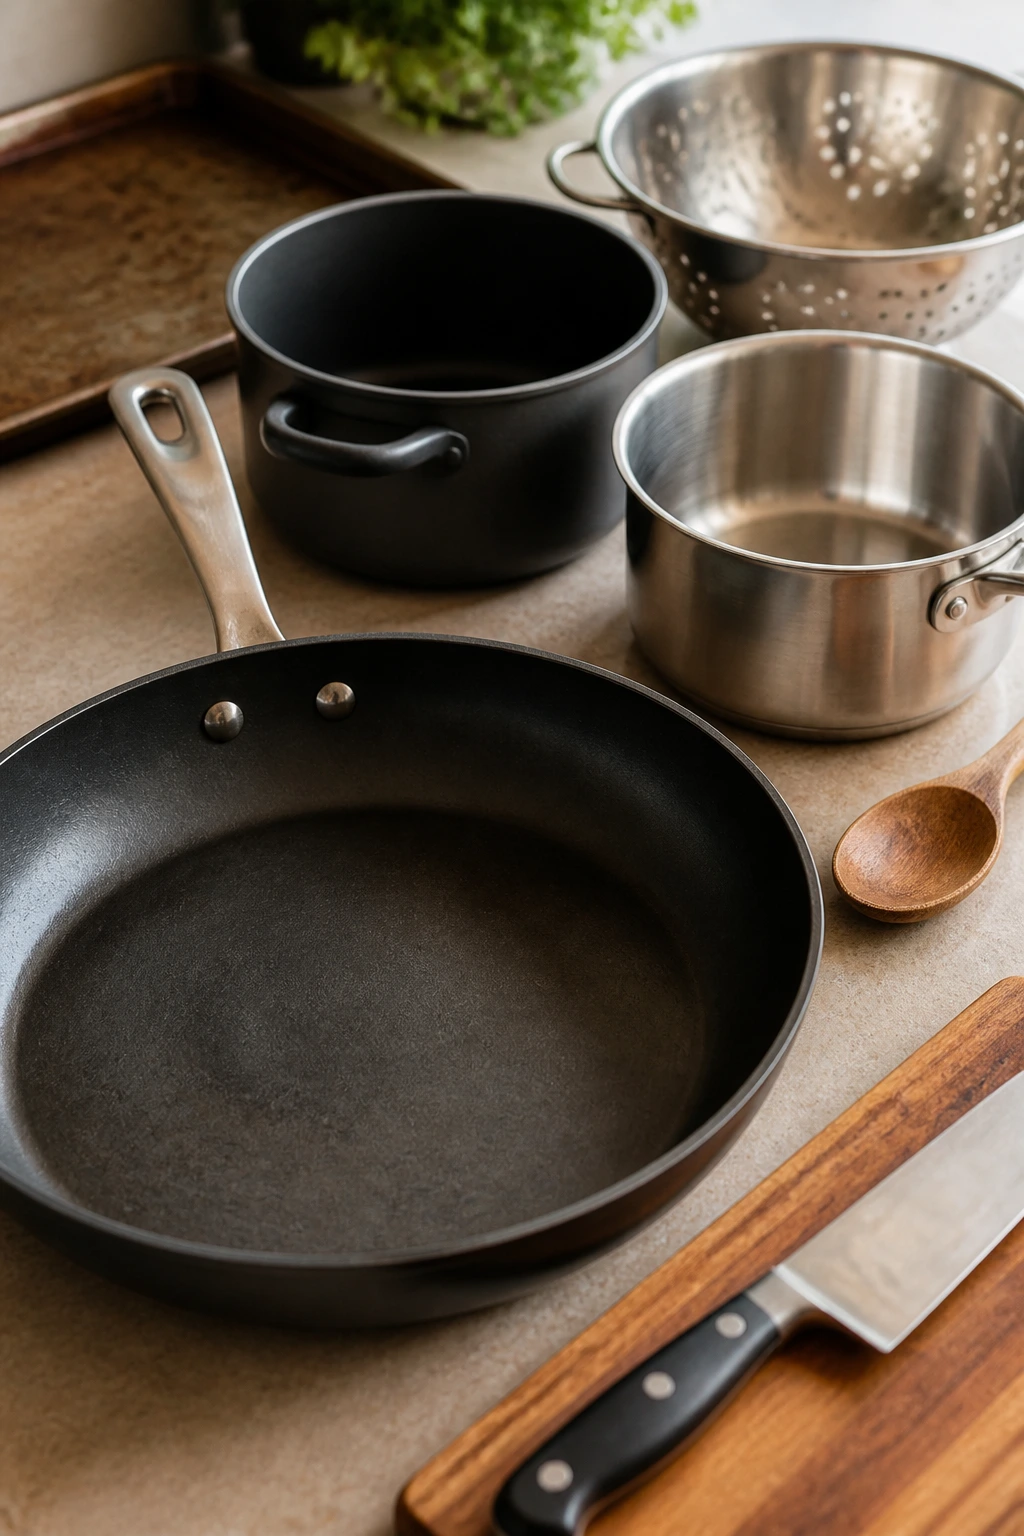
Essential Equipment for These Recipes
-
Large skillet or sauté pan: The workhorse for fried rice, shakshuka, quesadillas, skillet beans, and most fast stovetop meals.
-
Medium saucepan: Best for soup, lentils, pasta sauces, and anything that needs a steady simmer.
-
Large pot: You’ll need this for pasta, noodles, ramen, and boiling eggs without crowding.
-
Sheet pan: Useful for fajitas, crisping tortillas, and roasting ingredients without making a mess of the stove.
-
Colander: Pasta, rice, and canned beans all become easier when you can drain them cleanly.
-
Wooden spoon or heatproof spatula: Better than a flimsy spoon for mashing beans, stirring rice, and scraping browned bits.
-
Can opener: Not glamorous. Absolutely necessary.
-
Knife and cutting board: Onion, garlic, lemon, herbs, peppers, and scallions all depend on this pair.
-
Mixing bowl: Handy for patties, quesadilla fillings, sauces, and quick toss-together recipes.
-
Tongs: Great for pasta, toast, tortilla handling, and anything you need to flip without breaking.
-
Measuring cups and spoons: Pantry cooking looks casual, but the seasoning still needs to be measured or the salt gets away from you.
-
Airtight storage containers: Leftovers last better and reheat cleaner when you keep them sealed properly.
Smart Shopping and Ingredient Tips
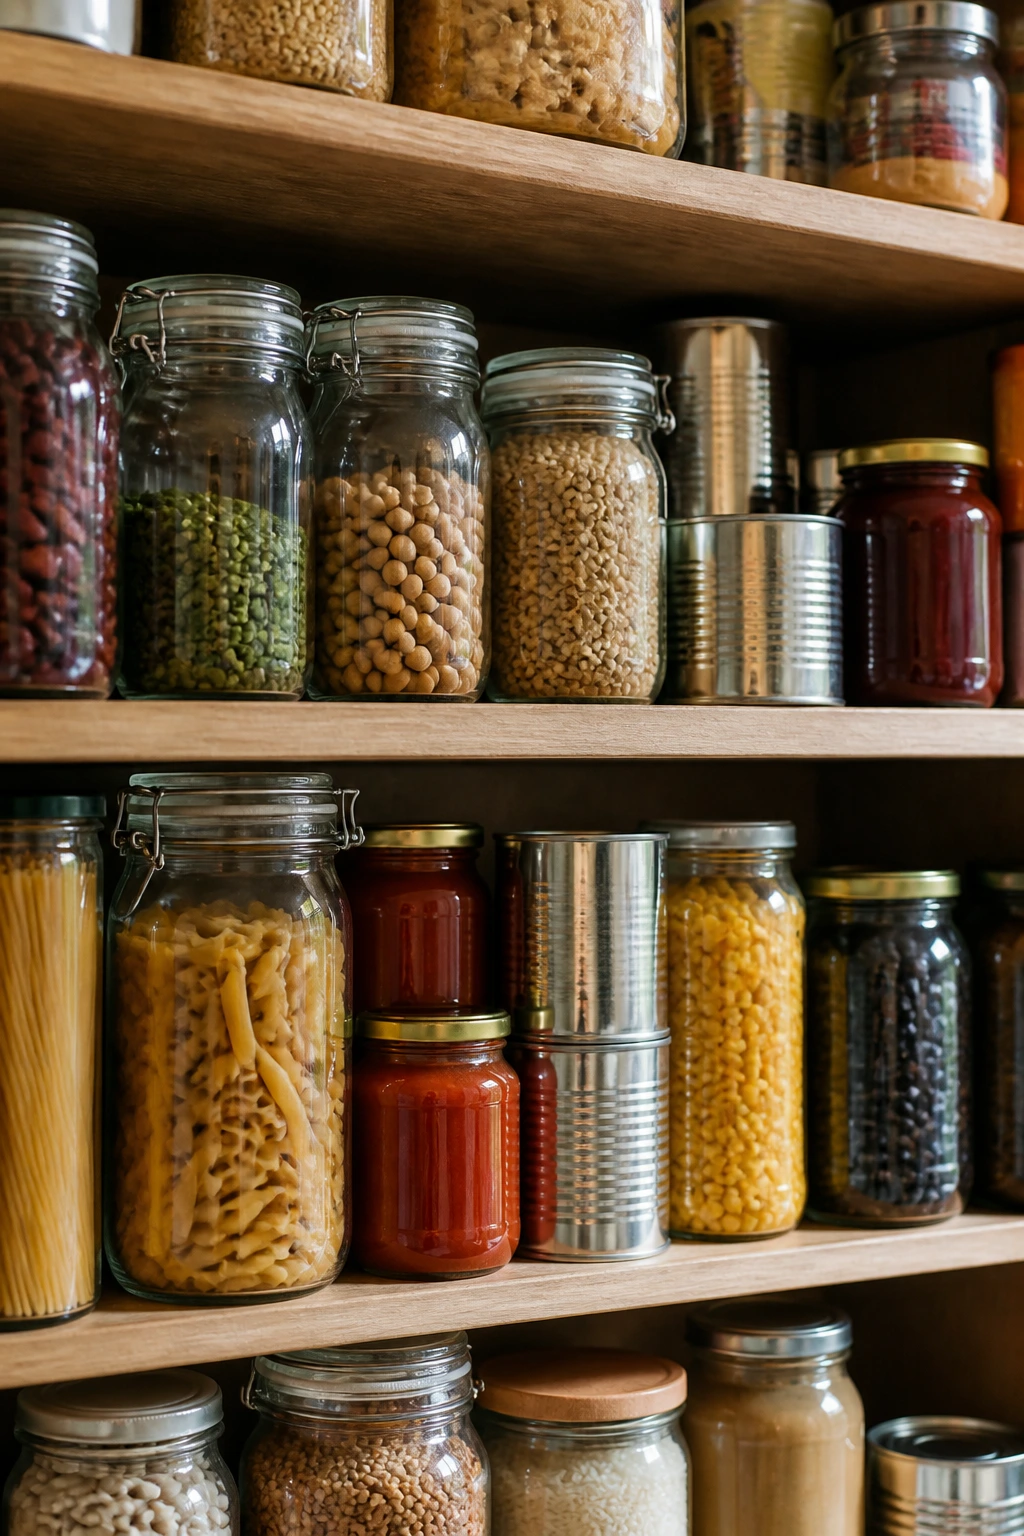
The best pantry meals usually come from a pantry that is stocked with a little intent. Not a warehouse. Just a few things chosen well. Canned beans should be low-sodium if possible, because that gives you room to season the dish instead of fighting the can. Canned tomatoes are worth buying in plain crushed or diced form without extra sugar or heavy seasoning; you can build your own flavor faster than you can fix a badly flavored sauce.
For tuna and sardines, pay attention to the packing liquid. Oil-packed versions taste richer and need less help from butter or mayonnaise, while water-packed fish works fine if you finish the dish with a little fat and acid. Pasta is one of the cheapest building blocks on the shelf, but shape matters. Spaghetti carries sauce differently than ditalini or couscous, so buy at least two shapes you actually like eating.
Rice deserves the same treatment. A long-grain white rice is the most forgiving for fried rice and burrito bowls, while brown rice brings a nuttier chew if you don’t mind the longer cook time. Shelf-stable gnocchi, ramen, tortillas, crackers, and couscous are also worth keeping around because they turn the same can of beans into completely different meals. That’s the whole trick: one pantry, many outcomes.
Frozen peas and spinach are pantry-adjacent in the best way. They are cheap, they last, and they save a meal when the fresh produce drawer looks tired. If your budget is tight, buy onions, garlic, lemons, and a few herbs, then let the canned and dried staples do the heavy lifting.
How to Serve These Pantry Meals
Presentation:
Keep the plate simple and let the texture do the work. Soups look better in shallow bowls with a drizzle of olive oil or a little black pepper. Toasts, tostadas, and quesadillas need a clean cut and a side garnish, not a pile of extra toppings that bury the crisp edge. For bowls, build in layers so the eye can read the meal before the first bite.
Accompaniments:
A green salad, sliced cucumbers, pickles, roasted frozen vegetables, or buttered toast can make a pantry meal feel finished. For pasta and curry, bread matters because the sauce is part of the point. For egg dishes, a sharp hot sauce or salsa keeps the flavor bright. If the dish is already heavy on starch, add something acidic on the side — lemon wedges, vinegar slaw, or pickled onions all work.
Portions:
Most of these recipes feed 2 to 4 people, but the scale changes easily. Pasta, fried rice, and chickpea curry stretch well for four if you serve them with bread or salad. Sardine toast and salmon patties lean smaller and work best when paired with a side. If you want to feed more people, add a second can of beans or a little extra rice before you double the protein.
Beverage Pairing:
Cold sparkling water with lemon works across the board and does not fight the food. For heartier tomato or bean dishes, iced tea or a crisp lager keeps the meal from feeling too heavy. If you want something warm, plain black tea or a weakly sweetened mint tea is a quiet but good fit.
Flavor Boosters That Cost Almost Nothing
Flavor Enhancement:
A splash of vinegar, lemon juice, or even pickle brine at the end can fix a dull pantry meal faster than another pinch of salt. Acid should be your first reach, not your last resort.
Customization:
Keep one crunchy thing around — breadcrumbs, tortilla chips, toasted nuts, or crumbled crackers — and add it at the end. Pantry meals often lean soft, so texture is what makes them memorable instead of merely edible.
Serving Suggestions:
Use chopped parsley, scallions, or a dusting of Parmesan when you have them, but don’t ignore the cheap finishers. Chili crisp, hot sauce, mustard, and a spoon of yogurt all change the feel of a dish in seconds. A little drizzle across the top goes a long way.
Make-It-Yours:
For gluten-free cooking, lean on rice bowls, tostadas, curries, soups, and corn tortillas. For dairy-free meals, use olive oil, coconut milk, tahini, or avocado instead of cream and cheese. For extra protein, add eggs, canned fish, or an extra can of beans. For lower sodium, rinse canned beans well and season with lemon, garlic, and herbs before you reach for more salt.
Make-Ahead, Storage, and Reheating Guidance
Most of these meals hold well for 3 to 4 days in the refrigerator, but the texture tells you a lot. Tomato-based soups, lentil sloppy joes, chickpea curry, and pasta e ceci keep the best because the sauces protect the ingredients. They also freeze well for up to 2 months, though pasta dishes are better when frozen before the noodles go in, if you have that option.
Rice dishes and fried rice are fine for 3 days refrigerated, as long as they cool quickly and go into a shallow container. Reheat them in a skillet with a teaspoon of oil or a splash of water until steaming hot, or microwave them covered with a damp paper towel. That damp towel matters more than people think; it keeps the grains from drying into little bullets.
Fish-based meals need a shorter leash. Tuna pasta, sardine toast toppings, and salmon patties are best within 1 to 2 days, especially if they contain lemon or mayonnaise. Reheat tuna pasta gently in a skillet with a splash of water. Salmon patties are best reheated in a 350°F oven for about 10 minutes so the crust comes back. Toasts and tostadas should be assembled fresh. Nobody wants a soft shell pretending to be crisp.
For make-ahead cooking, the smartest move is to prep the components, not always the full dish. Cook rice ahead, mix the bean filling ahead, simmer soup ahead, or chop onions and garlic in advance. Then the final cook takes 10 to 15 minutes and tastes fresher than a fully assembled leftover ever will.
Easy Swaps and Adaptations Across the Whole List
Gluten-Free Pantry Swap:
Use rice, corn tortillas, couscous alternatives like quinoa if you keep it, and certified gluten-free pasta when needed. Most of the bean, curry, soup, and bowl recipes already lean naturally gluten-free, so the main thing is changing the bread, pasta, or breadcrumbs.
Dairy-Free Without Losing Body:
Leave out cheese and use olive oil, tahini, coconut milk, or a spoonful of dairy-free yogurt where the recipe needs richness. The tomato soups, curries, and noodle sauces handle this switch well because the flavor comes from the cooking process, not just the dairy.
Lower-Sodium Pantry Cooking:
Rinse canned beans, use low-sodium broth, and taste before adding soy sauce, olives, capers, or canned fish. Acid becomes even more important here. A little lemon or vinegar keeps the food alive when the salt is trimmed back.
Kid-Friendly Mild Mode:
Skip the chili flakes, chili crisp, and hot sauce, then let people add them at the table. Tomato soup, quesadillas, fried rice, tostadas, and pasta are easy wins when you keep the heat separate. That way the adult bowl and the kid bowl do not fight each other.
Protein-Heavy Add-On:
Top soups with fried eggs, add canned tuna to noodles, fold extra beans into burrito bowls, or serve salmon patties with rice or potatoes. Pantry meals get more filling without getting complicated, which is the entire point for a lot of weeknights.
Regional Flavor Shift:
Move the same pantry base toward different flavor profiles with one or two changes. Cumin, tomato, and beans can go Tex-Mex. Chickpeas with coconut milk go curry. Anchovies, tomatoes, and breadcrumbs lean Italian. Lemon, capers, and olive oil pull things Mediterranean without much effort.
Common Mistakes to Avoid with Pantry Meals
The first mistake is treating the pantry as a place for shortcuts only, not flavor. That is how dinner ends up tasting one-note. The fix is simple: cook the garlic in oil, toast the spices, salt the water, and finish with something sharp. Pantry food needs the same attention as any other food; it just gets there faster.
Another common miss is not draining or rinsing canned ingredients. Beans, chickpeas, and tuna straight from the can can carry enough liquid or salt to throw off a dish. Rinse beans when the recipe needs a clean, brighter flavor. Drain tuna well when you want it to absorb butter or sauce instead of getting watery.
People also overcook the starch. Pasta goes mushy, rice turns wet, couscous clumps, and noodles lose their bounce. Watch the timing closely and stop just before the ingredient looks finished in the pot. It will keep cooking off the heat for a minute or two, and that minute matters.
Texture gets ignored, too. A bowl of soft things with no crunch is forgettable. Add toast, breadcrumbs, tortilla chips, crisp tortillas, or toasted seeds. That one move changes the eating experience more than adding another teaspoon of dried herbs.
The last mistake is making every pantry meal taste identical. Beans and tomatoes can do a lot, but they should not be the same bowl every time. Switch the acid, switch the fat, switch the herbs, and switch the base. A pantry should be a set of tools, not a single personality.
Frequently Asked Questions
What are the most useful pantry staples to keep on hand for quick meals?
If I had to narrow it down, I’d keep pasta, rice, couscous, canned beans, canned tomatoes, tuna or sardines, tortillas, eggs, broth, peanut butter, and one good soy sauce. Add onions, garlic, lemons, and a few dried spices, and you can build dinner in several directions without much planning.
Do canned beans need to be rinsed every time?
Not every time, but often enough to matter. Rinsing removes extra sodium and that canned liquid taste, which helps in bowls, soups, tostadas, and skillet meals. For recipes where you want a thicker sauce, you can keep a little of the bean liquid and use it on purpose.
How do I make a pantry meal more filling without spending much more?
Add one of three things: eggs, extra beans, or a starch with structure, like rice, pasta, or bread. Fat also helps a lot — olive oil, butter, mayonnaise, or coconut milk can make a bowl feel more complete without adding much cost.
Can I use frozen vegetables in these meals instead of fresh ones?
Yes, and in some recipes I’d rather use them. Frozen peas, spinach, corn, and mixed vegetables are usually picked at the right stage and cook fast. They’re especially useful in fried rice, curry, soup, and skillet dinners where freshness is less important than texture.
Which of these recipes freezes best?
The soups, lentil sloppy joes, chickpea curry, and some bean-based sauces freeze the cleanest. Pasta dishes and rice bowls can freeze, but the texture changes more. If you want the best result, freeze the saucy part and cook fresh starch when you reheat.
How do I keep pantry meals from tasting bland?
Use salt in layers, not all at the end. Bloom spices in oil, toast breadcrumbs, brown onions, and finish with lemon, vinegar, or hot sauce. Flat food usually needs acid or a little more salt, not a full overhaul.
Can I make these meals without a stove?
Some, yes. Tostadas can use the oven, couscous only needs hot water, and certain tuna or bean bowls can be assembled with a microwave. But the skillet dishes and pasta meals taste better with direct heat because browning and simmering build the flavor.
What if my sauce turns out too thin?
Keep simmering it uncovered until it reduces, then mash a few beans or chickpeas against the pan to thicken it naturally. If you’re working with pasta sauce or soup, a little starch from reserved pasta water or blended beans can pull it together without making it gluey.
The Pantry Habit That Changes Weeknights
The best part about these meals is not that they are cheap, though they are. It’s that they make dinner feel available again. When you know a can of beans, a box of pasta, or a packet of ramen can become something hot and satisfying in 15 to 25 minutes, the whole evening gets easier.
That kind of confidence comes from a stocked pantry and a few smart habits: salt in layers, finish with acid, and don’t forget texture. Keep those three in mind, and the shelves stop looking like backups. They start looking like dinner waiting to happen.