
Meal prep Sunday can go sideways fast when the fridge fills with soft vegetables, dry chicken, and a couple of containers nobody wants to open by Wednesday.
A good air fryer changes that math. Hot circulating air gives chicken thighs browned edges, keeps salmon from turning leathery, and turns vegetables into something closer to roast-dinner food than leftover steam. These low carb air fryer recipes also happen to be the ones that hold up after chilling for a day or three, which is the real test if you’re cooking lunches, quick dinners, or grab-and-go breakfasts.
The sweet spot is fat, protein, and vegetables that can take a blast of heat without collapsing. Chicken thighs beat breast meat here. Salmon with a little oil stays juicy. Stuffed peppers, mushroom caps, egg bites, and zucchini rounds reheat better than a bowl of dressed greens ever will. That’s the whole point: food that tastes planned, not patched together.
Why This Batch-Prep Approach Works
- The basket keeps the edges alive: Air fryers brown food from all sides, so chicken skin, pork crusts, and vegetables keep a roasted bite instead of going limp in a covered oven tray.
- You can cook by texture, not by guesswork: A thermometer and a short cook time make it easier to hit 165°F for poultry, 145°F for pork and fish, and pull vegetables before they slump.
- Low carb doesn’t have to mean cold food: These recipes lean on herbs, cheese, citrus, spice blends, and enough fat to stay satisfying after reheating.
- Small batches force better results: You’re less likely to crowd the pan when you know the basket only holds a single layer or two modest layers at most. That matters.
- Lunches assemble faster: Most of these dishes can be paired with cauliflower rice, salad greens, roasted broccoli, or a chopped cucumber bowl in under five minutes.
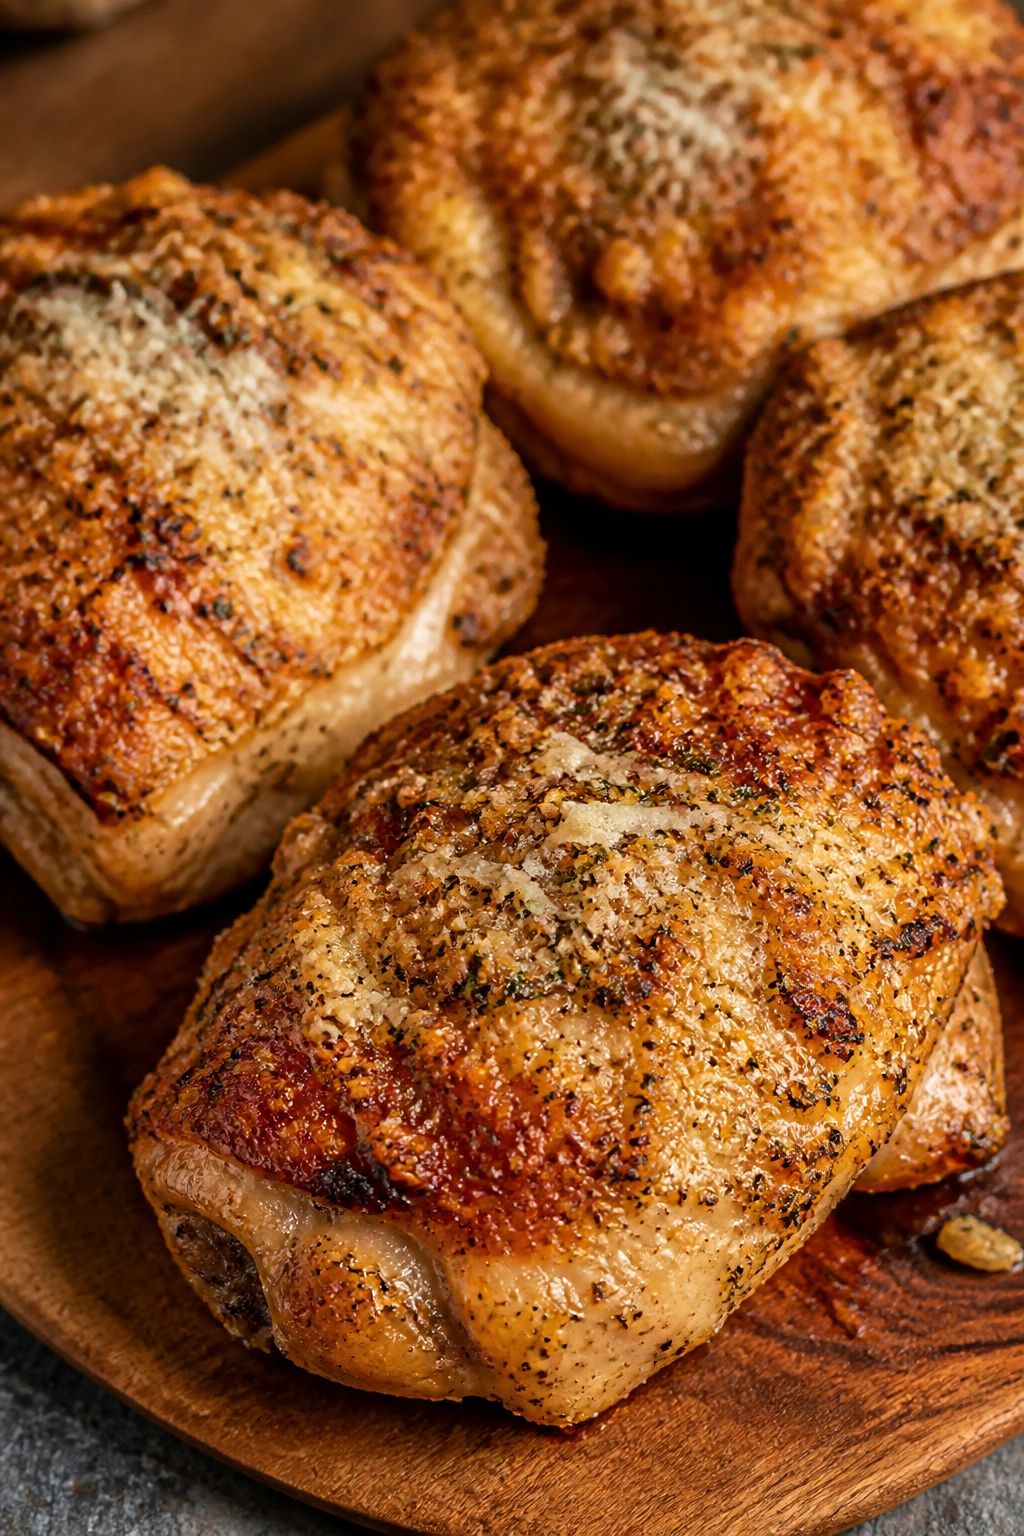
1. Garlic Parmesan Chicken Thighs
These are the kind of chicken thighs that come out bronzed, garlicky, and still juicy on day three. I’d pick thighs over breast meat here every time; the extra fat keeps the texture soft after reheating, and the parmesan clings to the surface instead of turning into a dusty coating.
Why It Works: Chicken thighs thrive in the air fryer because the skinless meat still has enough fat to stand up to high heat. A 380°F basket gives you browned edges without drying the center, and finely grated parmesan melts into a thin crust instead of burning in clumps. The garlic stays sweet, not harsh, when it’s mixed with oil before cooking.
Key Ingredients:
- 2 lbs boneless, skinless chicken thighs
- 2 tablespoons olive oil
- 4 cloves garlic, minced
- 1 teaspoon kosher salt
- 1 teaspoon black pepper
- 1 teaspoon Italian seasoning
- 1/2 teaspoon smoked paprika
- 1/2 cup finely grated parmesan cheese
- 1 tablespoon chopped parsley
- 1 lemon, cut into wedges
Quick Steps:
- Preheat the air fryer to 380°F (193°C) for 3 minutes.
- Pat the chicken thighs dry with paper towels, then toss them with olive oil, garlic, salt, pepper, Italian seasoning, and smoked paprika.
- Sprinkle in half the parmesan and coat the thighs evenly so the cheese sticks to the oiled surface.
- Arrange the thighs in a single layer in the basket and cook for 10 minutes.
- Flip the thighs, add the remaining parmesan, and cook for 6 to 8 minutes more, until the thickest part reaches 175°F and the edges look deeply golden.
- Rest the chicken for 5 minutes, then finish with parsley and a squeeze of lemon.
Equipment for This Recipe:
- Basket-style air fryer
- Mixing bowl
- Tongs
- Instant-read thermometer
- Paper towels
How to Serve This Dish: Serve one or two thighs with cauliflower mash and roasted broccoli, or slice them over chopped romaine with cucumber and avocado. The chicken also sits well beside a scoop of cauliflower rice if you want a lunch that feels more like a full plate than a container.
Pro Tips for This Recipe:
- Use finely grated parmesan, not chunky shreds; it melts into a thin crust instead of falling off.
- If the thighs are very large, add 2 extra minutes after the flip.
- Don’t skip the rest time. The juices need those 5 minutes to settle back into the meat.
- A squeeze of lemon at the end keeps the garlic from tasting heavy.
Variations on This Dish:
- Lemon-Herb Thighs: Add 1 teaspoon lemon zest and swap parsley for chopped dill.
- Spicy Garlic Thighs: Add 1/4 teaspoon red pepper flakes and 1/2 teaspoon extra paprika.
- Almond-Parmesan Crust: Mix 2 tablespoons almond flour into the parmesan for a slightly thicker coating.
Common Mistakes to Avoid with This Dish:
- Overcrowding the basket: The chicken steams instead of browns. Cook in two batches if needed.
- Using thick parmesan shreds: They can scorch before the chicken finishes. Finely grated cheese behaves better.
- Pulling the chicken too early: Thighs need to reach 175°F for the best texture; 165°F is safe, but the bite is better a little higher.
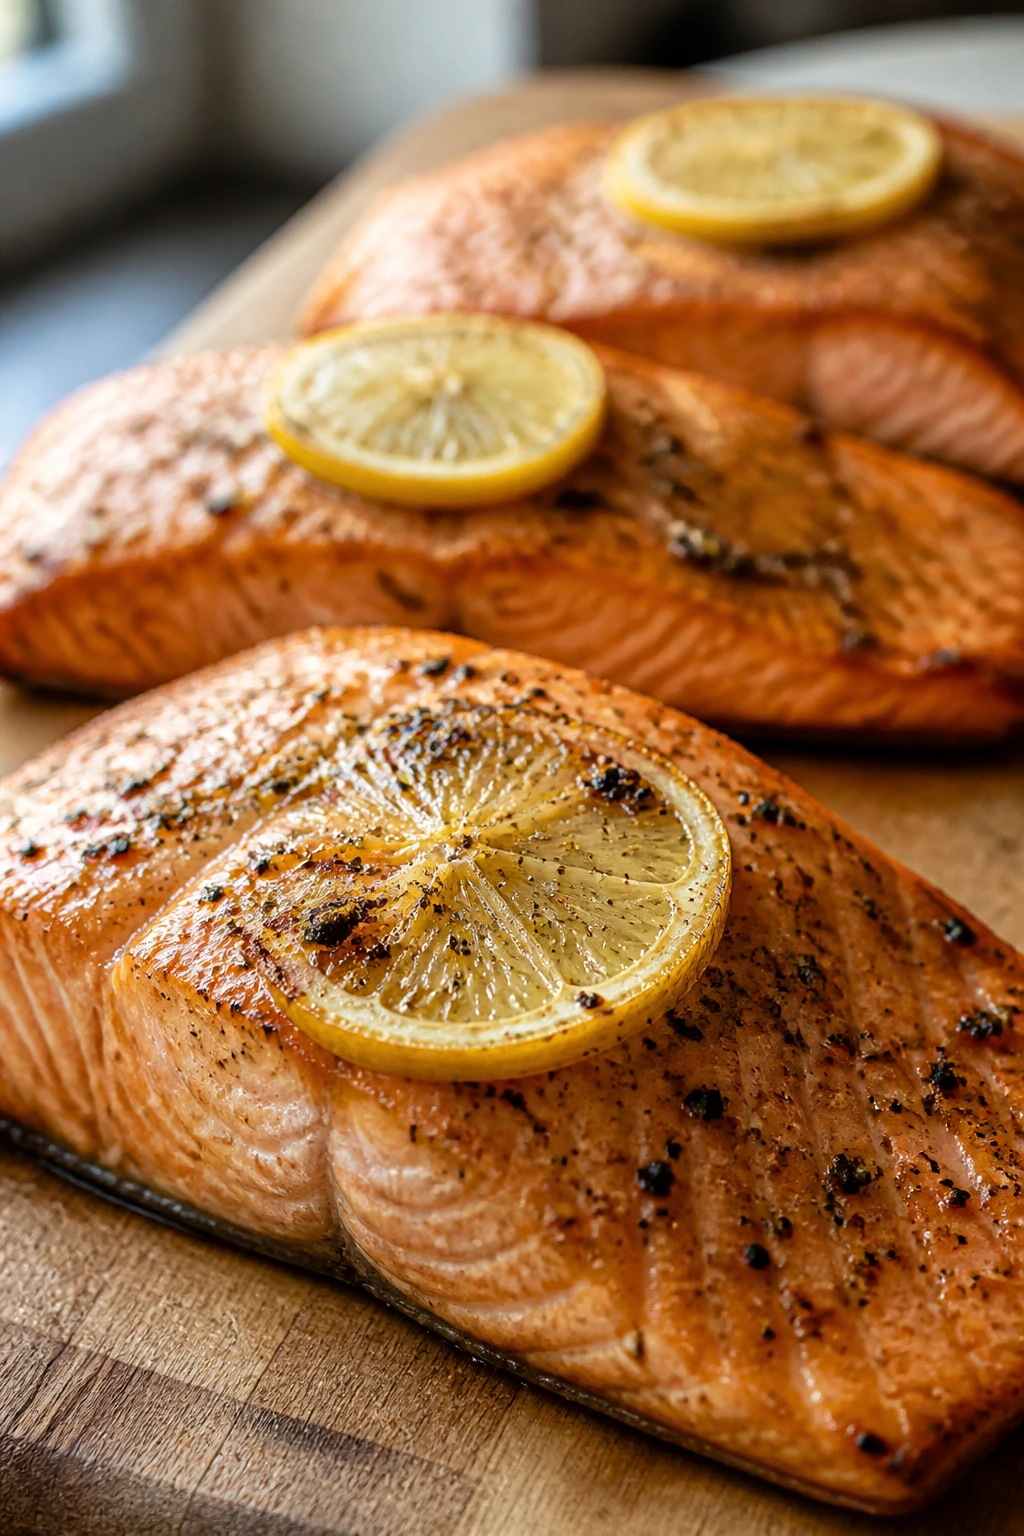
2. Lemon Pepper Salmon Fillets
Salmon is one of the few proteins that still feels generous after it’s been chilled and reheated, as long as you don’t overcook it on day one. The lemon pepper here gives you bright, salty edges and that clean fish flavor that stays pleasant in a lunch container instead of turning fishy.
Why It Works: Salmon has enough natural fat to handle the air fryer’s dry heat, which means you can brown the outside without chasing moisture with butter baths. A quick oil rub helps the seasoning stick, and the skin — if you leave it on — protects the bottom side from overcooking. The short cook time also makes this one of the fastest meals in the whole batch.
Key Ingredients:
- 4 salmon fillets, about 6 oz each
- 1 tablespoon olive oil
- 1 1/2 teaspoons lemon pepper seasoning
- 1/2 teaspoon kosher salt
- 1 lemon, sliced into thin rounds
- 1 tablespoon melted butter, optional
- 1 tablespoon chopped dill or parsley
Quick Steps:
- Preheat the air fryer to 400°F (205°C) for 3 minutes.
- Pat the salmon dry, then brush the tops with olive oil and season with lemon pepper and salt.
- Place a thin lemon slice on each fillet, or tuck the slices around the fish in the basket.
- Air fry for 7 to 9 minutes, depending on thickness, until the salmon flakes easily and reaches 145°F at the thickest point.
- Drizzle with melted butter, if using, and finish with dill or parsley before serving.
Equipment for This Recipe:
- Air fryer
- Small brush or spoon
- Tongs or a thin spatula
- Instant-read thermometer
- Plate or tray for resting
How to Serve This Dish: Salmon works well with cucumber salad, garlicky green beans, or asparagus spears. For a colder lunch, flake the fillets over a bed of romaine with avocado and a spoon of yogurt-dill dressing.
Pro Tips for This Recipe:
- Buy fillets that are roughly the same thickness so they finish together.
- If the salmon has very thin tails, tuck them under to keep them from drying out.
- Use a perforated parchment liner only if your air fryer allows it; it keeps the fish from sticking without blocking airflow.
- Don’t drown the fish in butter before cooking. Save the finish for after the salmon is done.
Variations on This Dish:
- Dill-Dijon Salmon: Brush the top with 1 tablespoon Dijon before adding seasoning.
- Garlic Citrus Salmon: Add 1 grated garlic clove and 1 teaspoon lemon zest to the oil.
- Pepper-Free Herb Salmon: Skip the lemon pepper blend and use salt, dill, parsley, and a touch of garlic powder.
Common Mistakes to Avoid with This Dish:
- Overcooking thin fillets: Salmon goes dry fast. Start checking at 7 minutes.
- Using too much seasoning blend: Lemon pepper can be salty. Taste the seasoning before adding extra salt.
- Letting the fish sit too long in the basket: Pull it as soon as it flakes; residual heat keeps cooking it.
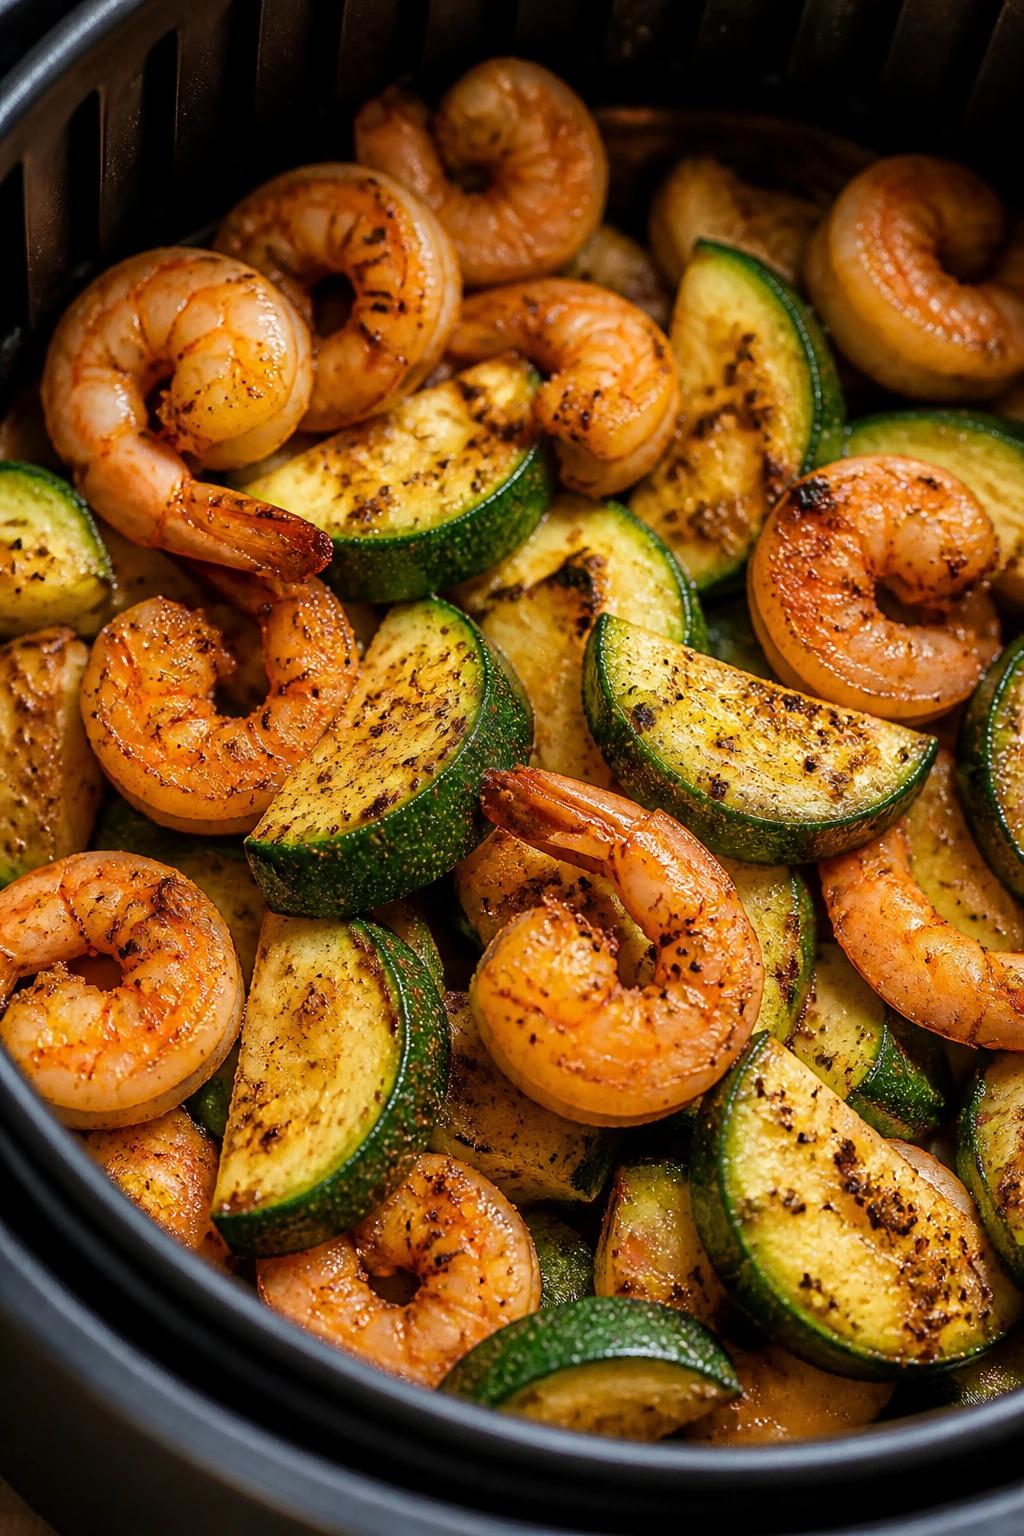
3. Cajun Shrimp and Zucchini
Shrimp cooks at a pace that makes some people nervous, but that’s the charm. You get a dinner that smells smoky and peppersweet, with zucchini that softens at the edges without collapsing into a puddle.
Why It Works: Shrimp and zucchini both like high heat and a short stay in the basket. Cajun seasoning gives enough depth that you don’t need a long marinade, and the olive oil helps the spices cling instead of sliding off into the tray. The best part is how fast this goes from raw to lunch-ready — and yes, it reheats better than you’d expect if you stop cooking the shrimp the moment it turns opaque.
Key Ingredients:
- 1 1/2 lbs large raw shrimp, peeled and deveined
- 2 medium zucchini, cut into half-moons
- 2 tablespoons avocado oil
- 1 1/2 tablespoons Cajun seasoning
- 1/2 teaspoon garlic powder
- 1 lemon, cut into wedges
- 1 tablespoon chopped green onion, optional
Quick Steps:
- Preheat the air fryer to 390°F (199°C) for 3 minutes.
- Toss the shrimp and zucchini with avocado oil, Cajun seasoning, and garlic powder in a large bowl.
- Spread the mixture in a single layer in the basket.
- Air fry for 6 to 8 minutes, shaking halfway through, until the shrimp are pink and curled and the zucchini is browned at the edges.
- Finish with lemon juice and green onion, if using, then serve immediately.
Equipment for This Recipe:
- Air fryer basket
- Large bowl
- Tongs
- Cutting board
- Citrus juicer, optional
How to Serve This Dish: This is strong over cauliflower rice, but it also works tucked into lettuce cups with sliced avocado. If you’re building lunch containers, add a scoop of slaw or roasted peppers next to it so the shrimp has something cool and crisp to sit against.
Pro Tips for This Recipe:
- Cut the zucchini thick enough to survive the heat. Thin coins vanish.
- If your Cajun blend is salt-heavy, reduce the added salt elsewhere that day.
- Shrimp should be just opaque. Pull it early; it keeps cooking for a minute after you remove it.
- If the basket is small, cook in two rounds rather than piling everything into one clump.
Variations on This Dish:
- Creole Lime Shrimp: Swap lemon for lime and add a pinch of thyme.
- Garlic Butter Cajun Shrimp: Toss the shrimp with 1 tablespoon melted butter after cooking.
- Pepper-Forward Zucchini Mix: Add sliced bell pepper for a sweeter, more colorful tray.
Common Mistakes to Avoid with This Dish:
- Cooking shrimp until it’s stiff: Once shrimp curls into a tight C, you’ve gone too far.
- Slicing zucchini too thin: It loses its shape and turns watery.
- Skipping the shake halfway through: The shrimp and zucchini need a flip or toss to brown evenly.
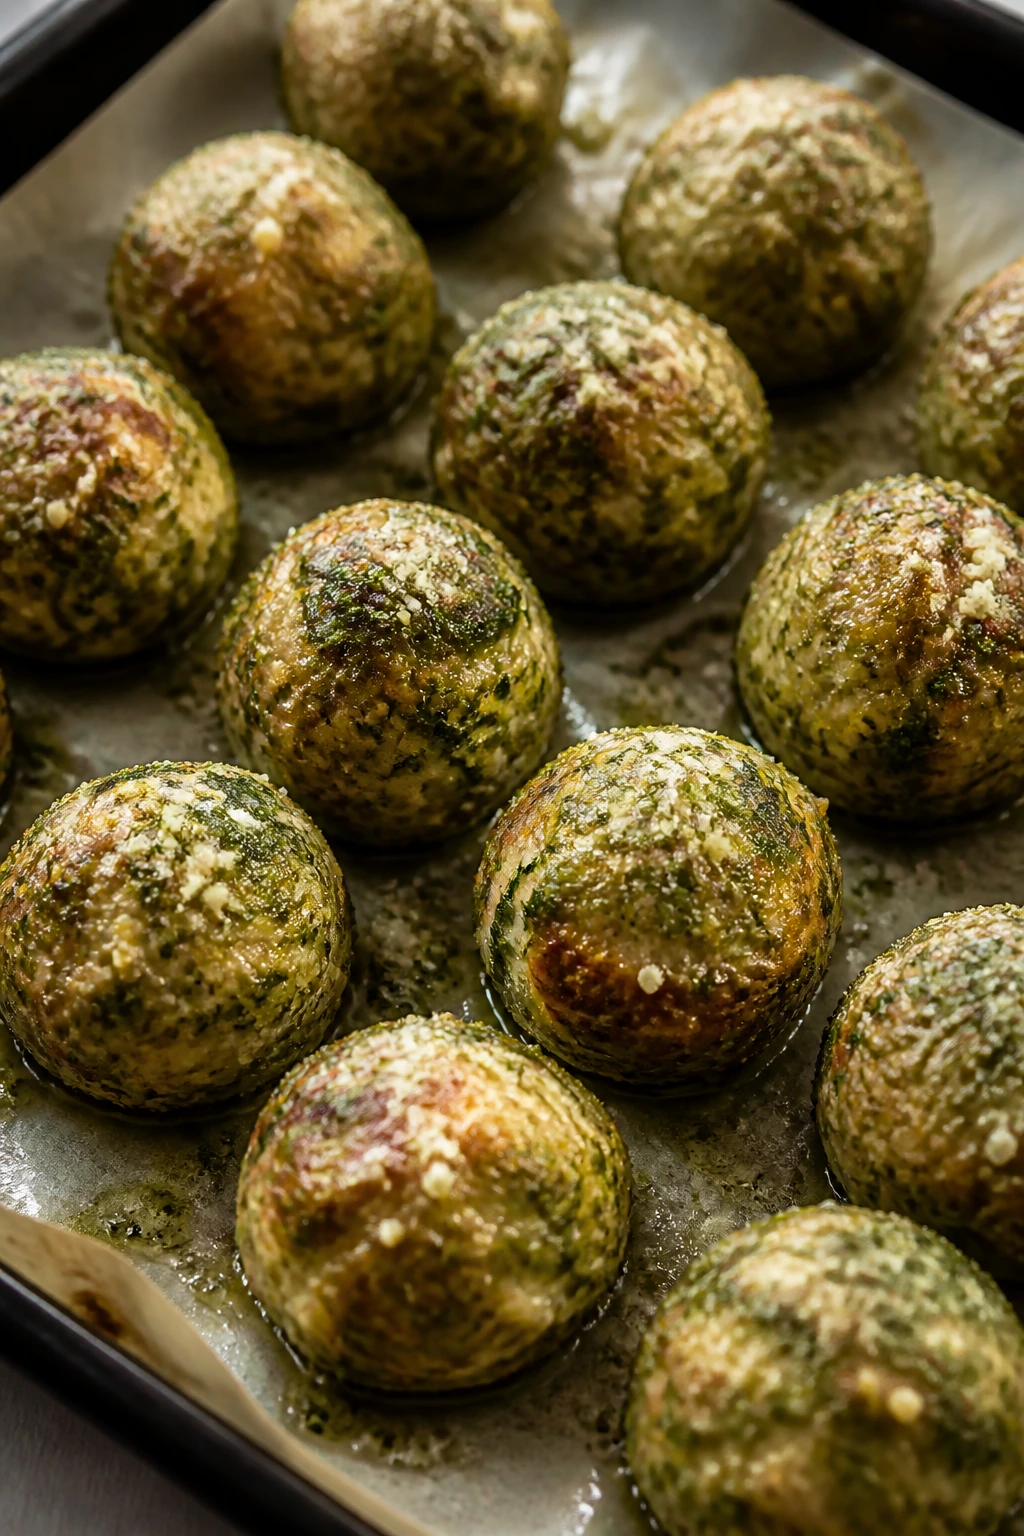
4. Basil Pesto Turkey Meatballs
These meatballs are lean, herby, and a little more interesting than the usual Monday turkey batch. The pesto gives them a fresh, green smell right out of the basket, and the parmesan keeps them from tasting dry — a real risk with turkey if you don’t build in some fat.
Why It Works: Ground turkey can get dense when it’s overworked, so the trick is adding just enough binder to hold the meatballs together without making them heavy. Almond flour and parmesan replace breadcrumbs without loading the mix with carbs. The air fryer browns the exterior fast, which helps the meatballs keep their shape when you portion them into containers.
Key Ingredients:
- 1 1/2 lbs ground turkey
- 1 large egg
- 1/3 cup almond flour
- 1/4 cup grated parmesan
- 2 tablespoons basil pesto
- 1 teaspoon garlic powder
- 1 teaspoon kosher salt
- 1/2 teaspoon black pepper
- 1 tablespoon chopped basil or parsley, optional
Quick Steps:
- Preheat the air fryer to 380°F (193°C) for 3 minutes.
- In a large bowl, mix the turkey, egg, almond flour, parmesan, pesto, garlic powder, salt, and pepper until just combined.
- Form the mixture into 20 meatballs, each about 1 1/2 inches wide.
- Place the meatballs in a single layer in the basket and cook for 10 to 12 minutes, shaking once halfway through, until they reach 165°F.
- Rest for 3 minutes, then spoon a little extra pesto over the top if you want a stronger herb finish.
Equipment for This Recipe:
- Air fryer
- Large mixing bowl
- Cookie scoop or spoon
- Tongs
- Instant-read thermometer
How to Serve This Dish: Serve the meatballs over zucchini noodles, cauliflower mash, or a salad with chopped cucumber and tomato. They also work well tucked into meal prep boxes with roasted broccoli and a small cup of pesto on the side.
Pro Tips for This Recipe:
- Chill the mixture for 10 minutes if it feels sticky. It shapes cleaner.
- Don’t pack the meatballs too tightly or they’ll turn bouncy.
- A tiny spoon of pesto after cooking tastes fresher than baking it all inside.
- Use a cookie scoop so the meatballs all finish at the same time.
Variations on This Dish:
- Sun-Dried Tomato Meatballs: Add 2 tablespoons finely chopped sun-dried tomatoes.
- Dairy-Light Version: Omit the parmesan and add 2 more tablespoons almond flour.
- Spicy Pesto Meatballs: Mix in 1/4 teaspoon red pepper flakes.
Common Mistakes to Avoid with This Dish:
- Overmixing the turkey: It turns the meatballs rubbery. Stop as soon as the mixture is combined.
- Skipping the thermometer: Turkey must hit 165°F in the center.
- Using too much pesto in the mix: The meatballs can get soft and greasy. Keep most of it for finishing.
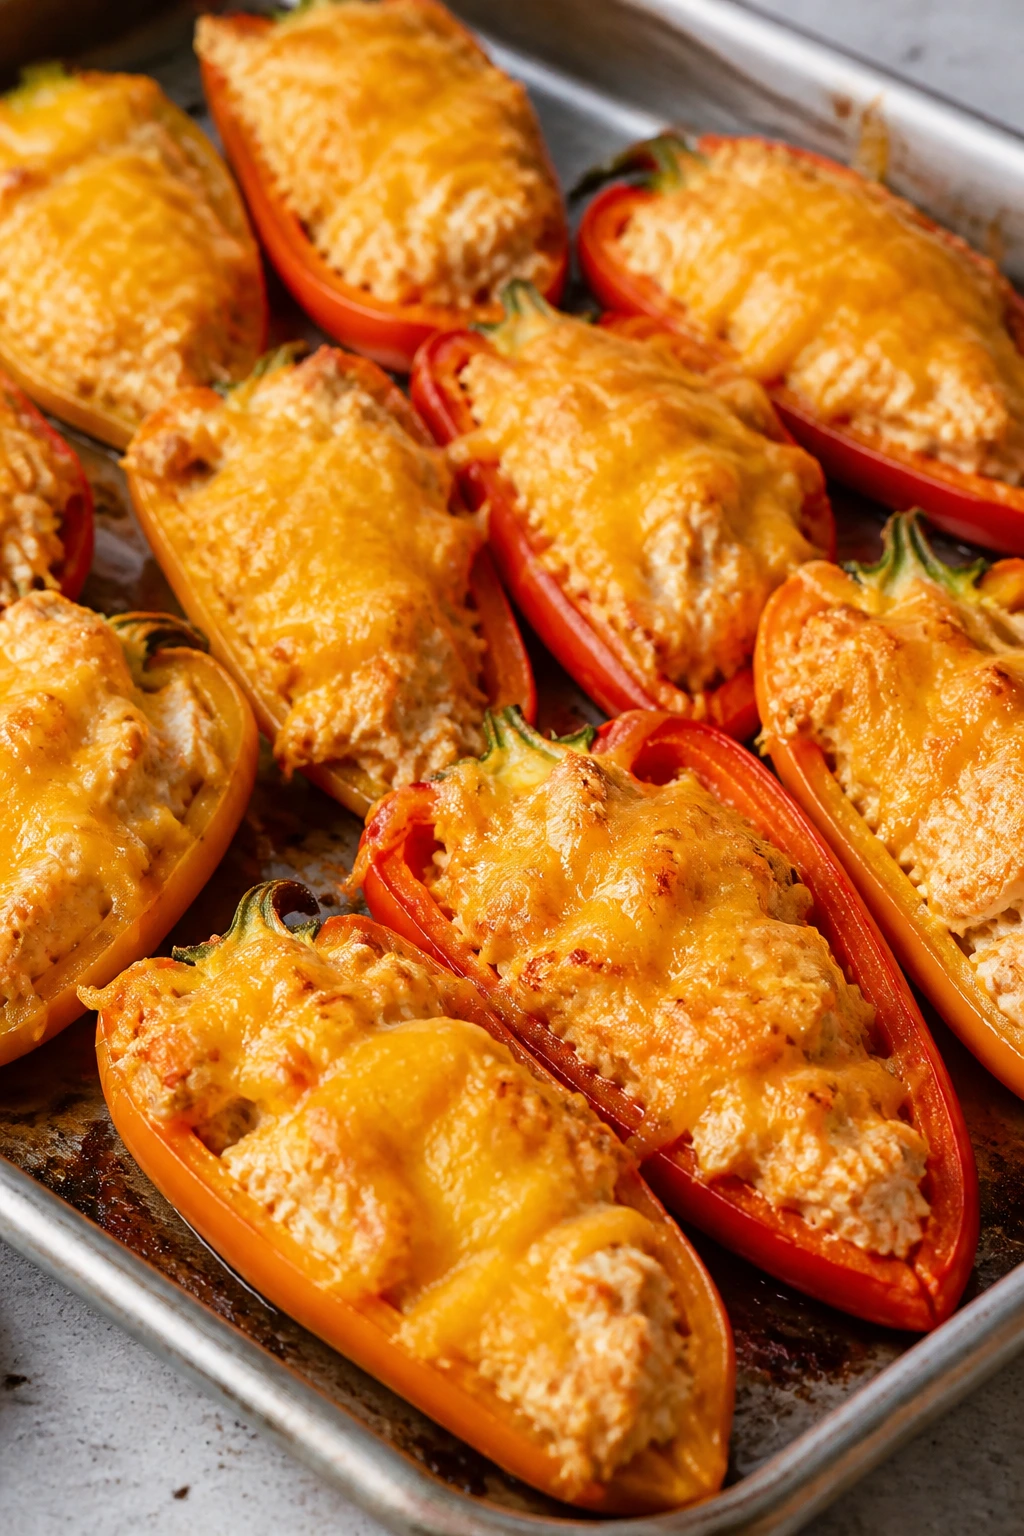
5. Buffalo Chicken Stuffed Mini Peppers
These peppers look bright and a little loud in the basket, which is exactly what you want from a meal prep lunch that has to survive three days in the fridge. The filling is creamy, tangy, and sharp enough to wake up the sweet pepper shells.
Why It Works: Mini sweet peppers hold their shape better than full-size bell peppers, so you get a built-in container that reheats without falling apart. Buffalo sauce, cream cheese, and shredded chicken make a filling that stays moist, and the cheddar on top gives you those browned edges people always scrape off first. This one is a fridge staple for a reason.
Key Ingredients:
- 12 mini sweet peppers, halved lengthwise and seeded
- 2 cups cooked shredded chicken
- 4 oz cream cheese, softened
- 1/3 cup buffalo sauce
- 1 cup shredded cheddar cheese
- 1 tablespoon sliced green onion
- 1/2 teaspoon garlic powder
- Salt and pepper, to taste
Quick Steps:
- Preheat the air fryer to 360°F (182°C) for 3 minutes.
- Mix the shredded chicken, cream cheese, buffalo sauce, garlic powder, salt, and pepper in a bowl until creamy.
- Spoon the filling into the pepper halves and top each one with a pinch of cheddar.
- Place the stuffed peppers in the basket and air fry for 8 to 10 minutes, until the peppers soften at the edges and the cheese melts.
- Finish with green onion before serving.
Equipment for This Recipe:
- Air fryer
- Mixing bowl
- Spoon
- Parchment liner with holes, optional
- Small knife for seeding peppers
How to Serve This Dish: Eat them as a lunch on their own, or pair them with celery sticks and ranch for a cooler plate. They also work next to a simple chopped salad if you want the meal to feel fuller without adding carbs.
Pro Tips for This Recipe:
- Soften the cream cheese fully before mixing or you’ll get cold lumps.
- Pat the pepper halves dry so the filling doesn’t slide.
- Use rotisserie chicken or leftover grilled chicken if you want the shortest prep.
- Add the green onion after cooking so it stays bright.
Variations on This Dish:
- Blue Cheese Buffalo Peppers: Swap half the cheddar for crumbled blue cheese.
- Milder Ranch Version: Replace half the buffalo sauce with ranch dressing.
- Smoky Chipotle Peppers: Mix in 1 teaspoon chipotle powder for a deeper heat.
Common Mistakes to Avoid with This Dish:
- Overfilling the peppers: The filling spills and burns on the basket.
- Using watery chicken: Excess moisture makes the filling runny.
- Cooking until the peppers collapse: You want a little bite left, not pepper soup.
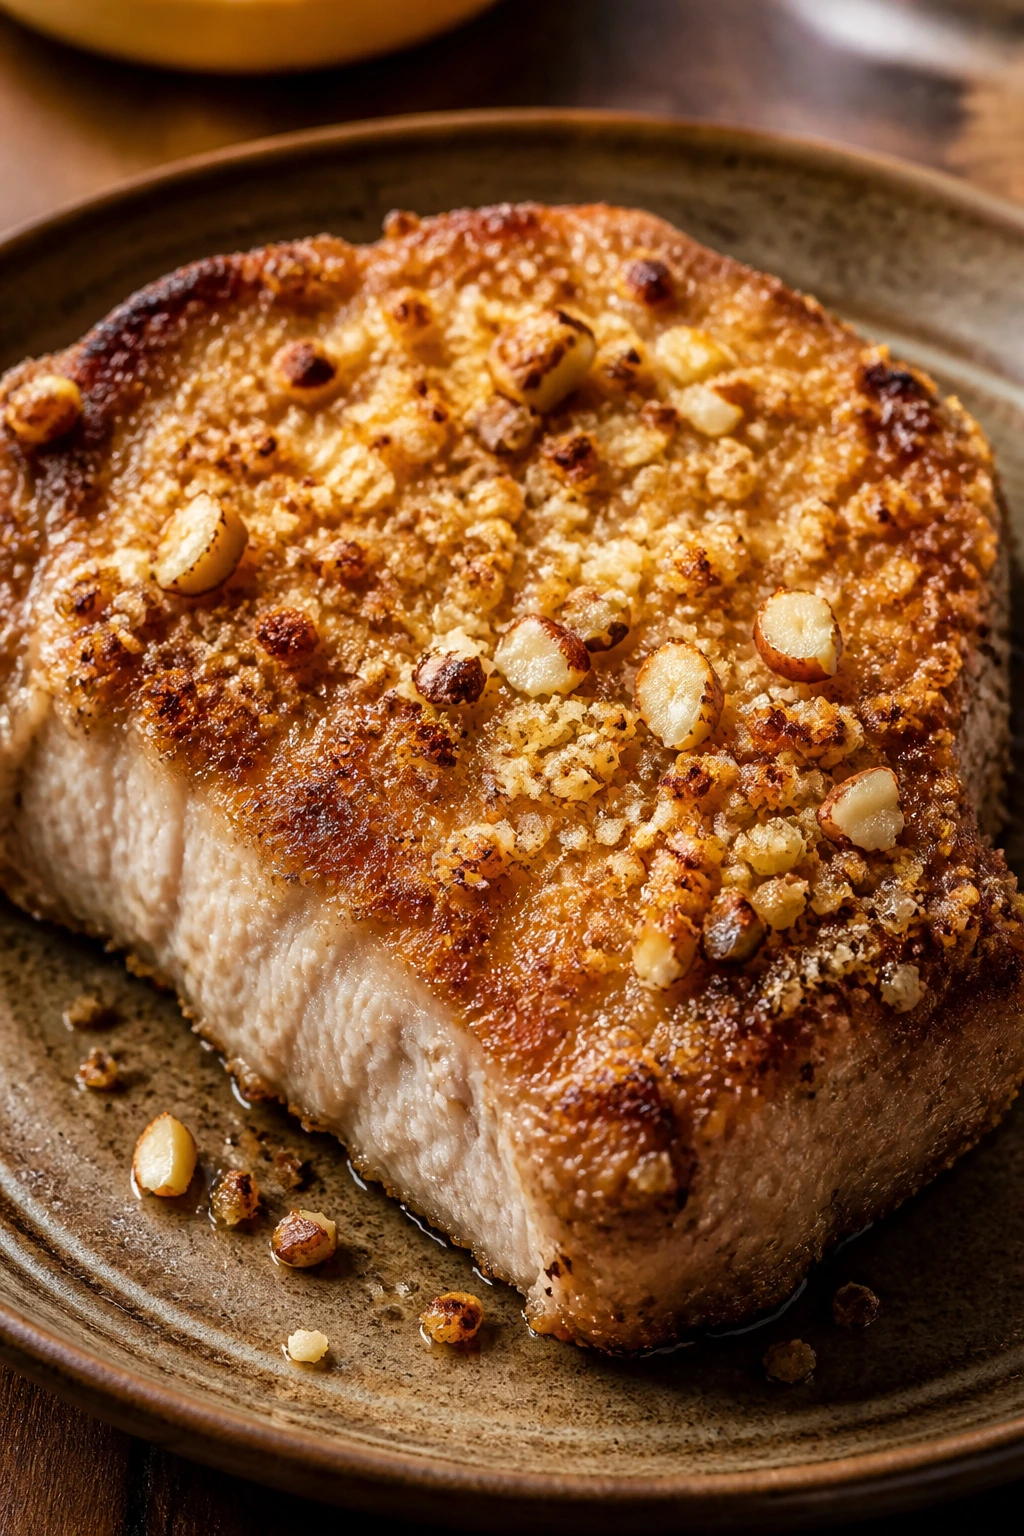
6. Crispy Pork Chops with Almond Crust
Pork chops are one of those cuts people overcook out of caution, which is a shame. In the air fryer, a thin almond-and-parmesan crust gives you a crisp shell and a juicy center without a breadcrumb in sight.
Why It Works: Pork chops dry out when they’re held too long over heat, so the air fryer’s quick blast is your friend. The almond flour keeps the crust low carb and gives it a nutty crunch, while parmesan adds salt and browning. A quick oil spray on top helps the coating toast instead of staying pale.
Key Ingredients:
- 4 boneless pork chops, about 1 inch thick
- 2 large eggs
- 1/2 cup almond flour
- 1/4 cup grated parmesan
- 1 teaspoon smoked paprika
- 1 teaspoon garlic powder
- 1 teaspoon kosher salt
- 1/2 teaspoon black pepper
- Olive oil spray
Quick Steps:
- Preheat the air fryer to 390°F (199°C) for 3 minutes.
- Whisk the eggs in one shallow bowl. In another bowl, mix the almond flour, parmesan, smoked paprika, garlic powder, salt, and pepper.
- Dip each pork chop in the egg, then press it into the almond mixture so the coating sticks on both sides.
- Spray the tops lightly with olive oil and place the chops in the basket in a single layer.
- Air fry for 12 to 14 minutes, flipping halfway, until the crust is golden and the pork reaches 145°F.
- Rest for 5 minutes before slicing.
Equipment for This Recipe:
- Air fryer
- Two shallow bowls
- Tongs
- Meat thermometer
- Olive oil spray
How to Serve This Dish: Pork chops like cabbage slaw, roasted green beans, or a spoon of mustardy cauliflower mash. For lunch prep, slice them and pack them with sautéed spinach or broccoli so the crust doesn’t sit against something wet.
Pro Tips for This Recipe:
- Choose chops of similar thickness so they finish at the same time.
- Press the coating in firmly; don’t just dust it on.
- A light spray of oil is what turns the crust from sandy to crisp.
- If the coating browns too fast, lower the heat to 375°F for the last few minutes.
Variations on This Dish:
- Herb-Dijon Pork: Brush the chops with Dijon before the egg dip.
- Cajun Crust: Replace the paprika with Cajun seasoning.
- Pork Cutlet Style: Pound the chops thinner and reduce the cook time by 3 to 4 minutes.
Common Mistakes to Avoid with This Dish:
- Using wet chops straight from packaging: The coating slides off. Pat them dry first.
- Skipping the rest: The juices need a few minutes to settle back in.
- Overcooking past 145°F: Pork chops go from juicy to dry fast.
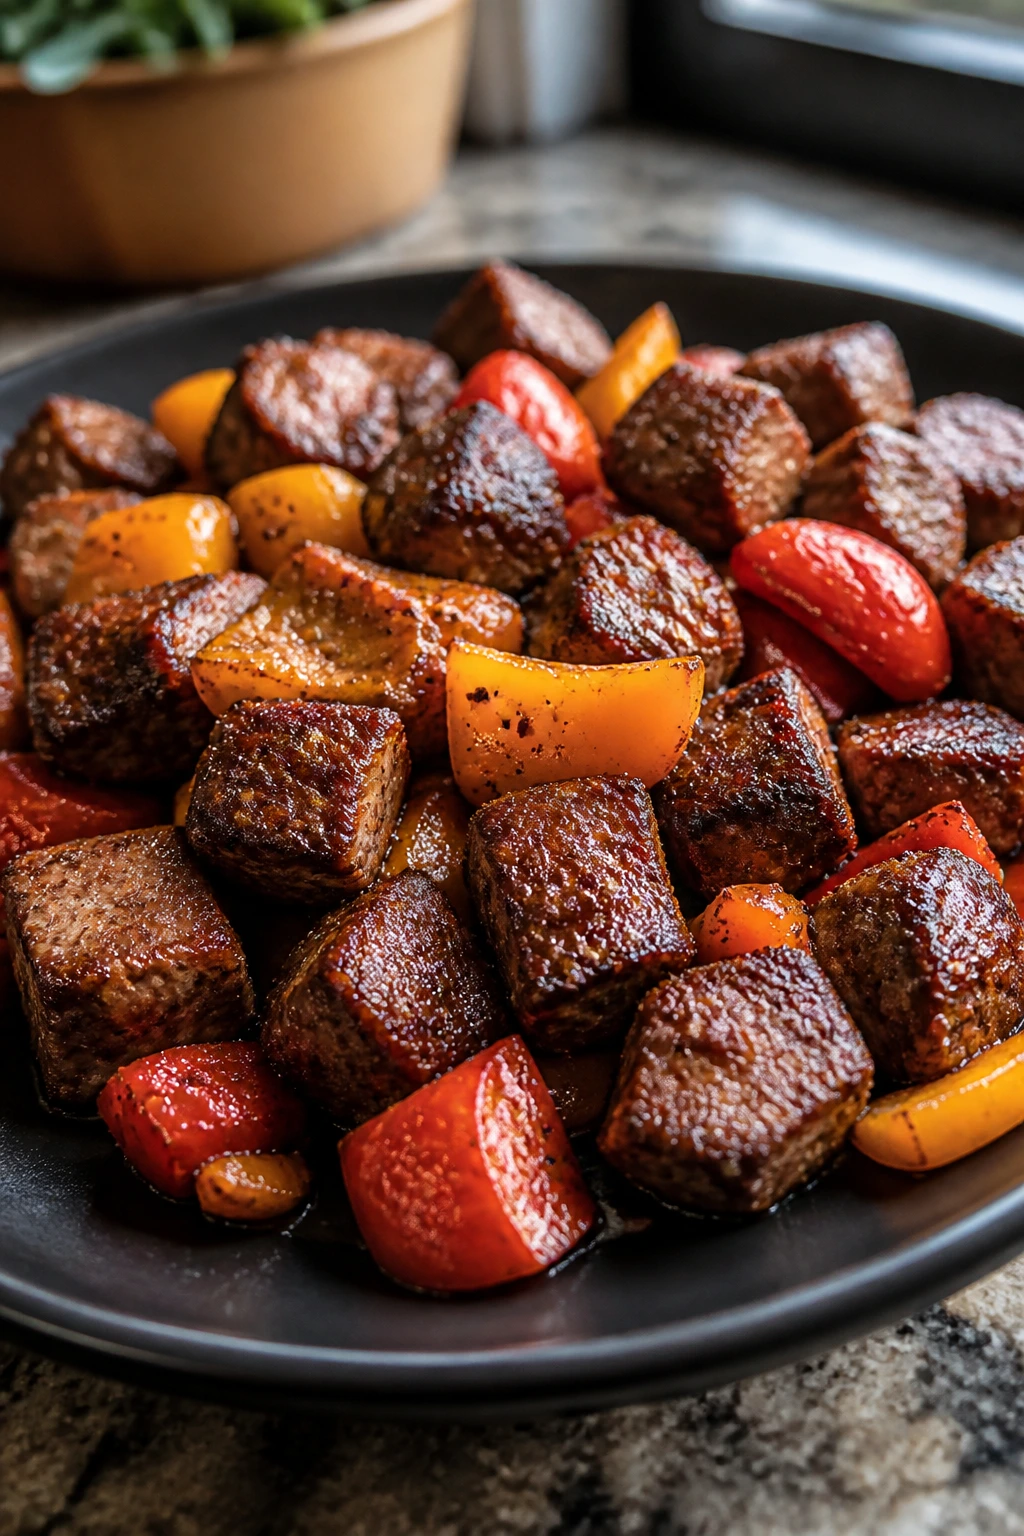
7. Chipotle Steak Bites and Peppers
This is the tray I make when I want lunch to feel a little more alive than “protein and vegetables.” The steak edges char, the peppers soften just enough, and the whole pan smells smoky the second it lands on the counter.
Why It Works: Sirloin or flank steak takes well to hot, fast air because the exterior browns before the center overcooks. Peppers and onions need that same heat to sweeten at the edges, so they fit the same basket perfectly. Chipotle powder adds smoke without making the dish greasy or heavy.
Key Ingredients:
- 1 1/2 lbs sirloin steak, cut into 1-inch cubes
- 2 bell peppers, cut into strips
- 1 small red onion, sliced
- 2 tablespoons avocado oil
- 1 tablespoon chipotle powder
- 1 teaspoon ground cumin
- 1 teaspoon kosher salt
- 1/2 teaspoon black pepper
- 1 lime, cut into wedges
Quick Steps:
- Preheat the air fryer to 400°F (205°C) for 3 minutes.
- Toss the steak, peppers, and onion with avocado oil, chipotle powder, cumin, salt, and pepper.
- Spread everything in a single layer in the basket.
- Air fry for 8 to 10 minutes, shaking once halfway through, until the steak is browned outside and cooked to your preferred doneness.
- Rest for 3 minutes, then finish with a squeeze of lime.
Equipment for This Recipe:
- Air fryer
- Large bowl
- Tongs
- Sharp knife
- Cutting board
How to Serve This Dish: Spoon the steak bites over cauliflower rice, chopped lettuce, or a bowl of sautéed zucchini. If you want a more filling lunch, add avocado and a spoon of salsa on the side.
Pro Tips for This Recipe:
- Cut the steak into even pieces so the smaller cubes don’t overcook.
- Don’t marinate it in a lot of liquid; the basket browns better when the surface is fairly dry.
- Shake the basket only once. Too much tossing lowers the heat and slows browning.
- Let the steak rest before packing it so the juices don’t flood the container.
Variations on This Dish:
- Fajita Lime Steak: Use chili powder and extra lime zest instead of chipotle.
- Garlic Butter Steak Bites: Finish with 1 tablespoon melted butter and minced garlic.
- Mild Dinner Bowl: Skip the chipotle and use smoked paprika only.
Common Mistakes to Avoid with This Dish:
- Crowding the basket: The steak steams and turns gray.
- Using a wet marinade: You lose the browned edges.
- Cooking all the way through for every meal: Thin steak gets tough if you chase well-done in a hot basket.
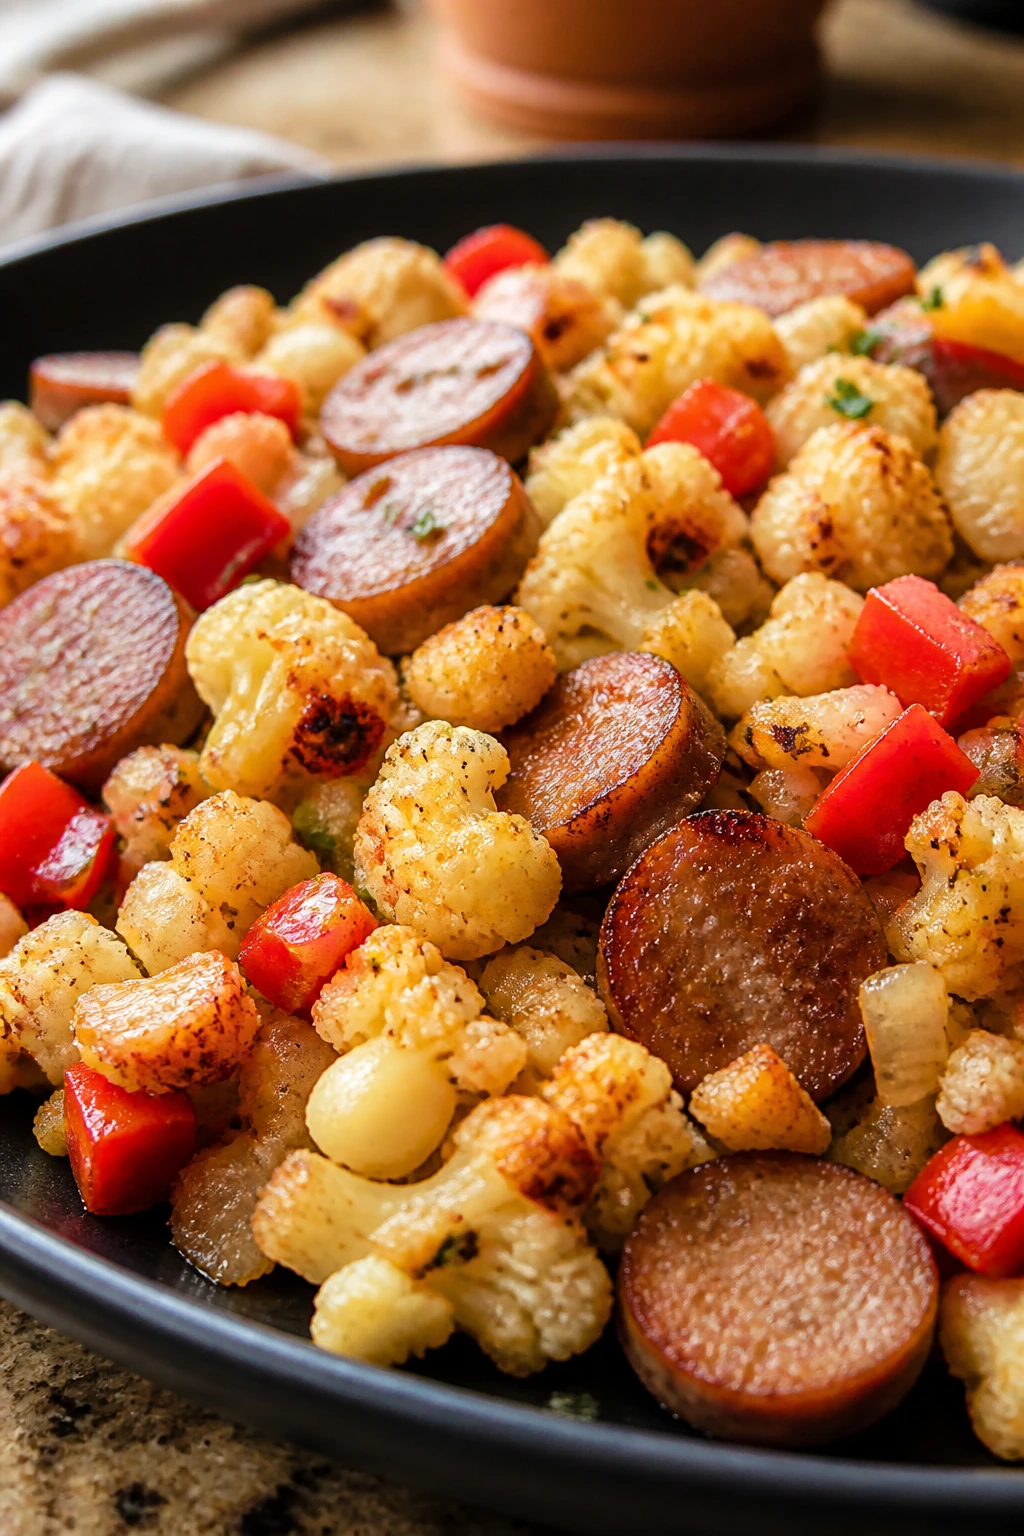
8. Sausage and Cauliflower Hash
This one feels like breakfast that decided to become lunch. The cauliflower picks up the sausage fat and seasoning, the peppers soften at the corners, and the whole tray tastes better after a night in the fridge than it has any right to.
Why It Works: Cauliflower can handle high heat if you cut it into small, even florets. Chicken sausage or smoked sausage already has flavor built in, so you don’t need a long seasoning list or a heavy sauce. The air fryer gives the cauliflower a roasted edge while keeping the center tender.
Key Ingredients:
- 12 oz fully cooked chicken sausage, sliced into rounds
- 1 medium head cauliflower, cut into small florets
- 1 red bell pepper, chopped
- 1 small yellow onion, chopped
- 1 tablespoon avocado oil
- 1 teaspoon garlic powder
- 1 teaspoon smoked paprika
- 1/2 teaspoon kosher salt
- 1/2 teaspoon black pepper
Quick Steps:
- Preheat the air fryer to 390°F (199°C) for 3 minutes.
- Toss the cauliflower, pepper, and onion with avocado oil, garlic powder, smoked paprika, salt, and pepper.
- Add the sausage slices and mix gently so the pieces stay in big, cookable chunks.
- Air fry for 12 to 14 minutes, shaking halfway through, until the cauliflower has brown spots and the onion is soft.
- Serve hot, or cool and portion into containers.
Equipment for This Recipe:
- Air fryer
- Large bowl
- Cutting board
- Chef’s knife
- Spatula or tongs
How to Serve This Dish: Top a bowl with a fried egg if you want breakfast, or serve it with a scoop of avocado and hot sauce for lunch. It also works as a side dish next to roasted chicken or pork chops when you want more vegetables on the plate.
Pro Tips for This Recipe:
- Cut the cauliflower small enough to cook through before the sausage dries out.
- Use fully cooked sausage for the cleanest air fryer timing.
- A quick toss halfway through keeps the onion from burning on the edges.
- Add cheese only after cooking if you want it to stay creamy rather than crisp.
Variations on This Dish:
- Breakfast Hash: Add a fried or poached egg on top.
- Jalapeño Hash: Toss in sliced jalapeños for heat.
- Cheddar Finish: Sprinkle 1/2 cup cheddar over the tray in the last 2 minutes.
Common Mistakes to Avoid with This Dish:
- Using cauliflower pieces that are too large: They stay firm while everything else is done.
- Packing the basket too full: The cauliflower won’t brown.
- Adding fresh cheese too early: It melts into strings and clogs the basket.
9. Spinach Cheddar Egg Bites
Egg bites are the quiet workhorse of meal prep. They’re small, sturdy, and easy to eat cold if you’re rushing out the door, but they’re better warmed for 30 seconds and served with a spoonful of salsa or avocado.
Why It Works: Eggs set fast in a small mold, so the air fryer gives you a tender center without needing a water bath. Cottage cheese makes the bites creamy and adds body without flour, and spinach keeps the texture from feeling too rich. The key is a gentle cook at a lower temperature so the eggs stay fluffy instead of rubbery.
Key Ingredients:
- 8 large eggs
- 1/2 cup cottage cheese
- 1 cup shredded cheddar cheese
- 1 cup fresh spinach, chopped and squeezed dry
- 1/4 cup diced ham, optional
- 1/2 teaspoon kosher salt
- 1/4 teaspoon black pepper
- 1 tablespoon chopped chives, optional
- Butter or oil for greasing the mold
Quick Steps:
- Preheat the air fryer to 300°F (149°C) for 3 minutes.
- Grease a silicone muffin mold or small ramekins well with butter or oil.
- Blend or whisk the eggs and cottage cheese until smooth, then stir in cheddar, spinach, ham if using, salt, pepper, and chives.
- Fill the molds about 3/4 full.
- Air fry for 12 to 14 minutes, until the centers are just set and no longer jiggly.
- Cool for 5 minutes before lifting them out.
Equipment for This Recipe:
- Air fryer
- Silicone muffin mold or ramekins
- Blender or whisk
- Mixing bowl
- Measuring cup
How to Serve This Dish: Eat them with sliced tomatoes and avocado for breakfast, or pack two with turkey bacon and berries if you want a grab-and-go meal. They also sit nicely beside a green salad for a light lunch that still feels complete.
Pro Tips for This Recipe:
- Squeeze the spinach dry or the bites get spongy.
- Blend the eggs and cottage cheese if you want a smoother texture.
- Don’t overfill the mold; eggs puff a little as they cook.
- Let them cool before removing so they don’t tear.
Variations on This Dish:
- Bacon-Chive Bites: Swap the ham for chopped cooked bacon.
- Mushroom Swiss Bites: Use sautéed mushrooms and Swiss cheese.
- Red Pepper Bites: Replace the spinach with finely diced roasted red pepper.
Common Mistakes to Avoid with This Dish:
- Using too much liquid filling: The centers won’t set cleanly.
- Cooking at too high a temperature: The tops puff and crack while the centers stay soft.
- Skipping the grease: Egg bites love to cling to dry molds.
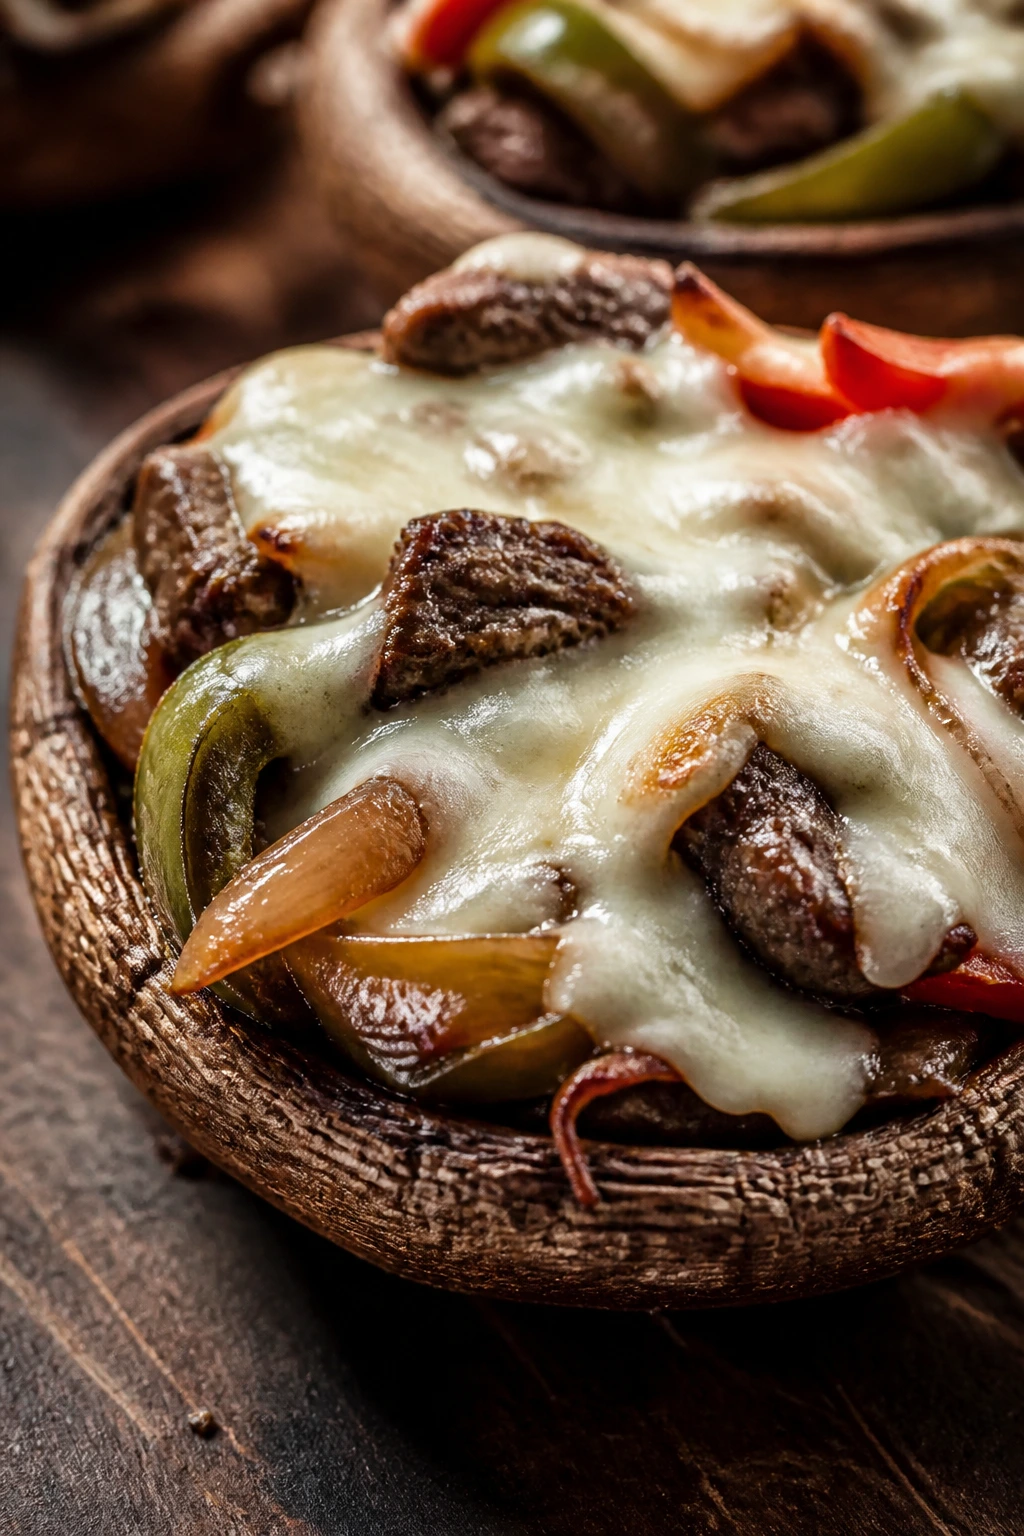
10. Philly Cheesesteak Stuffed Portobellos
A portobello cap turns into a shallow little skillet here, which is exactly why it works. You get melted cheese, browned steak, sweet onions, and mushroom juices that soak into the filling instead of escaping into the basket.
Why It Works: Portobellos are sturdy enough to hold a hot filling, and their size makes them feel like a real lunch rather than a side dish pretending to be a meal. A quick first cook drives off some moisture so the mushroom doesn’t turn watery. Then the steak and peppers finish quickly, and the provolone melts over the top in that familiar Philly way.
Key Ingredients:
- 4 large portobello mushroom caps, stems removed and gills scraped
- 1 lb thinly sliced sirloin or ribeye
- 1 bell pepper, sliced
- 1 small onion, sliced
- 4 slices provolone cheese
- 1 tablespoon olive oil
- 1 teaspoon kosher salt
- 1/2 teaspoon black pepper
- 1/2 teaspoon garlic powder
Quick Steps:
- Preheat the air fryer to 375°F (190°C) for 3 minutes.
- Lightly oil the portobello caps and air fry them empty for 4 minutes to release some moisture.
- Toss the steak, pepper, onion, salt, pepper, and garlic powder together.
- Add the steak mixture to the basket and cook for 6 to 8 minutes, shaking once, until the steak is browned and the vegetables are soft.
- Spoon the filling into the mushrooms, top each one with provolone, and air fry for 2 more minutes until the cheese melts.
Equipment for This Recipe:
- Air fryer
- Spoon
- Knife and cutting board
- Tongs
- Small brush for oil
How to Serve This Dish: Serve the stuffed mushrooms with a crisp salad or roasted asparagus. For meal prep, pack them with a fork and a side of cauliflower mash; the mushroom cap acts like its own edible bowl.
Pro Tips for This Recipe:
- Scrape the dark gills out if you want less moisture in the finished mushrooms.
- Don’t skip the empty first cook; it keeps the filling from sliding around later.
- Thin-sliced steak cooks fast, so keep an eye on it near the end.
- If the mushrooms release a lot of liquid, blot the basket before the final cheese melt.
Variations on This Dish:
- Pepper Jack Philly: Swap provolone for pepper jack.
- Mushroom-Heavy Version: Add a handful of sliced cremini mushrooms to the filling.
- Onion-Lover’s Tray: Double the onion and cook it until the edges are caramelized.
Common Mistakes to Avoid with This Dish:
- Leaving the caps wet: They steam and go soggy.
- Cooking steak too long before stuffing: It gets chewy after the final melt.
- Using cheese slices that are too thick: They can sit on top without melting properly.
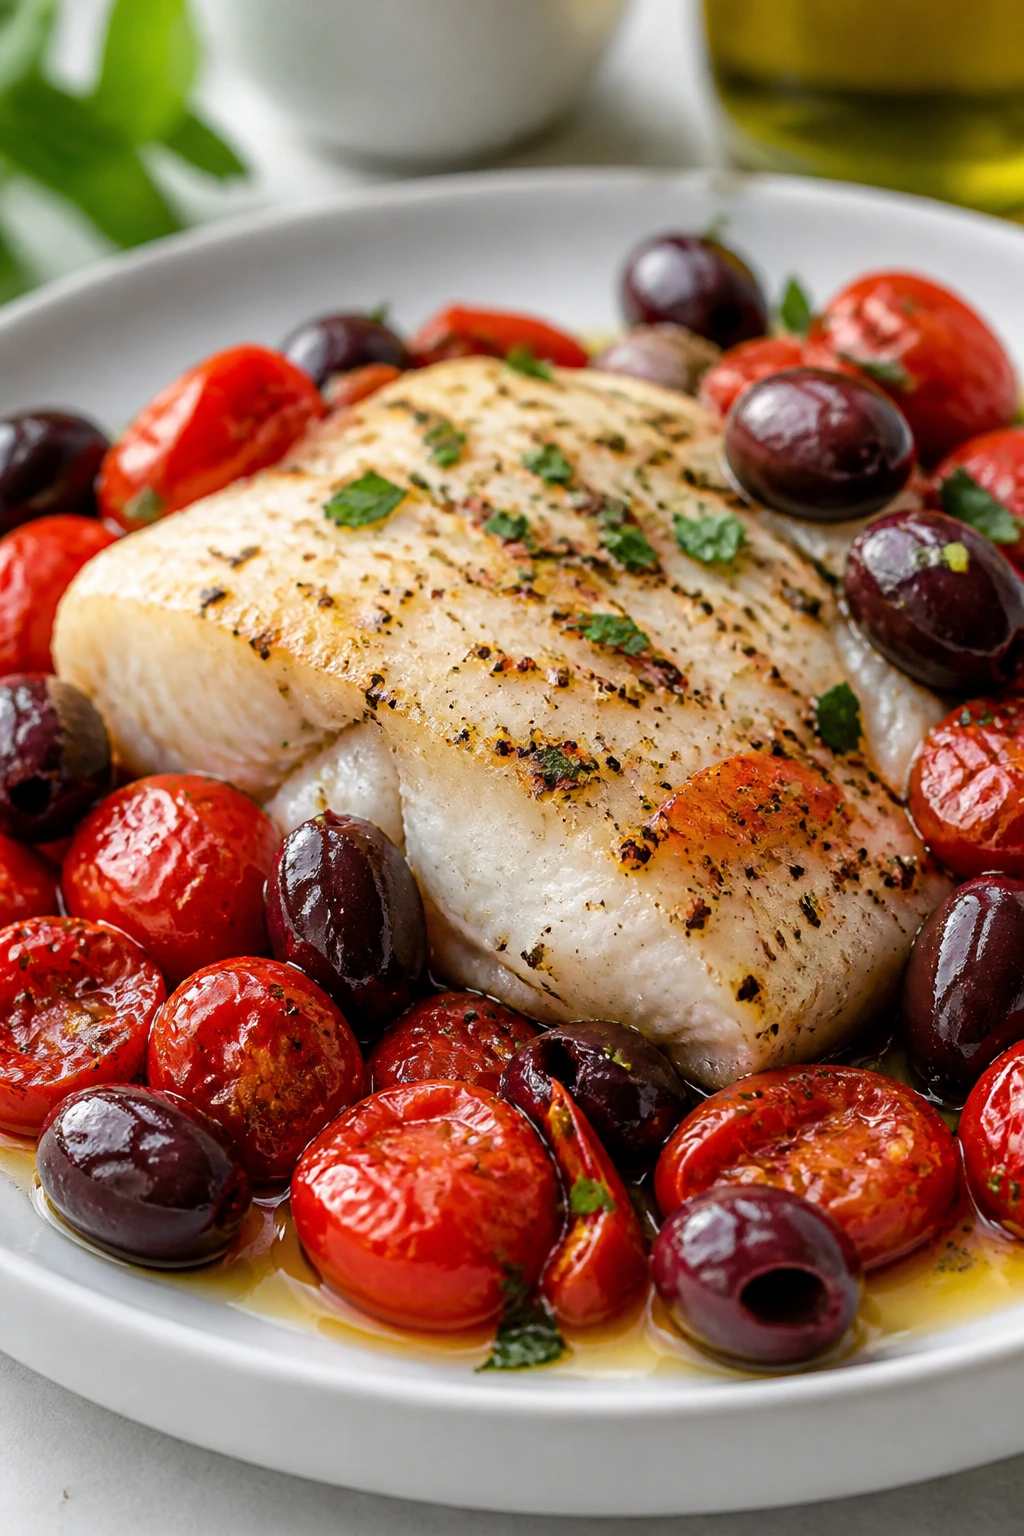
11. Mediterranean Cod with Tomatoes and Olives
Cod is mild enough to pick up flavor fast, which is useful when you want a lunch that tastes bright instead of heavy. Tomatoes burst, olives go briny, and the fish flakes in big soft pieces that hold up better than you’d expect in a lunch box.
Why It Works: Cod is lean, so the olive oil and tomatoes do some of the work of keeping it moist. The air fryer cooks the fish quickly before it dries out, and a shallow dish or foil sling lets the juices stay with the fish instead of dripping away. Feta at the end gives the dish a salty finish without much effort.
Key Ingredients:
- 4 cod fillets, about 6 oz each
- 1 cup cherry tomatoes
- 1/3 cup pitted olives, halved
- 2 tablespoons olive oil
- 1 teaspoon dried oregano
- 1 teaspoon lemon zest
- 1/2 teaspoon kosher salt
- 1/4 teaspoon black pepper
- 1/4 cup crumbled feta cheese
- 1 tablespoon chopped parsley
Quick Steps:
- Preheat the air fryer to 390°F (199°C) for 3 minutes.
- Place the cod in a lightly oiled air fryer-safe dish or foil sling.
- Scatter the tomatoes and olives around the fish, then drizzle with olive oil and season with oregano, lemon zest, salt, and pepper.
- Air fry for 10 to 12 minutes, until the cod flakes easily and reaches 145°F.
- Finish with feta and parsley before serving.
Equipment for This Recipe:
- Air fryer
- Air fryer-safe baking dish or foil sling
- Small bowl
- Spoon
- Instant-read thermometer
How to Serve This Dish: Pair the cod with cucumber salad, roasted zucchini, or a spoon of cauliflower rice. It also tastes good chilled over chopped romaine with a little extra lemon juice if you’re eating it cold at work.
Pro Tips for This Recipe:
- Choose thicker cod fillets so they don’t flake apart before the tomatoes soften.
- Don’t add too much salt; olives and feta already bring plenty.
- If your dish is deep, add 1 extra minute so the center cooks through.
- Fresh lemon zest matters here more than a heavy sauce.
Variations on This Dish:
- Greek-Style Cod: Add chopped red onion and extra oregano.
- Capers and Dill Cod: Swap olives for capers and use dill instead of parsley.
- Tomato-Free Lemon Cod: Leave out the tomatoes and finish with a lemon-butter drizzle after cooking.
Common Mistakes to Avoid with This Dish:
- Using very thin fillets: They overcook before the vegetables soften.
- Skipping a dish or sling: The juices disappear and the fish tastes flat.
- Pulling the fish too late: Cod gets dry fast once it flakes.
12. Bacon-Wrapped Chicken Tenders

Bacon-wrapped chicken sounds fussy, but the air fryer makes it feel straightforward. The bacon crisps, the chicken stays tender, and the finished pieces reheat better than plain grilled tenders ever do.
Why It Works: Thin-cut bacon gives you a chance to crisp the outside before the chicken dries out. Chicken tenders are already portioned into lunch-friendly pieces, which means they cook evenly and stack well in a container. A smoky spice rub helps the whole thing taste finished even before the bacon gets its last bit of color.
Key Ingredients:
- 1 1/2 lbs chicken tenders
- 8 slices thin-cut bacon
- 1 teaspoon smoked paprika
- 1 teaspoon garlic powder
- 1/2 teaspoon kosher salt
- 1/2 teaspoon black pepper
- 1 tablespoon olive oil
- Toothpicks, if needed
Quick Steps:
- Preheat the air fryer to 390°F (199°C) for 3 minutes.
- Toss the chicken tenders with olive oil, smoked paprika, garlic powder, salt, and pepper.
- Wrap each tender with a slice of bacon, tucking the ends under or securing them with a toothpick.
- Arrange the tenders in the basket, seam side down, and air fry for 16 to 18 minutes, flipping once halfway through, until the chicken reaches 165°F and the bacon is crisp.
- Rest for 5 minutes before serving.
Equipment for This Recipe:
- Air fryer
- Tongs
- Toothpicks, optional
- Cutting board
- Paper towels
How to Serve This Dish: These need a cool side like slaw, broccoli salad, or cucumber ribbons to balance the bacon. They’re also a strong dinner with roasted Brussels sprouts and a spoon of mustard or ranch on the side.
Pro Tips for This Recipe:
- Use thin-cut bacon; thick slices can stay limp while the chicken finishes.
- Tuck the bacon seam underneath so it doesn’t unwrap in the basket.
- Don’t add sugary sauce before cooking or the bacon can burn before the chicken is done.
- Let the tenders rest so the bacon stays on the meat instead of sliding off.
Variations on This Dish:
- Cajun Bacon Wrap: Add Cajun seasoning to the spice mix.
- Herb-Rubbed Tenders: Use rosemary and thyme with garlic.
- Jalapeño Version: Add a thin strip of jalapeño under the bacon wrap.
Common Mistakes to Avoid with This Dish:
- Using thick bacon: It won’t crisp in time.
- Wrapping loosely: The bacon can peel away mid-cook.
- Skipping the rest: Juices run out the second you cut into the chicken.
13. Zucchini Pizza Bites

These are the tray I make when I want pizza energy without the crust. The zucchini rounds get tender underneath the cheese, the sauce stays concentrated if you keep it light, and the pepperoni edges curl up in that familiar way people always reach for first.
Why It Works: Zucchini has enough water to soften, but not so much that it falls apart if you salt and blot it first. A short cook keeps the slices from turning mushy, and a thin layer of no-sugar-added marinara gives you real pizza flavor without loading up the carbs. They’re easy to eat cold, too, which is more useful than people admit.
Key Ingredients:
- 2 large zucchini, sliced into 1/2-inch rounds
- 1/2 teaspoon kosher salt
- 1/2 cup no-sugar-added marinara sauce
- 1 cup shredded mozzarella cheese
- 1/2 cup mini pepperoni slices
- 1 teaspoon dried Italian seasoning
- 1 tablespoon grated parmesan
- Black pepper, to taste
Quick Steps:
- Preheat the air fryer to 375°F (190°C) for 3 minutes.
- Salt the zucchini rounds lightly and let them sit for 5 minutes, then blot them dry with paper towels.
- Arrange the zucchini in a single layer in the basket and top each round with a small spoonful of marinara, mozzarella, pepperoni, Italian seasoning, parmesan, and a little black pepper.
- Air fry for 7 to 9 minutes, until the cheese melts and the zucchini is tender but still holds its shape.
- Let them cool for 2 minutes so the cheese sets a little before lifting.
Equipment for This Recipe:
- Air fryer
- Sharp knife
- Paper towels
- Spoon
- Parchment liner, optional
How to Serve This Dish: Serve these as a snack plate with celery and olives, or tuck them next to a chicken thigh and salad for a dinner that looks more put-together than the effort suggests. They also work as a lunch side when you want something warm beside a cold protein.
Pro Tips for This Recipe:
- Use thick zucchini rounds or they’ll collapse under the sauce.
- Keep the sauce layer thin. Too much turns the tray watery.
- Blotting the salted zucchini is the difference between tender and soggy.
- If you want more browning, run them for one extra minute.
Variations on This Dish:
- Margherita Bites: Use mozzarella, basil, and a thin tomato slice.
- Supreme Tray: Add chopped bell pepper and a few onion bits.
- Sausage Pizza Bites: Swap pepperoni for cooked crumbled sausage.
Common Mistakes to Avoid with This Dish:
- Overloading with sauce: It slides off and pools in the basket.
- Slicing zucchini too thin: The rounds can’t support the topping.
- Letting them sit too long before eating: The cheese softens the zucchini underneath.
14. Broccoli Cheddar Frittata Squares

This is the recipe that makes breakfast feel organized. The squares cut cleanly, travel well, and taste good warm or cold, which is more than you can say for most egg dishes that try to sit in the fridge for a few days.
Why It Works: Eggs and cream set into a tender base, while broccoli and cheddar keep the squares from tasting flat. The air fryer is gentle enough to cook the center without drying the edges, especially if you use a small pan and a lower temperature. Once cooled, the squares can be sliced into neat blocks that fit into meal prep containers without crumbling apart.
Key Ingredients:
- 10 large eggs
- 1/2 cup heavy cream
- 2 cups broccoli florets, chopped small and lightly steamed or microwaved
- 1 cup shredded cheddar cheese
- 1/4 cup diced onion
- 1/2 teaspoon kosher salt
- 1/4 teaspoon black pepper
- 1 tablespoon butter or oil for the pan
Quick Steps:
- Preheat the air fryer to 300°F (149°C) for 3 minutes.
- Grease a small square or round air fryer-safe baking pan well with butter or oil.
- Whisk the eggs, heavy cream, salt, and pepper until smooth, then stir in the broccoli, cheddar, and onion.
- Pour the mixture into the prepared pan and air fry for 18 to 20 minutes, until the center is set and no longer jiggles when the pan is nudged.
- Cool for 10 minutes, then cut into squares.
Equipment for This Recipe:
- Air fryer
- Air fryer-safe baking pan
- Whisk
- Mixing bowl
- Spatula or knife for slicing
How to Serve This Dish: Serve a square with avocado, salsa, or sliced tomatoes for breakfast. For lunch, tuck two squares beside a green salad and a spoon of mustard or hot sauce.
Pro Tips for This Recipe:
- Steam the broccoli briefly so it softens before the eggs set.
- Cut the broccoli small; large florets make the squares fall apart.
- Let the frittata rest before slicing or it tears at the edges.
- If the top browns too fast, lay a loose piece of foil over the pan for the last few minutes.
Variations on This Dish:
- Ham and Cheddar Squares: Add 1/2 cup diced ham.
- Swiss and Herb Version: Use Swiss cheese and chopped chives.
- Mushroom Broccoli Bake: Add sautéed mushrooms, but keep them dry.
Common Mistakes to Avoid with This Dish:
- Using watery broccoli: It loosens the eggs. Dry it well.
- Baking at too high a heat: The center stays soft while the top overbrowns.
- Cutting too soon: Warm egg squares need a brief rest to set cleanly.
15. Coconut Curry Tofu and Green Beans
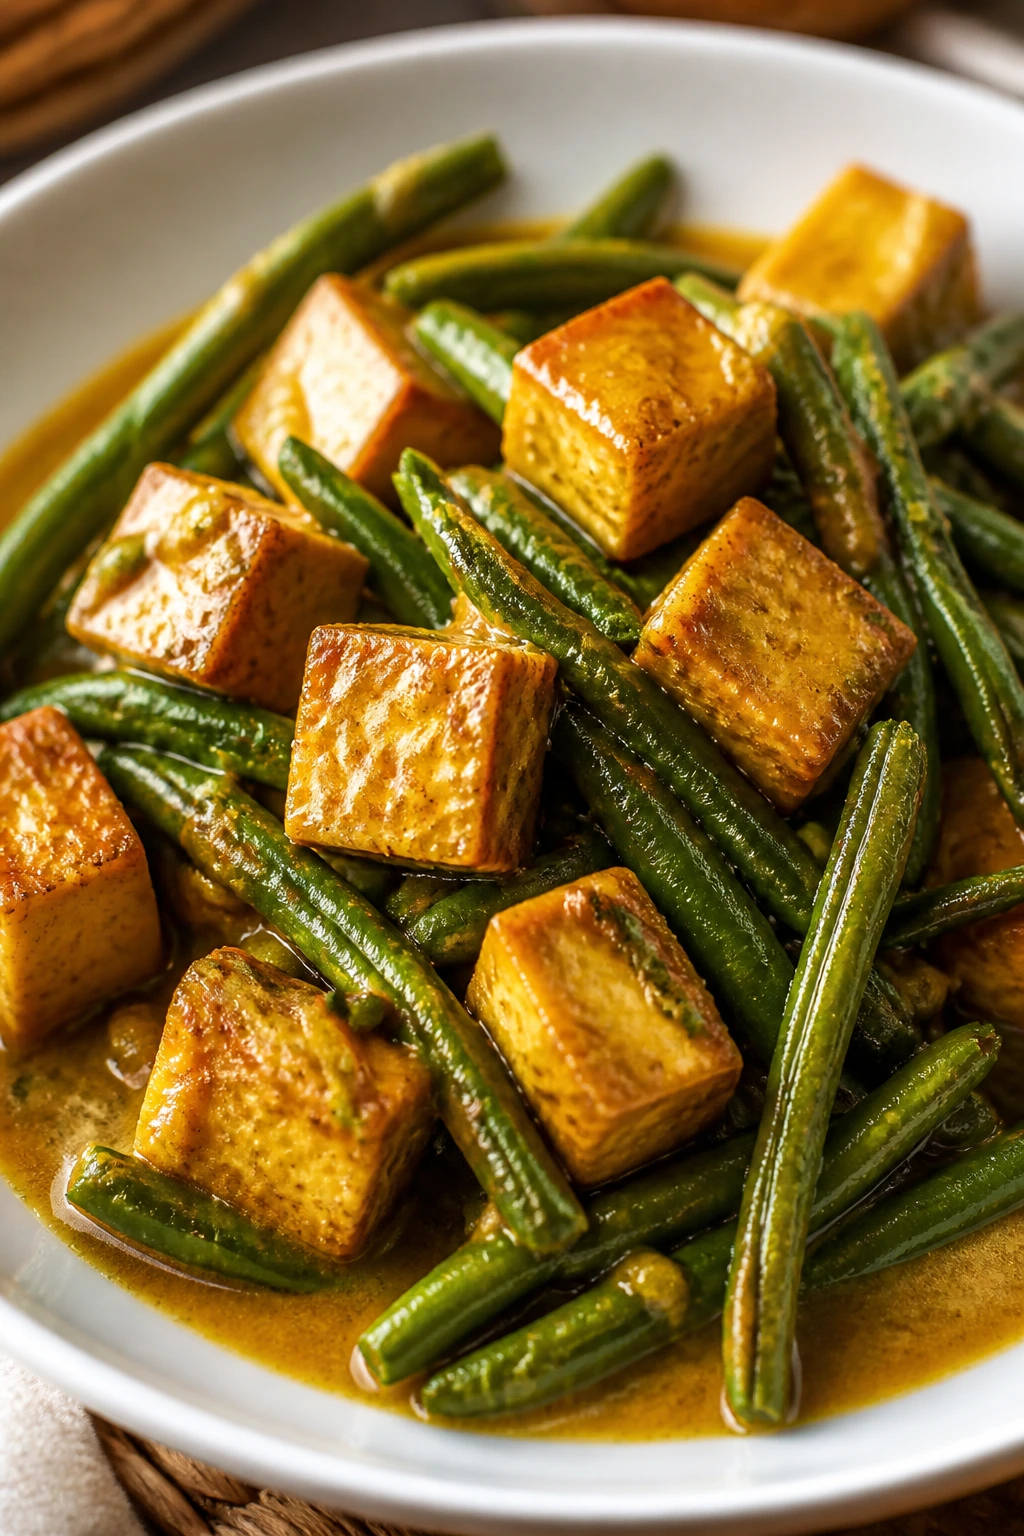
This tray is for the days when you want something plant-based that still has edges and bite. The tofu browns, the green beans stay snappy, and the curry seasoning brings enough warmth that you don’t miss bread, rice, or a long ingredient list.
Why It Works: Extra-firm tofu has the structure to survive the air fryer, but only if you press out the water first. Green beans cook at a similar pace when they’re trimmed and lightly oiled, so both ingredients can share a basket without one turning mushy. A little tamari and curry powder go a long way here — more than you think.
Key Ingredients:
- 14 oz extra-firm tofu, pressed and cut into 1-inch cubes
- 12 oz green beans, trimmed
- 2 tablespoons avocado oil
- 1 tablespoon tamari or coconut aminos
- 1 tablespoon curry powder
- 1 teaspoon garlic powder
- 1/2 teaspoon kosher salt
- 1/4 teaspoon black pepper
- 1 teaspoon sesame seeds, optional
- Lime wedges, for serving
Quick Steps:
- Press the tofu for 15 minutes, then cut it into cubes.
- Preheat the air fryer to 390°F (199°C) for 3 minutes.
- Toss the tofu with 1 tablespoon avocado oil, tamari, curry powder, garlic powder, salt, and pepper.
- Air fry the tofu for 8 minutes, then add the green beans tossed with the remaining 1 tablespoon oil.
- Cook for 4 to 6 minutes more, shaking once, until the tofu is browned and the beans are blistered at the edges.
- Finish with sesame seeds and lime juice.
Equipment for This Recipe:
- Air fryer
- Tofu press or paper towels and a plate
- Mixing bowl
- Tongs
- Knife and cutting board
How to Serve This Dish: Serve it over cauliflower rice or shredded cabbage for a full bowl. It also works in a lunch box with a small cup of yogurt sauce or chili crisp on the side if you want more punch.
Pro Tips for This Recipe:
- Press the tofu long enough; wet tofu won’t brown.
- Don’t stir the cubes too early or they’ll stick and break.
- Add the beans later so they keep a little snap.
- If you want deeper flavor, toss the tofu with the tamari mixture and let it sit for 10 minutes before cooking.
Variations on This Dish:
- Spicy Curry Tofu: Add 1/4 teaspoon cayenne or chili flakes.
- Peanut-Free Satay Style: Finish with a lime-yogurt sauce instead of peanut sauce.
- Chicken Swap: Use cubed chicken breast or thighs with the same seasoning if you want a meat version.
Common Mistakes to Avoid with This Dish:
- Skipping the tofu press: The cubes stay pale and soft.
- Using too much sauce: It burns and leaves the basket sticky.
- Overcooking the beans: They should blister, not turn limp.
Why the Air Fryer Makes Sunday Batching Easier
The air fryer rewards foods that already know how to brown: chicken thighs, salmon, pork chops, mushrooms, peppers, and little egg molds. That’s why it works so well for meal prep Sundays. You’re not asking one machine to handle a giant casserole with three textures fighting each other. You’re asking it to crisp, roast, and set small things fast.
That also means less cleanup. No sheet pans full of spatter. No oven preheat that feels like a commitment. A basket, a bowl, maybe a thermometer, and you’re done. The best part is the way leftovers hold together. Roasted food usually tastes better than steamed leftovers because the surface already has color and seasoning built in.
There is one catch. Air fryer success depends on spacing. Food needs room for air to move, and that means a batch of six stuffed peppers may need two rounds while a tray of egg bites needs a specific mold. Once you stop trying to force every recipe into one basket load, the whole method gets easier.
Essential Equipment for These Recipes
- Basket-style air fryer: A 5-quart or larger basket gives you enough room for chicken thighs, stuffed peppers, and steak bites without crowding.
- Instant-read thermometer: This is the difference between juicy and overdone for chicken, pork, fish, and turkey.
- Mixing bowls in two or three sizes: You’ll use one for seasonings, one for fillings, and one for tossing vegetables.
- Tongs: Essential for flipping chicken, pork, and steak without tearing the crust.
- Sharp knife and sturdy cutting board: Even cuts help everything finish at the same time.
- Silicone muffin mold or small air fryer-safe pan: Needed for egg bites and frittata squares.
- Parchment liners with holes: Useful for cheesy or delicate foods; the holes keep airflow moving.
- Meal prep containers with tight lids: Pick ones with separate compartments if you’re storing sauces or a cold side.
- Small brush or spoon: Handy for oiling fish, mushrooms, and portobellos without drowning them.
- Paper towels: Dry surfaces brown better. That’s not optional.
Smart Shopping and Ingredient Tips
A good meal prep week starts at the store, not at the basket. The cuts that work best here are the ones with enough fat or structure to survive reheating: chicken thighs instead of lean breast meat, center-cut salmon instead of fragile tail pieces, boneless pork chops that are close in thickness, and extra-firm tofu that doesn’t crumble when you cube it.
Read labels on sauces and seasonings. No-sugar-added marinara tastes cleaner on zucchini pizza bites, and some buffalo sauces are much saltier than others. Pesto is another one to watch; a decent jar should taste like basil and oil, not sugar and filler. If a spice blend lists sugar first or second, it may brown too fast in the air fryer.
Vegetables matter more than people give them credit for. Choose zucchini that feels firm and looks glossy, not floppy. Pick mushrooms with dry caps and closed gills if possible. Green beans should snap when bent. Broccoli florets should be tight, not shaggy. When the produce starts out wet or tired, the air fryer can’t rescue it.
Seafood deserves a quick glance for thickness and freshness. Cod, salmon, and shrimp all cook best when they’re close in size. If the fillets are wildly uneven, trim the thin ends or cook them separately. For shrimp, raw and peeled is the easiest route. For bacon, thin-cut is the move because thick slices take too long to crisp and can drag the chicken or tenders past the point of juiciness.
One last thing. Buy more herbs than you think you need. Parsley, dill, basil, and green onion can turn a tray of leftovers into something that tastes freshly made, even on day three.
How to Serve These Recipes
Presentation: Keep the plate or lunch container simple: one protein, one vegetable, one bright finish. A chicken thigh next to broccoli and a lemon wedge looks cleaner than a mixed pile, and the same rule works for salmon with cucumber salad or steak bites with cauliflower rice. If the food is going into containers, leave a little breathing room so steam doesn’t condense into puddles.
Accompaniments: Cauliflower rice, roasted broccoli, slaw, chopped romaine, cucumber salad, asparagus, green beans, and sautéed spinach all pair well with this collection. A cool sauce — ranch, yogurt-dill, mustard, or avocado crema — helps if the main dish leans spicy or smoky. For breakfast items, sliced avocado and salsa make the plate feel finished fast.
Portions: Most of these recipes land best at 4 to 6 oz of protein per serving, with 1 cup of vegetables or a small bed of cauliflower rice. Egg bites and frittata squares work as a two-piece breakfast with fruit on the side, while heartier items like pork chops or steak bites may only need one protein portion and one vegetable.
Beverage Pairing: Sparkling water with lime, unsweetened iced tea, and cold water with cucumber all fit the low carb angle cleanly. If you want something a little more grown-up with dinner, a dry white wine or a very dry sparkling drink is the least distracting match. Keep it crisp, not sweet.
Additional Tips and Flavor Boosters
Flavor Enhancement: A finishing drizzle does a lot of work here. Try lemon juice and olive oil on chicken, a little pesto on turkey meatballs, or a spoon of yogurt mixed with garlic and dill for fish and vegetables. That last move is one of my favorites because it wakes up leftovers without making them heavy.
Customization: Use the same seasoning logic across the week and swap the protein. Cajun seasoning works on shrimp, chicken, and steak. Garlic, paprika, and parmesan show up again and again because they brown well and don’t get weird after refrigeration. If you’re cooking for mixed tastes, keep the heat in a side sauce rather than building it into every tray.
Serving Suggestions: Pickled red onions, sliced avocado, chopped parsley, green onions, and a squeeze of citrus are the easiest ways to make a tray look intentional. A handful of chopped herbs at the end is not decoration; it changes the smell the second the lid comes off. That matters when you open a lunch box at your desk.
Make-It-Yours: Dairy-free? Skip the cheese-heavy finishes and lean on herbs, citrus, and olive oil. Higher protein? Add egg whites to the egg bites, serve the meatballs over extra greens, or pair the chicken and steak with Greek yogurt dips. Lower sodium? Use salt-free spice blends and fresh lemon, then season the finished dish lightly instead of loading the marinade.
Make-Ahead, Storage, and Reheating Guidance
Most of these dishes keep 3 to 4 days in the fridge if they’re cooled quickly and stored in airtight containers. Chicken thighs, pork chops, turkey meatballs, steak bites, stuffed peppers, sausage hash, egg bites, and frittata squares all fit that window comfortably. Salmon, cod, and shrimp are more delicate; they’re best eaten within 2 to 3 days, and shrimp is happiest on the shorter end of that range.
Freezing works best for the sturdier items. Chicken thighs, pork chops, turkey meatballs, steak bites, egg bites, and frittata squares can be frozen for up to 2 months. Stuffed peppers and portobellos freeze for about 1 month, though the vegetables soften a little on the reheat. Fish freezes too, but the texture gets softer, so I’d freeze salmon or cod only if you know you’ll eat it within 1 month and won’t mind a less firm bite. Shrimp can be frozen for about 1 month as well, though it’s never as good as fresh.
Reheating in the air fryer is the cleanest method for anything that should stay crisp. Use 325°F to 350°F for 3 to 6 minutes on chicken, pork, sausage, and steak bites. Fish usually only needs 2 to 4 minutes at the lower end of that range, and egg bites need about 2 to 3 minutes or they start to puff and dry out. If you’re reheating stuffed peppers or frittata squares, cover loosely with foil for the first few minutes if the top is already browned and you don’t want more color.
Microwaving is fine for egg bites, meatballs, and saucier dishes, but keep it short. Start with 30 to 45 seconds, then check. Seafood and bacon-wrapped items are the ones I’d reheat in the air fryer whenever possible, because the microwave turns them rubbery in a hurry. Let food cool before sealing the containers, and if a recipe has a crisp coating, tuck a paper towel under it to catch condensation.
Variations and Adaptations to Try
Dairy-Free Batch: Skip the parmesan, cheddar, feta, and cream cheese where needed, then lean harder on olive oil, lemon, herbs, and a good seasoning blend. The chicken thighs, salmon, steak bites, sausage hash, and tofu all adapt cleanly. Egg bites can be made without cheese, though they’ll be a little less creamy.
Lower-Sodium Week: Use salt-free seasoning blends, unsalted butter, and fresh citrus to do more of the heavy lifting. Chicken thighs, pork chops, and steak bites still taste complete if you season them at the end rather than dumping extra salt into the marinade. Olives, feta, and buffalo sauce are the main things to watch.
Heat-Seeker Tray: Add cayenne, red pepper flakes, jalapeño slices, or a smoky chili rub to the steak bites, chicken, shrimp, and buffalo peppers. Keep the heat in layers instead of a single blast. A spicy dish tastes better when it still has a little fat and citrus around it.
Kid-Calm Plates: Pull the hot sauce back and use garlic, paprika, parmesan, and mild cheese instead. The egg bites, pork chops, chicken thighs, and zucchini pizza bites are the easiest to keep friendly without making them bland. Put the spicy sauce on the table, not in the tray.
Vegetable-Heavy Rotation: Add more peppers, mushrooms, zucchini, green beans, and broccoli to the lineup, then reduce the cheese a little so the tray doesn’t get heavy. This is the easiest way to stretch the batch without changing the cooking method. Just keep the pieces cut to a similar size or the basket will roast unevenly.
Protein Swap Lane: Use chicken thighs in place of pork chops, tofu in place of chicken, or salmon in place of cod when the seasoning matches. Cajun, lemon-herb, and garlic-parmesan flavors move around well. The one rule: match the cut to the cook time. Thin foods need less heat. Thick foods need more patience.
Common Mistakes to Avoid

The first mistake is crowding the basket. It’s tempting, especially on meal prep day, to pile everything in and hope the air fryer “gets it done.” What usually happens is pale chicken, soft zucchini, and steak that tastes steamed. Cook in rounds if you have to. The better batch is worth the extra 10 minutes.
The second problem is skipping the dry step. Wet chicken, damp mushrooms, and zucchini straight from the sink all fight browning. Pat protein and vegetables dry before oiling them. That small move changes the whole tray. You’ll see it in the color and feel it in the texture.
Another one: using sauces that are too sugary too early. Buffalo, barbecue, marinara, and even some spice rubs can burn or turn sticky if they sit at the bottom of a hot basket. Keep the finish light, or add the sweet sauces after cooking. The air fryer is a browning machine, not a glaze machine.
People also overcook the delicate stuff. Salmon, cod, shrimp, and egg bites all move from done to dry fast. Start checking early. If the recipe says 8 minutes, don’t wander off and assume 10 will be better. It won’t.
Storage gets sloppy too. If you pack crisp items next to wet ones, the crust dies in the fridge. Use separate containers or at least separate compartments. Stuffed peppers and mushrooms can sit together. Zucchini pizza bites should not.
Finally, there’s the “one temperature fits all” mistake. Chicken thighs and pork chops like higher heat than egg bites. Shrimp and cod need a quicker run than steak or sausage. If you ignore that, the basket will still beep, but the food will tell on you.
Frequently Asked Questions
Can I prep all 15 recipes in one Sunday session?
You can, but I wouldn’t cook them all in one stretch unless you’ve got a big basket and a second tray. A smarter plan is to batch the heartier items first — chicken, pork, meatballs, steak bites — then move to egg bites, vegetables, and seafood so the lighter foods don’t sit around while you finish.
Which recipes hold up best for lunch?
Chicken thighs, turkey meatballs, pork chops, steak bites, sausage hash, egg bites, and frittata squares are the strongest lunch options. They reheat well and don’t get fragile in a container. Salmon, cod, and shrimp still work, but they’re better earlier in the week.
Can I use parchment paper or foil in the air fryer?
Yes, but only if the liner doesn’t block airflow and it stays weighted down by the food. Perforated parchment is the safest option for cheesy or sticky recipes. Full foil can work for fish or mushrooms in a dish, but don’t let loose edges fly around the basket.
What’s the best way to keep vegetables from getting soggy?
Dry them before cooking, don’t overcrowd the basket, and stop as soon as the edges color. Zucchini, mushrooms, and broccoli all release moisture, so a pre-salt and blot or a short pre-cook helps a lot. If a vegetable is holding sauce, keep the layer thin.
Can I freeze these recipes?
Yes, especially the chicken thighs, meatballs, pork chops, steak bites, egg bites, and frittata squares. Seafood freezes less gracefully, but it’s still usable if you don’t mind a softer texture. Put anything frozen into a shallow container so it cools and reheats more evenly.
How do I reheat leftovers without drying them out?
Use the air fryer at 325°F to 350°F and keep the timing short. Meatballs, chicken, and pork usually need only a few minutes. Seafood and egg-based dishes need even less. If something looks dry on the surface, a tiny splash of water or broth in the container can help before reheating.
Do these recipes work in a small air fryer basket?
Yes, but you’ll need to cook more of them in batches. The small basket is fine for salmon, egg bites, and shrimp, but chicken thighs, stuffed peppers, and portobellos usually need two rounds. A small basket doesn’t ruin the plan; it just means you plan around it.
Can I make these recipes if I’m cooking for one or two people?
Absolutely. Most of them scale down neatly, and a few — like egg bites, meatballs, and chicken thighs — are perfect for smaller portions. If you’re cooking for one, freeze half before cooking or keep the seasoning mix ready so the next batch takes almost no effort.
A Fridge Full of Ready Meals
The best part of a Sunday batch like this is not the cooking itself. It’s opening the fridge on a Tuesday and seeing food that still looks like it has a pulse — browned chicken, bright peppers, egg bites that didn’t collapse, salmon that hasn’t gone limp and gray at the edges.
That’s what good low carb air fryer recipes do. They give you meals with enough structure to survive the week, enough flavor to keep you interested, and enough speed that Sunday cooking doesn’t feel like a second job. Keep the basket uncrowded, season with purpose, and lean on vegetables that can handle heat. The rest takes care of itself.