
Getting healthy kid recipes under 500 calories onto the table can feel less like cooking and more like negotiating with a tiny food critic who has strong feelings about green specks. A plate has to look familiar, smell good, and survive the first bite without turning into a lecture about carrots.
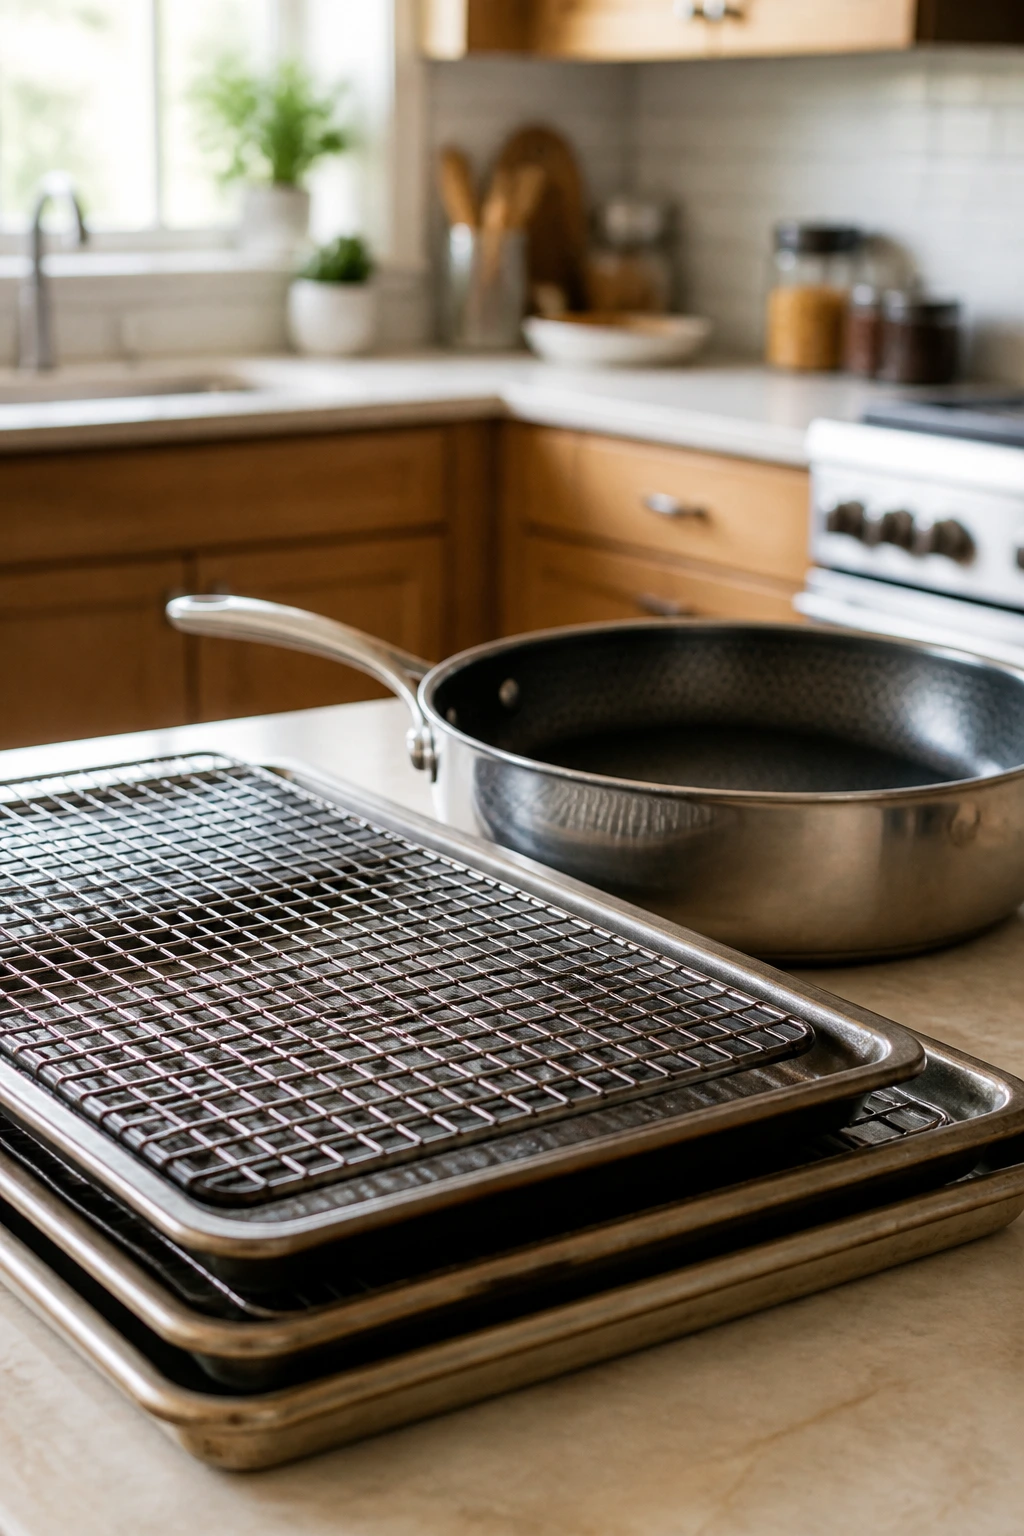
The trick is not making everything “diet” food. It is choosing recipes that already act like the foods kids want — crisp tenders, cheesy pasta, warm muffins, handheld pockets — and then building them with lean proteins, modest portions, and vegetables that stay in the background instead of shouting. A wire rack keeps breading crisp. Greek yogurt gives sauces body without the heaviness of a cream bomb. Grated zucchini disappears into meatballs so cleanly that most kids never clock it.
I also like recipes that give you some breathing room. If dinner needs to become lunch, or breakfast needs to become an after-school snack, these kinds of dishes travel well. Muffins, bowls, soups, patties, and quesadillas all reheat with less drama than a fussy casserole that turns gluey by the second day. That matters more than shiny nutrition advice. It matters in the real kitchen, where a calm meal is worth more than a clever one.
Why These Recipes Make Weeknight Plates Easier
-
The shapes are familiar: Nuggets, muffins, bowls, and pockets feel like foods kids already trust, which buys you a better first bite than a plate of random “healthy stuff.”
-
Vegetables show up without taking over: Grated zucchini, hidden carrots, pureed sauce, and broccoli tucked into mac and cheese add fiber and volume without forcing every bite to taste like a side salad.
-
Portions stay sensible: Most of these recipes land around 250 to 450 calories per serving, so you can add fruit, milk, or an extra vegetable and still keep the plate balanced.
-
The cooking methods stay sane: Baking, skillet cooking, and quick simmering keep the food from getting greasy or heavy, and they leave you with fewer pans to scrub.
-
Leftovers actually work: Meatballs, soup, rice, muffins, and patties reheat well enough that lunch the next day does not feel like a punishment.
-
Kids can help without wrecking dinner: Stirring, stuffing, sprinkling cheese, or shaping nuggets gives them a job they can handle, which often matters more than the recipe itself.
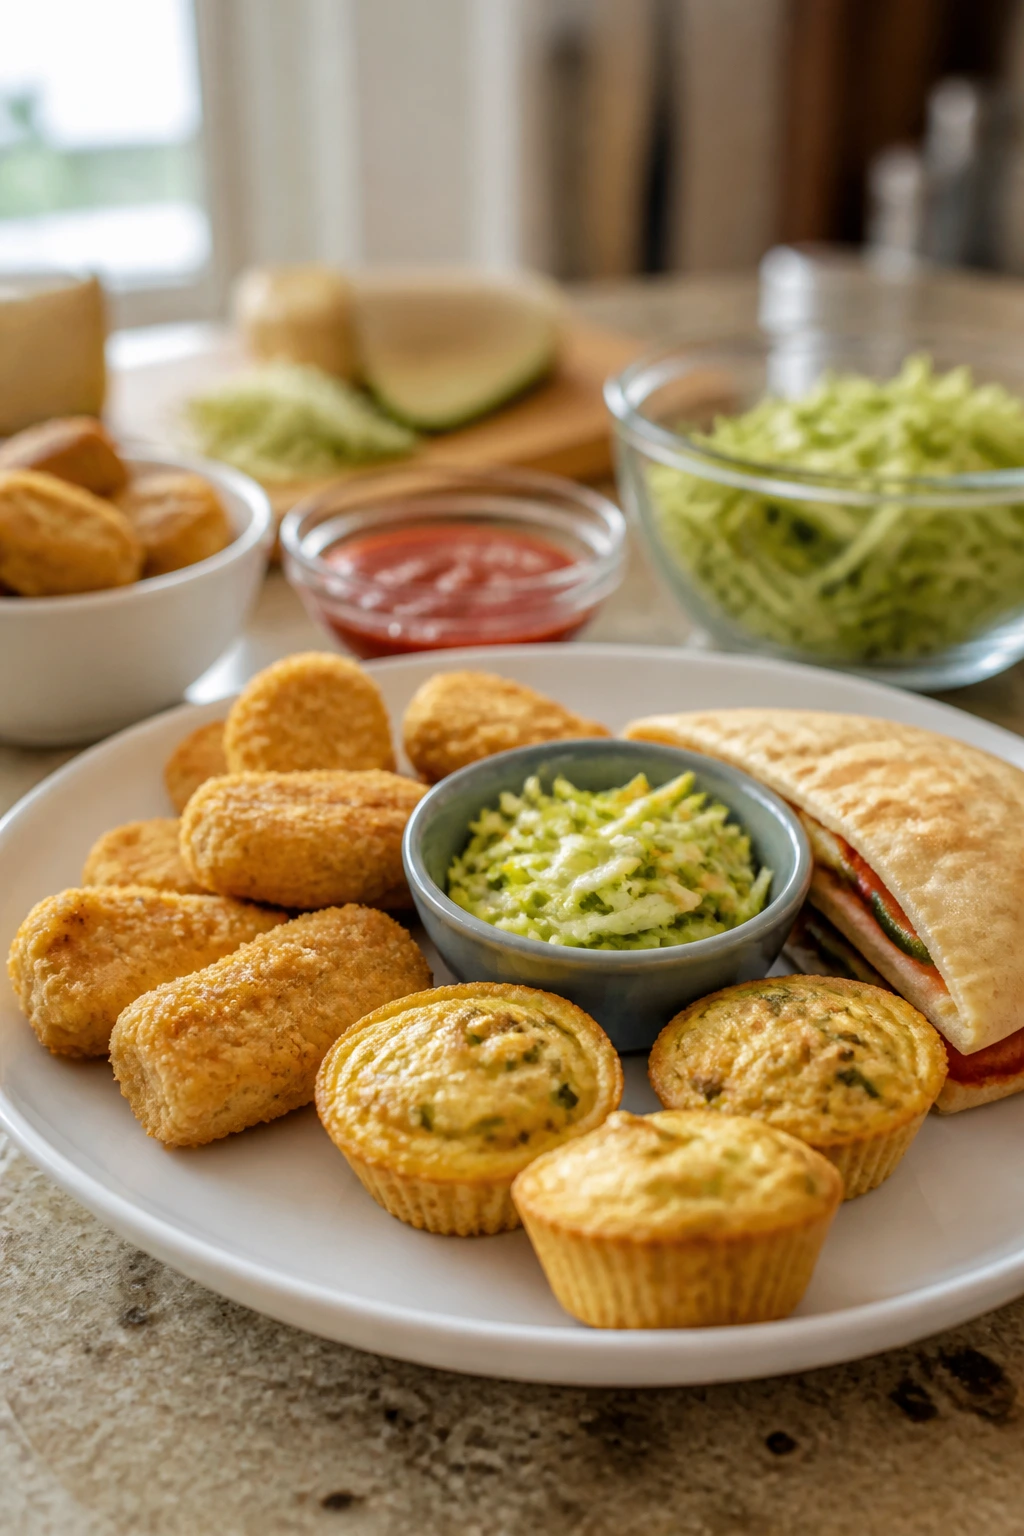
1. Baked Chicken Tenders with Cornflake Crust
Crispy chicken tenders are one of those meals that can disappear fast if you get the coating right. These bake on a rack, so the bottom stays dry instead of going soggy, and the cornflake crust gives you a sharp little crunch that feels closer to fried chicken than baked breadcrumb food.
Why It Works:
A 425°F oven is hot enough to brown the coating before the chicken dries out, and the wire rack keeps air moving under the tenders. I like this version because it lands around 330 calories per serving with a big enough portion to feel like dinner, not a snack. The seasoning lives in the flour and the crumb, so every bite tastes complete.
Key Ingredients:
- 1 1/2 pounds chicken tenders, trimmed
- 1/2 cup all-purpose flour
- 2 large eggs
- 2 cups cornflakes, crushed
- 1 teaspoon kosher salt
- 1 teaspoon paprika
- 1/2 teaspoon garlic powder
- Cooking spray or olive oil spray
Quick Steps:
- Preheat the oven to 425°F and set a wire rack over a rimmed sheet pan.
- Set up three bowls: flour mixed with salt, paprika, and garlic powder; beaten eggs; crushed cornflakes.
- Dredge each tender in flour, dip in egg, then press firmly into the cornflakes so the coating sticks.
- Arrange the tenders on the rack, leaving space between them, and mist lightly with cooking spray.
- Bake for 15 to 18 minutes, flipping once halfway through, until the coating is golden and the chicken reaches 165°F.
- Rest for 3 minutes before serving so the crust stays on the meat instead of sliding off.
Equipment for This Recipe:
- Rimmed sheet pan
- Wire rack
- Three shallow bowls
- Tongs or a fork
- Instant-read thermometer
How to Serve This Dish:
Serve with carrot sticks, cucumber coins, and a small bowl of plain yogurt ranch or honey mustard. Two or three tenders make a solid kid portion, and the plate looks better with one bright vegetable beside the chicken instead of a mountain of fries.
Pro Tips for This Recipe:
- Crush the cornflakes to a mix of fine crumbs and small shards; powder alone makes a dull crust.
- Press the coating on with your fingertips. Half-hearted breading falls off fast.
- A light spray on top matters. It helps the crumbs brown instead of drying pale.
- If your oven runs cool, give the tenders 2 extra minutes and check the center.
Variations on This Dish:
- Parmesan Crunch: Add 1/3 cup grated parmesan to the cornflakes for a saltier, more savory crust.
- Gluten-Free Crunch: Use crushed rice cereal and gluten-free flour in place of the standard breading.
- Buffalo Finish: Toss the baked tenders in 2 tablespoons warm buffalo sauce for older kids who want more kick.
Common Mistakes to Avoid with This Dish:
- Skipping the rack: The bottom steams on a bare pan, and the crust goes limp.
- Crowding the tenders: Steam trapped between pieces softens the coating and slows browning.
- Pulling them too early: If the coating is golden but the chicken is under 165°F, wait a few more minutes; dry chicken is annoying, but undercooked chicken is not negotiable.
2. Hidden-Veggie Turkey Meatballs
These meatballs are soft, savory, and a little sneaky in the best way. The zucchini and carrot melt into the turkey so cleanly that the texture stays tender, not crumbly, and a spoonful of marinara makes them feel like proper comfort food.
Why It Works:
Ground turkey is lean enough to keep the calorie count in check, and the grated vegetables add moisture so the meatballs do not bake up dry. This recipe comes in around 290 calories per serving if you serve four modest portions with sauce. The oven does the shaping for you, which means less babysitting at the stove.
Key Ingredients:
- 1 1/2 pounds ground turkey
- 1 cup zucchini, grated and squeezed dry
- 1/2 cup carrot, finely grated
- 1/2 cup breadcrumbs
- 1/4 cup parmesan, grated
- 1 large egg
- 2 cloves garlic, minced
- 1 teaspoon Italian seasoning
- 2 cups marinara sauce
Quick Steps:
- Preheat the oven to 400°F and line a sheet pan with parchment.
- Mix turkey, zucchini, carrot, breadcrumbs, parmesan, egg, garlic, and Italian seasoning in a bowl until just combined.
- Shape into 18 to 20 meatballs, using about 1 1/2 tablespoons for each one.
- Bake for 14 to 16 minutes, until browned on the outside and cooked through to 165°F.
- Warm the marinara in a skillet or saucepan, then add the baked meatballs and coat them gently.
- Serve hot, with a little extra sauce on the side if the kids are the type who dip everything.
Equipment for This Recipe:
- Rimmed sheet pan
- Parchment paper
- Mixing bowl
- Box grater
- Small scoop or tablespoon
How to Serve This Dish:
Pile them over whole wheat spaghetti, tuck them into rolls, or set them next to roasted broccoli. If you want a lower-calorie plate, serve the meatballs over zucchini noodles with a side of fruit.
Pro Tips for This Recipe:
- Squeeze the grated zucchini hard in a clean towel. Wet zucchini turns the mixture slack.
- Mix with your hands just until combined; overworking makes them dense.
- A small scoop keeps the meatballs even, which helps them finish at the same time.
- If you like a stronger tomato flavor, simmer the baked meatballs in the sauce for 5 minutes before serving.
Variations on This Dish:
- Swedish-Style Turkey Balls: Use dill and a little nutmeg, then serve with a lighter yogurt gravy.
- Dairy-Free Version: Skip the parmesan and add 2 tablespoons nutritional yeast for a savory edge.
- Mini Meatball Subs: Bake smaller meatballs and tuck 3 or 4 into slider rolls with sauce and mozzarella.
Common Mistakes to Avoid with This Dish:
- Too much moisture in the vegetables: Squeeze them dry or the meatballs slump in the oven.
- Packing them hard: Tight balls bake dense; light shaping keeps them tender.
- Boiling them in sauce too long: They can get grainy if you keep them simmering hard after baking.
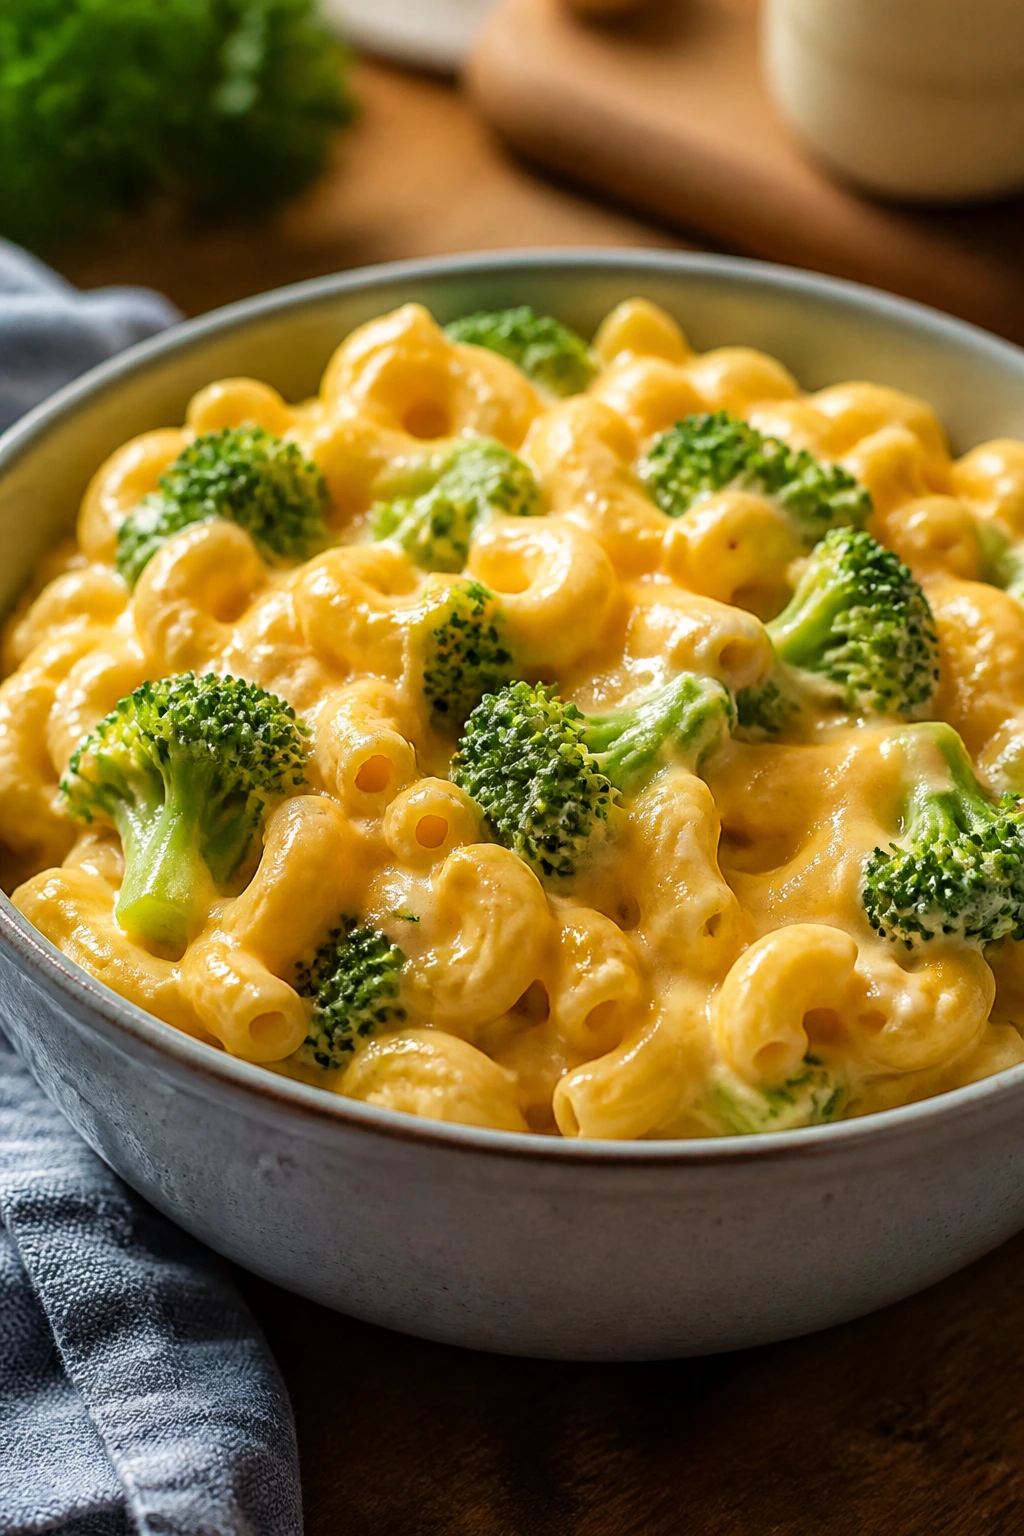
3. Creamy Broccoli Mac and Cheese

If you want a vegetable in the same bowl as the cheese, this is the move. The broccoli goes in with the pasta, so it picks up the sauce instead of sitting on the side like a polite afterthought, and the Greek yogurt keeps the sauce creamy without turning it into a brick of heaviness.
Why It Works:
This mac and cheese stays kid-friendly because the broccoli pieces are small, soft, and coated in cheddar. A serving comes in around 380 calories, which leaves room for apple slices or a simple salad if you want more on the table. The sauce thickens with a quick flour-and-milk base, so it clings instead of pooling at the bottom of the bowl.
Key Ingredients:
- 8 ounces whole wheat elbow macaroni
- 3 cups broccoli florets, chopped small
- 1 1/2 cups milk
- 2 tablespoons unsalted butter
- 2 tablespoons all-purpose flour
- 2 cups sharp cheddar, shredded
- 1/2 cup plain Greek yogurt
- 1/2 teaspoon salt
- 1/4 teaspoon black pepper
Quick Steps:
- Boil the pasta in salted water and add the broccoli during the last 2 minutes so it turns bright green and tender.
- Drain and set aside, reserving 1/2 cup pasta water.
- Melt butter in the same pot, whisk in flour, and cook for 1 minute until it smells faintly nutty.
- Whisk in the milk and cook over medium heat until the sauce lightly coats the spoon.
- Stir in cheddar, yogurt, salt, and pepper off the heat, then fold in the pasta and broccoli.
- Loosen with a splash of reserved pasta water if the sauce looks too thick.
Equipment for This Recipe:
- Large pot
- Whisk
- Colander
- Wooden spoon
- Box grater
How to Serve This Dish:
Serve it hot in shallow bowls with roasted carrots or apple wedges. The broccoli stays more appealing when it’s mixed in with the cheese instead of piled on top like a warning label.
Pro Tips for This Recipe:
- Shred the cheese yourself if you can; it melts smoother than most bagged blends.
- Add the yogurt off the heat so it stays silky instead of splitting.
- Keep the broccoli pieces small enough to fit on a spoon with the pasta.
- A spoonful of pasta water can fix a sauce that looks too tight after resting.
Variations on This Dish:
- Cauliflower Cheese Swap: Replace half the broccoli with small cauliflower florets for a softer texture.
- Sneaky Spinach Version: Stir in 2 packed cups of chopped spinach at the end; it wilts in seconds.
- Bacon-For-Texture Add-On: Add 2 tablespoons crumbled cooked bacon for kids who like a smoky note.
Common Mistakes to Avoid with This Dish:
- Overcooking the broccoli: It turns olive green and mushy fast.
- Boiling the sauce after the yogurt goes in: That can make it grainy.
- Using too little salt: Pasta needs seasoning in the water and in the sauce or the whole bowl tastes flat.
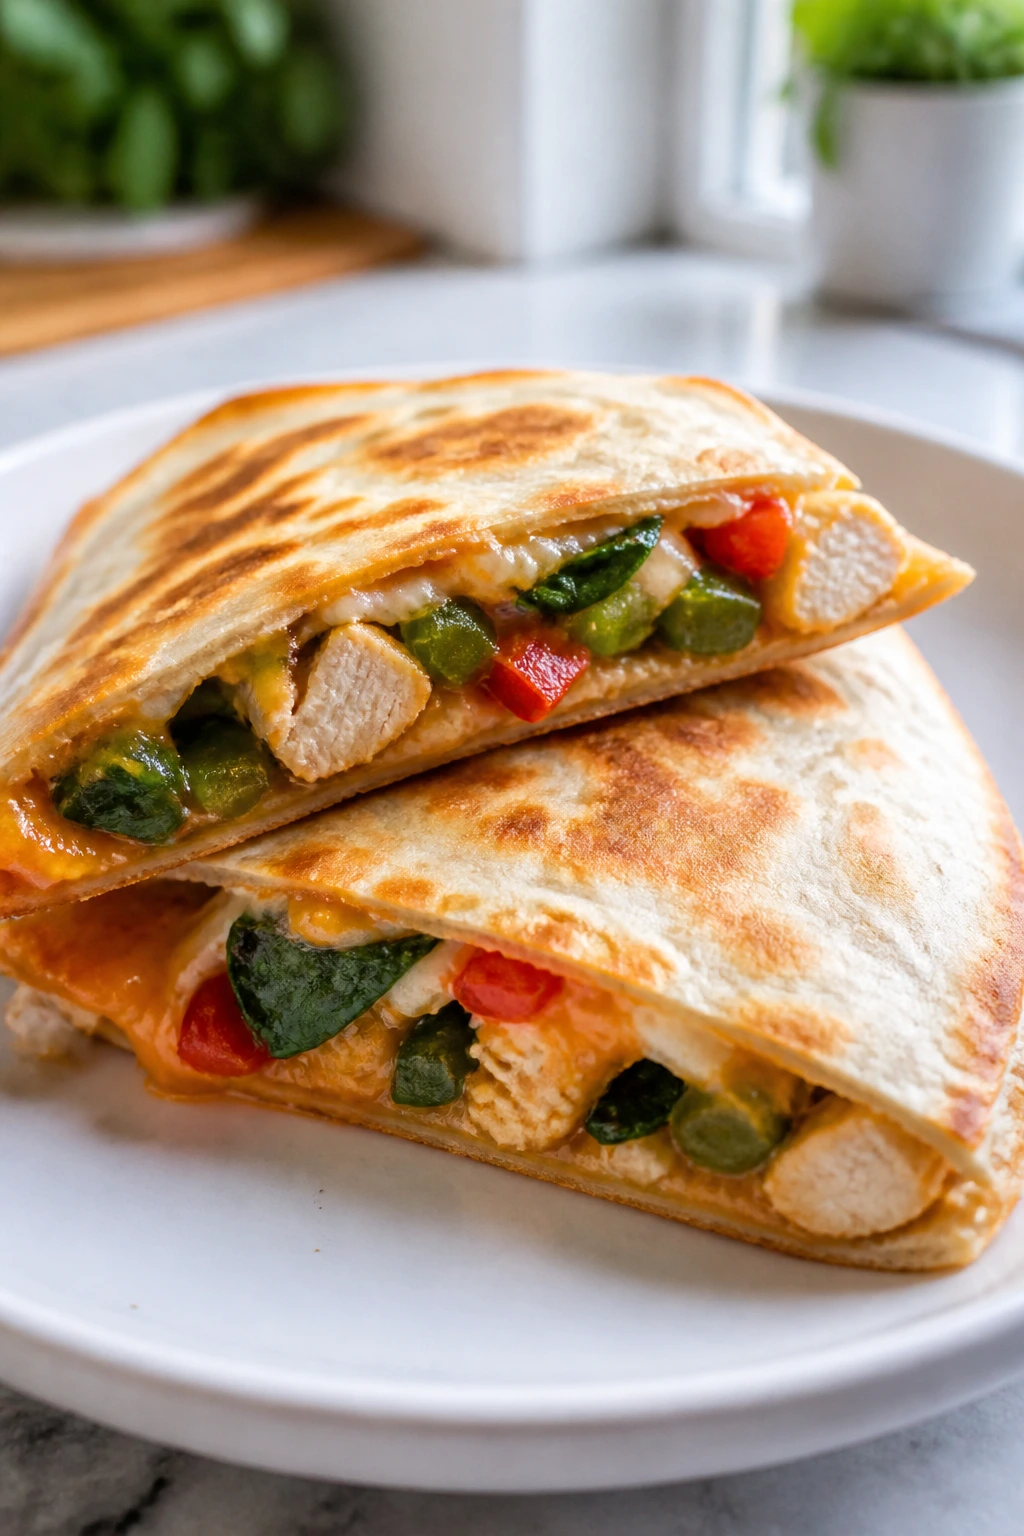
4. Mini Chicken and Veggie Quesadillas
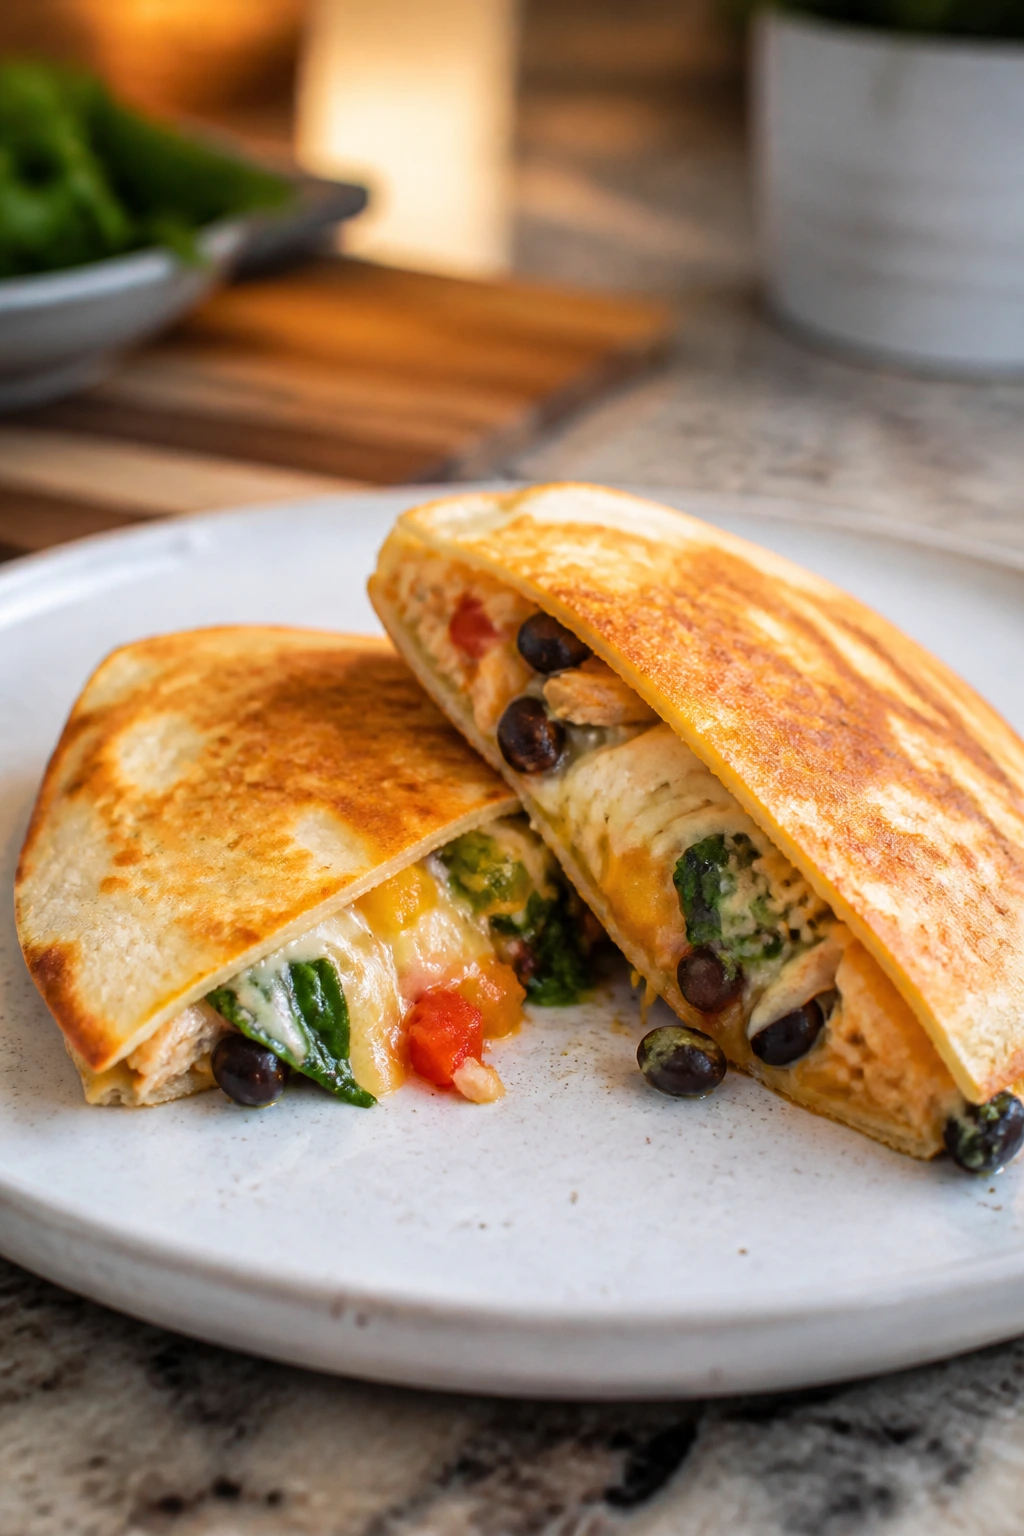
A good quesadilla should crack a little when you cut it. These do that. They’re filled with shredded chicken, beans, cheese, and finely chopped vegetables, so you get a warm, melty center without a greasy skillet puddle at the end.
Why It Works:
The filling is chopped small enough that kids don’t pick around it, and the tortilla browns fast enough to stay crisp without drying out the cheese. One serving lands around 350 calories if you keep to one filled tortilla and a side of salsa. It’s a nice bridge meal — familiar, fast, and easy to dip.
Key Ingredients:
- 4 whole wheat tortillas, 8-inch
- 1 1/2 cups cooked shredded chicken
- 1/2 cup black beans, rinsed and drained
- 1/2 cup finely chopped spinach
- 1/2 cup finely diced bell pepper
- 1 cup shredded cheddar or Monterey Jack
- 1 teaspoon cumin
- 1 teaspoon olive oil
- Salsa, for serving
Quick Steps:
- Mix chicken, beans, spinach, bell pepper, cumin, and half the cheese in a bowl.
- Warm a skillet over medium heat and brush it lightly with olive oil.
- Fill one tortilla on one half only, then fold it over and press gently.
- Cook 2 to 3 minutes per side until the tortilla is golden and the cheese has melted.
- Repeat with the remaining tortillas, adding a little oil only as needed.
- Rest the quesadillas for 1 minute before slicing into wedges.
Equipment for This Recipe:
- Large skillet
- Spatula
- Mixing bowl
- Cutting board
- Sharp knife or pizza cutter
How to Serve This Dish:
Cut into small wedges and serve with salsa, avocado slices, and a few cucumber sticks. For smaller kids, two wedges can be plenty; for older kids, a whole quesadilla with fruit on the side usually does the job.
Pro Tips for This Recipe:
- Keep the filling dry. Watery vegetables make tortillas go soft fast.
- Use medium heat, not high heat, or the tortilla browns before the cheese melts.
- Let the quesadilla sit for a minute before cutting; the filling holds together better.
- If you’re packing lunch, cool it first so the steam doesn’t fog the tortilla.
Variations on This Dish:
- Breakfast Quesadilla: Swap chicken for scrambled eggs and add a spoonful of salsa.
- Bean-and-Cheese Shortcut: Skip the chicken and use more beans for a meatless version.
- Corn Tortilla Stack: Use smaller corn tortillas for a crisp, gluten-free, taco-style plate.
Common Mistakes to Avoid with This Dish:
- Overfilling the tortilla: That leads to leaks and messy edges.
- Cooking too hot: The outside burns before the cheese melts through.
- Skipping the rest time: Slicing too soon sends the filling out onto the cutting board.
5. Salmon Patties with Lemon Yogurt Dip
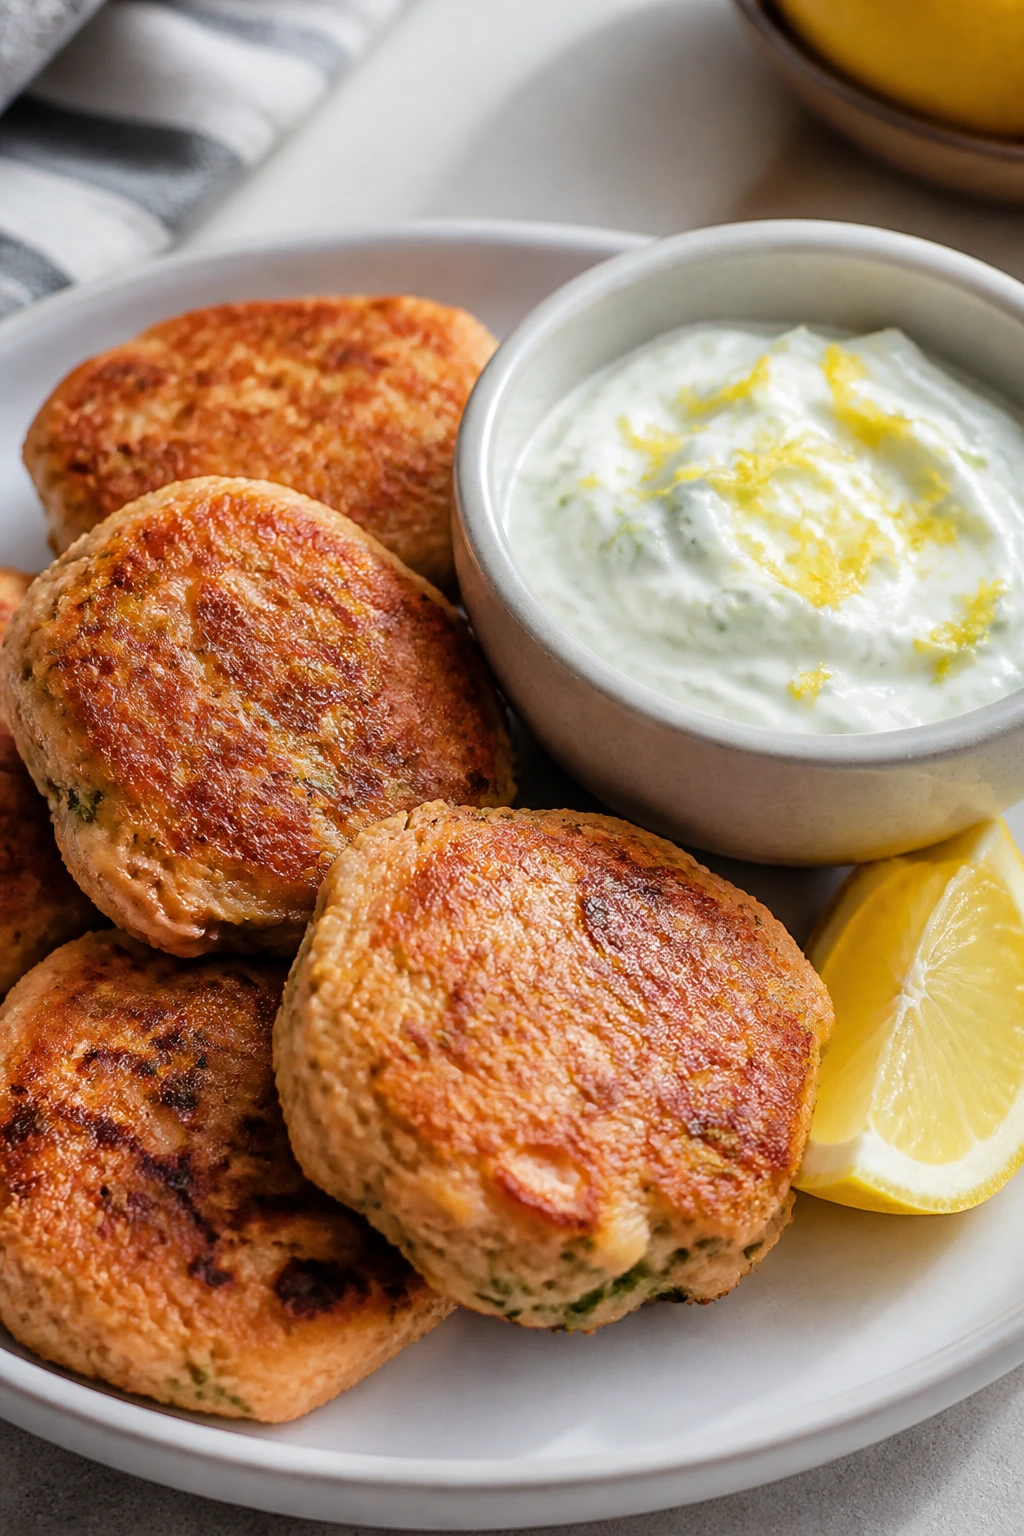
Salmon patties are one of those old-school meals that deserve a comeback when they’re done right. These are crisp on the outside, soft in the middle, and brightened with lemon so they don’t taste heavy or fishy.
Why It Works:
Canned salmon keeps this recipe quick and budget-friendly, while the egg and panko give the patties enough structure to hold together in the skillet. The whole plate sits around 310 calories per serving, dip included. I like them because they use pantry ingredients, but the finish still feels fresh.
Key Ingredients:
- 2 cans salmon, drained and flaked
- 1 large egg
- 1/3 cup panko breadcrumbs
- 2 tablespoons finely minced onion
- 1 tablespoon chopped dill or parsley
- Zest of 1 lemon
- 1 tablespoon lemon juice
- 2 tablespoons plain Greek yogurt
- 1 teaspoon Dijon mustard
- 1 tablespoon olive oil
Quick Steps:
- Stir salmon, egg, panko, onion, dill, lemon zest, and lemon juice in a bowl.
- Shape the mixture into 6 small patties and press them lightly so they hold.
- Whisk yogurt and Dijon together for the dip and set aside.
- Heat olive oil in a skillet over medium heat.
- Cook the patties for 3 to 4 minutes per side, until golden and heated through.
- Serve with the lemon yogurt dip while the edges are still crisp.
Equipment for This Recipe:
- Medium skillet
- Mixing bowl
- Fish spatula or wide spatula
- Citrus zester
- Small bowl for dip
How to Serve This Dish:
Put them on the plate with cucumber spears, peas, or a small pile of roasted potatoes. They also work nicely in a sandwich bun with lettuce if you need a lunch that feels bigger without turning into a calorie bomb.
Pro Tips for This Recipe:
- Drain the salmon well or the patties can fall apart in the pan.
- Chilling them for 10 minutes before cooking helps the surface firm up.
- Keep the heat at medium; high heat darkens the outside before the middle warms.
- A little lemon zest does more here than extra salt.
Variations on This Dish:
- Corn-Crusted Cakes: Roll the patties in crushed cornflakes before frying for extra crunch.
- Dairy-Free Dip: Use dairy-free yogurt or skip the dip and serve with lemon wedges.
- Herby Picnic Version: Add chopped chives and parsley for a fresher, more green flavor.
Common Mistakes to Avoid with This Dish:
- Too much mixing: That makes the patties dense and tough.
- Flipping too early: Wait until the first side is browned enough to release cleanly.
- Using a roaring hot pan: The edges scorch before the centers are warm.
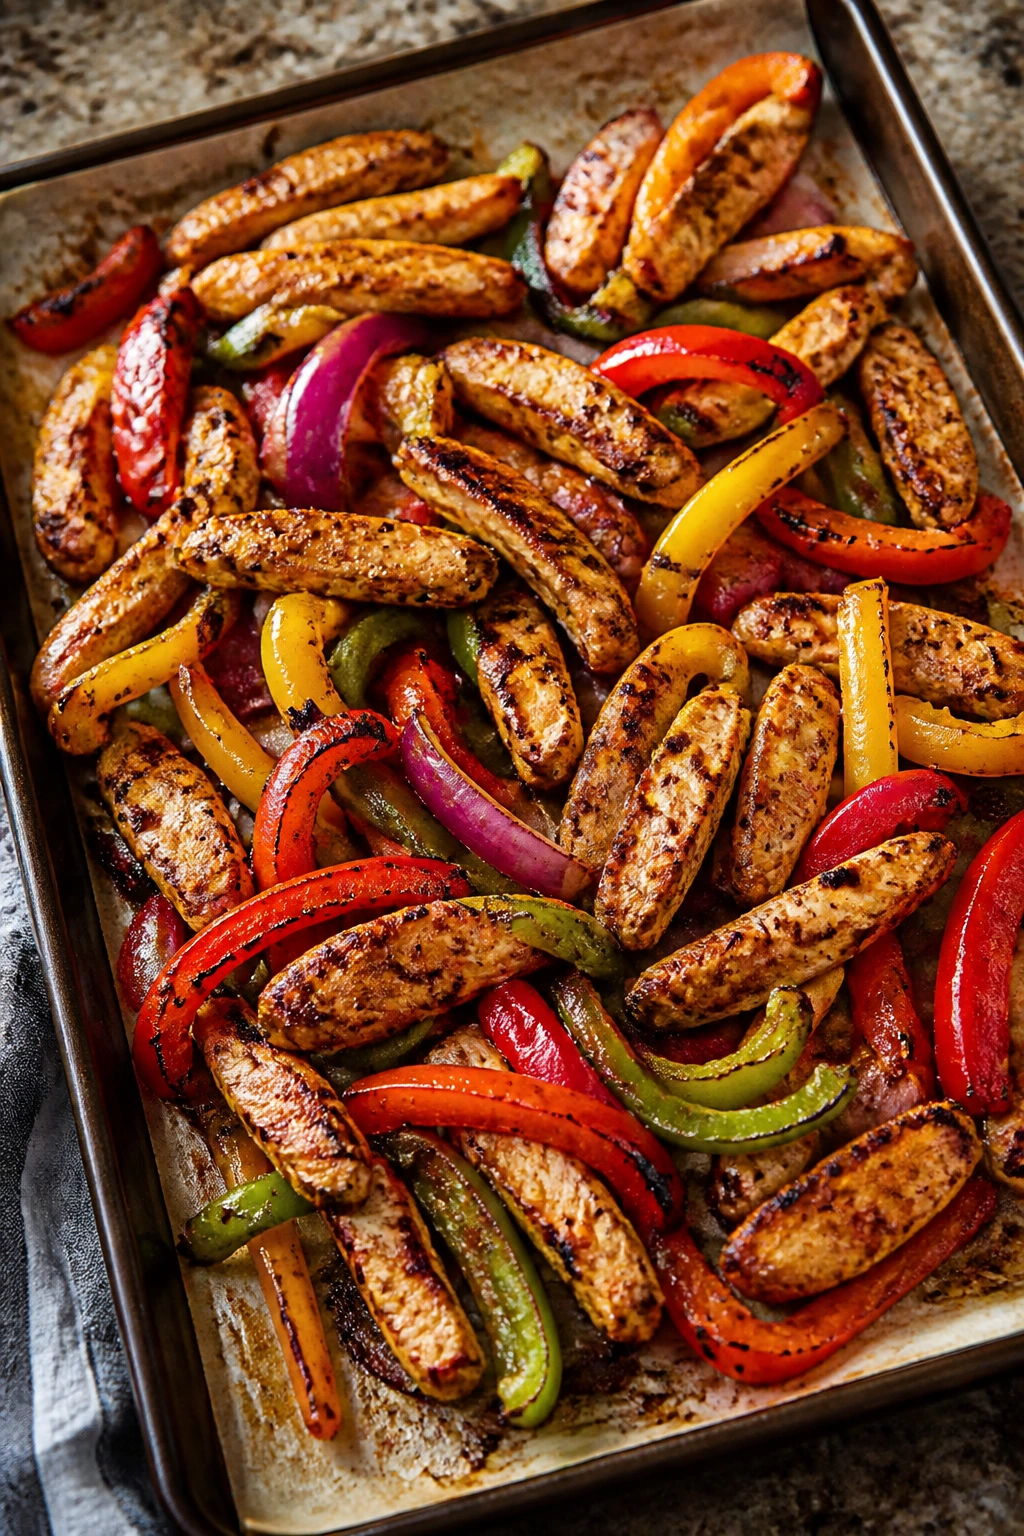
6. Sheet Pan Chicken Fajitas
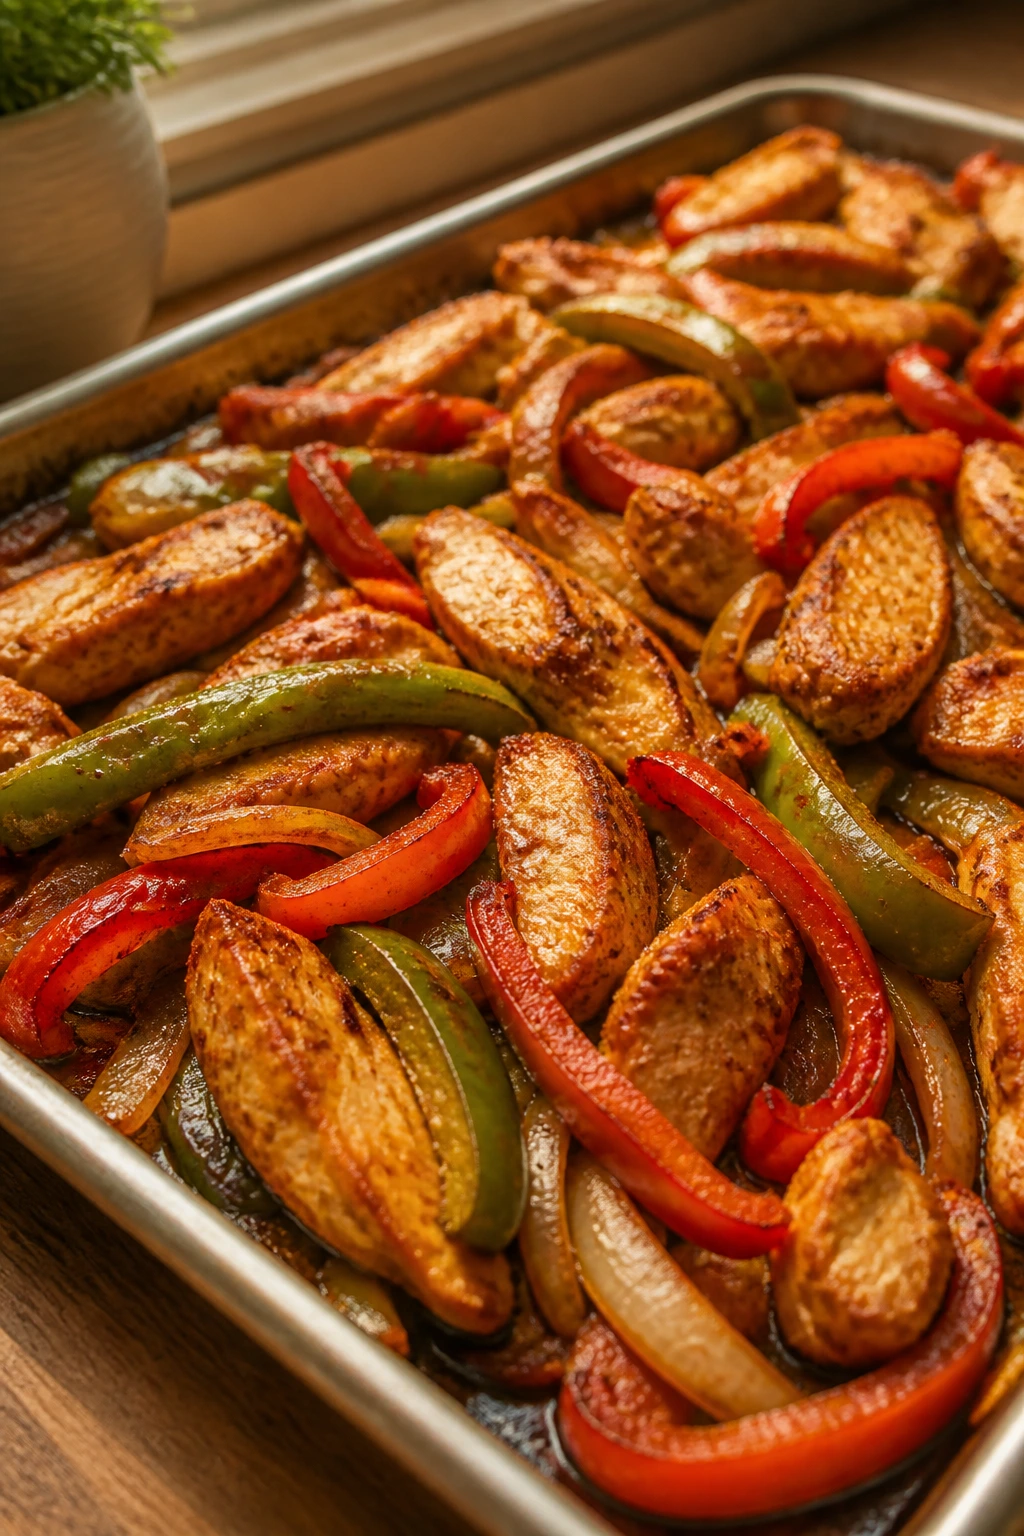
This is the kind of dinner that smells done before it looks done. The peppers soften, the onions sweeten, and the chicken picks up enough char at the edges to taste like it spent more time outside than it did.
Why It Works:
Sheet pan cooking keeps the slicing and cleanup manageable, and the high oven heat does the browning for you. A serving comes in around 420 calories with two small tortillas, which leaves room for salsa or a spoonful of yogurt on top. The recipe also scales well, which is handy when one child eats like a bird and the other eats like a grown adult.
Key Ingredients:
- 1 1/2 pounds boneless skinless chicken breast, sliced thin
- 3 bell peppers, sliced
- 1 large onion, sliced
- 2 tablespoons olive oil
- 2 tablespoons mild taco seasoning
- 1/2 teaspoon salt
- 8 small tortillas
- Lime wedges, for serving
Quick Steps:
- Preheat the oven to 425°F and line a sheet pan with parchment.
- Toss chicken, peppers, onion, oil, taco seasoning, and salt in a bowl until coated.
- Spread the mixture in a single layer on the pan.
- Roast for 18 to 20 minutes, stirring once halfway through, until the chicken is cooked and the vegetables have browned at the edges.
- Warm the tortillas while the pan comes out of the oven.
- Serve with lime wedges, salsa, or a little yogurt.
Equipment for This Recipe:
- Rimmed sheet pan
- Parchment paper
- Large mixing bowl
- Sharp knife
- Tongs
How to Serve This Dish:
Let everyone build their own tortilla with chicken, peppers, and onion. For a lower-calorie plate, skip the tortilla and serve the fajita mix in lettuce cups with black beans on the side.
Pro Tips for This Recipe:
- Slice the chicken thin so it cooks at the same pace as the vegetables.
- Don’t crowd the pan; space creates browning.
- Use mild seasoning if you’re feeding younger kids, then add hot sauce at the table for adults.
- A squeeze of lime at the end wakes up the whole tray.
Variations on This Dish:
- Chicken and Mushroom Fajitas: Replace one pepper with sliced mushrooms for a deeper savory note.
- Bean Bowl Version: Serve the roasted mix over rice with black beans instead of tortillas.
- Shrimp Shortcut: Use peeled shrimp and roast for about 8 minutes instead of 20.
Common Mistakes to Avoid with This Dish:
- Cutting the chicken too thick: It finishes late and dries out while the peppers are still soft.
- Overcrowding the pan: You get steamed vegetables instead of browned ones.
- Serving without acid: Lime or salsa keeps the dish from tasting one-note.
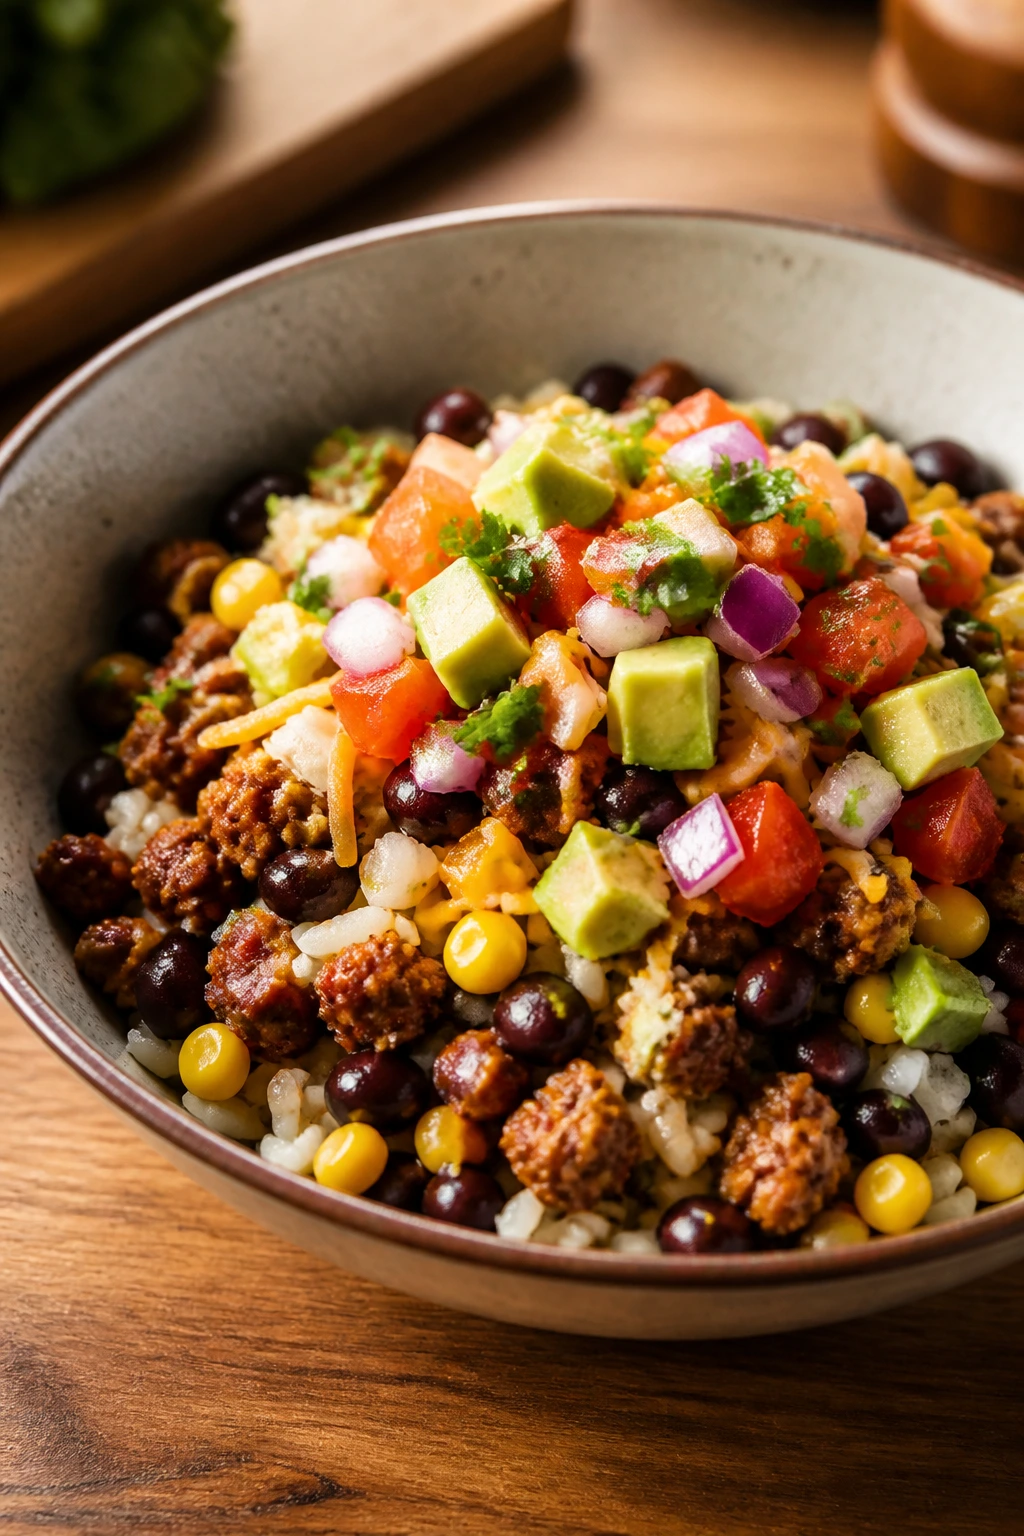
7. Turkey and Bean Taco Bowls
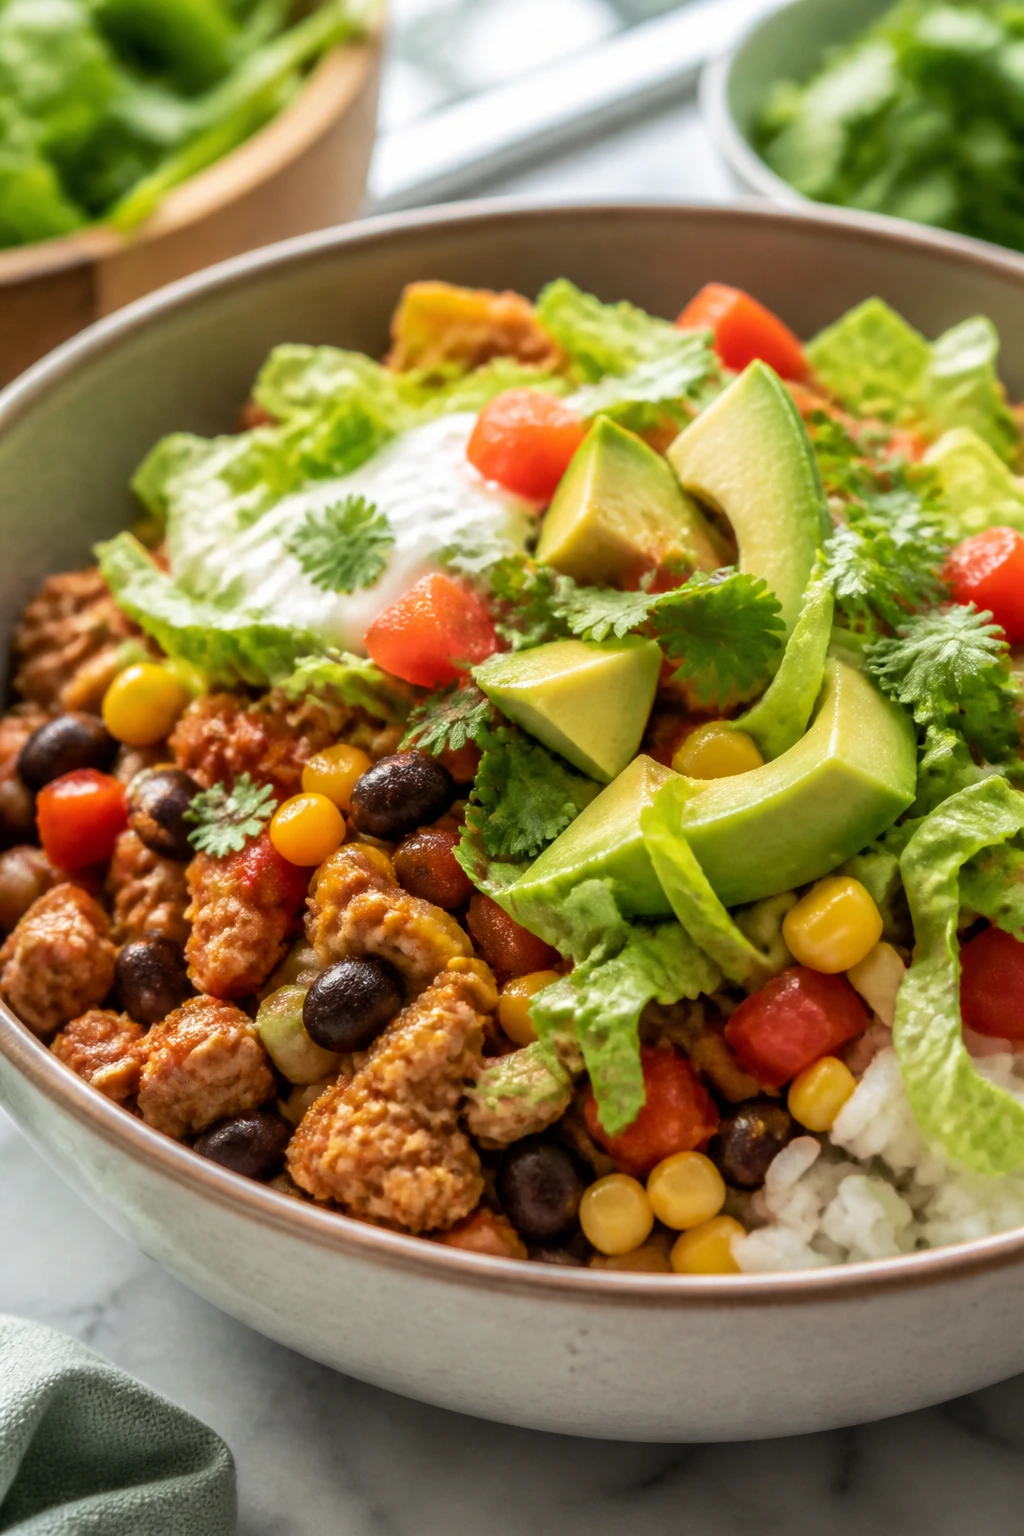
Bowls are useful because they let you control the parts without making dinner feel like a compromise. Here the turkey is seasoned, the beans add body, and the rice gives kids a familiar base that soaks up salsa instead of sliding around the bowl.
Why It Works:
This meal stays around 400 calories per serving with a modest scoop of rice, turkey, beans, and toppings. The beans stretch the protein without making the meal heavy, and the toppings let each kid customize the bowl without you cooking three separate dinners. It is one of those dinners that looks casual but lands with real staying power.
Key Ingredients:
- 1 pound lean ground turkey
- 1 tablespoon olive oil
- 1 packet or 2 tablespoons mild taco seasoning
- 1 can black beans, rinsed and drained
- 2 cups cooked rice
- 1 cup corn, thawed if frozen
- 1 cup shredded lettuce
- 1 avocado, sliced
- 1/2 cup salsa
Quick Steps:
- Heat oil in a skillet over medium heat.
- Cook the turkey with taco seasoning until browned and no pink remains, about 6 to 8 minutes.
- Stir in black beans and corn, then cook for 2 minutes until hot.
- Spoon rice into bowls.
- Top with the turkey mixture, lettuce, avocado, and salsa.
- Serve immediately while the rice is warm and the lettuce is still crisp.
Equipment for This Recipe:
- Large skillet
- Rice pot or rice cooker
- Bowls
- Wooden spoon
- Knife for avocado
How to Serve This Dish:
Set the toppings in little piles if your kids like to build their own bowls. A spoonful of plain Greek yogurt can stand in for sour cream, and a handful of cherry tomatoes gives the bowl more color without making it fussy.
Pro Tips for This Recipe:
- Brown the turkey well; pale turkey tastes flat.
- Warm the beans in the skillet so the bowl feels cohesive instead of cold and hot at the same time.
- Use day-old rice if you can. Fresh rice can turn mushy in a bowl.
- Avocado is best added right before eating, not an hour ahead.
Variations on This Dish:
- Cauliflower Rice Bowl: Swap half the rice for cauliflower rice if you want a lighter base.
- Cheesy Taco Bowl: Add a small sprinkle of cheddar on top for kids who want a little melt.
- Breakfast Bowl: Top with a fried egg and use breakfast sausage seasoning instead of taco seasoning.
Common Mistakes to Avoid with This Dish:
- Underseasoning the turkey: The beans and rice need the meat to carry the flavor.
- Using too much salsa: The bowl turns wet and loses texture.
- Skipping a crunchy element: Lettuce, corn, or tortilla strips keep the bite interesting.
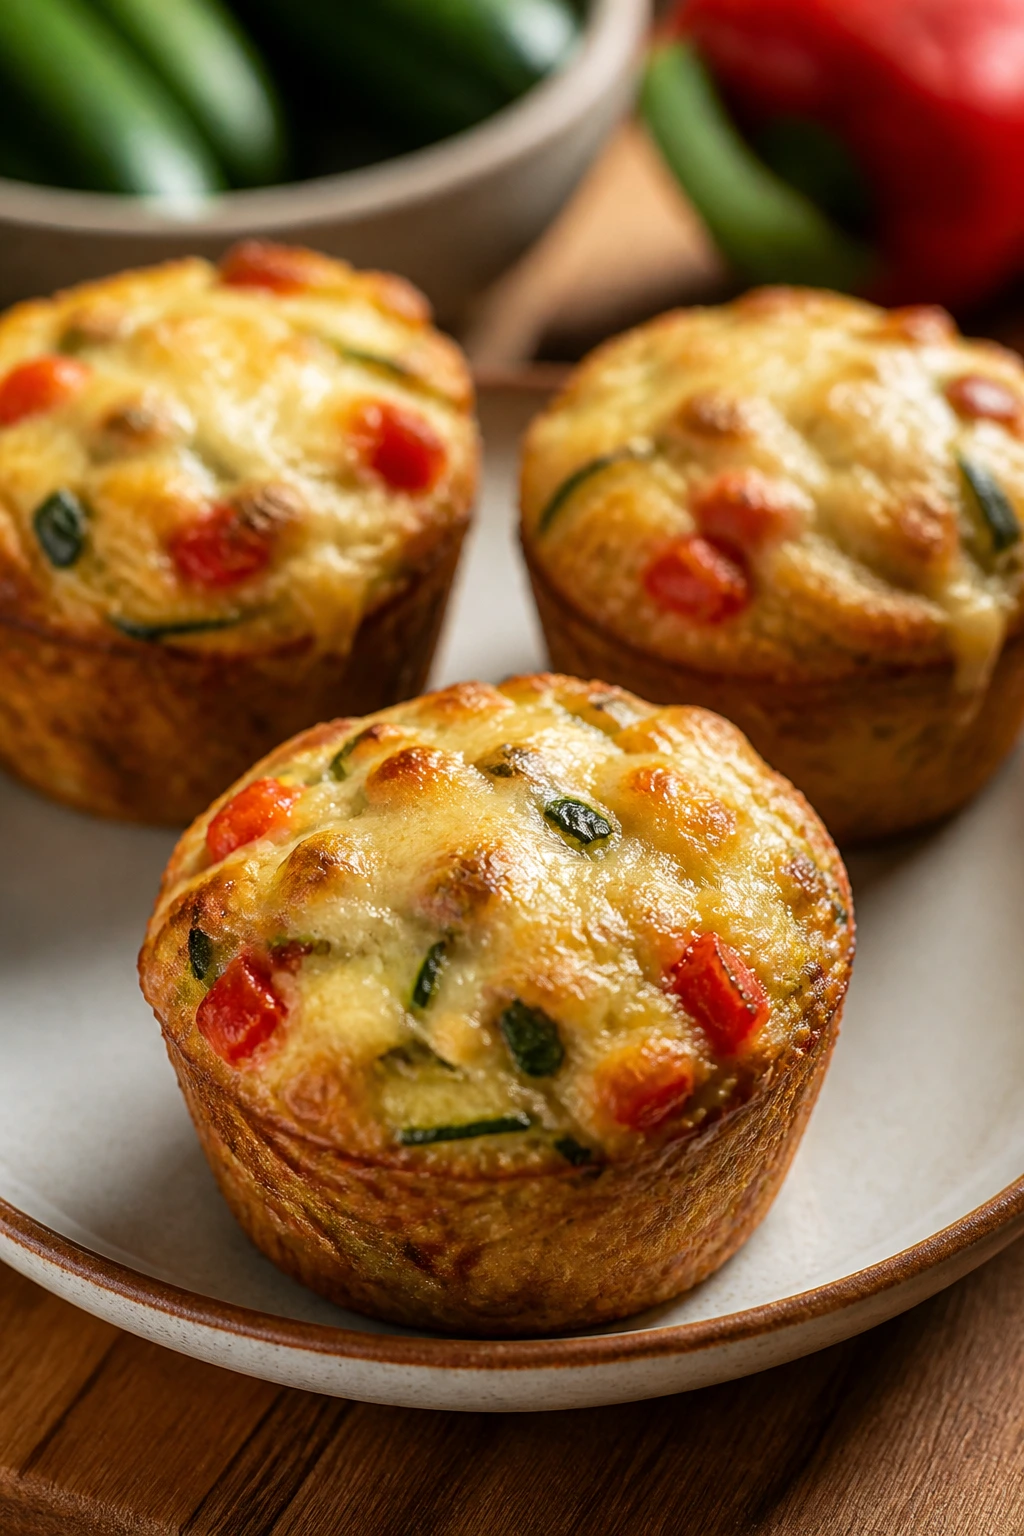
8. Veggie-Packed Pizza Muffins
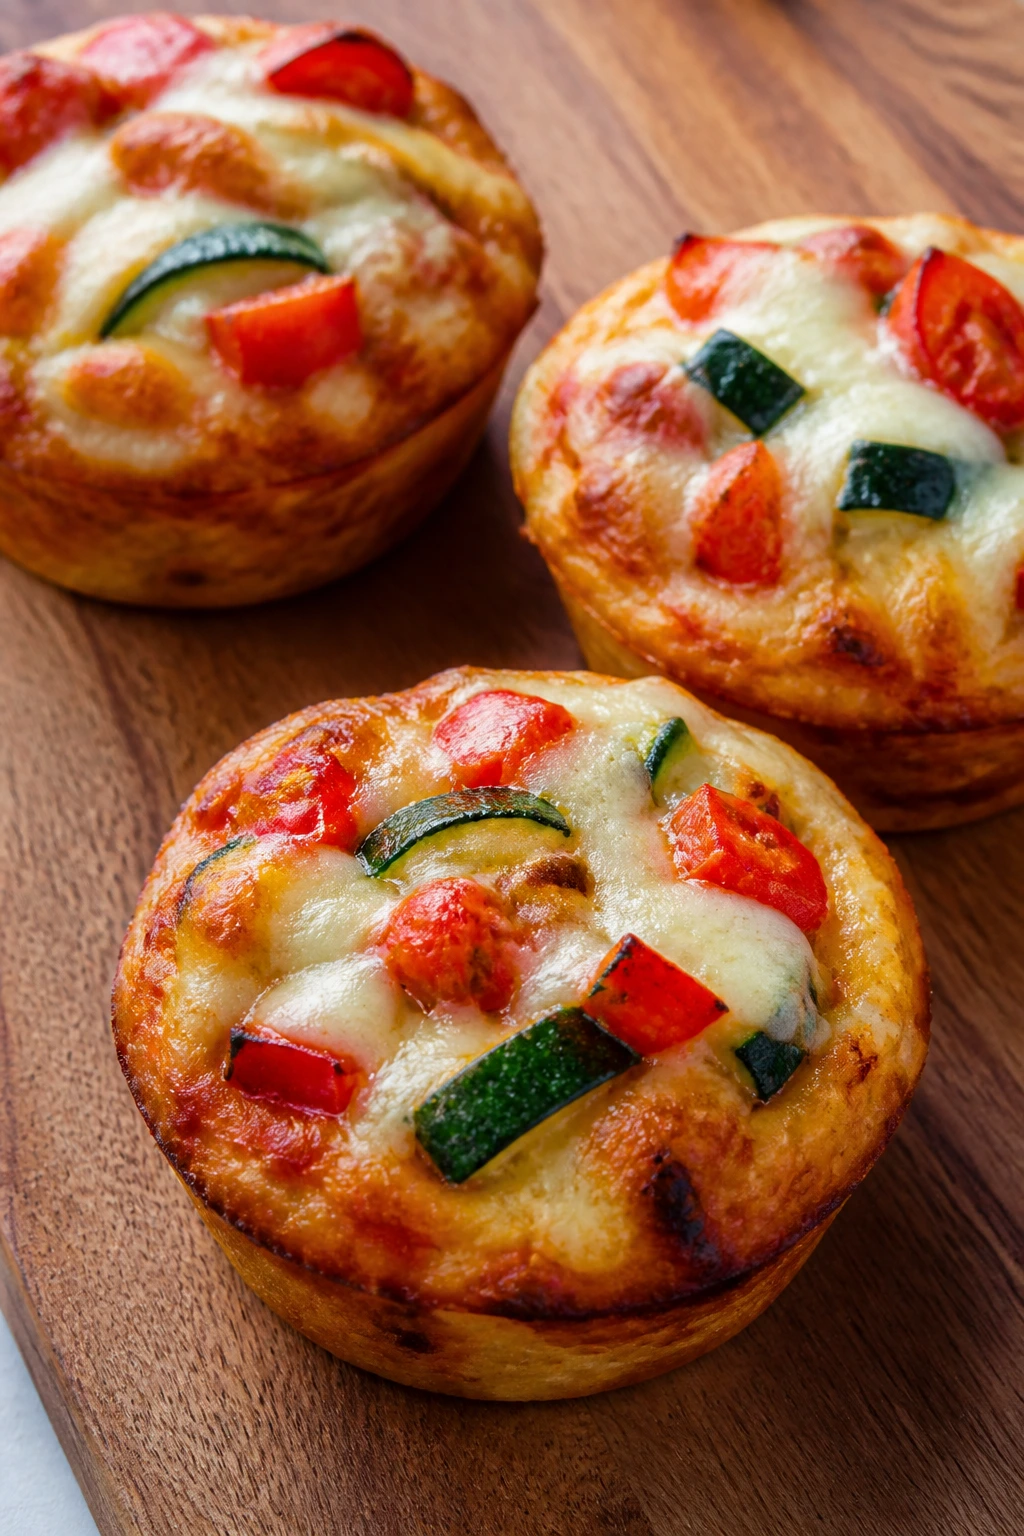
These are basically lunchbox bait, and I mean that as a compliment. They smell like pizza, they fit in a hand, and the grated vegetables disappear into the batter enough that the kids mostly notice the cheese.
Why It Works:
A mini muffin tin keeps the portion size small and the bake time short, which is how you land around 180 calories for 3 muffins. The yogurt in the batter gives the crumb a soft, bready texture without needing a lot of oil. They’re good warm, but they also hold up well at room temperature, which makes them useful for school lunches.
Key Ingredients:
- 1 3/4 cups whole wheat flour
- 2 teaspoons baking powder
- 1/2 teaspoon baking soda
- 1 cup plain Greek yogurt
- 2 large eggs
- 1/2 cup milk
- 1 cup shredded mozzarella
- 1/2 cup finely chopped zucchini, squeezed dry
- 1/2 cup finely diced bell pepper
- 1/3 cup grated carrot
- 1/2 cup pizza sauce
- 1 teaspoon dried oregano
Quick Steps:
- Preheat the oven to 375°F and grease a mini muffin tin well.
- Whisk flour, baking powder, and baking soda in one bowl.
- Whisk yogurt, eggs, milk, pizza sauce, and oregano in another bowl.
- Fold the wet mixture into the dry, then stir in mozzarella, zucchini, bell pepper, and carrot.
- Spoon the batter into the mini muffin cups, filling each about 3/4 full.
- Bake for 16 to 18 minutes, until the tops spring back and the edges are lightly browned.
Equipment for This Recipe:
- Mini muffin tin
- Mixing bowls
- Whisk
- Measuring cups and spoons
- Small spoon or cookie scoop
How to Serve This Dish:
Serve them warm with extra pizza sauce for dipping and a handful of grapes on the side. They also work as part of a lunch plate with cucumber sticks and a cheese cube or two.
Pro Tips for This Recipe:
- Squeeze the zucchini dry or the muffins get gummy.
- Don’t stir the batter until smooth; a few streaks are fine.
- Grease the tin well even if it’s nonstick, because cheese likes to grab.
- Let them cool for 5 minutes before lifting them out.
Variations on This Dish:
- Pepperoni Pizza Muffins: Add 1/3 cup chopped turkey pepperoni for a meatier version.
- Spinach Pizza Muffins: Swap the carrot for chopped spinach that has been squeezed dry.
- Gluten-Free Batch: Use a 1:1 gluten-free flour blend and check for doneness a minute early.
Common Mistakes to Avoid with This Dish:
- Too much sauce in the batter: The muffins bake up wet in the middle.
- Overfilling the cups: They puff and spill over, then turn jagged.
- Pulling them before the centers set: The top may look done while the middle is still soft.
9. Banana Oat Pancakes
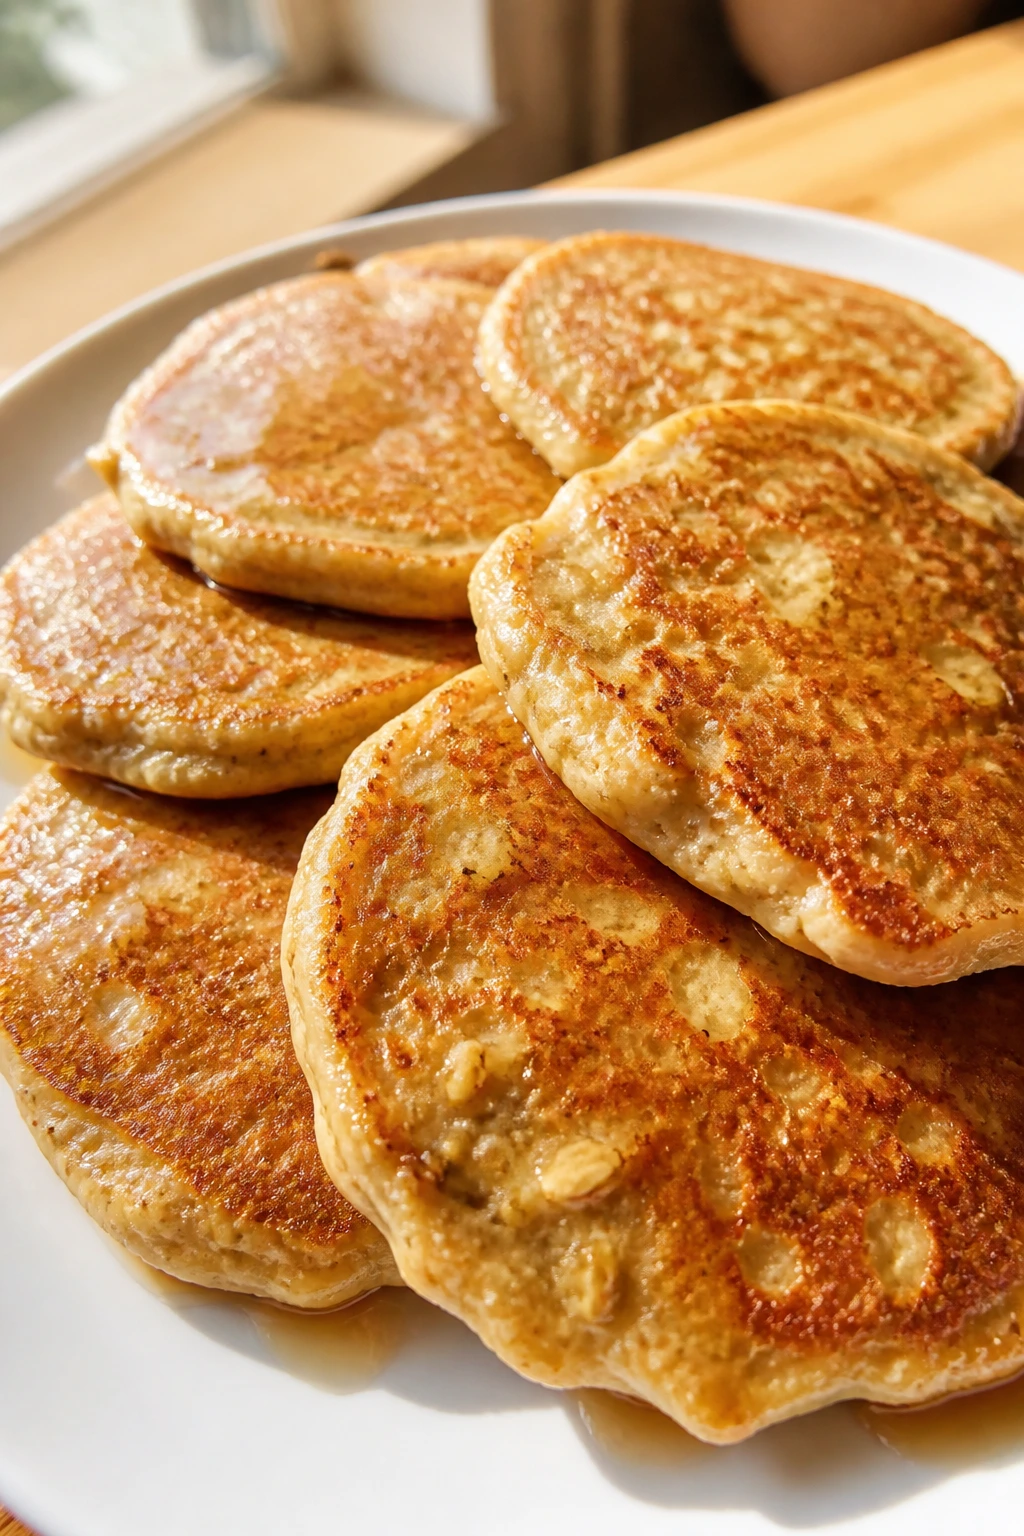
These pancakes taste like banana bread if you stop before the loaf goes into the oven. They’re soft, a little sweet, and thick enough to hold syrup without dissolving into mush.
Why It Works:
Bananas do the heavy lifting on sweetness, so you do not need much added sugar. A serving of three or four small pancakes comes in around 280 calories, depending on how much syrup you pour. Oats make the batter filling enough that kids do not bounce off breakfast 20 minutes later.
Key Ingredients:
- 2 ripe bananas
- 2 large eggs
- 1 cup rolled oats
- 1/2 cup milk
- 1 teaspoon baking powder
- 1/2 teaspoon cinnamon
- 1/2 teaspoon vanilla extract
- Butter or cooking spray, for the pan
Quick Steps:
- Blend or mash the bananas with eggs, oats, milk, baking powder, cinnamon, and vanilla until mostly smooth.
- Rest the batter for 5 minutes so the oats absorb some liquid.
- Heat a skillet or griddle over medium-low heat and grease it lightly.
- Scoop small rounds of batter, about 2 tablespoons each, into the pan.
- Cook for 2 to 3 minutes per side until the edges set and the centers look dry.
- Serve with berries, yogurt, or a thin drizzle of maple syrup.
Equipment for This Recipe:
- Blender or mixing bowl
- Skillet or griddle
- Spatula
- Measuring cups
- Ladle or tablespoon
How to Serve This Dish:
Stack them high with sliced strawberries, or serve them with peanut butter and banana if you need more staying power. A small pat of butter and a few blueberries are enough; these do not need much help.
Pro Tips for This Recipe:
- Use very ripe bananas with brown spots for the best flavor.
- Keep the heat at medium-low so the pancakes cook through without burning.
- Make them small. Tiny pancakes flip better and look more kid-friendly.
- If the batter feels too thick after resting, add 1 to 2 tablespoons milk.
Variations on This Dish:
- Blueberry Banana Pancakes: Fold in 1/2 cup blueberries at the end.
- Peanut Butter Swirl: Stir 2 tablespoons peanut butter into the batter for a richer breakfast.
- Gluten-Free Oat Cakes: Use certified gluten-free oats and blend the batter smooth.
Common Mistakes to Avoid with This Dish:
- Using high heat: The outside browns before the inside sets.
- Making giant pancakes: They are harder to flip and easier to tear.
- Skipping the rest: The oats need a few minutes to soften.
10. Berry Yogurt Parfaits with Crunchy Granola
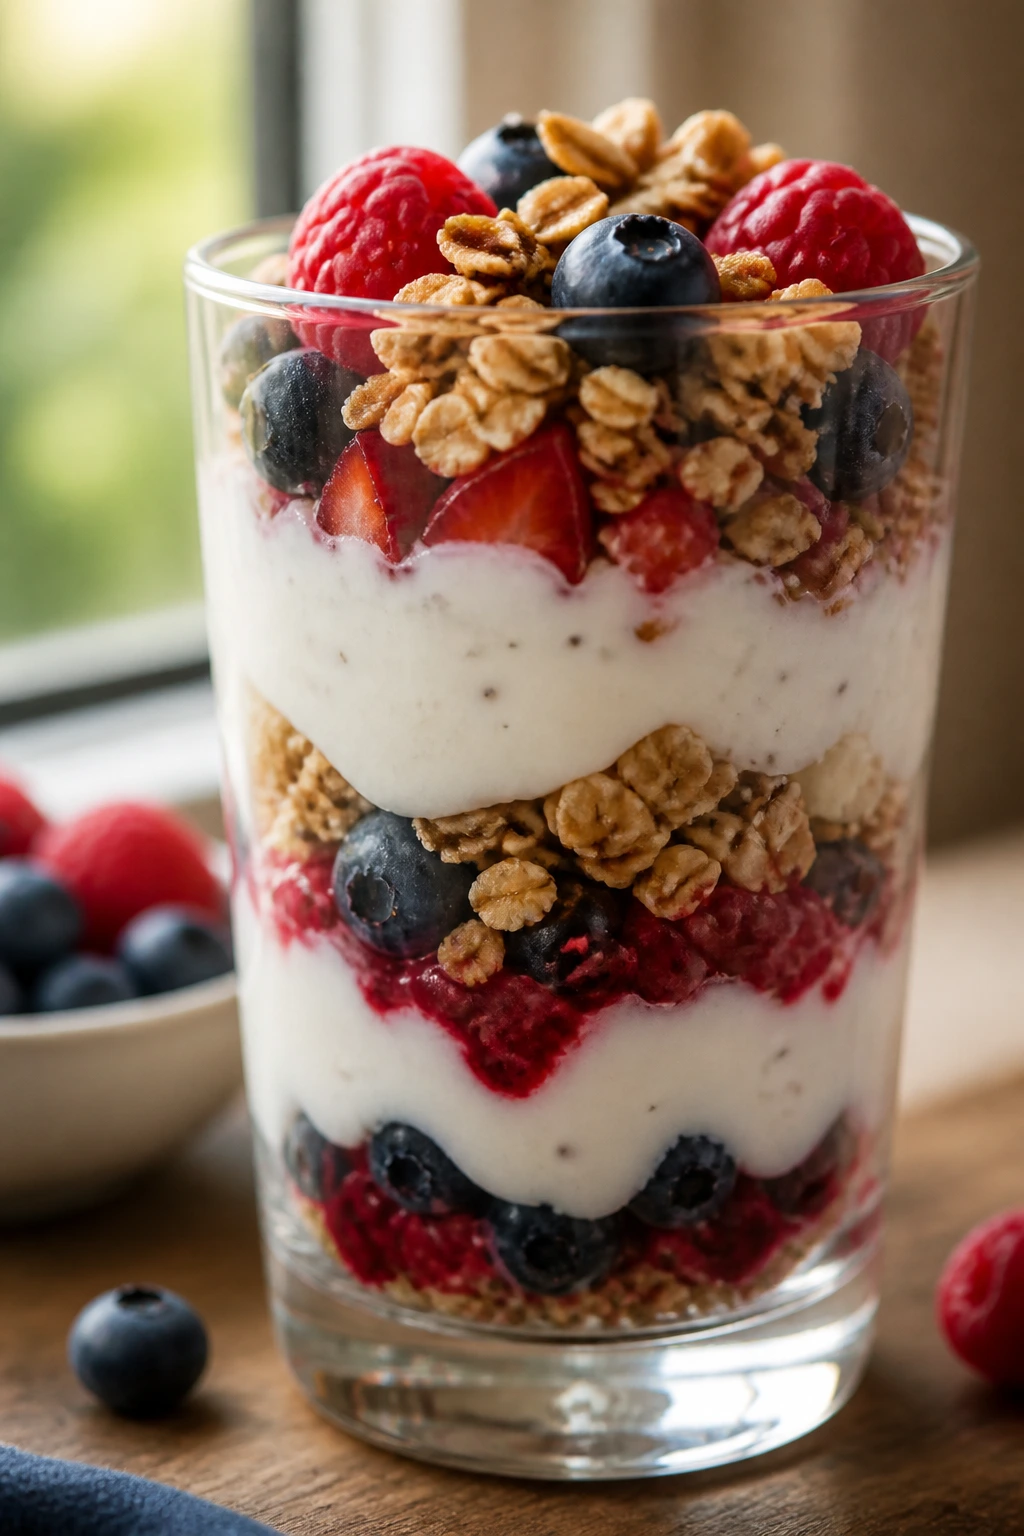
This is the meal you make when you want breakfast to feel like a treat without turning into dessert. Layered yogurt, berries, and crunchy granola look clean and cheerful in a glass, and the contrast in texture is half the appeal.
Why It Works:
Plain Greek yogurt brings protein, berries bring acid and color, and a measured amount of granola gives crunch without runaway sugar. A serving lands around 250 calories if you keep the granola to a modest handful. The best part is that nothing has to be cooked, which makes this one of the easiest ways to feed a tired morning.
Key Ingredients:
- 2 cups plain Greek yogurt
- 2 cups berries, mixed or single type
- 1 cup granola
- 2 tablespoons chia seeds
- 1 to 2 teaspoons honey
- 1/2 teaspoon vanilla extract
Quick Steps:
- Stir vanilla into the yogurt, then taste and add honey if you want a little sweetness.
- Spoon yogurt into the bottom of four glasses or jars.
- Add berries and a sprinkle of chia seeds.
- Repeat with another layer of yogurt and berries.
- Top with granola right before serving so it stays crisp.
- Serve immediately or chill the yogurt and berries separately until breakfast.
Equipment for This Recipe:
- Mixing bowl
- Spoon
- 4 small glasses or jars
- Measuring cups
How to Serve This Dish:
Use clear glasses if you want the layers to show, or just build the bowl and move on. Pair it with a boiled egg or a slice of toast if you need to make breakfast more substantial.
Pro Tips for This Recipe:
- Add granola last. Moist yogurt turns it soft fast.
- Frozen berries work fine if you thaw and drain them first.
- Use plain yogurt, not pre-sweetened fruit yogurt, or the whole thing gets cloying.
- A little vanilla goes a long way here.
Variations on This Dish:
- Peach and Almond Parfait: Swap berries for chopped peaches and sliced almonds.
- Chocolate Strawberry Parfait: Add a teaspoon of cocoa powder to the yogurt for a dessert-like breakfast.
- Dairy-Free Parfait: Use coconut yogurt and check the sugar in the granola.
Common Mistakes to Avoid with This Dish:
- Overloading the granola: The calories climb fast and the texture gets hard to eat.
- Using watery berries: Drain thawed fruit or the yogurt thins out.
- Making it too far ahead: The granola softens if it sits in yogurt overnight.
11. Sweet Potato Black Bean Nuggets

These nuggets have a softer bite than chicken tenders, but that’s part of the charm. They’re savory, a little sweet from the potato, and sturdy enough to dip in ketchup or yogurt without falling apart.
Why It Works:
Sweet potato and black beans make a filling base that keeps the calorie count low while still feeling like real food. A serving of these nuggets lands around 240 calories with dip, which is useful for lunch or a lighter dinner. They also freeze well, which makes one baking session pull double duty.
Key Ingredients:
- 2 cups mashed cooked sweet potato
- 1 can black beans, rinsed and mashed
- 1/2 cup rolled oats
- 1 large egg
- 1/2 cup shredded cheddar
- 1 teaspoon cumin
- 1/2 teaspoon smoked paprika
- 1/2 teaspoon salt
Quick Steps:
- Preheat the oven to 400°F and line a sheet pan with parchment.
- Mash the sweet potato and black beans together until mostly smooth.
- Stir in oats, egg, cheddar, cumin, paprika, and salt.
- Shape the mixture into nugget-size ovals with damp hands.
- Bake for 20 to 22 minutes, flipping once halfway through, until the edges are browned.
- Cool for 5 minutes so they firm up before serving.
Equipment for This Recipe:
- Sheet pan
- Parchment paper
- Mixing bowl
- Potato masher or fork
- Spatula
How to Serve This Dish:
Serve them with ketchup, yogurt dip, or guacamole and a side of steamed peas. They also work in a lunchbox with apple slices and crackers, which is exactly the sort of meal that disappears without a complaint.
Pro Tips for This Recipe:
- Mash the sweet potato well; big chunks make the nuggets crack.
- If the mixture feels wet, add 1 to 2 tablespoons oats.
- Wet hands keep the shaping job from sticking to your palms.
- Let them cool before packing or the steam softens the outside.
Variations on This Dish:
- Taco Nugget Version: Add taco seasoning and serve with salsa.
- No-Cheese Batch: Skip the cheddar and add an extra tablespoon oats for binding.
- Air-Fryer Nuggets: Cook at 375°F for about 10 minutes, flipping once.
Common Mistakes to Avoid with This Dish:
- Using watery mash: It makes the mixture too slack to hold shape.
- Not flipping: One side browns faster, and the nuggets can stay pale underneath.
- Serving straight from the oven: They need a few minutes to set or they fall apart.
12. Lentil Sloppy Joes
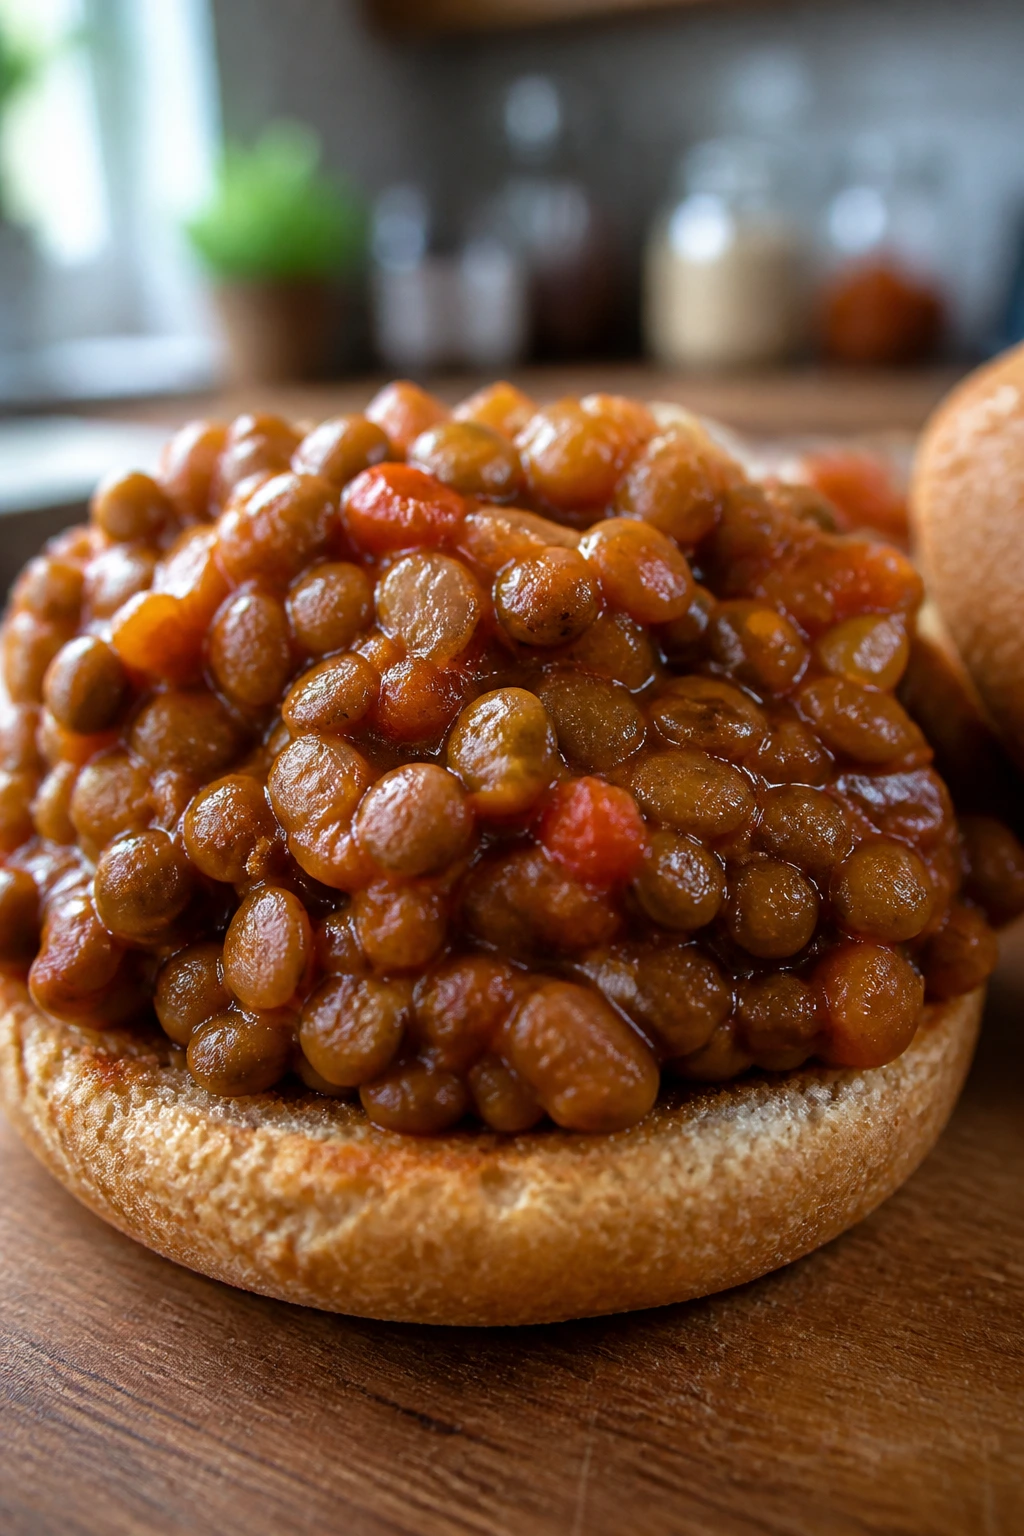
Lentils are the trick here. They give sloppy joes the same saucy, spoonable feel as the classic version, but with a lighter base that does not sit like a brick. It is messy food, yes, but in the fun way.
Why It Works:
Brown lentils break down just enough to soak up the sweet-savory sauce, and they cost less than most meat fillings. A sandwich comes in around 340 calories, depending on the bun size and how much filling you pile on. The filling also keeps well, which is handy because sloppy joes taste even better after a short rest.
Key Ingredients:
- 1 tablespoon olive oil
- 1 small onion, diced
- 2 cloves garlic, minced
- 1 cup dry brown lentils
- 2 cups water or low-sodium broth
- 1/2 cup ketchup
- 2 tablespoons tomato paste
- 1 tablespoon Worcestershire sauce
- 1 teaspoon smoked paprika
- 4 whole wheat buns
Quick Steps:
- Heat oil in a saucepan over medium heat and cook onion until soft, about 5 minutes.
- Stir in garlic and smoked paprika and cook for 30 seconds.
- Add lentils and water or broth, then simmer covered until the lentils are tender, about 20 to 25 minutes.
- Stir in ketchup, tomato paste, and Worcestershire sauce.
- Cook uncovered for 5 to 8 minutes until the mixture is thick enough to mound on a spoon.
- Spoon onto toasted buns and serve warm.
Equipment for This Recipe:
- Medium saucepan
- Wooden spoon
- Measuring cups
- Knife and cutting board
- Toaster or skillet for buns
How to Serve This Dish:
Serve the filling on toasted buns with pickle chips and a crunchy slaw. If you want to keep the calories lower, spoon it into lettuce cups or serve over baked potato wedges.
Pro Tips for This Recipe:
- Cook the lentils until tender but not mushy; they should still have shape.
- Toast the buns. Soft bread turns soggy fast with a saucy filling.
- Reduce the filling until it’s thick enough to stay put.
- A splash of vinegar or pickle juice at the end sharpens the sauce.
Variations on This Dish:
- Mushroom Joe: Add finely chopped mushrooms with the onion for a deeper, meatier texture.
- BBQ Lentil Joe: Swap half the ketchup for barbecue sauce.
- Open-Face Version: Serve on a single toast round to keep portions smaller.
Common Mistakes to Avoid with This Dish:
- Adding too much liquid at once: The filling turns runny and slides out of the bun.
- Cooking the lentils too long: They lose texture and become paste-like.
- Forgetting to toast the bread: That’s how you get a soggy sandwich bottom.
13. Veggie Fried Rice with Egg
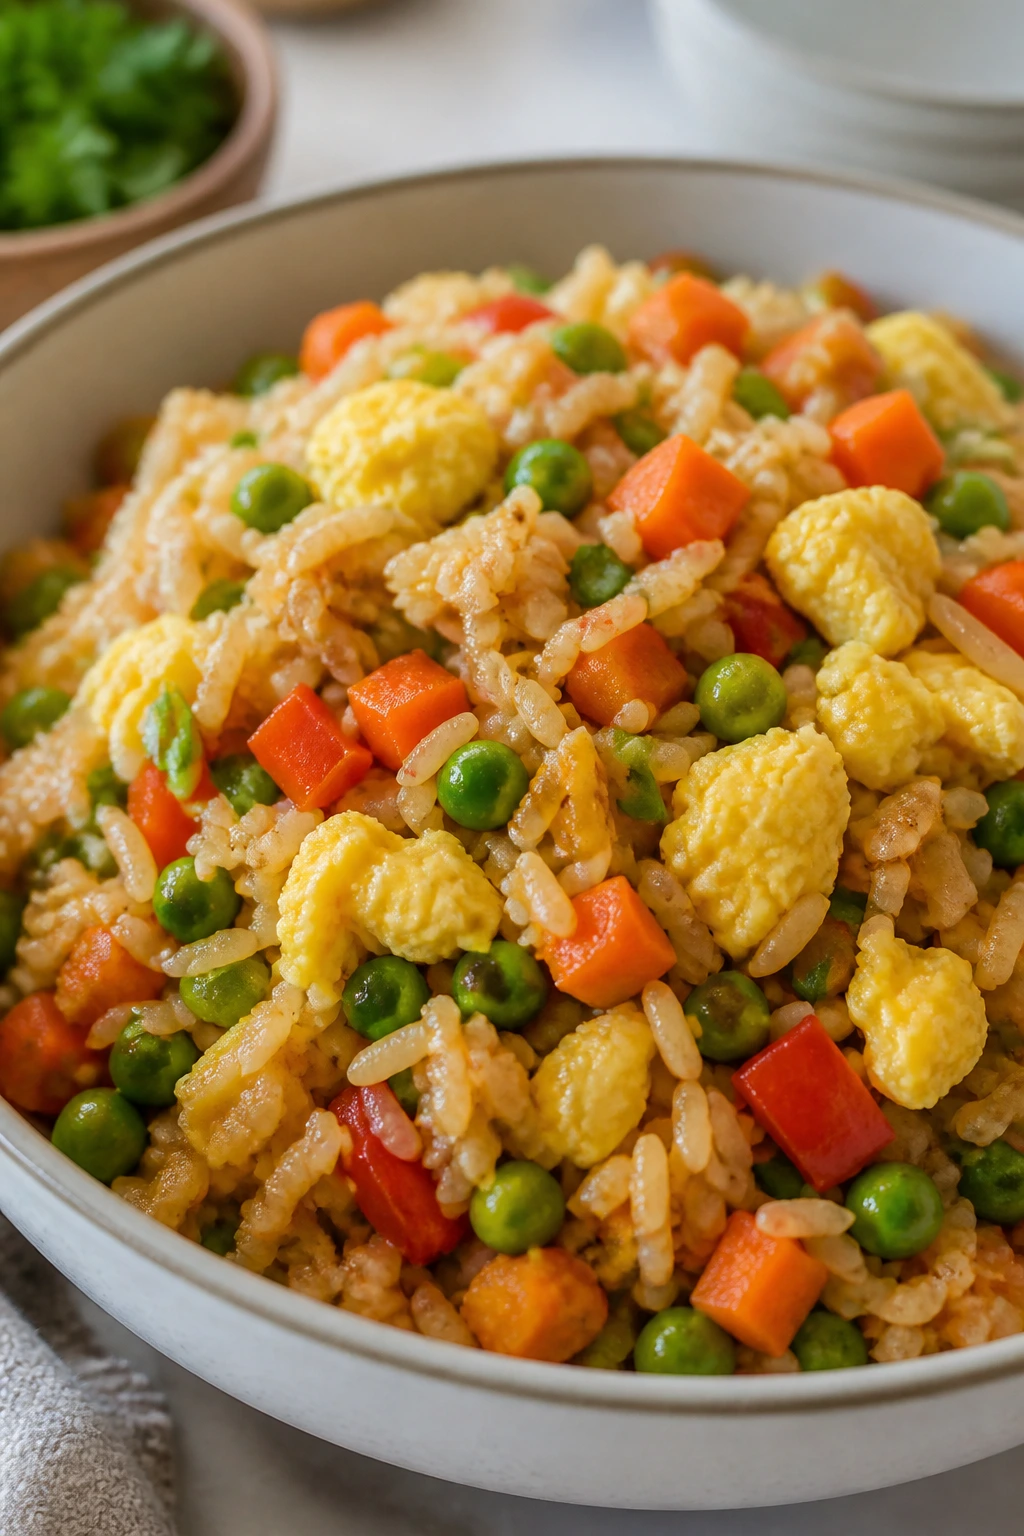
This is the kind of skillet meal that rescues leftover rice and turns it into dinner. The rice gets a little toasted, the vegetables stay colorful, and the eggs add enough richness that nobody complains about eating a vegetable-heavy bowl.
Why It Works:
Cold rice fries better than fresh rice because it dries out a bit in the fridge and won’t clump into mush. A serving sits around 360 calories with eggs and vegetables, which leaves room for fruit or a side of edamame. It also cooks fast, which is the whole point when dinner needs to happen without a long argument.
Key Ingredients:
- 3 cups cooked cold rice
- 2 large eggs
- 1 cup frozen peas and carrots
- 1 cup diced zucchini or bell pepper
- 2 scallions, sliced
- 2 tablespoons low-sodium soy sauce
- 1 tablespoon sesame oil
- 1 tablespoon neutral oil
- 1 clove garlic, minced
Quick Steps:
- Heat neutral oil in a large skillet or wok over medium-high heat.
- Scramble the eggs in the skillet, then move them to a plate.
- Stir-fry the vegetables and garlic for 2 to 3 minutes until bright and slightly tender.
- Add the rice, breaking up clumps with a spatula.
- Pour in soy sauce and sesame oil, then toss everything until hot and lightly toasted.
- Fold the eggs back in and finish with scallions.
Equipment for This Recipe:
- Large skillet or wok
- Spatula
- Small bowl for eggs
- Measuring spoons
How to Serve This Dish:
Serve it in shallow bowls with a few extra scallions on top and maybe a mandarin orange on the side. If your kids like crunch, a sprinkle of toasted sesame seeds or chopped peanuts adds a nice finish.
Pro Tips for This Recipe:
- Use rice that’s had time to cool. Fresh rice goes sticky.
- Keep the heat up so the rice gets a little toasted edge.
- Chop the vegetables small if you’re feeding younger kids.
- Add soy sauce gradually; you can always add more, but you can’t pull it back.
Variations on This Dish:
- Chicken Fried Rice: Stir in diced cooked chicken for a larger dinner plate.
- Cauliflower Rice Mix: Replace half the rice with cauliflower rice for a lighter bowl.
- Peanut Fried Rice: Finish with a teaspoon of peanut butter whisked into the soy sauce for a nutty note.
Common Mistakes to Avoid with This Dish:
- Using fresh hot rice: It clumps and steams instead of frying.
- Overcrowding the pan: The rice never gets the toasted edges you want.
- Pouring in too much soy sauce: The dish gets salty fast and loses balance.
14. Pasta with Blended Veggie Marinara
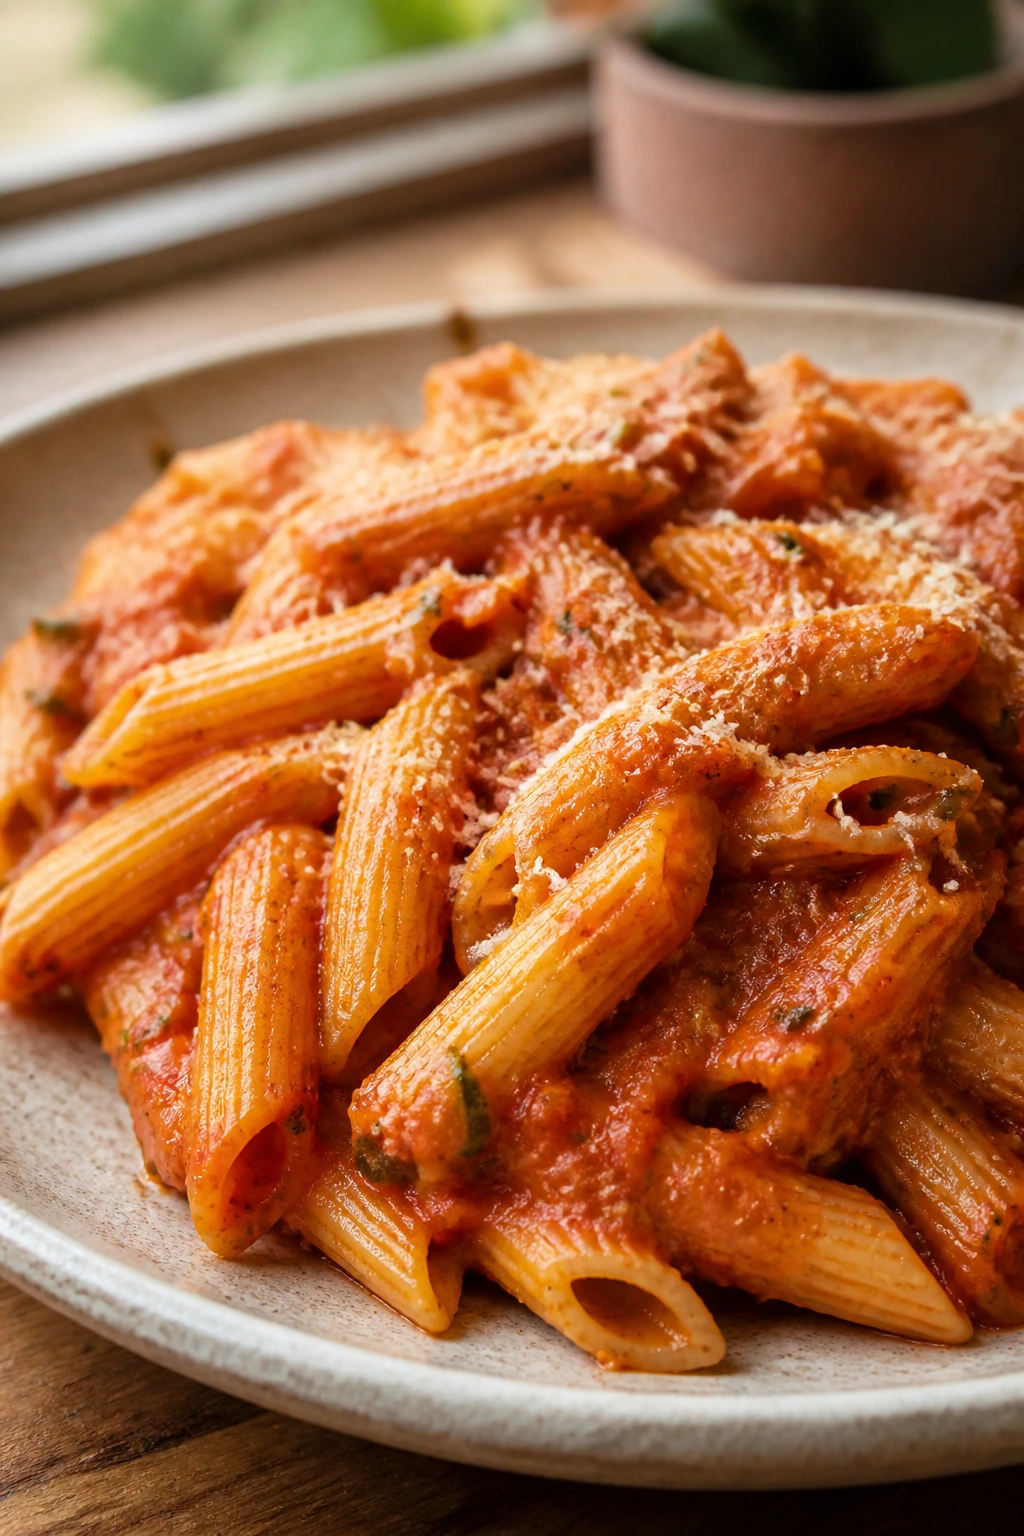
This sauce tastes like tomato sauce first, vegetables second, which is exactly the point. The carrots and zucchini disappear once blended, and the sauce turns silky enough to cling to every noodle without looking suspicious.
Why It Works:
Cooking the vegetables in the sauce gives them time to soften and sweeten before blending, so the finished jar tastes round instead of raw. A bowl comes in around 380 calories with a modest pasta portion, and the sauce is friendly enough to serve with meatballs or on its own. It’s the kind of recipe that quietly boosts the vegetable count without starting a fight.
Key Ingredients:
- 8 ounces pasta
- 1 tablespoon olive oil
- 1 small onion, chopped
- 1 carrot, chopped
- 1 zucchini, chopped
- 2 cloves garlic, minced
- 1 can crushed tomatoes, 28 ounces
- 1/2 teaspoon salt
- 1/4 teaspoon black pepper
- 2 tablespoons parmesan, for serving
Quick Steps:
- Cook the pasta in salted water until al dente, then drain.
- Heat olive oil in a saucepan and cook onion, carrot, and zucchini for 6 to 8 minutes until softened.
- Add garlic and cook for 30 seconds.
- Stir in crushed tomatoes, salt, and pepper, then simmer for 15 minutes.
- Blend the sauce until smooth with an immersion blender or countertop blender.
- Toss with pasta and serve with parmesan.
Equipment for This Recipe:
- Large pot
- Saucepan
- Immersion blender or countertop blender
- Colander
- Wooden spoon
How to Serve This Dish:
Serve with a small side of peas, broccoli, or a simple green salad if your crowd tolerates greens. A spoonful of ricotta on top can make it feel richer without driving the calories too high.
Pro Tips for This Recipe:
- Let the vegetables soften fully before blending or the sauce tastes sharp.
- Salt the pasta water well; bland noodles make bland pasta.
- Blend carefully if the sauce is hot. Steam can push the lid off a blender.
- If the sauce is too thick, loosen it with a splash of pasta water.
Variations on This Dish:
- Creamy Red Sauce: Stir in 2 tablespoons ricotta after blending.
- Hidden Spinach Version: Add a handful of spinach during the simmer and blend it in.
- Turkey Sauce: Brown 1/2 pound ground turkey with the onion for a meatier dinner.
Common Mistakes to Avoid with This Dish:
- Rushing the vegetable cook time: Raw carrot tastes harsh in the sauce.
- Blending too thin: If you add too much liquid, the sauce won’t cling.
- Overcooking the pasta: It softens again in the sauce, so stop at al dente.
15. Mini Meatloaf Muffins
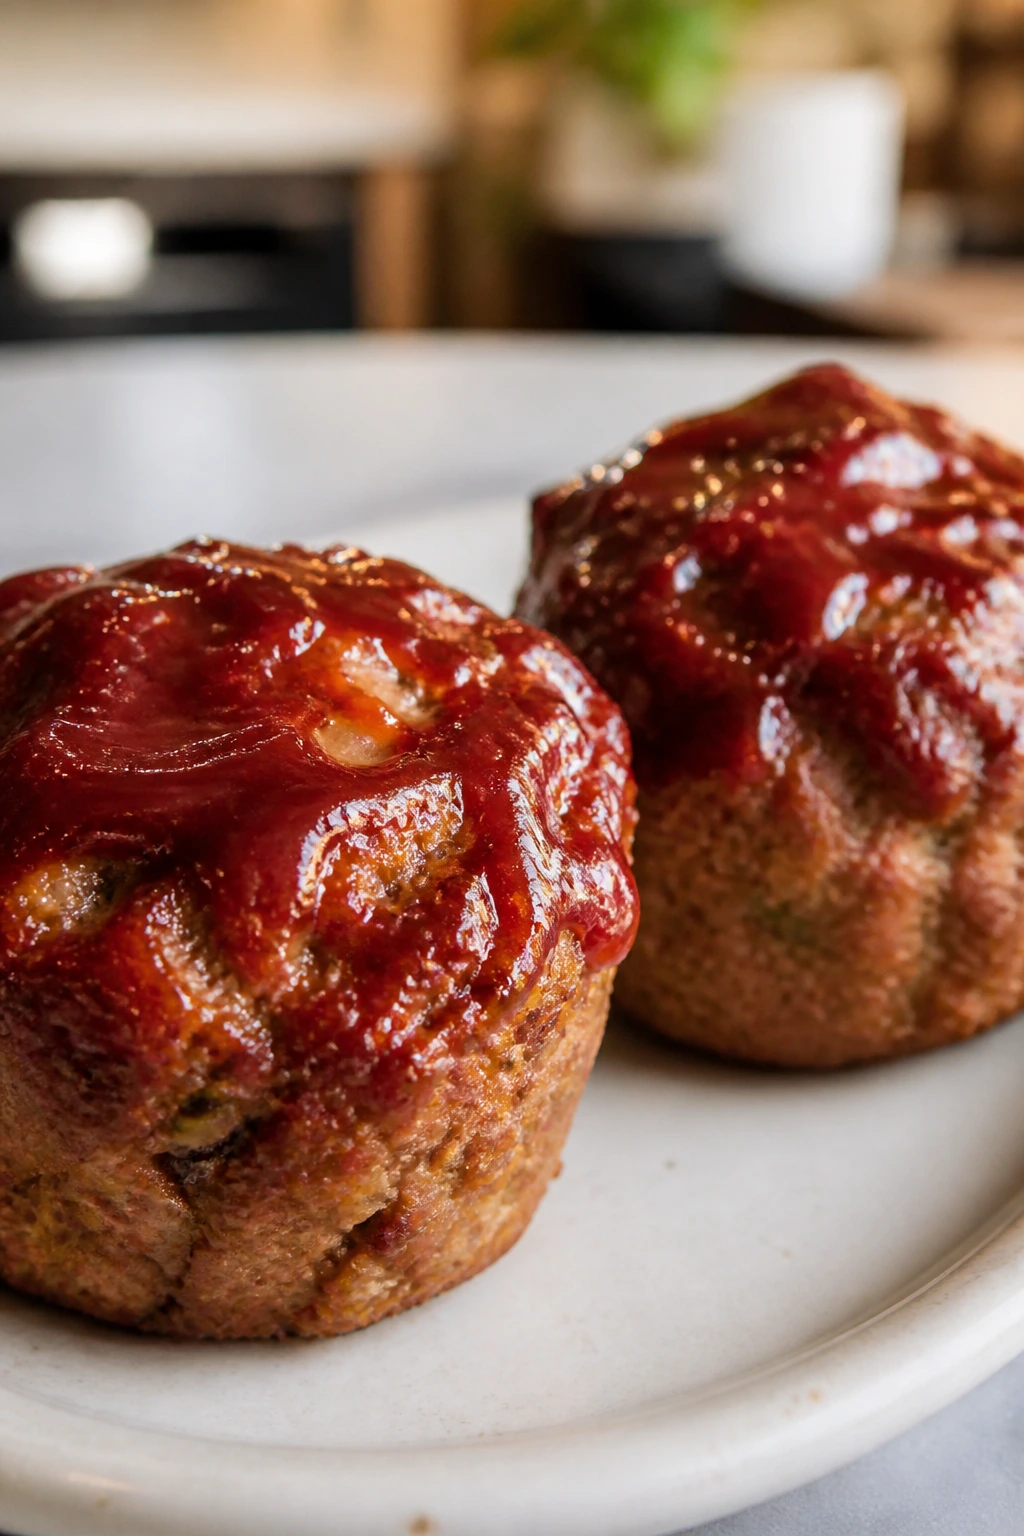
Meatloaf gets a better reputation when it arrives in a muffin tin. The edges caramelize, the center stays juicy, and the glaze on top gives each little portion the same sweet-salty finish without requiring a knife to serve it.
Why It Works:
Using lean ground beef or turkey keeps the fat in check, and the oat binder makes the mixture hold together without feeling heavy. Each muffin lands around 350 calories with a side vegetable, which makes this a useful dinner when you want something hearty but not huge. The muffin shape also cools faster than a big loaf, which means faster plates.
Key Ingredients:
- 1 pound lean ground beef or turkey
- 1/2 cup rolled oats
- 1 large egg
- 1/4 cup milk
- 1/4 cup ketchup
- 1/2 cup grated carrot
- 1/4 cup finely diced onion
- 1 teaspoon Worcestershire sauce
- 1 teaspoon garlic powder
- 2 tablespoons ketchup mixed with 1 teaspoon maple syrup, for glaze
Quick Steps:
- Preheat the oven to 375°F and grease a standard muffin tin.
- Mix meat, oats, egg, milk, ketchup, carrot, onion, Worcestershire, and garlic powder in a bowl until just combined.
- Divide into 8 muffin cups and press lightly into shape.
- Brush the tops with the ketchup-maple glaze.
- Bake for 20 to 22 minutes, until the centers reach 165°F.
- Rest for 5 minutes before lifting them out.
Equipment for This Recipe:
- Standard muffin tin
- Mixing bowl
- Spoon or scoop
- Pastry brush or spoon
- Instant-read thermometer
How to Serve This Dish:
Serve with mashed potatoes and green beans, or keep it lighter with roasted carrots and a side salad. The muffin shape makes lunch leftovers easy too; one or two fits neatly into a container with no slicing.
Pro Tips for This Recipe:
- Don’t overmix. The mixture should look combined, not kneaded.
- Grease the tin generously or the muffins stick around the edges.
- A little glaze on top keeps the surface from drying.
- Let them sit before removing so they don’t tear apart.
Variations on This Dish:
- BBQ Meatloaf Muffins: Swap the glaze for barbecue sauce.
- Italian-Style Muffins: Add oregano and parmesan, then serve with marinara.
- Turkey-and-Zucchini Version: Replace half the carrot with grated zucchini that has been squeezed dry.
Common Mistakes to Avoid with This Dish:
- Packing the mixture too tightly: Dense meatloaf muffins feel rubbery.
- Using fatty meat without draining: You get grease pooling in the tin.
- Skipping the rest period: They need a few minutes to firm up before serving.
16. Apple Cinnamon Baked Oatmeal Cups
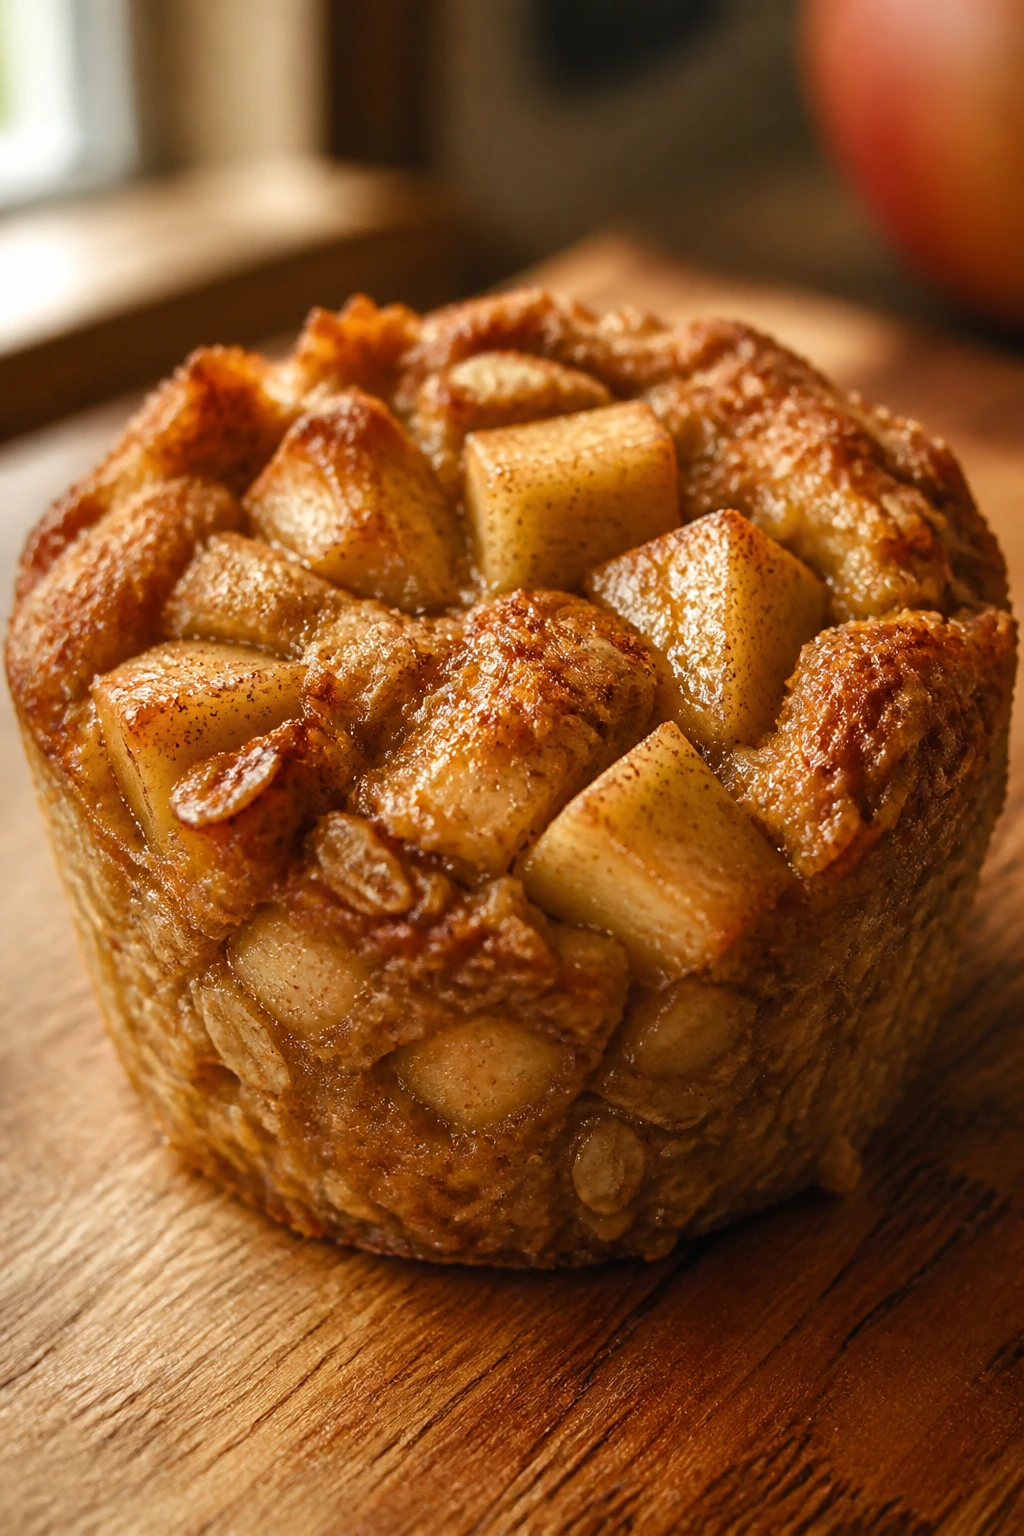
These are breakfast cups you can hold with one hand, which is reason enough to keep them around. They taste like baked oatmeal with apple pie energy, but the texture stays sturdy enough for little hands and lunchboxes.
Why It Works:
Rolled oats, egg, and milk bake into a soft, sliceable cup that feels filling without being heavy. A cup or two comes in around 260 calories, depending on toppings. The apple keeps things moist, and cinnamon does the job of making the kitchen smell like you worked harder than you did.
Key Ingredients:
- 2 cups rolled oats
- 1 apple, peeled if you want, finely diced or grated
- 2 large eggs
- 1 1/2 cups milk
- 2 tablespoons maple syrup
- 1 teaspoon cinnamon
- 1 teaspoon baking powder
- 1 teaspoon vanilla extract
- 2 tablespoons chopped walnuts, optional
Quick Steps:
- Preheat the oven to 350°F and grease a muffin tin well.
- Whisk eggs, milk, maple syrup, cinnamon, and vanilla in a bowl.
- Stir in oats, apple, baking powder, and walnuts if using.
- Divide the mixture among 10 muffin cups.
- Bake for 25 to 28 minutes, until set in the center and lightly browned on top.
- Cool for 10 minutes before removing from the pan.
Equipment for This Recipe:
- Muffin tin
- Mixing bowl
- Whisk
- Spoon
- Cooling rack
How to Serve This Dish:
Serve warm with yogurt or a spoonful of peanut butter. They’re also good cold, which makes them useful for rushed mornings when nobody wants to sit down and wait.
Pro Tips for This Recipe:
- Grated apple blends in more than diced apple and makes the cups softer.
- Grease the tin well, especially around the edges.
- Let them cool before removing or they’ll crumble.
- If you want sweeter cups, add 1 tablespoon brown sugar rather than extra syrup.
Variations on This Dish:
- Blueberry Oat Cups: Swap the apple for blueberries.
- Peanut Butter Apple Cups: Swirl a teaspoon of peanut butter into each cup before baking.
- Dairy-Free Batch: Use oat milk or almond milk and check the texture before baking.
Common Mistakes to Avoid with This Dish:
- Too much liquid: The centers won’t set cleanly.
- Pulling them out too soon: They need time to finish firming as they cool.
- Using giant apple chunks: They can create wet pockets in the middle.
17. Chicken Veggie Soup with Tiny Pasta
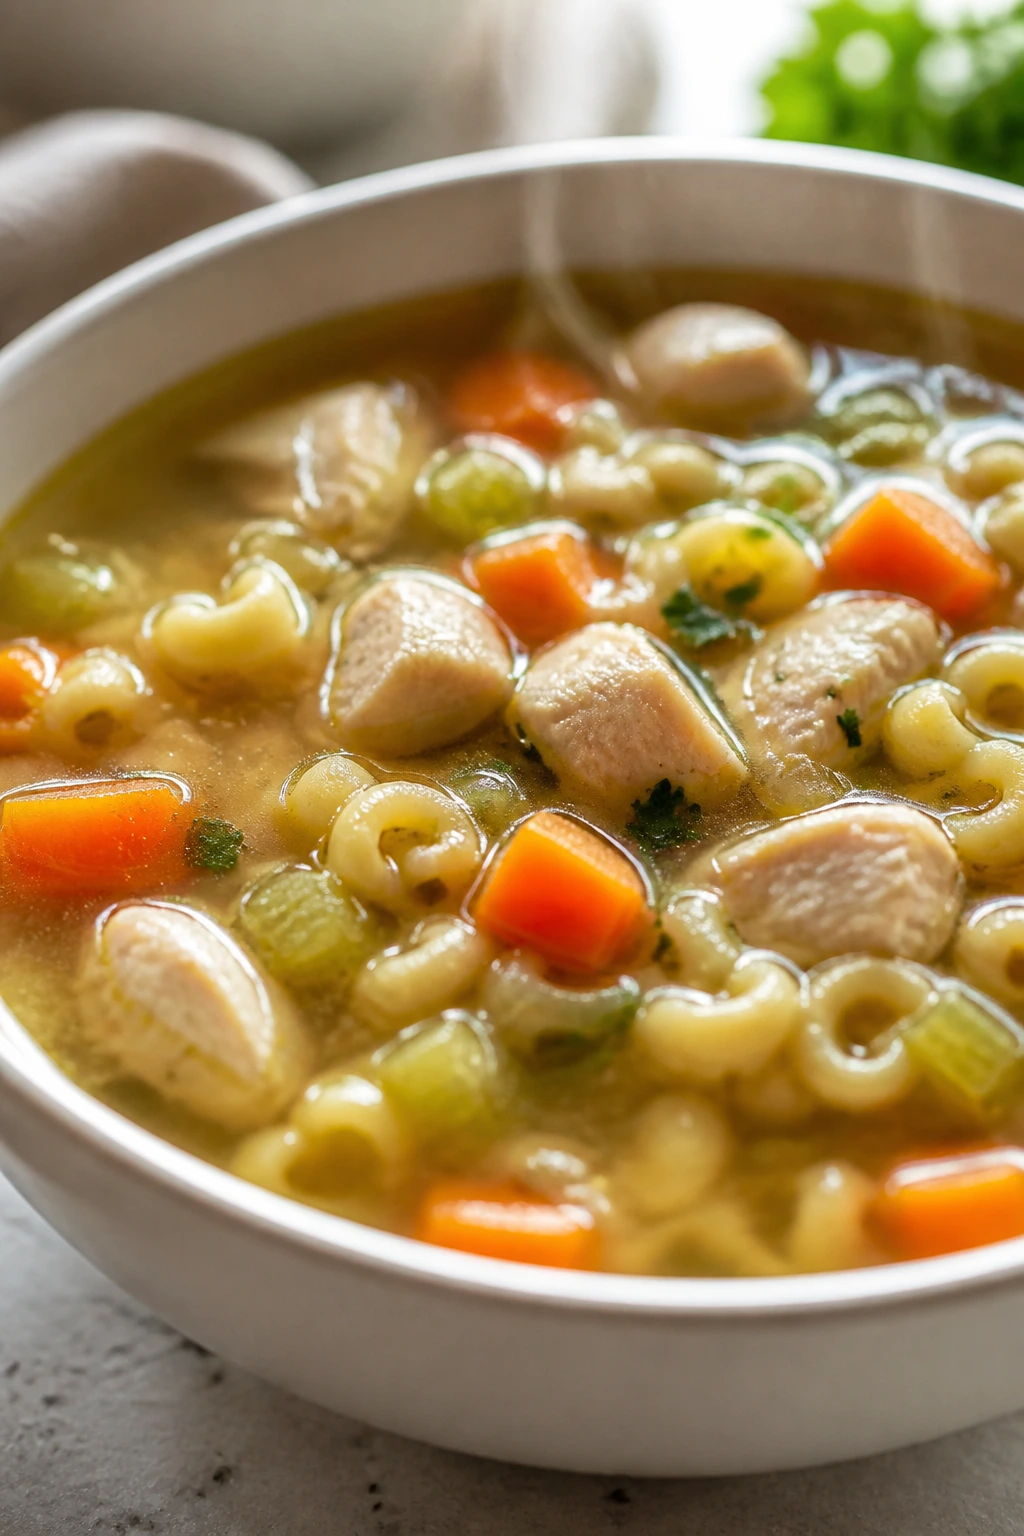
Soup earns its keep when the broth tastes like it took time, even if the method was simple. This version leans on carrots, celery, chicken, and tiny pasta, so every spoonful feels soft and comforting without turning into a noodle-heavy bowl.
Why It Works:
The chicken adds protein, the vegetables build flavor, and the small pasta gives enough body to make it a meal. A bowl lands around 280 calories if you keep the pasta modest, which is one reason I like this for lunches and lighter dinners. A little lemon at the end keeps the broth awake.
Key Ingredients:
- 1 tablespoon olive oil
- 1 small onion, diced
- 2 carrots, diced
- 2 celery stalks, diced
- 2 cloves garlic, minced
- 6 cups low-sodium chicken broth
- 2 cups cooked shredded chicken
- 1/2 cup tiny pasta, such as stars or ditalini
- 1 cup frozen peas
- 1 tablespoon chopped parsley
- 1 tablespoon lemon juice
Quick Steps:
- Heat oil in a soup pot over medium heat.
- Cook onion, carrots, and celery for 6 to 8 minutes until softened.
- Stir in garlic and cook for 30 seconds.
- Pour in broth and bring to a gentle simmer.
- Add chicken and pasta, then cook until the pasta is tender, about 8 to 10 minutes.
- Stir in peas, parsley, and lemon juice, then serve hot.
Equipment for This Recipe:
- Soup pot
- Ladle
- Cutting board and knife
- Wooden spoon
- Measuring cups
How to Serve This Dish:
Serve with crackers, toast soldiers, or a small grilled cheese half if you need to build out the plate. It also packs well in a thermos for school lunch, which is a very underrated use case.
Pro Tips for This Recipe:
- Keep the simmer gentle or the broth gets cloudy and the chicken toughens.
- Add the lemon at the end so the soup tastes fresh.
- If you plan on leftovers, cook the pasta separately and add it to each bowl later.
- Chop the vegetables small enough for easy spoonfuls.
Variations on This Dish:
- Rice Soup: Swap the pasta for cooked rice.
- Herbed Version: Add thyme and dill for a more classic chicken soup flavor.
- Creamier Bowl: Stir in 2 tablespoons plain yogurt off the heat for a softer broth.
Common Mistakes to Avoid with This Dish:
- Boiling the soup hard: The chicken goes stringy and the broth loses its clean taste.
- Cooking pasta in the pot for leftovers: It swells and steals broth overnight.
- Underseasoning the base: Soup needs enough salt to make the vegetables taste like themselves.
18. Tuna Cucumber Pita Pockets
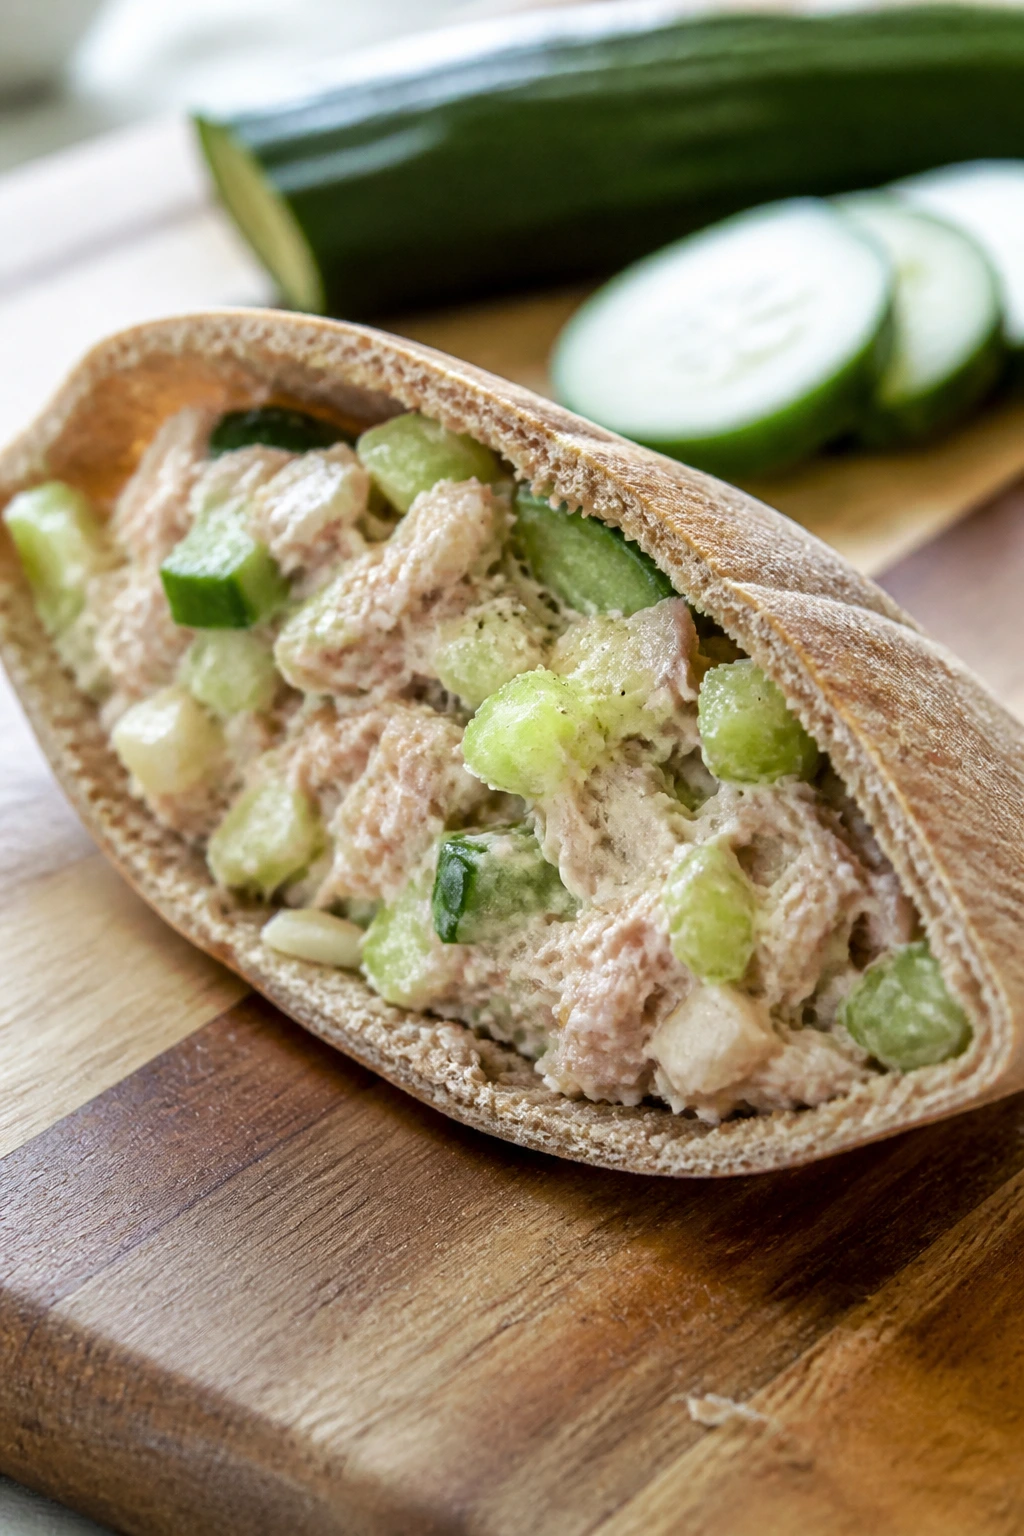
These are lunch pockets that feel cool, clean, and a little crunchy, which is a nice change from warm dinner food. The cucumber keeps the tuna salad from tasting heavy, and the pita makes it easy to hold without chasing fillings around a plate.
Why It Works:
Tuna gives you protein with a small calorie footprint, and Greek yogurt trims the mayo without making the filling dry. One pocket comes in around 290 calories, depending on the pita size. The cucumber and celery keep the texture lively, which matters more than people think when you’re feeding kids who hate mush.
Key Ingredients:
- 2 cans tuna, drained
- 1/3 cup plain Greek yogurt
- 1 tablespoon mayonnaise
- 1 celery stalk, finely diced
- 1/2 cup cucumber, finely diced and patted dry
- 1 tablespoon lemon juice
- 1 teaspoon dried dill or 1 tablespoon fresh dill
- 2 whole wheat pitas
- Lettuce leaves, optional
- Salt and pepper to taste
Quick Steps:
- Mix tuna, yogurt, mayonnaise, celery, cucumber, lemon juice, and dill in a bowl.
- Season lightly with salt and pepper.
- Warm the pitas for 20 to 30 seconds if you want them more flexible.
- Slice each pita in half and open the pocket gently.
- Fill with tuna salad and a lettuce leaf if using.
- Serve right away so the pita stays soft but not damp.
Equipment for This Recipe:
- Mixing bowl
- Fork
- Knife
- Cutting board
- Spoon
How to Serve This Dish:
Serve with apple wedges, pretzels, or a few carrot sticks. For younger kids, you can spoon the filling onto crackers instead of wrestling with a pita pocket that keeps closing.
Pro Tips for This Recipe:
- Pat the cucumber dry or the filling gets watery.
- Don’t overstuff the pita. Half a pocket that stays closed beats a bursting one.
- Use tuna packed in water if you want a lighter result.
- A squeeze of extra lemon at the end makes the filling taste brighter.
Variations on This Dish:
- Chickpea Pocket: Mash chickpeas and use the same mix-ins for a tuna-free version.
- Wrap Style: Roll the filling in a whole wheat tortilla if the pita keeps splitting.
- Curry Tuna Pocket: Add a pinch of curry powder for a warmer flavor.
Common Mistakes to Avoid with This Dish:
- Too much mayonnaise: The filling feels heavy and slides out.
- Wet cucumber: It thins the tuna salad fast.
- Serving too late: Pitas soften as they sit, so fill them close to eating time.
How These Healthy Kid Recipes Stay Under 500 Calories
The calorie cap works here because the recipes are built around a few smart habits, not because they taste like diet food. Lean proteins carry the center of the plate, vegetables add volume, and the starches show up in controlled portions instead of giant heaps. That means chicken tenders get a crisp coating rather than a deep fry, mac and cheese gets broccoli and a measured amount of cheddar, and pasta shows up with sauce that actually stretches.
A lot of the trick is in the shape. Nuggets, muffins, bowls, patties, and pockets naturally limit portions in a way that doesn’t feel punitive. Kids see a handful of pieces, a sandwich half, or a bowl with toppings, not a number on a box. That matters because the goal is not to sneak food past them; it’s to give them something they’ll happily finish.
I also lean on ingredients that pull double duty. Greek yogurt gives you creaminess and protein. Oats bind meatballs, meatloaf, and baked cups without a lot of extra fat. Beans stretch taco filling. Pureed vegetables make sauces thicker so you need less cheese or butter to get the same body. That’s how you keep the food satisfying while still leaving room for fruit, milk, or another vegetable on the plate.
And yes, the cooking method matters. Baking on a rack, roasting on a sheet pan, and simmering a sauce until it clings all produce a cleaner finish than pan-frying in a deep pool of oil. You still get color and texture, which is the part kids notice first. Bland is the real enemy. Not calories.
What the Right Kitchen Setup Makes Easier
A few tools show up again and again in this kind of cooking, and they earn their spot by saving time rather than looking fancy.
- Rimmed sheet pans: Best for tenders, nuggets, meatballs, and fajitas because they give you room to brown food instead of steaming it.
- Wire racks: The secret to keeping breaded food crisp underneath.
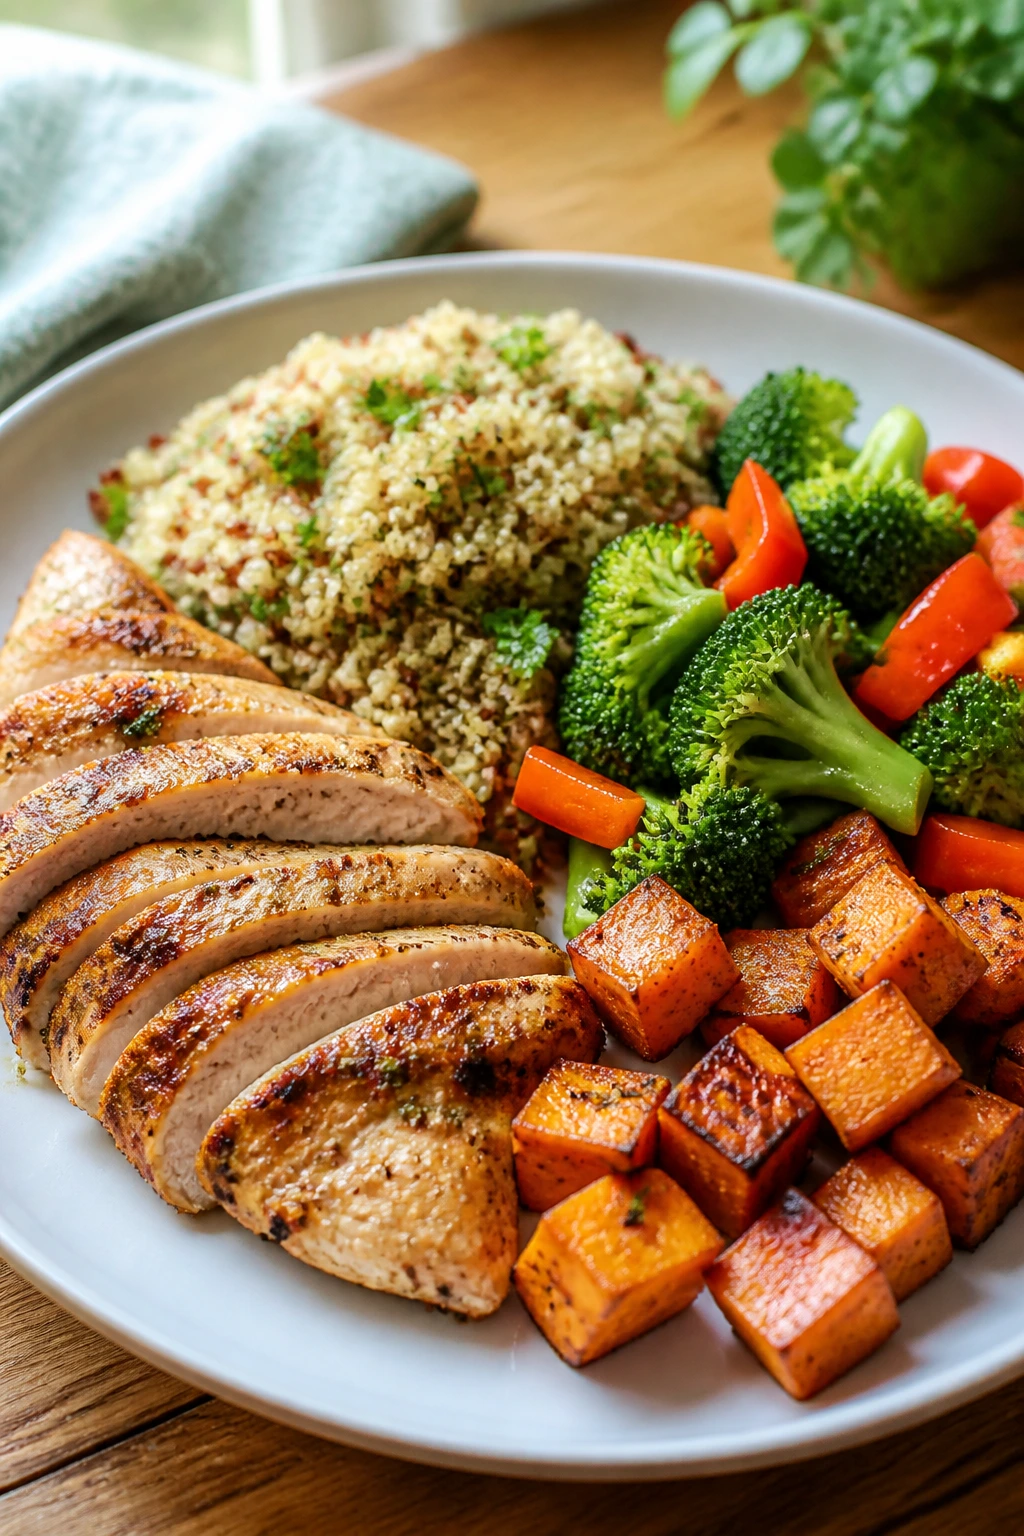
- Large skillet or wok: Fried rice, quesadillas, taco filling, and salmon patties all behave better in a pan with enough surface area A bowl of pasta can look harmless until you realize it’s doing all the wrong things: too much sauce, too little protein, and a kid who is asking for toast ten minutes later. The best healthy kid recipes under 500 calories don’t feel like compromise food. They eat like the meals kids already trust — crispy tenders, cheesy casseroles, soft muffins, handheld pockets, warm bowls — but the portions and ingredients are tuned so dinner doesn’t drift into overload.
That balance matters more than most recipe advice admits. Kids notice crunch first. Then color. Then whether the cheese pulls in a way that looks fun on the fork. A good kid recipe has to hit those marks while keeping the plate from turning into a calorie pile-up, and that’s where lean proteins, measured starches, vegetables that blend in, and smart cooking methods earn their keep. Bake on a rack. Roast on a sheet pan. Stir in Greek yogurt where heavy cream would usually show up. Little moves, big difference.
I’m fond of recipes that give you a second life the next day. Meatballs become lunch. Muffins become snacks. Soup becomes thermos food. Rice, tacos, quesadillas, nuggets, and pancakes all have a useful habit of reheating without much drama, which is half the battle in family cooking. The point isn’t to make food feel virtuous. The point is to make it easy to repeat.
Why These Healthy Kid Recipes Under 500 Calories Work So Well
-
The food looks familiar: Chicken tenders, pizza muffins, quesadillas, and taco bowls give kids a shape they already understand, which lowers the odds of a dinner-table standoff.
-
Portions stay useful, not tiny: Most servings land between 250 and 450 calories, leaving room for fruit, milk, or another vegetable without turning the meal into a math problem.
-
Vegetables show up in smarter places: Grated zucchini, blended marinara, carrots in meatballs, and spinach folded into quesadillas add texture and volume without forcing every bite to taste like a salad.
-
Cooking stays practical: Baking, sheet pan roasting, skillet meals, and simple simmering keep cleanup manageable and make the food easier to repeat on a busy night.
-
Leftovers don’t collapse: These recipes are built from foods that hold up in the fridge, travel well in lunch containers, and reheat without going gluey.
-
Kids can help without wrecking dinner: Scooping, stirring, topping, and shaping give them a job that feels real, and that usually buys you a better attitude at the table.
1. Baked Chicken Tenders with Cornflake Crust
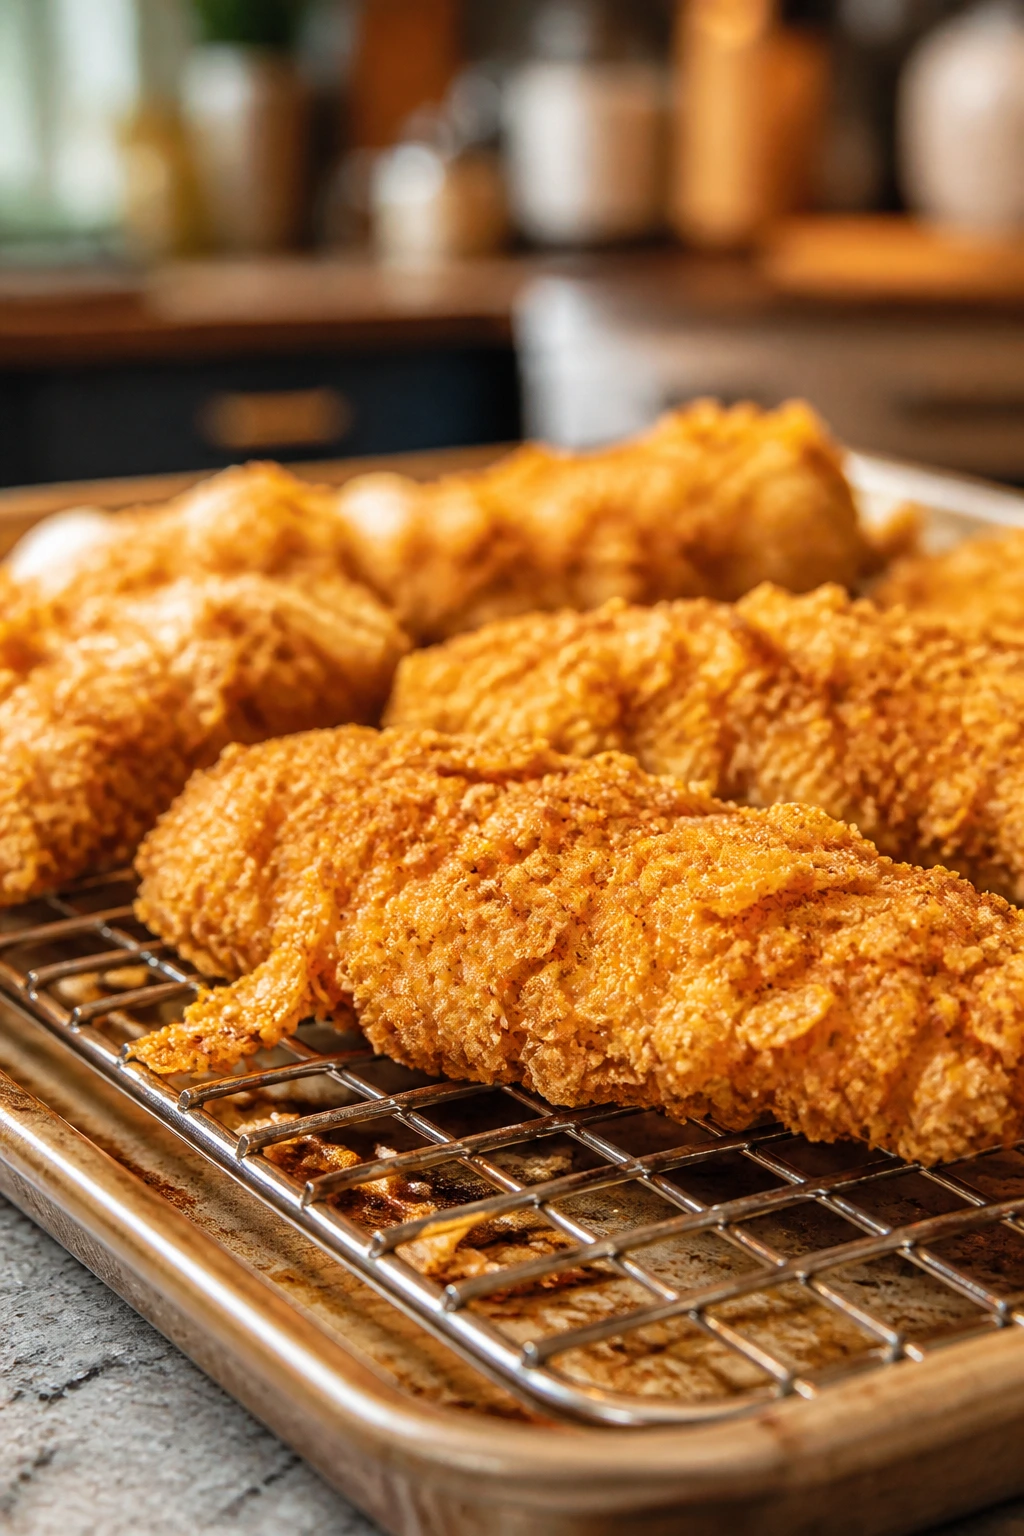
Crisp edges, juicy centers, and a crust that actually stays on the chicken. That’s the whole point here, and it’s why these baked tenders land so well with kids who usually turn their nose up at “healthy chicken.” A serving comes in around 330 calories, give or take the dip on the side.
Why It Works:
A hot oven and a wire rack do the same job that frying oil normally does: they brown the coating fast enough to keep the chicken from drying out. Cornflakes make the crust lighter and snappier than plain breadcrumbs, and the seasoning is built into every layer instead of hiding in a sauce. That means the tenders taste finished even before you dip them.
Key Ingredients:
- 1 1/2 pounds chicken tenders, trimmed
- 1/2 cup all-purpose flour
- 2 large eggs, beaten
- 2 cups cornflakes, crushed
- 1 teaspoon kosher salt
- 1 teaspoon paprika
- 1/2 teaspoon garlic powder
- Cooking spray
Quick Steps:
- Preheat the oven to 425°F and set a wire rack over a rimmed sheet pan.
- Mix the flour, salt, paprika, and garlic powder in one shallow bowl.
- Set up a second bowl with beaten eggs and a third with the crushed cornflakes.
- Dredge each tender in flour, dip it in egg, then press it firmly into the cornflakes.
- Arrange the coated tenders on the rack, leaving space between them, and spray the tops lightly with cooking spray.
- Bake for 15 to 18 minutes, flipping once halfway through, until the coating is golden and the chicken reaches 165°F in the thickest part.
Equipment for This Recipe:
- Rimmed sheet pan
- Wire rack
- Three shallow bowls
- Tongs
- Instant-read thermometer
How to Serve This Dish:
Pile the tenders beside carrot sticks, cucumber spears, or apple slices and add a small ramekin of yogurt ranch or honey mustard. Two or three tenders make a solid kid portion, and the plate looks more inviting when there’s a bright vegetable beside the crunch.
Pro Tips for This Recipe:
- Crush the cornflakes to a mix of fine crumbs and small shards; all powder makes a dull crust.
- Press the coating on with your fingertips. Loose crumbs fall off in the oven.
- A light spray on top matters. It helps the coating brown instead of baking pale and dry.
- If your oven runs cool, give the tenders 2 extra minutes and check again.
Variations on This Dish:
- Parmesan Crunch: Add 1/3 cup grated parmesan to the cornflakes for a saltier crust.
- Gluten-Free Version: Use gluten-free flour and crushed rice cereal instead of wheat flour and cornflakes.
- Buffalo Finish: Toss the baked tenders with 2 tablespoons warm buffalo sauce for older kids who like more kick.
Common Mistakes to Avoid with This Dish:
- Skipping the rack: The bottom steams on a bare pan and goes soft.
- Crowding the pan: Tight spacing traps steam and slows browning.
- Pulling them too early: The crust may look done, but chicken needs to hit 165°F before it leaves the oven.
2. Hidden-Veggie Turkey Meatballs
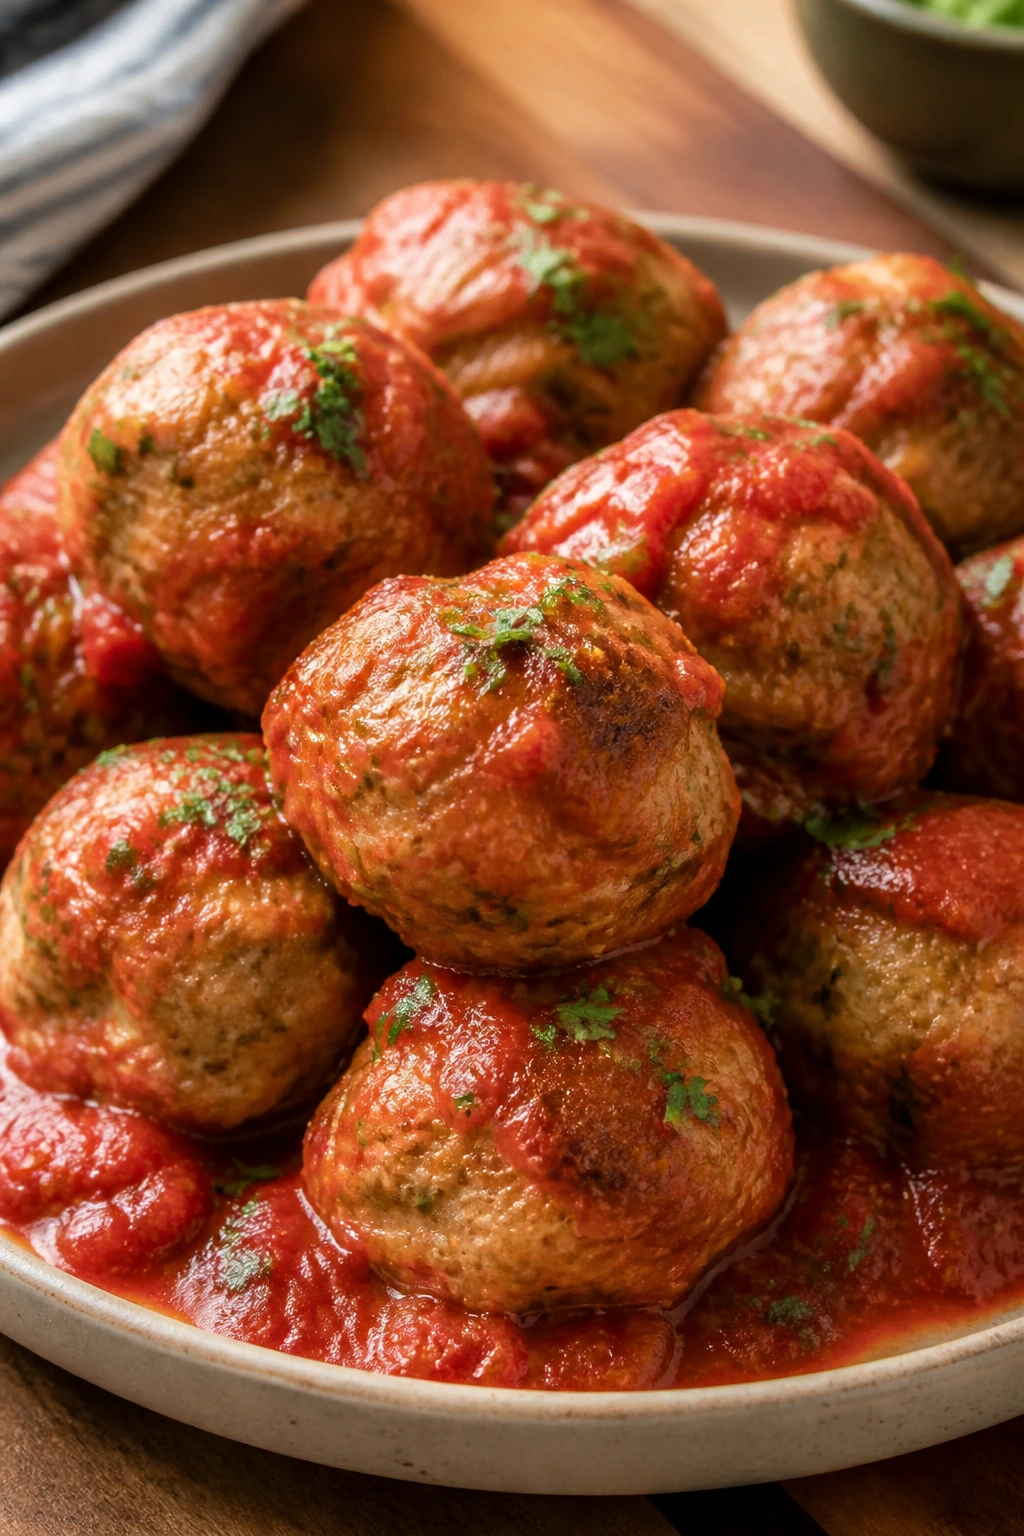
How do you get a kid to eat zucchini without starting a negotiation? You grate it fine, squeeze it dry, and tuck it into turkey meatballs with carrot, parmesan, and garlic. The result tastes like dinner, not an announcement, and a serving stays around 290 calories with sauce.
Why It Works:
Turkey gives you a lean base, but it can dry out fast if you’re careless. The grated zucchini and carrot add moisture and keep the meatballs tender, while the breadcrumbs and egg give enough structure to hold everything together. Baking them instead of frying keeps the texture clean and the cleanup easy.
Key Ingredients:
- 1 1/2 pounds ground turkey
- 1 cup zucchini, grated and squeezed dry
- 1/2 cup carrot, finely grated
- 1/2 cup breadcrumbs
- 1/4 cup parmesan, grated
- 1 large egg
- 2 cloves garlic, minced
- 1 teaspoon Italian seasoning
- 2 cups marinara sauce
Quick Steps:
- Preheat the oven to 400°F and line a sheet pan with parchment.
- Combine the turkey, zucchini, carrot, breadcrumbs, parmesan, egg, garlic, and Italian seasoning in a large bowl.
- Shape the mixture into 18 to 20 meatballs, using about 1 1/2 tablespoons for each one.
- Bake for 14 to 16 minutes, until the meatballs are browned and cooked through to 165°F.
- Warm the marinara in a saucepan, then add the baked meatballs and coat them gently.
- Serve right away, or let them sit in the sauce for 5 minutes if you want them a little softer.
Equipment for This Recipe:
- Rimmed sheet pan
- Parchment paper
- Mixing bowl
- Box grater
- Small scoop or tablespoon
How to Serve This Dish:
Serve them over whole wheat spaghetti, tucked into sub rolls, or with roasted broccoli on the side. If you want to keep the meal lighter, spoon them over zucchini noodles or a pile of steamed green beans.
Pro Tips for This Recipe:
- Squeeze the zucchini hard in a clean towel; wet zucchini makes loose meatballs.
- Mix just until combined. Overworking ground turkey turns the texture springy.
- A small scoop keeps the meatballs even, which means they finish at the same time.
- Simmering them in sauce for a few minutes after baking gives the outside a softer finish.
Variations on This Dish:
- Swedish-Style Turkey Balls: Add dill and a pinch of nutmeg, then serve with a lighter yogurt gravy.
- Dairy-Free Version: Skip the parmesan and add 2 tablespoons nutritional yeast for a savory note.
- Mini Meatball Subs: Bake smaller meatballs and tuck them into slider rolls with sauce and a little mozzarella.
Common Mistakes to Avoid with This Dish:
- Leaving the vegetables wet: Extra water makes the mixture slack.
- Packing the balls too tightly: Dense meatballs lose their tenderness.
- Boiling them hard in sauce: A gentle simmer is enough; a hard boil can make them grainy.
3. Creamy Broccoli Mac and Cheese
This is the bowl that gets broccoli into the meal without making a speech about broccoli. The florets are chopped small, folded into cheddar sauce, and coated so thoroughly that kids usually accept them as part of the pasta. A serving lands around 380 calories.
Why It Works:
Whole wheat pasta gives the dish more staying power than plain white noodles, and the broccoli gets a quick blanch in the pasta water so it stays bright and soft instead of stubborn. Greek yogurt adds creaminess without the weight of a full cream sauce, and the cheese melts into a sauce that clings instead of puddling. It feels rich because the texture is right, not because the butter count is loud.
Key Ingredients:
- 8 ounces whole wheat elbow macaroni
- 3 cups broccoli florets, chopped small
- 1 1/2 cups milk
- 2 tablespoons unsalted butter
- 2 tablespoons all-purpose flour
- 2 cups sharp cheddar, shredded
- 1/2 cup plain Greek yogurt
- 1/2 teaspoon salt
- 1/4 teaspoon black pepper
Quick Steps:
- Boil the pasta in salted water and add the broccoli during the last 2 minutes so it turns bright green and tender.
- Drain the pasta and broccoli, reserving 1/2 cup of the pasta water.
- Melt the butter in the same pot and whisk in the flour for 1 minute until it smells lightly nutty.
- Whisk in the milk and cook over medium heat until the sauce lightly coats the back of a spoon.
- Stir in the cheddar, Greek yogurt, salt, and pepper off the heat.
- Fold in the pasta and broccoli, adding a splash of pasta water if the sauce looks too thick.
Equipment for This Recipe:
- Large pot
- Whisk
- Colander
- Wooden spoon
- Box grater
How to Serve This Dish:
Serve it in shallow bowls with apple slices or roasted carrots on the side. If you want a little extra texture, a spoonful of toasted breadcrumbs on top gives the bowl a more finished look.
Pro Tips for This Recipe:
- Shred the cheese yourself if possible. It melts smoother than most bagged shreds.
- Add the yogurt off the heat so the sauce stays silky.
- Chop the broccoli small enough to sit on a spoon with the pasta.
- If the sauce thickens too much after sitting, loosen it with a spoonful of pasta water.
Variations on This Dish:
- Cauliflower Swap: Replace half the broccoli with small cauliflower florets for a softer bite.
- Spinach Boost: Stir in 2 packed cups of chopped spinach at the end and let it wilt.
- Chicken Mac: Add 1 cup diced cooked chicken if you want a more filling dinner.
Common Mistakes to Avoid with This Dish:
- Overcooking the broccoli: Mushy broccoli turns the whole bowl gray.
- Boiling after the yogurt goes in: Heat it gently or the sauce can split.
- Under-salting the pasta water: Bland noodles make the whole dish taste flat.
4. Mini Chicken and Veggie Quesadillas
A quesadilla only works if it’s crisp on the outside and melty in the middle. These mini versions do that job well, and the chopped vegetables hide inside the chicken and cheese filling instead of sitting in obvious piles. One serving comes in around 350 calories.
Why It Works:
Smaller tortillas brown faster and stay easier to handle, which is helpful when the goal is a kid-friendly plate rather than a giant folded slab that falls apart. Chicken, black beans, spinach, and bell pepper give you protein, fiber, and color in a package that still feels familiar. The key is keeping the filling dry and the heat moderate so the cheese melts before the tortilla burns.
Key Ingredients:
- 4 whole wheat tortillas, 8-inch
- 1 1/2 cups cooked shredded chicken
- 1/2 cup black beans, rinsed and drained
- 1/2 cup finely chopped spinach
- 1/2 cup finely diced bell pepper
- 1 cup shredded cheddar or Monterey Jack
- 1 teaspoon cumin
- 1 teaspoon olive oil
- Salsa, for serving
Quick Steps:
- Mix the chicken, beans, spinach, bell pepper, cumin, and half the cheese in a bowl.
- Heat a skillet over medium heat and brush it lightly with olive oil.
- Fill one half of each tortilla with the mixture, then fold the tortilla over and press gently.
- Cook for 2 to 3 minutes per side until the tortilla is golden and the cheese has melted.
- Repeat with the remaining tortillas, adding a little oil only when the pan looks dry.
- Rest the quesadillas for 1 minute before slicing into wedges so the filling stays put.
Equipment for This Recipe:
- Large skillet
- Spatula
- Mixing bowl
- Cutting board
- Sharp knife or pizza cutter
How to Serve This Dish:
Cut the quesadillas into wedges and serve with salsa, avocado slices, and a few cucumber sticks. For smaller kids, two or three wedges can be enough; older kids usually want the whole thing and a little fruit on the side.
Pro Tips for This Recipe:
- Keep the filling dry so the tortilla stays crisp.
- Use medium heat, not high heat, or the outside browns before the cheese melts.
- Let the quesadilla sit before cutting; it slices cleaner after a short rest.
- If you’re packing it for lunch, cool it first so steam doesn’t soften the tortilla.
Variations on This Dish:
- Breakfast Quesadilla: Swap chicken for scrambled eggs and add a spoonful of salsa.
- Bean-and-Cheese Version: Skip the chicken and use more beans for a meatless option.
- Corn Tortilla Stack: Use smaller corn tortillas for a gluten-free, taco-style plate.
Common Mistakes to Avoid with This Dish:
- Overfilling the tortilla: Too much filling leaks out and makes the pan messy.
- Cooking too hot: A burnt tortilla with cold cheese inside is a bad trade.
- Slicing too soon: Give it a minute so the cheese settles.
5. Salmon Patties with Lemon Yogurt Dip

Salmon patties can be a hard sell if they’re dry or fishy. These are neither. They’re crisp at the edges, soft in the middle, and brightened by lemon so the flavor stays clean. A serving is about 310 calories with dip.
Why It Works:
Canned salmon keeps the recipe fast, budget-friendly, and rich in protein without needing a long prep list. Egg and panko bind the patties together, while lemon zest and dill lift the flavor enough to keep the fish from tasting heavy. A quick pan fry gives you the browned edges kids like without deep-frying the whole thing.
Key Ingredients:
- 2 cans salmon, drained and flaked
- 1 large egg
- 1/3 cup panko breadcrumbs
- 2 tablespoons finely minced onion
- 1 tablespoon chopped dill or parsley
- Zest of 1 lemon
- 1 tablespoon lemon juice
- 2 tablespoons plain Greek yogurt
- 1 teaspoon Dijon mustard
- 1 tablespoon olive oil
Quick Steps:
- Stir the salmon, egg, panko, onion, dill, lemon zest, and lemon juice together in a bowl.
- Shape the mixture into 6 small patties and press them lightly so they hold.
- Whisk the yogurt and Dijon together for the dip and set it aside.
- Heat the olive oil in a skillet over medium heat.
- Cook the patties for 3 to 4 minutes per side until golden and heated through.
- Serve them with the dip while the edges are still crisp.
Equipment for This Recipe:
- Medium skillet
- Mixing bowl
- Fish spatula or wide spatula
- Citrus zester
- Small bowl for dip
How to Serve This Dish:
Put the patties on the plate with peas, cucumber spears, or roasted potatoes. They also work tucked into a bun with lettuce if you want to turn them into a sandwich for lunch.
Pro Tips for This Recipe:
- Drain the salmon well so the patties don’t fall apart.
- Chill the patties for 10 minutes before cooking if the mixture feels soft.
- Keep the heat at medium; high heat browns the outside too quickly.
- Lemon zest does more than extra salt here. Use it.
Variations on This Dish:
- Cornflake-Coated Cakes: Roll the patties in crushed cornflakes before frying for a crispier crust.
- Dairy-Free Dip: Skip the yogurt dip and serve with lemon wedges and cucumber.
- Herb-Heavy Version: Add chives and parsley for a brighter finish.
Common Mistakes to Avoid with This Dish:
- Overmixing the mixture: The patties get dense and tight.
- Flipping too early: Wait until the first side releases cleanly.
- Using a blazing hot pan: The outside burns before the center heats through.
6. Sheet Pan Chicken Fajitas
The smell alone sells this one. Peppers soften, onions sweeten, and the chicken picks up browned edges that make the whole tray taste like it had more effort behind it than it really did. A plate with two small tortillas lands around 420 calories.
Why It Works:
Sheet pan cooking is the easiest way to get fajita flavor without standing over a skillet for twenty minutes. Thin slices cook quickly and brown at the edges, while the peppers and onions get sweet instead of waterlogged. The whole tray keeps the calories controlled because there’s no deep fry, no heavy sauce, and no giant pile of cheese required.
Key Ingredients:
- 1 1/2 pounds boneless skinless chicken breast, sliced thin
- 3 bell peppers, sliced
- 1 large onion, sliced
- 2 tablespoons olive oil
- 2 tablespoons mild taco seasoning
- 1/2 teaspoon salt
- 8 small tortillas
- Lime wedges, for serving
Quick Steps:
- Preheat the oven to 425°F and line a sheet pan with parchment.
- Toss the chicken, peppers, onion, olive oil, taco seasoning, and salt in a large bowl.
- Spread the mixture on the pan in a single layer.
- Roast for 18 to 20 minutes, stirring once halfway through, until the chicken is cooked through and the vegetables have browned at the edges.
- Warm the tortillas while the tray rests for a minute.
- Serve with lime wedges, salsa, or a spoonful of yogurt.
Equipment for This Recipe:
- Rimmed sheet pan
- Parchment paper
- Large mixing bowl
- Sharp knife
- Tongs
How to Serve This Dish:
Let everyone build their own tortilla with chicken, peppers, and onion. If you want a lighter plate, skip the tortilla and serve the fajita mix in lettuce cups with black beans on the side.
Pro Tips for This Recipe:
- Slice the chicken thin so it cooks at the same pace as the vegetables.
- Don’t crowd the pan; space creates browning.
- Mild seasoning keeps the dish kid-friendly, and adults can add hot sauce at the table.
- A squeeze of lime at the end keeps the flavor from going flat.
Variations on This Dish:
- Chicken and Mushroom Fajitas: Replace one pepper with sliced mushrooms for a deeper savory taste.
- Bowl Version: Serve the roasted mix over rice with black beans instead of tortillas.
- Shrimp Swap: Use peeled shrimp and roast for about 8 minutes instead of 20.
Common Mistakes to Avoid with This Dish:
- Cutting the chicken too thick: It cooks unevenly and dries out.
- Overcrowding the pan: The vegetables steam instead of browning.
- Skipping the acid: Lime or salsa keeps the tray from tasting heavy.
7. Turkey and Bean Taco Bowls
Bowls are useful because they let everyone build a plate that feels personal without making you cook three different dinners. This one stays around 400 calories with a modest scoop of rice, turkey, beans, and toppings, and it’s sturdy enough to hold up when the kid at the table takes their time.
Why It Works:
Lean turkey gives you a protein base that browns quickly, and black beans stretch the filling without making it feel thin. Rice keeps the bowl familiar, while lettuce, salsa, and avocado add freshness and contrast. The best part is that nothing has to be stacked neatly. A bowl can be a little messy and still work.
Key Ingredients:
- 1 pound lean ground turkey
- 1 tablespoon olive oil
- 1 packet or 2 tablespoons mild taco seasoning
- 1 can black beans, rinsed and drained
- 2 cups cooked rice
- 1 cup corn, thawed if frozen
- 1 cup shredded lettuce
- 1 avocado, sliced
- 1/2 cup salsa
Quick Steps:
- Heat the olive oil in a skillet over medium heat.
- Cook the turkey with taco seasoning until browned and no pink remains, about 6 to 8 minutes.
- Stir in the black beans and corn and cook for 2 minutes until hot.
- Spoon rice into bowls.
- Top with the turkey mixture, lettuce, avocado, and salsa.
- Serve immediately while the rice is warm and the lettuce still has some crunch.
Equipment for This Recipe:
- Large skillet
- Rice pot or rice cooker
- Bowls
- Wooden spoon
- Knife for the avocado
How to Serve This Dish:
Set the toppings in little piles if your kids like building their own bowl. A spoonful of plain Greek yogurt can stand in for sour cream, and a handful of cherry tomatoes gives the bowl more color without adding much work.
Pro Tips for This Recipe:
- Brown the turkey well; pale turkey tastes flat.
- Warm the beans in the skillet so the bowl feels cohesive.
- Use day-old rice if you have it. Fresh rice can go mushy.
- Add avocado right before eating so it stays green and soft, not brown and tired.
Variations on This Dish:
- Cauliflower Rice Bowl: Swap half the rice for cauliflower rice if you want a lighter base.
- Cheesy Taco Bowl: Add a small sprinkle of cheddar for kids who want melt.
- Breakfast Bowl: Top with a fried egg and use breakfast sausage seasoning instead.
Common Mistakes to Avoid with This Dish:
- Underseasoning the turkey: The whole bowl tastes weak if the filling is bland.
- Using too much salsa: The rice goes wet and loses texture.
- Skipping something crunchy: Lettuce, corn, or tortilla strips keep the bowl lively.
8. Veggie-Packed Pizza Muffins
These are lunchbox food with pizza energy, and that’s a useful thing to have in your back pocket. The batter is soft, the cheese melts into the crumb, and the grated vegetables disappear enough that most kids notice the pizza flavor first. Three muffins land around 180 calories.
Why It Works:
Mini muffin tins control the portion size without making the food feel small, and Greek yogurt gives the crumb a soft, bakery-style texture without a lot of oil. Pizza sauce in the batter keeps the flavor familiar, while zucchini, bell pepper, and carrot add color and moisture. They’re good warm, but they also hold up at room temperature, which is why they travel so well.
Key Ingredients:
- 1 3/4 cups whole wheat flour
- 2 teaspoons baking powder
- 1/2 teaspoon baking soda
- 1 cup plain Greek yogurt
- 2 large eggs
- 1/2 cup milk
- 1 cup shredded mozzarella
- 1/2 cup finely chopped zucchini, squeezed dry
- 1/2 cup finely diced bell pepper
- 1/3 cup grated carrot
- 1/2 cup pizza sauce
- 1 teaspoon dried oregano
Quick Steps:
- Preheat the oven to 375°F and grease a mini muffin tin well.
- Whisk the flour, baking powder, and baking soda in one bowl.
- Whisk the yogurt, eggs, milk, pizza sauce, and oregano in another bowl.
- Fold the wet ingredients into the dry, then stir in the mozzarella, zucchini, bell pepper, and carrot.
- Spoon the batter into the muffin cups, filling each about 3/4 full.
- Bake for 16 to 18 minutes, until the tops spring back and the edges are lightly browned.
Equipment for This Recipe:
- Mini muffin tin
- Mixing bowls
- Whisk
- Spoon or cookie scoop
- Cooling rack
How to Serve This Dish:
Serve them warm with extra pizza sauce for dipping and a handful of grapes or strawberries on the side. They also work next to cucumber sticks and a cheese cube for a quick lunch plate.
Pro Tips for This Recipe:
- Squeeze the zucchini dry or the muffins turn gummy.
- Don’t stir until smooth; a few lumps are fine.
- Grease the tin well even if it’s nonstick, because cheese likes to stick.
- Let them cool for 5 minutes before lifting them out.
Variations on This Dish:
- Pepperoni Version: Add 1/3 cup chopped turkey pepperoni for a meatier muffin.
- Spinach Version: Swap the carrot for squeezed-dry chopped spinach.
- Gluten-Free Batch: Use a 1:1 gluten-free flour blend and check a minute early.
Common Mistakes to Avoid with This Dish:
- Too much sauce in the batter: The center stays wet.
- Overfilling the cups: They spill over and bake in jagged edges.
- Removing them too soon: They need a short rest to set.
9. Banana Oat Pancakes
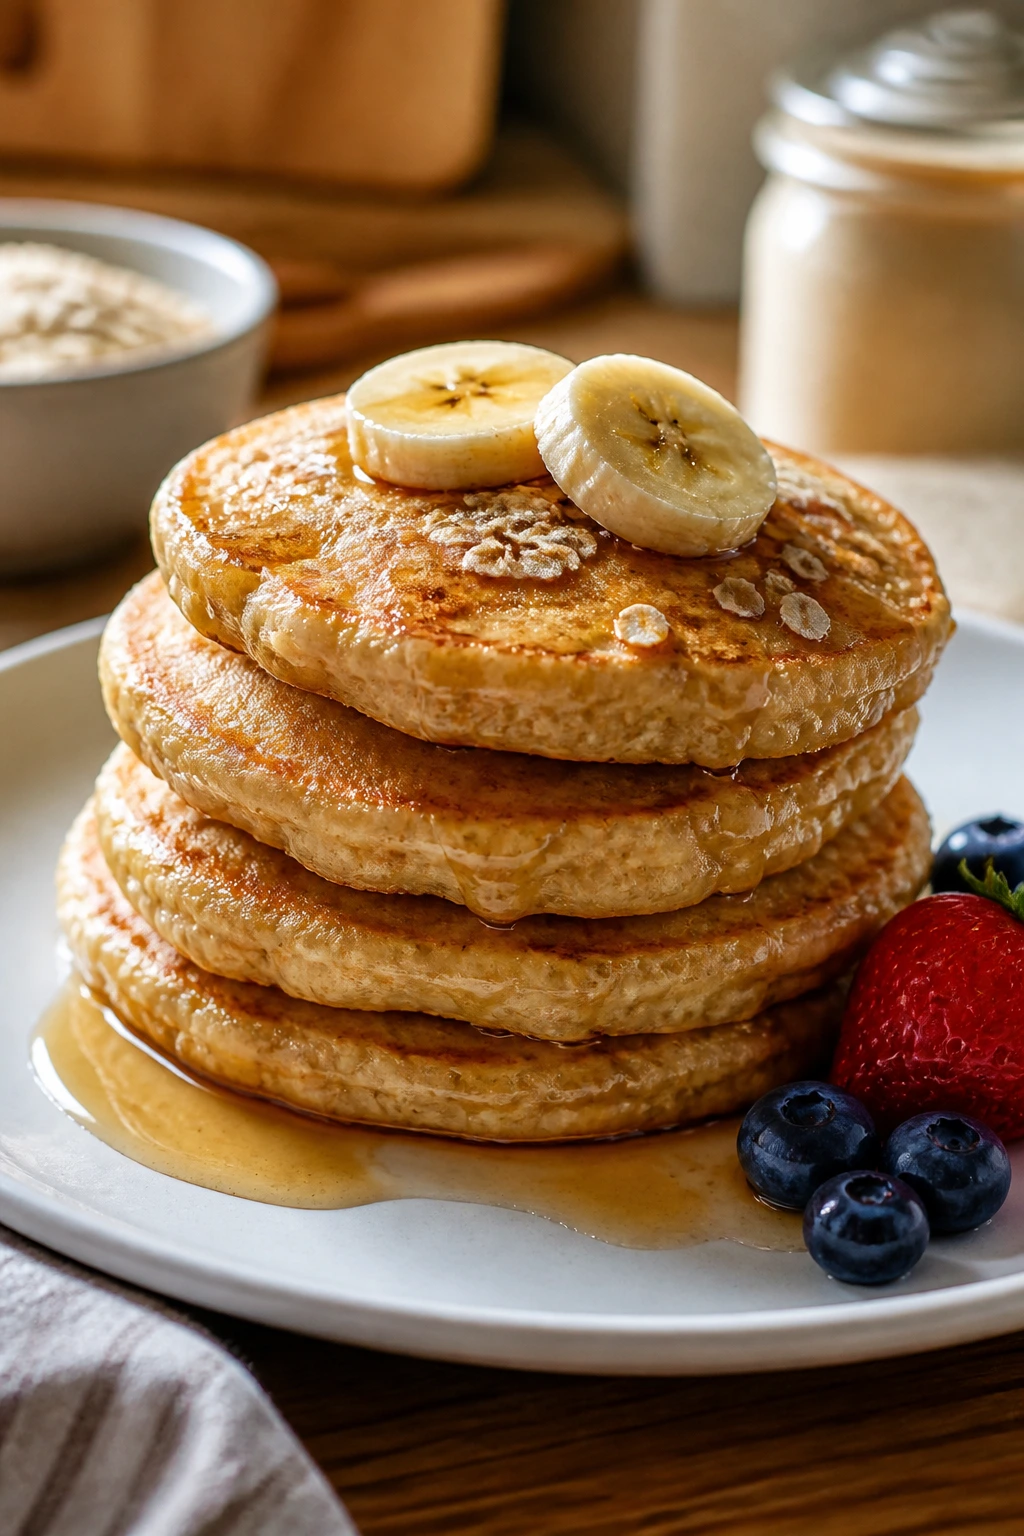
A stack of pancakes doesn’t have to be a sugar crash. These are soft, banana-sweet, and sturdy enough to hold a little syrup without falling apart, which is the real test. Three or four small pancakes come in around 280 calories.
Why It Works:
Bananas do a lot of the sweetening, so the batter doesn’t need much added sugar. Oats bring more fiber and make the pancakes filling enough to last past the first half hour of the morning. Cooking them small helps them set through in the middle before the outside gets too dark.
Key Ingredients:
- 2 ripe bananas
- 2 large eggs
- 1 cup rolled oats
- 1/2 cup milk
- 1 teaspoon baking powder
- 1/2 teaspoon cinnamon
- 1/2 teaspoon vanilla extract
- Butter or cooking spray, for the pan
Quick Steps:
- Blend or mash the bananas with eggs, oats, milk, baking powder, cinnamon, and vanilla until mostly smooth.
- Rest the batter for 5 minutes so the oats absorb some liquid.
- Heat a skillet or griddle over medium-low heat and grease it lightly.
- Scoop small rounds of batter, about 2 tablespoons each, into the pan.
- Cook for 2 to 3 minutes per side until the edges set and the centers look dry.
- Serve with berries, yogurt, or a thin drizzle of maple syrup.
Equipment for This Recipe:
- Blender or mixing bowl
- Skillet or griddle
- Spatula
- Measuring cups
- Ladle or tablespoon
How to Serve This Dish:
Stack them with sliced strawberries, or spread the tops with peanut butter if you want more staying power. A few blueberries and a small pat of butter are enough; these pancakes do not need much help.
Pro Tips for This Recipe:
- Use very ripe bananas with brown spots for the best flavor.
- Keep the heat at medium-low so the pancakes cook through.
- Make them small. Tiny pancakes flip better and look more kid-friendly.
- If the batter thickens too much after resting, add 1 to 2 tablespoons milk.
Variations on This Dish:
- Blueberry Banana Pancakes: Fold in 1/2 cup blueberries at the end.
- Peanut Butter Swirl: Stir 2 tablespoons peanut butter into the batter.
- Gluten-Free Version: Use certified gluten-free oats and blend the batter smooth.
Common Mistakes to Avoid with This Dish:
- Using high heat: The outside browns before the center sets.
- Making giant pancakes: They tear more easily.
- Skipping the rest: The oats need time to soften.
10. Berry Yogurt Parfaits with Crunchy Granola
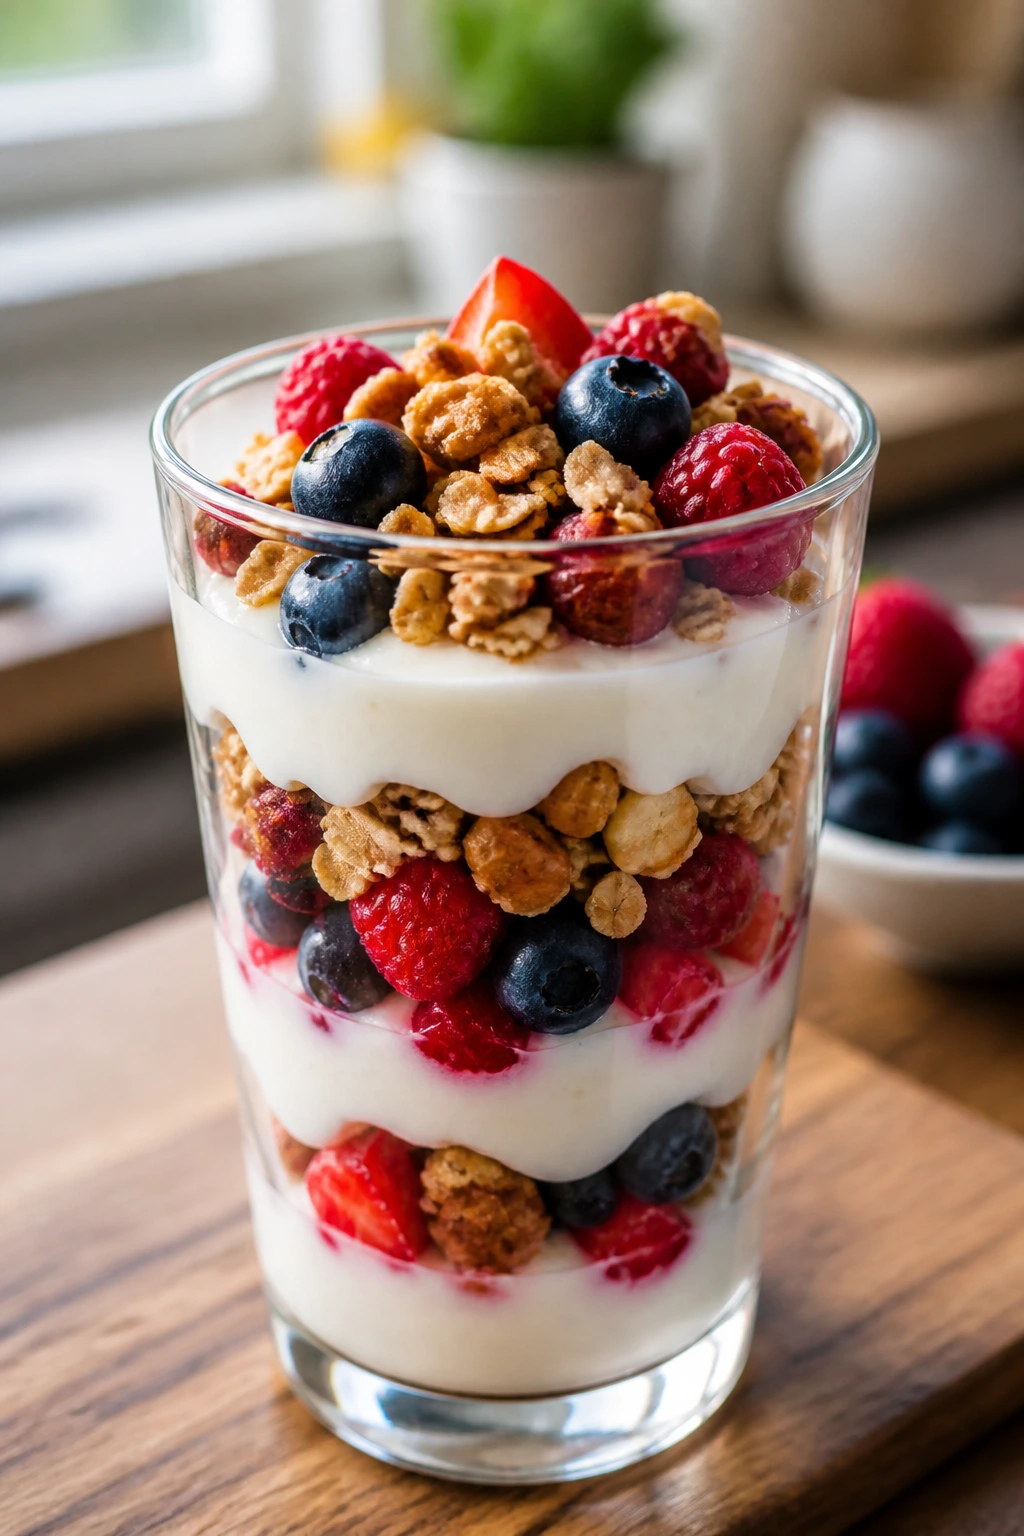
This is breakfast that looks polished without requiring any real work. Cool yogurt, sweet berries, and a measured layer of crunch make the bowl feel complete, and the whole thing lands around 250 calories if you keep the granola sensible.
Why It Works:
Plain Greek yogurt gives you protein and a clean base, while berries add brightness and color without much sugar. Granola supplies the crunch kids look for, but only if you add it at the end; otherwise it softens and turns dull. This one earns points because it can be assembled fast and still feels like a real meal.
Key Ingredients:
- 2 cups plain Greek yogurt
- 2 cups berries, mixed or single type
- 1 cup granola
- 2 tablespoons chia seeds
- 1 to 2 teaspoons honey
- 1/2 teaspoon vanilla extract
Quick Steps:
- Stir the vanilla into the yogurt and taste before adding honey.
- Spoon yogurt into the bottom of four glasses or jars.
- Add berries and a sprinkle of chia seeds.
- Repeat with another layer of yogurt and berries.
- Top with granola right before serving so it stays crisp.
- Serve right away, or keep the components separate until breakfast.
Equipment for This Recipe:
- Mixing bowl
- Spoon
- 4 small glasses or jars
- Measuring cups
How to Serve This Dish:
Use clear glasses if you want the layers to show, or just build the bowl and move on. Pair it with a boiled egg or toast if you need a bigger breakfast without much extra work.
Pro Tips for This Recipe:
- Add the granola last so it stays crunchy.
- Frozen berries work if you thaw and drain them first.
- Plain yogurt keeps the sugar in check better than fruit yogurt.
- A little vanilla goes a long way; don’t overdo it.
Variations on This Dish:
- Peach Almond Parfait: Swap berries for chopped peaches and sliced almonds.
- Chocolate Strawberry Parfait: Add a teaspoon of cocoa powder to the yogurt.
- Dairy-Free Version: Use coconut yogurt and check the granola label.
Common Mistakes to Avoid with This Dish:
- Overloading the granola: The crunch turns into a calorie pile fast.
- Using watery berries: Drain thawed fruit or the yogurt thins out.
- Assembling too early: The granola softens if it sits in yogurt overnight.
11. Sweet Potato Black Bean Nuggets

These nuggets are soft in the middle, a little crisp at the edges, and easy to dip. Sweet potato brings a mild sweetness, black beans bring body, and the whole thing holds together better than it sounds like it should. A serving comes in around 240 calories with dip.
Why It Works:
Sweet potato gives you moisture and a little natural sweetness, while black beans add fiber and enough heft to make the nuggets feel like a real meal. Oats and egg bind the mix without needing a ton of flour. Baking them on parchment keeps the outside dry enough to pick up and dunk.
Key Ingredients:
- 2 cups mashed cooked sweet potato
- 1 can black beans, rinsed and mashed
- 1/2 cup rolled oats
- 1 large egg
- 1/2 cup shredded cheddar
- 1 teaspoon cumin
- 1/2 teaspoon smoked paprika
- 1/2 teaspoon salt
Quick Steps:
- Preheat the oven to 400°F and line a sheet pan with parchment.
- Mash the sweet potato and black beans together until mostly smooth.
- Stir in oats, egg, cheddar, cumin, paprika, and salt.
- Shape the mixture into nugget-size ovals with damp hands.
- Bake for 20 to 22 minutes, flipping once halfway through, until the edges are browned.
- Cool for 5 minutes so they firm up before serving.
Equipment for This Recipe:
- Sheet pan
- Parchment paper
- Mixing bowl
- Potato masher or fork
- Spatula
How to Serve This Dish:
Serve them with ketchup, yogurt dip, or guacamole and a side of steamed peas. They also pack well in a lunchbox with apple slices and crackers.
Pro Tips for This Recipe:
- Mash the sweet potato thoroughly; chunks make the nuggets crack.
- If the mixture feels wet, add 1 to 2 tablespoons more oats.
- Wet hands keep the shaping job from sticking to your palms.
- Let them cool before packing or the steam softens the outside.
Variations on This Dish:
- Taco Nugget Version: Add taco seasoning and serve with salsa.
- No-Cheese Batch: Skip the cheddar and add an extra tablespoon of oats.
- Air-Fryer Version: Cook at 375°F for about 10 minutes, flipping once.
Common Mistakes to Avoid with This Dish:
- Using watery mash: It makes the mixture too loose to shape.
- Not flipping: One side browns faster and the nuggets stay pale underneath.
- Serving straight from the oven: They need a few minutes to settle.
12. Lentil Sloppy Joes
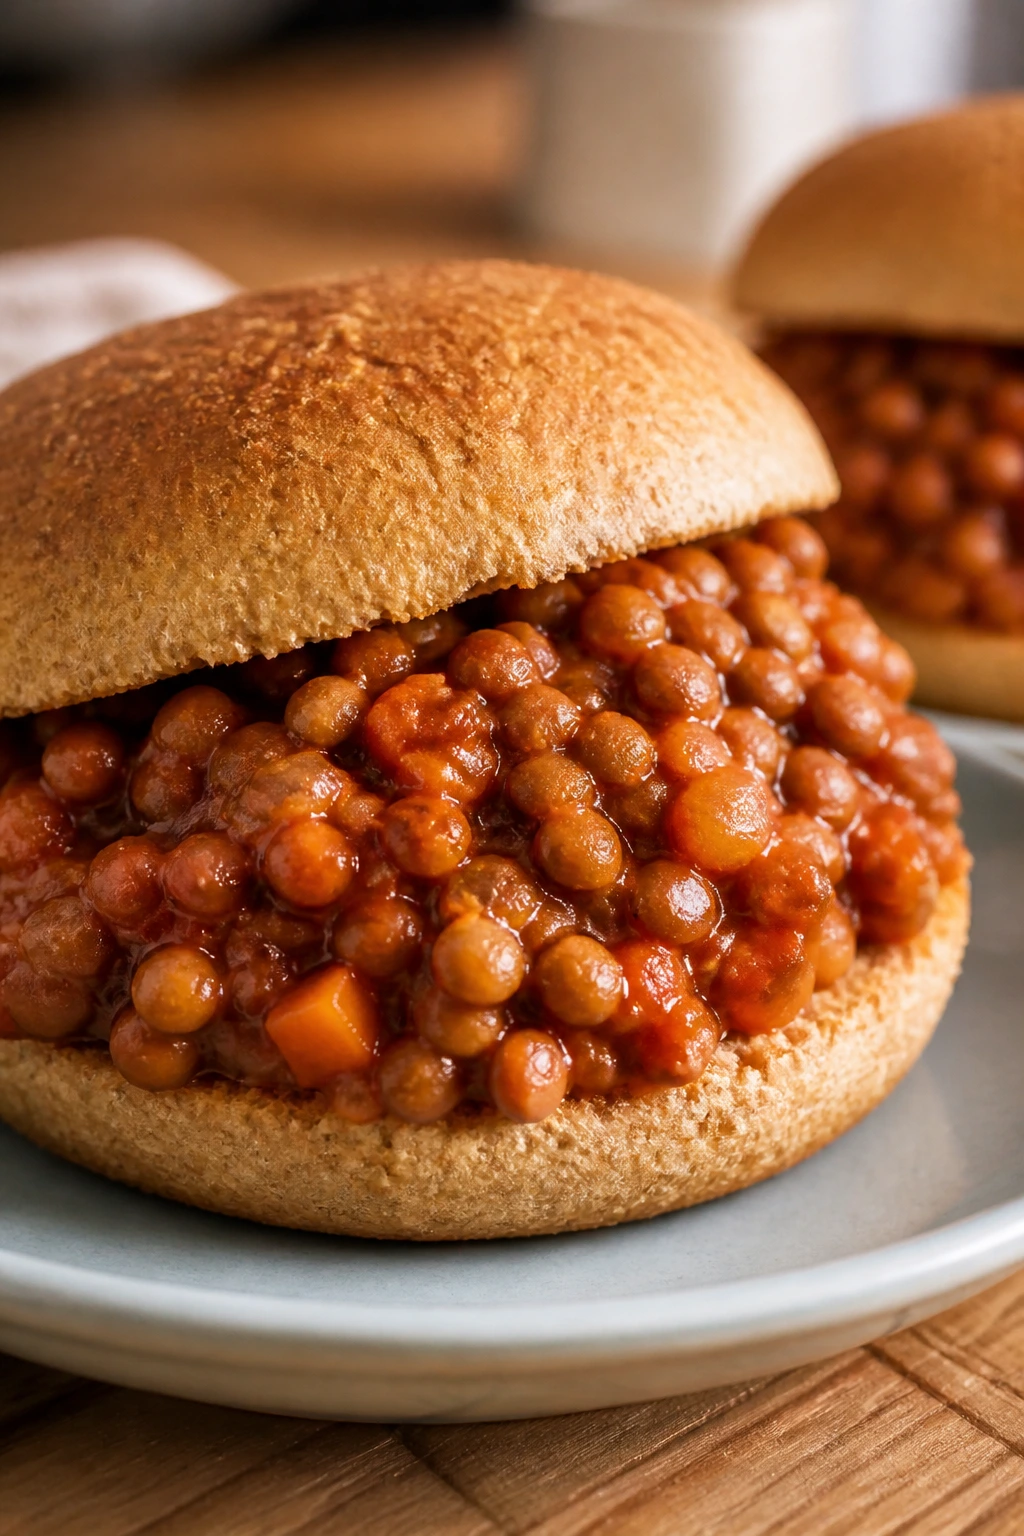
Messy food, but in the fun way. Lentils give these sloppy joes the spoonable, saucy texture kids expect, while keeping the meal light enough to stay under the calorie ceiling. One sandwich lands around 340 calories.
Why It Works:
Brown lentils soften into the sauce without disappearing completely, which gives the filling a meaty feel without actual meat. Onion, ketchup, tomato paste, and Worcestershire build the familiar sweet-savory flavor, and toasting the buns keeps the bottom from going soggy. They’re cheap, filling, and better than the canned version by a mile.
Key Ingredients:
- 1 tablespoon olive oil
- 1 small onion, diced
- 2 cloves garlic, minced
- 1 cup dry brown lentils
- 2 cups water or low-sodium broth
- 1/2 cup ketchup
- 2 tablespoons tomato paste
- 1 tablespoon Worcestershire sauce
- 1 teaspoon smoked paprika
- 4 whole wheat buns
Quick Steps:
- Heat the olive oil in a saucepan over medium heat and cook the onion for 5 minutes until soft.
- Stir in the garlic and smoked paprika and cook for 30 seconds.
- Add the lentils and water or broth, then simmer covered for 20 to 25 minutes until the lentils are tender.
- Stir in the ketchup, tomato paste, and Worcestershire sauce.
- Cook uncovered for 5 to 8 minutes until the filling is thick enough to mound on a spoon.
- Spoon onto toasted buns and serve warm.
Equipment for This Recipe:
- Medium saucepan
- Wooden spoon
- Measuring cups
- Knife and cutting board
- Toaster or skillet for buns
How to Serve This Dish:
Serve the filling on toasted buns with pickle chips and a crunchy slaw. If you want a lighter dinner, spoon it into lettuce cups or over baked potato wedges.
Pro Tips for This Recipe:
- Cook the lentils until tender but not mushy.
- Toast the buns. Soft bread turns soggy fast here.
- Reduce the filling until it’s thick enough to stay put.
- A splash of vinegar or pickle juice at the end sharpens the flavor.
Variations on This Dish:
- Mushroom Version: Add finely chopped mushrooms with the onion.
- BBQ Lentil Joes: Swap half the ketchup for barbecue sauce.
- Open-Face Version: Serve on a single toast round to keep portions smaller.
Common Mistakes to Avoid with This Dish:
- Adding too much liquid too soon: The filling turns runny.
- Cooking the lentils too long: They lose texture and turn pasty.
- Forgetting the toast: Soggy buns ruin the sandwich fast.
13. Veggie Fried Rice with Egg
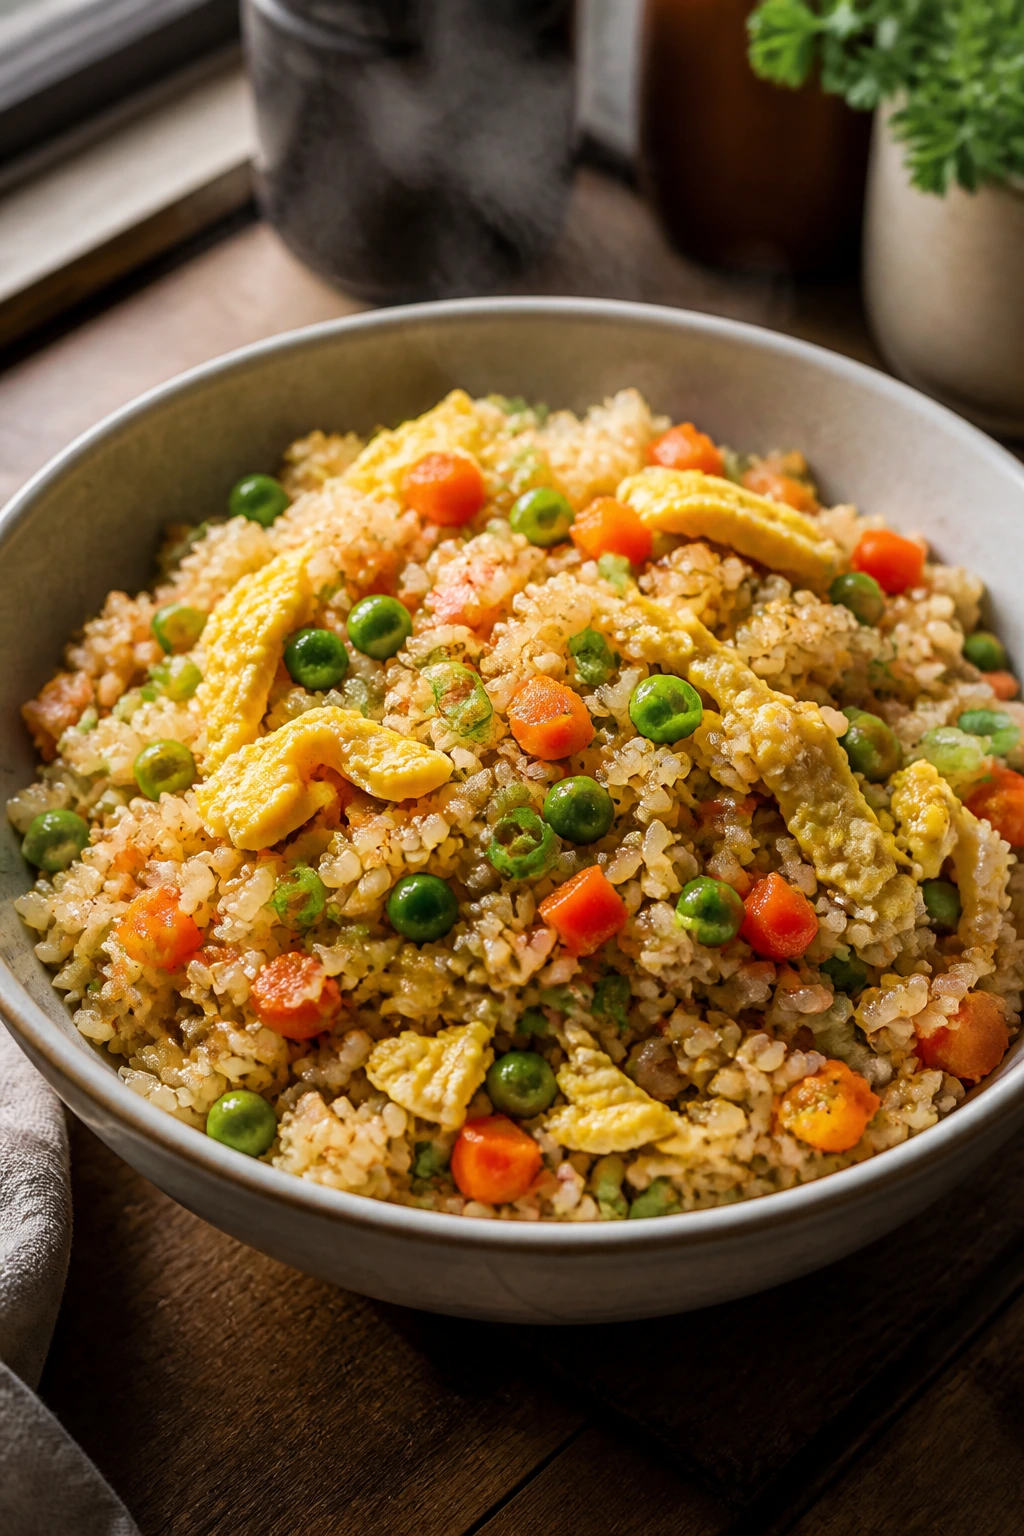
Leftover rice has a job now. It gets tossed in a hot skillet with vegetables, eggs, and a little sesame oil, then turns into something that tastes like dinner instead of leftovers. A serving comes in around 360 calories.
Why It Works:
Cold rice fries better than fresh rice because it’s a little dry and less likely to clump. The high heat creates some toasted edges, which gives the dish more flavor than a soft steamed bowl ever could. Eggs add richness and protein, and the vegetables keep the whole thing from feeling too plain.
Key Ingredients:
- 3 cups cooked cold rice
- 2 large eggs
- 1 cup frozen peas and carrots
- 1 cup diced zucchini or bell pepper
- 2 scallions, sliced
- 2 tablespoons low-sodium soy sauce
- 1 tablespoon sesame oil
- 1 tablespoon neutral oil
- 1 clove garlic, minced
Quick Steps:
- Heat the neutral oil in a large skillet or wok over medium-high heat.
- Scramble the eggs in the skillet, then move them to a plate.
- Stir-fry the vegetables and garlic for 2 to 3 minutes until bright and slightly tender.
- Add the rice, breaking up clumps with a spatula.
- Pour in the soy sauce and sesame oil and toss until everything is hot and lightly toasted.
- Fold the eggs back in and finish with scallions.
Equipment for This Recipe:
- Large skillet or wok
- Spatula
- Small bowl for eggs
- Measuring spoons
How to Serve This Dish:
Serve it in shallow bowls with orange slices or edamame on the side. A sprinkle of sesame seeds or chopped peanuts adds crunch if your kids like a little texture on top.
Pro Tips for This Recipe:
- Use cold rice. Fresh rice turns sticky and clumpy.
- Keep the heat up so the rice gets a toasted edge.
- Chop the vegetables small for easier bites.
- Add the soy sauce gradually; it’s easier to season twice than fix a salty pan.
Variations on This Dish:
- Chicken Fried Rice: Stir in diced cooked chicken for a more filling bowl.
- Cauliflower Mix: Replace half the rice with cauliflower rice for a lighter plate.
- Peanut Version: Whisk a teaspoon of peanut butter into the soy sauce for a nutty finish.
Common Mistakes to Avoid with This Dish:
- Using hot rice: It steams instead of frying.
- Overcrowding the pan: The rice never gets the toasted bits.
- Pouring in too much soy sauce: The dish turns salty fast.
14. Pasta with Blended Veggie Marinara
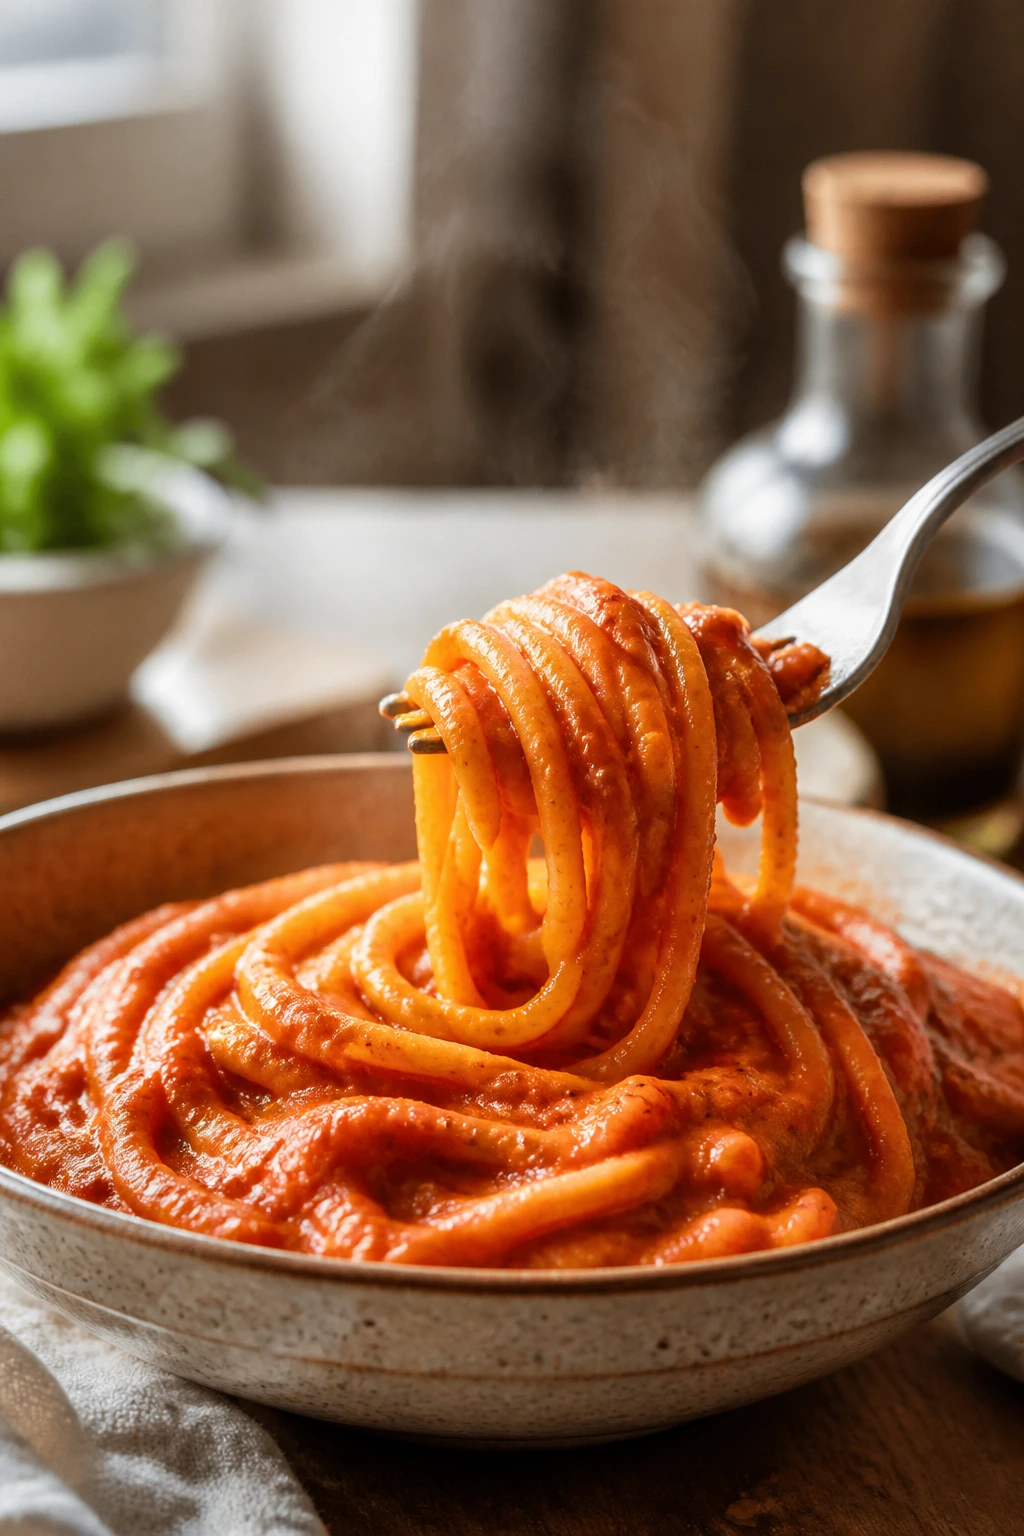
The trick here is simple: make the vegetables disappear into the sauce, not into the memory of the person eating dinner. The sauce tastes like tomato first, vegetables second, and that’s why it works. A bowl with modest pasta lands around 380 calories.
Why It Works:
Onion, carrot, zucchini, and garlic cook down before the tomatoes go in, which gives the sauce a sweeter, rounder taste. Blending it smooth removes the visible vegetable pieces that can trigger a hard no from picky eaters, while still adding body and fiber. The sauce clings to the pasta instead of pooling at the bottom of the bowl, which makes the plate feel more finished.
Key Ingredients:
- 8 ounces pasta
- 1 tablespoon olive oil
- 1 small onion, chopped
- 1 carrot, chopped
- 1 zucchini, chopped
- 2 cloves garlic, minced
- 1 can crushed tomatoes, 28 ounces
- 1/2 teaspoon salt
- 1/4 teaspoon black pepper
- 2 tablespoons parmesan, for serving
Quick Steps:
- Cook the pasta in salted water until al dente, then drain.
- Heat the olive oil in a saucepan and cook the onion, carrot, and zucchini for 6 to 8 minutes until softened.
- Add the garlic and cook for 30 seconds.
- Stir in the crushed tomatoes, salt, and pepper, then simmer for 15 minutes.
- Blend the sauce until smooth with an immersion blender or countertop blender.
- Toss with the pasta and serve with parmesan.
Equipment for This Recipe:
- Large pot
- Saucepan
- Immersion blender or countertop blender
- Colander
- Wooden spoon
How to Serve This Dish:
Serve it with peas, broccoli, or a simple green salad if the table can handle it. A spoonful of ricotta on top makes the plate feel richer without pushing the calories too high.
Pro Tips for This Recipe:
- Let the vegetables soften fully before blending.
- Salt the pasta water well; bland noodles make bland pasta.
- Blend carefully if the sauce is hot because steam can push a blender lid.
- If the sauce looks thick, loosen it with a splash of pasta water.
Variations on This Dish:
- Creamier Sauce: Stir in 2 tablespoons ricotta after blending.
- Spinach Version: Add a handful of spinach during the simmer and blend it in.
- Turkey Sauce: Brown 1/2 pound ground turkey with the onion for a meatier version.
Common Mistakes to Avoid with This Dish:
- Rushing the vegetable cook time: Raw carrot tastes sharp in the finished sauce.
- Blending too thin: Too much liquid makes the sauce slide off the pasta.
- Overcooking the noodles: They soften more once they hit the sauce.
15. Mini Meatloaf Muffins
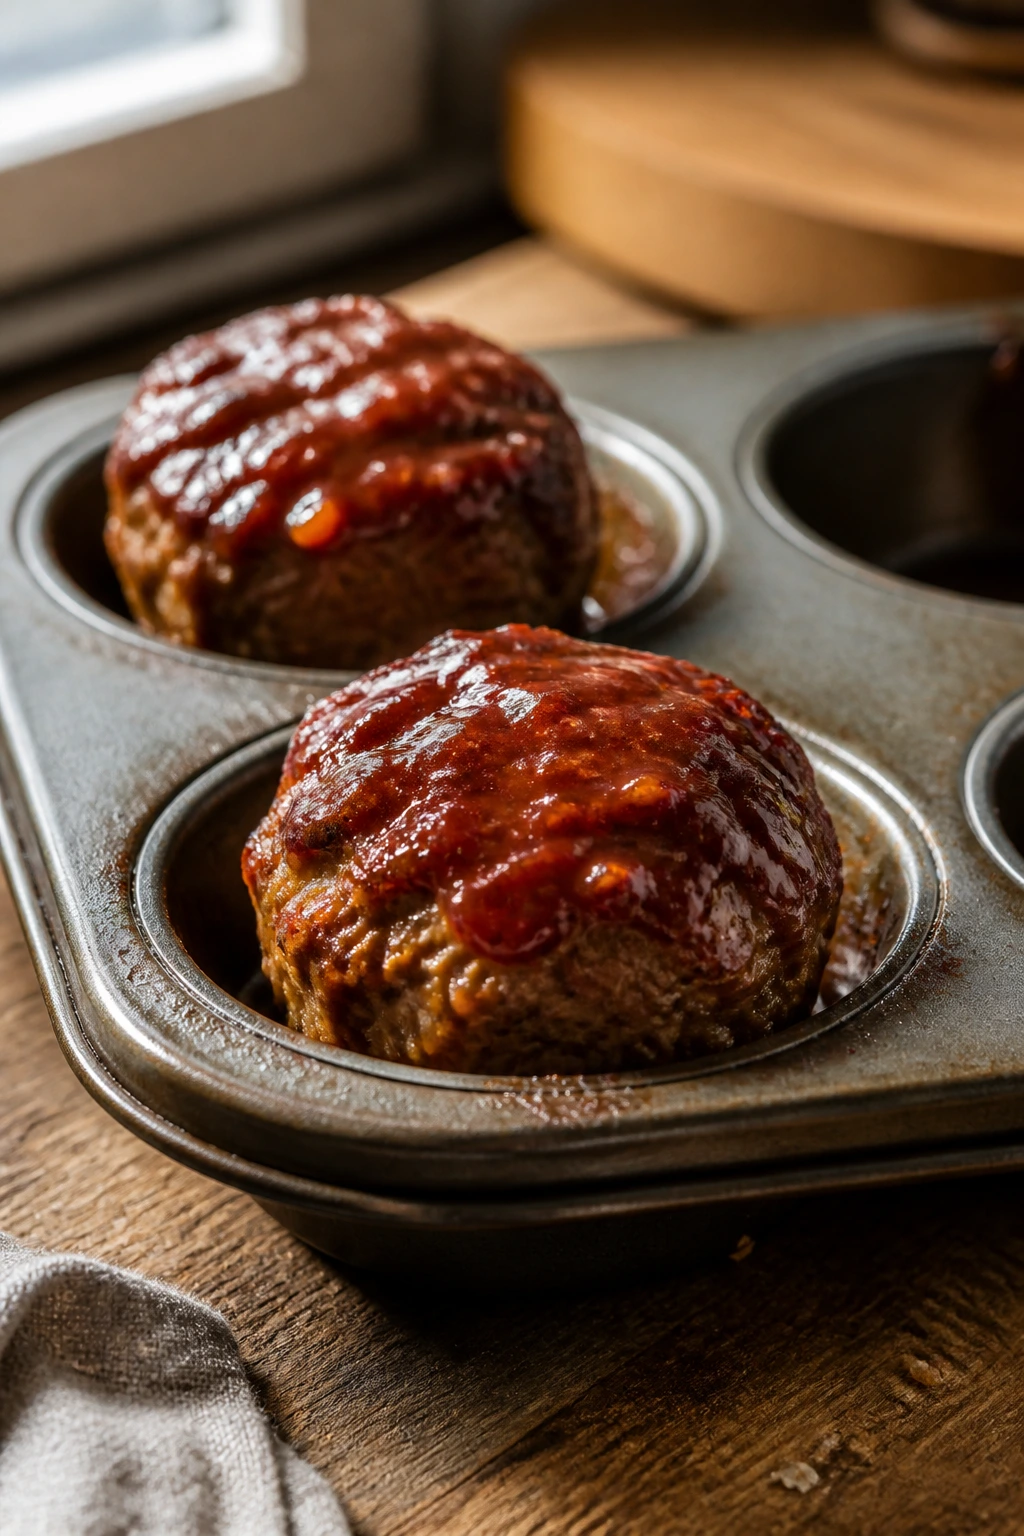
Meatloaf gets much more cooperative when it shows up in muffin form. The edges caramelize, the centers stay juicy, and the glaze on top gives each piece a sweet-salty finish without needing a knife to serve it. Two muffins plus vegetables usually stay around 350 calories.
Why It Works:
Lean ground beef or turkey keeps the fat in check, while oats and milk make the mixture tender without a heavy breadcrumb load. The muffin tin creates built-in portions, which makes serving faster and keeps the calories honest. I also like how quickly they cool; a big loaf can sit there forever, but these are ready much sooner.
Key Ingredients:
- 1 pound lean ground beef or turkey
- 1/2 cup rolled oats
- 1 large egg
- 1/4 cup milk
- 1/4 cup ketchup
- 1/2 cup grated carrot
- 1/4 cup finely diced onion
- 1 teaspoon Worcestershire sauce
- 1 teaspoon garlic powder
- 2 tablespoons ketchup mixed with 1 teaspoon maple syrup, for glaze
Quick Steps:
- Preheat the oven to 375°F and grease a standard muffin tin.
- Mix the meat, oats, egg, milk, ketchup, carrot, onion, Worcestershire, and garlic powder in a bowl until just combined.
- Divide the mixture among 8 muffin cups and press lightly into shape.
- Brush the tops with the ketchup-maple glaze.
- Bake for 20 to 22 minutes, until the centers reach 165°F.
- Rest for 5 minutes before lifting them out.
Equipment for This Recipe:
- Standard muffin tin
- Mixing bowl
- Spoon or scoop
- Pastry brush or spoon
- Instant-read thermometer
How to Serve This Dish:
Serve with mashed potatoes and green beans, or keep it lighter with roasted carrots and a side salad. The muffin shape also makes leftovers easy to pack into lunch containers.
Pro Tips for This Recipe:
- Don’t overmix. The texture should look combined, not kneaded.
- Grease the tin well or the edges stick.
- A little glaze on top keeps the surface from drying out.
- Let them sit before removing so they don’t tear apart.
Variations on This Dish:
- BBQ Muffins: Swap the glaze for barbecue sauce.
- Italian-Style Muffins: Add oregano and parmesan, then serve with marinara.
- Turkey-and-Zucchini Version: Replace half the carrot with grated zucchini that has been squeezed dry.
Common Mistakes to Avoid with This Dish:
- Packing the mixture too tightly: Dense meatloaf feels rubbery.
- Using fatty meat without draining: You get grease pooling in the tin.
- Skipping the rest: They need a few minutes to firm up.
16. Apple Cinnamon Baked Oatmeal Cups
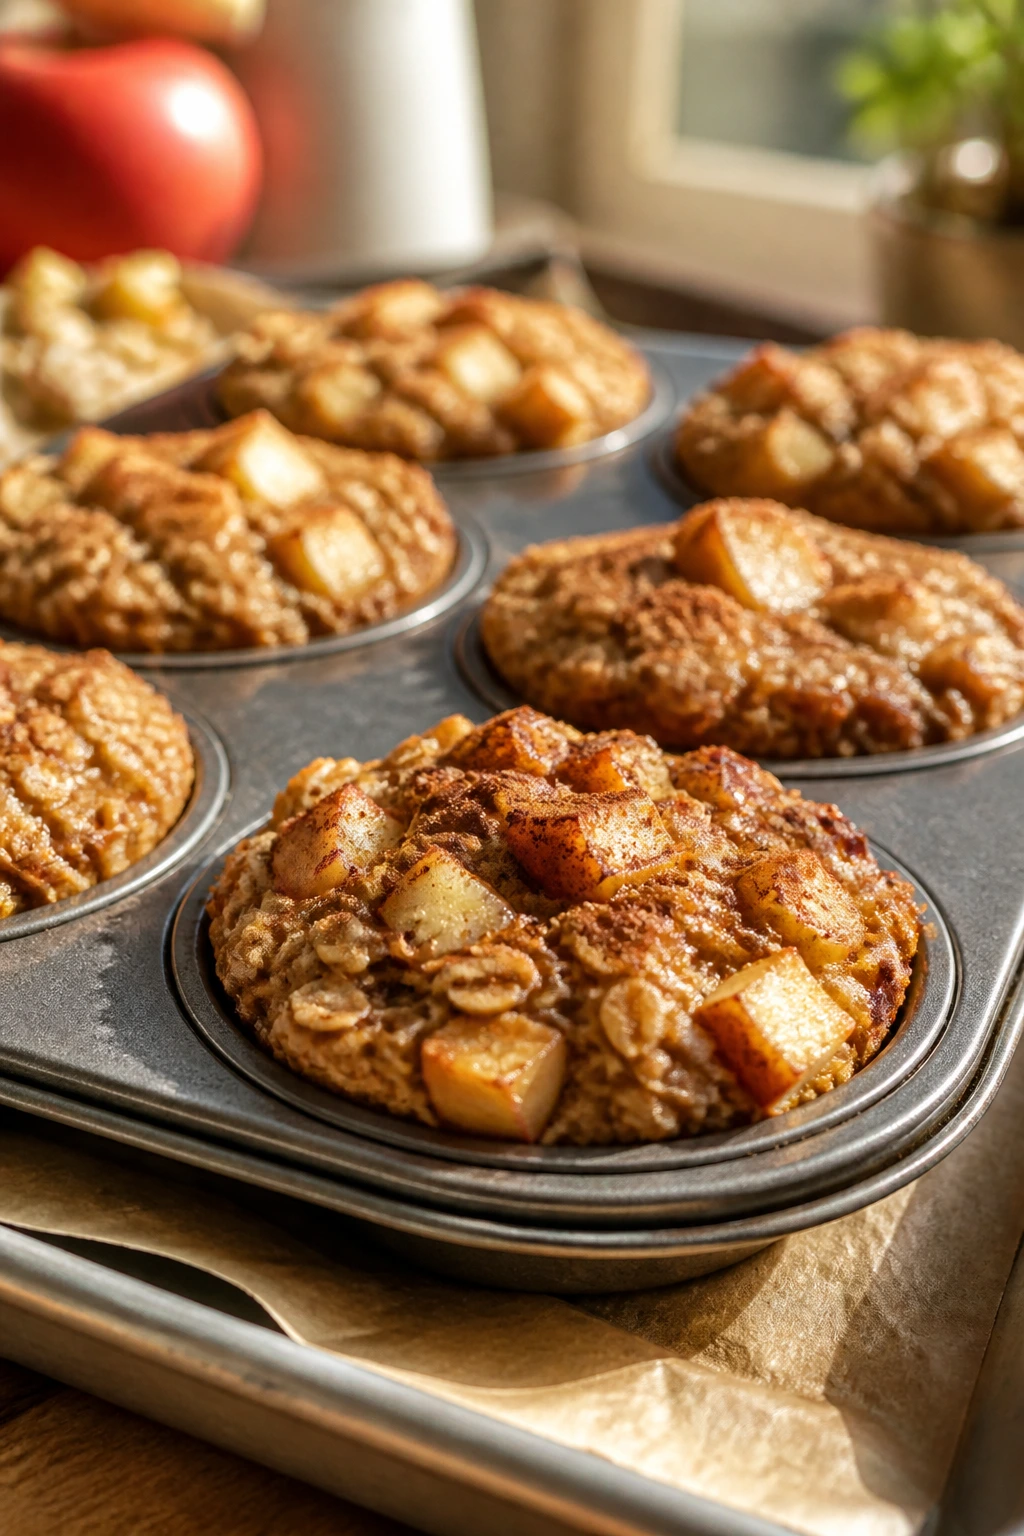
These are breakfast cups you can hold in one hand, which is reason enough to keep them in rotation. They taste like baked oatmeal with apple pie energy, but the texture stays sturdy enough for little hands and lunchboxes. One or two cups sit around 260 calories.
Why It Works:
Rolled oats, egg, milk, and apple bake into a soft but stable cup that feels filling without being heavy. Cinnamon and vanilla do a lot of flavor work, while the apple keeps the cups moist from the inside. They’re useful because they’re good warm, at room temperature, or chilled from the fridge.
Key Ingredients:
- 2 cups rolled oats
- 1 apple, peeled if you want, finely diced or grated
- 2 large eggs
- 1 1/2 cups milk
- 2 tablespoons maple syrup
- 1 teaspoon cinnamon
- 1 teaspoon baking powder
- 1 teaspoon vanilla extract
- 2 tablespoons chopped walnuts, optional
Quick Steps:
- Preheat the oven to 350°F and grease a muffin tin well.
- Whisk the eggs, milk, maple syrup, cinnamon, and vanilla in a bowl.
- Stir in the oats, apple, baking powder, and walnuts if using.
- Divide the mixture among 10 muffin cups.
- Bake for 25 to 28 minutes, until set in the center and lightly browned on top.
- Cool for 10 minutes before removing from the pan.
Equipment for This Recipe:
- Muffin tin
- Mixing bowl
- Whisk
- Spoon
- Cooling rack
How to Serve This Dish:
Serve them warm with yogurt or a spoonful of peanut butter. They also work cold, which is useful on rushed mornings when no one wants to wait for anything.
Pro Tips for This Recipe:
- Grated apple blends in more than diced apple and makes softer cups.
- Grease the tin well, especially around the edges.
- Let them cool before removing or they’ll crumble.
- If you want sweeter cups, add brown sugar instead of more syrup.
Variations on This Dish:
- Blueberry Oat Cups: Swap the apple for blueberries.
- Peanut Butter Version: Swirl a teaspoon of peanut butter into each cup before baking.
- Dairy-Free Batch: Use oat milk or almond milk and check the texture before baking.
Common Mistakes to Avoid with This Dish:
- Too much liquid: The centers never set cleanly.
- Pulling them out too soon: They finish firming as they cool.
- Using huge apple chunks: They leave wet pockets.
17. Chicken Veggie Soup with Tiny Pasta
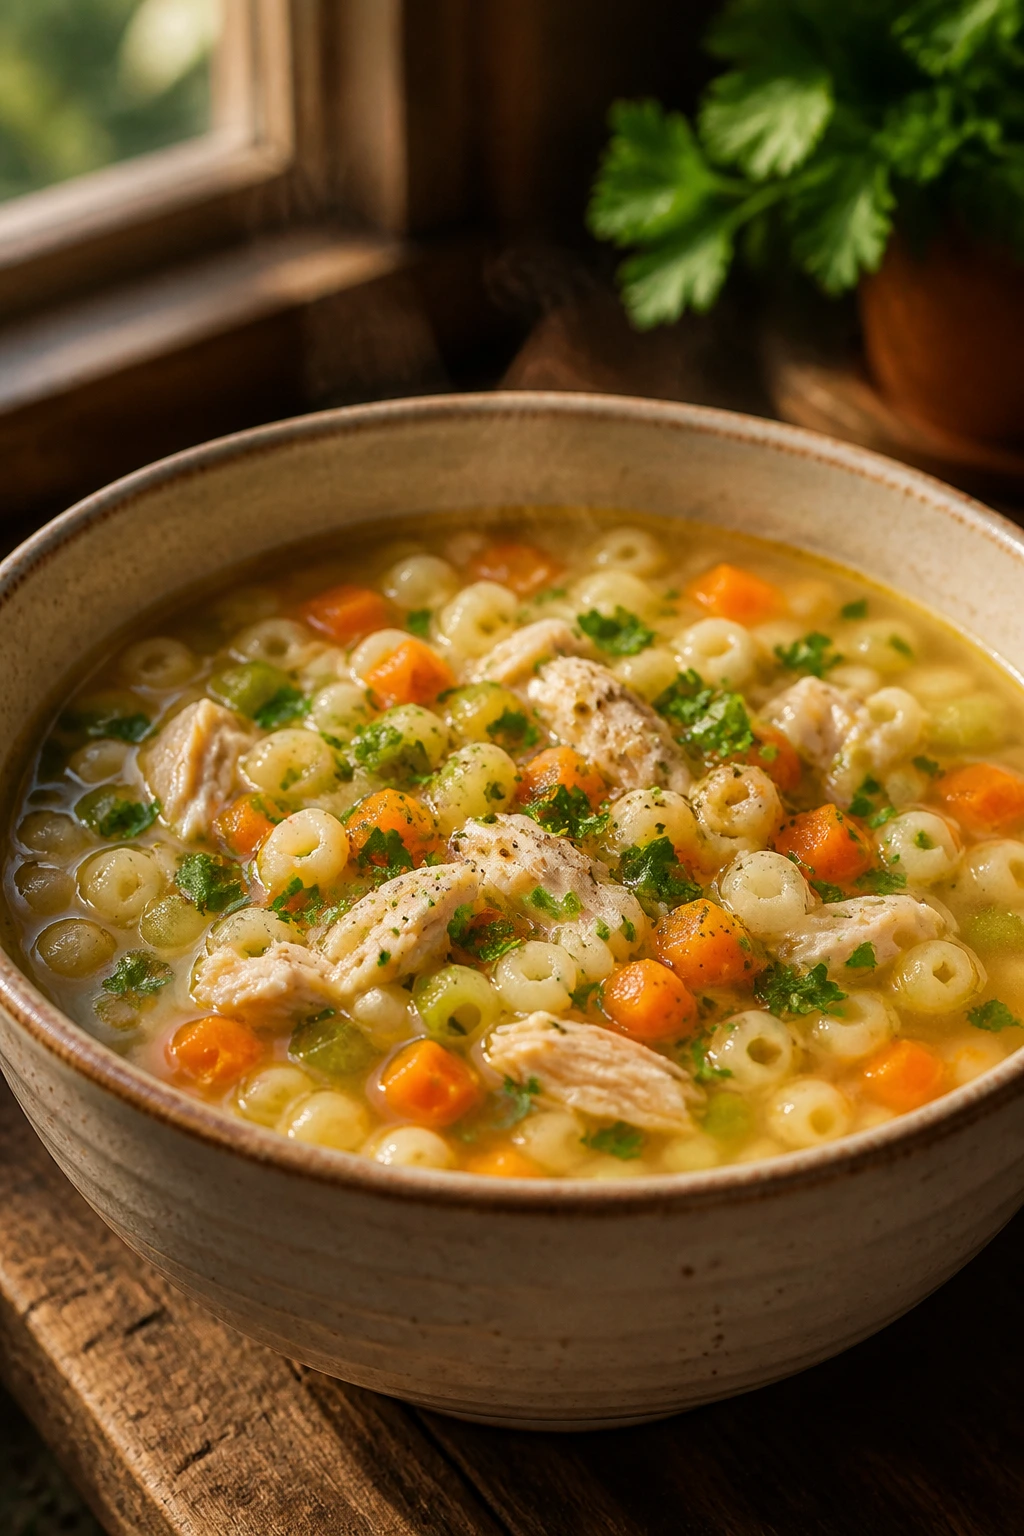
Soup is where a lot of family dinners quietly recover. This one tastes like it simmered longer than it did, and the tiny pasta makes it feel like a meal instead of a starter. A bowl comes in around 280 calories.
Why It Works:
Chicken gives the soup staying power, carrots and celery build a simple base, and tiny pasta keeps kids interested because each spoonful has something small and easy to scoop. A gentle simmer lets the broth stay clear and the chicken stay tender, which matters more than speed here. A squeeze of lemon at the end keeps the whole pot from tasting sleepy.
Key Ingredients:
- 1 tablespoon olive oil
- 1 small onion, diced
- 2 carrots, diced
- 2 celery stalks, diced
- 2 cloves garlic, minced
- 6 cups low-sodium chicken broth
- 2 cups cooked shredded chicken
- 1/2 cup tiny pasta, such as stars or ditalini
- 1 cup frozen peas
- 1 tablespoon chopped parsley
- 1 tablespoon lemon juice
Quick Steps:
- Heat the olive oil in a soup pot over medium heat.
- Cook the onion, carrots, and celery for 6 to 8 minutes until softened.
- Stir in the garlic and cook for 30 seconds.
- Pour in the broth and bring it to a gentle simmer.
- Add the chicken and pasta and cook for 8 to 10 minutes until the pasta is tender.
- Stir in the peas, parsley, and lemon juice, then serve hot.
Equipment for This Recipe:
- Soup pot
- Ladle
- Knife and cutting board
- Wooden spoon
- Measuring cups
How to Serve This Dish:
Serve with crackers, toast, or a small grilled cheese half if you want a fuller meal. It also packs well in a thermos, which is one of the few lunchbox tricks that actually feels worth the effort.
Pro Tips for This Recipe:
- Keep the simmer gentle so the broth stays clear.
- Add lemon at the end for a fresher taste.
- If leftovers matter, cook the pasta separately and add it to each bowl.
- Cut the vegetables small enough for easy spoonfuls.
Variations on This Dish:
- Rice Version: Swap the tiny pasta for cooked rice.
- Dill Version: Add dill for a more classic chicken-soup flavor.
- Creamier Bowl: Stir in 2 tablespoons plain yogurt off the heat.
Common Mistakes to Avoid with This Recipe:
- Boiling hard: The chicken gets stringy and the broth clouds up.
- Cooking pasta in the whole pot for leftovers: It swells and drinks the broth overnight.
- Underseasoning the base: The vegetables need enough salt to taste like themselves.
18. Tuna Cucumber Pita Pockets
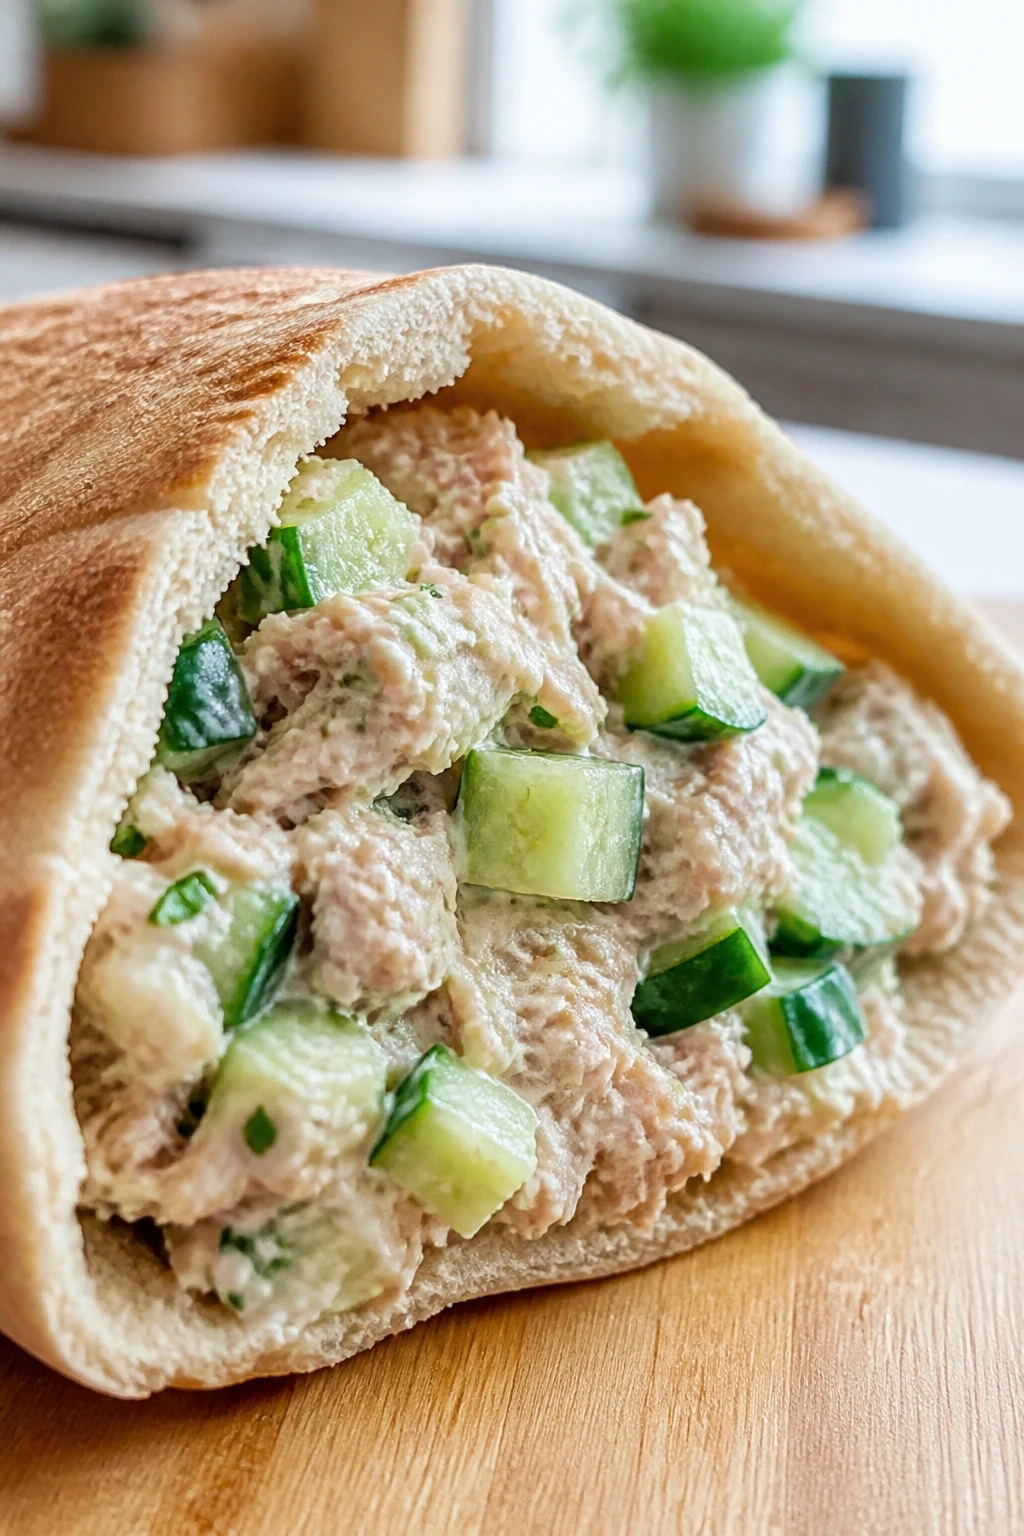
Cold, crunchy, and useful. That’s what these are. Tuna salad gets lighter with Greek yogurt, cucumber gives it a clean snap, and pita pockets make the whole thing easy to hold without chasing filling around a plate. One pocket lands around 290 calories.
Why It Works:
Tuna brings protein without a huge calorie load, and the yogurt keeps the filling creamy while cutting back on mayonnaise. Cucumber and celery add crunch, which keeps the texture lively and stops the tuna from feeling too soft or heavy. The pita gives the meal structure, and that matters when you want lunch to feel like lunch instead of snack fragments.
Key Ingredients:
- 2 cans tuna, drained
- 1/3 cup plain Greek yogurt
- 1 tablespoon mayonnaise
- 1 celery stalk, finely diced
- 1/2 cup cucumber, finely diced and patted dry
- 1 tablespoon lemon juice
- 1 teaspoon dried dill or 1 tablespoon fresh dill
- 2 whole wheat pitas
- Lettuce leaves, optional
- Salt and pepper to taste
Quick Steps:
- Mix the tuna, yogurt, mayonnaise, celery, cucumber, lemon juice, and dill in a bowl.
- Season lightly with salt and pepper.
- Warm the pitas for 20 to 30 seconds if you want them more flexible.
- Slice each pita in half and open the pocket gently.
- Fill with tuna salad and a lettuce leaf if using.
- Serve right away so the pita stays soft but not damp.
Equipment for This Recipe:
- Mixing bowl
- Fork
- Knife
- Cutting board
- Spoon
How to Serve This Dish:
Serve with apple wedges, pretzels, or carrot sticks. For younger kids, spoon the tuna salad onto crackers if the pita pockets keep splitting in half.
Pro Tips for This Recipe:
- Pat the cucumber dry or the filling turns watery fast.
- Don’t overstuff the pita. A half-full pocket that stays intact beats a bursting one.
- Use tuna packed in water if you want a lighter result.
- A squeeze of extra lemon makes the filling taste brighter and less flat.
Variations on This Dish:
- Chickpea Pocket: Mash chickpeas and use the same mix-ins for a tuna-free version.
- Wrap Style: Roll the filling in a whole wheat tortilla if the pita keeps tearing.
- Curry Version: Add a pinch of curry powder for a warmer flavor.
Common Mistakes to Avoid with This Dish:
- Too much mayonnaise: The filling gets heavy and slides out.
- Wet cucumber: It thins the salad too quickly.
- Filling too far ahead: The pita softens as it sits, so assemble close to eating time.
Why Healthy Kid Recipes Under 500 Calories Work Without Feeling Tiny
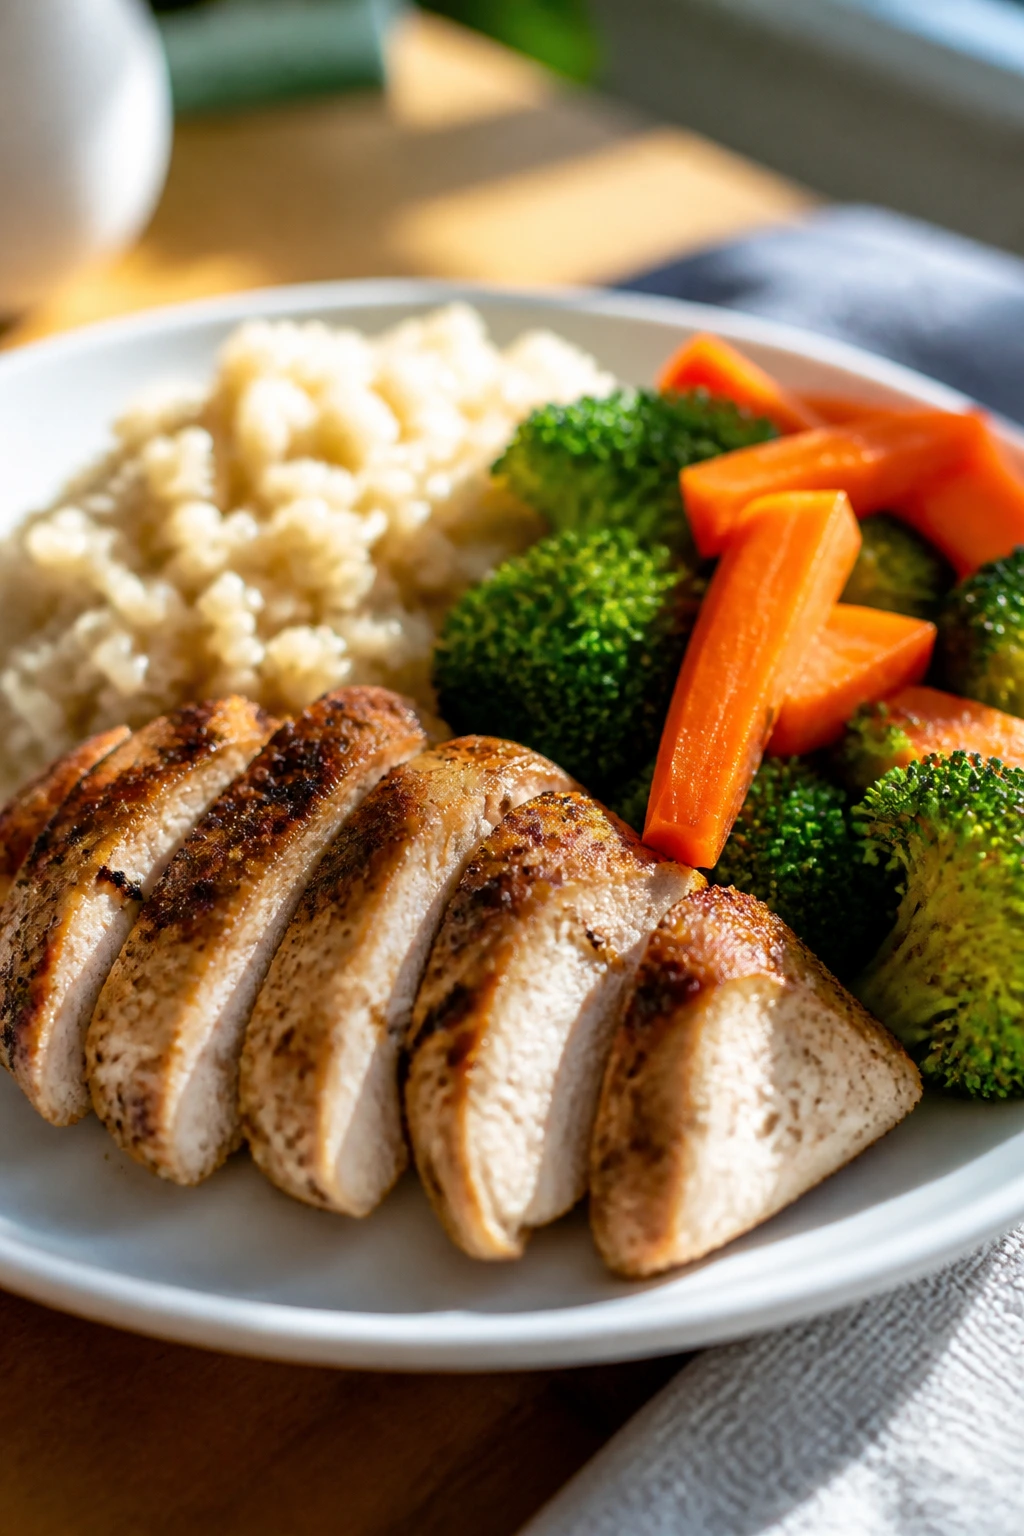
The calorie cap works best when you stop treating it like a punishment and start treating it like a design choice. Lean proteins, vegetables that blend in, and sensible starch portions do most of the work. A baked tender with a crunchy crust feels satisfying because the oven gives it real texture. A bowl of pasta feels complete because the sauce clings and the broccoli is cut small enough to disappear into the bite.
Portion shape matters too. Mini muffins, meatballs, nuggets, pita pockets, and bowls all give you a built-in brake pedal. The food looks generous, but the serving size stays manageable. That’s a useful trick for families because you can add a fruit cup, milk, or extra vegetables on the side without throwing the whole plate off balance.
I also like that these recipes don’t all lean on the same flavor lane. Some are cheesy. Some are bright and lemony. Some are warm and tomato-heavy. A few taste like breakfast disguised as lunch, which is one of the quieter victories in home cooking. Repeatable food matters more than impressive food.
The Pans, Bowls, and Tools That Show Up Again and Again
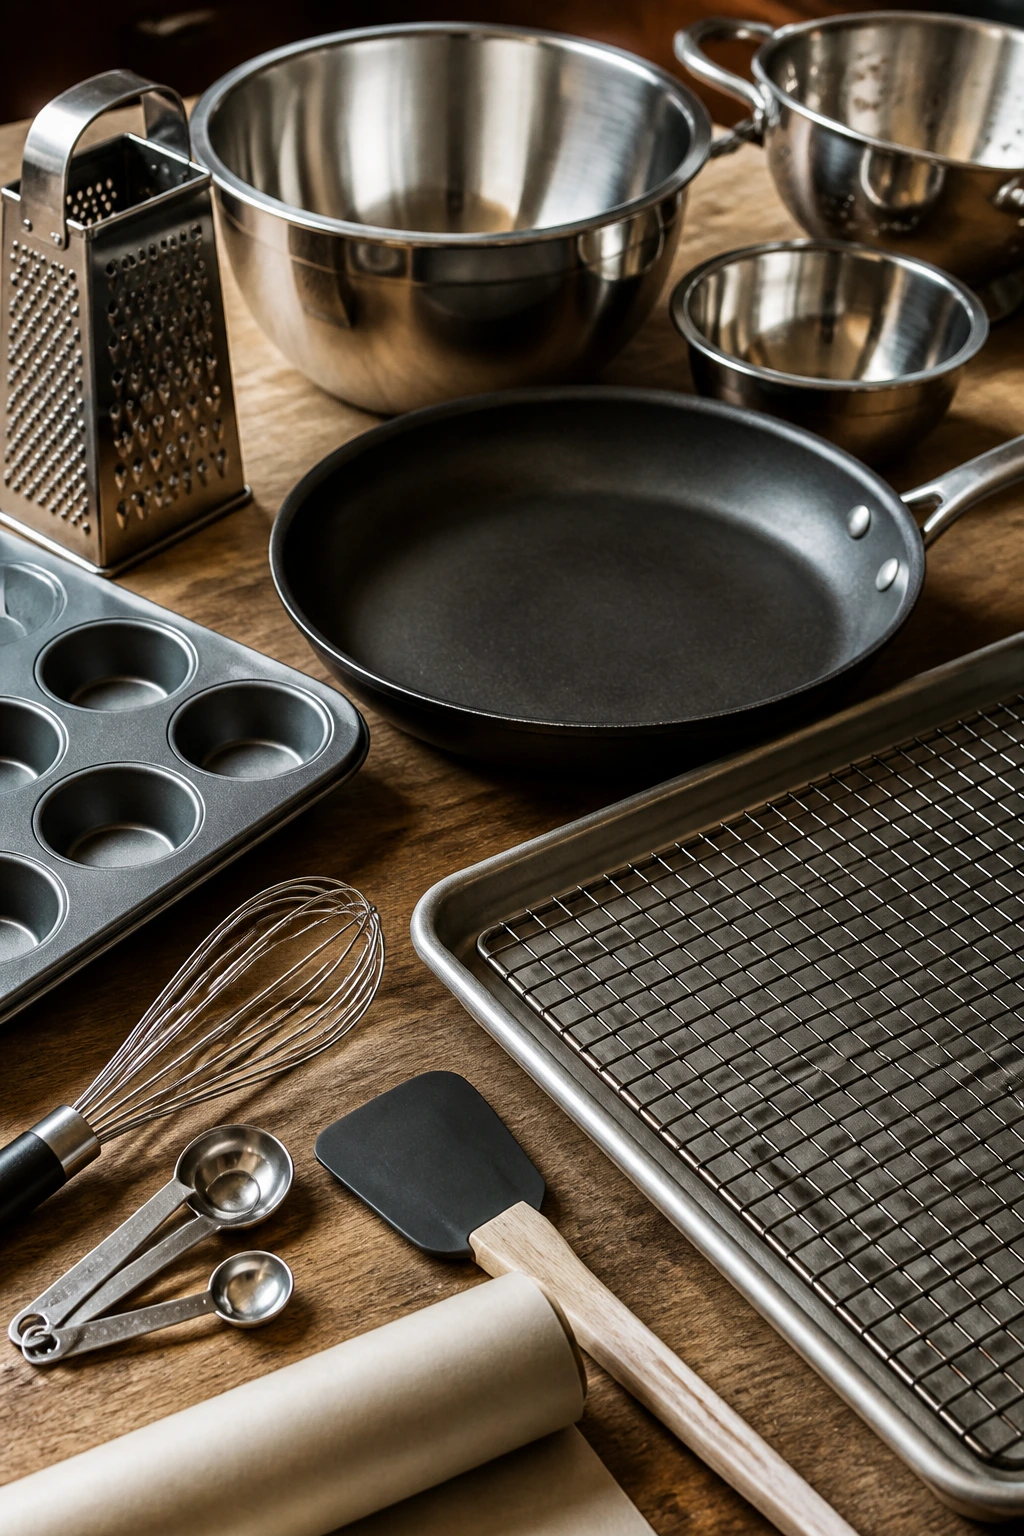
A small set of tools makes this kind of cooking much smoother. Nothing exotic. Mostly the things that earn their spot by being annoying to do without.
- Rimmed sheet pans: Best for tenders, meatballs, nuggets, and fajitas because they give food room to brown instead of steaming.
- Wire racks: Worth keeping on hand for breaded items so the bottoms stay crisp.
- Large skillet or wok: Useful for fried rice, quesadillas, taco filling, and salmon patties.
- Mixing bowls in 2 or 3 sizes: You’ll use them constantly for breading, batter, and fillings.
- Box grater: Handy for zucchini, carrot, cheese, and apple.
- Instant-read thermometer: Not glamorous. Extremely useful.
- Muffin tins: Mini and standard both show up in this set of recipes.
- Parchment paper: Makes cleanup easier and helps lean foods release cleanly.
- Colander: Good for pasta, vegetables, and draining tuna.
- Blender or immersion blender: Needed for the marinara and useful for smooth batters too.
Smart Shopping for Healthy Kid Recipes Under 500 Calories
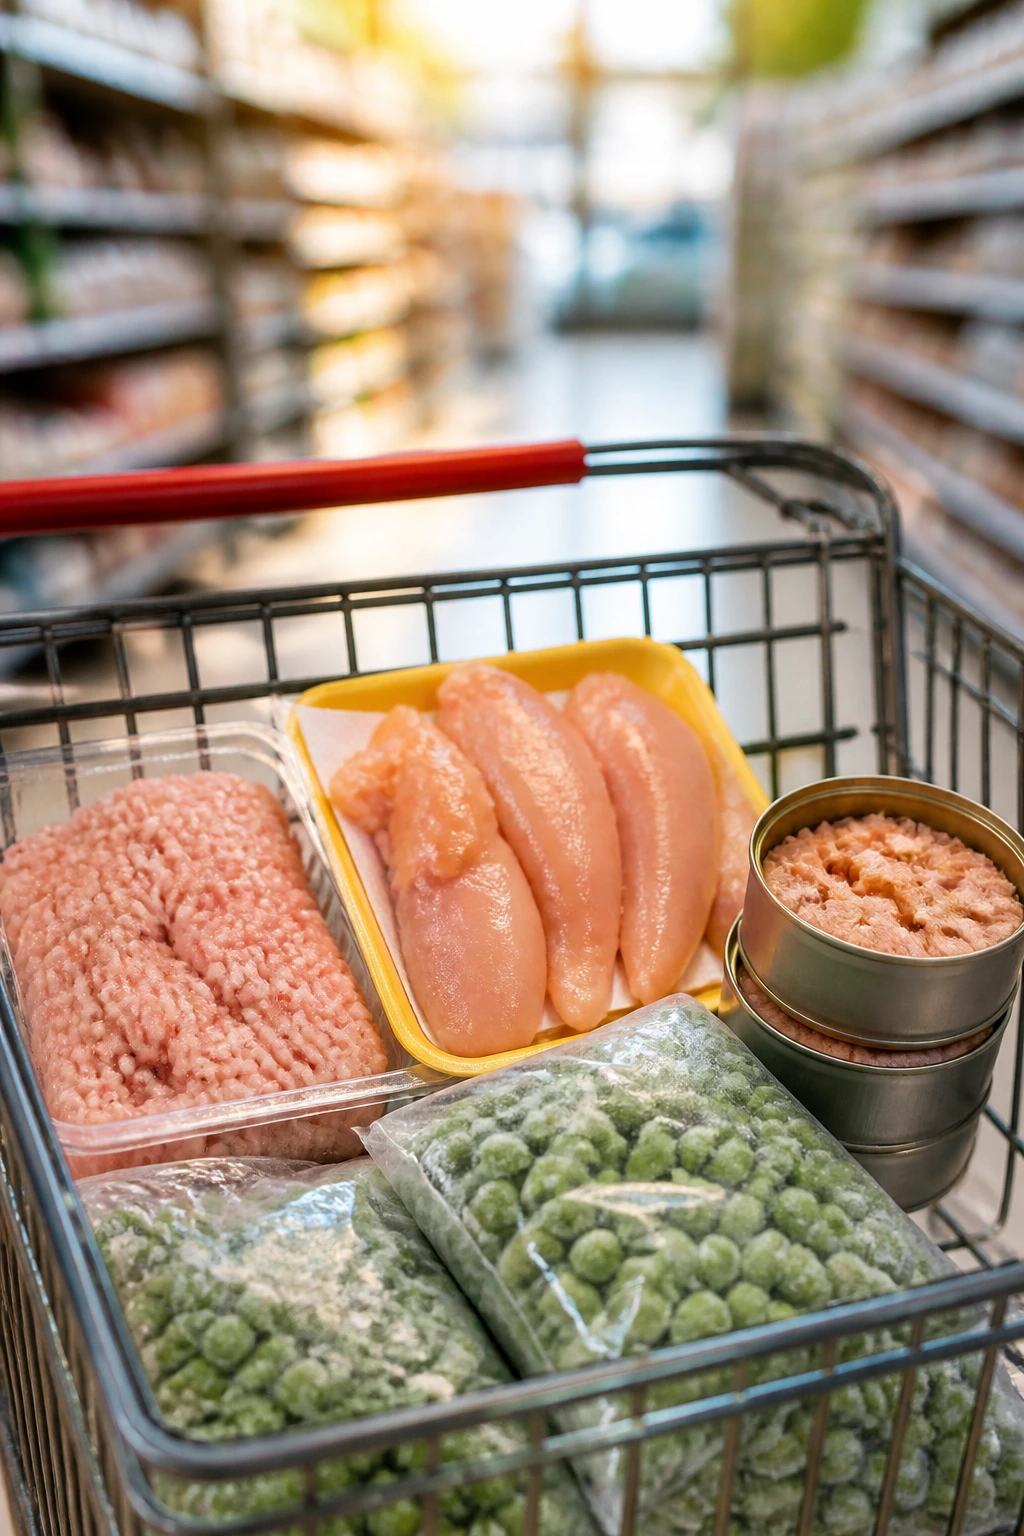
A lot of “healthy kid food” fails at the store before it ever hits the pan. The fix is simple: buy ingredients that already behave well in family cooking. Chicken tenders are easier than whole breasts when you want fast breading. Ground turkey in the 93/7 or 90/10 range gives you enough moisture for meatballs and meatloaf without flooding the pan. Canned salmon and tuna are not fancy, but they are reliable, and both work beautifully when you mix them with lemon, herbs, or yogurt.
Frozen vegetables are your friend. Peas, corn, broccoli, spinach, and mixed vegetables are picked at a sensible stage and save you from throwing away wilted produce three days later. Frozen peas are especially useful in rice, soup, and pasta because they go from freezer to skillet in minutes. Fresh vegetables still matter, but frozen ones keep weeknight cooking from becoming a race against the crisper drawer.
For dairy, plain Greek yogurt earns its place over and over. It adds creaminess to sauces, dips, parfaits, and batters, and it brings protein along with it. Choose unsweetened yogurt so you control the sugar. Same idea with marinara: buy crushed tomatoes or marinara with a short ingredient list and season it yourself if it tastes dull.
Buns, tortillas, oats, and pasta are worth thinking about the same way. Whole wheat versions add fiber without much drama. Small tortillas and mini pitas help keep portions controlled. Rolled oats work better than instant oats in baked cups and pancakes because they hold shape. Small choices, but they add up.
How to Serve Healthy Kid Recipes Under 500 Calories
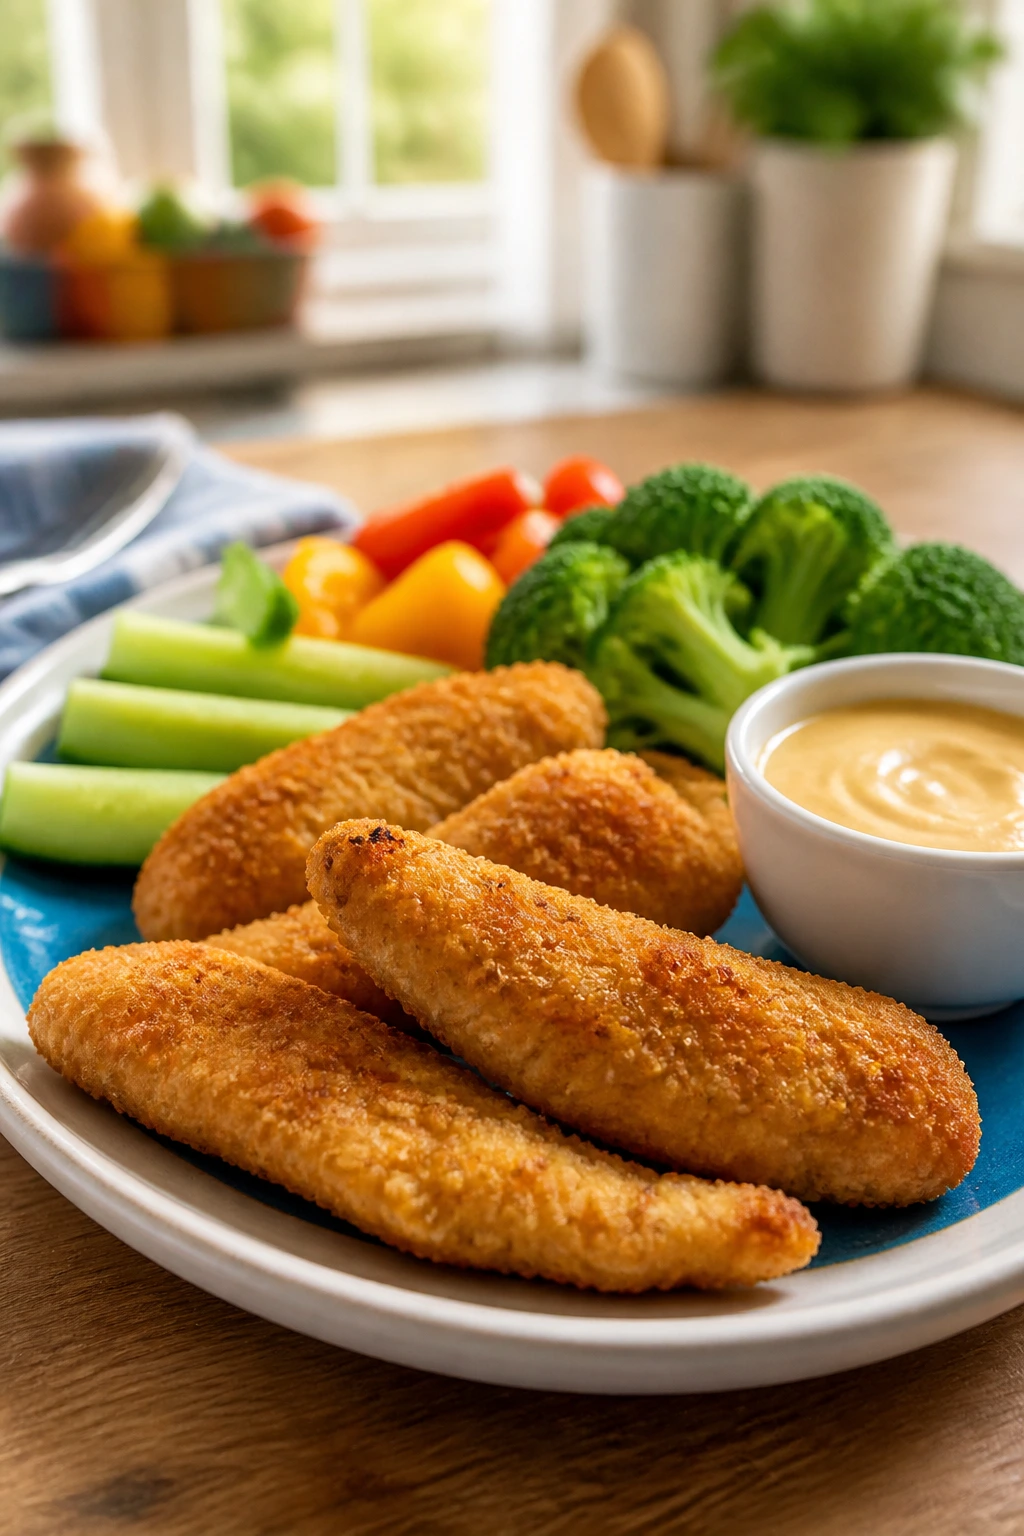
Presentation: Keep the plate simple and colorful. A crispy chicken tender beside cucumber sticks, a bowl of pasta with bright green broccoli, or a pita pocket cut on the diagonal looks more inviting than a crowded plate with seven competing foods. Kids tend to trust food that looks organized, even if they don’t say it out loud.
Accompaniments: Pair the main recipe with fruit, raw vegetables, or a small dairy side so the meal feels complete without getting heavy. Apples and carrots fit almost everything on this list. Roasted potatoes, steamed peas, crunchy slaw, and simple salads also work well when the main dish is lighter and you want the plate to feel finished.
Portions: A kid serving usually lands around 1 cup of food for bowls and pasta, 2 to 3 small pieces for meatballs or nuggets, or 1 small sandwich or pita pocket. For bigger appetites, add a second vegetable or fruit first, then increase the main portion if needed. That keeps the calories in check without shrinking the meal into something annoying.
Beverage Pairing: Cold milk, sparkling water with lemon, or plain water with sliced fruit all fit this set of recipes. For breakfast, milk pairs well with the oatmeal cups, pancakes, and parfaits. For lunch and dinner, water with a squeeze of lime or a few cucumber slices keeps the plate light and clean.
Extra Flavor Without Extra Fuss
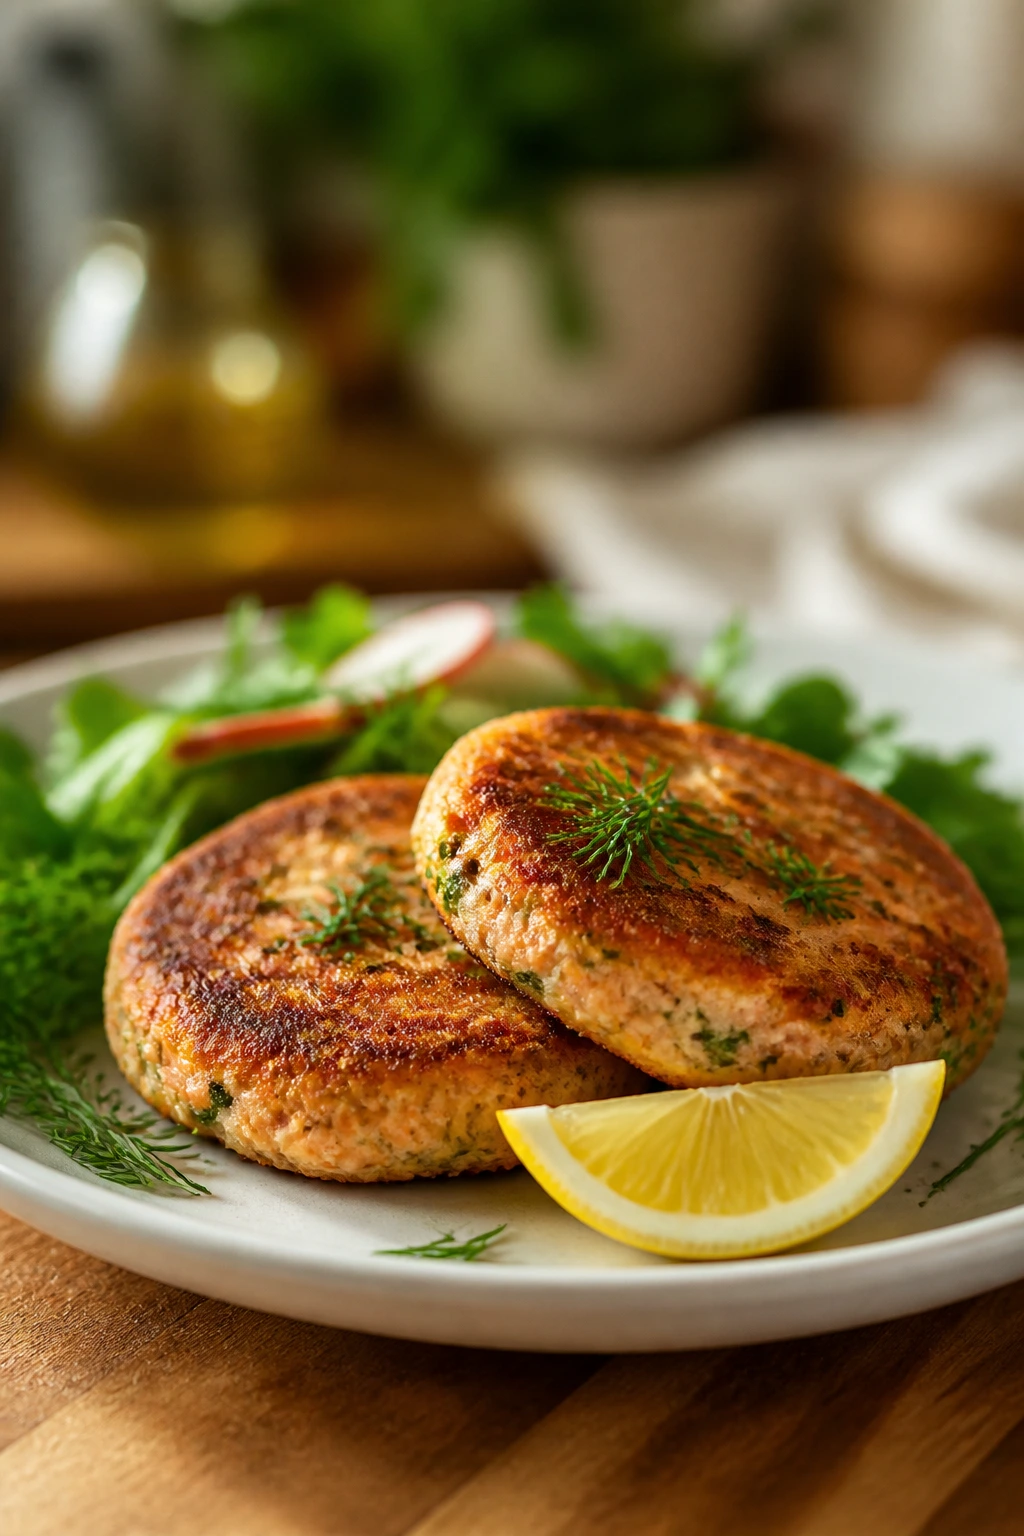
Flavor Enhancement: A squeeze of lemon at the end changes more meals here than another spoonful of cheese ever will. It sharpens salmon patties, brightens soup, wakes up marinara, and keeps rice bowls from tasting heavy. A little vinegar or pickle juice does the same thing in lentil sloppy joes and taco fillings.
Customization: If your kids lean mild, keep the seasoning gentle during cooking and bring the heat to the table with hot sauce, chili flakes, or spicy salsa for adults. If they like a sweeter edge, a touch of maple syrup in meatloaf glaze or baked oatmeal does the job without turning dinner into dessert. If they prefer crunchy textures, keep toppings separate and add them at the last minute.
Serving Suggestions: Fresh herbs do a lot of quiet work. Parsley on soup, dill on salmon, scallions on fried rice, and a few torn basil leaves on pasta all make the plate taste fresher. A small handful of sesame seeds, chopped nuts, or toasted breadcrumbs can also rescue a soft dish from feeling too soft.
Make-It-Yours: Dairy-free eaters can lean on olive oil, nutritional yeast, and coconut yogurt in a few of these recipes. Gluten-free cooks can use rice cereal coatings, corn tortillas, gluten-free pasta, or certified gluten-free oats. For extra protein, add eggs, chicken, beans, or Greek yogurt instead of increasing the cheese load.
Make-Ahead, Storage, and Reheating Guidance
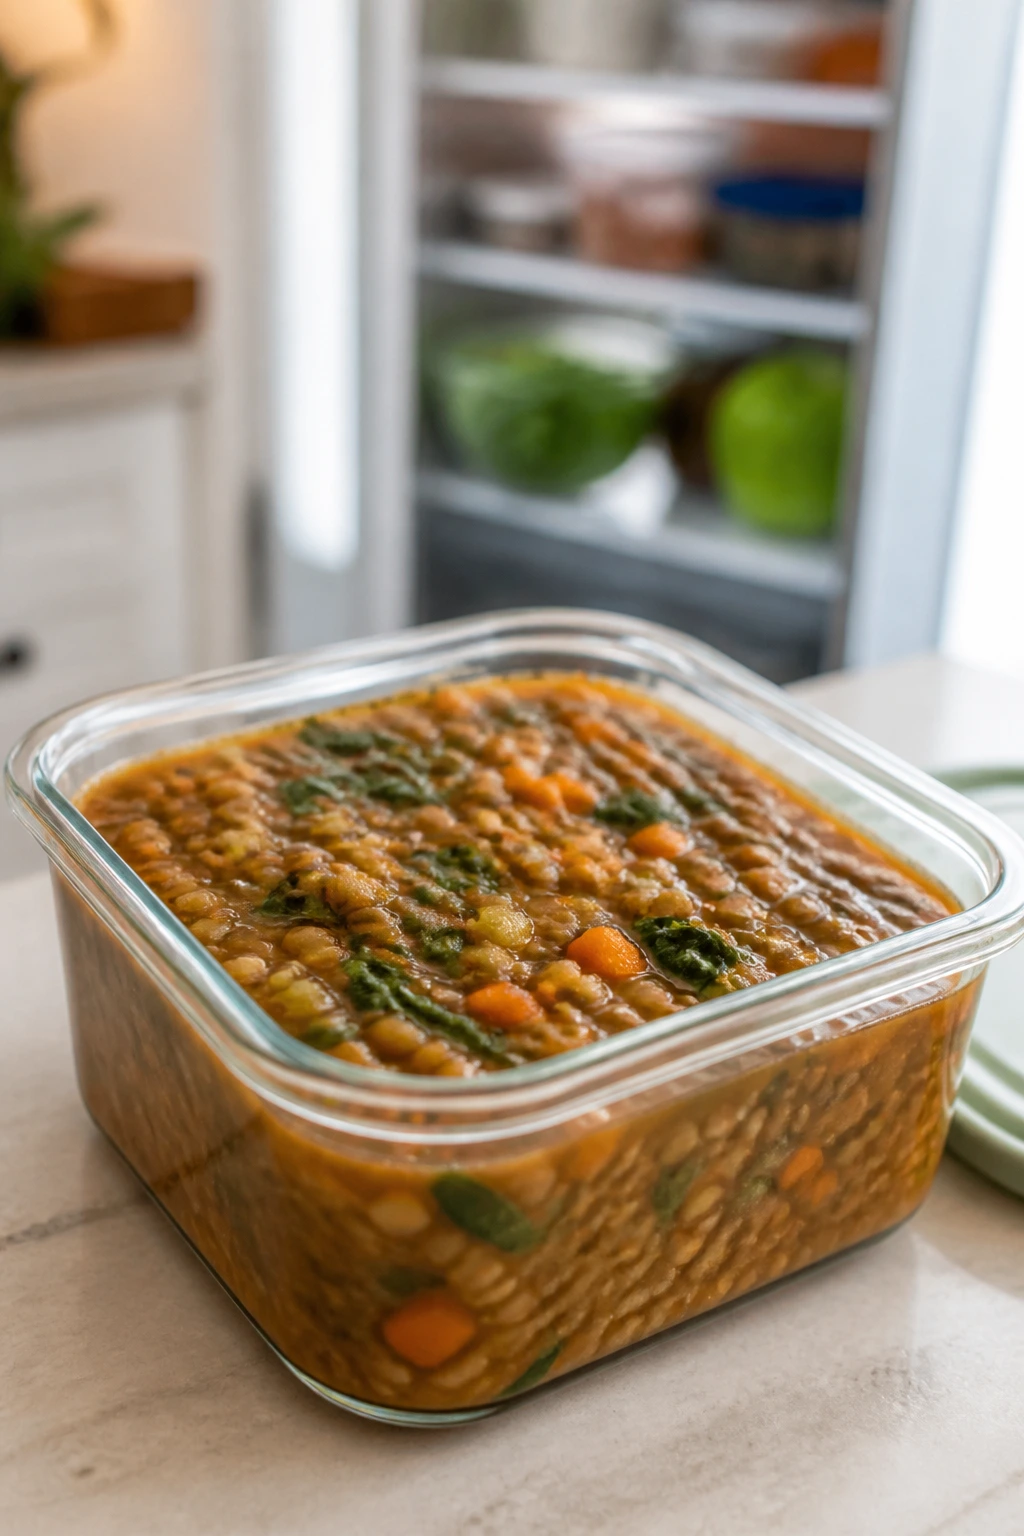
Most of these recipes keep well for 3 to 4 days in the refrigerator when stored in airtight containers. Soups, meatballs, taco filling, fried rice, marinara, and lentil joes can even improve overnight because the flavors settle a bit. Breaded items and quesadillas are the least forgiving; they still hold up, but they’re best when reheated on a rack or in a dry skillet so the outside doesn’t go soft.
Freezer life depends on the recipe, but up to 2 months is a useful rule for meatballs, nuggets, meatloaf muffins, sloppy joe filling, soup, and baked oatmeal cups. Cool everything fully before freezing, then wrap portions tightly or store them in freezer bags with the air pressed out. Label the container with the name and date so you’re not playing mystery dinner later.
Reheat baked items in a 375°F oven for 8 to 12 minutes on a sheet pan or wire rack. That works better than the microwave for tenders, nuggets, muffins, and quesadilla wedges because it revives the outside instead of softening it further. For skillet meals like fried rice, taco filling, and fajitas, a medium skillet with a teaspoon of water or oil helps the food warm through without drying.
Microwave-friendly dishes are the soups, rice bowls, marinara pasta, and oatmeal cups. Use medium power in short bursts and stir halfway through if the texture matters. For parfaits, keep the granola separate until the last minute; it has no business sitting in yogurt overnight.
Easy Swaps and Flavor Twists for Different Tastes
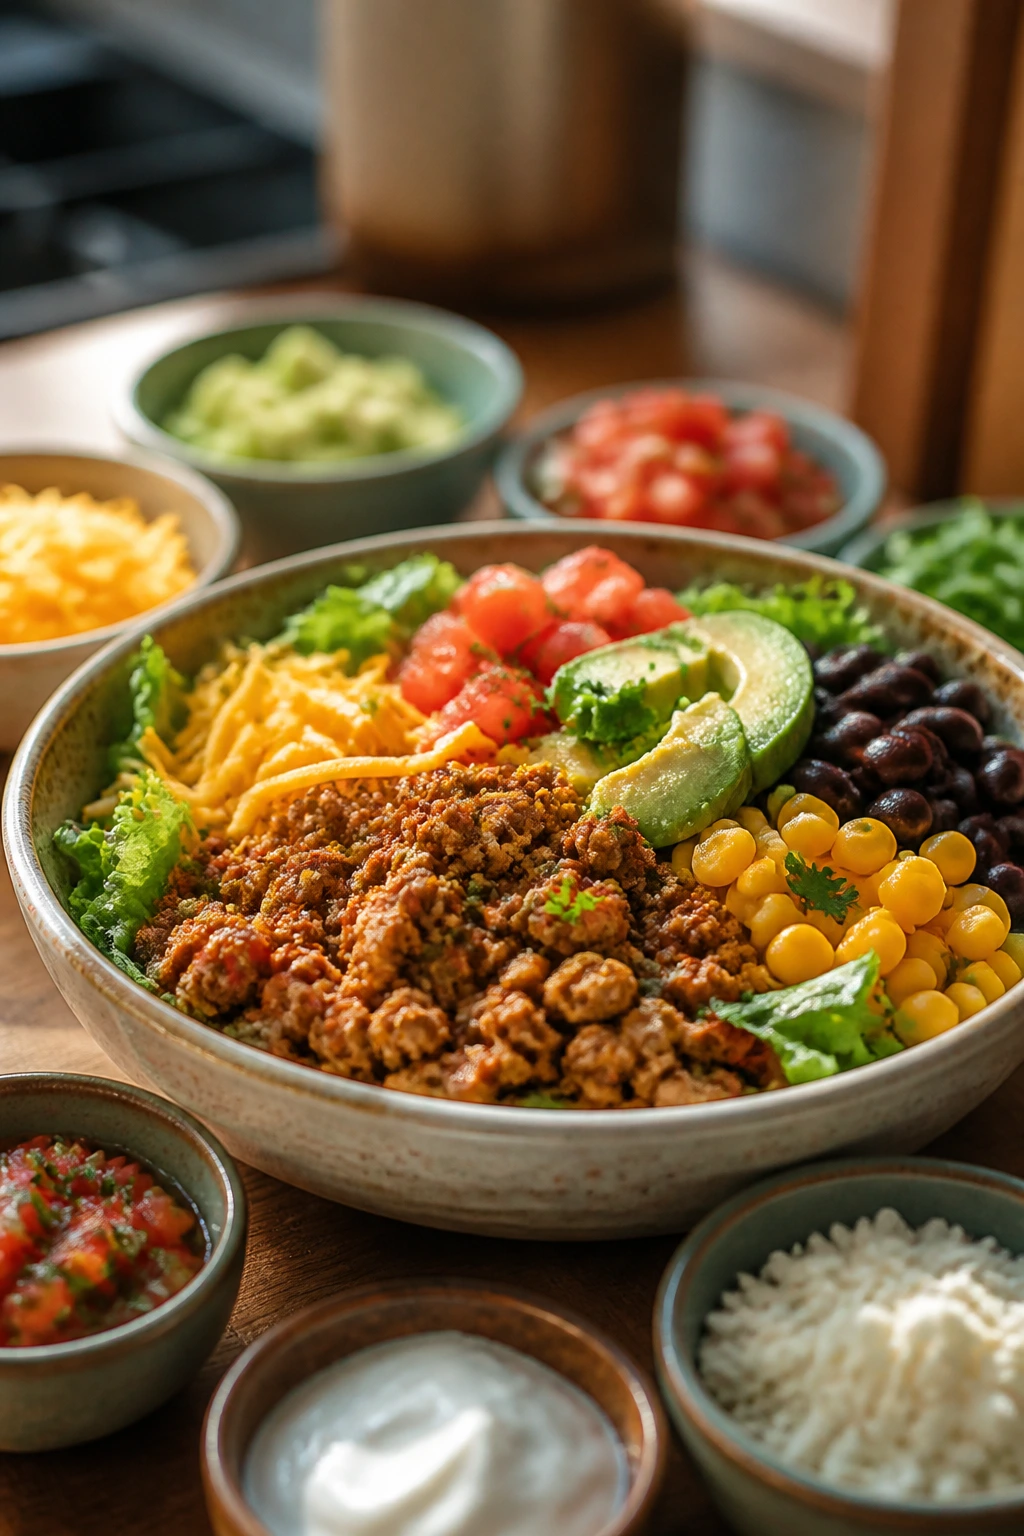
Gluten-Free Lane: Use gluten-free flour or rice cereal for breading, certified gluten-free oats for pancakes and baked cups, and corn tortillas or gluten-free pasta where needed. The texture shifts a little, but the recipes still hold together well if you keep moisture in check.
Dairy-Free Lane: Swap Greek yogurt for unsweetened coconut yogurt or skip creamy sauces in favor of lemon, olive oil, and broth. Nutritional yeast can stand in for parmesan in meatballs or pasta, and many of these recipes still taste complete without dairy if the seasoning is strong enough.
Higher-Protein Lane: Add an extra egg to baked oatmeal cups, stir chicken into fried rice, use a little more turkey in taco bowls, or pair parfaits with a boiled egg on the side. The plate gets more staying power without needing a second serving of starch.
Softer-Bite Lane: Cut vegetables smaller, cook them a minute longer, and lean into sauces that hold things together. This helps with younger kids who don’t like a lot of chew. Meatballs, soup, oatmeal cups, and pasta are especially useful here.
Spice-for-Adults Lane: Keep the base recipe mild, then finish the adult portions with chili crisp, hot sauce, pickled jalapeños, or extra black pepper. That way nobody at the table has to suffer through a one-temperature dinner.
The Mistakes That Make Healthy Kid Food Harder Than It Needs to Be
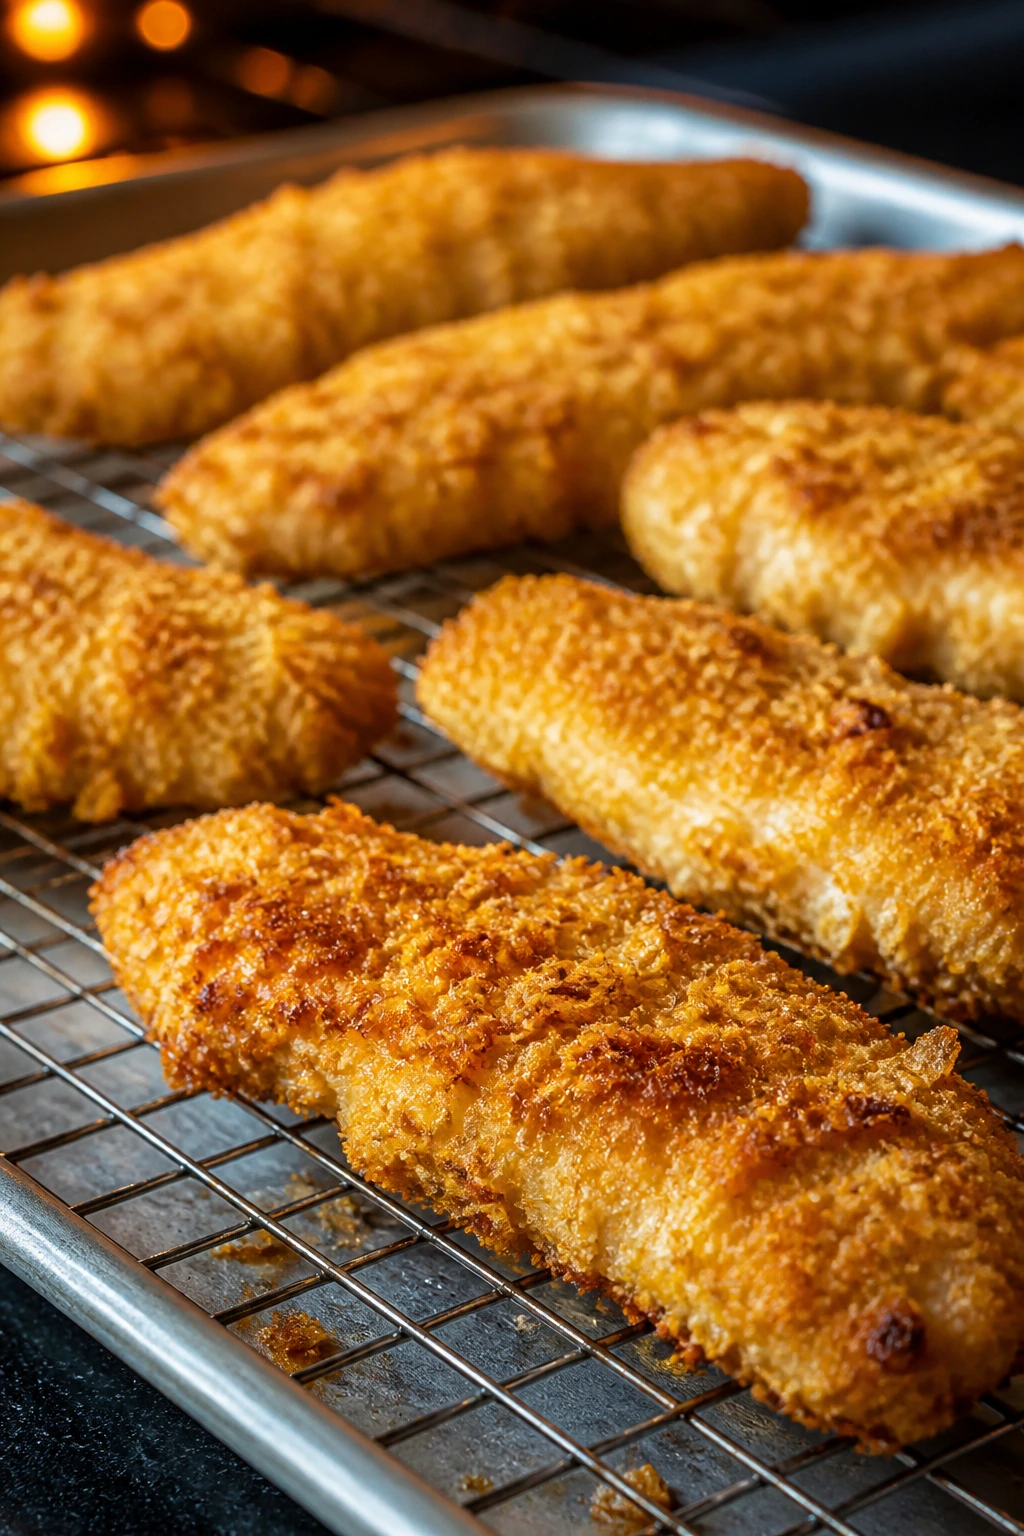
-
Making the portions too huge: A giant serving can erase the calorie control even if the recipe itself is balanced. Use smaller tortillas, mini tins, or a scoop so the serving size is baked into the food.
-
Letting moisture run wild: Wet zucchini, soggy cucumber, watery thawed vegetables, and too much sauce can sink a recipe fast. Squeeze, drain, pat dry, or simmer a bit longer until the food looks right.
-
Cooking everything at the wrong heat: Breaded food needs heat high enough to brown. Sauces need gentle heat. Fried rice wants a hot pan. Soup wants a simmer. The texture changes a lot depending on the temperature, and that’s usually where dinner goes wrong.
-
Skipping the salt: Lean protein and vegetables need seasoning or they taste like they were meant to be healthier than satisfying. Salt the pasta water, season the turkey, and taste the sauce before you stop.
-
Mixing in the crunchy part too early: Granola in yogurt, breadcrumbs on baked items, and toasted toppings on soup all lose their edge if they sit too long. Add crunch at the end or serve it separately.
-
Expecting one recipe to solve every dinner problem: Some kids want crisp food. Some want soft food. Some want dip. Some want a bowl. Build a small rotation instead of chasing one miracle meal.
Questions Parents Ask Before They Cook These
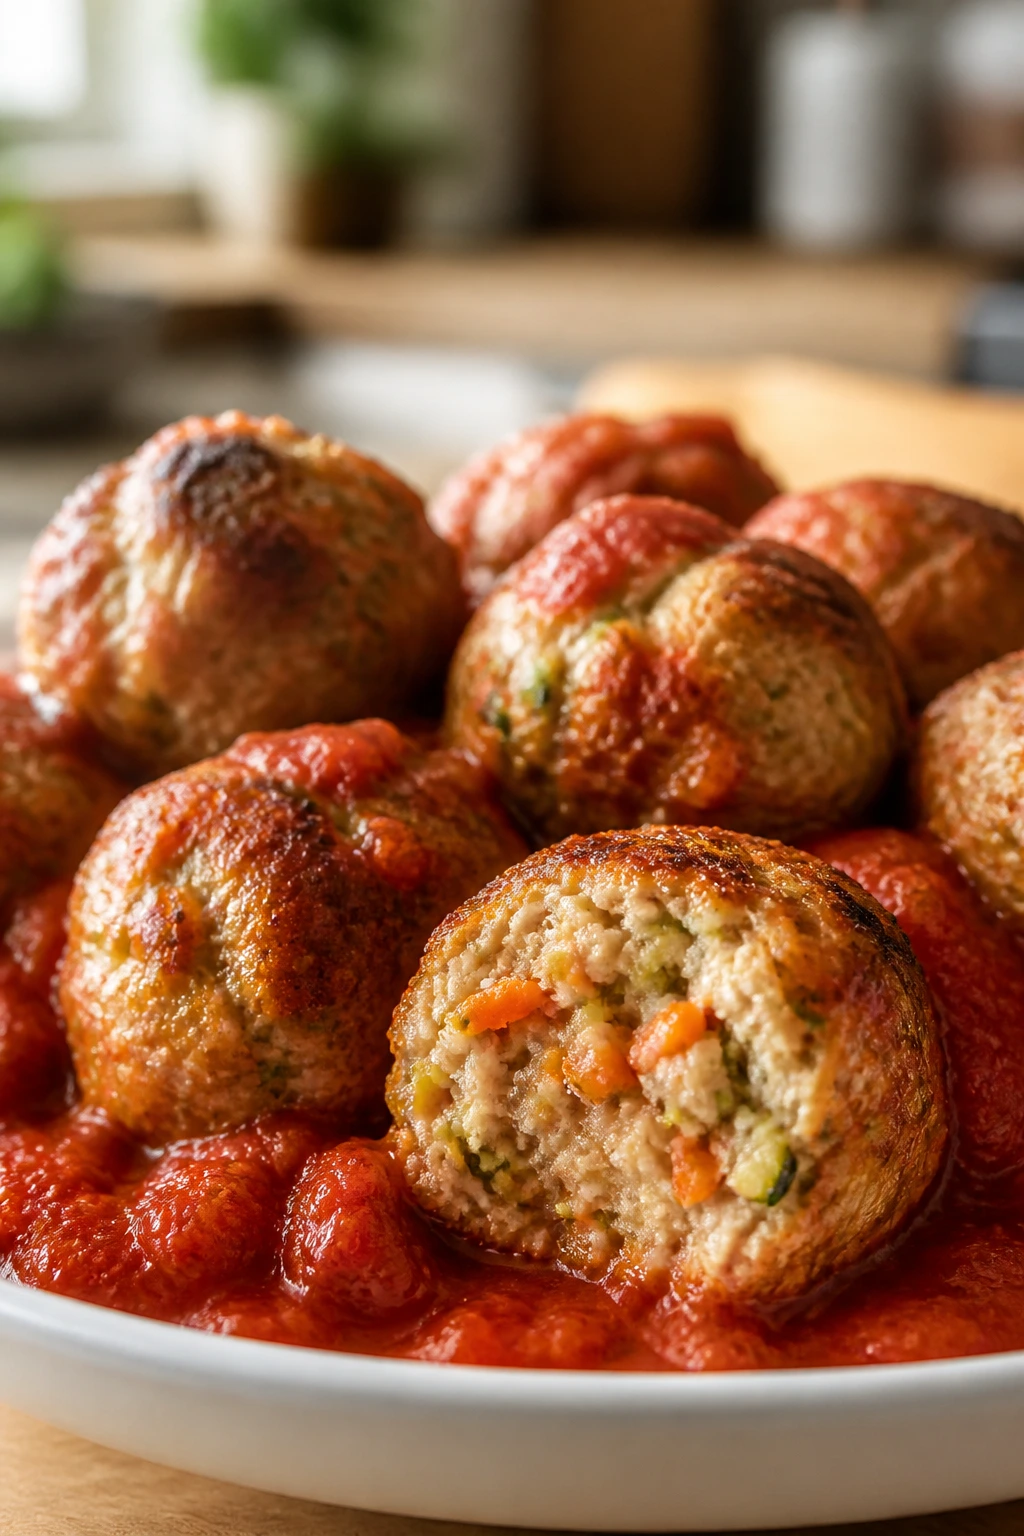
How do I keep these meals under 500 calories without measuring every bite?
Use the recipe portions as your anchor. Small tortillas, mini muffins, measured cheese, and lean proteins do most of the work for you. If you want to add more food to the plate, reach for fruit or vegetables first rather than extra bread or cheese.
Can I use frozen vegetables in these recipes?
Yes, and in several cases they’re the better choice. Frozen peas, corn, broccoli, and spinach fit neatly into fried rice, soup, pasta, and quesadillas, and they won’t go limp in the fridge before you use them.
What if my child hates visible vegetables?
Use the recipes that hide them in the texture: meatballs, pasta sauce, pizza muffins, baked oatmeal cups, and blended marinara are your best bets. Keep the pieces small, cook them soft, and put the vegetables where they disappear into the main bite.
Which recipes freeze best?
Meatballs, meatloaf muffins, nuggets, soup, sloppy joe filling, and baked oatmeal cups all freeze well. Quesadillas and fried rice are fine too, but they’re better when reheated in a skillet rather than the microwave.
Can I swap turkey and chicken around?
Usually, yes. Turkey meatballs can become chicken meatballs if the mixture has enough binder, and chicken fillings can move into quesadillas, fajitas, or taco bowls without much trouble. The key is watching moisture, because poultry can go dry if you overcook it.
How do I make these better for lunchboxes?
Choose foods that stay stable at room temperature or reheat cleanly: muffins, meatballs, oatmeal cups, pita pockets, and quesadillas are the easiest. Keep dips, sauces, and crunchy toppings separate until the last minute if you want to preserve texture.
What if the breading on baked tenders gets soft?
Use a wire rack, leave space between pieces, and reheat in a hot oven instead of the microwave. If you want extra insurance, give the tenders a light spray of oil before baking so the coating browns more firmly.
Are these enough for older kids with bigger appetites?
They can be. Add more vegetables, fruit, or a second serving of protein before doubling the starch. A bigger bowl of soup, extra fajita filling, or an additional meatball usually works better than piling on more bread.
A Calmer Plate at Dinner Time
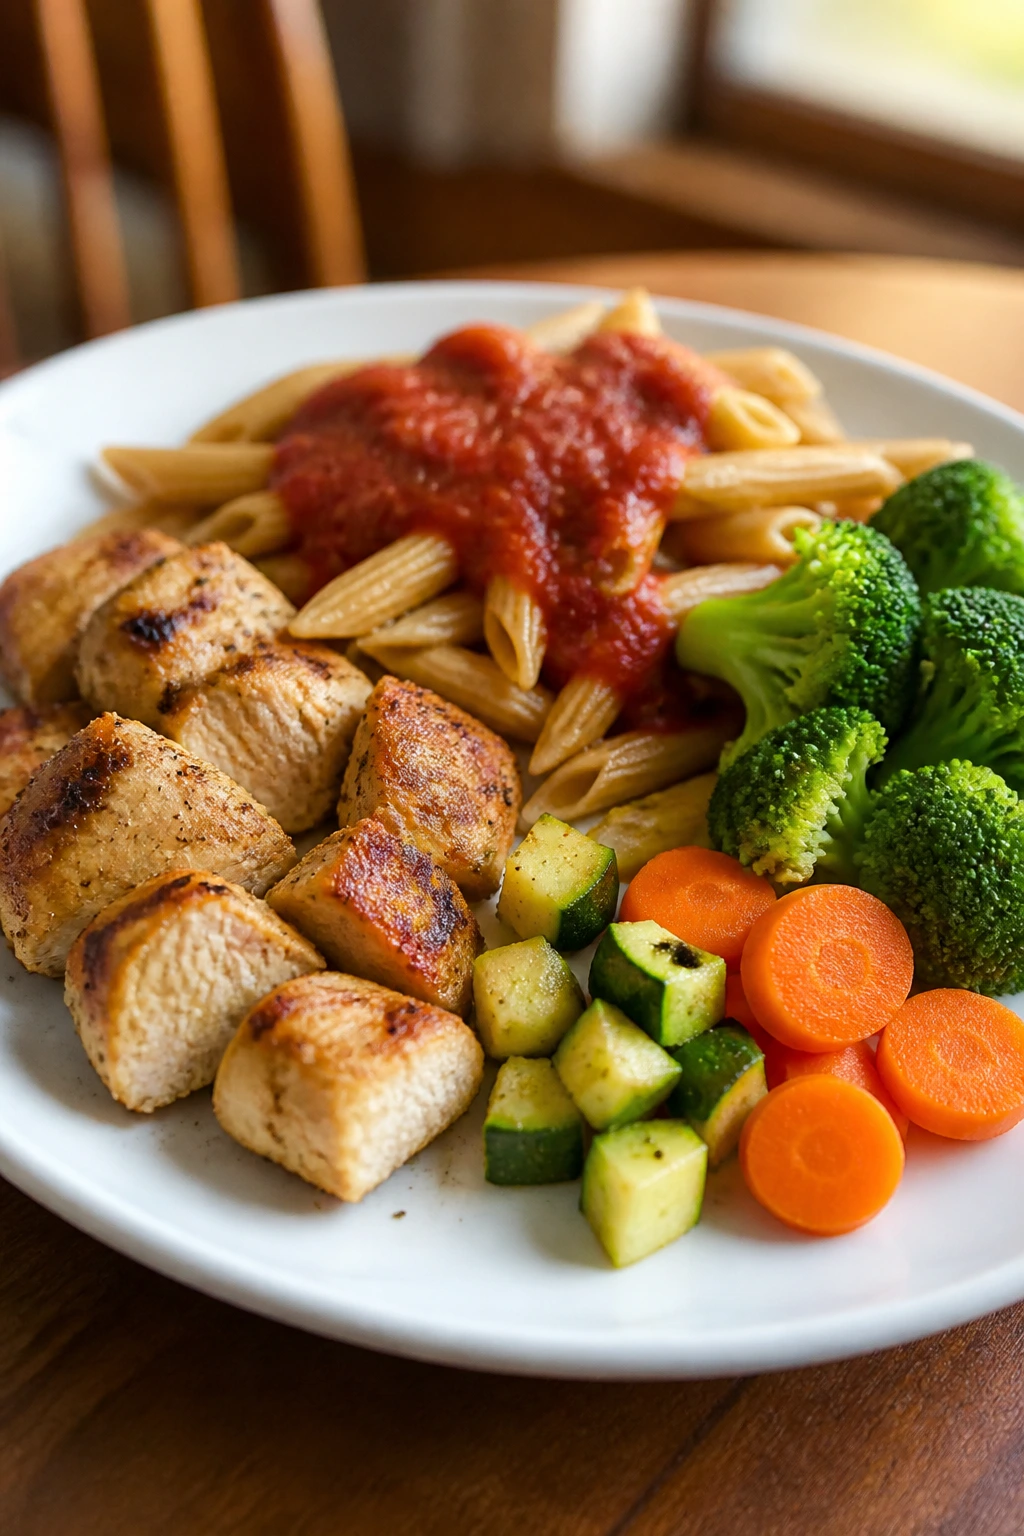
The nicest thing about cooking from a list like this is that it gives you repeatable answers. You don’t have to reinvent dinner every night, and you don’t have to choose between food kids will eat and food that stays under control. Crispy tenders, soft muffins, bright bowls, and comforting pasta can all live in the same rotation without making the table feel repetitive.
Pick three recipes that fit your week first. Maybe one breakfast, one lunch, and one dinner. That’s enough to make the whole thing feel less chaotic, and once those start working, the rest of the list gets easier to fold in. Good family cooking usually starts there — not with a perfect menu, just with a few meals that calm the room down.