
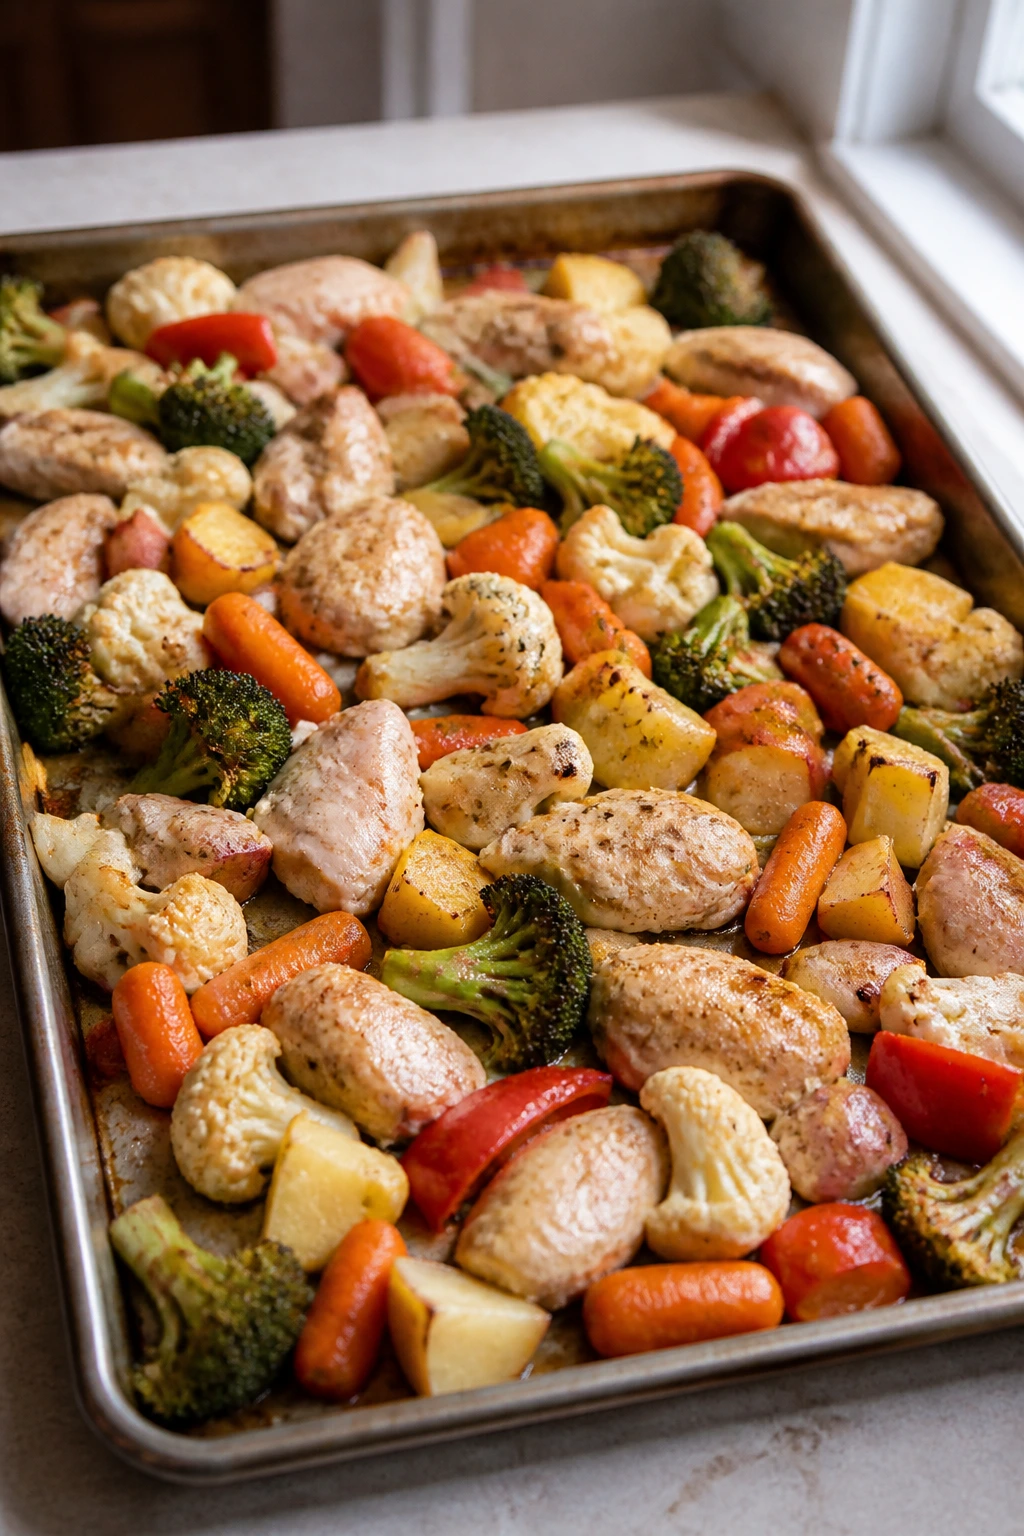
Picky eaters do not need dramatic dinners. They need dinner that looks familiar from the first glance: chicken with a browned edge, potatoes that stay crisp, vegetables that taste like themselves instead of a mystery sauce. That is exactly why sheet pan dinners for picky eaters work so well. The oven does the heavy lifting, but more important, each ingredient keeps its own shape and its own voice.
A good sheet pan meal does not bury everything under one flavor. It lets a kid pick the carrots off one side, keeps sauce on the chicken, and gives you enough browning to make dinner feel cooked, not assembled. The trick is heat, spacing, and a few smart seasonings—garlic, parmesan, honey mustard, ranch, BBQ, lemon butter—things that feel friendly instead of fussy.
And yes, the cleanup matters. A lot. There is something deeply satisfying about sliding one pan into the sink and being done with it, especially on a night when the table has already voted no on three vegetables and one sauce. The recipes below lean into that kind of quiet usefulness: simple flavors, familiar textures, and enough flexibility that you can keep the parts separate if that keeps the peace.
Why These Dinners Keep the Peace
-
Familiar flavors win faster: Garlic butter, parmesan, BBQ, pizza, and taco seasoning are all recognizable enough that most hesitant eaters will at least take a bite.
-
Separate ingredients lower the drama: A sheet pan gives you little zones of food, so someone can eat the chicken and potatoes while ignoring the broccoli without turning dinner into a standoff.
-
Roasting adds the good kind of texture: The browned edges on potatoes, chicken, and carrots do a lot of quiet persuasion that soft casseroles never manage.
-
Sauces stay in check: These dinners use sauce as a finish, not a flood, which keeps chicken crisp and vegetables from turning soggy.
-
One pan keeps the night lighter: Fewer dishes, fewer pans, fewer excuses to order takeout when everyone is already tired.
-
Easy swaps are built in: Change the vegetable, switch the protein, or keep the seasoning mild and you still end up with dinner that works.
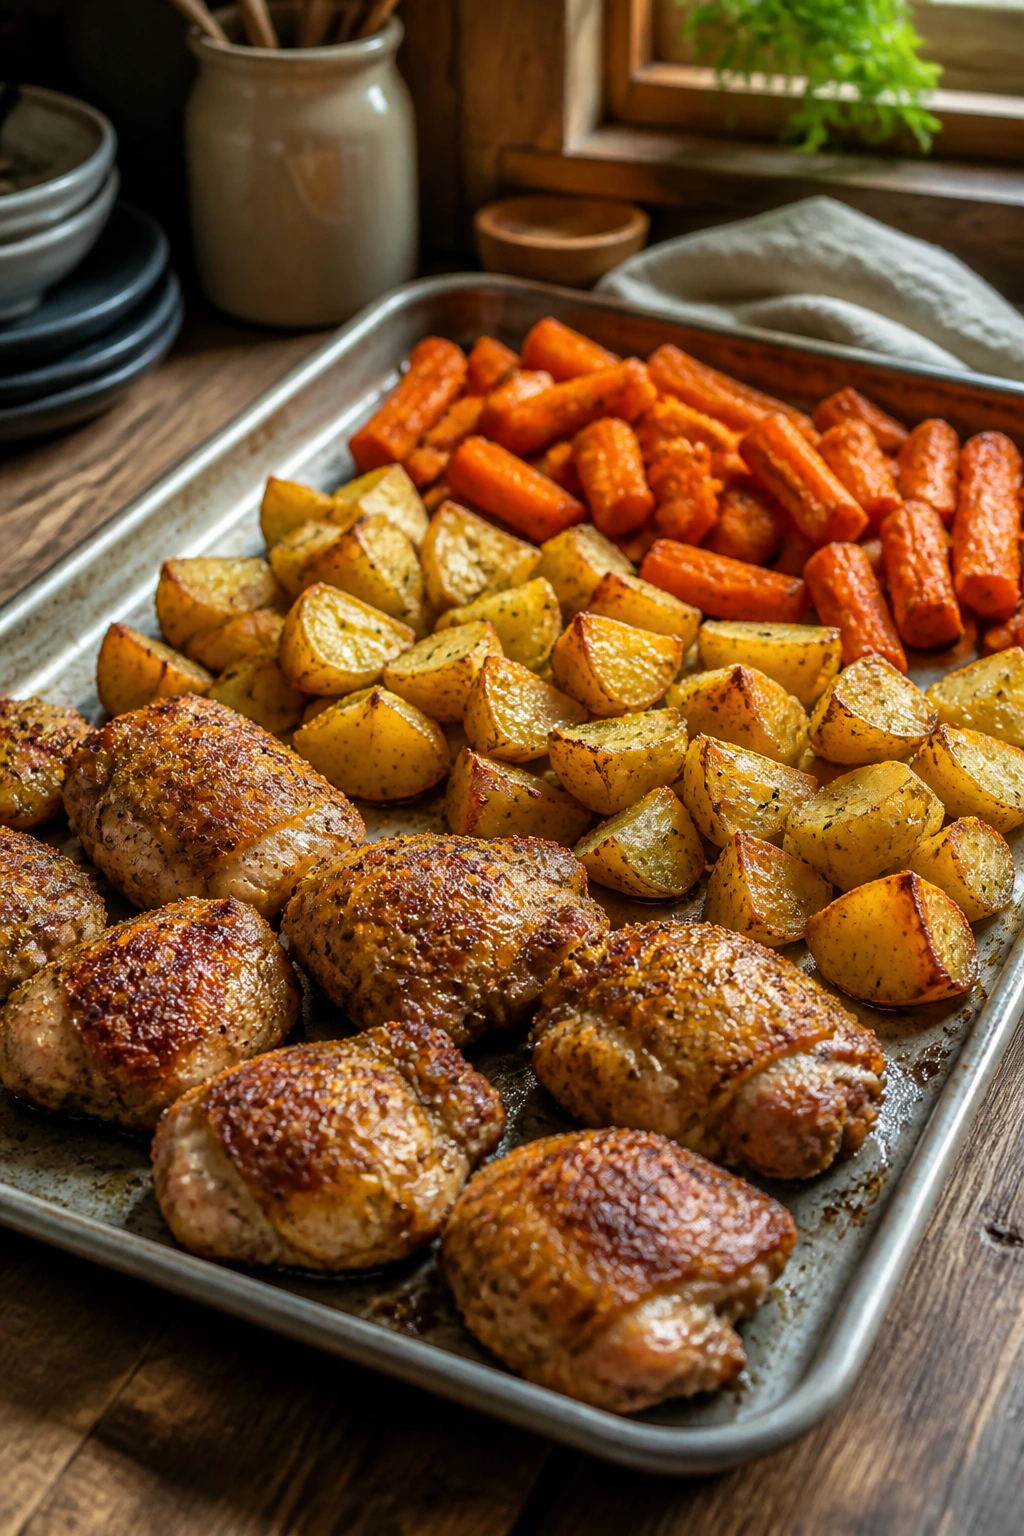
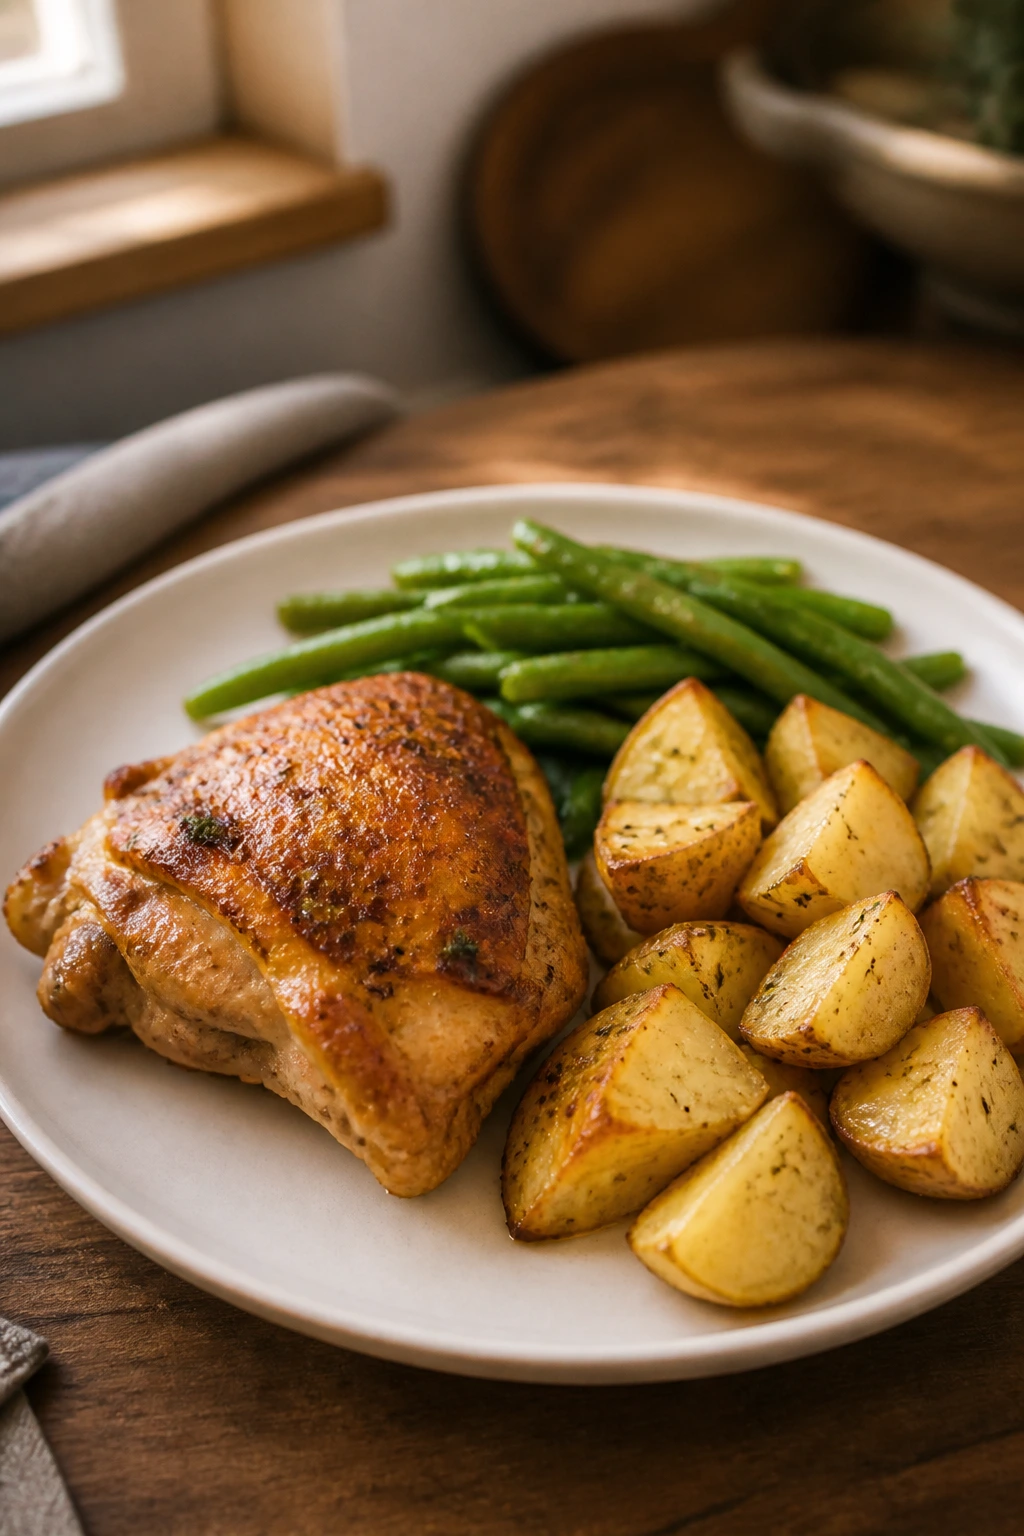
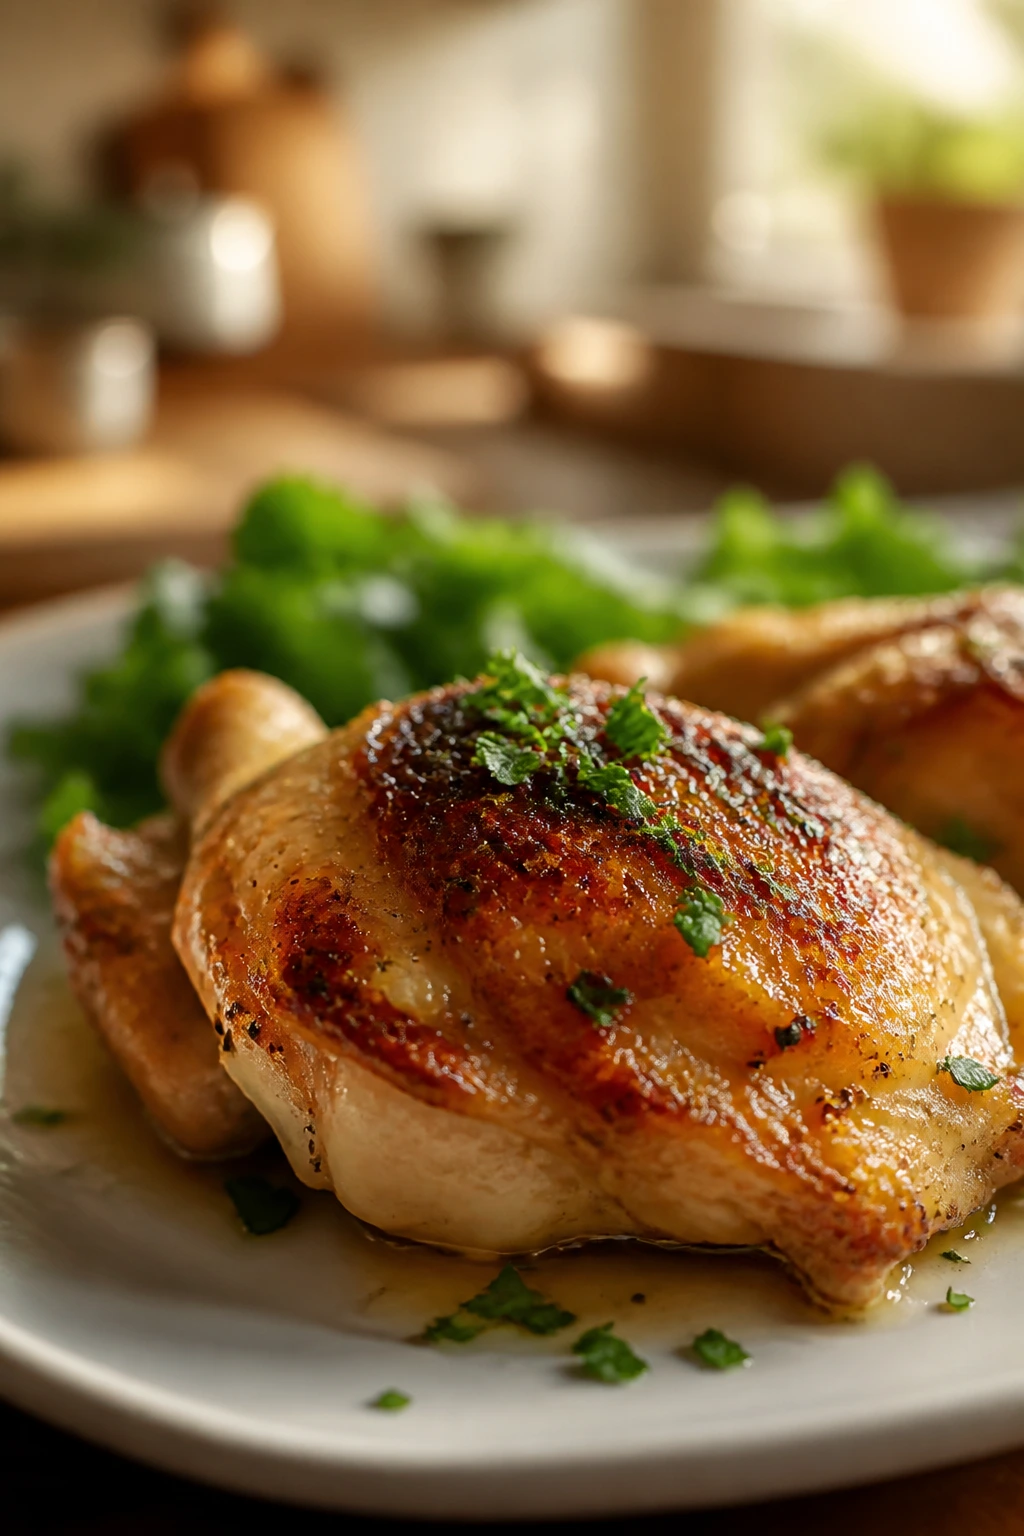
1. Garlic Butter Chicken Thighs with Potatoes and Carrots
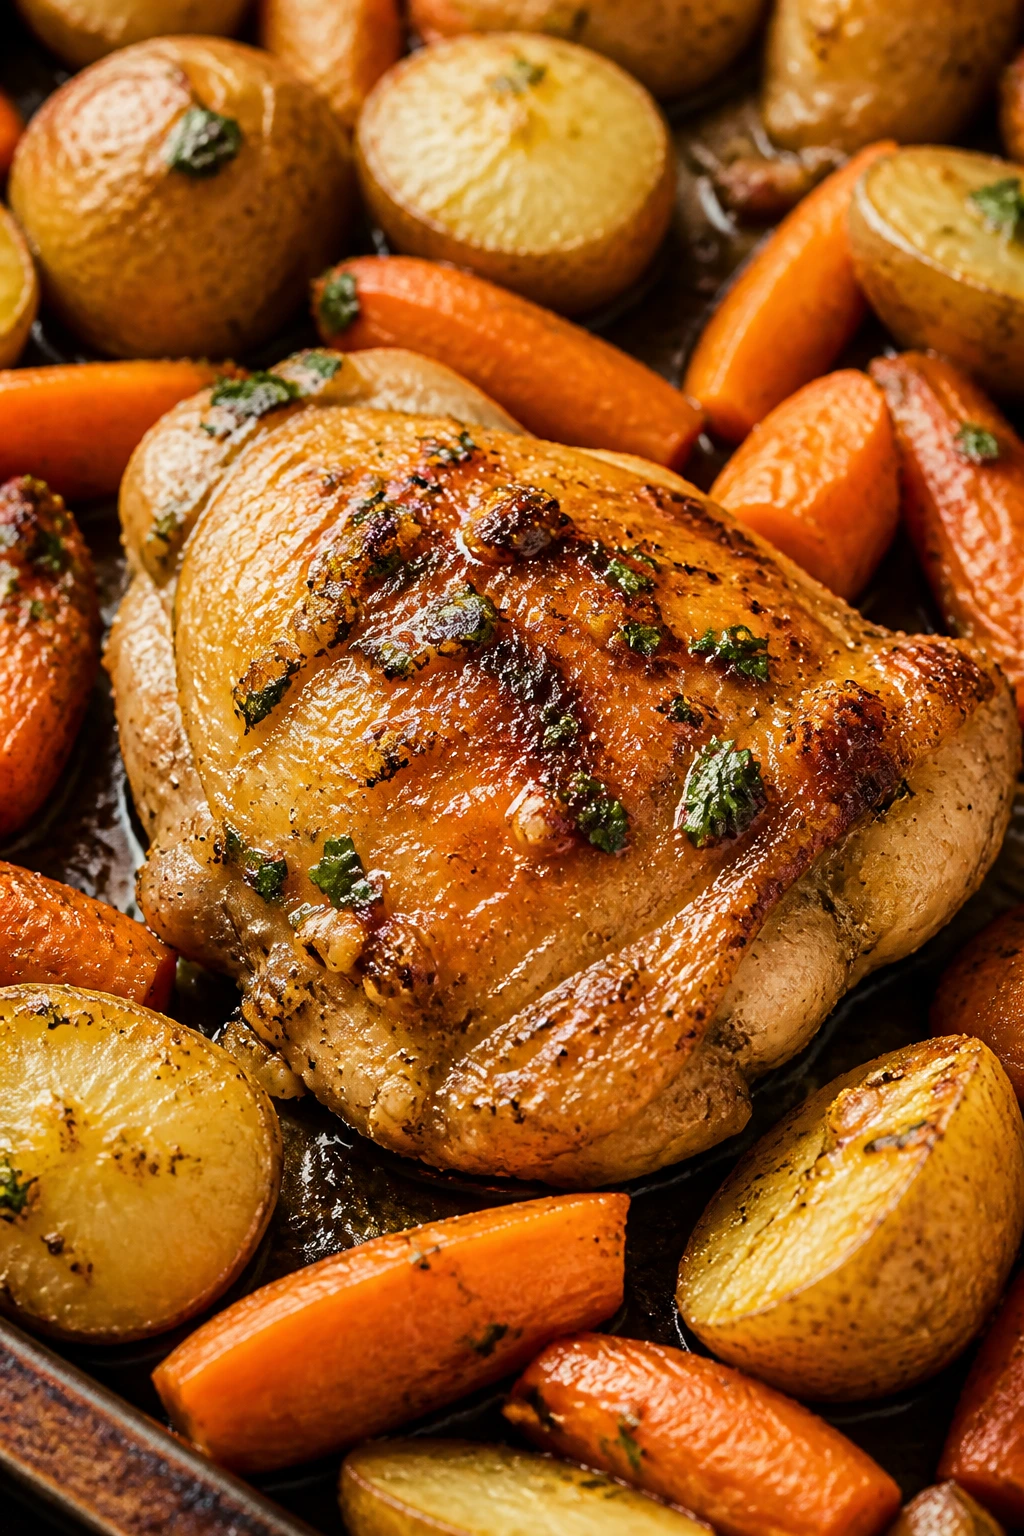
Garlic butter has a way of making even skeptical diners lean in. The smell alone does half the job here, and the finished pan looks like the kind of dinner people remember because it tastes like home: browned chicken, soft potatoes with crisp edges, and carrots that still hold their shape.
Quick timing: 15 minutes prep, 25 minutes cook, 40 minutes total. Serves 4.
Why It Works:
Chicken thighs are the right choice for this kind of sheet pan dinner because they stay juicy at high heat and tolerate a little extra time without drying out. The potatoes get a head start, which matters more than most people think; if they go in raw with the chicken, they usually end up underdone or cramped. Garlic butter gets brushed on near the end, so the garlic tastes sweet and rich instead of sharp. That little timing choice makes the whole pan feel better.
Key Ingredients:
- 2 lbs boneless, skinless chicken thighs — Thighs stay tender and forgive a hot oven.
- 1 1/2 lbs baby potatoes, halved — Halving them gives you crisp cut sides and even roasting.
- 1 lb carrots, cut into 2-inch sticks — Keep them thick enough to stay sweet, not shriveled.
- 3 tbsp olive oil — Helps the vegetables brown before the butter goes on.
- 4 tbsp unsalted butter, melted — Gives the chicken that classic garlic-butter finish.
- 4 garlic cloves, minced — Add this near the end so it stays fragrant.
- 1 tsp kosher salt — Season the whole pan, not just the meat.
- 1/2 tsp black pepper — Keeps the butter from tasting flat.
- 1 tsp paprika — Adds color and a little warmth without making the dish spicy.
- 1 tsp dried thyme — A little herb note keeps the pan from tasting heavy.
- 2 tbsp chopped parsley — Freshens the finish and makes the pan look alive.
Quick Steps:
-
Heat the oven. Set it to 425°F and line a large rimmed sheet pan with parchment for easier cleanup.
-
Start the vegetables first. Toss the potatoes and carrots with 2 tablespoons of olive oil, half the salt, half the pepper, paprika, and thyme, then spread them out in a single layer. Roast for 15 minutes.
-
Mix the garlic butter. Stir the melted butter, minced garlic, and remaining olive oil in a small bowl.
-
Season the chicken. Pat the thighs dry, season with the remaining salt and pepper, then place them on the pan with the vegetables.
-
Brush and roast. Spoon the garlic butter over the chicken and return the pan to the oven for 20 to 25 minutes, until the chicken reaches 165°F and the potatoes are tender when pierced.
-
Rest and finish. Let the pan sit for 5 minutes, then scatter parsley over the top and serve.
Equipment for This Recipe:
- Large rimmed sheet pan — A half-sheet pan gives the food room to brown.
- Parchment paper — Keeps the butter from sticking to the pan.
- Small mixing bowl — Handy for the garlic butter.
- Tongs — Makes moving the chicken simple.
- Instant-read thermometer — The easiest way to avoid dry thighs.
How to Serve This Dish:
Pile the potatoes and carrots to one side of each plate and lay the chicken on top so the garlic butter drips onto everything. A slice of warm bread is welcome here, because nobody complains about soaking up butter with bread. If you want a green side, use something plain and crisp, like a simple cucumber salad.
Pro Tips for This Recipe:
- Cut the potatoes to the same size so the pan finishes together.
- If the chicken thighs are thick, flatten them slightly with your hand so they roast evenly.
- Add the parsley after roasting. It tastes fresher that way.
- If your pan is crowded, split the batch across two pans. Crowding leads to steaming, and steaming is the enemy here.
Variations on This Dish:
- Lemon Garlic Swap: Add 1 tablespoon lemon zest to the butter and squeeze lemon over the finished pan for a brighter finish.
- Parmesan Finish: Shower the hot chicken with 1/3 cup grated parmesan right after roasting.
- Dairy-Free Version: Skip the butter and use another 2 tablespoons of olive oil plus a little extra garlic.
Common Mistakes to Avoid with This Dish:
- Putting everything on the pan at once: The potatoes will lag behind and the chicken will overcook while you wait. Give the vegetables their head start.
- Using wet chicken: Wet thighs steam before they brown. Pat them dry first.
- Overloading the pan: If the pieces touch too much, they soften instead of roast. Spread them out.
2. Parmesan Chicken Tenders with Broccoli and Ranch Dip
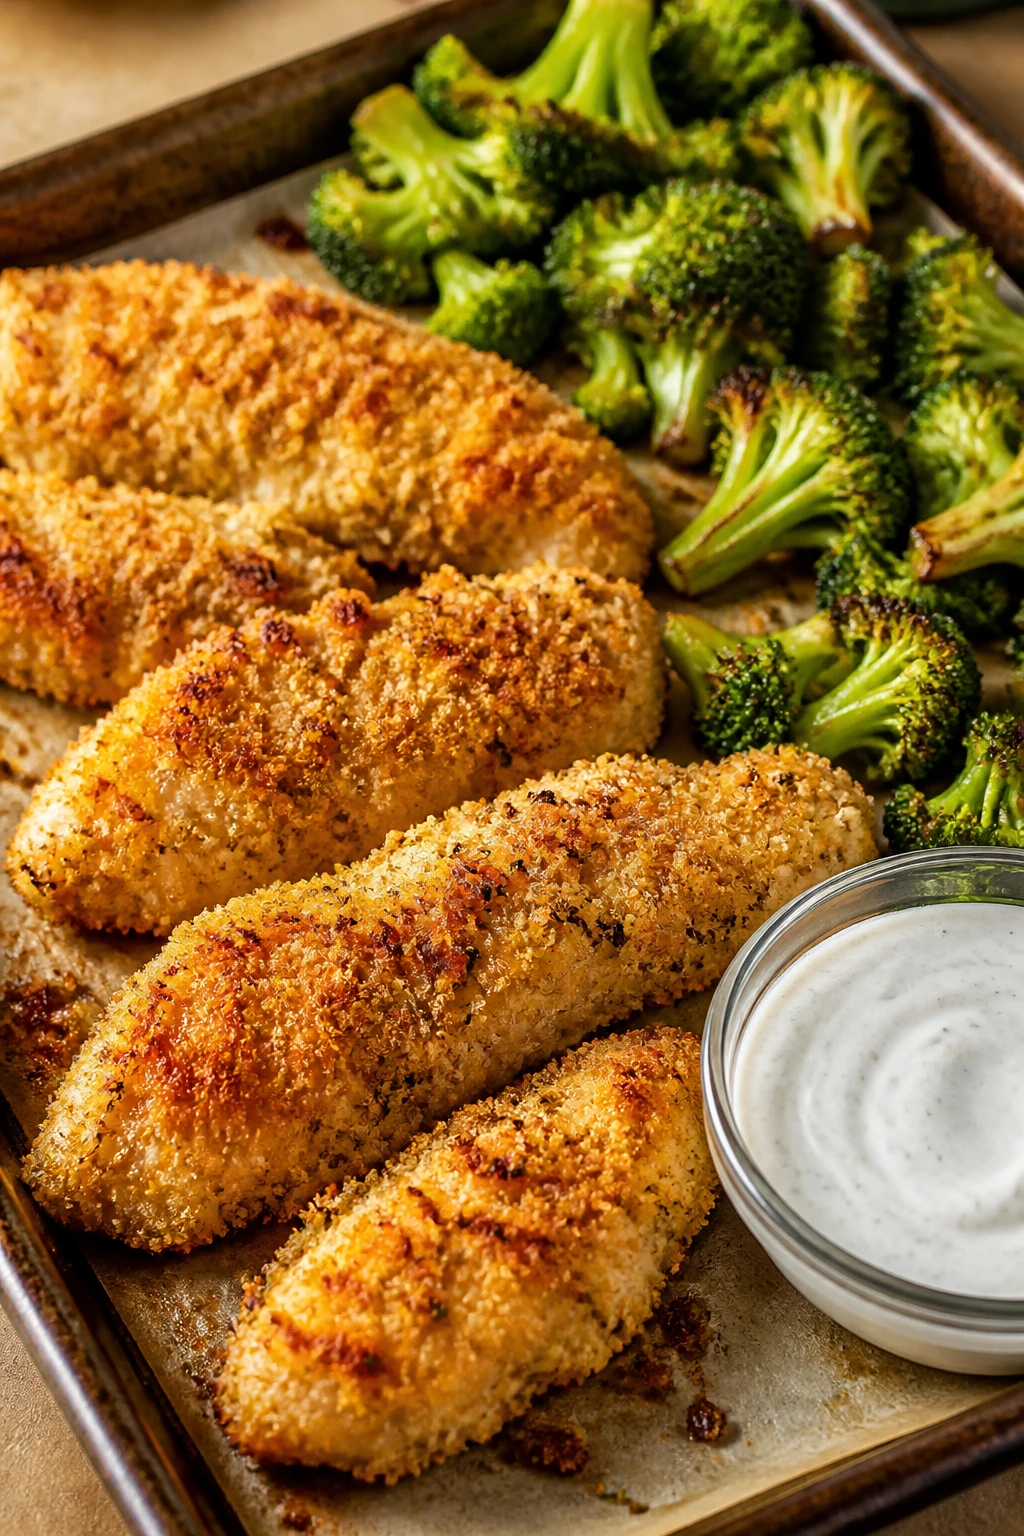
Crunch is doing a lot of work here. A parmesan crust on chicken tenders gives picky eaters something familiar to grab onto, and the broccoli roasts alongside without turning mushy or aggressive.
Quick timing: 20 minutes prep, 20 minutes cook, 40 minutes total. Serves 4.
Why It Works:
Chicken tenders cook quickly and stay tender even when breaded, which makes them easier to sell than thicker cutlets. The parmesan and panko combine into a crust that browns in a hot oven without needing a skillet of oil. Broccoli gets tossed with just enough oil to blister at the edges, but not so much that it feels greasy. A cool ranch dip gives the plate a familiar landing spot, and that matters when the vegetables are being negotiated one bite at a time.
Key Ingredients:
- 2 lbs chicken tenders — They cook fast and stay easy to chew.
- 2 large eggs — Helps the breading cling.
- 1 cup panko breadcrumbs — Gives the crust its light crunch.
- 1/2 cup finely grated parmesan — Adds salty flavor and helps the coating brown.
- 1 tsp garlic powder — Keeps the crust savory without needing fresh garlic.
- 1 tsp kosher salt — Seasons the chicken through the crust.
- 1/2 tsp black pepper — Gives the breading a little edge.
- 4 cups broccoli florets — Cut them small enough to roast quickly.
- 2 tbsp olive oil — Helps the broccoli brown.
- 1/2 cup ranch dressing — Serve it on the side so picky eaters can dip at their own pace.
Quick Steps:
-
Preheat and prep. Heat the oven to 425°F and line a sheet pan with parchment.
-
Season the broccoli. Toss the broccoli with olive oil and a pinch of salt, then spread it on one side of the pan.
-
Build the coating. Whisk the eggs in one bowl. In another, mix panko, parmesan, garlic powder, salt, and pepper.
-
Bread the chicken. Dip each tender in egg, then press into the breadcrumb mixture. Lay the coated tenders on the pan beside the broccoli.
-
Bake. Roast for 18 to 20 minutes, flipping the broccoli once halfway through, until the chicken reaches 165°F and the crust is golden.
-
Serve right away. Add ranch dressing to a small bowl and bring the pan to the table while the coating is still crisp.
Equipment for This Recipe:
- Rimmed sheet pan — Keeps crumbs from sliding off.
- Two shallow bowls — Makes breading easy.
- Parchment paper — Helps the crust release cleanly.
- Tongs — Useful for moving the tenders without knocking off the coating.
- Instant-read thermometer — Worth using with breaded chicken.
How to Serve This Dish:
Serve the tenders whole for smaller kids, or slice them into strips for a more casual dinner. A scoop of rice or buttered noodles turns it into a fuller meal, though honestly the chicken and broccoli do most of the work. Keep the ranch on the side so the crust stays crisp.
Pro Tips for This Recipe:
- Press the crumbs onto the chicken instead of just dipping and dropping. That extra contact helps the coating stay on.
- Spray the tops lightly with oil if you want a deeper golden color.
- Don’t let the tenders sit around after breading. Bake them soon after coating so the crust does not get soggy.
- Cut large broccoli florets in half so the stems roast before the tops burn.
Variations on This Dish:
- Chicken Nugget Mode: Cut chicken breasts into bite-size pieces and shorten the bake by a few minutes.
- Gluten-Free Crust: Use gluten-free panko or crushed rice crackers.
- Marinara Dip Swap: Replace ranch with warm marinara if that plays better at your table.
Common Mistakes to Avoid with This Dish:
- Wet breading: If the egg drips too much, the crust turns clumpy. Let excess egg fall off before pressing into crumbs.
- Crowded broccoli: Piled florets steam and stay pale. Give them room.
- Skipping the thermometer: Breaded chicken can look done before it is. Check the center.
3. Honey Mustard Pork Chops with Apples and Green Beans
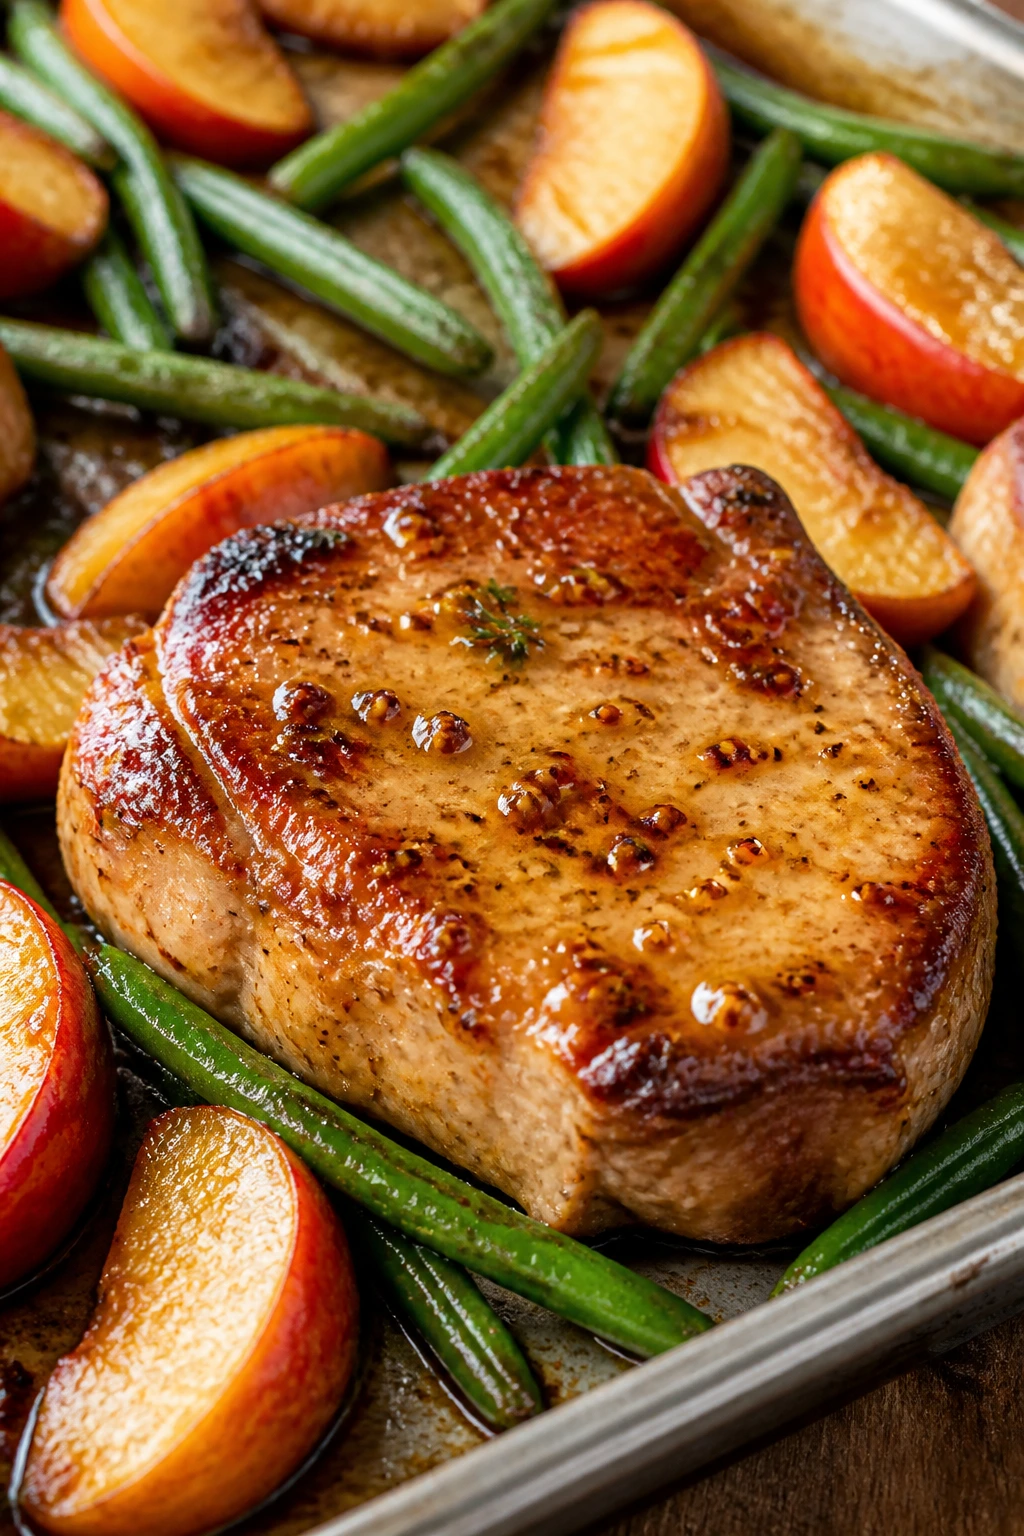
Sweet apples tame pork chops in a way that feels almost unfair. The pan smells a little like fall, but not in a heavy, candle-shop way—more like dinner should have always tasted this obvious.
Quick timing: 15 minutes prep, 30 minutes cook, 45 minutes total. Serves 4.
Why It Works:
Pork chops can dry out if you push them too far, so this recipe uses moderate heat and a glaze that protects the surface. Honey and Dijon make a sauce that is sweet enough to feel friendly but sharp enough to keep the dish from tasting flat. Apples roast into soft wedges that hold their shape, which gives the plate a familiar, almost lunchbox-level comfort. Green beans add color and a little snap, and they roast quickly enough to fit the same pan without fuss.
Key Ingredients:
- 4 boneless pork chops, about 1 inch thick — Thick chops stay juicy and are easier to time.
- 2 medium apples, cored and cut into wedges — Use tart-sweet apples that hold up in heat.
- 1 lb green beans, trimmed — Trimmed beans cook evenly and eat cleaner.
- 2 tbsp Dijon mustard — Gives the glaze its backbone.
- 2 tbsp honey — Balances the mustard and helps browning.
- 1 tbsp olive oil — Helps the vegetables roast instead of wilt.
- 1 tsp kosher salt — Needed for both pork and vegetables.
- 1/2 tsp black pepper — Keeps the glaze from tasting sweet-only.
- 1/2 tsp garlic powder — Adds mild savoriness.
- 1 tbsp butter, optional — A small finish makes the glaze glossy.
Quick Steps:
-
Heat the oven. Set it to 400°F and line the sheet pan with parchment.
-
Prep the vegetables. Toss the green beans and apple wedges with olive oil, half the salt, and half the pepper. Spread them on the pan.
-
Mix the glaze. Stir the Dijon, honey, garlic powder, and a pinch of salt in a small bowl.
-
Roast the first layer. Bake the beans and apples for 10 minutes so they start to soften.
-
Add the pork. Nestle the chops on the pan, brush the glaze over the top, and return the pan to the oven for 15 to 18 minutes, until the pork reaches 145°F and the apples are tender but not collapsing.
-
Rest and serve. Let the chops sit for 3 minutes before slicing. Spoon any juices from the pan over the pork.
Equipment for This Recipe:
- Sheet pan — A sturdy rimmed pan keeps glaze from running off.
- Small bowl — For the mustard-honey sauce.
- Tongs — Helps place the chops without dragging the glaze off.
- Instant-read thermometer — The safest way to know when pork is done.
- Paring knife — Handy for coring the apples.
How to Serve This Dish:
A pile of rice or mashed potatoes makes the honey mustard glaze feel like a proper sauce. I like to keep the apple wedges visible on the plate because they tell the story of the dish better than anything else. If your crowd likes bread, a warm roll is the easy add-on.
Pro Tips for This Recipe:
- Pick apples that still hold a bite, like Honeycrisp or Granny Smith.
- Keep the chops about the same thickness so they finish at the same time.
- Brush the glaze on the pork after the first roast, not before, or the honey can darken too fast.
- Let the pork rest before slicing; that short pause keeps the juices in the meat instead of on the cutting board.
Variations on This Dish:
- Maple Mustard Version: Swap honey for maple syrup for a deeper sweet note.
- Carrot Side Swap: Replace green beans with carrot coins if your crowd prefers sweeter vegetables.
- Bone-In Upgrade: Bone-in chops work too, but give them a few more minutes and check temperature carefully.
Common Mistakes to Avoid with This Dish:
- Thin chops: Thin pork dries out fast. Use 1-inch chops when you can.
- Slicing the apples too thin: They fall apart and turn to mush. Wedges hold better.
- Pushing pork past 145°F: Pork chops that go much farther than that lose their juiciness.
4. Cheeseburger Meatballs with Roasted Potatoes
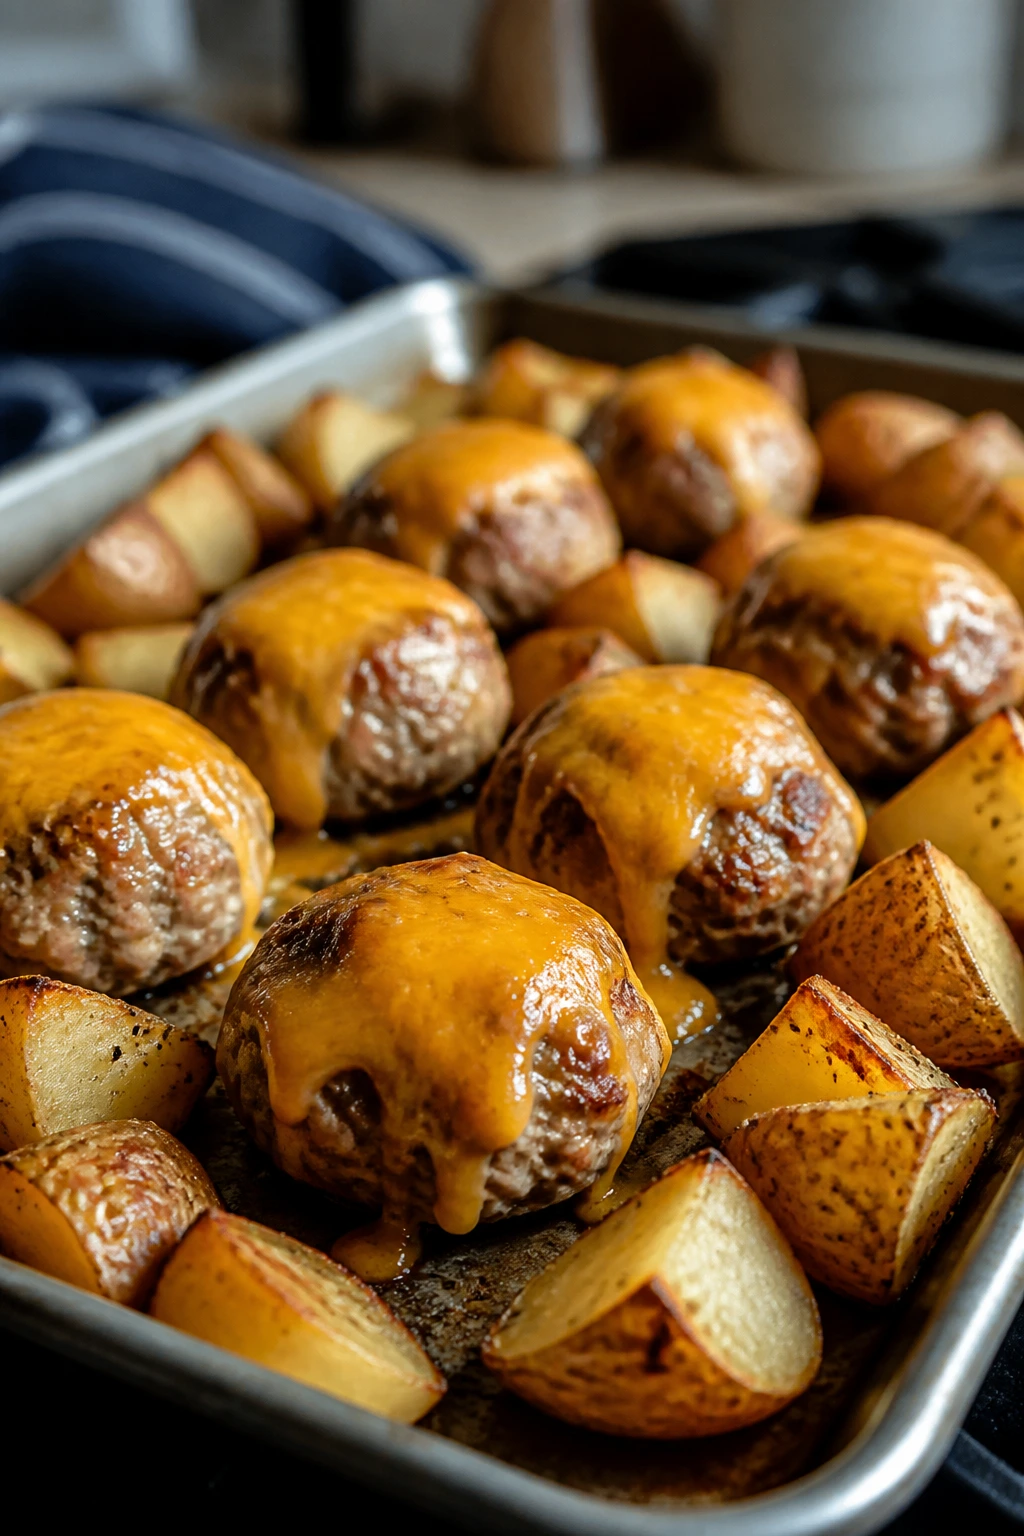
This one smells like a burger joint without the drive-through. The meatballs are savory and a little nostalgic, the potatoes roast up like the side nobody argues with, and the cheddar finish gives the whole pan a diner feel.
Quick timing: 20 minutes prep, 25 minutes cook, 45 minutes total. Serves 4.
Why It Works:
Ground beef is easy to shape into meatballs that cook quickly and stay familiar to picky eaters who may not trust anything fancy. Ketchup and mustard in the mix give the meatballs a cheeseburger flavor without needing a bun. The potatoes start first so they have time to brown, and the cheddar goes on at the end, which keeps it gooey instead of scorched. It’s a small thing, but that timing is what keeps the pan from tasting confused.
Key Ingredients:
- 1 1/2 lbs ground beef — Choose 85/15 for good flavor and enough fat.
- 1 large egg — Binds the meatballs.
- 1/2 cup breadcrumbs — Helps the meatballs stay soft.
- 2 tbsp ketchup — Brings the burger flavor home.
- 1 tbsp yellow mustard — Adds the classic cheeseburger note.
- 1 tsp onion powder — Keeps the mix savory without chunks of onion.
- 1 tsp kosher salt — Essential for ground beef.
- 1/2 tsp black pepper — Keeps the flavor from going flat.
- 1 1/2 lbs baby potatoes, halved — Small pieces roast evenly.
- 1 cup shredded cheddar — Melt it on top near the end.
- Pickles, for serving — Optional, but they make the cheeseburger idea land.
Quick Steps:
-
Preheat the oven. Set it to 425°F and line a sheet pan with parchment.
-
Start the potatoes. Toss the potatoes with oil, salt, and pepper, then roast for 12 minutes.
-
Mix the meatball base. Combine the ground beef, egg, breadcrumbs, ketchup, mustard, onion powder, salt, and pepper in a bowl. Mix gently; stop as soon as it comes together.
-
Shape and add. Roll into 1 1/2-inch meatballs and place them around the potatoes. Roast for 12 to 15 minutes.
-
Add cheese. Sprinkle cheddar over the hot meatballs and bake 2 more minutes, just until melted.
-
Serve. Add pickles on the side and let everyone build their own plate.
Equipment for This Recipe:
- Large sheet pan — Enough room matters here.
- Mixing bowl — For the meatball mixture.
- Small scoop or spoon — Helps keep the meatballs even.
- Parchment paper — Easier cleanup, fewer stuck bits.
- Instant-read thermometer — Meatballs should reach 160°F.
How to Serve This Dish:
This is the rare dinner that works with ketchup, pickles, or even a little burger sauce on the side. I’d keep the potatoes on the plate and the pickles separate so the kids who hate “mixed food” can keep everything apart. A simple salad is fine, but honestly this pan wants to be the main event.
Pro Tips for This Recipe:
- Do not overmix the beef. Tight, dense meatballs are the punishment for that mistake.
- Shape the potatoes small enough that they finish with the meatballs.
- If you want extra burger flavor, tuck a tiny cube of cheddar into the center of each meatball.
- Use a thermometer. Ground beef needs to hit 160°F, and guessing here is a bad bet.
Variations on This Dish:
- Turkey Burger Version: Use ground turkey and add an extra tablespoon of ketchup so the mix stays moist.
- Bacon Burger Finish: Sprinkle cooked crumbled bacon over the melted cheddar.
- Slider Style: Make smaller meatballs and serve them on mini buns.
Common Mistakes to Avoid with This Dish:
- Overcrowding the pan: Meatballs need space to brown.
- Using very lean beef: It can turn dry and chalky. A little fat helps.
- Adding cheese too early: Melt it at the end, not from the start.
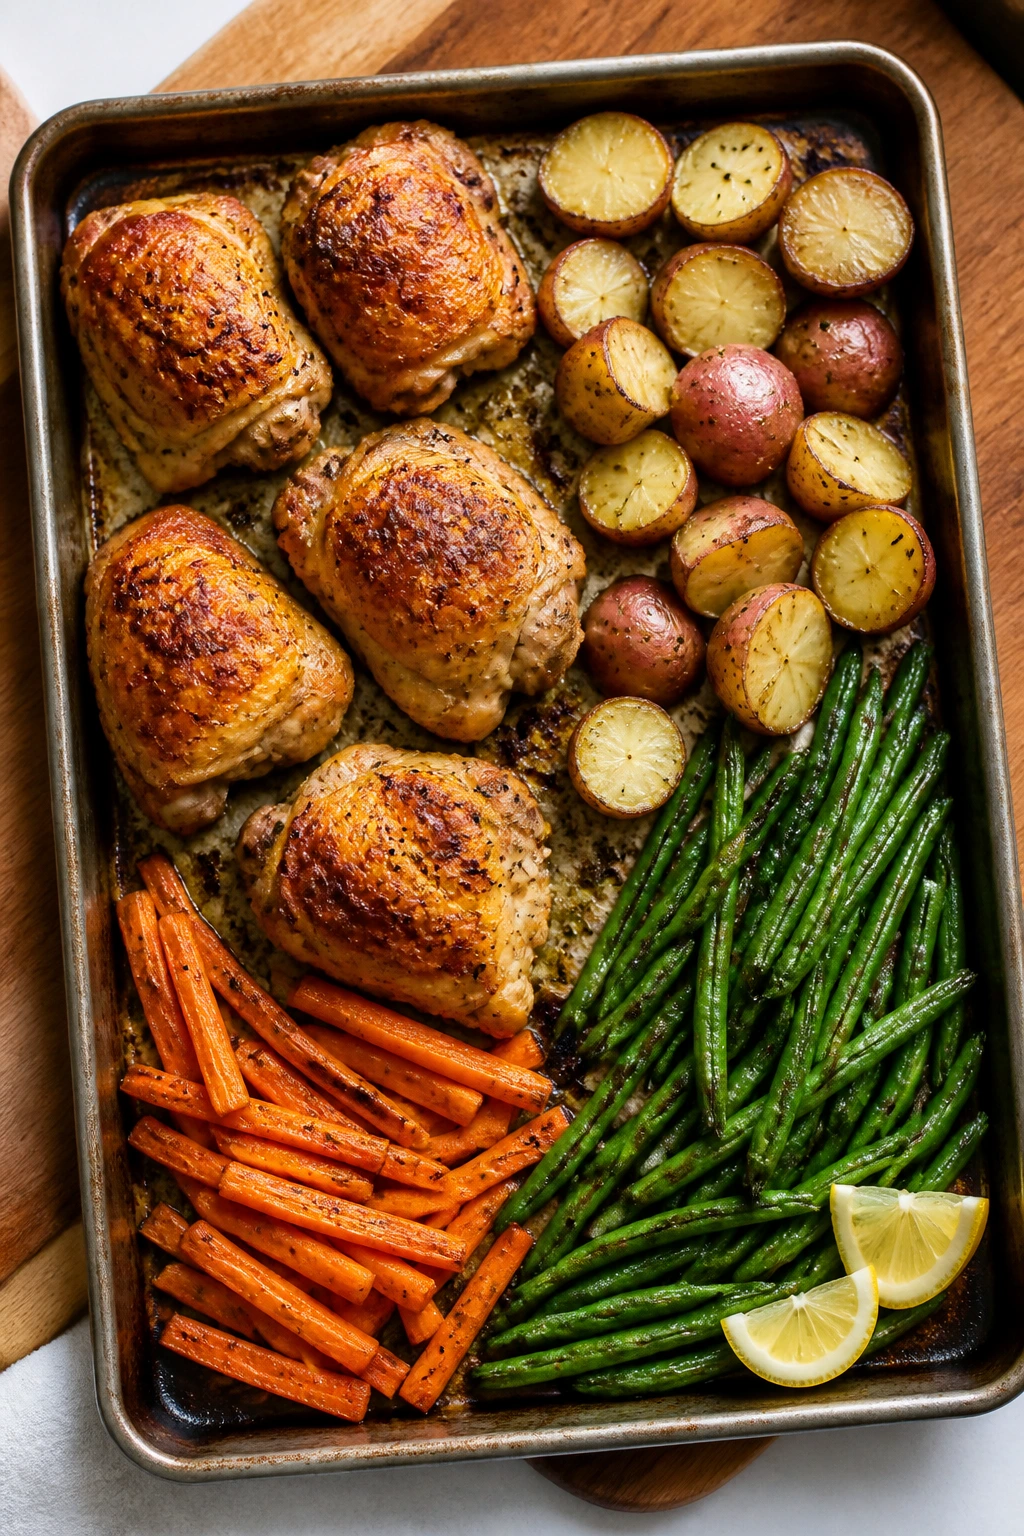
5. BBQ Chicken Drumsticks with Corn and Red Potatoes
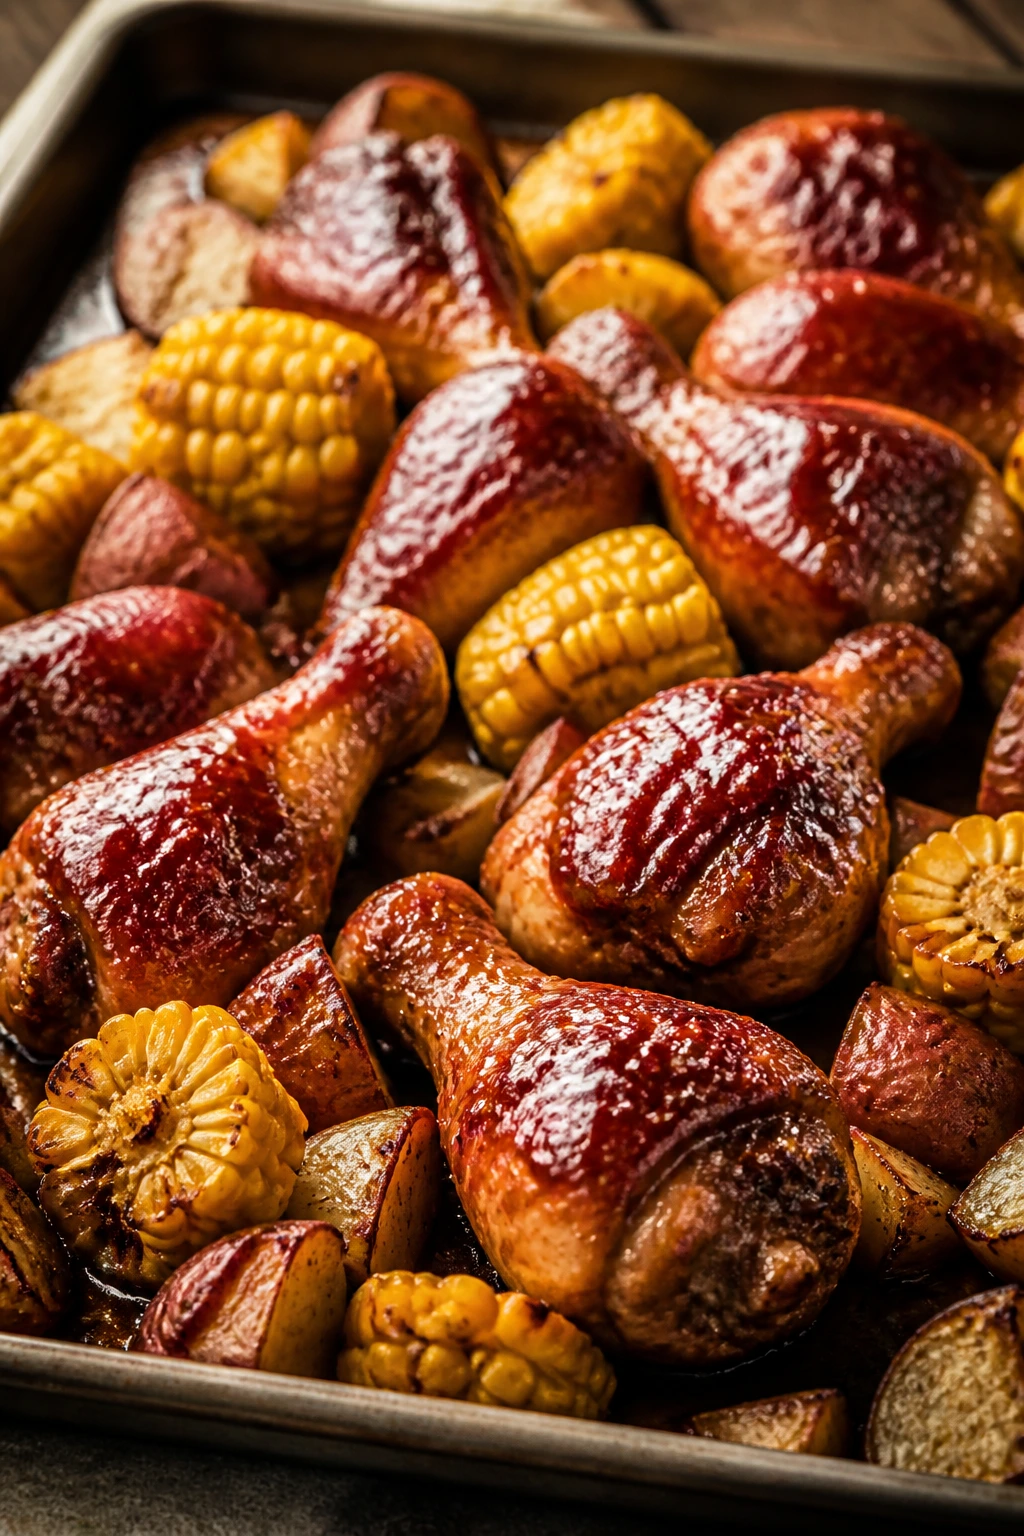
Some dinners do not need a speech. They just need barbecue sauce, browned drumsticks, and corn that smells a little sweet when it hits the hot pan.
Quick timing: 10 minutes prep, 35 minutes cook, 45 minutes total. Serves 4.
Why It Works:
Drumsticks are forgiving, which is why they show up often in family dinners. They can handle a hot oven, take on barbecue sauce without falling apart, and stay juicy even if your timing drifts a little. The potatoes get a head start because red potatoes need time to turn creamy inside and crisp outside. Corn goes in late so it warms and blisters instead of turning tough.
Key Ingredients:
- 8 chicken drumsticks, about 2 1/2 lbs — A classic kid-friendly cut.
- 1 1/2 lbs red potatoes, quartered — Small quarters roast quickly and evenly.
- 3 ears corn, cut into 3-inch pieces — Large pieces hold up better than loose kernels.
- 2 tbsp olive oil — Helps the potatoes brown.
- 1 tsp kosher salt — Needed for the potatoes and chicken.
- 1/2 tsp black pepper — Keeps the sauce from tasting one-note.
- 1 tsp smoked paprika — Gives the pan a little campfire depth.
- 3/4 cup barbecue sauce — Use a sauce that is not too sugary so it does not burn.
Quick Steps:
-
Preheat and prep. Heat the oven to 425°F and line a sheet pan with foil or parchment.
-
Roast the potatoes first. Toss the potatoes with olive oil, salt, pepper, and smoked paprika, then roast for 15 minutes.
-
Season the chicken. Pat the drumsticks dry and season them lightly with salt and pepper.
-
Add the drumsticks and corn. Nestle the chicken onto the pan, add the corn, and roast for 15 minutes.
-
Brush with sauce. Paint the drumsticks with barbecue sauce and return the pan to the oven for 10 more minutes, until the chicken reaches 165°F and the skin looks sticky and browned.
-
Rest briefly. Let the drumsticks sit for 5 minutes before serving so the juices settle.
Equipment for This Recipe:
- Rimmed sheet pan — Needed to catch the sauce.
- Foil or parchment — Makes cleanup easier.
- Pastry brush — Useful for the BBQ sauce.
- Tongs — Good for turning the drumsticks.
- Thermometer — Essential with bone-in chicken.
How to Serve This Dish:
Serve it with coleslaw if you want a cool contrast, or keep things simple with buttered bread and a stack of napkins. The corn can go right onto the plate with the potatoes, though I like to leave the drumsticks front and center because they look like a proper dinner. A little extra barbecue sauce on the side never hurts.
Pro Tips for This Recipe:
- Pat the chicken dry before seasoning so the skin browns instead of steaming.
- Choose a barbecue sauce that leans tangy rather than sticky-sweet.
- Brush the sauce near the end. Barbecue sauce burns faster than people expect.
- If the corn pieces roll around, set them cut-side down for more color.
Variations on This Dish:
- Honey BBQ Version: Add 1 tablespoon honey to the sauce for a softer finish.
- Green Bean Swap: Use trimmed green beans if corn is not your family’s thing.
- Boneless Version: Chicken thighs work, but shorten the cook time and check temperature early.
Common Mistakes to Avoid with This Dish:
- Saucing too early: The sugars darken too fast and can turn bitter.
- Using tiny potato pieces: They can dry out before the chicken finishes.
- Skipping the rest: Even drumsticks benefit from a short pause after roasting.
6. Mild Italian Sausage with Peppers and Baby Potatoes
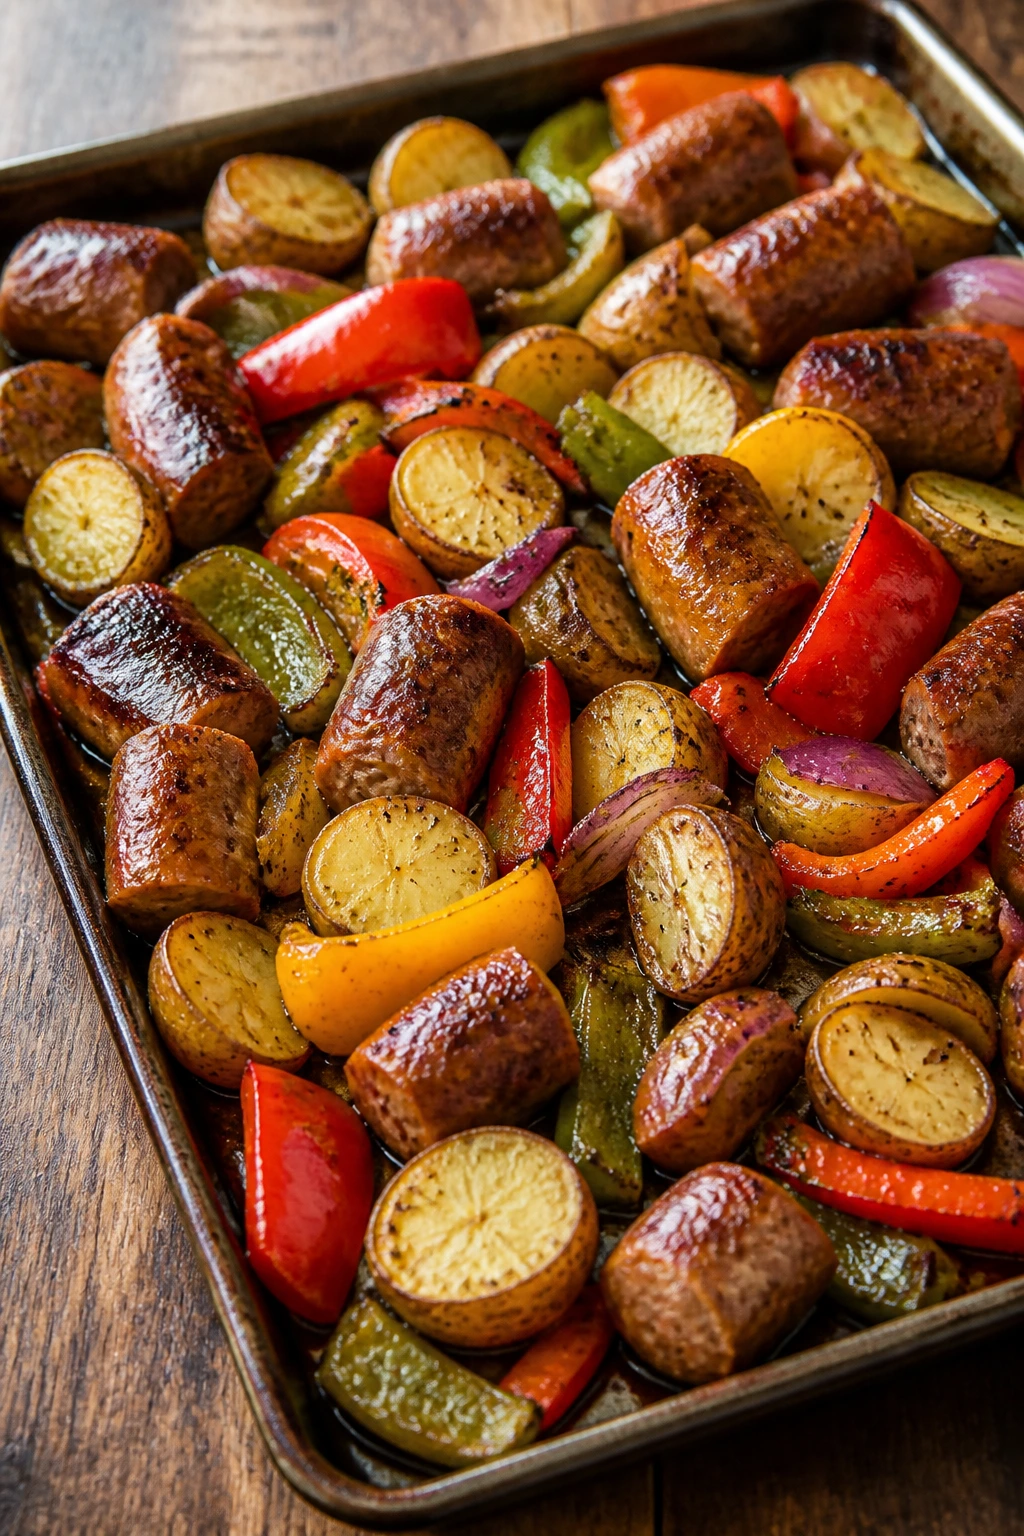
This is the sort of dinner that smells like a Friday without asking for much in return. Mild sausage, sweet peppers, and potatoes give you three very familiar flavors, and nobody has to wrestle with a sauce they do not trust.
Quick timing: 15 minutes prep, 30 minutes cook, 45 minutes total. Serves 4.
Why It Works:
Mild Italian sausage brings a lot of flavor with almost no effort, which is part of its charm. The peppers and onions soften into something sweet at high heat, while the potatoes get their own crunchy edges if you give them a head start. This is a smart sheet pan dinner for picky eaters because the ingredients stay separate enough to pick around, yet the pan still tastes cohesive. Nothing gets too fancy. That is the point.
Key Ingredients:
- 1 1/2 lbs mild Italian sausage links — Choose mild if your table is spice-shy.
- 1 1/2 lbs baby potatoes, halved — Small potatoes roast best.
- 2 bell peppers, sliced into thick strips — Thick strips hold their shape.
- 1 medium yellow onion, sliced — Adds sweetness as it roasts.
- 3 tbsp olive oil — Helps everything brown.
- 1 1/2 tsp Italian seasoning — Gives the pan a gentle herb note.
- 1 tsp kosher salt — Needed for the potatoes.
- 1/2 tsp black pepper — Keeps the sausage from tasting flat.
- 2 garlic cloves, minced — Optional, but nice.
- Grated parmesan, for serving — A small finish if your crew likes cheese.
Quick Steps:
-
Heat the oven. Set it to 425°F and line a large sheet pan.
-
Start the potatoes. Toss them with olive oil, salt, pepper, and Italian seasoning. Roast for 15 minutes.
-
Prep the vegetables. Toss the peppers and onion with a little olive oil and a pinch of salt.
-
Add the sausage and vegetables. Nestle the sausage links onto the pan and scatter the peppers and onions around them.
-
Finish roasting. Bake for 20 to 25 minutes more, turning the sausage once if needed, until the potatoes are tender and the sausage reaches 160°F.
-
Serve. Slice the sausage after resting if you want it easier for small hands.
Equipment for This Recipe:
- Sheet pan — A roomy pan matters.
- Tongs — Helps turn the sausage.
- Knife and cutting board — For the potatoes and peppers.
- Thermometer — Sausage should be cooked through.
- Serving platter — Optional, but nice if you slice the links.
How to Serve This Dish:
A crusty loaf of bread makes sense here because the roasted onions and sausage juices deserve something to soak into. You can also serve it over pasta if you want to stretch the meal, though the pan stands on its own. Keep mustard on the table if your family likes a little extra bite.
Pro Tips for This Recipe:
- Choose mild sausage links, not hot, if you are trying to win over cautious eaters.
- Slice the peppers thick enough that they do not collapse.
- If the potatoes are still firm when the sausage is done, pull the sausage and give the potatoes another 5 minutes.
- Turn the links once for even browning if your oven has hot spots.
Variations on This Dish:
- Chicken Sausage Version: Swap in mild chicken sausage for a lighter pan.
- Apple Twist: Add apple wedges in the last 15 minutes for a sweeter edge.
- No-Onion Version: Leave the onion out if that’s a hard no at your table.
Common Mistakes to Avoid with This Dish:
- Using hot sausage when your family likes mild flavors: That’s not the dinner for this crowd.
- Cutting peppers too thin: They shrivel before they soften.
- Underseasoning the potatoes: They need their own salt, not just whatever falls off the sausage.
7. Teriyaki Chicken with Broccoli and Pineapple
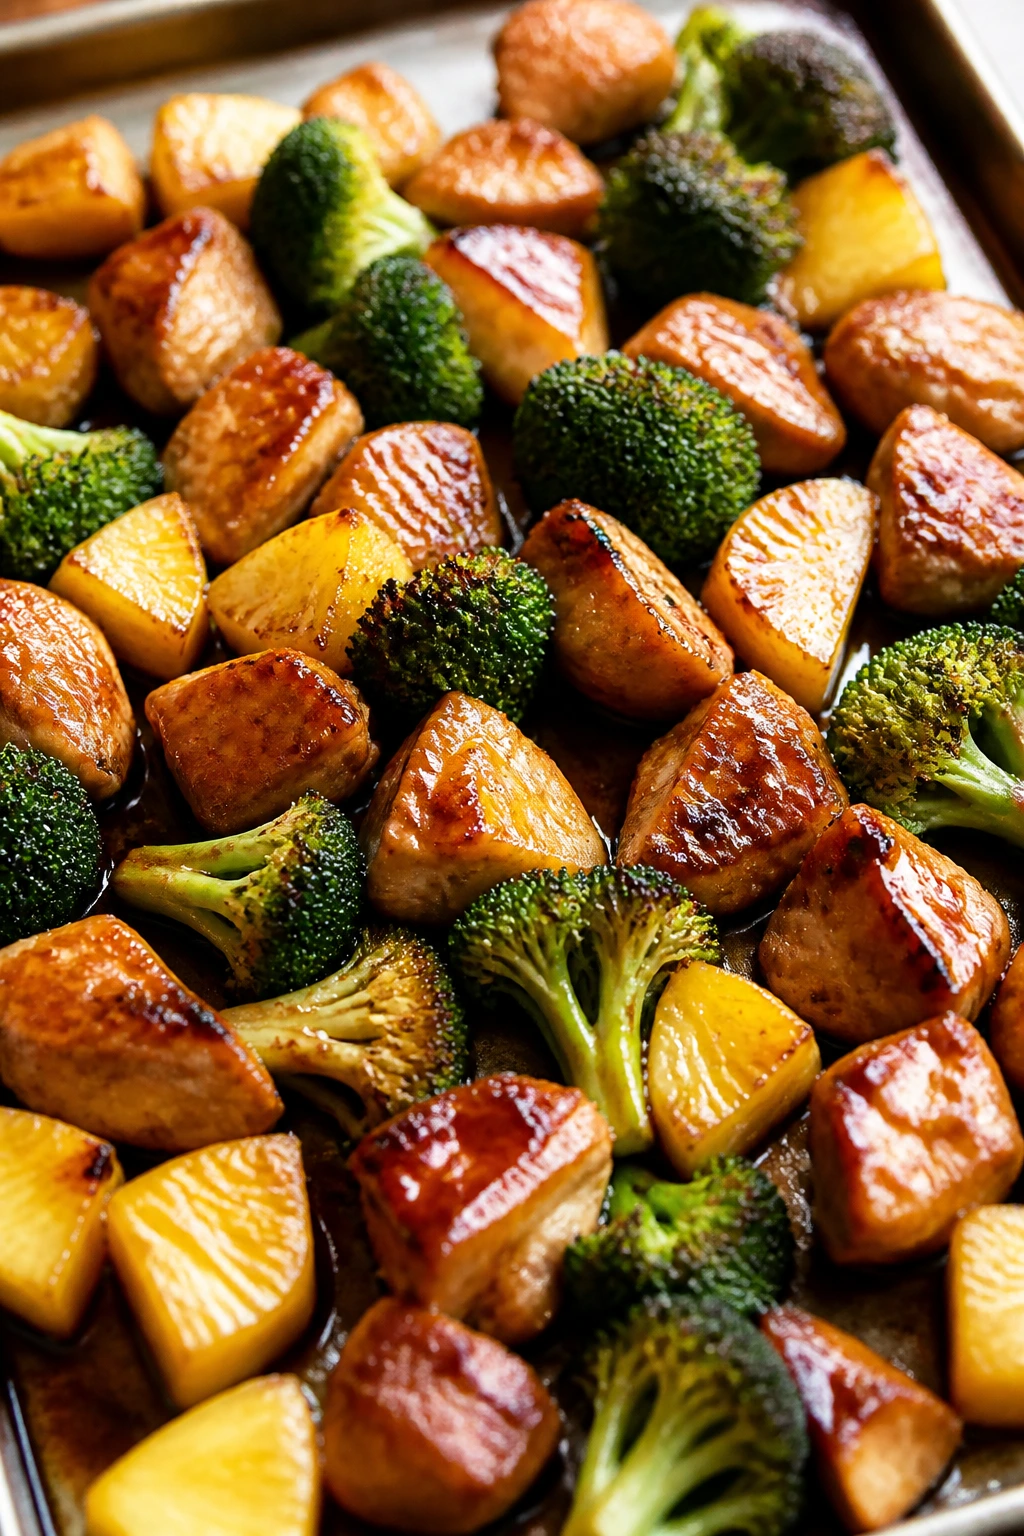
Sweet glaze, roasted broccoli, and pineapple that caramelizes at the edges. This is a sheet pan dinner that feels cheerful without being chaotic.
Quick timing: 15 minutes prep, 25 minutes cook, 40 minutes total. Serves 4.
Why It Works:
Teriyaki sauce gives you instant familiarity, which is useful when the table is suspicious of anything green. Chicken thighs are the safer choice because they stay tender under the glaze, and the broccoli roasts quickly enough to fit the same pan. Pineapple adds sweetness, but if you keep the pieces dry and add them late, they caramelize instead of turning watery. That balance matters. A wet pan makes the sauce thin and the broccoli sad.
Key Ingredients:
- 2 lbs boneless, skinless chicken thighs, cut into bite-size pieces — Bite-size pieces roast quickly and feel less intimidating.
- 4 cups broccoli florets — Keep them fairly large.
- 1 1/2 cups pineapple chunks, well drained — Drain canned pineapple so the pan stays dry.
- 1 red bell pepper, cut into strips — Adds color and sweetness.
- 1/3 cup teriyaki sauce — Use a sauce you already like the taste of.
- 1 tbsp soy sauce — Deepens the savory note.
- 1 tbsp sesame oil — Adds a warm finish.
- 1 tsp garlic powder — Keeps the seasoning simple.
- Sesame seeds, optional — A little crunch on top.
Quick Steps:
-
Heat the oven. Set it to 400°F and line the pan with parchment.
-
Season the chicken. Toss the chicken with half the teriyaki sauce, soy sauce, sesame oil, and garlic powder.
-
Roast the chicken first. Spread it on the pan and bake for 12 minutes.
-
Add the vegetables and pineapple. Stir the broccoli, bell pepper, and pineapple with the remaining sauce, then add them to the pan.
-
Finish roasting. Bake 10 to 12 minutes more, until the chicken reaches 165°F and the broccoli is crisp-tender.
-
Garnish and serve. Sprinkle sesame seeds over the top if using.
Equipment for This Recipe:
- Sheet pan — Standard half-sheet size works well.
- Mixing bowl — For tossing the sauce.
- Tongs or spatula — Helps move the chicken around.
- Thermometer — Important for bite-size chicken pieces.
- Parchment paper — Prevents glaze from sticking.
How to Serve This Dish:
Rice is the obvious move here, and it soaks up the extra teriyaki sauce in a way that feels generous. If you want to keep the plate lighter, serve it with steamed rice and nothing else. For picky eaters, I like to leave the pineapple in a separate pile so nobody feels ambushed by fruit in the main bite.
Pro Tips for This Recipe:
- Drain pineapple very well. Extra juice makes the pan watery.
- Cut the chicken into similar-size pieces so it cooks at the same speed.
- Keep the broccoli florets large enough to hold up under high heat.
- Use a low-sugar teriyaki sauce if your sauce tends to burn.
Variations on This Dish:
- Orange Teriyaki Swap: Add 2 tablespoons orange juice to the sauce for a brighter finish.
- Sesame-Free Version: Skip the sesame oil and use neutral oil plus a little extra garlic.
- Chicken Breast Version: Works fine, but watch the oven closely so it stays juicy.
Common Mistakes to Avoid with This Dish:
- Adding pineapple too early: It turns mushy and makes the pan wet.
- Using tiny broccoli florets: They brown too fast and get bitter.
- Over-saucing at the start: Save some sauce for the end so the chicken still browns.
8. Lemon Butter Salmon with Asparagus and Baby Potatoes
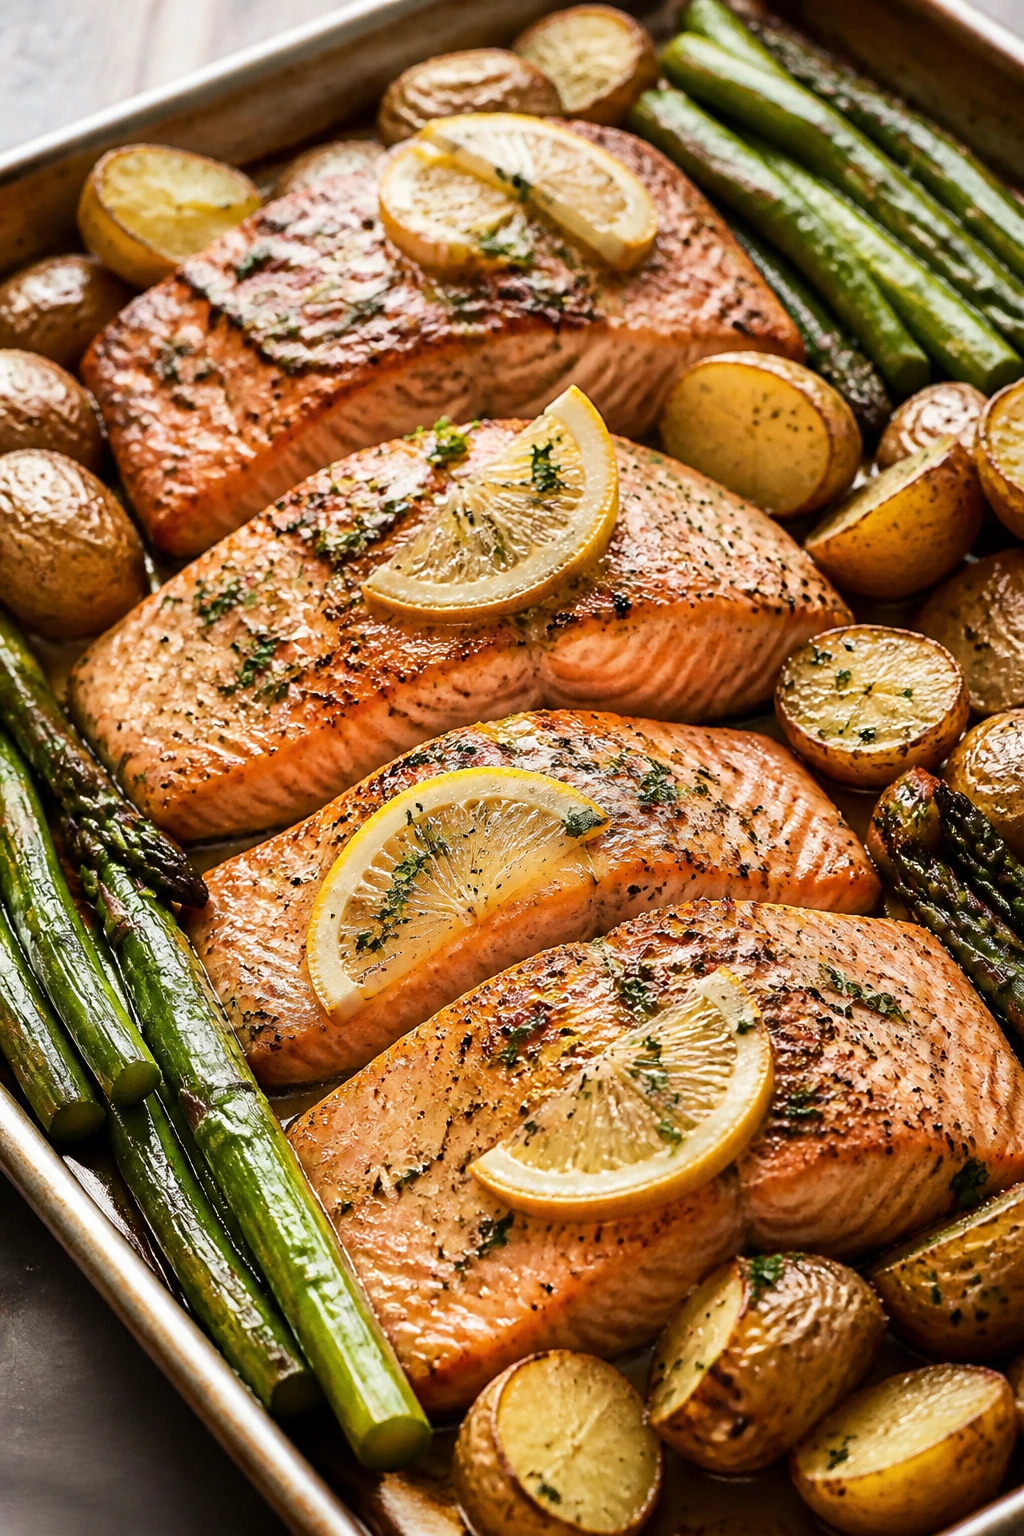
This pan tastes clean and calm. Salmon with lemon butter is mild enough for cautious eaters, and the asparagus brings a little snap without acting like a lecture about vegetables.
Quick timing: 10 minutes prep, 20 minutes cook, 30 minutes total. Serves 4.
Why It Works:
Salmon does not need much to taste good, which is part of why it works for picky eaters. Butter and lemon soften the fish’s flavor, while the potatoes roast first so they are ready when the salmon goes in. Asparagus cooks quickly and gets a gentle char instead of turning stringy, which is what happens when people leave it in too long. The whole dinner feels light but still substantial.
Key Ingredients:
- 4 salmon fillets, about 6 oz each — Choose fillets of similar thickness.
- 1 1/2 lbs baby potatoes, halved — The potatoes need the head start.
- 1 lb asparagus, trimmed — Use medium-thick spears if possible.
- 3 tbsp unsalted butter, melted — Gives the fish a rich finish.
- 2 tbsp olive oil — Helps the potatoes and asparagus roast.
- 1 lemon, zested and sliced — Zest brings more flavor than juice alone.
- 2 garlic cloves, minced — Optional but helpful.
- 1 tsp kosher salt — For the whole pan.
- 1/2 tsp black pepper — A small amount is enough.
- 1 tbsp chopped dill or parsley — Freshens the finish.
Quick Steps:
-
Heat the oven. Set it to 425°F and line a sheet pan.
-
Roast the potatoes first. Toss the halved potatoes with olive oil, half the salt, and half the pepper, then roast for 15 minutes.
-
Prep the salmon and asparagus. Pat the salmon dry. Toss the asparagus with a little olive oil, salt, and pepper.
-
Add the fish and vegetables. Place the salmon on the pan skin-side down, add the asparagus, then brush the salmon with melted butter, garlic, and lemon zest.
-
Bake. Return the pan to the oven for 10 to 12 minutes, until the salmon flakes easily and reaches 145°F and the asparagus is crisp-tender.
-
Finish. Add lemon slices and herbs just before serving.
Equipment for This Recipe:
- Rimmed sheet pan — Keeps the butter from running off.
- Parchment paper — Makes cleanup easier.
- Zester or microplane — Useful for the lemon.
- Thermometer — Helpful for salmon.
- Tongs — For the asparagus.
How to Serve This Dish:
A spoonful of rice or a slice of warm bread makes this feel like a complete dinner without burying the salmon. If your people are wary of fish, cut the fillets into smaller pieces before plating; that often makes the first bite easier. Keep the lemon slices visible. People trust dinner more when they can see what flavor is coming.
Pro Tips for This Recipe:
- Choose salmon fillets that are similar in thickness so they finish together.
- Dry the fish before buttering it so the surface roasts instead of steams.
- Keep the asparagus spears on the thicker side if you can.
- Pull the pan when the fish is opaque and flakes, not when it has gone dry.
Variations on This Dish:
- Maple Lemon Salmon: Add 1 tablespoon maple syrup to the butter for a softer sweet edge.
- Cod Swap: Cod works, though it may need a few fewer minutes.
- Herb-Only Version: Skip the garlic and keep the finish to lemon, butter, and dill.
Common Mistakes to Avoid with This Dish:
- Overbaking salmon: Dry fish is hard to win back.
- Adding asparagus too soon: It goes limp before the salmon is done.
- Leaving the skin wet: Dry it well for a better texture.
9. Taco Chicken with Sweet Potatoes and Cheese
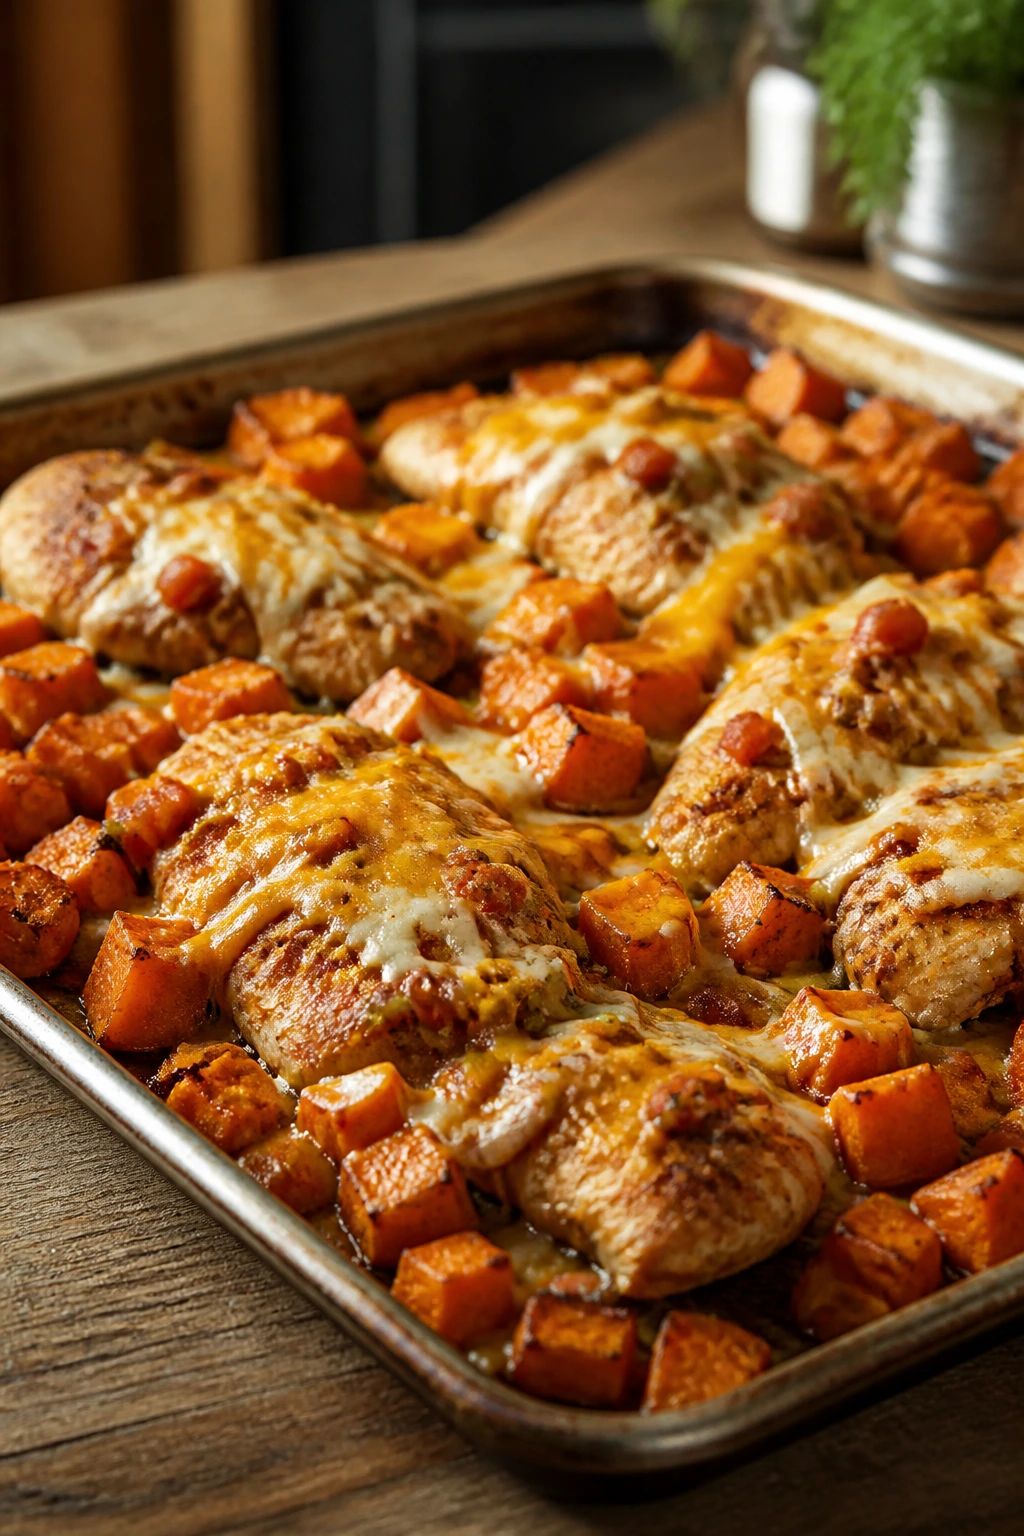
This is the dinner I reach for when I want the flavor of taco night without the whole taco assembly line. Sweet potatoes soften the edges of the seasoning, and the cheese gives cautious eaters something instantly familiar.
Quick timing: 20 minutes prep, 25 minutes cook, 45 minutes total. Serves 4.
Why It Works:
Mild taco seasoning gives chicken enough flavor to taste like dinner without lighting anyone’s mouth on fire. Sweet potatoes roast into something soft and slightly sweet, which balances the spice and gives the pan a color kids usually accept more easily than dark greens. Cheese goes on at the end so it melts over the chicken without drying out. That detail matters more than people realize. Cheese baked too long gets leathery, and no one wants that.
Key Ingredients:
- 2 lbs boneless, skinless chicken thighs or breasts — Thighs are juicier, breasts are leaner.
- 2 medium sweet potatoes, peeled and cubed — Keep the cubes about 3/4 inch.
- 1 red onion, cut into wedges — Softens and sweetens in the oven.
- 2 tbsp olive oil — Helps the potatoes and onion brown.
- 2 tbsp mild taco seasoning — Choose mild if your table is spice-sensitive.
- 1 tsp kosher salt — Needed for the potatoes.
- 1 cup shredded cheddar or Monterey Jack — Adds the finish.
- 1 lime, cut into wedges — Brightens the final plate.
- Cilantro, optional — Only if your people like it.
- Sour cream, optional — Good for dipping or cooling down the plate.
Quick Steps:
-
Heat the oven. Set it to 425°F and line the sheet pan.
-
Start the sweet potatoes. Toss them with olive oil, half the taco seasoning, and salt, then roast for 15 minutes.
-
Season the chicken. Coat the chicken with the remaining taco seasoning and a little olive oil if needed.
-
Add chicken and onion. Nestle them onto the pan and roast for 20 minutes, or until the chicken is nearly done.
-
Melt the cheese. Sprinkle cheddar over the chicken and return the pan to the oven for 2 to 3 minutes, just until melted and the chicken reaches 165°F.
-
Finish with lime. Serve with lime wedges and sour cream on the side.
Equipment for This Recipe:
- Sheet pan — A roomy one gives the potatoes space.
- Mixing bowl — Helpful for seasoning the chicken.
- Knife and cutting board — For the sweet potatoes and onion.
- Parchment paper — Optional, but makes cleanup easier.
- Thermometer — Needed for chicken.
How to Serve This Dish:
This works well as a build-your-own plate with tortillas on the side or over plain rice if the family wants something less hands-on. Keep the sour cream and lime nearby because they help picky eaters control the flavor. I would not bury the chicken under salsa unless you know that’s a winner in your house.
Pro Tips for This Recipe:
- Cut the sweet potatoes small enough that they finish with the chicken.
- Keep the taco seasoning mild. This is not the place to prove a point.
- If using chicken breasts, choose even-thickness pieces or pound them lightly.
- Add the cheese at the very end so it melts, not dries out.
Variations on This Dish:
- Deconstructed Taco Bowls: Serve the components over rice and let everyone build their own bowl.
- Turkey Version: Ground turkey works if you shape it into small patties or meatballs.
- Avocado Finish: Add sliced avocado at the table for a cooler, softer flavor.
Common Mistakes to Avoid with This Dish:
- Sweet potato cubes that are too big: They will lag behind everything else.
- Over-seasoning with spicy taco mix: Mild eaters will notice fast.
- Cheese baked too long: It tightens up instead of melting.
10. Turkey Meatloaf Patties with Green Beans and Onions
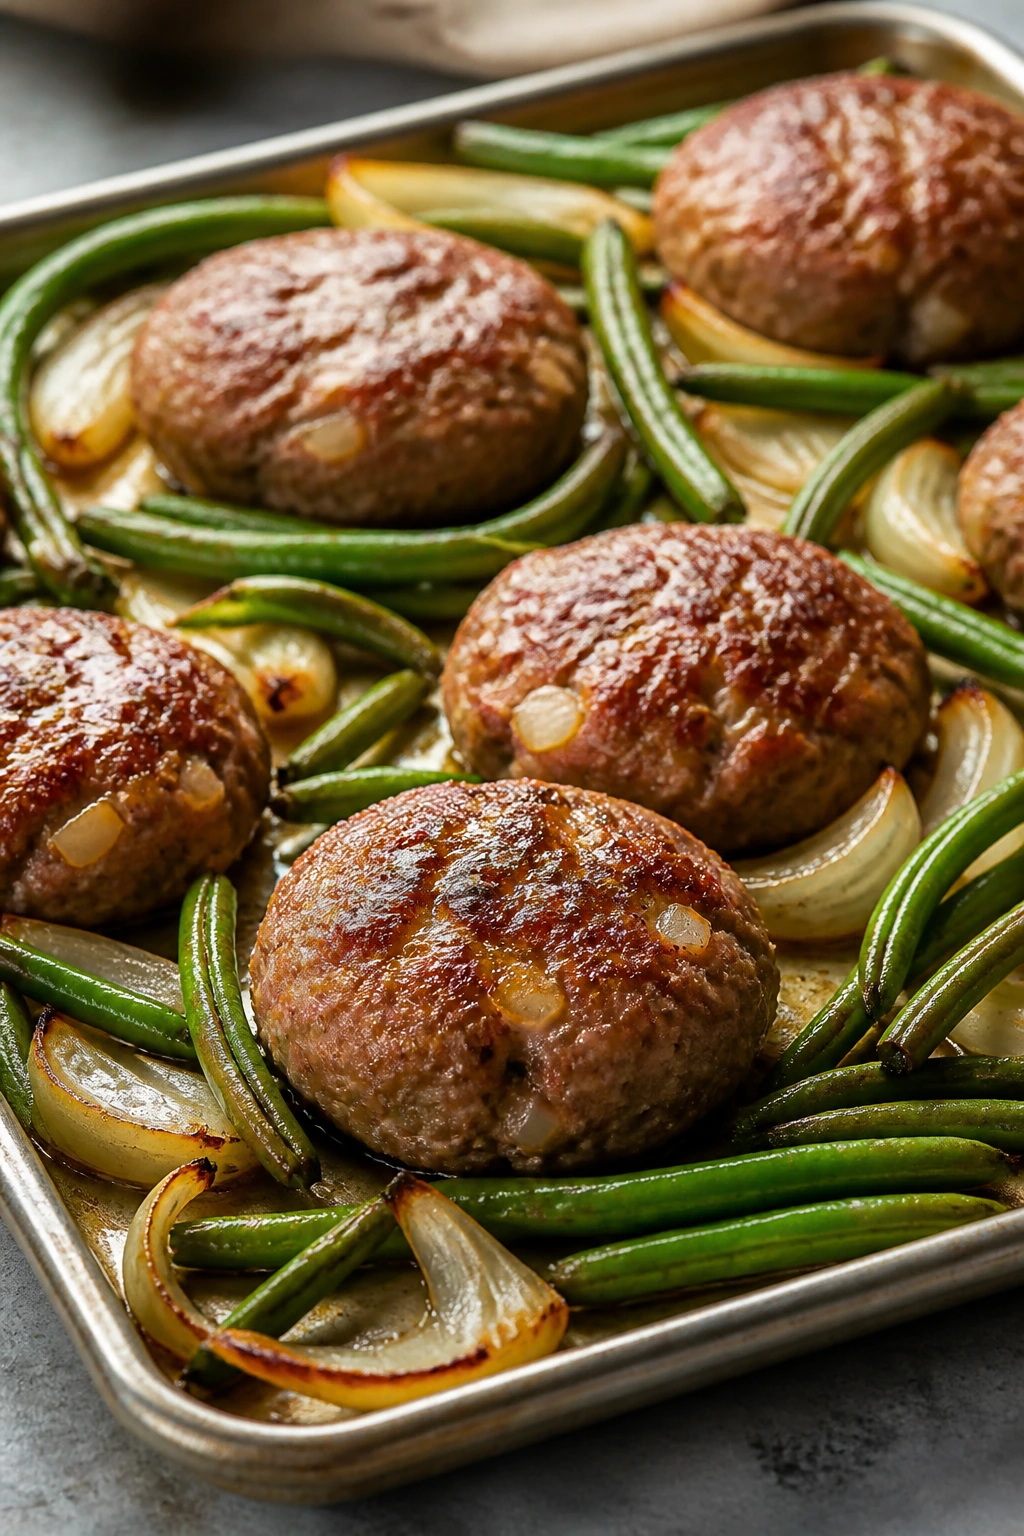
Meatloaf gets a better life when you stop pretending it has to be one giant loaf. These patties cook faster, brown better, and feel less like a school-night lecture.
Quick timing: 15 minutes prep, 25 minutes cook, 40 minutes total. Serves 4.
Why It Works:
Turkey meatloaf can be a little dry if you squeeze it too hard or cook it too long, so shaping it into patties gives you better control. Ketchup in the mix keeps the flavor familiar, and the green beans roast quickly enough to share the pan without turning sad. Onions soften and sweeten on the edge of the pan, which makes the whole dinner taste warmer than the ingredient list suggests. It’s plain, in the best way.
Key Ingredients:
- 1 1/2 lbs ground turkey — Use ground turkey with some fat if you can.
- 1 large egg — Holds the patties together.
- 1/2 cup breadcrumbs — Keeps the texture soft.
- 3 tbsp ketchup, divided — Two tablespoons in the mix and one for glazing.
- 1 tbsp Worcestershire sauce — Adds a savory backbone.
- 1 tsp onion powder — Helps the flavor without raw onion bits.
- 1 tsp kosher salt — Important for turkey.
- 1/2 tsp black pepper — Balances the ketchup.
- 1 lb green beans, trimmed — They roast fast and stay familiar.
- 1 medium onion, cut into wedges — Adds sweetness.
- 1 tbsp olive oil — Helps the vegetables brown.
Quick Steps:
-
Preheat the oven. Set it to 400°F and line the sheet pan.
-
Prep the vegetables. Toss the green beans and onion with olive oil and a pinch of salt, then spread them on the pan.
-
Mix the patties. Combine turkey, egg, breadcrumbs, 2 tablespoons ketchup, Worcestershire, onion powder, salt, and pepper. Mix gently.
-
Shape and start roasting. Form 6 oval patties and place them on the pan. Roast the vegetables and patties for 15 minutes.
-
Glaze and finish. Brush the patties with the remaining ketchup and bake 10 more minutes, until the turkey reaches 165°F.
-
Rest briefly. Let the patties sit for 3 minutes before serving.
Equipment for This Recipe:
- Sheet pan — A standard rimmed pan works.
- Mixing bowl — For the turkey mixture.
- Spatula — Helpful for lifting patties.
- Thermometer — Turkey needs to reach 165°F.
- Parchment paper — Makes the ketchup glaze easier to clean.
How to Serve This Dish:
These patties go well with mashed potatoes, buttered noodles, or even plain dinner rolls if you want a softer plate. I like to keep the ketchup glaze visible and maybe put a little extra ketchup on the table for the people who treat meatloaf like a dip. It’s not fancy. It does not need to be.
Pro Tips for This Recipe:
- Mix the turkey gently. Overworking it makes the patties tough.
- Keep the patties the same size so they finish together.
- If your turkey is very lean, add a tablespoon of olive oil to the mix.
- Use a thermometer. Turkey should never be guessed.
Variations on This Dish:
- Beef Meatloaf Patties: Ground beef gives a richer flavor and a firmer texture.
- BBQ Glaze: Swap the ketchup glaze for barbecue sauce.
- Gluten-Free Version: Use crushed gluten-free crackers instead of breadcrumbs.
Common Mistakes to Avoid with This Dish:
- Handling the mix too much: The patties get dense.
- Not seasoning enough: Turkey needs help; it is a blank canvas.
- Pulling them too early: Undercooked turkey is not a risk worth taking.
11. Ranch Pork Tenderloin with Carrots and Potatoes
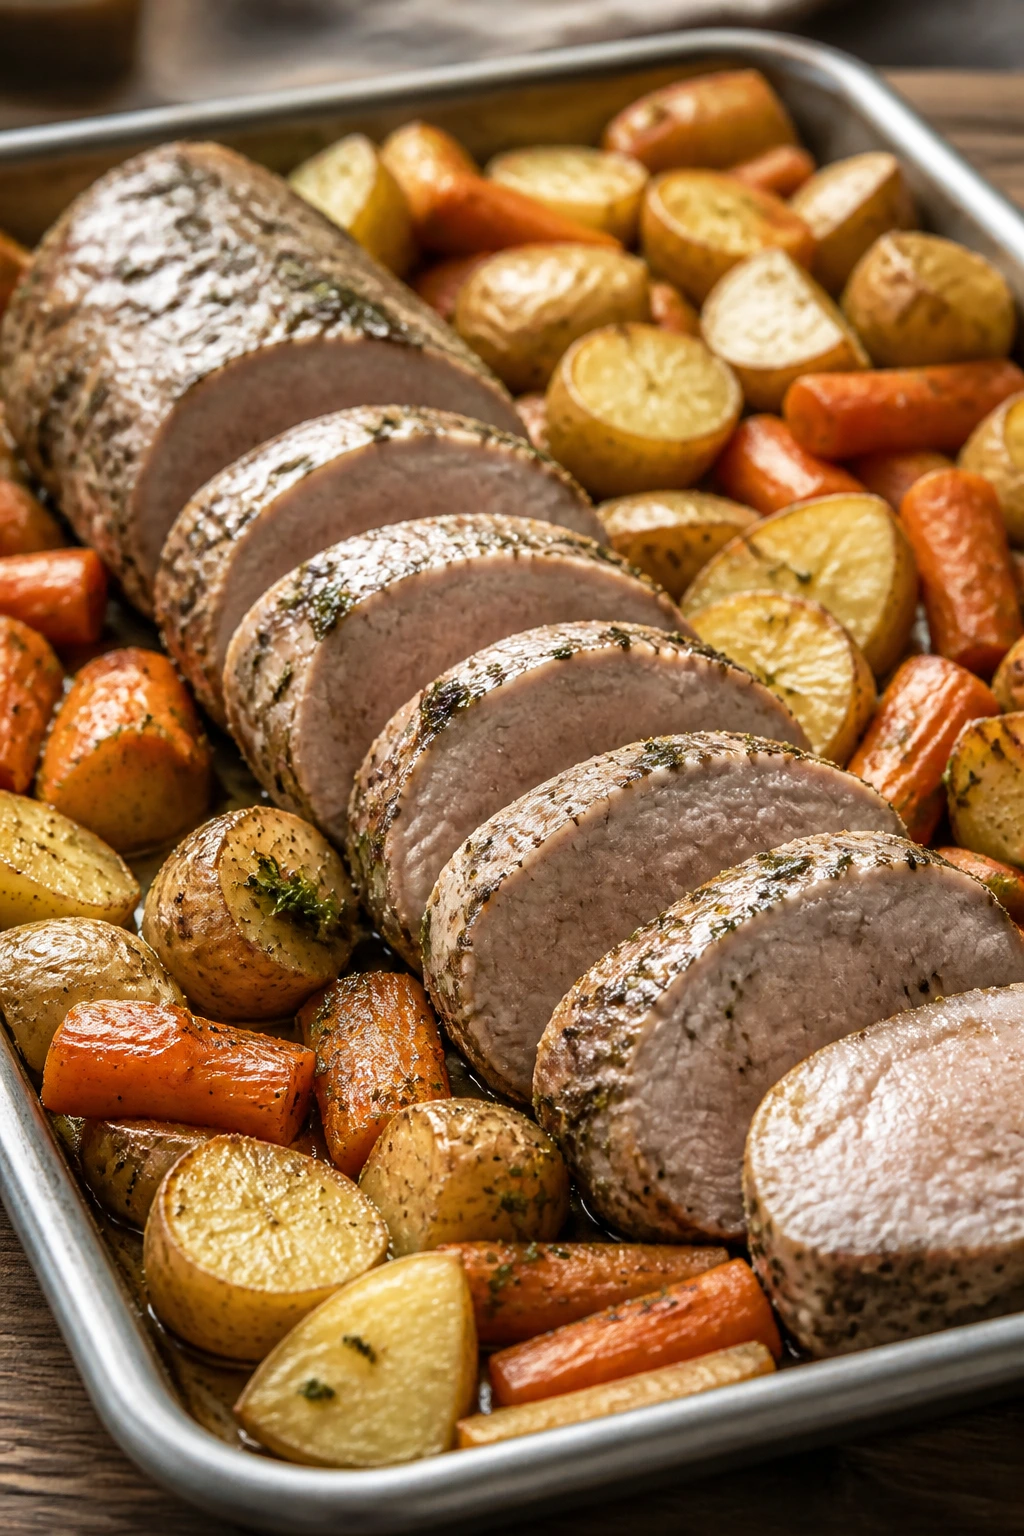
Ranch seasoning is a cheat code when you need dinner to feel familiar fast. Pork tenderloin, carrots, and potatoes turn into a pan that tastes like the word “easy” without tasting lazy.
Quick timing: 15 minutes prep, 30 minutes cook, 45 minutes total. Serves 4.
Why It Works:
Pork tenderloin cooks fast and stays tender if you do not overdo it. Ranch seasoning brings garlic, onion, and herb flavor in a package that picky eaters already recognize, which makes this one a strong bridge dinner. Potatoes and carrots start first because they need more time than the tenderloin, and that staggered timing keeps the whole pan on track. A thermometer is not optional here. It is the difference between juicy pork and dry disappointment.
Key Ingredients:
- 2 pork tenderloins, about 1 1/2 lbs total — Tenderloin cooks quickly and slices neatly.
- 1 1/2 lbs baby potatoes, halved — They roast into creamy centers.
- 1 lb carrots, cut on the bias — Bias cuts look nice and cook evenly.
- 2 tbsp olive oil — Helps the vegetables brown.
- 2 tbsp dry ranch seasoning — The flavor anchor.
- 1 tsp garlic powder — Adds another mild savory note.
- 1 tsp kosher salt — Use less if your ranch seasoning is salty.
- 1/2 tsp black pepper — Keeps the pan from tasting flat.
- 1 tbsp butter, optional — Nice melted over the sliced pork.
Quick Steps:
-
Heat the oven. Set it to 425°F and line the pan.
-
Start the vegetables. Toss the potatoes and carrots with olive oil, ranch seasoning, garlic powder, salt, and pepper. Roast for 15 minutes.
-
Season the pork. Rub the tenderloins lightly with oil and the remaining ranch seasoning.
-
Add the pork. Place the tenderloins on the pan and roast for 18 to 22 minutes, until the pork reaches 145°F.
-
Rest. Let the pork sit for 5 minutes before slicing. That short rest matters.
-
Serve. Spoon a little melted butter over the sliced pork if you want a softer finish.
Equipment for This Recipe:
- Sheet pan — Needs to be large enough for both tenderloins.
- Knife — For the carrots and trimming silver skin.
- Tongs — To place the pork.
- Thermometer — Absolutely necessary here.
- Parchment paper — Easy cleanup, less sticking.
How to Serve This Dish:
The pork slices cleanly, which makes it easy to portion around the table. Serve it with applesauce if your family likes a sweet side, or keep it with bread and the roasted vegetables if you want dinner to stay simple. I would not drown the plate in sauce; the ranch seasoning already does enough.
Pro Tips for This Recipe:
- Do not confuse pork tenderloin with pork loin roast. They are not the same thing.
- Check the temperature early, because tenderloin can move from perfect to dry quickly.
- Let the meat rest before slicing so the juices stay put.
- Keep the carrots thick enough to survive the oven.
Variations on This Dish:
- Apple Ranch Twist: Add apple wedges to the pan in the last 15 minutes.
- Herb Swap: Use dried thyme and parsley if you want a less ranch-heavy flavor.
- Dairy-Free Finish: Skip the butter and drizzle with a little olive oil instead.
Common Mistakes to Avoid with This Dish:
- Overcooking tenderloin: It dries out fast.
- Using too much ranch seasoning: The salt can get pushy.
- Slicing too soon: The juices need a few minutes to settle.
12. Pizza Chicken Cutlets with Zucchini and Mozzarella
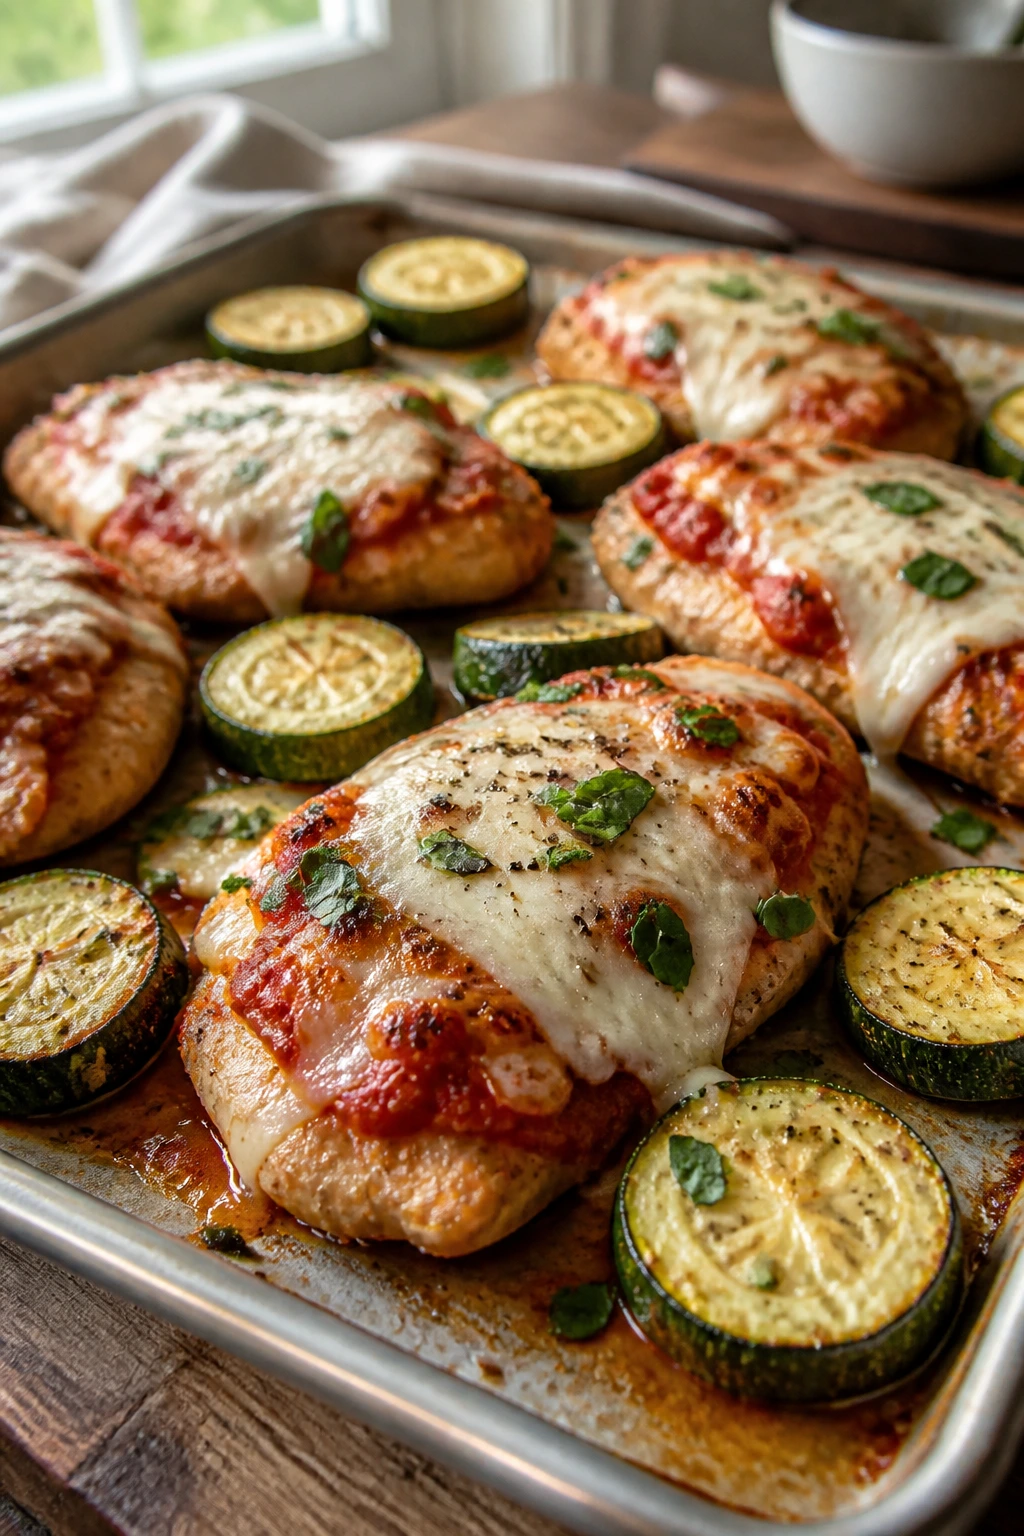
If your family trusts pizza flavors more than most vegetables, this pan will do a lot of quiet work. It tastes like Friday night, but it lands on a sheet pan with chicken and zucchini instead of a delivery box.
Quick timing: 20 minutes prep, 20 minutes cook, 40 minutes total. Serves 4.
Why It Works:
Pizza flavor is one of the easiest ways to get a cautious eater on board because it comes with a built-in memory. The marinara, mozzarella, and oregano are familiar enough that the chicken feels less like a separate protein and more like part of the same idea. Zucchini roasts best when sliced thick, and the marinara should be a spoonful, not a flood, or the whole pan gets watery. Thin chicken cutlets also help, because they cook at the same pace as the vegetables.
Key Ingredients:
- 2 lbs thin chicken cutlets — Thin pieces cook evenly and stay tender.
- 2 medium zucchini, sliced into 1/2-inch rounds — Thick slices hold their shape.
- 1 cup marinara sauce — Use a thick sauce, not a watery one.
- 1 1/2 cups shredded mozzarella — Melts fast and evenly.
- 1/4 cup grated parmesan — Adds extra saltiness.
- 2 tbsp olive oil — Helps the zucchini roast.
- 1 tsp dried oregano — Gives the pizza flavor.
- 1 tsp kosher salt — For the vegetables and chicken.
- 1/2 tsp black pepper — Just enough.
- 12 slices pepperoni, optional — Nice if your crowd wants the full pizza effect.
Quick Steps:
-
Heat the oven. Set it to 425°F and line the pan.
-
Roast the zucchini first. Toss the zucchini with olive oil, oregano, salt, and pepper. Bake for 10 minutes.
-
Add the chicken. Place the cutlets on the pan, then spoon a little marinara over each piece.
-
Top with cheese. Add mozzarella, parmesan, and pepperoni if using.
-
Finish baking. Return the pan to the oven for 12 to 15 minutes, until the chicken reaches 165°F and the cheese is melted and bubbling.
-
Rest briefly. Let the pan sit for 2 to 3 minutes before serving so the cheese settles a little.
Equipment for This Recipe:
- Sheet pan — A wide pan helps keep the chicken flat.
- Spoon — For the marinara.
- Tongs — Useful for moving the cutlets.
- Thermometer — Chicken should hit 165°F.
- Parchment paper — Helps with cheese cleanup.
How to Serve This Dish:
Serve it with garlic bread if you want to lean into the pizza mood, or with plain pasta if you want a softer landing. A small salad on the side works too, though the real selling point here is the cheese. Let the chicken and zucchini stay visible; it feels more like dinner and less like a trick.
Pro Tips for This Recipe:
- Use a thick marinara so the pan does not pool.
- Slice the zucchini thick enough that it roasts instead of melting.
- If the cutlets are uneven, pound them lightly for even cooking.
- Add the cheese near the end so it melts instead of drying out.
Variations on This Dish:
- Pepperoni Pizza Version: Add extra pepperoni for a stronger pizza feel.
- White Pizza Swap: Use ricotta and mozzarella with garlic and parsley instead of marinara.
- No-Zucchini Version: Replace zucchini with thin bell pepper strips if that works better at your table.
Common Mistakes to Avoid with This Dish:
- Watery sauce: Thin marinara makes the pan soupy.
- Underbaked chicken: Thin cutlets cook fast, but they still need a thermometer.
- Too much topping: Keep it moderate or the chicken steams.
13. Orange-Glazed Turkey Meatballs with Carrots and Snap Peas
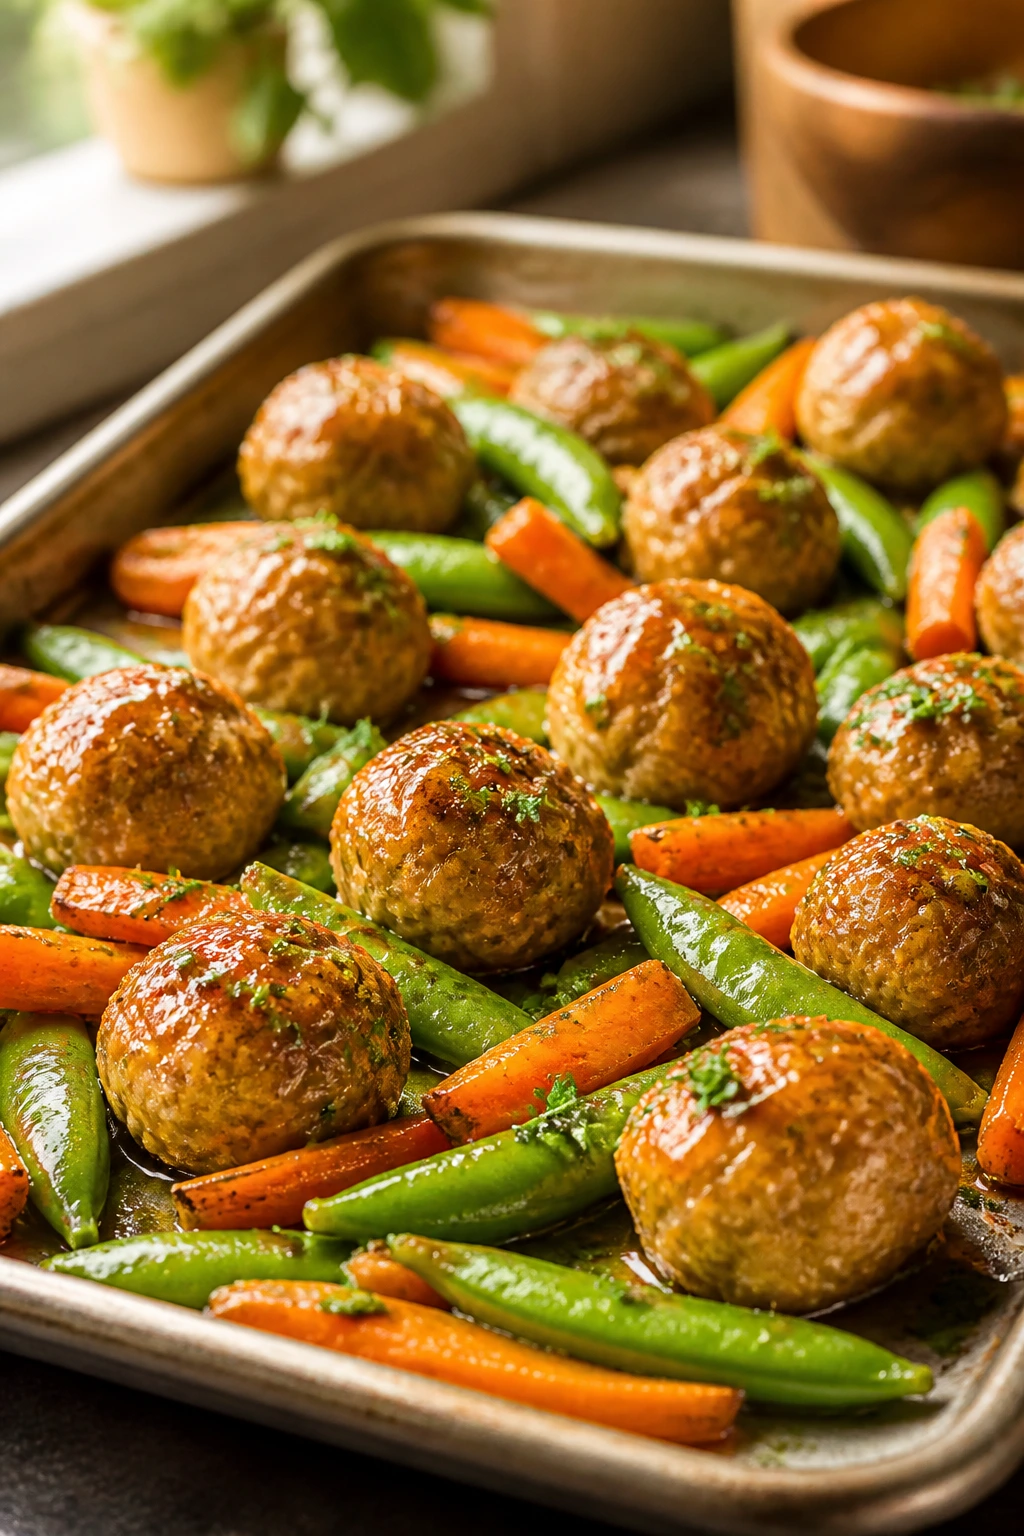
This pan has a little shine to it. The glaze is sweet and tangy, the turkey meatballs stay soft, and the snap peas bring just enough freshness to keep the plate from feeling heavy.
Quick timing: 15 minutes prep, 25 minutes cook, 40 minutes total. Serves 4.
Why It Works:
Turkey meatballs are a smart move when you want a lighter dinner that still feels friendly. Orange marmalade makes the glaze taste familiar, almost like a takeout sauce without the takeout price, and the carrots pick up enough sweetness to make the whole pan read as gentle. Snap peas cook fast, so they go in late and keep their snap. That texture matters more than people admit.
Key Ingredients:
- 1 1/2 lbs ground turkey — Use turkey that is not too lean if possible.
- 1 large egg — Holds the meatballs together.
- 1/2 cup panko breadcrumbs — Keeps them tender.
- 1 tsp garlic powder — Mild flavor for the meatballs.
- 1 tsp kosher salt — Important for turkey.
- 1/2 tsp black pepper — Keeps the glaze from tasting flat.
- 1 lb carrots, cut into sticks — They roast well and stay sweet.
- 1 cup snap peas — Add them near the end.
- 1/2 cup orange marmalade — The base of the glaze.
- 2 tbsp soy sauce — Balances the sweetness.
- 1 tbsp rice vinegar — Adds brightness.
- 1 tsp grated ginger — Optional, but nice if your family likes it.
- 1 tbsp olive oil — Helps the carrots roast.
Quick Steps:
-
Preheat the oven. Set it to 425°F and line the pan.
-
Roast the carrots first. Toss them with olive oil and a pinch of salt, then bake for 12 minutes.
-
Make the meatballs. Mix turkey, egg, panko, garlic powder, salt, and pepper. Form into 1-inch balls.
-
Add the meatballs. Place them on the pan with the carrots and bake for 10 minutes.
-
Glaze and finish. Stir marmalade, soy sauce, rice vinegar, and ginger. Brush over the meatballs, add snap peas, and bake 8 more minutes until the meatballs reach 165°F.
-
Serve. Spoon extra glaze over the top if you like a saucier finish.
Equipment for This Recipe:
- Sheet pan — A rimmed one is best.
- Mixing bowl — For the meatball mixture.
- Small bowl — For the glaze.
- Spoon or pastry brush — To coat the meatballs.
- Thermometer — Needed for turkey.
How to Serve This Dish:
Rice is the cleanest way to turn this into a full dinner, though it also works with noodles if that suits your family better. Keep extra glaze on the side so the kids who like sweet sauce can add more and the others can leave it alone. That kind of control matters more than people think.
Pro Tips for This Recipe:
- Make the meatballs small and even so they cook quickly.
- Brush the glaze near the end so the sugars do not scorch.
- Drain any excess liquid from the marmalade before measuring if it seems loose.
- Use parchment paper. The glaze can get sticky fast.
Variations on This Dish:
- Chicken Meatball Version: Ground chicken works with the same glaze.
- Low-Sugar Glaze: Use orange juice and a little honey instead of marmalade.
- Sesame Finish: Sprinkle sesame seeds on top if your crowd likes that flavor.
Common Mistakes to Avoid with This Dish:
- Glazing too early: The sauce can burn.
- Making the meatballs too large: They cook unevenly.
- Skipping the carrots’ head start: They need the extra time.
14. Maple Dijon Chicken with Brussels Sprouts and Apples
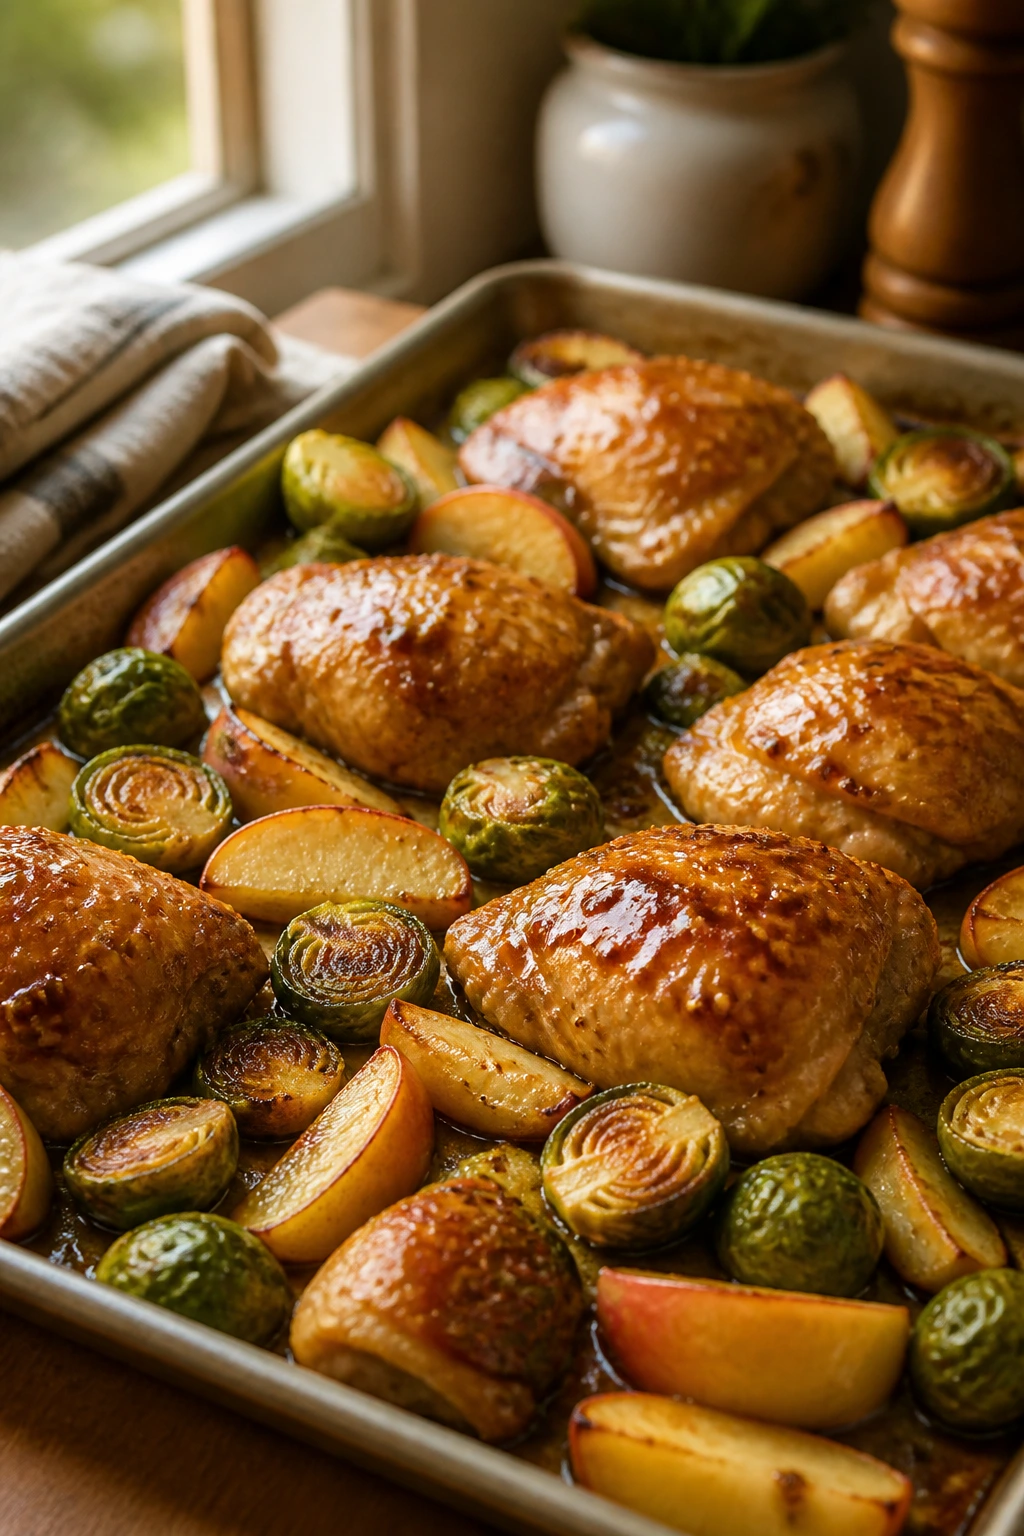
Brussels sprouts have to earn trust, and pairing them with apples helps. Maple Dijon chicken tastes polished without trying too hard, and the sweet-salty balance makes the pan feel more approachable than a straight-up roasted vegetable dinner.
Quick timing: 15 minutes prep, 25 minutes cook, 40 minutes total. Serves 4.
Why It Works:
The maple-Dijon glaze is gentle enough for picky eaters but still flavorful for adults who want dinner to taste like something. Brussels sprouts roast best when they are cut in half and given space, because crowded sprouts steam and lose their edge. Apples add a little softness and sweetness, which keeps the pan from feeling all green and sharp. Chicken thighs do especially well here because they keep the dish juicy while the vegetables finish.
Key Ingredients:
- 2 lbs boneless, skinless chicken thighs or breasts — Thighs stay juicier; breasts are leaner.
- 1 1/2 lbs Brussels sprouts, halved — Cut off the tough ends.
- 2 apples, cored and cut into wedges — Choose apples that hold their shape.
- 2 tbsp maple syrup — Brings sweetness without making the pan cloying.
- 2 tbsp Dijon mustard — Balances the maple.
- 2 tbsp olive oil — Helps the vegetables roast.
- 1 tsp kosher salt — Needed for the sprouts.
- 1/2 tsp black pepper — Keeps the glaze from tasting one-note.
- 1 tsp dried thyme — A gentle herb note.
- 1 tbsp butter, optional — Nice for a glossy finish.
Quick Steps:
-
Preheat the oven. Set it to 425°F and line the pan.
-
Start the Brussels sprouts. Toss them with olive oil, salt, pepper, and thyme. Roast for 15 minutes.
-
Make the glaze. Stir maple syrup and Dijon together in a small bowl.
-
Add the chicken and apples. Nestle them onto the pan, brush the chicken with the maple-Dijon mixture, and roast for 18 to 22 minutes, until the chicken reaches 165°F.
-
Finish. If using butter, melt it over the hot pan after roasting. Let the chicken rest for 3 to 5 minutes.
-
Serve. Spoon pan juices over the chicken and apples.
Equipment for This Recipe:
- Rimmed sheet pan — Gives the sprouts room.
- Small bowl — For the glaze.
- Tongs — Useful for moving the chicken.
- Thermometer — Needed for chicken.
- Knife — For the apples and sprouts.
How to Serve This Dish:
Serve it with rice, crusty bread, or a simple mashed potato if you want a more filling plate. Keep the apples obvious; they soften the brussels-sprout edge and make the meal feel more welcoming. If someone in your house still distrusts sprouts, give them a few apples and call it progress.
Pro Tips for This Recipe:
- Cut Brussels sprouts in halves or quarters if they are large.
- Use sweet-tart apples that keep their shape.
- Brush the glaze on the chicken near the end if your oven runs hot.
- Leave room on the pan so the sprouts can brown.
Variations on This Dish:
- Carrot Swap: Replace Brussels sprouts with carrot coins for a softer vegetable.
- Pork Version: Maple Dijon works very well on pork tenderloin.
- Balsamic Note: Add 1 teaspoon balsamic vinegar if you want more depth.
Common Mistakes to Avoid with This Dish:
- Crowding the Brussels sprouts: They steam and turn dull.
- Cutting apples too thin: They collapse too fast.
- Using too much glaze early: The sugars can darken before the chicken is done.
15. Loaded Nacho Chicken with Peppers and Tortilla Chips
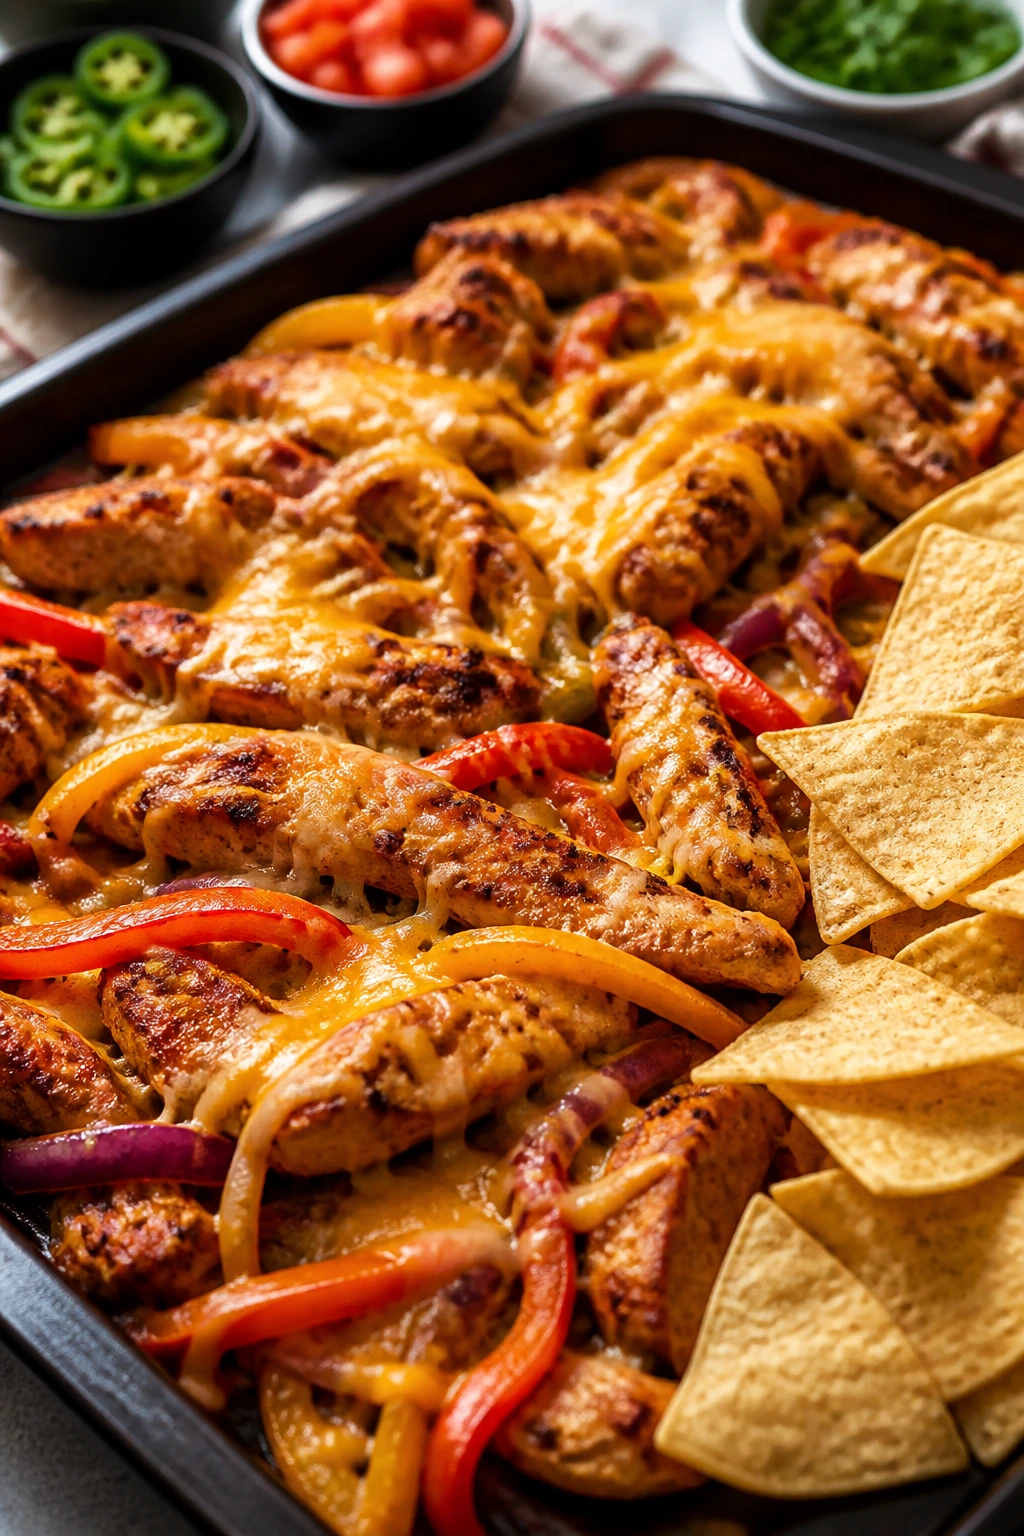
This is the dinner for nights when the table wants something fun but you still want a real meal. It tastes like nachos grew up and got a little more responsible.
Quick timing: 20 minutes prep, 20 minutes cook, 40 minutes total. Serves 4.
Why It Works:
Nacho flavors are easy to sell because they already come with their own fan club. Chicken, peppers, and onion roast together until the edges brown, then cheese melts over the top and gives the dish that familiar party-food pull. Tortilla chips should stay out of the oven until serving time, because nobody likes soggy nachos dressed up as sheet pan dinner. That one choice keeps the texture honest. It also keeps the chips from disappearing into mush.
Key Ingredients:
- 2 lbs boneless, skinless chicken thighs cut into strips — Strips cook fast and are easy to eat.
- 2 bell peppers, sliced — Use colors your family already likes.
- 1 red onion, sliced — Adds sweetness.
- 2 tbsp olive oil — Helps everything roast.
- 2 tbsp mild taco seasoning — Keeps the flavor familiar.
- 1 tsp kosher salt — Needed for the chicken and vegetables.
- 1 cup shredded cheddar — Melts over the top.
- 1 cup thick salsa — Serve it on the side or spoon it over right before eating.
- 4 cups tortilla chips — Add them at the table, not on the pan.
- 1 avocado, sliced, optional — Softens the flavor.
- Sour cream, optional — Useful for dips and drizzles.
Quick Steps:
-
Heat the oven. Set it to 425°F and line the sheet pan.
-
Season the chicken and vegetables. Toss the chicken, peppers, and onion with olive oil, taco seasoning, and salt.
-
Roast. Spread everything on the pan and bake for 18 to 20 minutes, until the chicken reaches 165°F.
-
Add cheese. Sprinkle cheddar over the hot chicken mixture and bake for 2 minutes, just until melted.
-
Build the plates. Add tortilla chips to each plate, then spoon the chicken and vegetables over or beside them.
-
Top and serve. Add salsa, avocado, and sour cream as desired.
Equipment for This Recipe:
- Sheet pan — For roasting the filling.
- Large bowl — For tossing everything together.
- Tongs — Good for serving.
- Knife and cutting board — For the vegetables and avocado.
- Thermometer — Needed for the chicken.
How to Serve This Dish:
Keep the chips separate and let everyone build their own plate. That one move solves a lot of soggy-chip grief. A simple side of corn or fruit keeps the meal feeling complete if you want something extra.
Pro Tips for This Recipe:
- Use thick salsa so it does not run everywhere.
- Cut the peppers and onion into similar-size slices.
- Keep the chips off the pan until the end.
- If your crowd likes it extra mild, serve salsa and jalapeños separately.
Variations on This Dish:
- Beef Nacho Version: Use ground beef or steak strips instead of chicken.
- Bean-Friendly Swap: Add drained black beans if your table likes them.
- Extra Mild Plate: Skip the salsa in the oven and keep all condiments at the table.
Common Mistakes to Avoid with This Dish:
- Baking the chips with everything else: They get soft fast.
- Using watery salsa: It turns the pan sloppy.
- Overloading the sheet pan: The chicken needs space to brown.
16. Steak Bites with Potatoes and Carrots
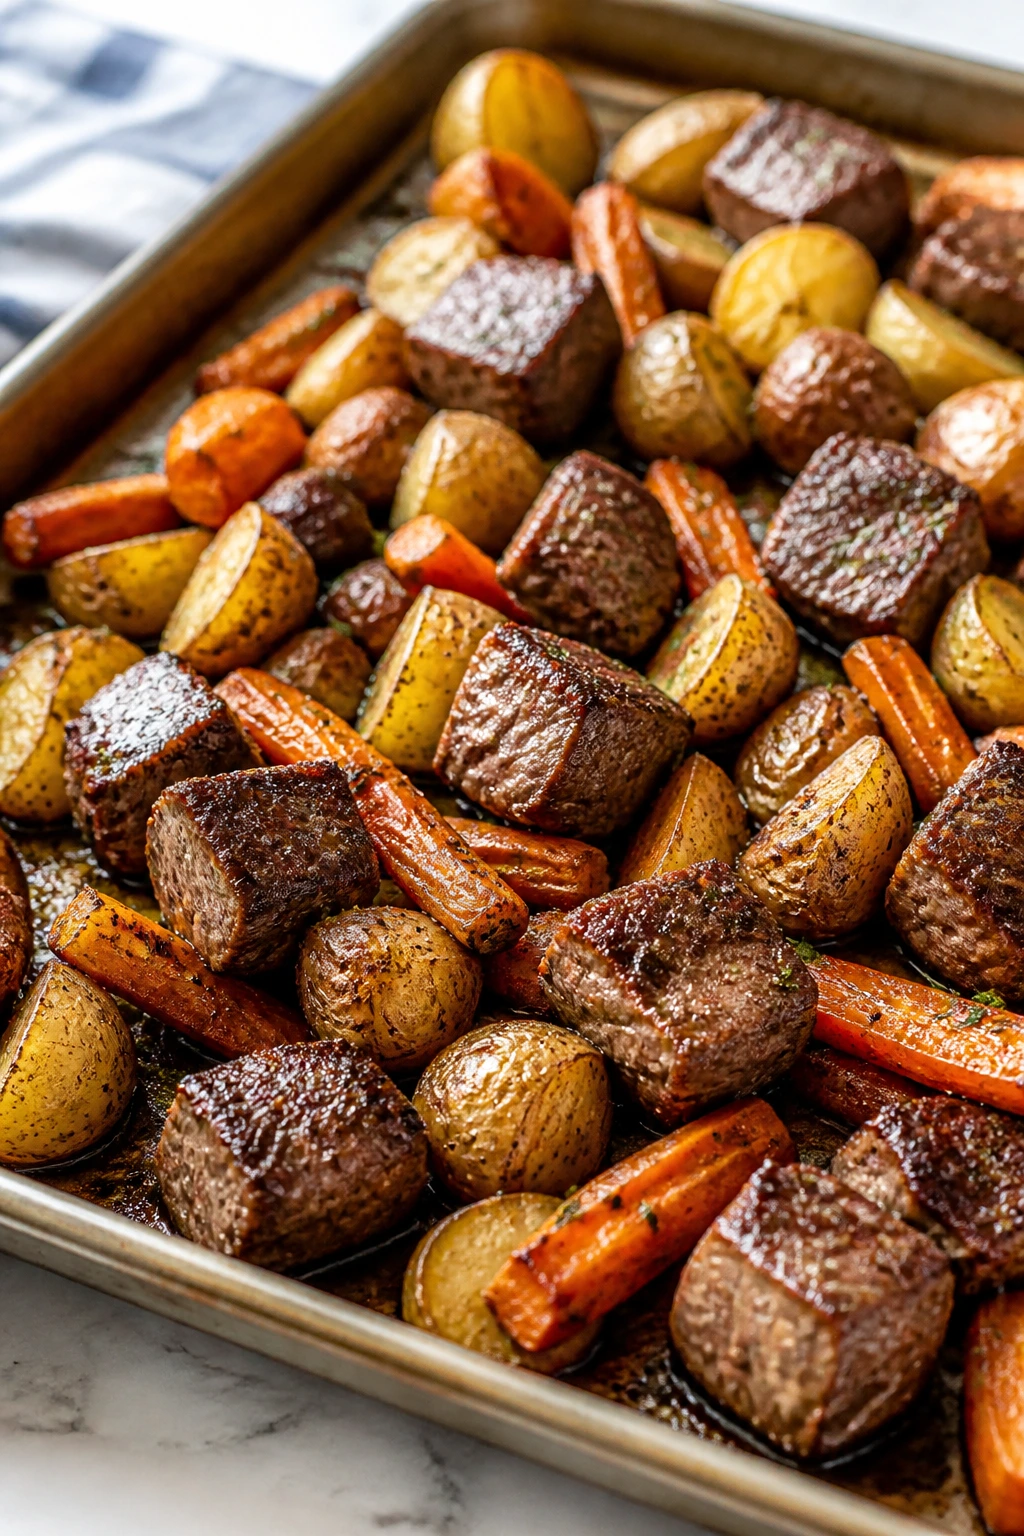
This is the dinner that feels a little special without asking you to do anything difficult. Steak bites are fast, potatoes bring the comfort, and carrots keep the pan grounded in the usual good stuff.
Quick timing: 15 minutes prep, 25 minutes cook, 40 minutes total. Serves 4.
Why It Works:
Sirloin is a smart cut for steak bites because it cooks quickly and stays tender when you do not overdo it. Cutting the steak into uniform pieces gives you better control over doneness, which matters on a sheet pan where everything is moving fast. Potatoes and carrots get the first roast so they do not lag behind the meat. A little garlic butter at the end gives the dish enough richness to feel complete without turning it heavy.
Key Ingredients:
- 2 lbs sirloin steak, cut into 1 1/2-inch cubes — Sirloin stays tender and cooks quickly.
- 1 1/2 lbs baby potatoes, halved — They roast into crisp, soft-edged bites.
- 1 lb carrots, cut into sticks — Keep them thick enough to stay sweet.
- 3 tbsp olive oil — Helps the vegetables brown.
- 3 tbsp butter — For the finish.
- 3 garlic cloves, minced — Mix into the butter after roasting.
- 1 tsp kosher salt — Needed for both meat and vegetables.
- 1/2 tsp black pepper — Keeps the pan from tasting dull.
- 1 tsp rosemary or Italian seasoning — A simple herb note.
- 1 tbsp chopped parsley, optional — Fresh finish.
Quick Steps:
-
Preheat the oven. Set it to 425°F and line the sheet pan.
-
Roast the vegetables first. Toss the potatoes and carrots with olive oil, salt, pepper, and seasoning. Roast for 15 minutes.
-
Season the steak. Pat the steak cubes dry, then toss them lightly with a pinch of salt and pepper.
-
Add the steak. Spread the cubes over the pan and roast for 8 to 10 minutes for medium, checking early if your pieces are small.
-
Finish with garlic butter. Stir the minced garlic into the butter, then toss it with the hot steak and vegetables right after roasting.
-
Rest and serve. Let the steak sit for 2 minutes before plating.
Equipment for This Recipe:
- Sheet pan — Plenty of room helps the steak brown.
- Sharp knife — For cubing the steak evenly.
- Mixing bowl — For tossing vegetables and meat.
- Thermometer — Useful if you want exact doneness.
- Small saucepan or microwave-safe bowl — For the butter.
How to Serve This Dish:
Steak bites are good with a plain green salad or a slice of bread, but they also stand fine on their own. If someone in your house likes ketchup with potatoes, that is not a crime here. Keep the steak visible and let the carrots and potatoes do the rest.
Pro Tips for This Recipe:
- Dry the steak before it goes on the pan so it browns instead of steaming.
- Cut the cubes to the same size so they finish together.
- Pull the steak a little early if you prefer medium-rare; it keeps cooking as it rests.
- Add the garlic butter after roasting, not before, so the garlic does not burn.
Variations on This Dish:
- Garlic Herb Version: Add a little more rosemary and finish with lemon.
- Dairy-Free Swap: Use olive oil instead of butter at the end.
- Mushroom Add-On: Add sliced mushrooms with the potatoes if your table likes them.
Common Mistakes to Avoid with This Dish:
- Cutting the steak unevenly: Smaller pieces cook too fast.
- Overcooking the meat: Steak bites dry out quickly.
- Adding butter before roasting: Burnt garlic is not the flavor you want.
Why Sheet Pan Dinners Work So Well for Picky Eaters
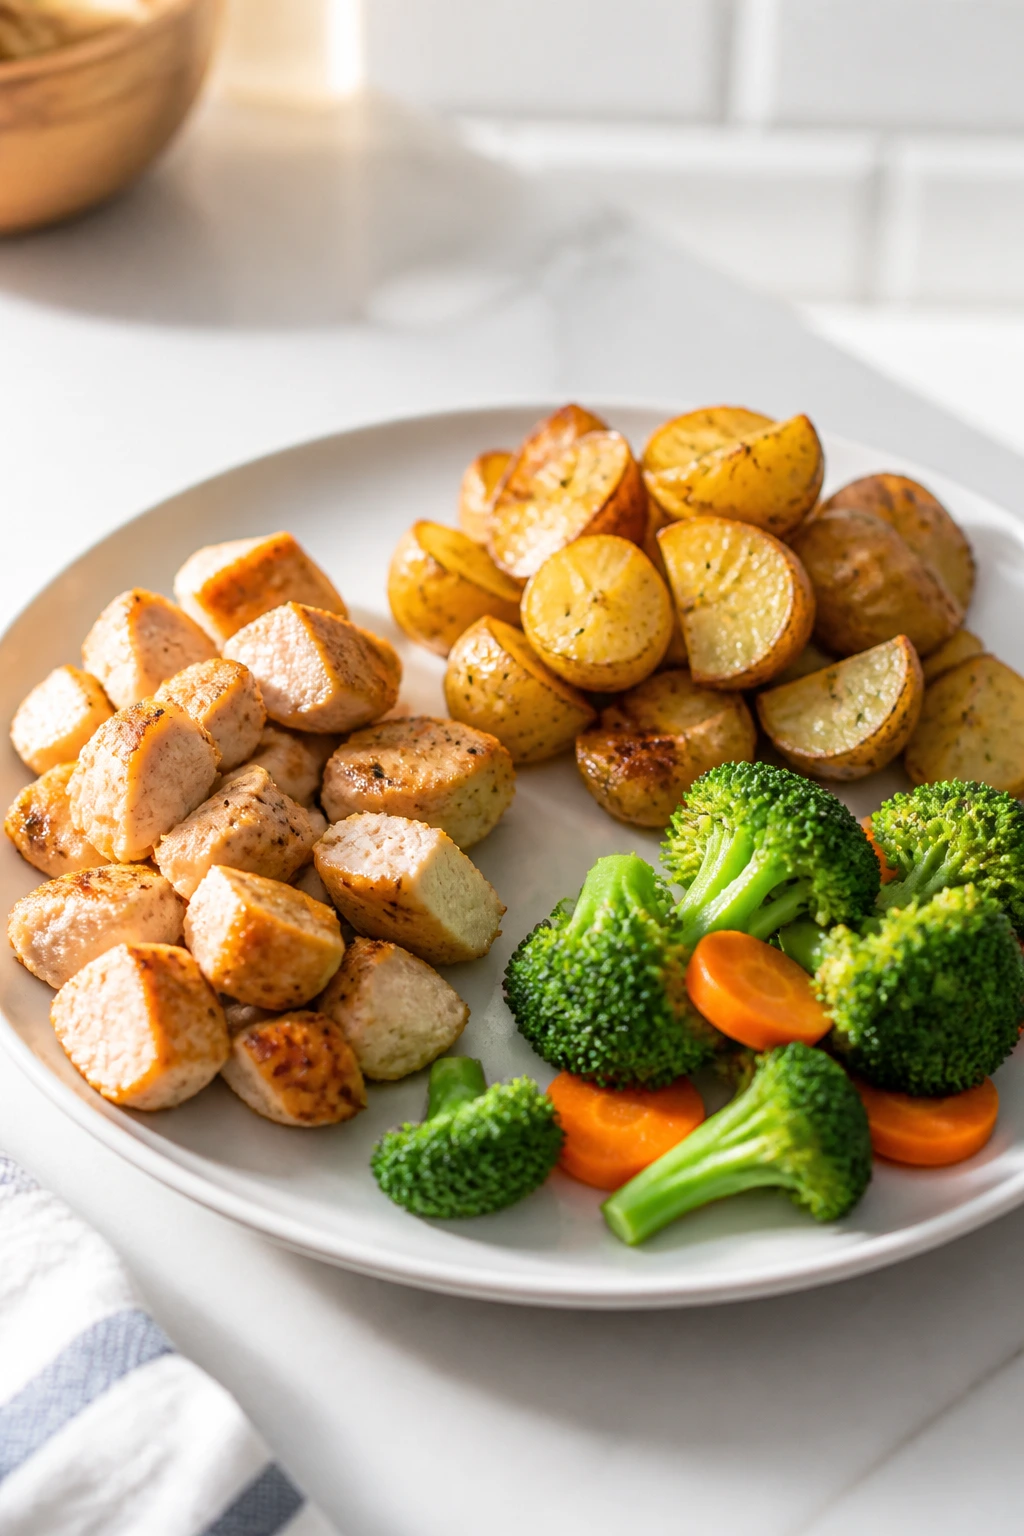
A picky eater usually has one loud complaint and five quieter ones. Too much sauce. Too many mixed textures. Vegetables that taste steamed into submission. A sheet pan dinner solves more of that than a casserole ever will, because the ingredients stay visible and the edges stay browned.
There is also something reassuring about dinner that looks organized before it hits the table. A chicken thigh has its own corner. The potatoes sit where everyone can see them. The vegetables can be ignored, which sounds like a defeat until you realize that visible vegetables are still a small win. That is how a lot of family dinners are actually won—slowly, by repetition, not by a speech about balance.
High heat matters too. Most of these recipes land in the 400°F to 425°F range because that is the sweet spot where vegetables brown, chicken stays juicy, and sauces finish glossy instead of watery. If you try to roast everything at a lower temperature, you get less color and more sighing. Nobody asked for that.
Essential Equipment for These Recipes
- Rimmed half-sheet pans — The rim keeps sauces, juices, and oil from running off the edge.
- Parchment paper or foil — Either one helps with cleanup, and parchment is especially useful for sticky glazes.
- Instant-read thermometer — The easiest way to keep chicken, pork, and turkey from going too far.
- Large mixing bowls — You will use these for tossing vegetables, coating meat, and mixing glazes.
- Tongs — Handy for flipping, moving, and serving without ripping breading.
- Sharp chef’s knife — Even cuts mean even roasting.
- Cutting board — A sturdy one matters more than people think.
- Small bowls — Good for glazes, dipping sauces, and seasoning mixes.
- Pastry brush or spoon — Useful when you want a glaze to stay on top instead of pooling underneath.
Smart Shopping and Ingredient Tips
The fastest way to make a sheet pan dinner go sideways is to buy ingredients that finish at different speeds. Potatoes should be small or cut small. Carrots need to be cut on purpose, not left as giant blunt sticks. Chicken thighs, tenders, pork chops, and salmon fillets all cook at different speeds, so buy pieces that are similar in size whenever you can.
For picky-eater dinners, mild seasoning goes farther than fancy seasoning. Dry ranch, mild taco mix, parmesan, honey mustard, and barbecue sauce all have a low barrier to entry because most people already know what they taste like. If you buy a sauce you already trust, you remove a lot of the dinner anxiety. That sounds small. It is not.
When you shop for vegetables, choose the ones that roast well. Baby potatoes, broccoli florets, green beans, carrots, Brussels sprouts, zucchini, and asparagus all play nicely with high heat. Frozen vegetables can work in some cases, but they often release more moisture, so use them only when the recipe can handle that extra steam. Fresh is easier on a sheet pan.
Protein choice matters too. Thighs are more forgiving than breasts. Pork tenderloin is lean and fast. Ground meat needs seasoning more than anything else. If you remember one shopping rule, make it this: choose ingredients that can share the same oven without making each other miserable.
How to Serve These Recipes
Presentation:
Keep the food visible. That sounds obvious, but it matters for picky eaters. Serve roasted chicken beside potatoes instead of burying it under sauce, lay vegetables in neat piles, and keep dips in small bowls instead of poured everywhere. A tidy plate feels less threatening than a messy one.
Accompaniments:
Bread, rice, buttered noodles, simple salad, applesauce, coleslaw, or a bowl of fruit all fit these dinners without fighting them. If the main pan already has potatoes, skip another heavy starch unless you need to stretch the meal. I like one simple green side when the sheet pan leans rich, and a soft bread when the pan leans savory.
Portions:
Most of these dinners serve 4 without much drama. If you are feeding bigger eaters, add bread, rice, or extra potatoes instead of doubling the meat first. That keeps cost in check and lets picky eaters build their own plate size without making the pan feel overloaded.
Beverage Pairing:
Cold water with lemon, unsweetened iced tea, or sparkling water all work well across the board. For the BBQ and nacho dinners, a ginger ale or a very mild soda feels right at home. For the lemon butter salmon, plain sparkling water with a lemon wedge keeps things clean.
Additional Tips and Flavor Boosters
Flavor Enhancement:
A small finishing move changes a sheet pan dinner more than an extra spice blend ever will. Fresh parsley on garlic butter chicken, a squeeze of lemon on salmon, or a brush of glaze at the end on pork can turn a plain pan into something that tastes finished.
Customization:
Build in escape hatches. Serve sauce on the side. Leave cheese off half the pan. Keep vegetables separate when the table wants that freedom. Picky eaters often relax when they can control the last step of the meal.
Serving Suggestions:
A dip bowl changes everything. Ranch for chicken tenders, ketchup for meatballs, sour cream for taco chicken, or extra barbecue sauce for drumsticks all make the plate feel more personal. That little bit of control can make vegetables go from ignored to tested.
Make-It-Yours:
For dairy-free eaters, use olive oil finishes and skip the cheese. For gluten-free plates, use gluten-free breadcrumbs or crumb coatings and double-check sauces. For lower-sodium dinners, choose unsalted butter, low-sodium sauce, and season in layers rather than dumping salt at the end.
Make-Ahead, Storage, and Reheating Guidance
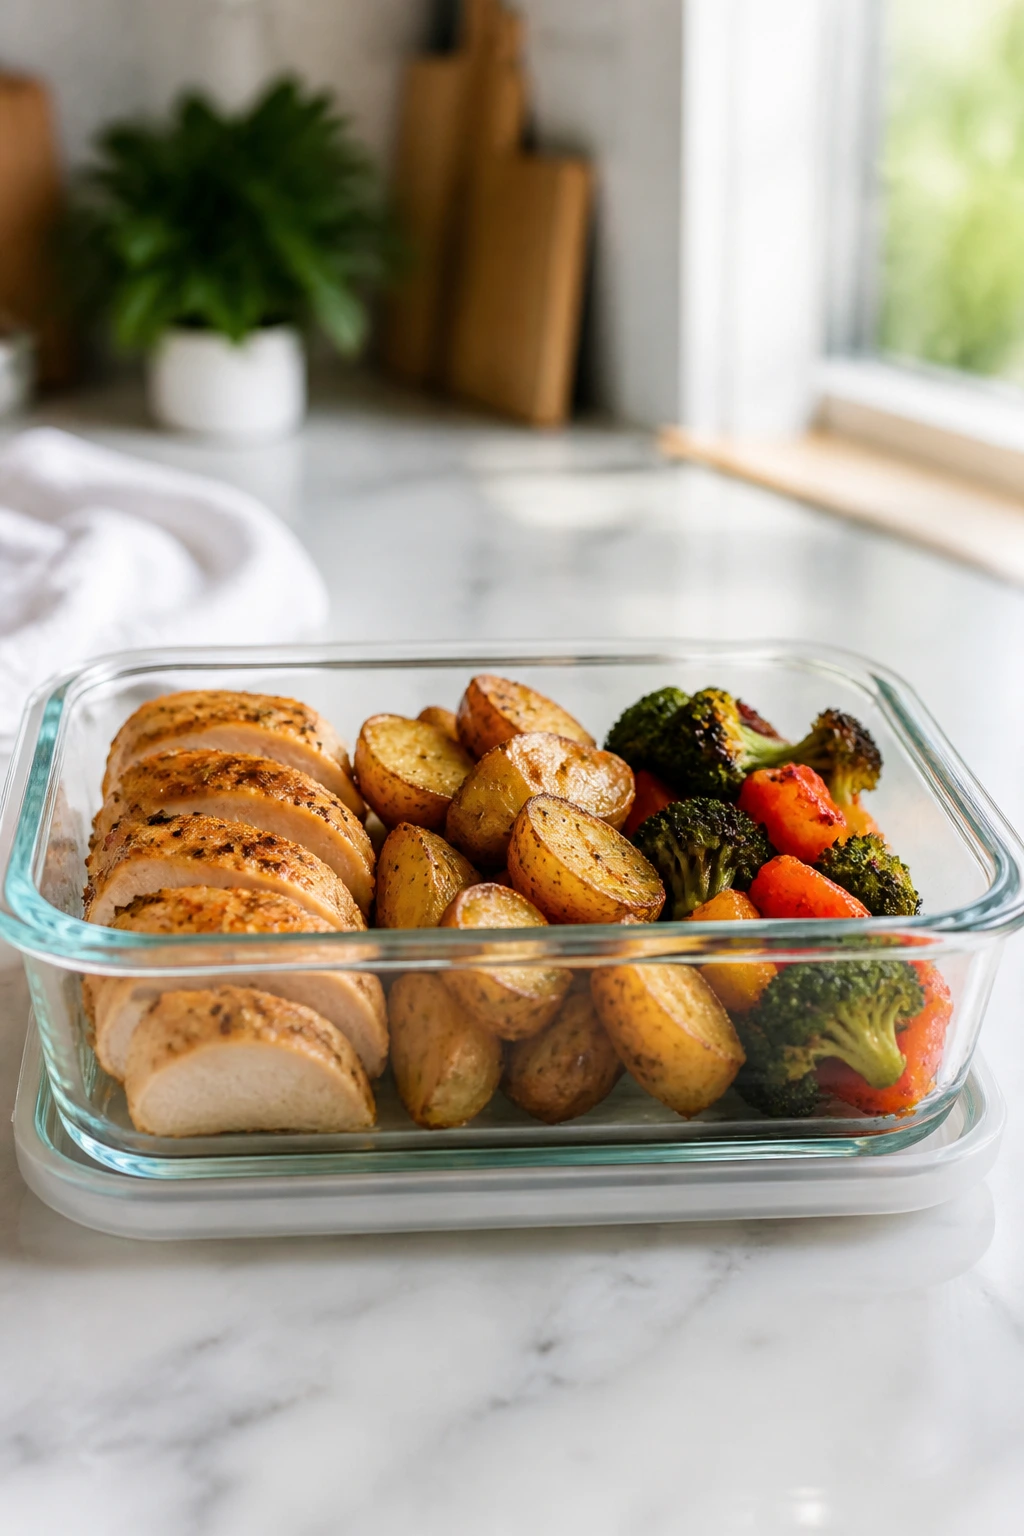
Most of these sheet pan dinners keep well in the refrigerator for 3 to 4 days in airtight containers. Chicken, pork, meatballs, and steak bites also freeze well for up to 2 months, though breaded items like the parmesan chicken tenders lose some crunch after freezing. Salmon is best eaten sooner, but leftovers are still fine for a couple of days if you do not overcook them the first time.
For reheating, the oven does a better job than the microwave when texture matters. Use 350°F to 375°F for about 10 to 15 minutes for chicken, pork, meatballs, or steak bites, just until warmed through. Add a splash of water or a tiny brush of oil if the pan looks dry. For breaded chicken, an air fryer works well at a moderate setting and brings the crust back to life faster than the oven.
Make-ahead prep is where sheet pan dinners quietly shine. You can cut vegetables the day before, mix dry seasonings ahead of time, and even marinate chicken or pork overnight in the fridge. If you are handling raw poultry, keep it sealed and separate from vegetables until it is time to cook. The vegetable prep alone can save you 15 minutes on a busy night, which is about the amount of time most people waste searching for a missing measuring spoon.
A few of these dinners improve overnight. Honey mustard pork, taco chicken, and orange-glazed meatballs all mellow nicely after a night in the fridge. Breaded tenders and nacho-style dinners are best eaten fresh, because crisp textures do not stay crisp forever. That is not a flaw. It is just the deal.
Variations and Adaptations to Try
The Mild-Sauce Table:
If your household is wary of strong flavors, keep every sauce in a small dish on the side and season the main pan lightly. This works especially well with taco chicken, BBQ drumsticks, and loaded nacho chicken. People can dip, drizzle, or ignore the sauce as they like, which usually leads to fewer complaints and fewer untouched plates.
The All-Separate Plate:
Roast the protein and vegetables together, but serve them in neat piles rather than mixing them before serving. This is the version I reach for when someone at the table hates “mixed food.” It works across the whole collection, and it gives picky eaters some control without forcing you to cook three separate dinners.
The Dairy-Free Switch:
Use olive oil, skip the cheese finish, and lean on herbs, mustard, citrus, or barbecue sauce for flavor. Garlic butter chicken becomes olive oil garlic chicken. Pizza chicken still works with marinara and a dairy-free cheese if you want it, though I prefer it plain and bright rather than pretending a substitute is the same thing.
The Gluten-Free Path:
Use gluten-free breadcrumbs or crushed gluten-free crackers for breaded chicken or meatballs, and check sauces carefully. Teriyaki, barbecue, ranch seasoning, and ketchup can hide gluten depending on the brand, so a quick label check matters. Once those details are sorted, the cooking method itself does not need to change.
The Protein Shuffle:
Most of these dinners can handle a swap if you keep the cooking time in mind. Chicken thighs can trade places with breasts, pork chops can become pork tenderloin, and turkey meatballs can stand in for beef. The main thing is to adjust for thickness and leaner meat. Thin or very lean proteins dry out faster.
The Kid-Friendly Reset:
When in doubt, keep one section of the pan plain. Roast some carrots with only salt and oil, or leave half the chicken unglazed until the end. That tiny bit of neutrality gives cautious eaters a safe starting point and keeps the rest of the pan free for more flavor.
Common Mistakes to Avoid
Overcrowding the sheet pan:
This is the big one. When the pan is packed too tightly, the food steams instead of browns, and suddenly your potatoes are pale and your chicken looks boiled. Use two pans if you need to. It is worth the extra dish.
Cutting vegetables too big or too small:
Too big, and they are still hard when the meat is done. Too small, and they collapse. Match the cut to the cooking time: baby potatoes halved, carrots in sticks, peppers in thick slices, broccoli in large florets.
Saucing too early:
Sticky sauces burn faster than people expect. BBQ, honey mustard, orange glaze, and teriyaki all do better when brushed on near the end or used in layers. If you want browning and flavor, leave some sauce for the finish.
Guessing at doneness:
Chicken, pork, turkey, and salmon are not dishes to eyeball if you can help it. Use a thermometer for the cut that matters. Chicken and turkey should reach 165°F. Pork tenderloin is done at 145°F with a short rest. Salmon should be opaque and flaky, and 145°F is the safe target if you want the clearest rule.
Not drying the protein first:
Wet chicken and wet fish steam. Pat everything dry before seasoning. That one move improves browning more than any fancy spice blend.
Making the flavors too bold too fast:
Picky eaters usually do better when the dinner starts mild and can be adjusted at the table. A gentle base plus a sauce on the side beats a pan so heavily seasoned that half the family won’t touch it.
Frequently Asked Questions
Can I make these sheet pan dinners ahead of time?
Yes, though some work better than others. You can chop vegetables, mix sauces, and season proteins a day ahead, then cook everything fresh. Breaded chicken and nacho-style dinners are best made right before serving because the textures soften if they sit too long.
What vegetables work best for picky eaters?
Potatoes, carrots, broccoli, green beans, corn, zucchini, asparagus, and bell peppers are the easiest places to start. They roast into familiar shapes and soften in a way that is easier to accept than steamed vegetables. Keep the cuts thick enough to hold up in a hot oven.
Do I need parchment paper?
No, but it makes life easier. Parchment helps with cleanup, keeps glazes from sticking, and protects breaded coatings from welding themselves to the pan. Foil works too, especially for barbecue dinners and sticky sauces.
How do I keep chicken from drying out?
Use thighs when you can, and check the temperature early. Chicken breasts need more attention because they go from juicy to dry faster. Pull the pan when the thickest part hits 165°F, then let it rest before slicing.
Can I use frozen vegetables?
You can, but be selective. Frozen broccoli, green beans, and corn can work if the recipe has enough heat and the vegetables are not too watery. Thaw and pat them dry first if possible, or they may steam the pan instead of roasting.
What if my family hates mixed food?
Serve everything in separate piles. A sheet pan dinner does not have to look mixed on the plate. Roast the components together, then divide them cleanly at serving time. That small shift changes how the meal lands.
How do I reheat leftovers without ruining them?
Use the oven for anything you want to keep textured. Around 350°F to 375°F for 10 to 15 minutes usually works well, depending on the protein and size of the pieces. Breaded chicken and meatballs do better in the oven or air fryer than in the microwave.
Can I double these recipes?
Yes, but do not cram two batches onto one pan unless the pan is huge. Use two pans or cook in batches so the food can brown. Doubling a recipe on one tight pan usually gives you worse texture, not a bigger dinner.
A Calmer Dinner Table
There is a reason these kinds of dinners stick. They are not flashy, and they do not ask much from you at the end of a long day. They give you familiar flavors, visible ingredients, and enough flexibility to keep the picky people from feeling cornered.
That is really the heart of it. Sheet pan dinners for picky eaters are less about sneaking in vegetables and more about making dinner feel safe enough to try. When the pan is browned, the flavors are plain enough to trust, and the sauces are where people can reach them, dinner gets easier without getting boring.
Every Recipe at a Glance
-
1. Garlic Butter Chicken Thighs with Potatoes and Carrots — Prep 15 min, Cook 25 min, Total 40 min. Serves 4. Standout: garlic butter over crispy-edged potatoes.
-
2. Parmesan Chicken Tenders with Broccoli and Ranch Dip — Prep 20 min, Cook 20 min, Total 40 min. Serves 4. Standout: crunchy breadcrumb coating with a kid-friendly dip.
-
3. Honey Mustard Pork Chops with Apples and Green Beans — Prep 15 min, Cook 30 min, Total 45 min. Serves 4. Standout: sweet apples and tangy glaze in one pan.
-
4. Cheeseburger Meatballs with Roasted Potatoes — Prep 20 min, Cook 25 min, Total 45 min. Serves 4. Standout: burger flavor without the bun.
-
5. BBQ Chicken Drumsticks with Corn and Red Potatoes — Prep 10 min, Cook 35 min, Total 45 min. Serves 4. Standout: sticky barbecue finish and classic barbecue-night feel.
-
6. Mild Italian Sausage with Peppers and Baby Potatoes — Prep 15 min, Cook 30 min, Total 45 min. Serves 4. Standout: simple sausage-and-peppers comfort.
-
7. Teriyaki Chicken with Broccoli and Pineapple — Prep 15 min, Cook 25 min, Total 40 min. Serves 4. Standout: sweet-savory glaze with caramelized pineapple.
-
8. Lemon Butter Salmon with Asparagus and Baby Potatoes — Prep 10 min, Cook 20 min, Total 30 min. Serves 4. Standout: bright, mild salmon with clean lemon flavor.
-
9. Taco Chicken with Sweet Potatoes and Cheese — Prep 20 min, Cook 25 min, Total 45 min. Serves 4. Standout: taco-night flavor without the mess.
-
10. Turkey Meatloaf Patties with Green Beans and Onions — Prep 15 min, Cook 25 min, Total 40 min. Serves 4. Standout: ketchup-glazed patties that cook fast.
-
11. Ranch Pork Tenderloin with Carrots and Potatoes — Prep 15 min, Cook 30 min, Total 45 min. Serves 4. Standout: ranch seasoning that keeps pork familiar.
-
12. Pizza Chicken Cutlets with Zucchini and Mozzarella — Prep 20 min, Cook 20 min, Total 40 min. Serves 4. Standout: pizza flavor with a chicken-and-veg base.
-
13. Orange-Glazed Turkey Meatballs with Carrots and Snap Peas — Prep 15 min, Cook 25 min, Total 40 min. Serves 4. Standout: glossy sweet-orange glaze with a soft bite.
-
14. Maple Dijon Chicken with Brussels Sprouts and Apples — Prep 15 min, Cook 25 min, Total 40 min. Serves 4. Standout: sweet apples that soften the Brussels sprouts.
-
15. Loaded Nacho Chicken with Peppers and Tortilla Chips — Prep 20 min, Cook 20 min, Total 40 min. Serves 4. Standout: nacho night with a real dinner underneath.
-
16. Steak Bites with Potatoes and Carrots — Prep 15 min, Cook 25 min, Total 40 min. Serves 4. Standout: fast steak dinner with roast-potato comfort.