
Cheesy ground beef casseroles have a way of fixing a noisy evening fast: one hot pan, a browned top, and dinner that smells like onions, garlic, and melted cheddar when it comes out of the oven. They’re sturdy, familiar, and forgiving in the way home cooks actually need. Not the imaginary kind of forgiving that shows up in glossy photos. The real kind, where the potatoes are sliced a little unevenly, the cheese is a touch darker on one edge, and everyone still asks for seconds.
The trick is never just “dump and bake.” The best ground beef casserole recipes build layers that make sense together. Beef brings savory depth, cheese brings salt and fat, and the starch underneath—potatoes, rice, pasta, or biscuit—keeps the whole pan from feeling flat. Get the ratio wrong and you end up with a greasy skillet or a dry one. Get it right and the casserole slices cleanly, holds its heat, and tastes even better at the table than it did in your head.
This collection leans into that sweet spot. Some pans are old-school and hearty. Some tilt Tex-Mex, some lean Italian, some borrow from cheeseburger night or stuffed peppers. All of them are meant for families that want dinner to feel generous without asking for a second shift in the kitchen.
Why These Family Casseroles Earn a Spot on the Table
-
Weeknight-friendly: Most of these casseroles turn 1½ pounds of ground beef into a full pan by adding potatoes, pasta, rice, or biscuits, so the grocery bill stays sane.
-
Kid-friendly: Cheddar, mozzarella, tortilla chips, tater tots, and biscuit tops are familiar enough to win over picky eaters without a long speech.
-
Make-ahead useful: Several of these can be assembled earlier in the day, then baked when everybody is actually home and hungry.
-
Leftovers that hold up: The stronger bakes reheat well because the sauce is thick enough to stay creamy instead of turning watery by the second day.
-
Flexible by nature: If you’ve got broccoli, peppers, mushrooms, or frozen corn hanging around, they can usually slide into one of these pans without drama.
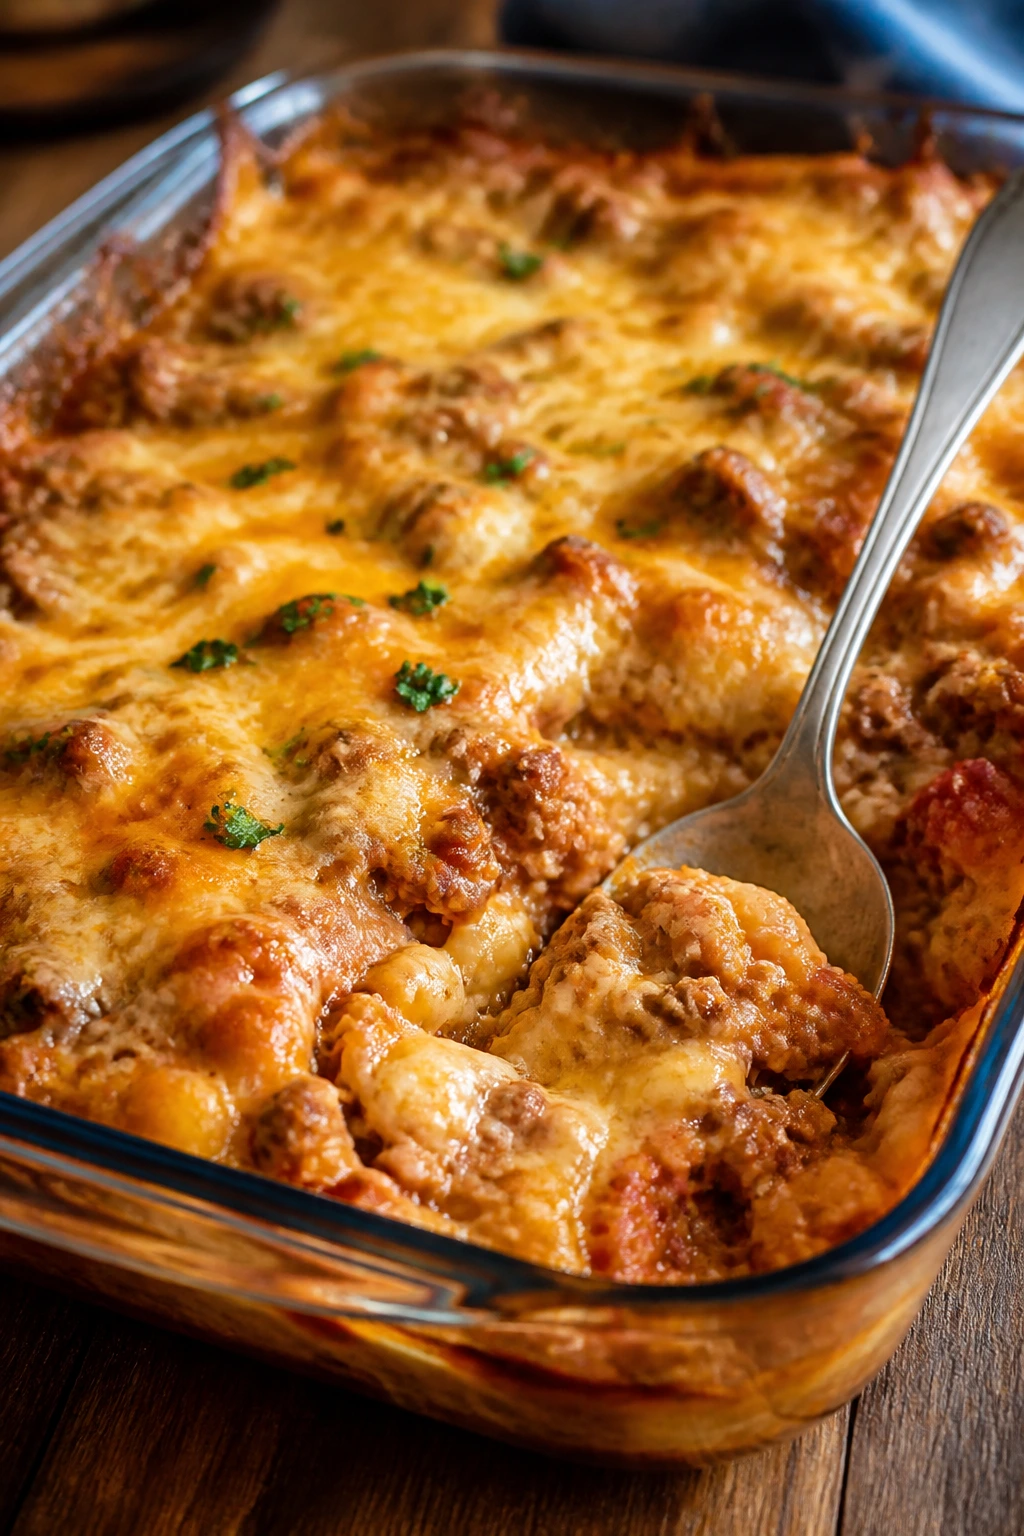
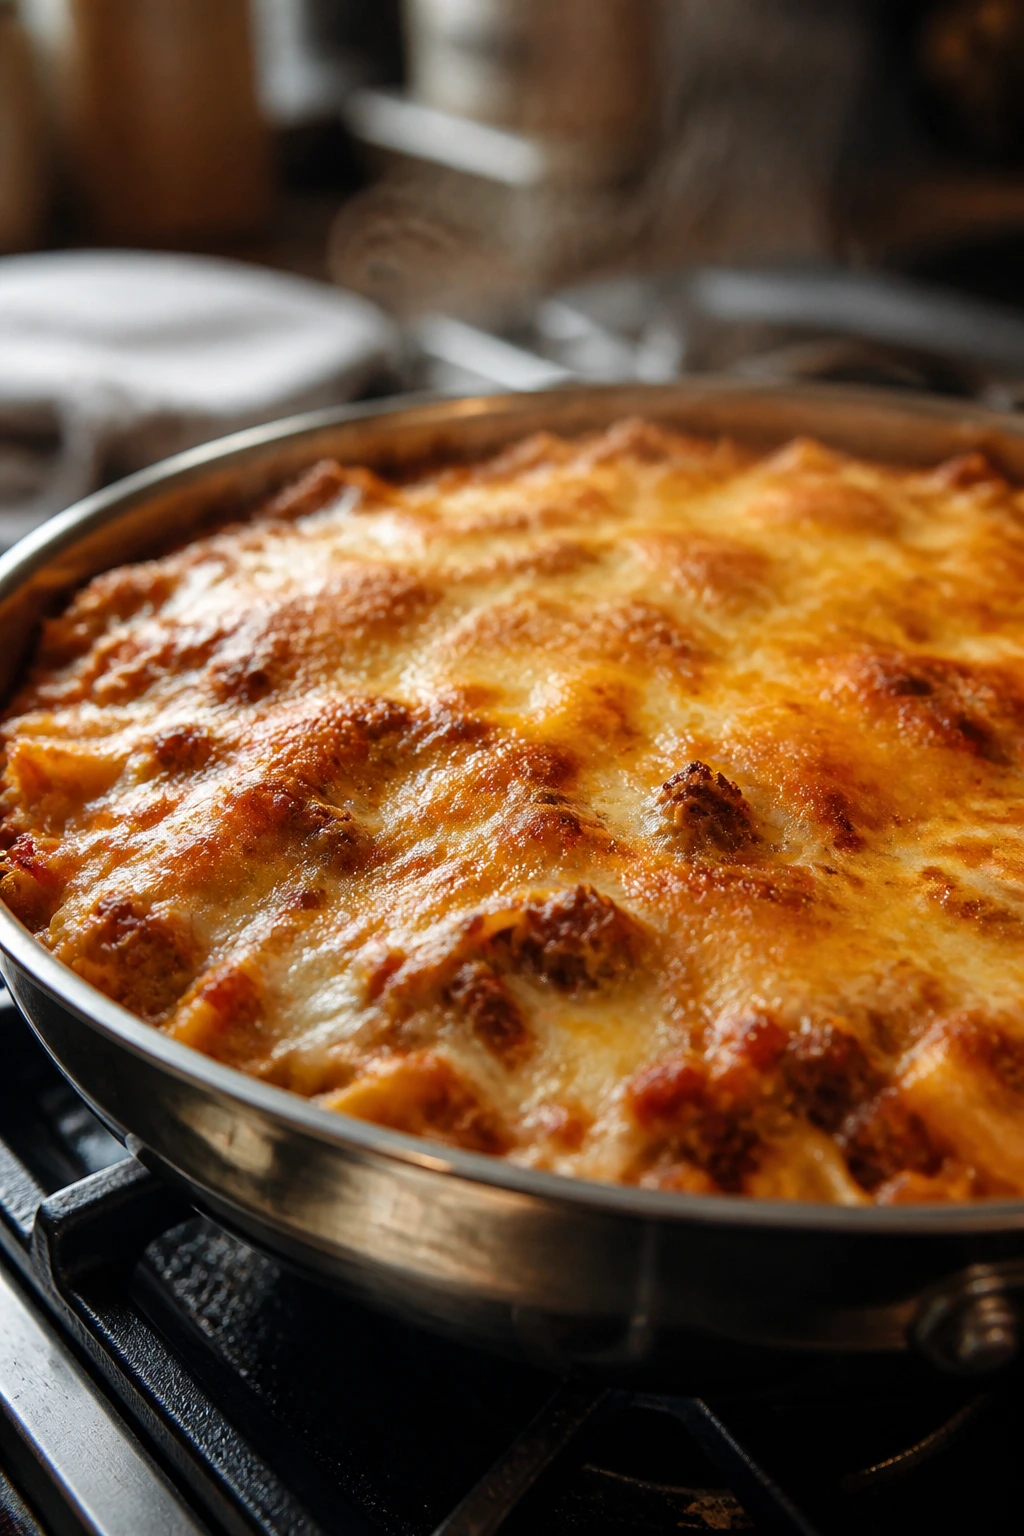
1. Classic Cheesy Beef and Potato Casserole
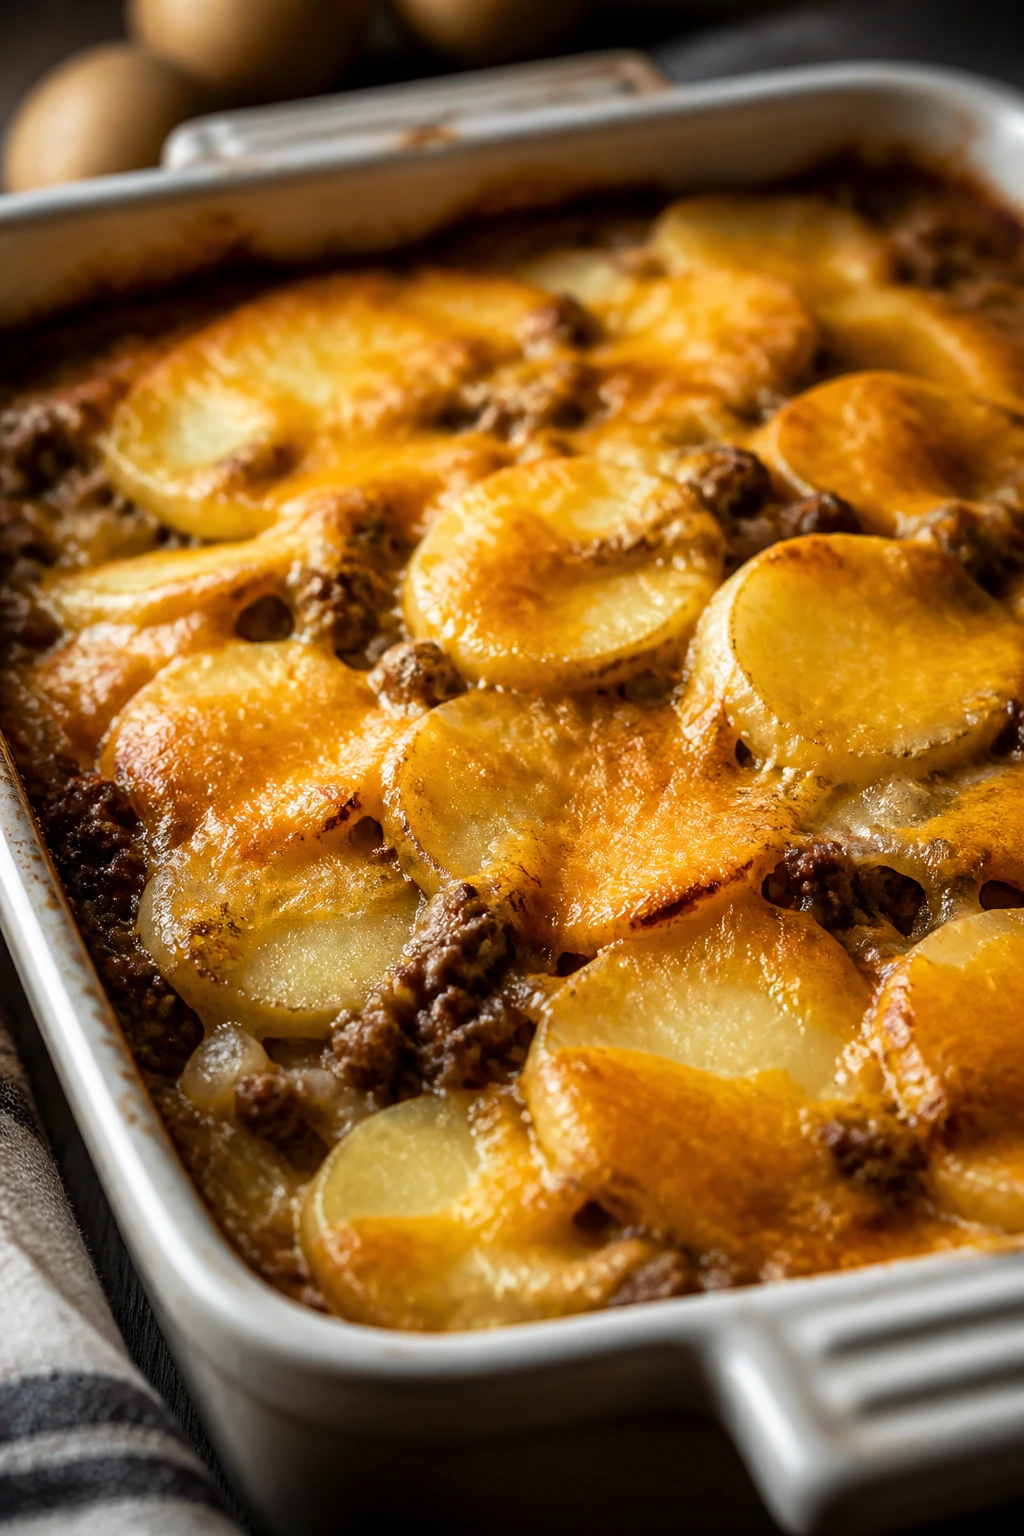
This is the casserole I make when I want dinner to feel steady and no-nonsense. Thin potatoes, seasoned beef, and sharp cheddar do the work here, and they do it well. It takes about 20 minutes of active work and 45 minutes in the oven, which is the kind of timing that lets you set the table, toss a salad, and still feel like you’ve got a little air left in the evening.
Why It Works
Raw potatoes soak up the beefy sauce as they bake, which is why this casserole tastes richer than a version built on pre-cooked potatoes. The foil cover traps steam long enough to soften the slices, then the uncovered finish gives the cheese its browned edges. That combo matters.
Thin slicing is the whole game. If the potatoes are too thick, the center stays stubborn and the top goes soft before the middle is done. Keep them around 1/8 inch, and they cook through at the same pace the beef sauce thickens.
Key Ingredients
-
1 1/2 pounds lean ground beef — 85/15 is a sweet spot here; it gives flavor without flooding the pan with grease.
-
1 medium yellow onion, diced — It melts into the beef and gives the filling a sweet edge.
-
3 garlic cloves, minced — Add them after the beef browns so they don’t burn.
-
2 tablespoons all-purpose flour — This helps the sauce cling to the potatoes instead of sliding off.
-
1 tablespoon tomato paste — A small spoonful deepens the beef flavor and keeps the sauce from tasting flat.
-
1 1/2 cups beef broth — Use a low-sodium broth if your cheese is salty.
-
1 cup whole milk — Whole milk gives the sauce a rounder finish than skim.
-
1 can (10.5 ounces) condensed cream of mushroom soup — It helps the sauce stay creamy through baking.
-
4 cups russet potatoes, peeled and sliced 1/8 inch thick — Russets soften nicely and still keep some shape.
-
2 1/2 cups shredded sharp cheddar, divided — Sharp cheddar gives the top real flavor instead of just melted color.
-
1 tablespoon Worcestershire sauce — Adds that beefy, savory note people can’t quite place.
-
1 teaspoon smoked paprika, 1 teaspoon kosher salt, and 1/2 teaspoon black pepper — Enough seasoning to carry the whole dish.
Quick Steps
-
Preheat the oven to 375°F and grease a 9×13-inch baking dish.
-
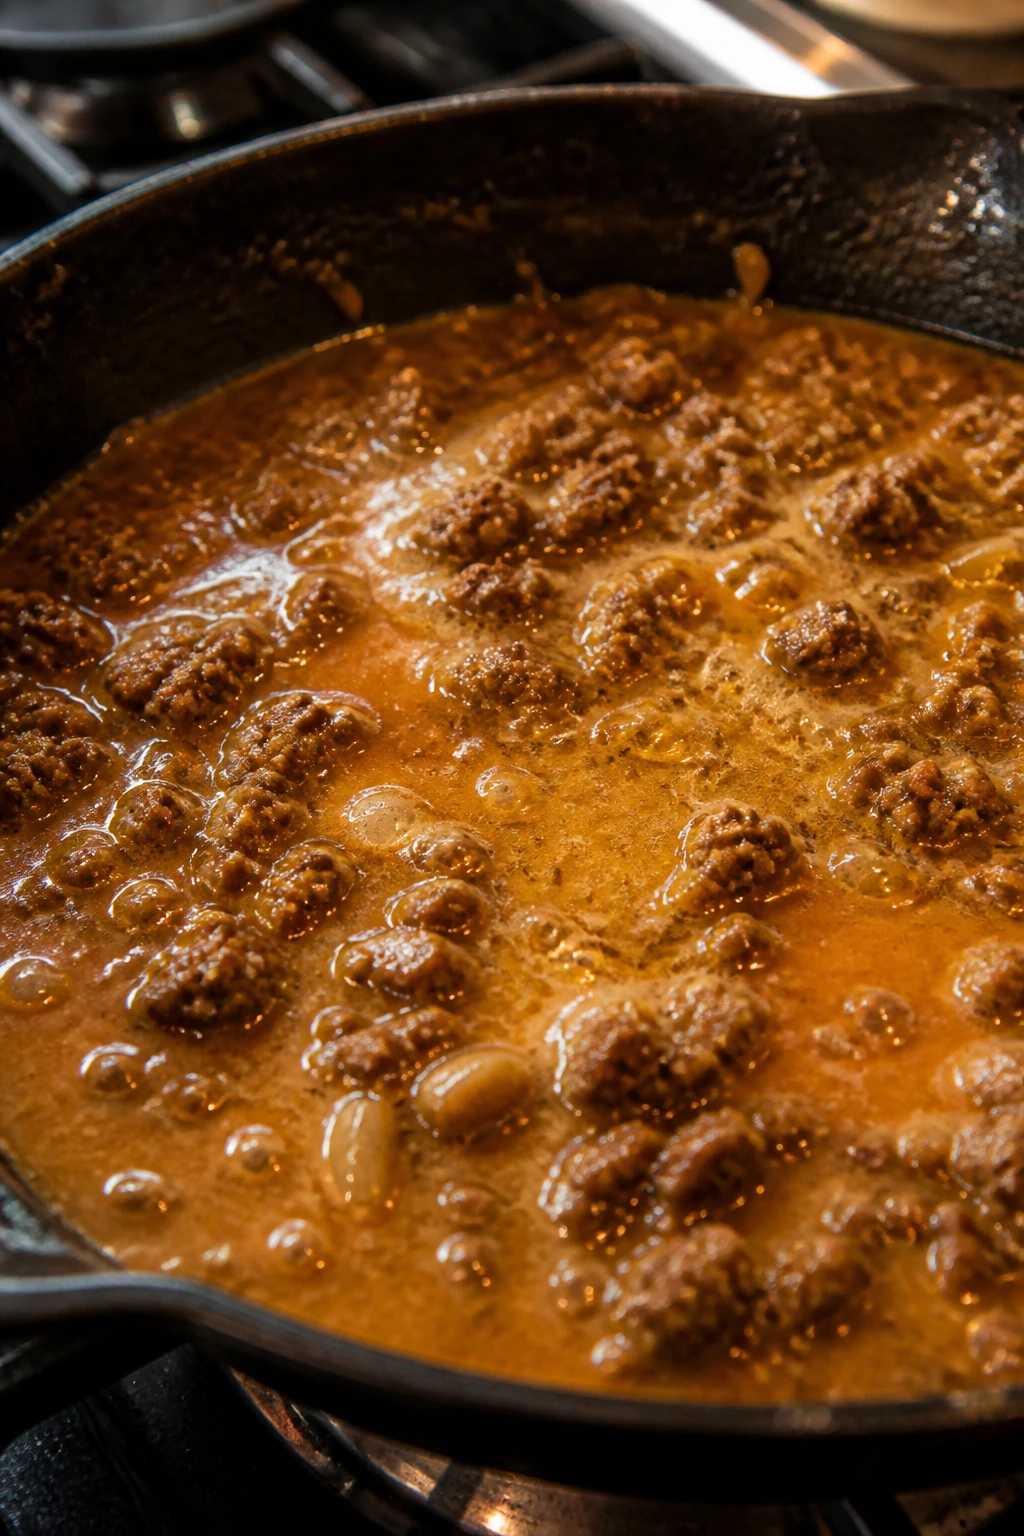
Brown the ground beef and onion in a large skillet over medium-high heat for 7 to 8 minutes, breaking the meat into small crumbles, until no pink remains. Drain off excess fat, then stir in the garlic for 30 seconds.
-
Build the sauce by adding the flour, tomato paste, Worcestershire sauce, paprika, salt, and pepper. Stir for 1 minute, then pour in the broth, milk, and cream of mushroom soup. Simmer for 2 to 3 minutes until the sauce thickens enough to coat a spoon.
-
Layer half of the potato slices in the dish, overlapping them slightly. Spoon on half the beef mixture, then repeat with the remaining potatoes and beef. Press down lightly so the sauce moves between the layers.
-
Cover tightly with foil and bake for 35 minutes, until a knife slides into the potatoes with only a little resistance.
-
Top with the remaining cheddar and bake uncovered for 10 to 12 minutes, until the cheese bubbles and the edges turn deep gold.
-
Rest for 10 minutes before cutting. That pause matters. The sauce settles, the slices hold together, and you get neat squares instead of a casserole slide.
Equipment for This Recipe
-
9×13-inch baking dish — The standard size keeps the layers even.
-
Large skillet — You need enough room to brown the beef without crowding it.
-
Sharp chef’s knife or mandoline — Thin potato slices make the difference.
-
Wooden spoon or spatula — Better than a whisk for stirring the beef mixture.
-
Aluminum foil — Tight coverage is what softens the potatoes properly.
How to Serve This Dish
Serve it with a crisp green salad or buttered green beans so the plate doesn’t feel heavy from edge to edge. A few dill pickle slices on the side are not a strange idea here; they cut through the richness in a way that works. One square usually feeds an adult nicely, and the browned cheese top makes it look more intentional than the ingredient list would suggest.
Pro Tips for This Recipe
-
Slice the potatoes evenly. A mandoline saves time and prevents the “some pieces are done, some are rude” problem.
-
Don’t skip the simmer on the sauce. If it still looks thin in the skillet, it will stay thin in the oven.
-
Use sharp cheddar, not mild. Mild melts, sure, but it disappears.
-
Let the pan rest before serving. It’s the difference between slices and a pile.
Variations on This Dish
-
Loaded Baked Potato Version: Stir 1/2 cup sour cream into the sauce and finish with chopped scallions and crumbled bacon.
-
Mushroom Lover’s Bake: Add 8 ounces sliced mushrooms with the onions and let them cook down before the flour goes in.
-
No-Can Swap: Replace the condensed soup with 3/4 cup thick béchamel and 1/2 cup sour cream for a from-scratch version.
Common Mistakes to Avoid with This Dish
-
Cutting the potatoes too thick: Thick slices stay crunchy in the center. Keep them close to 1/8 inch.
-
Using a watery sauce: If the skillet mixture looks loose, it will turn soupy in the oven. Simmer until it thickens.
-
Serving too soon: Hot casserole needs a short rest or it falls apart on the plate.
2. Tex-Mex Beef Enchilada Casserole
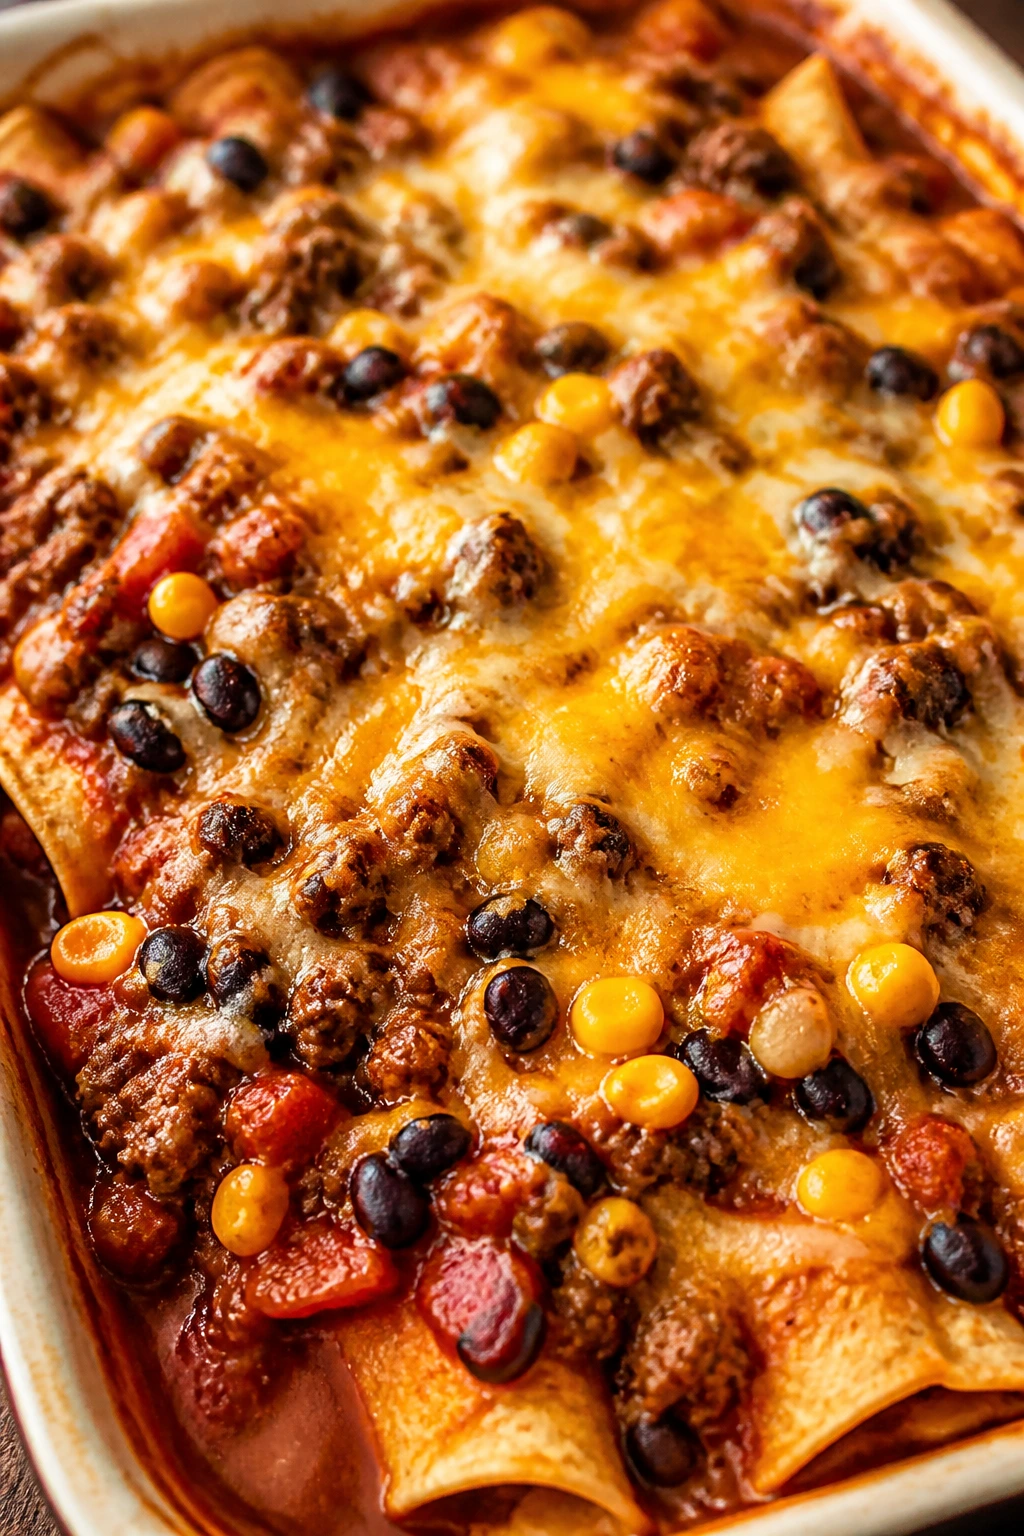
If a pan of enchiladas sounds appealing but rolling tortillas feels like a bad use of your evening, this is the smarter move. It’s all the flavor, none of the little repairs. The filling is saucy, the top gets cheesy, and the tortillas soften into neat layers instead of tearing apart. It takes about 20 minutes to assemble and 30 minutes to bake.
Why It Works
Corn tortillas are sturdier than flour tortillas in a casserole like this, which means they hold their shape better under sauce. Red enchilada sauce and salsa bring enough liquid to keep everything tender, while the beans and corn add body so the pan doesn’t eat like just meat and cheese. It’s a practical balance.
I like this one because it tastes layered even though it’s fast. Browned beef, cumin, chili powder, beans, and melted cheese each show up in a different way. The dish feels bigger than the effort it asks for.
Key Ingredients
-
1 1/2 pounds ground beef — Use 85/15 for flavor and enough structure.
-
1 medium onion, diced — It sweetens as it cooks with the beef.
-
1 packet taco seasoning or 2 tablespoons homemade taco seasoning — This gives the filling its Tex-Mex backbone.
-
1 cup salsa — Choose a thick salsa so the casserole doesn’t get soupy.
-
1 can (15 ounces) red enchilada sauce — Red sauce ties the layers together.
-
1 can (15 ounces) black beans, rinsed and drained — Beans make the pan more filling.
-
1 cup corn kernels, thawed if frozen — Corn adds pops of sweetness.
-
8 small corn tortillas, cut into strips — They soften into tender layers without getting gummy.
-
2 cups shredded Mexican blend cheese — A mix of cheddar, Monterey Jack, and similar cheeses melts well here.
-
1 cup shredded sharp cheddar — For a stronger cheese top.
-
2 tablespoons chopped cilantro, optional — It wakes up the finished pan.
Quick Steps
-
Preheat the oven to 375°F and lightly grease a 9×13-inch baking dish.
-
Cook the beef and onion in a large skillet over medium-high heat for 7 to 8 minutes, until the beef is browned and the onion softens. Drain the fat.
-
Season the meat with taco seasoning, then stir in the salsa, enchilada sauce, black beans, and corn. Simmer for 2 to 3 minutes until the mixture looks thick and spoonable.
-
Build the casserole by laying half the tortilla strips in the dish, then spooning on half the beef mixture and sprinkling on a third of the cheese. Repeat with the rest of the tortillas and filling.
-
Top with the remaining cheese, then cover loosely with foil and bake for 20 minutes.
-
Uncover and bake for 8 to 10 minutes more, until the cheese is melted and the edges are bubbling.
-
Finish with cilantro and let the pan stand for 5 to 10 minutes before serving.
Equipment for This Recipe
-
9×13-inch baking dish — Best for layered tortillas.
-
Large skillet — Needed for browning and simmering the filling.
-
Cutting board and sharp knife — For quick tortilla strips and onion prep.
-
Foil — Keeps the cheese from over-browning too soon.
How to Serve This Dish
Spoon it into shallow bowls and add sour cream, diced avocado, or chopped lettuce on top if you want more contrast. Chips on the side are fine, but this casserole already has enough structure that it doesn’t need a lot of help. It serves 8 with a salad, or 6 if you have a table full of serious eaters.
Pro Tips for This Recipe
-
Use a thick salsa, not a watery one. Thin salsa makes the tortillas mushy.
-
Don’t skip the rest time. The layers set up fast and cut much cleaner after a short pause.
-
If your family likes heat, stir in chopped jalapeños with the beans.
-
Corn tortillas give better texture than flour tortillas in this bake.
Variations on This Dish
-
Milder Family Pan: Use mild salsa and skip any hot peppers, then top with extra cheddar.
-
Green Enchilada Version: Swap the red sauce for green enchilada sauce and add shredded rotisserie chicken if you want a different protein.
-
Bean-Heavy Bake: Add a second can of beans and cut the beef back to 1 pound for a cheaper, meat-light version.
Common Mistakes to Avoid with This Dish
-
Using a thin sauce: Too much liquid turns the tortilla layers soft and slippery.
-
Overloading the cheese early: Save most of it for the top so it browns instead of disappearing into the filling.
-
Cutting while it’s still molten: The casserole needs a short rest or the layers slide apart.
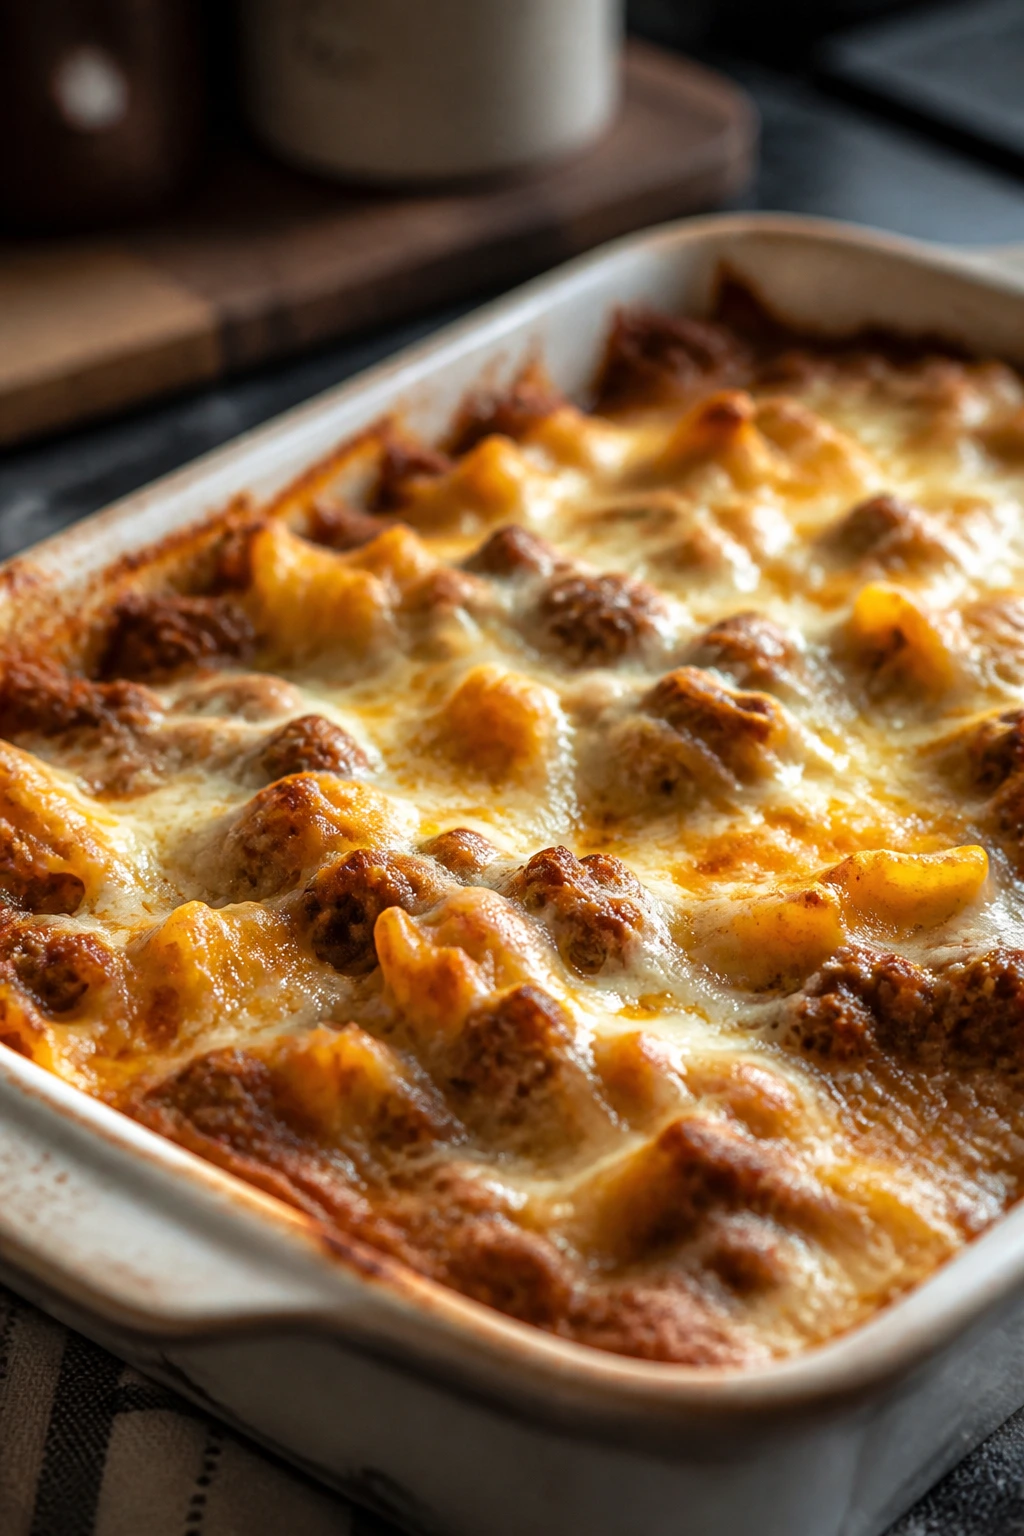
3. Cheeseburger Tater Tot Casserole
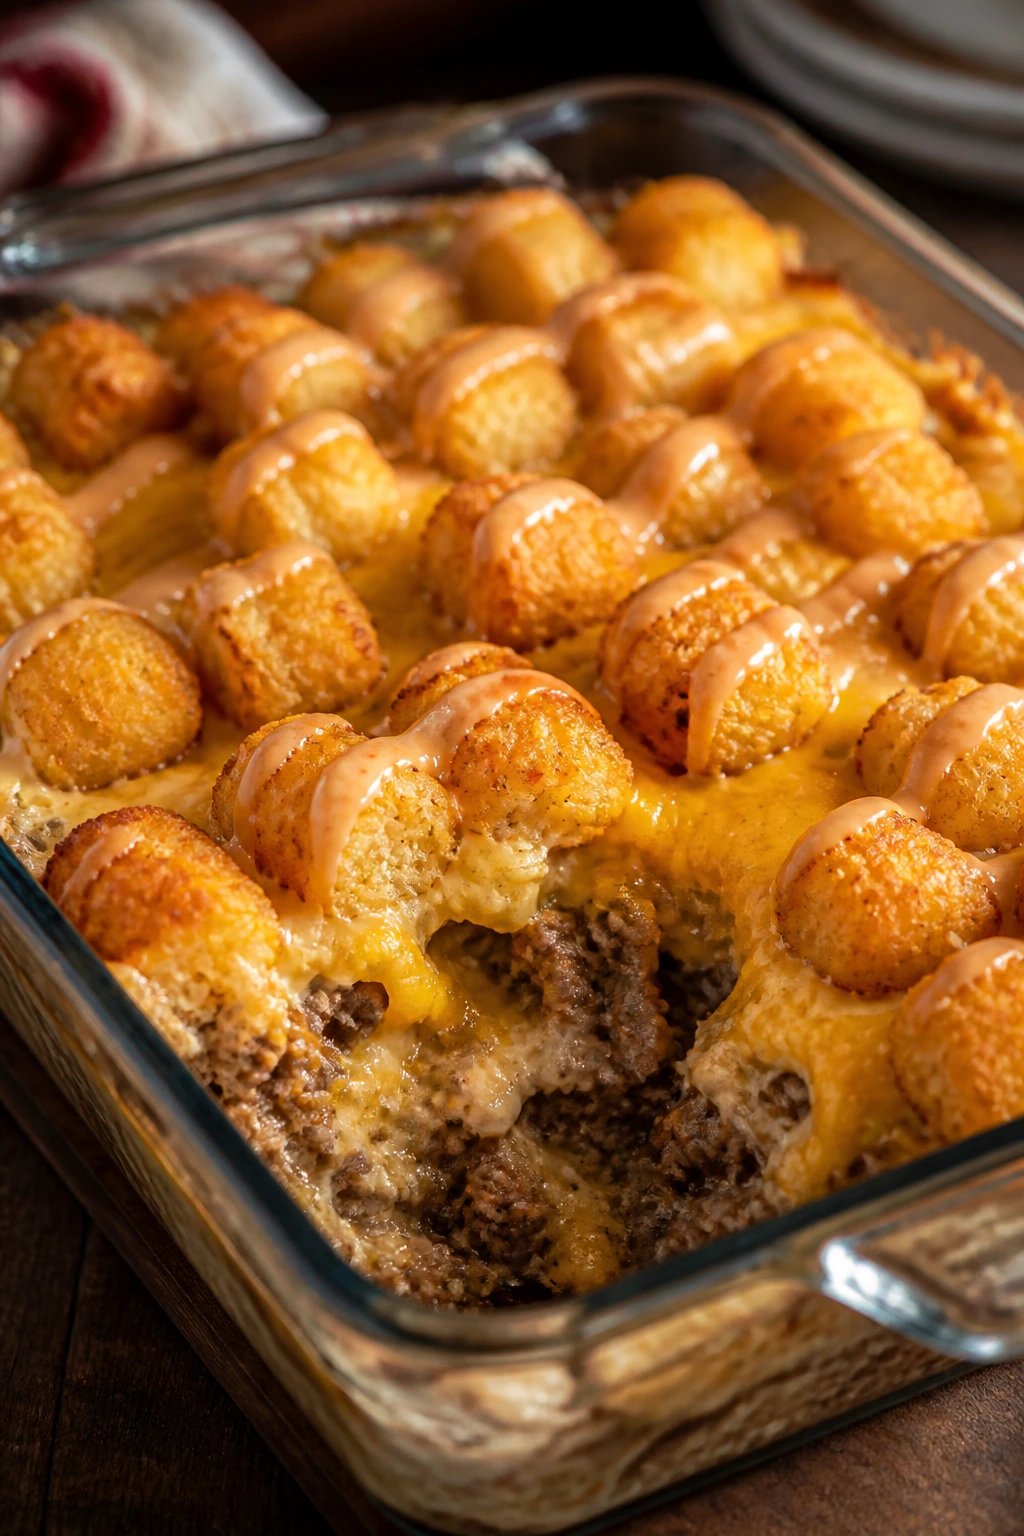
This one tastes like the diner version of a family bake, only less fussy and easier to live with. It’s beefy, tangy, salty, and all about texture: soft filling underneath, crisp tots on top. If you’ve got kids who treat cheeseburgers like a food group, this pan will disappear fast. It takes about 15 minutes to assemble and 40 minutes to bake.
Why It Works
The familiar burger flavors do a lot of the heavy lifting. Ketchup, mustard, and pickle relish create that unmistakable cheeseburger profile, while the tater tots give you a top layer that browns and stays crisp around the edges. That contrast is what makes the casserole feel fun instead of merely practical.
The base also stays creamy because the sauce is mixed before the tots go on. A lot of tater tot casseroles go wrong when the meat layer is too dry. This version keeps enough moisture in the middle that the whole pan eats like a complete dish.
Key Ingredients
-
1 1/2 pounds ground beef — The main flavor anchor.
-
1 small onion, diced — It softens into the beef and keeps the filling from tasting too blunt.
-
2 cloves garlic, minced — A little garlic sharpens the burger flavor.
-
1 can (10.5 ounces) condensed cheddar cheese soup — Builds the creamy base.
-
1/2 cup sour cream — Keeps the filling smooth and tangy.
-
1 tablespoon ketchup — Just enough to remind you of burger sauce.
-
1 tablespoon yellow mustard — Adds the right sharp edge.
-
1 tablespoon Worcestershire sauce — Deepens the savory notes.
-
1/4 cup dill pickle relish or finely chopped pickles — The burger-style tang needs this.
-
1 1/2 cups shredded cheddar, divided — Some inside, some on top.
-
1 bag (32 ounces) frozen tater tots — Don’t thaw them; frozen tots crisp up better.
Quick Steps
-
Preheat the oven to 400°F and grease a 9×13-inch baking dish.
-
Brown the beef and onion in a large skillet over medium-high heat for 7 to 8 minutes, then drain off excess fat. Stir in the garlic and cook for 30 seconds.
-
Mix in the cheddar soup, sour cream, ketchup, mustard, Worcestershire sauce, relish, salt, and pepper. Stir until the filling looks smooth and glossy.
-
Spread the beef mixture into the baking dish and sprinkle 1 cup of the cheddar over the top.
-
Arrange the frozen tater tots in a single layer over the cheese. If you want extra crunch, pack them in close but don’t stack them.
-
Bake for 35 minutes, until the tots are golden and the filling is bubbling at the edges.
-
Top with the remaining cheddar and bake for 5 minutes more, until the cheese melts into the tots.
-
Rest for 5 minutes before serving, then add chopped pickles if you want a sharper finish.
Equipment for This Recipe
-
9×13-inch baking dish — Needed for a full layer of tots.
-
Large skillet — For browning the beef and building the sauce.
-
Wooden spoon — Better than a whisk for this thick filling.
-
Measuring cups and spoons — The tangy sauce works best when it’s measured, not guessed.
How to Serve This Dish
Serve it with shredded lettuce or a simple tomato salad so the plate doesn’t feel too heavy. A few dill pickle chips on the side make perfect sense here. One square is enough for most adults, though bigger appetites will happily take two if there’s nothing else on the table.
Pro Tips for This Recipe
-
Keep the tots frozen until they go in the oven. Thawed tots turn soggy on the bottom.
-
Drain the beef well. Too much fat makes the casserole greasy.
-
Add the pickle relish after cooking if you want a brighter tang.
-
If you like a darker top, finish under the broiler for 1 minute, but watch it like a hawk.
Variations on This Dish
-
Bacon Burger Bake: Add 6 cooked, crumbled bacon slices to the filling before it goes into the dish.
-
Spicy Burger Version: Stir in chopped jalapeños and use pepper jack instead of some of the cheddar.
-
No-Relish Swap: Replace the relish with finely chopped dill pickles if you want a cleaner pickle flavor.
Common Mistakes to Avoid with This Dish
-
Thawing the tots first: They lose their edge and go soft.
-
Making the filling too loose: The sauce should be creamy, not runny.
-
Skipping the drain: Fat trapped in the skillet makes the casserole heavy and oily.
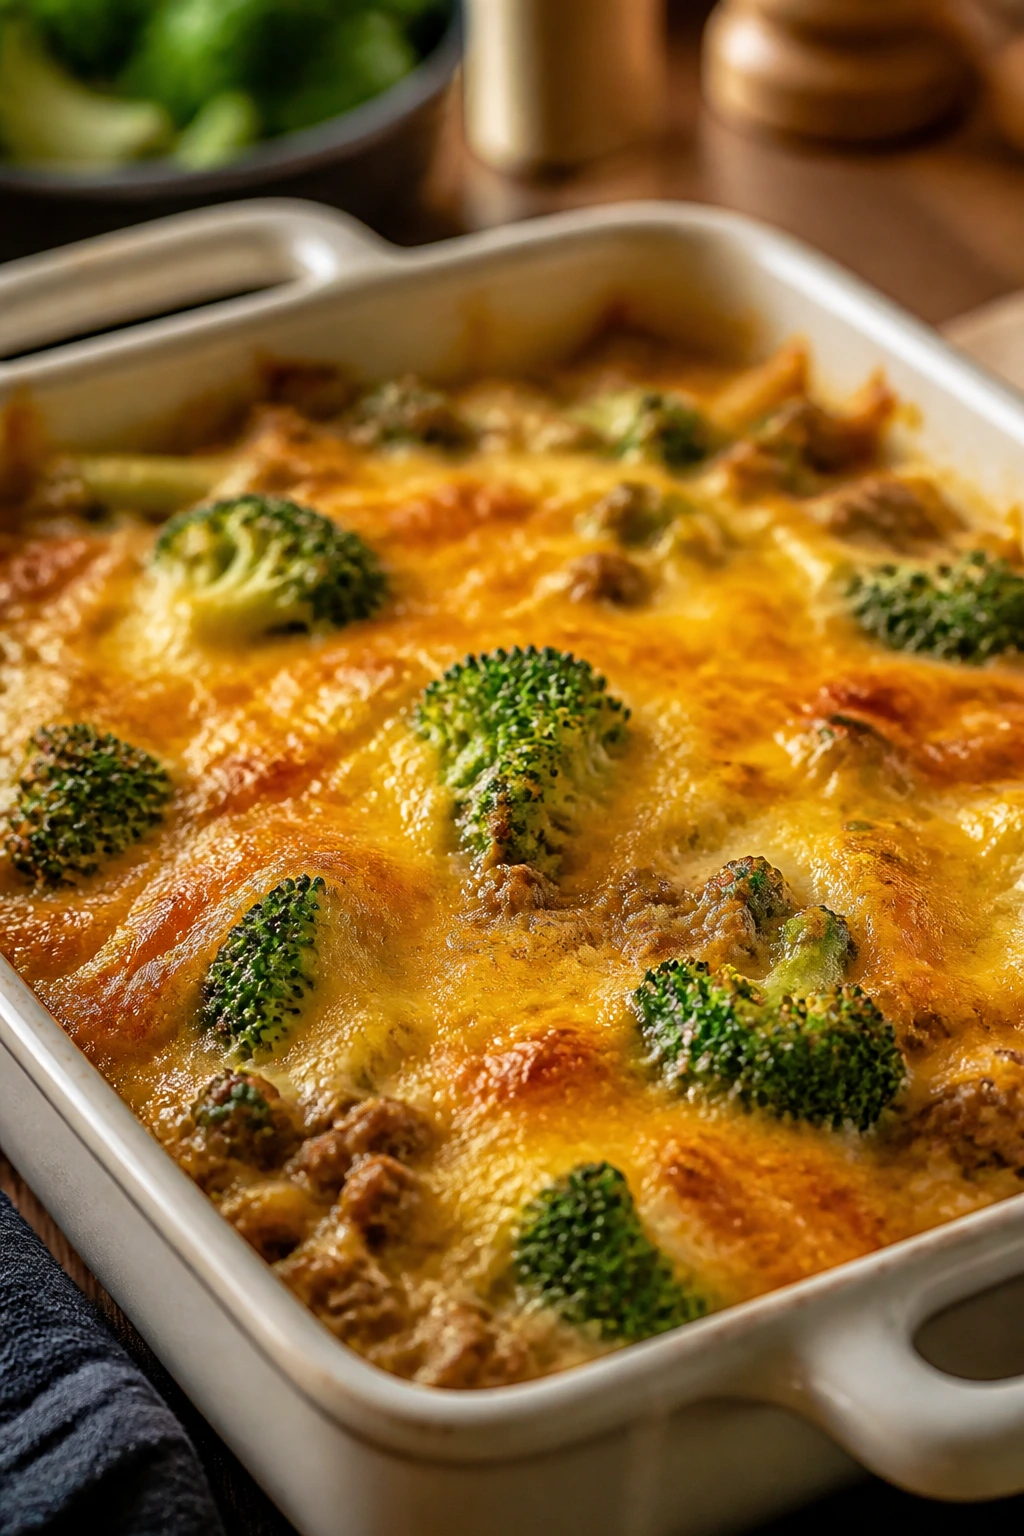
4. Creamy Beef and Broccoli Rice Bake
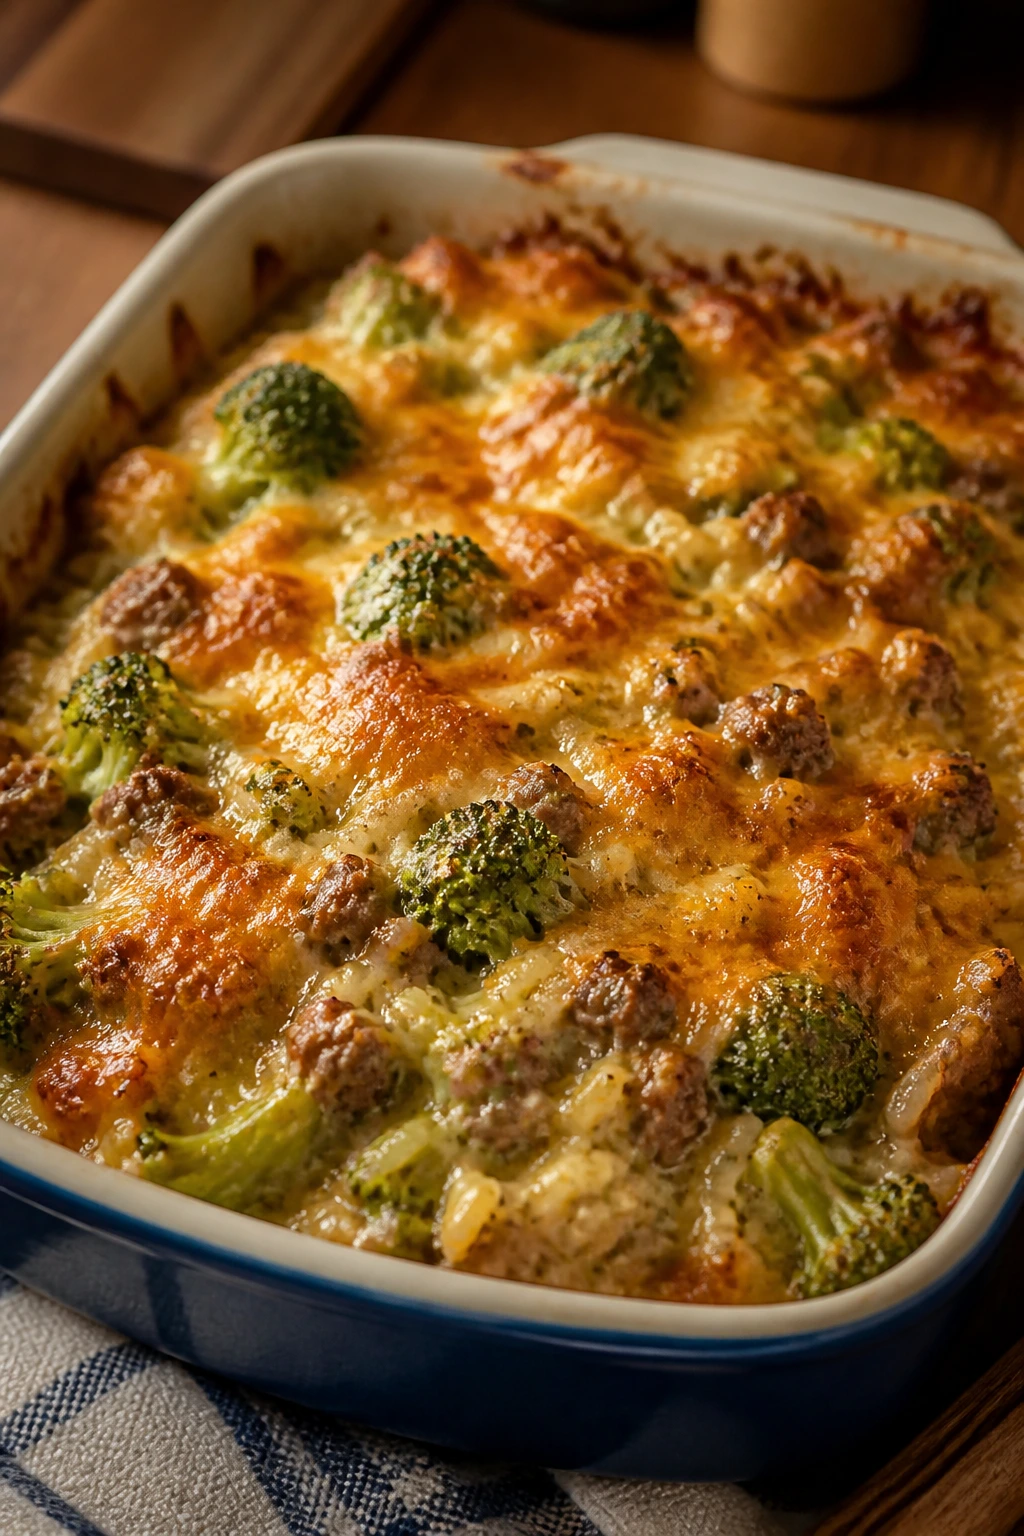
This is the pan I like when I want something that feels a little more balanced but still very much like comfort food. Beef, broccoli, rice, and cheddar are plainspoken ingredients, and that’s part of the charm. The finished bake is creamy in the middle, browned on top, and sturdy enough to scoop without collapsing. It takes about 20 minutes to build and 35 minutes to bake.
Why It Works
Rice gives the casserole structure, broccoli adds a fresh bite, and the sauce ties the whole thing together without making it dull. A short blanch on the broccoli keeps it green and just tender, so it doesn’t go army-green and soft in the oven. That small step changes the whole dish.
This is the kind of casserole that feels better when the beef is well browned. You want those dark bits on the skillet bottom because they flavor the sauce once the milk and soup go in. Skip that, and the pan tastes flatter than it should.
Key Ingredients
-
1 1/2 pounds ground beef — Brown it well for the best flavor.
-
1 medium onion, diced — Gives the beef a sweet base.
-
3 cloves garlic, minced — Adds bite to the creamy sauce.
-
3 cups cooked long-grain rice — Day-old rice works especially well.
-
3 cups broccoli florets, chopped into small pieces — Small florets bake evenly.
-
1 can (10.5 ounces) condensed cream of chicken or cream of mushroom soup — Both work, depending on what you like.
-
1 cup milk — Loosens the sauce so it coats the rice.
-
1 cup sour cream — Gives the casserole body and tang.
-
2 cups shredded cheddar — Sharp cheddar keeps the flavor from fading.
-
1 tablespoon soy sauce or Worcestershire sauce — A small hit of savory depth.
-
1 teaspoon kosher salt and 1/2 teaspoon black pepper — Enough to season the whole pan.
Quick Steps
-
Preheat the oven to 375°F and lightly grease a 9×13-inch baking dish.
-
Blanch the broccoli in boiling salted water for 2 minutes, then drain and rinse with cold water. It should stay bright green and still feel firm.
-
Brown the beef and onion in a large skillet over medium-high heat for 7 to 8 minutes. Drain the fat, then stir in the garlic for 30 seconds.
-
Stir in the soup, milk, sour cream, soy sauce, salt, and pepper. Let the sauce warm through for 1 to 2 minutes.
-
Fold in the cooked rice and broccoli, then spoon the mixture into the prepared dish. Top with 1 1/2 cups of the cheddar.
-
Bake for 25 minutes, uncovered, until the casserole is bubbling around the edges.
-
Add the remaining cheddar and bake for 8 to 10 minutes more, until the cheese is melted and lightly spotted with gold.
-
Rest for 5 minutes before serving so the rice holds together better.
Equipment for This Recipe
-
9×13-inch baking dish — Holds the rice mixture in a thin, even layer.
-
Large skillet — Needed for browning the beef and building the sauce.
-
Medium pot — For blanching the broccoli.
-
Colander — Drains the broccoli fast.
How to Serve This Dish
A simple cucumber salad or a tray of sliced tomatoes makes a good counterpoint to the creamy rice. You can also spoon this into bowls and let the cheese stretch a little when it’s hot; that’s part of the appeal. It serves 6 as a main dish, especially if you keep the portions generous but not oversized.
Pro Tips for This Recipe
-
Use rice that’s already cool or leftover. Hot, fresh rice tends to break down more in the oven.
-
Cut the broccoli small. Big florets look nice, but they can feel awkward in every bite.
-
Let the sauce cook in the skillet for a minute before baking. It should look creamy, not thin.
-
If you want a deeper flavor, add a pinch of garlic powder and onion powder with the salt.
Variations on This Dish
-
Cheddar-Mushroom Version: Add 6 ounces sliced mushrooms with the onions and use cream of mushroom soup.
-
Extra Veggie Bake: Stir in frozen peas or diced carrots with the broccoli.
-
Crispy Top Swap: Add buttered breadcrumbs over the final layer of cheese if you like a little crunch.
Common Mistakes to Avoid with This Dish
-
Overcooking the broccoli: It only needs a short blanch. More than that and it gets soft in the oven.
-
Using dry rice without enough sauce: The casserole needs enough liquid to stay creamy.
-
Forgetting to season the rice layer: The beef carries the dish, but the rice still needs salt.
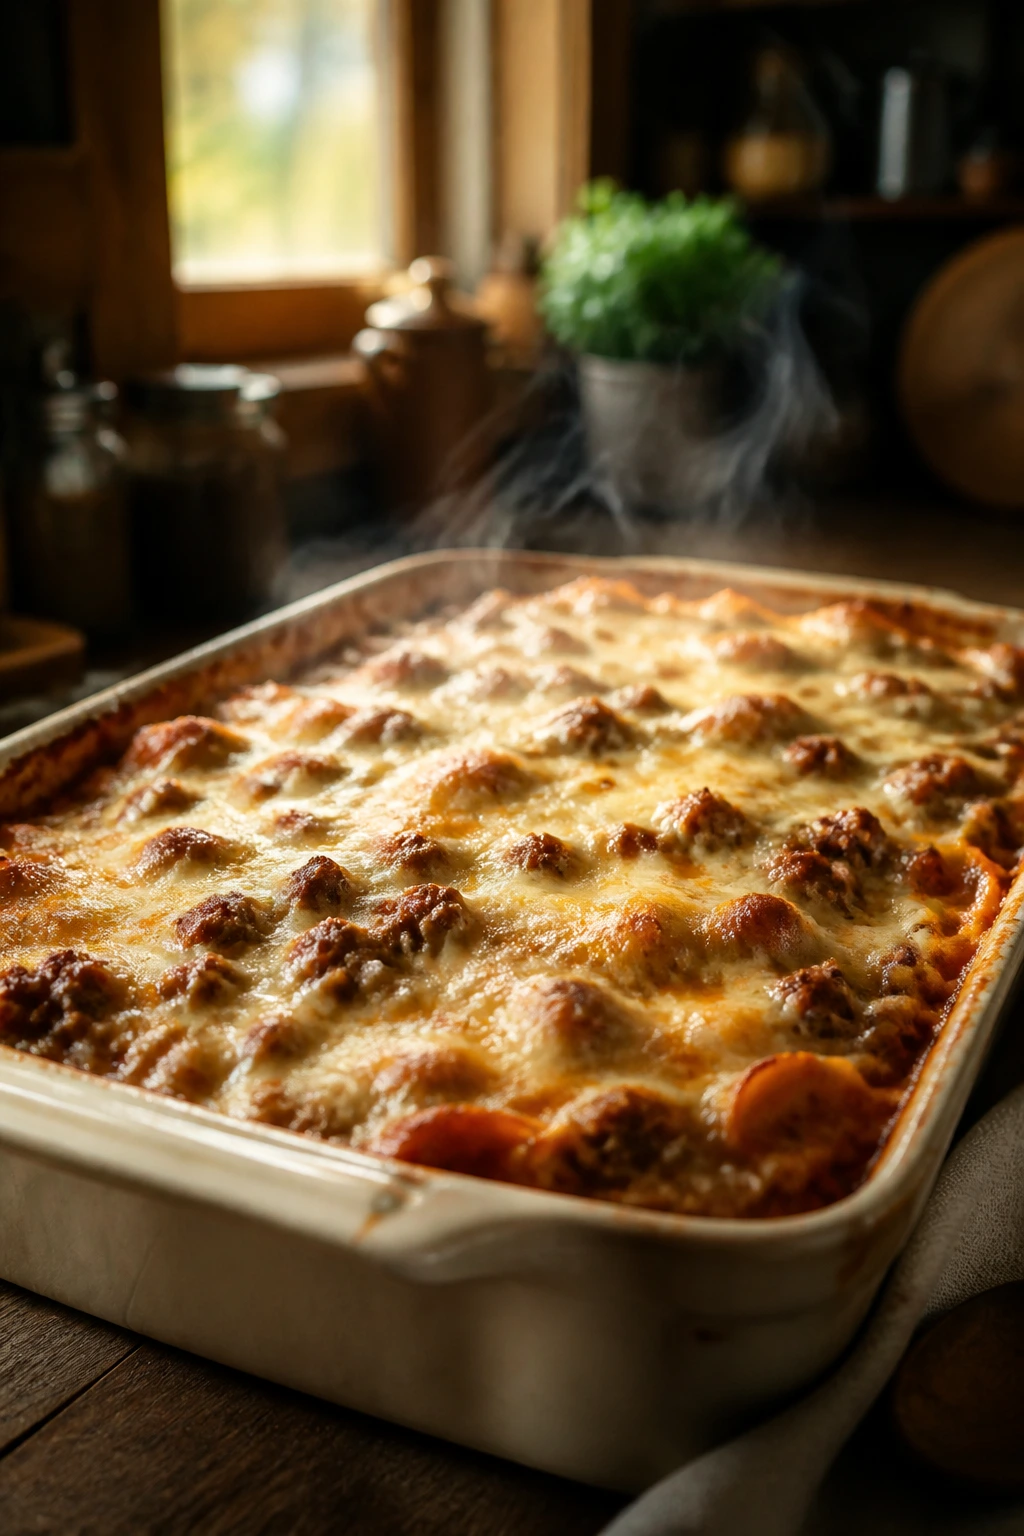
5. Italian Beef and Pasta Bake
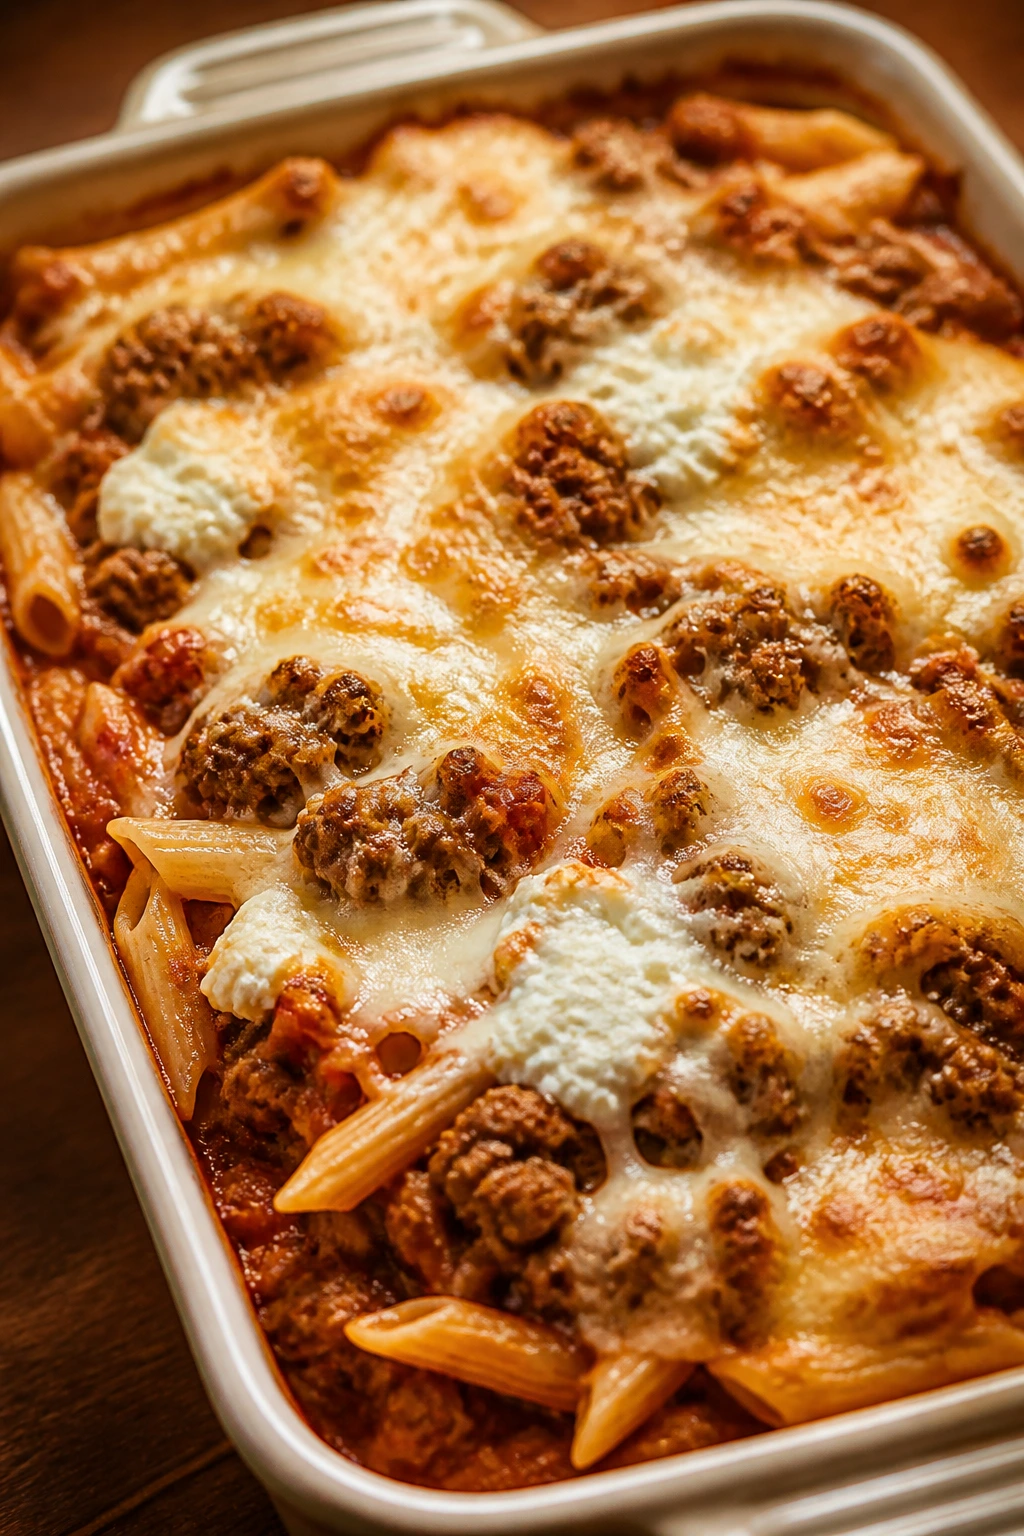
This is the casserole that shows up when pasta night needs more backbone. It tastes like lasagna’s easier cousin: saucy, cheesy, and full of beef, but without the careful layering that slow-cooks your evening. The mozzarella melts into the ricotta, the marinara keeps it lively, and the pasta catches all the little pockets of sauce. It takes about 20 minutes to prep and 35 minutes to bake.
Why It Works
Short pasta is the right shape for a bake like this because every piece holds sauce in a little pocket or curl. Ricotta gives the filling a creamy, almost lasagna-like middle, while mozzarella on top gives you that familiar stretch when you pull out a scoop. The egg helps the ricotta settle into the dish instead of breaking apart.
I also like that this version doesn’t depend on a ton of cheese to feel rich. The tomato sauce, herbs, and beef do enough work on their own. The cheese is there to finish the dish, not rescue it.
Key Ingredients
-
12 ounces penne or rotini, cooked al dente — Slightly undercooked pasta finishes in the oven.
-
1 1/2 pounds ground beef — The main protein and flavor base.
-
1 medium onion, diced — Gives the sauce sweetness.
-
3 cloves garlic, minced — Classic with tomato sauce.
-
1 jar (24 ounces) marinara sauce — Choose one with a flavor you actually like.
-
1 cup ricotta or cottage cheese — Ricotta gives a smoother finish; cottage cheese is a looser, lighter swap.
-
1 large egg — Helps bind the cheese layer.
-
2 cups shredded mozzarella — The melt factor.
-
1/2 cup grated Parmesan — Adds salt and a little nuttiness.
-
1 cup chopped spinach — Easy way to bring in a vegetable without changing the flavor much.
-
1 teaspoon Italian seasoning — Keeps the sauce bright.
Quick Steps
-
Preheat the oven to 375°F and grease a 9×13-inch baking dish.
-
Cook the pasta in salted water until just shy of tender, then drain it well. It should still have a little bite.
-
Brown the beef and onion in a large skillet over medium-high heat for 7 to 8 minutes. Drain excess fat, then stir in the garlic for 30 seconds.
-
Add the marinara, spinach, and Italian seasoning. Simmer for 2 minutes until the spinach wilts and the sauce looks glossy.
-
Mix the ricotta with the egg, half of the Parmesan, and a pinch of salt in a bowl.
-
Combine the pasta with the beef sauce, then spread half into the baking dish. Dollop on half the ricotta mixture, then repeat with the rest of the pasta and ricotta.
-
Top with mozzarella and the remaining Parmesan, then bake for 30 to 35 minutes until the cheese is melted and the edges are bubbling.
-
Rest for 10 minutes before serving so the layers settle.
Equipment for This Recipe
-
9×13-inch baking dish — Needed for the layered bake.
-
Large skillet — For the beef sauce.
-
Large pot — For boiling the pasta.
-
Mixing bowl — For the ricotta mixture.
-
Colander — Drains pasta cleanly.
How to Serve This Dish
A simple Caesar salad or a pile of roasted broccoli makes sense here. Garlic bread works too, though the pasta already brings plenty of starch. It serves 8, and leftovers are welcome because the flavors settle in nicely after a night in the fridge.
Pro Tips for This Recipe
-
Cook the pasta one minute under what the box says. It keeps its shape better after baking.
-
Use a marinara you like on its own. Bad jarred sauce will show up here.
-
Mix a little Parmesan into the ricotta. It sharpens the middle layer.
-
Let the casserole sit before cutting, or the first serving will slump.
Variations on This Dish
-
Sausage Blend Version: Replace half the beef with Italian sausage for a deeper, more peppery sauce.
-
Veggie-Heavy Bake: Add chopped zucchini or mushrooms with the spinach.
-
No-Ricotta Option: Use cottage cheese blended smooth with the egg if ricotta isn’t in the fridge.
Common Mistakes to Avoid with This Dish
-
Overcooking the pasta: Soft pasta turns mushy in the oven.
-
Using too little sauce: The noodles need enough moisture to finish cooking.
-
Skipping the rest: The cheese and sauce need a few minutes to settle before serving.
6. Sloppy Joe Biscuit Casserole
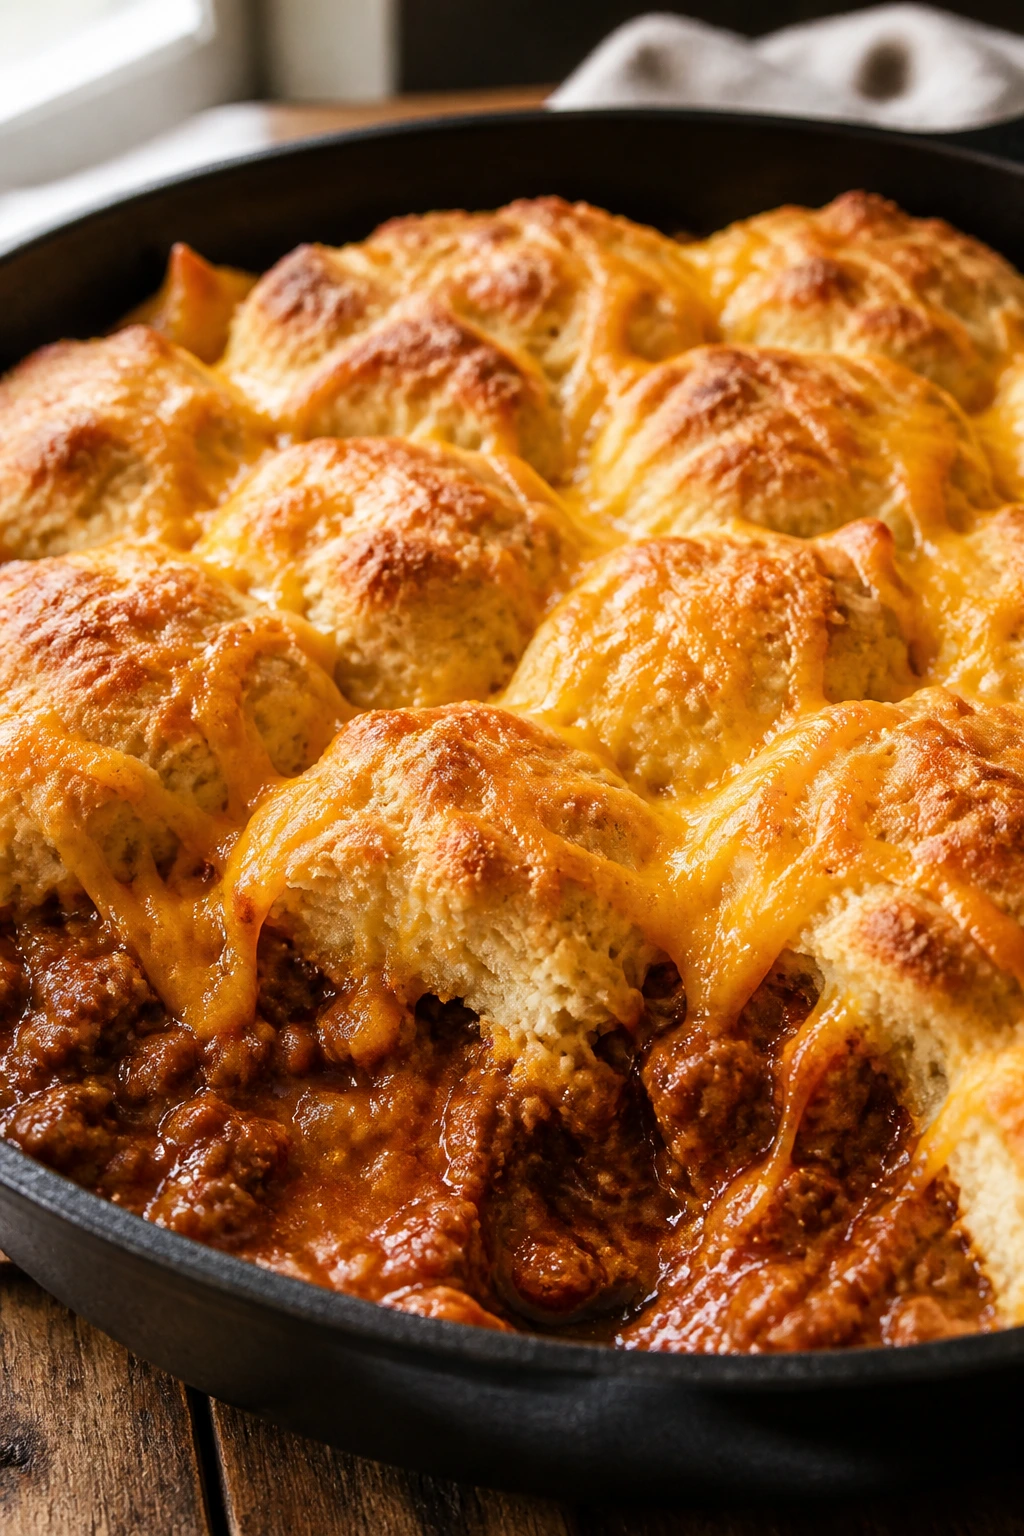
This pan is pure weeknight comfort, and I mean that in the best way. Sloppy Joe filling on the bottom, biscuit pieces on top, and melted cheddar in between makes the whole dish feel playful without turning childish. It’s messy in the right way. The kind of messy that stays on the plate. Plan on about 20 minutes of prep and 30 minutes in the oven.
Why It Works
Sloppy Joe filling already has the sweet-savory balance that families know how to eat, so the casserole doesn’t need much explaining. Biscuit dough on top takes the place of sandwich buns and bakes into a soft, golden cap. The contrast is what sells it: saucy meat underneath, tender bread on top, cheese in the middle.
The key is cooking the filling down until it’s thick. If it’s runny in the skillet, it will soak the biscuits before they have a chance to bake properly. Thick filling, loose biscuit top, hot oven. That’s the whole dance.
Key Ingredients
-
1 1/2 pounds ground beef — Use lean beef so the sauce isn’t greasy.
-
1 small onion, diced — Gives the filling sweetness.
-
1 green bell pepper, diced — Adds a little crunch and classic sloppy joe flavor.
-
2 tablespoons tomato paste — Deepens the sauce.
-
1 cup ketchup — Builds the familiar sweet tomato base.
-
1 tablespoon brown sugar — Adds the classic sloppy joe edge.
-
1 tablespoon Worcestershire sauce — Brings savory depth.
-
1 tablespoon yellow mustard — Keeps the filling from tasting flat.
-
1/2 cup water or beef broth — Enough to loosen the sauce before it thickens.
-
2 cups shredded cheddar — Melts into the filling and on top.
-
1 can refrigerated biscuit dough, 16.3 ounces — Cut into quarters so it bakes evenly.
-
1 tablespoon melted butter — Helps the biscuits brown.
Quick Steps
-
Preheat the oven to 375°F and grease a 9×13-inch baking dish.
-
Brown the beef, onion, and bell pepper in a large skillet over medium-high heat for 8 minutes, until the vegetables soften and the beef is cooked through. Drain the fat.
-
Stir in the tomato paste, ketchup, brown sugar, Worcestershire sauce, mustard, water or broth, salt, and pepper. Simmer for 5 to 6 minutes until the filling is thick enough to mound on a spoon.
-
Spread the beef mixture in the baking dish and sprinkle on 1 cup of the cheddar.
-
Arrange the biscuit quarters over the top in a single layer. Brush them lightly with melted butter.
-
Bake for 20 minutes, then sprinkle the remaining cheddar over the biscuits and bake for 8 to 10 minutes more, until the biscuits are cooked through and golden on top.
-
Rest for 5 minutes before serving so the filling doesn’t rush out.
Equipment for This Recipe
-
9×13-inch baking dish — Holds the filling and biscuit top.
-
Large skillet — For thickening the sloppy joe mixture.
-
Pastry brush — Helpful for the butter on the biscuits, though a spoon works.
-
Wooden spoon — Good for breaking up the beef.
How to Serve This Dish
A crunchy coleslaw or sliced cucumbers gives the plate some snap. The casserole is rich enough that it doesn’t need much else. One generous scoop is plenty for most people, though kids usually come back with a second biscuit and no shame about it.
Pro Tips for This Recipe
-
Reduce the filling until it’s thick. A loose filling makes the biscuits soggy.
-
Cut the biscuits into quarters so the centers cook through.
-
Butter on top helps the biscuits brown instead of looking pale.
-
If you want more tang, add chopped pickles after baking.
Variations on This Dish
-
Barbecue Joe Bake: Swap half the ketchup for barbecue sauce.
-
Cheesy Pickle Burger Version: Add chopped pickles to the filling and use extra cheddar.
-
Spicy Pantry Version: Stir in a little hot sauce or diced jalapeño with the bell pepper.
Common Mistakes to Avoid with This Dish
-
Leaving the filling watery: It needs to be thick before it goes into the oven.
-
Buried biscuit pieces: Keep them on top so they can bake, not stew.
-
Skipping the butter: The biscuit tops brown much better with a quick brush.
7. Stuffed Pepper Rice Casserole
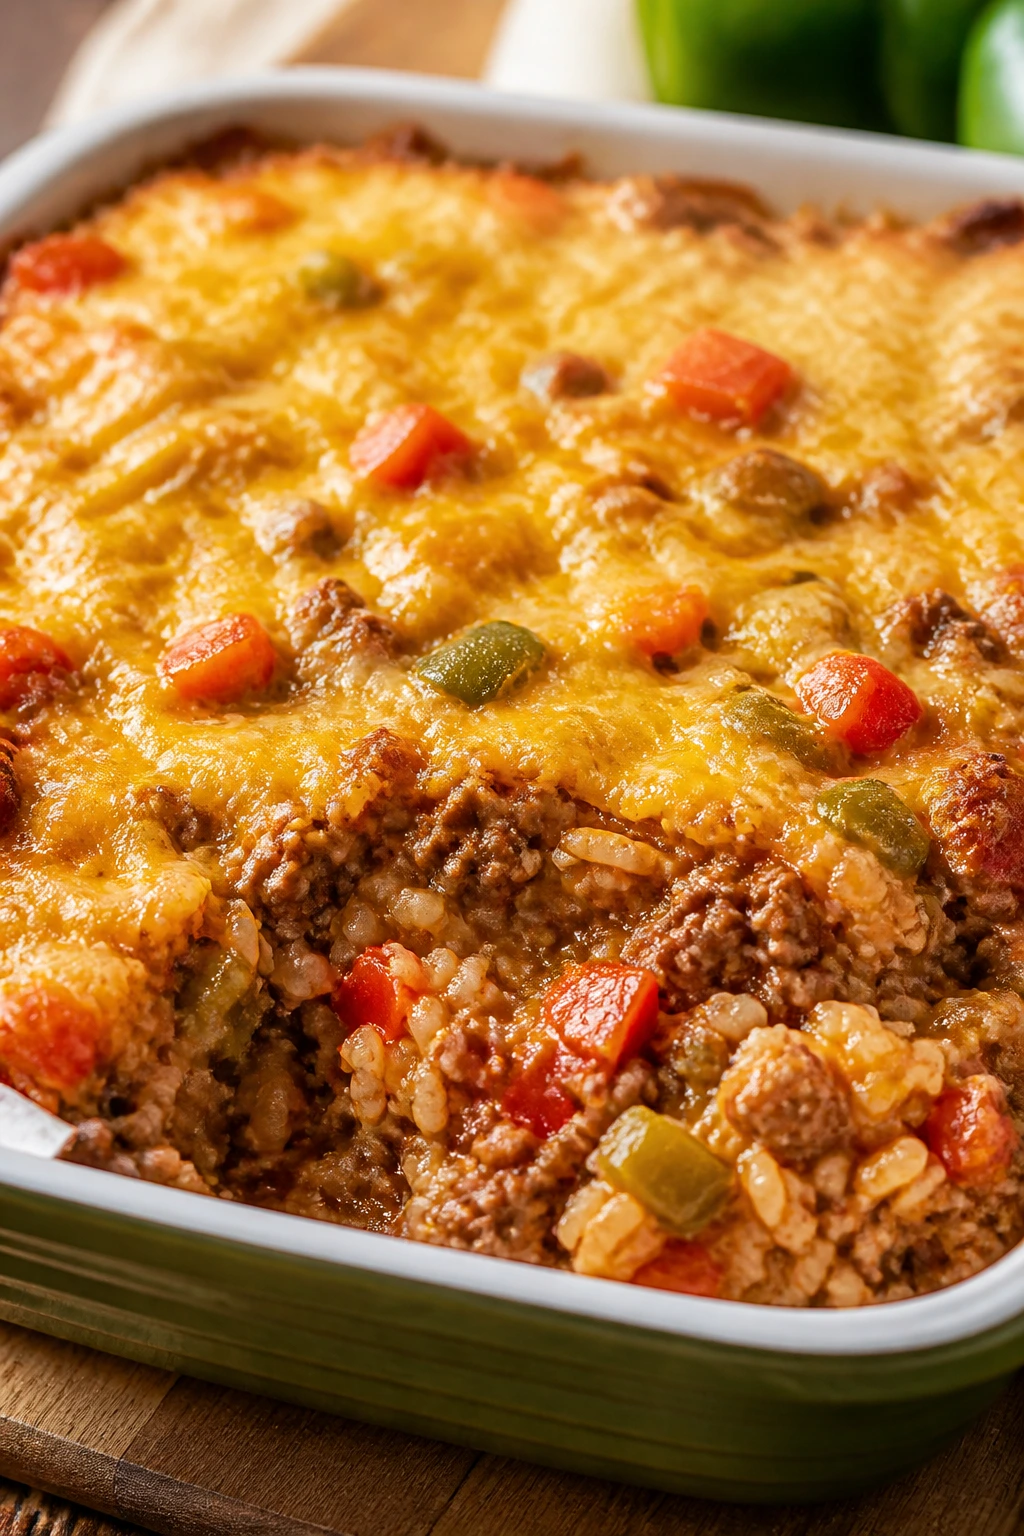
Stuffed peppers taste great, but they’re a bit of a production for a weeknight. This casserole gives you the same flavor without hollowing vegetables and trying to line them up in a pan like little boats. Beef, peppers, rice, tomato, and cheese all show up in a calmer format. It needs about 20 minutes of prep and 35 minutes in the oven.
Why It Works
Bell peppers soften just enough to sweeten the beef mixture while still keeping some bite. Rice turns the filling into a complete meal, and tomato sauce keeps the whole thing moist through baking. It’s one of those dishes that feels like it should take more effort than it does.
The cheese on top matters more than you’d think. Mozzarella gives you melt, but a little cheddar adds the salty finish that stuffed peppers often need. A casserole like this is really about balance: savory beef, sweet peppers, tangy tomato, creamy cheese.
Key Ingredients
-
1 1/2 pounds ground beef — Browned well for depth.
-
2 bell peppers, diced — Use red, green, or a mix.
-
1 medium onion, diced — Gives the base sweetness.
-
3 cloves garlic, minced — Builds the savory flavor.
-
2 cups cooked rice — White or brown rice both work.
-
1 can (14.5 ounces) diced tomatoes, drained slightly — Keep some juice, but not all of it.
-
1 cup tomato sauce — The sauce binds everything together.
-
1 tablespoon Worcestershire sauce — Boosts the beef flavor.
-
1 teaspoon dried oregano — A classic stuffed pepper note.
-
1/2 teaspoon paprika — Adds color and a mild smoky edge.
-
2 cups shredded mozzarella or Italian blend — Melts smoothly over the top.
Quick Steps
-
Preheat the oven to 375°F and grease a 9×13-inch baking dish.
-
Brown the beef, onion, and peppers in a large skillet over medium-high heat for 8 minutes, until the beef is cooked and the peppers begin to soften.
-
Add the garlic, oregano, paprika, Worcestershire sauce, diced tomatoes, tomato sauce, salt, and pepper. Simmer for 3 minutes.
-
Stir in the cooked rice until everything is evenly coated and the filling looks thick but still moist.
-
Spread the mixture into the dish and top with the shredded cheese.
-
Bake for 25 to 30 minutes, until the cheese is melted and the casserole bubbles at the edges.
-
Rest for 5 to 10 minutes before serving so the rice doesn’t fall apart on the scoop.
Equipment for This Recipe
-
9×13-inch baking dish — For the casserole itself.
-
Large skillet — For browning and seasoning the filling.
-
Wooden spoon — Helps break up the beef and fold in the rice.
-
Measuring cups and spoons — The tomato and rice balance works best when measured.
How to Serve This Dish
Serve it with crusty bread or a simple salad with vinaigrette. A spoonful of sour cream on top is a nice move if you like a little coolness with the tomatoes. It serves 6 cleanly, and the leftovers reheat without falling apart.
Pro Tips for This Recipe
-
Use cooked rice that’s not steaming hot. That keeps the filling from turning gluey.
-
Don’t drain the tomatoes too aggressively. A little juice helps the rice stay tender.
-
If your peppers are large, dice them small enough to soften in time.
-
Add chopped parsley at the end if you want a fresher finish.
Variations on This Dish
-
Mexican Pepper Bake: Add taco seasoning and swap the mozzarella for cheddar.
-
Brown Rice Version: Use cooked brown rice and bake a few minutes longer if needed.
-
Vegetable Boost: Stir in chopped zucchini or mushrooms with the peppers.
Common Mistakes to Avoid with This Dish
-
Using crunchy rice: Cook it fully before it goes in.
-
Too much tomato liquid: Excess liquid makes the casserole loose.
-
Overbaking: Once the cheese melts and the edges bubble, it’s done.
8. Philly Cheesesteak Noodle Bake
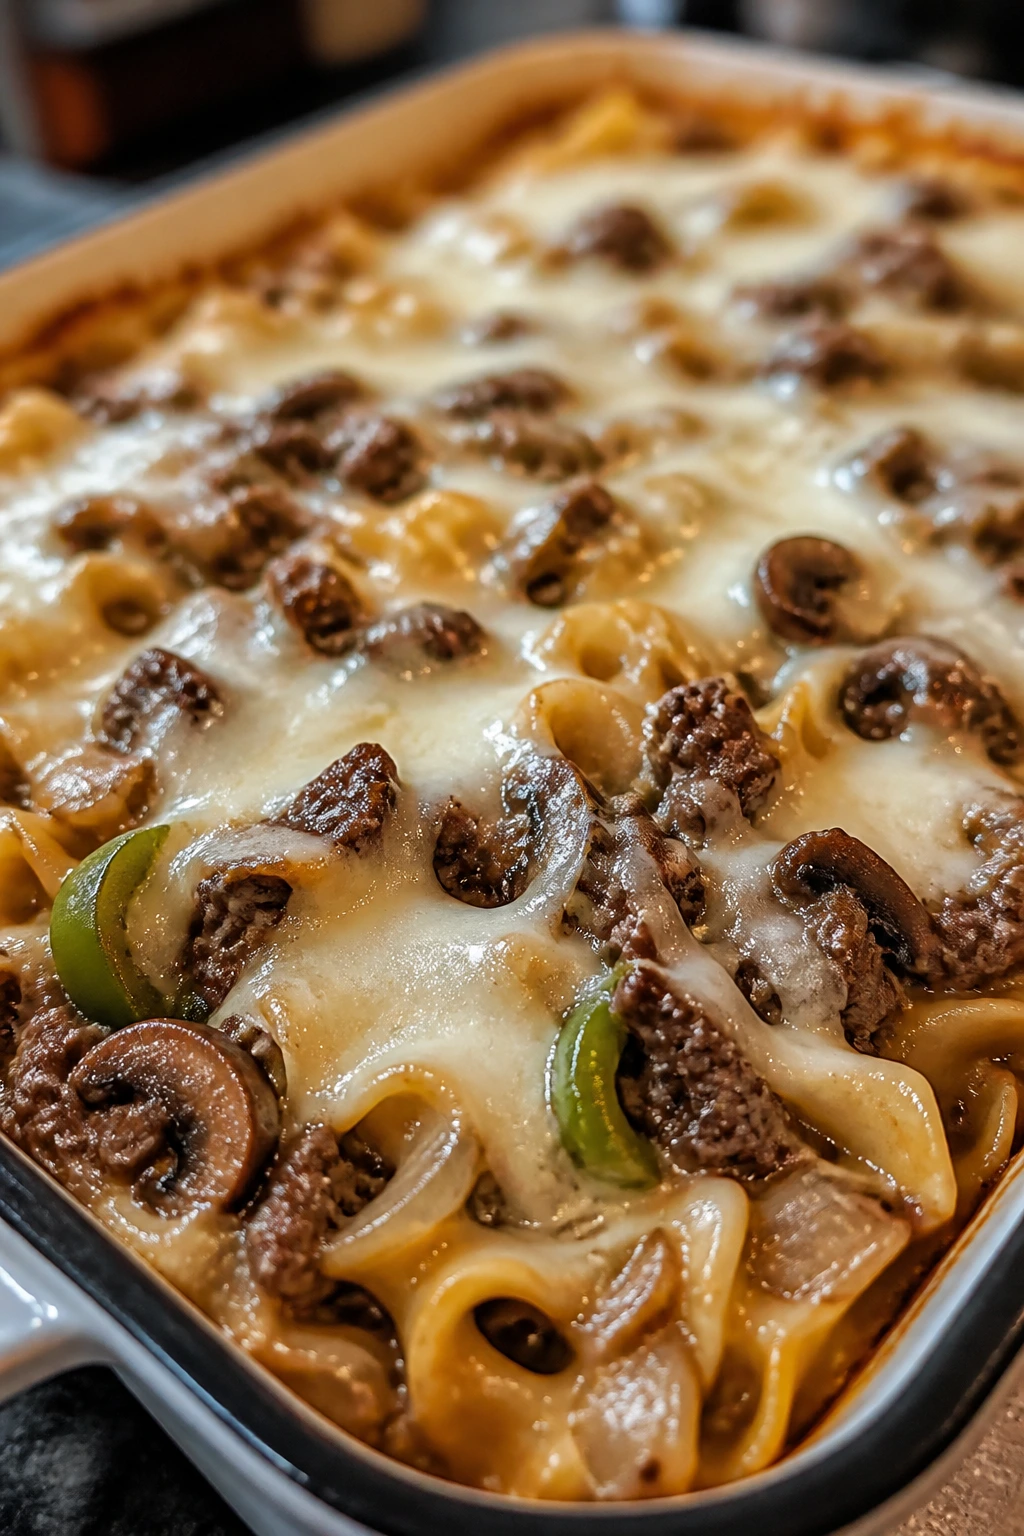
This is the casserole for people who like their comfort food on the rich side. Beef, onions, mushrooms, peppers, noodles, and provolone make the whole dish taste like a steak sandwich that decided to settle in and stay for dinner. It’s hearty without being heavy in a greasy way. Figure on 20 minutes of prep and 30 minutes in the oven.
Why It Works
Mushrooms matter here because they echo the savory, meaty taste of the beef while adding moisture. The cream cheese gives the sauce that silky, almost spreadable texture that a cheesesteak filling should have. Provolone on top keeps the flavor clean and sharp enough to cut through the richness.
Egg noodles are the right shape because they hold sauce without turning into glue. You want them cooked al dente and then baked just long enough to absorb the rest of the flavor. That’s how the pan stays creamy instead of pasty.
Key Ingredients
-
1 1/2 pounds ground beef — The main filling.
-
1 large onion, sliced — Classic cheesesteak flavor.
-
1 green bell pepper, sliced — Adds color and a little sweetness.
-
8 ounces mushrooms, sliced — Brings savory depth and moisture.
-
12 ounces egg noodles, cooked al dente — They catch the sauce well.
-
4 ounces cream cheese, softened — Makes the sauce rich and smooth.
-
1 cup beef broth — Loosens the sauce enough to coat the noodles.
-
1 tablespoon Worcestershire sauce — Gives the filling that steakhouse edge.
-
1 teaspoon garlic powder — Easy flavor without extra chopping.
-
2 cups shredded provolone — The right cheese for the job.
-
1/2 cup shredded mozzarella, optional — For a little extra melt.
Quick Steps
-
Preheat the oven to 375°F and grease a 9×13-inch baking dish.
-
Brown the beef in a large skillet over medium-high heat for 6 to 7 minutes, then drain the fat. Add the onion, pepper, and mushrooms and cook for 5 minutes more, until the vegetables soften.
-
Stir in the cream cheese, beef broth, Worcestershire sauce, garlic powder, salt, and pepper. Cook for 2 minutes until the sauce turns smooth and creamy.
-
Fold in the cooked noodles until everything is coated.
-
Transfer to the baking dish and top with provolone, then mozzarella if you’re using it.
-
Bake for 20 to 25 minutes, until the cheese melts and the edges bubble.
-
Rest for 5 minutes before serving so the noodles settle into the sauce.
Equipment for This Recipe
-
9×13-inch baking dish — For the noodle bake.
-
Large skillet — For the beef and vegetables.
-
Large pot — For the noodles.
-
Colander — For draining noodles cleanly.
-
Wooden spoon — For working the cream cheese into the sauce.
How to Serve This Dish
A peppery green salad or a tray of roasted asparagus gives this pan a sharper edge. It’s rich enough that you do not need a lot of sides. Serve it in deep bowls if you want it to feel cozy, or on plates if you want the melted cheese to stay stretched and visible.
Pro Tips for This Recipe
-
Soften the cream cheese before it goes in. Cold cream cheese leaves little stubborn lumps.
-
Cook the noodles just shy of done. They’ll finish in the oven.
-
Let the mushrooms cook long enough to lose their raw smell.
-
Provolone is the cheese that makes this taste like a cheesesteak, so don’t skip it.
Variations on This Dish
-
Pepper Jack Swap: Replace some provolone with pepper jack for a little heat.
-
Extra Mushroom Version: Double the mushrooms and cut the beef back slightly for a deeper, earthier pan.
-
Hoagie-Style Finish: Add a few spoonfuls of sautéed onions on top after baking.
Common Mistakes to Avoid with This Dish
-
Using dry noodles straight from the package: They need to be cooked first.
-
Adding cold cream cheese: It won’t melt evenly.
-
Skipping the mushroom cook-down: Mushrooms need time to lose water or the sauce gets thin.
9. Taco Mac and Cheese Casserole
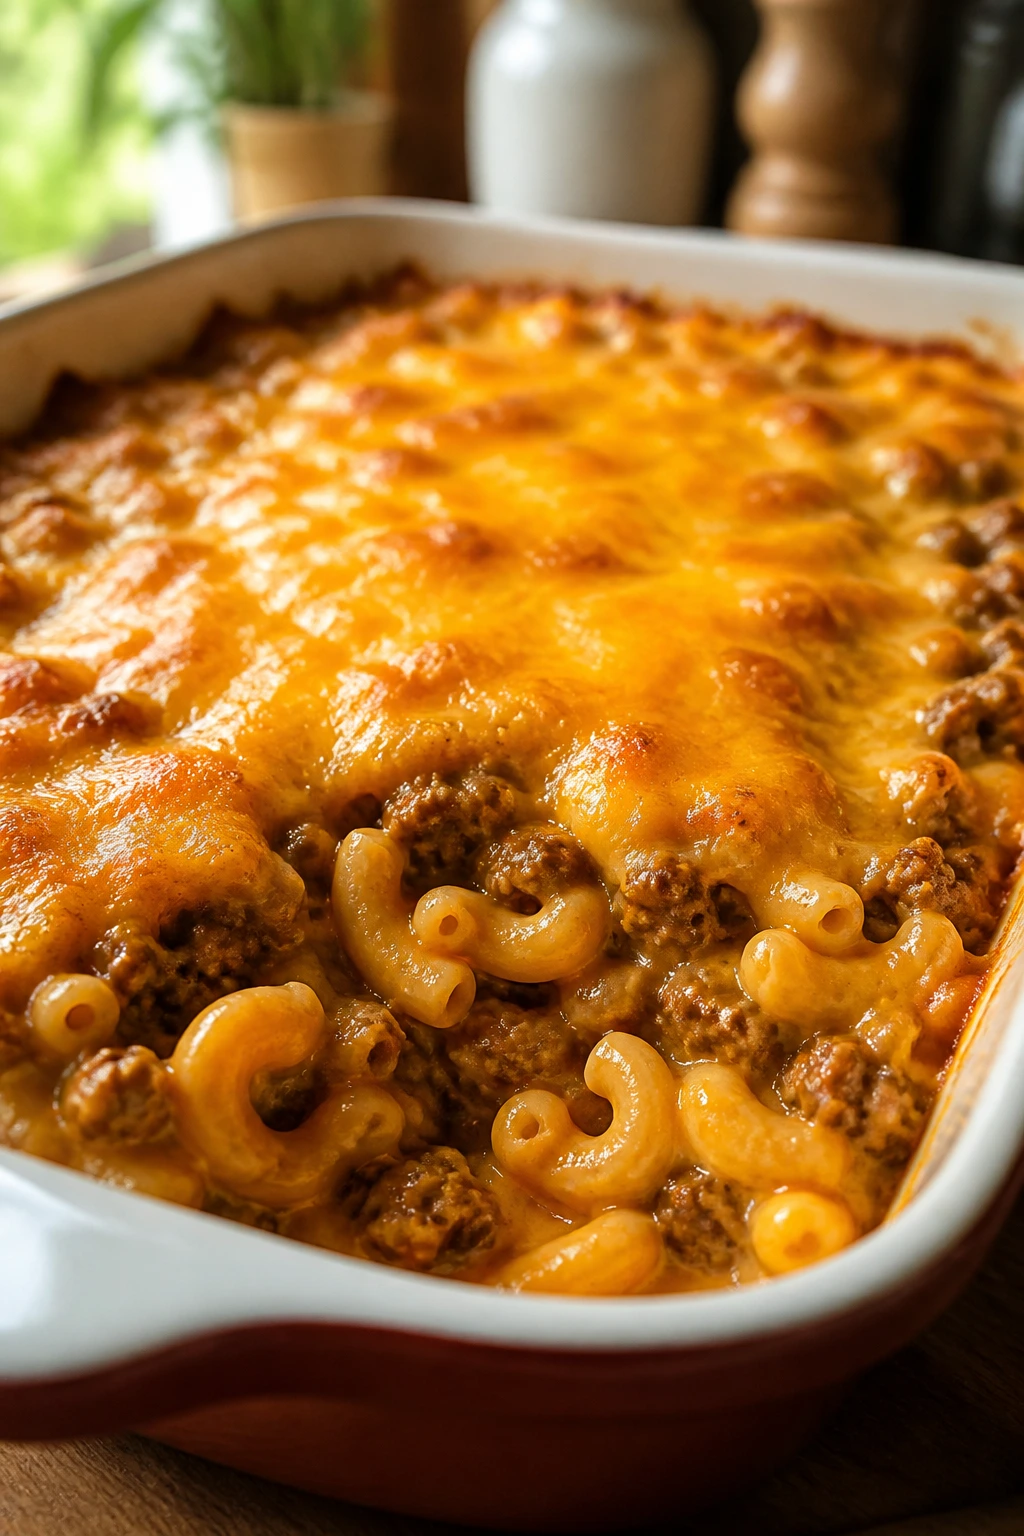
This is the pan that settles arguments about what to make when half the house wants tacos and the other half wants pasta. You get both. The macaroni is creamy, the beef is seasoned, the cheese is generous, and the whole thing lands somewhere between taco night and mac and cheese night, which is not a bad place to be. It takes about 20 minutes to prep and 30 minutes to bake.
Why It Works
Taco seasoning does the job of giving the beef immediate personality, while cream cheese and milk turn the pasta into a real casserole instead of a dry pile of noodles. Corn and diced tomatoes bring little bursts of sweetness and acidity. That keeps the dish from becoming one-note, which is the biggest problem with a lot of “taco pasta” recipes.
I also like the texture here. The noodles hold their shape, the cheese melts into the sauce, and a few crushed tortilla chips on top give the casserole a little crackle if you want it. Simple. Effective.
Key Ingredients
-
1 1/2 pounds ground beef — Lean enough to stay balanced, rich enough to taste good.
-
1 packet taco seasoning — Fast seasoning that works.
-
12 ounces elbow macaroni, cooked al dente — The classic shape for a cheesy bake.
-
1 can (10 ounces) diced tomatoes with green chilies — Adds acidity and mild heat.
-
1 cup salsa — Thick salsa keeps the sauce from thinning out.
-
1 cup corn kernels — Sweet contrast to the spice.
-
4 ounces cream cheese, softened — Makes the sauce creamy.
-
1 cup milk — Helps loosen the cheese mixture.
-
2 cups shredded cheddar — The main cheese flavor.
-
1 cup pepper jack — Gives the casserole a little kick and better melt.
-
1/2 cup crushed tortilla chips, optional — For a crunchy top.
Quick Steps
-
Preheat the oven to 375°F and grease a 9×13-inch baking dish.
-
Brown the beef in a large skillet over medium-high heat for 7 to 8 minutes. Drain the fat, then stir in the taco seasoning and 1/4 cup water.
-
Add the diced tomatoes, salsa, corn, cream cheese, and milk. Stir over low heat until the cream cheese melts and the sauce looks smooth.
-
Fold in the cooked macaroni and half of both cheeses. The sauce should coat every noodle.
-
Transfer to the baking dish and top with the remaining cheddar and pepper jack.
-
Bake for 20 to 25 minutes until bubbling. If you want a crunchy top, add tortilla chips during the last 5 minutes so they don’t burn.
-
Rest for 5 minutes before serving.
Equipment for This Recipe
-
9×13-inch baking dish — For the final bake.
-
Large skillet — For the beef and sauce.
-
Large pot — For cooking the macaroni.
-
Colander — For draining the pasta.
How to Serve This Dish
A wedge of iceberg lettuce with diced tomatoes, or a simple green salad with ranch, fits the mood here. Sour cream, sliced jalapeños, and chopped scallions can all go on top at the table. It serves 8, and it’s one of the stronger leftover casseroles in the bunch.
Pro Tips for This Recipe
-
Cook the macaroni just to al dente. It softens more in the oven.
-
Add the cream cheese over low heat so it melts smoothly.
-
Use thick salsa, not watery salsa.
-
If you like extra crunch, add the tortilla chips at the end, not the beginning.
Variations on This Dish
-
Mild Taco Bake: Use mild taco seasoning and plain diced tomatoes instead of tomatoes with chilies.
-
Black Bean Version: Stir in a can of black beans and reduce the beef to 1 pound.
-
Spicy Topper: Finish with sliced jalapeños or a drizzle of hot sauce.
Common Mistakes to Avoid with This Dish
-
Letting the pasta overcook: Soft noodles turn mushy after baking.
-
Adding cheese to a cold sauce: It melts better when the mixture is warm.
-
Skipping the rest: A short pause keeps the casserole creamy instead of runny.
10. Bacon Cheeseburger Cauliflower Bake
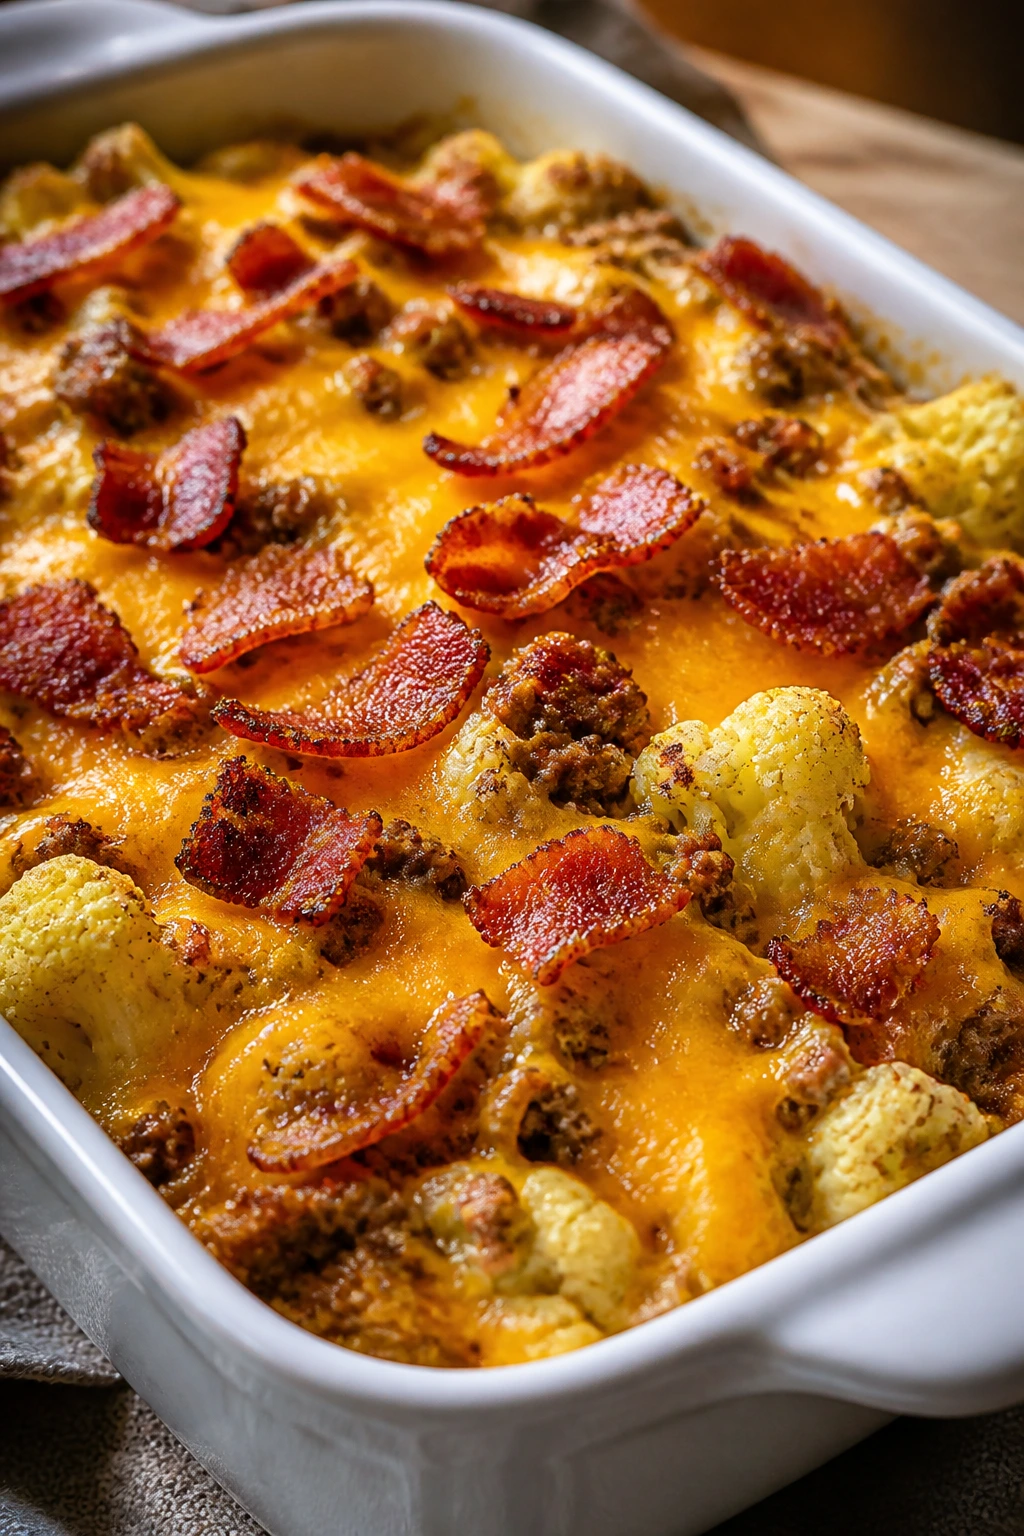
This one scratches the cheeseburger itch without the bun. Cauliflower keeps the pan lighter than the pasta or potato versions, but the bacon, cheddar, mustard, and pickles make sure nobody mistakes it for diet food in the sad sense. It’s rich, savory, and fast enough to fit a normal evening. Plan on 20 minutes of prep and 35 minutes of baking.
Why It Works
Cauliflower is mild, which makes it a good base for big burger flavors. It picks up the cheese sauce without fighting it. Bacon adds salt and crunch, while the mustard and pickles keep the casserole from feeling too heavy or too creamy.
This is one of the rare lower-carb casseroles that doesn’t feel like it’s apologizing for itself. It has enough fat, acid, and salt to taste complete. That’s the difference between a satisfying bake and a compromise that everyone notices.
Key Ingredients
-
1 1/2 pounds ground beef — Browned with enough time to get some color.
-
1 large head cauliflower, cut into small florets — Smaller pieces cook more evenly.
-
6 slices bacon, cooked and crumbled — Adds smoky saltiness.
-
1 small onion, diced — Gives the beef a sweeter base.
-
8 ounces cream cheese, softened — Builds the creamy binder.
-
1/2 cup sour cream — Makes the sauce tangy.
-
2 cups shredded cheddar — The main cheese flavor.
-
1 tablespoon ketchup — Just enough burger flavor.
-
1 tablespoon yellow mustard — Keeps the filling bright.
-
2 tablespoons chopped pickles or relish — The burger note that makes sense.
-
1/2 teaspoon black pepper — Helps the rich filling stay sharp.
Quick Steps
-
Preheat the oven to 375°F and grease a 9×13-inch baking dish.
-
Steam the cauliflower florets for 4 to 5 minutes, until barely tender but still holding their shape. Drain well.
-
Brown the beef and onion in a large skillet over medium-high heat for 7 to 8 minutes, then drain the fat.
-
Stir in the cream cheese, sour cream, ketchup, mustard, pickles, salt, and pepper. Heat gently until the mixture looks smooth.
-
Fold in the cauliflower and half the bacon, then spread into the baking dish.
-
Top with cheddar and the remaining bacon, then bake for 25 to 30 minutes until bubbling and lightly browned.
-
Rest for 5 minutes before serving so the sauce tightens up.
Equipment for This Recipe
-
9×13-inch baking dish — For the final bake.
-
Large skillet — For the beef base.
-
Steamer basket or microwave-safe bowl — For the cauliflower.
-
Wooden spoon — For folding in the cauliflower without breaking it.
How to Serve This Dish
A crisp salad with tomato and celery works well on the side because the casserole is rich. If you want to lean into the burger idea, add sliced pickles and a few tomato wedges on the plate. It feeds 6 comfortably and reheats well for lunch the next day.
Pro Tips for This Recipe
-
Don’t fully soften the cauliflower. It should still have some firmness before baking.
-
Drain the cauliflower well after steaming. Extra water thins the sauce.
-
Add the pickles after baking if you want them brighter and less muted.
-
Bacon on top gives the best crunch, so keep some for the end.
Variations on This Dish
-
Jalapeño Burger Bake: Stir in chopped jalapeños and use pepper jack cheese.
-
Double Pickle Version: Add chopped pickles to the filling and extra on top after baking.
-
No-Bacon Shortcut: Skip the bacon and add smoked paprika for a little smoky flavor.
Common Mistakes to Avoid with This Dish
-
Oversteaming the cauliflower: Soft cauliflower falls apart.
-
Using cold cream cheese: It won’t blend smoothly into the filling.
-
Adding too much liquid: The casserole should be creamy, not soupy.
11. Cheesy Beef, Mushroom, and Green Bean Casserole
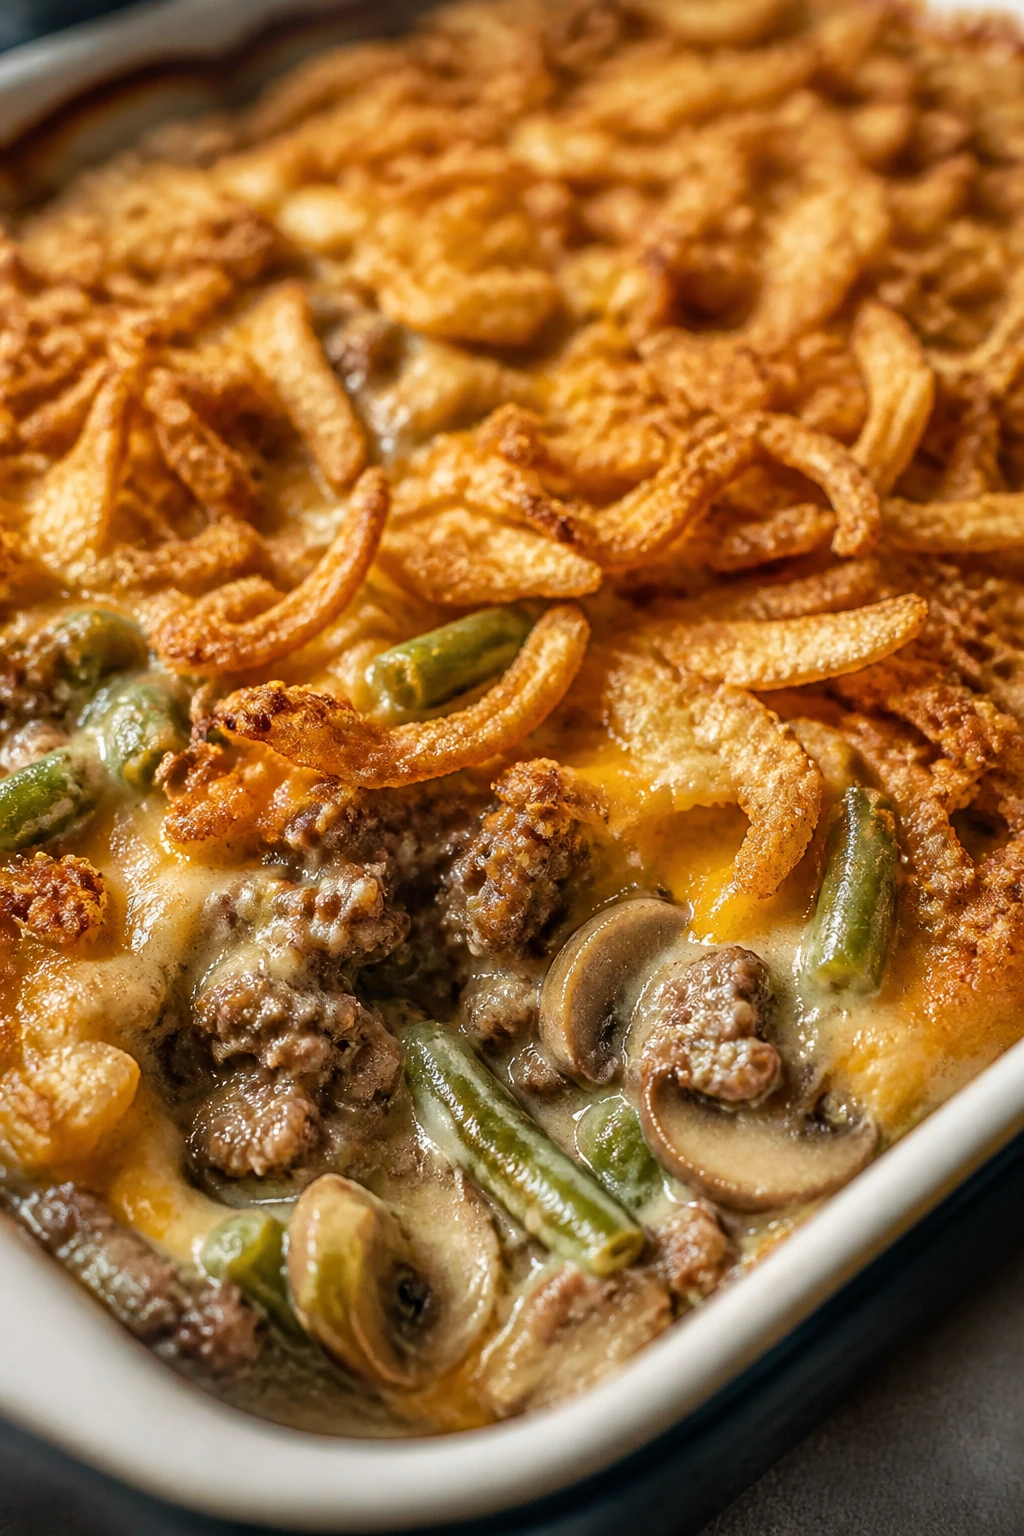
This is the casserole that feels a little more grown-up without turning precious. It has the familiar green bean casserole vibe, but beef and mushrooms give it enough body to work as dinner. The fried onions on top are not subtle. Good. They’re supposed to be there. It takes about 20 minutes to prepare and 40 minutes in the oven.
Why It Works
Green beans need help if they’re going to carry a casserole, and beef is a smart way to give them that help. Mushrooms deepen the flavor and echo the meaty notes, while the creamy sauce keeps everything from drying out. Cheddar gives the pan a familiar finish, and the fried onions bring crunch.
I like this one most when the green beans are cut into manageable pieces. Long beans look pretty for about five seconds, then they become awkward on a fork. Shorter pieces make the whole dish easier to eat, which matters more than the photo.
Key Ingredients
-
1 1/2 pounds ground beef — The base of the dish.
-
8 ounces mushrooms, sliced — They add moisture and a savory edge.
-
4 cups green beans, trimmed and cut into bite-size pieces or thawed from frozen — Fresh or frozen both work.
-
1 medium onion, diced — Sweetens the beef and mushrooms.
-
3 cloves garlic, minced — Keeps the flavors from going muddy.
-
2 tablespoons flour — Helps thicken the sauce.
-
1 cup beef broth — Builds the savory liquid.
-
1 cup milk — Gives the sauce a creamy finish.
-
2 cups shredded cheddar — The cheese that pulls the casserole together.
-
1 cup crispy fried onions — The crunchy top that makes the dish feel complete.
-
1 teaspoon dried thyme — A small herb note that fits mushrooms well.
Quick Steps
-
Preheat the oven to 375°F and grease a 9×13-inch baking dish.
-
Brown the beef, onion, and mushrooms in a large skillet over medium-high heat for 8 minutes, until the mushrooms release their moisture and the beef loses all pink color. Drain excess fat.
-
Stir in the garlic, thyme, and flour. Cook for 1 minute, then pour in the broth and milk. Simmer for 2 to 3 minutes until the sauce thickens.
-
Fold in the green beans and half of the cheddar. Spoon the mixture into the baking dish.
-
Top with the remaining cheddar and bake for 25 minutes.
-
Add the crispy fried onions and bake for 10 to 12 minutes more, until the top is golden and the beans are tender.
-
Rest for 5 minutes before serving.
Equipment for This Recipe
-
9×13-inch baking dish — Holds the casserole.
-
Large skillet — For the beef and sauce.
-
Wooden spoon — For thickening the sauce and folding in the beans.
-
Measuring cups and spoons — Important for the sauce balance.
How to Serve This Dish
A slice of buttered rye bread or a simple roll turns this into a very complete dinner. I also like serving it with sliced tomatoes or a plain cucumber salad. It feeds 6, and the leftovers are especially good once the flavors settle overnight.
Pro Tips for This Recipe
-
Let the mushrooms cook until their water cooks off. That keeps the sauce from thinning.
-
Frozen green beans are fine if they’re thawed and drained well.
-
Add the fried onions at the end so they stay crisp.
-
Taste the sauce before it goes in the dish. Green beans need enough seasoning to hold their own.
Variations on This Dish
-
Swiss Mushroom Version: Swap half the cheddar for Swiss for a more earthy finish.
-
Extra-Creamy Bake: Stir in 2 ounces cream cheese with the milk.
-
Bacon-Boosted Pan: Add crumbled bacon with the beef for more smoke and salt.
Common Mistakes to Avoid with This Dish
-
Watery mushrooms: Cook them long enough to lose their moisture.
-
Soggy onion topping: Add the fried onions near the end only.
-
Underseasoned beans: Green beans need more seasoning than you’d think.
12. Greek-Style Beef Orzo Bake
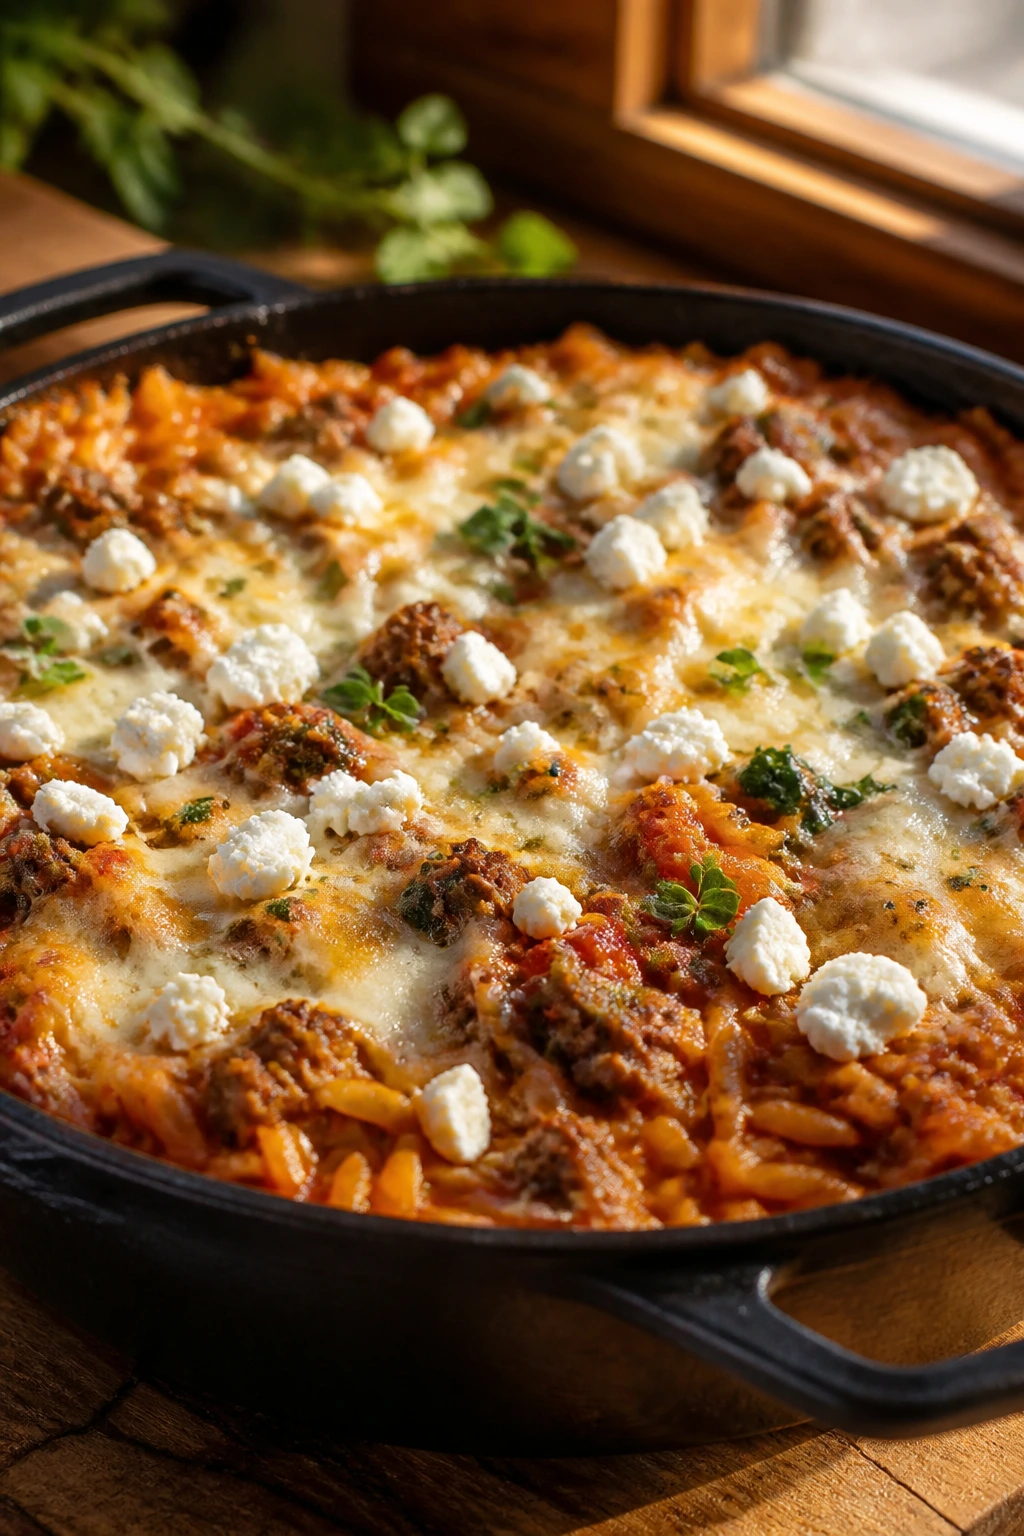
This pan has a little more brightness than the others, which is why I keep it in the rotation. Tomato, oregano, garlic, feta, and mozzarella make the casserole taste fuller than the ingredient list suggests. Orzo cooks right in the sauce, so the whole dish comes together in one snug bake. It needs about 20 minutes of prep and 35 minutes in the oven.
Why It Works
Orzo is small enough to absorb the broth and tomato without turning the casserole into a brick. The beef gives the dish weight, while spinach and olives bring sharpness and a bit of color. Feta on top adds salt, which is exactly what a tomato-based bake like this wants.
The cinnamon may seem tiny, but don’t skip it. A small pinch gives the meat sauce a warm undertone that plays well with tomato and oregano. You won’t taste “cinnamon casserole.” You’ll just taste a sauce that seems more rounded.
Key Ingredients
-
1 1/2 pounds ground beef — Browned for flavor.
-
1 medium onion, diced — The sweet base.
-
3 cloves garlic, minced — Essential with tomato and oregano.
-
1 1/2 cups dry orzo — Cooks right in the casserole.
-
1 can (14.5 ounces) diced tomatoes — Adds acidity and moisture.
-
2 1/2 cups beef broth — Enough liquid to cook the orzo.
-
1 teaspoon dried oregano — Gives the dish its Greek-style profile.
-
1/2 teaspoon cinnamon — A small warm note that works with beef.
-
1 cup chopped spinach — Easy way to bring in greens.
-
1/2 cup chopped kalamata olives, optional — For a saltier, brinier edge.
-
1 1/2 cups shredded mozzarella — For melt and stretch.
-
1/2 cup crumbled feta — For salt and tang.
Quick Steps
-
Preheat the oven to 375°F and grease a 9×13-inch baking dish.
-
Brown the beef and onion in a large skillet over medium-high heat for 7 to 8 minutes, then drain the fat. Stir in the garlic, oregano, cinnamon, salt, and pepper.
-
Add the diced tomatoes, beef broth, orzo, spinach, and olives if you’re using them. Stir well and pour into the baking dish.
-
Cover tightly with foil and bake for 20 minutes, until the orzo is mostly tender and most of the liquid has been absorbed.
-
Stir the pan once, then top with mozzarella and feta.
-
Bake uncovered for 10 to 12 minutes more, until the cheese melts and the edges bubble.
-
Rest for 5 minutes before serving so the orzo finishes setting.
Equipment for This Recipe
-
9×13-inch baking dish — For the orzo bake.
-
Large skillet — For browning and combining the beef mixture.
-
Foil — Needed for the covered bake.
-
Wooden spoon — For stirring the orzo so it cooks evenly.
How to Serve This Dish
A lemony salad with cucumbers and tomatoes makes a clean side. Pita bread is optional but nice if you want to scoop the saucy bits from the pan. It serves 6, and the leftovers hold up well, though the orzo will thicken in the fridge.
Pro Tips for This Recipe
-
Stir the orzo before baking so it doesn’t clump.
-
Use enough broth. Orzo drinks up liquid fast.
-
Add spinach near the end of the skillet step if you want it a little more visible in the finished dish.
-
Feta goes on after the first bake so it keeps its shape and doesn’t disappear.
Variations on This Dish
-
No-Olive Version: Leave out the olives and add a little extra oregano if you want a milder pan.
-
Spinach-Heavy Bake: Stir in 2 more cups of spinach for a greener casserole.
-
Chicken-Free Moussaka Mood: Add a spoonful of cinnamon and a little more feta for a deeper Mediterranean feel.
Common Mistakes to Avoid with This Dish
-
Not covering the first bake: Orzo needs steam to cook properly.
-
Using too little broth: The pasta will stay hard if the pan runs dry.
-
Adding all the cheese too early: Feta can dry out if it bakes too long.
Why Ground Beef Casseroles Work So Well Together
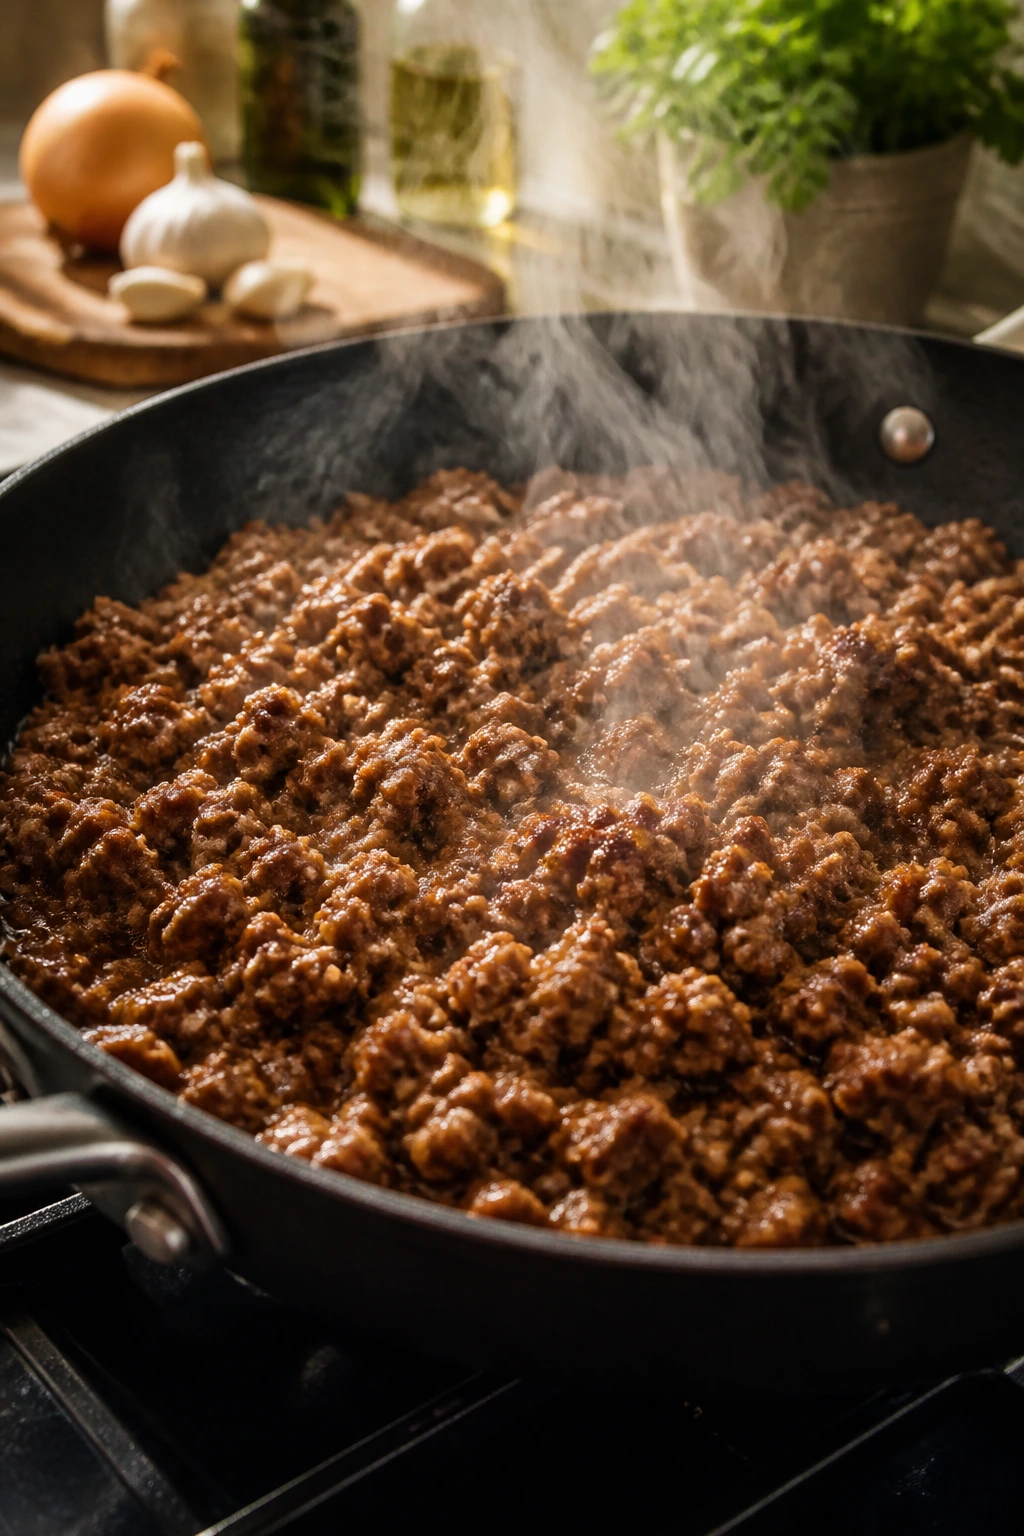
Ground beef is one of those ingredients that changes shape without losing its voice. Brown it hard and it tastes deeper. Drain it well and it stays clean. Mix it with sauce, starch, and cheese, and it turns into a dinner that can feel like a potato bake one night, a taco pan the next, and a pasta casserole after that. That flexibility is why it belongs in family cooking.
Cheese matters more than people admit. Not as a gimmick. As structure. Sharp cheddar, mozzarella, provolone, and feta each do a different job, and the best casseroles know which one to ask for. Cheddar gives edge. Mozzarella gives melt. Provolone gives that sandwich-shop flavor. Feta wakes things up with salt. When cheese is chosen well, it doesn’t just sit on top. It finishes the whole pan.
There’s also the matter of heat and rest. A casserole needs enough oven time to bring the center to a proper hot state—ground beef should be cooked through to 160°F in the finished pan—and then it needs a short pause. That rest lets the starch settle, the sauce thicken, and the slices hold. Skip it and the first serving always looks sloppy. Wait a few minutes and the same pan looks deliberate.
Tools That Keep These Bakes Easy
-
9×13-inch baking dish — The workhorse size for most family casseroles.
-
Large skillet — Wide enough to brown beef instead of steaming it.
-
Large pot — Useful for pasta, rice, or blanching vegetables.
-
Sharp chef’s knife — Makes even onion, pepper, and potato cuts easier.
-
Mandoline, optional — Handy for thin potato slices if you use it carefully.
-
Wooden spoon or sturdy spatula — Better for breaking up beef and stirring thick sauces.
-
Colander — Helps drain pasta, rice, or vegetables without fuss.
-
Foil — Important for covered bakes that need steam.
-
Measuring cups and spoons — The sauce-to-starch ratio is worth measuring.
-
Airtight storage containers — Make leftovers easier to store and reheat.
Smart Shopping for Beef, Cheese, and Starches
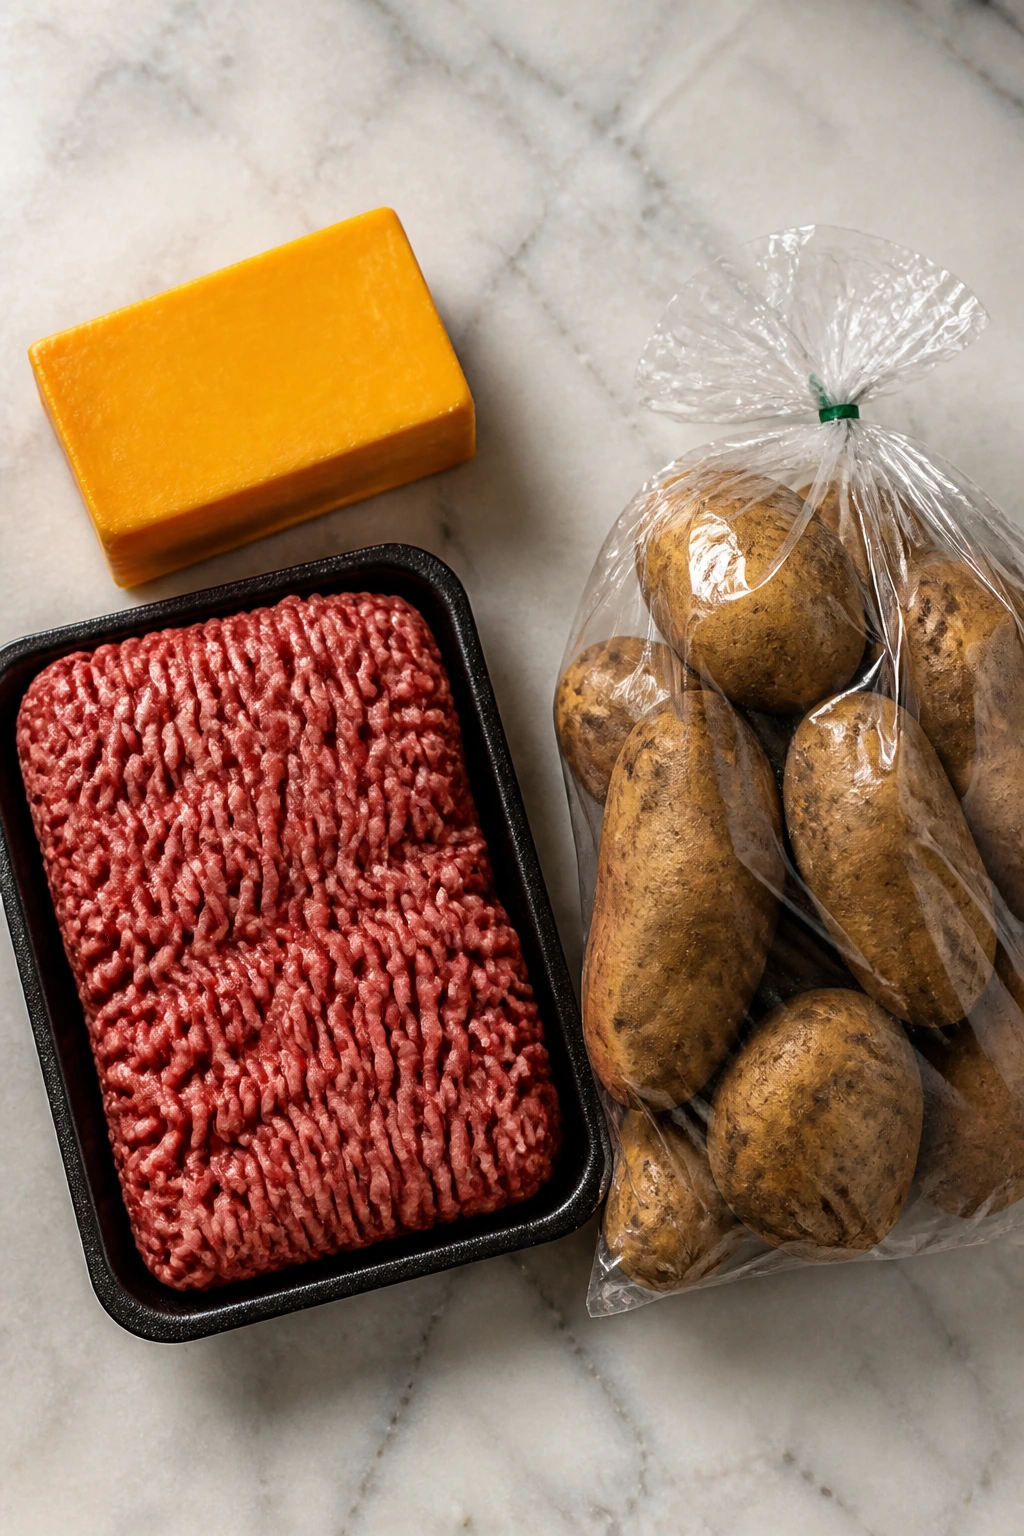
For ground beef, I like 85/15 for most casseroles. It has enough fat to taste good, but not so much that the pan turns slick. If you’re using 90/10, add a little olive oil to the skillet and season more carefully, because lean beef can taste plain if you let it. If you’re buying by budget alone, use the beef as the anchor and let the rest of the casserole do the stretching.
Cheese is worth a little thought. Pre-shredded bags are convenient, but they’re coated with anti-caking starch, which can make sauces a little grainy or less silky. A block of cheddar, mozzarella, or provolone shredded at home melts better and tastes fuller. If that extra minute matters, use the bagged cheese and accept that the melt won’t be as smooth.
Potatoes, rice, pasta, tortillas, and biscuit dough each bring their own rules. Russet potatoes need to be sliced thin and evenly. Pasta should usually be cooked a little under its final doneness. Rice works best if it’s already cooked and not wet. Tortillas should be thick enough to survive sauce. Biscuit dough needs room on top so it can brown rather than steam. Frozen vegetables are fine in a lot of these dishes, and in a few cases they’re better because they don’t turn watery as fast as fresh ones.
How to Serve a Family Casserole Dinner
Presentation: Bring the casserole to the table in the baking dish if the top looks browned and settled; that browned edge is part of the appeal. A spoon or square cutter gives you neat portions, and a quick shower of herbs, scallions, or extra cheese at the end makes the pan look finished.
Accompaniments: Crisp salad, roasted broccoli, green beans, cucumber salad, and buttered bread all work across the collection. If the casserole is already rich—like the tater tot or cheeseburger bakes—pick something sharp or fresh on the side. If it’s a tomato-based bake, garlic bread or a simple vinaigrette salad makes sense.
Portions: Most of these pans feed 6 to 8 people, depending on the sides and appetite. A standard serving is one generous square or about 1½ cups of a saucy casserole. If you’re feeding bigger eaters, plan on stretching the dish with a salad and bread rather than making the casserole itself enormous.
Beverage Pairing: I like sparkling water with lemon for the cheesier pans, iced tea with the Tex-Mex or sloppy joe casseroles, and a light red or a cold lager if you’re serving adults and want something a little more relaxed.
Small Tweaks That Change the Whole Pan
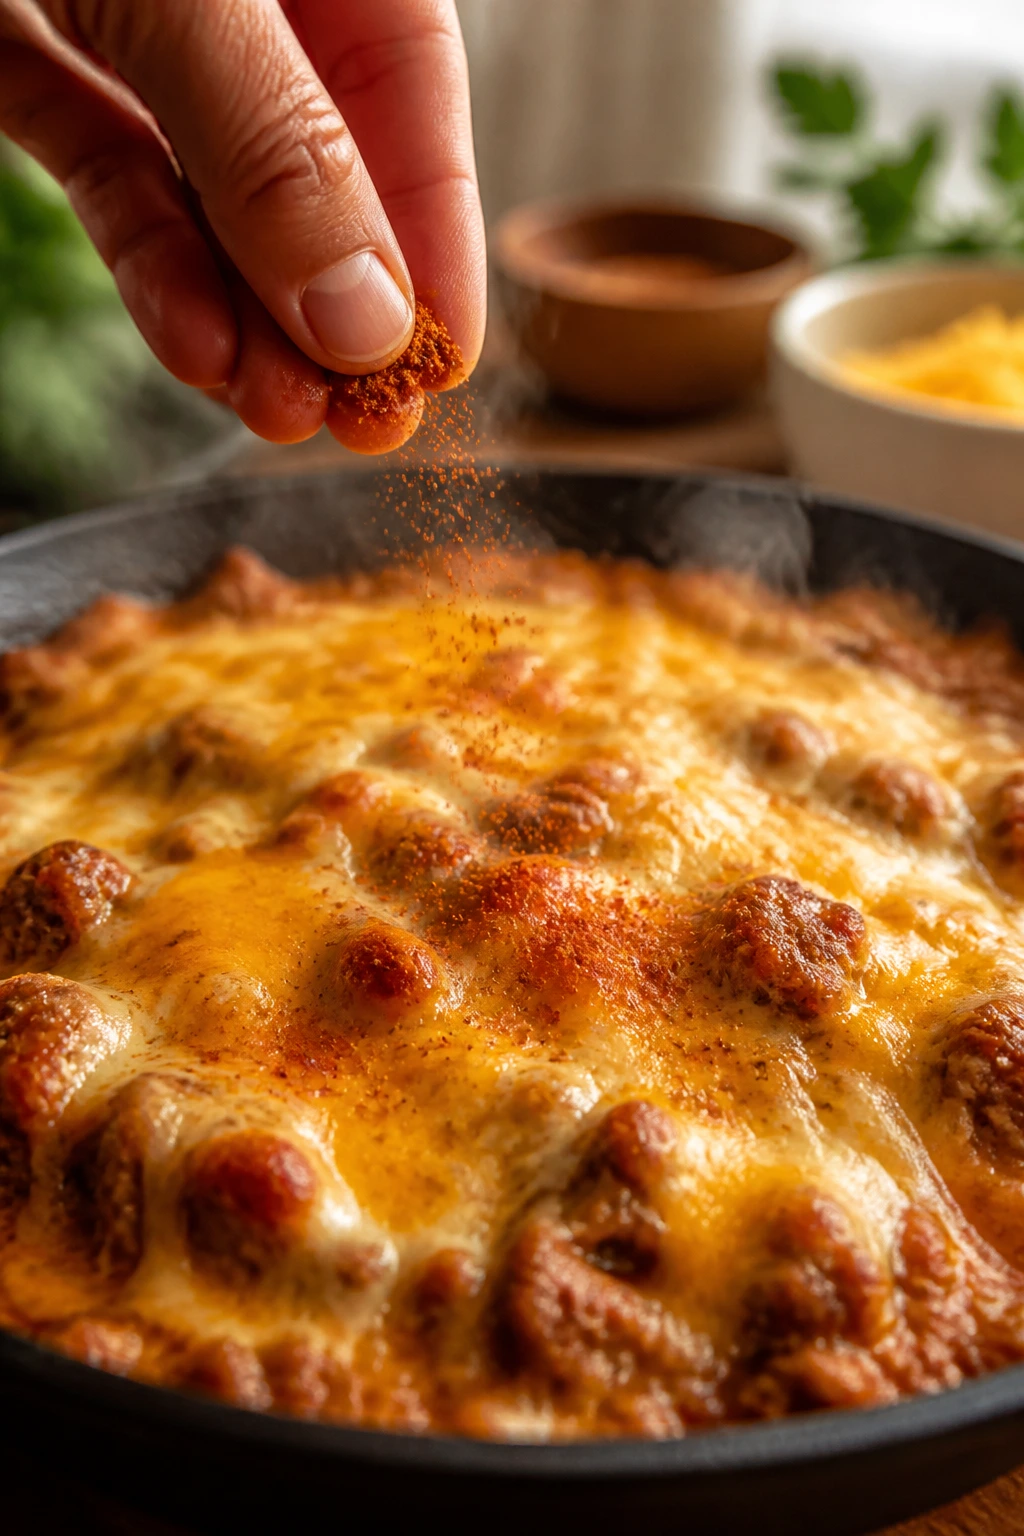
Flavor Enhancement: A spoonful of tomato paste, a dash of Worcestershire, or a pinch of smoked paprika can make a beef casserole taste deeper without changing the whole personality of the dish. Those tiny additions matter more than people think.
Customization: Add chopped mushrooms to almost any of these pans if you want more savoriness. Frozen corn, peas, diced peppers, spinach, and green beans are easy add-ins because they don’t demand a new recipe. You’re not rebuilding the casserole. You’re giving it a little more shape.
Serving Suggestions: Fresh herbs at the end help a heavy casserole feel brighter. Parsley on the potato bake, cilantro on the Tex-Mex pan, scallions on the cheeseburger casserole, and a squeeze of lemon on the orzo bake all make sense.
Make-It-Yours: If you want gluten-free, use cornstarch instead of flour where needed, and choose gluten-free pasta, tortillas, or condensed soup alternatives. For lower dairy, reduce the cheese slightly and lean on broth, tomato, and herbs for flavor. For more heat, add jalapeños or hot sauce at the end so the family can still keep their own portions mild.
Make-Ahead, Storage, and Reheating Guidance

Most of these casseroles can be assembled a few hours ahead, covered, and chilled until baking time. That’s the sweet spot if you know the evening is going to get messy. For dishes with raw potatoes or orzo, I prefer baking them the same day rather than letting them sit overnight, because starches can absorb liquid and change texture in the fridge. The pasta, rice, enchilada, and sloppy joe bakes are more forgiving.
Leftovers keep well in the refrigerator for 3 to 4 days in airtight containers. The denser casseroles, like the potato bake and the tater tot pan, tend to hold texture better than the rice-heavy ones, which can tighten up a little after cooling. Freeze most casseroles for up to 2 months, though the potato and cauliflower versions are better fresh because freezing can change their texture. If you freeze one, let it cool fully first and wrap it tightly.
Reheat covered in a 325°F oven until the center is hot, usually 20 to 30 minutes for a small portion or longer for a whole pan. A microwave works for single servings, but add a spoonful of water or a little sauce on top if the casserole looks dry. For pasta bakes and rice bakes, stir halfway through reheating. For potato or biscuit-topped casseroles, the oven gives better results because it revives the top instead of turning it rubbery.
Family-Friendly Swaps and Variations to Try
Gluten-Free Pan: Use cornstarch or a gluten-free flour blend to thicken sauces, and choose gluten-free pasta, tortillas, or biscuit dough where needed. Most of the beef-and-cheese flavor stays the same, which is the part people actually want.
Lighter Hand: Choose 90/10 ground beef, use a little less cheese, and lean harder on vegetables like broccoli, mushrooms, or peppers. The pan will still feel rich, just less heavy on the plate.
Spice-It-Up Tray: Add chopped jalapeños, chipotle powder, or hot sauce to the Tex-Mex, taco, and cheeseburger casseroles. Keep the base mild if you’re feeding kids, then let adults add heat at the table.
Vegetable-Forward Version: Add mushrooms to almost any beef casserole, because they blend in without making the dish feel like a “vegetable dinner.” Zucchini, spinach, peppers, and green beans work well too, as long as you don’t drown the pan in extra moisture.
No-Condensed-Soup Option: Make a quick white sauce with butter, flour, broth, and milk when a recipe calls for a canned soup. It takes a few extra minutes, but the flavor is cleaner and the salt level is easier to control.
Common Casserole Mistakes to Avoid
Too much liquid: A casserole should be saucy, not soupy. If the filling looks loose in the skillet, it will not magically fix itself in the oven.
Underseasoned beef: Ground beef needs salt, pepper, and usually one sharp note like Worcestershire, mustard, oregano, or tomato paste. Otherwise the whole pan tastes flat under the cheese.
Wrong starch texture: Potatoes sliced too thick stay firm, pasta cooked too long goes mushy, and biscuits tucked too deep never brown properly. Each starch has a job. Respect it.
Skipping the rest: A lot of casseroles need 5 to 10 minutes after baking so the sauce settles. If you cut right away, the first scoop looks sloppy and the texture suffers.
Using cheese that won’t melt well: Some low-moisture cheeses are fine for flavor but not for stretch. Mix in a reliable melter like cheddar, mozzarella, or Monterey Jack so the top actually behaves.
Forgetting to brown the beef enough: Pale beef tastes like boiled dinner. Let it pick up some color in the skillet. That’s where the good flavor lives.
Questions People Ask Before Baking

Can I use lean ground beef instead of 85/15?
Yes, but you may need a little extra fat or a more generous sauce so the casserole doesn’t taste dry. Lean beef works best in tomato-based or creamy casseroles where the moisture comes from elsewhere.
Do I have to brown the beef first?
For these casseroles, yes. Browning builds flavor, removes extra moisture, and helps the beef blend into the sauce instead of sitting there as plain crumbles.
Can I assemble a casserole the night before?
Some of them, yes. Pasta, rice, enchilada, and sloppy joe casseroles usually hold fine overnight if covered well. Potato, biscuit, and orzo bakes are better when assembled closer to baking time so the starches don’t soak up too much liquid.
What cheese melts the best for a ground beef casserole?
Sharp cheddar, mozzarella, Monterey Jack, provolone, and pepper jack all melt well. Parmesan and feta are better as support cheeses than as the whole top layer.
How do I keep a casserole from getting watery?
Brown the beef well, drain the fat, use thick sauces, and don’t overdo frozen vegetables without draining them first. Resting the pan after baking also helps the sauce tighten.
Can I freeze leftovers?
Yes, most of them freeze well for about 2 months. Pasta and rice casseroles are the safest bets. Potato and cauliflower versions can change texture a bit, so I usually eat those fresh or within a few days.
What if the top browns too fast?
Cover it loosely with foil for the last stretch of baking. That stops the cheese or biscuit top from darkening before the center is done.
Is it okay to use frozen vegetables straight from the bag?
Usually yes, but thaw and drain them if they hold a lot of water, especially for broccoli, green beans, or corn. Too much ice clinging to the vegetables can water down the sauce.
A Pan Worth Repeating
There’s a reason cheesy ground beef casseroles stay in family rotation. They’re forgiving without being boring, and they can look like five different dinners while sharing the same basic bones. That matters on real nights, when nobody wants a lecture and everyone wants the food hot.
The best part is that these pans invite small judgment calls. A little more cheddar. A few extra mushrooms. A sharper sauce. That’s where home cooking gets good, because the dish doesn’t need to be perfect to be worth making again.
Quick Reference for All 12 Casseroles
-
1. Classic Cheesy Beef and Potato Casserole — Prep 20 min, Cook 45 min, Total 1 hr 5 min. Serves 6. Standout: layered potatoes and a sharp cheddar crust.
-
2. Tex-Mex Beef Enchilada Casserole — Prep 20 min, Cook 30 min, Total 50 min. Serves 8. Standout: tortillas soak up red sauce without going soggy.
-
3. Cheeseburger Tater Tot Casserole — Prep 15 min, Cook 40 min, Total 55 min. Serves 6. Standout: crunchy tots over burger-style filling.
-
4. Creamy Beef and Broccoli Rice Bake — Prep 20 min, Cook 35 min, Total 55 min. Serves 6. Standout: broccoli keeps some bite under a cheddar sauce.
-
5. Italian Beef and Pasta Bake — Prep 20 min, Cook 35 min, Total 55 min. Serves 8. Standout: ricotta and mozzarella give it a lasagna feel.
-
6. Sloppy Joe Biscuit Casserole — Prep 20 min, Cook 30 min, Total 50 min. Serves 6. Standout: biscuit topping bakes into a soft, golden lid.
-
7. Stuffed Pepper Rice Casserole — Prep 20 min, Cook 35 min, Total 55 min. Serves 6. Standout: all the stuffed pepper flavor without hollowing peppers.
-
8. Philly Cheesesteak Noodle Bake — Prep 20 min, Cook 30 min, Total 50 min. Serves 6. Standout: cream cheese and provolone make it rich.
-
9. Taco Mac and Cheese Casserole — Prep 20 min, Cook 30 min, Total 50 min. Serves 8. Standout: taco spice and creamy pasta in one pan.
-
10. Bacon Cheeseburger Cauliflower Bake — Prep 20 min, Cook 35 min, Total 55 min. Serves 6. Standout: burger flavors with a lighter base.
-
11. Cheesy Beef, Mushroom, and Green Bean Casserole — Prep 20 min, Cook 40 min, Total 1 hr. Serves 6. Standout: green bean casserole meets skillet beef.
-
12. Greek-Style Beef Orzo Bake — Prep 20 min, Cook 35 min, Total 55 min. Serves 6. Standout: tomato, feta, and orzo bake into one pan.