
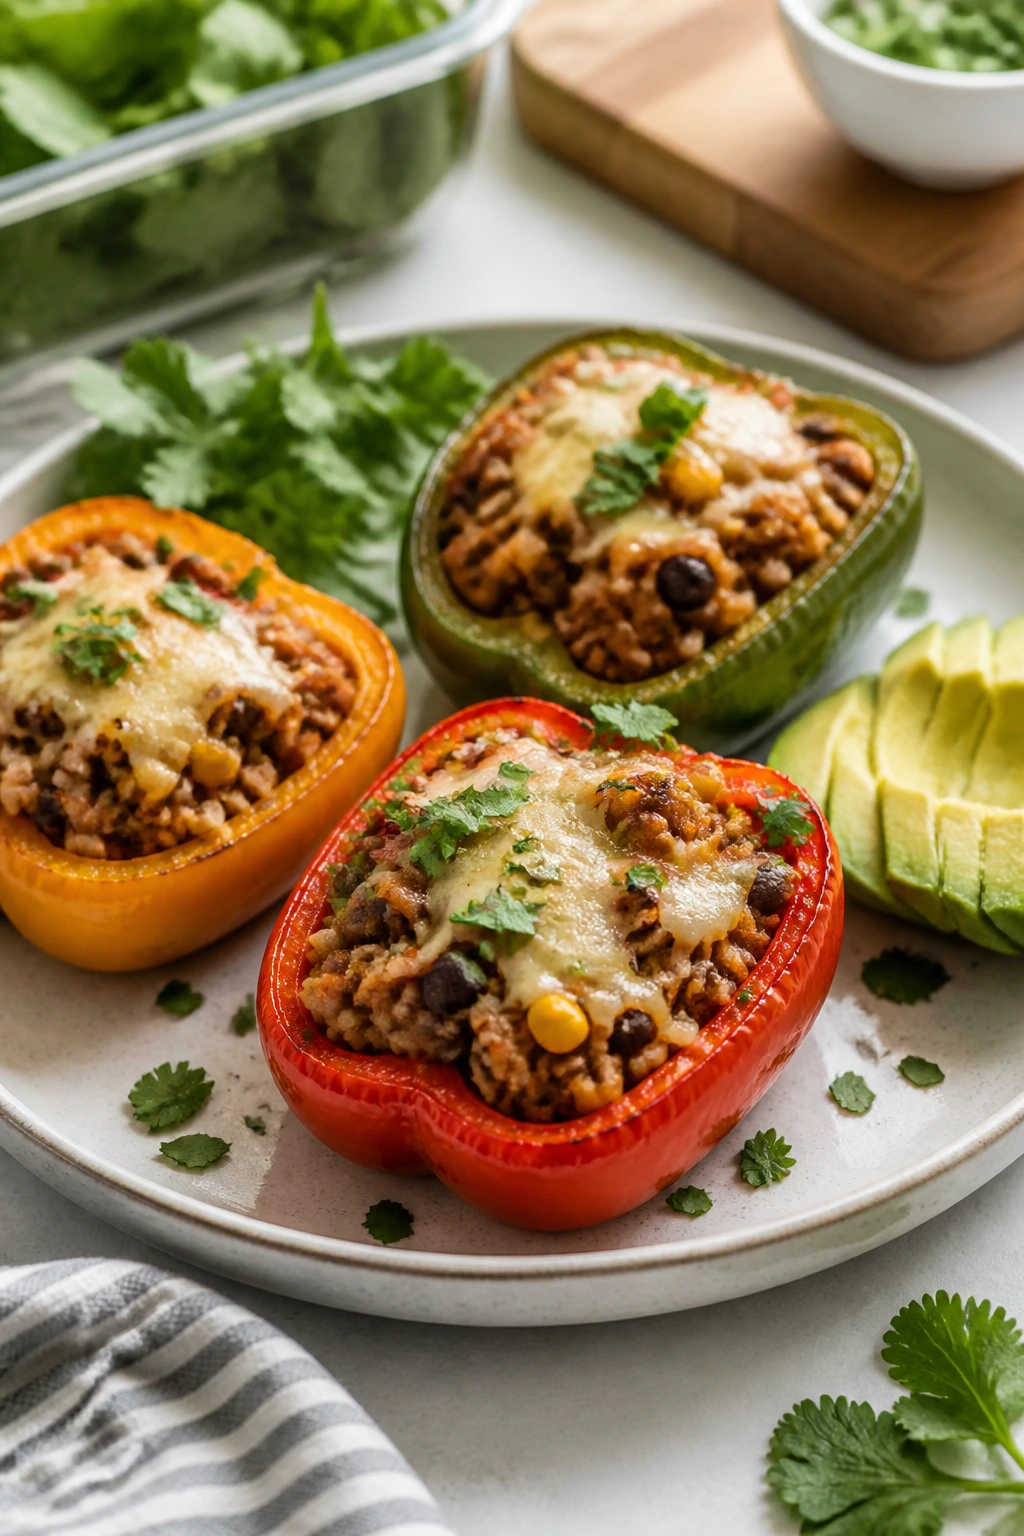
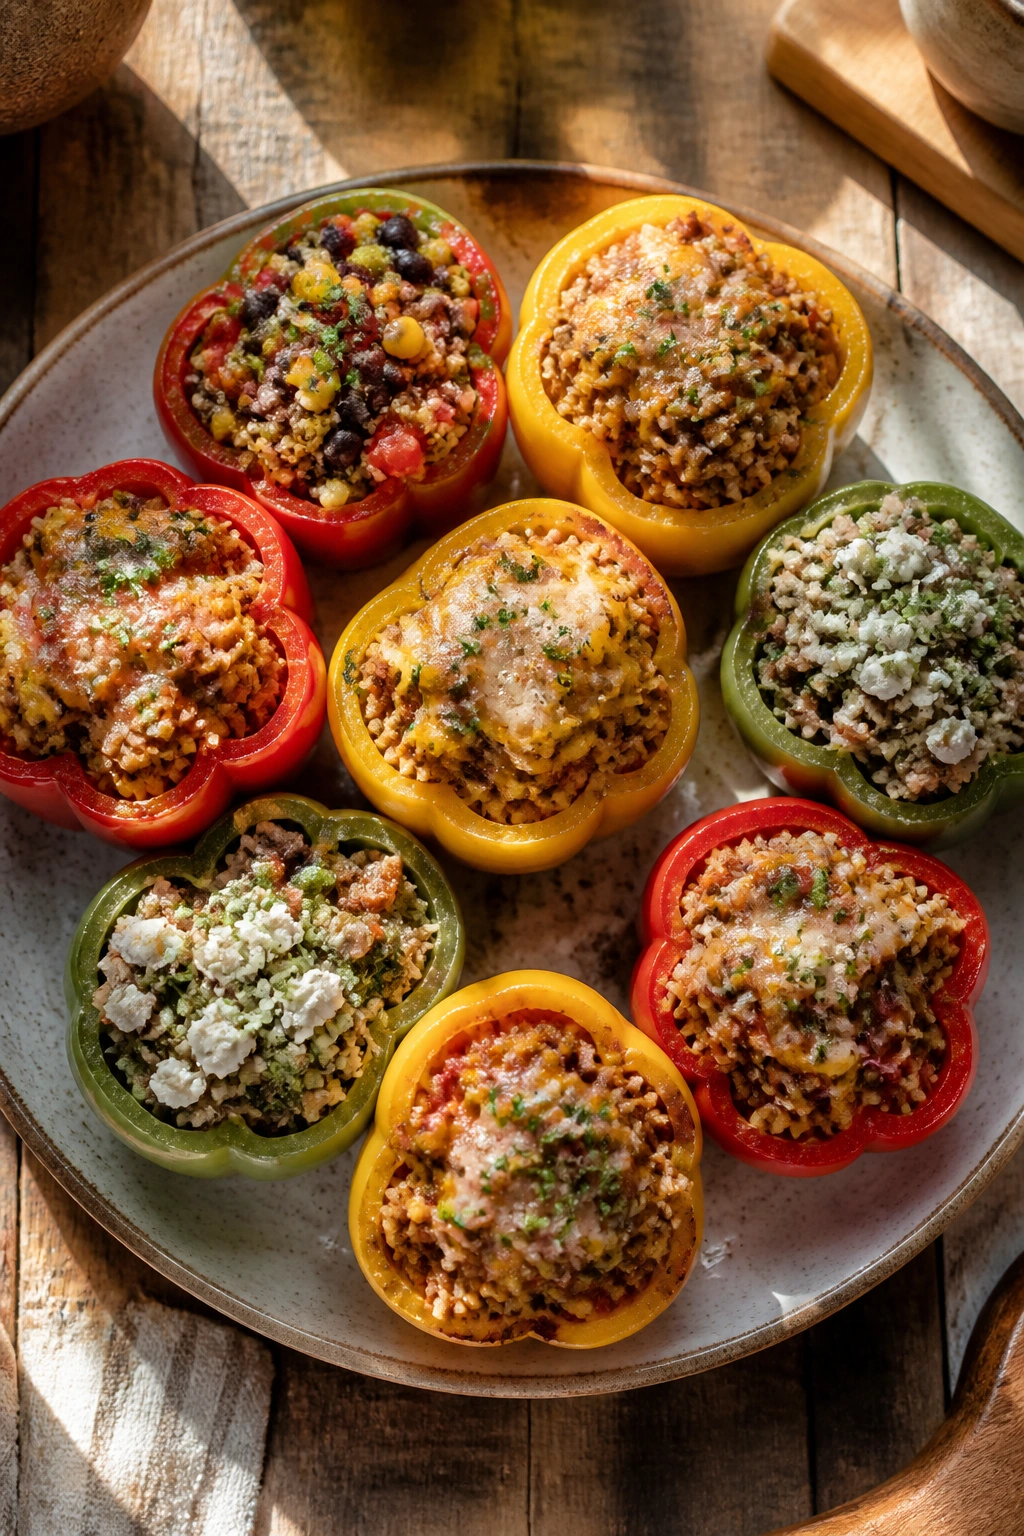
Stuffed pepper dinners for meal prep solve a very specific dinner problem: you want something that holds up in the fridge, reheats without turning to mush, and still feels like an actual meal when you open the container three days later. Bell peppers are good at this. They bring a little sweetness, a sturdy shell, and a built-in portion size that makes weeknight life feel less chaotic.
The best part is how forgiving they are. A pepper can handle beef and rice, sure, but it can also take taco filling, creamy chicken, beans and grain mixtures, or a loud, salty sausage situation and come out the other side looking neat and edible instead of sad and broken. I love that. Some meal prep food feels like compromise. Stuffed peppers feel planned.
There’s also the texture thing, which people don’t talk about enough. A good stuffed pepper isn’t just “healthy” or “easy.” It has contrast: soft filling, tender pepper walls, melted cheese, maybe a bright hit of herbs or acid at the end. That contrast is what keeps leftovers interesting, and it’s the reason a tray of peppers can carry you through several dinners without feeling like you’re eating the same thing on repeat.
Why You’ll Keep Coming Back to These
-
Fridge-friendly structure: Peppers keep their shape better than most baked dinners, so they stay intact after a few days of storage instead of collapsing into a scoopable mess.
-
Built-in portions: One pepper half is a ready-made serving, which makes packing lunches and scaling dinners a lot easier.
-
Easy to vary: Beef, turkey, chicken, sausage, beans, rice, quinoa, orzo, couscous — the base is flexible enough to carry a whole month of different flavors.
-
Reheats well: The fillings stay moist, and the pepper shell protects everything from drying out in the microwave or oven.
-
Budget control: A few peppers plus pantry staples can stretch into several meals without requiring a long grocery list.
-
Meal prep without boredom: The tray can look different every time if you change the seasoning, cheese, grain, or sauce.
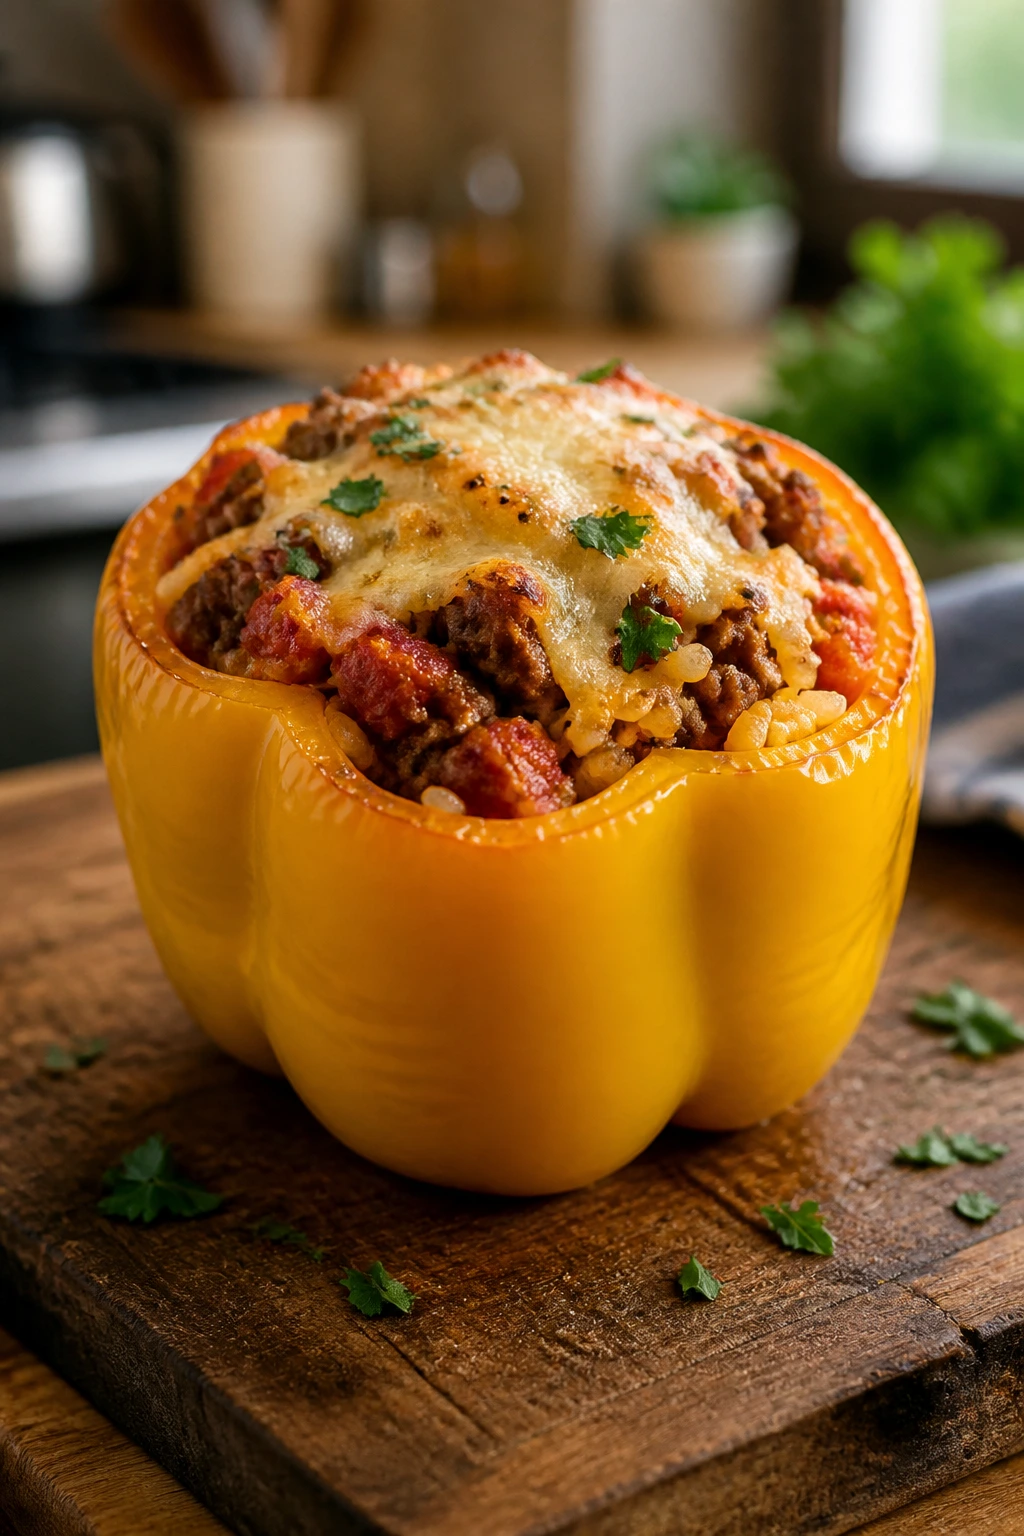
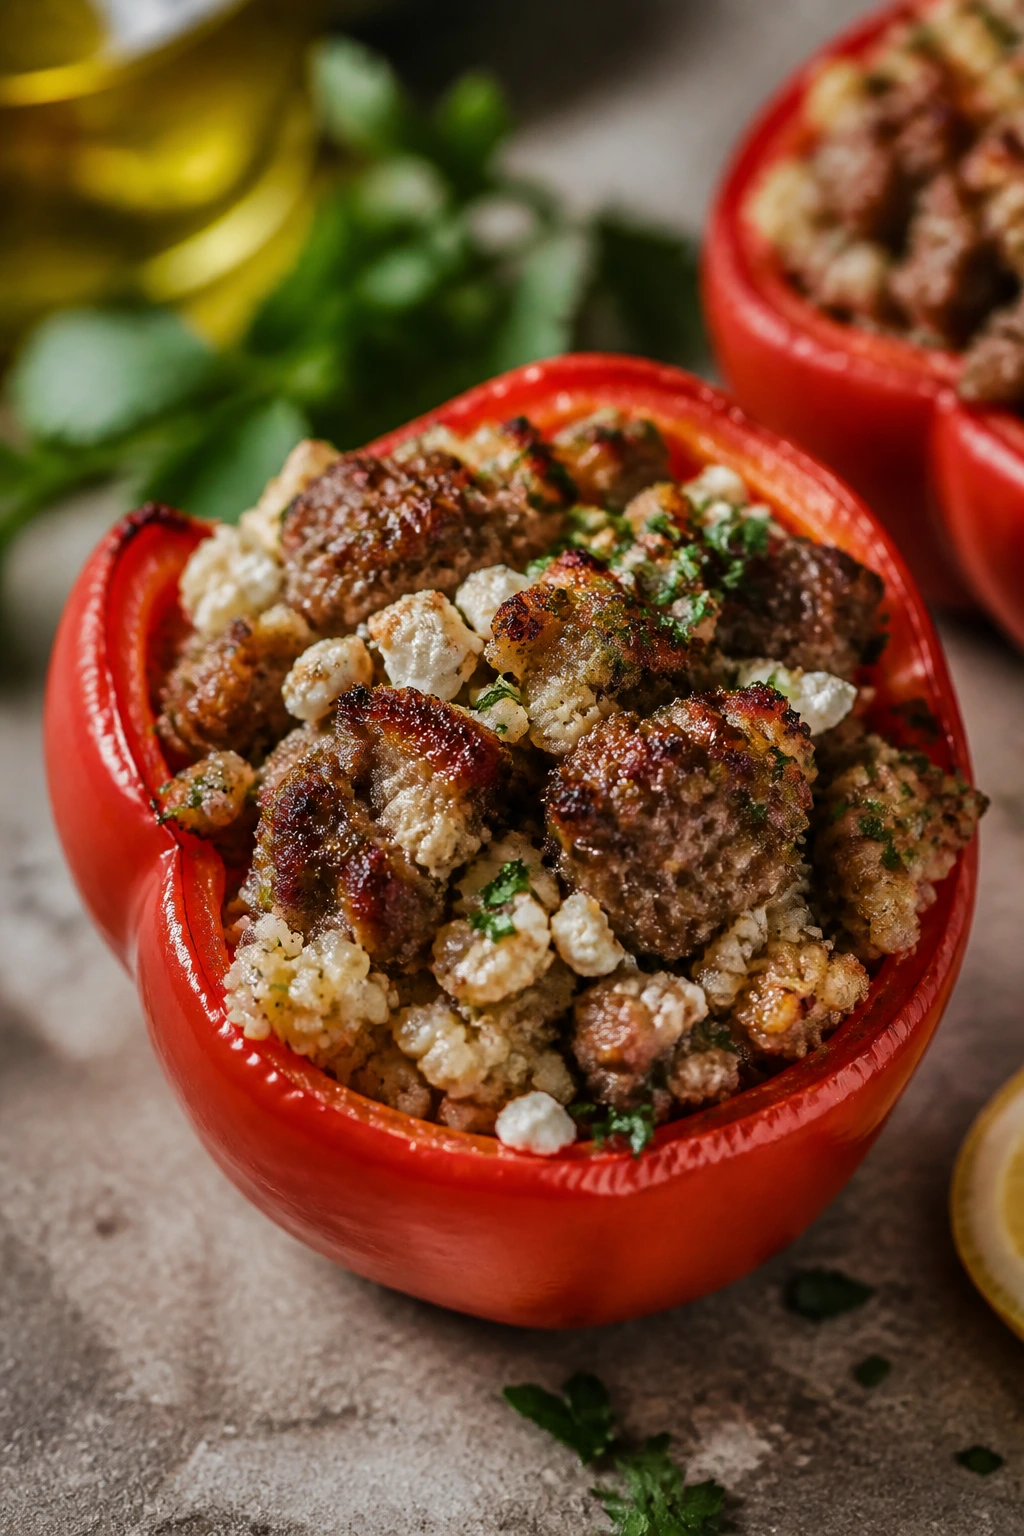
1. Classic Beef and Rice Stuffed Peppers
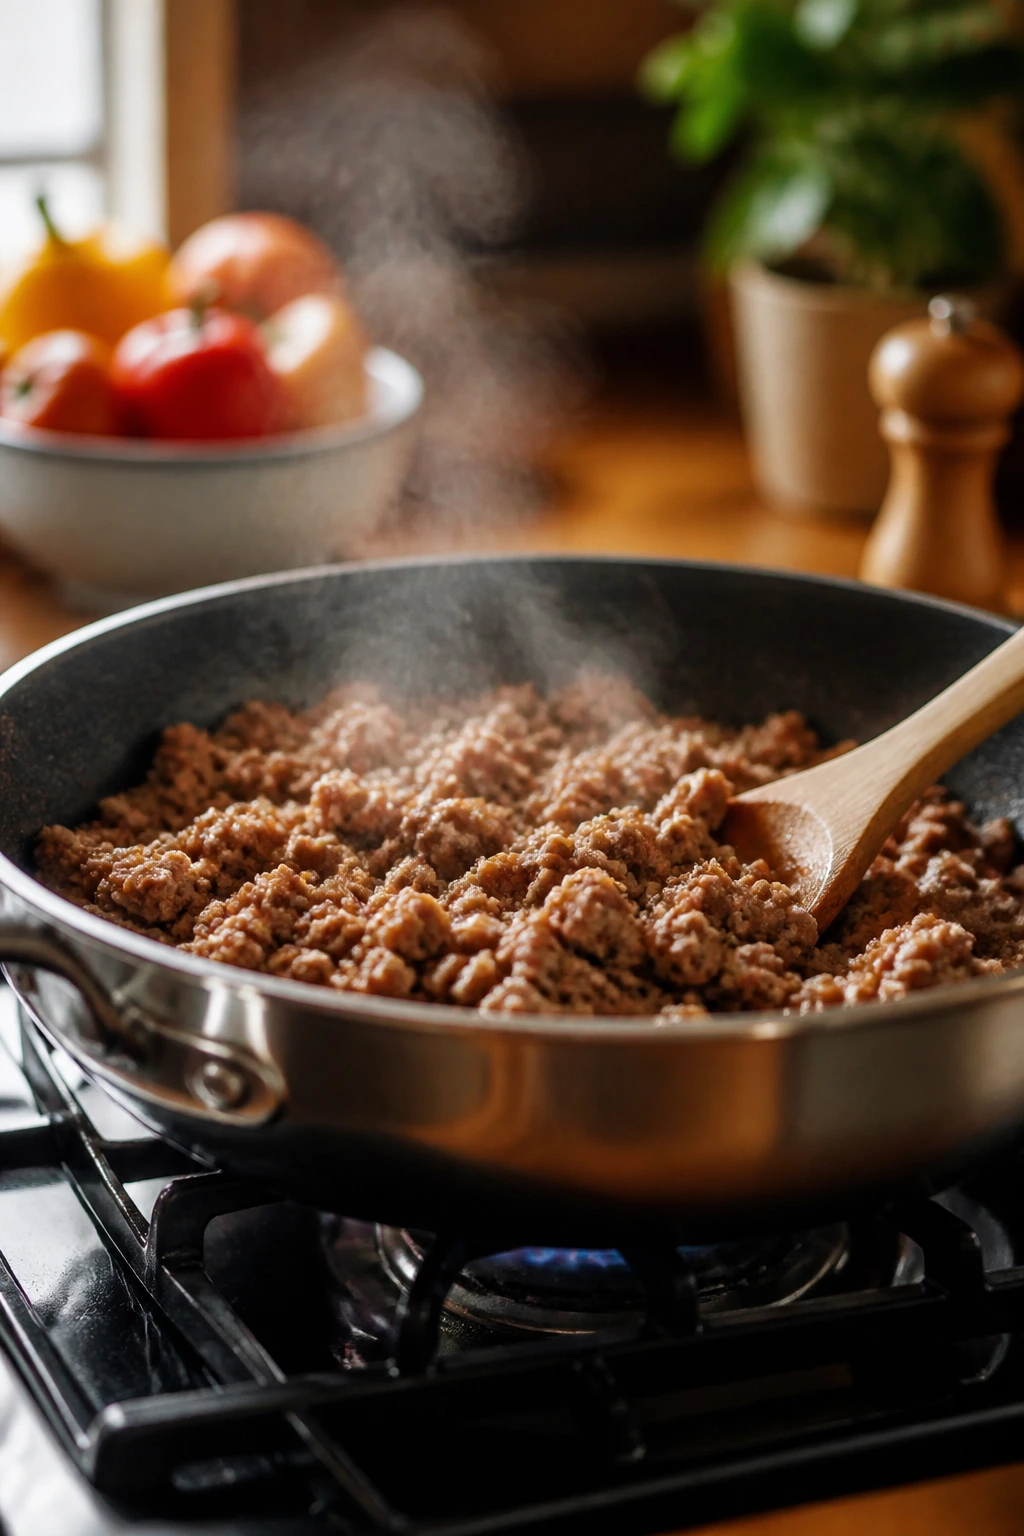
The classic version is still the one I reach for when I want dinner to feel familiar and dependable. It smells like onions, tomato, and browned beef, which is to say it smells like somebody actually cooked.
A good beef-and-rice pepper has a little sweetness from the vegetable shell and a savory, tomato-rich filling that settles in nicely after a night in the fridge. It’s the version most people picture, and for good reason.
Why It Works
This filling is sturdy enough for meal prep because the rice absorbs flavor without going soggy, and the beef gives the dish enough weight to feel like a real dinner. Pre-baking the peppers for a short stretch softens the edges without making them collapse. That matters. Nobody wants a pepper that turns into a floppy bowl by day two.
Key Ingredients
- 6 large bell peppers, tops removed and halved lengthwise for easy packing and even baking
- 1 tablespoon olive oil, for softening the onion and keeping the beef from sticking
- 1 small yellow onion, diced, which gives the filling a sweet base
- 2 garlic cloves, minced, because beef and garlic belong together
- 1 pound lean ground beef, preferably 85/15 or 90/10 so the filling isn’t greasy
- 2 cups cooked long-grain rice, cooled, which helps the filling stay fluffy
- 1 can (14.5 ounces) diced tomatoes, drained, for moisture and tomato flavor without excess liquid
- 2 tablespoons tomato paste, 1 teaspoon kosher salt, 1 teaspoon paprika, and 1/2 teaspoon black pepper, for depth and balance
- 1 1/2 cups shredded cheddar, divided for the filling and the top
Quick Steps
- Preheat the oven to 400°F (205°C) and arrange the halved peppers cut side up in a 9×13-inch baking dish.
- Bake the peppers for 10 minutes so they start to soften and release a little moisture.
- Heat the olive oil in a large skillet over medium heat. Add the onion and cook for 4 minutes, until it turns translucent.
- Add the beef and cook for 6 to 7 minutes, breaking it up with a spoon until no pink remains. Drain excess fat if needed.
- Stir in the garlic, tomatoes, tomato paste, rice, salt, paprika, and black pepper. Cook for 2 minutes until the filling looks thick and glossy, then fold in 1 cup of the cheddar.
- Spoon the mixture into the peppers, top with the remaining cheddar, cover with foil, and bake for 20 minutes. Uncover and bake for 8 to 10 minutes more, until the cheese bubbles and the peppers are tender.
- Rest for 10 minutes before packing. The filling firms up a bit as it cools.
Tips and Variations
- Meal-prep move: Cook the rice a day ahead so the filling goes together fast and stays dry.
- Flavor tweak: A spoonful of Worcestershire sauce gives the beef a deeper, steakhouse-style note.
- If you like heat: Add chopped pickled jalapeños or a pinch of red pepper flakes.
2. Turkey Taco Stuffed Peppers
Want taco night in a pepper shell? This is that, minus the mess of tortillas slipping apart on your plate. It’s bright, a little smoky, and built for people who like leftovers that don’t taste stale by lunch on day three.
The salsa and black beans do most of the heavy lifting here, which is a nice reminder that meal prep does not have to mean dull chicken breast and a sad grain. It can be louder.
Why It Works
Ground turkey is lean, so it benefits from the moisture and seasoning in salsa, beans, and cheese. The taco spices cling to the turkey, and the beans stretch the filling without making it heavy. If you let the peppers soften first, they’ll hold that filling neatly instead of fighting you when you try to eat them with a fork.
Key Ingredients
- 6 large bell peppers, halved lengthwise
- 1 tablespoon olive oil, for the skillet
- 1 small onion, diced, for sweetness and body
- 1 pound ground turkey, lean but not dry
- 2 tablespoons taco seasoning, or a homemade blend with cumin, chili powder, garlic powder, and oregano
- 1 cup salsa, chunky works best here
- 1 cup black beans, rinsed and drained, to make the filling more filling
- 1 cup frozen corn, thawed, for sweetness and texture
- 2 cups cooked brown rice or quinoa, cooled
- 1 1/2 cups shredded pepper jack or cheddar, plus more if you want a heavier cheese cap
- 2 tablespoons chopped cilantro and lime wedges, for serving
Quick Steps
- Heat the oven to 400°F (205°C). Set the pepper halves cut side up in a baking dish and bake them for 8 minutes.
- Warm the olive oil in a skillet over medium heat. Cook the onion for 3 to 4 minutes until soft.
- Add the turkey and cook for 6 to 7 minutes, breaking it apart until it’s no longer pink.
- Stir in the taco seasoning, salsa, black beans, corn, and rice or quinoa. Cook for 2 minutes until the mixture looks thick, not watery.
- Fold in 1 cup of the cheese, then spoon the filling into the peppers. Top with the remaining cheese.
- Cover with foil and bake for 18 minutes, then uncover and bake for 8 to 10 minutes more, until the turkey reaches 165°F (74°C) and the cheese is melted.
- Finish with cilantro and a squeeze of lime after baking.
Tips and Variations
- Sauce choice: Use a thick salsa, not a watery one, or the filling can slide around in the pepper.
- Crunch factor: Add crushed tortilla chips on top just before serving if you want texture.
- Lunch-box tip: Pack lime wedges separately so the peppers taste fresh after reheating.
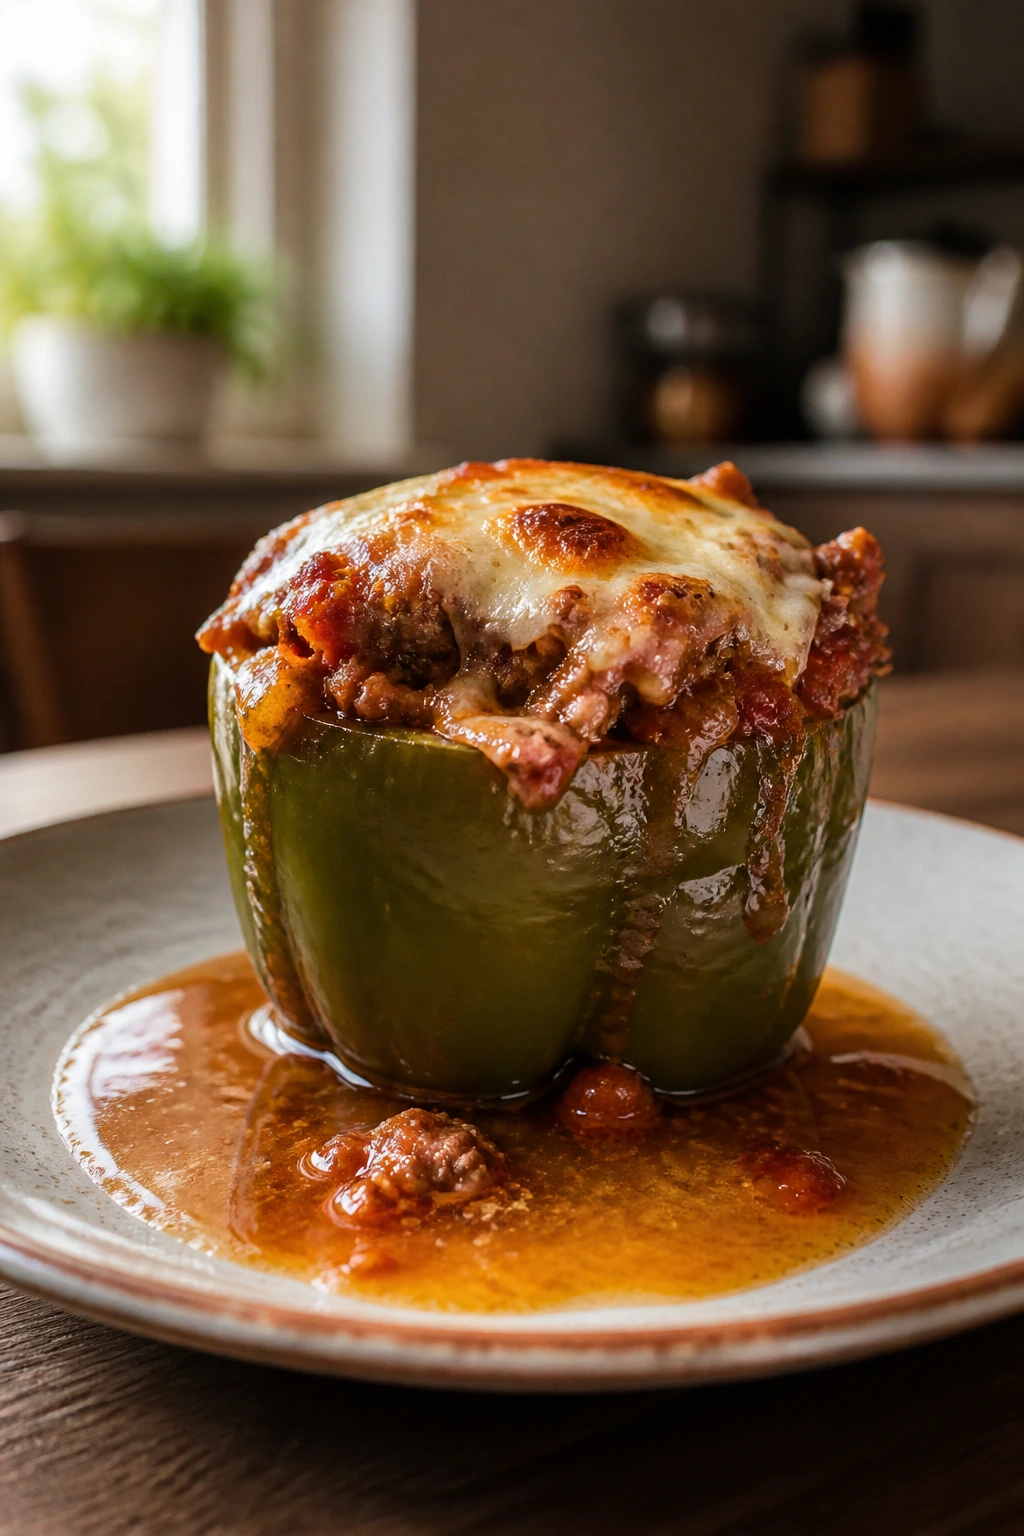
3. Italian Sausage and Mozzarella Stuffed Peppers
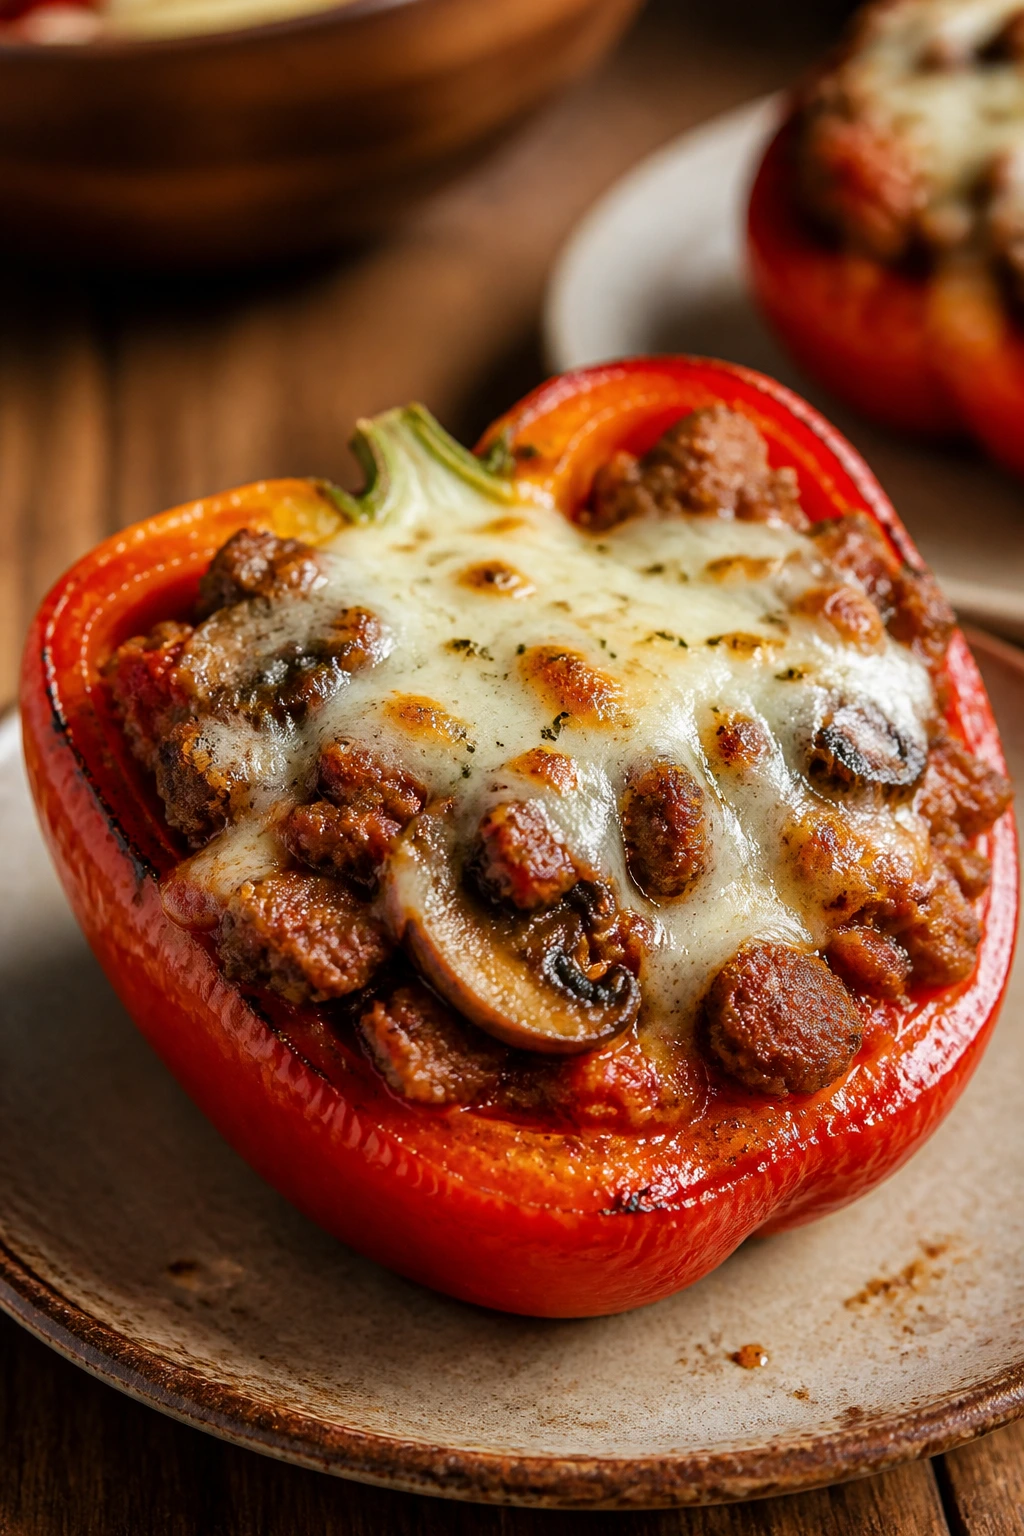
Italian sausage brings a garlicky, fennel-scented richness that changes the whole mood of the dish. This version smells like a skillet of marinara and browned sausage on a quiet weeknight, which is one of the better smells a kitchen can make.
I like this one because it has enough fat and spice to feel indulgent, but the peppers keep it from turning heavy. It lands in that sweet spot where you want another bite even after the container has been in the fridge for two days.
Why It Works
Sausage already comes seasoned, so you get a lot of flavor without building a spice cabinet from scratch. Mushroom and onion add moisture and bulk, while marinara and mozzarella pull the filling toward lasagna territory without the fuss. For meal prep, that’s the dream: strong flavor, good texture, and not a lot of extra work.
Key Ingredients
- 6 large bell peppers, halved lengthwise
- 1 tablespoon olive oil, for the vegetables
- 1 small onion, diced, to soften the sausage’s edges
- 8 ounces mushrooms, finely chopped, which soak up flavor and keep the filling juicy
- 1 pound mild Italian sausage, casings removed, or hot sausage if you want more heat
- 2 garlic cloves, minced, added near the end so they stay sweet
- 1 cup marinara sauce, thick enough to coat the meat
- 2 cups cooked farro or rice, cooled
- 1 teaspoon Italian seasoning, 1/2 teaspoon kosher salt, and 1/4 teaspoon black pepper, adjusted to taste
- 1 1/2 cups shredded mozzarella and 1/4 cup grated Parmesan, for a stretchy, salty finish
- Fresh basil, torn over the top after baking
Quick Steps
- Preheat the oven to 400°F (205°C) and bake the pepper halves for 10 minutes to give them a head start.
- Warm the olive oil in a skillet over medium heat. Add the onion and mushrooms and cook for 5 minutes until the mushrooms let go of their moisture.
- Add the sausage and cook for 6 to 8 minutes, breaking it apart until it’s browned and cooked through.
- Stir in the garlic, marinara, farro, Italian seasoning, salt, and pepper. Let the filling cook for 2 minutes until it thickens.
- Fold in 1 cup of the mozzarella, then spoon the mixture into the peppers and top with the remaining mozzarella and the Parmesan.
- Cover with foil and bake for 20 minutes. Uncover and bake for 8 to 10 minutes more, until the sausage reaches 160°F (71°C) and the cheese is bubbling.
- Let the peppers sit for 5 to 10 minutes, then scatter basil on top.
Tips and Variations
- Drain the pan: If the sausage releases a lot of fat, spoon off the excess before adding the marinara.
- Bright finish: A few red pepper flakes or a splash of balsamic vinegar makes the filling pop.
- Leftover rescue: Reheat with an extra spoonful of marinara so the sausage stays juicy.
4. Greek Chicken and Orzo Stuffed Peppers
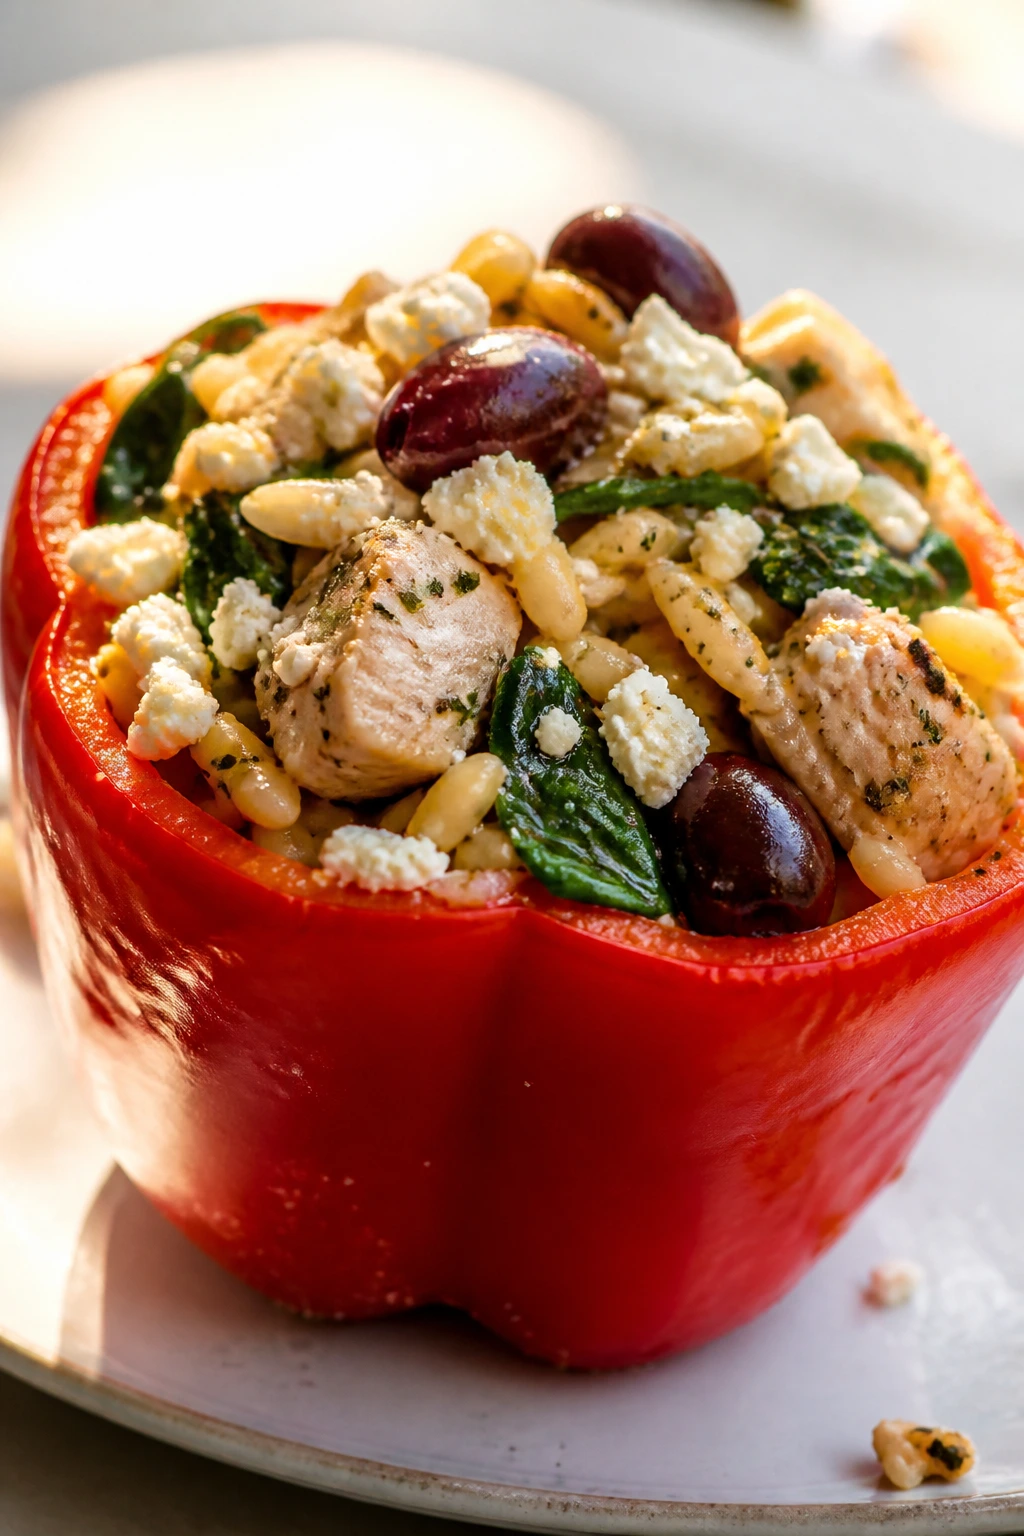
Chicken stuffed peppers can be bland if nobody pays attention. This one does pay attention. It’s lemony, briny, and a little herb-heavy in the best way, with feta bringing the salt and olives bringing the bite.
Orzo gives the filling a softer, silkier texture than rice, which makes the whole thing feel a bit more polished without turning fussy. I’d call it weeknight food with manners.
Why It Works
Cooked chicken soaks up lemon, oregano, and olive flavor fast, which is why this version tastes bright even after it sits in the fridge. The orzo catches the pan juices, spinach melts into the background, and feta keeps the filling from tasting flat. This is one of the better meal-prep options when you want something that feels lighter but still satisfying.
Key Ingredients
- 6 large bell peppers, halved lengthwise
- 2 tablespoons olive oil, divided
- 1 small red onion, diced, for color and sweetness
- 2 cups cooked shredded chicken, rotisserie chicken works well
- 2 cups cooked orzo, cooled
- 1 cup baby spinach, chopped, so it folds into the filling easily
- 1/2 cup chopped Kalamata olives, for salt and bite
- 1/2 cup crumbled feta, plus extra for topping if you want
- 2 tablespoons lemon juice, which keeps the filling bright
- 1 teaspoon dried oregano, 1/2 teaspoon kosher salt, and 1/4 teaspoon black pepper
- 1 tablespoon chopped parsley or dill, optional but worth it
Quick Steps
- Heat the oven to 400°F (205°C) and bake the pepper halves for 8 minutes.
- Warm 1 tablespoon of olive oil in a skillet. Cook the red onion for 3 minutes until soft.
- Add the chicken and warm it through for 2 minutes, then stir in the orzo, spinach, olives, lemon juice, oregano, salt, and pepper.
- Remove the skillet from the heat and fold in the feta and herbs.
- Spoon the mixture into the peppers, drizzle with the remaining olive oil, and add a little more feta on top if you want.
- Cover with foil and bake for 18 minutes. Uncover and bake for 8 minutes more, until the peppers are tender and the filling is hot.
- Rest for 5 minutes before packing. The lemon flavor settles in as it cools.
Tips and Variations
- Use rotisserie chicken: It saves time and usually gives better flavor than plain poached chicken.
- Freshness trick: Add a spoonful of tzatziki after reheating, not before.
- Texture note: If your orzo feels dry, stir in 2 to 3 tablespoons of broth before stuffing.
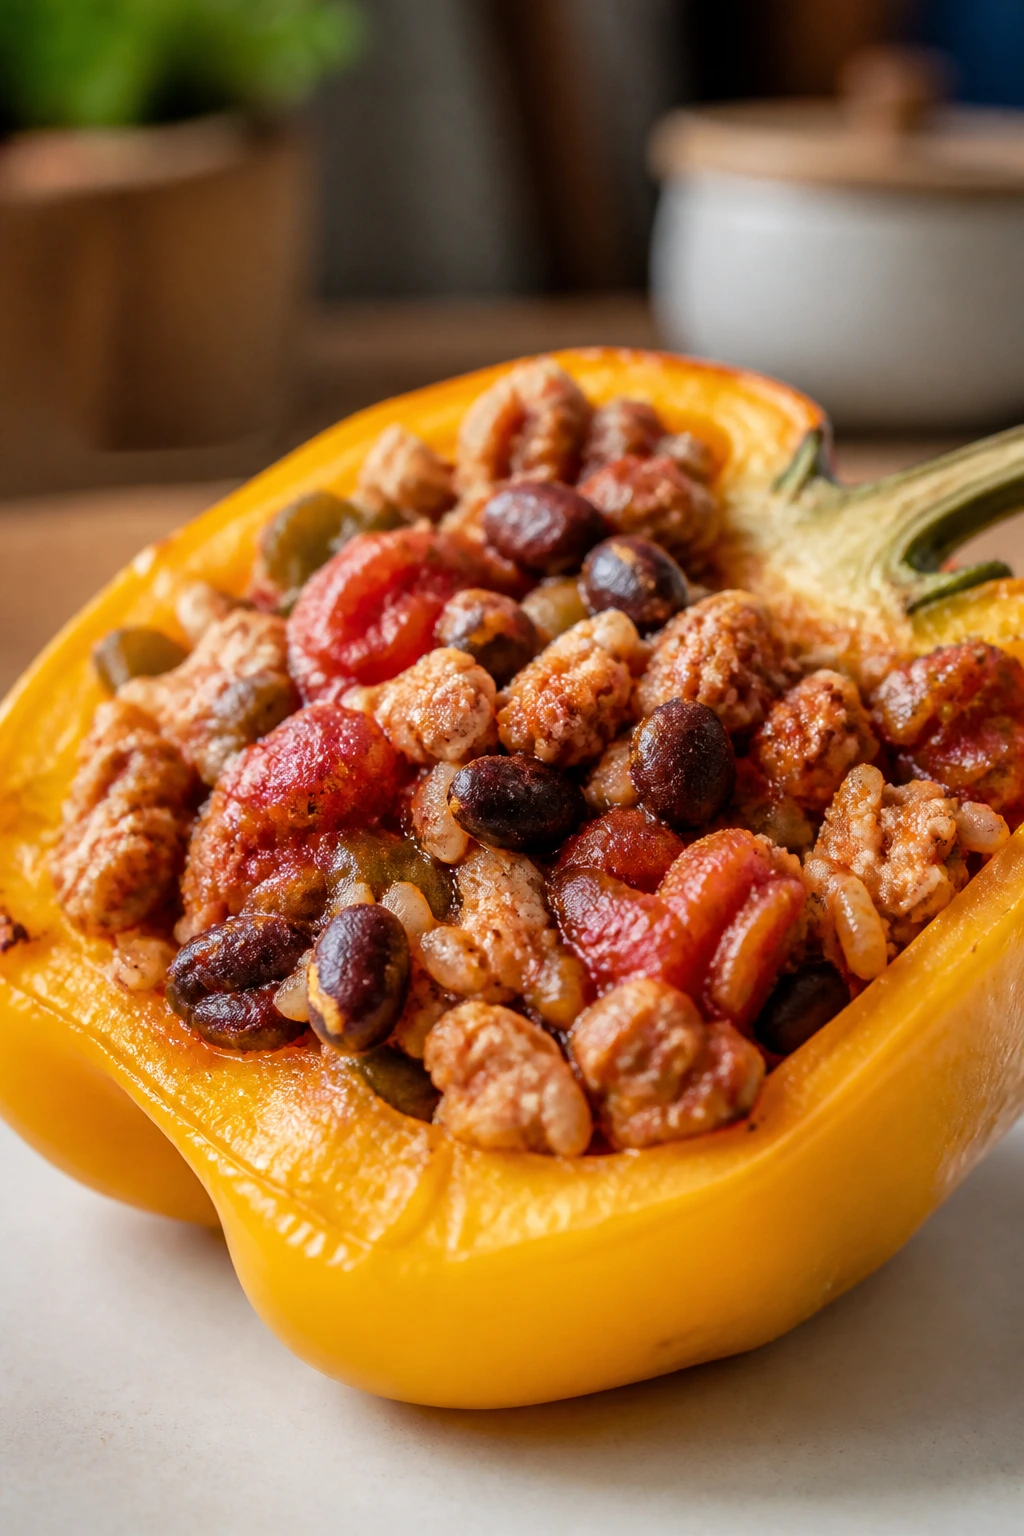
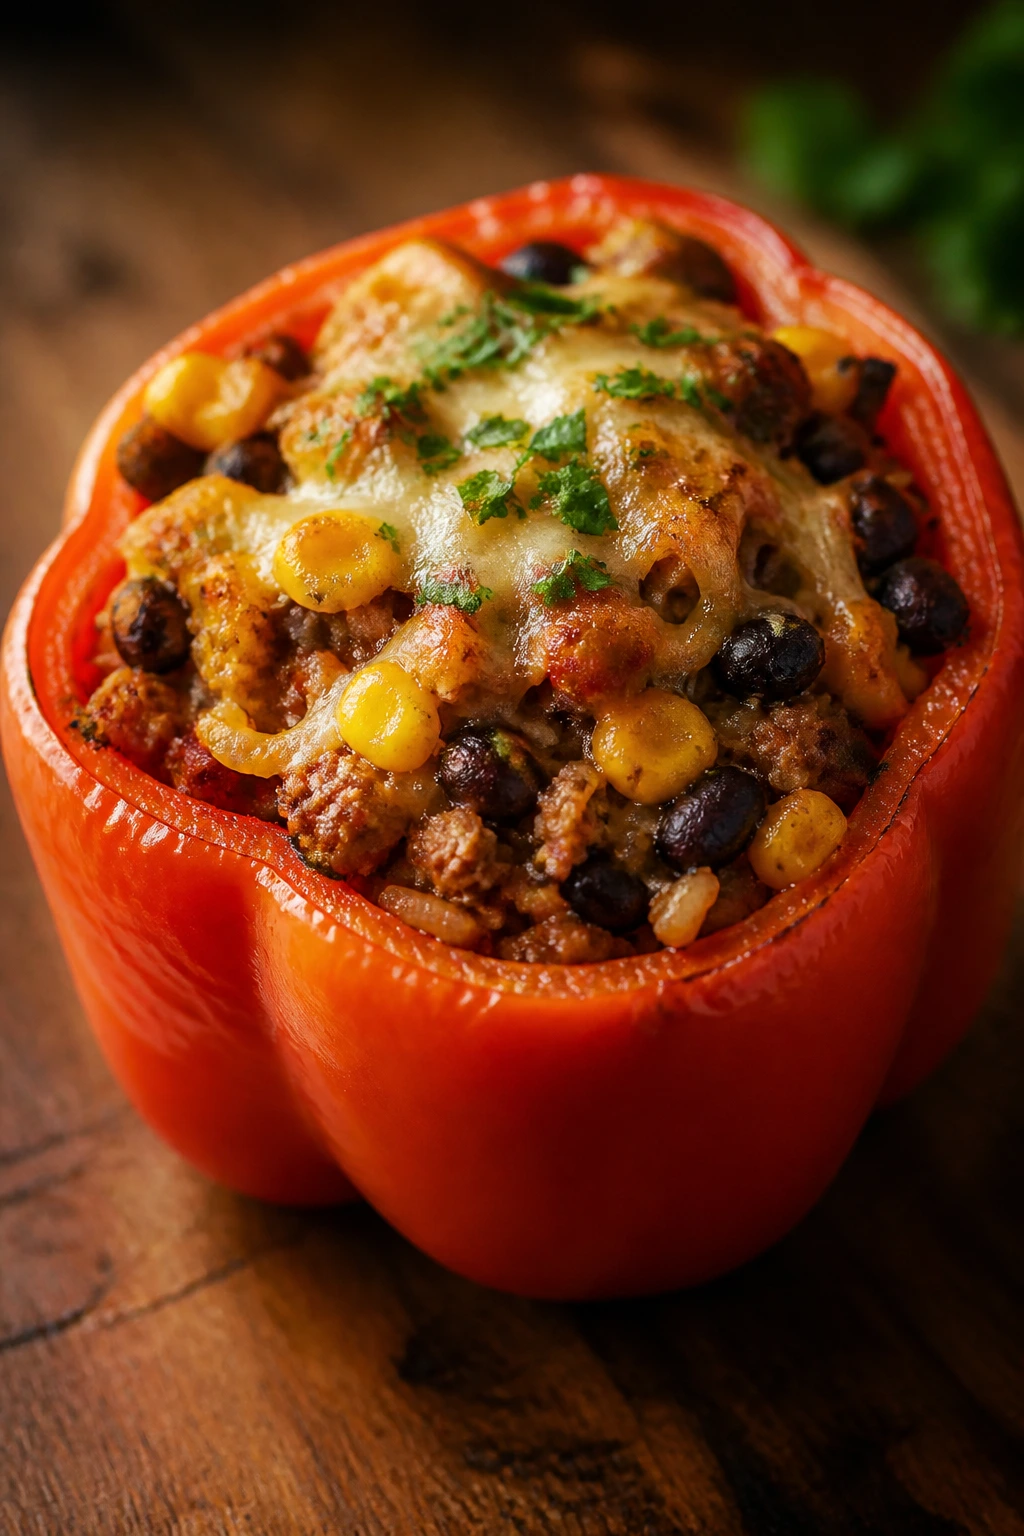
5. Vegetarian Quinoa and Black Bean Stuffed Peppers
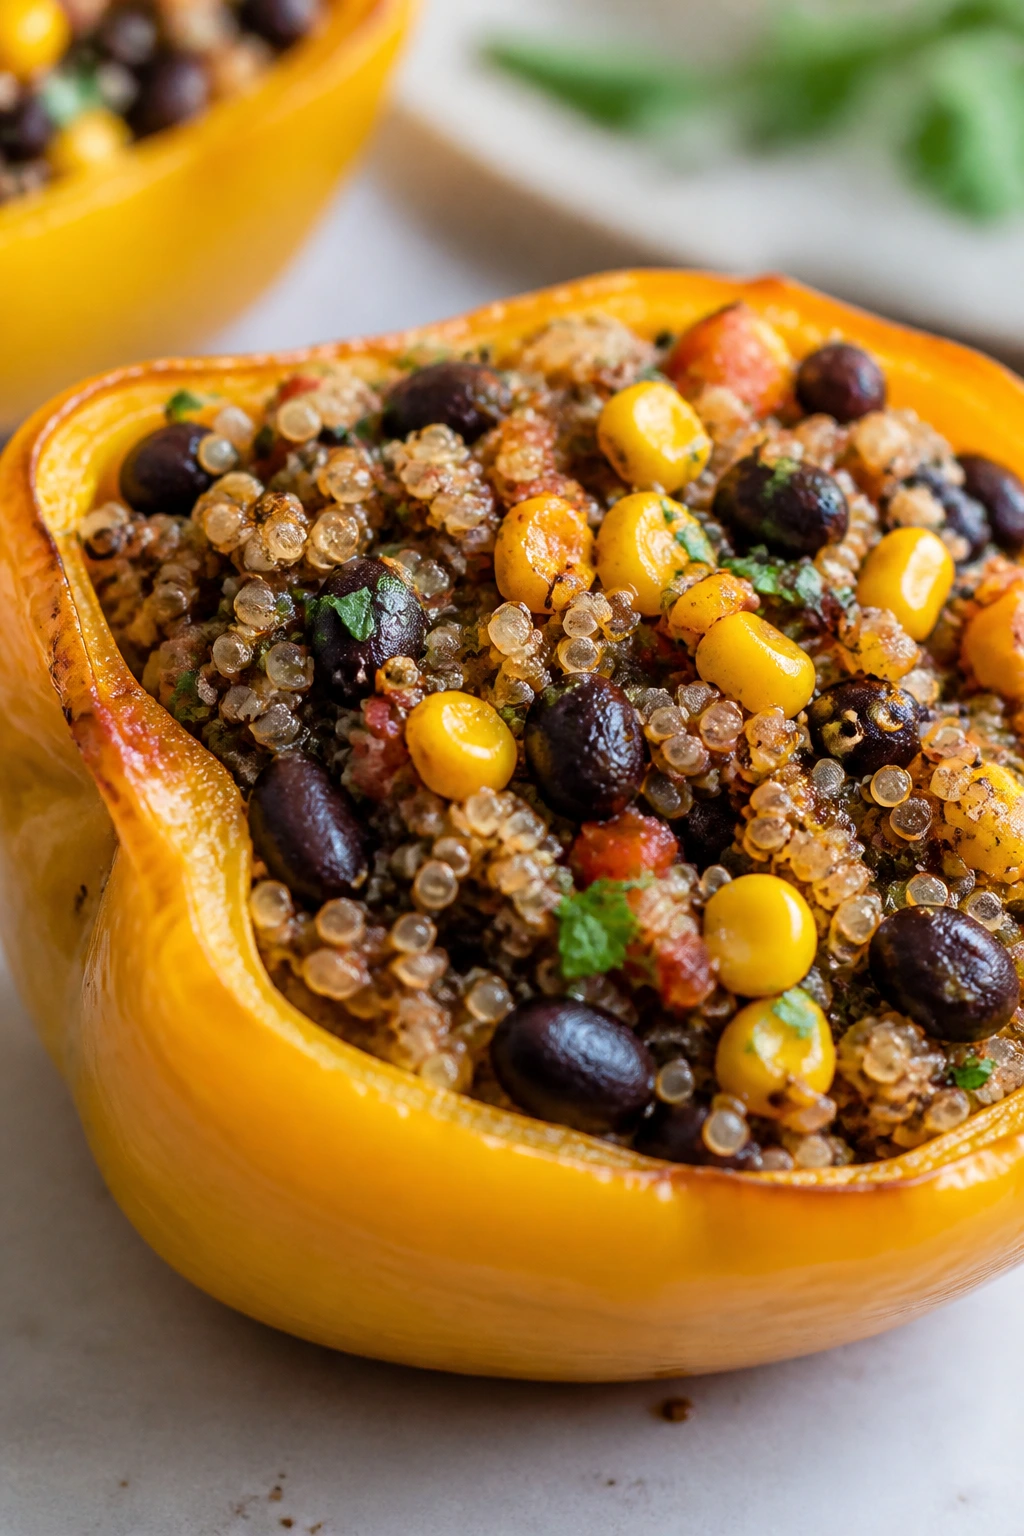
A meatless tray does not have to feel like the fallback option. This one is hearty, colorful, and built around the kind of filling that actually keeps you full: quinoa, beans, corn, and enough seasoning to stop it from tasting like health food.
The red and yellow pepper shells make the tray look bright, but the real reason I like this version is how well it holds up. Nothing here turns weird in the fridge. The quinoa stays loose, the beans stay firm, and the whole thing reheats better than most grain bowls I’ve had.
Why It Works
Quinoa is a smart meal-prep grain because it doesn’t turn gluey when reheated the way some starches do. Black beans add protein and body, while corn and tomatoes give the filling some moisture so it doesn’t dry out. You get a balanced dinner without needing meat, and the peppers keep the texture from feeling soft all the way through.
Key Ingredients
- 6 large bell peppers, halved lengthwise
- 1 tablespoon olive oil, for the vegetables
- 1 small onion, diced, to build flavor
- 2 garlic cloves, minced, for the savory base
- 2 cups cooked quinoa, cooled, fluffy and ready to mix
- 1 can black beans, rinsed and drained, the main protein here
- 1 cup corn, thawed if frozen
- 1 can (14.5 ounces) diced tomatoes, drained, to keep the filling from tasting dry
- 1 teaspoon ground cumin, 1 teaspoon chili powder, and 1 teaspoon kosher salt
- 1 1/2 cups shredded Monterey Jack, or cheddar if that’s what you have
- 2 tablespoons chopped cilantro and 1 tablespoon lime juice, for a fresh finish
Quick Steps
- Preheat the oven to 400°F (205°C) and pre-bake the pepper halves for 10 minutes.
- Heat the olive oil in a skillet over medium heat. Cook the onion for 4 minutes, then add the garlic for 30 seconds.
- Stir in the quinoa, black beans, corn, tomatoes, cumin, chili powder, and salt. Cook for 2 minutes until the filling is warm and thick.
- Remove the skillet from the heat and stir in the lime juice and 1 cup of the cheese.
- Fill the peppers, top with the remaining cheese, and cover with foil.
- Bake for 18 minutes, uncover, and bake for 8 to 10 minutes more, until the cheese melts and the peppers are tender.
- Finish with cilantro once the peppers have rested.
Tips and Variations
- Make it fuller: Add a diced zucchini or a handful of chopped spinach to stretch the filling.
- Flavor lift: A little smoked paprika gives the beans a deeper, almost grilled taste.
- Serving move: Add avocado after reheating so it stays green and clean-tasting.
6. Cheeseburger Stuffed Peppers
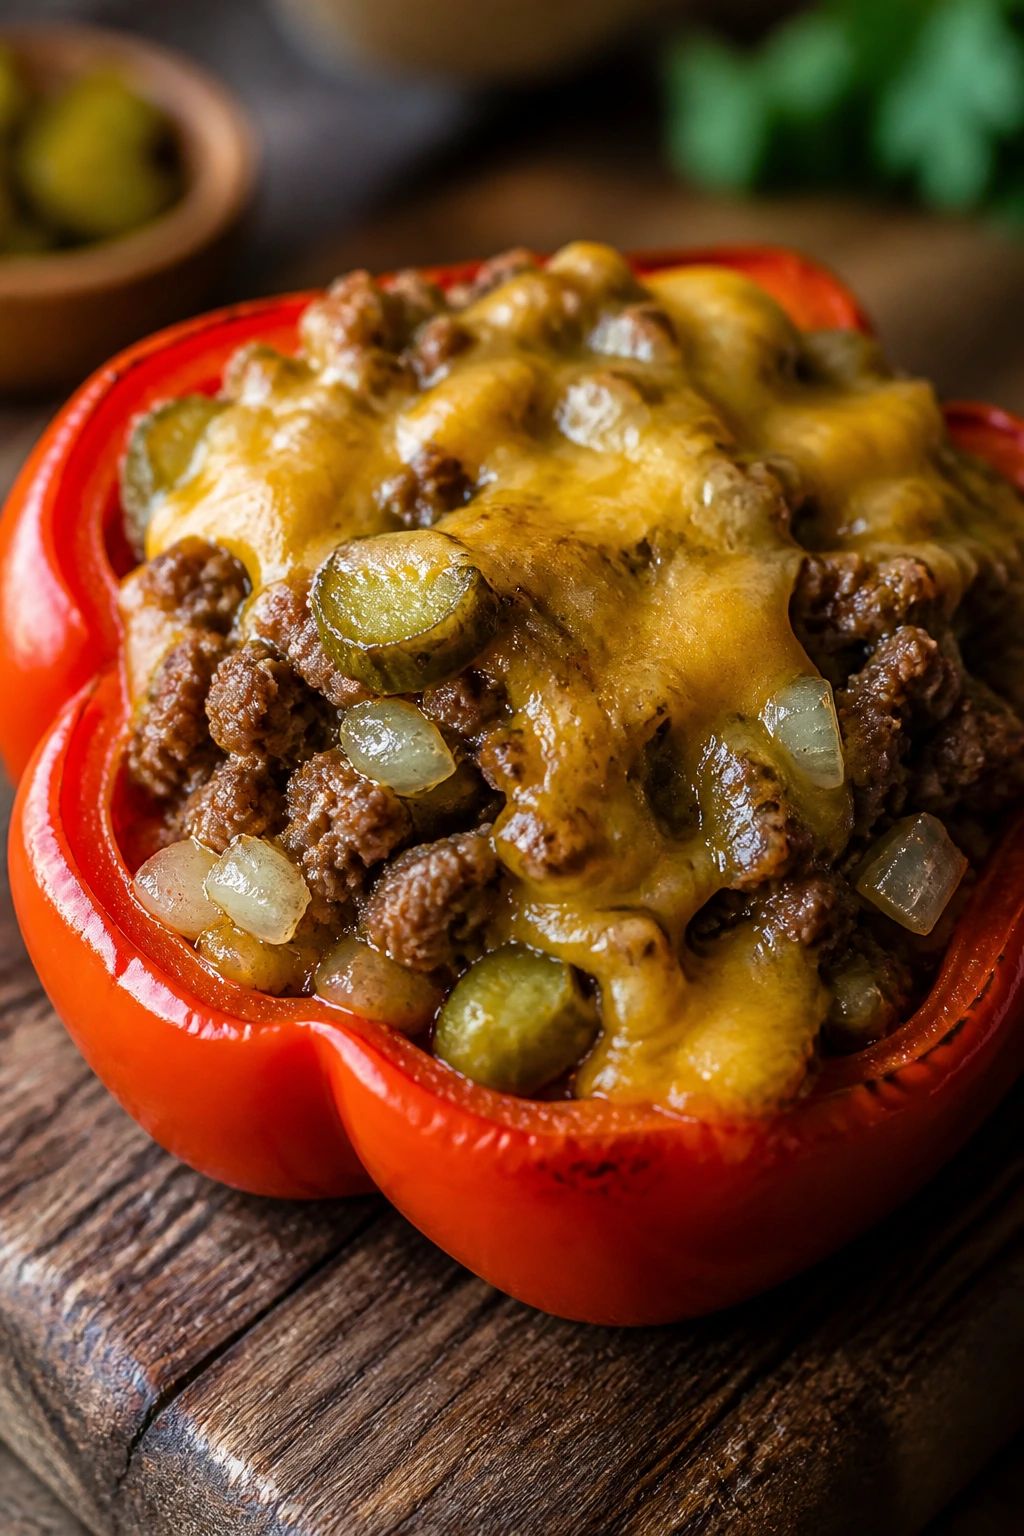
Cheeseburger filling sounds odd until you taste the first one. Then it makes sense. You get all the familiar notes — beef, onion, mustard, pickles, cheddar — but the pepper shell keeps everything neat and cuts the richness just enough.
This is one of my favorite meal prep tricks for people who want comfort food without a bun. It’s familiar, a little salty, and very hard to get bored with.
Why It Works
Ground beef carries the cheeseburger flavor well, and cauliflower rice or a small amount of veg helps soak up the juices so the filling doesn’t leak all over the pan. Ketchup and mustard bring the fast-food memory, while pickles give it snap after reheating. The pepper shell keeps it from feeling like a greasy skillet dinner.
Key Ingredients
- 6 large bell peppers, halved lengthwise
- 1 tablespoon olive oil, for the skillet
- 1 small onion, diced, for sweetness
- 1 pound lean ground beef, browned until crumbly
- 1 teaspoon kosher salt and 1/2 teaspoon black pepper
- 1 tablespoon Worcestershire sauce, for a burger-house note
- 2 tablespoons ketchup and 1 teaspoon yellow mustard, the classic combo
- 1 1/2 cups cauliflower rice, squeezed dry, to bulk up the filling without much starch
- 1/2 cup diced dill pickles or relish, stirred in at the end
- 1 1/2 cups shredded cheddar, for topping
- Sliced pickles and chopped tomato, optional but fun after baking
Quick Steps
- Heat the oven to 400°F (205°C) and bake the pepper halves for 8 minutes.
- Warm the olive oil in a skillet over medium heat. Cook the onion for 3 to 4 minutes until soft.
- Add the beef, salt, and pepper. Cook for 6 to 7 minutes until browned, then drain any excess fat.
- Stir in the Worcestershire sauce, ketchup, mustard, and cauliflower rice. Cook for 2 minutes until the mixture thickens.
- Fold in the pickles or relish, then spoon the filling into the peppers and top with the cheddar.
- Cover and bake for 20 minutes, then uncover and bake for 8 minutes more, until the cheese is melted and the beef reaches 160°F (71°C).
- Top with sliced pickles after baking, not before.
Tips and Variations
- Freezer note: Skip the fresh tomato garnish if you plan to freeze these.
- Bacon fan move: A tablespoon or two of cooked crumbled bacon makes the filling taste more like a deluxe burger.
- Sauce side: Serve with a little extra mustard or burger sauce for dipping.
7. Buffalo Chicken Stuffed Peppers
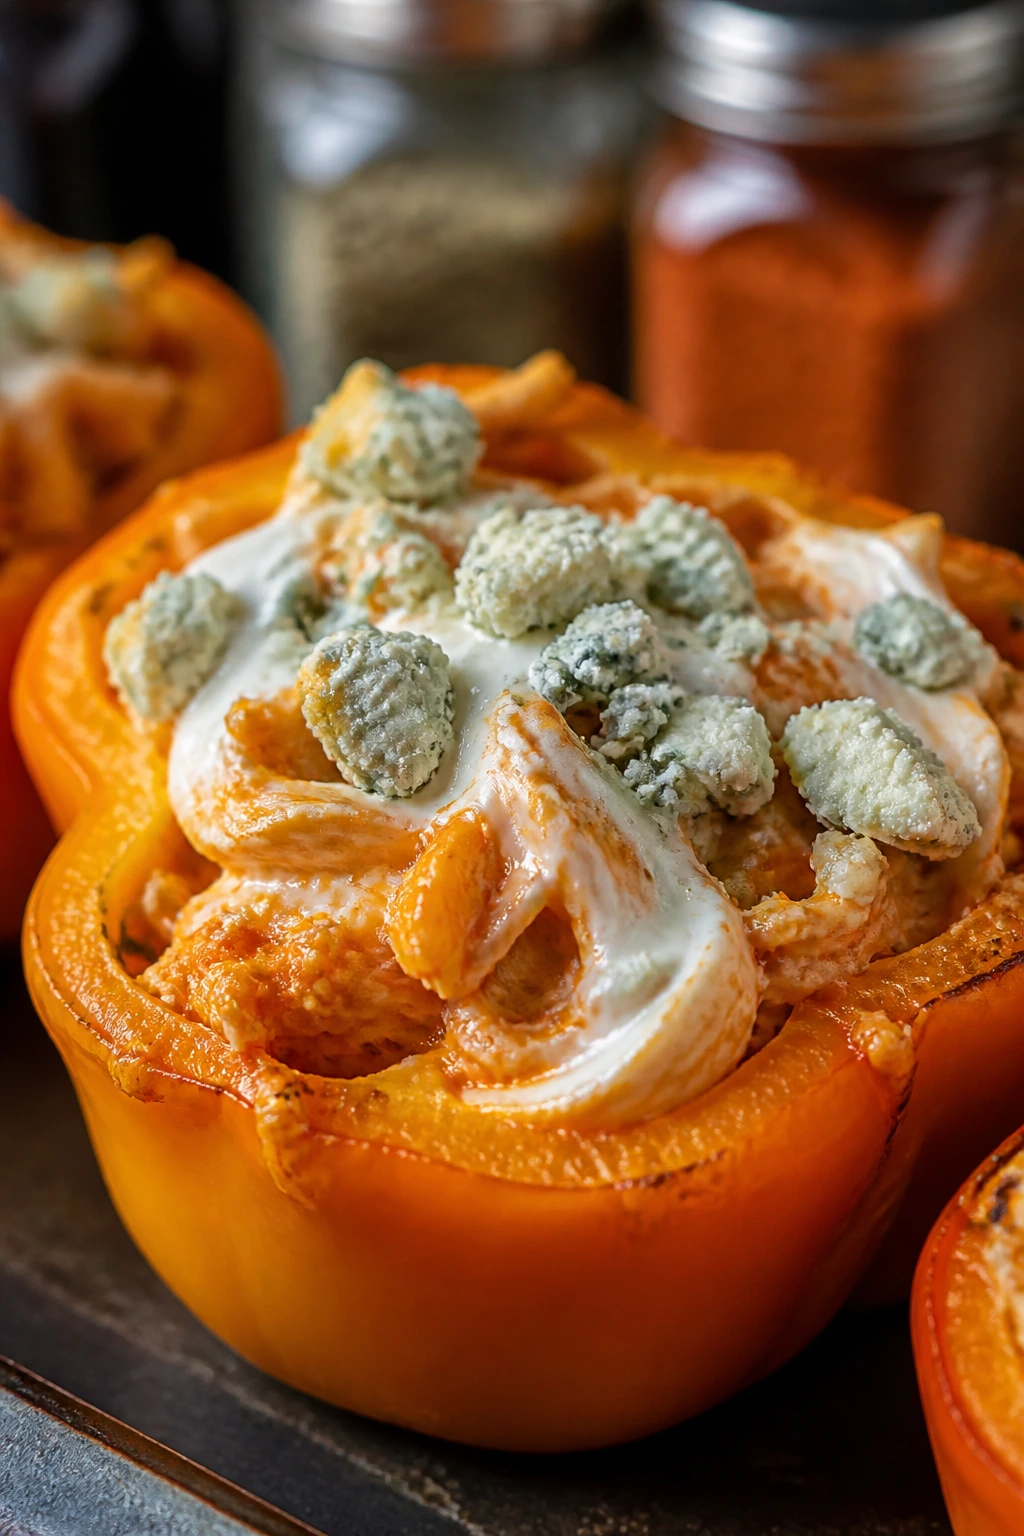
Buffalo sauce solves boring leftovers. It’s sharp, salty, and bold enough to wake up chicken that might otherwise taste plain by the second day. Add cream cheese and you get a filling that stays soft and spoonable instead of dry.
This one is for people who like a little heat without turning dinner into a dare. It’s messy in the good way, and the blue cheese on top gives it the kind of finish that makes the tray feel intentional.
Why It Works
Chicken needs moisture when it’s sitting in the fridge, and buffalo sauce plus cream cheese gives it exactly that. The celery adds crunch and keeps the texture from going completely soft. Because the filling already has strong flavor, it doesn’t fade when reheated.
Key Ingredients
- 6 large bell peppers, halved lengthwise
- 3 cups cooked shredded chicken, rotisserie chicken works well
- 1/2 cup buffalo sauce, choose your heat level
- 4 ounces cream cheese, softened, which makes the filling rich and smooth
- 1/4 cup plain Greek yogurt or ranch dressing, to loosen the mixture a little
- 1 cup cooked rice or cauliflower rice, cooled
- 1/2 cup finely diced celery, for crunch
- 1 cup shredded cheddar or mozzarella, for the top
- 1/4 cup blue cheese crumbles, optional but traditional
- 2 tablespoons sliced green onions, for serving
Quick Steps
- Preheat the oven to 400°F (205°C) and give the pepper halves 8 minutes in the oven first.
- Warm the buffalo sauce and cream cheese together in a skillet over low heat, stirring until smooth.
- Stir in the Greek yogurt or ranch, shredded chicken, celery, and rice. Cook for 2 minutes until the filling is hot and evenly coated.
- Spoon the mixture into the peppers and top with the shredded cheese.
- Cover and bake for 15 minutes, then uncover and bake for 10 minutes more, until the chicken is hot and the cheese melts.
- Scatter blue cheese and green onions over the top after baking.
- Let the peppers sit for 5 minutes before packing them up.
Tips and Variations
- Heat control: Use a milder buffalo sauce if the peppers are going into lunch containers for kids.
- Creamier version: Add a tablespoon more cream cheese if you want the filling extra rich.
- Serving move: A drizzle of ranch after reheating smooths out the heat nicely.
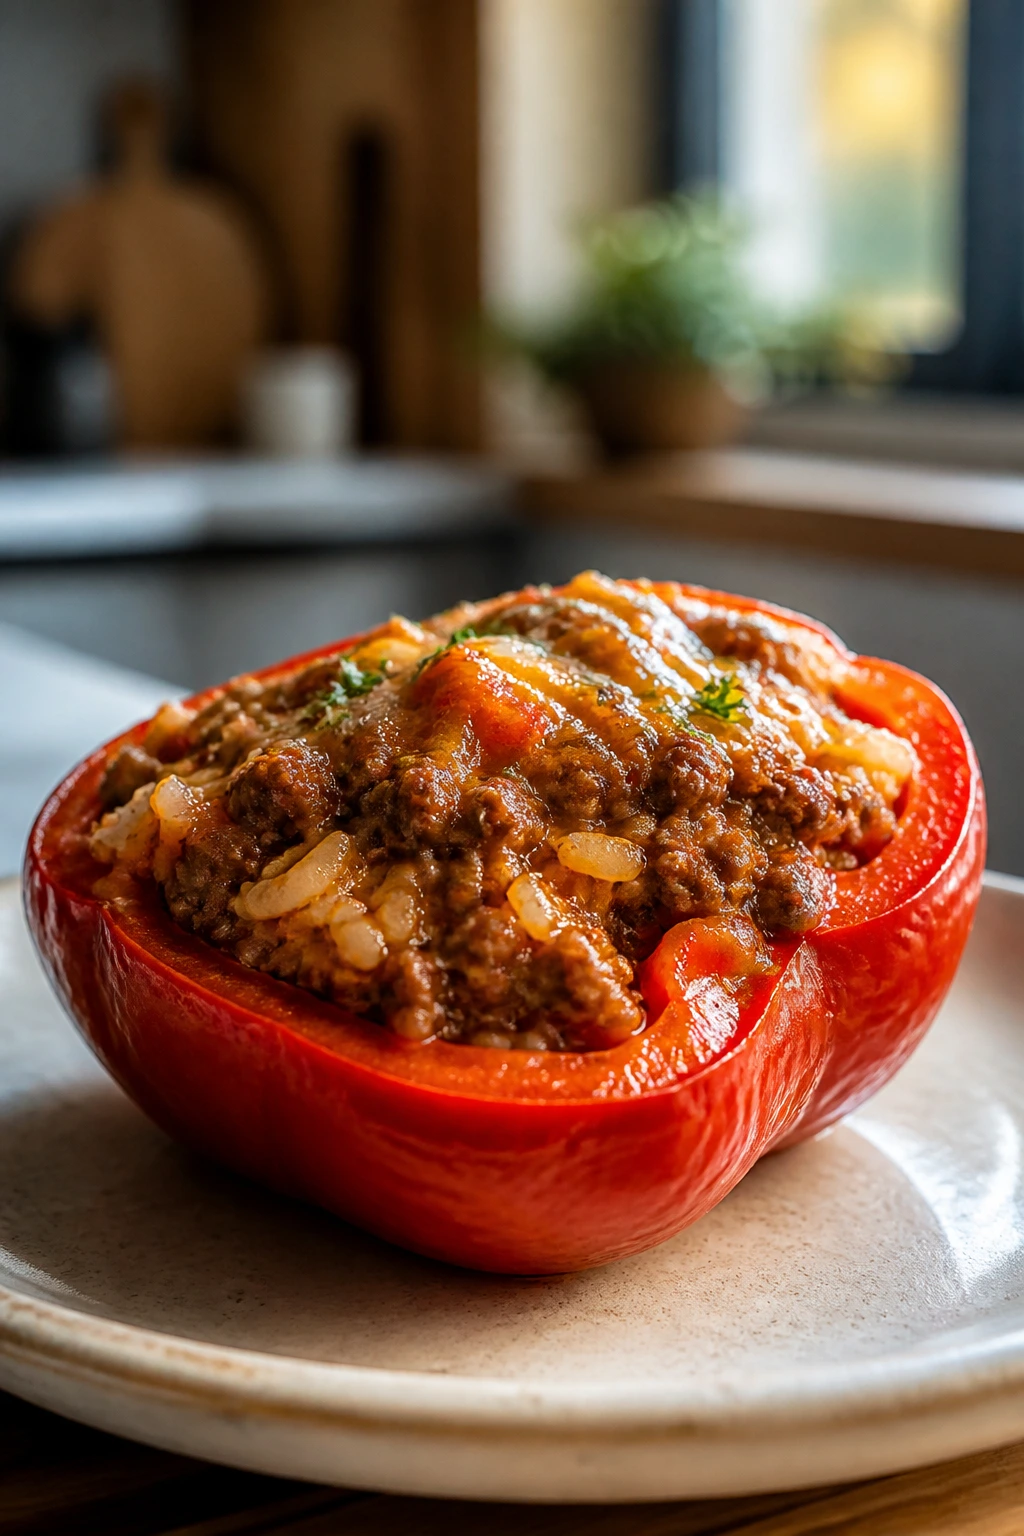
8. Mediterranean Lamb Stuffed Peppers
If you like lamb kofta, this is your lane. The flavor is warm, herbal, and a little rich, with lemon and mint keeping the whole tray from feeling heavy. It smells like garlic, cumin, and browned meat in the best possible way.
I love this one for dinner when I want something different from the usual beef-rice routine. It has character. That matters when you’re eating the same tray over several nights.
Why It Works
Ground lamb already has a distinct flavor, so you don’t need to pile on a dozen seasonings. A small amount of cinnamon adds warmth, not sweetness, and the couscous gives the filling a light, fluffy base that reheats well. Feta and herbs keep it bright enough to taste fresh even after a day in the fridge.
Key Ingredients
- 6 large bell peppers, halved lengthwise
- 1 tablespoon olive oil, for the skillet
- 1 small onion, diced, to soften the lamb
- 2 garlic cloves, minced, added near the end
- 1 pound ground lamb, browned for rich flavor
- 1 1/2 cups cooked couscous or bulgur, cooled
- 1 cup diced tomatoes, drained, to keep the filling juicy
- 1 teaspoon ground cumin, 1/2 teaspoon ground cinnamon, 1 teaspoon kosher salt, and 1/2 teaspoon black pepper
- 1/3 cup chopped parsley and 1/4 cup chopped mint, for a fresh finish
- 1/2 cup crumbled feta, plus a little extra if you like
- 1 tablespoon lemon juice, to brighten the tray
Quick Steps
- Heat the oven to 400°F (205°C) and bake the peppers for 10 minutes.
- Warm the olive oil in a skillet over medium heat. Cook the onion for 4 minutes until soft.
- Add the lamb and cook for 6 to 8 minutes, breaking it up until browned. Drain extra fat if needed.
- Stir in the garlic, tomatoes, couscous, cumin, cinnamon, salt, and pepper. Cook for 2 minutes until the filling thickens.
- Remove from the heat and fold in the parsley, mint, feta, and lemon juice.
- Fill the peppers, cover with foil, and bake for 18 minutes. Uncover and bake for 10 minutes more, until the lamb reaches 160°F (71°C).
- Let the peppers rest for 5 minutes before serving or storing.
Tips and Variations
- Herb swap: If mint feels too sharp, use all parsley and a little dill.
- Serving trick: A spoonful of plain yogurt on the side works better than you might expect.
- Batch move: This filling is excellent for freezing because the couscous and lamb stay tender.
9. Fajita Chicken Stuffed Peppers

Fajita night usually needs tortillas. Not here. The filling has all the good parts — onions, peppers, chicken, spice, cheese — but the bell pepper shell does the wrapping for you, which is a neat little piece of kitchen logic.
This one tastes lively even after it’s been chilled and reheated. The lime at the end matters. Skip it and the tray feels flatter than it should.
Why It Works
Chicken gives the filling structure, black beans add body, and salsa helps everything stay moist without turning soupy. The fajita seasoning brings the smoky edge, while the peppers on the inside echo the pepper shell outside. That double pepper note sounds obvious once you taste it, and it works.
Key Ingredients
- 6 large bell peppers, halved lengthwise
- 1 tablespoon olive oil, for the skillet
- 1 small onion, sliced, for that fajita-style sweetness
- 1 red bell pepper, diced, folded into the filling
- 3 cups cooked shredded chicken, or diced cooked chicken breast
- 1 cup black beans, rinsed and drained, for protein and texture
- 1 cup cooked brown rice, cooled
- 1 cup salsa, to keep the filling juicy
- 1 tablespoon fajita seasoning, or a blend of cumin, chili powder, garlic powder, and smoked paprika
- 1 1/2 cups shredded Monterey Jack or cheddar, for the top
- 1 lime and 2 tablespoons chopped cilantro, for serving
Quick Steps
- Preheat the oven to 400°F (205°C) and pre-bake the pepper halves for 8 minutes.
- Heat the olive oil in a skillet over medium-high heat. Cook the onion and diced red pepper for 4 to 5 minutes until they get a little color.
- Stir in the chicken, black beans, rice, salsa, and fajita seasoning. Cook for 2 minutes until everything is hot and the filling is thick.
- Spoon the mixture into the peppers and top with the cheese.
- Cover with foil and bake for 18 minutes, then uncover and bake for 10 minutes more, until the cheese melts and the peppers are tender.
- Finish with cilantro and a squeeze of lime right before serving.
Tips and Variations
- Char matters: Let the onions pick up a little brown color; it makes the filling taste more like fajitas.
- Meal-prep move: Pack lime wedges separately so the leftovers taste brighter.
- Kid-friendly fix: Use mild salsa and skip the extra seasoning shake at the table.
10. Philly Cheesesteak Stuffed Peppers
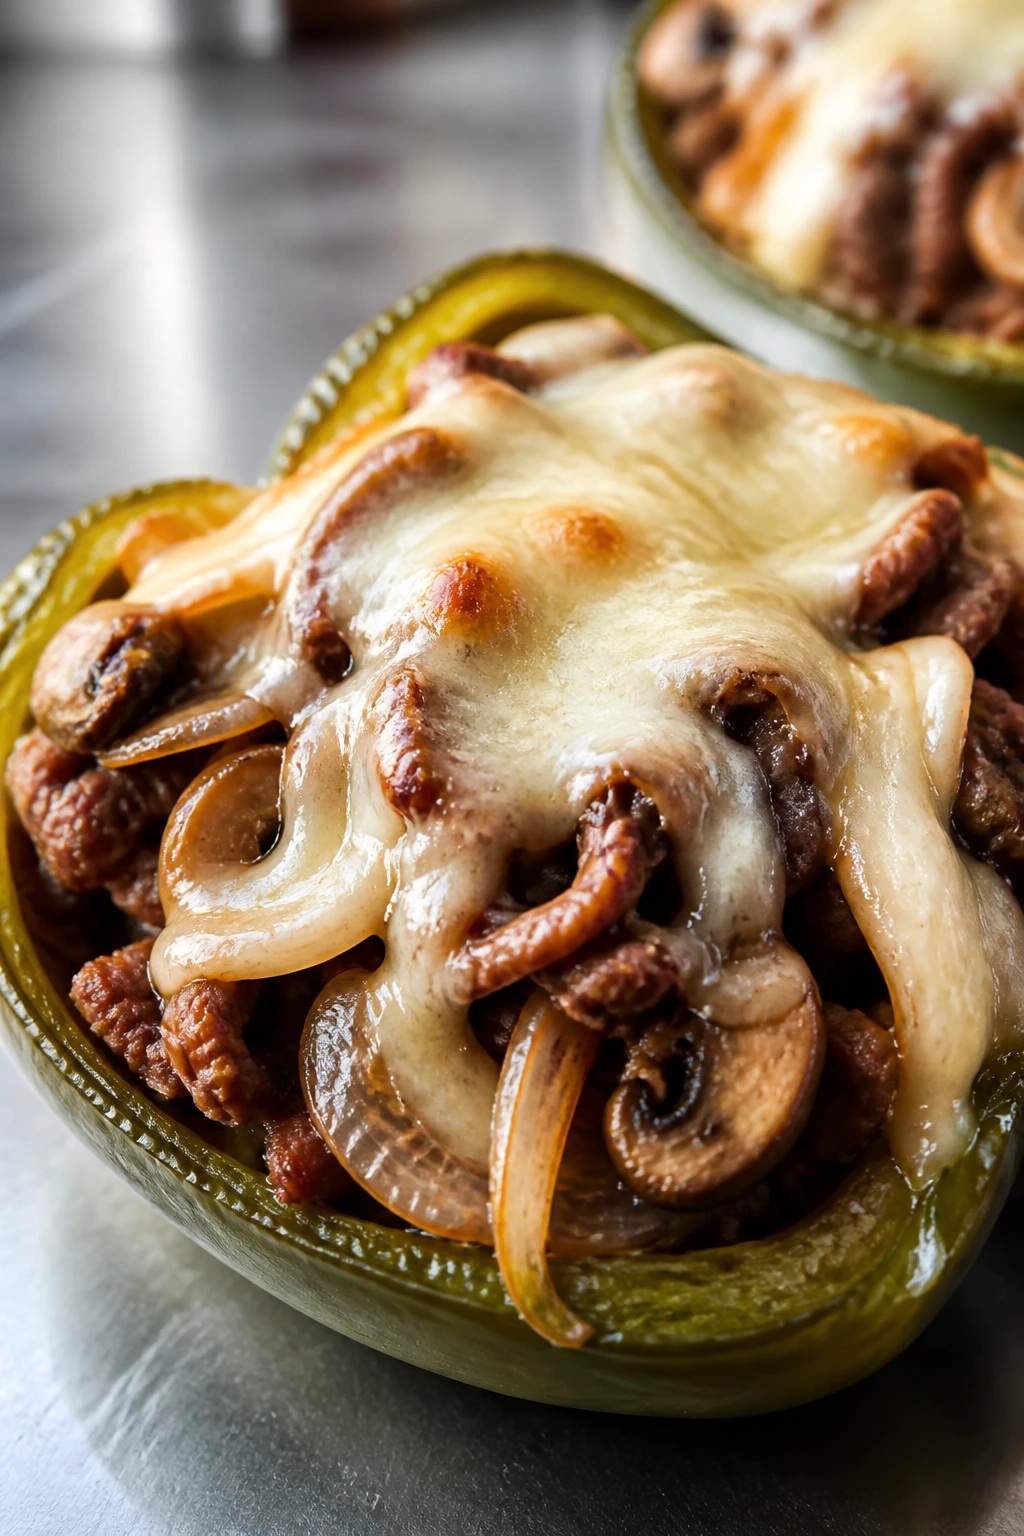
Philly cheesesteak peppers smell like onions, mushrooms, and melted provolone, which is enough to sell most people before they even sit down. The filling is rich, beefy, and savory, but the pepper shell keeps it from feeling like a brick.
I like this one because it gives you the flavor of a sandwich without needing bread to stay soft or dry out. Reheated, it still tastes like dinner, not compromise.
Why It Works
Thin steak cooks fast, and mushrooms help stretch the filling while soaking up the beef juices. Cream cheese gives the mix a little body, which matters when you’re eating it three days later and don’t want everything to taste dry. The pepper adds freshness and just enough sweetness to balance the savory filling.
Key Ingredients
- 6 large bell peppers, halved lengthwise
- 1 tablespoon olive oil, for the skillet
- 1 small onion, thinly sliced, classic cheesesteak base
- 8 ounces mushrooms, sliced, to add volume and flavor
- 1 pound thinly sliced sirloin or shaved steak, or use ribeye if you like it richer
- 1 teaspoon kosher salt and 1/2 teaspoon black pepper
- 1 teaspoon Worcestershire sauce, for depth
- 1 cup beef broth, to keep the filling saucy
- 1 cup cooked cauliflower rice, optional, but useful if you want a little more bulk
- 4 ounces cream cheese, softened, for richness
- 1 1/2 cups shredded provolone or mozzarella, for melting
- 2 tablespoons chopped parsley, optional garnish
Quick Steps
- Heat the oven to 400°F (205°C) and bake the pepper halves for 8 minutes.
- Warm the olive oil in a skillet over medium-high heat. Cook the onion and mushrooms for 5 minutes until browned and soft.
- Add the steak, salt, pepper, and Worcestershire sauce. Cook for 2 to 3 minutes until the meat is just done.
- Stir in the beef broth and cauliflower rice, then cook for 1 minute. Add the cream cheese and half the provolone, stirring until the filling turns creamy.
- Spoon the mixture into the peppers and top with the remaining cheese.
- Cover and bake for 15 minutes, then uncover and bake for 10 minutes more, until the cheese bubbles and the peppers are tender.
- Finish with parsley after resting for a few minutes.
Tips and Variations
- Steak shortcut: If the sirloin is too pricey, ground beef works, but the texture will be looser.
- Saucy fix: If the filling seems dry after reheating, add a splash of broth before microwaving.
- Topping idea: Sautéed mushrooms on top make the tray feel more sandwich-like.
11. Pesto White Bean and Spinach Stuffed Peppers
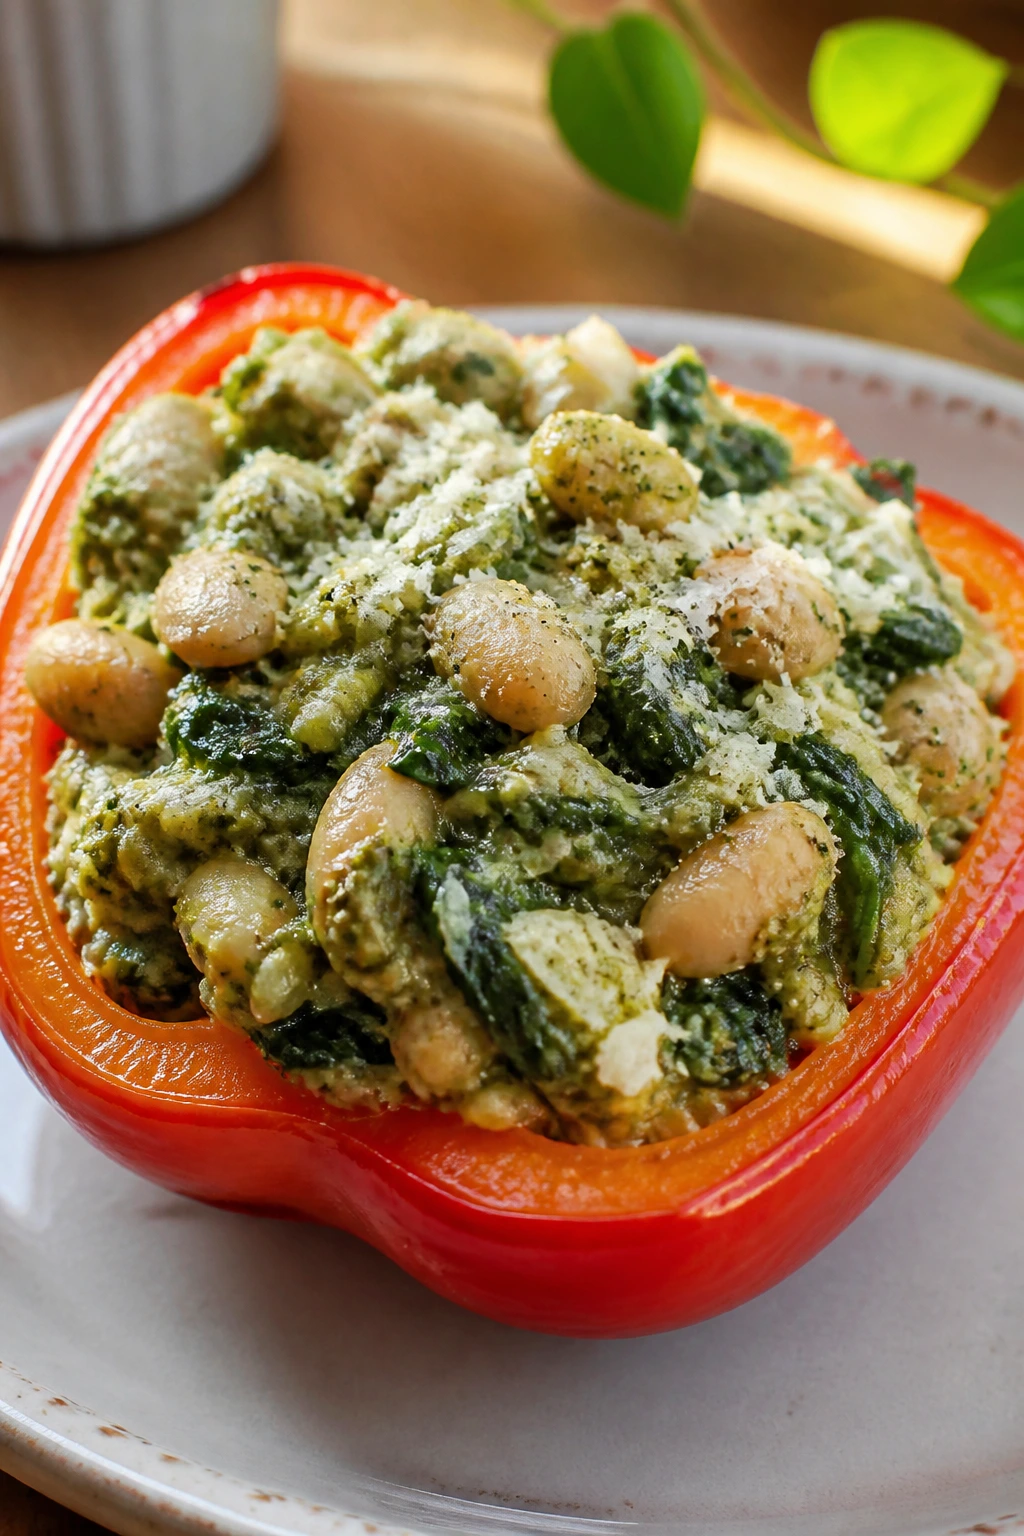
Can pesto and beans hold up in meal prep? Yes, and better than you might expect. This version is creamy, green, and a little nutty, with enough Parmesan and mozzarella to keep the filling from tasting like a side dish pretending to be dinner.
It’s also one of the easiest trays to customize. Once the beans and pesto are in place, you can move the flavor around without wrecking the whole thing.
Why It Works
White beans are soft enough to mash slightly in the pan, which helps the filling bind without needing a heavy sauce. Pesto brings fat, garlic, and basil in one spoonful, and spinach disappears into the mix while still adding color and a bit of freshness. It’s a good use of pantry food that doesn’t feel pantry-ish.
Key Ingredients
- 6 large bell peppers, halved lengthwise
- 1 tablespoon olive oil, for the pan
- 2 garlic cloves, minced, for a warm base
- 2 cans cannellini beans, drained and rinsed, the heart of the filling
- 2 cups cooked farro or brown rice, cooled
- 2 cups baby spinach, chopped, so it folds in easily
- 1/3 cup basil pesto, thick and flavorful
- 1/4 cup chopped sun-dried tomatoes, for a savory-sweet punch
- 1 teaspoon kosher salt and 1/2 teaspoon black pepper
- 1/2 cup grated Parmesan and 1 cup shredded mozzarella, for flavor and melt
- 1 tablespoon lemon zest, to keep the filling bright
Quick Steps
- Preheat the oven to 400°F (205°C) and bake the pepper halves for 10 minutes.
- Warm the olive oil in a skillet over medium heat. Add the garlic and cook for 30 seconds until fragrant.
- Stir in the beans and mash about 1/3 of them with the back of a spoon. Add the farro, spinach, pesto, sun-dried tomatoes, salt, pepper, and lemon zest.
- Cook for 2 minutes until the spinach wilts and the filling thickens. Fold in the Parmesan.
- Spoon the mixture into the peppers and top with the mozzarella.
- Cover with foil and bake for 18 minutes, then uncover and bake for 8 minutes more, until the cheese melts and the peppers are tender.
- Rest for 5 minutes before packing or serving.
Tips and Variations
- Pesto choice: Use a thick pesto so the filling doesn’t get oily.
- Flavor boost: A few chopped olives can swing this toward a more Mediterranean profile.
- Fresh finish: A squeeze of lemon after reheating wakes the whole dish back up.
12. Teriyaki Pork and Pineapple Stuffed Peppers

Sweet pineapple changes the whole mood here. The peppers taste more playful, the pork stays savory, and the teriyaki gives everything a sticky, glossy finish that reheats well if you don’t drown it in sauce.
This is the tray I’d make when I want something a little different from the usual Italian or taco flavors. It’s fast, bright, and the kind of dinner that keeps lunchtime from getting boring.
Why It Works
Ground pork has enough fat to stay juicy after reheating, and the teriyaki sauce adds both seasoning and moisture. Pineapple brings sweet acid, which cuts through the richness, while shredded cabbage or carrots keep the filling from turning paste-like. It’s a smart mix for meal prep because the flavors stay bold even after a day or two in the fridge.
Key Ingredients
- 6 large bell peppers, halved lengthwise
- 1 tablespoon sesame oil, for the skillet
- 1 small onion, diced, to build sweetness
- 1 pound ground pork, juicy and flavorful
- 2 garlic cloves, minced, plus 1 teaspoon grated fresh ginger
- 1 cup cooked jasmine rice, cooled
- 1 cup pineapple chunks, well drained and chopped if large, for sweet-sour balance
- 1/3 cup teriyaki sauce and 1 tablespoon low-sodium soy sauce, for the glaze
- 1 cup shredded cabbage or carrots, for crunch and structure
- 2 sliced scallions and 1 tablespoon sesame seeds, for topping
Quick Steps
- Heat the oven to 400°F (205°C) and bake the pepper halves for 10 minutes.
- Warm the sesame oil in a skillet over medium heat. Cook the onion for 3 to 4 minutes.
- Add the pork and cook for 6 to 7 minutes, breaking it up until it’s browned and cooked through.
- Stir in the garlic and ginger for 30 seconds, then add the rice, pineapple, teriyaki sauce, soy sauce, and cabbage or carrots. Cook for 2 minutes until the mixture looks glossy and thick.
- Fill the peppers with the pork mixture and cover with foil.
- Bake for 18 minutes, then uncover and bake for 8 minutes more, until the peppers are tender and the filling is hot.
- Top with scallions and sesame seeds after baking.
Tips and Variations
- Drain the pineapple: Too much juice can make the filling slippery.
- Heat option: A spoonful of chili crisp on top gives the tray a sharper finish.
- Rice swap: Brown rice works, but jasmine rice keeps the texture lighter.
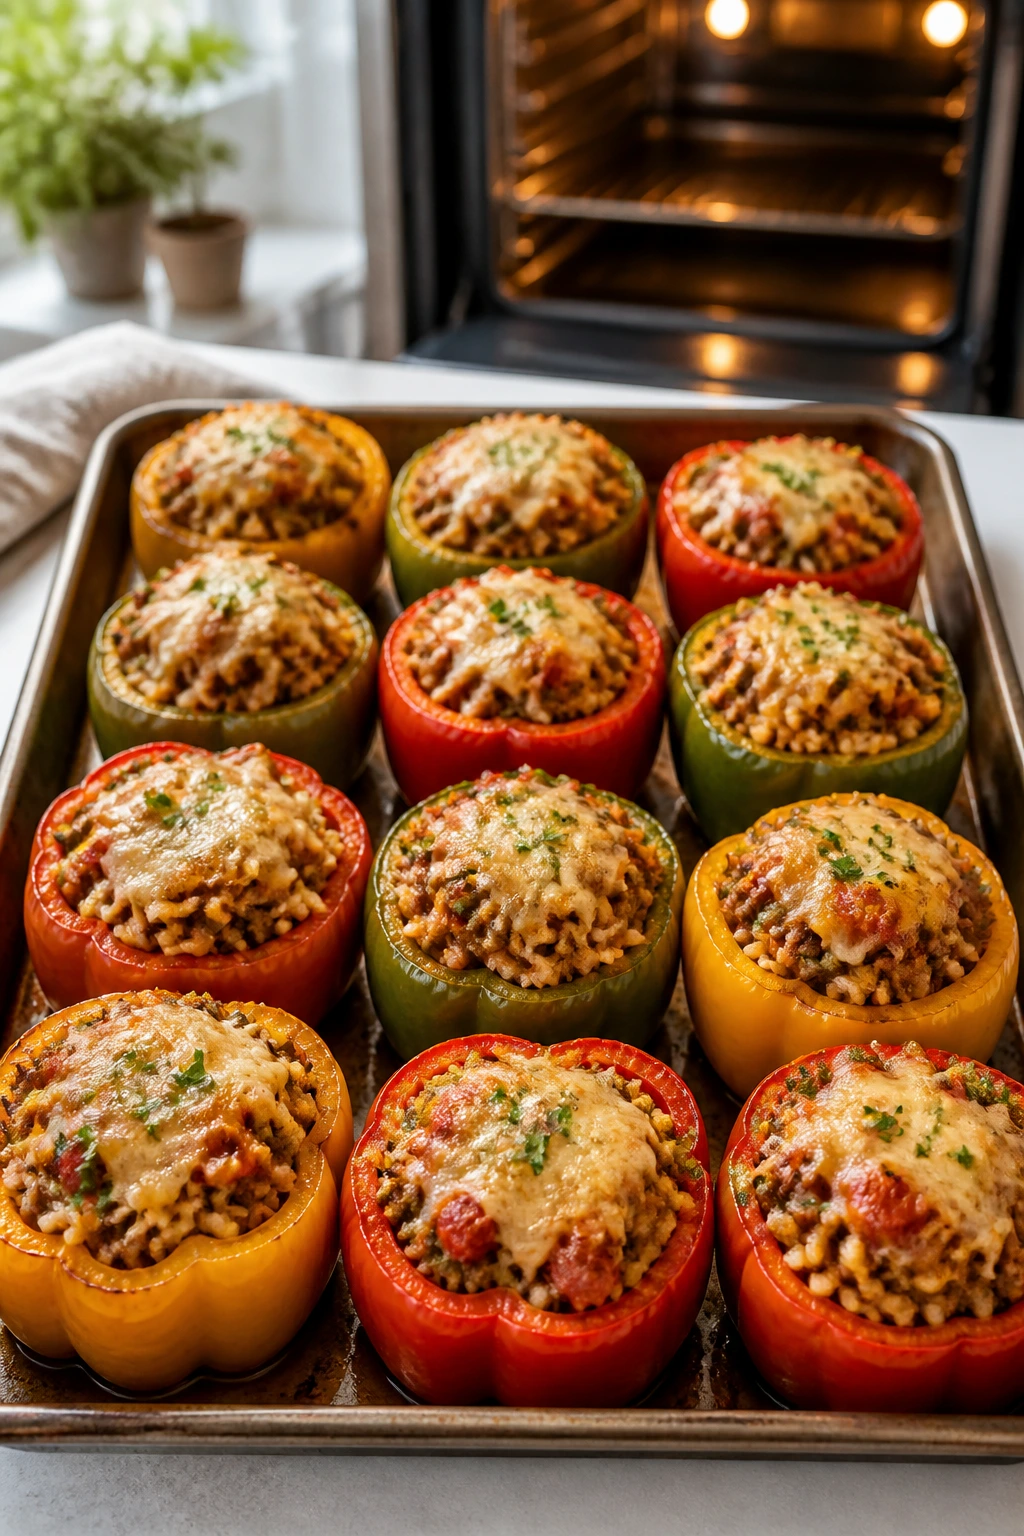
Why Stuffed Peppers Work So Well for Fridge Meals
A stuffed pepper has a built-in advantage that casseroles don’t always have: the shell. That shell acts like a little edible container, which means the filling stays put instead of spreading into a greasy puddle at the bottom of the dish. You get structure. You get a better reheat. You get dinner that still looks like dinner after it’s been through the fridge.
The other reason they work is moisture control. Peppers are watery enough to stay tender, but not so wet that they make everything soggy if you pre-bake them briefly and keep the fillings thick. Rice, quinoa, couscous, beans, and shredded chicken all absorb flavor in different ways, so you can shift the whole tray from comfort-food to lighter and fresher without changing the basic method.
I also like how forgiving the shape is. Halved peppers stack neatly in containers, and upright peppers can be packed more like a lunch bowl if that’s your thing. They aren’t precious. That’s part of the appeal.
Stuffed peppers also respond well to batch cooking. Make the rice, grains, or chicken in advance, and the rest comes together fast. If you’re the kind of person who gets tired of cooking by Wednesday, that matters a lot.
Essential Equipment for These Dinners
- 9×13-inch baking dish: The standard size for halved peppers; it keeps them snug so they don’t tip over.
- Large skillet: Needed for browning meat and cooking down the filling so it isn’t watery.
- Sharp chef’s knife: A clean cut matters when you’re halving peppers and trimming onions.
- Cutting board: Use one with a juice groove if you’re working with tomatoes or raw meat.
- Measuring cups and spoons: These keep seasoning balanced across a big batch.
- Wooden spoon or spatula: Better than a whisk for breaking up meat and folding in grains.
- Foil or a baking dish lid: Essential for the first part of baking so the peppers steam and soften.
- Colander: Handy for rinsing beans and draining tomatoes or pineapple.
- Instant-read thermometer: Not flashy, but worth it for checking chicken, turkey, pork, beef, or lamb without guessing.
- Airtight storage containers: Use shallow ones if you want the peppers to cool faster and reheat more evenly.
Smart Shopping and Ingredient Choices

Pick peppers with thick walls and a shape that sits flat without rolling around. Red, orange, and yellow peppers tend to taste sweeter than green ones, which matters if you’re making several trays in a row and want some variety. Size matters too. Similar-sized peppers cook more evenly, and that saves you from pulling half the tray while the other half still feels firm.
For the proteins, lean matters, but not too lean. Ground turkey and chicken need moisture from salsa, cheese, cream cheese, or broth, while beef, sausage, and lamb already bring more richness. If you’re freezing portions, meat with a little fat usually reheats better than ultra-lean cuts. Thin steak is fine for the Philly version, but shave it small so the filling doesn’t feel stringy after reheating.
Grains should be fully cooked and cooled before they go into the filling. Warm rice can turn sticky and wet inside the pepper. Brown rice, quinoa, farro, couscous, or orzo all work, but each one changes the texture. Rice feels classic. Quinoa feels lighter. Orzo and couscous lean soft and scoopable, which works nicely with chicken and herb-heavy fillings.
Cheese does more than melt on top. It helps bind the filling and protects the surface from drying out. Cheddar, Monterey Jack, mozzarella, provolone, and feta all play different roles. Use a sharper cheese when the filling is mild. Use a creamier cheese when the filling needs body. And if a recipe leans saucy already, go lighter on the top layer so the pepper doesn’t feel buried.
Canned tomatoes, salsa, and beans should be drained well unless the recipe calls for extra liquid. That one habit separates good meal prep from a container full of pepper soup. If you remember nothing else from the shopping list, remember that.
How to Serve These Recipes
Presentation: Serve halved peppers on a wide plate or in a shallow bowl so the filling stays visible. A final scatter of herbs, scallions, feta, or extra cheese gives the tray a fresher look and keeps the top from looking dry after reheating.
Accompaniments: A simple green salad, garlic bread, roasted broccoli, cucumber salad, or a spoonful of yogurt-based sauce works with almost every version here. For the taco and fajita peppers, tortilla chips on the side make sense. For the Greek and Mediterranean versions, a tomato-cucumber salad feels right.
Portions: Two pepper halves usually make a full dinner for most adults, especially when the filling includes rice, beans, or meat. One large pepper half plus a salad works for a lighter lunch. If you’re serving a mixed group, count on one and a half peppers per person and keep extra rice or salad on the side.
Beverage Pairing: Sparkling water with lemon keeps the flavors clean. Iced tea works well with the taco, cheeseburger, and buffalo versions. For the sausage, lamb, or Italian fillings, a medium-bodied red or a simple red wine spritzer is a pleasant fit.
Additional Tips and Flavor Boosters
Flavor Enhancement: A small spoonful of tomato paste, pesto, buffalo sauce, or teriyaki sauce can change the whole tray without extra work. Stir it into the filling while it’s still warm so the flavor spreads evenly. Acid matters too — a squeeze of lemon, lime, or a splash of vinegar will wake up a filling that tastes sleepy after refrigeration.
Customization: Add chopped mushrooms to meat fillings, zucchini to veggie fillings, or a handful of spinach to almost anything. If you want more heat, use pepper jack, hot sausage, or a pinch of red pepper flakes. If you want less richness, swap part of the cheese for herbs and extra vegetables.
Serving Suggestions: Fresh herbs go farther than people think. Parsley, cilantro, basil, dill, and scallions all make leftovers taste fresher. A final drizzle of yogurt sauce, ranch, or a little extra salsa is an easy way to keep reheated peppers from tasting flat.
Make-It-Yours: For dairy-free versions, skip the cream cheese and use olive oil, broth, and a dairy-free shred if you want a topping. For gluten-free needs, use rice, quinoa, or cauliflower rice and watch the sauce labels. For lower-carb meals, leave out the grain and bulk the filling with mushrooms, cauliflower rice, or shredded cabbage.
Make-Ahead, Storage, and Reheating Guidance
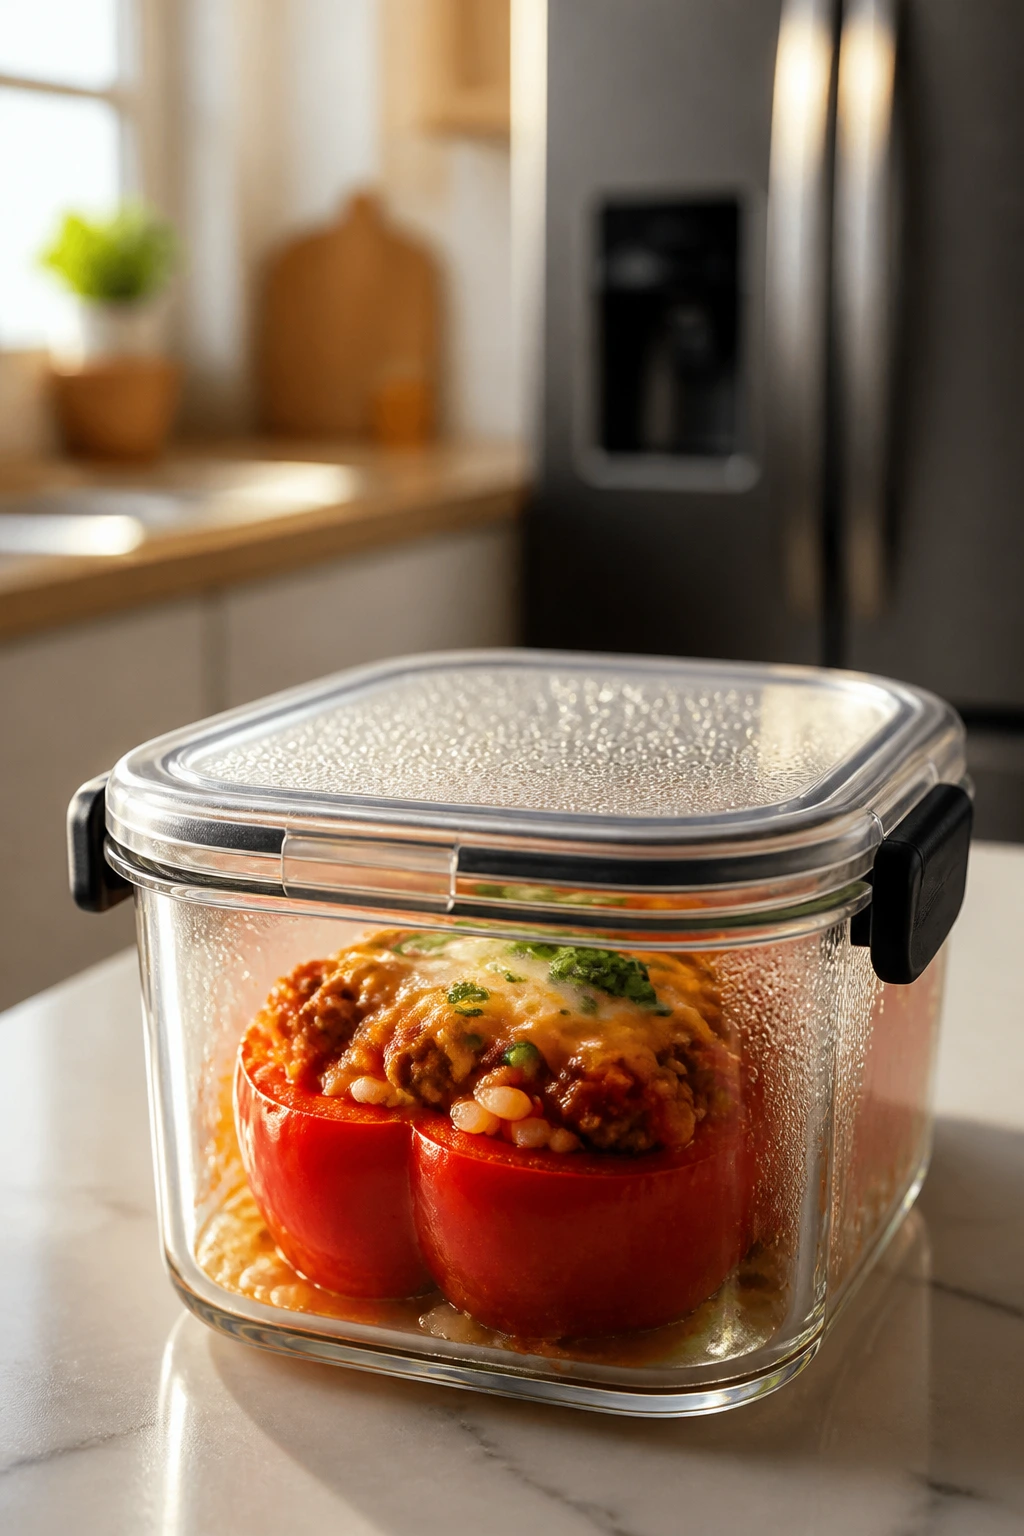
Baked stuffed peppers keep well in the refrigerator for 3 to 4 days when stored in airtight containers. Let them cool before sealing the lid, or the trapped steam will soften the peppers too much. Unbaked assembled peppers can usually sit covered in the fridge for up to 24 hours before baking, which is handy if you want to do the chopping and filling on one day and the baking on the next.
Most of these recipes freeze well for up to 2 months. Beef, turkey, sausage, chicken, bean, and grain fillings all handle freezing better than you’d expect. Creamier versions, like buffalo chicken or cheeseburger peppers, still freeze fine, but they taste best if you underbake them a little before freezing so they don’t overcook during the reheat. Wrap portions tightly or use containers with as little extra air as possible.
For the oven, reheat covered at 350°F (175°C) for 20 to 25 minutes if the peppers are refrigerated, or 35 to 45 minutes if they’re frozen and thawed first. If you’re using a microwave, cover the pepper loosely and heat in 60 to 90 second bursts until the center is hot. A little extra cheese or a spoonful of sauce on top can keep the filling from drying out during reheating.
The peppers usually hold their shape better the next day than they do right out of the oven, which is a nice surprise if you’re meal prepping for lunch. Fresh herbs, citrus, and crunchy garnishes should be added after reheating, not before. They wake the tray back up.
Variations and Adaptations to Try
Low-Carb Tray Bake: Skip the rice, orzo, couscous, or farro and bulk the filling with cauliflower rice, mushrooms, spinach, or shredded cabbage. The peppers still eat like a full dinner, and the texture stays lighter.
Dairy-Free Dinner Rotation: Leave out cream cheese, feta, and shredded cheese, then add a little more olive oil, tomato paste, or salsa for body. Nutritional yeast can bring a savory note without changing the whole filling. It won’t taste like the cheese-heavy versions, but it will still taste finished.
Big-Batch Freezer Pack: Double one of the meat-and-grain fillings, fill a second tray, and freeze it unbaked in a foil-lined dish. Once it’s solid, lift the whole block out and store it wrapped if you need the baking dish back. That’s a tidy trick for people who like their freezer to behave.
Mild Family Version: Use sweet peppers, mild cheese, and a gentle sauce like marinara or mild salsa. Keep the spice at the table instead of in the filling. Kids often do better with a tray that looks colorful but doesn’t surprise them with heat.
Regional Flavor Switches: Change the seasoning and sauce before you change anything else. Taco seasoning and salsa push the filling south of the border, pesto and Parmesan take it into herbier territory, and teriyaki or soy sauce turn it toward an Asian-style dinner. The pepper shell stays the same. The mood changes completely.
Common Mistakes to Avoid
-
Skipping the pre-bake: Raw peppers can stay too crisp while the filling is already done. Give them a short head start so the tray finishes evenly.
-
Making the filling too wet: This is the one that creates a puddle in the baking dish. Drain tomatoes, beans, pineapple, and salsa well, and cook off excess liquid in the skillet before stuffing.
-
Stuffing the peppers too tightly: If you pack the filling like concrete, the center can stay cool while the edges overbake. Spoon the filling in firmly, but don’t smash it down like you’re packing a lunchbox.
-
Using grain that’s still warm: Fresh hot rice or quinoa keeps steaming in the pepper and turns the filling gummy. Let grains cool first. Seriously. It makes a big difference.
-
Choosing peppers that wobble: Odd-shaped peppers slide around in the dish and cook unevenly. Try to buy similar-sized peppers with flat-ish sides so the tray behaves.
-
Forgetting the seasoning after reheating: Leftovers need a little brightness. A squeeze of lemon, lime, or a pinch of herbs after reheating keeps the whole thing from tasting muted.
Frequently Asked Questions
Can I assemble stuffed peppers the night before?
Yes. Assemble them, cover the baking dish, and refrigerate for up to 24 hours before baking. If you’re starting from the fridge, add a few extra minutes of bake time and keep the dish covered longer so the centers heat through.
Do I have to pre-cook the filling?
For these recipes, yes, unless the filling is already fully cooked when it goes into the peppers. Pre-cooking lets you control moisture and seasoning, which is the difference between a neat pepper and a watery one. It also keeps poultry and pork safe because you’re not relying on the pepper shell to do all the work.
Can I freeze stuffed peppers after baking?
Absolutely. Let them cool, wrap them tightly, and freeze for up to 2 months. Thaw overnight in the fridge if you can, then reheat covered in the oven so the pepper softens gently instead of drying out.
What’s the best grain for meal prep stuffed peppers?
Rice is the safest bet, but quinoa and farro hold their texture nicely too. Couscous and orzo work when you want a softer filling. If you’re after a lighter version, cauliflower rice does the job, though it reheats a little softer than the grains.
How do I stop the peppers from getting watery?
Drain wet ingredients, pre-bake the pepper shells, and cook the filling until it looks thick before stuffing. Tomatoes, salsa, pineapple, and beans all carry moisture, so give them a minute in the skillet before they go into the oven.
Can I use mini sweet peppers instead of full-size peppers?
Yes, but they cook faster and work better for snacks or lunches than for a full dinner tray. Cut the filling smaller, shorten the bake time, and watch them closely so they don’t collapse.
What if my peppers won’t sit flat in the dish?
Trim a thin slice from the rounded bottom or nestle them closely together in a smaller baking dish so they support each other. A tight fit is helpful here. It keeps the peppers upright and helps them steam more evenly.
Can I reheat these at work without ruining them?
Microwave them covered at medium power with a damp paper towel or a loose lid. Heat in short bursts and let them rest for a minute between rounds. That keeps the filling from exploding in one corner while the pepper edge stays cold.
A Tray Worth Repeating
A good tray of stuffed peppers gives you more than dinner. It gives you a backup plan with shape, flavor, and a little dignity left in the fridge. That’s not a small thing when the week starts getting loud.
The nice surprise here is how little boredom you need to accept. Swap the protein, change the grain, lean into a new sauce, and the same basic method keeps turning out different dinners without becoming a project. Pick one tray, pack the leftovers, and you’ve taken a few future nights off your plate in the easiest way possible.
| Recipe | Prep Time | Cook Time | Total Time | Servings | Standout Detail |
|---|---|---|---|---|---|
| Classic Beef and Rice Stuffed Peppers | 20 min | 35 min | 55 min | 6 servings | classic comfort, holds shape well |
| Turkey Taco Stuffed Peppers | 18 min | 30 min | 48 min | 6 servings | taco-night flavor with clean reheating |
| Italian Sausage and Mozzarella Stuffed Peppers | 20 min | 35 min | 55 min | 6 servings | rich, saucy, and extra satisfying |
| Greek Chicken and Orzo Stuffed Peppers | 20 min | 35 min | 55 min | 6 servings | bright lemon-feta finish |
| Vegetarian Quinoa and Black Bean Stuffed Peppers | 20 min | 35 min | 55 min | 6 servings | hearty meatless option that stays fluffy |
| Cheeseburger Stuffed Peppers | 20 min | 35 min | 55 min | 6 servings | burger flavor without the bun |
| Buffalo Chicken Stuffed Peppers | 15 min | 25 min | 40 min | 6 servings | the boldest leftover-friendly version |
| Mediterranean Lamb Stuffed Peppers | 20 min | 35 min | 55 min | 6 servings | warm herbs and tangy feta |
| Fajita Chicken Stuffed Peppers | 20 min | 35 min | 55 min | 6 servings | smoky and lime-bright |
| Philly Cheesesteak Stuffed Peppers | 20 min | 35 min | 55 min | 6 servings | melty, savory, sandwich-style filling |
| Pesto White Bean and Spinach Stuffed Peppers | 18 min | 30 min | 48 min | 6 servings | the freshest-tasting vegetarian tray |
| Teriyaki Pork and Pineapple Stuffed Peppers | 20 min | 35 min | 55 min | 6 servings | sweet-savory with a glossy finish |