
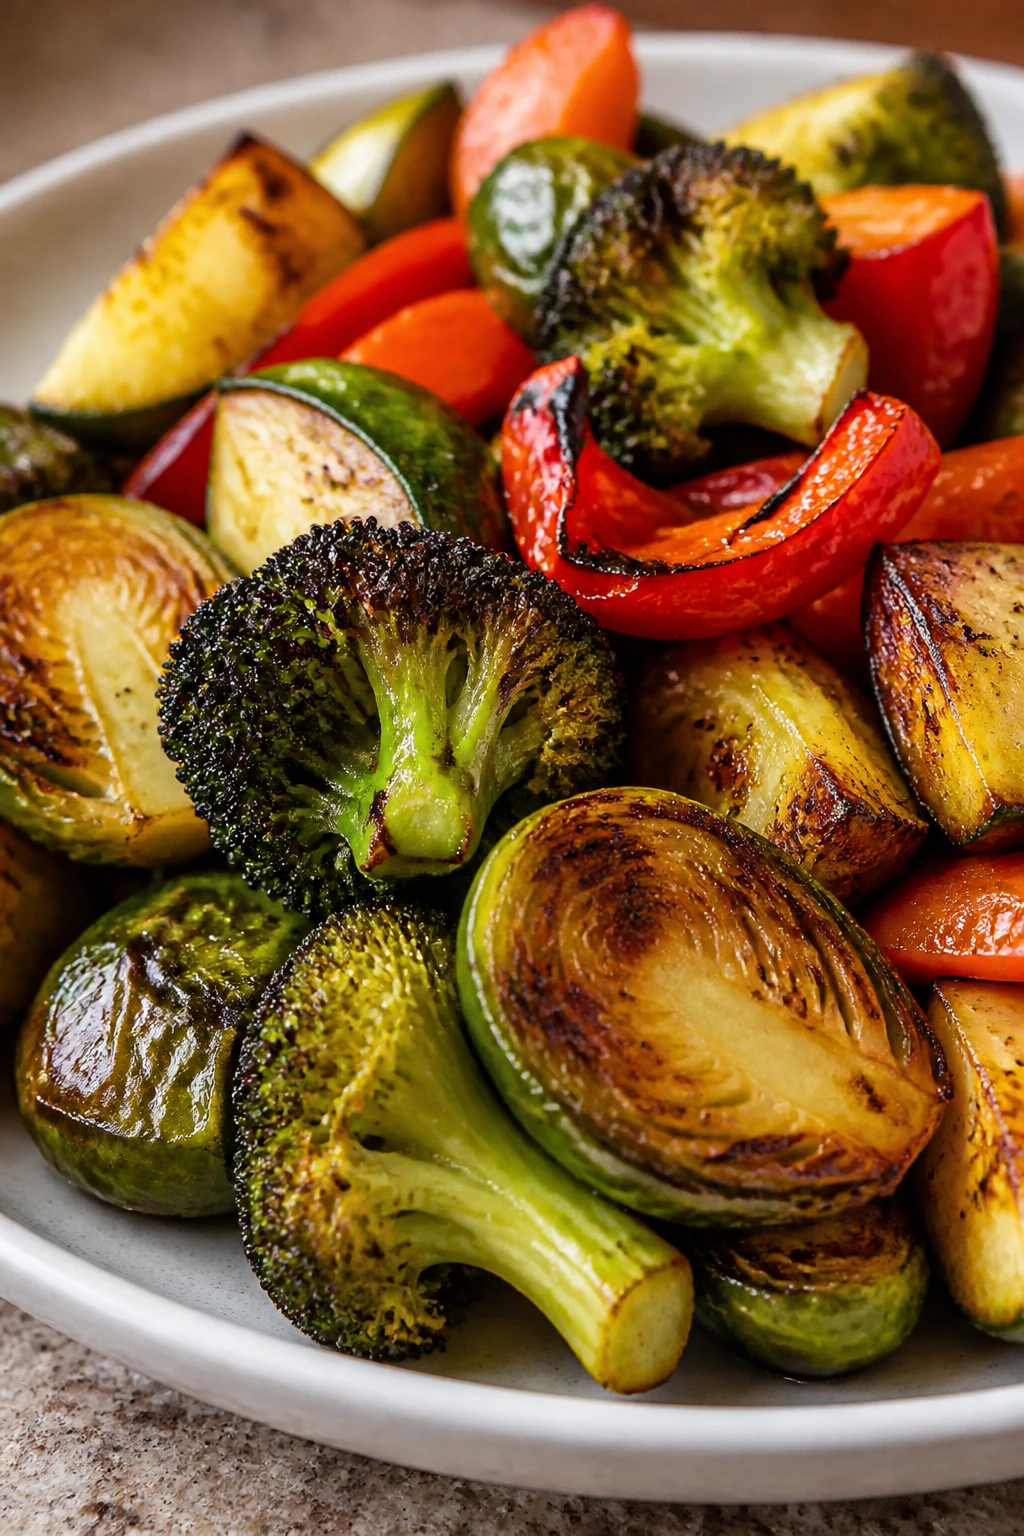
The smartest thing an air fryer does to vegetables is not magic. It’s physics. Hot air, tight space, a little oil, and suddenly broccoli gets browned at the tips, Brussels sprouts split open and crisp like tiny cabbages with attitude, and zucchini stops behaving like a sponge.
That’s why an air fryer vegetable dinner feels different from the same vegetables in the oven. You still get caramelization, but you don’t have to wait forever for it. You don’t need a second tray, a foil tent, or the patience of a saint. You need vegetables cut to the right size, enough breathing room in the basket, and the nerve to let the edges get a little dark.
The best part is the range. Air fryer vegetables can be a side dish, a base for grains, a meatless main, or the whole dinner if you build them with enough texture and a sharp finishing sauce. That’s the sweet spot this collection lives in: crisp, fast, and specific. No limp roasted mush. No bland “healthy” food that tastes like the color beige.
Why This Collection Earns a Spot in the Dinner Rotation
- Fast enough for weeknights: Most of these recipes cook in 8 to 18 minutes, which means the vegetables hit the table before you’ve lost interest.
- Built for real texture: The air fryer gives you blistered edges, browned spots, and tender centers without drowning everything in oil.
- Flexible by design: Several recipes work as sides, while others can be turned into bowls, wraps, tacos, or grain plates with very little extra effort.
- Uses vegetables at their best: The recipes lean into what each vegetable already does well — sturdy cauliflower for browning, zucchini for quick crisping, carrots for sweetness, mushrooms for deep savory flavor.
- Easy to batch and mix: If you’re cooking for more than two people, you can make a few of these in rounds and still keep dinner moving.
- Built around pantry staples: Olive oil, garlic, paprika, lemon, Parmesan, mustard, and breadcrumbs show up a lot because they work hard and don’t need babysitting.
There’s a reason air fryer vegetables have a loyal following. They don’t ask to be rescued. They just need the right heat and a little attention. Start with the ones that like browning best.
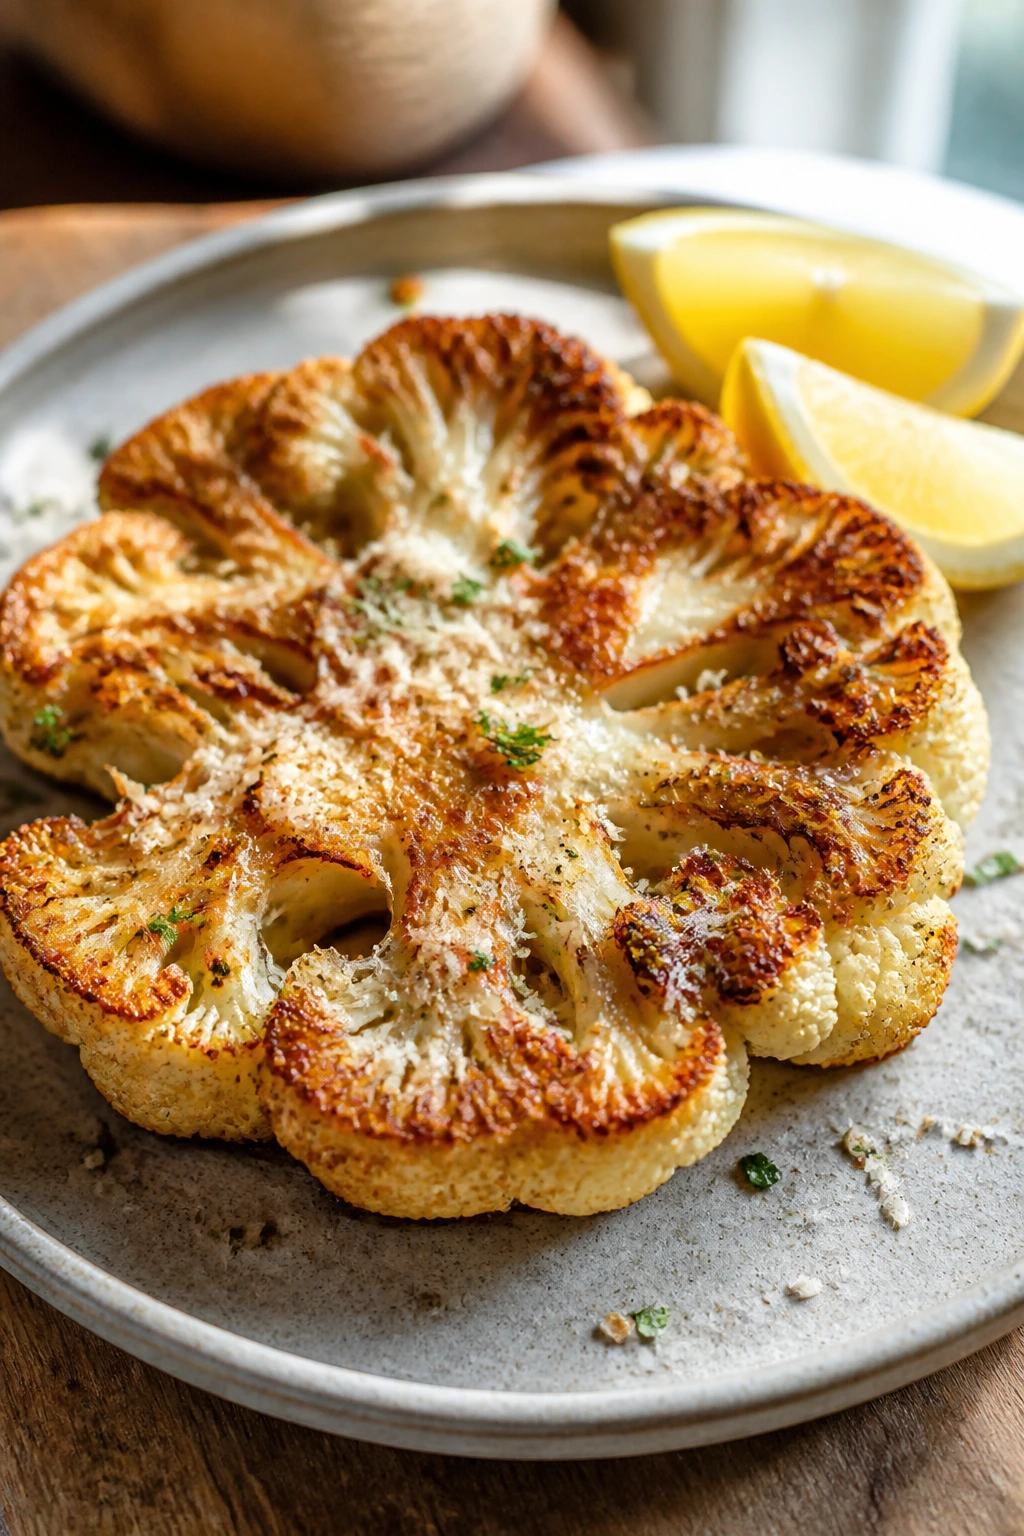
1. Crispy Air Fryer Cauliflower Steaks with Lemon and Parmesan
Cauliflower steaks can feel fussy on paper, but in the basket they make sense. Thick slices get a browned crust on the outside, while the center stays tender and almost buttery. The Parmesan lands at the end and melts just enough to cling to the ridges.
Why It Works:
Cauliflower has a dense stem and open florets, so it takes to high heat better than softer vegetables. A 390°F air fry gives you browning before the inside collapses, which is the whole trick. Lemon keeps the flavor from going heavy, and Parmesan adds salt without making the dish feel rich in a clunky way.
Key Ingredients:
- 1 large head cauliflower, about 2 to 2½ pounds, trimmed into 4 thick steaks and extra florets saved for later
- 2 tablespoons olive oil
- 1 teaspoon kosher salt
- ½ teaspoon black pepper
- 1 teaspoon garlic powder
- 1 teaspoon smoked paprika
- ¼ cup finely grated Parmesan
- 1 lemon, cut into wedges
- 1 pinch red pepper flakes, optional, for a little heat
Quick Steps:
- Preheat the air fryer to 390°F for 3 to 5 minutes.
- Cut the cauliflower into 4 thick steaks, keeping the core attached so the slices hold together.
- Brush both sides with olive oil, then season with salt, pepper, garlic powder, and smoked paprika.
- Air fry for 10 to 12 minutes, flip carefully with a wide spatula, then cook 6 to 8 minutes more until the edges are deeply golden and the stem feels tender when pierced with a fork.
- Sprinkle Parmesan over the hot steaks during the last 2 minutes so it softens and sticks.
- Finish with lemon juice and a pinch of red pepper flakes.
Equipment for This Recipe:
- Air fryer basket or tray
- Large chef’s knife
- Pastry brush
- Wide spatula or tongs
How to Serve This Dish:
Serve the steaks over herbed lentils, couscous, or a swipe of yogurt mixed with garlic. A shower of parsley on top makes the plate look finished without needing much else. If you want dinner to feel fuller, tuck the extra florets beside the steaks and let them crisp in the same batch.
Pro Tips for This Recipe:
- Cut from the center first; the outer slices usually fall apart, and that’s fine for snacks but not for steaks.
- Don’t drown the cauliflower in oil. A thin coat browns better than a slick one.
- If your basket is small, cook 2 steaks at a time. Crowding softens the edges fast.
Variations on This Dish:
- Tahini Lemon Finish: Swap the Parmesan for a spoonful of tahini thinned with lemon juice and water.
- Curry Cauliflower Steaks: Use curry powder instead of smoked paprika and finish with chopped cilantro.
- Vegan Umami Version: Replace Parmesan with nutritional yeast and a pinch of finely ground almonds.
Common Mistakes to Avoid with This Dish:
- Cutting steaks too thin: Thin slices dry out before they brown. Keep them at least ¾-inch thick.
- Flipping too early: If the surface still sticks, give it another minute; forcing it breaks the edges.
- Using wet cauliflower: Pat it dry after washing so the oil actually coats the surface instead of sliding off.
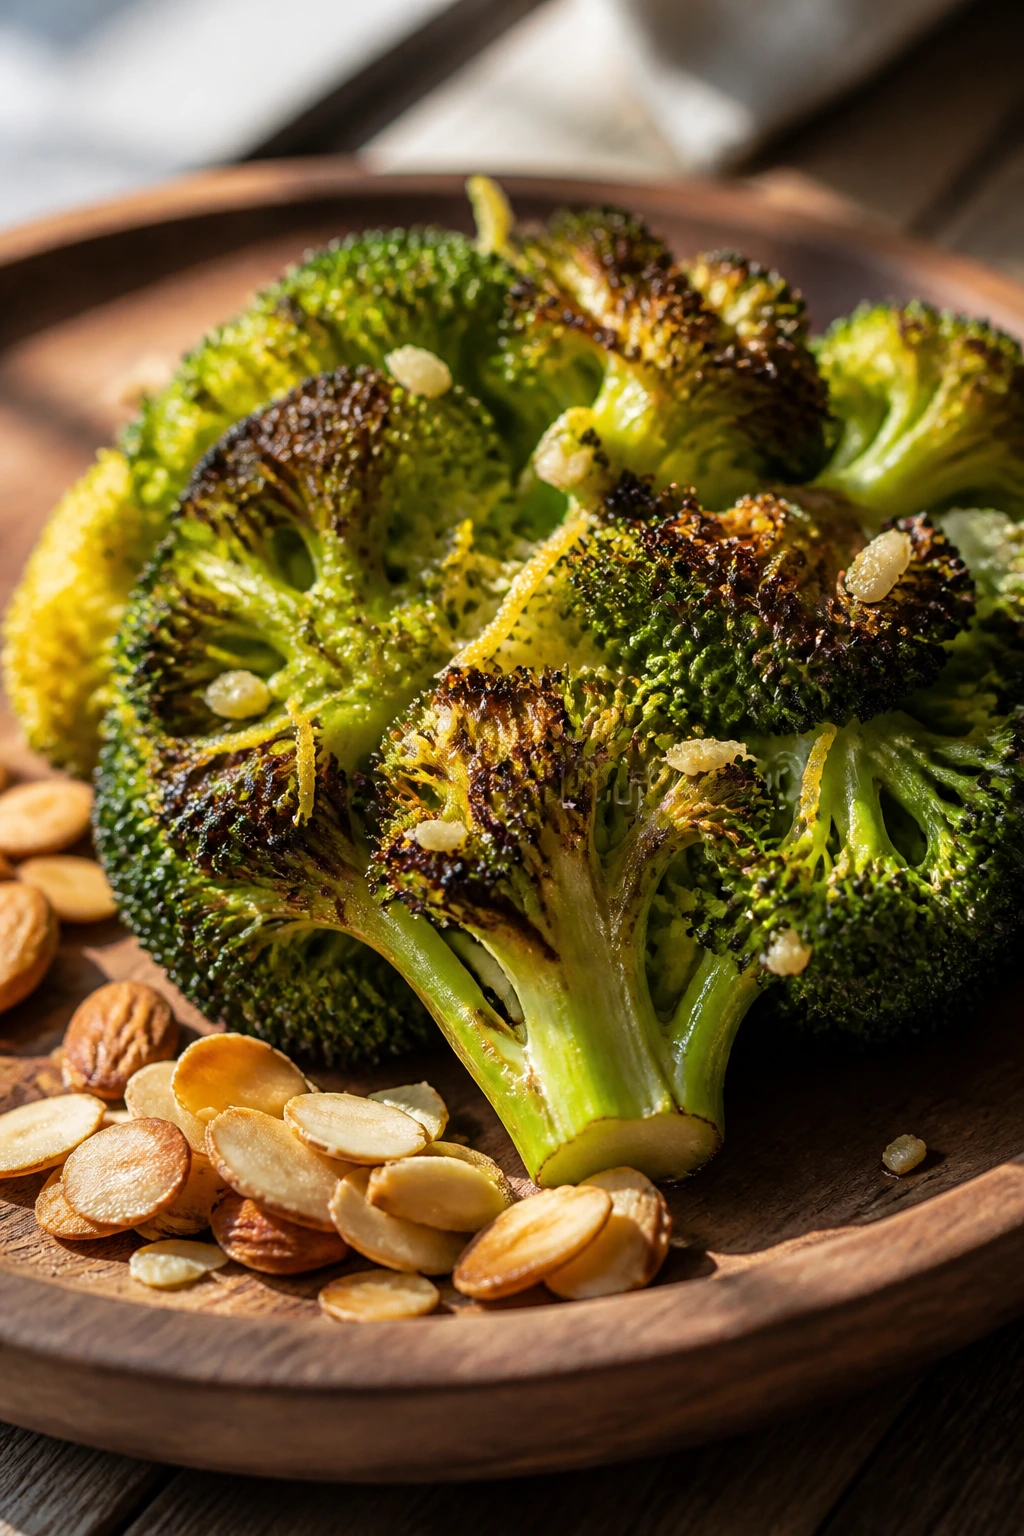
2. Lemon-Garlic Air Fryer Broccoli with Toasted Almonds
Broccoli in the air fryer gets those charred little crowns that people always pretend not to fight over. The stems stay sweet, the tops crisp, and the whole thing tastes a little more grown-up once lemon and almonds join the party.
Why It Works:
Broccoli likes direct heat because the florets are full of little pockets that brown quickly. A short cook at 380°F gives you tender stems and darker tips without the bitter edge that can show up when broccoli is left in too long. Almonds add crunch after cooking, which matters; if they go in too early, they lose their snap.
Key Ingredients:
- 1 large head broccoli, about 1½ pounds, cut into florets with peeled stems sliced thin
- 1½ tablespoons olive oil
- 2 cloves garlic, finely grated or minced
- ¾ teaspoon kosher salt
- ½ teaspoon black pepper
- ½ teaspoon lemon zest
- 2 tablespoons sliced almonds, toasted
- 1 tablespoon lemon juice
- 1 tablespoon grated Pecorino or Parmesan, optional
Quick Steps:
- Preheat the air fryer to 380°F.
- Toss the broccoli with olive oil, garlic, salt, pepper, and lemon zest.
- Arrange in a single layer and air fry for 7 minutes.
- Shake the basket, then cook 3 to 5 minutes more until the florets are browned at the edges and the stems are just tender.
- Transfer to a bowl, add lemon juice, and toss with toasted almonds and cheese if using.
- Serve right away so the tops stay crisp.
Equipment for This Recipe:
- Air fryer basket
- Mixing bowl
- Microplane or fine grater
- Small skillet for toasting almonds, if you aren’t using pre-toasted ones
How to Serve This Dish:
This one works as a side beside salmon, grilled tofu, or a bean bowl. If you want to make it dinner, spoon it over farro with chickpeas and a spoon of tahini. The broccoli should still have some bite when it lands on the plate.
Pro Tips for This Recipe:
- Cut the florets into similar sizes so the small bits don’t scorch while the stems lag behind.
- Add the lemon juice after cooking, not before. Acid can dull browning if you soak the broccoli in it.
- Toast the almonds until they smell nutty and look just a shade darker. That extra minute matters.
Variations on This Dish:
- Chili Crisp Broccoli: Drizzle with a teaspoon of chili crisp after cooking.
- Sesame Broccoli: Swap almonds for sesame seeds and finish with a few drops of toasted sesame oil.
- Cheesy Broccoli Bake-Style: Add a tablespoon of breadcrumbs and extra cheese during the last 2 minutes for a more crusty top.
Common Mistakes to Avoid with This Dish:
- Overloading the basket: Pile broccoli up and you’ll steam it. Give the florets space.
- Burning the garlic: Very fine garlic can scorch. If your air fryer runs hot, toss the garlic with the oil and broccoli but keep an eye on the last few minutes.
- Skipping the acid: A squeeze of lemon is not decoration here. It wakes the whole tray up.
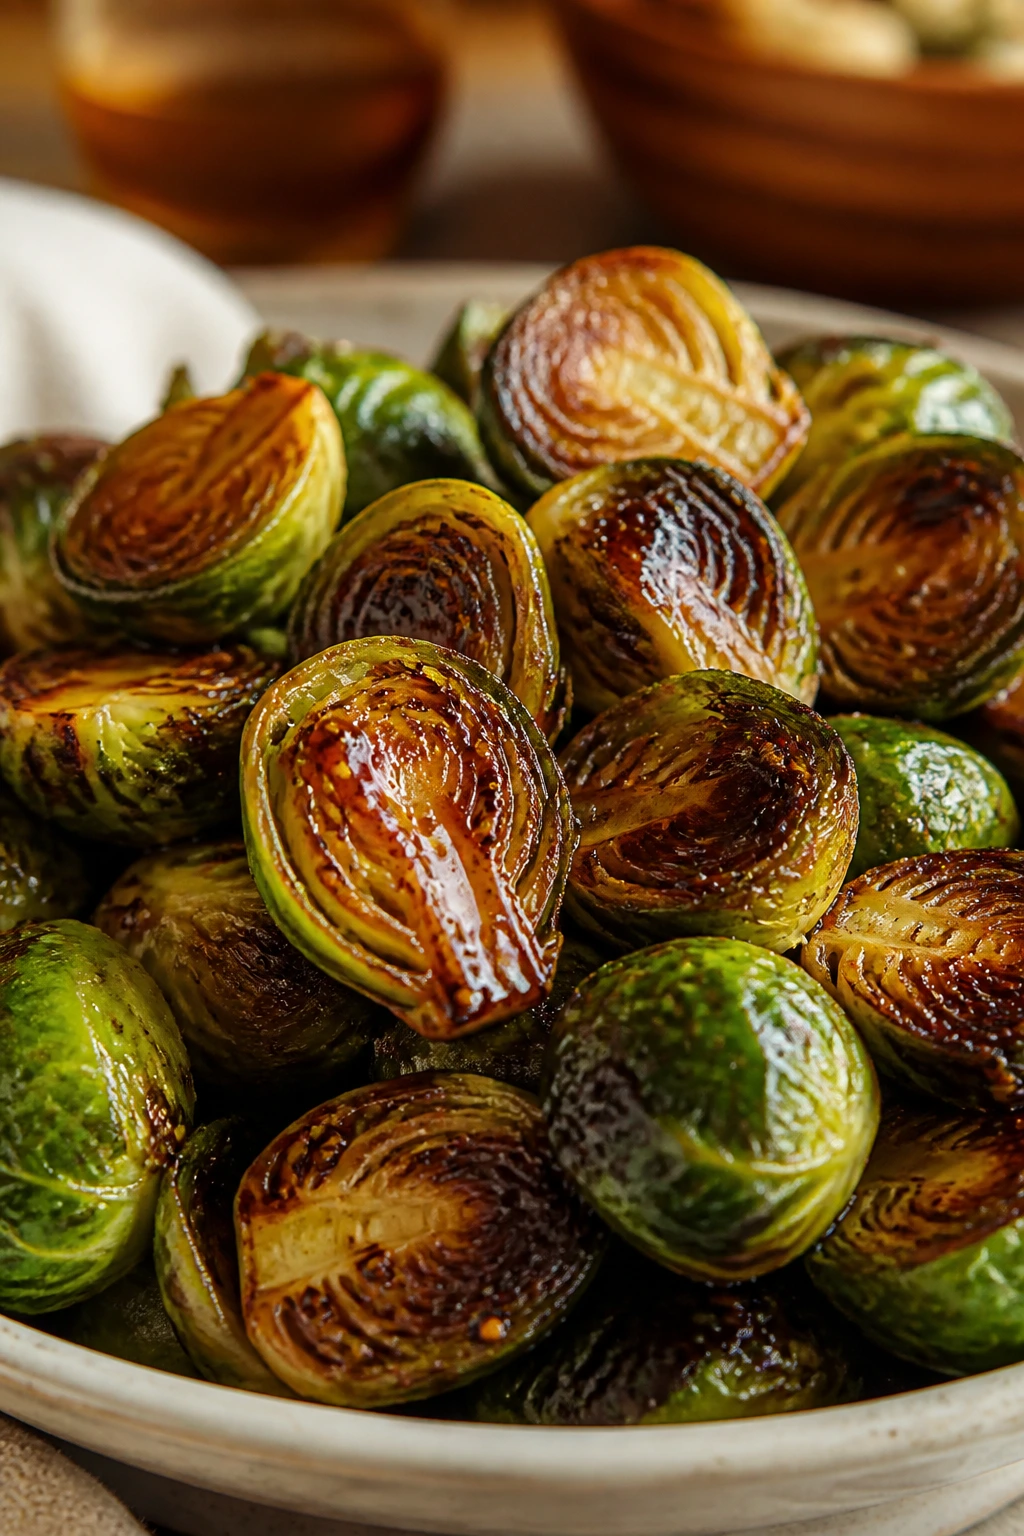
3. Balsamic-Glazed Brussels Sprouts with Maple and Mustard
Brussels sprouts can go from sharp to sweet in one blast of heat. The outer leaves crisp, the centers soften, and the glaze settles into the cut sides like sticky lacquer.
Why It Works:
Brussels sprouts have a natural shape for air frying. Cut them in half and they sit flat, which means the cut side gets direct contact with hot air. A quick glaze of balsamic, maple, and mustard adds shine and depth, but it needs to go on near the end so the sugars don’t burn.
Key Ingredients:
- 1½ pounds Brussels sprouts, trimmed and halved
- 1½ tablespoons olive oil
- ¾ teaspoon kosher salt
- ½ teaspoon black pepper
- 1 tablespoon balsamic vinegar
- 1 tablespoon maple syrup
- 1 teaspoon Dijon mustard
- 1 tablespoon pumpkin seeds or chopped pecans, optional
- 1 teaspoon lemon juice, optional, to sharpen the finish
Quick Steps:
- Preheat the air fryer to 390°F.
- Toss the sprouts with olive oil, salt, and pepper.
- Air fry for 10 minutes, shaking once halfway through.
- Mix balsamic vinegar, maple syrup, and Dijon in a small bowl.
- Brush or toss the glaze over the sprouts, then cook 2 to 4 minutes more until sticky and the edges are browned.
- Sprinkle with pumpkin seeds or pecans and a tiny squeeze of lemon if you want more lift.
Equipment for This Recipe:
- Air fryer basket
- Small bowl for glaze
- Silicone spatula or spoon
- Cutting board and sharp knife
How to Serve This Dish:
These are strong enough to sit beside roasted chicken or grilled tempeh, but they also work over mashed potatoes with a fried egg. If you’re serving them as a dinner vegetable, add something soft on the plate — rice, couscous, or polenta — because the contrast helps.
Pro Tips for This Recipe:
- Trim just enough of the stem to clean it up. If you cut too much, the leaves fall apart.
- Don’t add the glaze too soon. Maple can go from glossy to bitter in a hurry.
- Shake the basket once, but don’t toss the sprouts every minute; they need contact with the hot metal to brown.
Variations on This Dish:
- Spicy Maple Sprouts: Add ¼ teaspoon cayenne to the glaze.
- Orange-Dijon Sprouts: Replace balsamic with orange juice and add orange zest.
- Garlic-Parmesan Sprouts: Skip the glaze, then toss with grated Parmesan and minced roasted garlic after cooking.
Common Mistakes to Avoid with This Dish:
- Leaving wet sprouts in the basket: Dry them after washing or the browning slows down.
- Using too much glaze: A thin coating sticks better than a puddle.
- Cooking tiny loose leaves too long: They crisp fast. Pull them out if they darken early, because they turn bitter quickly.
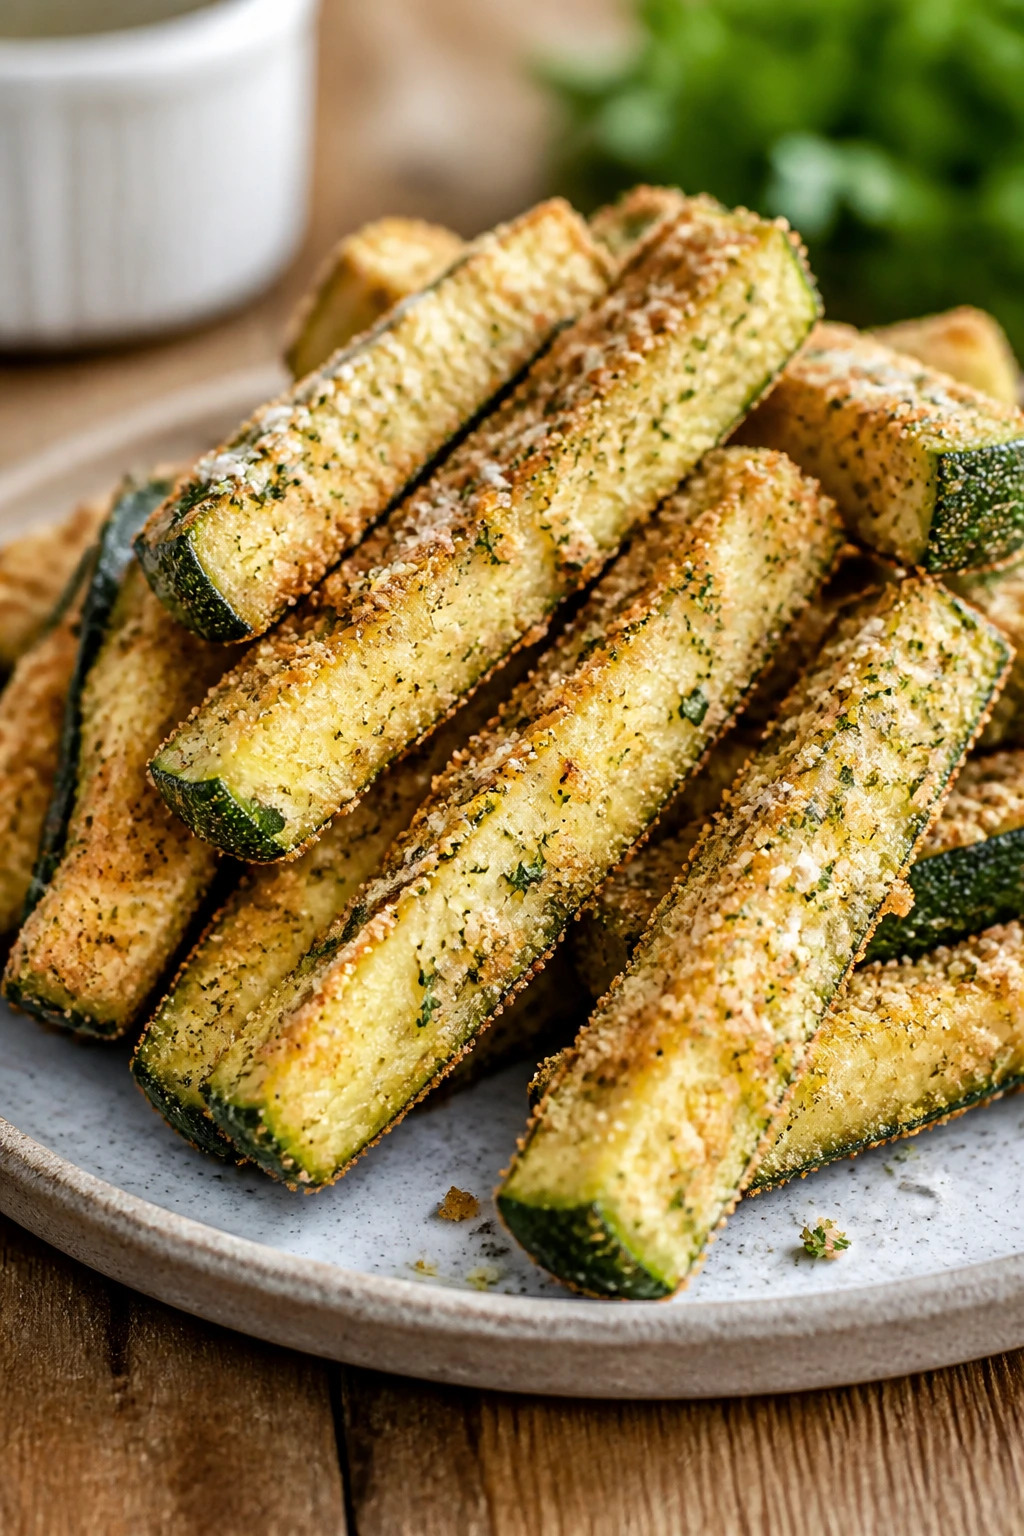
4. Air Fryer Zucchini Fries with Herbed Breadcrumbs
Zucchini fries are the recipe people try when they want crunch without a heavy batter. The coating gets crisp, the inside stays soft, and if you salt the zucchini properly, you avoid the soggy middle that ruins the whole point.
Why It Works:
Zucchini carries a lot of water, so the first job is drying it out a little. Salting the sticks briefly pulls some moisture to the surface, and the breadcrumb coating gives the air fryer something to brown. A spray of oil helps the crumbs crisp instead of drying out like sand.
Key Ingredients:
- 2 medium zucchini, about 1 pound total, cut into thick fries
- 1 teaspoon kosher salt
- ½ cup all-purpose flour
- 2 large eggs, beaten
- 1 cup panko breadcrumbs
- ¼ cup finely grated Parmesan
- 1 teaspoon dried oregano
- ½ teaspoon garlic powder
- ¼ teaspoon black pepper
- Olive oil spray
Quick Steps:
- Slice the zucchini into fry-shaped sticks, about 3 inches long and ½-inch thick.
- Toss with salt and let sit 10 minutes, then pat dry with paper towels.
- Set up three bowls: flour, beaten eggs, and panko mixed with Parmesan, oregano, garlic powder, and pepper.
- Coat each stick in flour, dip in egg, then press into breadcrumbs.
- Preheat the air fryer to 400°F and spray the basket lightly.
- Arrange fries in a single layer, spray the tops, and air fry for 8 minutes. Flip, spray again, and cook 4 to 6 minutes more until deeply golden.
- Serve immediately with marinara or garlicky yogurt dip.
Equipment for This Recipe:
- Air fryer basket
- 3 shallow bowls
- Paper towels
- Tongs
- Baking sheet, if you want to bread the fries in batches
How to Serve This Dish:
Pile them onto a tray with a bowl of marinara in the center and call it dinner with a big salad and a bean soup. They also work beside roasted fish or a tomato plate if you’re building a lighter meal. Serve them fast; zucchini fries lose crispness as they cool.
Pro Tips for This Recipe:
- Choose medium zucchini, not giant ones. Oversized zucchini are full of seeds and go mushy.
- Press the breadcrumb coating on firmly. Loose crumbs fly around and burn.
- If your air fryer runs hot, check a minute early. Panko can go from golden to too dark fast.
Variations on This Dish:
- Cornmeal Crunch Fries: Replace half the panko with fine cornmeal for a rougher crust.
- Gluten-Free Fries: Use rice flour and gluten-free breadcrumbs.
- Spicy Ranch Fries: Add smoked paprika and serve with a ranch-style yogurt dip.
Common Mistakes to Avoid with This Dish:
- Skipping the salt-and-dry step: That extra 10 minutes keeps the fries from steaming.
- Crowding the basket: Fries need air around them or they go soft in patches.
- Overhandling after breading: Press once, then move them to the basket. Too much fuss strips the coating.
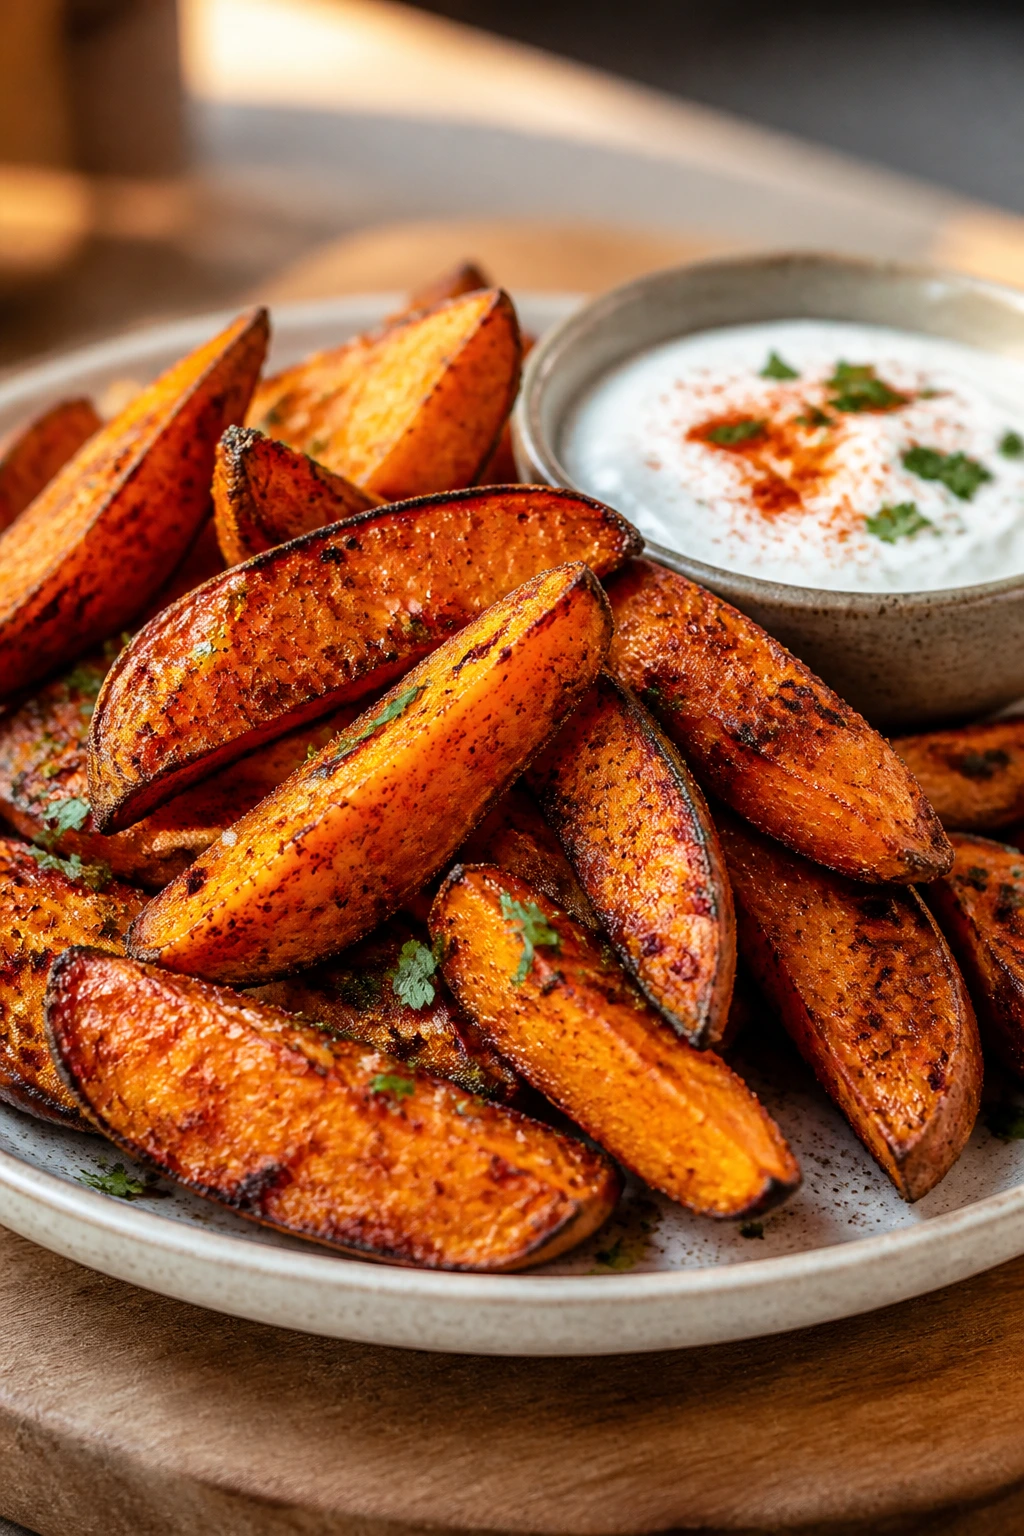
5. Sweet Potato Wedges with Smoked Paprika and Yogurt Dip
Sweet potatoes need a little discipline in the air fryer. Cut them too small and they dry out; leave them too thick and the centers lag behind. Wedges are the sweet spot because they brown on the edges and stay creamy in the middle.
Why It Works:
Sweet potatoes are dense and sugary, which makes them ideal for dry heat. The edges caramelize before the inside falls apart, especially if you cut the wedges evenly and keep the seasoning simple. Smoked paprika adds a woodsy note, and the yogurt dip cuts through the sweetness so the dish doesn’t feel like dessert.
Key Ingredients:
- 2 medium sweet potatoes, about 1½ pounds, scrubbed and cut into wedges
- 1½ tablespoons olive oil
- 1 teaspoon kosher salt
- 1 teaspoon smoked paprika
- ½ teaspoon garlic powder
- ¼ teaspoon black pepper
- ½ cup plain Greek yogurt
- 1 tablespoon lemon juice
- 1 tablespoon chopped chives or parsley
Quick Steps:
- Preheat the air fryer to 380°F.
- Toss the wedges with olive oil, salt, smoked paprika, garlic powder, and pepper.
- Arrange in a single layer and air fry for 12 minutes.
- Flip the wedges and cook 6 to 8 minutes more until the edges are browned and a knife slides through the thickest piece with little resistance.
- Stir the yogurt, lemon juice, and herbs together for the dip.
- Serve the wedges hot with the dip on the side.
Equipment for This Recipe:
- Air fryer basket
- Mixing bowl
- Sharp knife
- Small bowl for dip
How to Serve This Dish:
These work with black bean salad, grilled halloumi, or a pile of sautéed greens. If you want them to carry dinner, add a fried egg and a spoonful of salsa on top. The dip should be cool, tangy, and thick enough to cling to the wedge.
Pro Tips for This Recipe:
- Cut every wedge to similar thickness. Thin tips burn while thick centers stay hard.
- Don’t add sugar or honey here. Sweet potatoes already bring enough sweetness on their own.
- If you want more crispness, soak the cut wedges in cold water for 20 minutes, then dry them very well before seasoning.
Variations on This Dish:
- Cajun Wedges: Swap the paprika for Cajun seasoning and serve with scallion yogurt.
- Herby Garlic Wedges: Add rosemary and thyme to the oil mix.
- Tahini Drizzle Version: Replace the yogurt dip with tahini, lemon, and a splash of warm water.
Common Mistakes to Avoid with This Dish:
- Using too much oil: Sweet potatoes can get greasy fast. A light coating is enough.
- Skipping the flip: The bottom side needs help browning.
- Serving them cold: They taste flat once they sit. Put them on the plate right away.
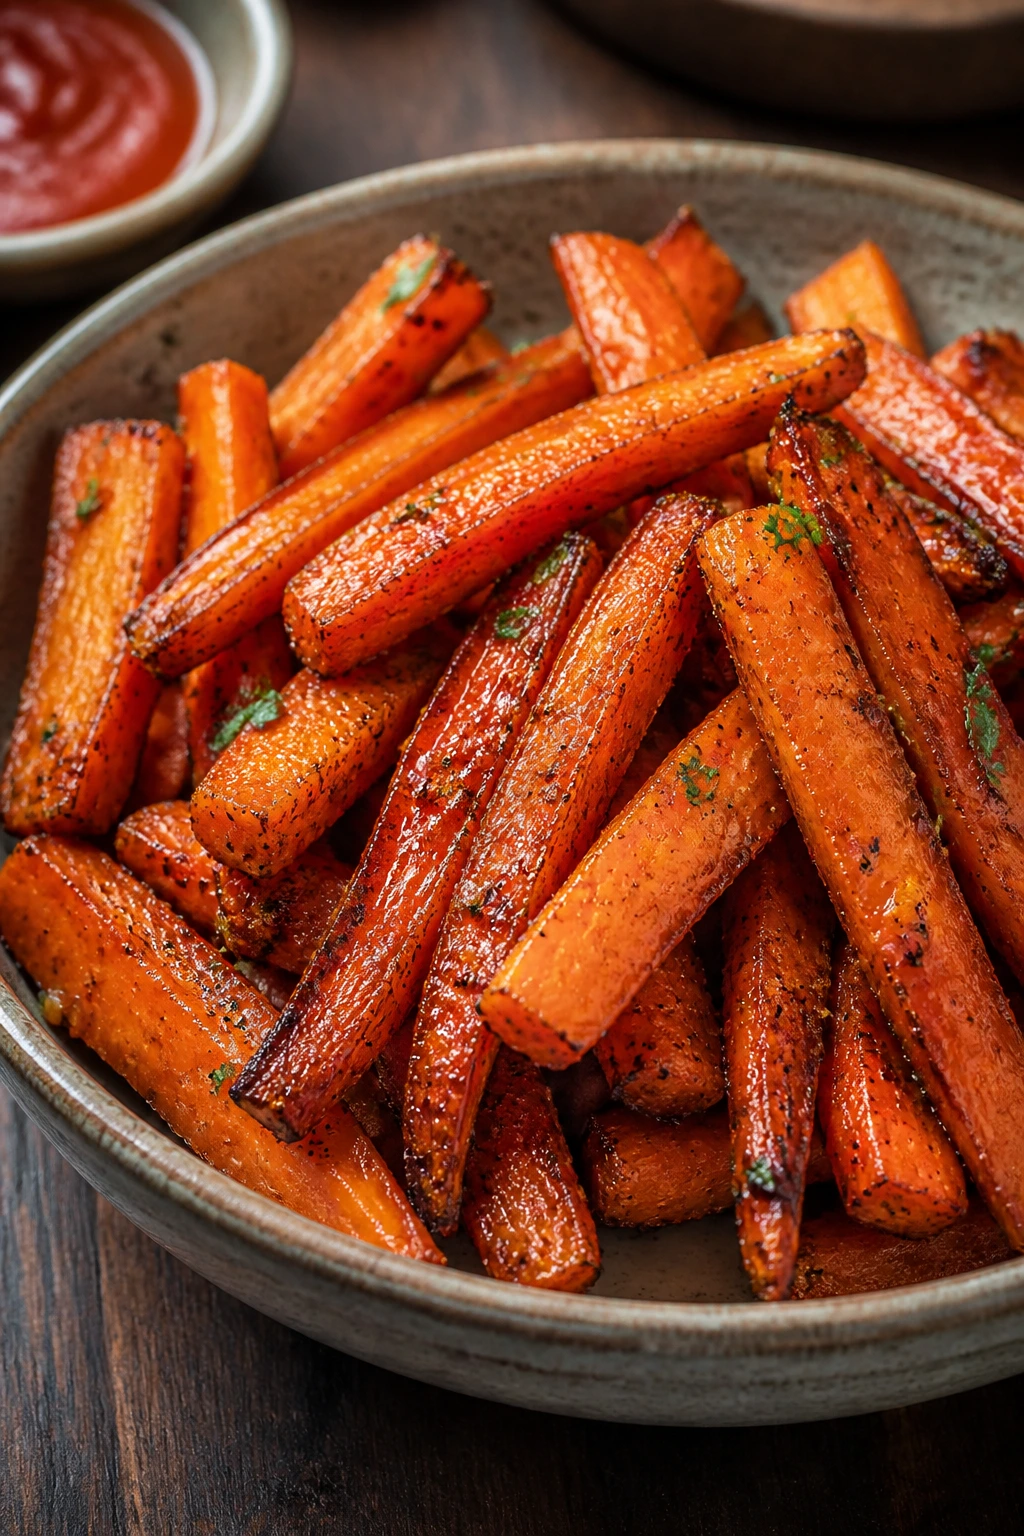
6. Carrot Fries with Harissa and Honey
Carrot fries sound simple, and that’s the beauty of them. The edges go dark and sweet, the centers stay firm, and harissa gives them a smoky heat that feels more dinner than snack.
Why It Works:
Carrots have enough natural sugar to caramelize at high heat, especially when cut into thick, fry-shaped sticks. Harissa clings to the surface and deepens the color, while a tiny bit of honey helps the spices bloom. The key is not cutting them too thin, or they dry out before the middle softens.
Key Ingredients:
- 1½ pounds carrots, peeled and cut into thick sticks
- 1½ tablespoons olive oil
- 1 tablespoon harissa paste
- 1 teaspoon honey
- ¾ teaspoon kosher salt
- ½ teaspoon ground cumin
- ¼ teaspoon black pepper
- 2 tablespoons chopped cilantro or parsley
- ¼ cup plain yogurt, optional, for serving
Quick Steps:
- Preheat the air fryer to 400°F.
- Whisk olive oil, harissa, honey, salt, cumin, and pepper in a bowl.
- Toss the carrot sticks in the mixture until evenly coated.
- Air fry for 12 minutes, shake the basket, then cook 4 to 6 minutes more until the edges look browned and the carrots are tender but still have a little snap.
- Toss with herbs and serve with yogurt if you want cooling contrast.
- Taste one before plating. If the carrots need more salt, add it while they’re hot.
Equipment for This Recipe:
- Air fryer basket
- Mixing bowl
- Whisk
- Vegetable peeler
- Knife and cutting board
How to Serve This Dish:
Serve these beside roasted chicken, lentil patties, or a grain bowl with cucumbers and herbs. They also make a sharp side for cumin-spiced rice. A spoon of yogurt on the plate keeps the harissa from taking over.
Pro Tips for This Recipe:
- Cut the carrots so the thicker end matches the thinner end as closely as possible.
- If your harissa is salt-heavy, reduce the added salt a little. Some jars pack a punch.
- Stir the carrots once after coating so the honey doesn’t pool at the bottom of the bowl.
Variations on This Dish:
- Maple Harissa Carrots: Use maple syrup instead of honey for a deeper sweetness.
- Za’atar Carrots: Swap harissa for za’atar and finish with lemon.
- Orange Carrot Fries: Add orange zest and a squeeze of juice after cooking.
Common Mistakes to Avoid with This Dish:
- Cutting narrow tips too small: They char before the thick pieces are done.
- Using a wet sauce: Thick paste sticks better than a runny glaze.
- Ignoring the last 2 minutes: That’s when the color gets good.
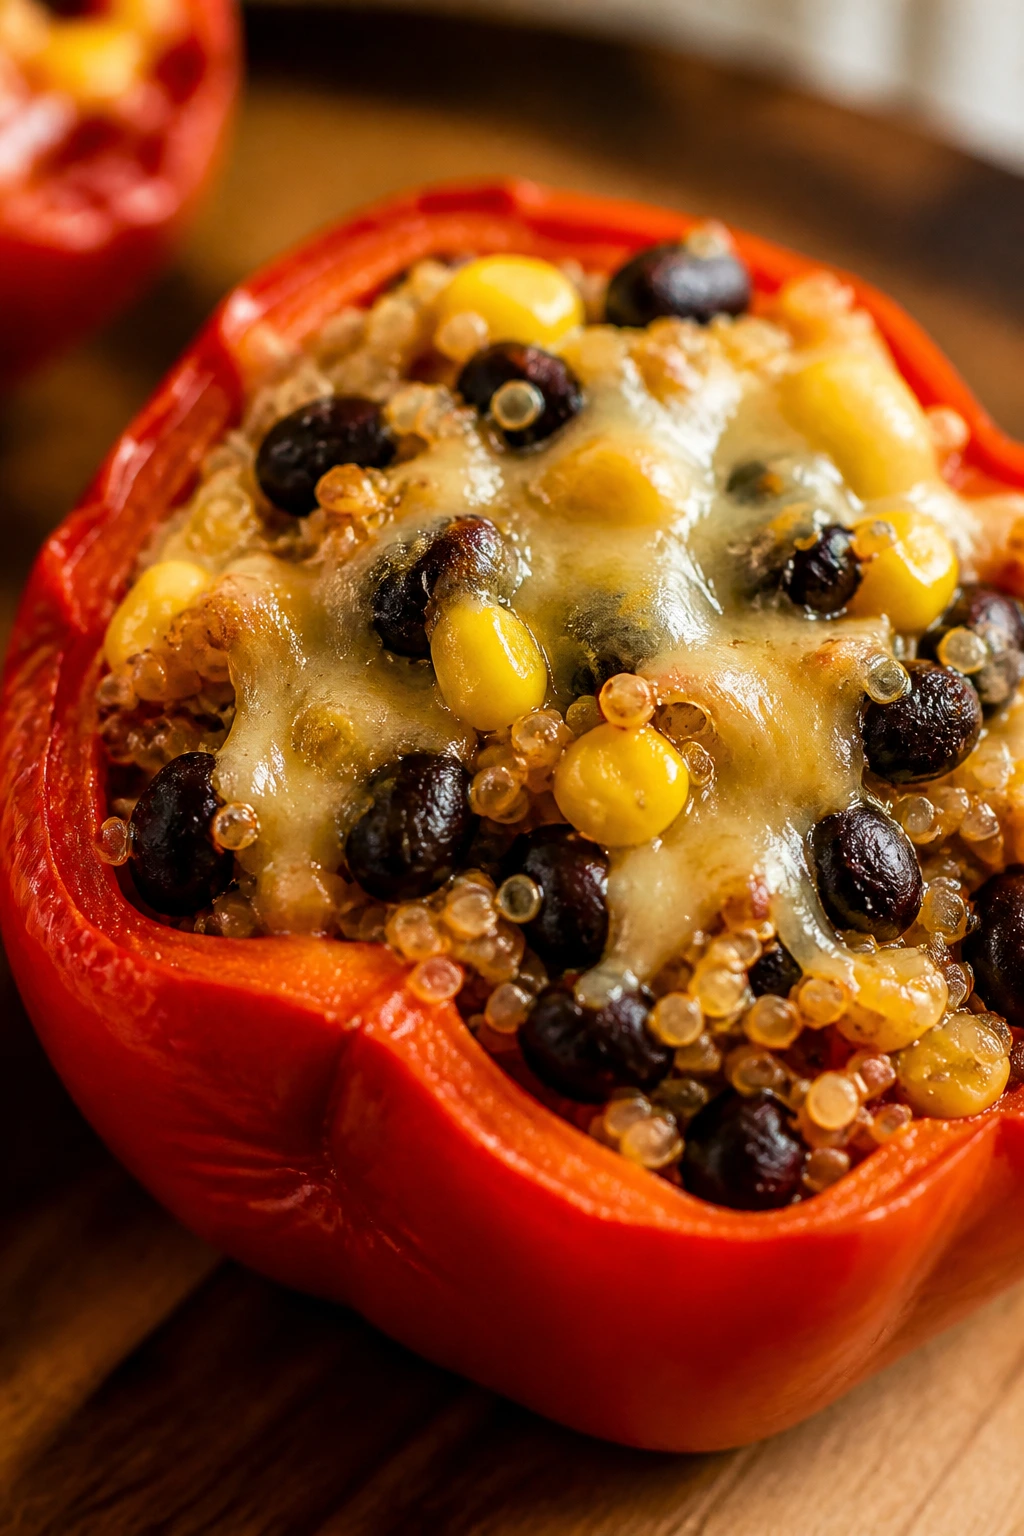
7. Air Fryer Stuffed Bell Peppers with Quinoa, Black Beans, and Corn
Stuffed peppers are one of the few dinner vegetables that can carry their own weight. In the air fryer, the peppers soften just enough to cut with a fork, while the filling heats through and turns a little crisp at the top.
Why It Works:
Bell peppers are sturdy enough to hold a filling, and the air fryer softens them without collapsing the walls. Quinoa keeps the stuffing light but complete, black beans bring body, and corn adds sweet pops that keep each bite from feeling flat. You get the feel of a full meal without turning on a huge oven.
Key Ingredients:
- 4 large bell peppers, halved lengthwise and seeded
- 1 tablespoon olive oil
- 1 cup cooked quinoa
- 1 cup canned black beans, rinsed and drained
- ½ cup corn kernels, fresh or frozen
- ½ cup diced red onion
- 1 teaspoon ground cumin
- 1 teaspoon chili powder
- 1 teaspoon kosher salt
- ½ cup shredded Monterey Jack or cheddar
- 2 tablespoons chopped cilantro
- 2 tablespoons salsa, for serving
Quick Steps:
- Preheat the air fryer to 370°F.
- Brush the pepper halves lightly with oil and set them cut side up.
- Mix quinoa, black beans, corn, onion, cumin, chili powder, salt, and half the cheese.
- Spoon the filling into the peppers and press it in gently.
- Air fry for 10 minutes, then top with the remaining cheese and cook 3 to 5 minutes more until the peppers are tender and the cheese is melted.
- Finish with cilantro and salsa.
Equipment for This Recipe:
- Air fryer basket or tray
- Mixing bowl
- Spoon
- Sharp knife
- Small brush for oil
How to Serve This Dish:
These are a full dinner on their own, but a spoon of guacamole or a simple green salad makes the plate feel more complete. Serve two halves per person for a lighter meal, one whole pepper for a bigger appetite. They hold together best after a 5-minute rest.
Pro Tips for This Recipe:
- If the peppers wobble, trim a sliver off the bottom so they sit flat.
- Pre-cook the filling ingredients only enough to warm them; the air fryer does the rest.
- Use peppers of similar size so they finish at the same time.
Variations on This Dish:
- Southwest Corn Chip Style: Add crushed tortilla chips on top for crunch.
- Mediterranean Stuffed Peppers: Swap black beans for chickpeas, add feta, and use oregano.
- Spicy Bean Version: Stir minced jalapeño into the filling and top with pepper jack.
Common Mistakes to Avoid with This Dish:
- Overfilling the peppers: Mounded is fine, but packed so tight that the filling spills out is not.
- Skipping the first roast: The pepper needs a head start or the filling overcooks before the shell softens.
- Using watery salsa inside the filling: Save it for the top so the stuffing stays cohesive.
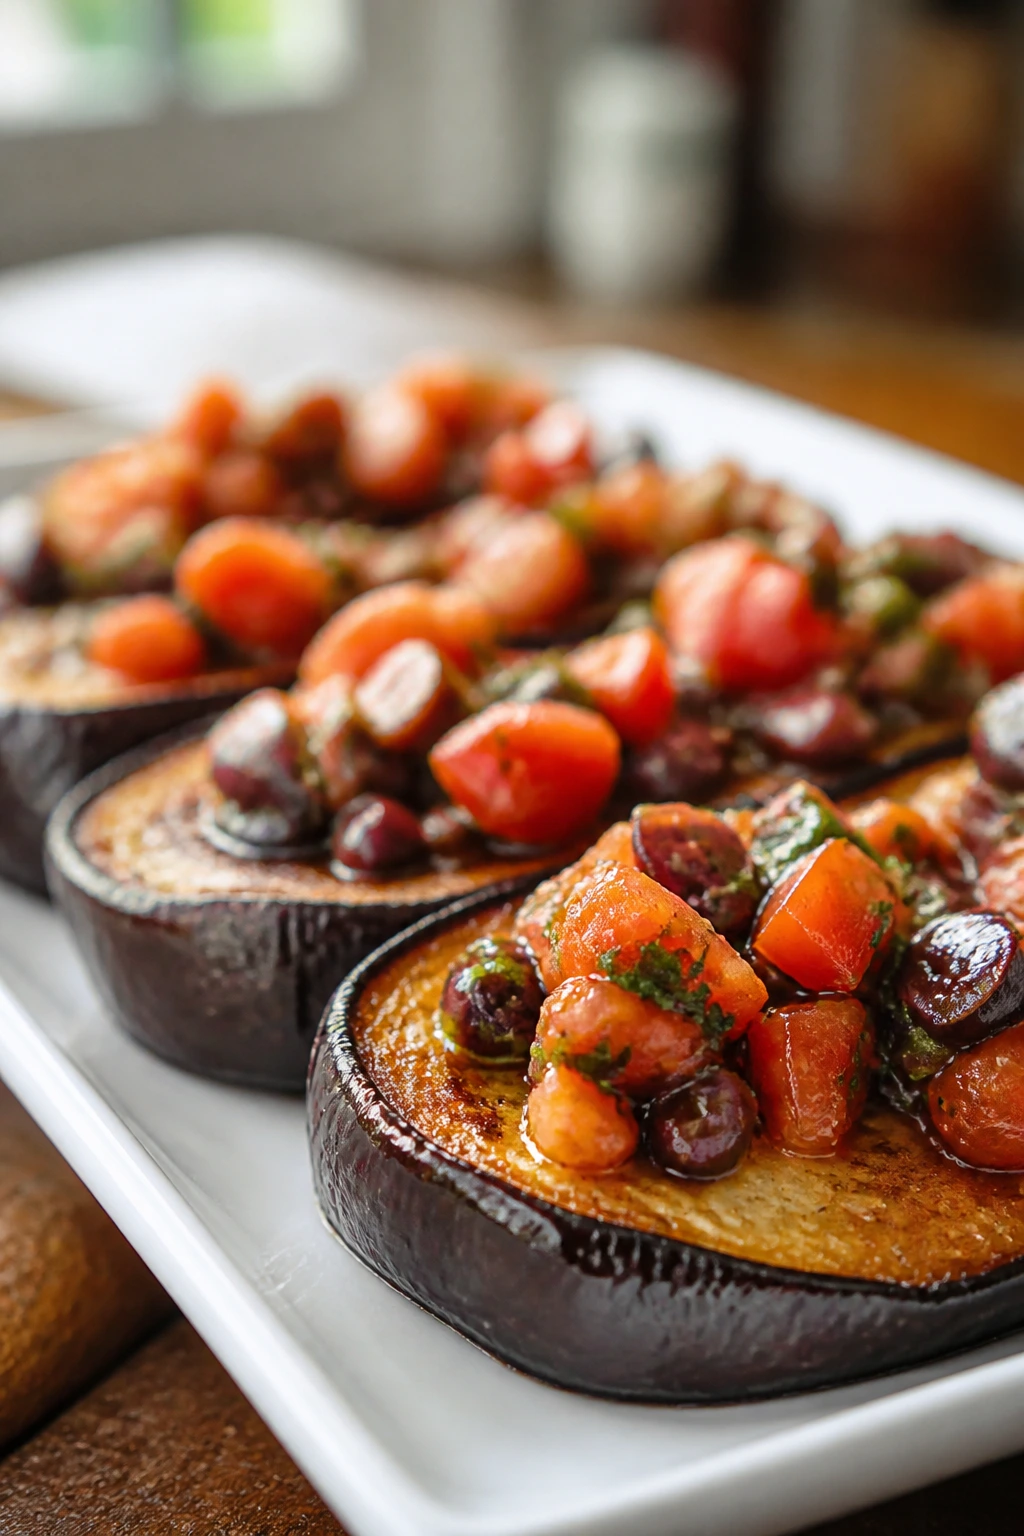
8. Eggplant Coins with Tomato-Olive Relish
Eggplant has a bad reputation because people overcook it into a sponge. Give it a hot basket and a short timer, though, and the slices turn silky inside with crisped edges that make the whole thing taste more deliberate.
Why It Works:
Eggplant likes heat, but it likes structure even more. Cutting it into coins gives more surface area for browning, and salting lightly before cooking draws out a little moisture so the slices don’t collapse. The tomato-olive relish adds brightness and salt, which eggplant always seems to appreciate.
Key Ingredients:
- 1 medium eggplant, about 1¼ pounds, sliced into ½-inch coins
- 1½ tablespoons olive oil
- 1 teaspoon kosher salt, divided
- ½ teaspoon black pepper
- 1 teaspoon dried oregano
- 1 cup cherry tomatoes, quartered
- ¼ cup pitted Kalamata olives, chopped
- 1 tablespoon red wine vinegar
- 1 tablespoon chopped basil
- 2 tablespoons crumbled feta, optional
Quick Steps:
- Salt the eggplant coins lightly and let them sit for 10 minutes, then pat dry.
- Toss with olive oil, half the salt, pepper, and oregano.
- Air fry at 390°F for 10 minutes, flip, then cook 5 to 7 minutes more until browned and tender.
- Stir the tomatoes, olives, vinegar, basil, and remaining salt together.
- Spoon the relish over the hot eggplant and finish with feta if using.
Equipment for This Recipe:
- Air fryer basket
- Sharp knife
- Cutting board
- Small mixing bowl
How to Serve This Dish:
Serve the eggplant over couscous, polenta, or a thick slice of toast if you want it to act like dinner. It’s also good alongside grilled shrimp or white beans, though it stands fine on its own with the relish. The tomato mixture should stay fresh and sharp, not watery.
Pro Tips for This Recipe:
- Keep the coins uniform or the thinner ones dry out before the center softens.
- If your eggplant is very seedy, cut the coins a little thicker and give them the full cook time.
- Add the relish after cooking, never before. Raw tomatoes release too much liquid in the basket.
Variations on This Dish:
- Harissa Eggplant: Toss the slices with harissa and serve with yogurt.
- Italian-Style Eggplant Coins: Use Parmesan instead of feta and add parsley.
- Garlic-Tahini Eggplant: Drizzle with tahini sauce and chopped dill.
Common Mistakes to Avoid with This Dish:
- Using stale eggplant: Very old eggplant tastes bitter and hollow. Choose one that feels heavy for its size.
- Overcrowding the coins: They need flat contact with the hot surface.
- Skipping the salt rest: That quick pause keeps the texture from turning spongy.
9. Air Fryer Asparagus with Garlic Breadcrumbs
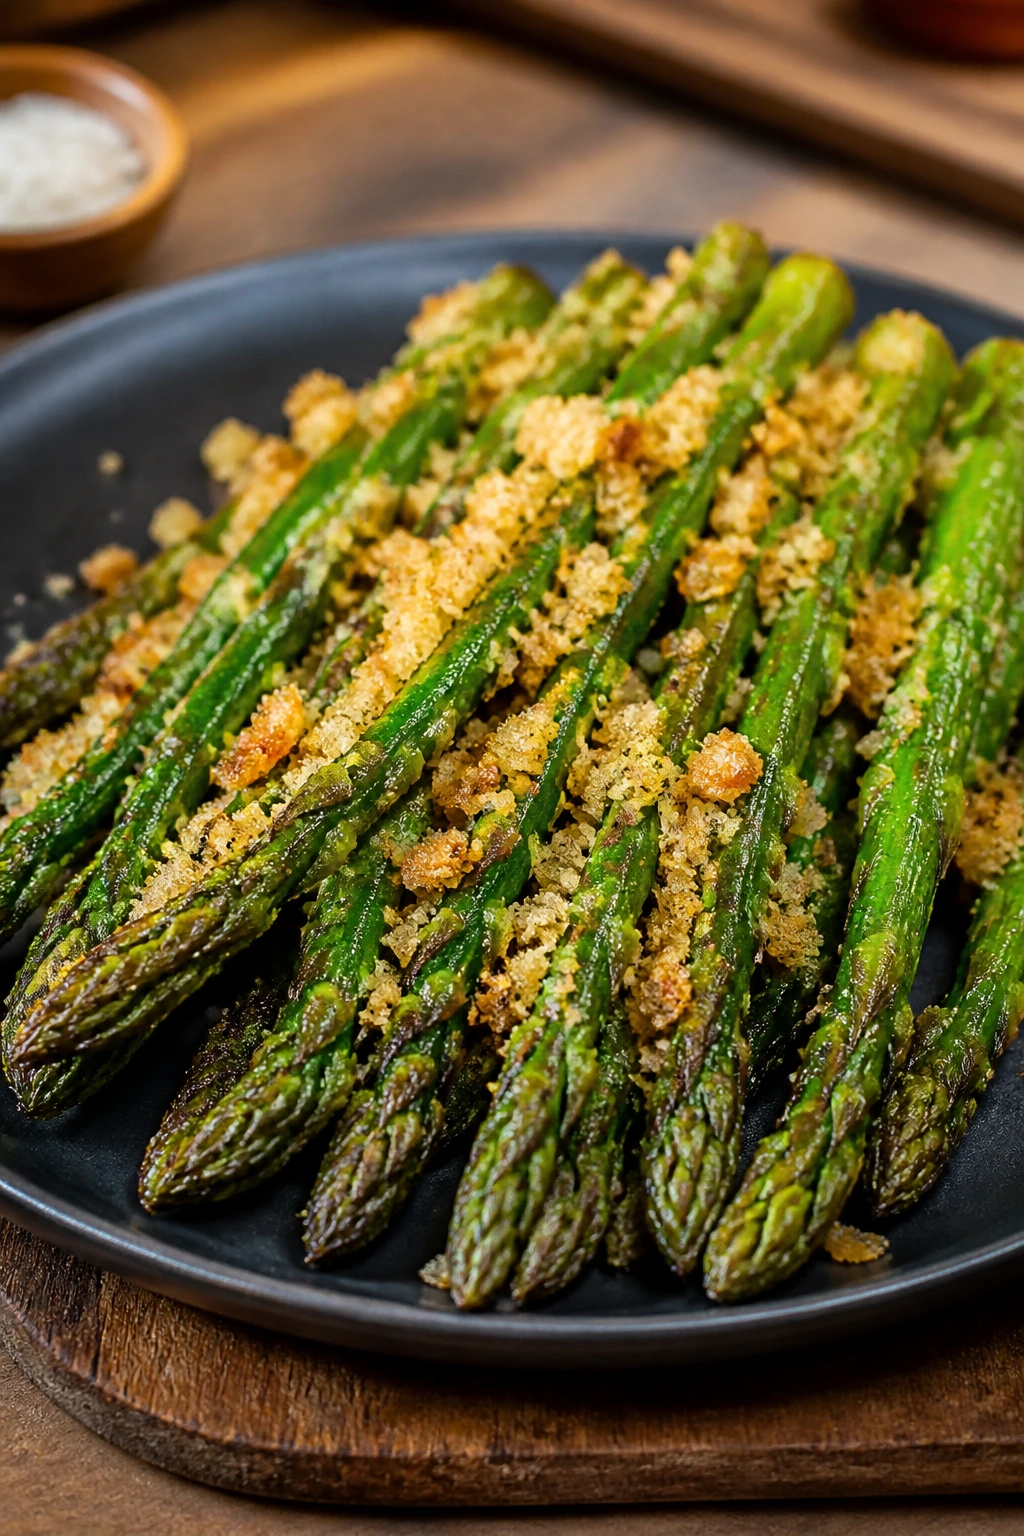
Asparagus cooks fast enough to punish distraction. In the air fryer, that works in your favor. The tips get crisp, the stalks stay snappy, and the breadcrumb topping gives you crunch without a heavy sauce.
Why It Works:
Asparagus is one of the few vegetables that goes from raw to ready in a narrow window. A short blast at 375°F keeps it bright green and tender, while the garlic breadcrumbs toast in the last minute or two. If you leave it in too long, the spears get limp and sad, which is a real shame.
Key Ingredients:
- 1 bunch asparagus, about 1 pound, woody ends trimmed
- 1 tablespoon olive oil
- ½ teaspoon kosher salt
- ¼ teaspoon black pepper
- ¼ cup panko breadcrumbs
- 1 clove garlic, finely grated
- 1 tablespoon grated Parmesan
- 1 teaspoon lemon zest
- Lemon wedges, for serving
Quick Steps:
- Preheat the air fryer to 375°F.
- Toss the asparagus with olive oil, salt, and pepper.
- Air fry for 5 minutes.
- Mix panko, garlic, Parmesan, and lemon zest, then sprinkle over the asparagus.
- Cook 1 to 3 minutes more until the breadcrumbs are golden and the spears are crisp-tender.
- Finish with lemon juice right before serving.
Equipment for This Recipe:
- Air fryer basket
- Tongs
- Small bowl
- Fine grater or microplane
How to Serve This Dish:
This is a clean side for salmon, eggs, or simple pasta. If you’re making a vegetarian dinner, stack it with mashed potatoes and a fried egg or serve it with mushroom toast. Don’t drown the plate; asparagus is at its best when the topping stays light and sharp.
Pro Tips for This Recipe:
- Choose medium-thick spears; pencil-thin asparagus goes limp in a blink.
- If the spears vary a lot in size, tuck the thin ones in the center of the basket.
- The breadcrumbs should be dry, not oily, before they go on. That’s what keeps them crisp.
Variations on This Dish:
- Sesame Asparagus: Use sesame seeds instead of breadcrumbs and finish with soy sauce.
- Chili-Lime Asparagus: Add chili powder to the oil and finish with lime zest.
- Cheesy Herb Asparagus: Mix chopped parsley and extra Parmesan into the topping.
Common Mistakes to Avoid with This Dish:
- Overtrimming the ends: Cut only the woody part; you’ll lose too much otherwise.
- Adding breadcrumbs too early: They burn before the spears are done.
- Waiting to salt until after cooking: The seasoning sticks better if it goes on before the heat.
10. Green Beans with Garlic and Toasted Sesame
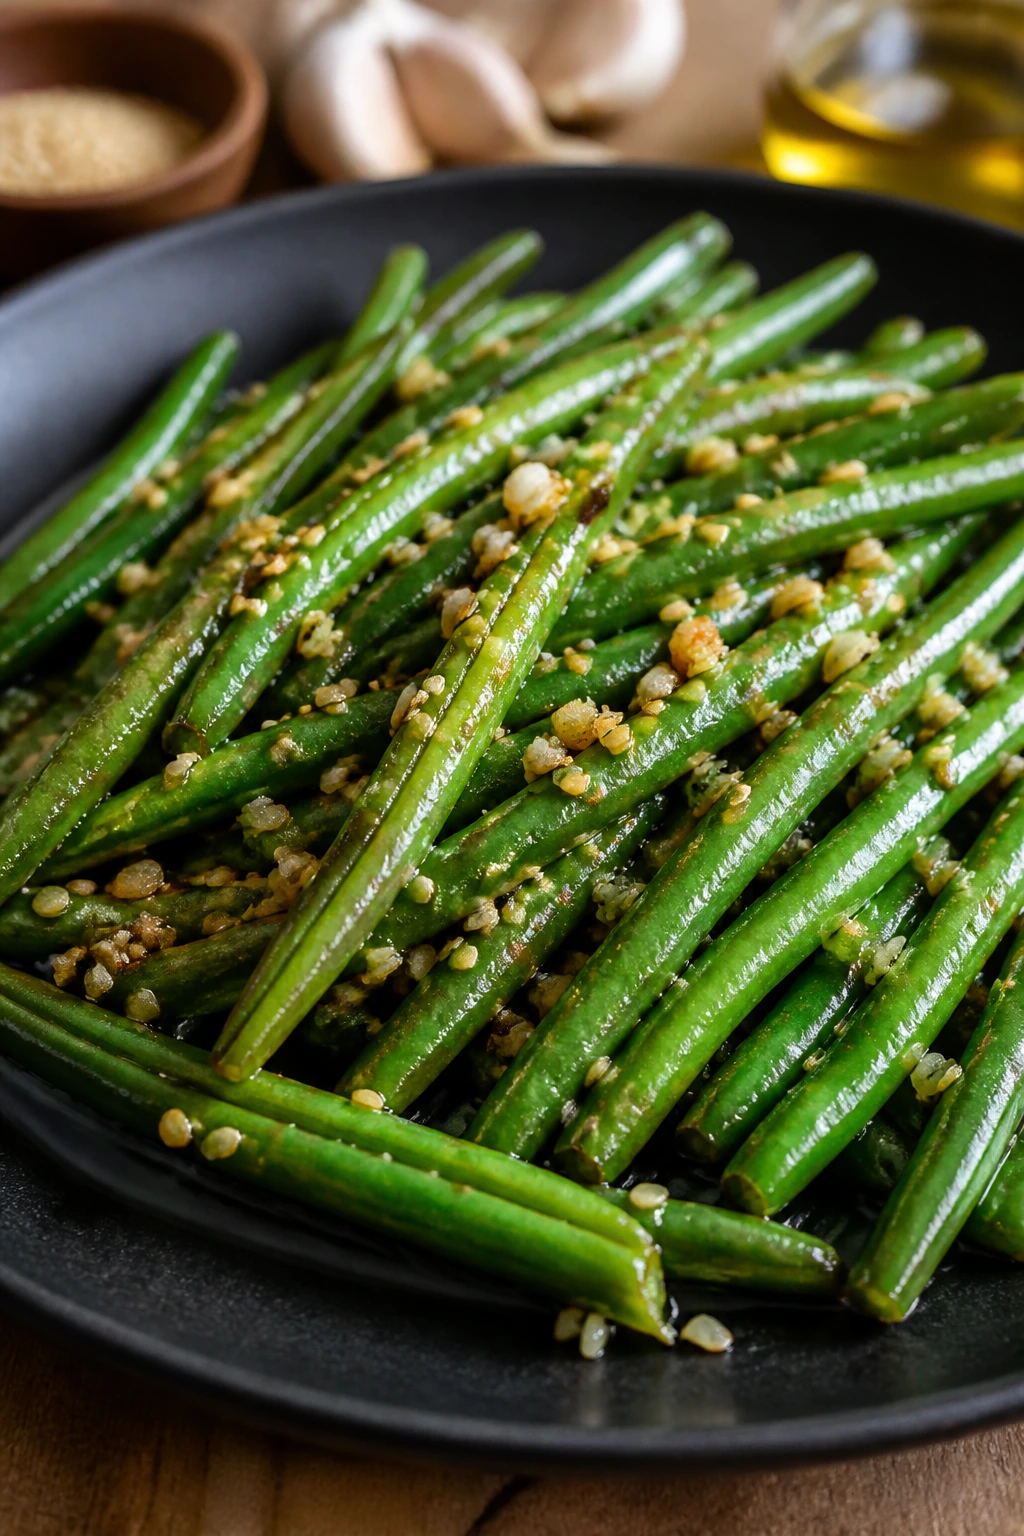
Green beans can taste flat when they’re boiled into submission. In the air fryer, they stay bright and snappy, with blistered spots that make them taste closer to a stir-fry than a side dish from a steam tray.
Why It Works:
Green beans have enough structure to take a fast cook at high heat. A little oil and garlic give them savory depth, while sesame seeds add a toasty finish that reads as intentional, not accidental. The trick is keeping the beans in a single layer so they brown instead of soften into each other.
Key Ingredients:
- 1 pound green beans, trimmed
- 1 tablespoon olive oil
- 2 cloves garlic, minced
- ¾ teaspoon kosher salt
- ¼ teaspoon black pepper
- 1 tablespoon sesame seeds
- 1 teaspoon soy sauce or tamari
- 1 teaspoon rice vinegar
- 1 teaspoon toasted sesame oil, optional
Quick Steps:
- Preheat the air fryer to 390°F.
- Toss the green beans with olive oil, garlic, salt, and pepper.
- Air fry for 8 minutes, shaking the basket halfway through.
- Sprinkle sesame seeds over the beans and cook 2 minutes more.
- Toss with soy sauce, rice vinegar, and sesame oil if using.
- Serve while the beans still have a little snap.
Equipment for This Recipe:
- Air fryer basket
- Mixing bowl
- Measuring spoons
- Tongs or spoon
How to Serve This Dish:
These are natural with rice, tofu, or seared mushrooms. They also sit well beside salmon or chicken if the rest of the meal is simpler. A few sesame seeds on top make them look finished without weighing them down.
Pro Tips for This Recipe:
- Trim the stem ends, but leave the beans whole for the best texture.
- Don’t use too much soy sauce in the basket; add it after cooking so the beans don’t steam.
- If your garlic is very fine, watch the last minutes closely so it doesn’t turn bitter.
Variations on This Dish:
- Ginger-Sesame Beans: Add grated ginger with the garlic.
- Spicy Korean-Style Beans: Toss with gochujang and a little honey after cooking.
- Lemony Beans: Skip the soy sauce and finish with lemon zest and parsley.
Common Mistakes to Avoid with This Dish:
- Overcooking until wrinkled: That texture means you went too far. Pull them while they’re still bright.
- Using frozen beans without thawing: They release too much water unless you dry them well first.
- Forgetting the acid: Vinegar or lemon keeps the beans from tasting one-note.
11. Air Fryer Mushrooms with Thyme and Balsamic
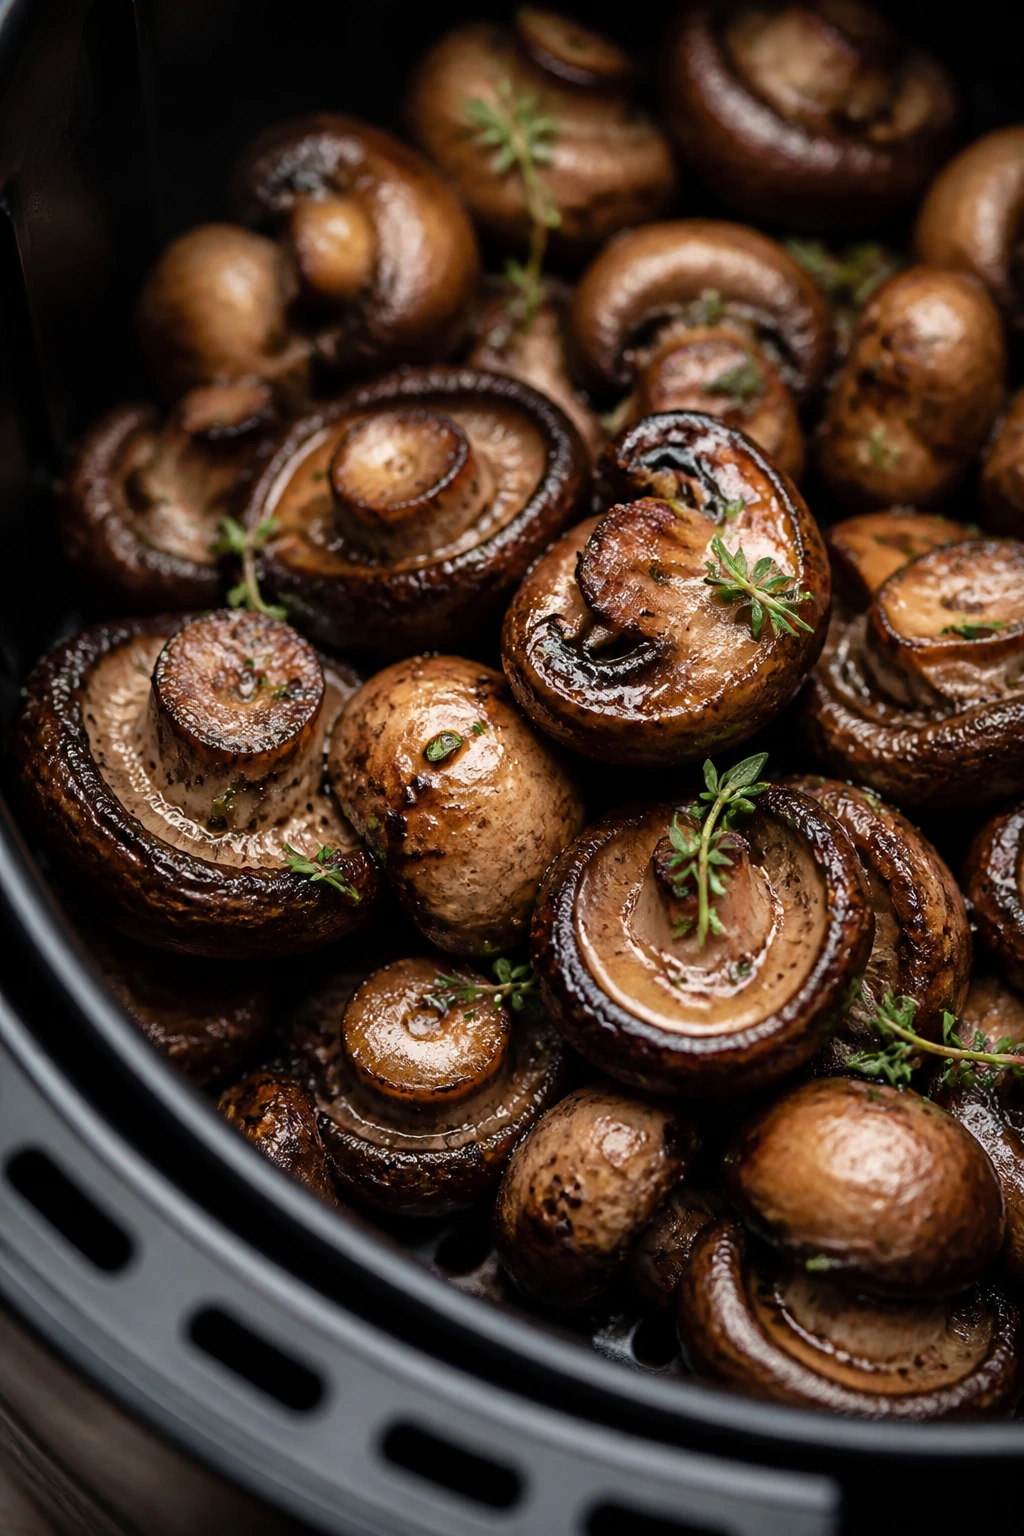
Mushrooms are one of the best reasons to own an air fryer. They shrink, darken, and turn deeply savory, almost meaty, without needing a pan full of butter.
Why It Works:
Mushrooms contain a lot of water, and high heat helps drive that moisture off so browning can happen. A little oil, thyme, and balsamic create a glossy coating that sticks to the crevices once the mushrooms collapse and wrinkle. If you crowd them, they steam; if you spread them out, they get almost caramelized.
Key Ingredients:
- 16 ounces cremini mushrooms, cleaned and halved if large
- 1½ tablespoons olive oil
- 1 teaspoon kosher salt
- ½ teaspoon black pepper
- 1 teaspoon fresh thyme leaves or ½ teaspoon dried thyme
- 1 tablespoon balsamic vinegar
- 1 tablespoon chopped parsley
- 1 tablespoon grated Parmesan, optional
Quick Steps:
- Preheat the air fryer to 400°F.
- Toss the mushrooms with olive oil, salt, pepper, and thyme.
- Air fry for 8 minutes.
- Shake the basket, drizzle with balsamic vinegar, and cook 4 to 6 minutes more until the mushrooms are browned and glossy.
- Finish with parsley and Parmesan if using.
Equipment for This Recipe:
- Air fryer basket
- Mixing bowl
- Spoon or spatula
- Paper towels for cleaning mushrooms
How to Serve This Dish:
Spoon these over polenta, pasta, or toasted bread with ricotta. They’re also excellent alongside a white bean salad. The glossy balsamic finish makes them feel like a deliberate part of dinner, not a throwaway side.
Pro Tips for This Recipe:
- Wipe mushrooms clean instead of soaking them. Waterlogged mushrooms take longer to brown.
- If using very small mushrooms, keep the whole caps intact so they don’t shrivel too fast.
- Add balsamic near the end; early vinegar can slow browning.
Variations on This Dish:
- Garlic Butter Mushrooms: Swap the oil for melted butter and add minced garlic in the last 2 minutes.
- Soy-Thyme Mushrooms: Use tamari instead of balsamic for a darker, saltier finish.
- Creamy Mushroom Toast Topping: Stir in a spoonful of Greek yogurt after cooking and serve on toast.
Common Mistakes to Avoid with This Dish:
- Using mushrooms straight from the sink: Dry them first or they’ll steam.
- Stopping too soon: Mushrooms need that wrinkled look to taste deep and savory.
- Adding salt too late: Seasoning before cooking helps pull out moisture.
12. Cabbage Wedges with Curry Yogurt

Cabbage gets overlooked because people think of it as filler. In the air fryer, wedges turn sweet at the edges and keep enough structure to feel substantial, which is exactly why they work so well as a dinner vegetable.
Why It Works:
Cabbage is dense and layered, which means it can hold up to longer heat without falling apart. Cut into wedges, it browns at the outer leaves while the center turns tender. Curry yogurt adds tang and warmth in one swoop, and the cool drizzle balances the roasted sweetness.
Key Ingredients:
- 1 medium green cabbage, cut into 4 wedges with core intact
- 1½ tablespoons olive oil
- 1 teaspoon kosher salt
- ½ teaspoon black pepper
- 1 teaspoon ground cumin
- 1 teaspoon curry powder
- ½ cup plain yogurt
- 1 teaspoon lemon juice
- 1 tablespoon chopped mint or cilantro
Quick Steps:
- Preheat the air fryer to 380°F.
- Brush the wedges with olive oil and season with salt, pepper, cumin, and curry powder.
- Air fry for 12 minutes, carefully flip, then cook 8 to 10 minutes more until the edges are browned and the center is tender when pierced.
- Mix yogurt, lemon juice, and herbs.
- Drizzle over the hot cabbage or serve on the side.
Equipment for This Recipe:
- Air fryer basket
- Sharp knife and cutting board
- Small bowl
- Pastry brush
How to Serve This Dish:
This is strong beside rice and lentils, or tucked next to a spicy chickpea stew. The cabbage should be cut into wedges you can actually spear and eat, not tiny ribbons that disappear. A little yogurt goes a long way.
Pro Tips for This Recipe:
- Leave the core intact so the wedge stays together.
- Don’t use too much oil; cabbage can go greasy fast.
- Let the outer leaves brown a bit. That’s where the flavor lives.
Variations on This Dish:
- Smoked Paprika Cabbage: Use smoked paprika instead of curry powder.
- Sesame-Lime Cabbage: Finish with sesame oil and lime juice.
- Harissa Cabbage: Brush with harissa and serve with mint yogurt.
Common Mistakes to Avoid with This Dish:
- Cutting the wedges too thin: They fall apart before browning.
- Skipping the flip: The cut side needs help getting color.
- Serving without acid: Cabbage tastes blunt without a bright finish.
13. Butternut Squash Cubes with Sage and Pepitas
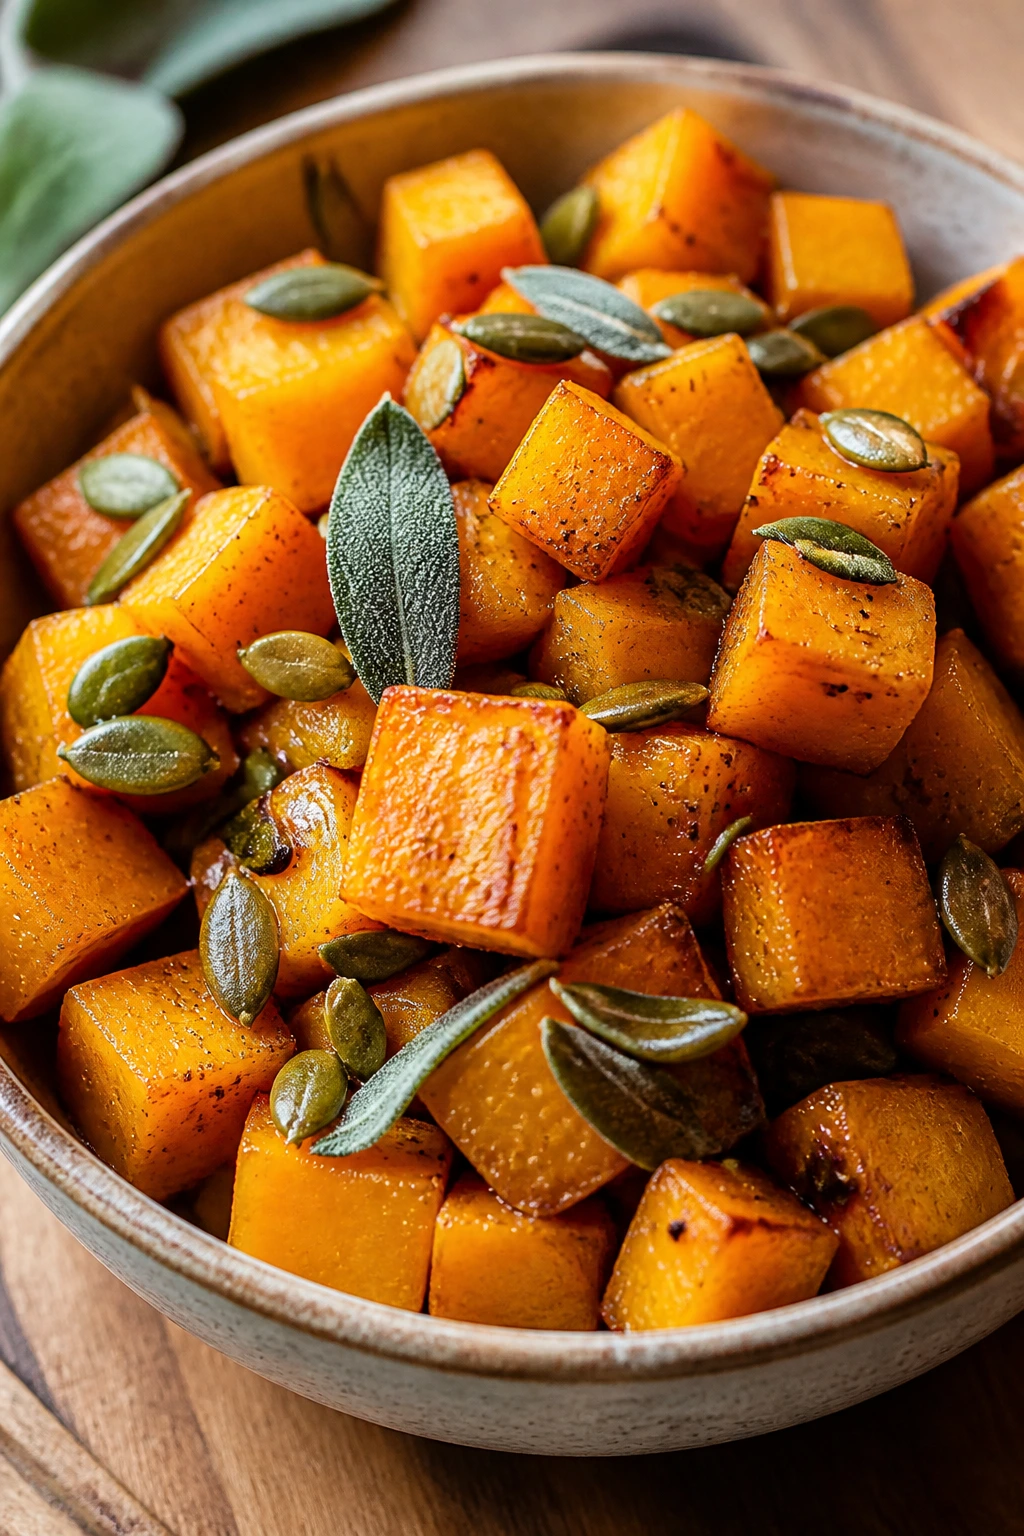
Butternut squash is at its best when the edges brown and the inside turns soft enough to mash with a fork. The air fryer gives you that without waiting for a full sheet pan to warm up and dry the kitchen out.
Why It Works:
Squash cubes cook evenly when they’re cut into similar sizes, and the air fryer helps the outside caramelize before the flesh turns watery. Sage keeps the sweetness in check, while pepitas add crunch at the end. This is one of those recipes that tastes like you worked harder than you did.
Key Ingredients:
- 1 medium butternut squash, about 2 pounds, peeled and cut into 1-inch cubes
- 1½ tablespoons olive oil
- ¾ teaspoon kosher salt
- ½ teaspoon black pepper
- 1 teaspoon chopped fresh sage or ½ teaspoon dried sage
- ¼ teaspoon cinnamon, optional
- 2 tablespoons pepitas
- 1 teaspoon maple syrup, optional for glaze
- 1 tablespoon crumbled goat cheese, optional
Quick Steps:
- Preheat the air fryer to 390°F.
- Toss squash cubes with olive oil, salt, pepper, and sage.
- Air fry for 12 minutes, shake the basket, then cook 6 to 8 minutes more until the cubes are browned and a fork slides in easily.
- Toss with pepitas and maple syrup if using.
- Finish with goat cheese if you want a sharper, creamier edge.
Equipment for This Recipe:
- Air fryer basket
- Vegetable peeler
- Sharp chef’s knife
- Mixing bowl
How to Serve This Dish:
Serve it with lentils, grain bowls, or a simple green salad with sharp vinaigrette. It also works next to pork or roasted tofu if you’re building a mixed dinner. The squash should keep its cube shape but give way without resistance.
Pro Tips for This Recipe:
- Cut the cubes evenly or the small ones will dry out before the large ones are done.
- Don’t overload the basket; squash likes a single layer.
- Add maple only at the end if you want gloss without burning the sugars.
Variations on This Dish:
- Maple-Sage Squash: Increase the maple to 2 teaspoons and skip the goat cheese.
- Curry Squash: Use curry powder and finish with cilantro.
- Garlic-Parmesan Squash: Swap sage for garlic powder and add Parmesan at the end.
Common Mistakes to Avoid with This Dish:
- Cutting cubes too big: They’ll brown on the outside and stay hard inside.
- Using too much cinnamon: It should whisper, not announce itself.
- Forgetting to shake the basket: Squash cubes need a turn for even color.
14. Spiced Air Fryer Okra with Cornmeal
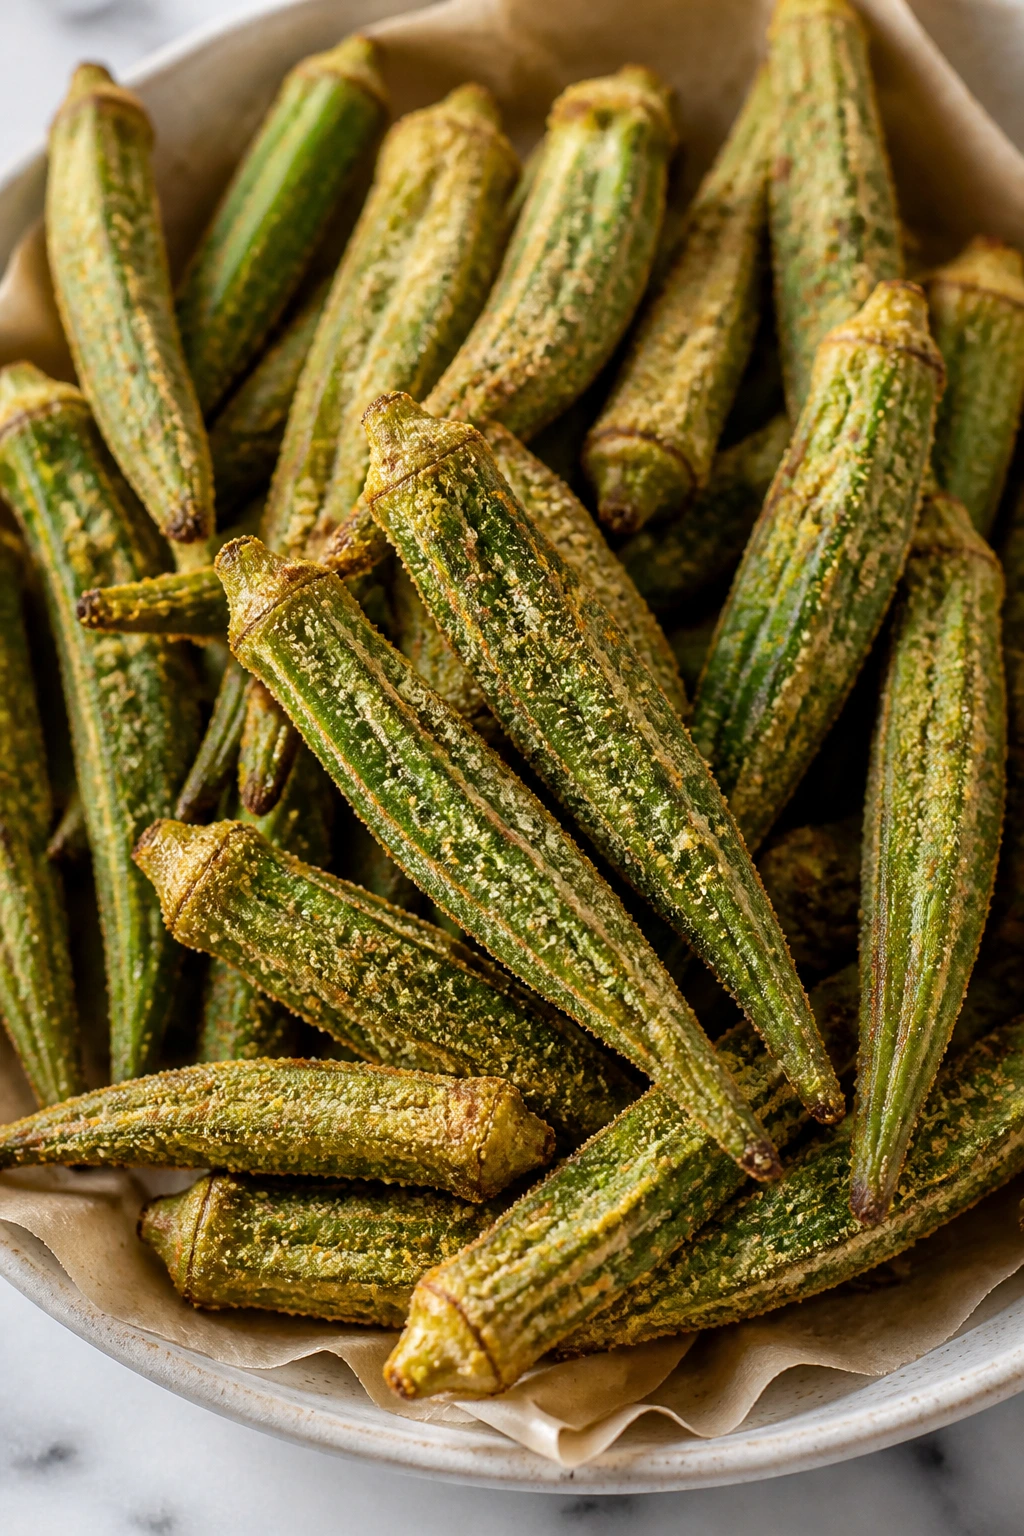
Okra gets dragged because of the slime factor, but dry heat solves most of that problem. In the air fryer, the pods blister, the coating turns crisp, and you get a snackable side that tastes closer to fried okra than to steamed vegetables.
Why It Works:
Okra has a lot of surface moisture, so a dry coating matters. Cornmeal gives the pods something rugged to crisp against, and high heat shrinks the slick texture that people usually complain about. The pods stay lively if you don’t drown them in batter.
Key Ingredients:
- 1 pound fresh okra, trimmed
- 1 tablespoon olive oil
- ½ teaspoon kosher salt
- ½ teaspoon black pepper
- ½ teaspoon garlic powder
- ½ teaspoon smoked paprika
- ⅓ cup fine cornmeal
- 2 tablespoons rice flour or all-purpose flour
- 1 tablespoon lemon juice, for finishing
Quick Steps:
- Preheat the air fryer to 400°F.
- Toss the okra with olive oil, salt, pepper, garlic powder, and smoked paprika.
- Add cornmeal and flour, then toss again until lightly coated.
- Air fry for 8 minutes, shake, and cook 4 to 6 minutes more until the coating is crisp and the pods have browned spots.
- Finish with lemon juice right before serving.
Equipment for This Recipe:
- Air fryer basket
- Mixing bowl with a lid or cover
- Measuring cups
- Tongs
How to Serve This Dish:
Okra works well with tomato rice, grilled fish, or a bowl of creamy grits if you want a Southern-leaning dinner. It’s also good with yogurt dip and hot sauce. Serve it quickly, because the coating softens as it sits.
Pro Tips for This Recipe:
- Use fresh, small okra pods. Big ones get woody.
- Dry the okra before coating; wet pods make the coating patchy.
- Don’t shake too violently or the cornmeal falls off before it crisps.
Variations on This Dish:
- Cajun Okra: Use Cajun seasoning instead of paprika and garlic.
- Lemon-Pepper Okra: Skip the paprika and add extra black pepper plus lemon zest.
- Gluten-Free Okra: Keep the cornmeal and use rice flour.
Common Mistakes to Avoid with This Dish:
- Using frozen okra straight from the bag: It needs thawing and drying first.
- Making a heavy batter: That turns into gummy patches.
- Letting the okra sit after cooking: The coating loses its crunch fast.
15. Delicata Squash Rings with Chili and Maple
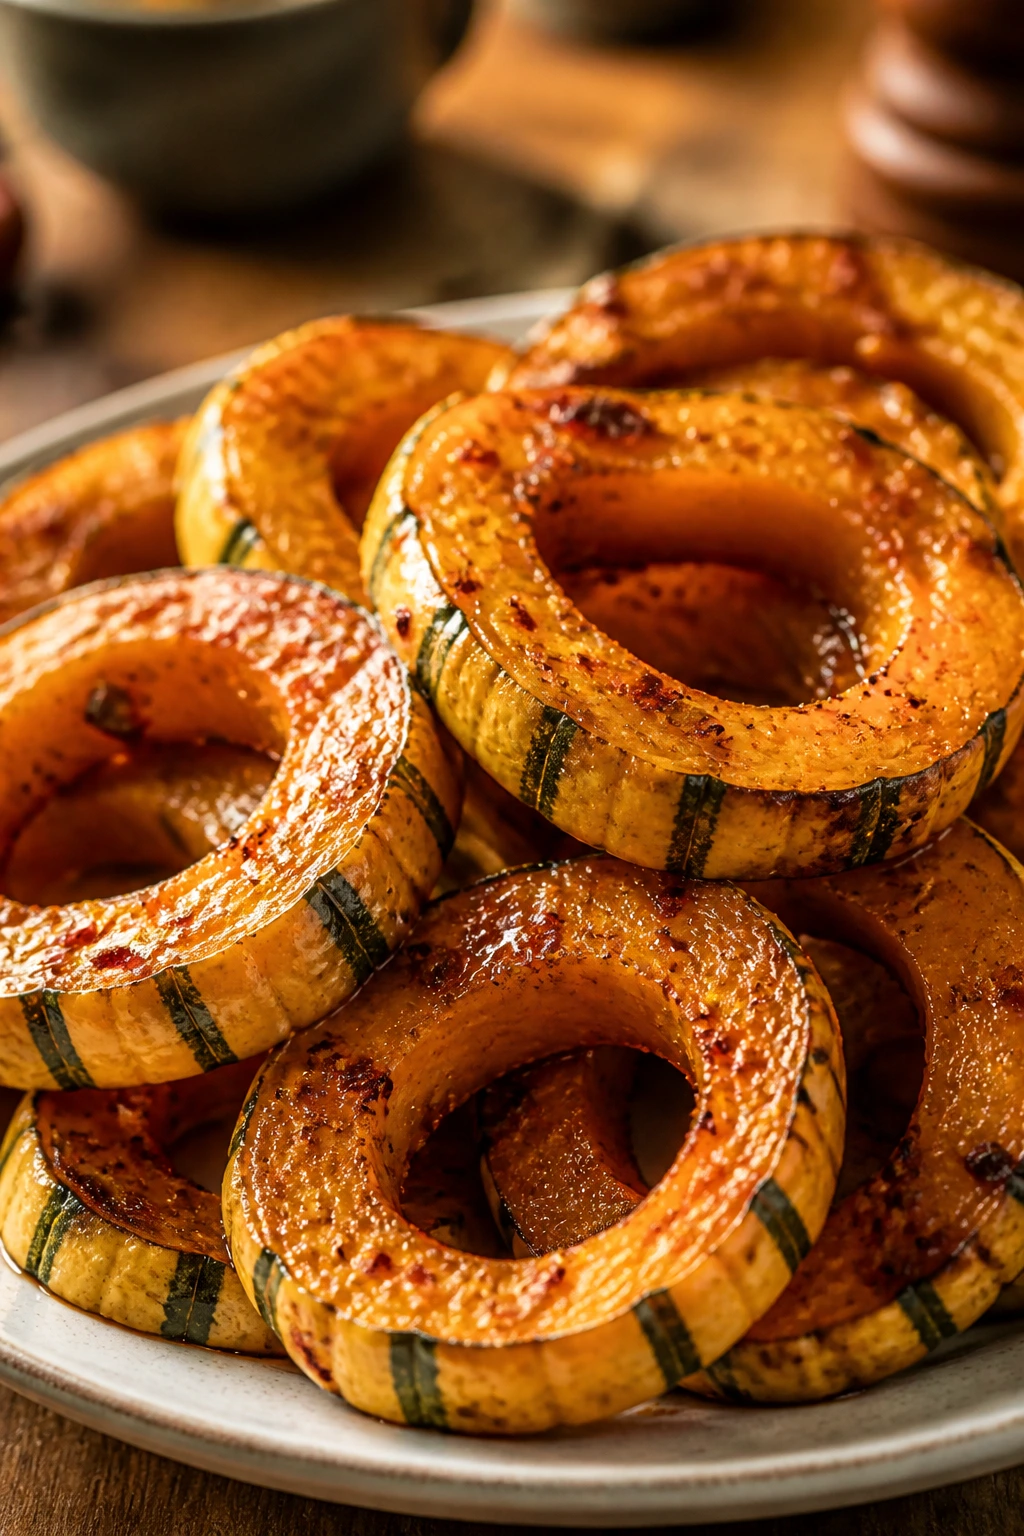
Delicata squash is a gift to air fryer cooking because you do not have to peel it. The skin turns tender, the rings hold their shape, and the maple-chili glaze creates a sweet-hot finish that tastes more layered than the ingredient list suggests.
Why It Works:
The rings expose enough surface for browning while the skin helps the squash keep its structure. Delicata’s flesh cooks faster than butternut, so it gets tender before the edges dry out. A light glaze at the end gives you color and stickiness without burning.
Key Ingredients:
- 2 delicata squash, halved lengthwise, seeded, and sliced into ½-inch rings
- 1½ tablespoons olive oil
- ¾ teaspoon kosher salt
- ½ teaspoon black pepper
- 1 teaspoon maple syrup
- ½ teaspoon chili powder
- ¼ teaspoon cinnamon
- 1 tablespoon chopped pepitas or sunflower seeds
- 1 tablespoon crumbled feta, optional
Quick Steps:
- Preheat the air fryer to 390°F.
- Toss the squash rings with olive oil, salt, pepper, chili powder, and cinnamon.
- Air fry for 10 minutes, flip, then cook 5 to 7 minutes more until browned and fork-tender.
- Drizzle with maple syrup in the last 2 minutes so it lightly caramelizes.
- Finish with pepitas and feta if using.
Equipment for This Recipe:
- Air fryer basket
- Sharp knife
- Spoon for seeding
- Mixing bowl
How to Serve This Dish:
Serve these with rice, farro, or a lentil salad. They also sit nicely alongside roasted Brussels sprouts if you want a two-vegetable plate with different shapes and textures. The rings should be glossy, not sticky-syrupy.
Pro Tips for This Recipe:
- Slice the rings evenly so they cook at the same speed.
- Use a small, sharp spoon to remove seeds cleanly.
- Add the maple only late in the cook or it will darken too fast.
Variations on This Dish:
- Savory Herb Rings: Skip the maple and use thyme and rosemary.
- Tahini Chili Rings: Drizzle with tahini instead of maple for a nuttier finish.
- Orange-Chili Rings: Add orange zest and juice for a brighter glaze.
Common Mistakes to Avoid with This Dish:
- Leaving the rings too thick: They’ll brown on the outside and stay firm inside.
- Ignoring basket space: Rings need a single layer or the glaze turns patchy.
- Using too much maple: A light sheen is enough.
16. Air Fryer Beet Wedges with Orange and Goat Cheese
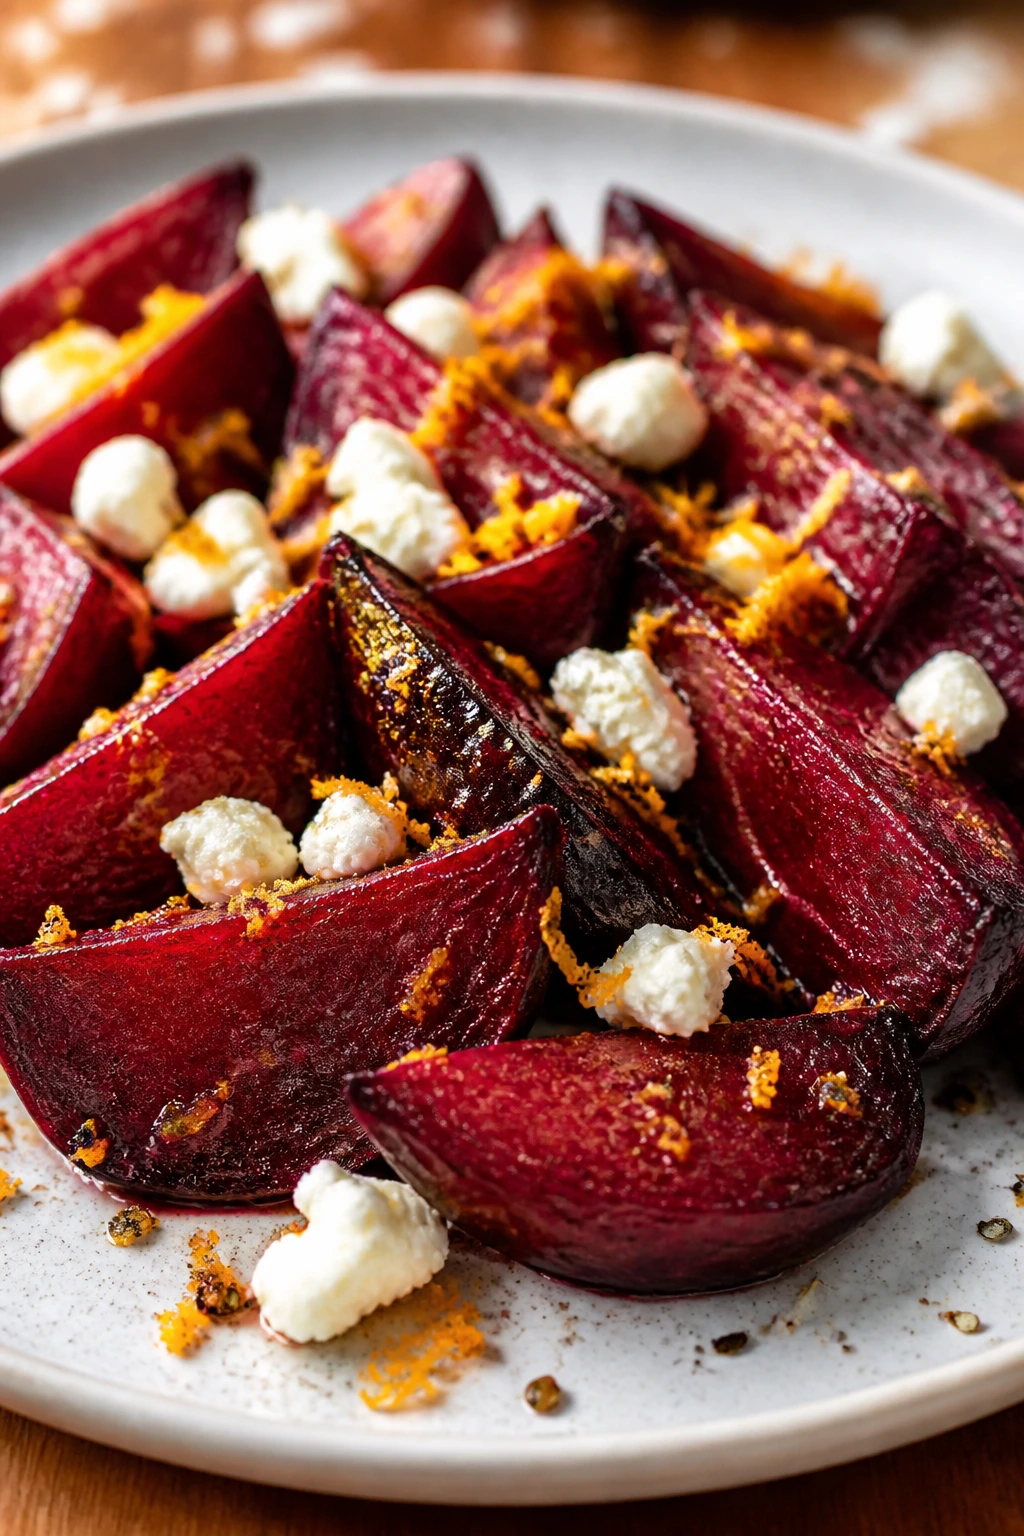
Beets can taste earthy in a way that either charms you or sends you running. Air frying softens that edge, gives the cut sides some color, and makes the whole dish feel more balanced once orange and goat cheese join in.
Why It Works:
Beets are dense, so they need enough heat to soften all the way through before the outside dries out. Wedges cook more evenly than whole beets in the air fryer, and a little oil helps the sugars on the cut sides caramelize. Orange juice brings sweetness and acid, which keeps the earthiness in check.
Key Ingredients:
- 3 medium beets, peeled and cut into wedges
- 1½ tablespoons olive oil
- ¾ teaspoon kosher salt
- ½ teaspoon black pepper
- 1 teaspoon fresh thyme leaves
- 1 orange, zested and juiced
- 2 tablespoons crumbled goat cheese
- 1 tablespoon chopped pistachios, optional
Quick Steps:
- Preheat the air fryer to 390°F.
- Toss beet wedges with olive oil, salt, pepper, and thyme.
- Air fry for 16 minutes, shake, then cook 6 to 8 minutes more until tender when pierced with a knife.
- Toss with orange zest and a spoonful of orange juice while hot.
- Finish with goat cheese and pistachios.
Equipment for This Recipe:
- Air fryer basket
- Gloves or a paper towel for handling beets
- Sharp knife
- Mixing bowl
How to Serve This Dish:
Serve the beets warm over arugula, grains, or creamy ricotta toast. They’re strong enough to stand beside roasted chicken but also feel complete with lentils and a little crusty bread. Keep the topping light so the beet flavor stays front and center.
Pro Tips for This Recipe:
- Wear gloves or use a paper towel; beet juice stains quickly.
- Cut the wedges evenly so the thin ends do not overcook.
- Add the orange after cooking or the sugar can scorch.
Variations on This Dish:
- Balsamic Beet Wedges: Swap orange for balsamic and thyme for rosemary.
- Citrus-Herb Beets: Use lemon and dill instead of orange and thyme.
- Vegan Beet Bowl: Skip the goat cheese and add tahini.
Common Mistakes to Avoid with This Dish:
- Cutting wedges too small: Beets shrink and dry out.
- Cooking with skins still muddy: Clean them well before peeling.
- Overloading with cheese: Beets need a little space to taste like themselves.
17. Artichoke Hearts with Garlic, Lemon, and Breadcrumbs
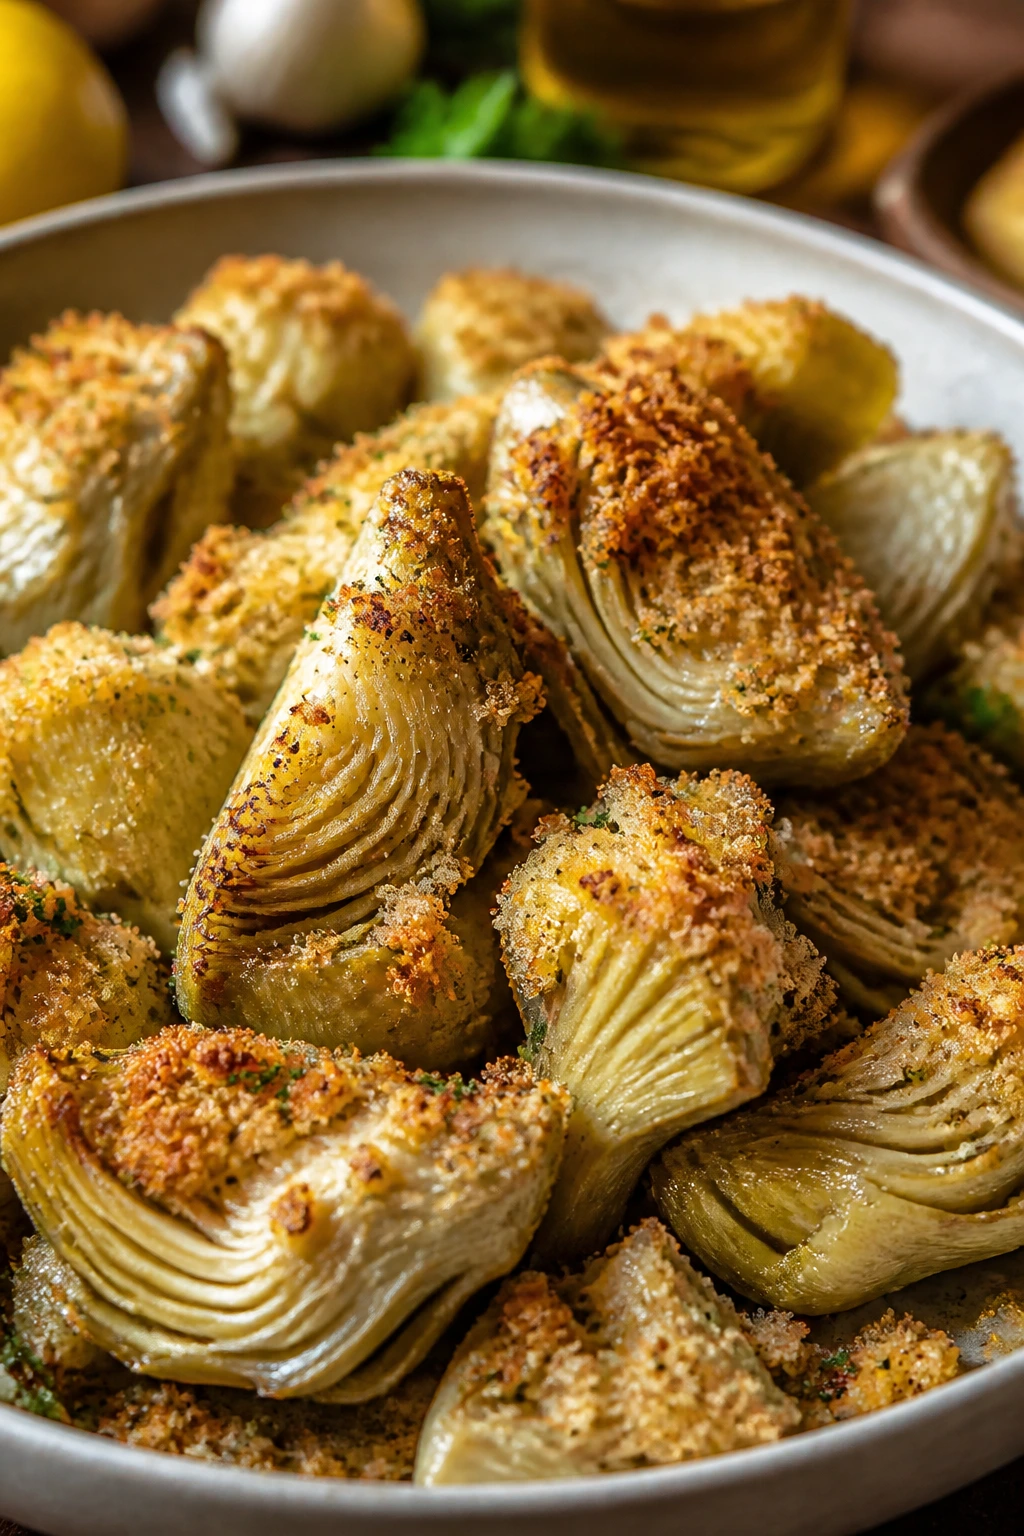
Artichoke hearts don’t get enough love because people think of them in jars, not as something worth crisping. Fresh or well-drained hearts in the air fryer turn golden at the edges and pick up garlic and lemon like they were made for it.
Why It Works:
Artichoke hearts have a meaty texture that holds up to high heat. If you dry them well, the air fryer can brown the edges instead of just warming them through. Garlic breadcrumbs add a crackly finish, and lemon keeps the flavor from feeling canned or heavy.
Key Ingredients:
- 12 ounces artichoke hearts, thawed if frozen or well-drained if jarred
- 1 tablespoon olive oil
- 1 teaspoon lemon zest
- ½ teaspoon kosher salt
- ¼ teaspoon black pepper
- ¼ cup panko breadcrumbs
- 1 clove garlic, finely grated
- 1 tablespoon chopped parsley
- 1 tablespoon lemon juice
Quick Steps:
- Pat the artichoke hearts very dry.
- Toss with olive oil, lemon zest, salt, and pepper.
- Air fry at 390°F for 8 minutes.
- Mix panko with garlic and parsley, sprinkle over the artichokes, and cook 3 to 4 minutes more until golden.
- Finish with lemon juice.
Equipment for This Recipe:
- Air fryer basket
- Paper towels
- Small bowl
- Tongs
How to Serve This Dish:
These are excellent on a platter with hummus, olives, and warm flatbread, but they also make a neat side for pasta or grilled fish. If you want them to read as dinner, scatter them over a grain salad with tomatoes and cucumbers. The crust should be dry and crisp, not greasy.
Pro Tips for This Recipe:
- Dry the hearts well; moisture is the enemy of browning.
- If using jarred hearts, choose ones packed in water or brine, not oil.
- Add the breadcrumbs only after the first cook so they toast instead of burning.
Variations on This Dish:
- Greek Artichokes: Add oregano and feta.
- Chili Lemon Hearts: Use chili flakes and extra lemon.
- Creamy Artichoke Toast Topping: Chop the cooked hearts and spread them over ricotta toast.
Common Mistakes to Avoid with This Dish:
- Using oily jarred artichokes without draining: They brown unevenly.
- Skipping the first drying step: Wet hearts steam and go soft.
- Burning garlic in the crumbs: Keep the crumb layer thin and brief.
18. Vegetable Fajita Medley with Peppers, Onions, and Portobellos
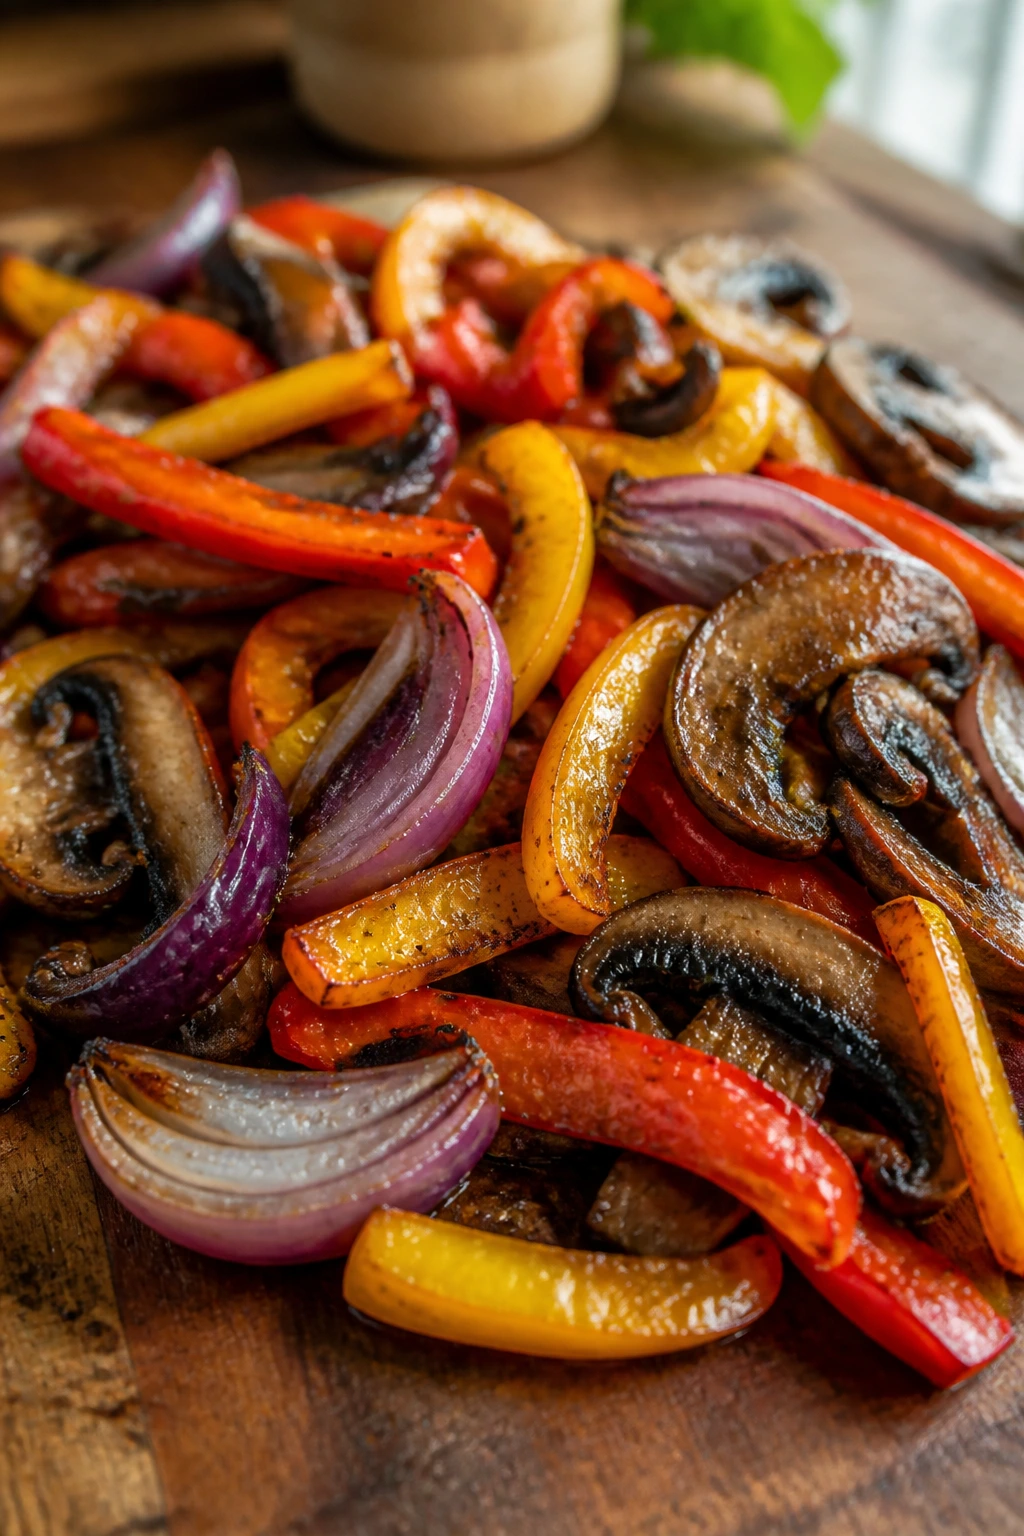
This is the tray I make when dinner needs to feel bigger than a side dish but still stay vegetable-forward. Peppers soften and sweeten, onions go jammy at the edges, and the mushrooms soak up the spice like they’re trying to make up for lost time.
Why It Works:
Different vegetables need different amounts of heat, but slicing everything into similar strips narrows that gap. The air fryer gives you char in spots without turning the vegetables mushy, and fajita seasoning adds enough punch that you do not miss a heavy sauce. The portobellos make the mix feel substantial enough for bowls or tortillas.
Key Ingredients:
- 2 bell peppers, sliced into strips
- 1 large red onion, sliced into thick wedges
- 8 ounces portobello mushrooms, sliced into strips
- 1 small zucchini, sliced into half-moons
- 1½ tablespoons olive oil
- 1 teaspoon kosher salt
- 1 teaspoon chili powder
- 1 teaspoon ground cumin
- ½ teaspoon smoked paprika
- ¼ teaspoon black pepper
- 1 tablespoon lime juice
- Warm tortillas, rice, or lettuce cups for serving
Quick Steps:
- Preheat the air fryer to 400°F.
- Toss the vegetables with olive oil, salt, chili powder, cumin, smoked paprika, and black pepper.
- Air fry for 8 minutes, shake the basket, then cook 4 to 6 minutes more until the peppers soften and the onion edges darken.
- Finish with lime juice.
- Serve in tortillas, over rice, or over greens with salsa and avocado.
Equipment for This Recipe:
- Air fryer basket
- Large mixing bowl
- Sharp knife
- Tongs
How to Serve This Dish:
If you’re hungry, tuck the vegetables into warm tortillas with beans and avocado. If you want something lighter, spoon them over brown rice or shredded lettuce with a dollop of yogurt. The medley should look glossy and colorful, with a few charred edges still visible.
Pro Tips for This Recipe:
- Slice the onion thick enough to hold together; paper-thin onions disappear.
- If your basket is small, cook the mushrooms separately from the peppers so nothing steams.
- Lime juice at the end matters. It sharpens the whole batch.
Variations on This Dish:
- Chipotle Fajita Medley: Add chipotle powder for more smoke.
- Cilantro-Lime Version: Finish with chopped cilantro and extra lime.
- Black Bean Bowl: Add warmed black beans after cooking for a fuller dinner.
Common Mistakes to Avoid with This Dish:
- Cutting the vegetables into random sizes: Some will burn while others stay raw.
- Adding lime before cooking: The acid softens the vegetables too early.
- Skipping the shake: The bottom layer needs a turn to brown evenly.
Why the Air Fryer Works So Well for Vegetable Dinners
The air fryer earns its keep with vegetables because it solves the two problems that ruin most weeknight veggie recipes: excess moisture and uneven browning. A sheet pan spreads heat over a wider area, which is fine when you have time. The basket concentrates hot air around smaller pieces, so cauliflower, Brussels sprouts, broccoli, and green beans brown before they slump.
The real trick is not using more oil. It’s using less, more deliberately. A thin coat helps heat stick to the surface, especially on watery vegetables like zucchini, mushrooms, and eggplant. Too much oil does the opposite. It slows the browning and gives you a glossy, limp finish that looks cooked but doesn’t have much texture.
Size matters, too. Cut carrots into thick fries, not skinny matchsticks. Halve Brussels sprouts. Slice cauliflower steaks with the core attached. The air fryer is fast, but it is not magic enough to fix bad cuts. Once you get the vegetable shape right, everything else starts to feel easier.
Essential Equipment for These Recipes
- Air fryer basket or tray: A basket with decent airflow gives the best browning, but a tray-style unit works too.
- Sharp chef’s knife: Uniform cuts are half the battle for even cooking.
- Cutting board with a damp towel underneath: Keeps slippery vegetables from skidding around while you work.
- Mixing bowls in 2 or 3 sizes: You’ll want one for seasoning, one for breading, and one for finished sauces.
- Tongs or a wide spatula: Helpful for flipping cauliflower steaks, peppers, and wedges without tearing them.
- Vegetable peeler: Worth keeping nearby for squash, carrots, and beets.
- Pastry brush or silicone brush: Useful for brushing oil and glaze exactly where you want it.
- Paper towels or clean kitchen towels: Dry vegetables before they go into the basket; water is the enemy of crisp edges.
- Microplane or fine grater: Best for lemon zest, garlic, and Parmesan that needs to melt quickly.
- Small skillet: Handy for toasting nuts, seeds, or breadcrumbs before finishing.
Smart Shopping and Ingredient Tips
Pick vegetables with shape in mind, not just size. For cauliflower, look for a tight head with heavy stems and no soggy spots. For broccoli, choose florets that feel firm, with stalks that snap cleanly when bent. Brussels sprouts should be compact and bright, not loose or yellowing at the edges.
With squashes, weight matters more than size. A small butternut squash can still be dense and sweet if it feels heavy in your hand. Delicata should have intact skin and no soft spots. Zucchini needs to be medium, not oversized; giant zucchini carry too much water and get seedy in the middle.
Packaged ingredients deserve a quick label scan. Jarred artichoke hearts packed in water or brine usually brown better than ones packed in oil. Frozen green beans or broccoli can work in a pinch, but they need to be thawed and dried first or the basket fills with steam. Breadcrumbs are one of those overlooked details that matter more than people admit; panko gives you more crunch than fine crumbs.
And don’t ignore your spice cabinet. Smoked paprika, cumin, Dijon mustard, curry powder, chili flakes, and garlic powder show up again and again because they’re the difference between “veg on a plate” and a meal that has a point of view. Fresh herbs are worth buying when the recipe uses them at the end, like parsley, cilantro, basil, mint, or dill. If a recipe finishes with lemon or lime, buy one extra. Citrus disappears faster than you think.
How to Serve These Recipes
Presentation:
Keep the plating loose and honest. Pile crisp vegetables on a shallow platter, not in a deep bowl where steam traps the edges and softens everything. Finish with something visible — herbs, seeds, cheese, lemon wedges, or a drizzle of yogurt — so the tray looks like dinner rather than leftovers.
Accompaniments:
These recipes sit well beside grain bowls, crusty bread, simple rice, lentils, beans, polenta, hummus, or a sharp salad. The more tender the vegetable, the more useful it is to have something with chew next to it. A soft grain and a crunchy vegetable usually make a better plate than two soft things together.
Portions:
As a side, most of these recipes feed 3 to 4 people. As a main, you’ll usually want to double the vegetable quantity and add one anchoring element — grains, beans, eggs, or a creamy sauce. If you’re cooking for one or two, many of the recipes reheat well for lunch, especially the sturdier ones like cauliflower, Brussels sprouts, cabbage, and squash.
Beverage Pairing:
Cold sparkling water with lemon fits almost everything here. For something with a little more personality, try a crisp white wine with broccoli, asparagus, or artichokes, or a light beer with the spiced and smoky dishes. Tomato-based or bean-based vegetable plates also pair nicely with iced tea that isn’t sweetened to death.
Additional Tips and Flavor Boosters
Flavor Enhancement:
A finishing acid changes everything. Lemon juice, lime juice, red wine vinegar, or even a tiny splash of balsamic at the end makes roasted vegetables taste brighter and less oily. If a tray tastes flat, the fix is usually acid or salt, not more spice.
Customization:
If you like heat, add red pepper flakes, cayenne, or chili crisp near the end so the flavor stays sharp. If you want a gentler dinner, lean into herbs — dill on asparagus, parsley on mushrooms, mint on beets, cilantro on peppers. A small spoon of yogurt, tahini, or pesto can also turn a simple vegetable side into a proper dinner plate.
Serving Suggestions:
Keep a few reliable finishing touches around: toasted seeds, crumbled feta, grated Parmesan, chopped nuts, or a quick herb sauce. They’re not decoration. They change texture, and texture is what keeps vegetable dinners interesting after the third bite.
Make-It-Yours:
For dairy-free versions, use tahini, herb oil, or nutritional yeast instead of cheese. For gluten-free crisping, choose rice flour or gluten-free breadcrumbs. For lower-salt cooking, season vegetables before cooking and finish with citrus, herbs, and a tiny pinch of flaky salt at the table rather than pouring everything on at once.
Make-Ahead, Storage, and Reheating Guidance

Most air fryer vegetables keep best when they’re treated like what they are: crisp foods. They’ll hold in the refrigerator for 3 to 4 days, though the texture is best in the first 24 hours. Store them in a shallow airtight container lined with a paper towel if the vegetables are especially moist, like zucchini, mushrooms, or eggplant.
Reheat them back in the air fryer at 350°F for 3 to 6 minutes, depending on the vegetable. Cauliflower, Brussels sprouts, green beans, and mushrooms come back well. Squash, beets, and cabbage are more forgiving than zucchini fries, which are at their best fresh and only acceptable reheated if you don’t mind some softness. If you’re reheating a breaded vegetable, skip the microwave. It turns the coating into damp paste.
Some components can be made ahead. You can wash and cut sturdy vegetables like cauliflower, broccoli, carrots, squash, and peppers up to a day in advance if you dry them well and store them cold. Glazes and dips can usually be mixed 2 to 3 days ahead. Breaded items, like zucchini fries or okra, are better breaded right before cooking so the coating doesn’t get gummy.
Freezing is a mixed bag. Cooked roasted vegetables can be frozen for up to 2 months, but the softer ones — zucchini, eggplant, and asparagus — usually come back with a looser texture. Cauliflower, Brussels sprouts, peppers, and squash do better. Reheat from thawed or partially thawed in the air fryer so the edges can recover some of their crispness.
Variations and Adaptations to Try
The Gluten-Free Crunch Swap:
Use rice flour, chickpea flour, or a gluten-free breadcrumb blend for zucchini fries, okra, and artichokes. The crunch changes a little, but the basket still does the heavy lifting. Cornmeal also works well when you want a rougher, more rustic crust.
The Dairy-Free Finish:
Skip Parmesan, feta, and yogurt and finish with tahini sauce, almond crumbs, or a spoon of pesto made without cheese. Lemon, herbs, and toasted seeds keep the vegetables from feeling bare.
The Spicy Dinner Version:
Add harissa to carrots, chili flakes to broccoli, cayenne to Brussels sprouts, or chipotle to fajita vegetables. Heat works best when it’s paired with something sweet or creamy, so keep yogurt, maple, or citrus nearby.
The Extra-Substantial Bowl:
Turn cauliflower, squash, peppers, mushrooms, or Brussels sprouts into grain bowls with rice, quinoa, farro, or lentils. A fried egg or a scoop of hummus makes the bowl feel finished without adding much effort.
The Kid-Friendly Mild Batch:
Pull back on garlic, chili, and mustard, then lean on Parmesan, maple, or a light herb coating. Carrots, sweet potatoes, zucchini fries, and cauliflower tend to win over picky eaters fastest because the texture is familiar even when the flavor shifts a little.
The Low-Oil Approach:
Most of these recipes can be made with about 25 percent less oil if your air fryer has strong airflow. Brush rather than pour, and use sauces after cooking so you don’t lose browning. The tradeoff is a little less gloss, not a ruined dinner.
Common Mistakes to Avoid
Crowding the basket:
This is the big one. Pile vegetables on top of each other and you get steam, not browning. If the basket looks full, cook in two batches.
Using pieces that are wildly different in size:
Tiny broccoli florets char while thick stems stay raw. Thin carrot tips burn while the thick ends stay hard. Uniform cuts are boring to look at and excellent to eat.
Adding wet sauce too early:
Balsamic, lemon, yogurt, and salsa all belong near the end or at the table. If they go in too early, they cool the basket down and soften the edges.
Forgetting to dry the vegetables:
A little water on the surface is enough to block browning. Pat washed vegetables dry, especially mushrooms, zucchini, broccoli, and green beans.
Treating every vegetable the same way:
Asparagus needs minutes, not tens of minutes. Squash needs a longer cook than zucchini. Beets and cabbage can take heat; okra and zucchini are more delicate. The basket is fast, but not all vegetables move at the same speed.
Using too much oil:
A thin coat helps the surface brown. Too much makes vegetables greasy and slows crisping. If the tray looks slick, you’ve probably gone too far.
Frequently Asked Questions
Can I cook more than one vegetable at the same time?
Yes, but only if they want roughly the same cook time. Broccoli with cauliflower works better than broccoli with asparagus, and carrots with squash work better than zucchini with mushrooms. If the timings are far apart, cook separately and combine at the end.
Do I need to preheat the air fryer?
Usually, yes. A preheated basket or tray gives vegetables a head start on browning, especially when you want crisp edges rather than a slow roast. Three to five minutes is usually enough.
What’s the best oil for air fryer vegetables?
Olive oil works for almost everything here, but avocado oil is useful when you’re cooking at higher heat or want a more neutral taste. Use enough to coat the surface lightly, not enough to pool in the bowl.
Can I use frozen vegetables?
You can, but dry them first and don’t expect the same texture as fresh. Frozen broccoli, cauliflower, and green beans are the safest bets. Zucchini and mushrooms are trickier because they release a lot of water.
How do I keep breaded vegetables crispy?
Use panko or cornmeal, spray the coating lightly with oil, and eat them right away. If you need to hold them for a few minutes, place them on a wire rack instead of a plate so steam doesn’t collect underneath.
Why do my vegetables taste burnt on the outside but raw in the middle?
The cut pieces are probably too big, or the air fryer is running hotter than expected. Lower the temperature by 15°F and extend the cook time, or cut the vegetables a little smaller next time.
Can I make these recipes ahead for lunch boxes?
Yes, but choose sturdier vegetables like cauliflower, Brussels sprouts, squash, cabbage, and peppers. Let them cool before packing, then reheat in the air fryer or enjoy them at room temperature with a sauce on the side.
How much oil should I actually use?
Usually 1 to 2 tablespoons for 1 to 1½ pounds of vegetables is enough. If the vegetables shine but don’t drip, you’re in the right zone. If there’s oil pooling at the bottom of the bowl, cut back next time.
A Better Way to Put Vegetables on the Table
Air fryer vegetables work because they respect the vegetable instead of trying to disguise it. Cauliflower stays cauliflower. Brussels sprouts still taste like Brussels sprouts. The air fryer just gives each one enough heat to show some edge.
That’s the part I keep coming back to: the basket rewards good cuts, smart seasoning, and a little restraint. Once you get used to that rhythm, vegetable dinners stop feeling like a compromise. They become the dish you build the rest of the plate around.