
A vegetable side dish earns its keep when it does more than sit politely next to the main course. It should have browned edges, a little salt bite, and enough texture that you want a second spoonful before you even think about the protein. The difference between “nice vegetables” and the side everyone reaches for is usually a small thing: a hotter oven, a sharp squeeze of lemon, a handful of toasted nuts, a spoon of yogurt, a hit of cheese, or a braise that softens something sturdy without turning it to mush.
That’s the real trick with filling vegetable side dishes without meat. They don’t need to impersonate steak. They need backbone. Sometimes that means starch, like potatoes, farro, or polenta. Sometimes it’s fat and crunch from olive oil, butter, almonds, feta, or pepitas. Sometimes it’s just the right cut and cooking method — cabbage charred into sweet wedges, Brussels sprouts roasted until the cut sides nearly crackle, carrots glazed until the edges go sticky and dark.
I keep coming back to the same rule: if the vegetables still taste like vegetables, but with a deeper, browner, more satisfying personality, you’re on the right track. That’s what the best vegetable side dishes do. They feel substantial enough to stand beside roast chicken, grilled fish, seared tofu, or a simple bowl of beans, and they’re often the first empty dish on the table.
What Makes These Vegetable Sides Feel Complete
Built to satisfy: These sides lean on fat, salt, browning, and texture, so they eat like a real part of the meal instead of a garnish.
No sad steamers here: Every recipe uses heat in a way that changes the vegetable’s flavor — roasting, charring, braising, gratinating, or pan-frying.
Flexible with the main course: They work with roast chicken, grilled salmon, tofu, lentils, pork, or a plain grain bowl without feeling tied to one cuisine.
Pantry-friendly by design: Olive oil, garlic, onions, lemons, vinegar, cheese, and herbs show up again and again because they do the heavy lifting.
Good hot or warm: Most of these hold up after a few minutes on the counter, which matters when the rest of dinner is still finishing in the oven.
Built for real appetites: Potatoes, chickpeas, lentils, polenta, squash, and mushrooms show up often, because a side dish should feel like food, not decoration.
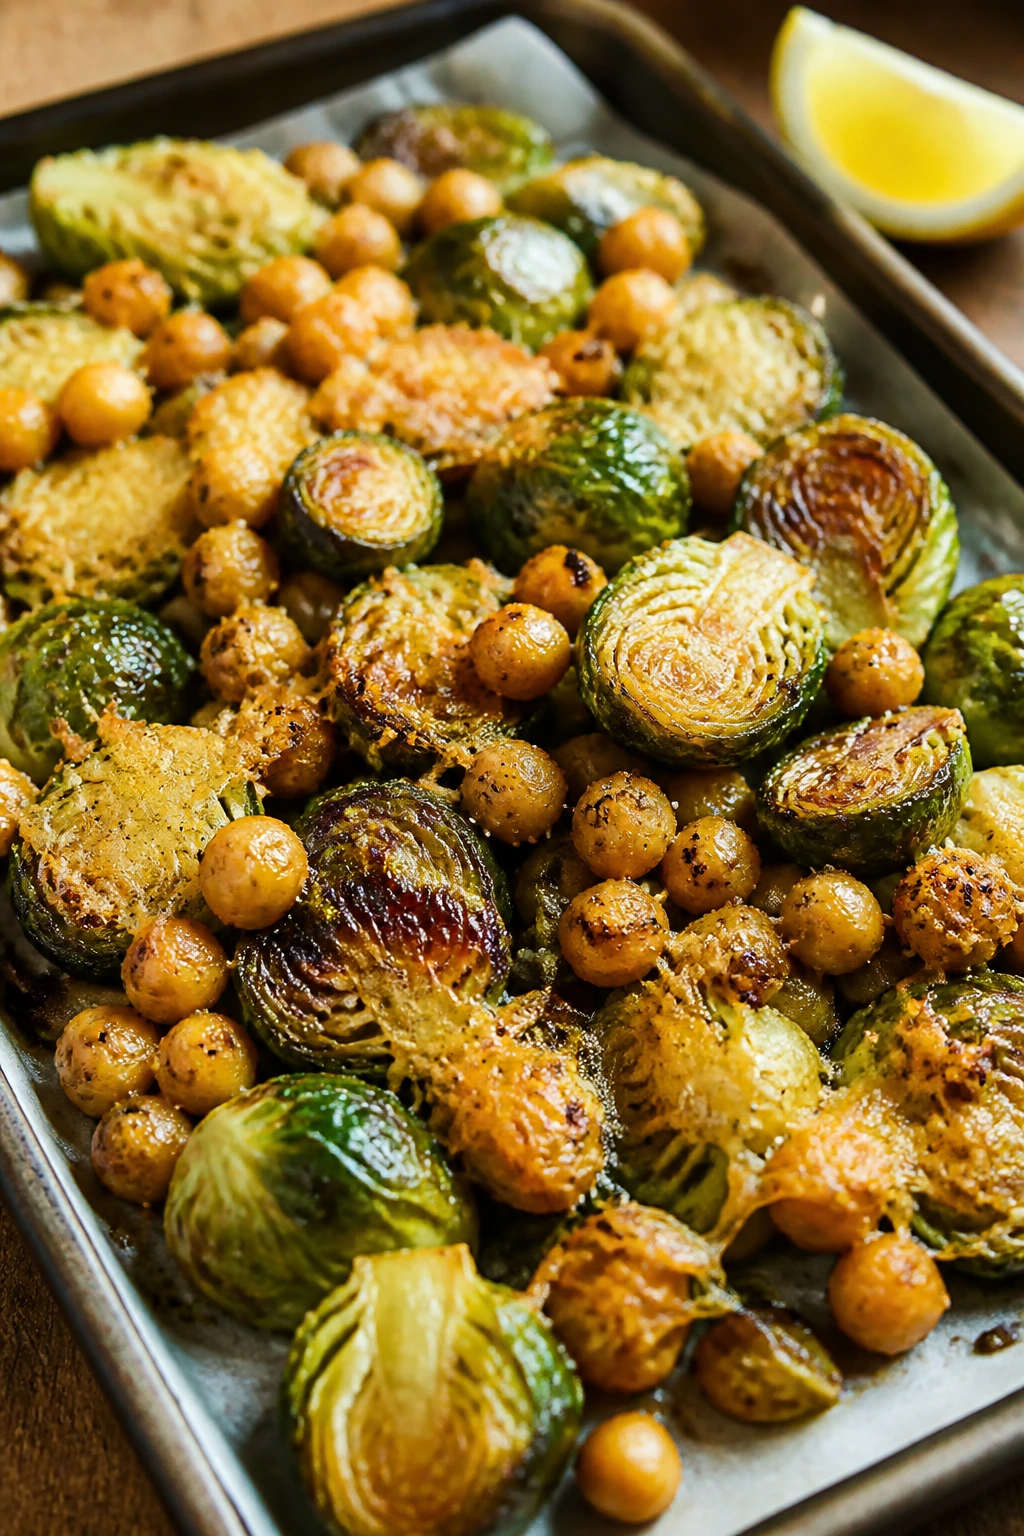
1. Crispy Parmesan Brussels Sprouts with Chickpeas
A tray of Brussels sprouts with dark, nutty edges and little chickpeas blistered in the same pan has a way of disappearing fast. The sprouts get sweet where they touch the sheet pan, the chickpeas turn crisp and sandy on the outside, and the Parmesan melts into tiny salty shards.
Why It Works: Brussels sprouts need high heat, and 425°F gives you the browned cut sides that make them taste almost toasted. Chickpeas add heft without turning the dish into a grain bowl, and the Parmesan finishes with a savory crust that clings to every rough edge. A lemon squeeze at the end keeps the whole pan from tasting heavy.
Key Ingredients:
- 1½ pounds Brussels sprouts, trimmed and halved
- 1 can (15 ounces) chickpeas, drained, rinsed, and patted very dry
- 3 tablespoons olive oil
- ¾ teaspoon kosher salt
- ½ teaspoon black pepper
- ½ teaspoon garlic powder
- ⅓ cup finely grated Parmesan
- 1 lemon, cut into wedges
Quick Steps:
- Preheat the oven to 425°F and line a rimmed sheet pan with parchment.
- Toss the Brussels sprouts and chickpeas with olive oil, salt, pepper, and garlic powder in a large bowl.
- Spread everything in a single layer with the cut sides of the sprouts facing down.
- Roast for 22 to 28 minutes, stirring once halfway through, until the sprouts are browned and the chickpeas are crisp at the edges.
- Scatter the Parmesan over the hot pan and finish with lemon juice.
Equipment for This Recipe:
- Rimmed sheet pan
- Large mixing bowl
- Parchment paper
- Microplane or fine grater
How to Serve This Dish: Spoon it into a shallow bowl so the chickpeas stay put and the cheese lands on top instead of sinking. It’s good alongside roast chicken, pan-seared salmon, or a simple lentil loaf, and it also works as a warm lunch if you add a fried egg.
Pro Tips for This Recipe:
- Dry the chickpeas well; wet chickpeas steam instead of crisp.
- Put the Brussels sprouts cut-side down. That one move matters.
- If the Parmesan browns too fast, add it only for the final 2 minutes.
- A tiny pinch of red pepper flakes makes the pan taste brighter, not hotter.
Variations on This Dish:
- Balsamic Finish: Add 1 tablespoon balsamic vinegar after roasting for a sharper, glossier pan.
- Smoky Pantry Version: Swap garlic powder for ½ teaspoon smoked paprika.
- Dairy-Free Crunch: Use 2 tablespoons nutritional yeast instead of Parmesan.
Common Mistakes to Avoid with This Dish:
- Crowding the pan: If the sprouts pile up, they steam. Use two pans if needed.
- Skipping the dry chickpeas: Moisture is the enemy of crisp edges.
- Adding lemon too early: Acid before roasting can mute browning; finish with it at the end.
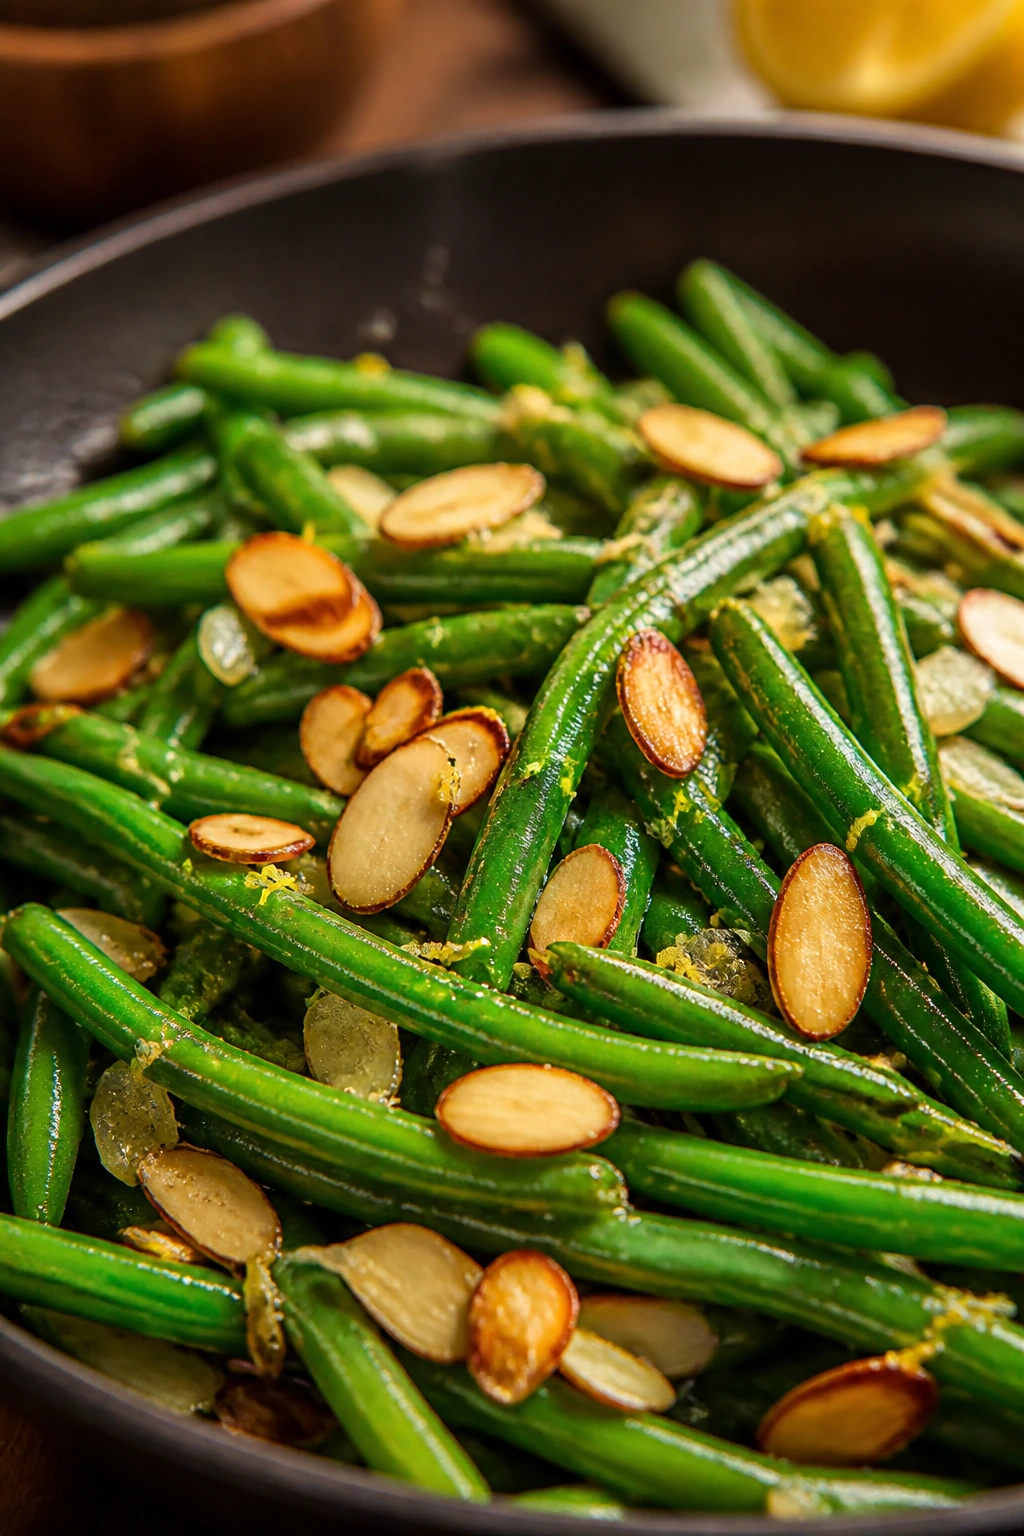
2. Garlicky Green Beans with Almonds
These green beans stay snappy, not limp, and that matters. A quick blanch followed by a hot skillet gives them a bright green color, while toasted almonds add the kind of crunch that keeps people reaching back into the bowl.
Why It Works: Green beans can taste flat if they’re cooked all the way through in water, so this recipe splits the difference: a short boil, then a fast sauté. Garlic softens in butter without scorching, and sliced almonds bring fat and crunch, which gives the dish more staying power than plain beans ever will. Lemon zest at the end makes the flavor lift instead of settle.
Key Ingredients:
- 1½ pounds fresh green beans, trimmed
- 2 tablespoons unsalted butter
- 1 tablespoon olive oil
- 4 garlic cloves, thinly sliced
- ½ cup sliced almonds
- ½ teaspoon kosher salt
- ¼ teaspoon black pepper
- 1 teaspoon lemon zest
Quick Steps:
- Bring a large pot of salted water to a boil and set up a bowl of ice water.
- Blanch the green beans for 2 minutes until bright green, then drain and shock them in the ice water.
- Warm the butter and olive oil in a large skillet over medium heat.
- Add the almonds and toast for 1 to 2 minutes, then add the garlic and cook just until fragrant.
- Toss in the green beans, salt, and pepper, and sauté for 3 to 4 minutes until hot and glossy. Finish with lemon zest.
Equipment for This Recipe:
- Large pot
- Large skillet
- Slotted spoon or spider strainer
- Bowl of ice water
How to Serve This Dish: Pile the beans on a narrow platter so the almonds stay visible. They sit well beside roast turkey, baked tofu, or salmon, and they’re especially useful when the rest of dinner is soft or creamy.
Pro Tips for This Recipe:
- Keep the garlic moving. It turns bitter fast if the pan is too hot.
- Salt the blanching water well; under-salted beans taste dull even after sautéing.
- If you want extra richness, add 1 teaspoon of lemon juice with the zest.
- Use raw almonds, not pre-salted ones, so the seasoning stays in your control.
Variations on This Dish:
- Brown Butter Almonds: Cook the butter until pale gold before adding the almonds.
- Shallot Swap: Use 1 minced shallot instead of garlic for a softer flavor.
- Sesame Green Beans: Finish with 1 teaspoon toasted sesame oil and 1 teaspoon sesame seeds.
Common Mistakes to Avoid with This Dish:
- Overblanching: Beans should still snap when bent, not droop.
- Burning the almonds: They go from toasted to bitter in seconds.
- Leaving out the acid: Lemon zest or juice is what keeps the beans from tasting heavy.
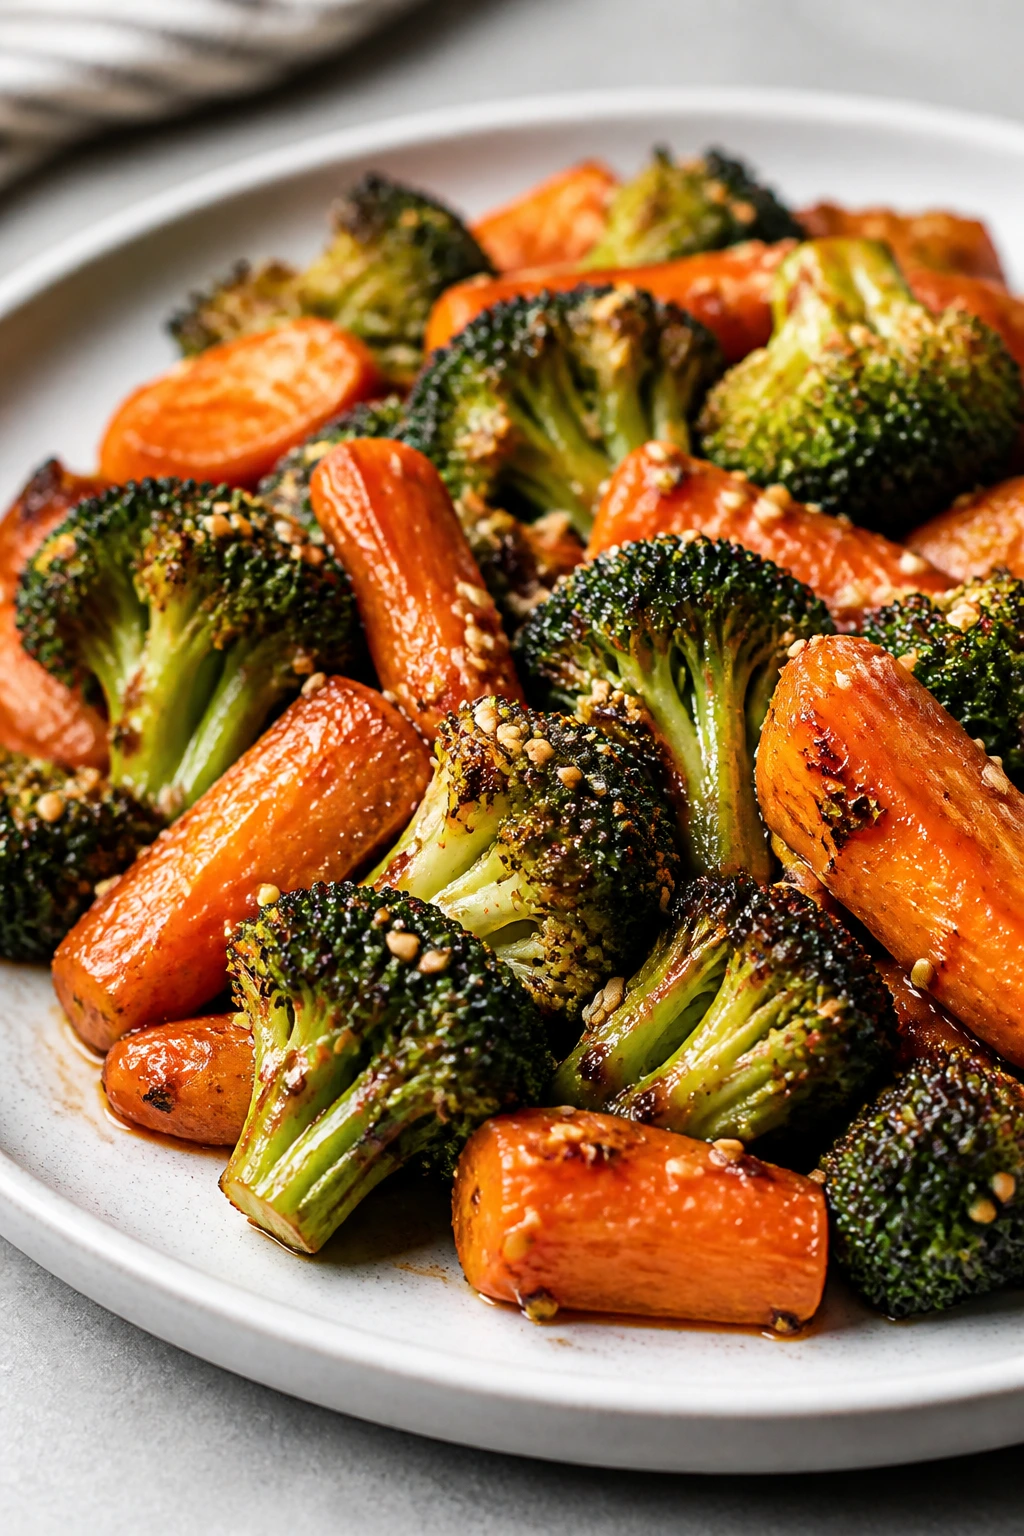
3. Honey-Glazed Roasted Carrots
Roasted carrots can taste flat if they’re only salted and put in the oven, but a little honey and butter changes everything. The edges go sticky and caramelized, the centers stay tender, and the whole tray smells faintly sweet in the best possible way.
Why It Works: Carrots already have natural sugar, so honey doesn’t make them sugary; it deepens the browning. Roasting at 425°F gives you those dark orange edges, while a little cumin or thyme keeps the glaze from drifting into dessert territory. The butter rounds out the finish and gives the glaze a soft sheen.
Key Ingredients:
- 2 pounds carrots, peeled and cut into 2-inch batons
- 2 tablespoons olive oil
- 1½ tablespoons honey
- 1 tablespoon unsalted butter, melted
- ¾ teaspoon kosher salt
- ¼ teaspoon black pepper
- ½ teaspoon ground cumin or 1 teaspoon fresh thyme leaves
- 1 tablespoon chopped parsley, for serving
Quick Steps:
- Preheat the oven to 425°F and line a sheet pan.
- Toss the carrots with olive oil, honey, melted butter, salt, pepper, and cumin or thyme.
- Spread them in a single layer and roast for 20 to 28 minutes, turning once.
- Roast until the edges are caramelized and a knife slips into the thickest piece with almost no resistance.
- Scatter parsley over the top and serve warm.
Equipment for This Recipe:
- Sheet pan
- Vegetable peeler
- Mixing bowl
- Rubber spatula
How to Serve This Dish: These carrots look best on a long plate with the tips pointed in the same direction. They go with roast chicken, baked lentils, or a grain pilaf, and they’re one of the easier sides to scale up for a crowded table.
Pro Tips for This Recipe:
- Cut the batons the same size so they brown evenly.
- If the honey starts darkening too fast, loosen the glaze with 1 tablespoon water.
- A squeeze of orange juice works if you want a softer citrus note.
- Don’t skip the butter; the glaze tastes thin without it.
Variations on This Dish:
- Maple-Thyme Version: Swap the honey for maple syrup and add thyme.
- Harissa Carrots: Stir 1 teaspoon harissa into the glaze for a slow, warm heat.
- Citrus Finish: Add orange zest right before serving.
Common Mistakes to Avoid with This Dish:
- Cutting carrots unevenly: Thin pieces burn before the thick ones soften.
- Using too much honey: A heavy glaze can go sticky-burnt in the oven.
- Pulling them early: Carrots should be tender all the way through, not just browned outside.
4. Creamy Mashed Cauliflower
Mashed cauliflower can be watery and disappointing if you treat it like potatoes. Done right, though, it turns silky, garlicky, and rich enough to anchor the plate, with a pale, smooth texture that catches butter in every spoonful.
Why It Works: Cauliflower carries flavor well but gives off a lot of moisture, so steam-drying is the hidden step most people skip. Cream cheese and parmesan create body, while butter and garlic keep the mash from tasting like a diet substitute. It’s the sort of side that can stand in for mashed potatoes without trying to cosplay as them.
Key Ingredients:
- 2 large heads cauliflower, cut into florets
- 3 tablespoons unsalted butter
- 2 garlic cloves, minced
- 2 ounces cream cheese, softened
- ¼ cup whole milk or half-and-half
- ⅓ cup grated Parmesan
- ¾ teaspoon kosher salt
- ¼ teaspoon white or black pepper
Quick Steps:
- Steam the cauliflower florets for 10 to 12 minutes until very tender.
- Drain well, then return them to the hot pot for 2 minutes to steam off extra moisture.
- Melt the butter in a small pan, add the garlic, and cook for 30 seconds.
- Blend or mash the cauliflower with butter, cream cheese, milk, Parmesan, salt, and pepper until smooth.
- Taste and adjust seasoning before serving hot.
Equipment for This Recipe:
- Large pot with steamer basket
- Food processor, immersion blender, or potato masher
- Fine strainer or colander
- Small saucepan
How to Serve This Dish: Spoon it into a warm bowl and make a shallow well for extra butter. It’s strongest next to seared mushrooms, roasted chicken, or braised greens, and it carries gravy better than people expect.
Pro Tips for This Recipe:
- Steam-drying matters; wet cauliflower makes soup, not mash.
- If using a food processor, pulse only until smooth so it doesn’t turn gluey.
- Warm the milk before adding it.
- A tiny pinch of nutmeg gives the mash a more finished flavor.
Variations on This Dish:
- Roasted Garlic Version: Use 4 roasted garlic cloves instead of fresh garlic.
- Cheddar Cauliflower Mash: Replace Parmesan with sharp cheddar.
- Dairy-Light Option: Use olive oil and a splash of chicken or vegetable broth instead of cream cheese and milk.
Common Mistakes to Avoid with This Dish:
- Leaving excess water in the cauliflower: This is the main reason it turns runny.
- Overprocessing: Too much blending can make it sticky.
- Underseasoning: Cauliflower needs more salt than you’d think.
5. Skillet Charred Corn with Lime and Cotija
Corn cooked this way tastes like summer with a little attitude. The kernels blister in a hot skillet, the lime wakes everything up, and the cotija clings to the buttered corn in salty little flecks.
Why It Works: Fresh or thawed frozen corn both work because the recipe depends on high heat, not long cooking. A little jalapeño gives the dish bite without making it spicy enough to scare anyone off, and cotija brings a dry, salty finish that stays on top of the kernels instead of melting away. The result eats like a side dish with some backbone.
Key Ingredients:
- 4 cups corn kernels, fresh or thawed from frozen
- 2 tablespoons butter
- 1 tablespoon olive oil
- 1 small jalapeño, finely chopped
- 2 garlic cloves, minced
- ½ teaspoon kosher salt
- 1 lime, zested and juiced
- ¼ cup crumbled cotija
- 2 tablespoons chopped cilantro
Quick Steps:
- Heat the butter and olive oil in a large skillet over medium-high heat.
- Add the corn in a single layer and let it sit for 2 minutes before stirring.
- Stir in the jalapeño, garlic, and salt, then cook for 3 to 5 minutes until the kernels get browned spots.
- Remove the pan from the heat and toss with lime zest, lime juice, cotija, and cilantro.
- Serve immediately while the kernels still pop under the fork.
Equipment for This Recipe:
- Large cast-iron or stainless steel skillet
- Wooden spoon
- Microplane
- Citrus juicer, optional
How to Serve This Dish: Put it in a wide bowl so the lime scent comes up when you lean in. It works beautifully with tacos, grilled shrimp, black bean patties, or a roast chicken with simple rice.
Pro Tips for This Recipe:
- Don’t overcrowd the skillet. Corn needs contact with the pan to char.
- Frozen corn should be thawed and patted dry first.
- Cotija is the right cheese here because it stays crumbly and salty.
- If you want more smoke, add a pinch of smoked paprika.
Variations on This Dish:
- Mexican Street Corn Style: Add 1 tablespoon mayonnaise and extra cotija.
- Herb-Lime Version: Swap cilantro for parsley and add minced chives.
- Spicy Hatch Swap: Use roasted green chiles instead of jalapeño.
Common Mistakes to Avoid with This Dish:
- Stirring too soon: Let the kernels sit long enough to brown.
- Using too little heat: Medium heat cooks corn, but it won’t char it.
- Adding cheese while the pan is screaming hot: Cotija is best sprinkled after the heat is off.
6. Lemon-Chili Roasted Broccoli
Broccoli gets a bad reputation from overcooked cafeteria trays, which is unfair. Roasted hard enough, the florets turn crisp at the tips, the stems stay sweet, and a hit of lemon at the end keeps the whole thing awake.
Why It Works: Broccoli needs direct heat and a dry surface, so roasting at 425°F is better than steaming by a mile. Chili flakes keep it from tasting one-note, and a little Parmesan or breadcrumbs add the rough, crunchy finish that makes the vegetable feel substantial. The lemon goes on after roasting, which keeps the flavor bright instead of cooked down.
Key Ingredients:
- 2 large heads broccoli, cut into florets
- 3 tablespoons olive oil
- ½ teaspoon kosher salt
- ¼ teaspoon black pepper
- ½ teaspoon red pepper flakes
- 2 garlic cloves, minced
- ¼ cup grated Parmesan
- 1 lemon, cut into wedges
- 2 tablespoons breadcrumbs, optional
Quick Steps:
- Preheat the oven to 425°F.
- Toss the broccoli with olive oil, salt, pepper, red pepper flakes, and garlic.
- Spread it on a sheet pan and roast for 15 to 18 minutes until the edges are browned.
- Sprinkle Parmesan and breadcrumbs over the top, then return to the oven for 2 minutes if you want extra crunch.
- Finish with lemon juice and serve hot.
Equipment for This Recipe:
- Sheet pan
- Large bowl
- Microplane or grater
- Spatula
How to Serve This Dish: Serve it on a platter, not a bowl, so the crispy bits stay visible. It pairs with pasta, roasted fish, chickpea cutlets, or a simple baked potato if you want a full meatless plate.
Pro Tips for This Recipe:
- Dry the broccoli after washing; wet florets steam.
- Keep the garlic in the oil coating, not clumped under the florets.
- If the stems are thick, peel the outer layer first.
- Breadcrumbs are optional, but they add a nice rough crunch.
Variations on This Dish:
- Lemon-Parmesan Finish: Add more lemon zest and skip the chili.
- Soy-Sesame Broccoli: Swap olive oil for sesame oil and use sesame seeds.
- Breadcrumb-Free Version: Leave off the crumbs and finish with toasted almonds.
Common Mistakes to Avoid with This Dish:
- Crowding the tray: Broccoli needs space to roast instead of steam.
- Burning the garlic: If your oven runs hot, toss the garlic in halfway through.
- Serving it plain: Acid and salt are what keep broccoli from tasting like a chore.
7. Braised Red Cabbage with Apples
This is the kind of vegetable side that gets better the longer it sits on the stove. Red cabbage softens into ribbons, the apples melt into the sauce, and the vinegar keeps the sweetness in line so the whole pot tastes sharp, glossy, and a little old-fashioned in the best way.
Why It Works: Red cabbage is sturdy enough to braise without collapsing into nothing, which makes it useful when you want make-ahead food that still has texture. Apples add body and a clean sweetness, while vinegar cuts through the richness of the butter and keeps the dish from tasting dull. It works especially well with roasted meat, but it also has enough presence for a vegetarian plate beside potatoes or lentils.
Key Ingredients:
- 1 medium red cabbage, cored and thinly sliced
- 2 apples, peeled, cored, and sliced
- 1 small onion, thinly sliced
- 2 tablespoons butter
- ¼ cup apple cider vinegar
- ¼ cup apple cider or water
- 1 tablespoon brown sugar
- 1 teaspoon kosher salt
- ½ teaspoon caraway seeds, optional
Quick Steps:
- Melt the butter in a large Dutch oven over medium heat.
- Add the onion and cook for 4 minutes until softened.
- Stir in the cabbage, apples, vinegar, cider, sugar, salt, and caraway seeds.
- Cover and simmer on low for 35 to 45 minutes, stirring once or twice, until the cabbage is tender but not mushy.
- Taste for salt and vinegar before serving warm.
Equipment for This Recipe:
- Dutch oven or heavy pot
- Sharp knife
- Cutting board
- Wooden spoon
How to Serve This Dish: Spoon it beside roast pork, sausage, potato cakes, or a buttered bean mash. The cabbage keeps its color, so it looks especially good under a pale protein or next to golden potatoes.
Pro Tips for This Recipe:
- Slice the cabbage thinly so it braises evenly.
- Use a tart apple if you want the sauce sharper.
- If the pot looks dry before the cabbage softens, add another splash of cider.
- Let it rest 10 minutes before serving; the flavor settles.
Variations on This Dish:
- Juniper Version: Add 3 lightly crushed juniper berries with the cabbage.
- Orange-Braised Swap: Replace half the cider with orange juice.
- Cider-Vinegar Sharpness: Increase vinegar by 1 tablespoon if you want more bite.
Common Mistakes to Avoid with This Dish:
- Cooking on high heat: The cabbage needs braising, not frying.
- Using overly sweet apples: They can flatten the flavor if the cabbage has little acid.
- Stopping too early: The texture should be tender with some body, not raw and crunchy in the center.
8. Stuffed Portobello Mushrooms with Spinach and Breadcrumbs
A stuffed portobello feels more like a meal than a side in the best possible way. The mushroom cap turns meaty and juicy, the spinach brings green freshness, and the breadcrumb topping gets bronzed and crisp in the oven.
Why It Works: Portobellos are naturally dense, so they can handle a filling without falling apart. Sautéed spinach keeps the stuffing from feeling heavy, and ricotta or cream cheese gives the center a soft, creamy texture that contrasts with the mushroom’s chew. A little Parmesan on top helps the crumbs brown into a proper crust.
Key Ingredients:
- 6 large portobello mushroom caps, stems removed and gills scraped out
- 1 tablespoon olive oil
- 3 cups fresh spinach
- 2 garlic cloves, minced
- ½ cup ricotta or cream cheese
- ¼ cup breadcrumbs
- ¼ cup grated Parmesan
- ½ teaspoon kosher salt
- ¼ teaspoon black pepper
Quick Steps:
- Preheat the oven to 400°F.
- Brush the mushroom caps with olive oil and place them gill-side up on a baking sheet.
- Sauté the spinach and garlic in a small skillet until wilted, then squeeze out extra moisture.
- Mix the spinach with ricotta, half the Parmesan, salt, and pepper, then spoon into the caps.
- Top with breadcrumbs and the remaining Parmesan, bake for 18 to 22 minutes, and serve hot.
Equipment for This Recipe:
- Baking sheet
- Small skillet
- Spoon
- Paper towels
How to Serve This Dish: Set one cap per plate if you want the side to feel substantial. They sit well with roast beef, polenta, or a tomato salad, and they’re one of the rare sides that can steal the dinner conversation.
Pro Tips for This Recipe:
- Scrape the gills so the filling tastes cleaner and the caps hold more stuffing.
- Squeeze the spinach dry or the filling gets loose.
- Don’t overfill the caps; a mound is fine, but it should stay put.
- If you want a deeper flavor, brush the mushrooms with a little balsamic before baking.
Variations on This Dish:
- Mozzarella Version: Swap half the ricotta for shredded mozzarella.
- Herby Cottage Cheese Swap: Use cottage cheese blended smooth with parsley.
- Breadcrumb-Free Top: Use crushed walnuts instead of crumbs.
Common Mistakes to Avoid with This Dish:
- Skipping the moisture squeeze: Wet spinach leaks into the caps.
- Using undersized mushrooms: Small caps cannot hold much filling.
- Baking too long: Portobellos should stay juicy, not shriveled.
9. Smoky Sweet Potato Wedges with Yogurt Dip
Sweet potato wedges can either be soft and dull or crisp at the edges and almost candy-like in the middle. The smoked paprika and garlic powder push them into savory territory, and the cool yogurt dip keeps the whole plate from leaning too sweet.
Why It Works: Sweet potatoes carry sugar, so a hot oven gives you caramelization fast. Cutting them into wedges instead of cubes gives more surface area for browning, and a little cornstarch in the coating helps them crisp. The yogurt dip brings acid and creaminess, which is what lets the wedges feel like a side dish instead of a snack.
Key Ingredients:
- 3 medium sweet potatoes, scrubbed and cut into wedges
- 2 tablespoons olive oil
- 1 teaspoon smoked paprika
- ½ teaspoon garlic powder
- 1 teaspoon kosher salt
- ¼ teaspoon black pepper
- ½ cup plain Greek yogurt
- 1 teaspoon lime juice
- 1 teaspoon chopped chives
Quick Steps:
- Preheat the oven to 425°F and line a sheet pan.
- Toss the sweet potato wedges with oil, paprika, garlic powder, salt, and pepper.
- Arrange them cut-side down and roast for 30 to 35 minutes, flipping once halfway through.
- Stir the yogurt with lime juice and chives.
- Serve the wedges hot with the dip on the side.
Equipment for This Recipe:
- Sheet pan
- Large bowl
- Small bowl for the dip
- Sharp knife
How to Serve This Dish: Put the dip in a small bowl right in the center of the platter. They’re strong next to grilled halloumi, black beans, roast chicken, or a burger, and they make a good bridge between snack food and dinner.
Pro Tips for This Recipe:
- Leave a little space between wedges so the sides brown.
- Cut the wedges evenly or the thin ones burn before the thick ones soften.
- If you want more crispness, dust the wedges with 1 teaspoon cornstarch.
- Lime in the dip beats lemon here; it suits the sweet potato better.
Variations on This Dish:
- Chipotle Version: Add ½ teaspoon chipotle powder to the seasoning.
- Rosemary Swap: Use fresh rosemary instead of smoked paprika.
- Tahini Dip: Replace yogurt with tahini and a splash of water.
Common Mistakes to Avoid with This Dish:
- Overloading the pan: The wedges need air around them.
- Using too much oil: A thin coat is enough and browns better.
- Skipping the dip: Without acid, sweet potatoes can taste one-note.
10. Rustic Ratatouille
Ratatouille is not fast food, and that’s part of why it works. Tomatoes, zucchini, eggplant, peppers, and onions cook down into a pot of glossy vegetables that taste deeper than the sum of their parts.
Why It Works: Each vegetable brings something different: eggplant turns silky, zucchini keeps some shape, peppers add sweetness, and tomatoes make the sauce. A long, gentle simmer lets them all soften without losing identity. A good ratatouille tastes better the next day, which makes it useful for planning ahead.
Key Ingredients:
- 1 medium eggplant, cut into 1-inch cubes
- 2 zucchini, cut into half-moons
- 2 bell peppers, chopped
- 1 large onion, sliced
- 4 garlic cloves, minced
- 4 cups chopped tomatoes or one 28-ounce can crushed tomatoes
- 3 tablespoons olive oil
- 1 teaspoon kosher salt
- 1 teaspoon herbes de Provence or dried thyme
Quick Steps:
- Salt the eggplant cubes lightly and let them sit for 15 minutes, then pat dry.
- Warm the olive oil in a large Dutch oven and cook the onion and peppers for 6 minutes.
- Add the eggplant, zucchini, and garlic, and cook for 5 minutes more.
- Stir in the tomatoes, salt, and herbs, then simmer uncovered for 25 to 35 minutes until thick.
- Serve warm or at room temperature.
Equipment for This Recipe:
- Dutch oven or deep skillet
- Sharp knife
- Cutting board
- Wooden spoon
How to Serve This Dish: Spoon ratatouille over crusty bread, soft polenta, or buttered rice. It also sits nicely beside grilled fish or a roast, but it’s substantial enough to be the anchor for a vegetarian supper.
Pro Tips for This Recipe:
- Salting the eggplant first pulls out some bitterness and excess moisture.
- Use a wide pot so the vegetables cook rather than steam.
- Let it rest before serving; the sauce thickens as it cools.
- A splash of red wine vinegar at the end sharpens the tomato flavor.
Variations on This Dish:
- Oven-Baked Version: Roast the vegetables first, then fold them into the sauce.
- Olive-Heavy Twist: Add chopped green olives for a briny edge.
- Herb Garden Swap: Finish with basil or parsley instead of dried herbs.
Common Mistakes to Avoid with This Dish:
- Cutting the vegetables too large: They need time to soften together.
- Rushing the simmer: Ratatouille wants patience.
- Overcrowding the pan at the start: Brown the vegetables in batches if needed.
11. Herbed Smashed Baby Potatoes
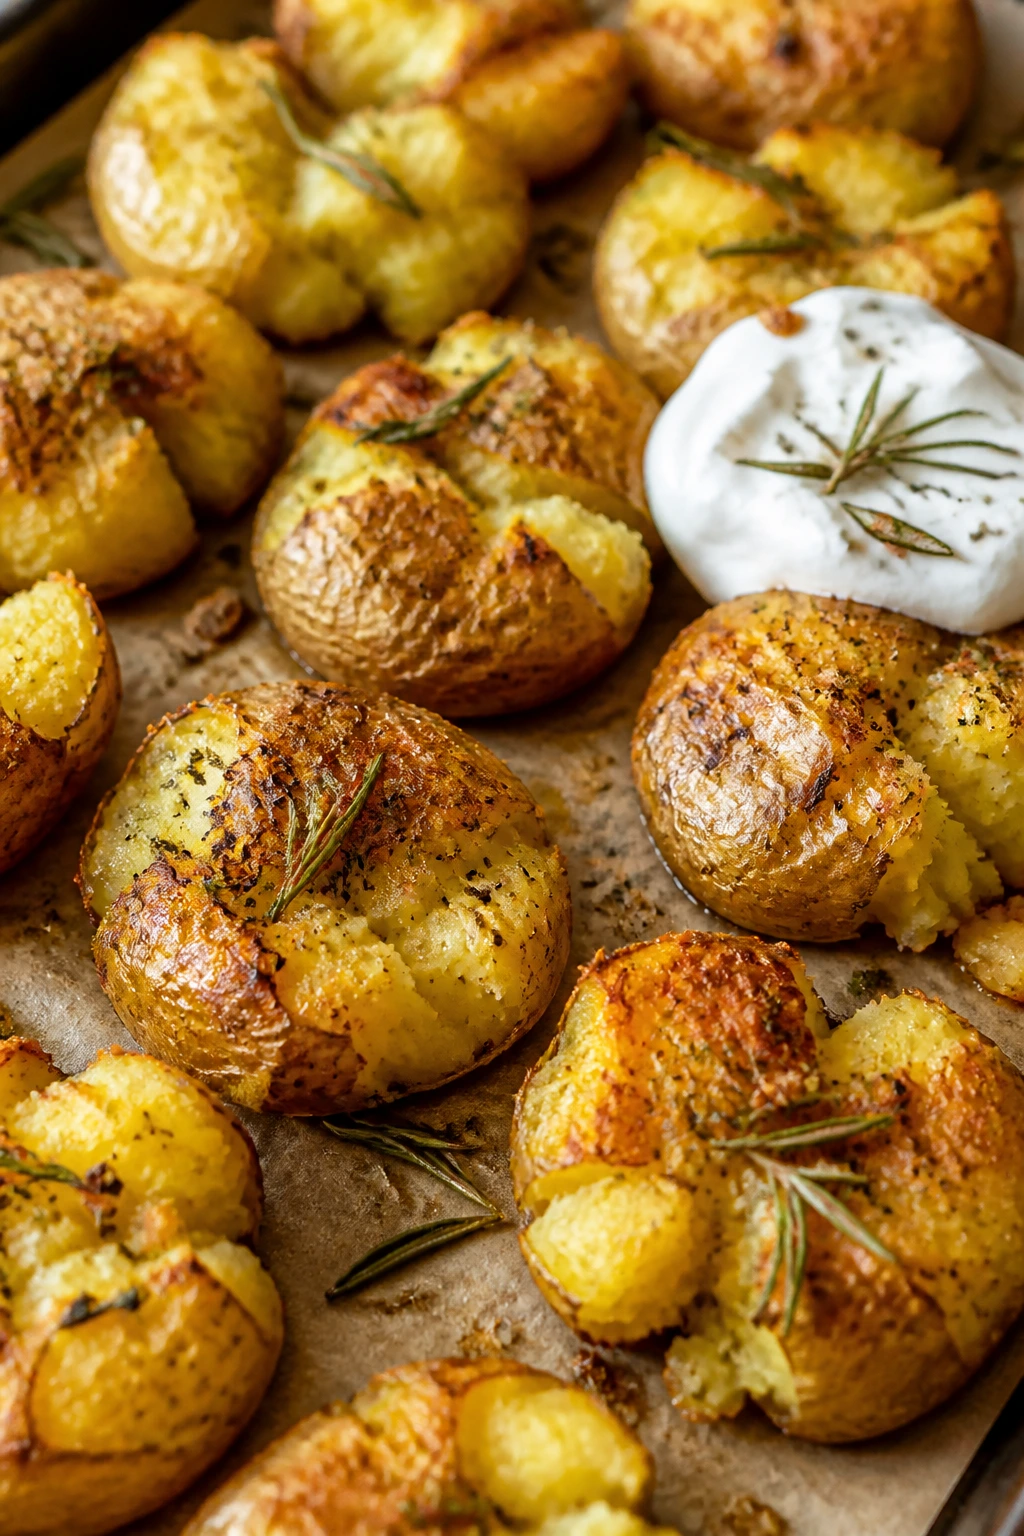
Smashed potatoes are where rustic turns useful. The skins crack, the centers fluff up, and the edges brown into little crisp ridges that hold butter and herbs like they were made for it.
Why It Works: Boiling the potatoes first gets the inside tender, and smashing them gives you more surface area for crisping in the oven. Olive oil plus butter makes the texture richer than oil alone, and garlic with rosemary gives the potatoes a sharp, savory smell as they roast. A sour cream spoon on top makes them feel like an honest side dish instead of a gimmick.
Key Ingredients:
- 2 pounds baby Yukon Gold potatoes
- 3 tablespoons olive oil
- 2 tablespoons melted butter
- 2 garlic cloves, minced
- 1 teaspoon kosher salt
- ½ teaspoon black pepper
- 1 tablespoon chopped rosemary
- ¼ cup sour cream or Greek yogurt, for serving
Quick Steps:
- Boil the potatoes in salted water for 15 to 18 minutes until just tender.
- Drain and let them steam dry for 5 minutes.
- Place them on a sheet pan and gently smash each one with a glass or potato masher.
- Drizzle with olive oil, butter, garlic, salt, pepper, and rosemary.
- Roast at 450°F for 20 to 25 minutes until the edges are crisp and golden.
Equipment for This Recipe:
- Large pot
- Sheet pan
- Potato masher or sturdy glass
- Spatula
How to Serve This Dish: Serve them in a loose pile with the crisp tops facing up. They’re excellent with roast chicken, mushroom gravy, or a big salad when you want a side that acts like a carb and a vegetable at once.
Pro Tips for This Recipe:
- Don’t mash them flat; a gentle press gives the best texture.
- Yukon Golds hold together better than Russets.
- Add the rosemary before roasting so it perfumes the oil.
- A pinch of flaky salt at the end gives you a sharper finish.
Variations on This Dish:
- Parmesan Smash: Add ¼ cup Parmesan before roasting.
- Dill Potato Version: Swap rosemary for dill and finish with lemon.
- Spicy Crust: Add a pinch of cayenne to the oil.
Common Mistakes to Avoid with This Dish:
- Boiling too long: Potatoes that fall apart are harder to smash neatly.
- Using too little oil: The crisp edges need a real coating.
- Flipping too early: Let the bottoms set before moving them.
12. Roast Butternut Squash with Sage and Pepitas
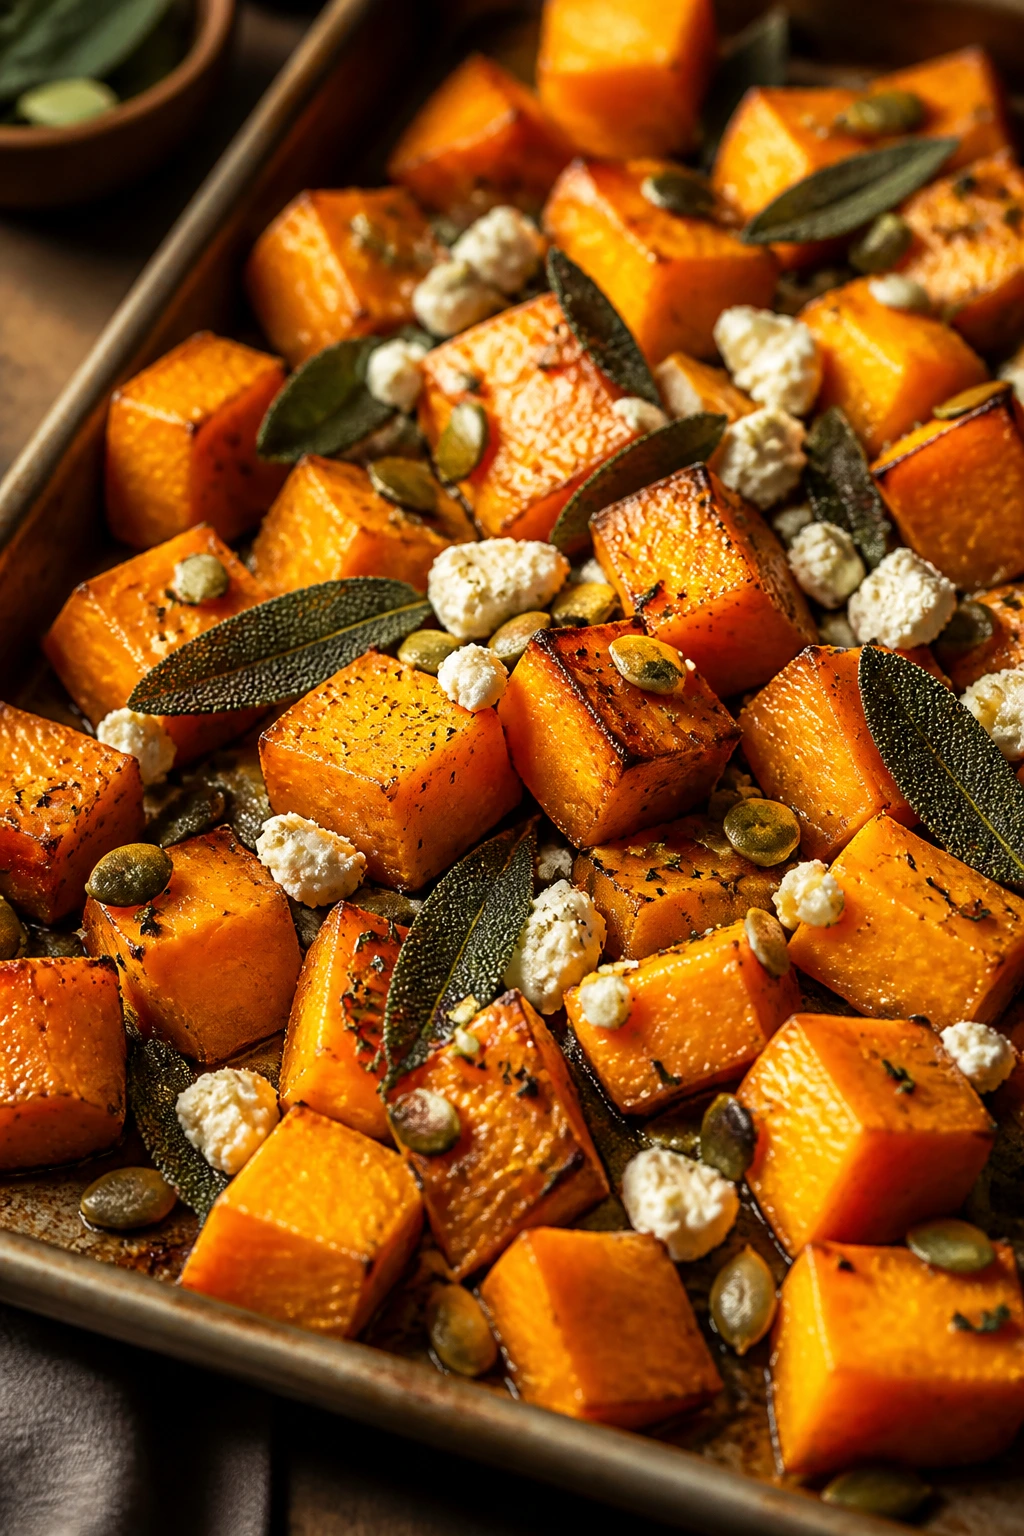
Butternut squash can be cloying if it’s only sweet. Roast it with sage and pepitas, and the dish suddenly has crunch, aroma, and enough savory edge to sit happily next to just about anything.
Why It Works: High heat concentrates the squash’s natural sweetness, while sage brings a dry, woodsy note that keeps the flavor grounded. Pepitas add the crunch that soft squash needs, and a little feta or goat cheese can make the whole dish feel more complete. It’s one of those sides that looks simple and still tastes layered.
Key Ingredients:
- 1 large butternut squash, peeled, seeded, and cut into 1-inch cubes
- 3 tablespoons olive oil
- 1 teaspoon kosher salt
- ½ teaspoon black pepper
- 1 teaspoon chopped fresh sage or ½ teaspoon dried sage
- ¼ cup pepitas
- ¼ cup crumbled feta, optional
Quick Steps:
- Preheat the oven to 425°F.
- Toss the squash with olive oil, salt, pepper, and sage.
- Spread on a sheet pan and roast for 25 to 30 minutes, flipping once.
- Toast the pepitas in a dry skillet for 2 minutes.
- Scatter pepitas and feta over the squash before serving.
Equipment for This Recipe:
- Sheet pan
- Vegetable peeler
- Sharp chef’s knife
- Small skillet
How to Serve This Dish: Put it on a wide plate so the pepitas stay on top. It pairs with roast turkey, baked beans, or a farro salad, and it holds its shape well enough to travel to a potluck.
Pro Tips for This Recipe:
- Cut the cubes evenly; tiny bits turn to mush.
- Don’t peel the squash with a dull peeler. It’s a fight you do not need.
- Pepitas should be toasted separately so they stay crisp.
- If you want more savory depth, add a tiny pinch of chili flakes.
Variations on This Dish:
- Maple-Sage Version: Add 1 teaspoon maple syrup to the oil.
- Miso Butter Squash: Toss the roasted squash with 1 teaspoon white miso and 1 tablespoon butter.
- Cranberry Toss: Add dried cranberries at the end for a sweeter holiday-style side.
Common Mistakes to Avoid with This Dish:
- Cutting uneven cubes: Some pieces will brown while others stay hard.
- Adding pepitas too early: They can burn in the oven.
- Using too much seasoning: Squash needs balance, not a heavy hand.
13. Zucchini Fritters with Dill Yogurt

Zucchini fritters are one of the smartest ways to turn a watery vegetable into something crisp. The edges fry up golden, the centers stay tender, and the dill yogurt makes each bite feel cool and fresh.
Why It Works: Zucchini carries a lot of water, so salting and squeezing it dry is the whole game. Eggs and flour bind the shreds into a batter that fries into tidy cakes, and Parmesan adds enough salt that the fritters don’t need much else. The yogurt sauce gives them the acid and creaminess that keep you going back for another.
Key Ingredients:
- 2 medium zucchini, grated
- 1 teaspoon kosher salt, plus more for seasoning
- 2 large eggs
- ½ cup all-purpose flour
- ¼ cup grated Parmesan
- 2 tablespoons chopped dill
- 2 tablespoons chopped scallions
- 3 tablespoons olive oil, for frying
- ½ cup plain Greek yogurt
- 1 teaspoon lemon juice
Quick Steps:
- Salt the grated zucchini and let it sit for 10 minutes, then squeeze it dry in a clean towel.
- Mix the zucchini with eggs, flour, Parmesan, dill, scallions, and pepper.
- Heat olive oil in a skillet over medium heat.
- Spoon in 2-tablespoon mounds and flatten gently, frying 2 to 3 minutes per side until golden.
- Stir the yogurt with lemon juice and serve alongside the fritters.
Equipment for This Recipe:
- Box grater
- Clean kitchen towel
- Large skillet
- Spatula
How to Serve This Dish: Stack the fritters on a platter with the yogurt in a bowl for dipping. They work as a side with grilled salmon, roast chicken, or a tomato salad, and they also make a very acceptable lunch with a fried egg.
Pro Tips for This Recipe:
- Squeeze the zucchini harder than feels polite; moisture is the enemy here.
- Keep the fritters small so they cook through without burning.
- If the batter looks loose, add 1 to 2 tablespoons more flour.
- Fry in batches and keep the finished ones on a wire rack, not paper towels.
Variations on This Dish:
- Corn-and-Zucchini Version: Add ½ cup corn kernels to the batter.
- Herb Swap: Use parsley and mint instead of dill.
- Gluten-Free Fritter: Replace flour with chickpea flour.
Common Mistakes to Avoid with This Dish:
- Skipping the squeeze step: You’ll get soggy fritters.
- Crowding the pan: The oil temperature drops and the crust softens.
- Turning too early: Let the bottom set before flipping.
14. Creamed Spinach
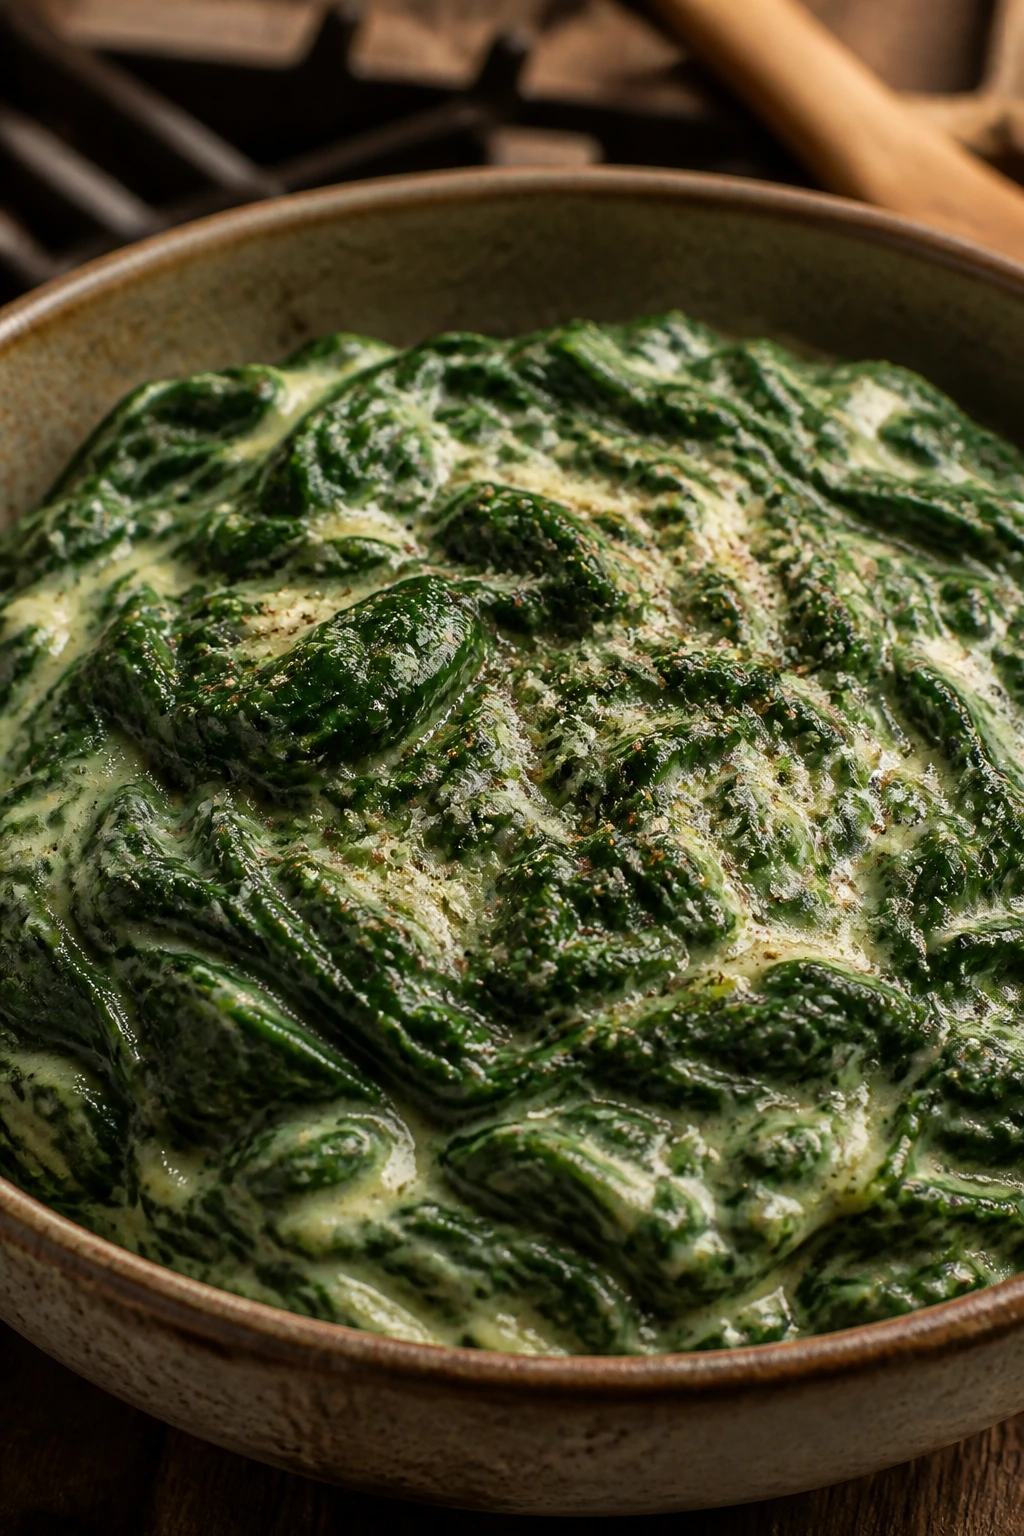
Creamed spinach has a reputation for being old-school, but there’s a reason it survives. The spinach turns silky and dark, the sauce clings instead of pooling, and a little nutmeg keeps the flavor from falling flat.
Why It Works: Spinach cooks down fast, so the trick is building the sauce first and then folding in the greens at the end. Butter, cream, and a little cream cheese create a thick base that doesn’t split, while garlic and nutmeg keep it from tasting like plain dairy. It’s rich, but not in a heavy-handed way.
Key Ingredients:
- 1½ pounds fresh spinach
- 2 tablespoons butter
- 1 small onion, finely minced
- 2 garlic cloves, minced
- 3 ounces cream cheese
- ½ cup heavy cream
- ¼ cup grated Parmesan
- ¼ teaspoon nutmeg
- ½ teaspoon kosher salt
Quick Steps:
- Wash the spinach and let it dry well.
- Melt the butter in a large skillet and cook the onion for 4 minutes.
- Add the garlic, cream cheese, and heavy cream, stirring until smooth.
- Add the spinach in batches and cook until wilted and the sauce thickens.
- Stir in Parmesan, nutmeg, and salt, then serve warm.
Equipment for This Recipe:
- Large skillet
- Salad spinner or towels for drying
- Wooden spoon
- Microplane
How to Serve This Dish: Put it in a shallow bowl, because a tall mound only hides how glossy it is. It sits next to steak, roast chicken, baked mushrooms, or seared tofu if you want a rich vegetable that still belongs on the plate.
Pro Tips for This Recipe:
- Dry spinach well or the sauce thins out.
- Cook the onion fully; raw onion in creamed spinach is a bad surprise.
- Add spinach in handfuls so it wilts evenly.
- Taste at the end; spinach can take more salt than you expect.
Variations on This Dish:
- Garlic-Lover’s Version: Use 4 garlic cloves.
- Gruyère Swap: Replace Parmesan with Gruyère for a nuttier sauce.
- Lighter Spinach: Use half cream and half milk.
Common Mistakes to Avoid with This Dish:
- Starting with wet spinach: The sauce turns thin and watery.
- Boiling the cream: Keep the heat moderate so it stays smooth.
- Overcooking the greens: Spinach should stay dark and tender, not stringy.
15. Charred Cabbage Steaks with Mustard Vinaigrette
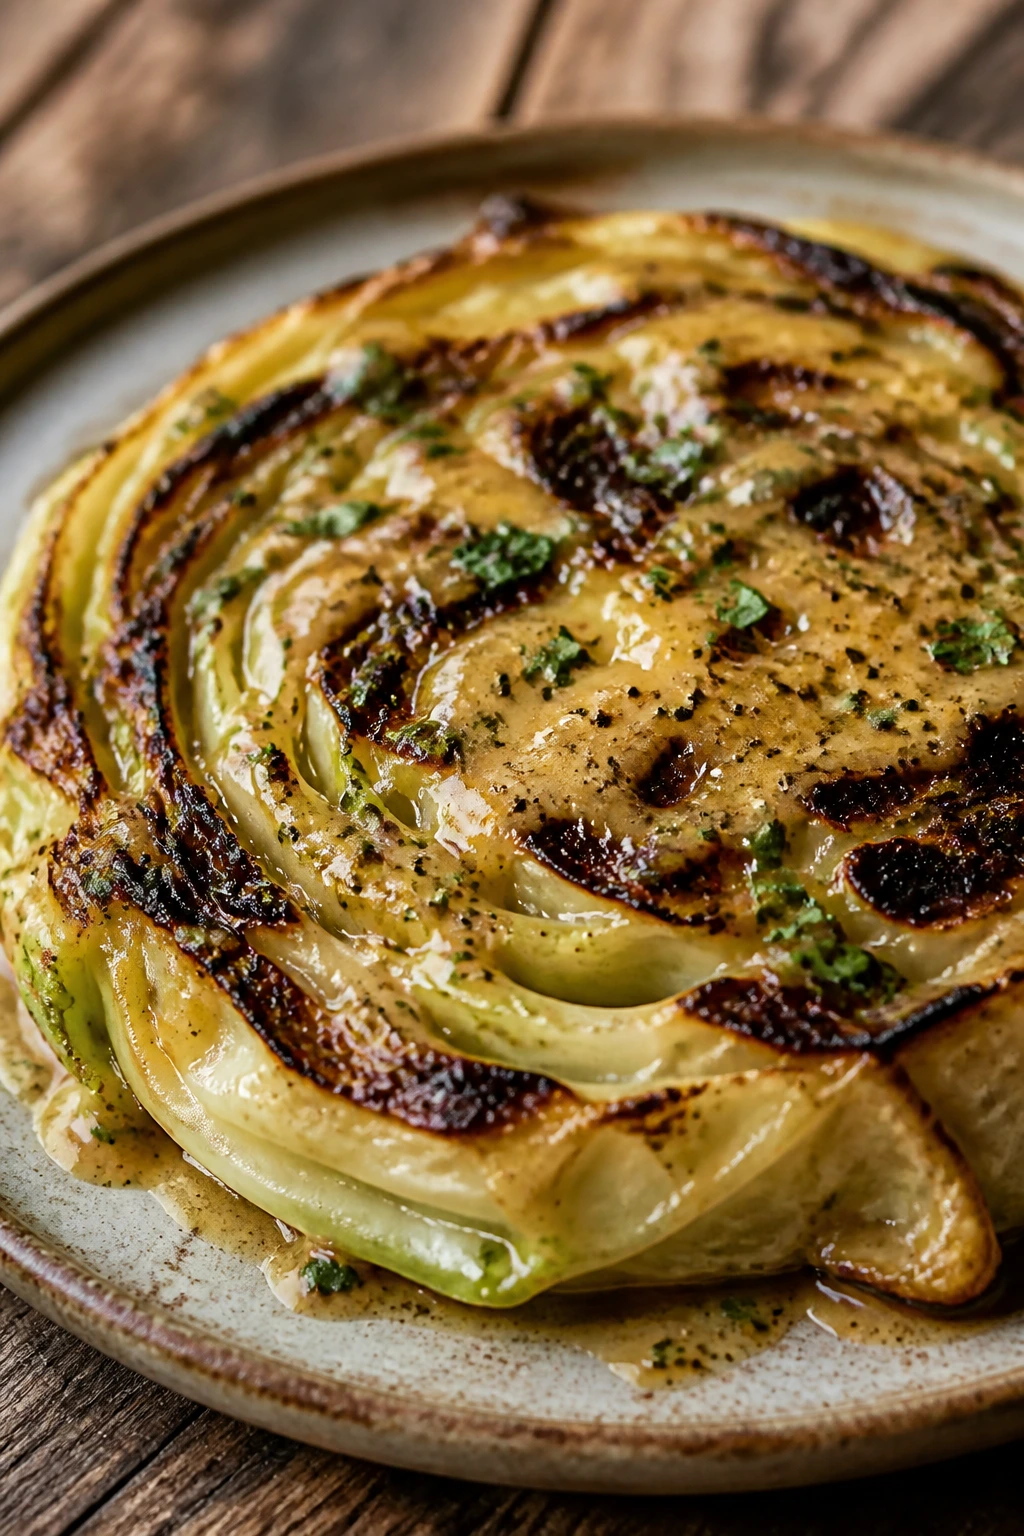
Cabbage steaks sound plain until you sear the edges. Then the slices go sweet, smoky, and just sturdy enough to soak up a sharp mustard dressing without falling apart.
Why It Works: Thick cabbage slices hold together better than chopped cabbage, so you get a real browned surface instead of a soft pile. Roasting or searing at high heat makes the outside crisp and the center tender, and the vinaigrette cuts through the natural sweetness. The whole thing feels satisfying in a way cabbage often doesn’t when it’s boiled to death.
Key Ingredients:
- 1 large green cabbage
- 3 tablespoons olive oil
- ¾ teaspoon kosher salt
- ½ teaspoon black pepper
- 1 tablespoon Dijon mustard
- 1 tablespoon apple cider vinegar
- 1 teaspoon honey
- 1 tablespoon chopped parsley
Quick Steps:
- Preheat the oven to 425°F or heat a grill pan over medium-high.
- Slice the cabbage into 1-inch steaks and brush both sides with olive oil, salt, and pepper.
- Roast or grill for 18 to 22 minutes, flipping once, until browned at the edges.
- Whisk the mustard, vinegar, honey, and 1 tablespoon olive oil into a vinaigrette.
- Drizzle over the cabbage and finish with parsley.
Equipment for This Recipe:
- Sharp chef’s knife
- Sheet pan or grill pan
- Small bowl
- Pastry brush, optional
How to Serve This Dish: Serve the steaks whole so the charred edges stay intact. They’re strong beside sausages, white beans, or roasted chicken, and they make a very good meatless plate with potatoes and a fried egg.
Pro Tips for This Recipe:
- Keep the core attached so the steaks stay together.
- Use a sharp knife; cabbage is dense and slides under dull blades.
- A little honey in the vinaigrette smooths the mustard bite.
- If grilling, oil the grates well to prevent sticking.
Variations on This Dish:
- Smoked Paprika Version: Add ½ teaspoon smoked paprika to the oil.
- Balsamic Vinaigrette: Swap cider vinegar for balsamic.
- Spicy Mustard Brush: Stir hot mustard into the dressing.
Common Mistakes to Avoid with This Dish:
- Cutting steaks too thin: They’ll break apart.
- Skipping the oil: Cabbage needs lubrication to char well.
- Serving without dressing: The vinaigrette is what makes the cabbage sing.
16. Lemony Lentil and Herb Salad with Roasted Veg
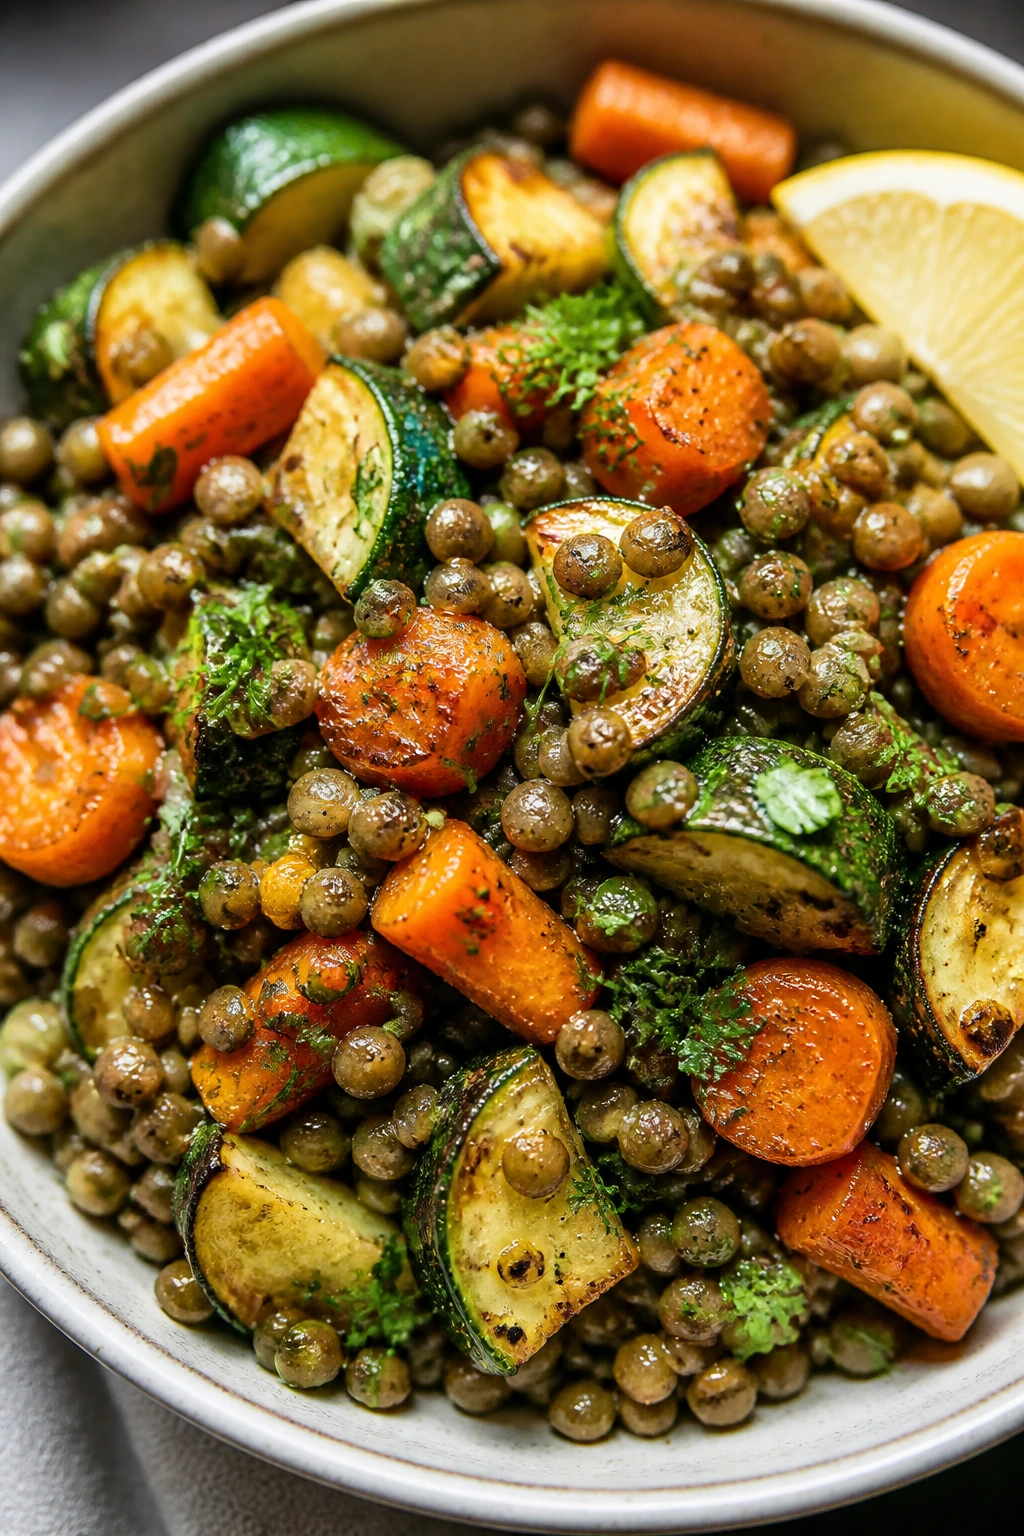
This is the kind of vegetable side that quietly becomes the most filling thing on the table. Lentils give it body, roasted vegetables give it sweetness, and herbs plus lemon keep it tasting bright rather than heavy.
Why It Works: Lentils bring protein and density without meat, which is why this salad eats like a side with real weight. Roasted carrots or zucchini add contrast, and a lemony dressing ties the warm and cool pieces together. It’s good warm, room temperature, or cold from the fridge, which is handy when dinner timing gets messy.
Key Ingredients:
- 1 cup green or brown lentils
- 2 cups water or vegetable broth
- 2 medium carrots, diced and roasted
- 1 zucchini, diced and roasted
- ¼ cup chopped parsley
- 2 tablespoons chopped dill or mint
- 3 tablespoons olive oil
- 2 tablespoons lemon juice
- 1 teaspoon Dijon mustard
- ½ teaspoon kosher salt
Quick Steps:
- Simmer the lentils in water or broth for 18 to 22 minutes until tender but not split.
- Roast the carrots and zucchini at 425°F with a little oil and salt until browned.
- Whisk the olive oil, lemon juice, Dijon, and salt into a dressing.
- Toss the lentils with the roasted vegetables and herbs.
- Add the dressing and serve warm or at room temperature.
Equipment for This Recipe:
- Medium saucepan
- Sheet pan
- Mixing bowl
- Whisk
How to Serve This Dish: Serve it in a wide bowl with the herbs scattered over the top. It works with grilled halloumi, roast chicken, a simple soup, or a crusty loaf, and it holds up better than most salads once it’s dressed.
Pro Tips for This Recipe:
- Salt the lentils after cooking if your broth is already salty.
- Keep the lentils just tender; mushy ones make the salad thick.
- Roast the vegetables until browned, not just softened.
- Add the herbs after the lentils cool a little so they stay fresh.
Variations on This Dish:
- Feta Version: Add crumbled feta before serving.
- Roasted Beet Swap: Replace zucchini with roasted beets.
- Tahini Dressing: Use tahini, lemon, and water instead of mustard vinaigrette.
Common Mistakes to Avoid with This Dish:
- Overcooking the lentils: They should hold their shape.
- Dressing too early: The herbs can dull if they sit too long.
- Using bland roasted vegetables: Browning is what gives the salad depth.
17. Stuffed Acorn Squash Halves
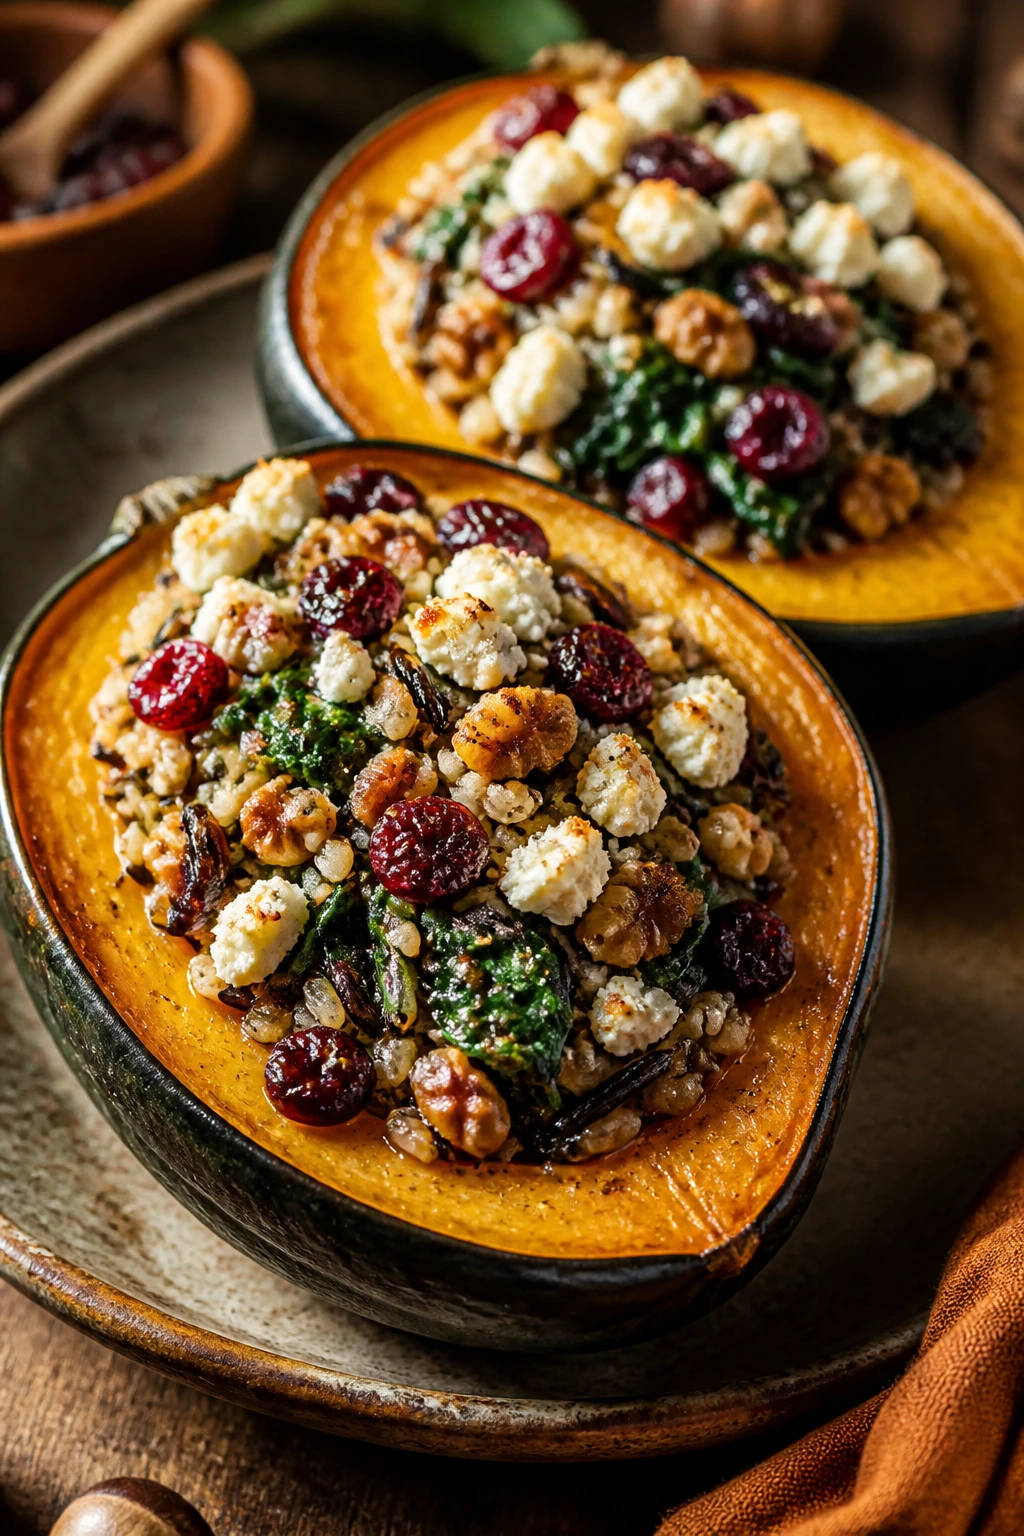
Acorn squash halves are what happen when a side dish decides to be generous. The flesh turns soft and sweet, the filling adds chew and salt, and every scoop gives you a little bit of everything on one fork.
Why It Works: Squash is sturdy enough to roast in halves, which creates a natural bowl for grains, nuts, and greens. Wild rice or quinoa gives the filling structure, cranberries add tartness, and goat cheese melts into the gaps so the whole thing feels composed instead of random. It’s the kind of side that can steal a fall meal.
Key Ingredients:
- 2 acorn squash, halved and seeded
- 2 tablespoons olive oil
- 1 teaspoon kosher salt
- 1 cup cooked wild rice or quinoa
- ¼ cup dried cranberries
- ¼ cup chopped walnuts
- 1 cup baby spinach
- 2 tablespoons goat cheese
- 1 tablespoon maple syrup, optional
Quick Steps:
- Roast the squash halves cut-side down at 425°F for 25 minutes.
- Flip them over and roast 10 minutes more until fork-tender.
- Toss the cooked grain with cranberries, walnuts, spinach, goat cheese, and a pinch of salt.
- Fill the squash halves with the mixture and drizzle with maple syrup if using.
- Return to the oven for 5 minutes to warm through.
Equipment for This Recipe:
- Sheet pan
- Sharp knife
- Mixing bowl
- Spoon
How to Serve This Dish: Serve each half as a shareable portion or slice them into wedges if you want a neater plate. They work with roast poultry, mushroom gravy, or a simple green salad, and they look especially good on a crowded holiday table.
Pro Tips for This Recipe:
- Roast the squash cut-side down first so it softens faster.
- Warm the filling before stuffing if your grains came from the fridge.
- Toast the walnuts for a deeper flavor.
- Goat cheese should be crumbled over, not stirred to death.
Variations on This Dish:
- Cranberry-Free Version: Use chopped dried apricots instead.
- Savory Herb Swap: Replace maple with sage and thyme.
- Cheddar Fill: Swap goat cheese for sharp cheddar.
Common Mistakes to Avoid with This Dish:
- Undercooking the squash: It should be easy to pierce with a fork.
- Overstuffing the halves: The filling should sit in the cavity, not tumble out.
- Using dry grains straight from the fridge: Warm them first for better texture.
18. Cauliflower Gratin
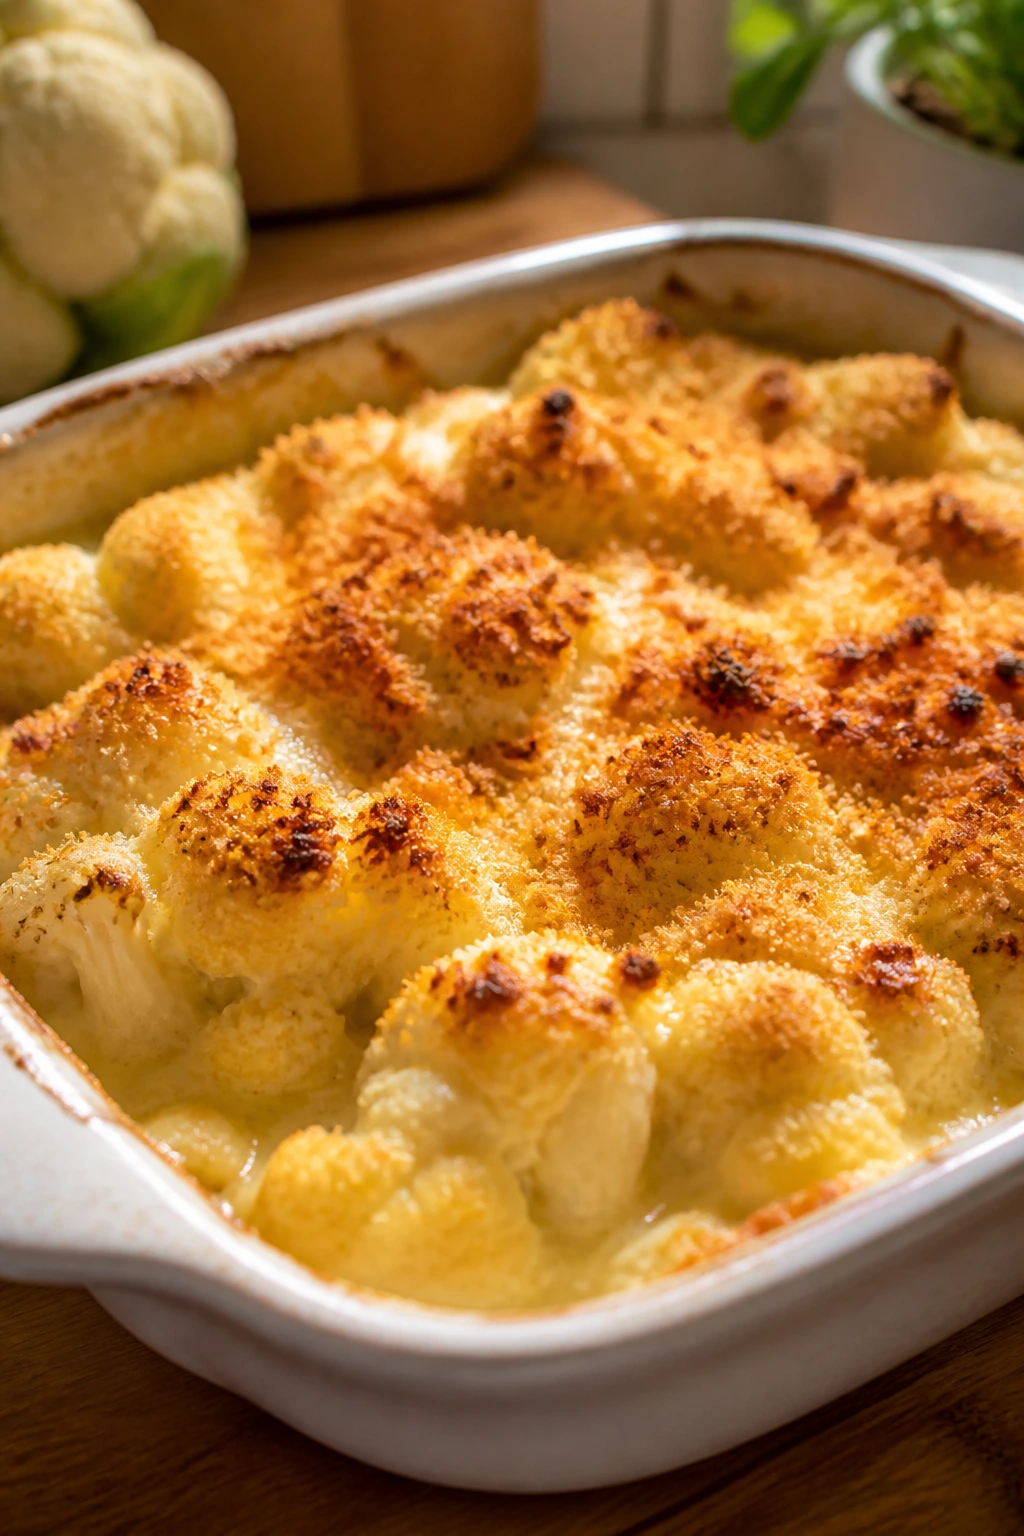
Cauliflower gratin is what happens when a humble vegetable gets a proper coat and tie. The florets turn tender under a blanket of cheese sauce, and the breadcrumbs on top crackle when you dig through them.
Why It Works: Cauliflower has enough structure to stay distinct under baking, which means you get creamy sauce without complete collapse. Gruyère or cheddar makes the sauce thick and savory, and a little mustard keeps it from tasting too soft. Breadcrumbs bring the final contrast — crisp on top, tender underneath.
Key Ingredients:
- 1 large head cauliflower, cut into florets
- 2 tablespoons butter
- 2 tablespoons flour
- 1½ cups whole milk
- 1 cup grated Gruyère or sharp cheddar
- 1 teaspoon Dijon mustard
- ½ teaspoon kosher salt
- ¼ teaspoon black pepper
- ¼ cup breadcrumbs
Quick Steps:
- Steam or boil the cauliflower for 5 minutes until barely tender, then drain well.
- Make a roux with butter and flour in a saucepan, then whisk in milk until thick.
- Stir in cheese, mustard, salt, and pepper until smooth.
- Pour the sauce over the cauliflower in a baking dish and top with breadcrumbs.
- Bake at 375°F for 25 to 30 minutes until bubbling and browned.
Equipment for This Recipe:
- Saucepan
- Baking dish
- Whisk
- Steamer basket or pot
How to Serve This Dish: Serve it straight from the dish while the top is still crisp. It sits well with roast beef, baked beans, or a pile of sautéed greens, and it makes cauliflower feel more substantial than most people expect.
Pro Tips for This Recipe:
- Drain the cauliflower thoroughly or the sauce will thin out.
- Grate the cheese yourself if you can; it melts cleaner.
- Keep the sauce at a gentle simmer, not a boil.
- Broil for 1 minute at the end if you want more color.
Variations on This Dish:
- Smoked Cheddar Version: Use smoked cheddar for a deeper flavor.
- Mustard-Herb Swap: Add thyme and extra Dijon.
- Breadcrumb Upgrade: Mix the crumbs with melted butter and parsley.
Common Mistakes to Avoid with This Dish:
- Overcooking the cauliflower first: It will go soft in the oven.
- A grainy sauce: Usually from boiling the cheese too hard.
- Skipping the breadcrumb top: You lose the texture contrast.
19. Shaved Brussels Sprout Salad with Dates and Pecans
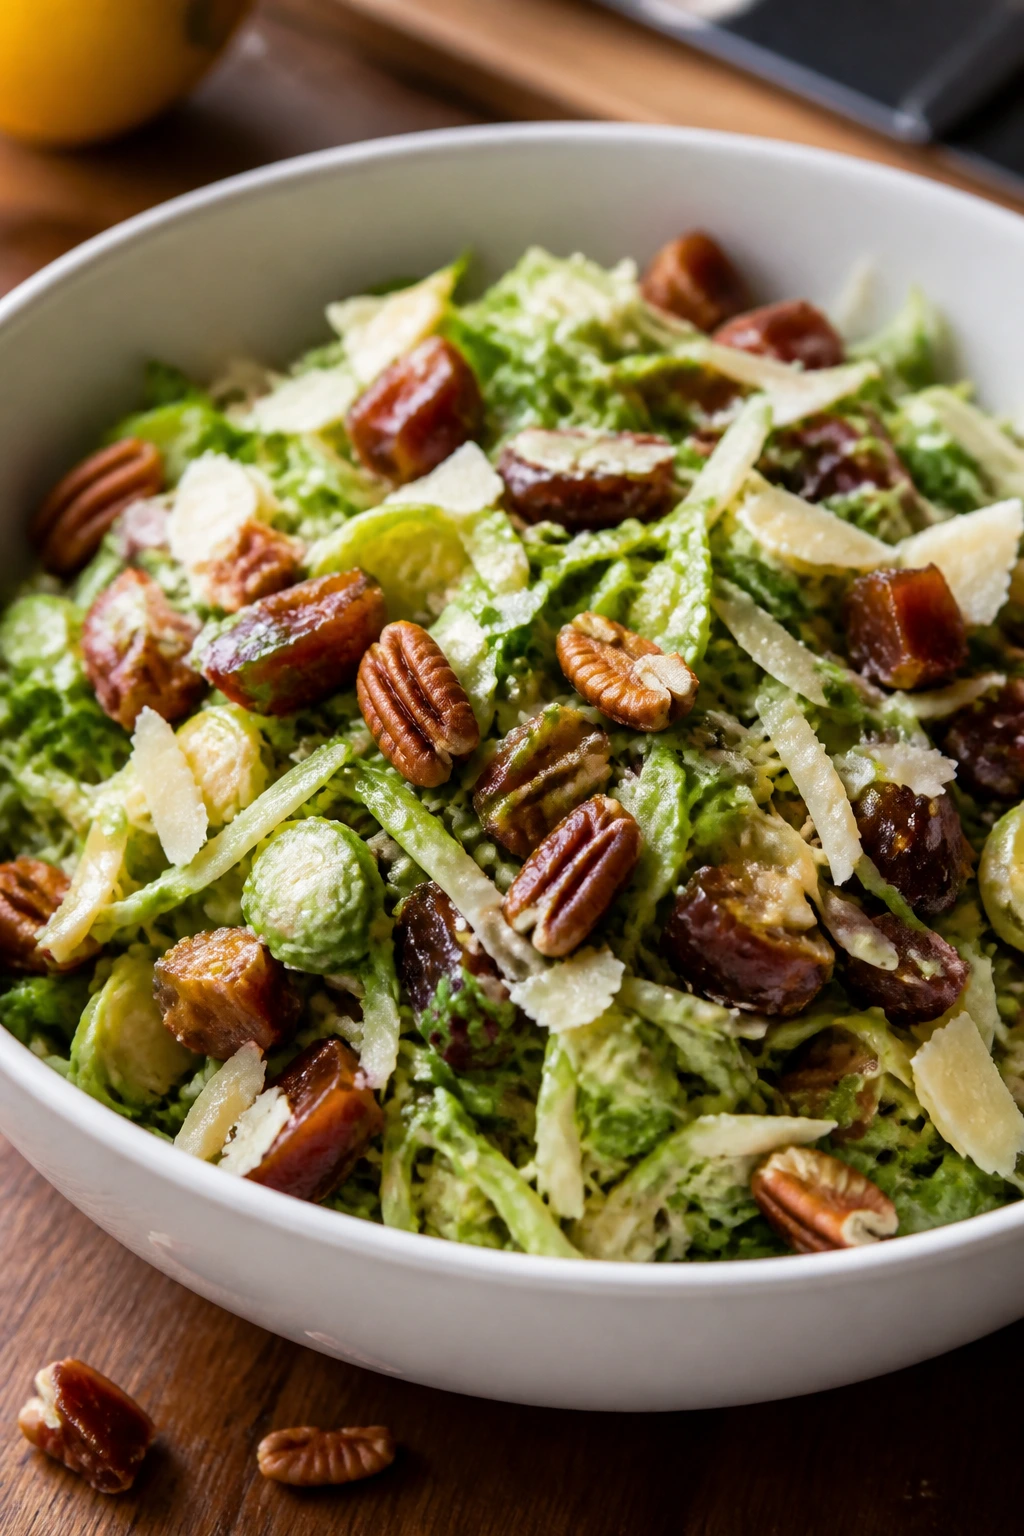
Raw Brussels sprouts can be a little stubborn, but shaved thin they turn crisp and nutty instead of harsh. Dates bring chew and sweetness, pecans add toastiness, and a lemon dressing pulls the salad together without making it wilt too fast.
Why It Works: Shaving the sprouts changes the whole personality of the vegetable. The fine slices soak up dressing better than whole leaves, and the nuts plus dates create the kind of sweet-salty balance that keeps a salad from feeling skinny. Parmesan adds a final savory note that makes the bowl feel more finished.
Key Ingredients:
- 1½ pounds Brussels sprouts, shaved thin
- ½ cup chopped dates
- ½ cup pecans, toasted and chopped
- ¼ cup grated Parmesan
- 3 tablespoons olive oil
- 2 tablespoons lemon juice
- 1 teaspoon Dijon mustard
- ½ teaspoon kosher salt
Quick Steps:
- Whisk olive oil, lemon juice, Dijon, and salt into a dressing.
- Toss the shaved sprouts with the dressing and massage for 30 seconds.
- Add dates, pecans, and Parmesan.
- Let the salad sit for 10 minutes so the sprouts soften slightly.
- Taste and add another squeeze of lemon if needed.
Equipment for This Recipe:
- Mandoline or sharp knife
- Large bowl
- Whisk
- Toaster oven or skillet for pecans
How to Serve This Dish: Serve it in a shallow bowl so the dates and pecans stay visible. It’s a smart side for roast chicken, salmon, lentil soup, or a cheese plate when you want something crisp and not hot.
Pro Tips for This Recipe:
- Shave the sprouts as thin as you can for the best texture.
- Toast the pecans; raw ones taste flat here.
- Massage the dressing in lightly, not aggressively.
- Let it sit a few minutes before serving so the edges soften.
Variations on This Dish:
- Apple Version: Add thin slices of crisp apple.
- Blue Cheese Swap: Replace Parmesan with blue cheese crumbles.
- Orange Dressing: Use orange juice in place of part of the lemon juice.
Common Mistakes to Avoid with This Dish:
- Cutting the sprouts too thick: They stay tough and chewy.
- Dressing right before serving only: A short rest improves the texture.
- Using stale nuts: They dull the whole salad fast.
20. Roasted Delicata Squash Rings
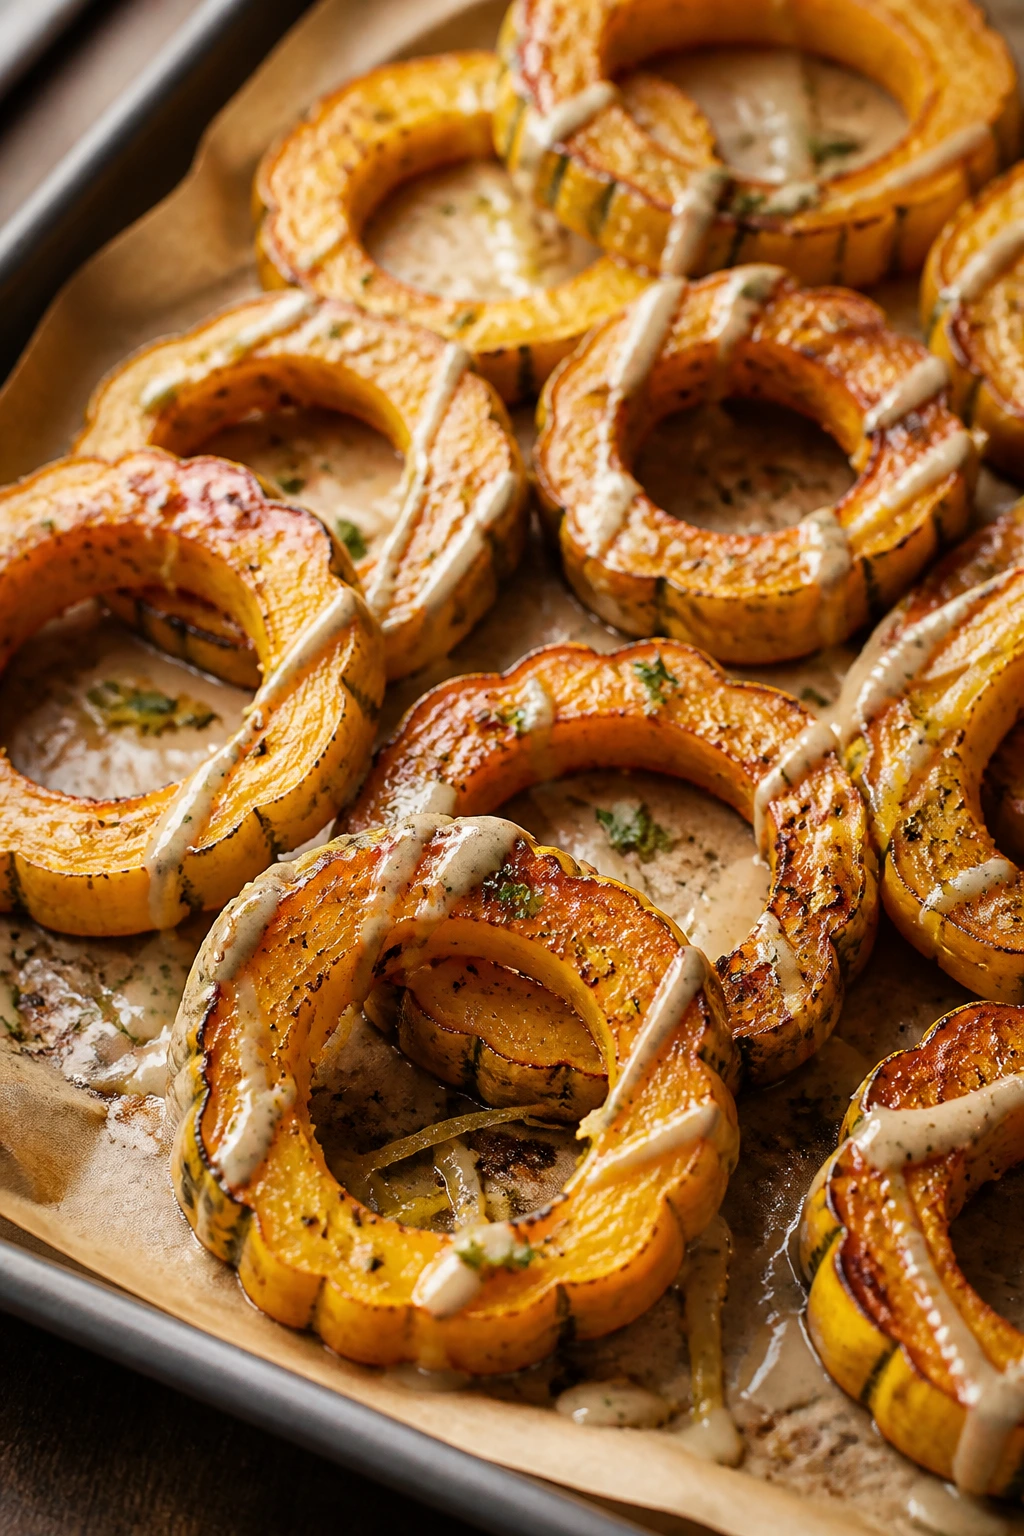
Delicata squash is the easiest squash to love because you do not have to peel it. The flesh roasts into tender rings with caramelized edges, and the thin skin turns pleasantly soft, which means less work and more flavor.
Why It Works: Delicata has a naturally sweet flesh that browns quickly, and the rings give you even cooking plus a neat presentation. A little chili powder or maple keeps the flavor interesting, and tahini on top adds richness that makes the side feel substantial. It’s a good example of a vegetable side dish doing more with less.
Key Ingredients:
- 2 delicata squash
- 2 tablespoons olive oil
- ¾ teaspoon kosher salt
- ¼ teaspoon black pepper
- ½ teaspoon chili powder
- 1 tablespoon maple syrup, optional
- 2 tablespoons tahini
- 1 tablespoon water
- 1 teaspoon lemon juice
Quick Steps:
- Preheat the oven to 425°F and line a sheet pan.
- Slice the squash into ½-inch rings and scoop out the seeds.
- Toss with olive oil, salt, pepper, chili powder, and maple syrup if using.
- Roast for 20 to 25 minutes, flipping once, until the edges brown.
- Drizzle with tahini thinned with water and lemon juice.
Equipment for This Recipe:
- Sharp chef’s knife
- Spoon for seeds
- Sheet pan
- Small bowl for tahini sauce
How to Serve This Dish: Fan the rings out on a platter and spoon the tahini across the middle. They pair well with roast chicken, chickpeas, or a grain salad, and they’re one of the prettiest sides on this list without trying too hard.
Pro Tips for This Recipe:
- Slice carefully; delicata’s shape can roll if your knife is dull.
- Leave space between rings so they brown at the edges.
- Tahini sauce should be pourable, not thick as paste.
- A pinch of flaky salt at the end sharpens the sweetness.
Variations on This Dish:
- Maple-Pecan Finish: Add chopped toasted pecans after roasting.
- Za’atar Version: Swap chili powder for za’atar.
- Yogurt Drizzle: Replace tahini with Greek yogurt and lemon.
Common Mistakes to Avoid with This Dish:
- Leaving the seeds in: They’ll block even roasting.
- Skipping the flip: You want both sides browned.
- Making the sauce too thick: It should drizzle, not sit in clumps.
21. Eggplant Caponata
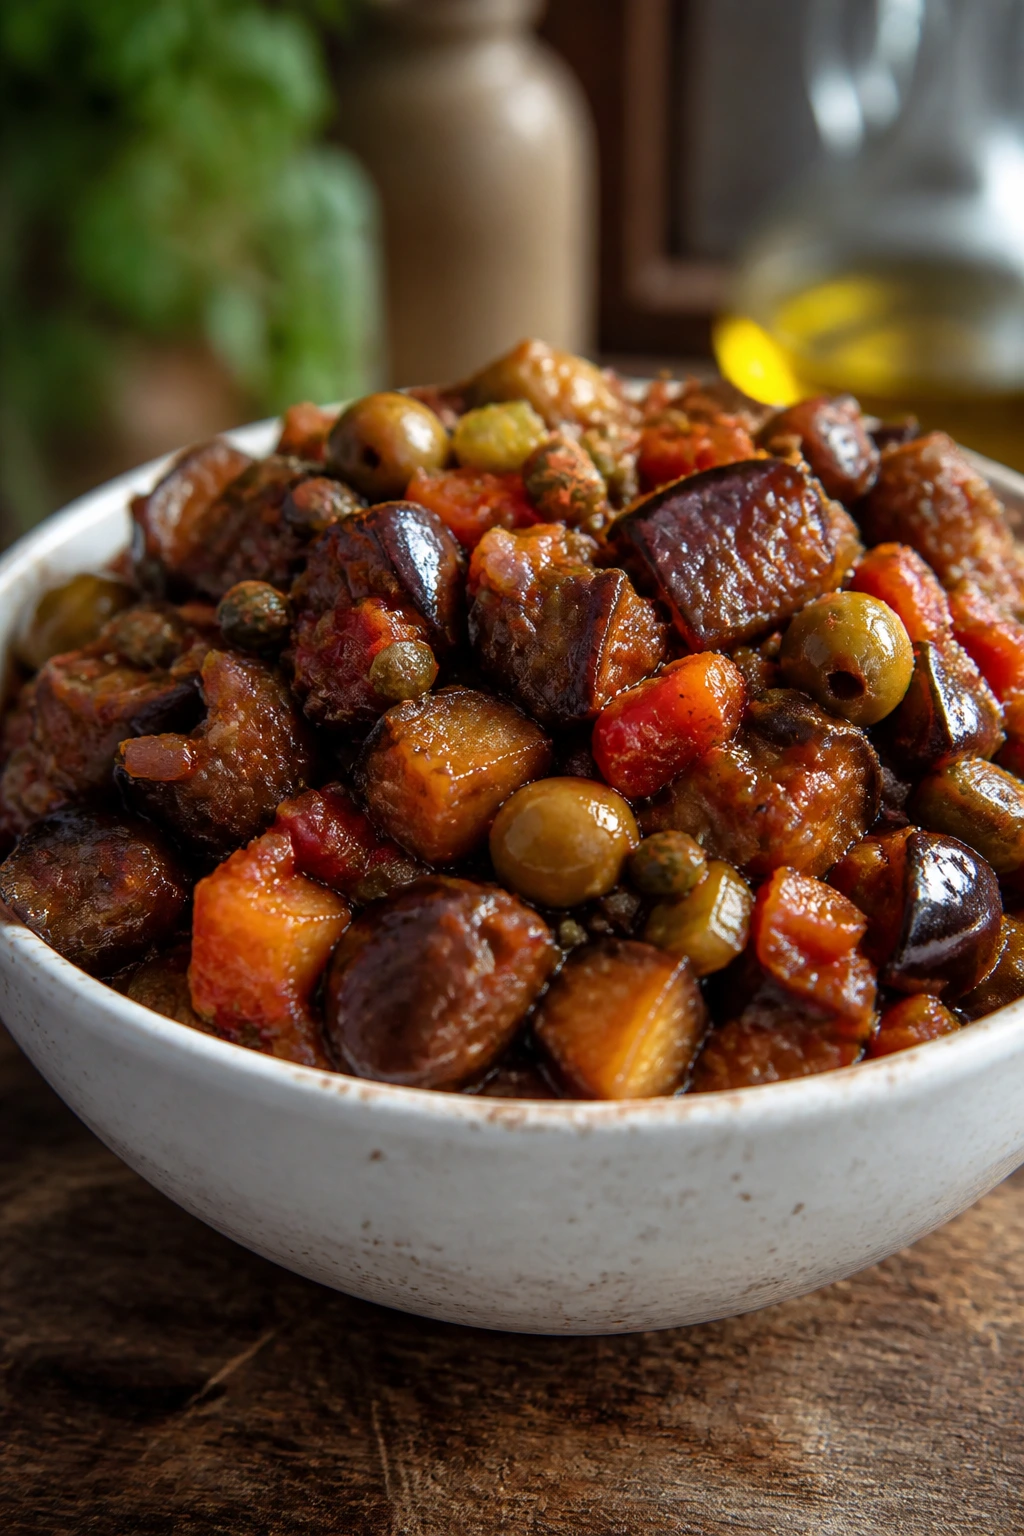
Caponata is sweet, sour, salty, and glossy all at once. Eggplant softens into the sauce, celery keeps some crunch, and capers and olives bring the briny hit that makes the dish memorable.
Why It Works: Eggplant drinks oil, so a careful sauté gets it tender without turning greasy. Vinegar and tomatoes build that classic caponata tang, while raisins give a little sweetness that makes the whole thing taste layered instead of muddled. Served warm or cold, it’s one of those sides that gets better after a rest.
Key Ingredients:
- 1 large eggplant, cut into 1-inch cubes
- 1 onion, chopped
- 2 celery ribs, chopped
- 3 tablespoons olive oil
- 1 cup crushed tomatoes
- 2 tablespoons capers, drained
- ¼ cup chopped green olives
- 2 tablespoons red wine vinegar
- 2 tablespoons raisins
- ½ teaspoon kosher salt
Quick Steps:
- Salt the eggplant and let it sit for 15 minutes, then pat dry.
- Sauté the onion and celery in olive oil for 5 minutes.
- Add the eggplant and cook until browned on most sides.
- Stir in tomatoes, capers, olives, vinegar, raisins, and salt, then simmer for 15 to 20 minutes.
- Serve warm or at room temperature.
Equipment for This Recipe:
- Large skillet or Dutch oven
- Wooden spoon
- Knife and cutting board
- Colander
How to Serve This Dish: Spoon it over toasted bread, next to grilled fish, or alongside roasted potatoes and greens. It also works well as part of an antipasto spread because the flavor gets even better after sitting a bit.
Pro Tips for This Recipe:
- Salt the eggplant if you want a softer, less watery result.
- Use a wide pan so the eggplant browns before it steams.
- Taste the vinegar balance before serving; caponata should be lively.
- Let it rest at least 15 minutes.
Variations on This Dish:
- Pine Nut Version: Add toasted pine nuts at the end.
- Spicy Caponata: Stir in red pepper flakes.
- Tomato-Heavy Swap: Use more tomatoes for a looser sauce.
Common Mistakes to Avoid with This Dish:
- Too much oil in the pan: Eggplant already absorbs plenty.
- Not simmering long enough: The flavors need time to blend.
- Serving it piping hot only: Caponata is often better warm or cool.
22. Balsamic Mushrooms and Pearl Onions
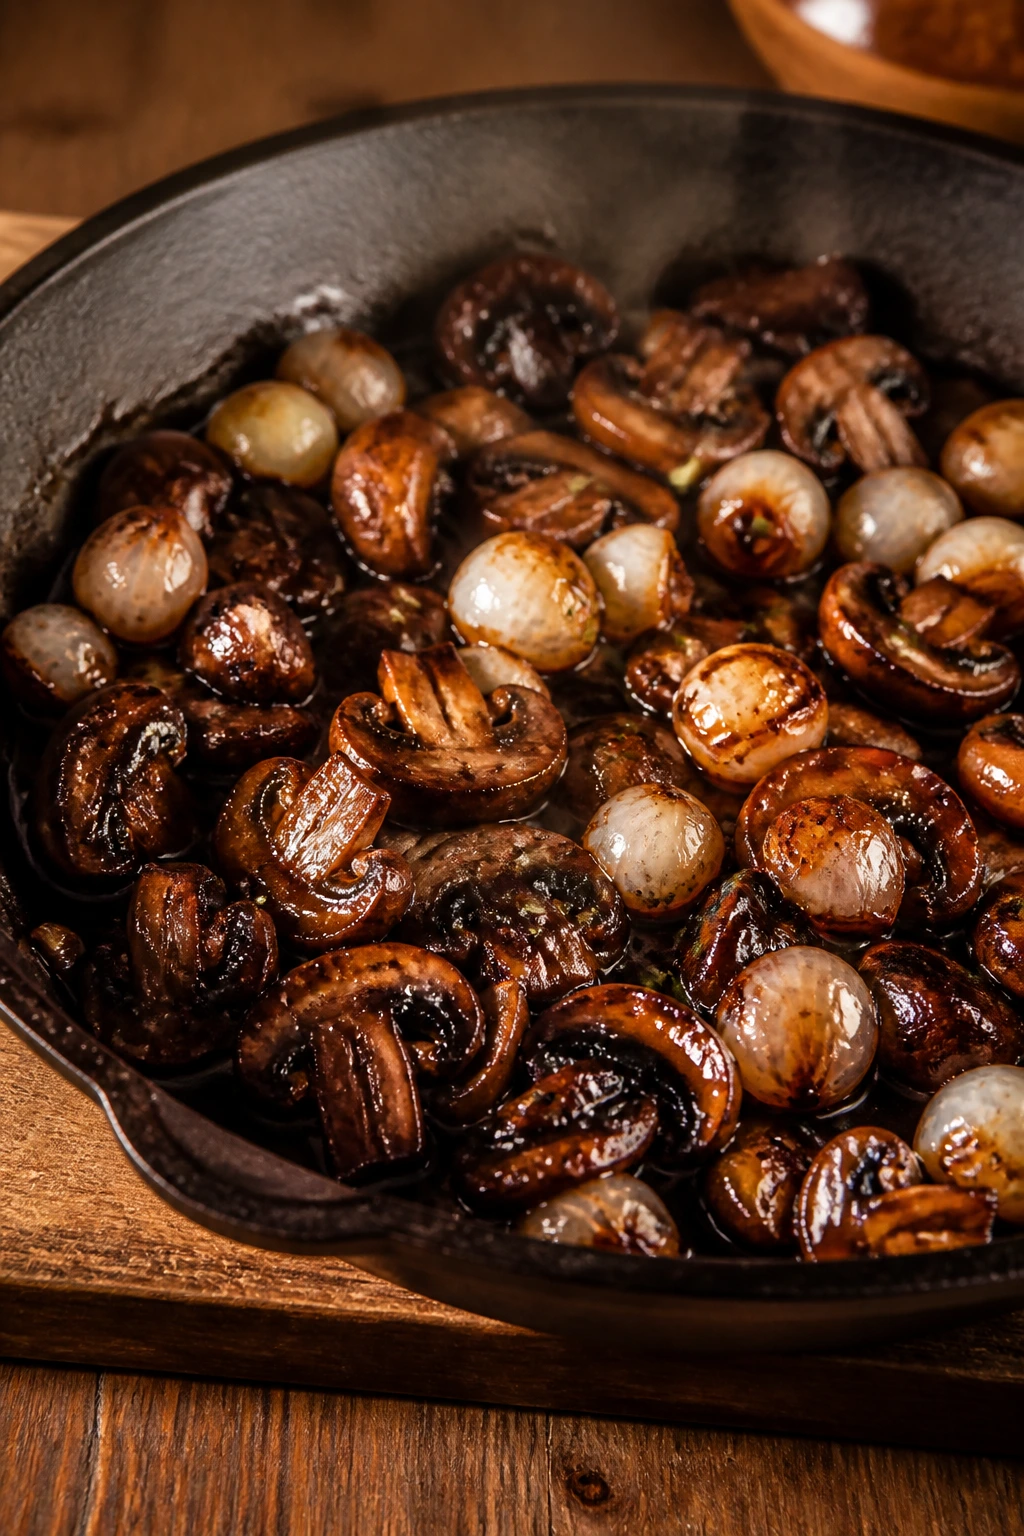
This is the side dish that smells like dinner before anyone sits down. Mushrooms go deep and meaty without meat, pearl onions turn sweet and soft, and the balsamic glaze gives the whole skillet a dark, glossy finish.
Why It Works: Mushrooms need high heat and room in the pan, or they steam and shrink into nothing. Pearl onions bring a gentle sweetness that balances the vinegar, and butter plus broth make the glaze cling instead of running off. It feels polished with almost no effort, which is why it shows up in my own kitchen more often than people would guess.
Key Ingredients:
- 1 pound cremini mushrooms, halved
- 12 pearl onions, peeled
- 2 tablespoons butter
- 1 tablespoon olive oil
- 2 tablespoons balsamic vinegar
- ¼ cup vegetable broth
- 1 teaspoon fresh thyme leaves
- ½ teaspoon kosher salt
- ¼ teaspoon black pepper
Quick Steps:
- Melt the butter and olive oil in a large skillet over medium-high heat.
- Add the mushrooms and onions and cook, undisturbed, for 4 minutes.
- Stir and cook 5 minutes more until browned.
- Add balsamic vinegar, broth, thyme, salt, and pepper, then simmer until the liquid turns syrupy.
- Serve hot with the glaze spooned over the top.
Equipment for This Recipe:
- Large skillet
- Paring knife
- Wooden spoon
- Small bowl for peeled onions, optional
How to Serve This Dish: Serve them in a narrow bowl so the glaze stays pooled at the bottom. They’re excellent next to roast beef, mashed potatoes, or a crisp lentil loaf, and they add a dark, savory note to a lighter plate.
Pro Tips for This Recipe:
- Don’t salt too early or the mushrooms dump water.
- Brown the mushrooms before the onions soften completely.
- Keep the heat up when the vinegar goes in so the glaze reduces.
- Thyme is the right herb here; rosemary can overpower the onions.
Variations on This Dish:
- Sherry Vinegar Swap: Use sherry vinegar for a softer tang.
- Garlic-Thyme Version: Add 2 minced garlic cloves at the end.
- Creamy Finish: Stir in 1 tablespoon crème fraîche off heat.
Common Mistakes to Avoid with This Dish:
- Overcrowding the skillet: The mushrooms need surface heat.
- Adding balsamic too early: It can turn harsh if it burns.
- Forgetting to peel the onions fully: Thin papery bits cling awkwardly in the finished dish.
23. Beet and Orange Salad with Pistachios
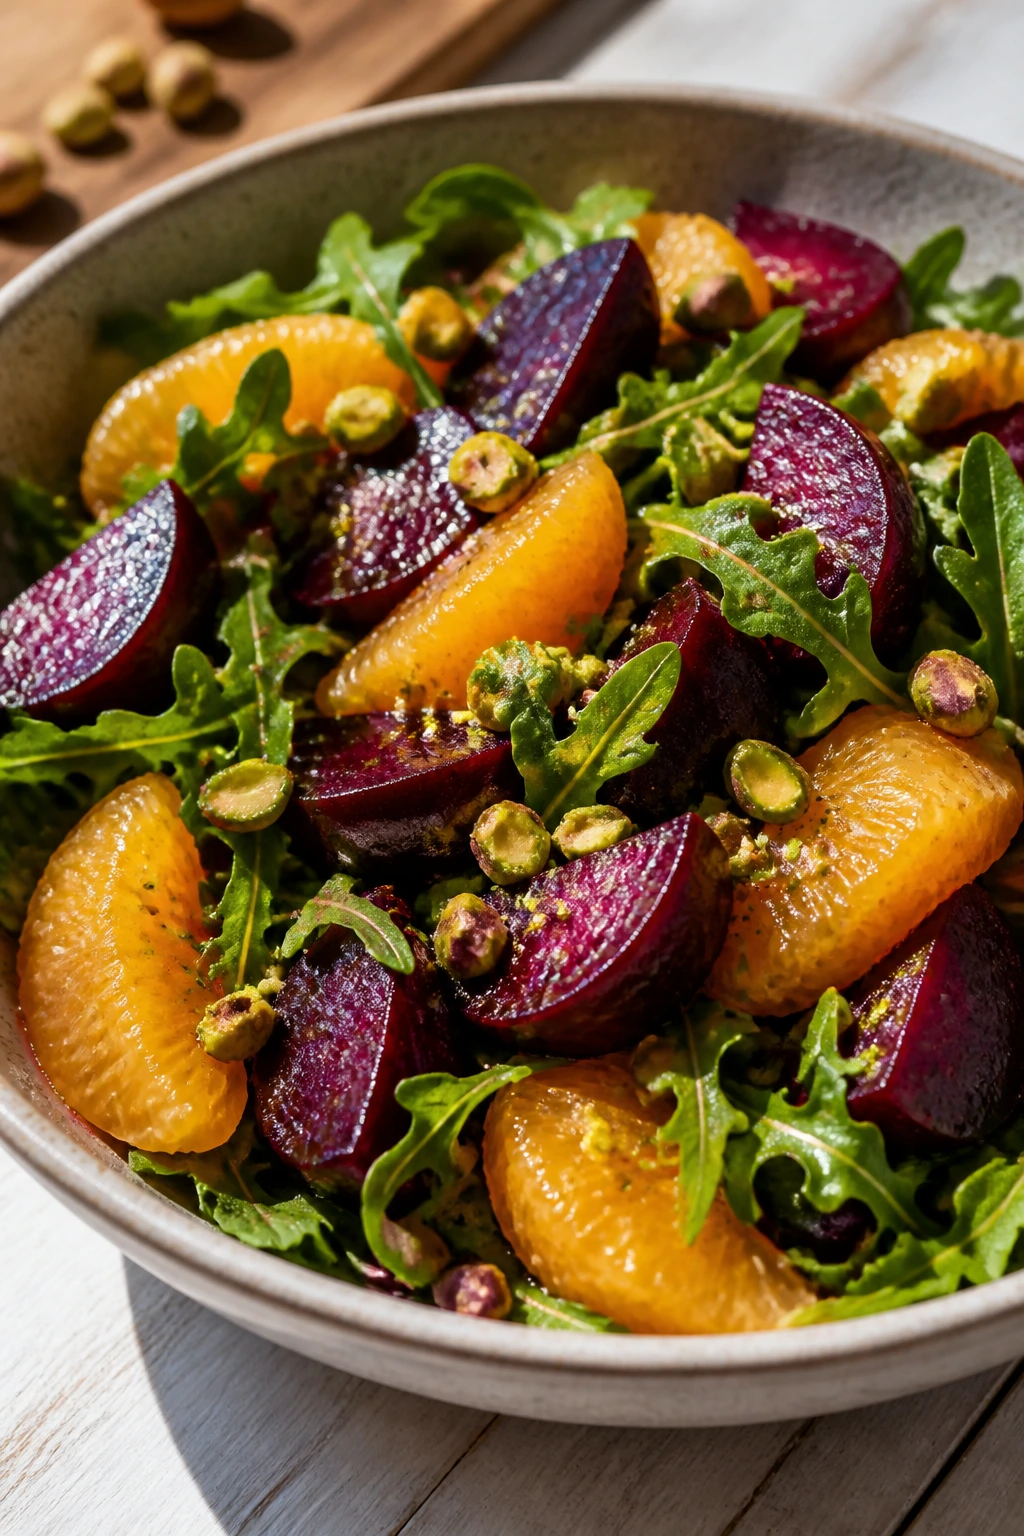
Beets and oranges are one of those combinations that feels obvious once you taste it. The beets bring earth, the oranges bring sharp juice, and the pistachios give the salad a green, buttery crunch that keeps it from leaning soft.
Why It Works: Roasted beets taste sweeter and less muddy than boiled ones. Orange segments give the salad acidity and a little bite, while pistachios and goat cheese add richness so the dish doesn’t disappear next to the rest of the meal. It’s a cold side, which is useful when the oven is already full.
Key Ingredients:
- 4 medium beets
- 2 oranges, peeled and segmented
- ⅓ cup shelled pistachios, toasted
- ¼ cup crumbled goat cheese
- 2 tablespoons olive oil
- 1 tablespoon red wine vinegar
- ½ teaspoon kosher salt
- 2 cups arugula, optional
Quick Steps:
- Roast the beets wrapped in foil at 400°F for 45 to 60 minutes until tender.
- Cool, peel, and slice the beets.
- Whisk olive oil, vinegar, and salt into a dressing.
- Toss the beets gently with the oranges and arugula if using.
- Top with pistachios and goat cheese.
Equipment for This Recipe:
- Foil
- Sheet pan
- Small bowl
- Sharp knife
How to Serve This Dish: Arrange the beets and oranges in overlapping slices so the colors show through. It fits well beside salmon, roasted poultry, or a grain pilaf, and it’s one of the easiest ways to put something fresh on a wintery-looking plate.
Pro Tips for This Recipe:
- Roast beets until a knife slides in easily; underdone beets taste starchy.
- Wear gloves if you want to keep your hands clean.
- Toss the salad lightly so the orange segments stay intact.
- Pistachios should be toasted for a deeper flavor.
Variations on This Dish:
- Fennel Addition: Add shaved fennel for more crunch.
- No Cheese Version: Skip the goat cheese and use extra pistachios.
- Citrus Mix: Use blood orange or grapefruit when you want sharper flavor.
Common Mistakes to Avoid with This Dish:
- Using watery canned beets without draining them well: The salad turns muddy.
- Cutting the oranges roughly: You lose the clean citrus texture.
- Overdressing: Beets should be glossy, not swimming.
24. Swiss Chard with Garlic and Raisins
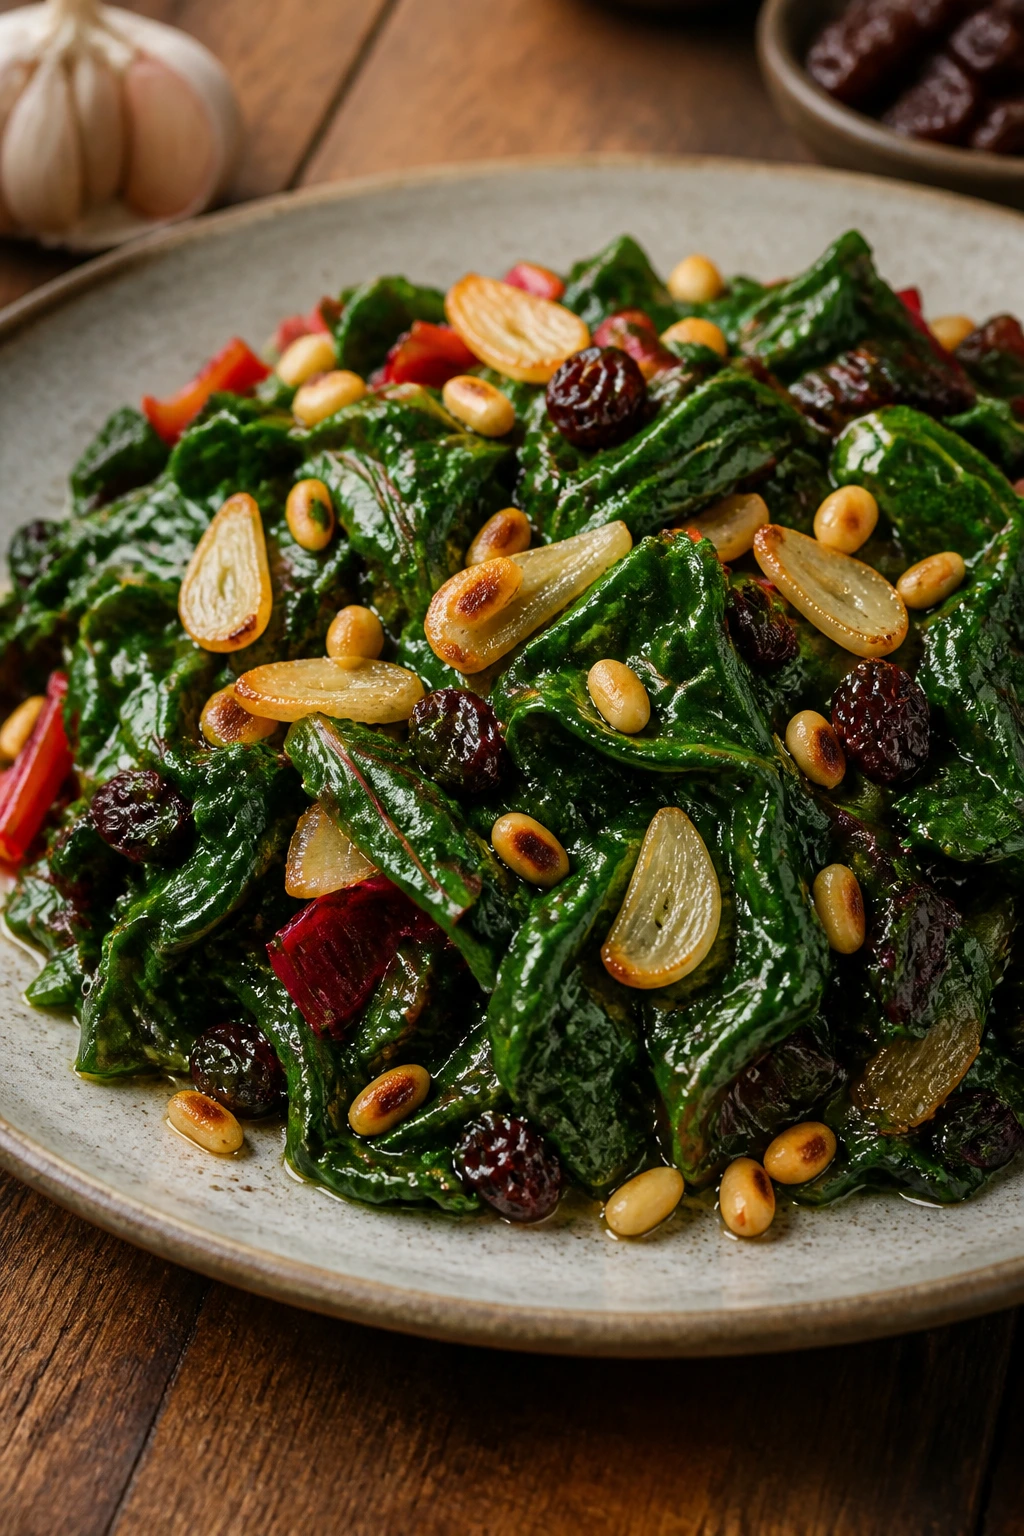
Swiss chard can handle more personality than people give it credit for. Garlic, raisins, and pine nuts turn it into a side with savory, sweet, and nutty notes, and the stems keep a nice bite if you cook them separately.
Why It Works: Chard cooks fast, so the trick is to treat the stems and leaves differently. Stems need a head start, leaves only need a short wilt, and raisins bring just enough sweetness to soften the greens’ slight bitterness. Pine nuts add richness and a little luxury without making the dish heavy.
Key Ingredients:
- 2 large bunches Swiss chard
- 3 tablespoons olive oil
- 4 garlic cloves, thinly sliced
- ¼ cup raisins
- ¼ cup pine nuts
- ½ teaspoon kosher salt
- 1 tablespoon lemon juice
Quick Steps:
- Separate the chard stems from the leaves and chop both.
- Toast the pine nuts in a dry skillet until lightly golden; set aside.
- Warm the olive oil and cook the stems for 3 to 4 minutes.
- Add the garlic and raisins, then the leaves, and cook just until wilted.
- Finish with salt, lemon juice, and pine nuts.
Equipment for This Recipe:
- Large skillet
- Cutting board
- Knife
- Wooden spoon
How to Serve This Dish: Heap the chard so the raisins and pine nuts sit on top. It plays well with polenta, grilled fish, roast chicken, or a bean stew, and it does a better job than most greens of feeling like a finished side.
Pro Tips for This Recipe:
- Don’t cook the leaves the same length as the stems.
- Raisins should soften in the oil and get a little plump.
- Pine nuts burn fast; toast them separately.
- Lemon at the end keeps the greens vivid.
Variations on This Dish:
- Golden Raisin Swap: Use golden raisins for a lighter sweetness.
- Anchovy Option: Melt 1 chopped anchovy with the garlic for extra savoriness.
- Chili Flake Version: Add a pinch of red pepper flakes.
Common Mistakes to Avoid with This Dish:
- Mixing stems and leaves too early: You’ll overcook one part or undercook the other.
- Burning the garlic: Low to medium heat is enough.
- Skipping the lemon: Greens need a final bright note.
25. Crispy Polenta Squares with Tomato Relish
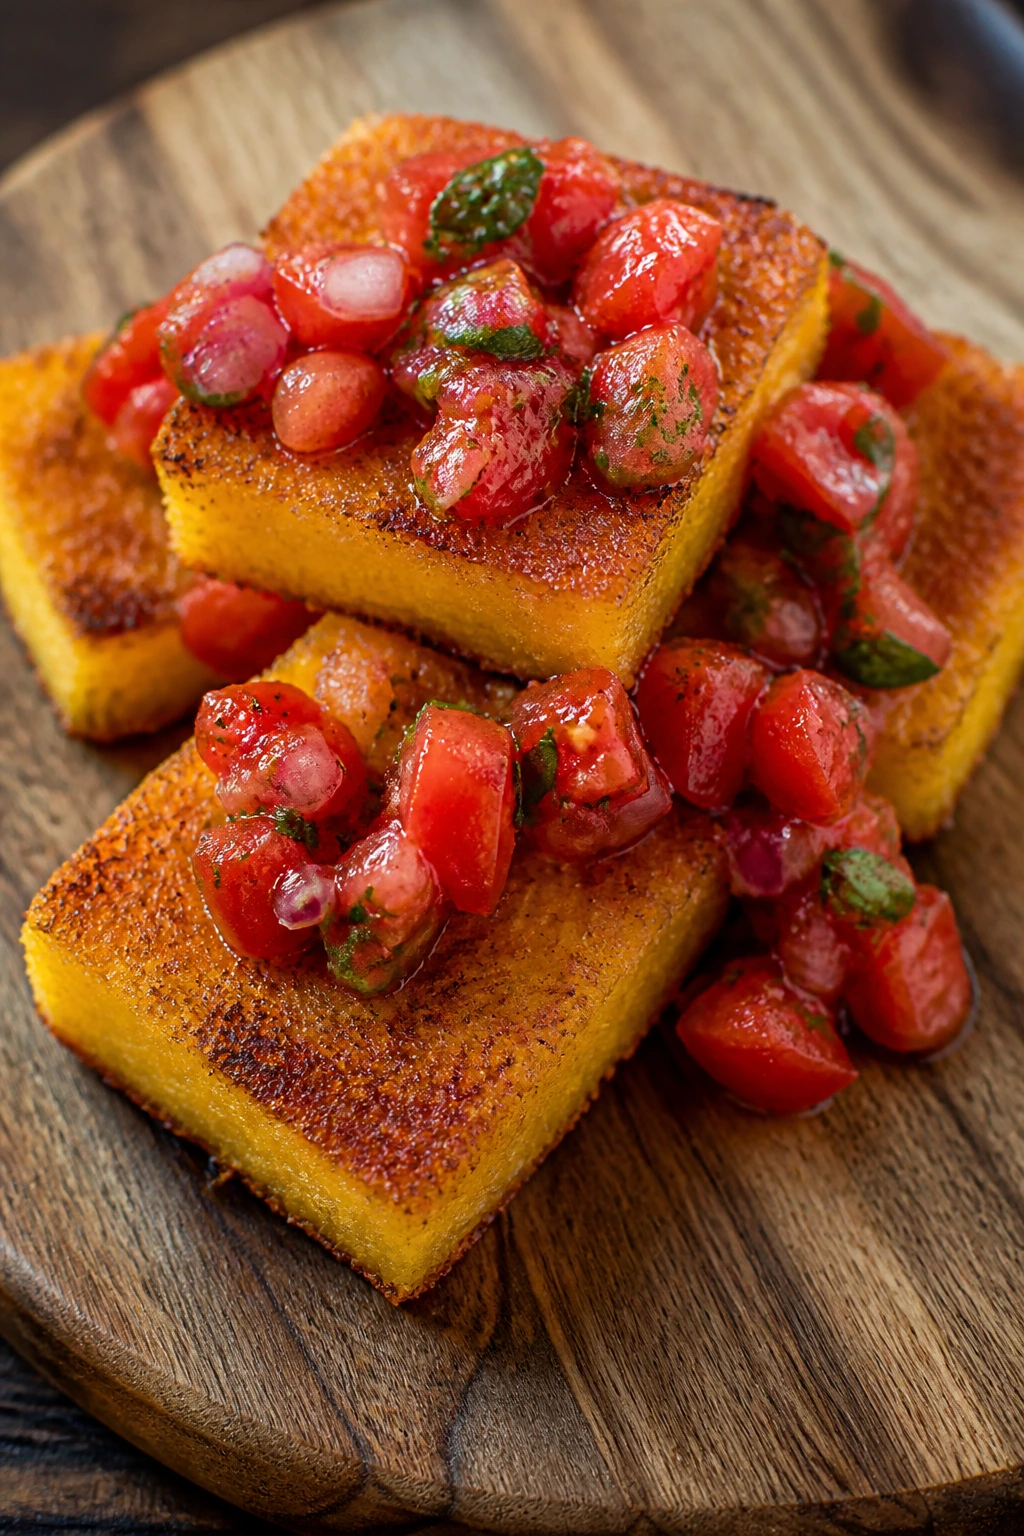
Polenta gets interesting when you let it set, slice it, and crisp the edges. The inside stays soft and corn-rich, the outside goes golden, and a quick tomato relish keeps the plate from feeling too dense.
Why It Works: Polenta is filling by nature, but it needs contrast. Chilling it first gives you clean slices that fry or roast without collapsing, and the relish adds acidity and freshness to balance the butter and Parmesan in the base. It’s a side that can lean rustic or polished depending on how you cut it.
Key Ingredients:
- 1 cup polenta
- 4 cups vegetable broth
- 2 tablespoons butter
- ½ cup grated Parmesan
- 1 teaspoon kosher salt
- 2 tablespoons olive oil, for crisping
- 2 tomatoes, diced
- 1 tablespoon red wine vinegar
- 1 tablespoon chopped basil
Quick Steps:
- Simmer the polenta in broth, stirring, until thick and smooth, about 25 minutes.
- Stir in butter, Parmesan, and salt, then spread into an oiled dish and chill until firm.
- Cut into squares and sear in olive oil for 3 to 4 minutes per side.
- Mix the tomatoes, vinegar, basil, and a pinch of salt.
- Spoon the relish over the warm squares.
Equipment for This Recipe:
- Saucepan
- Square baking dish
- Knife
- Skillet
How to Serve This Dish: Serve the squares on a plate with relish on top and extra around the edge. They’re especially good beside mushroom ragout, roasted vegetables, or a simple salad when you want a side that eats like a starch.
Pro Tips for This Recipe:
- Stir the polenta often so it stays smooth.
- Chill it fully or the squares will fall apart.
- A little extra broth can loosen it if it gets too stiff.
- Fresh basil in the relish makes a big difference.
Variations on This Dish:
- Creamy Polenta Bake: Serve it soft straight from the pot instead of slicing.
- Herb Polenta: Stir rosemary into the base.
- Roasted Pepper Relish: Replace tomatoes with chopped roasted peppers.
Common Mistakes to Avoid with This Dish:
- Not cooking the polenta long enough: It should taste smooth, not gritty.
- Cutting before it firms up: You’ll get ragged edges.
- Using too much relish: A spoonful is enough to keep the squares crisp.
26. Minted Pea Smash with Feta
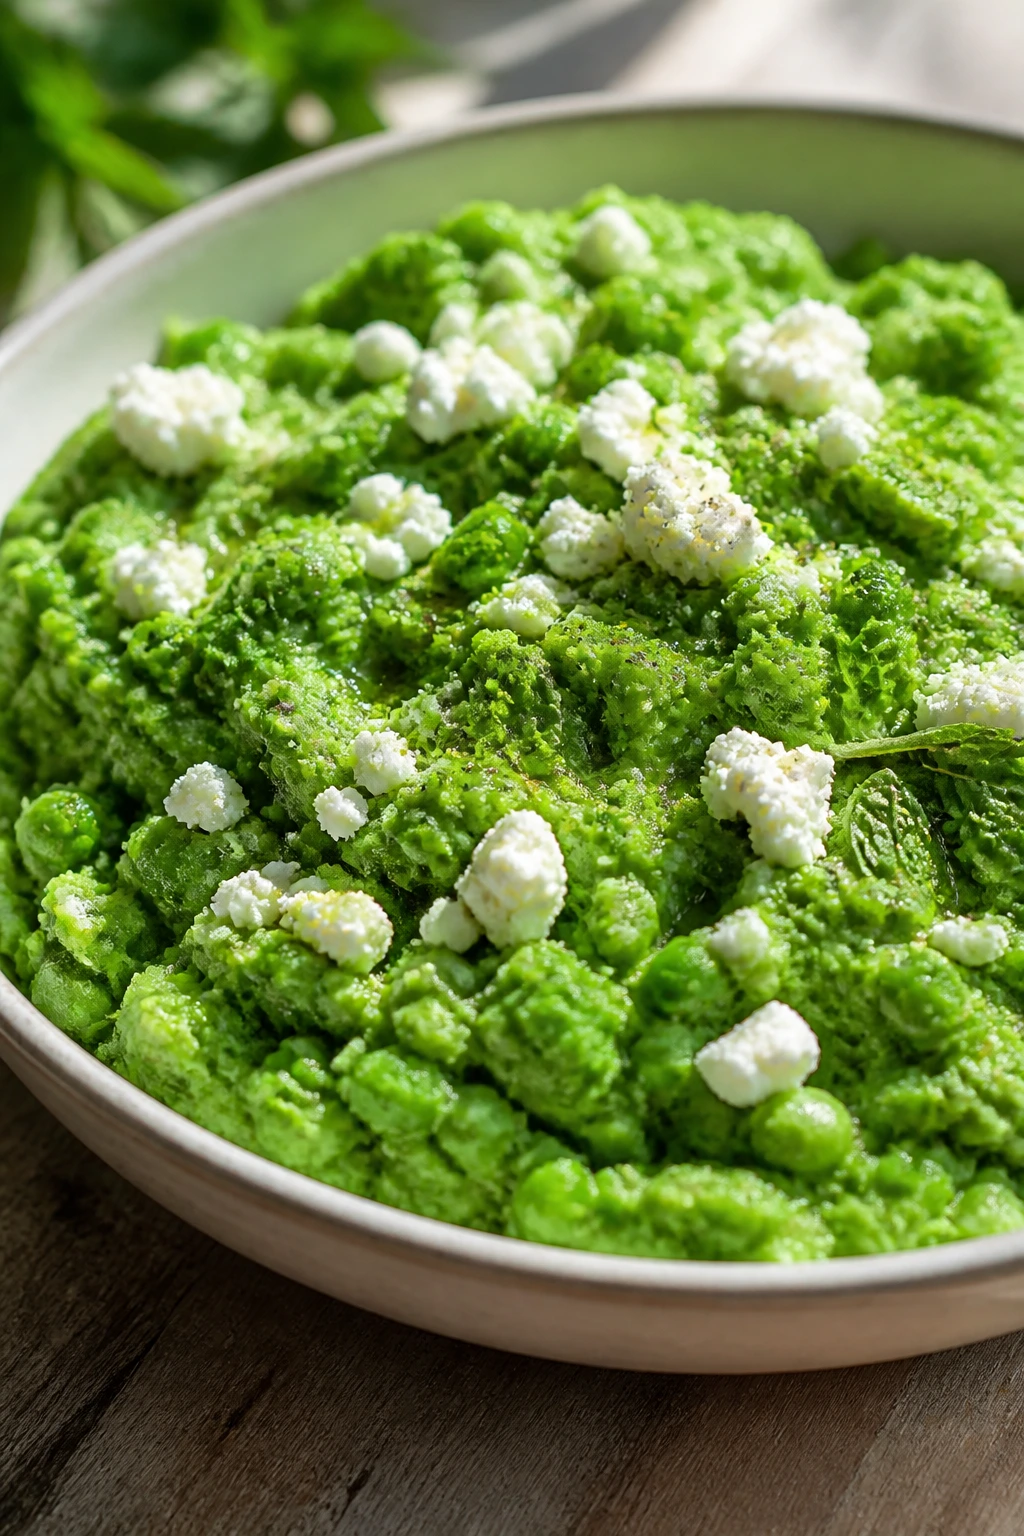
This is the bright, green side that tastes like it took almost no time, but still feels intentional. The peas stay a little rough instead of turning into puree, mint gives the dish a fresh snap, and feta makes it salty enough to matter.
Why It Works: Peas are sweet and soft, so a quick smash leaves some texture instead of turning them into baby food. Mint keeps the flavor lively, lemon sharpens it, and feta adds enough salt and creaminess to make the bowl feel complete. It works especially well when dinner needs a cold or room-temperature side.
Key Ingredients:
- 3 cups peas, fresh or frozen
- 2 tablespoons olive oil
- 1 garlic clove, minced
- 2 tablespoons chopped mint
- 2 tablespoons lemon juice
- ⅓ cup crumbled feta
- ½ teaspoon kosher salt
- ¼ teaspoon black pepper
Quick Steps:
- Boil or steam the peas for 2 to 3 minutes until tender.
- Drain and transfer them to a bowl.
- Smash lightly with a fork or potato masher so some peas stay whole.
- Stir in olive oil, garlic, mint, lemon juice, feta, salt, and pepper.
- Serve warm or at room temperature.
Equipment for This Recipe:
- Saucepan or steamer basket
- Bowl
- Fork or masher
- Spoon
How to Serve This Dish: Spread the pea smash on a plate like a rustic puree, then top with more feta. It goes well with grilled fish, roast chicken, toast, or as a bright side next to richer dishes like gratin or fried potatoes.
Pro Tips for This Recipe:
- Do not over-smash; some whole peas give the best texture.
- Frozen peas are fine if you cook them briefly.
- Mint should be chopped right before mixing so it stays fragrant.
- A little lemon zest adds extra lift.
Variations on This Dish:
- Ricotta Version: Swap feta for ricotta if you want it softer.
- Chili-Mint Swap: Add a pinch of chili flakes.
- Herb Blend: Use mint and parsley together for a milder flavor.
Common Mistakes to Avoid with This Dish:
- Overcooking the peas: They lose their sweet flavor fast.
- Turning it into a smooth puree: The texture is the whole point.
- Too much garlic: One clove is enough here.
27. Cheesy Baked Leeks
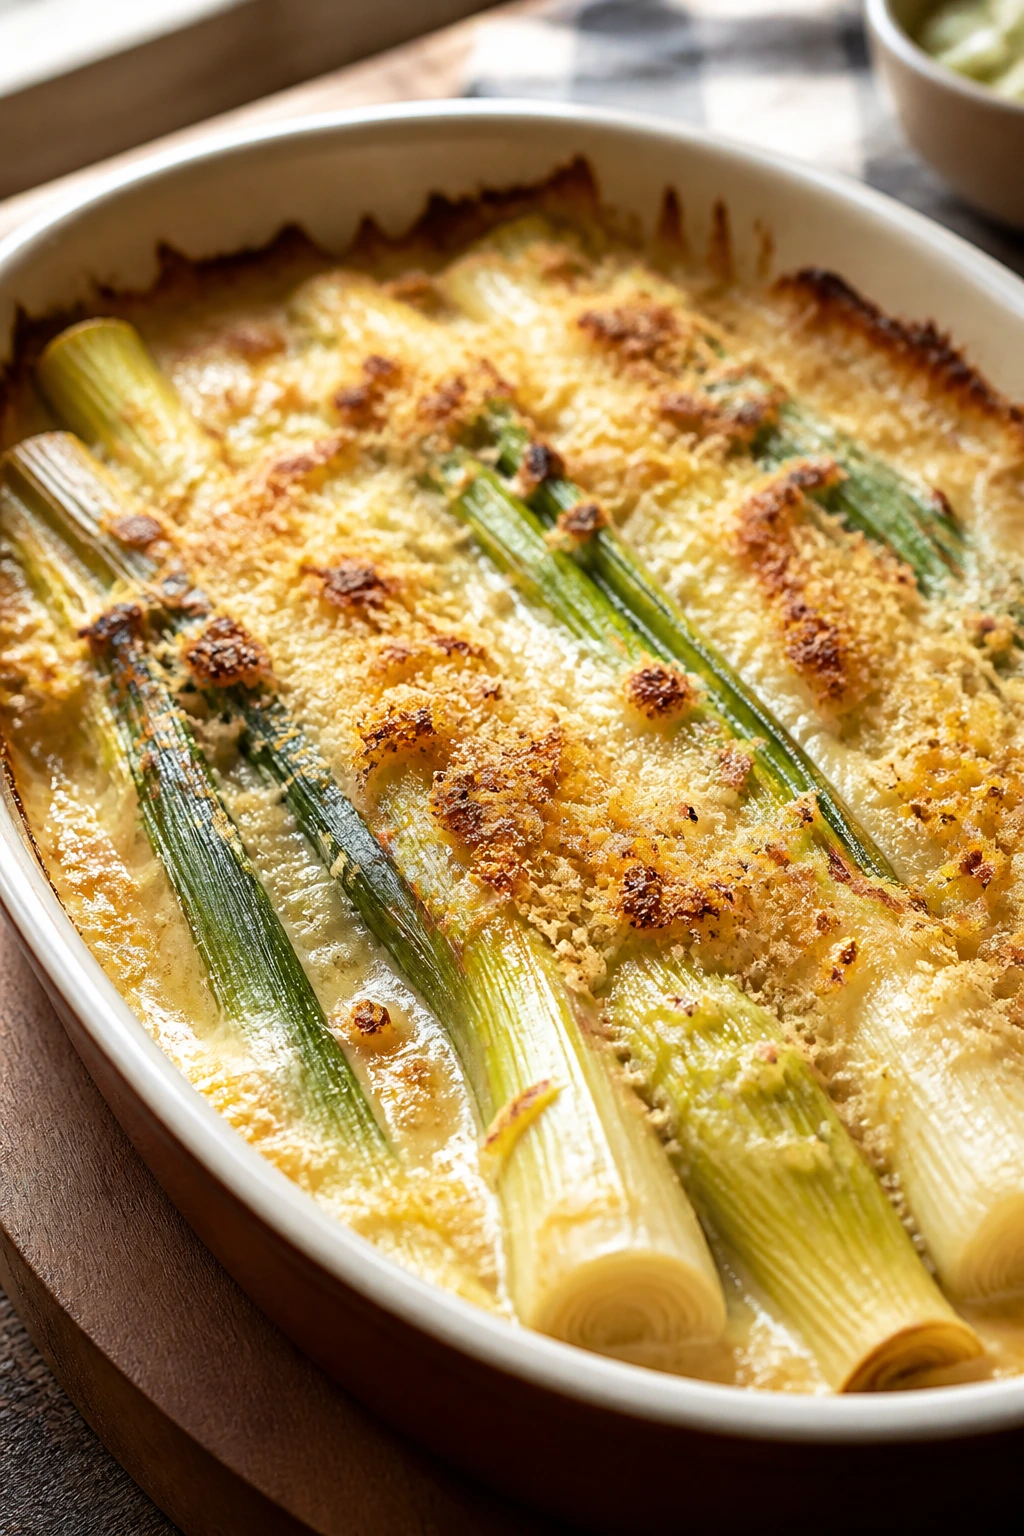
Leeks bake into something almost silky, with a mellow onion flavor that never gets harsh. Add a little cheese and breadcrumbs, and you’ve got a side that feels soft in the middle, crisp on top, and a lot more satisfying than people expect.
Why It Works: Leeks need cleaning, but once that’s done, they’re easy to dress up. Baking them with cream or milk softens the fibers, cheese adds body, and breadcrumbs keep the top from going bland. This is a low-drama side with high payoff.
Key Ingredients:
- 4 large leeks
- 2 tablespoons butter
- ½ cup heavy cream or whole milk
- ¾ cup grated Gruyère or cheddar
- ¼ cup breadcrumbs
- ½ teaspoon kosher salt
- ¼ teaspoon black pepper
- 1 teaspoon Dijon mustard, optional
Quick Steps:
- Split the leeks lengthwise and rinse well between the layers.
- Arrange them in a baking dish and dot with butter.
- Pour cream or milk over the leeks, then season with salt, pepper, and mustard if using.
- Top with cheese and breadcrumbs.
- Bake at 375°F for 25 to 30 minutes until bubbling and browned.
Equipment for This Recipe:
- Baking dish
- Knife
- Colander
- Small bowl
How to Serve This Dish: Serve leeks with a spoon so you get some of the creamy sauce on each plate. They pair nicely with roast chicken, baked fish, or a potato dish, and they’re one of those sides that quietly makes the meal feel more complete.
Pro Tips for This Recipe:
- Clean the leeks well; grit hides deep inside.
- Trim only the tough dark tops, not the whole leek.
- If the top browns too quickly, cover loosely with foil.
- Gruyère gives the best nuttiness, but cheddar works.
Variations on This Dish:
- Herb Cream Version: Add thyme to the cream.
- Breadcrumb-Free Swap: Use extra cheese instead of crumbs.
- Mustard-Leek Version: Increase Dijon to 2 teaspoons.
Common Mistakes to Avoid with This Dish:
- Not rinsing the leeks thoroughly: Grit ruins the texture.
- Using too much cream: The dish should coat, not swim.
- Overbaking until dry: Stop when the leeks are tender and the top is golden.
28. Sesame Roasted Broccoli and Carrots
Broccoli and carrots together need the right treatment to avoid feeling like cafeteria food. Sesame oil, garlic, and a little soy sauce turn them into a savory, slightly sweet side with roast edges and a nutty finish.
Why It Works: Broccoli and carrots roast at a similar pace if you cut them sensibly, which makes them a smart pair. Sesame oil brings depth, soy sauce adds salt and umami, and a touch of honey helps the carrots brown. The sesame seeds on top give you crunch without much work.
Key Ingredients:
- 1 large head broccoli, cut into florets
- 3 large carrots, cut into matchsticks or thin coins
- 2 tablespoons olive oil
- 1 tablespoon sesame oil
- 1 tablespoon soy sauce
- 2 garlic cloves, minced
- 1 teaspoon honey
- 1 tablespoon sesame seeds
Quick Steps:
- Preheat the oven to 425°F.
- Toss the broccoli and carrots with olive oil, sesame oil, soy sauce, garlic, and honey.
- Spread in a single layer on a sheet pan.
- Roast for 18 to 22 minutes, stirring once halfway through.
- Scatter sesame seeds over the vegetables before serving.
Equipment for This Recipe:
- Sheet pan
- Large bowl
- Spatula
- Measuring spoons
How to Serve This Dish: Serve it in a bowl with the sesame seeds visible on top. It sits well beside rice, dumplings, salmon, tofu, or a simple noodle dish, and it tastes especially good with something plain on the main plate.
Pro Tips for This Recipe:
- Cut the carrots small enough that they finish with the broccoli.
- Sesame oil is strong; a little goes far.
- Stir halfway, not constantly, so the vegetables brown.
- If you want more heat, add a pinch of chili flakes.
Variations on This Dish:
- Ginger-Sesame Swap: Add grated ginger to the oil mixture.
- Maple Soy Version: Replace honey with maple syrup.
- Nori Finish: Crumble a little toasted nori over the top.
Common Mistakes to Avoid with This Dish:
- Cutting the carrots too thick: They will lag behind the broccoli.
- Using too much soy sauce: The vegetables should taste seasoned, not wet.
- Skipping the toast on the seeds: Untoasted sesame seeds taste flat.
29. Roasted Asparagus with Breadcrumb Gremolata
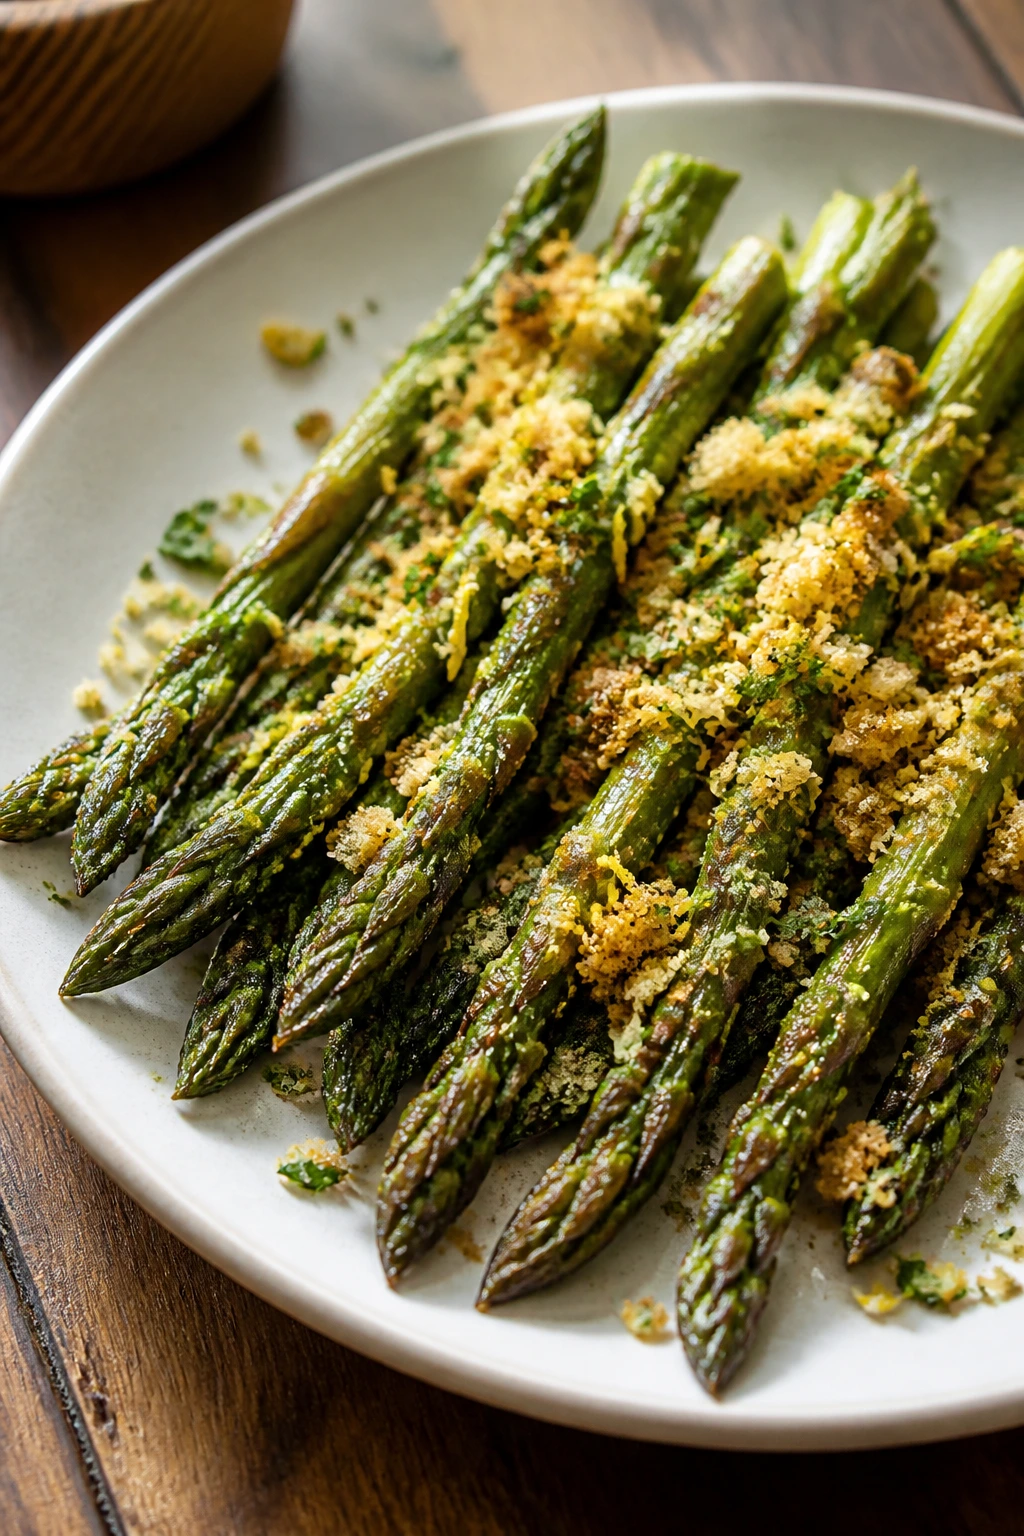
Asparagus does not need much, but it does need the right amount of attention. Roast it quickly, then top it with lemony breadcrumbs and garlic, and you get a side that tastes sharp, green, and clean.
Why It Works: Asparagus is tender and cooks fast, so a short blast in a hot oven keeps it from going limp. The gremolata — breadcrumbs, garlic, lemon zest, and parsley — adds crunch and brightness, which gives the stalks more staying power on the plate. It’s a small trick that makes a very simple vegetable feel finished.
Key Ingredients:
- 2 pounds asparagus, trimmed
- 2 tablespoons olive oil
- ½ teaspoon kosher salt
- ¼ teaspoon black pepper
- ¼ cup breadcrumbs
- 1 garlic clove, minced
- 1 teaspoon lemon zest
- 2 tablespoons chopped parsley
- 1 tablespoon butter, melted
Quick Steps:
- Preheat the oven to 425°F.
- Toss the asparagus with olive oil, salt, and pepper.
- Roast on a sheet pan for 10 to 12 minutes until tender-crisp.
- Mix the breadcrumbs, garlic, lemon zest, parsley, and melted butter.
- Spoon the gremolata over the asparagus and serve immediately.
Equipment for This Recipe:
- Sheet pan
- Small bowl
- Microplane
- Tongs
How to Serve This Dish: Lay the spears in a single direction on the plate so the topping stays put. It pairs with roast chicken, baked salmon, risotto, or a simple egg dish, and it’s one of the fastest sides on this list.
Pro Tips for This Recipe:
- Trim the woody ends instead of peeling the whole spear.
- Keep the roasting time short; asparagus keeps cooking after it leaves the oven.
- Toast the breadcrumbs lightly if you want extra crunch.
- Lemon zest matters more than lemon juice here.
Variations on This Dish:
- Parmesan Gremolata: Add 2 tablespoons Parmesan to the crumb mix.
- Garlic-Free Version: Use shallot powder or skip the garlic if you want a softer finish.
- Almond Crumb Swap: Replace breadcrumbs with finely chopped almonds.
Common Mistakes to Avoid with This Dish:
- Overroasting: Asparagus turns stringy fast.
- Using thick stale breadcrumbs: They can taste dusty; fresh crumbs are better.
- Adding too much topping: A light layer keeps the spears visible and crisp.
30. Farro Pilaf with Mushrooms and Herbs
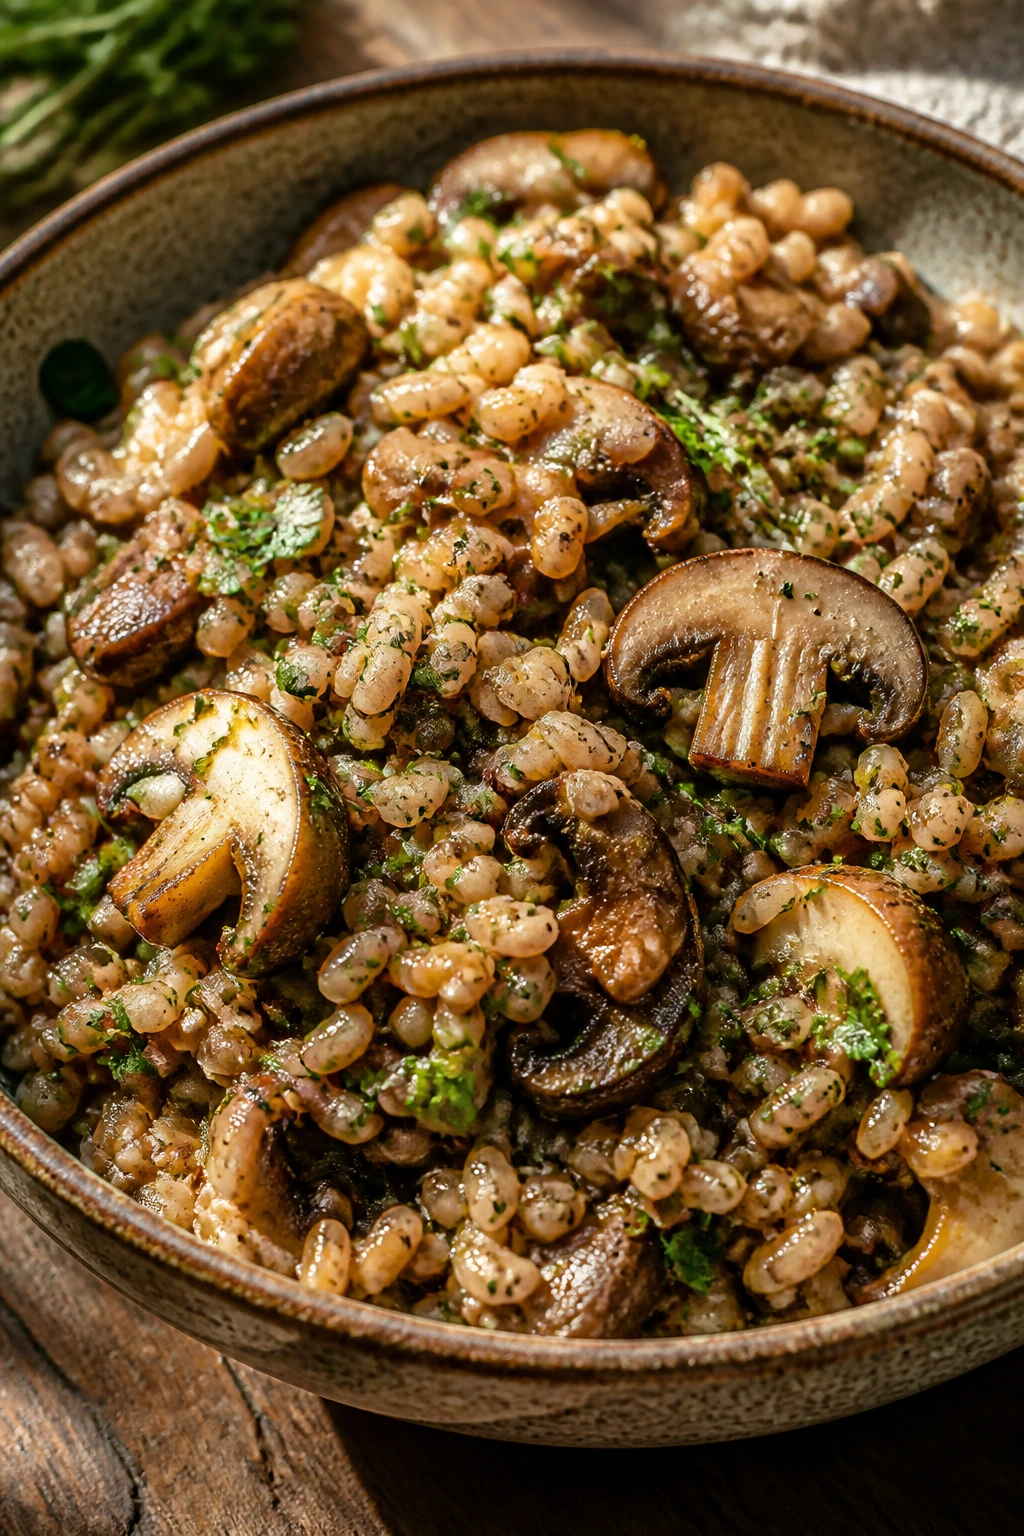
Farro is the side dish equivalent of a sturdy boot. It has chew, nuttiness, and enough body to make a plate feel complete, especially when it’s cooked with mushrooms and a handful of herbs.
Why It Works: Farro holds its shape better than many grains, so it stays pleasantly chewy instead of collapsing. Mushrooms add the savory depth that meat would normally bring, while onions, broth, and herbs turn the pot into something layered and earthy. It’s filling in a way that plain rice often isn’t.
Key Ingredients:
- 1 cup pearled farro
- 3 cups vegetable broth
- 8 ounces mushrooms, sliced
- 1 small onion, chopped
- 2 tablespoons olive oil
- 2 tablespoons chopped parsley
- 1 teaspoon thyme leaves
- ½ teaspoon kosher salt
- ¼ teaspoon black pepper
- 2 tablespoons chopped toasted pecans, optional
Quick Steps:
- Rinse the farro and simmer it in broth for 20 to 25 minutes until chewy-tender.
- Sauté the onion and mushrooms in olive oil until browned and the moisture cooks off.
- Toss the cooked farro with the mushrooms, parsley, thyme, salt, and pepper.
- Fold in pecans if using.
- Serve warm, with a splash of broth if the grains seem dry.
Equipment for This Recipe:
- Medium saucepan
- Large skillet
- Fine strainer
- Wooden spoon
How to Serve This Dish: Serve the farro in a wide bowl so the mushrooms and herbs stay mixed through the grains. It works beside roasted vegetables, grilled tofu, chicken, or a simple green salad, and it makes a vegetable-heavy plate feel complete without any meat at all.
Pro Tips for This Recipe:
- Cook farro until chewy, not hard in the center.
- Brown the mushrooms well before mixing them in.
- A spoonful of butter at the end gives the pilaf more gloss.
- Pecans are optional, but they add a good final crunch.
Variations on This Dish:
- Lemon Farro: Stir in lemon zest and juice at the end.
- Crumbly Feta Swap: Add feta for a saltier finish.
- Barley Version: Use pearl barley if farro is not available.
Common Mistakes to Avoid with This Dish:
- Undercooking the grain: Farro should be tender with bite.
- Skipping the browning on the mushrooms: That’s where the flavor lives.
- Letting it sit dry: A splash of broth brings the pilaf back to life.
Why Roasting, Braising, and Browning Change Everything
The common thread in all these vegetable side dishes is heat that does more than warm the food through. Roasting turns carrots sticky and sweet, browning makes Brussels sprouts taste nutty, and braising gives cabbage a soft, glossy depth you can’t fake with a quick sauté. The vegetable itself matters, sure, but the method matters more than people like to admit.
A lot of home cooks make the mistake of treating vegetables as a quick afterthought. That’s how you end up with pale broccoli, watery cauliflower, or green beans that taste like the inside of a soup can. The better approach is to decide what you want the vegetable to do on the plate: crisp, soften, caramelize, or soak up sauce. Once you do that, the side stops behaving like filler.
I also like how forgiving these methods are. A few extra minutes in the oven can deepen flavor instead of ruining it, and a braise can sit on the stove for a while without falling apart. That breathing room matters when the rest of dinner is doing ten things at once.
Essential Equipment for These Recipes
- Rimmed sheet pans: You’ll use these for roasting nearly half the recipes, and the rim keeps oil and juices from spilling.
- Large skillet or cast-iron pan: Good for charred corn, mushrooms, green beans, fritters, and anything that needs a fast sear.
- Dutch oven or heavy pot: Best for braised cabbage, ratatouille, lentils, and pilaf-style sides.
- Sharp chef’s knife: Uniform cuts mean even cooking, especially for carrots, squash, cabbage, and potatoes.
- Cutting board with a damp towel underneath: A small thing, but it keeps the board from slipping when you’re cutting dense vegetables.
- Mixing bowls in at least two sizes: One for tossing vegetables and one for dressings, sauces, or crumb toppings.
- Whisk: Useful for dressings, gratin sauce, yogurt dips, and mustard vinaigrettes.
- Box grater or microplane: Parmesan, lemon zest, and nutmeg all behave better when grated finely.
- Colander or salad spinner: Dry vegetables roast and sauté more cleanly.
- Airtight containers: Helpful for leftovers, make-ahead grains, and salad components that need to stay separate.
Smart Shopping and Ingredient Tips

The vegetables themselves matter more than fancy extras. Pick Brussels sprouts that feel tight and heavy, not loose and puffy. For cabbage, choose heads that seem dense for their size. With carrots, thinner isn’t always better; what you want is even thickness so the batch roasts at the same speed.
Cheese is one of the easiest ways to give vegetable side dishes more body, but the type matters. Parmesan and cotija bring salt and a dry finish. Gruyère melts into gratins and baked leeks without going stringy. Feta softens in heat but keeps enough shape to show up on the plate. If a recipe asks for a grating cheese, buy a wedge and grate it yourself if you can; the texture and melt are better than the bagged stuff.
Fresh herbs change a dish fast, so buy them with a purpose. Parsley, dill, mint, and basil all have jobs here. Parsley lifts roasted vegetables, dill makes yogurt sauces taste alive, mint sharpens peas, and basil suits tomato-heavy dishes. If herbs wilt in your crisper before you use them, chop and freeze them with a little olive oil in an ice cube tray. That trick saves more food than people expect.
For pantry items, canned chickpeas, lentils, and broth are worth keeping around because they stretch a side into something more filling. The same goes for nuts, seeds, and vinegars. A jar of toasted pepitas or pecans can turn a soft vegetable into something with crunch, and a sharp vinegar can rescue a dish that tastes too sweet or too rich.
Frozen vegetables deserve a place here too. Corn and peas are both excellent from frozen because they’re usually picked and packed at a good stage. Thaw them fully and dry them before roasting or sautéing, and they behave nicely.
How to Serve These Recipes
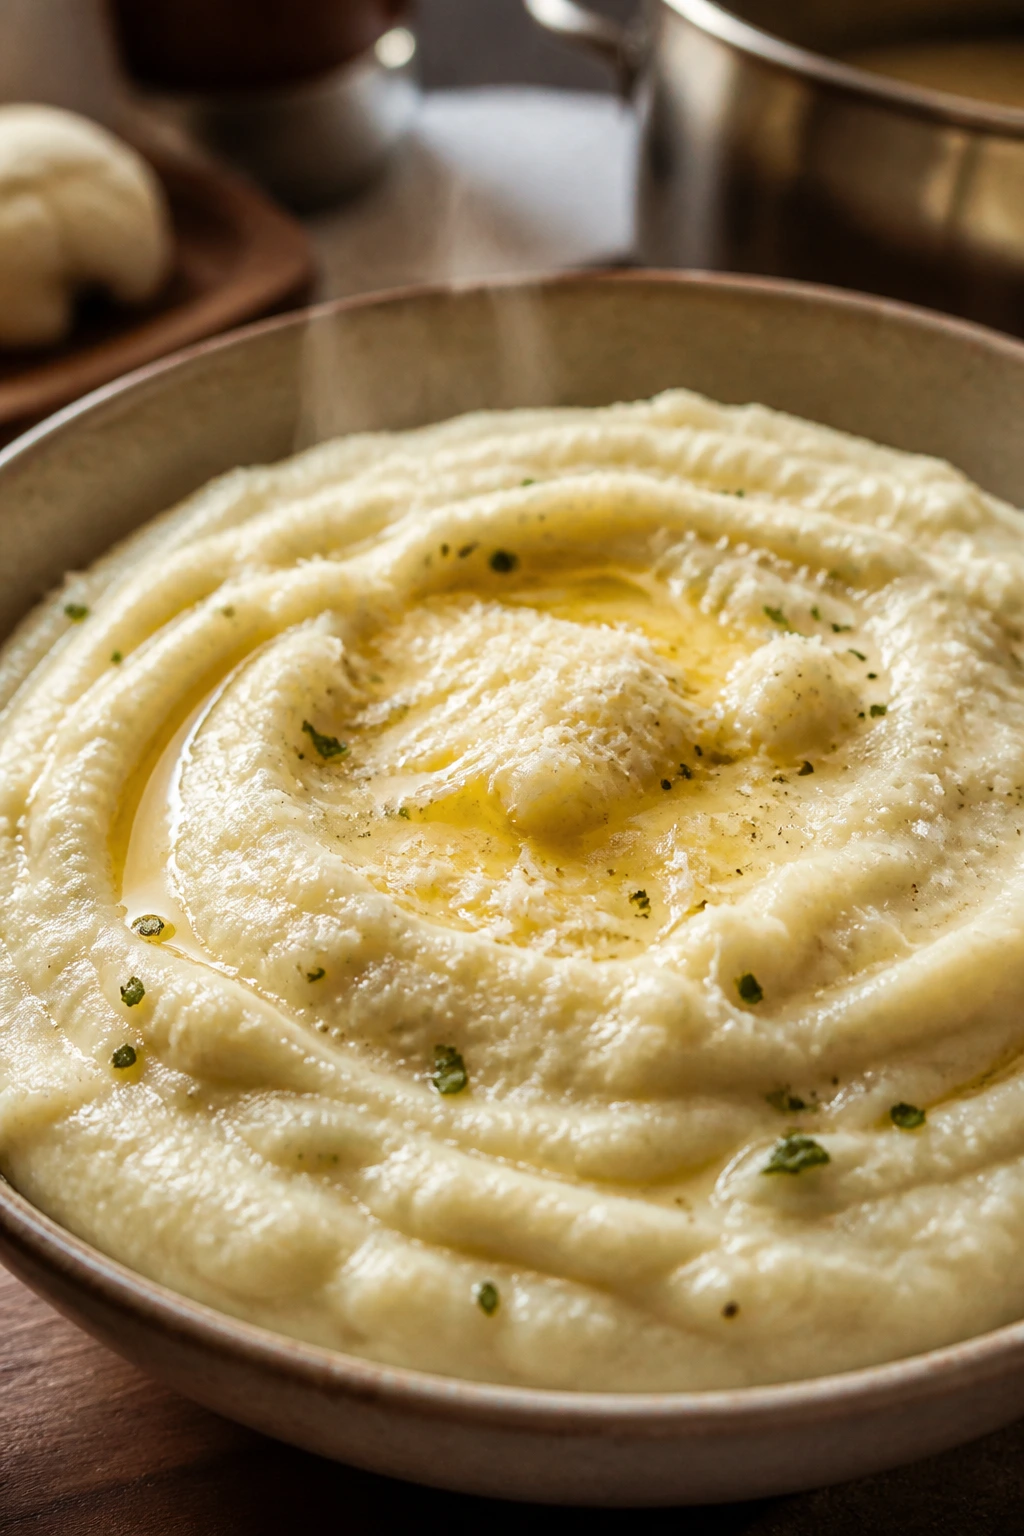
Presentation: Use shallow bowls and wide platters when you can. A pile of crisp Brussels sprouts or roasted broccoli looks better when the browned bits are visible instead of hidden in a deep serving bowl. For braises and gratins, let the sauce or crust show on top, then add herbs or cheese at the last minute.
Accompaniments: These sides pair well with roast chicken, grilled fish, baked tofu, bean stews, and simple grain bowls. If you’re building a vegetarian plate, combine one hot vegetable side with one starch — potatoes, polenta, rice, farro, or bread — and one sharp element like pickles, lemon, or vinaigrette. That balance matters more than any single ingredient.
Portions: For four people, plan on one medium vegetable side or two lighter ones. Roasted vegetables usually serve about ¾ cup per person; richer dishes like gratin, mashed cauliflower, or polenta can land closer to ½ cup. If you’re feeding a crowd, pick at least one oven-friendly recipe and one room-temperature side so the timing doesn’t get ugly.
Beverage Pairing: Sparkling water with lemon works across the board. For wine, a dry white such as Sauvignon Blanc or a light red like Pinot Noir handles most of these dishes. Beer drinkers will usually be happiest with a crisp pilsner or a pale ale that doesn’t bully the vegetables.
Additional Tips and Flavor Boosters
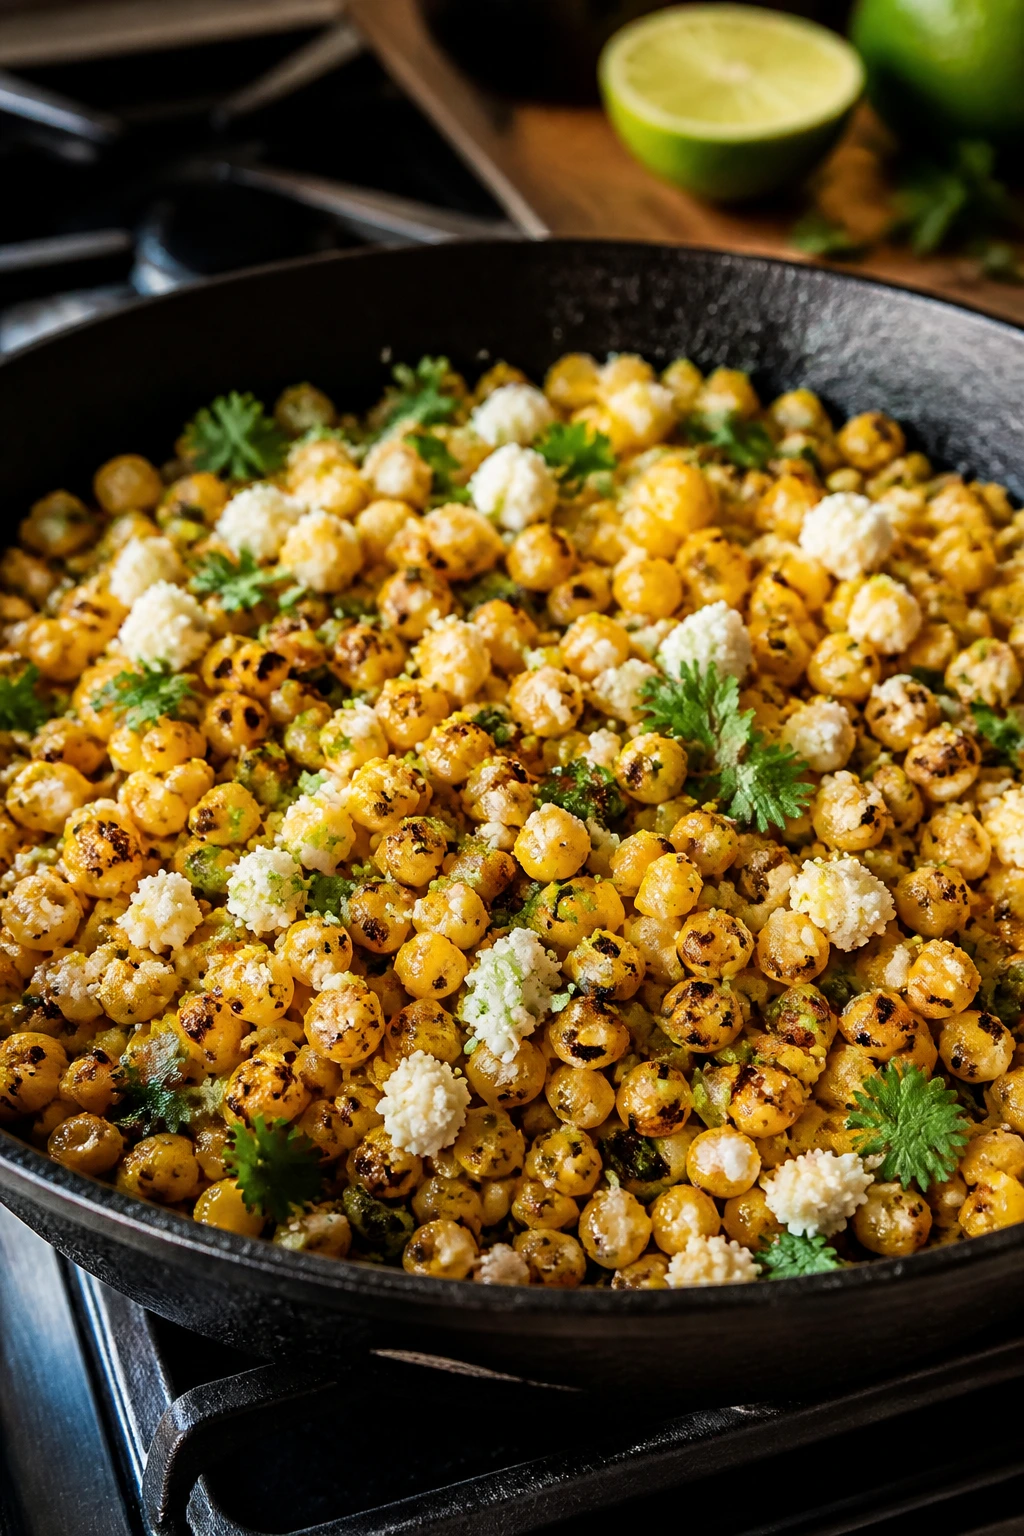
Flavor Enhancement: A final hit of acid changes everything. Keep lemons, vinegar, and a good Dijon mustard nearby, because a roasted vegetable often tastes 20 percent flatter before that last squeeze or drizzle.
Customization: If you want more heft, add chickpeas, lentils, farro, or toasted nuts to the roasted and braised dishes. If you want less richness, cut back on cheese and finish with herbs instead. You do not need to force every dish in one direction.
Serving Suggestions: Finish roasted vegetables with flaky salt, chopped parsley, dill, or mint right before serving. For creamy sides, a little nutmeg, chives, or lemon zest keeps the flavors from sitting too low.
Make-It-Yours: If you’re cooking for dairy-free eaters, tahini, olive oil, and nutritional yeast can do a surprising amount of work. If heat is welcome, a pinch of chili flakes or a spoon of harissa wakes up sweet vegetables like carrots and squash. For gluten-free plates, skip breadcrumbs or use crushed nuts instead.
Make-Ahead, Storage, and Reheating Guidance
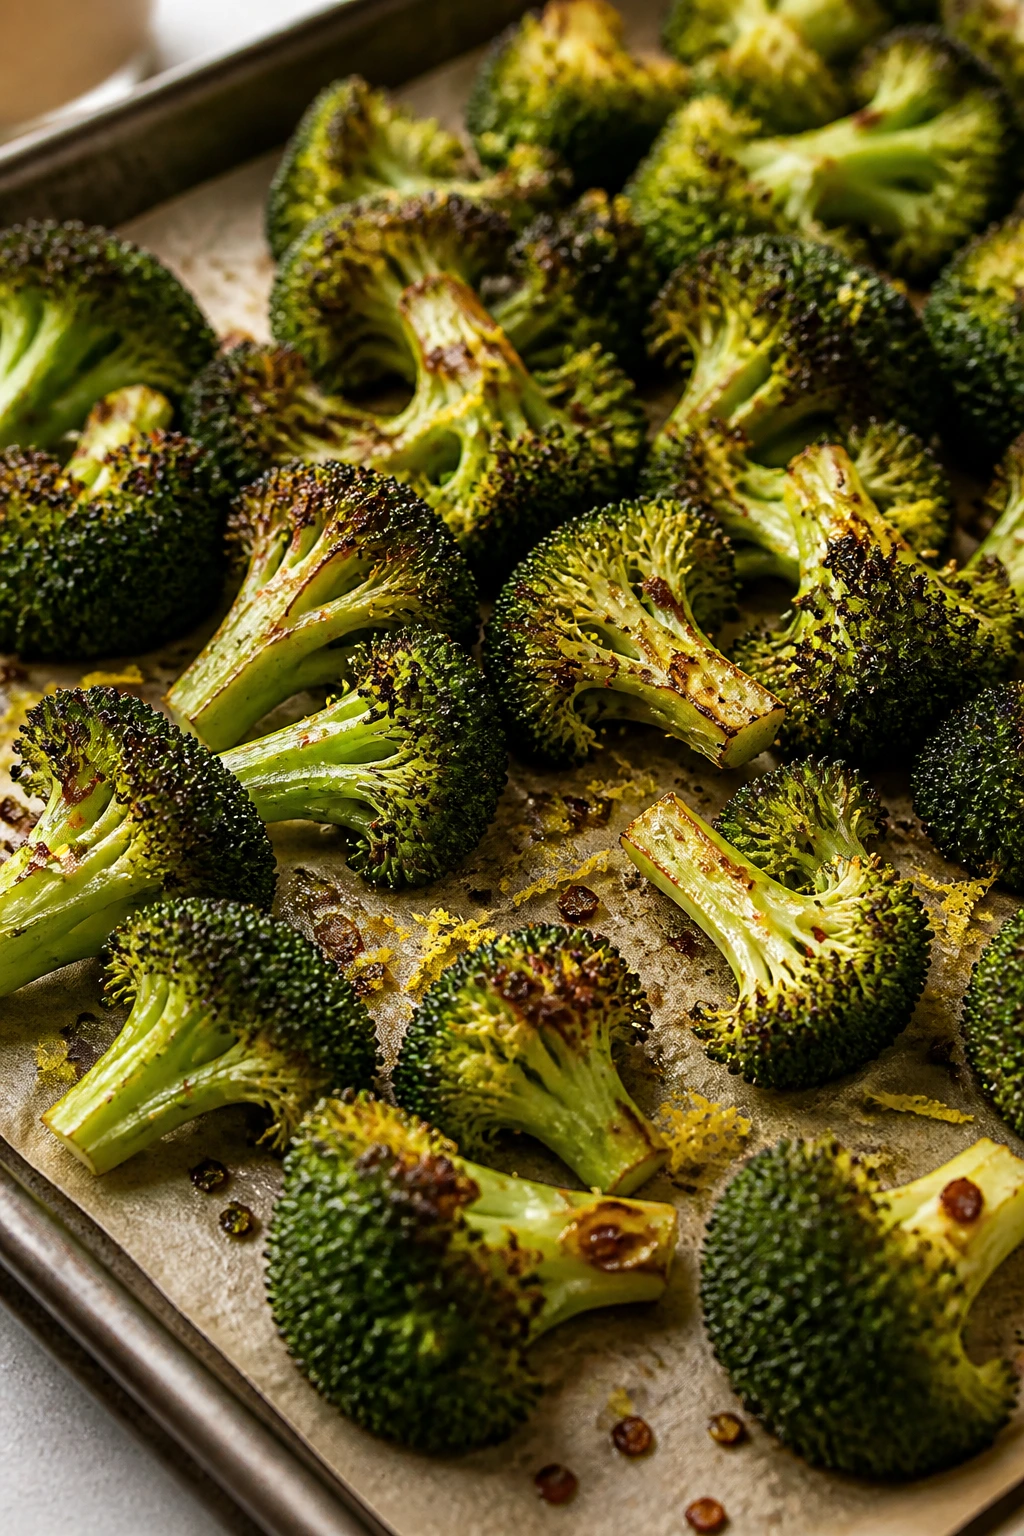
Most of these vegetable side dishes keep well for 3 to 4 days in the refrigerator, though the crisp ones are best eaten sooner. Roasted vegetables, braises, gratins, lentil salads, and pilafs are the most forgiving. Delicate things like asparagus, fritters, and shaved Brussels sprout salad are better the same day, or at least after a very short rest.
For freezer storage, the safest bets are braised cabbage, ratatouille, lentil salad without fresh herbs, farro pilaf, and some gratins. Freeze in airtight containers for up to 2 months, then thaw overnight in the fridge. Avoid freezing creamy spinach, fresh salads, or crispy roasted vegetables if texture matters to you; they come back soft in a way that rarely feels worth it.
Reheating depends on the recipe. Roast vegetables like Brussels sprouts, broccoli, carrots, and potatoes do best in a 400°F oven for 8 to 12 minutes on a sheet pan, which helps revive the edges. Cover braised dishes like cabbage or ratatouille and warm them gently on the stove over low heat with a splash of water or broth. Gratin and stuffed vegetables reheat best in the oven, loosely covered with foil at first, then uncovered for the last few minutes so the top wakes up again.
Make-ahead prep helps a lot. You can wash and trim vegetables the day before, peel squash and beets ahead of time, cook grains and lentils in advance, and whisk dressings or sauces a day early. If a dish has crunchy toppings, keep them separate until the last minute. That one habit saves more texture than any fancy trick.
Easy Swaps and Flavor Shifts to Try
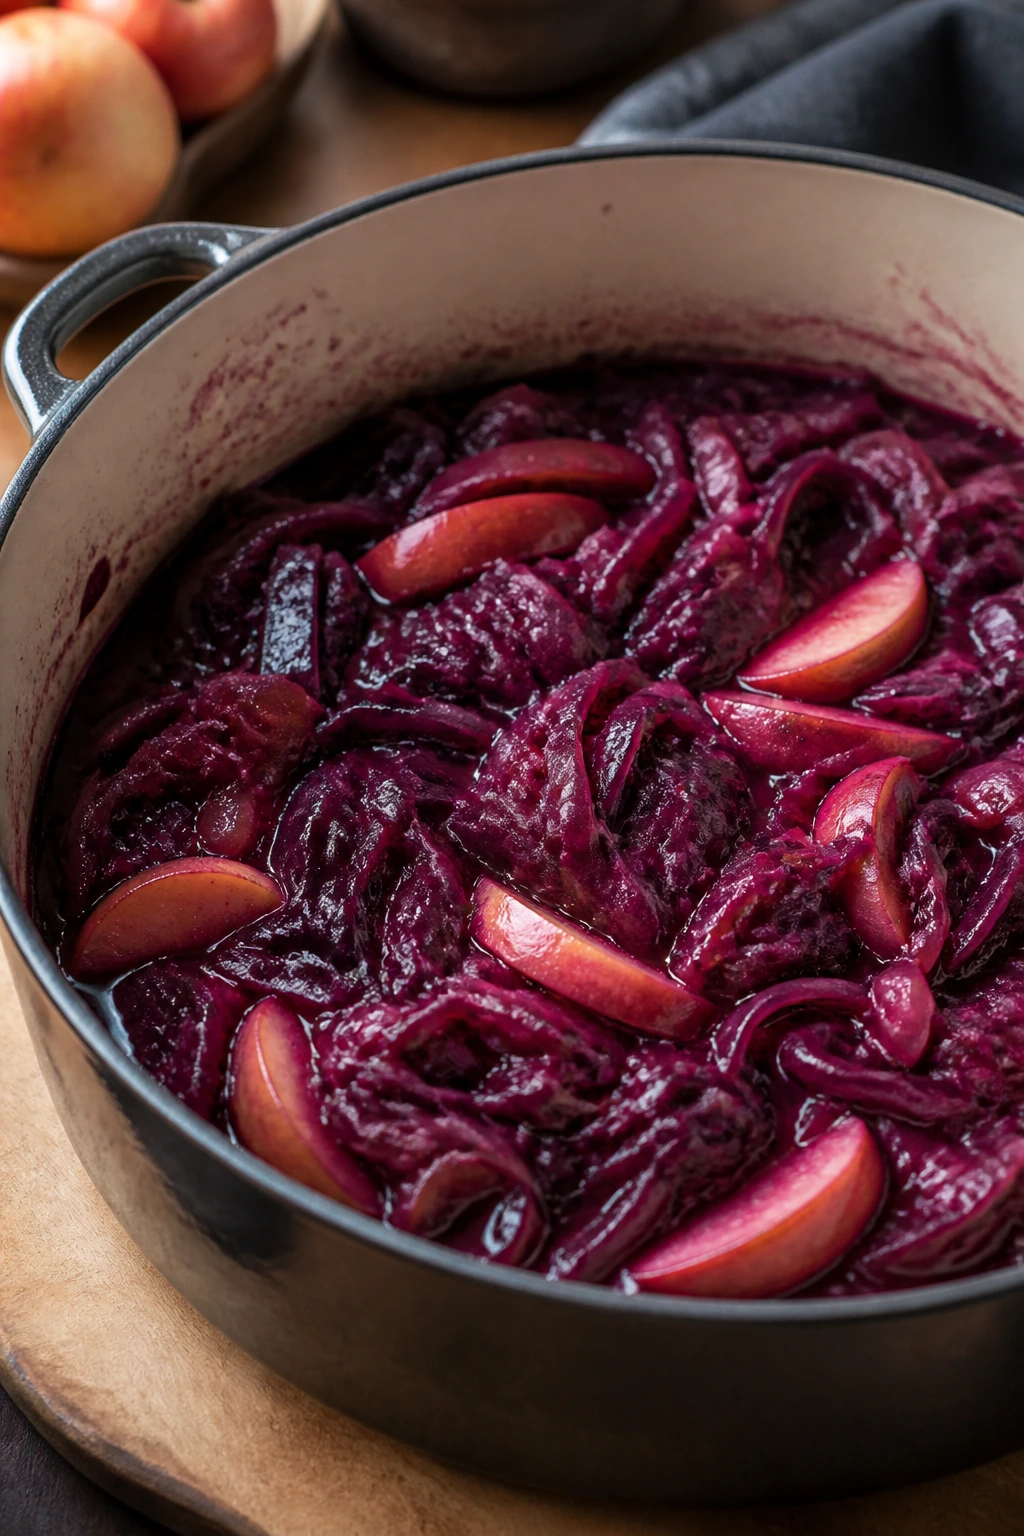
The Dairy-Free Route: Use olive oil, tahini, or a cashew-based sauce instead of cream, butter, or cheese. Roasted vegetables still taste rich if you season them well and finish with acid.
The Gluten-Free Route: Skip breadcrumbs or replace them with chopped nuts, seeds, or gluten-free crumbs. Polenta, mashed cauliflower, roasted vegetables, and braises all fit easily here without any awkward changes.
The Extra-Savory Route: Add mushrooms, miso, Parmesan, or a splash of soy sauce to deepen the flavor of mild vegetables like cauliflower, leeks, and cabbage. A tiny amount goes a long way.
The Brighter Route: Use citrus zest, lemon juice, vinegar, or fresh herbs at the end. This works especially well with sweet vegetables such as carrots, squash, and sweet potatoes.
The Spicier Route: Harissa, chili flakes, chipotle powder, or black pepper can be folded into roasted and sautéed vegetables without changing the whole dish. Keep the heat modest if you still want the vegetable to taste like itself.
The More Filling Route: Add grains, beans, lentils, or potatoes to the bowl. If a side needs to carry a vegetarian dinner, starch and legumes are the easiest way to get there.
Common Mistakes to Avoid
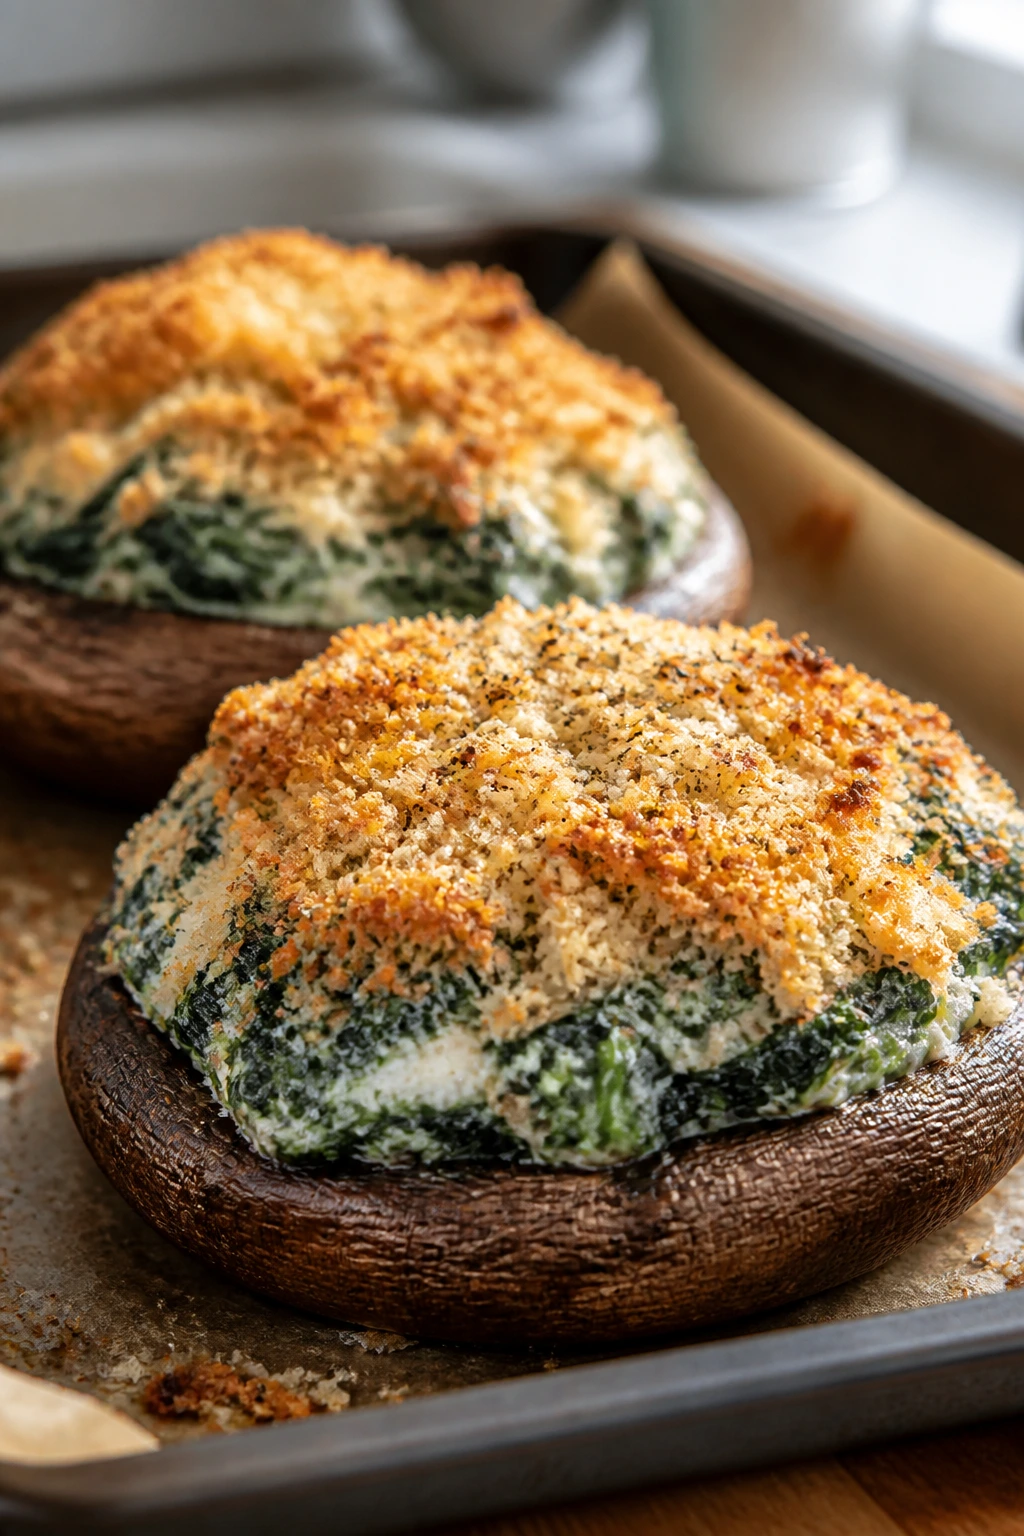
Skipping the dry step: Wet vegetables steam, and steam is the enemy of browning. Pat Brussels sprouts, broccoli, mushrooms, and chickpeas dry before they hit the heat.
Crowding the pan: If everything piles up, the vegetables collapse into each other and never brown properly. Use two sheet pans rather than forcing one tray to do too much.
Underseasoning early: Vegetables can take more salt than people think, especially if they’re roasted or braised. Salt the base, then taste again at the end when the texture has settled.
Adding acid too soon: Lemon juice and vinegar are best when they finish the dish. If they go in early on a roast, they can dull browning and make flavors taste flatter.
Overcooking delicate vegetables: Asparagus, green beans, spinach, and zucchini all go from just right to soft in a short window. Watch for the color change and the first sign of tenderness, then stop.
Treating every vegetable the same way: Carrots, cabbage, squash, and cauliflower each need different heat and time. If a recipe seems very specific about temperature or cutting size, there’s usually a reason.
Helpful Questions Before You Cook
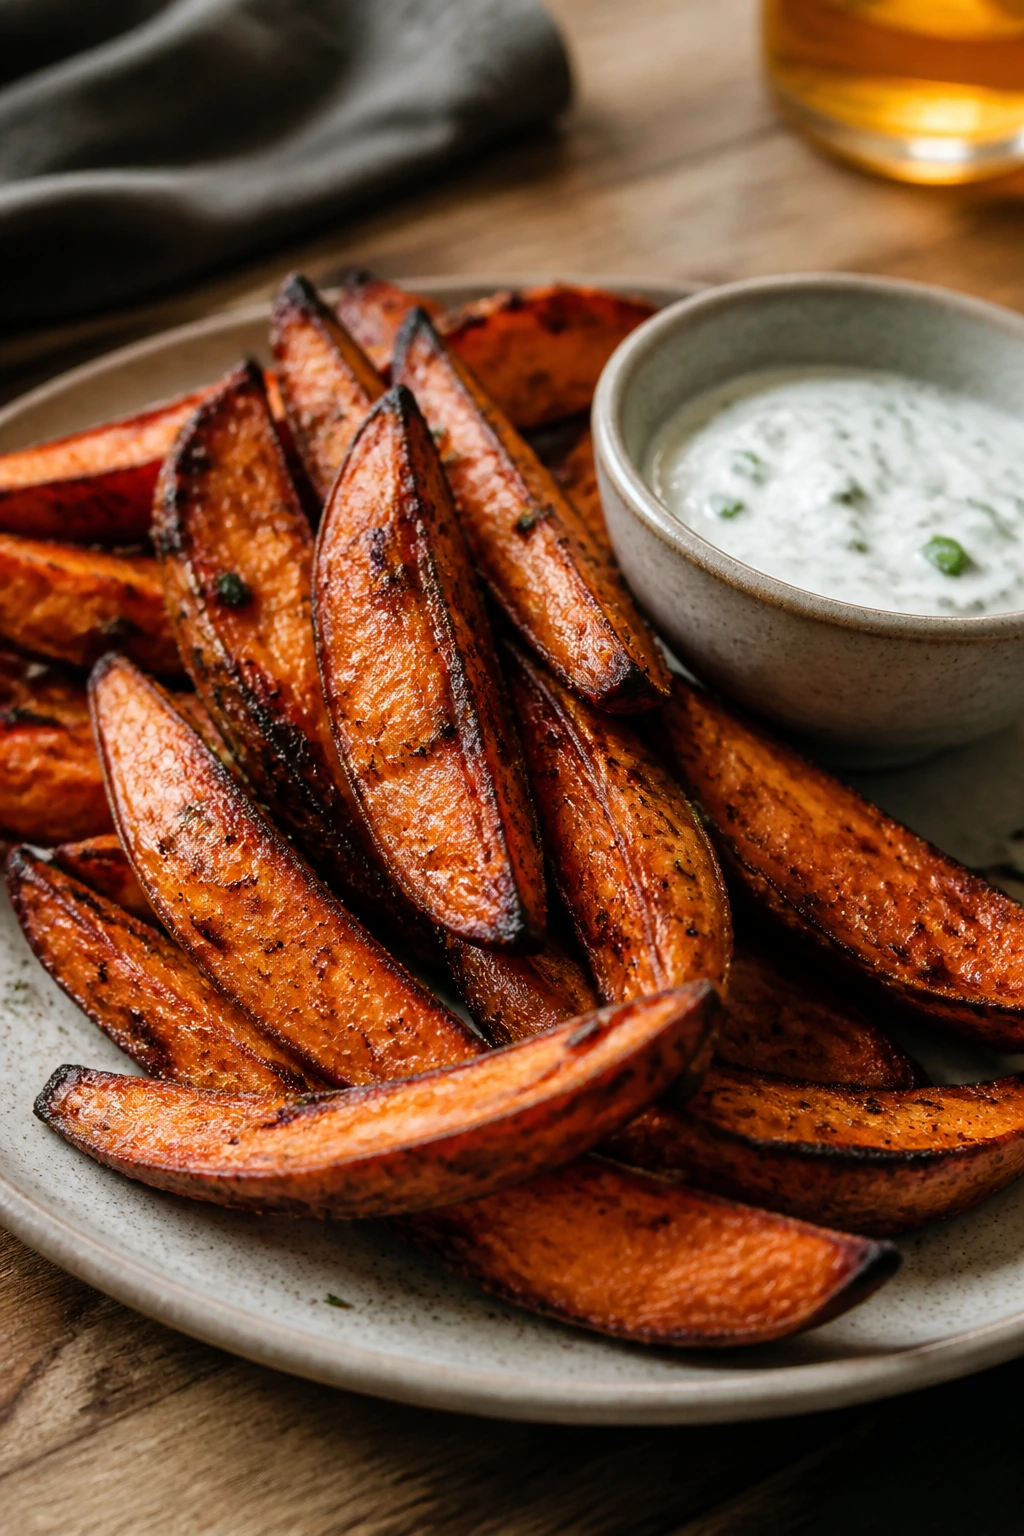
Can I make these vegetable side dishes ahead of time?
Yes, most of them can be prepped a day ahead, and many taste better after a short rest. Braises, lentil salads, gratins, and grain-based sides are the best make-ahead choices. Crisp roasted vegetables are better reheated in the oven just before serving.
Which of these sides works best for a holiday table?
Braised red cabbage, cauliflower gratin, stuffed acorn squash, roasted carrots, and mashed cauliflower are especially useful because they hold well and don’t demand last-second attention. Shaved Brussels sprout salad and beet salad add color and brightness if the rest of the table is rich.
What if I only have frozen vegetables?
Frozen corn and peas are the easiest wins. Thaw them fully, dry them, and use high heat for corn or a quick cook for peas. Frozen broccoli can work in a pinch, but it won’t roast as crisply as fresh florets.
How do I make these sides more filling without adding meat?
Add lentils, chickpeas, farro, potatoes, polenta, or a richer sauce. A side dish becomes much more substantial when it has either starch or protein, not just vegetables alone.
Can I use an air fryer for the roasted recipes?
Yes, for smaller batches. Brussels sprouts, broccoli, carrots, and sweet potato wedges all work well at about 375°F to 390°F, but you’ll need to shake the basket once or twice. Don’t overcrowd it, or you lose the crisp edges.
Why do some vegetable sides taste flat even when they’re salted?
Usually the problem is missing acid, missing browning, or both. Salt alone can’t make up for pale cooking. Lemon, vinegar, mustard, browned butter, or a deeply roasted pan changes the flavor in a way plain salting cannot.
What’s the easiest side here for a beginner?
Honey-roasted carrots, roasted broccoli, garlicky green beans, and smashed baby potatoes are the least fussy. They use simple techniques and clear visual cues: browned edges, tender centers, and a smell that tells you when they’re done.
A Better Way to Build the Vegetable Side of the Plate
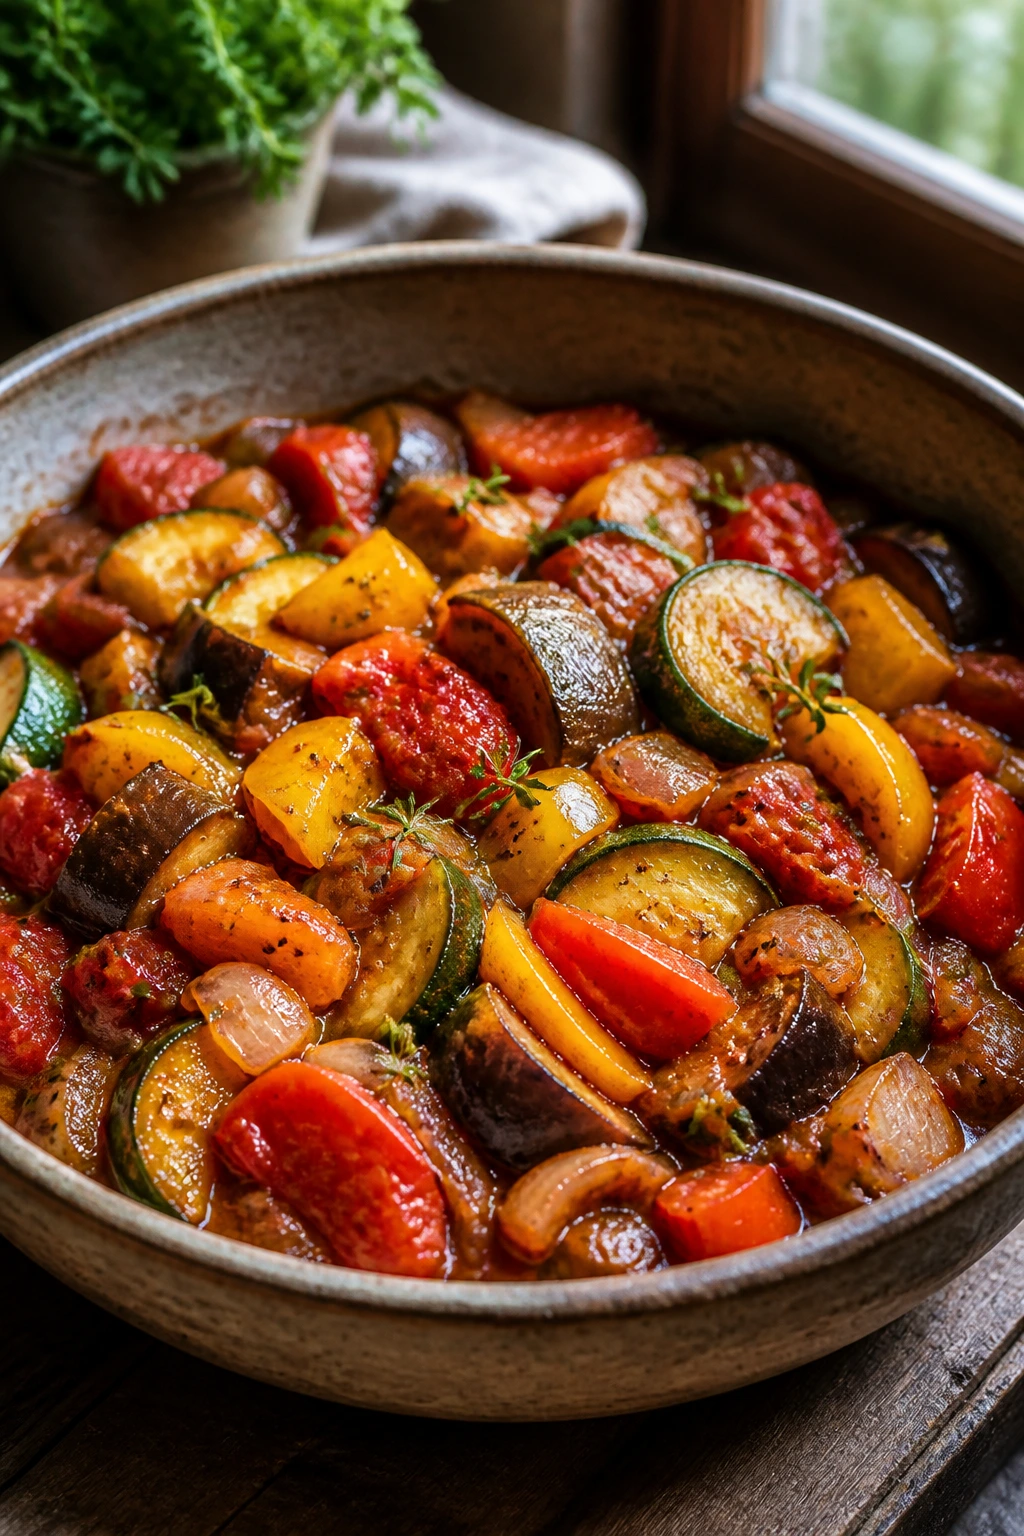
The nicest thing about a good vegetable side dish is that it doesn’t need to apologize for being vegetables. It just needs to be handled with a little care: enough heat to brown, enough salt to wake up the flavor, and enough texture to keep it interesting past the first bite. Once you get that balance right, vegetables stop being the quiet part of dinner.
I’d start with one roasted side, one creamy or braised side, and one fresh or sharp side if you’re feeding more than two people. That mix gives the table some lift, some comfort, and something with a little crunch. It also keeps you from leaning too hard on one flavor note, which is where so many vegetable spreads go wrong.
If you keep a lemon on the counter, a jar of mustard in the fridge, and a few nuts or seeds in the pantry, you’re already halfway there. The rest is just heat and timing, and those are skills that get easier every time you use them.