
A picnic sandwich has one job: make it from the kitchen counter to the blanket without turning soggy, sliding apart, or leaving half its filling behind in the wrapper. That sounds easy until the sun warms the cooler, the bread steams itself in plastic, and the tomato slices start acting like they were hired to leak. The best picnic sandwiches recipes are not built on excess. They’re built on bread that holds its shape, fillings that stay calm at room temperature, and a little bit of restraint.
That’s the part people miss. A sandwich for a picnic is not the same animal as a sandwich eaten over the sink. It needs a dry side and a moist side, a little fat to carry flavor, and enough structure that you can cut it without watching it slump open on the napkin. I like picnic sandwiches that taste even better after a short chill, because that tells me they were designed with the real world in mind.
Some of these are neat little tea sandwiches. Some are deli-style stacks wrapped in parchment and sliced on the bias. A few are the kind you pack in halves and eat with both hands. All of them are chosen for a simple reason: they survive the heat, the travel, and the moment when everybody is hungry and nobody wants to hunt for a fork.
Why These Sandwiches Earn Space in the Cooler
-
Bread that stays intact: These recipes use buns, rolls, sourdough, rye, ciabatta, or sturdy sandwich bread so the bottom slice doesn’t dissolve before the second serving round.
-
Fillings that travel well: Chicken salad, tuna salad, pimento cheese, hummus, and roasted vegetables taste better after a short rest and don’t panic when they’re packed cold.
-
A mix of textures: Crisp cucumber, crunchy celery, creamy cheese, salty meats, and tart pickles keep the basket from feeling one-note.
-
Make-ahead friendly: Several of these can be mixed, chilled, and wrapped the night before, which matters when you’d rather be loading the cooler than slicing onions at the last minute.
-
Enough variety for a crowd: There are light tea sandwiches, meatier deli builds, vegetarian choices, and a couple of sweet or kid-friendly options so nobody gets stuck eating the same thing twice.
-
Portable without fuss: These are sandwiches you can cut cleanly, wrap tightly, and hand across a picnic blanket without a pile of plates.
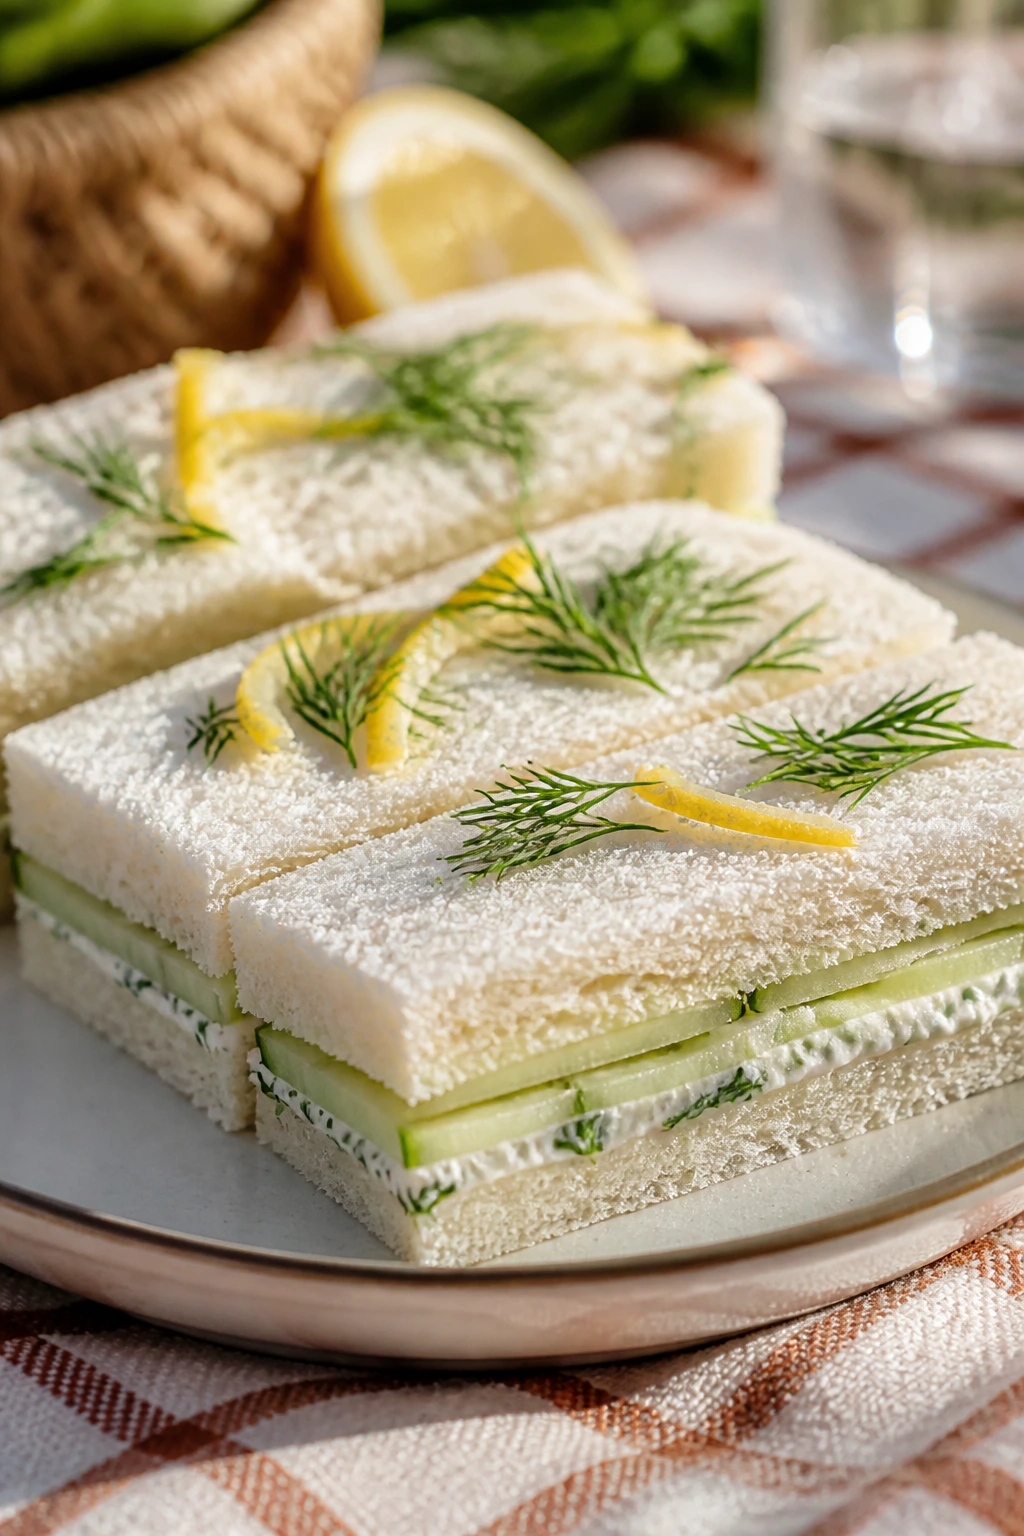
1. Cucumber-Dill Tea Sandwiches
A good cucumber sandwich has a very specific charm: cold, clean, faintly briny, and lighter than it looks. The trick is not the cucumber alone. It’s the cream cheese spread, the thin bread, and the discipline to keep the slices almost transparent so the sandwich tastes cool instead of watery.
Why It Works:
English cucumbers bring crunch without the big wet seed pockets you get from slicing a standard cucumber. Cream cheese gives the sandwich enough body to survive a few hours in a cooler, and dill plus lemon keep the whole thing from tasting flat. The crustless, slim format also makes these easy to stack in a container without crushing them.
Key Ingredients:
- 8 ounces cream cheese, softened
- 2 tablespoons mayonnaise
- 1 tablespoon fresh dill, finely chopped
- 1 tablespoon lemon juice
- 1/4 teaspoon fine salt
- 1/8 teaspoon black pepper
- 1 English cucumber, very thinly sliced
- 8 slices soft white sandwich bread, crusts removed
- 1 tablespoon softened butter, for the bread
- Microgreens, optional for a sharper finish
Quick Steps:
- In a bowl, mix the cream cheese, mayonnaise, dill, lemon juice, salt, and pepper until smooth.
- Slice the cucumber as thinly as you can, then lay the slices on a towel and sprinkle lightly with salt for 10 minutes.
- Pat the cucumber dry. Do not skip this. Wet cucumber is the fastest route to a damp sandwich.
- Spread a thin layer of butter on each bread slice, then spread the cream cheese mixture over half the slices.
- Layer cucumber slices over the spread, add microgreens if using, and top with the remaining bread.
- Press gently, trim the crusts, and cut into neat fingers or triangles. Chill for 15 to 20 minutes before packing.
Equipment for This Recipe:
- Sharp serrated knife
- Cutting board
- Small mixing bowl
- Paper towels or a clean kitchen towel
- Offset spatula or butter knife
How to Serve This Dish:
Arrange these in tidy triangles on a chilled plate or pack them in a single layer with parchment between rows. They’re best with a handful of kettle chips, a saltier snack on the side, or a glass of iced tea with lemon. Two or three triangles make a light serving; four if they’re the main lunch.
Pro Tips for This Recipe:
- Use the thinnest bread you can find. Thick sandwich slices fight the filling.
- Buttering the bread creates a moisture barrier. Small detail. Big difference.
- Keep the sandwiches cold until the last minute; they lose their snap fast in warm air.
- If the cucumbers are especially watery, salt them a little longer and blot twice.
Variations on This Dish:
- Smoked Salmon Ribbon: Add thin ribbons of smoked salmon under the cucumber for a more substantial bite.
- Everything Bagel Edge: Mix a pinch of everything seasoning into the cream cheese and use rye bread instead of white.
- Labneh Swap: Replace half the cream cheese with thick labneh for a tangier, less heavy spread.
Common Mistakes to Avoid with This Dish:
- Using thick cucumber slices: They slide around and dump water into the bread. Slice thinner.
- Assembling too early: The bread softens if these sit overnight fully built. Make them same-day if possible.
- Skipping the butter layer: The spread goes straight into the bread without it, and the texture suffers.
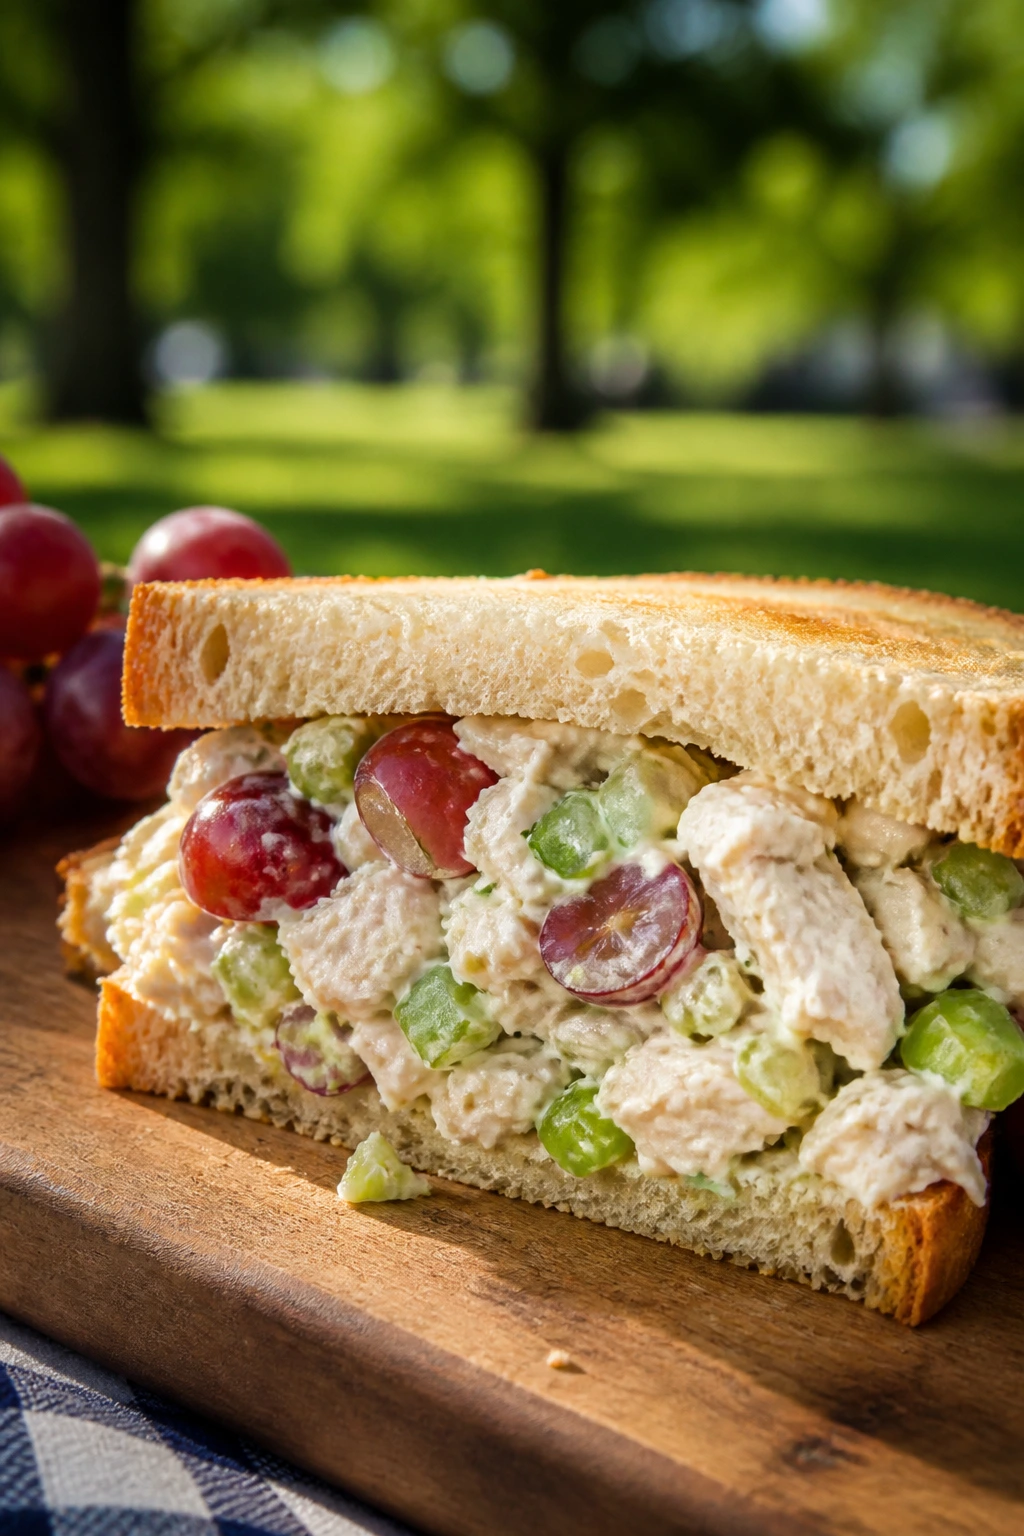
2. Chicken Salad with Grapes and Celery
Chicken salad is the kind of picnic sandwich that rewards a cold fridge and a sharp knife. The grapes bring little pops of sweetness, the celery gives you crunch, and the chicken needs to be chopped small enough that the sandwich holds together instead of spilling out in dry chunks.
Why It Works:
A mayo-based salad sounds simple, but the details matter. Small dice means better coverage, celery keeps the texture lively, and a little Dijon sharpens the flavor so the salad doesn’t taste like plain chicken in a coat. This one is sturdy enough for sandwich bread and forgiving enough to eat after a few hours on ice.
Key Ingredients:
- 3 cups cooked chicken, shredded or finely chopped
- 1/2 cup mayonnaise
- 1 tablespoon Dijon mustard
- 1 teaspoon lemon juice
- 1/2 cup red seedless grapes, halved
- 1/2 cup celery, finely diced
- 2 tablespoons toasted sliced almonds
- 1 tablespoon parsley, chopped
- 1/2 teaspoon kosher salt
- 1/4 teaspoon black pepper
- 8 slices sturdy sandwich bread or soft rolls
Quick Steps:
- In a bowl, stir together the mayonnaise, Dijon, lemon juice, salt, and pepper.
- Fold in the chicken, grapes, celery, almonds, and parsley until the meat is coated but not drowned.
- Taste and adjust with a squeeze more lemon if it feels heavy.
- Chill the salad for 20 minutes so the flavors settle and the bread doesn’t absorb too much moisture.
- Spoon the salad onto bread or rolls, then close and press lightly. Slice only after the sandwich is fully built.
Equipment for This Recipe:
- Mixing bowl
- Rubber spatula
- Chef’s knife
- Cutting board
- Airtight container for chilling
How to Serve This Dish:
Serve it on soft rolls, sourdough, or buttered sandwich bread, with lettuce if you want a little extra crunch. It plays well beside potato chips and sliced melon. One generous sandwich is enough for most adults; a small roll makes a cleaner picnic portion.
Pro Tips for This Recipe:
- Rotisserie chicken works well here, but chop it finely so the salad doesn’t feel chunky and dry.
- Toast the almonds before adding them; raw nuts taste flat beside the grapes.
- If the filling looks loose, add another spoonful of chicken before reaching for more mayo.
- Pack the salad and bread separately if the picnic lasts all day.
Variations on This Dish:
- Curry Chicken Salad: Add 1 teaspoon curry powder and swap the grapes for diced apple.
- Dill Pickle Version: Replace half the grapes with chopped dill pickles and skip the almonds.
- Avocado Chicken Salad: Mash 1/2 avocado into the mayo for a softer, greener filling.
Common Mistakes to Avoid with This Dish:
- Using big chicken chunks: They make the sandwich fall apart. Chop smaller than you think.
- Adding too much mayo: The salad should cling, not puddle.
- Packing it warm: Warm chicken and mayo in a picnic cooler are not friends.
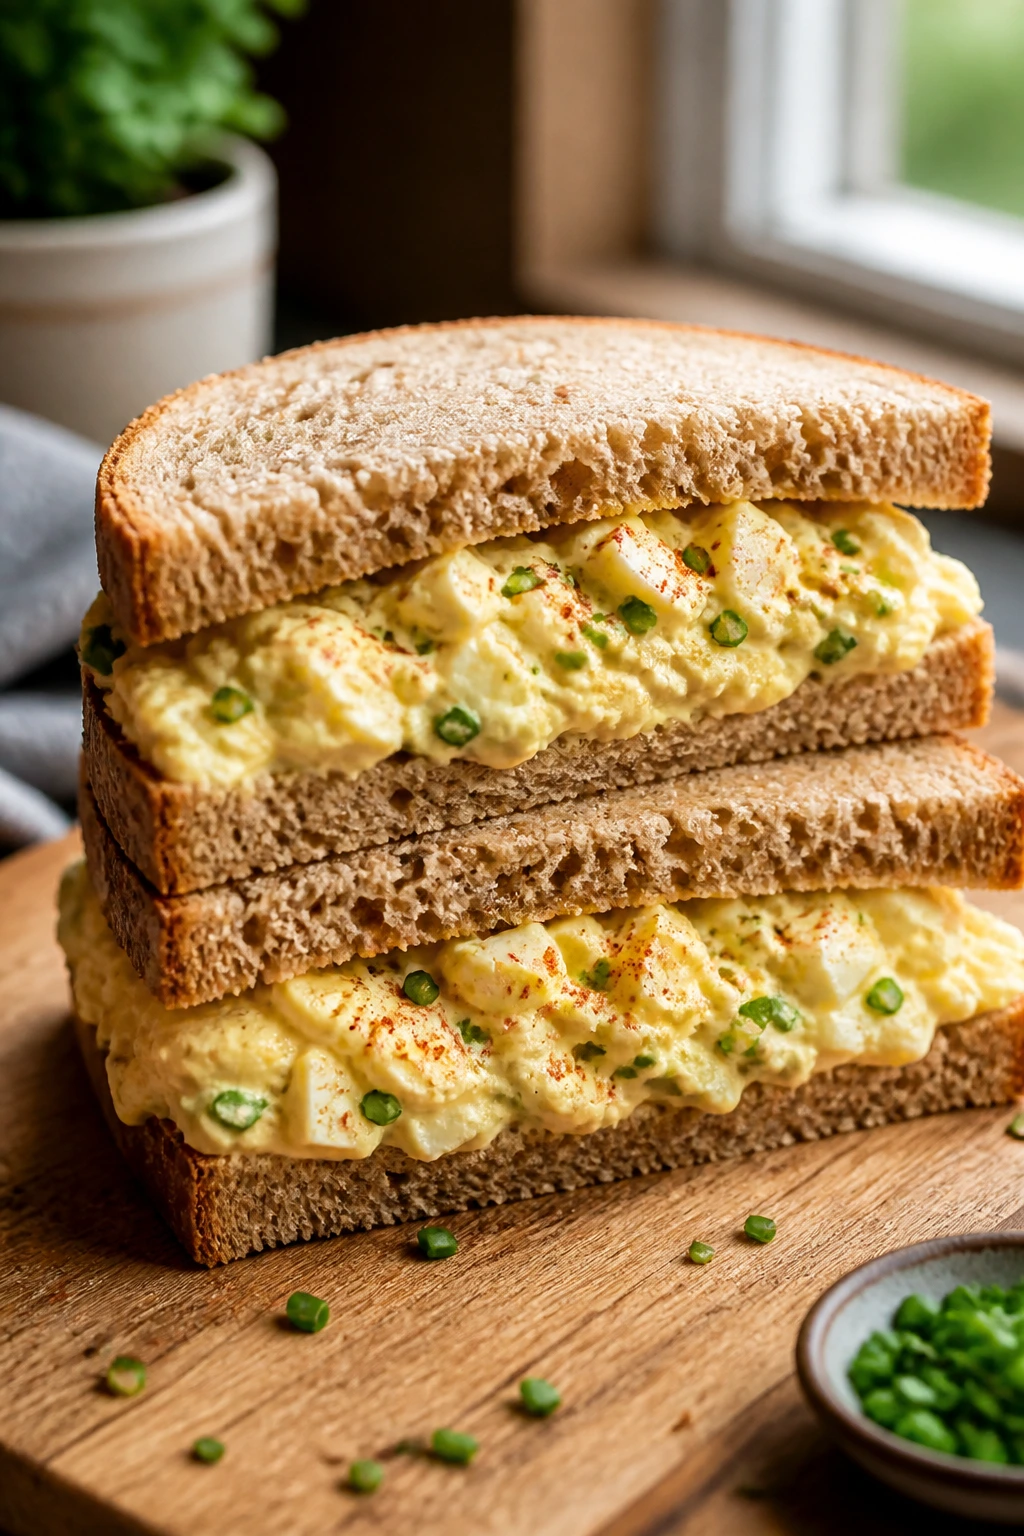
3. Classic Egg Salad with Chives
Egg salad has a reputation problem, mostly because people overcook the eggs and then bury them under so much mayo that everything turns gray and heavy. Done right, it’s creamy, a little sharp, and surprisingly elegant in a plain slice of bread.
Why It Works:
Cold eggs, a clean chop, and a small amount of vinegar give this filling enough lift to taste bright instead of flat. Chives bring onion flavor without the bite of raw onion, and paprika gives the surface a little color so the sandwich looks appetizing even after chilling. For picnics, egg salad is best when it’s thick enough to mound and not so loose that it leaks from the sides.
Key Ingredients:
- 8 large eggs
- 1/3 cup mayonnaise
- 1 teaspoon Dijon mustard
- 1 teaspoon apple cider vinegar
- 1 tablespoon chives, finely chopped
- 1/4 teaspoon paprika
- 1/4 teaspoon kosher salt
- 1/8 teaspoon black pepper
- 8 slices rye, white, or whole wheat bread
- Lettuce leaves, optional
Quick Steps:
- Place the eggs in a saucepan and cover with cold water by 1 inch.
- Bring to a boil, then turn off the heat, cover, and let sit for 10 to 11 minutes.
- Move the eggs to an ice bath and cool completely before peeling.
- Chop the eggs into small pieces, then fold them with the mayonnaise, mustard, vinegar, chives, paprika, salt, and pepper.
- Chill the filling for 15 minutes, then spread it on bread with lettuce if using.
- Close, trim, and cut into halves or rectangles for easier packing.
Equipment for This Recipe:
- Medium saucepan
- Slotted spoon
- Bowl for ice bath
- Mixing bowl
- Fork or pastry cutter
How to Serve This Dish:
Egg salad likes rye in my book, though soft white bread is fine if you’re making the sandwiches small. Serve it with crunchy pickles or radishes on the side; the sharpness matters. One thick sandwich is enough for a lunch portion, and mini versions work well for a mixed picnic spread.
Pro Tips for This Recipe:
- Cool the eggs fully before mixing or the filling turns loose.
- Chop by hand for a more textured bite; a food processor makes it paste-like fast.
- If the salad tastes dull, add a few drops more vinegar rather than more salt.
- Make the filling up to a day ahead, but assemble the sandwiches closer to serving time.
Variations on This Dish:
- Deviled-Egg Style: Add a pinch of mustard powder and extra paprika for a more familiar flavor.
- Avocado Egg Salad: Mash in half an avocado and use a little less mayo.
- Pickle-Forward Version: Fold in 2 tablespoons of chopped dill pickles for extra bite.
Common Mistakes to Avoid with This Dish:
- Overcooking the eggs: Green rings and chalky yolks make the filling taste dry.
- Using too much mayo: The filling should hold its shape when scooped.
- Letting it sit in warm weather: Egg salad needs a cold cooler, not a blanket in the sun.
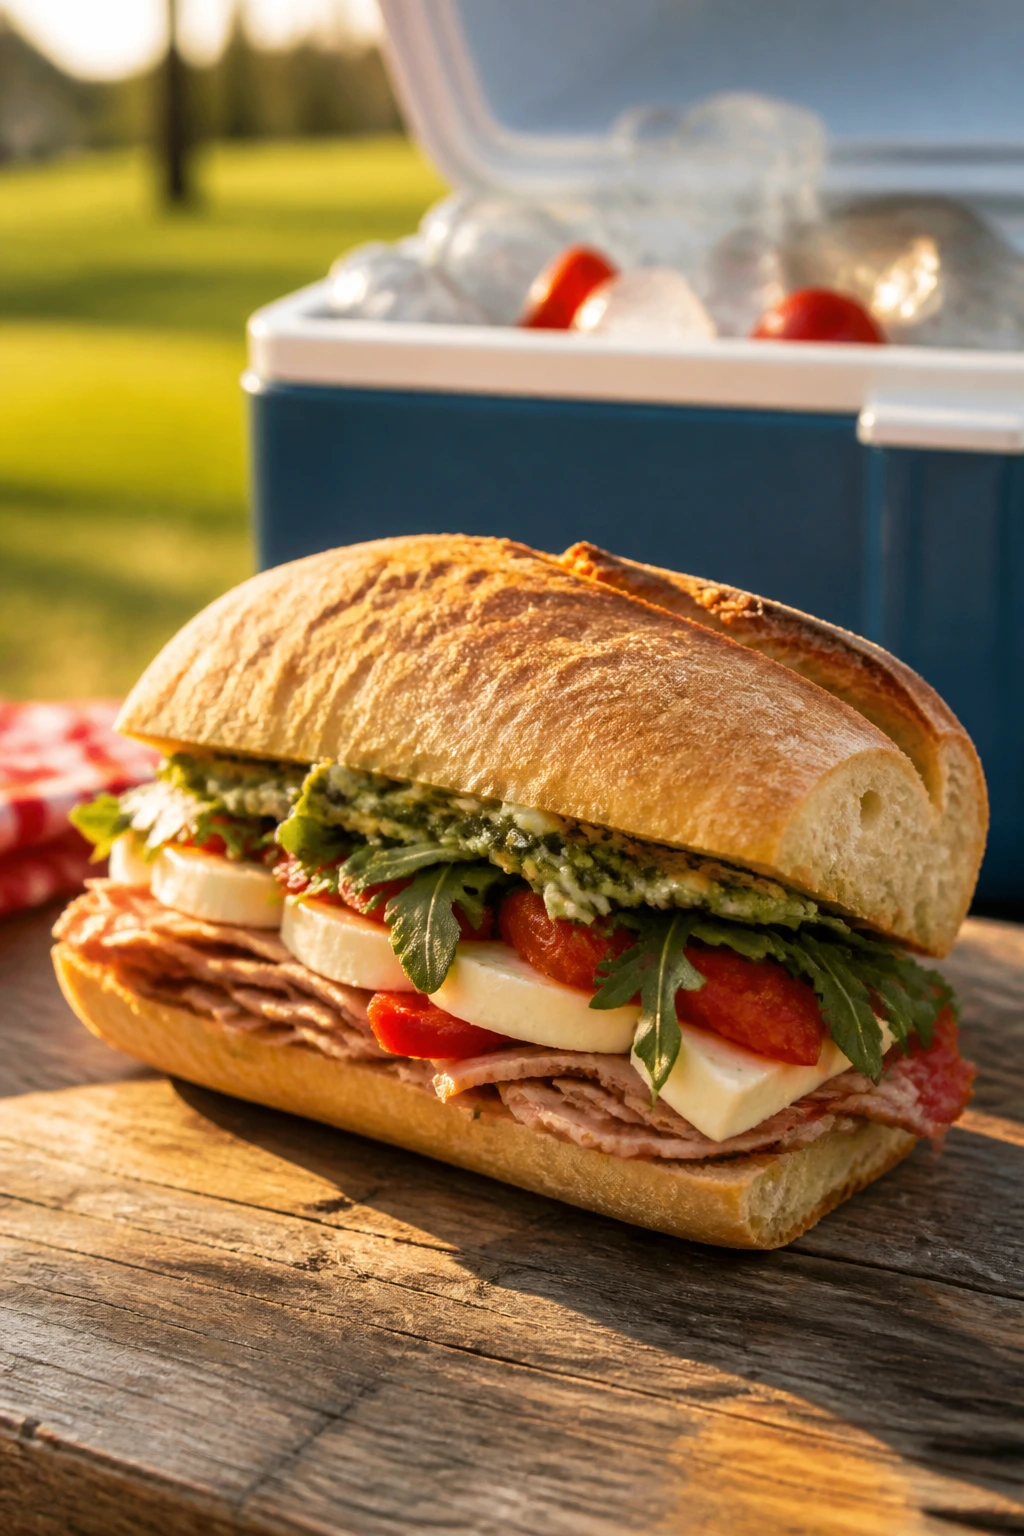
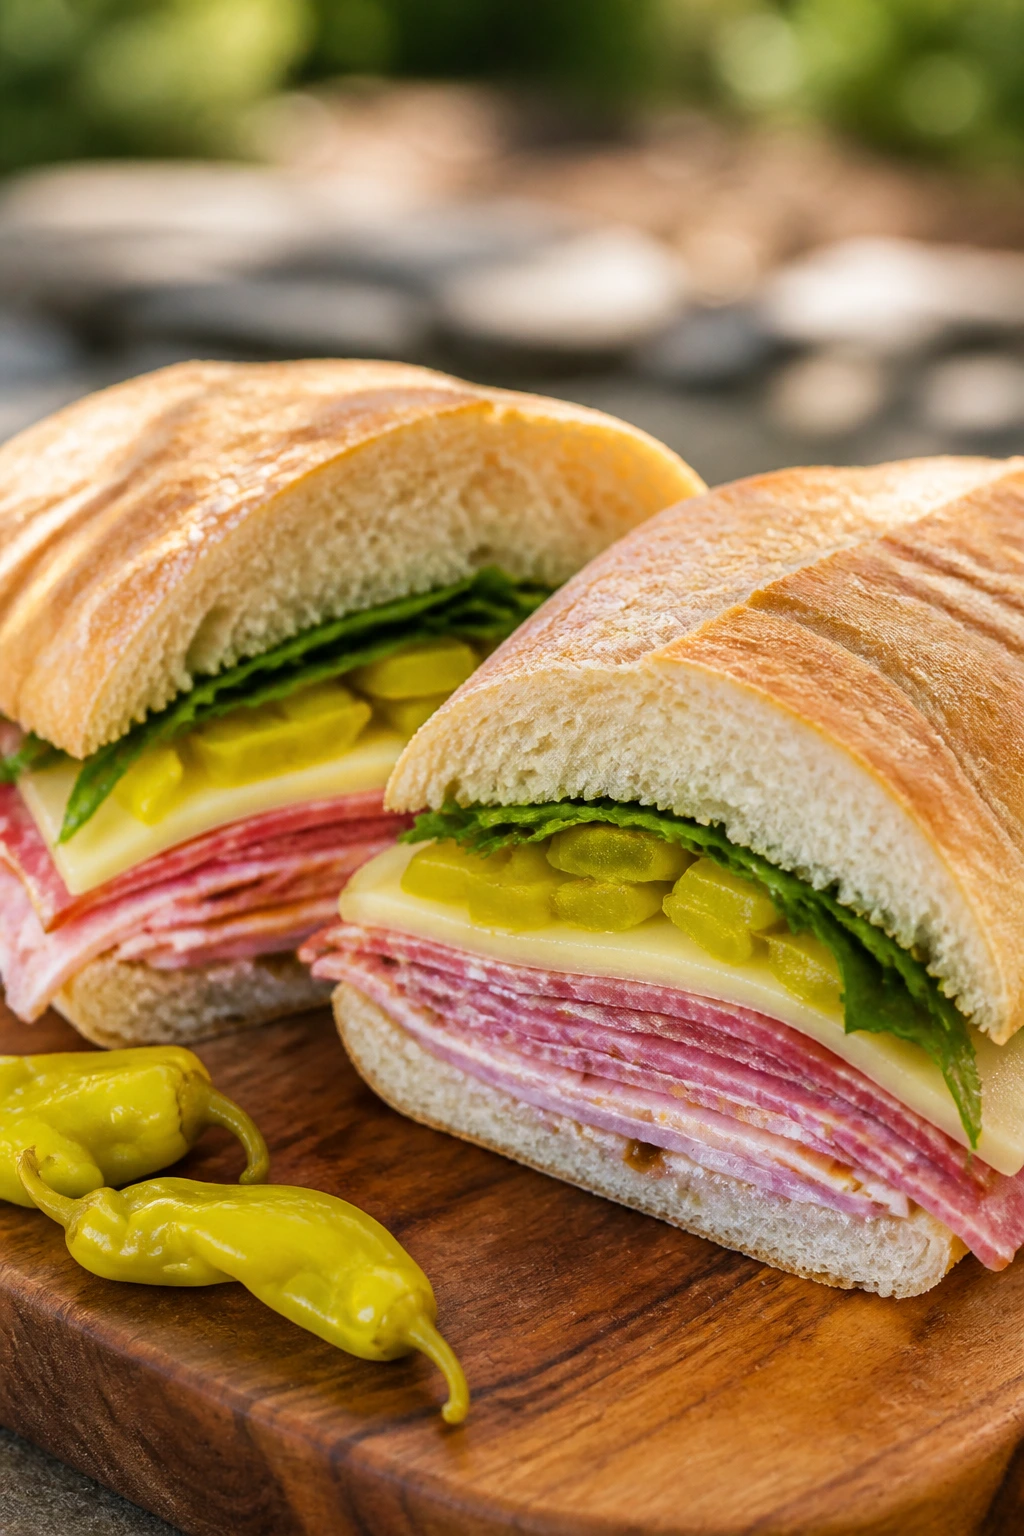
4. Italian Deli Sandwiches with Pepperoncini
This is the heavy hitter in the picnic basket. Salami, ham, provolone, peppers, and a vinegar-heavy dressing make a sandwich that tastes alive even when it’s eaten at room temperature. The trick is layering so the bread meets the cheese first, not the wet stuff.
Why It Works:
Italian deli sandwiches hold up because the fat from the meat and cheese buffers the acid from the vinegar and pepperoncini. A sturdy roll or ciabatta gives you enough chew to handle the juices, and a quick oil-vinegar mix seasons every layer instead of soaking one spot. If you’ve ever had a deli sandwich go limp by the second bite, this is the corrected version.
Key Ingredients:
- 1/4 cup olive oil
- 2 tablespoons red wine vinegar
- 1 teaspoon Dijon mustard
- 1/2 teaspoon dried oregano
- 1/4 teaspoon red pepper flakes
- 8 ounces sliced salami
- 8 ounces sliced ham or capicola
- 8 ounces sliced provolone
- 1 cup shredded iceberg lettuce
- 1/2 cup roasted red peppers, drained and patted dry
- 1/2 cup pepperoncini, sliced
- 4 hoagie rolls or 1 large ciabatta loaf
Quick Steps:
- Whisk the olive oil, vinegar, Dijon, oregano, and red pepper flakes together.
- Slice the rolls open and, if you like, toast the cut sides lightly for 2 to 3 minutes.
- Layer provolone on the bread first, then salami and ham, then lettuce, peppers, and pepperoncini.
- Drizzle a little dressing over the filling, then close the sandwich and press gently.
- Wrap tightly in parchment and let rest for 10 minutes before cutting.
Equipment for This Recipe:
- Sharp knife
- Small bowl and whisk
- Cutting board
- Paper or parchment wrap
- Sheet pan for toasting, optional
How to Serve This Dish:
Cut the sandwich into big diagonal halves and pack each half wrapped separately. A pile of kettle chips and a crisp dill pickle are enough alongside it. This one feeds an adult lunch easily, and a half sandwich can work if the picnic table is crowded with other dishes.
Pro Tips for This Recipe:
- Drain the peppers well. Extra brine is the enemy here.
- Put cheese against the bread so it acts as a moisture shield.
- Press the sandwich lightly while wrapped so the layers settle.
- Use a bakery roll with a firm crust; soft sub buns collapse fast.
Variations on This Dish:
- Turkey Italian: Swap the ham for sliced turkey and keep the same dressing.
- Spicy Calabrian Version: Add a spoonful of Calabrian chili paste to the dressing.
- Vegetarian Grinder: Use marinated artichokes, extra provolone, and sliced zucchini.
Common Mistakes to Avoid with This Dish:
- Overdressing the sandwich: A little goes a long way. You want flavor, not runoff.
- Adding wet tomatoes without prep: If you use tomato, seed and blot it first.
- Choosing flimsy bread: This sandwich needs structure, not a cloud.
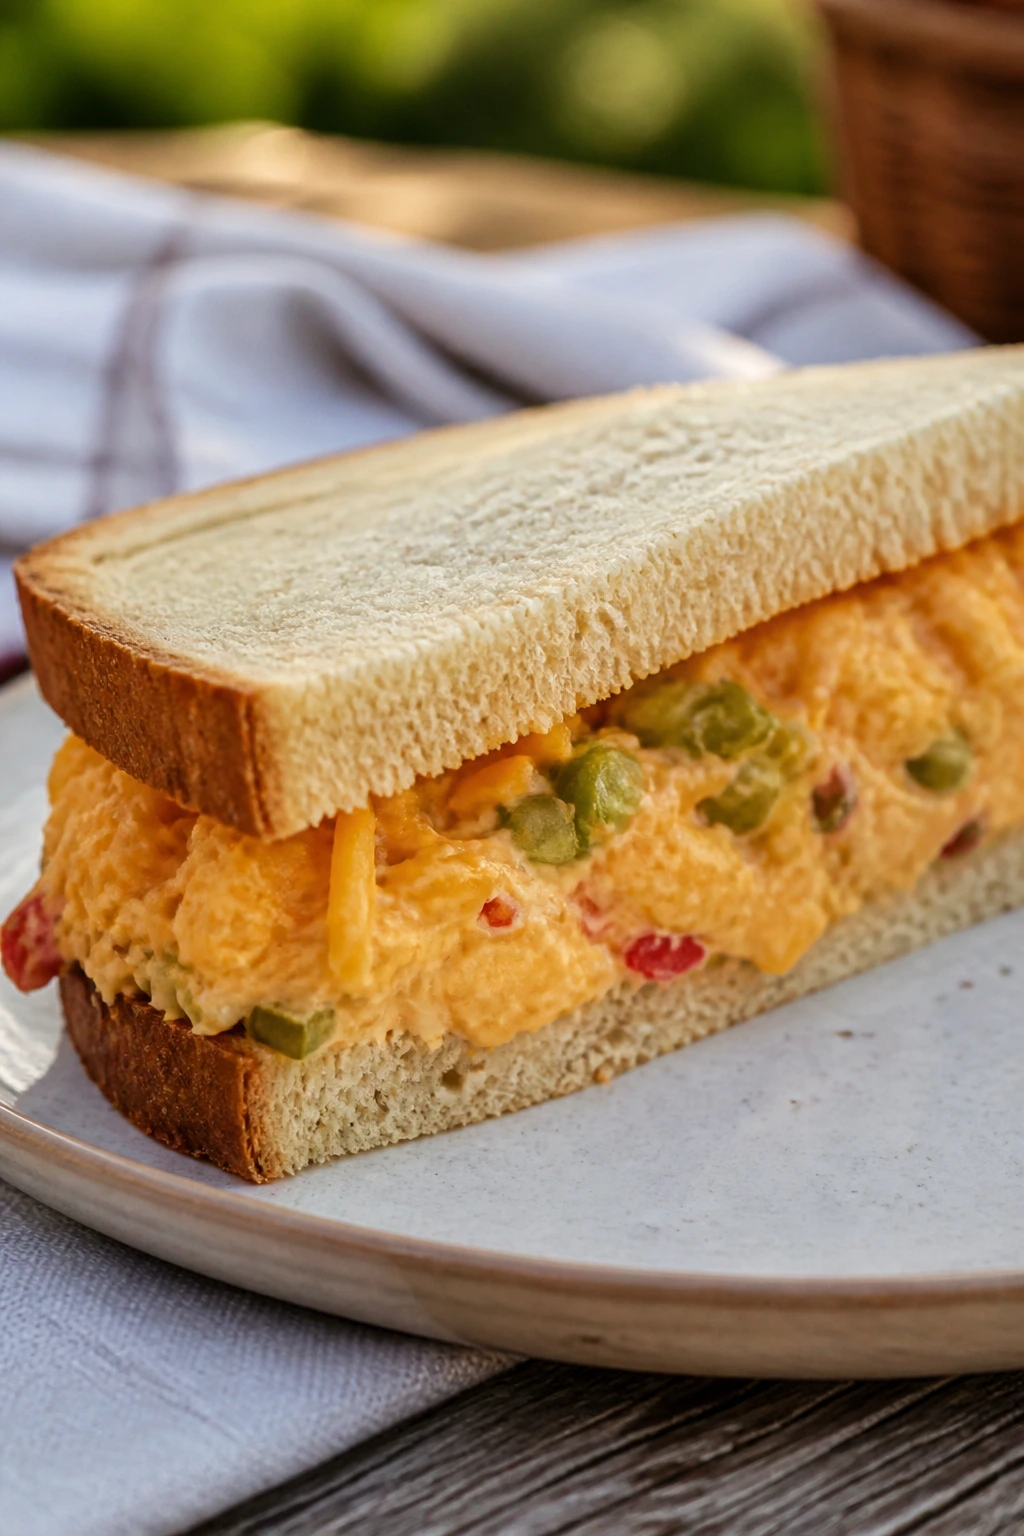
5. Pimento Cheese and Pickle Sandwiches
Pimento cheese is one of those fillings that seems simple until you taste a good one. Sharp cheddar, cream cheese, a little heat, and pimento peppers make a spread that’s thick, salty, and perfect for a picnic because it doesn’t mind a cold box and a few hours of resting.
Why It Works:
The cream cheese gives the filling body, while sharp cheddar carries the flavor. Pimentos and hot sauce keep it from tasting dense, and chopped pickles bring a clean snap that cuts through the richness. This is one of the strongest sandwiches in the whole lineup for make-ahead travel.
Key Ingredients:
- 8 ounces sharp cheddar, grated
- 4 ounces cream cheese, softened
- 1/4 cup mayonnaise
- 1/4 cup diced pimentos, drained
- 1 teaspoon hot sauce
- 1/2 teaspoon garlic powder
- 1/4 teaspoon kosher salt
- 1/4 teaspoon black pepper
- 1/2 cup chopped dill pickles
- 8 slices white bread or potato bread
Quick Steps:
- Stir the cheddar, cream cheese, mayonnaise, pimentos, hot sauce, garlic powder, salt, and pepper together until thick and spreadable.
- Chill the filling for at least 20 minutes so it firms up.
- Spread a generous layer over four bread slices, then add chopped pickles.
- Top with the remaining bread, press lightly, and cut into squares or triangles.
- Wrap each sandwich in parchment so the filling stays put in the cooler.
Equipment for This Recipe:
- Mixing bowl
- Box grater
- Spatula
- Knife
- Parchment or wax paper
How to Serve This Dish:
These are strong with potato chips, sliced cucumbers, or celery sticks on the side. They work as a main lunch or as one of several sandwiches on a picnic board. If you’re making smaller portions, cut them into four neat fingers and stack them on a plate.
Pro Tips for This Recipe:
- Grate the cheese yourself. Pre-shredded cheddar does not melt into the spread as cleanly.
- Let the filling chill before spreading or it can squish out at the edges.
- If you want more bite, add 1 tablespoon finely chopped scallions.
- Butter the bread lightly if it’s very soft.
Variations on This Dish:
- Bacon Pimento: Fold in 1/2 cup finely chopped cooked bacon.
- Jalapeño Pimento: Add 2 tablespoons minced pickled jalapeños.
- Open-Face Toast: Serve it on toasted country bread for a sturdier version.
Common Mistakes to Avoid with This Dish:
- Using too much pickle juice: The spread turns loose and grainy.
- Skipping the chill: Warm pimento cheese is harder to spread cleanly.
- Choosing stale bread: Soft bread is part of the point here.
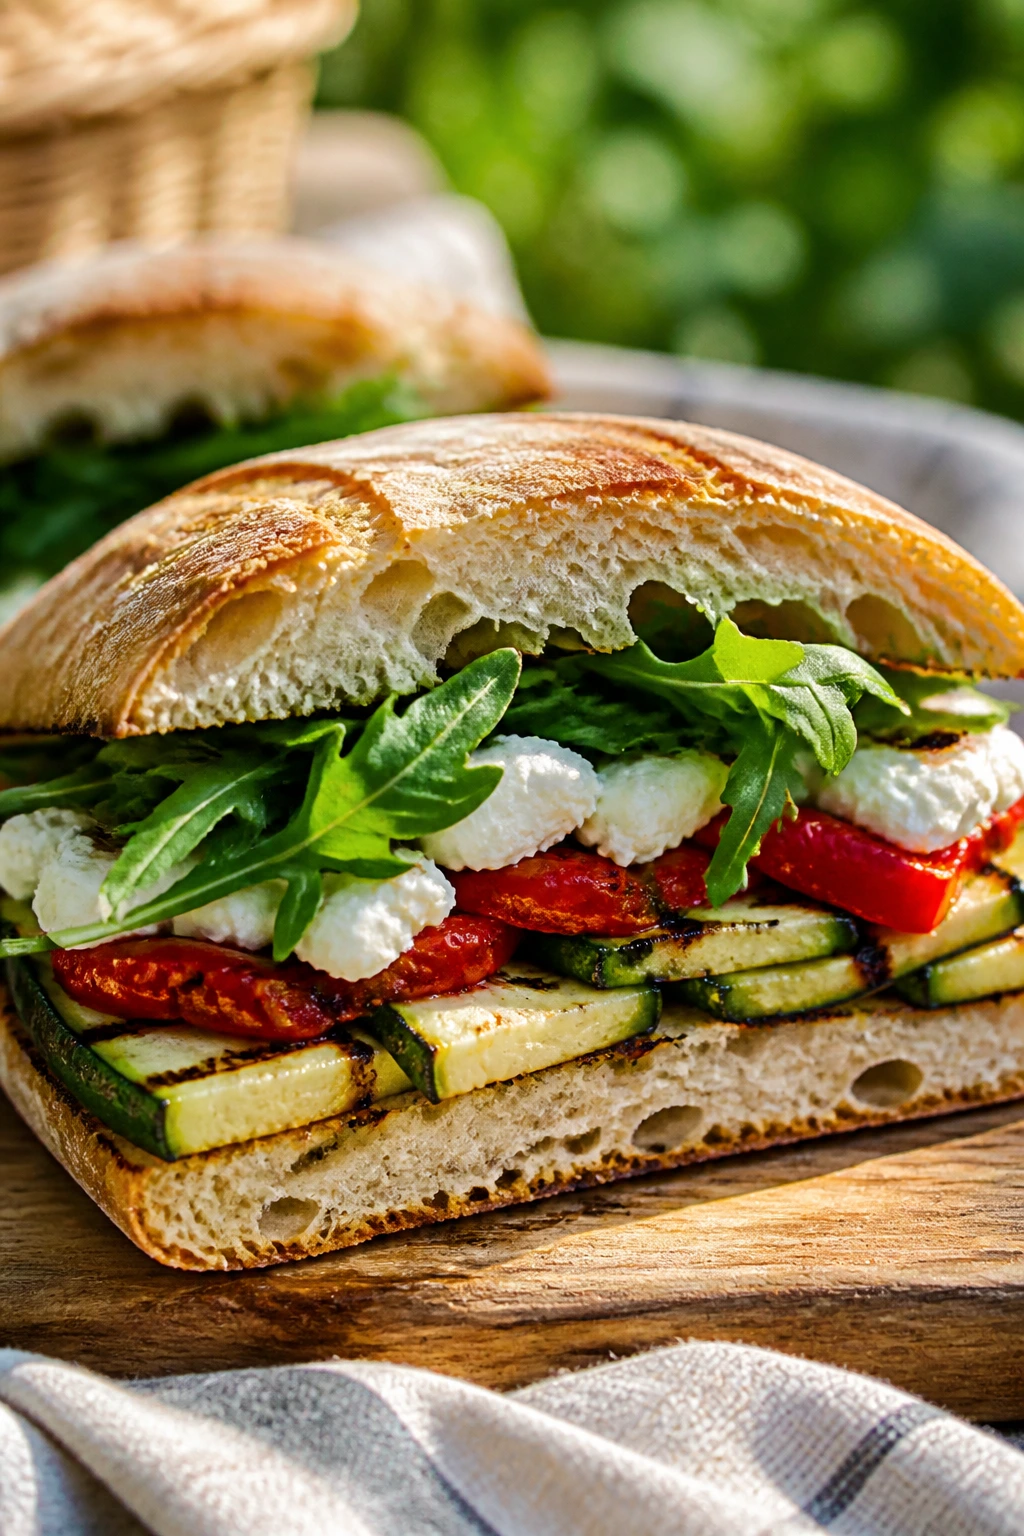
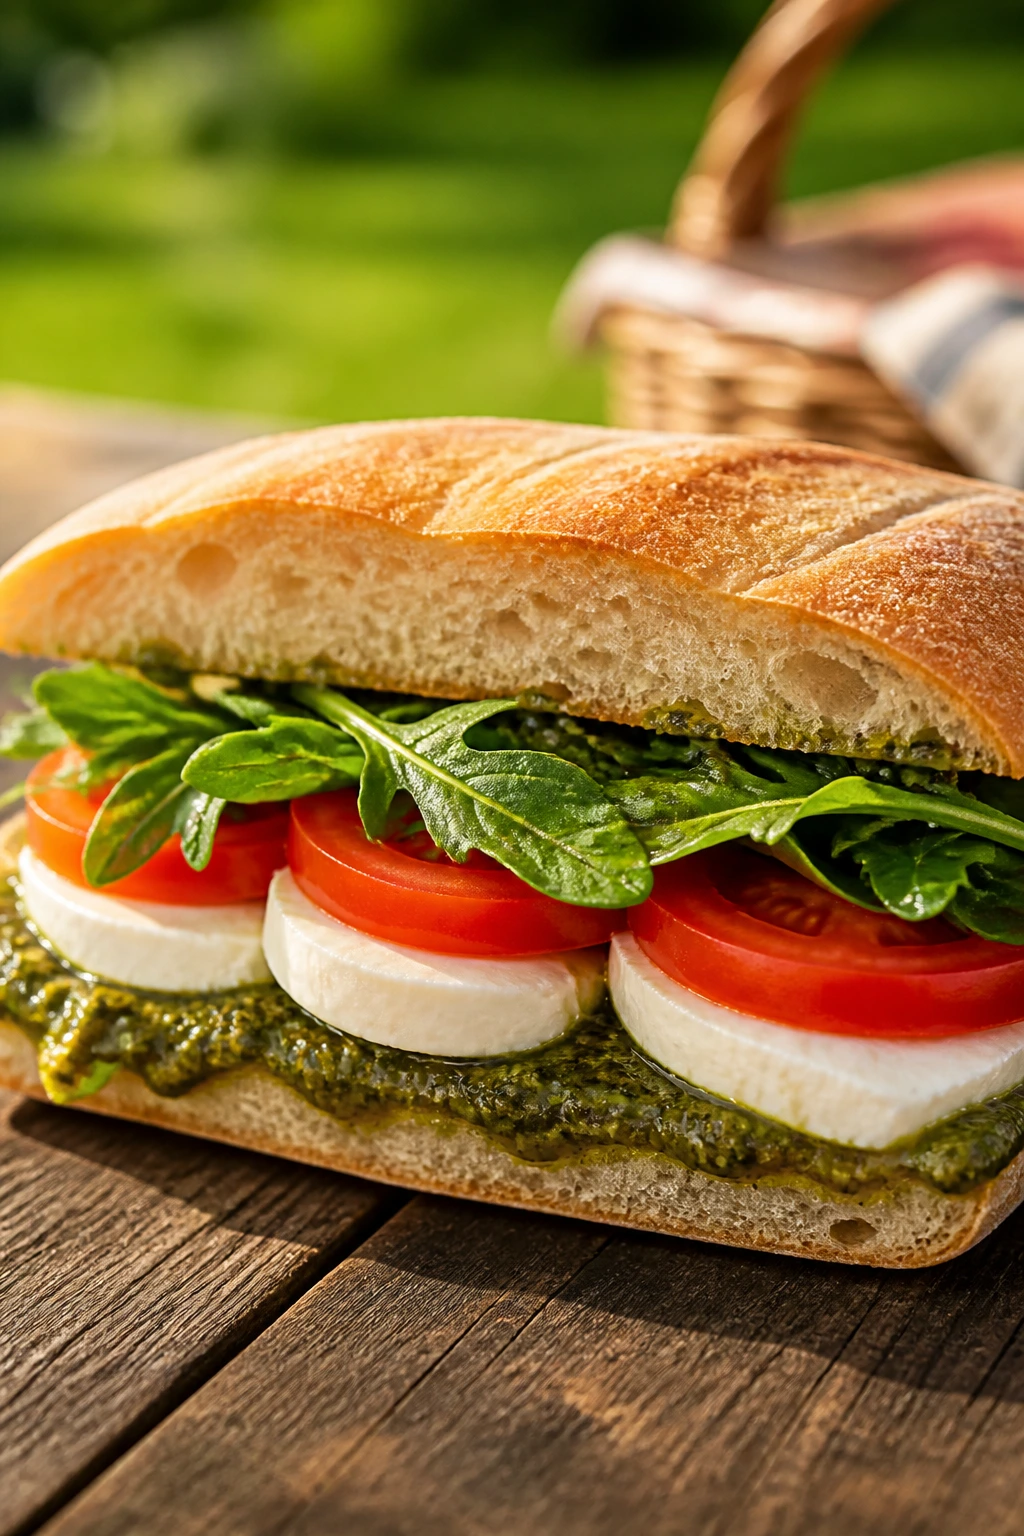
6. Caprese Pesto Sandwiches
Caprese sandwiches can be gorgeous or they can be a dripping mess. The difference is moisture control. Salt the tomatoes, use enough pesto to season but not flood, and choose bread with a crust that can fight back a little.
Why It Works:
Mozzarella brings milky richness, pesto gives you basil, garlic, and oil in one shot, and tomatoes provide acid and juiciness. Arugula adds peppery lift, which matters because a sandwich this soft needs a few sharp edges. For picnics, this is one of the best choices when you want something that feels fresh without being fragile.
Key Ingredients:
- 1 large ciabatta loaf or 4 ciabatta rolls
- 1/3 cup basil pesto
- 12 ounces fresh mozzarella, sliced
- 2 large tomatoes, sliced
- 1 cup arugula
- 2 tablespoons balsamic glaze
- 2 tablespoons olive oil
- 1/2 teaspoon kosher salt
- 1/4 teaspoon black pepper
Quick Steps:
- Slice the tomatoes and lay them on paper towels with a pinch of salt for 10 minutes.
- Brush the bread lightly with olive oil and toast it for 3 to 4 minutes, just until the cut sides feel crisp.
- Spread pesto on both sides of the bread.
- Layer mozzarella, tomato, and arugula, then drizzle with balsamic glaze and a pinch of pepper.
- Close the sandwich, press gently, and cut with a serrated knife.
Equipment for This Recipe:
- Serrated knife
- Baking sheet
- Paper towels
- Pastry brush
- Cutting board
How to Serve This Dish:
Serve it cut into thick wedges with olives, chips, or a tomato-free salad on the side. A half sandwich is usually enough if the picnic includes other food, but a full ciabatta roll makes a solid lunch on its own. If you want to keep it neat, wrap it tightly and slice it only when you’re ready to eat.
Pro Tips for This Recipe:
- Drain the tomatoes more than you think you need to.
- Use a pesto with a thick texture, not one that pours like soup.
- If the picnic is long, add a few leaves of arugula instead of more tomato.
- Fresh mozzarella is best, but low-moisture mozzarella holds up longer if you need extra stability.
Variations on This Dish:
- Roasted Tomato Version: Use roasted tomato slices instead of fresh for less runoff.
- Focaccia Build: Swap ciabatta for focaccia if you want more herb flavor.
- Prosciutto Add-On: Add thin prosciutto for a saltier, meatier version.
Common Mistakes to Avoid with This Dish:
- Using wet tomatoes straight from the cutting board: They make the bread slip.
- Overdoing the pesto: Too much oil turns the sandwich slick.
- Packing without parchment: The glaze and cheese can smear everywhere.
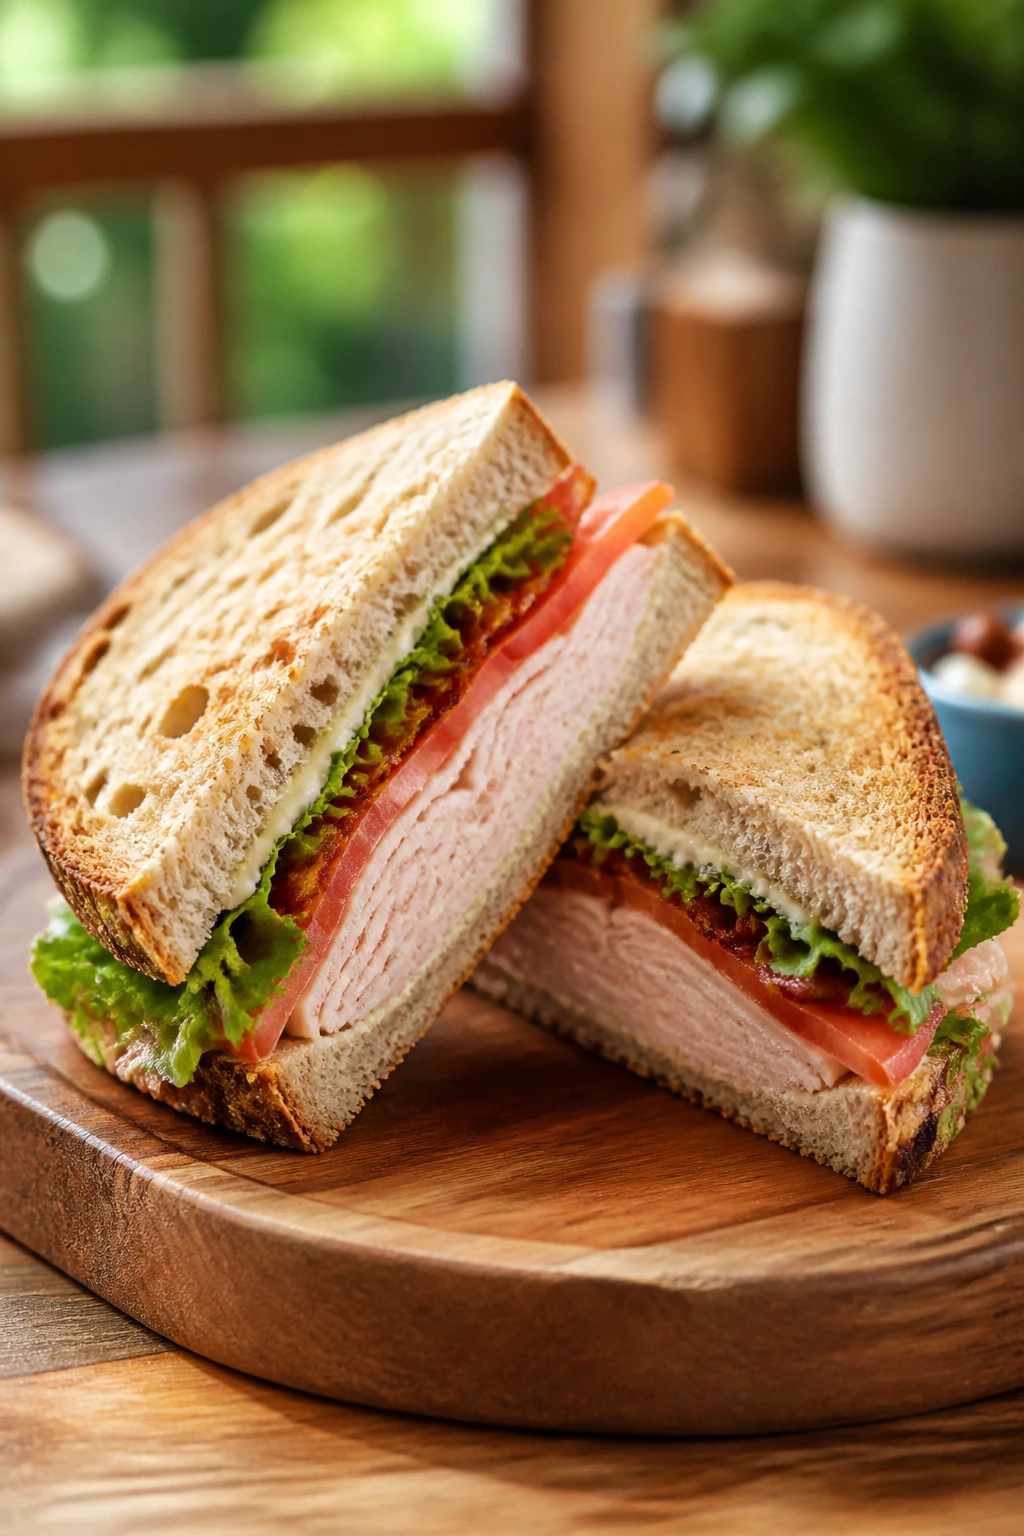
7. Turkey, Bacon, and Avocado Sandwiches
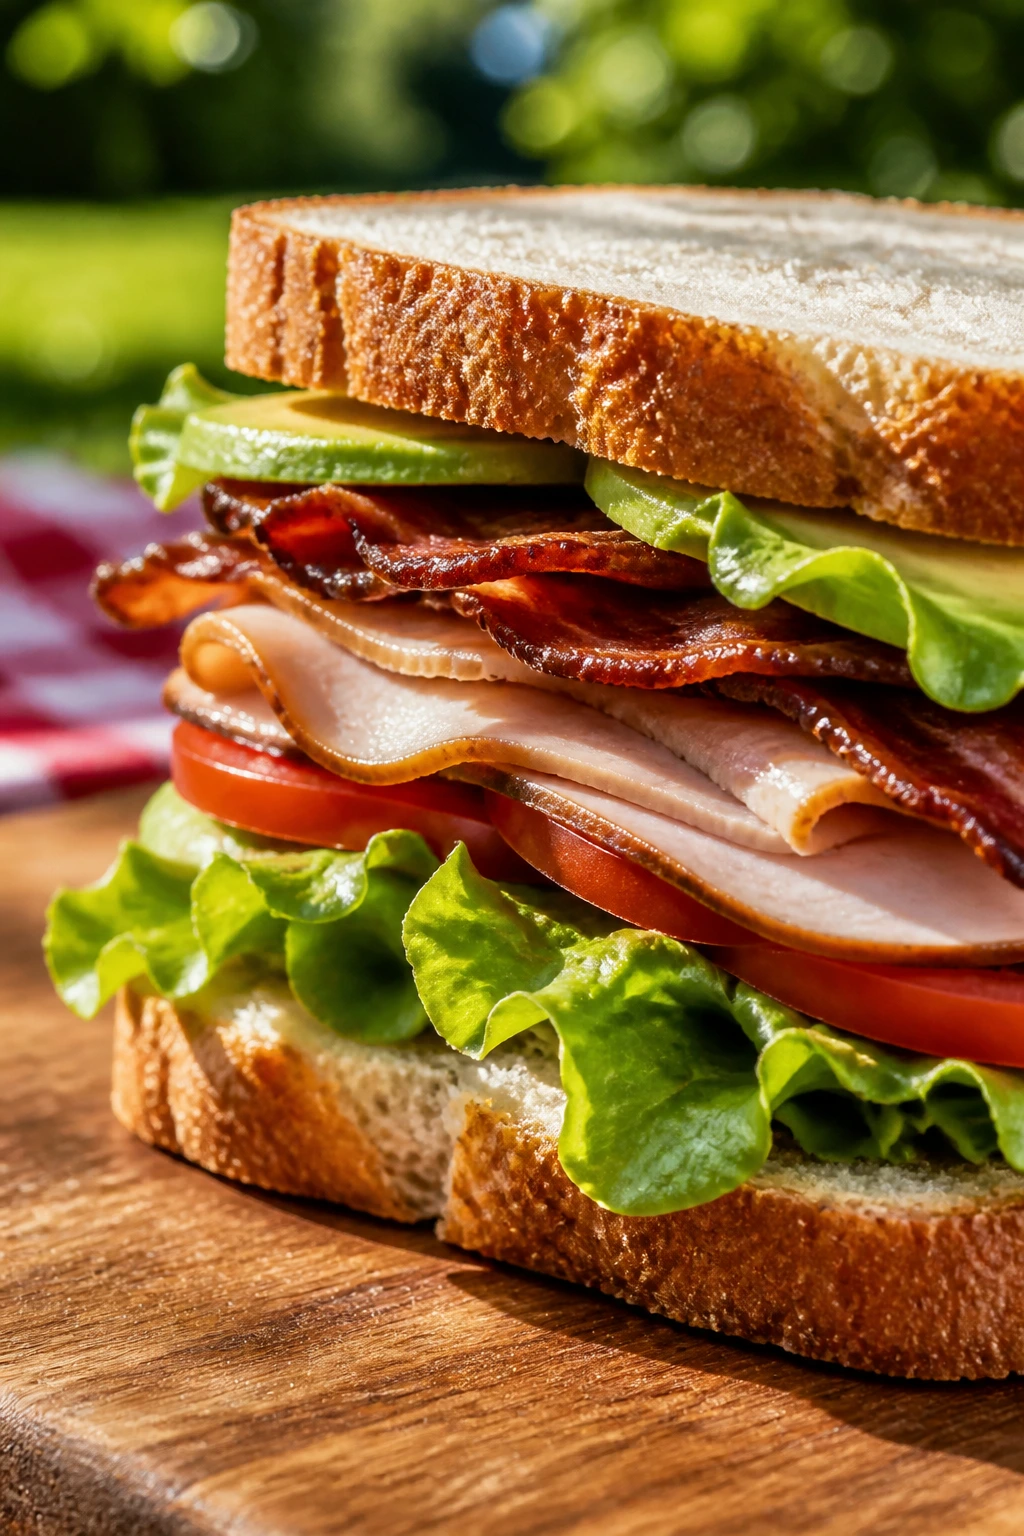
This is the picnic sandwich that feels familiar in the best way. Turkey gives it structure, bacon adds salt and crunch, avocado brings creaminess, and the whole thing works because each ingredient has a job instead of just taking up space.
Why It Works:
Avocado and bacon are rich, so you need lettuce and mustard to keep the flavor from going flat. Lemon juice on the avocado slows browning and keeps the slices tasting brighter. A sturdy roll or thick bread matters here because this sandwich has enough weight to crush a weak loaf.
Key Ingredients:
- 8 slices sturdy bread or 4 hoagie rolls
- 6 tablespoons mayonnaise
- 2 teaspoons Dijon mustard
- 8 ounces sliced turkey
- 6 slices cooked bacon
- 1 ripe avocado, sliced
- 1 cup shredded romaine
- 1 tomato, seeded and sliced
- 1 teaspoon lemon juice
- 1/4 teaspoon black pepper
Quick Steps:
- Stir the mayonnaise and Dijon together.
- Toss the avocado slices with lemon juice and a pinch of pepper.
- Spread the mustard mayo on the bread, then layer turkey, bacon, lettuce, tomato, and avocado.
- Close the sandwich and press gently so the layers settle.
- Wrap and chill for 10 minutes before slicing.
Equipment for This Recipe:
- Knife
- Cutting board
- Small bowl
- Skillet or oven for the bacon if needed
- Parchment paper
How to Serve This Dish:
Cut it into halves or quarters and serve with chips or crisp cucumber spears. It makes a proper lunch sandwich, especially on a roll, and it’s one of the easiest to scale up if you’re feeding a group. Pack the avocado separate if the picnic is long and assemble just before eating.
Pro Tips for This Recipe:
- Seed the tomato or it will flood the bread.
- Use bacon that’s fully crisp, not chewy.
- If the avocado is very ripe, mash it slightly with the mayo instead of slicing.
- Keep the turkey cold until assembly time.
Variations on This Dish:
- Club Style: Add a second layer of bread and a fried egg if you’re serving early lunch.
- Spicy Turkey Version: Add sliced pickled jalapeños or chipotle mayo.
- Cranberry Turkey Swap: Replace the tomato with a thin spread of cranberry relish.
Common Mistakes to Avoid with This Dish:
- Packing cut avocado too early: It browns and softens fast.
- Using undercooked bacon: The chew fights the bread.
- Overloading with tomato: More tomato is not more flavor if the sandwich falls apart.
8. Tuna Salad with Capers and Lemon
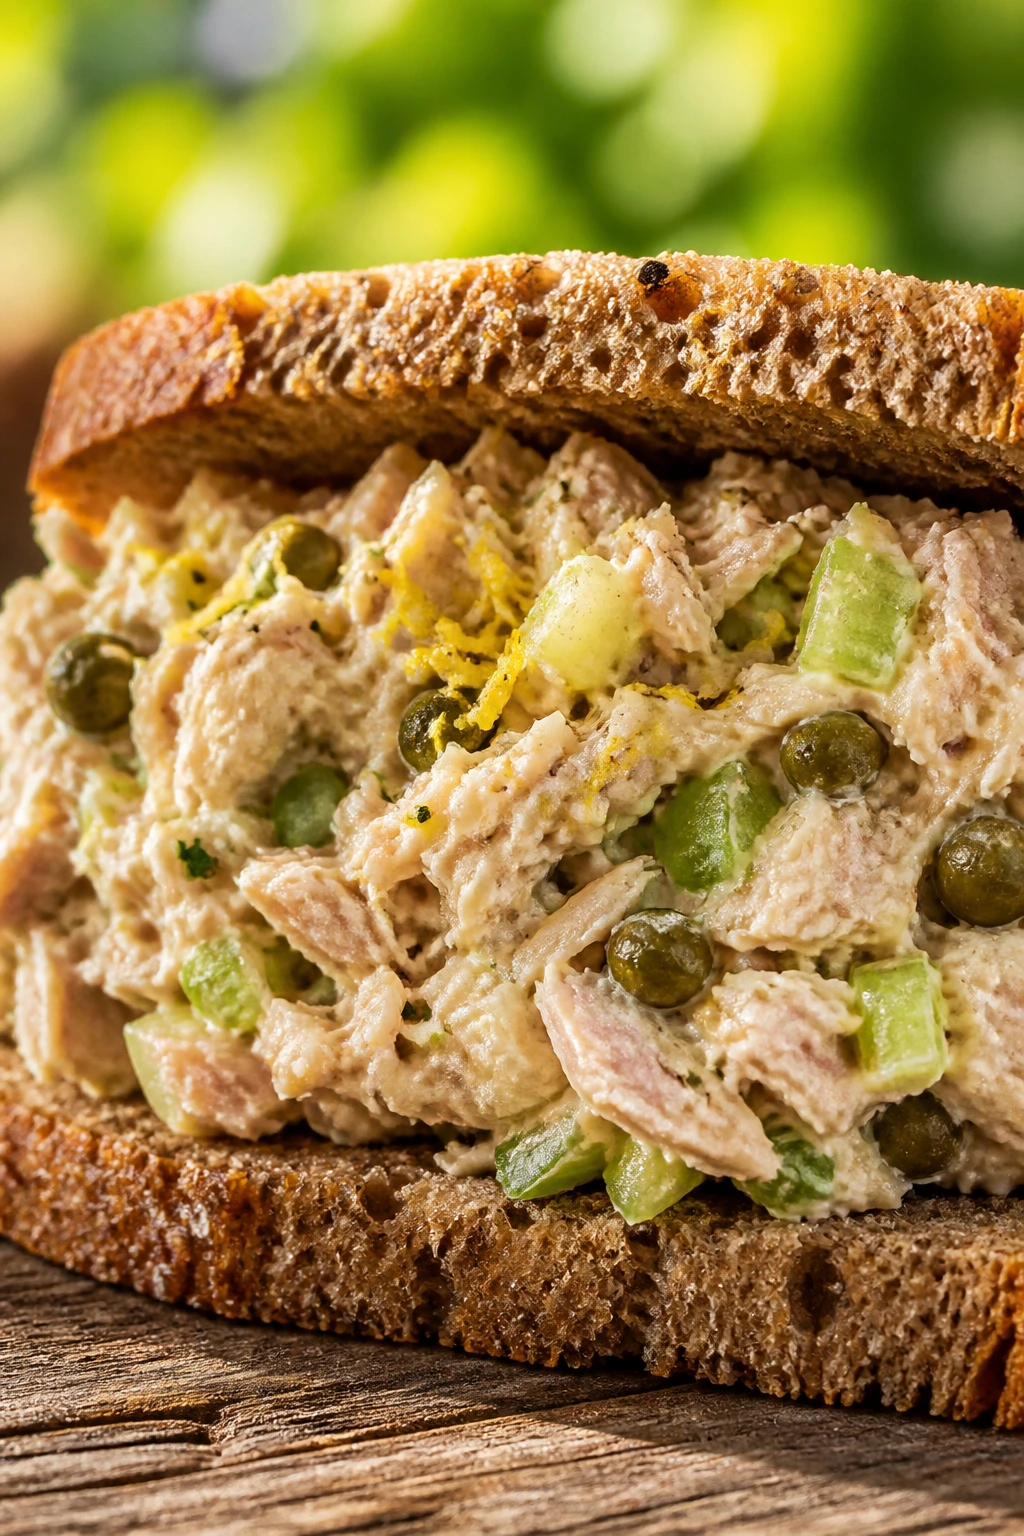
Tuna salad can taste dull in a hurry, which is why capers and lemon matter so much here. They give the filling a salty, bright edge that keeps the picnic version from tasting like fridge food in a bread jacket.
Why It Works:
Good tuna salad should be moist, not wet, and the mix of celery, onion, and capers gives each bite a little snap and brine. Lemon juice wakes up the tuna without making it soupy. Rye or whole grain bread holds the filling better than soft white slices, which matters once you start packing it.
Key Ingredients:
- 2 cans tuna, 5 ounces each, drained well
- 1/3 cup mayonnaise
- 1 tablespoon lemon juice
- 1 tablespoon capers, chopped
- 2 tablespoons celery, finely diced
- 2 tablespoons red onion, finely diced
- 1 tablespoon parsley, chopped
- 1/4 teaspoon kosher salt
- 1/8 teaspoon black pepper
- 8 slices rye or whole grain bread
Quick Steps:
- Flake the tuna into a bowl with a fork.
- Stir in the mayonnaise, lemon juice, capers, celery, onion, parsley, salt, and pepper.
- Taste and adjust the lemon or salt before adding more mayo.
- Chill the salad for 15 minutes.
- Spoon onto bread and press the sandwich together gently before slicing.
Equipment for This Recipe:
- Mixing bowl
- Fork
- Knife
- Cutting board
- Airtight container
How to Serve This Dish:
Serve with dill pickles, kettle chips, or a few cherry tomatoes if you’re not worried about extra moisture on the side. One sandwich makes a solid lunch, and smaller tea-style halves work well if you’re building a mixed basket. The rye gives it enough character that it doesn’t need much else.
Pro Tips for This Recipe:
- Drain the tuna until it looks almost dry. Canned tuna holds more water than people expect.
- Chop the onion very fine so it doesn’t dominate.
- A little caper goes a long way; don’t turn the filling into a brine bomb.
- If the bread is soft, toast it lightly first.
Variations on This Dish:
- Mediterranean Tuna: Add chopped olives and a pinch of oregano.
- Dijon Tuna: Replace half the mayonnaise with Dijon-heavy yogurt.
- Open-Face Rye: Serve it open-faced on toasted rye with sliced cucumber.
Common Mistakes to Avoid with This Dish:
- Not draining the tuna enough: The filling gets loose and drips.
- Using too much onion: Big raw onion bites overpower everything.
- Packing it with watery toppings: Keep tomatoes and lettuce separate if possible.
9. Roast Beef and Horseradish Sandwiches
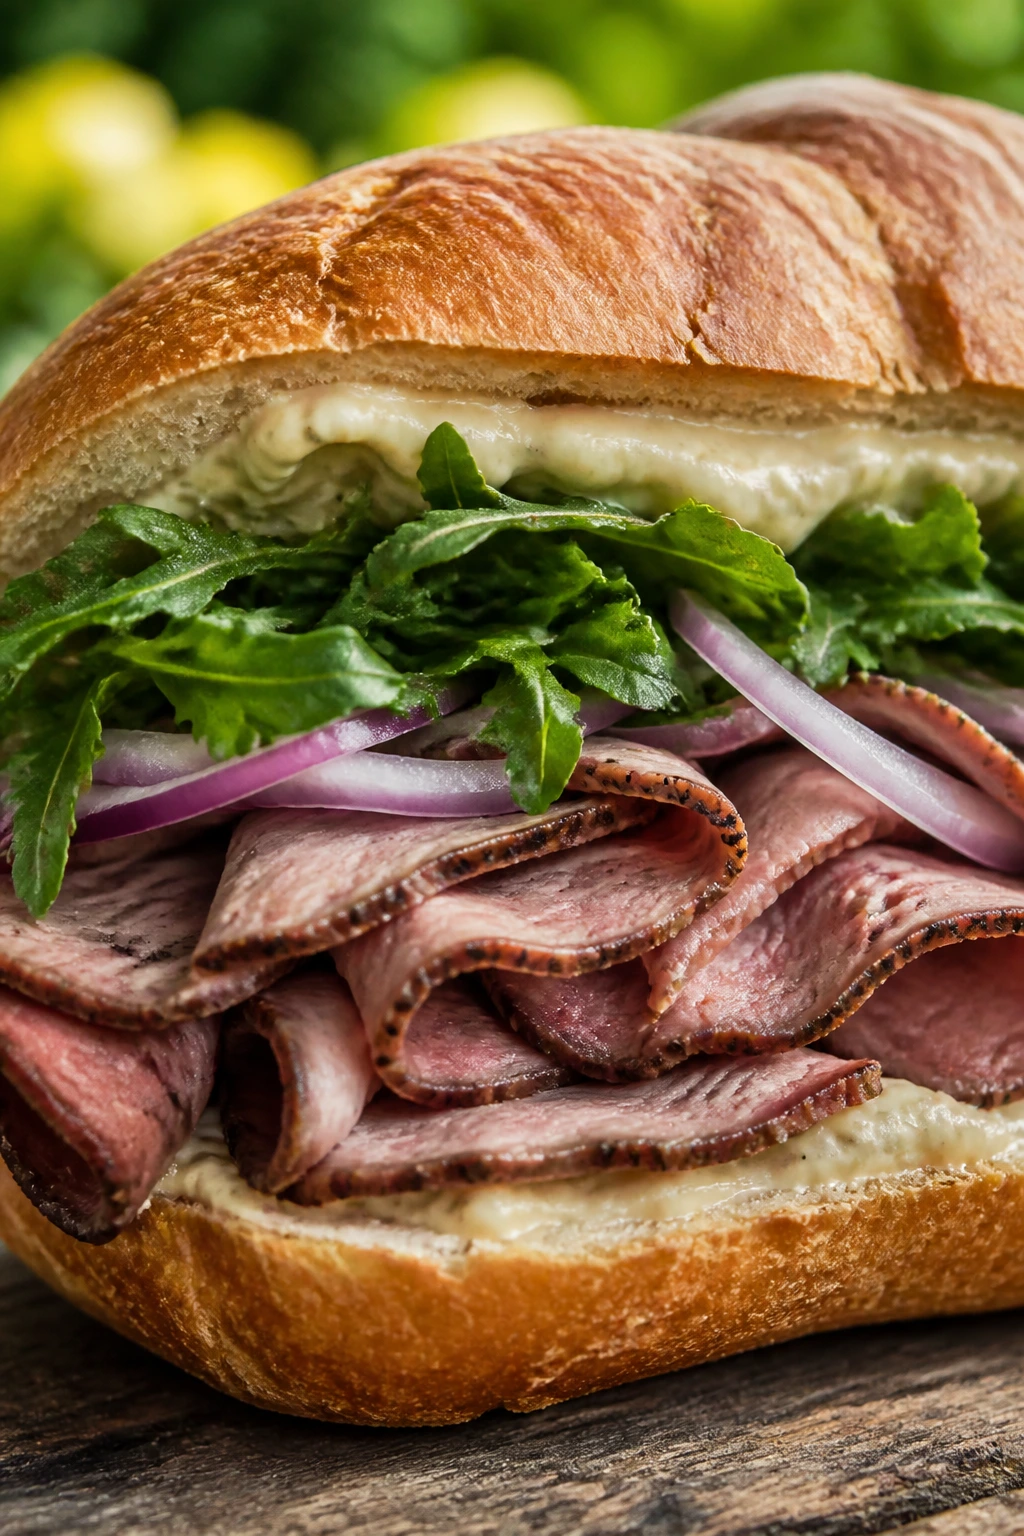
Roast beef needs something with bite beside it, and horseradish is the obvious answer. Add arugula for a peppery green layer and a roll that can stand up to thin slices of meat, and you have a sandwich that tastes deliberate instead of thrown together.
Why It Works:
The sharpness of horseradish cuts through the richness of the beef, and a little mayo softens the heat so it doesn’t burn out the palate. Arugula keeps the sandwich from feeling heavy. If you’ve ever had roast beef on bread and thought it needed more personality, this is the fix.
Key Ingredients:
- 1/4 cup mayonnaise
- 2 tablespoons prepared horseradish
- 1 teaspoon Dijon mustard
- 1 pound thinly sliced roast beef
- 1 cup arugula
- 1/2 red onion, very thinly sliced
- 4 crusty rolls or 8 slices bakery bread
- 1 tablespoon softened butter, optional
- 1/4 teaspoon black pepper
Quick Steps:
- Stir the mayonnaise, horseradish, and Dijon together.
- Slice the rolls and butter the cut sides if you want extra protection against moisture.
- Spread the horseradish mayo on both sides.
- Layer roast beef, onion, arugula, and black pepper.
- Close, press gently, and wrap tightly before packing.
Equipment for This Recipe:
- Knife
- Cutting board
- Small bowl
- Butter knife
- Parchment wrap
How to Serve This Dish:
A roast beef sandwich wants something crisp on the side, like cucumber spears or kettle chips. It’s filling enough for a full lunch and sturdy enough to be cut into two thick halves. If the crowd likes bolder flavors, serve a little extra horseradish mayo on the side.
Pro Tips for This Recipe:
- Thin-sliced roast beef is easier to bite through than thick-cut leftovers.
- If the onion tastes too sharp, soak the slices in cold water for 10 minutes.
- Use a crusty roll, not a fluffy bun.
- Keep the arugula dry so it doesn’t collapse.
Variations on This Dish:
- French Dip Style: Add a little warm jus on the side for dipping.
- Cheddar Roast Beef: Tuck in a slice of sharp cheddar for a richer build.
- Onion Jam Version: Swap the raw onion for onion jam if you want less bite.
Common Mistakes to Avoid with This Dish:
- Too much horseradish: The heat should support the beef, not erase it.
- Using soft bread: The sandwich gets squashed in the cooler.
- Skipping a green layer: The beef alone tastes heavy without arugula or lettuce.
10. BLT with Herb Mayo
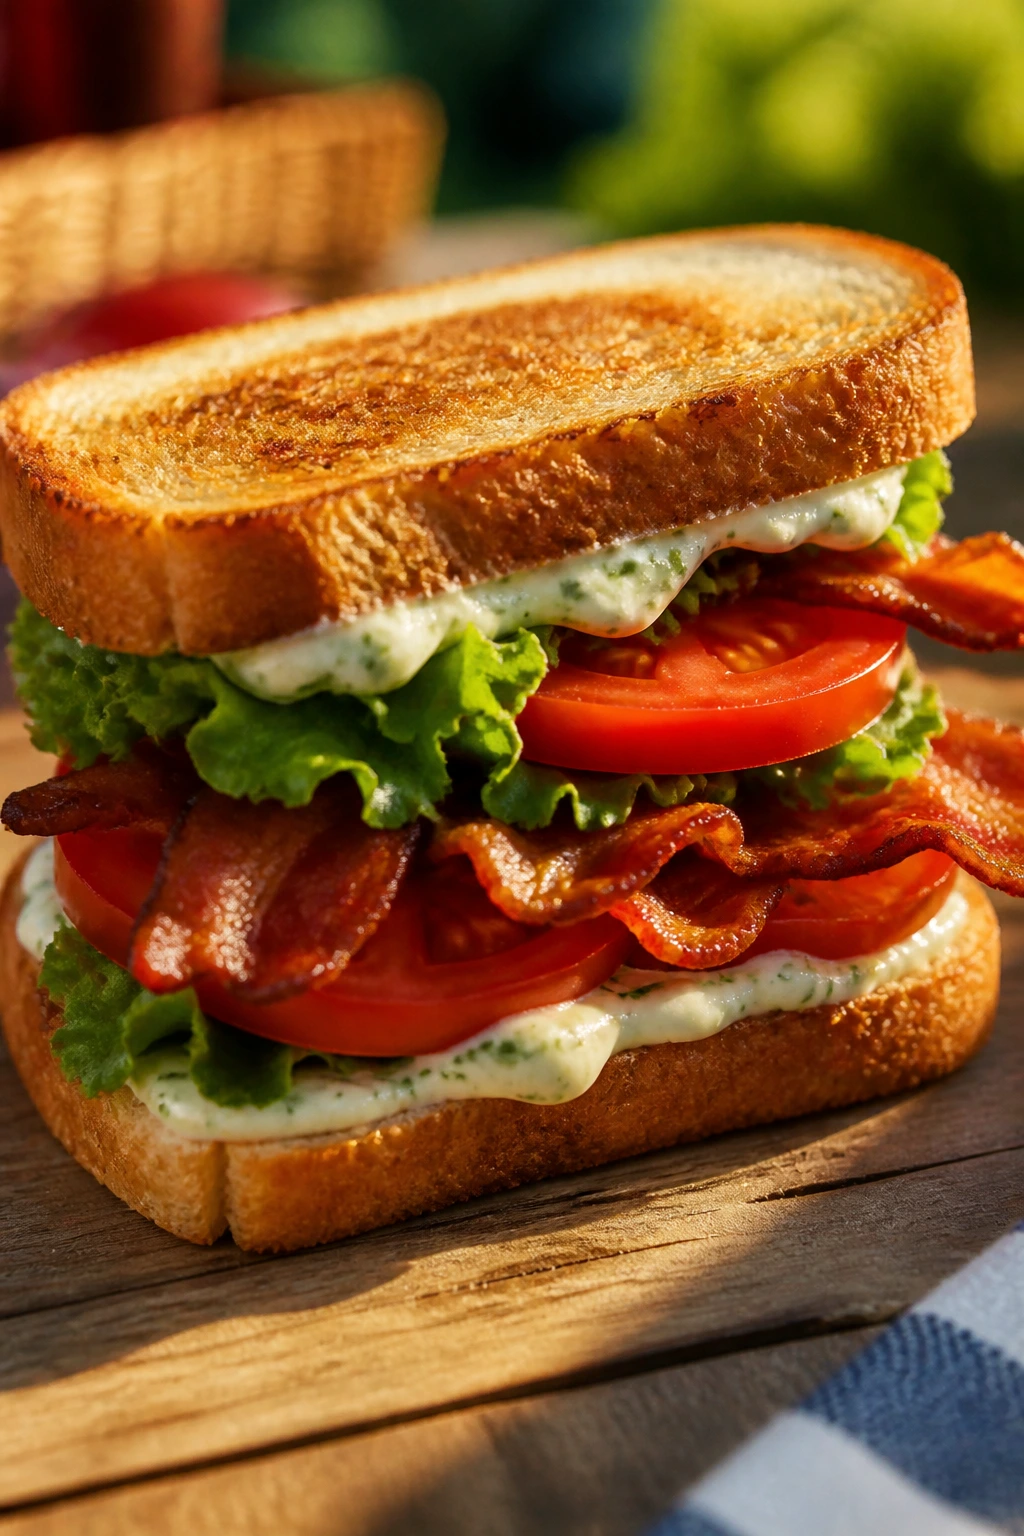
A BLT is a beautiful sandwich when the tomatoes are good and the bacon is crisp. It’s also a little needy, because moisture management is everything here. Get that part right, and it stays one of the best summer sandwiches on the table.
Why It Works:
The herb mayo gives the sandwich flavor without relying on too much tomato juice, and toasted bread makes a barrier against sogginess. Lettuce adds crunch, bacon brings salt, and the tomato does the sweet, juicy part if it’s salted and blotted first. I like this sandwich most when it’s built close to serving time, not hours ahead.
Key Ingredients:
- 1/3 cup mayonnaise
- 2 tablespoons chopped basil, chives, or parsley
- 8 slices bacon
- 4 slices hearty bread, toasted
- 2 ripe tomatoes, sliced
- 4 large lettuce leaves
- 1/2 teaspoon kosher salt
- 1/4 teaspoon black pepper
- 1 tablespoon butter, optional for toasting
Quick Steps:
- Mix the mayonnaise with the herbs.
- Cook the bacon until crisp, then drain it on a rack or paper towels.
- Salt the tomato slices lightly and blot them after 5 minutes.
- Toast the bread until golden, then spread with herb mayo.
- Layer lettuce, bacon, and tomatoes, season with black pepper, and close the sandwich.
- Cut and serve soon after assembly.
Equipment for This Recipe:
- Skillet or sheet pan
- Paper towels
- Knife
- Cutting board
- Toaster or broiler
How to Serve This Dish:
Serve it with chips, corn on the cob, or a pickle spear if you want something sharper on the plate. It’s a full lunch sandwich, not a dainty one, so one per person is usually enough. If you’re packing it, keep the tomatoes separate until the last minute.
Pro Tips for This Recipe:
- Salt and blot the tomatoes. That step matters more than the herbs.
- Toast the bread well; pale toast goes soggy fast.
- Cook the bacon until brittle enough to snap.
- Assemble the sandwich just before eating if possible.
Variations on This Dish:
- Avocado BLT: Add sliced avocado for a softer, richer bite.
- Turkey BLT: Swap half the bacon for turkey if you want a lighter version.
- Smoky Mayo Version: Add a pinch of smoked paprika to the mayo.
Common Mistakes to Avoid with This Dish:
- Building it too early: Tomatoes win. Bread loses.
- Using limp lettuce: The sandwich needs crunch.
- Undertoasting the bread: Soft toast can’t fight the tomato juice.
11. Hummus, Roasted Veg, and Feta Sandwiches
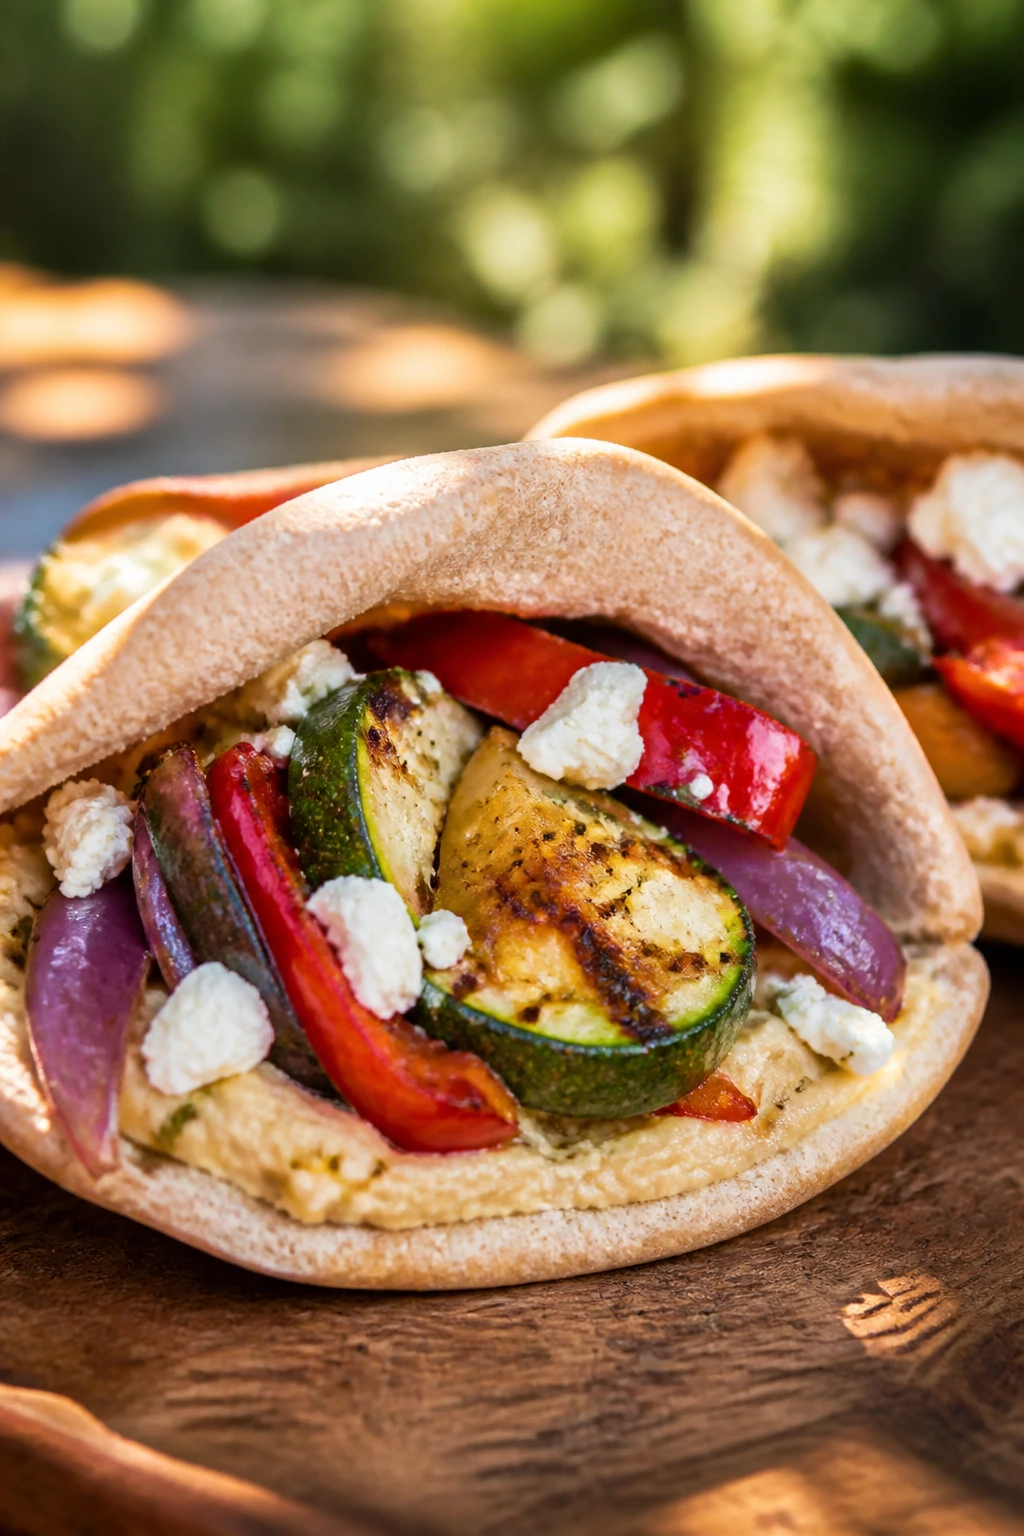
This is the vegetarian sandwich I pack when I want something that still feels substantial. Hummus brings creaminess, roasted vegetables bring sweetness and chew, and feta adds the salty hit that keeps each bite from getting dull.
Why It Works:
Roasted zucchini, peppers, and onion taste better after they cool, which makes them ideal picnic ingredients. Hummus acts like glue and flavor at the same time, while feta and a little lemon keep the sandwich from feeling dense. It’s also one of the easiest fillings to scale up for a crowd.
Key Ingredients:
- 1 small zucchini, sliced lengthwise
- 1 red bell pepper, sliced
- 1 yellow bell pepper, sliced
- 1 small red onion, sliced
- 2 tablespoons olive oil
- 1/2 teaspoon kosher salt
- 1/4 teaspoon black pepper
- 3/4 cup hummus
- 1/2 cup feta crumbles
- 2 tablespoons sun-dried tomatoes, chopped
- 4 pita pockets or 8 slices multigrain bread
Quick Steps:
- Toss the zucchini, peppers, and onion with olive oil, salt, and pepper.
- Roast at 425°F for 18 to 22 minutes, until the edges are browned and the vegetables are soft.
- Cool the vegetables completely.
- Spread hummus on the bread or inside the pita, then layer in vegetables, feta, and sun-dried tomatoes.
- Press the sandwich together and wrap snugly.
Equipment for This Recipe:
- Sheet pan
- Parchment paper
- Mixing bowl
- Knife
- Spatula
How to Serve This Dish:
This tastes good at room temperature, which is half the appeal. Pair it with olives, grapes, or a simple green salad if you’re setting out a picnic spread. Pita makes a neat hand-held version, while bread gives you a fuller lunch.
Pro Tips for This Recipe:
- Let the vegetables cool all the way before building the sandwich.
- Use a thick hummus. Thin hummus slides around.
- Pat the sun-dried tomatoes dry if they’re oil-packed.
- Warm pita can tear, so split it gently.
Variations on This Dish:
- Olive Tapenade Version: Swap the sun-dried tomatoes for chopped olives.
- Grilled Eggplant Swap: Replace zucchini with grilled eggplant slices.
- Vegan Version: Skip the feta and add a little extra salt plus lemon zest.
Common Mistakes to Avoid with This Dish:
- Building with hot vegetables: They steam the bread.
- Using too much hummus: The sandwich turns slick.
- Overfilling the pita: It splits at the seam.
12. Smoked Salmon and Cucumber Sandwiches
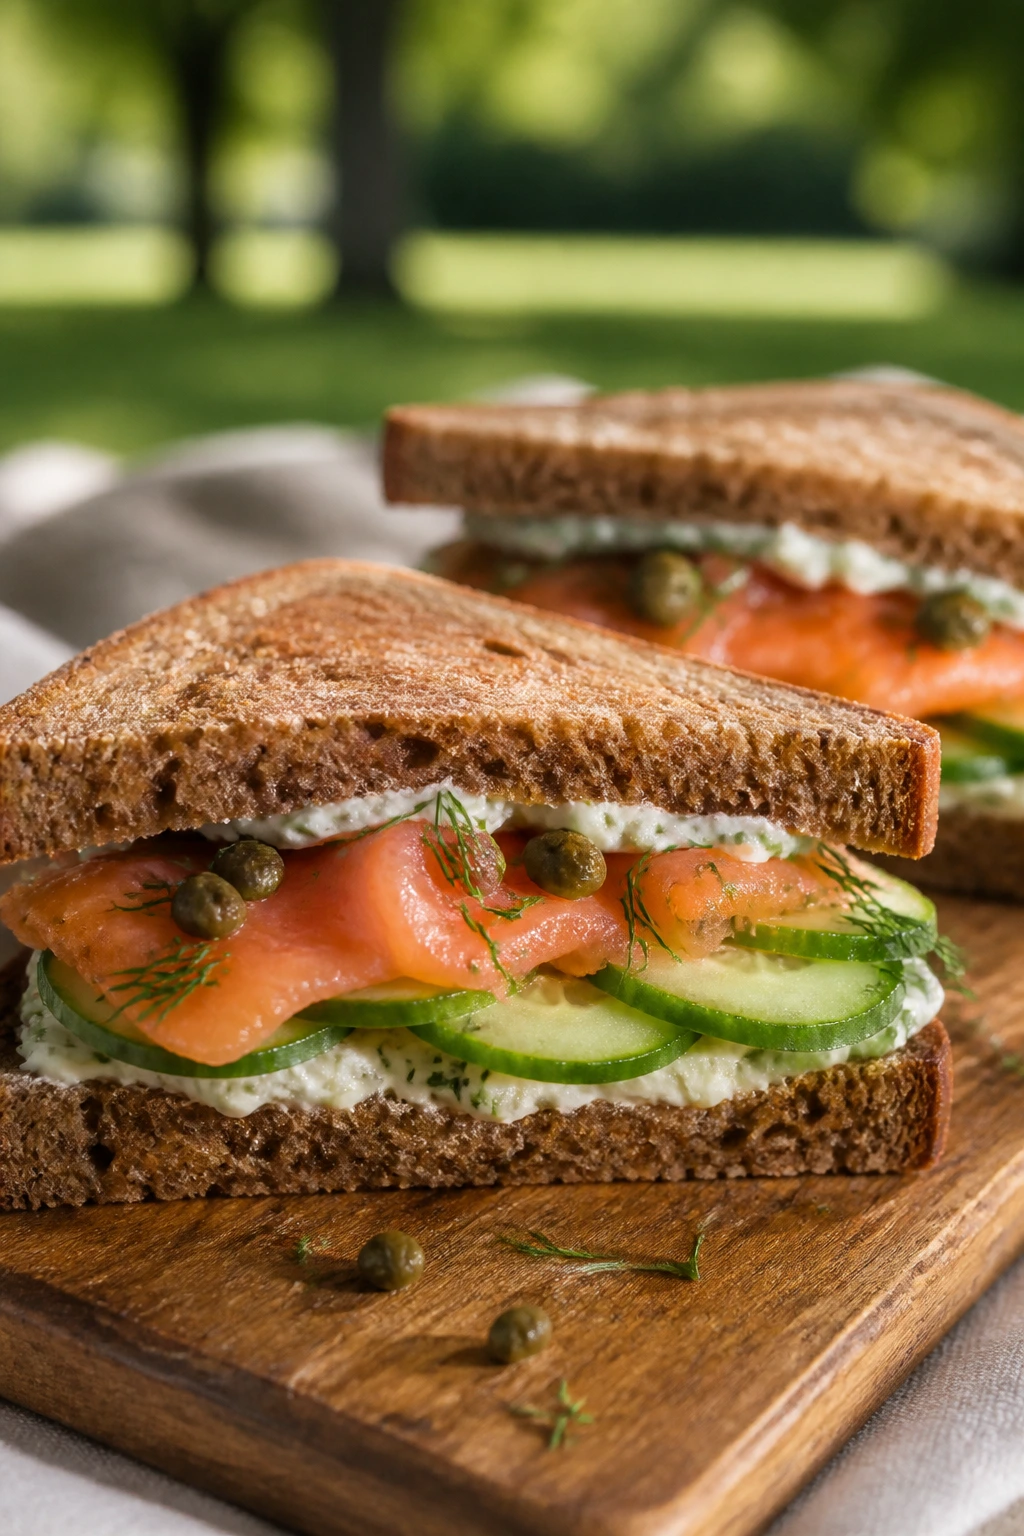
Smoked salmon brings a silky, salty edge that feels right at home in a chilled picnic spread. Pair it with cucumber, dill, and cream cheese, and you get a sandwich that tastes clean but still feels rich enough to matter.
Why It Works:
The cream cheese spread gives structure, cucumber adds crunch and water without chaos, and the smoked salmon carries the flavor. Rye bread is especially good here because its earthiness balances the fish. This is one of the smartest choices for a picnic where you want a cold sandwich that still feels a little special.
Key Ingredients:
- 8 ounces cream cheese, softened
- 2 tablespoons sour cream
- 1 tablespoon fresh dill, chopped
- 1 teaspoon lemon juice
- 8 ounces smoked salmon
- 1 cucumber, thinly sliced
- 2 tablespoons capers, drained
- 8 slices rye bread or 4 bagels, split
- 1/4 teaspoon black pepper
Quick Steps:
- Mix the cream cheese, sour cream, dill, lemon juice, and pepper until smooth.
- Slice the cucumber thin and blot it dry.
- Spread the cream cheese mixture on the bread.
- Layer salmon, cucumber, and capers.
- Close, press gently, and chill for 10 minutes before cutting.
Equipment for This Recipe:
- Mixing bowl
- Knife
- Cutting board
- Spreader or knife
- Parchment paper
How to Serve This Dish:
Serve with lemon wedges, sliced radishes, or potato chips if you want a little crunch on the side. Two halves make a tidy lunch, and small tea-sandwich fingers work well if this is part of a larger basket. Keep it cold until serving; smoked salmon likes the chill.
Pro Tips for This Recipe:
- Dry the cucumber slices carefully so the bread stays firm.
- Don’t overdo the capers; they should punctuate, not dominate.
- Use a soft spreader to keep the salmon slices intact.
- Rye gives this sandwich more backbone than plain white bread.
Variations on This Dish:
- Bagel Board Style: Serve on sliced bagels with extra dill and sliced red onion.
- Herb Cheese Swap: Replace some cream cheese with herbed fromage blanc.
- Beet-Cured Salmon Version: Use beet-cured salmon if you want a sweeter, deeper flavor.
Common Mistakes to Avoid with This Dish:
- Packing it warm: The cream cheese softens fast.
- Using thick cucumber slices: They break the balance.
- Making it too far ahead: The bread stays better when built close to eating time.
13. Pulled Pork Sliders with Vinegar Slaw
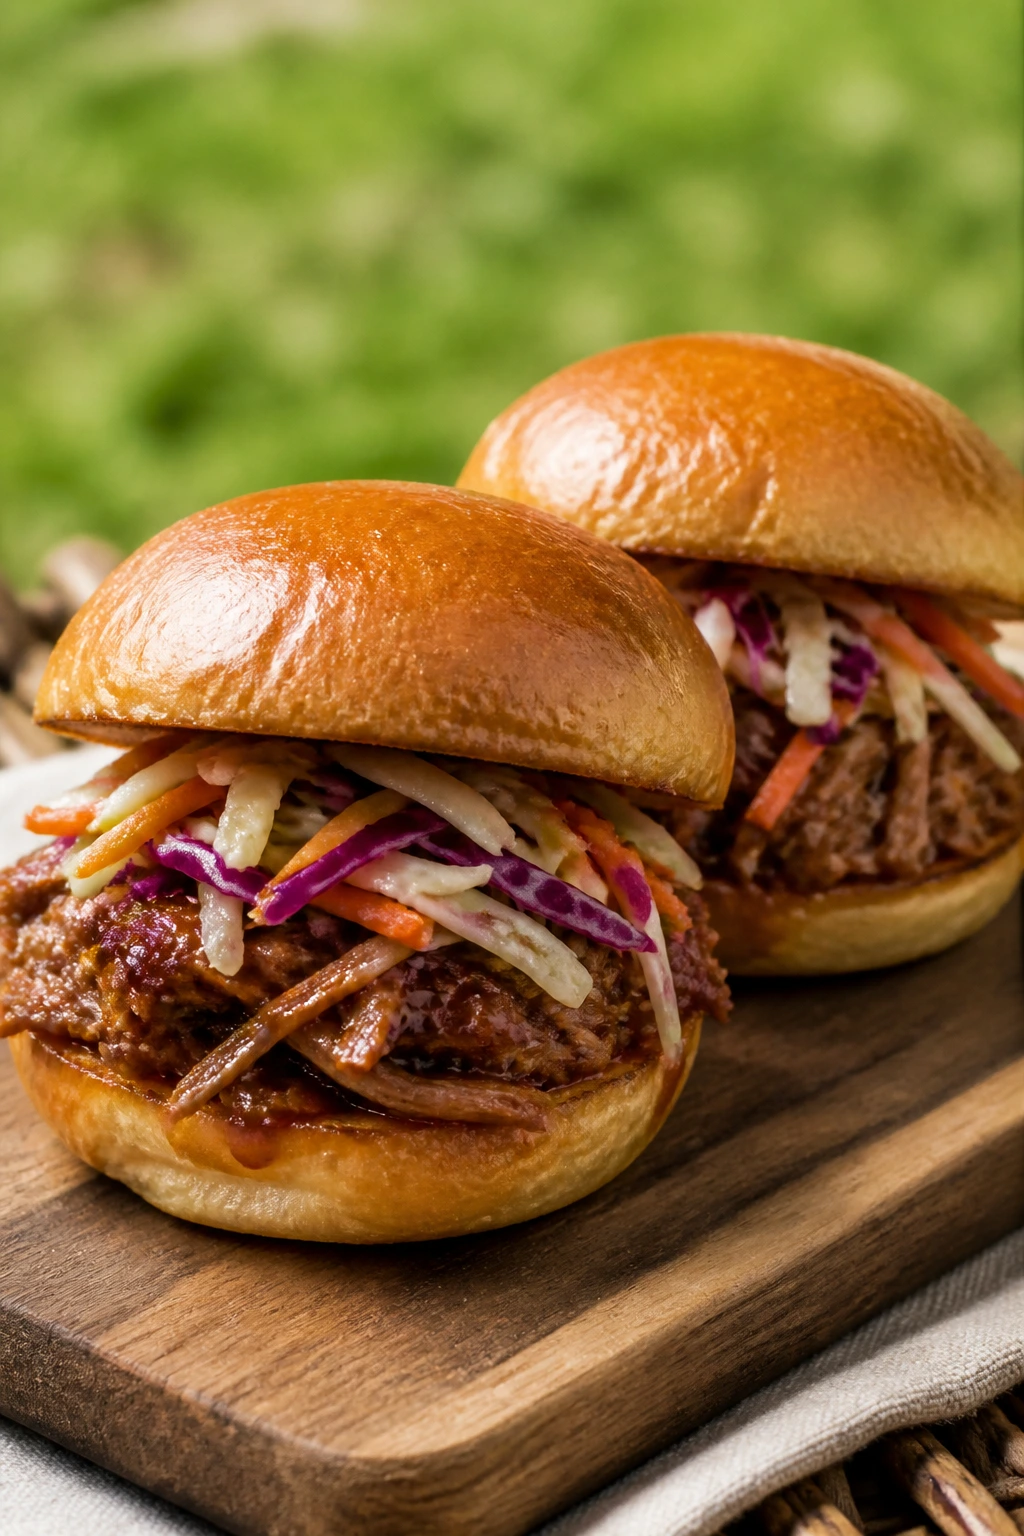
Pulled pork is not the lightest sandwich on the list, but it earns its place because it travels well and tastes even better after the sauce has had time to settle into the meat. The slaw matters just as much as the pork. Without it, the slider gets heavy fast.
Why It Works:
Slow-cooked pork shoulder turns tender enough to shred with a fork, and the vinegar-based sauce keeps it lively instead of sweet and muddy. Slaw gives you crunch and acid, which is the exact thing pulled pork needs after a long cook. These sliders are best when they’re warm but not steaming, so the buns don’t disintegrate.
Key Ingredients:
- 2 pounds boneless pork shoulder
- 2 teaspoons kosher salt
- 1 teaspoon black pepper
- 1 tablespoon paprika
- 1 tablespoon brown sugar
- 1 teaspoon garlic powder
- 1 cup apple cider vinegar
- 1/2 cup ketchup
- 1 tablespoon Worcestershire sauce
- 1/2 cup water
- 2 cups shredded cabbage
- 2 tablespoons apple cider vinegar
- 1 tablespoon olive oil
- 1 teaspoon sugar
- 1/2 teaspoon salt
- 8 slider buns
Quick Steps:
- Heat the oven to 300°F.
- Rub the pork with salt, pepper, paprika, brown sugar, and garlic powder.
- Place the pork in a Dutch oven with the vinegar, ketchup, Worcestershire, and water. Cover and bake for 3 to 3 1/2 hours, until the meat pulls apart easily.
- Mix the cabbage with the vinegar, olive oil, sugar, and salt to make the slaw.
- Shred the pork, toss it with some of the cooking juices, and pile it onto the buns.
- Top with slaw and serve warm or room temperature.
Equipment for This Recipe:
- Dutch oven or covered roasting pan
- Forks for shredding
- Mixing bowl
- Tongs
- Measuring cups and spoons
How to Serve This Dish:
Serve these as two-bite sliders or full mini sandwiches, depending on the rest of the menu. They’re good with baked beans, chips, or a vinegar-heavy potato salad. Pack the pork and buns separately if you want the best texture on arrival.
Pro Tips for This Recipe:
- Shred the pork while it’s still warm; it falls apart more easily.
- Add sauce gradually. Too much and the sliders go soggy.
- Keep the slaw crisp by dressing it just before serving.
- Use soft slider buns that still have enough structure to hold juice.
Variations on This Dish:
- Carolina Style: Add mustard to the sauce for a tangier edge.
- Hot Honey Version: Drizzle a little hot honey over the pork before topping with slaw.
- Smoky BBQ Swap: Stir in a spoonful of smoked paprika or a thicker barbecue sauce.
Common Mistakes to Avoid with This Dish:
- Saturating the meat in sauce: A slider should taste sauced, not soaked.
- Using buns that are too sweet and soft: They collapse under the pork.
- Skipping the slaw: Without crunch, the sandwich feels heavy and dull.
14. Fried Chicken Sandwiches with Pickles
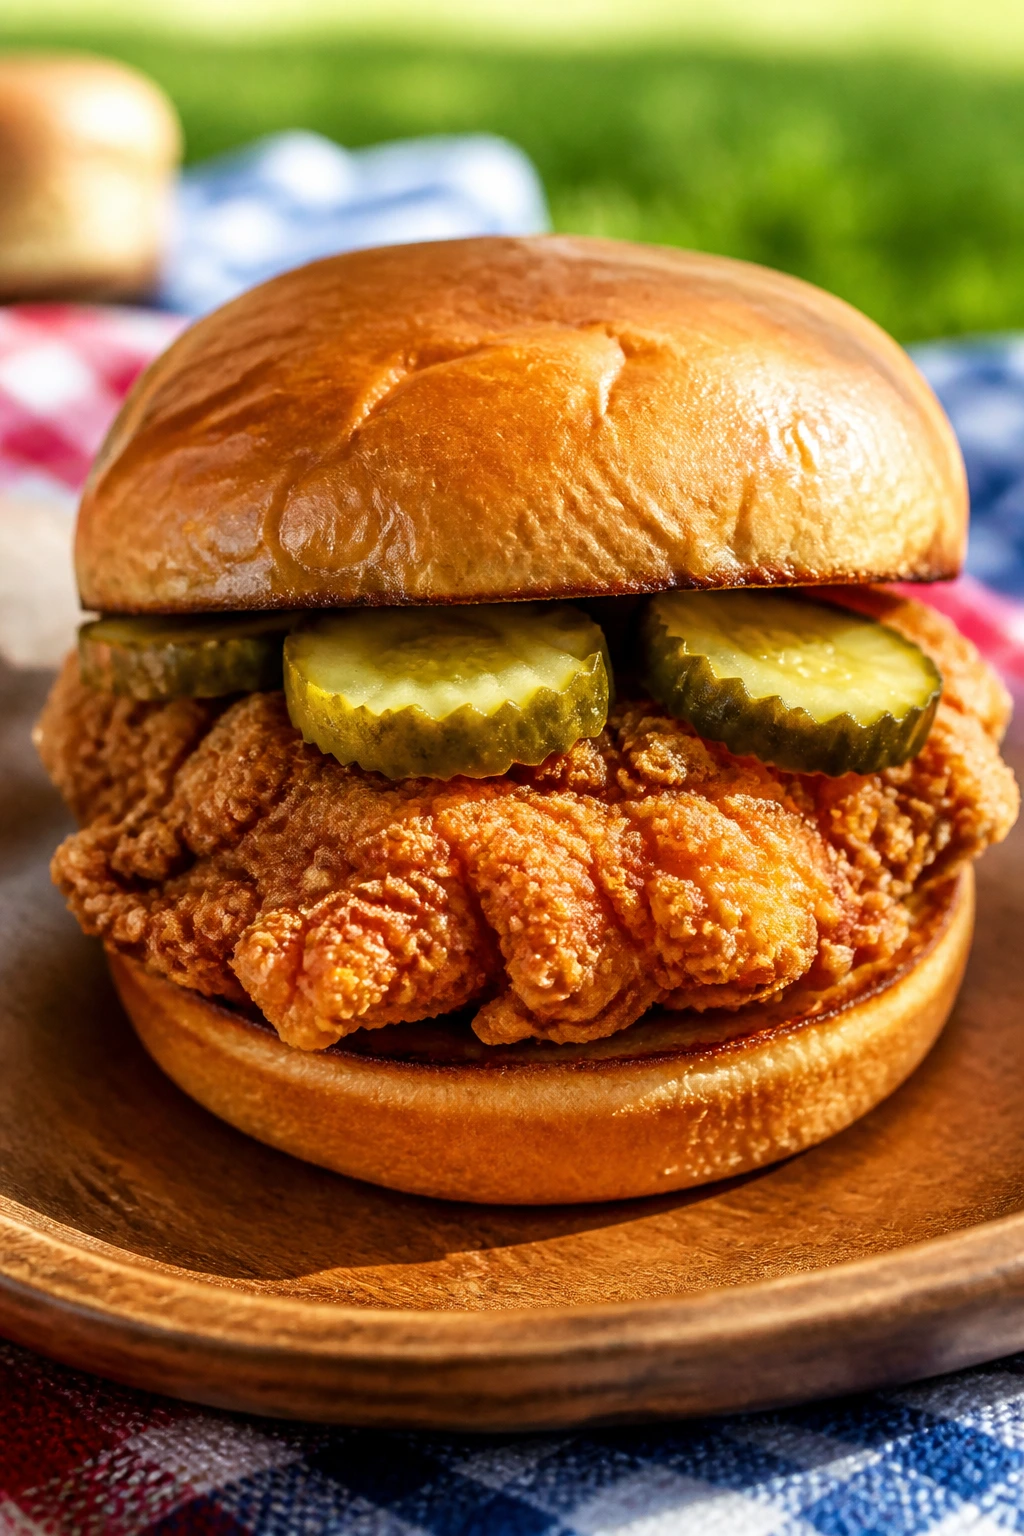
Fried chicken belongs in a picnic basket if you treat it with respect. The crust needs to cool on a rack, the breading has to stay crisp, and the sandwich should be assembled close enough to serving that it still has snap when you bite in.
Why It Works:
Buttermilk tenderizes the chicken and helps the flour coating cling, while pickles and a little pickle-bright mayo cut through the richness. Thighs stay juicier than breasts, which is why I prefer them here. A good fried chicken sandwich is all about contrast: hot and cool, salty and sharp, crisp and soft.
Key Ingredients:
- 1 1/2 pounds boneless chicken thighs
- 1 cup buttermilk
- 1 teaspoon hot sauce
- 1 1/2 cups all-purpose flour
- 1 teaspoon paprika
- 1 teaspoon garlic powder
- 1 teaspoon kosher salt
- 1/2 teaspoon black pepper
- 1/2 cup neutral oil for frying
- 1/3 cup mayonnaise
- 2 tablespoons pickle juice
- Dill pickle slices
- 4 soft sandwich buns or brioche buns
- Lettuce, optional
Quick Steps:
- Mix the buttermilk and hot sauce, then soak the chicken for at least 30 minutes.
- Stir the flour, paprika, garlic powder, salt, and pepper in a shallow dish.
- Coat the chicken in the flour mixture, pressing hard so the crust sticks.
- Fry in 1/2 inch of oil over medium heat for 4 to 5 minutes per side, until deep golden and the chicken reaches 165°F.
- Mix the mayonnaise with pickle juice.
- Cool the chicken on a rack, then build the sandwich with mayo, pickles, and lettuce if using.
Equipment for This Recipe:
- Heavy skillet or cast-iron pan
- Thermometer
- Wire rack
- Shallow bowls for dredging
- Tongs
How to Serve This Dish:
Serve it warm if you can, but not scorching hot. If you need to pack it, cool the chicken fully before wrapping so the crust stays crisp as long as possible. Chips and cold coleslaw fit the mood, and one sandwich per person is a fair picnic portion.
Pro Tips for This Recipe:
- Don’t crowd the pan or the crust goes pale and greasy.
- Let the dredged chicken sit for 5 minutes before frying so the coating hydrates.
- A rack beats paper towels for cooling because it keeps the underside crisp.
- Pack the pickles separately if the sandwich has to travel.
Variations on This Dish:
- Nashville Hot: Toss the fried chicken with chili oil and cayenne before building.
- Oven-Fried: Bake on a rack at 425°F for a less greasy version.
- Chicken Tender Style: Use tenders if you want easier packing and smaller bites.
Common Mistakes to Avoid with This Dish:
- Frying at low heat: The crust drinks oil and turns heavy.
- Assembling while the chicken is steaming: That steam kills the crunch.
- Overusing mayo: A thin smear is enough; too much makes the bun slide.
15. Peanut Butter, Banana, and Honey Sandwiches
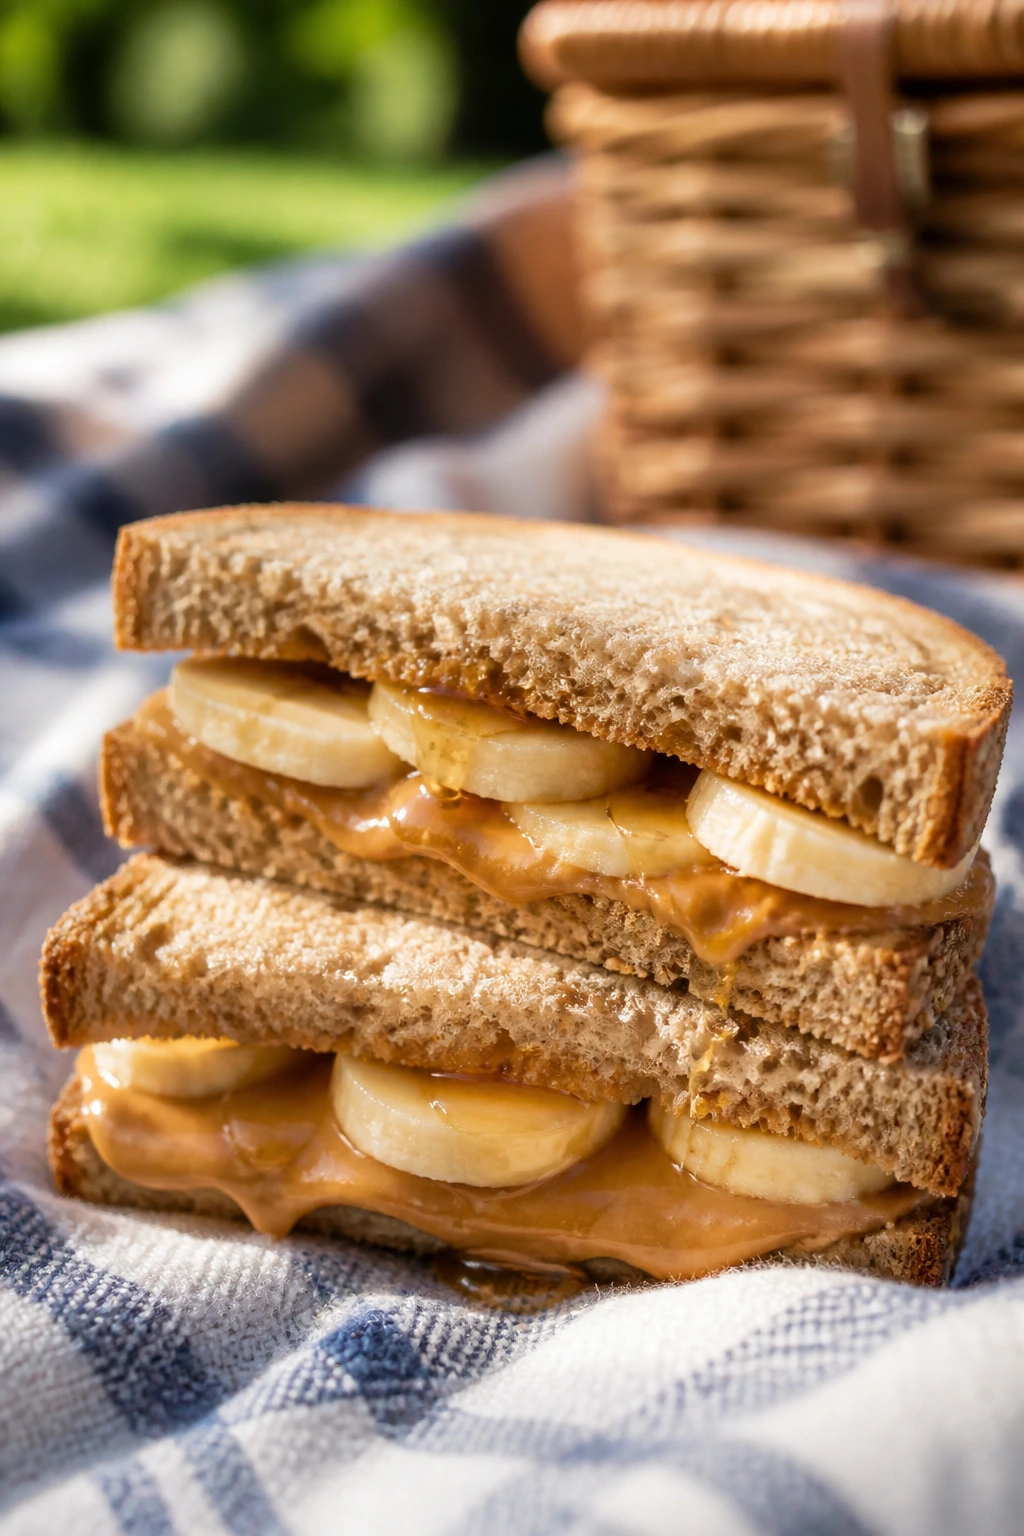
There’s nothing fancy here, and that’s the point. When you’re packing for a picnic with kids, or adults who want something simple and satisfying, peanut butter, banana, and honey does the job with almost no drama.
Why It Works:
Peanut butter acts as glue and insulation, which helps keep the banana from soaking into the bread. Honey adds sweetness without needing jam, and chopped peanuts or granola give the sandwich a little crunch. This is one of the few picnic sandwiches that can survive a little travel without feeling fragile.
Key Ingredients:
- 8 slices bread
- 1/2 cup peanut butter
- 2 bananas, sliced
- 2 tablespoons honey
- 2 tablespoons chopped peanuts or granola
- Pinch of flaky salt
- 1/4 teaspoon cinnamon, optional
Quick Steps:
- Spread peanut butter on all bread slices, all the way to the edges.
- Layer banana slices over four slices of bread.
- Drizzle with honey and add peanuts, granola, salt, and cinnamon if using.
- Close the sandwiches and press gently.
- Slice in half and wrap tightly for packing.
Equipment for This Recipe:
- Knife
- Cutting board
- Small spoon
- Airtight container or wrap
- Optional small bowl for honey
How to Serve This Dish:
Cut these into halves or small rectangles for easy grabbing. They work well with fruit, yogurt cups, or a handful of pretzels. One sandwich is usually enough for a light lunch, though a hungry kid may take down two halves without blinking.
Pro Tips for This Recipe:
- Spread peanut butter edge to edge so the bread doesn’t get damp.
- Use bananas that are ripe but still firm.
- Granola gives more crunch than chopped peanuts if the sandwich will sit for a while.
- A pinch of salt matters; it keeps the sweetness from tasting flat.
Variations on This Dish:
- Sunflower Butter Swap: Use sunflower seed butter for a nut-free version.
- PB&J Banana: Add a thin layer of jam beneath the banana slices.
- Chocolate Drizzle: A few drops of melted chocolate make this feel like dessert without turning it messy.
Common Mistakes to Avoid with This Dish:
- Using overripe bananas: They go soft and mushy fast.
- Skipping the edge-to-edge spread: Bare bread turns stale in spots.
- Adding too much honey: The sandwich gets slippery and hard to pack.
16. Curried Chickpea Salad Sandwiches
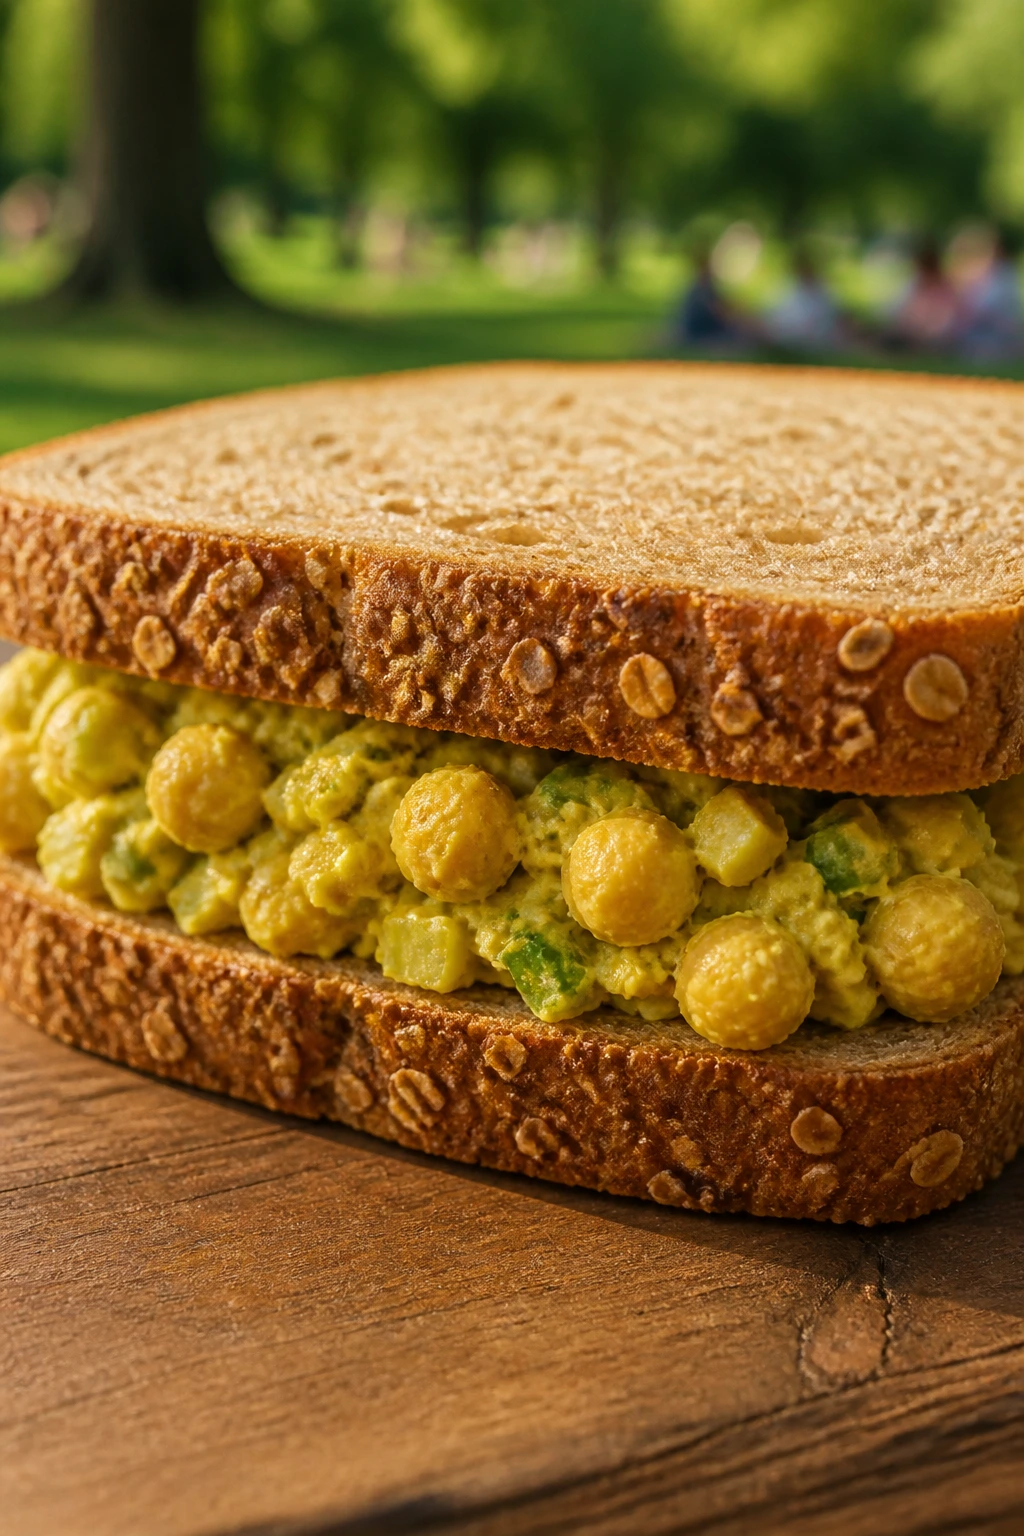
Curried chickpea salad is one of my favorite vegetarian picnic fillings because it has texture. It’s not pretending to be tuna salad, and that’s what makes it work. The chickpeas stay a little chunky, the curry brings warmth, and the sweet bits keep things from getting monotone.
Why It Works:
Chickpeas are sturdy, so they don’t collapse the minute they meet dressing. Curry powder gives the filling color and depth, celery adds crunch, and raisins or chopped apricots lend a little sweetness that plays well with the spice. This is one of the easiest fillings to make ahead and pack in whole grain bread or pita.
Key Ingredients:
- 2 cans chickpeas, 15 ounces each, drained and rinsed
- 1/3 cup mayonnaise or plain yogurt
- 1 tablespoon curry powder
- 1 teaspoon lemon juice
- 1/2 cup celery, finely diced
- 1/4 cup raisins or chopped dried apricots
- 2 tablespoons cilantro, chopped
- 1/2 teaspoon kosher salt
- 1/4 teaspoon black pepper
- 8 slices whole grain bread or 4 pita pockets
Quick Steps:
- Mash about half the chickpeas with a fork, leaving the rest partly whole.
- Stir in the mayonnaise, curry powder, lemon juice, celery, raisins, cilantro, salt, and pepper.
- Taste and add another pinch of salt if the curry feels muted.
- Chill for 15 to 20 minutes.
- Fill the bread or pita, press gently, and wrap tightly.
Equipment for This Recipe:
- Mixing bowl
- Fork or potato masher
- Knife
- Cutting board
- Spoon for filling
How to Serve This Dish:
This sandwich is good at room temperature, which makes it picnic-friendly by design. Pair it with grapes, carrot sticks, or a simple cucumber salad. Whole grain bread makes it feel hearty, while pita keeps the portion neat and hand-held.
Pro Tips for This Recipe:
- Mash only part of the chickpeas so the filling has texture.
- Let the curry powder bloom in the dressing before adding the chickpeas.
- If you want more zip, add a tiny spoonful of chutney.
- Pita tears less if you warm it for just 10 seconds and then cool it.
Variations on This Dish:
- Mango Chutney Version: Replace the raisins with chopped mango chutney for a sweeter profile.
- Tahini Curry Swap: Add 1 tablespoon tahini for a nuttier finish.
- Dill Chickpea Salad: Swap cilantro for dill and use lemon zest instead of raisins.
Common Mistakes to Avoid with This Dish:
- Turning it into hummus: Leave some chickpeas whole.
- Using too much yogurt: The filling can get loose fast.
- Forgetting to season enough: Chickpeas need salt more than most people expect.
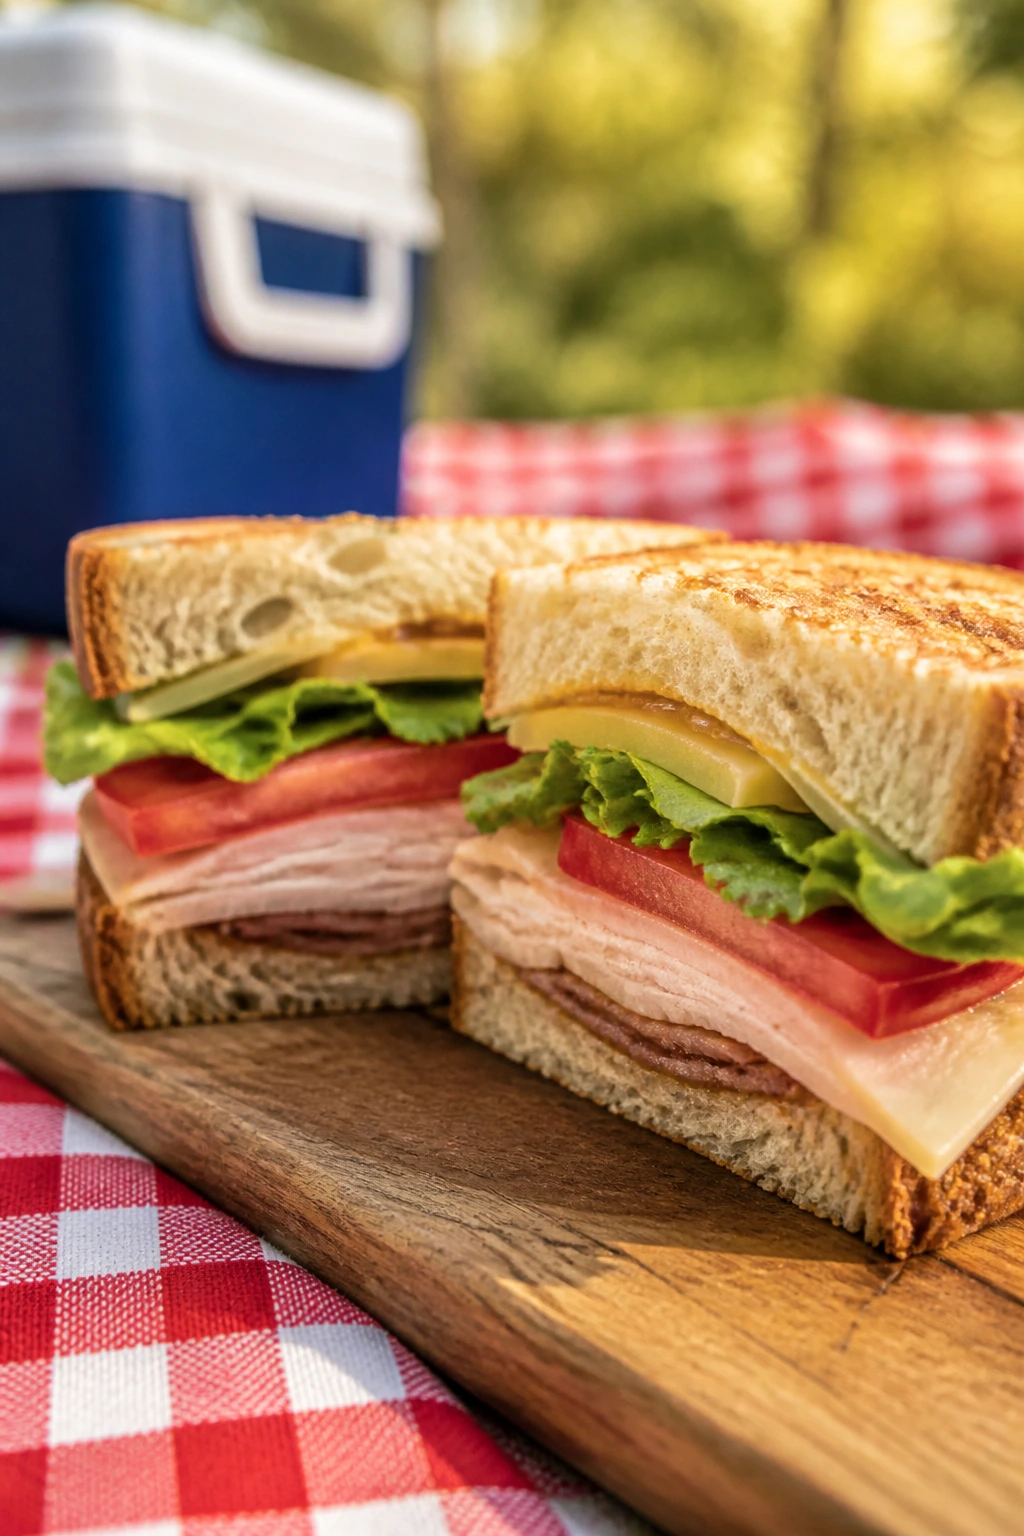
17. Ham, Swiss, and Apple Sandwiches
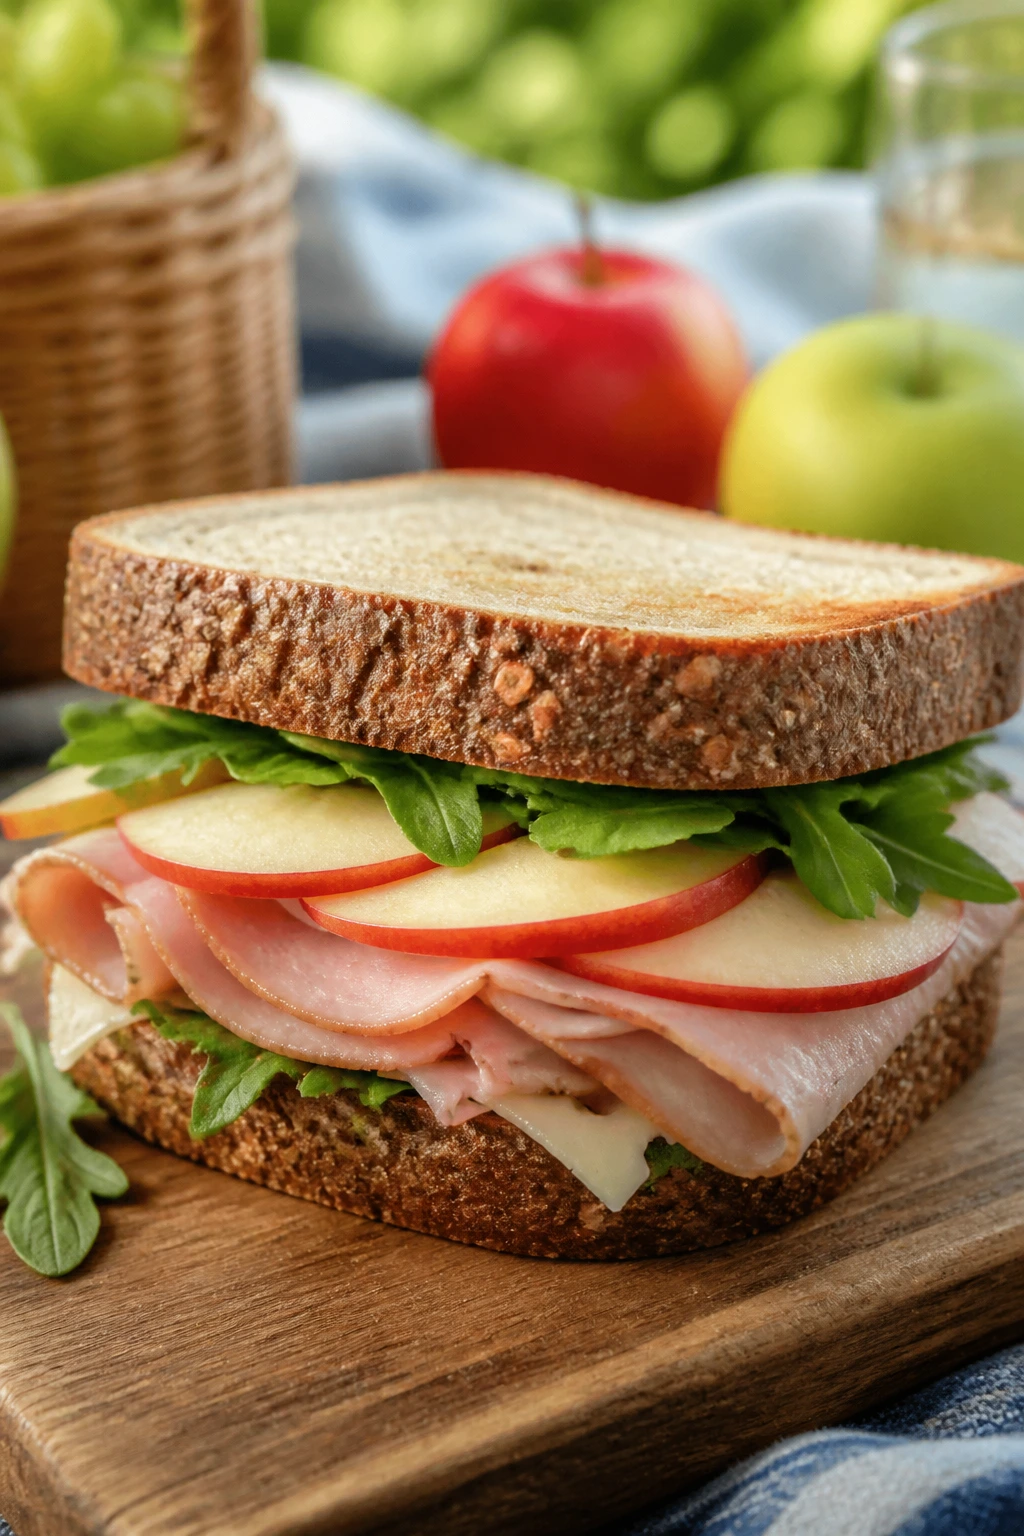
Ham and Swiss has a built-in comfort factor, but the apple is the move that wakes it up. Crisp, tart slices cut through the salt and make the sandwich feel fresh instead of heavy, which is exactly what you want in summer heat.
Why It Works:
Swiss cheese melts nicely if the sandwich is warm, but it also tastes good cold, which gives you flexibility. Thin apple slices add crunch and a little acidity, while Dijon mayo keeps the filling from tasting dry. This one works especially well on grainy bread or a roll with some chew.
Key Ingredients:
- 2 tablespoons mayonnaise
- 2 tablespoons Dijon mustard
- 8 slices ham
- 8 slices Swiss cheese
- 1 large apple, thinly sliced
- 1 teaspoon lemon juice
- 1 cup arugula
- 4 rolls or 8 slices grain bread
- 1 tablespoon softened butter, optional
Quick Steps:
- Toss the apple slices with lemon juice so they stay bright.
- Mix the mayonnaise and Dijon.
- Spread the mixture on the bread, then layer ham, Swiss, apple, and arugula.
- Close the sandwich and press lightly.
- Wrap and chill for 10 minutes before slicing.
Equipment for This Recipe:
- Sharp knife
- Cutting board
- Small bowl
- Spoon or butter knife
- Parchment paper
How to Serve This Dish:
This is a solid lunch sandwich with chips, grapes, or a mustardy potato salad on the side. It cuts nicely into halves or quarters, especially if you use a roll. If you want extra crunch, add a few cornichons on the side rather than inside the sandwich.
Pro Tips for This Recipe:
- Use a crisp apple like Honeycrisp or Granny Smith.
- Slice the apple thin so it doesn’t push the bread apart.
- Grain bread or a roll keeps the sandwich more stable than soft white bread.
- If the ham is very salty, use less Dijon.
Variations on This Dish:
- Brie and Ham: Replace Swiss with brie for a softer, richer sandwich.
- Honey Mustard Swap: Add a touch of honey to the Dijon mayo.
- Croissant Version: Works if you’re eating soon after assembly, but it’s less picnic-stable.
Common Mistakes to Avoid with This Dish:
- Cutting the apple too thick: The slices should bend, not crack the sandwich apart.
- Using mushy apples: They turn the filling soft and dull.
- Packing it too warm: The cheese softens and the bread sweats.
18. Grilled Zucchini and Goat Cheese Sandwiches
Grilled zucchini gives you smoky edges and a little chew, which is exactly what this sandwich needs. Goat cheese brings tang, roasted peppers add sweetness, and basil or pesto ties it all together. It tastes like someone planned the picnic on purpose.
Why It Works:
Zucchini is mild, so grilling it until it picks up color keeps it from disappearing under the cheese. Goat cheese has enough tang to stand up to olive oil and herbs, and arugula gives the sandwich a peppery finish. Ciabatta is the right bread here because it can handle the filling without going soft.
Key Ingredients:
- 2 medium zucchini, sliced lengthwise into 1/4-inch planks
- 2 tablespoons olive oil
- 1/2 teaspoon kosher salt
- 1/4 teaspoon black pepper
- 4 ounces goat cheese, softened
- 2 tablespoons basil pesto
- 1/2 cup roasted red peppers, drained and patted dry
- 1 cup arugula
- 4 ciabatta rolls or 8 slices sourdough
Quick Steps:
- Toss the zucchini with olive oil, salt, and pepper.
- Grill over medium heat for 2 to 3 minutes per side, until marked and tender.
- Cool the zucchini slightly so it doesn’t steam the bread.
- Spread goat cheese and pesto on the bread.
- Layer zucchini, roasted peppers, and arugula, then close the sandwich.
- Wrap and press lightly before cutting.
Equipment for This Recipe:
- Grill pan or outdoor grill
- Tongs
- Knife
- Cutting board
- Pastry brush or spoon
How to Serve This Dish:
Serve it cut into thick wedges with olives, chips, or a tomato-free salad. It’s a good vegetarian main dish because the goat cheese gives it real heft. If you’re packing it ahead, keep the arugula dry and the peppers well-drained.
Pro Tips for This Recipe:
- Grill the zucchini until it has visible marks; pale slices taste underdone.
- Pat the peppers dry or the bread will slide.
- Soft goat cheese spreads more easily if it sits out for 10 minutes.
- A little extra pesto goes a long way, so use a light hand.
Variations on This Dish:
- Feta Swap: Replace goat cheese with feta for a saltier version.
- Balsamic Finish: Add a few drops of balsamic glaze before closing the sandwich.
- Panini Style: Press it briefly in a skillet or sandwich press if you want a warm version before packing.
Common Mistakes to Avoid with This Dish:
- Undergrilling the zucchini: Pale slices disappear into the filling.
- Using too much pesto: The sandwich gets oily fast.
- Packing hot vegetables: Steam is the quickest way to ruin good bread.
Why Picnic Sandwiches Need a Different Playbook
A picnic sandwich is judged under unfair conditions. It sits in a cooler, gets opened and rewrapped, and may spend part of the afternoon at room temperature while someone hunts for napkins or a bottle opener. That means you cannot treat moisture, bread, and filling as separate things. They have to work together from the start.
The easiest way to think about it is in layers. Dry layer against wet layer. Cheese or butter near the bread. Crisp ingredient tucked between soft ones. Bread with enough chew to survive being wrapped, but not so crusty that it shatters when you bite it in half. That balance is why some sandwiches fall apart in ten minutes while others taste better after a short rest.
I’m opinionated about one thing here: the bread matters more than people think. A great filling on flimsy bread is a bad sandwich. A decent filling on good bread, packed cleanly, can carry a whole picnic.
Essential Equipment for These Recipes
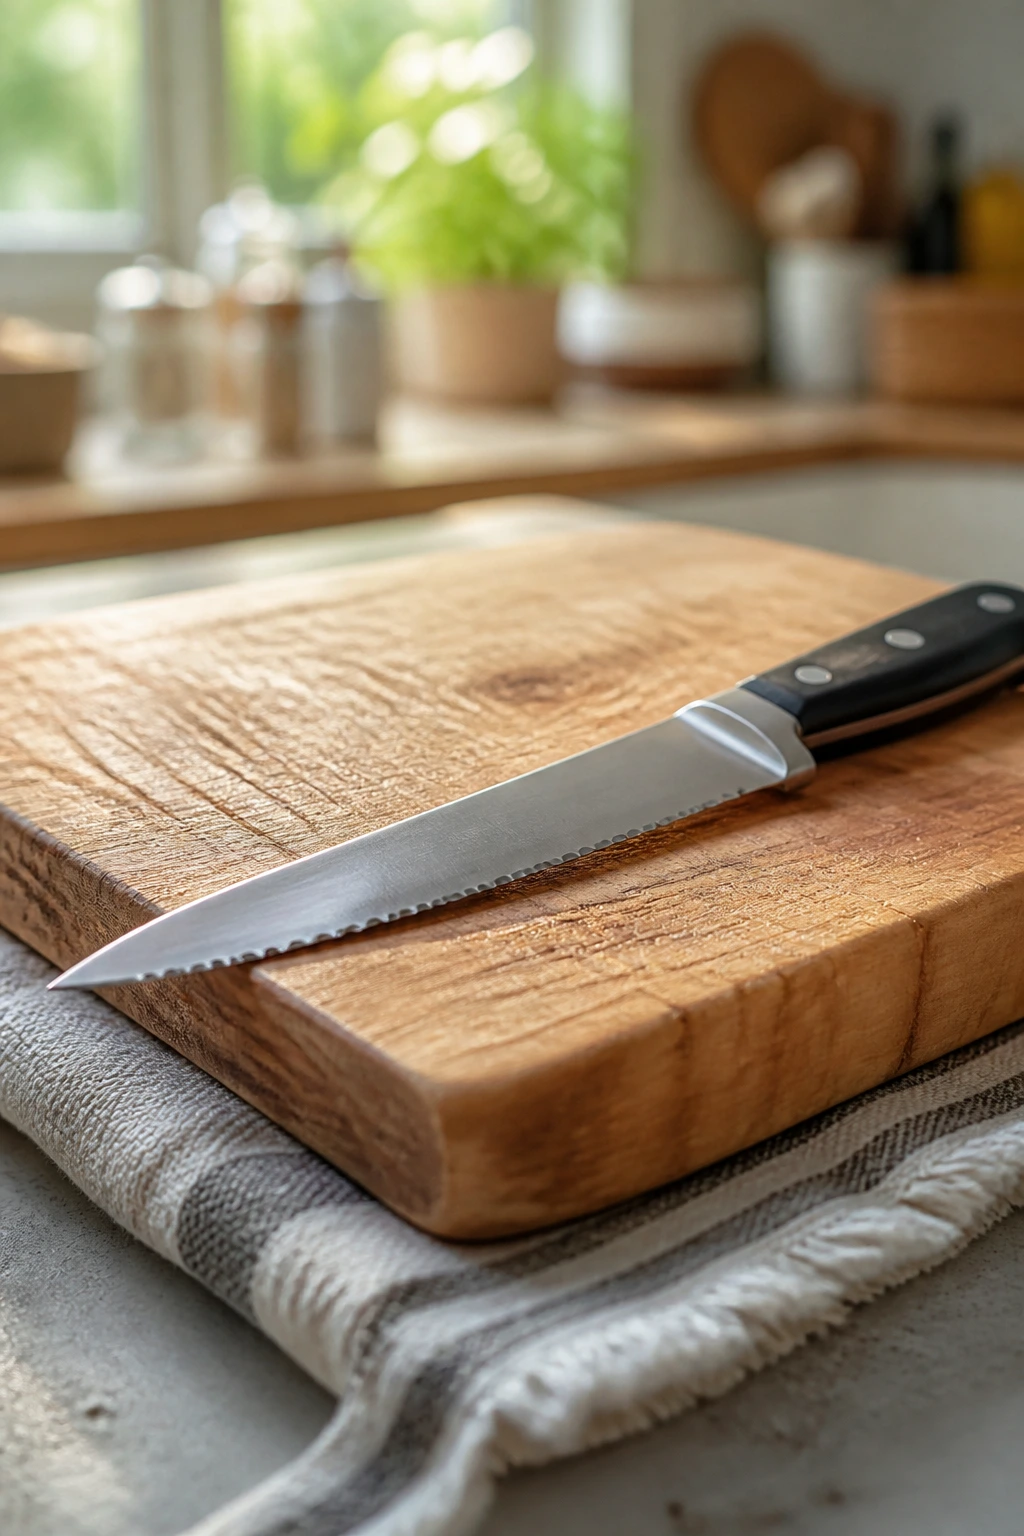
- Sharp serrated knife: Clean cuts matter, especially with tomato-heavy or deli-style sandwiches.
- Cutting board with a stable surface: A damp towel underneath keeps it from sliding while you slice.
- Mixing bowls in two sizes: One for spreads and one for larger fillings like chicken or tuna salad.
- Parchment paper or wax paper: Best for wrapping individual sandwiches so they hold their shape.
- Airtight containers: Useful for fillings and for keeping cut sandwiches from drying out.
- Sheet pan: Handy for toasting bread, cooling fried chicken, or roasting vegetables.
- Wire rack: The right way to cool bacon or fried chicken so the underside stays crisp.
- Cooler with ice packs: Picnic sandwiches do not love warmth; this is not optional for mayo-based fillings.
- Small spatula or spreader: Makes it easier to layer fillings without tearing soft bread.
- Grill pan or skillet, optional: Useful for zucchini, bread toasting, or warming certain sandwiches before packing.
Smart Shopping and Ingredient Tips
Start with bread that was baked for structure, not air. Soft sandwich bread is fine for tea sandwiches and peanut butter builds, but deli stacks, grilled vegetable sandwiches, and anything juicy need rolls, sourdough, rye, ciabatta, or a sturdy bakery loaf. If the loaf is unsliced, ask for a thicker cut or slice it yourself at home. Thin bread collapses under picnic conditions.
Buy produce with firmness in mind. Look for cucumbers with tight skin, tomatoes that smell like tomatoes, apples that snap cleanly when you bite them, and avocados that give slightly but don’t feel mushy. For tomato sandwiches, seed and salt the slices before packing. For cucumber sandwiches, blot them dry. Those two moves solve more picnic problems than any fancy spread.
Deli meat should be sliced thin but not shredded. If the slices are too thick, the sandwich gets chewy and awkward; too thin, and it all bunches up in a soggy wad. For cheese, buy blocks or wedges when possible and slice or grate them yourself. Pre-sliced cheese is convenient, but it does not always melt or spread as cleanly in recipes like pimento cheese or grilled builds.
Condiments deserve more respect than they get. Dijon, horseradish, pesto, pickle juice, balsamic glaze, and olive oil are the parts that give plain chicken or turkey a direction. Use them carefully. The goal is seasoning, not flooding.
How to Serve These Recipes
Presentation:
Cut sandwiches into halves, thirds, or tidy fingers depending on the filling. Stack wedges on a tray with parchment between layers so the cut edges stay neat. Tea sandwiches look best in triangles, while sliders and deli sandwiches usually read better as big diagonal halves.
Accompaniments:
Kettle chips, dill pickles, grapes, melon wedges, carrot sticks, potato salad, and simple slaws all fit naturally here. The best sides for picnic sandwiches bring crunch or acidity, not another soft, creamy thing. That’s the combination that keeps the basket from feeling heavy.
Portions:
Plan on one substantial sandwich per adult if the basket includes sides, or two smaller sandwiches if you’re serving a casual lunch. Tea sandwiches work as 3 to 4 triangles per person. Sliders usually run 2 per person, especially if there are chips and fruit on the blanket.
Beverage Pairing:
Iced tea with lemon, sparkling lemonade, cucumber water, or a dry pilsner all fit the theme. For the richer sandwiches, especially pulled pork or fried chicken, cold sparkling drinks cut the fat nicely. For cucumber, tuna, or smoked salmon, plain iced tea keeps the palate clean.
Additional Tips and Flavor Boosters
Flavor Enhancement: A tiny amount of acid changes everything. Lemon juice, vinegar, pickle brine, or a few capers can wake up a filling that tastes sleepy once it’s cold.
Customization: Keep one sandwich creamy, one crunchy, and one salty if you’re packing for a group. That small mix makes the basket feel varied without adding much work.
Serving Suggestions: Fresh herbs are worth the trouble. Dill on cucumber and salmon, chives in egg salad, basil with Caprese, parsley in chicken salad — they make the sandwiches taste fresher than the ingredient list suggests.
Make-It-Yours: For gluten-free versions, use a sturdy gluten-free loaf or lettuce cups for the softer fillings like tuna, chicken, or chickpea salad. For dairy-free versions, swap in hummus, avocado, or a plant-based spread and keep the wetter ingredients in check.
Make-Ahead, Storage, and Reheating Guidance
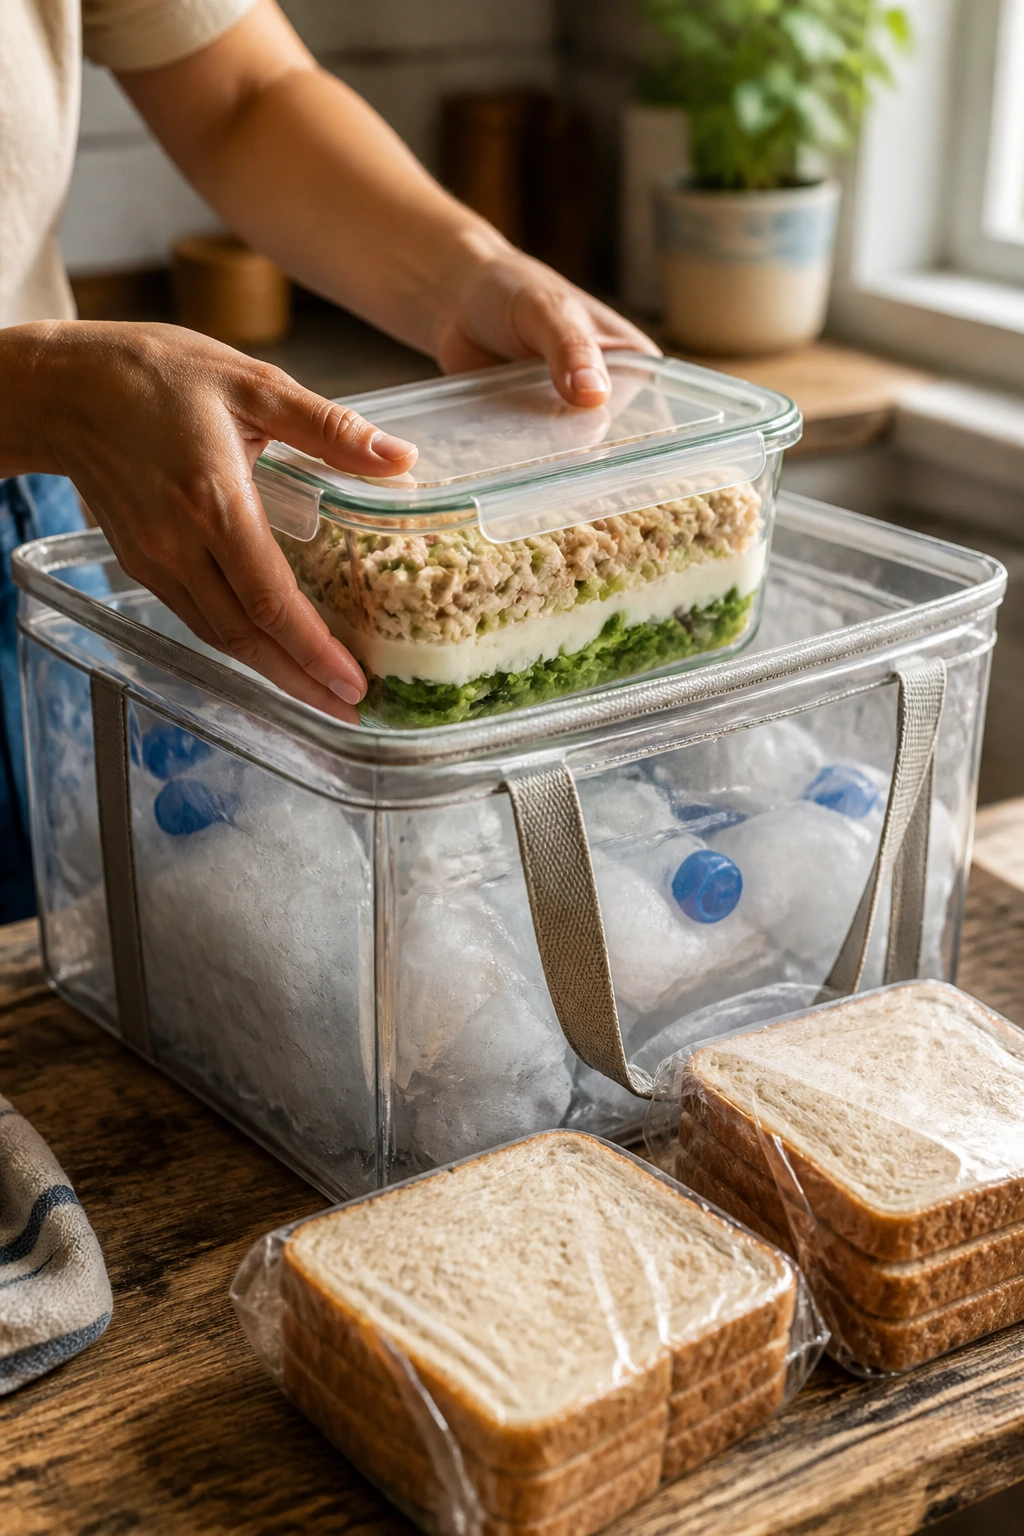
Most picnic sandwich fillings keep best in the refrigerator for 3 days. Chicken salad, tuna salad, egg salad, chickpea salad, and pimento cheese all fit that window if they’re stored in airtight containers. Assembled sandwiches are a different story. Once bread and wet fillings meet, give them about 24 hours at most, and less time if tomatoes, cucumber, or avocado are involved.
For the best texture, pack fillings and bread separately when the picnic is more than a few hours away. Wrap assembled sandwiches tightly in parchment, then foil, and keep them in a cooler with ice packs until serving. Perishable sandwiches should not sit out longer than 2 hours, and only 1 hour if the day is hot enough that the cooler opens and closes all afternoon.
Freezing is useful for a few parts of the collection, not all of it. Pulled pork freezes well for up to 2 months in a sealed container, and it reheats nicely in a 325°F oven covered with foil and a splash of sauce. Fried chicken can be frozen, too, though the crust softens on thawing; reheat it on a rack in a 375°F oven until hot and crisp again. Mayo-heavy fillings do not freeze well. They separate and turn grainy.
Reheating works best for the hot or warm fillings, not the finished sandwiches. Warm pulled pork before building. Re-crisp fried chicken before assembly. Cold sandwiches like cucumber, tuna, egg, and salmon are better left chilled and eaten as-is. That’s part of their charm.
Variations and Adaptations to Try
Crustless Tea-Sandwich Mode:
Cut the bread crusts off any soft sandwich and slice it into fingers or triangles. This works especially well for cucumber, egg salad, and smoked salmon. The smaller shape feels neat and keeps the filling proportion under control.
Gluten-Free Picnic Stack:
Use a gluten-free loaf with a firm crumb, or switch to lettuce wraps for tuna, chicken salad, and curried chickpeas. Sturdier fillings do better than slippery ones here, so keep the spreads thick and the wet ingredients well drained.
No-Mayo Picnic Filling:
Replace mayonnaise with thick yogurt, mashed avocado, or hummus in recipes that can take the change. Chicken salad and chickpea salad can handle it if you keep the dressing restrained and season more aggressively.
Spice-First Basket:
Add pickled jalapeños, Calabrian chili paste, hot sauce, or horseradish to one or two fillings. The trick is to spice the sandwich, not torch it. A little heat goes further in a picnic setting where cold food mutes flavor.
Kid-Size Mini Lunches:
Turn deli sandwiches, PB banana, egg salad, and chicken salad into halves or thirds. Smaller portions are easier for little hands and don’t waste as much if someone changes their mind halfway through.
Vegetarian Mix-and-Match:
The hummus-roasted veg, caprese, curried chickpea, and zucchini-goat cheese sandwiches all fit neatly into a meat-free basket. Build them with firm bread and a dry layer near the bread, and they’ll hold up just as well as the meat versions.
Common Mistakes to Avoid
The first mistake is overfilling. Picnic sandwiches do not need to bulge to be satisfying. A tight, even layer slices better, packs better, and tastes better when you’re eating it off a paper napkin with one hand.
The second mistake is ignoring moisture. Tomatoes, cucumbers, pickles, roasted peppers, and avocado all bring something useful — and all can ruin the bread if they’re not managed. Salt, blot, drain, and layer with intention. Cheese or butter near the bread is not fussy behavior; it’s insurance.
The third mistake is packing everything warm. Warm chicken salad, warm egg salad, warm bacon, and warm bread all get weird fast. Cool the components first, then build. If you want a hot sandwich, keep the filling hot and the bread separate until the last possible minute.
The fourth mistake is using weak bread. Soft, airy bread may look fine on the counter, but it folds under pressure. For picnic duty, choose bread with real chew or a roll with a firm crust. The sandwich should feel like it can survive being wrapped, stacked, and handled twice.
The fifth mistake is waiting too long to assemble delicate sandwiches. BLTs, Caprese, cucumber, and smoked salmon all taste best when they’re built close to serving. Some fillings welcome a short rest. Others do not. Know which one you’re making.
Frequently Asked Questions
What bread holds up best for picnic sandwiches?
Ciabatta, sourdough, rye, hoagie rolls, and firm bakery loaves hold up the best. Soft white bread works for tea sandwiches and peanut butter fillings, but it struggles with juicy tomatoes, deli meats, or roasted vegetables.
How do I keep sandwiches from getting soggy?
Salt and blot wet vegetables, use cheese or butter against the bread, and keep especially juicy fillings like tomato or avocado from sitting directly on the bottom slice. Wrapping in parchment and chilling the sandwich also helps it stay together.
Can I make these sandwiches the night before?
Some of them, yes. Chicken salad, tuna salad, egg salad, chickpea salad, pimento cheese, and pulled pork all handle make-ahead prep well. Fully assembled sandwiches are safer when they’re built the same day, especially if they include tomatoes, cucumber, or lettuce.
Which sandwiches are safest in hot weather?
The sturdier, less perishable ones — Italian deli, pimento cheese, hummus and roasted veg, peanut butter and banana — travel better than mayo-heavy sandwiches or smoked salmon builds. Anything with chicken salad, egg salad, tuna, or salmon should stay in a cooler until serving.
Can I use gluten-free bread for all of these?
You can, but choose a sturdy loaf, not a crumbly one. Gluten-free bread is often more fragile, so keep the fillings a little thicker and avoid overstuffing. For some fillings, lettuce wraps are the cleaner answer.
What’s the best way to pack warm sandwiches like pulled pork or fried chicken?
Pack the filling separately in an insulated container and keep the buns wrapped on the side. Assemble just before eating if possible. If you must build ahead, let the filling cool slightly so steam doesn’t soften the bread.
Should I cut picnic sandwiches before packing them?
For most of them, yes. Halves or quarters are easier to hand out and less likely to squish when people dig into the cooler. Very delicate sandwiches like cucumber or smoked salmon should be cut after a brief chill so the layers stay clean.
Can I freeze any of the fillings?
Pulled pork freezes well, and grilled vegetables can be frozen, though their texture softens a bit. Mayo-based fillings like chicken salad, tuna salad, egg salad, and pimento cheese do not freeze well; they separate and turn grainy when thawed.
The Cooler Opens Better With These Inside
A picnic spread gets better the moment the sandwiches stop fighting the weather. That means choosing fillings that know how to behave, bread with some backbone, and a little common sense about moisture and time. The recipes here cover the full range: crisp and delicate, meaty and sturdy, creamy and sharp, even a few that feel close to snack food in the best possible way.
I’d pack one sandwich that’s cold and tidy, one that’s rich and salty, and one that brings crunch or acid. That little trio makes the basket feel thought through, and it keeps the last sandwich from tasting like an afterthought. Pick your mix, wrap it well, and the blanket lunch gets a lot more interesting.