
A dessert can look expensive without being expensive. That’s the quiet charm of elegant desserts that use pantry staples: a loaf cake glazed while still warm, a tray of cocoa-dusted truffles lined up like tiny velvet stones, a dark chocolate torte sliced into dense, glossy wedges. None of it asks for specialty sugar, a pastry lab, or a shopping cart full of fragile produce that needs to be used by Thursday.
I’ve always liked desserts that know how to wear simple ingredients well. Flour, sugar, cocoa, eggs, butter, olive oil, oats, jam, canned fruit, nuts, molasses, espresso powder, tahini, semolina — these are humble things, but they can do polished work when you handle them with care. A pinch of salt sharpens chocolate. A little citrus zest wakes up a butter cake. A glossy glaze or a tumble of toasted nuts changes the whole mood of a dish.
And that’s really the point here. Pantry staples are not a compromise; they’re a set of tools. Used well, they make desserts that slice cleanly, hold their shape, travel well, and land on a plate with enough style to make people think you planned far ahead. Some of these are quick. Some need a chill or a proper bake. A few are old-fashioned in the best possible way. All of them can earn their place at a dinner table that has a cloth napkin on it.
Why This Collection Feels Special
-
Built from real staples: Every dessert here leans on ingredients that are usually already in the house, so you can bake without a rescue run to the store.
-
Fancy without fuss: These desserts rely on smart textures — glossy chocolate, crisp edges, silky custard, neat glaze — instead of hard-to-find ingredients.
-
Good for last-minute hosting: Several of these chill well, slice neatly, or improve after a few hours, which means you can make them before people arrive and stop worrying.
-
Flexible by design: Jam, nuts, citrus, spices, canned fruit, and different chocolates can all be swapped around without wrecking the dessert.
-
Useful beyond one occasion: A shortbread round can live next to coffee, a torte can finish a dinner, and bark or truffles can be tucked into a tin for gifts.
-
Small effort, strong payoff: A whisk, a bowl, and a decent oven do more work here than an expensive ingredient list ever could.
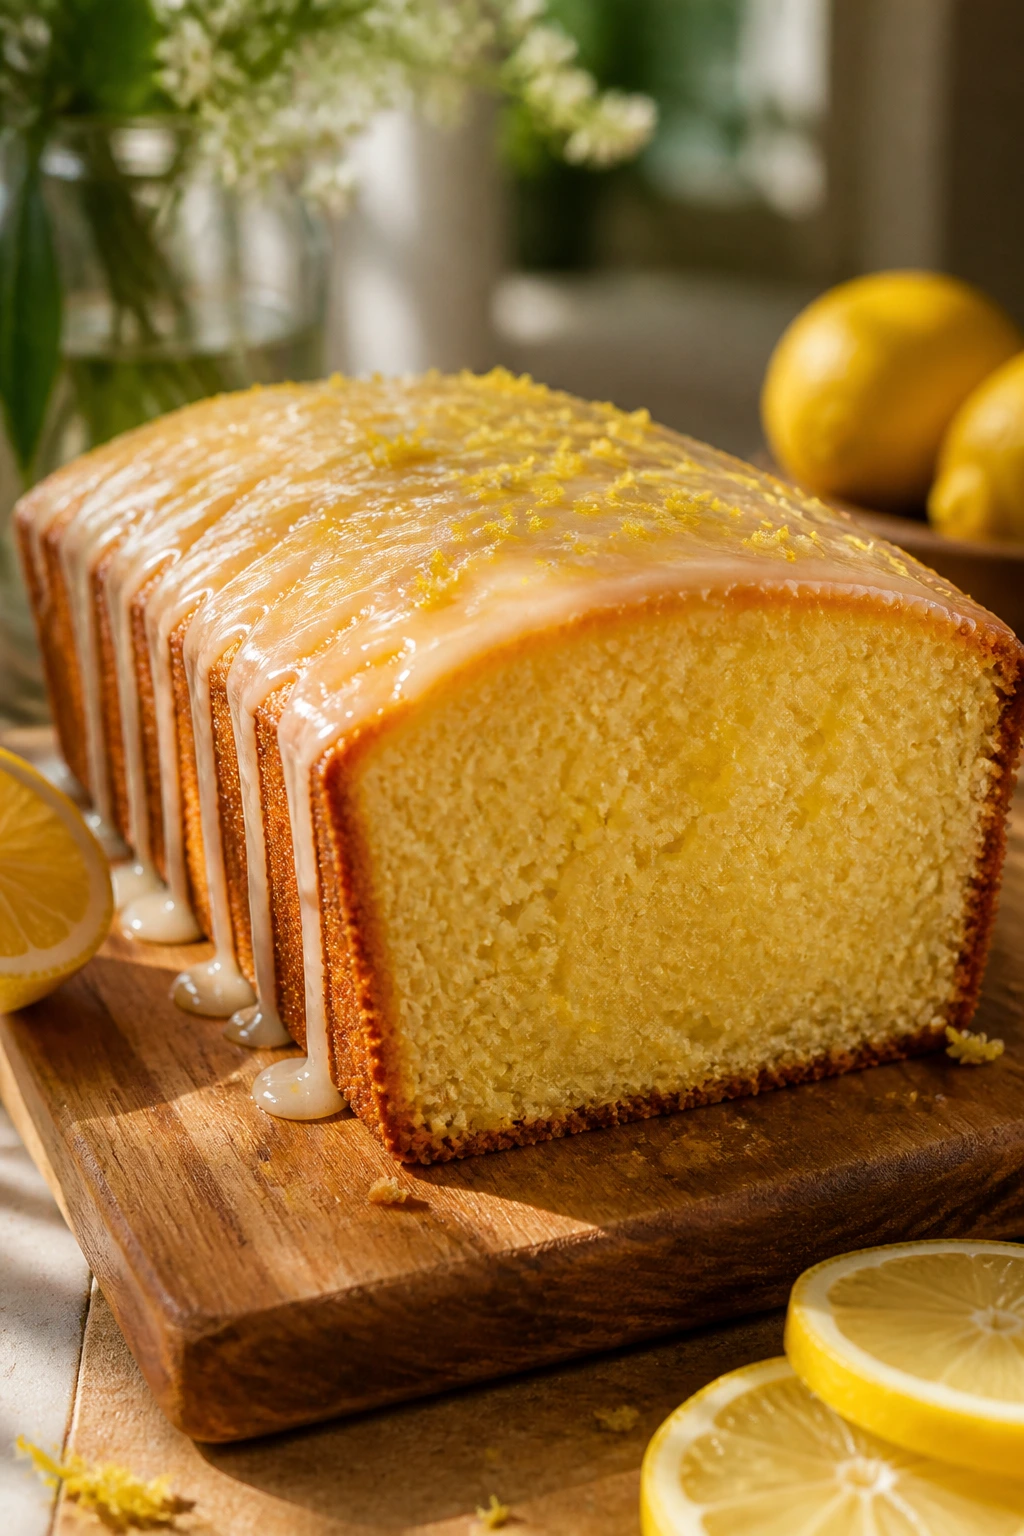
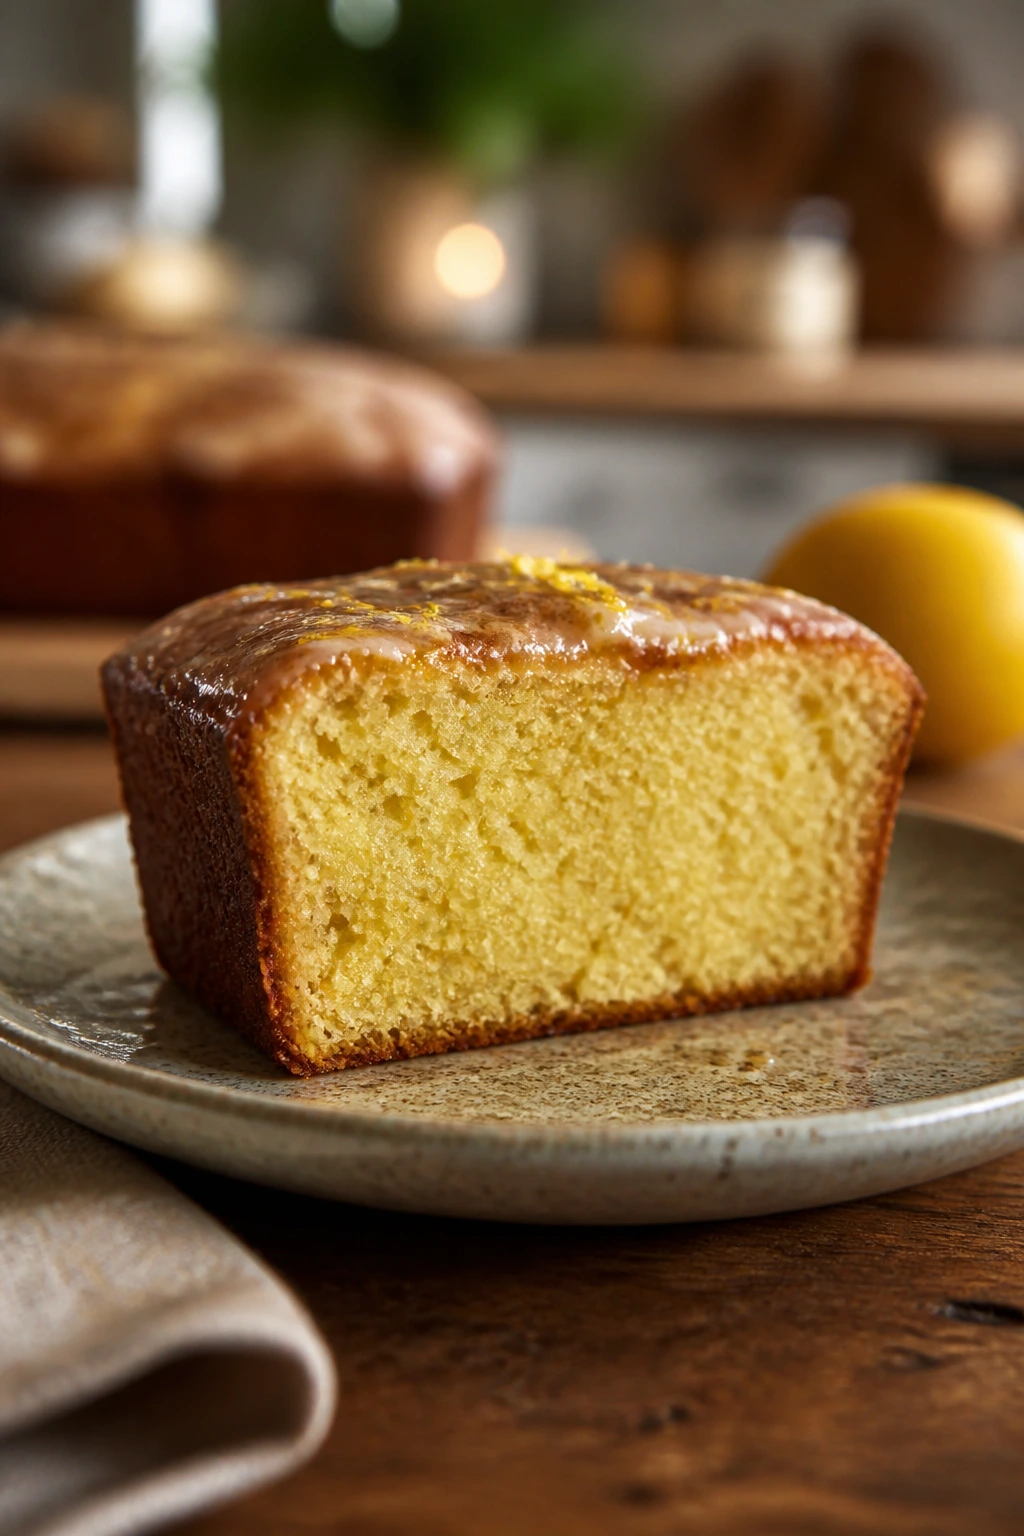
1. Olive Oil Lemon Loaf Cake
Intro:
This loaf is what happens when a basic cake gets dressed properly. The crumb stays tender from olive oil, the lemon zest perfumes the whole kitchen, and the top takes on a thin, pale-gold crust that slices without crumbling. I like it best with a soft glaze that drips down the sides in uneven white ribbons. Very little about it is loud. That’s the charm.
Why It Works:
Olive oil keeps the crumb moist for days, and a mild one lets lemon stay in charge instead of fighting for attention. The sugar and zest rubbed together before mixing release oils that make the cake smell brighter before it even hits the oven. A loaf pan gives you those neat bakery-style slices, which is half the elegance right there. It also travels well, and a cake that can sit under a dome overnight without drying out is a cake worth remembering.
Key Ingredients:
- 2 cups all-purpose flour
- 1 1/2 teaspoons baking powder
- 1/2 teaspoon fine salt
- 1 cup granulated sugar
- 3 large eggs, room temperature
- 1/2 cup mild extra-virgin olive oil
- 1/2 cup whole milk
- 2 tablespoons lemon zest
- 3 tablespoons lemon juice
- 1 teaspoon vanilla extract
- 1/2 cup powdered sugar
- 1 to 2 tablespoons milk or lemon juice, for the glaze
Quick Steps:
- Preheat the oven to 350°F and grease a 9×5-inch loaf pan. Line it with parchment so the loaf lifts cleanly.
- Whisk the flour, baking powder, and salt in one bowl.
- In another bowl, rub the sugar and lemon zest together, then whisk in the eggs, olive oil, milk, lemon juice, and vanilla until smooth.
- Fold the dry ingredients into the wet mixture just until the flour streaks disappear. Do not beat it into submission.
- Scrape the batter into the pan and bake for 45 to 55 minutes, until the center springs back and a tester comes out with a few moist crumbs.
- Cool for 15 minutes in the pan, then turn out and glaze once the loaf is barely warm.
Equipment for This Recipe:
- 9×5-inch loaf pan
- Mixing bowls
- Whisk and rubber spatula
- Microplane or fine grater
- Parchment paper
How to Serve This Dish:
A thin slice on a plain white plate is enough. If you want to lean into the lemon, add a spoonful of berries or a few curls of candied peel. It takes well to tea, espresso, or a late-afternoon coffee you forgot to finish.
Pro Tips for This Recipe:
- Use a mild olive oil, not a peppery one; strong oil can turn the cake savory in the wrong way.
- Rub the zest into the sugar with your fingertips. It sounds fussy. It also works.
- Glaze the loaf when it’s just warm, not hot, so the icing clings instead of melting off.
- If your oven runs hot, check at 42 minutes. Loaf cakes can go from tender to dry faster than people expect.
Variations on This Dish:
Orange-Almond Loaf: Swap lemon zest for orange zest and add 1/4 teaspoon almond extract. The flavor reads softer and warmer.
Rosemary Glaze Version: Steep a small rosemary sprig in the milk for the glaze, then strain it out. Use a light hand; this should whisper, not shout.
Dairy-Free Loaf: Use plain unsweetened almond milk and keep the olive oil. The cake stays plush and slices cleanly.
Common Mistakes to Avoid with This Dish:
- Using heavy, grassy olive oil: The cake tastes harsh instead of bright. Choose a mild bottle.
- Overmixing after the flour goes in: You’ll get a tight crumb and a sad, rubbery slice. Fold until just combined.
- Glazing too soon: The icing melts into a thin, sticky puddle. Let the loaf cool a bit first.
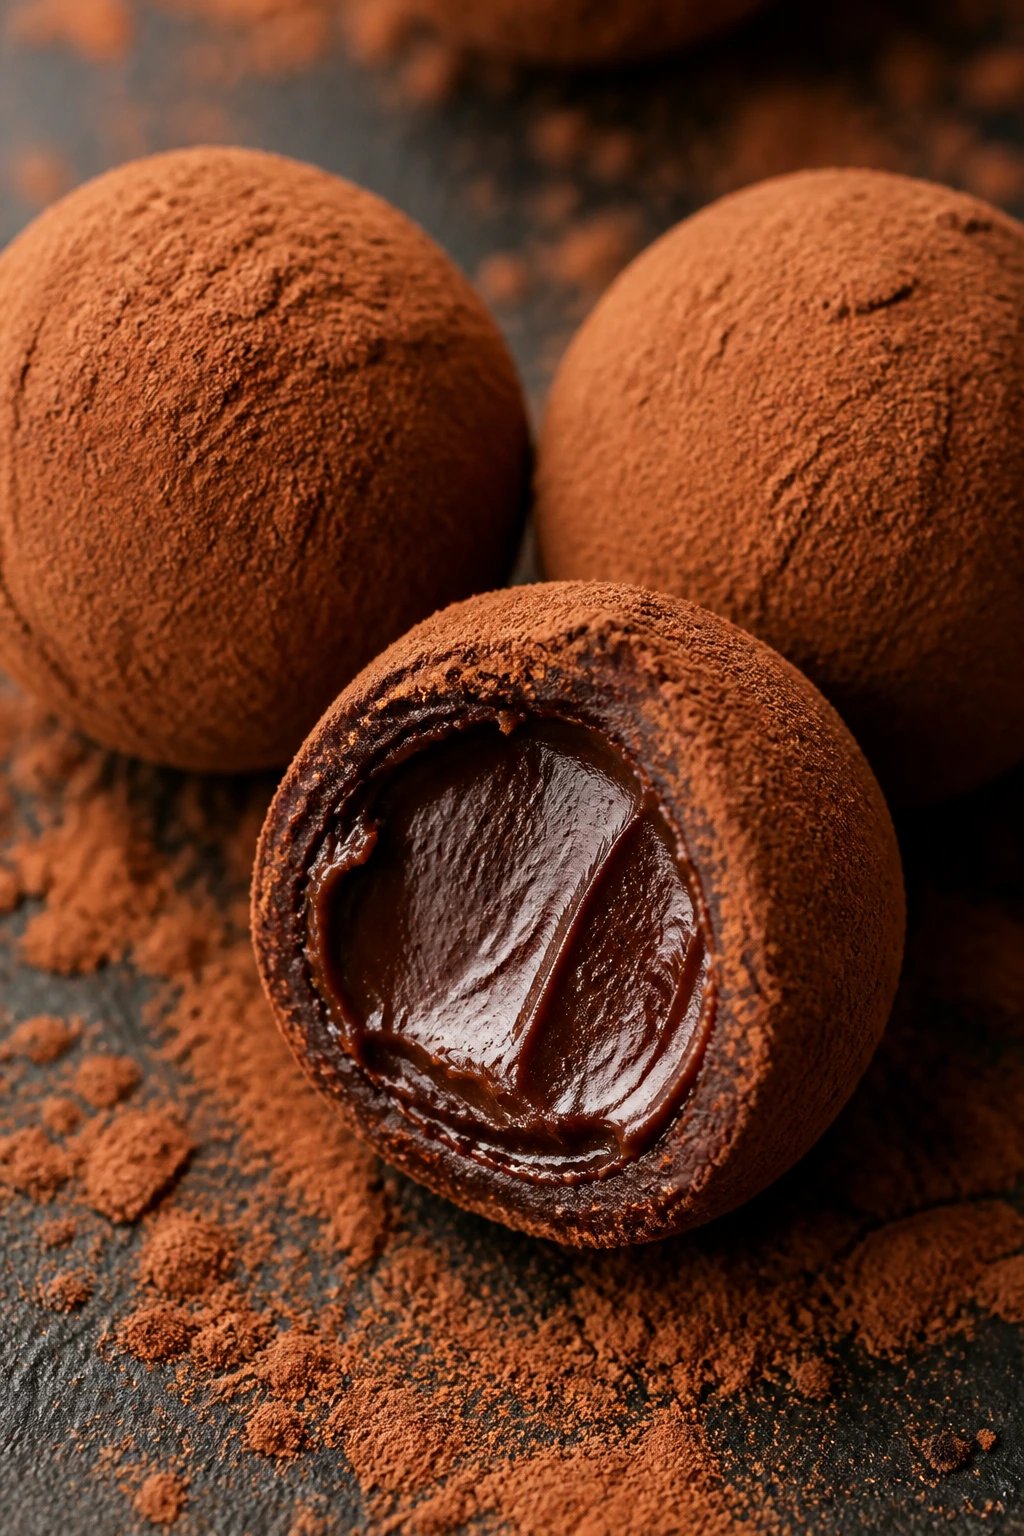
2. Cocoa-Dusted Chocolate Truffles
Intro:
Truffles look more complicated than they are, which is part of the appeal. Once the ganache sets, you roll little rounds between your palms, coat them in cocoa, and suddenly the tray looks like something from a proper chocolate shop. The center should be soft, dark, and almost creamy rather than chewy. If your hands are warm, the outside will tell on you fast.
Why It Works:
Ganache is a two-ingredient trick with excellent manners: chocolate and cream become one smooth filling when you stir them together patiently. Butter adds a little sheen, vanilla rounds the edges, and a pinch of salt keeps the chocolate from tasting flat. The cocoa coating does more than decorate; it keeps the truffles from sticking and gives each bite that dry, bitter finish before the center melts. They’re easy to portion and even easier to gift, which makes them feel more polished than their ingredient list suggests.
Key Ingredients:
- 8 ounces bittersweet chocolate, chopped or in chips
- 1/2 cup heavy cream
- 1 tablespoon unsalted butter
- 1 teaspoon vanilla extract
- 1 tablespoon instant espresso powder or 1 teaspoon instant coffee
- 1/4 teaspoon fine salt
- 1/2 cup unsweetened cocoa powder
- 1/4 cup finely chopped toasted nuts, optional
- 1 tablespoon powdered sugar, optional for a sweeter finish
Quick Steps:
- Warm the cream, espresso powder, and salt in a small saucepan over medium heat until steaming, not boiling.
- Pour the hot cream over the chocolate and butter in a bowl, then let it sit for 2 minutes.
- Stir from the center outward until smooth and glossy. Add the vanilla. If the mixture looks broken, keep stirring; it often comes back together.
- Chill the ganache for 1 1/2 to 2 hours, until firm enough to scoop.
- Scoop small portions, roll into balls, and coat in cocoa powder or chopped nuts.
- Chill again for 20 minutes so the centers set before serving.
Equipment for This Recipe:
- Small saucepan
- Heatproof bowl
- Small cookie scoop or teaspoon
- Parchment-lined tray
- Fine mesh sieve for the cocoa coating
How to Serve This Dish:
Pile them in a shallow bowl or tuck them into paper candy cups. They look especially good next to black coffee or after a rich dinner when nobody wants a large slice of cake. A few flaky salt crystals on top can make them read even more deliberate.
Pro Tips for This Recipe:
- Use chopped chocolate if you have it; chips work, but bars melt smoother.
- Chill the ganache until it is firm, not rock hard. If it gets too cold, rolling becomes a mess.
- Dust your hands lightly with cocoa if the mixture starts softening while you roll.
- Cocoa powder tastes more elegant than powdered sugar here. I’d save the sugar coating for sweeter fillings.
Variations on This Dish:
Orange Zest Truffles: Stir in 1 teaspoon orange zest with the vanilla. The citrus lifts the chocolate without making it taste bright or dessert-y in a childish way.
Rum Truffles: Add 1 tablespoon dark rum to the ganache after it comes together. Good for a grown-up dessert plate.
Hazelnut Truffles: Roll the finished truffles in very finely chopped toasted hazelnuts instead of cocoa for a more textured finish.
Common Mistakes to Avoid with This Dish:
- Letting the cream boil hard: That can make the chocolate seize or split. Steam is enough.
- Rolling too early: Soft ganache sticks everywhere and loses its shape. Wait until it holds a scoop.
- Skimping on the cocoa coating: A thin dusting looks neat for five minutes, then the truffles glue themselves to the tray.
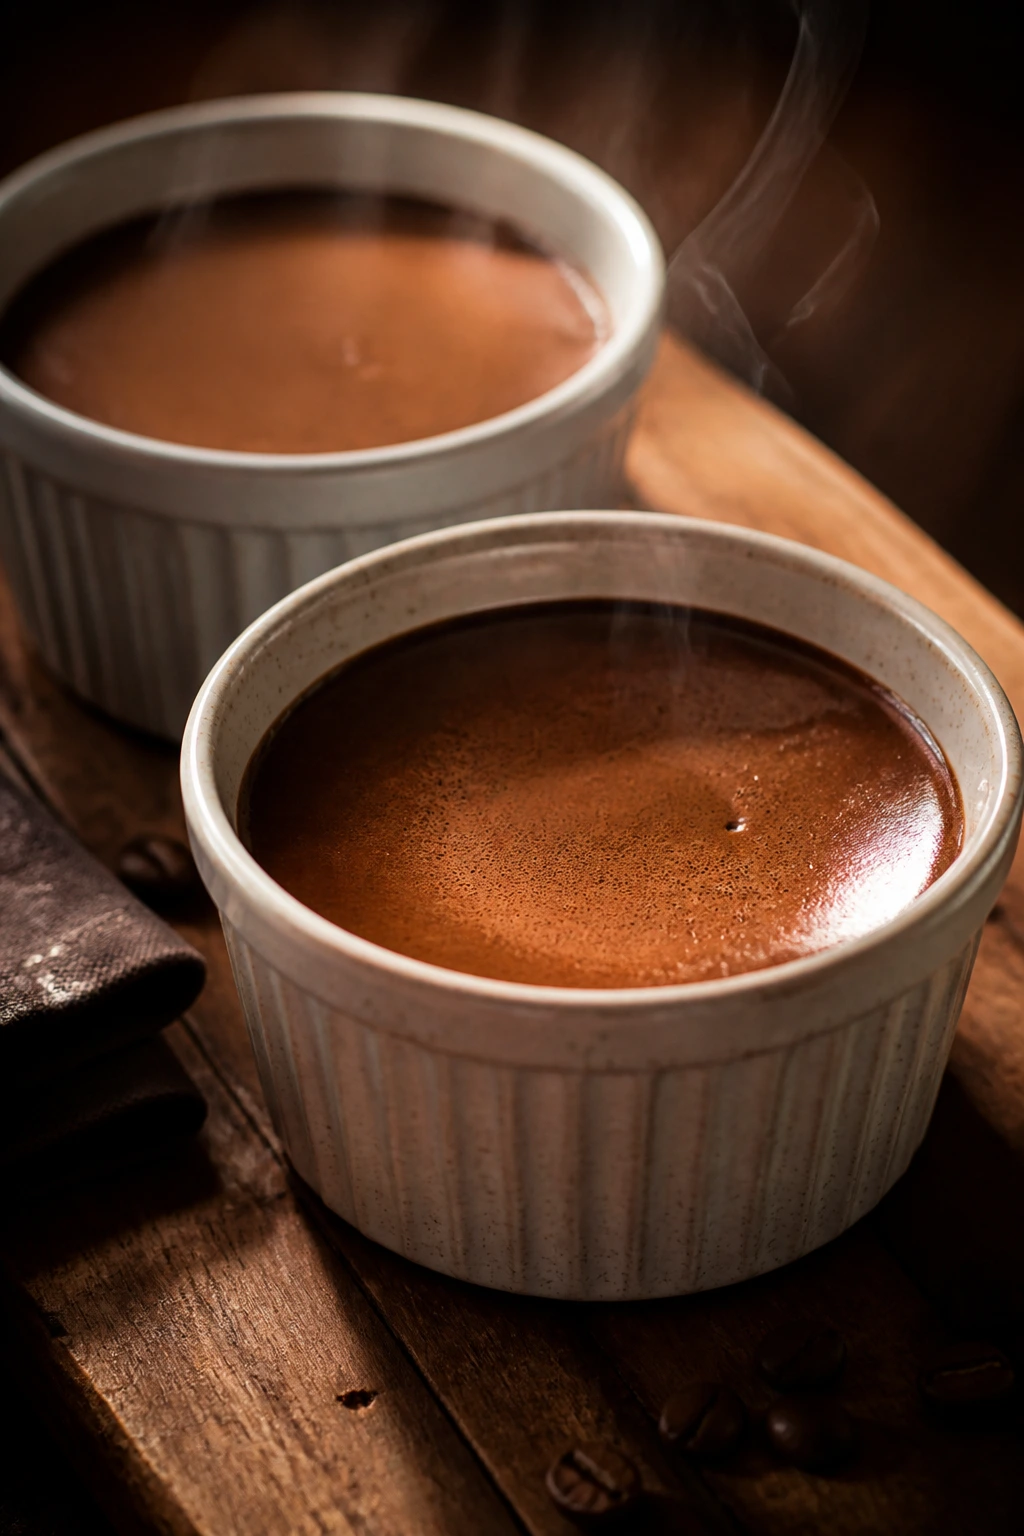
3. Espresso Pots de Crème
Intro:
There’s a reason this dessert feels expensive the second it lands on the table. A spoon slides through the surface, and the custard gives way with almost no resistance — smooth, cold, and faintly bitter in the right way. Espresso keeps it from tasting like plain sweet cream. The texture matters here more than decoration ever could.
Why It Works:
Custard gets its refinement from restraint. Egg yolks thicken the cream, instant espresso or strong coffee gives depth, and straining the mixture before baking removes any bits that would interrupt the silkiness. A water bath keeps the edges from turning grainy before the centers set. Chill time matters too; this is one of those desserts that straightens its clothes in the fridge.
Key Ingredients:
- 4 large egg yolks
- 1 large egg
- 1/4 cup granulated sugar
- 1 1/2 cups heavy cream
- 1/2 cup whole milk
- 2 teaspoons instant espresso powder
- 2 ounces bittersweet chocolate, chopped
- 1 teaspoon vanilla extract
- 1/4 teaspoon fine salt
- Whipped cream or shaved chocolate, for serving
Quick Steps:
- Preheat the oven to 300°F and set a kettle of water to boil.
- Warm the cream, milk, espresso powder, and chocolate in a saucepan over medium heat until the chocolate melts and the mixture is hot but not bubbling.
- Whisk the yolks, egg, sugar, vanilla, and salt in a bowl until smooth.
- Slowly whisk the hot cream into the eggs to temper them, then strain through a fine sieve into a pitcher or bowl.
- Pour into ramekins and set them in a baking dish. Add enough hot water to come halfway up the sides.
- Bake for 25 to 35 minutes, until the edges are set and the centers still wobble like soft gelatin. Chill for at least 3 hours.
Equipment for This Recipe:
- 4 to 6 ramekins
- Fine-mesh strainer
- Whisk and saucepan
- Deep baking dish or roasting pan
- Pitcher or measuring cup with a spout
How to Serve This Dish:
Serve them cold, straight from the fridge, with a spoonful of whipped cream and maybe a few chocolate curls. Small spoons matter here. The dessert is rich enough that a little goes a long way.
Pro Tips for This Recipe:
- Strain the custard. Every time. It’s the difference between smooth and vaguely bumpy.
- Pull the ramekins when the center still jiggles. If the custard looks fully firm in the oven, it’s already overdone.
- Use very hot water in the bath so the oven temperature doesn’t drop too much when you load the pan.
- A pinch of salt sharpens the espresso and keeps the custard from reading as sweet cream soup.
Variations on This Dish:
Mocha Pots de Crème: Add an extra ounce of chocolate and reduce the cream by 2 tablespoons. The flavor moves deeper into dessert territory.
Cardamom Cream Version: Add 1/4 teaspoon ground cardamom to the cream before heating. It plays well with coffee without turning perfume-heavy.
Dairy-Light Coconut Custard: Swap the milk and half the cream for canned coconut milk. The texture changes a bit, but the set stays lovely.
Common Mistakes to Avoid with This Dish:
- Boiling the custard mix: That scrambles the eggs in a hurry. Keep the heat gentle.
- Overbaking: A firm center means a grainy custard later. Stop while it still wobbles.
- Skipping the chill: Warm custard tastes flat and loose. It needs time to set and sharpen.
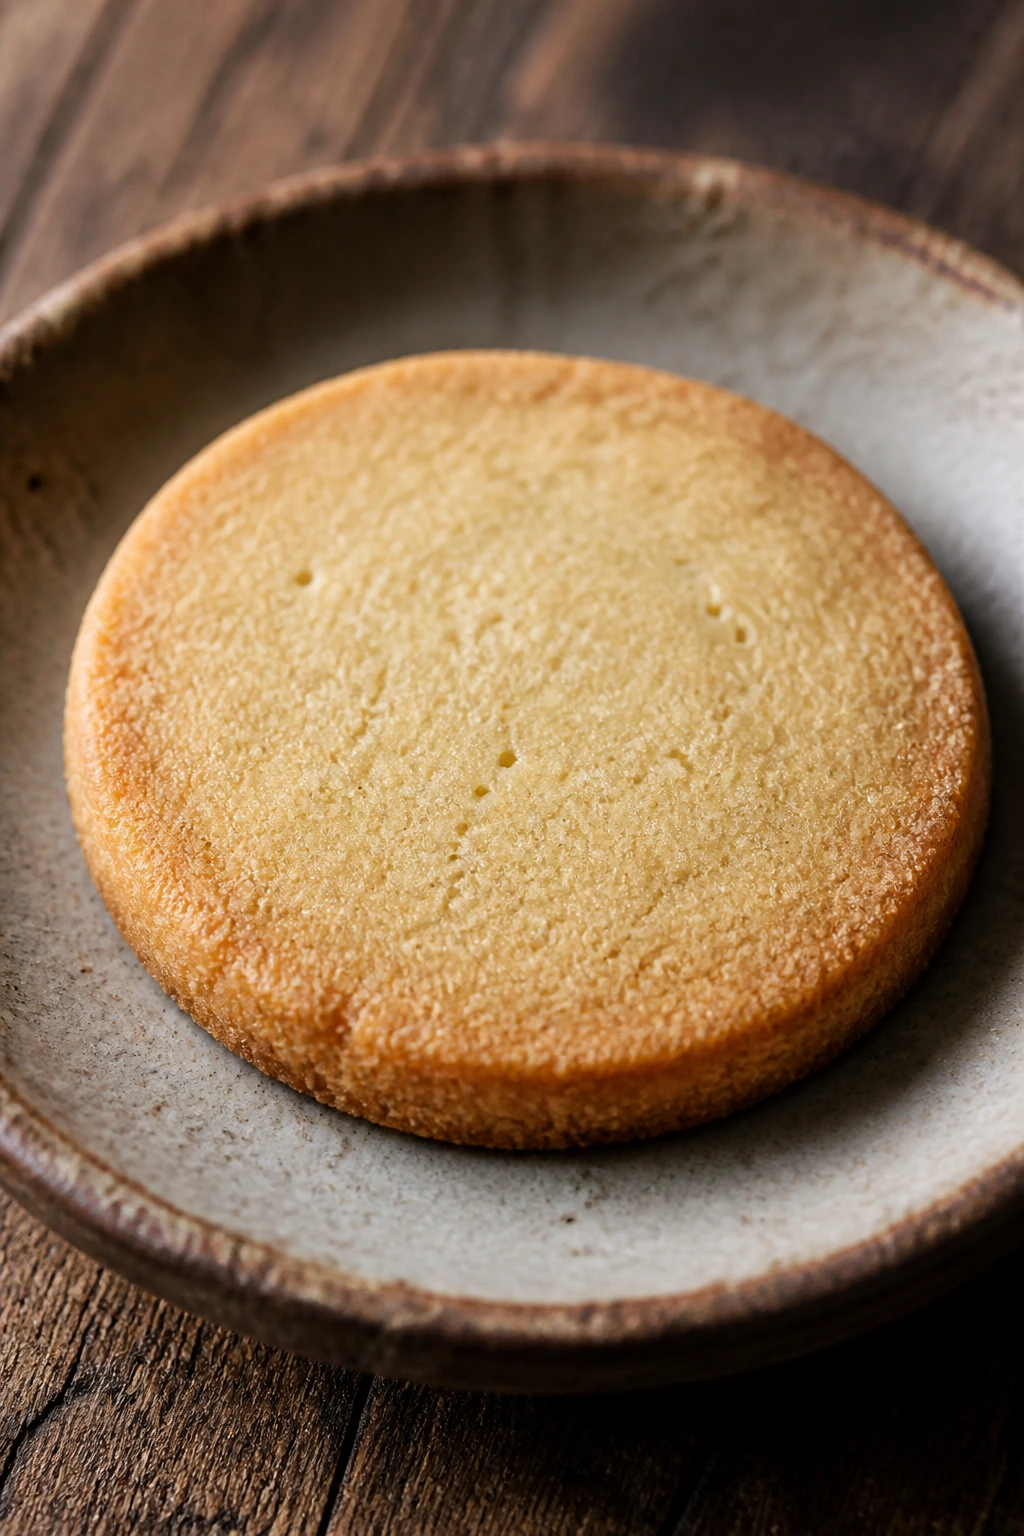
4. Brown Butter Shortbread
Intro:
Shortbread is at its best when it is plain enough to show off the butter. Brown the butter first, and the whole cookie shifts into hazelnut territory — deeper, toastier, more grown-up. The finished rounds or fingers should break with a clean snap and leave a sandy, buttery crumb on your tongue. No frosting. No drama. Good shortbread does the talking itself.
Why It Works:
Brown butter adds a caramel note that makes a three-ingredient cookie taste as though you worked much harder than you did. Shortbread relies on fat, flour, and sugar in a ratio that stays tender but still holds its shape. A little cornstarch makes the crumb finer, and a chill before baking keeps the cookies from spreading into greasy puddles. These are the sort of cookies that disappear near tea cups.
Key Ingredients:
- 1 cup unsalted butter
- 1/2 cup powdered sugar
- 2 cups all-purpose flour
- 1/4 cup cornstarch
- 1/2 teaspoon fine salt
- 1 teaspoon vanilla extract
- Flaky salt, for finishing
- 1 tablespoon granulated sugar, optional for the top
Quick Steps:
- Brown the butter in a small saucepan over medium heat until the milk solids turn golden and smell nutty, about 5 to 7 minutes. Cool until opaque but still soft.
- Whisk the browned butter with powdered sugar and vanilla.
- Add the flour, cornstarch, and salt, then mix just until a crumbly dough forms.
- Press the dough into a disc or a 9-inch round and chill for 30 minutes. Cold dough keeps the shortbread tidy.
- Cut into fingers or wedges, prick lightly with a fork, and bake at 325°F for 22 to 28 minutes, until the edges are pale gold.
- Cool on the pan for 10 minutes, then move to a rack and finish with a pinch of flaky salt.
Equipment for This Recipe:
- Small saucepan
- Mixing bowl
- 9-inch round pan or baking sheet
- Sharp knife or bench scraper
- Parchment paper
How to Serve This Dish:
Serve the shortbread with black tea, strong coffee, or a spoonful of tart jam on the side. If you’re putting out a cookie platter, these give the whole tray a cleaner, more adult feel.
Pro Tips for This Recipe:
- Brown the butter slowly. Burnt butter tastes bitter, and shortbread has nowhere to hide it.
- If the dough feels greasy, chill it before pressing or cutting.
- For sharper edges, slice the shortbread while it is still warm from the oven, then leave the pieces on the tray to cool.
- A light dusting of sugar on top before baking gives the cookies a little sparkle and crunch.
Variations on This Dish:
Rosemary Shortbread: Add 1 teaspoon very finely chopped rosemary to the dough. Use less than you think; shortbread and rosemary should nod to each other, not start a conversation.
Chocolate-Dipped Shortbread: Dip one end of each cooled cookie in melted dark chocolate and let it set on parchment.
Lemon Shortbread: Add 1 tablespoon zest to the dough and skip the vanilla. Bright and clean.
Common Mistakes to Avoid with This Dish:
- Using butter that’s still hot: It melts the sugar and makes the dough greasy. Cool it first.
- Overbaking until deeply golden: Shortbread should be pale with lightly browned edges. Dark is not better here.
- Cutting before it cools enough: The cookies can crumble or bend. Give them a few minutes on the tray.
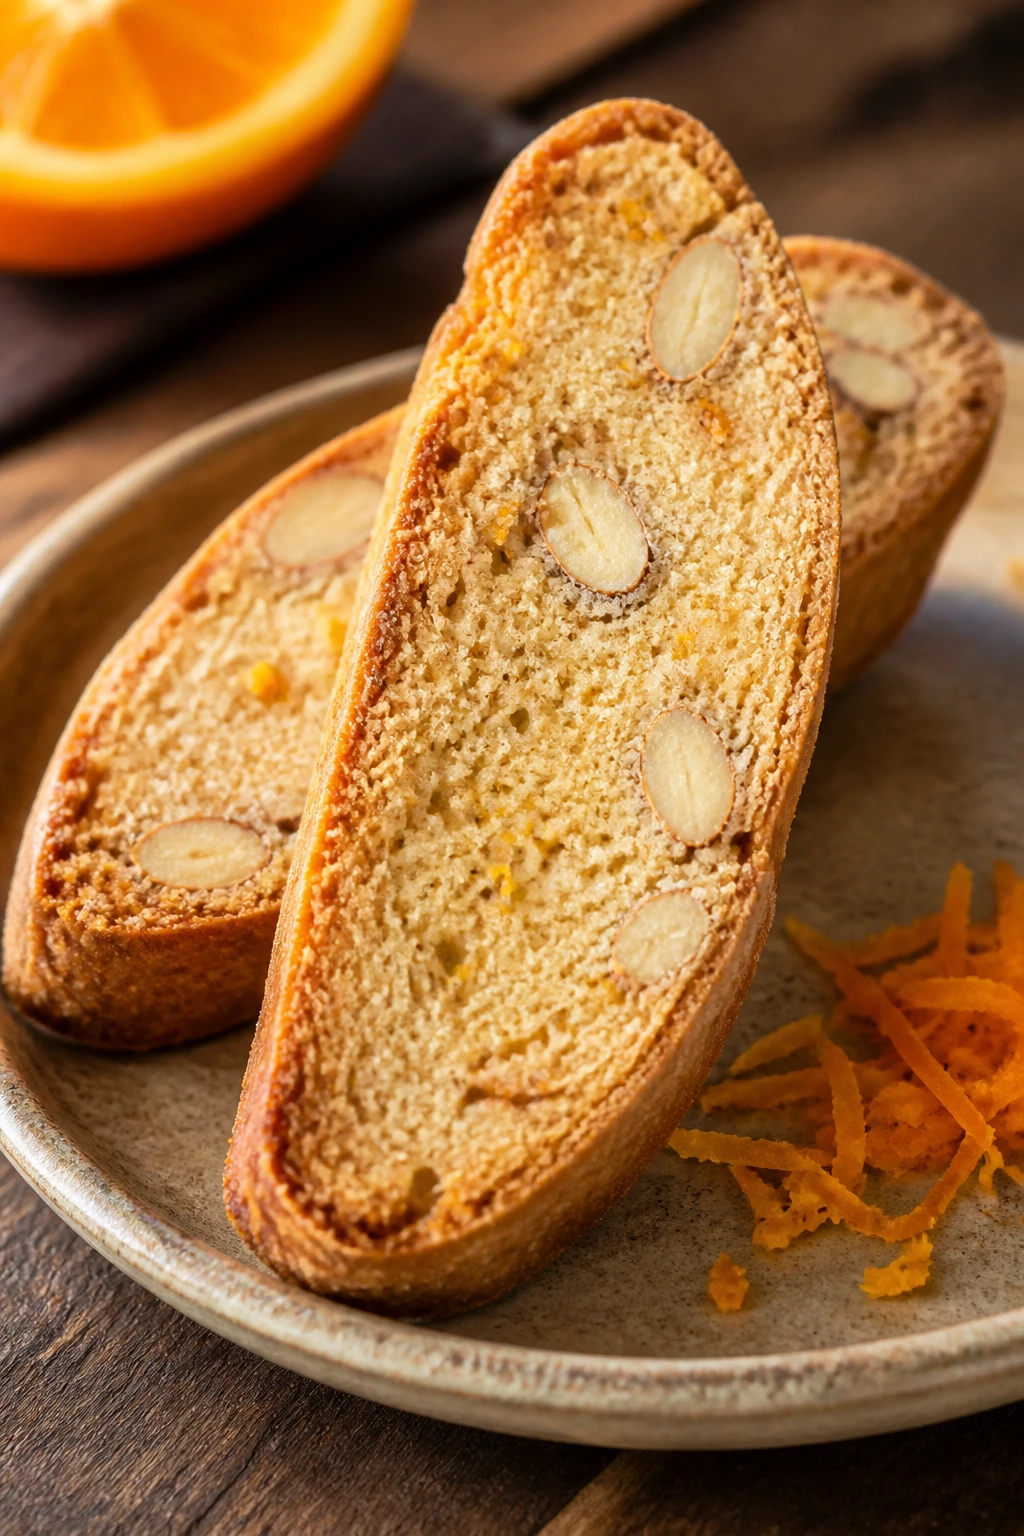
5. Almond Biscotti with Orange Zest
Intro:
Biscotti has a reputation for being sturdy, and that’s exactly why I like it. The slices are crisp at the edges, dry enough to dunk, and packed with toasted almond flavor that gets better after the second bake. Orange zest keeps the cookie from tasting dusty. If you want something that looks tidy in a jar and behaves well on a dessert tray, this is it.
Why It Works:
The twice-baked method dries the cookies without turning them hard as rocks, as long as you slice them while the logs are still warm. Almonds toast inside the dough, and orange zest keeps the aroma lifted instead of heavy. Biscotti also keeps for days without fuss, which is useful if you’re making dessert before the rest of the dinner even exists. The long shape makes them look elegant with almost no decoration.
Key Ingredients:
- 1 3/4 cups all-purpose flour
- 1/2 cup granulated sugar
- 1 teaspoon baking powder
- 1/2 teaspoon fine salt
- 2 large eggs
- 1 teaspoon vanilla extract
- 1/2 teaspoon almond extract
- 3/4 cup whole almonds, toasted
- 1 tablespoon orange zest
- 1 egg white, lightly beaten, for brushing
- 2 tablespoons coarse sugar, optional
Quick Steps:
- Preheat the oven to 350°F and line a baking sheet with parchment.
- Whisk the flour, sugar, baking powder, salt, and orange zest in a bowl.
- Beat in the eggs, vanilla, and almond extract, then fold in the almonds. The dough will be sticky and stiff. That’s normal.
- Shape it into two long logs on the baking sheet and brush lightly with egg white if you want shine.
- Bake for 22 to 26 minutes, until lightly golden and firm to the touch. Cool for 10 minutes.
- Slice on a slight diagonal with a serrated knife, then bake the slices cut-side down for 8 to 10 minutes per side, until dry and crisp.
Equipment for This Recipe:
- Baking sheet
- Parchment paper
- Serrated knife
- Mixing bowl
- Pastry brush, optional
How to Serve This Dish:
Put biscotti next to espresso, cappuccino, or dessert wine if that’s the direction the table is going. They also make an excellent end to a meal when you want something sweet but not sticky.
Pro Tips for This Recipe:
- Toast the almonds first. Raw almonds are fine; toasted ones taste like the whole cookie got dressed up.
- Slice while the logs are still warm, not fully cool, or they’ll crack badly.
- A diagonal cut gives a taller, more elegant shape than straight slices.
- If your knife drags, switch to a sawing motion and clean the blade between cuts.
Variations on This Dish:
Cranberry-Pistachio Biscotti: Swap half the almonds for pistachios and add 1/3 cup dried cranberries. Good color, good crunch.
Chocolate-Dipped Biscotti: Dip one end in melted dark chocolate after the second bake. It turns a pantry cookie into a gift cookie.
Anise Biscotti: Add 1/2 teaspoon anise seed or a touch of anise extract for a more classic Italian profile.
Common Mistakes to Avoid with This Dish:
- Waiting too long to slice: The logs harden and crack into ugly chunks.
- Overbaking the second time: Biscotti should dry out, not turn dark brown.
- Skipping the nuts’ toast: Untoasted nuts taste flat and make the cookie feel less finished.
6. Cardamom Snickerdoodles
Intro:
Snickerdoodles already have one foot in elegance if you swap the plain cinnamon sugar for something a little sharper. Cardamom gives the cookies a cool, floral edge that wakes up the brown sugar dough. The centers should stay soft and almost cakey while the edges crackle with sugar. A good one leaves a little spice on your fingers.
Why It Works:
Cream of tartar gives snickerdoodles their gentle tang and their characteristic chew. Cardamom brings a clean fragrance that keeps the cookies from tasting like every school-bake-sale version you’ve already had. Rolling the dough in spiced sugar creates that crackly shell, and a short bake preserves a soft middle. If you want a cookie that feels familiar but not boring, this is the move.
Key Ingredients:
- 2 3/4 cups all-purpose flour
- 2 teaspoons cream of tartar
- 1 teaspoon baking soda
- 1/2 teaspoon fine salt
- 1 cup unsalted butter, softened
- 1 1/2 cups granulated sugar
- 2 large eggs
- 2 teaspoons ground cinnamon
- 1 teaspoon ground cardamom
- 1/4 cup granulated sugar, for rolling
Quick Steps:
- Preheat the oven to 375°F and line two baking sheets with parchment.
- Whisk the flour, cream of tartar, baking soda, salt, cinnamon, and cardamom in a bowl.
- Cream the butter and sugar until pale and fluffy, then beat in the eggs.
- Add the dry ingredients and mix just until combined. Chill the dough for 20 to 30 minutes if it feels sticky.
- Roll the dough into balls, coat in the sugar-spice mixture, and place 2 inches apart.
- Bake for 9 to 11 minutes, until the edges are set and the centers still look slightly underdone. Cool on the pan for 5 minutes.
Equipment for This Recipe:
- Mixing bowls
- Electric mixer or sturdy whisk
- Two baking sheets
- Parchment paper
- Cookie scoop, optional
How to Serve This Dish:
These are excellent with coffee, chai, or a glass of cold milk. They also work well on a mixed cookie platter because the cardamom gives the whole tray a different scent when the lid comes off.
Pro Tips for This Recipe:
- Fresh cardamom matters. Old cardamom tastes dusty, and you’ll notice it immediately.
- Pull them early. Snickerdoodles finish setting on the hot pan.
- If the dough is too warm, refrigerate the shaped balls before rolling them in sugar.
- Don’t skimp on the sugar coating. It’s the thing that gives the cookie its crackled surface.
Variations on This Dish:
Orange-Cardamom Snickerdoodles: Add 1 tablespoon orange zest to the dough. Bright and fragrant.
Brown Butter Snickerdoodles: Brown the butter first and cool it until soft before creaming. The flavor gets deeper and a little nutty.
Chai Snickerdoodles: Add a pinch of ginger and cloves with the cardamom for a warmer spice profile.
Common Mistakes to Avoid with This Dish:
- Using stale spices: The cookie ends up tasting plain no matter how much you add.
- Overbaking until firm: They should still look a little soft in the center when you pull them.
- Skipping the sugar roll: The outside loses its signature crackly finish.
7. Vanilla Rice Pudding with Raisins
Intro:
Rice pudding has a humble reputation, but it can be surprisingly refined when you let it cook down slowly. The grains should swell in the milk until the whole pot turns creamy and spoonable, with raisins tucked through it like little dark beads. A little vanilla and cinnamon keep it from feeling flat. Served cold in small glasses, it stops looking like leftovers and starts looking intentional.
Why It Works:
Short-grain rice releases enough starch to thicken the milk naturally, which is what gives rice pudding its velvet texture. Raisins soften as they cook and bring small bursts of sweetness. Gentle heat keeps the milk from scorching, and a final rest lets the pudding tighten up. This is the sort of dessert that rewards patience more than trickery.
Key Ingredients:
- 1/2 cup arborio rice or other short-grain rice
- 4 cups whole milk
- 1/2 cup heavy cream
- 1/3 cup granulated sugar
- 1/2 teaspoon fine salt
- 1 cinnamon stick
- 1/2 cup raisins
- 1 teaspoon vanilla extract
- 1 egg yolk, optional for extra richness
- Freshly grated nutmeg, for serving
Quick Steps:
- Rinse the rice briefly, then combine it with the milk, cream, sugar, salt, and cinnamon stick in a heavy saucepan.
- Bring it to a gentle simmer over medium-low heat, stirring often so the milk does not catch on the bottom.
- Cook for 30 to 40 minutes, stirring every few minutes, until the rice is soft and the mixture is thick and creamy.
- Stir in the raisins during the last 10 minutes so they plump without turning mushy.
- If using an egg yolk, whisk it in a bowl with a few spoonfuls of the hot pudding, then return it to the pot and cook for 1 minute more.
- Remove from heat, stir in the vanilla, and cool slightly before spooning into cups.
Equipment for This Recipe:
- Heavy saucepan
- Wooden spoon or heatproof spatula
- Small bowl, if using the yolk
- Ladle or spoon for serving
How to Serve This Dish:
Spoon it into small bowls or little glass cups and dust the top with nutmeg. A strip of lemon peel or a spoon of jam on the side can change the mood without making the dessert fussy. It’s excellent warm, but I like it cold best.
Pro Tips for This Recipe:
- Stir often enough to keep the milk from sticking. Not constantly. Just enough.
- Use a pot with a thick bottom. Thin pans burn rice pudding from the edges inward.
- Add vanilla at the end so it stays fragrant.
- If the pudding thickens too much after chilling, loosen it with a splash of milk.
Variations on This Dish:
Coconut Rice Pudding: Swap 1 1/2 cups of the milk for canned coconut milk. The pudding becomes richer and more tropical.
Citrus Rice Pudding: Add lemon or orange zest during cooking. The fresh note keeps the dessert from feeling heavy.
Bourbon Raisin Pudding: Stir in 1 tablespoon bourbon with the vanilla. It reads warm and grown-up.
Common Mistakes to Avoid with This Dish:
- Cooking on high heat: The milk scorches before the rice softens. Keep it gentle.
- Walking away too long: Rice pudding needs attention or it catches.
- Adding vanilla too early: You lose the aroma. Add it after the pot comes off the heat.
8. Peanut Butter Meringue Kisses
Intro:
These are light, crisp little puffs with a surprise inside the flavor. Peanut butter makes the meringue taste fuller than plain sugar-and-egg-white versions, and the finished cookies almost melt before they crunch. They’re delicate enough to look fancy on a tray, but not so delicate that you can’t make them from a cupboard and an egg carton. A good one should crack softly, not shatter.
Why It Works:
Meringue gets its structure from whipped egg whites and dissolved sugar, and the peanut butter adds roasted depth without turning the cookie heavy if you fold it in carefully. Low heat dries them out instead of browning them too fast. A clean bowl matters here because even a smear of grease can flatten the whole batch. These are more about texture than size, and that’s what makes them feel polished.
Key Ingredients:
- 4 large egg whites, room temperature
- 1 cup granulated sugar
- 1/2 teaspoon cream of tartar
- 1/2 cup smooth peanut butter
- 1 teaspoon vanilla extract
- 1/4 teaspoon fine salt
- 2 tablespoons chopped roasted peanuts, optional
- 2 tablespoons mini chocolate chips, optional
Quick Steps:
- Preheat the oven to 225°F and line two baking sheets with parchment.
- Beat the egg whites and cream of tartar on medium speed until foamy, then gradually add the sugar and salt.
- Whip to stiff, glossy peaks. The meringue should stand upright when you lift the beaters.
- Fold in the peanut butter with a few broad strokes, leaving faint ribbons if you want a marbled look.
- Pipe or spoon small kisses onto the baking sheets.
- Bake for 1 hour to 1 hour 15 minutes, then turn off the oven and leave them inside for another 30 minutes to dry.
Equipment for This Recipe:
- Stand mixer or hand mixer
- Parchment-lined baking sheets
- Piping bag or two spoons
- Metal spoon or spatula for folding
How to Serve This Dish:
Pile them high on a cake stand or in a glass jar with the lid off. They are good with coffee and even better on a dessert board where you want something small between richer bites. A sprinkle of chopped peanuts makes the tray look more finished.
Pro Tips for This Recipe:
- Make sure the bowl is squeaky clean. Egg whites notice grease before you do.
- Fold the peanut butter in gently; aggressive mixing deflates the meringue.
- Leave them in the turned-off oven so they dry instead of going chewy on the outside.
- If the day is humid, let them dry a bit longer. Meringue gets moody in damp air.
Variations on This Dish:
Chocolate Swirl Meringues: Drizzle in melted chocolate after the meringue is whipped, then fold once or twice.
Almond Butter Kisses: Swap the peanut butter for almond butter for a softer, more floral nut flavor.
Cocoa Meringue Kisses: Add 2 tablespoons cocoa powder at the end and reduce the sugar slightly if you want a darker version.
Common Mistakes to Avoid with This Dish:
- Adding the sugar too fast: It won’t dissolve properly and the meringue turns gritty.
- Skipping the drying time: The outside browns before the center sets.
- Using natural peanut butter that’s too oily: It can loosen the meringue. Stir it well first or choose a stiffer style.
9. Coconut Macaroons
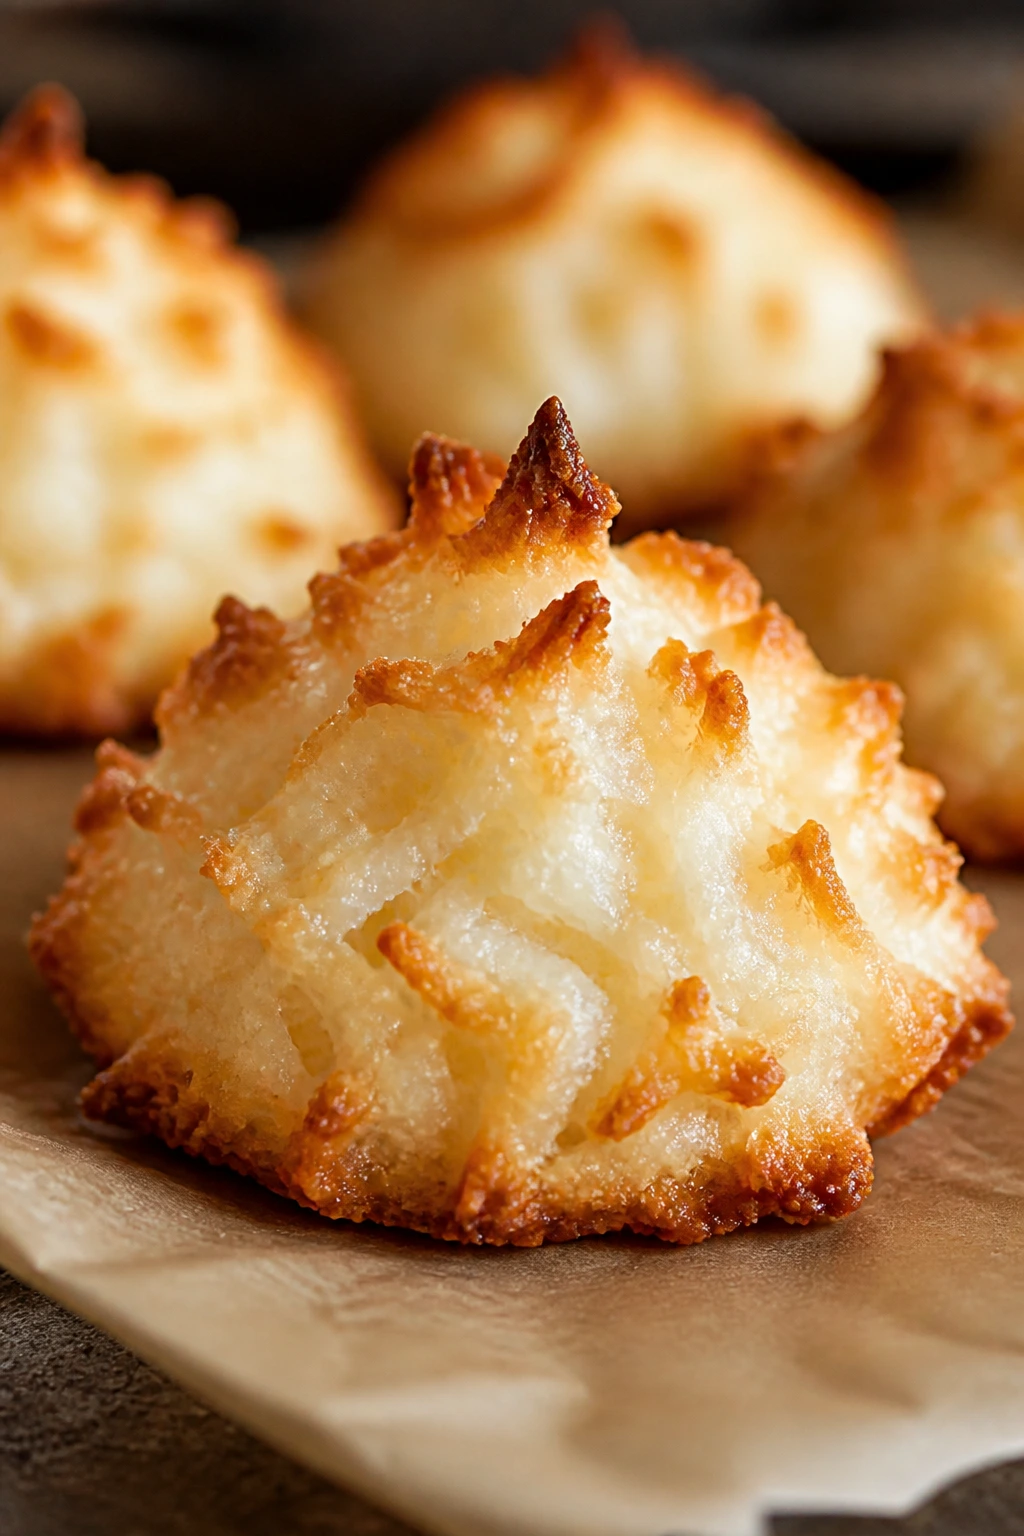
Intro:
Macaroons should not be confused with macarons, and I’m going to be a little stern about that. Coconut macaroons are chewy, golden, and deeply aromatic, with crisp edges and a soft center that tastes like toasted sugar and coconut oil. Dipped in chocolate, they suddenly look like something from a small confectionery instead of a mixing bowl. They are one of the easiest desserts here to dress up.
Why It Works:
Egg whites bind the coconut together, sugar sweetens and helps with browning, and a little flour gives the mounds enough structure to hold their shape. The coconut toasts in the oven, which is where most of the flavor comes from. If you dip the bottoms in chocolate, you get a pleasing bitter note and a cleaner finish on the plate. These cookies also keep their shape well, which makes them useful for gifting.
Key Ingredients:
- 4 cups shredded sweetened coconut
- 4 large egg whites
- 3/4 cup granulated sugar
- 1/4 cup all-purpose flour
- 1 teaspoon vanilla extract
- 1/4 teaspoon fine salt
- 4 ounces dark chocolate, optional for dipping
- 1 teaspoon coconut oil, optional with the chocolate
Quick Steps:
- Preheat the oven to 325°F and line a baking sheet with parchment.
- Whisk the egg whites, sugar, vanilla, and salt in a bowl until combined.
- Stir in the coconut and flour until the mixture holds together.
- Scoop mounds onto the sheet and lightly press them so they don’t collapse after baking.
- Bake for 20 to 24 minutes, until the edges are golden and the tops feel dry.
- Cool fully, then dip the bottoms in melted chocolate if you want a sharper, more finished look.
Equipment for This Recipe:
- Mixing bowl
- Cookie scoop or two spoons
- Baking sheet
- Parchment paper
- Small bowl for melting chocolate, optional
How to Serve This Dish:
Serve them on a small platter with coffee or tea. If you dip them in chocolate, they look good lined up in a single row on a narrow tray. They also make a nice edible gift when packed in tissue-lined boxes.
Pro Tips for This Recipe:
- If the coconut looks dry, let the mixture sit for 5 minutes before scooping. The sugar helps bind it.
- Don’t bake until deeply brown; coconut can go bitter at the edges.
- Use a cookie scoop for even size. Uneven mounds bake unevenly.
- Chocolate-dipped bottoms should set on parchment in a cool room, not a warm counter.
Variations on This Dish:
Lemon Coconut Macaroons: Add 1 tablespoon lemon zest to the mixture. Bright and clean.
Chocolate Chip Macaroons: Stir in 1/3 cup mini chocolate chips before scooping.
Almond Coconut Macaroons: Add 1/2 teaspoon almond extract and a few sliced almonds on top before baking.
Common Mistakes to Avoid with This Dish:
- Overbaking until very dark: The coconut tastes bitter and dry.
- Using too little binder: The mounds spread or slump. Make sure the egg white mixture is evenly mixed.
- Dipping while warm: The chocolate melts right off. Cool the cookies first.
10. Tahini Dark Chocolate Fudge
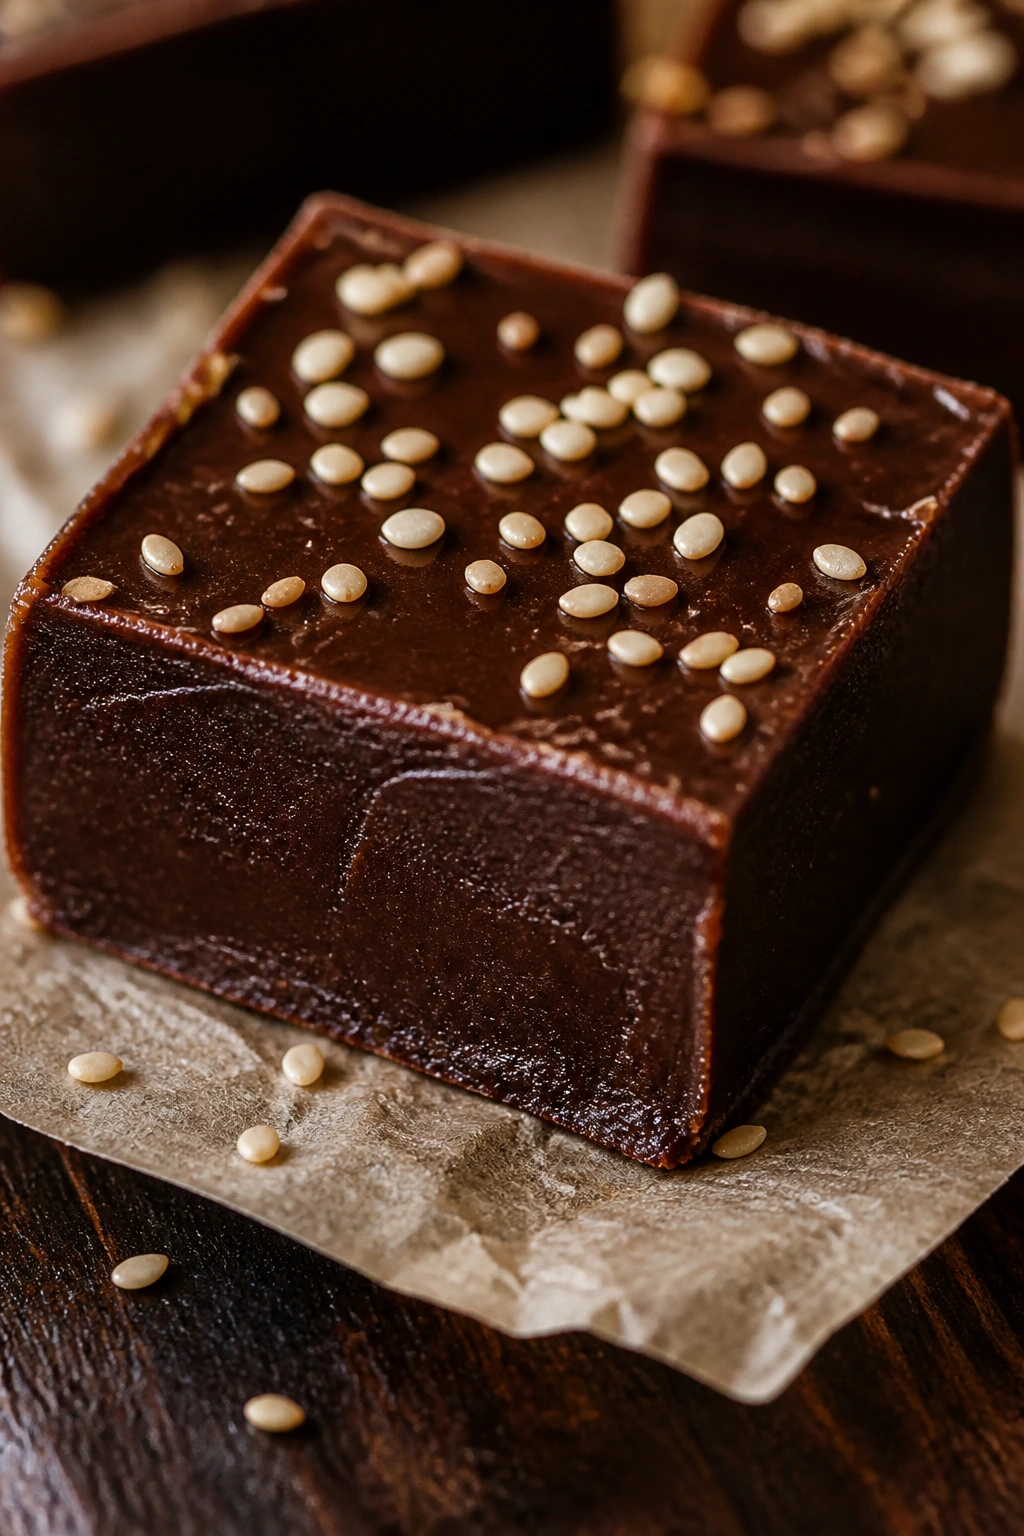
Intro:
This is the dessert I reach for when I want something that feels expensive but takes almost no ceremony. Tahini gives the fudge a quiet sesame depth, and dark chocolate keeps it from tipping into candy-store sweetness. A little swirl on top and a pinch of salt are enough to make it look deliberate. Small squares are the right move.
Why It Works:
Sweetened condensed milk gives you the creamy body that traditional fudge gets from cooking sugar to a very specific stage. Tahini cuts through the richness with a nutty, almost savory edge, which is why the fudge tastes richer rather than sweeter. A parchment-lined pan and a quick chill are all you need to get clean cuts. It’s a pantry dessert that happens to wear very good clothes.
Key Ingredients:
- 2 cups dark chocolate chips
- 1 can sweetened condensed milk, 14 ounces
- 1/3 cup tahini
- 1 tablespoon honey
- 1 teaspoon vanilla extract
- 1/2 teaspoon flaky salt
- 2 tablespoons sesame seeds
- 1 tablespoon neutral oil or coconut oil, optional for gloss
Quick Steps:
- Line an 8-inch square pan with parchment, leaving an overhang.
- Warm the condensed milk and chocolate chips in a saucepan over low heat, stirring constantly until smooth.
- Stir in the tahini, honey, vanilla, and salt until the mixture turns glossy.
- Spread into the pan and swirl the top with a knife or skewer. Scatter sesame seeds over the surface.
- Chill for at least 2 hours, then lift out and cut with a warm knife.
Equipment for This Recipe:
- 8-inch square pan
- Parchment paper
- Small saucepan
- Offset spatula or spoon
- Sharp knife for slicing
How to Serve This Dish:
Cut it into tiny squares and put them on a dark plate or in paper candy cups. One square goes a long way, especially after dinner. A little espresso or black tea beside it keeps the sweetness in check.
Pro Tips for This Recipe:
- Keep the heat low. Chocolate hates being bullied.
- Warm the knife with hot water and wipe it dry before cutting. The squares will look clean instead of jagged.
- Use a tahini that’s smooth and well-stirred; separated tahini can make the fudge grainy.
- For a deeper finish, sprinkle the salt right before chilling so it stays crisp.
Variations on This Dish:
Orange Tahini Fudge: Add 1 teaspoon orange zest for a brighter edge.
Date-Swirl Fudge: Press in a few ribbons of date paste before chilling. Very rich, very good.
White-Chocolate Tahini Fudge: Swap half the dark chocolate for white chocolate if you want a sweeter, softer profile.
Common Mistakes to Avoid with This Dish:
- Heating the mixture too fast: The chocolate can seize or turn dull. Low heat wins.
- Using runny tahini without stirring it first: The fudge can separate a bit.
- Cutting before it’s fully chilled: You get sticky edges and sloppy squares.
11. Semolina Orange Cake
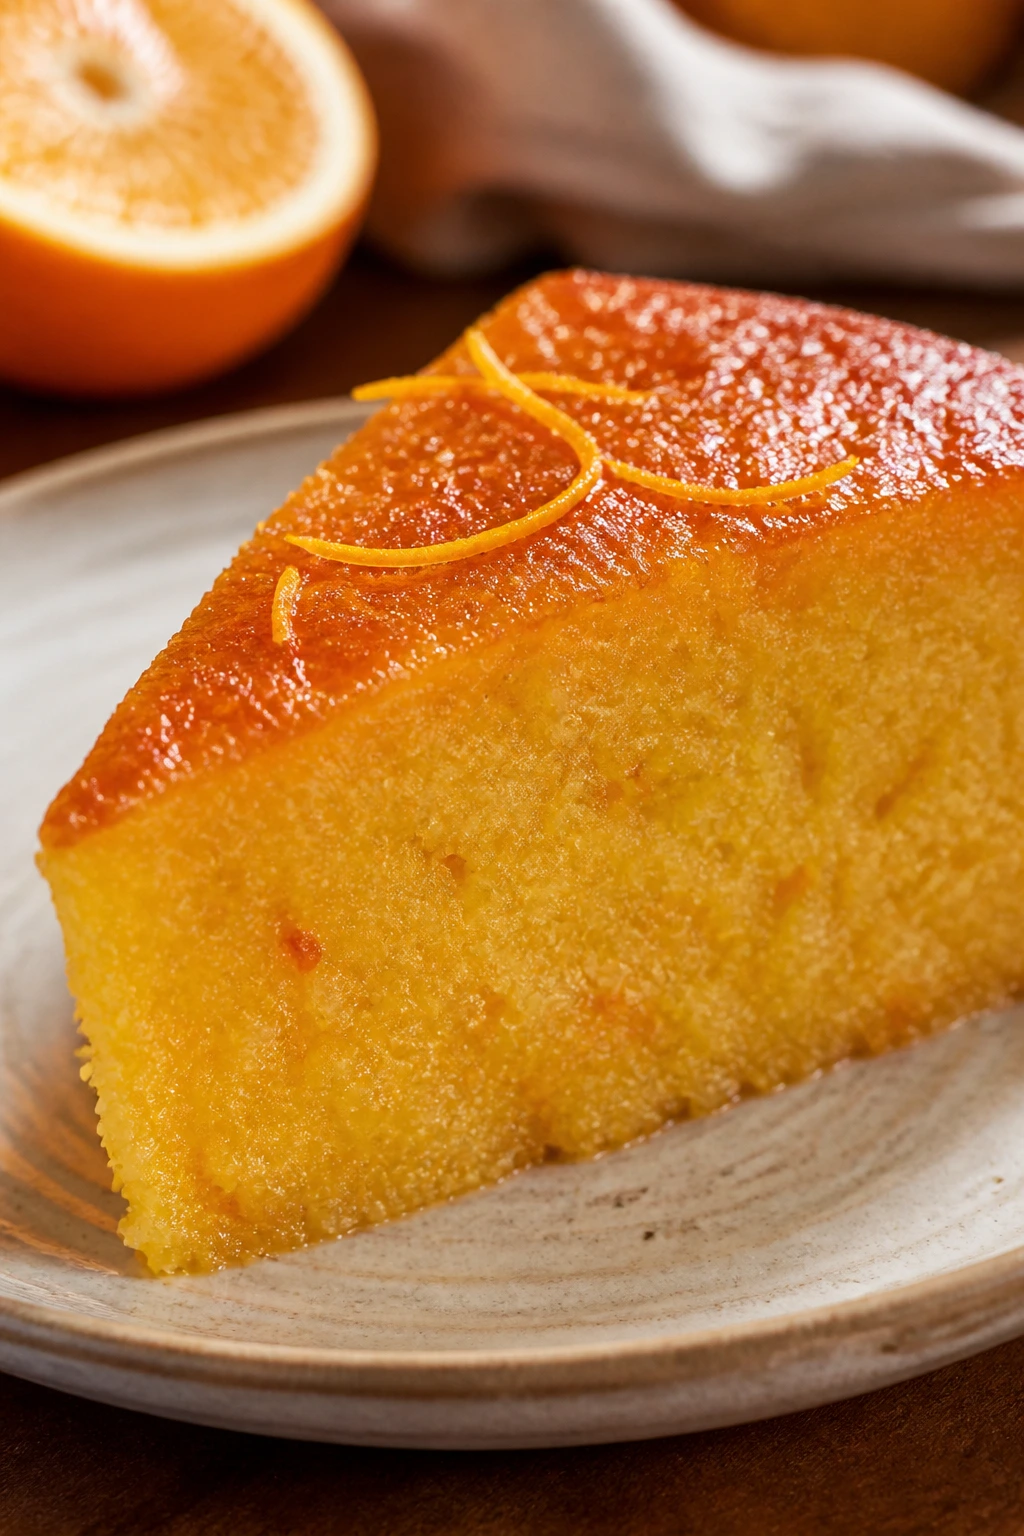
Intro:
Semolina cake has a texture people don’t always expect: slightly grainy in the best way, almost like it remembers every ingredient that went into it. Orange syrup soaks into the warm crumb and leaves the top glossy and fragrant. It looks simple in the pan, then changes into something far more interesting after it rests. I’m fond of that kind of dessert.
Why It Works:
Semolina gives the cake a sturdy, sunny crumb that stays interesting even after it cools. The orange syrup keeps it moist, and because the cake is not overly delicate, it can take on a good amount of soak without falling apart. Olive oil makes it plush, though melted butter works too if you want a rounder flavor. It’s a cake that slices neatly and holds its shape on a dessert plate.
Key Ingredients:
- 1 cup semolina
- 1 cup all-purpose flour
- 1 cup granulated sugar
- 2 teaspoons baking powder
- 1/2 teaspoon fine salt
- 3 large eggs
- 1/2 cup olive oil or melted unsalted butter
- 1/2 cup whole milk
- Zest of 2 oranges
- 1/4 cup orange juice
- 1 teaspoon vanilla extract
For the Syrup:
- 1/2 cup orange juice
- 1/2 cup granulated sugar
- 1 strip orange zest
Quick Steps:
- Preheat the oven to 350°F and grease an 8-inch round cake pan.
- Make the syrup by simmering the orange juice, sugar, and zest for 3 to 4 minutes, until slightly syrupy. Cool it.
- Whisk the semolina, flour, baking powder, and salt.
- Beat the eggs, sugar, oil, milk, orange zest, orange juice, and vanilla until smooth.
- Fold in the dry ingredients, scrape into the pan, and bake for 35 to 40 minutes, until golden and springy.
- While the cake is warm, brush or spoon the syrup over the top gradually, letting it soak in before adding more.
Equipment for This Recipe:
- 8-inch round cake pan
- Saucepan for syrup
- Mixing bowls
- Whisk and spatula
- Toothpick or cake tester
How to Serve This Dish:
Serve it in wedges with a spoonful of whipped cream or plain yogurt if you want a sharper edge. A little pistachio or sliced almond on top gives the plate a finished look. It’s especially nice at room temperature, when the syrup has settled.
Pro Tips for This Recipe:
- Let the syrup cool a bit before using it. Hot syrup on hot cake can make the crumb collapse around the edges.
- Don’t panic if the batter seems grainy from the semolina. That’s the texture you want.
- Orange zest is doing real work here. Use plenty.
- The cake is better after an hour of rest, once the syrup has spread evenly.
Variations on This Dish:
Lemon-Semolina Cake: Swap oranges for lemons and add a little extra sugar to the syrup.
Almond Semolina Cake: Replace 1/4 cup flour with finely ground almonds for a richer crumb.
Cardamom Orange Cake: Add 1/2 teaspoon cardamom to the batter. It suits the citrus beautifully.
Common Mistakes to Avoid with This Dish:
- Pouring all the syrup at once: It pools on top instead of soaking through. Add it slowly.
- Using coarse semolina only: The crumb can turn too gritty. A finer grind gives a better slice.
- Serving it straight from the oven: The cake needs a rest to absorb the syrup properly.
12. Jam Swirl Snack Cake
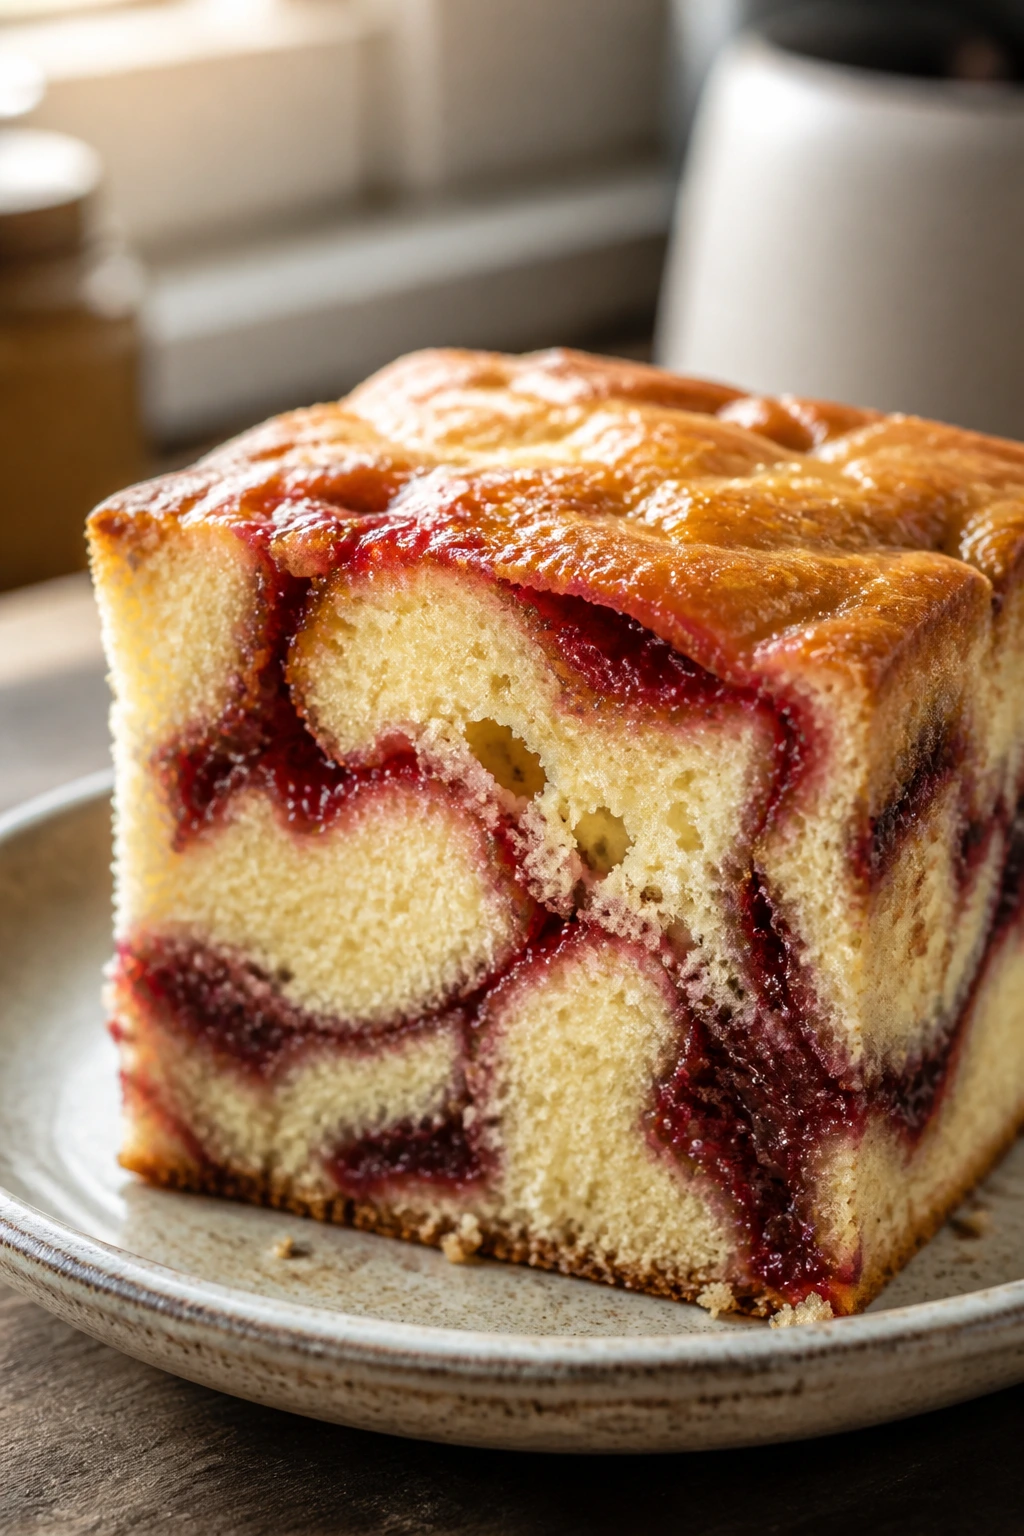
Intro:
A good jam cake doesn’t taste like a shortcut. It tastes like someone knew exactly where to place the sweetness. The swirl should stay marbled through the crumb rather than disappearing, and the top should carry a shiny streak of fruit wherever the knife went through. Raspberry, apricot, plum — all of them can make the cake look more elegant than the recipe has any right to.
Why It Works:
Thick jam adds flavor without making the batter watery, which is the trick most people miss. A simple butter cake base holds the swirl in place, and a bit of acidity from the fruit keeps the cake from tasting flat. You get a tender crumb, a glossy top, and little pockets of fruit that feel more deliberate than decorative. It’s a snack cake, yes, but it slices nicely enough for company.
Key Ingredients:
- 2 cups all-purpose flour
- 1 1/2 teaspoons baking powder
- 1/2 teaspoon fine salt
- 3/4 cup granulated sugar
- 1/2 cup unsalted butter, softened
- 2 large eggs
- 1 cup whole milk
- 1 teaspoon vanilla extract
- 1/2 cup thick jam
- 1 teaspoon cinnamon, optional
- 1 tablespoon flour for dusting the jam, optional
Quick Steps:
- Preheat the oven to 350°F and grease an 8-inch square pan or round cake pan.
- Whisk the flour, baking powder, salt, and cinnamon.
- Cream the butter and sugar, then beat in the eggs and vanilla.
- Add the flour mixture and milk in alternating additions, mixing just until the batter is smooth.
- Spoon half the batter into the pan, dollop with jam, add the rest of the batter, and swirl lightly with a knife. Don’t over-marble it.
- Bake for 30 to 35 minutes, until the center springs back and the top is set.
Equipment for This Recipe:
- 8-inch cake pan or square pan
- Mixing bowls
- Electric mixer or whisk
- Knife for swirling
- Parchment paper, optional but useful
How to Serve This Dish:
Serve it with a dusting of powdered sugar or a thin glaze if you want a cleaner finish. A spoonful of whipped cream makes it feel more dinner-party friendly. It also holds up well alongside tea in the afternoon.
Pro Tips for This Recipe:
- Use thick jam. Thin jam sinks and stains the batter.
- Warm the jam slightly if it’s stiff; it swirls more easily.
- Swirl once or twice only. The marbling should look intentional, not muddied.
- If you want the top extra glossy, brush it with a bit of warmed jam after baking.
Variations on This Dish:
Apricot-Almond Cake: Use apricot jam and add 1/2 teaspoon almond extract to the batter.
Blackberry Lemon Cake: Use blackberry jam and add lemon zest.
Chocolate-Raspberry Cake: Add 1/3 cup cocoa powder to the batter and use raspberry jam.
Common Mistakes to Avoid with This Dish:
- Using runny jam: It sinks and makes wet pockets. Thick jam is the better choice.
- Overmixing after the flour goes in: The cake turns tight.
- Swirling too much: The fruit disappears into the batter instead of making clean ribbons.
13. Pumpkin Spice Bars with Cream Cheese Swirl
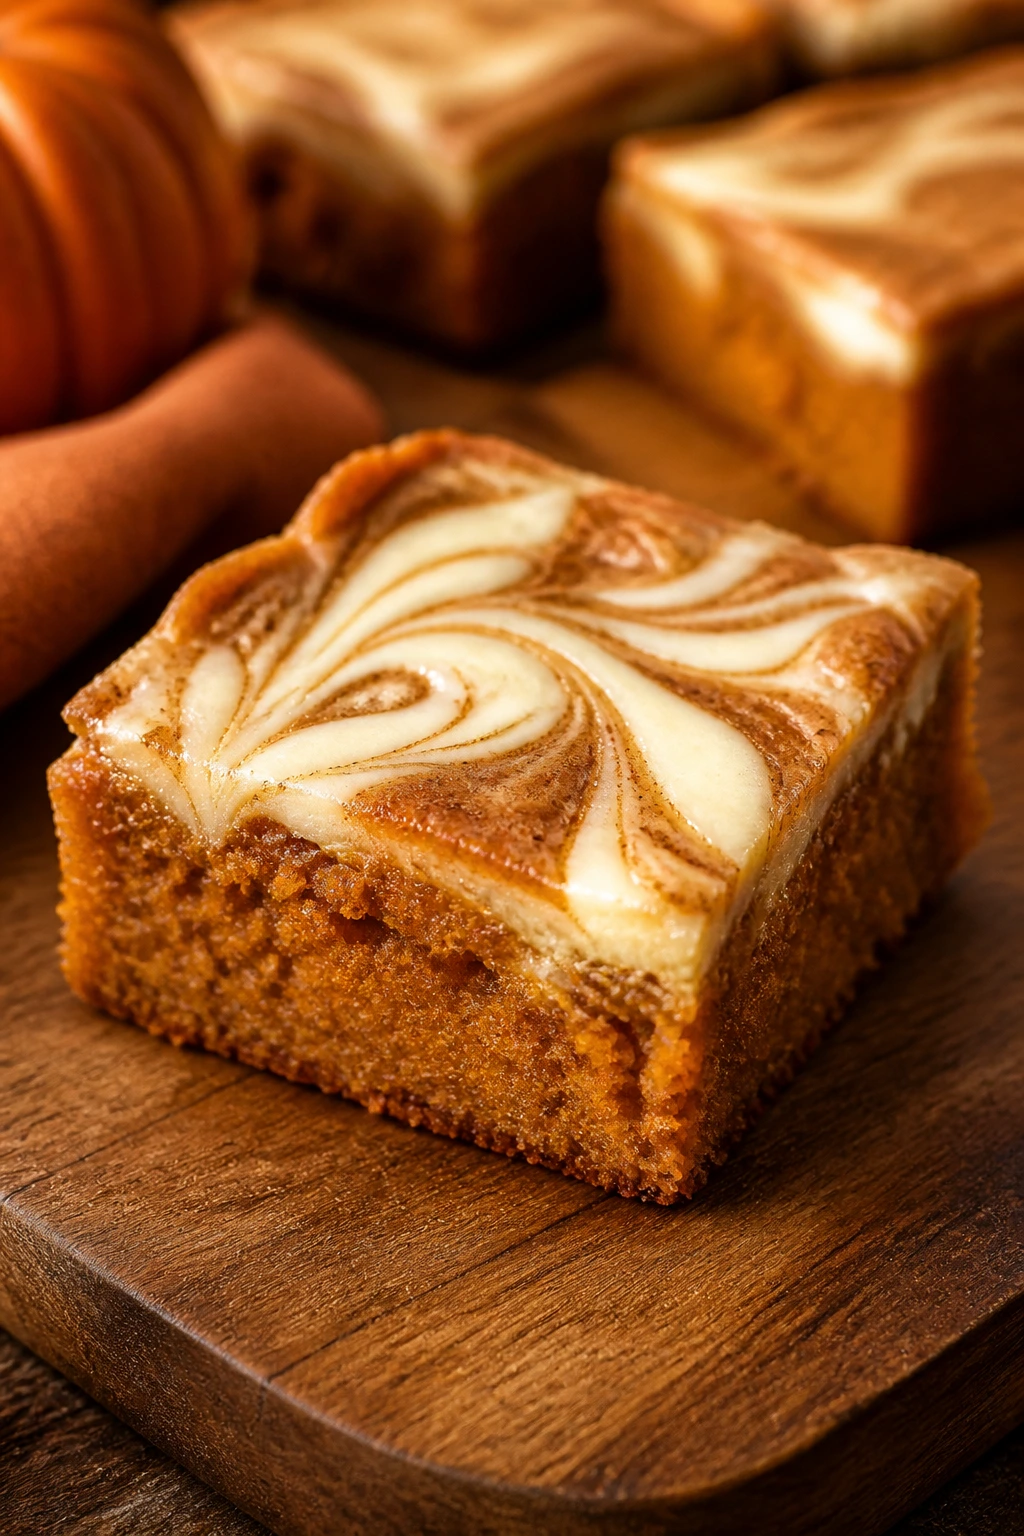
Intro:
These bars are the kind of dessert that can sit on a tray and still look considered. Pumpkin gives them body, spice gives them warmth, and the cream cheese swirl cuts through the sweetness with a tang that feels clean rather than heavy. Cut them into neat squares and they look far more polished than the average pumpkin bake. They also disappear fast, which is a useful trait.
Why It Works:
Canned pumpkin is dense and consistent, which is why it makes such a reliable bar base. The oil keeps the crumb soft for days, and the spice blend keeps the flavor from tasting one-note. Cream cheese swirled across the top gives you contrast in both color and taste, and that contrast is what makes these bars feel finished. If you dust the top lightly with cinnamon sugar, they look even sharper.
Key Ingredients:
- 1 1/2 cups all-purpose flour
- 1 teaspoon baking powder
- 1/2 teaspoon baking soda
- 1 teaspoon ground cinnamon
- 1/2 teaspoon ground ginger
- 1/4 teaspoon ground nutmeg
- 1/2 teaspoon fine salt
- 1 cup canned pumpkin puree
- 2 large eggs
- 1 cup light brown sugar
- 1/2 cup neutral oil
- 8 ounces cream cheese, softened
- 1/4 cup granulated sugar
- 1 teaspoon vanilla extract
Quick Steps:
- Preheat the oven to 350°F and line an 8-inch square pan with parchment.
- Whisk the flour, baking powder, baking soda, spices, and salt.
- Beat the pumpkin, eggs, brown sugar, oil, and vanilla until smooth, then fold in the dry ingredients.
- Spread the batter into the pan.
- Beat the cream cheese and granulated sugar until smooth, then dollop over the batter and swirl gently with a knife.
- Bake for 28 to 32 minutes, until the center is set and a tester comes out with a few moist crumbs.
Equipment for This Recipe:
- 8-inch square pan
- Mixing bowls
- Hand mixer or sturdy whisk
- Parchment paper
- Knife or skewer for swirling
How to Serve This Dish:
These bars look best when cut cleanly into squares and served on a platter with the swirl facing up. A dusting of cinnamon or powdered sugar works if you want a softer look. A small spoonful of whipped cream on the side makes them feel a touch more formal.
Pro Tips for This Recipe:
- Use pumpkin puree, not pumpkin pie filling.
- Let the cream cheese soften all the way or the swirl will stay lumpy.
- Pull the bars as soon as the center looks set. Overbaking dries the edges.
- Chill before cutting if you want razor-clean squares.
Variations on This Dish:
Maple Pumpkin Bars: Swap 2 tablespoons of the brown sugar for maple syrup and reduce the oil slightly.
Walnut Pumpkin Bars: Stir 1/2 cup chopped walnuts into the batter for crunch.
Dairy-Free Pumpkin Bars: Skip the cream cheese swirl and finish with a simple powdered sugar glaze instead.
Common Mistakes to Avoid with This Dish:
- Using watery pumpkin filling: The bars bake up loose and gummy.
- Over-swirling the cream cheese: You lose the contrast that makes the bars pretty.
- Cutting too early: Warm bars smear and tear. Chill them first if you want clean edges.
14. Chocolate Crinkle Cookies
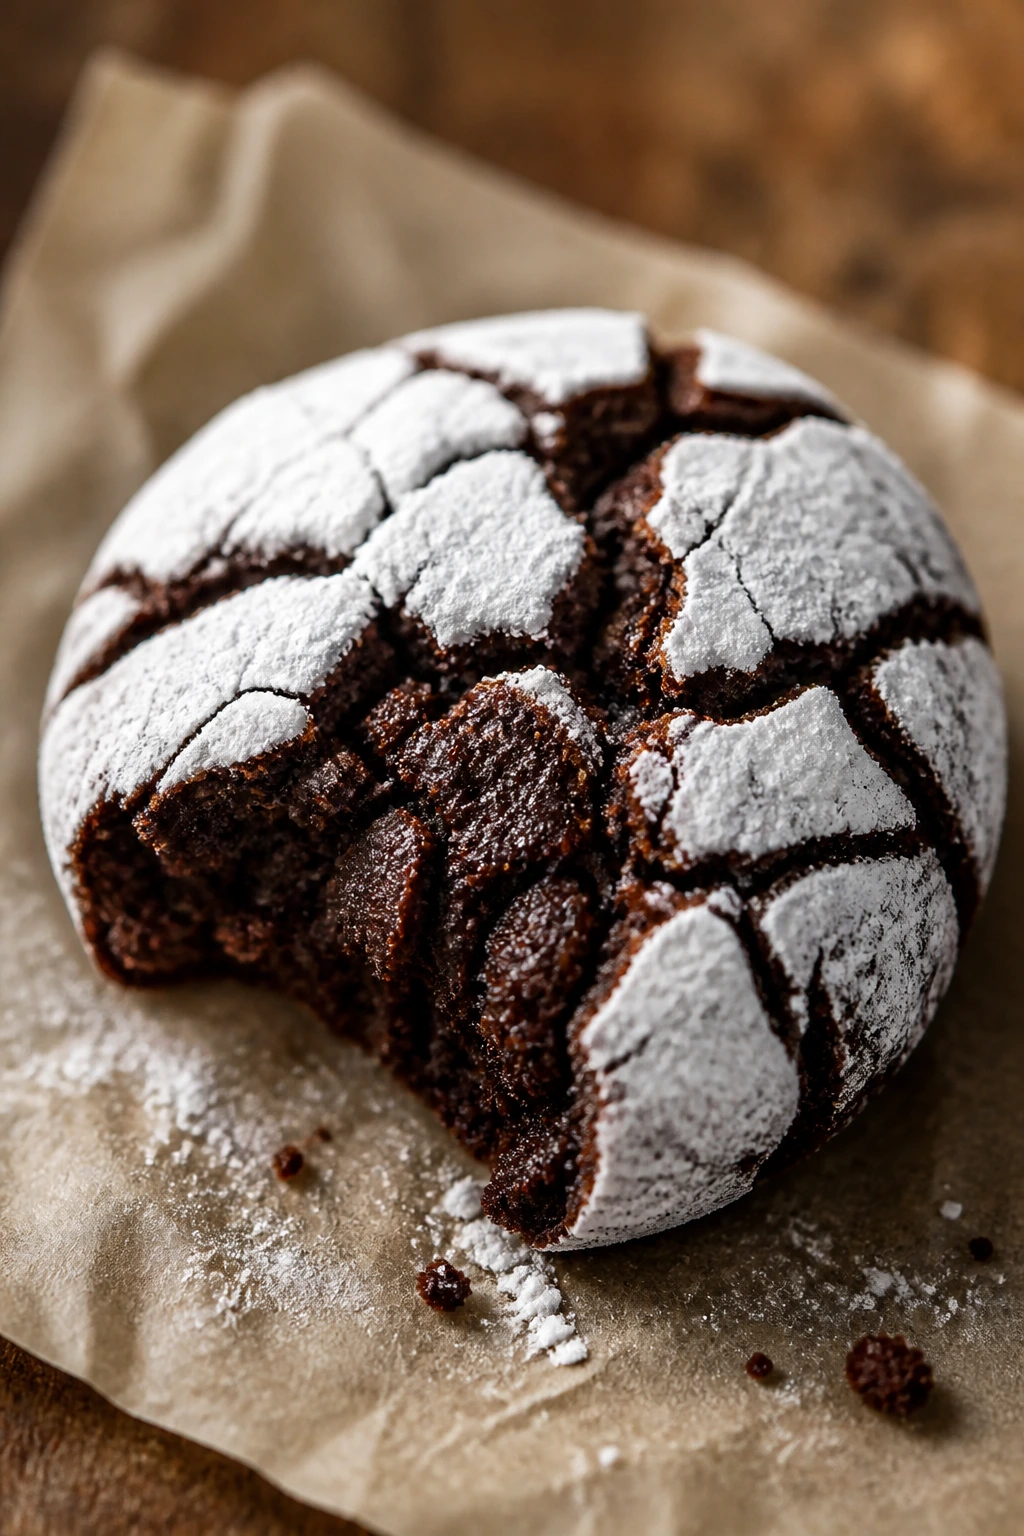
Intro:
Crinkle cookies always look a little theatrical, and I mean that as a compliment. The dark chocolate dough cracks open under the powdered sugar, so every cookie looks like it got dusted with snow while it was still warm from the oven. The texture should be soft and brownie-like inside with a thin shell outside. They’re one of the easiest ways to make cocoa look fancy.
Why It Works:
Oil keeps the cookies tender and gives them that deep, fudgy center. Chilling the dough helps the sugar coating stay dramatic instead of soaking in. Baking powder creates the lift that causes the top to split, and the powdered sugar settles into those cracks where it can do the most visual work. A touch of espresso powder deepens the chocolate without making the cookie taste like coffee.
Key Ingredients:
- 1 cup granulated sugar
- 1/2 cup neutral oil
- 2 large eggs
- 1 teaspoon vanilla extract
- 1 cup all-purpose flour
- 1/2 cup unsweetened cocoa powder
- 2 teaspoons baking powder
- 1/4 teaspoon fine salt
- 1 teaspoon espresso powder, optional
- 1 cup powdered sugar, for rolling
Quick Steps:
- Whisk the sugar, oil, eggs, vanilla, and espresso powder until smooth.
- Stir in the flour, cocoa, baking powder, and salt until a thick dough forms.
- Cover and chill for at least 2 hours, or overnight if you want cleaner scoops.
- Preheat the oven to 350°F and line baking sheets with parchment.
- Roll the dough into balls, coat generously in powdered sugar, and place them apart on the sheet.
- Bake for 10 to 12 minutes, until the tops are cracked but the centers still look soft.
Equipment for This Recipe:
- Mixing bowl
- Baking sheets
- Parchment paper
- Cookie scoop
- Wire rack
How to Serve This Dish:
These work well on their own, but they also look handsome beside vanilla ice cream or a cup of coffee. The white crackled tops make a simple tray look more deliberate. A dark platter helps the sugar show up.
Pro Tips for This Recipe:
- Chill the dough long enough. Soft dough won’t hold the powdered sugar nicely.
- Roll heavily in sugar. The coating should look thick before baking.
- Pull them while the centers still seem underbaked; they set as they cool.
- Line the pans. The cookies are soft at first and can stick.
Variations on This Dish:
Peppermint Crinkles: Add a little peppermint extract and crushed candy on top for a sharper finish.
Orange Crinkles: Add orange zest to the dough and a tiny splash of orange extract.
Double-Chocolate Crinkles: Fold in mini chocolate chips for a richer, denser cookie.
Common Mistakes to Avoid with This Dish:
- Not chilling the dough: The cookies spread too fast and lose their crackled look.
- Using too little powdered sugar: The top bakes dull instead of snowy.
- Overbaking: You want soft centers, not dry brownie stones.
15. Oatmeal Lace Cookies
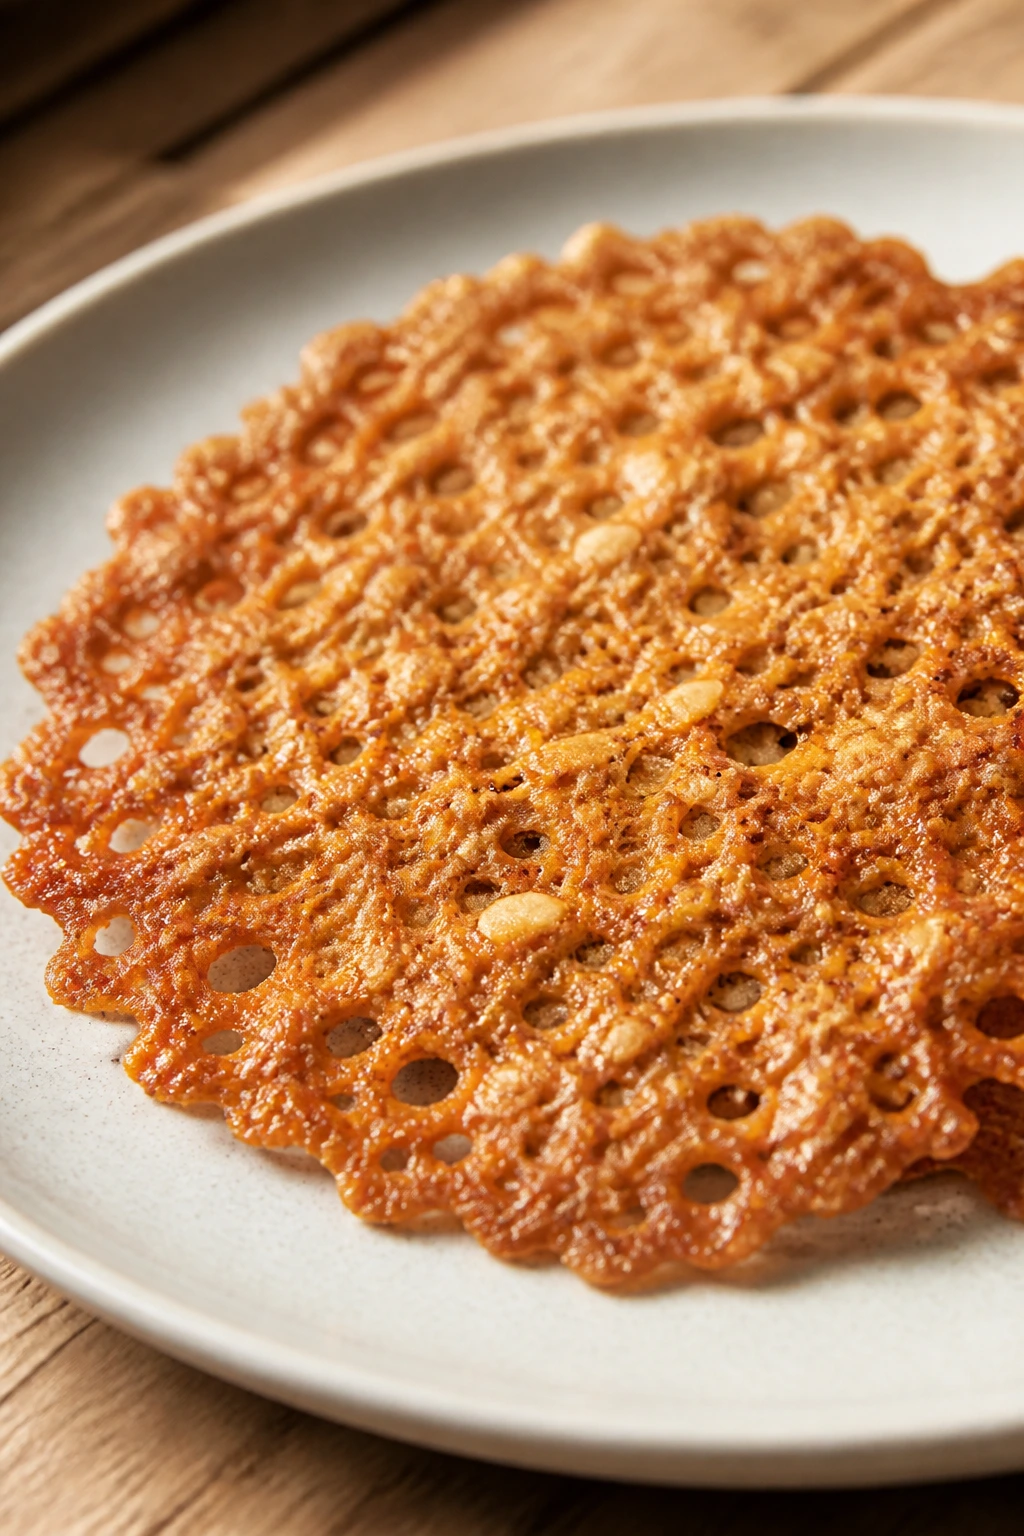
Intro:
These are the prettiest kind of thin cookie, the kind that turns almost glassy at the edges. Oats give them a nutty backbone, but the real magic is the caramelized sugar that spreads into a lace pattern while they bake. If you’re after something fragile and crisp that still uses ordinary ingredients, this is a very good place to stop looking.
Why It Works:
Butter and sugar spread into a syrup that thins out in the oven, and the oats hold tiny islands of texture while the spaces between turn delicate and crisp. A little flour keeps the cookies from becoming caramel puddles. The result is a cookie that looks detailed without requiring any piping or patience beyond a careful scoop. They are also excellent with a layer of melted chocolate on one side, which sounds fancier than the work involved.
Key Ingredients:
- 1/2 cup unsalted butter
- 1/2 cup light brown sugar
- 1/4 cup granulated sugar
- 1 large egg
- 1 teaspoon vanilla extract
- 1/2 cup all-purpose flour
- 1 1/2 cups rolled oats
- 1/4 teaspoon fine salt
- 1 tablespoon corn syrup or honey
- 1/2 teaspoon cinnamon, optional
Quick Steps:
- Preheat the oven to 325°F and line baking sheets with parchment.
- Melt the butter, then whisk in the sugars, egg, vanilla, salt, corn syrup, and cinnamon.
- Stir in the flour and oats until evenly coated.
- Drop teaspoonfuls of batter onto the sheet, leaving at least 3 inches between them. They spread a lot.
- Bake for 8 to 10 minutes, until deeply golden at the edges and bubbling in the center.
- Cool completely on the sheet before lifting them. They crisp as they sit.
Equipment for This Recipe:
- Saucepan or microwave-safe bowl
- Baking sheets
- Parchment paper
- Small spoon or teaspoon
- Offset spatula, optional for lifting
How to Serve This Dish:
Serve them with ice cream, mousse, or any creamy dessert that needs a crisp edge beside it. They also make a sharp-looking garnish on a cake plate. If you stack them, use parchment between layers or they’ll glue themselves together.
Pro Tips for This Recipe:
- Give the cookies room. Too close, and they merge into one giant brittle sheet.
- Let them cool fully before moving them, or they’ll bend.
- If you want perfect circles, trim the warm edges with a ring cutter while they’re still soft.
- A small amount of honey or corn syrup helps the spread; don’t skip it if you want the lace effect.
Variations on This Dish:
Chocolate Lace Cookies: Drizzle melted chocolate over the cooled cookies or dip half of each one.
Sesame Lace Cookies: Add a tablespoon of sesame seeds for a nuttier profile.
Ginger Lace Cookies: Add ground ginger and a pinch of clove for a warmer edge.
Common Mistakes to Avoid with This Dish:
- Using too much batter per cookie: They spread into an uneven mess instead of a neat lace.
- Moving them too soon: They tear before they crisp.
- Underbaking: Pale lace cookies taste chewy, not crisp.
16. Salted Chocolate Bark with Nuts and Dried Fruit
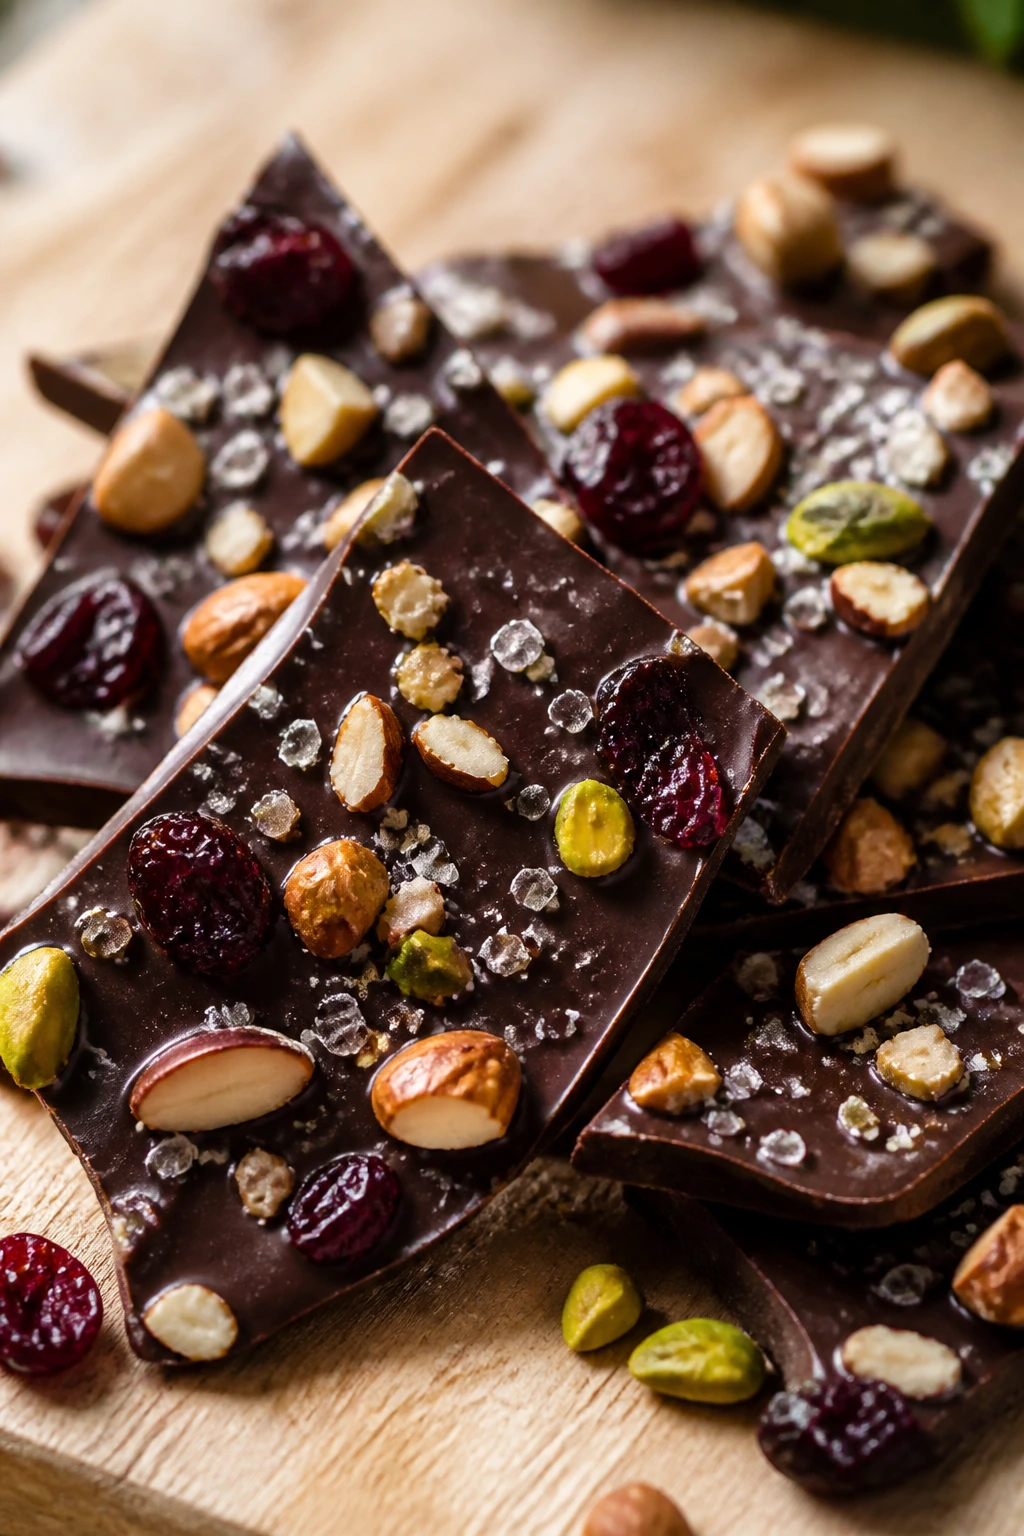
Intro:
Chocolate bark looks simple until you notice how elegant the shards can be when they’re broken at random. A dark base, a scatter of glossy nuts, a few jewel-like bits of dried fruit, and a pinch of salt make something that feels tailored rather than thrown together. It’s the sort of dessert that can sit on a plate between richer sweets and still hold its own. The trick is choosing toppings with some contrast.
Why It Works:
Dark chocolate gives you a firm, snappy base, while nuts add crunch and dried fruit gives a little chew. Salt keeps the sweetness from flattening out. Because bark is broken rather than cut, it has a casual edge that still looks deliberate when you arrange the shards. There’s almost no fuss to it, which is useful when elegance needs to happen quickly.
Key Ingredients:
- 12 ounces dark chocolate
- 1 tablespoon coconut oil or neutral oil, optional for gloss
- 1/2 cup almonds, toasted and roughly chopped
- 1/2 cup pistachios
- 1/3 cup dried cherries
- 1/4 cup chopped dried apricots
- 1 teaspoon orange zest
- 1/2 teaspoon flaky salt
- 2 tablespoons cocoa nibs, optional
Quick Steps:
- Line a baking sheet with parchment.
- Melt the chocolate slowly with the oil if using, stirring until smooth.
- Spread it into a thin, even layer on the parchment.
- Scatter the nuts, fruit, orange zest, cocoa nibs, and flaky salt over the top while the chocolate is still soft.
- Let it set at room temperature or chill for 15 to 20 minutes until firm.
- Break into irregular shards.
Equipment for This Recipe:
- Baking sheet
- Parchment paper
- Heatproof bowl
- Spatula
- Sharp knife, optional for chopping toppings
How to Serve This Dish:
Pile the bark into a bowl or arrange the shards loosely on a platter. It looks especially good with the rough broken edges facing up. For a dessert spread, place it near the end so guests can grab a piece with coffee.
Pro Tips for This Recipe:
- Use good chocolate. Bark shows off the flavor more than you’d think.
- Dry the fruit if it feels sticky. Damp fruit can dull the chocolate.
- Add flaky salt at the end so it stays visible.
- Thin bark breaks more elegantly than thick bark.
Variations on This Dish:
White Chocolate Bark: Swap in white chocolate and use pistachios, cranberries, and lemon zest.
Spiced Bark: Add a pinch of cinnamon or chili powder to the melted chocolate.
Seed Bark: Replace the fruit with pumpkin and sunflower seeds for a less sweet version.
Common Mistakes to Avoid with This Dish:
- Spreading the chocolate too thick: It becomes heavy and harder to break neatly.
- Adding wet toppings: Moisture can make the chocolate streak or bloom.
- Letting the chocolate set before topping it: The ingredients won’t stick well.
17. Pineapple Upside-Down Cake
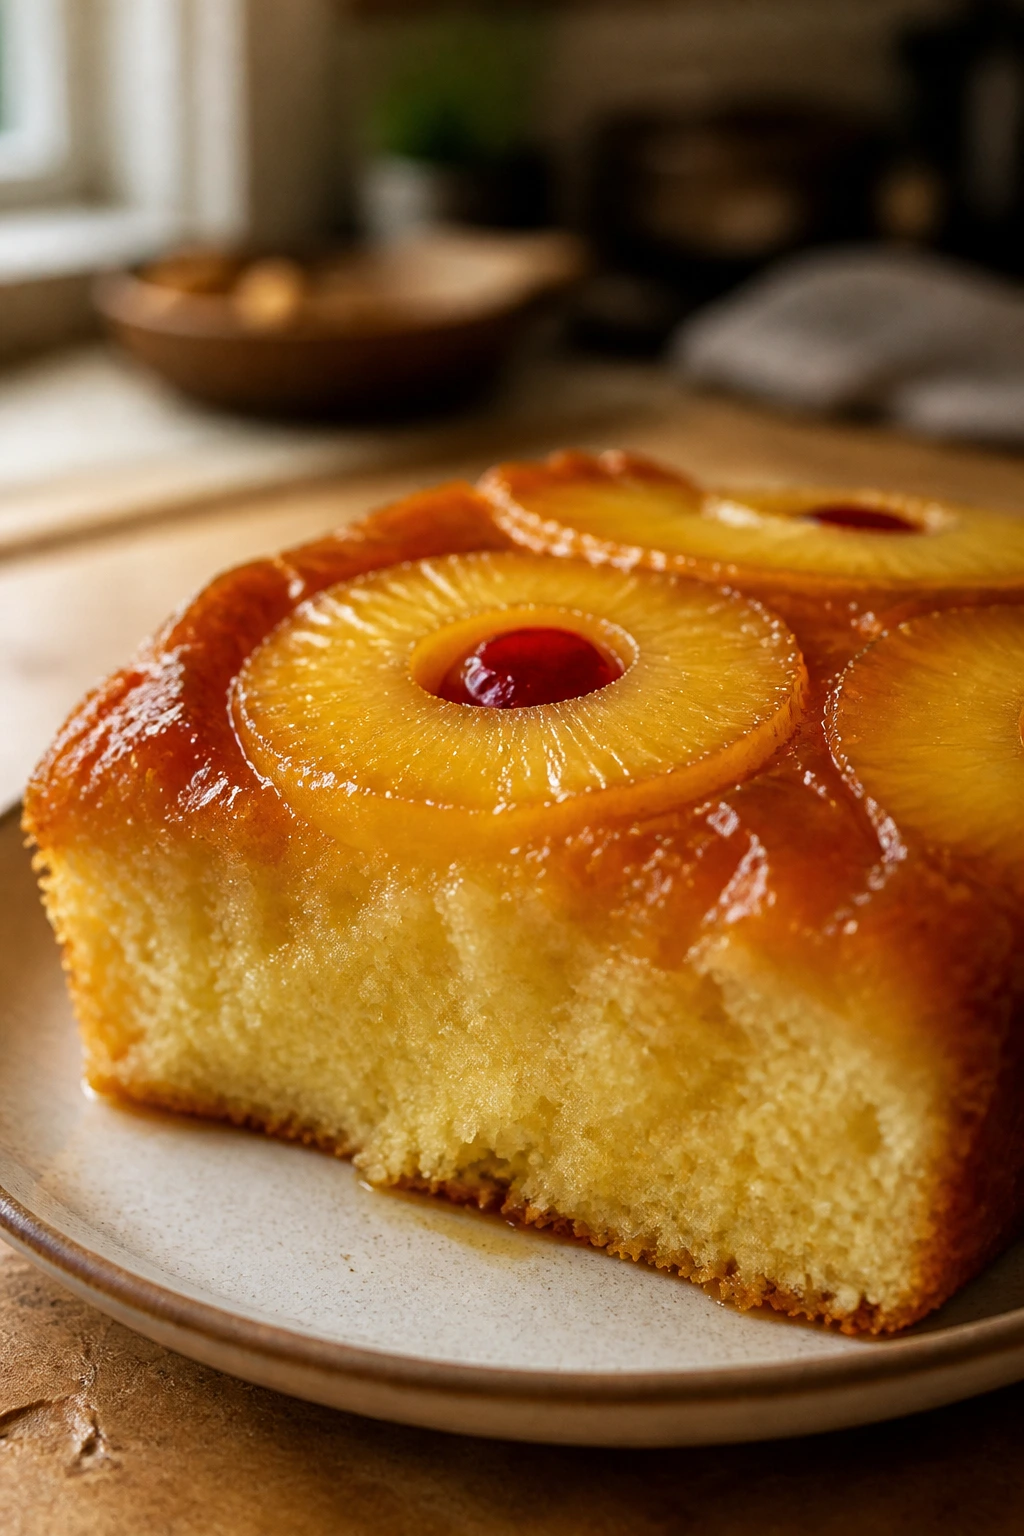
Intro:
Few pantry desserts look as theatrical as this one when you flip it out of the pan. The pineapple rings shine in caramelized brown sugar, and the cake underneath holds enough softness to balance the sticky top. It reads retro without feeling dated. If you want a dessert that gets a room talking before anyone takes a bite, this is a safe bet.
Why It Works:
Canned pineapple is predictable, which is exactly what this cake needs. The sugar and butter cook into a caramel layer under the fruit, and the cake batter bakes into that topping, soaking up flavor where the two meet. A sturdy vanilla cake underneath keeps the slices upright after the flip. The whole thing depends on timing and confidence, not hard ingredients.
Key Ingredients:
- 1/2 cup unsalted butter
- 1 cup packed light brown sugar
- 1 can pineapple rings, 20 ounces, well drained
- 1/2 cup maraschino cherries, optional
- 1 1/2 cups all-purpose flour
- 2 teaspoons baking powder
- 1/2 teaspoon fine salt
- 1/2 cup granulated sugar
- 2 large eggs
- 1/2 cup whole milk
- 1 teaspoon vanilla extract
- 1/4 teaspoon almond extract, optional
Quick Steps:
- Preheat the oven to 350°F. Melt the butter and pour it into a 9-inch round cake pan.
- Sprinkle the brown sugar evenly over the butter, then arrange the pineapple rings and cherries on top.
- Whisk the flour, baking powder, and salt.
- Beat the granulated sugar, eggs, milk, vanilla, and almond extract until smooth, then fold in the dry ingredients.
- Spoon the batter over the fruit and bake for 35 to 40 minutes, until the top is golden and a tester comes out clean.
- Let the cake rest for 10 minutes, then invert onto a plate in one confident motion.
Equipment for This Recipe:
- 9-inch round cake pan
- Mixing bowls
- Whisk and spatula
- Serving plate with a rim, optional but smart
- Offset spatula, optional
How to Serve This Dish:
Serve it warm or at room temperature, with the fruit side up. A spoon of softly whipped cream gives you a nice contrast to the caramel topping. One slice is plenty because this cake is richer than it looks.
Pro Tips for This Recipe:
- Drain the pineapple very well. Extra juice makes the topping soupy.
- Don’t let the cake sit too long before flipping. The sugar sets hard.
- A parchment circle on the bottom of the pan gives peace of mind.
- Use a plate larger than the pan so the caramel has somewhere to land.
Variations on This Dish:
Cherry-Pineapple Upside-Down Cake: Add extra cherries and a splash of cherry juice to the caramel.
Coconut Pineapple Cake: Stir shredded coconut into the batter for a tropical note.
Rum-Glazed Version: Add 1 tablespoon dark rum to the caramel for a warmer finish.
Common Mistakes to Avoid with This Dish:
- Using fruit that’s still wet: The caramel becomes thin and slippery.
- Waiting too long to invert: The topping can cling to the pan.
- Overbaking: Dry cake beneath sticky fruit is a bad trade.
18. Spiced Apple Galette with Apricot Glaze

Intro:
A galette is what you make when you want pie without the whole personality test. The crust folds around the fruit on its own terms, which means it looks rustic but not careless. Thin apple slices soften in the oven, and the apricot glaze gives the finished tart a gentle shine. It’s a good dessert for people who like the plate to look relaxed and intentional.
Why It Works:
The free-form crust lets steam escape, so the apples cook without turning the bottom soggy. A little flour or cornstarch in the filling helps capture juices, and apricot glaze gives the top a glossy finish that feels bakery-made. The shape is forgiving, which is why galettes are often better than pie when you’re short on time or patience. They also slice cleanly after a short rest.
Key Ingredients:
- 1 1/4 cups all-purpose flour
- 1 tablespoon granulated sugar
- 1/2 teaspoon fine salt
- 1/2 cup unsalted butter, cold and cubed
- 3 to 4 tablespoons ice water
- 3 medium apples, peeled and thinly sliced
- 2 tablespoons granulated sugar
- 1 teaspoon cinnamon
- 1 tablespoon flour or cornstarch
- 1 tablespoon lemon juice
- 2 tablespoons apricot jam
- 1 tablespoon water
- 1 egg, beaten, for brushing
- 1 tablespoon coarse sugar, optional
Quick Steps:
- Mix the flour, sugar, and salt, then cut in the butter until the pieces are pea-sized.
- Add ice water a tablespoon at a time until the dough holds together. Chill for 30 minutes.
- Toss the apple slices with sugar, cinnamon, flour, and lemon juice.
- Roll the dough into a rough circle, transfer to a parchment-lined sheet, and mound the fruit in the center, leaving a 2-inch border.
- Fold the edges over the apples, brush with egg, and sprinkle with coarse sugar if using.
- Bake at 400°F for 35 to 40 minutes, until the crust is golden and the fruit is tender.
- Warm the apricot jam with water and brush it over the fruit while the galette is still warm.
Equipment for This Recipe:
- Baking sheet
- Parchment paper
- Rolling pin
- Pastry cutter or fork
- Small saucepan for the glaze
How to Serve This Dish:
Cut it into wedges and serve with whipped cream, vanilla ice cream, or plain crème fraîche if you want a sharper edge. It looks handsome on a wooden board or a cake stand with a slight lip. The glaze makes the fruit gleam enough that you do not need much else.
Pro Tips for This Recipe:
- Keep the dough cold. Warm butter means a limp crust.
- Slice the apples thinly so they soften fully before the crust burns.
- Don’t overload the center. A galette should be generous, not stuffed.
- Brushing with glaze after baking gives the fruit a polished look.
Variations on This Dish:
Pear Galette: Swap the apples for firm pears and add a little ginger.
Apple-Cranberry Galette: Add dried cranberries to the filling for tartness and color.
Frangipane Galette: Spread a thin layer of almond paste under the fruit for a richer dessert.
Common Mistakes to Avoid with This Dish:
- Using too much filling: The crust can’t hold it all, and juices leak.
- Skipping the chill on the dough: The butter melts before the crust can set.
- Cutting immediately: Give it a little rest or the filling will run.
19. Molasses Ginger Cake

Intro:
Molasses cake has a dark, old-school charm that I’ll defend all day. The crumb is tender and slightly sticky in the best way, the spice scent fills the kitchen, and the top settles into a gentle sheen once it cools. This is not a delicate dessert. It is a sturdy one that wears a spoon of whipped cream very well.
Why It Works:
Molasses brings deep flavor and a moist crumb that lasts longer than lighter cakes. Ginger, cinnamon, and cloves build warmth without making the cake taste like a spice cabinet emptied into the bowl. Hot coffee or hot water loosens the batter and helps the spices bloom. The result is a cake that slices cleanly but still feels soft under the fork.
Key Ingredients:
- 2 cups all-purpose flour
- 1 teaspoon baking soda
- 1 teaspoon ground ginger
- 1 teaspoon ground cinnamon
- 1/4 teaspoon ground cloves
- 1/2 teaspoon fine salt
- 1/2 cup unsalted butter, softened
- 3/4 cup light brown sugar
- 1/2 cup unsulphured molasses
- 1 large egg
- 1 cup hot water or hot coffee
- 1 teaspoon vanilla extract
Quick Steps:
- Preheat the oven to 350°F and grease an 8-inch square pan or round cake pan.
- Whisk the flour, baking soda, spices, and salt.
- Beat the butter and brown sugar until fluffy, then mix in the molasses and egg.
- Add the dry ingredients and hot water alternately, mixing until the batter is smooth. Stir in the vanilla.
- Bake for 30 to 35 minutes, until the center springs back and a tester comes out with only a few crumbs.
- Cool before slicing. The texture tightens and improves as it rests.
Equipment for This Recipe:
- Mixing bowls
- Hand mixer or sturdy whisk
- Cake pan or square pan
- Spatula
- Cake tester or toothpick
How to Serve This Dish:
Serve it with whipped cream, crème fraîche, or a spoonful of lightly sweetened yogurt. It also pairs well with poached pears or a little orange zest on top. The dark cake looks especially handsome on a plain plate with nothing more than a dusting of sugar.
Pro Tips for This Recipe:
- Use unsulphured molasses. Blackstrap is too bitter for this cake unless you want a much darker result.
- Hot coffee deepens the flavor without making the cake taste like coffee.
- Let the cake cool before cutting or it can feel gummy.
- A little butter on the pan helps, but parchment makes the cleanest release.
Variations on This Dish:
Ginger-Date Cake: Fold in 1/2 cup chopped dates for more sweetness and chew.
Orange Molasses Cake: Add orange zest to the batter and a little orange glaze on top.
Chocolate-Ginger Cake: Stir in 1/4 cup cocoa powder and reduce the flour slightly.
Common Mistakes to Avoid with This Dish:
- Using blackstrap molasses by accident: The cake turns harsh and bitter.
- Cutting too soon: Warm molasses cake can seem underbaked when it isn’t.
- Underseasoning the batter: The spices should be present. Not shy.
20. Flourless Chocolate Torte
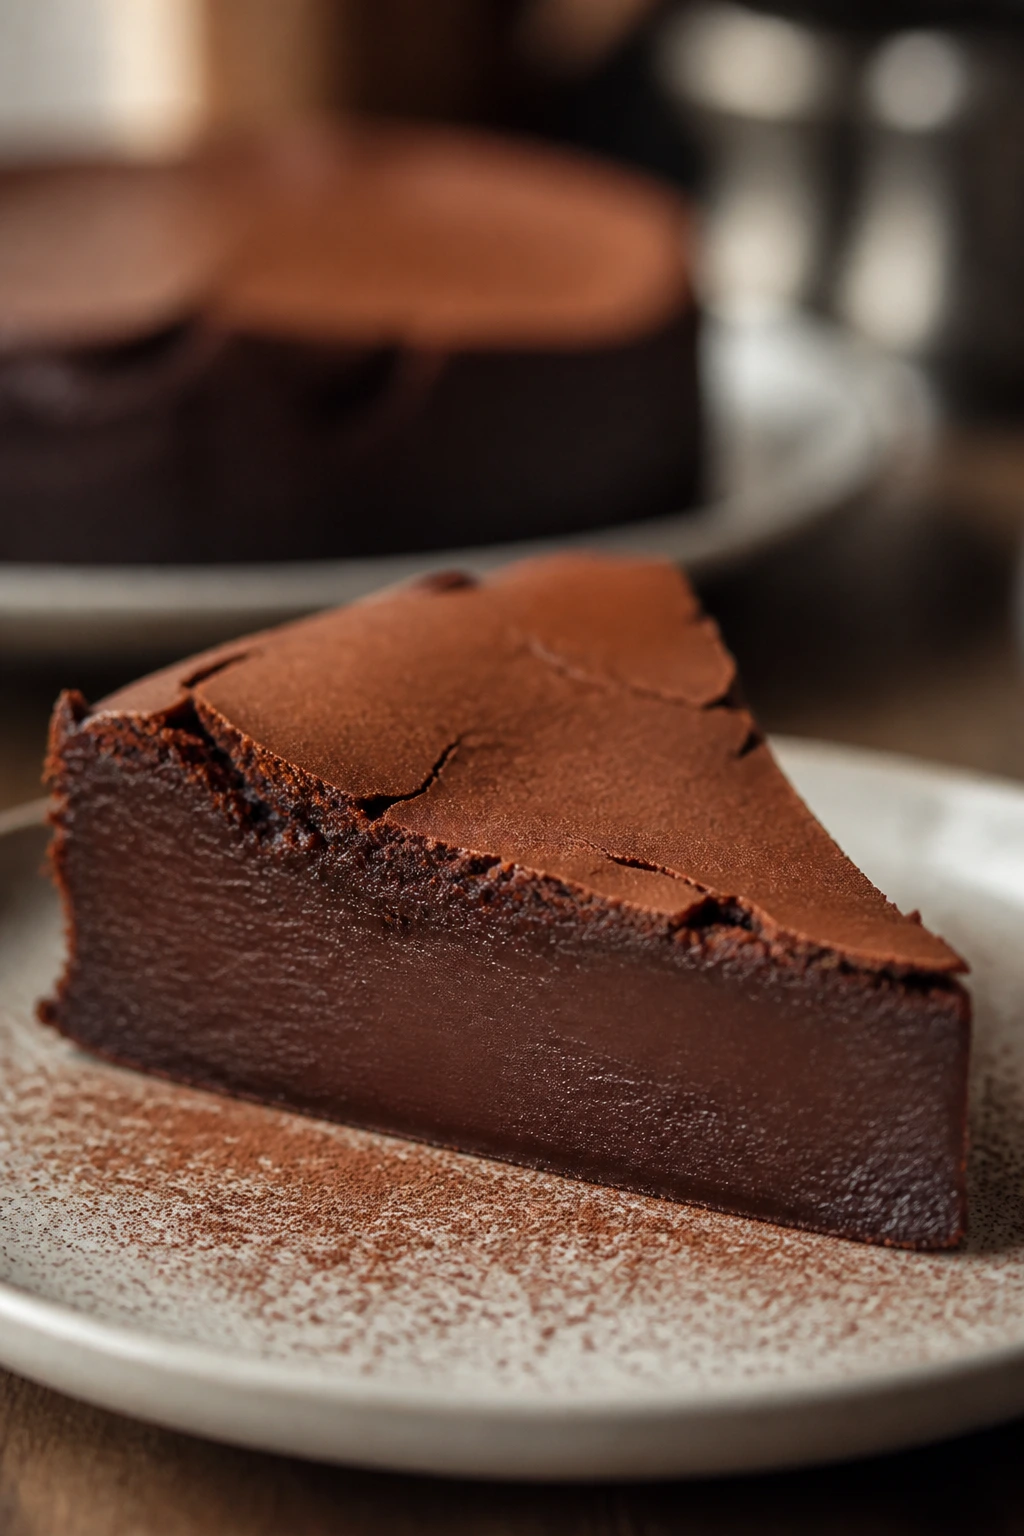
Intro:
A flourless torte is the dessert I make when I want the final plate to feel sleek. It sets up dense and almost mousse-like, with a top that cracks a little as it cools and a center that stays satin-smooth. Dust it with cocoa or powdered sugar and it suddenly looks as if you planned the whole meal around it. Which, in fairness, might happen after one bite.
Why It Works:
Chocolate, butter, eggs, and sugar are enough to build a dessert with real shape when the eggs are whipped and folded carefully. The lack of flour gives the torte a tighter, more intense chocolate flavor and a fudgier finish. A springform pan helps it release cleanly, and chilling sharpens the slices so they stand up on the plate. This is the kind of dessert that looks minimal but lands heavily in the best way.
Key Ingredients:
- 8 ounces bittersweet chocolate
- 1/2 cup unsalted butter
- 3/4 cup granulated sugar
- 5 large eggs, separated
- 1/3 cup unsweetened cocoa powder
- 1 teaspoon vanilla extract
- 1/4 teaspoon fine salt
- Powdered sugar or cocoa powder, for dusting
- 1 teaspoon espresso powder, optional
Quick Steps:
- Preheat the oven to 325°F and line the bottom of an 8-inch springform pan with parchment.
- Melt the chocolate and butter together until smooth, then whisk in the sugar, cocoa, vanilla, salt, and espresso powder if using.
- Stir in the egg yolks.
- Whip the egg whites to medium-stiff peaks and fold them into the chocolate mixture in three additions. Keep the folding gentle so you don’t lose the air.
- Scrape into the pan and bake for 25 to 30 minutes, until the top looks set but the center still has a little wobble.
- Cool fully, then chill for at least 2 hours before removing the pan ring and dusting the top.
Equipment for This Recipe:
- 8-inch springform pan
- Electric mixer
- Mixing bowls
- Rubber spatula
- Parchment paper
How to Serve This Dish:
Serve small wedges with whipped cream, crème fraîche, or a few berries if you have them. The torte is rich enough that thin slices are better than thick ones. A little cocoa dusting on the plate can make the whole thing look more deliberate.
Pro Tips for This Recipe:
- Fold the egg whites carefully. The air is part of the structure.
- Use room-temperature eggs; they whip and blend better.
- Chill before slicing for the cleanest edges.
- A warm knife wiped between cuts makes the slices look polished.
Variations on This Dish:
Orange Chocolate Torte: Add orange zest to the batter and a tiny splash of orange liqueur if you keep it around.
Hazelnut Torte: Replace a little cocoa with finely ground hazelnuts for a softer, nuttier flavor.
Espresso Torte: Increase the espresso powder slightly for a deeper chocolate profile.
Common Mistakes to Avoid with This Dish:
- Overbaking: A dry torte loses the whole point. Stop while it still has a slight wobble.
- Deflating the egg whites: Fold, don’t stir aggressively.
- Removing the pan ring too early: Chill first so the cake can hold its shape.
Why Pantry Staples Make Elegant Desserts Work
The best pantry desserts don’t succeed because they are cheap or convenient, though both are useful. They succeed because the ingredients are already telling you what they want to do. Sugar caramelizes. Butter browns. Cocoa deepens. Eggs set into custard, sponge, or mousse. Flour can be tender or sturdy depending on how much you stir it. That’s enough to build a dessert with character.
Structure Beats Fussy Ingredients
A cookie that snaps cleanly, a cake with a thin glaze, a custard that wobbles just so — these things feel elegant because the texture is controlled. Pantry staples give you the building blocks, and the baking method does the styling. Brown butter changes a shortbread more than a rare extract ever could. A slow chill changes truffles more than a fancy garnish. That’s the part people miss when they assume “simple” means plain.
Finish Is Half the Look
A dusting of cocoa. A swipe of glaze. A few toasted nuts. A line of powdered sugar across a dark torte. These are not throwaway touches. They’re the difference between “dessert made from what was around” and “dessert that looks like it belongs on a proper plate.” If you keep one thing in mind across all twenty recipes, make it this: a small, sharp finish goes farther than a crowded list of ingredients.
Pantry Desserts Age Better Than You’d Expect
Many of these desserts taste better after a rest. The syrup sinks into semolina cake. The molasses cake settles. Rice pudding thickens. Shortbread firms up. Truffles lose their edge and become smoother. That’s one reason pantry baking is so practical. You can make something that doesn’t need to be served at the exact second it comes out of the oven.
Essential Equipment for These Desserts
-
Mixing bowls in at least two sizes: You’ll use them for batters, fillings, whipped whites, and dry ingredients, and a small bowl always seems to disappear when you need it most.
-
Whisk and rubber spatula: The whisk handles custards and smooth batters; the spatula does the gentle folding and scraping that keeps cakes tender.
-
Hand mixer or stand mixer: Helpful for meringues, whipped eggs, and butter cakes, though a strong whisk can still get some of these done.
-
9×5-inch loaf pan: Essential for the lemon loaf and useful for other cakes that want clean slices.
-
8-inch square pan: Handy for bars, fudge, and snack cakes; parchment overhang makes lifting easy.
-
Round cake pan or springform pan: Useful for upside-down cakes, semolina cake, and the flourless torte.
-
Baking sheets: You’ll need them for cookies, biscotti, bark, and meringues, and lined sheets save a lot of cleanup.
-
Parchment paper: Worth using on almost everything here. It helps with release, shaping, and tidy edges.
-
Fine-mesh strainer: Necessary for silky custards and useful for dusting cocoa or powdered sugar evenly.
-
Microplane or zesting tool: Citrus zest does a lot of heavy lifting in pantry desserts, and a fine grater is the easiest way to get it.
-
Instant-read thermometer, optional: Very useful for custards and chocolate work if you like precision, not mandatory for every recipe.
-
Cookie scoop: Makes meringues, truffles, and cookies more uniform, which helps them bake evenly and look neat.
Smart Shopping and Ingredient Tips
Pantry-staple desserts still depend on a few ingredients being in decent shape. Cocoa powder should smell deep and almost reddish, not stale or dusty. Chocolate should melt smoothly and taste like chocolate, not wax. Sugar is easy, but brown sugar should be soft; if it’s hard as a brick, stash a slice of bread in the container overnight or break it up before measuring. Old spices are a bigger problem than many people realize. Ground cinnamon, cardamom, ginger, and cloves fade quietly, and faded spice makes even a good cake taste strangely blank.
With nuts, smell is everything. Toasted almonds, pistachios, hazelnuts, and peanuts should smell warm and clean, never paint-like or sour. Dried fruit should be plump enough to chop without turning into dust. For jams and fruit preserves, go for something thick and glossy. Thin jam can vanish into batters instead of swirled cleanly through them, and that is how a pretty cake turns muddled.
Canned fruit matters too. Pineapple rings packed in juice tend to behave better than syrup-heavy versions, and they need to be drained very well before baking. Sweetened condensed milk should be smooth in the can when you open it. If it’s separated or grainy, skip it. Tahini should be stirred from top to bottom until it’s silky; separated tahini can split fudge and make it look streaked in a bad way, not a decorative one.
I also like to keep one very good bottle of vanilla and one that is perfectly ordinary. Use the better one where vanilla is on its own — custards, cakes, shortbread. Save the cheaper bottle for places where chocolate or molasses will do most of the talking. Same with olive oil: mild and fruity is what you want for cake, not a bottle so assertive it acts like salad dressing.
How to Serve These Desserts
Presentation:
Keep the plates simple. Dark chocolate desserts look best on pale ceramic; pale cakes and citrus desserts look better on darker or warmer-toned plates. A dusting of cocoa, powdered sugar, or cinnamon should be light enough that the shape of the dessert still shows through. A fork and a small spoon are sometimes all you need for a plate to feel intentional.
Accompaniments:
Whipped cream is the easiest universal partner, but it is not the only one. Berries suit lemon loaf and flourless torte. Crème fraîche helps molasses cake and upside-down cake feel less sweet. Espresso, black tea, and chai work across almost the whole collection. For cookies and bars, a small scoop of vanilla ice cream can turn a casual sweet into a proper plated dessert.
Portions:
Tiny portions suit rich desserts: truffles, fudge, bark, torte, and pots de crème. Larger slices make sense for loaf cakes, snack cakes, and galettes. If you’re serving a mixed dessert spread, I’d cut everything smaller than you think, then let guests come back for seconds. A table crowded with dessert pieces is more inviting than a single giant slab.
Beverage Pairing:
Coffee is the obvious answer, but tea does a lot of work here too. Earl Grey and lemon cake make sense together. Espresso sharpens chocolate torte and truffles. Chai likes cardamom snickerdoodles and molasses cake. If you want one bottle for the table, a sweet dessert wine or a small glass of tawny port can carry the richer chocolate and custard desserts without getting in the way.
Additional Tips and Flavor Boosters
Flavor Enhancement:
A little salt changes everything. Flaky salt on chocolate bark, shortbread, or chocolate torte gives the finish some lift. Citrus zest rubbed into sugar before mixing is one of the easiest ways to make pantry cake taste more vivid. For chocolate desserts, a teaspoon of espresso powder is worth considering even if you don’t want the flavor to read as coffee.
Customization:
Use what the cupboard actually has. Apricot jam can become a glaze, a swirl, or a filling. Nuts can go inside cookies, on top of bark, or under caramel on an upside-down cake. If you have both cinnamon and cardamom, use them together sparingly rather than dumping in more of one spice. A balanced spice blend usually tastes more polished than a single loud note.
Serving Suggestions:
Add a little contrast on the plate. Cream with something dark. Fruit with something chocolatey. A crisp cookie next to a soft custard. A handful of toasted nuts over rice pudding or semolina cake gives texture without making the dessert feel crowded. And if the dessert already has a glossy top, let it be the star.
Make-It-Yours:
For dairy-free baking, olive oil cake, bark, galette, and the chocolate torte adapt nicely. For gluten-free needs, flourless torte, bark, truffles, and rice pudding are easy wins, while semolina cake and galette need more specific swaps. If you want less sugar, use darker chocolate, reduce glaze, and let citrus or espresso carry more of the flavor. No need to make every dessert identical in sweetness. That would be boring anyway.
Make-Ahead, Storage, and Reheating Guidance
Loaf cakes, snack cakes, and shortbread keep well at room temperature for 2 to 3 days if they’re covered tightly. Shortbread can stretch to 1 week in a tin or airtight container, and biscotti often stays crisp for 10 days or more if the container stays dry. Fudge, bark, and truffles like a cool room or the fridge depending on how warm your kitchen runs; they’ll hold for 1 to 2 weeks in an airtight box, though truffles are at their best within the first 5 days.
Custards and rice pudding belong in the refrigerator and should be eaten within 3 days. Cover them closely so they don’t pick up fridge smells, because custard is annoyingly good at absorbing whatever is sitting nearby. A torte can keep for 3 to 4 days chilled, and many people think the flavor deepens overnight. Upside-down cake and semolina cake both hold for 2 to 3 days wrapped well. If you want to reheat them, use a low oven at 300°F for 8 to 10 minutes, just enough to take the chill off without drying the crumb.
Cookies vary more. Snickerdoodles and chocolate crinkles are best within 3 to 4 days in a sealed container. Meringues hate humidity and should be stored with a paper towel in an airtight box if you must keep them, though they’re best within 2 days. Lace cookies are fragile and crisp for about 4 to 5 days if kept dry. If they soften, a few minutes in a 275°F oven can help, but only if they have not absorbed too much moisture.
For make-ahead planning, truffles, bark, fudge, biscotti, shortbread, and torte are the safest bets. You can make them a day or two ahead without sacrificing texture. Loaf cakes and semolina cake often taste better the next day after the syrup or glaze settles. Galette is the least make-ahead-friendly of the bunch if you care about a crisp crust, though the dough can be made a day in advance and chilled. That’s the smarter move.
Variations and Adaptations to Try
Gluten-Free Pantry Swaps:
Flourless chocolate torte, truffles, bark, rice pudding, fudge, and custards are naturally easy to adapt or already gluten-free. For cakes and cookies, a 1:1 gluten-free flour blend can work well in loaf cakes, snack cakes, and chocolate crinkles. Biscotti and galettes need the most attention; use a blend with xanthan gum or add it separately if your flour doesn’t include it.
Dairy-Light Desserts:
Olive oil loaf cake, semolina cake, galette, bark, and several chocolate desserts can move into dairy-light territory with little trouble. Use coconut milk in rice pudding or custards if you want a rounder flavor. Coconut oil can stand in for butter in fudge or bark, though it brings its own flavor, and I would not use it where browned butter is the point.
Egg-Free Paths:
Bark, fudge, and some quick cakes can be adapted more easily than custards or meringues, which depend on eggs for structure. For the cakes, egg replacers or applesauce can help, though the texture shifts. If you need dessert without eggs, I’d lean toward bark, fudge, olive oil cake with a proper egg substitute, or a fruit galette.
Lower-Sugar Finishes:
Dark chocolate, citrus zest, toasted nuts, and unsweetened cocoa are the best ways to keep sweetness in check without making the desserts dull. Cut back on glaze and use fruit with a little tartness. Apricot glaze on a galette is fine, but brush it thinly. The same goes for upside-down cake — the caramel can be smaller than you think.
Spice-First Desserts:
Cardamom, cinnamon, ginger, cloves, nutmeg, and a little black pepper can shift these desserts fast. Molasses cake, snickerdoodles, semolina cake, and rice pudding all take spice well. Use a lighter hand with cardamom than with cinnamon; it reads louder than people expect.
Small-Batch Baking:
Many of these can be halved neatly. Use smaller pans and keep a close eye on baking time. Truffles, bark, cookies, and shortbread are easy to scale down. A galette or loaf cake can be made in a smaller pan if you trim the bake time by a few minutes and watch the center.
Common Mistakes to Avoid
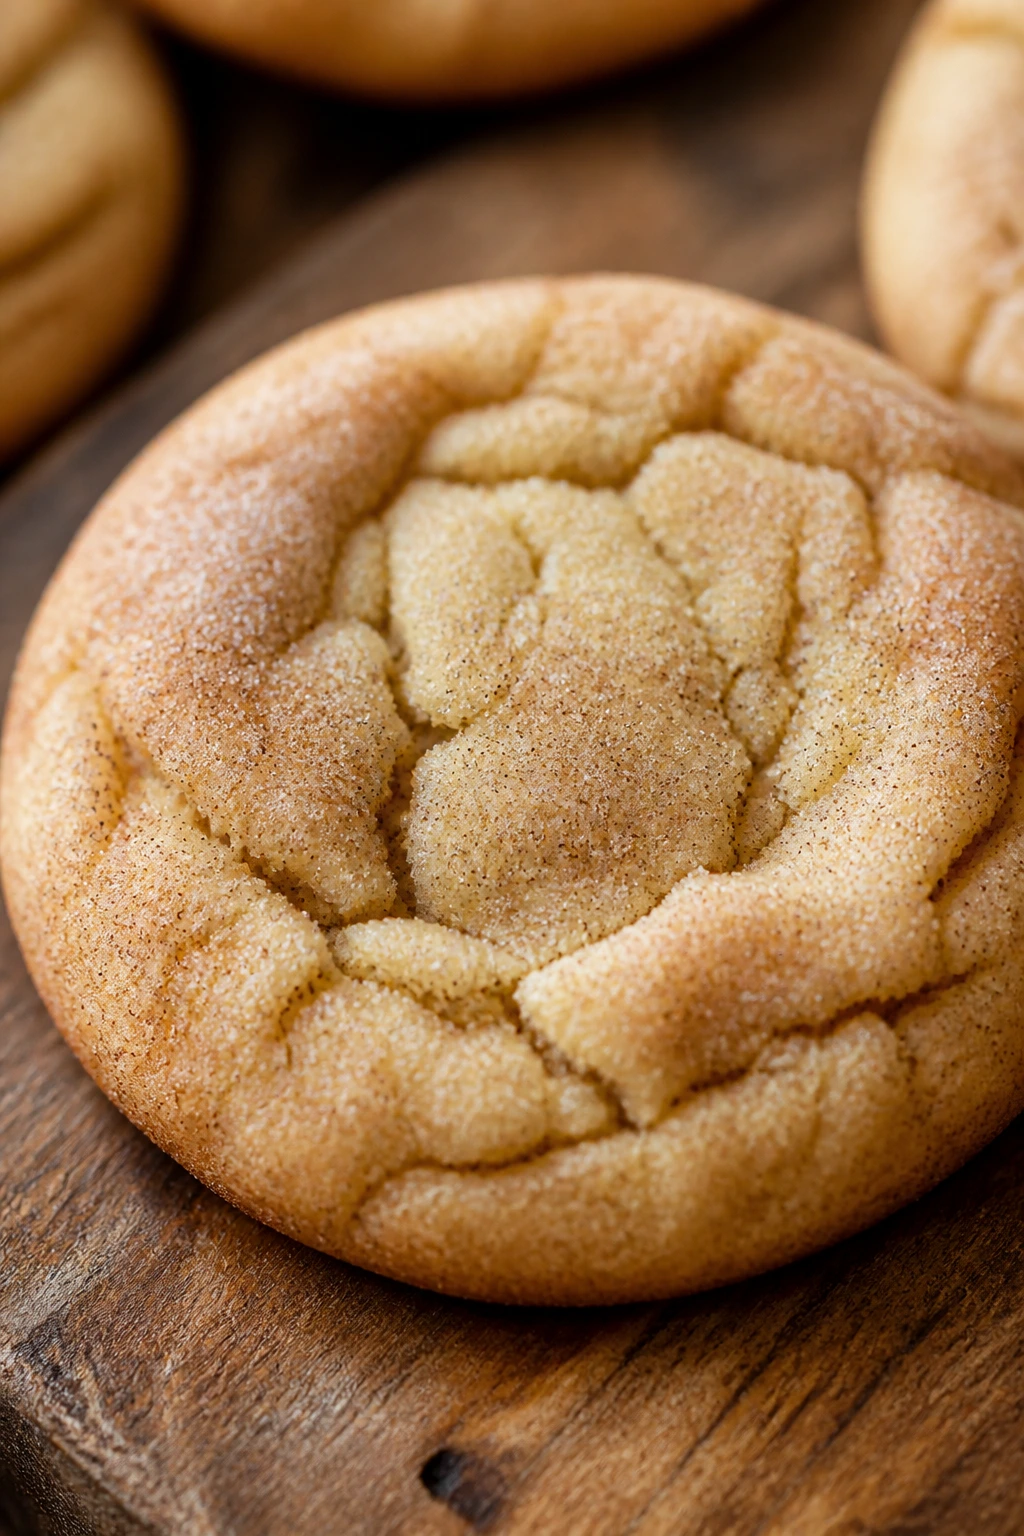
The first mistake is treating pantry ingredients like they’re all equal. They aren’t. Stale cocoa, faded cinnamon, dry brown sugar, and tired nuts can make a dessert taste flat before you even turn the oven on. Smell and taste the ingredients that matter. If something seems dead on the spoon, it will not wake up in the oven.
Another one is overmixing batters that should stay tender. Loaf cakes, snack cakes, semolina cakes, and jam swirls all need a light hand once flour goes in. If you beat them into a smooth, glossy batter just because it looks neat, the finished cake can turn tight and chewy. A few flour streaks are not a disaster. They’re a sign you stopped at the right time.
People also rush the cooling. Truffles need chilling before rolling. Fudge needs to set before slicing. Custard needs time to tighten. Shortbread needs a few minutes on the tray before moving. If you try to handle any of these while they are still soft, you get smears, cracks, or mushy edges that look sloppy on the plate.
A fourth mistake is ignoring contrast. A rich dessert can taste flat if every note is sweet and soft. Add salt, acidity, or a crisp element. That’s what keeps chocolate torte from feeling heavy, rice pudding from feeling sleepy, and bark from tasting like one long sugar hit. The pantry gives you plenty of ways to create contrast if you look for them.
Finally, don’t overbake to play it safe. That habit wrecks more dessert than underbaking ever does. Cakes dry out. Meringues brown. Custards turn grainy. Cookies lose their chew. Better to trust the cues — a gentle wobble, a springy top, pale edges, a clean but moist tester — than to keep baking because you’re nervous.
Frequently Asked Questions
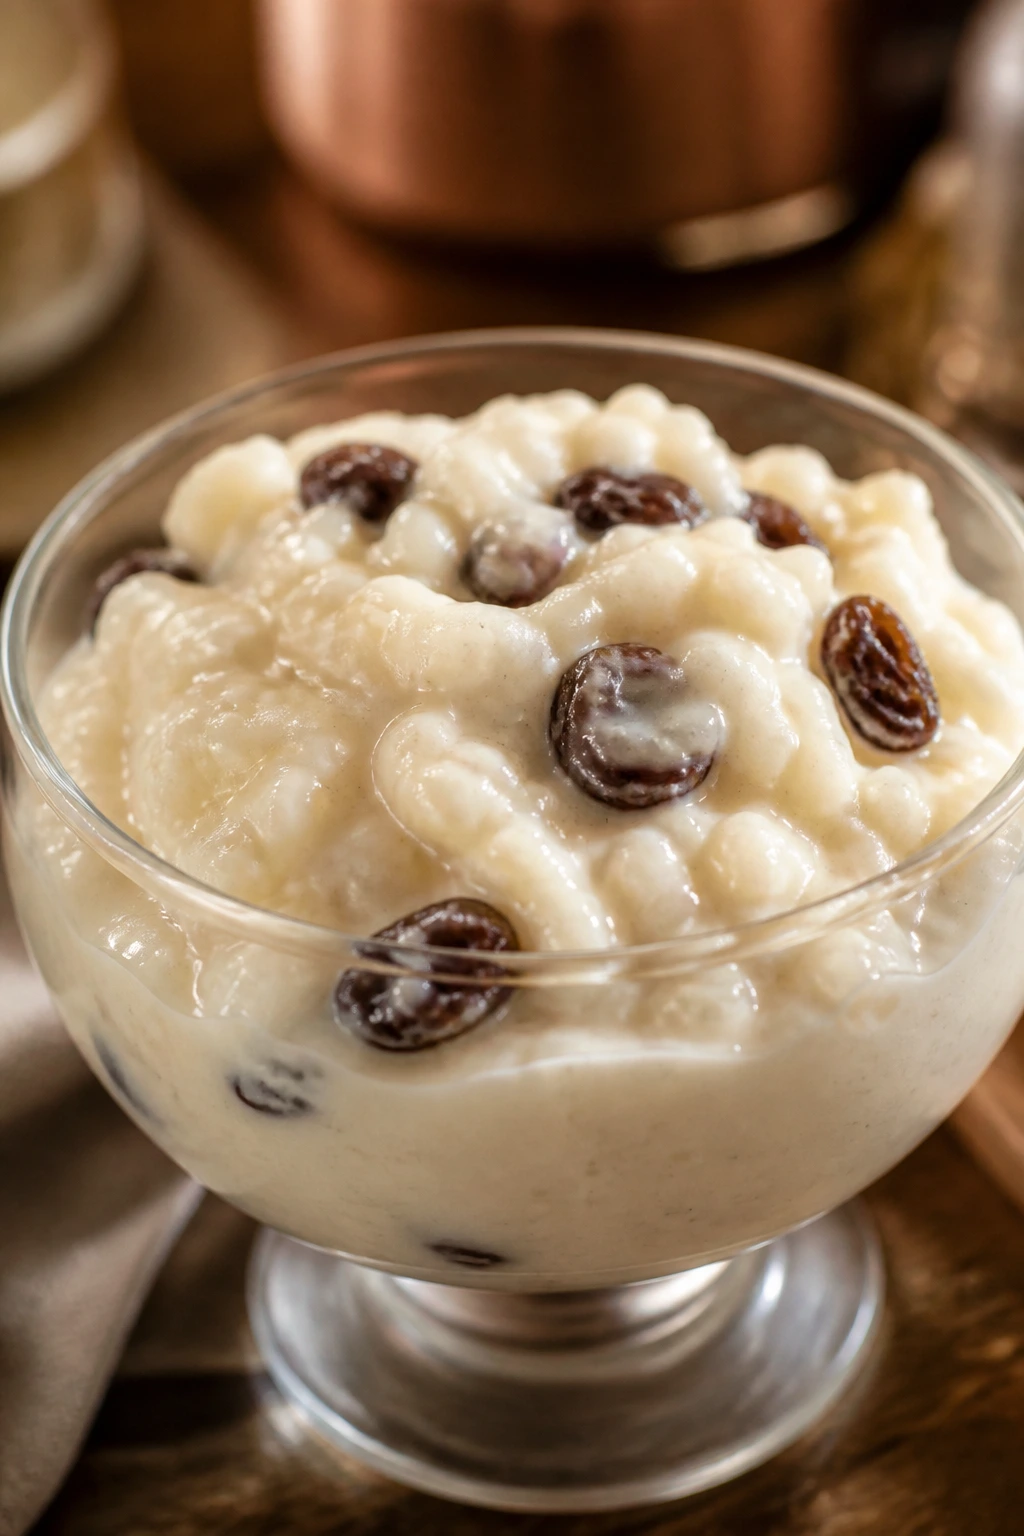
Can I make most of these desserts from ingredients already in my pantry?
Mostly, yes, if you count eggs, butter, milk, and cream as baking basics. The strongest pantry-only winners are bark, fudge, shortbread, biscotti, cookies, and flourless chocolate torte. A few others need fruit, dairy, or fresh eggs, but they still lean heavily on shelf-stable staples.
Which dessert should I make if I want the biggest payoff for the least effort?
Chocolate bark, cocoa truffles, and brown butter shortbread are the easiest places to start. They need few steps, don’t ask for special equipment, and still look finished on a plate. If you want a cake instead, the olive oil loaf gives you a lot of polish for very little drama.
How do I keep cookies from turning soft after a day or two?
Cool them completely before packing them up, then use an airtight container with a piece of parchment between layers. For crisp cookies like biscotti and lace cookies, keep the container dry and avoid storing them next to anything moist. If they soften slightly, a short trip in a low oven can bring some texture back.
Can I swap butter for oil in these desserts?
Sometimes, yes. Oil works well in cakes like the olive oil loaf, semolina cake, pumpkin bars, and even some chocolate cakes, but it won’t mimic butter’s flavor in shortbread or biscotti. If butter is doing the flavor work, I’d be cautious about swapping it unless the recipe is designed for it.
What if my chocolate seizes while I’m melting it?
Take it off the heat right away and stir in a small spoonful of warm cream or oil if the recipe allows it. The texture may loosen enough to recover. Prevention is easier: keep water away from the bowl and melt chocolate slowly over low heat.
Do any of these desserts improve overnight?
Yes. Molasses cake, semolina cake, fudge, truffles, and loaf cakes often taste better after a rest. The flavors settle, the crumb relaxes, and glaze or syrup spreads more evenly. That’s one reason these recipes are useful for entertaining.
How do I make these desserts feel elegant without extra ingredients?
Use smaller portions, cleaner cuts, and one finishing touch. A dusting of cocoa on torte, a glaze on cake, a little salt on bark, a neat pile of shortbread fingers — those details matter more than a long garnish list. Elegance usually comes from restraint.
Can I halve or double these recipes easily?
Most cakes, cookies, bars, and bark recipes scale well if you keep the pan sizes sensible. Custards and meringues are a little fussier, so I’d halve or double those more carefully and watch the bake time closely. If you’re doubling, measure precisely; baking punishes sloppy math.
What pantry ingredient gives the biggest flavor boost?
Citrus zest, good cocoa, and vanilla all pull their weight, but salt may be the most underrated one. A pinch in chocolate desserts, shortbread, or caramel-based bakes changes the whole profile. It keeps sweetness from flattening the flavor.
Small Ingredients, Proper Finish
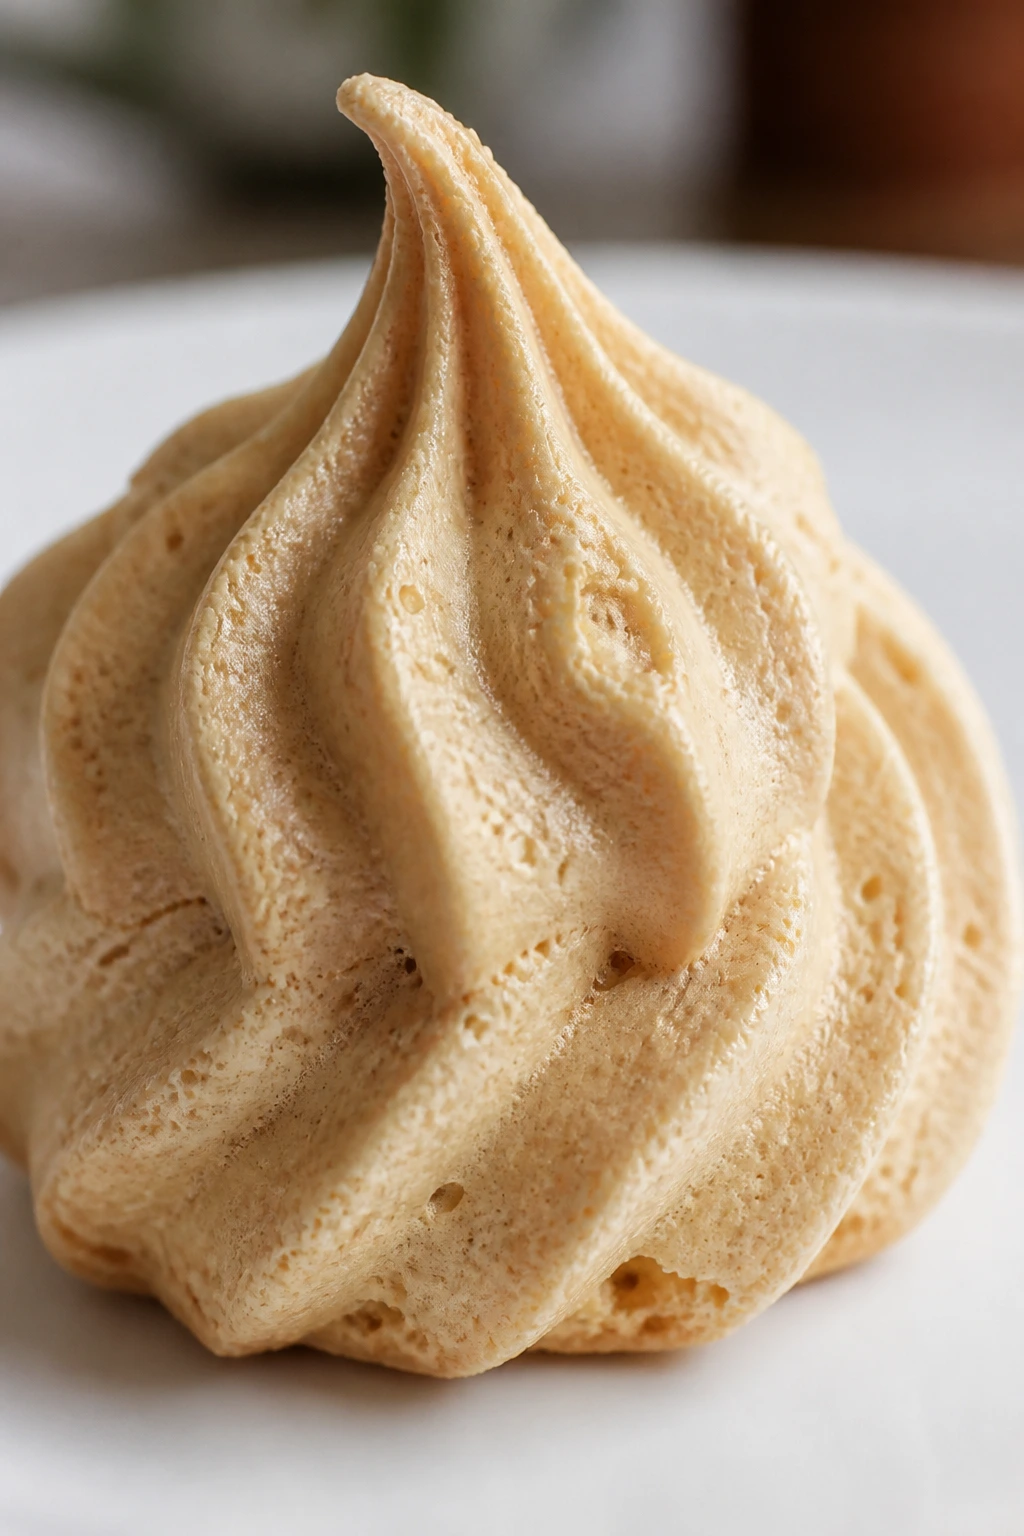
There’s a nice kind of satisfaction in pulling a polished dessert out of ingredients you already know how to use. Not because it feels thrifty, although that helps, but because it proves technique matters more than clutter. A well-glazed loaf, a dark torte, a tray of truffles, or a clean slice of semolina cake can look finished without asking for a long shopping list.
That’s the whole appeal of pantry baking when it’s done well. The ingredients are ordinary. The result doesn’t have to be.
If your cupboard already has flour, cocoa, sugar, and a few good flavoring agents, you’re closer to a proper dessert than you might think. Pick one recipe, pay attention to the texture cues, and give it a finish that looks intentional. Then do another one next week.