
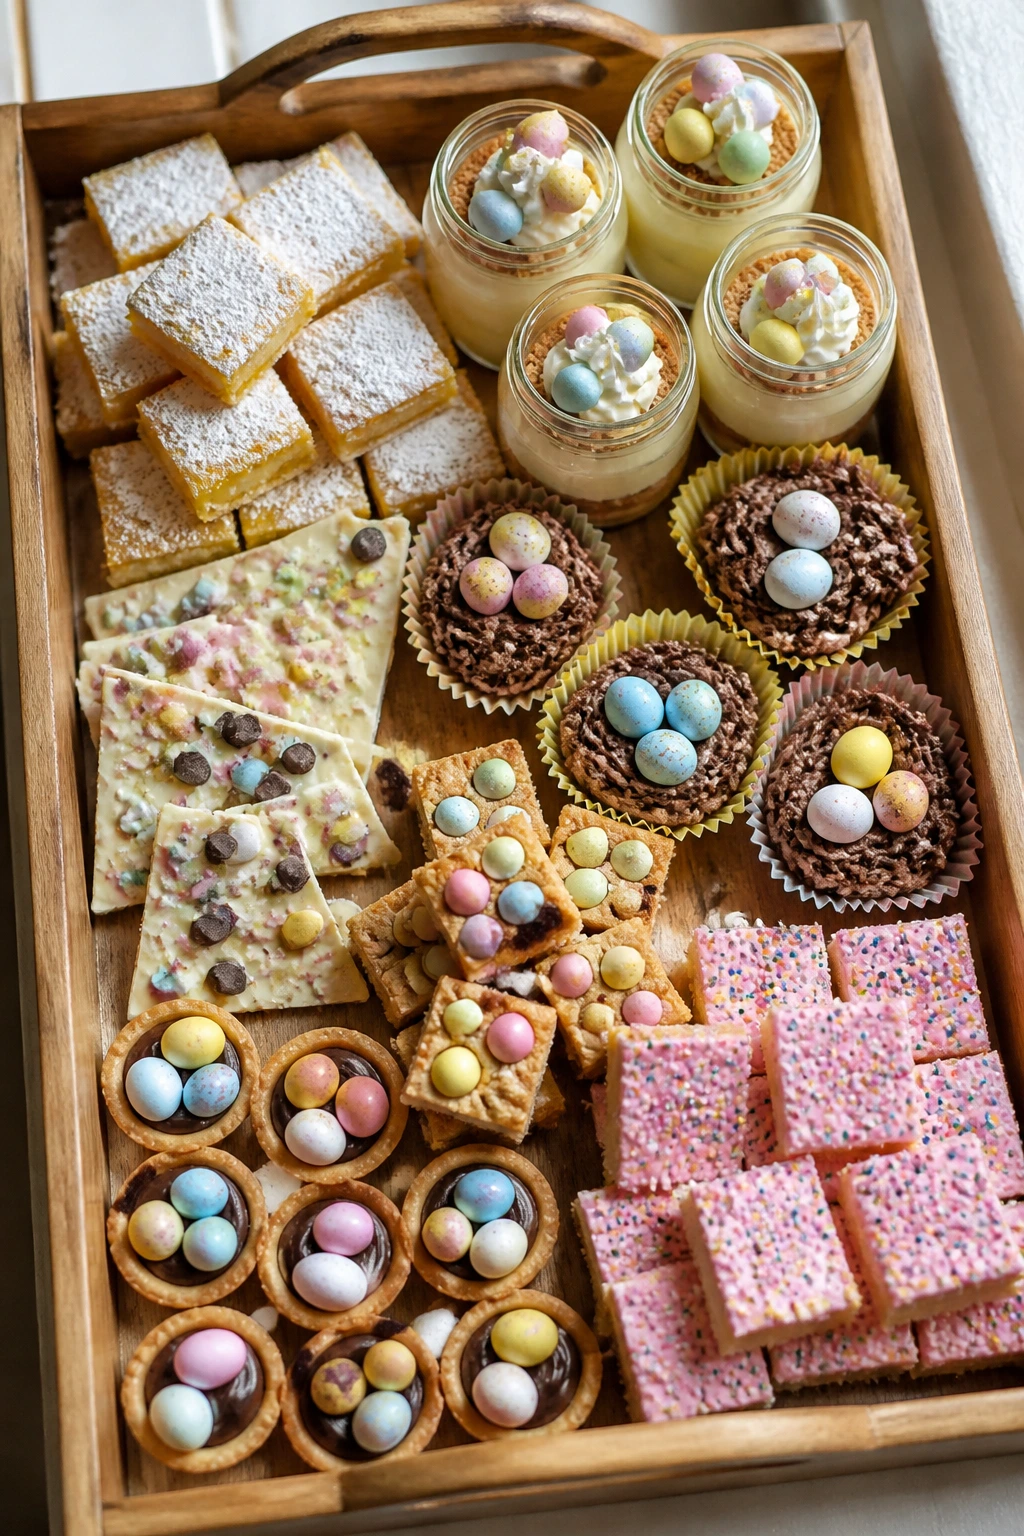
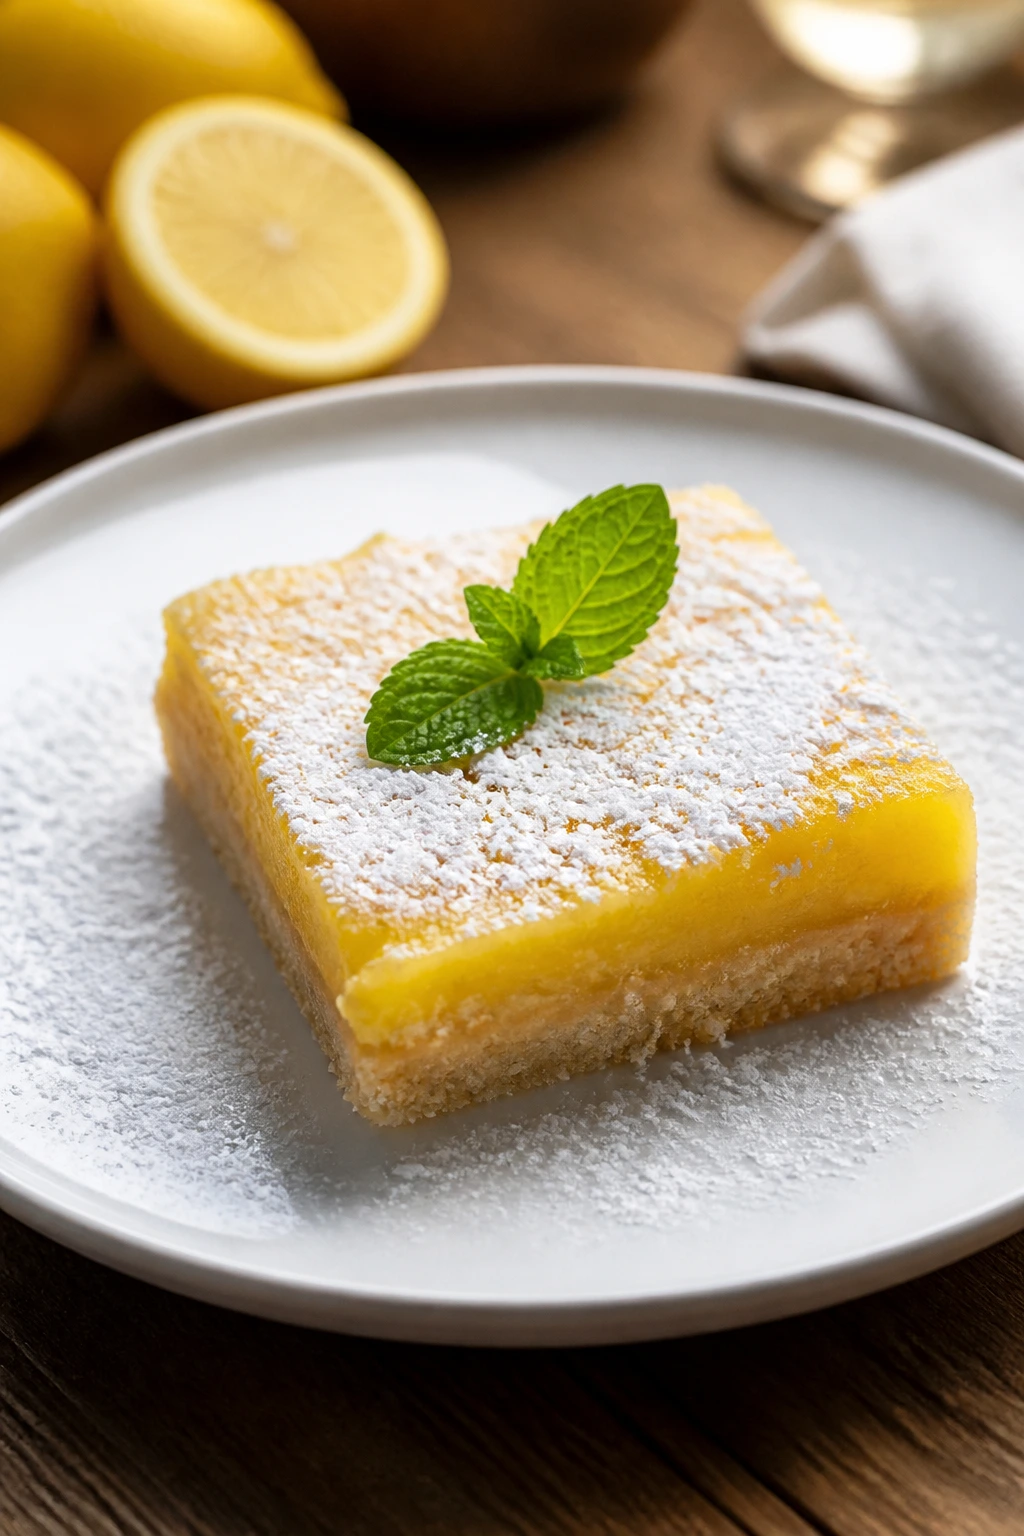
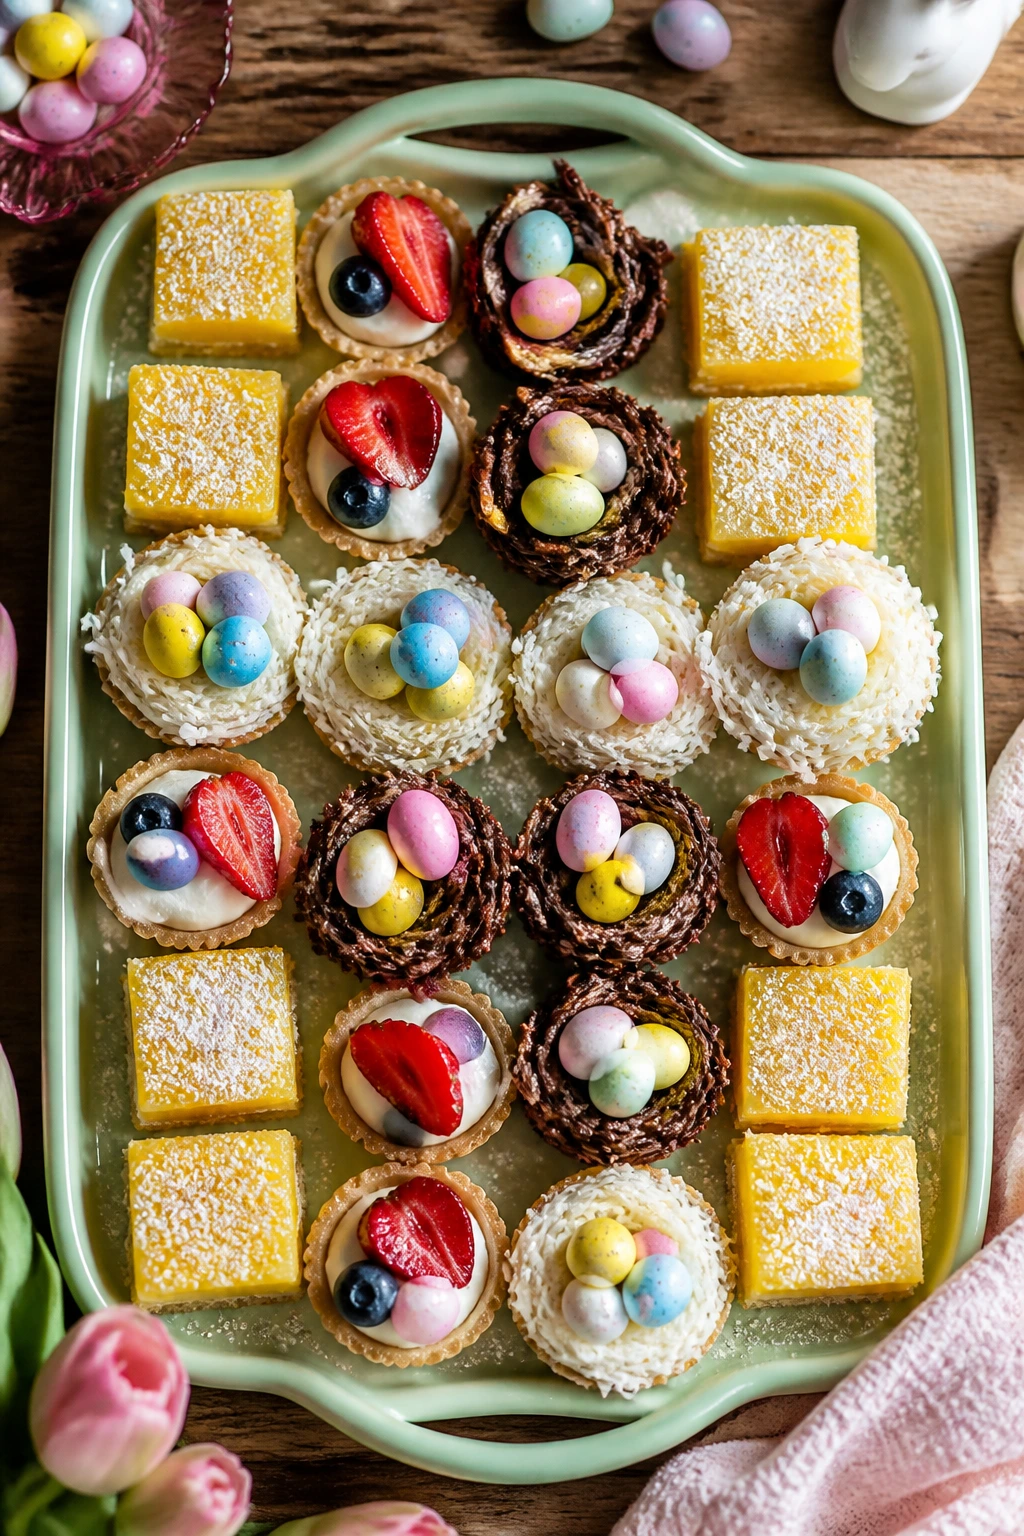
Easter desserts do not need a parade of piping bags and a full afternoon of cooling racks. The best Easter dessert ideas for real life are the ones that can be made after work, pulled together from a few smart shortcuts, and still look like somebody thought ahead. Lemon bars with a dusting of sugar. Strawberry cups with a little extra cream. Chocolate nests piled with candy eggs. That’s the lane.
There’s a reason these easy weeknight treats work so well for spring gatherings: the flavors are bright, the colors do half the decorating for you, and most of the heavy lifting comes from chill time, not constant attention. You can keep a tray of bars in the fridge, stack cookies in a tin, or tuck no-bake cups behind the milk carton and call it dessert later.
I’m partial to desserts that give you a clean payoff for not much effort. If a recipe uses one bowl, one pan, or a handful of pantry staples and still feels festive when you set it out, that’s my kind of holiday food. The 25 recipes below lean hard into that idea—some are baked, some are no-bake, and a few ride the line between snack and dessert in the best possible way.
Why These Easter Dessert Ideas Work on a Weeknight
-
Fast Active Time: Most of these recipes ask for 10 to 20 minutes of hands-on work, which means the oven or fridge does the rest while you clear the table.
-
Spring Flavors Without Fuss: Lemon, strawberry, coconut, carrot, vanilla, and chocolate egg candy show up in ways that taste seasonal without chasing hard-to-find ingredients.
-
Festive Without Special Tools: A bowl, a whisk, a baking pan, and parchment paper will carry most of the load here; no candy thermometer or pastry torch needed.
-
Easy to Dress Up: A dusting of powdered sugar, a handful of pastel sprinkles, or a few candy-coated eggs changes the look fast.
-
Good Make-Ahead Behavior: Bars, cookies, puddings, and bark hold up well overnight, which matters when dessert has to wait behind dinner and cleanup.
-
Mix of Baked and No-Bake: If the oven is already busy, there are plenty of fridge-first options that still feel holiday-ready.
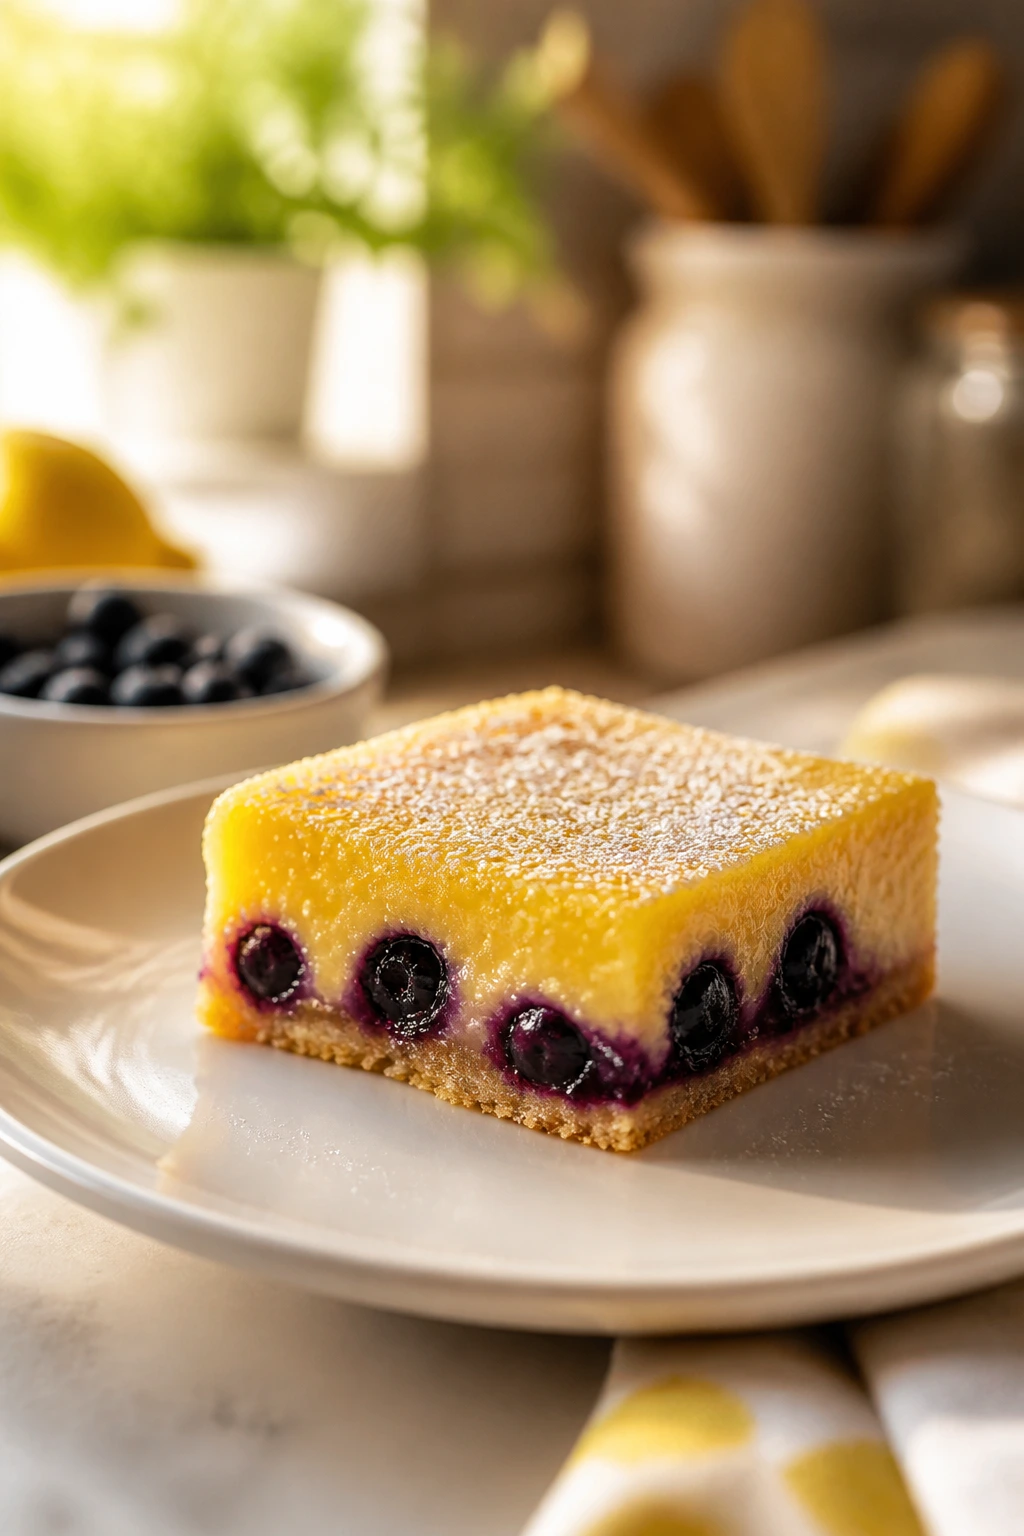
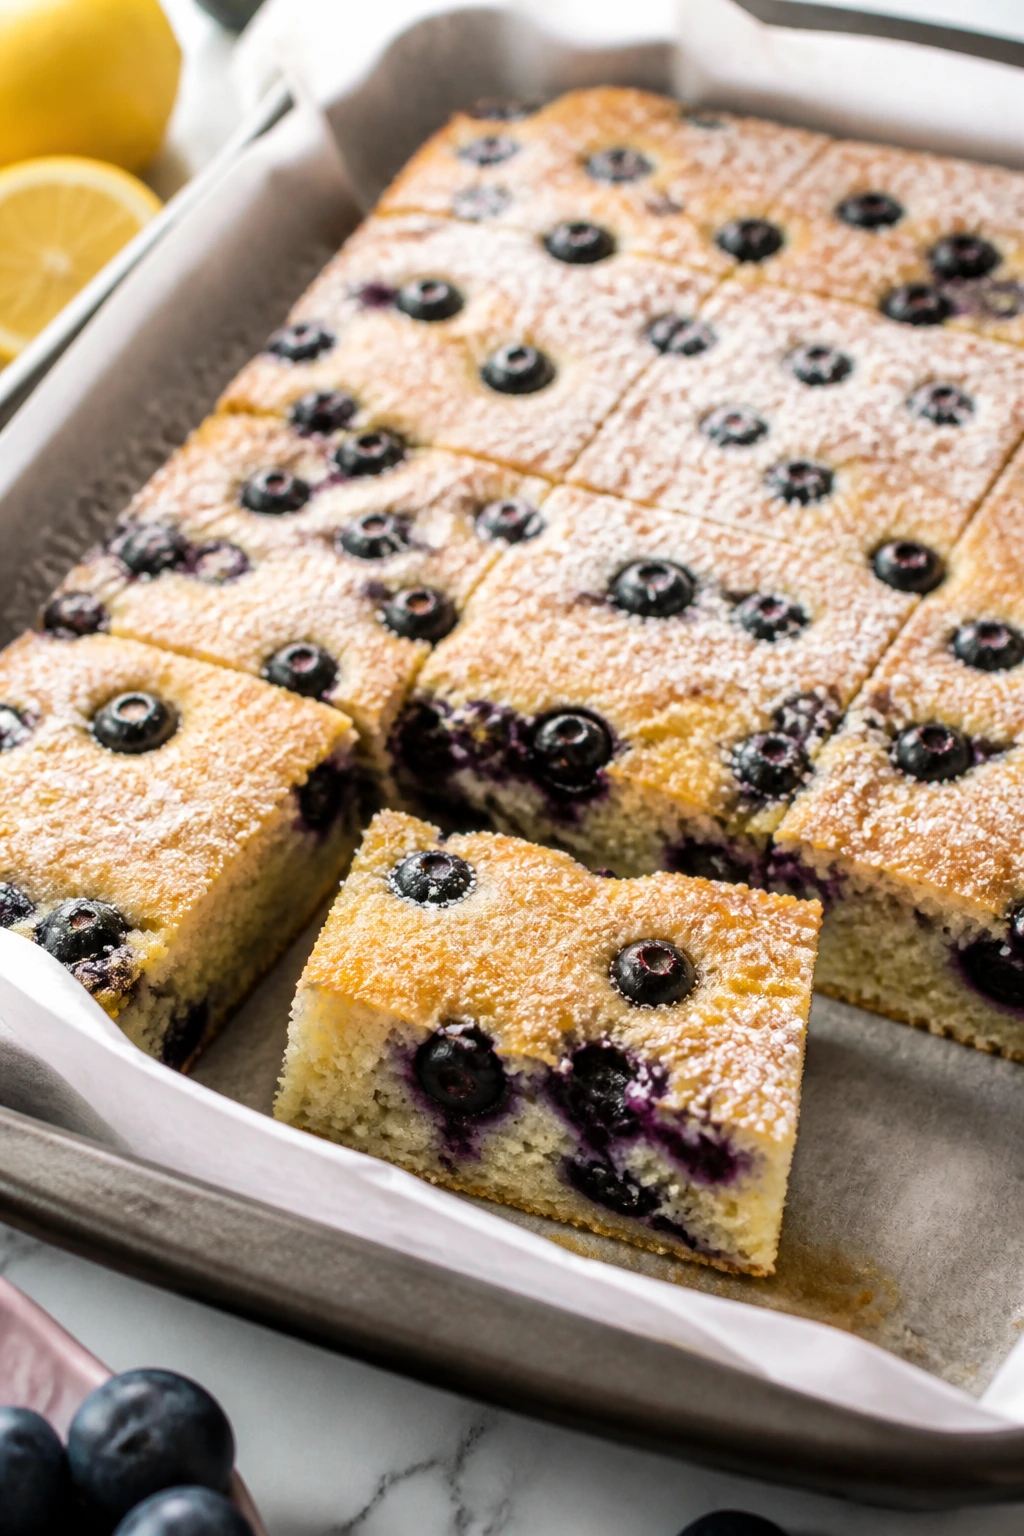
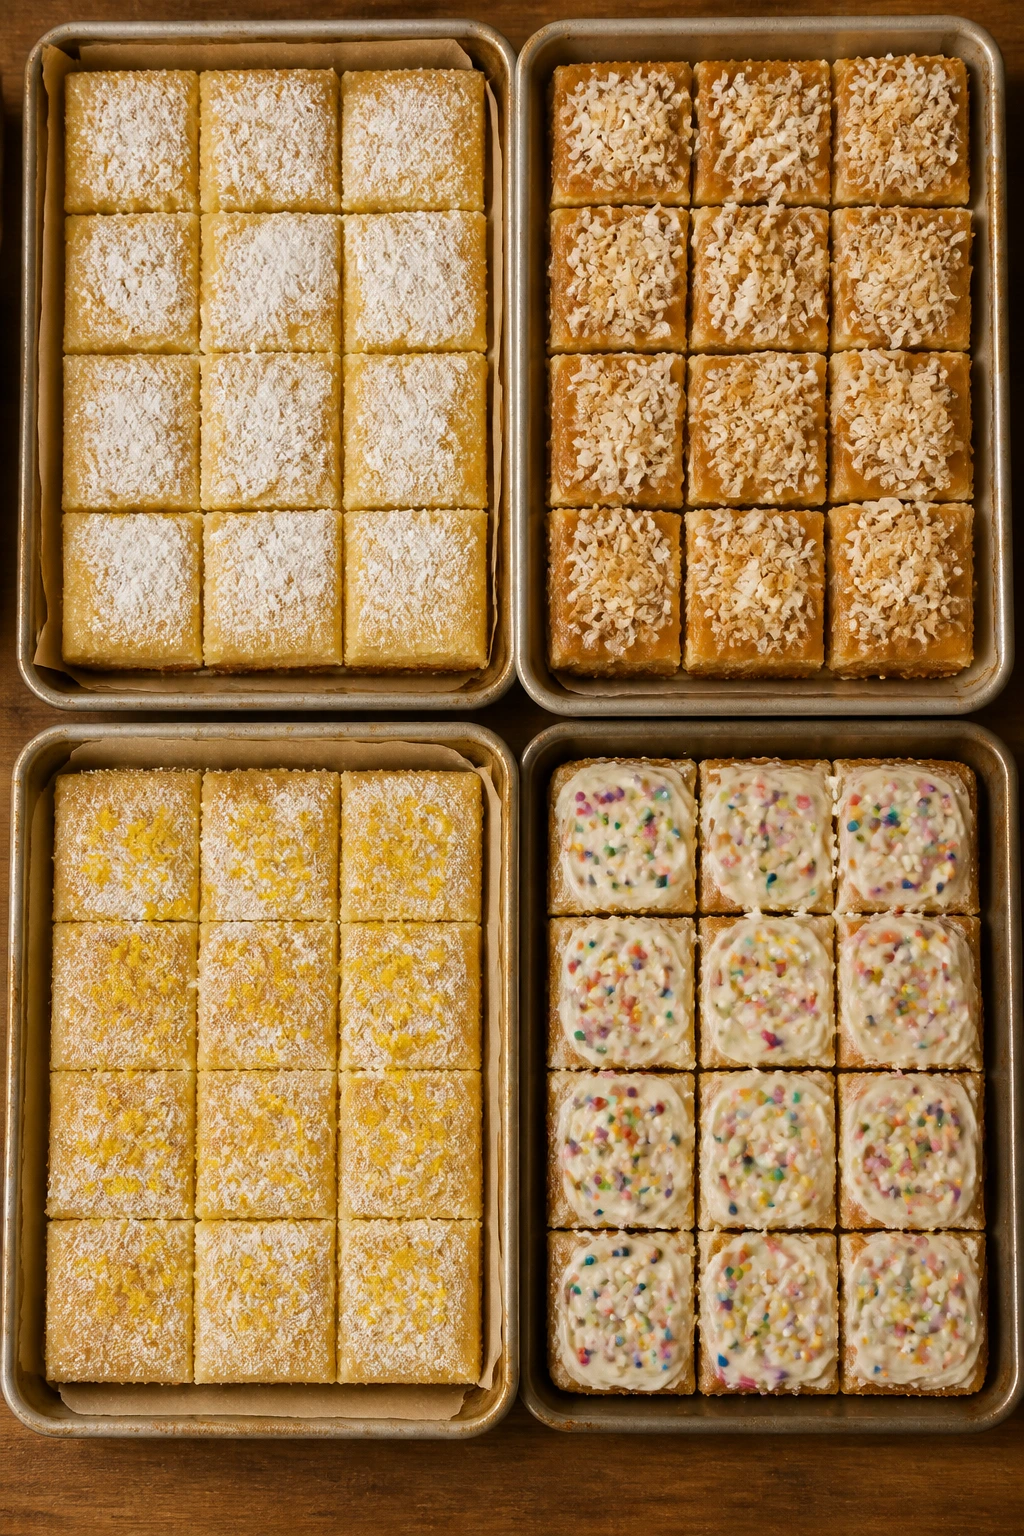
1. Lemon-Blueberry Sheet-Pan Bars
Intro:
These bars taste like a lemon poppyseed muffin’s sharper, fruitier cousin. The crumb stays tender, the blueberries burst into little jammy pockets, and the powdered sugar on top gives the whole pan that slightly snowy Easter look without any actual decorating work.
Why It Works:
Lemon and blueberry are one of those pairings that never needs coaxing. The lemon keeps the bars from tasting flat, while the berries bring enough moisture that the crumb feels soft rather than cakey. A shallow pan bakes the edges just enough to set them while leaving the center plush.
Key Ingredients:
- 1 cup unsalted butter, softened
- 1 cup granulated sugar
- 2 large eggs, room temperature
- 2 teaspoons finely grated lemon zest
- 3 tablespoons fresh lemon juice
- 2 cups all-purpose flour
- 1/2 teaspoon baking powder
- 1/2 teaspoon fine salt
- 1 cup blueberries, rinsed and patted dry
- 1/2 cup powdered sugar, for finishing
Quick Steps:
- Preheat the oven to 350°F and line an 8×8-inch pan with parchment, leaving a little overhang.
- Beat the butter and sugar for 2 to 3 minutes until pale and fluffy.
- Add the eggs one at a time, then mix in the lemon zest and juice.
- Fold in the flour, baking powder, and salt, then gently fold in the blueberries.
- Spread the batter in the pan and bake for 28 to 32 minutes, until the center looks set and the edges are lightly golden.
- Cool fully before dusting with powdered sugar and slicing.
Equipment for This Recipe:
- 8×8-inch baking pan
- Parchment paper
- Medium mixing bowl
- Hand mixer or sturdy whisk
- Rubber spatula
How to Serve This Dish:
Cut the bars into neat squares and dust them right before serving so the sugar stays bright. A few extra blueberries scattered on the plate make the tray look finished without much effort.
Pro Tips for This Recipe:
- Toss the blueberries with 1 teaspoon flour if they’re very juicy; that helps keep them from sinking.
- Cool the pan fully before cutting or the centers will smear.
- If your lemons are small, add an extra teaspoon of zest; that pulls the flavor forward.
Variations on This Dish:
- Raspberry Swirl Bars: Swap the blueberries for raspberries and marble 2 tablespoons of raspberry jam through the batter.
- White Chocolate Spring Bars: Fold in 1/2 cup white chocolate chips for a sweeter finish.
- Gluten-Free Version: Use a 1:1 gluten-free flour blend and let the batter rest 10 minutes before baking.
Common Mistakes to Avoid with This Dish:
- Wet berries: Damp blueberries can sink and stain the batter muddy. Pat them dry and fold them in at the end.
- Cutting too soon: Warm bars fall apart. Give them at least 1 hour to cool.
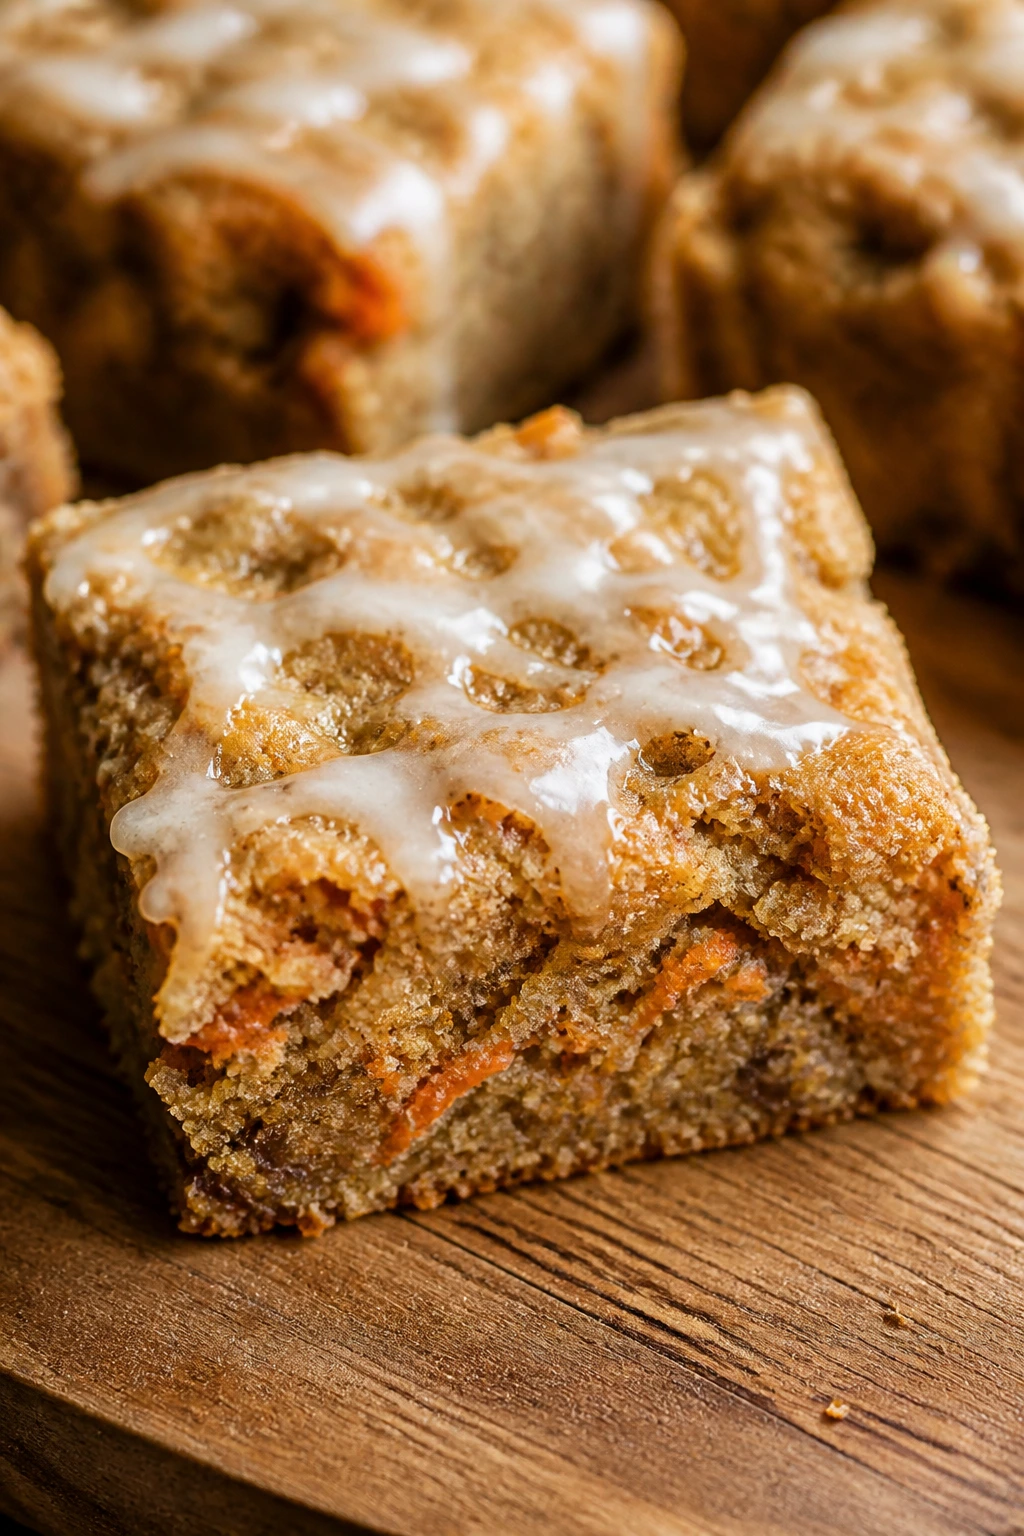
2. Carrot Cake Blondies
Intro:
These blondies take the best part of carrot cake—the warm spice, the soft middle, the cream cheese finish—and strip away the fussy layer work. You get a dense, chewy square with little orange flecks and a glaze that sinks into the top instead of sitting there like makeup.
Why It Works:
Melted butter and brown sugar give the bars that soft, almost toffee-like chew. Finely grated carrots disappear into the batter enough that they keep the texture moist without turning it wet. A small batch bakes fast and slices cleanly, which is exactly what you want on a weeknight.
Key Ingredients:
- 1 cup unsalted butter, melted
- 1 cup packed brown sugar
- 1/2 cup granulated sugar
- 2 large eggs
- 2 teaspoons vanilla extract
- 2 cups all-purpose flour
- 1 teaspoon ground cinnamon
- 1/2 teaspoon ground nutmeg
- 1/2 teaspoon baking powder
- 1/2 teaspoon fine salt
- 1 1/2 cups finely grated carrots
- 1/2 cup chopped walnuts, optional
- 4 ounces cream cheese, softened
- 1 cup powdered sugar
- 2 tablespoons milk
Quick Steps:
- Heat the oven to 350°F and line an 8×8-inch pan with parchment.
- Stir the melted butter, brown sugar, and granulated sugar until glossy.
- Beat in the eggs and vanilla, then fold in the flour, spices, baking powder, and salt.
- Fold in the carrots and walnuts, then spread the batter into the pan.
- Bake for 26 to 30 minutes, until the center feels set and a toothpick comes out with a few moist crumbs.
- Beat the cream cheese, powdered sugar, and milk into a smooth glaze, then spread it over the cooled blondies.
Equipment for This Recipe:
- 8×8-inch baking pan
- Parchment paper
- Mixing bowls
- Whisk or hand mixer
- Box grater or fine grater
How to Serve This Dish:
Slice into tidy squares and serve them cold or at room temperature. They look especially good with a tiny extra drizzle of glaze and a few chopped walnuts sprinkled over the top.
Pro Tips for This Recipe:
- Grate the carrots finely; coarse shreds can leave the bars looking stringy.
- Pull them from the oven when the center still has a little give.
- If you want a stronger carrot cake flavor, add 1/4 teaspoon ground ginger.
Variations on This Dish:
- Raisin-Studded Version: Fold in 1/3 cup golden raisins for a sweeter bite.
- Pecan Crunch Blondies: Swap the walnuts for toasted pecans and add a pinch of allspice.
- Maple Glaze Swap: Replace the milk in the glaze with 1 tablespoon maple syrup and 1 tablespoon milk.
Common Mistakes to Avoid with This Dish:
- Overbaking: Dry blondies lose the whole point. Bake until just set and stop there.
- Skipping the cool-down: Warm glaze slides off and the bars can break when sliced.
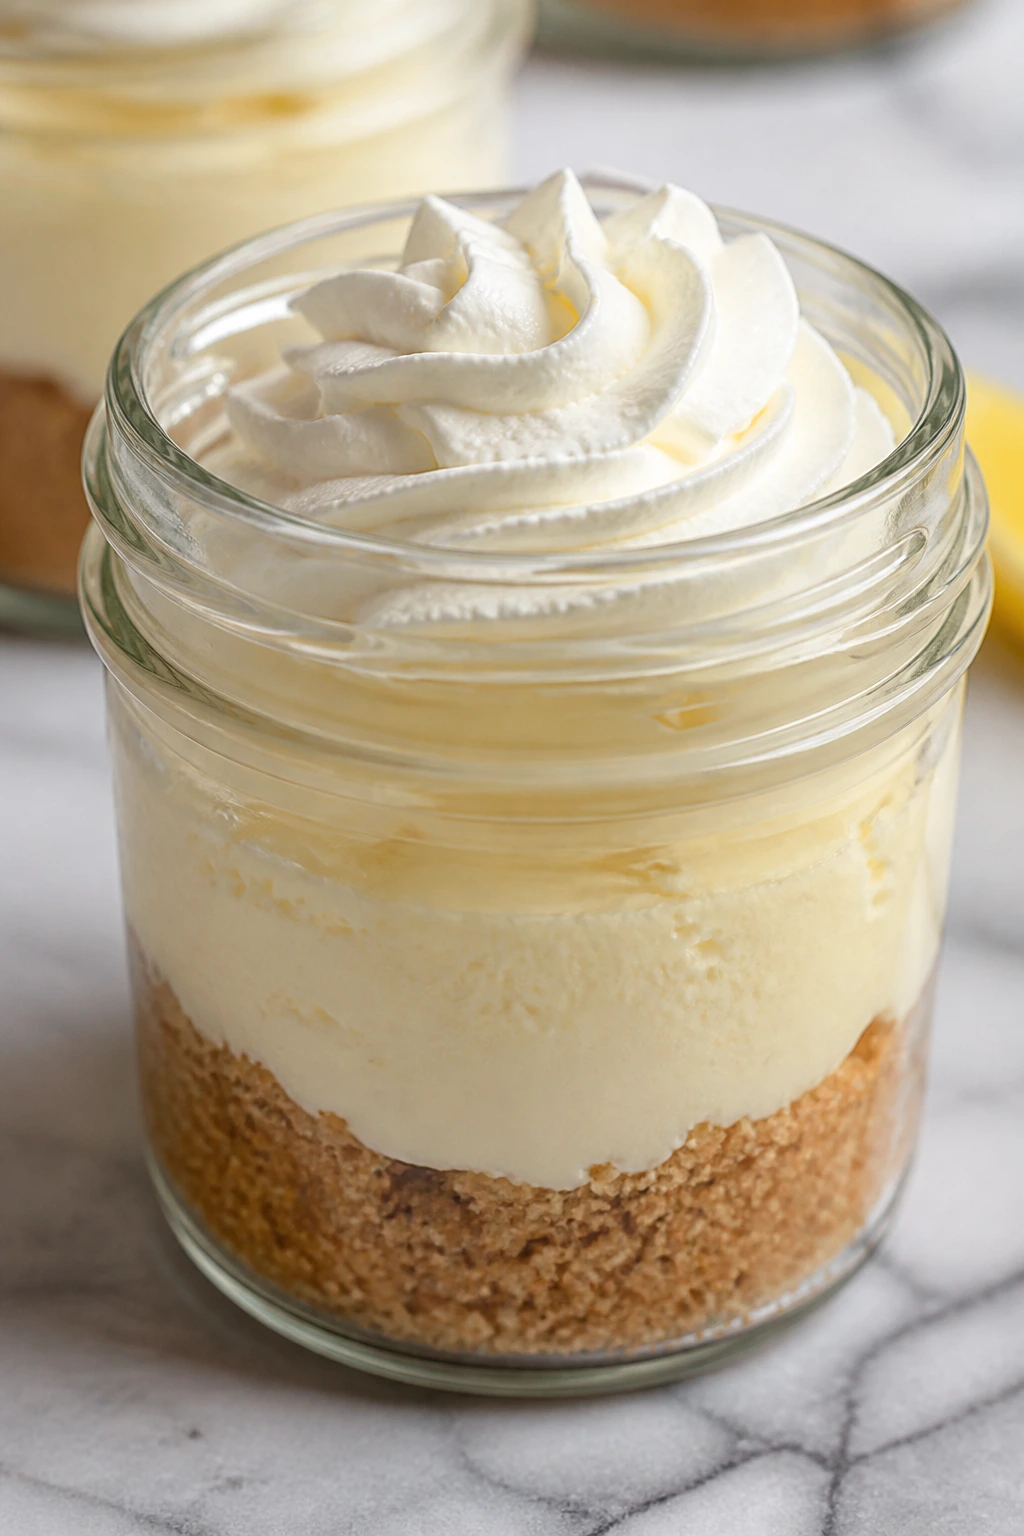
3. No-Bake Mini Cheesecake Cups
Intro:
These little cups are the kind of dessert that makes people think you did more work than you did. The crust tastes like a graham cracker base should—crumbly, buttery, a little sandy—and the filling is cool, tangy, and sturdy enough to hold berries or candy eggs on top.
Why It Works:
Cream cheese and whipped cream give you that cheesecake feel without turning on the oven. Because the cups are portioned individually, they chill fast and set firmly. That makes them a lifesaver when dessert has to happen in the narrow gap between dinner and cleanup.
Key Ingredients:
- 1 1/2 cups graham cracker crumbs
- 6 tablespoons unsalted butter, melted
- 16 ounces cream cheese, softened
- 1/2 cup powdered sugar
- 1 teaspoon vanilla extract
- 1 tablespoon lemon juice
- 1 cup cold heavy cream
- 1 cup berries or pastel candy eggs for topping
Quick Steps:
- Mix the graham crumbs and melted butter until the crumbs look evenly damp.
- Spoon the mixture into 6 to 8 small jars or cups and press lightly.
- Beat the cream cheese, powdered sugar, vanilla, and lemon juice until smooth.
- Whip the heavy cream to soft peaks, then fold it into the cream cheese mixture.
- Spoon the filling over the crusts and chill for at least 2 hours.
- Top with berries or candy eggs just before serving.
Equipment for This Recipe:
- Small jars or dessert cups
- Mixing bowls
- Hand mixer
- Rubber spatula
- Measuring cups and spoons
How to Serve This Dish:
Serve them cold with a spoon tucked into each cup. A few berries on one side and a single candy egg on the other keeps the look tidy instead of cluttered.
Pro Tips for This Recipe:
- Make sure the cream cheese is soft or the filling stays lumpy.
- Fold the whipped cream in gently so the mixture stays airy.
- Add toppings right before serving so the crust stays crisp.
Variations on This Dish:
- Lemon Cheesecake Cups: Add another teaspoon of lemon zest and top with candied lemon peel.
- Chocolate Crumb Cups: Use chocolate cookie crumbs instead of grahams.
- Berry Swirl Cups: Spoon 1 teaspoon of berry jam into each cup and swirl it once with a toothpick.
Common Mistakes to Avoid with This Dish:
- Filling the cups too early with juicy fruit: Berries can bleed into the top layer. Add them at the table if needed.
- Overbeating the cream: Stiff, grainy cream makes the filling heavy. Stop at soft peaks.
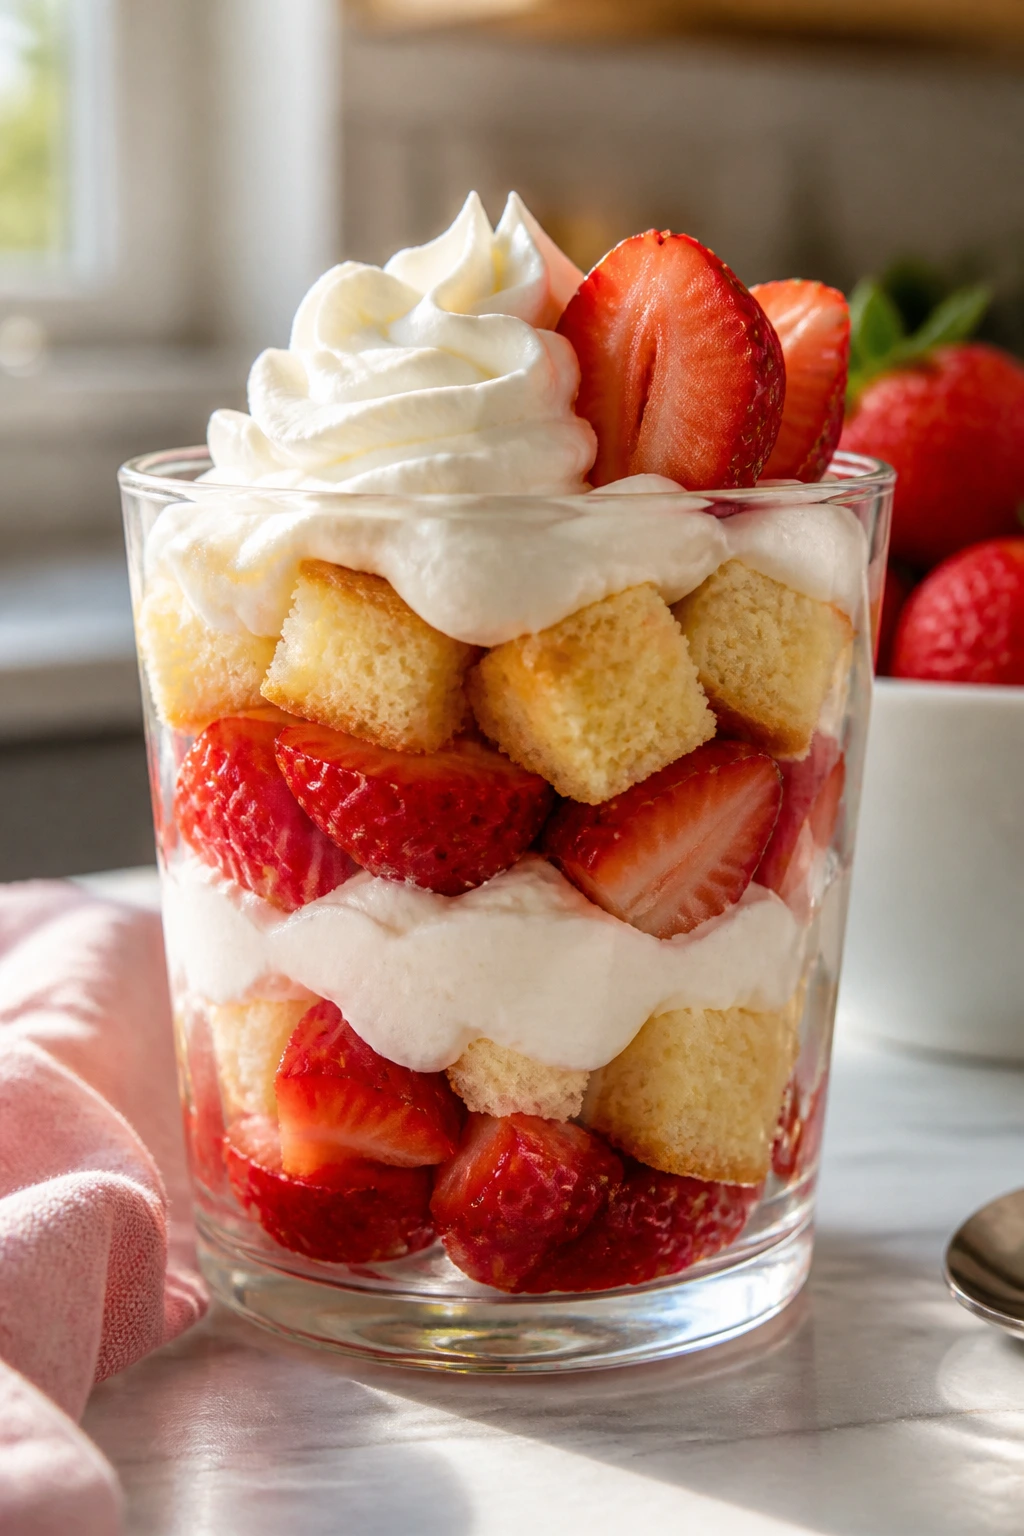
4. Strawberry Shortcake Parfaits
Intro:
This is the dessert I reach for when strawberries are good and the clock is not. Layered in glasses, it looks brighter than it is hard to make, and the mix of syrupy berries, soft cake, and cold cream gives every spoonful a little contrast.
Why It Works:
Shortcake desserts are built for fast assembly. The strawberries soften in sugar within minutes, so you get a sauce without cooking anything. Pound cake, angel food cake, or even split biscuits all absorb the berry juices in a different way, which lets you work with what’s on hand.
Key Ingredients:
- 1 pound fresh strawberries, hulled and sliced
- 2 tablespoons granulated sugar
- 1 teaspoon lemon juice
- 4 cups cubed pound cake or angel food cake
- 1 cup cold heavy cream
- 2 tablespoons powdered sugar
- 1 teaspoon vanilla extract
- 1/2 cup plain Greek yogurt, optional
Quick Steps:
- Toss the strawberries with sugar and lemon juice, then let them sit for 10 minutes.
- Whip the cream, powdered sugar, vanilla, and yogurt, if using, until soft peaks form.
- Add a layer of cake cubes to the bottom of each glass.
- Spoon in berries and their juices, then add a layer of cream.
- Repeat the layers once more and chill for 15 minutes before serving, if you can wait that long.
Equipment for This Recipe:
- Parfait glasses or small jars
- Mixing bowls
- Whisk or hand mixer
- Sharp knife
- Spoon
How to Serve This Dish:
Serve in clear glasses so the red berries and white cream show through. A mint leaf on top is enough; don’t bury the layers under too many extras.
Pro Tips for This Recipe:
- Use ripe berries with fragrance, not just color.
- If the cake is dry, drizzle 1 teaspoon of milk or orange juice over each layer.
- Assemble close to serving time or the cake gets too soft.
Variations on This Dish:
- Raspberry Shortcakes: Swap half the strawberries for raspberries and cut the sugar to 1 tablespoon.
- Biscuit Cup Version: Use split refrigerated biscuits instead of cake for a sturdier texture.
- Dairy-Free Parfaits: Use coconut whipped cream and a dairy-free cake.
Common Mistakes to Avoid with This Dish:
- Using under-ripe strawberries: Pale berries stay tart and watery. Wait for deep red fruit with a sweet smell.
- Letting the layers sit too long: The cake can turn mushy fast. These are best the same day.
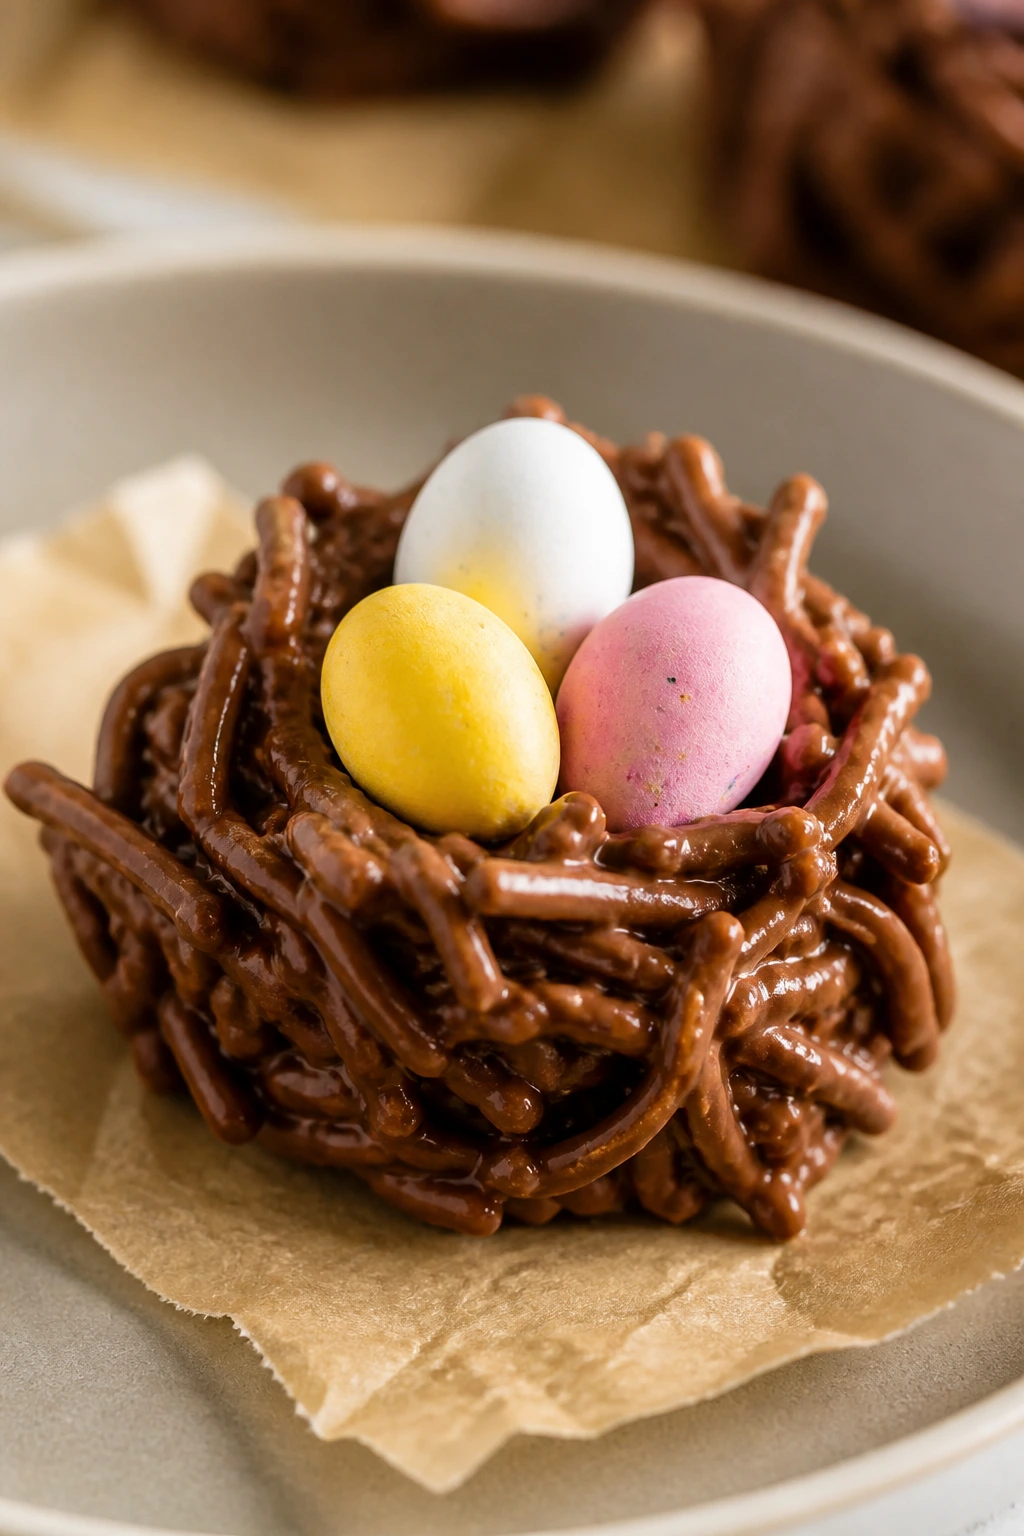
5. Crispy Chocolate Nests with Candy Eggs
Intro:
These are the dessert equivalent of a quick craft project, except you can eat the result. The noodles or pretzels get coated in melted chocolate and shaped into little nests that crack pleasantly when you bite them, then the candy eggs settle into the middle like they were meant to be there.
Why It Works:
Chocolate sets around the crispy strands and gives the nests enough structure to hold their shape. Because the mixture is portioned into little mounds, you do not need a special mold. The result looks playful on a tray and comes together fast.
Key Ingredients:
- 3 cups chow mein noodles
- 8 ounces milk chocolate chips
- 8 ounces semisweet chocolate chips
- 1 tablespoon neutral oil
- 1/2 teaspoon vanilla extract
- 24 pastel candy eggs
- Pinch of fine salt
Quick Steps:
- Line a baking sheet with parchment paper.
- Melt the chocolate chips with the oil in short bursts, stirring until smooth.
- Stir in the vanilla and salt, then fold in the noodles until coated.
- Scoop mounds onto the sheet and press the centers lightly with a spoon to make nest shapes.
- Add candy eggs before the chocolate sets, then chill for 20 minutes.
Equipment for This Recipe:
- Baking sheet
- Parchment paper
- Microwave-safe bowl
- Spoon or small scoop
- Rubber spatula
How to Serve This Dish:
Pile the nests on a flat tray so the little centers stay visible. They work as a dessert centerpiece or as a grab-and-go sweet for a bigger spread.
Pro Tips for This Recipe:
- Work fast once the chocolate is melted.
- If the mixture feels dry, add another tablespoon of melted chocolate rather than oil.
- Press the centers only a little or the nests flatten out.
Variations on This Dish:
- Peanut Butter Nest: Stir 2 tablespoons peanut butter into the melted chocolate for a nutty finish.
- Butterscotch Nest: Replace half the semisweet chips with butterscotch chips.
- Pretzel Nest: Use broken pretzel sticks for a saltier, sturdier crunch.
Common Mistakes to Avoid with This Dish:
- Overheating the chocolate: Grainy chocolate won’t coat evenly. Melt low and slow.
- Adding the eggs too late: Once the chocolate starts to set, the eggs roll off. Nest them right away.
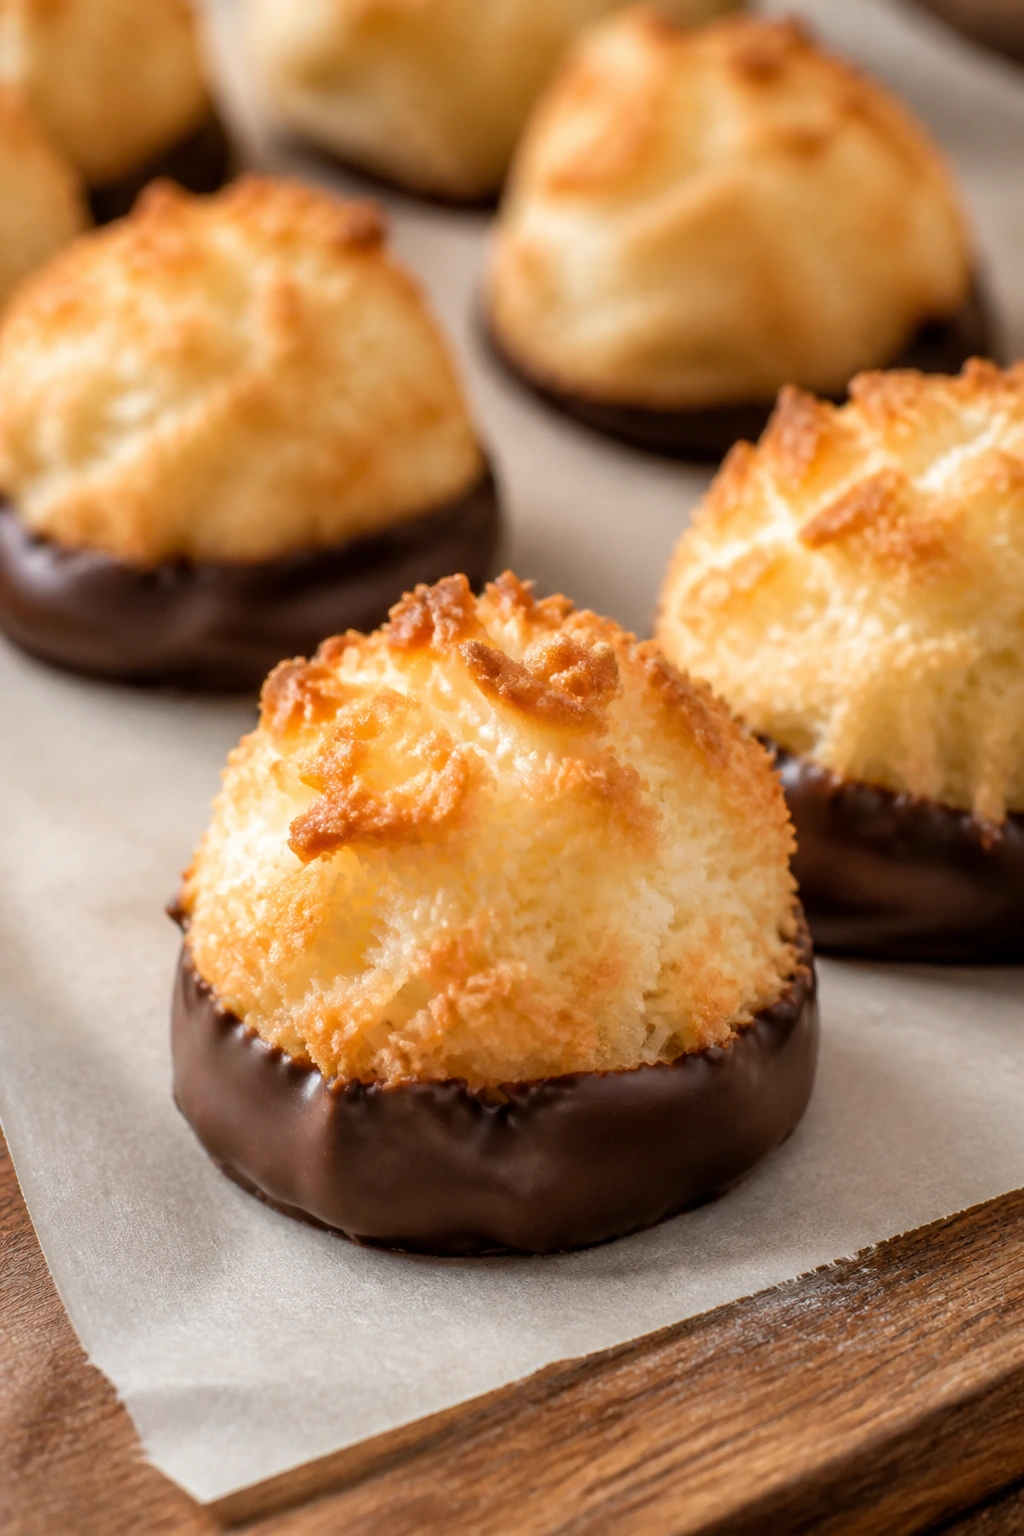
6. Chocolate-Dipped Coconut Macaroons
Intro:
Macaroons bring a lot of payoff for a short ingredient list. The outside bakes to a toasted edge, the middle stays chewy, and the chocolate dip on the bottom gives them enough contrast that they feel more finished than a plain coconut mound.
Why It Works:
Sweetened condensed milk binds the coconut without needing flour. Egg whites give the cookies lift and keep them from turning into dense little rocks. A quick chocolate dip adds a clean finish and lets you dress them up with a few sprinkles if you want.
Key Ingredients:
- 4 cups sweetened shredded coconut
- 2/3 cup sweetened condensed milk
- 2 large egg whites
- 1 teaspoon vanilla extract
- 1/4 teaspoon fine salt
- 4 ounces dark chocolate, melted
- 1 teaspoon coconut oil, optional
Quick Steps:
- Heat the oven to 325°F and line a baking sheet with parchment.
- Stir the coconut, condensed milk, vanilla, and salt together.
- Beat the egg whites to soft peaks, then fold them into the coconut mixture.
- Scoop small mounds onto the sheet and bake for 18 to 22 minutes, until the edges are golden.
- Cool fully, dip the bottoms in melted chocolate, and let them set on parchment.
Equipment for This Recipe:
- Baking sheet
- Parchment paper
- Mixing bowl
- Hand mixer
- Small bowl for chocolate dipping
How to Serve This Dish:
Serve them in a shallow bowl or on a cake stand with the chocolate side down. A dusting of toasted coconut on the tray makes them look extra neat.
Pro Tips for This Recipe:
- Use parchment, not a greased pan, or the bottoms can brown too fast.
- If your coconut is coarse, chop it once or twice for tighter macaroons.
- Let them cool fully before dipping so the chocolate clings cleanly.
Variations on This Dish:
- Lemon Coconut Macaroons: Add 1 teaspoon lemon zest to the batter.
- Almond Kiss Macaroons: Replace half the vanilla with almond extract.
- Half-Dipped Version: Dip only the tips in chocolate and add pastel sprinkles before it sets.
Common Mistakes to Avoid with This Dish:
- Packing the coconut too tightly: Dense mounds bake unevenly. Scoop loosely.
- Pulling them too early: Pale bottoms need a little more time to set.
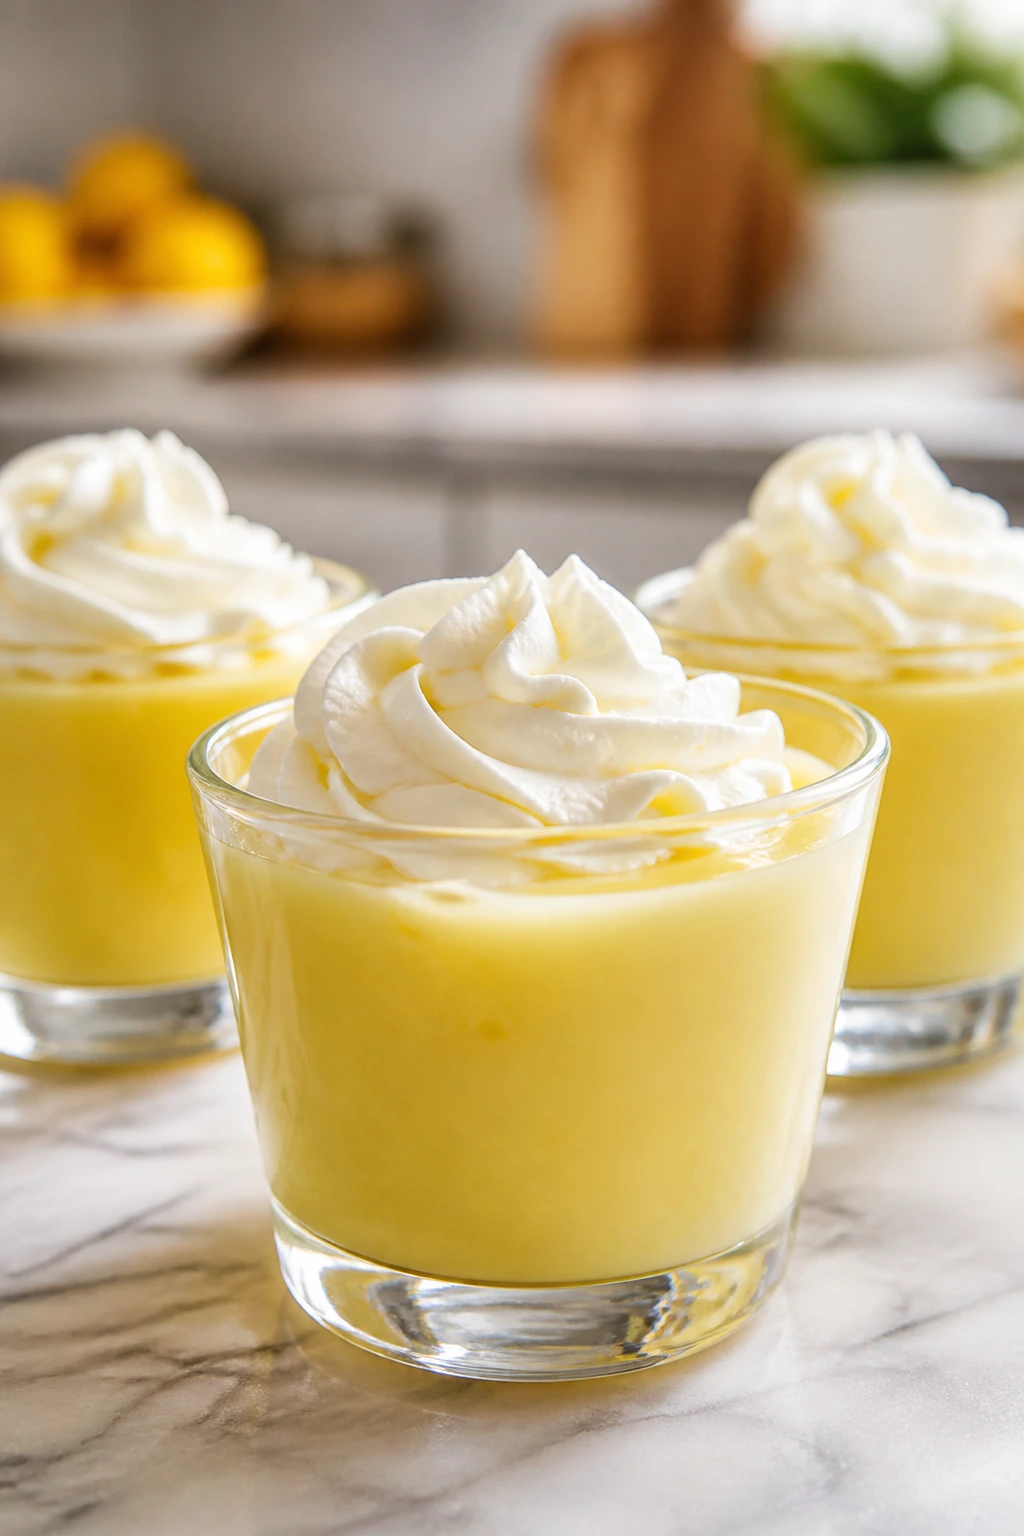
7. Creamy Lemon Pudding Cups
Intro:
If you want a dessert that tastes bright and cool without needing cake layers or frosting, lemon pudding does the job. The texture lands somewhere between custard and silk, and served in little cups it feels polished enough for a holiday table.
Why It Works:
Cornstarch thickens the pudding quickly, while egg yolks give it that lush texture that instant mix packets never quite match. Lemon juice and zest go in at the end so the flavor stays fresh instead of cooked flat. Chilling turns it from warm custard into a spoonable, tidy dessert.
Key Ingredients:
- 2 1/2 cups whole milk
- 1/2 cup granulated sugar
- 1/4 cup cornstarch
- 4 large egg yolks
- 1 tablespoon lemon zest
- 1/4 cup fresh lemon juice
- 2 tablespoons unsalted butter
- 1 teaspoon vanilla extract
- Whipped cream, for topping
Quick Steps:
- Whisk the sugar, cornstarch, and egg yolks in a saucepan until smooth.
- Slowly whisk in the milk and lemon zest.
- Cook over medium heat, whisking constantly, until the mixture thickens and bubbles lazily.
- Remove from heat, whisk in the lemon juice, butter, and vanilla.
- Spoon into cups, cover the surface with plastic wrap, and chill for at least 2 hours.
- Top with whipped cream before serving.
Equipment for This Recipe:
- Medium saucepan
- Whisk
- Measuring cups and spoons
- Small cups or ramekins
- Fine grater or microplane
How to Serve This Dish:
Top each cup with a spoonful of whipped cream and a few flecks of lemon zest. They look especially good in clear cups where the pale yellow shows through.
Pro Tips for This Recipe:
- Whisk constantly once the heat goes on; custard can go lumpy fast.
- Press plastic wrap onto the surface so the top doesn’t form a skin.
- Add lemon juice off the heat so the pudding stays smooth.
Variations on This Dish:
- Lime Pudding Cups: Use lime zest and juice for a sharper finish.
- Berry Lemon Cups: Layer a spoonful of berry compote under the pudding.
- Coconut Lemon Cups: Replace 1/2 cup of the milk with coconut milk.
Common Mistakes to Avoid with This Dish:
- Boiling hard: That can make the pudding grainy. Gentle bubbles are enough.
- Skipping the chill: Warm pudding tastes thin and slides around in the cup.
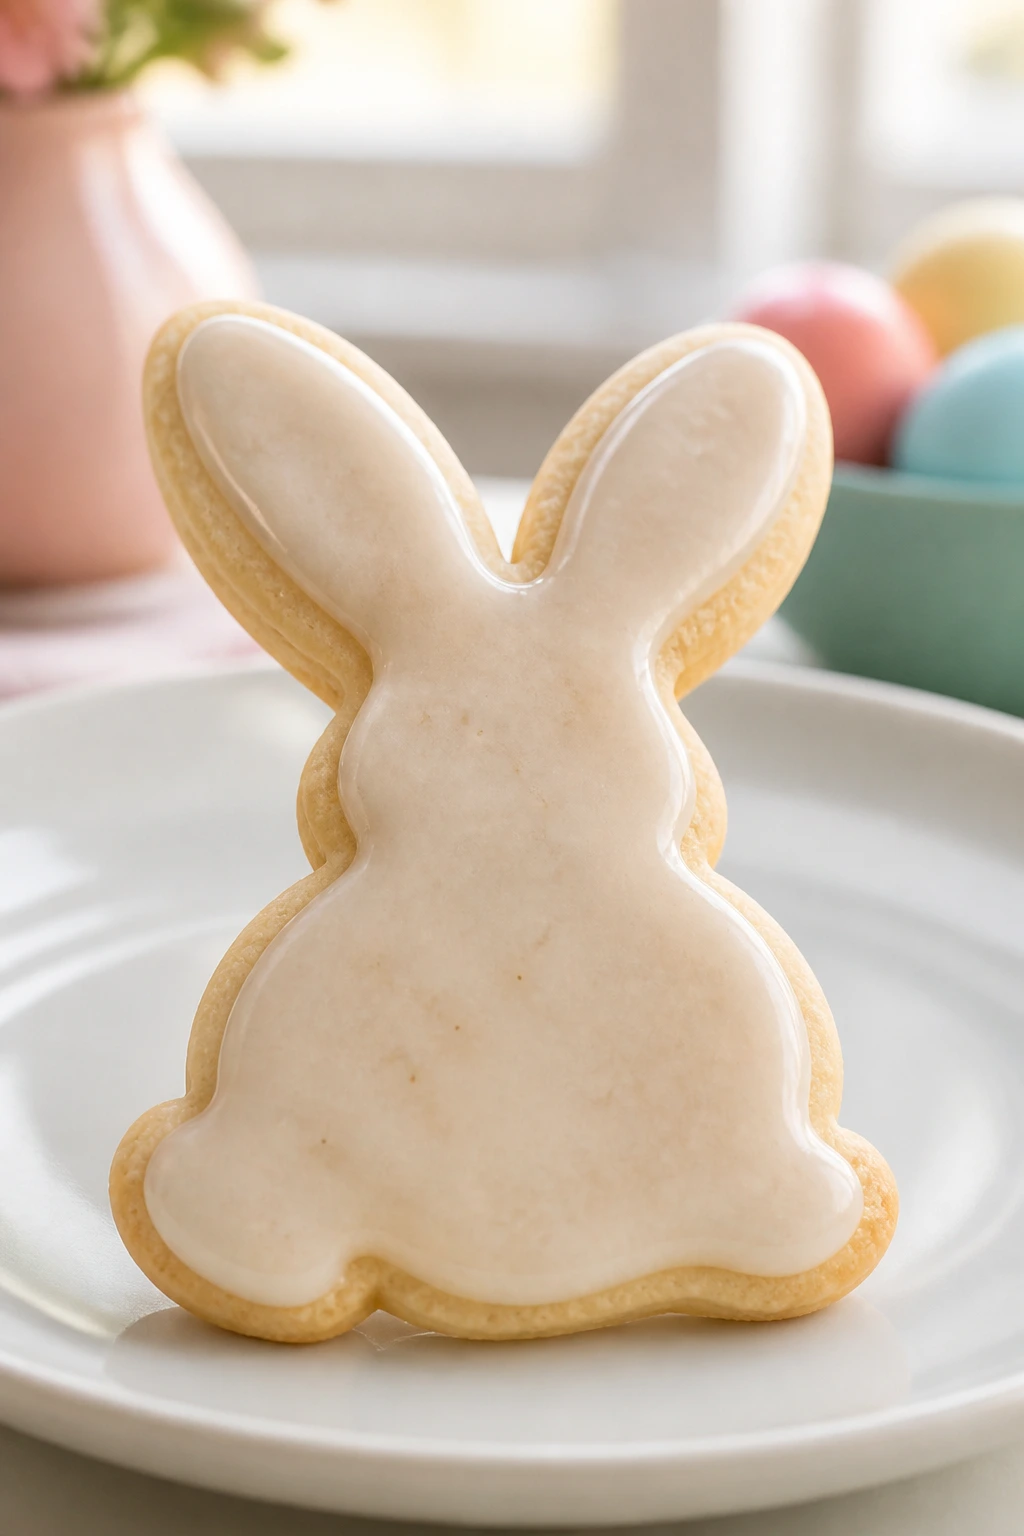
8. Bunny-Shaped Sugar Cookies
Intro:
Sugar cookies are the blank canvas of Easter baking, and I mean that in the most useful way. They’re sturdy enough to cut into shapes, plain enough to carry a soft vanilla glaze, and forgiving enough that a slightly uneven bunny still looks charming on a tray.
Why It Works:
A butter-rich dough rolls well after a short chill and bakes into cookies that hold their shape without turning dry. Because the decoration is simple—glaze, sprinkles, maybe a dot of colored sugar—you can let the shapes do the heavy lifting. That makes them a smart weeknight project if kids want to help.
Key Ingredients:
- 3 cups all-purpose flour
- 1 teaspoon baking powder
- 1/2 teaspoon fine salt
- 1 cup unsalted butter, softened
- 1 cup granulated sugar
- 1 large egg
- 1 tablespoon milk
- 2 teaspoons vanilla extract
- 1 1/2 cups powdered sugar, for glaze
- 2 to 3 tablespoons milk, for glaze
- Sprinkles or colored sugar
Quick Steps:
- Whisk the flour, baking powder, and salt together.
- Beat the butter and sugar until fluffy, then add the egg, milk, and vanilla.
- Mix in the dry ingredients, then chill the dough for 30 minutes.
- Roll to 1/4-inch thickness, cut bunny shapes, and bake at 350°F for 8 to 10 minutes.
- Cool completely, then glaze and decorate.
Equipment for This Recipe:
- Mixing bowls
- Rolling pin
- Bunny cookie cutters
- Baking sheets
- Parchment paper
How to Serve This Dish:
Stack them on a platter with a little space between each shape so the decorations stay visible. They also tuck nicely into paper treat bags if you’re handing out extras.
Pro Tips for This Recipe:
- Chill the cut cookies on the tray for 10 minutes before baking if the dough feels soft.
- Roll the dough between two sheets of parchment to keep the surface smooth.
- Decorate after cooling or the glaze will slide.
Variations on This Dish:
- Lemon Sugar Cookies: Add 1 tablespoon lemon zest to the dough.
- Almond Glaze Cookies: Swap half the vanilla in the glaze for almond extract.
- Plain Sprinkle Cookies: Skip the glaze and press colored sugar into the tops before baking.
Common Mistakes to Avoid with This Dish:
- Warm dough: Soft dough spreads and loses the bunny shape. Chill it.
- Overbaking: Pale edges are the goal. Brown cookies taste dry here.
9. Mini Pavlovas with Berries
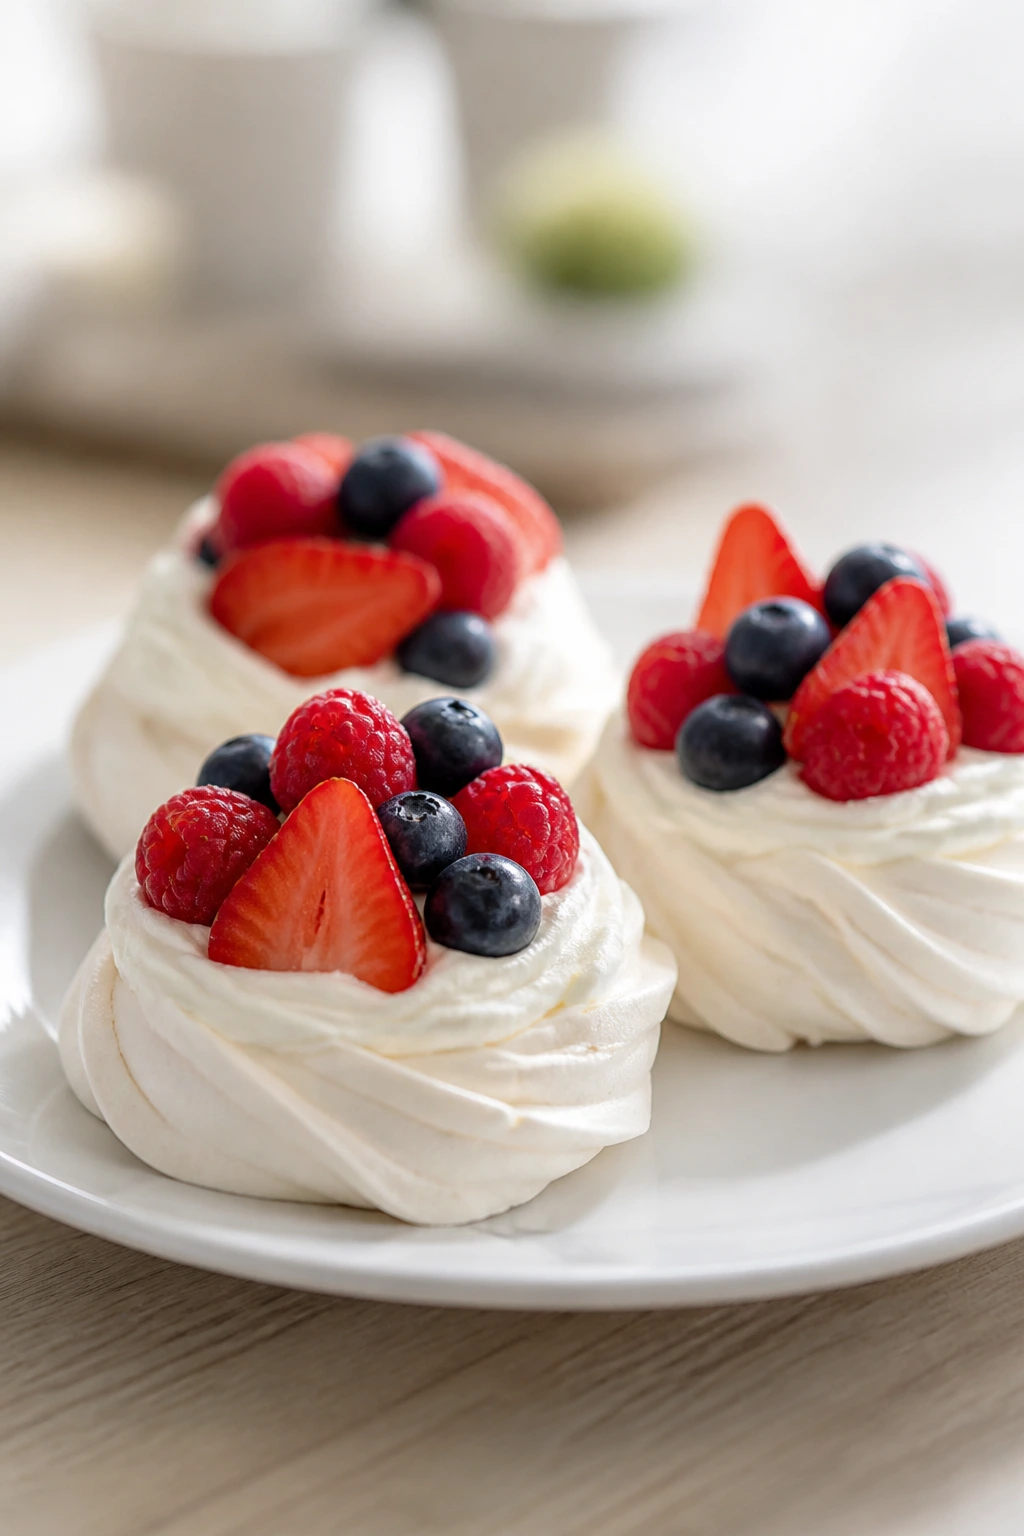
Intro:
Pavlovas sound fancier than they are. Really, they’re crisp meringue shells with marshmallow-soft centers, and once you top them with whipped cream and berries, they look like a dessert from a nicer bakery without asking for much more than patience.
Why It Works:
Sugar stabilizes the whipped egg whites, while cornstarch and vinegar help the shells keep that crisp exterior and soft middle. The low oven does the drying instead of aggressive baking, which is why the texture ends up so delicate. Once they cool, they hold cream and berries without collapsing.
Key Ingredients:
- 4 large egg whites
- 1 cup granulated sugar
- 1 teaspoon cornstarch
- 1 teaspoon white vinegar
- 1 teaspoon vanilla extract
- 1 cup heavy cream
- 2 tablespoons powdered sugar
- 2 cups mixed berries
Quick Steps:
- Beat the egg whites until foamy, then slowly add the sugar until stiff, glossy peaks form.
- Fold in the cornstarch, vinegar, and vanilla.
- Spoon small rounds onto a parchment-lined baking sheet and make a shallow dip in each center.
- Bake at 250°F for 70 to 80 minutes, then turn the oven off and let them cool inside.
- Top with whipped cream and berries just before serving.
Equipment for This Recipe:
- Stand mixer or hand mixer
- Baking sheet
- Parchment paper
- Mixing bowl
- Rubber spatula
How to Serve This Dish:
Set each pavlova on a small plate and spoon the berries on top so some spill over the edge. They look best when the cream and fruit sit loosely instead of being packed down.
Pro Tips for This Recipe:
- Make sure the bowl and beaters are grease-free or the whites won’t whip well.
- Don’t open the oven during baking; sudden air changes can crack the shells.
- Assemble right before serving or the meringue softens.
Variations on This Dish:
- Lemon Curd Pavlovas: Add a spoonful of lemon curd under the berries.
- Chocolate Pavlovas: Fold 1 tablespoon cocoa powder into the meringue with the cornstarch.
- Peach-Raspberry Version: Use sliced peaches and raspberries when you want softer fruit.
Common Mistakes to Avoid with This Dish:
- Humidity and soft shells: If the kitchen is very damp, bake them a few minutes longer and cool slowly.
- Assembling too early: Cream turns the crisp shell soft within hours.
10. White Chocolate Easter Bark
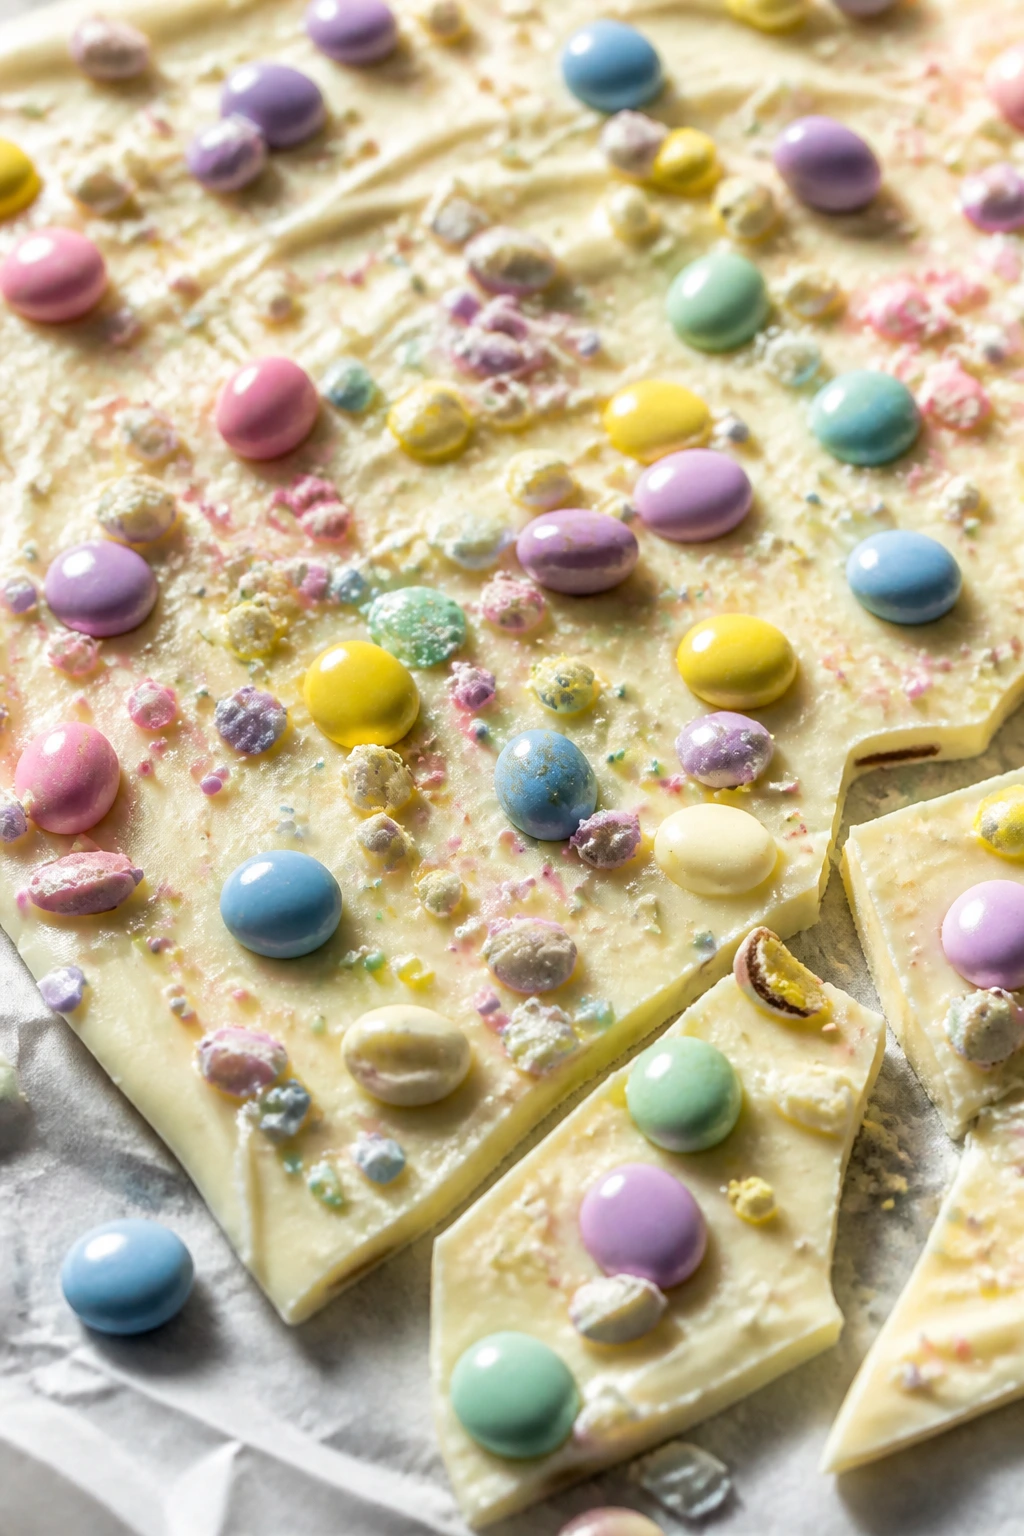
Intro:
Bark is the dessert version of a collage. Melted white chocolate gives you a smooth base, then the toppings do the decorating while the chocolate is still soft enough to catch them. It breaks into irregular pieces, which is part of the charm.
Why It Works:
White chocolate sets up fast and gives a pale backdrop that makes pastel candy pop. Because the recipe relies on spreading and sprinkling rather than mixing or shaping, it’s one of the fastest desserts in the whole batch. That also makes it useful when you need something edible for a tray with almost no prep.
Key Ingredients:
- 12 ounces white chocolate chips
- 1 teaspoon coconut oil
- 1 cup pastel candy-coated chocolates
- 1/2 cup mini pretzels, broken
- 1/4 cup shredded coconut
- 2 tablespoons rainbow sprinkles
- Pinch of fine salt
Quick Steps:
- Line a baking sheet with parchment.
- Melt the white chocolate with the coconut oil in short bursts, stirring often.
- Spread it into a thin layer on the sheet.
- Scatter the candies, pretzels, coconut, sprinkles, and salt over the top.
- Chill until firm, then break into pieces.
Equipment for This Recipe:
- Baking sheet
- Parchment paper
- Microwave-safe bowl
- Offset spatula or spoon
- Sharp knife, optional for chopping toppings
How to Serve This Dish:
Pile the bark pieces in a wide bowl or wrap them in small cellophane bags for easy sharing. A mix of big shards and small bits makes the tray look casual and lively.
Pro Tips for This Recipe:
- Keep every topping dry; one drop of water can make chocolate seize.
- If the chocolate starts to thicken, stop and rewarm it gently.
- Add the sprinkles last so they stay bright.
Variations on This Dish:
- Dark Chocolate Bark: Use semisweet chocolate and chopped almonds instead.
- Strawberry Bark: Swirl in a few tablespoons of melted strawberry candy coating.
- Nutty Bark: Add pistachios for green color and crunch.
Common Mistakes to Avoid with This Dish:
- Overheating chocolate: Hot chocolate turns dull and grainy. Melt it gently.
- Using too many toppings: If the layer is overloaded, the bark breaks in messy clumps.
11. Pastel Sprinkle Snack Cake
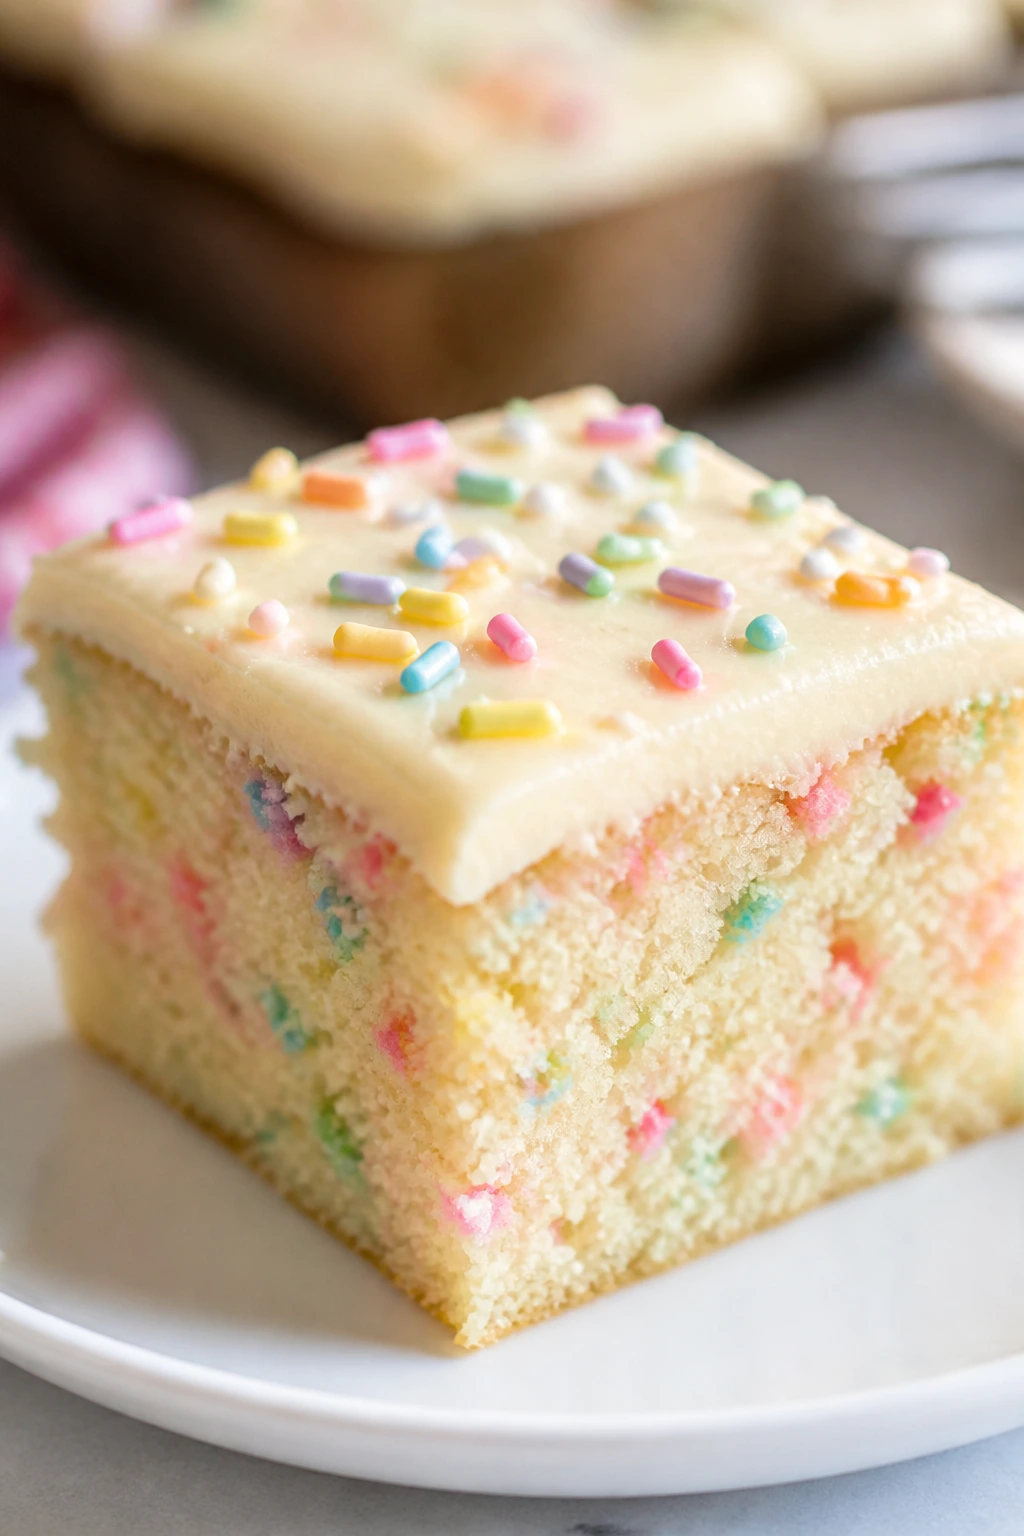
Intro:
A snack cake is the right size when you want cake without planning a parade around it. This one bakes into a soft, vanilla-forward square with sprinkles tucked through the batter and a simple icing that drips a little down the sides if you let it.
Why It Works:
The cake is tender because it uses both butter and sour cream, which gives richness without heaviness. Sprinkles stay bright when folded in at the end, and the small pan means the cake rises enough to feel celebratory without turning into a layer project. It’s the sort of thing you can make, cool, frost, and slice in one evening.
Key Ingredients:
- 1/2 cup unsalted butter, softened
- 1 cup granulated sugar
- 2 large eggs
- 2 teaspoons vanilla extract
- 1/2 cup sour cream
- 1/2 cup whole milk
- 1 1/2 cups all-purpose flour
- 1 1/2 teaspoons baking powder
- 1/2 teaspoon fine salt
- 1/3 cup pastel sprinkles
- 1 cup powdered sugar
- 1 to 2 tablespoons milk, for icing
Quick Steps:
- Heat the oven to 350°F and line an 8×8-inch pan with parchment.
- Beat the butter and sugar until fluffy, then add the eggs and vanilla.
- Stir in the sour cream and milk.
- Fold in the flour, baking powder, and salt, then gently fold in the sprinkles.
- Bake for 25 to 30 minutes, cool fully, then drizzle the icing over the top.
Equipment for This Recipe:
- 8×8-inch pan
- Parchment paper
- Mixing bowls
- Hand mixer
- Rubber spatula
How to Serve This Dish:
Cut it into squares and serve from the pan for a relaxed look. A few extra sprinkles on the serving plate keep it from feeling bare.
Pro Tips for This Recipe:
- Use jimmies, not hard sugar pearls; they bleed less in the batter.
- Let the cake cool fully or the icing sinks in too much.
- A pinch of salt in the icing keeps the sweetness in check.
Variations on This Dish:
- Lemon Sprinkle Cake: Add 1 tablespoon lemon zest to the batter and use lemon juice in the icing.
- Chocolate Sprinkle Cake: Replace 1/4 cup flour with cocoa powder.
- Sheet Pan Version: Bake the same batter in a 9×13 pan for a thinner cake and shorter bake time.
Common Mistakes to Avoid with This Dish:
- Overmixing after the flour goes in: That makes the cake tight. Fold only until combined.
- Using the wrong sprinkles: Non-jimmies can melt into streaks.
12. Hot Cross Bun Bread Pudding
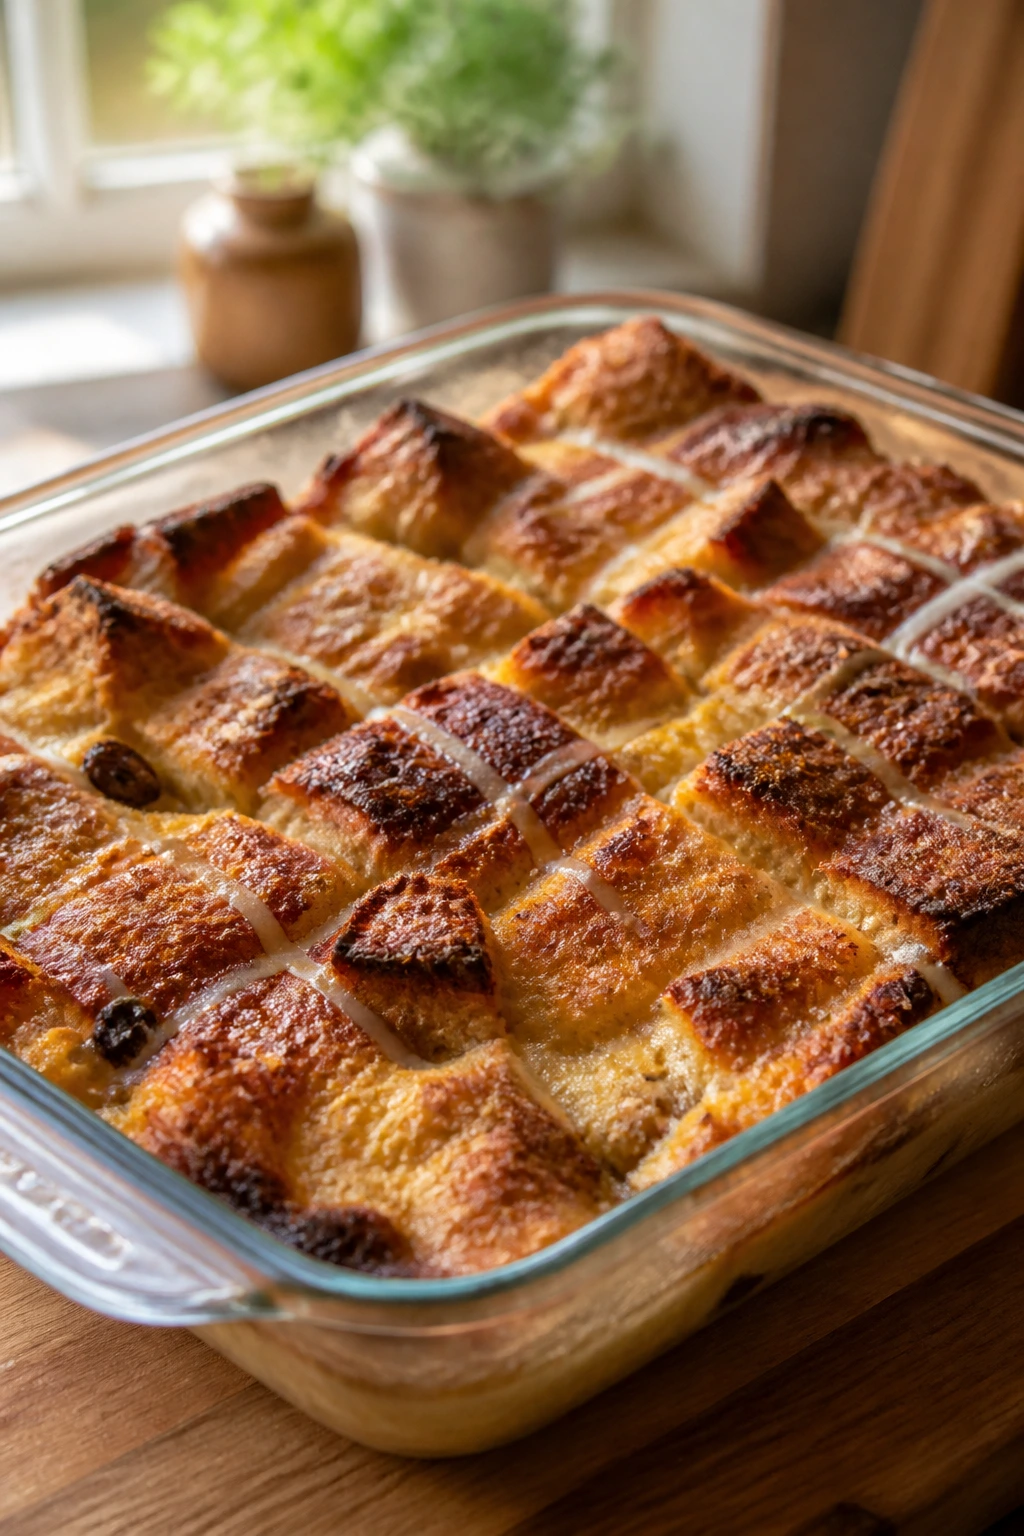
Intro:
This is the dessert that makes use of leftover hot cross buns without feeling like leftovers. The spice in the buns, the creamy custard, and the baked edges give you something that tastes close to French toast and bread pudding had a spring holiday child.
Why It Works:
Day-old buns soak up custard faster than fresh ones, which means the middle turns soft without becoming soggy. The raisins or currants already in the buns carry their own sweetness, so the custard can stay simple. A little orange zest makes the whole pan smell bright while it bakes.
Key Ingredients:
- 6 hot cross buns, sliced into chunks
- 2 cups whole milk
- 1 cup heavy cream
- 3 large eggs
- 1/2 cup granulated sugar
- 1 teaspoon vanilla extract
- 1 teaspoon ground cinnamon
- 1 tablespoon orange zest
- 2 tablespoons melted butter
Quick Steps:
- Grease an 8×8-inch baking dish and heat the oven to 350°F.
- Whisk the milk, cream, eggs, sugar, vanilla, cinnamon, and orange zest together.
- Tuck the bun pieces into the dish and pour the custard over them.
- Press the buns down lightly and let them soak for 10 minutes.
- Drizzle with melted butter and bake for 30 to 35 minutes, until the center is set and the top is browned.
Equipment for This Recipe:
- 8×8-inch baking dish
- Mixing bowl
- Whisk
- Measuring cups and spoons
- Sharp knife
How to Serve This Dish:
Serve warm in squares or scoops with a spoon of whipped cream. A little orange zest on top makes the spice flavor pop more.
Pro Tips for This Recipe:
- Use buns that are a day or two old so they hold their shape better.
- Press the bread down just enough to absorb custard, not so much that it turns pasty.
- Cover loosely with foil if the top browns early.
Variations on This Dish:
- Apple Bun Pudding: Add a diced apple to the dish before baking.
- Chocolate Chip Version: Stir 1/3 cup chocolate chips between the layers.
- Brioche Swap: Use thick brioche slices if hot cross buns aren’t handy.
Common Mistakes to Avoid with This Dish:
- Too much custard: The dish can turn soupy. The bread should look soaked, not drowned.
- Baking until dry: A slight wobble in the center is fine; it firms as it cools.
13. Raspberry Almond Hand Pies
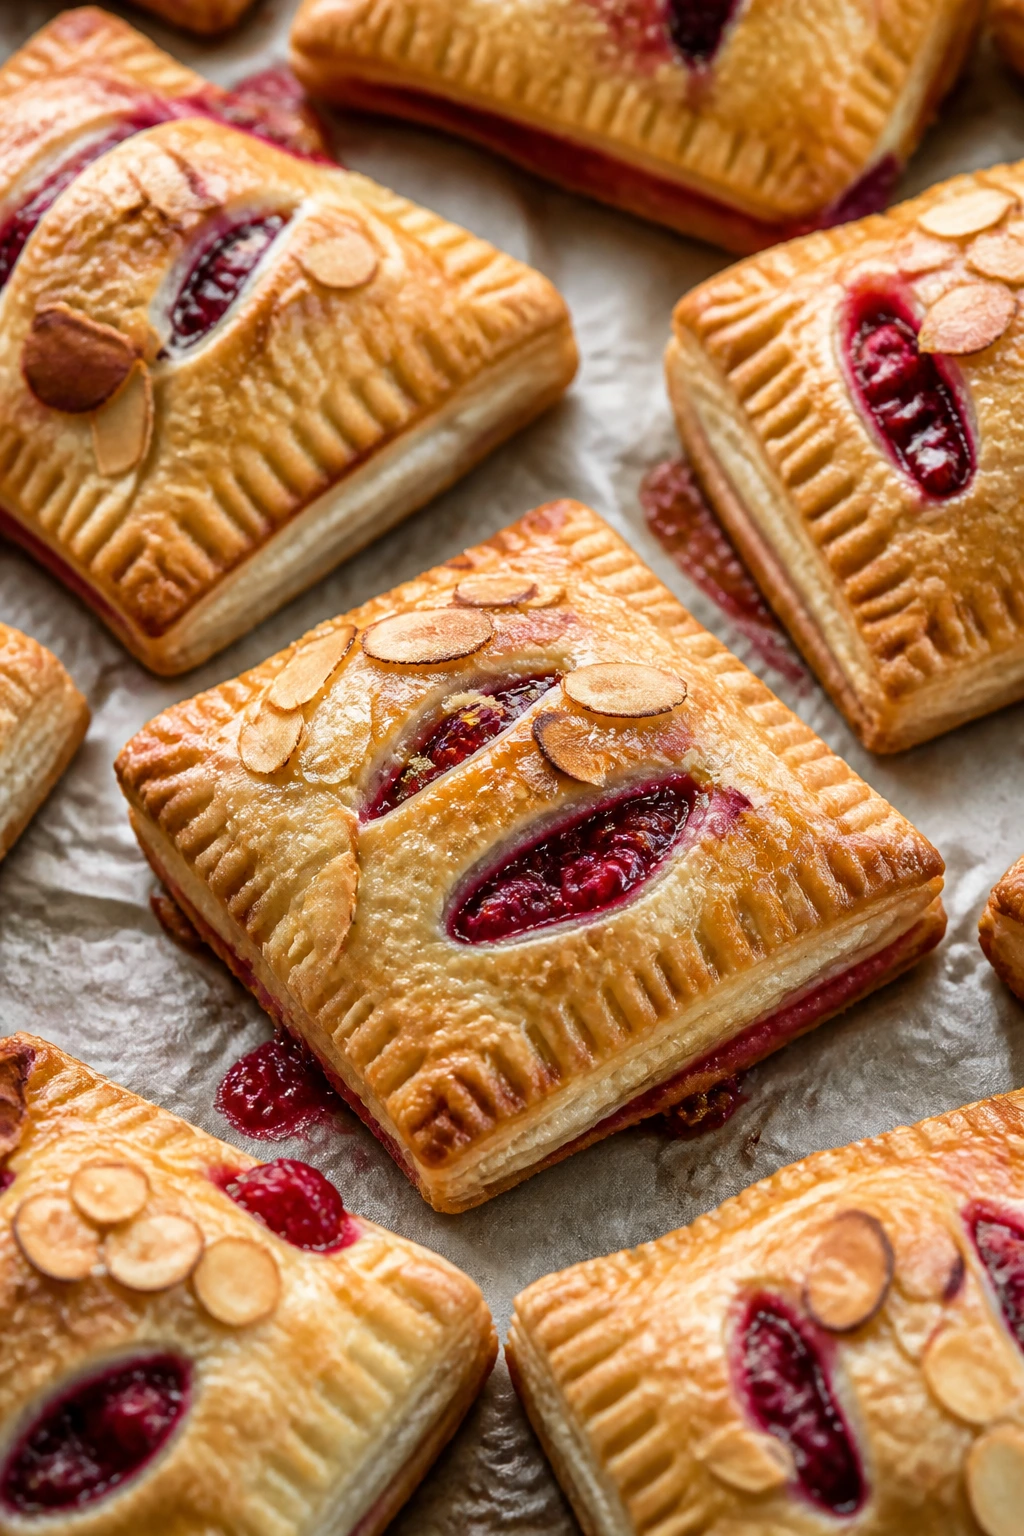
Intro:
Hand pies give you all the pleasure of a fruit pie with none of the whole-pan commitment. Puff pastry makes the crust flaky fast, and the raspberry-almond filling tastes like something from a pastry case even when you assemble it on a weekday.
Why It Works:
Puff pastry bakes quickly, which keeps the fruit filling from leaking everywhere. Raspberry jam thickens the chopped berries, while almond extract gives the filling a bakery note that makes the pies taste a little more grown-up. The sealed edges keep each pie tidy enough to pick up by hand.
Key Ingredients:
- 1 sheet frozen puff pastry, thawed
- 1 cup raspberry jam
- 1/2 cup fresh raspberries, chopped
- 1/2 teaspoon almond extract
- 1 tablespoon cornstarch
- 1 egg, beaten with 1 tablespoon water
- 2 tablespoons coarse sugar
- 1/2 cup powdered sugar, for glaze
Quick Steps:
- Heat the oven to 400°F and line a baking sheet with parchment.
- Stir the jam, raspberries, almond extract, and cornstarch together.
- Cut the puff pastry into squares, add a spoonful of filling, and fold into triangles or rectangles.
- Crimp the edges with a fork, brush with egg wash, and sprinkle with coarse sugar.
- Bake for 16 to 20 minutes, until puffed and golden.
- Drizzle with powdered sugar glaze after cooling.
Equipment for This Recipe:
- Baking sheet
- Parchment paper
- Sharp knife or pizza cutter
- Fork
- Pastry brush
How to Serve This Dish:
Serve the pies warm enough that the fruit smells fragrant, but not so warm that the glaze runs off. A small scoop of vanilla ice cream works well if you want to lean toward dessert rather than snack.
Pro Tips for This Recipe:
- Keep the puff pastry cold until the last minute.
- Don’t overfill the pies or the seams burst open.
- Cut a tiny steam slit if you make larger hand pies.
Variations on This Dish:
- Cherry Almond Pies: Use cherry preserves and chopped cherries.
- Lemon Berry Pies: Add 1 teaspoon lemon zest to the filling.
- Apricot Version: Swap in apricot jam and sliced apricots for a brighter color.
Common Mistakes to Avoid with This Dish:
- Warm pastry before baking: Soft pastry won’t puff. Chill assembled pies if needed.
- Too much glaze too soon: Glaze on hot pies melts into a sticky mess.
14. Marshmallow Rice Cereal Nests

Intro:
Rice cereal nests are one of those desserts that feel almost unfairly easy. You melt, stir, shape, and top, and suddenly you’ve got something that looks like a little bird’s nest with candy eggs tucked in the center.
Why It Works:
Marshmallows glue the cereal together while keeping the texture light. Shaping the mixture into muffin tin cups gives you consistent little bowls for the candy eggs, which is cleaner than free-form mounds if you’re serving a crowd. They’re also fast to set, which is handy when time is short.
Key Ingredients:
- 4 tablespoons unsalted butter
- 10 ounces mini marshmallows
- 1 teaspoon vanilla extract
- 1/4 teaspoon fine salt
- 5 cups crisp rice cereal
- 1 cup mini candy eggs
Quick Steps:
- Grease a 12-cup muffin tin lightly.
- Melt the butter in a large pot, then stir in the marshmallows until smooth.
- Add the vanilla and salt, then fold in the cereal.
- Spoon the mixture into the muffin cups and press a dip into the center with a greased spoon.
- Let them set for 20 minutes, pop them out, and fill the centers with candy eggs.
Equipment for This Recipe:
- Large pot
- Muffin tin
- Wooden spoon or spatula
- Measuring cups
- Small spoon for shaping
How to Serve This Dish:
Set the nests on a platter lined with parchment or grass-colored paper. They work well as individual desserts because no cutting is needed.
Pro Tips for This Recipe:
- Grease your hands or spoon so the mixture doesn’t stick.
- Press lightly; packing them too hard turns them dense.
- Add the eggs after they cool so the shells stay shiny.
Variations on This Dish:
- Brown Butter Nests: Brown the butter before adding marshmallows for a nutty note.
- Peanut Butter Nests: Stir 1/3 cup peanut butter into the melted marshmallow mixture.
- Chocolate Nests: Add 2 tablespoons cocoa powder to the melted marshmallow base.
Common Mistakes to Avoid with This Dish:
- Waiting too long to shape them: The mixture firms up fast. Work while it’s warm.
- Pressing too hard into the tin: Dense nests are harder to bite. Keep them light.
15. Lemon Ricotta Cookies
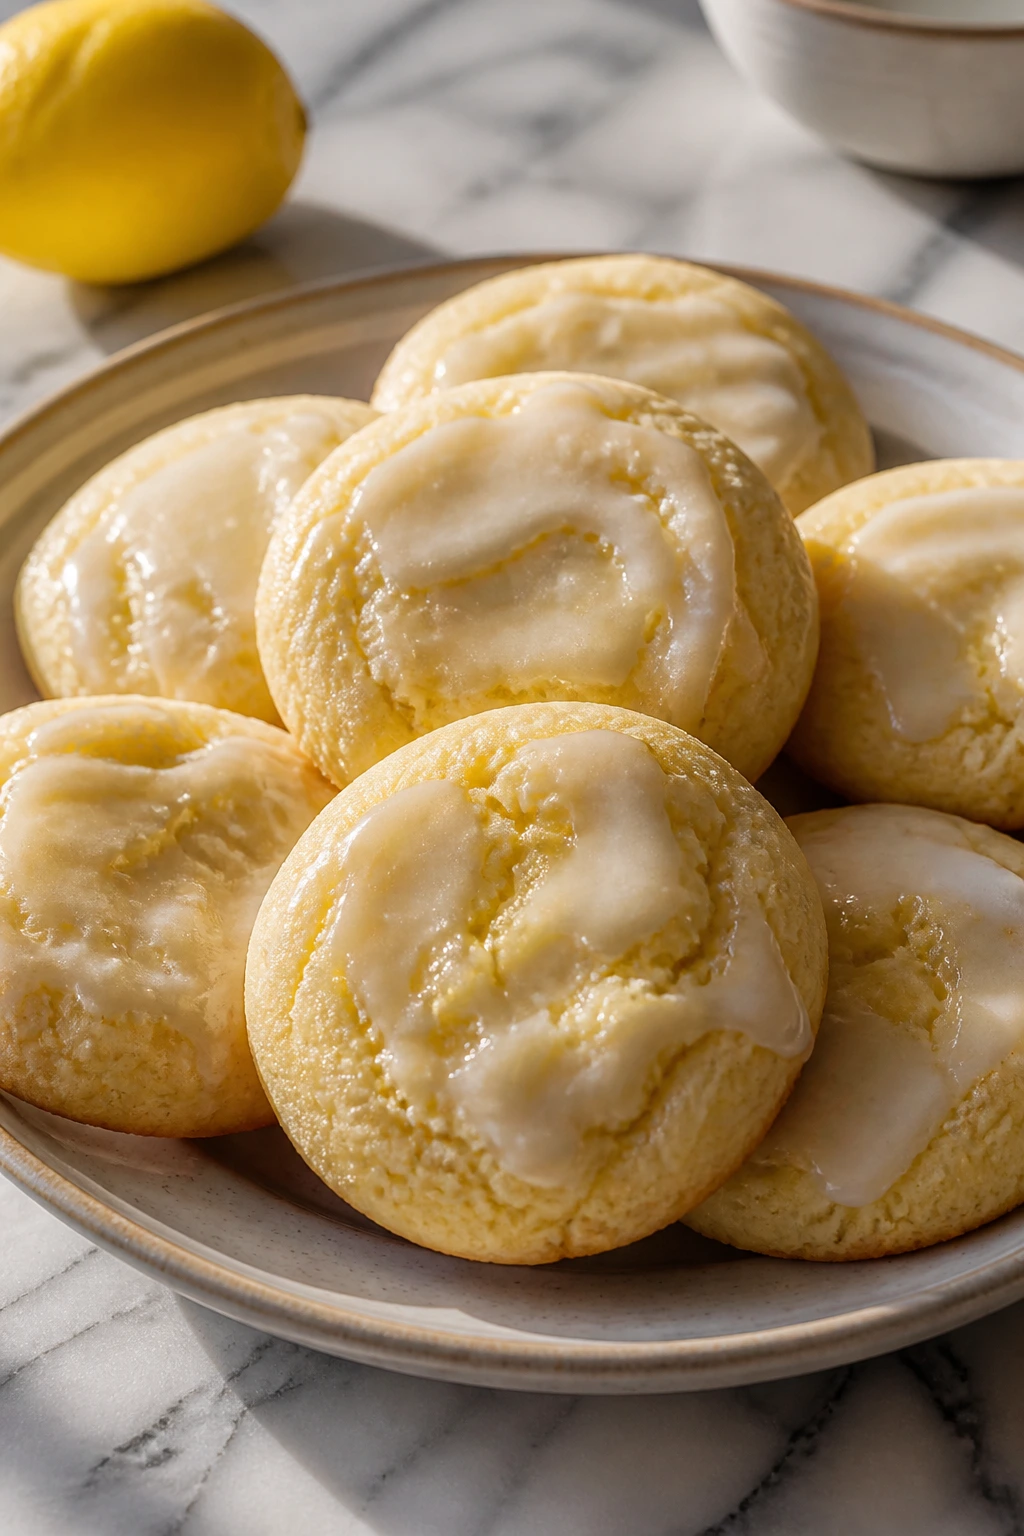
Intro:
These cookies are soft in the middle, almost cake-like, with a lemon glaze that sets into a thin shell on top. Ricotta keeps them tender in a way butter-only cookies can’t quite match, and the lemon flavor comes through clean rather than candy-sweet.
Why It Works:
Ricotta adds moisture without making the dough loose. That means the cookies bake up puffed and soft, then settle into a texture that stays pleasant for days. The glaze is thin on purpose; it lets the lemon flavor hit first instead of burying the cookie under icing.
Key Ingredients:
- 1 cup unsalted butter, softened
- 1 3/4 cups granulated sugar
- 2 large eggs
- 15 ounces ricotta cheese, drained if watery
- 2 tablespoons lemon zest
- 3 1/4 cups all-purpose flour
- 2 teaspoons baking powder
- 1/2 teaspoon fine salt
- 1 1/2 cups powdered sugar
- 2 tablespoons lemon juice
- 1 tablespoon milk
Quick Steps:
- Heat the oven to 350°F and line two baking sheets with parchment.
- Beat the butter and sugar until fluffy, then add the eggs, ricotta, and lemon zest.
- Fold in the flour, baking powder, and salt.
- Scoop the dough onto the sheets and bake for 12 to 14 minutes, until the bottoms are lightly golden.
- Cool the cookies, then whisk the glaze ingredients and spoon or drizzle it over the tops.
Equipment for This Recipe:
- Mixing bowls
- Hand mixer
- Baking sheets
- Parchment paper
- Cookie scoop, optional
How to Serve This Dish:
Serve them glazed side up on a simple plate so the lemon scent hits before the first bite. They’re soft enough to stack lightly, but I’d keep the stacks small so the glaze stays neat.
Pro Tips for This Recipe:
- Drain the ricotta if it looks wet or the dough gets slack.
- Don’t overbake; these should stay pale.
- Add the glaze only after the cookies cool or it slides off.
Variations on This Dish:
- Orange Ricotta Cookies: Swap lemon zest and juice for orange.
- Almond Ricotta Cookies: Add 1/2 teaspoon almond extract to the dough.
- Poppy Seed Version: Stir in 1 tablespoon poppy seeds for texture.
Common Mistakes to Avoid with This Dish:
- Skipping the ricotta drain: Too much moisture makes the cookies spread.
- Glazing warm cookies: The glaze thins into a puddle.
16. Mini Carrot Cake Loaves
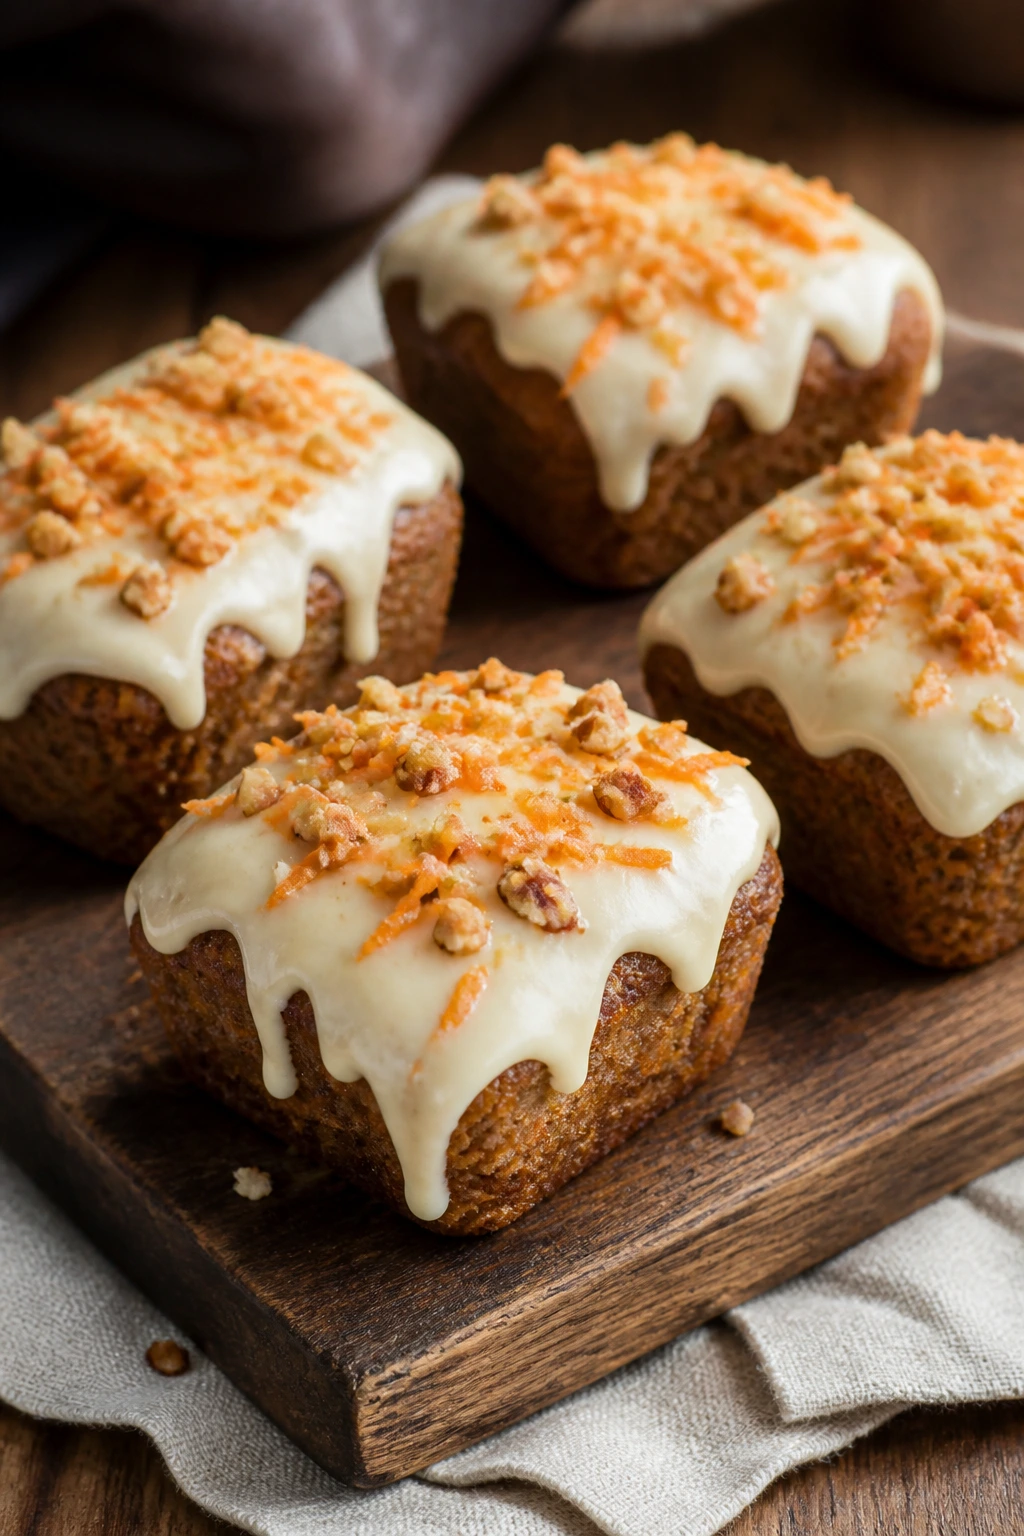
Intro:
Mini loaf pans are the sweet spot for carrot cake when you do not want to build a full layer cake. The little loaves bake faster, slice neatly, and give you the same spice-and-cream-cheese payoff with a lot less fuss.
Why It Works:
Oil keeps carrot cake moist, and the grated carrot does the rest. Baking in mini pans means the center cooks through at the same pace as the edges, so you avoid that thick, underdone middle that can happen in a big loaf. A thin cream cheese glaze gives the tops a finished look without turning them into a project.
Key Ingredients:
- 1 1/2 cups all-purpose flour
- 1 teaspoon baking soda
- 1/2 teaspoon baking powder
- 1 teaspoon ground cinnamon
- 1/2 teaspoon ground ginger
- 1/2 teaspoon fine salt
- 1/2 cup neutral oil
- 3/4 cup packed brown sugar
- 2 large eggs
- 1 1/2 cups finely grated carrots
- 1/2 cup applesauce
- 1/2 cup chopped pecans, optional
- 4 ounces cream cheese, softened
- 3/4 cup powdered sugar
- 1 to 2 tablespoons milk
Quick Steps:
- Heat the oven to 350°F and grease 4 mini loaf pans.
- Whisk the dry ingredients together in one bowl.
- In another bowl, whisk the oil, brown sugar, eggs, carrots, and applesauce.
- Fold the dry mixture into the wet mixture, then add pecans if using.
- Divide between the pans and bake for 22 to 28 minutes, until a toothpick comes out clean.
- Cool, then drizzle with cream cheese glaze.
Equipment for This Recipe:
- Mini loaf pans
- Mixing bowls
- Box grater
- Whisk
- Cooling rack
How to Serve This Dish:
Slice the loaves once they’re fully cool and serve one or two slices per person. They look good on a tray with a few carrot ribbons or toasted nuts scattered around.
Pro Tips for This Recipe:
- Grate the carrots finely so they melt into the crumb.
- Don’t overfill the mini pans; leave room for rise.
- If you want a deeper spice note, add a pinch of cloves.
Variations on This Dish:
- Pineapple Carrot Loaves: Fold in 1/3 cup crushed pineapple, well drained.
- Walnut-Free Version: Skip the nuts and add 1/4 cup raisins.
- Maple Glazed Loaves: Use maple syrup in the glaze instead of milk for a softer sweetness.
Common Mistakes to Avoid with This Dish:
- Leaving carrot shreds too large: They don’t blend into the cake well.
- Glazing too early: Warm loaves make the topping slide off.
17. Chocolate-Dipped Pretzel Rods
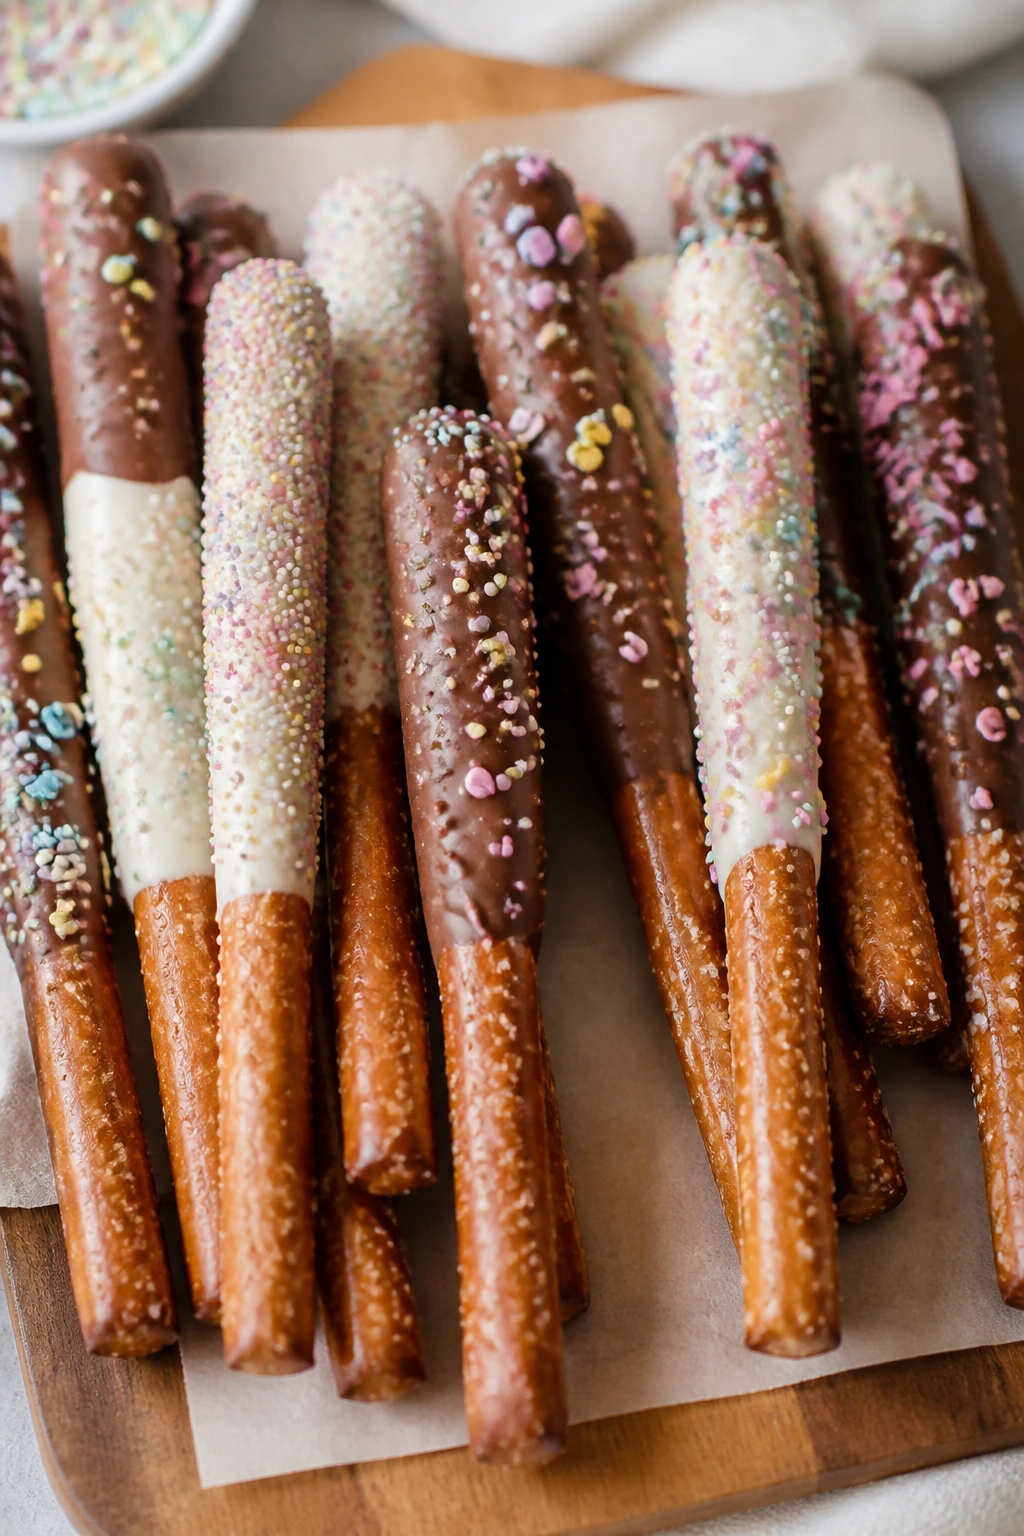
Intro:
These are the kind of treat you make when you want a little crunch, a little salt, and a lot of color on a platter. Pretzel rods hold up beautifully under chocolate, and once they’re dressed with sprinkles or chopped candy, they look like candy-shop decorations.
Why It Works:
Pretzel rods give you a built-in handle, which makes dipping easier and keeps the final look tidy. The salty base cuts the sweetness of the chocolate and candy coating, so the result doesn’t feel heavy. Because they dry upright, you can make a batch fast and leave them alone.
Key Ingredients:
- 12 pretzel rods
- 8 ounces white chocolate chips
- 8 ounces milk chocolate chips
- 1 teaspoon coconut oil, divided
- 1/2 cup pastel sprinkles
- 1/2 cup chopped mini candy eggs or chopped nuts
Quick Steps:
- Line a baking sheet with parchment or wax paper.
- Melt each chocolate with a little coconut oil in separate bowls.
- Dip each pretzel rod halfway into the chocolate and let excess drip off.
- Roll or sprinkle with toppings while the coating is still soft.
- Lay on the sheet and chill for 10 to 15 minutes.
Equipment for This Recipe:
- Baking sheet
- Parchment or wax paper
- Two microwave-safe bowls
- Tall glass, optional for deeper dipping
- Spoon for drizzling
How to Serve This Dish:
Stand the rods in a tall jar or lay them across a platter in a loose fan. They make an easy add-on for a dessert board because nobody needs a fork.
Pro Tips for This Recipe:
- Dry the pretzels before dipping or the chocolate may slip.
- Use tall, narrow bowls if you want a cleaner coating.
- If the chocolate gets too thick, warm it again in very short bursts.
Variations on This Dish:
- White-and-Dark Stripe Rods: Dip in one chocolate, then drizzle with the other.
- Coconut Pretzel Rods: Roll the wet chocolate in toasted coconut.
- Cookie Crumble Rods: Press crushed sandwich cookies onto the coating before it sets.
Common Mistakes to Avoid with This Dish:
- Chocolate too hot: It can slide right off the pretzels. Let it cool slightly after melting.
- Overloading toppings: Thick coatings crack as they dry.
18. No-Bake Banana Cream Pie Jars
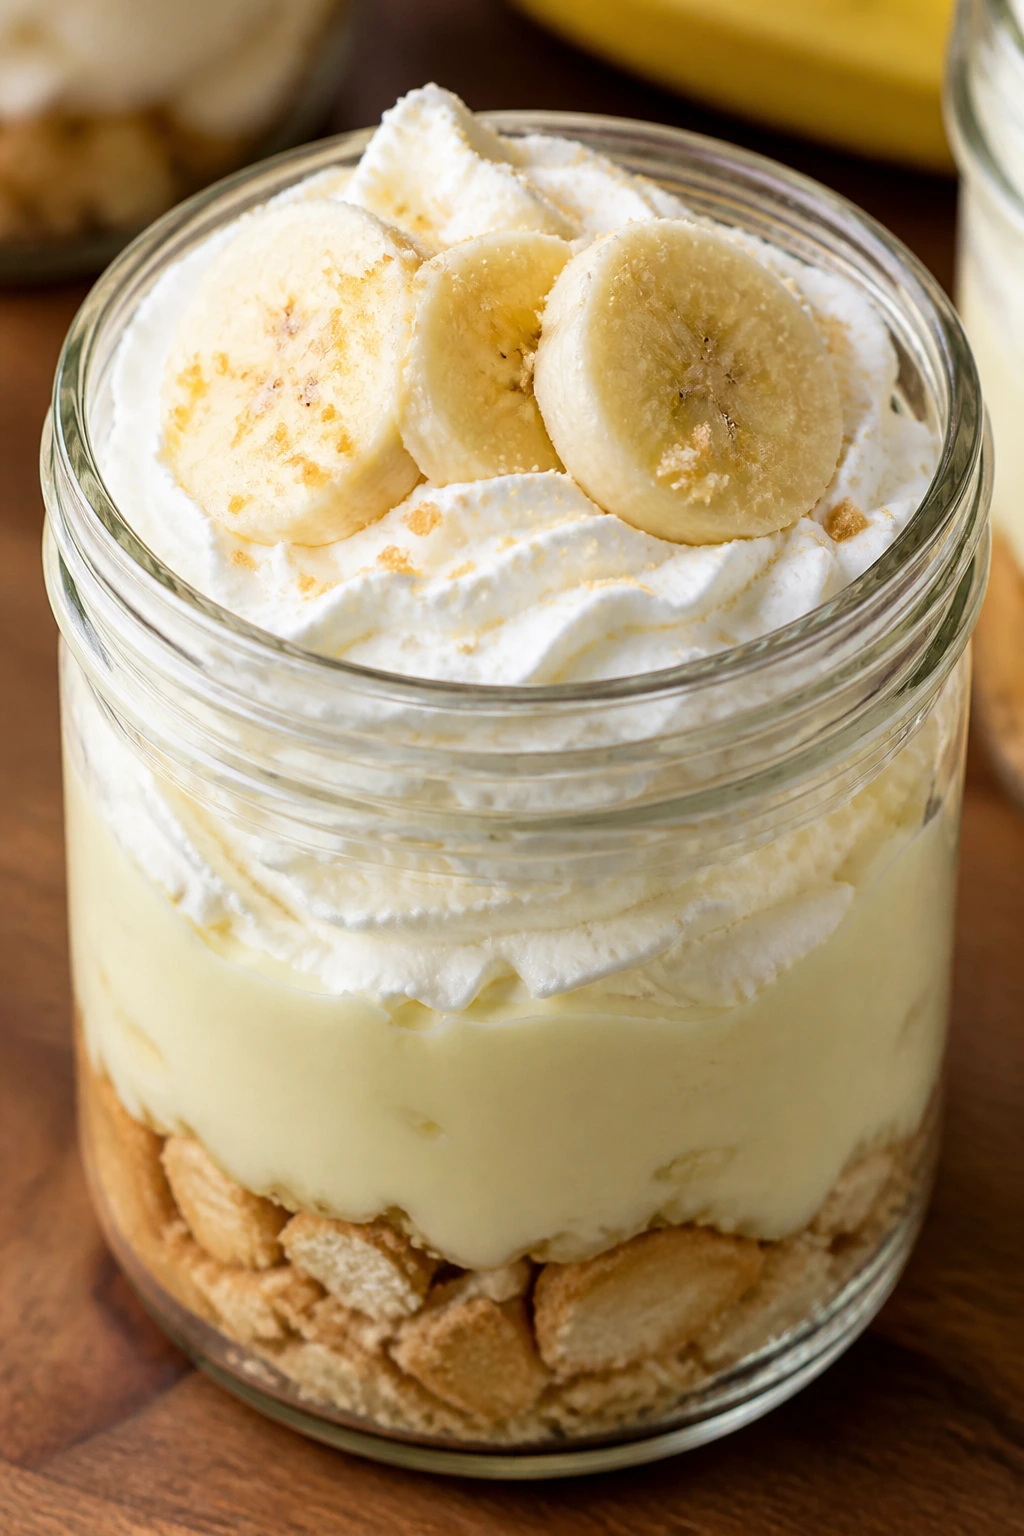
Intro:
Banana cream pie in a jar is what happens when you want pie flavor without committing to a crust that needs crimping. The crushed vanilla wafers bring the crunch, the pudding brings the soft banana cream flavor, and the jars make the layers look intentional even if you assembled them in ten minutes.
Why It Works:
Instant pudding gives you a thick base fast, and bananas add enough freshness that the dessert does not feel canned. Because the portions are sealed into jars, they chill evenly and transport better than a full pie. You also get built-in serving control, which is handy after a big meal.
Key Ingredients:
- 1 1/2 cups crushed vanilla wafers
- 6 tablespoons unsalted butter, melted
- 1 package instant vanilla pudding mix, 3.4 ounces
- 2 cups cold whole milk
- 2 ripe bananas, sliced
- 1 cup whipped cream
- 1 teaspoon vanilla extract
- 1 tablespoon lemon juice
Quick Steps:
- Mix the crushed wafers and melted butter, then spoon into jars.
- Whisk the pudding mix and milk for 2 minutes until thick.
- Fold in the vanilla and a little whipped cream for a softer texture.
- Layer pudding, banana slices tossed with lemon juice, and more crumbs in the jars.
- Chill for at least 30 minutes, then top with whipped cream before serving.
Equipment for This Recipe:
- Small jars or cups
- Mixing bowl
- Whisk
- Spoon
- Measuring cups
How to Serve This Dish:
Serve them cold with a little extra crumb sprinkled on top. A single banana slice pressed into the whipped cream makes each jar look finished without extra work.
Pro Tips for This Recipe:
- Toss the banana slices with lemon juice so they don’t brown too fast.
- Keep the top layer of crumbs for serving or they lose crunch in the fridge.
- Make the pudding a little thicker than usual so the jars hold their shape.
Variations on This Dish:
- Chocolate Banana Jars: Use chocolate pudding instead of vanilla.
- Peanut Butter Banana Jars: Add a spoonful of peanut butter to each jar.
- Coconut Banana Jars: Swap some of the crumbs for toasted coconut.
Common Mistakes to Avoid with This Dish:
- Using very ripe bananas: They turn mushy and overpower the pudding. Use ripe, but still firm, slices.
- Assembling too far ahead: Bananas soften fast once layered.
19. Orange Creamsicle Mousse Cups
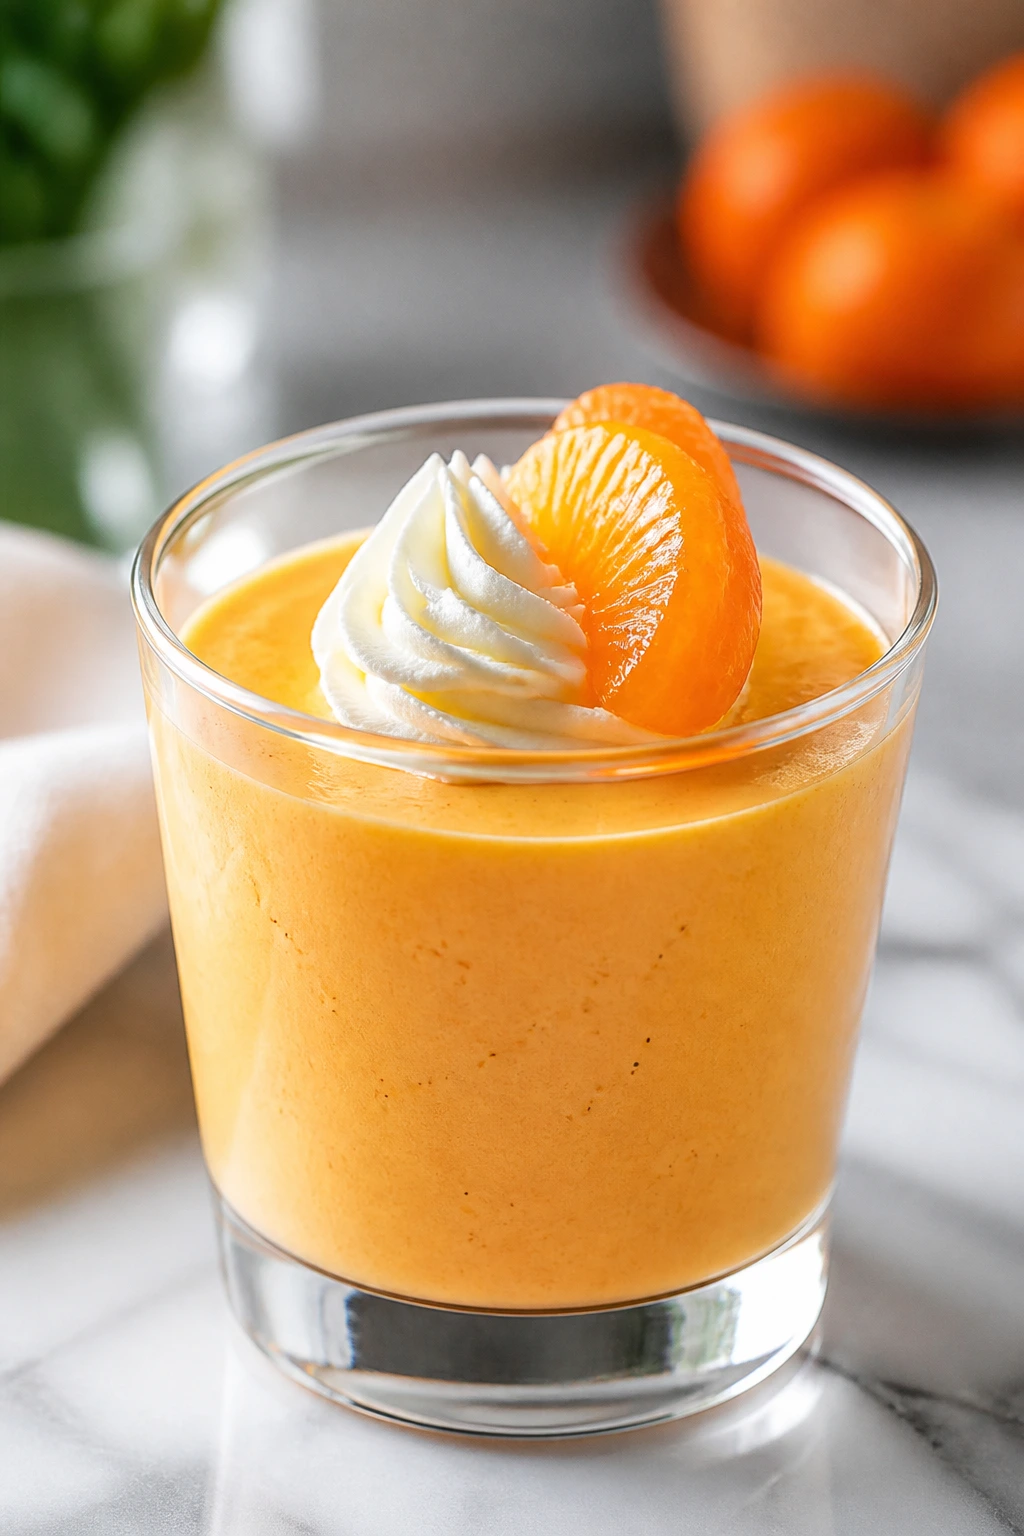
Intro:
Orange creamsicle flavor has a very specific trick: it tastes nostalgic and fresh at the same time. In mousse form, it turns into a cool, lightly tangy cup with enough orange perfume to feel springlike without becoming too sweet.
Why It Works:
Cream cheese gives the mousse body, powdered sugar smooths it out, and whipped cream keeps the texture light. Orange zest matters more than orange juice here; zest gives flavor without thinning the mixture. The cups chill fast and hold their shape, which makes them good for a dinner-dessert gap.
Key Ingredients:
- 8 ounces cream cheese, softened
- 1/2 cup powdered sugar
- 1 tablespoon orange zest
- 1/4 cup fresh orange juice
- 1 teaspoon vanilla extract
- 1 1/2 cups cold whipped cream
- 1 cup mandarin orange segments
- 1/2 cup crushed vanilla wafers or shortbread
Quick Steps:
- Beat the cream cheese, powdered sugar, orange zest, orange juice, and vanilla until smooth.
- Fold in the whipped cream in two additions.
- Spoon a layer of crumbs into each cup.
- Add the mousse, then chill for at least 1 hour.
- Top with mandarin segments right before serving.
Equipment for This Recipe:
- Mixing bowl
- Hand mixer
- Small cups or jars
- Rubber spatula
- Zester
How to Serve This Dish:
Serve in clear cups so the pale orange mousse and bright fruit show together. A little extra zest on top adds color and scent.
Pro Tips for This Recipe:
- Don’t add too much juice or the mousse loosens.
- Fold the whipped cream gently to keep it airy.
- Use chilled cups if you want the dessert to set faster.
Variations on This Dish:
- Lemon Creamsicle Cups: Replace the orange with lemon zest and juice.
- Berry Creamsicle Cups: Add a spoonful of berry sauce under the mousse.
- Dairy-Free Cups: Use dairy-free cream cheese and coconut whipped cream.
Common Mistakes to Avoid with This Dish:
- Making the filling too loose: Extra juice can turn mousse into a soft cream.
- Adding the fruit too early: Mandarin segments weep in the fridge if layered in too soon.
20. Brown Butter Rice Krispie Squares with Mini Eggs
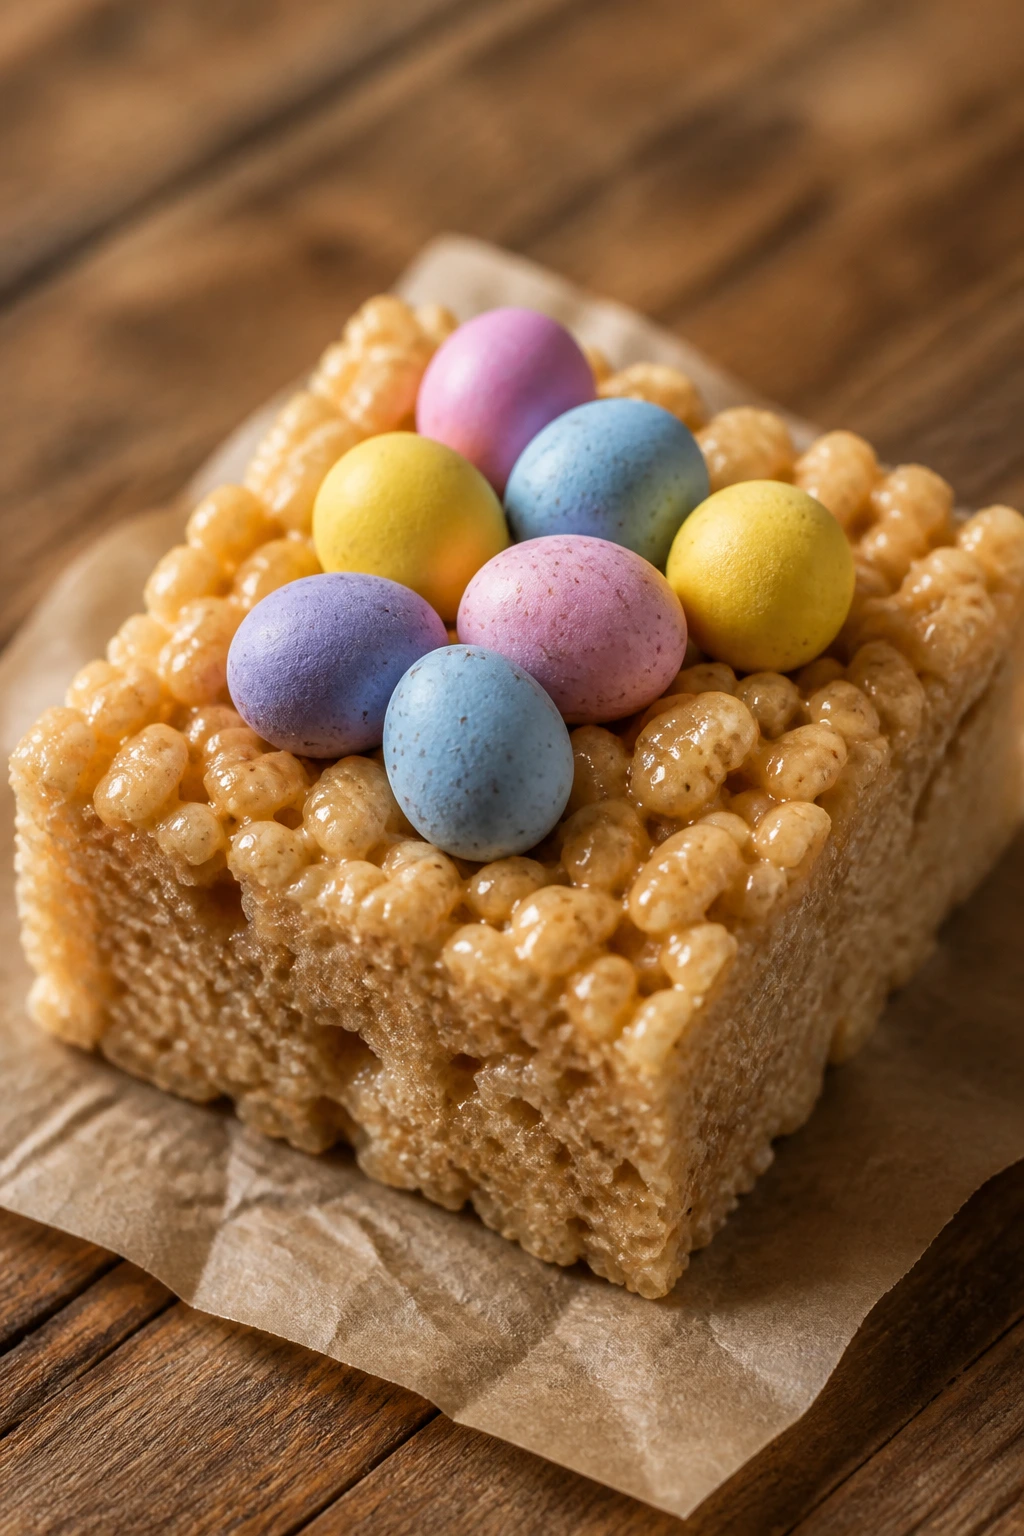
Intro:
Brown butter gives cereal treats a toasty depth that plain melted butter never manages. Add candy eggs on top and you get a dessert that feels a little more grown-up than the lunchbox version, but it still takes almost no time.
Why It Works:
Browning the butter adds a nutty note that wakes up the marshmallow. The cereal stays crisp because the mixture is pressed into the pan while still warm, and the mini eggs on top add crunch and color without needing extra baking. It’s an easy win when you need a tray dessert with almost no wait.
Key Ingredients:
- 6 tablespoons unsalted butter
- 10 ounces mini marshmallows
- 1 teaspoon vanilla extract
- 1/4 teaspoon fine salt
- 6 cups crisp rice cereal
- 1 1/2 cups mini chocolate eggs
Quick Steps:
- Grease a 9×9-inch pan and line it with parchment.
- Cook the butter over medium heat until golden and nutty-smelling.
- Stir in the marshmallows, then add the vanilla and salt.
- Fold in the cereal, press into the pan, and scatter mini eggs over the top.
- Let it cool, then slice into squares.
Equipment for This Recipe:
- Medium saucepan
- 9×9-inch pan
- Parchment paper
- Wooden spoon
- Spatula
How to Serve This Dish:
Cut into small squares because they’re richer than they look. A shallow tray keeps the eggs on top from rolling off.
Pro Tips for This Recipe:
- Brown the butter until you smell toasted nuts, not burned milk solids.
- Press the mixture lightly; packed treats turn hard.
- Add the eggs while the top is still warm so they stick.
Variations on This Dish:
- Peanut Butter Squares: Stir in 1/3 cup peanut butter with the marshmallows.
- Chocolate Drizzle Squares: Finish with a thin drizzle of melted chocolate.
- Salted Caramel Version: Sprinkle a tiny pinch of flaky salt over the top.
Common Mistakes to Avoid with This Dish:
- Burning the butter: It goes from nutty to bitter fast. Watch it closely.
- Packing too hard: Dense squares lose the crisp-chewy contrast.
21. Vanilla Bean Panna Cotta with Berry Sauce
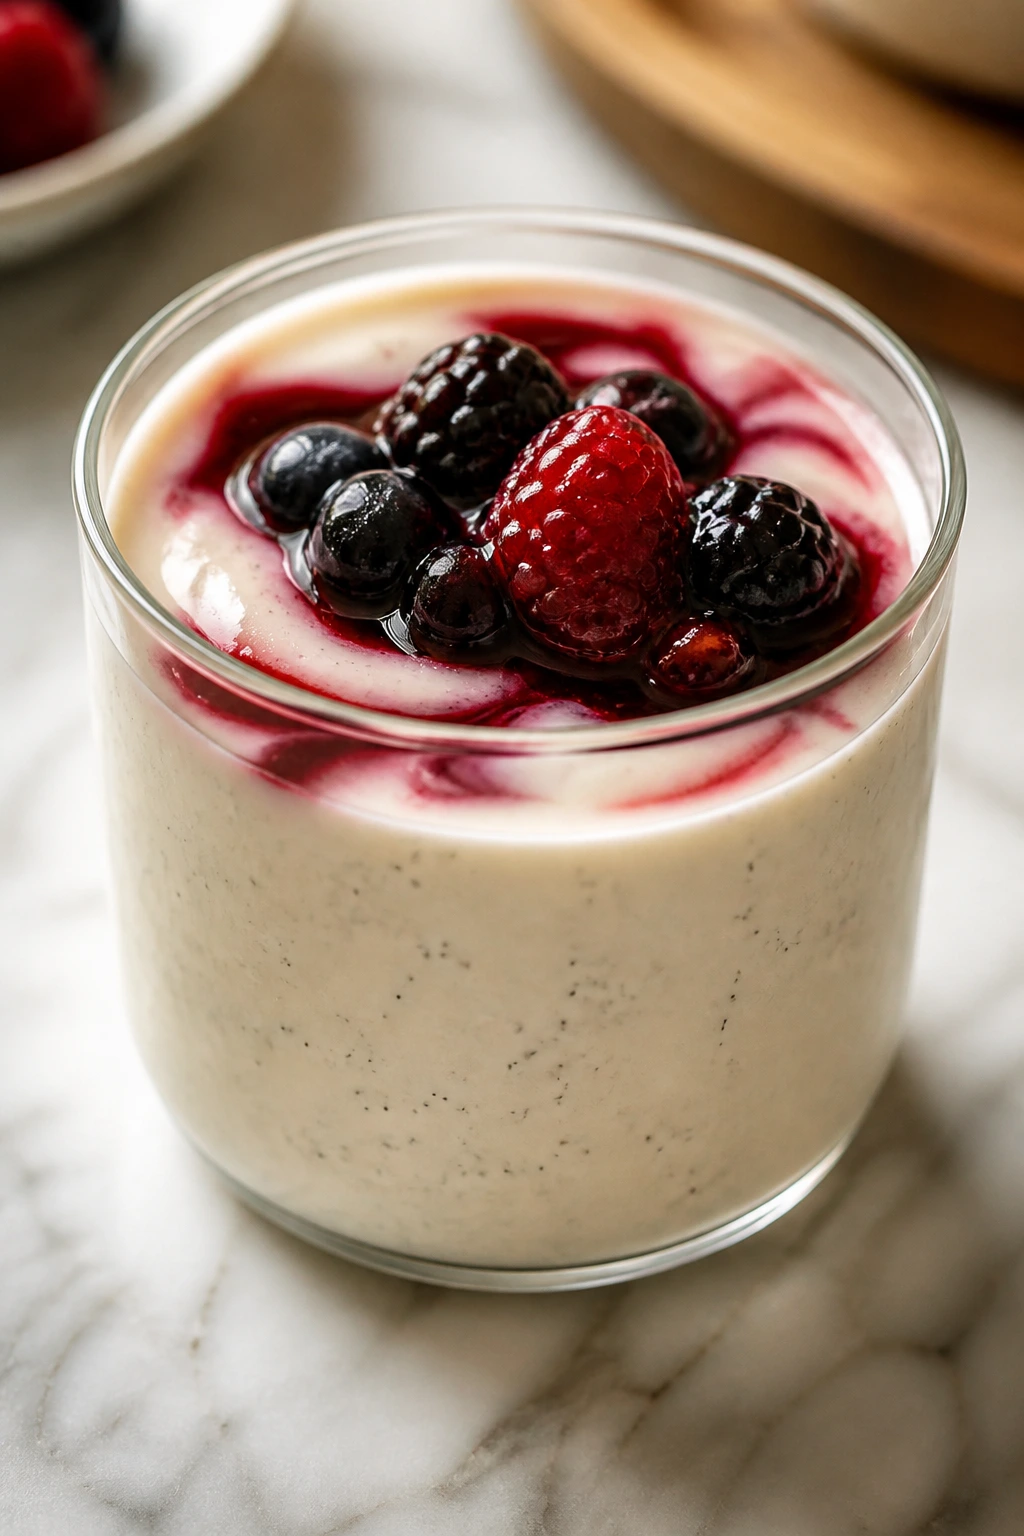
Intro:
Panna cotta sounds like a restaurant dessert, but it behaves more like a very polite custard. It sets in the fridge, unmolds cleanly if you want it to, and carries vanilla and berries in a way that feels cool and springlike.
Why It Works:
Gelatin gives the cream structure without baking. Vanilla bean paste or a scraped bean gives visible specks and deeper flavor than extract alone. The berry sauce adds sharpness so the dessert doesn’t read as plain cream, which is the common mistake with panna cotta.
Key Ingredients:
- 2 1/2 cups heavy cream
- 1/2 cup whole milk
- 1/3 cup granulated sugar
- 2 teaspoons vanilla bean paste
- 2 1/4 teaspoons unflavored gelatin
- 3 tablespoons cold water
- 2 cups mixed berries
- 2 tablespoons sugar
- 1 tablespoon lemon juice
Quick Steps:
- Sprinkle the gelatin over the cold water and let it bloom for 5 minutes.
- Warm the cream, milk, sugar, and vanilla until steaming, not boiling.
- Stir in the bloomed gelatin until dissolved.
- Pour into small cups or ramekins and chill for at least 4 hours.
- Simmer the berries, sugar, and lemon juice briefly for the sauce, then cool.
- Spoon the sauce over the panna cotta before serving.
Equipment for This Recipe:
- Small saucepan
- Whisk
- Ramekins or glasses
- Measuring spoons
- Fine mesh strainer, optional for sauce
How to Serve This Dish:
Serve in the cups for the easiest route, or unmold onto plates if you want a cleaner look. A spoonful of berry sauce at the side keeps the plate from feeling bare.
Pro Tips for This Recipe:
- Don’t boil the cream or the texture can turn grainy.
- Chill long enough for a firm wobble, not a loose slosh.
- Warm the outside of the ramekin with a damp towel if you unmold it.
Variations on This Dish:
- Coconut Panna Cotta: Replace half the cream with coconut milk.
- Lemon Vanilla Panna Cotta: Add lemon zest to the cream and keep the berry sauce simple.
- Strawberry Sauce Version: Use strawberries instead of mixed berries for a softer color.
Common Mistakes to Avoid with This Dish:
- Not blooming the gelatin: Dry gelatin won’t dissolve evenly.
- Pouring the sauce while hot: Let it cool or it can melt the top layer.
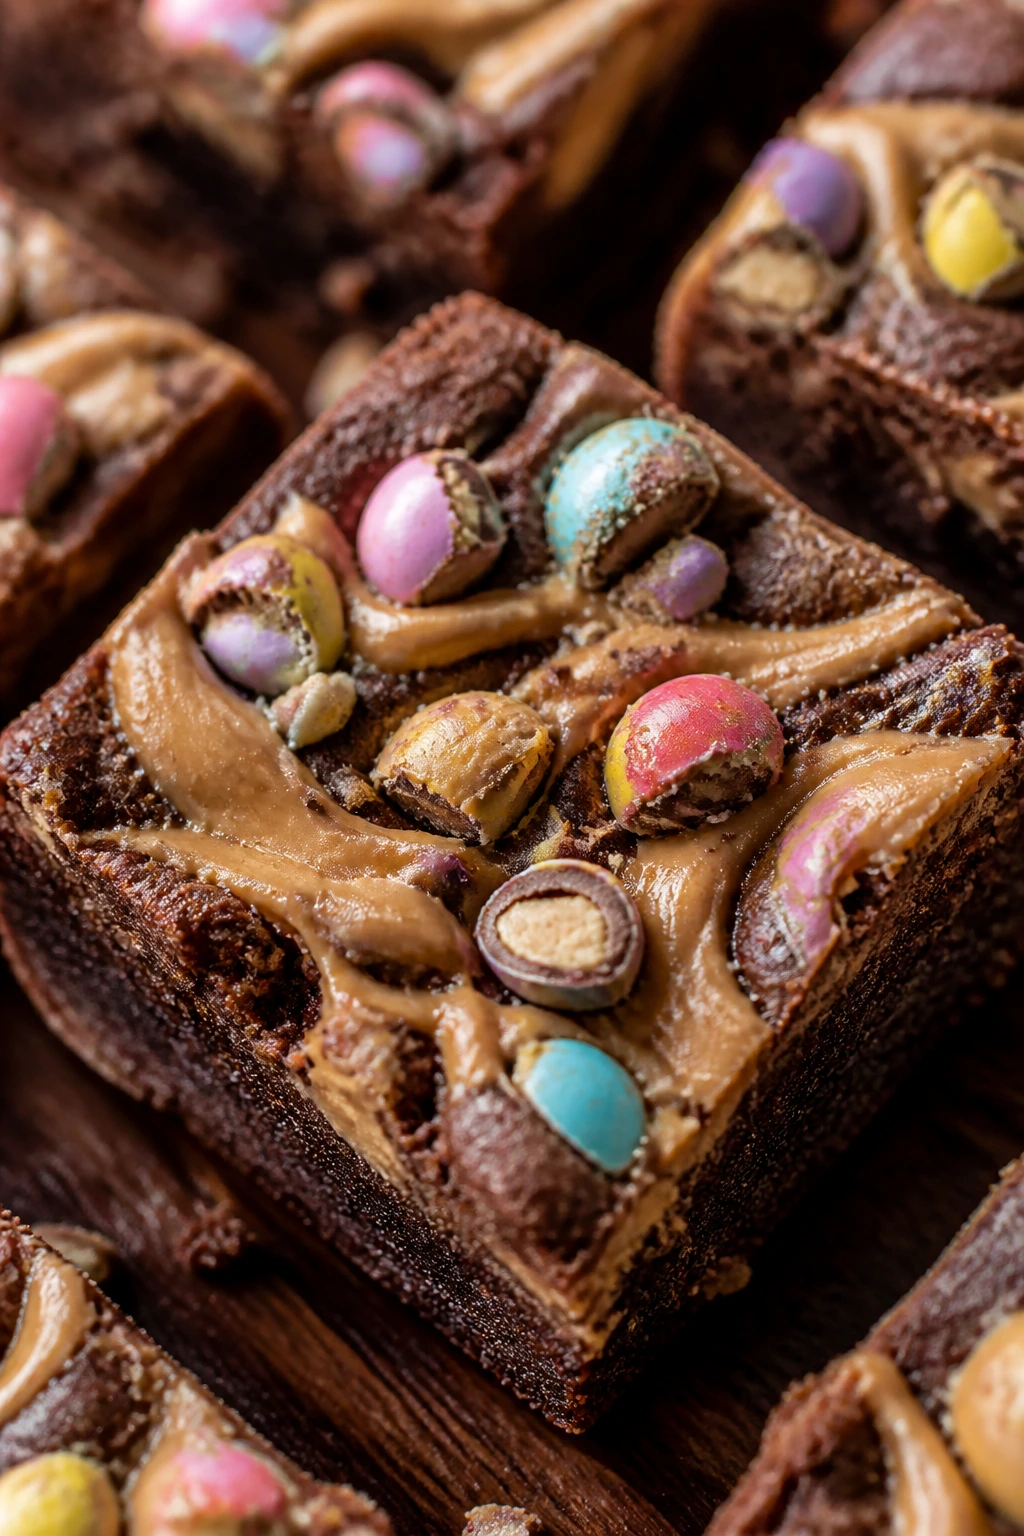
22. Peanut Butter Egg Brownies
Intro:
Brownies and peanut butter eggs are a dangerous pair in the best way. The brownie stays dense and fudgy, the peanut butter melts slightly into the top, and the chopped candy eggs give you little pockets of crunch.
Why It Works:
A fudgy brownie base carries the candy without getting cakey or dry. Peanut butter swirled over the top adds salt and fat, which keeps the chocolate from tasting one-note. Chopped candy eggs distribute the Easter color without turning the whole pan into pure sugar.
Key Ingredients:
- 1/2 cup unsalted butter
- 1 cup granulated sugar
- 1/2 cup packed brown sugar
- 2 large eggs
- 1 teaspoon vanilla extract
- 3/4 cup all-purpose flour
- 1/2 cup unsweetened cocoa powder
- 1/2 teaspoon fine salt
- 1/2 cup creamy peanut butter
- 1 cup chopped candy eggs
Quick Steps:
- Heat the oven to 350°F and line an 8×8-inch pan with parchment.
- Melt the butter, then whisk in the sugars, eggs, and vanilla.
- Fold in the flour, cocoa, and salt.
- Spread the batter in the pan, dollop peanut butter over the top, and swirl once with a knife.
- Scatter the chopped candy eggs over the batter and bake for 25 to 30 minutes, until the center is just set.
- Cool completely before slicing.
Equipment for This Recipe:
- 8×8-inch pan
- Parchment paper
- Mixing bowl
- Whisk
- Knife for swirling
How to Serve This Dish:
Cut the brownies into small squares; they’re rich enough that a little goes a long way. A few whole candy eggs on the serving plate make the brownies look intentional rather than leftover-driven.
Pro Tips for This Recipe:
- Pull them when the center still looks a little soft.
- Let the brownies cool all the way or they’ll tear.
- If the peanut butter is thick, warm it for 10 seconds so it swirls easier.
Variations on This Dish:
- Almond Butter Brownies: Swap the peanut butter for almond butter.
- Extra Fudgy Version: Add 2 ounces chopped dark chocolate to the batter.
- Blondie Base: Use a blondie batter and keep the candy eggs on top.
Common Mistakes to Avoid with This Dish:
- Overbaking: Dry brownies lose their dense center. Stop early.
- Adding too many candy eggs: Too much candy can make the top hard and sticky.
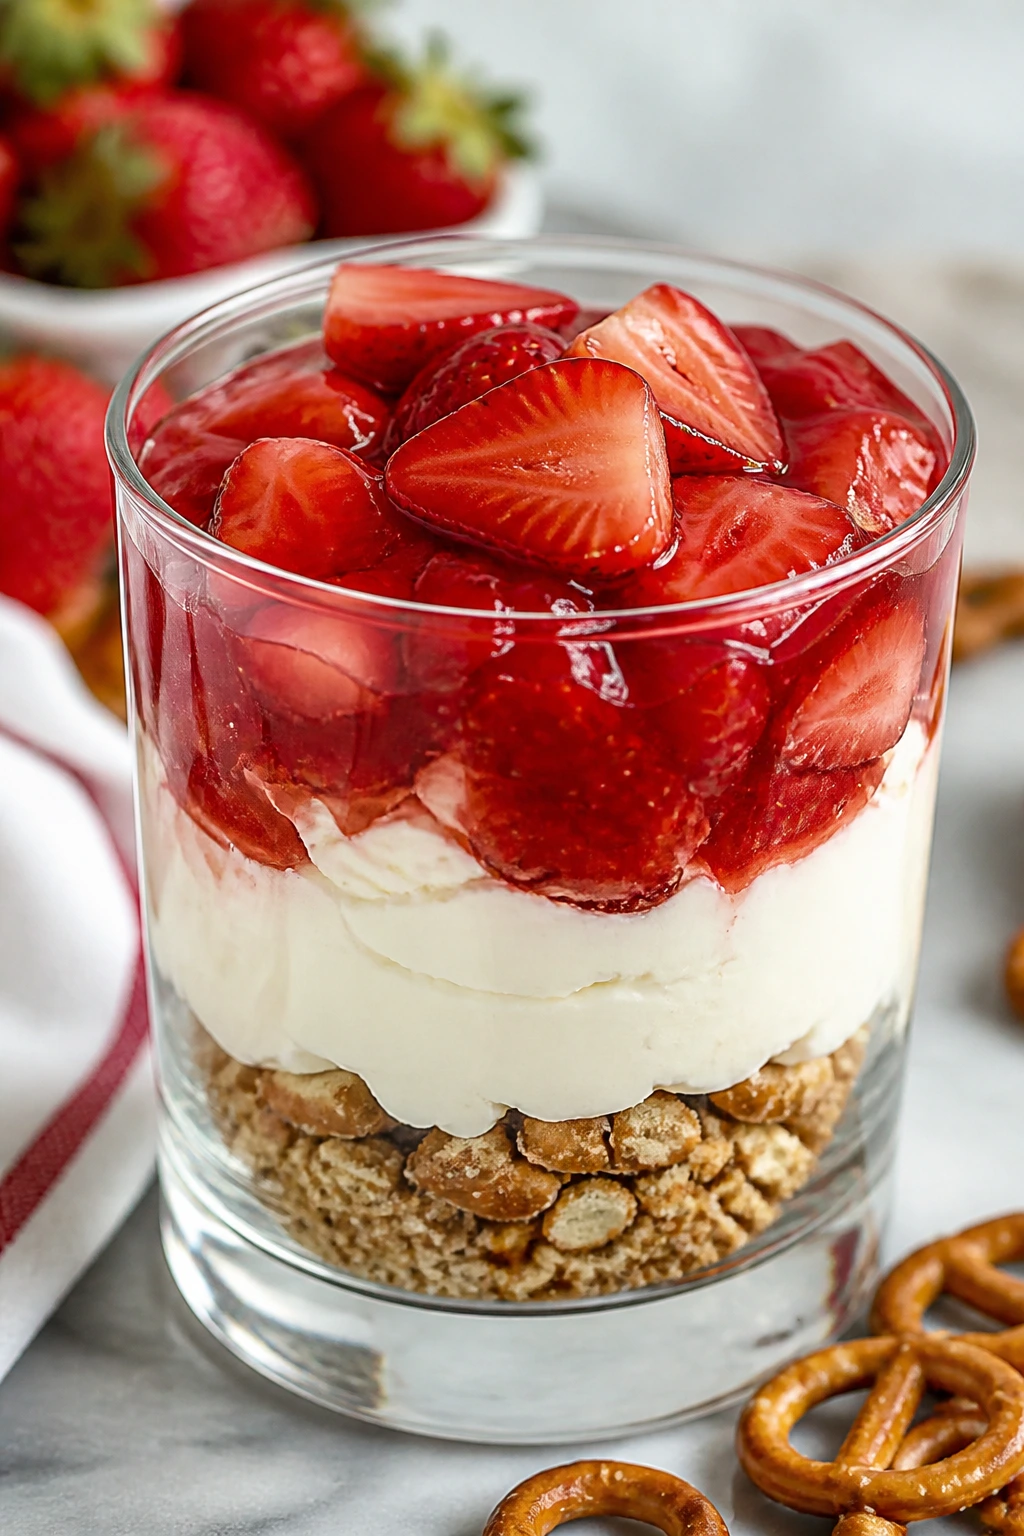
23. Strawberry Pretzel Parfaits
Intro:
Strawberry pretzel salad is a classic for a reason, but in parfait form it behaves better on a weeknight. You get the sweet-salty crunch, the cream cheese layer, and the strawberry layer in tidy glasses instead of one big slab that needs careful cutting.
Why It Works:
Pretzels give salt and texture, cream cheese gives body, and strawberries bring brightness. Layering them in cups keeps the crust from turning soggy as quickly as it would in a casserole dish. You also get the visual trick of seeing the red, white, and tan layers stacked in order.
Key Ingredients:
- 1 1/2 cups crushed pretzels
- 4 tablespoons unsalted butter, melted
- 2 tablespoons granulated sugar
- 8 ounces cream cheese, softened
- 1/2 cup powdered sugar
- 1 1/2 cups whipped cream
- 2 cups sliced strawberries
- 1/4 cup strawberry jam
Quick Steps:
- Mix the pretzels, melted butter, and sugar, then spoon a layer into each glass.
- Beat the cream cheese and powdered sugar until smooth, then fold in the whipped cream.
- Spoon the cream layer over the pretzels.
- Toss the strawberries with strawberry jam, then spoon them on top.
- Chill for 20 minutes and serve cold.
Equipment for This Recipe:
- Mixing bowls
- Hand mixer
- Small glasses or jars
- Spoon
- Measuring cups
How to Serve This Dish:
Serve these in clear glasses so the contrast is obvious. A single pretzel twist tucked into the top gives you a little crunch and a tidy finish.
Pro Tips for This Recipe:
- Crush the pretzels by hand for a mix of fine crumbs and bigger bits.
- Use strawberries that are ripe but still firm.
- Keep the layers separate until serving if you want the crunch to stay sharp.
Variations on This Dish:
- Blueberry Pretzel Cups: Swap strawberries for blueberries and blueberry jam.
- Raspberry Pretzel Cups: Use raspberry preserves for a sharper finish.
- Lighter Version: Use Greek yogurt mixed with the cream cheese for a tangier filling.
Common Mistakes to Avoid with This Dish:
- Letting the pretzels sit too long in the cream: They lose crunch fast.
- Using watery strawberries: They can flood the top layer.
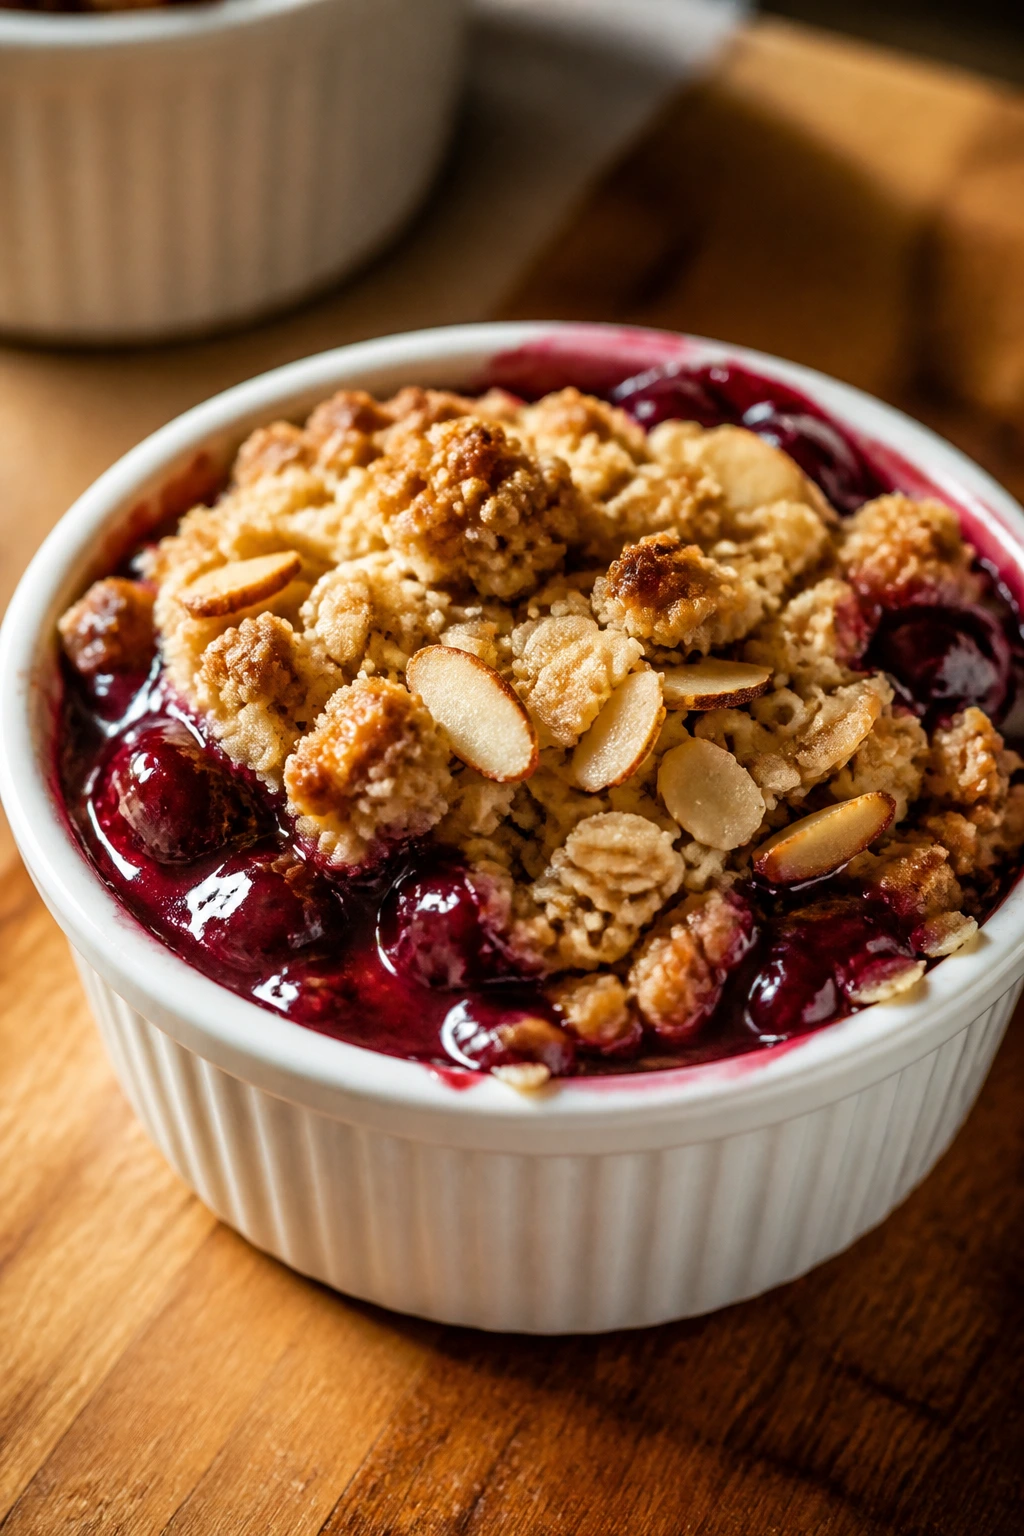
24. Cherry Almond Crisp Cups
Intro:
Fruit crisps are comforting, but in little cups they become easier to manage and faster to bake. Cherries bring a deep ruby color, almond extract gives the filling a bakery smell, and the oat topping turns golden and craggy in a way that looks good in any small dish.
Why It Works:
Baking the crisp in individual ramekins speeds up the cooking time and keeps the topping crunchy. Cornstarch thickens the fruit juices just enough so the filling turns glossy instead of soupy. Almond and cherry are old friends; together they make a simple dessert taste more finished than the ingredient list suggests.
Key Ingredients:
- 4 cups fresh or thawed cherries, pitted
- 1/3 cup granulated sugar
- 1 tablespoon cornstarch
- 1 tablespoon lemon juice
- 1 cup old-fashioned oats
- 1/2 cup all-purpose flour
- 1/2 cup packed brown sugar
- 1/2 teaspoon ground cinnamon
- 6 tablespoons unsalted butter, cold and cubed
- 1/2 teaspoon almond extract
Quick Steps:
- Heat the oven to 375°F and set out 4 to 6 ramekins.
- Toss the cherries, sugar, cornstarch, and lemon juice, then divide between the ramekins.
- Mix the oats, flour, brown sugar, cinnamon, and butter until crumbly.
- Stir in the almond extract and sprinkle the topping over the fruit.
- Bake for 25 to 30 minutes, until the filling bubbles and the top is golden.
Equipment for This Recipe:
- Ramekins
- Mixing bowls
- Fork or pastry cutter
- Baking sheet
- Measuring cups and spoons
How to Serve This Dish:
Serve warm with a spoon of vanilla ice cream or whipped cream. The little cups keep the topping crisp longer than a full pan would.
Pro Tips for This Recipe:
- Use a baking sheet under the ramekins to catch drips.
- Cold butter makes the topping craggier.
- Let the crisp rest 10 minutes so the fruit thickens.
Variations on This Dish:
- Berry Crisp Cups: Swap cherries for mixed berries and reduce the sugar slightly.
- Peach Almond Crisp: Use sliced peaches with the same topping.
- Nutty Crisp: Add 1/4 cup chopped almonds to the topping.
Common Mistakes to Avoid with This Dish:
- Too much fruit juice: If the cherries are very wet, drain off a spoonful before baking.
- Ground-up topping: The best crisp topping has bigger crumbs, not sand.
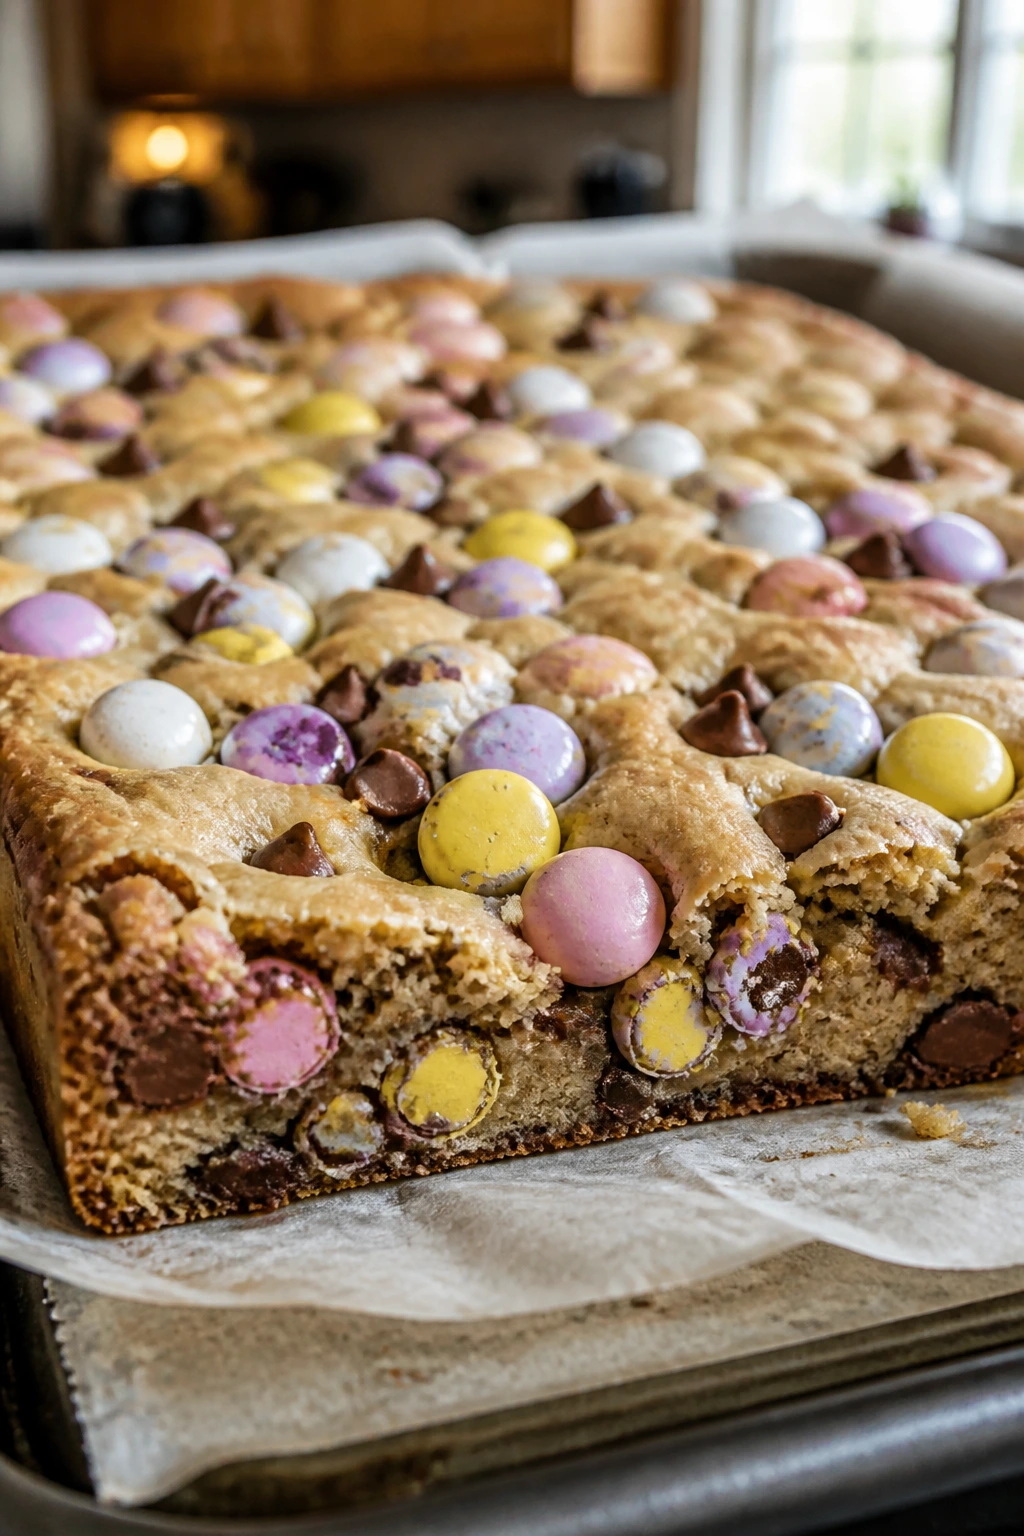
25. Mini Egg Cookie Bars
Intro:
Cookie bars are the shortcut I trust when I want something that looks like a bakery pan cookie without cutting out rounds. The dough bakes into a thick, chewy slab, and the chopped candy eggs give each square a bright little crunch.
Why It Works:
Bar cookies bake more evenly than scoop cookies, especially when the batter is studded with candy. Brown sugar keeps the center chewy, while the candy eggs add color and texture on top and inside the dough. A parchment-lined pan makes it easy to lift the whole slab out cleanly.
Key Ingredients:
- 1 cup unsalted butter, softened
- 1 cup packed brown sugar
- 1/2 cup granulated sugar
- 2 large eggs
- 2 teaspoons vanilla extract
- 2 1/2 cups all-purpose flour
- 1 teaspoon baking soda
- 1/2 teaspoon fine salt
- 1 cup chocolate chips
- 1 1/2 cups candy-coated mini eggs, lightly chopped
Quick Steps:
- Heat the oven to 350°F and line a 9×13-inch pan with parchment.
- Beat the butter and sugars until fluffy, then add the eggs and vanilla.
- Fold in the flour, baking soda, and salt.
- Stir in the chocolate chips and half the mini eggs.
- Press the dough into the pan, scatter the remaining mini eggs over the top, and bake for 22 to 26 minutes.
- Cool fully before slicing into bars.
Equipment for This Recipe:
- 9×13-inch pan
- Parchment paper
- Mixing bowls
- Hand mixer
- Spatula
How to Serve This Dish:
Cut the slab into rectangles or squares and stack them loosely on a plate. The chopped candy on top gives them enough color that they barely need anything else.
Pro Tips for This Recipe:
- Chop some of the candy eggs so every bite gets color and crunch.
- Pull the bars when the middle still looks a little soft.
- Use parchment overhang so you can lift the whole slab out at once.
Variations on This Dish:
- Peanut Butter Cookie Bars: Replace 1/4 cup butter with peanut butter.
- Blondie Version: Skip the chocolate chips and add white chocolate chips instead.
- Salted Caramel Bars: Drizzle cooled bars with a little caramel sauce.
Common Mistakes to Avoid with This Dish:
- Overbaking the center: Cookie bars dry out fast if you wait for a deep brown top.
- Adding too many whole candy eggs: They can make cutting messy; some chopped pieces help a lot.
Why a Tray of Easter Sweets Feels Easier Than One Big Dessert
A collection of Easter dessert ideas works better on busy nights because the desserts do not all ask for the same thing. Some need the oven for 15 minutes. Some need the fridge for an hour. Some are happiest with a spoon and a bowl of chocolate, and that variety matters when dinner is already happening in the same kitchen.
The other quiet advantage is control. A pan of bars gives you squares. Jars give you portions. Bark gives you shards. That means you can scale the dessert to the night instead of building a giant cake and hoping someone arrives hungry enough to finish it.
I also like that these recipes let spring flavors do the decorating. Lemon looks fresh on its own. Strawberries look like a holiday. Chocolate eggs and pastel sprinkles give you the Easter cue without much else. That’s a useful trick, and not just for holidays—plain desserts with a few smart toppings tend to age better on a table.
Essential Equipment for These Recipes
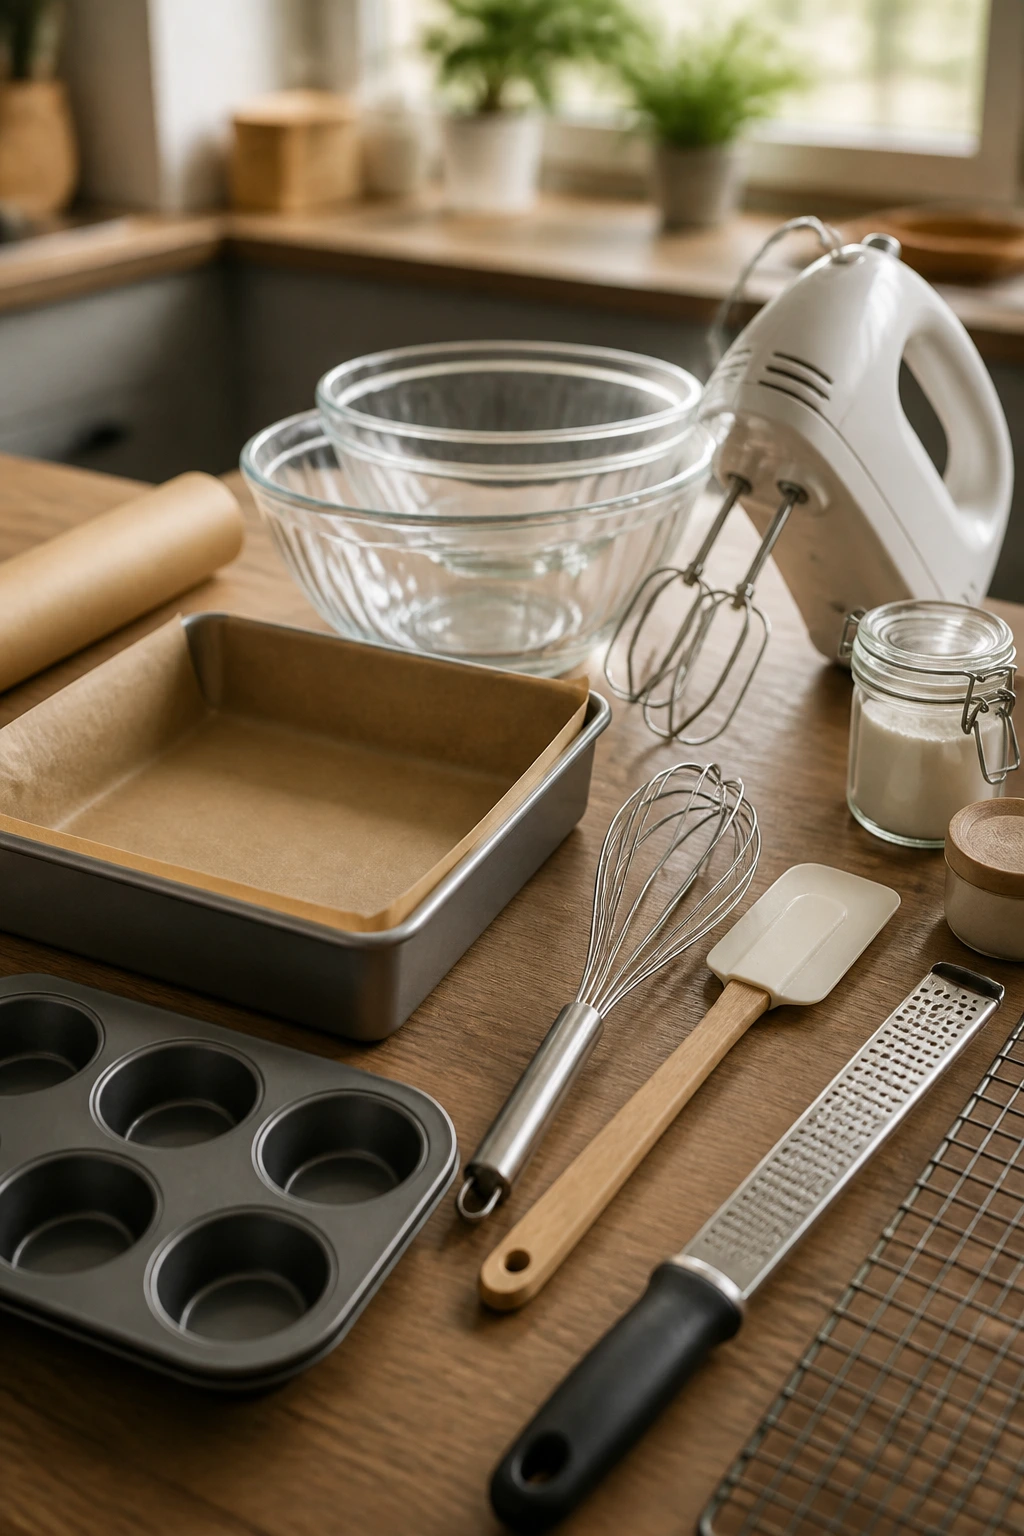
- 8×8-inch baking pan: Handy for bars, blondies, snack cake, brownies, and several small-batch bakes.
- 9×13-inch baking pan: Best for cookie bars, snack cake, and any dessert you want to slice into a crowd.
- Parchment paper: Makes lifting bars, bark, and cookie slabs much easier, and it saves cleanup.
- Mixing bowls in two or three sizes: Most of these recipes need one bowl for wet ingredients and one for dry.
- Hand mixer: Useful for cheesecake cups, ricotta cookies, mousse, and glaze-heavy desserts.
- Whisk: Needed for puddings, custards, and any batter you want smooth before the flour goes in.
- Rubber spatula: Good for folding whipped cream, scraping bowls, and smoothing batter into pans.
- Cooling rack: Keeps bars and cookies from steaming on the bottom after they come out of the oven.
- Microplane or fine grater: The easiest way to get lemon zest and orange zest without bitter pith.
- Muffin tin or ramekins: Ideal for nests, crisps, puddings, and individual desserts that need neat portions.
- Small jars or dessert cups: Useful for parfaits, mousse, cheesecake cups, and banana cream jars.
- Small saucepan: Needed for pudding, custard, panna cotta, and browning butter cleanly.
Smart Shopping and Ingredient Tips
Look for fruit that smells like fruit. That sounds obvious, but it’s the fastest way to pick good strawberries, lemons, and cherries. Strawberries should be red all the way through with no white shoulders if you want them to soften well in parfaits and shortcake. Lemons should feel heavy for their size; that usually means more juice and a thinner, zest-friendly skin. Cherries want firmness first and sweetness second, because soft cherries break down too fast in crisps.
For dairy, a few small choices matter. Use block cream cheese for cheesecake cups and mousse instead of the spreadable tub kind, which can be softer and looser. Heavy cream with a higher fat content whips better and holds longer in cups and pavlovas. Ricotta for cookies should be drained if it looks watery; otherwise the dough can spread more than you want.
Chocolate behaves better when you treat it gently. White chocolate chips and candy melts are easier for bark than chopped bars, while semisweet chips work well for brownies, nests, and dipped pretzels. Keep every bowl and spoon dry. Water and melted chocolate do not get along, and even a teaspoon of moisture can turn a smooth dip into a grainy mess.
A few shortcuts are worth buying on purpose. Puff pastry belongs in the freezer for hand pies. Frozen fruit works well in crisps and sauces, as long as you thaw and drain it. Marshmallows, mini candy eggs, vanilla wafers, and crisp rice cereal are the pantry items that let you make a dessert without a special trip. If you keep those around, a holiday tray gets a lot easier.
How to Serve These Recipes
Presentation:
Use white platters, shallow cake stands, and clear cups whenever you can. Bars look better when cut into even squares and nudged into a slight overlap; jars and parfaits look best when the layers stay visible. A few mint leaves, a little zest, or a dusting of powdered sugar goes farther than a pile of decorations.
Accompaniments:
Serve lemon bars, ricotta cookies, and berry desserts with coffee or tea. Put cream-heavy desserts next to fresh strawberries or a small bowl of fruit so the plate doesn’t feel too rich. Vanilla ice cream works with crisps, hand pies, bread pudding, and warm brownies, while whipped cream is the easier choice for almost everything else.
Portions:
Plan on one bar, one cookie, or one small cup per person if dessert follows a full meal. Richer items like brownies, panna cotta, and peanut butter bars can be cut smaller than you think—people often take more than one if the pieces are neat. For a mixed dessert tray, offer 2 to 3 bites per person across a few recipes instead of huge servings of one thing.
Beverage Pairing:
Hot coffee works with most of the chocolate and brownie desserts. Earl Grey or chamomile fits lemon, berry, and ricotta treats without fighting them. If you want something colder, sparkling lemonade or plain milk keeps the whole spread from feeling too sweet.
Additional Tips and Flavor Boosters
Flavor Enhancement:
A little citrus zest changes more than people expect. Lemon zest in cheesecake, ricotta cookies, and berry bars sharpens the flavor without extra liquid, and a pinch of flaky salt on chocolate bark or brownies keeps the sweetness from flattening out.
Customization:
If your fridge is heavy on berries, use them across the board—parfaits, crisps, hand pies, and sauce all welcome them. If you prefer chocolate, you can push bark, brownies, cookie bars, and pretzel rods in that direction with very little extra work. A teaspoon of almond extract in cherry or raspberry desserts gives a bakery smell that reads as more polished than the ingredient list.
Serving Suggestions:
Powdered sugar is a useful finish, but it works best on dry surfaces like bars, cookies, and hand pies. For creamier desserts, use toasted coconut, chopped nuts, thin chocolate curls, or a single candy egg on top. The goal is not decoration for decoration’s sake. It is giving each dessert one clear finishing note.
Make-It-Yours:
For gluten-free versions, use a 1:1 baking flour in bars and cookies, swap crisp rice cereal or almond flour crusts where it makes sense, and choose gluten-free pretzels for dipped rods. For dairy-free versions, coconut cream, dairy-free butter, and dairy-free cream cheese can carry a lot of these recipes. For a lower-sugar tray, lean harder on fruit, reduce frosting, and use dark chocolate instead of white chocolate wherever the recipe allows.
Make-Ahead, Storage, and Reheating Guidance
Most of these desserts do well with a little planning. Bars, brownies, snack cake, cookie bars, and blondies keep for 3 to 4 days in the fridge in airtight containers, though many are fine at room temperature for a day if they do not have cream cheese or whipped cream on top. Bark and dipped pretzel rods keep at room temperature for about 1 week in a dry container, away from heat and sunlight. Coconut macaroons hold for 4 to 5 days at room temperature or up to 1 week refrigerated.
Cream-based desserts need the fridge. Cheesecake cups, lemon pudding, mousse cups, panna cotta, parfaits, banana cream jars, and strawberry pretzel cups should stay chilled and are best within 2 to 3 days. If the dessert includes fresh fruit, the texture is usually best on day one or two. Pavlovas are the exception—they need to be assembled at the last minute, because cream softens the shells quickly.
Freezing works for some, not all. Cookie bars, brownies, blondies, and unfrosted snack cakes freeze well for up to 2 months if wrapped tightly. Hand pies can also be frozen after baking and reheated in a low oven. Panna cotta, pudding, bark, and whipped-cream desserts do not freeze well; the texture changes too much.
For reheating, use a 300°F oven for 5 to 8 minutes on brownies, bars, bread pudding, and hand pies if you want them warm again. A microwave works for a single square, but use short bursts so the edges do not turn rubbery. Do not reheat meringues, pavlovas, or cream cups. Those are meant to stay cool and stay put.
Four Ways to Change the Tray Without Starting Over
Gluten-Free Spring Swap:
Use a dependable 1:1 gluten-free flour blend for bars, cookie bars, blondies, and cookies. For no-bake desserts, the swap is easier still—use gluten-free graham-style crumbs, gluten-free pretzels, or naturally gluten-free cereal. The only real catch is texture; gluten-free batters sometimes need a few minutes of rest before baking.
Dairy-Free Spring Tray:
Coconut cream can stand in for whipped cream, and dairy-free butter works in bark, crispy treats, and many cookies. Dairy-free cream cheese handles cheesecake cups and mousse surprisingly well if it is beaten until smooth first. Dark chocolate is usually the simplest chocolate choice here because it sets well and tastes balanced.
Lower-Sugar Celebration:
Cut sugar by about 1/4 in bar cookies, snack cake, and fruit desserts, then lean harder on lemon zest, vanilla, and ripe fruit for flavor. Use unsweetened whipped cream instead of heavy frosting, and choose berries or cherries instead of extra candy toppings. The dessert still feels festive, only less sticky on the teeth.
Kid-Decorating Batch:
Pick bark, sugar cookies, pretzel rods, rice nests, and cookie bars when kids want to help. Set out toppings in small bowls—sprinkles, candy eggs, coconut, crushed pretzels—and let them finish the surface. The trick is to do the melting, mixing, and oven work yourself, then hand over the fun part.
Citrus-First Variation:
If you want the tray to taste brighter, push lemon, orange, and lime through the whole set. Lemon bars become lime bars, mousse turns into creamsicle cups, ricotta cookies go orange, and berry desserts get a little zest in the syrup or filling. That one move makes the collection feel more unified.
Fruit-Forward Version:
Use berries, cherries, or citrus everywhere and cut back on the chocolate-heavy items. Shortcake cups, crisps, hand pies, pudding cups, and parfaits already live in that lane, so the spread ends up feeling lighter and more springlike. A fruit-heavy tray also holds up better after dinner, when nobody wants a sugar wall.
Common Mistakes to Avoid With Easter Desserts
One mistake shows up again and again: pulling baked desserts late. Bars, brownies, snack cake, cookies, and blondies all keep cooking a little after they come out of the oven. If you wait for a deep brown top, they cross into dry territory fast. Pull them when the center still has a slight give and the edges look set.
Another easy miss is using wet fruit without drying it. Blueberries, strawberries, cherries, and even citrus segments can add more water than the recipe wants. Pat fruit dry after washing, drain thawed fruit well, and keep juicy toppings for the very end. That small habit saves bark from sweating and bars from turning loose.
Skipping chill time causes more trouble than people expect. Cheesecake cups, mousse, pudding, panna cotta, and cookie dough all need time to settle. If you cut or spoon too soon, the texture stays soft and uneven. Give the dessert the fridge time it asks for, even if that means making it earlier in the evening.
Chocolate can also go wrong in a hurry. Overheated chocolate turns thick, dull, and stubborn. Melt it in short bursts, stir often, and stop before it looks completely finished; the residual heat will carry it home. Keep water away from the bowl, too. A wet spoon is enough to spoil a whole batch.
Finally, there’s overdecorating. Easter colors are fun, but a dessert buried under sprinkles, candy eggs, coconut, and glaze can lose its texture. Pick one or two finishes and stop there. A dessert with a clear center—fruit, cream, chocolate, or crumb—tends to taste better and look calmer.
Easter Dessert Questions People Actually Ask
Can I make most of these desserts a day ahead?
Yes. Bars, brownies, cookie bars, bark, cheesecakes in cups, pudding, and most chilled desserts hold well overnight. Add fresh fruit, whipped cream, or crunchy toppings at the last minute so they stay bright.
Which desserts travel best to a potluck or office table?
Cookie bars, brownies, bark, pretzel rods, macaroons, and sugar cookies are the easiest to transport because they do not need plating. Put them in a tin or sturdy container with parchment between layers so the decorations stay intact.
What if I only have frozen fruit?
Frozen fruit works best in crisps, sauces, hand pies, and bread pudding. Thaw it first and drain off extra liquid, or the filling can go watery. I would not use frozen berries in pavlovas or parfaits unless you want a softer result.
Can I use store-bought shortcuts without ruining the dessert?
Absolutely. Puff pastry, pound cake, instant pudding, and premade cookie dough fit several of these recipes well. The trick is to keep the shortcut and still add one homemade touch—zest, a glaze, toasted coconut, or a fruit layer.
How do I keep cream cheese fillings smooth?
Start with fully softened cream cheese and beat it before adding anything else. Cold cream cheese leaves little lumps that are hard to chase down later. If the filling still looks grainy, keep mixing a bit longer before adding whipped cream.
Which desserts are best for kids to help with?
Bark, pretzel rods, cereal nests, sugar cookies, and mini cookie bars all invite decorating without much danger. Kids can sprinkle, press candy eggs, or cut shapes while you handle the oven and the melted chocolate.
Can I halve these recipes if I do not need a full batch?
Most of them halve cleanly, especially bars, cookies, pudding, and no-bake cups. Use a smaller pan and start checking for doneness a few minutes early. Meringue and custard recipes are a little less forgiving, so those are better made in the full batch.
What should I do if my brownies or bars come out dry?
A dry pan usually means the bake went a few minutes too long. Next time, pull them when the center still looks a shade softer than you think it should. For the batch you already made, serve them with whipped cream, ice cream, or warm berry sauce and no one will complain.
Small Treats, Big Easter Energy
The nicest thing about a tray of holiday desserts is that it does not have to look formal to feel special. A few neat bars, a cup of pudding, a handful of chocolate nests, and one or two fruit desserts can carry the whole evening without making the kitchen feel like a second job.
That’s the real charm of these easy weeknight treats: they let you keep the flavors bright and the effort sane. Lemon, strawberry, coconut, chocolate, and caramelized sugar do most of the talking. You just arrange the pieces, chill what needs chilling, and set out the spoons.
Keep one or two of these in your back pocket, and a plain weekday can still end with something pastel, creamy, crisp, or chocolate-dusted on the table.