
A store run for Valentine’s desserts can turn into a weird little scavenger hunt. One minute you’re looking for chocolate, and the next you’re carrying three kinds of sprinkles, a bakery box you didn’t need, and a carton of strawberries that will look tired by the time they hit the plate. Pantry staples cut through that mess. Flour. Cocoa. Sugar. Oats. Jam. Peanut butter. Chocolate chips. A few basic fridge regulars, and suddenly the whole evening feels calmer.
That’s the part I like most about desserts built from the cupboard. They don’t taste like a backup plan. They taste like someone actually thought ahead. A thick brownie still gets that crackly top, a jam thumbprint still looks sweet enough for the holiday, and a bowl of fudge can feel more polished than a tray of expensive fruit if you cut it cleanly and give it a pinch of salt. The trick is knowing which pantry ingredients do the heavy lifting and which ones are just there to make the whole thing smell like you know what you’re doing.
There’s also a quiet advantage here: pantry-based Valentine’s desserts are flexible. If you’ve got cocoa but no fresh berries, you’re fine. If you’ve got a jar of cherry preserves and a bag of oats, you’re fine. If your kitchen is missing the dramatic holiday props, you can still make something that looks intentional, with a little powdered sugar, a chocolate drizzle, or a heart-shaped cut. No frantic shopping. No stress. Just a table full of sweets that came from ordinary ingredients and ended up looking like a small gesture that actually landed.
Why These Pantry Staples Make the Holiday Easier
No special trip required: Most of these recipes start with ingredients people already keep around, so you can make dessert when the mood strikes instead of planning three days around it.
Small ingredients, big effect: Cocoa, jam, oats, peanut butter, and chocolate chips each change texture and flavor in a way you can taste right away, which is why simple recipes can still feel complete.
They hold up well: Bars, cookies, fudge, bark, and truffles keep their shape better than delicate plated desserts, which matters when you want something pretty without a lot of fuss.
They scale cleanly: Double a brownie tray, halve a mug cake, or make a whole stack of thumbprints; these formulas are built for that kind of flexibility.
They look more thoughtful than they are: A dusting of powdered sugar, a spoonful of jam, or a chocolate dip goes a long way when the base recipe is already solid.
There’s room for mood, not just sweetness: You can make one dessert dark and rich, another bright with fruit jam, and another crisp and buttery, which keeps a holiday spread from feeling one-note.
1. Cocoa Crinkle Cookies
The first crack into one of these cookies is the whole point. The powdered sugar shell shatters a little, then you hit a soft, fudgy center that smells like hot cocoa left on the stove for two minutes too long. They look like you spent more effort than you did.
Why It Works:
The dough leans on cocoa, sugar, and a little oil, which keeps the cookies tender instead of cakey. Chilling the dough for 30 minutes helps the cookies puff before they spread, so the crinkles open up in those dramatic little fault lines in the oven.
Key Ingredients:
- 1 cup all-purpose flour
- 1/2 cup unsweetened cocoa powder
- 3/4 cup granulated sugar
- 1 teaspoon baking powder
- 1/4 teaspoon fine salt
- 2 large eggs
- 1/4 cup neutral oil
- 1 teaspoon vanilla extract
- 1/2 cup powdered sugar, for rolling
Quick Steps:
- Whisk the flour, cocoa, baking powder, and salt in a medium bowl.
- In another bowl, whisk the eggs, sugar, oil, and vanilla until smooth and glossy.
- Stir the dry ingredients into the wet mixture just until no dry streaks remain. Do not overmix.
- Cover the bowl and chill the dough for 30 minutes, until it firms up and scoops cleanly.
- Heat the oven to 350°F (175°C) and line two sheet pans with parchment.
- Scoop the dough into 1-inch balls, roll each one in powdered sugar, and set them 2 inches apart.
- Bake for 10 to 11 minutes, until the tops are cracked but the centers still look a little soft.
- Cool on the pan for 5 minutes before moving them to a rack.
Equipment for This Recipe:
- Mixing bowls
- Whisk
- Cookie scoop or tablespoon
- Parchment-lined baking sheets
- Cooling rack
How to Serve This Dish:
Pile these on a white plate and let the powdered sugar do the decorating. They’re good with hot coffee, but they’re even better with cold milk if you want the cocoa flavor to read more clearly.
Pro Tips for This Recipe:
- Roll the dough generously in powdered sugar; a thin coat melts into the cookie.
- If your kitchen is warm, chill the scooped balls for 10 extra minutes before baking.
- Pull them early. The centers finish setting on the hot pan.
Variations on This Dish:
- Espresso Crinkle: Add 1 teaspoon instant espresso powder to the dry ingredients for a darker, sharper chocolate flavor.
- Peppermint Edge: Stir 1/4 teaspoon peppermint extract into the wet ingredients and roll in half powdered sugar, half crushed peppermint candy.
- Orange Cocoa: Add 1 teaspoon orange zest for a bright finish that works well with dark chocolate.
Common Mistakes to Avoid with This Dish:
- Skipping the chill: Warm dough spreads too fast and loses the crinkle pattern. Chill until it feels firm.
- Overbaking: If the tops look fully set in the oven, the cookies will be dry. They should still look slightly underdone in the middle.
- Using old baking powder: Flat cookies with weak lift usually trace back to stale leavener.
2. Strawberry Jam Thumbprint Cookies
These are the kind of cookies that make a plate look like you planned for the holiday. The buttery base stays tender, the jam bakes into a glossy center, and every bite gives you that sweet-tart hit that keeps the cookie from feeling heavy.
Why It Works:
The dough is rich enough to hold a thumbprint without cracking apart, and the jam bakes down into a sticky little jewel in the middle. A yolk gives the cookies more tenderness than a whole egg would, which matters when you want a soft, short bite instead of a cakey one.
Key Ingredients:
- 1/2 cup unsalted butter, softened
- 1/2 cup granulated sugar
- 1 large egg yolk
- 1 teaspoon vanilla extract
- 1 1/2 cups all-purpose flour
- 1/4 teaspoon fine salt
- 1/2 cup thick strawberry jam
Quick Steps:
- Heat the oven to 350°F (175°C) and line a baking sheet with parchment.
- Cream the butter and sugar until pale and fluffy, about 2 minutes.
- Mix in the egg yolk and vanilla.
- Add the flour and salt, stirring just until the dough comes together.
- Roll the dough into 1-inch balls and set them on the pan.
- Press your thumb or the back of a teaspoon into each ball to make a deep well.
- Fill each well with about 1/2 teaspoon jam.
- Bake for 12 to 14 minutes, until the edges are lightly golden.
- Cool on the pan for 10 minutes so the jam settles.
Equipment for This Recipe:
- Mixing bowl
- Hand mixer or sturdy spoon
- Baking sheet
- Parchment paper
- Teaspoon or thumb for indenting
How to Serve This Dish:
These belong on a platter with a little powdered sugar scattered around the edges. I like them with tea because the jam keeps the flavor bright, and the butter in the cookie softens the edges of every sip.
Pro Tips for This Recipe:
- Use thick jam or preserves; thin jelly tends to run.
- Press the wells before baking, then press again halfway through if they puff too much.
- Warm jam spreads more easily, so stir it before spooning.
Variations on This Dish:
- Cherry Heart Thumbprints: Swap in cherry preserves for a deeper red center.
- Raspberry Spark: Use seedless raspberry jam for a brighter, tangier finish.
- Cocoa Base: Add 2 tablespoons cocoa powder to the flour for a chocolate cookie around the jam.
Common Mistakes to Avoid with This Dish:
- Making the wells too shallow: The jam slides off instead of sitting in the center. Press down firmly.
- Overfilling: More jam sounds good, but it bubbles over and makes sticky edges.
- Letting the dough get too soft: If the balls slump before baking, chill them for 15 minutes.
3. One-Bowl Fudge Brownies
These brownies are dense in the right way: a thin crackle on top, a middle that stays glossy, and a chocolate flavor that tastes deeper if you use a little extra salt. They’re the dessert I’d make if I wanted something simple that still feels like a proper ending.
Why It Works:
Melted butter gives the batter that shiny surface, while the small amount of flour keeps the crumb tight and fudgy. The eggs emulsify the batter, and that’s what makes the top form a delicate crust instead of turning matte and dull.
Key Ingredients:
- 1/2 cup unsalted butter, melted
- 1 cup granulated sugar
- 2 large eggs
- 1 teaspoon vanilla extract
- 1/3 cup unsweetened cocoa powder
- 1/2 cup all-purpose flour
- 1/4 teaspoon fine salt
- 1/4 teaspoon baking powder
- 1/2 cup chocolate chips, optional
Quick Steps:
- Heat the oven to 350°F (175°C) and line an 8×8-inch pan with parchment.
- Whisk the melted butter and sugar together for 30 seconds.
- Whisk in the eggs and vanilla until the mixture looks glossy.
- Stir in the cocoa, flour, salt, and baking powder just until combined.
- Fold in the chocolate chips if you want extra pockets of melt.
- Spread the batter into the pan and smooth the top.
- Bake for 22 to 26 minutes, until the center looks set but still a little soft and a toothpick comes out with moist crumbs.
- Cool completely before slicing.
Equipment for This Recipe:
- 8×8-inch baking pan
- Parchment paper
- Mixing bowl
- Whisk and spatula
- Cooling rack
How to Serve This Dish:
Cut the brownies into neat squares, then dust the tops with cocoa or powdered sugar. A small scoop of vanilla ice cream works if you have it, but they hold their own even plain, especially with coffee beside them.
Pro Tips for This Recipe:
- Stop mixing as soon as the flour disappears.
- Underbake slightly; the pan heat keeps them cooking as they cool.
- Use parchment with an overhang so you can lift the whole slab out cleanly.
Variations on This Dish:
- Salted Fudge Brownies: Sprinkle flaky salt over the batter before baking.
- Mocha Brownies: Add 1 teaspoon instant espresso powder to the melted butter and sugar.
- Walnut Crunch: Fold in 1/2 cup chopped walnuts for a firmer bite.
Common Mistakes to Avoid with This Dish:
- Cutting too early: Warm brownies smear instead of slicing. Let them cool all the way down.
- Overbaking by chasing a clean toothpick: A few moist crumbs are the goal, not a dry stick.
- Using too much flour: Scoop-and-level measuring matters here. A packed cup makes them cakier.
4. Pantry Shortbread Hearts
Shortbread is almost stubbornly simple, which is why I love it for a holiday spread. The edges turn pale gold, the center stays sandy and buttery, and the heart shape does more work than any garnish could.
Why It Works:
The recipe keeps the liquid out and lets butter carry the whole flavor, which gives shortbread that clean snap. A little powdered sugar softens the crumb, and vanilla rounds off the butter so the cookies taste richer than the ingredient list suggests.
Key Ingredients:
- 1 cup unsalted butter, softened
- 1/2 cup powdered sugar
- 2 cups all-purpose flour
- 1/4 teaspoon fine salt
- 1 teaspoon vanilla extract
- Extra flour, for rolling
Quick Steps:
- Heat the oven to 325°F (165°C) and line a baking sheet with parchment.
- Cream the butter and powdered sugar until smooth but not fluffy.
- Mix in the vanilla.
- Add the flour and salt, stirring until the dough looks crumbly, then press it together with your hands.
- Roll the dough to about 1/4-inch thick and cut heart shapes.
- Set the cookies on the sheet and chill for 10 minutes.
- Bake for 14 to 16 minutes, until the bottoms are just turning gold.
- Cool on the pan for 5 minutes, then move to a rack.
Equipment for This Recipe:
- Mixing bowl
- Rolling pin
- Heart cookie cutter
- Parchment-lined baking sheet
- Cooling rack
How to Serve This Dish:
Serve them plain if you like clean, buttery flavor, or dust the tops with powdered sugar through a small sieve. They look especially nice stacked in a shallow bowl with a ribbon tied around the napkin.
Pro Tips for This Recipe:
- Chill the cut shapes before baking so the edges stay sharp.
- If the dough crumbles, press it together with warm hands instead of adding liquid.
- Bake just until the bottoms color; pale shortbread tastes better than dry shortbread.
Variations on This Dish:
- Jam Sandwich Hearts: Spread 1 teaspoon strawberry jam between two cooled cookies.
- Cocoa Shortbread: Replace 1/4 cup flour with cocoa powder for a darker, less sweet cookie.
- Lemon Butter Hearts: Add 1 teaspoon lemon zest if you want a brighter finish.
Common Mistakes to Avoid with This Dish:
- Whipping the butter too much: Airy shortbread spreads and loses its clean shape.
- Overworking the dough: That makes the cookies tough instead of tender.
- Baking until brown all over: Shortbread should be barely golden, not deeply colored.
5. Chocolate Peanut Butter No-Bake Bars
These bars taste like the kind of thing people assume took more work than it did. Peanut butter gives the middle a soft, nutty chew, the chocolate top snaps when you cut it, and the whole pan disappears fast if you set it near a coffee pot.
Why It Works:
Crushed graham crackers and powdered sugar make the base sturdy without baking. Melted butter and peanut butter bind everything together, and the chocolate layer sets into a neat top that slices cleanly after chilling.
Key Ingredients:
- 1/2 cup unsalted butter
- 1 cup creamy peanut butter
- 2 cups graham cracker crumbs
- 2 cups powdered sugar
- 1 teaspoon vanilla extract
- 1 cup semi-sweet chocolate chips
- 2 tablespoons peanut butter
Quick Steps:
- Line an 8×8-inch pan with parchment.
- Melt the butter, then stir in the peanut butter and vanilla.
- Add the graham crumbs and powdered sugar, mixing until the base feels thick and moldable.
- Press the mixture firmly into the pan with the bottom of a measuring cup.
- Melt the chocolate chips with the extra peanut butter in 20-second bursts, stirring between each round.
- Spread the chocolate over the base and smooth it out.
- Chill for at least 2 hours, until firm enough to lift out and cut.
Equipment for This Recipe:
- 8×8-inch pan
- Parchment paper
- Mixing bowl
- Spatula
- Microwave-safe bowl or small saucepan
How to Serve This Dish:
Cut the bars into tight squares or skinny rectangles and serve them cold. A tiny pinch of flaky salt on top makes the peanut butter taste fuller, not sweeter, which is exactly where you want it.
Pro Tips for This Recipe:
- Pack the base hard or it will crumble when sliced.
- Use creamy peanut butter for the smoothest texture.
- Warm the knife under hot water before cutting clean bars.
Variations on This Dish:
- Crunchy Peanut Butter Bars: Use crunchy peanut butter and add 1/4 cup chopped peanuts.
- Chocolate Swirl Top: Swirl melted white chocolate into the dark chocolate before chilling.
- Pretzel Base: Replace 1/2 cup of the graham crumbs with crushed pretzels for a salty edge.
Common Mistakes to Avoid with This Dish:
- Pressing the base loosely: The bars need real pressure or they fall apart.
- Skipping the chill: Soft bars cut badly and smear the chocolate top.
- Overheating the chocolate: Stop microwaving while a few chips are still visible and stir until smooth.
6. Espresso Cocoa Cookies
If you want a chocolate cookie that tastes grown-up without turning fussy, this is the one. The espresso powder sharpens the cocoa, the centers stay soft, and the edges take on that slight chew that makes a cookie worth reaching for twice.
Why It Works:
Instant espresso powder doesn’t make these taste like coffee; it deepens the chocolate. Brown sugar keeps the middle moist, while a small amount of baking soda helps the cookies spread just enough to stay tender.
Key Ingredients:
- 1 cup all-purpose flour
- 1/2 cup unsweetened cocoa powder
- 1 teaspoon instant espresso powder
- 1/2 teaspoon baking soda
- 1/4 teaspoon fine salt
- 1/2 cup unsalted butter, softened
- 3/4 cup brown sugar
- 1 large egg
- 1 teaspoon vanilla extract
- 1/2 cup chocolate chips
Quick Steps:
- Heat the oven to 350°F (175°C) and line a baking sheet with parchment.
- Whisk the flour, cocoa, espresso powder, baking soda, and salt.
- Beat the butter and brown sugar until creamy.
- Mix in the egg and vanilla.
- Stir in the dry ingredients, then fold in the chocolate chips.
- Scoop dough balls onto the pan and flatten them slightly with your palm.
- Bake for 9 to 11 minutes, until the edges are set and the centers still look soft.
- Cool on the pan for 5 minutes before moving to a rack.
Equipment for This Recipe:
- Mixing bowl
- Hand mixer or wooden spoon
- Baking sheet
- Parchment paper
- Cookie scoop
How to Serve This Dish:
Stack these beside a small bowl of whipped cream or serve them with a mug of strong coffee. They look especially good when the chocolate chips are still glossy in the center and the edges have a faint shine of sugar.
Pro Tips for This Recipe:
- Use espresso powder, not brewed coffee, so the dough stays balanced.
- Chill the dough for 15 minutes if it feels sticky.
- Pull them early; the centers should look just a little underdone.
Variations on This Dish:
- Chocolate Orange: Add 1 teaspoon orange zest for a sharper holiday-style aroma.
- Hazelnut Version: Fold in 1/3 cup chopped hazelnuts if you have them.
- Double-Chip: Mix in 1/4 cup white chocolate chips for contrast.
Common Mistakes to Avoid with This Dish:
- Using too much espresso powder: The coffee note should support the chocolate, not take over.
- Overbaking until firm: These cookies need that soft middle.
- Skipping the parchment: Cocoa cookies can cling to a bare pan more than you’d expect.
7. Molten Mug Cakes
A mug cake sounds like a shortcut, and it is, but it can still taste good if you keep the batter lean and the cooking time tight. This one gives you a warm cocoa cake with a soft center and melted chocolate pockets if you tuck chips into the middle.
Why It Works:
The batter is tiny, which means the microwave cooks it fast enough to keep the crumb tender. A little oil keeps the cake from drying out, and the chocolate chips sink into the center to make the whole thing feel richer than a one-minute dessert should.
Key Ingredients:
- 4 tablespoons all-purpose flour
- 4 tablespoons granulated sugar
- 2 tablespoons unsweetened cocoa powder
- 1/4 teaspoon baking powder
- Pinch of fine salt
- 3 tablespoons milk
- 2 tablespoons neutral oil
- 1/2 teaspoon vanilla extract
- 1 tablespoon chocolate chips
Quick Steps:
- Choose a microwave-safe mug that holds at least 12 ounces.
- Whisk the flour, sugar, cocoa, baking powder, and salt directly in the mug.
- Stir in the milk, oil, and vanilla until the batter looks smooth.
- Drop the chocolate chips into the center and nudge them under the surface.
- Microwave on high for 60 to 75 seconds, until the top looks set but the center still glistens a little.
- Rest for 1 minute before eating.
Equipment for This Recipe:
- Large microwave-safe mug
- Spoon
- Measuring spoons
- Microwave
How to Serve This Dish:
Eat it straight from the mug with a spoon, or tip it onto a plate and add a dusting of powdered sugar. A spoonful of jam on the side sounds odd until you try it; the sweet fruit makes the cocoa taste deeper.
Pro Tips for This Recipe:
- Use a mug with straight sides so the cake cooks evenly.
- Stop microwaving early; a mug cake dries out fast.
- Stir well from the bottom, where cocoa likes to hide.
Variations on This Dish:
- Peanut Butter Center: Drop 1 teaspoon peanut butter into the middle before cooking.
- Cherry Chocolate: Stir in 1 tablespoon chopped dried cherries.
- Mocha Mug Cake: Add 1/4 teaspoon espresso powder to the dry ingredients.
Common Mistakes to Avoid with This Dish:
- Using a tiny mug: The batter can overflow in the microwave.
- Cooking too long: One extra 10-second burst can turn it rubbery.
- Skipping the rest time: The cake finishes setting as the steam settles.
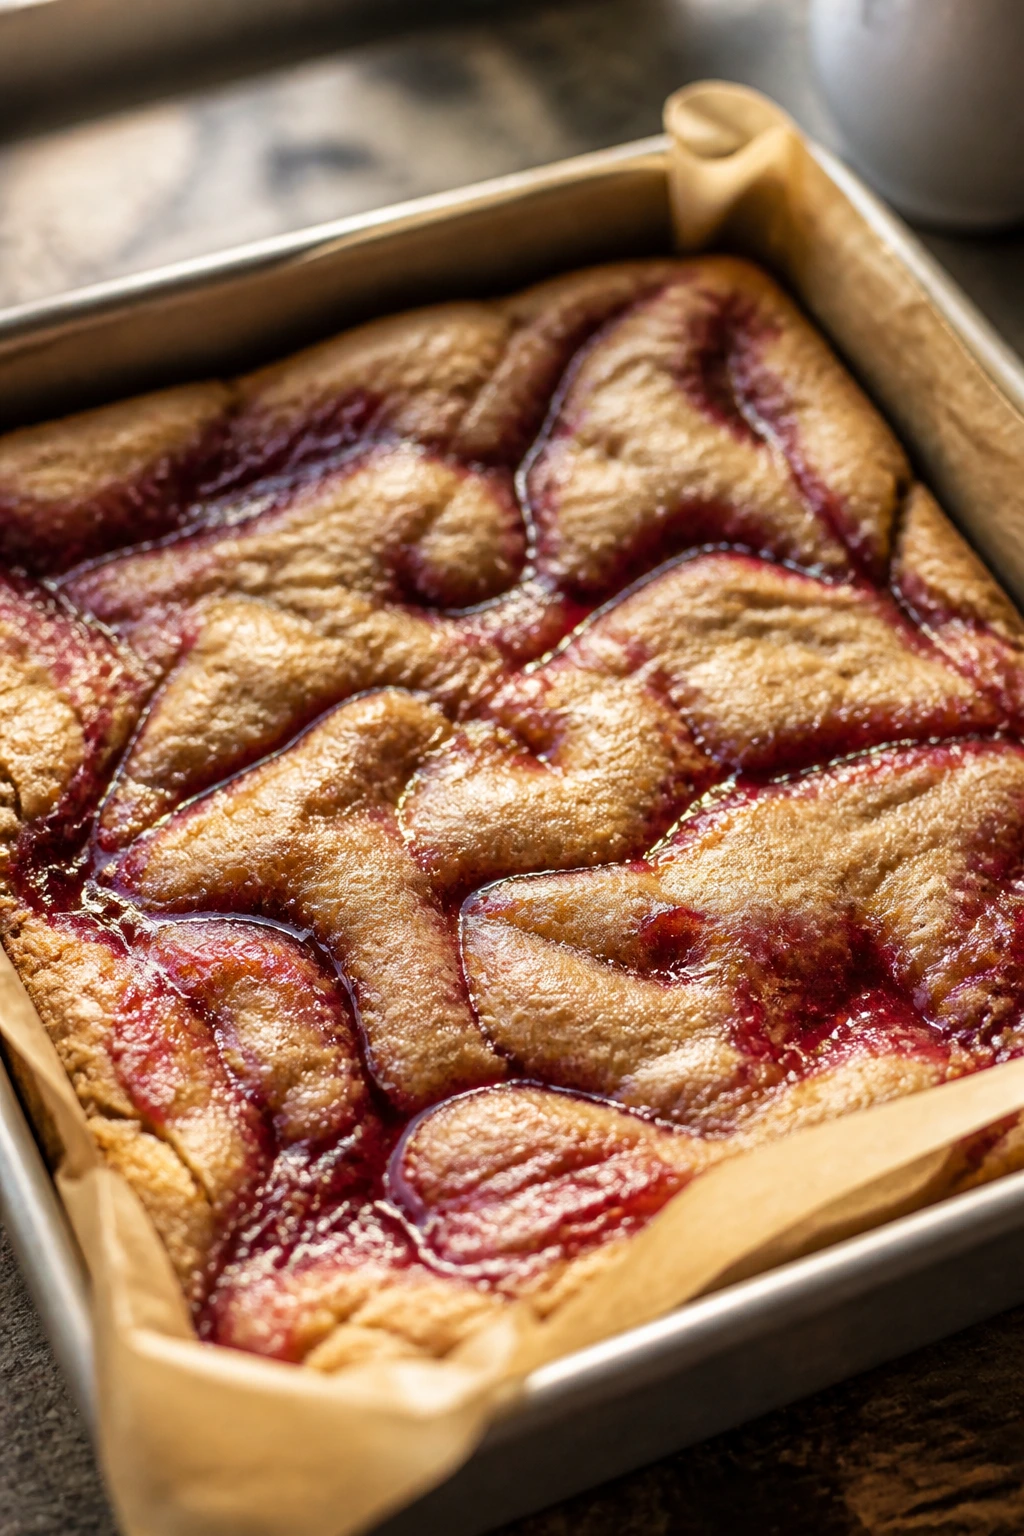
8. Raspberry Oat Crumble Bars
These bars have the kind of texture people remember. Buttery oats on top and bottom, a sticky raspberry layer in the middle, and edges that get a little chewy where the jam bubbles up against the pan.
Why It Works:
Oats and flour create a sturdy base that doubles as the crumble top, so you’re not making two separate components. Raspberry jam bakes into a thicker layer than fresh berries would, which means the bars cut cleanly once they cool.
Key Ingredients:
- 1 1/2 cups old-fashioned oats
- 1 cup all-purpose flour
- 3/4 cup brown sugar
- 1/4 teaspoon fine salt
- 1/2 teaspoon baking soda
- 1/2 cup unsalted butter, melted
- 1 teaspoon vanilla extract
- 1 cup raspberry jam
Quick Steps:
- Heat the oven to 350°F (175°C) and line an 8×8-inch pan with parchment.
- Stir the oats, flour, brown sugar, salt, and baking soda together.
- Add the melted butter and vanilla, mixing until the mixture looks like damp sand.
- Press about two-thirds of the mixture into the pan.
- Spread the jam in an even layer over the base.
- Sprinkle the remaining oat mixture over the jam.
- Bake for 25 to 30 minutes, until the top is golden and the jam bubbles at the edges.
- Cool completely before slicing.
Equipment for This Recipe:
- 8×8-inch baking pan
- Parchment paper
- Mixing bowl
- Spatula
- Cooling rack
How to Serve This Dish:
Cut these into tidy squares and serve them on a platter with a few fresh napkins nearby; the jam layer can be sticky in the best way. A little powdered sugar on top turns the bars into something that feels more like dessert and less like snack food.
Pro Tips for This Recipe:
- Use thick jam rather than thin jelly.
- Press the bottom layer firmly so it doesn’t crumble.
- Let the bars cool all the way or the jam will run.
Variations on This Dish:
- Cherry Oat Bars: Swap in cherry preserves for a deeper red color.
- Apricot Twist: Use apricot jam for a brighter, tangier filling.
- Nutty Crumble: Add 1/3 cup chopped pecans to the oat mixture.
Common Mistakes to Avoid with This Dish:
- Underbaking the base: The bottom needs a little color or it turns sandy.
- Spreading jam too thick: A heavy layer leaks and makes the bars sloppy.
- Cutting while warm: The filling needs time to set.
9. Simple Chocolate Fudge
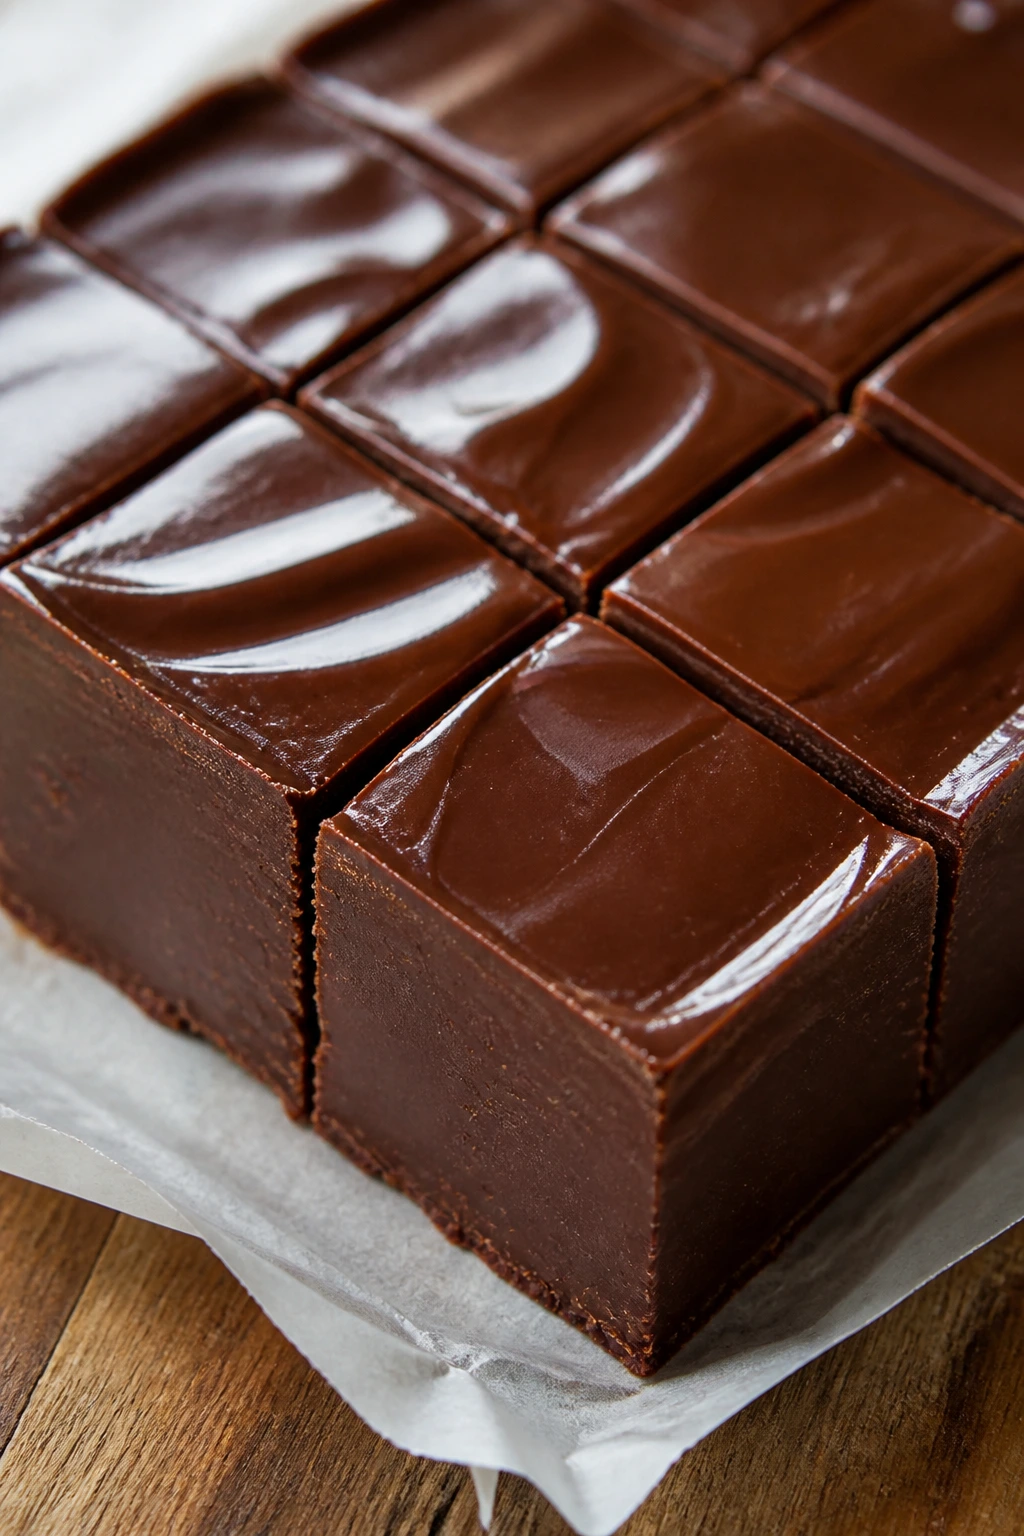
Fudge is one of those desserts that looks polished even when you make it in the smallest possible way. The texture is dense and smooth, the chocolate flavor is deep, and the whole pan can sit in the fridge until you’re ready to cut it into neat little squares.
Why It Works:
Sweetened condensed milk replaces the usual sugar-candy headache and gives the fudge a creamy, stable set. A bit of butter adds gloss, and salt keeps the sweetness from flattening out into one note.
Key Ingredients:
- 3 cups semi-sweet chocolate chips
- 1 can sweetened condensed milk, 14 ounces
- 2 tablespoons unsalted butter
- 1 teaspoon vanilla extract
- 1/4 teaspoon fine salt
Quick Steps:
- Line an 8×8-inch pan with parchment.
- Melt the chocolate chips, condensed milk, and butter together in a saucepan over low heat, stirring constantly.
- As soon as the mixture is smooth, remove it from the heat.
- Stir in the vanilla and salt.
- Spread the fudge into the pan and smooth the top.
- Chill for at least 2 hours, until firm.
- Lift out and cut with a hot knife.
Equipment for This Recipe:
- 8×8-inch pan
- Parchment paper
- Saucepan
- Spatula
- Sharp knife
How to Serve This Dish:
Cut the fudge into small squares; it’s richer than it looks. I like a pinch of flaky salt on top and a few pieces stacked on a narrow plate rather than spread out in a wide pile.
Pro Tips for This Recipe:
- Keep the heat low so the chocolate stays silky.
- Line the pan with overhang for easy lifting.
- Warm the knife between cuts for clean edges.
Variations on This Dish:
- Peppermint Fudge: Stir in 1/4 teaspoon peppermint extract.
- Walnut Fudge: Fold in 1/2 cup chopped walnuts before spreading.
- Swirled Fudge: Marble in 1/4 cup peanut butter before chilling.
Common Mistakes to Avoid with This Dish:
- Boiling the mixture: Heat can make the fudge grainy.
- Using a pan that’s too warm: The chocolate can seize and separate.
- Cutting before it sets: Fudge needs a full chill or it smears.
10. Peanut Butter Blossoms

These cookies are built around a simple trick that still works every time: soft peanut butter dough, a sugar roll, and a chocolate kiss pressed into the middle while the cookie is warm. They’re sweet, a little salty, and very hard to stop eating two at a time.
Why It Works:
Peanut butter gives the dough enough fat to stay tender, while the sugar coating adds a faint crunch on the outside. Pressing the chocolate kiss in right after baking softens it slightly, which makes the whole cookie feel like a single bite instead of two separate parts.
Key Ingredients:
- 1/2 cup unsalted butter, softened
- 1/2 cup creamy peanut butter
- 1/2 cup brown sugar
- 1/4 cup granulated sugar
- 1 large egg
- 1 teaspoon vanilla extract
- 1 3/4 cups all-purpose flour
- 1 teaspoon baking soda
- 1/2 teaspoon fine salt
- 24 chocolate kisses
Quick Steps:
- Heat the oven to 350°F (175°C) and line a baking sheet with parchment.
- Cream the butter, peanut butter, brown sugar, and granulated sugar until smooth.
- Beat in the egg and vanilla.
- Mix in the flour, baking soda, and salt until a soft dough forms.
- Roll the dough into 1-inch balls, then roll each one in sugar.
- Bake for 10 to 12 minutes, until puffed and lightly cracked.
- Press a chocolate kiss into the center of each cookie while they’re still hot.
- Let them cool on the pan for 10 minutes.
Equipment for This Recipe:
- Mixing bowl
- Baking sheet
- Parchment paper
- Cookie scoop
- Cooling rack
How to Serve This Dish:
Pile them in a shallow bowl so the chocolate centers stay visible. They travel well, which makes them a smart choice if you want to send dessert with someone instead of setting out a whole platter.
Pro Tips for This Recipe:
- Unwrap the kisses before baking so you can press them in fast.
- Don’t bake until browned; the cookies should stay pale and soft.
- Roll the dough balls evenly or some kisses sink deeper than others.
Variations on This Dish:
- Dark Chocolate Blossoms: Use dark chocolate kisses for a less sweet finish.
- Crunchy Peanut Butter: Swap in crunchy peanut butter for a little texture.
- Cocoa Roll: Roll the dough in a mix of sugar and cocoa instead of plain sugar.
Common Mistakes to Avoid with This Dish:
- Waiting too long to press the chocolate in: The cookies firm up and crack.
- Overbaking: Dry blossoms lose the soft peanut butter center.
- Using natural peanut butter with a lot of oil: The dough can spread too much.
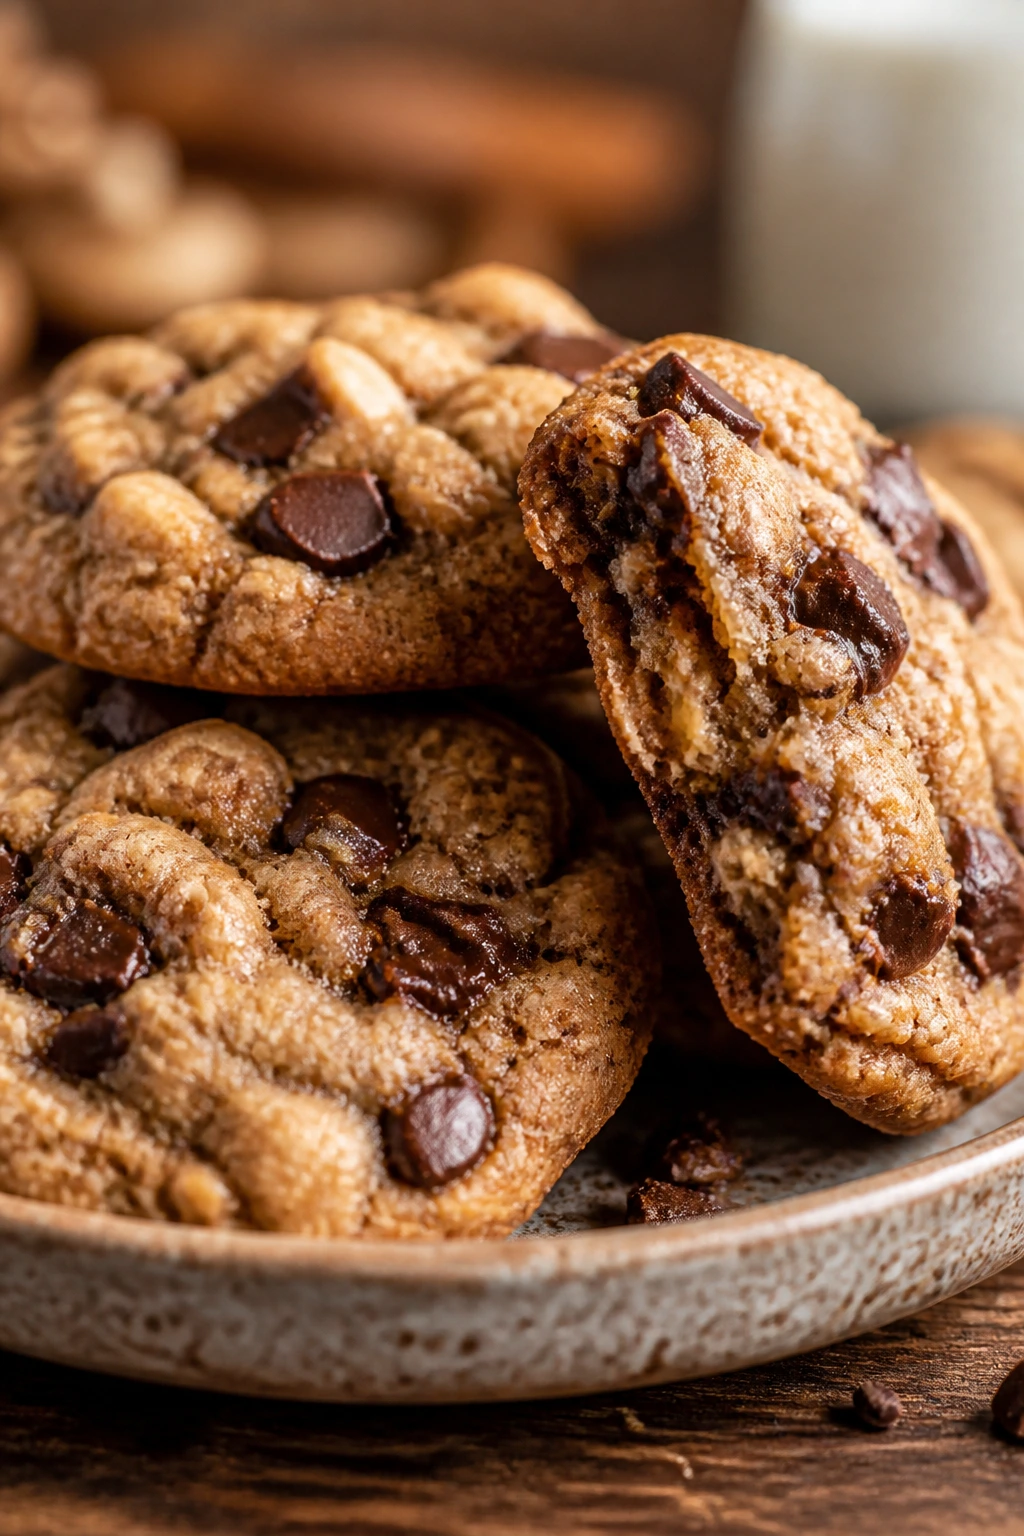
11. Chocolate Chip Skillet Cookie
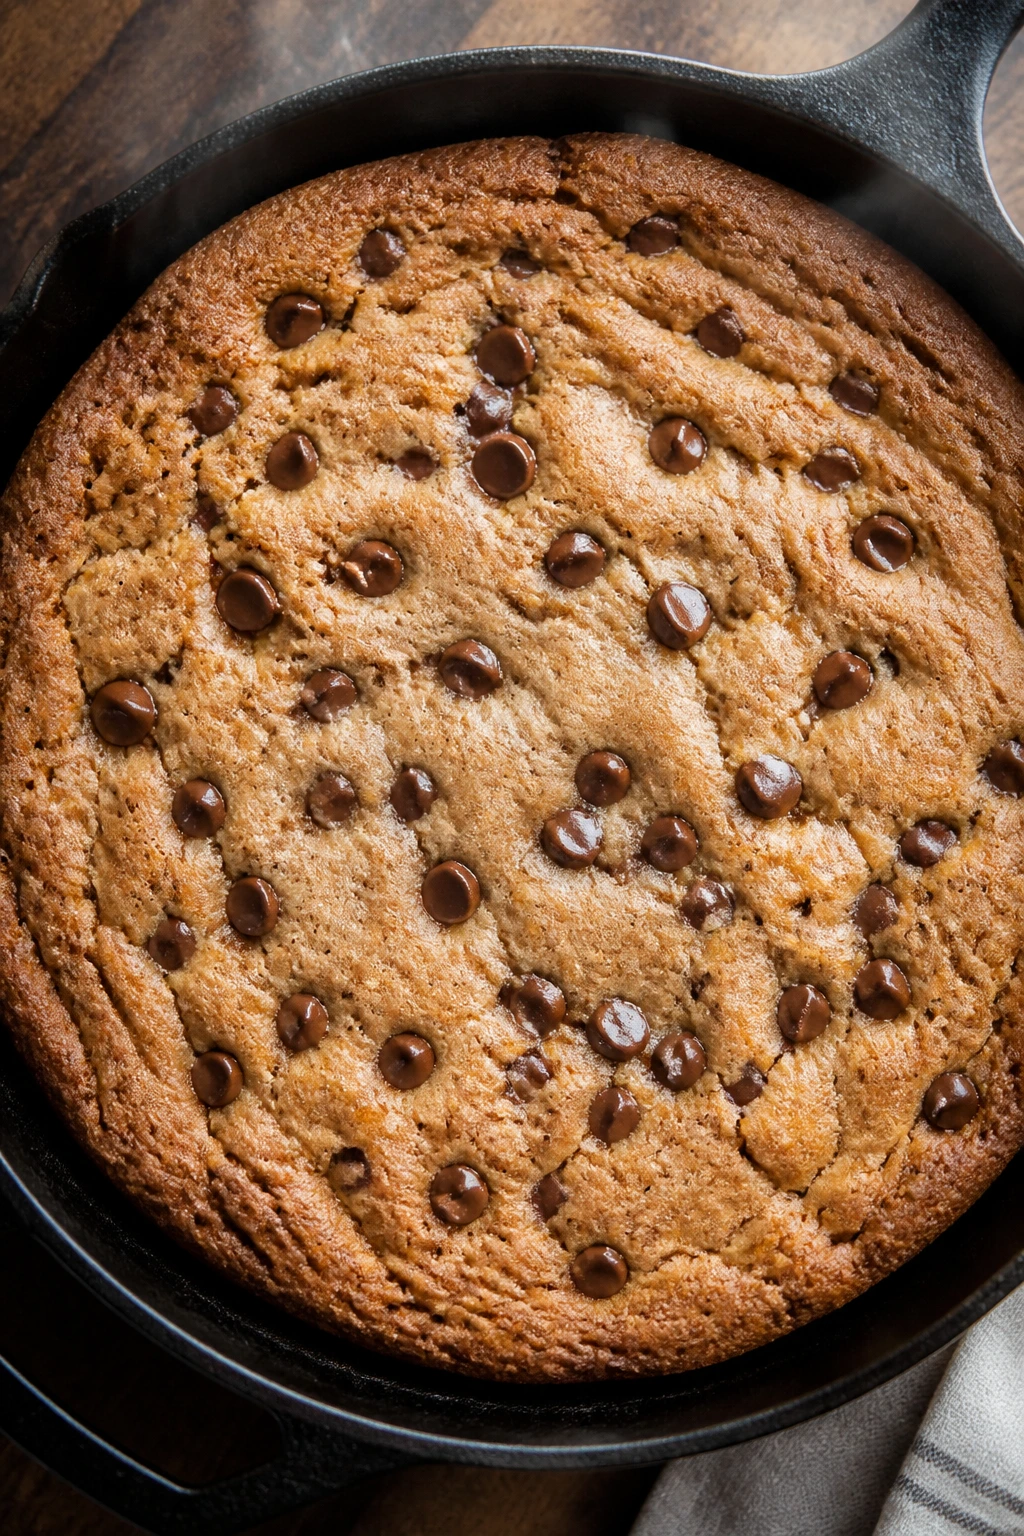
A skillet cookie brings the drama without making the dessert hard to serve. The edges go crisp, the center stays soft, and every spoonful gets a mix of browned butter flavor, melted chocolate, and warm cookie dough that’s just barely set.
Why It Works:
Cast iron holds heat so the edges cook faster than the center, which is exactly what you want here. Brown sugar keeps the dough chewy, and the whole dessert stays soft enough to scoop if you catch it at the right minute.
Key Ingredients:
- 1/2 cup unsalted butter, softened
- 1/2 cup brown sugar
- 1/4 cup granulated sugar
- 1 large egg
- 1 teaspoon vanilla extract
- 1 1/4 cups all-purpose flour
- 1/2 teaspoon baking soda
- 1/2 teaspoon fine salt
- 1 cup chocolate chips
Quick Steps:
- Heat the oven to 375°F (190°C).
- Beat the butter, brown sugar, and granulated sugar until creamy.
- Mix in the egg and vanilla.
- Stir in the flour, baking soda, and salt.
- Fold in the chocolate chips and spread the dough into a greased 10-inch cast-iron skillet.
- Bake for 18 to 20 minutes, until the edges are brown and the center still looks a little soft.
- Rest for 10 minutes before serving.
Equipment for This Recipe:
- 10-inch cast-iron skillet
- Mixing bowl
- Wooden spoon or spatula
- Measuring cups and spoons
- Oven mitts
How to Serve This Dish:
Bring the skillet to the table and scoop it straight into bowls. A little vanilla ice cream is classic, but even without it, the warm chocolate pockets and crisp edges give enough contrast to feel complete.
Pro Tips for This Recipe:
- Grease the skillet well or the edges stick.
- Watch the center; carryover heat keeps baking after it comes out.
- A few extra chips on top make it look more finished.
Variations on This Dish:
- Nutty Skillet Cookie: Add 1/2 cup chopped walnuts or pecans.
- Salted Pretzel Top: Scatter pretzel pieces over the dough before baking.
- Double Chocolate: Replace 1/4 cup flour with cocoa powder.
Common Mistakes to Avoid with This Dish:
- Overbaking until the center is fully set: The texture goes from gooey to dry fast.
- Using a skillet that’s too small: The cookie thickens too much and bakes unevenly.
- Serving immediately: The middle needs a few minutes to settle.
12. Jam Swirl Blondies
Blondies are the sweet, buttery cousin of brownies, and a swirl of jam gives them a Valentine look without turning them into cake. The edges stay chewy, the center stays soft, and the fruit ribbon cuts through the brown sugar flavor in a nice clean line.
Why It Works:
Brown sugar and butter create a dense batter that holds jam without collapsing. A small amount of baking powder gives just enough lift so the bars don’t feel heavy, while the jam bakes into glossy streaks instead of disappearing.
Key Ingredients:
- 1/2 cup unsalted butter, melted
- 1 cup brown sugar
- 1 large egg
- 1 large egg yolk
- 1 teaspoon vanilla extract
- 1 1/4 cups all-purpose flour
- 1/2 teaspoon baking powder
- 1/4 teaspoon fine salt
- 1/3 cup strawberry or cherry jam
Quick Steps:
- Heat the oven to 350°F (175°C) and line an 8×8-inch pan with parchment.
- Whisk the melted butter and brown sugar until smooth.
- Whisk in the egg, yolk, and vanilla.
- Stir in the flour, baking powder, and salt just until combined.
- Spread the batter in the pan.
- Spoon jam over the top and swirl it with a knife.
- Bake for 22 to 25 minutes, until the top is set and the center still has a little give.
- Cool completely before slicing.
Equipment for This Recipe:
- 8×8-inch baking pan
- Parchment paper
- Mixing bowl
- Whisk
- Butter knife for swirling
How to Serve This Dish:
Cut the blondies into squares and line them up in a neat row. The jam swirl makes them pretty enough on their own, but a dusting of powdered sugar gives the top a softer finish.
Pro Tips for This Recipe:
- Use thick jam so the swirl holds its shape.
- Don’t over-swirl; a few visible streaks look better than a pink blur.
- Let the bars cool all the way or they’ll fall apart.
Variations on This Dish:
- Raspberry Ribbon: Use raspberry jam for a brighter color and sharper bite.
- Chocolate Chip Blondies: Fold in 3/4 cup chocolate chips for more richness.
- Almond Jam Blondies: Add 1/2 teaspoon almond extract if you want a bakery-style note.
Common Mistakes to Avoid with This Dish:
- Using too much jam: The bars turn wet in the middle.
- Overmixing the batter: That makes blondies tough instead of chewy.
- Cutting warm: Wait until the pan is cool or the center stays gummy.
13. Cocoa-Dusted Truffles
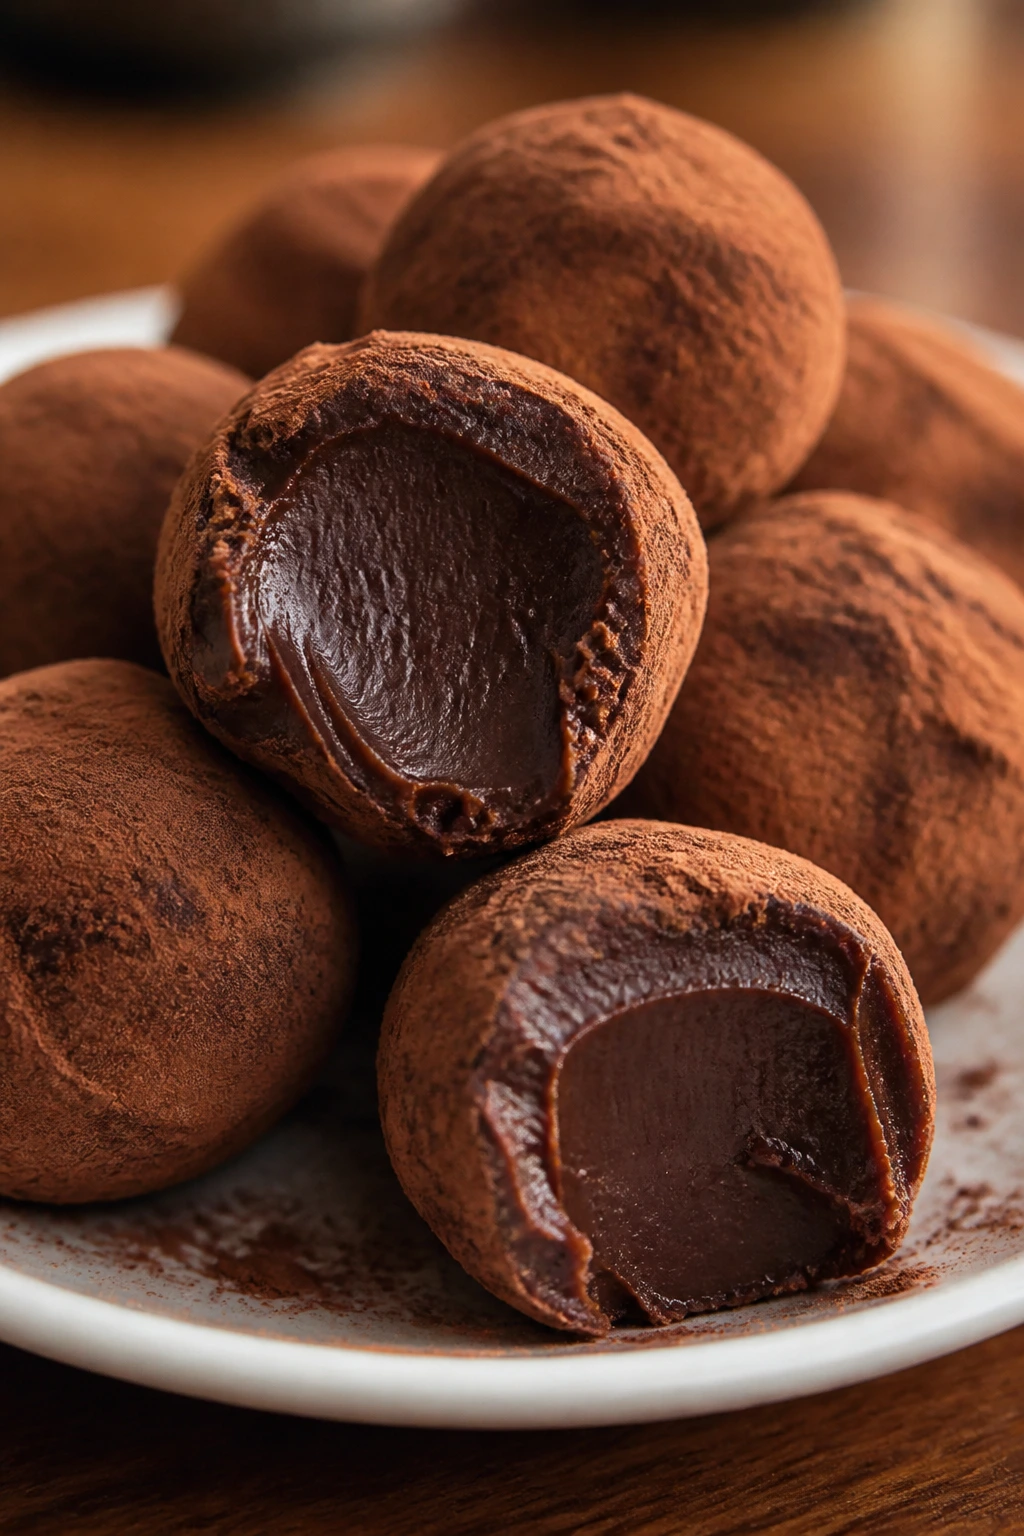
Truffles look fancy in a small, almost old-fashioned way, which is part of their charm. The ganache center is smooth and creamy, the cocoa powder keeps the outside dry enough to handle, and each bite melts before you’ve finished chewing.
Why It Works:
Warm cream melts the chocolate into a ganache that sets firmly after chilling. A little butter makes the filling silkier, and rolling the balls in cocoa powder gives them a dry finish that keeps them from sticking together.
Key Ingredients:
- 8 ounces semi-sweet chocolate chips
- 1/2 cup heavy cream
- 1 tablespoon unsalted butter
- 1 teaspoon vanilla extract
- Pinch of fine salt
- 1/2 cup unsweetened cocoa powder, for rolling
Quick Steps:
- Place the chocolate chips in a heatproof bowl.
- Heat the cream and butter until the edges just begin to bubble.
- Pour the hot cream over the chocolate and let it sit for 2 minutes.
- Stir until smooth, then add the vanilla and salt.
- Chill the ganache for 1 to 2 hours, until scoopable.
- Scoop into small balls and roll quickly between your palms.
- Roll the truffles in cocoa powder and chill again for 20 minutes.
Equipment for This Recipe:
- Heatproof bowl
- Small saucepan
- Spoon or small scoop
- Baking sheet or plate
- Cocoa powder for dusting
How to Serve This Dish:
Set them in tiny paper cups if you have them, or simply arrange them in a single layer on a chilled plate. They taste richest after 10 minutes at room temperature, when the center softens a little.
Pro Tips for This Recipe:
- Use a small scoop so the truffles stay even.
- Chill the ganache only until firm enough to roll; too cold and it cracks.
- Dust your hands lightly with cocoa if the mixture gets sticky.
Variations on This Dish:
- Orange Truffles: Add 1 teaspoon orange zest to the ganache.
- Espresso Truffles: Stir in 1/2 teaspoon espresso powder with the cream.
- Coconut Finish: Roll the truffles in shredded coconut instead of cocoa.
Common Mistakes to Avoid with This Dish:
- Overheating the cream: Hot enough to bubble at the edge is enough.
- Rolling before the ganache is firm: The mixture turns into a mess.
- Using weak chocolate: Truffles are only as good as the chocolate you melt.
14. Vanilla Rice Pudding with Cinnamon
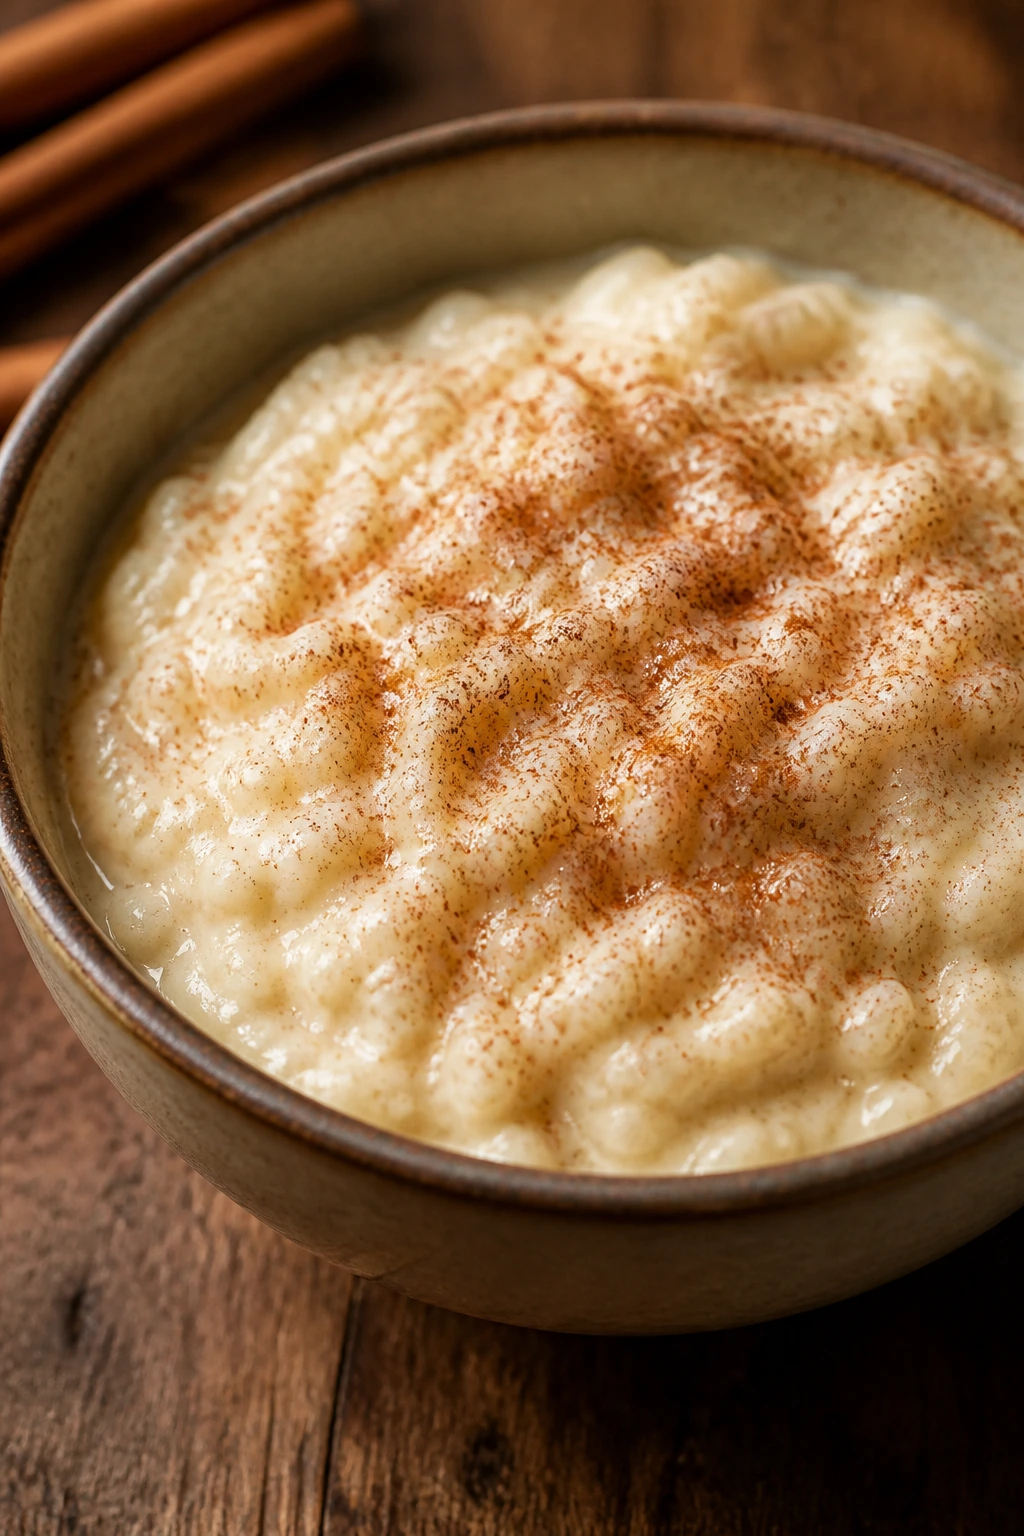
Rice pudding isn’t flashy, and that’s exactly why it works. It’s soft, warm, and comforting in a way that feels old-fashioned without being dull, and cinnamon gives it enough edge to keep each spoonful interesting.
Why It Works:
Slow simmering breaks the rice down just enough to thicken the milk naturally. Sugar and vanilla keep the flavor gentle, while a pinch of salt stops the pudding from tasting flat or milky.
Key Ingredients:
- 1/2 cup long-grain white rice
- 4 cups whole milk
- 1/3 cup granulated sugar
- 1/4 teaspoon fine salt
- 1 teaspoon vanilla extract
- 1 teaspoon ground cinnamon
- 1/4 cup raisins or dried cherries, optional
Quick Steps:
- Combine the rice, milk, sugar, and salt in a heavy saucepan.
- Bring the mixture to a gentle simmer over medium-low heat.
- Cook for 35 to 40 minutes, stirring often, until the rice is tender and the pudding coats a spoon.
- Stir in the vanilla, cinnamon, and raisins or dried cherries if using.
- Let it stand for 10 minutes to thicken before serving.
Equipment for This Recipe:
- Heavy saucepan
- Wooden spoon
- Measuring cups
- Serving bowls
How to Serve This Dish:
Serve it warm in small bowls with an extra sprinkle of cinnamon on top. A spoonful of cherry preserves swirled in at the table gives it a Valentine look and adds a nice sharp note.
Pro Tips for This Recipe:
- Stir often so the milk doesn’t scorch.
- Keep the heat gentle; boiling hard makes the pudding grab and stick.
- It thickens as it cools, so stop while it still looks a touch loose.
Variations on This Dish:
- Chocolate Rice Pudding: Stir in 2 tablespoons cocoa powder with the sugar.
- Cardamom Version: Add 1/4 teaspoon cardamom for a warmer spice note.
- Cherry Pudding: Fold in chopped dried cherries for color and chew.
Common Mistakes to Avoid with This Dish:
- Cooking on high heat: Scorched milk ruins the whole pot.
- Walking away: Rice pudding needs attention.
- Serving too soon: It needs a little time to settle into the right texture.
15. Cherry Cobbler with Biscuit Lid
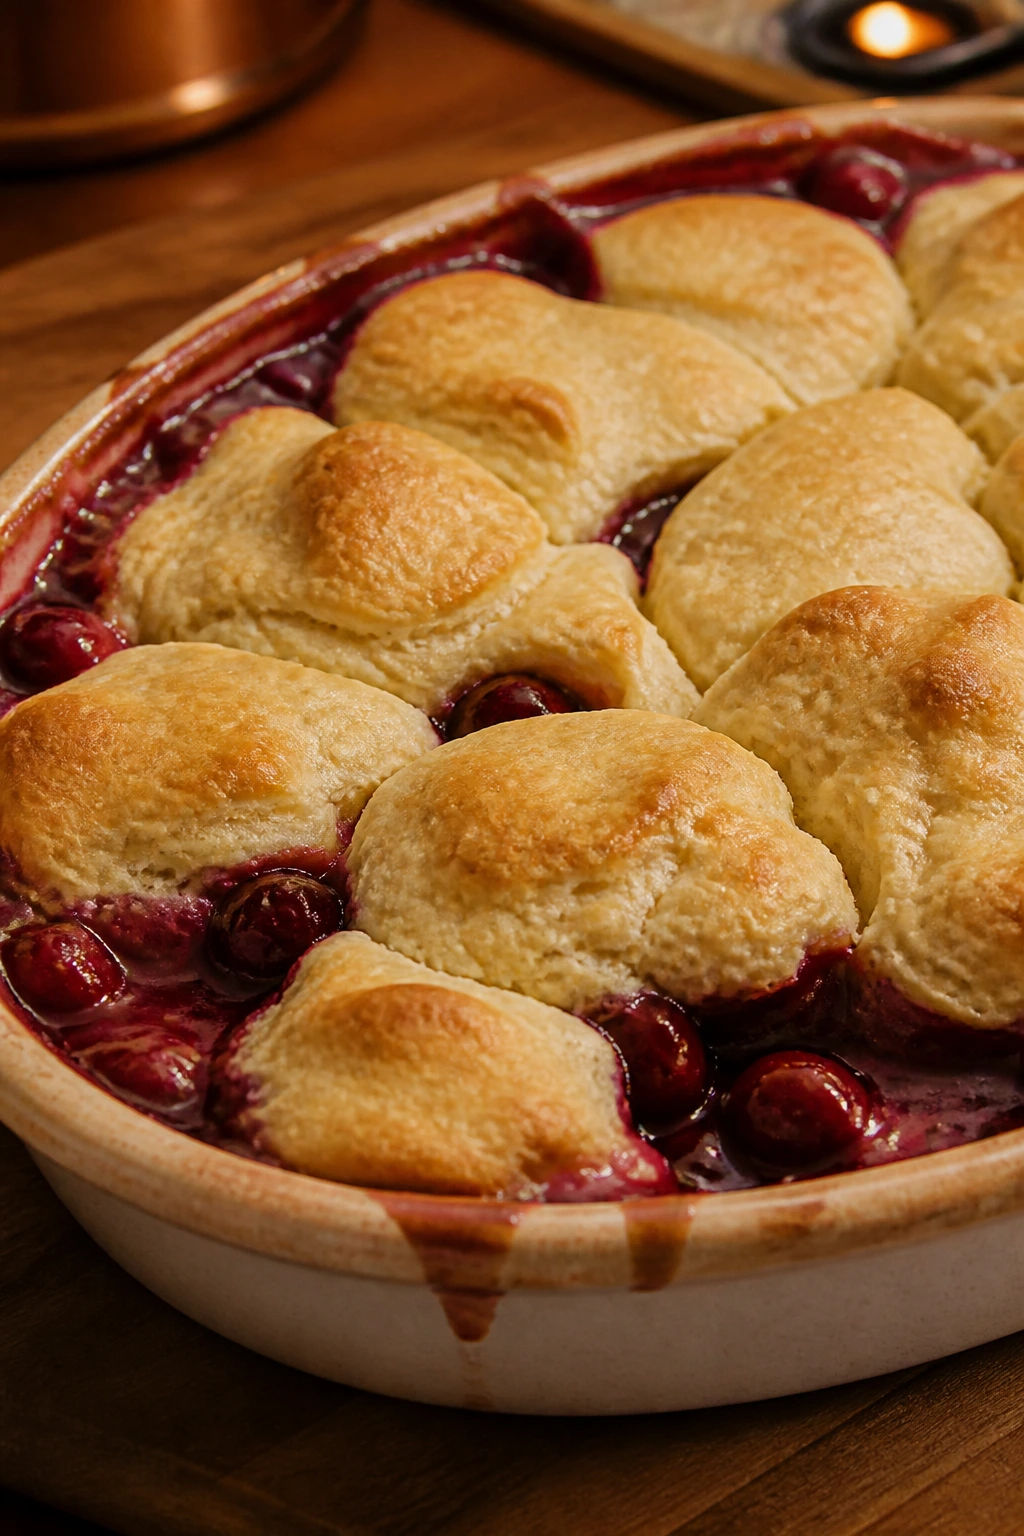
This is the kind of dessert that fills the kitchen with the smell of butter and fruit before anyone touches a spoon. The cherry filling bubbles up around the biscuit topping, and the contrast between soft fruit and crisp golden crust is the whole show.
Why It Works:
Canned cherry filling saves time and still gives you that ruby-red center. The biscuit dough bakes fast enough to stay light, and the fruit juices steam up into the top layer so the bottom of the topping stays tender instead of dry.
Key Ingredients:
- 2 cans cherry pie filling, 21 ounces each
- 1 cup all-purpose flour
- 1/2 cup granulated sugar
- 1 1/2 teaspoons baking powder
- 1/4 teaspoon fine salt
- 6 tablespoons unsalted butter, cold and diced
- 1/2 cup milk
- 1 teaspoon vanilla extract
Quick Steps:
- Heat the oven to 375°F (190°C) and grease an 8×8-inch baking dish.
- Spread the cherry filling in the dish.
- Whisk the flour, sugar, baking powder, and salt in a bowl.
- Cut in the cold butter until the mixture looks like coarse crumbs.
- Stir in the milk and vanilla just until the dough comes together.
- Drop spoonfuls of dough over the cherry filling.
- Bake for 30 to 35 minutes, until the topping is golden and the fruit bubbles at the edges.
- Rest for 10 minutes before serving.
Equipment for This Recipe:
- 8×8-inch baking dish
- Mixing bowl
- Pastry cutter or fork
- Spoon
- Cooling rack
How to Serve This Dish:
Scoop the cobbler into shallow bowls so the cherry juices spread a little around the biscuit pieces. A spoonful of whipped cream or a scoop of vanilla ice cream is classic, but the filling is bold enough to stand on its own.
Pro Tips for This Recipe:
- Keep the butter cold for a lighter biscuit topping.
- Leave gaps between the dough spoonfuls so steam can escape.
- Don’t overmix the biscuit dough or it turns dense.
Variations on This Dish:
- Cherry-Almond Cobbler: Add 1/2 teaspoon almond extract to the biscuit dough.
- Mixed Berry Version: Use a second can of berry filling if you want more tartness.
- Spiced Cobbler: Add 1/4 teaspoon cinnamon to the biscuit topping.
Common Mistakes to Avoid with This Dish:
- Covering the filling completely: The topping needs a few open spots to bake well.
- Using warm butter in the biscuit dough: That makes the topping greasy.
- Serving immediately: The juices need a few minutes to thicken.
16. Coconut Macaroons
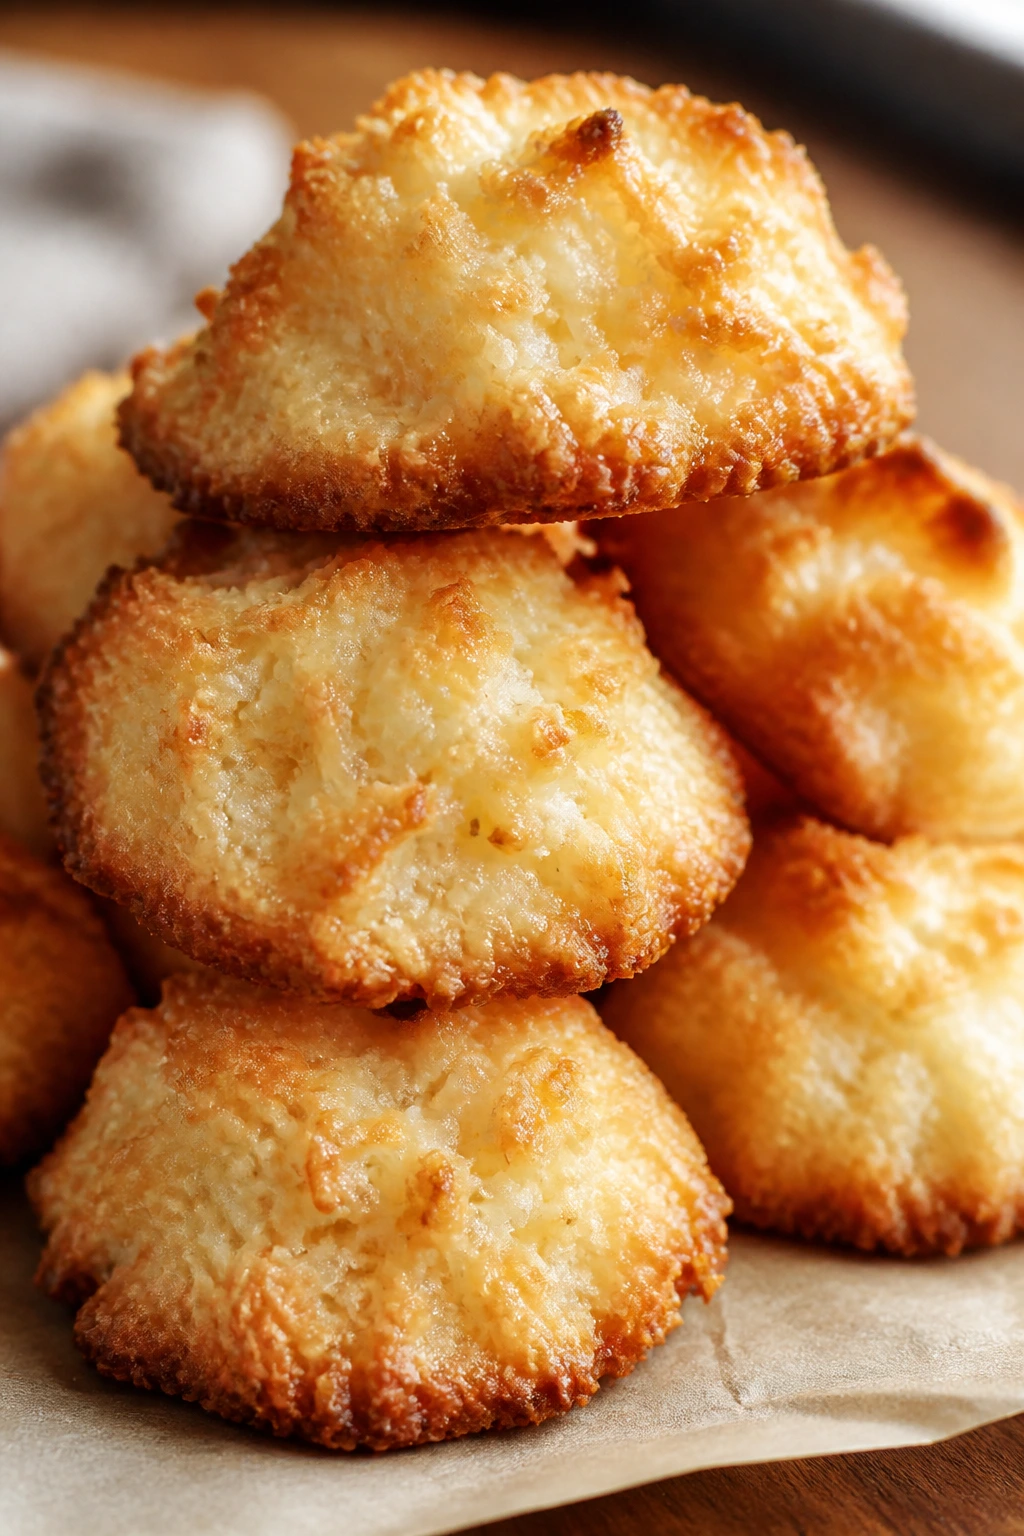
Coconut macaroons are crisp on the outside, chewy in the middle, and not nearly as fussy as they look. They’re also one of the few desserts here that can feel naturally white and gold, which is a nice visual break on a red-and-chocolate-heavy table.
Why It Works:
Egg whites bind the shredded coconut without much added flour, so the cookies keep their distinctive texture. Sugar melts into the coconut as it bakes, giving the edges a caramelized finish while the centers stay soft.
Key Ingredients:
- 4 cups sweetened shredded coconut
- 2/3 cup granulated sugar
- 4 large egg whites
- 1 teaspoon vanilla extract
- 1/4 teaspoon fine salt
- 1/2 cup semi-sweet chocolate chips, optional for drizzling
Quick Steps:
- Heat the oven to 325°F (165°C) and line a baking sheet with parchment.
- Stir the coconut, sugar, egg whites, vanilla, and salt in a bowl until evenly coated.
- Scoop the mixture into mounds and pack each one lightly.
- Bake for 20 to 22 minutes, until the tops and edges are golden.
- Cool completely, then drizzle with melted chocolate if you want.
Equipment for This Recipe:
- Mixing bowl
- Baking sheet
- Parchment paper
- Cookie scoop or spoon
- Small bowl for melting chocolate
How to Serve This Dish:
Arrange them in a loose circle and let the uneven peaks do the decorating. They pair well with coffee or black tea, and a chocolate drizzle makes them feel more holiday-ready without much extra work.
Pro Tips for This Recipe:
- Pack the mounds lightly so they hold together.
- Bake until the edges color; pale macaroons taste gummy.
- Let them cool before moving them, or they can stick.
Variations on This Dish:
- Chocolate-Dipped Base: Dip the bottoms in melted chocolate after cooling.
- Cherry Coconut: Stir in 1/4 cup finely chopped dried cherries.
- Lemon Coconut: Add 1 teaspoon lemon zest for a brighter finish.
Common Mistakes to Avoid with This Dish:
- Using unsweetened coconut without adjusting sugar: The texture gets dry and the flavor drops flat.
- Underbaking: Pale macaroons can feel sticky in the middle.
- Trying to move them too soon: They need to set before they leave the tray.
17. Molasses Spice Cookies
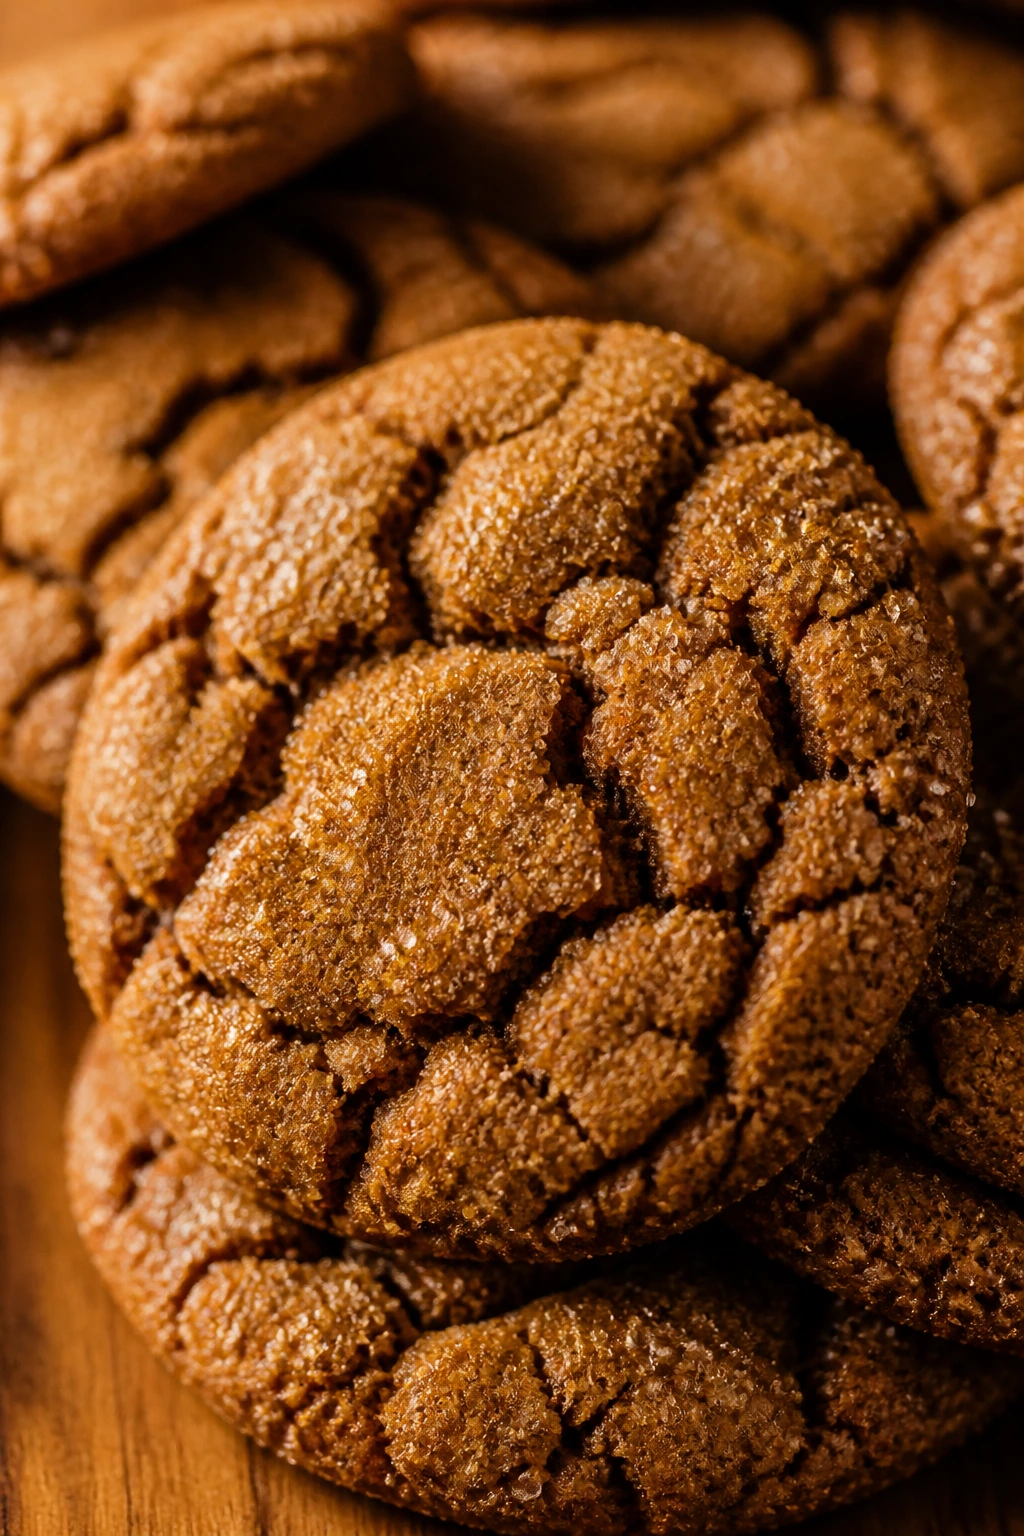
These cookies smell like warm cabinets and dark sugar. They’re soft in the middle, a little crackly on top, and they bring a spiced depth that makes a Valentine dessert tray feel less one-dimensional.
Why It Works:
Molasses keeps the cookies moist and gives them that dark, almost chewy center. Ginger, cinnamon, and cloves sharpen the sweetness, while rolling the dough in sugar creates a crisp outer shell that breaks nicely when you bite into it.
Key Ingredients:
- 3/4 cup unsalted butter, softened
- 1 cup brown sugar
- 1/3 cup molasses
- 1 large egg
- 2 1/4 cups all-purpose flour
- 2 teaspoons ground ginger
- 1 teaspoon ground cinnamon
- 1/2 teaspoon ground cloves
- 1 teaspoon baking soda
- 1/2 teaspoon fine salt
- 1/3 cup granulated sugar, for rolling
Quick Steps:
- Heat the oven to 350°F (175°C) and line a baking sheet with parchment.
- Cream the butter and brown sugar until fluffy.
- Beat in the molasses and egg.
- Stir in the flour, ginger, cinnamon, cloves, baking soda, and salt.
- Chill the dough for 20 minutes, then roll it into balls.
- Roll each ball in granulated sugar.
- Bake for 10 to 12 minutes, until the tops crack and the centers still look soft.
- Cool on the pan for 5 minutes.
Equipment for This Recipe:
- Mixing bowl
- Hand mixer or spoon
- Baking sheet
- Parchment paper
- Cookie scoop
How to Serve This Dish:
These work well beside a dark chocolate dessert because the spices add a different kind of warmth. I like them stacked three high on a small plate with a few sugar crystals scattered around the base.
Pro Tips for This Recipe:
- Chill the dough so the cookies don’t spread too much.
- Roll them generously in sugar for that classic crackled top.
- Pull them when they still look a little underbaked in the center.
Variations on This Dish:
- Orange Spice: Add 1 teaspoon orange zest to the dough.
- Black Pepper Ginger: Add a tiny pinch of black pepper for extra bite.
- Iced Top: Drizzle cooled cookies with a thin vanilla glaze.
Common Mistakes to Avoid with This Dish:
- Using too much molasses: The dough becomes too wet and sticky.
- Baking until firm all over: These cookies should stay soft in the middle.
- Skipping the sugar roll: It helps form the crackled surface.
18. Chocolate Chip Biscotti
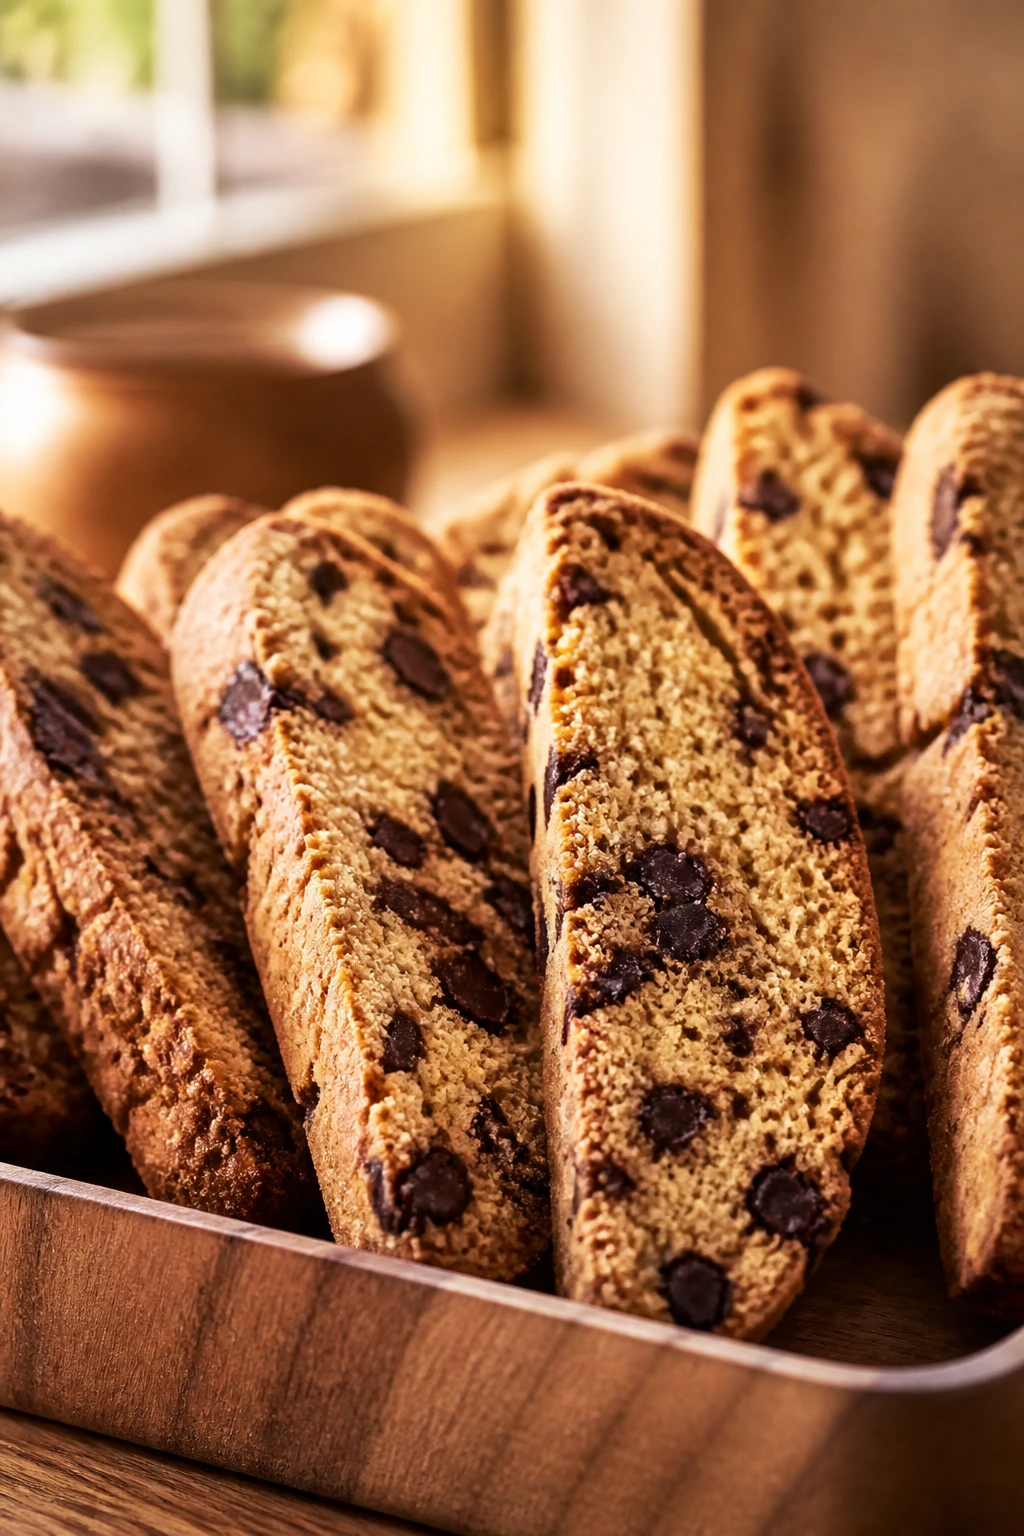
Biscotti are for people who like a cookie with a little structure. These are crisp, not dry, and the chocolate chips melt into the dough in small dark streaks that make every slice look a little handmade, which is exactly right here.
Why It Works:
Baking the dough twice pulls out moisture and creates that firm texture that stands up to coffee or milk. The first bake sets the loaf shape, and the second one dries the slices just enough to keep them snappy without turning them tooth-breakingly hard.
Key Ingredients:
- 2 cups all-purpose flour
- 3/4 cup granulated sugar
- 1 teaspoon baking powder
- 1/2 teaspoon fine salt
- 2 large eggs
- 1/4 cup unsalted butter, melted
- 1 teaspoon vanilla extract
- 3/4 cup chocolate chips
- 1/2 cup chopped nuts, optional
Quick Steps:
- Heat the oven to 350°F (175°C) and line a baking sheet with parchment.
- Whisk the flour, sugar, baking powder, and salt.
- Stir in the eggs, melted butter, and vanilla until a sticky dough forms.
- Fold in the chocolate chips and nuts if using.
- Shape the dough into a flat log on the pan.
- Bake for 24 to 26 minutes, until lightly golden.
- Cool for 10 minutes, then slice diagonally into sticks.
- Bake the slices for 8 to 10 minutes per side until dry and crisp.
Equipment for This Recipe:
- Baking sheet
- Parchment paper
- Sharp serrated knife
- Mixing bowl
- Cooling rack
How to Serve This Dish:
Serve biscotti with coffee, hot chocolate, or even a small bowl of melted chocolate for dipping. Their long shape makes them good for a plate lined with parchment or folded napkins.
Pro Tips for This Recipe:
- Slice while warm so the cuts are clean.
- Use a serrated knife to avoid crumbling.
- Leave space between slices on the second bake so the edges dry properly.
Variations on This Dish:
- Chocolate Almond Biscotti: Use sliced almonds and a little almond extract.
- Cocoa Biscotti: Replace 1/4 cup flour with cocoa powder.
- Dipped Ends: Dip cooled biscotti in melted chocolate for a sweeter finish.
Common Mistakes to Avoid with This Dish:
- Slicing too late: The loaf hardens and cracks.
- Underbaking the second round: The centers stay soft and stale faster.
- Making the log too thick: Thick biscotti bake unevenly.
19. Oatmeal Chocolate Chunk Cookies
These are chewy cookies with enough oat texture to feel substantial, but not so much that they turn into granola in disguise. The brown sugar keeps them soft, the chocolate chunks melt in uneven puddles, and the cinnamon gives the whole batch a warm edge.
Why It Works:
Old-fashioned oats stay toothsome after baking, which makes the cookie feel chewy instead of crumbly. Brown sugar and a little cinnamon keep the flavor grounded, while chocolate chunks melt more loosely than chips and leave better pockets.
Key Ingredients:
- 1/2 cup unsalted butter, softened
- 1/2 cup brown sugar
- 1/3 cup granulated sugar
- 1 large egg
- 1 teaspoon vanilla extract
- 1 1/4 cups all-purpose flour
- 1 teaspoon ground cinnamon
- 1/2 teaspoon baking soda
- 1/2 teaspoon fine salt
- 2 cups old-fashioned oats
- 1 cup chocolate chunks
Quick Steps:
- Heat the oven to 350°F (175°C) and line a baking sheet with parchment.
- Cream the butter and sugars until smooth.
- Beat in the egg and vanilla.
- Stir in the flour, cinnamon, baking soda, and salt.
- Fold in the oats and chocolate chunks.
- Scoop onto the pan and flatten each mound just a little.
- Bake for 10 to 12 minutes, until the edges are golden and the centers still look soft.
- Cool on the pan for 5 minutes.
Equipment for This Recipe:
- Mixing bowl
- Cookie scoop
- Baking sheet
- Parchment paper
- Cooling rack
How to Serve This Dish:
These are good on their own, which is one reason I keep making them. If you want to make them feel more like a holiday dessert, stack them beside a few chocolate crinkles and use a little cocoa dusting on the plate.
Pro Tips for This Recipe:
- Use old-fashioned oats, not quick oats, for better chew.
- Let the dough rest 10 minutes if it feels loose.
- Pull them when the centers still look a touch underdone.
Variations on This Dish:
- Cranberry Oat Cookies: Swap in dried cranberries for some of the chocolate chunks.
- Walnut Oat Cookies: Add 1/2 cup chopped walnuts.
- Salted Chocolate: Finish with a pinch of flaky salt after baking.
Common Mistakes to Avoid with This Dish:
- Using quick oats without adjusting texture: The cookies turn softer and less chewy.
- Overpacking the flour: The dough gets dry.
- Overbaking until crisp: These should stay chewy in the center.
20. Cocoa Marble Pound Cake
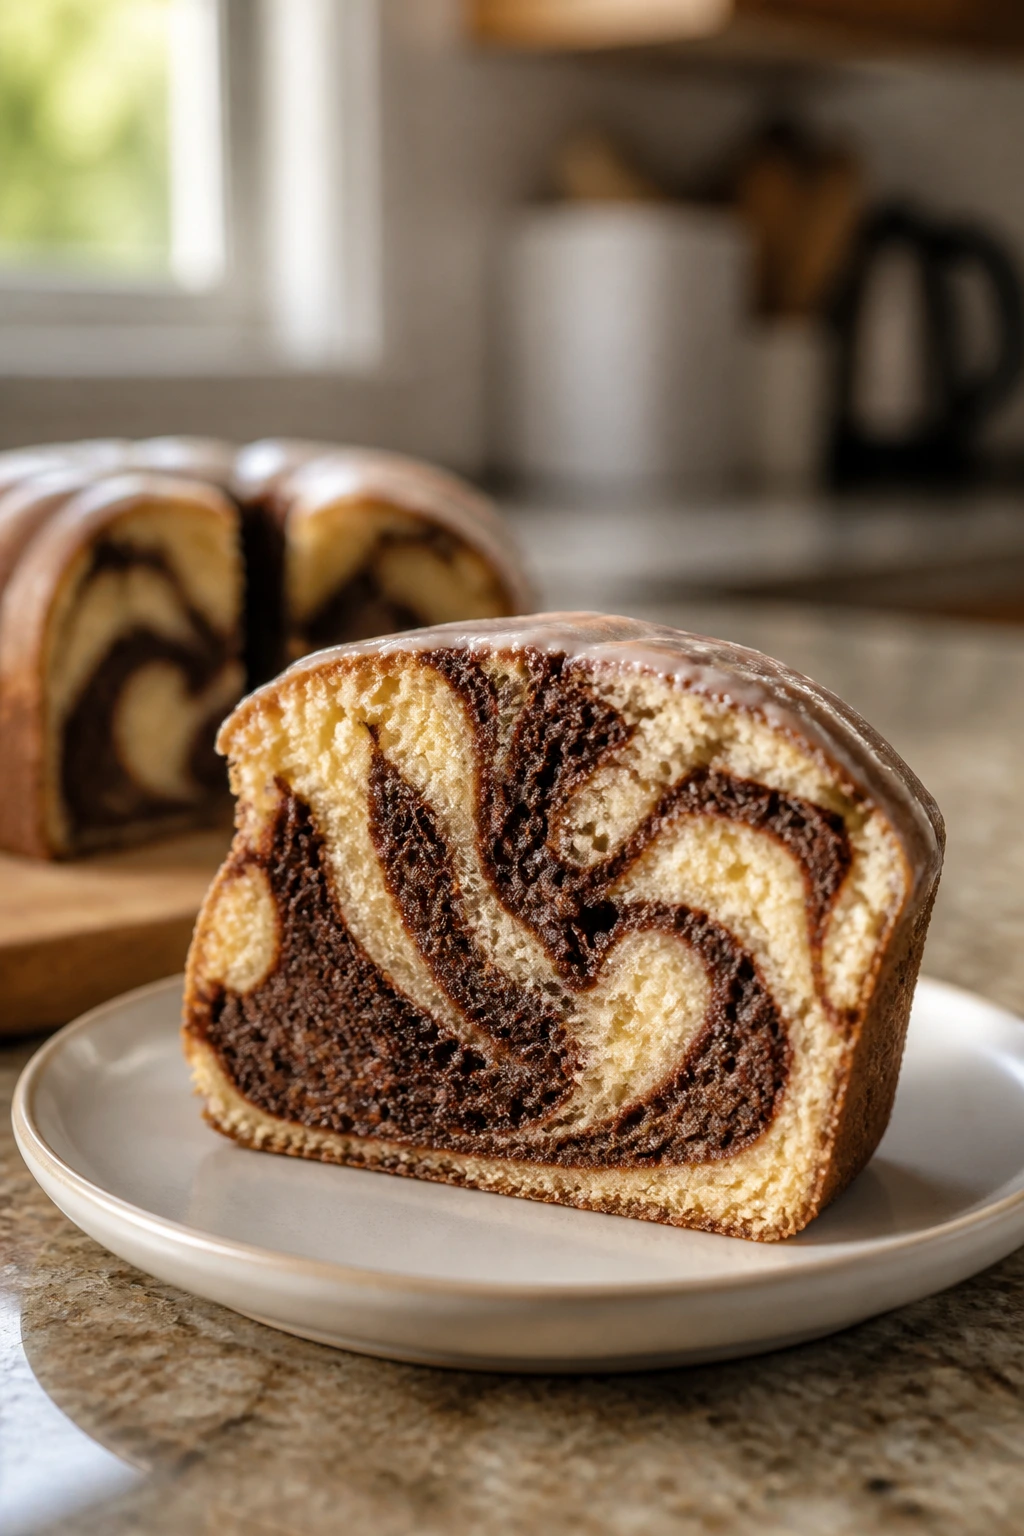
Pound cake is quietly luxurious in a way that fancy layer cakes sometimes aren’t. The vanilla batter bakes up fine and buttery, the cocoa swirl gives each slice a dark ribbon, and a thin glaze or powdered sugar is enough to finish it.
Why It Works:
The batter is rich with butter and eggs, which gives the cake its tight, tender crumb. Swirling in cocoa batter creates contrast without needing extra frosting, and that makes the cake easy to slice neatly for a dessert plate.
Key Ingredients:
- 1 cup unsalted butter, softened
- 1 3/4 cups granulated sugar
- 4 large eggs
- 2 cups all-purpose flour
- 1 teaspoon baking powder
- 1/2 teaspoon fine salt
- 1/2 cup milk
- 1 teaspoon vanilla extract
- 1/4 cup unsweetened cocoa powder
Quick Steps:
- Heat the oven to 350°F (175°C) and grease a loaf pan or small Bundt pan.
- Cream the butter and sugar until pale and fluffy.
- Beat in the eggs one at a time.
- Stir together the flour, baking powder, and salt.
- Add the dry ingredients to the butter mixture in batches, alternating with the milk and vanilla.
- Scoop about one-third of the batter into a separate bowl and mix in the cocoa powder.
- Layer the two batters and swirl lightly with a knife.
- Bake for 55 to 65 minutes, until a toothpick comes out clean.
- Cool in the pan for 15 minutes, then turn out and cool fully.
Equipment for This Recipe:
- Loaf pan or small Bundt pan
- Mixing bowls
- Hand mixer
- Spatula
- Cooling rack
How to Serve This Dish:
Slice it thick and serve it with a cup of coffee or hot tea. A dusting of powdered sugar across the top makes the cocoa marbling show up better, especially if you slice it at the table.
Pro Tips for This Recipe:
- Bring the butter and eggs to room temperature so the batter emulsifies.
- Don’t over-swirl; you want streaks, not one muddy color.
- Check the center well before pulling it from the oven.
Variations on This Dish:
- Chocolate Orange Pound Cake: Add 1 teaspoon orange zest to the vanilla batter.
- Almond Marble Cake: Swap 1/2 teaspoon of the vanilla for almond extract.
- Mini Loaves: Divide the batter into smaller pans and reduce the bake time.
Common Mistakes to Avoid with This Dish:
- Undercreaming the butter and sugar: The cake turns tight.
- Pulling it before the center sets: Pound cake can look done on top and still be wet inside.
- Rushing the cool-down: Warm pound cake breaks when sliced.
21. Peanut Butter Pretzel Bark
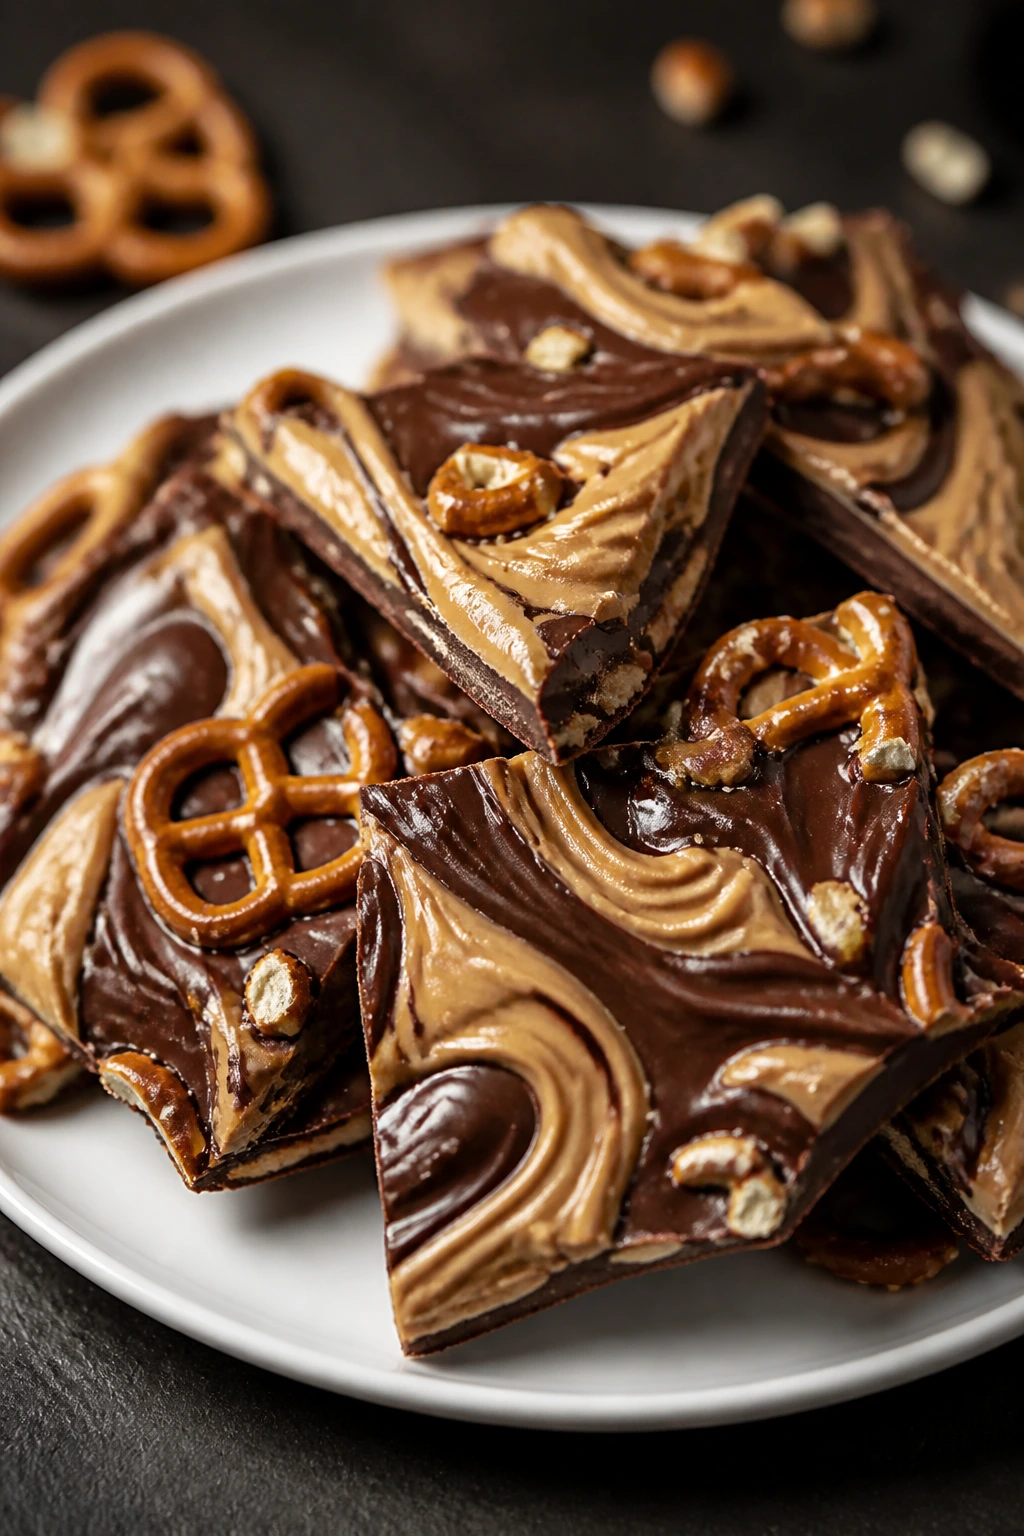
This bark brings salt into the picture, which is a smart move after all the sweet cookies and fudge. The pretzels crack under your teeth, the chocolate sets hard, and the peanut butter swirls into ribbons that make every piece look different.
Why It Works:
Melted chocolate forms the base, peanut butter softens the top, and pretzels bring crunch and salt. The whole thing sets in the fridge without needing any oven time, which makes it a reliable last-minute dessert.
Key Ingredients:
- 12 ounces semi-sweet chocolate chips
- 3/4 cup creamy peanut butter
- 1 cup pretzel pieces
- 1/4 cup chopped peanuts, optional
- Flaky salt, for finishing
Quick Steps:
- Line a baking sheet with parchment.
- Melt the chocolate chips until smooth.
- Spread the chocolate into a thin layer on the sheet.
- Warm the peanut butter slightly so it drizzles, then spoon it over the chocolate.
- Swirl lightly with a knife.
- Scatter pretzel pieces and chopped peanuts over the top.
- Sprinkle with flaky salt and chill until set.
- Break into shards.
Equipment for This Recipe:
- Baking sheet
- Parchment paper
- Microwave-safe bowl or saucepan
- Knife for swirling
- Offset spatula or spoon
How to Serve This Dish:
Pile the bark into a bowl rather than arranging every shard perfectly. The rough edges are part of the charm, and the salt catches the eye enough that it doesn’t need extra decoration.
Pro Tips for This Recipe:
- Use thin layers or the bark becomes hard to bite cleanly.
- Add the pretzels before the chocolate sets.
- Break it by hand for a more natural shape.
Variations on This Dish:
- White-Chocolate Swirl: Add a few stripes of melted white chocolate across the top.
- Cherry Pretzel Bark: Toss in chopped dried cherries for a sweeter, red-accented version.
- Nut-Free Bark: Skip the peanuts and use just pretzels and chocolate.
Common Mistakes to Avoid with This Dish:
- Spreading the chocolate too thick: Thick bark cracks awkwardly.
- Adding wet toppings: Any moisture can make the chocolate seize.
- Not chilling long enough: Soft bark bends instead of breaking.
22. Meringue Kisses with Cocoa Drizzle
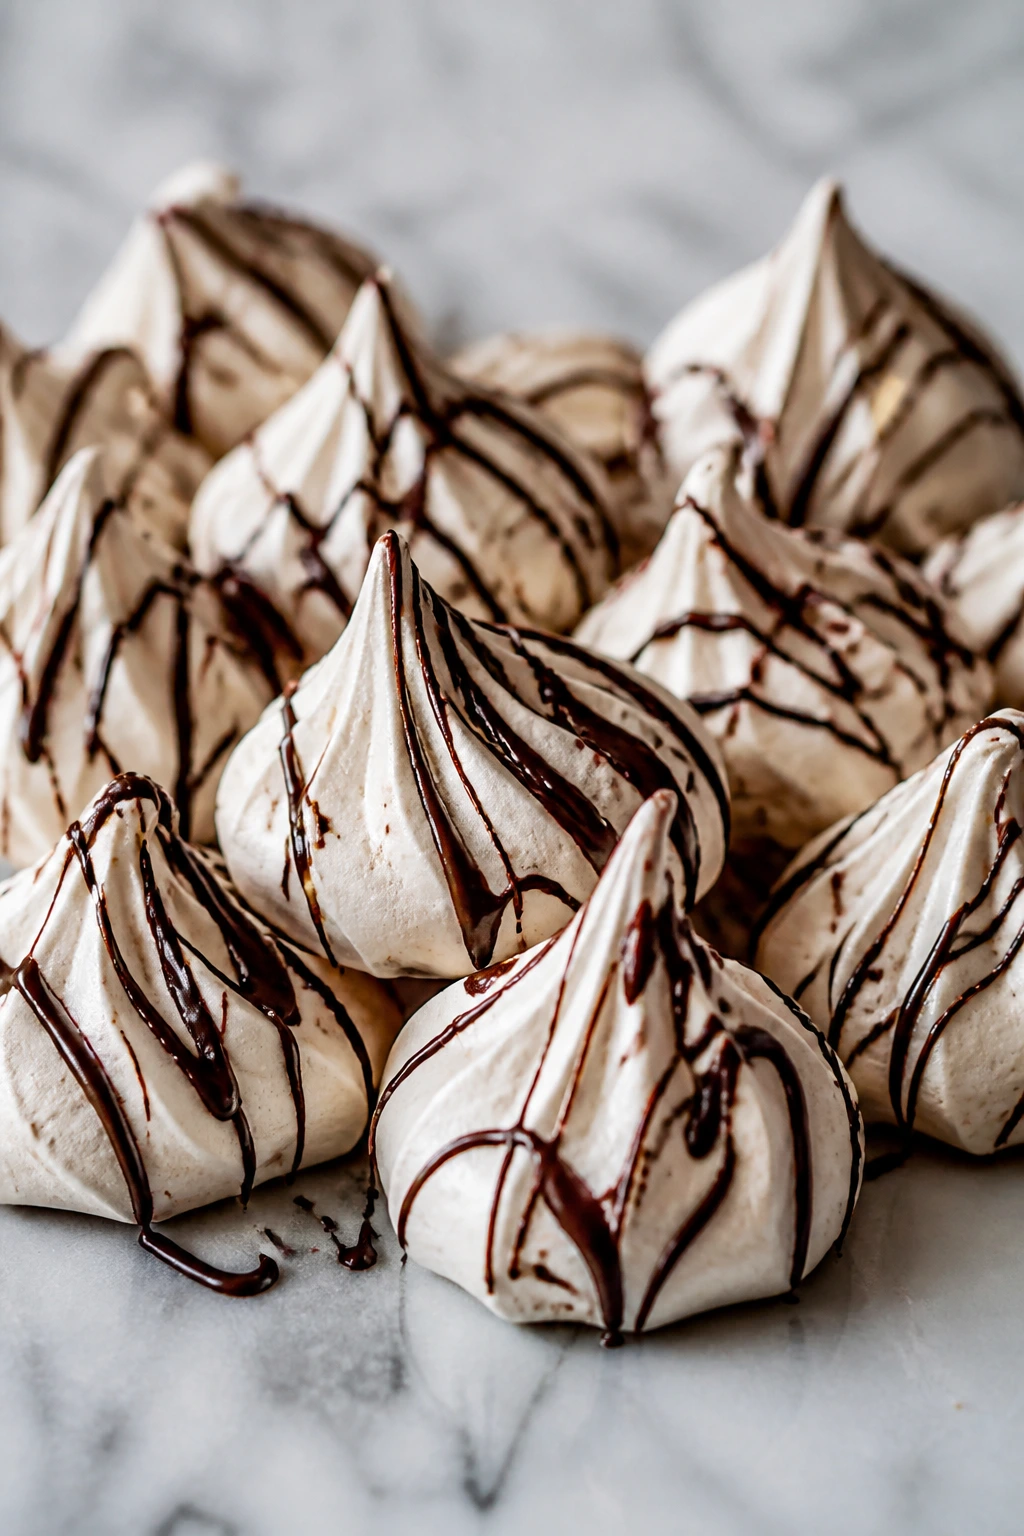
Meringues are light enough to feel almost delicate, but they’re more practical than people give them credit for. Once they’re baked dry, they stay crisp for days, and a little chocolate drizzle gives them enough contrast to feel like a real dessert.
Why It Works:
Egg whites whip into a foam that traps sugar and air, and that structure bakes into a crisp shell. The low oven dries them instead of browning them, which is why they stay pale and feather-light rather than turning chewy.
Key Ingredients:
- 4 large egg whites
- 1 cup granulated sugar
- 1/4 teaspoon cream of tartar
- Pinch of fine salt
- 1 teaspoon vanilla extract
- 1/4 cup semi-sweet chocolate chips, melted
Quick Steps:
- Heat the oven to 200°F (95°C) and line a baking sheet with parchment.
- Beat the egg whites, cream of tartar, and salt until foamy.
- Add the sugar a tablespoon at a time while beating, until the meringue is glossy and holds stiff peaks.
- Beat in the vanilla.
- Pipe or spoon small kisses onto the sheet.
- Bake for 1 hour 20 minutes to 1 hour 30 minutes, then turn off the oven and let them cool inside for 30 minutes.
- Drizzle with melted chocolate after they cool.
Equipment for This Recipe:
- Stand mixer or hand mixer
- Mixing bowl
- Baking sheet
- Parchment paper
- Piping bag or spoon
How to Serve This Dish:
Set them on a dry plate, not a damp one, because humidity is the enemy here. A few chocolate drips across the top are enough; too much and they stop looking airy.
Pro Tips for This Recipe:
- Make sure the bowl is grease-free before whipping.
- Add sugar slowly so the meringue stays stable.
- Keep them away from steam after baking.
Variations on This Dish:
- Strawberry Dust: Sprinkle a tiny bit of freeze-dried strawberry powder over the chocolate.
- Mint Meringues: Add 1/4 teaspoon peppermint extract.
- Cocoa Meringues: Fold 1 tablespoon cocoa powder into the finished meringue for a light chocolate note.
Common Mistakes to Avoid with This Dish:
- Whipping in a greasy bowl: The whites won’t hold.
- Baking too hot: Meringues brown and crack.
- Storing them in a humid kitchen: They soften fast.
23. Brown Sugar Toffee Bars
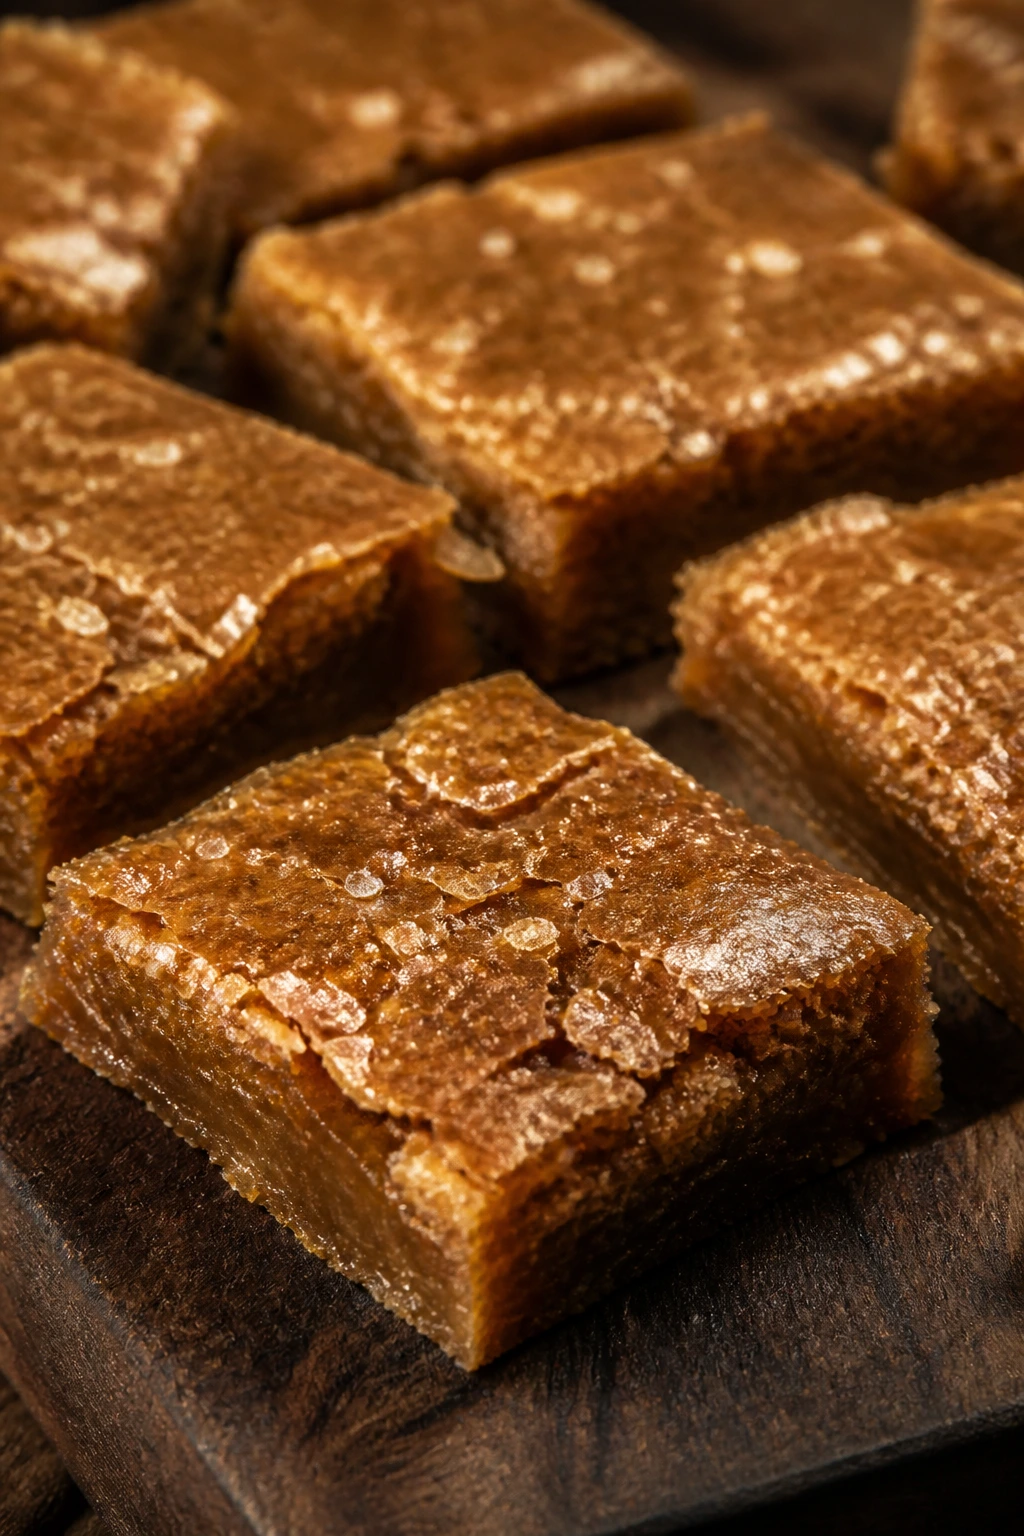
These bars sit in that sweet spot between cookie and candy. The base is buttery and firm, the top turns glossy and a little chewy, and chopped chocolate or nuts give the surface just enough texture to keep each square interesting.
Why It Works:
Brown sugar and butter make the bottom layer taste like caramel without needing to cook sugar separately. A thin top batter bakes into a crackly bar layer, and the texture firms up as it cools, which is why these cut neatly once chilled.
Key Ingredients:
- 1/2 cup unsalted butter, softened
- 1/2 cup brown sugar
- 1 cup all-purpose flour
- 1/4 teaspoon fine salt
- 1 cup brown sugar
- 1 large egg
- 2 tablespoons all-purpose flour
- 1 teaspoon vanilla extract
- 1 cup chocolate chips or chopped nuts
Quick Steps:
- Heat the oven to 350°F (175°C) and line an 8×8-inch pan with parchment.
- Mix the butter, 1/2 cup brown sugar, flour, and salt until crumbly.
- Press the mixture into the pan and bake for 10 minutes.
- Whisk the remaining brown sugar, egg, 2 tablespoons flour, and vanilla until smooth.
- Stir in the chocolate chips or nuts.
- Spread the topping over the warm base.
- Bake for 15 to 18 minutes more, until set and lightly golden.
- Cool completely before slicing.
Equipment for This Recipe:
- 8×8-inch pan
- Parchment paper
- Mixing bowls
- Whisk
- Spatula
How to Serve This Dish:
Cut these into skinny bars if you want a candy-like feel, or into squares for a fuller dessert. They sit well on a tray beside coffee because the brown sugar flavor gets a little deeper as the bars cool.
Pro Tips for This Recipe:
- Press the bottom layer firmly and evenly.
- Let the pan cool before cutting or the top layer will tear.
- Use nuts if you want extra crunch and chocolate if you want more richness.
Variations on This Dish:
- Pecan Toffee Bars: Use chopped pecans for a classic buttery crunch.
- Chocolate Chip Bars: Stick with chips for a softer, sweeter top.
- Sea Salt Finish: Add a pinch of flaky salt after baking.
Common Mistakes to Avoid with This Dish:
- Underbaking the base: The crust needs a few minutes on its own.
- Cutting warm: The bars need time to firm.
- Using too much topping mixture: The top can slide off if it’s overloaded.
24. Chocolate Bread Pudding
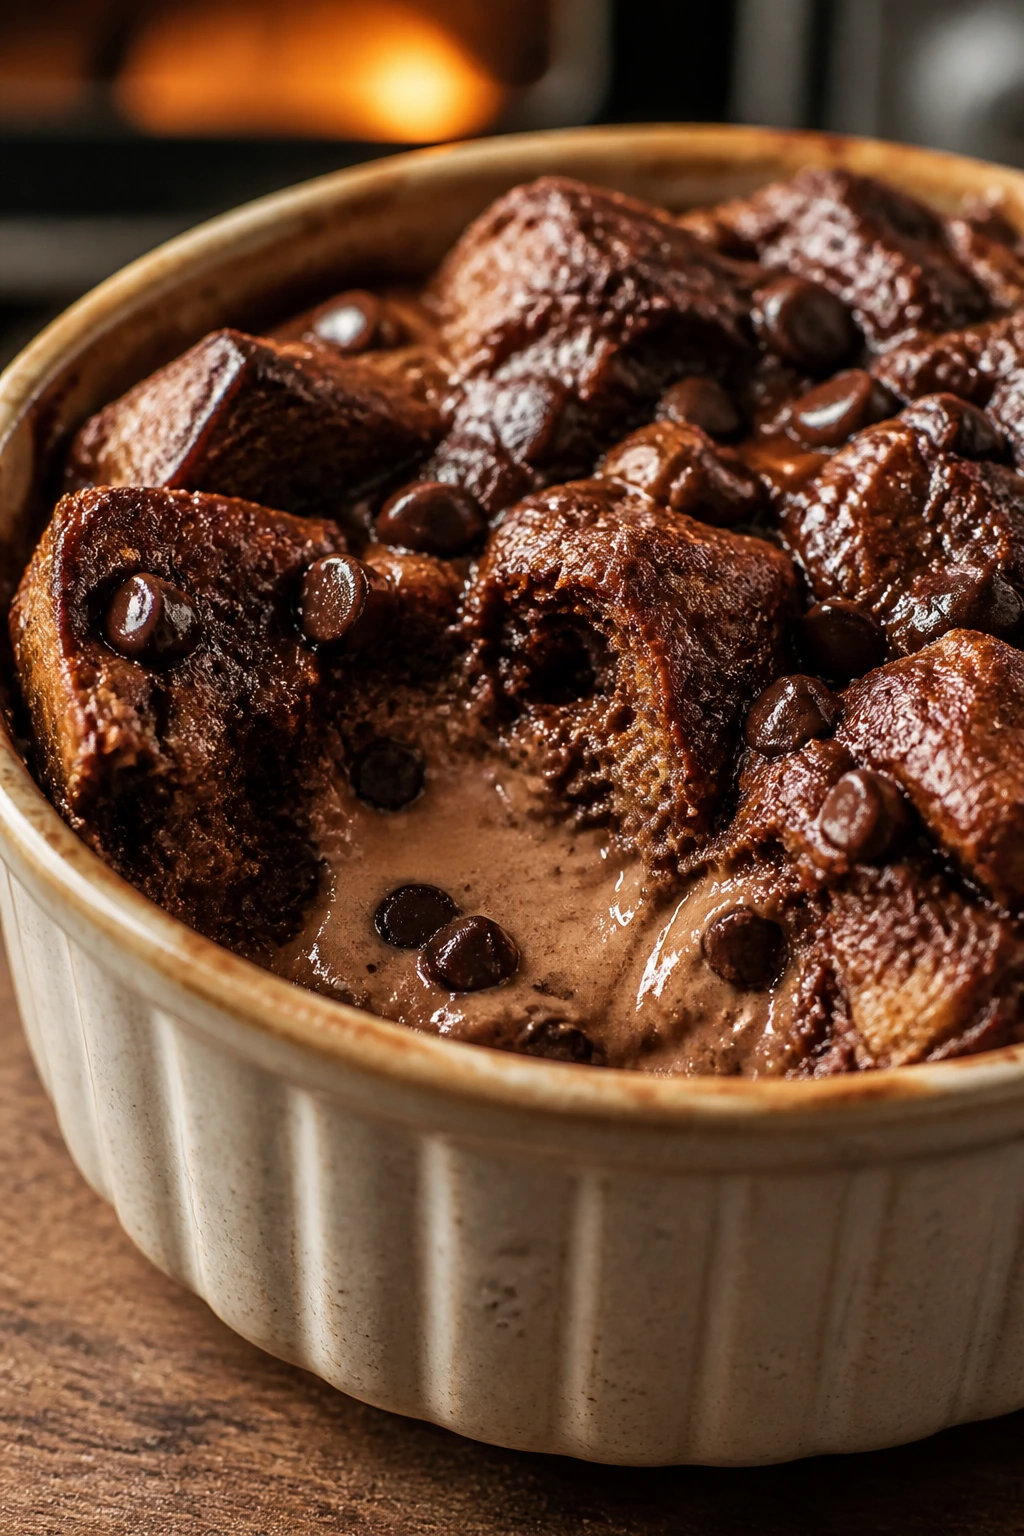
Bread pudding is the opposite of fussy. You’re turning stale bread into a warm chocolate dessert with a custardy center and crisp top edges, and honestly, that still feels like a small kitchen triumph every time.
Why It Works:
The bread soaks up the cocoa custard and holds it through baking, which gives you a soft, spoonable middle. Chocolate chips melt into the pockets between the cubes, and cinnamon adds a subtle background note that keeps the chocolate from tasting flat.
Key Ingredients:
- 6 cups day-old bread cubes
- 2 cups whole milk
- 2 large eggs
- 3/4 cup granulated sugar
- 1/4 cup unsweetened cocoa powder
- 1 teaspoon vanilla extract
- 1/2 teaspoon ground cinnamon
- 1 cup chocolate chips
Quick Steps:
- Heat the oven to 350°F (175°C) and grease an 8×8-inch baking dish.
- Spread the bread cubes in the dish.
- Whisk the milk, eggs, sugar, cocoa, vanilla, and cinnamon until smooth.
- Pour the custard over the bread and press gently so the cubes soak it up.
- Sprinkle chocolate chips over the top.
- Bake for 35 to 40 minutes, until the center is set but still soft.
- Rest for 10 minutes before serving.
Equipment for This Recipe:
- Baking dish
- Mixing bowl
- Whisk
- Measuring cups
- Spoon
How to Serve This Dish:
Serve it warm in bowls, not neat squares. A spoonful of whipped cream or a little powdered sugar on top gives it a softer holiday look, and the melted chips in the middle do plenty of work on their own.
Pro Tips for This Recipe:
- Use sturdy bread, not very soft sandwich bread.
- Press the bread down so the custard reaches the bottom.
- Let it rest after baking so the custard settles.
Variations on This Dish:
- Cherry Chocolate Pudding: Add 1/2 cup chopped dried cherries.
- Orange Cocoa Bread Pudding: Use 1 teaspoon orange zest in the custard.
- Nutty Version: Add 1/2 cup chopped pecans.
Common Mistakes to Avoid with This Dish:
- Using fresh bread: It turns mushy too fast.
- Pouring in cold milk-custard straight from the fridge: The bread absorbs it more slowly.
- Overbaking: The center should be set, not dry.
25. Icebox Sandwich Cookies
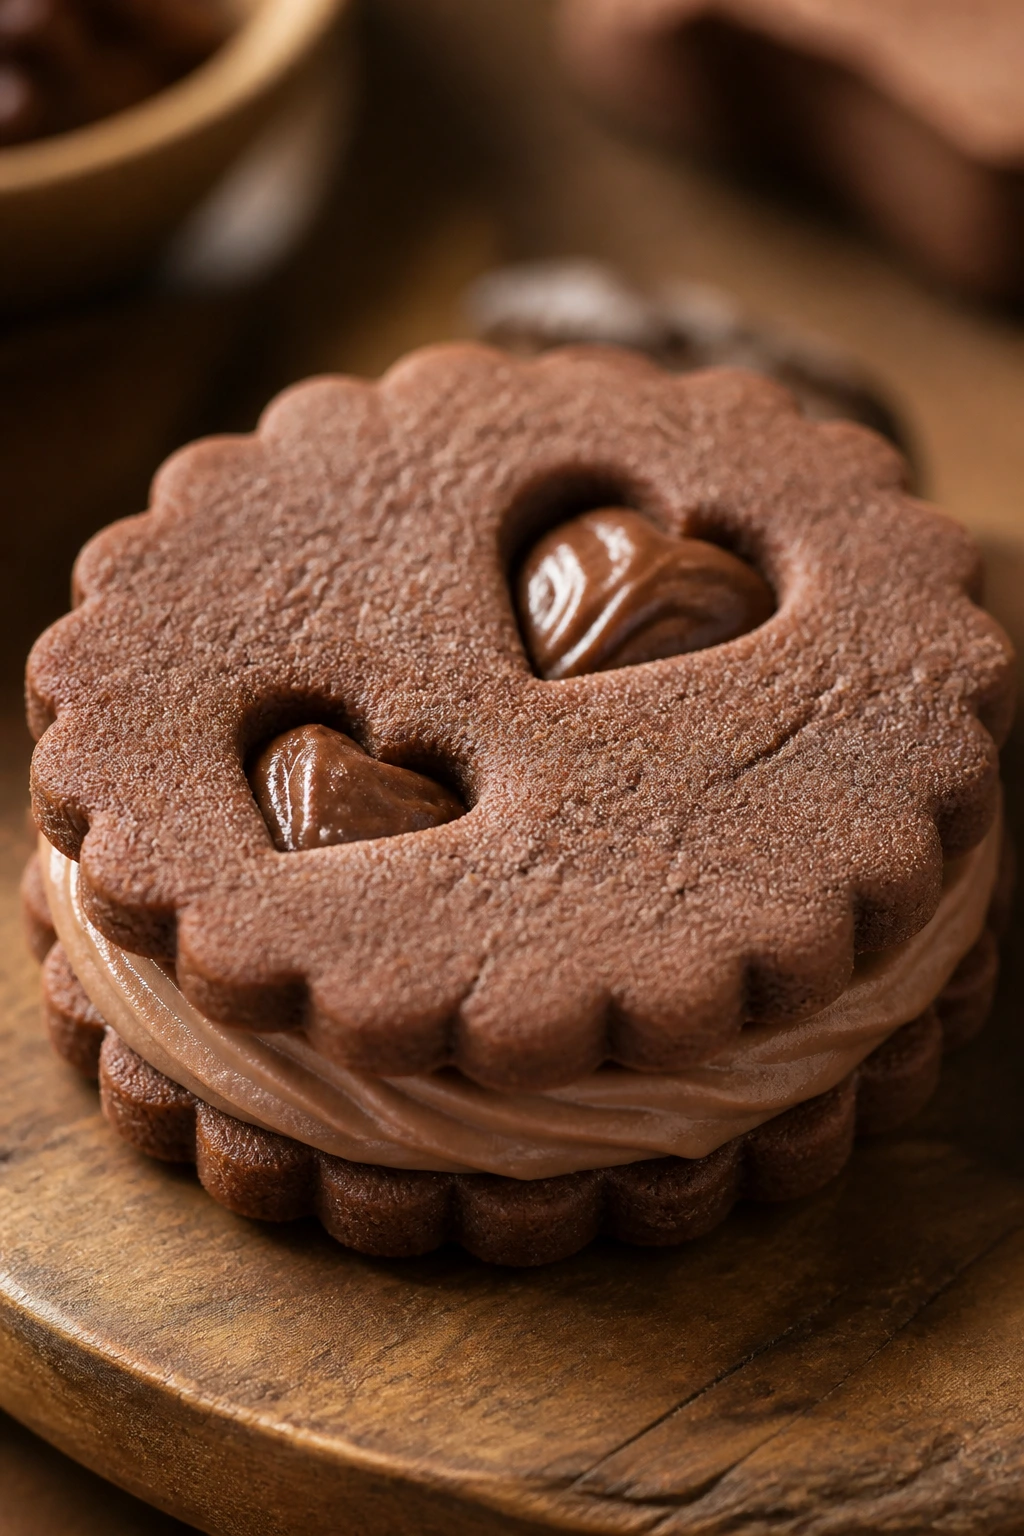
Icebox cookies are the sort of dessert that rewards patience. You chill the dough, slice it cleanly, bake it into little rounds, and then sandwich the cookies with a soft filling that makes each bite feel complete instead of just sweet.
Why It Works:
The dough firms up in the fridge, which makes the cookies easy to slice evenly. A simple buttercream or cocoa filling adds contrast without making the cookie too rich, and the sandwich format gives you a neat, giftable shape.
Key Ingredients:
- 1 cup unsalted butter, softened
- 1/2 cup powdered sugar
- 2 cups all-purpose flour
- 1/4 teaspoon fine salt
- 1 teaspoon vanilla extract
- 1/2 cup unsalted butter, softened, for filling
- 1 cup powdered sugar, for filling
- 1 tablespoon milk
- 1 teaspoon cocoa powder
Quick Steps:
- Cream the butter and powdered sugar until smooth.
- Mix in the vanilla, flour, and salt to form a soft dough.
- Shape the dough into a log, wrap it, and chill for 1 hour.
- Heat the oven to 350°F (175°C) and line a baking sheet with parchment.
- Slice the log into rounds and bake for 10 to 12 minutes, until the edges barely color.
- Cool completely.
- Beat the filling ingredients until fluffy.
- Sandwich the cookies with a small spoonful of filling.
Equipment for This Recipe:
- Mixing bowl
- Plastic wrap
- Sharp knife
- Baking sheet
- Hand mixer
How to Serve This Dish:
Stack the sandwiches in a tidy row or lean them against each other on a plate so the filling shows. They’re sturdy enough to pack up, which makes them a nice choice if you want dessert to travel instead of sit on the counter.
Pro Tips for This Recipe:
- Chill the log fully so the slices stay round.
- Don’t overfill the centers or the filling squeezes out.
- Let the cookies cool all the way before assembling.
Variations on This Dish:
- Strawberry Filling: Stir a spoonful of strawberry jam into the buttercream.
- Chocolate Sandwiches: Add 2 tablespoons cocoa to the dough.
- Vanilla Bean Style: Skip the cocoa and use extra vanilla in the filling.
Common Mistakes to Avoid with This Dish:
- Slicing the log before it’s cold: The dough smears and squashes.
- Baking until brown: These should stay pale.
- Adding too much filling: It makes the cookies slide apart.
26. Cinnamon Sugar Churro Bites
These baked churro bites give you the same cinnamon-sugar appeal without a pot of hot oil. The shells puff up, the centers stay airy, and the butter-cinnamon coating clings to every ridge while they’re still warm.
Why It Works:
This is a choux-style dough, which means the water-butter mixture creates steam and lifts the pastry in the oven. Once baked, brushing the bites with butter helps the cinnamon sugar stick in a thick, sandy coat that reads like a proper churro.
Key Ingredients:
- 1 cup water
- 1/2 cup unsalted butter
- 1 tablespoon granulated sugar
- 1/4 teaspoon fine salt
- 1 cup all-purpose flour
- 3 large eggs
- 1/2 cup granulated sugar, for coating
- 2 teaspoons ground cinnamon
- 3 tablespoons unsalted butter, melted, for coating
Quick Steps:
- Heat the oven to 400°F (205°C) and grease a mini muffin tin.
- Bring the water, butter, sugar, and salt to a boil.
- Stir in the flour all at once and cook, stirring, until the dough pulls from the pan.
- Cool the dough for 5 minutes, then beat in the eggs one at a time.
- Spoon or pipe the dough into the mini muffin tin.
- Bake for 18 to 20 minutes, until puffed and golden.
- Mix the sugar and cinnamon, brush the warm bites with melted butter, and roll them in the coating.
Equipment for This Recipe:
- Mini muffin tin
- Saucepan
- Wooden spoon
- Piping bag or spoon
- Mixing bowl
How to Serve This Dish:
Serve them in a bowl lined with parchment and put the cinnamon sugar front and center. A side of warm chocolate sauce turns them into a dessert that people stand around and pick at, which is usually a good sign.
Pro Tips for This Recipe:
- Beat the eggs in one at a time or the dough gets slick.
- Don’t open the oven early; the puffs need steam.
- Coat them while they’re warm so the sugar sticks.
Variations on This Dish:
- Chocolate Churro Bites: Add 1 tablespoon cocoa to the cinnamon sugar.
- Orange Sugar Coating: Mix in finely grated orange zest.
- Dipping Style: Serve with chocolate fudge sauce or jam.
Common Mistakes to Avoid with This Dish:
- Adding eggs to hot dough: They scramble instead of blending.
- Underbaking: The insides stay wet and collapse.
- Waiting too long to coat: The butter cools and the sugar slides off.
27. Honey Cornflake Clusters with Chocolate
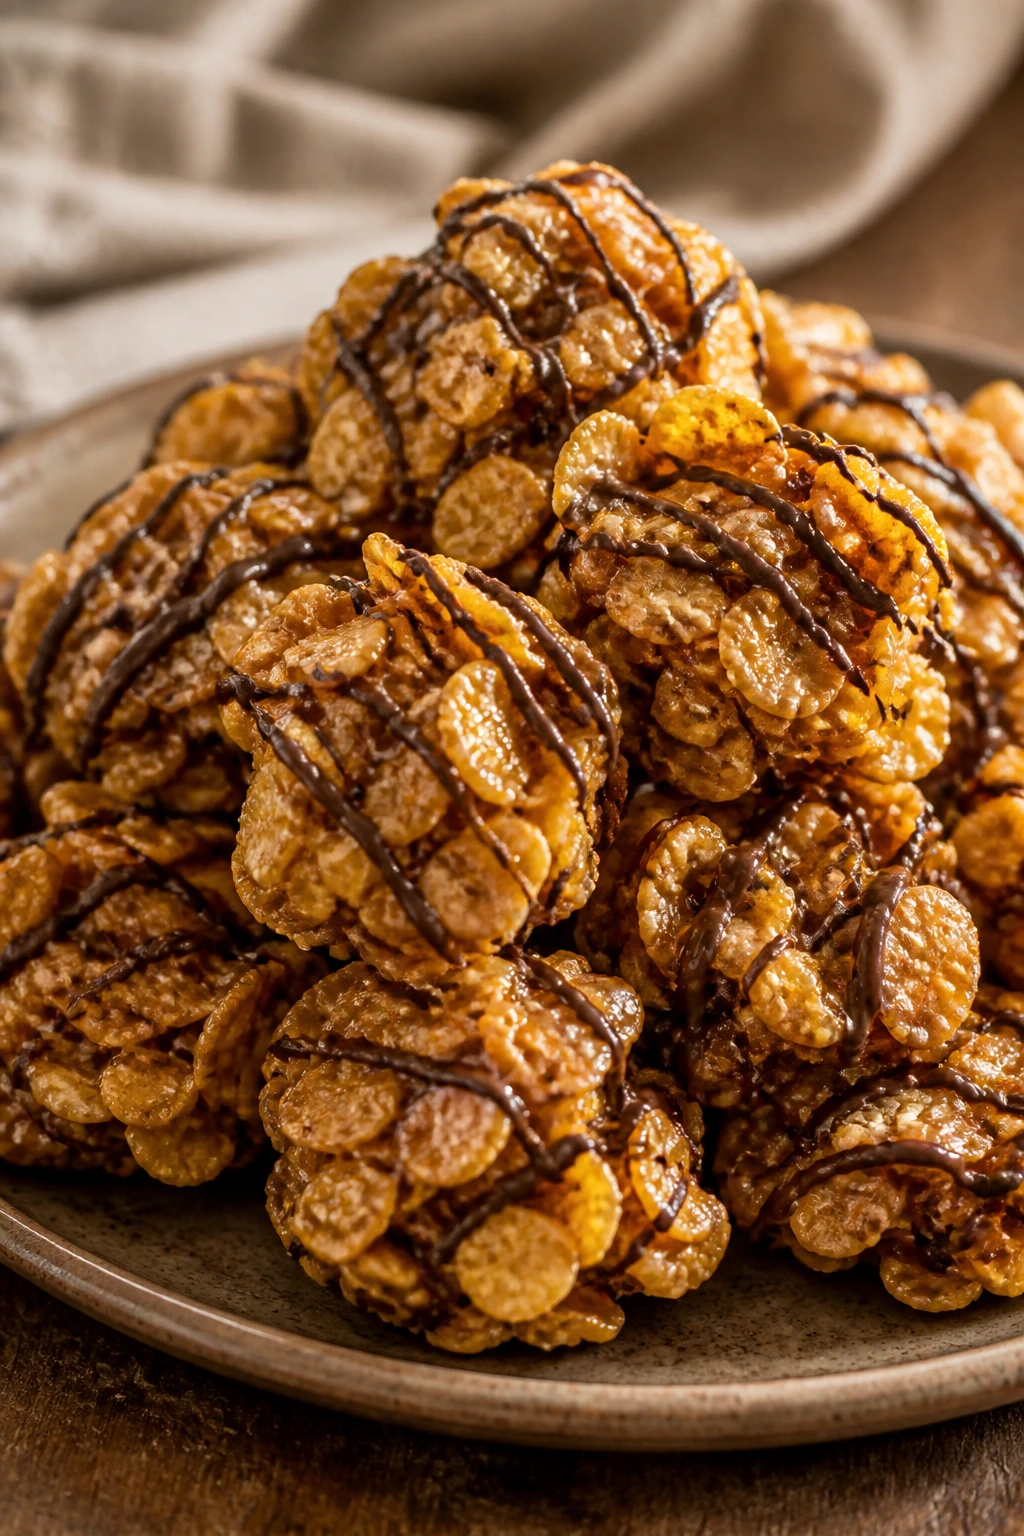
These clusters are crunchy, sticky, and a little nostalgic in the best way. Honey and peanut butter glue the cornflakes together, the chocolate drizzle cools into thin dark lines, and the whole batch disappears before you think it will.
Why It Works:
The honey keeps the coating glossy, peanut butter adds body, and cornflakes stay crisp as long as you don’t drown them. Because there’s no baking, you get clean crunch and very little cleanup.
Key Ingredients:
- 4 cups cornflakes
- 1/2 cup honey
- 1/2 cup creamy peanut butter
- 1/4 cup unsalted butter
- 1/2 teaspoon vanilla extract
- 1/2 cup semi-sweet chocolate chips
Quick Steps:
- Line a baking sheet with parchment.
- Warm the honey, peanut butter, and butter together until smooth.
- Stir in the vanilla.
- Fold the cornflakes into the warm mixture until evenly coated.
- Drop spoonfuls onto the sheet.
- Melt the chocolate chips and drizzle over the clusters.
- Chill for 20 to 30 minutes, until set.
Equipment for This Recipe:
- Mixing bowl
- Saucepan or microwave-safe bowl
- Spoon
- Baking sheet
- Parchment paper
How to Serve This Dish:
These look nicest in a wide bowl so the ridges stay visible. They’re an easy add-on for a dessert board because they give you crunch in between all the softer cookies and fudge.
Pro Tips for This Recipe:
- Work quickly so the coating doesn’t stiffen before the flakes are mixed in.
- Don’t crush the cornflakes too much or you lose the texture.
- Drizzle chocolate after the clusters are shaped, not before.
Variations on This Dish:
- Cherry Crunch Clusters: Add chopped dried cherries.
- Chocolate-Covered Version: Dip the bottoms of the clusters in melted chocolate.
- Seeded Crunch: Mix in a few tablespoons of sunflower seeds if you want extra texture.
Common Mistakes to Avoid with This Recipe:
- Using too much coating: The clusters turn soggy.
- Packing them too tightly: They lose the crisp edges.
- Skipping the chill: The clusters fall apart when you lift them.
28. Peanut Butter Oat Granola Cups
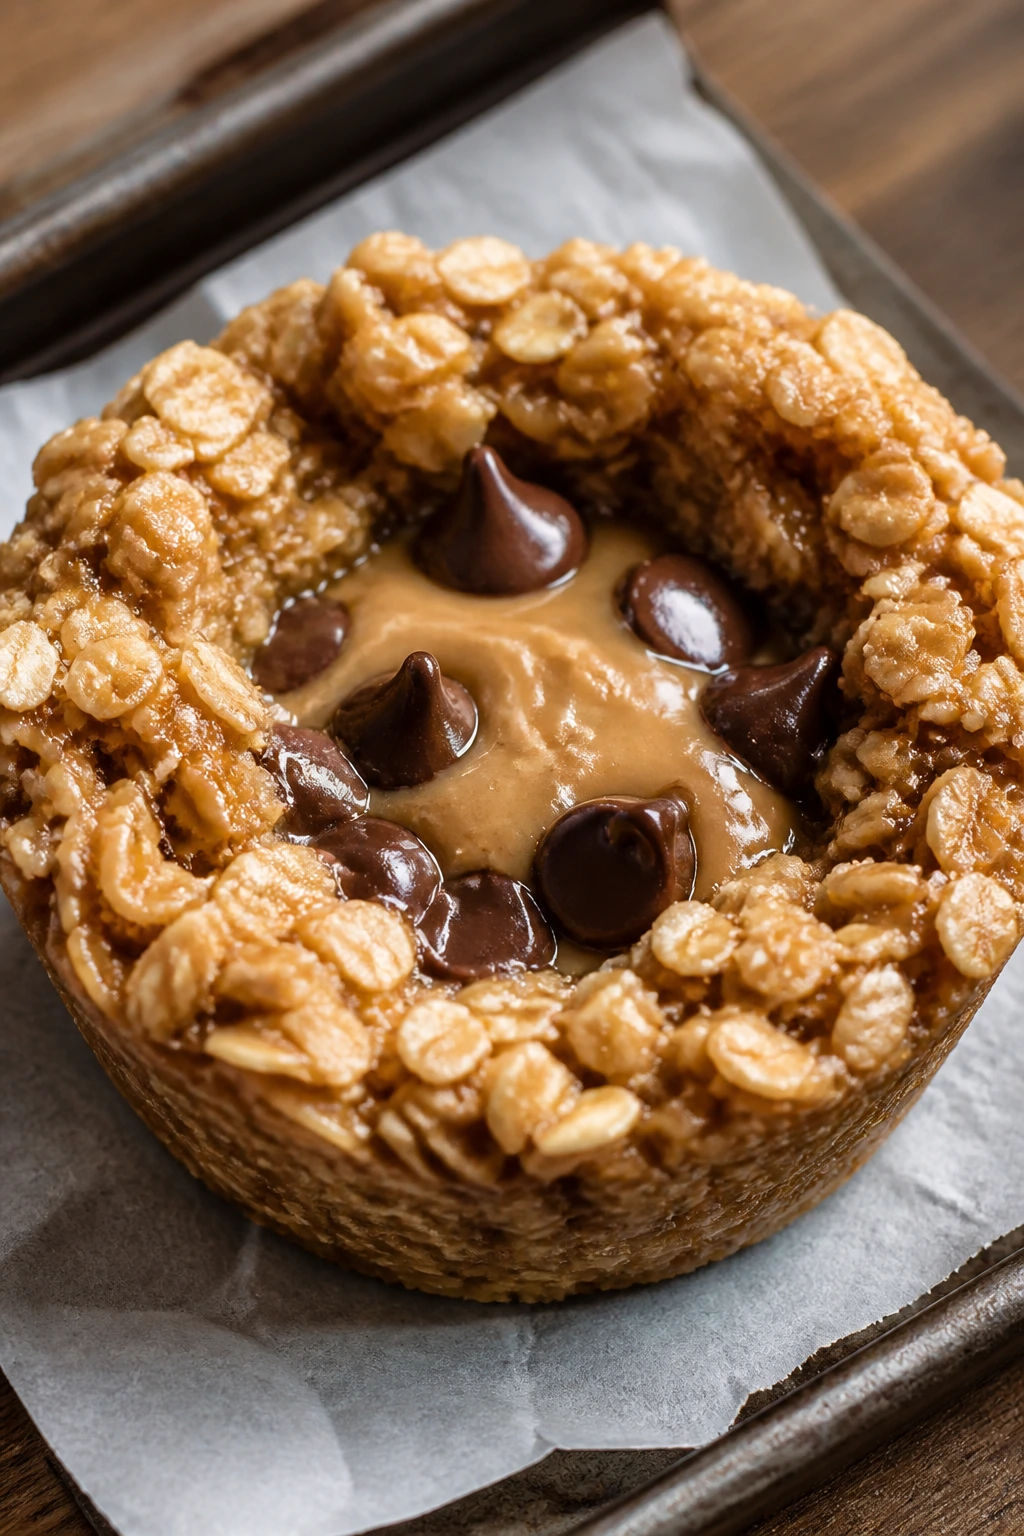
These little cups are part cookie, part snack, part dessert, and they’re better than they have any right to be. The oats toast up around the edges, the peanut butter keeps them chewy, and the chocolate chips in the center make each cup feel finished.
Why It Works:
Pressing the mixture into a muffin tin gives you a shape that holds after baking. The peanut butter and honey bind the oats, and the short bake time keeps the cups from turning hard, which is the mistake people make with oat-based treats all the time.
Key Ingredients:
- 2 cups old-fashioned oats
- 1/2 cup creamy peanut butter
- 1/3 cup honey
- 1/4 cup unsalted butter, melted
- 1 teaspoon vanilla extract
- 1/4 teaspoon fine salt
- 1/2 cup mini chocolate chips
Quick Steps:
- Heat the oven to 350°F (175°C) and grease a standard muffin tin.
- Stir the oats, peanut butter, honey, melted butter, vanilla, and salt together.
- Fold in half the chocolate chips.
- Divide the mixture among the muffin cups and press it firmly up the sides.
- Bake for 10 to 12 minutes, until the edges are golden.
- Press the centers down again with a spoon while warm.
- Sprinkle the remaining chocolate chips into the cups.
- Cool completely before removing.
Equipment for This Recipe:
- Standard muffin tin
- Mixing bowl
- Spoon
- Measuring cups
- Cooling rack
How to Serve This Dish:
Fill the cups with a spoonful of yogurt, whipped cream, or extra chocolate chips if you want them more dessert-like. They’re compact enough to sit on a tray without much fuss, which makes them nice for a mixed spread.
Pro Tips for This Recipe:
- Grease the tin well so the oats release cleanly.
- Press the mixture hard; loose cups crumble.
- Let them cool before unmolding or the edges break.
Variations on This Recipe:
- Cherry Chip Cups: Add chopped dried cherries with the chocolate chips.
- Coconut Oat Cups: Stir in 1/3 cup shredded coconut.
- Dark Chocolate Finish: Use dark chocolate chips instead of mini chips.
Common Mistakes to Avoid with This Recipe:
- Underpressing the mixture: The cups fall apart.
- Baking too long: They become hard instead of chewy.
- Trying to unmold too soon: Warm oat cups break at the base.
29. Cherry Almond Crumb Cake
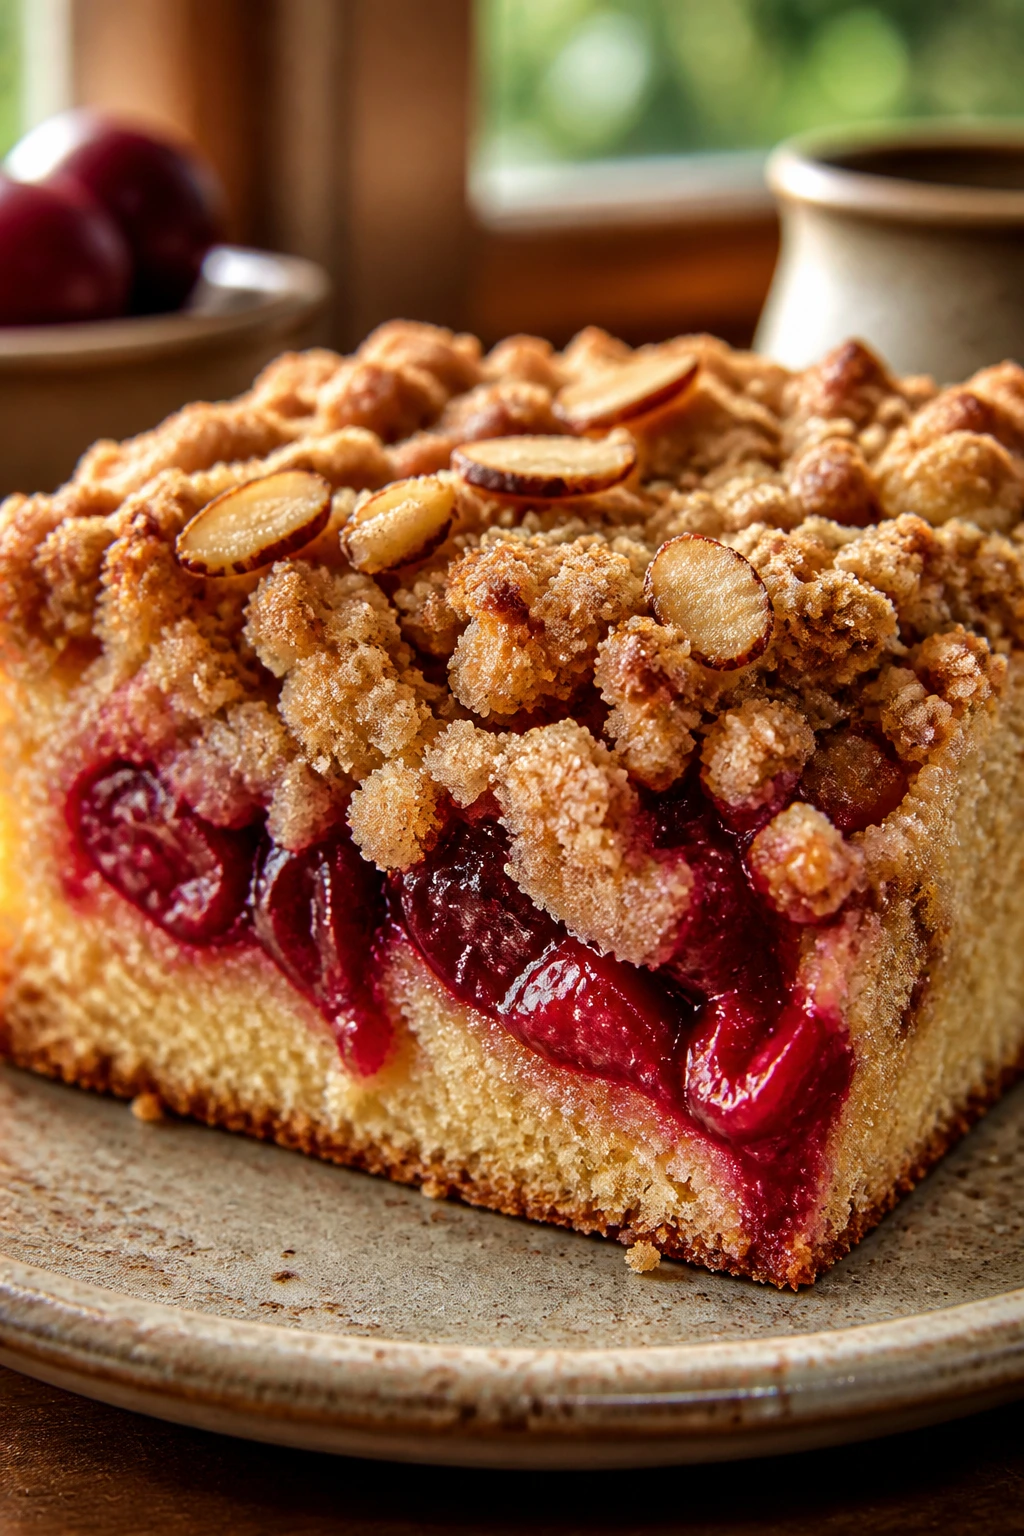
Crumb cake brings a bakery mood to the table without asking much from you. The soft cake holds the cherry filling, the crumb topping bakes into buttery pebbles, and almond extract gives the whole thing a sweet, almond-cookie scent that feels right for the holiday.
Why It Works:
The batter is simple and sturdy enough to hold a heavy layer of fruit. The crumb topping adds texture and protects the surface from drying out, while the cherry filling sinks into the cake in the places you want, not everywhere.
Key Ingredients:
- 1/2 cup unsalted butter, softened
- 3/4 cup granulated sugar
- 2 large eggs
- 1 1/2 cups all-purpose flour
- 1 teaspoon baking powder
- 1/2 teaspoon fine salt
- 1/2 cup milk
- 1 teaspoon almond extract
- 1 cup cherry pie filling
- 1/3 cup all-purpose flour, for crumb topping
- 1/3 cup brown sugar, for crumb topping
- 3 tablespoons unsalted butter, cold, for crumb topping
Quick Steps:
- Heat the oven to 350°F (175°C) and grease an 8×8-inch baking dish.
- Cream the butter and sugar.
- Beat in the eggs and almond extract.
- Stir in the flour, baking powder, salt, and milk until the batter is smooth.
- Spread the batter in the dish and spoon the cherry filling over it.
- Mix the crumb topping ingredients until clumpy and scatter them over the top.
- Bake for 35 to 40 minutes, until the topping is golden and the cake springs back lightly.
- Cool before slicing.
Equipment for This Recipe:
- 8×8-inch baking dish
- Mixing bowls
- Hand mixer
- Fork or pastry cutter
- Cooling rack
How to Serve This Dish:
Cut it into squares and serve it slightly warm or at room temperature. The crumb topping keeps its texture better than frosting would, and a light dusting of powdered sugar makes the red cherry layer stand out.
Pro Tips for This Recipe:
- Use cold butter in the crumble so it stays pebbly.
- Don’t bury the cherries under the batter; let some sit on top.
- Cool fully if you want clean slices.
Variations on This Dish:
- Raspberry Almond Cake: Use raspberry preserves instead of cherry filling.
- Chocolate Crumb Cake: Add 2 tablespoons cocoa to the crumb topping.
- Lemon-Cherry Version: A little lemon zest brightens the fruit.
Common Mistakes to Avoid with This Dish:
- Using too much filling: The center gets wet and sinks.
- Making the crumb too fine: You want clumps, not sand.
- Slicing while hot: The cake needs time to set.
30. Cherry Chocolate Bark
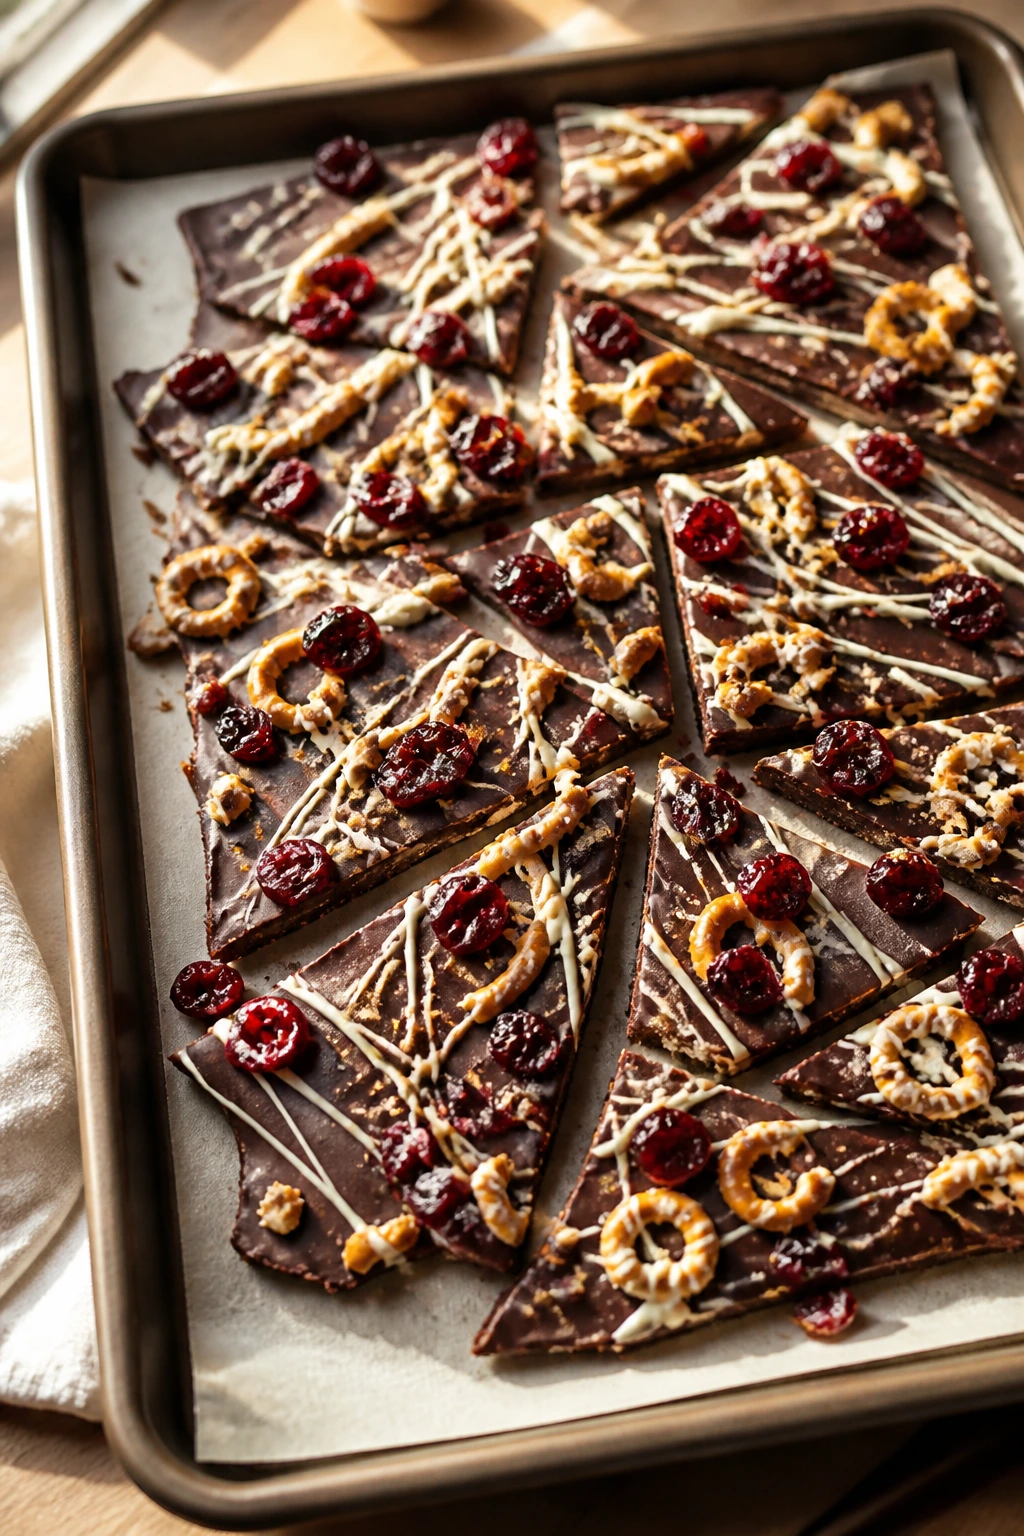
This is the easiest way to make a red-and-dark dessert look intentional. The chocolate base snaps cleanly, the dried cherries bring tart chew, and the pretzel or almond crunch keeps the bark from feeling like plain melted chocolate on a tray.
Why It Works:
Bark only needs a few ingredients to make contrast work: smooth chocolate, chewy fruit, and something salty or crisp. Because it sets fast, you can make it the same day and still end up with a dessert that looks put together.
Key Ingredients:
- 12 ounces semi-sweet chocolate chips
- 1/2 cup dried cherries
- 1/2 cup pretzel pieces or chopped almonds
- 1/4 cup white chocolate chips, optional for drizzle
- Pinch of flaky salt
Quick Steps:
- Line a baking sheet with parchment.
- Melt the chocolate chips until smooth.
- Spread the chocolate into a thin layer on the sheet.
- Scatter the dried cherries and pretzel pieces over the top.
- Drizzle with white chocolate if using.
- Finish with a pinch of flaky salt.
- Chill until firm, then break into shards.
Equipment for This Recipe:
- Baking sheet
- Parchment paper
- Microwave-safe bowl
- Spoon or spatula
- Small bowl for the drizzle
How to Serve This Dish:
Break the bark into uneven pieces and pile it high so the colors show off. It’s one of the best add-ons for a dessert board because it brings color, crunch, and a little tartness without asking for a plate and fork.
Pro Tips for This Recipe:
- Keep the layer thin so it snaps cleanly.
- Add fruit and crunch while the chocolate is still glossy.
- Store it in a cool place so the chocolate stays firm.
Variations on This Dish:
- Dark Cherry Bark: Use dark chocolate chips for a less sweet result.
- Orange Cherry Bark: Add a little orange zest for a brighter aroma.
- Nutty Bark: Replace the pretzels with toasted almonds.
Common Mistakes to Avoid with This Dish:
- Using wet fruit: Moisture can make the chocolate seize.
- Spreading the chocolate too thick: Thick bark bends instead of breaking.
- Skipping the salt: Even a small pinch makes the chocolate taste fuller.
Why Pantry Staples Carry the Whole Dessert Table

The best thing about pantry desserts is that they don’t ask you to start from scratch in your head. You already know what flour does, what sugar does, what cocoa does, and once those pieces are in play, the holiday gets easier. A brownie pan, a tray of cookies, a bowl of bark, and a pot of pudding can all come from the same cupboard. That’s not a consolation prize. That’s a method.
I also like how forgiving these recipes are. A jam swirl can hide a rough hand. A dusting of powdered sugar can make plain shortbread feel intentional. A little flaky salt on fudge, a few extra chocolate chips on a skillet cookie, or a careful chill before slicing bars can change the whole mood. Small moves. Big payoff.
And if you only make one dessert from the list, start with the one that matches your energy. The no-bake bars and bark reward almost no effort. The brownies and cookies give you more texture and a warmer smell in the kitchen. Either way, you end up with something sweet that doesn’t depend on a crowded store shelf.
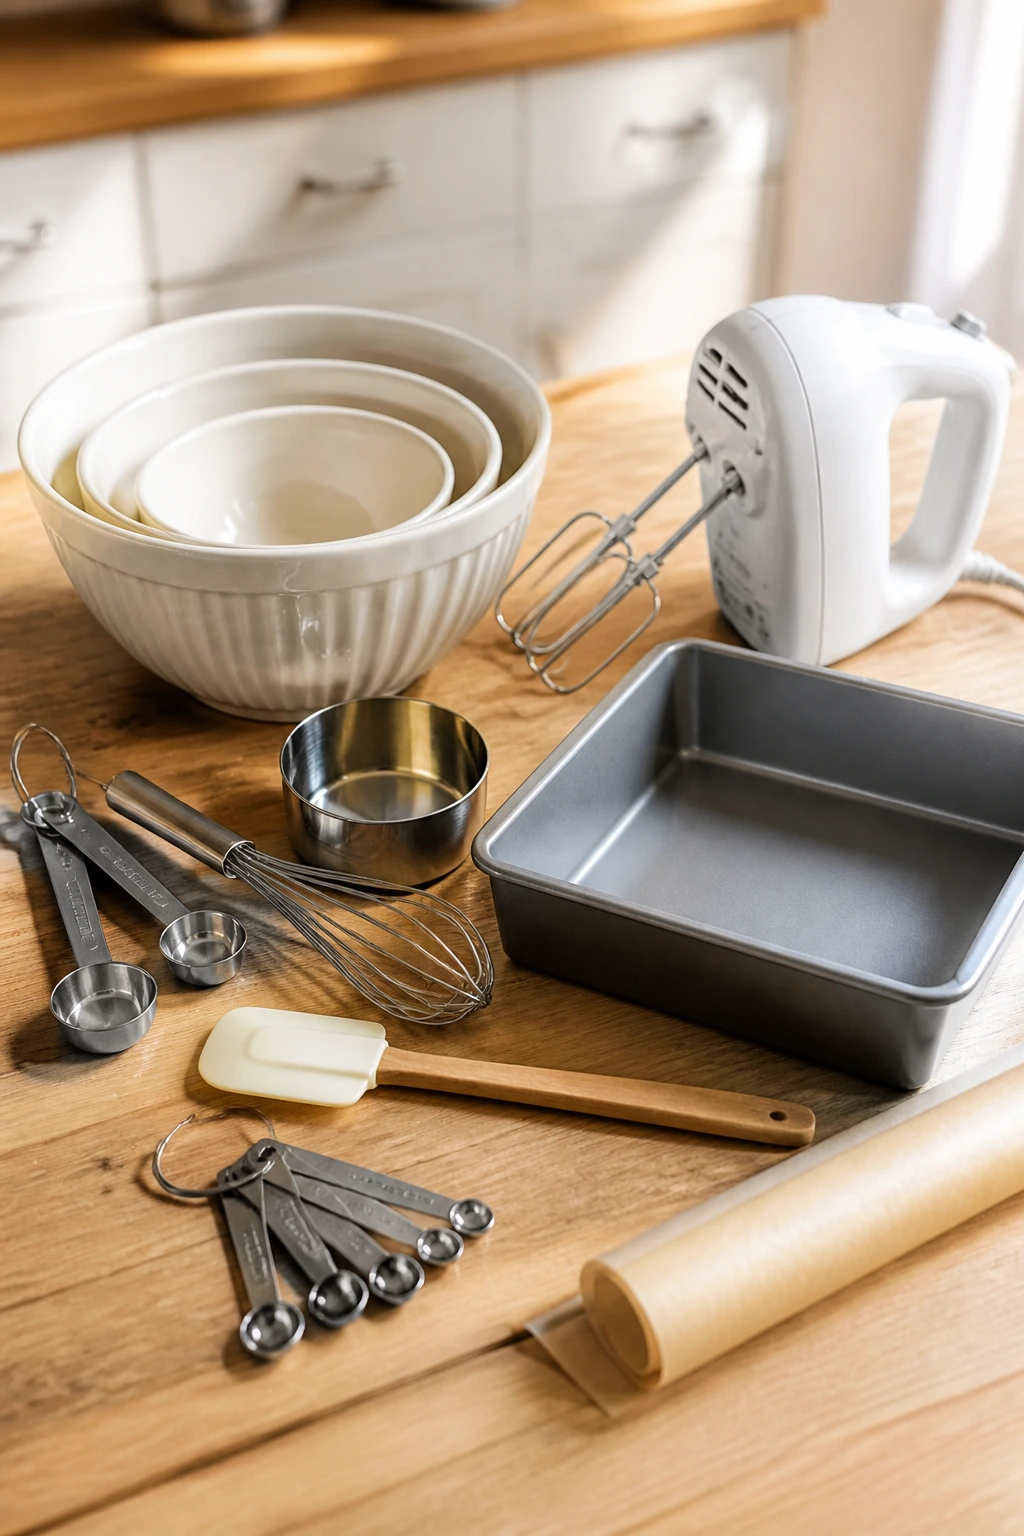
The Tools That Pull This Off
- Mixing bowls in three sizes: One small bowl for coatings or drizzles, one medium bowl for doughs, and one large bowl for batter keeps the kitchen from feeling cramped.
- Measuring cups and spoons: The recipes lean on exact ratios, especially the bars, fudge, and cookies.
- Whisk: Best for cocoa batters, custards, and melted-butter mixtures.
- Rubber spatula: Good for scraping every bit of batter from the bowl and folding in chocolate or oats without smashing them.
- Hand mixer: Helpful for butter cookies, frosting, and meringue, though several recipes work by hand.
- 8×8-inch baking pan: The workhorse pan for brownies, bars, blondies, fudge, and pudding bakes.
- 9×13-inch baking pan: Handy if you want to double bars, cake, or bread pudding for a larger crowd.
- Rimmed baking sheets: Needed for cookies, bark, biscotti, and meringues.
- Parchment paper: Keeps sticky chocolate, jam, and caramelized edges from welding to the pan.
- Cast-iron skillet: Best for skillet cookie, but a heavy oven-safe skillet works too.
- Mini muffin tin: Useful for churro bites and granola cups.
- Cooling rack: Helps cookies and bars stop carrying over heat in the pan.
- Sharp knife or bench scraper: Makes clean cuts through fudge, bars, and brownies.
- Airtight storage containers: Keep crisp cookies crisp and chewy bars from drying out.
Smart Shopping for Cocoa, Chocolate, and Jam
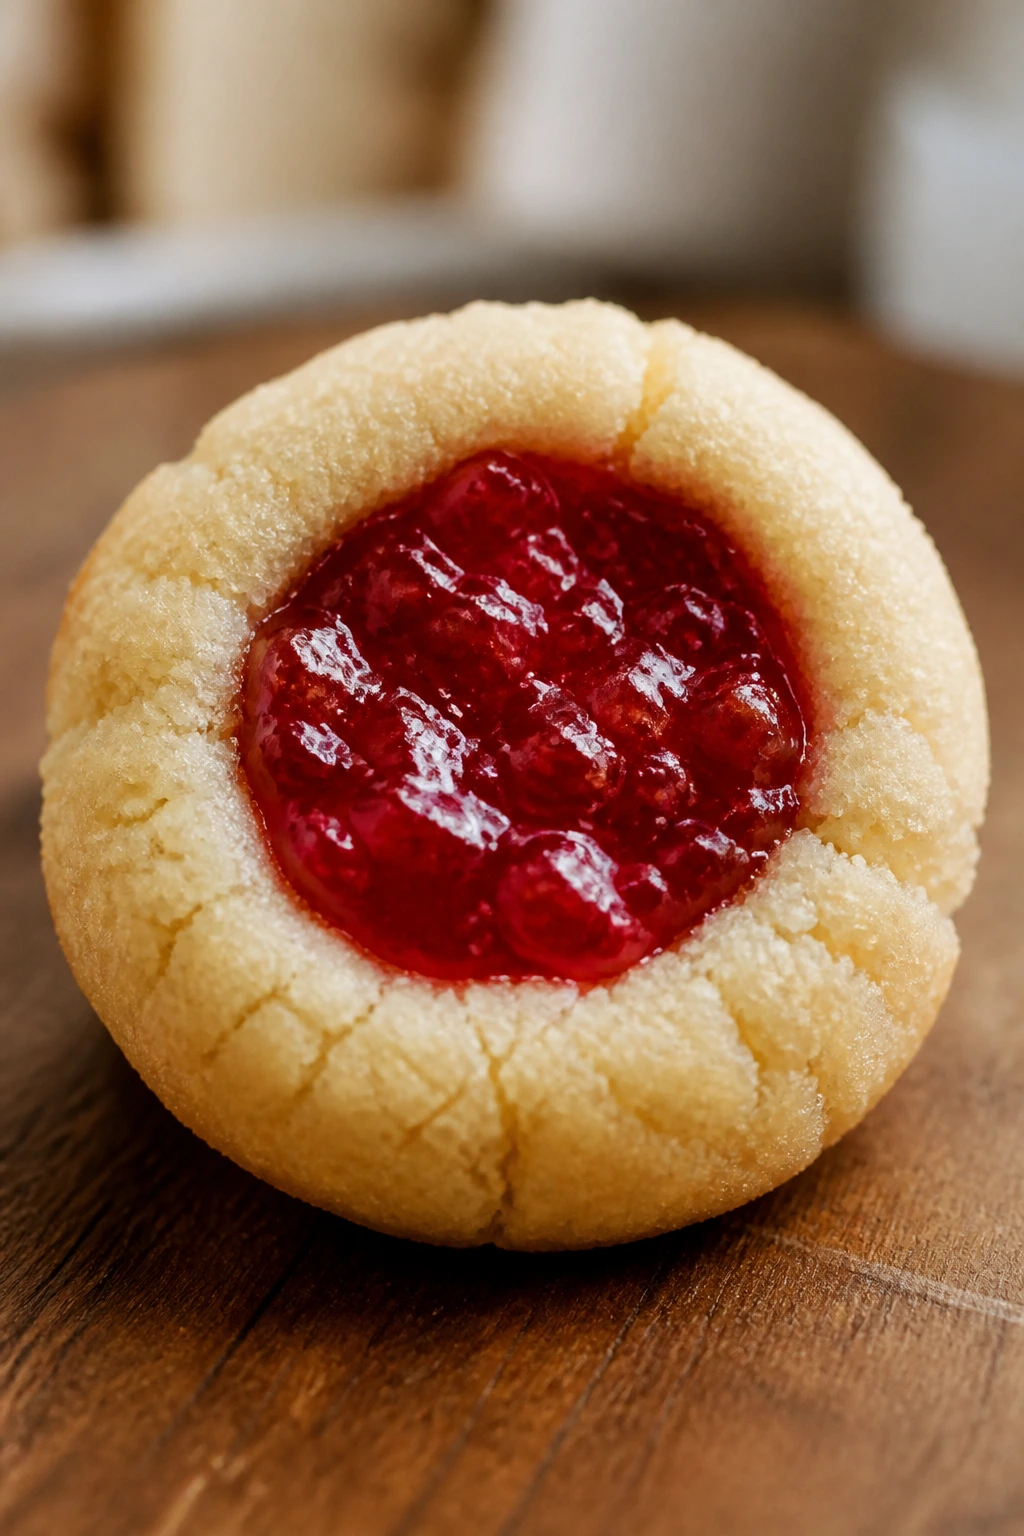
The pantry aisle can be a little deceptive. A chocolate chip is not just a chocolate chip, and jam is not all the same when it gets hot in the oven. For these desserts, the useful question is not “What is cheapest?” It’s “What will still taste right after baking, chilling, or slicing?”
Cocoa powder matters more than people think. Natural cocoa gives a sharper chocolate taste and plays nicely with baking soda in cookies and cakes. Dutch-process cocoa is darker and smoother, which I like in brownies, fudge, and skillet cookies. If you only keep one kind on hand, natural cocoa is more flexible, but either one can work in a pinch if the recipe uses baking powder instead of soda.
Chocolate chips should melt smoothly, especially for fudge, bark, truffles, and drizzles. Semi-sweet is the safest all-purpose choice. If you want a more grown-up flavor, pick a bar or chips with cocoa butter high on the ingredient list. Cheap chips can still work in cookies, but they’re less reliable in ganache and fudge.
Jam and preserves should be thick. Thin jelly tends to sink or leak, while preserves hold a little shape and keep their color. Strawberry, raspberry, and cherry are the easiest fits for the Valentine angle because they bake into a red or ruby tone that still looks good once the dessert cools. If the jar looks watery, stir it well and, if needed, warm it just enough to loosen it, not liquefy it.
Oats, flour, and leaveners should be fresh. Baking soda and baking powder lose punch with age, and old ones make cookies flat or cakes dense. A quick check is worth it: if the powder doesn’t fizz in hot water, replace it. Same with oats — old oats can taste dull and dry instead of nutty.
Butter, eggs, vanilla, and peanut butter are the usual backbone here. Use unsalted butter if you can, because it gives you more control over the final salt level. If you only have salted butter, trim the added salt by about 1/4 teaspoon per half cup of butter.
How to Plate a Valentine Dessert Spread
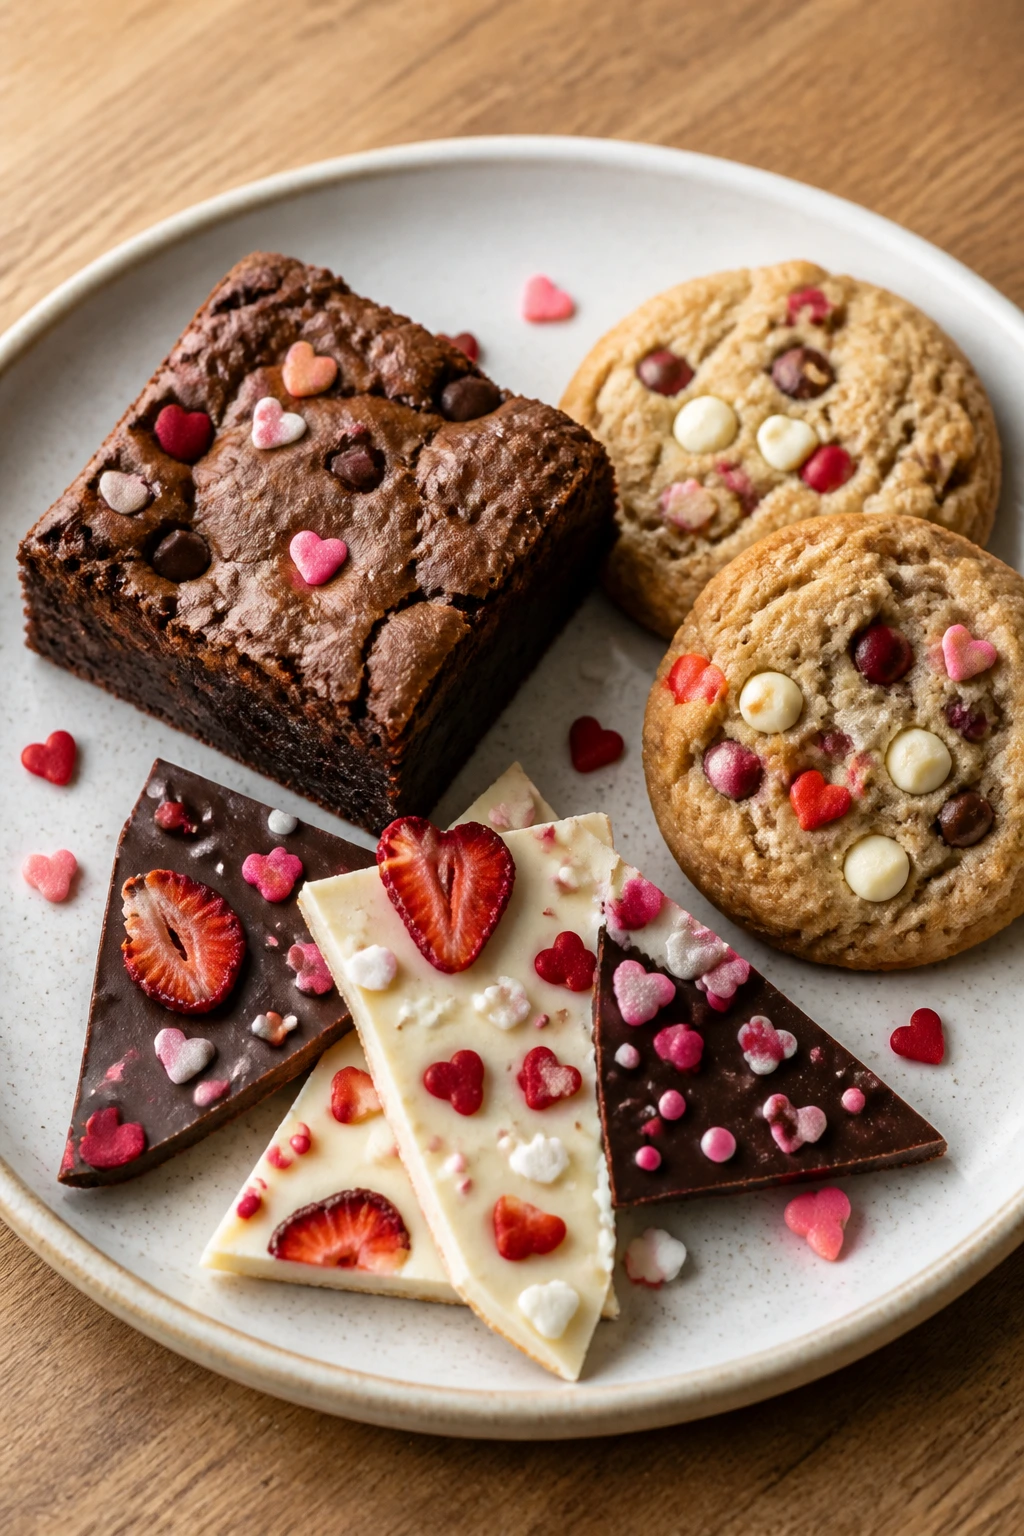
Presentation:
Stack cookies in odd numbers, cut bars into sharp squares, and break bark into rough pieces rather than neat slices. That mix of shapes looks more natural than a row of identical treats. A little powdered sugar sifted over dark desserts makes the plate read brighter without adding more sweetness.
Accompaniments:
Coffee is the easiest match, especially for brownies, biscotti, truffles, and skillet cookie. Cold milk works for peanut butter and chocolate desserts. If you’re setting out a small spread, pair one rich item like fudge or truffles with one crisp item like meringues or biscotti so the textures don’t blur together.
Portions:
For a mixed dessert tray, count on 2 cookies, 1 brownie square, 2 or 3 small truffles, or 1 small wedge of cake per person. For a crowd, bars and bark are the easiest to scale because they cut neatly and hold well on a plate. Mug cake and rice pudding are best kept as single-serve options.
Beverage Pairing:
Espresso is excellent with anything chocolate-heavy. Black tea works with shortbread, thumbprints, and almond cakes. If you want something softer, cold whole milk or a lightly sweetened iced coffee keeps the desserts from feeling too heavy.
Small Tweaks That Add More Chocolate, Crunch, or Color

Flavor Enhancement:
A pinch of espresso powder in anything chocolate makes the cocoa taste darker without turning the dessert into coffee. Flaky salt over fudge, bark, or blondies does the same job in a different way. It sharpens the sweet parts.
Customization:
If you want more fruit color, go to cherry preserves, raspberry jam, or dried cherries. If you want more crunch, use pretzels, nuts, or extra oats. If you want softer, richer desserts, lean on chocolate chips, butter, and peanut butter instead of adding more sugar.
Serving Suggestions:
Powdered sugar stencils, chocolate drizzles, and a few chopped nuts go farther than a pile of sprinkles. A spoonful of jam on the side can make a plate feel deliberate, especially with brownies or pound cake. Tiny paper cups are useful for truffles and macaroons if you have them.
Make-It-Yours:
For a gluten-free version, use a good 1:1 flour blend in the cookies, bars, blondies, and cake. For dairy-free treats, coconut oil works in bark and clusters, and dairy-free butter substitutes can handle many cookies. For lower-sugar dessert trays, choose meringues, biscotti, or lightly sweetened shortbread and let the chocolate or jam provide the rest.
Keeping Cookies, Bars, Fudge, and Cake Fresh
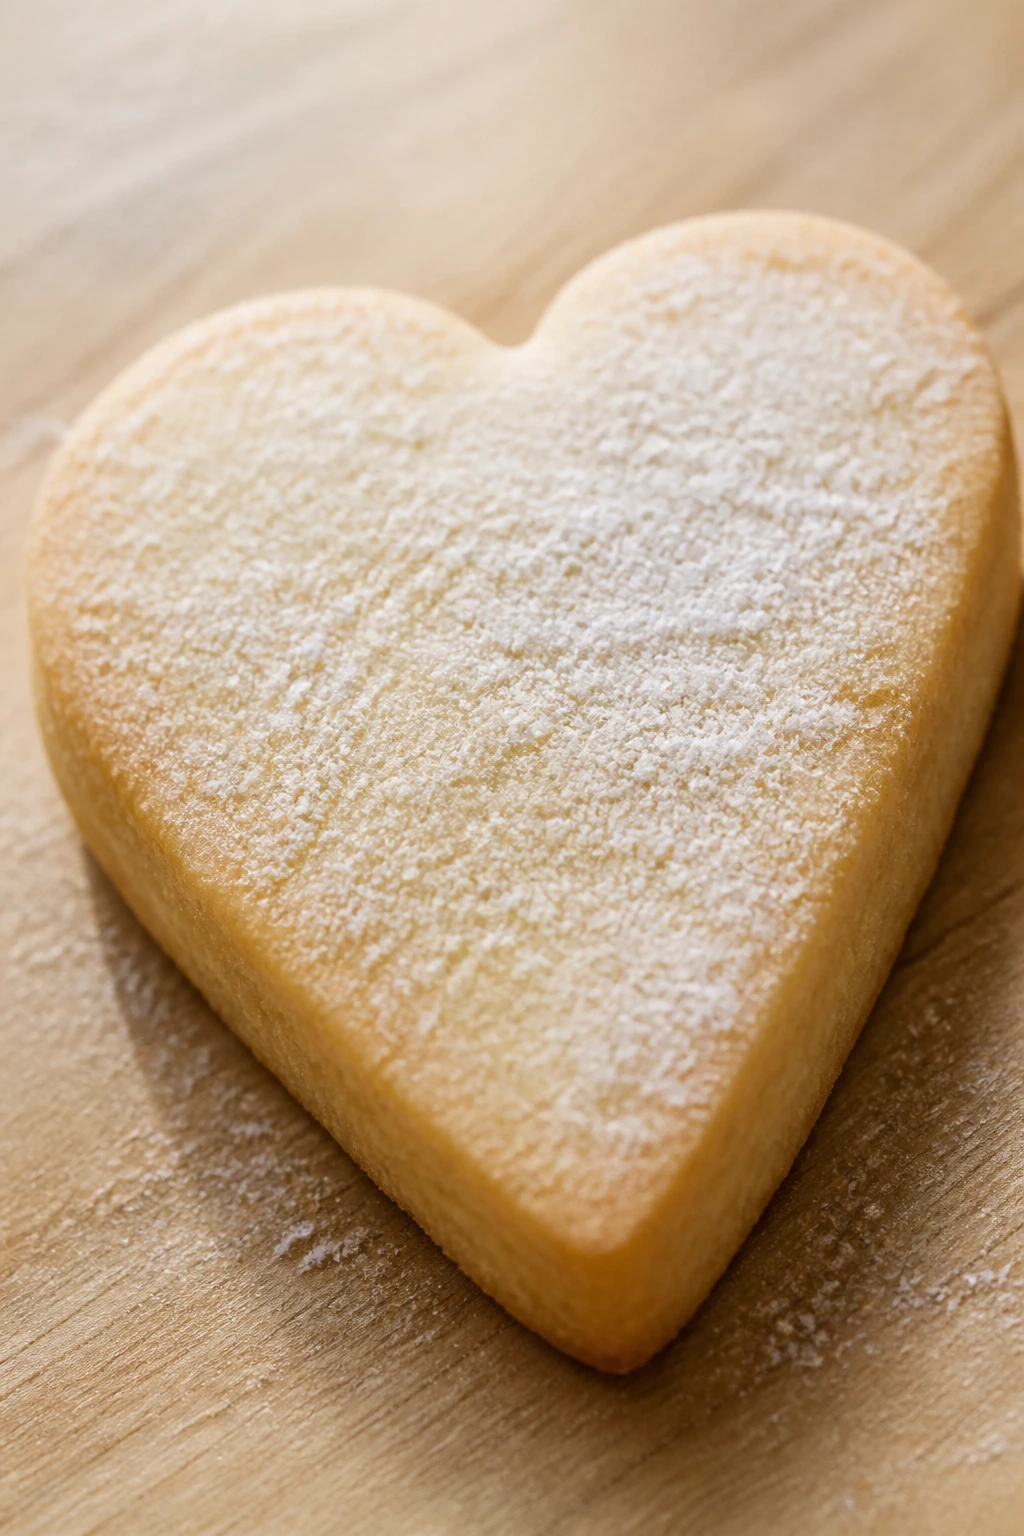
Most of these desserts hold well, but they don’t all like the same storage conditions. Cookies and bars usually keep for 3 to 4 days in an airtight container at room temperature, with parchment between layers if they’re sticky. Soft items like blondies and brownies can also be chilled for up to 1 week, though I think the texture is best after they sit out for 15 to 20 minutes before serving.
Fudge, truffles, bark, and peanut butter bars keep longer in the fridge, about 1 to 2 weeks if sealed well. Fudge and truffles can be frozen for up to 2 months; wrap them tightly and thaw in the fridge so they don’t sweat. Bark is happiest in a cool, dry place, but if your kitchen runs warm, the fridge is safer.
Meringues are their own animal. Store them airtight at room temperature with a little dry parchment, and keep them away from steam or they’ll soften. They don’t love the fridge. Neither do biscotti, which stay crisp best in a tin or container that isn’t packed too tightly.
Cakes, puddings, and bread pudding are usually best the day they’re made, but most can be refrigerated for 3 to 4 days. Warm individual slices of pound cake or skillet cookie in a 300°F oven for 8 to 10 minutes. Rice pudding and bread pudding reheat gently on the stovetop or in the microwave with a splash of milk to loosen the texture.
Variations for Different Diets and Kitchens
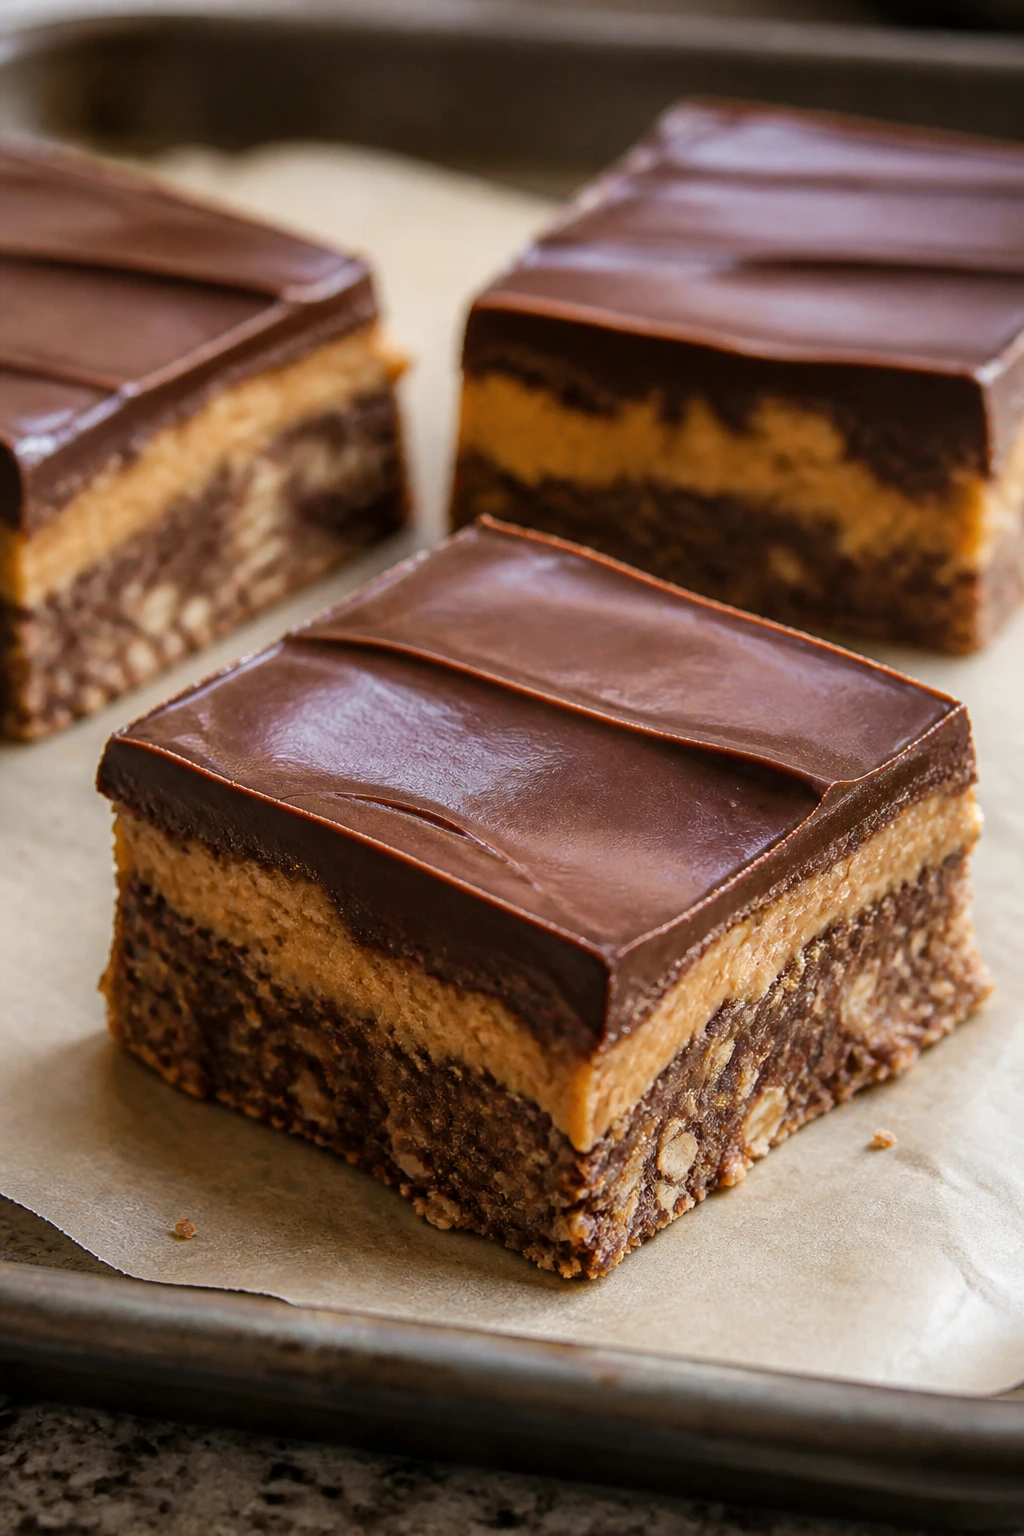
Gluten-Free Pantry Shelf:
Use a 1:1 gluten-free flour blend in brownies, blondies, cookies, and cake. Choose certified gluten-free oats for the oat bars and granola cups. The texture will be a little more tender, but the desserts still hold their shape if you don’t overmix.
Dairy-Free Chocolate Box:
Coconut oil can stand in for butter in bark, clusters, mug cakes, and some cookies. Dairy-free butter substitutes work in shortbread-style recipes and bars. Skip the truffles or use a dairy-free ganache if you’ve got a chocolate that melts well.
Egg-Free Emergency Plan:
The no-bake bars, fudge, bark, and some cereal-based treats are naturally easy to make without eggs. For cookies and brownies, a flax egg can work in a pinch, though the texture shifts a little. Meringues and choux-style churro bites are not the place to force it.
Lower-Sugar Sweet Spot:
Use a little less sugar in brownies, blondies, and bars if you’re pairing the dessert with jam, chocolate, or a sweet topping. Keep the sugar in meringues and fudge where it does structural work. That’s not the recipe to start trimming blindly.
Extra-Red Valentine Finish:
Choose cherry or raspberry preserves, dried cherries, and a light dusting of powdered sugar to push the color palette without buying decorations. Even one red accent on a plate changes the whole look.
Coffee-Lover’s Corner:
Add espresso powder to chocolate cookies, brownies, fudge, and bark. It gives the desserts a more adult flavor and pairs well with the buttery pieces in the collection.
The Mistakes That Make These Desserts Fall Flat
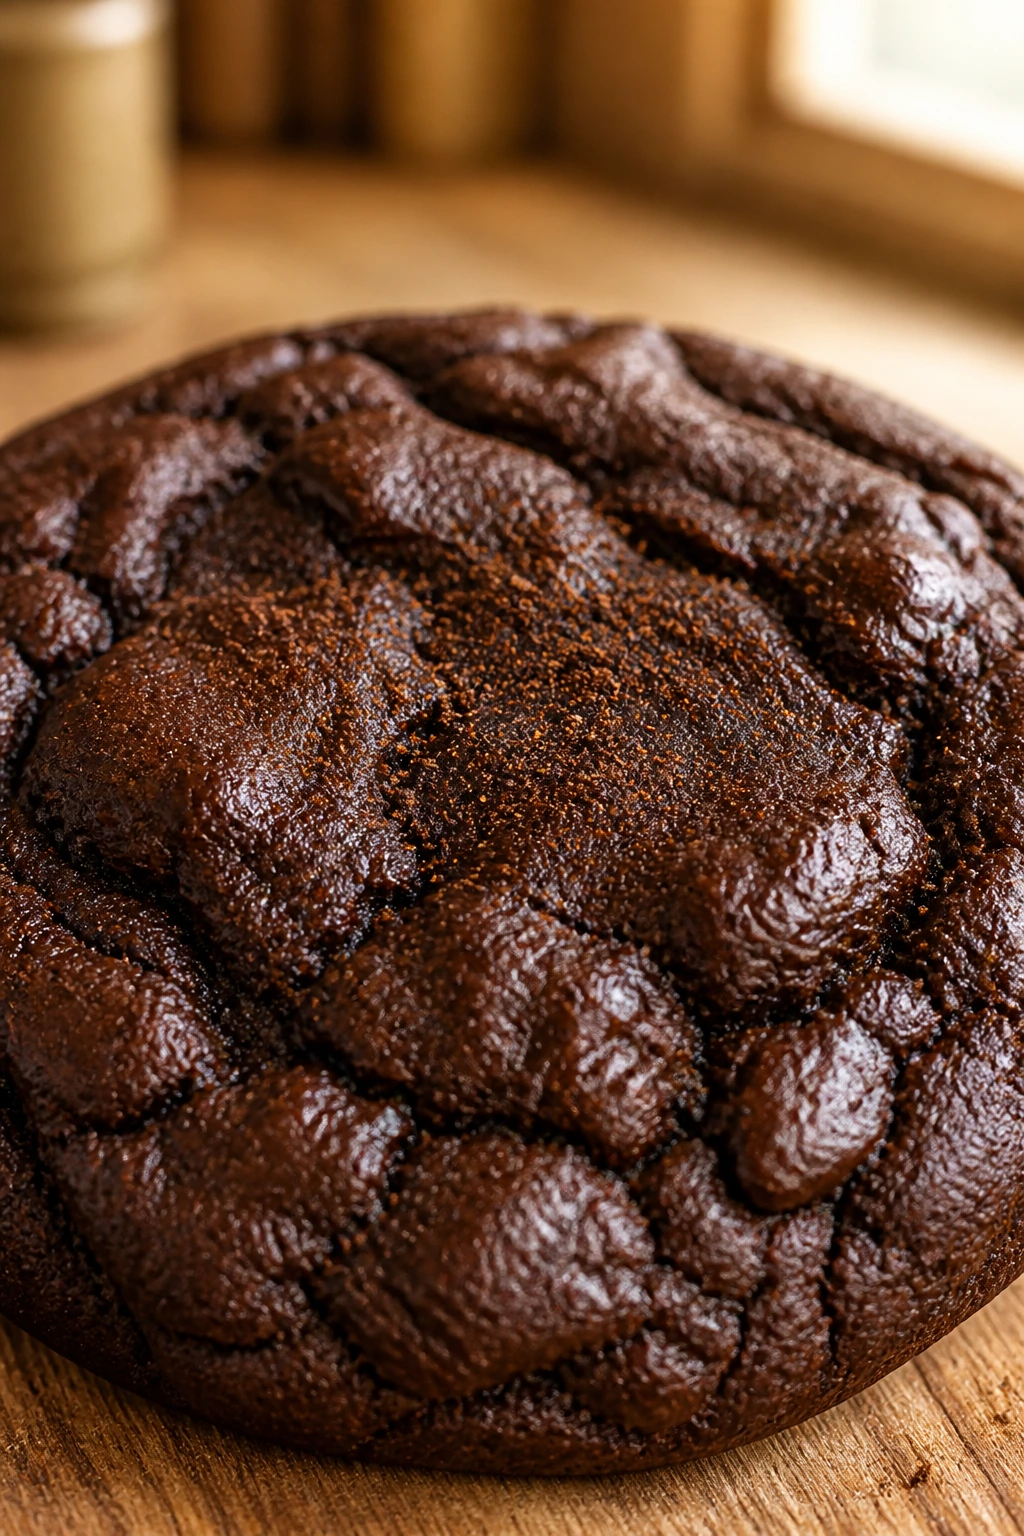
Old leavener, flat result:
If cookies spread like pancakes or cake layers feel dense, check the baking powder and baking soda first. Replace anything that doesn’t react in hot water or that has sat in the cupboard for years. This fix matters more than people want to admit.
Measuring flour by scooping the cup:
That packs in too much flour and dries out brownies, cookies, and pound cake. Spoon the flour into the cup and level it off with a knife. It’s boring advice, but it saves a lot of weak dessert.
Baking until everything looks fully set:
Brownies, blondies, bars, and skillet cookies usually finish as they cool. If you wait for a fully firm center in the oven, you often get a dry edge and a tired middle. Pull them when the center still has a little softness.
Using runny jam or preserves:
Thin filling leaks into the dough and muddies the look. Thick jam stays put in thumbprints, swirls, and bars. If the jar seems loose, warm it only enough to stir smoothly, not until it pours like syrup.
Mishandling melted chocolate:
High heat makes chocolate seize, and a wet spoon can do the same. Melt it gently in short bursts and keep every bowl dry. That one mistake ruins bark, truffles, and drizzles faster than almost anything else.
Storing crisp and chewy desserts together:
Meringues soften if they sit beside bars or cookies with a lot of moisture. Keep the crunchy things apart from the soft ones. It sounds fussy, but the textures stay where they’re supposed to.
Questions People Ask Before They Bake
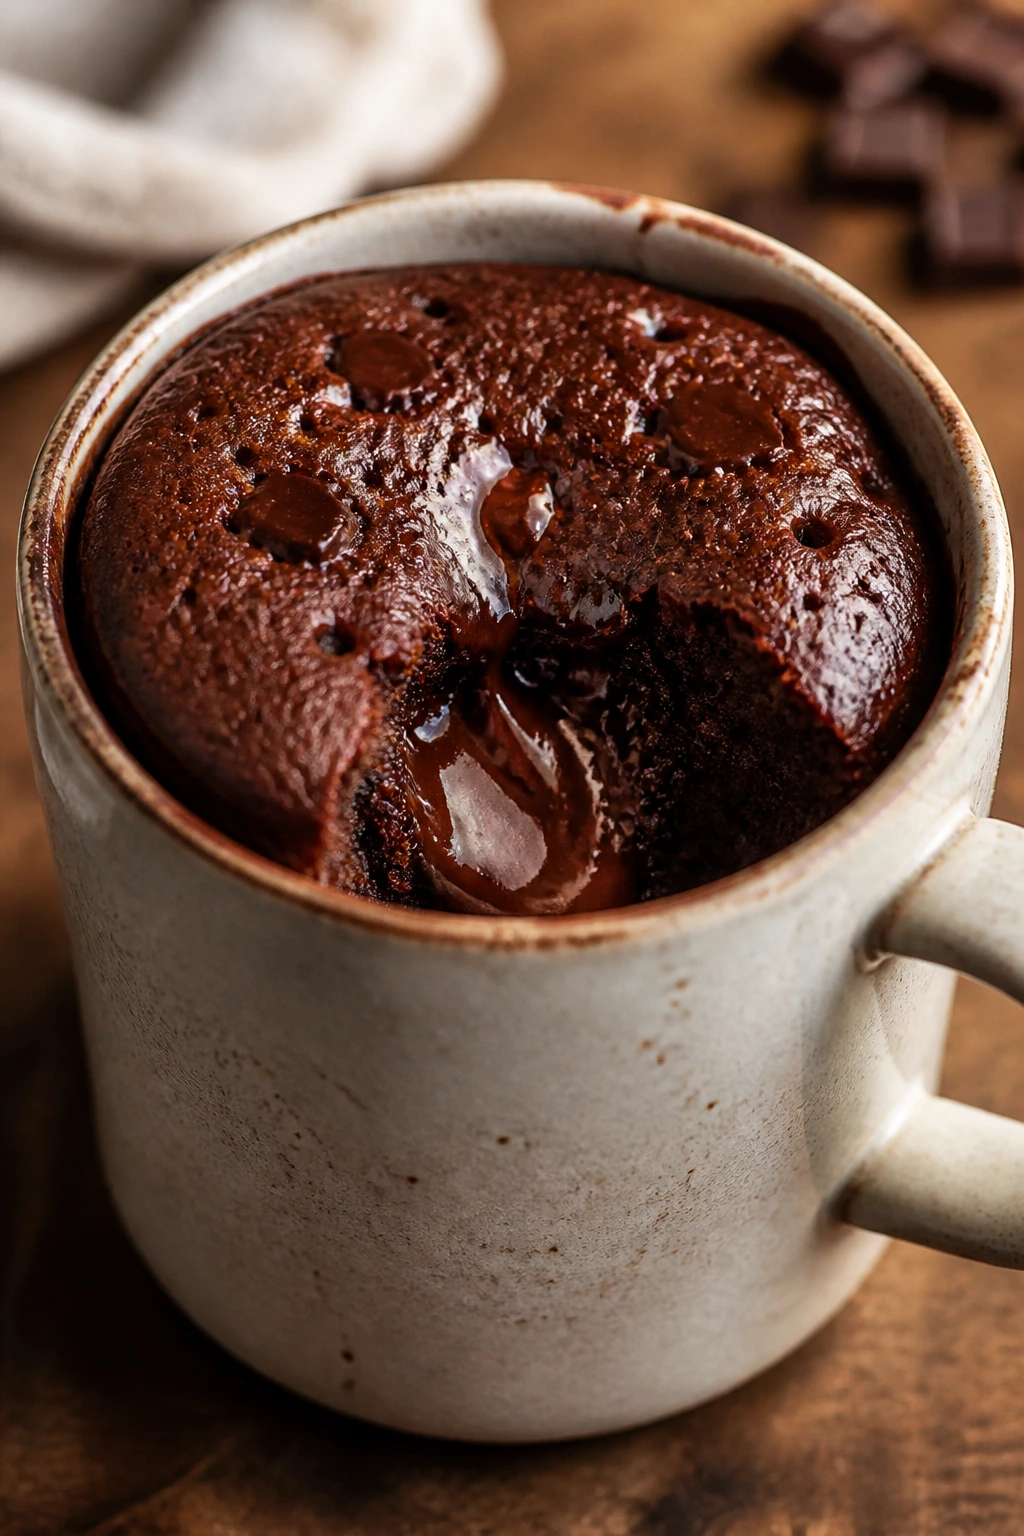
Can I make most of these desserts without a mixer?
Yes. Cookies, bars, bark, fudge, puddings, and no-bake treats all work with a whisk, spoon, or spatula. A mixer helps with butter-heavy doughs and meringues, but it’s not required for most of the list.
What’s the fastest dessert on the list if I’m short on time?
Chocolate bark, mug cake, and simple fudge are the quickest wins. Bark needs the least hands-on work, while the mug cake gives you something warm in about a minute. Fudge takes a little chilling, but the active work is tiny.
Can I swap jam flavors in the thumbprints and bars?
Yes, as long as the jam is thick enough to stay put. Strawberry, raspberry, cherry, and apricot all work. Very loose jelly usually leaks and dulls the look.
How do I keep cookies soft for a couple of days?
Underbake them by a minute, cool them fully, and store them in an airtight container with parchment between layers. For extra softness, tuck a small piece of bread into the container, but don’t let it touch the cookies directly if they’re delicate.
What if my brownies come out dry?
Most of the time that means they baked too long or had too much flour. Next time, pull them when the center still has moist crumbs and measure the flour lightly. A dry batch can still be saved with ice cream or a spoon of warm fudge sauce.
Are these freezer-friendly?
Most bars, cookies, fudge, truffles, and cake slices freeze well if wrapped tightly. Meringues and bark prefer dry storage and can lose texture in the freezer if you’re not careful. Label the container so you remember what’s inside.
Can I make a whole dessert board from these recipes?
Absolutely, and that’s one of the better uses for this collection. Pick one soft dessert, one chewy dessert, one crisp dessert, and one chocolate-heavy dessert so the board has movement. A plate that mixes texture always looks more thought-out than a pile of the same thing.
What if I only have cocoa powder and no chocolate chips?
You can still make crinkles, brownies, cake, rice pudding, and some cookies. Fudge, truffles, bark, and dips rely on actual chocolate, so I’d switch to a different recipe if chips or a bar aren’t in the cabinet. Cocoa gives flavor; chocolate gives body.
A Sweet Ending

The nice thing about pantry desserts is that they don’t need to pretend to be something bigger. They’re not trying to outshine a bakery case. They’re trying to turn a shelf of ordinary ingredients into something warm, shareable, and just polished enough to feel like the evening mattered.
That’s a pretty good deal for a holiday that can get weirdly expensive, too. Start with one chocolate dessert, add one fruit-forward cookie or bar, and keep one no-bake option in your back pocket. That combination covers almost every mood, and it leaves you with the one thing a good dessert spread really needs: enough sweetness to make the table feel cared for.