
Game night gets messy fast when dinner needs a timer, a second pan, and a prayer.
The best family game night dinner ideas are the ones that land hot, get passed around without much fuss, and leave enough of the kitchen standing that tomorrow morning doesn’t feel punished. I’m talking about the sort of food that can be eaten between card shuffles, rule arguments, and someone insisting they were definitely not cheating. Bonus points if the leftovers hold up in a lunchbox or reheat without turning rubbery by breakfast.
That’s the real test here. Not fancy. Not fussy. Just dinners with enough structure to feed a crowd and enough flexibility to survive a weeknight that’s already crowded with homework bags, piano practice, and one very determined child who cannot find a sock. I keep coming back to sheet pans, skillet bakes, sliders, soups, and hand-held fillings because they work under pressure, which is more than I can say for a delicate dinner that needs five minutes of undivided attention.
Why These Dinners Earn Their Spot on a Busy Table
- Fast Assembly: Most of these recipes lean on 10 to 20 minutes of hands-on work, so you can get dinner moving before the room turns into a relay race of backpacks, shoes, and board-game pieces.
- Leftover-Friendly: Saucy bakes, soups, meatballs, rice bowls, and sliders reheat cleanly the next morning, which matters when you want breakfast or lunch to be more than cereal and regret.
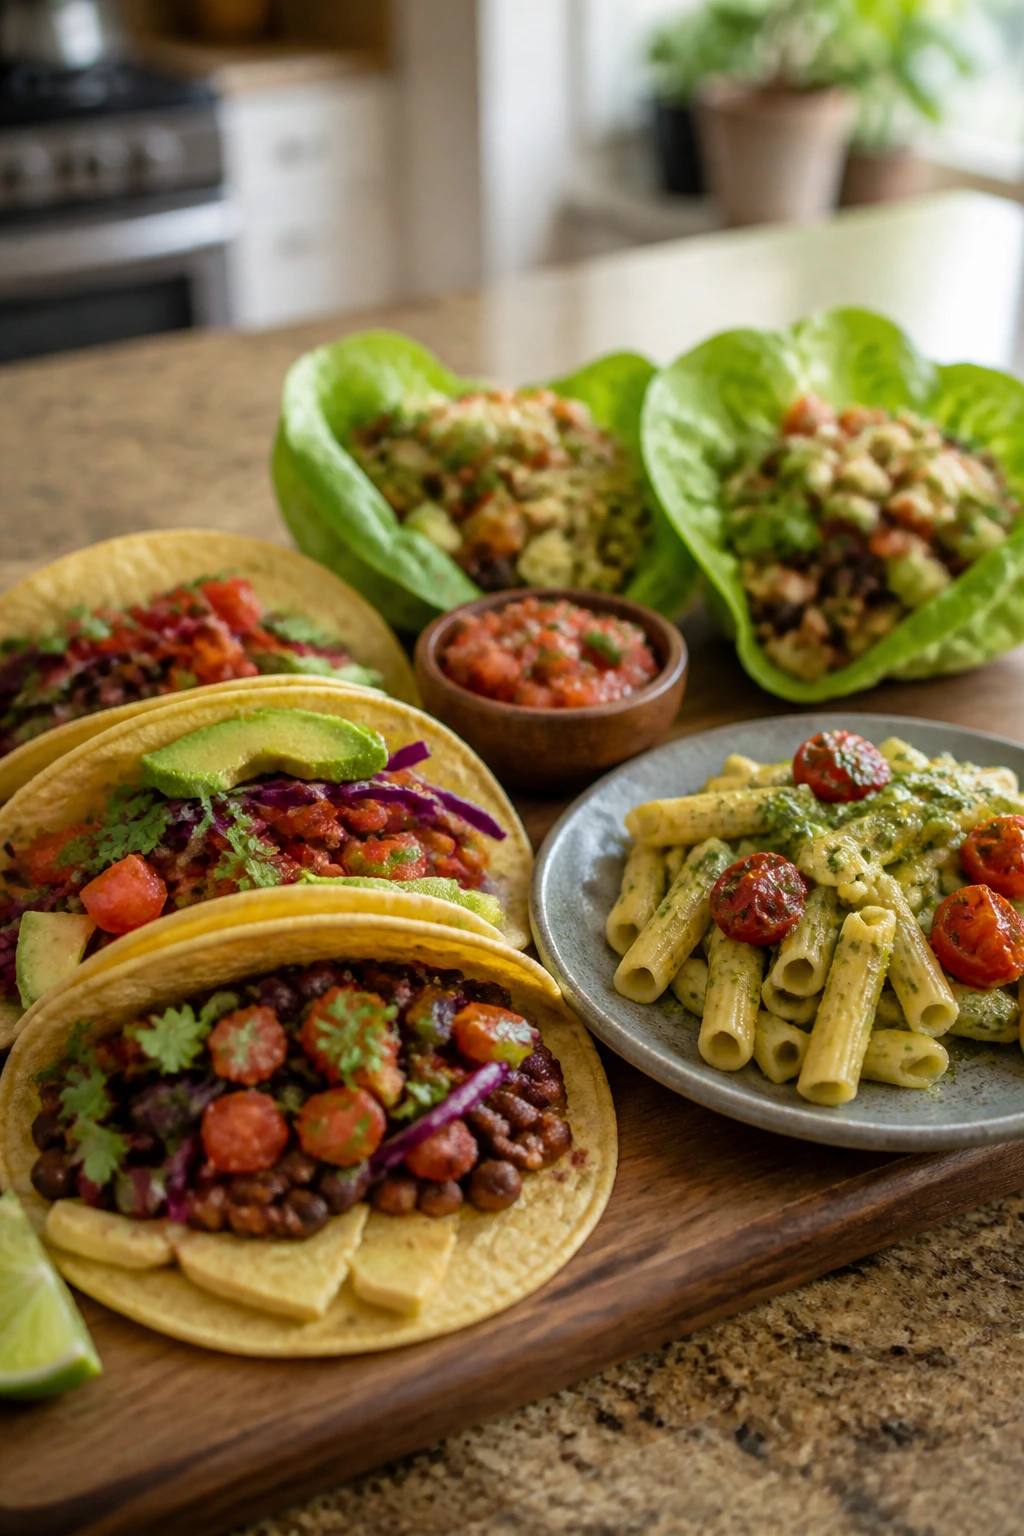
- Easy to Pass Around: Hand-held tacos, quesadillas, subs, nachos, and sliders let people eat while the game is still on the table, and that matters when the night keeps moving.
- Low-Dish Cleanup: Sheet pans, skillets, and one-pot meals keep the sink from becoming the second event of the evening.
- Flexible Heat Levels: Mild for the kids, hot sauce for the adults, pickled jalapeños for the brave one in the group. Simple fix.
- Pantry-Smart: Pasta, rice, tortillas, beans, frozen vegetables, and canned tomatoes do a lot of heavy lifting here, which is exactly what a school-night dinner should do.
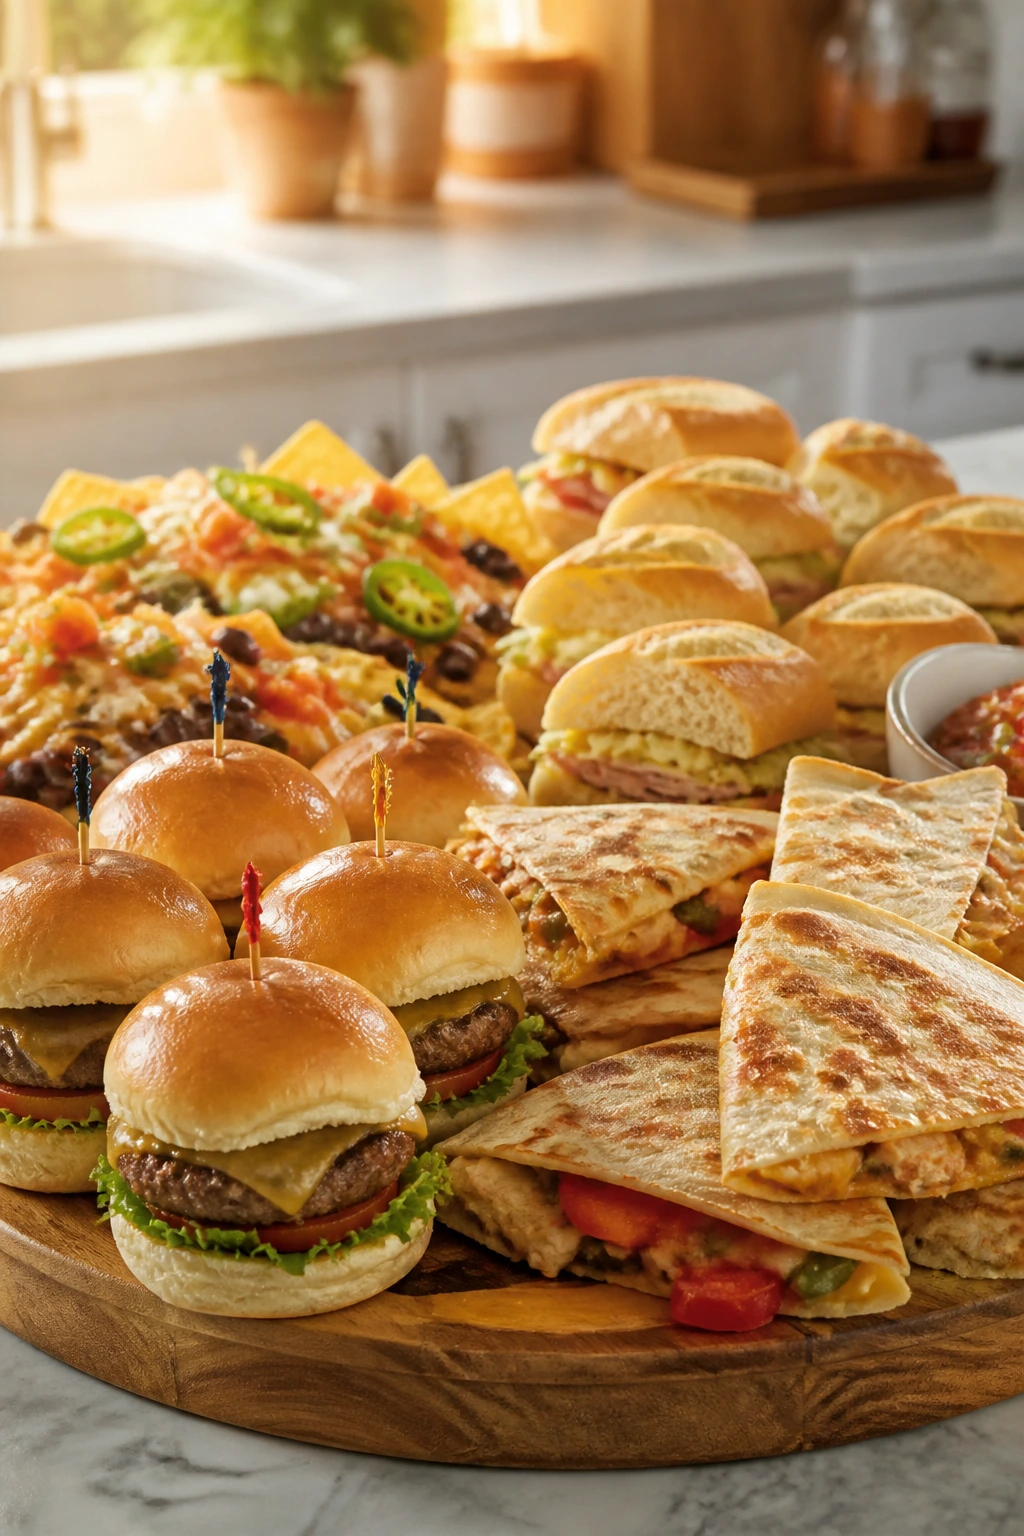
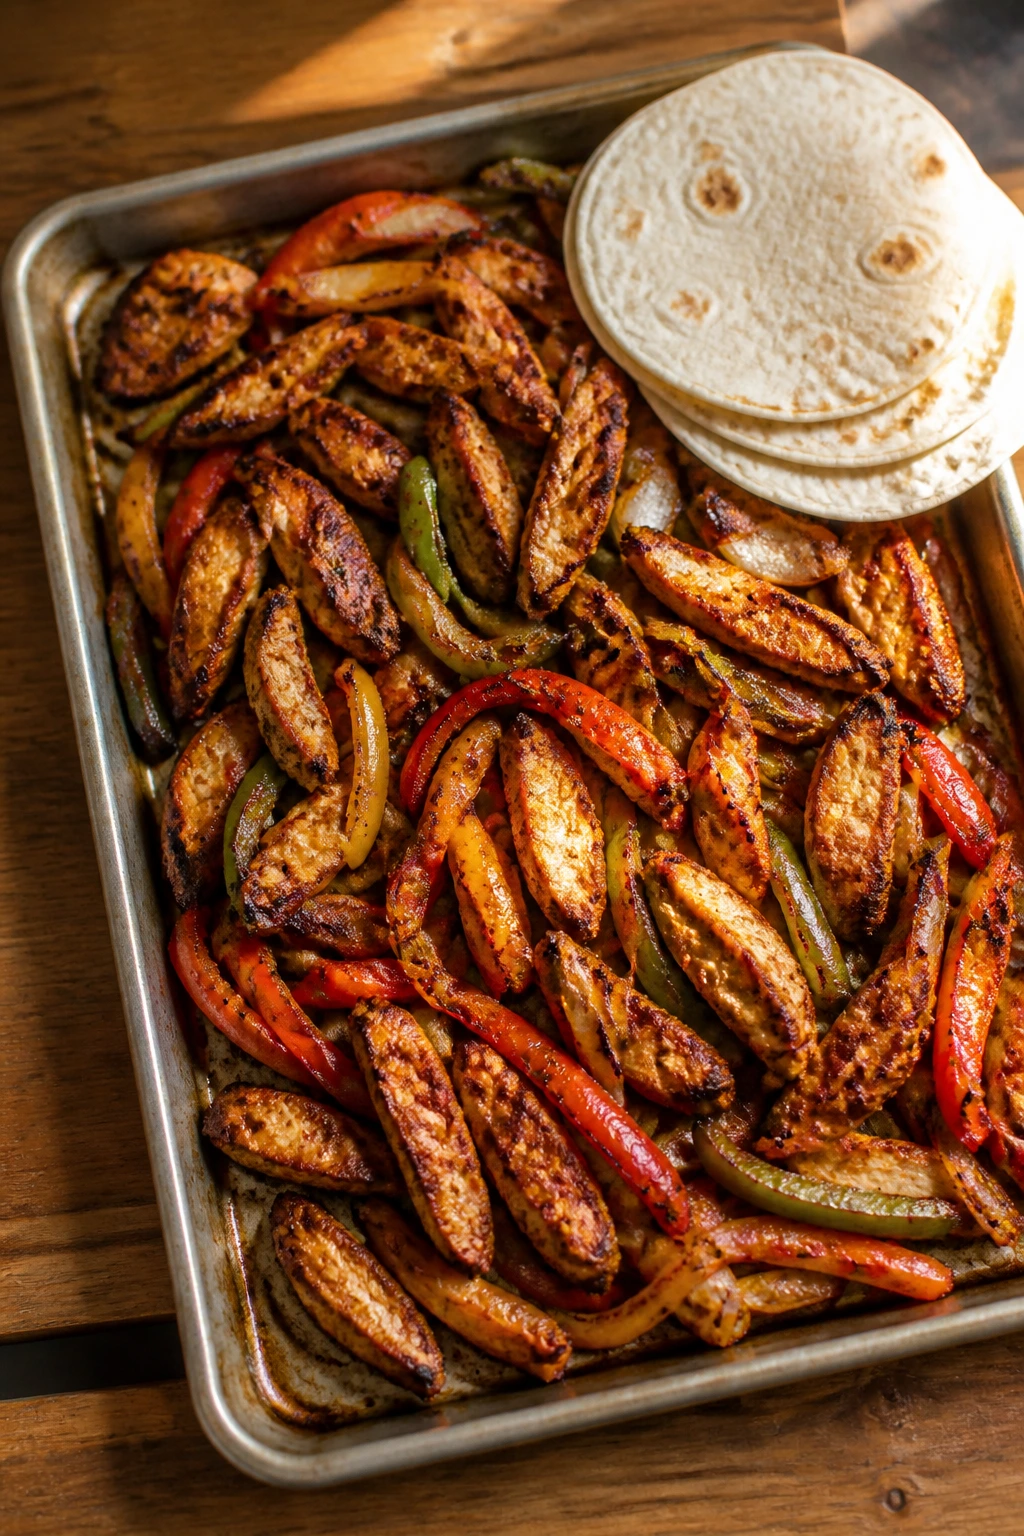
1. Sheet-Pan Chicken Fajita Tacos
The chicken, peppers, and onions come off the pan with charred edges and that sweet-salty smell that tells you dinner is already doing half the work. I like this one because it feels lively on the table without asking for much in the kitchen.
Why It Works:
A sheet pan gives you browned edges on the vegetables and enough surface area for the chicken to roast instead of steam. The filling is finished in about 20 minutes, and the tortillas can warm while you carry the pan to the table. Leftovers make a solid next-day lunch filling, especially with rice or scrambled eggs.
Key Ingredients:
- 1 1/2 pounds boneless, skinless chicken thighs, sliced into 1-inch strips
- 3 bell peppers, sliced into thin strips
- 1 large yellow onion, sliced
- 2 tablespoons olive oil
- 2 teaspoons chili powder
- 1 teaspoon ground cumin
- 1 teaspoon garlic powder
- 1 teaspoon kosher salt
- 1/2 teaspoon black pepper
- 8 small flour tortillas
- 1 cup shredded Monterey Jack cheese
- 1 lime, cut into wedges
Quick Steps:
- Preheat the oven to 425°F and line a rimmed sheet pan with parchment.
- Toss the chicken, peppers, onion, oil, chili powder, cumin, garlic powder, salt, and pepper on the pan until coated.
- Spread everything into one layer and roast for 18 to 22 minutes, until the chicken reaches 165°F and the peppers look blistered at the edges.
- Warm the tortillas in a dry skillet for 20 to 30 seconds per side, or wrap them in foil and slide them into the oven for the last 5 minutes.
- Fill each tortilla with the chicken mixture, cheese, and a squeeze of lime.
Equipment for This Recipe:
- Rimmed 18×13-inch sheet pan
- Parchment paper
- Large mixing bowl
- Tongs
- Instant-read thermometer
How to Serve This Dish:
Pile the filling into a shallow bowl and let everyone build their own tacos. A bowl of salsa, sour cream, and sliced avocado makes the table look full without adding work.
Pro Tips for This Recipe:
- Cut the peppers thick enough to stay a little crisp after roasting.
- Don’t crowd the pan; if it looks packed, use two pans.
- Warm tortillas before serving or they tear under the filling.
- A spoonful of pickled red onions adds sharpness that balances the cheese.
Variations on This Dish:
- Smoky Chipotle Swap: Add 1 minced chipotle in adobo to the seasoning mix for a deeper, smoky heat.
- Steak Night Version: Replace the chicken with 1 1/2 pounds sliced flank steak and roast just until browned, about 12 to 15 minutes.
- Bean-Heavy Vegetarian Turn: Use two cans of drained black beans in place of the chicken and add sliced zucchini.
Common Mistakes to Avoid with This Dish:
- Overcrowding the pan: The vegetables go soft instead of blistering. Use a second sheet pan if needed.
- Skipping the thermometer: Chicken thighs should hit 165°F in the thickest piece.
- Using cold tortillas straight from the package: They crack and spill filling everywhere.
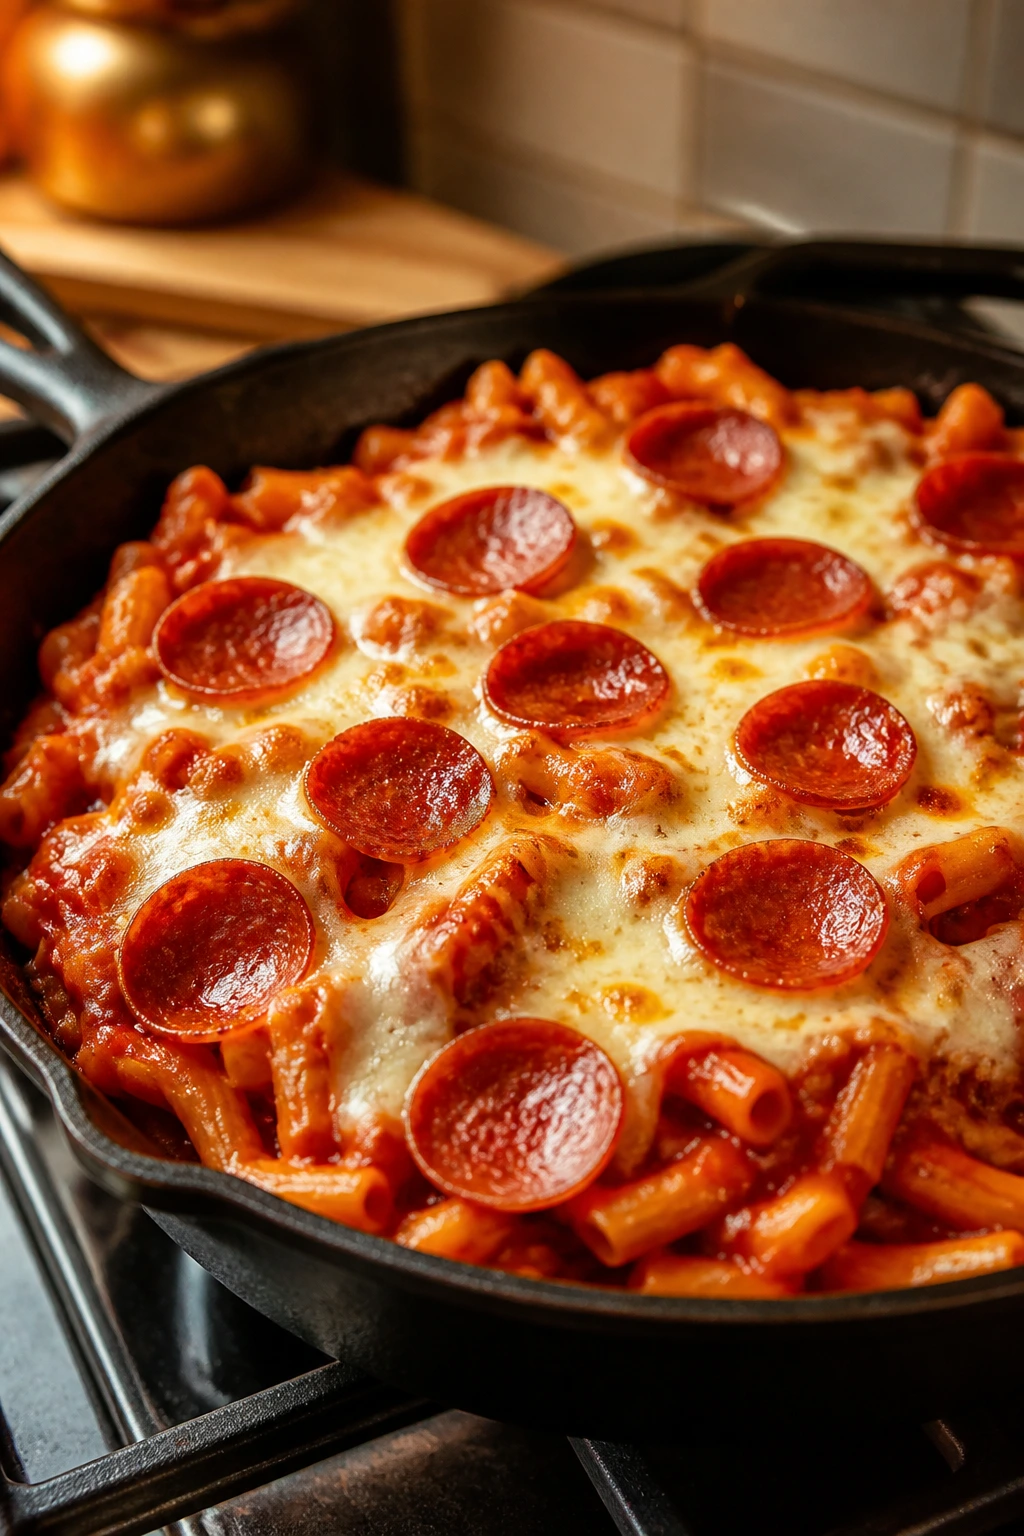
2. Pizza Pasta Skillet with Pepperoni
This tastes like pizza night met pasta night and decided not to pick a side. The sauce clings to every curve of the noodles, the pepperoni curls a little, and the mozzarella stretches in the exact way kids notice first.
Why It Works:
You get all the familiar pizza flavors without waiting on dough. Pasta cooks fast, tomato sauce warms in the same skillet, and the whole thing can be on the table in under 30 minutes. It’s also one of the better leftovers on this list because the pasta soaks up the sauce overnight instead of drying out.
Key Ingredients:
- 12 ounces short pasta, such as rotini or penne
- 2 tablespoons olive oil
- 1/2 cup diced yellow onion
- 2 cloves garlic, minced
- 2 1/2 cups marinara sauce
- 1 teaspoon dried oregano
- 1/2 teaspoon crushed red pepper flakes
- 1 cup sliced pepperoni
- 1 1/2 cups shredded mozzarella
- 1/4 cup grated parmesan
Quick Steps:
- Boil the pasta in salted water until just shy of tender, then drain.
- Heat the olive oil in a large oven-safe skillet over medium heat and cook the onion for 3 minutes.
- Add the garlic, marinara, oregano, and red pepper flakes, then stir in the cooked pasta and half the pepperoni.
- Scatter the mozzarella and parmesan over the top, then broil for 2 to 3 minutes until the cheese bubbles and spots brown.
- Finish with the remaining pepperoni and let the skillet rest for 2 minutes before serving.
Equipment for This Recipe:
- Large oven-safe skillet
- Pot for boiling pasta
- Colander
- Wooden spoon
- Broiler-safe oven mitt
How to Serve This Dish:
Serve it straight from the skillet with a green salad and garlic bread. It looks best with a few basil leaves on top, but it does not need them to vanish fast.
Pro Tips for This Recipe:
- Undercook the pasta by 1 minute so it doesn’t turn soft in the skillet.
- Use low-moisture mozzarella; fresh mozzarella can make the sauce watery.
- If your skillet is not broiler-safe, cover it for 2 to 3 minutes off heat until the cheese melts.
- Save a few pepperoni slices for the top so the browning looks intentional.
Variations on This Dish:
- Sausage and Peppers Edition: Swap the pepperoni for cooked Italian sausage and sautéed bell peppers.
- Veggie Pizza Bake: Add mushrooms, black olives, and diced zucchini instead of meat.
- White Pizza Pasta: Replace the marinara with 1 1/2 cups cream sauce and 1/2 cup ricotta.
Common Mistakes to Avoid with This Dish:
- Overcooking the pasta: Soft noodles get mushy once the sauce bakes.
- Using too much sauce: The skillet should look coated, not soupy.
- Walking away from the broiler: Cheese turns from bubbly to burned in a minute.
3. Sloppy Joe Sliders
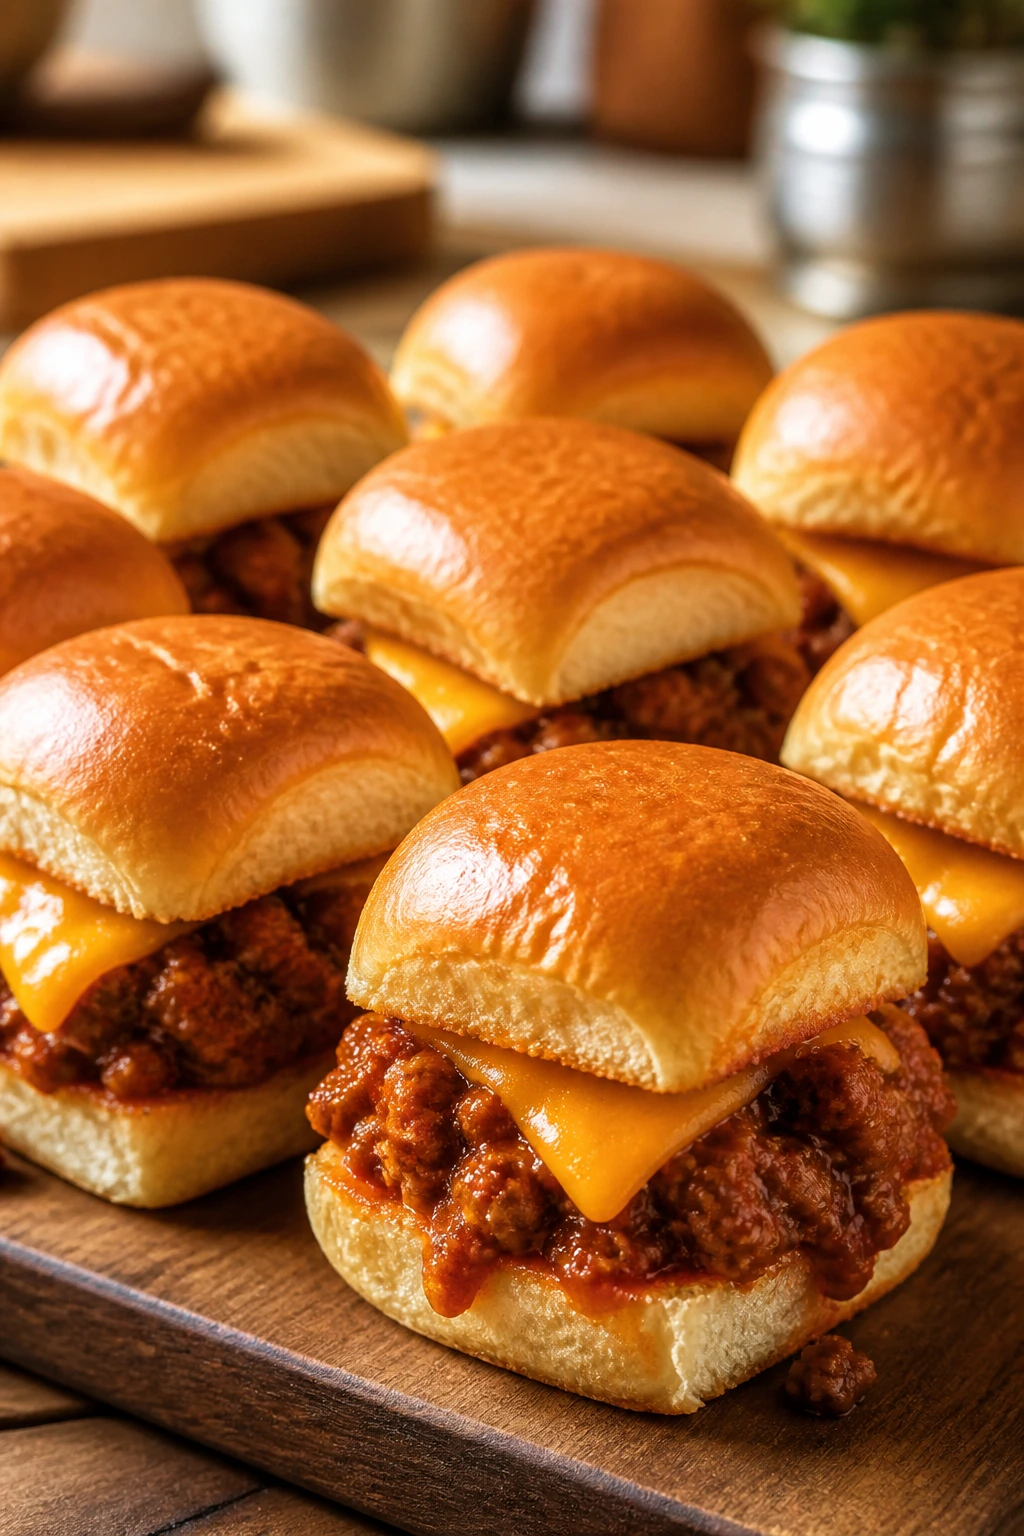
These are sticky in the right way. The beef gets glossy, the sauce clings to the rolls, and the little tops brown just enough to hold their shape when somebody grabs one too quickly.
Why It Works:
Sloppy Joes are already built for casual eating, and sliders make them less messy for kids with small hands. A little cheddar melted into the beef helps it hold together, and baking the assembled sliders for a few minutes softens the rolls just enough without turning them soggy. They disappear fast, which is useful when the game is louder than the dinner conversation.
Key Ingredients:
- 1 pound ground beef
- 1/2 cup diced onion
- 1/2 cup ketchup
- 2 tablespoons tomato paste
- 1 tablespoon Worcestershire sauce
- 1 tablespoon brown sugar
- 1 teaspoon yellow mustard
- 1/2 teaspoon salt
- 1 cup shredded cheddar
- 12 slider rolls
- 12 dill pickle chips
Quick Steps:
- Brown the beef and onion in a skillet over medium-high heat for 6 to 8 minutes, then drain off excess fat.
- Stir in the ketchup, tomato paste, Worcestershire, brown sugar, mustard, and salt, then simmer for 5 minutes until thick and glossy.
- Split the rolls and set the bottoms in a baking dish.
- Spoon the beef over the rolls, add cheddar and pickles, then cap with the tops.
- Bake at 350°F for 8 to 10 minutes until the cheese melts and the tops feel warm.
Equipment for This Recipe:
- Large skillet
- 9×13-inch baking dish
- Spatula
- Knife for slicing rolls
How to Serve This Dish:
Set out the sliders with carrot sticks, chips, and extra pickles. The plate looks better when the rolls are brushed with a little melted butter before baking.
Pro Tips for This Recipe:
- Drain the beef well so the sauce doesn’t slide off the buns.
- Let the filling simmer until it mounds on a spoon.
- Use soft rolls, not crusty ones; they hold the sauce better.
- Add pickles after baking if you want them to stay sharp and crunchy.
Variations on This Dish:
- Turkey Lunchbox Swap: Use ground turkey and add 1 extra tablespoon of ketchup for moisture.
- Spicy Drip Version: Stir in 1 teaspoon hot sauce and a few jalapeño slices.
- Cheese-Only Kid Cut: Skip the pickles and tuck a thin slice of cheddar under the meat instead.
Common Mistakes to Avoid with This Dish:
- Leaving the filling too wet: The rolls go soggy fast. Simmer until thick.
- Overbaking the sliders: The bottoms get hard and the tops go dry.
- Serving them straight from the oven without a brief rest: The filling runs out in hot puddles.
4. Broccoli Cheddar Mac Bake
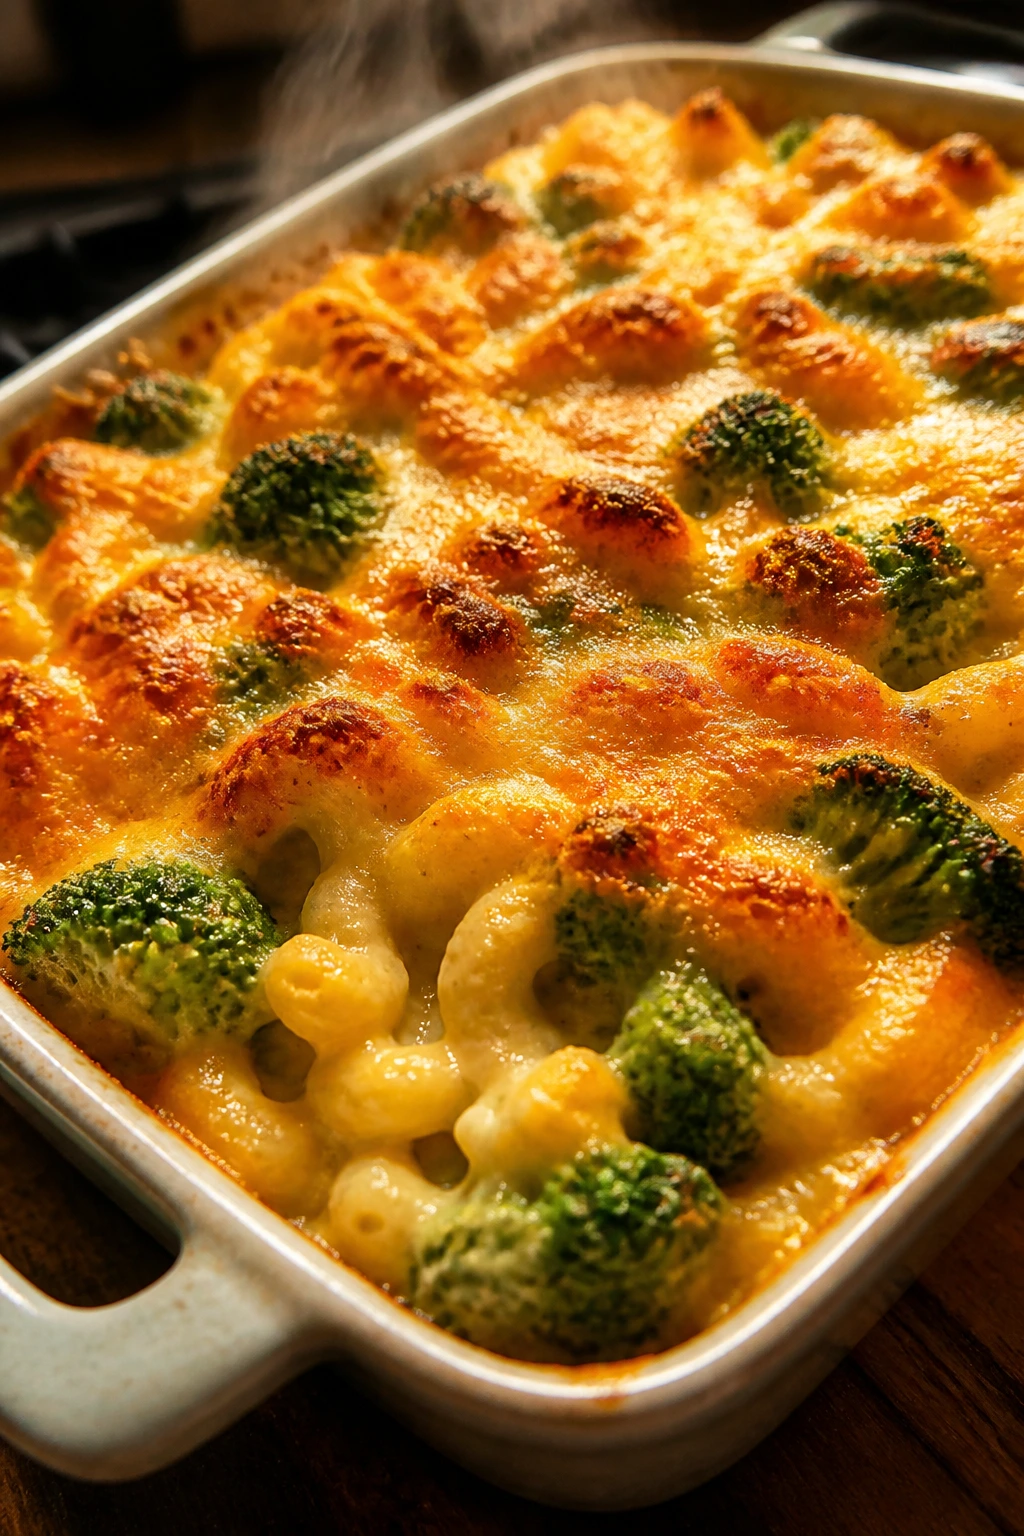
The smell here is pure comfort: butter, cheddar, and broccoli steam rising from the dish as the top goes golden. The broccoli keeps the mac from feeling one-note, and a little crisp crust on top makes it feel finished instead of merely melted.
Why It Works:
Mac and cheese is already a reliable family dinner, but baking it gives the top better texture and helps the dish stay warm through a long game. Broccoli adds a little bite and cuts the richness just enough that a second helping feels reasonable. It also reheats nicely, which matters when somebody asks for “just a little more” after the cleanup starts.
Key Ingredients:
- 12 ounces elbow macaroni
- 3 cups small broccoli florets
- 4 tablespoons butter
- 1/4 cup all-purpose flour
- 3 cups milk
- 2 cups shredded sharp cheddar
- 1 cup shredded mozzarella
- 1 teaspoon kosher salt
- 1/2 teaspoon black pepper
- 1/2 cup breadcrumbs
Quick Steps:
- Cook the macaroni in salted water until just tender, adding the broccoli for the last 2 minutes; drain.
- Melt the butter in a saucepan over medium heat, whisk in the flour, and cook for 1 minute.
- Whisk in the milk and simmer for 3 to 4 minutes until slightly thickened.
- Stir in the cheddar, mozzarella, salt, and pepper, then fold in the pasta and broccoli.
- Transfer to a buttered baking dish, sprinkle breadcrumbs on top, and bake at 375°F for 15 to 20 minutes until bubbling and browned.
Equipment for This Recipe:
- Medium saucepan
- Large pot
- Colander
- 9×13-inch baking dish
- Whisk
How to Serve This Dish:
Serve with sliced apples or a simple green salad so the plate doesn’t feel heavy. I like to spoon it into wide bowls; it holds heat longer and keeps the cheese from running all over the table.
Pro Tips for This Recipe:
- Stop cooking the pasta while it still has a slight bite.
- Shred the cheese yourself if you can; it melts smoother.
- If the top browns too fast, cover loosely with foil for the last few minutes.
- Add a pinch of mustard powder if you want the cheddar to taste sharper.
Variations on This Dish:
- Cauliflower Cheddar Swap: Replace half the broccoli with small cauliflower florets.
- Bacon Finish Version: Stir in 6 cooked bacon strips for a smoky edge.
- Extra-Green Twist: Add a handful of chopped spinach right before baking.
Common Mistakes to Avoid with This Dish:
- Using pre-cooked broccoli that’s already soft: It turns limp in the bake.
- Sauce that’s too thin: The mac sets poorly and looks runny.
- Skipping the rest time: Give it 5 minutes before scooping so it firms up.
5. BBQ Chicken Quesadillas
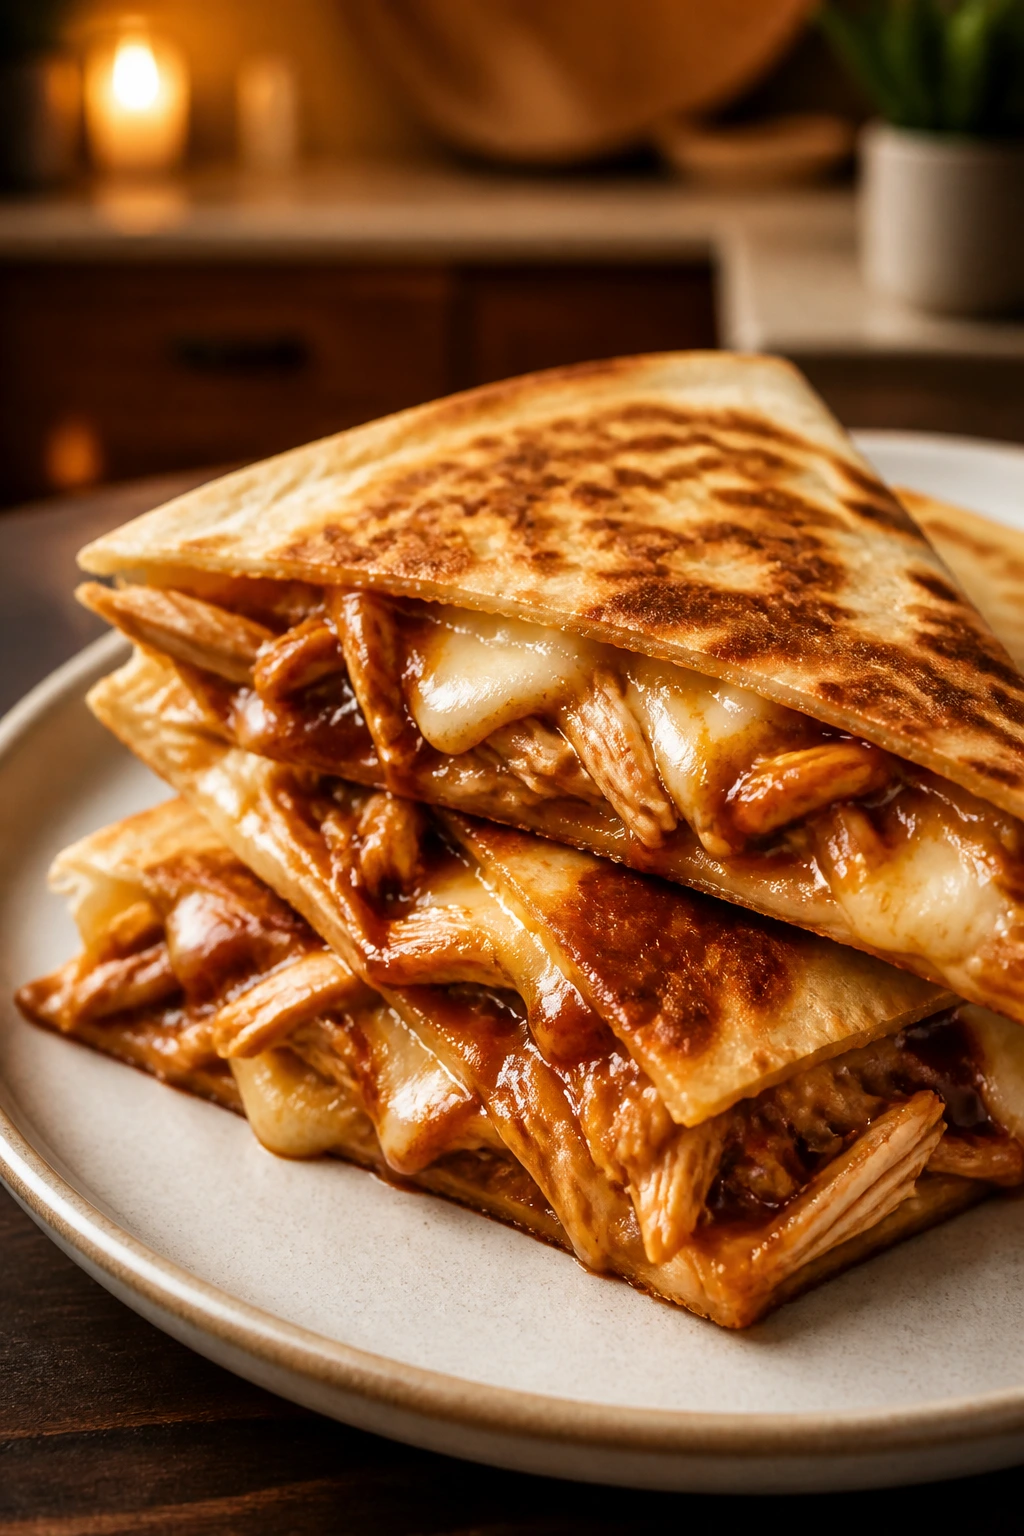
These are all about the edges. The tortillas crisp, the cheese melts into the shredded chicken, and the barbecue sauce gives the whole thing a sweet-smoky pull that feels bigger than the ingredient list.
Why It Works:
Quesadillas are one of the fastest ways to turn leftover chicken into a real dinner. The filling needs almost no cooking if the chicken is already shredded, and the skillet does the rest in a few minutes per batch. They slice neatly into wedges, which makes them easy to share on a crowded table.
Key Ingredients:
- 2 cups shredded cooked chicken
- 1/3 cup barbecue sauce
- 1 1/2 cups shredded cheddar
- 1/2 cup corn kernels
- 1/4 cup thinly sliced red onion
- 4 large flour tortillas
- 1 tablespoon butter or oil
- Sour cream, for serving
Quick Steps:
- Mix the chicken, barbecue sauce, corn, and red onion in a bowl.
- Heat a large skillet over medium heat and melt a little butter or oil in the pan.
- Lay down one tortilla, sprinkle half with cheese, add the chicken filling, then top with a little more cheese and fold over.
- Cook for 2 to 3 minutes per side until golden brown and the cheese melts.
- Slice into wedges and serve with sour cream.
Equipment for This Recipe:
- Large skillet
- Spatula
- Mixing bowl
- Sharp knife or pizza cutter
How to Serve This Dish:
Cut the quesadillas into triangles and stack them on a board with salsa and sliced cucumbers. They look good with the browned side up, which is useful when the rest of dinner is chaos.
Pro Tips for This Recipe:
- Keep the heat at medium so the tortilla browns after the cheese melts.
- Use rotisserie chicken when the evening is already crowded.
- Don’t overfill; quesadillas with too much filling slide apart.
- A spoon of pickled jalapeños gives them real lift.
Variations on This Dish:
- Pulled Pork Shortcut: Swap the chicken for 2 cups shredded pork and use the same sauce.
- Mild Cheddar Version: Skip the red onion and use Monterey Jack for a softer flavor.
- Black Bean Boost: Add 1/2 cup drained black beans for a heavier filling.
Common Mistakes to Avoid with This Dish:
- High heat: The tortilla scorches before the cheese melts.
- Wet filling: Too much barbecue sauce leaks out and burns in the skillet.
- Cutting immediately: Give each quesadilla a minute to settle before slicing.
6. Turkey Taco Stuffed Sweet Potatoes
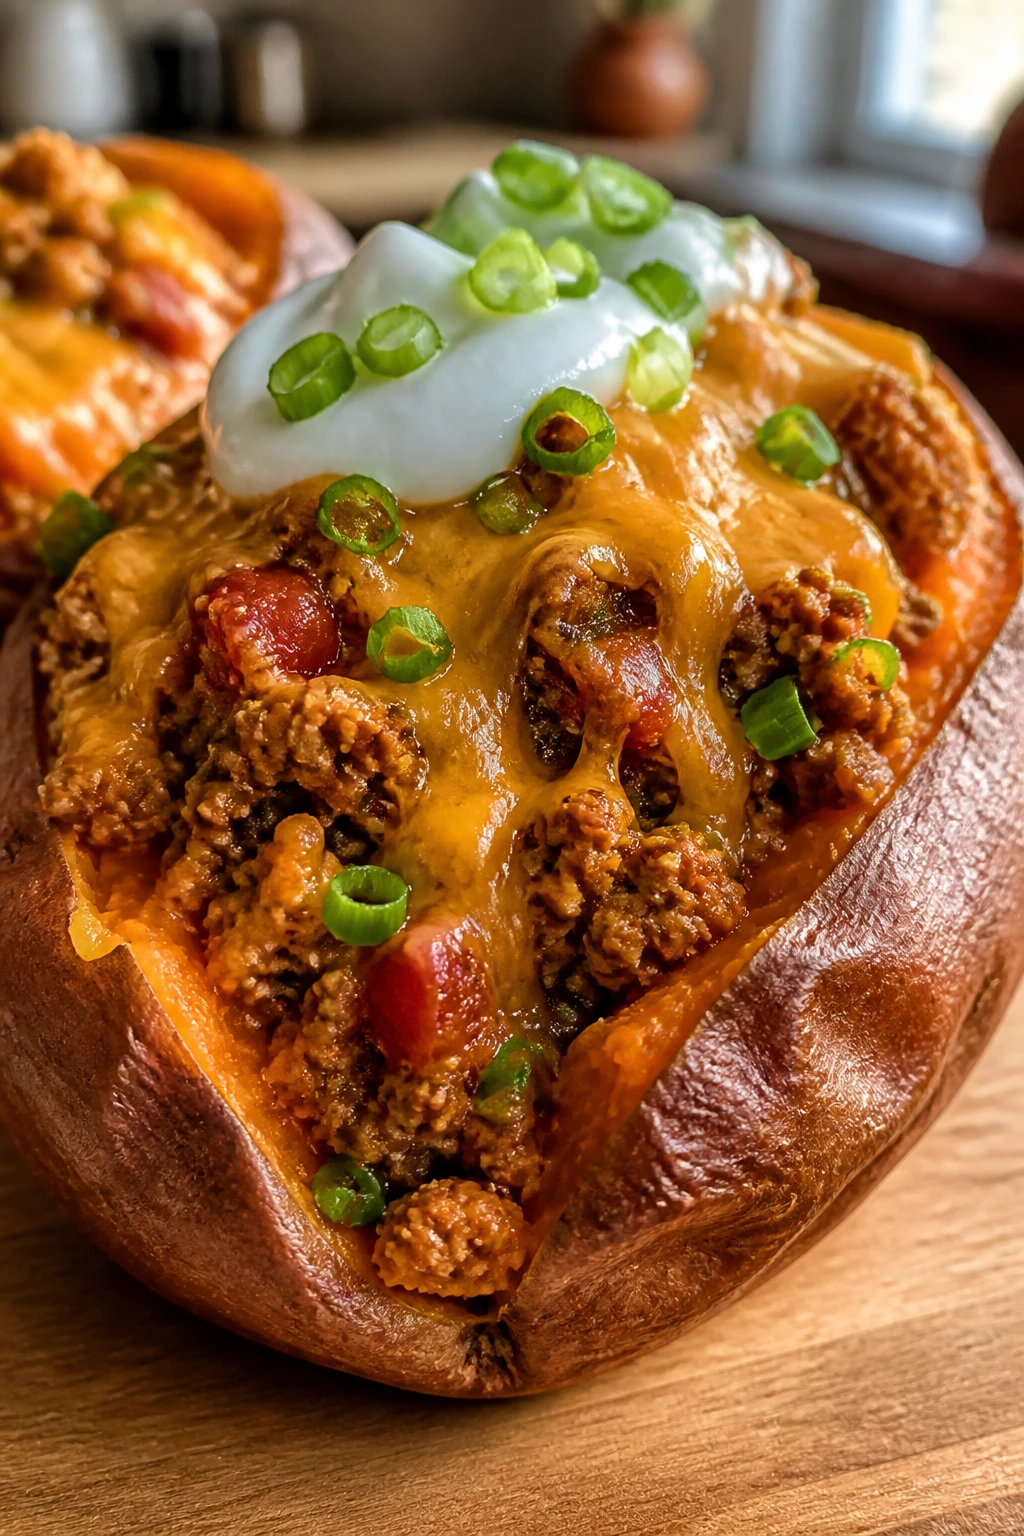
Sweet potatoes turn creamy and a little caramelized around the edges, then the taco filling brings the salty, spiced contrast. I like the way this dish feels complete without a pile of side dishes.
Why It Works:
Microwaving the sweet potatoes saves a full half hour, and the turkey filling cooks in one skillet with pantry seasoning. You get a dinner that can be eaten with a fork or scooped with tortilla chips, which means fewer rules at the table. The extra potatoes also hold up well the next day under a quick reheat.
Key Ingredients:
- 4 medium sweet potatoes
- 1 pound ground turkey
- 1 tablespoon olive oil
- 1 packet taco seasoning, or 2 tablespoons homemade blend
- 1/2 cup water
- 1 cup black beans, drained and rinsed
- 1/2 cup salsa
- 1/2 cup shredded cheddar
- 1/2 cup plain Greek yogurt
- 2 tablespoons sliced green onions
Quick Steps:
- Prick the sweet potatoes all over and microwave for 8 to 10 minutes, turning once, until tender.
- Brown the turkey in a skillet with olive oil for 5 to 6 minutes.
- Stir in the taco seasoning and water, then add the black beans and salsa and simmer for 2 minutes.
- Split the sweet potatoes open and fluff the centers with a fork.
- Spoon in the turkey mixture, then top with cheddar, yogurt, and green onions.
Equipment for This Recipe:
- Microwave-safe plate
- Large skillet
- Fork
- Knife for splitting potatoes
How to Serve This Dish:
Serve with a bowl of tortilla chips on the side. The split potato shells look best when you pile the filling high and let the yogurt melt into the hot beans.
Pro Tips for This Recipe:
- Choose potatoes that are similar in size so they finish together.
- If you want more caramelization, move the microwaved potatoes under the broiler for 2 minutes.
- Greek yogurt gives a sharper finish than sour cream.
- A few crushed tortilla chips on top add crunch that lasts.
Variations on This Dish:
- Beef Taco Version: Use ground beef and drain it well before adding the seasoning.
- Vegetarian Bean Bowl: Replace turkey with two cans of black beans and 1 cup corn.
- Chipotle Heat Build: Stir 1 tablespoon chopped chipotle peppers into the filling.
Common Mistakes to Avoid with This Dish:
- Undercooked potatoes: They should feel soft when squeezed with an oven mitt.
- Watery filling: Simmer long enough for the salsa to reduce.
- Skipping toppings: The yogurt, cheese, and onions turn this from plain to finished.
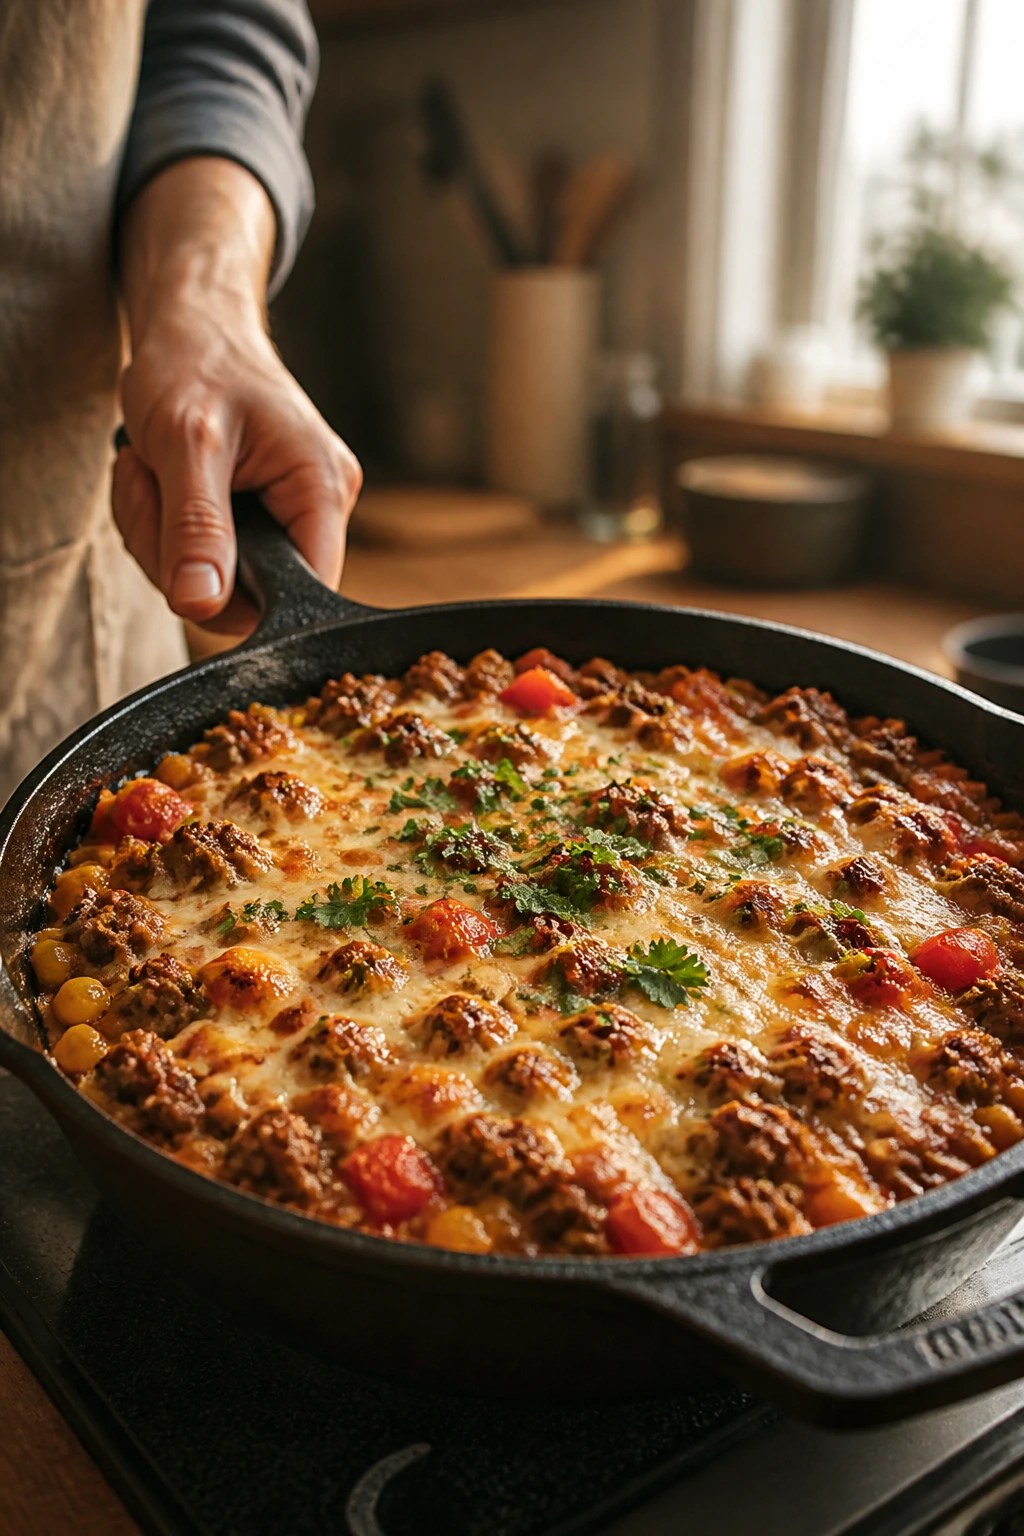
7. Mini Meatloaf Muffins with Mashed Potatoes
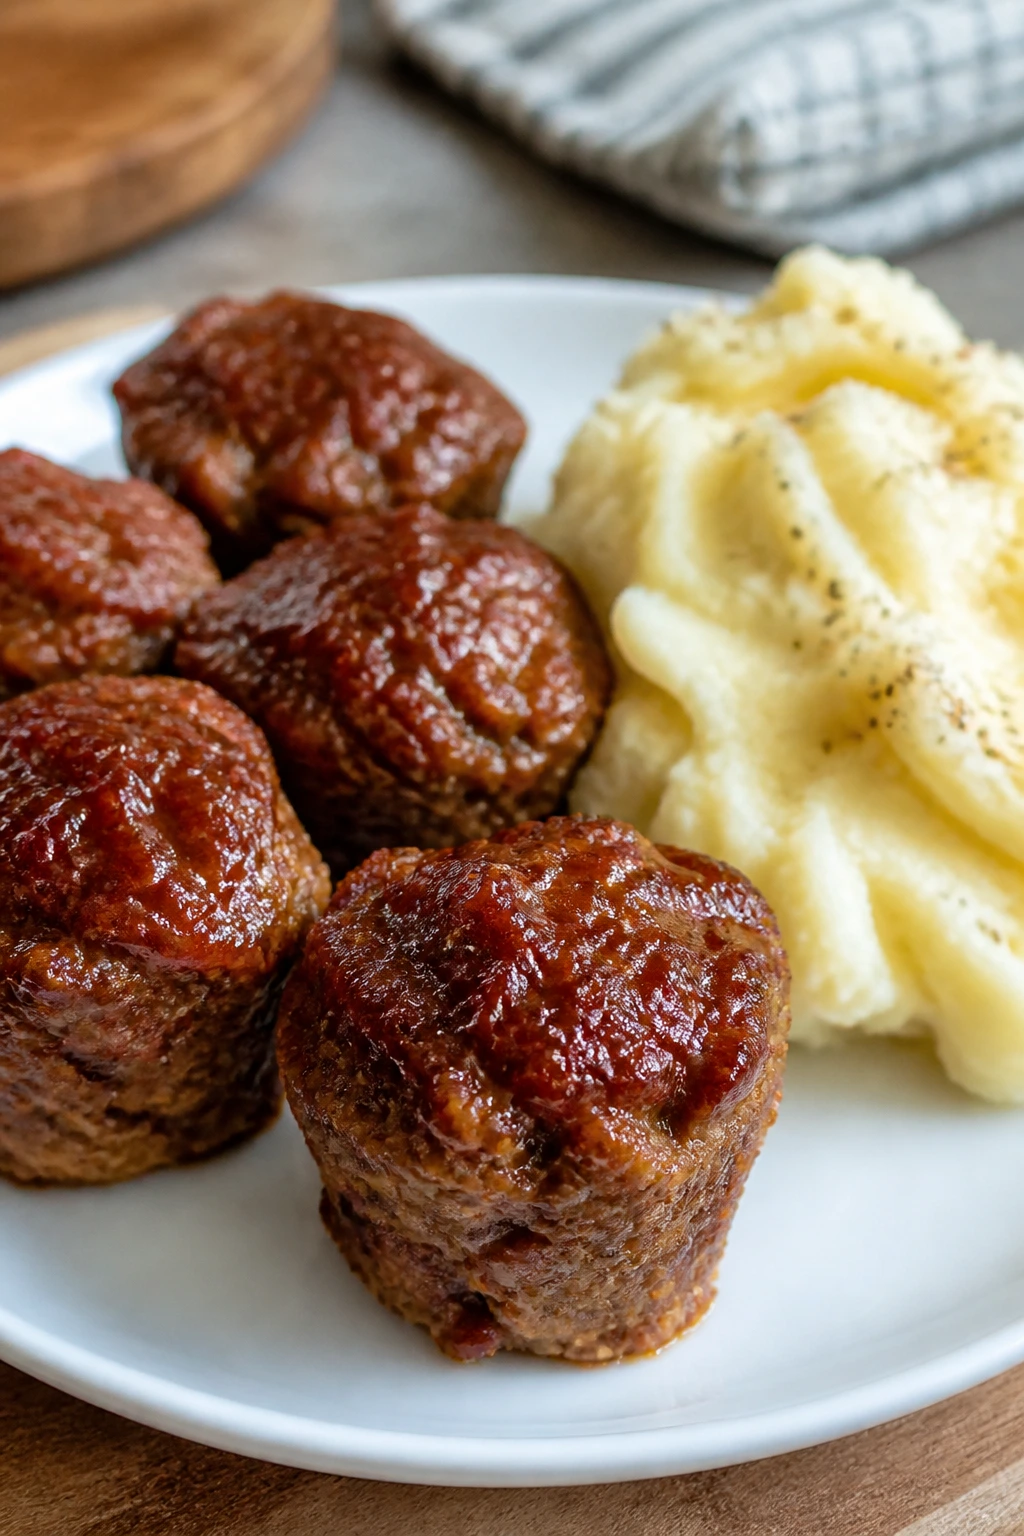
These bake faster than a full loaf, and that matters on a busy evening. The edges brown in the muffin tin, the centers stay juicy, and the ketchup glaze gets sticky in the best possible way.
Why It Works:
Meatloaf muffins cook in about half the time of a standard loaf, which means less waiting and more actual dinner. The small portions are easy for kids to handle, and they reheat well in the morning if someone wants a protein-heavy breakfast. A tray of mashed potatoes alongside them makes the plate feel old-school in a good way.
Key Ingredients:
- 1 1/2 pounds ground beef
- 1/2 cup breadcrumbs
- 1 egg
- 1/2 cup milk
- 1/2 cup finely diced onion
- 2 tablespoons ketchup
- 1 teaspoon garlic powder
- 1 teaspoon salt
- 1/2 teaspoon pepper
- 1/4 cup ketchup mixed with 1 tablespoon brown sugar, for glaze
Quick Steps:
- Preheat the oven to 400°F and grease a 12-cup muffin tin.
- Mix the beef, breadcrumbs, egg, milk, onion, ketchup, garlic powder, salt, and pepper until just combined.
- Divide the mixture among the muffin cups and press lightly to level the tops.
- Spoon a little glaze over each muffin and bake for 18 to 20 minutes, until the centers reach 160°F.
- Rest for 5 minutes before lifting them out.
Equipment for This Recipe:
- 12-cup muffin tin
- Large mixing bowl
- Spoon or scoop
- Instant-read thermometer
How to Serve This Dish:
Serve with mashed potatoes and green beans, or tuck two muffins into slider rolls the next day. They look neat on the plate, which is a small miracle when dinner is happening around game pieces.
Pro Tips for This Recipe:
- Mix only until the ingredients disappear; overmixing makes them dense.
- A muffin scoop keeps the portions even.
- Put the muffin tin on a sheet pan in case the glaze bubbles over.
- Let them rest before removing, or they’ll fall apart.
Variations on This Dish:
- Turkey Version: Swap in ground turkey and add 1 extra tablespoon milk for moisture.
- BBQ Glaze Swap: Use barbecue sauce instead of ketchup for a smokier top.
- Cheddar Core: Press a teaspoon of shredded cheddar into the center of each muffin before baking.
Common Mistakes to Avoid with This Dish:
- Packing the meat too tightly: The texture turns rubbery.
- Skipping the rest: The muffins need a few minutes to settle.
- Too much glaze too early: It can burn before the meat finishes cooking.
8. One-Pan Sausage, Peppers, and Rice
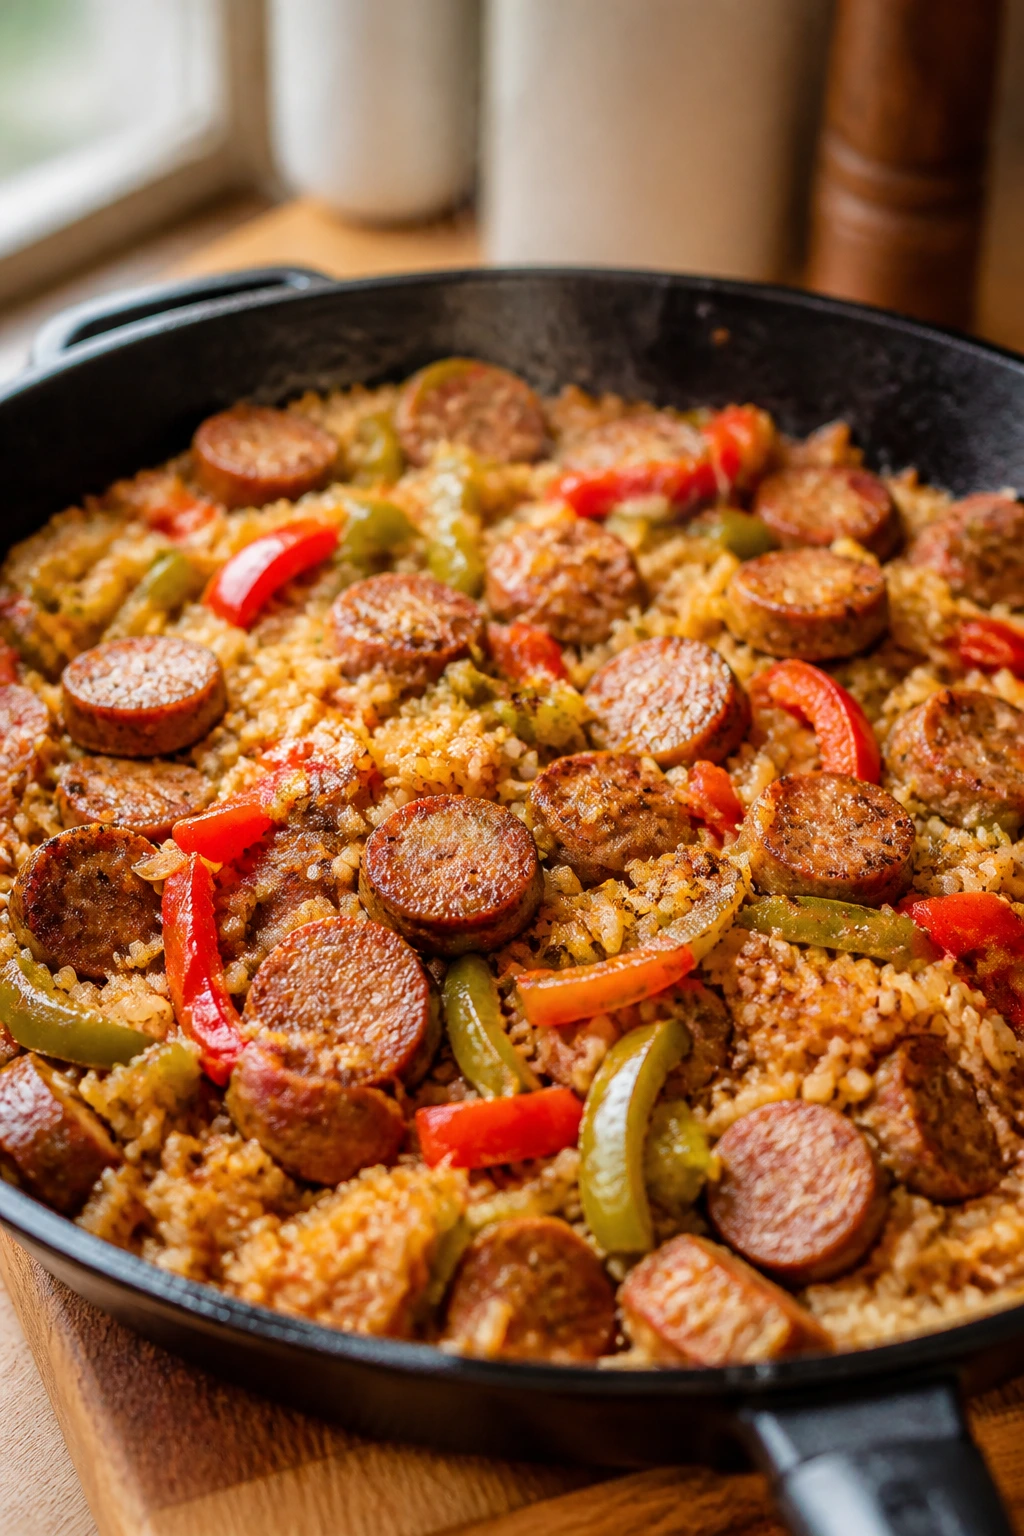
The rice picks up the sausage drippings and broth, so every bite tastes like it spent more time on the stove than it actually did. The peppers keep their shape, which gives the pan enough color to look like dinner, not just fuel.
Why It Works:
Everything cooks in one pan after the sausage browns, so cleanup stays sane. The rice simmers in the same savory liquid that picked up the browned bits from the bottom, and that’s where the flavor lives. It’s the kind of dinner that feels sturdy enough for hungry kids and easy enough for the adult who’s loading the dishwasher at the same time.
Key Ingredients:
- 1 pound Italian sausage links, sliced into rounds
- 1 tablespoon olive oil
- 1 red bell pepper, sliced
- 1 green bell pepper, sliced
- 1 small onion, sliced
- 1 cup long-grain rice
- 2 cups chicken broth
- 1 tablespoon tomato paste
- 1 teaspoon dried Italian seasoning
- 2 tablespoons chopped parsley
Quick Steps:
- Brown the sausage in a large deep skillet over medium-high heat for 5 minutes.
- Add the oil, peppers, and onion and cook for 4 minutes until slightly softened.
- Stir in the rice, broth, tomato paste, and Italian seasoning.
- Bring to a simmer, cover, and cook on low for 18 minutes until the rice is tender and the liquid is gone.
- Fluff with a fork and finish with parsley.
Equipment for This Recipe:
- Large deep skillet with lid
- Wooden spoon
- Measuring cups
- Fork
How to Serve This Dish:
Serve it in shallow bowls with grated parmesan on the side. It looks especially good with the red and green peppers cut in long strips instead of tiny pieces.
Pro Tips for This Recipe:
- Use long-grain rice; short-grain turns sticky here.
- Don’t stir once the lid goes on.
- If the rice is still firm, add 2 tablespoons broth and cook 3 more minutes.
- A squeeze of lemon at the end brightens the whole pan.
Variations on This Dish:
- Chicken Sausage Light Version: Use chicken sausage for a leaner skillet.
- Mushroom Pepper Mix: Add 8 ounces sliced mushrooms with the peppers.
- Spicy Red Pepper Cut: Stir in 1/2 teaspoon red pepper flakes with the broth.
Common Mistakes to Avoid with This Dish:
- Lifting the lid too often: The rice cooks unevenly.
- Using too little broth: The grains stay firm in the center.
- Skipping the browning step: The sausage loses most of its flavor.
9. Chicken Parmesan Meatball Subs
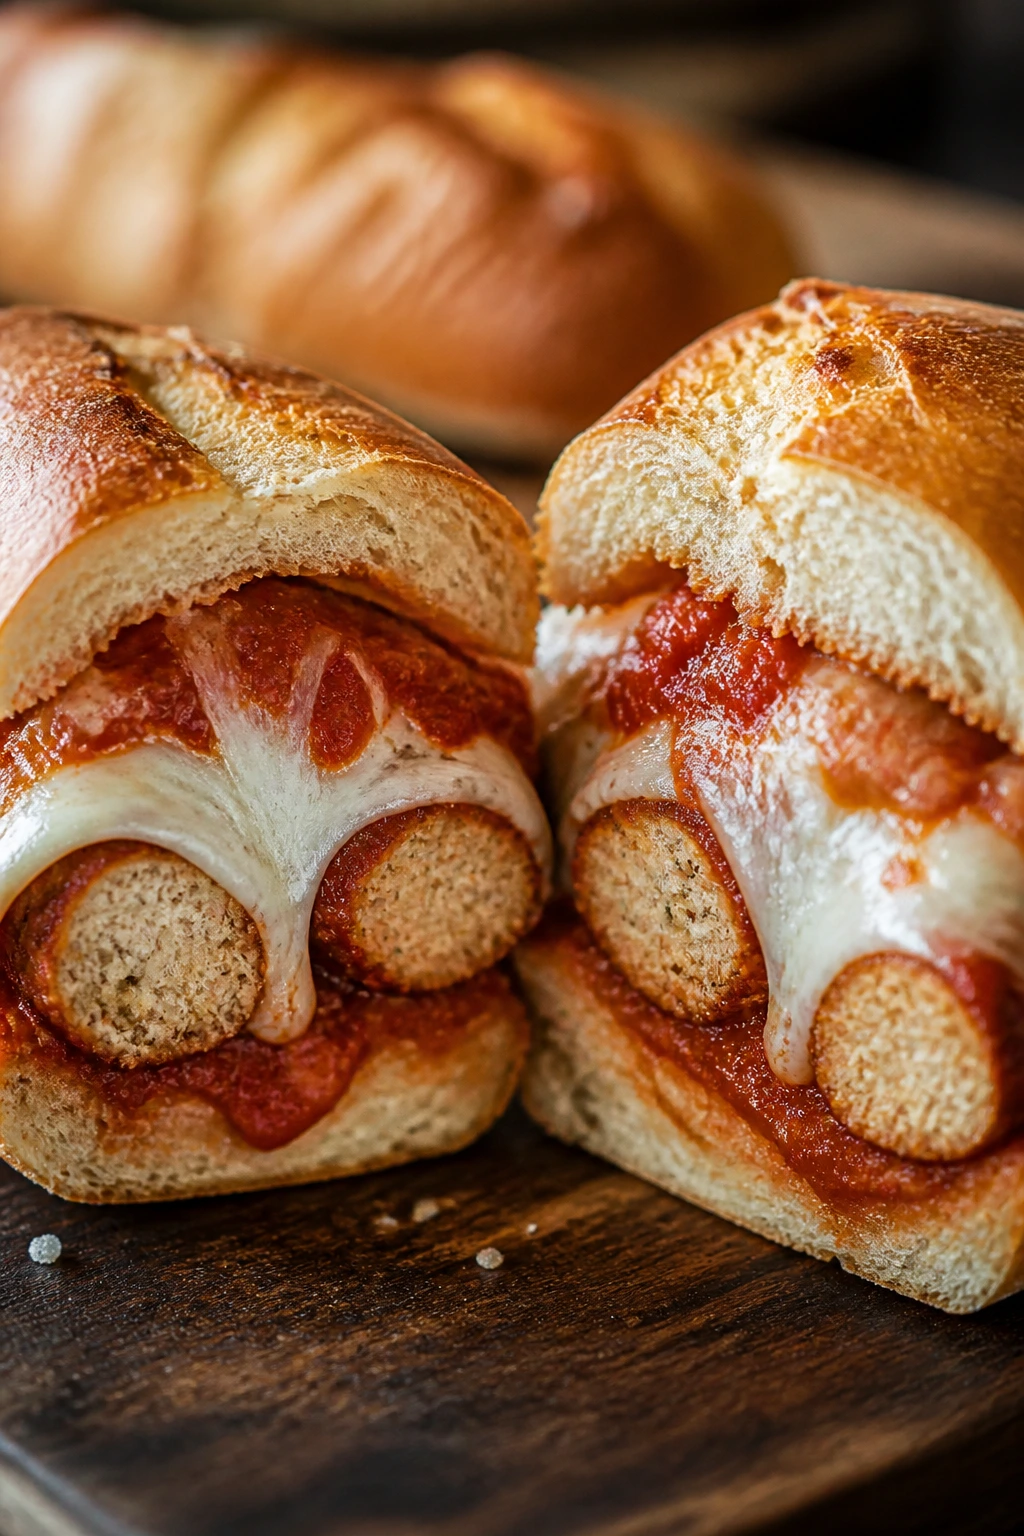
These smell like a red-sauce dinner you’d actually plan for, but they move fast enough for a school night. The meatballs stay tender, the marinara soaks into the roll, and the mozzarella gives you the stretch people always hope for.
Why It Works:
Making the meatballs from ground chicken or turkey keeps them light and fast-cooking. Baking them on a sheet pan means less handling than pan-frying, and the subs assemble in minutes once the sauce is hot. They are a little messy, which is honestly part of the charm.
Key Ingredients:
- 1 pound ground chicken
- 1/2 cup breadcrumbs
- 1/4 cup grated parmesan
- 1 egg
- 2 cloves garlic, minced
- 1 teaspoon Italian seasoning
- 1/2 teaspoon salt
- 2 cups marinara sauce
- 1 1/2 cups shredded mozzarella
- 4 sub rolls
Quick Steps:
- Mix the chicken, breadcrumbs, parmesan, egg, garlic, Italian seasoning, and salt in a bowl.
- Roll into 16 meatballs and place on a parchment-lined sheet pan.
- Bake at 400°F for 15 minutes, until the meatballs reach 165°F.
- Warm the marinara in a skillet, add the meatballs, and spoon them into split rolls.
- Top with mozzarella and broil for 1 to 2 minutes until melted.
Equipment for This Recipe:
- Rimmed sheet pan
- Parchment paper
- Mixing bowl
- Saucepan or skillet
- Broiler-safe sub rolls
How to Serve This Dish:
Serve the subs wrapped loosely in parchment so the filling stays put. A crisp Caesar salad makes a sharp side if you want something that cuts the cheese.
Pro Tips for This Recipe:
- Wet your hands before rolling meatballs; they shape faster.
- Don’t pack them too tightly.
- Use rolls that are sturdy enough to hold sauce.
- Broil only long enough to melt the cheese.
Variations on This Dish:
- Beef-and-Pork Blend: Use 1 pound meatball mix instead of chicken for a richer flavor.
- Meatball Bowl Shortcut: Skip the rolls and serve over spaghetti.
- Herby Garden Version: Add chopped parsley and basil to the meatball mix.
Common Mistakes to Avoid with This Dish:
- Dry meatballs: Overbaking makes them tough.
- Thin sauce: The subs fall apart if the marinara is watery.
- Burned cheese: Broil close and watch closely.
10. Breakfast Hash with Eggs and Bacon
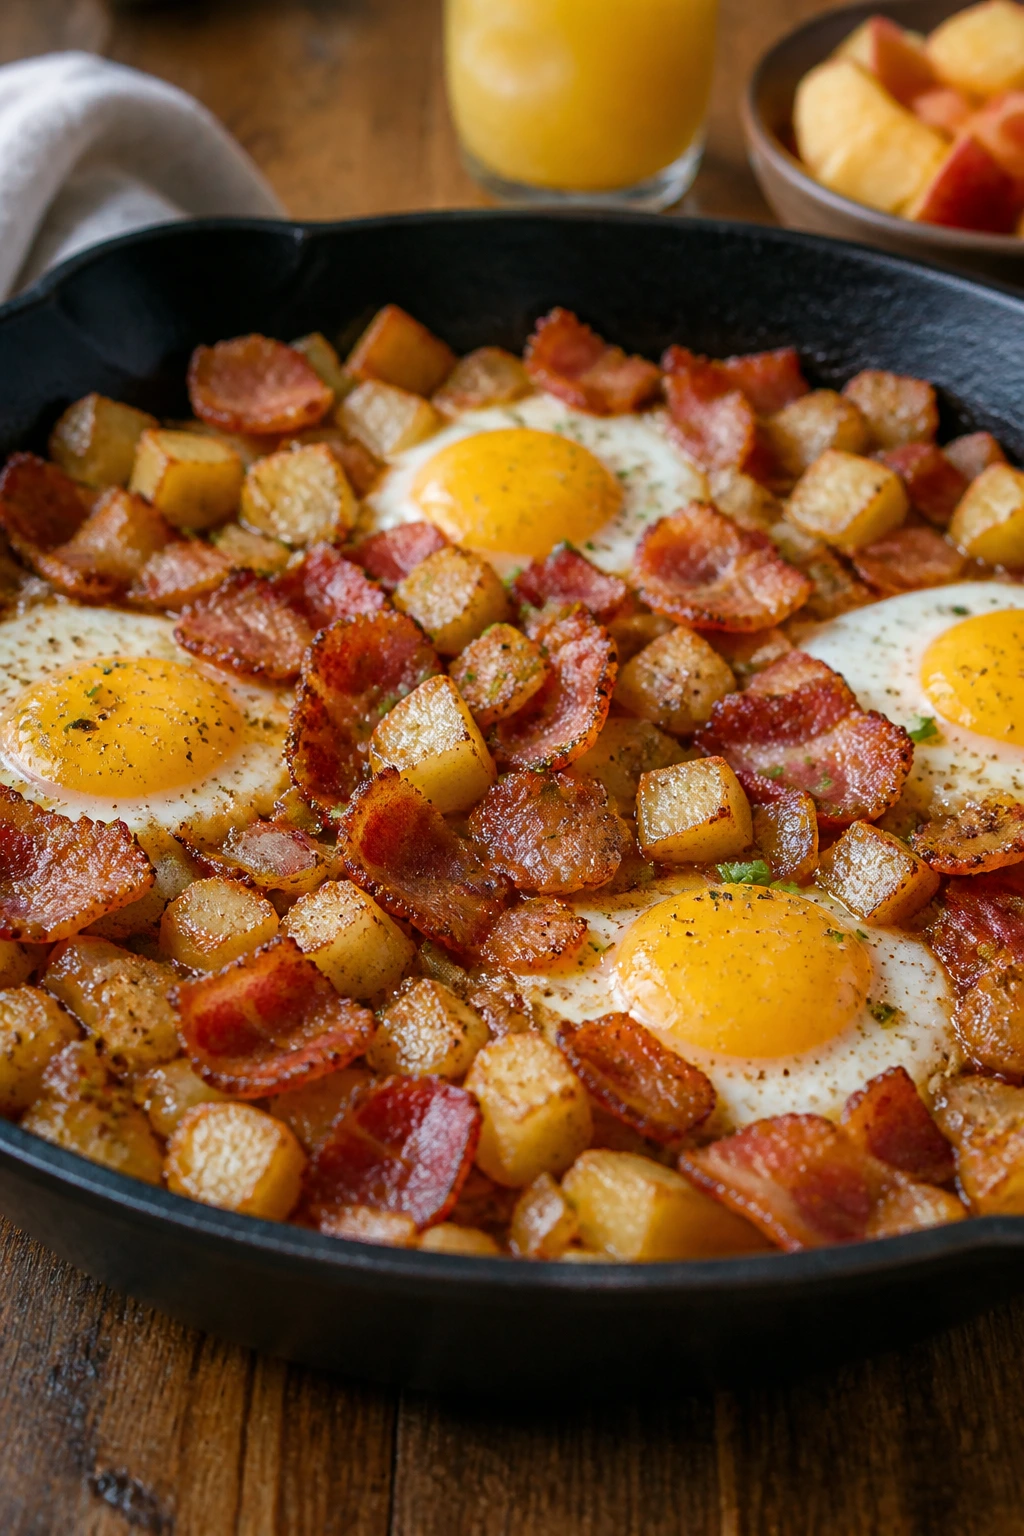
There’s something rude, in the best possible way, about serving breakfast for dinner when everyone expected pasta. The potatoes get crisp, the bacon turns salty and crackly, and the eggs slide into the pan just in time to make the whole thing feel complete.
Why It Works:
Hash is built from parts that cook at different speeds, which makes it forgiving when somebody interrupts you halfway through. It also uses the same ingredients you’d use for breakfast, so the morning leftovers are already halfway useful. A skillet this size feeds a table without making you babysit four separate pans.
Key Ingredients:
- 6 slices bacon, chopped
- 3 medium russet potatoes, peeled and diced
- 1 small onion, diced
- 1 teaspoon paprika
- 1 teaspoon salt
- 1/2 teaspoon black pepper
- 4 to 6 eggs
- 1 cup shredded cheddar
- 2 tablespoons chopped green onions
Quick Steps:
- Cook the bacon in a large skillet over medium heat until crisp, then remove it but leave 1 tablespoon fat in the pan.
- Add the potatoes and onion, season with paprika, salt, and pepper, and cook for 12 to 15 minutes until browned and tender.
- Return the bacon to the skillet and make 4 to 6 wells in the hash.
- Crack an egg into each well, cover, and cook for 4 to 6 minutes until the whites set.
- Scatter cheddar and green onions over the top.
Equipment for This Recipe:
- Large cast-iron or nonstick skillet
- Spatula
- Knife and cutting board
- Lid for the skillet
How to Serve This Dish:
Serve straight from the skillet with toast or warm tortillas. It looks best when the eggs stay soft in the center, so bring the pan to the table before they overcook.
Pro Tips for This Recipe:
- Dice the potatoes small so they brown and soften faster.
- Dry the potatoes after cutting; wet cubes steam instead of crisp.
- If your skillet is small, cook in two batches.
- A splash of hot sauce wakes up the eggs without changing the base.
Variations on This Dish:
- Sausage Swap: Replace bacon with breakfast sausage for a different salty note.
- Veggie Hash: Leave out the bacon and add bell peppers and mushrooms.
- Cheesy Baked Finish: Slide the skillet under the broiler for 1 minute after adding cheese.
Common Mistakes to Avoid with This Dish:
- Crowding the potatoes: They steam instead of browning.
- Cracking eggs too early: The whites spread before the hash is ready.
- Too much heat: The outside burns before the potato center softens.
11. Creamy Tomato Tortellini Soup
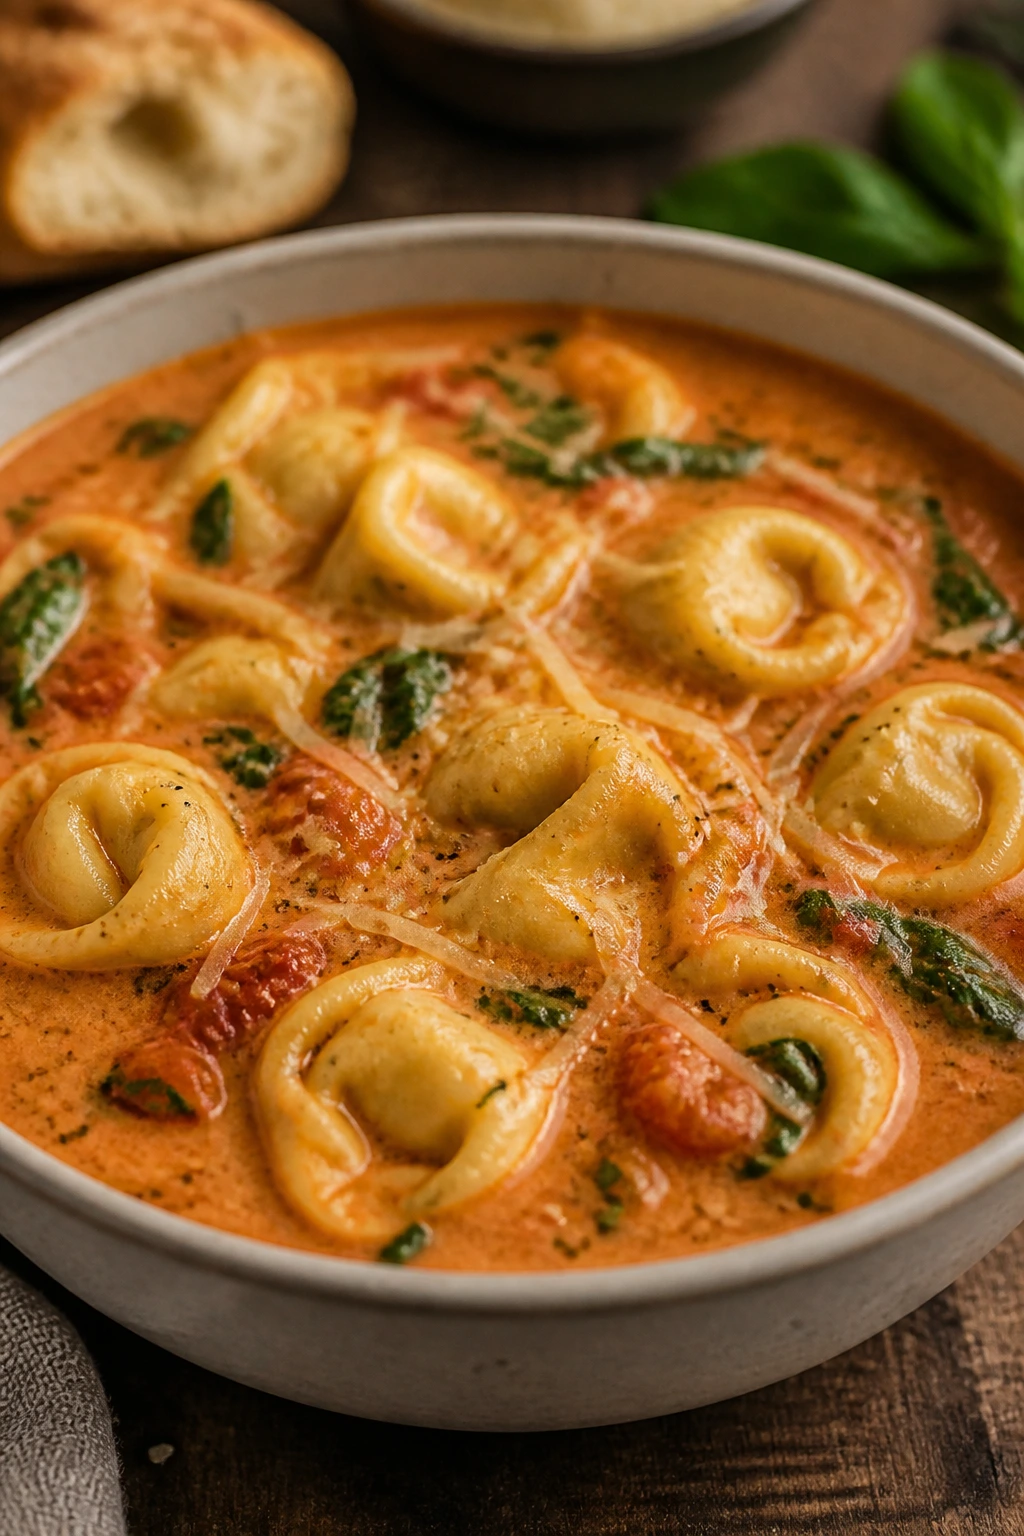
This is the kind of soup that gets quieter as people eat, which is always a good sign. The tortellini brings heft, the tomato base stays silky, and the cream makes it taste fuller than the ingredient list suggests.
Why It Works:
Refrigerated tortellini turns a basic tomato soup into dinner without much extra effort. The soup simmers in one pot, and the pasta cooks right in the broth so there’s one less thing to drain. A piece of crusty bread on the side is enough to make the whole table feel covered.
Key Ingredients:
- 1 tablespoon olive oil
- 1 small onion, diced
- 3 cloves garlic, minced
- 1 can (28 ounces) crushed tomatoes
- 4 cups chicken or vegetable broth
- 1 teaspoon salt
- 1/2 teaspoon black pepper
- 1 package (9 ounces) refrigerated cheese tortellini
- 1/2 cup heavy cream
- 2 cups baby spinach
- 1/4 cup grated parmesan
Quick Steps:
- Heat the olive oil in a large pot over medium heat and cook the onion for 4 minutes.
- Add the garlic, crushed tomatoes, broth, salt, and pepper, then simmer for 10 minutes.
- Stir in the tortellini and cook according to package time, usually 4 to 6 minutes, until tender.
- Lower the heat and stir in the cream and spinach until the leaves wilt.
- Ladle into bowls and finish with parmesan.
Equipment for This Recipe:
- Large soup pot
- Wooden spoon
- Ladle
- Measuring cups
How to Serve This Dish:
Serve with grilled cheese cut into strips or thick buttered bread. The soup looks best in deep bowls because the tortellini tends to float and show off the cheesy filling.
Pro Tips for This Recipe:
- Add the cream after the pasta cooks so it stays smooth.
- Fresh tortellini cooks faster than dried and can go soft quickly.
- Wilt the spinach at the very end.
- If the soup gets too thick, add a splash more broth.
Variations on This Dish:
- Sausage Tomato Soup: Brown 1/2 pound Italian sausage with the onions.
- Roasted Garlic Version: Stir in 1 tablespoon roasted garlic paste.
- Dairy-Light Bowl: Skip the cream and add a spoon of ricotta to each serving.
Common Mistakes to Avoid with This Dish:
- Boiling the cream: It can split.
- Overcooking tortellini: It gets bloated and fragile.
- Using too little salt: Tomato soup needs a stronger hand than people expect.
12. Teriyaki Chicken Rice Bowls
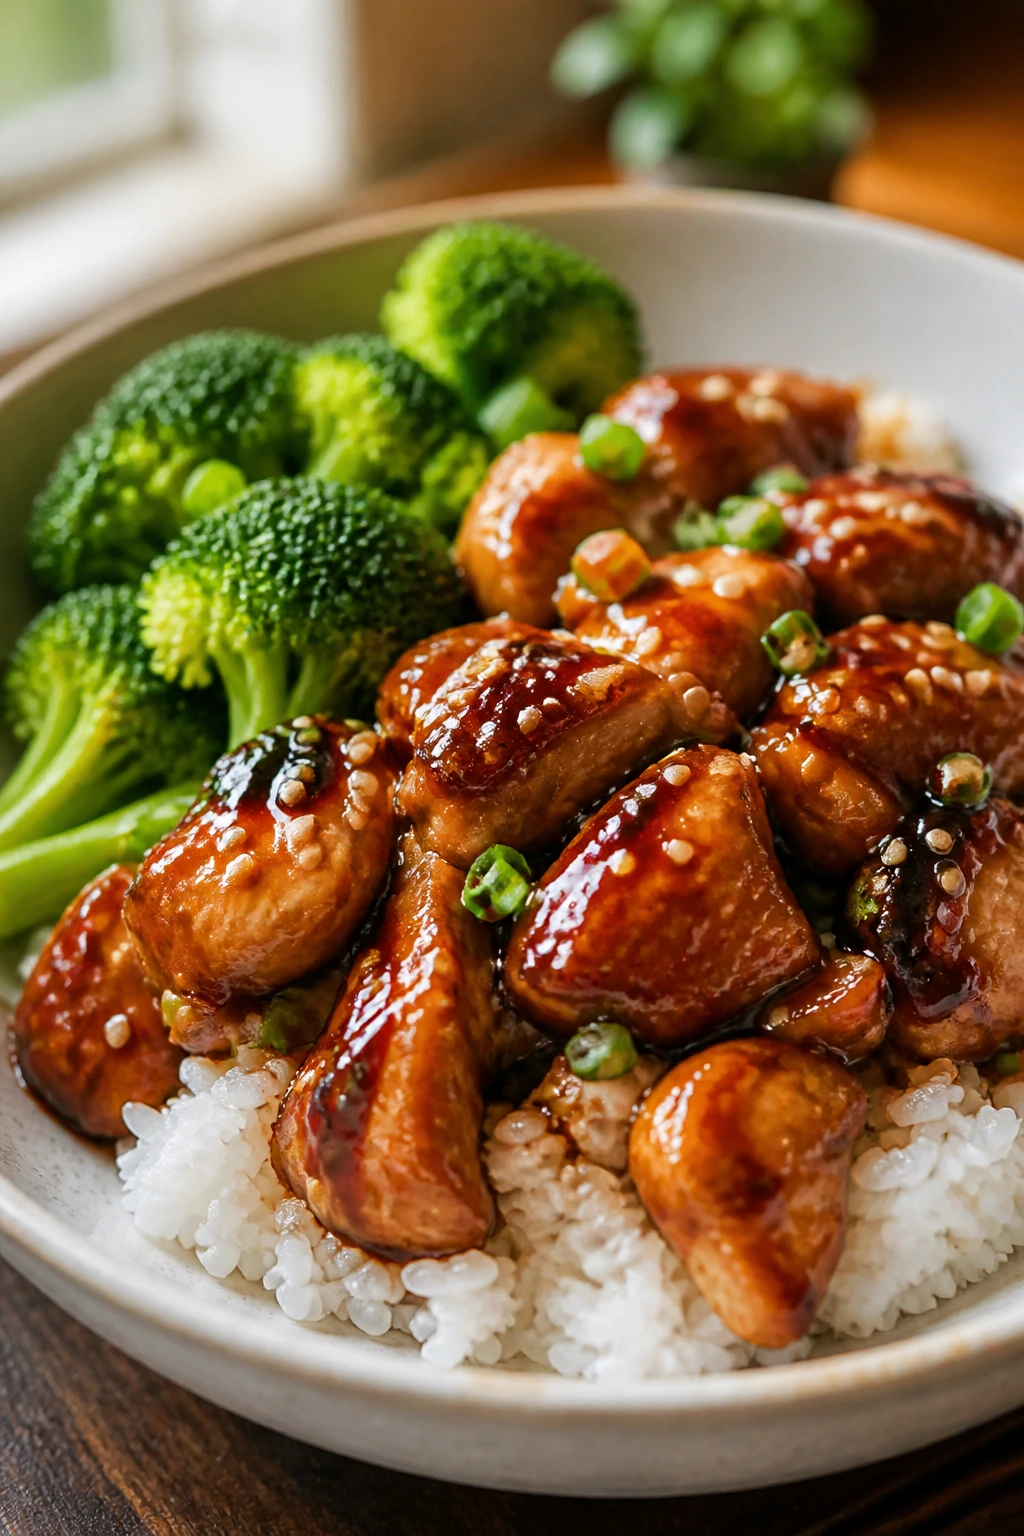
The sauce turns glossy and dark, the chicken picks up just enough sticky sheen, and the broccoli keeps the bowl from feeling flat. This is a dinner that looks organized even if the rest of the evening is not.
Why It Works:
Rice bowls are easy to portion, easy to customize, and easy to turn into tomorrow’s lunch. The teriyaki sauce thickens quickly in the pan, so the chicken gets coated instead of swimming. You can keep the broccoli crisp-tender, which gives the bowl some bite instead of one soft texture from top to bottom.
Key Ingredients:
- 1 1/2 pounds boneless chicken thighs, cut into bite-size pieces
- 2 tablespoons neutral oil
- 1/4 cup soy sauce
- 3 tablespoons honey
- 2 tablespoons rice vinegar
- 2 cloves garlic, minced
- 1 teaspoon grated ginger
- 3 cups cooked white rice
- 2 cups broccoli florets
- 1 tablespoon sesame seeds
- 2 sliced green onions
Quick Steps:
- Whisk the soy sauce, honey, rice vinegar, garlic, and ginger in a bowl.
- Cook the chicken in oil over medium-high heat for 6 to 8 minutes until browned and cooked through.
- Pour in the sauce and simmer for 2 to 3 minutes until it turns shiny and coats the chicken.
- Steam or microwave the broccoli until bright green and just tender.
- Spoon the rice into bowls, top with chicken and broccoli, then finish with sesame seeds and green onions.
Equipment for This Recipe:
- Large skillet
- Small bowl
- Measuring spoons
- Rice pot or rice cooker
How to Serve This Dish:
Serve in wide bowls with a little extra sauce drizzled over the rice. If you want the table to look fuller, add cucumber slices or shredded carrots on the side.
Pro Tips for This Recipe:
- Cut the chicken evenly so it cooks at the same speed.
- Let the sauce simmer until it lightly thickens; don’t rush it.
- Use day-old rice if you want the grains to stay separate.
- A few drops of toasted sesame oil at the end change the whole bowl.
Variations on This Dish:
- Shrimp Shortcut: Swap in peeled shrimp and cook only until pink.
- Pineapple Bowl: Add 1/2 cup pineapple chunks with the broccoli.
- Brown Rice Version: Use brown rice and add 1/4 cup extra sauce for moisture.
Common Mistakes to Avoid with This Dish:
- Crowding the chicken: It steams instead of browning.
- Boiling the sauce hard: Honey can scorch.
- Serving with overcooked broccoli: The texture gets mushy fast.
13. Taco Crescent Ring

This is the dinner that gets a little gasp when it comes out of the oven. The crescent dough turns golden, the taco filling stays tucked inside, and the center dip bowl makes the whole thing feel like party food with less planning.
Why It Works:
Crescent dough gives you built-in structure, and taco filling gives the ring enough heft to feel like a meal. Kids like tearing off wedges, and adults like the fact that the whole thing can be served with salsa and sour cream without a stack of plates. It also reheats well in an air fryer the next day.
Key Ingredients:
- 1 pound ground beef
- 1 packet taco seasoning
- 1/2 cup water
- 1 cup refried beans
- 1 1/2 cups shredded cheddar
- 2 cans refrigerated crescent rolls
- 1/2 cup salsa
- 1/4 cup sliced olives, optional
Quick Steps:
- Brown the beef in a skillet, drain it, then stir in the taco seasoning and water and simmer for 3 minutes.
- Spread the crescent triangles in a ring on a parchment-lined sheet pan, with the wide ends overlapping in the center.
- Spread refried beans down the middle, top with beef, cheese, and olives.
- Fold the pointed ends of the dough over the filling and tuck them underneath.
- Bake at 375°F for 18 to 20 minutes until deep golden brown.
Equipment for This Recipe:
- Rimmed sheet pan
- Parchment paper
- Skillet
- Spatula
How to Serve This Dish:
Put salsa in the center or on the side and let everyone pull off wedges. It looks best with chopped tomatoes and lettuce scattered around the board.
Pro Tips for This Recipe:
- Keep the filling centered so the dough can fold cleanly.
- Drain the beef well before assembling.
- Let the ring rest for 5 minutes before slicing.
- A brush of milk over the dough helps the top brown evenly.
Variations on This Dish:
- Chicken Enchilada Ring: Swap the beef for shredded chicken and enchilada sauce.
- Bean-and-Cheese Version: Leave out the meat and use extra refried beans.
- Mild Kid Cut: Skip olives and use only cheddar and beans.
Common Mistakes to Avoid with This Dish:
- Overfilling the ring: The dough tears open.
- Using warm, watery filling: It makes the bottom dough gummy.
- Cutting too soon: The filling runs out before it sets.
14. Chili Cheese Baked Potatoes
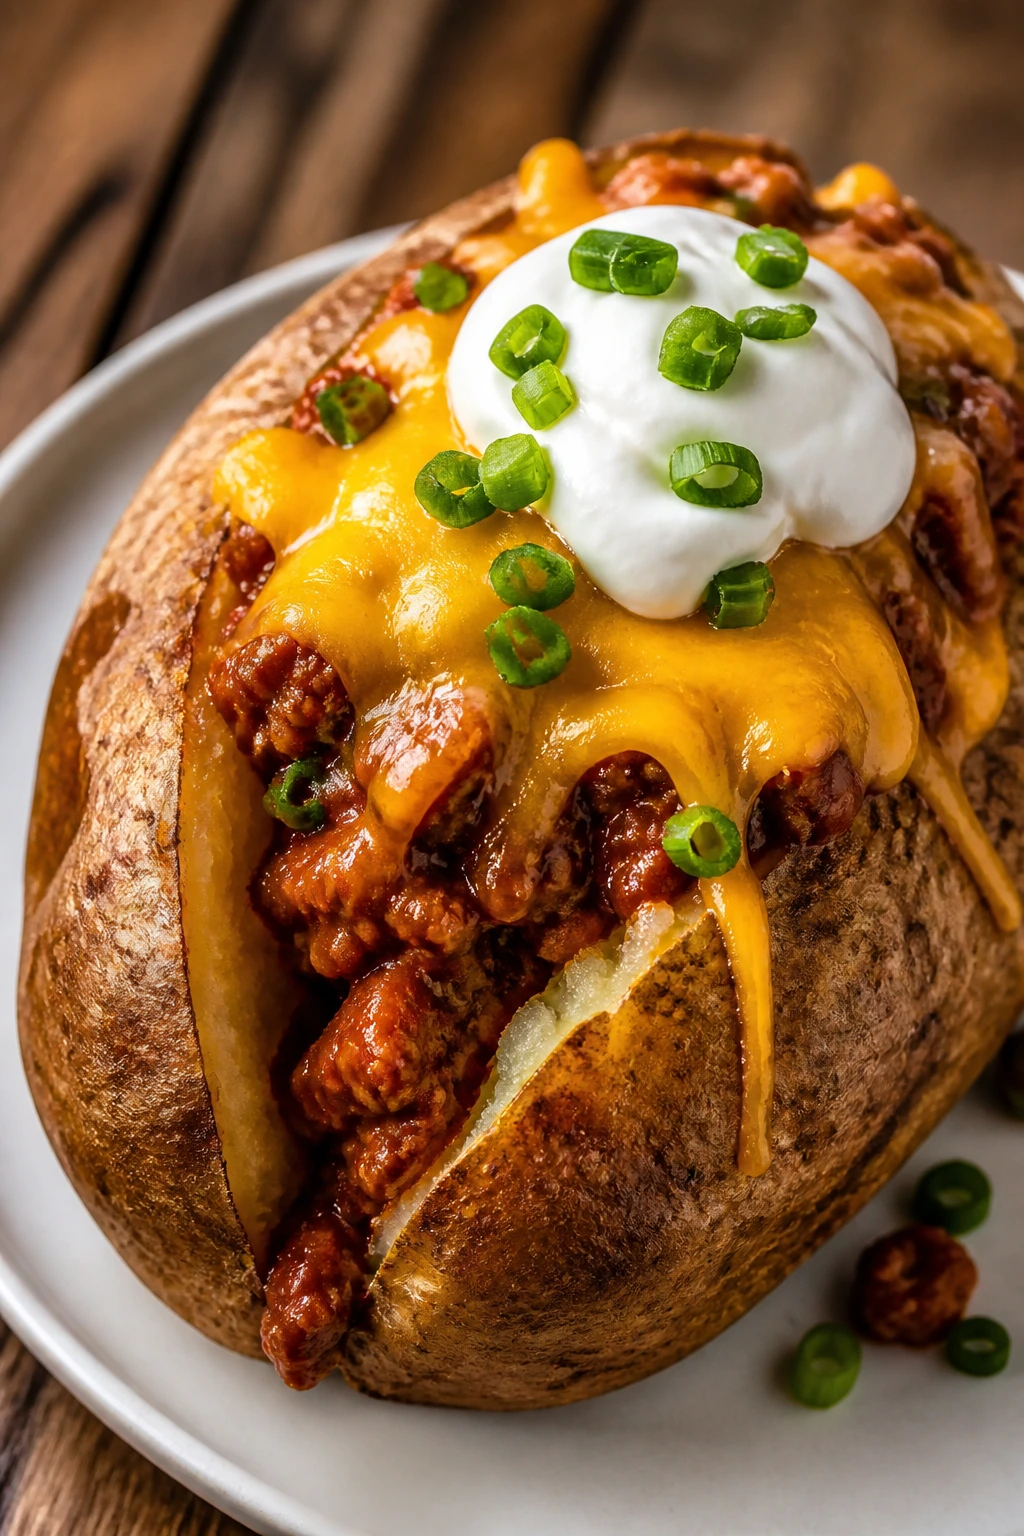
There’s nothing fancy here, and that’s the point. The potato skin goes crisp, the inside gets fluffy, and the chili melts into the hot center with a layer of cheese that pulls into strings when you cut it open.
Why It Works:
Baked potatoes are naturally portioned, which helps when the table has different appetites. Using leftover chili turns this into a second dinner without feeling recycled, and the toppings make it feel finished with almost no extra cooking. It’s one of the most forgiving meals in the group.
Key Ingredients:
- 4 large russet potatoes
- 1 tablespoon olive oil
- 2 cups prepared chili
- 1 1/2 cups shredded cheddar
- 1/2 cup sour cream
- 2 tablespoons sliced green onions
- Salt for the potato skins
Quick Steps:
- Scrub the potatoes, prick them with a fork, rub with oil and salt, and bake at 425°F for 45 to 60 minutes until soft.
- Heat the chili in a saucepan until steaming hot.
- Cut each potato open and fluff the insides with a fork.
- Spoon chili over each potato and top with cheddar.
- Add sour cream and green onions.
Equipment for This Recipe:
- Sheet pan
- Fork
- Small saucepan
- Knife
How to Serve This Dish:
Serve on wide plates because the toppings will tumble. A crisp salad on the side keeps the meal from feeling too heavy, which matters if there’s cake later.
Pro Tips for This Recipe:
- Don’t wrap potatoes in foil if you want crisp skin.
- Rub the skins with salt before baking.
- Microwave the potatoes first if you need to cut the oven time.
- Heat the chili separately so it doesn’t cool the potatoes down.
Variations on This Dish:
- Turkey Chili Version: Use turkey chili for a lighter topping.
- Broccoli Cheddar Cut: Swap the chili for steamed broccoli and cheese sauce.
- Loaded Nacho Potato: Add jalapeños and crushed tortilla chips on top.
Common Mistakes to Avoid with This Dish:
- Undercooked potatoes: They should feel soft all the way through.
- Cold chili: It kills the heat of the potato fast.
- Skipping the salt on the skin: The outside tastes flat without it.
15. Veggie Fried Rice with Eggs
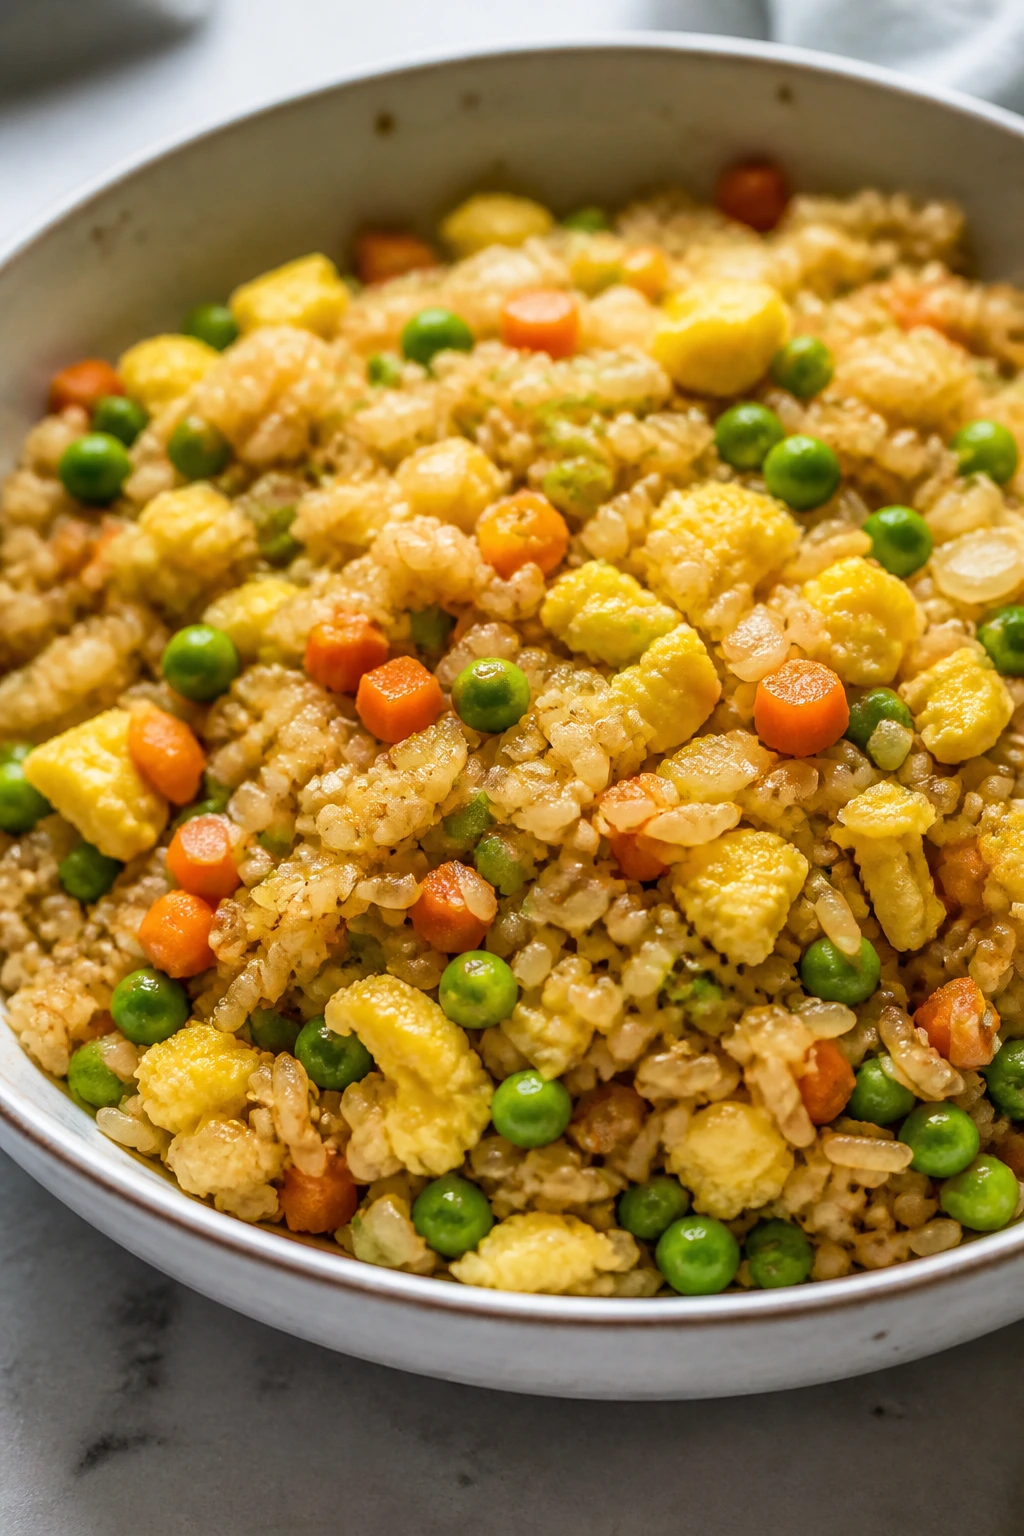
This one is fast, salty, and a little addictive if you get the soy sauce right. The rice fries up with crisp bits, the vegetables stay bright, and the scrambled egg threads through the pan like a built-in protein boost.
Why It Works:
Day-old rice is the trick. Fresh rice clumps, while chilled rice breaks apart and fries instead of steaming. Frozen peas and carrots make the vegetable part nearly instant, which is about as useful as a weeknight dinner gets when the homework clock is ticking.
Key Ingredients:
- 4 cups cooked, chilled white rice
- 2 tablespoons neutral oil
- 3 eggs, lightly beaten
- 1 cup frozen peas and carrots
- 1/2 cup diced onion
- 3 tablespoons soy sauce
- 1 teaspoon sesame oil
- 2 sliced green onions
Quick Steps:
- Heat 1 tablespoon oil in a large skillet or wok and scramble the eggs, then remove them.
- Add the remaining oil and cook the onion for 2 minutes.
- Stir in the frozen peas and carrots and cook until hot.
- Add the rice, break it apart, and fry for 3 to 4 minutes, then stir in the soy sauce and sesame oil.
- Return the eggs to the pan and finish with green onions.
Equipment for This Recipe:
- Large skillet or wok
- Spatula
- Bowl for eggs
- Measuring spoons
How to Serve This Dish:
Serve in bowls with extra soy sauce on the side. It also does well with cucumber sticks or leftover chicken if you want to stretch it.
Pro Tips for This Recipe:
- Chill the rice before frying; warm rice sticks.
- Use high heat once the rice goes in.
- Push the rice to the edges so it can crisp a little.
- Taste before adding more soy sauce; it can tip salty fast.
Variations on This Dish:
- Chicken Fried Rice: Add 1 cup diced cooked chicken.
- Sesame Mushroom Version: Stir in sliced mushrooms with the vegetables.
- Spicy Adult Bowl: Add chili crisp at the table.
Common Mistakes to Avoid with This Dish:
- Fresh rice: It clumps and turns soft.
- Too much sauce: The rice gets wet instead of fried.
- Low heat: The pan never gets those crisp bits.
16. Pesto Chicken Gnocchi Skillet
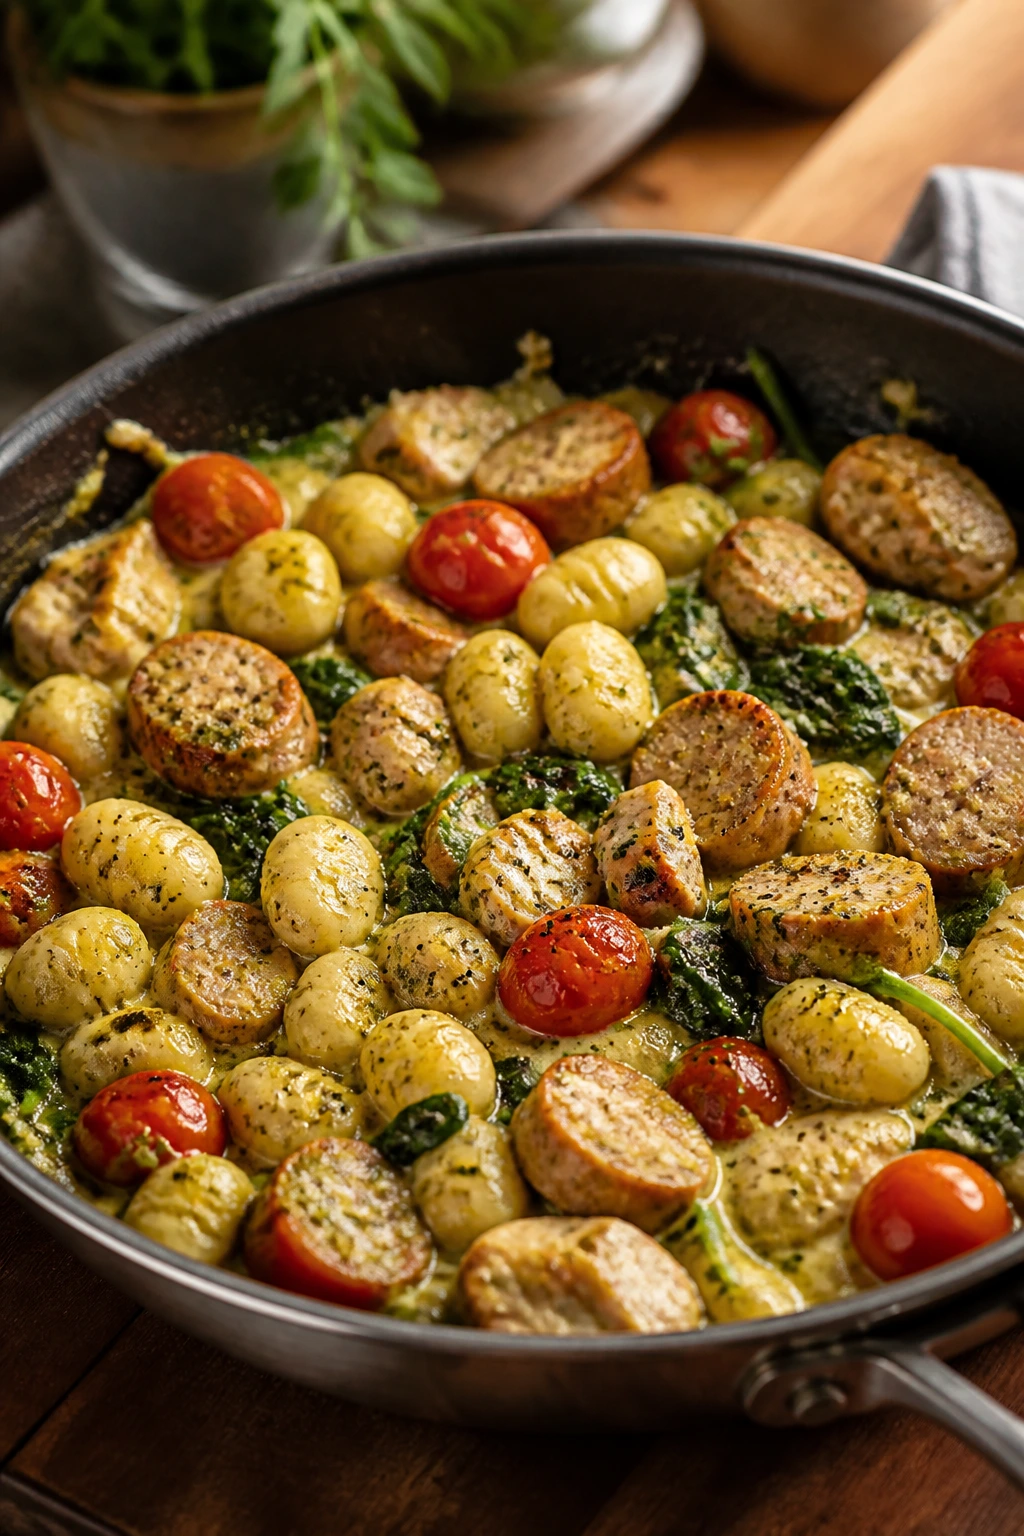
The gnocchi gets golden in spots, the pesto turns the cream a soft green, and the tomatoes burst just enough to stain the sauce. It looks more complicated than it is, which is a useful quality on a school night.
Why It Works:
Shelf-stable gnocchi cooks straight in the skillet, so there’s no boiling pot to manage separately. Chicken sausage or leftover chicken both work, and the pesto gives the dish enough flavor that you don’t need much else. It’s rich without being heavy enough to put the table to sleep.
Key Ingredients:
- 1 pound potato gnocchi
- 12 ounces chicken sausage, sliced
- 1 tablespoon olive oil
- 1 pint cherry tomatoes
- 2 cups baby spinach
- 1/2 cup pesto
- 1/2 cup heavy cream
- 1/4 cup grated parmesan
Quick Steps:
- Brown the chicken sausage in a large skillet over medium-high heat for 4 to 5 minutes.
- Add the olive oil, gnocchi, and tomatoes and cook for 5 minutes, stirring until the gnocchi starts to brown.
- Pour in the cream and pesto and simmer for 2 minutes.
- Stir in the spinach until wilted.
- Finish with parmesan and serve hot.
Equipment for This Recipe:
- Large skillet with lid
- Wooden spoon
- Measuring cups
- Grater for parmesan
How to Serve This Dish:
Spoon it into shallow bowls and add extra parmesan on top. A slice of crusty bread is enough, though garlic bread is never a bad call.
Pro Tips for This Recipe:
- Let the gnocchi sit untouched for a minute or two so it browns.
- Use a pesto you actually like; the sauce is only as good as the jar.
- If the sauce thickens too much, add a splash of broth.
- Stir the spinach in at the end so it stays green.
Variations on This Dish:
- Sun-Dried Tomato Version: Add 1/4 cup chopped sun-dried tomatoes with the pesto.
- Vegetarian Gnocchi: Skip the sausage and add cannellini beans.
- Lighter Cream Cut: Replace half the cream with milk.
Common Mistakes to Avoid with This Dish:
- Boiling the gnocchi too long: It turns gummy.
- Using too much pesto: The dish gets muddy and salty.
- Adding spinach too early: It disappears into the sauce.
17. Slow Cooker Pulled Pork Sandwiches
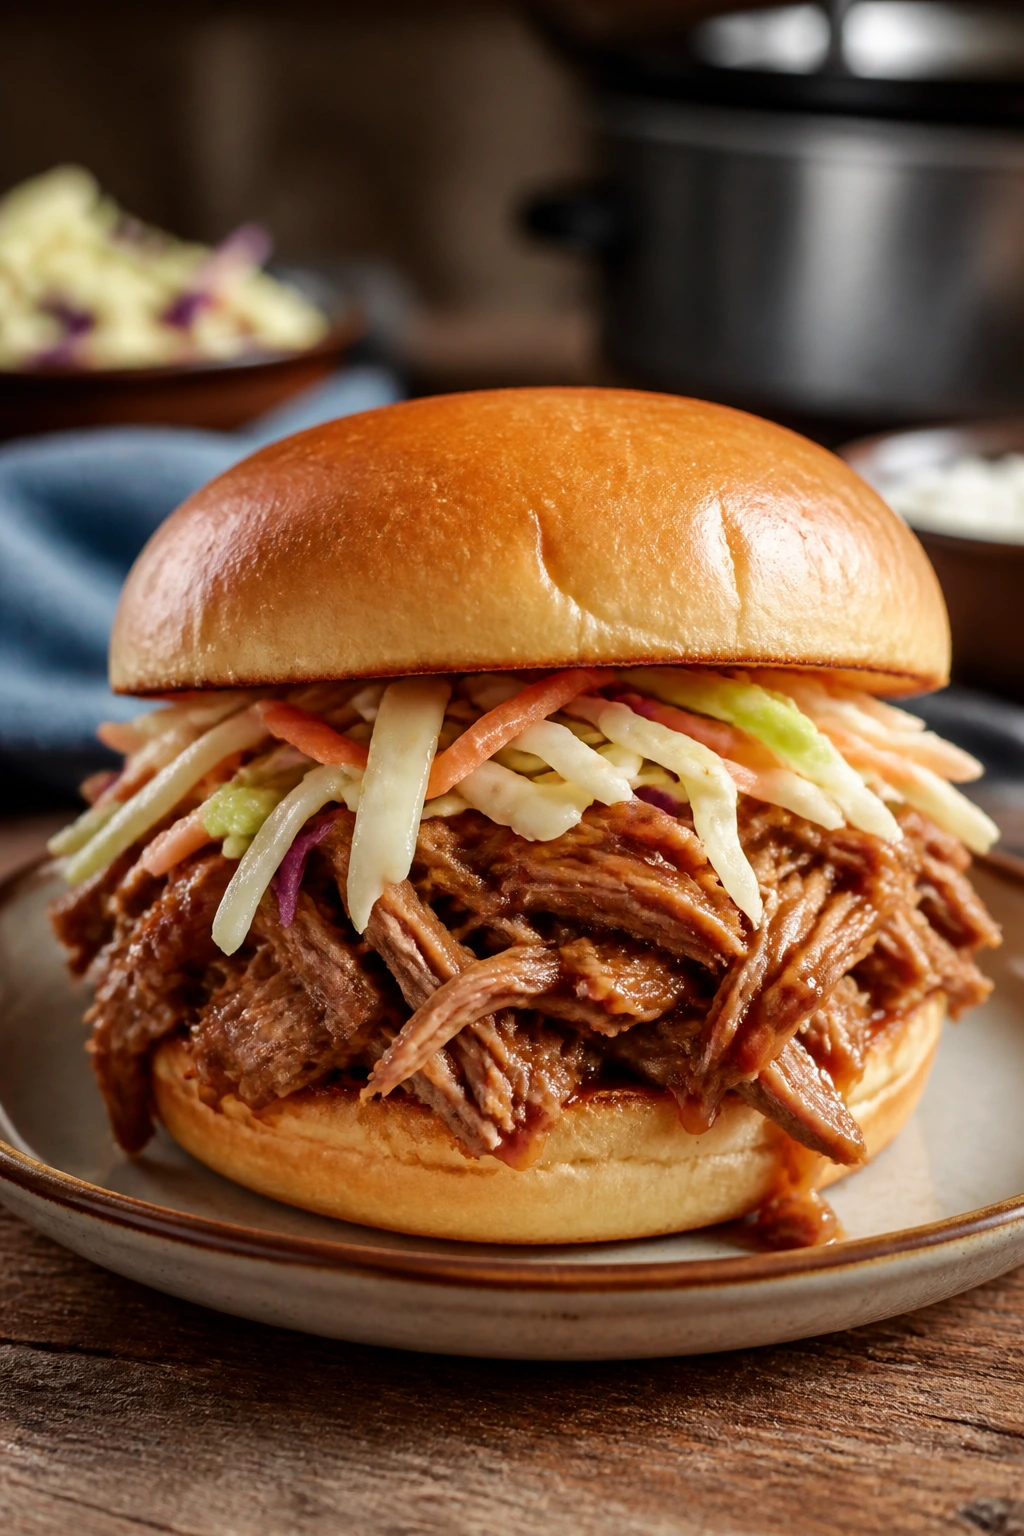
This is the one you start before the afternoon gets loud and then forget about, in the best way. By dinner, the pork shreds with almost no resistance, and the barbecue sauce turns the whole thing into something you can pile onto buns without thinking hard.
Why It Works:
The slow cooker does the hard part while you’re doing everything else. Pork shoulder has enough fat and connective tissue to stay juicy through a long cook, and the vinegar in the sauce keeps the flavor from getting heavy. If you need a dinner that can wait for the rest of the family to arrive, this is one of the easiest ways to do it.
Key Ingredients:
- 3 pounds pork shoulder
- 1 sliced onion
- 1 cup barbecue sauce
- 1/4 cup apple cider vinegar
- 2 tablespoons brown sugar
- 1 tablespoon paprika
- 1 teaspoon salt
- 8 sandwich buns
- 2 cups coleslaw, optional
Quick Steps:
- Put the onion in the slow cooker and set the pork shoulder on top.
- Mix the barbecue sauce, vinegar, brown sugar, paprika, and salt, then pour over the pork.
- Cook on low for 8 hours or high for 4 to 5 hours until the meat shreds easily.
- Pull the pork apart with two forks and stir it back into the sauce.
- Serve on buns with coleslaw if you want crunch.
Equipment for This Recipe:
- Slow cooker
- Two forks
- Measuring cup
- Slotted spoon
How to Serve This Dish:
Toast the buns if you have 2 extra minutes; they hold up better. A pile of coleslaw on the side keeps the plate from feeling too soft and saucy.
Pro Tips for This Recipe:
- Trim only obvious hard fat; some fat helps keep the pork moist.
- Don’t add extra liquid beyond the sauce mix.
- Shred the pork while it’s hot.
- Save some sauce for spooning over the top at the table.
Variations on This Dish:
- Carolina-Style Tang: Add extra vinegar and a spoonful of mustard.
- Spicy Chipotle Pork: Stir chipotle peppers into the sauce mix.
- Slider Version: Serve the pork on small rolls for a game-night spread.
Common Mistakes to Avoid with This Dish:
- Cooking it dry: Too little sauce leaves the meat stringy.
- Skipping the shred-and-stir step: The pork tastes flat if it doesn’t get tossed back into the juices.
- Using lean pork: It dries out before it gets tender.
18. Cheeseburger Pasta Skillet
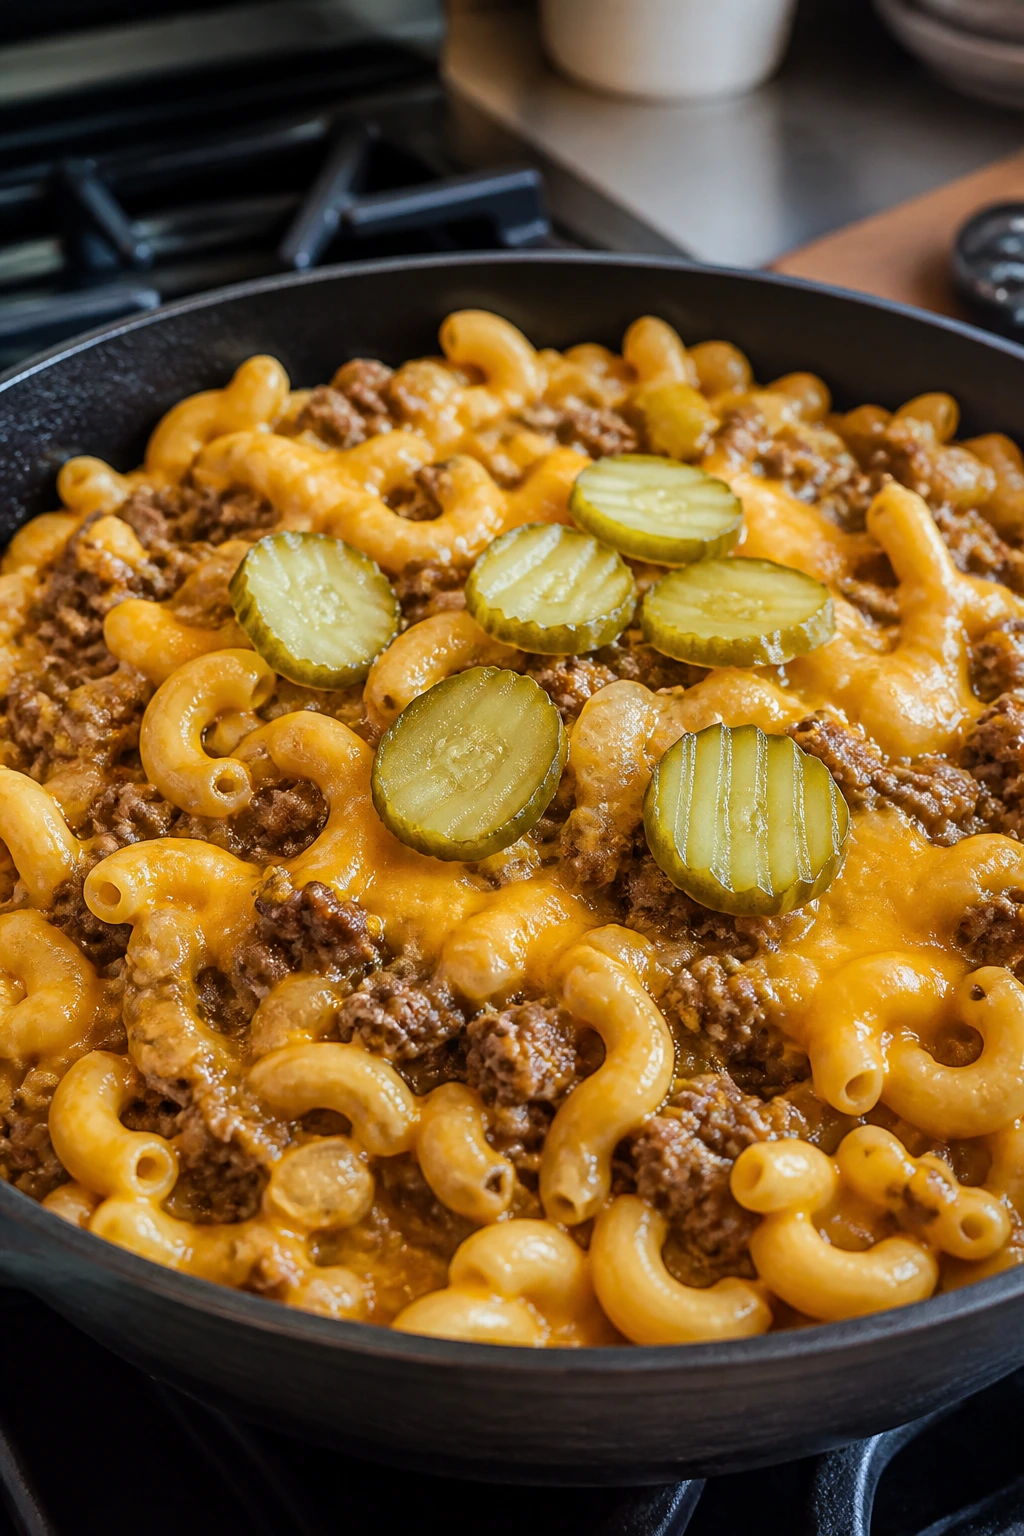
This tastes like a cheeseburger that decided to become a weeknight pasta instead of a sandwich. The beef gives it backbone, the cheese sauce coats every noodle, and the pickle garnish at the end is the part I always insist on.
Why It Works:
This is a one-pan dinner with a built-in kid factor. Ground beef browns quickly, pasta cooks right in the skillet, and the sauce thickens around the noodles instead of sitting underneath them. If you like a meal that feels familiar but not boring, this one lands in that space.
Key Ingredients:
- 1 pound ground beef
- 1 small onion, diced
- 2 cloves garlic, minced
- 2 cups beef broth
- 2 cups milk
- 8 ounces elbow macaroni
- 1 cup shredded cheddar
- 2 tablespoons ketchup
- 1 tablespoon yellow mustard
- 1/4 cup chopped pickles, for topping
Quick Steps:
- Brown the beef and onion in a large skillet over medium-high heat, then drain if needed.
- Stir in the garlic, broth, milk, macaroni, ketchup, and mustard.
- Bring to a simmer and cook, stirring often, for 10 to 12 minutes until the pasta is tender.
- Stir in the cheddar until melted and glossy.
- Top with chopped pickles before serving.
Equipment for This Recipe:
- Large deep skillet
- Wooden spoon
- Measuring cups
- Lid or foil
How to Serve This Dish:
Serve in bowls with a side of sliced tomatoes or a simple salad. The pickles on top keep it from tasting too soft and cheesy, which is the whole point.
Pro Tips for This Recipe:
- Stir often so the macaroni doesn’t stick.
- Add a splash more broth if the pan gets dry before the pasta finishes.
- Sharp cheddar gives more flavor than mild.
- Pickles should go on at the end so they stay crisp.
Variations on This Dish:
- Bacon Cheeseburger Bowl: Stir in 4 chopped cooked bacon strips.
- Turkey Burger Cut: Use ground turkey and add a little extra mustard.
- Mushroom Melt Version: Add sliced mushrooms with the onions.
Common Mistakes to Avoid with This Dish:
- Letting the pasta sit without stirring: It can stick to the skillet bottom.
- Adding cheese over high heat: The sauce can turn grainy.
- Using weak seasoning: Ketchup and mustard need salt and beef to feel balanced.
19. Baked Ziti with Spinach and Ricotta
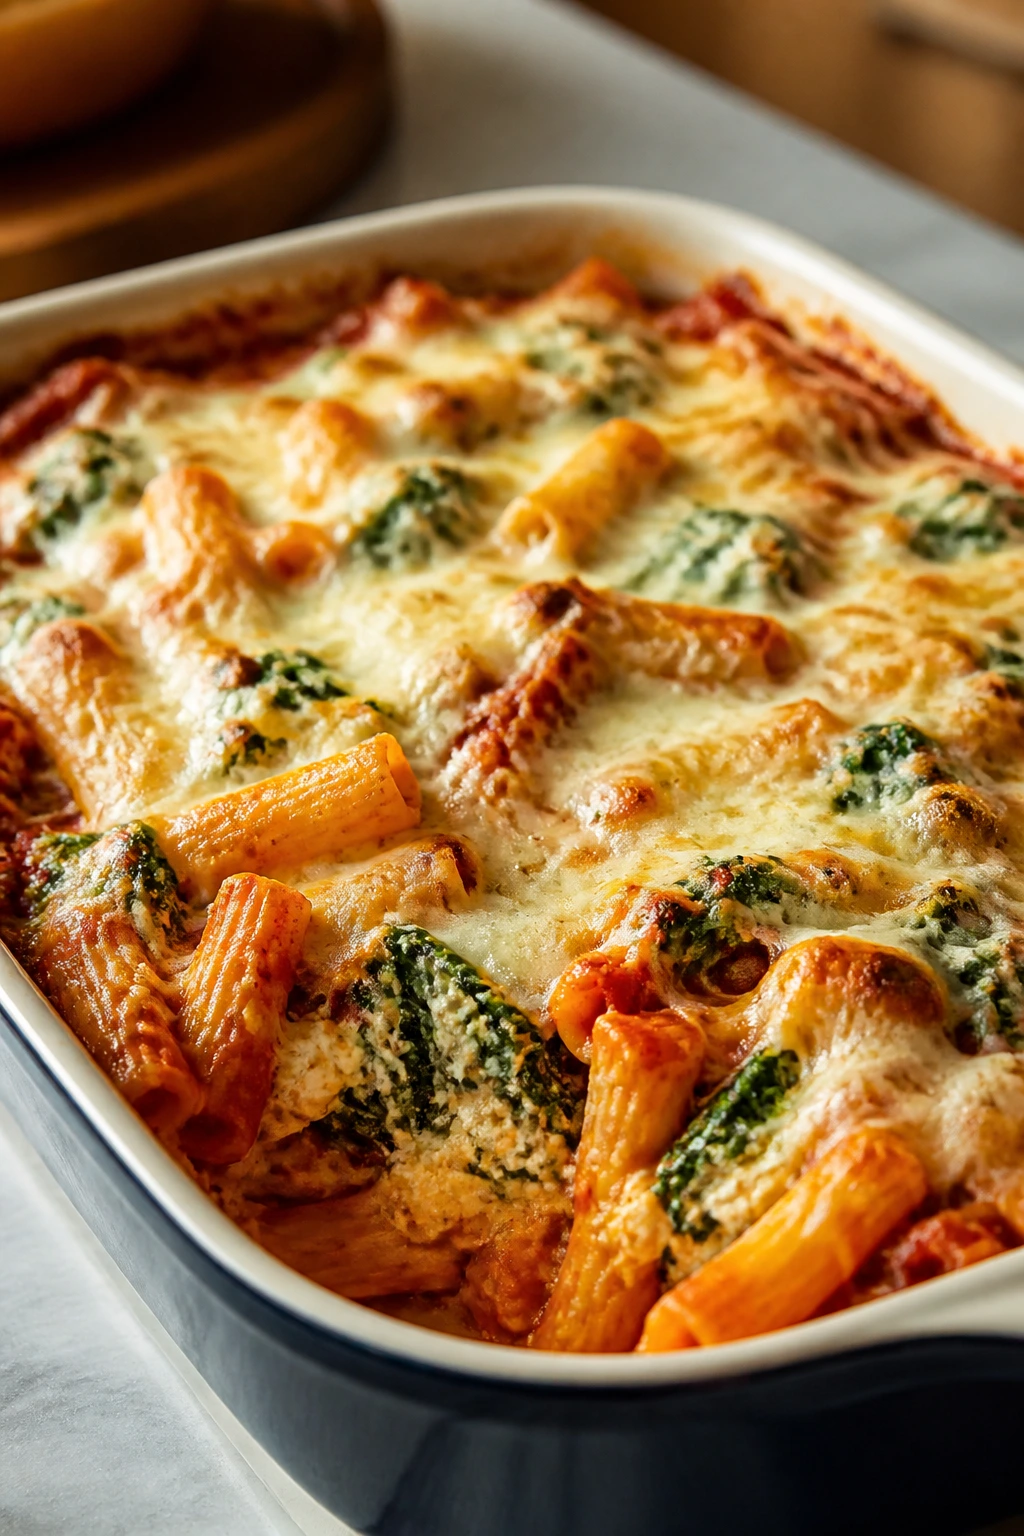
This is the casserole that behaves like a full dinner and then keeps being useful later. The edges bake to a darker, almost chewy finish, the ricotta stays soft in pockets, and the spinach disappears into the sauce in a way that makes it feel a little more responsible than it probably is.
Why It Works:
Baked ziti is built for making ahead because the pasta, sauce, and cheese all settle in together. The spinach adds enough green to matter without changing the dish’s shape, and the whole pan reheats cleanly the next day. It’s one of those dinners that feels calmer than the evening around it.
Key Ingredients:
- 1 pound ziti
- 4 cups marinara sauce
- 2 cups ricotta
- 2 cups shredded mozzarella
- 1 cup chopped spinach
- 1/2 cup grated parmesan
- 2 cloves garlic, minced
- 1 teaspoon Italian seasoning
- 1 teaspoon salt
Quick Steps:
- Cook the ziti until just shy of tender, then drain.
- Stir the marinara with garlic, Italian seasoning, and salt in a bowl.
- Mix the pasta with half the sauce, then layer half in a baking dish.
- Dot with ricotta, spinach, mozzarella, and parmesan, then repeat with the rest of the pasta and sauce.
- Bake at 400°F for 25 minutes until bubbling, then rest 10 minutes before serving.
Equipment for This Recipe:
- Large pot
- 9×13-inch baking dish
- Mixing bowl
- Colander
How to Serve This Dish:
Serve with garlic bread and a green salad. It slices better after the rest, so give it that 10 minutes even when everyone is hovering.
Pro Tips for This Recipe:
- Cook the pasta under al dente so it doesn’t go soft in the oven.
- Drain spinach well if you use frozen.
- Cover with foil for the first half of baking if the top browns too fast.
- A little extra parmesan on the edges makes the crust better.
Variations on This Dish:
- Meat Sauce Version: Add browned ground beef or sausage to the marinara.
- Four-Cheese Cut: Swap in provolone and fontina for some of the mozzarella.
- White Ziti Swap: Use a cream sauce instead of marinara for a richer bake.
Common Mistakes to Avoid with This Dish:
- Overcooked pasta: It turns soft after baking.
- Too much sauce between layers: The casserole slumps.
- Cutting it right away: It needs a little time to hold its shape.
20. Loaded Sheet-Pan Nachos with Chicken and Beans
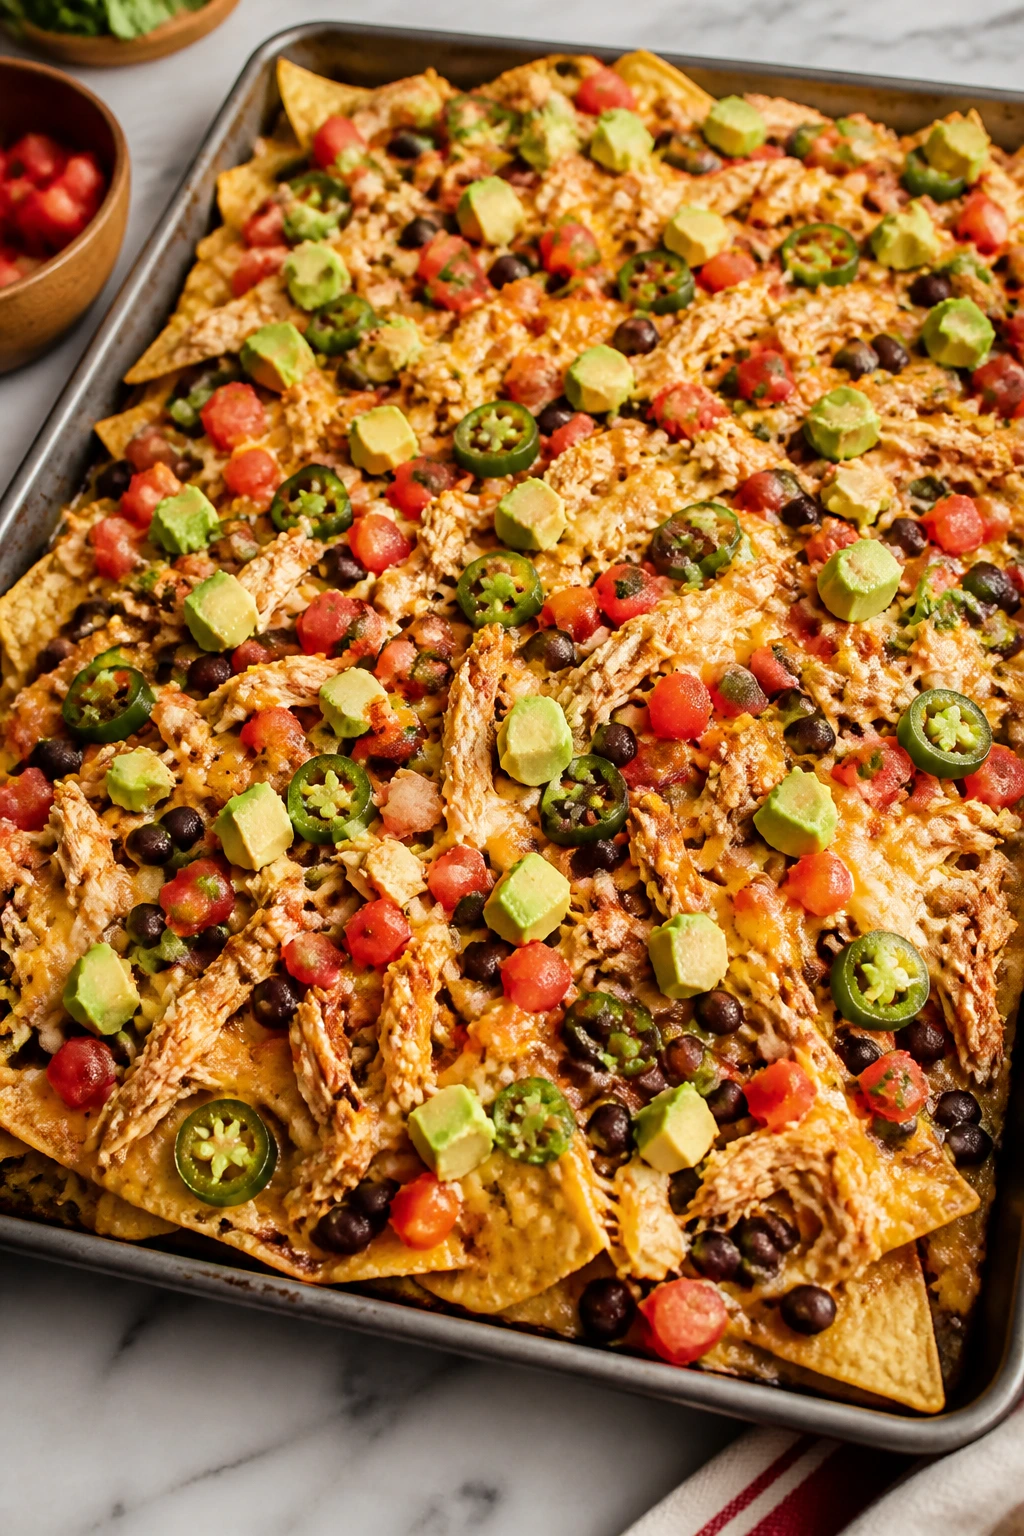
This is the loudest dinner on the list, which is saying something. The chips stay mostly crisp if you layer smartly, the cheese melts into the chicken and beans, and the whole tray lands on the table like an invitation to stop arguing and start eating.
Why It Works:
Nachos are built for sharing, and a sheet pan turns them into a real meal instead of a snack. Using cooked chicken cuts the timing down, while black beans add enough heft to keep the tray from disappearing before everyone sits down. The trick is balance: enough cheese to bind, not so much topping that the chips collapse.
Key Ingredients:
- 10 ounces sturdy tortilla chips
- 2 cups shredded cooked chicken
- 1 can black beans, drained and rinsed
- 2 cups shredded Mexican blend cheese
- 1 small jalapeño, sliced
- 1 cup diced tomatoes
- 1 avocado, diced
- 1/4 cup sour cream
- 2 tablespoons chopped cilantro
Quick Steps:
- Preheat the oven to 400°F and line a sheet pan with parchment.
- Spread half the chips on the pan, add half the chicken, beans, and cheese, then repeat with the rest.
- Add jalapeño slices on top and bake for 8 to 10 minutes until the cheese melts.
- Finish with tomatoes, avocado, sour cream, and cilantro.
- Serve immediately before the chips soften.
Equipment for This Recipe:
- Rimmed sheet pan
- Parchment paper
- Small bowls for toppings
- Spoon
How to Serve This Dish:
Set the tray down in the middle of the table and let people dive in. I like a few extra bowls of salsa and hot sauce on the side so the tray doesn’t need to be overloaded.
Pro Tips for This Recipe:
- Use thick chips; thin ones snap under the toppings.
- Put wet toppings on after baking.
- Layer the cheese across the whole pan so the chips bind together.
- If the chicken is cold, warm it first so the nachos don’t cool off fast.
Variations on This Dish:
- Beef-and-Bean Tray: Swap chicken for seasoned ground beef.
- Vegetarian Party Pan: Use extra beans and roasted corn instead of meat.
- Breakfast Nacho Cut: Top with scrambled eggs and bacon instead of chicken.
Common Mistakes to Avoid with This Dish:
- Piling everything too high: The chips break before you get to the bottom.
- Adding avocado before baking: It turns dull and soft.
- Waiting too long to serve: Nachos are best in the first few minutes.
Why One-Pan, Hand-Held, and Bake-Ahead Dinners Win on Game Night
Game-night food has a very simple job: keep people fed without making the room feel like it needs a cleanup crew. That’s why sheet-pan dinners, skillet bakes, sliders, soups, and tray meals show up so often here. They let you cook once, serve fast, and keep the table moving while somebody keeps trying to explain the rules one more time.
The morning-after angle matters, too. A good weeknight dinner should leave you with something useful in the fridge, not a container of mystery food nobody wants to touch. Pasta bakes, pulled pork, sliders, rice bowls, and soups all do that well because they hold moisture and flavor overnight. Reheat them gently and they come back looking like dinner instead of leftovers.
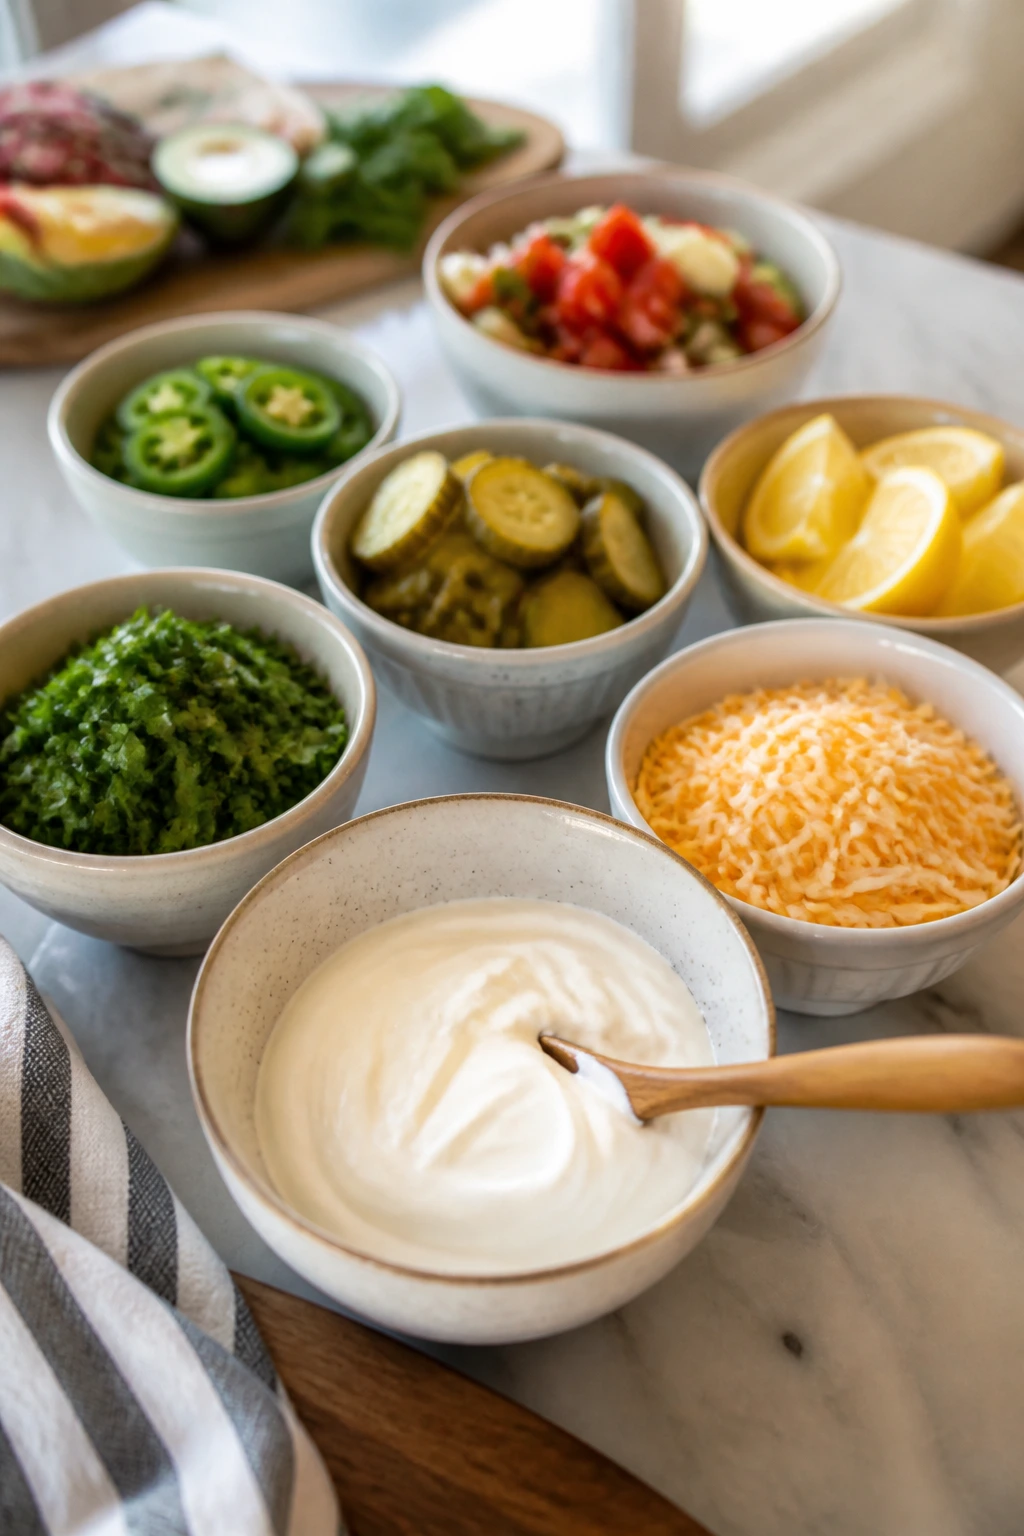
I also like meals that stay flexible at the table. A bowl of sour cream, a handful of herbs, salsa, sliced pickles, hot sauce, or shredded lettuce can pull the same base dinner in different directions. That means the picky eater, the hungry teenager, and the adult who wants more heat can all build a plate that works.
Essential Equipment for These Recipes
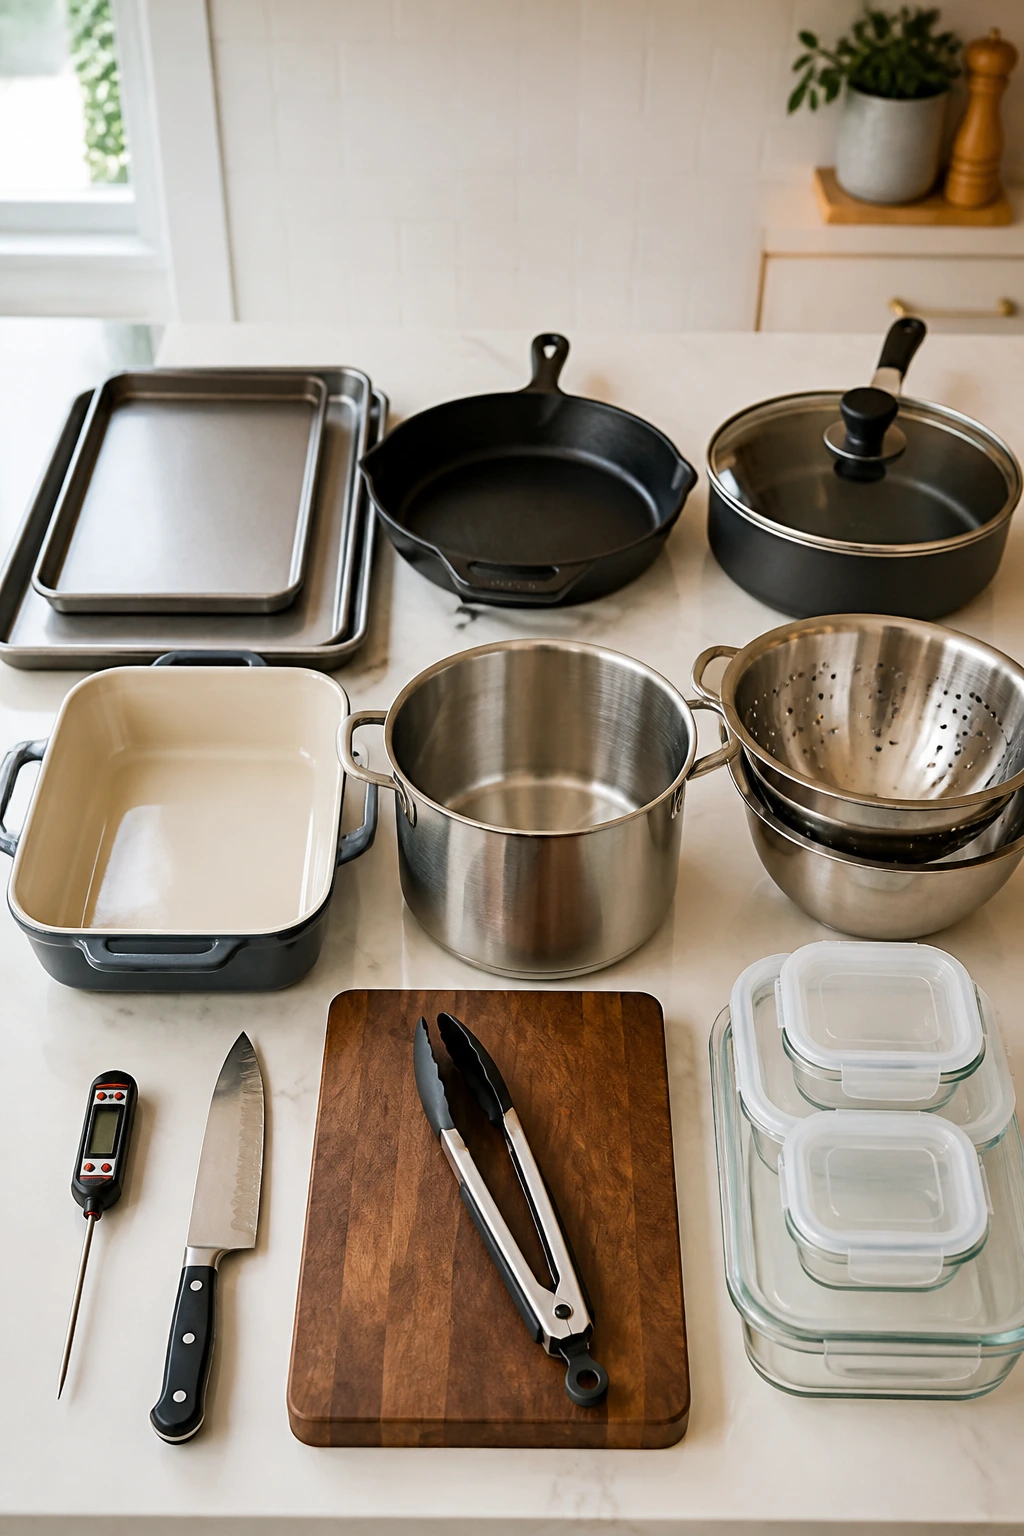
- Rimmed sheet pans, 18×13 inches: Best for fajitas, nachos, meatballs, and any dinner that needs room to brown instead of steam.
- Large oven-safe skillet: Useful for pasta bakes, gnocchi, cheeseburger pasta, and anything you want to move from stove to broiler.
- Deep skillet with lid: Good for rice dishes, soup, fried rice, and saucy one-pan meals that need even heat.
- 9×13-inch baking dish: The home base for baked ziti, mac and cheese, sliders, and crescent-ring style bakes.
- Large pot or Dutch oven: Necessary for soups, boiling pasta, and any recipe with a broth base.
- Instant-read thermometer: Not glamorous, but it keeps chicken at 165°F, ground beef at 160°F, and meatloaf from crossing into dry territory.
- Sharp chef’s knife: Saves time on onions, peppers, and chicken strips.
- Cutting board with a damp towel underneath: Stops sliding when you’re chopping quickly.
- Tongs and a sturdy spatula: Better than chasing food around a pan.
- Mixing bowls in two sizes: Handy for sauces, fillings, and topping prep.
- Colander: You’ll use it more than you think.
- Airtight storage containers: Leftovers stay useful instead of drying out.
Smart Shopping and Ingredient Tips
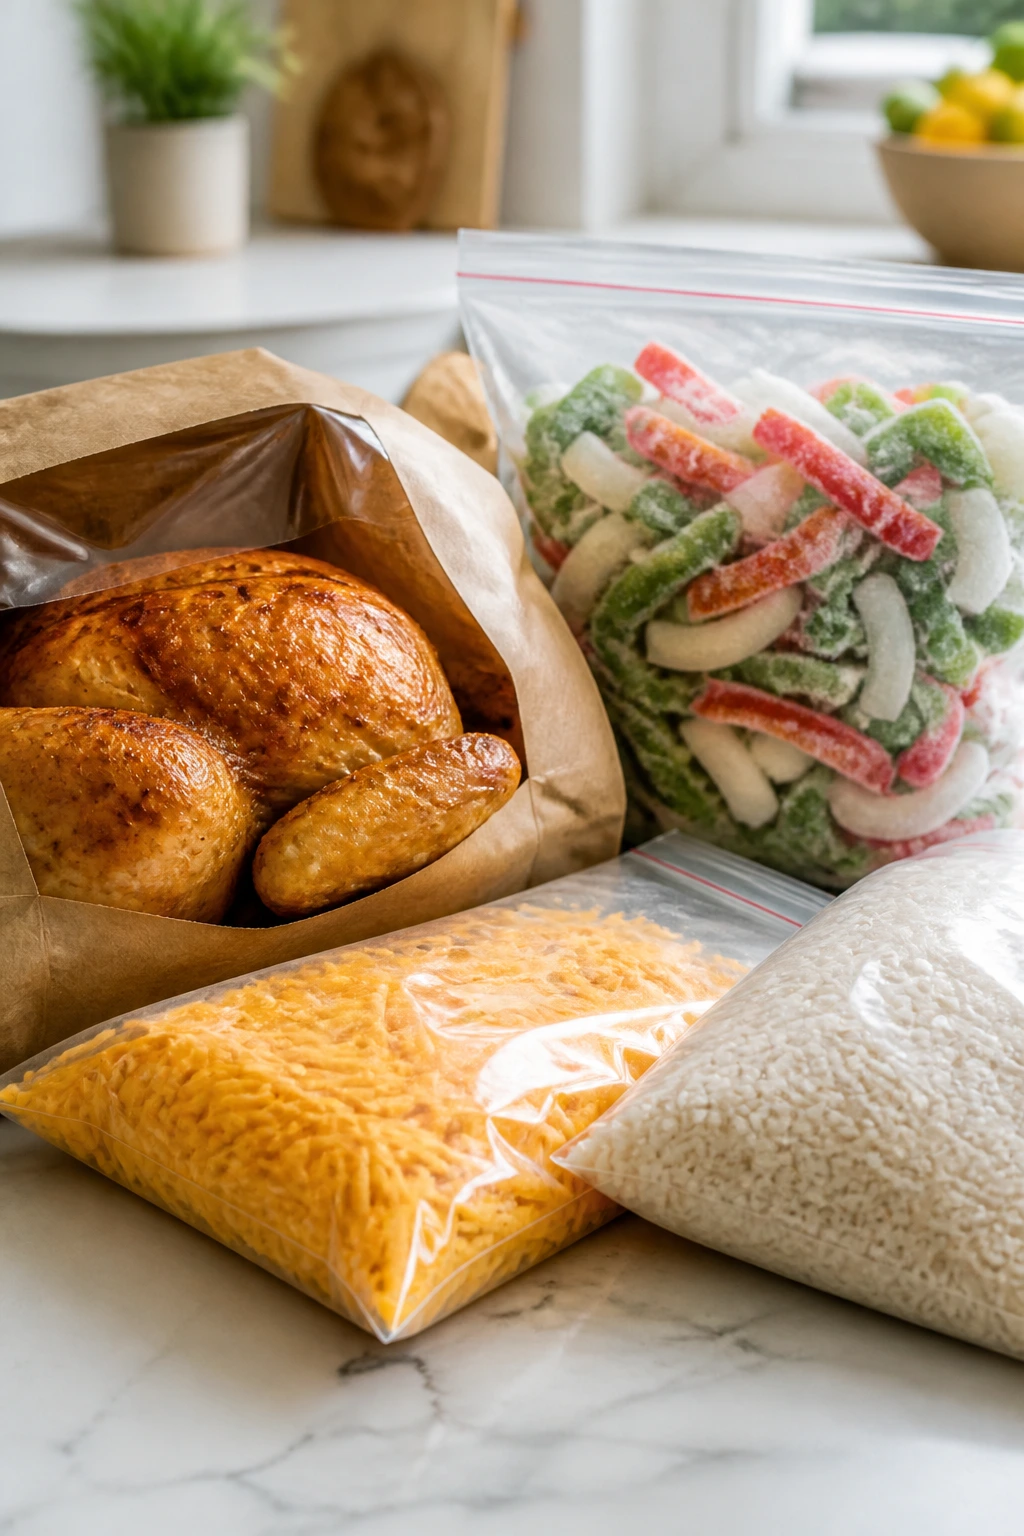
The easiest way to keep these dinners on track is to buy ingredients that do half the work before you get home. Rotisserie chicken is fair game here, and so are frozen onion and pepper mixes if the alternative is skipping dinner because chopping sounded too ambitious. I’m also perfectly happy with pre-shredded cheese in a pinch, though a block of cheddar melts more smoothly in mac, ziti, and nachos if you have the minute to grate it.
For pasta bakes and skillet dinners, choose short shapes that catch sauce: rotini, penne, macaroni, and ziti all do the job well. For rice bowls, long-grain white rice stays fluffy, while day-old rice is the move for fried rice because the grains stay separate instead of clumping. On the meat side, ground beef around 80/20 gives you flavor without too much grease, and chicken thighs stay juicier than breasts when you’re roasting or skillet-cooking.
Canned tomatoes matter more than people admit. Crushed tomatoes make a smoother soup and ziti sauce; diced tomatoes keep a little texture in chili or taco fillings. Beans should be rinsed unless the recipe specifically needs their starch. And if you’re buying tortillas for quesadillas or tacos, go with the softest ones you can find—stiff tortillas crack before the filling is even hot.
For dairy, I prefer plain Greek yogurt in place of sour cream when I want a little more body, and low-moisture mozzarella for baked dishes because it melts in a cleaner sheet. Fresh mozzarella looks nice, but it leaks water if you bury it in a casserole. That’s a trade I usually skip on a school night.
How to Serve These Recipes
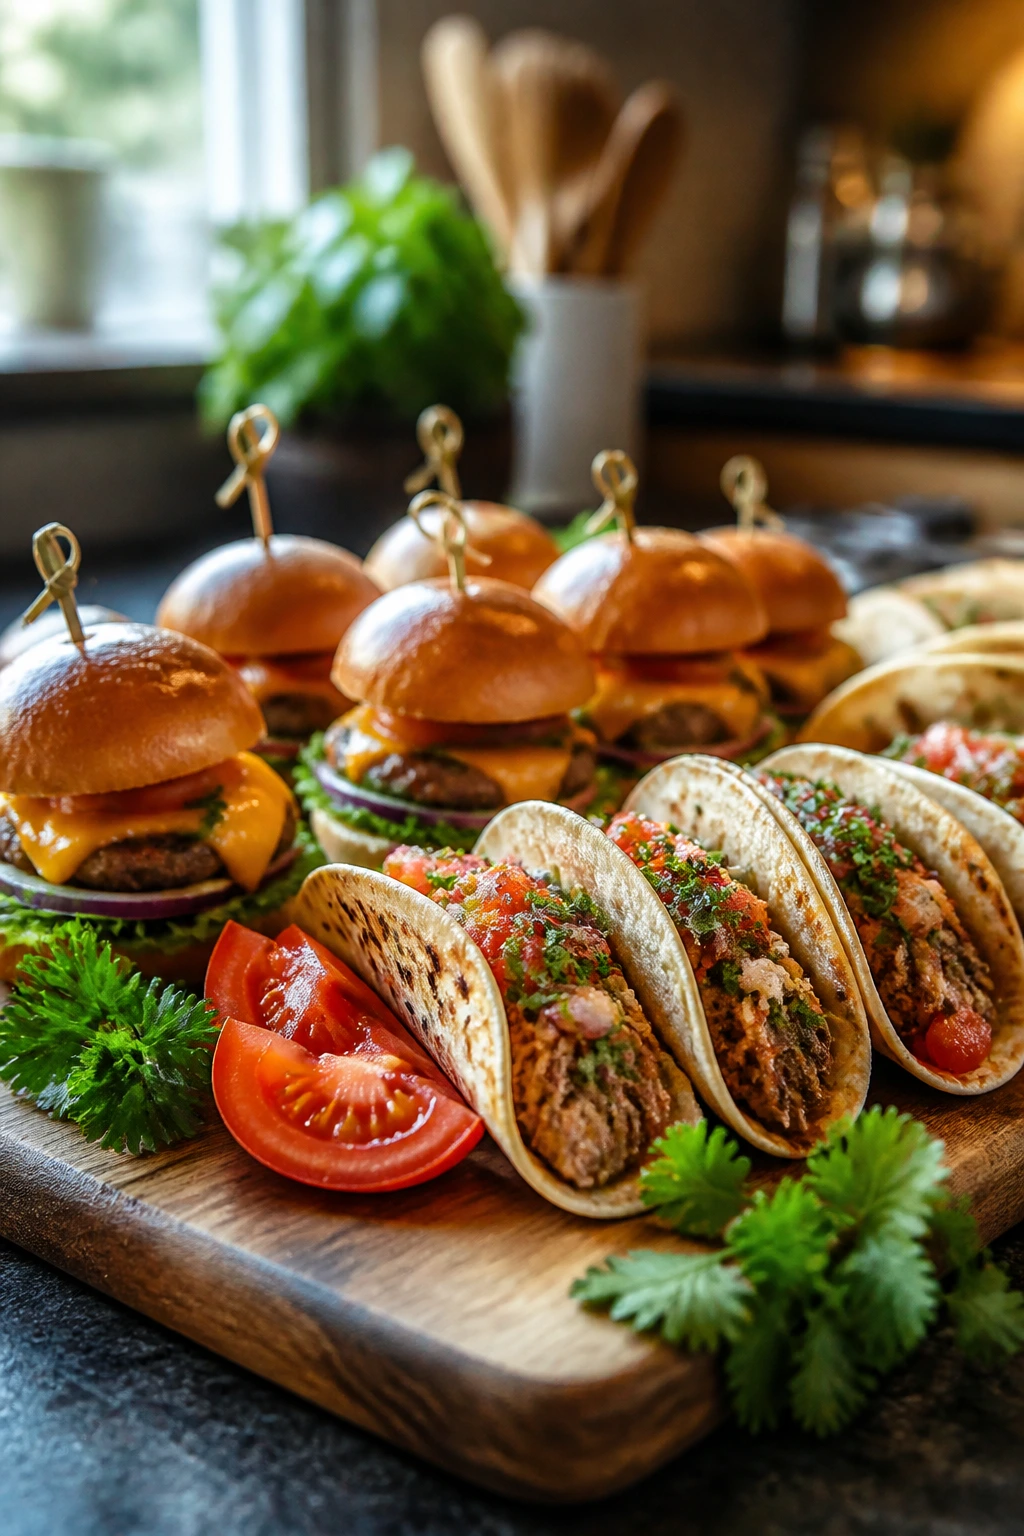
Presentation:
Family game night dinners work best when they look easy to grab. Serve tacos and sliders on boards, soups in deep bowls, pasta bakes in wide squares, and nachos directly on the sheet pan if the tray is sturdy enough. A scattering of herbs, sliced scallions, or chopped tomatoes makes even simple food look ready without requiring plating skills.
Accompaniments:
Keep the sides plain and useful: green salad, sliced cucumbers, carrot sticks, fruit, garlic bread, tortilla chips, or steamed broccoli. For the richer dishes, a crisp side matters more than another heavy starch. For the lighter ones, bread or rice fills in the gap without stealing the show.
Portions:
Most of these recipes land in the 4- to 6-serving range, though sliders, nachos, and quesadillas often stretch farther because people graze. If you’re feeding larger kids or a full crowd, add one extra roll, one extra tortilla, or a second pan rather than hoping everyone will “just have a little.” That never works.
Beverage Pairing:
Sparkling water with lime keeps the table bright and doesn’t compete with saucy food. For something with a little more character, iced tea or a light ginger beer works nicely with tacos, subs, and nachos. Tomato-based bakes and mac-and-cheese dinners also play well with a cold lemonade.
Additional Tips and Flavor Boosters
Flavor Enhancement:
A final squeeze of lemon or lime wakes up cheesy, creamy, or rich dinners in a way salt alone cannot. I use citrus on fajitas, soup, rice bowls, and pulled pork when the flavors start feeling heavy.
Customization:
Build a small topping station and let people steer their own plates. Pickles, hot sauce, sour cream, sliced jalapeños, chopped herbs, and extra cheese solve most family arguments before they start.
Serving Suggestions:
When a dish is soft all the way through—think ziti, mac, soup, or meatballs—add crunch somewhere else. Toasted breadcrumbs, tortilla chips, lettuce, or a crisp salad keep the plate from going flat.
Make-It-Yours:
If you need gluten-free, swap in corn tortillas, GF pasta, rice, or potatoes and you won’t lose much. For dairy-free meals, use olive oil, dairy-free shreds, or skip the cheese-heavy dishes and lean on rice bowls, chili potatoes, and pork sandwiches instead.
Make-Ahead, Storage, and Reheating Guidance
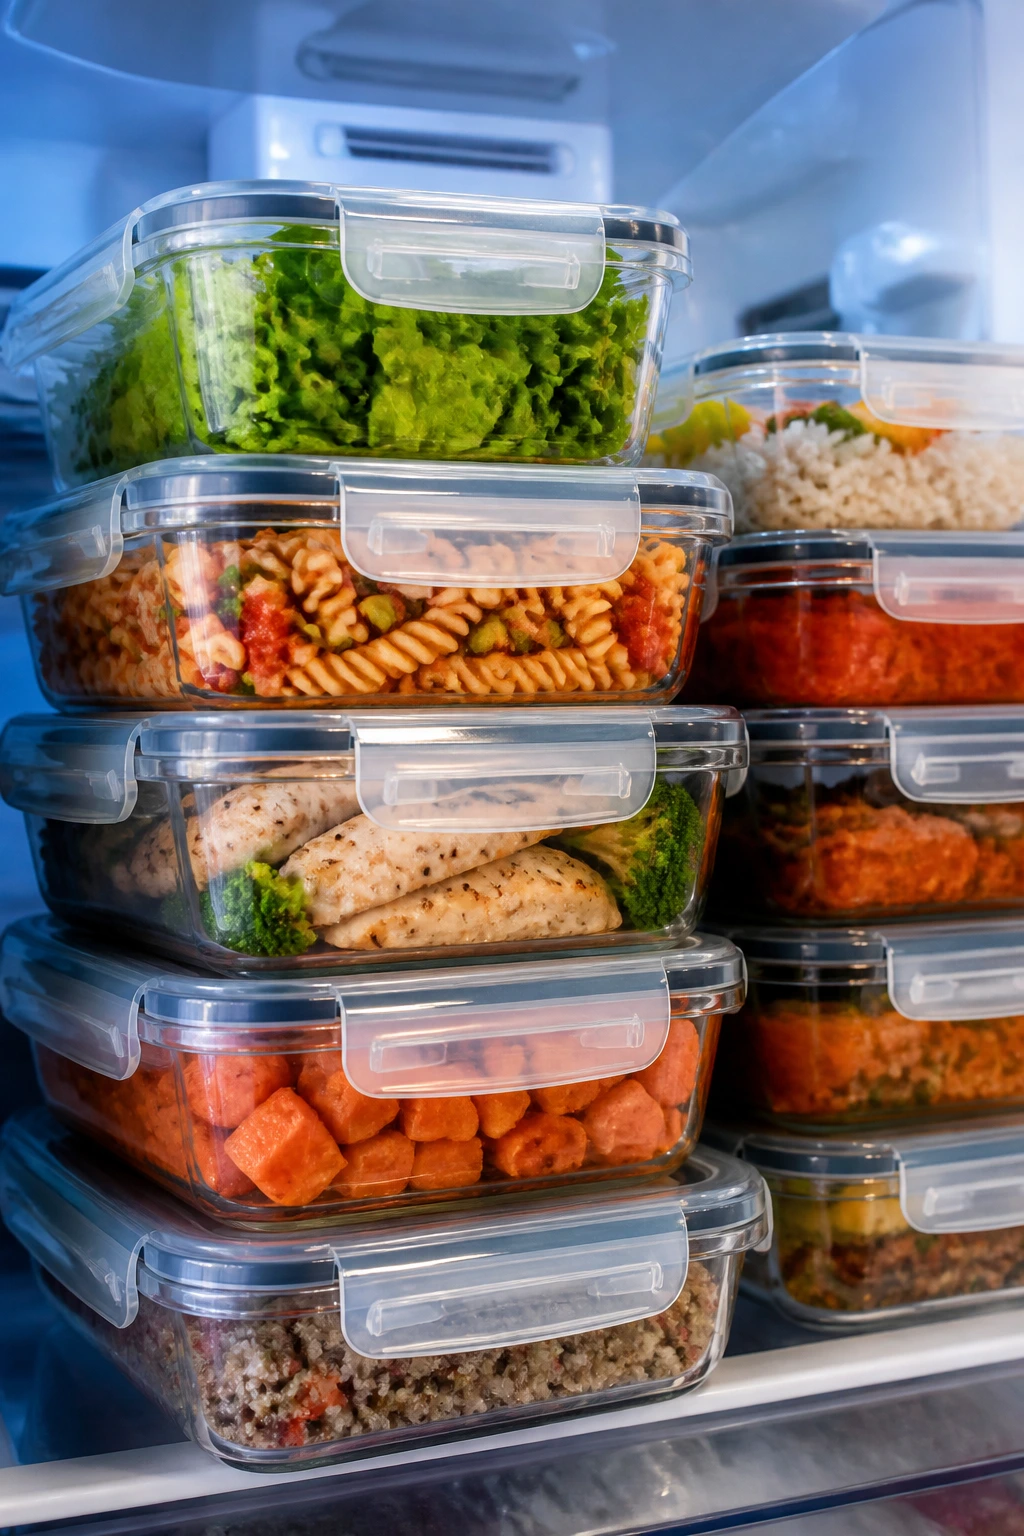
Most of these dinners keep well for 3 to 4 days in the refrigerator in airtight containers, as long as they were cooled and tucked away within about 2 hours of cooking. Soups, pasta bakes, pulled pork, meatloaf muffins, and rice dishes all fit that window comfortably. Nachos and quesadillas are the exceptions; they’re best fresh, though leftover filling can be saved separately and assembled again later.
For the freezer, think in terms of the parts that like being frozen. Pulled pork, meatballs, chili, sloppy joe filling, taco meat, baked ziti, and soup all freeze well for up to 2 months. Wrap tightly or use freezer containers with as little air as possible. Tortillas, lettuce, avocado, sour cream, and fresh tomato toppings should stay out of the freezer and be added later.
Reheating depends on texture. Bakes and casseroles do best covered at 325°F until hot, then uncovered for a few minutes if you want the top to crisp again. Skillet meals and rice bowls reheat well in a covered pan with a splash of broth or water. Soups should be warmed gently over medium-low heat so the dairy doesn’t split. For meatballs, sliders, and quesadillas, an air fryer or dry skillet brings the edges back to life better than a microwave.
If you’re planning ahead for a particularly full evening, make the sauces, fillings, or chopped toppings in the morning and assemble at dinnertime. That’s the move that keeps game night feeling calm instead of rushed.
Variations and Adaptations to Try
The Meatless Board Game Night:
Swap the chicken, beef, or pork in several of these recipes for black beans, pinto beans, chickpeas, or plant-based crumbles. It works especially well in tacos, quesadillas, nachos, ziti, and fried rice, where the sauce and cheese carry a lot of the weight.
The Gluten-Free Shuffle:
Use corn tortillas, gluten-free pasta, rice, potatoes, or lettuce cups where they make sense. Fajitas, chili potatoes, rice bowls, soup, and hash are the easiest places to make that switch without changing the dinner’s shape.
The Lower-Sodium Pantry Build:
Choose low-sodium broth, rinse canned beans, and cut back on packaged seasoning blends by replacing them with cumin, garlic powder, paprika, oregano, and lemon juice. The food still tastes finished, but you control the salt instead of letting it control the pan.
The Spice-On-the-Side Plan:
Keep the main dish mild, then set out hot sauce, chili crisp, jalapeños, or red pepper flakes for the adults. That keeps the kids happy and saves you from making two separate dinners.
The Lunchbox Leftover Mode:
Make one or two extra portions of saucy, sturdy dishes like ziti, sloppy joe filling, pulled pork, or rice bowls. They pack well the next day and don’t need a lot of fuss to become a lunch that actually gets eaten.
The Freezer-First Batch:
If you like to stock meals ahead, focus on meatballs, chili, pulled pork, soup, and taco fillings. Those are the dishes that come back from the freezer with their texture mostly intact, which is more than you can say for a tray of nachos.
Common Mistakes to Avoid
Making too much of the “crispy” part too early:
Tortilla chips, baked potato skins, queso toppings, and broiled cheese are at their best right after cooking. If they sit too long, the edges soften or toughen in ways that are hard to fix. Add wet toppings at the end and serve immediately.
Overcrowding pans and skillets:
That’s how you get steamed peppers, pale chicken, and mushy potatoes. If the pan looks packed, split the food across two pans or cook in batches.
Using too much sauce before you know the texture:
A lot of weeknight dinners get soggy because the sauce goes in before the pasta, rice, or filling is done absorbing it. Start with less, then add more if the dish needs it.
Skipping the rest time after baking or simmering:
Ziti, meatloaf muffins, sliders, and stuffed potatoes all hold together better after a short pause. Five to ten minutes can save you from a plate that collapses the second it gets cut.
Under-seasoning the base because the toppings look busy:
Cheese and sauce can hide a flat filling for one bite, then the food falls apart. Taste the meat, rice, or sauce before it goes into the bake and adjust the salt, acid, or herbs.
Forgetting tomorrow’s texture:
If a dish is meant to be leftover-friendly, don’t drown it in delicate toppings before it goes into the fridge. Keep lettuce, avocado, sour cream, chips, and herbs separate until serving time.
Frequently Asked Questions
Can I prep these dinners before school pickup?
Yes. The best prep-for-later options are chopped vegetables, shredded cheese, cooked chicken, rice, meatballs, taco filling, and sauces. If you want dinner to feel almost automatic, choose recipes where the final assembly is only 10 minutes or less.
Which recipes work best if my kids are picky about textures?
Sliders, quesadillas, pizza pasta, cheeseburger pasta, and baked ziti usually do well because the textures are familiar and soft without being mushy. If a child hates visible vegetables, hide them in sauce-based dishes or keep them on the side.
What if I only have one skillet and one sheet pan?
That’s enough for most of this list. Use the skillet for saucy dinners and the sheet pan for roasted or broiled meals; everything else can wait in a bowl while you wash the first pan or line it with fresh parchment.
Can I use rotisserie chicken in several of these recipes?
Absolutely. It works in quesadillas, tacos, rice bowls, nachos, pesto gnocchi, and chicken parmesan meatball subs if you’re using a shredded shortcut version. Add it near the end so it stays moist.
How do I keep nachos or quesadillas from getting soggy?
Use sturdy chips or tortillas, don’t pile on wet toppings before baking, and serve them right away. For quesadillas, medium heat gives the cheese time to melt before the tortilla gets too dark.
Which dinners freeze the best?
Pulled pork, baked ziti, chili-topped potatoes with the chili stored separately, sloppy joe filling, meatballs, and soup all freeze well. Nachos, fried rice, and quesadillas are better made fresh or assembled from leftovers rather than frozen whole.
How can I stretch these dinners for a bigger family?
Add a side starch or build in one extra base ingredient: more tortillas, more pasta, another pan of potatoes, an extra cup of rice, or a second loaf of rolls. It’s cheaper and easier than trying to double every topping.
What if my pasta bake or mac comes out dry?
Stir in a splash of warm milk, broth, or sauce before reheating, then cover the dish so the steam settles back into the pasta. Dry baked pasta usually means it needed a little more sauce before it hit the oven.
Are these dinners safe to leave out during game night?
Keep hot food hot and serve within a reasonable window. Perishable dishes shouldn’t sit out for more than 2 hours, and less than that if the room is warm. If the game runs long, keep the food covered in a low oven or on a warm setting.
Can I make these milder for younger kids without making a second dinner?
Yes. Leave the heat out of the pan and set spicy add-ons on the side. Jalapeños, hot sauce, chili flakes, and pepper relish are easy to offer separately, and the base recipes stay friendly for everyone else.
The Dinner That Keeps the Evening Moving
The smartest weeknight dinners do one quiet job well: they feed people without making the night feel smaller than it already is. That’s why I keep reaching for sheet pans, skillet bakes, sliders, soups, and trays of food that can be passed around while the dice are still on the table. They’re not precious. They just work.
The other thing they do well is rescue tomorrow morning a little bit. A pan of ziti, a container of pulled pork, a bowl of soup, or leftover taco filling means breakfast or lunch gets easier before the alarm even goes off. That kind of margin matters more than a perfect table does.
Pick one of these tonight, keep the toppings simple, and let the game run a little long. The kitchen will still be there in the morning.