
Vegetable side dishes recipes can rescue dinner in a way main dishes often can’t. A plate with roast chicken or tofu and one limp pile of overcooked vegetables feels unfinished; the same plate with bronzed broccoli, glossy carrots, and something bright and crunchy suddenly tastes like somebody paid attention. The side is where the meal gets its edges.
The trick is not piling on more ingredients. It’s getting the vegetables to do what they already want to do: brown, soften, blister, sweeten, and hold onto a little bite. Heat does a lot of the work. Salt does more than people think. Acid at the end can wake up an entire tray of vegetables that looked a little sleepy halfway through roasting.
The recipes below lean on that kind of cooking. Some are sheet-pan simple. Some are quick skillet jobs. Some bring crunch, some bring creaminess, and a few are the sort of side dish that disappears before the main course is even carved. Nothing here is fussy, but none of it is boring either.
Why These Vegetable Side Dish Recipes Earn a Place on the Plate
-
They use high heat where it matters. Roasting at 425°F or quick pan-cooking pulls water out of vegetables fast enough to create browned edges instead of mush.
-
They balance soft and crisp textures. A forkful of creamy cauliflower mash hits differently when it sits beside a crunchy cabbage wedge or blistered green beans.
-
They lean on pantry ingredients. Olive oil, garlic, lemon, Dijon, vinegar, and dried herbs do a lot of heavy lifting here, so the recipes stay practical.
-
They fit a real dinner table. These sides pair as easily with fish, beans, chicken, steak, or a grain bowl as they do with each other.
-
They make vegetables taste finished. A good side dish doesn’t just “include vegetables.” It gives them a clear flavor plan: char, glaze, crunch, or a bright finish.
-
They stay flexible. If you’ve got broccoli instead of cauliflower or dill instead of parsley, most of these recipes can absorb the swap without falling apart.
1. Lemon-Garlic Roasted Broccoli
The first time broccoli comes out of a hot oven with crisp, browned tips and a lemony garlic smell drifting off the tray, it stops being the vegetable people push around and starts earning real attention. The florets go nutty at the edges, the stems stay tender, and the lemon cuts through the richness so the whole thing tastes awake. I like this one because it’s fast, but more than that, it has a clean, sharp finish that works next to almost anything.
Why It Works:
Broccoli loves dry heat. At 425°F, the cut surfaces brown before the florets collapse, which gives you that good roasted flavor instead of steamed sulfur notes. Garlic cooks fast here, so it needs oil and even spacing on the tray. The lemon goes on at the end, where its juice stays bright instead of disappearing into the pan.
Key Ingredients:
- 2 large heads broccoli, cut into medium florets — medium pieces cook evenly and don’t scorch as fast as tiny ones.
- 2 tablespoons olive oil — enough to coat without making the tray greasy.
- 3 cloves garlic, minced — keep it small so it clings to the florets.
- 1 teaspoon kosher salt — this is what makes the broccoli taste like itself.
- 1/2 teaspoon black pepper — enough for a little bite.
- Zest and juice of 1 lemon — add the zest before roasting and the juice after.
- 2 tablespoons grated Parmesan, optional — a little goes a long way.
Quick Steps:
- Preheat the oven to 425°F and line a sheet pan with parchment for easier cleanup.
- Toss the broccoli with olive oil, garlic, salt, pepper, and lemon zest until every floret is lightly coated.
- Spread it in a single layer, cut sides down where possible. Do not crowd the pan or the broccoli will steam.
- Roast for 18 to 22 minutes, flipping once halfway through, until the edges are deeply browned and the stems are tender when pierced with a knife.
- Finish with lemon juice and Parmesan, if using, then serve right away.
Equipment for This Recipe:
- Rimmed sheet pan — gives the broccoli room to brown.
- Mixing bowl — large enough to toss without crushing the florets.
- Microplane or fine grater — best for lemon zest.
How to Serve This Dish:
Pile it beside salmon, grilled chicken, or a chickpea bowl. The browned bits on the tray are the prize, so scrape them up and spoon them over the top.
Pro Tips for This Recipe:
- Use broccoli with tight, dark green florets; the loose, yellowing kind can taste flat after roasting.
- Dry the broccoli well after washing. Water on the surface steals browning.
- If you like a deeper garlic flavor, tuck a few whole smashed cloves into the tray instead of mincing all of it.
Variations on This Dish:
- Sesame-Lemon Broccoli: Swap Parmesan for toasted sesame seeds and finish with a drizzle of sesame oil.
- Cheesy Broccoli: Add 1/3 cup finely grated Parmesan during the last 3 minutes so it melts and clings.
- Spicy Broccoli: Add 1/4 teaspoon crushed red pepper flakes with the oil and garlic.
Common Mistakes to Avoid with This Dish:
- Packing the pan too tightly: The broccoli turns soft and pale instead of brown. Use two pans if needed.
- Adding lemon too early: Acid dulls in the oven. Finish with it after roasting.
- Cutting pieces too small: Tiny florets burn before the stems finish cooking.
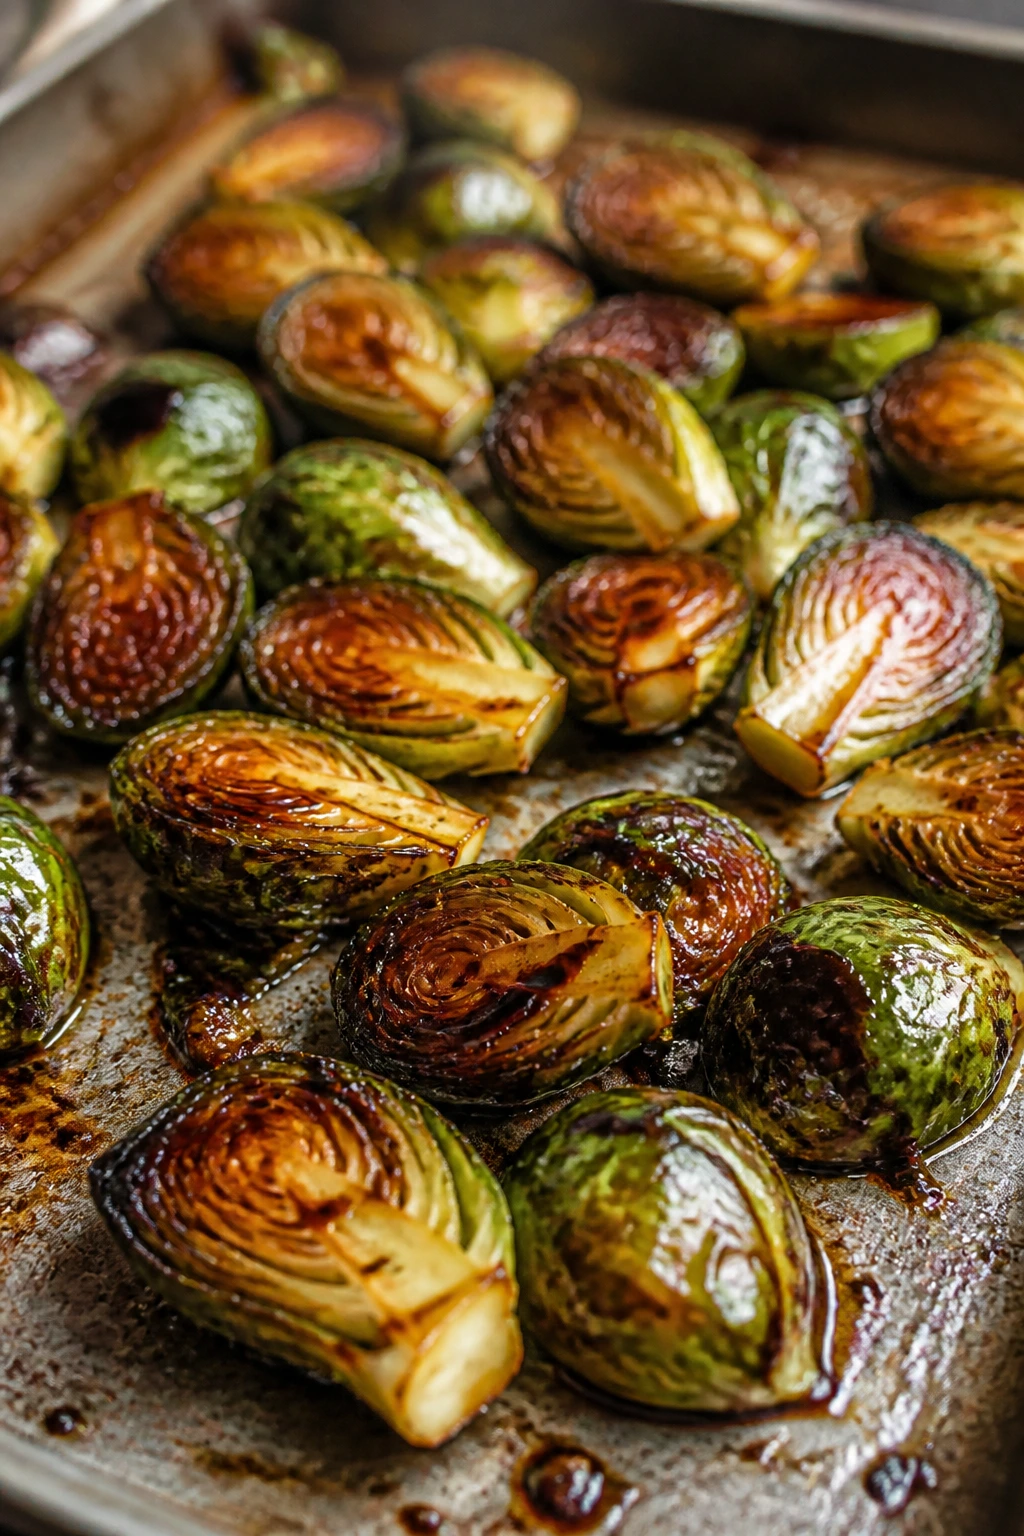
2. Honey-Balsamic Brussels Sprouts
Brussels sprouts are at their best when the cut sides hit the pan hard and turn almost candy-colored at the edges. A good honey-balsamic glaze doesn’t bury that flavor; it wraps around it. The vinegar gives the sprouts a dark, winey note, while the honey smooths out the sharpness so they taste glossy rather than sour.
Why It Works:
Brussels sprouts need a little aggression. Roasting them cut side down gives the exposed leaves direct contact with heat, which creates those crisp, browned layers everyone actually wants. A small amount of honey is enough here; too much and the glaze turns sticky in a cloying way. Balsamic vinegar does the heavy lifting for depth.
Key Ingredients:
- 1 1/2 pounds Brussels sprouts, trimmed and halved — choose sprouts that feel heavy for their size.
- 2 tablespoons olive oil — helps the cut sides brown.
- 2 tablespoons balsamic vinegar — adds sharpness and color.
- 1 tablespoon honey — just enough to soften the vinegar.
- 1 teaspoon Dijon mustard — helps the glaze cling.
- 1/2 teaspoon kosher salt — seasons the dense centers.
- 1/4 teaspoon black pepper — keeps the glaze from tasting flat.
- 2 tablespoons toasted pecans, optional — for a nutty crunch at the end.
Quick Steps:
- Heat the oven to 425°F.
- Toss the halved sprouts with olive oil, salt, and pepper.
- Place them cut side down on a sheet pan and roast for 20 to 25 minutes, until the bottoms are well browned and the outer leaves are crisp.
- Whisk balsamic vinegar, honey, and Dijon in a small bowl.
- Drizzle the glaze over the hot sprouts, toss gently, and return to the oven for 2 minutes so everything coats evenly. Finish with pecans.
Equipment for This Recipe:
- Sheet pan — necessary for a browned, not steamed, finish.
- Small bowl — for the glaze.
- Whisk or fork — to bring the glaze together.
How to Serve This Dish:
Serve these next to roast turkey, baked tofu, or a simple rice bowl. A few glistening sprouts scattered over the plate make the whole dinner look deliberate.
Pro Tips for This Recipe:
- Pick sprouts of similar size so they roast at the same pace.
- If some outer leaves fly off during trimming, keep them. They turn into crisp bits on the pan.
- Don’t glaze before roasting; the sugar can burn before the sprouts are done.
Variations on This Dish:
- Maple Pecan Sprouts: Replace honey with maple syrup and keep the pecans.
- Mustard-Dill Sprouts: Skip the balsamic and finish with Dijon, lemon juice, and chopped dill.
- Garlic-Sesame Sprouts: Toss with 1 teaspoon sesame oil and a sprinkle of sesame seeds after roasting.
Common Mistakes to Avoid with This Dish:
- Skipping the cut-side-down position: You lose the caramelized surface that gives the sprouts their best flavor.
- Using too much glaze: The sprouts turn sticky and wet. A light coat is enough.
- Roasting untrimmed sprouts straight from the bag: The dry outer leaves and hard stems need a quick trim first.
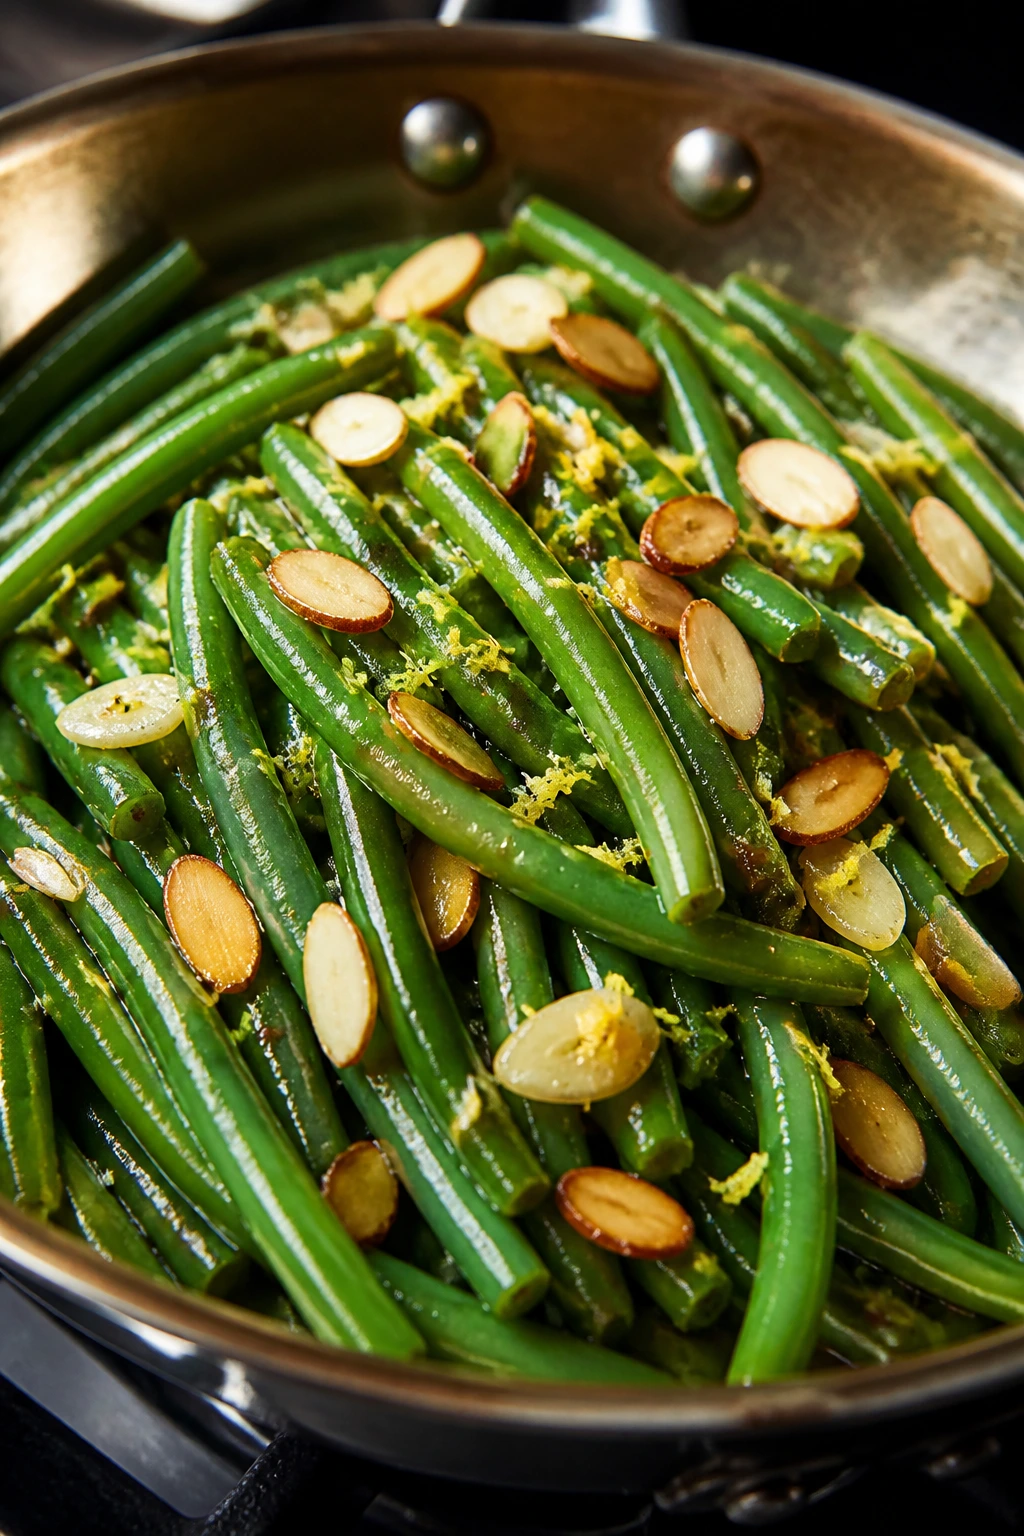
3. Garlic Green Beans with Toasted Almonds
Green beans can be crisp and snappy or tired and olive-drab. This version keeps them on the bright side. The beans get a quick sauté, the garlic perfumes the oil without burning, and the almonds bring a dry crunch that makes the whole dish feel more finished than a plain steamed bowl ever could.
Why It Works:
Green beans are one of the few vegetables that can handle a fast, hot pan without collapsing. A short blanch gives you that vivid green color and takes the raw edge off, while the final sauté keeps the texture clean. Almonds add contrast, and a little lemon zest at the end stops the dish from tasting heavy.
Key Ingredients:
- 1 1/2 pounds fresh green beans, trimmed — thin, tender beans cook fastest.
- 1 tablespoon olive oil — enough to coat the pan.
- 2 tablespoons sliced almonds — toast them lightly for more flavor.
- 3 cloves garlic, thinly sliced — sliced garlic is less likely to burn than minced.
- 1/2 teaspoon kosher salt — adjust after tasting.
- 1/4 teaspoon black pepper — adds a faint bite.
- Zest of 1 lemon — optional, but it sharpens the finish.
Quick Steps:
- Bring a pot of salted water to a boil and set up a bowl of ice water nearby.
- Blanch the green beans for 2 minutes, then drain and plunge them into the ice water so they stay bright green.
- Toast the almonds in a dry skillet over medium heat for 2 to 3 minutes, until lightly golden. Transfer them out right away.
- Add olive oil to the skillet, then sauté the garlic for about 30 seconds. Add the beans, salt, and pepper, and cook for 3 to 4 minutes until hot and glossy.
- Toss in the almonds and lemon zest and serve immediately.
Equipment for This Recipe:
- Large skillet — big enough for the beans to spread out.
- Pot for blanching — optional, but it keeps the beans crisp.
- Slotted spoon or colander — helps move the beans fast.
How to Serve This Dish:
It sits neatly beside grilled fish, roast chicken, or a lentil loaf. The almonds make it look a little dressier than the cooking time suggests.
Pro Tips for This Recipe:
- Trim off the tough stem ends, but don’t fuss over tiny bits.
- If you skip blanching, add 2 tablespoons water to the pan and cover for 1 minute so the beans soften without drying out.
- A tiny pinch of red pepper flakes works well if your main dish is mild.
Variations on This Dish:
- Sesame Green Beans: Swap the almonds for sesame seeds and use 1 teaspoon sesame oil.
- Garlic Butter Beans: Use 1 tablespoon butter plus olive oil for a richer finish.
- Herby Lemon Beans: Finish with chopped parsley and a little dill instead of almonds.
Common Mistakes to Avoid with This Dish:
- Overcooking after blanching: The beans lose their snap and go limp.
- Burning the garlic: Keep the heat at medium and stir fast.
- Adding almonds too soon: They’ll soften if they sit in the hot pan too long.
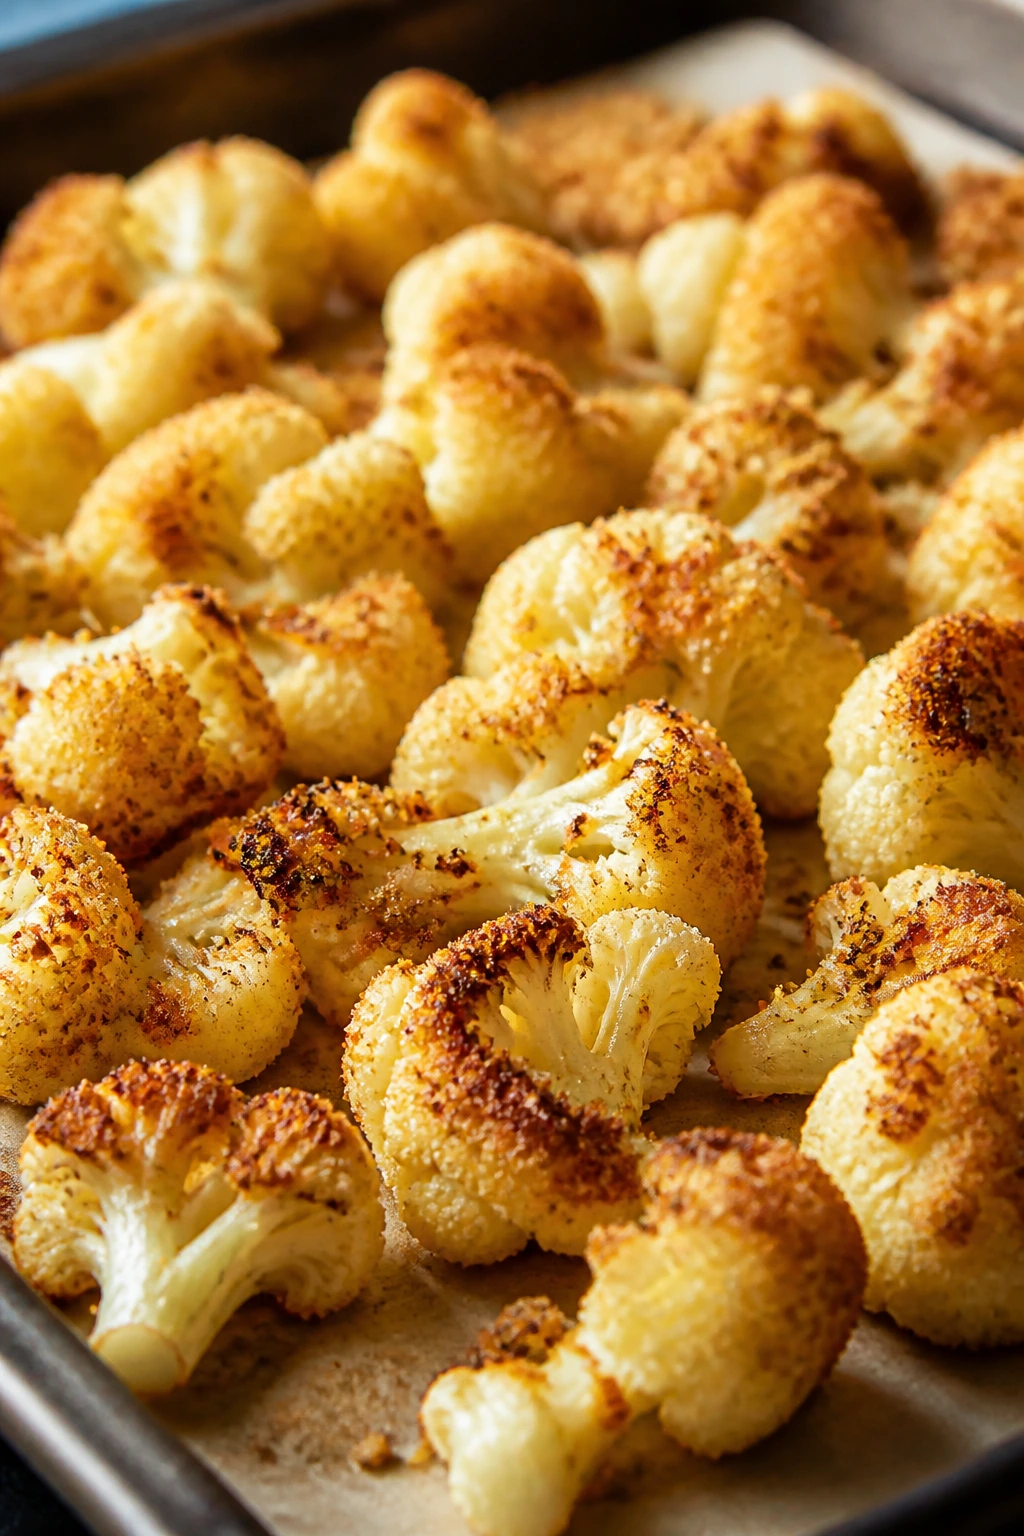
4. Parmesan Roasted Cauliflower
Roasted cauliflower can taste nutty, browned, and almost popcorn-like when it comes out right. Parmesan helps in a very specific way here: it melts into the florets, catches on the rough edges, and turns into salty little crusts. The result feels far more substantial than plain steamed cauliflower, which is why I keep coming back to this version.
Why It Works:
Cauliflower’s surface has enough texture to grab oil and cheese, and that roughness is what makes roasting work so well. A hot oven dries the outside before the inside turns soft, so you get contrast instead of a mealy, uniform bite. Garlic powder helps without adding wetness, which matters more than people think with cauliflower.
Key Ingredients:
- 1 large head cauliflower, cut into bite-size florets — keep the pieces close in size.
- 2 tablespoons olive oil — coats the florets and helps browning.
- 1 teaspoon kosher salt — essential for bringing out the sweetness.
- 1/2 teaspoon black pepper — enough to keep it lively.
- 1 teaspoon garlic powder — better here than fresh garlic, which can scorch.
- 1/2 cup finely grated Parmesan — the fine grate melts better than chunky shreds.
- 1 tablespoon chopped parsley — for a fresh finish.
Quick Steps:
- Heat the oven to 425°F and line a sheet pan.
- Toss the cauliflower with olive oil, salt, pepper, and garlic powder.
- Spread it out and roast for 15 minutes.
- Sprinkle the Parmesan over the florets, then roast 8 to 10 minutes more until the cheese melts into pale gold spots and the edges brown.
- Finish with parsley and serve hot.
Equipment for This Recipe:
- Sheet pan — a crowded pan gives you soft cauliflower.
- Large bowl — useful for getting the oil onto every floret.
- Microplane or fine grater — for the Parmesan.
How to Serve This Dish:
Serve it with grilled steak, baked beans, or a simple grain bowl. The browned cheese bits are best when they stay attached, so move the cauliflower gently.
Pro Tips for This Recipe:
- Dry the cauliflower after washing. Wet florets steam before they brown.
- If the florets are large and dense, give them a 3-minute head start before adding Parmesan.
- Use a fine grate of cheese, not chunky shreds; it melts into the edges instead of rolling off the pan.
Variations on This Dish:
- Smoky Cauliflower: Add 1/2 teaspoon smoked paprika with the garlic powder.
- Lemon-Parmesan Cauliflower: Finish with lemon zest and a squeeze of juice.
- Vegan “Cheesy” Cauliflower: Use nutritional yeast instead of Parmesan and add an extra pinch of salt.
Common Mistakes to Avoid with This Dish:
- Using too much oil: The florets turn slick instead of roasted.
- Adding Parmesan too early: It can dry out and taste bitter.
- Cutting the florets too small: Tiny bits burn before the larger pieces soften.
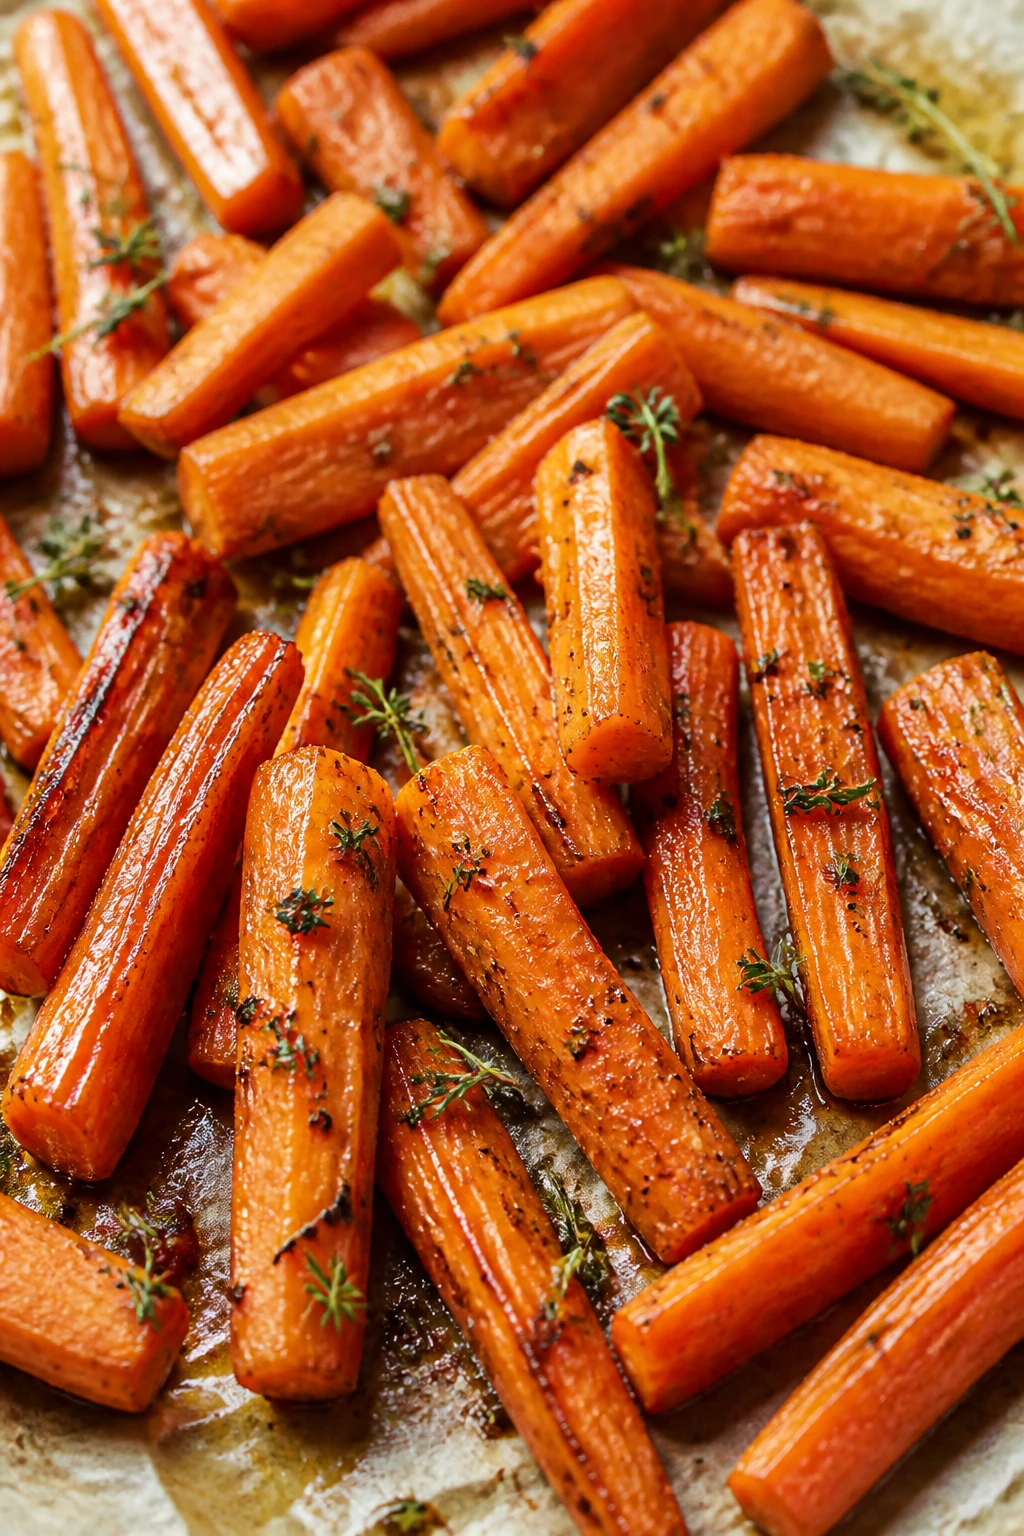
5. Maple-Thyme Roasted Carrots
Carrots get sweeter in the oven, but they need a little help to stay interesting. Maple syrup gives them a lacquered finish, thyme adds a woodsy note, and the edges turn bronzed in a way that makes the whole tray smell like dinner is already halfway done. This is one of those sides that looks simple and eats like more effort was involved.
Why It Works:
Carrots are dense and full of natural sugar, which means they take well to high heat and a touch of sweetness. Cutting them lengthwise gives more surface area, so the glaze can cling and the edges can brown. Thyme stays sturdy in the oven, unlike softer herbs that fade or burn.
Key Ingredients:
- 2 pounds carrots, peeled and halved lengthwise if thick — thinner carrots can stay whole.
- 1 1/2 tablespoons olive oil — keeps them from drying out.
- 1 tablespoon maple syrup — enough for gloss, not candy.
- 1 teaspoon fresh thyme leaves — or 1/2 teaspoon dried thyme.
- 1/2 teaspoon kosher salt — draws out the sweetness.
- 1/4 teaspoon black pepper — gives the glaze a little lift.
- 1 teaspoon Dijon mustard, optional — adds a subtle sharp edge.
Quick Steps:
- Preheat the oven to 425°F.
- Toss the carrots with olive oil, maple syrup, thyme, salt, pepper, and Dijon if using.
- Spread them in one layer on a sheet pan.
- Roast for 25 to 30 minutes, turning once, until the carrots are tender and the tips are caramelized.
- Serve warm, with any glaze left in the pan spooned over the top.
Equipment for This Recipe:
- Sheet pan — gives the carrots room to roast instead of steam.
- Vegetable peeler — handy if the carrots are thick and a little rough.
- Mixing bowl — for coating the carrots evenly.
How to Serve This Dish:
These sit nicely beside roasted chicken, lentils, or a bean pilaf. A scatter of chopped parsley on top makes the orange and gold colors pop.
Pro Tips for This Recipe:
- Keep the carrot pieces similar in thickness so the tips don’t burn before the centers soften.
- If the carrots are very sweet, skip the Dijon and use lemon zest instead.
- Roasted carrots taste best when they still have a little firmness in the middle.
Variations on This Dish:
- Cumin-Carrot Roast: Replace thyme with cumin and a little coriander.
- Orange-Glazed Carrots: Swap maple for orange juice and zest, then finish with dill.
- Spiced Carrot Coins: Slice carrots into coins and add a pinch of cinnamon and paprika.
Common Mistakes to Avoid with This Dish:
- Using too much syrup: The carrots can burn before they finish.
- Cutting uneven pieces: Some turn soft and others stay hard.
- Pulling them too early: You want browning on the edges, not just warmth.
6. Creamy Cauliflower Mash
This is what happens when cauliflower gets treated like a real side instead of a substitute trying to imitate something else. The texture turns smooth and spoonable, with enough body to hold butter or olive oil, and the garlic gives it a warm, savory note. I like it when I want something soft on the plate without giving up vegetable flavor.
Why It Works:
Cauliflower has a high water content, so the main job is drying it out enough to mash without turning soupy. Steaming or simmering works, but draining well matters even more. Greek yogurt adds tang and a little thickness without the heaviness of a full cream mash, and it holds up better next to roasted meat or beans.
Key Ingredients:
- 1 large head cauliflower, cut into florets — smaller florets cook faster and mash smoother.
- 2 cloves garlic, peeled — steam them with the cauliflower.
- 2 tablespoons plain Greek yogurt — adds body and tang.
- 1 tablespoon olive oil or butter — for richness.
- 1/4 cup grated Parmesan or nutritional yeast — for savory depth.
- 3/4 teaspoon kosher salt — start here, then taste.
- 1/4 teaspoon black pepper — optional, but helpful.
- 2 tablespoons chopped chives — for the top.
Quick Steps:
- Steam the cauliflower and garlic for 10 to 12 minutes, until the florets collapse easily when pierced.
- Drain very well and let the cauliflower sit for 2 minutes so excess steam escapes.
- Transfer to a bowl or food processor and add Greek yogurt, olive oil, Parmesan, salt, and pepper.
- Mash or blend until smooth, stopping before it turns gluey.
- Spoon into a bowl, top with chives, and serve warm.
Equipment for This Recipe:
- Steamer basket or pot with lid — a fast way to cook the florets evenly.
- Food processor or potato masher — choose your texture.
- Fine colander — helps drain off water.
How to Serve This Dish:
It’s a smart side for roast chicken, seared salmon, or mushroom gravy. I like to make a little well in the center and spoon olive oil or herb butter into it.
Pro Tips for This Recipe:
- Dry the cauliflower aggressively after steaming; moisture is the enemy here.
- If using a food processor, pulse rather than run it nonstop. Too much processing makes it gummy.
- A tiny pinch of nutmeg works if you want it to feel a little more like mashed potatoes.
Variations on This Dish:
- Roasted Garlic Mash: Roast the garlic first for a sweeter, deeper flavor.
- Herb-Loaded Mash: Blend in parsley, chives, and dill.
- Dairy-Free Mash: Use olive oil and nutritional yeast instead of yogurt and Parmesan.
Common Mistakes to Avoid with This Dish:
- Leaving too much water in the cauliflower: The mash turns loose and thin.
- Over-blending: The texture goes past creamy into paste.
- Under-salting: Cauliflower needs a firm hand with salt or it tastes dull.
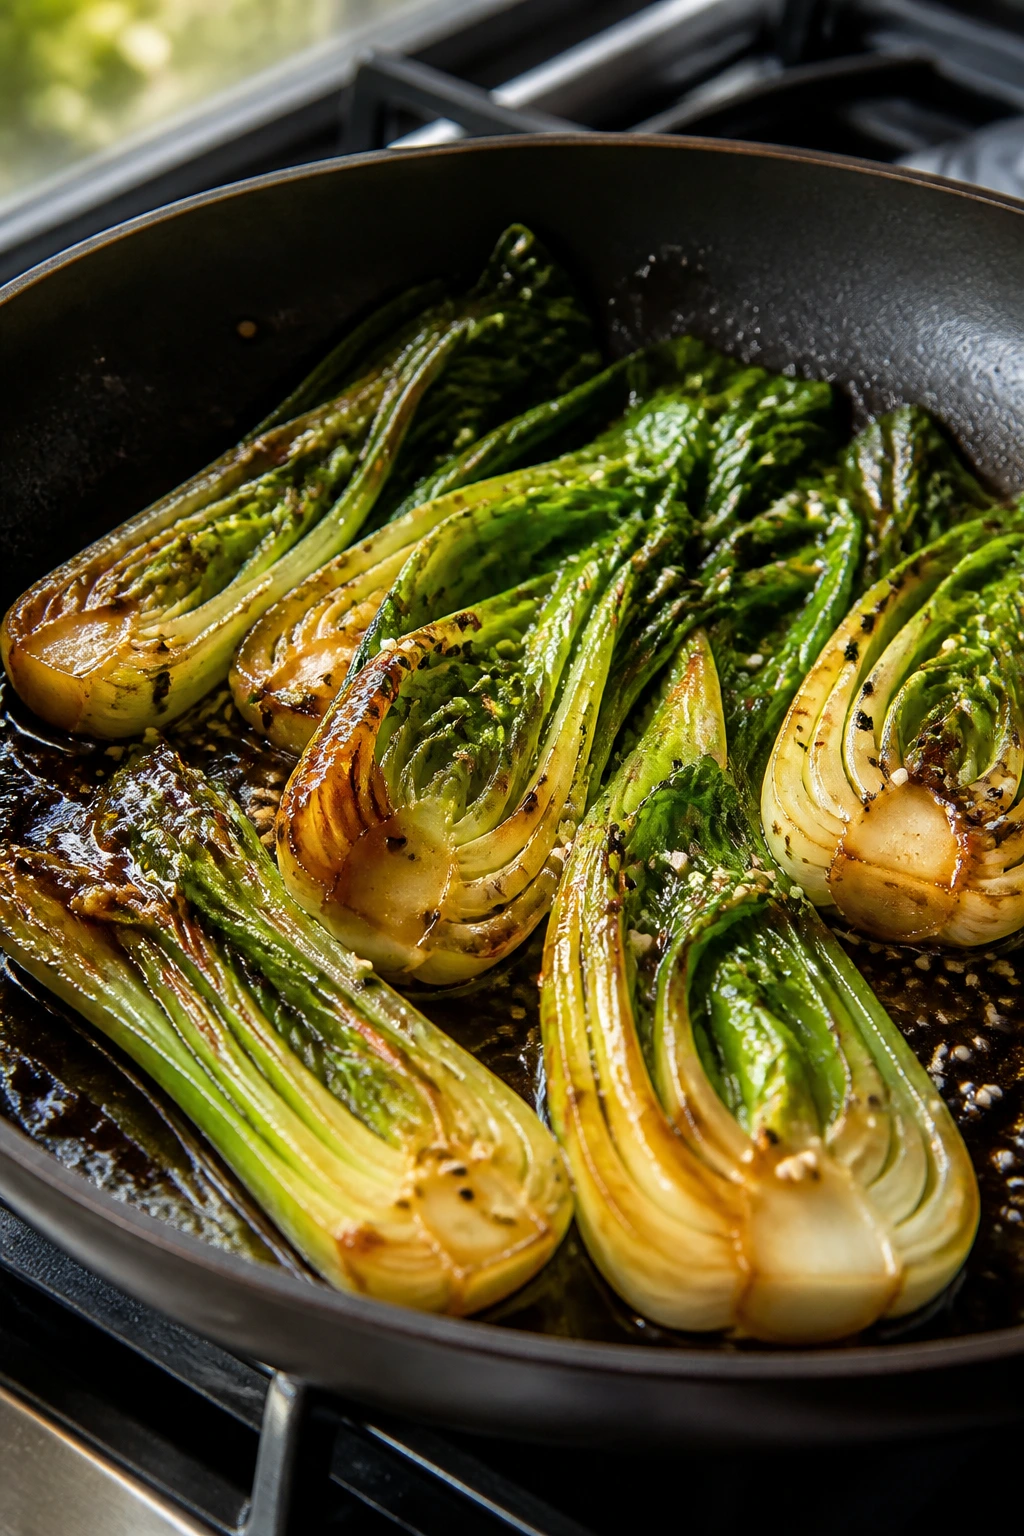
7. Sesame-Ginger Bok Choy
Bok choy is one of the easiest vegetables to make taste like a restaurant side. The stems stay crisp and juicy, the leaves wilt just enough, and the sesame-ginger sauce lands in that sweet spot between savory and bright. It’s fast, and because it cooks in a hot pan for only a few minutes, the greens keep their shape instead of slumping into the skillet.
Why It Works:
Bok choy cooks in two parts: the thick stems need a little more time than the leaves. Starting cut side down in a hot pan gives the stems a faint sear, which makes them taste sweeter. Ginger and garlic go in late enough to perfume the oil without burning, and soy sauce adds salt plus a deep brown note.
Key Ingredients:
- 8 baby bok choy, halved lengthwise — rinse well; grit hides near the base.
- 1 tablespoon sesame oil — for flavor.
- 1 tablespoon neutral oil, like avocado or canola — keeps the sesame oil from scorching.
- 2 cloves garlic, minced — fresh works best here.
- 1 tablespoon fresh ginger, grated — bright and sharp.
- 2 tablespoons soy sauce or tamari — tamari keeps it gluten-free.
- 1 teaspoon rice vinegar — gives the sauce lift.
- 1 teaspoon sesame seeds — for the finish.
- Pinch of chili flakes, optional — if you want heat.
Quick Steps:
- Heat both oils in a large skillet over medium-high heat.
- Place the bok choy cut side down and cook for 2 minutes until the stems pick up a little color.
- Flip, add garlic and ginger, and cook 1 minute more.
- Add soy sauce and rice vinegar, then cover for 1 to 2 minutes until the stems are tender but still crisp.
- Sprinkle with sesame seeds and serve right away.
Equipment for This Recipe:
- Large skillet with a lid — the lid helps steam the stems just enough.
- Microplane — useful for fresh ginger.
- Tongs — easier than a spoon for turning the bok choy.
How to Serve This Dish:
Serve it with rice, teriyaki salmon, tofu, or noodle bowls. The glossy stems look especially good arranged in a fan across the plate.
Pro Tips for This Recipe:
- Keep the bok choy whole if it’s tiny; halve only the larger ones.
- Don’t walk away during the garlic step. It can go from fragrant to bitter in under a minute.
- If the pan looks dry, add 1 tablespoon water before covering so the stems finish cooking evenly.
Variations on This Dish:
- Chili Crisp Bok Choy: Drizzle with chili crisp at the end instead of sesame seeds alone.
- Miso-Ginger Bok Choy: Whisk 1 teaspoon white miso into the sauce for more depth.
- Lemon-Sesame Bok Choy: Swap rice vinegar for lemon juice and finish with zest.
Common Mistakes to Avoid with This Dish:
- Not washing the base well: Grit ruins an otherwise clean side dish.
- Cooking only the leaves: The stems need the first hit of heat.
- Using too much soy sauce: The bok choy should taste seasoned, not drowned.
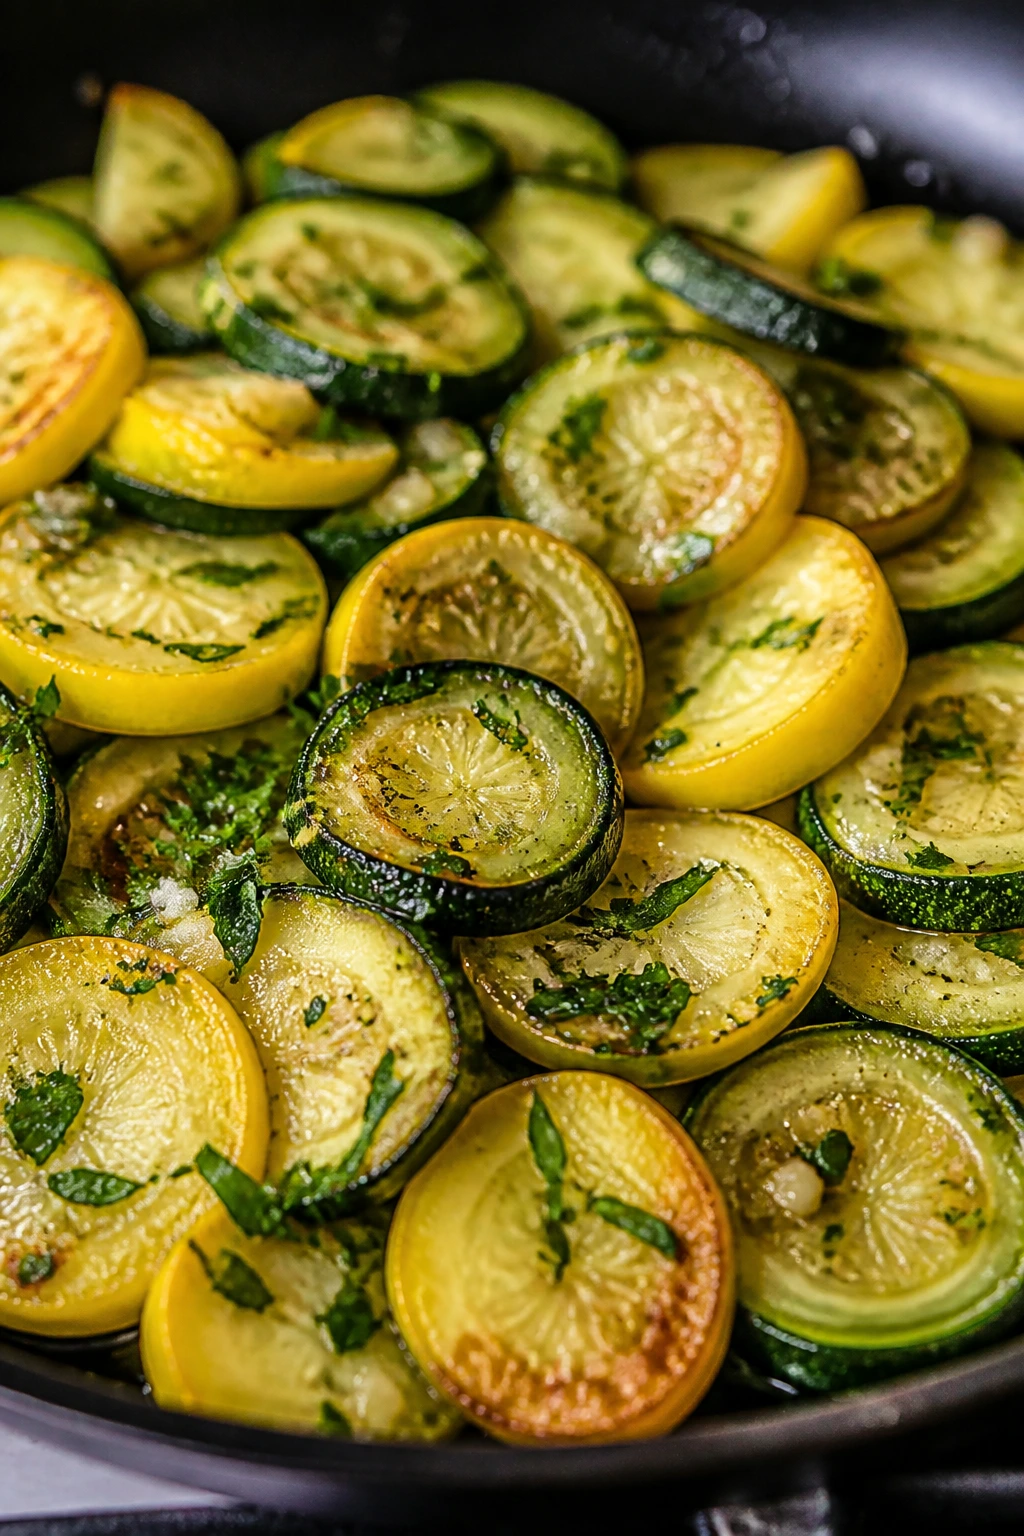
8. Zucchini and Yellow Squash Sauté
Zucchini and yellow squash can go soft in a hurry, which is exactly why this recipe leans on speed and a hot pan. You want a little browning, a little bite, and enough garlic and herbs to keep the squash from tasting watery. Done right, this is the kind of side that feels light without disappearing.
Why It Works:
Summer squash is full of moisture, so the pan needs to stay hot and the slices need room. If you crowd them, they steam and slump. A quick sauté on medium-high heat brings out sweetness, and a squeeze of lemon at the end keeps the flavor from flattening.
Key Ingredients:
- 2 medium zucchini, sliced into half-moons — about 1/4-inch thick.
- 2 medium yellow squash, sliced the same way — matching thickness keeps the texture even.
- 1 tablespoon olive oil — enough for the pan without turning greasy.
- 2 cloves garlic, minced — add late so it doesn’t burn.
- 1 teaspoon Italian seasoning — or a mix of oregano and thyme.
- 1/2 teaspoon kosher salt — helps draw out moisture.
- 1/4 teaspoon black pepper — for balance.
- 2 tablespoons chopped basil or parsley — fresh finish.
- 1 teaspoon lemon juice — optional, but sharpens the flavor.
Quick Steps:
- Heat the olive oil in a large skillet over medium-high heat.
- Add the squash in a single layer and cook for 3 to 4 minutes without stirring much, so some sides brown.
- Stir in garlic, Italian seasoning, salt, and pepper, and cook for 1 to 2 minutes more until fragrant and just tender.
- Remove from the heat and add basil or parsley plus lemon juice.
- Serve immediately while the squash still has a little firmness.
Equipment for This Recipe:
- Large skillet — the wider the better.
- Sharp knife — even slices matter here.
- Wooden spoon or spatula — gentle stirring keeps the squash intact.
How to Serve This Dish:
Serve it beside grilled fish, pasta, or a plate of white beans. It also works well tucked under a fried egg the next day, which is not a bad use for leftovers.
Pro Tips for This Recipe:
- Salt the squash right before cooking, not early, or it will leak water into the bowl.
- Leave the slices a little thick. Thin slices go from browned to soggy fast.
- A spoonful of ricotta on top turns this into a softer, richer side.
Variations on This Dish:
- Garlic-Chili Squash: Add red pepper flakes with the garlic.
- Pesto Squash: Toss with 1 tablespoon basil pesto after cooking.
- Lemon-Herb Squash: Use dill, mint, and extra lemon zest for a brighter finish.
Common Mistakes to Avoid with This Dish:
- Salting too far ahead: The squash starts sweating before it hits the pan.
- Using a crowded skillet: You lose browning and end up with soft squash.
- Overcooking: Squash should bend, not collapse.
9. Smoked Paprika Sweet Potatoes
Sweet potatoes can be soft and sweet on their own, but smoked paprika gives them backbone. A hot oven turns the cubes crisp at the edges, and the spice adds a campfire note that keeps the sweetness from taking over. This is one of the easiest sides in the group, and one of the most useful.
Why It Works:
Sweet potatoes roast beautifully because their starch turns creamy while the outside browns. Cubes are the right shape here; they give you lots of surface area and plenty of crisp edges. Smoked paprika adds depth without heat, though cumin gives it a little more grip if you want that.
Key Ingredients:
- 2 pounds sweet potatoes, peeled and cut into 3/4-inch cubes — keep them close in size.
- 2 tablespoons olive oil — enough for a light, even coat.
- 1 teaspoon smoked paprika — the main flavor note.
- 1/2 teaspoon ground cumin — optional, but it adds warmth.
- 1 teaspoon kosher salt — needed to balance the sweetness.
- 1/4 teaspoon black pepper — a small amount helps a lot.
- 1 tablespoon chopped cilantro or parsley — for the top.
- Lime wedges, optional — a bright finish works well.
Quick Steps:
- Heat the oven to 425°F.
- Toss the sweet potato cubes with olive oil, smoked paprika, cumin, salt, and pepper.
- Spread them on a lined sheet pan in a single layer.
- Roast for 25 to 30 minutes, flipping once halfway through, until the edges are browned and the centers are tender.
- Finish with herbs and a squeeze of lime.
Equipment for This Recipe:
- Sheet pan — essential for crisp edges.
- Large bowl — for coating the cubes evenly.
- Spatula — helps flip the potatoes without smashing them.
How to Serve This Dish:
Put these next to black beans, roast chicken, or a cabbage slaw. They’re also excellent under a fried egg with hot sauce.
Pro Tips for This Recipe:
- Don’t peel if the skins are thin and clean; they add texture.
- If your cubes are large, roast a few minutes longer instead of guessing.
- A pinch of cinnamon works, but only if you want the dish to lean sweeter.
Variations on This Dish:
- Chili-Lime Potatoes: Add chili powder and finish with lime zest.
- Garlic-Rosemary Potatoes: Swap paprika for rosemary and garlic powder.
- Crispy Air Fryer Potatoes: Cook at 400°F and shake the basket halfway through.
Common Mistakes to Avoid with This Dish:
- Uneven cube size: Some pieces burn while others stay hard.
- Too little salt: Sweet potatoes need more seasoning than many cooks expect.
- Overcrowding the pan: The cubes soften instead of crisping.
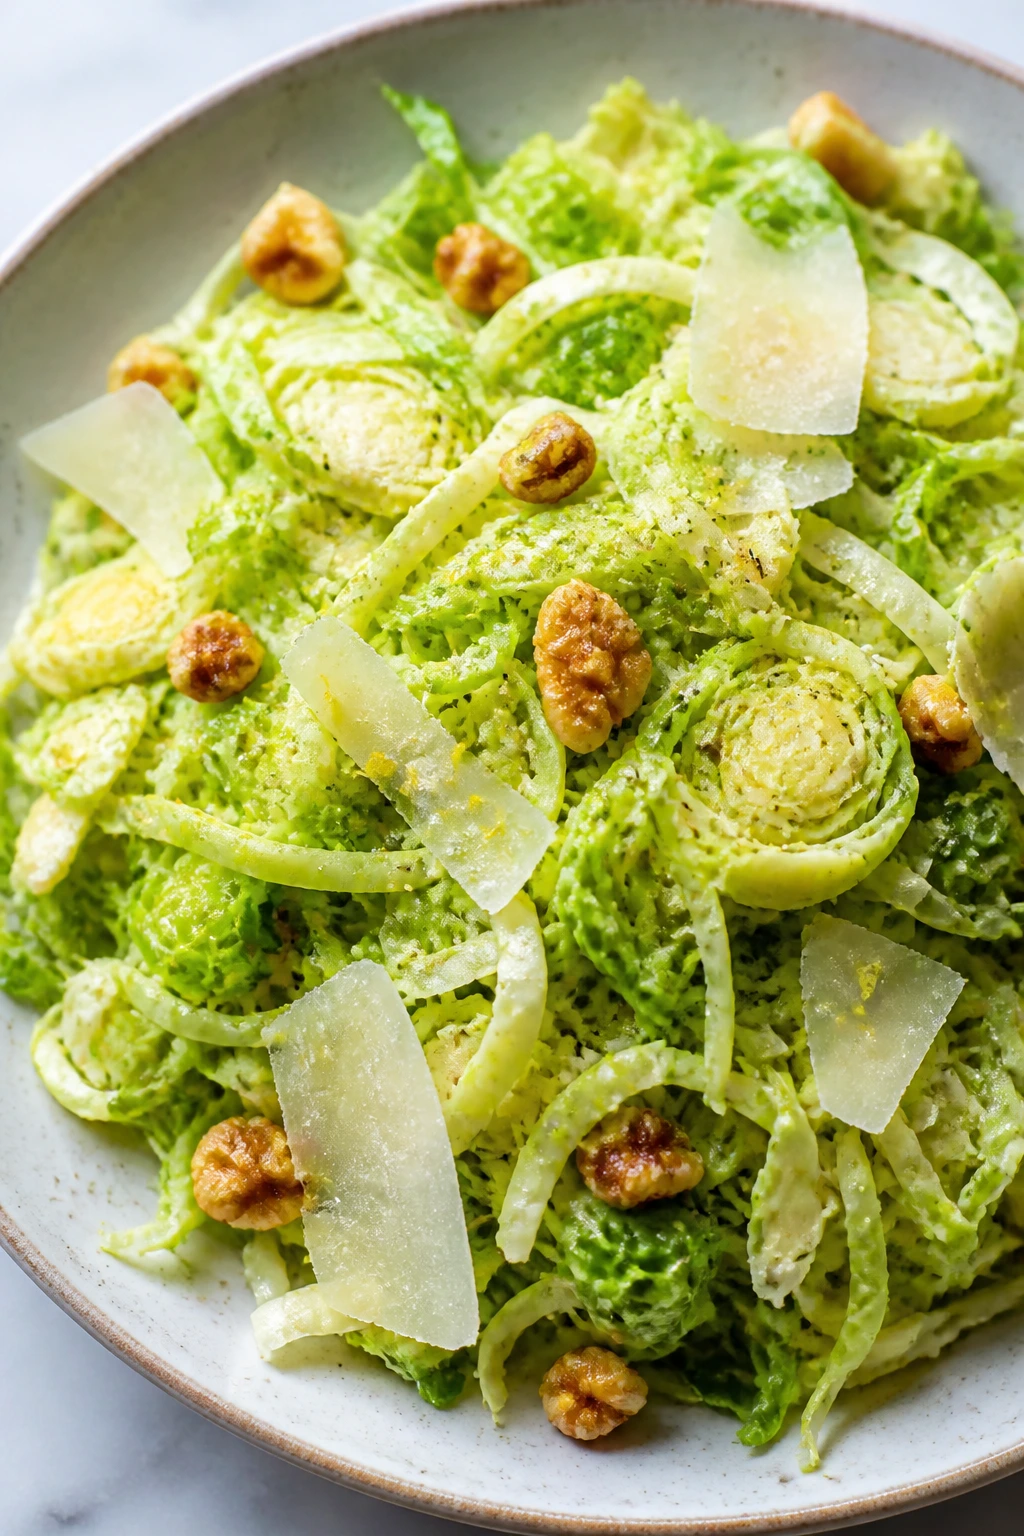
10. Shaved Brussels Sprout Salad with Lemon and Pecorino
Raw Brussels sprouts can be brilliant when they’re shaved thin enough to lose their toughness. The leaves soften under lemon and oil, the Pecorino brings sharp salt, and the walnuts add a clean crunch that keeps the salad from feeling like rabbit food. I like this when dinner needs something crisp and bright beside a richer main.
Why It Works:
Shaving turns Brussels sprouts from dense little cabbages into a salad base that can actually absorb dressing. Lemon juice and Dijon help break down the leaves just enough so the texture becomes tender without going limp. The cheese is sharp, so you don’t need much; it should season the salad, not smother it.
Key Ingredients:
- 1 pound Brussels sprouts, trimmed and shaved thin — use a knife, mandoline, or food processor.
- 2 tablespoons olive oil — the dressing base.
- Juice of 1 lemon — brightens the raw sprouts.
- 1 teaspoon Dijon mustard — helps the dressing hold together.
- 1/4 cup finely grated Pecorino Romano — sharp and salty.
- 1/4 cup toasted walnuts, chopped — for crunch.
- 1/2 teaspoon kosher salt — start light and taste.
- 1/4 teaspoon black pepper — just enough bite.
Quick Steps:
- Whisk olive oil, lemon juice, Dijon, salt, and pepper in a large bowl.
- Add the shaved Brussels sprouts and toss well with your hands or tongs.
- Let them sit for 5 to 10 minutes so the dressing softens the leaves.
- Toss in the Pecorino and walnuts.
- Taste and adjust the salt right before serving.
Equipment for This Recipe:
- Sharp knife or mandoline — the sprouts need to be very thin.
- Large mixing bowl — room is important for tossing.
- Microplane — good for the Pecorino.
How to Serve This Dish:
Serve it with roasted fish, grain bowls, or anything creamy and rich. It also handles warm mains well because the sprouts stay crisp.
Pro Tips for This Recipe:
- Remove any tough outer leaves before shaving.
- If you shave with a mandoline, watch your fingers. This is one of those jobs that deserves patience.
- Add the walnuts at the end so they stay crunchy.
Variations on This Dish:
- Apple Brussels Salad: Add thin apple slices for sweetness and extra crunch.
- Cranberry Brussels Salad: A small handful of dried cranberries works well with the lemon.
- Shaved Fennel Swap: Replace half the sprouts with shaved fennel for a lighter anise note.
Common Mistakes to Avoid with This Dish:
- Shaving too thick: The sprouts stay leathery instead of tender.
- Dressing too early and walking away: They soften best with a short rest, not a long soak.
- Using too much cheese: The salad turns salty and loses its clean finish.
11. Garlic Butter Mushrooms and Spinach
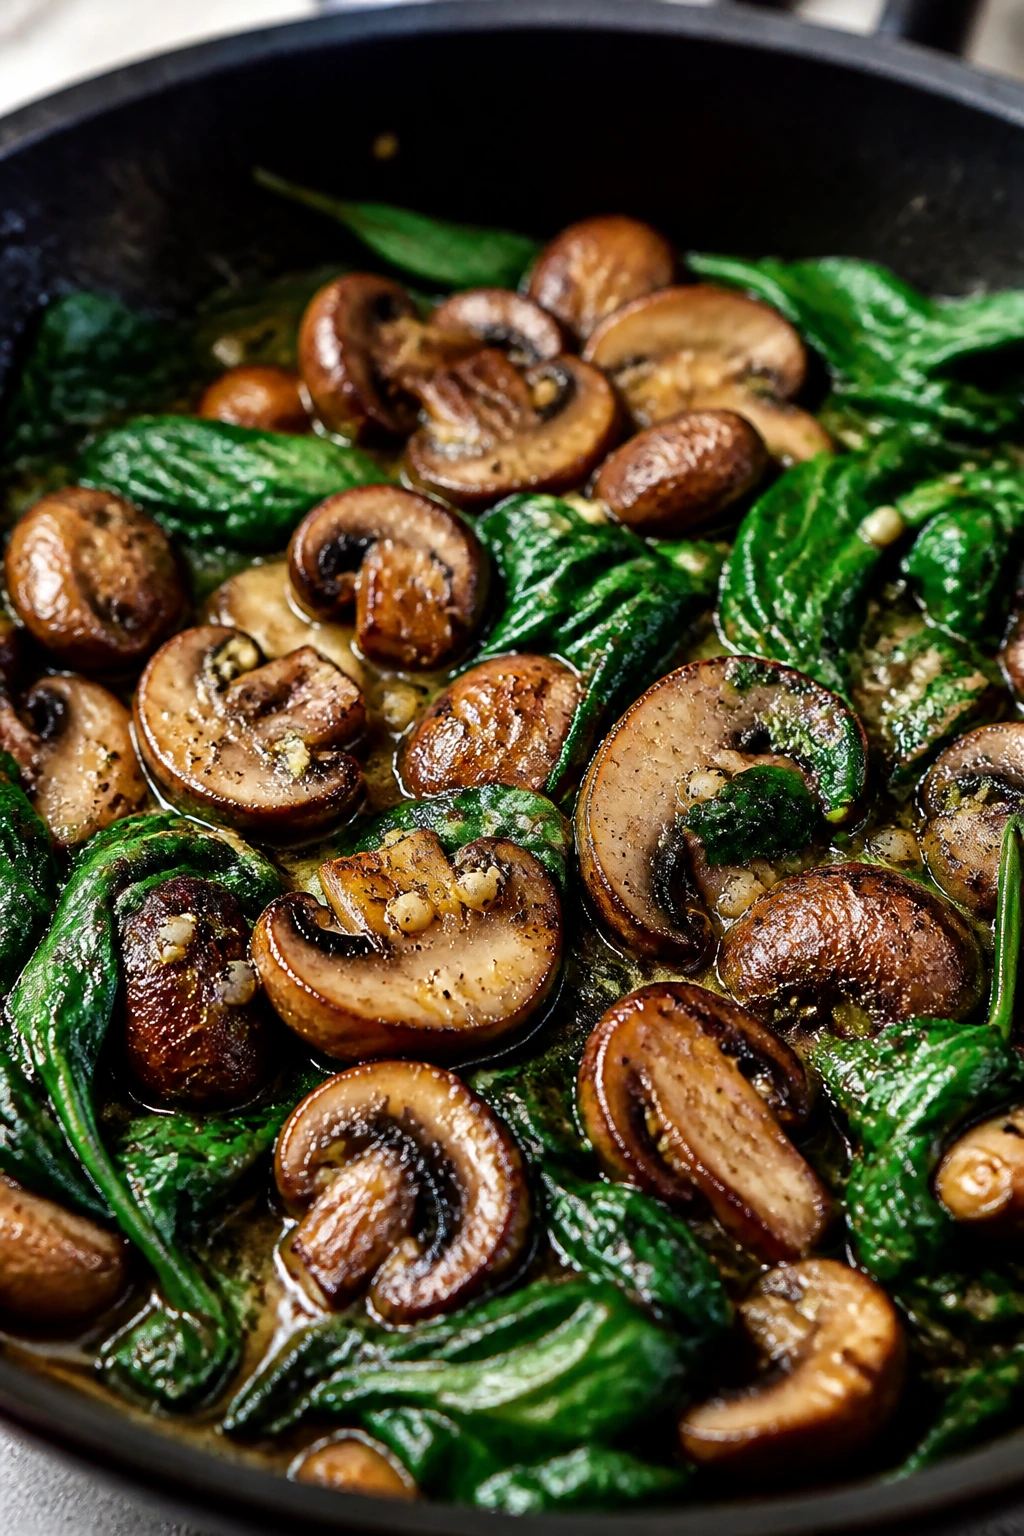
Mushrooms and spinach are a natural pair, but they only work when the mushrooms get a proper sear before the spinach goes in. Otherwise, you get a watery skillet and a dull finish. Done right, the mushrooms taste meaty, the spinach goes silky, and the garlic butter clings to everything in the pan.
Why It Works:
Cremini mushrooms have enough structure to brown instead of collapsing if the pan is hot and the salt comes later. Spinach wilts in seconds, so it should go in only after the mushrooms are nearly done. A splash of lemon or balsamic keeps the butter from tasting flat.
Key Ingredients:
- 1 pound cremini mushrooms, sliced — choose firm caps with dry surfaces.
- 5 ounces baby spinach — washed and well dried.
- 1 tablespoon olive oil — helps the mushrooms sear.
- 1 tablespoon butter — gives the sauce body.
- 3 cloves garlic, minced — add after the mushrooms brown.
- 1 teaspoon fresh thyme leaves — or 1/2 teaspoon dried.
- 1/2 teaspoon kosher salt — add toward the end.
- 1/4 teaspoon black pepper — for balance.
- 1 teaspoon lemon juice or balsamic vinegar — a bright finish.
Quick Steps:
- Heat olive oil in a large skillet over medium-high heat.
- Add the mushrooms in a single layer and cook for 6 to 8 minutes, stirring only once or twice, until they release moisture and then brown.
- Add butter, garlic, and thyme, and cook for 30 seconds until fragrant.
- Stir in the spinach and cook just until wilted.
- Season with salt, pepper, and lemon juice or balsamic, then serve.
Equipment for This Recipe:
- Large skillet — wide enough for the mushrooms to brown.
- Paper towels or salad spinner — useful for drying the spinach.
- Wooden spoon — for stirring without smashing the mushrooms.
How to Serve This Dish:
It works well with steak, lentils, or roasted potatoes. Spoon the pan juices over the top; that’s where the flavor sits.
Pro Tips for This Recipe:
- Don’t salt the mushrooms early. Salt pulls out moisture too soon.
- If the pan looks crowded, cook the mushrooms in two batches.
- A pinch of chili flakes wakes up the butter without changing the dish much.
Variations on This Dish:
- Creamy Mushroom Spinach: Stir in 2 tablespoons Greek yogurt off the heat.
- Miso Mushroom Spinach: Add 1 teaspoon white miso with the butter.
- Herb Garden Version: Use parsley, tarragon, and chives instead of thyme.
Common Mistakes to Avoid with This Dish:
- Starting with a cold pan: The mushrooms sweat instead of browning.
- Adding spinach too soon: It turns into a watery layer under the mushrooms.
- Over-salting at the end: The pan juices can get salty fast, especially if you add vinegar.
12. Lemon-Dill Asparagus
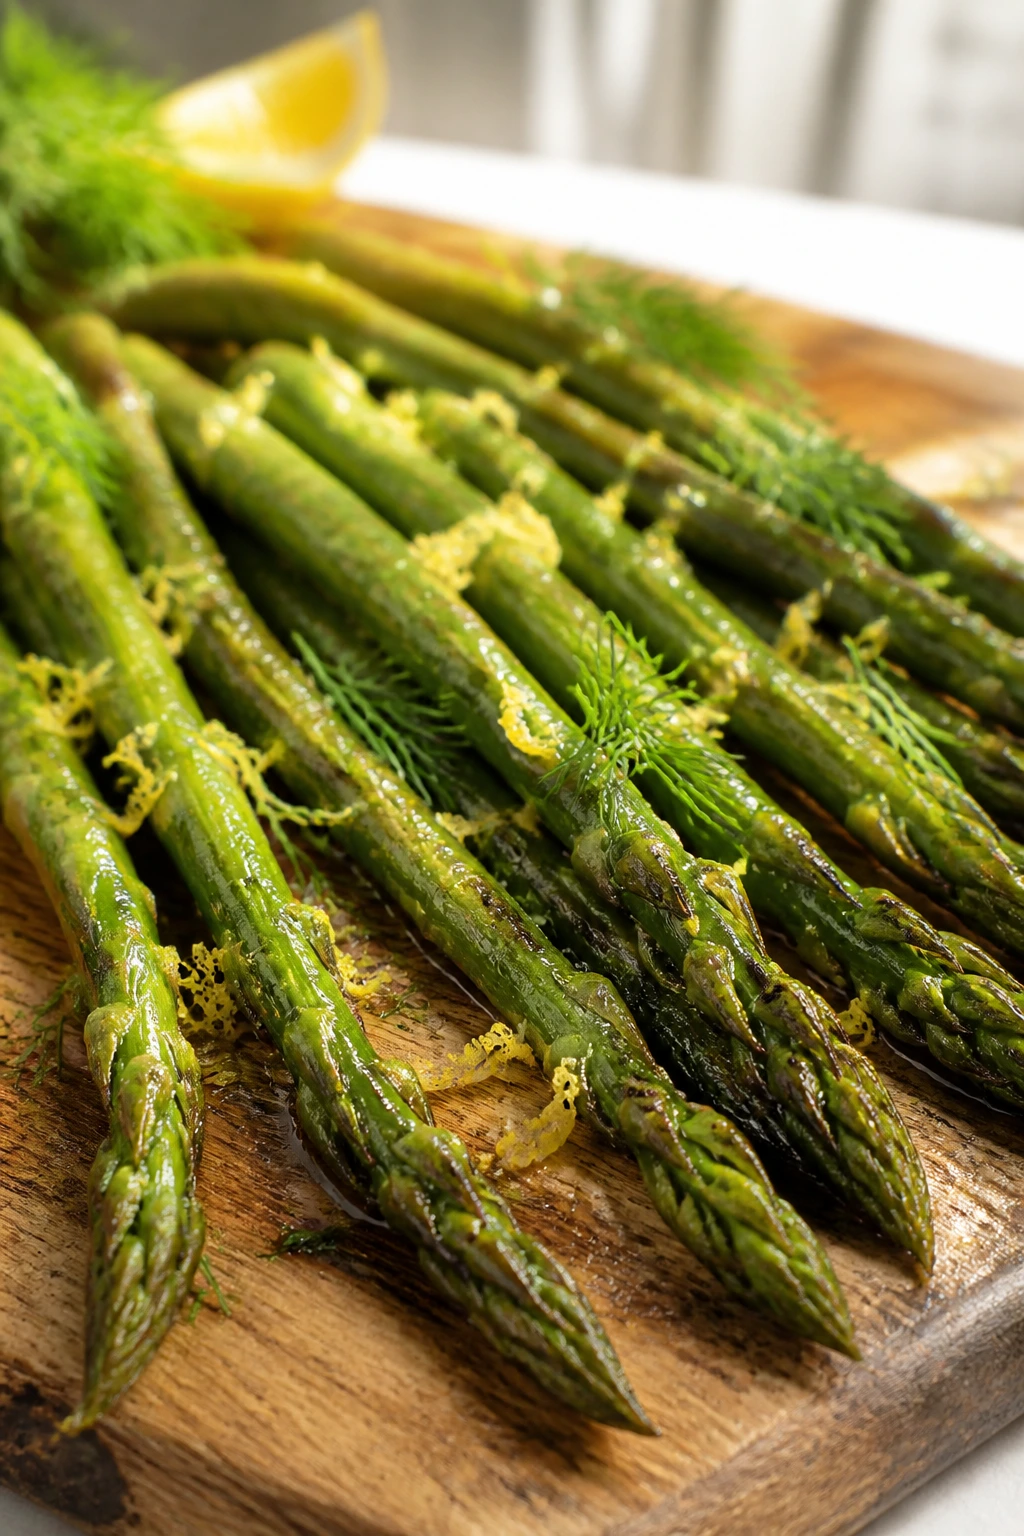
Asparagus doesn’t need much, which is exactly why it’s so easy to get wrong. A quick roast or sauté keeps the stalks tender with a little snap, and lemon plus dill give them a clean, green finish. I reach for this one when the plate needs something slim, bright, and fast.
Why It Works:
Asparagus cooks quickly because the stalks are slender and full of water. That means high heat and a short cooking window are your friends. Lemon zest at the end gives more aroma than juice alone, and dill keeps the flavor fresh rather than heavy.
Key Ingredients:
- 1 1/2 pounds asparagus, woody ends trimmed — medium stalks are easiest to cook evenly.
- 1 tablespoon olive oil — enough for a light coat.
- 1/2 teaspoon kosher salt — helps the spears taste green and sweet.
- 1/4 teaspoon black pepper — keeps the flavor from fading.
- Zest of 1 lemon — bright, fragrant finish.
- 1 tablespoon lemon juice — add after cooking.
- 1 tablespoon chopped dill — fresh is best here.
- 1 tablespoon shaved Parmesan, optional — if you want a little richness.
Quick Steps:
- Heat the oven to 425°F or a skillet over medium-high heat.
- Toss the asparagus with olive oil, salt, and pepper.
- Roast for 10 to 12 minutes, or sauté for 4 to 6 minutes, until the stalks are tender but still hold their shape.
- Finish with lemon zest, lemon juice, dill, and Parmesan if using.
- Serve immediately.
Equipment for This Recipe:
- Sheet pan or skillet — either method works.
- Vegetable peeler — useful for thick asparagus stems.
- Microplane — for the lemon zest.
How to Serve This Dish:
Serve it with eggs, fish, or a simple roast. The long spears look especially good laid across the plate rather than piled up.
Pro Tips for This Recipe:
- Bend one spear to find the natural breaking point, then trim the rest to match.
- Thick asparagus benefits from a quick peel on the lower third of the stalk.
- Pull it the second it turns bright and tender; overcooked asparagus gets stringy fast.
Variations on This Dish:
- Garlic Asparagus: Add sliced garlic during the last minute of cooking.
- Pistachio Asparagus: Finish with chopped pistachios instead of Parmesan.
- Balsamic Asparagus: Swap lemon juice for a light drizzle of balsamic glaze.
Common Mistakes to Avoid with This Dish:
- Leaving the woody ends on: They stay tough no matter how long you cook them.
- Cooking until limp: Asparagus should still have a little snap.
- Using too much lemon juice early: It can mute the fresh flavor.
13. Tahini-Roasted Eggplant
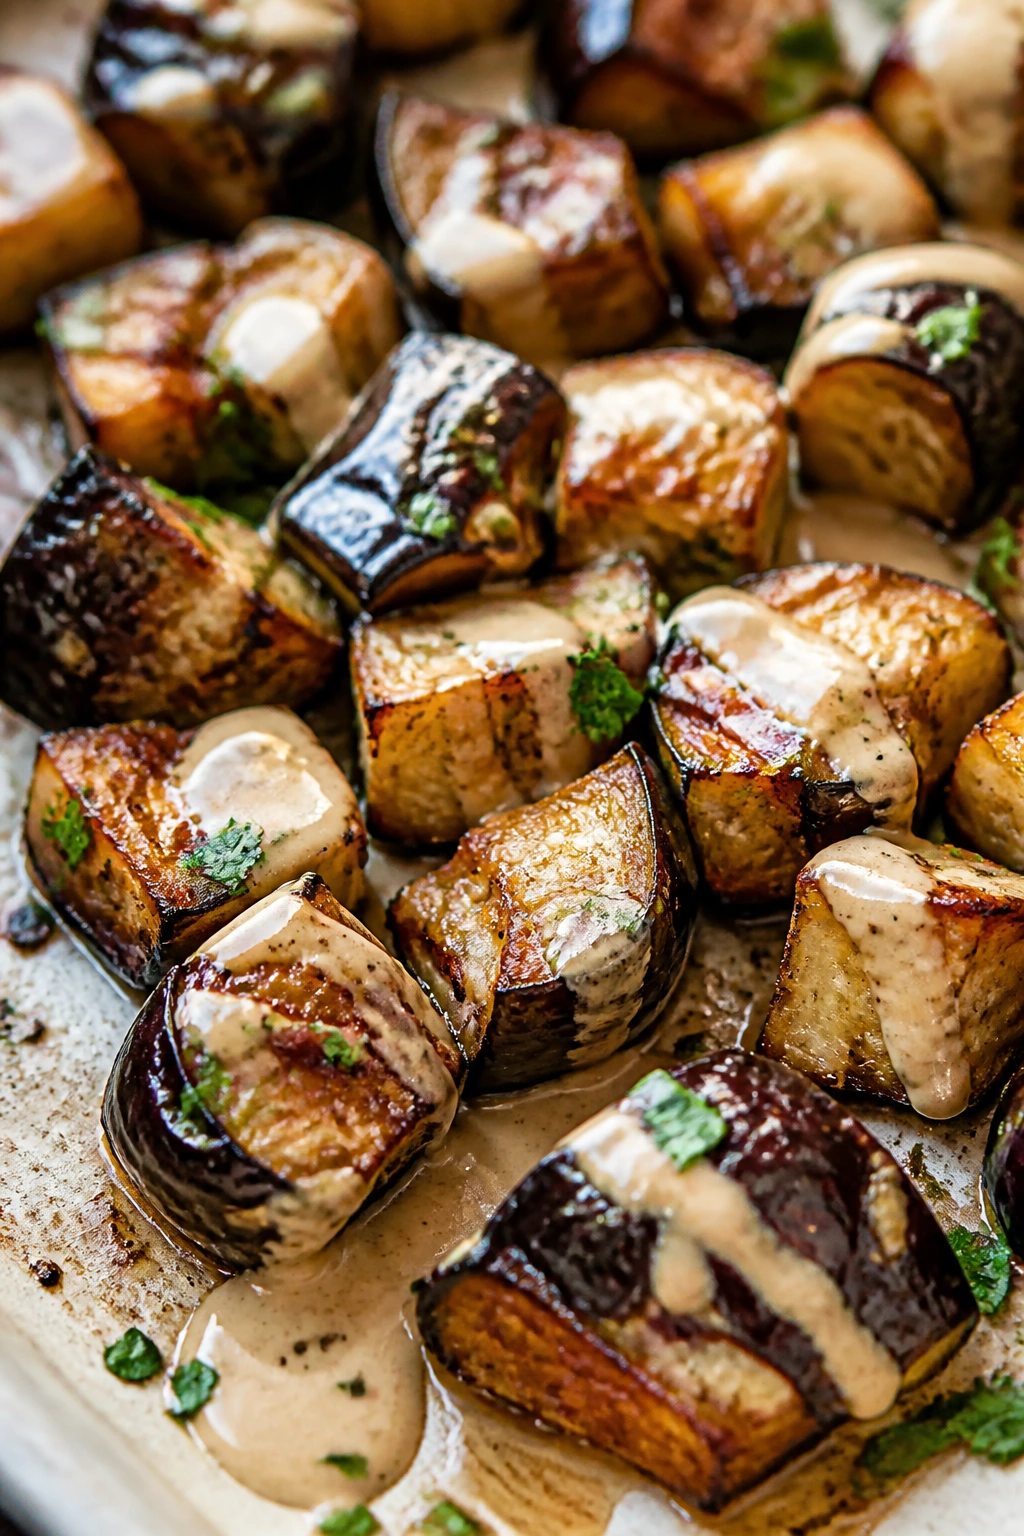
Eggplant gets a bad reputation because people either undercook it or drown it in oil. Roasted at the right temperature, though, it turns soft and silky inside with bronzed edges outside. Tahini adds a nutty, slightly bitter finish that keeps the whole dish grounded instead of greasy.
Why It Works:
Eggplant is a sponge, so the oil amount matters. Too little and it dries out; too much and it turns slick. Roasting on a hot tray lets the cubes soften and brown before they collapse, and the tahini sauce gives the final dish a creamy, savory coat without using dairy.
Key Ingredients:
- 2 medium eggplants, cut into 1-inch cubes — keep the pieces even.
- 3 tablespoons olive oil — enough for roasting without soaking.
- 1 teaspoon kosher salt — draws out the moisture.
- 1/2 teaspoon ground cumin — gives the eggplant warmth.
- 2 tablespoons tahini — for the sauce.
- 1 tablespoon lemon juice — cuts the richness.
- 1 clove garlic, finely grated — a little goes far.
- 2 tablespoons chopped parsley — for freshness.
- 1 tablespoon water, as needed — to thin the tahini sauce.
Quick Steps:
- Heat the oven to 425°F.
- Toss the eggplant with olive oil, salt, and cumin.
- Spread on a sheet pan and roast for 25 to 30 minutes, turning once, until browned and soft.
- Whisk tahini, lemon juice, garlic, and enough water to make a spoonable sauce.
- Spoon the sauce over the hot eggplant and finish with parsley.
Equipment for This Recipe:
- Sheet pan — needed for good browning.
- Small bowl and whisk — for the tahini sauce.
- Sharp knife — eggplant cubes need to be uniform.
How to Serve This Dish:
It’s good beside grilled chicken, lentils, or rice with cucumbers. A little extra parsley on top keeps the plate from feeling heavy.
Pro Tips for This Recipe:
- Use eggplants that feel firm and light for their size.
- Don’t peel unless the skin is very thick; it helps the cubes hold shape.
- If the tahini seizes, whisk in water a teaspoon at a time until smooth again.
Variations on This Dish:
- Harissa Eggplant: Add a small spoonful of harissa to the tahini sauce.
- Pomegranate Eggplant: Scatter pomegranate seeds on top for a sweet-tart pop.
- Garlic Herb Eggplant: Swap cumin for oregano and thyme.
Common Mistakes to Avoid with This Dish:
- Using too much oil: Eggplant turns heavy and slick.
- Skipping the turning step: One side browns while the other steams.
- Putting sauce on before roasting: The eggplant won’t caramelize properly.
14. Ratatouille-Style Roasted Vegetables
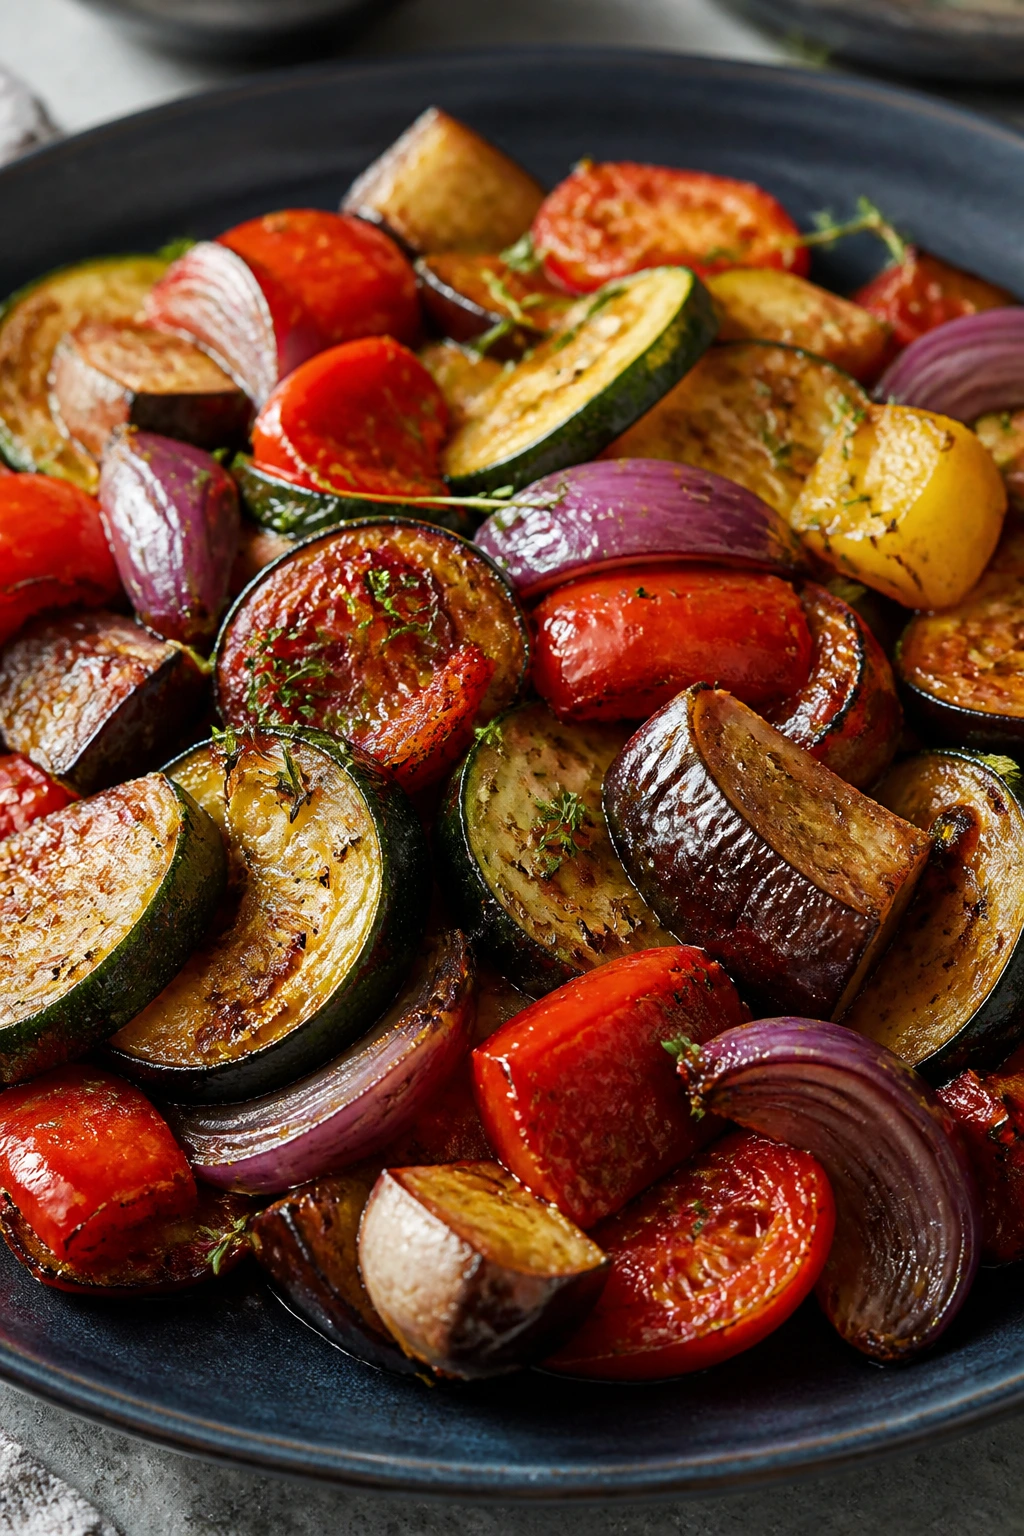
This is the kind of vegetable side that quietly does a lot. Zucchini, eggplant, peppers, onions, and tomatoes roast down into something sweet, soft, and deeply savory without needing a long simmer on the stove. It’s less fussy than classic ratatouille and a lot easier to fit into a weeknight dinner.
Why It Works:
Each vegetable brings a different moisture level, which matters. Eggplant needs time, peppers soften fast, tomatoes break down and make a little sauce, and onions sweeten as they roast. The trick is cutting everything into similar sizes and giving them enough space to brown instead of stew.
Key Ingredients:
- 1 zucchini, sliced into half-moons — about 1/2 inch thick.
- 1 yellow squash, sliced the same way — keeps the mix balanced.
- 1 medium eggplant, cubed — 1-inch pieces hold up well.
- 1 red bell pepper, chopped — sweet and sturdy.
- 1 red onion, cut into wedges — adds sweetness.
- 3 medium tomatoes, cut into chunks — they create the saucy part.
- 3 tablespoons olive oil — enough to coat everything lightly.
- 3 cloves garlic, minced — add before roasting.
- 1 teaspoon dried thyme — or a mix of thyme and oregano.
- 1 teaspoon kosher salt and 1/2 teaspoon black pepper — seasoning matters here.
- 2 tablespoons chopped basil — finish fresh.
Quick Steps:
- Heat the oven to 425°F.
- Toss all the vegetables with olive oil, garlic, thyme, salt, and pepper.
- Spread them across a large sheet pan or roasting dish in an even layer.
- Roast for 30 to 35 minutes, stirring once halfway through, until the vegetables are soft at the edges and browned in spots.
- Finish with basil and serve warm.
Equipment for This Recipe:
- Large sheet pan or roasting dish — you need room.
- Big mixing bowl — this is a lot of vegetables.
- Spatula — useful for one gentle stir halfway through.
How to Serve This Dish:
Spoon it beside grilled fish, polenta, or beans. It also works tucked over crusty bread with a fried egg.
Pro Tips for This Recipe:
- Keep the tomatoes in bigger chunks so they don’t vanish too soon.
- If the pan looks crowded, split it across two pans; that’s the difference between roasting and softening.
- A splash of red wine vinegar at the end makes the vegetables taste more alive.
Variations on This Dish:
- Olive Tapenade Ratatouille: Add chopped olives after roasting.
- Herbed Goat Cheese Ratatouille: Crumble a little cheese over the hot vegetables.
- Spicy Ratatouille: Add chili flakes and smoked paprika with the thyme.
Common Mistakes to Avoid with This Dish:
- Chopping everything too small: The vegetables disappear into mush.
- Crowding the pan: You lose the roasted edges that make the dish worth making.
- Forgetting the salt: The vegetables taste flat without it.
15. Corn and Tomato Sauté with Basil
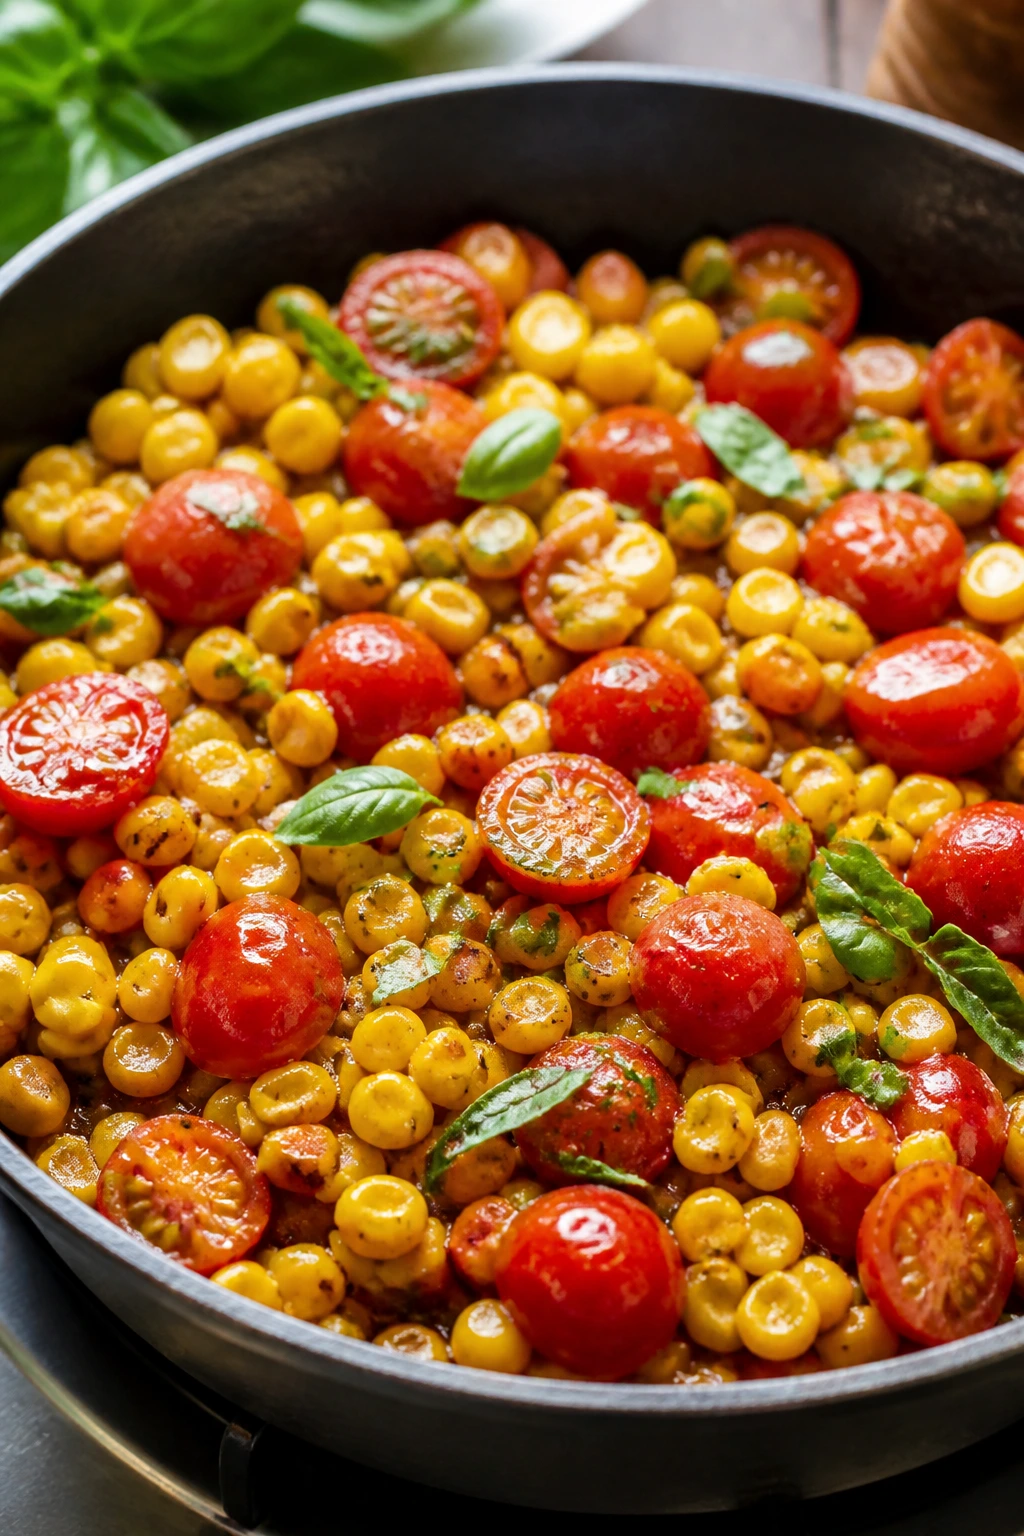
Corn and tomatoes taste like they were made to share a skillet. The corn brings sweetness and a little chew, the tomatoes collapse into a light sauce, and basil keeps the whole pan smelling like summer without making it fussy. This is the kind of side that turns into lunch leftovers if you’re lucky.
Why It Works:
Corn kernels like a hot pan, but they don’t need long cooking. Tomatoes break down quickly and give you just enough moisture to glaze the corn without drowning it. A tiny splash of vinegar at the end keeps the sweetness from taking over.
Key Ingredients:
- 3 ears corn, kernels cut off, or 3 cups frozen corn — thaw frozen corn first.
- 2 cups cherry tomatoes, halved — they break down at the right pace.
- 1 tablespoon olive oil — starts the sauté.
- 1 tablespoon butter, optional — adds richness if you want it.
- 2 cloves garlic, minced — gives the pan a savory base.
- 1/2 teaspoon kosher salt — helps the tomatoes release their juices.
- 1/4 teaspoon black pepper — for balance.
- 2 tablespoons chopped basil — fresh and non-negotiable here.
- 1 teaspoon red wine vinegar or lemon juice — bright finish.
Quick Steps:
- Heat olive oil, and butter if using, in a skillet over medium-high heat.
- Add the corn and cook for 3 to 4 minutes until it starts to pick up color.
- Stir in garlic and tomatoes and cook another 3 to 5 minutes until the tomatoes soften and release juices.
- Season with salt and pepper, then finish with basil and vinegar.
- Serve warm, not piping hot.
Equipment for This Recipe:
- Large skillet — wide surface helps the corn brown.
- Sharp knife — useful for cutting kernels from the cob.
- Wooden spoon — for gentle stirring.
How to Serve This Dish:
Serve it with grilled chicken, black beans, or a bowl of grains. A spoonful over toasted bread with ricotta is hard to argue with.
Pro Tips for This Recipe:
- If using frozen corn, dry it on a towel before it hits the pan.
- Don’t overcook the tomatoes or they’ll disappear completely. A little shape is nice.
- Add basil off the heat so it stays fragrant.
Variations on This Dish:
- Feta Corn Salad: Toss in crumbled feta right before serving.
- Chili Corn Skillet: Add jalapeño or red pepper flakes with the garlic.
- Lime Corn Medley: Swap vinegar for lime juice and add cilantro.
Common Mistakes to Avoid with This Dish:
- Using wet corn: It steams instead of browns.
- Cooking the basil too long: The flavor fades fast.
- Turning it into soup: Keep the heat high enough to reduce the tomato juices a bit.
16. Crispy Cabbage Wedges with Dijon
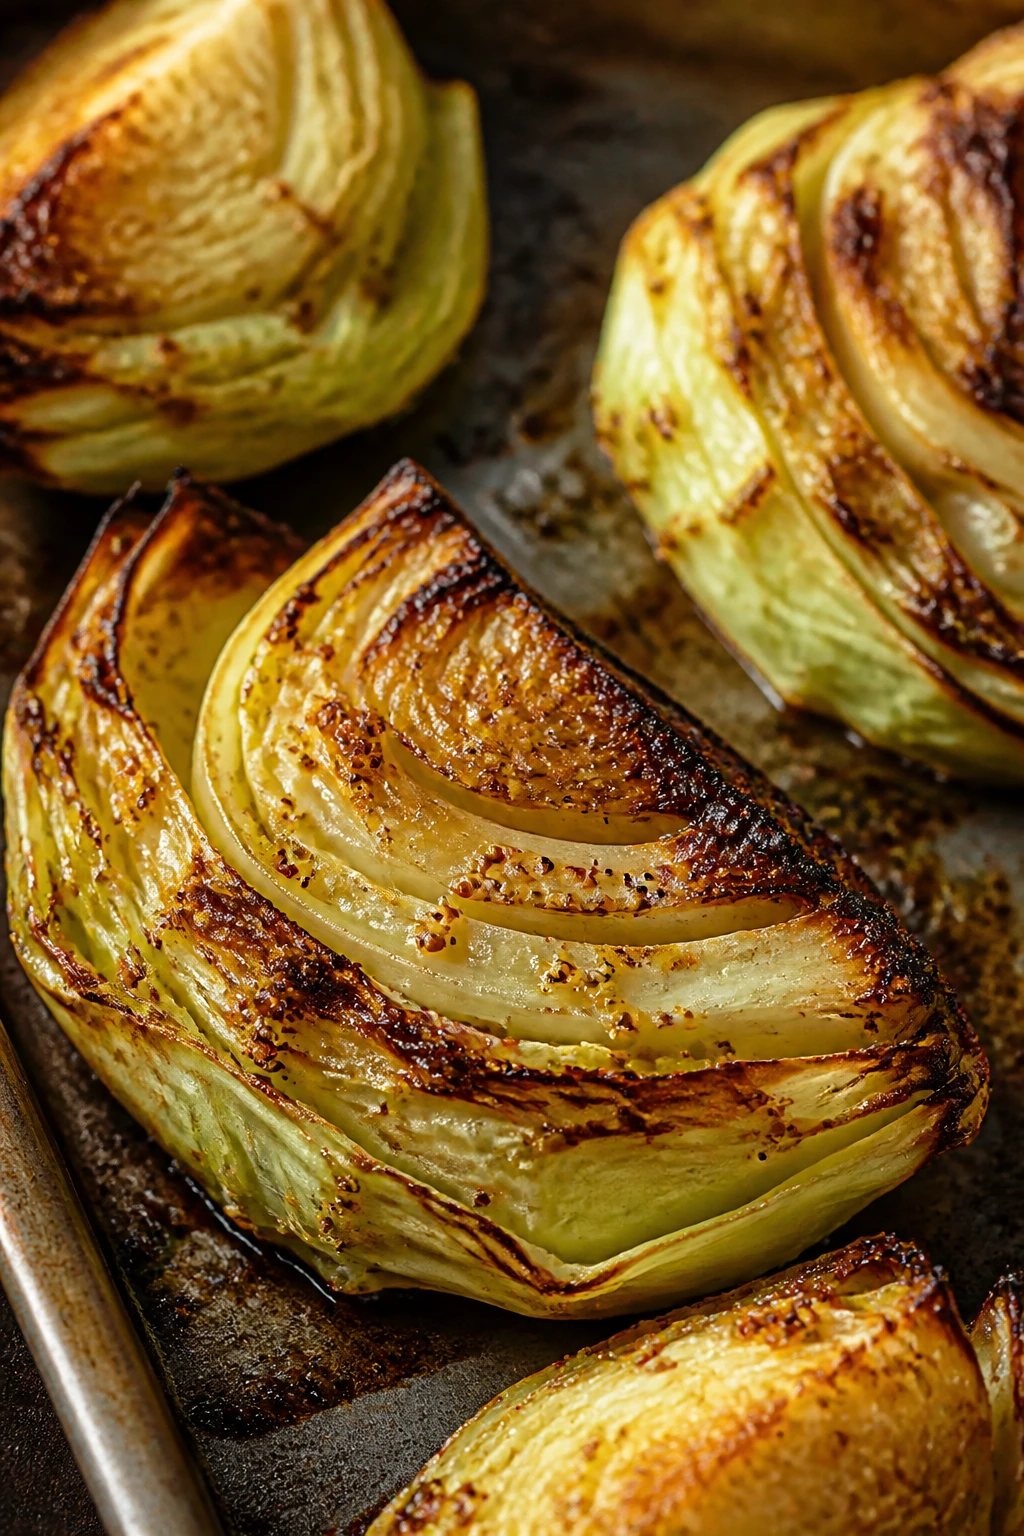
Cabbage gets overlooked because people mostly meet it in slaw or soup. Roast it into wedges, though, and it changes personality. The outer leaves get crisp and dark, the center turns tender, and the Dijon gives the whole thing a sharp, savory shell that tastes much bigger than the ingredient list looks.
Why It Works:
Cabbage has layers, and those layers catch heat differently. Roasting wedges keeps the core intact while the outer leaves turn almost crackly. Dijon mixed with oil helps the cabbage brown while adding a mustard bite that stands up well to richer mains.
Key Ingredients:
- 1 medium green cabbage, cut into 6 wedges — leave enough core so the wedges hold together.
- 2 tablespoons olive oil — for brushing and roasting.
- 1 tablespoon Dijon mustard — the flavor anchor.
- 1 teaspoon garlic powder — easy and even.
- 1 teaspoon kosher salt — needed to bring out the sweetness.
- 1/2 teaspoon black pepper — for the edges.
- 1 tablespoon apple cider vinegar — finish with a little sharpness.
- 1 tablespoon chopped parsley — optional, but nice.
Quick Steps:
- Heat the oven to 425°F.
- Whisk olive oil, Dijon, garlic powder, salt, and pepper together.
- Brush the wedges on all sides and place them cut side down on a lined sheet pan.
- Roast for 25 to 30 minutes, flipping once, until the edges are browned and the centers are tender.
- Finish with apple cider vinegar and parsley.
Equipment for This Recipe:
- Sheet pan — gives the wedges room.
- Pastry brush or spoon — useful for coating the cabbage.
- Sharp chef’s knife — for clean wedges.
How to Serve This Dish:
Serve it with sausages, roast chicken, or lentils. The browned leaves make the cabbage look almost charred in a good way.
Pro Tips for This Recipe:
- Keep a bit of core attached to each wedge so it doesn’t fall apart.
- If the mustard mix seems too thick, loosen it with 1 teaspoon water.
- Add a sprinkle of flaky salt right before serving if you like a crisper edge.
Variations on This Dish:
- Caraway Cabbage: Add 1/2 teaspoon caraway seeds to the mustard mixture.
- Garlic-Parmesan Cabbage: Finish with grated Parmesan in the last 5 minutes.
- Spicy Cabbage: Add cayenne or chili flakes to the mustard glaze.
Common Mistakes to Avoid with This Dish:
- Removing too much core: The wedges fall apart in the oven.
- Skipping the flip: One side browns while the other stays pale.
- Adding vinegar too early: It’s better as a finish than a roast-time ingredient.
17. Braised Red Cabbage with Apple Cider Vinegar
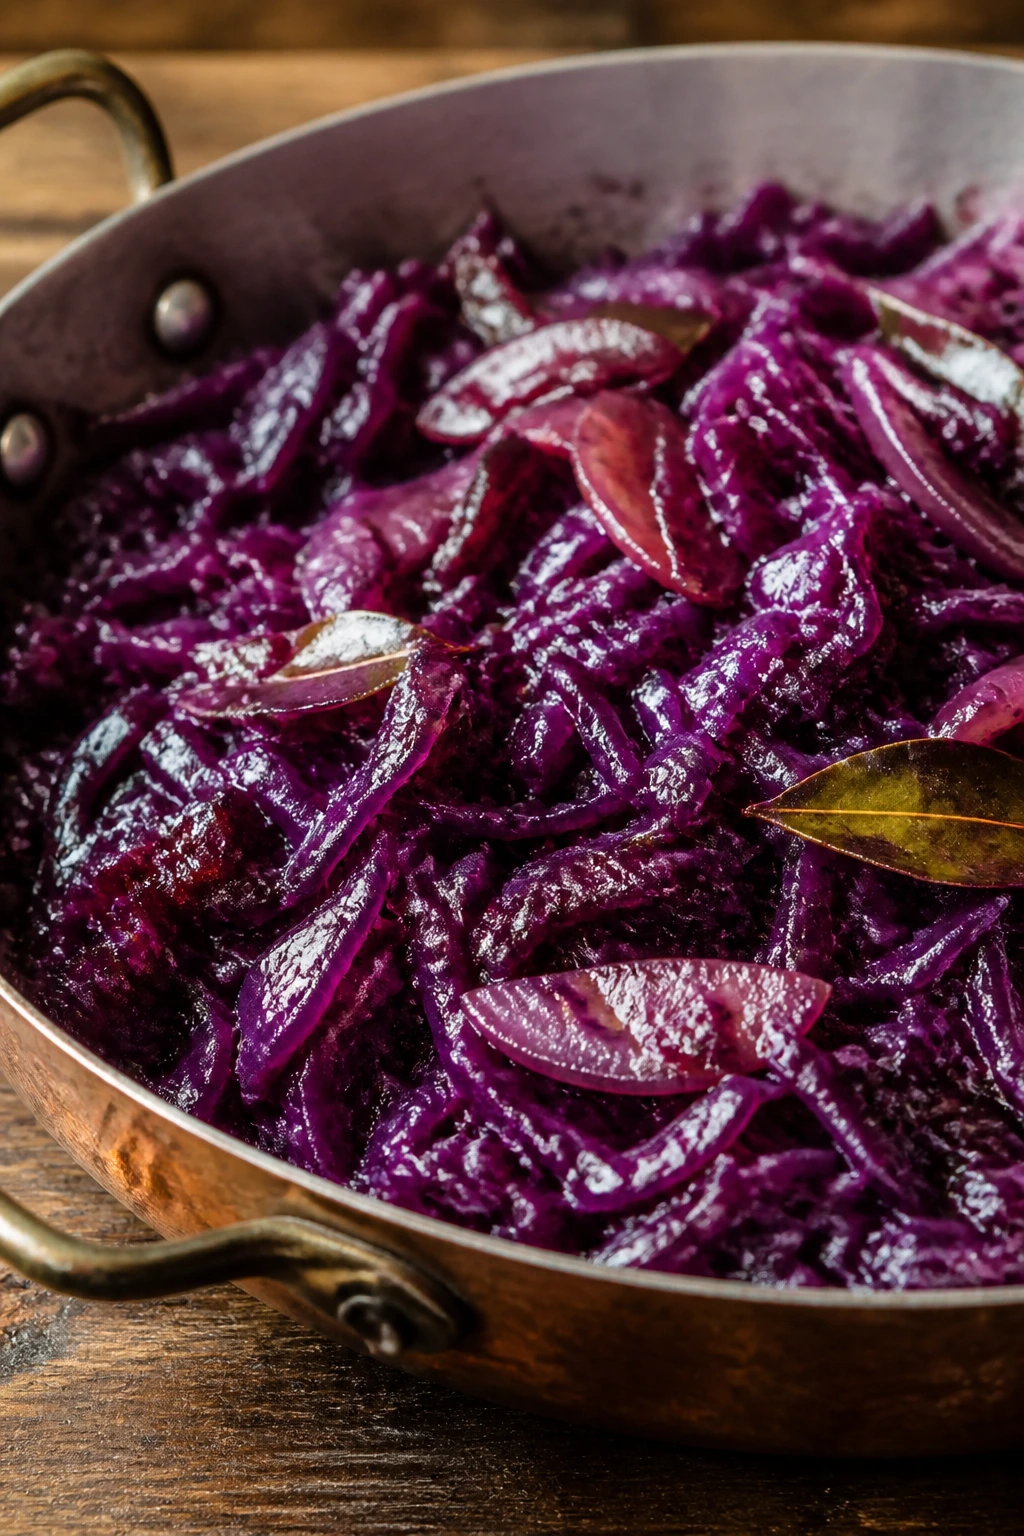
This is the softer, deeper cousin of roasted cabbage. Red cabbage turns jewel-toned when it braises, and the apple cider vinegar keeps it from getting sweet in a tired, one-note way. I like it with pork, beans, or anything that needs a sharp, tangy side on the plate.
Why It Works:
Red cabbage holds color well during slow cooking, which makes it a reliable braise. A sliced apple melts into the pot and adds body without making the dish taste like dessert. Vinegar at the beginning and a little salt at the end keep the flavor clean.
Key Ingredients:
- 1 medium red cabbage, cored and thinly sliced — thin strands cook evenly.
- 1 apple, thinly sliced — a firm tart variety works best.
- 1 small onion, sliced — adds sweetness.
- 1 tablespoon olive oil — for the pot.
- 1/4 cup apple cider vinegar — the sharp, bright base.
- 1/2 cup water or vegetable broth — enough liquid to braise without flooding.
- 1 tablespoon brown sugar, optional — if you want a rounder finish.
- 1 teaspoon kosher salt — more after cooking, if needed.
- 1/2 teaspoon caraway seeds, optional — a classic flavor with cabbage.
- 1/4 teaspoon black pepper — for balance.
Quick Steps:
- Warm the olive oil in a Dutch oven over medium heat.
- Add onion and apple and cook for 3 minutes, until the onion softens.
- Stir in cabbage, vinegar, water or broth, salt, pepper, and caraway if using.
- Cover and simmer on low for 25 to 30 minutes, stirring once or twice, until the cabbage is tender but still has shape.
- Taste and adjust salt or vinegar before serving.
Equipment for This Recipe:
- Dutch oven or heavy pot — helps the braise cook evenly.
- Sharp knife — for thin, even cabbage slices.
- Wooden spoon — for occasional stirring.
How to Serve This Dish:
Serve it with roasted meats, sausages, or baked beans. It also gives a bean-and-grain plate more punch than plain greens.
Pro Tips for This Recipe:
- Slice the cabbage thinly so it softens evenly.
- If the pot looks dry during cooking, add another splash of water.
- Let it sit for 10 minutes before serving; the flavor settles a bit as it rests.
Variations on This Dish:
- Apple-Only Braise: Skip the sugar and let the apple do the sweetening.
- Spiced Cabbage: Add cloves and a cinnamon stick for a warmer profile.
- Mustard Cabbage: Stir in 1 teaspoon Dijon at the end for a sharper taste.
Common Mistakes to Avoid with This Dish:
- Using too much liquid: You want a braise, not soup.
- Cooking over high heat the whole time: The cabbage will scorch before it softens.
- Forgetting to taste at the end: Vinegar and salt usually need a final tweak.
18. Pea and Mint Salad with Feta
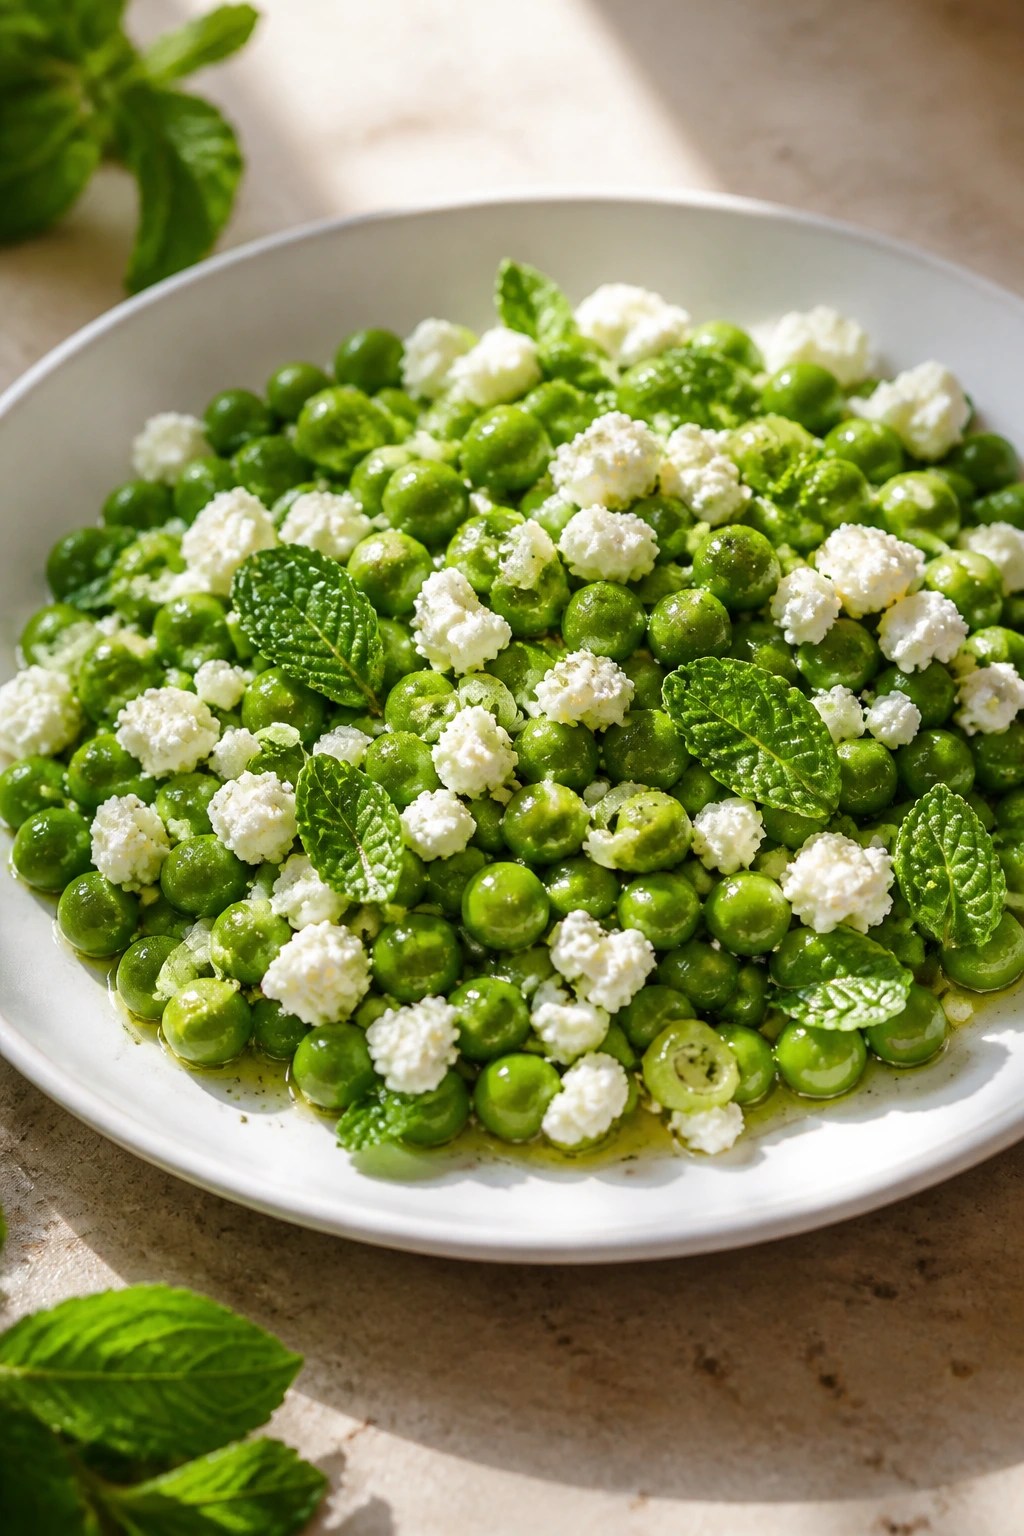
Frozen peas are one of the easiest vegetables to keep around, and they can be far better than their reputation suggests. Thawed properly, they stay sweet and green, and mint gives them a cool, bright lift. Feta brings the salt, which means the salad tastes complete without needing much else.
Why It Works:
Peas don’t want much cooking. They need thawing, not boiling, so they keep their pop and don’t turn starchy. Mint and lemon make the sweetness taste fresh, while feta makes the salad more than a side of cold vegetables. A little scallion adds a mild bite that keeps it from going flat.
Key Ingredients:
- 4 cups frozen peas, thawed — no need to cook them unless they’re very firm.
- 1 tablespoon olive oil — gives the dressing some body.
- Juice of 1 lemon — brightens the peas.
- 1/4 cup chopped fresh mint — the main herb.
- 1/4 cup crumbled feta — salty and creamy.
- 2 tablespoons thinly sliced scallions — for sharpness.
- 1/2 teaspoon kosher salt — use lightly since feta is salty.
- 1/4 teaspoon black pepper — a small amount is enough.
- 1 tablespoon chopped cucumber, optional — for extra crunch.
Quick Steps:
- Thaw the peas under cool water or at room temperature until no longer icy.
- Whisk olive oil, lemon juice, salt, and pepper in a bowl.
- Toss the peas with scallions and cucumber if using.
- Add mint and feta just before serving so the herbs stay fresh and the cheese keeps its shape.
- Taste and adjust the lemon.
Equipment for This Recipe:
- Mixing bowl — for tossing everything together.
- Colander — useful for draining thawed peas.
- Sharp knife — for mint and scallions.
How to Serve This Dish:
This is sharp and cool beside grilled lamb, salmon, or grain bowls. It also does well on a buffet because it doesn’t wilt quickly.
Pro Tips for This Recipe:
- Don’t boil frozen peas unless they’re very old and tough.
- Add mint at the last minute so it doesn’t darken.
- If you want more body, add a spoonful of Greek yogurt to the dressing.
Variations on This Dish:
- Herby Pea Salad: Add dill and parsley along with the mint.
- Avocado Pea Salad: Fold in diced avocado right before serving.
- Lemony Pea Salad: Use extra lemon zest and skip the cucumber.
Common Mistakes to Avoid with This Dish:
- Over-thawing the peas until they go mushy: Stop when they’re just no longer icy.
- Salting too early: Feta already brings plenty of salt.
- Mixing too far ahead with mint: The herb loses its fresh color and smell.
19. Roasted Beet and Orange Salad with Pistachios
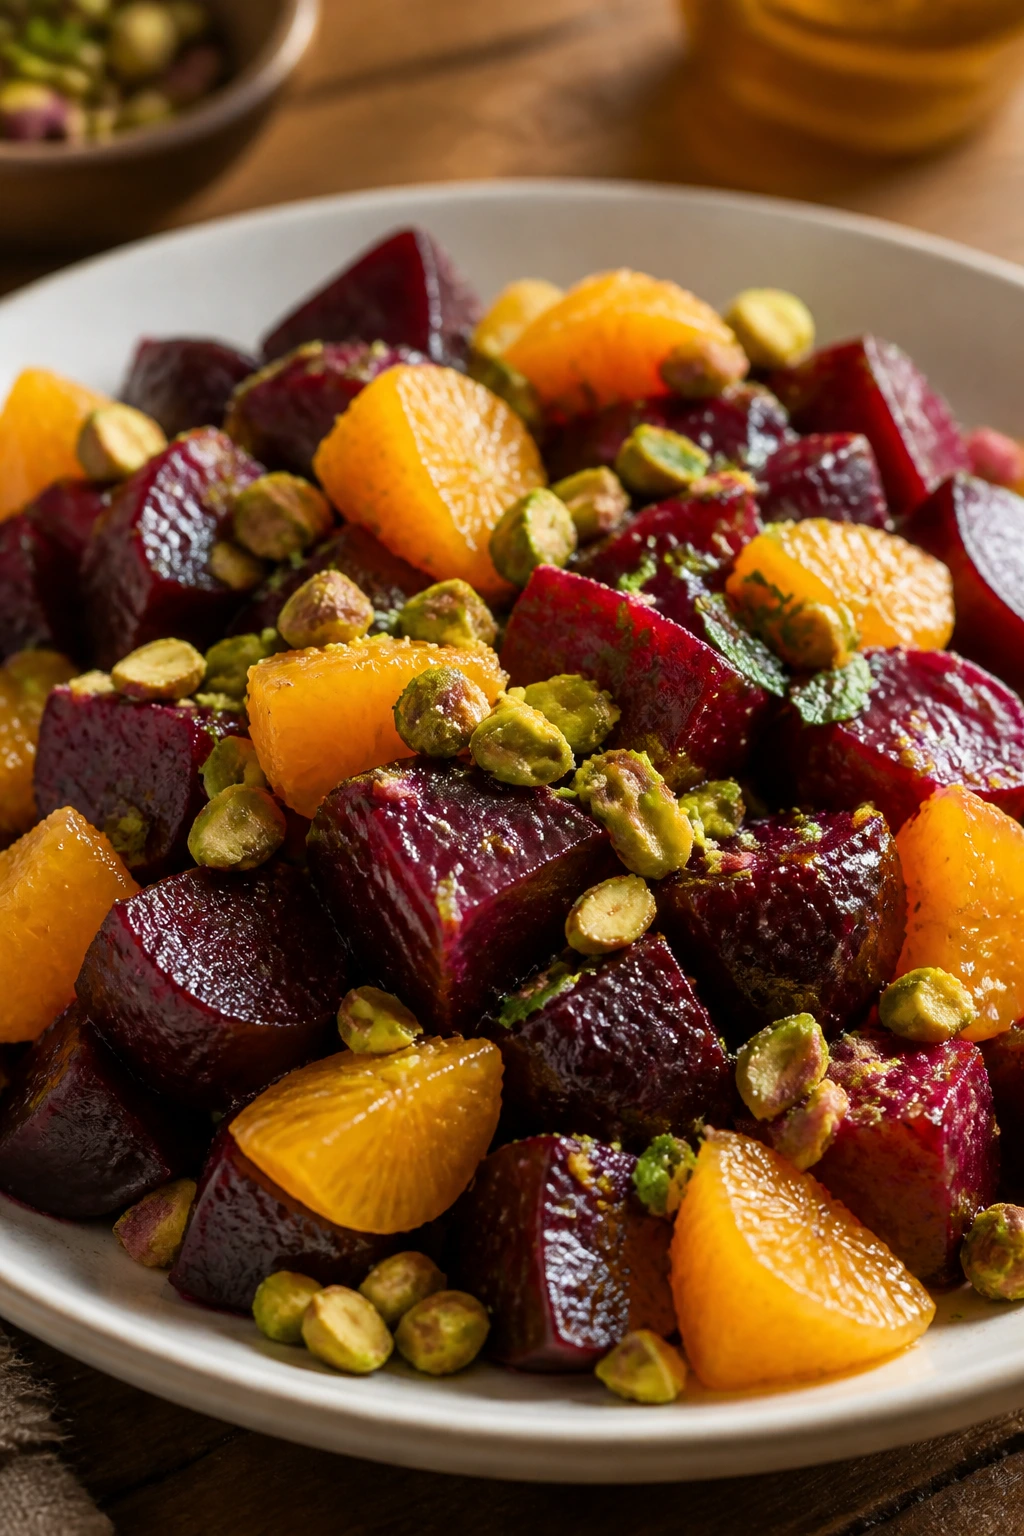
Beets and oranges have that sweet-earthy thing going on that never gets old. Roast the beets until they’re tender, slice the oranges cleanly, and add pistachios for crunch, and you end up with a side that feels bright without being flimsy. I like this one when dinner needs color on the plate.
Why It Works:
Roasting deepens the beet flavor and keeps their juice from making the salad muddy. Oranges cut through the earthiness with acidity and sweetness at once. Pistachios give the salad a savory crunch, and a little goat cheese or arugula can push it either toward rich or peppery.
Key Ingredients:
- 4 medium beets — scrubbed clean, stems trimmed, and kept whole for roasting.
- 2 tablespoons olive oil — for roasting or dressing.
- 2 oranges — peeled and sliced into rounds or supremed.
- 2 tablespoons red wine vinegar — for the dressing.
- 1 teaspoon Dijon mustard — helps the dressing emulsify.
- 1/2 teaspoon kosher salt — split between the beets and dressing.
- 1/4 teaspoon black pepper — light but useful.
- 1/4 cup pistachios, chopped — the crunch element.
- 2 ounces goat cheese, optional — if you want a creamier salad.
- 3 cups arugula, optional — adds peppery bulk.
Quick Steps:
- Roast the beets at 400°F, wrapped in foil or covered, for 45 to 60 minutes until a knife slides in easily.
- Cool, peel, and slice the beets.
- Whisk olive oil, red wine vinegar, Dijon, salt, and pepper into a dressing.
- Arrange the beets and oranges on a platter, then drizzle with dressing.
- Top with pistachios and goat cheese or arugula if using.
Equipment for This Recipe:
- Baking dish or foil-lined sheet pan — for roasting the beets.
- Sharp knife — for clean slicing.
- Small whisk bowl — for the dressing.
How to Serve This Dish:
Serve it with roast chicken, lentils, or salmon. A wide platter shows off the colors better than a deep bowl.
Pro Tips for This Recipe:
- Roast beets until fully tender; underdone beets slice badly and taste too firm.
- Wear gloves if you don’t want red fingers for an hour.
- Salt the oranges lightly only if they taste flat; many are sweet enough on their own.
Variations on This Dish:
- Citrus Herb Salad: Add mint or dill instead of goat cheese.
- Orange-Fennel Beet Salad: Add thin shaved fennel for extra crunch.
- Walnut Beet Salad: Swap pistachios for toasted walnuts.
Common Mistakes to Avoid with This Dish:
- Trying to dress hot beets too soon: They bleed into everything. Cool them first.
- Using dull, old oranges: The salad needs juicy fruit.
- Cutting the beets before they’re tender enough: They’ll crumble or fight the knife.
20. Herbed Parsnip and Carrot Fries
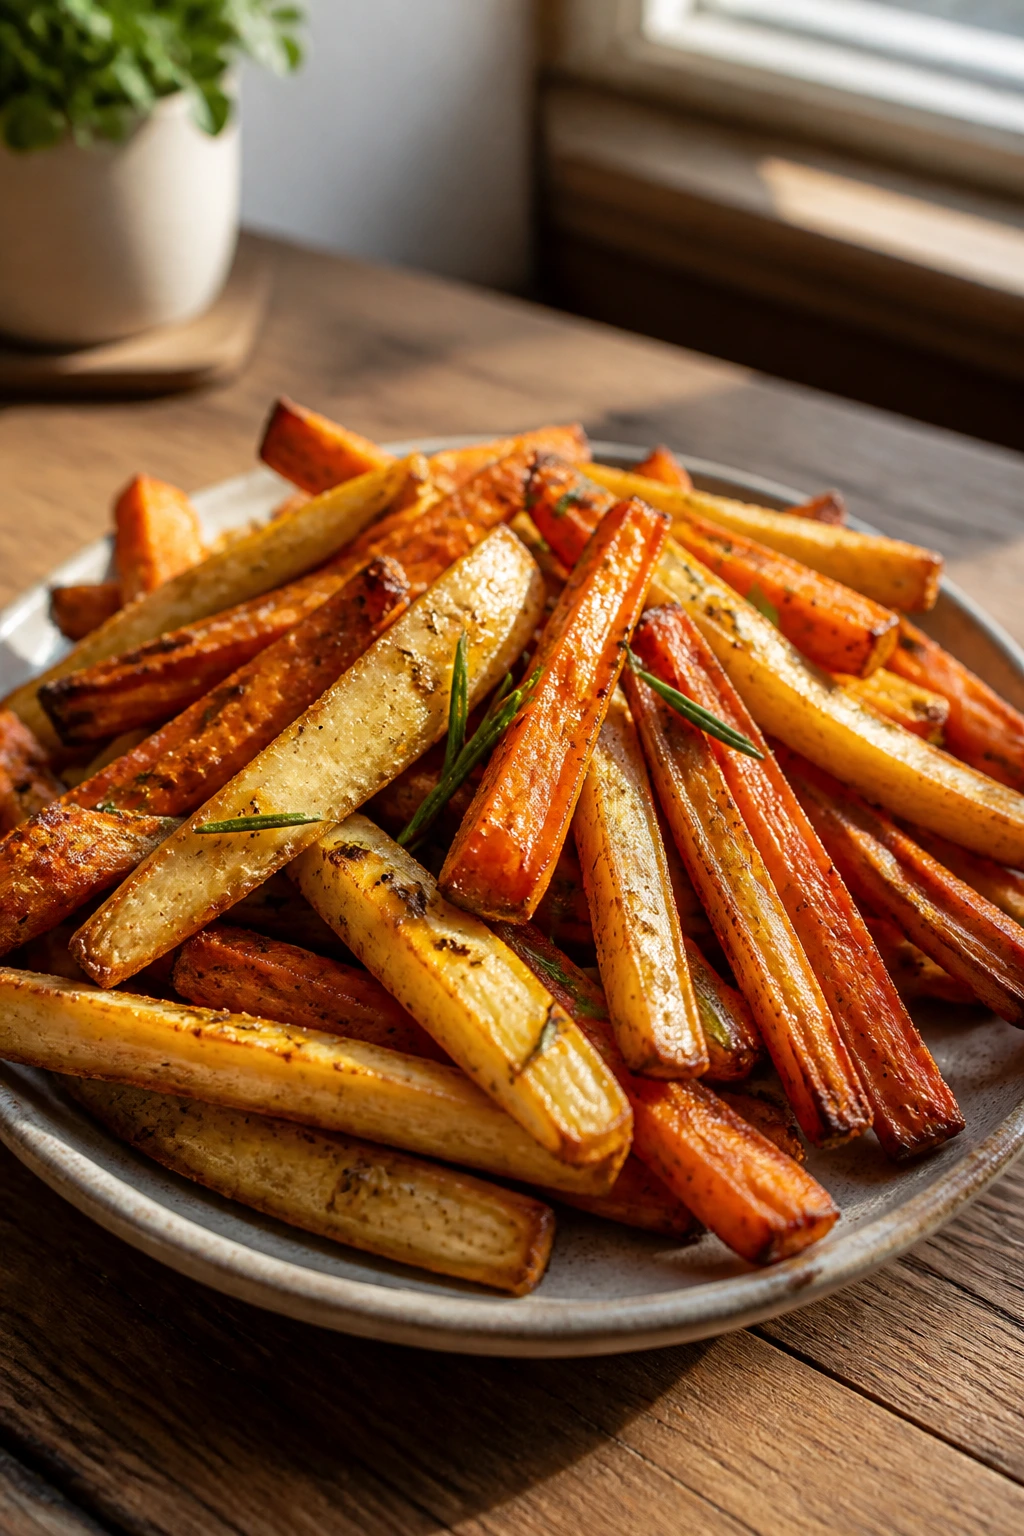
Parsnips and carrots roasted into fries are a reminder that “fries” doesn’t have to mean potatoes. Parsnips bring a sweet, almost nutty flavor, carrots add color and a little sugar, and herbs keep the tray from tasting too starchy. They’re crisp at the edges, soft in the middle, and easy to eat with your hands if dinner drifts in that direction.
Why It Works:
Root vegetables like parsnips and carrots roast well because their sugars brown in the oven. Cutting them into fry shapes gives enough surface area for crisping while still holding a tender center. Rosemary and garlic powder make the tray smell savory instead of sweet.
Key Ingredients:
- 1 pound parsnips, peeled and cut into fry shapes — remove the woody center if it’s thick.
- 1 pound carrots, peeled and cut the same way — matching size matters.
- 2 tablespoons olive oil — coats the fries without weighing them down.
- 1 teaspoon chopped rosemary — or 1/2 teaspoon dried.
- 1 teaspoon garlic powder — more even than fresh garlic here.
- 1 teaspoon kosher salt — needed for browning and taste.
- 1/4 teaspoon black pepper — for balance.
- 2 tablespoons plain Greek yogurt, mixed with lemon juice, optional — for dipping.
Quick Steps:
- Heat the oven to 425°F and line a large sheet pan.
- Toss the parsnips and carrots with olive oil, rosemary, garlic powder, salt, and pepper.
- Spread them in a single layer with a little space between pieces.
- Roast for 25 to 30 minutes, flipping once, until the edges are browned and the centers are tender.
- Serve with the yogurt dip if using.
Equipment for This Recipe:
- Sheet pan — essential for crisp edges.
- Sharp knife — fry shapes need to be even.
- Small bowl — for the dip, if you make it.
How to Serve This Dish:
Serve these with burgers, roast chicken, or lentil patties. They’re also good as a snacky side with a dip and a big salad.
Pro Tips for This Recipe:
- Cut the fries thick enough to hold shape, but not so thick that the centers stay hard.
- If some pieces are much thinner, pull them early and let the thicker ones finish.
- A squeeze of lemon over the hot tray sharpens the sweetness in a good way.
Variations on This Dish:
- Curry Fries: Add curry powder and a pinch of turmeric.
- Parmesan Herb Fries: Sprinkle with Parmesan during the last 5 minutes.
- Maple-Rosemary Fries: Add 1 teaspoon maple syrup for a deeper roast flavor.
Common Mistakes to Avoid with This Dish:
- Leaving the fries wet after washing: Dry them well or they steam.
- Cutting uneven pieces: Some burn while others stay hard in the center.
- Piling them on top of each other: They need space to brown.
What Makes a Vegetable Side Feel Like Dinner

The difference between a forgettable vegetable side and one you actually want to make again usually comes down to three things: heat, salt, and contrast. Vegetables taste fuller when they brown. They taste brighter when they meet acid at the end. And they feel more complete when something on the plate gives you crunch, creaminess, or a salty edge. That’s the quiet pattern running through these vegetable side dishes recipes.
Roasting is the easiest place to start because it handles broccoli, cauliflower, carrots, Brussels sprouts, parsnips, and even cabbage without much drama. A sheet pan at 425°F gives you dry heat, which is what creates those browned edges that taste roasted instead of merely cooked. The same idea works in a skillet; the trick is to keep water under control. Mushrooms need space. Zucchini needs speed. Green beans need a fast finish. If you remember that, half the battle is already won.
There’s also a reason lemon, vinegar, Dijon, and mustard keep showing up. They’re not there to make vegetables “taste better” in a vague way. They sharpen the fat from olive oil, keep sweet vegetables from getting sleepy, and make the whole side dish read as finished. A vegetable side should have a point. Acid gives it one.
Essential Equipment for These Recipes
-
Rimmed sheet pans — the workhorses for roasting broccoli, Brussels sprouts, carrots, cauliflower, beets, and root vegetables without spilling onto the oven floor.
-
Large skillet — needed for green beans, bok choy, mushrooms, corn, squash, and any side that should stay crisp rather than soft.
-
Dutch oven or heavy pot — useful for braised red cabbage and any longer, wetter vegetable cook.
-
Mixing bowls in two sizes — one big enough for tossing vegetables, one small enough for dressings and glazes.
-
Sharp chef’s knife — uneven cuts are one of the fastest ways to ruin roasted vegetables.
-
Vegetable peeler — not glamorous, but handy for carrots, parsnips, and beets.
-
Microplane or fine grater — best for lemon zest, garlic, Parmesan, and ginger.
-
Tongs and a wide spatula — make turning vegetables easier without tearing them.
-
Fine-mesh colander or salad spinner — useful for drying greens, peas, and blanched beans so excess water doesn’t end up in the pan.
-
Airtight storage containers — necessary if you want the leftovers to reheat without losing all their texture.
Smart Shopping and Ingredient Tips
Vegetables are one of those grocery categories where freshness shows fast. Broccoli should have tight florets and firm stems, not yellowing tops or mushy ends. Brussels sprouts should feel heavy for their size, because light sprouts usually mean dry interiors. For cauliflower, look for a white head with no dark spots and florets that feel dense when you press them gently.
Root vegetables tell you a lot by weight and skin. Carrots and parsnips should feel firm, not bendy. Sweet potatoes with smooth skin and no soft patches roast more evenly, and beets with their greens removed often keep better if you’re not cooking them the same day. If the produce section has smaller versions of a vegetable, those are often the better choice for roasting because they cook through before the edges dry out.
Frozen vegetables deserve a fair hearing. Frozen peas are excellent here, and frozen corn can be better than sad off-season fresh cobs if you dry it before sautéing. The catch is moisture. If you cook frozen vegetables straight from the bag without thawing or patting them dry, they steam and soften in the pan. Same with washed greens: dry them well or they’ll water down the skillet.
Choose herbs with a clear job in mind. Dill, mint, parsley, basil, and chives all work as finishing herbs because they stay bright. Rosemary, thyme, oregano, and caraway can handle heat better. And if you’re shopping for acids, pick one lemon or vinegar with a clean job to do; you don’t need three.
How to Serve These Recipes
Presentation: Spread roasted vegetables on a wide platter instead of piling them into a deep bowl. The browned edges and different colors show up better, and the plate looks more intentional when the pieces aren’t crushed under their own weight.
Accompaniments: These sides fit with roast chicken, salmon, tofu, lentils, beans, grain bowls, eggs, and simple rice dishes. Broccoli and cauliflower like richer mains. Bright salads, cabbage, and asparagus sit well beside heavier proteins. Sweet potatoes and carrots are good with anything smoky or savory.
Portions: Plan on about 3/4 to 1 cup per person for a side dish if there are several other items on the table. For a more vegetable-forward dinner, double that and build the plate around two different sides, one roasted and one fresh or braised.
Beverage Pairing: Sparkling water with lemon works across the board, but dry white wine fits many of the roasted sides nicely. For heartier vegetable dishes like cabbage or mushrooms, a light red or a crisp hard cider can hold up better than a delicate drink.
Additional Tips and Flavor Boosters
Flavor Enhancement: A small finish changes everything. Lemon zest on broccoli, a spoonful of Dijon on cabbage, or a drizzle of tahini over eggplant gives a side dish a shape it wouldn’t have otherwise. If the vegetable tastes flat, it usually needs one of three things: salt, acid, or something crunchy.
Customization: Keep toasted nuts, seeds, chili flakes, fresh herbs, and a few good cheeses around and you can nudge almost any side in a new direction. Almonds and green beans, pistachios and beets, feta and peas, Pecorino and Brussels sprouts — those are small moves, not complicated ones.
Serving Suggestions: Warm vegetables look best with a finishing herb or a dusting of cheese added right before they hit the table. A little flaky salt on roasted cabbage, a pinch of parsley on carrots, or sesame seeds over bok choy makes the dish feel finished in the last 10 seconds.
Make-It-Yours: For dairy-free plates, lean on olive oil, tahini, nutritional yeast, and lemon. For a vegetarian dinner, pair two sides with grains or beans and call it a meal. For lower-sodium cooking, use more herbs and acid so you don’t feel like you’re trying to eat plain vegetables with restraint.
Make-Ahead, Storage, and Reheating Guidance

Roasted vegetables keep best in the fridge for about 3 to 4 days in airtight containers. The texture softens a little after the first day, which is normal, but they should still reheat well if you give them back some heat. A sheet pan in a 400°F oven for 8 to 12 minutes usually brings back enough life to make them worth serving again. Microwaves work in a pinch, though they soften the edges.
Braised vegetables like red cabbage hold even longer, often 4 to 5 days in the refrigerator, and their flavor can deepen overnight. Cold salads are the opposite. Shaved Brussels sprouts are best within a day or two, and pea salad holds up a little better if the herbs are added just before serving. Keep dressing separate when you can; that buys you texture.
Some sides freeze better than others. Cauliflower mash freezes well for up to 2 months if you cool it first and store it in a flat container. Braised red cabbage also freezes nicely. Roasted squash, asparagus, and green beans do not freeze well; they go limp after thawing and never quite recover. If you want to make ahead, prep the vegetables, trim them, and store them raw for 1 to 2 days before cooking. That gives you most of the convenience without the soggy leftovers.
Variations and Adaptations to Try
All-Pantry Swap: Keep a bag of frozen peas, frozen corn, canned chickpeas, and jarred roasted peppers around. Those ingredients can step in when the produce drawer is empty, and they’re useful in skillet sides where a little moisture is not a problem.
Dairy-Free Plate: Skip Parmesan, Pecorino, butter, and goat cheese, then lean on olive oil, tahini, lemon, toasted nuts, and herbs. The dishes still feel complete because the finishing flavor comes from acid and crunch instead of cheese.
Lower-Sodium Version: Pull back on the cheese, reduce the salt a little, and use more lemon, vinegar, and herbs. Roasted vegetables still taste full if the pan has enough browning and the finish is sharp enough to wake them up.
Kid-Friendly Mild Version: Favor carrots, sweet potatoes, corn, and cauliflower with a light glaze or simple roast. Keep spicy toppings off the table and serve the finishing herb on the side if the green flecks look suspicious to younger eaters.
Spice-Raised Version: Add smoked paprika, chili flakes, harissa, or a little cayenne to the tray, but only one at a time. Too many hot elements at once muddies the flavor. A single spice note tends to read cleaner.
Air Fryer Shortcut: Broccoli, Brussels sprouts, carrots, and sweet potatoes all work well in an air fryer if you keep the basket from crowding. Shake once halfway through and watch the last few minutes closely; air fryers brown fast, and there’s no honor in a burnt edge.
Common Mistakes to Avoid
Crowding the pan is the biggest one. It’s the mistake that turns roasted vegetables into soft, damp vegetables, and it shows up everywhere from broccoli to Brussels sprouts to carrots. If the pieces touch too much, they trap steam. Use two pans if you need to. The oven is not a place to save space at the expense of texture.
Under-seasoning is another easy way to flatten vegetables. People often assume the natural sweetness of carrots or corn will carry the dish, but salt is what makes that sweetness readable. Acid matters too. A roasted tray without lemon, vinegar, mustard, or another sharp finish can taste oddly tired even when it’s cooked correctly.
Cutting pieces unevenly causes more problems than most people expect. Small pieces burn before the large ones are tender, and then you’re forced to choose between undercooked and overdone. Take the extra minute to match your cuts. It pays off.
Adding wet ingredients too early can ruin the surface texture. Lemon juice, vinegar, and some glazes are better after roasting than before it. Same for soft herbs like basil and mint; heat dulls them. If a recipe says to finish with something fresh, that’s not decorative fluff. It’s doing a job.
Then there’s the quiet mistake of not drying vegetables. Broccoli, squash, bok choy, beans, peas, and greens all carry surface water that changes the way they cook. Pat them dry. Shake off the colander. Lay them on a towel if you have to. The difference between a browned vegetable and a bland one is often just moisture sitting where it shouldn’t.
Frequently Asked Questions

Can I mix two vegetables on one sheet pan?
Yes, but only if they roast at roughly the same speed. Broccoli and cauliflower work well together, as do carrots and parsnips. Pairing zucchini with hard root vegetables usually leads to one overcooked side and one underdone side.
What’s the best temperature for roasted vegetable sides?
425°F is the sweet spot for most of these recipes because it browns the surface without drying out the middle too fast. For delicate vegetables like asparagus, you can go a little lower if needed, but the pan still needs enough heat to create color.
How do I keep vegetables from getting soggy?
Use enough heat, don’t crowd the pan, and dry the vegetables before they hit the oil. Soggy vegetables are usually a moisture problem, not a seasoning problem. If the tray looks crowded before you start, split it.
Can I make these side dishes ahead of time for guests?
Some of them, yes. Braised cabbage and cauliflower mash hold well, and vegetables that reheat in the oven — like broccoli, carrots, and Brussels sprouts — can be partially cooked ahead and finished later. Raw salads are better assembled close to serving time.
What if I only have frozen vegetables?
Frozen peas and corn are the easiest wins, and frozen broccoli can work if you dry it well after thawing. They won’t all roast the same way fresh vegetables do, but they’re still useful when the pantry is doing the heavy lifting.
Do I need fancy equipment for these recipes?
Not at all. A sheet pan, a skillet, a knife, and a bowl will cover most of the list. The only truly helpful extras are a microplane, a colander, and a good spatula.
Which side dishes pair best with rich mains?
Bright, acidic sides do the best job there. Lemon broccoli, shaved Brussels sprout salad, green beans with almonds, and asparagus with dill all cut through richer foods without fighting them.
How do I reheat roasted vegetables without ruining them?
Use a hot oven, not a low one. Spread them on a pan and heat at 400°F until the edges wake back up. A skillet works too, especially for mushrooms, broccoli, and Brussels sprouts.
A Better Plate
Vegetables don’t need to be side notes in the usual dull sense. When they’re roasted hard, seasoned well, and finished with something sharp or crunchy, they start carrying part of the meal instead of sitting beside it. That’s the whole point of good vegetable side dishes recipes: they make the plate taste considered.
The nice thing is that none of this demands a complicated pantry or a long shopping list. A few smart techniques, a hot oven, and a good sense of texture can turn broccoli, cabbage, carrots, or bok choy into the part people talk about after dinner. And that’s a pretty useful habit to have around.