
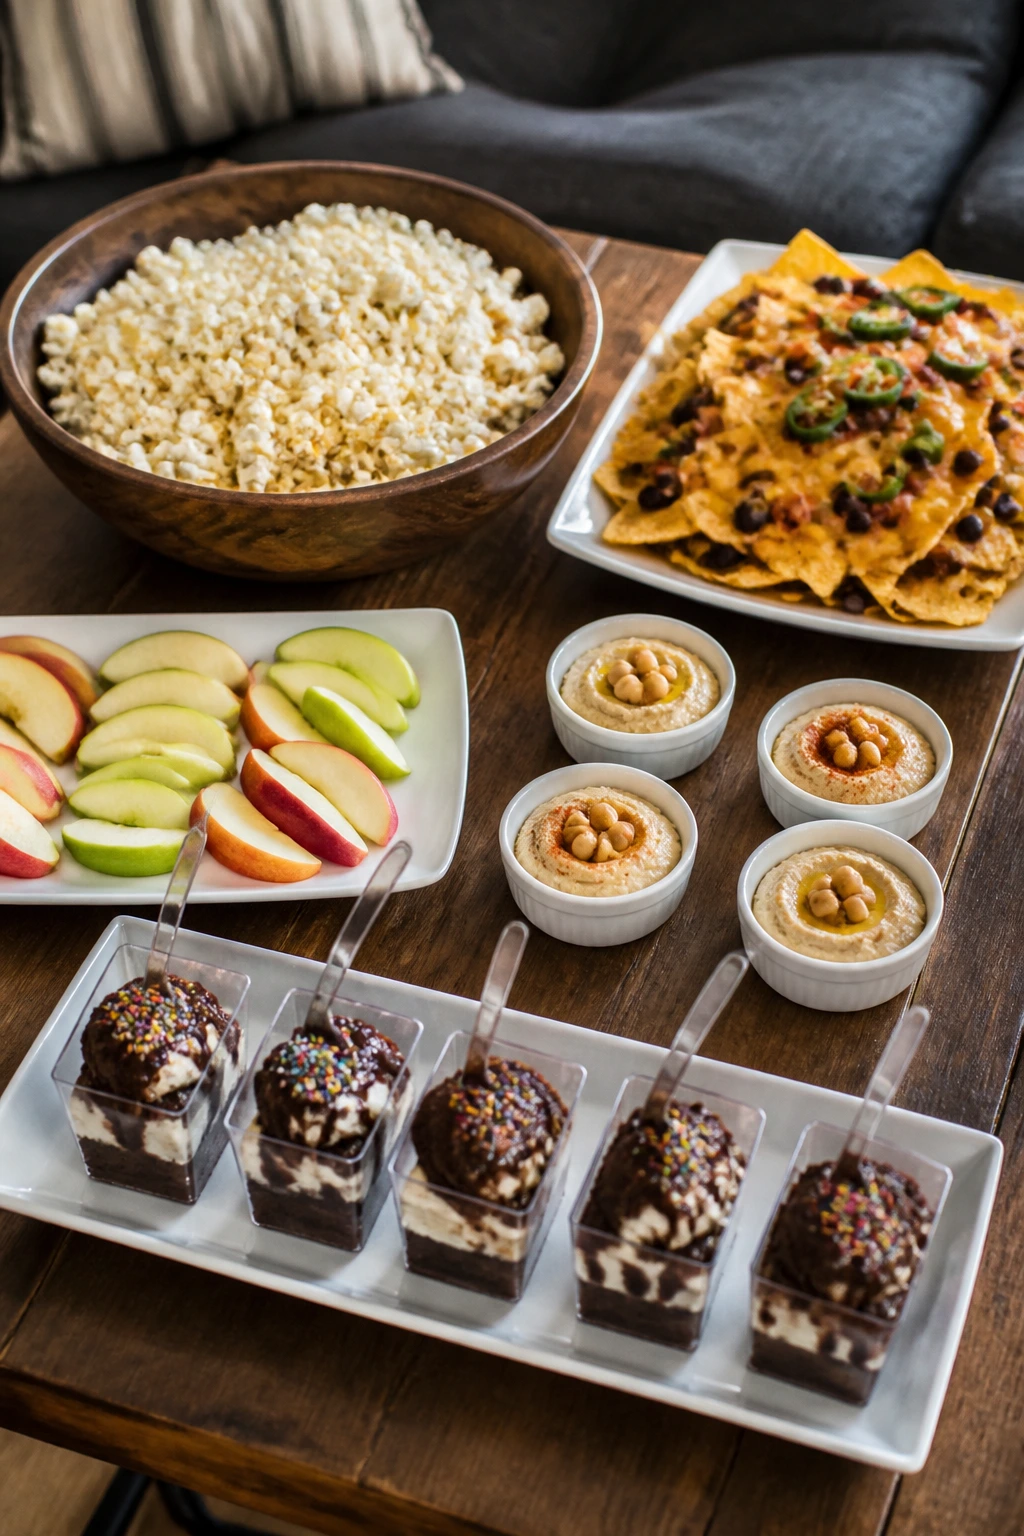
The best kid recipes for family movie night are the ones that stay crisp in a lap, survive a pause for the bathroom break, and don’t turn into a greasy disaster under a dim couch lamp. That’s the test I keep coming back to. If a snack can be picked up with two fingers, eaten in a few bites, and still taste good after the opening credits are long gone, it earns a spot on the tray.
And that’s the trick with movie-night food: you do not want a full dinner pretending to be a snack. You want small, sturdy, cheerful things that give kids a job to do with their hands. Dip, assemble, sprinkle, skewer, bite. The more tactile the recipe, the less likely you are to hear, “I’m bored,” before the previews end. A lot of these recipes lean on melted cheese, fruit, popcorn, soft dough, or crunchy edges because those textures hold up in the dark.
I also like movie-night recipes that let kids help without turning the kitchen into a cleanup project worthy of a disaster movie. Measuring pretzels into a bowl. Drizzling peanut butter over apples. Pressing mozzarella into a mini pizza. Those are the kinds of tasks that keep little hands busy and give the snack a sense of occasion. The food feels special, but you do not need a sink full of bowls to get there.
Why These Snacks Win on Couch Night

- Handheld by design: Every recipe here can be eaten with minimal fuss, which matters when someone is balancing a blanket, a remote, and a half-full drink cup.
- Fast enough to make before the opening scene: Most of these recipes take 10 to 25 minutes, and several use pantry staples that are already sitting there.
- Built for kids to help with: Stirring, scooping, sprinkling, and stacking show up again and again, which gives the snack a little ritual.
- Flexible with what you have: If your pantry is missing one ingredient, there’s usually a swap that won’t wreck the whole idea.
- A mix of salty, sweet, and crunchy: A movie-night spread gets boring fast if everything tastes the same, so this list moves between popcorn, fruit, cheese, bread, and dessert.
- Easy to scale up: Double the popcorn, add one more pan of quesadillas, or make a second tray of fruit skewers when cousins show up.
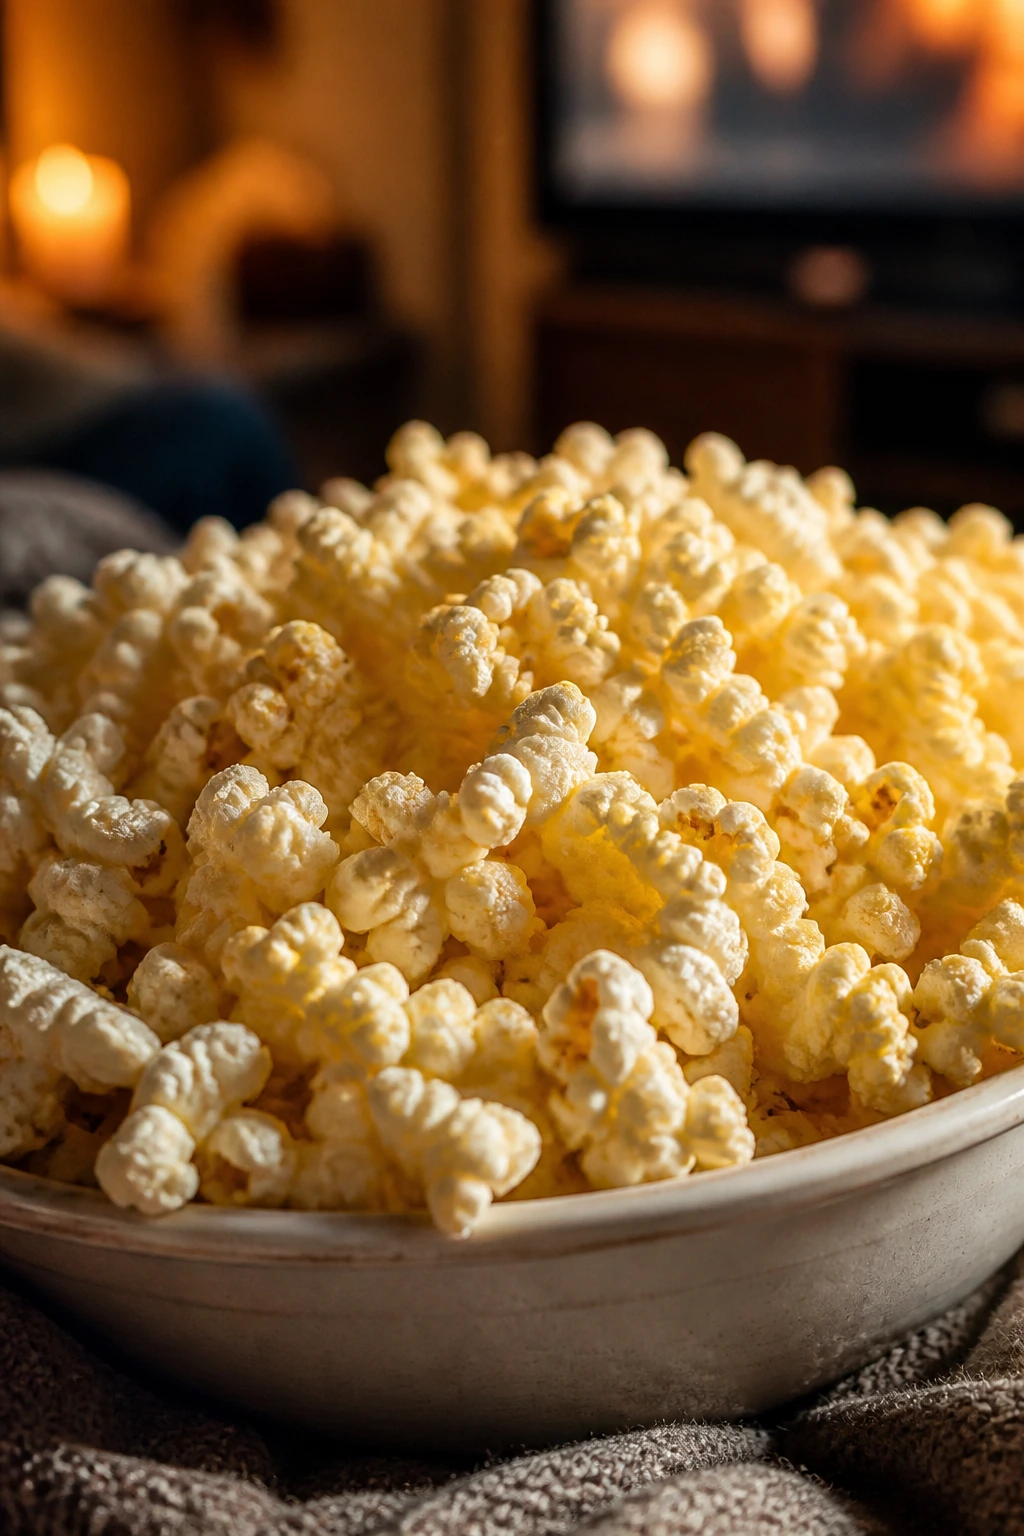
1. Buttery Movie Theater Popcorn
The smell alone does half the work here. Hot popcorn with melted butter and a good pinch of salt has that unmistakable movie-theater pull, but you can make it at home without paying for a cardboard tub that goes stale by the second half. The key is getting the kernels fully popped and coating them while they’re still warm.
Why It Works:
Stovetop popcorn gives you crisp kernels with fewer unpopped stragglers than a lot of microwave bags. The butter clings better if you drizzle it slowly and toss the popcorn in a big bowl right away. A tiny bit of sugar is optional, but I skip it here; salt and butter do the job better for movie night.
Key Ingredients:
- 1/2 cup popcorn kernels
- 3 tablespoons neutral oil
- 3 tablespoons unsalted butter, melted
- 1 teaspoon fine salt
- 1 tablespoon nutritional yeast or grated Parmesan, optional
- 1/2 teaspoon garlic powder, optional
Quick Steps:
- Heat the oil in a large pot over medium-high heat.
- Add 3 kernels. When they pop, pour in the remaining kernels.
- Cover the pot slightly ajar and shake it every few seconds until popping slows to 2 to 3 seconds between pops.
- Pour the popcorn into a large bowl, drizzle with melted butter, sprinkle with salt, and toss well.
Equipment for This Recipe:
- Large heavy pot with lid
- Wooden spoon or pot holder
- Large mixing bowl
- Measuring cups
How to Serve This Dish:
Pile it into one oversized bowl for the room, or split it into smaller paper bowls so little hands don’t fish through the same pile. A light dusting of Parmesan makes it feel more snack-bar-ish. Serve it first, before the movie starts, because once the bowl hits the lap, it disappears fast.
Pro Tips for This Recipe:
- Add the salt while the popcorn is still hot; it sticks better.
- Use a pot that’s at least 4 quarts so the kernels have room to move.
- If you want extra crunch, let the popcorn sit uncovered for 5 minutes before buttering.
- Truffle oil is overkill here. Save your money.
Variations on This Dish:
- Sweet-Salty Cinema Mix: Add 2 tablespoons mini chocolate chips and 1/4 cup pretzel pieces after the popcorn cools for 2 minutes.
- Cheesy Cloud Popcorn: Use 2 tablespoons grated Parmesan plus 1 tablespoon nutritional yeast for a savory, dusty finish.
- Maple Butter Popcorn: Stir 1 teaspoon maple syrup into the melted butter for a faint caramel note.
Common Mistakes to Avoid with This Dish:
- Using too much oil: The popcorn turns heavy and greasy. Stick to 3 tablespoons for 1/2 cup kernels.
- Waiting to season it: Salt won’t cling well if the popcorn cools too much. Season right away.
- Walking away from the pot: Once popping starts, it moves quickly. Pull it off the heat when the pops slow down.
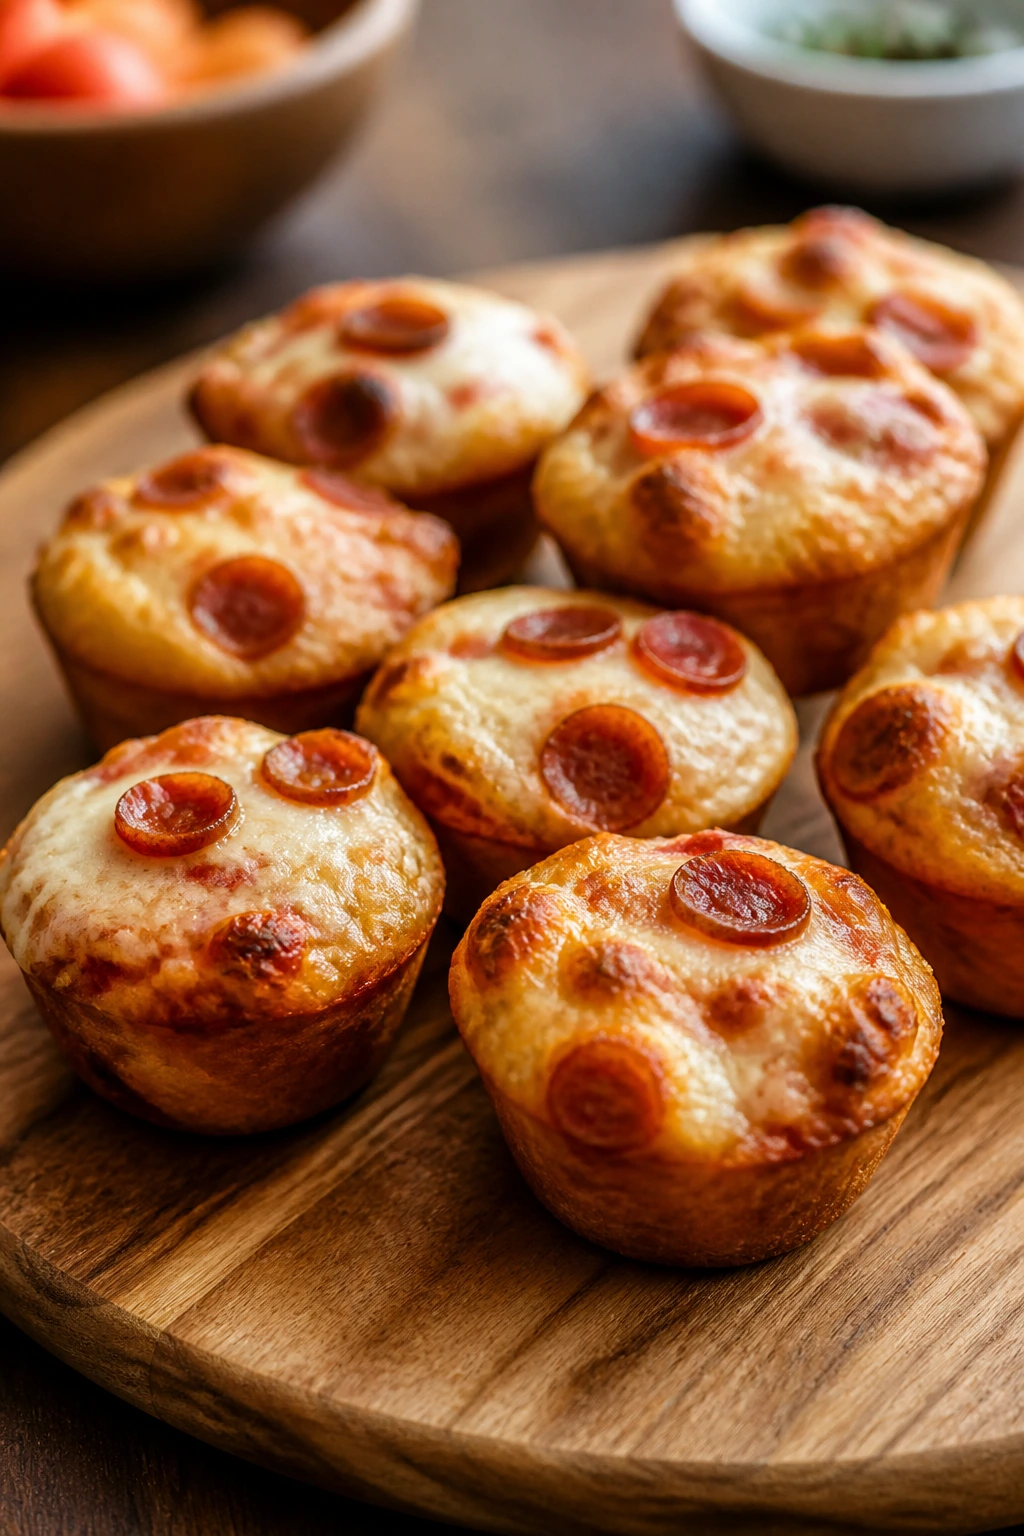
2. Mini Pepperoni Pizza Puffs
These bake up like a cross between a soft muffin and a personal pizza, which is exactly why kids grab them without thinking twice. The edges brown, the cheese melts into little pockets, and the pepperoni gets just a touch crisp on top. They’re best when served warm, when the mozzarella still stretches a little.
Why It Works:
A quick batter made with biscuit dough or baking mix gives you pizza flavor without yeast or a rising time. Tiny pepperoni pieces distribute better than full slices, so every bite gets a little salt and smoke. The muffin pan keeps the portions tidy, which helps when you’re serving kids on a couch.
Key Ingredients:
- 2 cups biscuit baking mix
- 1 cup whole milk
- 1 large egg
- 1 cup shredded mozzarella
- 1/2 cup mini pepperoni, chopped
- 1/2 cup pizza sauce
- 1 teaspoon Italian seasoning
Quick Steps:
- Preheat the oven to 375°F (190°C) and grease a 12-cup muffin tin.
- Whisk the baking mix, milk, and egg until just combined.
- Fold in the mozzarella, pepperoni, pizza sauce, and Italian seasoning.
- Spoon the batter into the muffin cups, filling each about 3/4 full.
- Bake for 18 to 20 minutes, until puffed and golden.
- Cool for 5 minutes before lifting them out.
Equipment for This Recipe:
- 12-cup muffin tin
- Mixing bowl
- Whisk
- Spoon or small scoop
How to Serve This Dish:
Serve 2 puffs per child with a small bowl of warmed marinara for dipping. A few cucumber slices or grapes on the side keep the plate from feeling too heavy. They look nicest when you put them on a tray lined with parchment, not stacked in a bowl where they steam.
Pro Tips for This Recipe:
- Chop the pepperoni small so it doesn’t sink.
- Do not overmix the batter; it should look a little rough.
- Let them cool for 5 minutes or they’ll tear when you remove them from the pan.
- A pinch of red pepper flakes works for older kids and adults, but keep the base mild.
Variations on This Dish:
- Veggie Pizza Puffs: Swap the pepperoni for finely chopped bell pepper and black olives.
- Cheesy Garlic Version: Leave out the pepperoni and add 1 teaspoon garlic powder plus 2 tablespoons Parmesan.
- Hawaiian Puff Bites: Use diced ham and crushed pineapple that’s been well drained.
Common Mistakes to Avoid with This Dish:
- Adding too much sauce: The batter gets wet and dense. Stick to the measured 1/2 cup.
- Skipping the grease: The cheese loves to stick to muffin tins.
- Baking until deeply browned: They dry out fast. Pull them when the tops are golden, not dark.
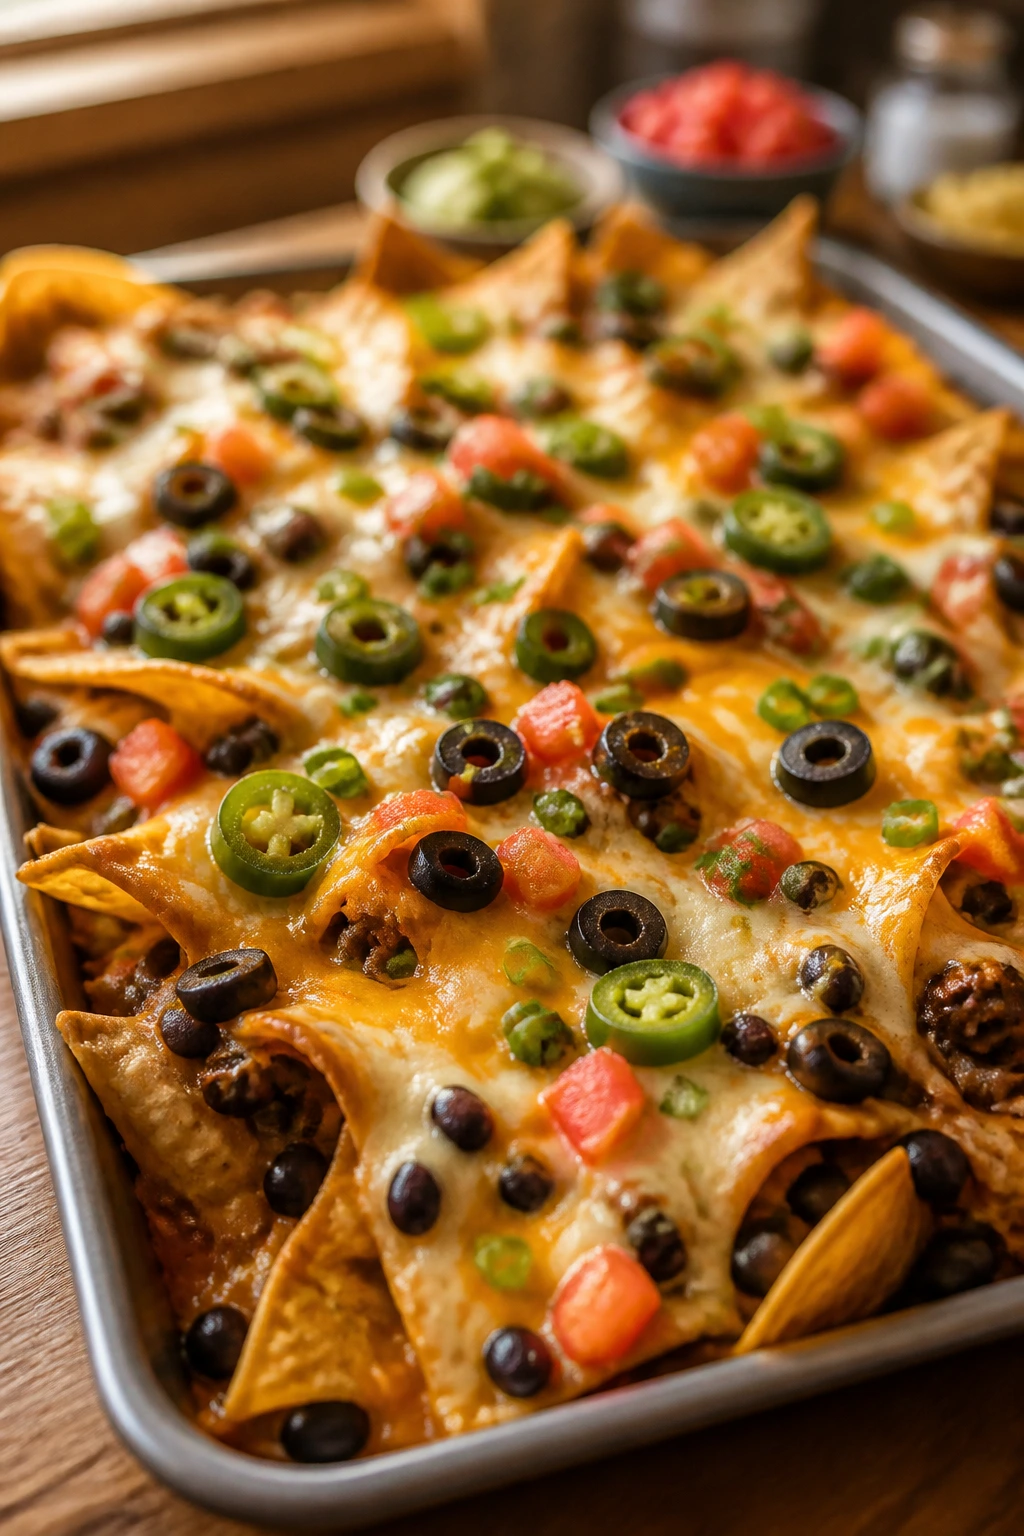
3. Oven-Baked Loaded Nachos
Nachos disappear with almost embarrassing speed on movie night. The good kind are layered, not piled, so the chips under the cheese don’t stay bare and the ones on top don’t burn into salty little shingles. A tray of these makes the table smell like warm tortilla chips, cumin, and melted cheddar, which is a pretty persuasive combination.
Why It Works:
Oven nachos are better than stovetop versions for a group because the cheese melts evenly across the pan. Layering matters. If you put chips, cheese, beans, and toppings in one neat pile, the middle turns soggy; spread them out and each bite stays crisp around the edges.
Key Ingredients:
- 10 ounces sturdy tortilla chips
- 2 cups shredded cheddar
- 1 cup shredded Monterey Jack
- 1 cup black beans, rinsed and drained
- 1/2 cup sliced black olives
- 1/2 cup pickled jalapeños, optional
- 1 cup salsa
- 1/2 cup sour cream
Quick Steps:
- Preheat the oven to 400°F (200°C).
- Spread half the chips on a rimmed baking sheet.
- Scatter over half the cheese, beans, olives, and jalapeños.
- Repeat with the remaining chips and toppings.
- Bake for 8 to 10 minutes, until the cheese is melted and bubbly.
- Spoon on salsa and sour cream after baking.
Equipment for This Recipe:
- Rimmed baking sheet
- Box grater
- Spoon
- Small bowls for toppings
How to Serve This Dish:
Serve it straight from the pan while the cheese is still glossy. If you want neater movie-night eating, add the salsa and sour cream to the side instead of on top. I like to set out one pan and a pile of extra napkins because nachos are not a tidy food. They never were.
Pro Tips for This Recipe:
- Use thick chips; thin ones collapse under the toppings.
- Drain beans well so the chips stay crisp.
- Add cold toppings after baking, not before.
- If you want more heat, use hot salsa instead of extra jalapeños.
Variations on This Dish:
- Chicken Nacho Tray: Add 1 cup shredded rotisserie chicken between the cheese layers.
- Breakfast Nachos: Swap in scrambled eggs and crumbled breakfast sausage for a weekend-movie twist.
- Bean-Only Nachos: Double the beans and add corn for a meatless version that still feels substantial.
Common Mistakes to Avoid with This Dish:
- Overloading the tray: Too many toppings make the chips soggy. Two light layers beat one mountain.
- Baking too long: The cheese should melt, not turn oily and browned.
- Using watery salsa on top: Save that for serving; otherwise the chips soften fast.
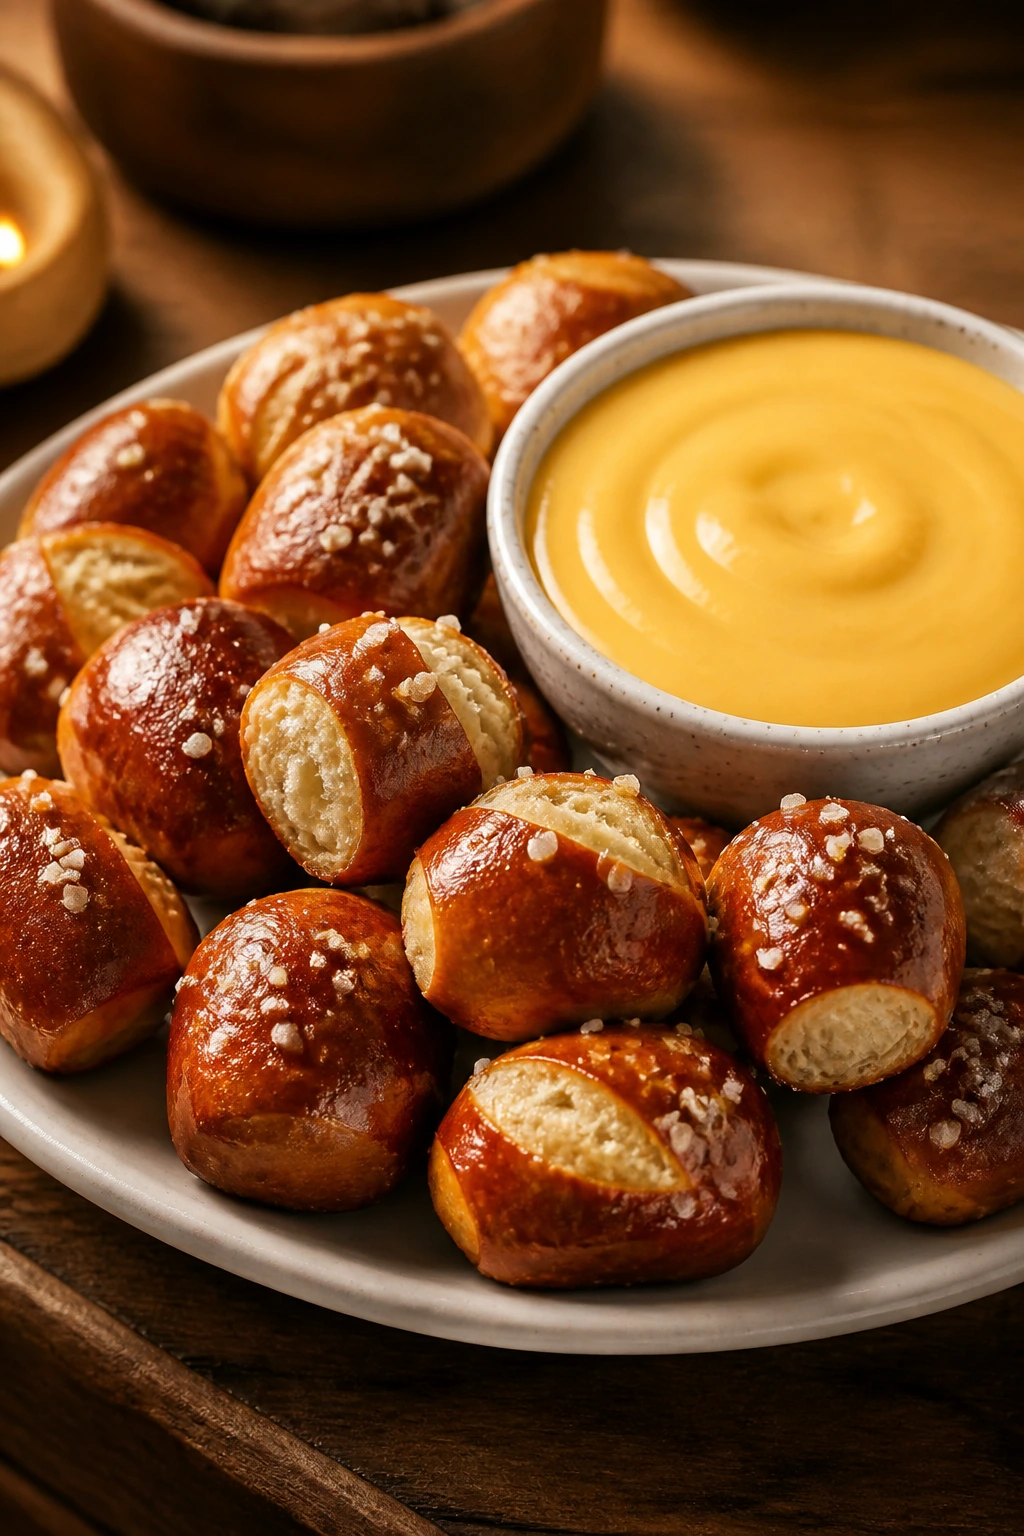
4. Soft Pretzel Bites with Cheese Dip
Warm pretzel bites have a way of making a living room feel like a snack counter. The outside gets shiny and bronzed, the inside stays soft and chewy, and the salt crystals crack a little when you bite down. The cheese dip gives you that creamy, salty contrast that keeps everyone reaching for one more.
Why It Works:
Pretzel dough is forgiving and doesn’t ask for fancy shaping. Cutting the rope into little pieces makes them faster to boil and bake, which is the part most people forget. The baking soda bath gives the crust that deep pretzel color and flavor.
Key Ingredients:
- 2 1/4 teaspoons active dry yeast
- 1 1/2 cups warm water
- 1 tablespoon sugar
- 4 cups all-purpose flour
- 1 teaspoon fine salt
- 1/2 cup baking soda for the boiling water
- 1 egg yolk mixed with 1 tablespoon water
- Coarse salt for topping
- 1 cup shredded cheddar
- 1/2 cup milk for the dip
Quick Steps:
- Mix the yeast, warm water, and sugar; let it foam for 5 minutes.
- Stir in flour and salt, then knead until smooth, about 5 minutes.
- Let the dough rise for 45 minutes.
- Shape into ropes, cut into 1-inch bites, and dip briefly in boiling water with baking soda.
- Brush with egg wash, sprinkle with coarse salt, and bake at 425°F (220°C) for 12 to 14 minutes.
- Warm the cheddar with milk for a simple dip.
Equipment for This Recipe:
- Large mixing bowl
- Baking sheet
- Parchment paper
- Slotted spoon
How to Serve This Dish:
Pretzel bites belong in a wide bowl with the cheese dip in the middle, not buried on the side where it gets forgotten. Serve them with apple slices or grapes if you want a fresh bite between the salty ones. They are best the minute they come out of the oven.
Pro Tips for This Recipe:
- The water should feel warm, not hot, or the yeast will sulk.
- Boil the bites only 20 to 30 seconds each.
- Salt them right after the egg wash so it sticks.
- Reheat leftovers in a 350°F oven for 5 minutes instead of microwaving them.
Variations on This Dish:
- Garlic Butter Pretzel Bites: Brush with melted butter and garlic powder after baking.
- Cinnamon Sugar Pretzel Bites: Skip the coarse salt and toss in cinnamon sugar with a cream cheese dip.
- Stuffed Pretzel Bites: Wrap the dough around tiny cubes of cheddar before boiling.
Common Mistakes to Avoid with This Dish:
- Letting the dough rise too little: Dense bites feel heavy. Wait until the dough has doubled.
- Boiling too long: They get rubbery. A short dip is enough.
- Skipping the egg wash: The bites bake pale and the salt falls off.
5. Apple Nachos with Peanut Butter Drizzle
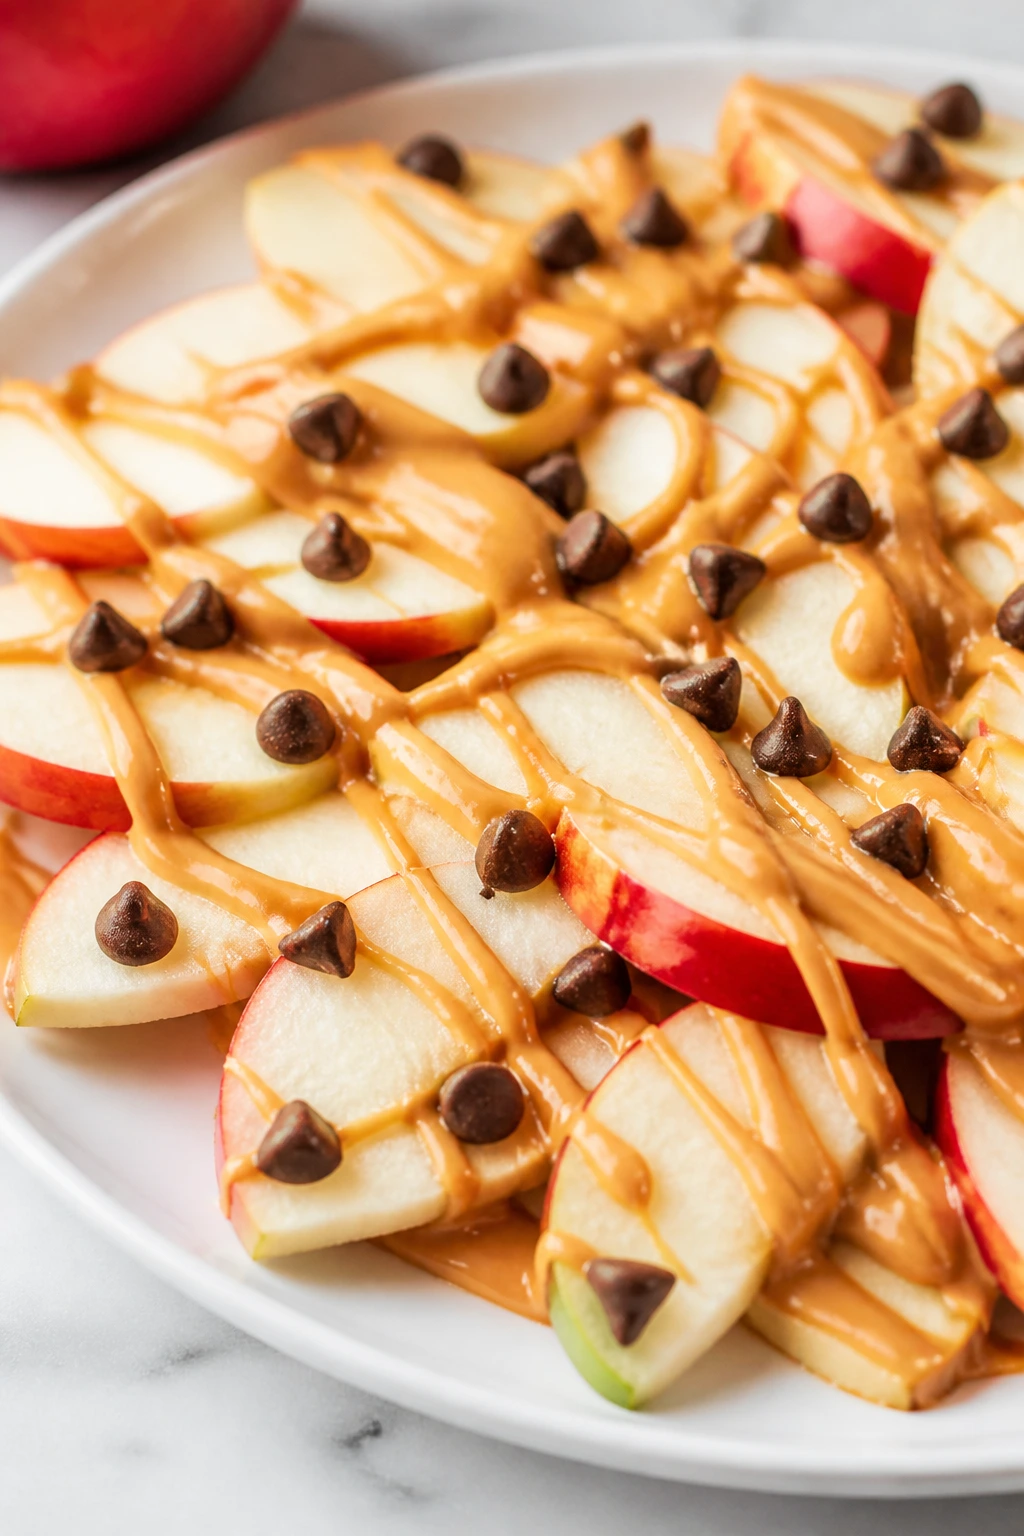
This is the snack I make when I want something that feels playful but doesn’t require turning on the oven. Crisp apple slices, a warm peanut butter drizzle, and a scatter of mini chocolate chips make a plate that looks a little messy in the best way. Kids like it because they can build their own bite; adults like it because it doesn’t feel like a sugar bomb.
Why It Works:
Sliced apples give you crunch, juiciness, and a cold contrast to the warm peanut butter. The drizzle needs to be thinned just enough to move across the fruit instead of clumping in one place. A squeeze of lemon keeps the slices from turning brown if you’re setting the tray out before the movie begins.
Key Ingredients:
- 3 large apples, cored and sliced
- 1/2 cup peanut butter
- 1 tablespoon honey
- 1 to 2 tablespoons warm water
- 1 tablespoon mini chocolate chips
- 2 tablespoons granola
- 1 teaspoon lemon juice
Quick Steps:
- Toss the apple slices with lemon juice.
- Arrange them in a single layer on a platter.
- Stir the peanut butter, honey, and warm water until pourable.
- Drizzle over the apples.
- Sprinkle with chocolate chips and granola.
- Serve right away so the apples stay crisp.
Equipment for This Recipe:
- Cutting board
- Sharp knife
- Small bowl
- Spoon or squeeze bottle
How to Serve This Dish:
Use a wide platter instead of a deep bowl. That keeps the drizzle visible and makes it easy for kids to pick up slices without digging. A few extra napkins help, because peanut butter and movie-night fingers have a tendency to meet.
Pro Tips for This Recipe:
- Fuji, Honeycrisp, and Gala hold their crunch well.
- Warm the peanut butter for 10 to 15 seconds in the microwave before thinning.
- Add granola at the end so it stays crisp.
- If school allergies are a concern, swap in sunflower seed butter.
Variations on This Dish:
- Caramel Apple Nachos: Swap the peanut butter drizzle for warm caramel sauce.
- Yogurt Fruit Plate: Use vanilla Greek yogurt and sliced strawberries instead of peanut butter.
- Trail-Mix Version: Add raisins, chopped peanuts, and coconut flakes for extra texture.
Common Mistakes to Avoid with This Dish:
- Using soft apples: They bruise and go mushy fast. Stick with firm apples.
- Making the drizzle too thick: It should ribbon off a spoon, not sit in a lump.
- Letting the tray sit too long: Apples brown and the granola softens.
6. Crispy Chicken Nugget Sliders
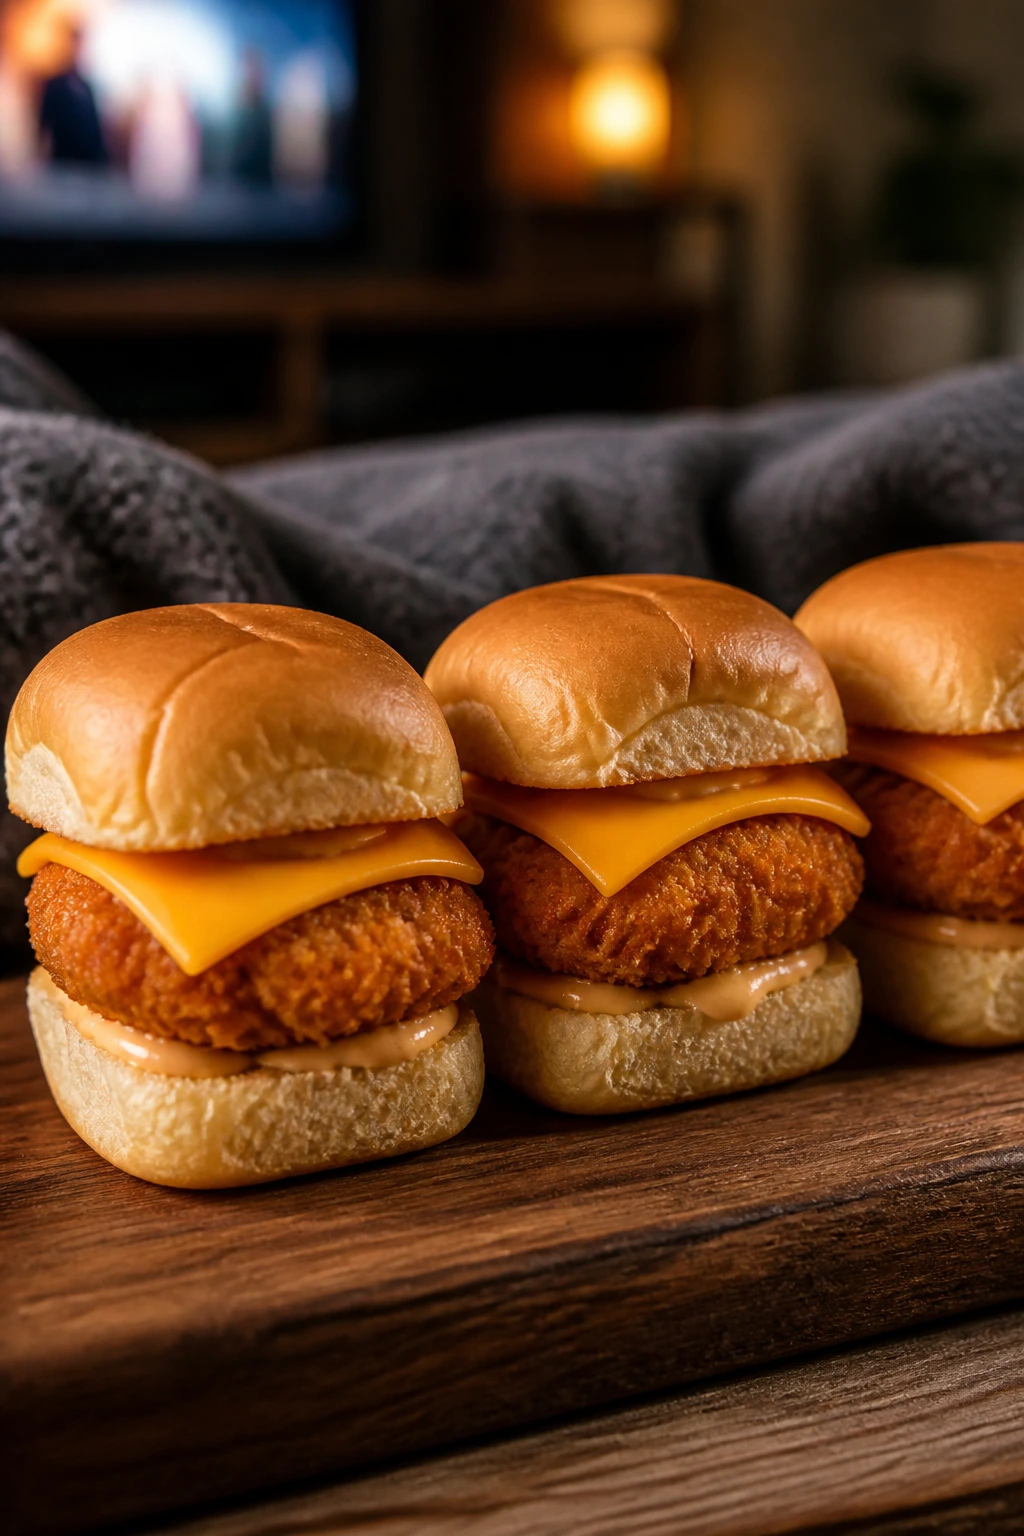
Nugget sliders are one of those foods that make kids sit up a little straighter. Two small buns, a crispy chicken nugget, a slice of melty cheese, and a swipe of sauce turn into something that feels like a treat without requiring an actual burger commitment. They’re sturdy, neat, and easy to hold with one hand while the other hand stays under a blanket.
Why It Works:
This recipe uses frozen chicken nuggets as a shortcut, which is exactly the sort of shortcut I support on movie night. Toasting the buns first keeps them from turning soggy. A little cheese helps the nuggets cling to the bread instead of sliding off onto the sofa.
Key Ingredients:
- 12 frozen chicken nuggets
- 6 slider buns
- 6 slices cheddar cheese, halved
- 1/4 cup mayonnaise
- 2 tablespoons ketchup
- 1 tablespoon pickle relish
- Butter for toasting
Quick Steps:
- Bake or air-fry the nuggets according to the package directions until crisp.
- Split the slider buns and butter the cut sides.
- Toast the buns in a skillet or oven until lightly golden.
- Mix the mayonnaise, ketchup, and relish for a quick sauce.
- Build each slider with sauce, one nugget, and a half slice of cheddar.
- Serve warm.
Equipment for This Recipe:
- Baking sheet or air fryer basket
- Skillet or sheet pan for toasting buns
- Small bowl
- Spatula
How to Serve This Dish:
Serve two sliders per child with carrot sticks or apple slices on the side. They also work well lined up on a tray with toothpicks for older kids who like the look of a tiny sandwich spread. Keep extra sauce nearby; the good ones disappear in the first five minutes.
Pro Tips for This Recipe:
- Toast the buns or the sliders get soft fast.
- Use nuggets that stay crisp after baking, not the thin ones that go dry.
- A slice of cheese cut in half fits better than a full slice.
- Let the nuggets cool for 1 minute before building so the bread doesn’t steam.
Variations on This Dish:
- Buffalo Sliders: Toss the nuggets in mild buffalo sauce and use ranch.
- BBQ Chicken Sliders: Swap ketchup mayo for barbecue sauce and pickles.
- Breakfast Sliders: Use chicken sausage patties instead of nuggets for a morning-movie spread.
Common Mistakes to Avoid with This Dish:
- Building them too early: The buns soften while you wait. Assemble right before serving.
- Skipping the toast: Untoasted buns absorb sauce and get mushy.
- Overstuffing with sauce: A thin layer is enough. Too much slides out in the first bite.
7. Pizza Quesadillas
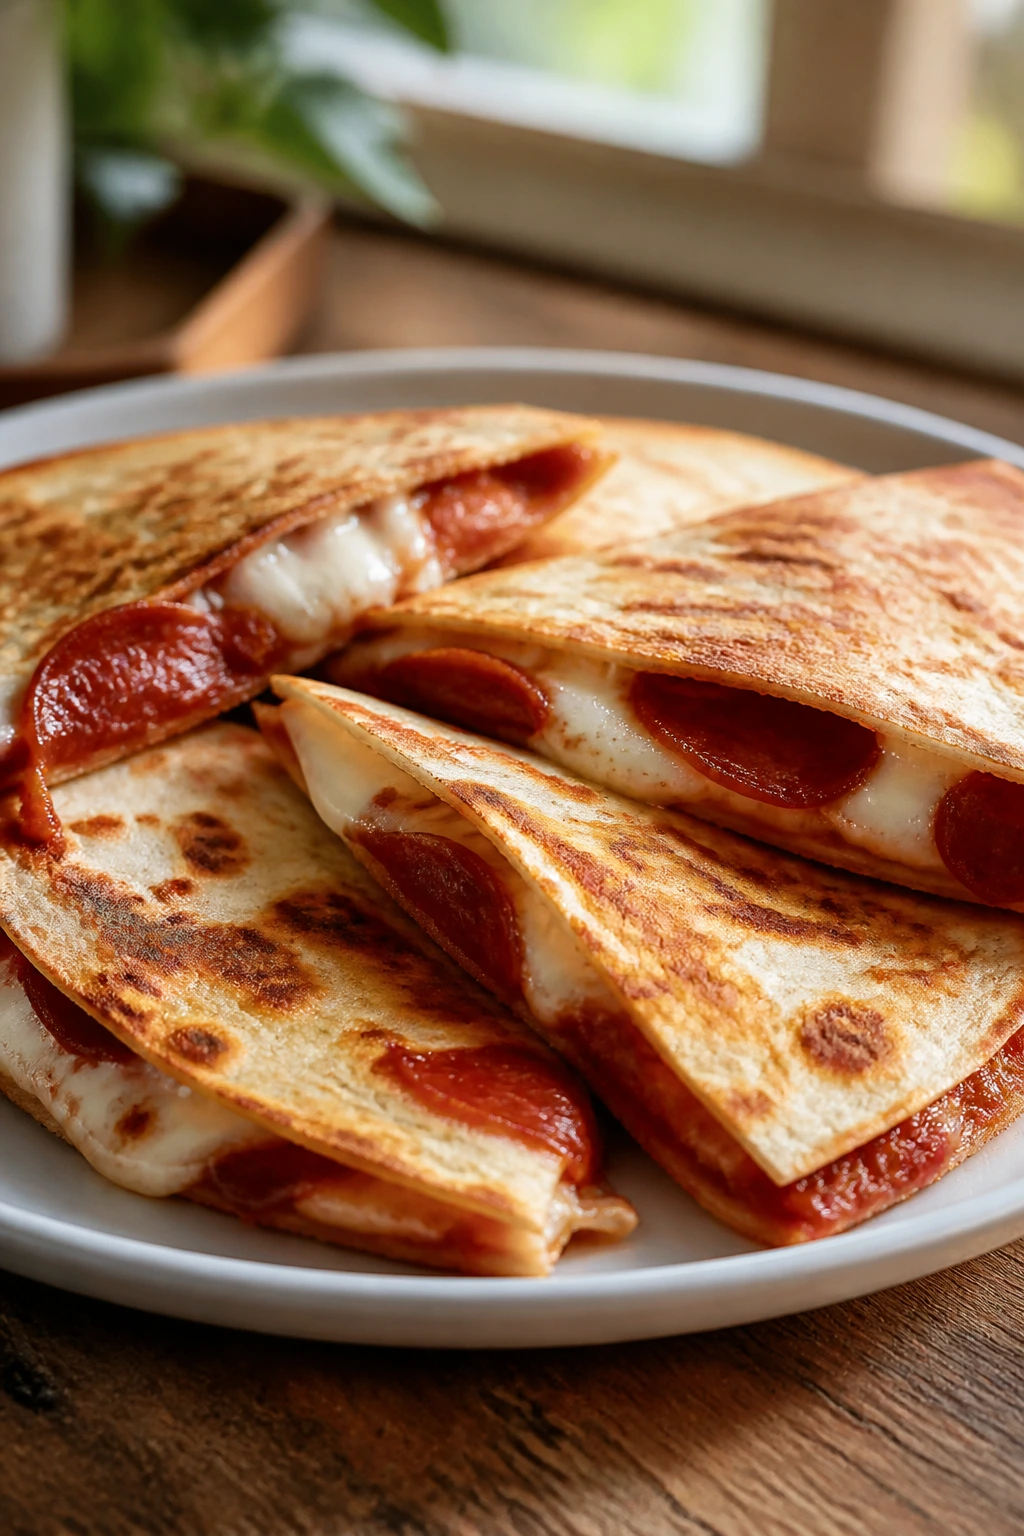
Pizza quesadillas are what happen when two kid favorites stop arguing and decide to share the same tortilla. They crisp up in a skillet in minutes, the cheese melts into the middle, and the sauce stays where it should instead of running across the plate. Folded and cut into wedges, they feel like a snack and a meal at the same time.
Why It Works:
A flour tortilla browns fast and gives you crisp edges before the cheese overcooks. The trick is using a light hand with sauce so the quesadilla does not turn wet and floppy. Pepperoni is optional, which makes this one easy to adapt for picky eaters.
Key Ingredients:
- 4 large flour tortillas
- 1 cup pizza sauce
- 2 cups shredded mozzarella
- 1/2 cup mini pepperoni
- 1/4 cup diced bell pepper
- 1 teaspoon Italian seasoning
- Butter or oil for the skillet
Quick Steps:
- Heat a skillet over medium heat and add a little butter.
- Lay in one tortilla and spread a thin layer of sauce over half.
- Add mozzarella, pepperoni, bell pepper, and seasoning.
- Fold the tortilla over and cook 2 to 3 minutes per side until golden and crisp.
- Cut into wedges and serve with extra sauce.
Equipment for This Recipe:
- Large skillet
- Spatula
- Cutting board
- Pizza cutter or sharp knife
How to Serve This Dish:
Cut each quesadilla into 3 or 4 triangles and set them on a tray with small cups of warm sauce. They pair well with a simple salad, but for movie night I usually go with cucumber slices or grapes. The crisp edges are the selling point, so serve them hot.
Pro Tips for This Recipe:
- Use only a thin smear of sauce.
- Shred the cheese yourself if you want smoother melting.
- Cook over medium heat, not high heat, or the tortilla burns before the cheese melts.
- Let it rest 1 minute before cutting so the filling settles.
Variations on This Dish:
- Veggie Pizza Quesadilla: Add mushrooms, spinach, and olives.
- White Pizza Quesadilla: Skip the red sauce and use ricotta with mozzarella.
- Breakfast Pizza Quesadilla: Add scrambled eggs and a little sausage.
Common Mistakes to Avoid with This Dish:
- Too much filling: The tortilla splits. Keep it modest.
- High heat: The outside scorches before the middle melts.
- Cutting too soon: The cheese runs everywhere. Give it a short rest.
8. Peanut Butter Banana Roll-Ups
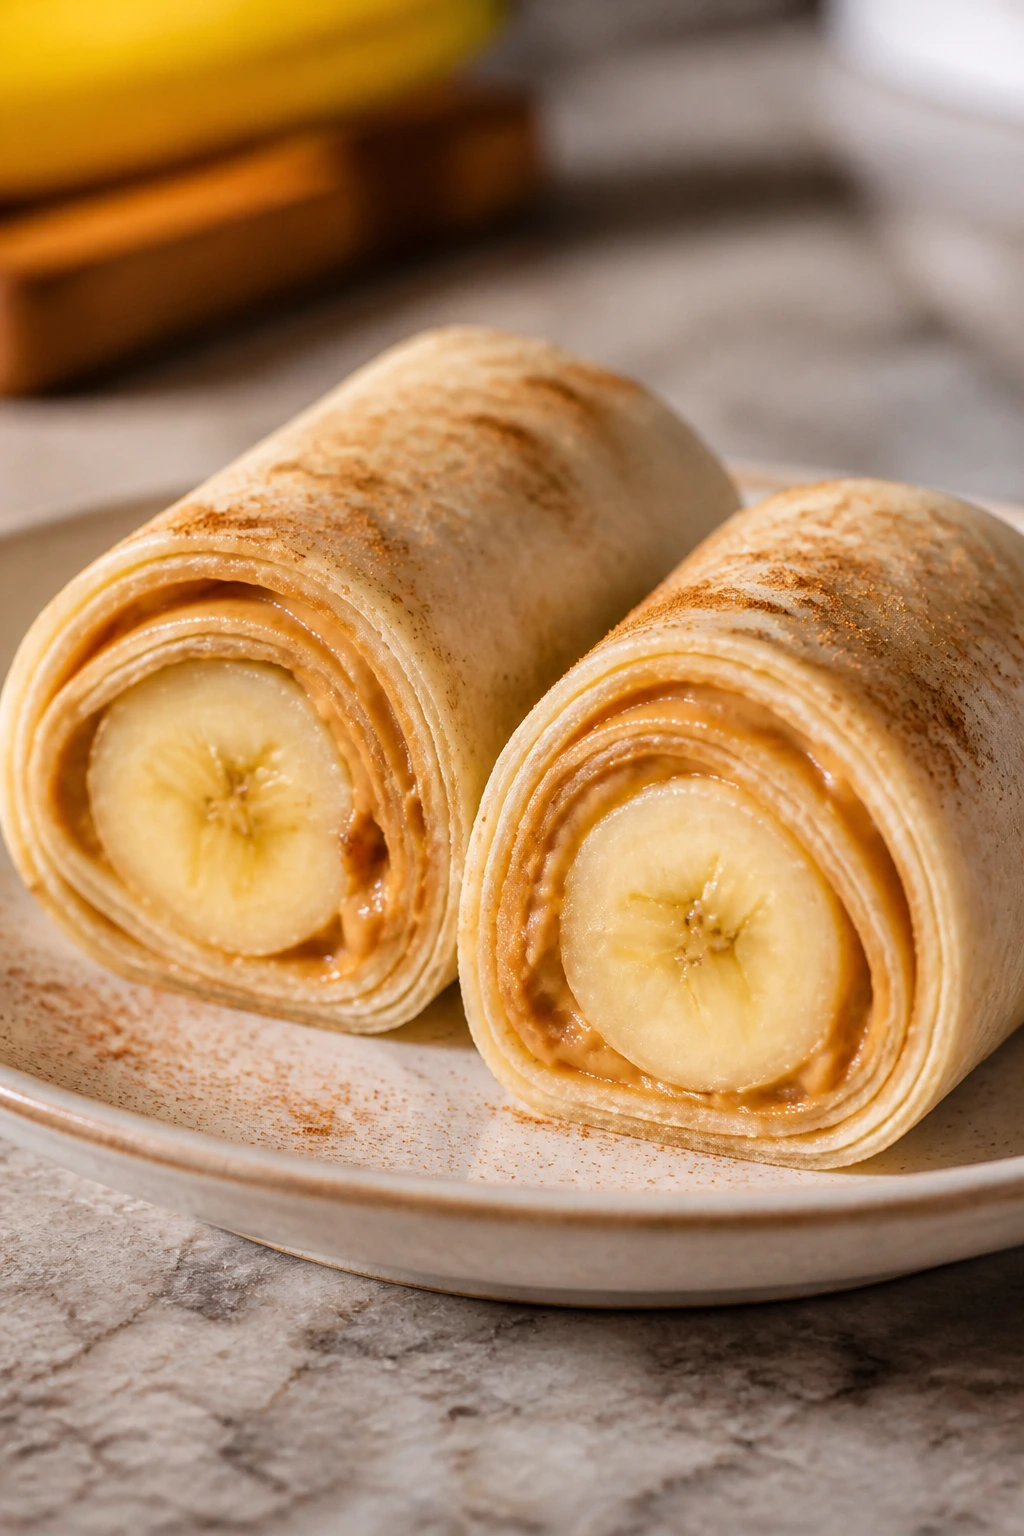
Some snacks need no introduction. Peanut butter, banana, and a soft tortilla are one of those combinations that never tries too hard. Rolled up and sliced, they make tidy little pinwheels with creamy centers and a sweet banana smell that kids seem to notice from across the room.
Why It Works:
The tortilla keeps the banana and peanut butter from becoming a sticky mess, and rolling it tightly helps the slices hold their shape. A sprinkle of cinnamon adds warmth without turning the snack into dessert. This is one of the fastest recipes in the bunch, which is handy when the previews start sooner than expected.
Key Ingredients:
- 2 large flour tortillas
- 4 tablespoons peanut butter
- 2 bananas
- 1/2 teaspoon cinnamon
- 1 tablespoon honey, optional
- 2 tablespoons crushed graham crackers, optional
Quick Steps:
- Spread peanut butter across each tortilla.
- Place one banana near the edge of each tortilla.
- Sprinkle with cinnamon and drizzle with honey if using.
- Roll tightly, then slice into 1-inch rounds.
- Serve immediately.
Equipment for This Recipe:
- Cutting board
- Butter knife or spatula
- Sharp knife
- Small plate
How to Serve This Dish:
Stack the slices on a small plate or skewer them for a playful look. They go well with apple slices or a handful of raisins if you want a little more texture. Keep them close to serving time; bananas brown if they sit around too long.
Pro Tips for This Recipe:
- Use ripe but still firm bananas.
- Warm the peanut butter for 10 seconds if it’s thick.
- Press the seam side down before slicing.
- A whole-wheat tortilla gives a nuttier flavor and holds up well.
Variations on This Dish:
- Chocolate Banana Roll-Ups: Add mini chocolate chips before rolling.
- Sunflower Seed Version: Use sunflower butter for school-safe snack prep.
- Cinnamon Toast Roll-Ups: Brush the tortilla with butter and cinnamon sugar before rolling.
Common Mistakes to Avoid with This Dish:
- Overfilling the tortilla: It pops open while slicing.
- Using overripe bananas: They squish and smear.
- Leaving them out too long: The banana edges darken and the wrap softens.
9. Marshmallow Popcorn Balls
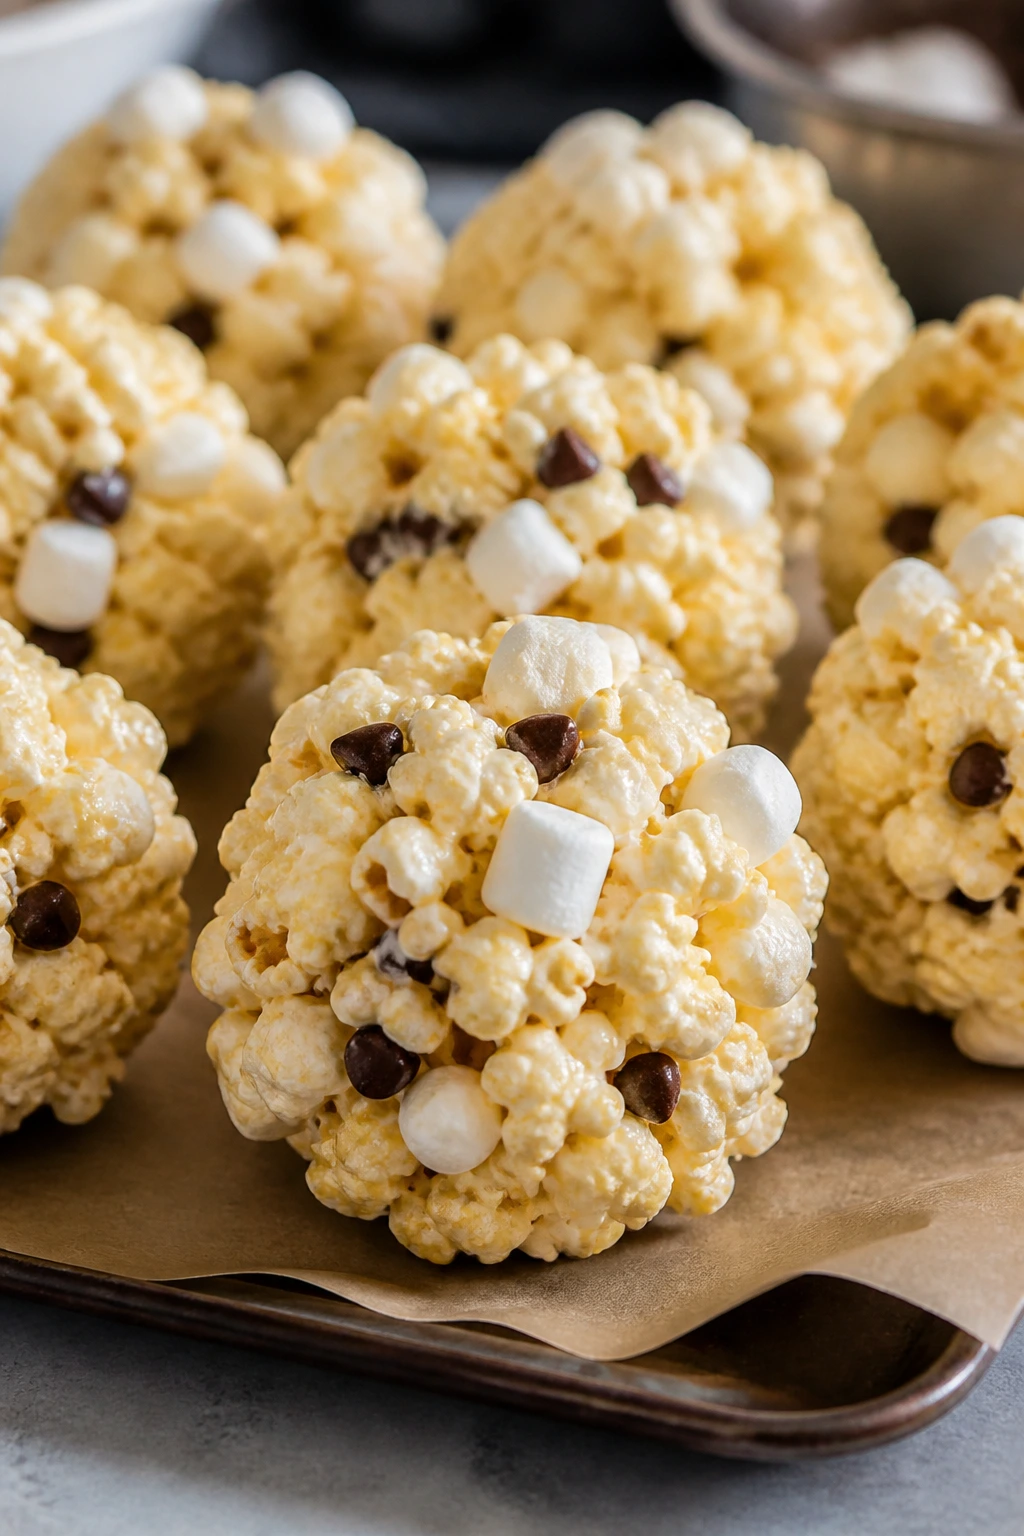
Popcorn balls bring a little old-school fun to movie night, and they are still a good idea. The texture is chewy and crunchy at the same time, with marshmallow glue holding everything together in sweet, sticky handfuls. Kids like shaping them. Adults like that they’re portioned out already.
Why It Works:
Melted marshmallows bind popcorn without needing a candy thermometer, which keeps the method simple. A buttered hand is the difference between a tidy ball and a glued-to-everything situation. Stir in the add-ins while the mixture is warm so they distribute evenly.
Key Ingredients:
- 10 cups popped popcorn
- 3 tablespoons butter
- 10 ounces mini marshmallows
- 1/2 teaspoon salt
- 1/2 cup mini chocolate chips
- 1/4 cup colorful sprinkles, optional
Quick Steps:
- Melt butter in a large pot over low heat.
- Add the marshmallows and stir until smooth.
- Remove from heat and mix in salt.
- Pour over popcorn and stir quickly.
- Let cool 1 minute, then shape into balls with buttered hands.
- Set on parchment until firm.
Equipment for This Recipe:
- Large pot
- Wooden spoon
- Parchment-lined tray
- Butter wrapper or a little extra butter for hands
How to Serve This Dish:
Wrap each ball in parchment squares if you want less stickiness on the couch. They’re fun in a bowl but even better when they’re portioned as individual treats. A cold glass of milk makes sense here, and so does a mug of warm cocoa.
Pro Tips for This Recipe:
- Keep the heat low or the marshmallows seize.
- Work quickly once the popcorn is mixed in.
- Butter your hands again after every 2 or 3 balls.
- Add chips only after the mixture cools slightly or they melt too much.
Variations on This Dish:
- Birthday Cake Popcorn Balls: Add rainbow sprinkles and a little vanilla extract.
- Peanut Butter Popcorn Balls: Stir 1/4 cup peanut butter into the melted marshmallows.
- S’mores Popcorn Balls: Add crushed graham crackers and mini marshmallows.
Common Mistakes to Avoid with This Dish:
- Using stale popcorn: The balls taste flat and dry.
- Letting the marshmallow get too hot: It hardens into strings.
- Skipping the salt: The flavor tastes one-note without it.
10. Taco Cups
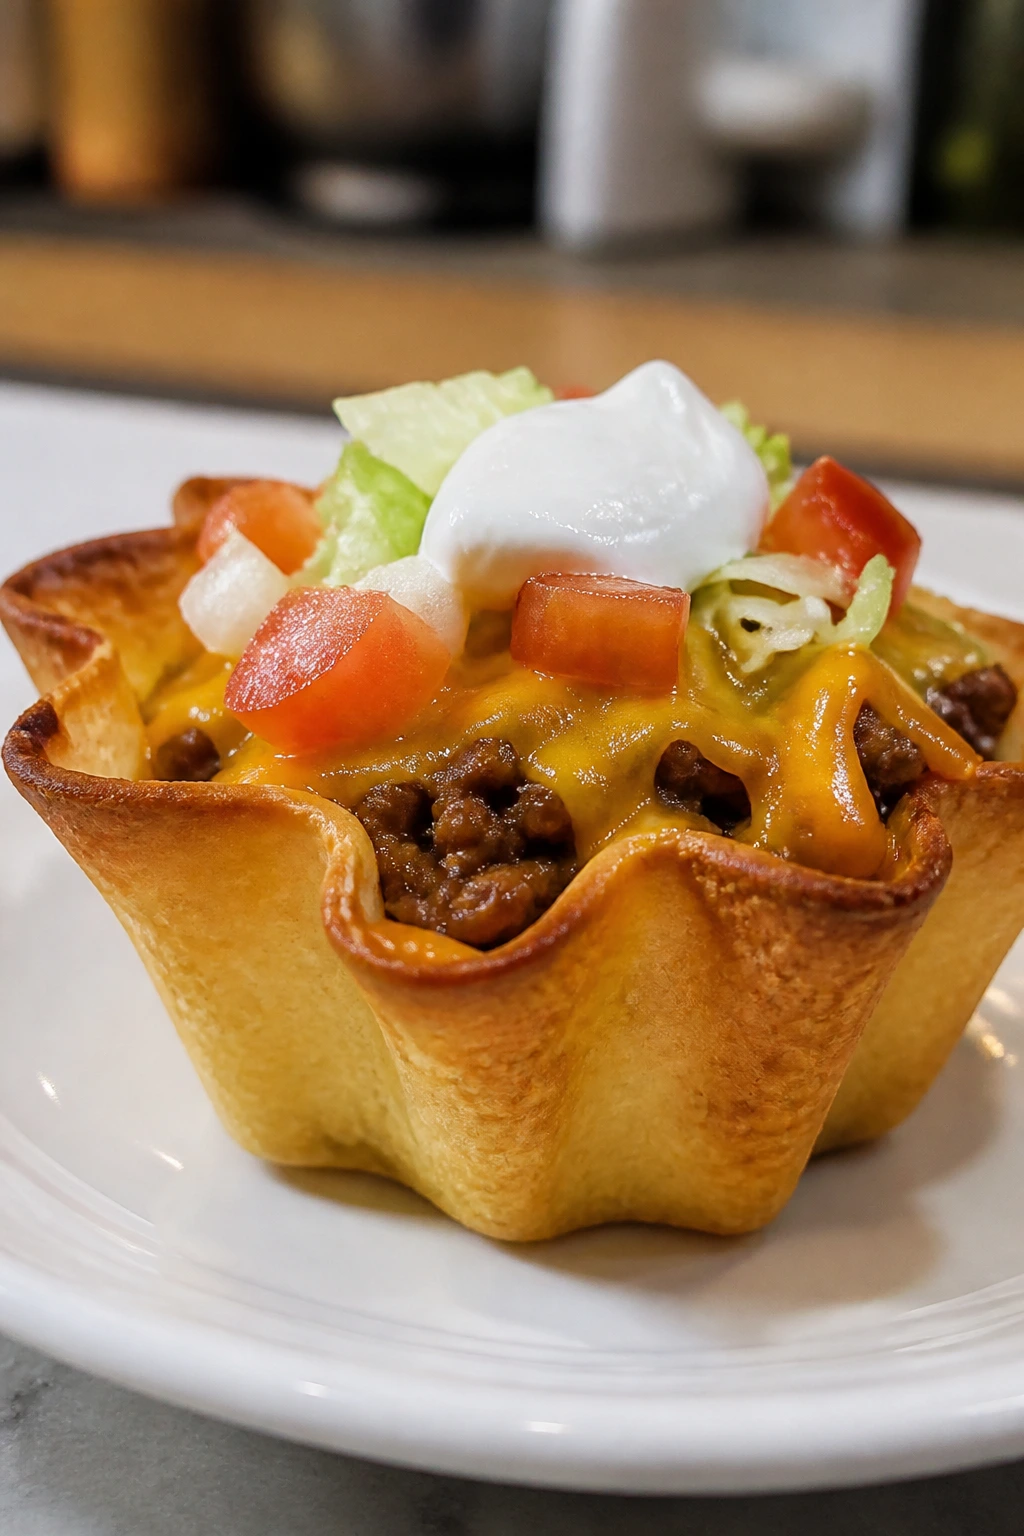
Taco cups are tiny, crisp-edged little lunches disguised as snacks. They bake in a muffin tin, which means each one comes out holding its shape instead of collapsing on the first bite. The shell gets crunchy, the beef stays juicy, and the toppings go on after baking so everything stays fresh.
Why It Works:
Pressing small tortillas into a muffin tin gives you built-in portion control and a sturdy shell. Ground beef cooks quickly with taco seasoning, and the cups stay less messy than a full taco tray. They’re especially nice for kids who like topping things themselves.
Key Ingredients:
- 8 small flour tortillas
- 1 pound ground beef
- 2 tablespoons taco seasoning
- 1/3 cup water
- 1 cup shredded cheddar
- 1 cup shredded lettuce
- 1/2 cup diced tomatoes
- 1/4 cup sour cream
Quick Steps:
- Preheat the oven to 375°F (190°C) and lightly oil a muffin tin.
- Brown the beef, drain the fat, and stir in taco seasoning with water.
- Press each tortilla into a muffin cup.
- Fill with beef and cheddar.
- Bake for 10 to 12 minutes until the edges crisp.
- Top with lettuce, tomatoes, and sour cream.
Equipment for This Recipe:
- Muffin tin
- Skillet
- Spoon
- Measuring cup
How to Serve This Dish:
Serve 2 cups per child and set the toppings in small bowls so everyone can customize. A side of corn or fruit keeps the plate balanced. These look best when the toppings are added right before serving, not ahead of time.
Pro Tips for This Recipe:
- Warm the tortillas for 10 seconds so they bend without cracking.
- Use lean beef so the cups do not pool with grease.
- Let the shells bake until the edges are golden and crisp.
- Keep wet toppings light or they soften the cups fast.
Variations on This Dish:
- Chicken Taco Cups: Use shredded rotisserie chicken with taco seasoning.
- Bean-and-Corn Cups: Swap the meat for black beans and corn.
- Spicy Teen Version: Add diced jalapeño and hot sauce to the beef.
Common Mistakes to Avoid with This Dish:
- Filling too high before baking: The tortilla softens and sags.
- Skipping the draining step: Greasy beef makes soggy cups.
- Adding lettuce too early: It wilts and loses its crunch.
11. Mini Bagel Pizzas
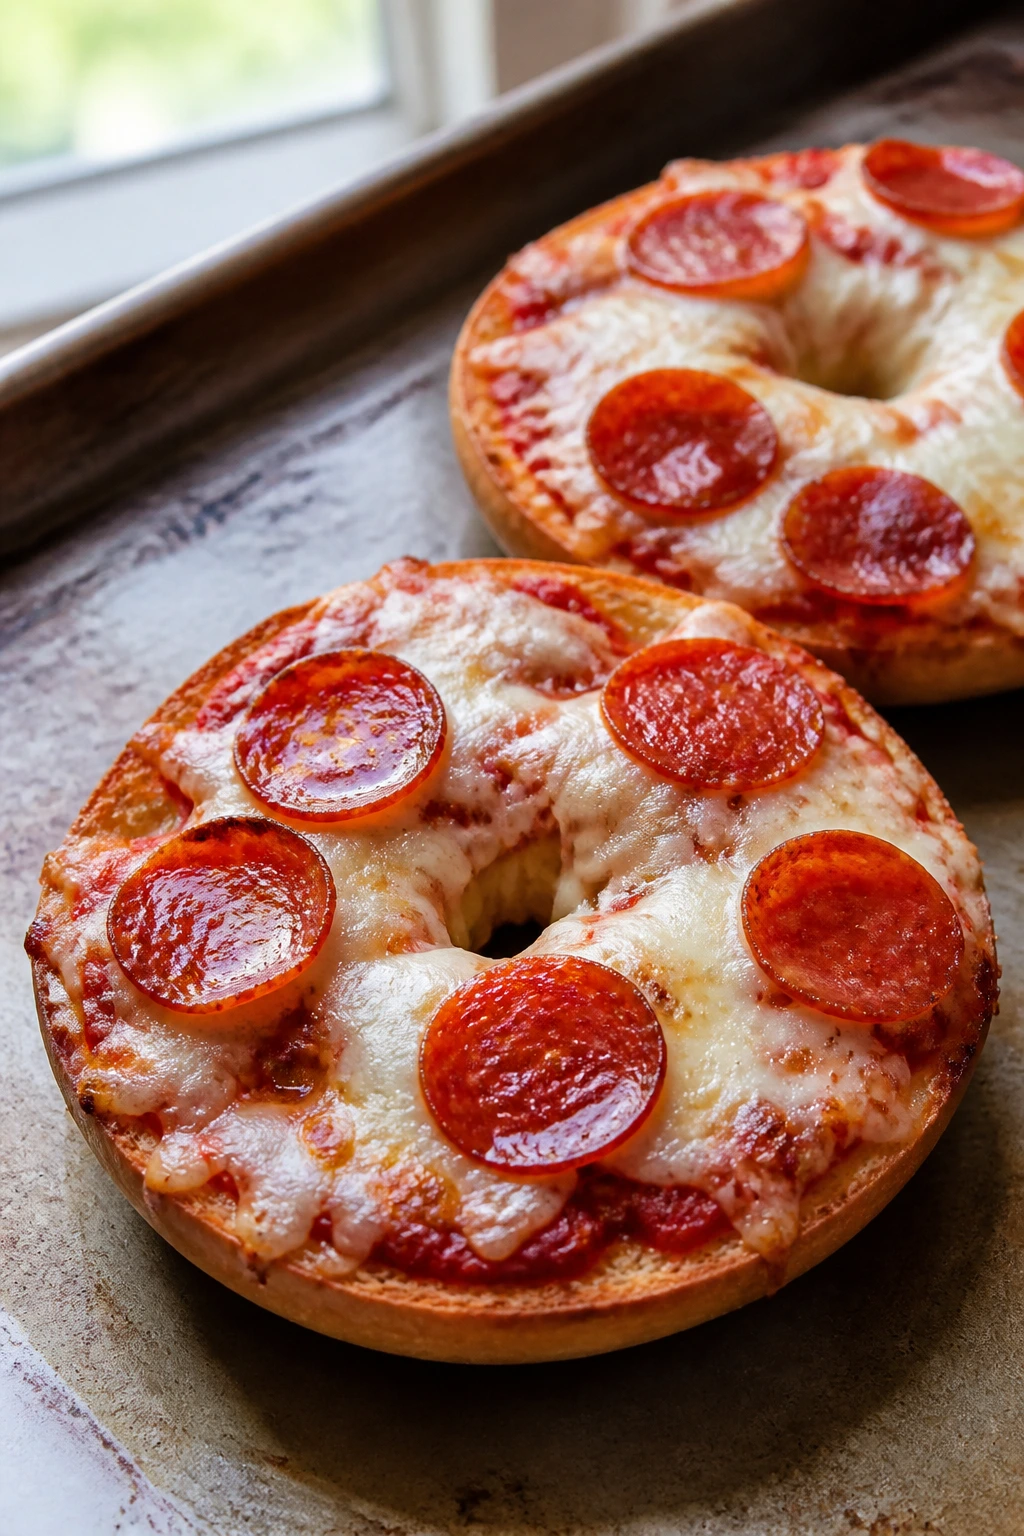
Mini bagel pizzas are the reliable friend in this lineup. They take almost no time, they brown well, and every kid already understands the mission: sauce, cheese, toppings, heat. The result is crisp around the edges, soft in the middle, and exactly the right size for a couch snack.
Why It Works:
Bagels have enough structure to hold sauce without going limp, which makes them better than plain bread for movie-night pizza. Toasting the cut sides first helps the bagels stay crisp underneath the toppings. It’s a good one for younger kids because they can assemble their own piece without much mess.
Key Ingredients:
- 6 mini bagels, split
- 3/4 cup pizza sauce
- 2 cups shredded mozzarella
- 1/2 cup mini pepperoni
- 1/4 cup diced bell pepper
- 1 teaspoon dried oregano
Quick Steps:
- Preheat the oven to 400°F (200°C).
- Toast the bagel halves for 3 minutes.
- Spread with sauce.
- Top with mozzarella, pepperoni, bell pepper, and oregano.
- Bake for 8 to 10 minutes until the cheese melts and bubbles.
Equipment for This Recipe:
- Baking sheet
- Spoon
- Knife
- Oven mitts
How to Serve This Dish:
Serve them warm on a tray with extra sauce for dipping. Two mini bagel pizzas make a light meal, or one per child works if the rest of the spread is generous. A simple green salad on the side helps if you want something fresher.
Pro Tips for This Recipe:
- Use plain mini bagels, not cinnamon-raisin.
- Grate the cheese finely so it melts fast.
- Keep the sauce layer thin.
- Add fresh basil after baking if you have it.
Variations on This Dish:
- BBQ Chicken Bagels: Use barbecue sauce and shredded chicken.
- Supreme Bagels: Add olives, mushrooms, and onion.
- Cheese-Only Bagels: Perfect for the picky eaters who want a clean, simple bite.
Common Mistakes to Avoid with This Dish:
- Overloading the bagels: They get soggy in the middle.
- Skipping the toast: The sauce leaks into the bread.
- Using too much sauce: A light spread is enough.
12. Loaded Tater Tot Cups
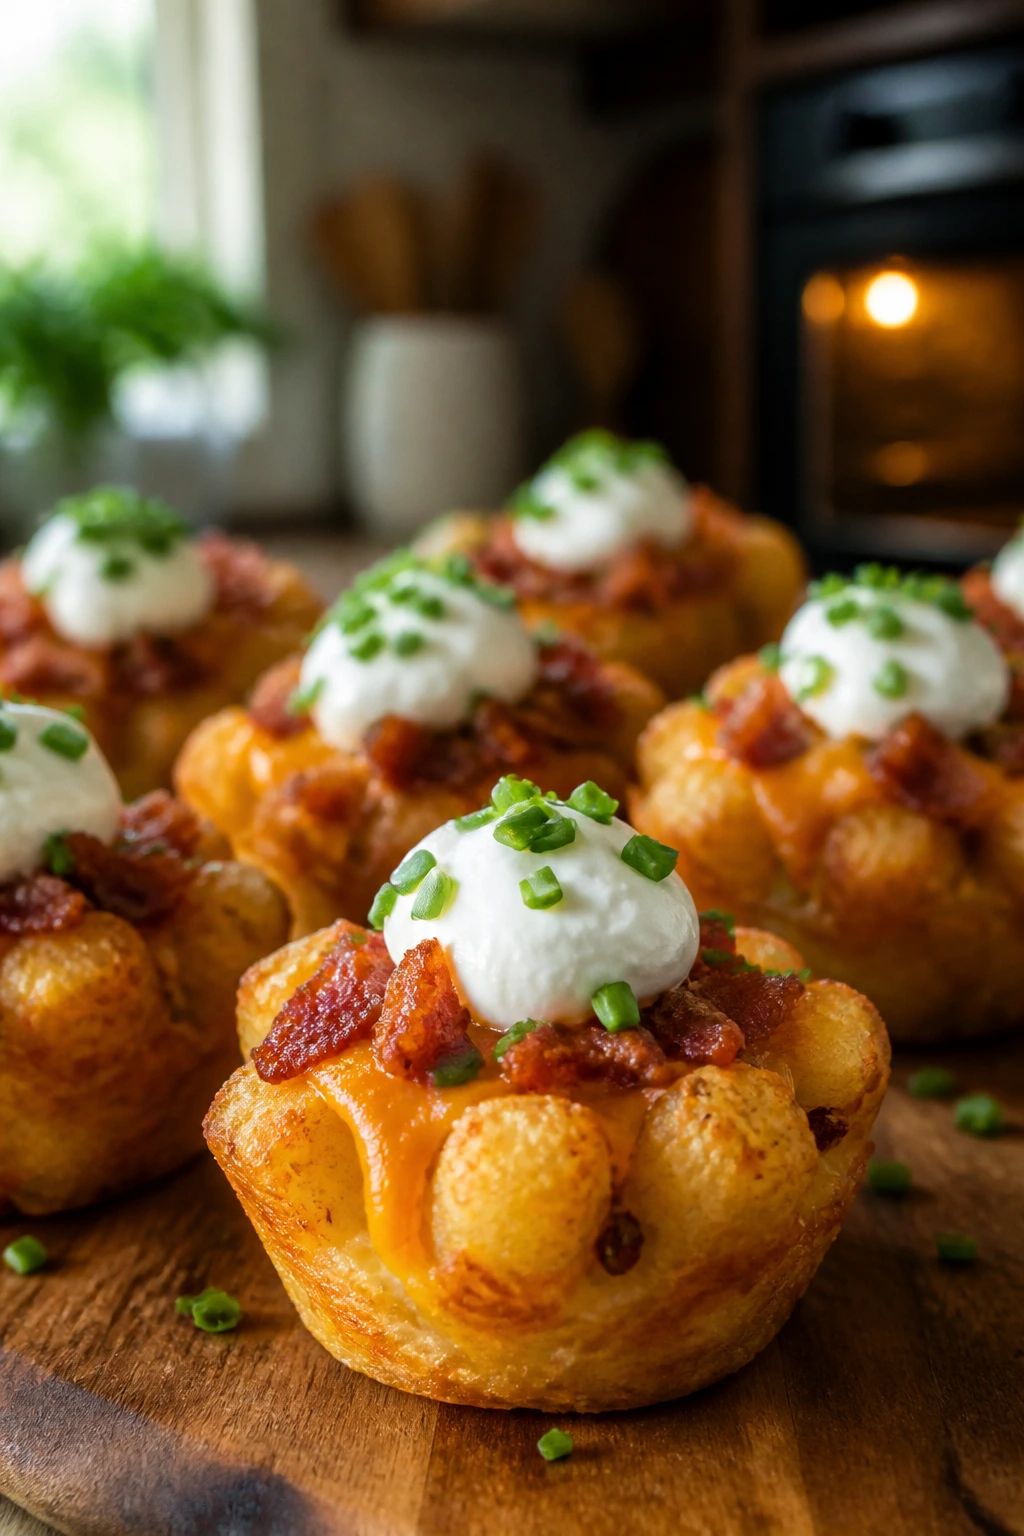
Tater tots already feel like a treat. Baking them into little cups with cheese and a savory filling makes them even more fun. The outside crisps up, the middle stays soft, and you get a snack that tastes like a tiny baked potato crossed with a nacho tray.
Why It Works:
The muffin tin gives the tots a shape they would not hold on their own. A little pre-bake is the secret; once the tot cups firm up, they can hold cheese, bacon, or whatever kid-friendly topping you choose. They’re nice because they can be made with freezer staples.
Key Ingredients:
- 24 frozen tater tots
- 1 cup shredded cheddar
- 1/2 cup cooked crumbled bacon
- 1/4 cup sour cream
- 2 tablespoons chopped chives
- Salt and pepper
Quick Steps:
- Preheat the oven to 425°F (220°C).
- Place 2 tots in each muffin cup and bake 10 minutes.
- Press them down with a spoon to form cups.
- Fill with cheddar and bacon.
- Bake 8 more minutes until melted.
- Top with sour cream and chives.
Equipment for This Recipe:
- Muffin tin
- Spoon
- Baking sheet if needed
- Small bowls for toppings
How to Serve This Dish:
Serve them while the cheese is still soft. They work well as a side, but I usually put them out as one of several snackable plates. A little ketchup or ranch on the side keeps kids from asking for extra fuss.
Pro Tips for This Recipe:
- Pre-baking the tots is what makes the cup shape work.
- Use regular muffin tins, not mini ones, or the tots crowd.
- Press gently; don’t mash them flat.
- If the bacon is salty, ease up on extra salt.
Variations on This Dish:
- Pizza Tot Cups: Use pizza sauce, mozzarella, and pepperoni.
- Veggie Tot Cups: Add sautéed mushrooms and peppers.
- Chili Tot Cups: Spoon in a little chili and cheddar for an older-kid crowd.
Common Mistakes to Avoid with This Dish:
- Filling before the cups are set: They collapse.
- Using too many tots per cup: The shape gets cramped.
- Overbaking after filling: The cheese turns greasy.
13. Fruit Pizza Bites
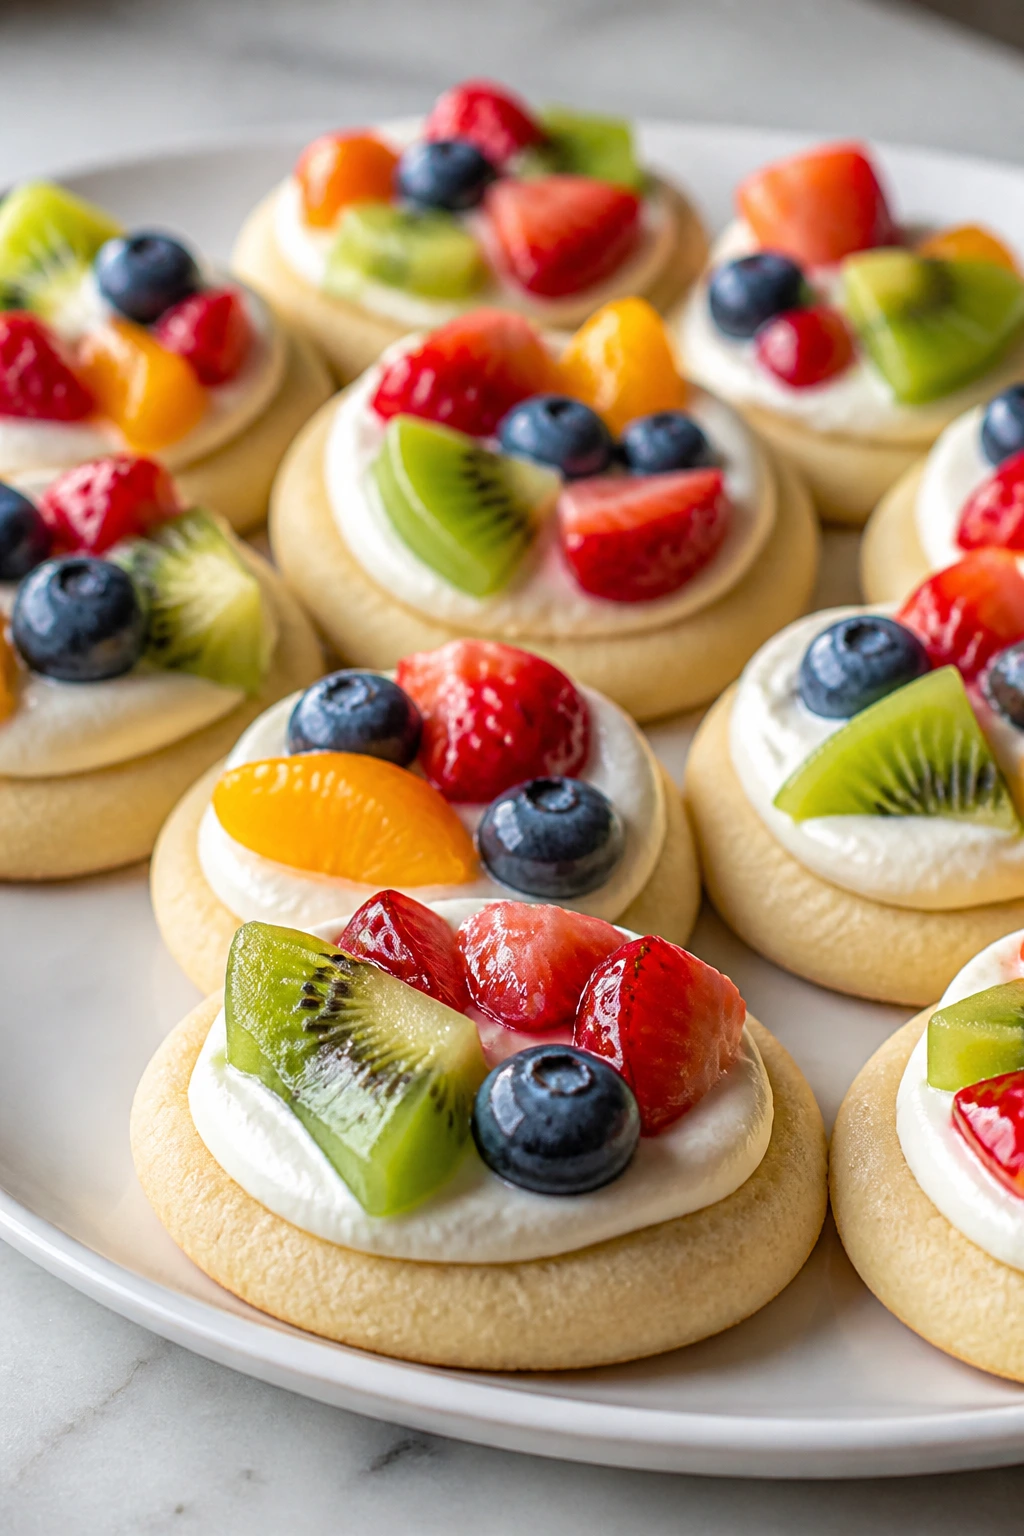
Fruit pizza bites have the cheerful look of a dessert platter and the practicality of a hand-held snack. A soft cookie base, a smooth cream cheese layer, and a few colorful fruit pieces make each bite feel a little dressed up. They’re best when the fruit is dry and the cookies are fully cooled, or the whole thing slides around.
Why It Works:
Small cookie rounds are easier for kids than a full fruit pizza, which tends to get messy the moment someone takes a slice. Cream cheese gives the topping body so the fruit stays put. You get a sweet finish without turning the kitchen into a bakery project.
Key Ingredients:
- 12 sugar cookie rounds, baked and cooled
- 4 ounces cream cheese, softened
- 2 tablespoons powdered sugar
- 1 teaspoon vanilla extract
- 1/2 cup strawberries, diced
- 1/2 cup blueberries
- 1 kiwi, peeled and diced
Quick Steps:
- Mix the cream cheese, powdered sugar, and vanilla until smooth.
- Spread a small spoonful on each cookie round.
- Top with fruit.
- Chill for 10 minutes if you want a firmer set.
Equipment for This Recipe:
- Mixing bowl
- Spoon
- Knife and cutting board
- Serving tray
How to Serve This Dish:
Arrange them in a ring on a platter so the colors show off. They’re a better dessert choice when you want something lighter than brownies but still fun enough for a movie. Serve with napkins; the fruit can slip if the cream cheese layer is generous.
Pro Tips for This Recipe:
- Pat the fruit dry so it doesn’t weep onto the cookies.
- Use small, even pieces.
- Keep the cream cheese layer thin.
- Bake the cookie rounds ahead and cool them completely.
Variations on This Dish:
- Berry-Only Bites: Use strawberries and blueberries for a simpler look.
- Tropical Bites: Swap in mango and pineapple.
- Chocolate Cookie Version: Use chocolate sugar cookies for a richer base.
Common Mistakes to Avoid with This Dish:
- Assembling too far ahead: The cookies soften.
- Using wet fruit: It loosens the topping.
- Spreading cream cheese too thick: It makes the bites heavy.
14. Cinnamon Sugar Tortilla Chips
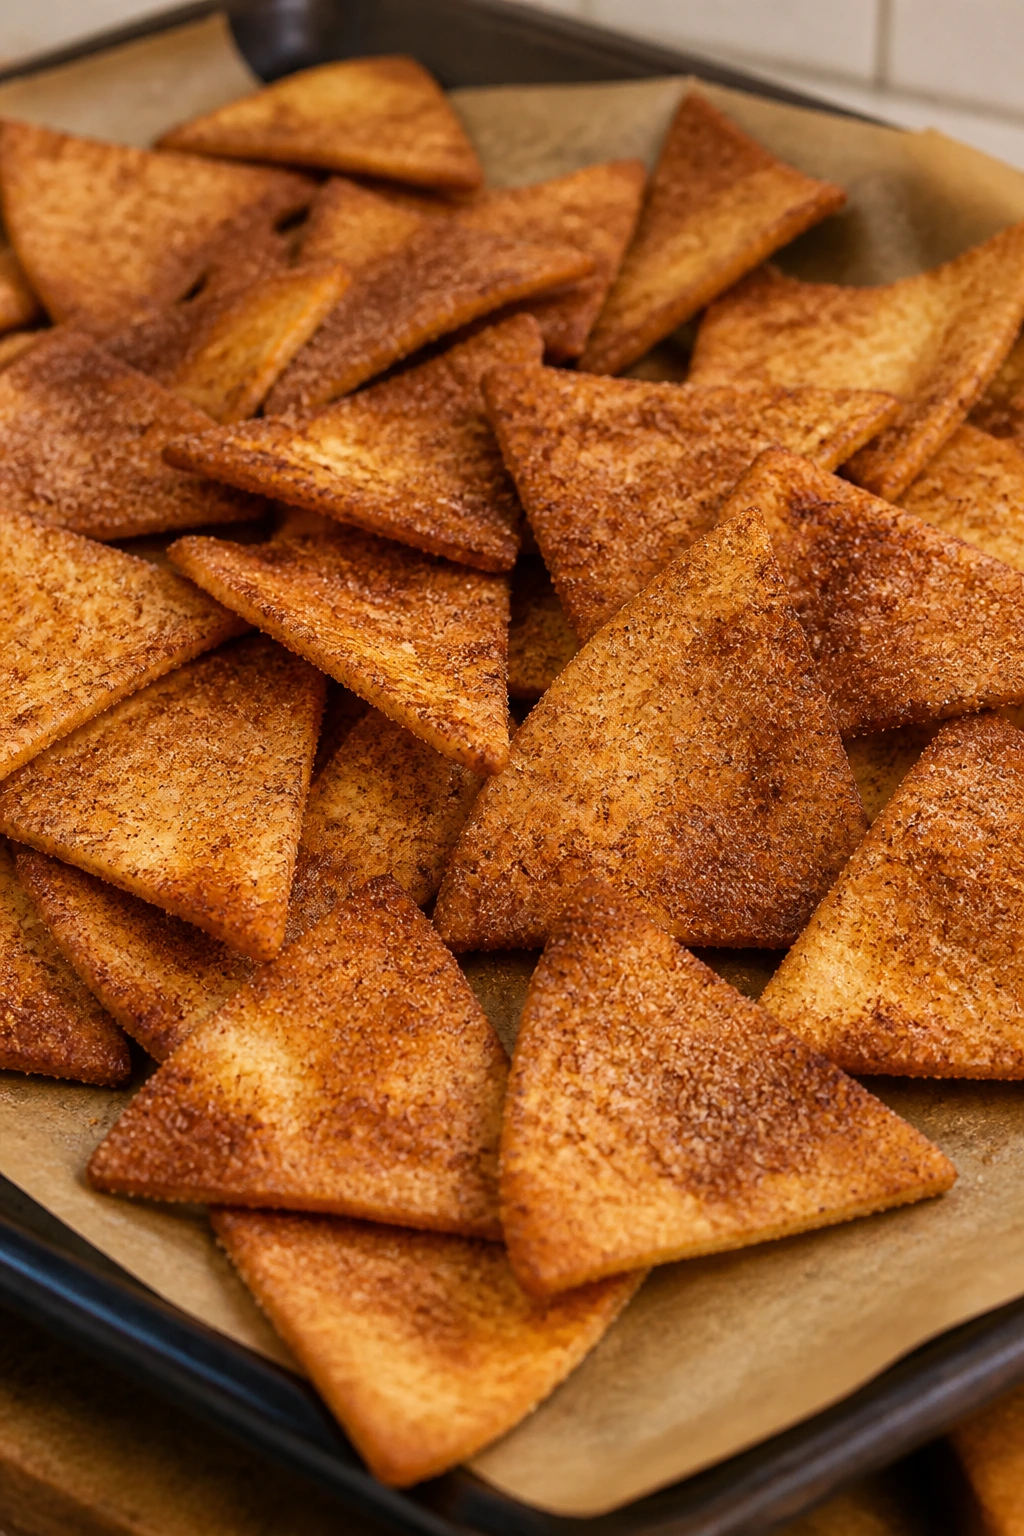
These are the homemade version of those sweet little snacks people remember from school fairs and café counters. Warm tortillas brushed with butter, sprinkled with cinnamon sugar, and baked until crisp make a snack that smells like toast and dessert at once. The crunch matters here. You want a clean snap, not a bend.
Why It Works:
Flour tortillas crisp quickly in the oven and take on cinnamon sugar beautifully. Cutting them into wedges before baking gives you neat, snackable pieces. The key is not over-buttering them; too much makes the chips chewy instead of crisp.
Key Ingredients:
- 4 flour tortillas
- 3 tablespoons melted butter
- 1/4 cup granulated sugar
- 1 tablespoon cinnamon
- Pinch of salt
Quick Steps:
- Preheat the oven to 375°F (190°C).
- Brush both sides of the tortillas lightly with melted butter.
- Mix the sugar, cinnamon, and salt.
- Cut each tortilla into wedges and sprinkle with the cinnamon sugar.
- Bake for 8 to 10 minutes until crisp.
Equipment for This Recipe:
- Baking sheet
- Pastry brush
- Sharp knife or pizza cutter
- Small bowl
How to Serve This Dish:
Serve them with fruit salsa, yogurt dip, or melted chocolate for dipping. They also work on their own in a bowl, which is probably why they disappear so fast. Let them cool for a minute or two before serving; they crisp as they sit.
Pro Tips for This Recipe:
- Keep the butter layer thin.
- Flip halfway through if your oven browns unevenly.
- Add a little orange zest to the sugar if you want a brighter flavor.
- Use a pizza cutter for cleaner wedges.
Variations on This Dish:
- Churro-Style Chips: Add a dusting of extra cinnamon sugar after baking.
- Chocolate Dip Chips: Serve with melted chocolate instead of fruit dip.
- Honey Butter Chips: Swap some sugar for a brush of honey butter.
Common Mistakes to Avoid with This Dish:
- Too much butter: The chips soften.
- Baking at too low a heat: They dry out without crisping.
- Leaving them on the pan too long after baking: They can overbrown fast.
15. Mini Meatball Subs
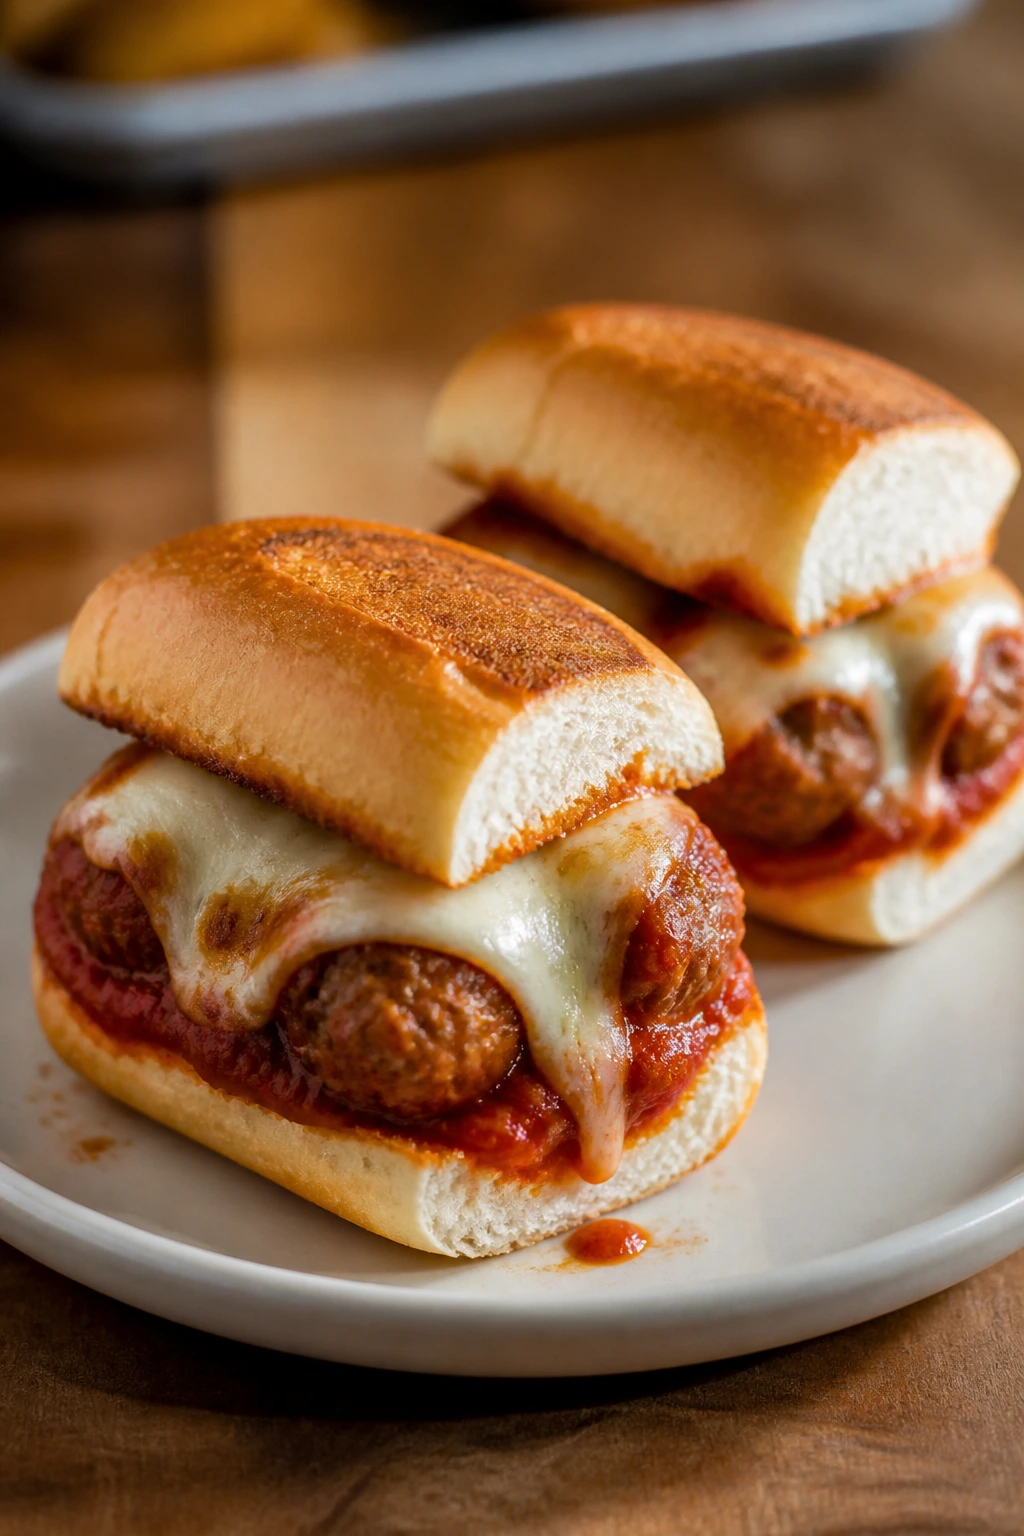
A mini meatball sub feels like the snack version of a hug. Soft rolls, saucy meatballs, and a layer of melted cheese make a tidy little sandwich that is hearty without being enormous. They’re especially useful when movie night slides closer to dinner time and everyone’s hungry enough for something a little more substantial.
Why It Works:
Small rolls keep the portions manageable, and using frozen or pre-cooked meatballs saves time without wrecking the flavor. Toasting the rolls first protects them from the sauce. The melted cheese seals the deal and helps the sandwich stay together.
Key Ingredients:
- 12 small meatballs, cooked
- 6 mini sub rolls
- 1 cup marinara sauce
- 1 1/2 cups shredded mozzarella
- 1 tablespoon butter
- 1 teaspoon dried basil
Quick Steps:
- Warm the meatballs in marinara sauce over low heat.
- Split and butter the rolls, then toast them for 2 minutes.
- Fill each roll with 2 meatballs and some sauce.
- Top with mozzarella and basil.
- Bake at 375°F (190°C) for 5 minutes until the cheese melts.
Equipment for This Recipe:
- Skillet or saucepan
- Baking sheet
- Spoon
- Knife
How to Serve This Dish:
Serve them wrapped in parchment or napkins so sauce spills stay under control. A side salad or carrot sticks makes the plate less heavy, but honestly, these can stand on their own if the rest of the spread is lighter. They’re the kind of snack that makes the room go quiet.
Pro Tips for This Recipe:
- Use small meatballs so the rolls don’t split.
- Don’t drown them in sauce.
- Toasting the rolls matters more than you’d think.
- Add Parmesan at the end for a salty finish.
Variations on This Dish:
- Meatball Parm Subs: Add a dusting of Parmesan and extra sauce.
- Turkey Meatball Subs: Use turkey meatballs for a lighter version.
- Veggie Meatball Subs: Swap in plant-based meatballs if that’s easier.
Common Mistakes to Avoid with This Dish:
- Using oversized meatballs: The rolls tear.
- Skipping the toast: The bread turns soft fast.
- Too much sauce: It leaks onto laps and blankets.
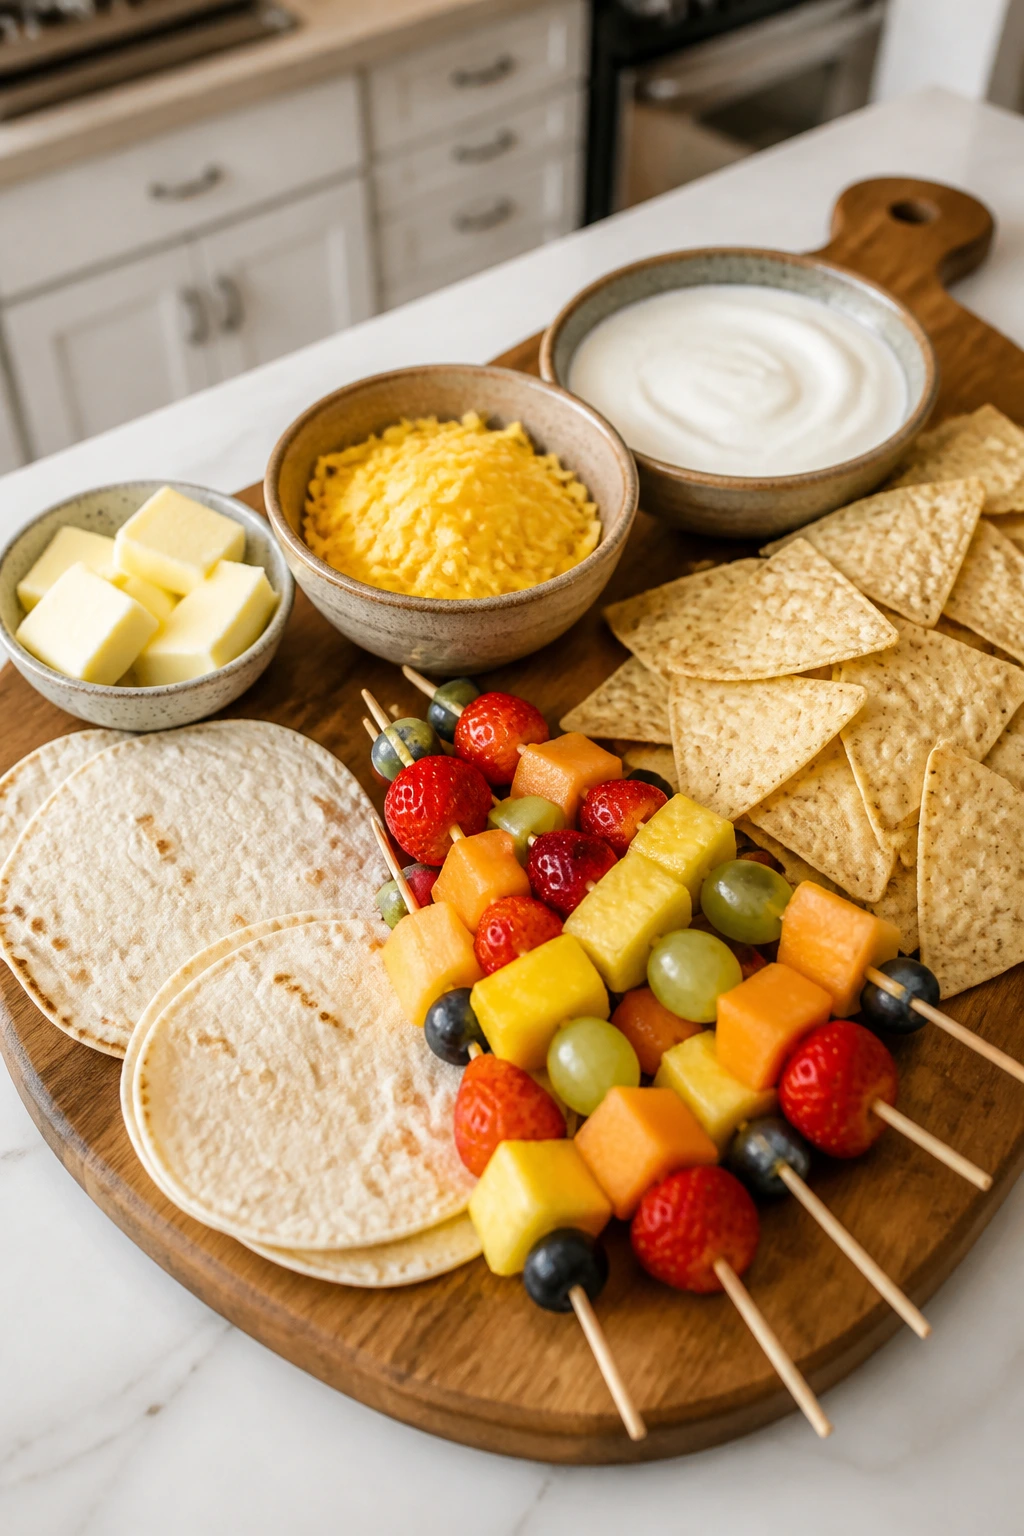
16. Rainbow Snack Kabobs
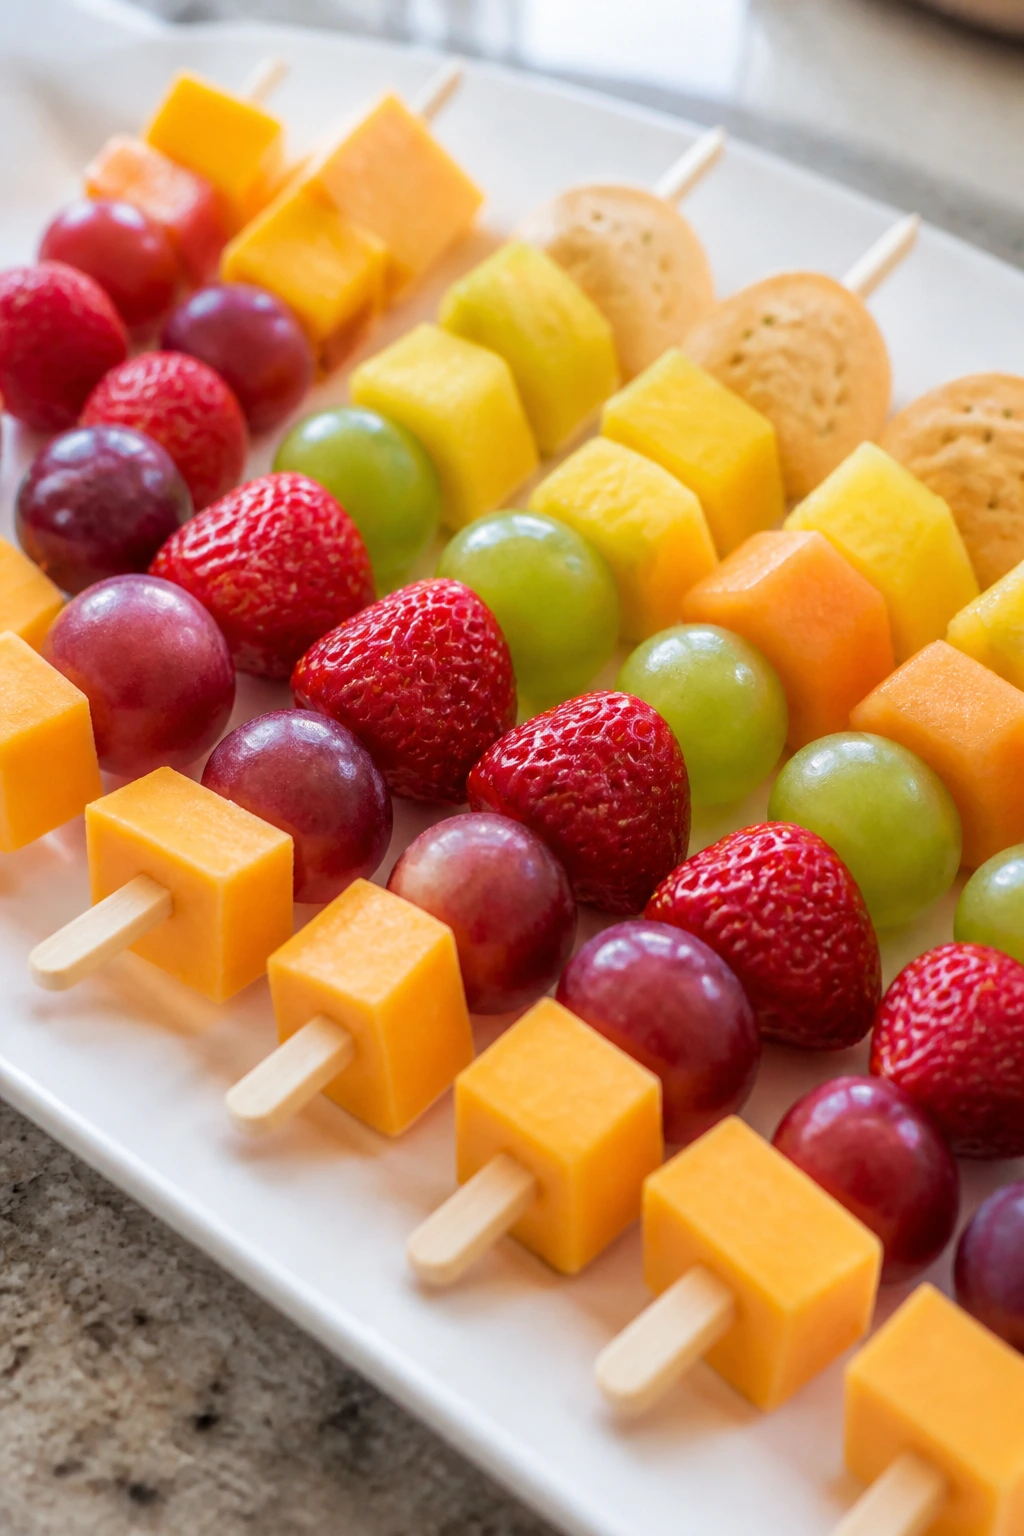
These are snack skewers without the fuss of a cooking project, and they always feel a little more playful than a bowl of fruit. Cheese cubes, grapes, strawberries, and crackers stacked in color order make a bright, grab-and-go bite that fits movie night perfectly. They also buy you time, because kids usually slow down to look at what they’re picking up.
Why It Works:
The skewer format turns ordinary snack pieces into something that feels assembled on purpose. The contrast of cheese and fruit keeps the sweetness from getting one-note. If you include a cracker between pieces, you get a little crunch too.
Key Ingredients:
- 8 ounces cheddar cheese, cut into cubes
- 1 cup seedless grapes
- 1 cup strawberries, hulled
- 1 cup cubed melon
- 12 small square crackers
- 8 to 10 small skewers or toothpicks
Quick Steps:
- Wash and dry all the fruit.
- Cut the cheese into bite-size cubes.
- Thread fruit, cheese, and crackers onto the skewers.
- Arrange on a platter and serve chilled.
Equipment for This Recipe:
- Cutting board
- Knife
- Small skewers or toothpicks
- Serving platter
How to Serve This Dish:
Lay them in a single layer so the colors show. These work well alongside salty snacks like popcorn or pretzel bites. They’re also one of the easiest things to let older kids assemble themselves, which is always worth doing.
Pro Tips for This Recipe:
- Dry the fruit well or the crackers soften.
- Cut everything in similar sizes.
- Use rounded skewers for younger kids, or skip the skewer and make a bowl version.
- Chill the kabobs for 15 minutes if your room is warm.
Variations on This Dish:
- All-Fruit Kabobs: Skip the cheese and crackers for a lighter plate.
- Cheese-and-Apple Kabobs: Use apple chunks instead of melon.
- Savory Kabobs: Add cucumber and turkey slices.
Common Mistakes to Avoid with This Dish:
- Cutting pieces too big: They slide off the skewer.
- Not drying the fruit: Crackers turn limp.
- Using brittle picks: Little hands need something sturdy.
17. Brownie Skillet Sundaes
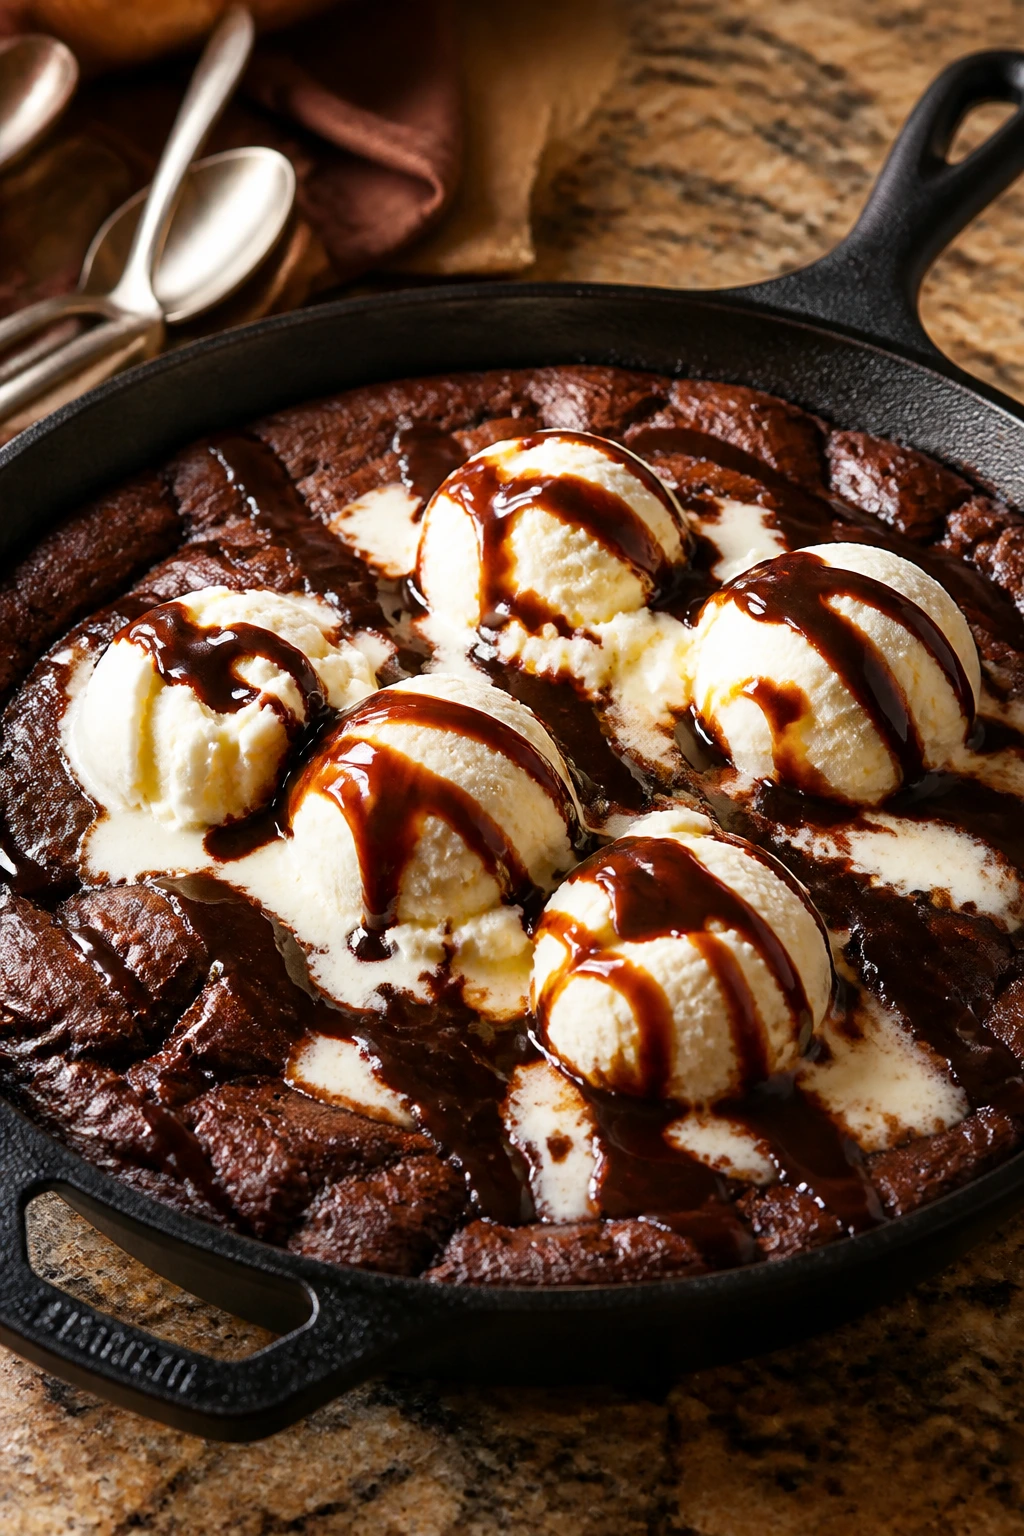
This one is pure movie-night indulgence, and I won’t pretend otherwise. A warm skillet brownie with scoops of ice cream melting into the cracks is the kind of dessert that makes kids sit very still for one glorious minute. It’s messy, rich, and worth the extra spoons.
Why It Works:
A cast-iron skillet keeps the brownie edges chewy while the middle stays soft. Baking it in one pan means you can serve straight from the oven, which matters when you do not want to fuss with slices. Ice cream belongs on top while the brownie is still warm so you get that melting edge.
Key Ingredients:
- 1 boxed brownie mix, plus the ingredients listed on the box
- 2 tablespoons chocolate chips
- 1 pint vanilla ice cream
- 1/4 cup chocolate sauce
- 1/4 cup chopped peanuts or sprinkles, optional
Quick Steps:
- Preheat the oven and make the brownie batter according to the box.
- Stir in the chocolate chips.
- Pour into a greased 10-inch skillet.
- Bake until the center is set but still a little soft.
- Top with scoops of ice cream, sauce, and peanuts or sprinkles.
Equipment for This Recipe:
- 10-inch cast-iron skillet
- Mixing bowl
- Spoon
- Ice cream scoop
How to Serve This Dish:
Put the skillet on a trivet in the middle of the table and hand out spoons. If you want smaller servings, scoop the brownie into bowls first and top each one with a little ice cream. Either way, serve it warm and fast.
Pro Tips for This Recipe:
- Pull it from the oven when the center still looks slightly underdone.
- Let it rest 5 minutes before topping with ice cream.
- A pinch of salt on top sharpens the chocolate.
- If the skillet is seasoned well, the edges release easily.
Variations on This Dish:
- S’mores Skillet Sundae: Add crushed graham crackers and mini marshmallows.
- Mint Chip Sundae: Use mint ice cream and chocolate sauce.
- Berry Brownie Skillet: Add strawberries on top of the ice cream.
Common Mistakes to Avoid with This Dish:
- Overbaking the brownie: It gets dry fast.
- Serving in a hot skillet without warning: Little hands need a trivet.
- Adding ice cream too early: It melts into a puddle before anyone can take a bite.
18. Sweet-and-Salty Trail Mix Popcorn
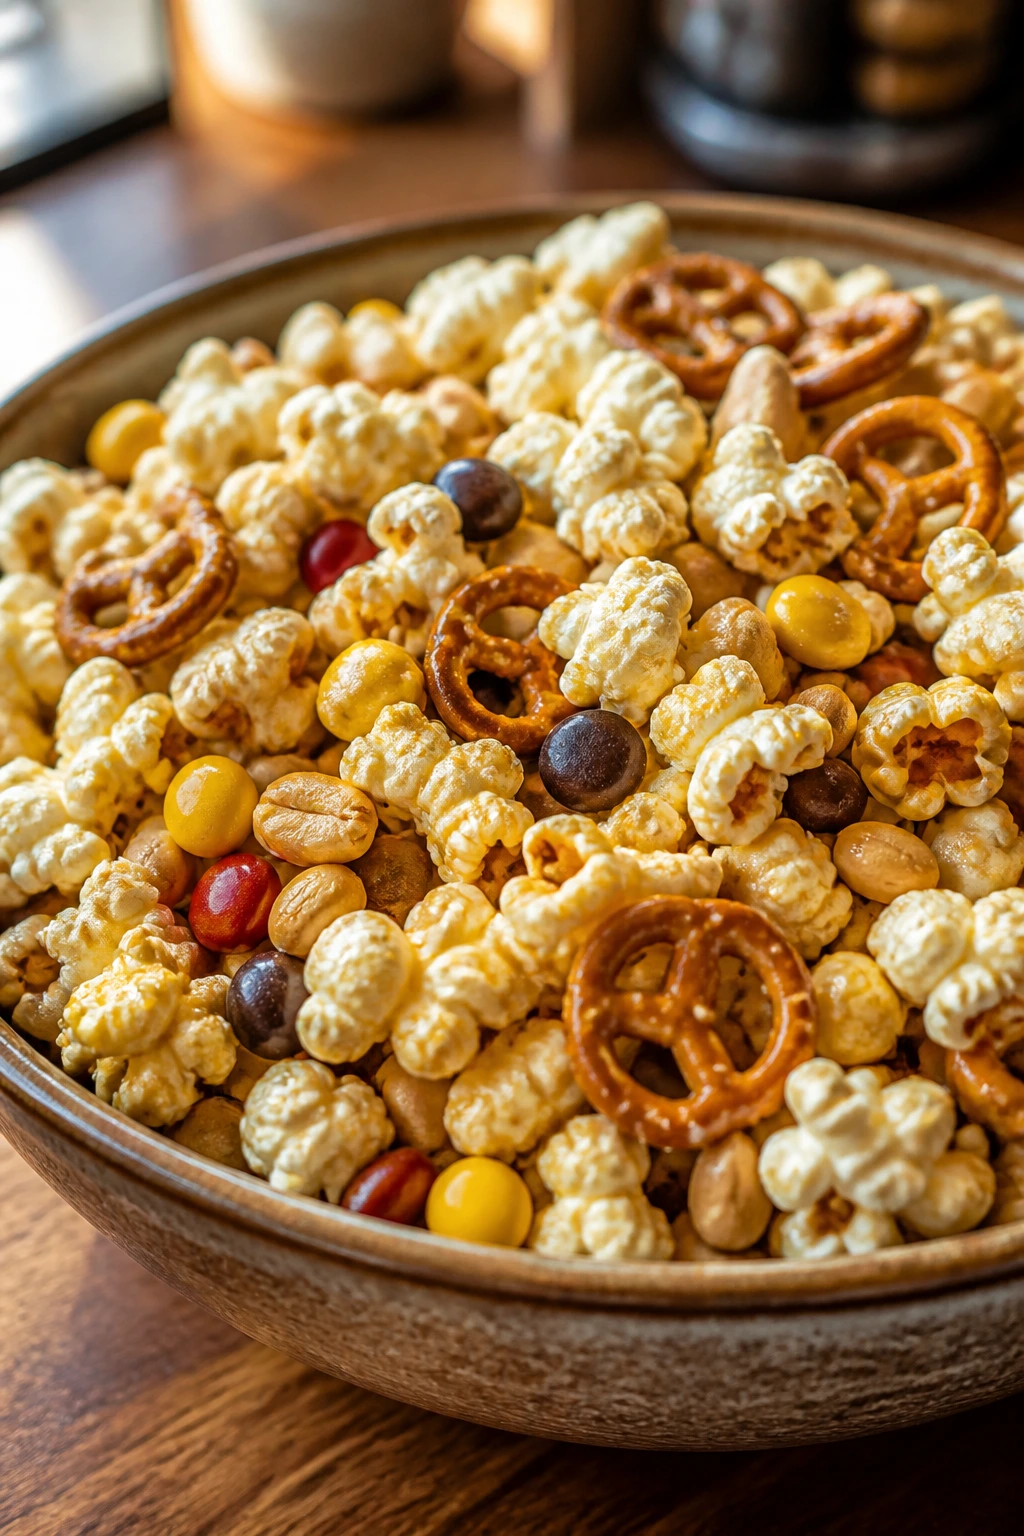
Trail mix popcorn is the snack that keeps reaching for more popcorn, then peanuts, then chocolate, then pretzels. It’s salty, sweet, crunchy, and a little messy, which is kind of the point. It’s also a strong choice when you want a big bowl that feels festive without needing a stove.
Why It Works:
Popcorn gives you volume, trail mix gives you texture, and a light buttery coating helps the seasonings stick. The balance matters: too much candy and it turns cloying; too many nuts and younger kids lose interest. A little restraint makes the whole bowl more snackable.
Key Ingredients:
- 8 cups popped popcorn
- 1 cup pretzel twists
- 1/2 cup roasted peanuts
- 1/2 cup mini chocolate candies
- 3 tablespoons melted butter
- 1 tablespoon brown sugar
- 1/2 teaspoon flaky salt
Quick Steps:
- Combine the popcorn, pretzels, peanuts, and candies in a large bowl.
- Stir together the melted butter and brown sugar.
- Drizzle over the mix and toss.
- Sprinkle with flaky salt.
- Serve right away or let it cool for a crunchier texture.
Equipment for This Recipe:
- Large mixing bowl
- Spoon or spatula
- Measuring cups
- Serving bowl
How to Serve This Dish:
Serve it in one big bowl for sharing or divide it into paper cones for cleaner couch eating. It pairs nicely with something warm and plain, like the pretzel bites or a simple fruit tray. I’d keep this one near the center of the snack spread because it tends to vanish first.
Pro Tips for This Recipe:
- Let hot popcorn cool for 2 to 3 minutes before adding candy so it doesn’t melt.
- Use roasted, not raw, peanuts for better flavor.
- Add the salt at the end.
- If you want less sweetness, cut the candy amount in half.
Variations on This Dish:
- Cinnamon Pretzel Mix: Add 1/2 teaspoon cinnamon to the butter mixture.
- Birthday Trail Popcorn: Use colorful candies and extra sprinkles.
- Nut-Free Version: Swap peanuts for sunflower seeds and pumpkin seeds.
Common Mistakes to Avoid with This Dish:
- Adding chocolate to piping-hot popcorn: It melts into streaks.
- Making it too sweet: The salt disappears and the snack gets sticky.
- Using stale pretzels: The whole bowl tastes flat.
19. Veggie Hummus Cups
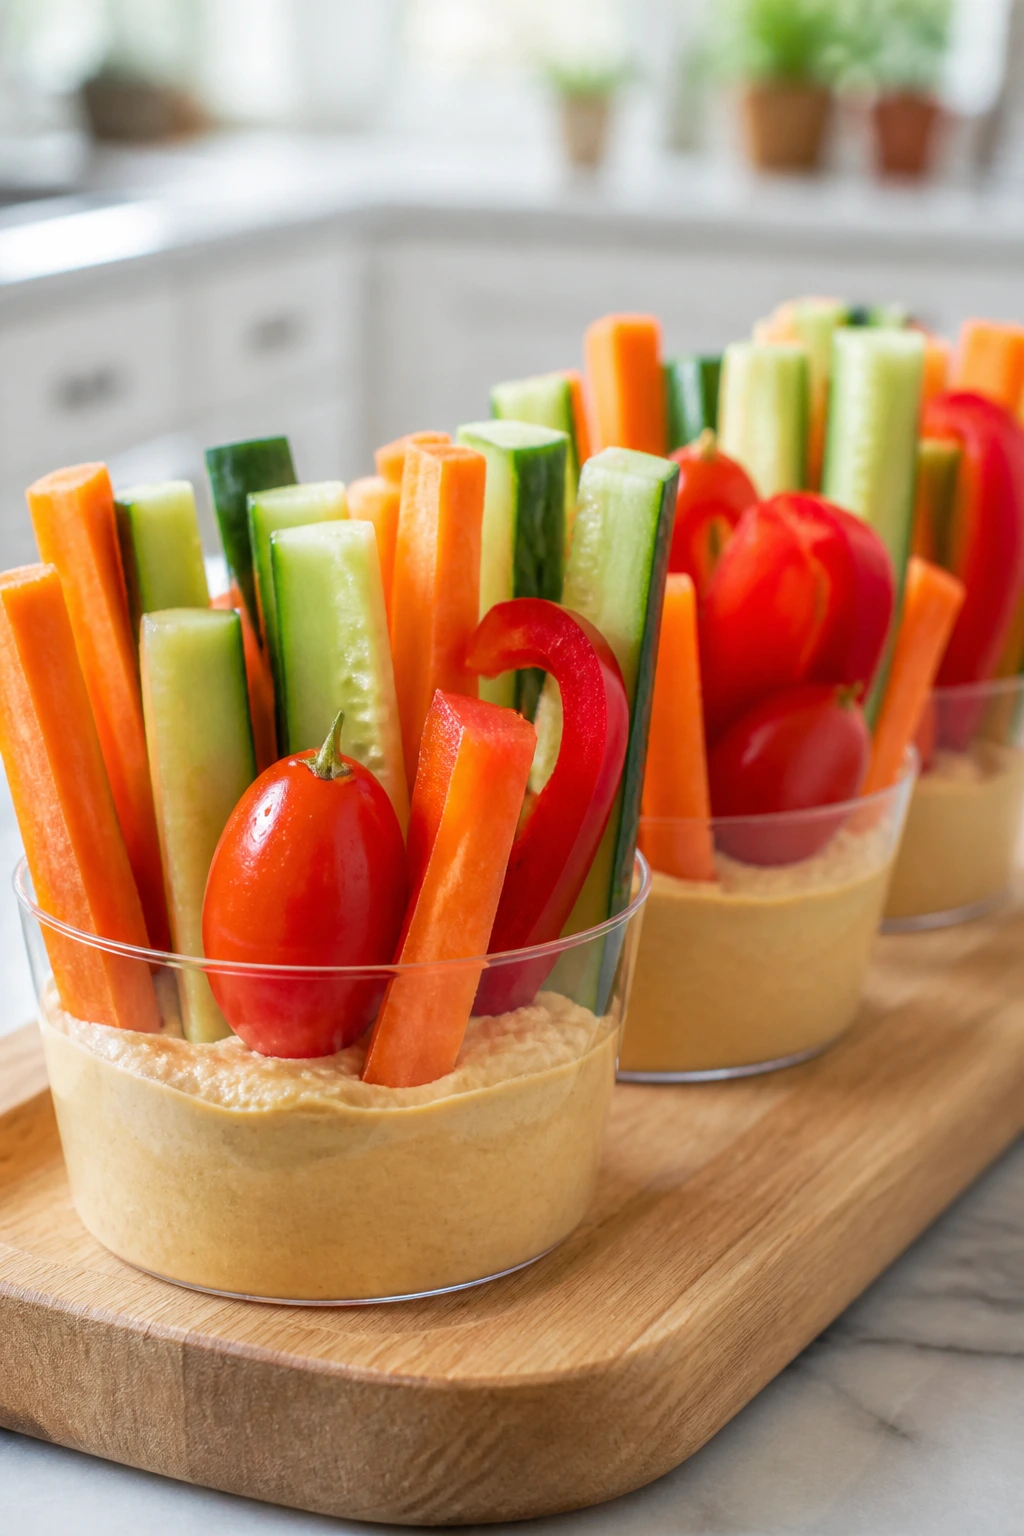
These are the quiet overachievers of the snack table. Crisp vegetables in little cups with hummus at the bottom make a neat, colorful bite that kids can carry without dropping half of it on the rug. They’re cool, fresh, and a nice reset between the richer snacks.
Why It Works:
The cup format solves the two big problems with veggie trays: dip spills and wandering pieces. Hummus at the bottom keeps the vegetables from drying out while also holding them in place. It’s a smart way to get crunch without asking anyone to sit down and eat salad like it’s homework.
Key Ingredients:
- 1 1/2 cups hummus
- 2 carrots, cut into sticks
- 1 cucumber, cut into sticks
- 1 red bell pepper, sliced thin
- 1 cup cherry tomatoes
- 6 small cups or jars
Quick Steps:
- Spoon hummus into the bottom of each cup.
- Arrange the vegetables upright in the hummus.
- Add cherry tomatoes on the side or on top.
- Chill until serving.
Equipment for This Recipe:
- Knife
- Cutting board
- Small cups or jars
- Spoon
How to Serve This Dish:
Set these in a row on a tray so each kid gets their own cup. They’re useful when you want one thing on the table that feels fresh beside the cheese, popcorn, and baked snacks. A light dusting of paprika over the hummus makes them look finished with almost no extra work.
Pro Tips for This Recipe:
- Pat the vegetables dry so the hummus stays thick.
- Cut the sticks the same length as the cups are deep.
- Use a thicker hummus so the veggies stand up.
- Add pita chips if you want more crunch.
Variations on This Dish:
- Ranch Hummus Cups: Stir a spoonful of ranch seasoning into the hummus.
- Mediterranean Cups: Add olives and cucumber ribbons.
- Rainbow Cups: Use purple cabbage, yellow peppers, and snap peas for color.
Common Mistakes to Avoid with This Dish:
- Using watery vegetables without drying them: The hummus gets loose.
- Packing the cups too full: Kids can’t pull the veggies out cleanly.
- Making them hours ahead without covering: The veg loses its snap.
20. Ham and Cheese Pinwheels
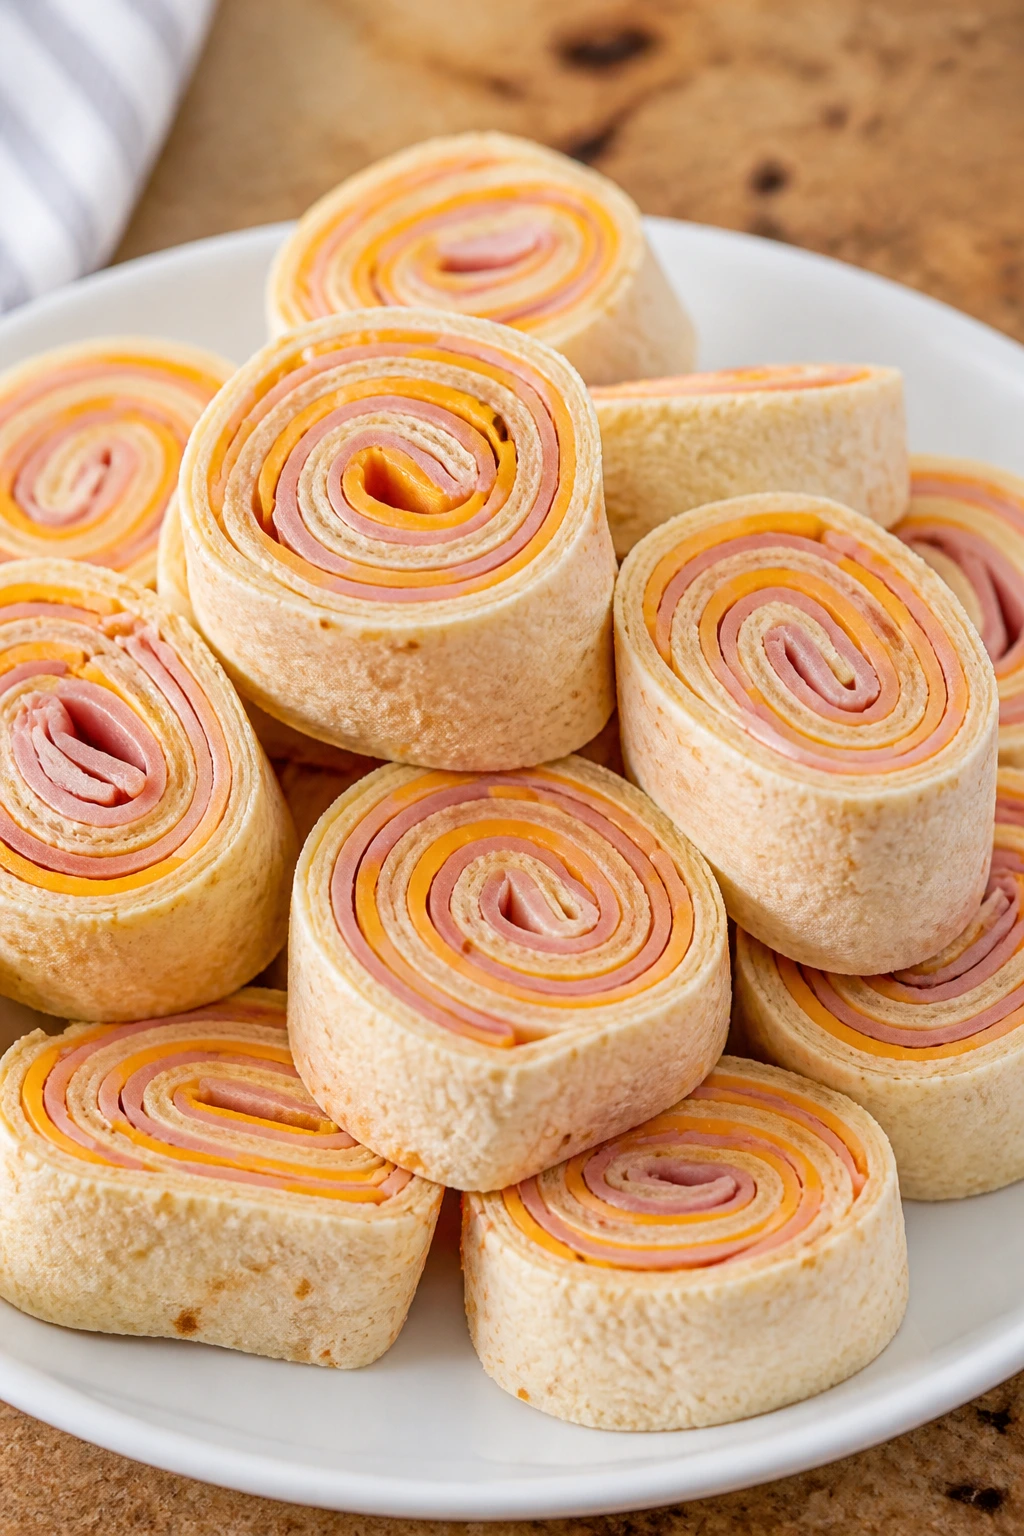
Pinwheels are one of those snacks that look more complicated than they are. A tortilla, a spread, a few slices of ham, and cheese rolled tight into a log becomes a neat spiral once sliced. They’re cool, creamy, and soft enough for younger kids, but the edges still give a little bite.
Why It Works:
A thin spread of cream cheese acts like glue, which helps the fillings stay put. Rolling them tightly and chilling the log for a bit makes cleaner slices. They’re especially useful when the rest of the spread leans sweet and you want one savory bite that does not require heating.
Key Ingredients:
- 4 large flour tortillas
- 8 ounces cream cheese, softened
- 8 slices ham
- 1 cup shredded cheddar
- 1 tablespoon Dijon mustard, optional
- 1 tablespoon chopped chives, optional
Quick Steps:
- Mix the cream cheese with mustard and chives if using.
- Spread it over each tortilla.
- Layer on ham and cheddar.
- Roll tightly into logs.
- Chill for 20 minutes, then slice into 1-inch pinwheels.
Equipment for This Recipe:
- Cutting board
- Spatula or knife
- Plastic wrap
- Sharp knife
How to Serve This Dish:
Stack the slices cut-side up on a platter so the spiral shows. They work well with grapes or cucumber slices and travel nicely if movie night moves to another room. If the room is warm, keep them chilled until right before serving.
Pro Tips for This Recipe:
- Softened cream cheese spreads more evenly.
- Press the roll seam-side down before chilling.
- Slice with a sharp knife so the tortillas don’t tear.
- If you want extra flavor, use honey mustard instead of Dijon.
Variations on This Dish:
- Turkey Ranch Pinwheels: Swap ham for turkey and add ranch seasoning.
- Veggie Pinwheels: Use shredded carrots, spinach, and cucumber.
- Pizza Pinwheels: Spread with pizza sauce and add mozzarella and pepperoni.
Common Mistakes to Avoid with This Dish:
- Rolling too loosely: The slices fall apart.
- Skipping the chill time: You get squashed spirals instead of neat rounds.
- Using too much spread: The tortilla slips and becomes soggy.
21. Easy S’mores Dip
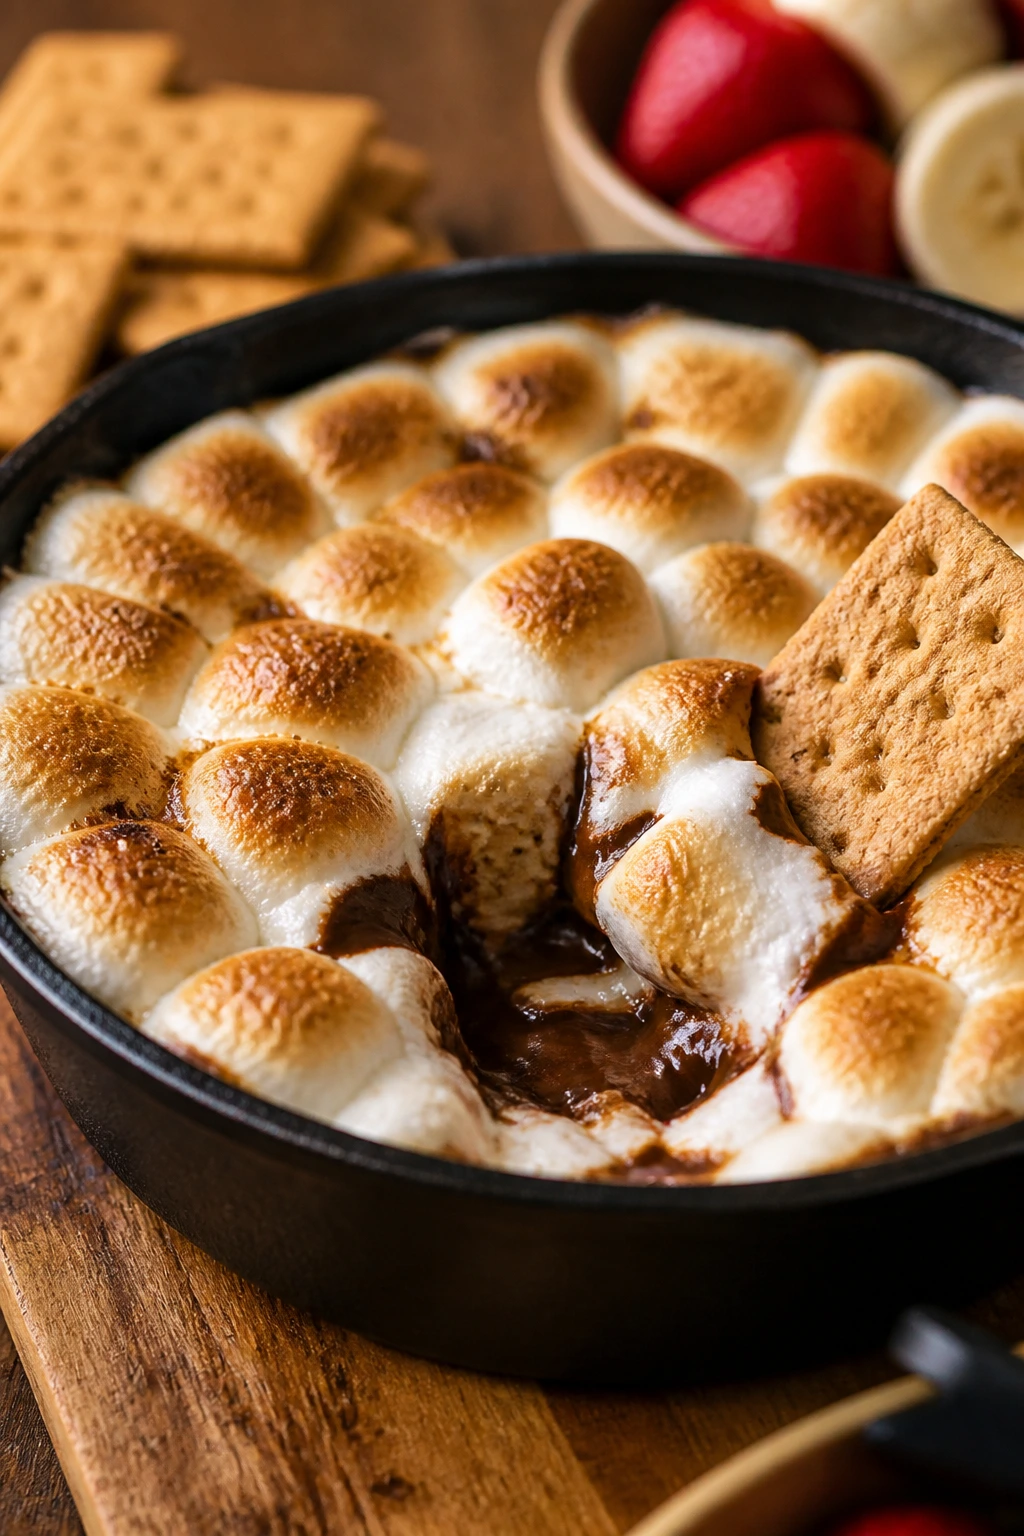
This is the dessert that makes everyone lean forward. Chocolate on the bottom, marshmallows on top, and a quick blast under the broiler gives you a bubbling pan that tastes like campfire nostalgia without smoke in the curtains. It’s one of the easiest dramatic desserts I know, which is part of the appeal.
Why It Works:
Chocolate and marshmallows melt at different speeds, so layering them in a skillet gives you a gooey base with toasted tops. A broiler or hot oven is enough to brown the marshmallows fast. Crackers, strawberries, or graham sticks all work for dipping, so the dessert stays casual.
Key Ingredients:
- 1 1/2 cups chocolate chips
- 2 cups mini marshmallows
- 1 tablespoon butter
- Graham crackers for serving
- Strawberries, optional
Quick Steps:
- Preheat the broiler and butter a small oven-safe skillet.
- Spread the chocolate chips in the skillet.
- Top with marshmallows.
- Broil for 1 to 2 minutes, watching closely, until the tops are golden.
- Serve immediately with dippers.
Equipment for This Recipe:
- Small cast-iron skillet or oven-safe dish
- Broiler-safe oven
- Spoon
- Serving plate
How to Serve This Dish:
Set it in the center of the table and surround it with graham crackers, strawberries, and pretzel rods. It’s rich, so small dips go a long way. If you’re serving kids, keep a stack of napkins nearby and call that a plan.
Pro Tips for This Recipe:
- Watch the broiler the whole time; marshmallows brown fast.
- Use semi-sweet chocolate if you want less sweetness.
- Let the skillet sit for 1 minute before serving so the chocolate isn’t lava-hot.
- If you want a stronger graham flavor, crush some crumbs over the top after broiling.
Variations on This Dish:
- Peanut Butter S’mores Dip: Swirl peanut butter into the chocolate layer.
- Cookie Butter Dip: Replace half the chocolate with cookie butter.
- Mint S’mores Dip: Add a few chopped mint candies on top before broiling.
Common Mistakes to Avoid with This Dish:
- Walking away from the broiler: Marshmallows go from gold to burnt fast.
- Using a dish that isn’t broiler-safe: That’s a bad surprise.
- Serving without dippers ready: The dip cools faster than people think.
22. Frozen Yogurt Bark
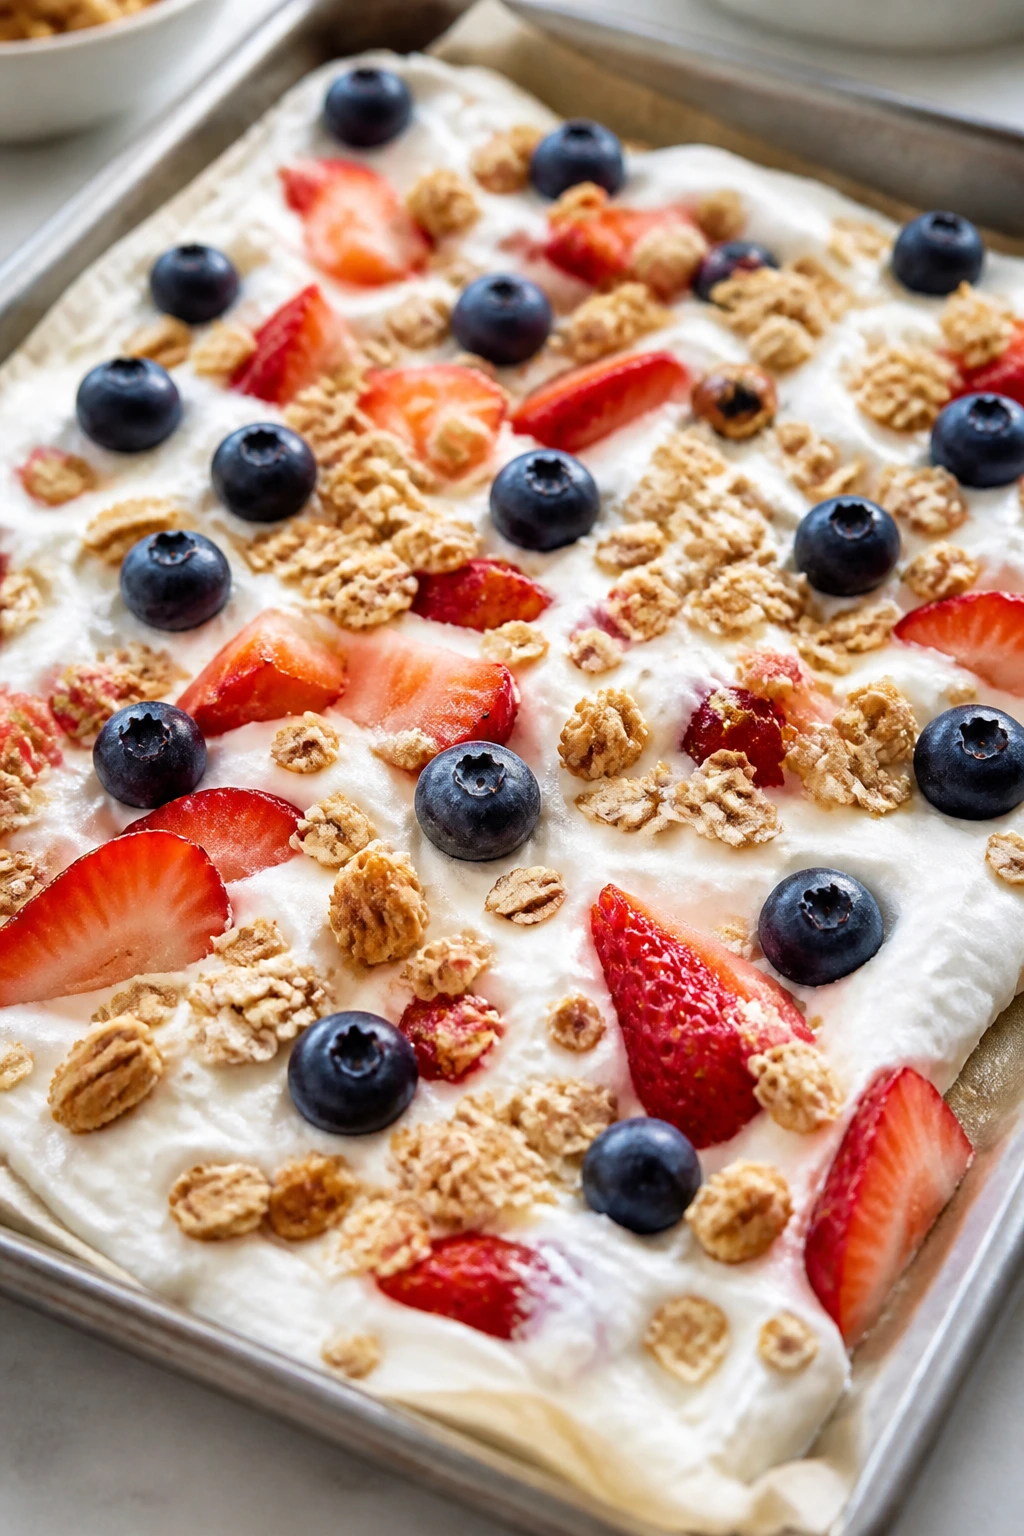
Frozen yogurt bark is the cool, crisp finish that balances out all the warm, cheesy snacks on the table. It’s sweet without being heavy, and the snap when you break it into pieces is satisfying in a very simple way. Kids like the color; adults like that it lives in the freezer until needed.
Why It Works:
Thick yogurt freezes into a breakable slab when spread thinly on a lined tray. Fruit and granola add color and texture, and the bark can be customized without much effort. It’s a nice make-ahead dessert because it does not ask for much once it’s frozen.
Key Ingredients:
- 3 cups thick Greek yogurt
- 2 tablespoons honey
- 1 teaspoon vanilla extract
- 1/2 cup blueberries
- 1/2 cup sliced strawberries
- 1/4 cup granola
Quick Steps:
- Line a baking sheet with parchment paper.
- Stir the yogurt, honey, and vanilla together.
- Spread the yogurt into a 1/4-inch-thick layer.
- Top with berries and granola.
- Freeze for 3 to 4 hours, then break into pieces.
Equipment for This Recipe:
- Baking sheet
- Parchment paper
- Spatula
- Freezer space
How to Serve This Dish:
Serve the bark straight from the freezer in small shards, not huge slabs. It’s good after a salty spread because it cools everything down. If you want it less icy and more creamy, let it sit at room temperature for 2 minutes before serving.
Pro Tips for This Recipe:
- Use thick yogurt so the bark isn’t watery.
- Dry the fruit before topping it.
- Add granola after the bark is partly frozen if you want it extra crisp.
- Break it into uneven pieces for a more casual look.
Variations on This Dish:
- Chocolate Swirl Bark: Swirl in melted chocolate before freezing.
- Peach Almond Bark: Use sliced peaches and chopped almonds.
- Dairy-Free Bark: Use coconut yogurt and maple syrup.
Common Mistakes to Avoid with This Dish:
- Spreading the yogurt too thick: It takes forever to freeze and cracks oddly.
- Using watery fruit: Ice crystals form and the bark goes slushy.
- Leaving it out too long: It softens fast, so serve straight from the freezer.
Why Handheld and Scoopable Snacks Work Better Than a Full Dinner
Movie night is not the moment for anything that needs a knife-and-fork setup or a lot of sitting still. The best family movie night snacks are the foods that stay friendly in low light: a chip that can take a dip, a mini sandwich that won’t fall apart, a fruit skewer that doesn’t leak, a dessert that can be eaten from a bowl without a fuss. That shape matters more than people think.
Texture matters too. Crunch keeps kids interested, especially during a long movie. Soft cheese, warm bread, and cold fruit give you enough contrast that the snack does not feel repetitive by the halfway mark. If every item on the table is soft and sweet, the whole spread gets flat fast. If everything is salty, it starts to feel heavy. The mix is what keeps people grazing.
I also like recipes that can be made in separate batches. One tray goes in the oven while the popcorn is on the stove and the fruit gets sliced on the counter. That little stagger keeps the kitchen calmer and lets you serve food in waves instead of dumping everything on the table at once. Which, in my experience, is how you end up with melted cheese on one hand and a missing fork on the other.
Essential Equipment for These Recipes
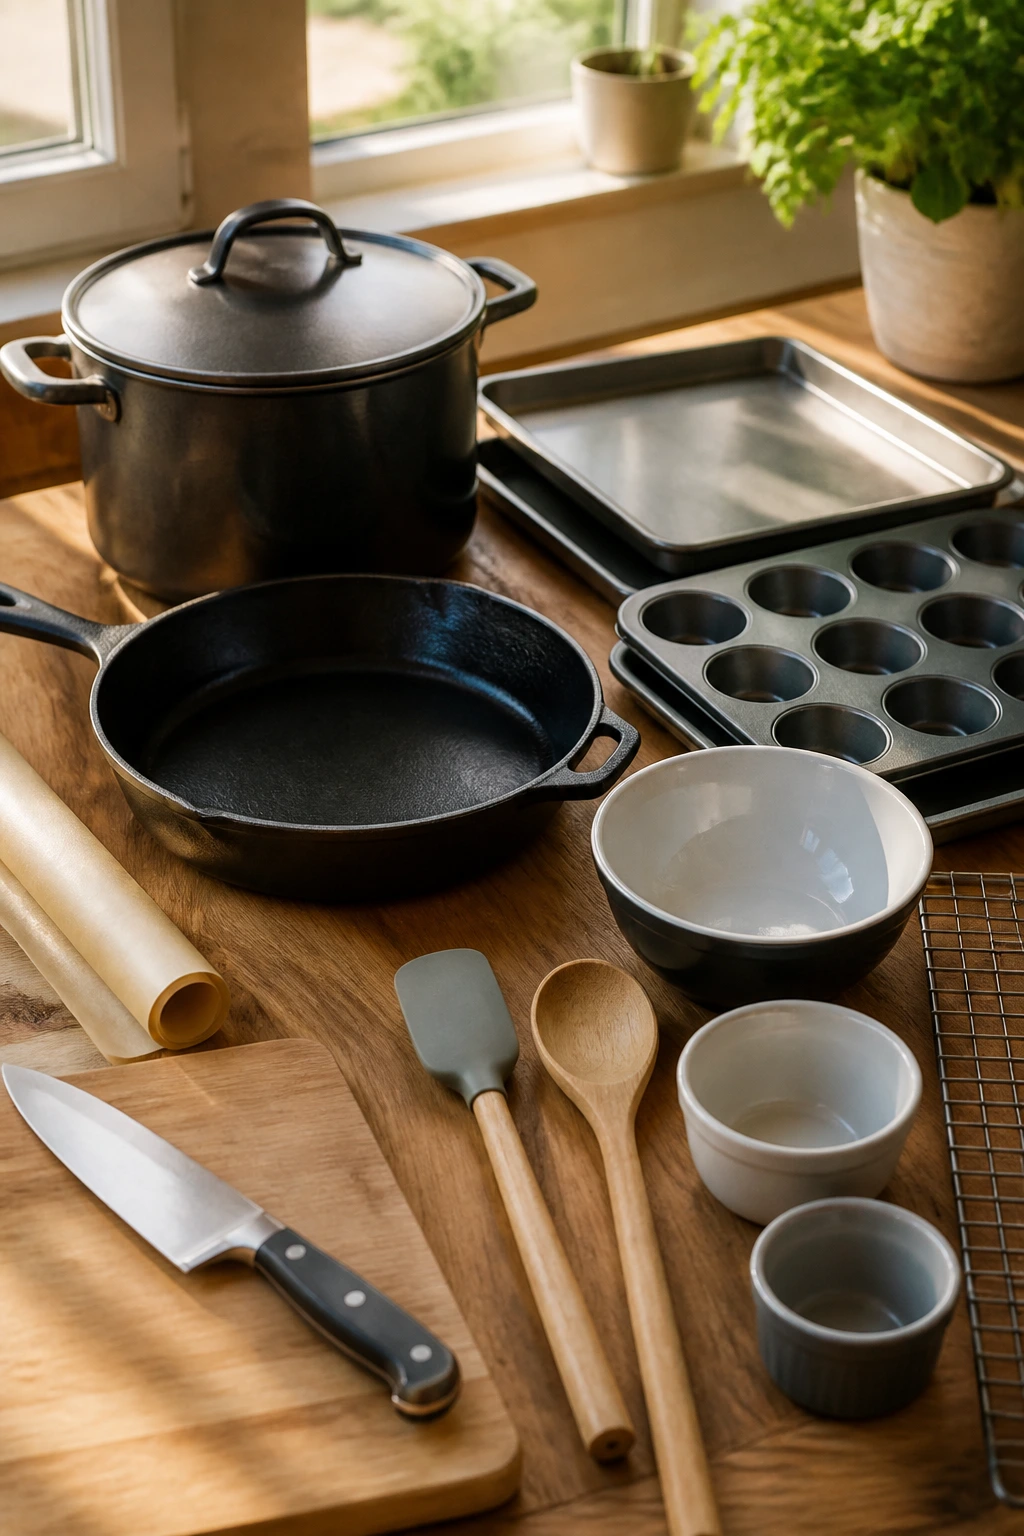
- Large heavy pot with lid: Best for popcorn and anything that needs even heat without scorching.
- Rimmed baking sheets: Useful for nachos, bagel pizzas, s’mores dip toppings, and baked chips.
- 12-cup muffin tin: A workhorse for pizza puffs, taco cups, and tot cups.
- Large skillet or cast-iron pan: Handy for quesadillas, brownie sundaes, and s’mores dip.
- Mixing bowls in two sizes: One small bowl for sauces, one larger bowl for popcorn, batter, or fillings.
- Sharp knife and cutting board: Needed for fruit, vegetables, tortillas, and clean slices.
- Parchment paper: Keeps sticky snacks from welding themselves to the pan.
- Spatula and wooden spoon: Good for stirring, folding, and scraping the last bit of sauce.
- Small cups, jars, or ramekins: Ideal for hummus cups, dips, and individual portions.
- Cooling rack: Helps baked items stay crisp instead of steaming on a hot tray.
Smart Shopping and Ingredient Tips
The grocery list for movie night is easier than it looks if you shop by texture, not just by recipe. Look for one crunchy snack, one salty baked item, one fruit-based tray, and one dessert. That gives you balance without buying twenty different things that all taste similar. A big bag of popcorn kernels, a few tortilla packs, shredded cheese, yogurt, and fruit can carry a whole evening.
For cheese, buy what melts well: cheddar, Monterey Jack, mozzarella, or a blend. Pre-shredded cheese is fine for snacks like nachos and pizza cups, and I do not think it’s worth arguing about on a weeknight. For tortillas, use the flour kind when you want folding and rolling, and save corn tortillas for a firmer crunch. For apples, choose crisp varieties like Honeycrisp, Fuji, or Gala, because softer apples go mealy fast under peanut butter or yogurt.
Frozen shortcuts are welcome here. Frozen meatballs, nuggets, tater tots, and even sliced fruit for some recipes can save the evening if the fridge is bare. Just check texture: frozen strawberries are fine for yogurt bark if you thaw and drain them first, but they’re not a fit for apple nachos. And for popcorn, kernels beat microwave bags more often than not; you get better control, less waste, and a fresher smell drifting through the room.
How to Serve These Recipes
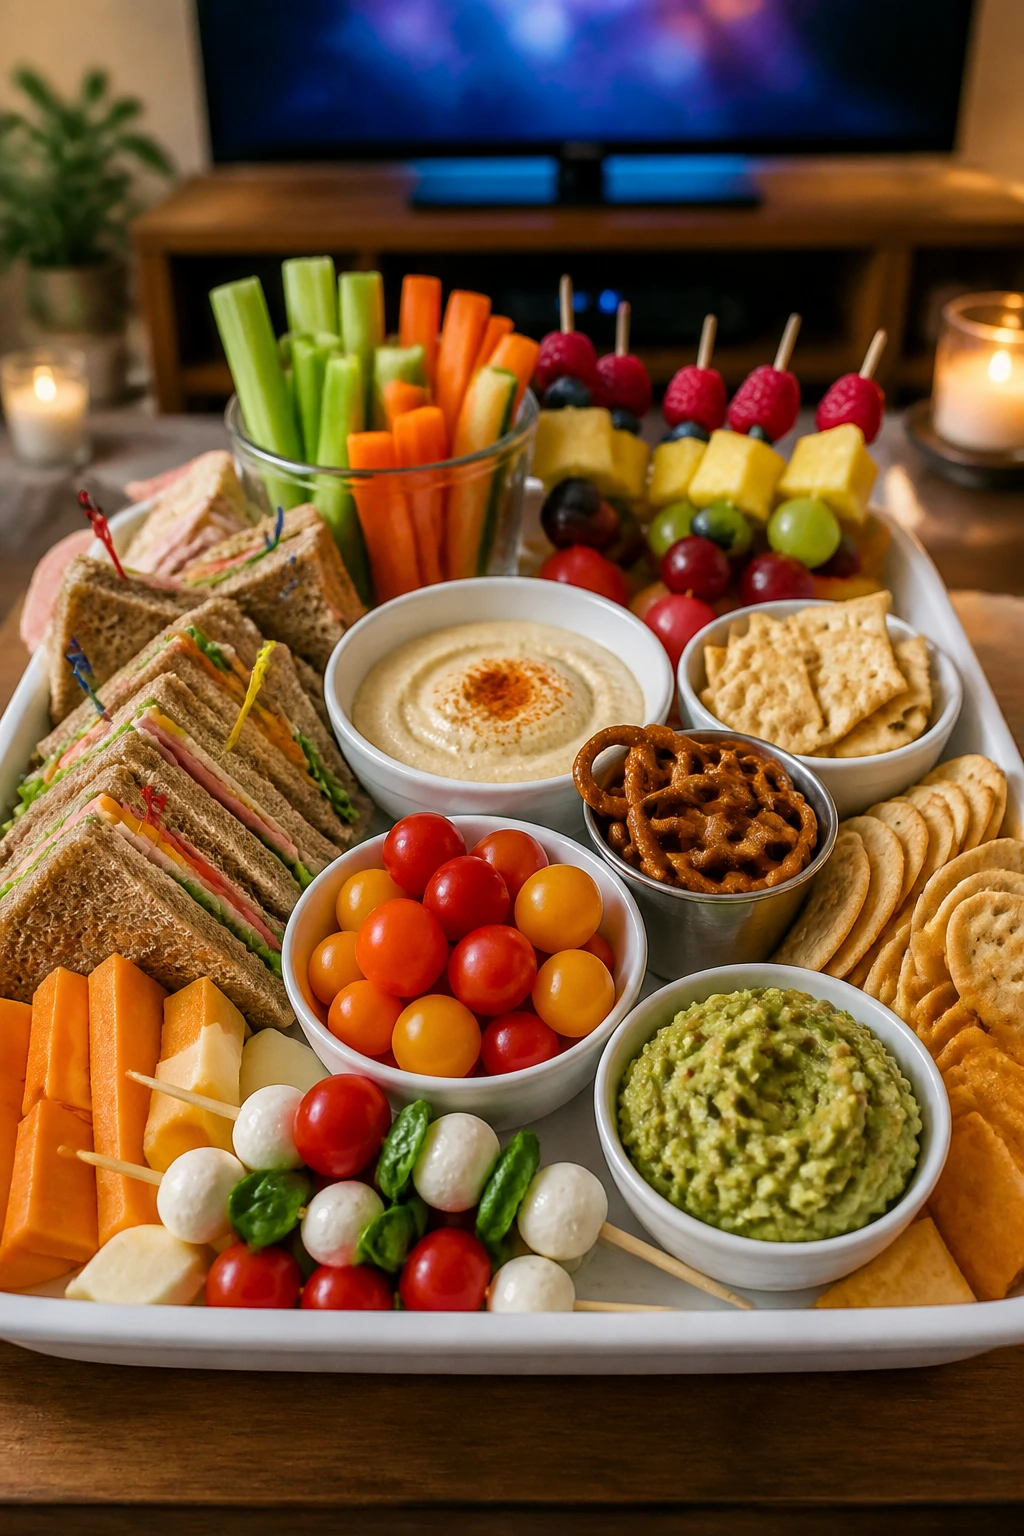
Presentation:
Use separate bowls, trays, or platters so each snack has its own space. A mixed table looks better when the popcorn stays in one big bowl, the fruit bites sit on a flat tray, and the warm foods get lined up on one side. It keeps the textures from collapsing into each other.
Accompaniments:
Pair the rich snacks with fresh ones. Popcorn and nachos sit well beside apple slices, hummus cups, or rainbow kabobs. The sweeter items, like brownie sundaes and s’mores dip, benefit from plain dippers such as graham crackers or strawberries so the whole spread does not turn sugary all at once.
Portions:
For kids, count on 2 to 3 snack items plus one sweet finish if you’re serving a full spread. One batch of popcorn or nachos usually covers 4 to 6 people, while smaller bites like pinwheels or mini pizzas often disappear faster than you expect. If the crowd is mixed-age, make one extra savory tray and one extra fruit-based tray.
Beverage Pairing:
Cold milk works with the dessert-heavy recipes. Sparkling water with lemon suits the salty snacks. For younger kids, apple juice or diluted lemonade is an easy match, and it keeps the table from feeling too heavy.
Additional Tips and Flavor Boosters
Flavor Enhancement:
A pinch of flaky salt on sweet snacks—apple nachos, bark, brownie sundaes—keeps them from tasting flat. For savory recipes, a little Parmesan or a dusting of garlic powder can wake up the whole tray without changing the recipe’s shape.
Customization:
Let kids add one topping of their choice to each recipe. It could be sprinkles on the popcorn balls, extra cheese on pizza puffs, or blueberries on yogurt bark. One choice is enough; five choices turns the kitchen into a buffet with a line.
Serving Suggestions:
Use small paper liners for sticky snacks like popcorn balls and brownie squares. Parchment squares help with quesadillas, nuggets, and sliders. It sounds fussy until you’re trying to hand out food in a dark room and avoid greasy fingerprints on the remote.
Make-It-Yours:
For dairy-free needs, use plant-based cheese, coconut yogurt, or olive-oil-based spread where it fits. For gluten-free guests, choose corn chips, gluten-free tortillas, and certified GF popcorn kernels. For nut-free homes, sunflower butter handles a lot of the sweet snacks without a complaint.
Make-Ahead, Storage, and Reheating Guidance
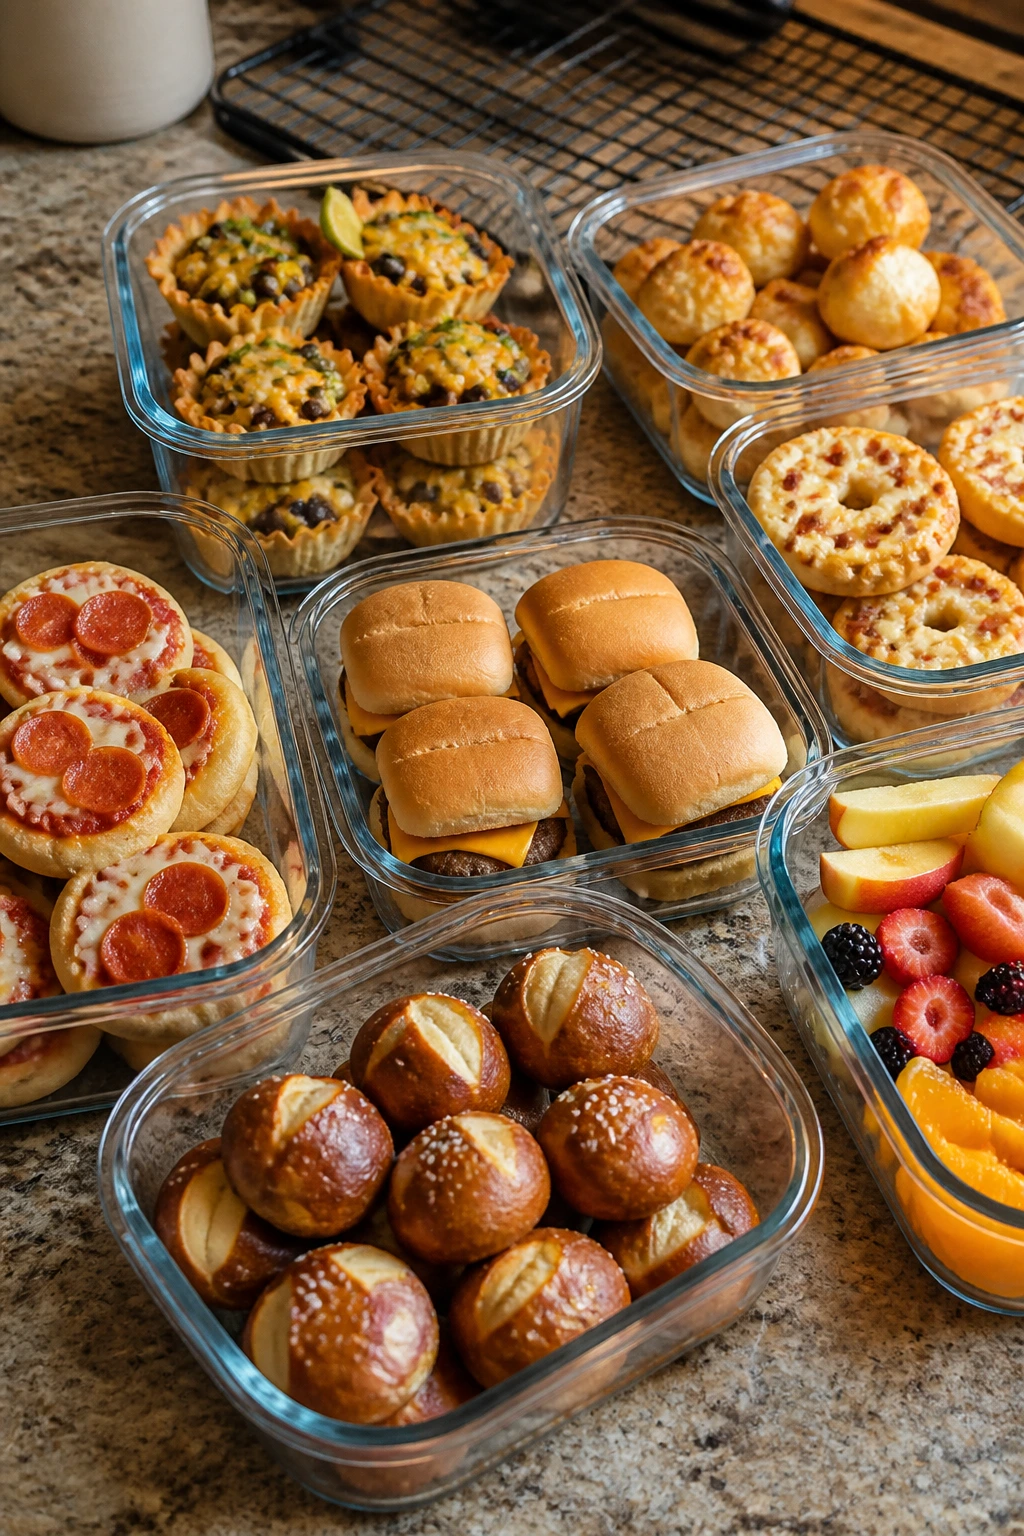
A few of these recipes are best made right before the movie, but plenty can be prepped earlier. Popcorn is at its best the same day, though you can pop the kernels ahead and store them in an airtight container for up to 2 days. Pretzel bites, pizza puffs, taco cups, bagel pizzas, quesadilla wedges, and sliders all hold well for 1 to 2 days in the fridge, tightly covered. Most fruit-based snacks are a same-day deal, especially anything with apples, bananas, or yogurt.
For reheating, use the oven or toaster oven when you want to rescue crispness. A 350°F oven for 5 to 8 minutes brings back the edges on pretzel bites, pizza puffs, tortilla chips, and sliders much better than a microwave does. Microwave only the soft, cheesy items when texture doesn’t matter much, like meatballs in sauce or brownie sundaes before adding ice cream. For popcorn, reheating is not the move; just make a fresh batch.
The USDA advice on leftovers is worth following: refrigerate perishable food within 2 hours, sooner if the room is warm or the tray sits out longer than it should. Brownie skillet leftovers can be covered and kept in the fridge for 3 to 4 days. Frozen yogurt bark keeps for about 1 month in the freezer, wrapped well, and popcorn balls keep 2 to 3 days at room temperature if they’re wrapped or stored airtight. Anything with fresh fruit or dairy should be covered and chilled quickly so it doesn’t pick up that stale-fridge smell nobody likes.
Variations and Adaptations to Try
The Dairy-Free Swap:
Use dairy-free butter, plant-based cheese, coconut yogurt, and nut-free or seed-based spreads where needed. Popcorn, nachos, fruit kabobs, tortilla chips, and hummus cups adapt well with almost no drama.
The Gluten-Free Night:
Choose corn chips, certified gluten-free popcorn, GF tortillas, and gluten-free brownie mix. The actual cooking methods stay the same, which is the best kind of substitution: invisible and easy.
The Lower-Sugar Spread:
Lean harder on popcorn, pretzel bites, hummus cups, veggie cups, and savory pinwheels. Keep one dessert, not three, and use fruit as the sweet finish instead of heavy candy toppings.
The Picky-Eater Path:
Build a table with plain versions of the food and a few toppings in separate bowls. Bare mini pizzas, plain popcorn, cheese cubes, fruit skewers, and sliders with sauce on the side tend to get eaten faster than anything disguised as a surprise.
The Spicy-For-Adults Sidecar:
Set out jalapeños, hot sauce, chili flakes, or buffalo sauce in a separate bowl. That way the main trays stay kid-friendly, and the grown-ups can add heat without turning the whole spread into a negotiation.
The Bigger Crowd Fix:
Double the popcorn, nachos, and bark first. Those stretch best. Then add one baked tray of pizza puffs or taco cups, and you’ve covered the table without spending the night at the stove.
Common Mistakes to Avoid
Making everything sweet:
Movie night food gets dull fast when the whole table tastes like dessert. A good spread needs salty, creamy, crunchy, and fresh pieces, or the sugary snacks start to feel heavy by the end.
Overstuffing the trays:
Nachos, sliders, and quesadillas all fall apart when they’re overloaded. Thin layers and moderate filling keep the food tidy and the texture better.
Skipping the texture checks:
A soft apple, limp chip, or soggy tortilla can wreck an otherwise easy recipe. Choose sturdy ingredients up front and you save yourself a lot of annoyance later.
Serving too early:
Some snacks need to stay hot, some need to stay cold, and a few should be assembled at the last minute. Brownie sundaes, pretzel bites, popcorn, and fruit nachos all taste better when timing gets a little attention.
Ignoring the cleanup factor:
Sticky fingers happen. So do crumbs. Put napkins, small plates, and a trash bowl within reach before anyone sits down, and the whole thing runs more smoothly.
Trying to make one recipe do everything:
A single dip or giant tray can’t cover every appetite. A better movie-night table has a few small wins instead of one oversized centerpiece.
Frequently Asked Questions
Can I make these kid recipes for family movie night ahead of time?
Yes, but not all of them. Baked snacks like pizza puffs, pretzel bites, taco cups, and pinwheels can be made earlier in the day and reheated briefly. Fresh fruit snacks, popcorn, and s’mores dip are better made close to serving.
What’s the easiest recipe on the list if I only have 10 minutes?
Peanut butter banana roll-ups, apple nachos, rainbow snack kabobs, and hummus cups are the fastest. If you already have popcorn kernels popped, the popcorn and trail mix recipes are nearly instant too.
How do I keep popcorn from getting soggy?
Store it uncovered for a few minutes after popping so steam can escape, then season it right away. If you’re adding butter or a sweet coating, toss it in a big bowl instead of a closed container so the heat doesn’t trap moisture.
Can I make these recipes in an air fryer?
Some can. Nuggets, tater tots, pretzel bites, and even small pizza bites do well in an air fryer, but you still need to watch the timing closely. Wet or delicate snacks like yogurt bark and apple nachos don’t belong there.
What if my kids have nut allergies?
Use sunflower butter or seed butter in place of peanut butter, skip mixed-nut trail mix, and check labels on chocolate candies and granola. Plenty of the savory recipes—pizza puffs, taco cups, bagel pizzas, popcorn, and sliders—work without nuts at all.
How can I make the table less messy?
Use parchment squares, paper liners, and small cups. The more individual portions you can hand out, the less likely you are to end up scraping cheese off the couch arm.
Which recipes work best for younger kids to help make?
Fruit kabobs, popcorn mix, hummus cups, pinwheels, and yogurt bark are the easiest. They can stack, spread, sprinkle, and arrange without needing sharp tools or hot pans.
Can I double these recipes for a bigger crowd?
Most of them double cleanly, especially popcorn, nachos, pretzel bites, pizza puffs, and taco cups. The only thing I’d keep an eye on is oven space; if you try to bake too many trays at once, the timing gets messy and the bottoms don’t crisp evenly.
A Table Full of Small Wins

Movie night gets easier when the food behaves itself. A tray of crisp popcorn, a plate of mini pizzas, a bowl of fruit, something warm to dip, and one dessert that feels a little special—that combination covers almost every mood in the room. You don’t need perfection. You need snacks that can survive a blanket, a pause button, and a kid who wants “just one more.”
What I keep coming back to is this: the best family movie night recipes are the ones that feel like part of the ritual, not a separate project. A little rolling, a little dipping, a little sprinkling, then everybody settles in. Keep a few of these on repeat, and the hardest part of movie night becomes choosing the film.