
After-school hunger has a way of turning a quiet kitchen into a tiny negotiation room. One kid wants cheese but no sauce. Another wants sauce but no cheese. A third wants dinner that can be eaten in three bites while a backpack is still on the floor and a soccer cleat is left in the hallway. Picky eaters usually do not need more drama on the plate. They need food that looks familiar, feels manageable, and tastes like something they already trust.
That’s why these dinner ideas for picky eaters work so well as after-school snacks too. They sit right in the middle ground: enough substance to pass for dinner, enough bite-sized charm to feel snacky, and enough built-in comfort — cheese, noodles, bread, potatoes, mild chicken, soft tortillas — to avoid the long stare that follows unfamiliar food. The trick is not hiding everything. The trick is making each plate readable at a glance.
I’ve leaned hard into recipes that can be broken into pieces, dipped, folded, dunked, or picked up with fingers. That matters. A child who refuses a casserole may happily eat the same flavors wrapped in a tortilla, tucked into a muffin tin, or baked into a crisp little pocket. Small format changes can make a huge difference at the table, and once you notice it, you start seeing the same pattern everywhere.
Why These Snack-Size Dinners Work for Picky Eaters
- Familiar shapes: Round bagels, little cups, rolls, and strips look less intimidating than a full casserole dish or a pile of mixed food.
- Built-in control: Kids can eat the cheese first, the bread first, or the chicken first, which lowers the pressure that often comes with a mixed plate.
- Fast recovery after school: These recipes lean on pantry staples, frozen shortcuts, and short oven times, so the food lands on the table before the after-school crash turns into a meltdown.
- Easy to scale: Most of these can be made as a snack for two or expanded into a full family dinner with a side of fruit, vegetables, or a simple dip.
- Tweak-friendly: Mild seasoning, small vegetable add-ins, and dip-on-the-side serving make it easier to please different eaters without cooking separate meals.
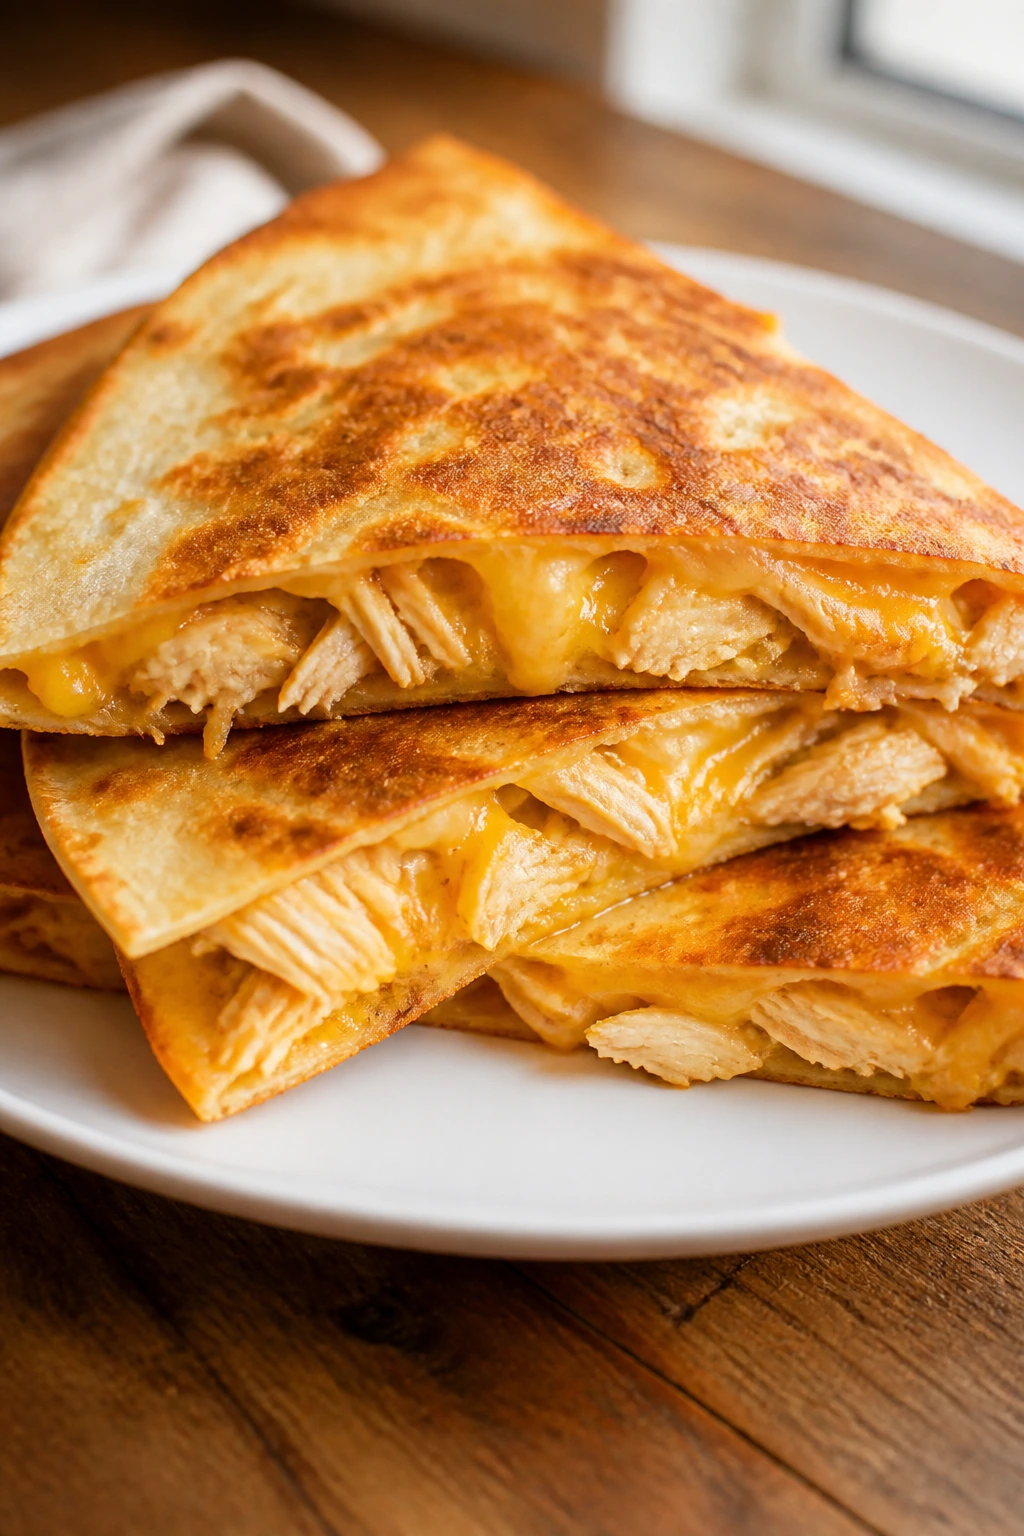
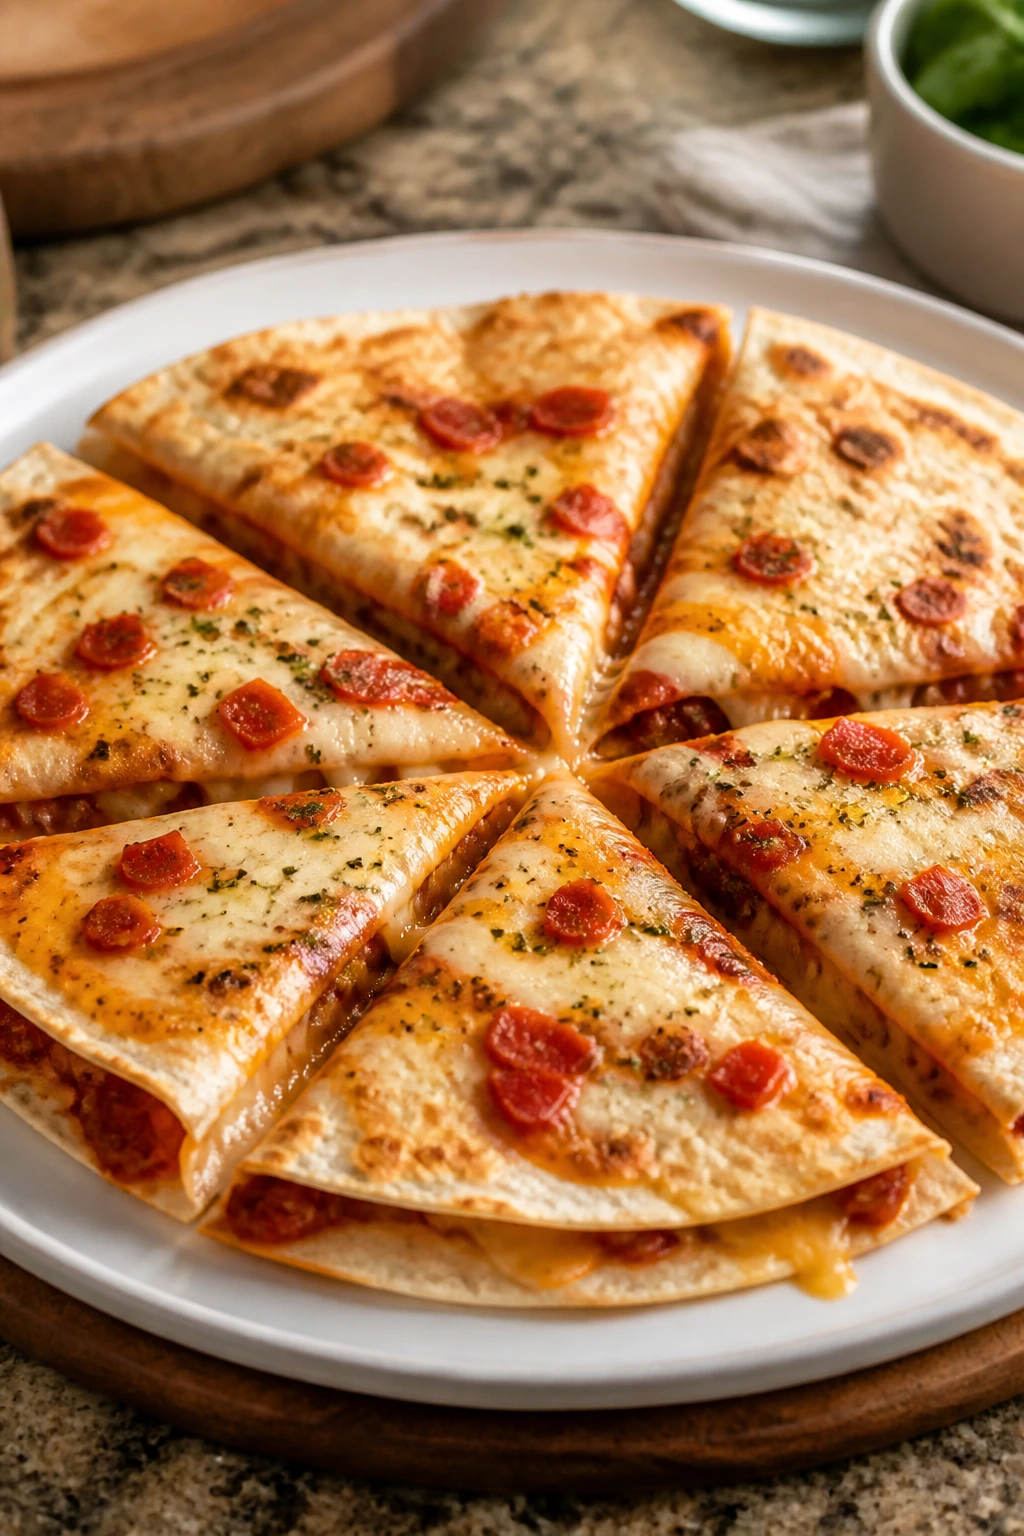
1. Cheesy Chicken Quesadillas
A hot quesadilla is one of the few foods that can make a hungry kid stop talking for half a minute. The tortilla gets crisp and speckled, the cheese melts into the chicken, and every bite stays recognizable instead of mysterious. That alone makes it a reliable weeknight move.
Why It Works:
Mild chicken, melted cheese, and a crisp tortilla hit three picky-eater checkpoints at once: familiar, salty, and easy to chew. The cream cheese keeps the filling soft even after a few minutes on the pan, which helps avoid the dry, stringy problem that ruins a lot of homemade quesadillas. A quick 2-minute sear on each side gives you the browned edges kids actually notice.
Key Ingredients:
- 4 medium flour tortillas
- 1 cup cooked shredded chicken
- 1 1/2 cups shredded Monterey Jack or cheddar
- 2 tablespoons cream cheese, softened
- 1 tablespoon butter
- 1/4 cup mild salsa
- 1/4 teaspoon fine salt
- 1 tablespoon chopped cilantro, optional
Quick Steps:
- In a bowl, mix the chicken, cream cheese, salsa, and salt until the filling looks evenly coated.
- Heat a large skillet over medium heat and melt half the butter.
- Lay one tortilla in the pan, sprinkle half the cheese over one side, add half the chicken mixture, then top with more cheese and fold.
- Cook for 2 to 3 minutes per side until the tortilla is golden brown and the cheese is fully melted.
- Repeat with the remaining ingredients, then rest the quesadillas for 1 minute before slicing into wedges.
Equipment for This Recipe:
- Large nonstick skillet
- Flexible spatula
- Mixing bowl
- Sharp knife or pizza cutter
How to Serve This Dish:
Cut each quesadilla into 3 or 4 wedges and serve with a small bowl of salsa or plain sour cream. A few apple slices or cucumber coins on the side keep the plate balanced without turning it into a lecture.
Pro Tips for This Recipe:
- Use medium heat, not high heat. High heat burns the tortilla before the cheese softens.
- Shred the chicken finely if the eater is texture-sensitive. Big chunks make the filling feel awkward.
- Let the quesadilla rest for a minute before cutting. The cheese settles and stays inside instead of sliding out.
Variations on This Dish:
- BBQ Chicken Version: Swap the salsa for 2 tablespoons of barbecue sauce and use cheddar for a sweeter, smokier filling.
- Breakfast Quesadilla: Replace the chicken with scrambled eggs and a few diced ham pieces for a morning-style version.
- Bean-and-Cheese Fold: Skip the chicken and use 1/2 cup refried beans for a meatless option.
Common Mistakes to Avoid with This Dish:
- Overstuffing the tortilla: The filling leaks out and the quesadilla won’t seal. Keep it thin.
- Using too much salsa: Wet filling makes the tortilla soggy. If your salsa is watery, drain it first.
- Cutting too soon: The cheese runs everywhere. Give it that short rest.
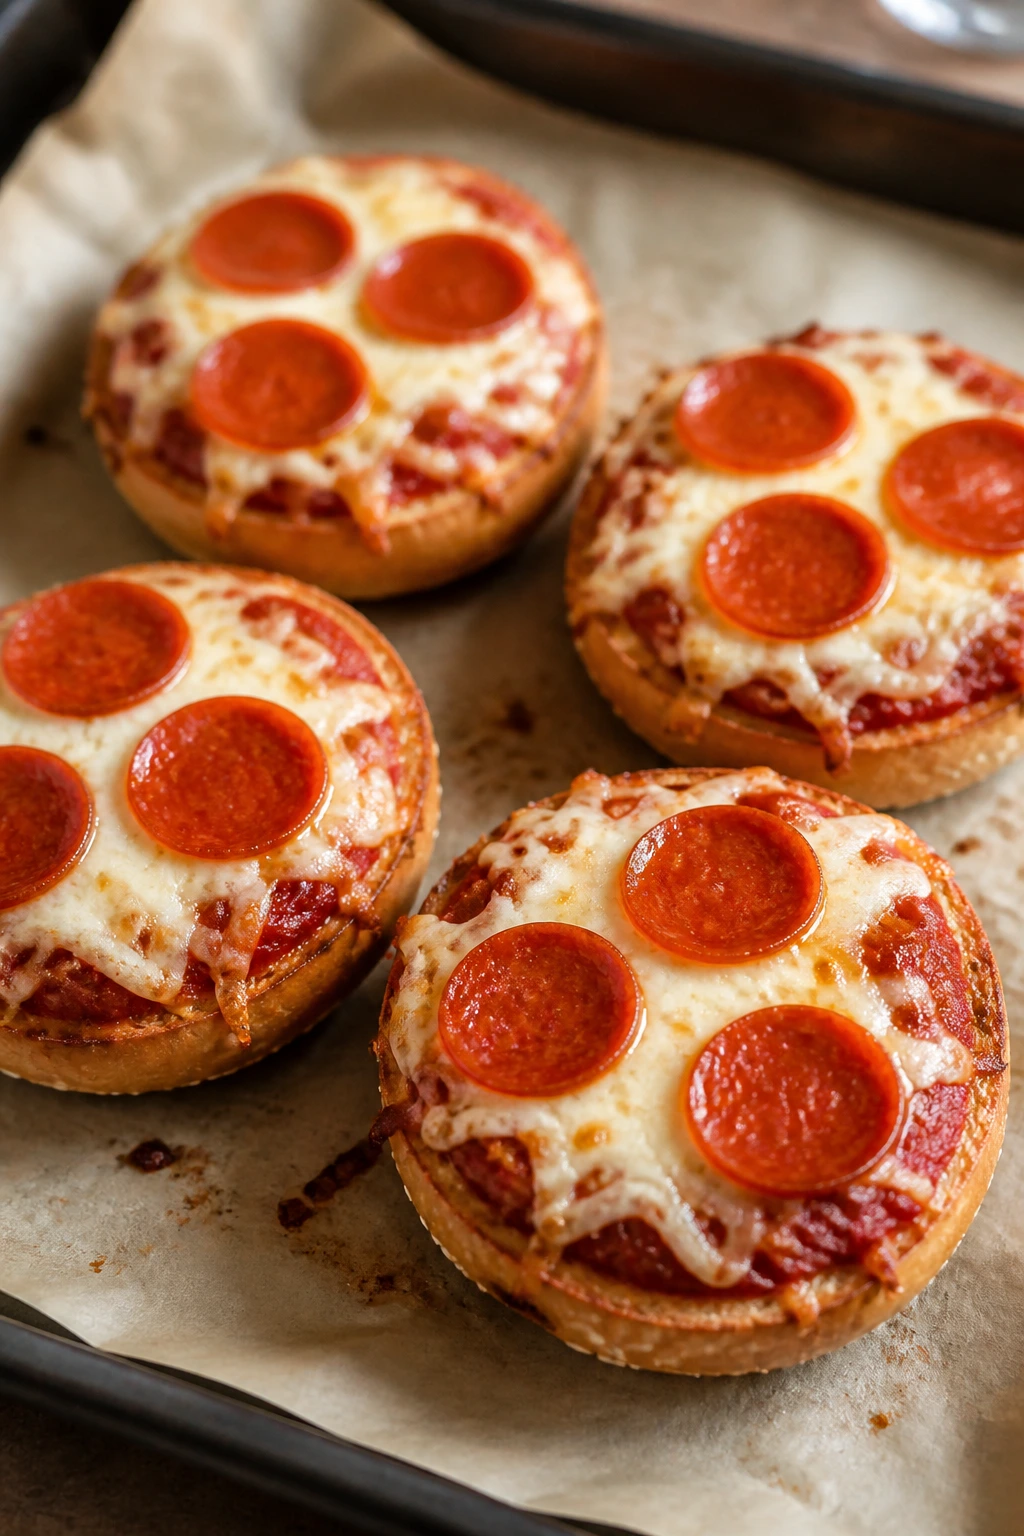
2. Mini Pizza Bagels
Mini pizza bagels have a built-in advantage: they already look like a snack. That means less resistance before the first bite, which is half the battle with picky eaters. Crisp edges, melty mozzarella, and a little pepperoni make them feel familiar in the best way.
Why It Works:
Bagels hold sauce better than toast and stay a little chewy under the toppings, so they don’t collapse into mush. A quick pre-toast keeps the bottoms from going soft, and that tiny step changes everything. These bake fast, smell like a pizza shop, and let kids eat by hand without losing toppings on the floor.
Key Ingredients:
- 4 mini bagels, split
- 1/2 cup pizza sauce
- 1 1/2 cups shredded mozzarella
- 24 mini pepperoni slices
- 1 teaspoon olive oil
- 1/2 teaspoon dried oregano
- Pinch of garlic powder
Quick Steps:
- Preheat the oven to 425°F (220°C) and line a sheet pan with parchment.
- Brush the cut sides of the bagels with olive oil and toast them for 3 minutes.
- Spread 1 tablespoon of sauce on each half, then add mozzarella, pepperoni, oregano, and garlic powder.
- Bake for 7 to 9 minutes until the cheese is bubbling and the edges are lightly browned.
- Cool for 2 minutes before serving so the cheese firms up a little.
Equipment for This Recipe:
- Sheet pan
- Parchment paper
- Small spoon
- Oven mitts
How to Serve This Dish:
Serve 2 bagel halves per child with carrot sticks or grapes. They also work well sliced into quarters for an after-school snack tray.
Pro Tips for This Recipe:
- Toast first, then top. Skipping that step gives you soft, floppy bagels.
- Use a thick sauce. Thin sauce runs into the holes and burns at the edges.
- If the pepperoni is greasy, blot it once with a paper towel before baking.
Variations on This Dish:
- Cheese-Only Classic: Skip the pepperoni and add extra mozzarella for the most cautious eaters.
- Hawaiian-Style Bagels: Add tiny pieces of pineapple and ham, but keep the amounts small.
- Veggie Pizza Bagels: Use finely chopped mushrooms or peppers if your crowd accepts them in tiny bits.
Common Mistakes to Avoid with This Dish:
- Too much sauce: The bagels get soggy fast.
- Crowding the pan: The cheese needs space to bubble without steaming.
- Baking too long: Mozzarella turns rubbery if it goes past that bubbling stage.
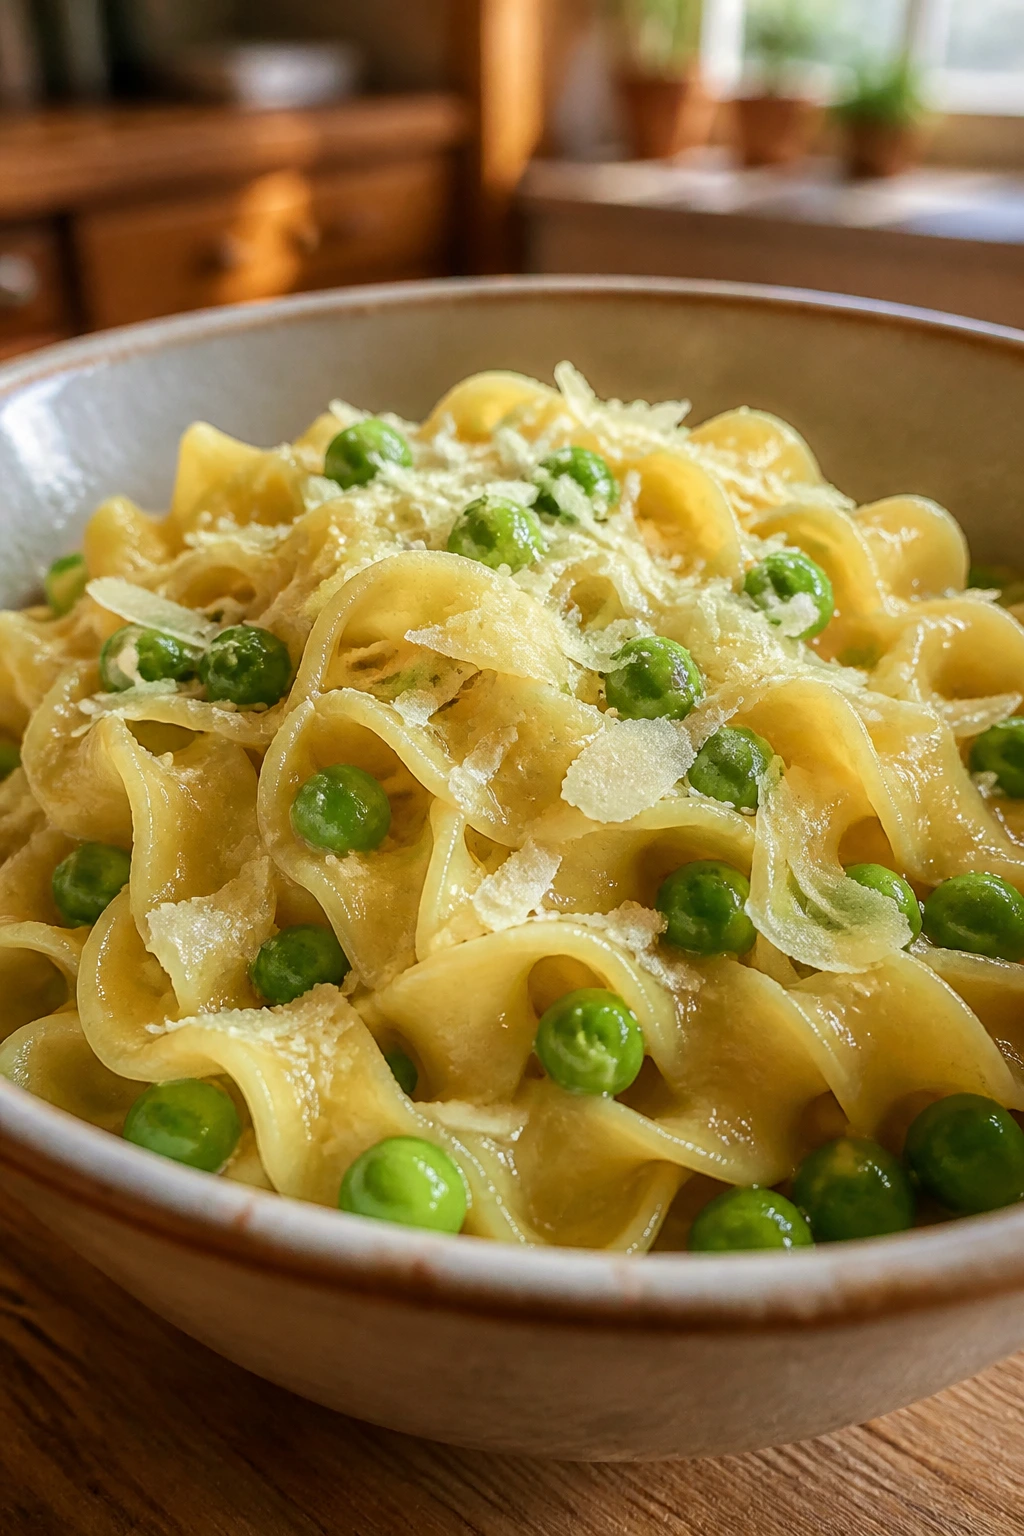
3. Buttered Noodles with Parmesan and Peas
Some nights, the winning dinner is a bowl of noodles that looks plain on purpose. Buttered noodles are calm food. They don’t argue with a tired kid, and they don’t ask for a big emotional commitment at the table.
Why It Works:
Egg noodles cook quickly and stay soft without falling apart, which is exactly why they work here. The peas add color and a little sweetness, but they stay optional in spirit because they’re mixed in, not piled on top like a demand. A splash of pasta water helps the butter and cheese cling instead of sliding to the bottom of the bowl.
Key Ingredients:
- 12 ounces egg noodles
- 3 tablespoons unsalted butter
- 1 cup frozen peas
- 1/2 cup finely grated Parmesan
- 1/4 cup reserved pasta water
- 1/2 teaspoon salt
- 1/4 teaspoon black pepper
- 1/4 teaspoon garlic powder
Quick Steps:
- Bring a large pot of salted water to a boil and cook the egg noodles until just tender, about 7 to 8 minutes.
- Add the peas during the last 1 minute of cooking, then drain and reserve 1/4 cup of pasta water.
- Return the noodles and peas to the pot and add butter, Parmesan, salt, pepper, garlic powder, and pasta water.
- Toss over low heat for 30 to 45 seconds until the sauce turns glossy and coats the noodles.
- Serve right away while the butter is still silky.
Equipment for This Recipe:
- Large pot
- Colander
- Wooden spoon
- Measuring cup
How to Serve This Dish:
Pile it into warm bowls and add a little extra Parmesan on top. For a fuller dinner, set out sliced fruit or a few chicken tenders beside it.
Pro Tips for This Recipe:
- Grate the Parmesan finely so it melts into the butter instead of clumping.
- If peas are a hard sell, use fewer of them and stir them in at the end.
- Don’t rinse the noodles. The starch helps the sauce stick.
Variations on This Dish:
- Garlic Butter Version: Add 1 minced garlic clove to the butter for 30 seconds before tossing.
- Cheddar Noodles: Swap Parmesan for mild cheddar and use a little extra pasta water.
- No-Pea Bowl: Leave the peas out entirely and serve them on the side for kids who want to “separate the foods.”
Common Mistakes to Avoid with This Dish:
- Using too little salt in the water: The noodles taste flat.
- Skipping the pasta water: The sauce turns greasy instead of creamy.
- Overcooking the peas: They go dull and mushy.
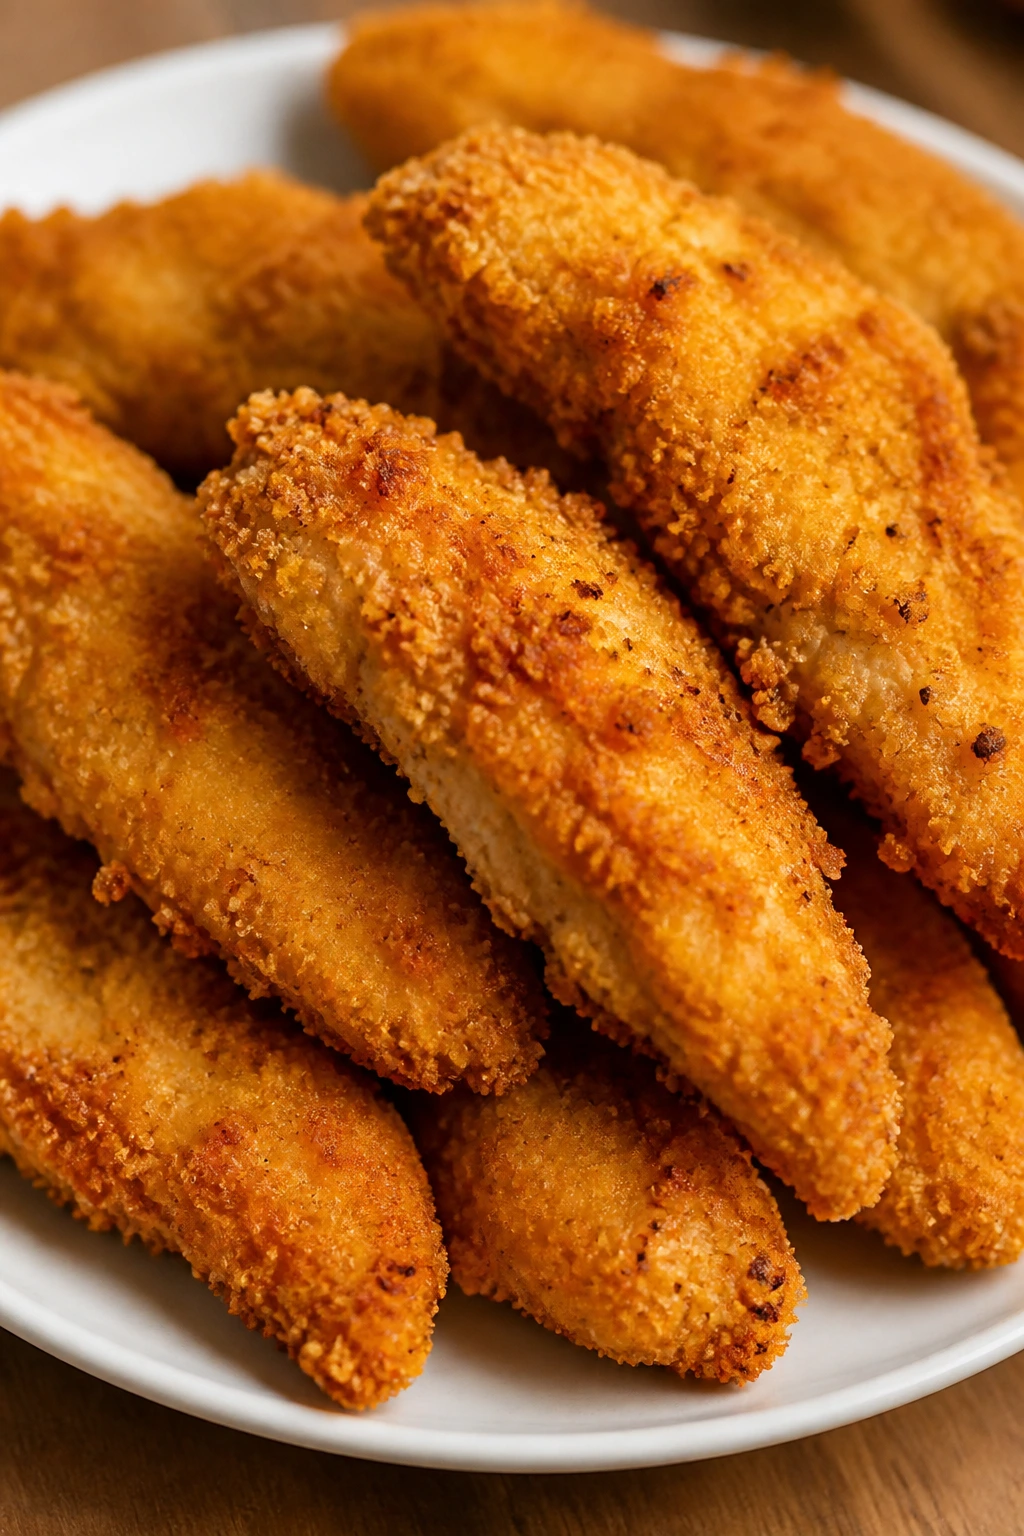
4. Baked Chicken Tenders
Crispy chicken tenders are one of those rare foods that can feel like a treat and a real dinner at the same time. They’re familiar, finger-friendly, and better from the oven than many people expect if you give the coating enough time to brown.
Why It Works:
Panko brings the crunch, but the flour-and-egg sequence is what helps the crust stay attached. A hot oven gives the coating color without needing a frying pan, and that matters when you want less mess after school. Kids tend to trust food that has a clear shape, and a chicken tender is basically the definition of easy to read.
Key Ingredients:
- 1 1/2 pounds chicken tenders
- 1/2 cup all-purpose flour
- 2 large eggs
- 1 tablespoon milk
- 1 1/2 cups panko breadcrumbs
- 1/2 teaspoon salt
- 1/2 teaspoon paprika
- 2 tablespoons olive oil
Quick Steps:
- Preheat the oven to 425°F (220°C) and place a wire rack over a sheet pan.
- Mix flour, salt, and paprika in one bowl. Whisk the eggs and milk in another bowl. Put the panko in a third bowl.
- Dredge each tender in flour, dip in egg, then press into the panko so the crumbs stick in a thick layer.
- Arrange on the rack, drizzle or brush with olive oil, and bake for 15 to 18 minutes, flipping once halfway through.
- Cook until the coating is deep golden and the chicken reaches 165°F (74°C) in the center.
Equipment for This Recipe:
- Sheet pan
- Wire rack
- Three shallow bowls
- Tongs
How to Serve This Dish:
Serve with ketchup, honey mustard, or ranch. Add potato wedges or a small pile of corn if you want it to feel like dinner instead of a snack tray.
Pro Tips for This Recipe:
- Press the crumbs on with your fingers. A light touch won’t hold.
- Use a rack if you have one. It keeps the bottoms from going soft.
- Cut one tender open to check doneness if you’re unsure. It should look opaque all the way through.
Variations on This Dish:
- Parmesan Crust: Mix 1/4 cup grated Parmesan into the panko.
- Gluten-Free Tenders: Use gluten-free flour and breadcrumbs.
- Mild Ranch Coating: Add 1 teaspoon dry ranch seasoning to the flour.
Common Mistakes to Avoid with This Dish:
- Crowding the pan: Steam softens the crust.
- Skipping oil on the crumbs: Dry panko browns unevenly.
- Overbaking: The chicken dries out fast once it passes 165°F.
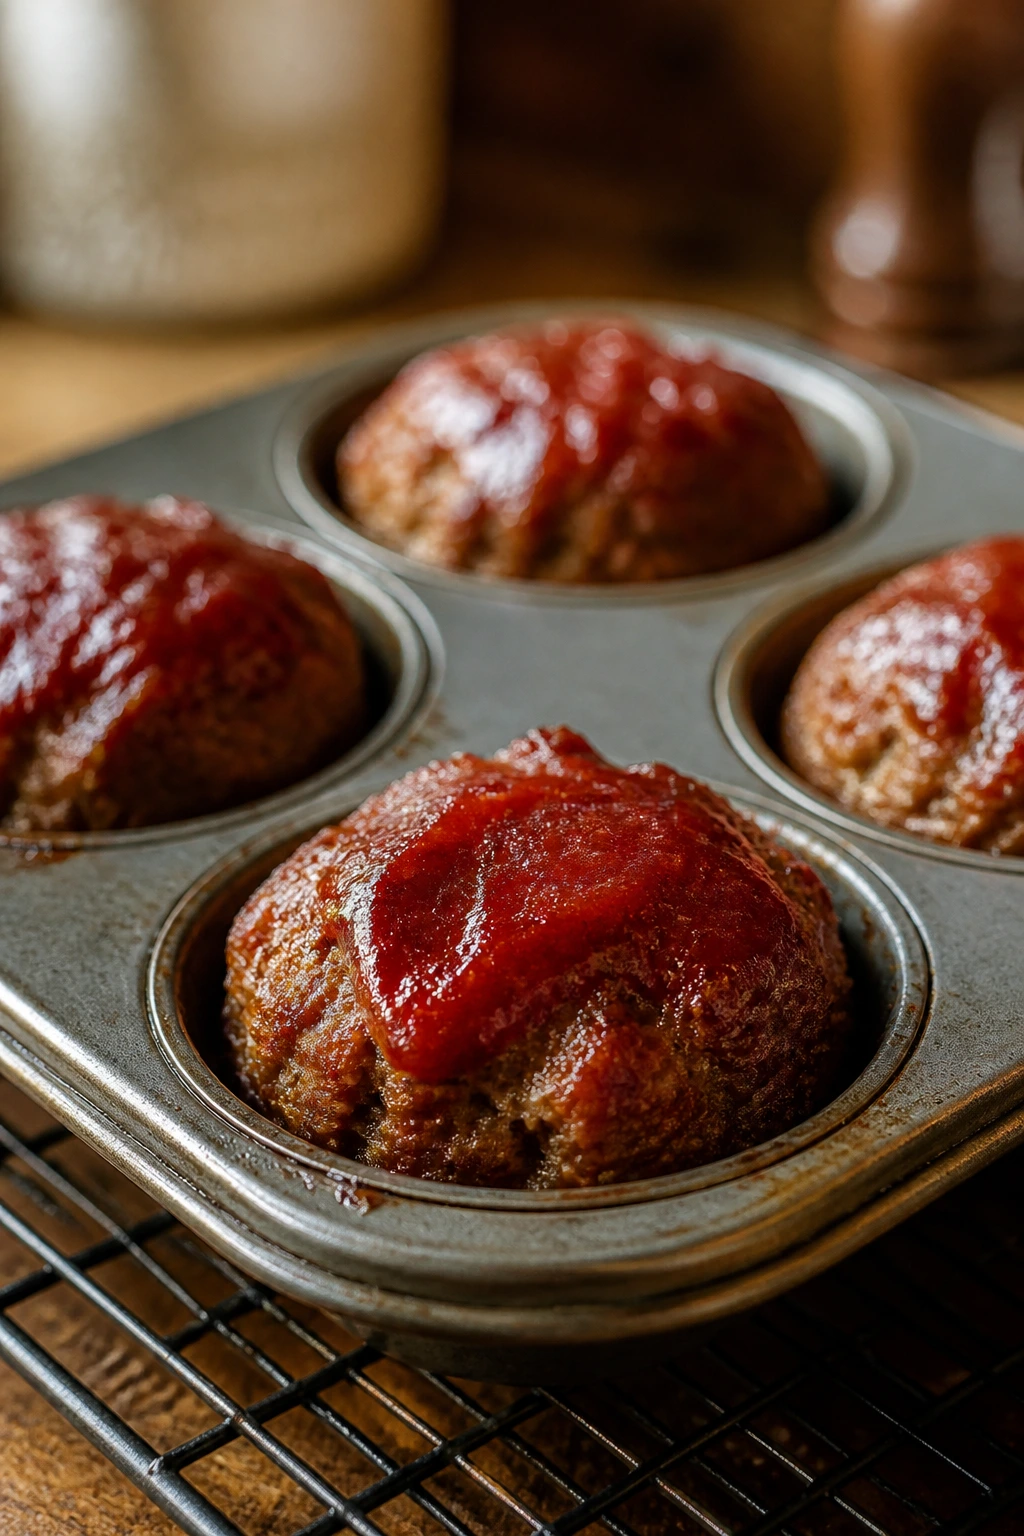
5. Mini Meatloaf Muffins
Meatloaf gets friendlier when it shows up in a muffin tin. The edges brown faster, the portions are small, and nobody has to stare at a giant loaf wondering where to begin. That change alone can make a skeptical eater more willing to try it.
Why It Works:
Mini meatloaves cook faster than a full loaf, so the outside doesn’t dry out while the middle finishes. A little grated carrot melts into the meat and disappears, which is useful if your crowd accepts vegetables only when they’re hidden in plain sight. The ketchup glaze gives you that sticky, familiar top kids usually notice first.
Key Ingredients:
- 1 pound ground beef
- 1/2 cup breadcrumbs
- 1 large egg
- 1/4 cup milk
- 1/4 cup ketchup
- 1 tablespoon Worcestershire sauce
- 1 small carrot, finely grated
- 1/2 teaspoon onion powder
Quick Steps:
- Preheat the oven to 375°F (190°C) and grease a 12-cup muffin tin.
- In a bowl, mix beef, breadcrumbs, egg, milk, Worcestershire, carrot, onion powder, and half the ketchup.
- Divide the mixture evenly among the muffin cups and press gently so each one holds together.
- Spoon the remaining ketchup over the top of each muffin.
- Bake for 20 to 22 minutes until the centers reach 160°F (71°C) and the tops look glossy and browned.
Equipment for This Recipe:
- 12-cup muffin tin
- Large mixing bowl
- Spoon
- Instant-read thermometer
How to Serve This Dish:
Serve 2 muffins per child with mashed potatoes or buttered noodles. A little extra ketchup on the side makes the plate feel familiar enough for hesitant eaters.
Pro Tips for This Recipe:
- Don’t pack the meat too tightly or the texture turns dense.
- Grate the carrot finely so it melts into the mixture.
- Let the muffins rest for 5 minutes before lifting them out. They hold together better.
Variations on This Dish:
- Turkey Muffins: Use ground turkey and add 1 tablespoon olive oil for moisture.
- BBQ Glaze: Swap ketchup for barbecue sauce.
- Cheesy Center: Press a small cube of cheddar into the middle of each muffin.
Common Mistakes to Avoid with This Dish:
- Overmixing: The meatloaf gets tough.
- Skipping the rest time: The muffins can crumble.
- Too much glaze too early: The tops may burn before the centers finish.
6. Grilled Cheese Dippers with Tomato Soup
There’s a reason grilled cheese and tomato soup keep showing up in kid-friendly dinners. The bread goes crisp, the cheese stays melty, and the soup gives you something warm to dunk into if the eater likes to control each bite. That matters.
Why It Works:
The sandwich format keeps the cheese and bread separate enough to feel safe, but the dip brings the whole thing together. A little sugar in the soup softens the tomato edge without making it taste like dessert. If you cut the sandwich into sticks, even a cautious eater can treat it like finger food.
Key Ingredients:
- 8 slices sandwich bread
- 8 slices cheddar cheese
- 2 tablespoons butter
- 1 tablespoon olive oil
- 1 tablespoon chopped onion
- 1 can (14 ounces) crushed tomatoes
- 1 cup chicken or vegetable broth
- 1/4 cup heavy cream
- 1 teaspoon sugar
Quick Steps:
- Melt 1 tablespoon butter in a saucepan and cook the onion for 3 minutes until soft.
- Add tomatoes, broth, sugar, and a pinch of salt, then simmer for 10 minutes. Stir in cream and keep warm on low.
- Build sandwiches with bread and cheddar, then spread the outside with the remaining butter.
- Cook in a skillet over medium heat for 2 to 3 minutes per side until the bread is golden and the cheese melts.
- Slice into sticks and serve with the soup.
Equipment for This Recipe:
- Skillet
- Saucepan
- Spatula
- Bread knife
How to Serve This Dish:
Serve the sandwich sticks standing up in a mug or leaning against the soup bowl. Add a few crackers or celery sticks if you want extra crunch.
Pro Tips for This Recipe:
- Keep the heat at medium. High heat burns the bread before the cheese melts.
- Shred or thin-slice the cheese if it melts slowly.
- Blend the soup if your eater dislikes onion bits.
Variations on This Dish:
- Mozzarella Dipper: Use mozzarella for a milder, stretchier sandwich.
- No-Soup Version: Skip the soup and serve with ketchup for dipping.
- Herby Soup: Stir in basil or oregano for more tomato flavor.
Common Mistakes to Avoid with This Dish:
- Using bread that’s too thin: It tears when dunked.
- Cooking too fast: The outside browns before the center softens.
- Serving soup boiling hot: It’s too hot for small mouths.
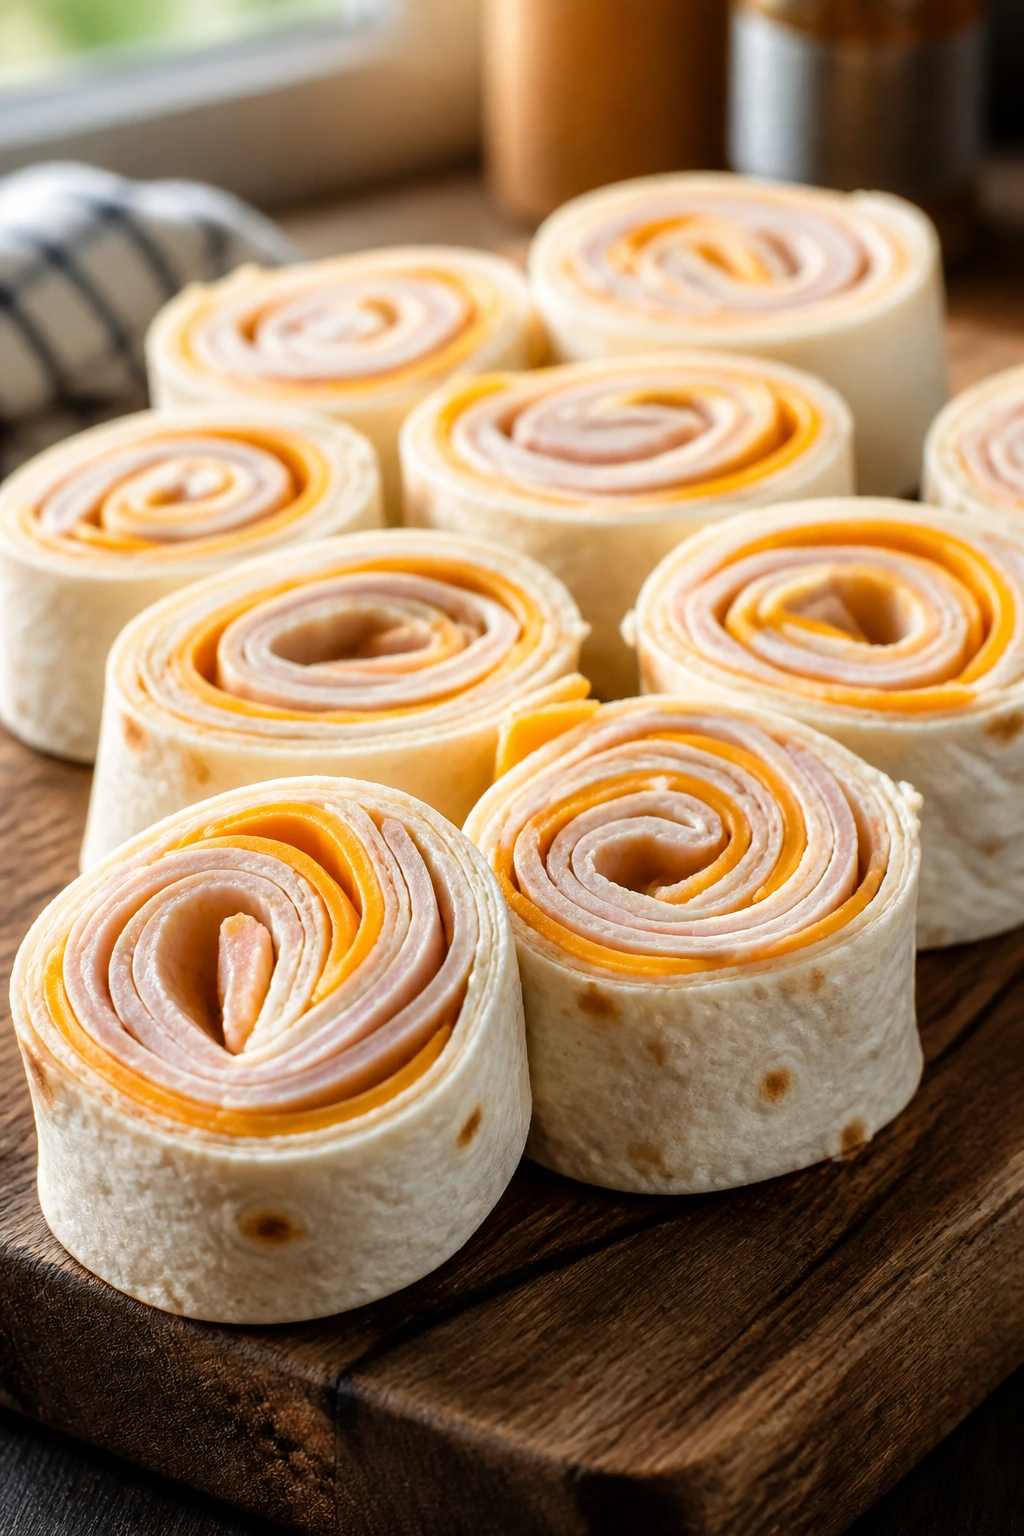
7. Turkey and Cheese Pinwheels
Pinwheels have a cheerful look that works in your favor. They’re neat, portable, and easy to count, which gives some kids a sense of control before they’ve even sat down. That’s not a small thing.
Why It Works:
The tortilla softens the edges of the meat and cheese so nothing feels sharp or overwhelming. Cream cheese acts like edible glue, keeping the roll tight and the slices tidy. A short chill in the fridge helps the pinwheels slice cleanly instead of squishing into a sad stack.
Key Ingredients:
- 4 large flour tortillas
- 6 ounces cream cheese, softened
- 8 ounces deli turkey, sliced thin
- 6 slices mild cheddar
- 1 tablespoon ranch seasoning
- 1/2 cup shredded lettuce, optional
- 1/4 cup finely diced cucumber, optional
Quick Steps:
- Stir the cream cheese and ranch seasoning together until smooth.
- Spread a thin layer over each tortilla, leaving a 1-inch border at the edge.
- Layer turkey, cheddar, and optional vegetables in an even strip across each tortilla.
- Roll each tortilla tightly, then chill for 20 minutes.
- Slice into 1-inch pinwheels with a sharp knife and serve.
Equipment for This Recipe:
- Cutting board
- Sharp knife
- Mixing bowl
- Plastic wrap
How to Serve This Dish:
Set out 6 to 8 pinwheels per plate with grapes or pretzels. They’re also good tucked into lunchboxes or served as part of an after-school snack board.
Pro Tips for This Recipe:
- Roll tightly from the first turn. Loose rolls fall apart at slicing.
- Use deli turkey sliced thin, not thick chunks.
- Chill before cutting. That step makes the clean slices.
Variations on This Dish:
- Ham-and-Cheddar Pinwheels: Swap the turkey for ham.
- Pizza Roll-Up: Use cream cheese mixed with a spoonful of pizza sauce.
- Veggie-Only Roll: Use cucumber, lettuce, and shredded carrot for a cold crunch.
Common Mistakes to Avoid with This Dish:
- Too much filling: The roll splits open.
- Skipping the chill: The slices smudge.
- Using wet vegetables: They make the tortilla slippery.
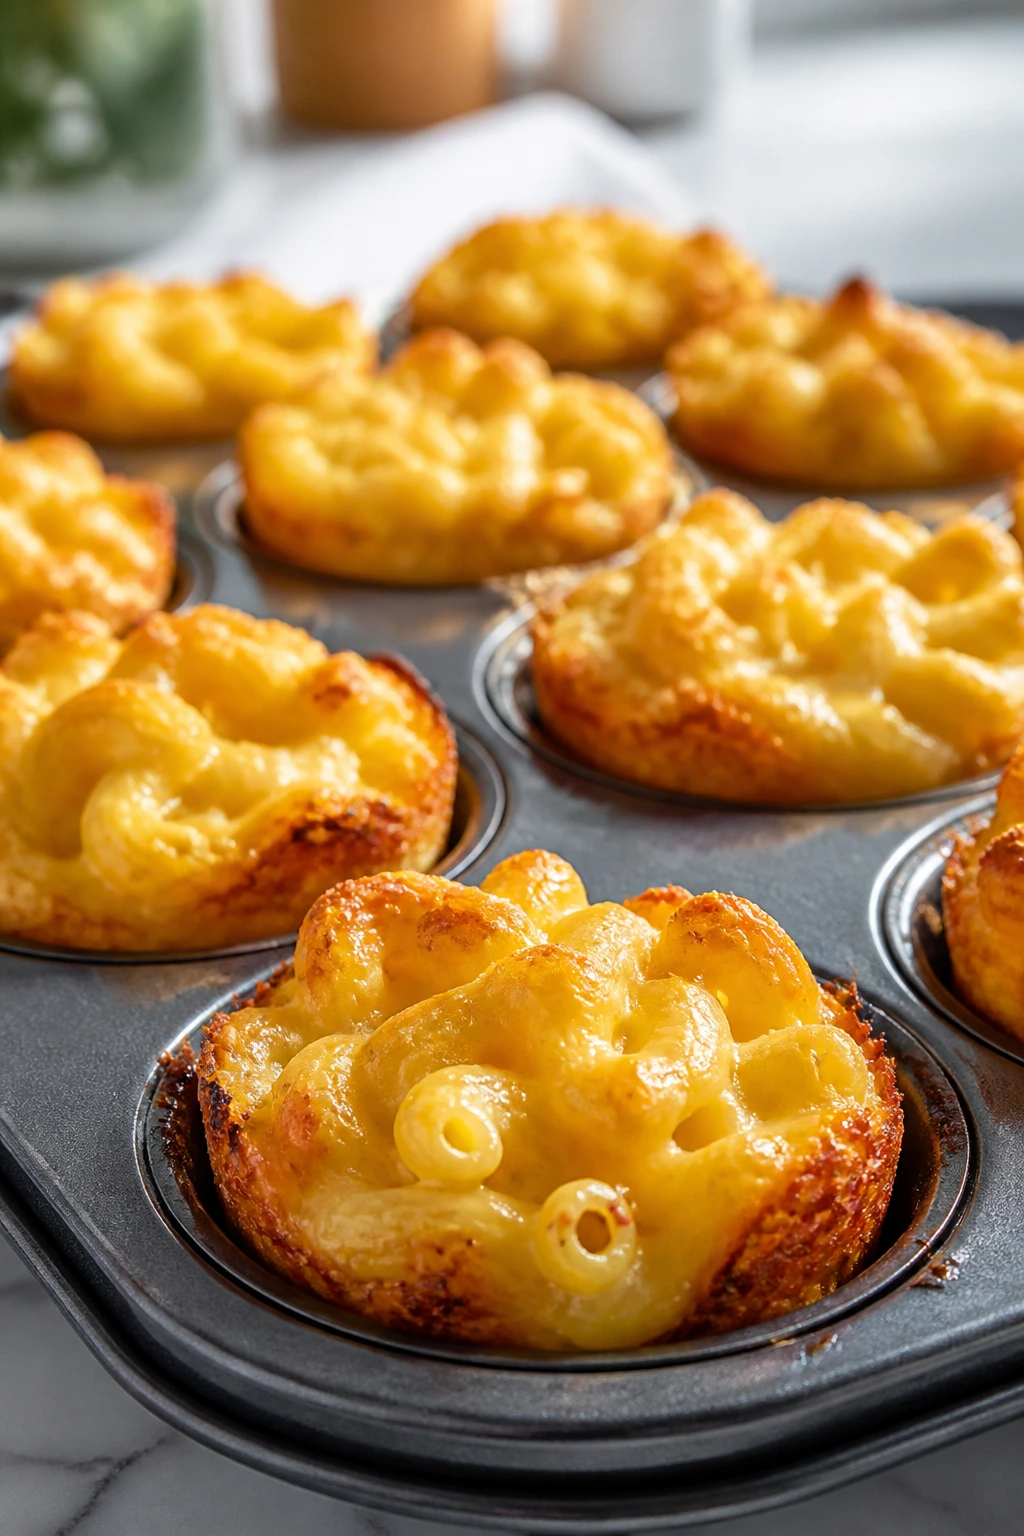
8. Mac and Cheese Muffin Cups
Mac and cheese in a muffin tin feels like a party trick, but it’s really just a smart way to make the meal easier to handle. The edges bake up a little firmer, which gives kids a tidy shape instead of a bowl of sliding noodles. That matters more than it sounds.
Why It Works:
Egg helps the mac hold together without turning it into a brick. Sharp cheddar gives flavor, while mild cheddar keeps the taste familiar. Baked in cups, the mac and cheese gets crispy on the outside and creamy inside, which is a better texture contrast than most stovetop versions manage.
Key Ingredients:
- 8 ounces elbow macaroni
- 2 cups shredded cheddar
- 1 cup milk
- 1 large egg
- 2 tablespoons butter
- 1 tablespoon flour
- 1/2 teaspoon salt
- 1/4 teaspoon paprika
Quick Steps:
- Cook macaroni until just tender, then drain.
- In a saucepan, melt butter and whisk in flour for 1 minute, then whisk in milk until smooth and slightly thickened.
- Stir in 1 1/2 cups cheddar, salt, and paprika until melted, then fold in the macaroni and egg.
- Spoon into a greased muffin tin and top with remaining cheddar.
- Bake at 375°F (190°C) for 15 to 18 minutes until set and lightly browned on top.
Equipment for This Recipe:
- Muffin tin
- Saucepan
- Whisk
- Spoon
How to Serve This Dish:
Serve 2 muffin cups per child with apple slices or peas. They reheat well, so they also work as a quick grab-and-go dinner.
Pro Tips for This Recipe:
- Don’t overcook the pasta. It keeps baking later.
- Grease the tin well or use parchment liners.
- Let the cups cool a few minutes before lifting them out.
Variations on This Dish:
- Broccoli Mac Cups: Add 1/2 cup very small broccoli florets.
- Bacon Mac Cups: Stir in 1/4 cup cooked bacon bits.
- Mild White Cheddar: Swap in white cheddar for a less orange, more mellow flavor.
Common Mistakes to Avoid with This Dish:
- Sauce too thin: The cups won’t set well.
- Skipping the egg: They fall apart.
- Overfilling the tin: They puff and spill over.
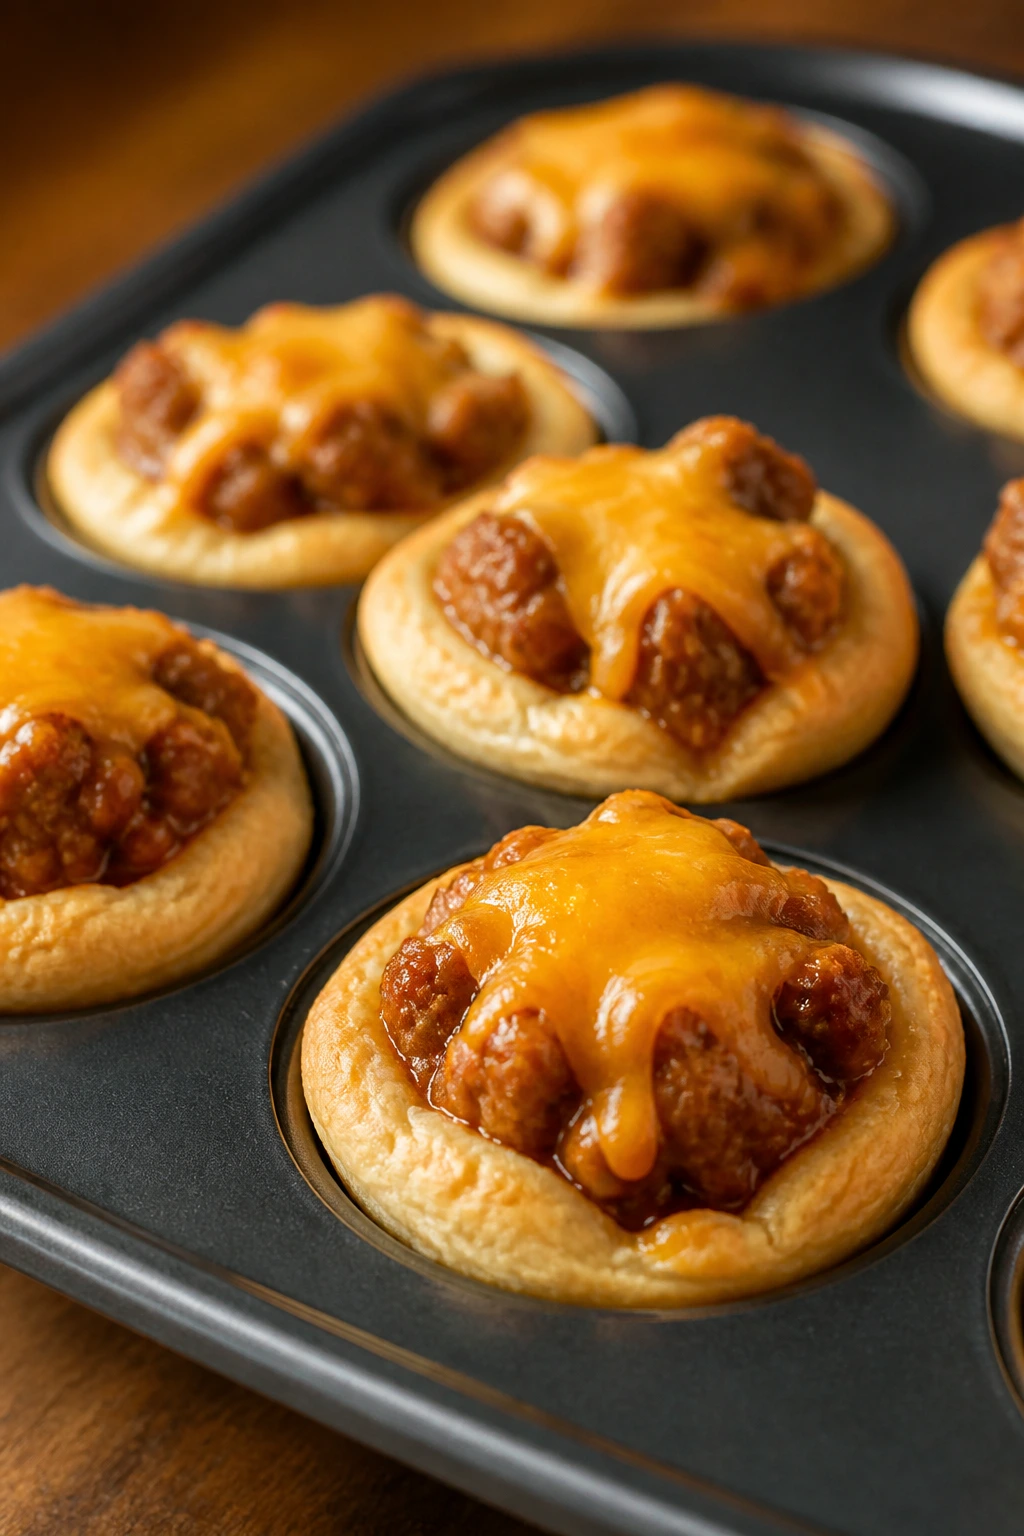
9. Sloppy Joe Biscuit Bites
Sloppy Joes can be messy in the best way, but a muffin-tin biscuit bite keeps the mess under control. The filling stays inside a little dough cup, which means fewer drips and a plate that still looks sane at the end of dinner. That alone is worth the extra minute.
Why It Works:
The biscuit dough acts like a built-in crust, and kids usually trust bread more than sauce. The meat filling gets a sweet-savory finish from the tomato-based sauce, which is one reason this dish works so well with picky eaters who like familiar flavors. Cheese on top adds a soft melt that helps everything feel milder.
Key Ingredients:
- 1 pound ground beef
- 1/2 small onion, finely diced
- 3/4 cup ketchup
- 1/4 cup tomato sauce
- 1 tablespoon brown sugar
- 1 tablespoon Worcestershire sauce
- 1 can refrigerated biscuit dough, 8 biscuits
- 1 cup shredded cheddar
Quick Steps:
- Brown the beef and onion in a skillet over medium heat until no pink remains.
- Stir in ketchup, tomato sauce, brown sugar, Worcestershire, and a pinch of salt, then simmer for 5 minutes until thick.
- Press each biscuit into a greased muffin cup, shaping it into a small bowl.
- Spoon in the filling, top with cheddar, and bake at 375°F (190°C) for 12 to 14 minutes.
- Cool for 3 minutes before serving.
Equipment for This Recipe:
- Skillet
- Muffin tin
- Spoon
- Colander, optional if draining extra fat
How to Serve This Dish:
Serve 1 or 2 bites per child with corn, carrots, or a simple green salad for the adults. They also work as a snack straight from the tin.
Pro Tips for This Recipe:
- Drain the beef if it looks greasy. Too much fat makes the biscuit bottoms soggy.
- Pinch the dough up the sides before adding filling.
- Let the filling cool slightly before spooning it in.
Variations on This Dish:
- Turkey Joe Bites: Use ground turkey for a lighter filling.
- BBQ Joe Bites: Swap the ketchup for barbecue sauce.
- Cheese-Stuffed Version: Place a small cube of cheese under the filling for extra melt.
Common Mistakes to Avoid with This Dish:
- Wet filling: The dough gets gummy.
- Raw biscuit centers: Press the dough thin enough to bake through.
- Overbrowning cheese: Tent lightly with foil if needed.
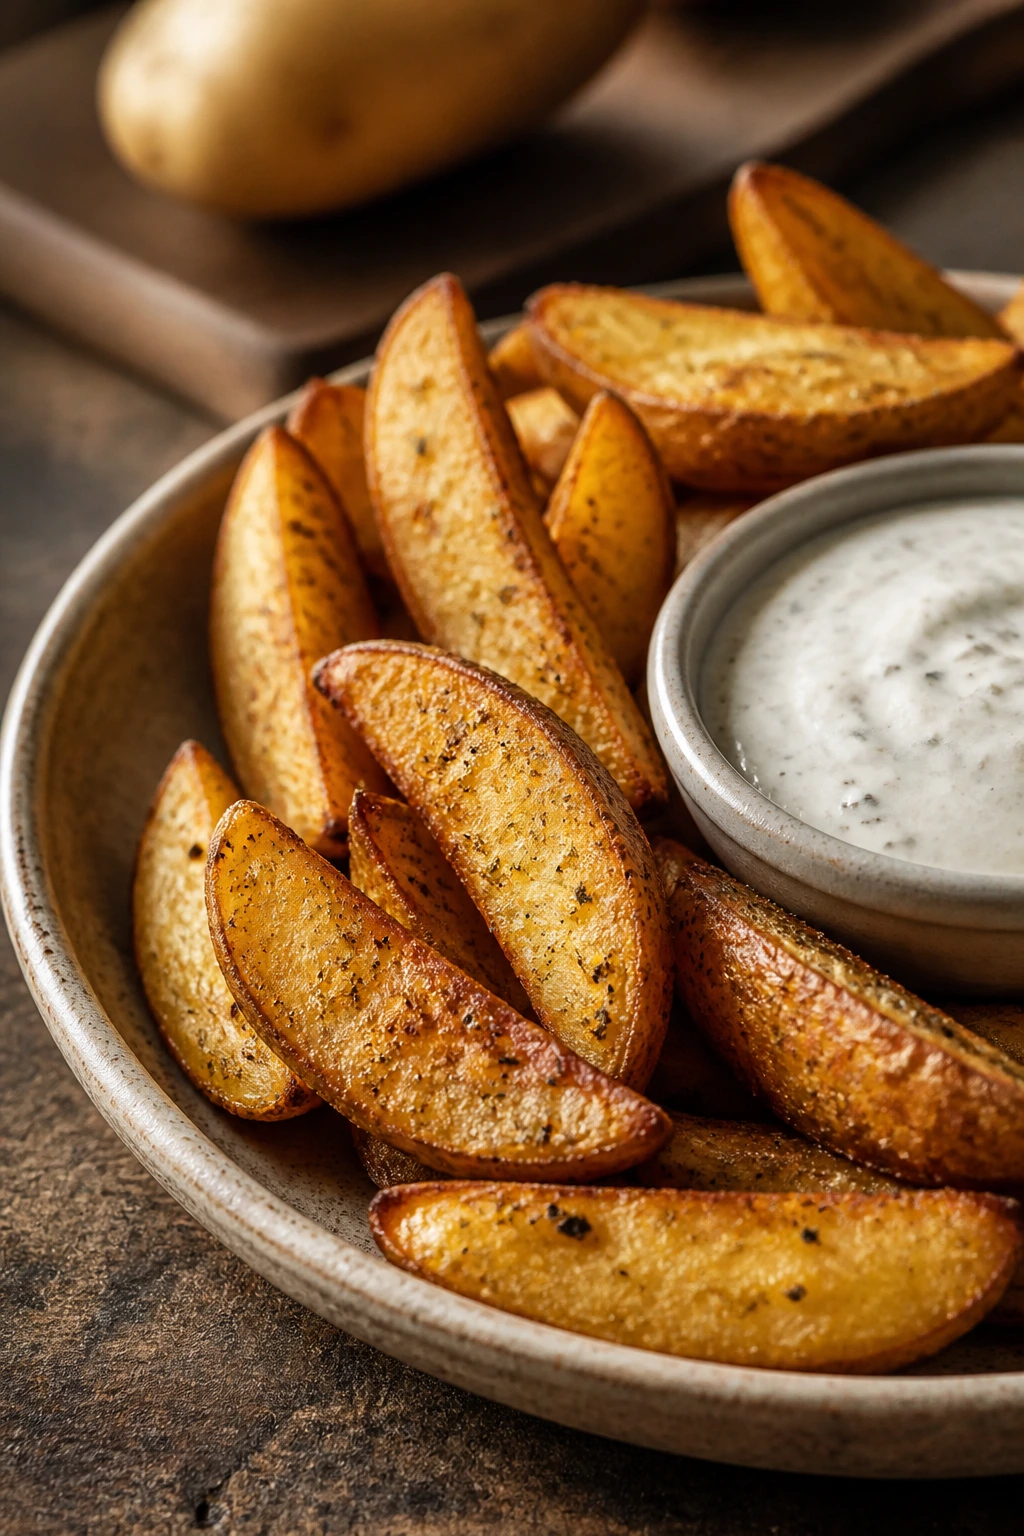
10. Crispy Potato Wedges with Ranch Dip
Potato wedges are one of the easiest ways to win over a tired eater. They’re familiar, salty, and built for dipping, which gives kids something to do with their hands while the rest of dinner catches up. That helps more than people admit.
Why It Works:
Russet potatoes crisp well because they have enough starch to brown without collapsing. Cutting them into wedges gives you soft centers and crunchy edges in the same bite, which is the texture combo most kids tend to accept. A short soak in cold water removes surface starch and helps the wedges roast instead of steam.
Key Ingredients:
- 2 pounds russet potatoes
- 2 tablespoons olive oil
- 1 teaspoon paprika
- 1 teaspoon garlic powder
- 1 teaspoon salt
- 1/2 teaspoon black pepper
- 1/2 cup ranch dressing
- 2 tablespoons sour cream
Quick Steps:
- Heat the oven to 425°F (220°C) and line a sheet pan.
- Cut the potatoes into wedges and soak them in cold water for 10 minutes, then dry them well.
- Toss with oil, paprika, garlic powder, salt, and pepper.
- Spread in a single layer and bake for 30 to 35 minutes, flipping once, until golden and crisp at the edges.
- Mix ranch and sour cream for dipping.
Equipment for This Recipe:
- Sheet pan
- Large bowl
- Knife and cutting board
- Mixing spoon
How to Serve This Dish:
Serve alongside chicken tenders, sliders, or eggs. A little cup of dip on the side makes the wedges feel like a snack even when they’re doing dinner duty.
Pro Tips for This Recipe:
- Dry the potatoes well before roasting.
- Leave space between wedges so they brown.
- Flip only once. Too much handling knocks off the crust.
Variations on This Dish:
- Cheesy Wedges: Sprinkle with Parmesan during the last 5 minutes.
- Mild Taco Wedges: Use taco seasoning instead of paprika.
- Air Fryer Version: Cook at 400°F for about 18 to 20 minutes in batches.
Common Mistakes to Avoid with This Dish:
- Skipping the soak: The wedges can bake up less crisp.
- Too much oil: They get soft instead of crunchy.
- Crowding the pan: Steam is the enemy here.
11. Mini Taco Cups

Mini taco cups give kids all the parts they like about tacos — meat, cheese, crunch — without the stress of a shell cracking in half. They’re tidy, friendly, and easy to customize one cup at a time.
Why It Works:
Wonton wrappers or small tortilla rounds turn into crisp little cups that hold the filling instead of spilling it. Mild taco seasoning keeps the flavor familiar, and the cheese helps hold the top together. Since each cup is its own portion, picky eaters can choose how much salsa or sour cream they want.
Key Ingredients:
- 1 pound ground turkey or beef
- 1 tablespoon taco seasoning
- 12 wonton wrappers
- 1 cup shredded cheddar
- 1/2 cup mild salsa
- 1 tablespoon olive oil
- 1/4 cup sour cream
- 1/4 cup shredded lettuce, optional
Quick Steps:
- Preheat the oven to 375°F (190°C) and grease a muffin tin.
- Brown the meat with taco seasoning and a splash of water until well coated.
- Press one wonton wrapper into each muffin cup and fill with meat and cheddar.
- Bake for 10 to 12 minutes until the cups are crisp and the cheese melts.
- Top with salsa, sour cream, and lettuce if using.
Equipment for This Recipe:
- Muffin tin
- Skillet
- Spoon
- Small bowl for toppings
How to Serve This Dish:
Serve 2 or 3 cups per child with fruit or corn. They’re also good on a snack tray with a dip spooned into the center.
Pro Tips for This Recipe:
- Press the wrappers firmly into the tin so they keep the cup shape.
- Drain the meat well if it releases a lot of liquid.
- Add toppings after baking, not before.
Variations on This Dish:
- Chicken Taco Cups: Use shredded chicken instead of beef.
- Bean Taco Cups: Swap in refried beans for a meatless version.
- Extra-Cheesy Cups: Add a little Monterey Jack with the cheddar.
Common Mistakes to Avoid with This Dish:
- Too much filling: The cups overflow.
- Wet meat mixture: The wrappers go limp.
- Overbaking: The edges get brittle and break.
12. English Muffin Pizzas
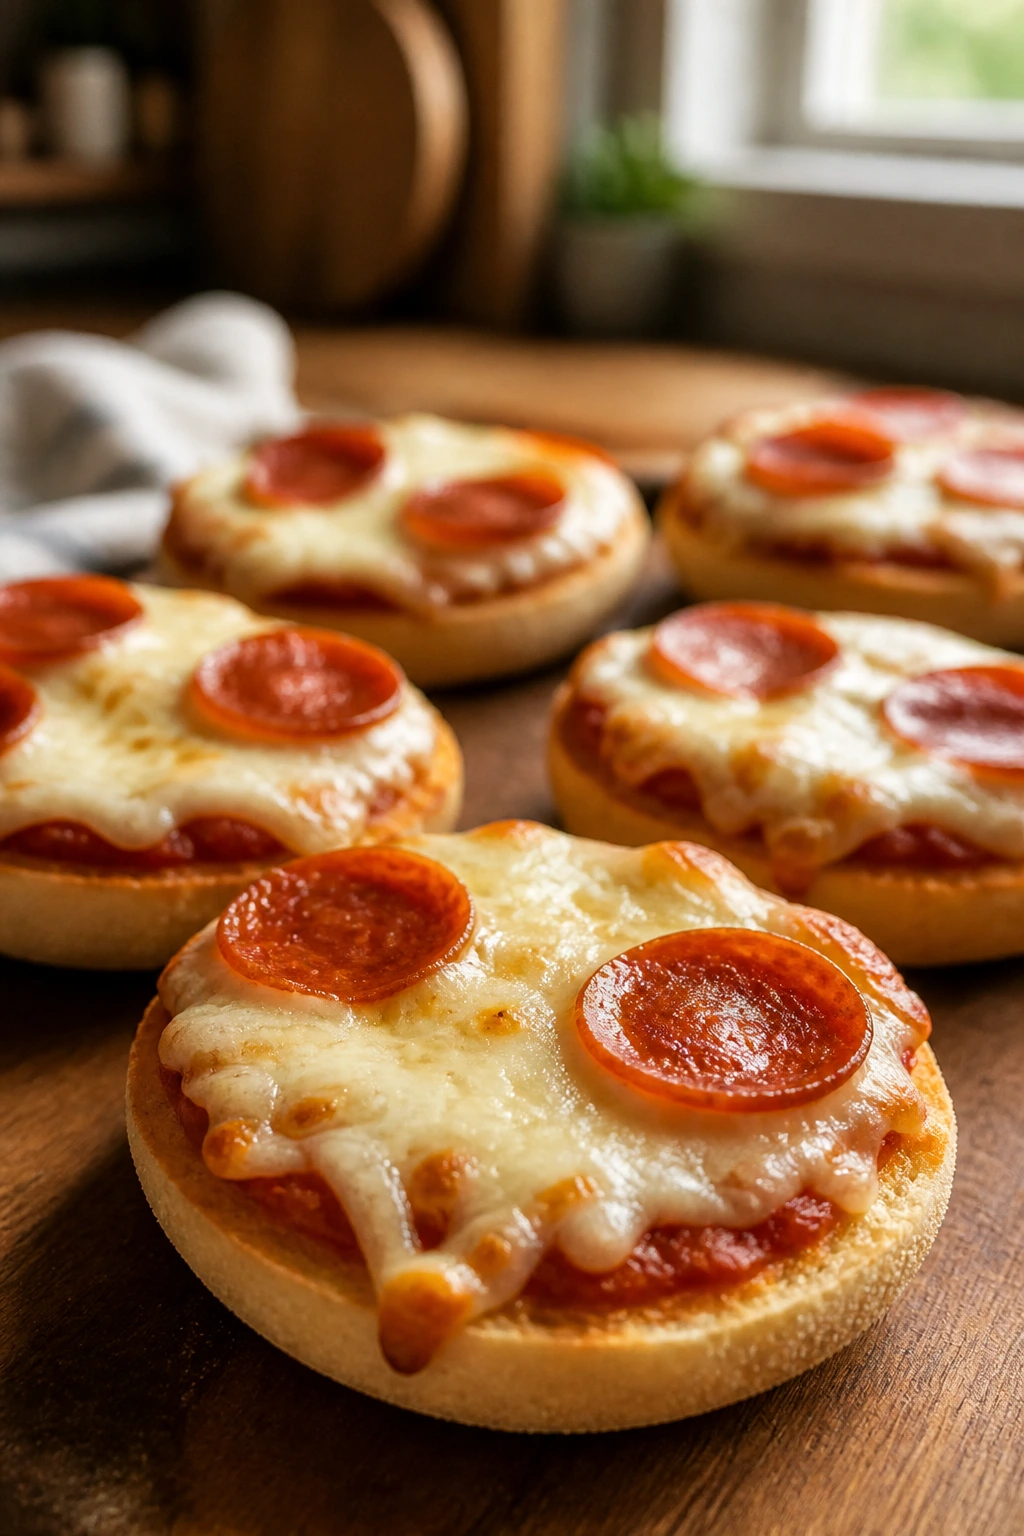
English muffin pizzas are the kind of thing kids recognize instantly. They’re small, crisp, and customizable, which makes them easier to sell than a full-size pizza with half the toppings in dispute. That is not a small advantage.
Why It Works:
The nooks and crannies of the muffin hold sauce well, but the pre-toast step protects the bottom from getting damp. Mozzarella melts fast, and the small size means every pizza reaches the table while the cheese still looks soft and stretchy. Pepperoni gives familiar flavor without forcing a lot of toppings on anyone.
Key Ingredients:
- 4 English muffins, split
- 1/2 cup pizza sauce
- 1 1/4 cups shredded mozzarella
- 16 pepperoni slices
- 1 teaspoon dried oregano
- 1 teaspoon olive oil
- Pinch of salt
Quick Steps:
- Toast the English muffins under the broiler or in a toaster until lightly crisp.
- Spread each half with sauce, then add mozzarella, pepperoni, oregano, and a tiny pinch of salt.
- Bake or broil for 4 to 6 minutes until the cheese melts and bubbles.
- Let cool for 1 minute, then serve.
Equipment for This Recipe:
- Sheet pan
- Toaster or broiler
- Spoon
- Oven mitts
How to Serve This Dish:
Serve as a main dish with a side salad or as a snack with sliced fruit. They disappear quickly, so plan on 2 halves per child.
Pro Tips for This Recipe:
- Toast first or the base turns soft.
- Don’t overload with sauce.
- Broil with the door cracked if your broiler runs hot.
Variations on This Dish:
- Cheese Pizza: Skip the pepperoni for the simplest version.
- Ham and Pineapple: Use tiny bits of ham and pineapple if that combo gets approval.
- Veggie-Minute Pizza: Add a few finely chopped mushrooms or peppers.
Common Mistakes to Avoid with This Recipe:
- Using too much cheese: It slides off the muffin.
- Skipping the toast: The base gets soggy.
- Broiling too long: The tops burn fast.
13. Honey Mustard Chicken Bites
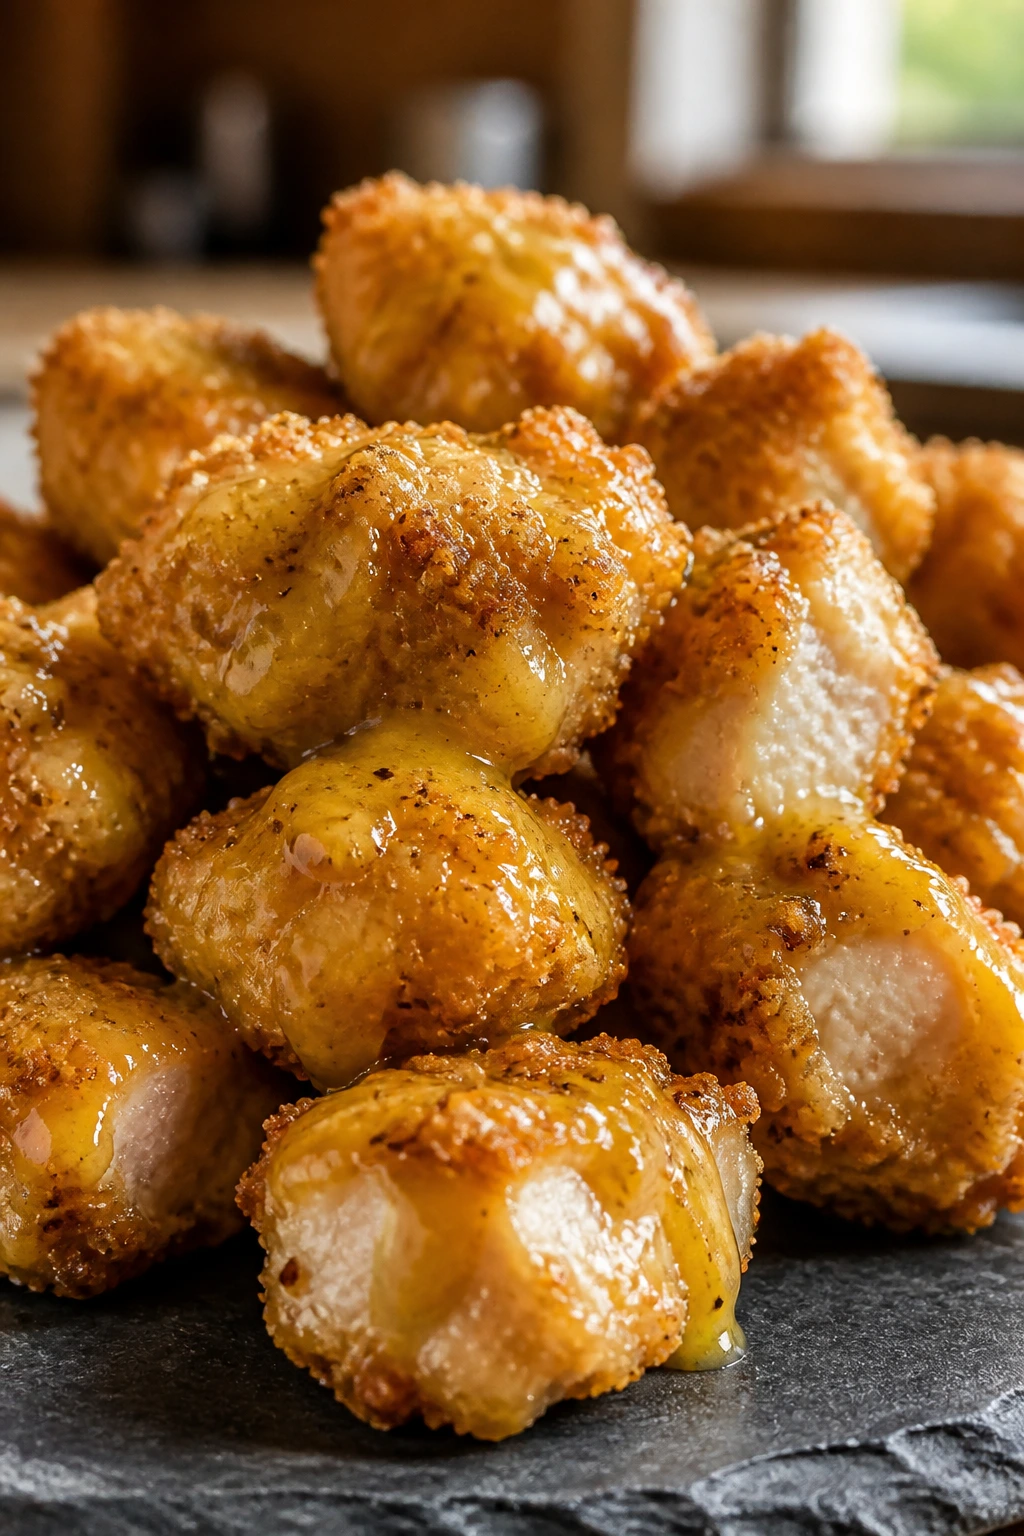
These chicken bites taste like something from a lunchbox dream, but they’re baked, not fried, and that keeps the kitchen simpler. The honey mustard glaze adds enough sweetness to feel kid-friendly without turning the chicken into dessert. That balance matters.
Why It Works:
Small chicken pieces cook quickly and stay tender if you don’t overbake them. The breadcrumb coating gives a little crunch, while the glaze adds stickiness and flavor that helps the bites feel finished. This is a good recipe for kids who reject plain chicken but happily eat anything with a sweet dip.
Key Ingredients:
- 1 pound boneless chicken breast, cut into 1-inch pieces
- 2 large eggs
- 1 cup panko breadcrumbs
- 1/2 teaspoon salt
- 1/2 teaspoon garlic powder
- 1/4 teaspoon paprika
- 3 tablespoons honey mustard
- 1 tablespoon olive oil
Quick Steps:
- Preheat the oven to 425°F (220°C) and line a sheet pan.
- Whisk the eggs in one bowl; mix panko, salt, garlic powder, and paprika in another.
- Dip the chicken pieces in egg, then coat in panko and place on the sheet pan.
- Bake for 12 to 15 minutes until the coating is golden and the chicken reaches 165°F (74°C).
- Toss gently with honey mustard and olive oil before serving.
Equipment for This Recipe:
- Sheet pan
- Two bowls
- Tongs
- Instant-read thermometer
How to Serve This Dish:
Serve with rice, potato wedges, or steamed carrots. A small dish of extra honey mustard on the side makes them feel snackable.
Pro Tips for This Recipe:
- Cut the chicken evenly so the bites finish at the same time.
- Toss with sauce after baking, not before, if you want a crisp coating.
- Don’t skip the thermometer. Chicken bites overcook fast.
Variations on This Dish:
- Ranch Chicken Bites: Swap honey mustard for ranch.
- Parmesan Chicken Bites: Add Parmesan to the panko.
- Air Fryer Version: Cook at 400°F for 8 to 10 minutes, shaking once.
Common Mistakes to Avoid with This Recipe:
- Pieces too big: The outside dries before the inside cooks.
- Saucing too early: The coating softens.
- Overcrowding: The bites steam instead of crisp.
14. Baked Ravioli Bites
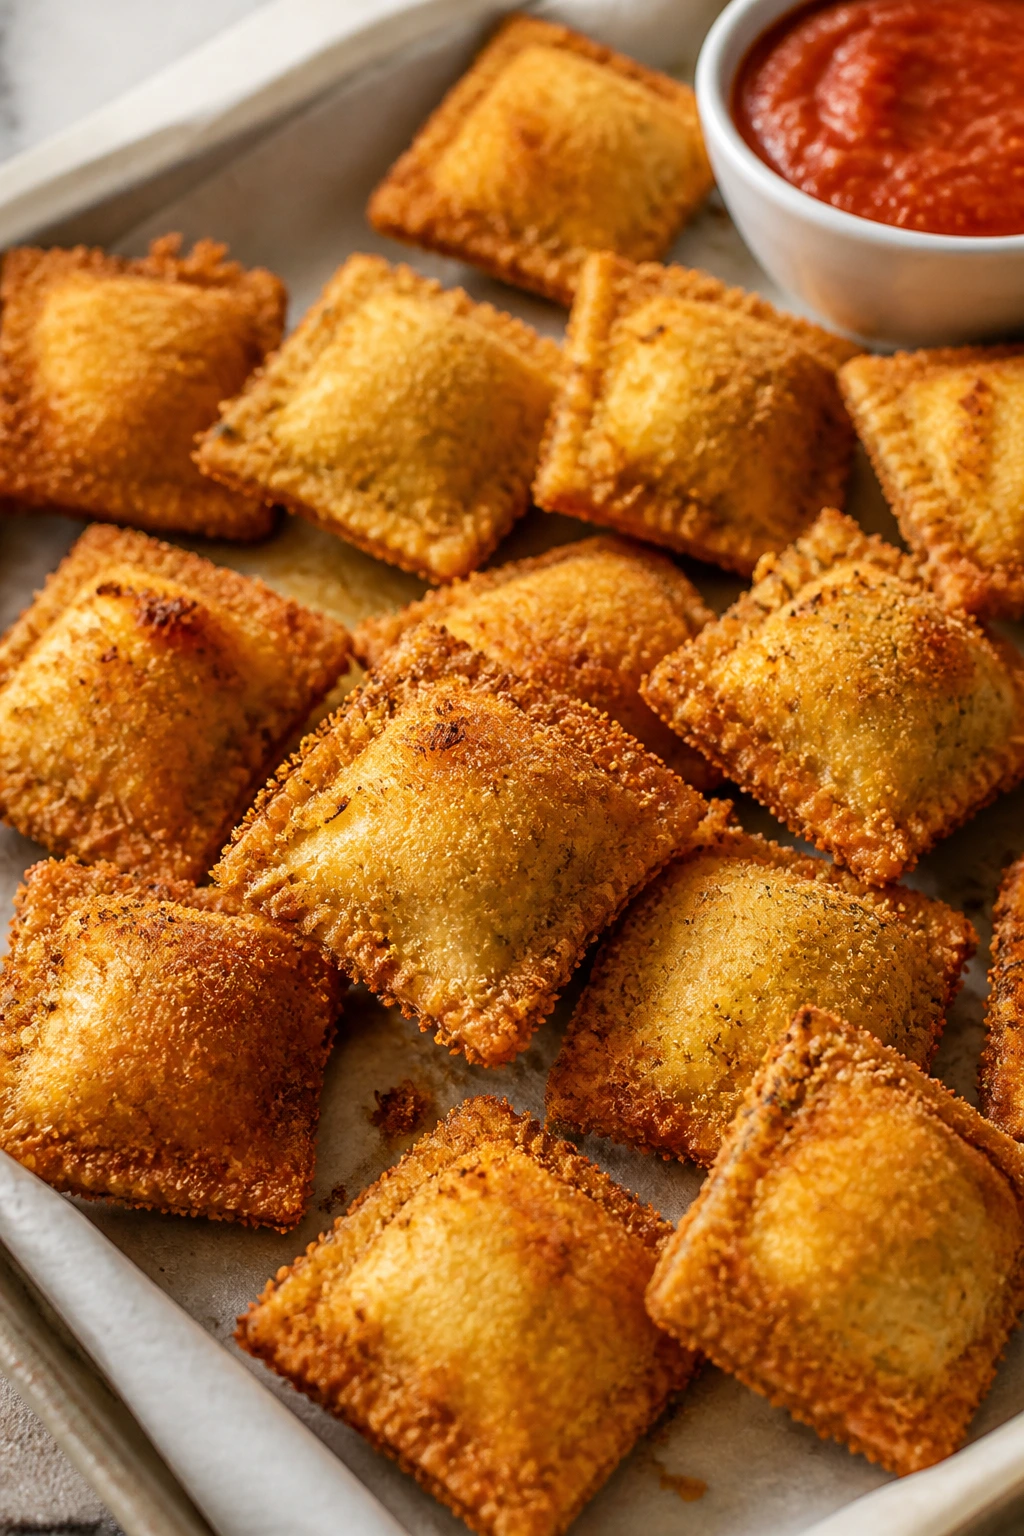
Baked ravioli bites are a smart trick for families who want pasta without a full bowl of sauce-slick noodles. They’re crisp, dippable, and easy to portion, which makes them feel more like finger food than dinner homework.
Why It Works:
Refrigerated ravioli already carries filling inside, so the breading does most of the work. Baking them gives the pasta a crispy shell while keeping the center soft and cheesy. Marinara on the side keeps control in the eater’s hands, which is often the difference between “no thanks” and “I’ll try one.”
Key Ingredients:
- 1 package refrigerated cheese ravioli, about 20 ounces
- 2 large eggs
- 1 cup Italian-style breadcrumbs
- 1/2 cup grated Parmesan
- 1 teaspoon Italian seasoning
- 1 tablespoon olive oil
- 1 cup marinara sauce
Quick Steps:
- Preheat the oven to 400°F (205°C) and line a sheet pan.
- Whisk the eggs in one bowl and mix breadcrumbs, Parmesan, and Italian seasoning in another.
- Dip each ravioli in egg, then coat in the breadcrumb mixture and place on the pan.
- Drizzle lightly with olive oil and bake for 12 to 14 minutes, flipping once halfway through.
- Serve hot with marinara for dipping.
Equipment for This Recipe:
- Sheet pan
- Parchment paper
- Two shallow bowls
- Tongs
How to Serve This Dish:
Serve in a small bowl with toothpicks or by hand if the ravioli are cool enough. A side of cucumber slices or a small salad keeps the meal from feeling too snack-only.
Pro Tips for This Recipe:
- Don’t over-handle the ravioli or the filling can leak.
- Use a light hand with the oil.
- Serve immediately for the best crunch.
Variations on This Dish:
- Spinach Ravioli Bites: Use spinach ravioli for a little more flavor.
- Mozzarella-Stuffed Version: Choose mozzarella-filled ravioli if that’s the preferred cheese.
- Air Fryer Version: Cook in batches at 375°F for about 8 minutes.
Common Mistakes to Avoid with This Dish:
- Wet ravioli: Pat them dry before breading.
- Too much breadcrumb coating: It can fall off in chunks.
- Waiting too long to serve: They lose crunch fast.
15. Hidden Veggie Spaghetti
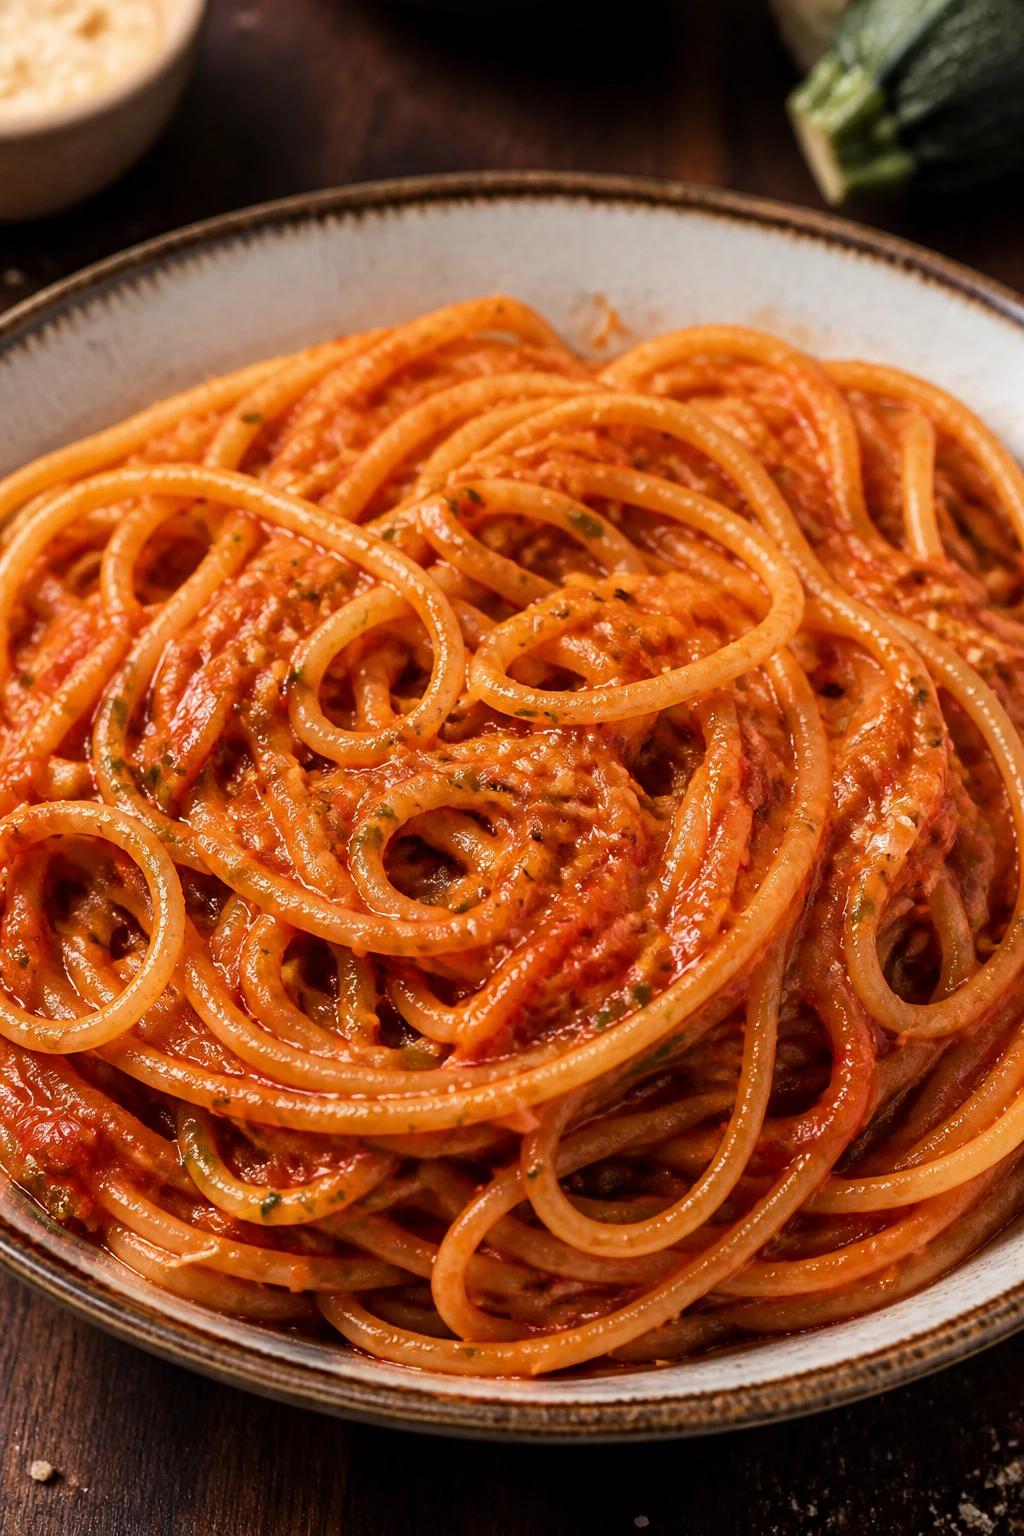
Spaghetti is classic enough to earn trust, which is why it’s a good place to sneak in a little extra vegetable without causing a scene. If the sauce tastes like what they already know, the grated vegetables usually disappear into the background.
Why It Works:
Fine shreds of zucchini and carrot melt into the sauce as they simmer, leaving sweetness and body instead of obvious vegetable pieces. Ground meat gives the sauce enough weight to feel like a real meal, and short simmering makes everything taste cohesive. Kids who reject chunky sauces often do better with this one because the texture stays smooth.
Key Ingredients:
- 12 ounces spaghetti
- 1 pound ground turkey or beef
- 1 small zucchini, finely grated
- 1 small carrot, finely grated
- 2 cups marinara sauce
- 1 tablespoon olive oil
- 1/2 teaspoon salt
- 1/4 teaspoon black pepper
Quick Steps:
- Cook the spaghetti in salted water until al dente, then drain.
- Brown the meat in olive oil over medium heat.
- Stir in zucchini and carrot and cook for 3 minutes until they soften.
- Add marinara, salt, and pepper, then simmer for 10 minutes.
- Toss with the spaghetti and serve warm.
Equipment for This Recipe:
- Large pot
- Large skillet
- Grater
- Colander
How to Serve This Dish:
Serve in shallow bowls with Parmesan on the side. Garlic bread or a few breadsticks make it feel like a meal without adding much work.
Pro Tips for This Recipe:
- Grate the vegetables finely so they vanish into the sauce.
- Simmer long enough for the sauce to lose that raw tomato edge.
- Keep some pasta water if the sauce needs loosening.
Variations on This Dish:
- Meatless Sauce: Replace the meat with finely chopped mushrooms.
- Turkey Version: Use ground turkey for a lighter sauce.
- Creamier Finish: Stir in 2 tablespoons ricotta at the end.
Common Mistakes to Avoid with This Dish:
- Using chunky vegetables: They don’t hide well.
- Overcooking the pasta: It gets mushy fast in the sauce.
- Too much salt early: The sauce can reduce and turn too salty.
16. Cheesy Broccoli Rice Cups
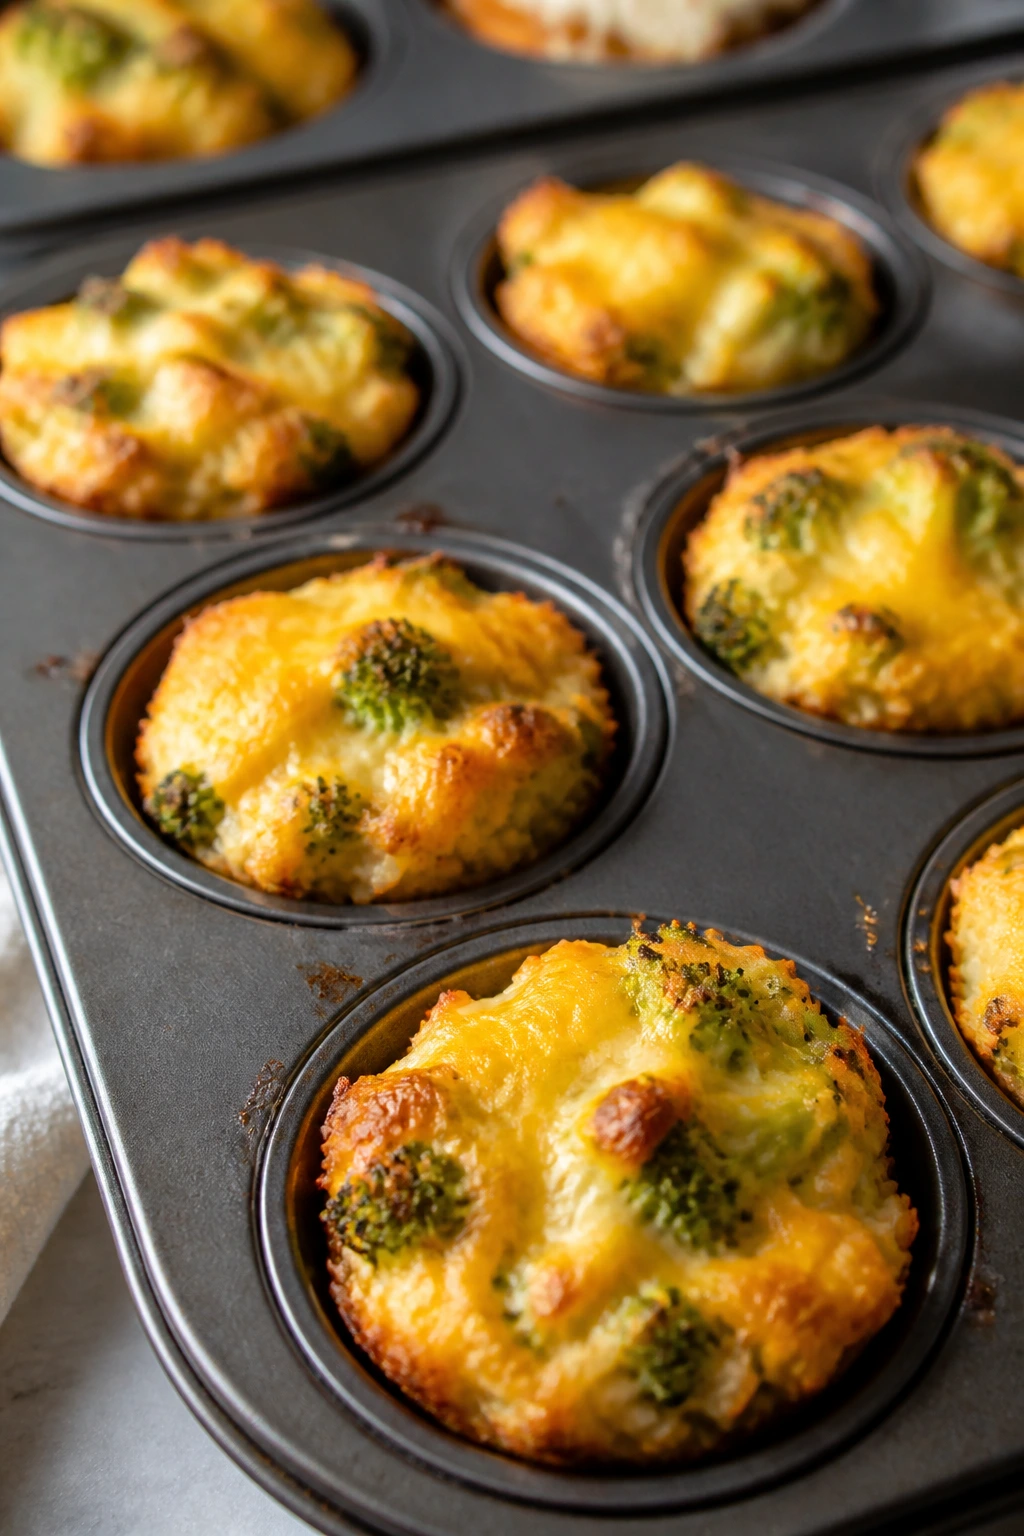
Rice cups are one of my favorite tricks for kids who like their food separated but still warm and filling. Broccoli disappears more easily here because it’s chopped small and wrapped in cheese and rice, not sitting there in a giant green pile.
Why It Works:
Eggs bind the rice so the cups hold their shape, and cheddar gives a strong enough flavor to pull the broccoli into the same lane. These bake into tidy portions, which means you can serve them as a snack or a side without scooping loose grains from a dish. The texture lands somewhere between casserole and muffin, and that seems to be the sweet spot for a lot of kids.
Key Ingredients:
- 2 cups cooked white rice
- 2 cups very small broccoli florets, chopped
- 1 cup shredded cheddar
- 2 large eggs
- 1/2 cup milk
- 1/2 teaspoon salt
- 1/4 teaspoon garlic powder
Quick Steps:
- Preheat the oven to 375°F (190°C) and grease a muffin tin.
- Mix rice, broccoli, cheese, eggs, milk, salt, and garlic powder in a bowl.
- Spoon the mixture into the muffin cups and press gently so it compacts.
- Bake for 18 to 20 minutes until set and lightly browned on top.
- Cool for 5 minutes before removing.
Equipment for This Recipe:
- Muffin tin
- Mixing bowl
- Spoon
- Measuring cups
How to Serve This Dish:
Serve 2 cups per child with chicken, fruit, or a simple yogurt dip if that’s their style. They also work well in lunchboxes.
Pro Tips for This Recipe:
- Chop the broccoli small enough that it blends in.
- Use rice that’s cooled a little; hot rice can make the mixture gummy.
- Pack the cups lightly, not hard.
Variations on This Dish:
- Cauliflower Swap: Replace broccoli with cauliflower rice or tiny florets.
- Ham Add-In: Stir in 1/2 cup diced ham.
- Extra-Cheese Version: Mix in a little mozzarella with the cheddar.
Common Mistakes to Avoid with This Dish:
- Too much liquid: The cups won’t set.
- Large broccoli pieces: They make every bite feel like a challenge.
- Removing too soon: They fall apart while hot.
17. Chicken Taquitos
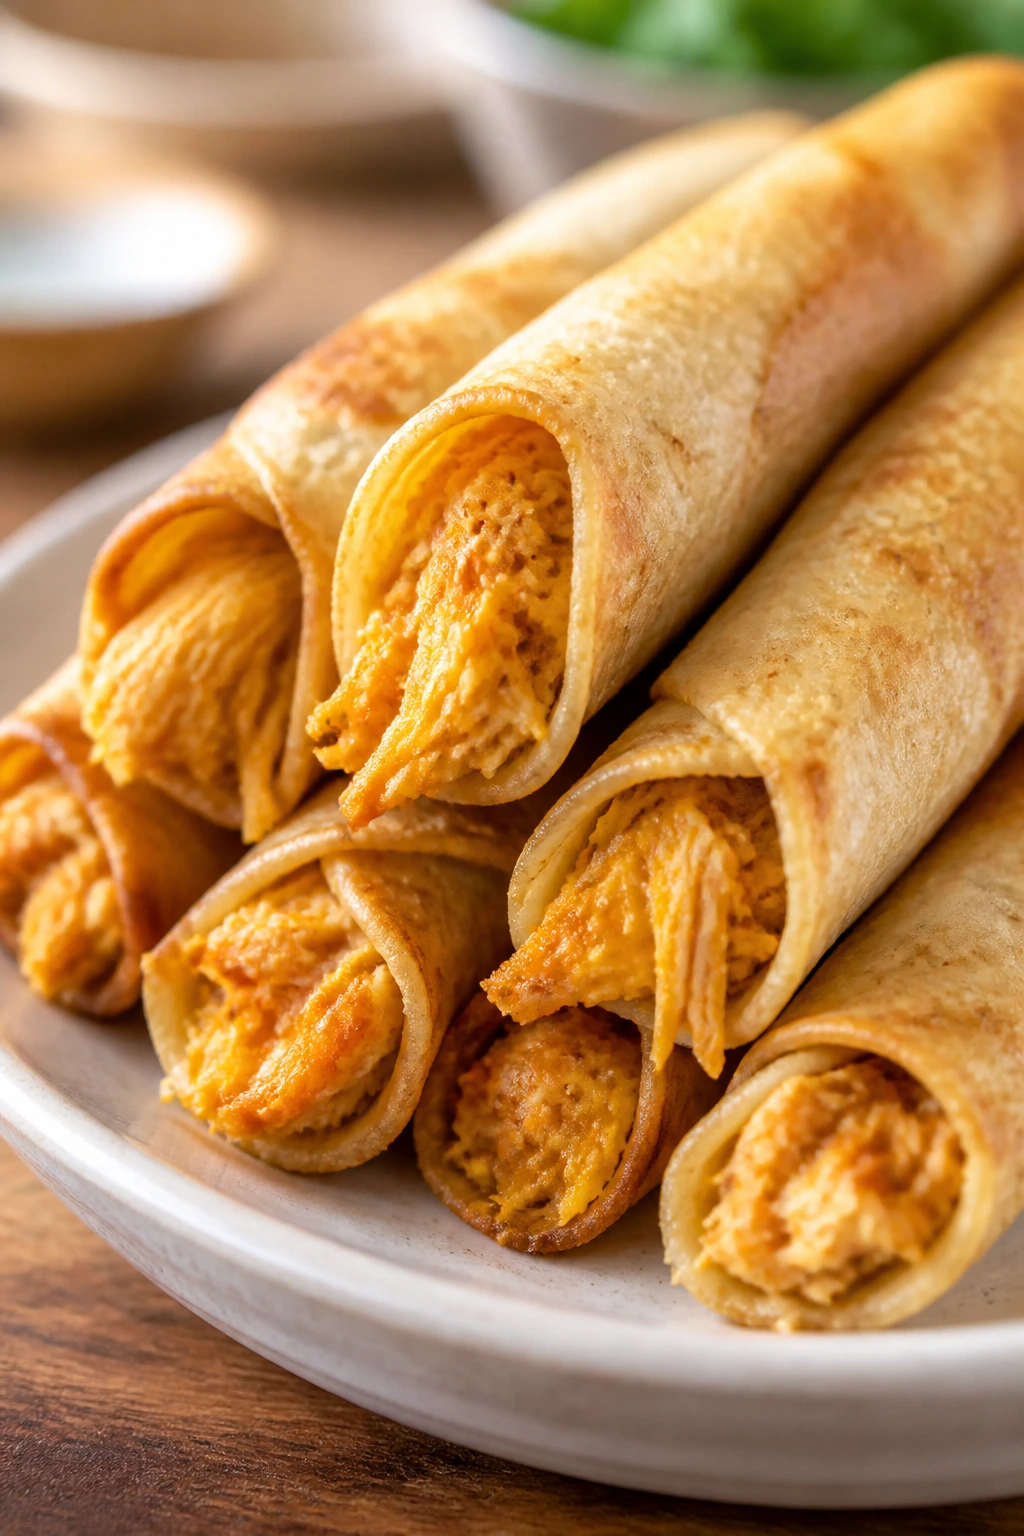
Chicken taquitos solve a common problem: kids who like chicken but don’t want the same old chicken. Rolled tortillas give the filling a crisp shell, and the shape makes them feel a little more fun than a plain plate of meat and rice.
Why It Works:
Small rolled tortillas crisp up fast in the oven, and brushing them lightly with oil helps the seams seal instead of opening up. Shredded chicken mixed with cheese and salsa stays soft inside, so you get a crunchy outside and a mild, melty center. They’re also easy to hold, which is half the appeal.
Key Ingredients:
- 2 cups cooked shredded chicken
- 1 cup shredded Monterey Jack cheese
- 1/2 cup mild salsa
- 8 small corn tortillas
- 1 tablespoon olive oil
- 1/2 teaspoon cumin
- 1/4 teaspoon salt
Quick Steps:
- Preheat the oven to 425°F (220°C) and line a sheet pan.
- Warm the tortillas for 20 seconds so they roll without cracking.
- Mix chicken, cheese, salsa, cumin, and salt.
- Place filling on each tortilla, roll tightly, and set seam-side down on the pan. Brush lightly with oil.
- Bake for 12 to 15 minutes until crisp and lightly browned.
Equipment for This Recipe:
- Sheet pan
- Skillet or microwave for warming tortillas
- Pastry brush
- Tongs
How to Serve This Dish:
Serve with sour cream, mild salsa, or guacamole. A side of rice or corn makes them feel like a full dinner.
Pro Tips for This Recipe:
- Warm the tortillas first or they crack.
- Don’t overfill the taquitos.
- Place them seam-side down so they stay rolled.
Variations on This Dish:
- Bean Taquitos: Add 1/2 cup refried beans to the filling.
- Cheese-Heavy Version: Use extra cheese and a little less chicken.
- Air Fryer Taquitos: Cook at 400°F for about 8 minutes.
Common Mistakes to Avoid with This Dish:
- Cold tortillas: They split when rolled.
- Wet filling: It soaks the tortilla.
- Crowding the pan: They steam instead of crisping.
18. Soft Pretzel Bites with Cheese Dip

Soft pretzel bites feel like a snack, but they can absolutely pass for dinner when the rest of the plate is simple. They’re salty, chewy, and dip-friendly, which is often enough to keep a picky eater happy through the end of the meal.
Why It Works:
Pretzel dough gets its signature flavor from the baking soda bath, which gives the crust that deep brown look and slightly tangy taste. Bite-sized pieces bake faster than full pretzels, so the interior stays soft. Cheese dip makes them feel richer and turns the whole thing into a more complete plate.
Key Ingredients:
- 1 pound pizza dough, room temperature
- 8 cups water
- 1/2 cup baking soda
- 1 egg, beaten
- 1 tablespoon coarse salt
- 1 tablespoon butter
- 1 cup shredded cheddar
- 1/2 cup milk
Quick Steps:
- Preheat the oven to 425°F (220°C) and line a sheet pan with parchment.
- Bring the water and baking soda to a gentle boil.
- Cut the dough into 1-inch pieces and boil in batches for 20 seconds, then drain well.
- Place on the pan, brush with egg, sprinkle with coarse salt, and bake for 12 to 14 minutes until deep golden.
- Melt cheddar with milk and butter over low heat for the dip.
Equipment for This Recipe:
- Large pot
- Sheet pan
- Parchment paper
- Small saucepan
How to Serve This Dish:
Serve warm in a bowl with the cheese dip in the center. They also pair well with apple slices or sliced ham if you want to round out the meal.
Pro Tips for This Recipe:
- Keep the boil gentle. A rolling boil can rough up the dough.
- Don’t skip the egg wash if you want that shiny top.
- Serve soon after baking; pretzels are best warm.
Variations on This Dish:
- Cinnamon Sugar Bites: Skip the salt and toss with butter, sugar, and cinnamon.
- Garlic Pretzel Bites: Add garlic powder to the egg wash.
- Spicy Cheese Dip: Stir a pinch of paprika into the dip for adults.
Common Mistakes to Avoid with This Dish:
- Boiling too long: The bites get rubbery.
- Using cold dough: It fights you when you cut it.
- Overbaking: They dry out fast.
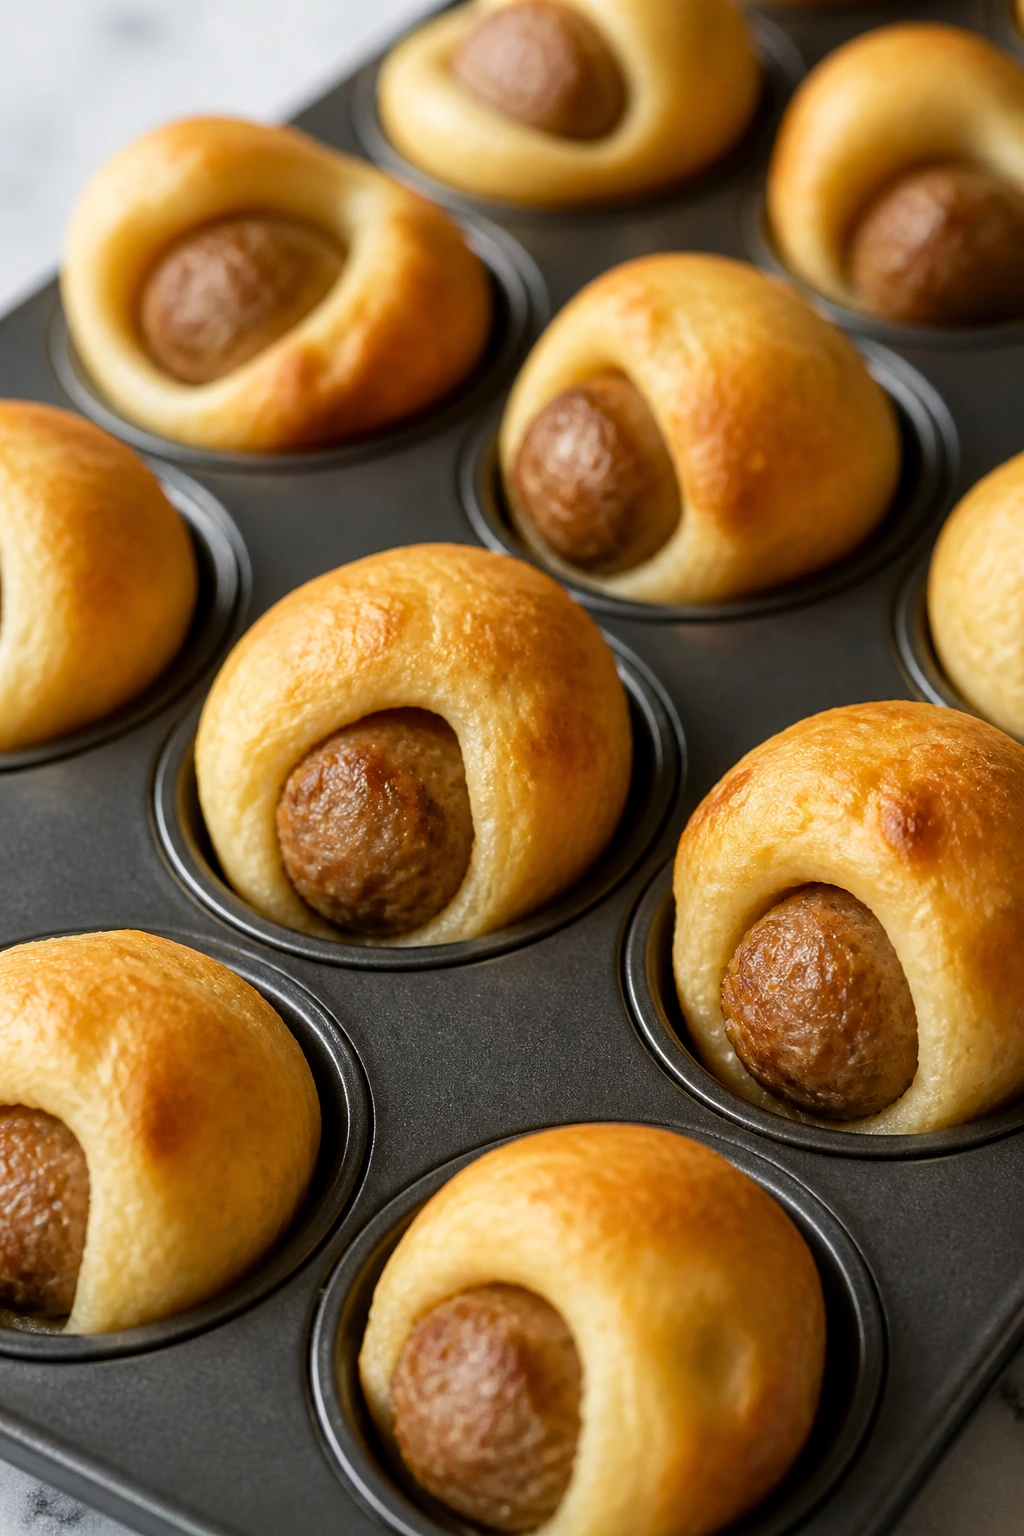
19. Ham and Cheese Crescent Rolls

If you want a dinner that feels almost suspiciously easy, crescent rolls filled with ham and cheese do the job. The dough bakes into a buttery shell, and the filling stays simple enough that even cautious eaters usually know what they’re getting.
Why It Works:
Crescent dough bakes into soft layers that feel more like a treat than a chore. Ham and mild cheese bring a salty, melty center without too many competing flavors. Because the rolls are sealed, they’re easy to pick up and easier to keep from falling apart.
Key Ingredients:
- 1 can refrigerated crescent roll dough, 8 rolls
- 8 thin slices deli ham
- 8 slices mild cheddar or Swiss
- 1 tablespoon melted butter
- 1/2 teaspoon garlic powder
- 1 teaspoon honey mustard, optional
Quick Steps:
- Heat the oven to 375°F (190°C) and line a sheet pan.
- Unroll the crescent dough and place ham and cheese on each triangle.
- Roll up from the wide end to the tip and place seam-side down.
- Brush with melted butter and garlic powder.
- Bake for 11 to 13 minutes until golden and puffed.
Equipment for This Recipe:
- Sheet pan
- Pastry brush
- Knife
- Parchment paper
How to Serve This Dish:
Serve 1 or 2 rolls with grapes, baby carrots, or a small cup of soup. They also work well in a lunchbox the next day.
Pro Tips for This Recipe:
- Keep the filling thin so the dough seals.
- Don’t overfill with cheese or it leaks out.
- Brush the tops lightly for color, not a puddle of butter.
Variations on This Dish:
- Pizza Rolls: Add a spoonful of pizza sauce and mozzarella.
- Turkey Roll-Ups: Swap ham for turkey slices.
- Everything Seasoning Top: Sprinkle a little seasoning on top before baking.
Common Mistakes to Avoid with This Dish:
- Using thick-cut ham: It makes rolling awkward.
- Too much filling: The seams burst.
- Baking too long: The bottoms brown fast.
20. Mini Pancake Sausage Bites
These are breakfast-for-dinner in bite-size form, and that kind of food tends to get a pass from even picky eaters. The sweet pancake outside and savory sausage inside make a familiar combo that doesn’t ask much from anyone.
Why It Works:
The batter bakes around the sausage, which means the protein stays tucked inside and easy to handle. The result is soft on the inside with just enough browned edge to feel finished. A little maple syrup on the side helps kids who want to keep the sweet and savory separate.
Key Ingredients:
- 1 cup pancake mix
- 3/4 cup milk
- 1 large egg
- 12 cooked mini sausage links
- 1 tablespoon melted butter
- 1/2 teaspoon cinnamon, optional
- Maple syrup, for serving
Quick Steps:
- Preheat the oven to 375°F (190°C) and grease a mini muffin tin.
- Whisk pancake mix, milk, egg, butter, and cinnamon until smooth.
- Spoon a little batter into each cup, add one sausage link, then cover with a little more batter.
- Bake for 12 to 14 minutes until puffed and golden.
- Cool for 3 minutes before removing.
Equipment for This Recipe:
- Mini muffin tin
- Mixing bowl
- Whisk
- Spoon
How to Serve This Dish:
Serve warm with maple syrup, fruit, or yogurt. They work as a snack box item or a dinner side when the main meal needs backup.
Pro Tips for This Recipe:
- Use cooked sausage links so the bake time stays short.
- Don’t overfill the cups.
- Let them cool slightly so the pancake sets.
Variations on This Dish:
- Cheddar Pancake Bites: Add a little shredded cheddar to the batter.
- Turkey Sausage Version: Use turkey links for a lighter flavor.
- Blueberry Side Version: Skip the sausage and add a couple of blueberries per bite.
Common Mistakes to Avoid with This Dish:
- Raw batter center: Bake until the tops spring back.
- Too much batter: It spills over the tin.
- Cold sausage: It takes longer to heat through.
21. BBQ Chicken Flatbread
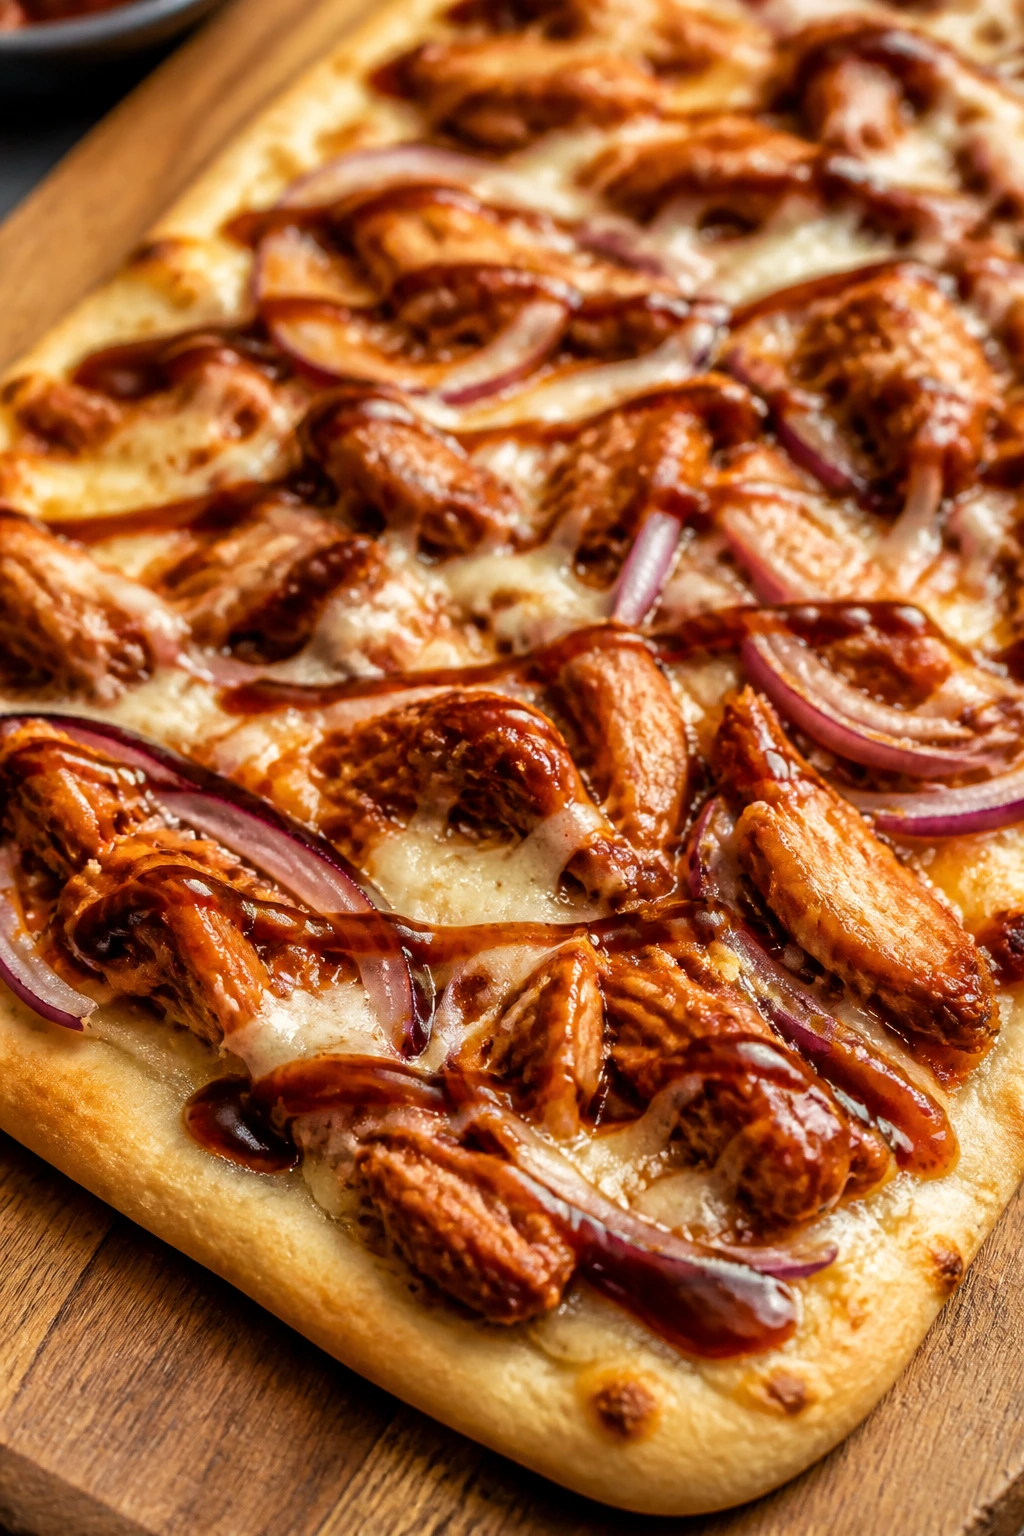
Flatbread gives you the speed of a snack and the shape of a pizza, which is one reason it works so well on chaotic afternoons. BBQ chicken keeps the flavor familiar and a little sweet, and the crust stays thin enough that nobody has to wrestle with a thick doughy base.
Why It Works:
Flatbread cooks fast, and shredded chicken soaks up barbecue sauce without becoming watery. The mozzarella melts into a soft blanket over the top, while the red onion stays optional for kids who can handle a little bite. It’s a solid use for leftover chicken too.
Key Ingredients:
- 2 flatbreads or naan
- 1 1/2 cups cooked shredded chicken
- 1/2 cup barbecue sauce
- 1 cup shredded mozzarella
- 1/4 cup thinly sliced red onion, optional
- 1 tablespoon chopped parsley
- 1 teaspoon olive oil
Quick Steps:
- Preheat the oven to 425°F (220°C).
- Toss the chicken with barbecue sauce and olive oil.
- Place the flatbreads on a sheet pan, top with chicken, mozzarella, and optional onion.
- Bake for 8 to 10 minutes until the cheese melts and the edges crisp.
- Finish with parsley and slice into strips.
Equipment for This Recipe:
- Sheet pan
- Knife or pizza cutter
- Mixing bowl
- Parchment paper
How to Serve This Dish:
Slice into strips for easy handling. Serve with coleslaw, fruit, or plain carrot sticks if you want a little crunch on the side.
Pro Tips for This Recipe:
- Use a sauce that isn’t too thin.
- Tear the chicken into small pieces if texture is an issue.
- Bake directly on a pan, not a thick casserole dish, for better crisping.
Variations on This Dish:
- Bacon BBQ Flatbread: Add cooked bacon bits.
- Mild Ranch Chicken: Swap barbecue sauce for ranch and use cheddar.
- Veggie Flatbread: Add a few finely chopped bell peppers if they’re accepted.
Common Mistakes to Avoid with This Dish:
- Too much sauce: The bread gets soft.
- Overloading toppings: The flatbread bends and tears.
- Skipping the slice: Strips are easier for small hands.
22. Honey Garlic Meatballs and Rice
Honey garlic meatballs are one of those dinners that sounds fancy enough to buy you some trust, then turns out to be straightforward enough for a weeknight. The sauce is sweet and glossy, and the meatballs stay small enough to eat without a knife.
Why It Works:
Small meatballs cook evenly and keep their shape better than larger ones, especially when baked before glazing. The honey garlic sauce coats the outside without drowning the rice, so the whole bowl stays balanced. Mild sweetness helps the dish land with kids who reject stronger sauces.
Key Ingredients:
- 1 pound ground beef or turkey
- 1/2 cup breadcrumbs
- 1 large egg
- 2 cloves garlic, minced
- 1/2 teaspoon salt
- 1/4 teaspoon black pepper
- 1/3 cup honey
- 2 tablespoons soy sauce
- 2 cups cooked rice
Quick Steps:
- Preheat the oven to 400°F (205°C) and line a sheet pan.
- Mix meat, breadcrumbs, egg, garlic, salt, and pepper, then shape into 1-inch meatballs.
- Bake for 12 to 14 minutes until cooked through.
- Warm honey and soy sauce in a skillet, then toss the meatballs in the glaze.
- Serve over rice.
Equipment for This Recipe:
- Sheet pan
- Mixing bowl
- Skillet
- Spoon
How to Serve This Dish:
Serve the meatballs over rice with steamed peas or cucumber slices. For smaller eaters, pile them into a small bowl so the sauce doesn’t spread too far.
Pro Tips for This Recipe:
- Keep the meatballs small so they finish evenly.
- Don’t skip the bake before glazing; it helps them hold together.
- Taste the sauce before tossing. Some honey is sweeter than others.
Variations on This Dish:
- Teriyaki Version: Add a little grated ginger and swap in teriyaki sauce.
- Swedish-Style: Use a creamy gravy instead of the honey glaze.
- No-Rice Bowl: Serve with noodles or mashed potatoes.
Common Mistakes to Avoid with This Recipe:
- Making oversized meatballs: The centers cook unevenly.
- Too much glaze: The bowl gets sticky and heavy.
- Packing the meat too hard: They turn dense.
23. Parmesan Chicken Pasta
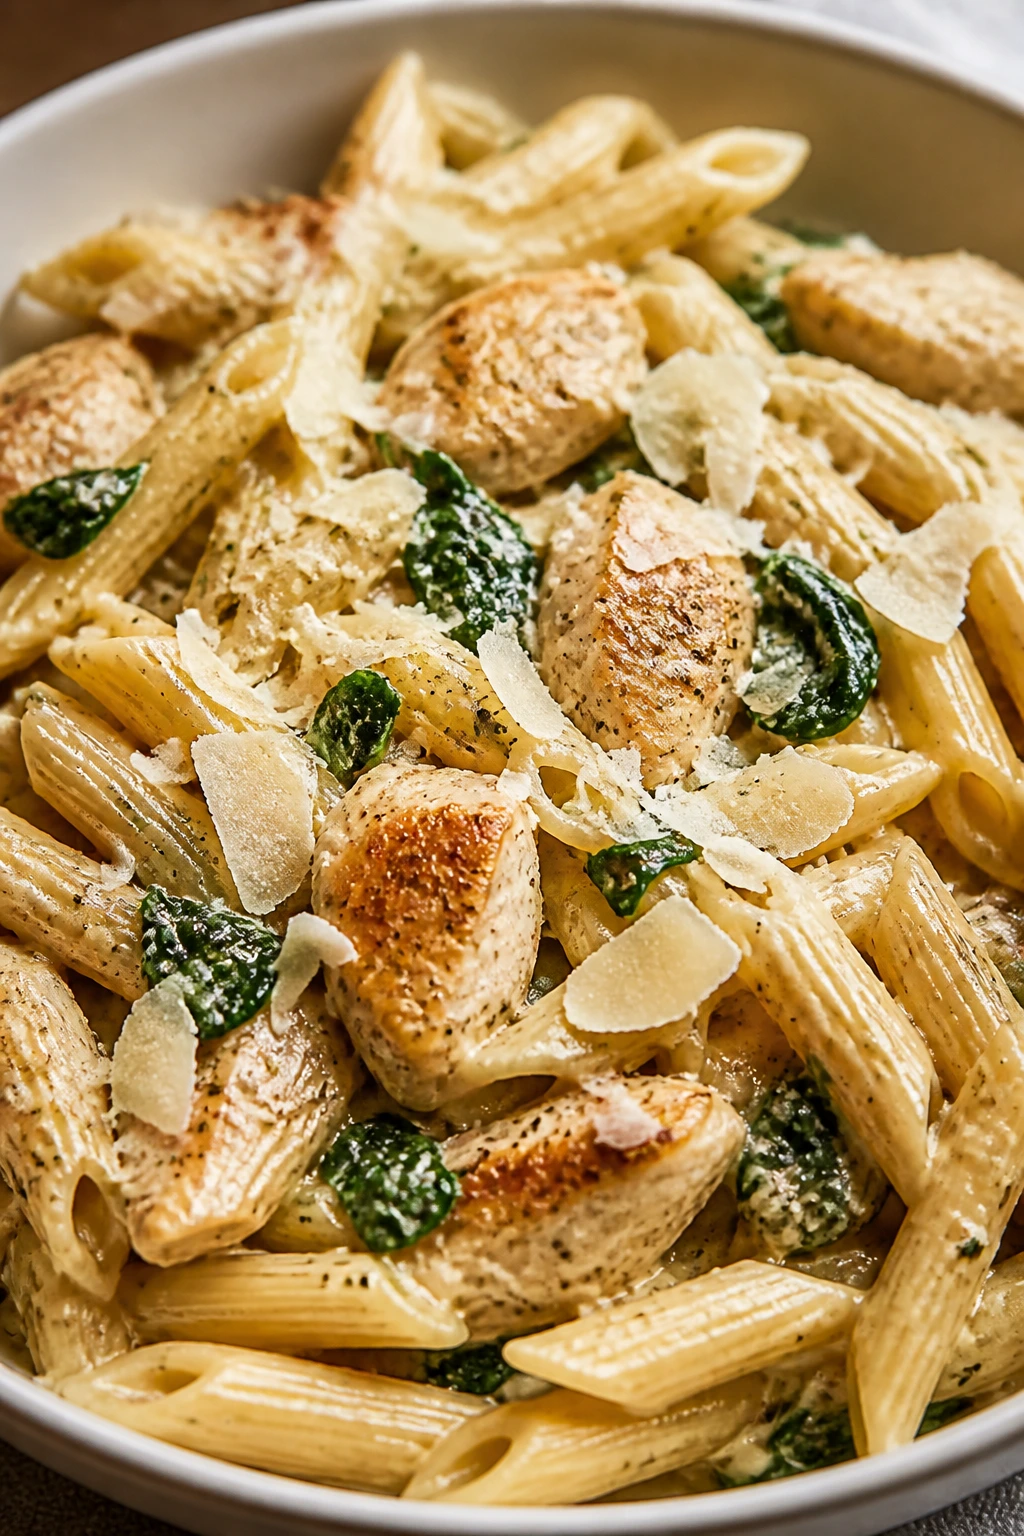
Parmesan chicken pasta is one of those dishes that feels safe without being boring. The sauce is mild, the chicken is familiar, and the pasta gives every bite a soft, comforting shape that tends to go over well with cautious eaters.
Why It Works:
A little butter, garlic, and broth make the sauce rich without turning heavy. Parmesan melts into a silky coating that clings to the pasta and chicken, which helps the dish feel cohesive instead of like three separate things on a plate. If you keep the chicken pieces small, the pasta handles them nicely.
Key Ingredients:
- 12 ounces penne or rotini
- 1 pound boneless chicken breast, cut into 1-inch pieces
- 2 tablespoons butter
- 2 cloves garlic, minced
- 1 cup chicken broth
- 1/2 cup grated Parmesan
- 1 cup baby spinach, optional
- 1/2 teaspoon salt
- 1/4 teaspoon black pepper
Quick Steps:
- Cook the pasta in salted water until al dente, then drain.
- Cook the chicken in butter over medium heat until no pink remains.
- Add garlic and cook for 30 seconds, then pour in broth and simmer for 2 minutes.
- Stir in Parmesan and spinach, then add pasta and toss until coated.
- Serve immediately.
Equipment for This Recipe:
- Large skillet
- Pot
- Colander
- Wooden spoon
How to Serve This Dish:
Serve in bowls with extra Parmesan on top. A piece of bread on the side helps catch the sauce, which is never a bad idea.
Pro Tips for This Recipe:
- Grate the Parmesan finely so it melts smoothly.
- Don’t overcook the chicken before the sauce goes in.
- Add spinach at the very end so it wilts without disappearing.
Variations on This Dish:
- Creamier Pasta: Stir in 2 tablespoons cream.
- Broccoli Version: Swap spinach for very small broccoli florets.
- Garlic-Lite: Use only 1 clove if your eaters are sensitive to garlic.
Common Mistakes to Avoid with This Recipe:
- Using pre-shredded Parmesan only: It can melt less smoothly.
- Overcooking the pasta: It gets soft fast in the skillet.
- Adding too much broth: The sauce becomes thin.
24. Loaded Baked Potato Skins

Potato skins bring crunch, cheese, and a salty filling that tends to win over even skeptical eaters. They feel like bar food in a kid-friendly shape, which is honestly a pretty useful thing to have in your pocket.
Why It Works:
Twice-baked potatoes give you crispy edges and a soft center, and that contrast keeps each bite interesting. Cheese melts into the hollowed-out potato, while bacon and sour cream add the familiar baked-potato flavor many kids already know. Because the filling is scooped out and mixed back in, the whole thing feels neat instead of overloaded.
Key Ingredients:
- 4 medium russet potatoes
- 1 tablespoon olive oil
- 1 cup shredded cheddar
- 1/4 cup cooked bacon bits
- 1/4 cup sour cream
- 2 tablespoons chopped chives
- 1/2 teaspoon salt
Quick Steps:
- Bake the potatoes at 400°F (205°C) for 45 to 50 minutes until tender.
- Cut them in half, scoop out most of the inside, and brush the skins with olive oil and salt.
- Return the skins to the oven for 10 minutes to crisp.
- Fill with a little potato, cheddar, and bacon bits, then bake 8 more minutes.
- Top with sour cream and chives.
Equipment for This Recipe:
- Sheet pan
- Spoon
- Pastry brush
- Knife
How to Serve This Dish:
Serve 2 halves per child with a simple protein like chicken tenders or meatballs. They’re best hot, when the cheese is soft and the skin still has crunch.
Pro Tips for This Recipe:
- Don’t scoop too aggressively or the skins tear.
- Crisp the shells before refilling.
- Use small bacon bits for easier eating.
Variations on This Dish:
- Cheese-Only Skins: Skip the bacon for a simpler version.
- Broccoli Cheddar Skins: Add tiny broccoli pieces to the filling.
- Turkey Chili Skins: Top with a spoonful of mild chili.
Common Mistakes to Avoid with This Dish:
- Underbaked potatoes: The skins don’t crisp well.
- Too much filling: They collapse.
- Serving cold: The texture gets dull fast.
25. Mini Calzones

Mini calzones feel like pizza’s quieter cousin. They hide the filling inside the dough, which makes them less messy and a little more fun to eat. For picky eaters, that hidden-center format can work better than a slice with toppings sitting out in the open.
Why It Works:
Pizza dough bakes into a soft, chewy pocket that seals in cheese and pepperoni. Since each calzone is its own package, kids don’t have to negotiate with toppings falling off the side. A light brush of oil gives the crust color and helps it feel finished.
Key Ingredients:
- 1 pound pizza dough
- 1 cup shredded mozzarella
- 1/2 cup chopped pepperoni
- 1/3 cup pizza sauce
- 1 tablespoon olive oil
- 1/2 teaspoon Italian seasoning
- 1 egg, beaten for brushing
Quick Steps:
- Heat the oven to 425°F (220°C) and line a sheet pan.
- Divide the dough into 6 small pieces and flatten each into a circle.
- Add mozzarella, pepperoni, and a small spoonful of sauce to one half.
- Fold over, seal the edges well, brush with egg and oil, and sprinkle with Italian seasoning.
- Bake for 14 to 16 minutes until golden.
Equipment for This Recipe:
- Sheet pan
- Rolling pin, optional
- Pastry brush
- Fork for sealing
How to Serve This Dish:
Serve warm with extra sauce for dipping. A fruit cup or carrot sticks on the side keeps the meal simple and balanced.
Pro Tips for This Recipe:
- Don’t overfill or the pockets burst open.
- Press the edges with a fork to seal.
- Let them cool for a minute before serving.
Variations on This Dish:
- Cheese Calzones: Use only mozzarella and sauce.
- Ham and Cheese Pocket: Swap pepperoni for diced ham.
- Veggie Pocket: Add finely chopped mushrooms or spinach if tolerated.
Common Mistakes to Avoid with This Dish:
- Tight sealing skipped: The filling leaks out.
- Too much sauce inside: It makes the dough soggy.
- Baking too hot: The outside browns before the center cooks.
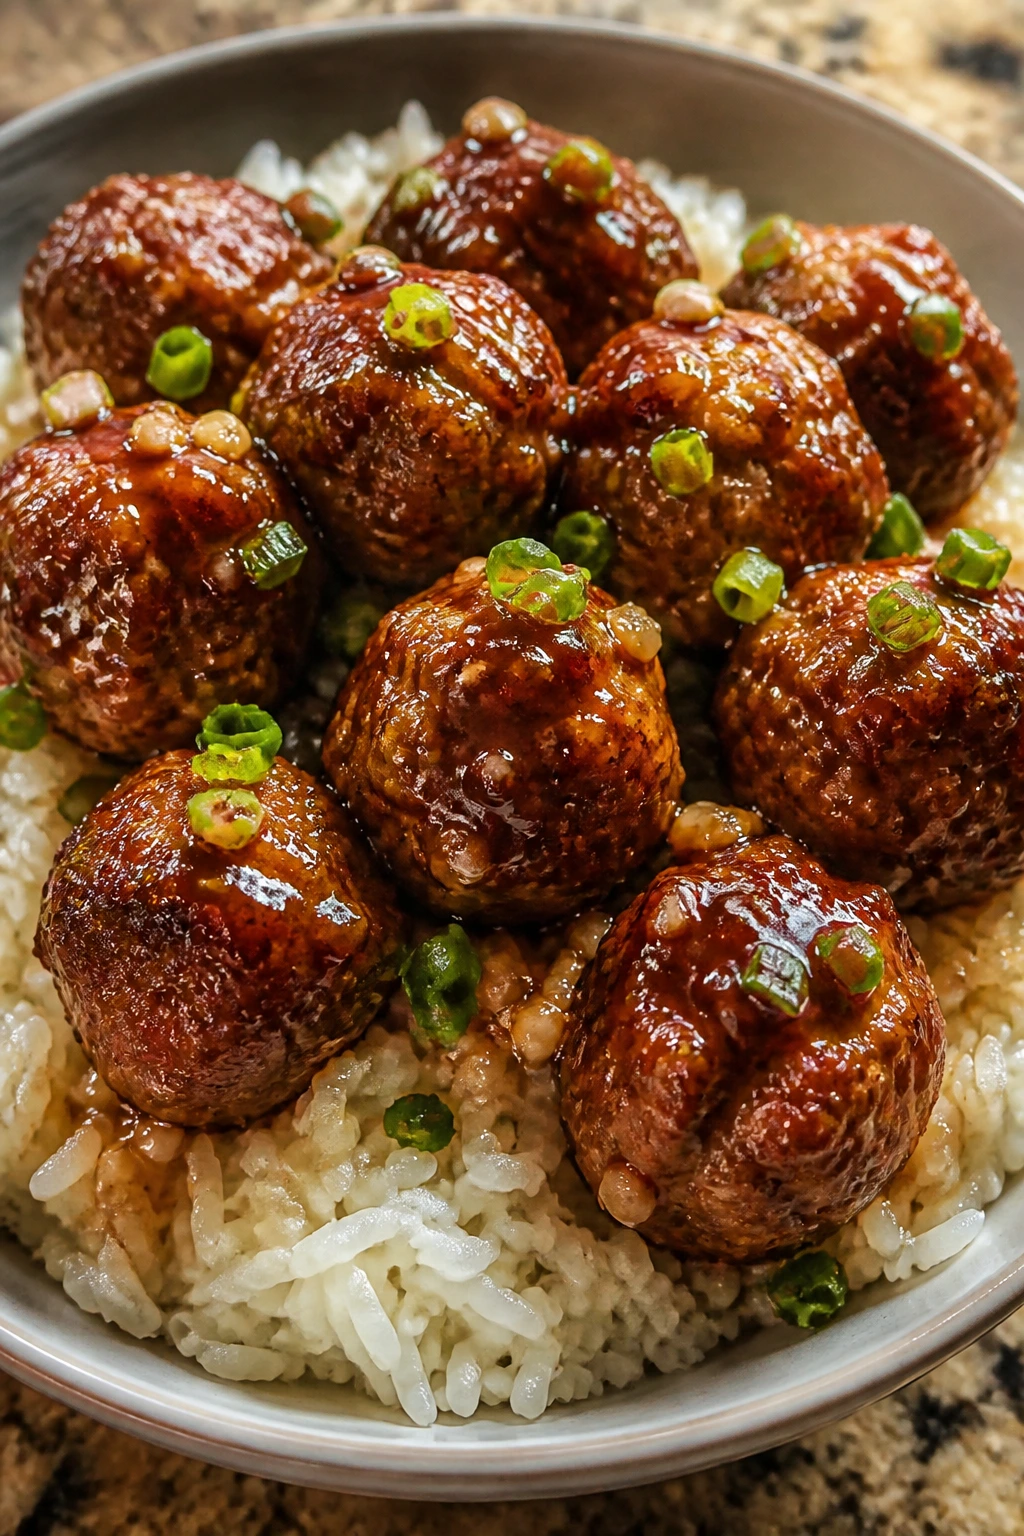
26. Teriyaki Meatball Rice Bowls
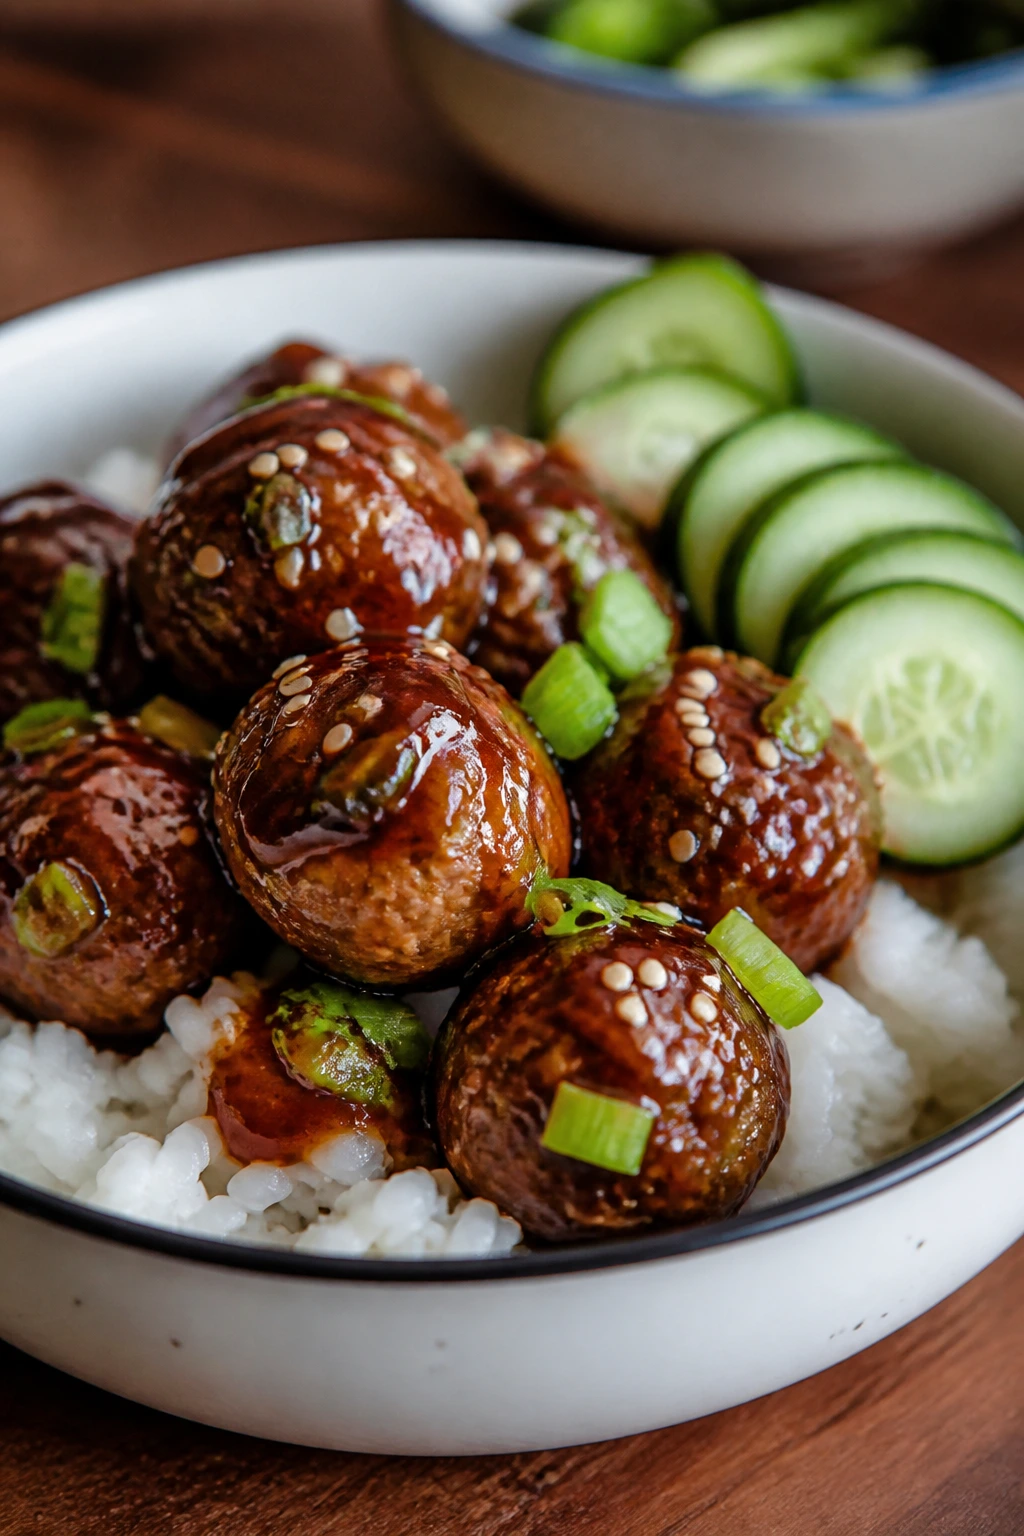
Rice bowls can be a hard sell if they look too complicated, but this one stays simple on purpose. A few meatballs, sticky sauce, and plain rice give you enough structure to feel like dinner without asking for too much bravery from the eater.
Why It Works:
Meatballs give you a familiar shape, and teriyaki sauce adds sweetness that many picky eaters accept more easily than sharper flavors. White rice softens the whole bowl and lets each bite stay separate if the eater likes to keep foods from touching too much. Cucumber slices on top add crunch without a strong flavor.
Key Ingredients:
- 1 pound frozen or homemade meatballs
- 1/2 cup teriyaki sauce
- 2 cups cooked white rice
- 1/2 cup cucumber slices
- 1 tablespoon sesame seeds
- 1 teaspoon sesame oil, optional
- 1 tablespoon sliced green onion, optional
Quick Steps:
- Heat the meatballs according to package directions or bake homemade meatballs until done.
- Warm the teriyaki sauce in a skillet and coat the meatballs.
- Spoon rice into bowls and add 4 to 5 meatballs each.
- Top with cucumber, sesame seeds, and optional green onion.
- Finish with a few drops of sesame oil if using.
Equipment for This Recipe:
- Skillet
- Saucepan or rice cooker
- Serving bowls
- Spoon
How to Serve This Dish:
Serve in shallow bowls so the rice stays visible and the meatballs are easy to find. For a younger eater, keep the cucumber on the side instead of on top.
Pro Tips for This Recipe:
- Keep the sauce light; too much makes the rice soggy.
- Use small meatballs for easier eating.
- Serve the rice warm so the sauce spreads nicely.
Variations on This Dish:
- Chicken Meatball Bowl: Use chicken meatballs instead.
- No-Veg Bowl: Skip the cucumber and sesame seeds.
- Sticky Pineapple Version: Add a few tiny pineapple pieces if that flavor is welcome.
Common Mistakes to Avoid with This Recipe:
- Too much sauce: The bowl turns mushy.
- Large meatballs: They can be hard to eat with a spoon.
- Cold rice: The bowl feels dull and dry.
27. Quesadilla Pizzas
Quesadilla pizzas are exactly what they sound like, and that’s part of the charm. They give kids the look of pizza with the fast cook time of a quesadilla, which means fewer complaints about waiting and more time actually eating.
Why It Works:
The tortilla crisps up faster than dough, and the cheese glues the top and bottom together into a handheld round. Pizza sauce keeps the flavor familiar, while pepperoni or plain cheese lets you tune the filling to the eater. It’s a good recipe when you need something that feels a little playful without getting weird.
Key Ingredients:
- 4 flour tortillas
- 1/2 cup pizza sauce
- 1 1/2 cups shredded mozzarella
- 20 pepperoni slices
- 1 teaspoon dried oregano
- 1 tablespoon butter
- 1 tablespoon olive oil
Quick Steps:
- Heat a skillet over medium heat and melt the butter with olive oil.
- Place one tortilla in the skillet and spread with sauce, cheese, pepperoni, and oregano.
- Top with a second tortilla and cook for 2 to 3 minutes per side until crisp and melted.
- Repeat with the remaining tortillas.
- Cut into wedges and serve warm.
Equipment for This Recipe:
- Skillet
- Spatula
- Knife or pizza cutter
- Spoon
How to Serve This Dish:
Slice into wedges and serve with extra sauce for dipping. They’re easy to split into snack portions or plate as a quick dinner with fruit.
Pro Tips for This Recipe:
- Keep the sauce layer thin.
- Use medium heat so the cheese melts before the tortilla burns.
- Let it rest briefly before cutting.
Variations on This Dish:
- Cheese Quesadilla Pizza: Skip the pepperoni and go all cheese.
- Ham Pizza: Use diced ham and a little cheddar.
- Veggie Pizza: Add tiny bits of peppers if tolerated.
Common Mistakes to Avoid with This Recipe:
- Too much sauce: The tortilla turns slippery.
- High heat: The outside burns too fast.
- Cutting hot: The filling spills out.
28. Mini Cheeseburger Sliders
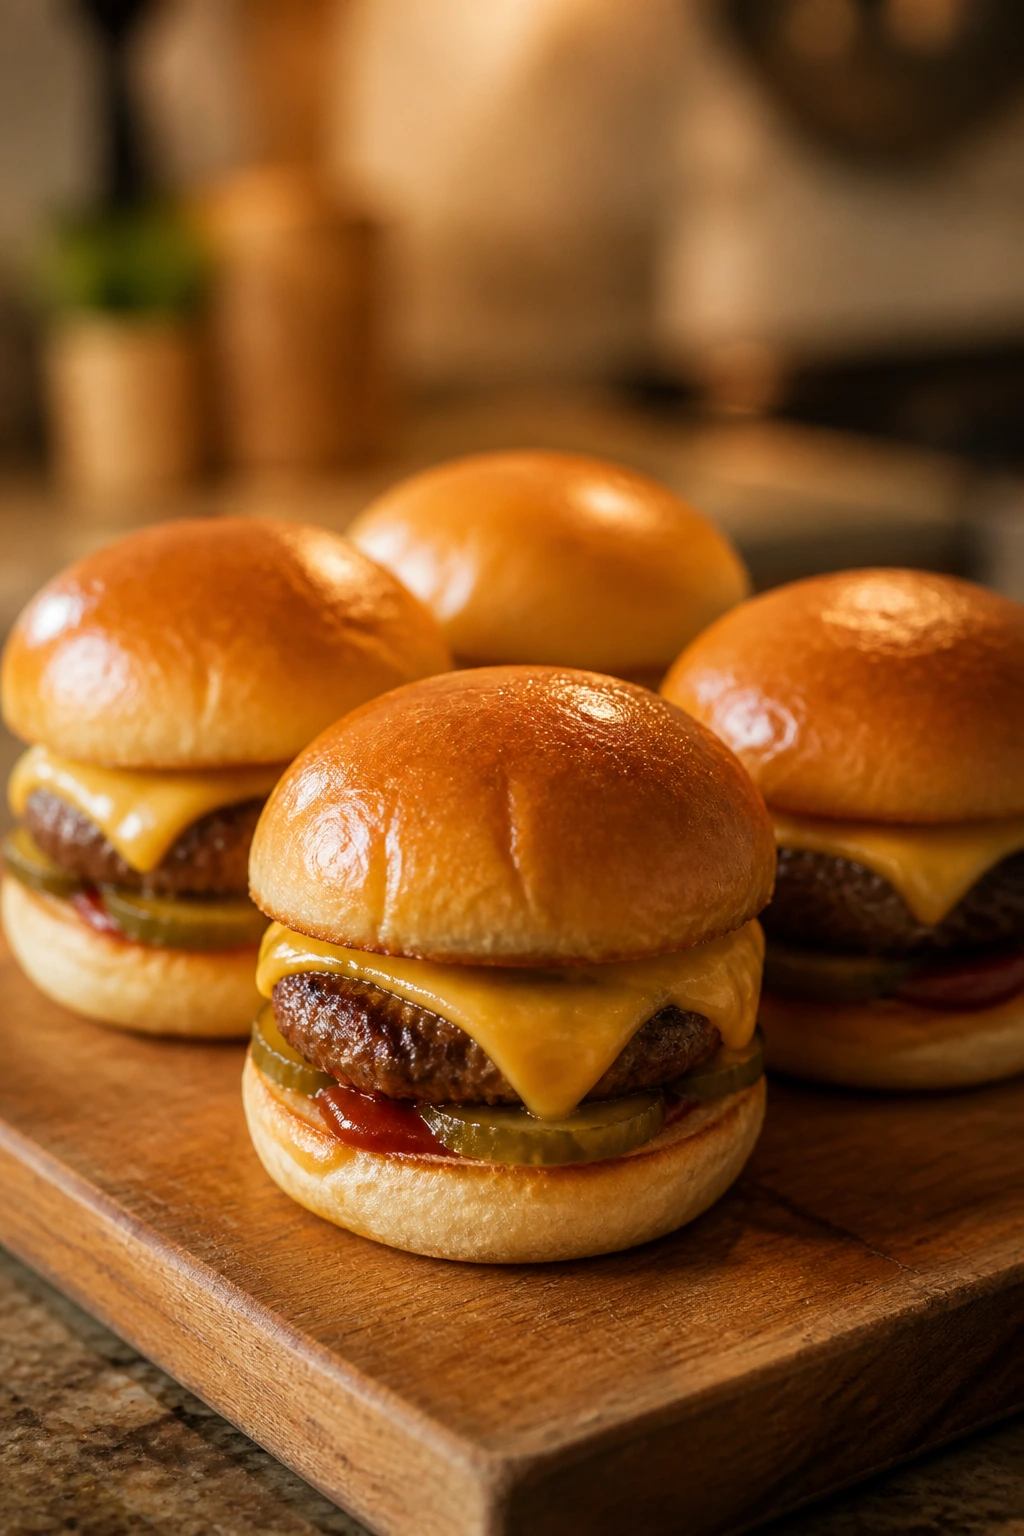
Mini cheeseburger sliders have a built-in advantage: they look like the real thing, just smaller and less intimidating. That makes them a solid fit for picky eaters who like burgers but don’t want a giant plate situation. The bun, beef, and cheese are clear and easy to trust.
Why It Works:
Small patties cook quickly and stay juicy if you stop at the right temperature. Melting the cheese over the top seals the burger together, and the slider bun keeps everything neat enough for little hands. A tiny smear of ketchup or mustard is often all you need.
Key Ingredients:
- 1 pound ground beef
- 1/2 teaspoon salt
- 1/4 teaspoon black pepper
- 4 slices American cheese, halved
- 8 slider buns
- 2 tablespoons ketchup
- 1 tablespoon mustard, optional
- 1 tablespoon butter, softened
Quick Steps:
- Heat a skillet or griddle over medium-high heat.
- Shape the beef into 8 small patties and season with salt and pepper.
- Cook for 2 to 3 minutes per side until browned and cooked through, then top with cheese to melt.
- Lightly toast the buns with butter.
- Assemble with ketchup or mustard and serve warm.
Equipment for This Recipe:
- Skillet or griddle
- Spatula
- Knife
- Small bowl for condiments
How to Serve This Dish:
Serve 2 sliders per child with potato wedges or sliced fruit. If you want them snack-style, cut the sliders in half and stack them on a plate.
Pro Tips for This Recipe:
- Make the patties thin and slightly larger than the bun, since they shrink.
- Press a tiny dimple in the center of each patty so it cooks flat.
- Toast the buns. Soft buns are fine, but toasted buns hold up better.
Variations on This Dish:
- Cheeseburger Deluxe: Add a thin pickle slice if it’s welcome.
- BBQ Slider: Swap ketchup for barbecue sauce.
- Turkey Slider: Use ground turkey and cook gently so it stays moist.
Common Mistakes to Avoid with This Recipe:
- Thick patties: They take too long and can dry out.
- Cold buns: The sliders feel less finished.
- Overloading condiments: The buns slip apart.
Why Snack-Size Dinners Work Better Than You’d Think
There’s a reason a plate of small foods often goes over better than a single big dish. Kids — especially the picky ones — tend to eat in stages. They’ll take the bread first, then the cheese, then come back for the chicken, and that little bit of control can be the difference between a calm meal and a full-scale refusal.
The other advantage is practical. Snack-size dinners are easier to reheat, easier to scale, and easier to rescue when someone changes their mind halfway through. A quesadilla can become wedges. A slider can become a half-slider. A pasta cup can sit on a plate without collapsing into a puddle. That flexibility is why these recipes earn repeat status.
What You’ll Need in the Kitchen
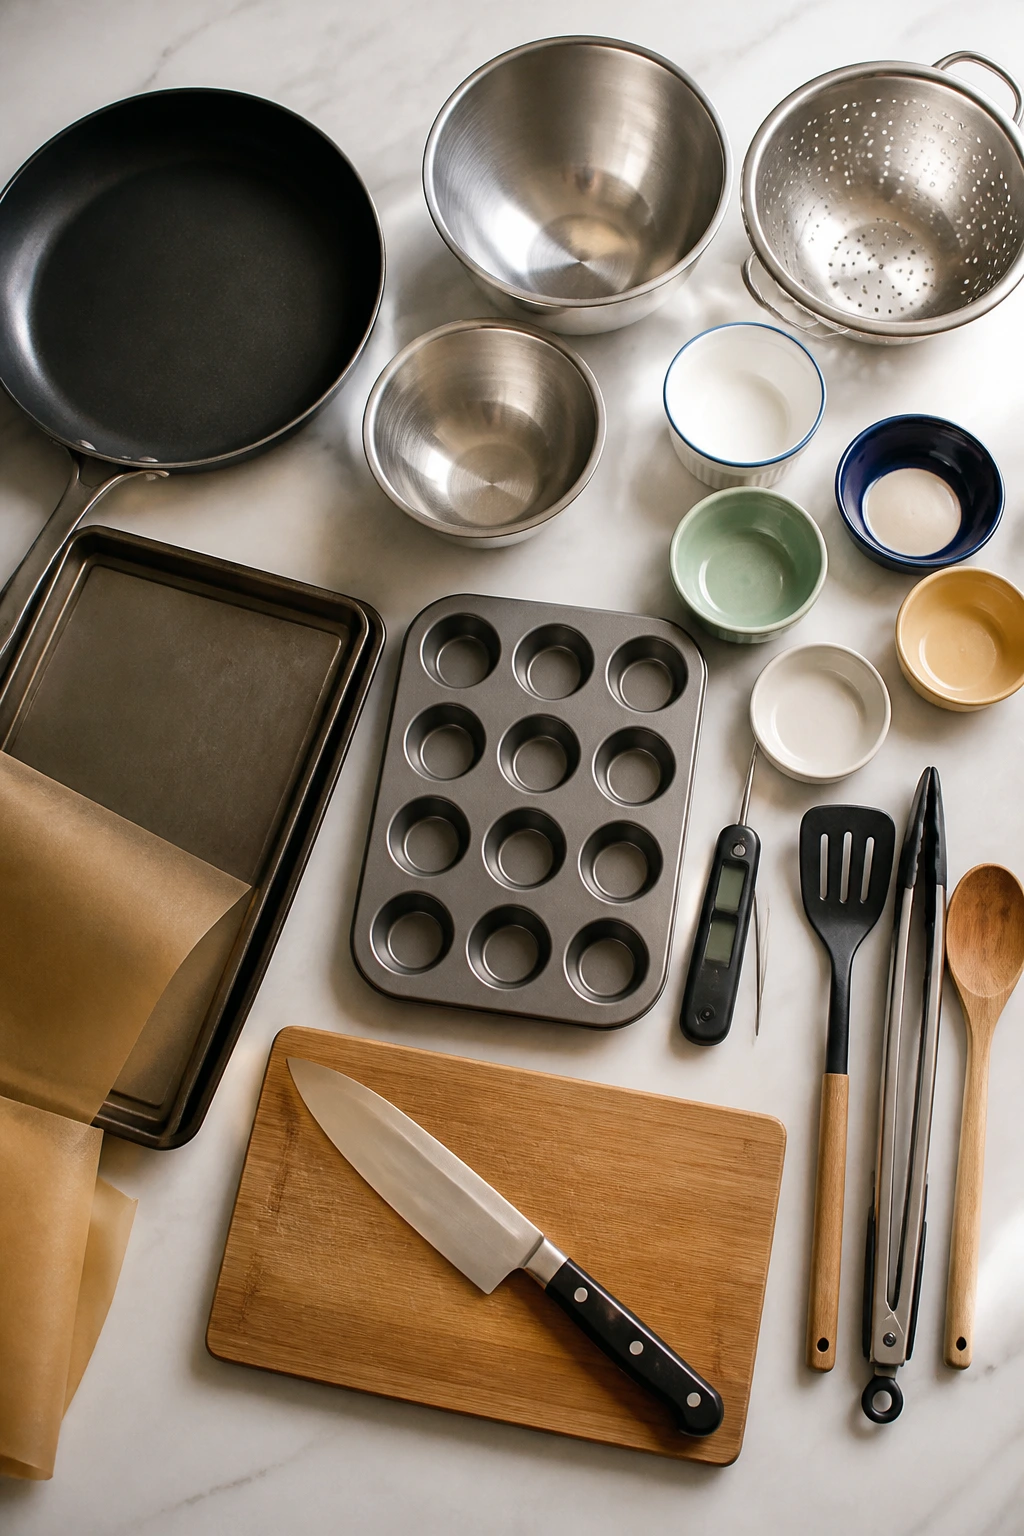
- Large skillet or nonstick pan: Essential for quesadillas, grilled cheese, sliders, and quick chicken bites.
- Sheet pans: You’ll use these for tenders, taquitos, pretzel bites, flatbreads, and anything that needs oven heat.
- Muffin tins, standard and mini: These turn mac and cheese, taco cups, rice cups, meatloaf muffins, and pancake bites into tidy portions.
- Mixing bowls: Keep at least 2 or 3 on hand so breading, sauce, and filling don’t fight for space.
- Sharp knife and cutting board: Small, even cuts make every recipe easier to eat and faster to cook.
- Parchment paper: A quiet helper for sticky cheese, sauces, and baked bites.
- Instant-read thermometer: Useful for chicken, meatballs, and meatloaf muffins.
- Spatula and tongs: Better control means less broken breading and fewer torn tortillas.
- Colander: Pasta recipes depend on it, and so do a few of the rice and noodle dishes.
- Small bowls for dips: Parents always end up reaching for these, and they do matter.
Smart Shopping and Ingredient Tips
The best kid-friendly dinners usually start with ingredients that are mild, not fancy. Pick plain shredded cheddar, mozzarella, or American cheese when you want the most reliable melt. Stronger cheeses can be lovely, but they can also scare off a child who is already suspicious of dinner before it hits the table.
For chicken, cooked rotisserie meat or leftover roasted chicken saves time and usually shreds more easily than fresh breast meat. If you’re buying raw chicken for tenders or bites, look for pieces that are even in thickness so they cook at the same pace. That sounds small. It is not.
Canned sauces matter more than people think. Choose pizza sauce, marinara, and barbecue sauce that are on the thicker side, because thin sauces make tortillas soggy, bagels wet, and flatbreads limp. For pasta and rice recipes, plain long-grain rice, elbow macaroni, and egg noodles tend to be safer bets than trendy shapes that overcook fast.
Frozen vegetables are your friend here, especially peas, broccoli, and mixed corn. They’re picked at a decent stage of ripeness and usually hold up better than limp fresh vegetables sitting in the produce drawer. For tortillas and rolls, check the package date and buy the softer, fresher ones when possible — cracks and dry edges turn simple recipes into repair jobs.
How to Plate These for Dinner or Snack Time
Presentation:
Keep the plate simple and separate the pieces when you can. Wedges, bites, pinwheels, cups, and sticks all do better when they aren’t piled into one confusing mound. If the food looks organized, kids usually feel less cornered by it.
Accompaniments:
Fruit is the easiest side to add without starting a debate: apple slices, grapes, berries, melon, or orange wedges all work. For vegetables, choose the least controversial ones first — cucumber sticks, carrot coins, peas, corn, or a tiny salad for the people who want one. Bread, crackers, and dip also help stretch snack dinners into real meals.
Portions:
For younger kids, start with 2 to 4 small pieces or one modest bowl. For older kids and adults, plan on doubling the snack portion into a full dinner plate. These recipes scale up well because most of them are built from modular parts, not one giant casserole that has to be all or nothing.
Beverage Pairing:
Milk fits the cheesier recipes, while sparkling water with a squeeze of lemon keeps salty bites from feeling heavy. For warmer dishes like soup or pasta, plain water or iced tea does the job without fighting the food.
Small Tweaks That Add Flavor Without Scaring Kids Off
Flavor Enhancement:
A pinch of garlic powder or onion powder does more than a lot of people think. It deepens the flavor quietly, especially in chicken tenders, potato wedges, and pasta dishes, without announcing itself like a loud spice cabinet.
Customization:
Keep toppings and dips on the side when in doubt. Salsa, sour cream, ketchup, mustard, ranch, and marinara all work better as optional extras than as heavy-handed sauce dumps. Letting kids choose their dip is often the easiest path to an empty plate.
Serving Suggestions:
Cut foods into clear shapes. Wedges instead of whole sandwiches. Strips instead of slabs. Muffin cups instead of scoops. It sounds like a tiny change, and it is. Tiny changes matter when you’re serving someone who watches dinner the way a suspicious cat watches a cucumber.
Make-It-Yours:
For dairy-free eaters, swap in plant-based cheese that melts well and use olive oil or dairy-free butter. For gluten-free diners, use certified gluten-free breadcrumbs, pasta, tortillas, and buns where needed. For lower-sodium plates, lean on herbs, garlic powder, and lemon instead of just adding more salt.
Make-Ahead, Storage, and Reheating Guidance

Most of these recipes hold up well for 3 to 4 days in the fridge if they’re cooled and stored in airtight containers. Chicken tenders, taquitos, sliders, meatballs, and baked bites usually freeze for up to 2 months, though crispy foods lose some crunch. That’s fine. Crunch can be revived. Soggy food is harder.
For reheating, use the oven or air fryer when you want the crust to come back. A 375°F oven for 8 to 12 minutes usually works for taquitos, tenders, pizza bagels, and pretzel bites. Microwave only the softer dishes — noodles, rice cups, meatballs, and macaroni cups — because the microwave tends to flatten anything breaded or crisp.
Sauces and dips should be stored separately whenever possible. Tomato soup, ranch, honey mustard, marinara, and cheese dip all keep better in small containers, and they reheat more evenly that way. If you’re making ahead, undercook pasta by 1 minute and leave baked items just a shade lighter than you want them; they’ll finish during reheating.
A few of these dishes improve overnight. Meatloaf muffins, sloppy joe bites, and some pasta dishes settle into each other and taste more unified the next day. Crispy items do not improve overnight. Those are best fresh, or at least refreshed in a hot oven before serving.
Easy Swaps for Different Diets and Preferences
Gluten-Free Comfort:
Use gluten-free tortillas, breadcrumbs, pasta, and buns where needed. The structure of these dishes matters more than the flour type, so most of them adapt well if you keep the cooking times close and watch for browning.
Dairy-Free Adjustments:
Plant-based shredded cheese can work in quesadillas, pizza bagels, calzones, and pinwheels if you choose a melty version. Coconut-free is usually safer for savory dishes, so look for oat- or soy-based options when possible.
Vegetable-Light Plates:
If your eater notices vegetables from across the room, keep them grated, minced, or blended into sauces. Zucchini in spaghetti, broccoli in rice cups, and carrot in meatloaf are the least disruptive starting points.
Extra-Protein Swaps:
Chicken, turkey, beef, ham, and eggs can move around between recipes with very little trouble. If one protein gets rejected, another often slips in because the texture is different even when the flavor profile stays mild.
Lower-Spice Versions:
Skip pepper flakes, hot sauce, and strong salsa. Use garlic powder, onion powder, paprika, oregano, and parsley instead. Flavor does not have to shout to be useful.
Common Mistakes That Make Picky Eaters Push the Plate Away
- Serving mixed-up food too soon: If everything is piled together before the child can inspect it, resistance often goes up. Keep components visible when possible.
- Overseasoning the first try: Strong spice, too much garlic, or a heavy herb hand can send a cautious eater straight into refusal. Start mild and add more at the table.
- Making portions too big: A giant slider or overloaded quesadilla looks like work. Small pieces feel easier to finish.
- Skipping texture checks: Soggy tortillas, dry chicken, gummy pasta, and limp wedges are a fast way to lose trust. Pay attention to crispness, moisture, and doneness.
- Forgetting the dip: Dips let kids decide. That tiny bit of control is often the whole game.
Questions Parents Actually Ask
Can I make most of these ahead of time?
Yes, especially the meatballs, pinwheels, rice cups, and meatloaf muffins. Assemble or cook them earlier in the day, then reheat gently so they do not dry out.
What if my child hates sauce?
Serve sauces on the side and keep the base food mild. Many kids will eat pizza, chicken, or pasta more easily when they can decide whether to dip or skip.
Do I need an air fryer for any of this?
No. It helps with crisping, but every recipe here can be done in a regular oven or skillet. The air fryer is a nice option, not a requirement.
How do I keep chicken from getting dry?
Use small pieces, cook just to 165°F, and stop there. For baked tenders or bites, a little oil on the coating helps more than people expect.
Can I use frozen vegetables?
Absolutely. Frozen peas, broccoli, and corn are often easier to manage than fresh ones, and they mix into rice, noodles, and pasta dishes without much fuss.
What if the food falls apart when I cut it or move it?
That usually means it needed more rest time. Quesadillas, calzones, pinwheels, and mac cups all hold together better after a short pause.
Which recipes are best for lunchboxes the next day?
Pinwheels, mini meatloaf muffins, mac and cheese cups, and crescent rolls pack well. Skip the crispiest items unless you plan to reheat them.
How can I make dinner feel like a snack without starting a second meal later?
Serve two or three small items together — for instance, chicken tenders with potato wedges and fruit, or pizza bagels with cucumber slices and a dip. That keeps the meal playful without making it feel unfinished.
Keeping Dinner Low-Drama
The best part about these meals is not that they’re clever. It’s that they respect how picky eaters actually behave. Small food feels safer. Familiar food gets eaten. Crisp edges, melty cheese, and dip on the side buy you a little breathing room at the end of the day.
I like recipes that can survive a change of plan, and these do that well. A quesadilla can become wedges for a snack plate. A slider can become half a sandwich. A pasta bowl can be a small after-school fix or a full dinner with almost no extra effort. That flexibility is the whole point.
If the kitchen has been a battleground lately, start with the most familiar recipe on this list and make it once without changing much. Then adjust one thing next time — the cheese, the sauce, the size, the dip. Small wins stack up quickly, and dinner gets easier one plate at a time.