
When the opening credits start, the food that survives a family movie night is rarely the fanciest dish on the table. It’s the one that can sit on a lap tray, get dipped with one hand, and still taste good after a kid pauses the film three times to ask for “just one more napkin.” That’s why picky eater recipes for family movie night live or die by texture: crisp edges, mild seasoning, cheese that stretches instead of splattering, and portions small enough to vanish in two bites.
I like movie-night food that keeps its promise. No loose toppings sliding off a bun. No sauces leaking into the couch cushions. No giant casserole that needs a fork, a knife, and a patient adult standing by the oven. The recipes below stay friendly to plain eaters but still give you enough range to keep the adults happy, too. One tray can lean cheesy and mild while another gets a little smoky, tangy, or crunchy at the edges.
What matters most here is flexibility. Some of these are full dinners in miniature; others are the kind of snack that lets everybody graze through the second act. A few can be mixed ahead and baked right before the previews, which is the sweet spot if you ask me. And because movie night has a habit of stretching later than anyone planned, every recipe here is built to hold its shape, hold its temperature, and not turn into a disappointment by the time somebody says, “Wait, rewind that part.”
Why These Picky Eater Recipes Work on Movie Night
-
One-Handed Eating: Every recipe is either handheld, dippable, or fork-light, so nobody has to juggle a plate and a remote at the same time.
-
Mild First, Optional Bold: The base flavors stay gentle, but you can always set out hot sauce, pickles, salsa, or extra pepper for the people who want more.
-
Crisp Beats Messy: Movie-night food lives longer when it has a crust, a toast, a baked edge, or a crunchy topping that keeps the bite interesting.
-
Batch-Friendly Sizes: Sliders, cups, sticks, and minis cook faster than full-size casseroles and cool down in a way that makes serving easier.
-
Picky-Eater Proofing: Plain cheese, familiar bread, chicken, pasta, and potatoes show up often for a reason; they’re the ingredients kids usually trust first.
-
Clean-Up Stays Manageable: Sheet pans, muffin tins, and one-skillet recipes keep the post-movie sink pile from turning into a second feature.
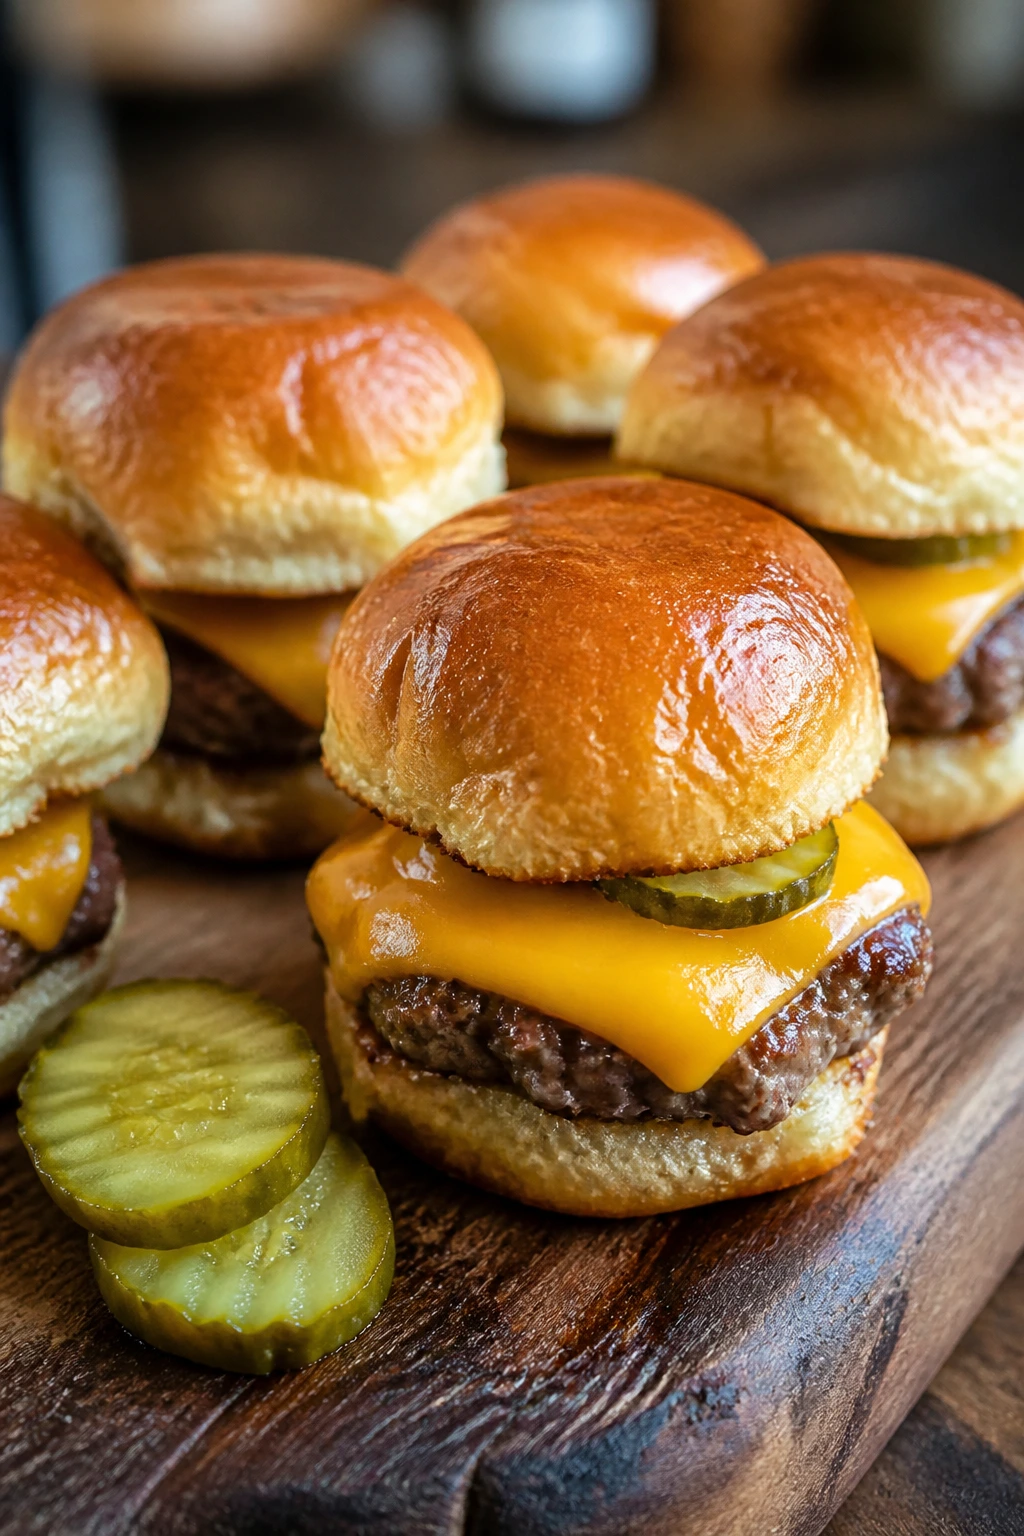
1. Mini Cheeseburger Sliders
Tiny cheeseburgers have a way of disappearing fast, and that’s partly because they feel familiar the second they hit the table. Soft buns, melted American cheese, and a little pickle crunch are enough to keep picky eaters happy without asking anyone to commit to a full burger.
Why It Works:
These sliders work because the beef cooks quickly in thin patties, so you get a browned edge without a dry center. American cheese melts into the meat instead of sitting there like a slice that forgot its job. A quick buttered bun bake at 375°F gives the tops a glossy finish and keeps the whole tray warm for several minutes.
Key Ingredients:
- 1 lb ground beef, 80/20
- 1 teaspoon kosher salt
- 1/2 teaspoon black pepper
- 1 teaspoon Worcestershire sauce
- 6 slices American cheese
- 8 slider buns
- 2 tablespoons unsalted butter, melted
- 1 teaspoon sesame seeds
- Dill pickle chips and ketchup, for serving
Quick Steps:
- Preheat the oven to 375°F and line a baking dish with parchment.
- Mix the beef with salt, pepper, and Worcestershire, then shape into 8 thin patties.
- Sear the patties in a skillet over medium-high heat for 2 minutes per side.
- Set 1/2 slice cheese on each patty, then let it melt for 1 minute.
- Place the patties in the buns, brush the tops with melted butter, sprinkle with sesame seeds, and bake for 5 minutes until warm and lightly toasted.
Equipment for This Recipe:
- Large skillet
- 9×13-inch baking dish
- Parchment paper
- Thin spatula
- Pastry brush
How to Serve This Dish:
Stack the sliders on a wooden board with pickles in the middle and ketchup in a few small bowls. A handful of oven fries or potato chips makes the plate feel finished without crowding the table. Two sliders is a solid movie-night portion for younger eaters; three usually covers an adult.
Pro Tips for This Recipe:
- Make the patties wider than the buns; they shrink as they cook.
- If your buns are extra soft, toast the cut sides for 1 minute in the skillet first.
- American cheese melts more cleanly than most cheddar slices here. I’d use it.
- Keep pickles on the side if you’re serving a very cautious crowd.
Variations on This Dish:
- BBQ Burger Slider: Swap ketchup for barbecue sauce and top the patties with cheddar instead of American.
- Chicken Slider: Use thin ground chicken patties and add a teaspoon of onion powder for extra flavor.
- Dairy-Free Version: Skip the cheese and brush the buns with olive oil instead of butter.
Common Mistakes to Avoid with This Dish:
- Making the patties too thick: Thick patties stay pink in the middle while the buns overtoast. Keep them thin.
- Overstuffing the bun: A mountain of toppings makes sliders fall apart. Stay simple.
- Skipping the buttered top: That quick bake keeps the buns from tasting plain and dry.
2. Crispy Oven Chicken Tenders
Chicken tenders are the quiet hero of picky-eater cooking. They look familiar, they dip well, and they do not ask anyone to eat a strange texture before the movie starts. The trick is getting the coating crisp without deep frying, which is easier than it sounds.
Why It Works:
A flour-egg-panko breading gives the tenders a crunchy shell that holds up to ranch, honey mustard, or ketchup. Baking at 425°F cooks the chicken quickly enough that the meat stays juicy. A little grated parmesan in the breading adds salt and browning, which matters more than people think.
Key Ingredients:
- 1 1/2 lb chicken tenders
- 1/2 cup all-purpose flour
- 2 large eggs
- 1 1/2 cups panko breadcrumbs
- 1/3 cup grated parmesan
- 1 teaspoon paprika
- 1 teaspoon garlic powder
- 1 teaspoon kosher salt
- 1/2 teaspoon black pepper
- Olive oil spray
Quick Steps:
- Preheat the oven to 425°F and place a wire rack over a sheet pan.
- Set out three shallow bowls: flour mixed with salt, pepper, paprika, and garlic powder; beaten eggs; and panko mixed with parmesan.
- Dredge each tender in flour, then egg, then panko, pressing so the crumbs stick.
- Arrange the tenders on the rack and spray both sides lightly with oil.
- Bake for 15 to 18 minutes, flipping halfway, until the coating is golden and the internal temperature reaches 165°F.
Equipment for This Recipe:
- Rimmed sheet pan
- Wire rack
- 3 shallow bowls
- Tongs
- Instant-read thermometer
How to Serve This Dish:
Serve the tenders in a basket lined with parchment and put dips at the edge of the tray. They go nicely with carrot sticks, fries, or buttered noodles if you want a full dinner. Three to four tenders per person is a fair estimate for a movie-night meal.
Pro Tips for This Recipe:
- Press the panko onto the chicken with your fingers. Loose crumbs fall off in the oven.
- Don’t skip the rack. It keeps the bottom crisp instead of soggy.
- If your tenders are thick, pound the thicker end gently so everything cooks at the same speed.
- Season the flour; bland breading is the fastest way to lose the room.
Variations on This Dish:
- Parmesan Ranch Tenders: Add 1 teaspoon dried dill and 1 tablespoon ranch seasoning to the panko.
- Gluten-Free Crunch: Use gluten-free flour and crushed gluten-free cornflakes instead of panko.
- Buffalo Sidekick: Toss baked tenders in a tablespoon or two of mild buffalo sauce right before serving.
Common Mistakes to Avoid with This Dish:
- Crowding the pan: Steam softens the coating. Give each tender room.
- Baking without oil spray: The breading will look pale and dusty instead of crisp.
- Overbaking: Chicken tenders dry out fast. Start checking at 14 minutes.
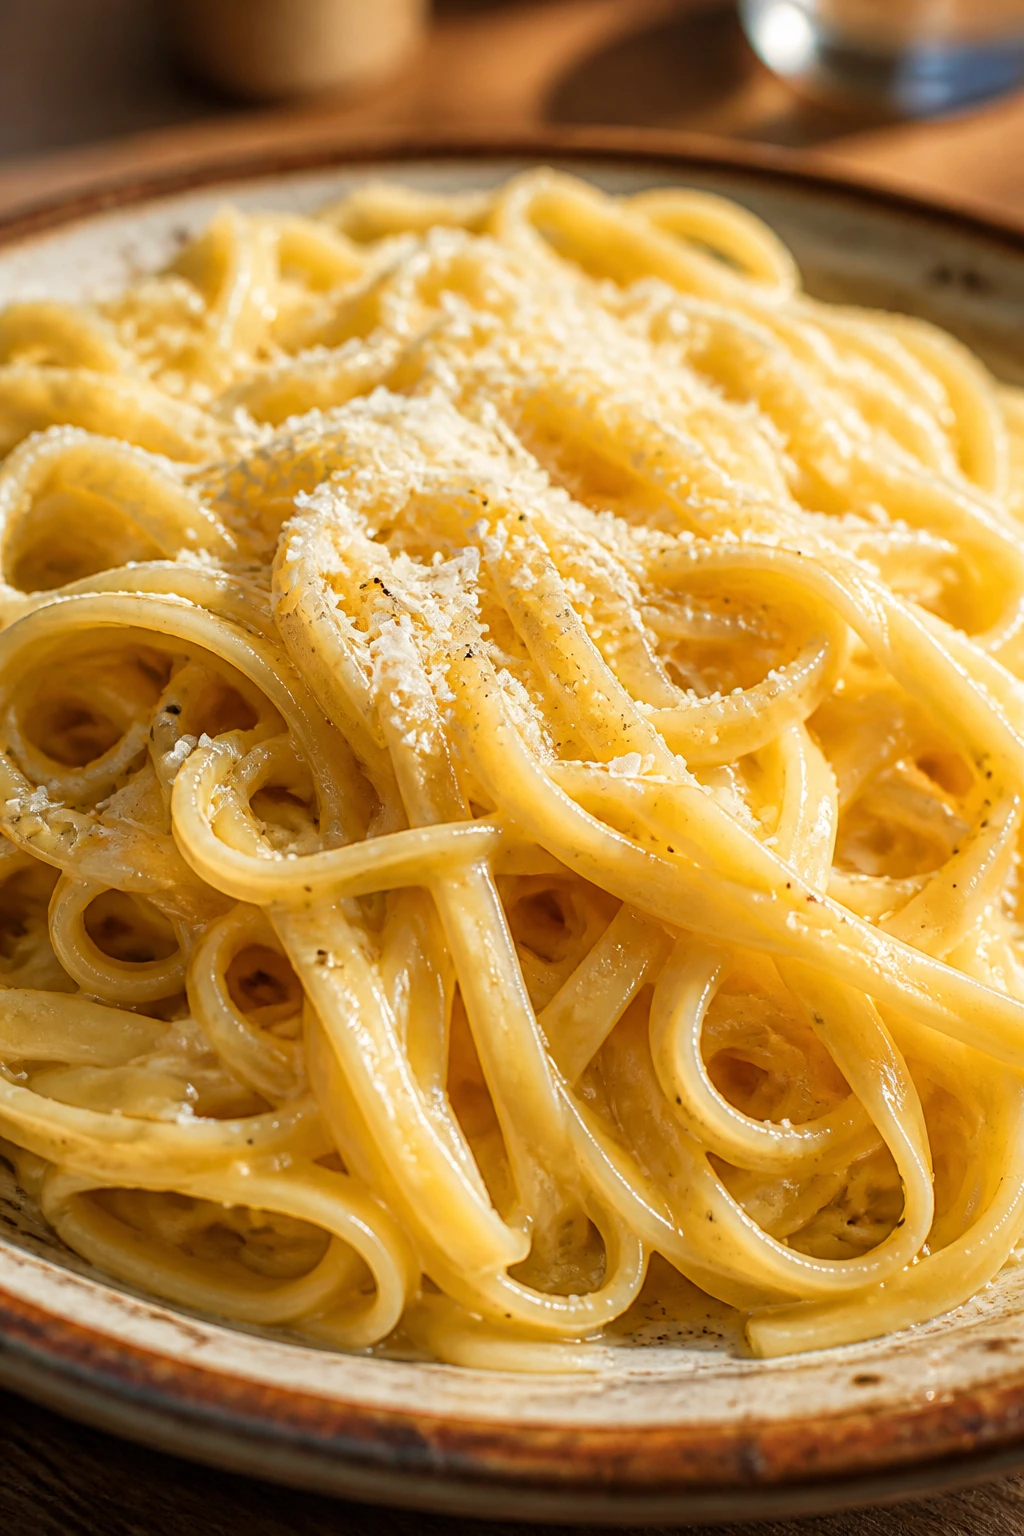
3. Parmesan Butter Noodles
A bowl of buttered noodles is never trying too hard. That’s the point. It’s soft, salty, and familiar enough that even the fussiest eater usually clears the bowl before the opening scene ends.
Why It Works:
This recipe leans on pasta water, which helps the butter and parmesan cling instead of sliding to the bottom of the bowl. A small amount of salt and black pepper keeps the noodles from tasting flat. It comes together in about 15 minutes, which is useful when everybody is already hungry and half-distracted.
Key Ingredients:
- 12 oz spaghetti, linguine, or rotini
- 4 tablespoons unsalted butter
- 1/2 cup reserved pasta water
- 3/4 cup finely grated parmesan
- 1/2 teaspoon kosher salt
- 1/4 teaspoon black pepper
- 1 tablespoon chopped parsley, optional
- 1 small garlic clove, grated, optional
Quick Steps:
- Boil the pasta in salted water until just al dente, then reserve 1 cup of pasta water.
- Melt the butter in a large skillet over low heat.
- Add the drained pasta, 1/4 cup pasta water, parmesan, salt, and pepper.
- Toss until the cheese melts and the noodles look glossy, adding more pasta water a tablespoon at a time if needed.
- Finish with parsley or grated garlic if you want a little more lift.
Equipment for This Recipe:
- Large pot
- Large skillet or sauté pan
- Colander
- Tongs
- Microplane or box grater
How to Serve This Dish:
Pile the noodles into shallow bowls so they cool a little faster and stay easy to twirl. They work as a side with chicken tenders or sliders, or as a standalone plate when you want something calm in the middle of a noisy night. A little extra parmesan at the table is worth setting out.
Pro Tips for This Recipe:
- Grate the parmesan finely so it melts into the butter instead of clumping.
- Use more pasta water than you think you need; it turns the sauce silky.
- Keep the heat low once the cheese goes in.
- Rotini catches sauce well if you want every bite coated.
Variations on This Dish:
- Garlic Parm Noodles: Stir in 2 cloves of garlic, grated, with the butter.
- Cheesy White Cheddar Version: Swap half the parmesan for finely shredded white cheddar.
- Dairy-Light Version: Use half butter and half olive oil, then finish with a smaller amount of parmesan.
Common Mistakes to Avoid with This Dish:
- Draining the pasta too dry: You need that starchy water for the sauce.
- Cooking on high heat: Parmesan can turn grainy if the pan is too hot.
- Using big coarse cheese shreds: They won’t melt as smoothly as finely grated cheese.
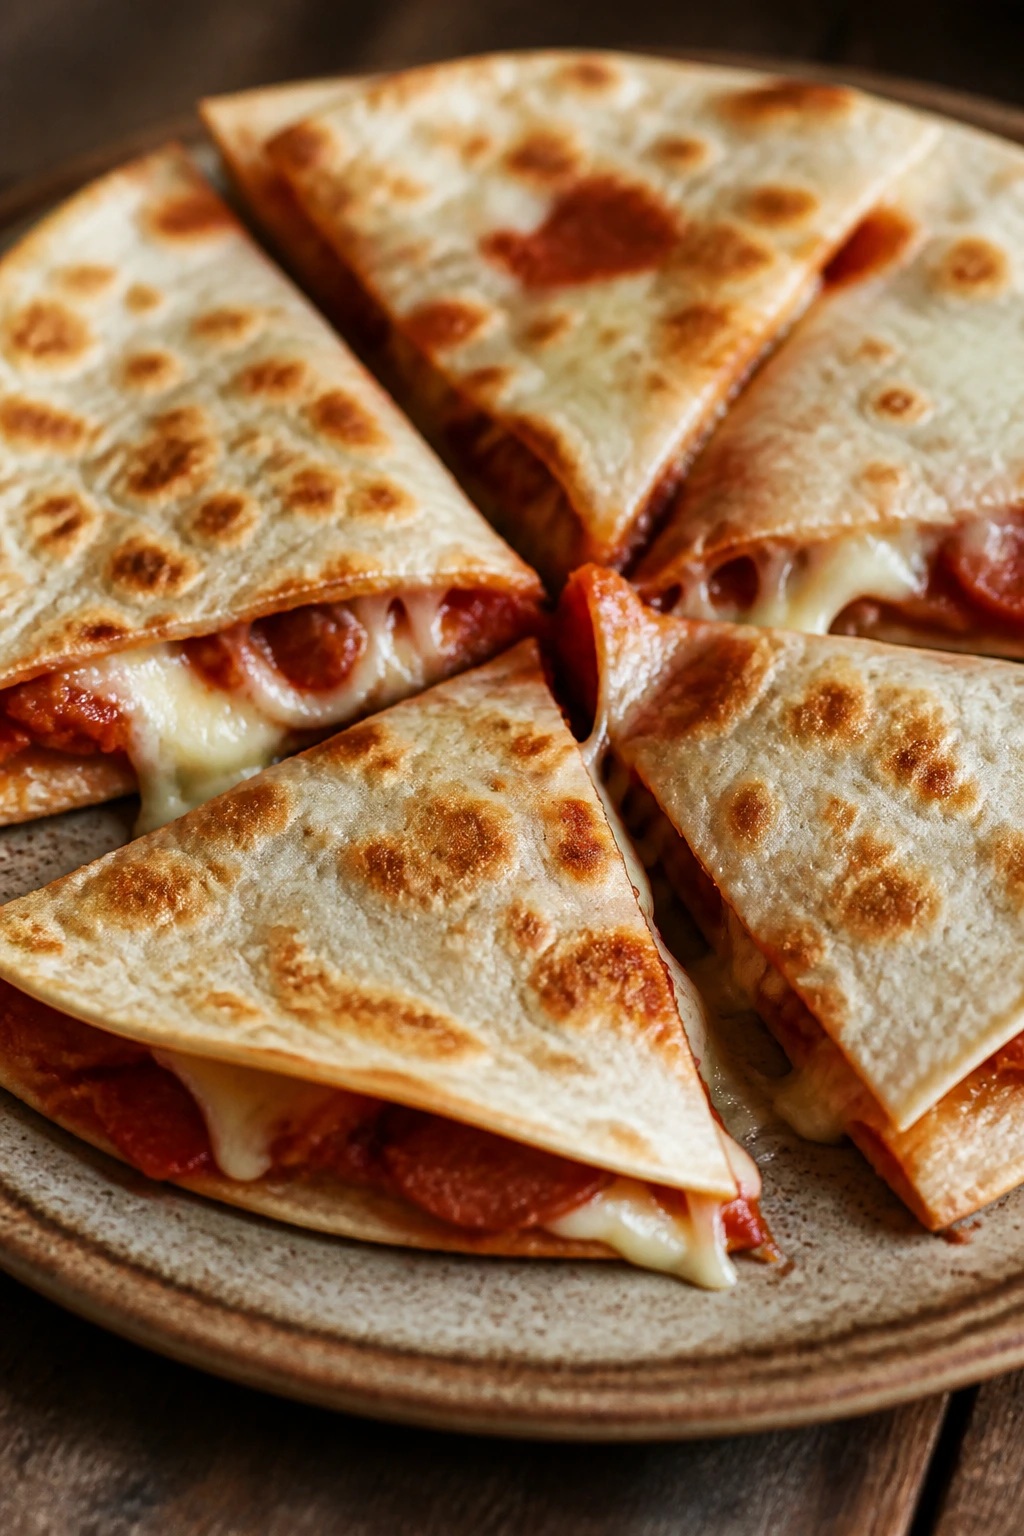
4. Pizza Quesadillas
Pizza quesadillas solve the eternal movie-night problem: kids want pizza, adults want something that doesn’t take an hour, and nobody wants floppy slices dripping sauce. This lands somewhere between the two, and it holds together better than a regular slice.
Why It Works:
Tortillas crisp fast in a skillet, so the filling gets hot before the cheese can leak everywhere. Pizza sauce stays in a thin layer, which keeps the tortilla from going soggy. Pepperoni is optional, but even picky eaters usually accept it because the flavor is familiar and mild.
Key Ingredients:
- 4 large flour tortillas
- 2 cups shredded mozzarella
- 1/2 cup pizza sauce
- 1/2 cup mini pepperoni or diced ham
- 1 tablespoon olive oil or butter
- 1/4 teaspoon garlic powder
- 1 tablespoon grated parmesan, optional
- Dried oregano, optional
Quick Steps:
- Heat a large skillet over medium heat and brush it with oil or butter.
- Place 1 tortilla in the skillet, sprinkle on cheese, add a thin layer of sauce, then scatter pepperoni or ham.
- Add a second tortilla on top and cook for 2 to 3 minutes per side until golden and the cheese melts.
- Slide onto a board and let it rest for 1 minute before slicing into wedges.
- Repeat with the remaining tortillas.
Equipment for This Recipe:
- Large skillet
- Spatula
- Cutting board
- Pizza cutter or sharp knife
- Measuring cups
How to Serve This Dish:
Cut the quesadillas into triangles and stack them like pizza slices. Serve with little bowls of warm marinara, ranch, or plain sour cream for dipping. Four wedges make a nice snack portion; one whole quesadilla can stand in for a light dinner.
Pro Tips for This Recipe:
- Use a thin layer of sauce. More sauce means more mess.
- Shred your own mozzarella if you want the cleanest melt.
- Let the quesadilla rest before slicing so the cheese sets.
- If you want extra crispness, cook it with a second skillet pressing down lightly on top.
Variations on This Dish:
- White Pizza Quesadilla: Skip the sauce and use mozzarella with ricotta dots and oregano.
- Ham-and-Pineapple Version: Add a few small pineapple tidbits if your crowd accepts sweet-savory pizza.
- Bean-and-Cheese Version: Leave out the meat and use seasoned refried beans as the base.
Common Mistakes to Avoid with This Dish:
- Overfilling the tortilla: The filling will spill when you flip it.
- Using too much heat: The tortilla browns before the cheese melts.
- Cutting immediately: Hot cheese runs everywhere if you slice too soon.
5. Baked Mac and Cheese Cups
Mac and cheese is already a safe bet. Baking it in muffin tins makes it even more movie-night friendly because each serving is a little self-contained bundle of noodles and sauce. No scooping. No searching for a fork in the dark.
Why It Works:
The pasta gets coated in a thick cheese sauce before it goes into the muffin tin, so each cup sets into a neat little mound. A mix of cheddar and mozzarella gives you both flavor and stretch. Baking them for a short time at 375°F firms the tops without drying out the center.
Key Ingredients:
- 12 oz elbow macaroni
- 3 tablespoons unsalted butter
- 3 tablespoons all-purpose flour
- 2 cups milk
- 2 cups shredded sharp cheddar
- 1 cup shredded mozzarella
- 1/2 teaspoon kosher salt
- 1/4 teaspoon black pepper
- 1/4 teaspoon mustard powder
- 1/2 cup panko breadcrumbs, optional
Quick Steps:
- Cook the macaroni until just shy of al dente, then drain.
- Melt butter in a saucepan, whisk in the flour, and cook for 1 minute.
- Slowly whisk in the milk and cook until the sauce thickens enough to coat a spoon.
- Stir in the cheddar, mozzarella, salt, pepper, and mustard powder, then fold in the pasta.
- Spoon into a greased muffin tin, top with panko if using, and bake at 375°F for 15 to 18 minutes.
Equipment for This Recipe:
- Muffin tin
- Saucepan
- Whisk
- Measuring cups
- Grease brush or paper towel
How to Serve This Dish:
Serve the cups warm on a platter with a little marinara on the side if anyone wants a dip. They work well next to chicken tenders or as a standalone snack when dinner needs to be easy. Two cups per child is usually enough; three to four covers most adults.
Pro Tips for This Recipe:
- Grease the muffin tin well; cheese sauce likes to stick.
- Pack the pasta in lightly, but do not mash it hard.
- Let the cups cool for 5 minutes so they hold their shape.
- A tiny bit of mustard powder keeps the cheese flavor from tasting flat.
Variations on This Dish:
- Bacon Mac Cups: Fold in 1/2 cup cooked, crumbled bacon before baking.
- Broccoli Cheddar Version: Add 1/2 cup very finely chopped steamed broccoli.
- Dairy-Free Version: Use plant milk and a good melting dairy-free cheese blend.
Common Mistakes to Avoid with This Dish:
- Overcooking the pasta: It keeps cooking in the oven.
- Skipping the thick sauce: Thin sauce won’t set into neat cups.
- Trying to unmold too soon: Give them a few minutes or they’ll fall apart.
6. Popcorn Chicken with Honey Mustard
Popcorn chicken is the kind of movie-night food that disappears by the handful. It’s small enough for younger kids, crunchy enough for adults, and much easier to serve than a whole pan of fried chicken pieces.
Why It Works:
Boneless chicken thighs stay juicier than breasts when baked or air-fried, which matters when the coating is thin and crisp. Cutting the chicken into bite-size pieces shortens the cooking time to under 15 minutes in a hot oven. The honey mustard dip adds sweetness and tang without making the chicken itself fussy.
Key Ingredients:
- 1 1/2 lb boneless, skinless chicken thighs, cut into 1-inch pieces
- 1 cup buttermilk
- 1 cup all-purpose flour
- 1/2 cup cornstarch
- 1 teaspoon paprika
- 1 teaspoon garlic powder
- 1 teaspoon kosher salt
- 1/2 teaspoon black pepper
- Olive oil spray
- 1/2 cup mayonnaise
- 2 tablespoons honey
- 1 tablespoon yellow mustard
Quick Steps:
- Soak the chicken pieces in buttermilk for 15 minutes.
- Mix flour, cornstarch, paprika, garlic powder, salt, and pepper in a bowl.
- Dredge the chicken in the coating and shake off the excess.
- Place on a rack over a sheet pan, spray lightly with oil, and bake at 425°F for 12 to 15 minutes.
- Stir the dip ingredients together and serve right away.
Equipment for This Recipe:
- Rimmed sheet pan
- Wire rack
- Two mixing bowls
- Tongs
- Small bowl for dipping sauce
How to Serve This Dish:
Pile the chicken in a paper-lined bowl with the honey mustard on the side so the coating stays crisp. Add celery sticks, fries, or a little fruit on the side if you want to round it out. A handful works as a snack; a larger bowl becomes dinner fast.
Pro Tips for This Recipe:
- Cornstarch helps the coating crisp up without deep frying.
- Do not skip the rack. Bottom-sitting chicken goes soft.
- Cut the pieces the same size so they finish together.
- If you like a stronger dip, add 1 teaspoon of pickle juice to the honey mustard.
Variations on This Dish:
- Parmesan Popcorn Chicken: Mix 1/4 cup parmesan into the breading.
- Mild Buffalo Version: Toss the baked chicken in a spoonful of very mild buffalo sauce.
- Air Fryer Version: Cook at 400°F for about 10 minutes, shaking once.
Common Mistakes to Avoid with This Dish:
- Wet breading clumps: Shake off excess buttermilk before coating.
- Crowding the rack: The pieces need space for the edges to crisp.
- Serving late: Popcorn chicken loses its crunch as it sits, so time it close to movie start.
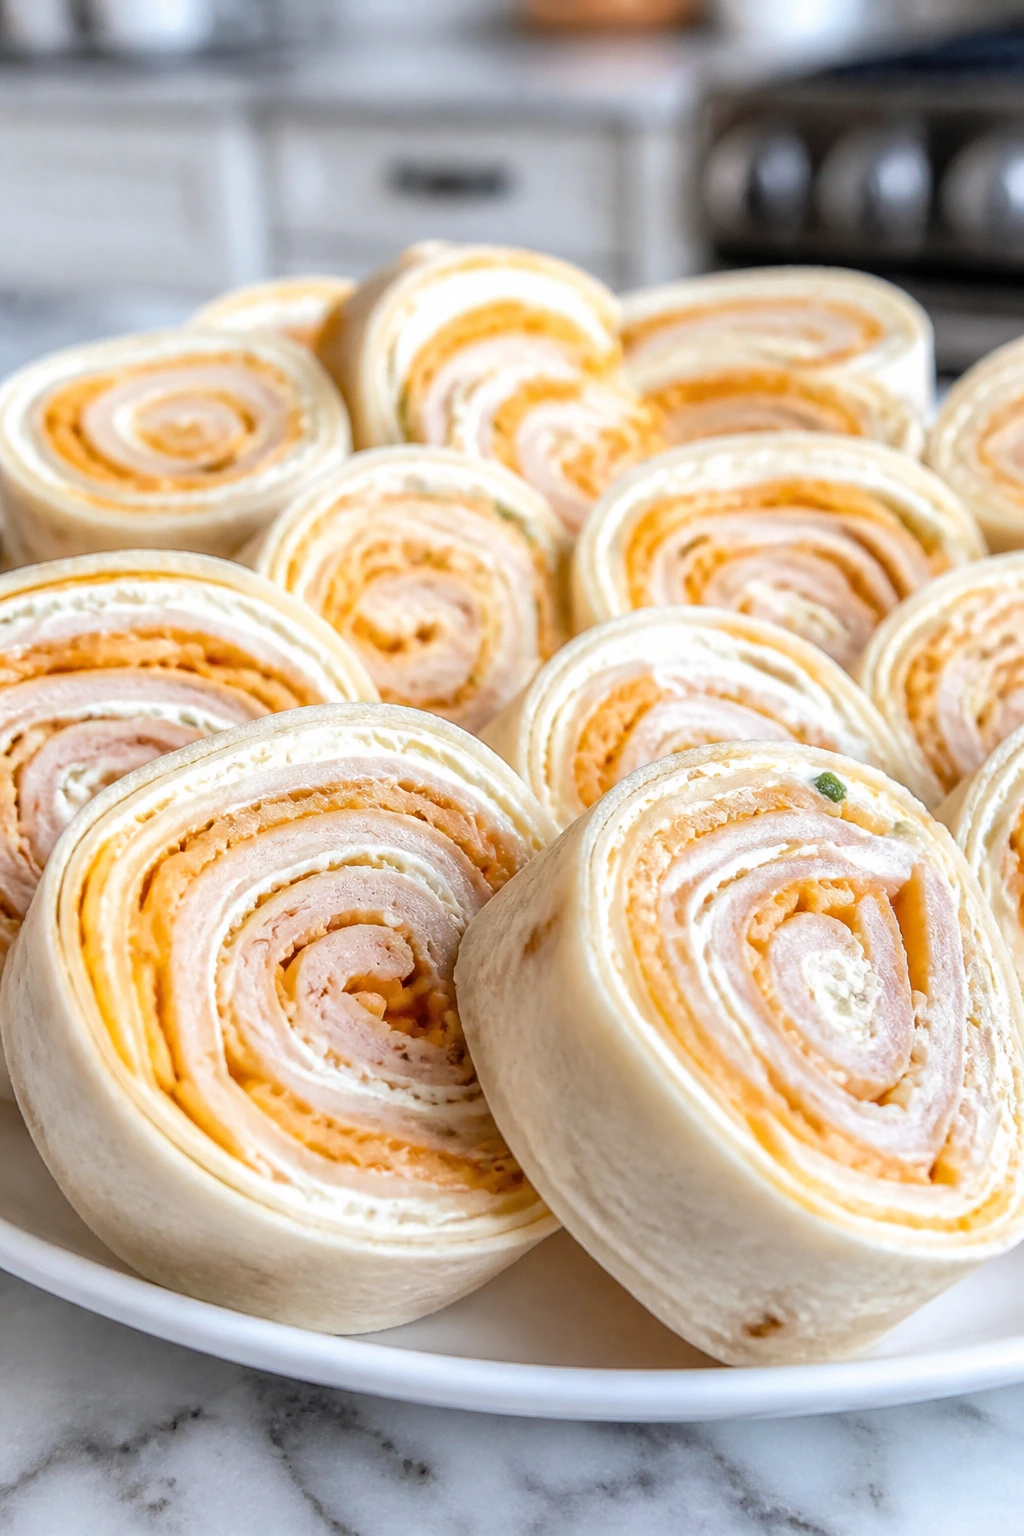
7. Turkey Pinwheel Roll-Ups
These are the sort of snack that feels almost too simple to count as cooking, which is exactly why they work. No baking. No messy sauce. Just a soft tortilla wrapped around familiar lunchbox flavors.
Why It Works:
Cream cheese acts like glue, holding the turkey and cheddar in a tight spiral so the slices stay tidy. Chilling the rolls for 20 minutes makes cutting much cleaner. The mild filling means you can set out a tray without worrying that a cautious eater will spot something unexpected.
Key Ingredients:
- 4 large flour tortillas
- 8 oz cream cheese, softened
- 8 slices deli turkey
- 1 cup shredded cheddar
- 1/4 teaspoon garlic powder
- 1 tablespoon chopped chives, optional
- 1 cup baby carrots or grapes, for serving
Quick Steps:
- Stir the cream cheese with garlic powder and chives, if using.
- Spread a thin layer over each tortilla.
- Lay 2 slices turkey and a quarter cup of cheddar on each tortilla.
- Roll each one tightly, wrap in plastic, and chill for 20 minutes.
- Slice into 1-inch pinwheels and arrange cut-side up.
Equipment for This Recipe:
- Cutting board
- Butter knife or offset spatula
- Plastic wrap
- Sharp knife
- Serving platter
How to Serve This Dish:
Serve the pinwheels with grapes or carrot sticks so the plate looks like a proper snack tray instead of just a stack of rolls. They’re excellent as an early movie nibble before the hot food comes out. Six to eight pinwheels per person is a normal snack serving.
Pro Tips for This Recipe:
- Soften the cream cheese fully or the tortillas will tear.
- Roll tightly from the first turn; loose rolls look sloppy when sliced.
- Use large tortillas, not medium ones, or the filling gets crowded.
- A sharp knife makes the cleanest slices.
Variations on This Dish:
- Ham-and-Cheddar Roll-Ups: Swap turkey for ham and add a thin swipe of honey mustard.
- Ranch Chicken Pinwheels: Use shredded chicken, ranch seasoning, and shredded cheddar.
- Veggie Version: Fill with cream cheese, cucumber strips, and shredded carrots.
Common Mistakes to Avoid with This Dish:
- Skipping the chill time: Warm rolls squish when sliced.
- Overfilling the tortilla: The spiral won’t hold.
- Using cold cream cheese: It tears the tortilla and makes spreading miserable.
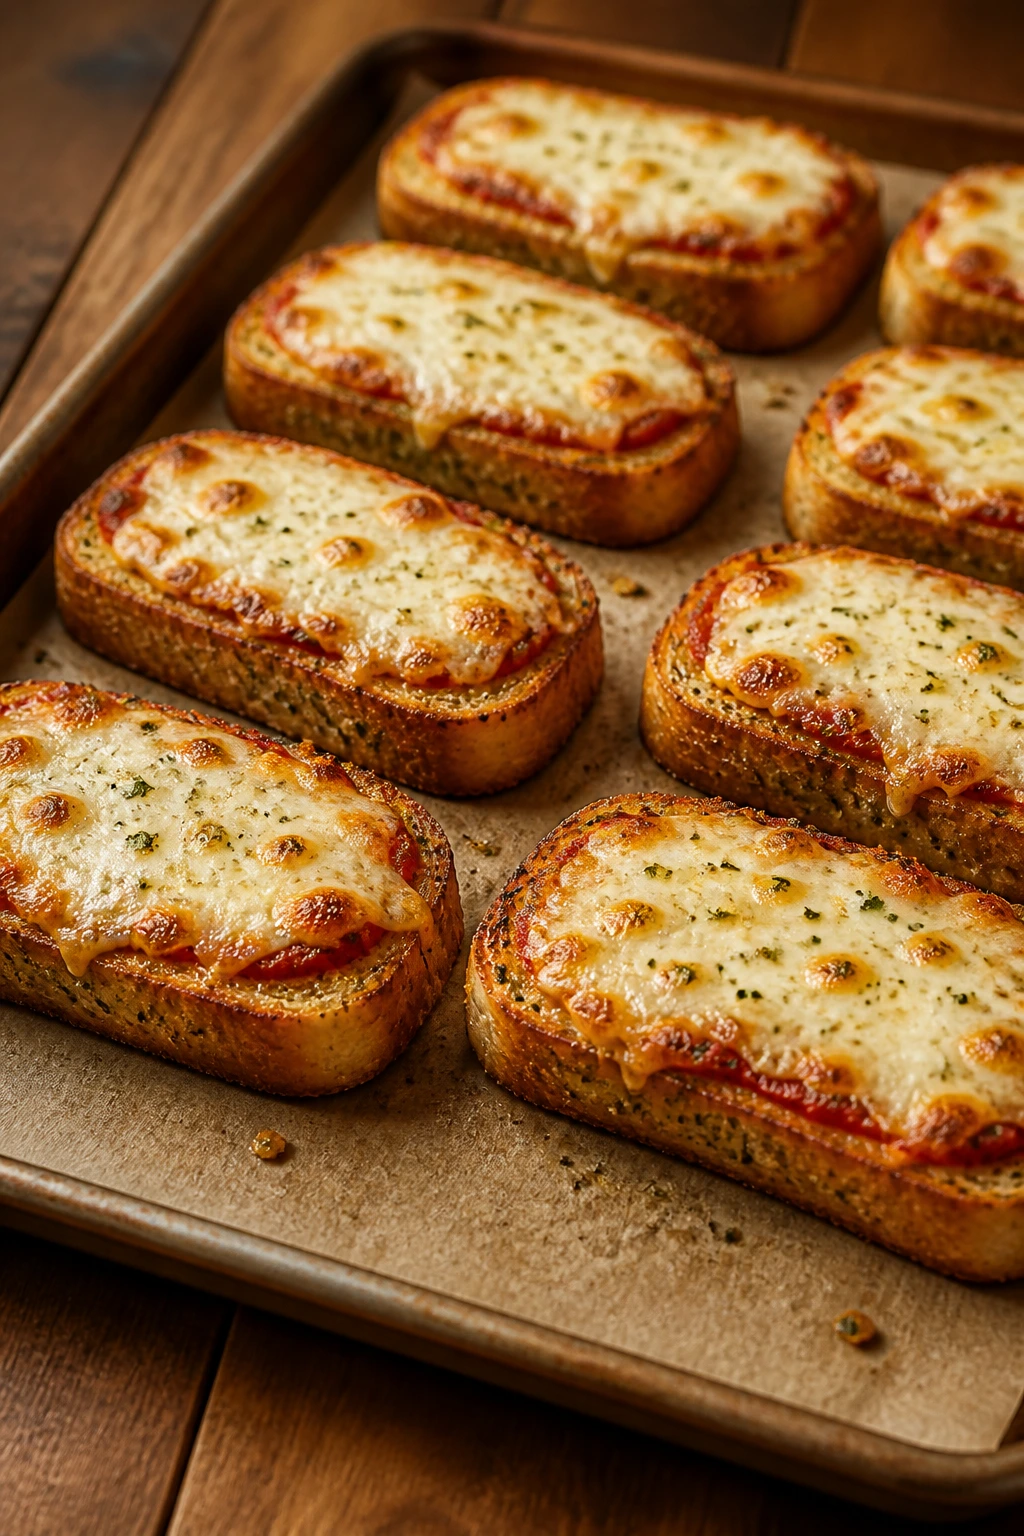
8. Garlic Bread Pizza Toasts
Garlic bread pizza toasts are the loud, happy cousin of frozen pizza bites. They’re crisp, cheesy, and deeply familiar, but they bake fast enough to keep movie night moving.
Why It Works:
The bread gets a quick buttery garlic base before the sauce goes on, which keeps the crust from tasting dry. A short bake at 425°F gives the edges a toasted snap while the cheese melts into the sauce. It’s also one of the easiest recipes here to customize one slice at a time.
Key Ingredients:
- 1 loaf French bread, split lengthwise
- 4 tablespoons unsalted butter, softened
- 1 teaspoon garlic powder
- 1 cup pizza sauce
- 2 cups shredded mozzarella
- 1/2 cup mini pepperoni
- 1 teaspoon dried oregano
- 1 tablespoon grated parmesan, optional
Quick Steps:
- Preheat the oven to 425°F and place the bread halves on a sheet pan.
- Mix butter with garlic powder and spread it over the cut sides of the bread.
- Add a thin layer of pizza sauce, then top with mozzarella, pepperoni, and oregano.
- Bake for 8 to 10 minutes until the cheese bubbles and the edges brown.
- Let rest for 2 minutes, then cut into strips.
Equipment for This Recipe:
- Sheet pan
- Serrated knife
- Small bowl
- Spoon or offset spatula
- Parchment paper
How to Serve This Dish:
Cut the toasts into long strips so they’re easy to hold during the movie. A small bowl of warm marinara makes dipping easy, but they’re sturdy enough to eat plain. Two or three strips can hold a hungry kid over; a half loaf is a real dinner.
Pro Tips for This Recipe:
- Use a light hand with sauce or the bread goes soggy.
- Bake directly on the pan for a firmer bottom crust.
- Add parmesan after baking if you want a sharper cheese note.
- If you like extra crunch, toast the bread with butter for 2 minutes before topping.
Variations on This Dish:
- Pepper-Free Cheese Toast: Leave off pepperoni and just use mozzarella and parmesan.
- Veggie Pizza Toasts: Use finely chopped mushrooms or peppers, but keep the pieces small.
- White Garlic Toasts: Replace pizza sauce with ricotta and a little mozzarella.
Common Mistakes to Avoid with This Dish:
- Thick sauce layer: Too much sauce sinks into the bread.
- Too much topping: The cheese needs room to melt, not pile up.
- Using soft sandwich bread: French bread or Italian bread holds up better.
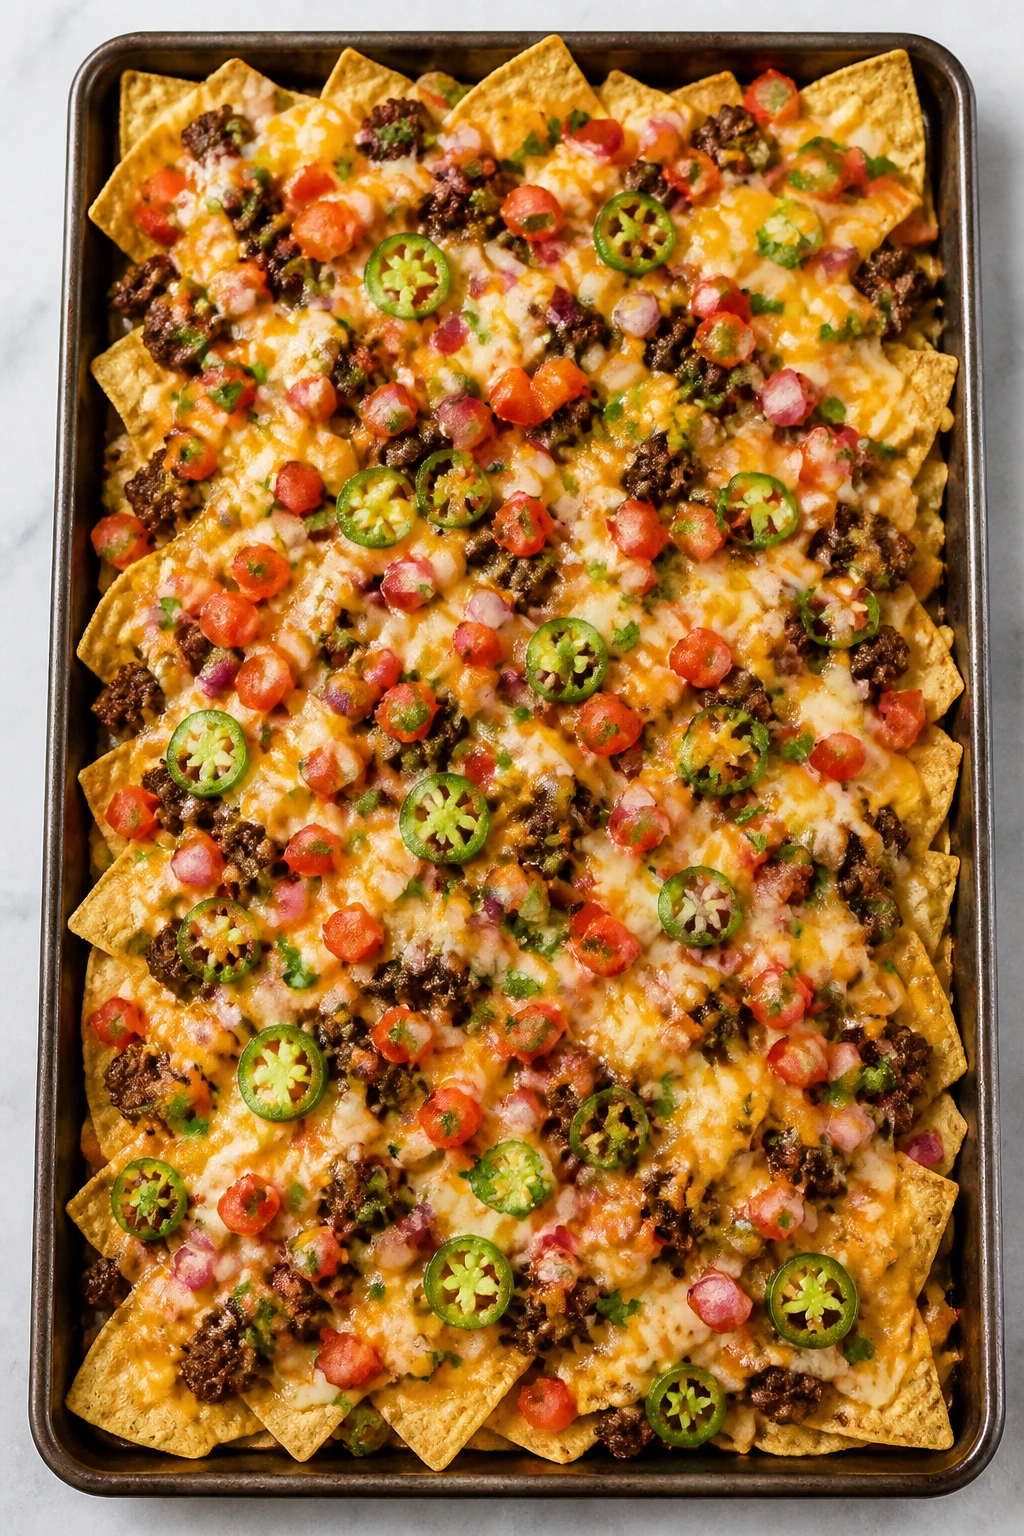
9. Sheet Pan Nachos
Nachos are one of those foods that can go wrong fast if you load them too heavily, but when they’re done right they vanish in minutes. The trick is keeping the toppings mild and spread thin so every chip gets a little something.
Why It Works:
A single layer on a sheet pan means the chips crisp instead of steaming under a mound of toppings. Cheese melts better when it’s scattered evenly across the pan. Cooking the beef first keeps the nachos fast and lets you control the seasoning before anything touches the chips.
Key Ingredients:
- 1 large bag sturdy tortilla chips
- 1 lb ground beef
- 1 teaspoon chili powder
- 1/2 teaspoon garlic powder
- 1/2 teaspoon kosher salt
- 2 cups shredded cheddar
- 1 cup shredded Monterey Jack
- 1/2 cup mild salsa
- 1/4 cup sliced olives, optional
- Sour cream and chopped green onions, for serving
Quick Steps:
- Brown the beef in a skillet, then drain if needed and season with chili powder, garlic powder, and salt.
- Spread the chips across a rimmed sheet pan in one even layer.
- Sprinkle on the beef and cheeses.
- Bake at 400°F for 6 to 8 minutes until the cheese melts.
- Add salsa, sour cream, and green onions after baking.
Equipment for This Recipe:
- Large sheet pan
- Skillet
- Wooden spoon
- Cheese grater
- Serving spoon
How to Serve This Dish:
Bring the pan straight to the table if you can, but set it on a trivet first. Serve sour cream and salsa on the side so each person can choose how much they want. A pile of nachos is best eaten immediately; this is not a sit-around-and-chat recipe.
Pro Tips for This Recipe:
- Use sturdy chips. Thin chips buckle under the cheese.
- Keep wet toppings off until after baking.
- Spread the cheese to the edges so no chip gets left bare.
- If you want bean-free nachos, skip the beans altogether instead of hiding them under the chips.
Variations on This Dish:
- Chicken Nachos: Replace beef with 2 cups shredded rotisserie chicken.
- Plain Cheese Nachos: Skip the meat and add extra cheddar for the youngest eaters.
- Mild Bean Nachos: Add drained, rinsed black beans if your crowd accepts them.
Common Mistakes to Avoid with This Dish:
- Piling toppings in the center: The middle burns while the edges stay empty.
- Adding salsa before baking: That makes the chips soggy.
- Walking away too long: Nachos go from perfect to limp in a few minutes.
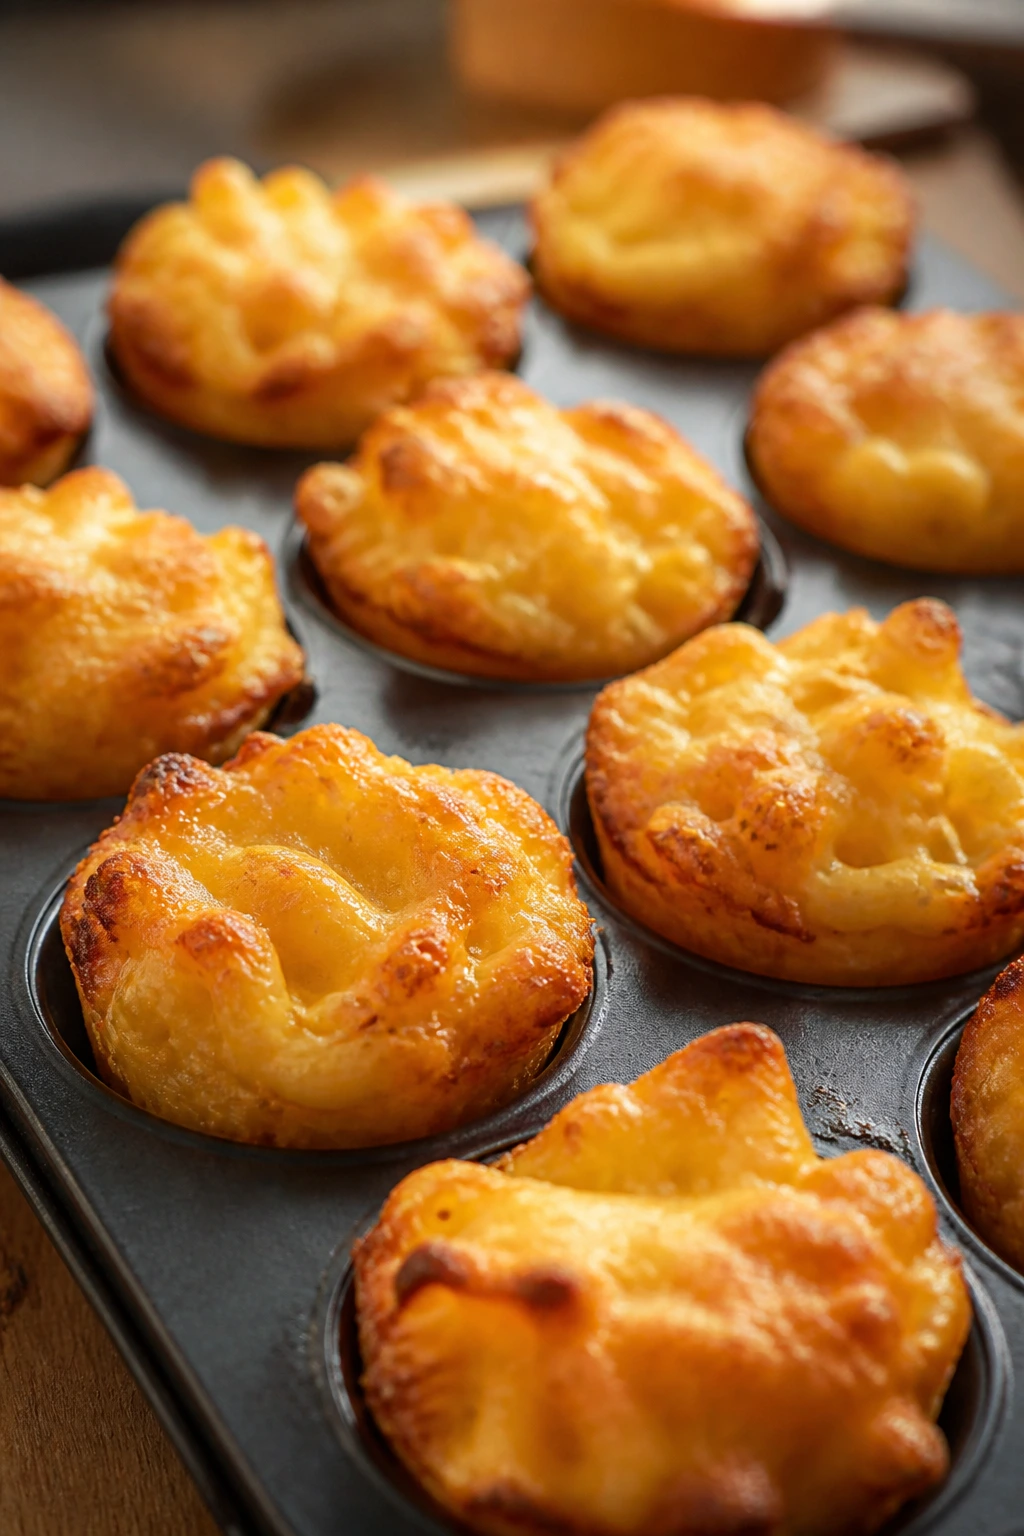
10. Ham and Cheese Puff Pastry Twists
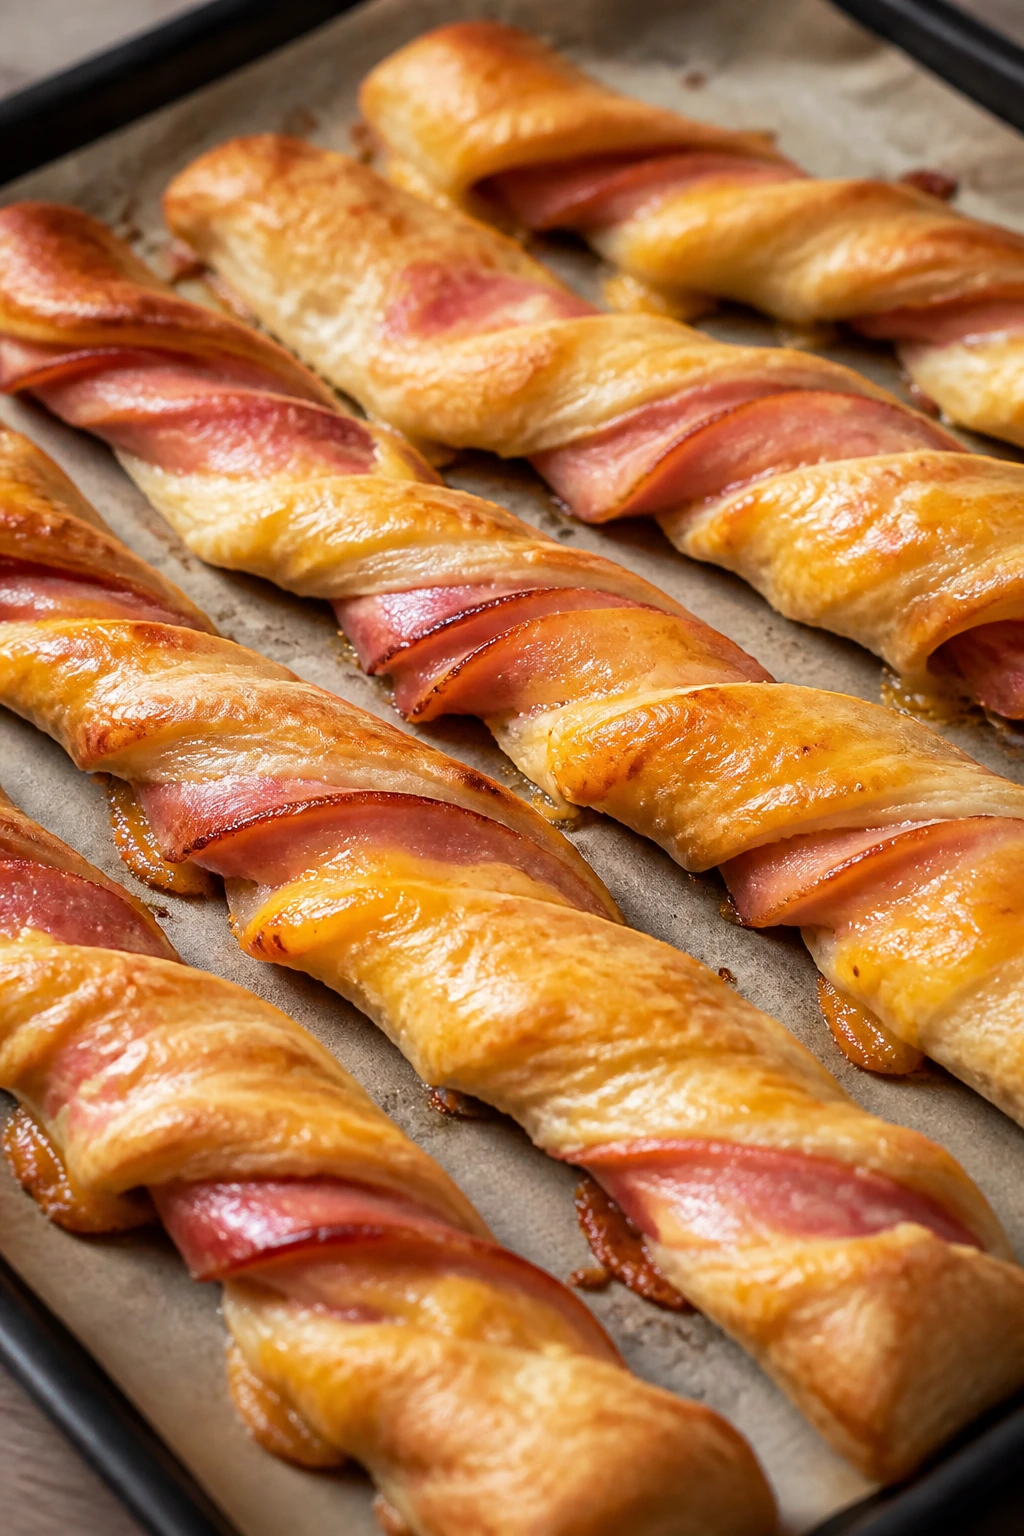
These twists look fancier than they are. Puff pastry, ham, and cheese are a classic trio, and twisting them into strips makes the whole thing feel snacky enough for movie night without asking much from the cook.
Why It Works:
Puff pastry puffs because of the cold butter layers, so the strip gets flaky and crisp around a simple filling. Ham stays mild, and cheddar brings salt and chew. A quick egg wash gives the twists a shiny finish that makes them look like you put in more work than you actually did.
Key Ingredients:
- 1 sheet frozen puff pastry, thawed
- 4 oz sliced ham, finely chopped
- 1 cup shredded cheddar
- 1 tablespoon Dijon mustard, optional
- 1 large egg
- 1 tablespoon water
- 1 teaspoon sesame seeds or poppy seeds, optional
Quick Steps:
- Preheat the oven to 400°F and line a sheet pan with parchment.
- Roll the puff pastry slightly, then spread a thin layer of mustard if using.
- Scatter ham and cheddar over half the pastry, fold the other half on top, and cut into strips.
- Twist each strip and place on the pan.
- Brush with egg wash, sprinkle with seeds, and bake for 15 to 18 minutes until puffed and golden.
Equipment for This Recipe:
- Sheet pan
- Parchment paper
- Sharp knife or pizza cutter
- Pastry brush
- Fork, if needed for sealing
How to Serve This Dish:
Serve the twists in a tall glass or cup so they stand up on the table and don’t get squashed under other snacks. They’re good with a little mustard or plain ketchup for dipping. Three twists per person makes a solid snack portion.
Pro Tips for This Recipe:
- Keep the puff pastry cold until the oven is hot.
- Don’t use huge chunks of ham; small bits twist better.
- Bake on parchment so the melted cheese doesn’t glue itself to the pan.
- If the pastry softens while shaping, chill the tray for 10 minutes before baking.
Variations on This Dish:
- Pizza Twist: Use mozzarella, a thin swipe of sauce, and a little oregano.
- Everything Bagel Twist: Skip the ham and top with cream cheese and seasoning.
- Turkey Club Twist: Swap in turkey and a tiny bit of cooked bacon.
Common Mistakes to Avoid with This Dish:
- Warm pastry: It won’t puff as well.
- Too much filling: The twists unwrap in the oven.
- Underbaking: Pale pastry tastes doughy, not flaky.
11. Mini Meatball Subs
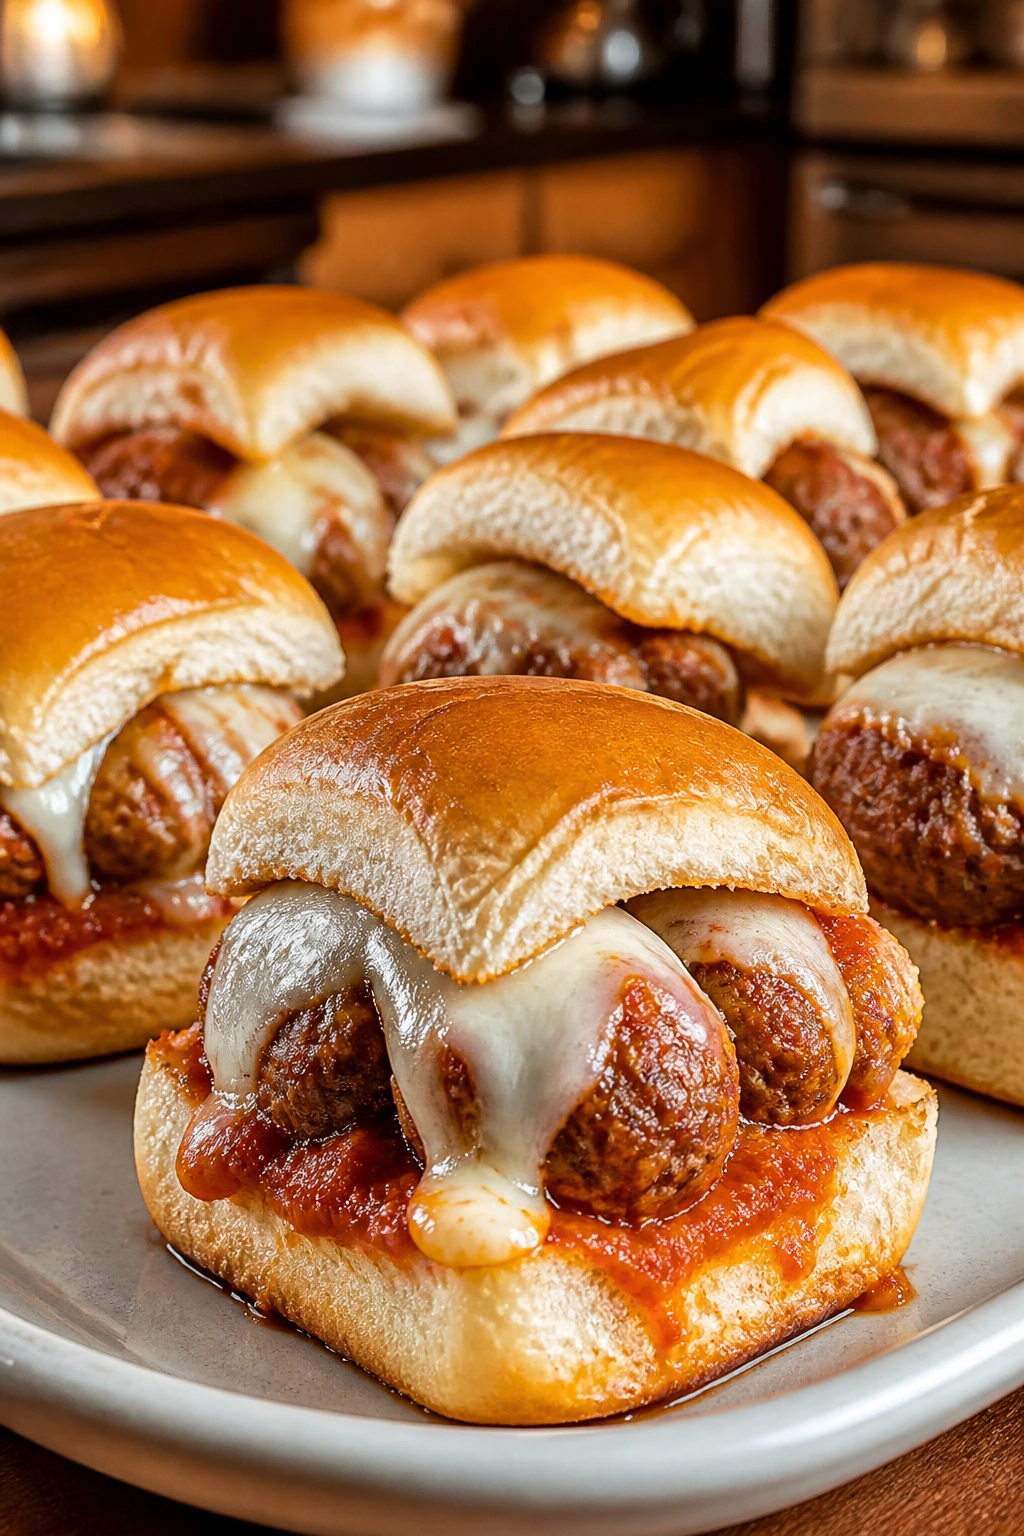
Mini meatball subs are what I make when the movie is long and everyone needs actual dinner, not just snacks. They’re hearty without being huge, and the slider size keeps them from becoming messy beasts.
Why It Works:
Small meatballs heat through quickly and soak up marinara better than oversized ones. A little mozzarella on top helps lock the sandwich together. Baking the assembled subs for a few minutes softens the bread just enough that the first bite doesn’t spill filling into your lap.
Key Ingredients:
- 20 small cooked meatballs
- 1 1/2 cups marinara sauce
- 8 small hoagie rolls or slider buns
- 1 1/2 cups shredded mozzarella
- 2 tablespoons grated parmesan
- 1 tablespoon melted butter
- 1 teaspoon dried Italian seasoning
Quick Steps:
- Warm the meatballs in marinara over medium heat until hot.
- Split the rolls and place them on a sheet pan.
- Spoon 2 to 3 meatballs and a little sauce into each roll.
- Top with mozzarella and parmesan, then bake at 400°F for 6 to 8 minutes.
- Brush the tops with melted butter and Italian seasoning before serving.
Equipment for This Recipe:
- Saucepan
- Sheet pan
- Spoon
- Pastry brush
- Tongs
How to Serve This Dish:
Line the subs up on a tray with extra marinara in small cups for dipping. A green salad or a bowl of grapes helps break up the richness if you’re turning these into dinner. Two mini subs is usually enough for children; adults may want three.
Pro Tips for This Recipe:
- Keep the sauce thick so it does not flood the bread.
- Slice the rolls almost all the way through but leave one hinge if you want cleaner handling.
- Use small meatballs; large ones make the sandwiches awkward.
- If you want extra melt, cover the pan loosely with foil for the first 3 minutes of baking.
Variations on This Dish:
- Turkey Meatball Subs: Use turkey meatballs for a lighter version.
- Pizza Meatball Subs: Add pepperoni bits and extra mozzarella.
- Garlic Bread Subs: Brush the rolls with garlic butter before filling.
Common Mistakes to Avoid with This Dish:
- Wet bread: Too much sauce turns the rolls soggy.
- Oversized meatballs: They make the subs hard to eat.
- Skipping the warm bake: The cheese won’t melt into the sandwich.
12. Baked Mozzarella Sticks
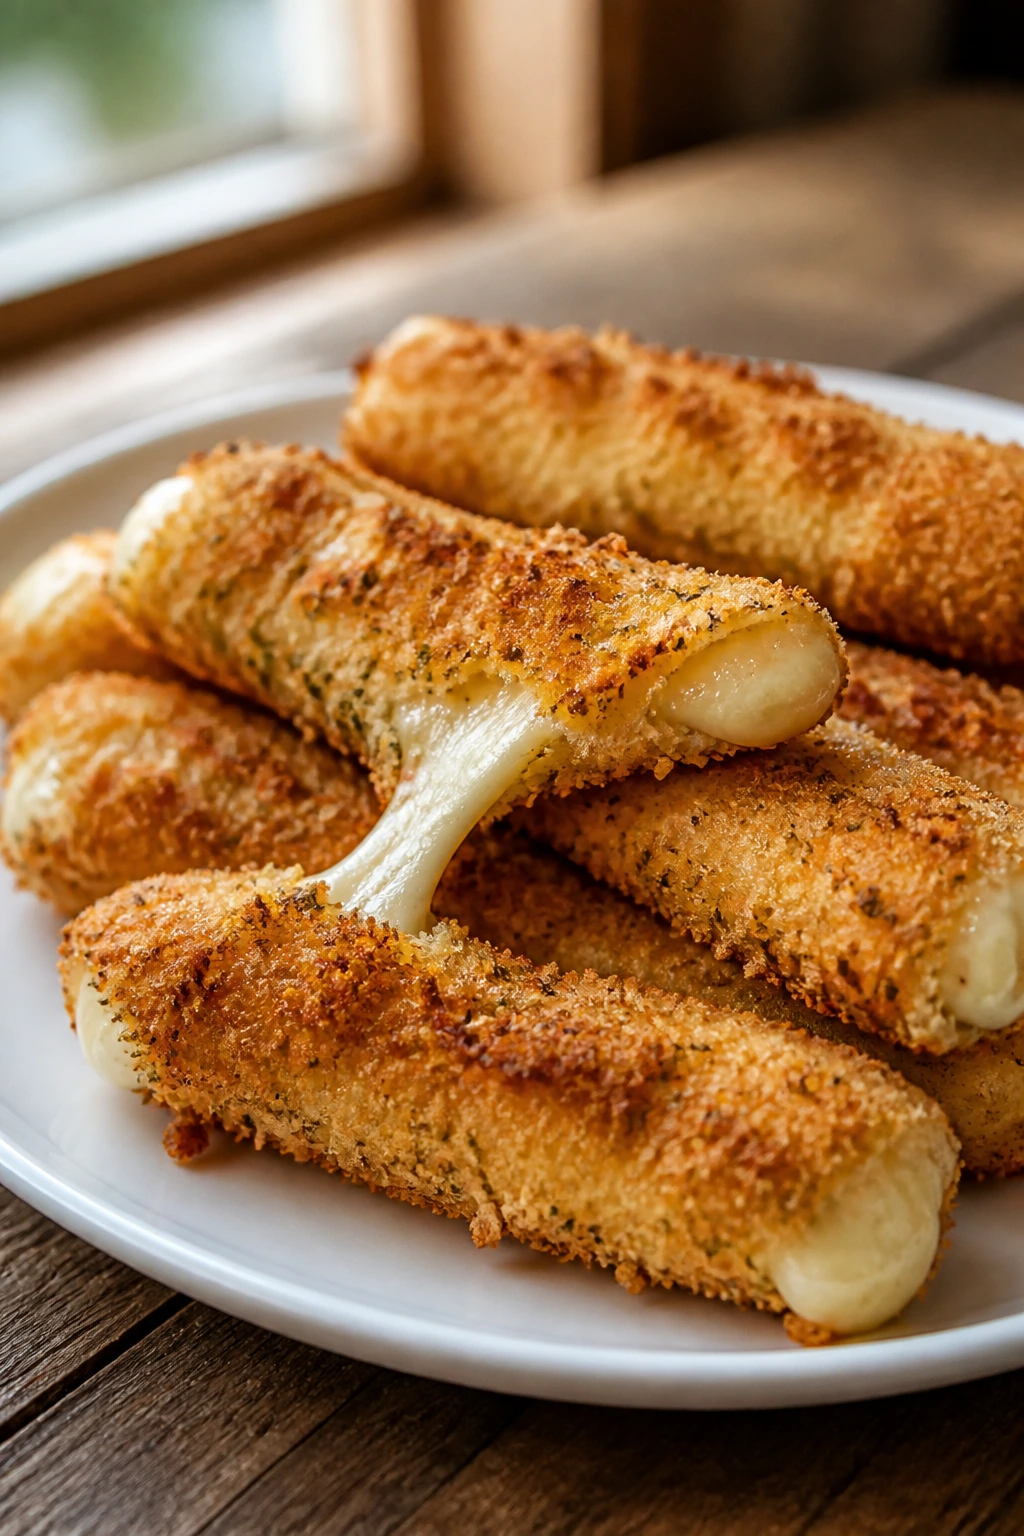
Mozzarella sticks are the snack people reach for first, which is telling. They are crisp, stretchy, and unapologetically cheesy. The baked version is the smart move for home movie night because you still get the pull without setting up a fryer.
Why It Works:
Freezing the cheese before baking keeps it from collapsing too early. A double coating of flour, egg, and panko seals the cheese in long enough for the crust to brown. A hot oven gives you the crunch, and a fast bake keeps the center from leaking.
Key Ingredients:
- 12 mozzarella string cheese sticks
- 1/2 cup all-purpose flour
- 2 large eggs
- 1 tablespoon water
- 1 1/2 cups panko breadcrumbs
- 1 teaspoon Italian seasoning
- 1 teaspoon garlic powder
- 1/2 teaspoon kosher salt
- Olive oil spray
- 1 cup marinara sauce, for serving
Quick Steps:
- Cut each string cheese stick in half and freeze for 30 minutes.
- Set up three bowls with flour, beaten eggs and water, and panko mixed with seasoning, garlic powder, and salt.
- Coat each cheese piece in flour, egg, and panko, then repeat the egg and panko for a thicker shell.
- Freeze the coated sticks for another 15 minutes.
- Bake at 425°F for 8 to 10 minutes, spraying lightly with oil, until golden and just starting to leak at the edges.
Equipment for This Recipe:
- Sheet pan
- Parchment paper
- Three shallow bowls
- Tongs
- Freezer-safe plate or tray
How to Serve This Dish:
Serve the sticks immediately with warm marinara, because they lose their magic as they sit. A few celery sticks or cucumber slices on the side help balance the plate. Four sticks make a good snack serving, six if they’re part of a bigger spread.
Pro Tips for This Recipe:
- Freeze between coating rounds. That step matters.
- Use panko, not fine breadcrumbs, for a crisp shell.
- Keep the sticks spaced apart so they brown evenly.
- If one leaks a little cheese, that is normal. A lot of leakage means the freezer time was too short.
Variations on This Dish:
- Pizza Sticks: Add a tiny strip of pepperoni inside each stick before coating.
- Gluten-Free Version: Use gluten-free crumbs and flour.
- Herb-Crusted Version: Mix in dried basil and oregano for a more savory crust.
Common Mistakes to Avoid with This Dish:
- Skipping the second freeze: The cheese will escape too fast.
- Baking too long: The crust gets dark and the center collapses.
- Using low-moisture but wrong cheese: Stick with string cheese or a firm mozzarella block cut into sticks.
13. Corn Dog Muffins
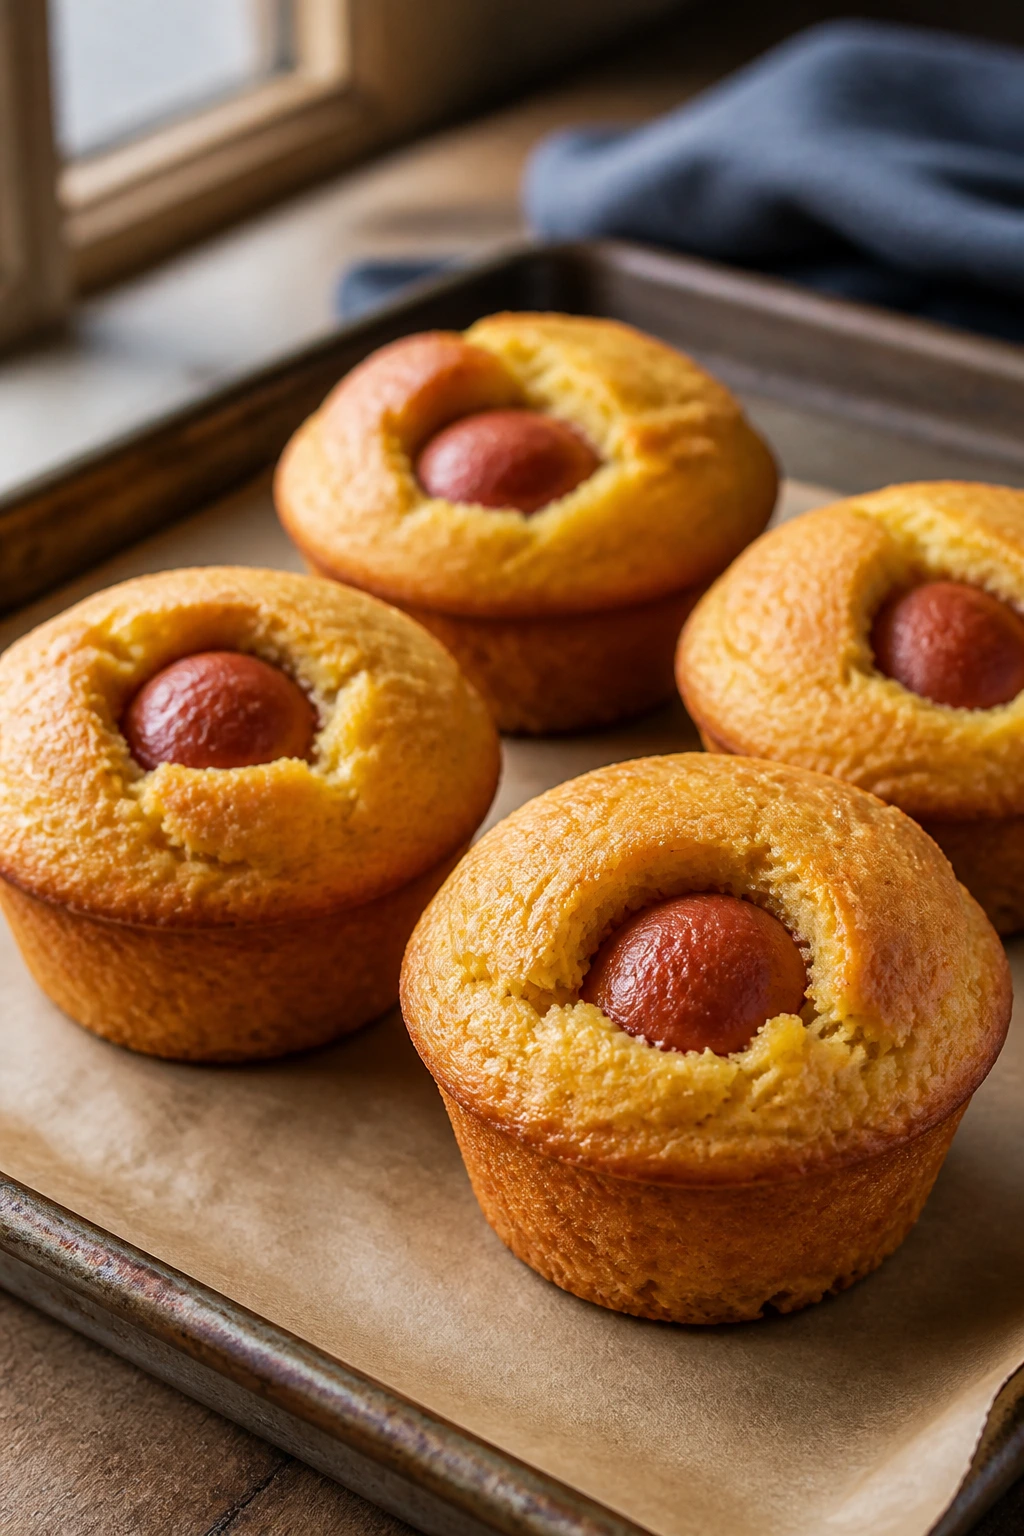
Corn dog muffins are pure nostalgia in a mini package. They taste like fair food without requiring skewers, hot oil, or a drive across town. Kids tend to trust them instantly because they look like snack-sized muffins, not an experiment.
Why It Works:
Cornmeal batter bakes into a tender, slightly sweet crust that wraps around the hot dog pieces. A mini muffin tin makes the portions bite-size and keeps the batter from spreading too thin. They’re good warm, but they also hold well for a little while, which is handy when the movie starts late.
Key Ingredients:
- 1 cup yellow cornmeal
- 1 cup all-purpose flour
- 2 tablespoons sugar
- 1 tablespoon baking powder
- 1 teaspoon kosher salt
- 2 large eggs
- 1 1/4 cups milk
- 2 tablespoons melted butter
- 8 hot dogs, cut into thirds
- Ketchup and yellow mustard, for serving
Quick Steps:
- Preheat the oven to 400°F and grease a mini muffin tin.
- Whisk cornmeal, flour, sugar, baking powder, and salt together.
- Add eggs, milk, and melted butter, stirring until just combined.
- Spoon a little batter into each cup, press in one hot dog piece, and cover with more batter.
- Bake for 12 to 14 minutes until the tops are golden and spring back when touched.
Equipment for This Recipe:
- Mini muffin tin
- Mixing bowl
- Whisk
- Measuring cups
- Small spoon or cookie scoop
How to Serve This Dish:
Serve them with little cups of ketchup and mustard so everyone can dip at their own pace. They sit nicely on a tray with fruit or potato chips, which keeps the table from looking too bare. Four to six muffins per person is a practical movie-night portion.
Pro Tips for This Recipe:
- Grease the muffin tin generously or the edges will cling.
- Cut the hot dogs evenly so they stay centered in the batter.
- Use a cookie scoop to keep the cups the same size.
- If you want a softer top, bake for the lower end of the time range.
Variations on This Dish:
- Cheddar Corn Dog Muffins: Stir 1/2 cup shredded cheddar into the batter.
- Turkey Dog Version: Use turkey hot dogs for a milder flavor.
- Mini Cornbread Bites: Leave out the hot dogs and serve with butter.
Common Mistakes to Avoid with This Dish:
- Overfilling the cups: The batter puffs and spills.
- Undermixing the batter: Dry pockets make the texture odd.
- Using cold hot dogs straight from the fridge: They can lower the bake temperature inside the cup.
14. Cheesy Ranch Potato Wedges
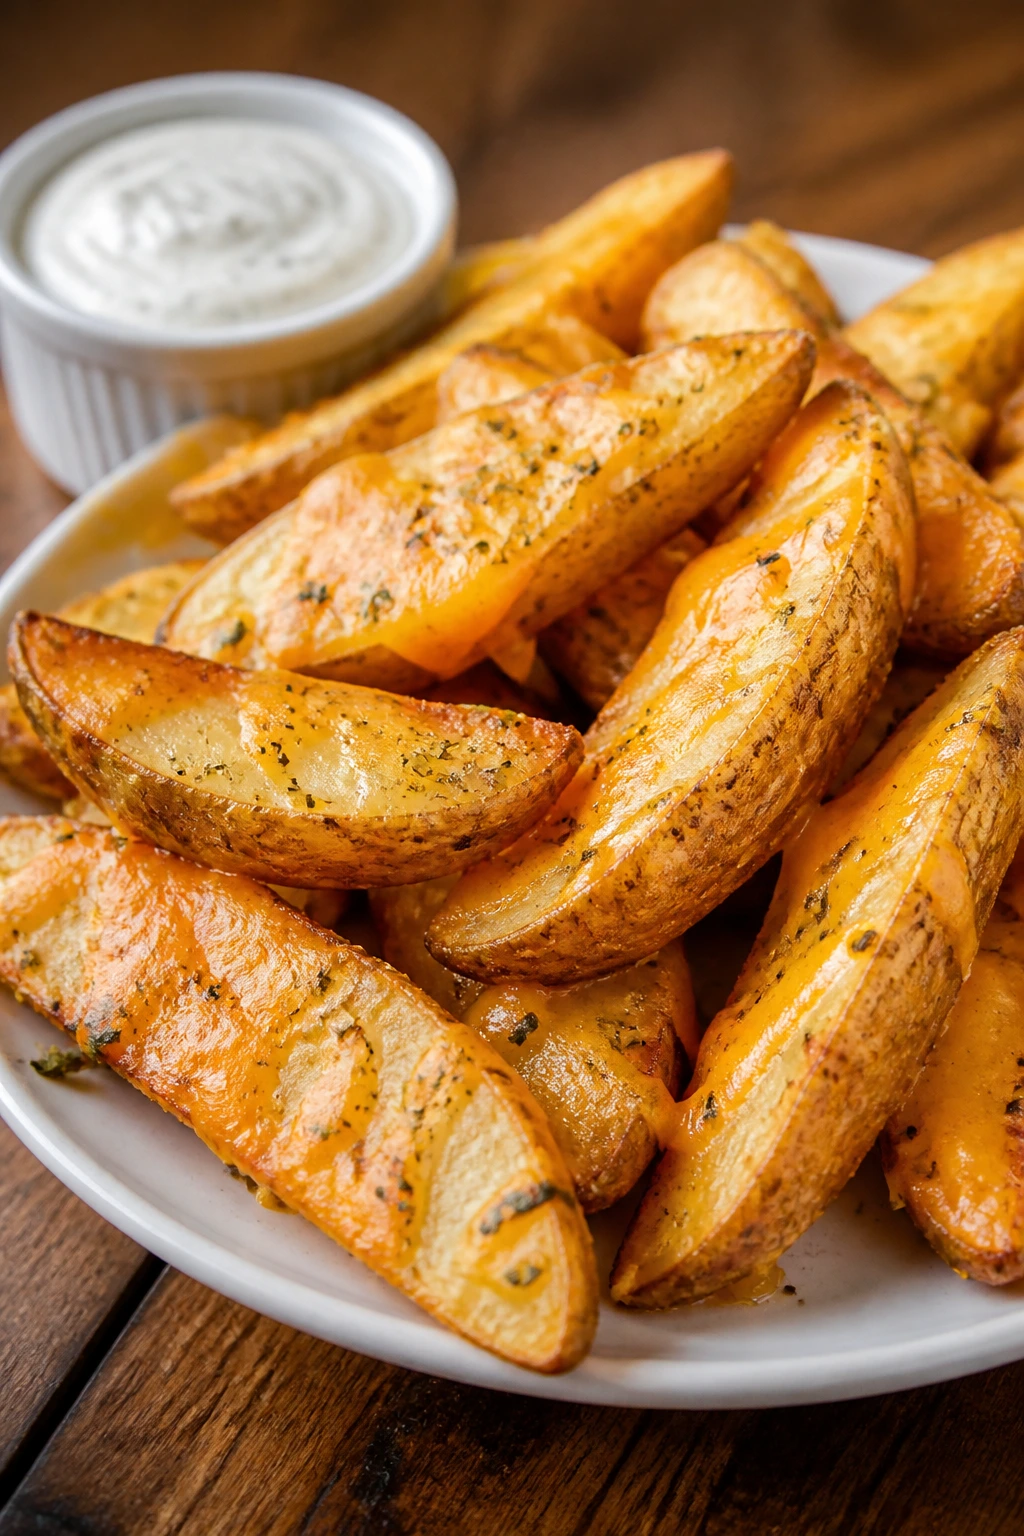
Potato wedges are one of those foods that satisfy a lot of different eaters at the same table. They’re salty, familiar, and sturdy enough to scoop with or eat by hand if the mood is casual.
Why It Works:
Russet potatoes crisp up nicely because of their starchy interior and thick skins. Baking them on a hot sheet pan keeps the edges brown instead of limp. Ranch seasoning and cheddar make the wedges taste like a snack people recognize on sight.
Key Ingredients:
- 2 lb russet potatoes
- 2 tablespoons olive oil
- 2 teaspoons ranch seasoning
- 1 teaspoon kosher salt
- 1/2 teaspoon black pepper
- 1 cup shredded cheddar
- 2 tablespoons chopped parsley
- Sour cream, for serving
Quick Steps:
- Heat the oven to 425°F and place a sheet pan inside while it preheats.
- Cut the potatoes into wedges and toss with oil, ranch seasoning, salt, and pepper.
- Spread them on the hot pan in a single layer.
- Bake for 30 to 35 minutes, flipping halfway, until browned and tender.
- Sprinkle with cheddar for the last 3 minutes, then finish with parsley.
Equipment for This Recipe:
- Large sheet pan
- Sharp knife
- Large bowl
- Spatula
- Small bowl for sour cream
How to Serve This Dish:
Serve the wedges with sour cream or ranch in small bowls so people can dip as they go. They can sit beside sliders, chicken tenders, or nachos without fighting for attention. A generous handful makes a side; a full plate makes a filling snack.
Pro Tips for This Recipe:
- Preheating the pan gives the bottoms a head start.
- Cut the wedges evenly so they roast at the same rate.
- Dry the potatoes well after washing; wet potatoes steam.
- Add the cheese late so it melts without burning.
Variations on This Dish:
- Garlic Herb Wedges: Add garlic powder and dried rosemary.
- Loaded Wedges: Top with bacon bits and extra cheddar after baking.
- Dairy-Free Version: Skip the cheese and serve with a garlicky dip instead.
Common Mistakes to Avoid with This Dish:
- Too much oil: The wedges turn greasy instead of crisp.
- Crowding the pan: The potatoes need space to brown.
- Adding cheese too early: It can scorch before the wedges finish.
15. Taco Cups
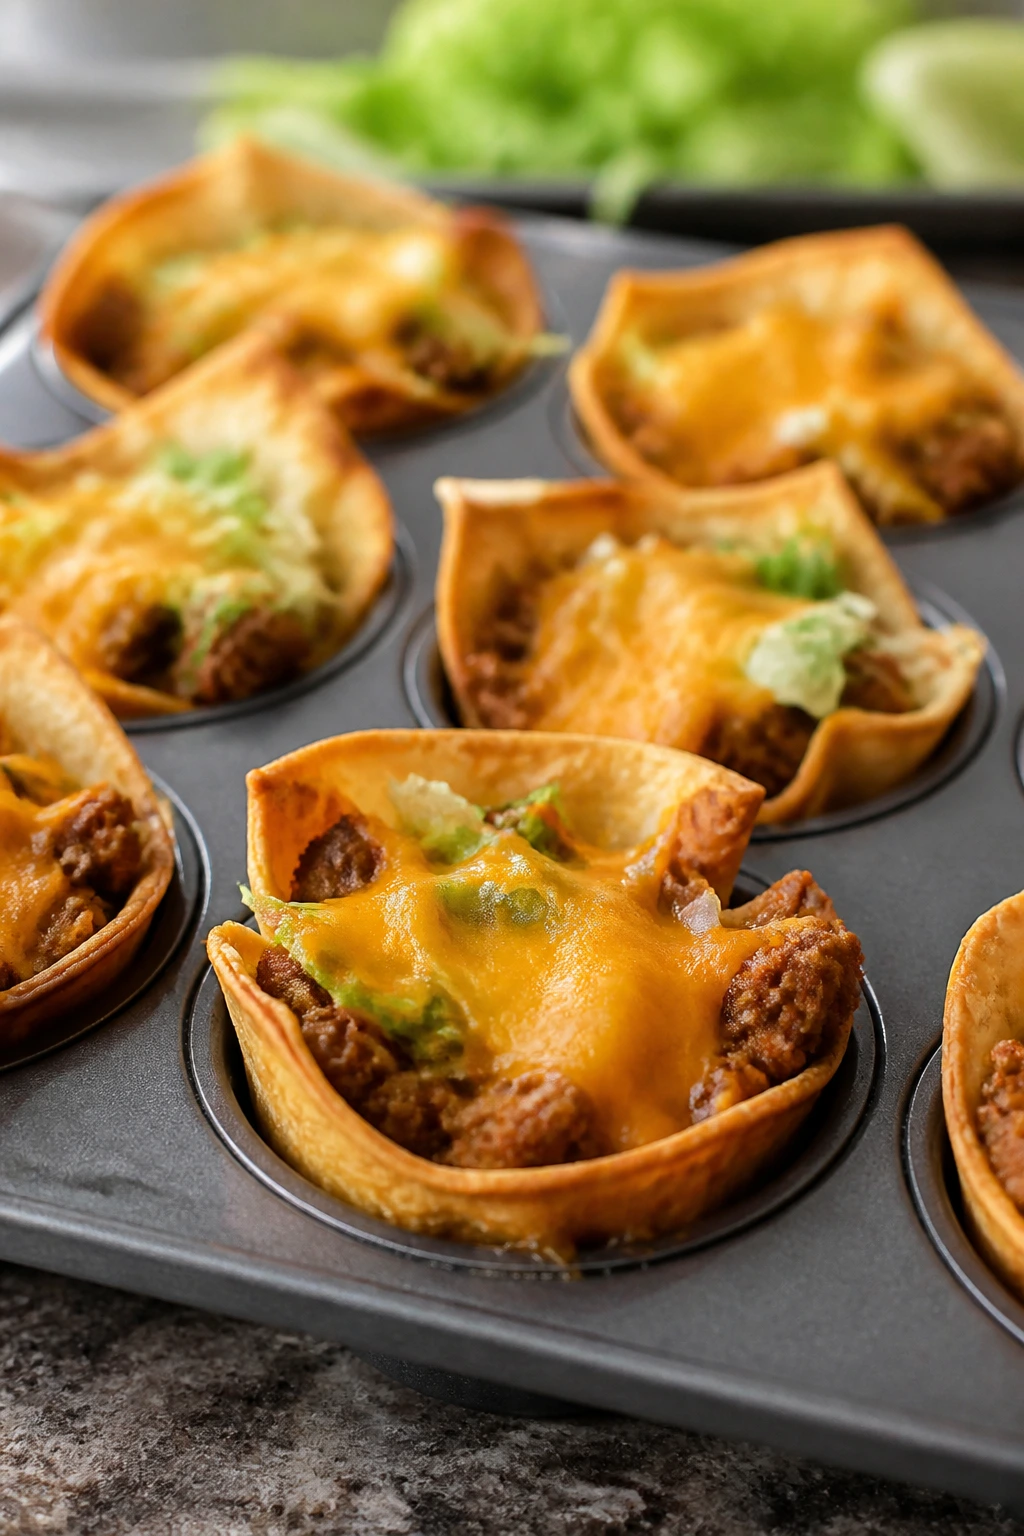
Taco cups are the right answer when taco night needs to happen but nobody wants a messy shell breaking in their lap. The muffin tin turns each one into a compact little package that’s easy to hold and easy to customize.
Why It Works:
Wonton wrappers or small tortillas crisp around the edges while the filling stays soft in the center. The shape keeps the meat and cheese contained, which is useful when you have a room full of picky eaters who want to control every topping. They also bake quickly, so they’re ready before the room gets restless.
Key Ingredients:
- 12 wonton wrappers or 6 small flour tortillas, cut in half
- 1 lb ground turkey or beef
- 1 tablespoon taco seasoning
- 1/4 cup water
- 1 cup shredded cheddar
- 1/2 cup salsa
- Shredded lettuce, for serving
- Sour cream, for serving
Quick Steps:
- Preheat the oven to 375°F and grease a muffin tin.
- Brown the meat, stir in seasoning and water, and cook until thick.
- Press the wrappers or tortilla pieces into the muffin cups.
- Fill with meat and cheese, then bake for 10 to 12 minutes until crisp.
- Top with salsa, lettuce, and sour cream after baking.
Equipment for This Recipe:
- Muffin tin
- Skillet
- Spoon
- Pastry brush or paper towel for greasing
- Cutting board
How to Serve This Dish:
Serve the taco cups on a platter with the toppings on the side so each person can keep things plain or build from there. They’re sturdy enough to hold with one hand, which is half the point. Two to three cups per person usually works if there are other snacks on the table.
Pro Tips for This Recipe:
- Grease the muffin tin well or the wrappers will stick.
- Let the filling cool for a minute before spooning it in.
- Use mild salsa if you’re cooking for younger eaters.
- Tortilla halves work better if you want a softer shell than wontons.
Variations on This Dish:
- Chicken Taco Cups: Use shredded rotisserie chicken instead of ground meat.
- Bean-and-Cheese Cups: Replace the meat with refried beans.
- Breakfast Taco Cups: Fill with scrambled eggs and cheese.
Common Mistakes to Avoid with This Dish:
- Wet filling: It softens the wrapper and ruins the crunch.
- Overstuffing: The filling rises and spills over.
- Skipping toppings on the side: Picky eaters do better when they can control the finish.
16. Baked Taquitos

Baked taquitos have just enough crunch to feel like a treat, but they’re less fussy than fried ones. You can fill them with very familiar ingredients and still get that tight rolled shape kids like to pick up.
Why It Works:
Warm tortillas roll more easily and stay sealed better during baking. A creamy filling with shredded chicken and cheese keeps the inside tender while the outside crisps in a hot oven. Brushing or spraying the tortillas with oil is the difference between a pale roll and one that actually crunches.
Key Ingredients:
- 2 cups cooked shredded chicken
- 4 oz cream cheese, softened
- 1 cup shredded cheddar
- 1/4 cup salsa
- 1 teaspoon taco seasoning
- 8 small flour tortillas
- Olive oil spray
- Sour cream and guacamole, for serving
Quick Steps:
- Preheat the oven to 425°F and line a sheet pan.
- Mix chicken, cream cheese, cheddar, salsa, and taco seasoning.
- Warm the tortillas for 20 seconds so they bend without cracking.
- Spoon filling into each tortilla, roll tightly, and place seam-side down.
- Spray lightly with oil and bake for 12 to 15 minutes until crisp and golden.
Equipment for This Recipe:
- Sheet pan
- Mixing bowl
- Spoon
- Parchment paper
- Kitchen towel for warming tortillas
How to Serve This Dish:
Set out the taquitos with sour cream, guacamole, or plain salsa in small bowls. They work as a meal or a snack, depending on how many you stack on the plate. Three to four taquitos is a good dinner serving for most people.
Pro Tips for This Recipe:
- Warm the tortillas first so they do not split.
- Roll tightly and place seam-side down every time.
- Don’t add too much salsa inside or the filling gets loose.
- If the tortillas want to open, secure them with toothpicks before baking and remove them later.
Variations on This Dish:
- Bean Taquitos: Swap half the chicken for refried beans.
- Cheesy Chicken Taquitos: Increase the cheese and skip the salsa.
- Air Fryer Version: Cook at 400°F for about 8 minutes, turning once.
Common Mistakes to Avoid with This Dish:
- Cold tortillas cracking: Warm them first.
- Too much filling: The roll will burst open.
- Baking without oil spray: The outside will look dry and pale.
17. Sloppy Joe Sliders
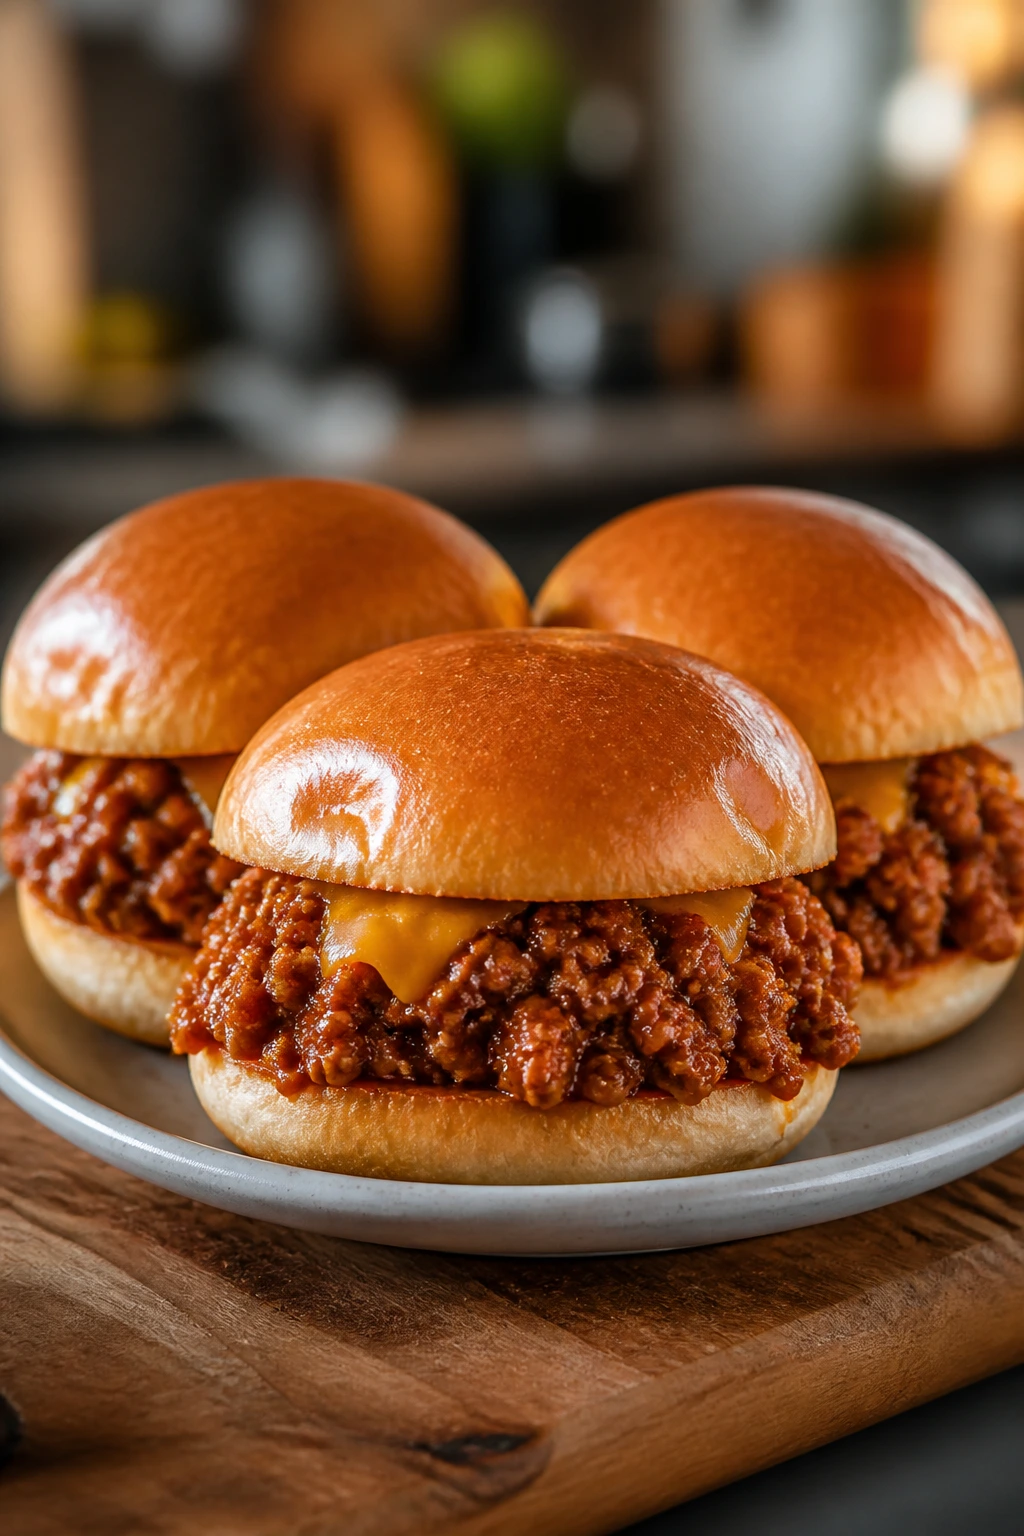
Sloppy Joe sliders are messy in the exact way this dish is supposed to be messy. The filling is sweet, savory, and saucy, but the slider bun keeps it under control enough for movie night.
Why It Works:
Cooking the meat down until the sauce is thick keeps the filling from flooding the buns. Brown sugar, ketchup, and tomato sauce create a familiar sweet-savory flavor that younger eaters usually accept quickly. Baking the assembled sliders for a few minutes helps the tops set so they can be handled more easily.
Key Ingredients:
- 1 lb ground beef
- 1/2 small onion, finely diced
- 1 cup ketchup
- 1/2 cup tomato sauce
- 1 tablespoon brown sugar
- 1 tablespoon Worcestershire sauce
- 1 teaspoon yellow mustard
- 8 slider buns
- 4 slices mild cheddar, optional
- 2 tablespoons melted butter
Quick Steps:
- Brown the beef and onion in a skillet, then drain if needed.
- Stir in ketchup, tomato sauce, brown sugar, Worcestershire, and mustard.
- Simmer for 8 to 10 minutes until thick enough to mound on a spoon.
- Spoon onto slider buns, top with cheddar if using, and cover with the bun tops.
- Brush with butter and bake at 375°F for 5 minutes.
Equipment for This Recipe:
- Skillet
- Wooden spoon
- Baking dish
- Measuring spoons
- Pastry brush
How to Serve This Dish:
Serve the sliders with a pile of napkins. That’s not a joke; they need them. Chips or carrot sticks on the side keep the plate simple, and the filling pairs nicely with a mild pickle if your crowd likes a little tang.
Pro Tips for This Recipe:
- Simmer until the sauce thickens. Thin sloppy joes are a mess.
- Toast the buns only lightly so they do not crack.
- Use mild cheddar if you want extra cheese without changing the flavor too much.
- Spoon the filling onto the lower buns first, then add the tops so they stay aligned.
Variations on This Dish:
- Turkey Joe Sliders: Use ground turkey and add an extra splash of Worcestershire.
- BBQ Joe Sliders: Replace half the ketchup with barbecue sauce.
- Cheesy Joe Cups: Spoon the filling into toasted rolls and top with more cheddar.
Common Mistakes to Avoid with This Dish:
- Watery filling: It soaks the buns.
- Overloading the slider: Small buns need small spoonfuls.
- Skipping the final bake: It helps the buns stay together.
18. Cinnamon Sugar Popcorn
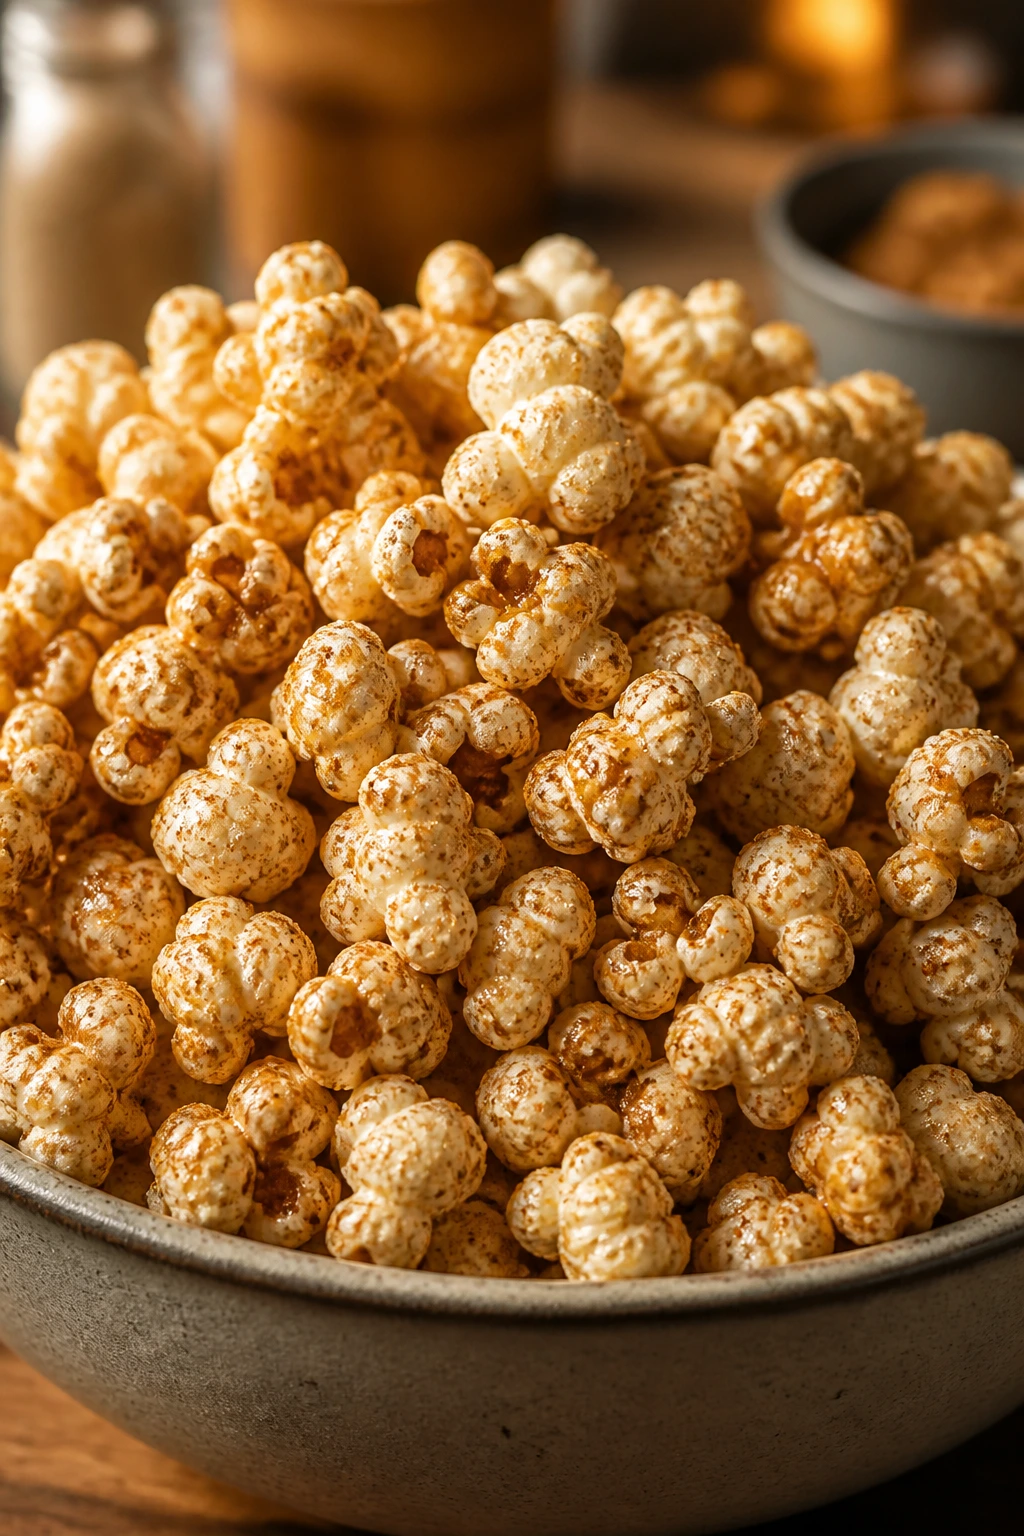
Popcorn is already movie-night food, but cinnamon sugar popcorn changes the mood a little. It’s sweet, lightly spiced, and easy to portion into bowls without needing any plate.
Why It Works:
Warm butter helps the cinnamon sugar cling to the kernels instead of sitting in a pile at the bottom. A brief bake at low heat dries the coating just enough so it doesn’t feel sticky. The result is crunchy, sweet, and easy to snack on in the dark.
Key Ingredients:
- 12 cups popped popcorn
- 4 tablespoons unsalted butter
- 1/3 cup granulated sugar
- 1 teaspoon ground cinnamon
- 1/4 teaspoon kosher salt
- 1/2 teaspoon vanilla extract, optional
Quick Steps:
- Preheat the oven to 250°F and line a sheet pan with parchment.
- Melt the butter and stir in vanilla if using.
- Toss the popcorn with butter, sugar, cinnamon, and salt in a large bowl.
- Spread on the sheet pan and bake for 10 minutes, stirring once.
- Cool for 5 minutes so the coating crisps slightly.
Equipment for This Recipe:
- Large mixing bowl
- Sheet pan
- Parchment paper
- Measuring cups
- Spatula
How to Serve This Dish:
Scoop the popcorn into paper cones, bowls, or a big serving bowl with a spoon. It works as a sweet break between salty snacks, or as the thing people reach for when the movie gets quiet. One to two cups is a normal snack portion.
Pro Tips for This Recipe:
- Use plain popcorn with minimal salt so the sugar coating stays balanced.
- Stir after baking or the bottom layer can clump.
- Let it cool before eating if you want more crunch.
- If you prefer a softer sweet note, reduce the cinnamon slightly.
Variations on This Dish:
- Caramel-Cinnamon Popcorn: Drizzle with a little caramel after baking.
- Chocolate Dust Popcorn: Add mini chocolate chips after the popcorn cools.
- Nutty Version: Toss in chopped pecans or cashews for adults.
Common Mistakes to Avoid with This Dish:
- Overwetting the popcorn: Too much butter makes it soggy.
- Skipping the low bake: The coating won’t set well.
- Using heavily salted popcorn: The sweet-salty balance gets thrown off.
19. Pita Pizzas

Pita pizzas are a low-stress fix for kids who want to build their own dinner. The base is flat, the toppings stay put, and the portions are small enough that nobody feels trapped by one topping choice.
Why It Works:
A pita base bakes fast and gets crisp around the edges while staying soft enough in the middle to feel like pizza. Because each one is individual, you can keep some plain and some more loaded without making a separate dinner for everybody. The short bake time also means the cheese melts before the bread dries out.
Key Ingredients:
- 6 pita rounds
- 1 cup pizza sauce
- 2 cups shredded mozzarella
- 1/2 cup mini pepperoni
- 1/4 cup diced bell pepper, optional
- 1 teaspoon Italian seasoning
- 1 tablespoon olive oil
Quick Steps:
- Heat the oven to 425°F and place the pitas on a sheet pan.
- Brush lightly with olive oil.
- Spread a thin layer of sauce, then add cheese and toppings.
- Bake for 8 to 10 minutes until the cheese melts and the edges crisp.
- Slice into wedges or serve whole.
Equipment for This Recipe:
- Sheet pan
- Spoon
- Pastry brush
- Sharp knife or pizza cutter
- Parchment paper, optional
How to Serve This Dish:
Serve one pita per person for a light meal, or cut them into quarters as part of a snack spread. They’re especially good when the toppings are varied, because a picky eater can claim one plain wedge while the rest of the table gets pepperoni. A side salad or fruit bowl keeps the spread from feeling too heavy.
Pro Tips for This Recipe:
- Use thin sauce, not a thick mound.
- Shred the cheese finely so it melts fast.
- Bake directly on the pan if you want the bottom crisper.
- Let kids assemble their own pitas if that helps dinner go smoother.
Variations on This Dish:
- Garlic White Pitas: Use ricotta, mozzarella, and a little garlic powder.
- Breakfast Pitas: Top with scrambled eggs and cheese.
- No-Meat Version: Keep it cheese-heavy and add just one vegetable if needed.
Common Mistakes to Avoid with This Dish:
- Too much sauce: The pita softens and bends.
- Overloading toppings: The bread can’t hold too much weight.
- Baking too long: Pita goes from crisp to dry quickly.
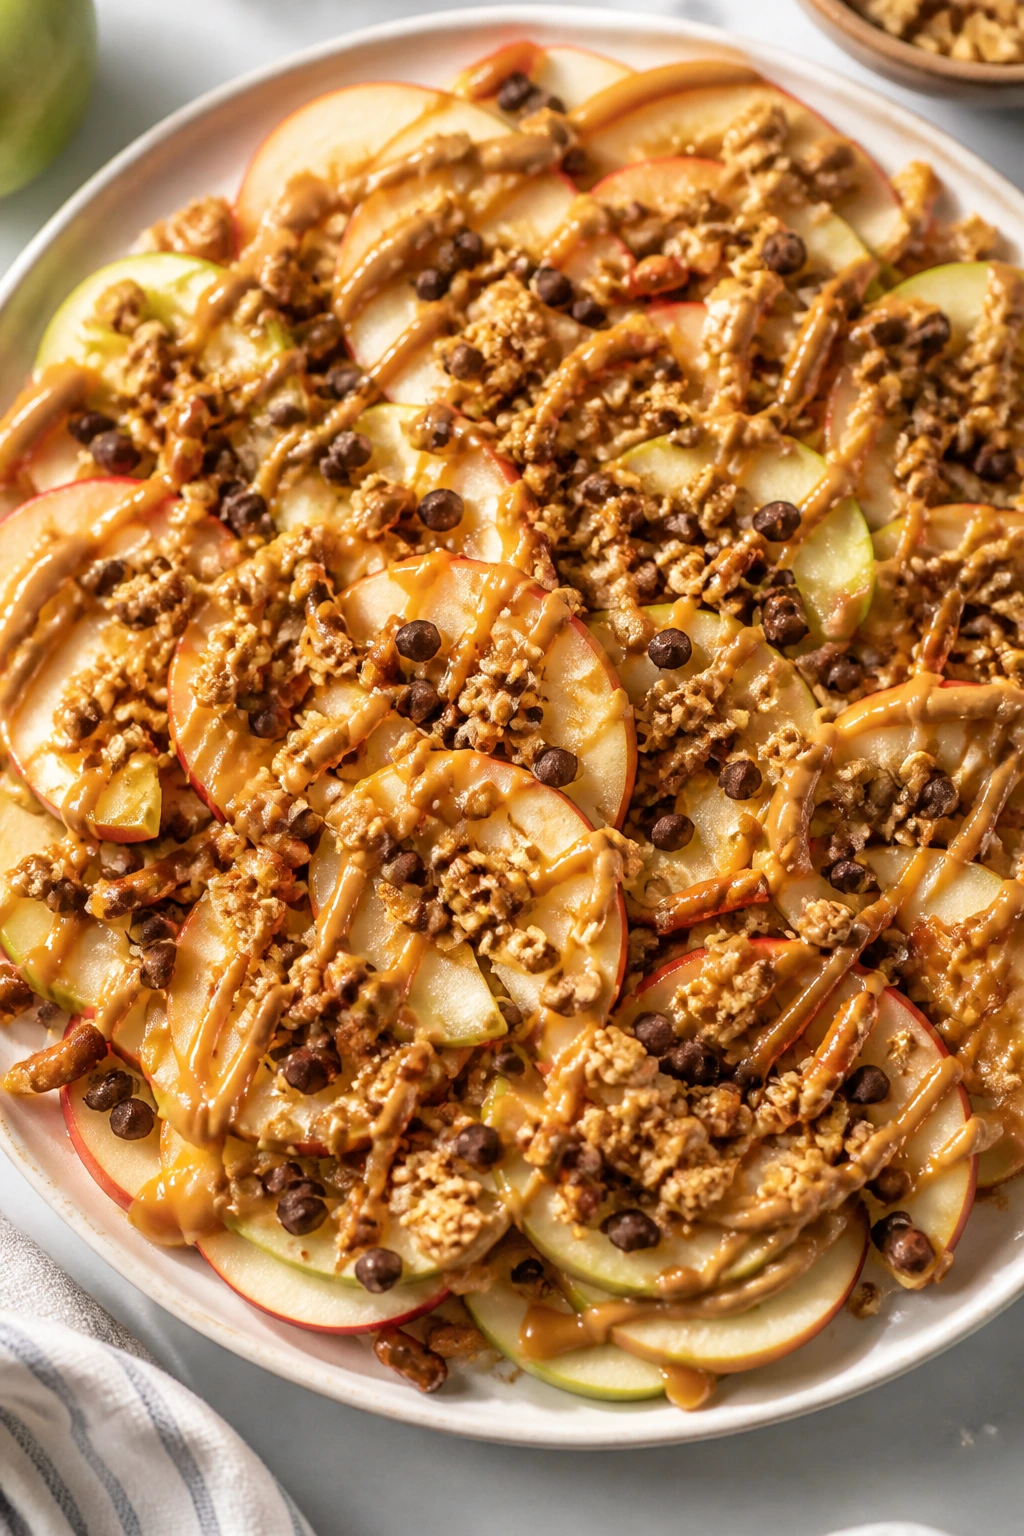
20. Apple Nachos
Apple nachos look playful and taste like a snack someone actually wanted to make. They are sweet, crunchy, and easy to keep customized, which matters when half the group wants plain fruit and the other half wants chocolate.
Why It Works:
Thin apple slices make a good base because they are crisp and sturdy. A drizzle of peanut butter or sunflower butter gives the snack a dessert-like feel without drowning the fruit. Since everything goes on after slicing, there’s no bake time at all.
Key Ingredients:
- 4 medium apples, cored and thinly sliced
- 1 tablespoon lemon juice
- 1/4 cup peanut butter or sunflower seed butter
- 2 tablespoons caramel sauce
- 2 tablespoons mini chocolate chips
- 2 tablespoons granola
- 2 tablespoons crushed pretzels
Quick Steps:
- Toss the apple slices with lemon juice to slow browning.
- Arrange them in a wide layer on a platter.
- Warm the peanut butter slightly so it drizzles.
- Drizzle peanut butter and caramel over the apples.
- Finish with chocolate chips, granola, and pretzels.
Equipment for This Recipe:
- Cutting board
- Sharp knife
- Small microwave-safe bowl
- Spoon
- Serving platter
How to Serve This Dish:
Serve apple nachos right after assembling them so the apples stay crisp and the toppings look fresh. They work best as a sweet snack between savory dishes or as the last plate on the table when people still want “just a little something.” A handful of slices is enough for a small snack.
Pro Tips for This Recipe:
- Slice the apples thin so they eat like nachos instead of wedges.
- Warm the nut butter for 10 to 15 seconds so it drizzles cleanly.
- Use firm apples like Honeycrisp or Fuji for the best crunch.
- Add the granola last so it stays crisp.
Variations on This Dish:
- Yogurt Drizzle Version: Swap caramel for thick vanilla yogurt.
- Nut-Free Version: Use sunflower seed butter and skip the pretzels if needed.
- S’mores Style: Add crushed graham crackers and mini marshmallows.
Common Mistakes to Avoid with This Dish:
- Cutting apples too thick: They feel clumsy instead of snacky.
- Assembling too early: The fruit starts to brown and the toppings sink.
- Using too much drizzle: The plate turns slippery fast.
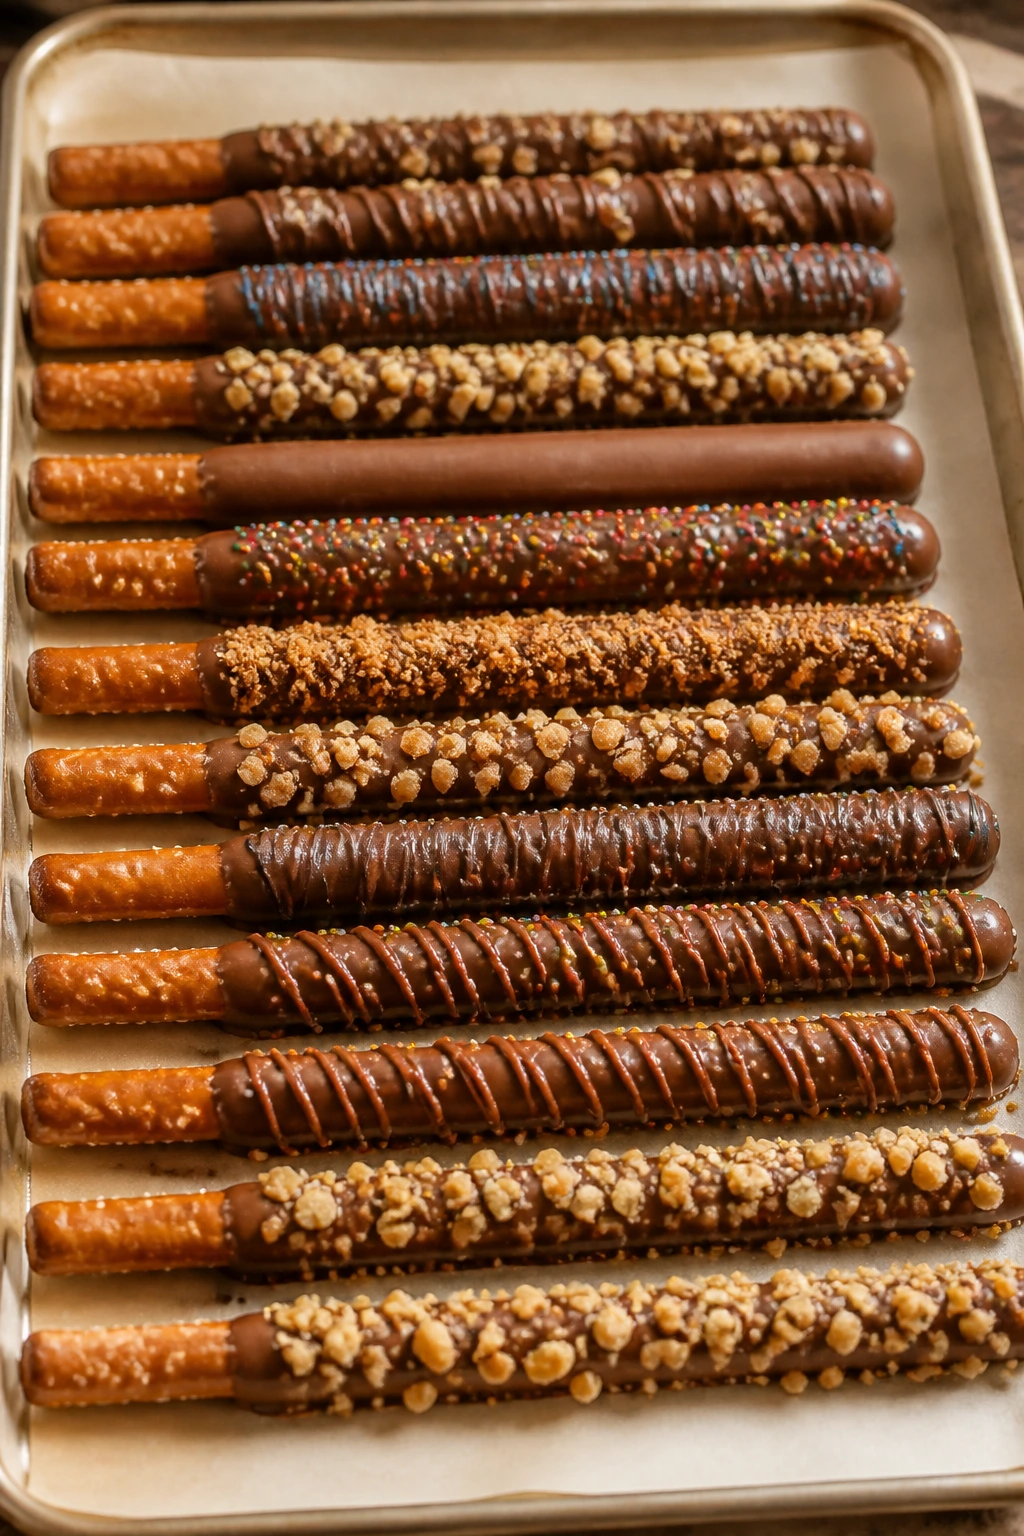
21. Chocolate Pretzel Rods
Chocolate pretzel rods are the kind of treat that looks like you bought them from a bakery case, even though they’re mostly assembly and a little patience. They’re sweet, salty, and easy to hold, which makes them perfect for the end of movie night.
Why It Works:
A pretzel rod gives you built-in crunch and a handle, which makes dipping and snacking cleaner than with loose candy. Melted chocolate coats smoothly if it’s warmed gently, and toppings stick before the shell sets. Because they harden at room temperature, they’re one of the easiest make-ahead sweets in this collection.
Key Ingredients:
- 12 pretzel rods
- 8 oz melting chocolate or chocolate chips
- 1 tablespoon coconut oil or shortening, optional
- 2 tablespoons sprinkles
- 2 tablespoons crushed nuts or mini chocolate chips
- 1/4 teaspoon flaky salt, optional
Quick Steps:
- Melt the chocolate slowly in a microwave-safe bowl, stirring every 20 seconds.
- Dip each pretzel rod halfway into the chocolate.
- Roll or sprinkle on toppings before the coating sets.
- Lay on parchment paper.
- Let harden for 20 to 30 minutes at room temperature.
Equipment for This Recipe:
- Microwave-safe bowl
- Spoon or spatula
- Sheet pan
- Parchment paper
- Small bowls for toppings
How to Serve This Dish:
Stand the rods upright in a glass or lay them on a tray in a single layer so the coating does not rub off. They make a neat final snack after the salty foods are gone. One or two rods per person is enough unless you want the bowl emptied fast.
Pro Tips for This Recipe:
- Use a deep bowl so the dip covers the rod cleanly.
- Work quickly once the chocolate is melted.
- Let excess chocolate drip off before adding toppings.
- Keep the rods away from heat until fully set.
Variations on This Dish:
- White Chocolate Version: Use white melting chocolate and colorful sprinkles.
- Peanut Butter Drizzle: Drizzle a little melted peanut butter over the chocolate.
- Holiday-Style Sprinkle Mix: Choose any simple sprinkle mix that fits the night.
Common Mistakes to Avoid with This Dish:
- Overheated chocolate: It seizes and turns thick.
- Toppings added too late: They fall off after the chocolate hardens.
- Storing before fully set: The coating smears.
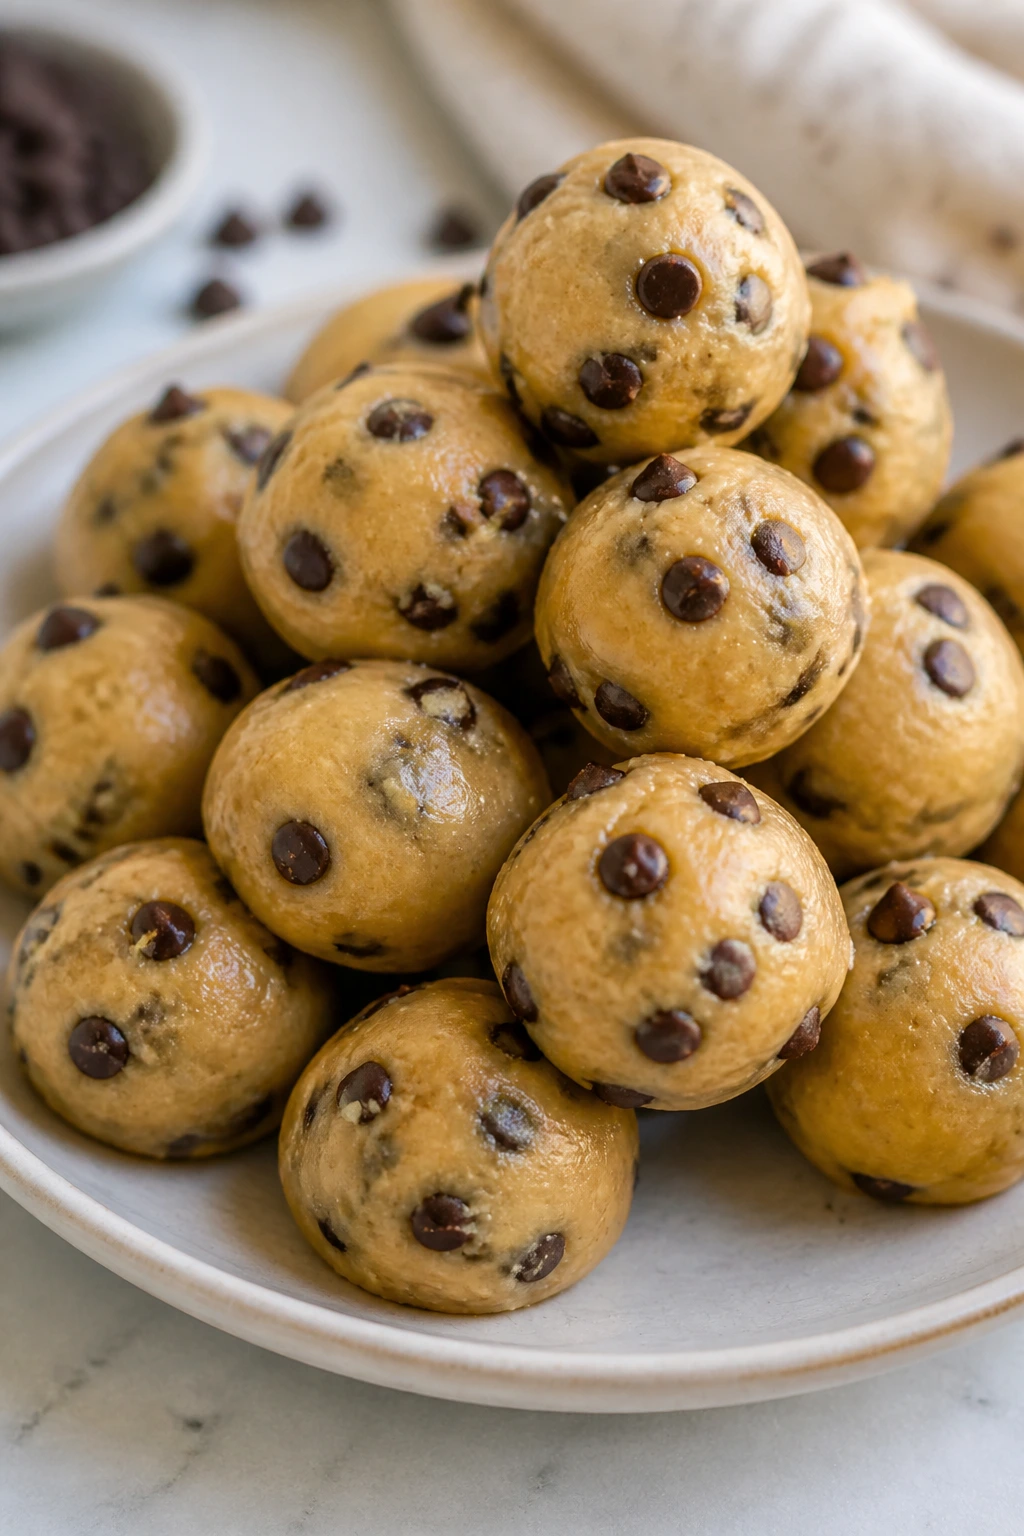
22. No-Bake Cookie Dough Bites
These taste like the part everyone secretly wants to eat straight from the mixing bowl, except this version is planned and safe. They’re soft, sweet, and easy to keep in the fridge for movie night or the next day.
Why It Works:
Heat-treated flour removes the raw flour problem, and skipping eggs keeps the texture creamy instead of custardy. A little brown sugar and vanilla make the bites taste like classic cookie dough, while mini chocolate chips give you the familiar speckled look. Rolling them into small balls makes them feel like candy, not a project.
Key Ingredients:
- 1 cup all-purpose flour, heat-treated
- 1/2 cup packed brown sugar
- 1/4 cup unsalted butter, softened
- 2 tablespoons milk
- 1 teaspoon vanilla extract
- 1/4 teaspoon kosher salt
- 1/3 cup mini chocolate chips
Quick Steps:
- Heat-treat the flour by baking it at 350°F for 5 minutes, then let it cool.
- Beat the butter and brown sugar until smooth.
- Mix in the milk, vanilla, salt, and flour.
- Stir in the chocolate chips.
- Roll into 1-inch balls and chill for 20 minutes.
Equipment for This Recipe:
- Mixing bowl
- Hand mixer or sturdy spoon
- Baking sheet or plate
- Measuring cups
- Parchment paper
How to Serve This Dish:
Serve the bites chilled in a small bowl or paper candy cups. They’re best after the savory snacks have made their exit and everyone wants one small sweet thing. Three or four bites per person is a sensible serving.
Pro Tips for This Recipe:
- Cool the flour before mixing or the butter softens too much.
- If the dough feels dry, add milk one teaspoon at a time.
- Chill before serving so the bites hold their shape.
- Mini chips distribute better than regular chocolate chunks.
Variations on This Dish:
- Peanut Butter Dough Bites: Replace 2 tablespoons of butter with peanut butter.
- Oat Flour Version: Swap in oat flour for a slightly nuttier flavor.
- Birthday Cake Style: Add rainbow sprinkles instead of chocolate chips.
Common Mistakes to Avoid with This Dish:
- Skipping the heat-treated flour: Raw flour is not the thing you want here.
- Too much milk: The dough turns sticky and hard to roll.
- Serving warm: They’re better once chilled and firm.
Why Bite-Sized Food Wins When the Screen Is On
Movie-night food has a practical job to do, and it’s not glamorous. It needs to be eaten between jokes, passed across a sofa, and set down without wrecking the blanket. Bite-sized food does that better than a big plated dinner because the portions are already broken into the scale of the evening. Nobody has to cut anything. Nobody has to ask where the fork went. That matters more than people admit.
Texture matters, too. Crisp things stay interesting longer than soft ones, which is why toaster-style recipes, baked sticks, and sealed little cups show up so often here. A soft noodle bowl has its place, but most of the strongest movie-night choices have some edge or shell that keeps the bite lively after a few minutes on the table.
I also like how these recipes let you stagger the pacing. A batch of sliders can come out hot, then the popcorn chicken follows, then the sweet stuff lands at the end. That sequence keeps the room fed without forcing every dish to arrive at the same second, which is exactly how real family movie nights work.
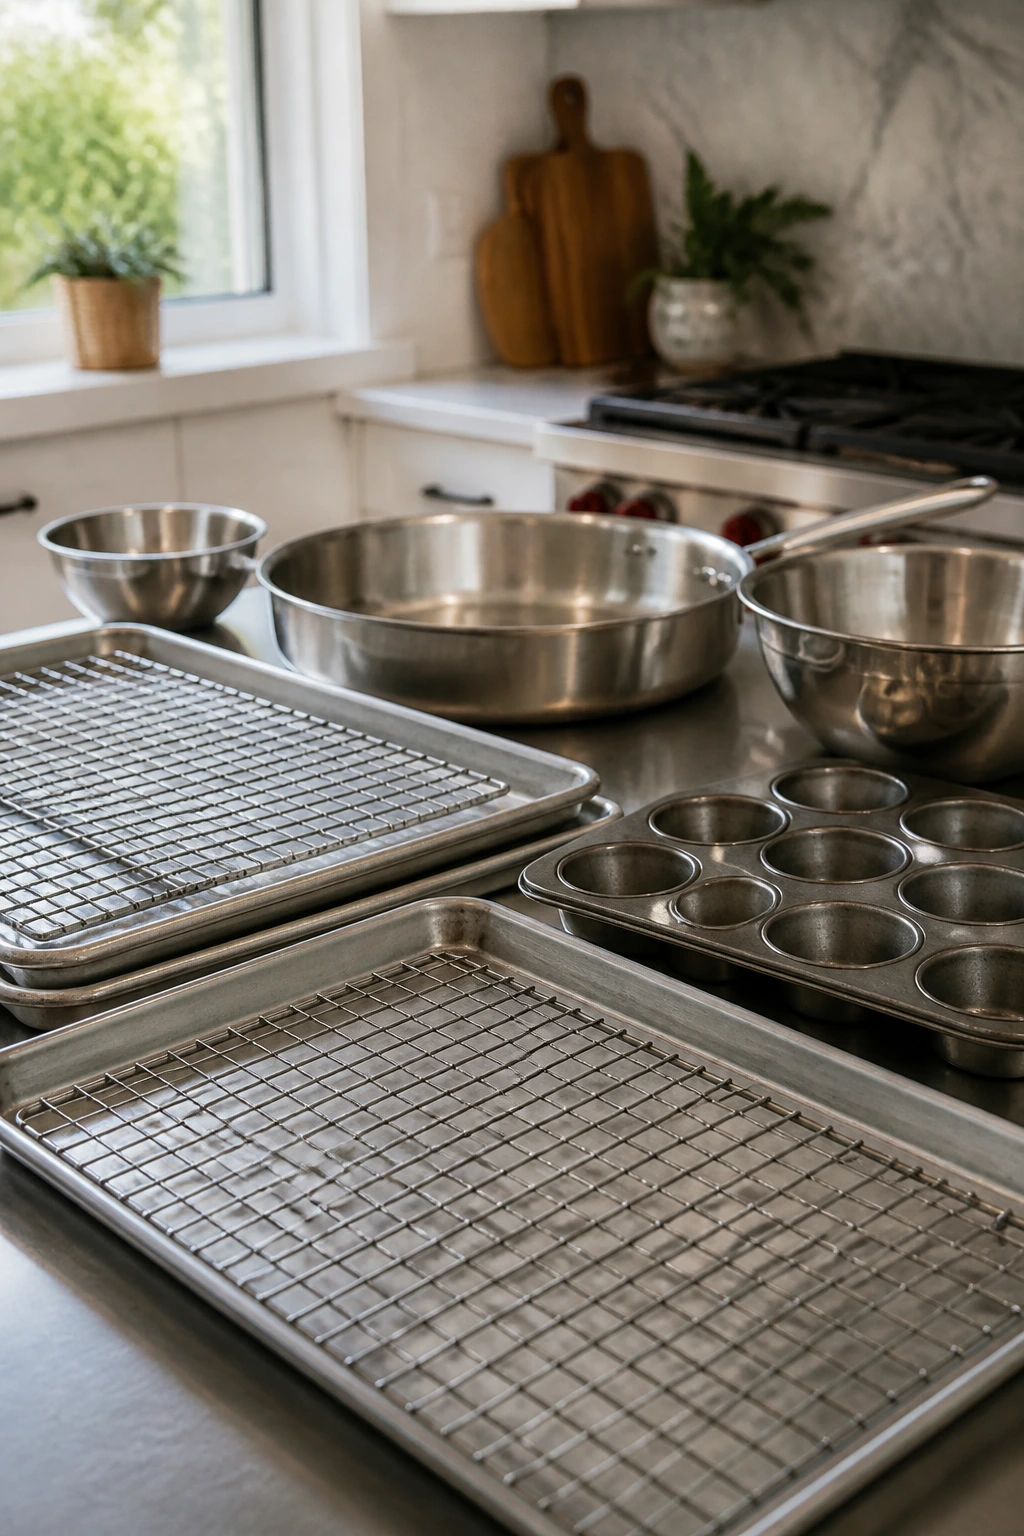
Essential Equipment for These Movie-Night Recipes
-
Rimmed sheet pans: You’ll use these for tenders, nachos, taquitos, pizza toasts, and anything that needs heat from the oven without spilling over.
-
Wire racks: Worth owning for chicken tenders and popcorn chicken because they keep the bottoms from steaming.
-
Muffin tins: Mini muffin pans and standard pans are the secret to taco cups, mac and cheese cups, and corn dog muffins.
-
Large skillet: A good skillet handles sliders, sloppy joes, pizza quesadillas, and anything that needs quick browning.
-
Mixing bowls in two or three sizes: You need a place for breading, sauce, or a quick toss of ingredients without scrambling.
-
Parchment paper: Saves cleanup and keeps sticky cheese or puff pastry from welding itself to the pan.
-
Tongs and a thin spatula: Useful for flipping tenders, moving sliders, and handling baked items without tearing them.
-
Sharp chef’s knife and serrated knife: One for prep, one for bread and rolls.
-
Measuring cups and spoons: Small recipes are less forgiving than they look; a tablespoon too much sauce can change the texture fast.
-
Instant-read thermometer: Especially handy for chicken and meatballs, where a quick temperature check keeps you from serving dry meat or undercooked centers.
Smart Shopping and Ingredient Tips for Picky Eater Recipes
The smartest shopping move for this kind of cooking is not buying fancy ingredients. It’s buying ingredients that behave well when you’re cooking for people with strong opinions. Soft slider buns should feel fresh but not squishy enough to collapse under a burger. Tortillas need to bend without cracking. String cheese should be firm enough to bread. Potatoes should be starchy and dry-skinned, not waxy little holdouts that roast like they resent you.
For cheese-heavy recipes, I’d pick a few dependable melt-friendly options and stop there. American cheese on sliders melts cleanly. Mozzarella on pizzas and sticks gives you the stretch. Cheddar adds flavor, but it browns faster, so it works best mixed with something milder. Pre-shredded cheese is fine for a fast family night, though block cheese tends to melt a little smoother in sauces and mac and cheese.
When you’re buying chicken, thighs are often the better call for popcorn chicken and baked taquitos because they stay juicier in short bake times. Breasts can work, but they punish overcooking more quickly. For meatballs and sliders, choose beef with some fat so the filling tastes rich instead of dry. A lean grind seems tidy in the package and disappoints later in the pan.
For snacks like nachos and popcorn, the chips and kernels matter more than people expect. Thick tortilla chips hold cheese better. Sturdy popcorn kernels pop into bigger, fewer broken pieces. And if you’re making apple nachos, firm apples such as Honeycrisp or Fuji hold their crunch longer than soft varieties that bruise the second the knife hits them.
How to Serve These Recipes Without Losing the Crunch
Presentation:
Use trays, baskets, or wide shallow bowls instead of deep serving dishes whenever you can. Shallow containers keep sliders from steaming, let nachos stay spread out, and make snacks feel like they’re meant for passing around. Parchment paper does more than save cleanup; it gives everything a casual, movie-night look that feels intentional instead of fussy.
Accompaniments:
A few sides can make this whole collection feel like a proper spread without adding much work. Fries, fruit, carrot sticks, celery, and a simple green salad all sit nicely beside sliders, tenders, or meatball subs. For dessert-style snacks, keep the table simpler: popcorn, pretzels, or apple slices are enough to round things out.
Portions:
For younger eaters, think in small counts: 2 sliders, 3 tenders, 1 pita pizza, 4 to 6 mac and cheese cups, or a handful of popcorn chicken. Adults usually eat a little more when the food is snackable, so plan for a second round if the movie runs long. If the evening is built around one main dish and a couple of extras, one full tray recipe plus two lighter snacks usually covers a family of four to six.
Beverage Pairing:
Cold seltzer, lemonade, or iced tea works across almost every recipe here because none of these dishes needs a complicated drink. For the sweet snacks, milk is a classic choice. For the salty trays, a simple sparkling water with lemon keeps the table from feeling sticky.
Additional Tips and Flavor Boosters for Movie-Night Plates
Flavor Enhancement:
A tiny finishing move can make these recipes taste like you planned harder than you did. A sprinkle of parmesan on sliders, a dusting of oregano on pizza toasts, or a pinch of flaky salt on chocolate pretzel rods is enough to wake up the whole tray. I also like keeping one small bowl of warm marinara or ranch on the table. It gives the food a second life.
Customization:
The easiest customization trick is to split the table into plain and dressed-up versions. Keep one half of the nachos cheese-only, leave one pita pizza sauce-free, or reserve a few chicken tenders before tossing anything spicy on the rest. That way nobody has to negotiate with dinner halfway through the movie.
Serving Suggestions:
Fresh herbs help more than people expect. A little chopped parsley on potato wedges, green onions on nachos, or chives in pinwheels makes the food look and taste less flat. If you’re serving several recipes at once, put the dips in tiny bowls and label them with a scrap of masking tape. It sounds fussy. It saves arguments.
Make-It-Yours:
For dairy-free eaters, keep the base recipe and switch the cheese to a melting plant-based version where it matters most. For gluten-free guests, focus on naturally simple options like apple nachos, popcorn, and chicken tenders with gluten-free crumbs. For lower-salt preferences, lean on herbs, garlic powder, and mild mustard instead of heavy seasoning shakes.
Make-Ahead, Storage, and Reheating Guidance
A few of these recipes are best eaten the minute they leave the oven. Nachos, apple nachos, cinnamon sugar popcorn, and chocolate pretzel rods fall into that camp. They don’t really “reheat”; they’re better when you plan the timing so they never sit long enough to lose their edge. Keep the components separate if you need advance prep: slice the apples, melt the chocolate, or pop the popcorn ahead, then assemble at the last minute.
The baked and assembled items hold up well for short storage. Mini sliders, meatball subs, taquitos, chicken tenders, popcorn chicken, mac and cheese cups, and cheesy potato wedges can all be refrigerated for 3 to 4 days in airtight containers. For the best texture, reheat them in a 375°F oven or air fryer until hot and crisp again. A microwave works in a pinch, but it softens every crunchy coating and bun it touches.
Freezer storage works for several of the savory recipes if you freeze them after baking and cooling. Chicken tenders, taquitos, meatballs, mac and cheese cups, and sliders can usually hold for up to 2 months. Reheat from frozen in a 350°F oven, loosely covered at first, then uncovered near the end so the outside re-crisps. Frozen mac and cheese cups need a little extra time; frozen sliders do best wrapped in foil for the first half so the bread warms through.
For make-ahead planning, build the meals in layers. Bread the chicken earlier in the day and bake it later. Mix meatball or sloppy joe filling ahead and warm it just before serving. Pre-slice fruit, prep sauces, and line pans before movie time starts. That’s the part that keeps the evening calm. The food tastes better when you’re not rushing around after the previews begin.
Variations and Adaptations to Try

The Dairy-Free Swap:
Lean on recipes that already have a simple structure: sliders without cheese, popcorn chicken, apple nachos, cinnamon popcorn, and sheet pan nachos with no sour cream all fit easily. When cheese is the point, use a melting dairy-free alternative and keep expectations modest; some melt better than others, and the ones that brown cleanly usually win.
The Gluten-Free Tray:
Chicken tenders with gluten-free crumbs, popcorn, apple nachos, potato wedges, and taco filling over chips all work without much drama. Use corn tortillas or gluten-free wraps where needed, and choose panko alternatives that stay crisp in the oven. The key is not making the whole table “special” in a way that makes it feel separate.
The Lower-Sodium Night:
Cut back on deli meats, use less cheese, and lean on unsalted butter, garlic powder, lemon, and herbs. Pizza toasts, noodles, potato wedges, and apple nachos all adapt well when the seasoning is quieter. You lose some punch, so add texture instead—crisp edges and good browning carry a lot of weight.
The Mildest Possible Version:
Keep the base ingredients plain and set out dips and extras separately. That means cheese-only quesadillas, plain sliders with ketchup on the side, tenders without hot sauce, and taco cups with lettuce, salsa, and sour cream kept in separate bowls. This works better than hiding ingredients inside the food, which picky eaters spot immediately.
The Big-Kid Upgrade:
Adults at the table usually want a little more contrast. Add pickles to sliders, jalapeños to nachos, mustard to pinwheels, or a dusting of chili powder on potato wedges. Tiny adjustments like that let one batch serve both the cautious eater and the person who wants more bite.
Common Mistakes to Avoid on Movie Night
Trying to make every dish the same kind of food:
A whole table of soft foods gets dull fast. The fix is a mix: one crisp item, one cheesy item, one cold snack, and one sweet finish. That combination keeps everyone picking at the spread instead of getting bored halfway through.
Serving everything at once:
This is how good food turns tired. Nachos go soft, tenders cool too fast, and popcorn loses its crunch. Bring out the hot foods first, then add the sweet or cold items later so the table keeps moving.
Overseasoning for the adults and losing the kids:
It’s easy to get carried away with spice or strong sauces when you’re cooking a big batch. The cleaner move is to keep the main recipe mild and set out extras in little bowls. That way nobody is trapped.
Forgetting about texture:
A soggy bun or limp chip can ruin an entire plate. Bake on racks when you can, use sturdy chips for nachos, and don’t drown anything in sauce before the oven. Texture is the difference between “this disappeared” and “why did nobody eat this?”
Making portions too large:
Big burgers, oversized taquitos, and giant bread slices can be awkward for couch eating. Smaller pieces travel better from tray to mouth and give picky eaters a cleaner escape route if they only want part of a serving.
Not planning for napkins:
It sounds silly until you’re midway through a movie with sloppy joes, cheese pulls, and chocolate drizzle. Put napkins on the table before the food goes out. That one habit saves the sofa.
Frequently Asked Questions
Which of these recipes should I make first if I have very cautious eaters?
Start with the least threatening shapes: butter noodles, chicken tenders, sliders with only cheese, or pizza toasts. Those foods look familiar before anyone tastes them, which is half the battle with picky eaters. Once the table is calm, add a second dish with a little more personality.
How do I keep nachos and crunchy snacks from getting soggy?
Keep wet toppings off until the last minute and spread everything in a single layer when possible. Use a wire rack for fried or baked crunchy items, and don’t cover them tightly with foil unless you’re only doing it for a minute or two to hold heat. Heat trapped under a lid is usually the enemy here.
Can I prep the food earlier in the day?
Yes, and for movie night that’s often the smart move. Breading chicken, making meatball filling, rolling taquitos, chilling pinwheels, and mixing dips can all happen hours ahead. The trick is to bake or reheat as close to serving time as possible so the food still has texture.
What’s the best way to serve kids who only eat plain food?
Keep one base recipe completely plain and put dips, toppings, and sauces in separate bowls. That works better than trying to hide vegetables or strong flavors inside the food, because many picky eaters spot the switch immediately. Plain sliders, butter noodles, cheese quesadillas, and chicken tenders do well here.
Which recipes freeze the best?
Chicken tenders, taquitos, mac and cheese cups, meatballs, and sliders all freeze reasonably well once cooled. Bake or reheat from frozen in the oven rather than the microwave if you want to preserve the crust. Sweet snacks like pretzel rods and cookie dough bites are better stored chilled than frozen for long periods.
How do I keep the couch from becoming part of dinner?
Choose bite-size food, keep sauces in cups, and avoid overfilling anything rolled or stacked. Crisp edges and neat containers help more than fancy serving pieces. I also recommend setting out a small stack of napkins before the first snack leaves the kitchen.
Can I make these recipes without an oven?
Several of them work on the stovetop or need no heat at all. Pizza quesadillas, butter noodles, pinwheels, apple nachos, and chocolate pretzel rods fit that category. For oven-based dishes, the air fryer is often the closest substitute if you need a faster, smaller-batch method.
What if my family likes totally different toppings?
Split the tray before it goes into the oven. Build a plain half and a dressed-up half, or serve toppings separately so each person can finish their own portion. That approach saves you from making three separate dinners and keeps everyone at the table.
Lights Down, Plates Up
Movie night food works best when it acts like good furniture: sturdy, comfortable, and not trying to steal the scene. These picky eater recipes for family movie night do that. They hold together. They taste familiar. They give the kids a safe first bite and still leave room for the grown-ups to want seconds.
I’d start with two hot dishes and one sweet snack, then stop there. The table doesn’t need to look like a buffet to feel generous. A tray of sliders, a crisp pan of tenders, and a bowl of cookie dough bites or chocolate pretzel rods is enough to carry the night without turning the kitchen into a cleanup marathon.
Keep the napkins close, the dips simple, and the portions small enough to grab without thinking. That’s the formula I trust when the lights go down and the previews begin, and it’s hard to beat.