
Kid approved meals for picky eaters live or die on texture. If the sauce is lumpy, the broccoli is too green, or the chicken has even a hint of chewiness, dinner can go sideways before anyone has taken a second bite. That’s not drama. That’s dinner with real kids.
The meals that win usually aren’t flashy. They’re the ones that arrive on the plate looking familiar, smelling friendly, and behaving the same way from the first forkful to the last. Mild cheese sauces, soft pasta, crisp breading, mashed potatoes, rice, tortillas, buns — those are the dependable building blocks. When you keep the flavor steady and the texture predictable, you get a lot more cooperation at the table.
I’ve built this collection around that exact idea. Some dishes are classic comfort food with a smarter structure. Some hide vegetables so well you’ll barely notice them. A few are the kind of meals adults will eat without grumbling, which matters more than it sounds. Because if you’re cooking two separate dinners, you’re already tired. These recipes are meant to keep that from happening.
Why These Meals Keep the Peace at the Table
-
Familiar texture first: Each dish leans on a texture kids usually trust — crisp, creamy, soft, or saucy — instead of mixing too many surprises into one bite.
-
Mild flavor, not bland flavor: The seasoning stays gentle, but it still tastes like real food, with garlic, cheese, butter, or a little sweetness doing the heavy lifting.
-
Easy to separate on the plate: A picky eater can eat the chicken tenders, skip the peas, and still have dinner. That kind of control matters.
-
Flexible toppings and add-ins: Most of these meals can be dressed up for adults at the table with hot sauce, herbs, pickles, or extra cheese without changing the base recipe.
-
Leftovers that still behave: These dishes reheat without turning into sad mush, which is a bigger victory than people admit.
-
Real weeknight ingredients: Nothing here depends on a special store run. If you keep pasta, cheese, eggs, bread, and a few proteins around, you’re already halfway there.
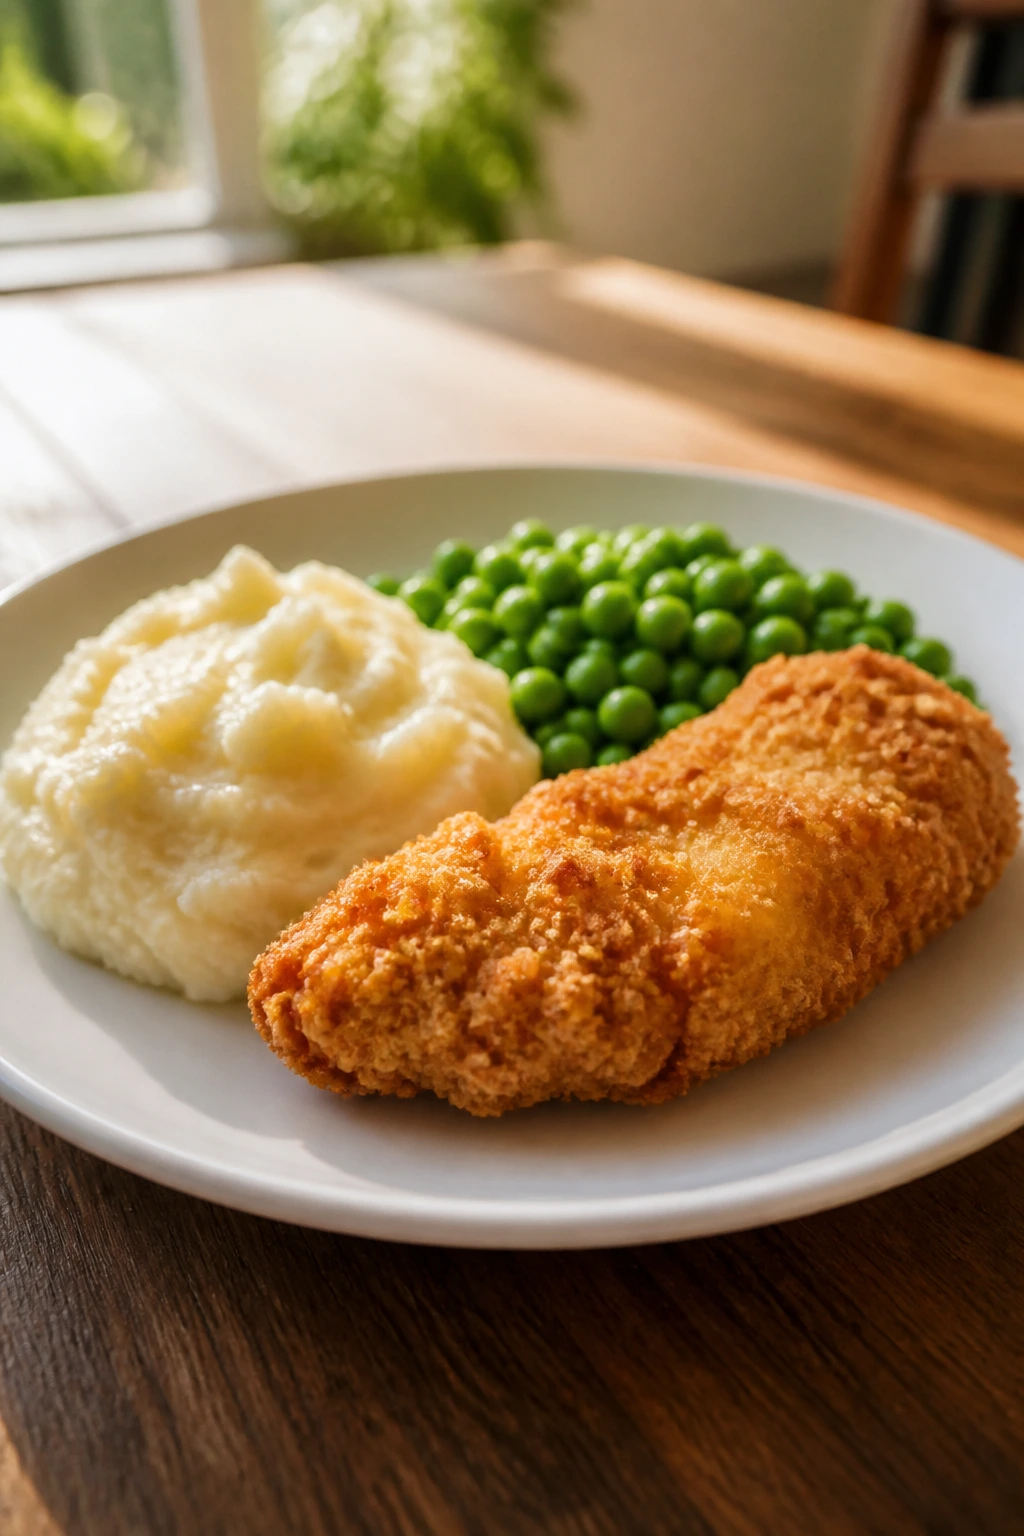
1. Crispy Oven Chicken Tenders with Buttery Breadcrumbs
A good chicken tender should crunch a little when you bite in, then give way to juicy meat instead of dry stringiness. That’s the whole trick here. These bake in the oven, but the panko and melted butter make them taste close to fried without the oily mess.
Why It Works:
Kids trust chicken tenders because they’re predictable. The coating is thin, golden, and salty, and the chicken stays in strips that are easy to dip. Baking at 425°F gives the crumbs enough heat to brown fast before the meat dries out.
Key Ingredients:
- 1 1/2 pounds chicken tenders — Use tenderloins if you can; they cook evenly and stay soft.
- 1 cup all-purpose flour — Helps the egg cling to the chicken.
- 2 large eggs — Whisked with milk for a smoother dip.
- 2 tablespoons milk — Keeps the egg coating from getting too sticky.
- 2 cups panko breadcrumbs — The crunch comes from here.
- 1/2 cup grated Parmesan — Adds salt and a nutty edge kids usually accept.
- 3 tablespoons melted butter — Makes the coating toast instead of dry out.
- 1 teaspoon kosher salt + 1 teaspoon garlic powder — Enough flavor without turning the tenders into “spicy” territory.
Quick Steps:
- Preheat the oven to 425°F and line a rimmed baking sheet with parchment. Set a wire rack on top if you have one.
- Set up three shallow bowls: flour in one, beaten eggs and milk in the second, panko mixed with Parmesan, salt, and garlic powder in the third.
- Dredge each chicken tender in flour, then egg, then breadcrumbs. Press lightly so the crumbs stick.
- Arrange the tenders on the rack or baking sheet and drizzle or brush with the melted butter.
- Bake for 18 to 22 minutes, flipping once halfway through, until the crust is deep golden and the chicken hits 165°F in the thickest part.
Equipment for This Recipe:
- Rimmed baking sheet
- Wire rack, optional but helpful
- Three shallow bowls
- Tongs
- Instant-read thermometer
How to Serve This Dish:
Pile these on a plate with ketchup, honey mustard, or ranch in small dipping bowls. They’re good with roasted carrots, waffle fries, or a simple pile of buttered peas. Four tenders usually feeds one hungry kid or one adult with a side.
Pro Tips for This Recipe:
- Pat the chicken dry first. Wet chicken makes the coating slip.
- If the breadcrumbs look pale after baking, give them 1 to 2 minutes under the broiler, but watch them like a hawk.
- The wire rack helps the bottoms stay crisp. Straight on the pan works too, but the underside softens faster.
Variations on This Dish:
- Plain-Jane Crunch: Skip the Parmesan and garlic powder for the simplest possible version.
- Cornflake Coating: Crush plain cornflakes instead of panko for a sweeter, thicker crust.
- Air-Fryer Batch: Cook at 400°F for 10 to 12 minutes, turning once, if you want a faster finish.
Common Mistakes to Avoid with This Dish:
- Skipping the flour step: The coating can slide off in sheets. Flour gives the egg something to grip.
- Overcrowding the pan: Steam softens the crust, and nobody wants soggy tenders.
- Cutting too early: If you slice before the chicken rests for 3 minutes, the juices run out onto the board.
2. Cheesy Taco Pasta Skillet
This is what happens when taco night and mac and cheese decide not to fight. The pasta gets coated in a mild, creamy sauce that tastes like familiar taco beef, but without the sharp heat that sends picky eaters running. It’s saucy, soft, and easy to twirl.
Why It Works:
The pasta cooks right in the skillet, which means it picks up flavor from the beef, broth, and tomatoes instead of tasting like plain noodles with stuff on top. A handful of cheddar melts in at the end and thickens the sauce into something kids usually accept on first contact.
Key Ingredients:
- 1 pound ground beef — Choose 85/15 for enough flavor without excess grease.
- 1 small yellow onion, finely diced — It melts into the sauce.
- 2 tablespoons mild taco seasoning — Use mild, not hot.
- 2 cups dry small pasta — Shells or rotini hold the sauce well.
- 1 can (14.5 ounces) diced tomatoes, drained — Keeps the skillet from turning watery.
- 2 cups beef broth — Cooks the pasta right in the pan.
- 1 1/2 cups shredded cheddar — Sharp cheddar works, but mild melts smoother for kids.
- 1/2 cup sour cream — Makes the sauce creamy instead of grainy.
Quick Steps:
- Brown the beef and onion in a large skillet over medium-high heat until the meat is no longer pink and the onion softens.
- Stir in the taco seasoning, pasta, tomatoes, and broth. Bring it to a simmer.
- Cover and cook for 10 to 12 minutes, stirring once or twice, until the pasta is tender and most of the liquid is absorbed.
- Turn the heat to low and stir in the cheddar and sour cream until the sauce turns glossy and coats every noodle.
- Let it sit for 2 minutes before serving so the sauce settles.
Equipment for This Recipe:
- Large deep skillet with lid
- Wooden spoon
- Measuring cups
- Box grater, if shredding cheese yourself
How to Serve This Dish:
Serve it in shallow bowls with extra cheese on top. A few tortilla chips on the side give kids a crunchy dipper, and a spoonful of plain Greek yogurt can stand in for sour cream if that’s what’s in the fridge. This feeds 4 to 5 easily.
Pro Tips for This Recipe:
- Use a deep skillet. Pasta needs room to move.
- If the pan looks dry before the pasta is tender, splash in 1/4 cup more broth.
- Shred the cheese yourself if you can; pre-shredded cheese is fine, but fresh shreds melt more smoothly.
Variations on This Dish:
- Bean Boost: Add 1 cup drained black beans with the pasta for more fiber.
- Chicken Taco Pasta: Swap in 2 cups chopped cooked chicken.
- Extra-Mild Version: Replace taco seasoning with 1 teaspoon garlic powder, 1 teaspoon cumin, and 1 teaspoon paprika.
Common Mistakes to Avoid with This Dish:
- Using too much liquid: The pasta can end up soupy. Stick close to the measured broth.
- Boiling after the cheese goes in: High heat can make the sauce separate.
- Choosing hot seasoning: Kids notice heat fast, even when adults think it’s mild.
3. Mini Meatloaf Muffins with Ketchup Glaze
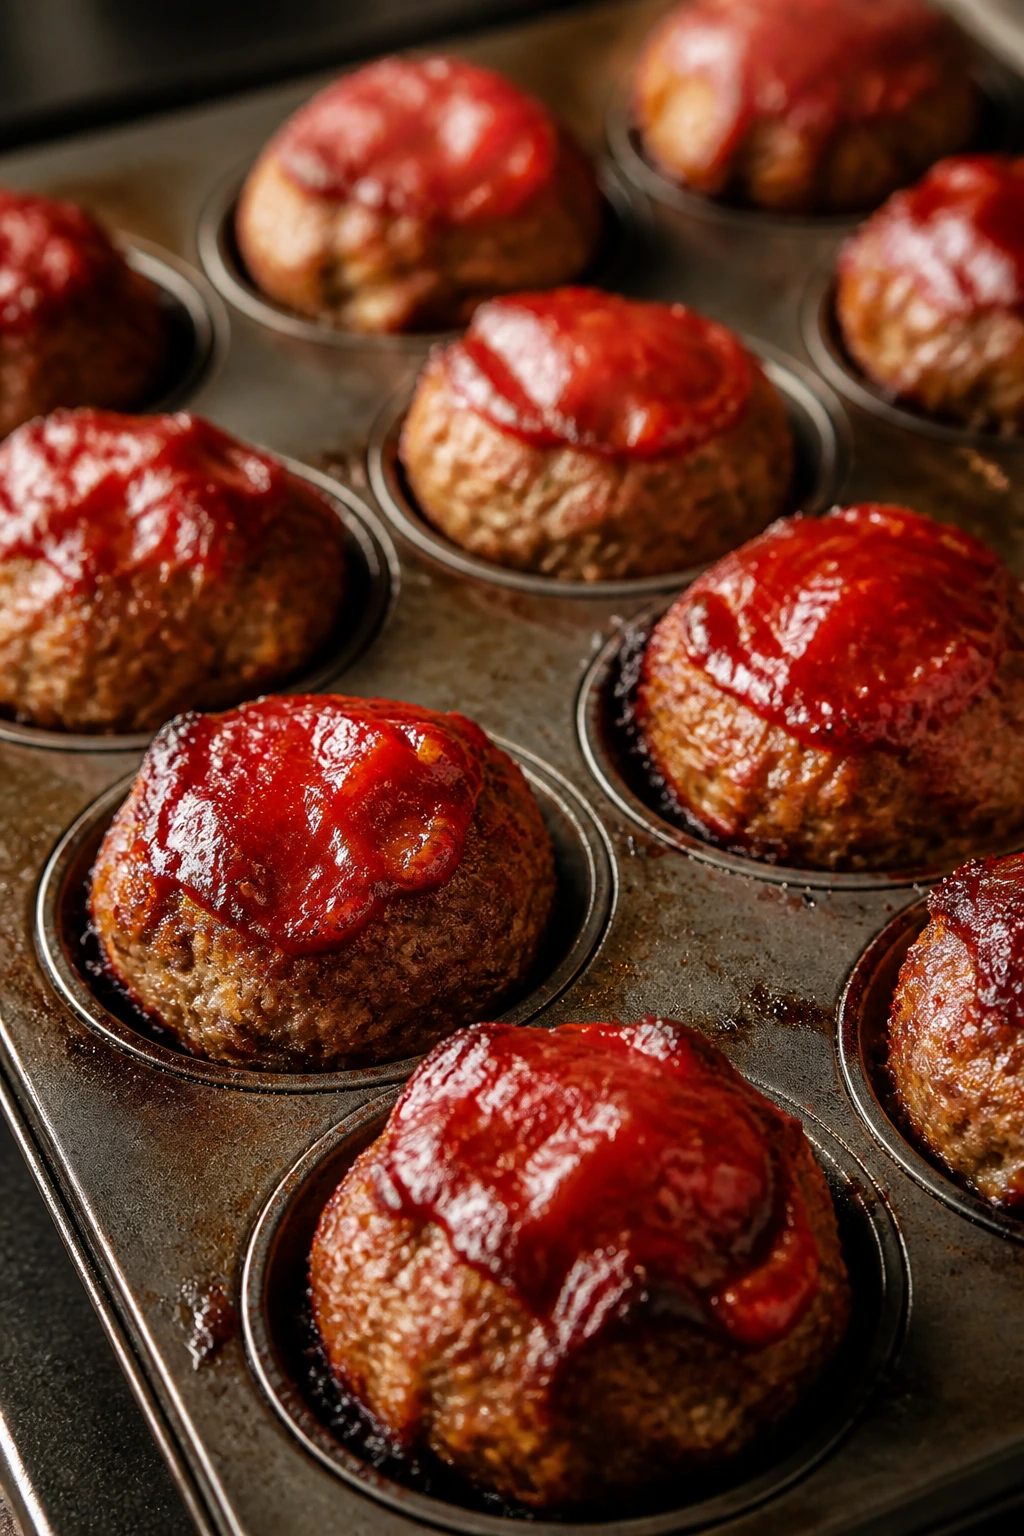
Meatloaf gets a better reputation when you shrink it. These bake in a muffin tin, which means each portion cooks faster, gets a little caramelized on top, and looks less like a slab on a plate. The ketchup glaze turns sticky and sweet in the oven.
Why It Works:
Kids often reject meatloaf because the slices can look dense and gray. Muffin-sized portions solve that problem. They’re faster to cook, easier to serve, and easier to pair with mashed potatoes or mac and cheese.
Key Ingredients:
- 1 pound ground beef — 85/15 keeps the muffins moist.
- 1/2 pound ground pork — Adds softness and a little richness.
- 3/4 cup breadcrumbs — Holds the mixture together.
- 1 large egg — Binds everything without making it rubbery.
- 1/3 cup milk — Keeps the texture tender.
- 1/4 cup finely grated onion — Disappears into the meat.
- 1 teaspoon salt + 1 teaspoon garlic powder — Simple seasoning.
- 1/3 cup ketchup mixed with 1 tablespoon brown sugar — The glaze.
Quick Steps:
- Preheat the oven to 375°F and grease a 12-cup muffin tin well.
- Mix the beef, pork, breadcrumbs, egg, milk, onion, salt, and garlic powder in a large bowl until just combined.
- Spoon the mixture into the muffin cups and press lightly to fill each one.
- Stir the ketchup and brown sugar together, then spoon a little over each muffin.
- Bake for 20 to 25 minutes, until the tops are browned and the center reaches 160°F.
- Rest for 5 minutes before lifting them out.
Equipment for This Recipe:
- 12-cup muffin tin
- Large mixing bowl
- Small bowl for glaze
- Spoon or ice cream scoop
How to Serve This Dish:
Two muffins with mashed potatoes makes a solid dinner. Add peas or green beans on the side if they’ll be eaten, or keep the plate simple and let the meatloaf and potatoes carry it. The muffins also pack neatly into lunch boxes once cooled.
Pro Tips for This Recipe:
- Mix gently. Compact meatloaf turns chewy.
- If the tops brown too fast, lay a loose piece of foil over the pan for the last 5 minutes.
- A muffin scoop makes the portions even, which helps them cook at the same rate.
Variations on This Dish:
- Turkey Swap: Use 1 1/2 pounds ground turkey and add 1 extra tablespoon milk.
- BBQ Topper: Replace the ketchup glaze with barbecue sauce for a sweeter finish.
- Cheese Surprise: Tuck a small cube of mozzarella into the center of each muffin.
Common Mistakes to Avoid with This Dish:
- Overmixing the meat: The muffins turn dense and springy.
- Underfilling the tin: They can dry out if the portions are too small.
- Skipping the rest time: The muffins fall apart if you try to remove them too soon.
4. Hidden-Veggie Mac and Cheese
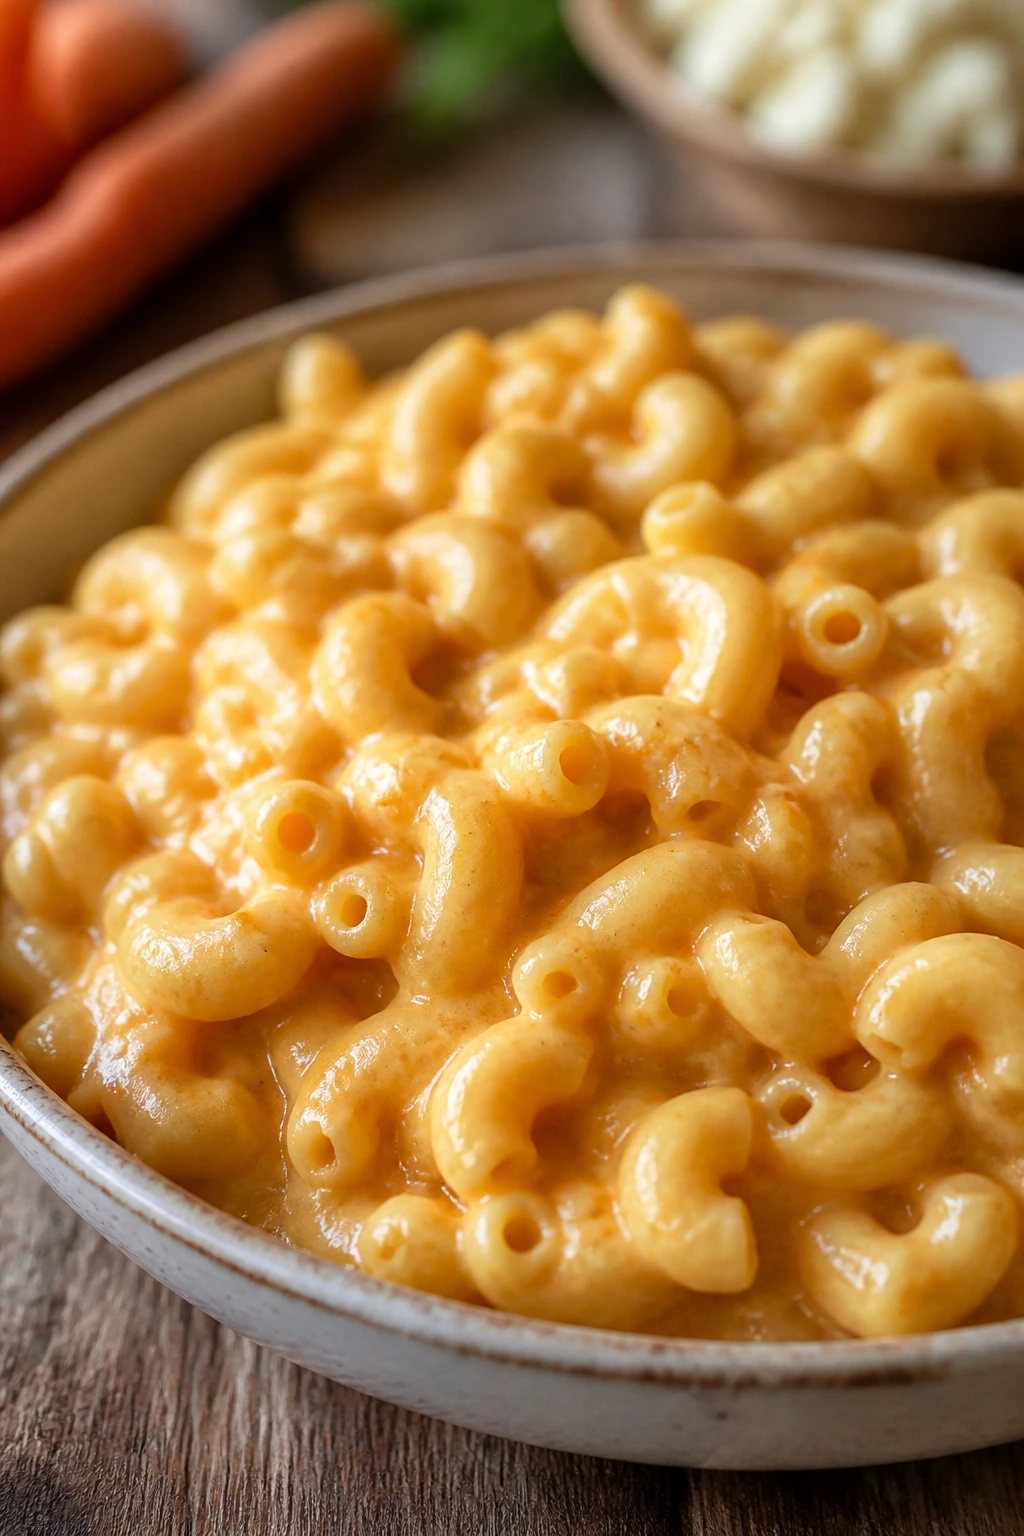
This is the mac and cheese that quietly does more than it lets on. The sauce stays creamy and orange, but a little cauliflower and carrot blend into the base so smoothly that even suspicious kids usually just notice the cheese. It still tastes like comfort food.
Why It Works:
Picky eaters tend to accept vegetables better when the texture disappears into something familiar. Blended cauliflower adds body, carrots add color, and cheddar covers the whole thing with a sauce that clings to every noodle.
Key Ingredients:
- 12 ounces elbow macaroni — Small shapes hold sauce well.
- 2 cups cauliflower florets — Steamed until soft enough to blend.
- 1 cup chopped carrots — Sweetens the sauce a little.
- 2 tablespoons butter — For the roux.
- 2 tablespoons flour — Thickens the cheese sauce.
- 2 cups milk — Whole milk makes the smoothest sauce.
- 2 cups shredded cheddar — Mild cheddar is the easiest sell.
- 1/2 teaspoon salt + pinch of paprika — Keeps the flavor from going flat.
Quick Steps:
- Cook the macaroni in salted water until just tender, then drain.
- Steam the cauliflower and carrots until very soft, about 10 to 12 minutes, then blend with 1/2 cup milk until smooth.
- Melt the butter in a saucepan, whisk in the flour, then slowly whisk in the remaining milk and the veggie puree.
- Cook for 3 to 5 minutes until the sauce thickens, then stir in the cheddar, salt, and paprika.
- Fold in the pasta and serve warm.
Equipment for This Recipe:
- Large pot
- Medium saucepan
- Blender or immersion blender
- Whisk
- Colander
How to Serve This Dish:
Serve it in bowls with a few extra shreds of cheese on top. If you want a side, keep it simple: apple slices, cucumber coins, or a piece of buttered toast. This is rich enough to stand alone.
Pro Tips for This Recipe:
- Blend the vegetables until silky. Any little chunks will stand out.
- Reserve a splash of pasta water in case the sauce tightens too much.
- Shred the cheese off the block if you want the smoothest texture.
Variations on This Dish:
- Broccoli Blend: Swap cauliflower for steamed broccoli florets if your kids already accept broccoli in other dishes.
- Baked Top: Pour into a baking dish, top with buttered crumbs, and bake at 375°F for 15 minutes.
- Gluten-Free Bowl: Use gluten-free elbows and rice flour in the sauce.
Common Mistakes to Avoid with This Dish:
- Leaving the vegetables undercooked: The sauce turns gritty.
- Adding cheese over high heat: It can turn grainy instead of creamy.
- Using too much pureed vegetable: The color gets dull and the cheese flavor fades.
5. Chicken Quesadilla Triangles
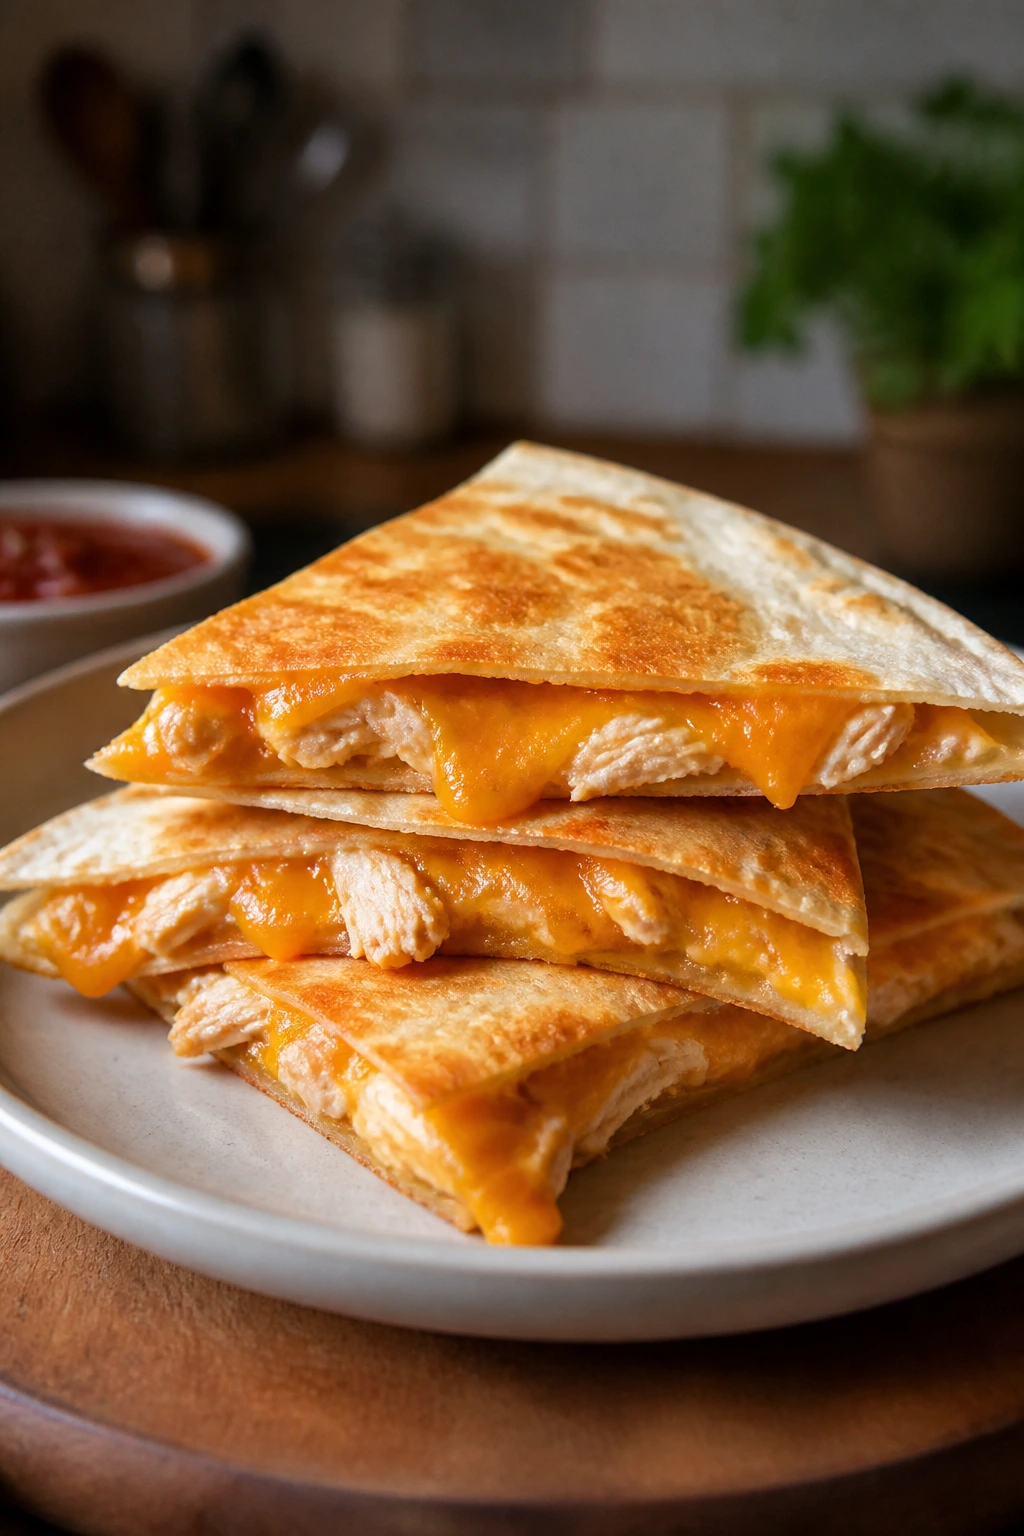
A quesadilla is one of those meals that looks almost too plain until you bite in and realize the cheese has fused the whole thing together. These use cooked chicken, mild salsa, and lots of cheddar, then get crisped in a skillet until the tortillas freckle brown.
Why It Works:
The filling stays tucked inside a tortilla, which makes the meal easy to hold and easier to accept. Kids who hate mixed textures often do better with a quesadilla because the cheese, chicken, and tortilla stay in clean layers.
Key Ingredients:
- 2 cups shredded cooked chicken — Rotisserie chicken works well here.
- 4 large flour tortillas — Soft and flexible, not brittle.
- 2 cups shredded cheddar or Monterey Jack — Mild cheese keeps the flavor familiar.
- 1/3 cup mild salsa — Adds moisture without heat.
- 1 tablespoon butter or neutral oil — For the skillet.
- 1/2 teaspoon garlic powder — Optional, but useful.
- Pinch of salt — Only if the chicken is plain.
Quick Steps:
- Mix the chicken with salsa and garlic powder in a bowl.
- Heat a skillet over medium heat and melt a little butter.
- Lay down a tortilla, sprinkle cheese over half, add chicken, then more cheese, and fold it over.
- Cook for 2 to 3 minutes per side until the tortilla is golden and the cheese melts fully.
- Rest for 1 minute, then cut into triangles.
Equipment for This Recipe:
- Large skillet or griddle
- Spatula
- Cutting board
- Sharp knife or pizza cutter
How to Serve This Dish:
Cut each quesadilla into 3 or 4 triangles and serve with sour cream or guacamole on the side. A pile of corn or a few baby carrots rounds it out. They’re also useful for lunch because they reheat neatly.
Pro Tips for This Recipe:
- Don’t overfill the tortilla. If the edges bulge, the filling leaks.
- Cook over medium heat, not high. You want melted cheese before the tortilla burns.
- Press lightly with the spatula so the filling settles into one solid layer.
Variations on This Dish:
- Bean and Cheese Version: Add 1/2 cup refried beans for a softer filling.
- Pizza Quesadilla: Swap salsa for pizza sauce and use mozzarella.
- Veggie Hideaway: Stir in 1/4 cup finely chopped cooked peppers or zucchini.
Common Mistakes to Avoid with This Dish:
- Using cold chicken straight from the fridge: It slows the melt.
- Cooking too hot: Burnt tortillas with unmelted centers are the worst version of this meal.
- Cutting right away: The cheese spills out if you don’t let it set for a minute.
6. Turkey Sloppy Joes

There’s something deeply practical about a sloppy joe: it’s soft, saucy, and familiar enough that kids usually know what to do with it. Ground turkey keeps it lighter, while ketchup, tomato sauce, and a little brown sugar keep the flavor round and sweet.
Why It Works:
A soft bun and a sticky filling are the point here. The sauce soaks slightly into the bread, which makes the sandwich feel cohesive instead of dry and crumbly. That’s why sloppy joes tend to beat drier burger-style dinners for picky eaters.
Key Ingredients:
- 1 pound ground turkey — Use 93/7 for decent flavor.
- 1 small onion, finely diced — Cooked until soft.
- 1/2 cup ketchup — Gives the sauce its familiar tang.
- 1/2 cup tomato sauce — Loosens the filling.
- 1 tablespoon brown sugar — Softens the acidity.
- 1 tablespoon Worcestershire sauce — Deepens the flavor.
- 1 teaspoon mustard — Just enough to round things out.
- 4 to 6 hamburger buns — Toasted if you want them sturdier.
Quick Steps:
- Brown the turkey and onion in a skillet over medium heat until the meat is cooked through.
- Stir in the ketchup, tomato sauce, brown sugar, Worcestershire, and mustard.
- Simmer for 5 to 8 minutes until the sauce thickens and turns glossy.
- Spoon onto buns and serve warm.
Equipment for This Recipe:
- Large skillet
- Wooden spoon
- Measuring cups and spoons
- Toaster or sheet pan for warming buns
How to Serve This Dish:
Serve on lightly toasted buns so the bread doesn’t collapse under the filling. Potato wedges, apple slices, or a simple cucumber salad fit on the side without competing for attention. For smaller kids, make open-faced sandwiches with a fork and knife.
Pro Tips for This Recipe:
- Simmer long enough for the sauce to cling. Watery sloppy joes get messy in the wrong way.
- If the filling tastes sharp, add another teaspoon of brown sugar.
- Toasting the buns keeps the bottom from turning soggy in 5 minutes flat.
Variations on This Dish:
- Cheesy Topper: Add a slice of cheddar on each bun.
- Hidden Veggie Base: Finely grate carrot into the onion and cook it down.
- Ground Beef Version: Use 85/15 beef if you want a richer flavor.
Common Mistakes to Avoid with This Dish:
- Leaving the sauce too thin: It slides everywhere.
- Using raw onion in the filling: The bite can be harsh for kids.
- Skipping bun toast: Soft buns collapse fast.
7. Creamy Tomato Soup with Grilled Cheese Soldiers
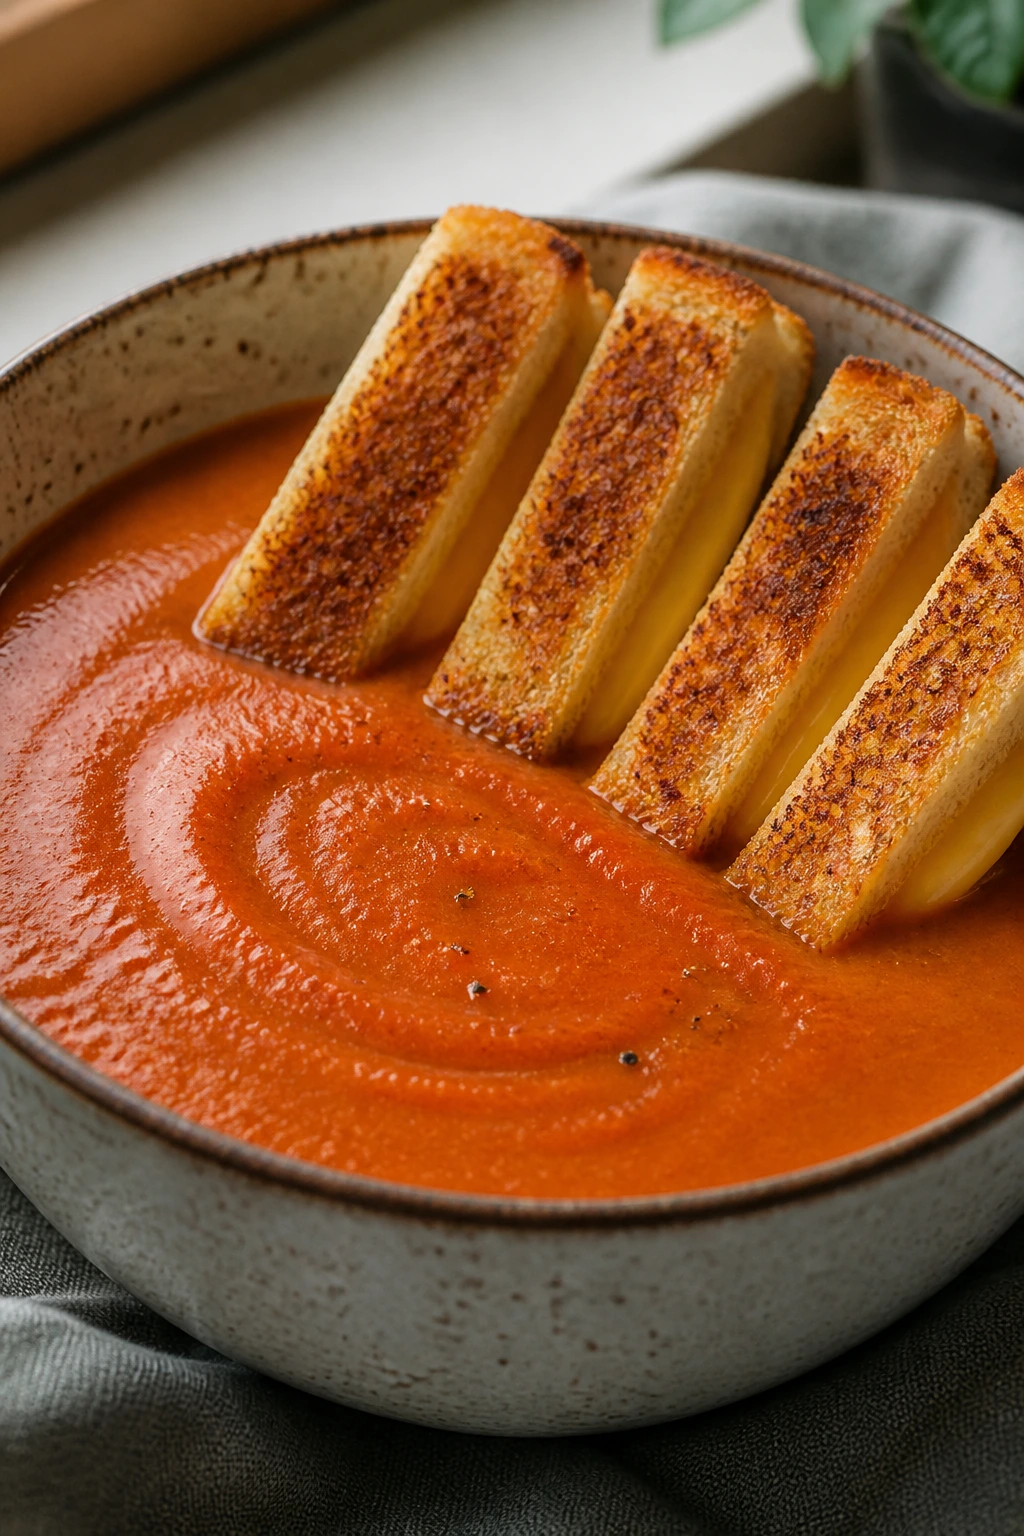
Tomato soup is only as good as its texture. Make it smooth, keep it warm, and let the cheese sandwich do the heavy lifting on the side. These grilled cheese soldiers are cut into strips, which makes dipping less awkward for small hands.
Why It Works:
The soup tastes mellow instead of sharp because the tomatoes simmer with onion and a little cream. The sandwich strips offer crunch outside and molten cheese inside, so kids get a clear dipper and a clear reward.
Key Ingredients:
- 2 tablespoons butter — For the soup base.
- 1 small onion, chopped — Cooked soft.
- 2 cloves garlic, minced — Optional, but worth it.
- 2 cans (14.5 ounces each) crushed tomatoes — Smooth enough for kids.
- 2 cups chicken broth — Or vegetable broth.
- 1/2 cup heavy cream — Rounds off the acidity.
- 4 slices sandwich bread — For the grilled cheese.
- 4 slices cheddar or American cheese — American melts especially neatly.
Quick Steps:
- Cook the onion in butter over medium heat until soft, then add garlic for 30 seconds.
- Add tomatoes and broth, then simmer for 15 minutes.
- Blend until smooth, stir in cream, and season lightly with salt.
- Make the grilled cheese sandwiches in a skillet, then cut each one into 3 strips.
- Serve the soup hot with the cheese strips on the side.
Equipment for This Recipe:
- Medium pot
- Blender or immersion blender
- Skillet
- Spatula
- Knife
How to Serve This Dish:
Ladle the soup into bowls and float a few buttered croutons on top if you want more texture. The grilled cheese strips should be the star, so keep them warm on a plate while you finish the soup. This is a 2-sandwich meal for 2 kids or 4 small servings.
Pro Tips for This Recipe:
- Blend carefully if the soup is hot; vent the blender lid.
- A pinch of sugar can calm overly sharp tomatoes.
- American cheese melts into the neatest, stretchiest sandwich strips.
Variations on This Dish:
- Roasted Tomato Version: Use roasted canned tomatoes for a deeper flavor.
- Dairy-Light Bowl: Swap heavy cream for evaporated milk.
- Garlic Bread Swap: Use garlic toast instead of grilled cheese strips.
Common Mistakes to Avoid with This Dish:
- Boiling after adding cream: The soup can split.
- Serving the sandwich too thick: Tall slices are hard for little hands.
- Under-salting the soup: Tomato soup tastes flat without enough salt.
8. Baked Ziti with Ricotta and Mozzarella
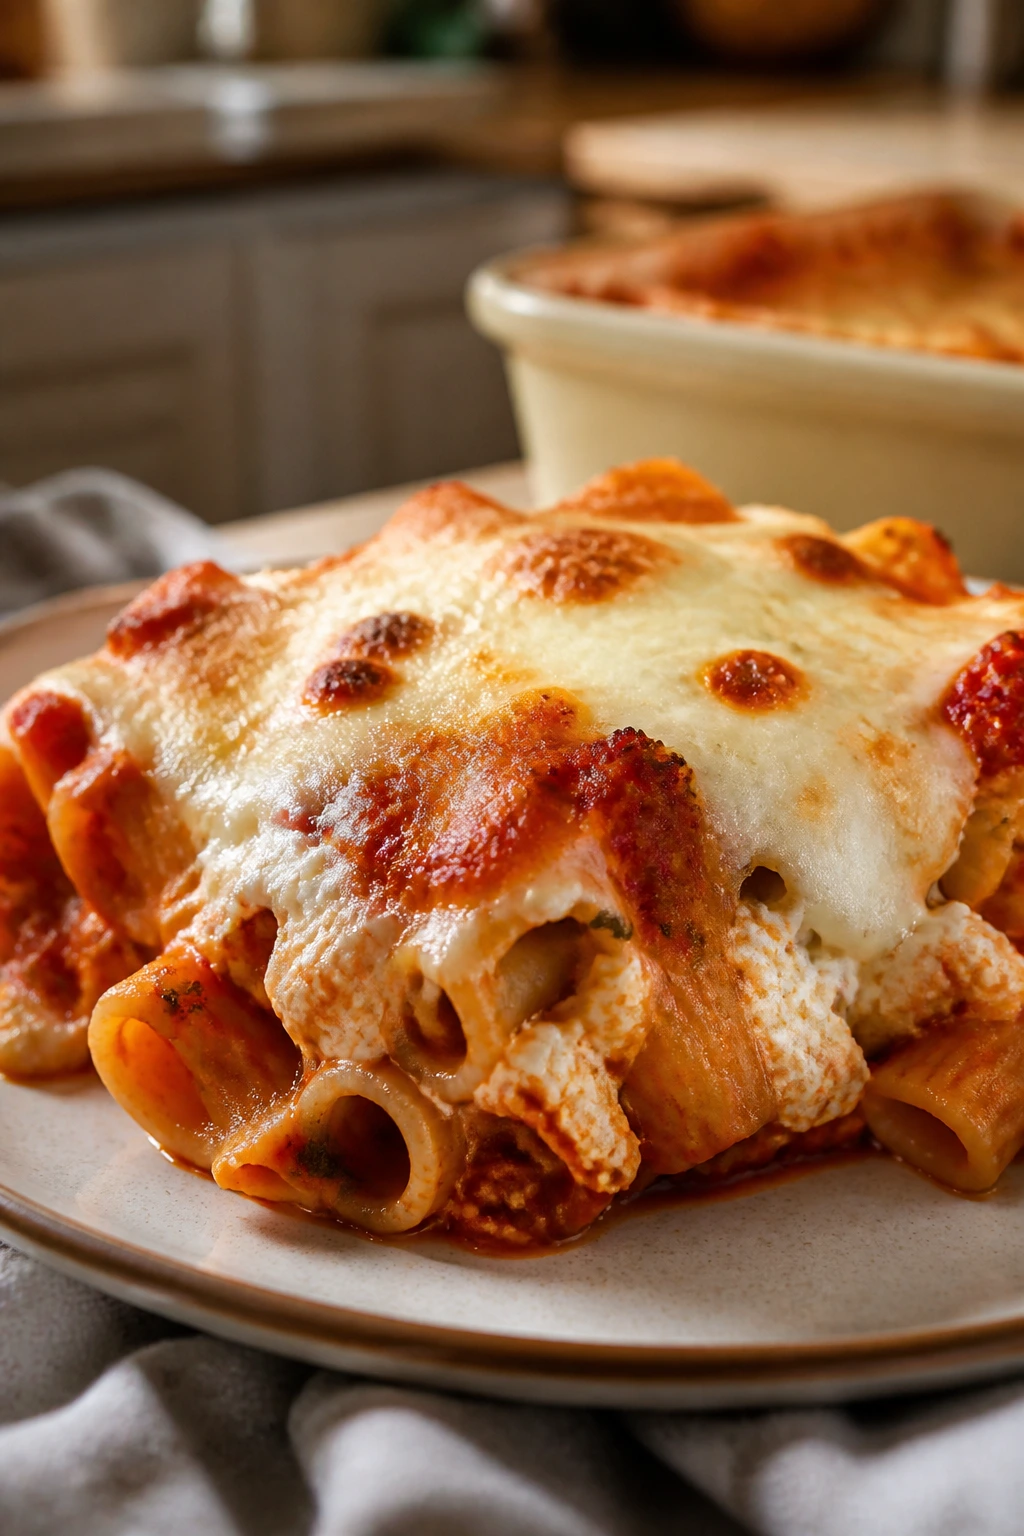
Baked ziti works because it’s pasta, sauce, and cheese in one tidy pan. There’s no complicated shaping and no fussy topping. Just soft noodles, mild marinara, and a browned blanket of mozzarella.
Why It Works:
Kids often accept baked pasta better than saucy spaghetti because the cheese creates a softer, more unified texture. Ricotta makes the center creamy, mozzarella gives the top those browned edges, and the pasta holds everything in place.
Key Ingredients:
- 1 pound ziti or penne — Short pasta holds up best.
- 3 cups marinara sauce — Choose a mild jarred sauce if needed.
- 1 1/2 cups ricotta cheese — For creaminess.
- 2 cups shredded mozzarella — The melty top layer.
- 1/2 cup grated Parmesan — Adds salt and depth.
- 1 egg — Helps the ricotta layer set.
- 1 teaspoon Italian seasoning — Keep it light.
- 1/2 teaspoon salt — Adjust based on the sauce.
Quick Steps:
- Cook the pasta until just shy of tender, then drain.
- Mix ricotta, egg, Parmesan, Italian seasoning, and salt in a bowl.
- Toss the pasta with marinara, then layer half in a baking dish, spoon over ricotta mixture, and add the rest of the pasta.
- Top with mozzarella and bake at 375°F for 25 to 30 minutes until bubbling.
- Rest for 10 minutes before scooping.
Equipment for This Recipe:
- Large pot
- 9×13-inch baking dish
- Mixing bowl
- Colander
- Spoon or spatula
How to Serve This Dish:
Serve with garlic bread and maybe a plain green salad for the adults. Kids often just want the baked pasta and a small side of fruit. This dish feeds 6 with decent leftovers.
Pro Tips for This Recipe:
- Pull the pasta before it’s fully soft; it finishes in the oven.
- Cover loosely with foil if the cheese browns too fast.
- Let it rest. Baked ziti cuts like soup if you rush it.
Variations on This Dish:
- Meat Sauce Ziti: Add 1 pound browned ground beef to the marinara.
- Spinach Hidden Under the Cheese: Fold 1 cup chopped cooked spinach into the ricotta.
- Mini Bake: Divide into smaller dishes for fast lunches.
Common Mistakes to Avoid with This Dish:
- Overcooking the pasta first: It turns mushy after baking.
- Using too little sauce: The ziti dries out at the edges.
- Skipping the rest time: The layers slide apart.
9. Honey-Garlic Chicken and Rice
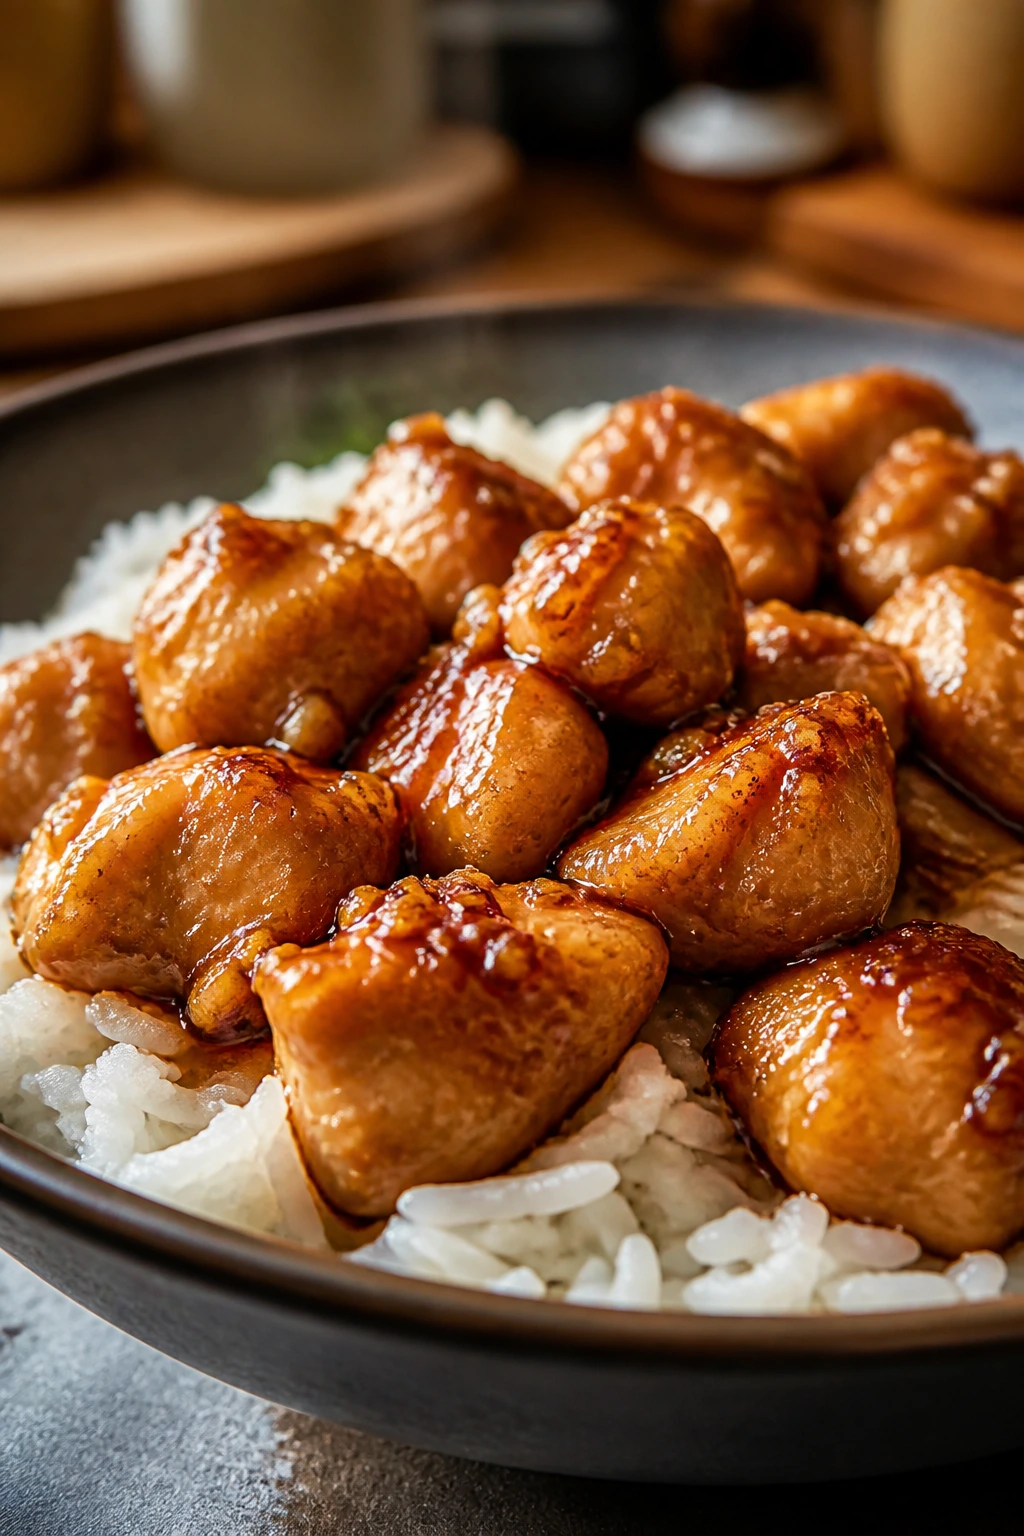
Sweet, glossy chicken over rice is one of those plates that looks friendly before anyone takes a bite. The sauce is sticky enough to coat the meat and mild enough that most kids won’t object. The rice soaks up the extra glaze, which is half the point.
Why It Works:
Honey gives the sauce a familiar sweetness, garlic adds just enough depth, and soy sauce keeps it from tasting one-note. Because the chicken cooks in bite-size pieces, each bite stays tender instead of dry at the edges.
Key Ingredients:
- 1 1/2 pounds boneless chicken thighs, cut into chunks — Thighs stay juicier than breasts.
- 2 cups cooked white rice — Warm it before serving.
- 1/4 cup honey — The sweet base.
- 3 tablespoons soy sauce — Use low-sodium if possible.
- 2 cloves garlic, minced — Fresh garlic gives the sauce a clean bite.
- 1 tablespoon cornstarch mixed with 2 tablespoons water — Thickens the glaze.
- 1 tablespoon oil — For browning.
- 1 cup frozen peas or diced carrots — Optional and easy.
Quick Steps:
- Brown the chicken in oil over medium-high heat until the pieces lose their pink centers.
- Stir in garlic, honey, soy sauce, and any vegetables.
- Simmer for 3 to 4 minutes, then add the cornstarch slurry.
- Cook until the sauce turns shiny and coats the chicken.
- Spoon over hot rice.
Equipment for This Recipe:
- Large skillet
- Wooden spoon
- Small bowl for slurry
- Measuring spoons
- Rice cooker or saucepan, if making rice from scratch
How to Serve This Dish:
Serve the chicken and rice in shallow bowls so the sauce gathers at the bottom. A few cucumber slices or steamed broccoli on the side keeps the plate from feeling too heavy. Kids who dislike mixed food can keep the chicken and rice separated.
Pro Tips for This Recipe:
- Don’t let the honey burn. Keep the heat at medium-high, not screaming hot.
- Thighs forgive a little overcooking. Breasts need a tighter watch.
- Add the slurry only after the sauce simmers, or it can clump.
Variations on This Dish:
- Sesame Finish: Sprinkle sesame seeds on top if that’s a flavor your kids already know.
- Orange-Garlic Swap: Add 2 tablespoons orange juice for a softer citrus note.
- Veggie Bowl: Stir in steamed broccoli florets at the end.
Common Mistakes to Avoid with This Dish:
- Crowding the pan: The chicken steams instead of browns.
- Adding too much soy sauce: The glaze gets salty fast.
- Serving over cold rice: Warm rice absorbs the sauce far better.
10. Pizza Pita Pockets

Pizza in pocket form solves a lot of problems. The edges stay contained, the filling can’t slide off, and the flavor lands somewhere between toast and pizza slice. That’s a useful place to be when you’re feeding a suspicious child.
Why It Works:
Pita gives you built-in structure, which means less mess than a floppy slice. The cheese melts inside the pocket, so each bite tastes like a small sealed pizza instead of a pile of toppings.
Key Ingredients:
- 4 pita rounds — Split open if they’re thick enough.
- 1 cup pizza sauce — Keep it mild.
- 2 cups shredded mozzarella — The main melt.
- 1/2 cup mini pepperoni — Optional, but kid-friendly.
- 1/4 cup finely diced bell pepper — Optional if your kid tolerates it.
- 1 tablespoon olive oil — For brushing.
- 1 teaspoon Italian seasoning — Light hand only.
Quick Steps:
- Preheat the oven to 400°F and line a baking sheet with parchment.
- Open the pita pockets gently and spread a spoonful of sauce inside each one.
- Add mozzarella, pepperoni, and any vegetables, then close the pitas.
- Brush the outsides with olive oil and bake for 8 to 10 minutes until crisp and warm.
- Slice in half or quarters.
Equipment for This Recipe:
- Baking sheet
- Parchment paper
- Pastry brush
- Sharp knife
How to Serve This Dish:
Cut the pockets into wedges and serve with extra sauce for dipping. Carrot sticks, grapes, or a few cucumber spears keep the meal simple. These are easy to hold, which makes them useful for lunch too.
Pro Tips for This Recipe:
- Don’t overfill. Pitas split if you get greedy with the cheese.
- Warm the sauce a little if it’s thick; it spreads better.
- Use small pepperoni so the pocket closes cleanly.
Variations on This Dish:
- Cheese-Only Pocket: Skip the toppings and keep it plain.
- Chicken Pizza Pocket: Add chopped cooked chicken instead of pepperoni.
- Breakfast Pocket: Fill with scrambled egg and cheese.
Common Mistakes to Avoid with This Dish:
- Using thin pita that tears: Choose sturdy pita rounds.
- Baking too long: The pocket turns dry and crackly.
- Adding wet toppings: Too much moisture makes the pita soggy.
11. Parmesan Fish Sticks
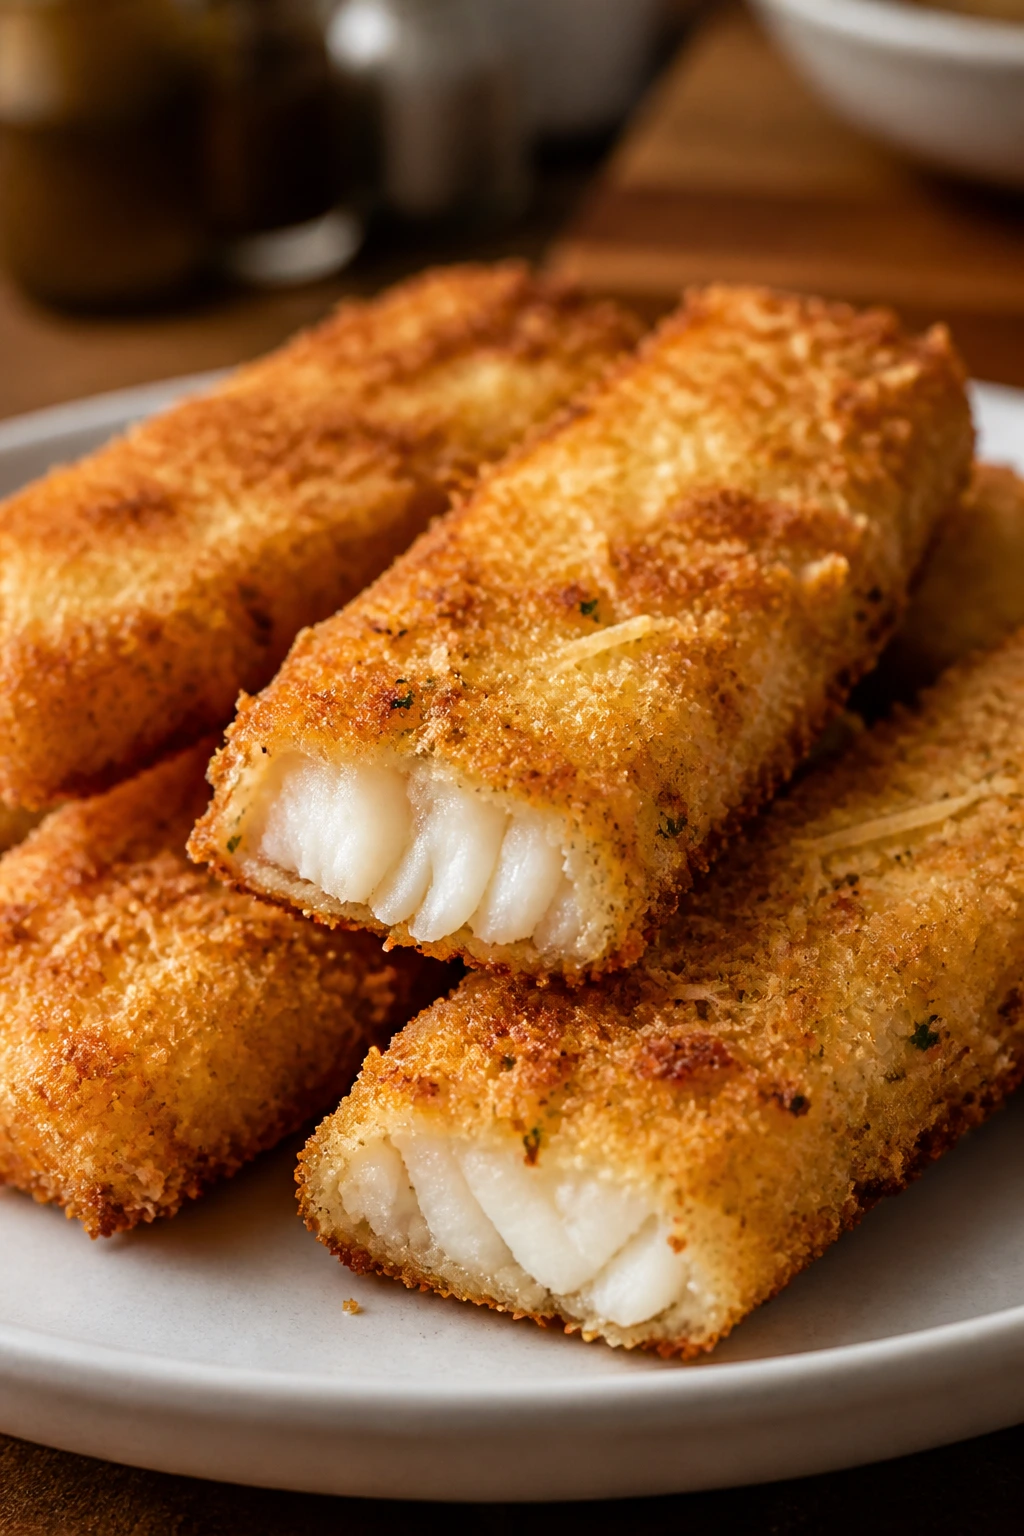
Fish sticks get a bad reputation only when they’re limp and pale. These bake until crisp, with a Parmesan-panko crust that gives the fish a clean, savory edge. Cod works well because it flakes softly and doesn’t taste aggressive.
Why It Works:
Kids who object to “fishy” flavor usually do better with mild white fish. The breading seals in moisture, and the strips are sized for dipping, which is half the appeal of fish sticks anyway.
Key Ingredients:
- 1 1/2 pounds cod fillets, cut into strips — Haddock also works.
- 1/2 cup flour — First layer for the coating.
- 2 eggs, beaten — Helps the crumbs adhere.
- 1 1/2 cups panko — For crunch.
- 1/2 cup grated Parmesan — Adds salt and browning.
- 1 teaspoon salt — Keep the seasoning plain.
- 1/2 teaspoon paprika — Optional, for color.
- 2 tablespoons melted butter or oil — Helps the crust brown.
Quick Steps:
- Heat the oven to 425°F and line a sheet pan.
- Coat the fish strips in flour, dip in egg, then press into the panko-Parmesan mixture.
- Lay the strips on the pan and brush lightly with butter or oil.
- Bake for 12 to 15 minutes, until the crust is golden and the fish flakes easily.
- Serve right away with tartar sauce or ketchup.
Equipment for This Recipe:
- Sheet pan
- Parchment paper
- Three shallow bowls
- Tongs or one clean hand for each step
- Fish spatula, optional
How to Serve This Dish:
Set the fish sticks beside oven fries, peas, or coleslaw. A lemon wedge on the plate is nice for adults; kids can ignore it. Three to four strips per person usually works with a side.
Pro Tips for This Recipe:
- Dry the fish well before breading.
- Cut the strips evenly so they finish at the same time.
- Use Parmesan that’s finely grated, not giant shreds, so the crust sticks better.
Variations on This Dish:
- Mild Lemon Version: Add lemon zest to the crumb mixture.
- Air-Fryer Fish Sticks: Cook at 400°F for 8 to 10 minutes.
- Gluten-Free Crust: Use gluten-free crumbs and rice flour.
Common Mistakes to Avoid with This Dish:
- Overbaking fish: It goes dry fast.
- Skipping the flour: The coating falls off in pieces.
- Using thick fillets without cutting them down: They cook unevenly.
12. Buttered Noodles with Peas and Ham
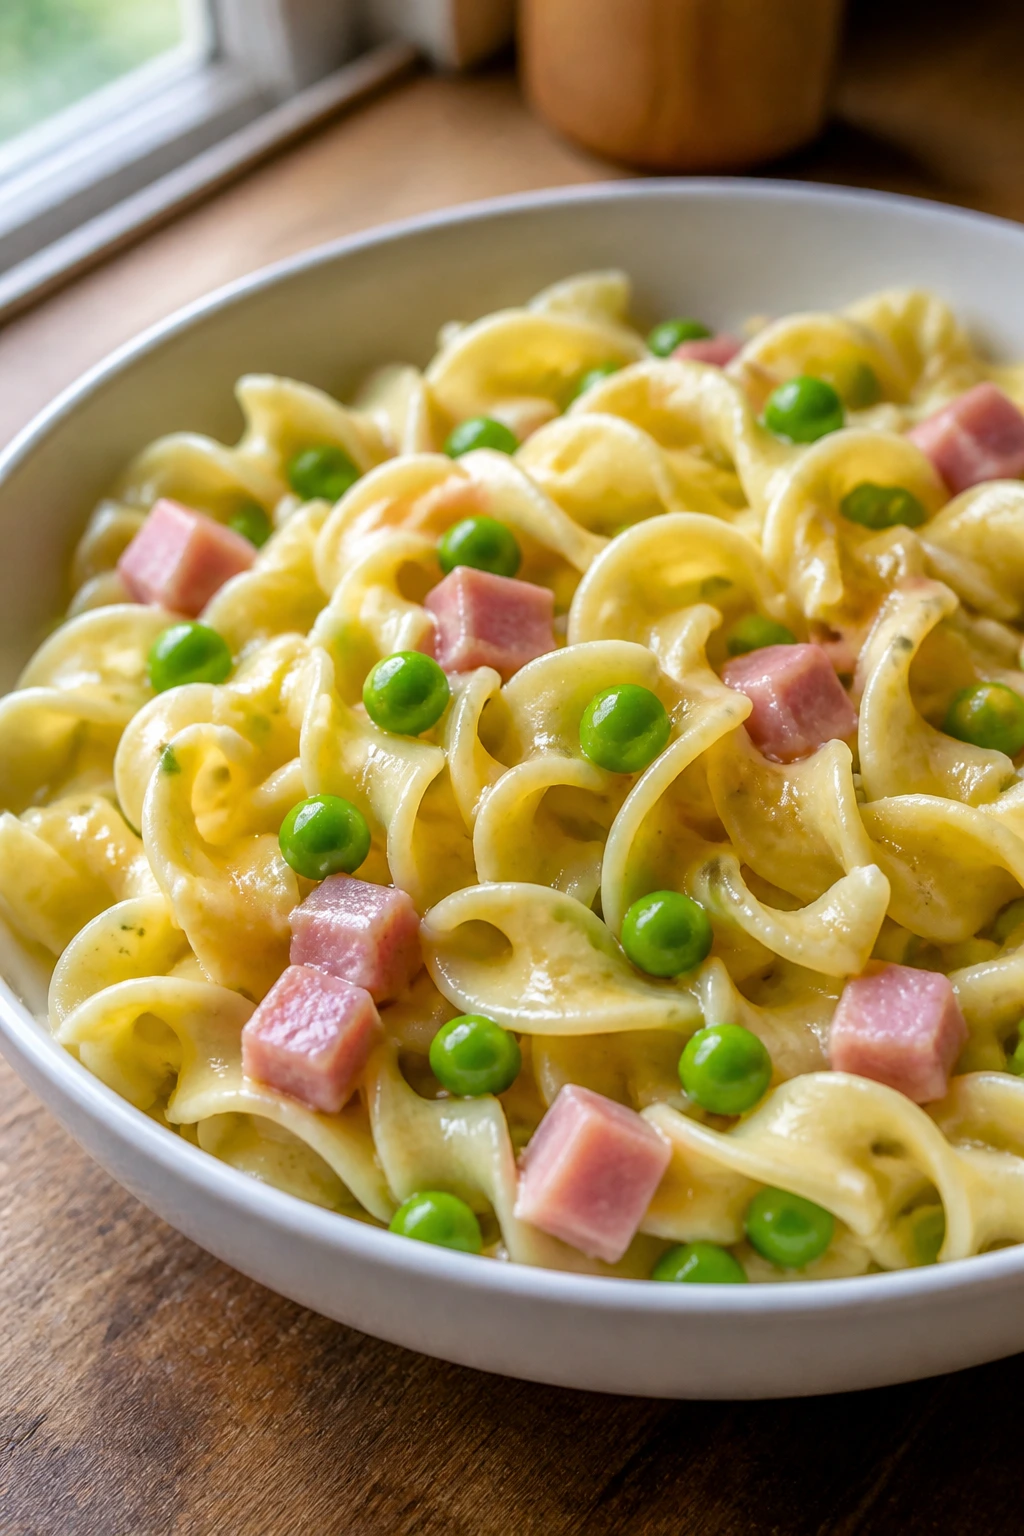
This is the kind of dinner that can save a tired night. The noodles are soft, glossy, and lightly salty. The peas add little pops of sweetness, and the ham makes it feel like a complete meal instead of a side dish that wandered onto a plate.
Why It Works:
The flavors are mild and the texture is easy to accept. Butter and Parmesan coat the noodles, so every bite tastes familiar, and the ham pieces are small enough that picky eaters can ignore them if needed.
Key Ingredients:
- 12 ounces egg noodles — They stay tender and soft.
- 3 tablespoons butter — The main sauce.
- 1 cup diced cooked ham — Bite-size pieces.
- 1 cup frozen peas — Thawed or blanched.
- 1/3 cup grated Parmesan — Salt and umami.
- 1/4 cup chicken broth or pasta water — Helps the butter cling.
- 1/2 teaspoon black pepper — Optional.
- Pinch of salt — Only if the ham is mild.
Quick Steps:
- Cook the noodles in salted water until tender, then drain and reserve a little pasta water.
- Melt the butter in the warm pot and stir in the ham.
- Add the noodles, peas, broth or pasta water, and Parmesan.
- Toss over low heat until the noodles are coated and the peas warm through.
- Serve immediately.
Equipment for This Recipe:
- Large pot
- Colander
- Wooden spoon
- Measuring cup
How to Serve This Dish:
Serve in bowls with extra Parmesan on top and maybe a few buttered breadcrumbs if you want crunch. A piece of toast or a few apple slices round it out without making the plate crowded. This is also a strong lunch leftover.
Pro Tips for This Recipe:
- Save the pasta water. It helps the butter turn into a loose sauce.
- Don’t overcook the peas; they should stay bright and sweet.
- If the ham is salty, skip the added salt altogether.
Variations on This Dish:
- Cheese Version: Stir in 1/2 cup shredded cheddar for a richer bowl.
- Chicken Swap: Use diced rotisserie chicken instead of ham.
- Veg-Heavy Bowl: Add tiny broccoli florets along with the peas.
Common Mistakes to Avoid with This Dish:
- Draining the noodles too dry: You need a little water to build the sauce.
- Using too much pepper: Some kids will spot it instantly.
- Letting the noodles sit too long: They clump as they cool.
13. Beef and Rice Burrito Bowls
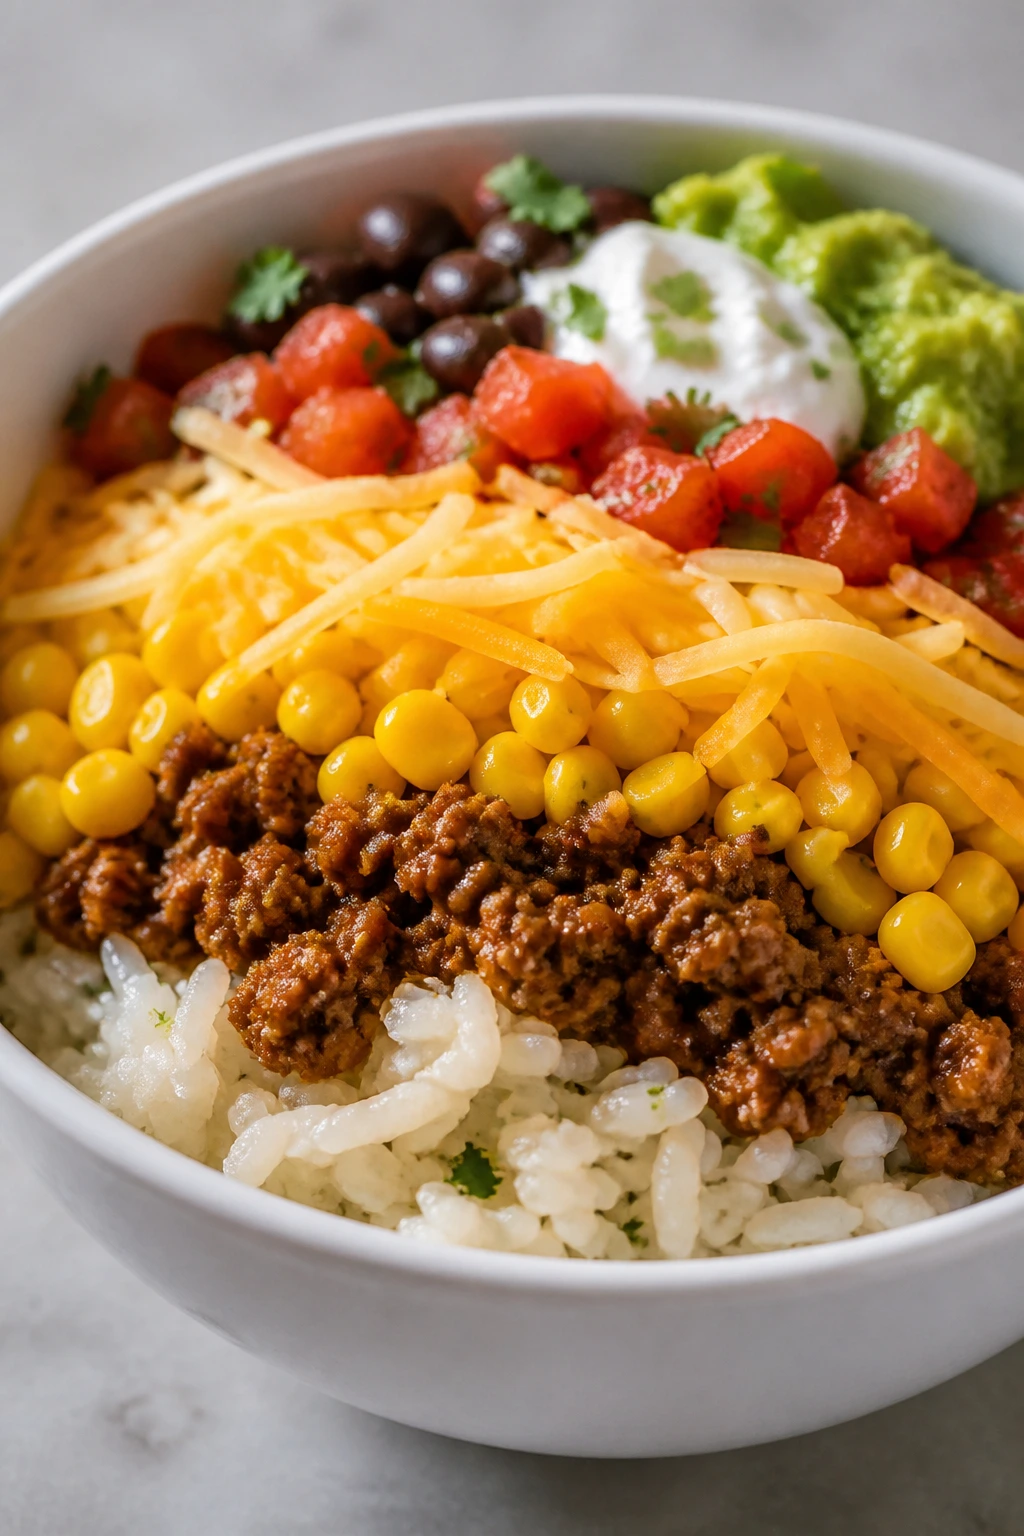
Burrito bowls work well for picky eaters because they can be built in pieces. Rice goes here, beef goes there, cheese can stay on top, and nobody has to eat a mixed scoop if they don’t want to. That kind of control lowers the temperature of dinner fast.
Why It Works:
The bowl format is forgiving. One child might eat rice and beef only, another might add cheese, and an adult can pile on salsa. The base stays simple, which keeps the whole thing from feeling too busy.
Key Ingredients:
- 1 pound ground beef — Browned and drained.
- 1 small onion, diced — Optional but useful.
- 2 cups cooked rice — White or brown.
- 1 tablespoon taco seasoning — Mild version.
- 1/2 cup tomato sauce — Keeps the beef moist.
- 1 cup corn — Frozen or canned.
- 1 cup shredded cheddar — For topping.
- 1/2 cup sour cream — Optional finish.
Quick Steps:
- Cook the beef and onion in a skillet until browned.
- Stir in taco seasoning and tomato sauce, then simmer for 5 minutes.
- Warm the rice and corn separately.
- Build bowls with rice on the bottom, beef in the center, and cheese on top.
- Add sour cream if desired.
Equipment for This Recipe:
- Large skillet
- Medium saucepan or rice cooker
- Serving bowls
- Spoon for portioning
How to Serve This Dish:
Keep the toppings in little bowls so everyone can pick what they want. Tortilla chips on the side are useful for scooping. This is the kind of meal where portions can be small for kids and larger for adults without changing the recipe.
Pro Tips for This Recipe:
- Make the beef saucy enough to coat the rice, but not so wet it puddles.
- Warm the corn before serving; cold corn feels oddly out of place.
- Mild salsa can go on the side for adults only.
Variations on This Dish:
- Chicken Bowl: Swap in shredded chicken.
- Bean Bowl: Add black beans for more fiber.
- Cheese-Heavy Version: Melt cheese into the beef for extra richness.
Common Mistakes to Avoid with This Dish:
- Mixing everything in one bowl too soon: Some kids want separate piles.
- Using dry rice: It makes the bowl feel unfinished.
- Overseasoning the beef: Taco flavor should stay gentle here.
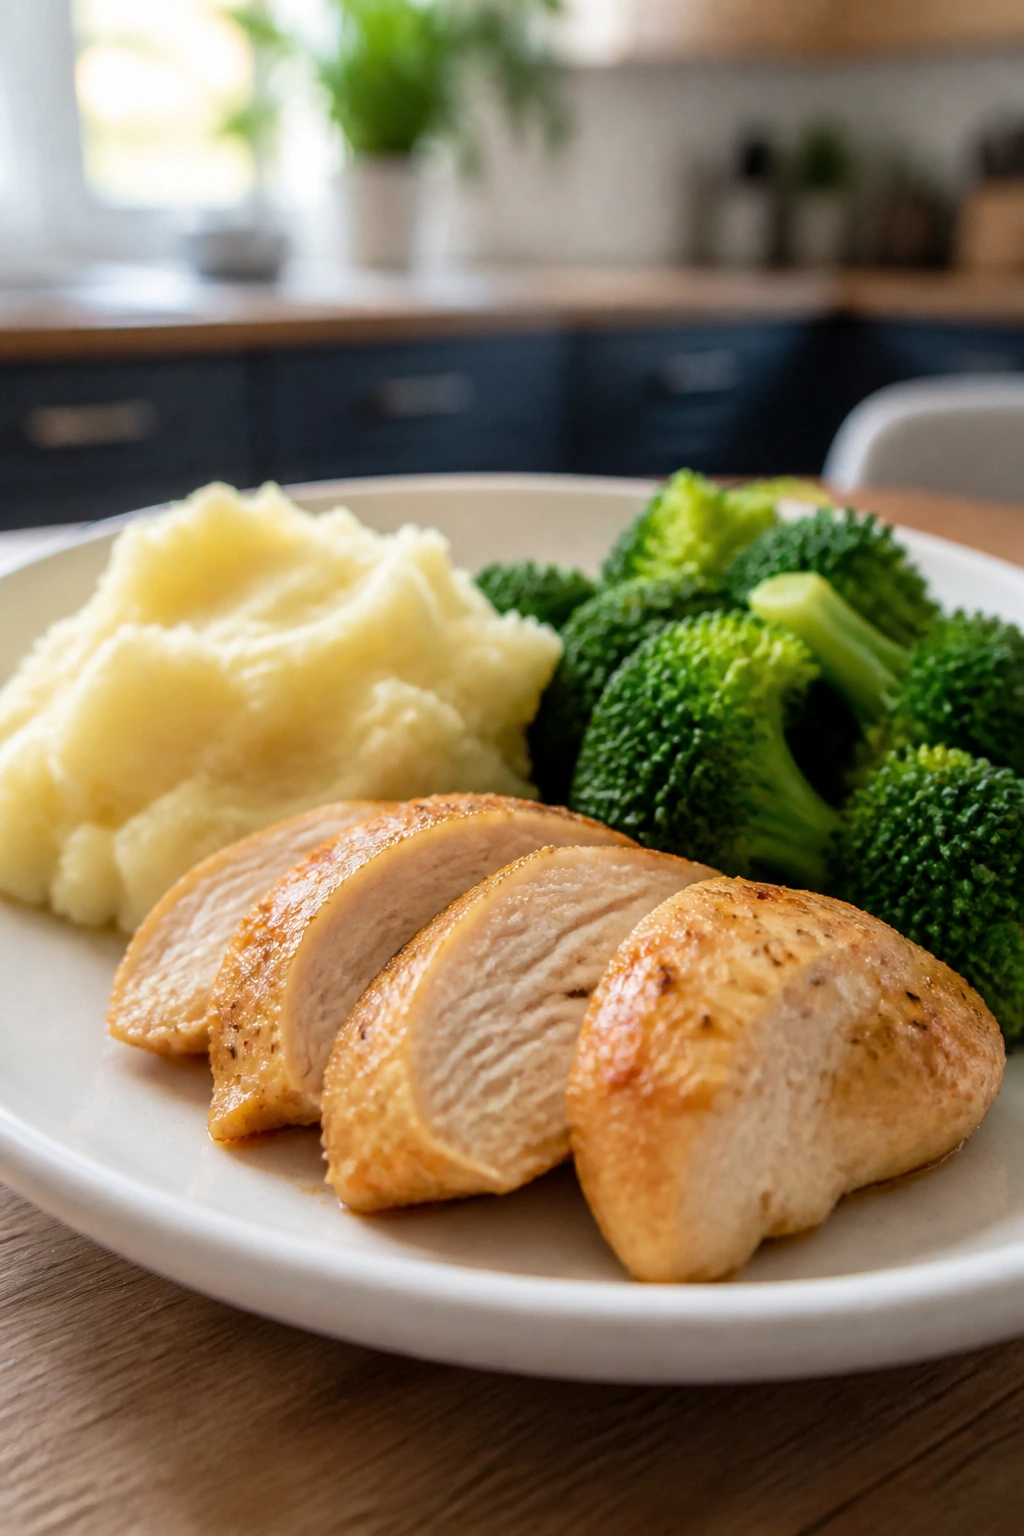
14. Chicken Alfredo with Broccoli

A creamy Alfredo bowl can be a hard sell if the sauce is thin or the chicken is chewy. Get those two details right and the whole dish turns into a solid family dinner. The broccoli is there for color, but it also gives a small break from the richness.
Why It Works:
The sauce clings to wide noodles, and the chicken is cut into small pieces so there’s no big protein challenge on the fork. Broccoli works best when it’s cooked until just tender, not soft enough to collapse into the pasta.
Key Ingredients:
- 12 ounces fettuccine — Or linguine.
- 2 chicken breasts, cut into bite-size pieces — Boneless and skinless.
- 2 tablespoons butter — For the sauce.
- 2 cloves garlic, minced — Optional.
- 1 1/2 cups heavy cream — The base of the sauce.
- 1 cup grated Parmesan — Freshly grated if possible.
- 2 cups small broccoli florets — Steam or blanch.
- 1 tablespoon olive oil, salt, and pepper — For the chicken.
Quick Steps:
- Cook the pasta and broccoli; drain separately.
- Season the chicken lightly and cook it in oil until golden and cooked through.
- Melt butter in the same pan, add garlic, then pour in the cream and simmer for 3 minutes.
- Stir in Parmesan until smooth, then add pasta, broccoli, and chicken.
- Toss and serve right away.
Equipment for This Recipe:
- Large pot
- Deep skillet
- Colander
- Whisk
- Tongs
How to Serve This Dish:
Serve in wide bowls with extra Parmesan on top. A slice of garlic bread gives kids something familiar to grab, while adults can add black pepper or red pepper flakes at the table. This fills 4 to 5 people comfortably.
Pro Tips for This Recipe:
- Cook the chicken first so it stays juicy.
- Don’t let the cream boil hard.
- Save a little pasta water if the sauce needs loosening.
Variations on This Dish:
- Rotisserie Shortcut: Use 2 cups shredded rotisserie chicken.
- Cauliflower Swap: Replace broccoli with cauliflower florets.
- Lighter Sauce: Use half cream and half milk, though it will be a bit thinner.
Common Mistakes to Avoid with This Dish:
- Using powdered Parmesan: It can make the sauce grainy.
- Overcooking the broccoli: It turns dull and mushy.
- Letting the pasta sit in the pan too long: Alfredo thickens fast.
15. BBQ Chicken Sliders
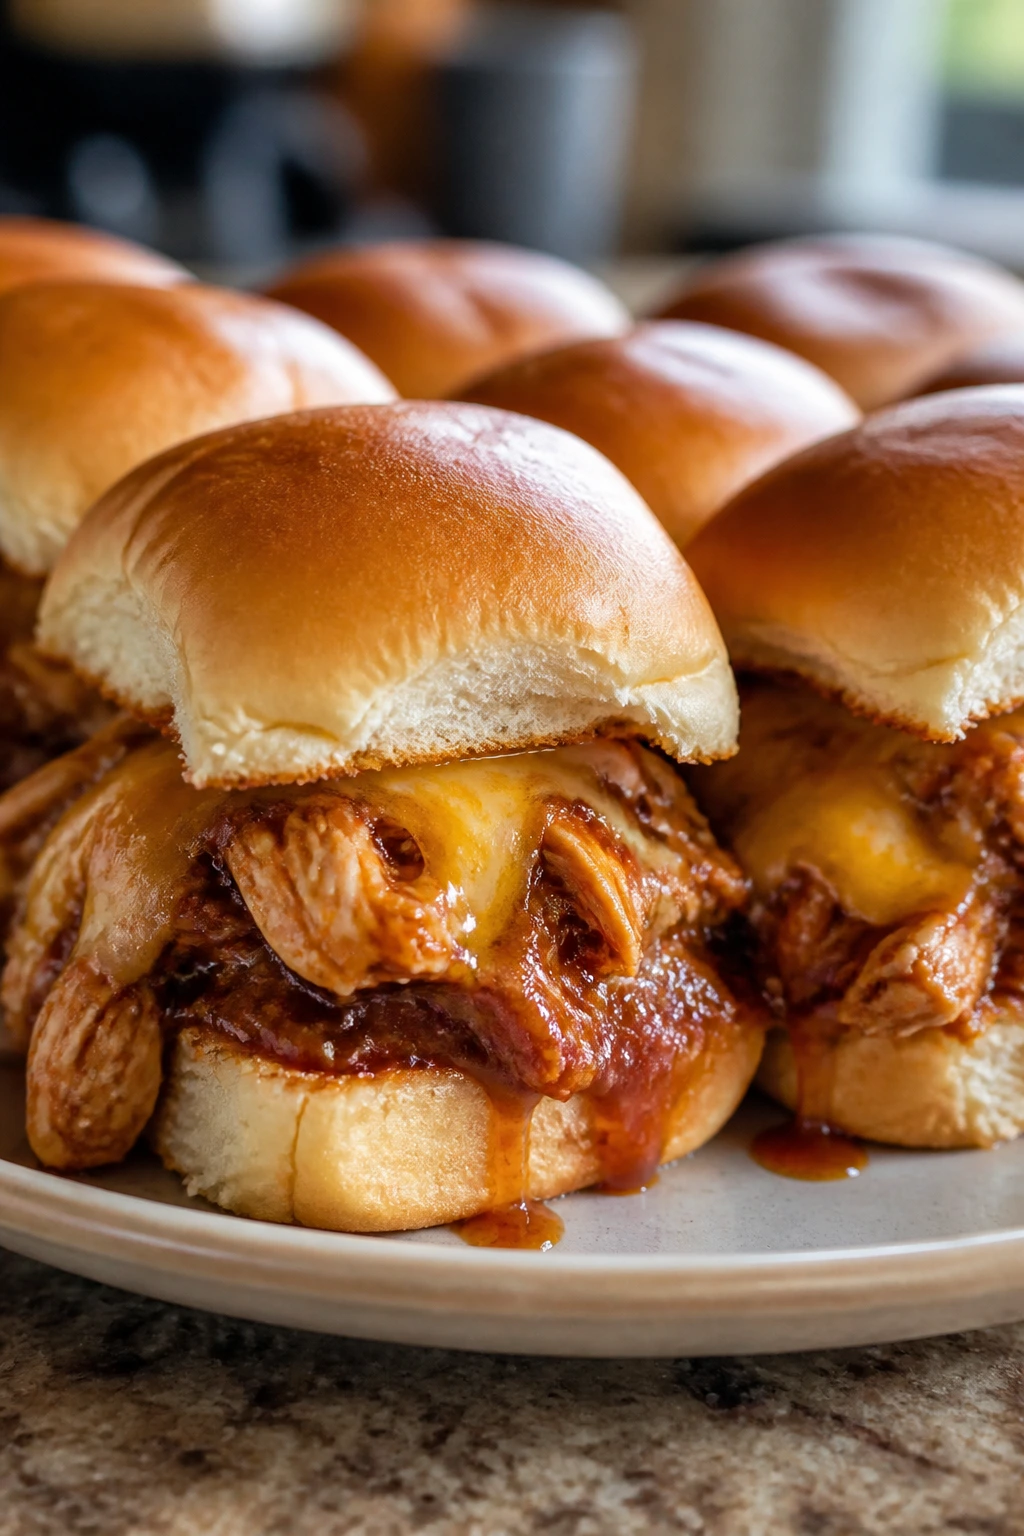
Sliders are smaller, less intimidating, and usually easier to accept than a full sandwich. These use shredded chicken tossed in barbecue sauce, then tucked into soft rolls with melted cheese. They taste like game-day food, but they work just as well on a school night.
Why It Works:
The sweetness of barbecue sauce lands well with picky eaters who like ketchup or sweet teriyaki. Soft slider buns keep the sandwich from feeling heavy, and the chicken is shredded enough to stay tender.
Key Ingredients:
- 2 cups cooked shredded chicken — Rotisserie chicken is perfect here.
- 3/4 cup barbecue sauce — Choose a sweeter style.
- 8 slider buns — Soft and slightly sweet.
- 8 slices mozzarella or cheddar — Cheese helps hold the filling together.
- 2 tablespoons melted butter — For brushing the tops.
- 1 teaspoon garlic powder — Optional.
- 1 tablespoon chopped pickles — Optional for adults or bold kids.
Quick Steps:
- Mix chicken with barbecue sauce in a saucepan or skillet and warm through.
- Split the slider buns and arrange the bottoms in a baking dish.
- Add chicken and cheese, then set the tops in place.
- Brush with melted butter and bake at 350°F for 10 to 12 minutes until warm and melty.
- Slice and serve.
Equipment for This Recipe:
- Baking dish
- Small saucepan or skillet
- Pastry brush
- Knife
How to Serve This Dish:
Serve the sliders in a pile with carrot sticks or potato wedges on the side. They’re easy to hold, which makes them one of the better options for casual dinners or packed lunches. Two sliders per child is usually enough.
Pro Tips for This Recipe:
- Keep the barbecue sauce on the sweeter side if the kids are cautious.
- Warm the chicken before assembling so the cheese melts evenly.
- If the buns are very soft, toast the bottoms lightly first.
Variations on This Dish:
- Cheddar Melt: Use sharp cheddar and bake until the edges brown.
- Spicy Adult Version: Add hot sauce to just the grown-up portion.
- Pulled Turkey Swap: Use shredded turkey instead of chicken.
Common Mistakes to Avoid with This Dish:
- Overstuffing the sliders: They fall apart in the tray.
- Using a sauce that’s too smoky: Kids often prefer sweet over smoky.
- Skipping the butter brush: The tops bake up dry and pale.
16. Egg and Cheese Muffins

These are tiny, portable egg bakes that feel more like breakfast cups than a “healthy protein recipe.” That’s useful. They’re soft, cheesy, and easy to eat with one hand, which makes them useful for breakfast, lunch, or a quick dinner with toast.
Why It Works:
Egg muffins are naturally portioned, which helps picky eaters because there’s less commitment on the plate. Cheese keeps the flavor familiar, and any add-ins stay small enough that the texture still feels smooth.
Key Ingredients:
- 8 large eggs — The base.
- 1/4 cup milk — Keeps the eggs tender.
- 1 cup shredded cheddar — Mild and melt-friendly.
- 1/2 cup diced cooked ham — Optional.
- 1/4 cup finely chopped spinach — Optional and best kept small.
- 1/4 teaspoon salt — Don’t overdo it.
- 1/8 teaspoon black pepper — Optional.
- Butter or nonstick spray — For the muffin tin.
Quick Steps:
- Heat the oven to 350°F and grease a muffin tin.
- Whisk the eggs, milk, salt, and pepper until smooth.
- Stir in cheese and any add-ins, then pour into the cups.
- Bake for 18 to 22 minutes until puffed and set in the middle.
- Cool for 5 minutes before removing.
Equipment for This Recipe:
- Muffin tin
- Mixing bowl
- Whisk
- Measuring cups
How to Serve This Dish:
Serve two muffins with toast or fruit for breakfast. For dinner, pair them with roasted potatoes and a few cucumber slices. They also pack neatly for a lunchbox once cooled.
Pro Tips for This Recipe:
- Don’t overfill the cups; the eggs puff a lot.
- Finely chop any vegetables so they blend into the eggs.
- A silicone muffin pan makes release easier.
Variations on This Dish:
- Cheese Only: Skip the ham and spinach.
- Mini Omelet Cups: Add tiny diced bell pepper.
- Bacon Version: Use cooked crumbled bacon instead of ham.
Common Mistakes to Avoid with This Recipe:
- Baking too long: The eggs get rubbery.
- Adding too much milk: The muffins can turn watery.
- Using big vegetable chunks: They make the texture uneven.
17. Teriyaki Meatballs with Rice
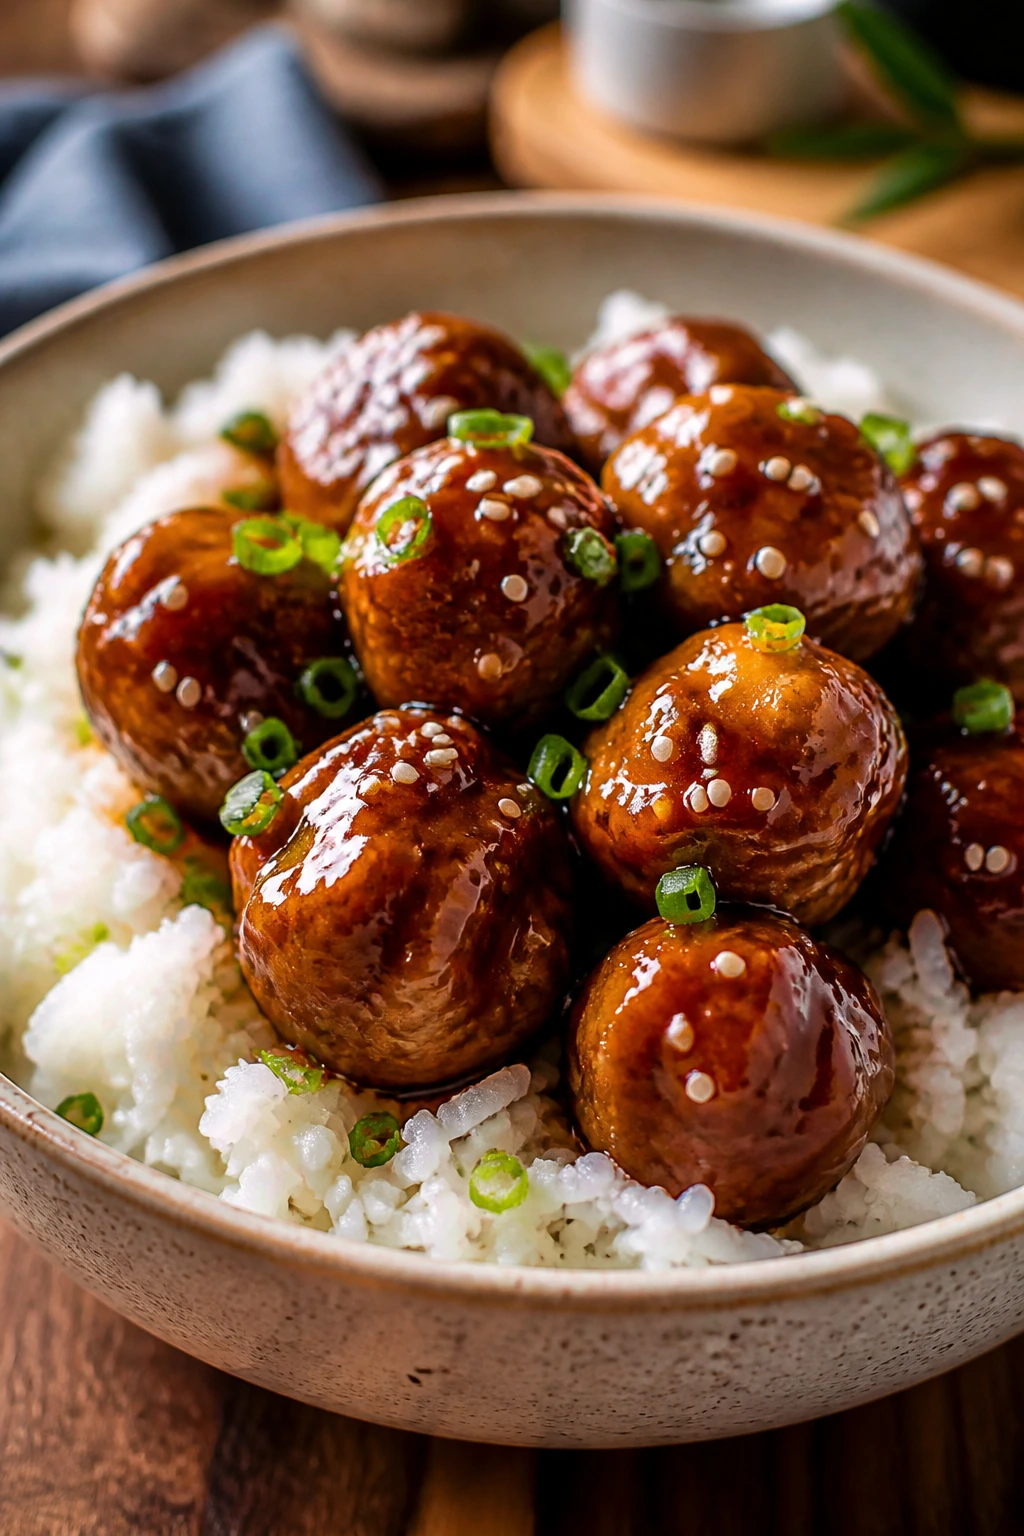
These meatballs are soft, glazed, and a little sweet, which is why kids usually take to them faster than a spicier stir-fry. The sauce is sticky enough to coat the meatballs without drowning the plate, and rice gives the whole thing a calm, familiar base.
Why It Works:
Meatballs are easier for picky eaters than loose ground meat because they feel organized. The teriyaki glaze keeps the flavor mild and slightly sweet, and the meatballs stay juicy if you don’t overbake them.
Key Ingredients:
- 1 pound ground turkey — Or ground chicken.
- 1/2 cup breadcrumbs — Holds the meatballs together.
- 1 egg — Binder.
- 2 tablespoons milk — Softens the mixture.
- 1 teaspoon salt — Enough for a mild batch.
- 1/2 cup teriyaki sauce — For glazing.
- 2 cups cooked rice — White rice works best here.
- 1 cup steamed carrots or broccoli — Optional side.
Quick Steps:
- Heat the oven to 400°F and line a baking sheet.
- Mix turkey, breadcrumbs, egg, milk, and salt, then form 1-inch meatballs.
- Bake for 14 to 16 minutes until cooked through.
- Warm the teriyaki sauce in a skillet, add the meatballs, and toss until coated.
- Serve over rice.
Equipment for This Recipe:
- Baking sheet
- Parchment paper
- Large bowl
- Small skillet or saucepan
How to Serve This Dish:
Serve the meatballs over rice with a spoonful of sauce draped on top. A few sesame seeds are fine for adults, but don’t rely on them for kid appeal. It’s also easy to keep the sauce on the side for kids who like drier food.
Pro Tips for This Recipe:
- Wet your hands lightly before rolling; the mixture won’t stick as much.
- Use a gentle teriyaki sauce, not a fiery or ginger-heavy one.
- If the meatballs brown too fast, lower the oven rack one level.
Variations on This Dish:
- Pineapple Bowl: Add a few pineapple chunks on the side.
- Beef Version: Use ground beef for a richer meatball.
- Sauce-Side Serving: Leave the glaze off the meatballs and offer dipping sauce separately.
Common Mistakes to Avoid with This Recipe:
- Packing the meatballs too tight: They turn dense.
- Using too much sauce: The rice turns soggy.
- Skipping the baking sheet liner: Sticky glaze cleanup gets annoying fast.
18. Mild Chili with Cornbread Toppers
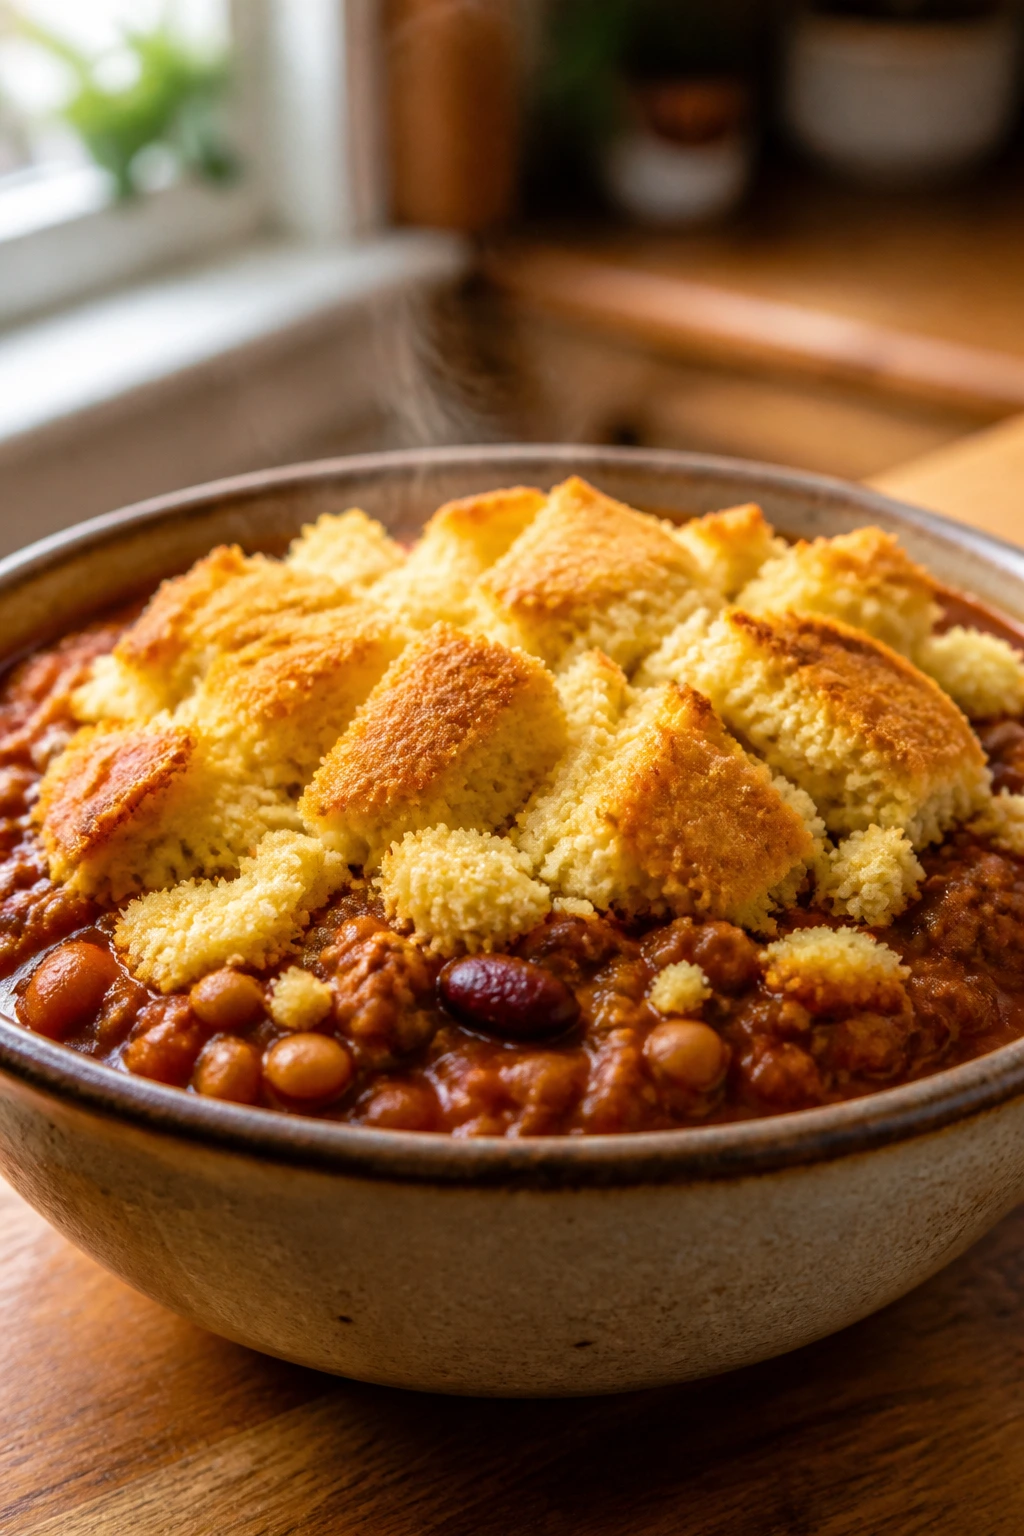
Chili can be a hard sell if it’s too dark, too spicy, or too bean-heavy. This version stays mild and balanced, with enough tomato and beef flavor to feel warm without scaring anyone off. Cornbread on top makes it feel like dinner, not a challenge.
Why It Works:
The sweetness of cornbread softens the chili’s edges, and the beans stay tender instead of mealy if you simmer them gently. This is one of those meals that works because every spoonful can be adjusted with cheese, sour cream, or plain cornbread.
Key Ingredients:
- 1 pound ground beef — Or turkey.
- 1 small onion, diced — Optional but useful.
- 1 can (15 ounces) kidney or pinto beans, drained — Mild and filling.
- 1 can (14.5 ounces) diced tomatoes — Base liquid.
- 1 cup tomato sauce — Gives it body.
- 1 tablespoon chili powder — Keep it gentle.
- 1 teaspoon cumin — Enough for warmth, not heat.
- 1 box cornbread mix — For the topping.
Quick Steps:
- Brown the beef and onion in a pot, then drain excess fat.
- Stir in beans, tomatoes, tomato sauce, chili powder, and cumin.
- Simmer for 20 minutes until thickened.
- Bake the cornbread in a separate pan or spoon batter on top of the chili if your mix allows it.
- Serve with cheese on top.
Equipment for This Recipe:
- Large pot
- Wooden spoon
- Baking dish or skillet for cornbread
- Ladle
How to Serve This Dish:
Spoon the chili into bowls and top with shredded cheddar or a dollop of sour cream. Cornbread on the side is easiest, though a thicker batter can be baked over the top if you want a cobbler-like finish. Keep the toppings separate for picky eaters.
Pro Tips for This Recipe:
- Let the chili simmer long enough to lose its sharp tomato edge.
- If the beans are very firm, simmer a little longer and add a splash of water.
- Mild cheese on top tends to be more accepted than anything sharp.
Variations on This Dish:
- Bean-Light Version: Use half the beans and more ground beef.
- White Chili Switch: Swap in white beans and chicken.
- Cheese Bowl: Stir in a small handful of cheddar at the table.
Common Mistakes to Avoid with This Dish:
- Adding too much chili powder: Picky eaters notice the heat fast.
- Serving it too thin: Chili should spoon, not pour.
- Forcing too many toppings into one bowl: Keep it simple.
19. Spinach Ricotta Stuffed Shells
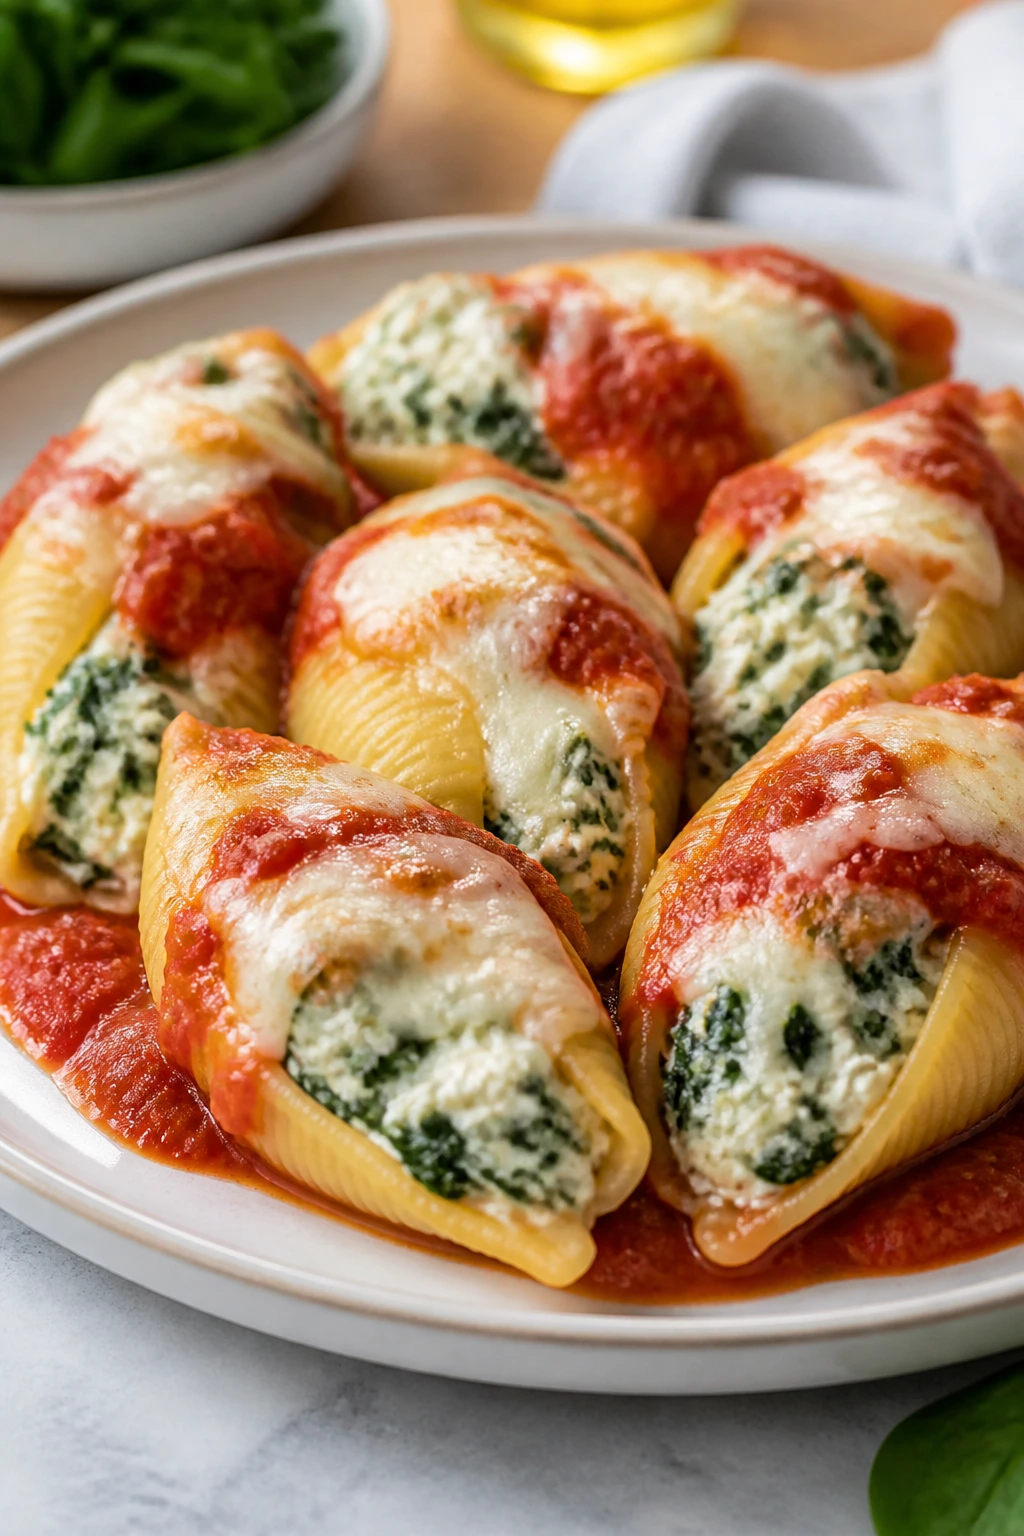
Stuffed shells look fancier than they are. Inside, they’re just pasta, ricotta, spinach, and sauce. That makes them useful for families because they feel like a special dinner while still staying mild enough for kids who side-eye anything leafy.
Why It Works:
The spinach is chopped small and mixed into ricotta, so it softens into the filling instead of sitting there as a leafy surprise. The shells hold the mixture in neat portions, which helps kids accept the idea of “one shell, one bite.”
Key Ingredients:
- 20 jumbo pasta shells — Cooked until just tender.
- 1 1/2 cups ricotta cheese — The filling base.
- 1 cup chopped cooked spinach, squeezed dry — Small and well-drained.
- 1 cup shredded mozzarella — Mixed in and topped on the shells.
- 1/4 cup grated Parmesan — For flavor.
- 1 egg — Helps the filling set.
- 2 cups marinara sauce — Mild sauce.
- 1/2 teaspoon salt — Adjust to taste.
Quick Steps:
- Cook the shells and set them aside.
- Mix ricotta, spinach, mozzarella, Parmesan, egg, and salt in a bowl.
- Spread sauce in a baking dish and fill each shell with the cheese mixture.
- Arrange the shells in the dish, top with more sauce and mozzarella, and bake at 375°F for 25 minutes.
- Rest for 5 minutes before serving.
Equipment for This Recipe:
- Large pot
- 9×13-inch baking dish
- Spoon
- Mixing bowl
- Strainer or clean towel for squeezing spinach
How to Serve This Dish:
Two to four shells per person works well, depending on age and appetite. Serve with garlic bread or plain breadsticks and keep the sauce mild. If a child prefers no visible green, use extra-finely chopped spinach.
Pro Tips for This Recipe:
- Don’t overcook the shells or they’ll tear when you fill them.
- Squeeze the spinach very dry; wet spinach makes the filling loose.
- A piping bag or zip-top bag with the corner snipped makes filling easier.
Variations on This Dish:
- Cheese-Only Shells: Skip the spinach.
- Meat Version: Add cooked ground beef to the filling.
- Mini Shell Bake: Use smaller shells if you want more bite-sized portions.
Common Mistakes to Avoid with This Recipe:
- Filling torn shells: They collapse in the dish.
- Using watery spinach: The sauce gets thin.
- Baking without enough sauce underneath: The pasta edges dry out.
20. Pancake Sausage Bites

Breakfast for dinner gets a different reaction when it looks like snacks. These pancake sausage bites are soft on the inside, a little golden on the outside, and easy to dip in syrup without turning the whole plate into a puddle.
Why It Works:
The shape matters. Mini portions feel lower-stakes than a full stack of pancakes, and the sausage gives each bite enough salt to keep the sweetness from becoming cloying. Kids who like waffles and breakfast sausages usually warm up to these fast.
Key Ingredients:
- 1 cup pancake mix — A standard mix is fine.
- 3/4 cup milk — Enough to make a thick batter.
- 1 egg — Helps the batter set.
- 12 mini sausage links, cooked — Fully cooked before baking.
- 1 tablespoon melted butter — For flavor.
- Maple syrup for serving — Optional but useful.
- Pinch of cinnamon — Optional.
Quick Steps:
- Heat the oven to 375°F and grease a mini muffin tin.
- Whisk the pancake mix, milk, egg, butter, and cinnamon into a thick batter.
- Spoon a little batter into each cup, add one sausage link, then cover with a bit more batter.
- Bake for 12 to 15 minutes until puffed and golden.
- Cool slightly and serve with syrup.
Equipment for This Recipe:
- Mini muffin tin
- Mixing bowl
- Whisk
- Small spoon or scoop
How to Serve This Dish:
Serve warm with syrup in a tiny cup for dipping. Fruit salad or sliced strawberries fit well beside them. They work for dinner, but they’re also good for school mornings if you make them ahead.
Pro Tips for This Recipe:
- Use cooked sausage; raw sausage won’t finish fast enough.
- Don’t overfill the mini cups or the batter spills over.
- A thicker batter holds the sausage better than a thin one.
Variations on This Dish:
- Cheddar Pancake Bites: Fold a little shredded cheese into the batter.
- Blueberry Version: Add a few blueberries to the batter instead of sausage.
- Turkey Sausage Swap: Use mini turkey links for a leaner option.
Common Mistakes to Avoid with This Recipe:
- Thin batter: The sausage sinks.
- Uneven cooking: Fill the cups the same amount.
- Serving cold: These are much better warm.
21. Shepherd’s Pie with Hidden Veggies
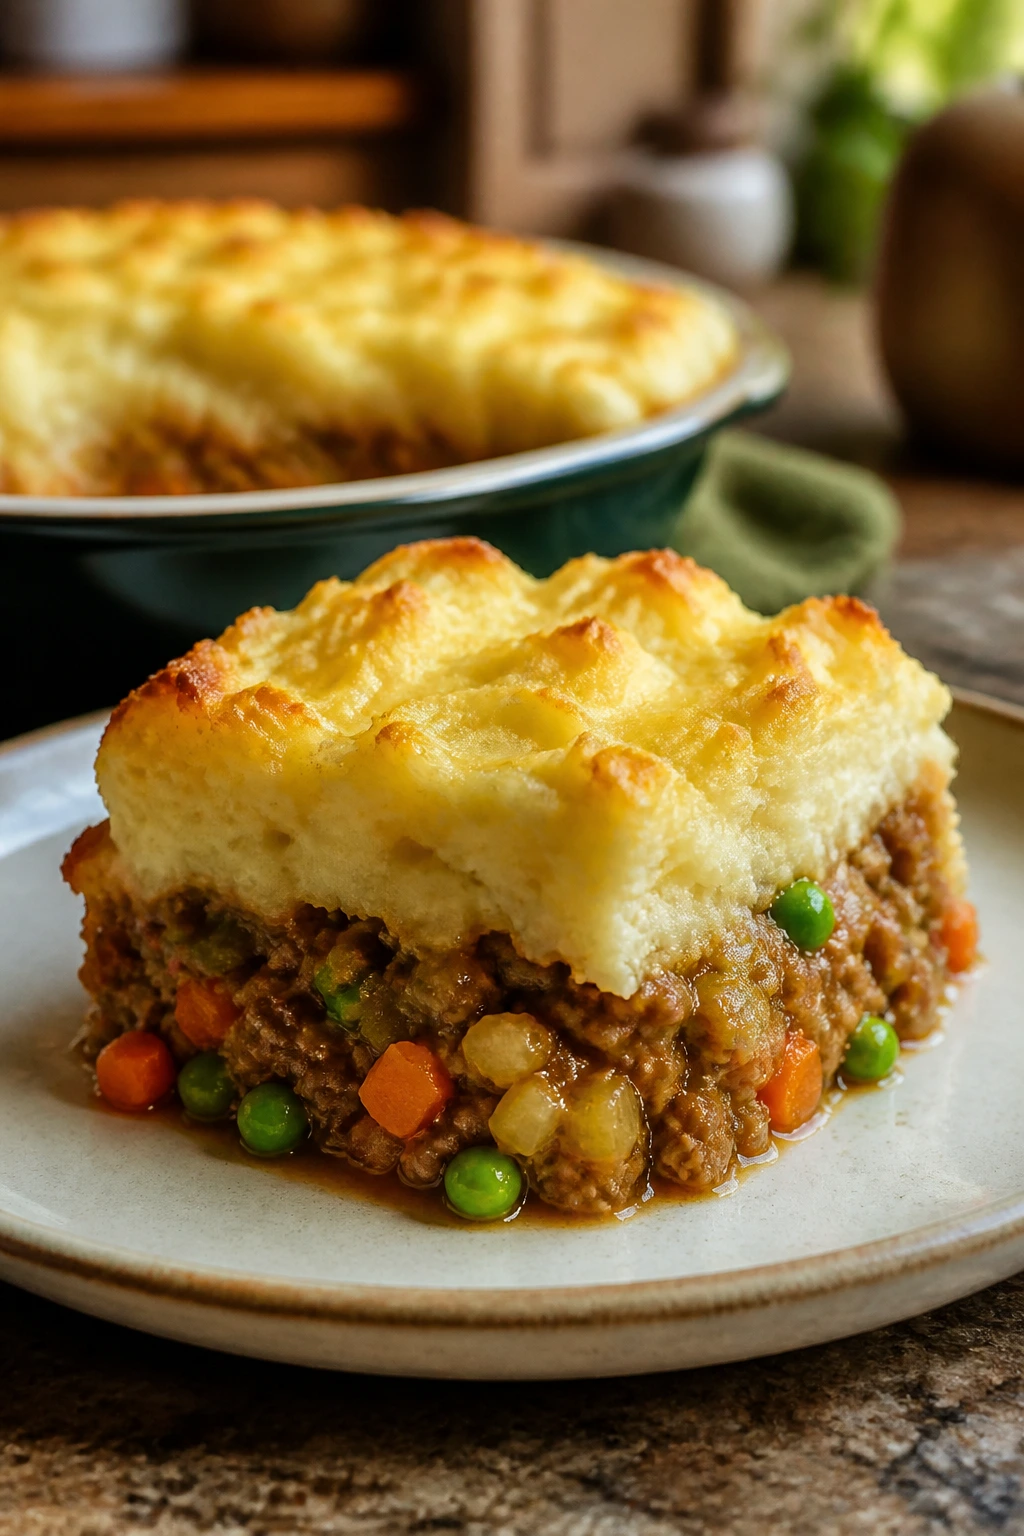
A good shepherd’s pie should feel like two separate comforts meeting in one dish: savory meat underneath, mashed potatoes on top. The hidden vegetables disappear into the filling, which is helpful when you want the nutrition but not the visible evidence.
Why It Works:
The mashed potato layer creates a soft, familiar top that kids recognize right away. The bottom layer can carry carrots, peas, and celery without making the plate look busy, and the whole thing slices neatly once it cools a little.
Key Ingredients:
- 1 pound ground beef or lamb — Beef is usually more accepted.
- 1 cup finely diced carrots — Cook until soft.
- 1/2 cup diced celery — Optional.
- 1 cup frozen peas — Stir in near the end.
- 2 tablespoons tomato paste — Adds depth.
- 1 cup beef broth — For the gravy.
- 4 cups mashed potatoes — Fresh or leftover.
- 1 tablespoon butter — For the top.
Quick Steps:
- Brown the meat in a skillet, then add carrots and celery.
- Stir in tomato paste and broth, and simmer until thick.
- Fold in peas, then spread the filling in a baking dish.
- Top with mashed potatoes and dot with butter.
- Bake at 400°F for 20 minutes until the top browns.
Equipment for This Recipe:
- Large skillet
- Baking dish
- Potato masher, if making mashed potatoes fresh
- Spoon or spatula
How to Serve This Dish:
Serve in generous squares with a little extra gravy spooned around the edge. Buttered peas or a few slices of bread fit well, though the pie is filling enough to stand alone. Let it sit for 10 minutes so the layers hold.
Pro Tips for This Recipe:
- Mash the potatoes smoothly so the top spreads without tearing.
- Cook the filling until it’s thick, not soupy.
- A fork dragged over the potatoes creates ridges that brown better.
Variations on This Dish:
- Sweet Potato Top: Swap in sweet potatoes for a softer sweetness.
- Turkey Version: Use ground turkey and chicken broth.
- Cheddar Crust: Stir cheese into the mashed potatoes.
Common Mistakes to Avoid with This Recipe:
- Thin filling: It leaks into the potato layer.
- Cold potatoes straight from the fridge: They don’t spread well.
- Serving too hot: The layers slide apart.
22. Creamy Pesto Pasta with Chicken
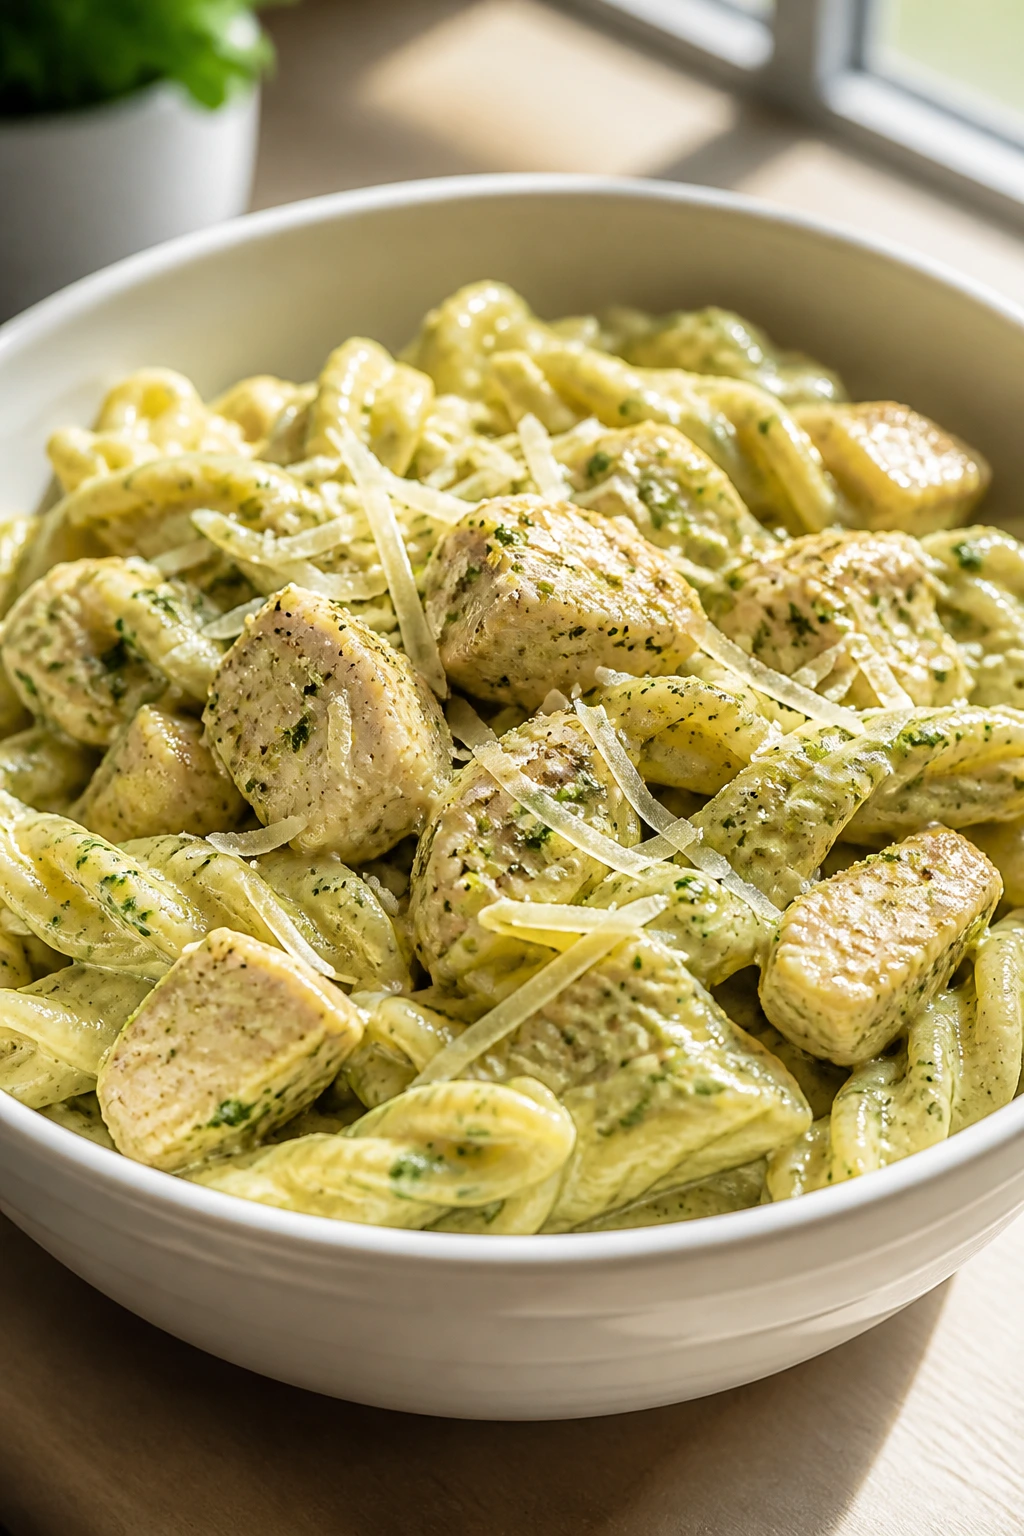
Pesto can scare picky eaters if it’s too green and too sharp. This version cuts the basil sauce with cream and Parmesan so it tastes mellow, not aggressive. The chicken keeps it feeling complete, and the pasta carries the sauce without fuss.
Why It Works:
The cream softens the pesto’s herbal bite, which matters for kids who don’t like strong flavors. Cutting the chicken into small pieces and keeping the pasta shape short gives the whole bowl a friendly, easy-to-eat texture.
Key Ingredients:
- 12 ounces rotini or penne — Short pasta holds sauce well.
- 2 cups cooked chicken, chopped — Rotisserie chicken saves time.
- 1/2 cup basil pesto — Use a mild version if possible.
- 1/2 cup heavy cream — Softens the pesto.
- 1/4 cup grated Parmesan — Adds salt and body.
- 1 cup frozen peas — Optional and sweet.
- 1 tablespoon butter — For extra richness.
Quick Steps:
- Cook the pasta and peas together, then drain.
- Warm the cream and pesto in a skillet over low heat.
- Stir in butter, Parmesan, and chicken.
- Add the pasta and toss until coated and glossy.
- Serve right away.
Equipment for This Recipe:
- Large pot
- Large skillet
- Colander
- Wooden spoon
How to Serve This Dish:
Serve in bowls with a little extra Parmesan and maybe plain bread on the side. A salad is fine for adults, but most kids will focus on the pasta. The sauce is best when it looks creamy, not green and oily.
Pro Tips for This Recipe:
- Keep the heat low after the pesto goes in.
- If the sauce seems thick, add a splash of pasta water.
- Use rotini if your child likes little pockets of sauce.
Variations on This Dish:
- No-Pea Version: Leave them out entirely.
- Sun-Dried Tomato Twist: Add a spoonful of chopped sun-dried tomatoes for adults.
- Vegetarian Bowl: Skip the chicken and add more peas.
Common Mistakes to Avoid with This Recipe:
- Heating pesto too hard: The flavor gets dull.
- Using too much pesto: The dish can turn sharp and oily.
- Overloading with add-ins: Keep the bowl simple.
23. Tuna Melts on English Muffins
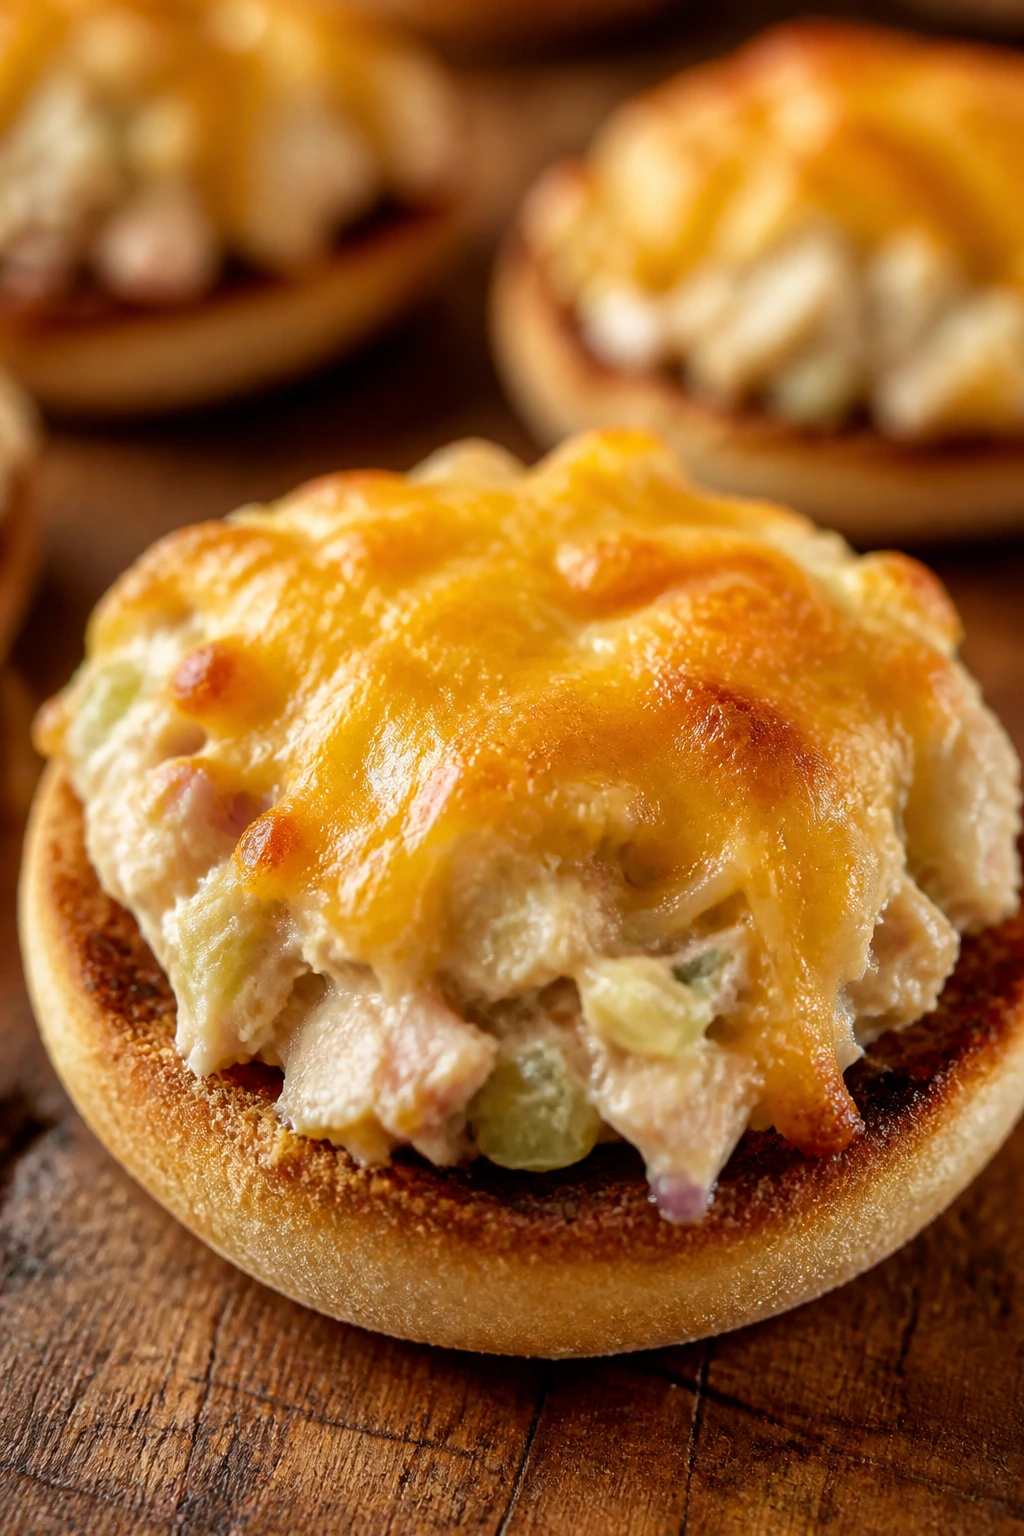
Tuna melts work when the tuna mixture is creamy and the bread crisps without burning. English muffins are a smart base because the nooks and crannies catch the filling, and the halves are easy for small hands to hold.
Why It Works:
This is a sandwich that feels toasty and soft at the same time. The cheese on top gives kids an obvious sign that it’s “finished,” and the tuna salad inside stays mild if you keep the seasoning restrained.
Key Ingredients:
- 2 cans tuna, drained — Packed in water or oil.
- 1/4 cup mayonnaise — Enough to bind, not drown.
- 1 tablespoon finely diced celery — Optional for crunch.
- 1 teaspoon lemon juice — Brightens the filling.
- 1/4 teaspoon salt — Adjust carefully.
- 4 English muffins, split — The base.
- 4 slices cheddar cheese — Melts cleanly.
Quick Steps:
- Mix tuna, mayo, celery, lemon juice, and salt in a bowl.
- Spread the mixture onto the English muffin halves.
- Top with cheddar.
- Broil for 1 to 2 minutes until the cheese melts and the edges toast.
- Serve warm.
Equipment for This Recipe:
- Baking sheet
- Mixing bowl
- Spoon
- Broiler-safe oven rack position
How to Serve This Dish:
Serve with tomato soup, baby carrots, or a few potato chips if you’re trying to keep the mood light. The half-muffin shape makes the portions easy to scale. Three halves can be enough for a small child; four are more realistic for older kids.
Pro Tips for This Recipe:
- Drain the tuna well or the muffins get soggy.
- Keep a close eye under the broiler. Cheese goes from melted to scorched fast.
- Use mild cheddar if the kids are cautious about sharper flavors.
Variations on This Dish:
- Tuna Pizza Melt: Add a spoonful of pizza sauce under the cheese.
- Plain Melt: Skip the celery completely.
- Open-Face Lunch: Use one muffin half for smaller appetites.
Common Mistakes to Avoid with This Recipe:
- Overmixing the tuna salad: It turns paste-like.
- Broiling too far from the heat: The muffin dries out before the cheese melts.
- Using wet tuna: The sandwich gets messy fast.
24. Salisbury Steak Meatballs with Mashed Potatoes
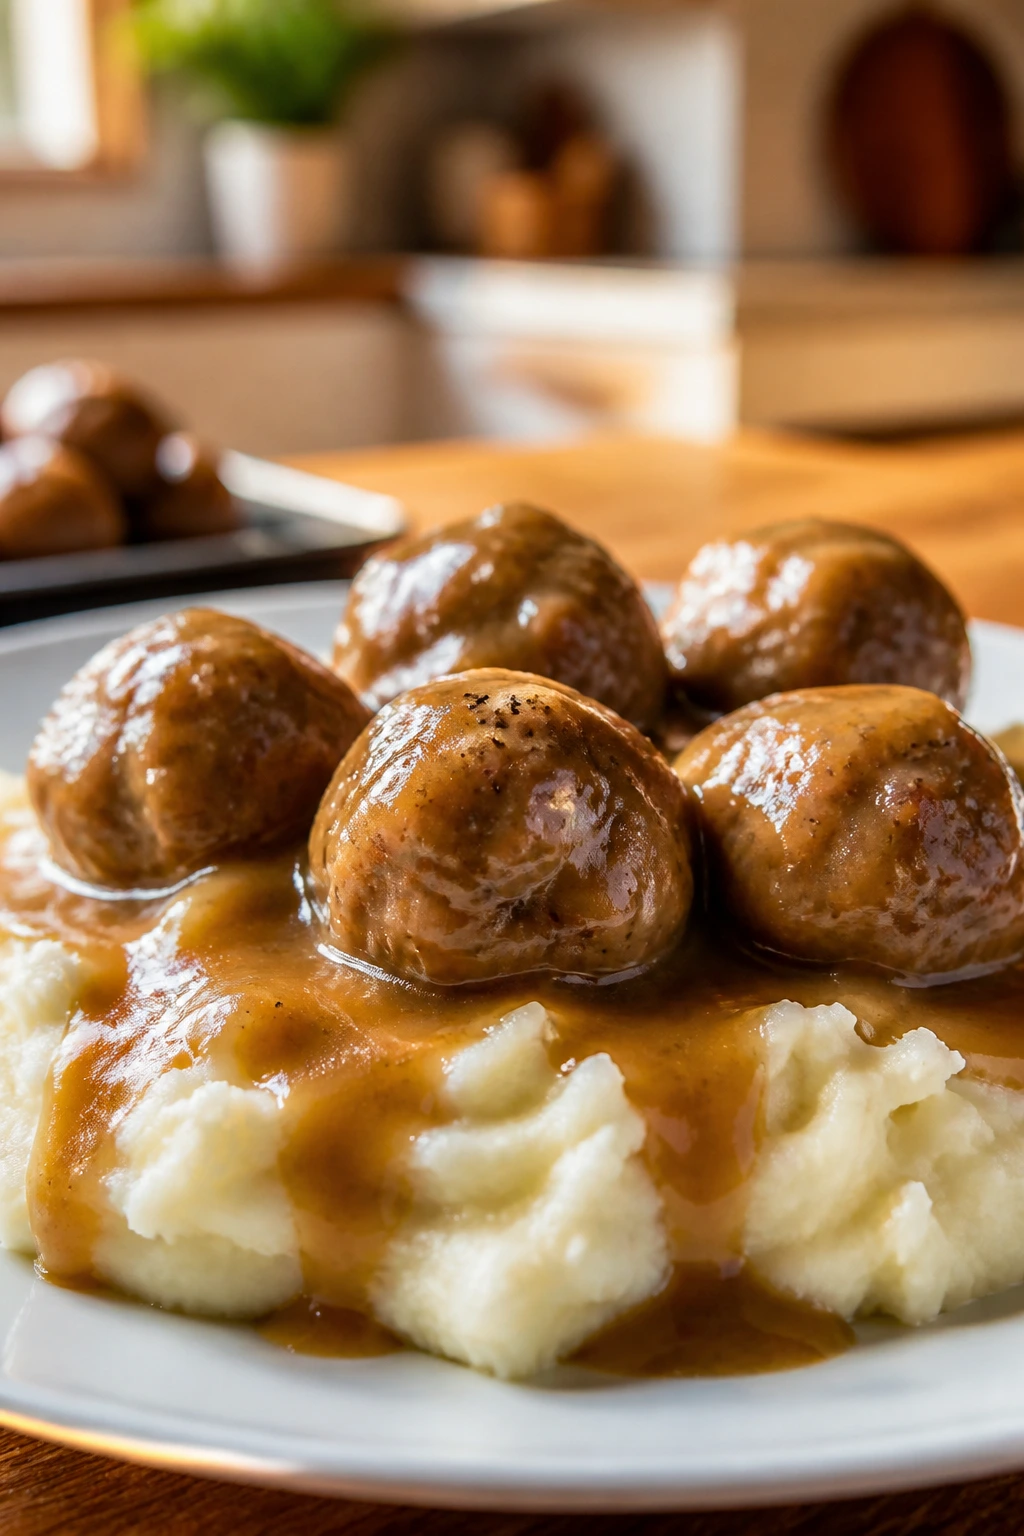
This dish gives you the flavor of Salisbury steak without the need for neat patties or heavy carving. The meatballs are soft, the gravy is brown and mild, and the mashed potatoes underneath make the whole plate feel settled.
Why It Works:
Meatballs are less intimidating than a full steak-shaped patty. The gravy coats them in a familiar way, and the mashed potatoes keep the meal from feeling dry or too “brown” for kids who eat with their eyes first.
Key Ingredients:
- 1 pound ground beef — Use 85/15.
- 1/3 cup breadcrumbs — For tenderness.
- 1 egg — Binder.
- 1 teaspoon onion powder — Easier than visible onion.
- 1/2 teaspoon salt — Season the meat lightly.
- 2 cups beef broth — For the gravy.
- 1 tablespoon flour — Thickens the sauce.
- 4 cups mashed potatoes — For serving.
Quick Steps:
- Mix beef, breadcrumbs, egg, onion powder, and salt, then shape into meatballs.
- Brown the meatballs in a skillet until all sides are seared.
- Stir flour into the pan, then add broth and simmer into gravy.
- Return the meatballs to the skillet and cook until done.
- Serve over mashed potatoes.
Equipment for This Recipe:
- Large skillet with lid
- Mixing bowl
- Whisk
- Spoon
How to Serve This Dish:
Spoon the meatballs and gravy over mashed potatoes and keep the serving simple. Green beans or peas fit well on the side, but they’re optional. This is a fork-and-spoon meal, which makes it easy for younger kids.
Pro Tips for This Recipe:
- Brown the meatballs before simmering for better flavor.
- Whisk the gravy well so it doesn’t clump.
- If the gravy gets too thick, loosen it with a splash more broth.
Variations on This Dish:
- Mushroom-Free Gravy: Keep it plain if mushrooms are a no-go.
- Turkey Meatballs: Swap in ground turkey and use chicken broth.
- Mini Dinner Plates: Serve with buttered noodles instead of potatoes.
Common Mistakes to Avoid with This Recipe:
- Making the gravy too salty: Broth can vary a lot.
- Skipping the browning step: The meatballs taste flat.
- Serving with cold potatoes: Warm potatoes catch the gravy better.
25. Sausage and Potato Sheet Pan Dinner
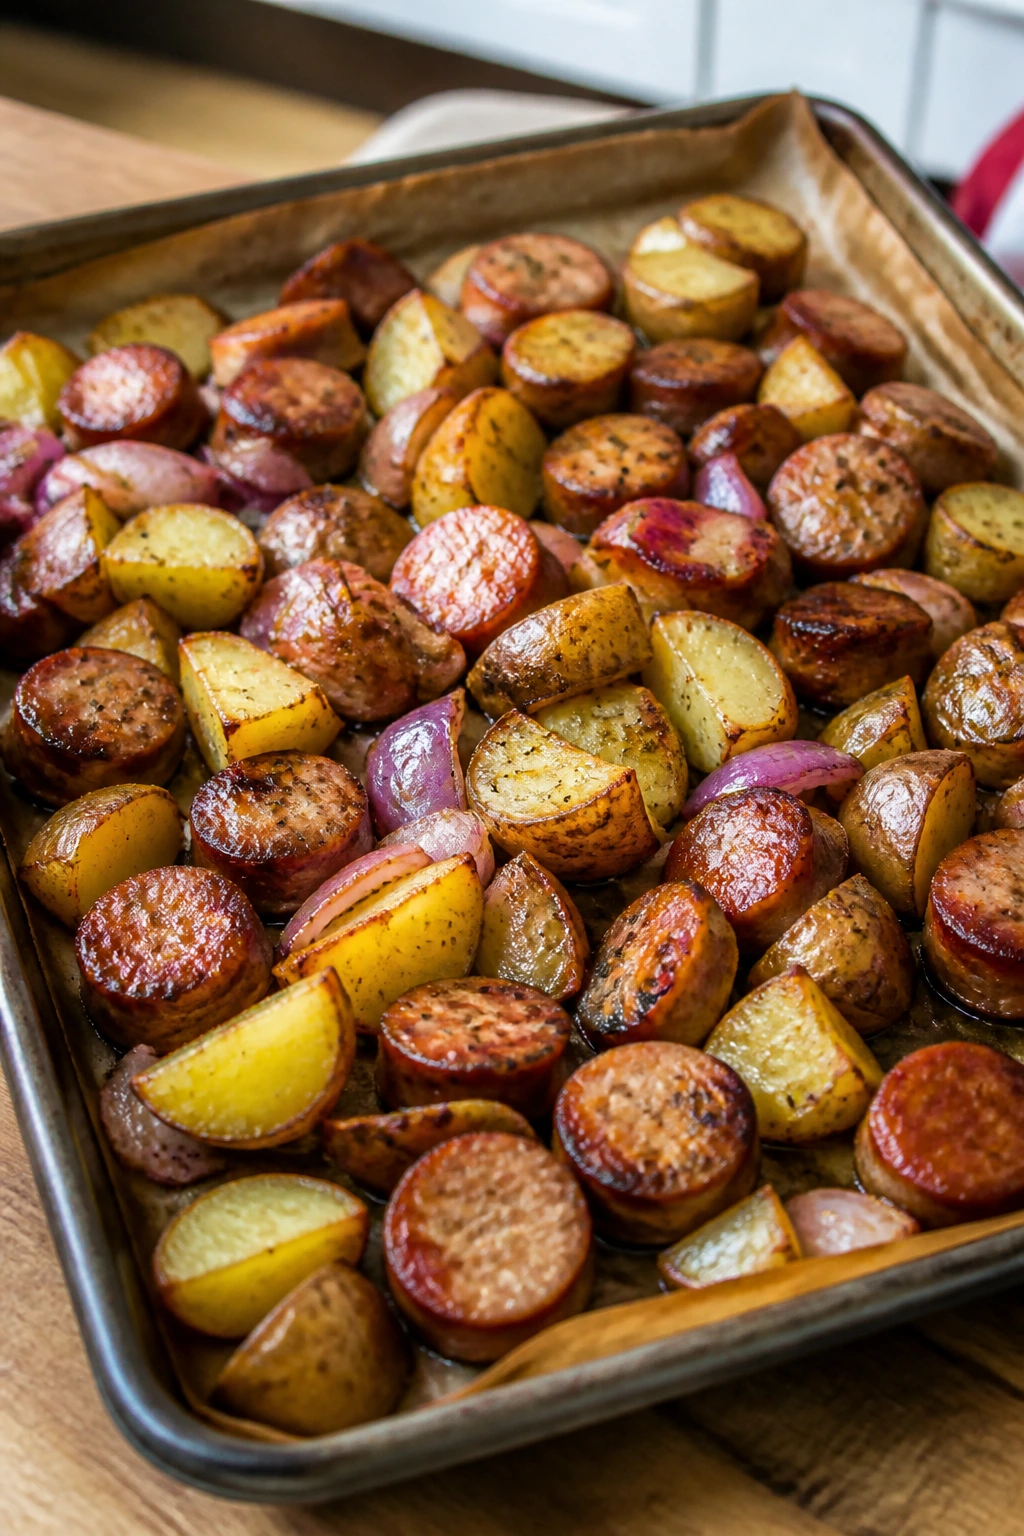
There’s a lot to like about a meal that roasts on one tray and tastes like it required more effort than it did. The potatoes go crisp on the outside, the sausage browns, and the carrots turn sweet. It’s a useful dinner when the table is split between hungry and fussy.
Why It Works:
Everything cooks at about the same rate if you cut the vegetables evenly. The sausage provides enough flavor that you don’t need a long ingredient list, and the potatoes offer the soft, familiar part kids usually reach for first.
Key Ingredients:
- 1 pound smoked sausage, sliced — Mild sausage works best.
- 1 1/2 pounds baby potatoes, halved — Small and even.
- 2 carrots, sliced into rounds — Optional but useful.
- 2 tablespoons olive oil — For roasting.
- 1 teaspoon garlic powder — Gentle seasoning.
- 1 teaspoon salt — Or less if the sausage is salty.
- 1/2 teaspoon black pepper — Optional.
- 1 teaspoon dried parsley — Optional finish.
Quick Steps:
- Heat the oven to 425°F and line a sheet pan.
- Toss potatoes and carrots with oil, garlic powder, salt, and pepper.
- Roast for 15 minutes, then add the sausage.
- Roast another 15 to 20 minutes until the potatoes are tender and browned.
- Sprinkle with parsley and serve.
Equipment for This Recipe:
- Rimmed sheet pan
- Large mixing bowl
- Spatula
- Knife and cutting board
How to Serve This Dish:
Serve directly from the sheet pan or transfer to a wide platter. Ketchup or honey mustard on the side can make the meal more kid-friendly. This pairs nicely with a simple fruit salad if you want a brighter plate.
Pro Tips for This Recipe:
- Cut the potatoes small enough to finish in the same window as the sausage.
- Don’t crowd the pan or the potatoes will steam.
- If you want more browning, flip the potatoes once midway through.
Variations on This Dish:
- Chicken Sausage Swap: Use mild chicken sausage links.
- Sweet Potato Mix: Replace half the potatoes with sweet potatoes.
- Onion Add-In: Add thick onion wedges for adults.
Common Mistakes to Avoid with This Dish:
- Uneven cutting: Some pieces burn while others stay hard.
- Using too much oil: The pan gets greasy instead of crisp.
- Starting the sausage too early: It can dry out before the potatoes finish.
26. Chicken Pot Pie Biscuit Bake
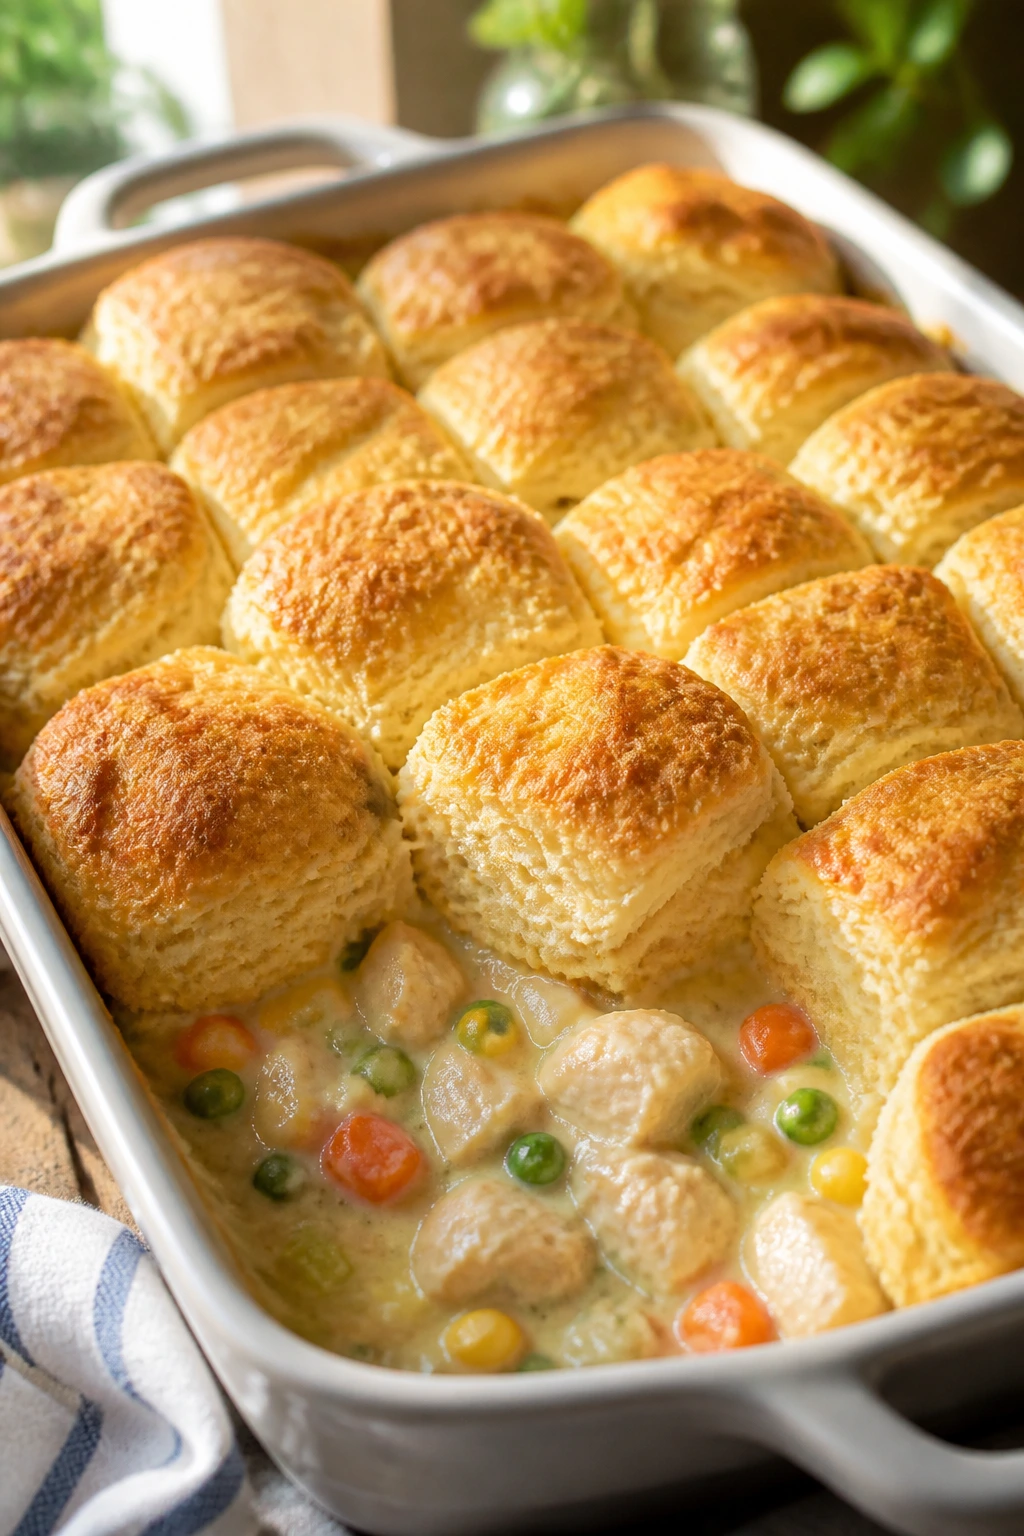
This is the casserole version of chicken pot pie, and that matters because it’s easier to serve and a little less fussy. The biscuit topping gets golden while the filling stays creamy underneath. Kids usually understand biscuits faster than pastry.
Why It Works:
The biscuit top gives a clear, soft cap on a creamy chicken filling. If your child likes soup, chicken, or bread, this is a very reasonable place to start. The vegetables are chopped small and tucked into the sauce, so they don’t stand out.
Key Ingredients:
- 2 cups cooked chicken, chopped — Rotisserie chicken helps.
- 1 cup frozen mixed vegetables — Small pieces are best.
- 1 can cream of chicken soup — The shortcut sauce.
- 1/2 cup milk — Loosens the filling.
- 1 teaspoon dried thyme — Optional.
- 1 can refrigerated biscuits — The topping.
- 1/4 teaspoon black pepper — Optional.
Quick Steps:
- Heat the oven to 375°F and grease a baking dish.
- Stir chicken, vegetables, soup, milk, thyme, and pepper together.
- Spread the filling into the dish.
- Arrange biscuits on top and bake for 25 to 30 minutes until the biscuits are browned and the filling bubbles around the edges.
- Rest for 5 minutes before scooping.
Equipment for This Recipe:
- Baking dish
- Mixing bowl
- Spoon
- Oven mitts
How to Serve This Dish:
Serve with the biscuit on top of each portion so the filling stays contained. A few apple slices or a simple side salad round it out. The casserole spoon can take care of the rest.
Pro Tips for This Recipe:
- If the biscuits brown too fast, cover loosely with foil.
- Dice any larger vegetable pieces before mixing them in.
- Let the filling bubble for a few minutes so the center is hot.
Variations on This Dish:
- Turkey Pot Pie: Swap in cooked turkey.
- Cheddar Biscuit Top: Sprinkle a little cheese over the biscuits.
- Veggie-Heavy Version: Add more peas and carrots if they’re accepted.
Common Mistakes to Avoid with This Recipe:
- Using cold filling straight from the fridge: The biscuits overbake before the center warms.
- Overcrowding biscuit tops: They need room to brown.
- Serving immediately: The filling needs a short rest to set.
27. Cheesy Broccoli Rice Casserole
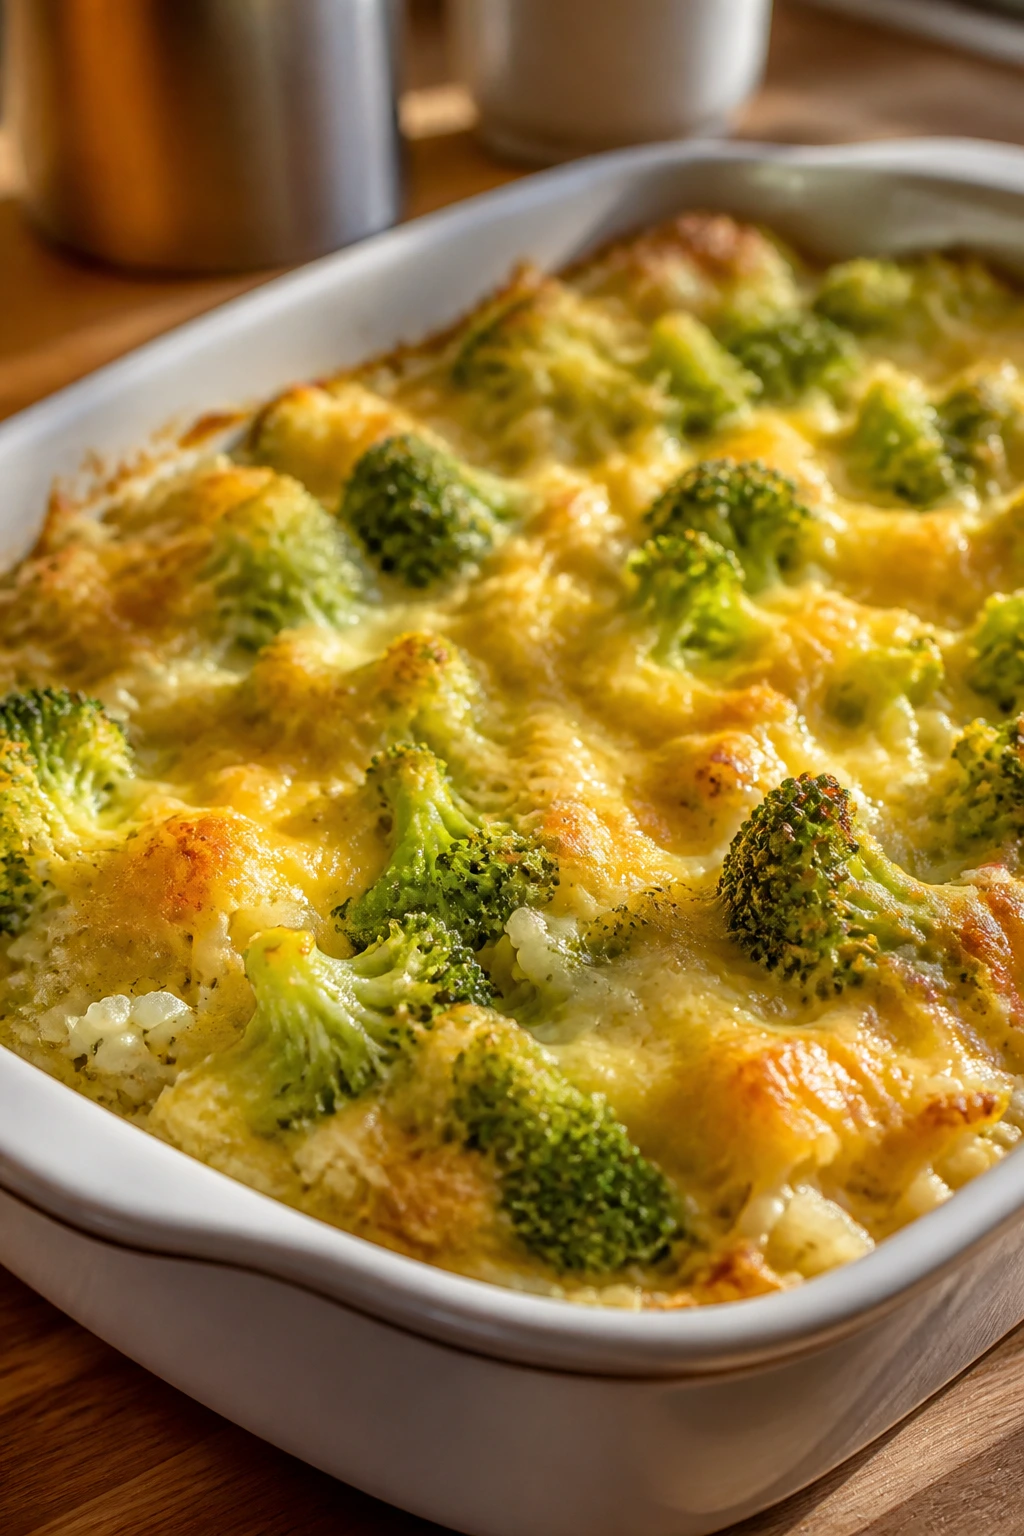
Broccoli casserole is often judged too quickly. If the rice is soft, the cheese is good, and the broccoli stays in bite-size pieces, it becomes one of those dishes kids will accept because it looks like cheesy rice with a green bonus. That’s the angle.
Why It Works:
Rice is a safe base. Cheese sauce covers the broccoli in a way that lowers the vegetable’s visual shock, and the casserole format keeps everything warm and unified. It’s especially useful when you need a side that can become a main.
Key Ingredients:
- 3 cups cooked white rice — Slightly cooled is fine.
- 3 cups small broccoli florets — Lightly steamed.
- 2 cups shredded cheddar — Mild and melty.
- 1 can cream of mushroom or chicken soup — For creaminess.
- 1/2 cup milk — Makes the mixture spreadable.
- 1/2 cup sour cream — Optional, but useful.
- 1/2 teaspoon salt — Adjust to taste.
Quick Steps:
- Heat the oven to 375°F and grease a baking dish.
- Stir rice, broccoli, cheese, soup, milk, sour cream, and salt together.
- Spread into the dish and top with a little extra cheese.
- Bake for 25 minutes until hot and bubbling.
- Rest for 5 minutes before serving.
Equipment for This Recipe:
- Large mixing bowl
- Baking dish
- Spoon
- Steamer basket or pot for broccoli
How to Serve This Dish:
This can sit beside chicken, ham, or meatballs, but it also stands alone in a bowl with a little extra cheddar on top. Keep portions moderate because it’s rich. Kids usually accept it best when the broccoli pieces are not giant.
Pro Tips for This Recipe:
- Steam the broccoli just until bright green.
- Don’t drown the casserole in soup; it should hold together.
- A little buttered crumb topping gives the top a better bite if your kids like crunch.
Variations on This Dish:
- Ham and Broccoli Bake: Add diced cooked ham.
- Cauliflower Swap: Replace half the broccoli with cauliflower.
- Stovetop Version: Heat it in a skillet if you don’t want to bake.
Common Mistakes to Avoid with This Recipe:
- Using mushy broccoli: It disappears into the rice.
- Too much liquid: The casserole turns soupy.
- Skipping the cheese on top: The browned top is what sells it.
28. French Toast Casserole with Cinnamon Sugar
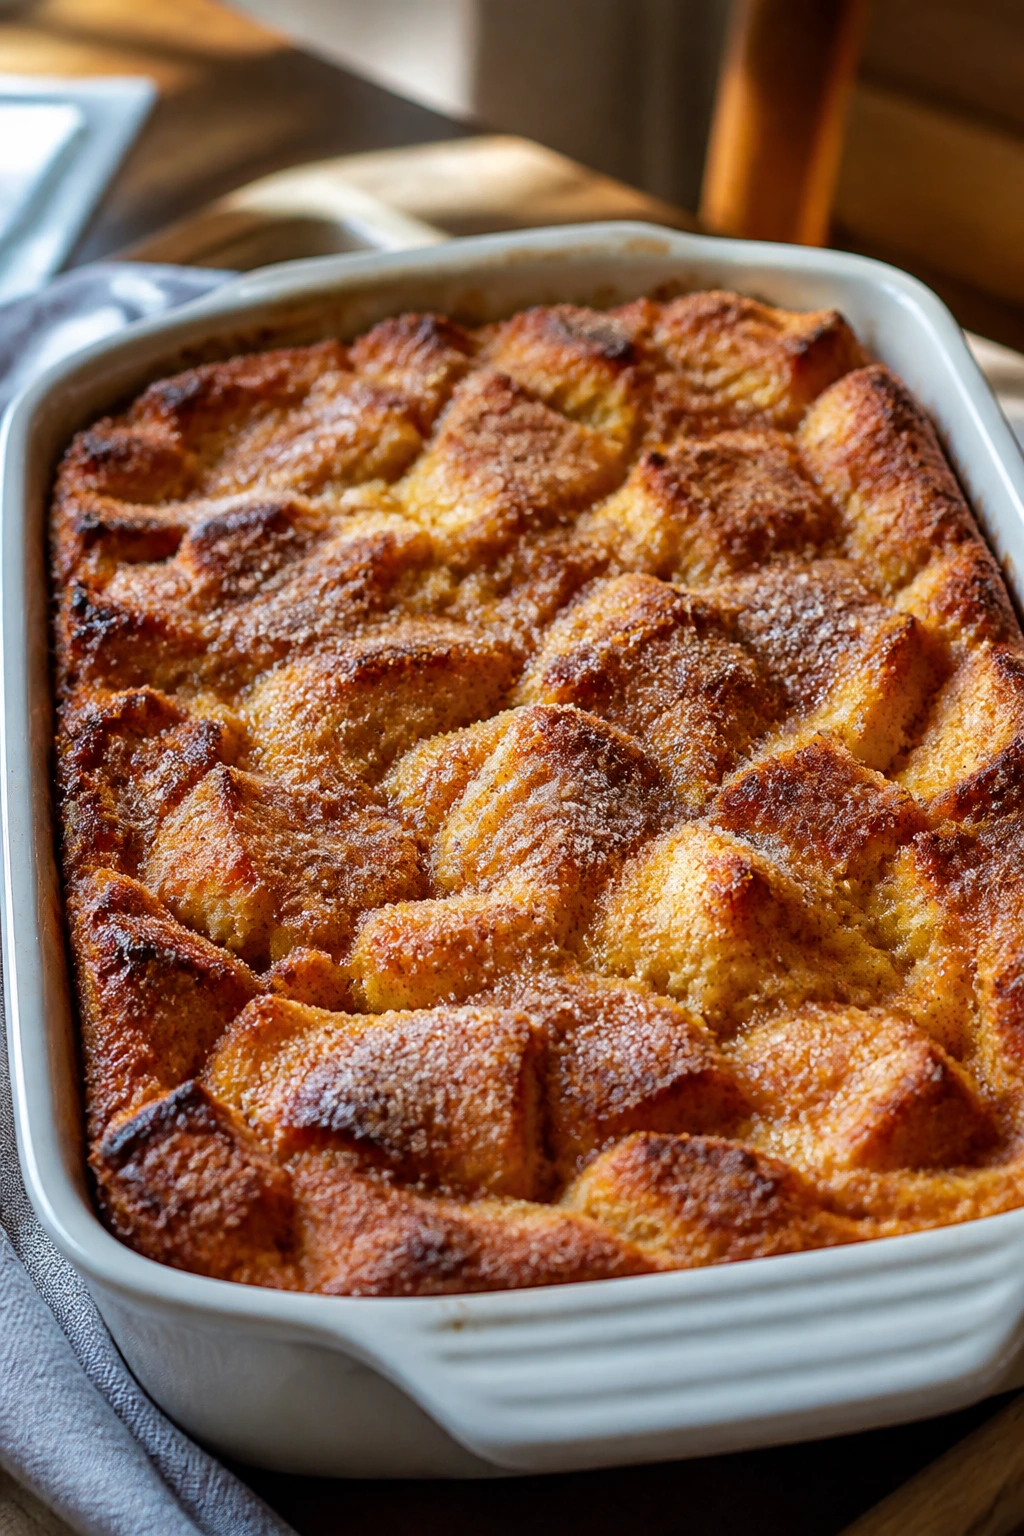
Breakfast casserole can be a miracle on a slow morning because it tastes like French toast but bakes in one dish. The edges go crisp, the middle stays soft, and the cinnamon sugar makes the top smell like a bakery without becoming too sweet.
Why It Works:
Kids who want pancakes usually accept this because the texture sits between bread pudding and toast. It can be sliced into squares, which makes serving easier, and the custardy interior keeps it from drying out like plain toast sometimes does.
Key Ingredients:
- 1 loaf sturdy bread, cubed — Brioche or challah works well.
- 6 large eggs — For the custard.
- 2 cups milk — Whole milk gives the best texture.
- 1/3 cup sugar — Enough to sweeten the custard.
- 2 teaspoons cinnamon — The main flavor.
- 2 tablespoons melted butter — For the baking dish and top.
- 1 teaspoon vanilla extract — Optional but nice.
- 2 tablespoons brown sugar — For the top.
Quick Steps:
- Grease a baking dish and spread in the bread cubes.
- Whisk eggs, milk, sugar, cinnamon, and vanilla together.
- Pour over the bread and press lightly so it soaks in.
- Sprinkle with brown sugar and bake at 350°F for 35 to 40 minutes until puffed and set.
- Rest for 10 minutes before cutting.
Equipment for This Recipe:
- Baking dish
- Mixing bowl
- Whisk
- Measuring cups
How to Serve This Dish:
Serve warm with maple syrup, berries, or a dusting of powdered sugar. If you want to keep it simple, cut squares and set the syrup on the side. It’s one of the few breakfasts that also works as dessert-adjacent dinner.
Pro Tips for This Recipe:
- Use bread that’s a little stale so it soaks evenly.
- Don’t soak the casserole too long before baking or it can turn soggy.
- A loose foil cover for part of the bake helps the top stay soft while the center cooks.
Variations on This Recipe:
- Apple Cinnamon Bake: Add thin apple slices between the bread cubes.
- Berry Version: Fold in blueberries.
- No-Vanilla Version: Skip the vanilla if you want a plainer custard.
Common Mistakes to Avoid with This Recipe:
- Using flimsy sandwich bread: It falls apart in the custard.
- Skipping the rest after baking: The squares won’t hold together.
- Overbaking: The casserole turns dry fast.
29. Loaded Baked Potato Soup

This soup tastes like a baked potato got comfortable and turned into dinner. The texture is creamy, the potatoes are soft, and the toppings can stay separate until each bowl is assembled. That makes it easier to please both cautious and adventurous eaters.
Why It Works:
Potato soup is friendly because the base is mild and familiar. You can leave the bacon or scallions off the kids’ bowls and still serve something substantial. The cheese and cream build a thick soup that feels more like a meal than a starter.
Key Ingredients:
- 2 pounds russet potatoes, peeled and diced — They break down well.
- 1 small onion, diced — Cooked soft.
- 4 cups chicken broth — The cooking liquid.
- 1 cup milk — For creaminess.
- 1/2 cup sour cream — Optional, but useful.
- 1 1/2 cups shredded cheddar — Mild cheese works best.
- 4 slices cooked bacon, crumbled — Optional topping.
- Salt and pepper — To taste.
Quick Steps:
- Simmer potatoes and onion in broth until very tender, about 15 to 20 minutes.
- Mash some of the potatoes in the pot or blend part of the soup for a thicker base.
- Stir in milk, sour cream, and cheddar over low heat.
- Ladle into bowls and top with bacon or extra cheese.
- Serve hot.
Equipment for This Recipe:
- Large pot
- Potato masher or immersion blender
- Ladle
- Sharp knife
How to Serve This Dish:
Use small bowls with toppings on the side so kids can choose what lands on top. Breadsticks or a plain roll work well for dipping. For younger eaters, keep the bacon and scallions off the plate and just lean into cheese.
Pro Tips for This Recipe:
- Don’t let the soup boil after the dairy goes in.
- Mash only part of the potatoes if you want some texture.
- A little extra broth can loosen soup that gets too thick on standing.
Variations on This Dish:
- Turkey Bacon Topping: Use turkey bacon if that’s what you keep.
- Cheddar-Only Bowl: Skip all garnish except cheese.
- Ham and Potato Soup: Add diced ham for a heavier version.
Common Mistakes to Avoid with This Dish:
- Using waxy potatoes: They don’t break down as nicely.
- Adding dairy on high heat: The soup can separate.
- Serving it too thick straight from the stove: It firms up as it sits.
30. Mozzarella Meatball Subs
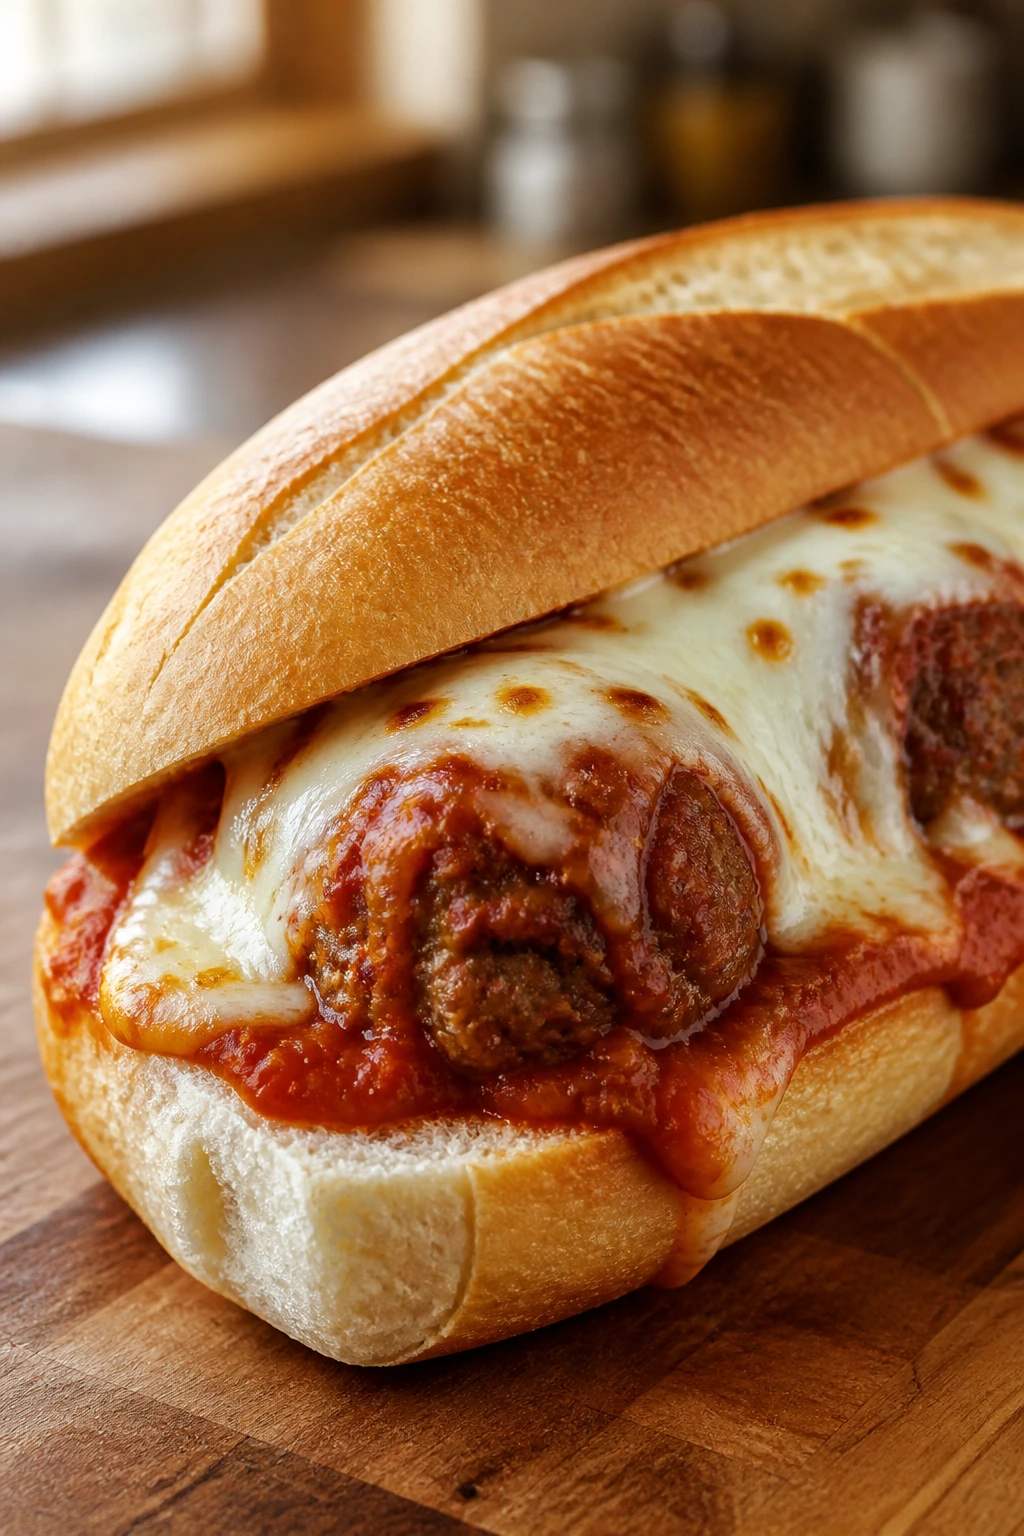
A good meatball sub should be saucy enough to feel exciting but not so wet that it slithers apart. These use soft meatballs, mild marinara, and a blanket of mozzarella that melts into the bread. It’s messy in the right way.
Why It Works:
The sub roll gives you a clear handheld meal, and the meatballs are familiar enough that kids often accept them before they accept other sauces. Mozzarella keeps the flavor mild, while the bread catches the extra marinara instead of dumping it on the plate.
Key Ingredients:
- 12 small cooked meatballs — Homemade or store-bought.
- 2 cups mild marinara sauce — Keep it gentle.
- 4 sub rolls — Soft but sturdy.
- 2 cups shredded mozzarella — For melting.
- 2 tablespoons butter — Optional for the rolls.
- 1 teaspoon dried oregano — Optional.
- 1/4 cup grated Parmesan — Optional finish.
Quick Steps:
- Warm the meatballs in the marinara sauce over low heat until heated through.
- Split the rolls and place them on a sheet pan.
- Spoon meatballs and sauce into each roll, then top with mozzarella.
- Bake at 375°F for 8 to 10 minutes until the cheese melts and the bread toasts at the edges.
- Serve immediately.
Equipment for This Recipe:
- Saucepan or deep skillet
- Baking sheet
- Knife
- Spoon or ladle
How to Serve This Dish:
Serve the subs with extra napkins and a simple side like carrot sticks or potato chips. If you want a cleaner version for smaller kids, slice the sub into shorter sections. They hold together better that way.
Pro Tips for This Recipe:
- Toast the rolls slightly before adding the filling if they’re very soft.
- Use smaller meatballs so each bite stays manageable.
- Don’t overload the sauce; the bread should stay structured.
Variations on This Dish:
- Garlic Butter Roll: Brush the rolls with garlic butter before baking.
- Turkey Meatball Sub: Use turkey meatballs for a lighter bite.
- Open-Face Version: Serve on half rolls for younger kids.
Common Mistakes to Avoid with This Dish:
- Using too much sauce: The bread collapses.
- Skipping the toast step: The sub gets soggy fast.
- Serving immediately from the pan without a rest: The filling slides out.
Why Mild, Familiar Dinners Keep Working
The best thing about kid approved meals for picky eaters is that they don’t fight the people eating them. They don’t arrive with too many colors, too many sauces, or too many surprises hiding under the cheese. A plate that feels calm is often eaten more calmly. Funny how that works.
I also like that these meals give you room to adjust without rethinking dinner from scratch. You can keep the base recipe the same and shift the toppings, the cheese, the dipping sauce, or the side dish depending on who’s at the table. That flexibility is the whole game on a Tuesday night.
Essential Equipment for the Whole Collection
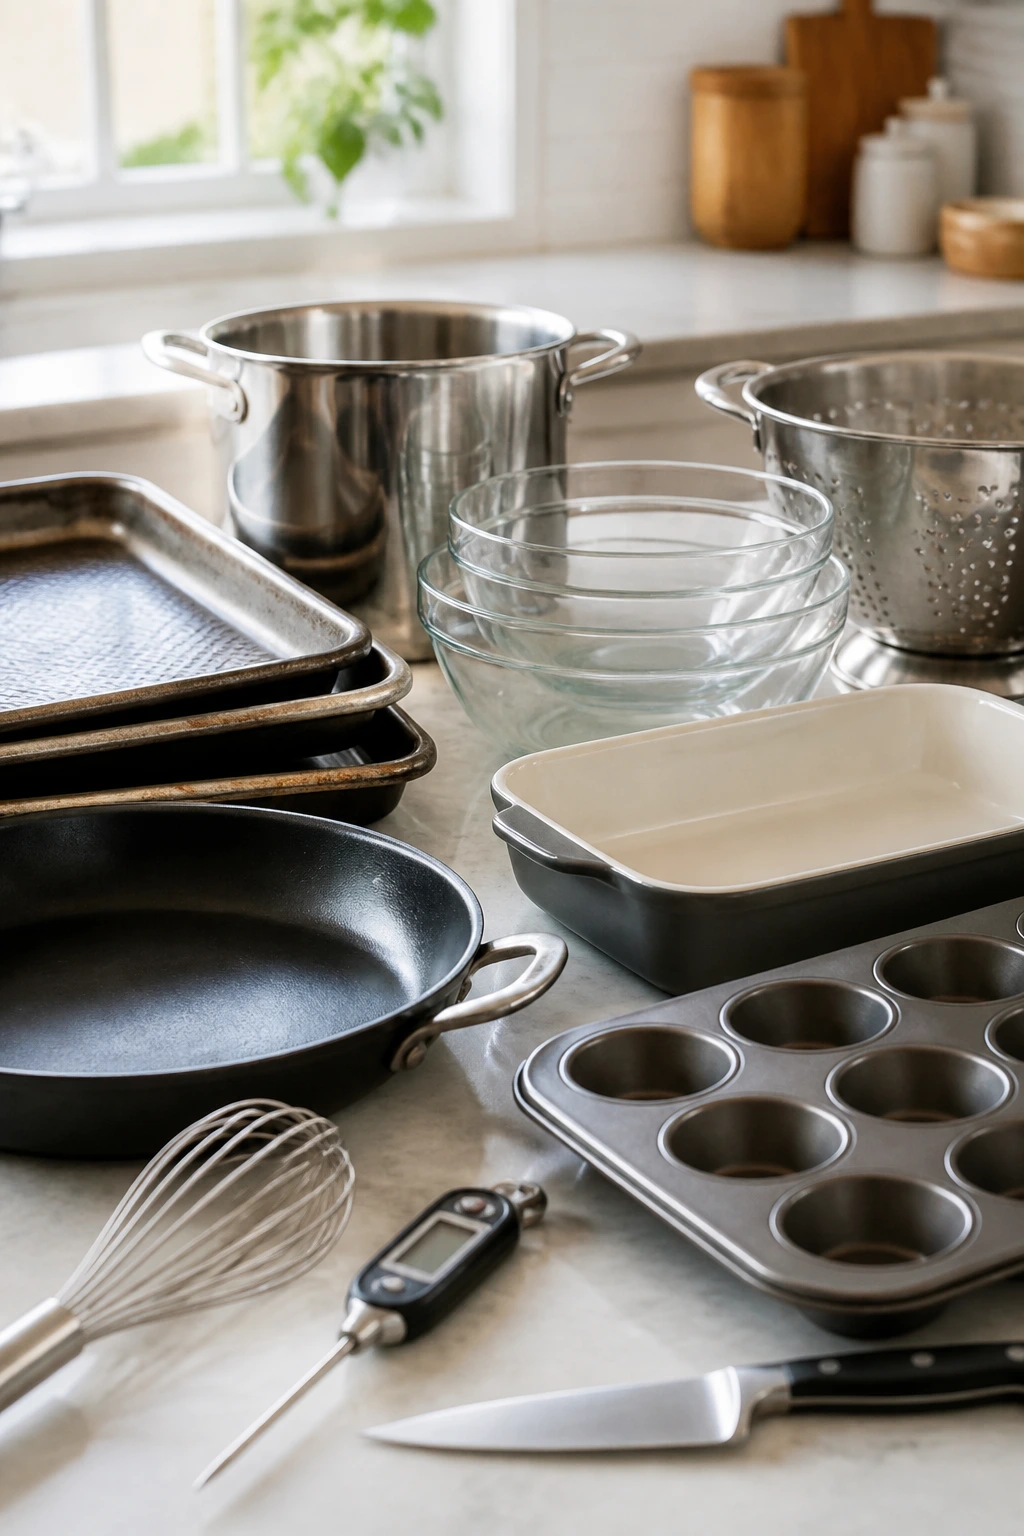
-
Rimmed baking sheets — Useful for chicken tenders, fish sticks, sliders, and anything that benefits from even browning.
-
Large skillet or sauté pan — Needed for taco pasta, sloppy joes, honey-garlic chicken, and several of the one-pan dinners.
-
9×13-inch baking dish — The workhorse for ziti, pot pie bake, casseroles, and French toast casserole.
-
Muffin tin — Handy for meatloaf muffins and egg muffins, where portion size matters.
-
Large pot — Essential for pasta, soup, chili, and anything that needs a good simmer.
-
Mixing bowls, at least 2 sizes — One for sauces or fillings, one for breading or batter.
-
Whisk — Useful for cream sauces, egg mixtures, and gravy.
-
Colander — For pasta, potatoes, and draining tuna well.
-
Instant-read thermometer — Especially helpful for chicken, turkey, and meatloaf. 165°F for poultry, 160°F for ground beef and pork mixtures.
-
Sharp knife and cutting board — Cutting evenly is half the battle in sheet-pan meals and casseroles.
Smart Shopping for Kid-Friendly Ingredients
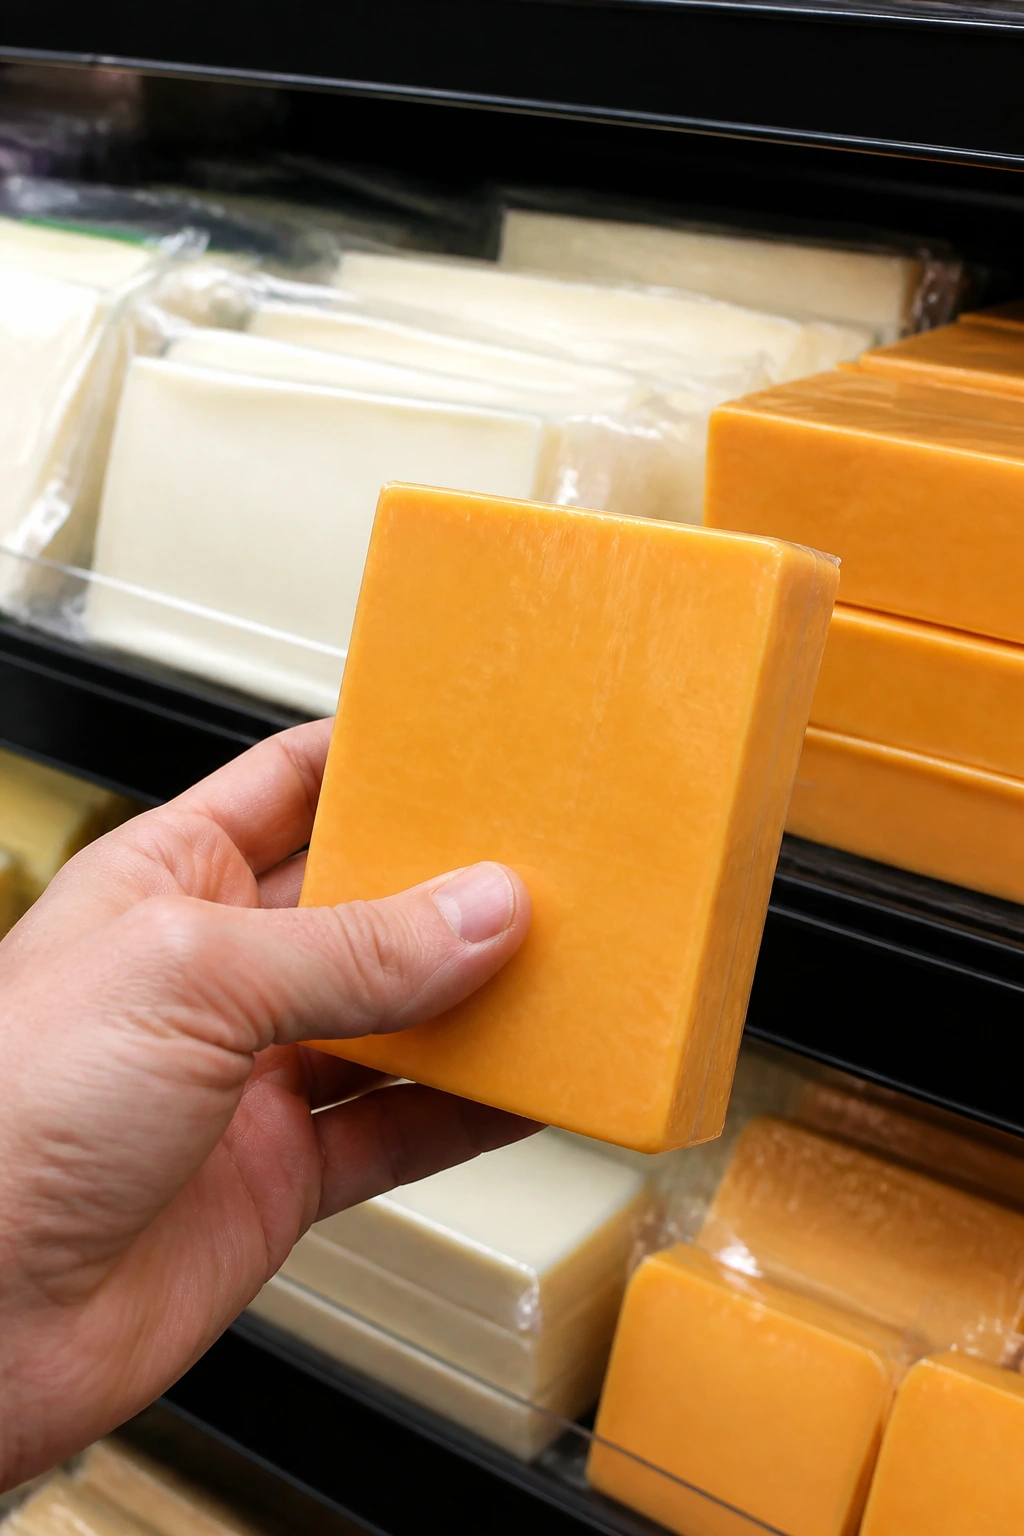
A lot of picky-eater cooking starts in the grocery aisle, not the kitchen. I’d reach for mild cheddar, mozzarella, or American cheese before I reached for anything sharp or funky. Sharp cheese can be fine for adults, but kids tend to notice the edge right away, and not in a good way. The same goes for sauces: plain marinara often works better than the fancy jar with olives, wine, or lots of herbs.
Protein choice matters too. Chicken thighs stay juicier than breasts in skillet meals and oven bakes, while ground turkey gives you a softer flavor in meatballs, sloppy joes, and taco pasta. If your child dislikes chewy meat, avoid overcooked chicken breasts and dry burger patties. That texture is where meals get rejected.
For pantry items, buy the boring stuff on purpose. Panko, breadcrumbs, egg noodles, elbow macaroni, rice, tortillas, and slider buns are the quiet heroes here. Frozen vegetables are useful too, especially peas, broccoli florets, and mixed veg for casseroles. They’re picked at a usable stage and usually save you from trimming and chopping at the end of the day.
Canned tomato products deserve a quick look. Choose low-sodium broth and tomato sauce when you can, because you can add salt later. You cannot take it back once the soup, chili, or pasta sauce gets too salty. That’s one of those kitchen truths that sounds small until it ruins dinner.
How to Serve These Meals
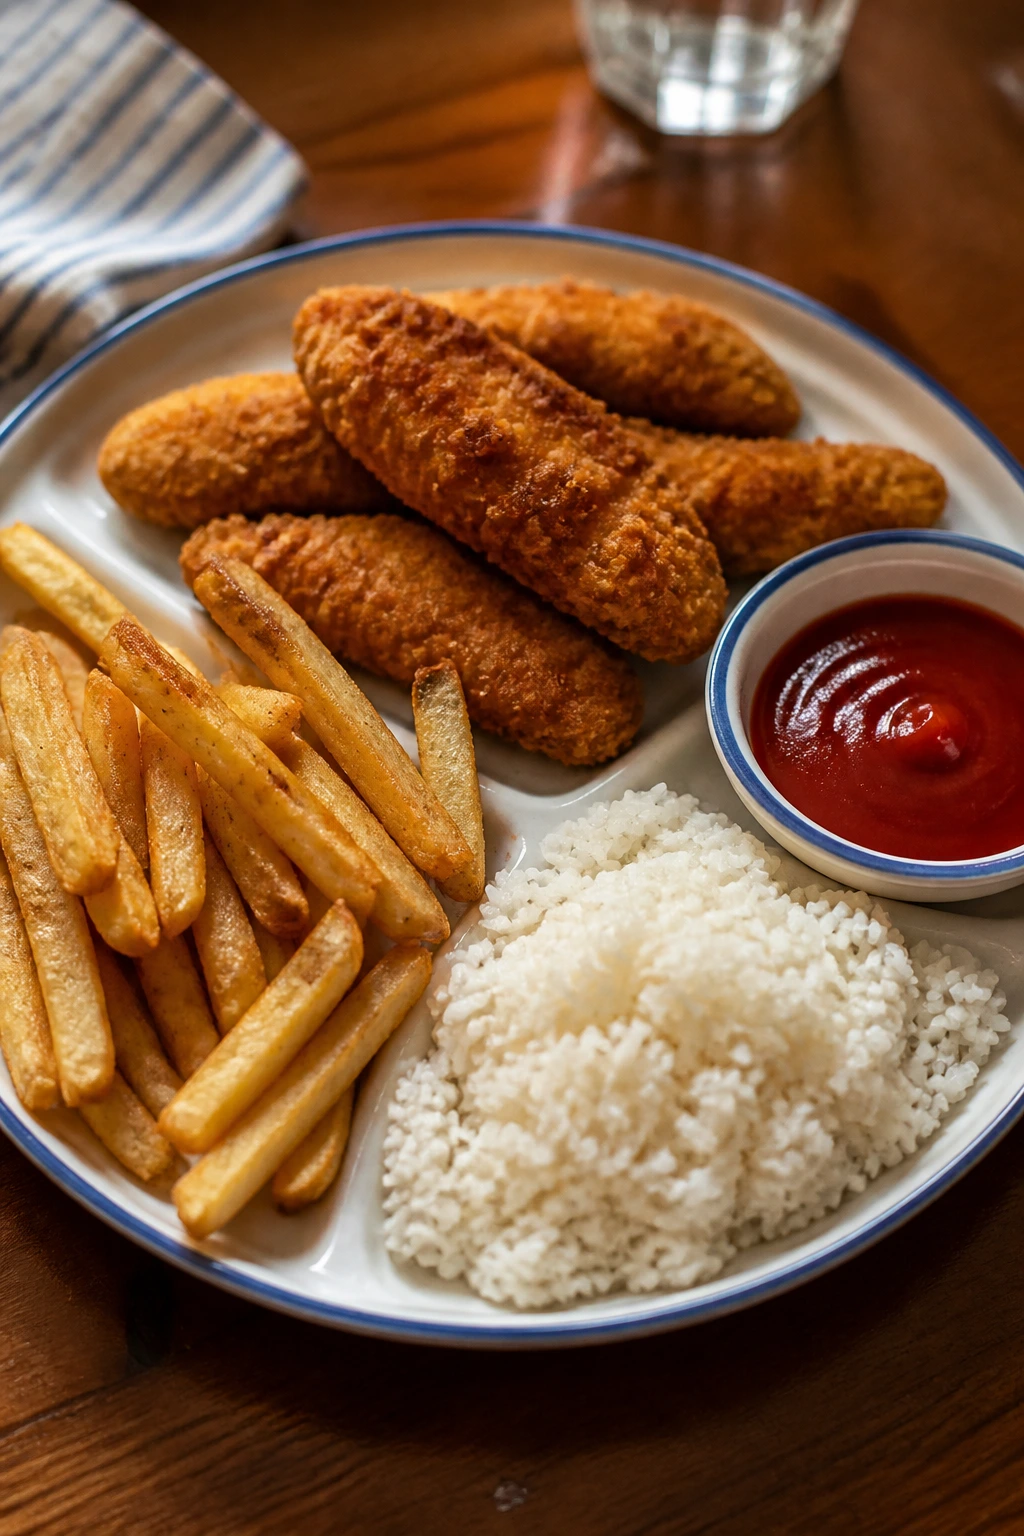
Presentation: Keep the plate readable. Separate the chicken tenders from the fries, the rice from the sauce, and the dip from the main dish when you can. Kids often eat better when they can identify each part at a glance.
Accompaniments: The easiest side dishes here are plain things that don’t argue with the main meal: apple slices, cucumber coins, carrot sticks, buttered peas, roasted potatoes, garlic bread, toast, and rice. If you’re serving something rich like Alfredo or potato soup, balance it with a crisp or fresh side.
Portions: Younger kids usually do well with 1 modest main portion plus 1 simple side. Older kids and teens may need double the starch or an extra slider, meatball, or scoop of pasta. I’d rather serve a smaller base and offer seconds than pile a plate too high and watch it come back half-eaten.
Beverage Pairing: Milk still works for a lot of these meals, especially the cheesy ones. For something colder and brighter, water with lemon slices or a simple fruit smoothie keeps the table calm without adding sugar overload.
Additional Tips and Flavor Boosters
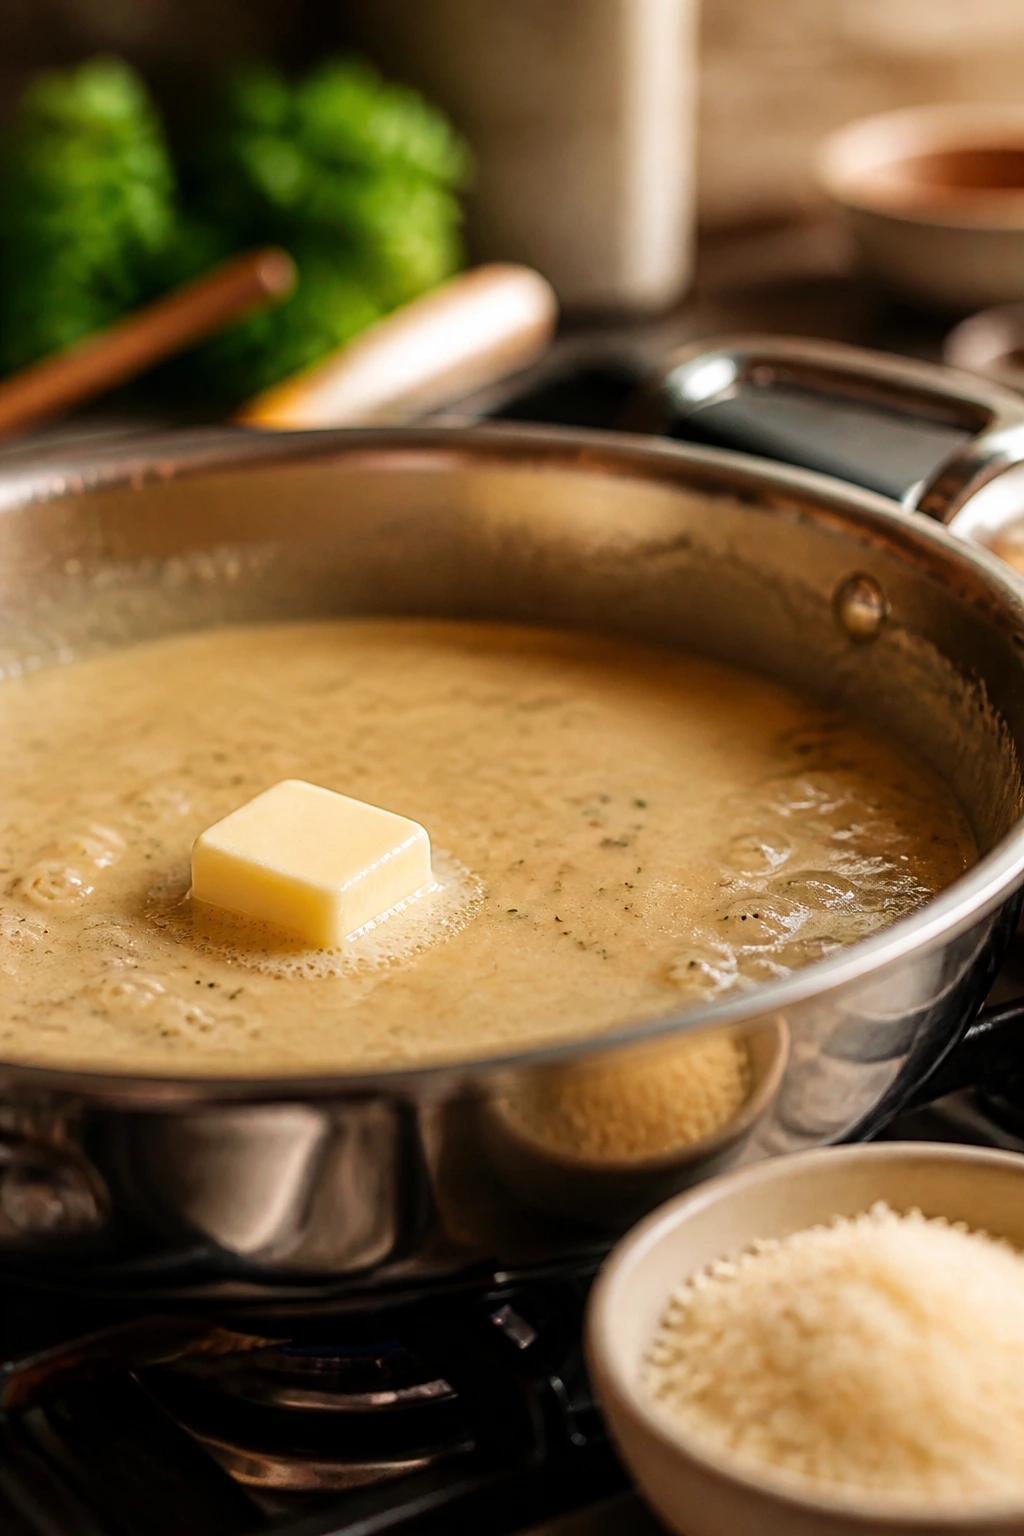
Flavor Enhancement: If a sauce tastes a little thin or flat, a spoonful of butter or a small handful of cheese often fixes it faster than another round of seasoning. For tomato dishes, a pinch of sugar can soften acidity. For chicken and rice, a teaspoon of soy sauce or Parmesan can add depth without making the meal taste “adult.”
Customization: Let kids choose the last step. Extra cheese, plain rice, sauce on the side, or a few toppings in separate bowls can turn a no into a maybe. That’s not indulgence. That’s strategy.
Serving Suggestions: Use small dip bowls. Ketchup, ranch, sour cream, barbecue sauce, and mild salsa feel more approachable when they’re not poured all over the plate. A sprinkle of parsley or Parmesan is fine for adults, but I’d never make a garnish the reason a child tries dinner.
Make-It-Yours: For gluten-free versions, use GF pasta, GF breadcrumbs, and corn tortillas where needed. For dairy-free versions, swap in nondairy cheese cautiously and choose broth-based dishes where the sauce doesn’t depend entirely on cheese. For lower-sodium meals, lean on herbs, garlic, and onion powder instead of extra salt.
Make-Ahead, Storage, and Reheating Guidance
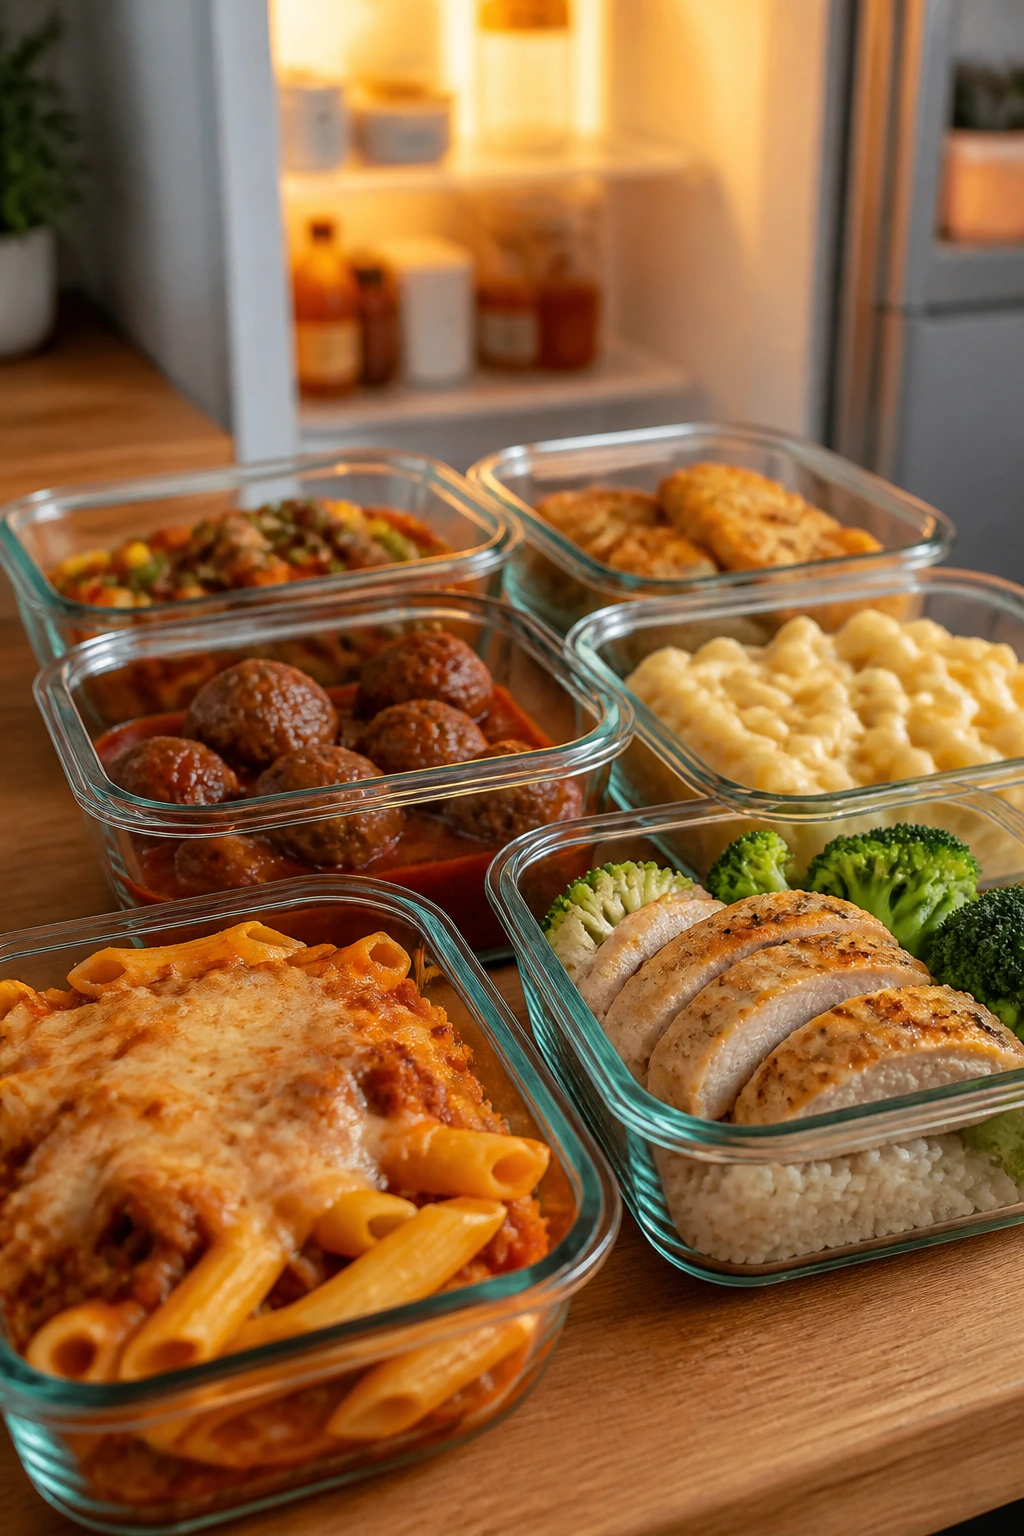
A lot of these meals hold up well because they’re built from sturdy parts. Cooked chicken dishes, casseroles, pasta bakes, chili, meatballs, and soups usually keep 3 to 4 days in the fridge in covered containers. Most of the baked casseroles and meatballs freeze well for up to 2 months, though cream-heavy sauces can separate a little after thawing.
For reheating, I prefer the oven for anything breaded or baked. Chicken tenders, fish sticks, sliders, ziti, and pot pie bakes do better at 350°F, loosely covered with foil, until hot. The microwave works for softer meals like mac and cheese, sloppy joes, soup, or rice bowls, but add a splash of milk or broth first so they don’t dry out. That tiny step makes a big difference.
A few of these dishes are better made ahead in parts. Meatloaf muffins, egg muffins, meatballs, chili, and soup can be cooked a day early and warmed later. Quesadillas and fish sticks are best fresh, because crisp food usually loses steam in storage. If you want to prep early, assemble the breading, chop the vegetables, or cook the sauce ahead rather than fully finishing the dish.
Food safety matters here, even when dinner is casual. Don’t leave cooked food out more than 2 hours, and less if the room is warm. Poultry should still hit 165°F, and ground meat mixtures should hit 160°F before you call them done.
Variations and Adaptations to Try
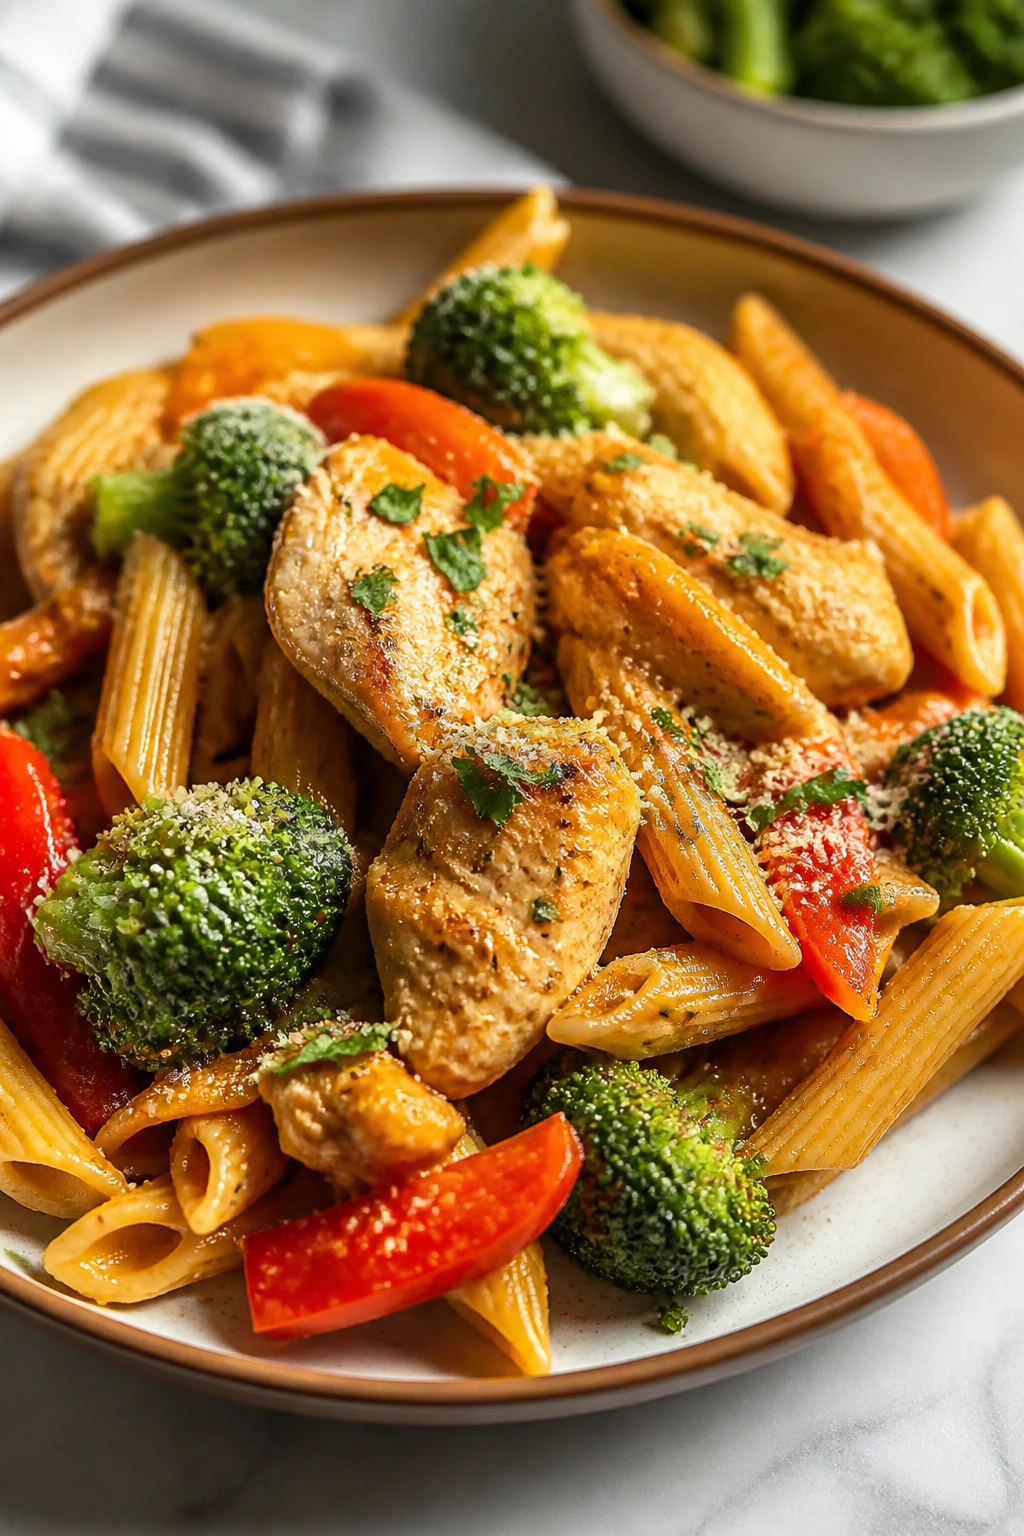
Dairy-Free Comfort: Use dairy-free shreds, olive oil, and broth-based sauces for pasta bakes, meatballs, and skillet meals. The texture won’t be identical, so lean into dishes that don’t depend entirely on cheese — sloppy joes, chili, honey-garlic chicken, and burrito bowls are good candidates.
Gluten-Free Switch: Swap in gluten-free pasta, rice, corn tortillas, and gluten-free breadcrumbs. Chicken tenders, meatloaf muffins, stuffed shells, and baked ziti all adapt well if the sauce is naturally thick enough to hold the dish together.
Veggie-Forward Rescue: For kids who tolerate vegetables only in small doses, mince them tiny or blend them into the sauce. Carrots into meat sauce, cauliflower into mac and cheese, spinach into ricotta, and broccoli chopped small into rice casserole are the quietest wins.
Lower-Sodium Version: Use low-sodium broth, rinse canned beans, choose unsalted butter, and season with garlic powder, onion powder, paprika, and lemon juice. The food still tastes full if you build flavor in layers instead of leaning on the salt shaker.
Extra-Crisp Option: For kids who eat with their eyes first, add crunch where it helps: panko on casseroles, toasted breadcrumbs on mac and cheese, lightly browned cheese on baked pasta, and oven-roasted potatoes instead of steamed ones. Crisp edges often do more than a long pep talk.
Sauce-on-the-Side Style: Some kids hate food that arrives already mixed. Serve the marinara, gravy, barbecue sauce, or cheese sauce in separate bowls and let them dip or spoon it on themselves. That small shift can change the whole meal.
Common Mistakes to Avoid
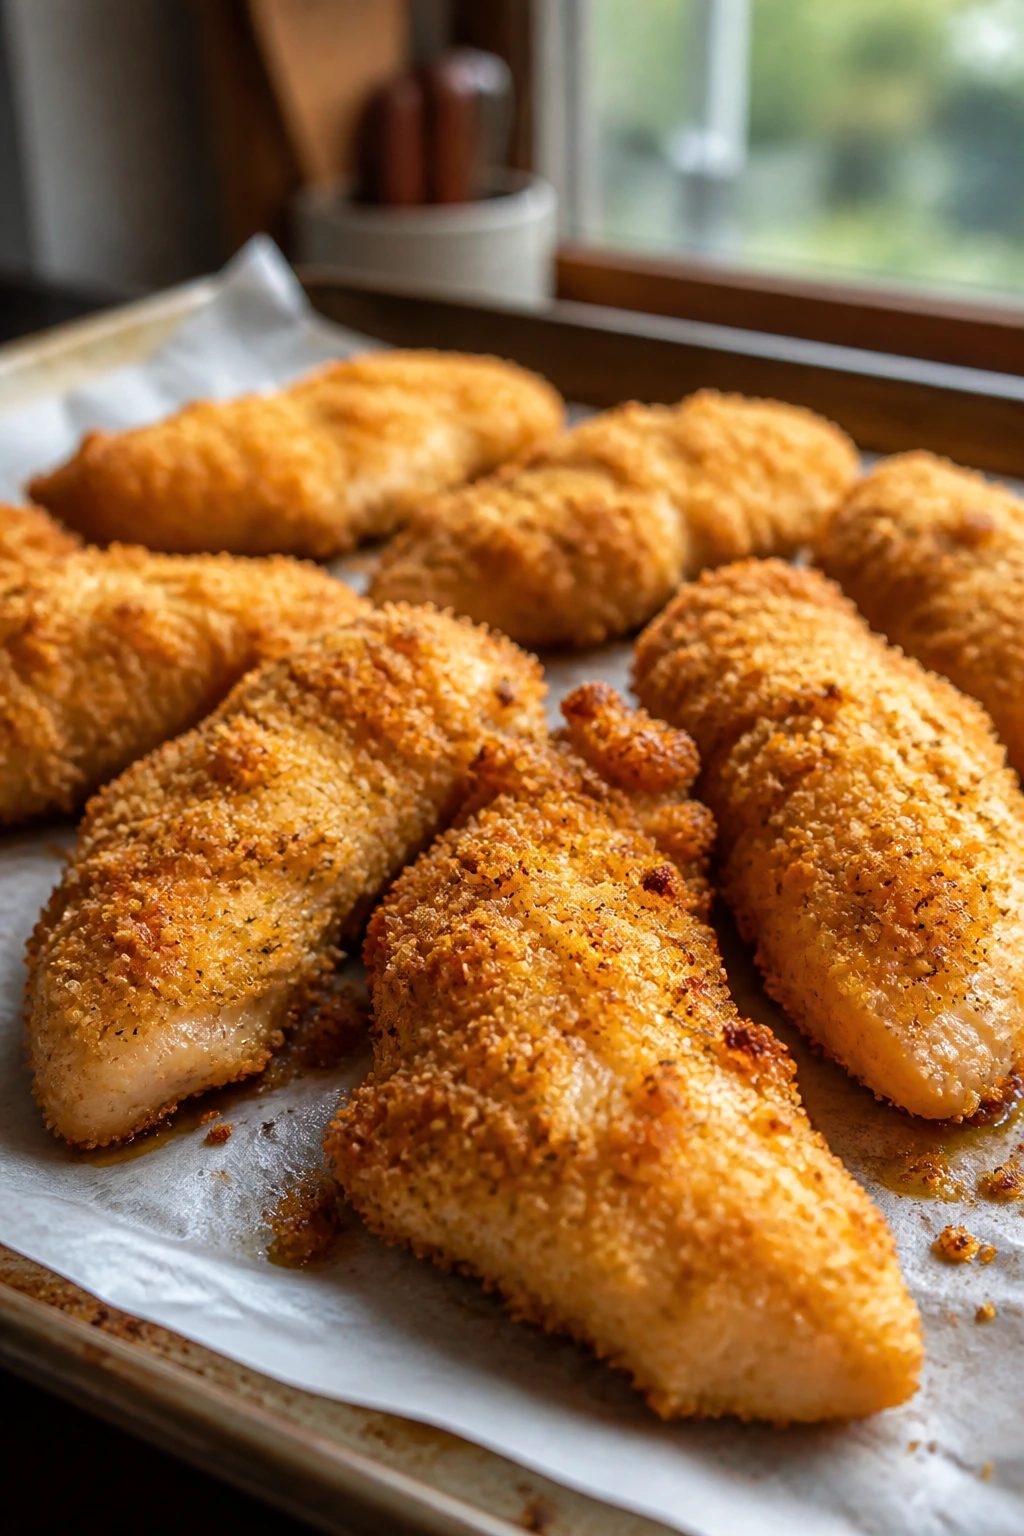
The first mistake is pushing too many flavors into one dish. A casserole packed with olives, onion chunks, peppers, and three cheeses can look busy before anyone tastes it. For picky eaters, busy often reads as unsafe. Keep the ingredient list simple, and let one or two flavors carry the recipe.
The second mistake is aiming for “healthier” by stripping out the parts kids actually trust. If you remove the cheese, cut the butter, and use dry lean meat, you may have made the plate less appealing without making it more useful. Better to keep the familiar base and add a small vegetable, a side of fruit, or a few extra peas.
Another one: undercooking the starch. Pasta that’s too firm, rice that’s too dry, potatoes that aren’t fully soft — all of that gets noticed. Kids are often more texture-driven than flavor-driven, and a bad texture can sink an otherwise fine dinner. If in doubt, cook the base until tender, then watch the sauce so it doesn’t go past the point of holding together.
Don’t forget the temperature issue. Breaded food served lukewarm tastes limp. Soup served too hot makes kids wary. Casseroles pulled from the oven and plated immediately can slide around like lava. Give everything a brief rest when it needs one, and serve crispy foods quickly while they still have a little edge.
Finally, don’t hide every ingredient so well that the meal turns into beige mush. A little vegetable camouflage can help, but the plate still needs shape. One green thing, one orange thing, one crisp thing — that’s often enough.
Frequently Asked Questions
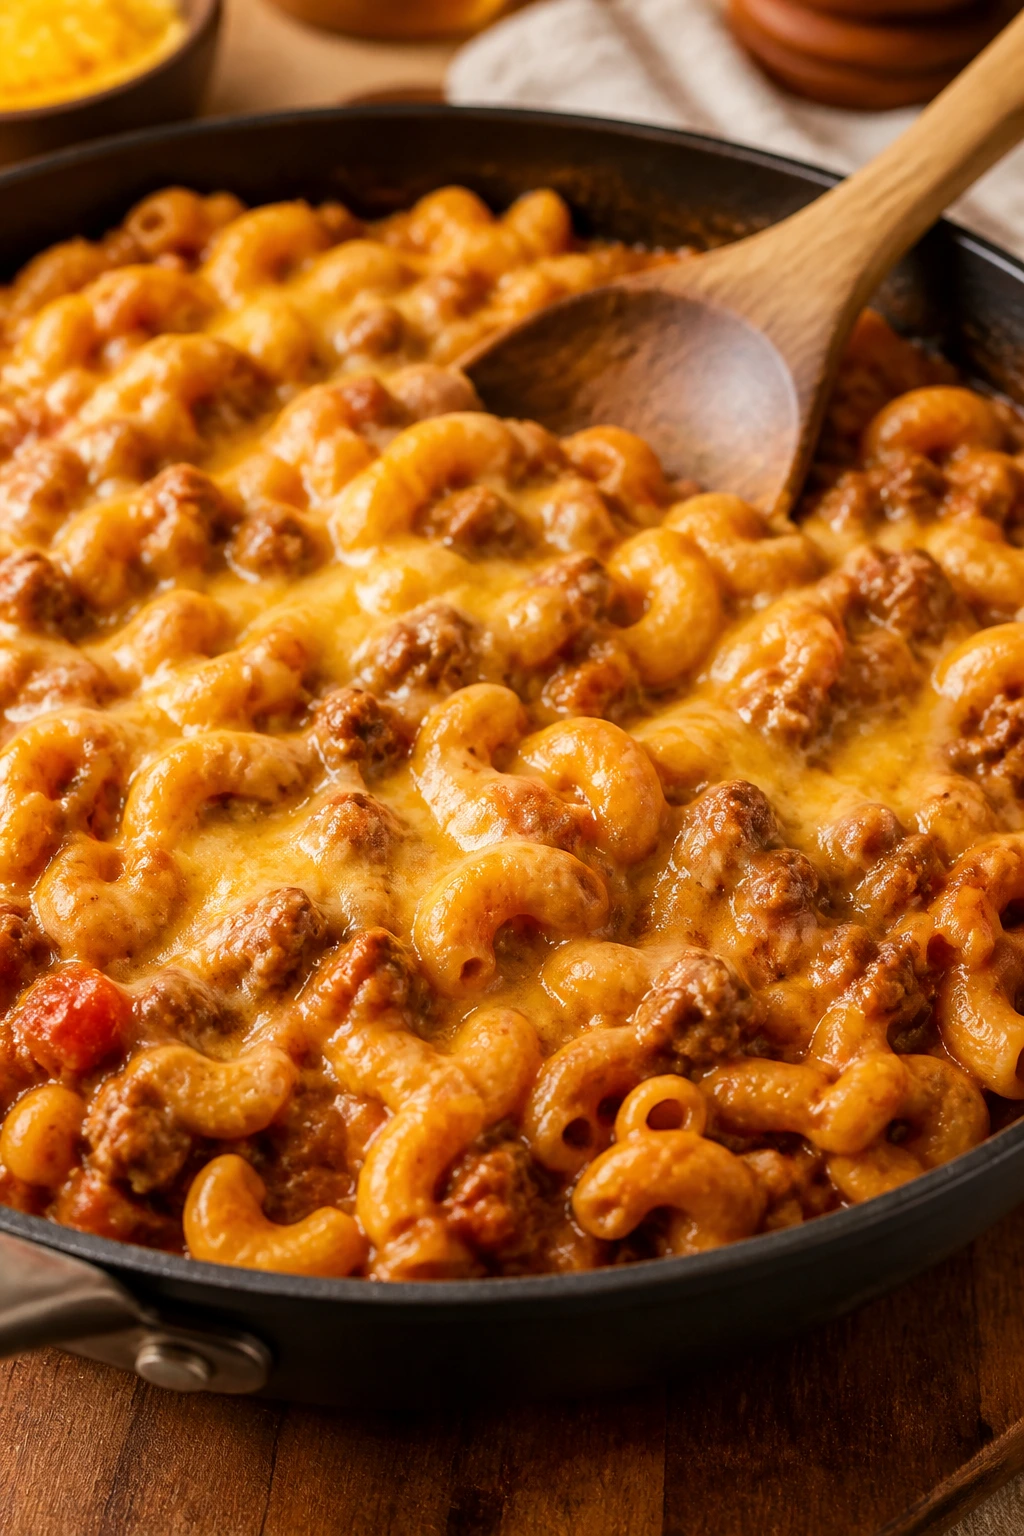
How do I get a picky eater to try a new meal without a fight?
Start with a familiar base and change only one thing at a time. If they already like chicken tenders, move to baked fish sticks or quesadilla triangles before jumping to a layered casserole with five ingredients they’ve never seen.
What foods are usually safest for picky eaters?
Soft pasta, mild cheese, rice, chicken, potatoes, tortillas, bread, and lightly sweet sauces tend to land well. Texture matters as much as flavor, so foods that are crisp outside, soft inside, or clearly separated often work better than mixed dishes.
Can I make these meals ahead of time for busy nights?
Yes, several of them are good candidates for advance prep. Meatloaf muffins, chili, soup, casserole bakes, meatballs, and egg muffins all hold well in the fridge and reheat cleanly if you don’t dry them out.
What if my child hates sauce on food?
Serve the sauce on the side. That works for sloppy joes, meatballs, burrito bowls, pizza pockets, and even chicken tenders. Once kids realize they control the dip, resistance usually drops.
How do I add vegetables without making dinner look “mixed”?
Keep them small, soft, and well-cooked. Finely diced carrots in meat sauce, blended cauliflower in mac and cheese, chopped spinach in ricotta, and peas tucked into buttered noodles are all less threatening than a big visible pile of broccoli.
Are these meals okay for school lunches too?
Several are. Quesadillas, sliders, egg muffins, tuna melts, meatloaf muffins, and pasta bakes pack well if you cool them first and use insulated containers. Breaded food is less ideal unless you don’t mind losing the crunch.
What’s the best way to reheat pasta without drying it out?
Add a spoonful of milk, water, broth, or extra sauce before reheating. Cover it loosely in the microwave and heat in short bursts, stirring once. Baked pasta and Alfredo-style dishes especially need that little rescue step.
Can I make these recipes with frozen vegetables?
Absolutely. Frozen peas, broccoli, mixed vegetables, and carrots work well in casseroles, soups, and skillet meals. In a few cases, like mac and cheese or pot pie filling, frozen vegetables are actually easier because they’re already soft enough to blend into the dish.
How do I know when chicken or turkey dishes are done?
Use a thermometer if you have one. Poultry should reach 165°F, and ground meat mixtures should reach 160°F. If you’re checking by look, the juices should run clear and the center should no longer look translucent, but a thermometer is the safer tool.
A Gentle End to Dinner Battles
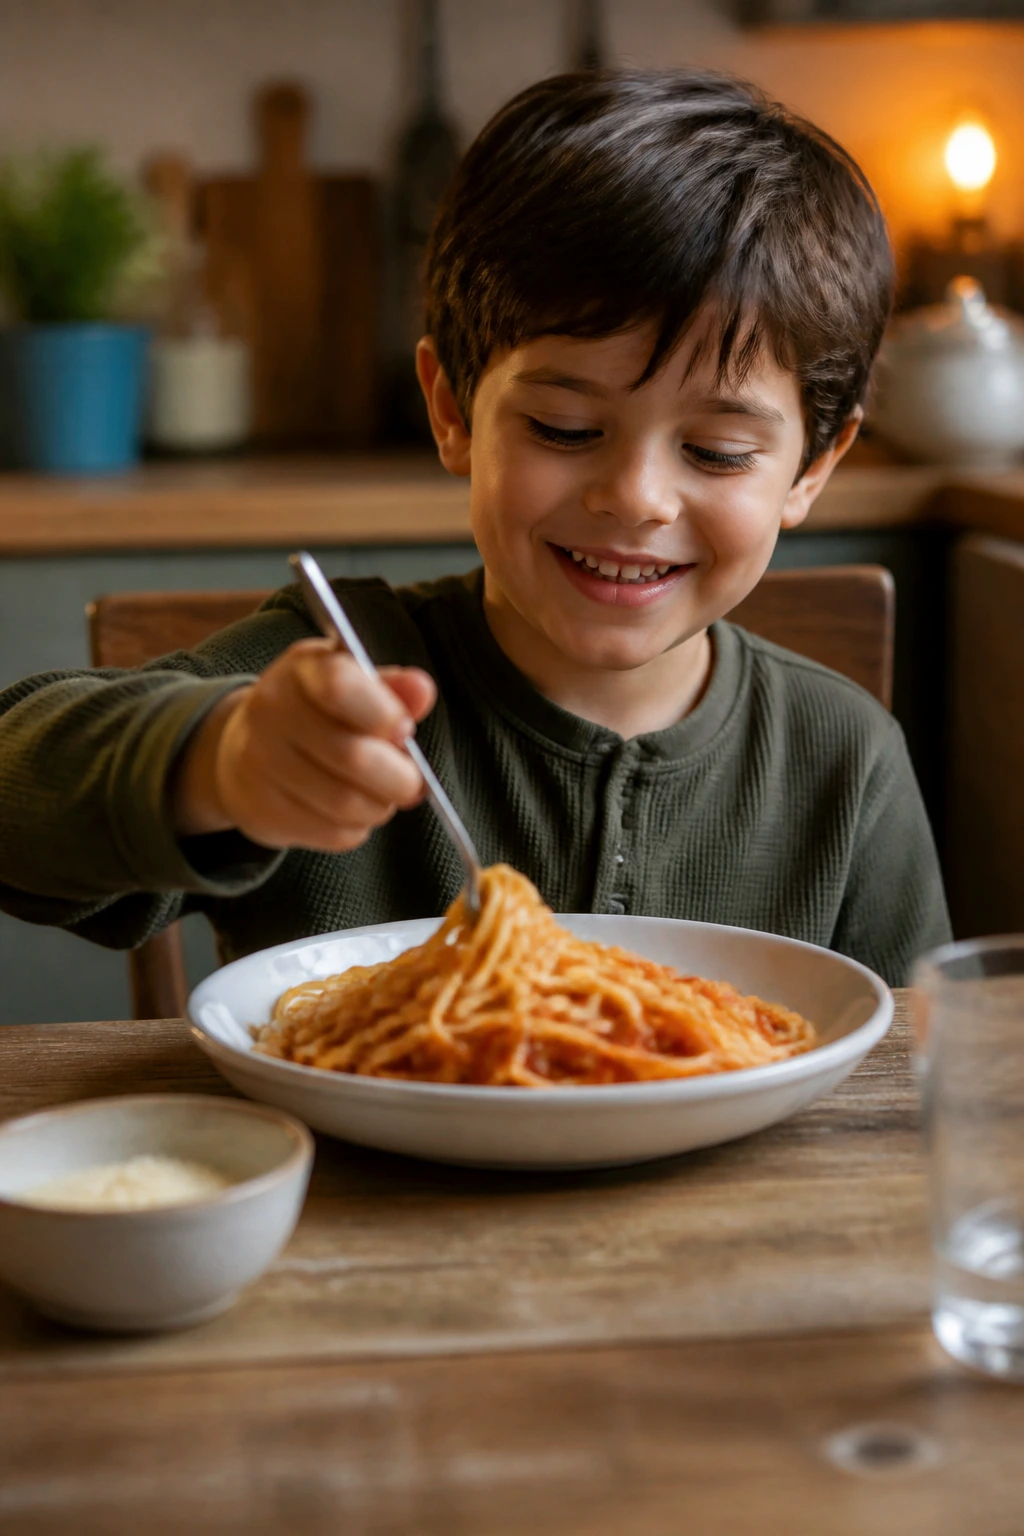
A table full of picky eaters can make a cook feel like a referee. It does not have to stay that way. When the meal is built on familiar textures, mild flavors, and enough flexibility for everyone to pick their own path through the plate, dinner gets a lot less tense.
The strongest move here is not cleverness. It’s restraint. A crunchy chicken tender, a cheesy pasta skillet, a soft meatball, a bowl of soup with a good dipper on the side — those are the kinds of meals that earn repeat requests because they respect the eater. Keep a few of them in rotation, and weeknight dinner starts feeling less like a negotiation and more like supper.