
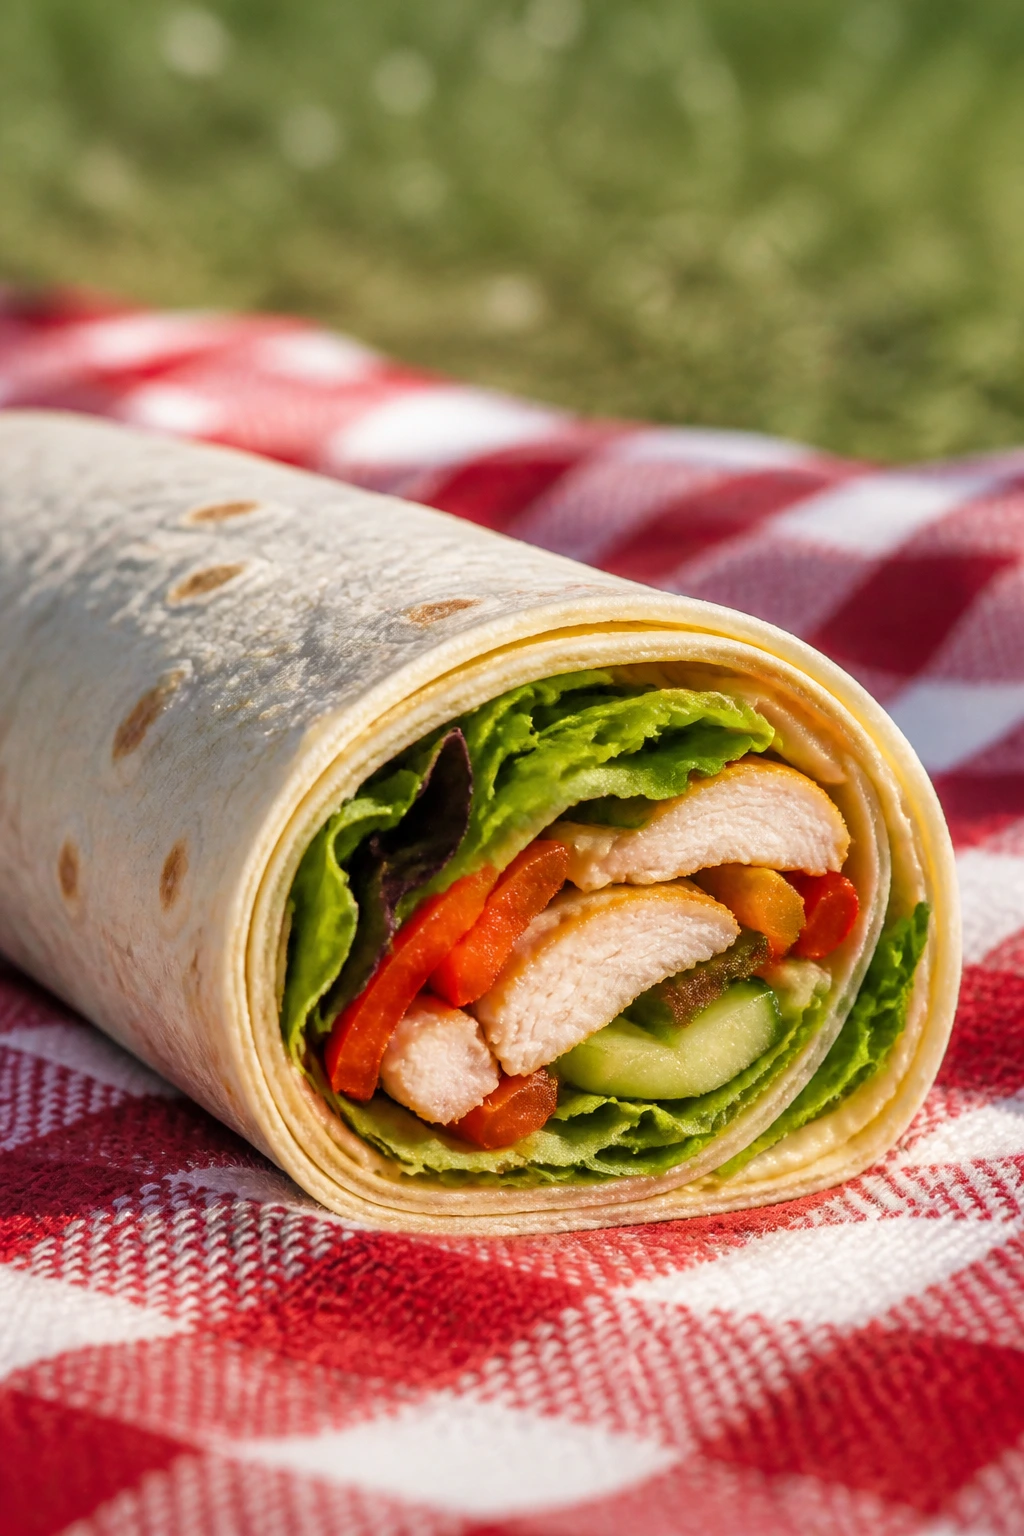
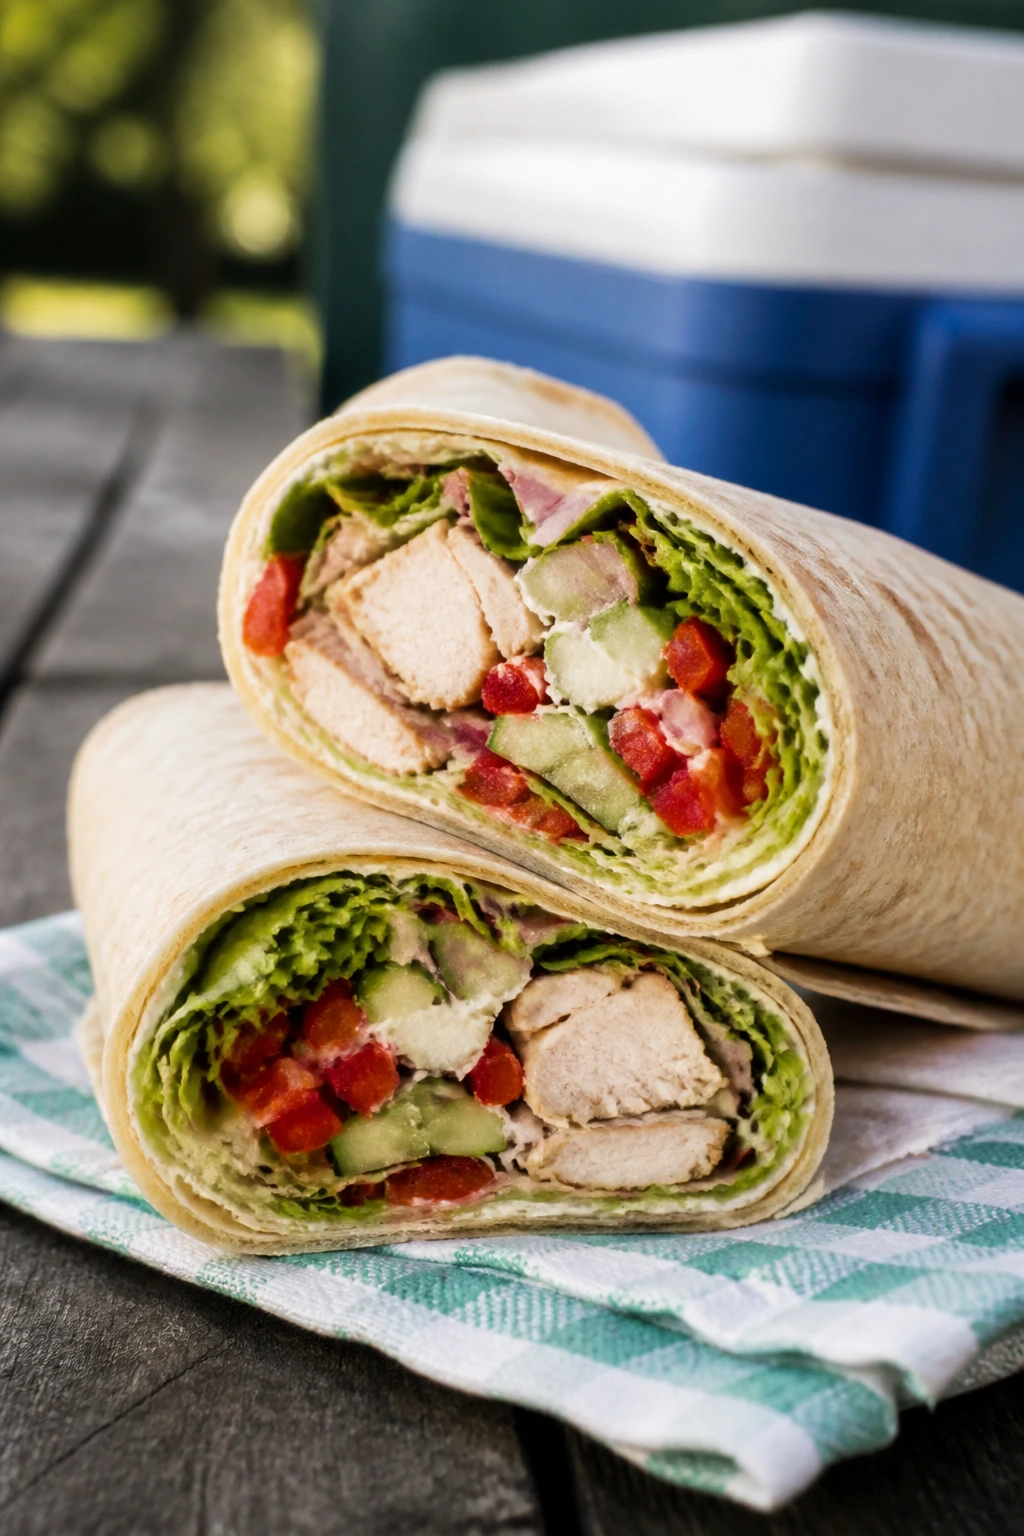
A good picnic wrap has to do three things at once: stay tight in a cooler, taste good after sitting for a bit, and keep your fingers dry while you eat it with a cold drink sweating beside you. That sounds fussy until you’ve bitten into a sad, leaky sandwich with damp bread and one lonely tomato slice sliding into your lap.
Picnic wraps solve that problem when they’re built the right way. A tortilla gives you a little more grip than sliced bread, and the filling can be layered so the wet stuff sits in the center instead of soaking through the edges. I’ve learned to treat every wrap like a small engineering job: dry greens first, sauce in a thin smear, heavy ingredients in the middle, then a tight roll and a five-minute rest before slicing.
These 22 picnic wraps lean on that logic, but they don’t all taste the same. Some are sharp and crunchy, some are creamy and salty, some have grilled meat that’s cooled just enough to pack well, and some are the kind of vegetarian lunch that makes a cooler feel more thoughtful than a deli tray. A cold drink—lemonade, iced tea, sparkling water, maybe a beer if that’s your lane—makes each one feel even more complete.
Why These Wraps Belong in the Cooler
-
Tortillas beat sliced bread here: A good flour tortilla seals around fillings better than sandwich bread, so juicy tomatoes and creamy spreads stay inside instead of turning everything soggy.
-
They travel in neat halves: Slice a wrap on the bias and you get a lunch that looks cared for, even if you made it in ten minutes before leaving the house.
-
Cold flavors stay sharp: Chicken Caesar, tuna salad, tzatziki, pesto, and dill all hold their edge after a short chill, which is exactly what a picnic lunch needs.
-
No fork required: You can eat these while standing near the grill, perched on a park bench, or cross-legged on a blanket without hunting for silverware.
-
One cooler, many moods: Deli-style, smoky, briny, crunchy, or herb-heavy—there’s enough range here that nobody gets stuck with the same lunch twice.
1. Lemon-Herb Chicken Caesar Wrap
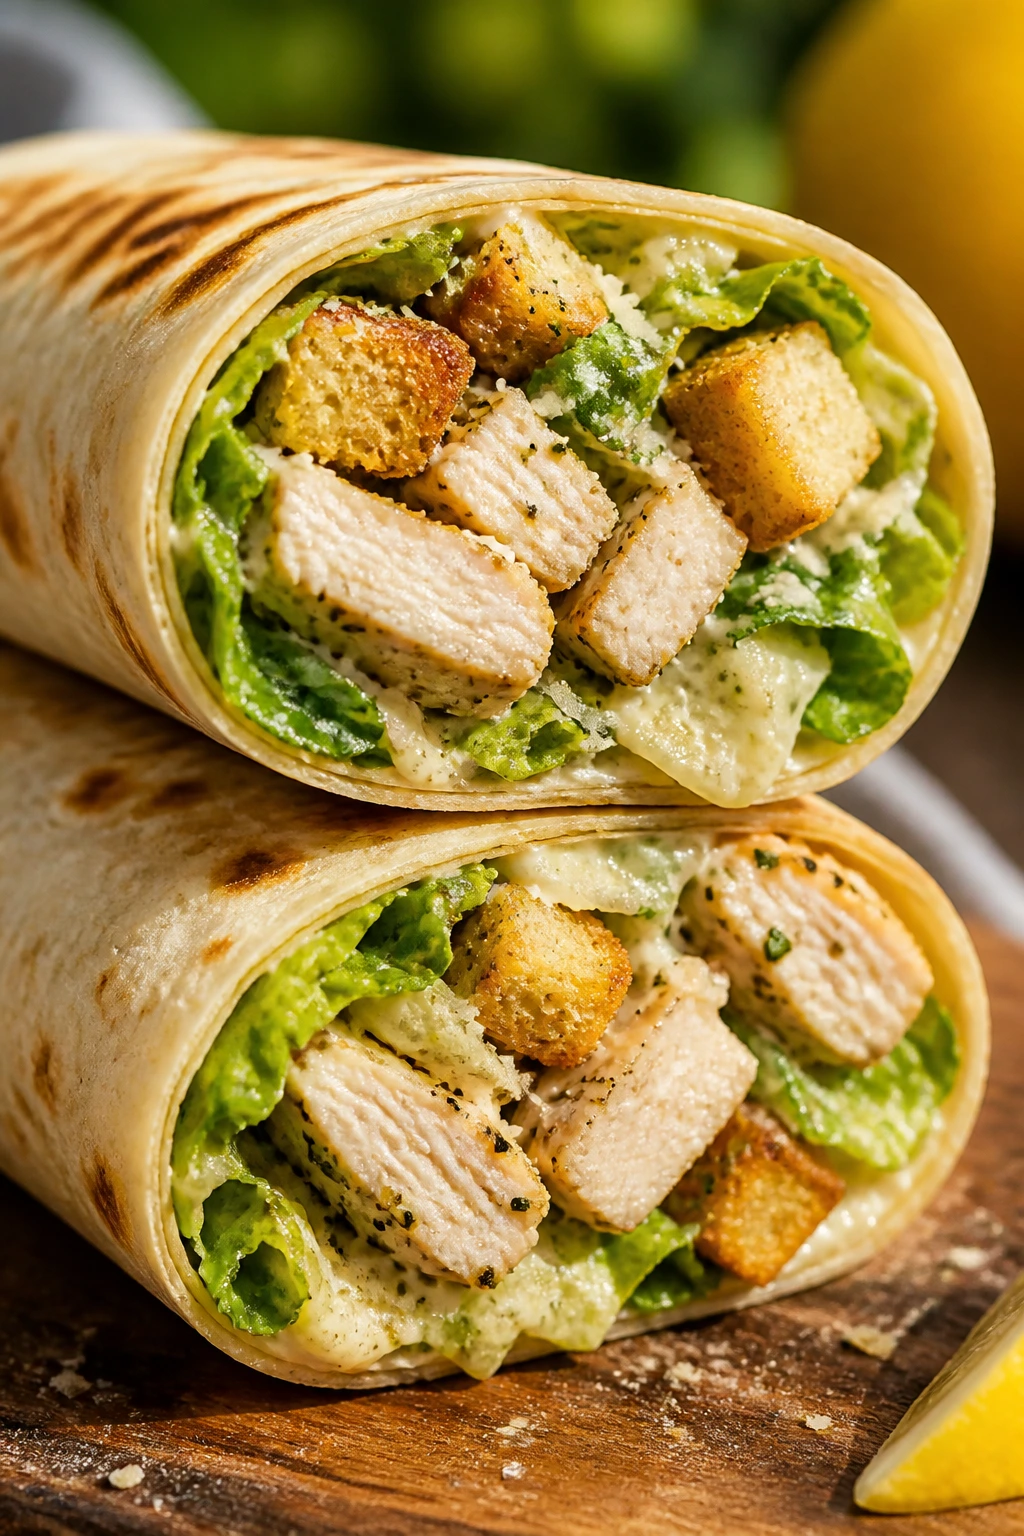
A Caesar wrap only works when the chicken is cold, the lettuce is dry, and the dressing is used with a light hand. Done right, you get salty Parmesan, a little lemon snap, and crouton crunch tucked into every bite.
Why It Works:
The lemon juice brightens the dressing so it doesn’t taste heavy after a few minutes in the cooler. Crushed croutons give you that Caesar salad texture without stabbing through the tortilla, and romaine stays crisp far better than softer greens.
Key Ingredients:
- 2 cups cooked chicken breast, chopped into bite-size pieces
- 1/3 cup Caesar dressing
- 1 tablespoon lemon juice
- 1 teaspoon lemon zest
- 2 cups chopped romaine, well dried
- 1/3 cup grated Parmesan
- 1/2 cup croutons, lightly crushed
- 4 large flour tortillas, 10-inch
- 1/2 teaspoon black pepper
Quick Steps:
- Mix the chicken filling: Stir the chicken, Caesar dressing, lemon juice, lemon zest, and black pepper in a bowl until coated. Chill for 10 minutes so the dressing tightens a bit.
- Build the salad layer: Toss the romaine with Parmesan and crushed croutons in a separate bowl. Keep it dry and fluffy, not wet and flattened.
- Warm the tortillas: Heat each tortilla in a dry skillet for 10 to 15 seconds per side, just until flexible. Do not overheat them or they’ll crack when you roll.
- Assemble tightly: Spread the romaine down the center of each tortilla, spoon the chicken mixture on top, then finish with a little extra Parmesan.
- Roll and rest: Fold the sides in, roll firmly, and let the wrap sit seam-side down for 5 minutes before cutting.
Equipment for This Recipe:
- Medium mixing bowl
- Dry skillet or microwave
- Sharp knife
- Cutting board
- Spoon or rubber spatula
How to Serve This Dish:
Cut each wrap in half and stack the pieces with the seam tucked under so they don’t open on the plate. I like it with dill pickle chips and a cold lemonade that can handle the salty Parmesan.
Pro Tips for This Recipe:
- Dry the romaine with a towel or salad spinner; wet lettuce is the fastest way to get a slimy tortilla.
- Crush the croutons by hand so you get rough pieces, not dust.
- If your chicken is plain, add a pinch of garlic powder to the filling; Caesar dressing needs a little backbone.
Variations on This Dish:
- Grilled Romaine Caesar: Char romaine hearts for 30 seconds per side and chill before wrapping for a smoky edge.
- Spicy Lemon Caesar: Add 1 teaspoon of hot sauce to the dressing for a sharper finish.
- Gluten-Free Crunch Wrap: Use gluten-free tortillas and swap croutons for crushed rice crackers.
Common Mistakes to Avoid with This Dish:
- Using too much dressing: The wrap turns slick and spills when you bite into it. Use enough to coat, not drown.
- Skipping the rest time: Slice too soon and the filling slides out. Give the wrap 5 minutes to settle.
- Packing warm chicken: Steam softens the tortilla fast. Cool the chicken completely before assembly.
2. Turkey Avocado Cranberry Wrap
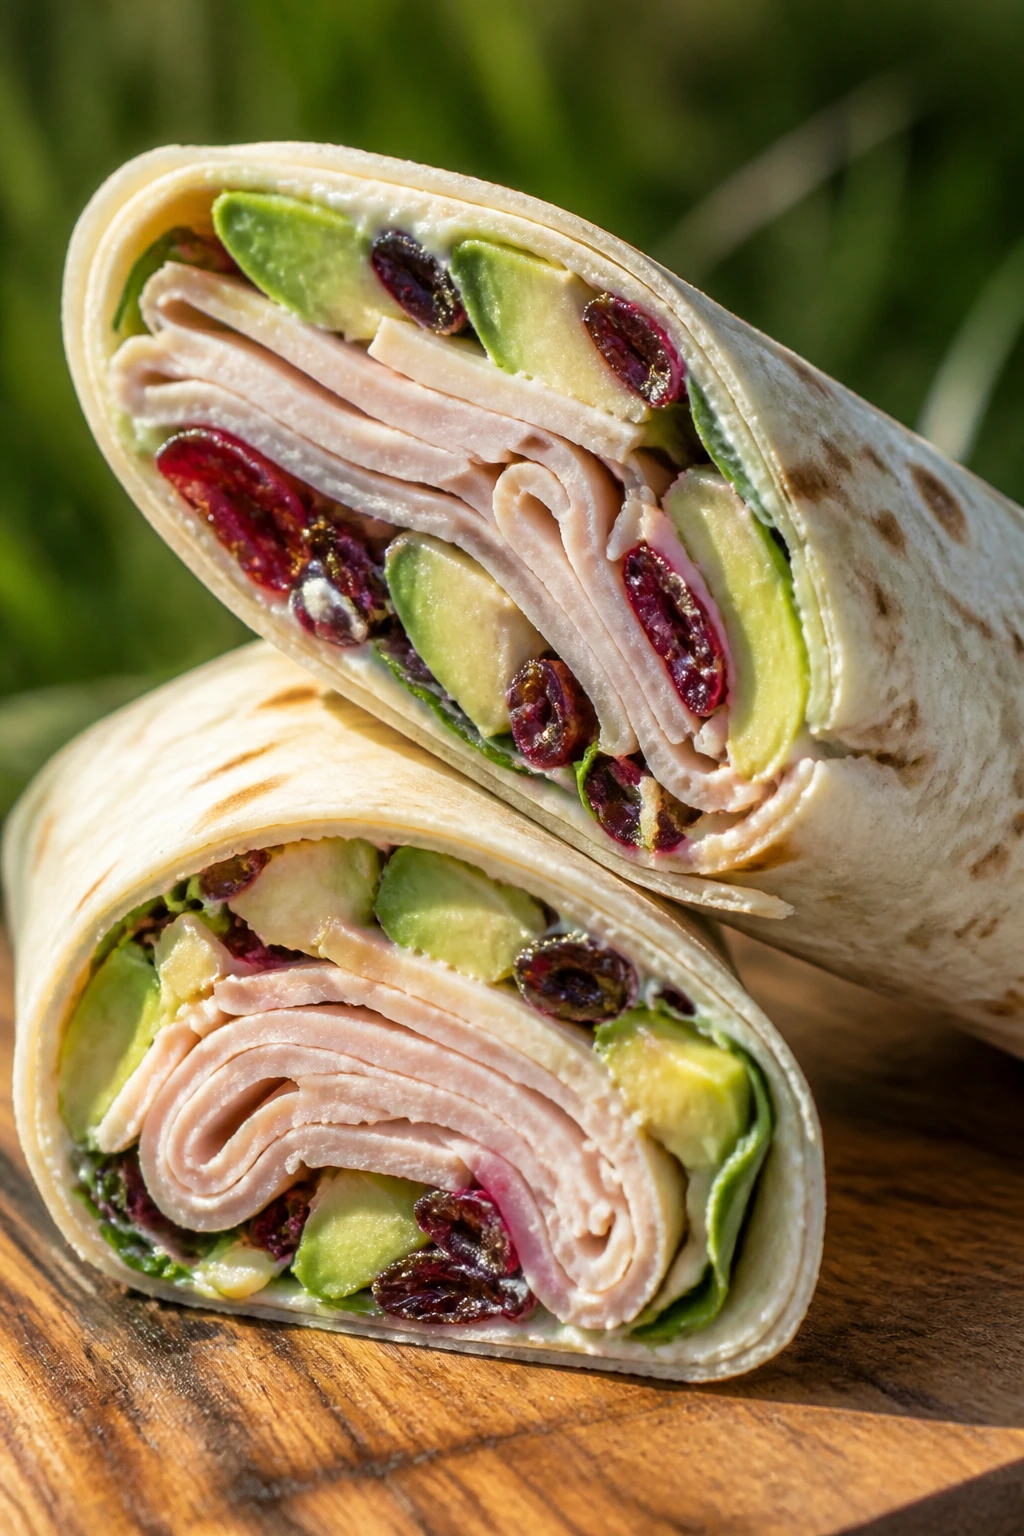
This one tastes like lunch from a deli that cares about texture. Soft avocado, salty turkey, tart cranberries, and a little creaminess from the spread make a wrap that never feels flat.
Why It Works:
The sweetness of the cranberries keeps the turkey from reading as plain, and avocado gives the tortilla a richer mouthfeel without needing a heavy sauce. A little lemon juice slows browning, which matters if the wrap sits in a cooler for an hour or two.
Key Ingredients:
- 8 ounces sliced turkey breast
- 1 ripe avocado, sliced
- 2 tablespoons cream cheese or mayonnaise
- 1 tablespoon honey mustard
- 1 teaspoon lemon juice
- 1/4 cup dried cranberries
- 1 cup baby spinach
- 1/2 cup shredded cheddar
- 4 large flour tortillas
Quick Steps:
- Mix the spread: Stir the cream cheese or mayonnaise with honey mustard and lemon juice until smooth.
- Prep the avocado: Slice the avocado and toss it gently with a little extra lemon juice so it stays green.
- Lay down the greens: Spread the honey-mustard mixture over each tortilla, then add a layer of spinach.
- Stack the filling: Add turkey, avocado, cranberries, and cheddar in the center.
- Roll and chill: Roll tightly, wrap in parchment, and chill for 10 minutes before slicing.
Equipment for This Recipe:
- Small bowl
- Sharp knife
- Cutting board
- Spoon
- Parchment paper
How to Serve This Dish:
Serve it with kettle chips and a cold sparkling water with lime. If you’re packing for a long picnic, keep the avocado side facing the cooler pack so it stays as cold as the rest of the wrap.
Pro Tips for This Recipe:
- Choose an avocado that gives slightly at the stem, not one that feels mushy.
- Thin-sliced turkey rolls better than thick deli slabs.
- If you want more bite, add a few thin slices of red onion.
Variations on This Dish:
- Apple-Turkey Swap: Replace half the avocado with matchstick apple for a sharper crunch.
- Herbed Cream Cheese Version: Mix chopped chives and dill into the spread.
- Dairy-Free Build: Use avocado mash instead of cream cheese and add a little extra lemon.
Common Mistakes to Avoid with This Dish:
- Using overripe avocado: It smears and turns the wrap muddy. Pick fruit that slices cleanly.
- Overstuffing with turkey: Thick layers make the wrap spring open. Keep the stack compact.
- Skipping the lemon: Avocado browns fast once cut. A little acid buys you time.
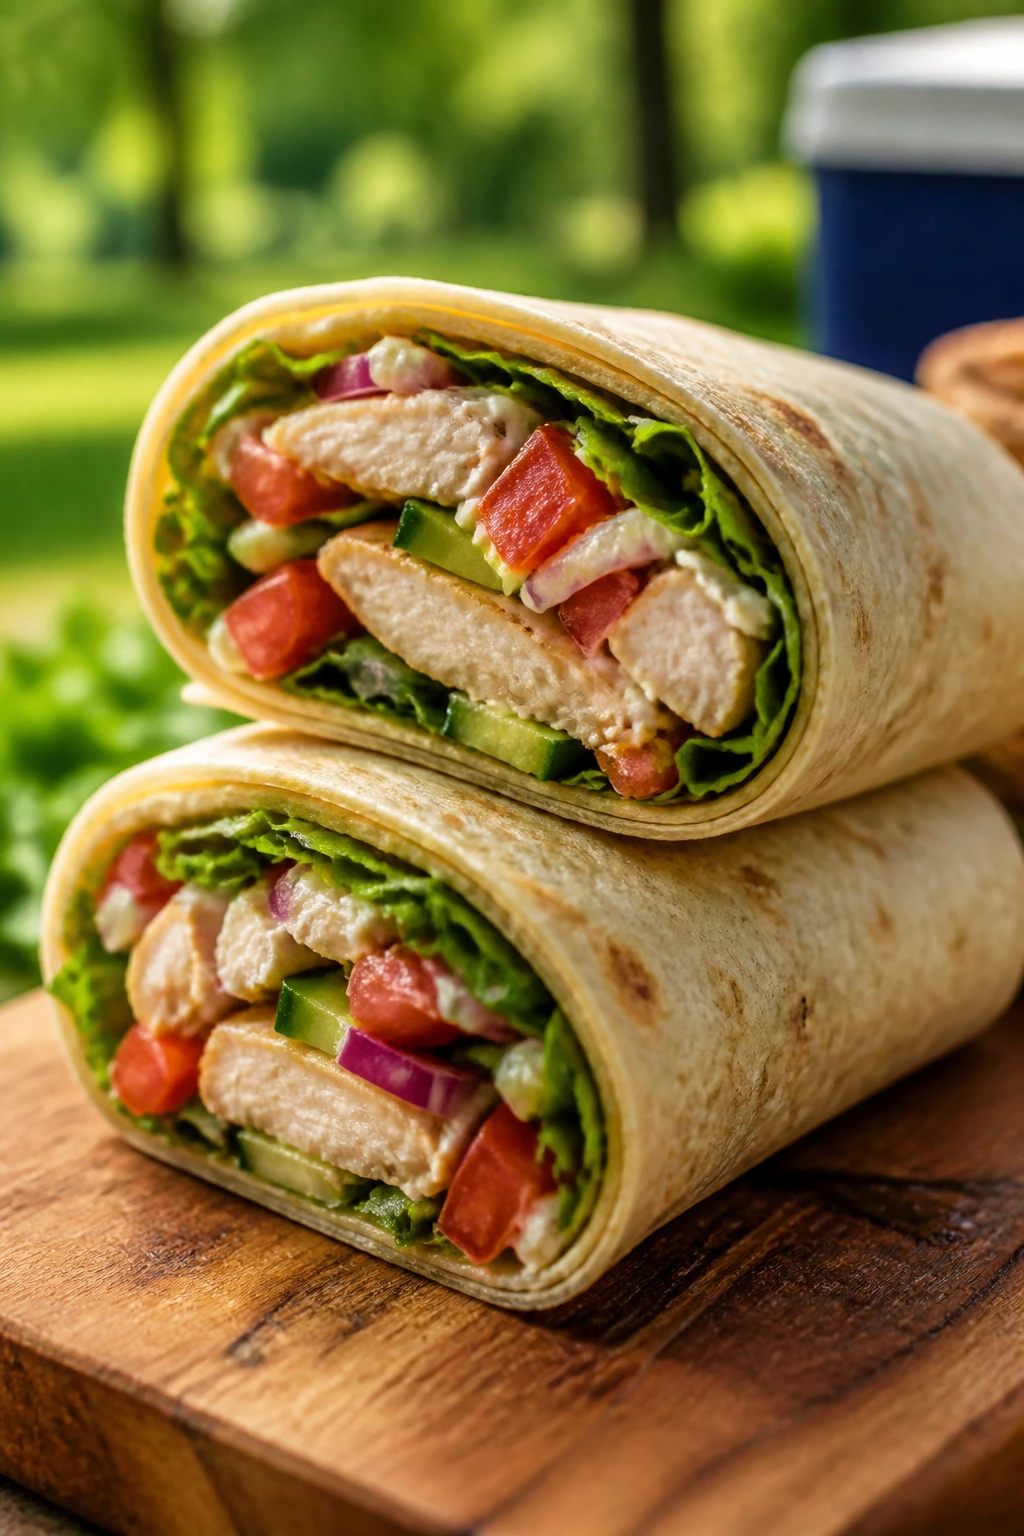
3. BLT Ranch Wrap
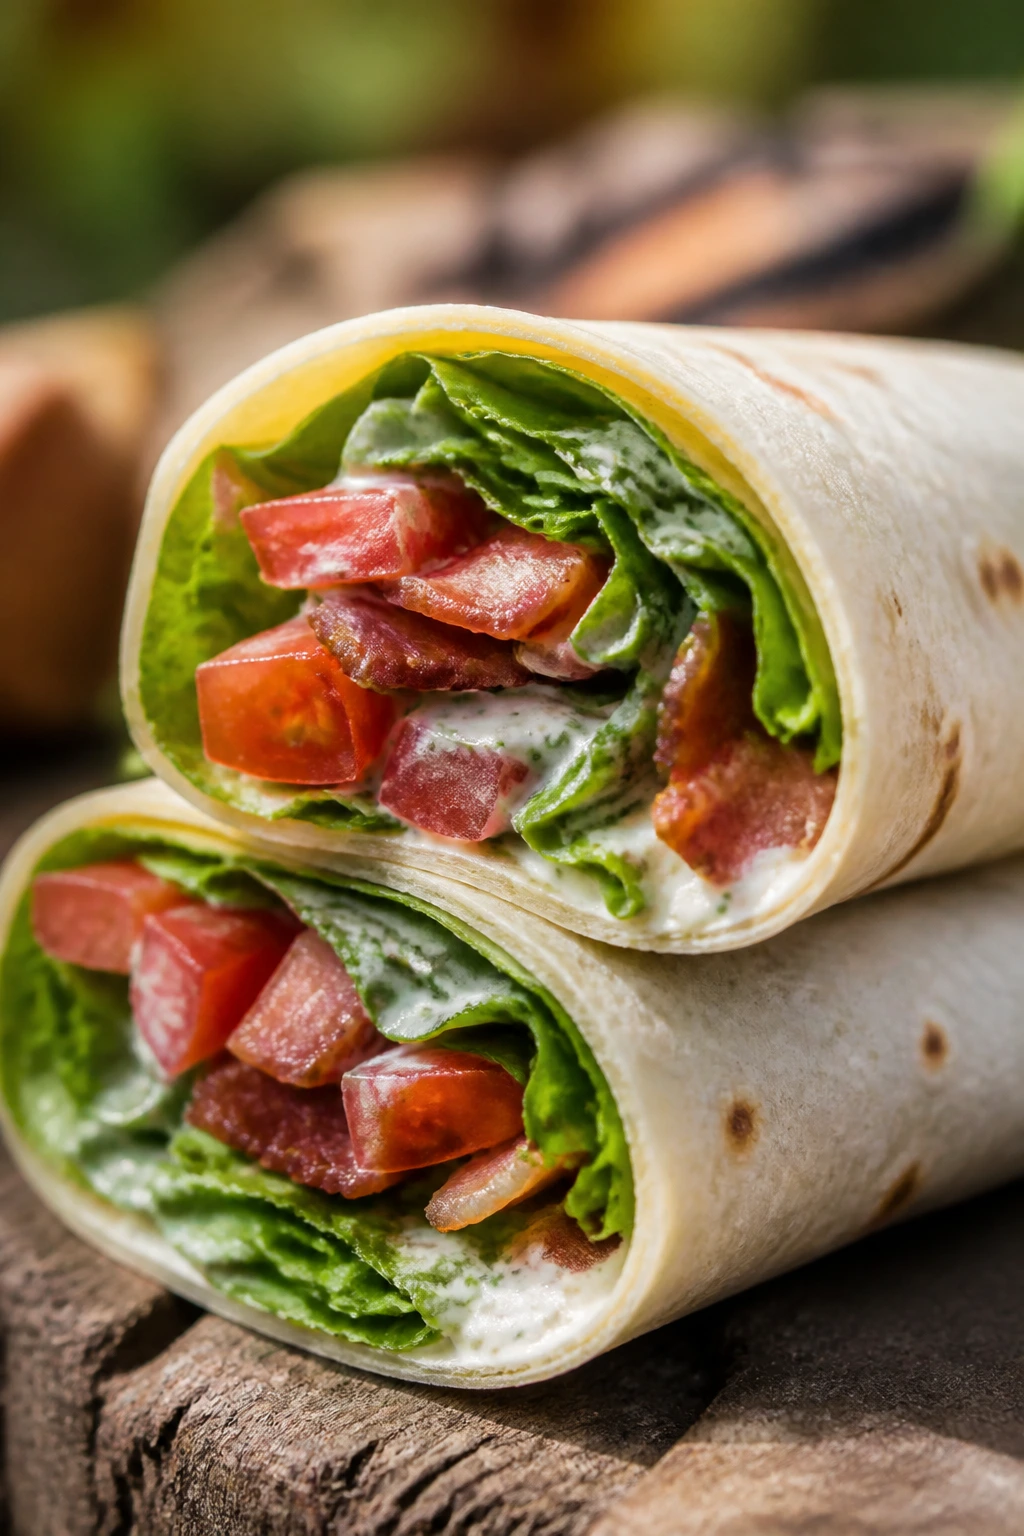
A BLT wrap is all about control. Bacon should be crisp, tomatoes should be seeded, and ranch should stay in a thin stripe instead of soaking the tortilla like a bad idea.
Why It Works:
The classic BLT flavor set is already picnic-friendly: salty bacon, cool lettuce, and tomato. In wrap form, the ranch becomes a barrier layer that keeps the greens from sliding and softens the sharp edge of the bacon just enough.
Key Ingredients:
- 8 slices bacon, cooked crisp and drained
- 1 large tomato, seeded and diced
- 1 1/2 cups chopped romaine
- 1/4 cup ranch dressing
- 1/2 cup shredded cheddar
- 1 tablespoon mayonnaise
- 4 large flour tortillas
Quick Steps:
- Cool the bacon: Cook the bacon until crisp, then drain it on paper towels and let it cool so it stays snappy.
- Seed the tomato: Cut the tomato, scoop out some of the seeds, and dice the flesh into small pieces.
- Spread the base: Smear mayonnaise and ranch down the center of each tortilla.
- Layer the fillings: Add romaine, tomato, bacon, and cheddar in a tight strip.
- Roll and rest: Fold the tortilla around the filling, rest seam-side down for 5 minutes, then cut on the diagonal.
Equipment for This Recipe:
- Skillet or oven for bacon
- Paper towels
- Knife
- Cutting board
- Spoon
How to Serve This Dish:
Serve it with potato chips and iced tea. I like these cut into shorter halves because a BLT wrap can be a little slippery if you try to eat the whole thing in one go.
Pro Tips for This Recipe:
- Seed the tomato. Always. That liquid is the enemy.
- Use romaine, not iceberg shreds, if you want better structure.
- If the ranch is thick, stir in a teaspoon of milk so it spreads in a thinner layer.
Variations on This Dish:
- BLT Plus Avocado: Add a few avocado slices for a creamier bite.
- Spicy Ranch BLT: Mix hot sauce into the ranch for a sharper finish.
- Turkey-BLT Wrap: Swap half the bacon for deli turkey if you want a lighter filling.
Common Mistakes to Avoid with This Dish:
- Using wet tomatoes: They leak and make the wrap slide apart. Seed them first.
- Adding bacon while hot: Steam softens the tortilla and wilts the lettuce.
- Too much ranch: The wrap gets slick. Use just enough to coat the center line.
4. Tuna Salad Crunch Wrap
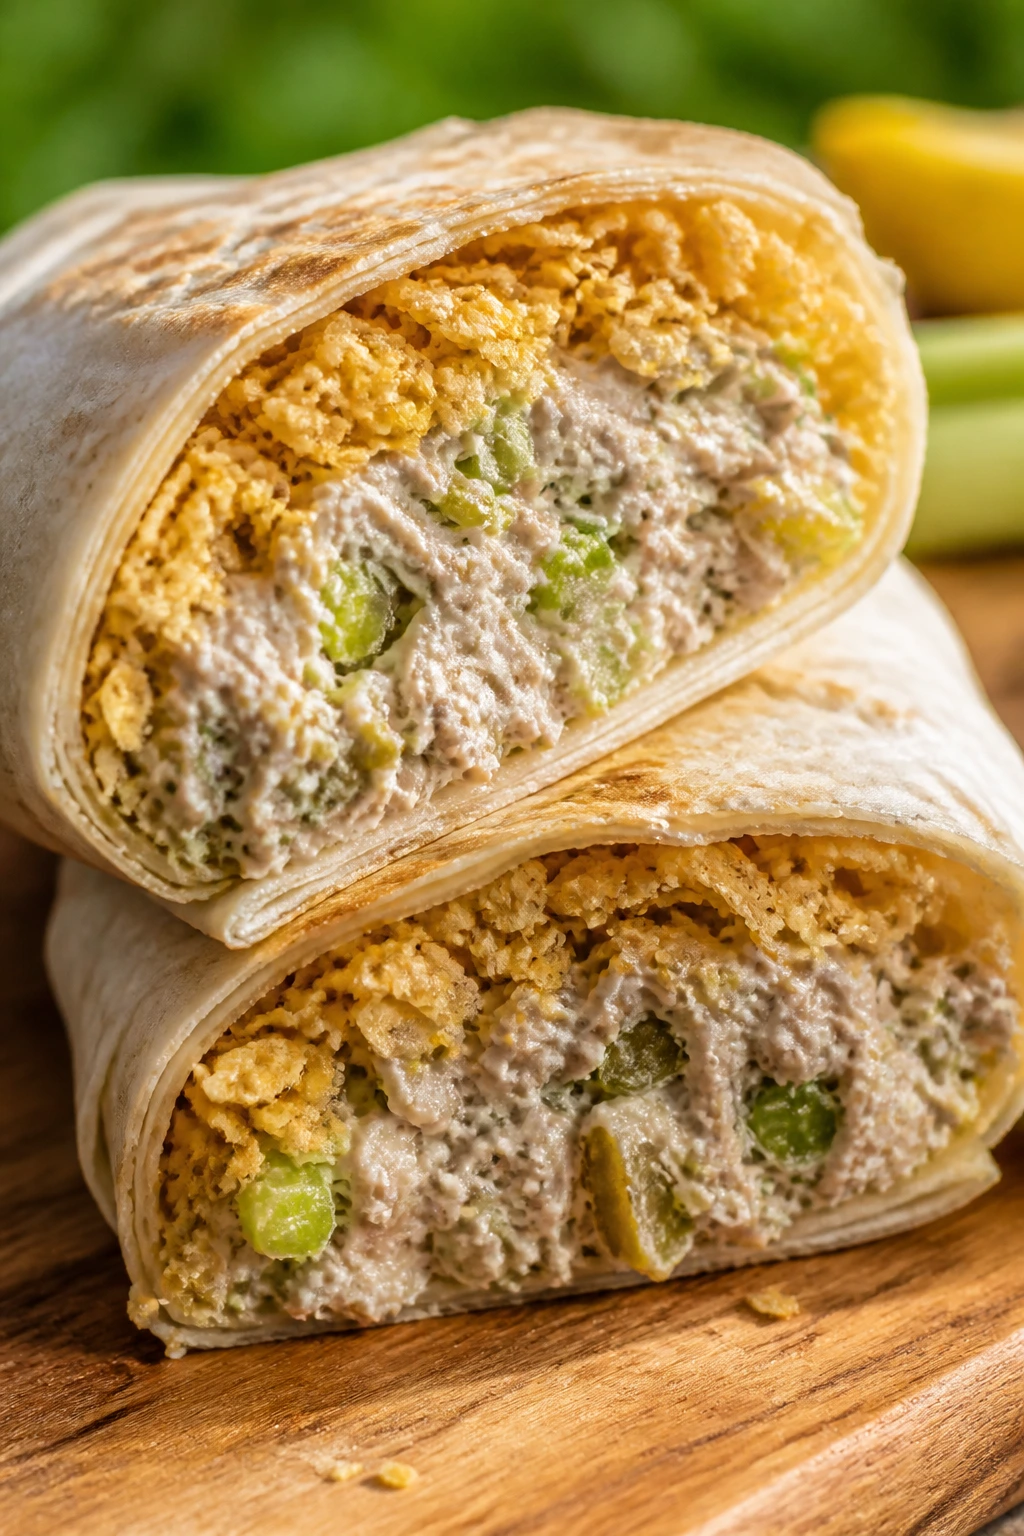
Tuna salad can go one of two ways: limp and bland, or sharp and bright with a little crunch. This version leans into celery, pickle, and lemon so it tastes like lunch you actually planned.
Why It Works:
Tuna is sturdy, which makes it a natural for picnics, and the salad mixture only gets better after a short chill. The crushed chips or crisp celery give you contrast against the soft filling, which matters more than most people think.
Key Ingredients:
- 2 cans tuna in water, drained well
- 1/4 cup mayonnaise
- 2 tablespoons Greek yogurt
- 1 tablespoon Dijon mustard
- 1 celery stalk, finely diced
- 2 tablespoons dill pickle, finely chopped
- 1 tablespoon lemon juice
- 1/4 cup crushed kettle chips
- 1 cup lettuce
- 4 large tortillas
Quick Steps:
- Mix the tuna salad: Combine tuna, mayonnaise, yogurt, Dijon, celery, pickle, and lemon juice in a bowl.
- Chill briefly: Let the mixture sit for 10 minutes so the flavors settle and the salad firms up.
- Set the texture layer: Spread lettuce over the tortilla, then add a small line of crushed chips.
- Add the tuna: Spoon the tuna mixture over the crunch layer and keep the mound narrow.
- Roll carefully: Fold in the sides, roll tightly, and cut once with a sharp knife.
Equipment for This Recipe:
- Mixing bowl
- Fork
- Knife
- Cutting board
- Spoon
How to Serve This Dish:
A tuna wrap likes a cold lemon-lime soda or sparkling water with cucumber slices. Serve it with carrot sticks if you want more crunch, though I’d still keep the chip layer inside the wrap because that’s the fun part.
Pro Tips for This Recipe:
- Drain the tuna harder than you think you need to.
- Add the chips right before rolling so they stay crisp.
- A little extra lemon zest gives the filling a cleaner finish.
Variations on This Dish:
- Dill-Forward Tuna: Double the dill pickle and add chopped fresh dill.
- No-Mayo Version: Use all Greek yogurt and a spoonful of olive oil.
- Curried Tuna Crunch: Add 1/2 teaspoon curry powder and a few golden raisins.
Common Mistakes to Avoid with This Dish:
- Leaving the tuna too wet: The tortilla gets soggy fast. Press out the liquid well.
- Over-mashing the salad: You want flakes, not paste.
- Packing chips too early: They soften. Add them right before rolling.
5. Greek Chicken Tzatziki Wrap
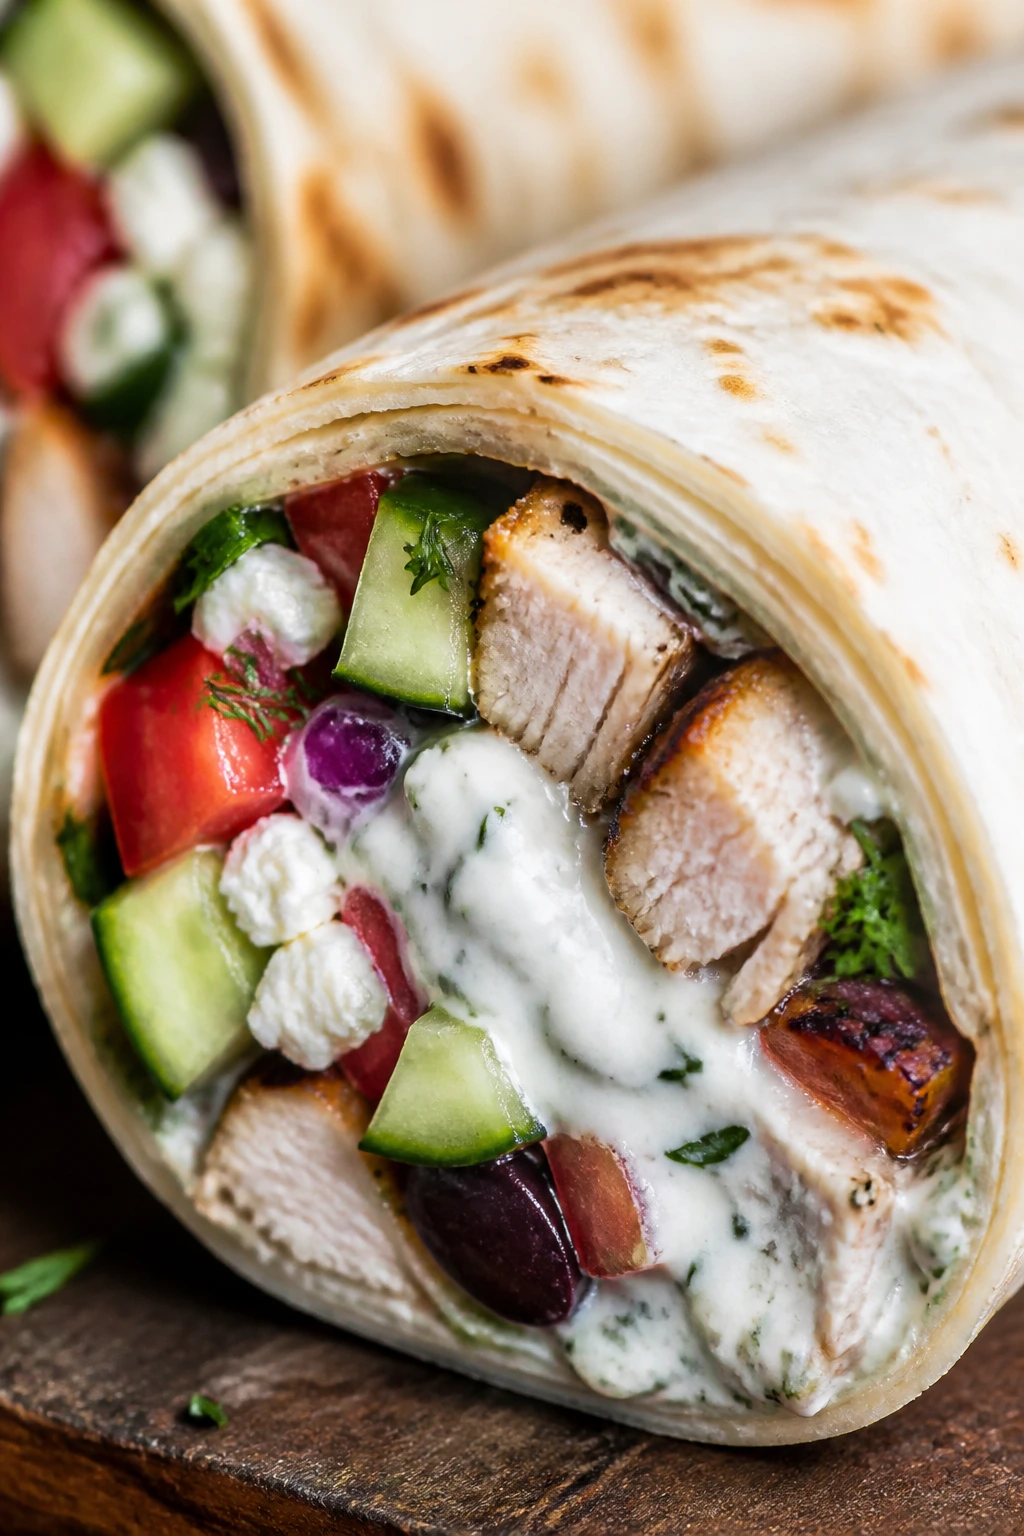
This wrap brings the best kind of salty-cool energy. You get cucumber, dill, feta, and lemon with enough chicken to make it feel like an actual lunch instead of a side dish.
Why It Works:
Tzatziki gives you moisture without the heaviness of mayo, and the cucumber-tomato mix tastes cleaner after a cold rest. The chicken anchors the wrap so the vegetables don’t feel like they’re floating around.
Key Ingredients:
- 2 cups cooked chicken, chopped
- 1/2 cup tzatziki
- 1 cup cucumber, diced and patted dry
- 1 cup tomato, seeded and diced
- 1/4 red onion, thinly sliced
- 1/3 cup feta, crumbled
- 1/4 cup kalamata olives, chopped
- 4 large tortillas
- 1 teaspoon dried oregano
Quick Steps:
- Season the chicken: Toss the chopped chicken with oregano and a spoonful of tzatziki.
- Dry the vegetables: Pat the cucumber and tomato dry with paper towels so they don’t puddle inside the wrap.
- Spread the sauce: Smear tzatziki down the middle of each tortilla.
- Layer the fillings: Add chicken, cucumber, tomato, onion, feta, and olives in a tidy line.
- Roll and chill: Wrap firmly and chill for 15 minutes before serving.
Equipment for This Recipe:
- Two bowls
- Paper towels
- Sharp knife
- Cutting board
- Spoon
How to Serve This Dish:
This one wants cold sparkling water or an iced mint tea. Serve it with a few extra cucumber coins and a wedge of lemon on the side so the last bite tastes as clean as the first.
Pro Tips for This Recipe:
- Pat the cucumber dry or the wrap will sweat.
- Use a crumbly feta rather than a soft one packed in brine.
- Thin onion slices matter here; thick ones take over the whole wrap.
Variations on This Dish:
- No-Chicken Greek Wrap: Replace chicken with chickpeas for a vegetarian version.
- Herb-Loud Tzatziki Wrap: Add mint and parsley to the sauce.
- Spicy Feta Wrap: Stir a pinch of chili flakes into the tzatziki.
Common Mistakes to Avoid with This Dish:
- Using watery tomatoes: They make the tortilla slick. Seed them first.
- Overloading with olives: The salt piles up fast. A small chop goes farther than you think.
- Skipping the chill: Tzatziki tastes better after a short rest, and the wrap holds together more cleanly.
6. Caprese Pesto Wrap
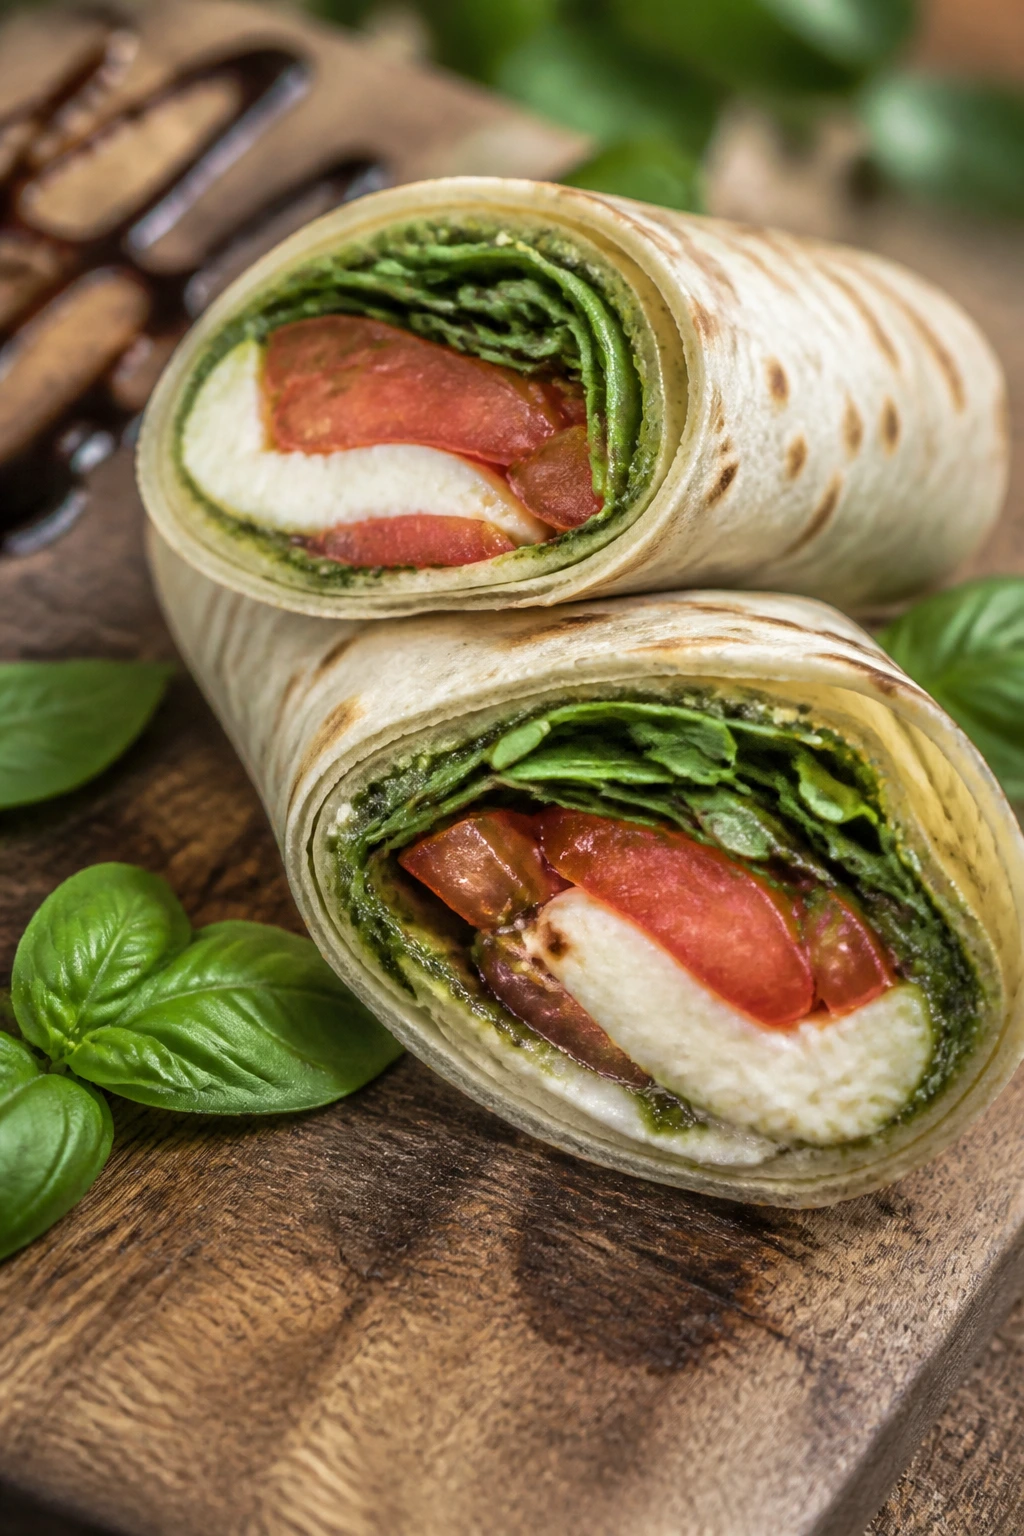
Tomato, basil, mozzarella, pesto, and balsamic glaze are so familiar that people forget how precise the balance has to be. Too much balsamic and it tastes sticky; too much tomato juice and the tortilla gives up.
Why It Works:
Caprese flavors stay lively when the ingredients are dry and cool. Pesto coats the tortilla in a thin, oily layer that keeps the bread side from taking on moisture from the tomatoes.
Key Ingredients:
- 4 large tortillas
- 1/3 cup basil pesto
- 8 ounces fresh mozzarella, sliced and patted dry
- 2 medium tomatoes, sliced and seeded
- 1 cup arugula
- 2 tablespoons balsamic glaze
- 8 to 10 basil leaves
- Pinch of salt and black pepper
Quick Steps:
- Dry the cheese and tomatoes: Pat the mozzarella and tomato slices dry with paper towels.
- Spread the pesto: Brush or spread pesto over each tortilla, leaving a small border.
- Build the layers: Add arugula, mozzarella, tomato, basil, salt, and black pepper.
- Finish lightly: Drizzle a small zigzag of balsamic glaze over the center.
- Roll and slice: Roll snugly, rest seam-side down, then cut cleanly with a sharp knife.
Equipment for This Recipe:
- Paper towels
- Knife
- Cutting board
- Spoon or spatula
- Small brush, optional
How to Serve This Dish:
Serve with sparkling water or a chilled white wine if that’s the plan. A few olives or marinated peppers on the side keep the plate from feeling too soft and sweet.
Pro Tips for This Recipe:
- Use mozzarella that’s been blotted dry; wet cheese is the sabotage nobody sees coming.
- Go easy on the glaze. A teaspoon or two is enough.
- Arugula gives a peppery edge that keeps the wrap from leaning too sweet.
Variations on This Dish:
- Roasted Pepper Caprese: Add strips of well-drained roasted red peppers.
- Chicken Caprese Wrap: Add sliced grilled chicken for a more filling version.
- Dairy-Free Basil Wrap: Use dairy-free mozzarella-style slices and extra pesto.
Common Mistakes to Avoid with This Dish:
- Not seeding the tomatoes: The extra liquid leaks fast.
- Too much balsamic glaze: It turns sticky and masks the basil.
- Using soft, wet mozzarella straight from the package: Pat it dry first.
7. Buffalo Chicken Slaw Wrap
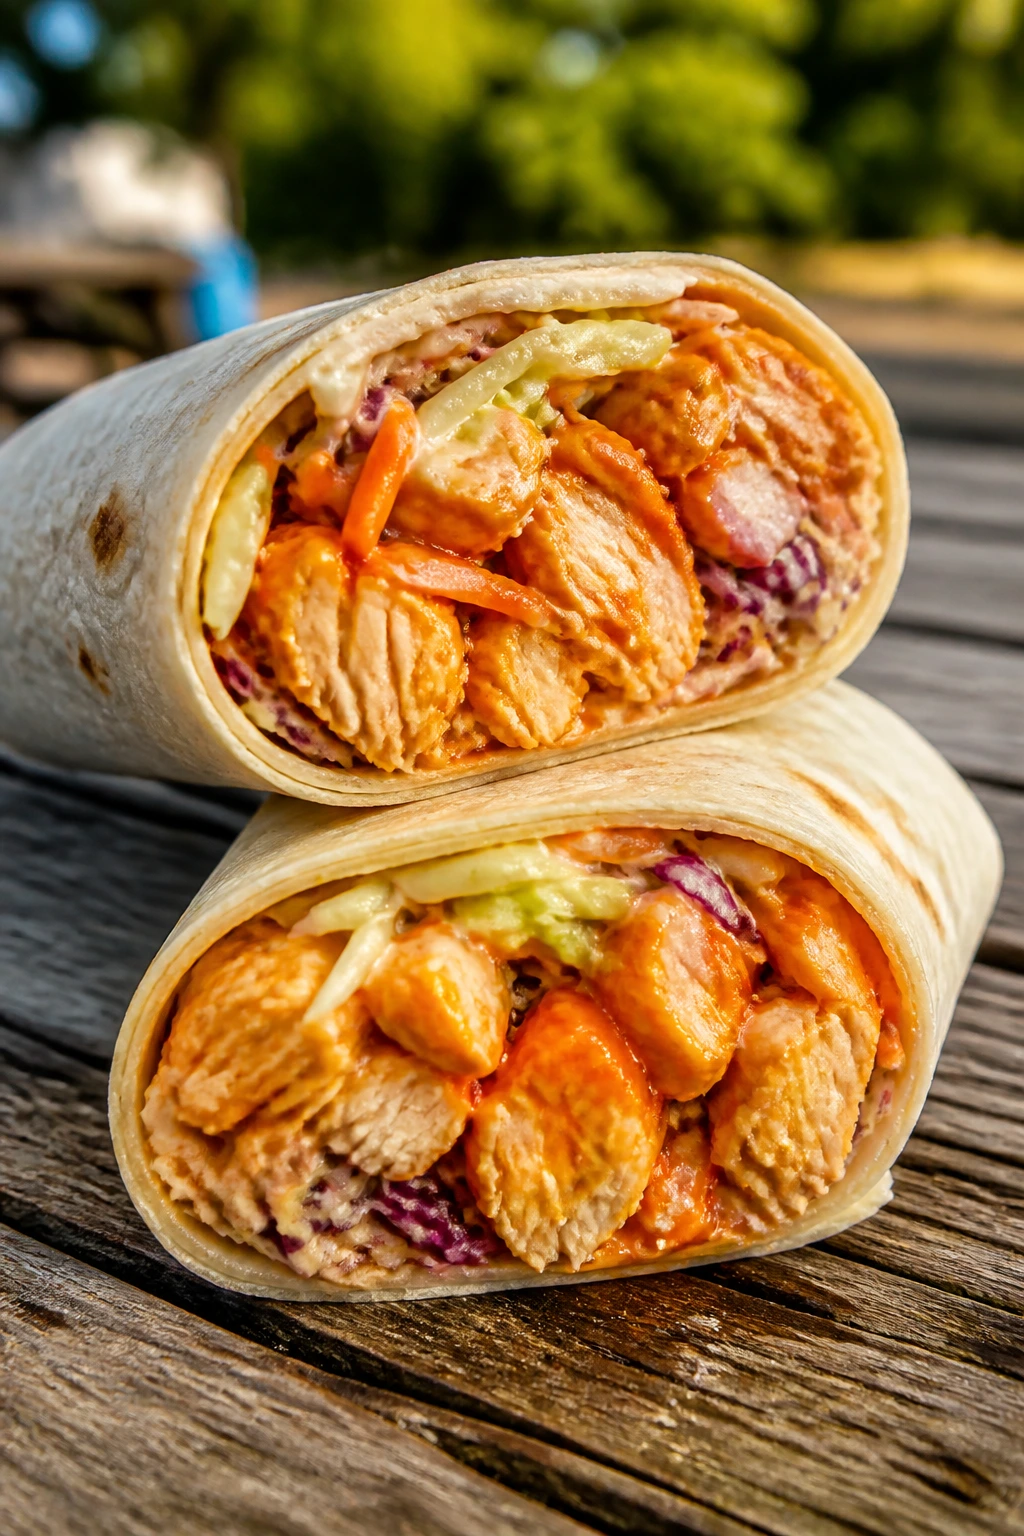
Buffalo chicken on a picnic sounds messy until you pair it with a crisp slaw that cools the heat down. The trick is to keep the sauce on the chicken, not all over the tortilla.
Why It Works:
Buffalo sauce gives the filling a sharp, salty heat that cuts through the richness of ranch or blue cheese dressing. Coleslaw mix adds crunch without extra slicing, and cabbage holds up better than lettuce after a little cooler time.
Key Ingredients:
- 2 cups cooked shredded chicken
- 1/3 cup buffalo sauce
- 1/3 cup ranch or blue cheese dressing
- 2 cups coleslaw mix
- 1 tablespoon mayonnaise
- 1/4 teaspoon celery seed
- 1/4 cup blue cheese crumbles, optional
- 4 large tortillas
Quick Steps:
- Toss the chicken: Mix shredded chicken with buffalo sauce until evenly coated.
- Dress the slaw: Stir coleslaw mix with mayonnaise, celery seed, and a spoonful of ranch.
- Layer the base: Spread a thin stripe of ranch or blue cheese dressing down each tortilla.
- Add the filling: Spoon on slaw, buffalo chicken, and blue cheese crumbles if using.
- Roll firmly: Fold, roll, and chill for 10 minutes before cutting.
Equipment for This Recipe:
- Mixing bowls
- Spoon
- Knife
- Cutting board
- Dry skillet, optional for warming tortillas
How to Serve This Dish:
This wrap likes a cold cucumber-lime drink or an ice-cold lager. Serve with celery sticks if you want to echo the buffalo flavor, though the wrap already does enough work on its own.
Pro Tips for This Recipe:
- Use a chunky slaw mix with cabbage and carrots; fine slaw can go limp.
- Keep the buffalo sauce on the chicken only.
- If the filling tastes too hot, add a spoonful more ranch rather than more tortilla.
Variations on This Dish:
- Extra-Spicy Buffalo Wrap: Add sliced pickled jalapeños.
- Cool-Down Version: Use only ranch and skip the blue cheese.
- Vegetarian Cauliflower Swap: Replace the chicken with roasted cauliflower florets.
Common Mistakes to Avoid with This Dish:
- Saucing the whole wrap: It gets slippery and leaks.
- Using soft lettuce instead of slaw: The crunch disappears fast.
- Skipping the chill: The filling needs a minute to settle, or it slips out on the first bite.
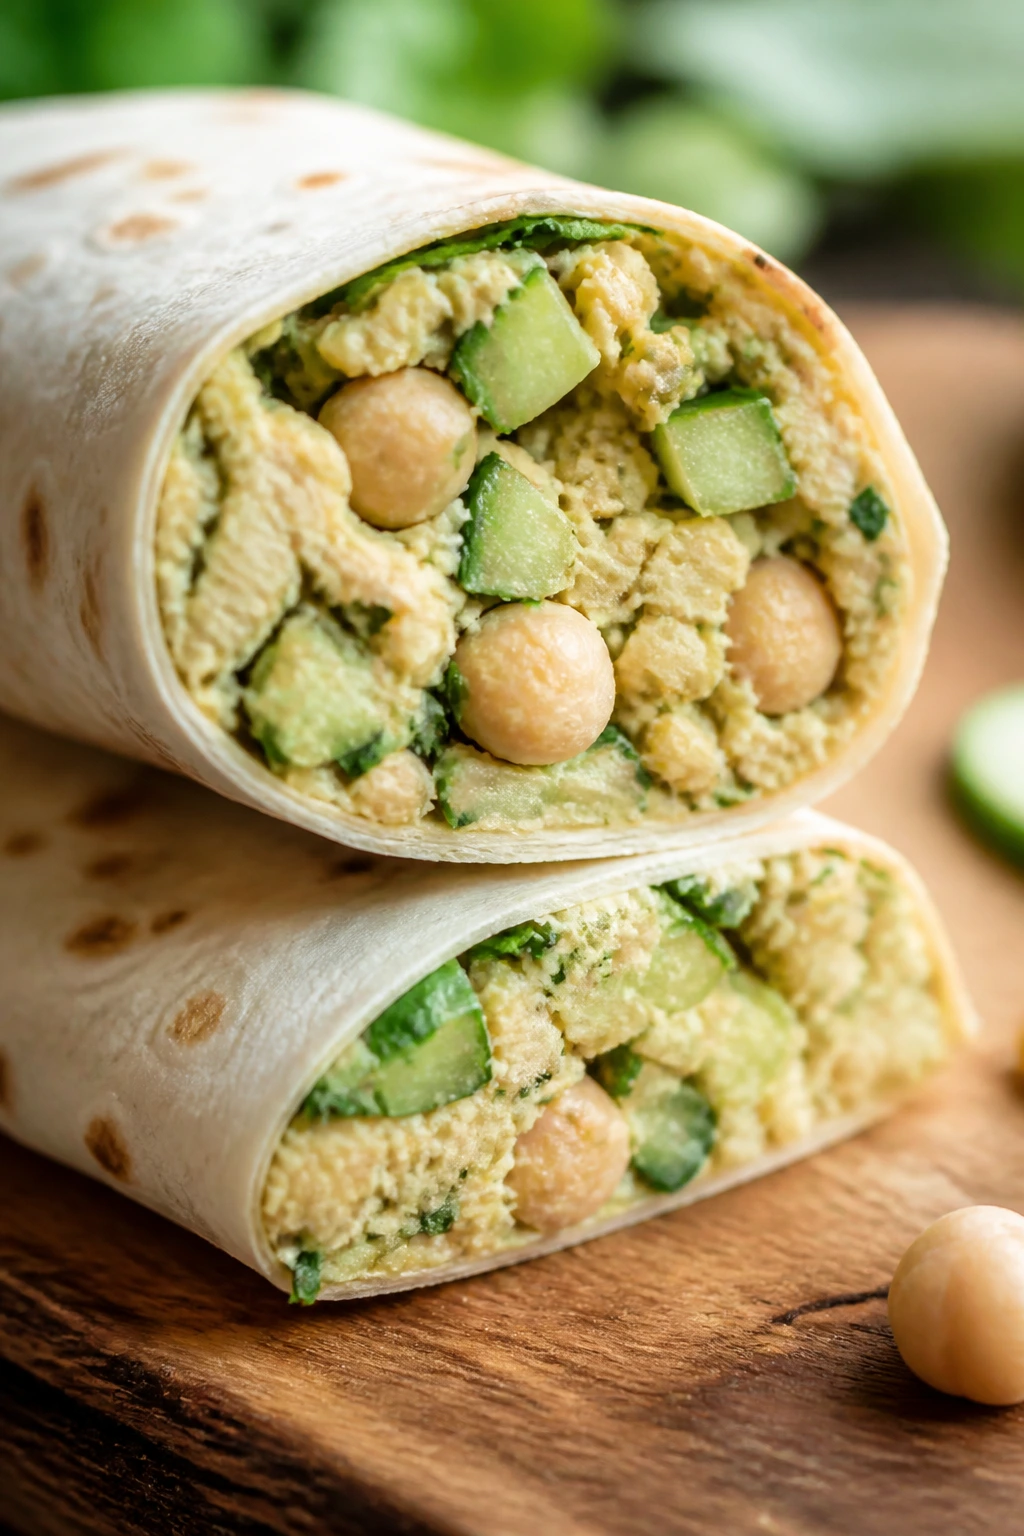
8. Falafel Hummus Veggie Wrap
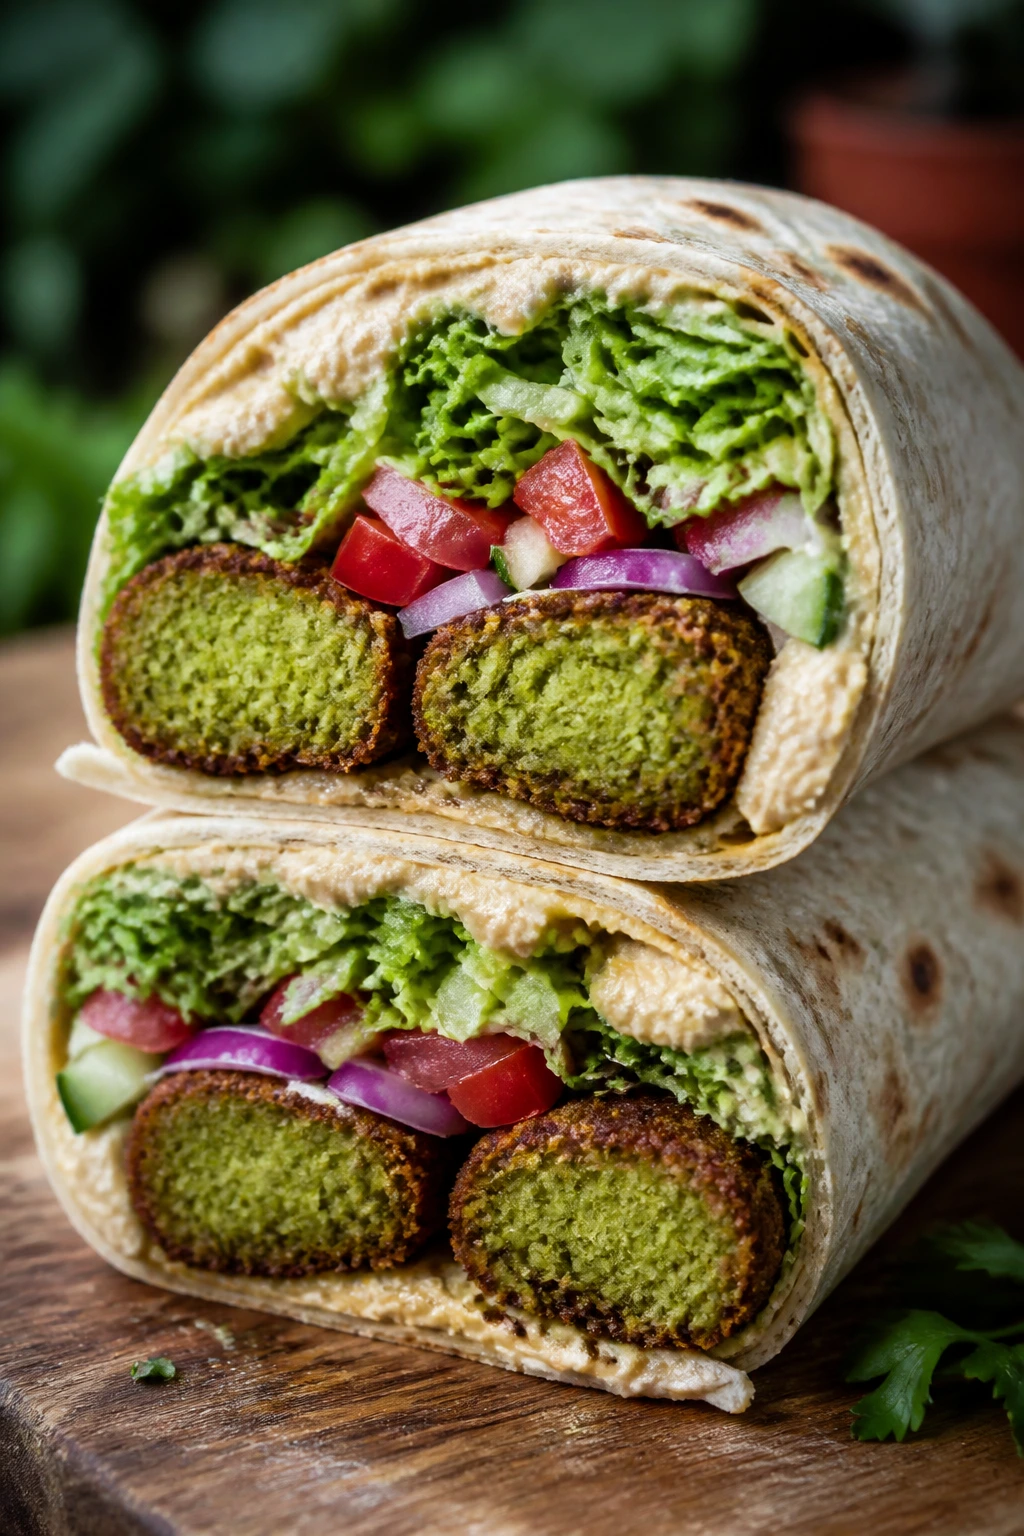
A falafel wrap can get dense if you pile on too many wet vegetables. Keep the line clean, and it becomes one of the best picnic wraps on the list.
Why It Works:
Falafel brings heft, hummus adds creaminess, and crisp vegetables give the wrap a fresh finish. The flavors are sturdy enough to survive a cooler, which is more than you can say for a lot of delicate lunch fillings.
Key Ingredients:
- 8 falafel balls, cooked and cooled
- 1/2 cup hummus
- 1 cup romaine, shredded
- 1 cucumber, cut into thin sticks
- 1 medium tomato, seeded and diced
- 1/4 red onion, thinly sliced
- 2 tablespoons tahini sauce
- 4 large tortillas or flatbreads
- 1/4 cup pickled onions, optional
Quick Steps:
- Cool the falafel: Cook the falafel until crisp, then let them cool so they don’t steam the wrap.
- Spread the hummus: Use a generous line of hummus down the center of each tortilla.
- Add the greens: Layer romaine, cucumber, tomato, and onion on top.
- Nest the falafel: Split the falafel in half or leave them whole and tuck them into the center.
- Finish and roll: Drizzle tahini sauce, add pickled onions if using, and roll tightly.
Equipment for This Recipe:
- Skillet, oven, or air fryer
- Knife
- Cutting board
- Spoon
- Paper towels
How to Serve This Dish:
Serve with mint lemonade or sparkling water with lemon. A handful of olives on the side keeps the plate feeling Mediterranean without making it fussy.
Pro Tips for This Recipe:
- Falafel should be crisp on the outside and dry enough to handle.
- Blot the tomato pieces so they don’t flood the hummus.
- Flatbreads are easier to roll than thick pita if you want a tighter picnic wrap.
Variations on This Dish:
- Avocado Falafel Wrap: Add thin avocado slices for extra richness.
- Herby Tahini Version: Mix parsley and lemon zest into the tahini.
- Gluten-Free Build: Use a certified gluten-free wrap or serve it as a lettuce bundle.
Common Mistakes to Avoid with This Dish:
- Using hot falafel: It creates steam inside the tortilla. Cool it first.
- Overdoing the tahini: Too much turns the wrap pasty.
- Leaving the cucumber wet: Dry it with a towel before assembly.
9. Roast Beef and Horseradish Arugula Wrap
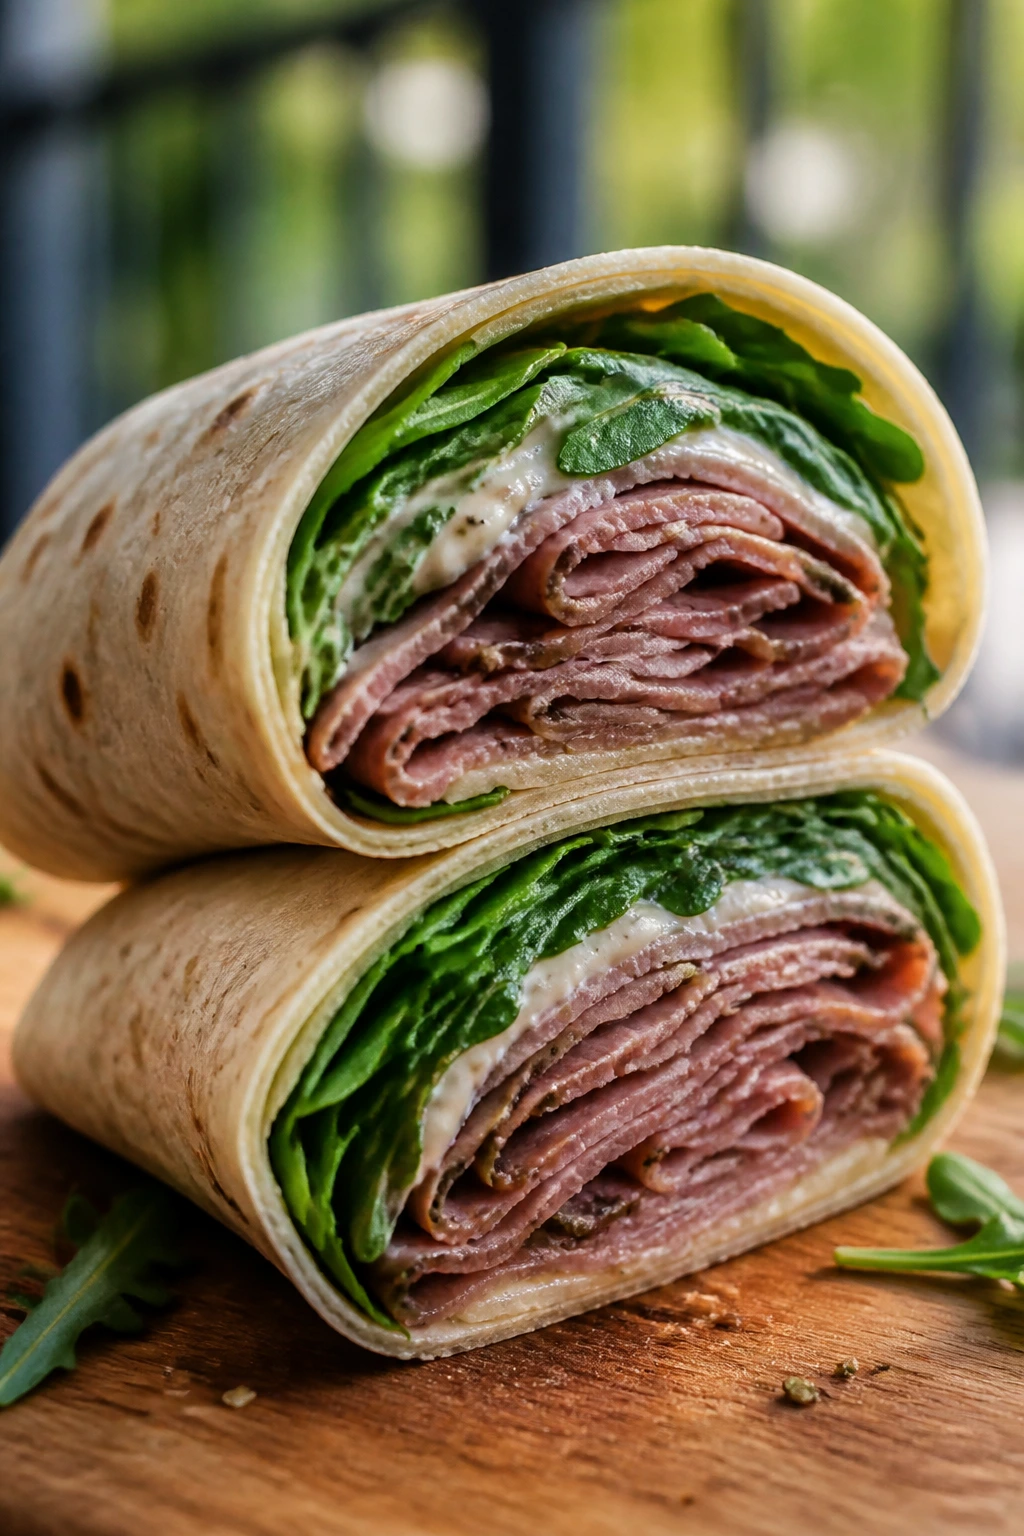
This one is bold and a little sharp, which is exactly why it works with a cold drink. Roast beef likes peppery arugula and horseradish because the flavors don’t whisper.
Why It Works:
Horseradish cuts through the richness of the beef, while arugula keeps the whole wrap from feeling heavy. If you use thin-sliced roast beef, the wrap rolls tighter and eats cleaner.
Key Ingredients:
- 8 ounces thin-sliced roast beef
- 2 tablespoons mayonnaise
- 1 tablespoon prepared horseradish
- 2 cups arugula
- 1/2 cup thinly sliced red onion or pickled onions
- 4 slices provolone or Swiss cheese
- 4 large tortillas
- Black pepper, to taste
Quick Steps:
- Mix the spread: Stir mayonnaise and horseradish together until smooth.
- Lay the cheese: Spread the horseradish mayo down each tortilla, then place cheese over the center line.
- Add the beef: Fold the roast beef into loose ribbons and tuck it over the cheese.
- Finish with greens: Top with arugula, onion, and a little black pepper.
- Roll tightly: Fold and roll, then rest seam-side down before cutting.
Equipment for This Recipe:
- Small bowl
- Knife
- Cutting board
- Spoon
- Parchment paper, optional
How to Serve This Dish:
Serve with dill pickle chips and ginger ale or iced tea. I like this wrap cut into short, thick halves because the beef can slide if you make the pieces too long.
Pro Tips for This Recipe:
- Thin-sliced beef rolls better than chunky deli slices.
- Go easy on the horseradish unless you want the wrap to bite back.
- Pickled onions are cleaner than raw red onion if the wrap will sit for a while.
Variations on This Dish:
- Cheddar Roast Beef Wrap: Swap provolone for sharp cheddar.
- Peppery Steakhouse Wrap: Add cracked black pepper and sliced pickles.
- Milder Version: Use a little extra mayonnaise and half the horseradish.
Common Mistakes to Avoid with This Dish:
- Using too much horseradish: It takes over the beef. Start small.
- Thick beef slices: They make the wrap bulky and hard to roll.
- Skipping the cheese layer: It helps buffer the beef and keeps the tortilla from getting direct moisture.
10. Ham Swiss Pickle Wrap
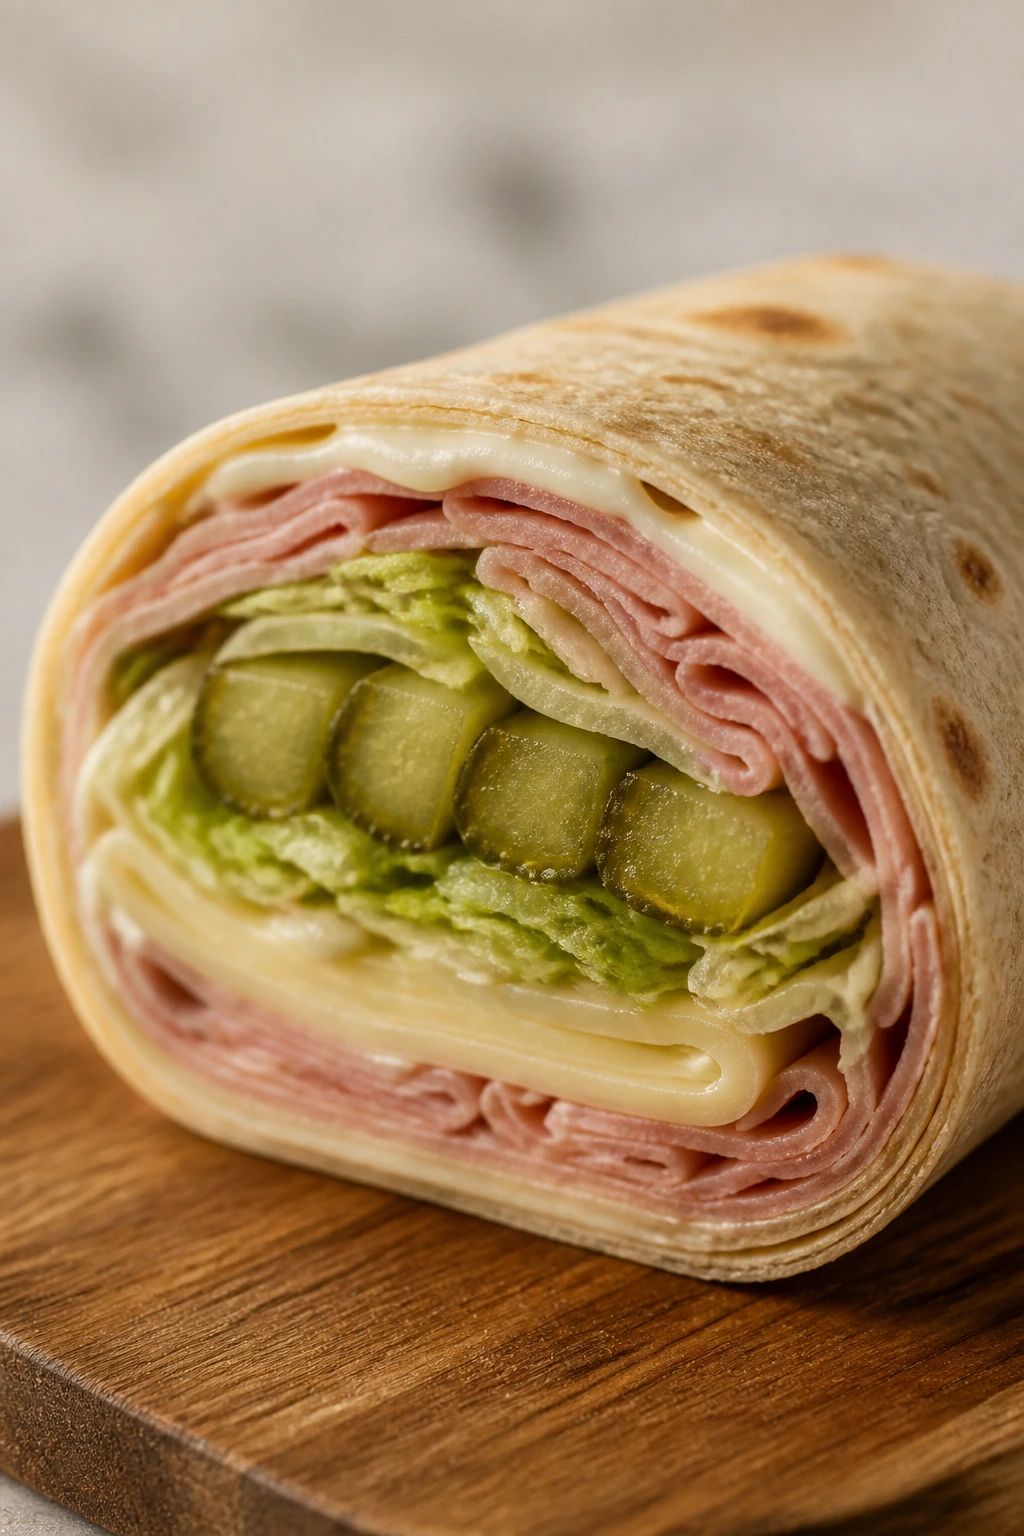
This is the wrap you make when you want deli flavor without hauling around a heavy sandwich stack. The pickle slices do the sharp work, and the Swiss keeps everything grounded.
Why It Works:
Ham and Swiss already know how to behave together, and the wrap format keeps them from getting stale on the edges. A little Dijon mayo gives the filling enough lift so it doesn’t taste like plain cold cuts.
Key Ingredients:
- 8 ounces deli ham, thinly sliced
- 4 slices Swiss cheese
- 2 tablespoons mayonnaise
- 1 tablespoon Dijon mustard
- 1/2 cup dill pickle spears, sliced thin
- 1 cup shredded lettuce
- 4 large tortillas
- 1 tablespoon chopped chives, optional
Quick Steps:
- Mix the spread: Combine mayonnaise and Dijon mustard in a small bowl.
- Build the base: Spread the mustard mayo over each tortilla in a thin layer.
- Add the deli layers: Arrange ham and Swiss over the center, then top with lettuce and pickles.
- Finish with chives: Sprinkle chives if you want a brighter, onion-like note.
- Roll and set: Roll tightly and let the wraps sit seam-side down for 5 minutes before slicing.
Equipment for This Recipe:
- Small bowl
- Spoon
- Knife
- Cutting board
- Parchment, optional
How to Serve This Dish:
Cold cola or iced black tea is the right kind of simple here. Pair it with potato chips or a few extra pickle spears, and you’ve got the kind of lunch that disappears without drama.
Pro Tips for This Recipe:
- Slice the pickles thin so they don’t pry open the wrap.
- Use lettuce as a moisture buffer between the pickles and tortilla.
- A little chive goes farther than it sounds.
Variations on This Dish:
- Honey Ham Version: Swap Dijon for honey mustard.
- Turkey-Swiss Pickle Wrap: Use turkey if you want a milder deli flavor.
- Spicy Deli Wrap: Add sliced banana peppers or a few drops of hot sauce.
Common Mistakes to Avoid with This Dish:
- Using thick pickle chunks: They create pressure points and tearing.
- Too much mustard mayo: It leaks when the wrap sits.
- Packing it while warm: Always keep it fully chilled.
11. Egg Salad Dill Wrap
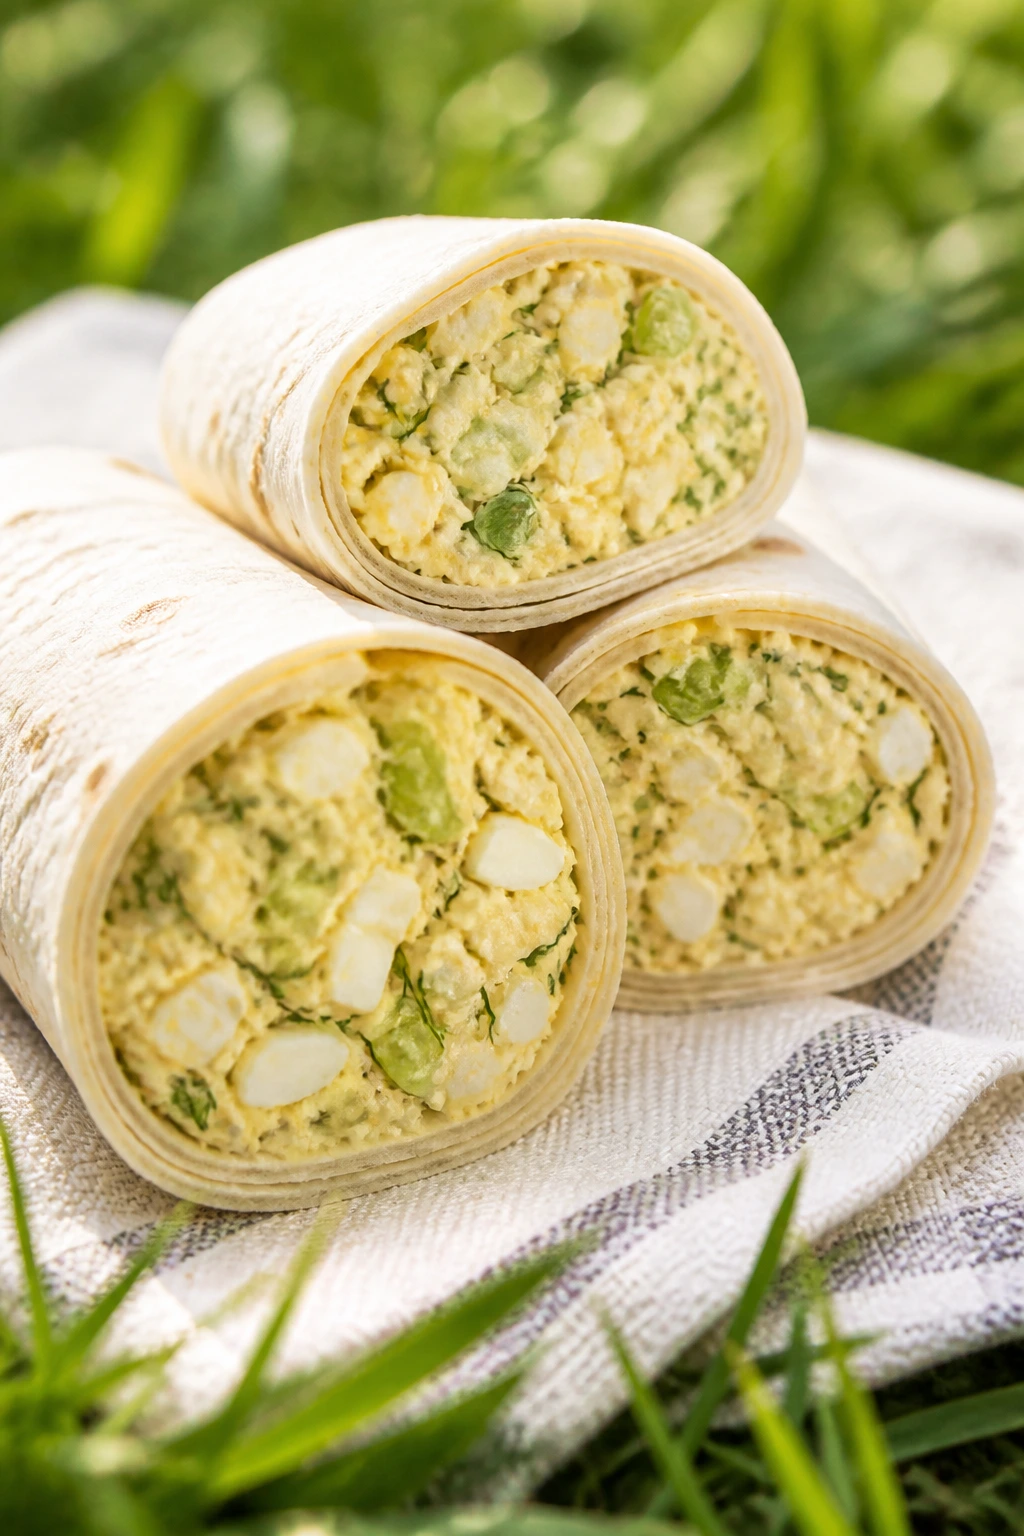
Egg salad can turn gluey fast, so the goal is a filling that stays soft but still has shape. Dill, celery, and lemon keep it from reading as old-fashioned in the dull way.
Why It Works:
Egg salad tastes best after a short chill because the mayonnaise and mustard settle into the eggs. Fresh dill and celery give the filling a cold, green snap that makes the wrap feel lighter than the ingredients suggest.
Key Ingredients:
- 6 hard-cooked eggs, chopped
- 1/4 cup mayonnaise
- 1 tablespoon Dijon mustard
- 1 celery stalk, finely diced
- 2 tablespoons fresh dill, chopped
- 1 teaspoon lemon juice
- 1/4 teaspoon paprika
- 1 cup lettuce
- 4 large tortillas
Quick Steps:
- Mix the egg salad: Combine eggs, mayonnaise, Dijon, celery, dill, lemon juice, and paprika in a bowl.
- Chill the filling: Let it rest for 15 minutes so it firms up slightly.
- Set the greens: Lay lettuce down the center of each tortilla.
- Add the salad: Spoon egg salad onto the lettuce in a narrow strip.
- Roll gently: Fold and roll without pressing so hard that the eggs squeeze out.
Equipment for This Recipe:
- Mixing bowl
- Fork or spoon
- Knife
- Cutting board
- Egg slicer, optional
How to Serve This Dish:
This wrap likes iced tea or sparkling water with lemon. Serve it with sliced radishes or a few cucumber sticks if you want a little extra crunch on the side.
Pro Tips for This Recipe:
- Chop the eggs by hand rather than smashing them into paste.
- A little paprika gives the salad a color lift and a soft smoky note.
- Chill the filling before assembling so the wrap doesn’t turn messy.
Variations on This Dish:
- Pickle-Dill Egg Salad: Add chopped dill pickles for more bite.
- Avocado Egg Wrap: Replace half the mayo with mashed avocado.
- Curried Egg Version: Add a pinch of curry powder and chopped scallions.
Common Mistakes to Avoid with This Dish:
- Over-mixing the eggs: You lose texture. Fold gently.
- Too much mayonnaise: The wrap gets soft and slides.
- Skipping the cool-down: Warm egg salad is a bad picnic move.
12. Chickpea Salad Cucumber Wrap
This is the wrap for people who want something filling without leaning on meat. Chickpeas bring heft, cucumber brings snap, and lemon makes the whole thing taste clean instead of heavy.
Why It Works:
Mashing part of the chickpeas helps the filling cling together, while whole chickpeas keep the texture interesting. Cucumber and herbs make it taste like a lunch that belongs outside, which is half the point.
Key Ingredients:
- 1 can chickpeas, drained and rinsed
- 2 tablespoons Greek yogurt or mayonnaise
- 1 tablespoon lemon juice
- 1 tablespoon olive oil
- 1 celery stalk, finely diced
- 1/2 cucumber, diced and patted dry
- 2 tablespoons parsley, chopped
- 1 tablespoon scallions, chopped
- 1/4 teaspoon ground cumin
- 4 large tortillas
Quick Steps:
- Mash the chickpeas: Use a fork to mash about half the chickpeas in a bowl.
- Build the salad: Stir in yogurt or mayonnaise, lemon juice, olive oil, celery, cucumber, parsley, scallions, and cumin.
- Taste and chill: Season lightly with salt and pepper, then chill the mixture for 10 minutes.
- Spread the filling: Add a small line of lettuce or spinach to each tortilla if you want extra structure.
- Roll snugly: Spoon the chickpea salad down the center, roll tight, and slice cleanly.
Equipment for This Recipe:
- Mixing bowl
- Fork
- Knife
- Cutting board
- Spoon
How to Serve This Dish:
Serve with iced herbal tea or a cold fizzy lemonade. I like a few extra cucumber sticks on the side because they echo the wrap without making it repetitive.
Pro Tips for This Recipe:
- Mash only part of the chickpeas so the filling doesn’t turn mushy.
- Pat the cucumber dry or the salad will loosen up.
- Add lemon in two small hits instead of one big splash so you can control the acidity.
Variations on This Dish:
- Curry Chickpea Wrap: Add 1/2 teaspoon curry powder and a few raisins.
- Tahini Herb Version: Swap yogurt for tahini and add dill.
- Avocado Chickpea Wrap: Fold in diced avocado right before assembly.
Common Mistakes to Avoid with This Dish:
- Leaving all the chickpeas whole: The filling falls apart.
- Using wet cucumber: It thins the salad fast.
- Overdoing the seasoning: Chickpeas take salt quickly, so taste before adding more.
13. Shrimp Po’ Boy Wrap
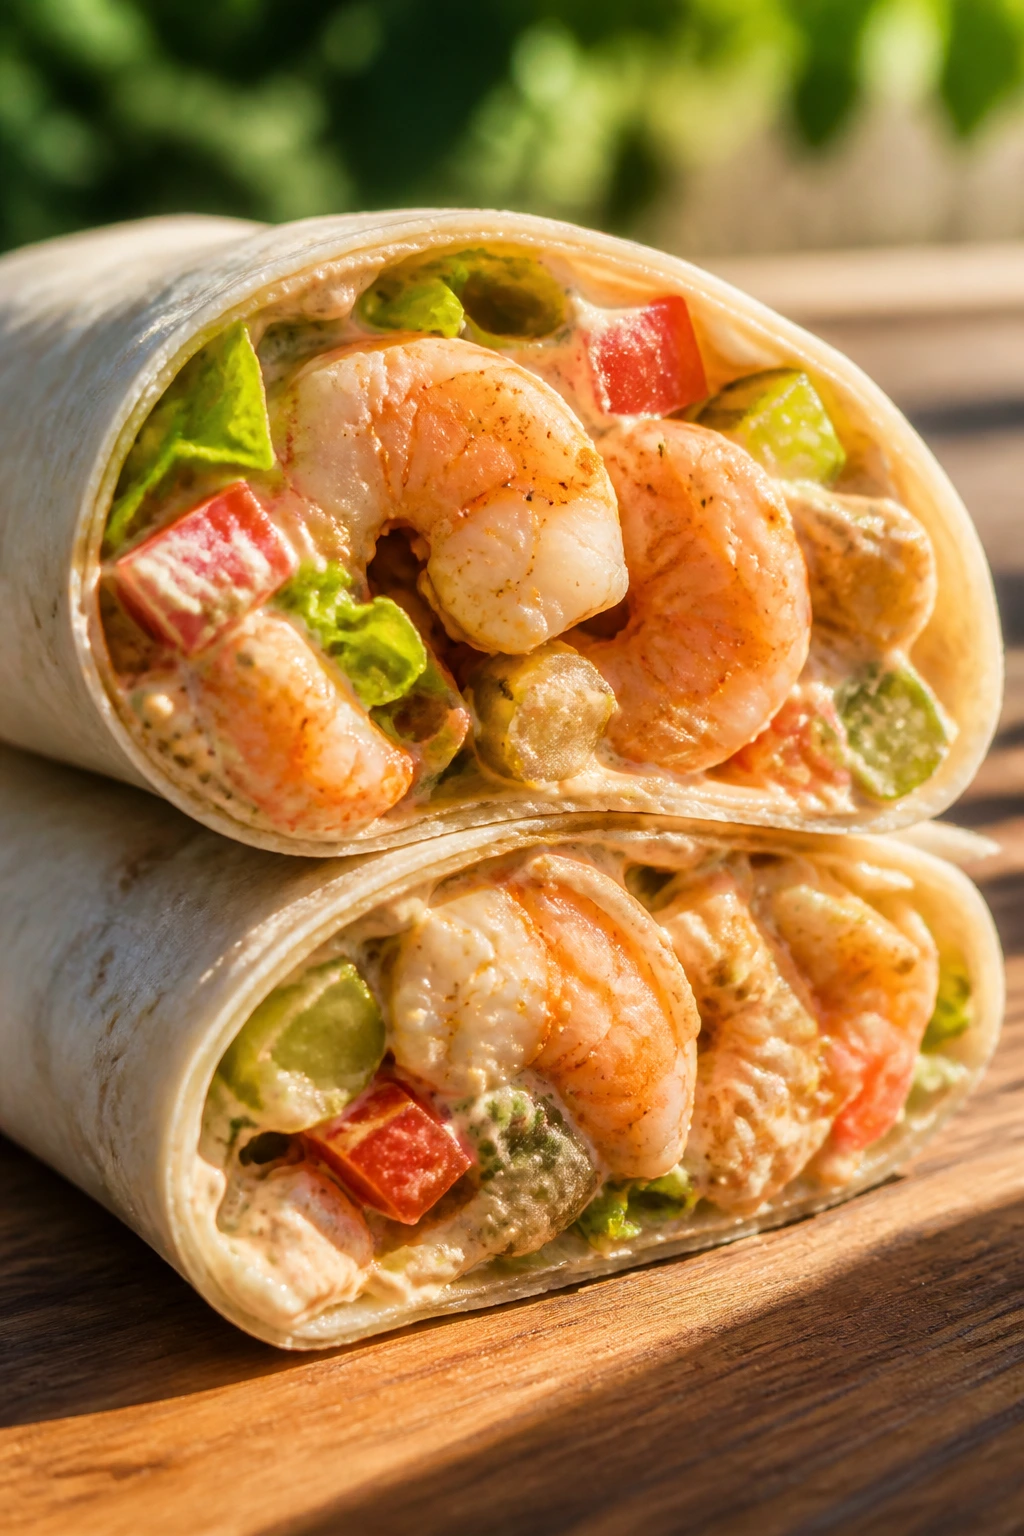
Shrimp and a creamy remoulade make a wrap that feels a little louder than the others. That’s a good thing on a warm day when you want something briny and crisp with your drink.
Why It Works:
Shrimp cooks fast and chills fast, which makes it useful for picnic planning. The lettuce, tomato, and pickles keep the wrap from becoming too rich, and the Cajun seasoning gives it enough edge to stand up to a cold soda or beer.
Key Ingredients:
- 1 pound raw shrimp, peeled and deveined
- 1 tablespoon oil
- 1 teaspoon Cajun seasoning
- 1/3 cup remoulade or spicy mayonnaise
- 1 cup shredded lettuce
- 1 medium tomato, seeded and sliced
- 1/2 cup dill pickle chips
- 4 large tortillas
- Lemon wedges, optional
Quick Steps:
- Cook the shrimp: Toss shrimp with oil and Cajun seasoning, then sauté over medium-high heat for 2 to 3 minutes per side until pink and just firm.
- Cool completely: Move the shrimp to a plate and let them cool so they don’t steam the wrap.
- Spread the sauce: Smear remoulade down each tortilla.
- Layer the fillings: Add lettuce, tomato, pickles, and shrimp in a narrow pile.
- Roll and chill: Roll tightly, wrap, and refrigerate for 10 minutes before serving.
Equipment for This Recipe:
- Skillet
- Tongs
- Mixing bowl
- Knife
- Cutting board
How to Serve This Dish:
Serve with lemonade, a cold lager, or sparkling water with lime. A few extra lemon wedges make sense here; shrimp and acid are old friends.
Pro Tips for This Recipe:
- Do not overcook the shrimp. Once they curl and turn opaque, pull them off the heat.
- Seed the tomato, or the remoulade gets diluted.
- If the shrimp are large, slice them in half so the wrap rolls more easily.
Variations on This Dish:
- Extra-Crunch Po’ Boy: Add a handful of shredded cabbage.
- Garlic Shrimp Version: Stir minced garlic into the oil before cooking.
- Mild Remoulade Wrap: Use plain mayo with a little paprika if Cajun heat is too much.
Common Mistakes to Avoid with This Dish:
- Overcooking shrimp: They turn rubbery fast.
- Assembling while hot: The tortilla gets wet and weak.
- Using too much sauce: It masks the shrimp and leaks through.
14. BBQ Pulled Pork Coleslaw Wrap
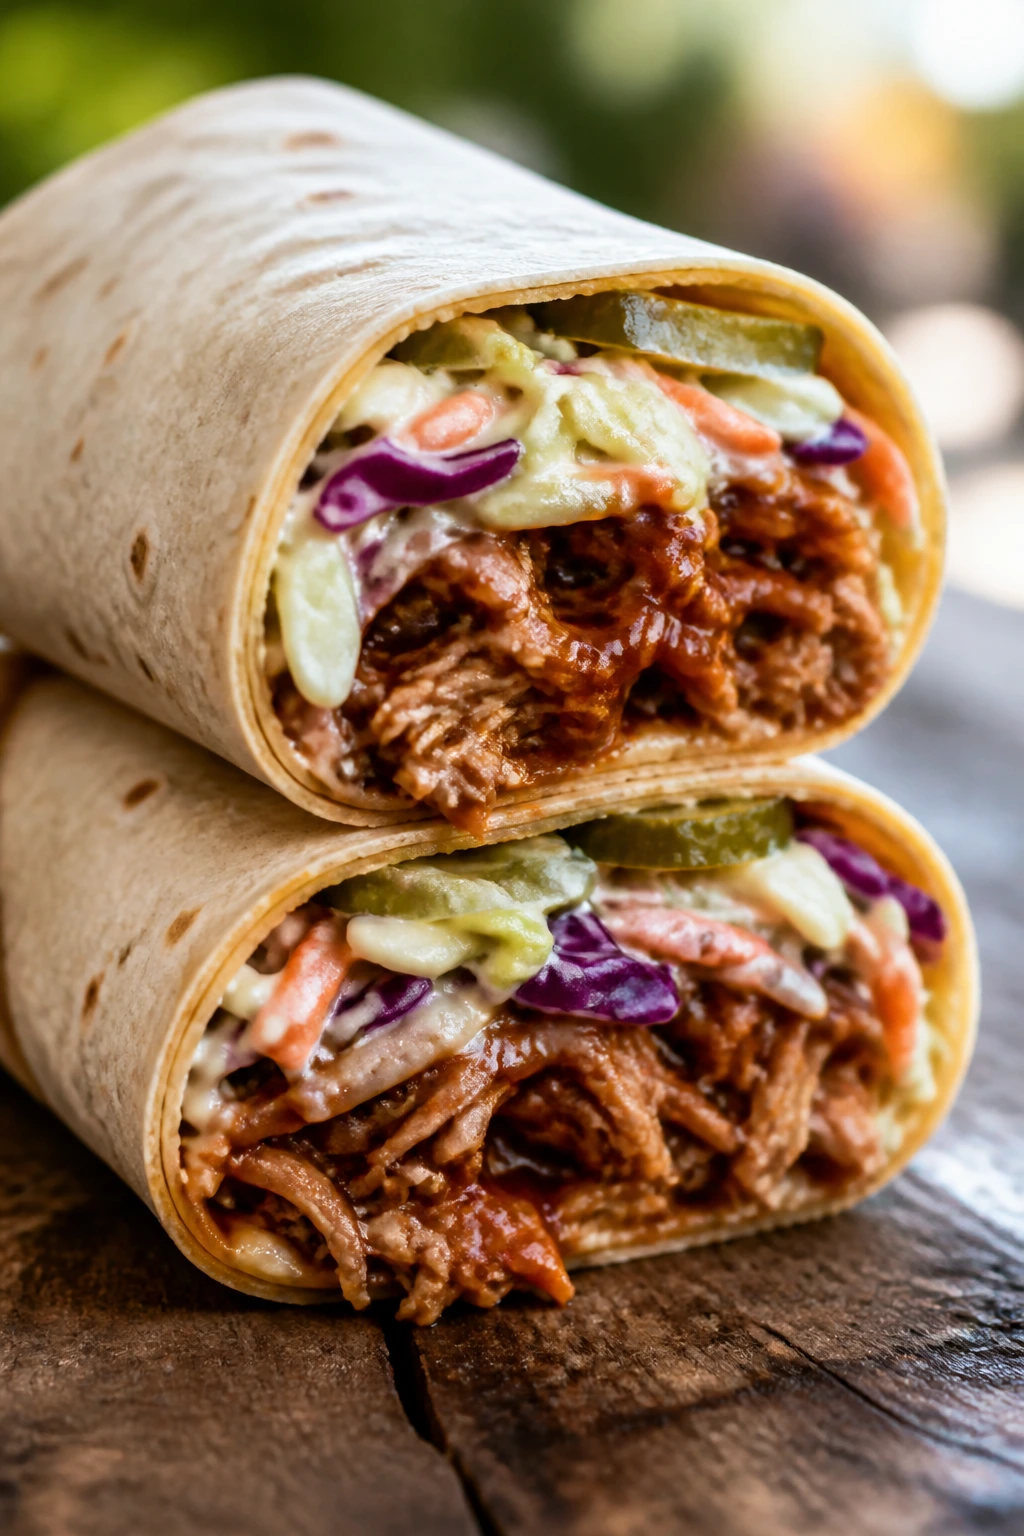
Pulled pork needs a cool, crisp partner or it eats like a bowl, not a wrap. Coleslaw solves that, and pickles keep the whole thing from getting too sweet.
Why It Works:
BBQ sauce clings well to pulled pork, which means the filling stays put instead of running across the tortilla. The slaw gives you crunch and acidity, and that matters because barbecue without acid can feel sticky.
Key Ingredients:
- 2 cups pulled pork, warmed and then cooled slightly
- 1/3 cup barbecue sauce
- 2 cups coleslaw mix
- 2 tablespoons mayonnaise
- 1 tablespoon apple cider vinegar
- 1/4 cup chopped pickles
- 1/4 cup shredded cheddar
- 4 large tortillas
Quick Steps:
- Sauce the pork: Stir barbecue sauce into the pulled pork while it’s still warm.
- Mix the slaw: Toss coleslaw mix with mayonnaise and apple cider vinegar.
- Build the base: Spread a small line of slaw down each tortilla.
- Add the pork: Spoon the sauced pork over the slaw, then top with pickles and cheddar.
- Roll and rest: Roll tightly and let it sit for 5 minutes so the wrap tightens up.
Equipment for This Recipe:
- Mixing bowls
- Spoon
- Knife
- Cutting board
- Skillet or microwave, optional for warming pork
How to Serve This Dish:
This wrap tastes right with iced tea or a cold cola. Serve it with kettle chips if you want more crunch, though the slaw already does a lot of the heavy lifting.
Pro Tips for This Recipe:
- Let the pork cool before wrapping or the slaw will wilt.
- Keep the slaw lightly dressed; too much dressing makes the wrap slide.
- Chopped pickles add a sharper finish than sweet relish.
Variations on This Dish:
- Spicy BBQ Pork Wrap: Add sliced jalapeños.
- Chicken Barbecue Swap: Use shredded chicken instead of pork.
- Tangy Mustard Slaw Version: Swap half the barbecue sauce for mustard-based barbecue sauce.
Common Mistakes to Avoid with This Dish:
- Using too much sauce on the pork: It leaks and drowns the slaw.
- Packing it hot: Warm filling kills crunch.
- Skipping vinegar in the slaw: The wrap ends up too sweet.
15. Smoked Salmon Cream Cheese Wrap
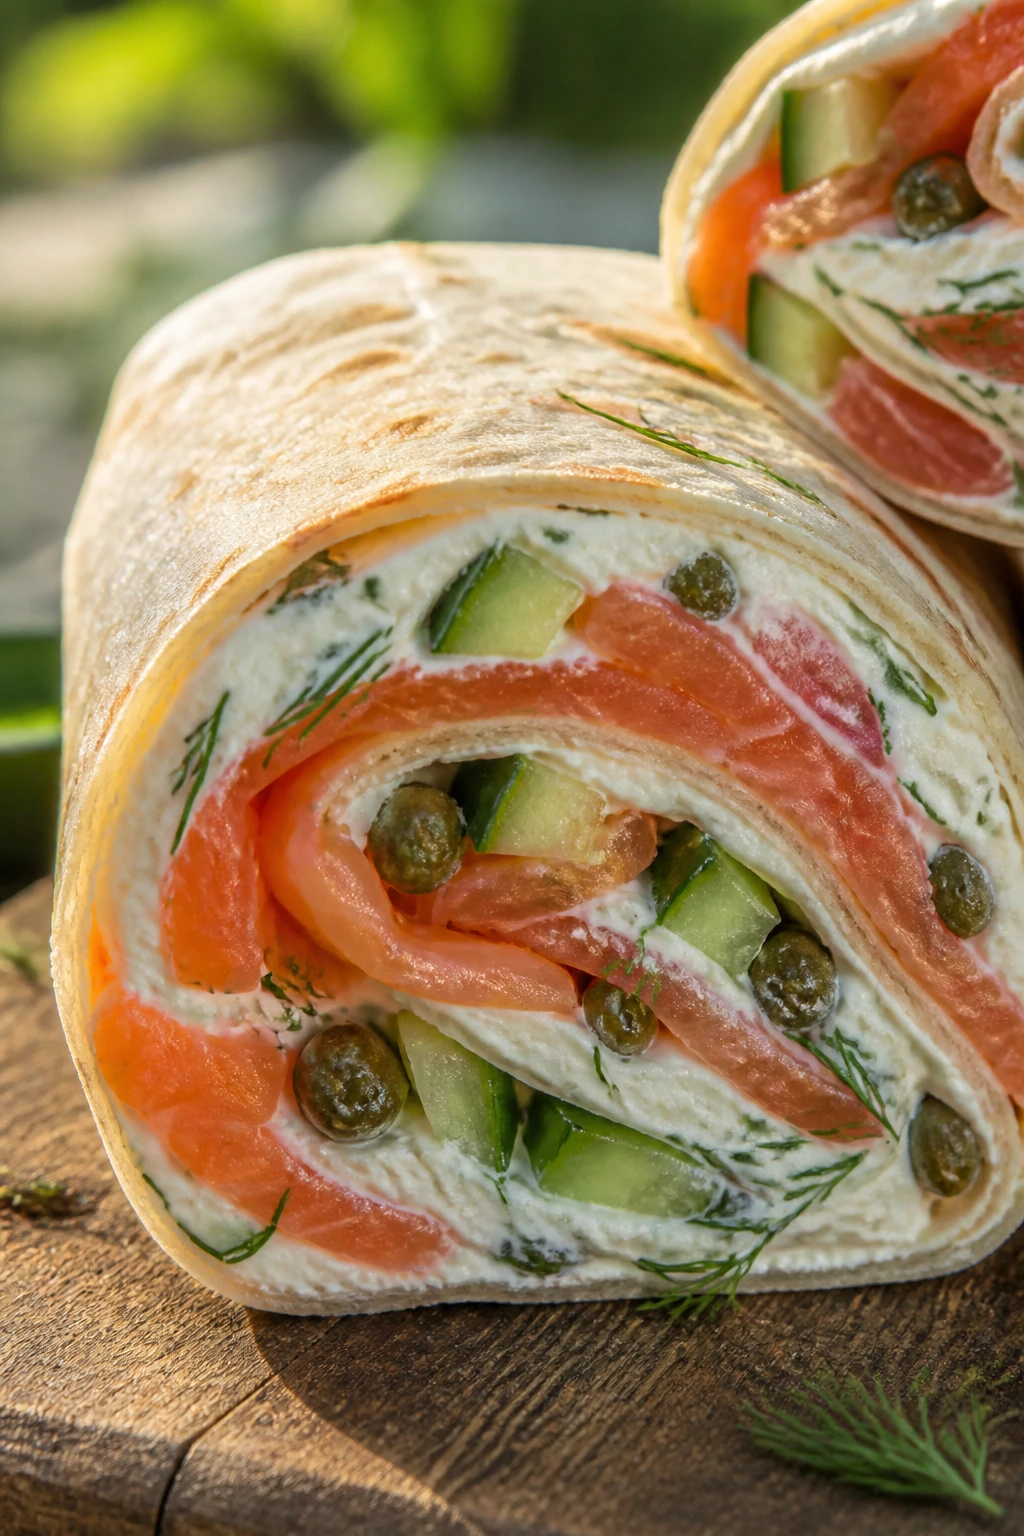
This wrap has deli-counter grace without the price tag of fuss. Smoked salmon, cream cheese, dill, and cucumber make a cold lunch that tastes deliberate.
Why It Works:
The cream cheese acts like glue and moisture control at once, which is useful when you’re working with silky salmon. Dill and cucumber keep the wrap bright, while capers add little bursts of salt that keep each bite awake.
Key Ingredients:
- 6 ounces smoked salmon
- 1/2 cup cream cheese, softened
- 1 tablespoon lemon juice
- 1 tablespoon fresh dill, chopped
- 1/2 cucumber, thinly sliced and patted dry
- 1/4 red onion, thinly sliced
- 1 tablespoon capers, drained
- 1 cup spinach or baby greens
- 4 large tortillas or lavash
Quick Steps:
- Mix the spread: Stir cream cheese with lemon juice and dill until smooth.
- Dry the vegetables: Blot the cucumber slices so they don’t water down the filling.
- Spread the base: Smear the cream cheese mixture over each wrap.
- Layer the salmon: Add spinach, salmon, cucumber, onion, and capers in a thin line.
- Roll gently: Roll without pressing too hard, then chill before slicing.
Equipment for This Recipe:
- Small bowl
- Spoon
- Knife
- Cutting board
- Paper towels
How to Serve This Dish:
Serve with sparkling water, iced tea, or a crisp cucumber lemonade. A few extra capers on the side are nice if you like a brinier bite.
Pro Tips for This Recipe:
- Use salmon that is cold but not icy.
- Pat the cucumber dry, or the cream cheese will slide.
- Lavash rolls tighter than thick tortillas if you want a neater cut.
Variations on This Dish:
- Everything-Seasoning Wrap: Sprinkle the outside of the cream cheese with everything seasoning.
- Avocado Salmon Wrap: Add thin avocado slices for a richer version.
- Dairy-Free Salmon Wrap: Use a dairy-free spread and a little extra lemon.
Common Mistakes to Avoid with This Dish:
- Using too much onion: It can drown out the salmon.
- Overstuffing with capers: The salt jumps past pleasant.
- Cutting too soon: The cream cheese needs a short chill to set.
16. Thai Peanut Noodle Wrap
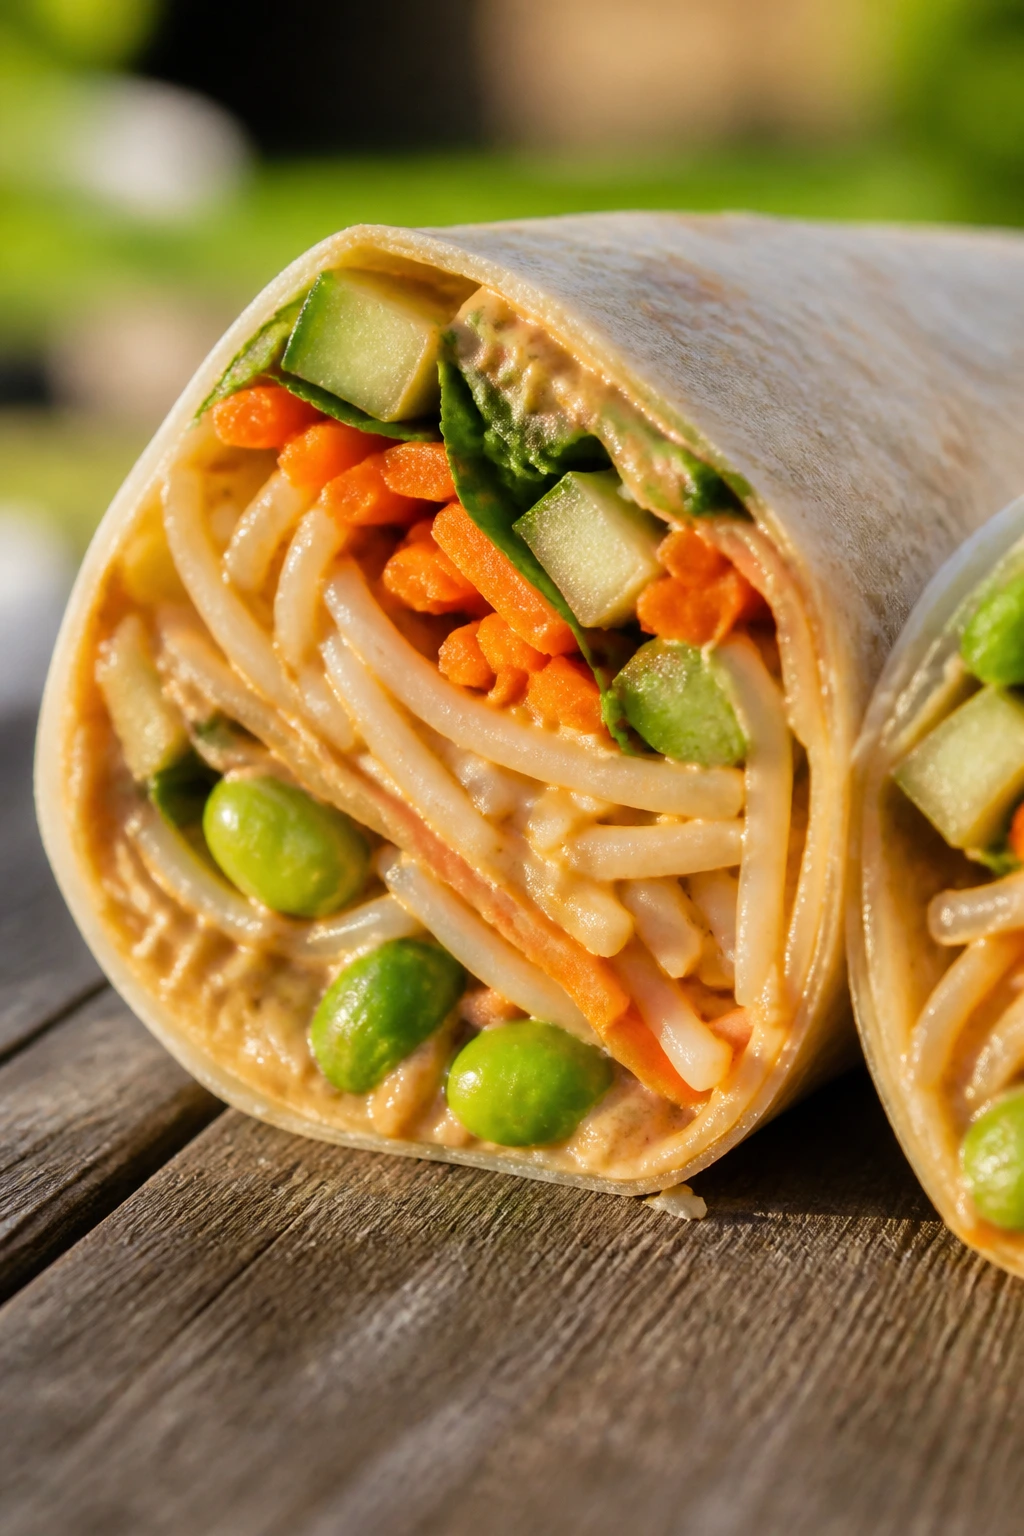
This one eats like a picnic version of a noodle bowl, but it’s less likely to end up in your lap. Peanut sauce, cool noodles, and crisp vegetables make a wrap with real chew.
Why It Works:
Rice noodles hold sauce well, and peanut butter gives you enough body that the filling doesn’t leak. Cucumber and carrots keep the wrap fresh, while lime keeps the sauce from tasting heavy.
Key Ingredients:
- 4 ounces rice noodles
- 1/3 cup peanut butter
- 1 tablespoon soy sauce
- 1 tablespoon lime juice
- 1 teaspoon honey
- 1/2 cup shredded carrots
- 1/2 cup cucumber matchsticks
- 1/2 cup shelled edamame
- 2 tablespoons chopped cilantro
- 4 large tortillas
Quick Steps:
- Cook the noodles: Boil rice noodles until tender, then rinse under cold water and drain well.
- Make the sauce: Whisk peanut butter, soy sauce, lime juice, and honey until smooth.
- Toss the filling: Stir noodles, carrots, cucumber, edamame, and cilantro with the sauce.
- Let it firm up: Chill the mixture for 10 minutes so the sauce clings better.
- Roll the wrap: Spoon the noodle mixture into tortillas and roll snugly.
Equipment for This Recipe:
- Saucepan
- Bowl
- Whisk or fork
- Colander
- Knife
How to Serve This Dish:
Serve with cold green tea or a lime soda. I like this wrap cut into short pieces because the noodles can tug a little if you try to eat a very long section.
Pro Tips for This Recipe:
- Drain the noodles well; extra water wrecks the peanut sauce.
- If the sauce feels thick, loosen it with a teaspoon of warm water.
- Add mint if you want a brighter, cooler finish.
Variations on This Dish:
- Spicy Peanut Wrap: Add chili crisp or sriracha.
- Chicken Noodle Version: Fold in chopped cooked chicken.
- Sesame-Lime Swap: Use tahini instead of peanut butter for a different nutty note.
Common Mistakes to Avoid with This Dish:
- Rinsing noodles poorly: Water pools in the wrap.
- Too much sauce: It becomes slippery and heavy.
- Skipping the chill: Cold noodles roll tighter than warm ones.
17. Steak Fajita Wrap
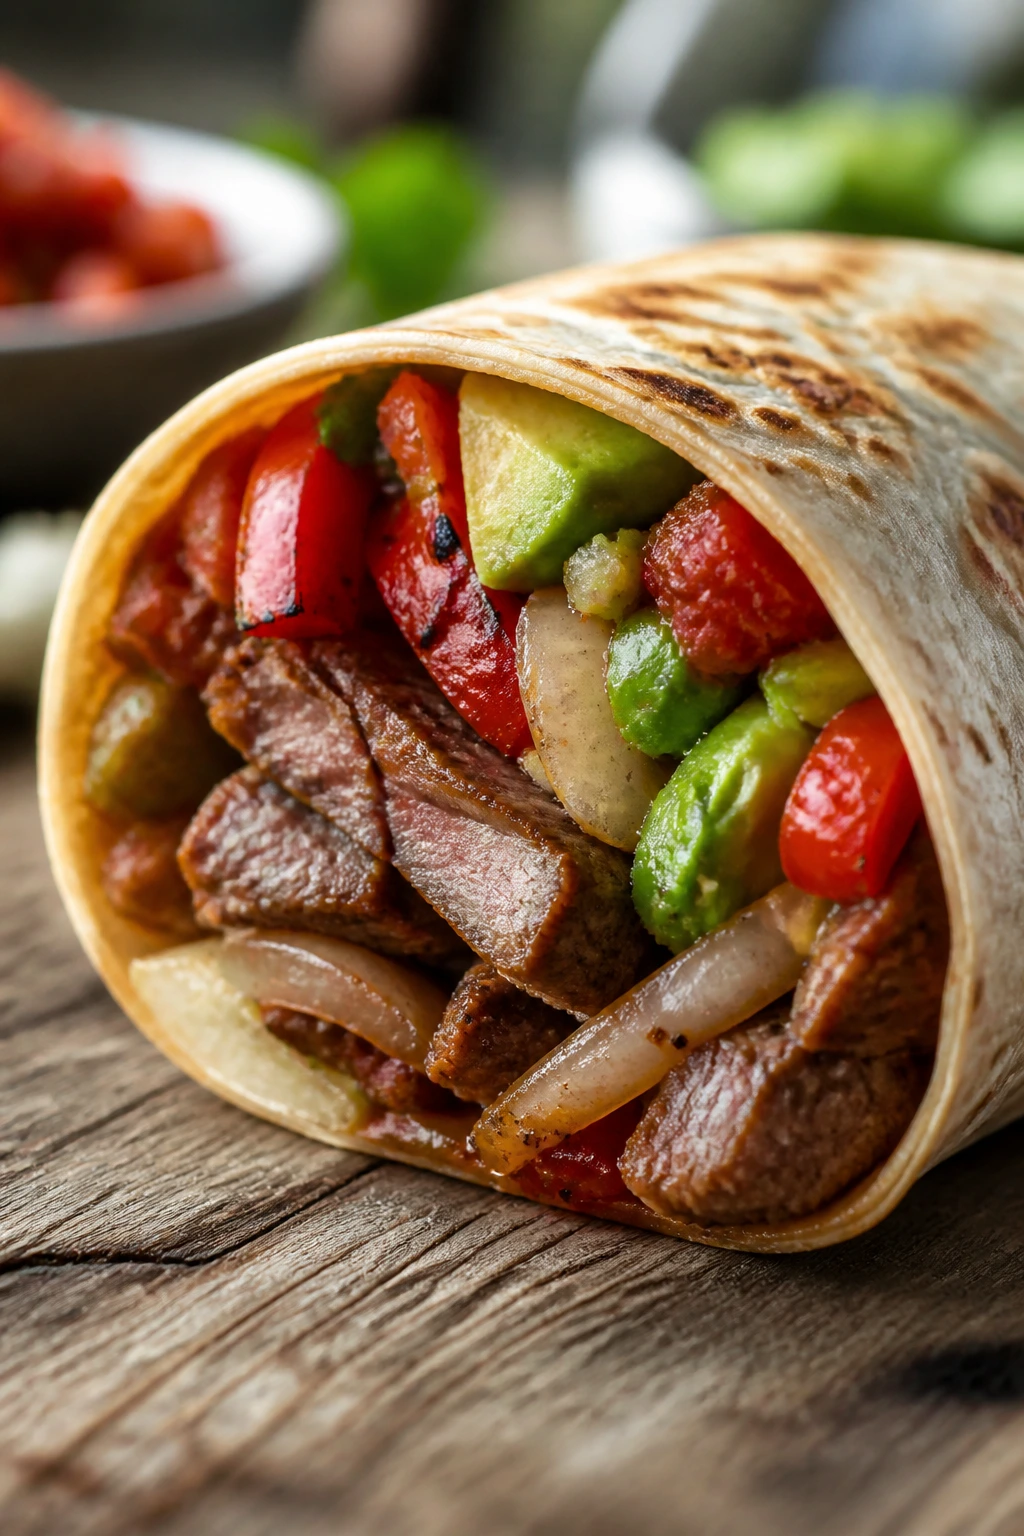
Steak fajita filling does a lot of work on its own, so the wrap has to stay out of the way and let the smoke and char show through. Peppers, onions, avocado, and salsa make it feel full but not clumsy.
Why It Works:
Sliced steak keeps its juices better than chopped pieces, and the peppers-onions mix adds sweetness and bite. A little salsa gives the wrap moisture without forcing you into a sauce that runs everywhere.
Key Ingredients:
- 1 pound flank steak
- 1 tablespoon oil
- 1 teaspoon cumin
- 1 teaspoon chili powder
- 1 bell pepper, sliced
- 1 small onion, sliced
- 1/3 cup salsa
- 1 avocado, sliced
- 1/2 cup shredded cheddar
- 4 large tortillas
Quick Steps:
- Season the steak: Rub the steak with oil, cumin, and chili powder.
- Sear and rest: Cook over medium-high heat until browned outside and medium inside, then rest for 10 minutes.
- Cook the vegetables: Sauté the pepper and onion until softened with a little char on the edges.
- Slice thinly: Cut the steak against the grain into thin strips.
- Assemble and roll: Add steak, vegetables, salsa, avocado, and cheddar to tortillas, then roll tightly.
Equipment for This Recipe:
- Skillet or grill pan
- Tongs
- Knife
- Cutting board
- Spoon
How to Serve This Dish:
Serve with a cold limeade or a chilled beer. Tortilla chips and salsa on the side make sense here, but don’t pile too much onto the wrap itself.
Pro Tips for This Recipe:
- Rest the steak before slicing, or the juices run out on the cutting board.
- Slice against the grain for tenderness.
- Keep the salsa modest so the tortilla doesn’t soften.
Variations on This Dish:
- Chicken Fajita Wrap: Swap in chicken thighs or breasts.
- Extra-Smoky Version: Add smoked paprika to the spice rub.
- Bean-Lovers Wrap: Add black beans for a more filling lunch.
Common Mistakes to Avoid with This Dish:
- Slicing steak with the grain: It turns chewy.
- Wrapping hot steak: The tortilla weakens fast.
- Using too much salsa: Great taste, bad structural choice.
18. Mediterranean Turkey Feta Wrap
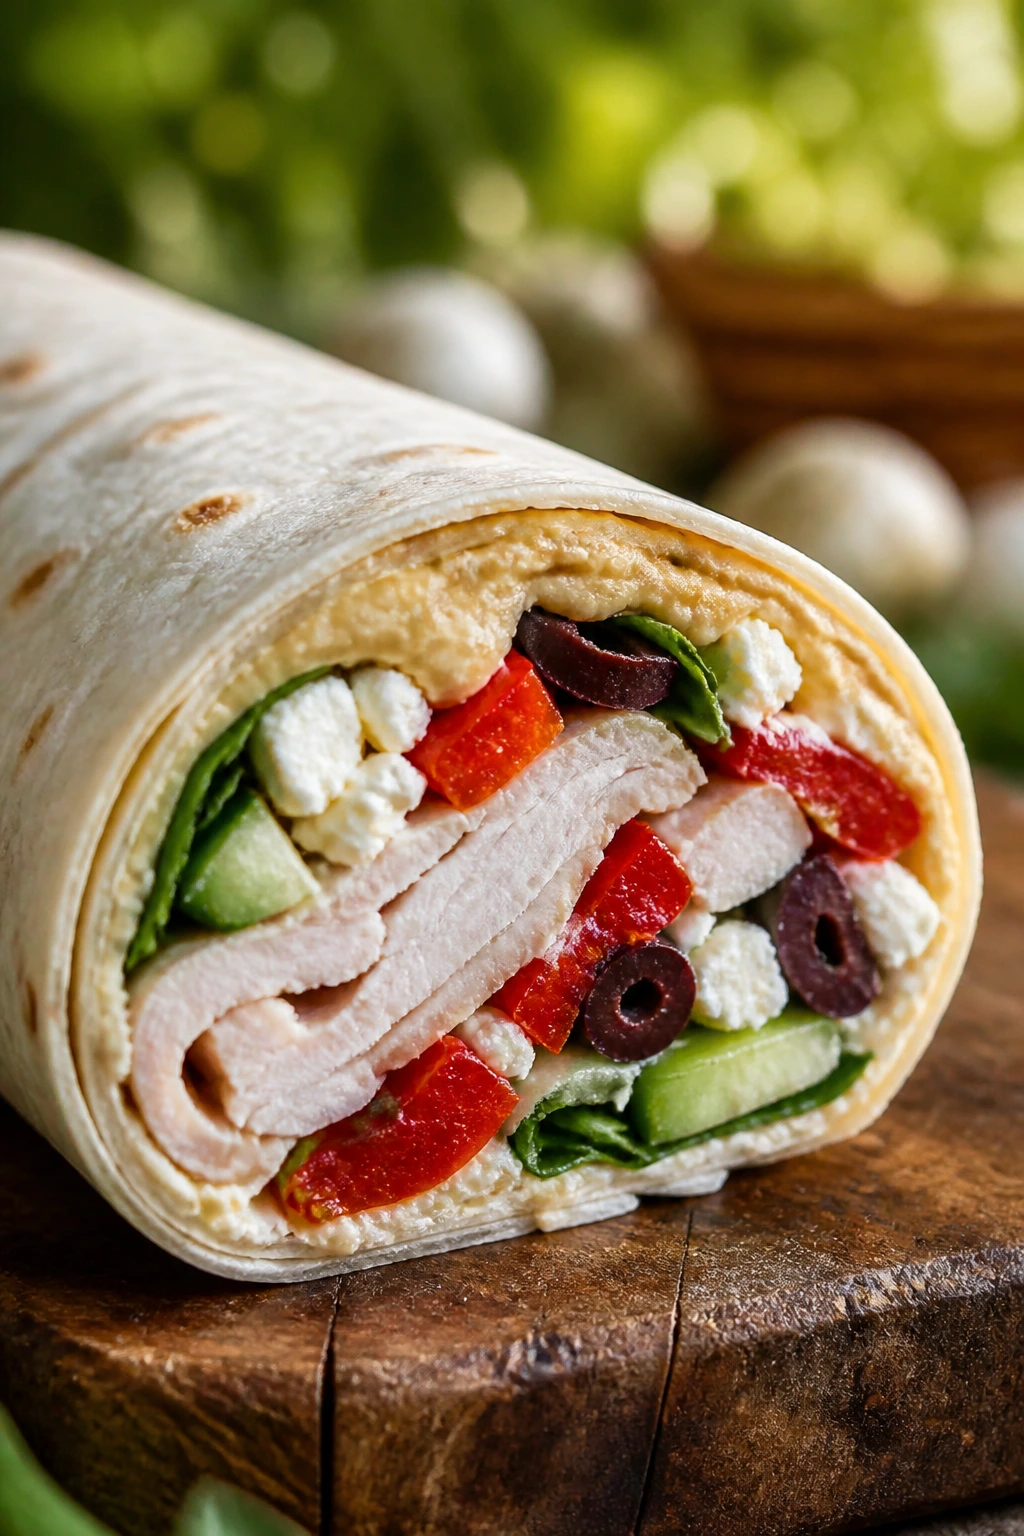
This wrap lives in the sweet spot between deli lunch and mezze plate. Hummus, feta, roasted peppers, and turkey give you enough salt and creaminess to stay interesting even after chilling.
Why It Works:
Hummus coats the tortilla and keeps the vegetables from making it soggy. Roasted peppers bring sweetness without extra water, and the turkey gives the wrap enough body to hold everything together.
Key Ingredients:
- 8 ounces sliced turkey breast
- 1/2 cup hummus
- 1/2 cup feta, crumbled
- 1 cup cucumber, sliced thin
- 1/2 cup roasted red peppers, well drained
- 1 cup spinach
- 2 tablespoons kalamata olives, chopped
- 4 large tortillas
Quick Steps:
- Drain the peppers: Pat the roasted peppers dry so they don’t bleed moisture.
- Spread the hummus: Use a thin, even layer over each tortilla.
- Layer the greens: Add spinach first, then turkey, cucumber, peppers, feta, and olives.
- Roll tightly: Fold the sides in and roll the wrap into a firm cylinder.
- Rest before slicing: Let it sit seam-side down for 5 minutes, then cut cleanly.
Equipment for This Recipe:
- Knife
- Cutting board
- Spoon
- Paper towels
- Mixing bowl, optional
How to Serve This Dish:
Cold sparkling water with lemon fits this wrap well. Add a few olives or a little fruit salad on the side if you want the plate to feel fuller without getting heavier.
Pro Tips for This Recipe:
- Drain the roasted peppers or they’ll slick the hummus.
- Spinach works better than tender lettuce because it doesn’t collapse as fast.
- Keep the feta crumbled, not packed in big chunks, so every bite gets a little salt.
Variations on This Dish:
- Chicken-Mediterranean Wrap: Swap turkey for grilled chicken.
- Zesty Olive Version: Add chopped pepperoncini for extra punch.
- Dairy-Free Build: Skip feta and add more hummus plus lemon zest.
Common Mistakes to Avoid with This Dish:
- Using wet roasted peppers: They water down the filling.
- Too much feta: The salt can get harsh.
- Skipping the hummus barrier: It helps the wrap stay intact.
19. Pimento Cheese Tomato Wrap
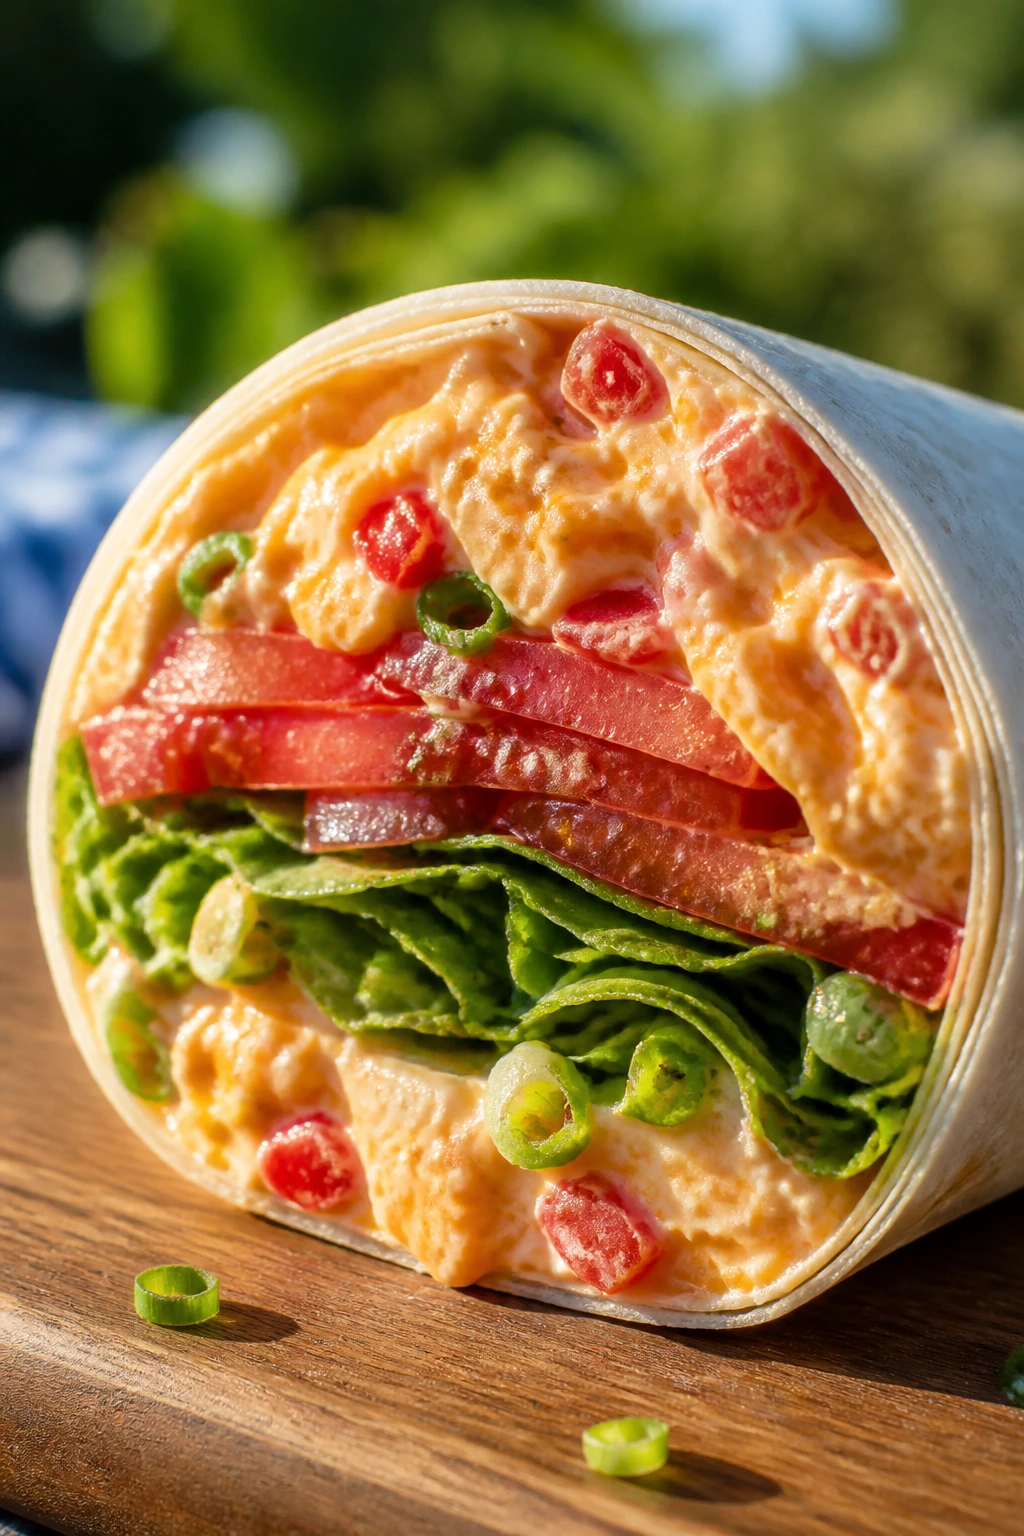
Pimento cheese and ripe tomato are one of those Southern pairings that can get too soft if you don’t manage the moisture. Keep the tomatoes salted and drained, and the wrap becomes picnic gold.
Why It Works:
Pimento cheese is thick enough to act as both spread and glue, which makes it ideal for wrap duty. Salted tomato slices bring acidity and sweetness, and lettuce gives the filling a crisp edge so the cheese doesn’t feel like a brick.
Key Ingredients:
- 1 cup pimento cheese
- 2 medium tomatoes, sliced
- 1/2 teaspoon salt
- 1 cup lettuce
- 1 scallion, thinly sliced
- 4 large tortillas
- Black pepper, to taste
- 4 slices bacon, cooked crisp, optional
Quick Steps:
- Salt the tomatoes: Lay tomato slices on paper towels, sprinkle with salt, and let them drain for 10 minutes.
- Spread the cheese: Smear pimento cheese across each tortilla.
- Add the greens: Place lettuce over the cheese, then add tomatoes and scallion.
- Add bacon if using: Crumble it over the top for extra crunch.
- Roll carefully: Roll the tortillas snugly and cut once the filling settles.
Equipment for This Recipe:
- Paper towels
- Knife
- Cutting board
- Spoon
- Plate for draining tomatoes
How to Serve This Dish:
Sweet tea is the obvious drink here, and it earns the job. Serve with potato chips or cucumber slices, depending on whether you want more crunch or more freshness.
Pro Tips for This Recipe:
- Salt the tomatoes and let them sit; that step matters.
- If the pimento cheese is stiff, let it soften at room temperature for 10 minutes before spreading.
- Bacon is optional, but if you use it, cool it fully.
Variations on This Dish:
- Hot Pimento Version: Add sliced jalapeños.
- Turkey-Pimento Wrap: Add deli turkey for a meatier lunch.
- Vegan Cheese Swap: Use a dairy-free pimento-style spread.
Common Mistakes to Avoid with This Dish:
- Skipping the tomato drain: You’ll fight a watery wrap.
- Spreading cheese too thick: It crowds out the vegetables.
- Using hot bacon: Steam and pimento cheese do not belong together.
20. Taco Salad Wrap

A taco salad wrap can be brilliant or sloppy, and the line between those two is thin. Keep the meat seasoned, the lettuce dry, and the salsa controlled, and it becomes a very good picnic lunch.
Why It Works:
The taco flavors are already punchy enough to carry a tortilla, and the beans and corn add texture without making the filling feel tiny. Avocado cools the spice, while cheese and salsa keep the whole thing familiar.
Key Ingredients:
- 1 pound ground beef or turkey
- 1 tablespoon taco seasoning
- 1/2 cup salsa
- 1 cup lettuce, shredded
- 1/2 cup black beans, rinsed and drained
- 1/2 cup corn, drained if canned
- 1 avocado, diced
- 1/2 cup shredded cheddar
- 4 large tortillas
Quick Steps:
- Cook the meat: Brown the beef or turkey in a skillet, then stir in taco seasoning and a spoonful of water.
- Cool slightly: Let the meat rest for 10 minutes so it doesn’t wilt the lettuce.
- Dry the vegetables: Pat the lettuce dry and drain the beans and corn well.
- Assemble the wrap: Add lettuce, meat, beans, corn, avocado, salsa, and cheddar to each tortilla.
- Roll and set: Roll tightly, rest for 5 minutes, then slice.
Equipment for This Recipe:
- Skillet
- Spoon
- Knife
- Cutting board
- Paper towels
How to Serve This Dish:
Serve with lime soda or a cold beer if the day calls for it. Tortilla chips on the side work, but I’d keep the salsa portion inside the wrap modest so it doesn’t soften everything.
Pro Tips for This Recipe:
- Drain the beans and corn well.
- Use salsa as a flavor note, not a flood.
- If you want better grip, add the lettuce right against the tortilla.
Variations on This Dish:
- Bean-Only Taco Wrap: Skip the meat and double the beans.
- Spicy Taco Version: Add pickled jalapeños or hot sauce.
- Lighter Yogurt Taco Wrap: Swap some cheese for a spoonful of plain Greek yogurt.
Common Mistakes to Avoid with This Dish:
- Using hot taco meat: It softens the wrap fast.
- Too much salsa: The tortilla gets damp and fragile.
- Skipping the avocado check: Use firm slices, not mushy ones.
21. Mushroom Spinach Goat Cheese Wrap
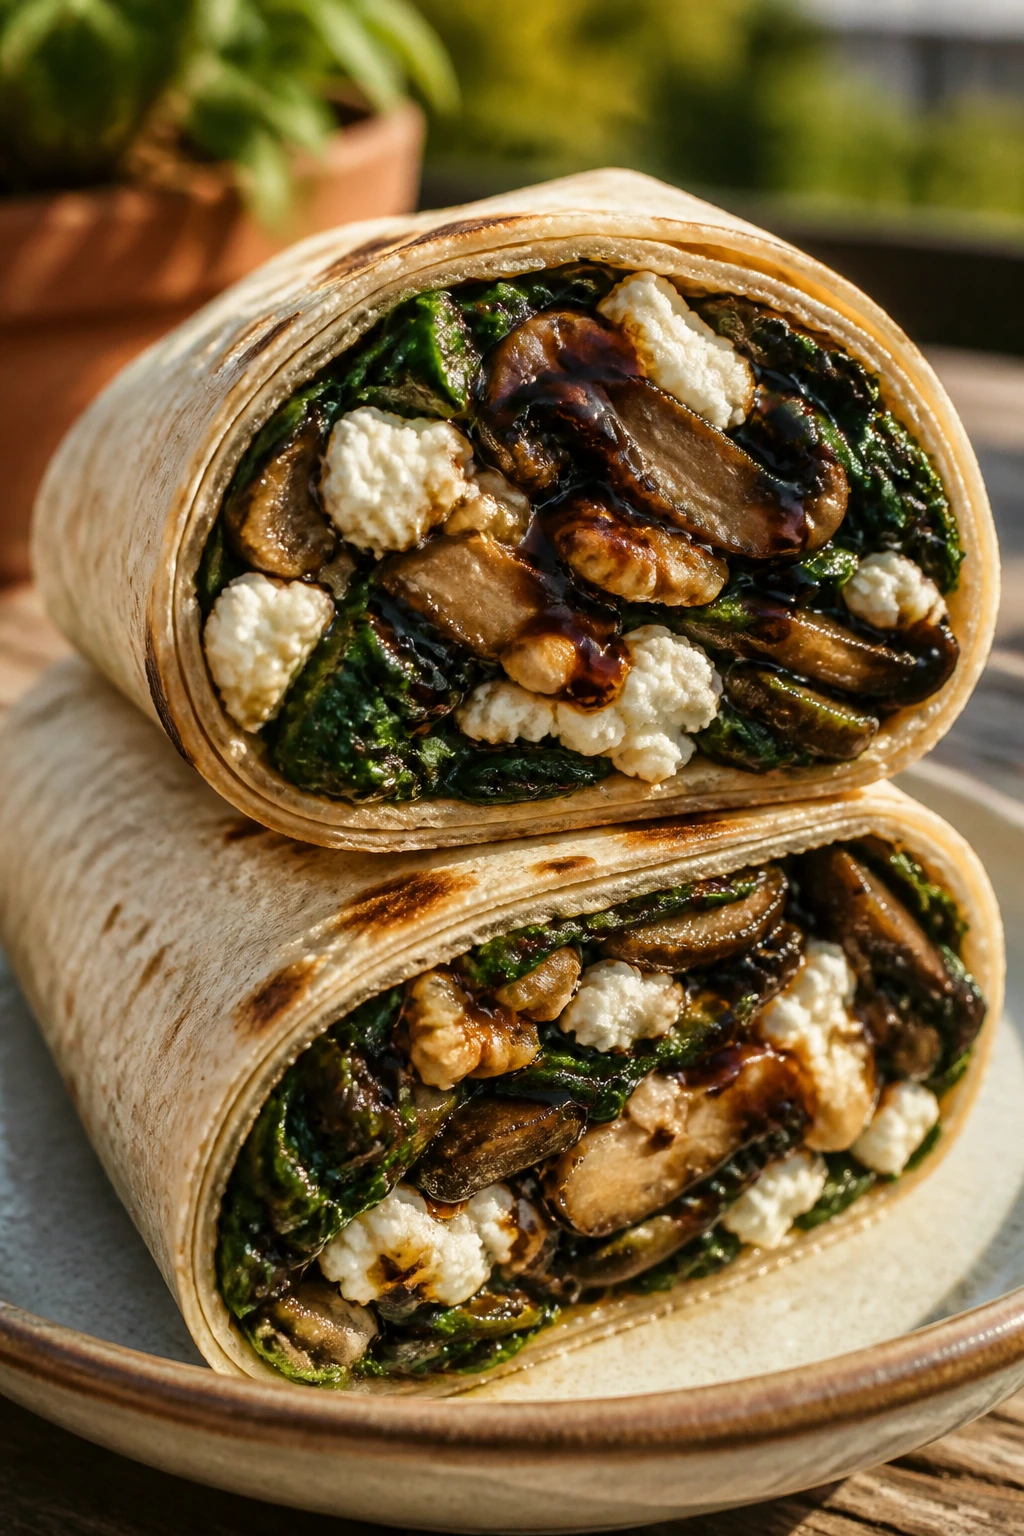
This wrap is earthy, soft, and a little tangy, which makes it a nice break from the deli-heavy lineup. The mushrooms have to be cooked until they’ve given up their moisture, or the whole thing goes soft in a hurry.
Why It Works:
Goat cheese brings a sharp creaminess that plays well against browned mushrooms. Spinach adds freshness, and toasted walnuts give the wrap a bit of bite so it doesn’t feel all soft edges.
Key Ingredients:
- 12 ounces mushrooms, sliced
- 1 tablespoon butter or olive oil
- 1 small shallot, minced
- 2 cups spinach
- 4 ounces goat cheese
- 1 tablespoon balsamic glaze
- 1/4 cup walnuts, toasted and chopped
- 4 large tortillas
- Salt and black pepper, to taste
Quick Steps:
- Cook the mushrooms: Sauté mushrooms and shallot in butter or oil over medium-high heat until browned and the liquid has evaporated.
- Season and cool: Add salt and black pepper, then let the mushrooms cool completely.
- Spread the cheese: Smear goat cheese over each tortilla.
- Layer the fillings: Add spinach, mushrooms, walnuts, and a small drizzle of balsamic glaze.
- Roll firmly: Roll the wrap tight, rest it briefly, and cut with a sharp knife.
Equipment for This Recipe:
- Skillet
- Spatula
- Knife
- Cutting board
- Spoon
How to Serve This Dish:
Serve with sparkling water, iced tea, or a cold dry cider. A few cherry tomatoes on the side make sense, but keep them separate so they don’t wet the wrap.
Pro Tips for This Recipe:
- Cook the mushrooms until the pan is dry; that’s the whole trick.
- Let them cool before assembling or the goat cheese will melt into a smear.
- Toast the walnuts lightly so they taste nutty instead of raw.
Variations on This Dish:
- Feta Mushroom Wrap: Swap goat cheese for feta if you want less tang.
- Chicken Mushroom Version: Add sliced chicken for more protein.
- Vegan Earthy Wrap: Use a dairy-free cheese spread and extra walnuts.
Common Mistakes to Avoid with This Dish:
- Leaving mushroom liquid in the pan: It leaks into the wrap.
- Too much balsamic glaze: It turns sticky and overpowering.
- Using cold, stiff goat cheese: Let it soften so it spreads cleanly.
22. Apple Cheddar Chicken Wrap
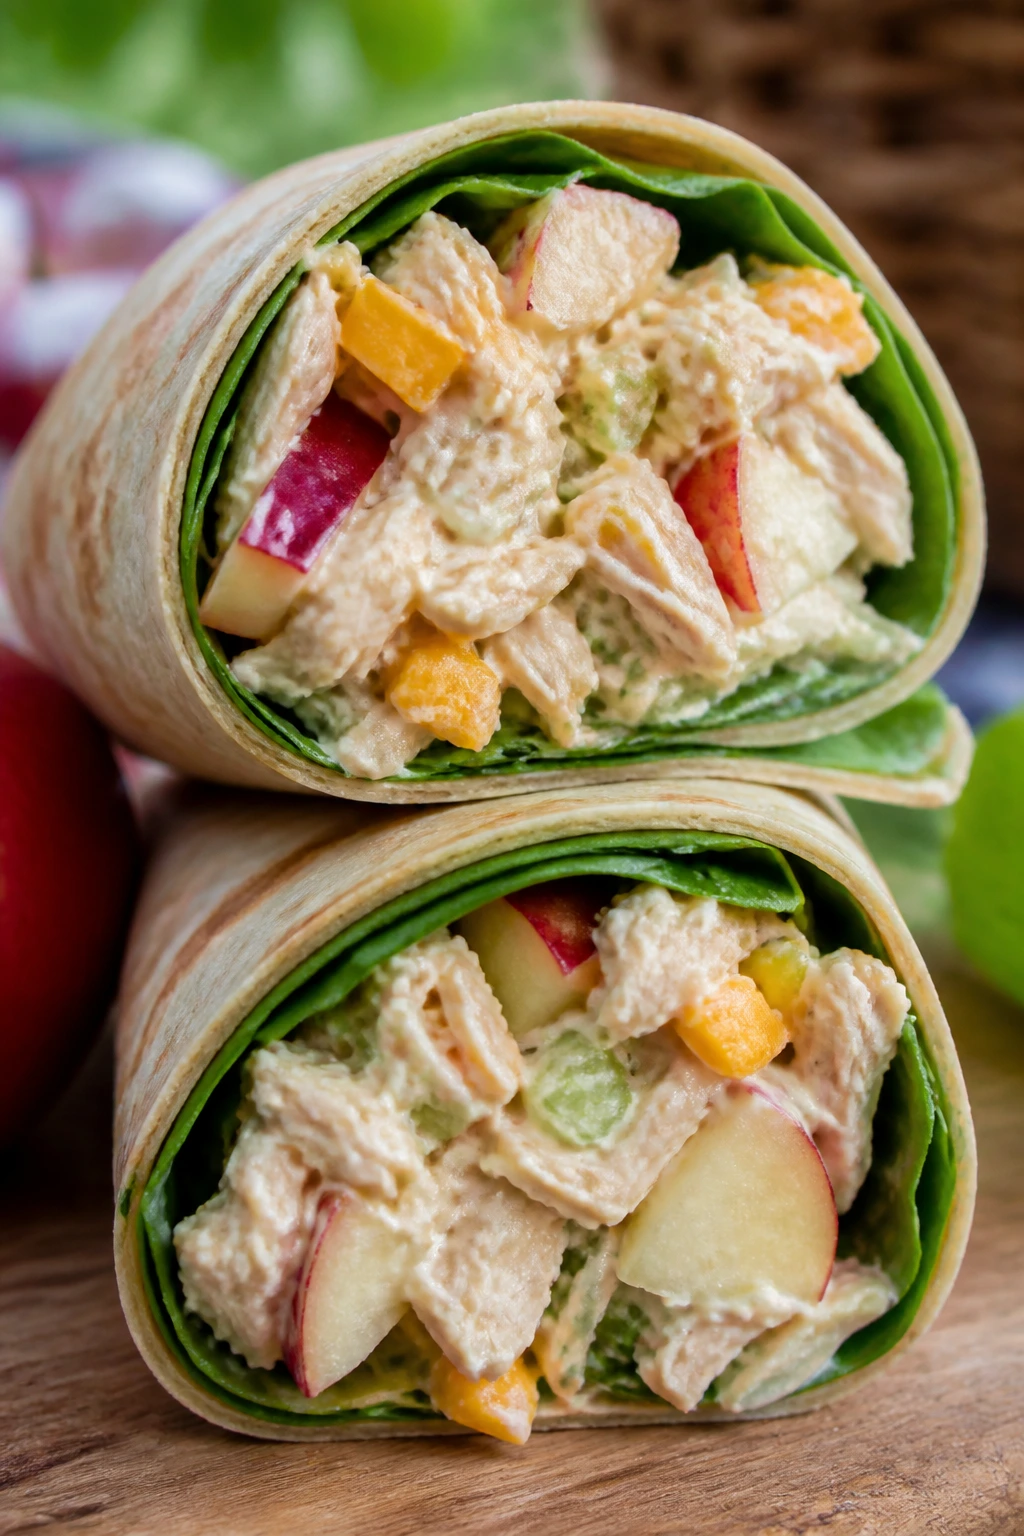
There’s a reason apple and cheddar keep showing up together: the sweet crunch and sharp cheese cut across each other cleanly. Add chicken and a little Dijon, and you get a wrap that feels crisp instead of heavy.
Why It Works:
The apple gives the filling snap, while the chicken keeps it from drifting into snack territory. A little lemon juice slows browning and keeps the fruit tasting fresh after a stint in the cooler.
Key Ingredients:
- 2 cups cooked chicken, chopped
- 1 apple, julienned or diced
- 1/2 cup sharp cheddar, shredded
- 1 celery stalk, finely diced
- 2 tablespoons mayonnaise or Greek yogurt
- 1 teaspoon Dijon mustard
- 1 tablespoon lemon juice
- 1 cup spinach
- 4 large tortillas
Quick Steps:
- Mix the chicken salad: Stir chicken, mayonnaise or yogurt, Dijon, celery, and lemon juice in a bowl.
- Add the apple last: Fold in the apple right before assembly so it stays crisp.
- Lay the greens: Spread spinach over each tortilla.
- Build the wrap: Spoon the chicken mixture over the spinach, then add cheddar.
- Roll and chill: Roll tightly and refrigerate for 10 minutes before slicing.
Equipment for This Recipe:
- Mixing bowl
- Spoon
- Knife
- Cutting board
- Paper towels, optional
How to Serve This Dish:
This one is nice with sparkling apple cider or cold iced tea. A few kettle chips on the side keep the lunch from leaning too soft.
Pro Tips for This Recipe:
- Cut the apple into thin matchsticks so the wrap rolls neatly.
- Use a crisp apple that holds its shape, not a mealy one.
- Add the apple at the end so it stays bright.
Variations on This Dish:
- Curried Apple Chicken: Add a pinch of curry powder to the chicken mix.
- Turkey Cheddar Swap: Use turkey instead of chicken.
- Dairy-Free Apple Wrap: Replace cheddar with sliced avocado or a dairy-free cheese.
Common Mistakes to Avoid with This Dish:
- Mixing the apple too early: It can brown and soften.
- Using too much dressing: The wrap gets loose and slippery.
- Choosing a soft apple: Crunch is the point here, and mush ruins it.
Why Wraps Travel Better Than Sandwiches on a Blanket
A picnic wrap does one job sandwiches often fail at: it keeps its own shape when you move it from the cutting board to the cooler to the blanket. Bread has open edges and air pockets. Tortillas are more compact, and that matters when you’re dealing with heat, condensation, and a lunch that might sit for 30 minutes before anyone opens it.
Tight Layers Matter More Than Fancy Fillings
A good wrap is built in layers, not stuffed like a pillow. Dry greens belong next to the tortilla, moist fillings belong in the center, and sauces need to be spread thin enough that they cling instead of pool. That sounds picky because it is. Pickiness pays off here.
Cooler Time Helps the Texture
Most of these wraps taste better after 10 to 20 minutes in the fridge. The filling firms up, the tortilla relaxes, and the slice holds together instead of trying to unwind the second you cut it. That little bit of chill is the difference between a wrap and a mess wrapped in paper.
Essential Equipment for These Recipes
- Large cutting board: Gives you room to roll, slice, and stack without chasing ingredients around the counter.
- Sharp chef’s knife or serrated knife: A clean cut matters more than people think; a dull blade drags fillings out.
- Medium mixing bowls: You’ll want at least two so sauces and fillings stay separate until assembly.
- Nonstick skillet or grill pan: Useful for bacon, chicken, shrimp, steak, mushrooms, and warming tortillas.
- Measuring cups and spoons: Keep sauces and spreads from getting too heavy.
- Paper towels or clean kitchen towels: Dry vegetables, blotted cheese, and cooled proteins all need help here.
- Parchment paper or foil: Helps hold wraps together in the cooler and makes cleanup easier.
- Airtight containers: Best for fillings you make ahead and don’t want drying out.
Smart Shopping and Ingredient Tips
Choose tortillas with enough flexibility to bend without splitting. Ten-inch flour tortillas are the most forgiving, but lavash and larger spinach wraps can work too if they’re fresh and not brittle. If the package feels stiff in your hand, it probably needs a brief warm-up before rolling.
Wet ingredients are the real enemy. Tomatoes need to be seeded, cucumbers should be patted dry, roasted peppers should be drained, and anything in brine—pickles, olives, capers—needs a light hand. I’d rather trim moisture before assembly than spend the afternoon mopping up a soggy cooler.
Buy proteins with the final texture in mind. Thin-sliced deli meat rolls better than thick stacks, rotisserie chicken should be chopped small, and cooked shrimp or steak needs to cool fully before you touch the tortilla. For vegetarian wraps, hummus, cream cheese, goat cheese, or mashed avocado can act as a buffer layer so the filling doesn’t slide.
How to Serve These Recipes
Presentation:
Cut each wrap on a sharp diagonal and set the halves seam-side down. If you’re serving a mixed spread, wrap each half in parchment and tie it with kitchen twine or slide it into a waxed paper sleeve; it keeps the cut edges from drying out and looks cleaner on a picnic tray.
Accompaniments:
Kettle chips, fruit salad, pickle spears, cherry tomatoes, cucumber sticks, and a simple slaw all play nicely here. Pick one crunchy side and one juicy side, and the meal feels complete without turning into a buffet.
Portions:
One full wrap usually feeds one person for lunch, though the richer ones—like smoked salmon, pimento cheese, or tuna—can be sliced into halves and shared. If you’re feeding a crowd, make a couple of each type and cut them into thirds for easy mixing.
Beverage Pairing:
Cold lemonade suits chicken, turkey, and herb-heavy wraps. Iced tea is the safe all-purpose choice. For the wraps with more salt or heat—buffalo, barbecue, roast beef, shrimp po’ boy—a crisp lager, sparkling water with citrus, or a cola keeps the meal in balance.
Additional Tips and Flavor Boosters
Flavor Enhancement: A thin swipe of something sharp—Dijon, horseradish mayo, lemony yogurt, or pickled onion—makes the whole wrap taste more alive. One bright note is usually enough.
Customization: Add crunch with celery, cabbage, cucumbers, or crushed chips. Add creaminess with avocado, hummus, goat cheese, or a spoon of ranch. Keep one from each category and the wrap stays balanced.
Serving Suggestions: A handful of herbs changes more than people expect. Dill with salmon, cilantro with taco fillings, mint with Greek wraps, basil with Caprese, parsley with chickpeas. The herb should make sense, not just sit there looking green.
Make-It-Yours: For gluten-free versions, use a certified gluten-free wrap or turn the filling into lettuce bundles. For dairy-free wraps, avocado and hummus do a lot of the heavy lifting. For lower-sodium versions, lean on lemon, vinegar, and herbs instead of piling on deli meat and cheese.
Make-Ahead, Storage, and Reheating Guidance
Most of the fillings in these picnic wraps keep well for 3 to 4 days in the refrigerator if they’re stored in airtight containers. Chicken salad, tuna salad, chickpea salad, slaw, and cooked vegetables all fit that pattern. Assembled wraps are a different story; once rolled, they’re best eaten within 24 hours, and the drier ones are better if you cut them right before serving.
If a wrap uses cooked meat—chicken, pork, steak, shrimp, or mushrooms—you can cook those components ahead and freeze them for up to 2 months in freezer-safe containers, as long as you freeze them without lettuce, tomato, or mayo-heavy sauces. Thaw overnight in the refrigerator, then chill again before rolling. Seafood and egg salad don’t freeze well. The texture turns mushy, and there’s no polite way to fix that.
Reheating only applies to the cooked fillings, not the full wrap. Warm chicken, pork, or steak in a skillet over medium heat with a splash of water or broth until hot through, then cool it before assembling. If you’re taking wraps to a picnic, keep them in an insulated cooler with ice packs and try to hold them at 40°F or below until you’re ready to eat. Once they’ve sat out warm for too long, the texture goes sideways fast.
Variations and Adaptations to Try
Gluten-Free Wrap Day:
Swap in certified gluten-free tortillas, rice paper, or sturdy lettuce leaves. The fillings here are already doing most of the work, so you don’t need to rebuild the whole lunch. Keep the wet ingredients a little lighter than usual, because gluten-free wraps tend to crack faster if they’re overloaded.
Dairy-Free Cooler Pack:
Lean on hummus, avocado, tahini, mustard, salsa, or dairy-free mayonnaise. Chicken Caesar, salmon cream cheese, and pimento cheese all have easy dairy-free versions if you’re willing to adjust the spread. The main trick is to replace creaminess with something that still grips the tortilla.
Low-Carb Roll-Ups:
Use large romaine leaves, collard greens, or thin cucumber sheets if you want the filling without the tortilla. These work best with drier fillings like tuna, turkey, chicken salad, or roast beef. Anything too wet will slide around, so keep the sauce minimal.
Kid-Mild Picnic Wraps:
Pull back on horseradish, buffalo sauce, raw onion, and big chunks of pickle. Turkey, cheddar, apple, chicken salad, and ham are the easiest starting points. A wrap sliced into little pinwheels also tends to disappear faster than a full half-wrap, which tells you something.
Protein-Heavy Lunches:
If you want these to carry farther, add extra chicken, turkey, steak, or chickpeas and reduce the lettuce a little. That keeps the wrap from feeling airy and helps it hold together after an hour in a cooler. Heavier fillings work best when the sauce stays restrained.
Regional Flavor Swaps:
Use barbecue in place of ranch for a Southern tilt, hummus and feta for a Mediterranean feel, peanut sauce for an Asian-inspired lunch, or horseradish and roast beef for a deli-style build. The structure stays the same, but the personality shifts fast.
Common Mistakes to Avoid
-
Overfilling the tortilla: A wrap that looks generous on the board usually turns into a seam-splitting mess in your hand. Keep the filling in a narrow line and you’ll get a tighter roll.
-
Using wet ingredients without a barrier: Tomatoes, cucumbers, pickles, and roasted peppers all need dry prep. Put greens or cheese between them and the tortilla, and the whole wrap lasts longer.
-
Skipping the chill time: A wrap straight from the cutting board is still loose. Five to fifteen minutes in the fridge helps the seam set and makes slicing much cleaner.
-
Cutting with a dull knife: A ragged cut pulls fillings out the end. Use a sharp blade and wipe it between slices if the filling is sticky.
-
Packing hot fillings: Warm chicken, shrimp, pork, or vegetables create steam, and steam ruins texture fast. Cool everything fully before assembly.
-
Treating all tortillas the same: Thin wraps crack, sturdy wraps forgive, and lavash behaves differently from standard flour tortillas. Warm the one you’re using, not the one you wish you had.
Frequently Asked Questions
How far ahead can I make picnic wraps?
Most of the fillings can be made a day or two ahead, and some improve overnight after the flavors settle. Fully assembled wraps are best within 24 hours, and the cleaner ones—like turkey, ham, or chicken Caesar—hold up better than tomato-heavy wraps.
What tortillas work best for picnic wraps?
Large flour tortillas are the easiest to roll and the least likely to crack. Lavash, spinach wraps, and larger whole-wheat tortillas also work if they’re fresh and flexible. If the tortilla feels stiff, warm it briefly before filling.
How do I keep wraps from getting soggy?
Dry the vegetables, drain the proteins, and keep sauces thin. Put greens or cheese next to the tortilla as a barrier, then keep tomatoes, pickles, and juicy fillings closer to the center.
Can I use leftover grilled meat in these wraps?
Yes, and that’s one of the best ways to make them. Cool the meat completely first, slice it thin, and keep it in the refrigerator until assembly so it doesn’t steam the wrap.
Do any of these wraps freeze well?
Only the cooked fillings freeze well, not the assembled wraps. Chicken, pork, beef, and some sautéed vegetables can be frozen for up to 2 months, but lettuce, tomato, cucumber, mayo-based salads, and cream cheese fillings should stay out of the freezer.
What if my tortilla cracks while rolling?
Warm it for 10 to 15 seconds and try again with a fresh one if needed. Cracking usually means the tortilla is cold, stale, or overloaded. A little warmth and less filling fix most of it.
Can I make these without mayonnaise?
Absolutely. Hummus, tzatziki, avocado, mustard, pesto, or Greek yogurt all work depending on the wrap. The important part is choosing a spread that holds the filling together instead of making it slide.
How do I keep the wraps cold on the trip?
Pack them seam-side down in a container, add an ice pack on both sides if you can, and keep them in the cooler until serving time. If the day is warm and the wraps will sit out, bring them out in smaller batches instead of exposing the whole stack at once.
Cooler-Ready Wraps Worth Repeating
A picnic wrap is only as good as its structure. Get the dry ingredients in the right place, keep the sauces under control, and let the filling cool before you roll it, and the whole lunch changes character.
The best part is how forgiving the format is. One tortilla, a careful layer of something creamy, something crisp, something salty, and a cold drink beside it—that’s enough to make lunch feel planned without making it fussy. Keep a stack of wraps in the refrigerator, and the next picnic practically builds itself.