
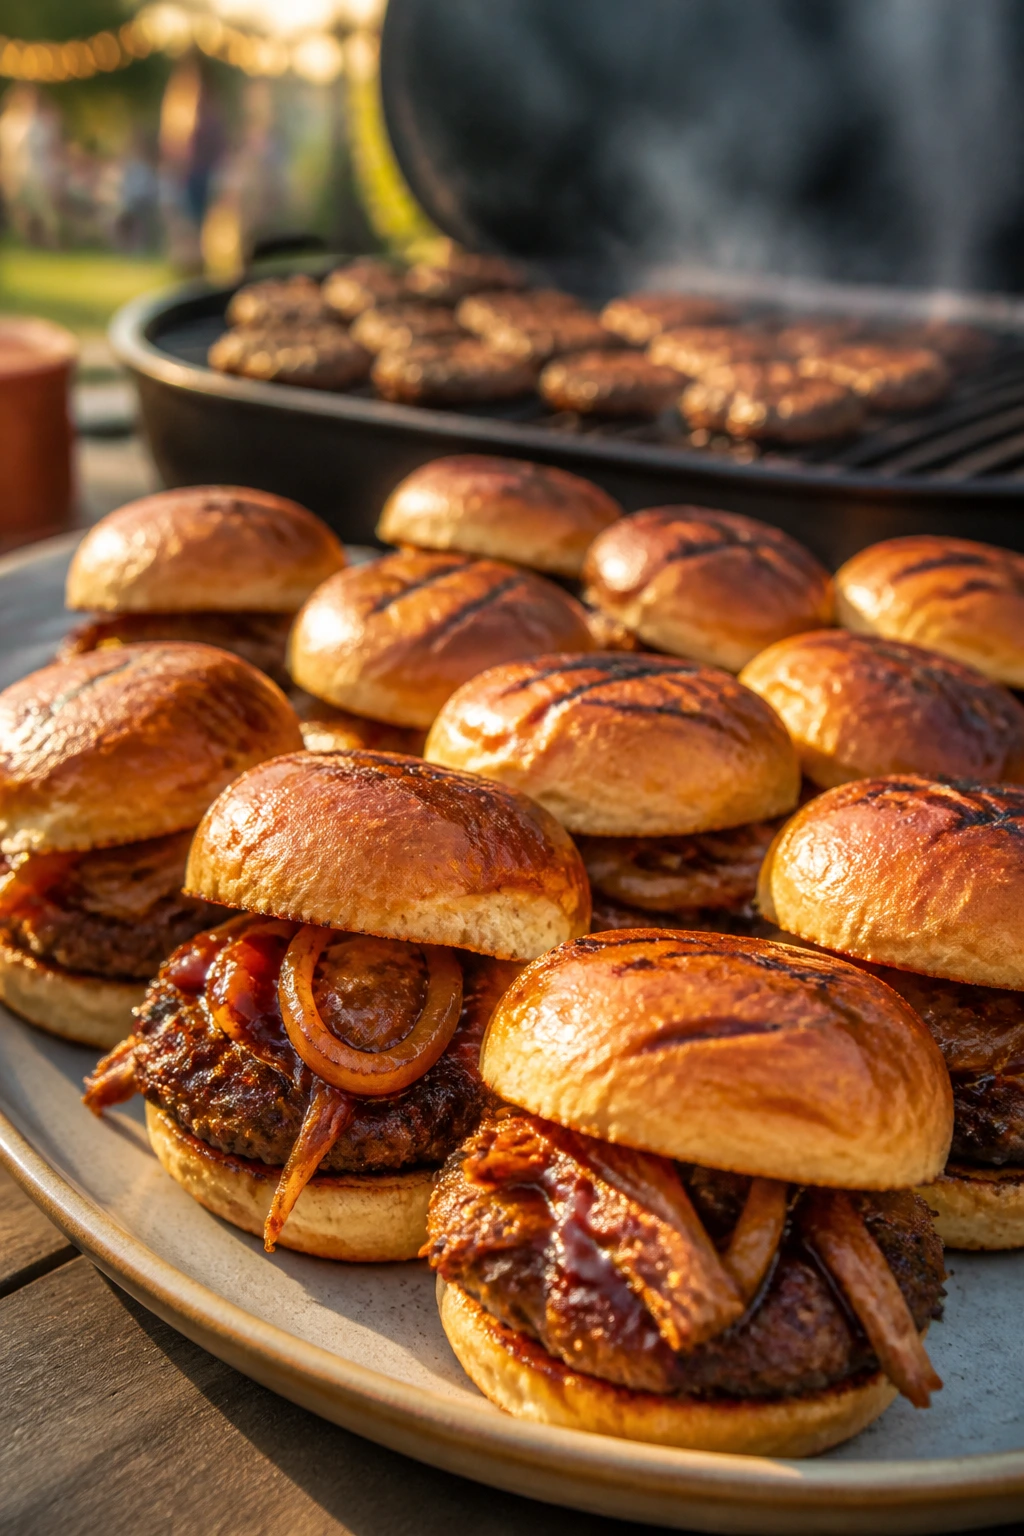
A good BBQ slider has a narrow job: it has to taste like a full cookout in two bites, hold together with sauce on the bun, and still come off a hot grate with a little char on the edges. That is a tougher brief than it sounds. Too much filling and the bun tears. Too little and you get a cute sandwich that disappears before the smoke lands.
The smartest barbecue sliders are built in layers. Toast the cut side of the rolls. Keep wet slaw separate until the last minute. Brush sauce on after the meat hits the grill, not before, unless you want black sugar on the grates and a bitter crust. Small food. Big rules.
That’s why a weekend grill spread built around BBQ sliders works so well: you can cook pork, chicken, beef, seafood, and vegetables in bite-size form without turning the table into a buffet of giant sandwiches. The grill gives you char, drips, smoke, and fast turnover, and the slider bun gives you a neat little landing pad for all of it.
Why These Grill-Ready Sliders Earn Their Place at the Table
-
Built for the grate: Small portions cook fast, pick up more surface char, and are easier to manage when you’re juggling burgers, buns, and a second tray of toppings.
-
Less bun regret: Slider rolls stay intact better than full-size sandwich buns when you toast them well and keep the wet stuff tucked where it belongs.
-
One menu, many moods: You can serve sticky pork, vinegary chicken, smoky beef, seafood, and vegetarian options from the same platter without making the meal feel random.
-
Party math is painless: Two sliders can be a light lunch, four can be a real dinner, and you don’t have to cut anything into strange little pieces later.
-
Sauce has a job, not a takeover: Good sliders use barbecue sauce, slaw, pickles, or cheese as support, not glue. That keeps each bite readable instead of sloppy.
-
Leftovers work hard: Pulled meats, chopped brisket, and grilled patties reheat well, which means tomorrow’s lunch is already handled.
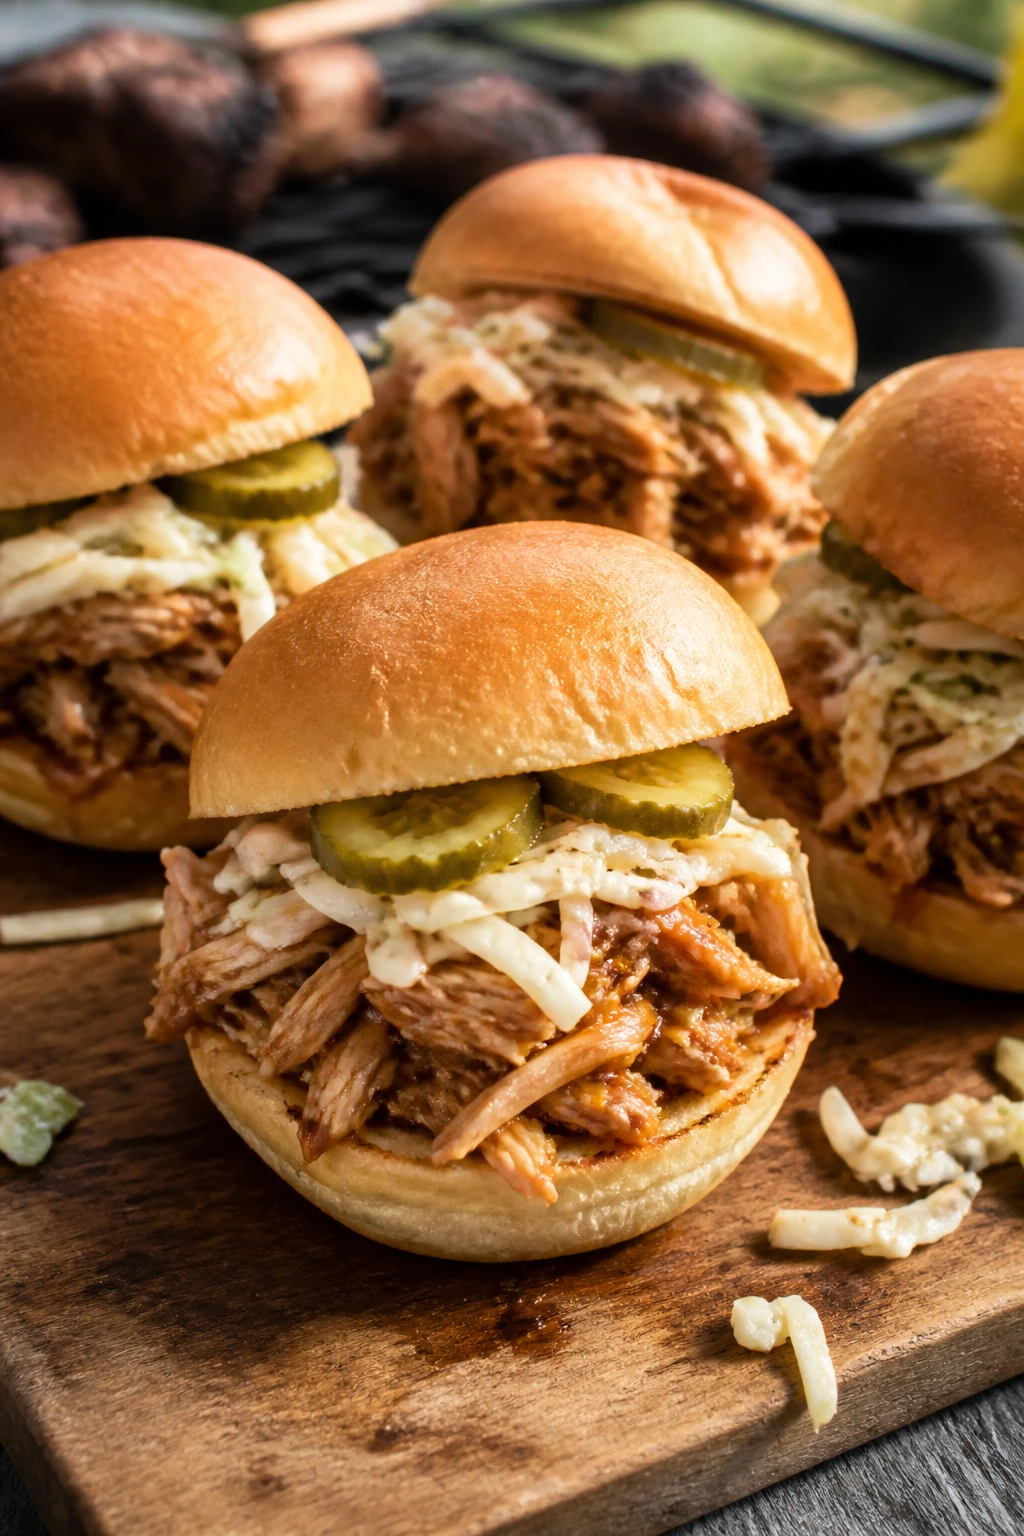
1. Sticky Brown Sugar Pulled Pork Sliders
The first platter should be a little messy, and this is the kind of mess I mean. Pork shoulder turns sweet, smoky, and shreddable on a covered grill, then gets pulled into a vinegar-spiked barbecue sauce that clings to the meat instead of sliding off the bun. Add a cool, dry slaw and the whole thing eats like a tiny backyard sandwich with a proper spine.
Why It Works: Pork shoulder has enough fat to stay juicy through a long indirect cook, and the brown sugar in the rub helps the bark go dark without tasting burnt. A 300°F grill gives you steady heat, not flare-up chaos. Toasted rolls keep the bottom from turning soft the second the slaw lands.
Key Ingredients:
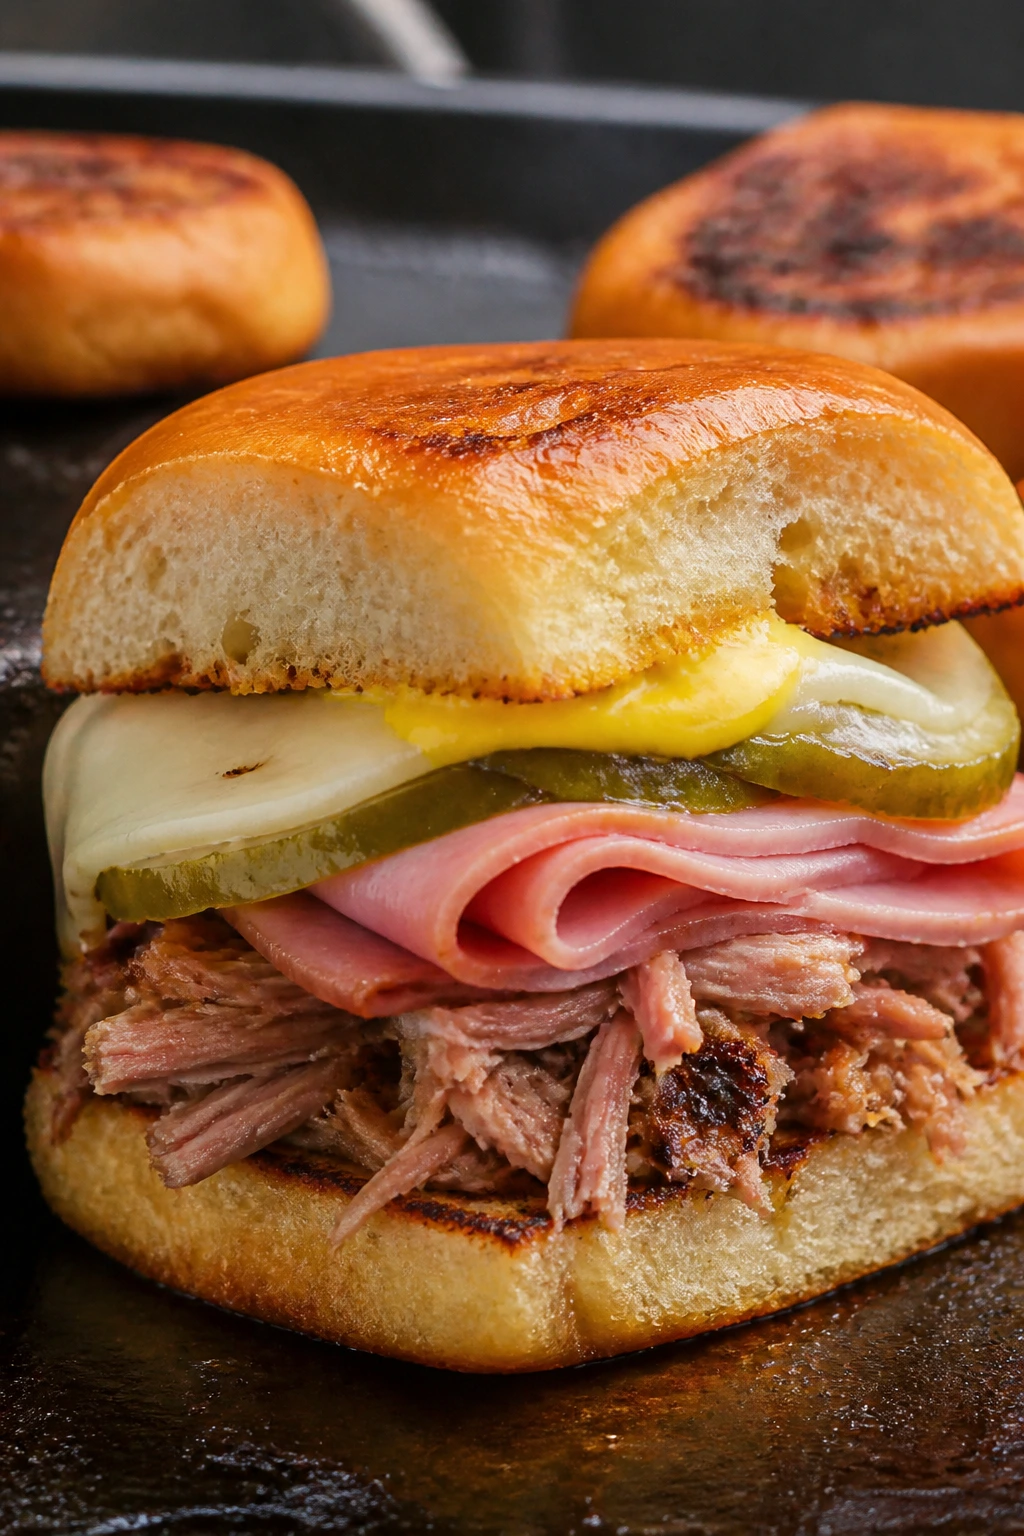
- 3 lb pork shoulder, trimmed of excess surface fat
- 2 tbsp brown sugar
- 1 tbsp smoked paprika
- 2 tsp kosher salt
- 1 tsp black pepper
- 1 cup barbecue sauce
- 1/2 cup apple cider vinegar
- 12 slider buns
- 2 cups coleslaw mix, kept dry
- 1 cup dill pickle chips
Quick Steps:
- Preheat a covered grill for indirect heat at 300°F (150°C).
- Mix the brown sugar, paprika, salt, and pepper, then rub it all over the pork shoulder.
- Place the pork on the cool side of the grill and cook 2 1/2 to 3 1/2 hours, until the internal temperature reaches 195°F to 200°F and the meat pulls apart easily.
- Rest the pork for 20 minutes, then shred it with two forks and toss with barbecue sauce and cider vinegar.
- Toast the slider buns cut-side down for 30 to 45 seconds.
- Pile on pork, top with dry slaw and pickles, and serve hot.
Equipment for This Recipe:
- Covered gas or charcoal grill
- Instant-read thermometer
- Rimmed sheet pan for holding the shredded pork
- Two forks or meat claws
How to Serve This Dish: Stack them on a warm platter with pickles on the side and a pile of chips underneath so the juice has somewhere to go. Two sliders per person works for lunch; three is a proper dinner.
Pro Tips for This Recipe:
- Use pork shoulder, not loin. Loin dries out before the bark gets interesting.
- Keep the slaw dry until the last second or the buns go limp fast.
- If the sauce is sweet, add the vinegar. The bite matters here.
Variations on This Dish:
- Carolina Sharp: Swap the barbecue sauce for a vinegar-forward sauce with mustard and red pepper flakes.
- Spicy Molasses: Add chipotle powder and a spoonful of molasses to the rub for a darker, deeper finish.
- Cheddar Melt: Add a thin slice of sharp cheddar on the hot pork and close the bun for 20 seconds.
Common Mistakes to Avoid with This Dish:
- Don’t cook it over direct flame; the outside will scorch before the inside softens.
- Don’t shred it right away. If you skip the rest, the juices run out onto the board.
- Don’t drown the meat in sauce. You want it coated, not soupy.
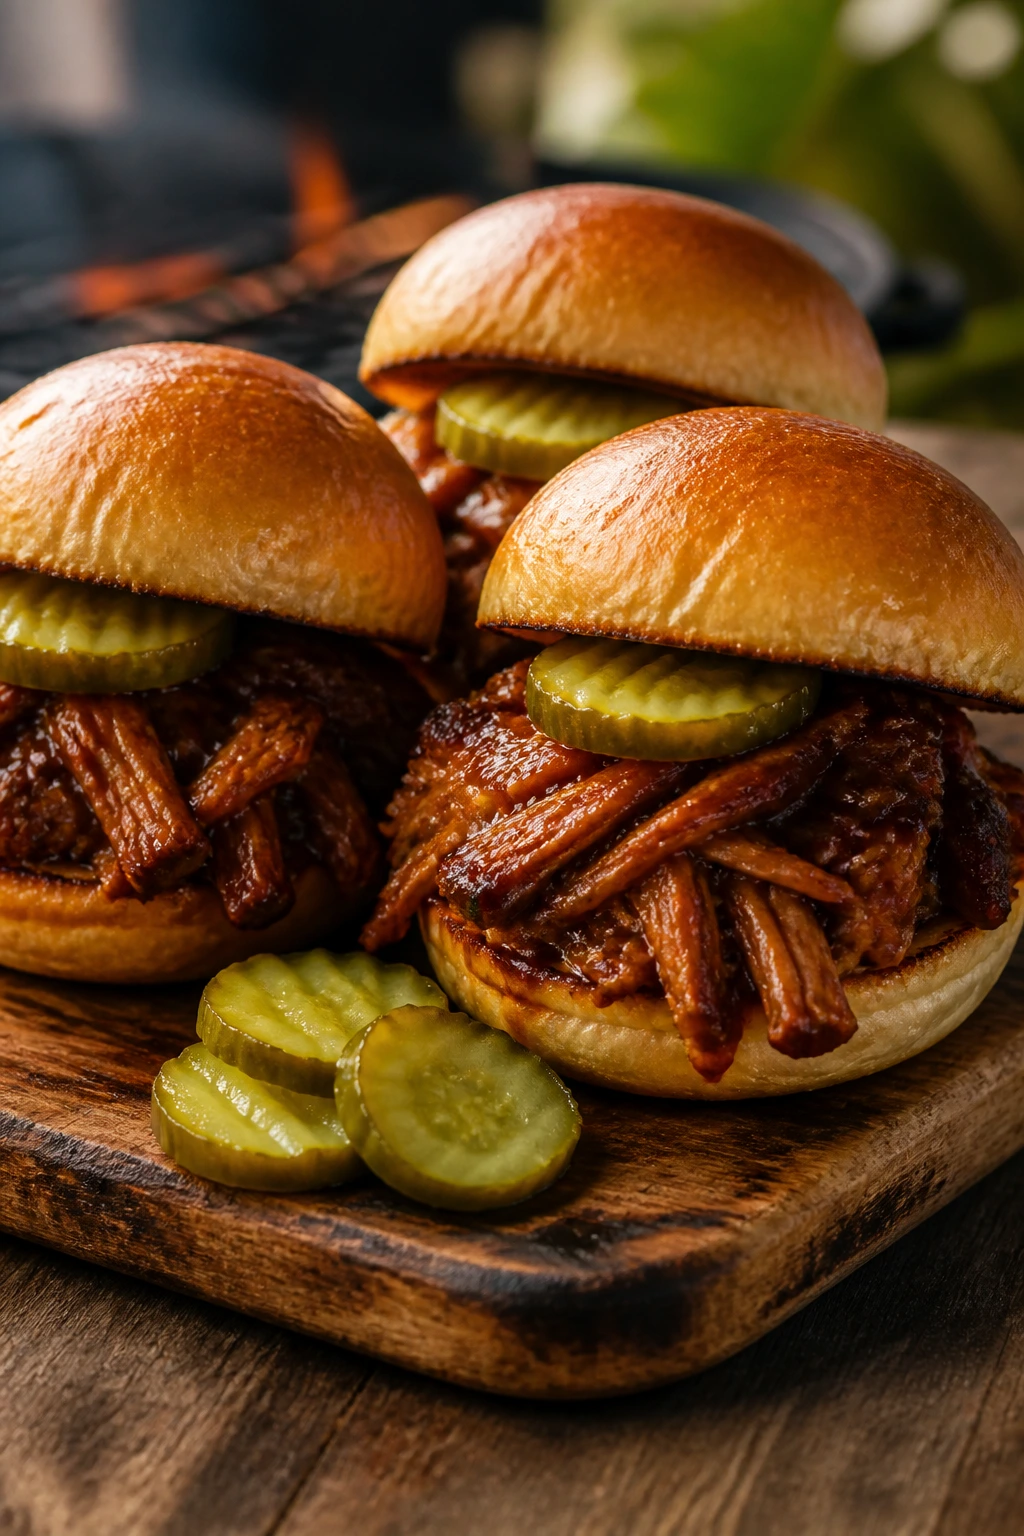
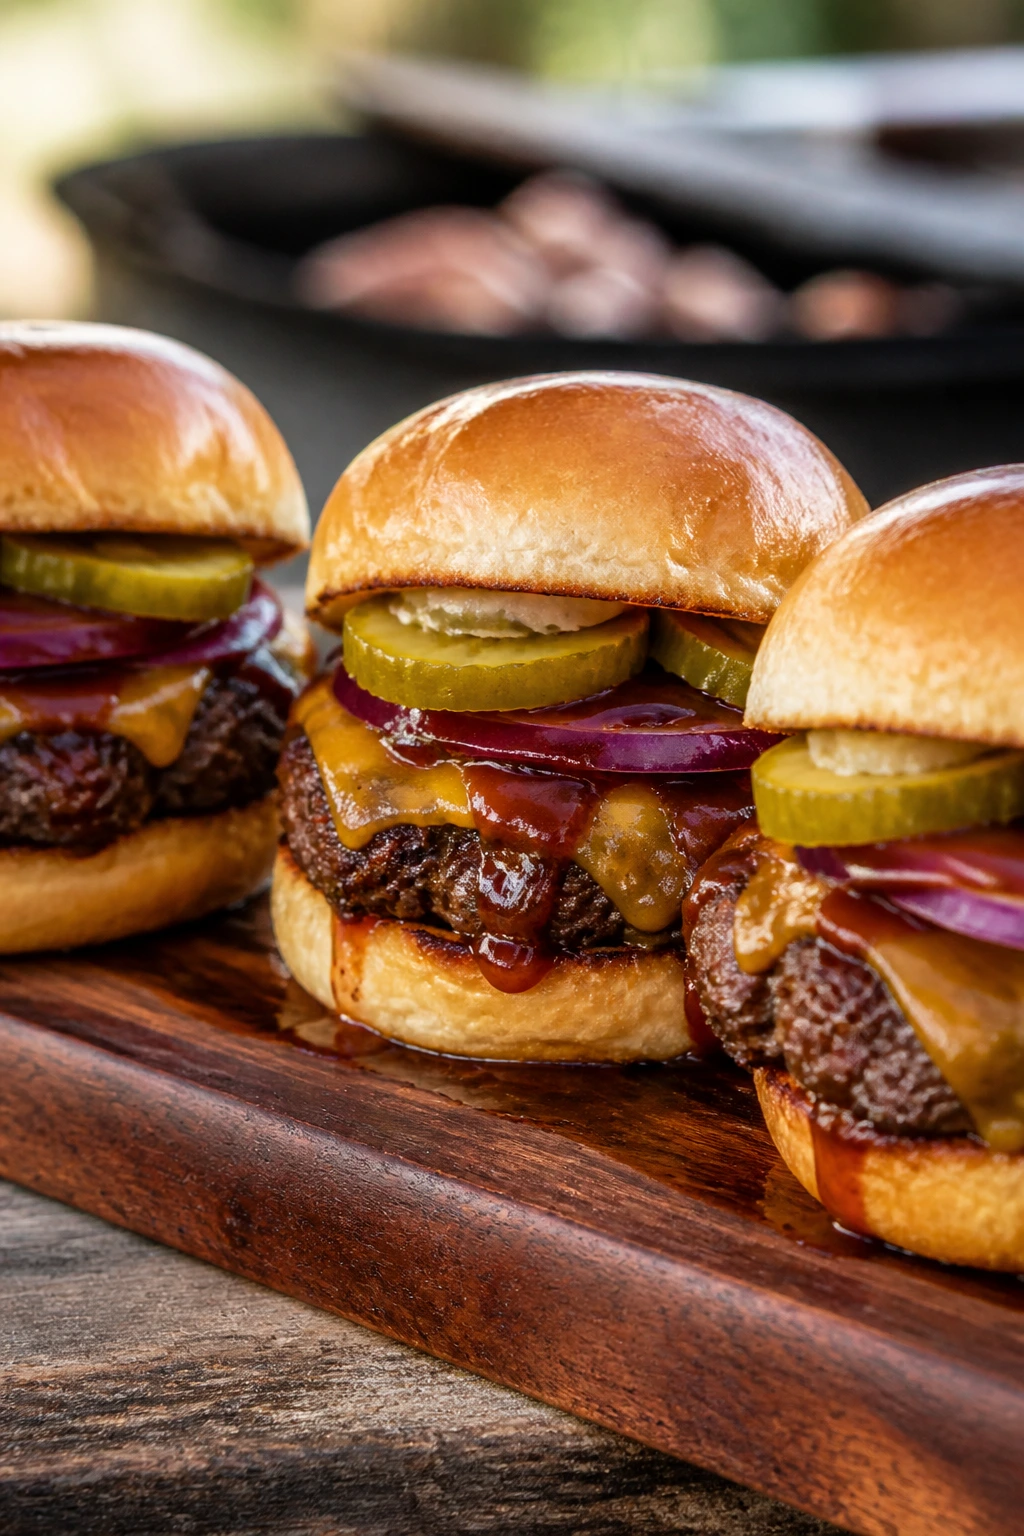
2. Texas-Style Chopped Brisket Sliders
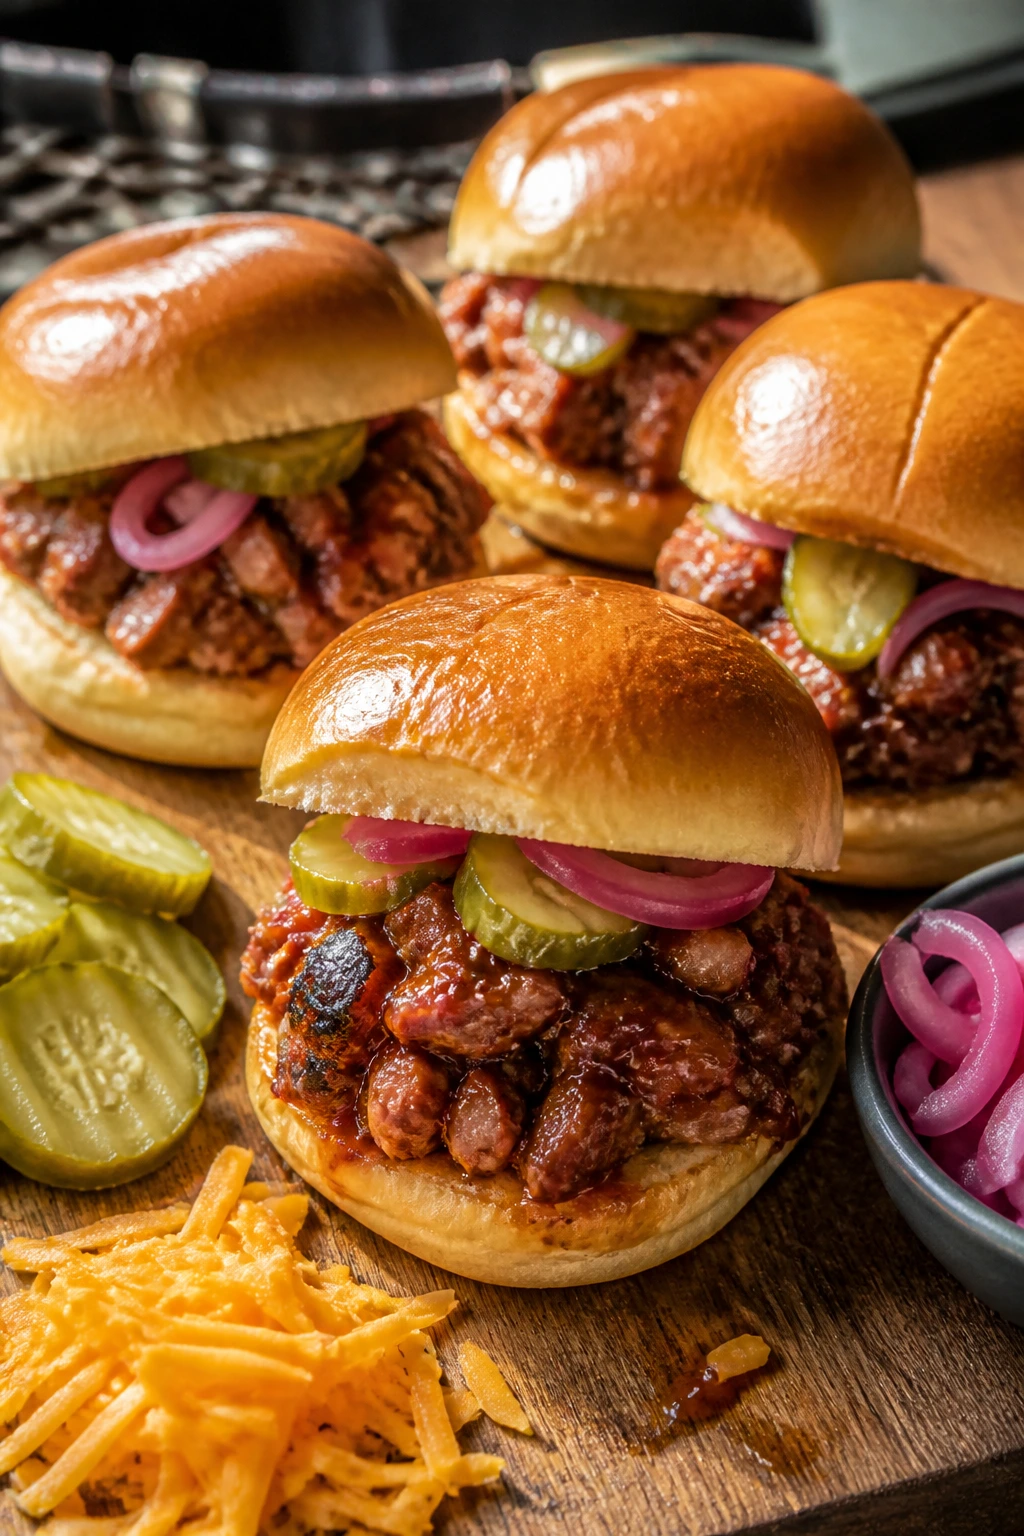
Brisket sliders have a certain swagger, even when they’re small. The meat should be sliced or chopped into rough, juicy shards, not minced into paste, and it needs enough fat left on it to stay glossy under heat. A little pickle sharpness and a soft bun keep the whole thing from feeling too heavy.
Why It Works: Brisket loves low, steady heat and hates rushing. If you’re using cooked brisket, a quick warm-up on the grill in foil keeps the slices tender. The chopped style gives you more edges for sauce to catch, which matters more in a slider than on a full sandwich.
Key Ingredients:
- 2 lb cooked brisket, chopped or thinly sliced
- 3/4 cup barbecue sauce
- 2 tbsp beef drippings or melted butter
- 12 slider buns
- 1 cup pickled red onions
- 1 cup dill pickles, chopped
- 1 cup shredded cheddar
- 1 tsp coarse black pepper
Quick Steps:
- Heat the grill to medium, about 325°F (165°C), with one cool zone for gentle warming.
- Toss the brisket with barbecue sauce and beef drippings in a foil pan.
- Set the pan on the cool side of the grill and warm for 15 to 20 minutes, stirring once, until the brisket is hot and glossy.
- Toast the buns cut-side down for about 30 seconds.
- Fill each bun with brisket, cheddar, pickles, and pickled onions.
- Serve right away while the cheese is still soft.
Equipment for This Recipe:
- Grill with lid
- Foil pan or cast-iron skillet
- Tongs
- Sharp slicing knife
How to Serve This Dish: Pile these on a wooden board with extra onions in a small bowl. They go well with beans, potato salad, or salt-and-vinegar chips.
Pro Tips for This Recipe:
- Warm brisket gently. Hard heat dries the edges before the fat loosens.
- Chop some pieces finer and leave some chunky for better texture.
- Use pickled onions, not raw onion, if the brisket is rich and smoky.
Variations on This Dish:
- Pepper-Crusted: Add extra coarse pepper and a spoon of grain mustard to the sauce.
- Burnt-Edge Style: Reheat chopped brisket in a cast-iron skillet on the grill until some pieces crisp at the edges.
- Jalapeño Cheddar: Swap in pepper jack and sliced jalapeños for more snap.
Common Mistakes to Avoid with This Dish:
- Don’t slice brisket cold and pile it straight onto buns; it eats dense and tight.
- Don’t skip the fat or drippings in the reheat pan. Dry brisket is the fastest way to ruin a good slider.
- Don’t overload the bun with onions and pickles at the same time. Pick one sharp note and let it speak.
3. Burnt-End Sliders with Pickles
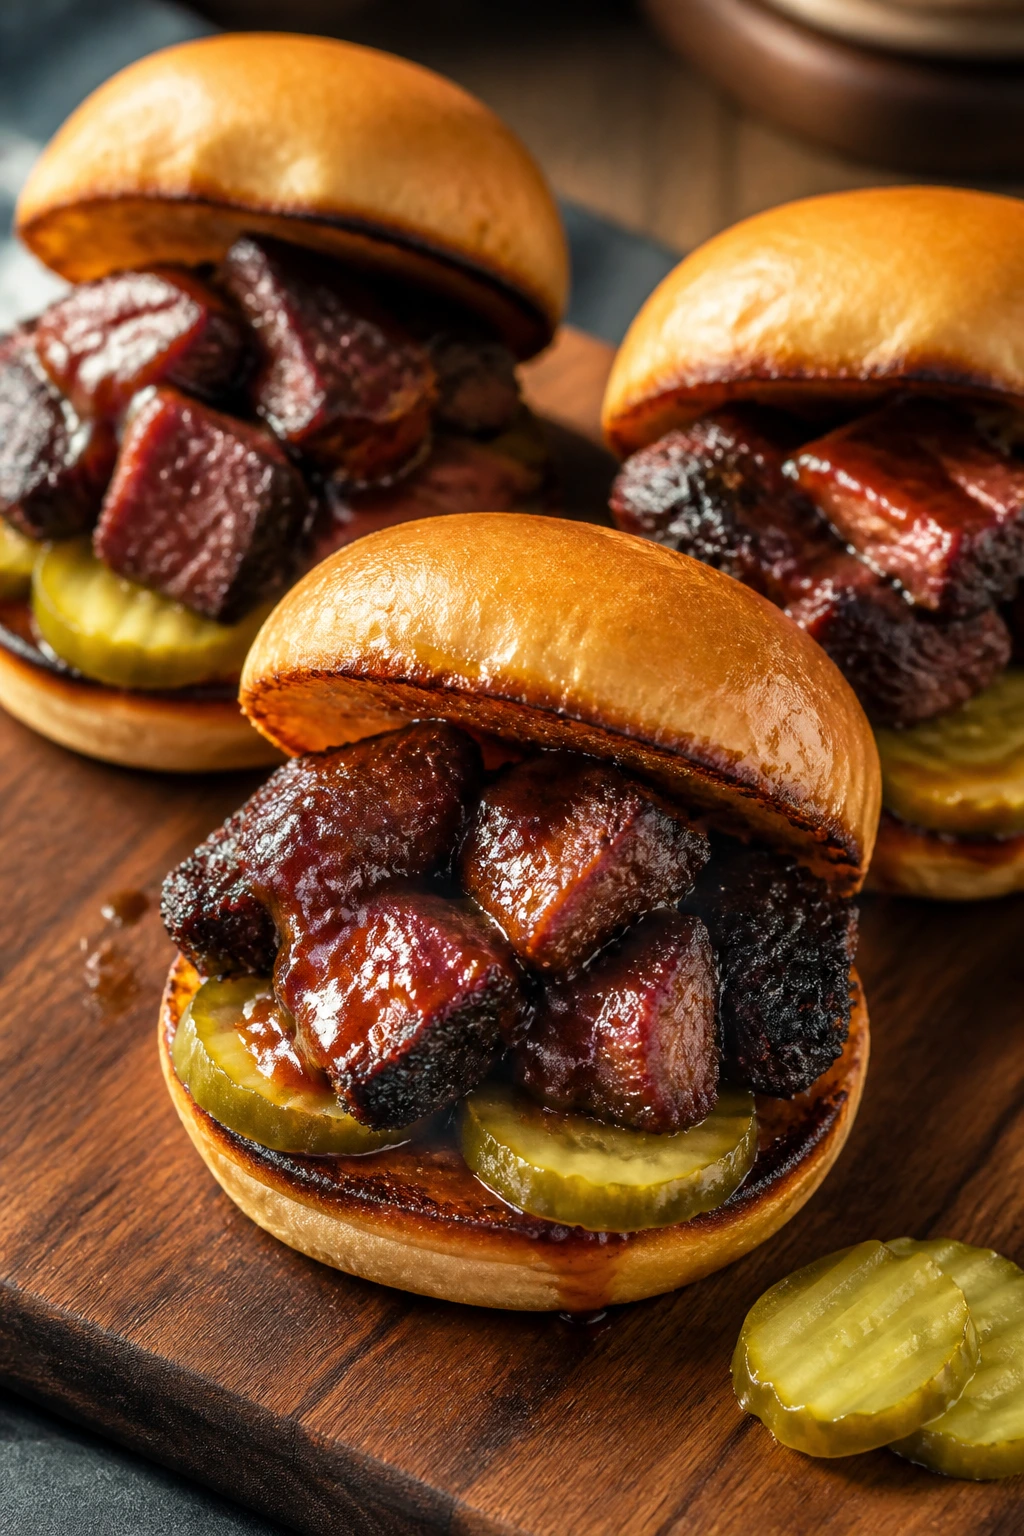
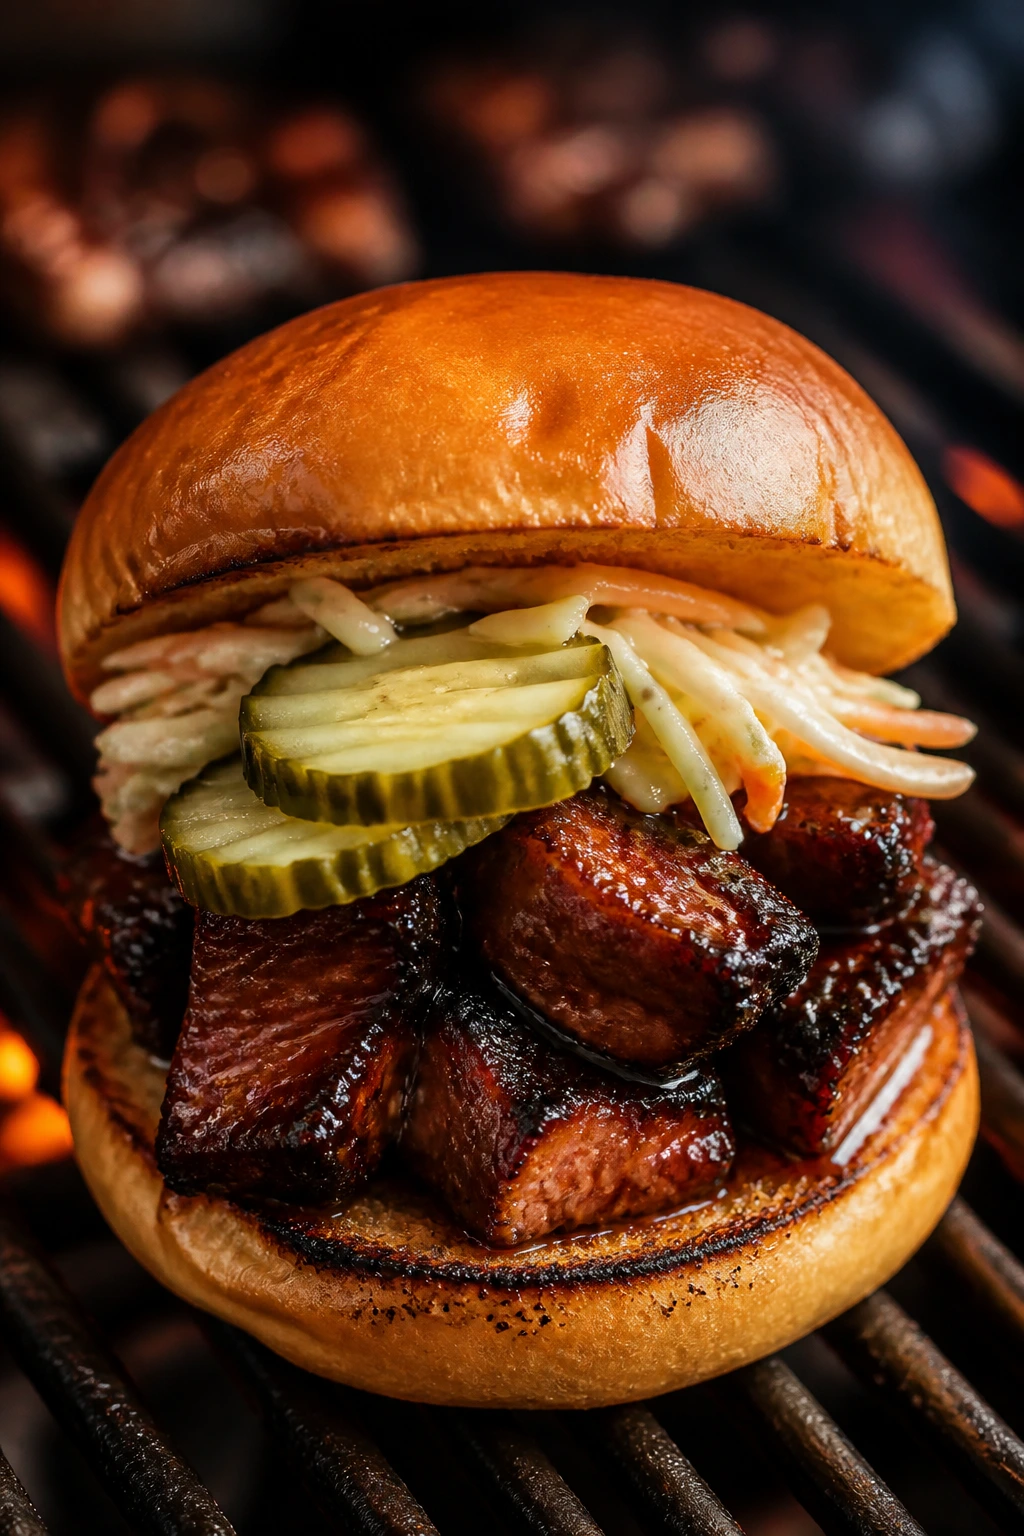
If you want one slider that makes people stop talking mid-bite, this is the one. Burnt ends bring a sticky, charred crust and a soft center that almost melts once it hits the bun. They’re richer than pulled pork, louder than brisket slices, and built for people who like barbecue with edges.
Why It Works: Cubed chuck roast or brisket point cooks faster than a whole brisket and still gives you the bark and tenderness that make burnt ends worth the trouble. The second saucing stage on the grill turns glossy, not soggy. Pickles cut through the fat before the slider becomes a brick.
Key Ingredients:
- 2 1/2 lb chuck roast, cut into 1 1/2-inch cubes
- 2 tbsp barbecue rub
- 1 cup barbecue sauce
- 2 tbsp butter, melted
- 1 tbsp brown sugar
- 12 slider buns
- 1 cup dill pickle chips
- 1/2 cup sliced scallions
Quick Steps:
- Preheat the grill to 275°F (135°C) for indirect cooking.
- Toss the beef cubes with rub and place them in a foil pan.
- Cook for 2 to 2 1/2 hours, until the edges darken and the beef starts to turn tender.
- Stir in barbecue sauce, butter, and brown sugar, then cook 20 to 30 minutes more until the cubes are sticky and soft.
- Toast the buns quickly over direct heat.
- Stack the burnt ends with pickles and scallions.
Equipment for This Recipe:
- Covered grill
- Foil pan
- Tongs
- Instant-read thermometer
How to Serve This Dish: Serve them on small plates with napkins that can take a beating. They’re rich enough to stand alone, though a vinegar slaw or grilled corn keeps the plate from tipping too far into sweet territory.
Pro Tips for This Recipe:
- Keep the lid closed. Opening it every few minutes steals the heat you need for bark.
- Use coarse rub, not a salty dusting, so the sauce can finish the job.
- Let the cubes sit in sauce for 10 minutes before serving so the glaze sticks.
Variations on This Dish:
- Hot Honey Burnt Ends: Add 2 tbsp hot honey to the glaze for a sweet burn.
- Mustard Burnt Ends: Swap half the barbecue sauce for spicy brown mustard.
- Peppery Smoke: Add cracked black pepper and a little espresso powder to the rub.
Common Mistakes to Avoid with This Dish:
- Don’t blast them over direct flame; the sugar in the sauce will blacken too fast.
- Don’t pull them off while they’re still chewy. Burnt ends should give when pressed.
- Don’t use a thin sauce. It runs off before it has a chance to set.
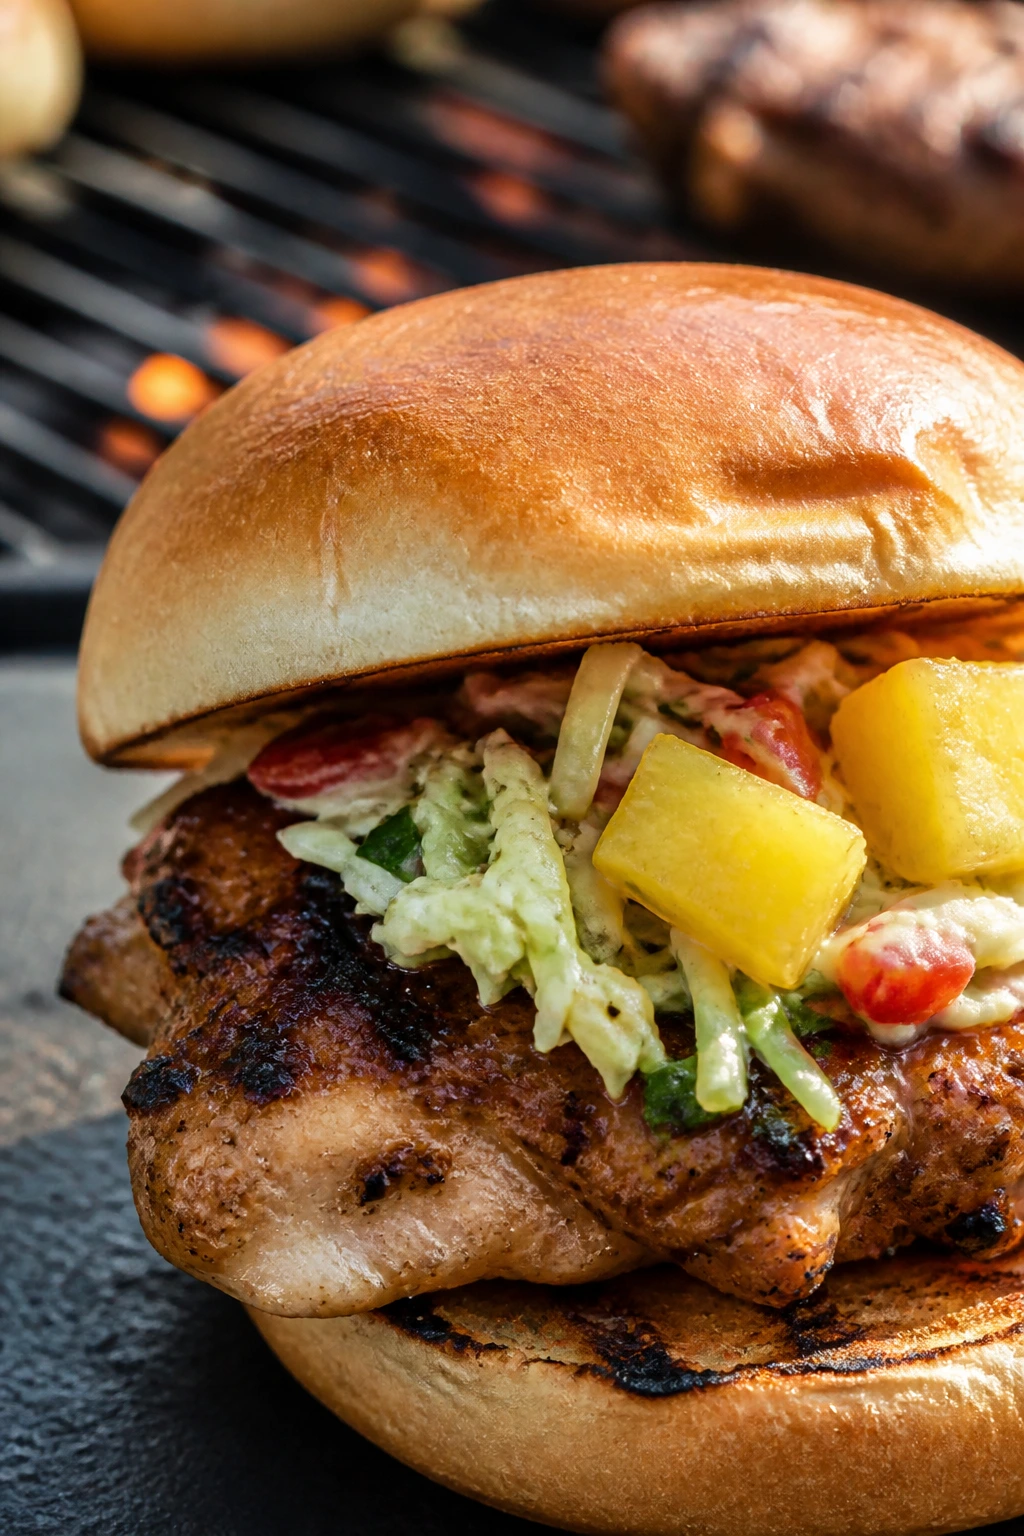
4. Carolina Vinegar Pulled Chicken Sliders
These are sharper, cleaner, and a little leaner than pulled pork. The vinegar sauce bites back in the best way, and grilled chicken thighs keep the texture juicy without needing a lot of babysitting. If you like a slider that wakes up the palate instead of coating it, this one belongs on the tray.
Why It Works: Chicken thighs handle grill heat better than breasts, especially once they’re chopped and tossed with a vinegar-based sauce. The tang keeps the meat lively, and the dry bun-to-sauce ratio is easier to control. It’s the slider I make when the rest of the menu is rich.
Key Ingredients:
- 2 1/2 lb boneless, skinless chicken thighs
- 1 tbsp olive oil
- 2 tsp kosher salt
- 1 tsp black pepper
- 3/4 cup vinegar-based barbecue sauce
- 1 tbsp hot sauce
- 12 slider buns
- 2 cups thin cabbage slaw
- 1 cup dill pickle slices
Quick Steps:
- Heat the grill to medium-high, about 425°F (220°C).
- Rub the chicken with oil, salt, and pepper.
- Grill 6 to 7 minutes per side, until the thighs reach 165°F and the juices run clear.
- Rest 5 minutes, chop the chicken, and toss it with barbecue sauce and hot sauce.
- Toast the buns for 20 to 30 seconds.
- Add chicken, slaw, and pickles, then serve warm.
Equipment for This Recipe:
- Grill grate or grill pan
- Tongs
- Cutting board
- Sharp knife
How to Serve This Dish: These work well with creamy sides like potato salad because the vinegar in the chicken keeps the plate from feeling heavy. Put the slaw on last so it stays crisp.
Pro Tips for This Recipe:
- Chop the chicken against the grain so it eats tender.
- Use thighs, not breasts, unless you’re very careful with timing.
- Add the sauce after grilling; vinegar sauces taste flat if they cook too long.
Variations on This Dish:
- Mustard-Forward: Add Dijon to the sauce for a sharper finish.
- Spicy Slaw: Mix sliced jalapeños into the cabbage.
- Bread-and-Butter Pickle: Swap dill pickles for sweet pickle chips if you like a sweeter edge.
Common Mistakes to Avoid with This Dish:
- Don’t let the chicken go past 165°F by much or it dries out fast.
- Don’t pour the sauce over the buns too early.
- Don’t use wet slaw straight from the bowl. Drain it first.
5. Alabama White Sauce Chicken Sliders
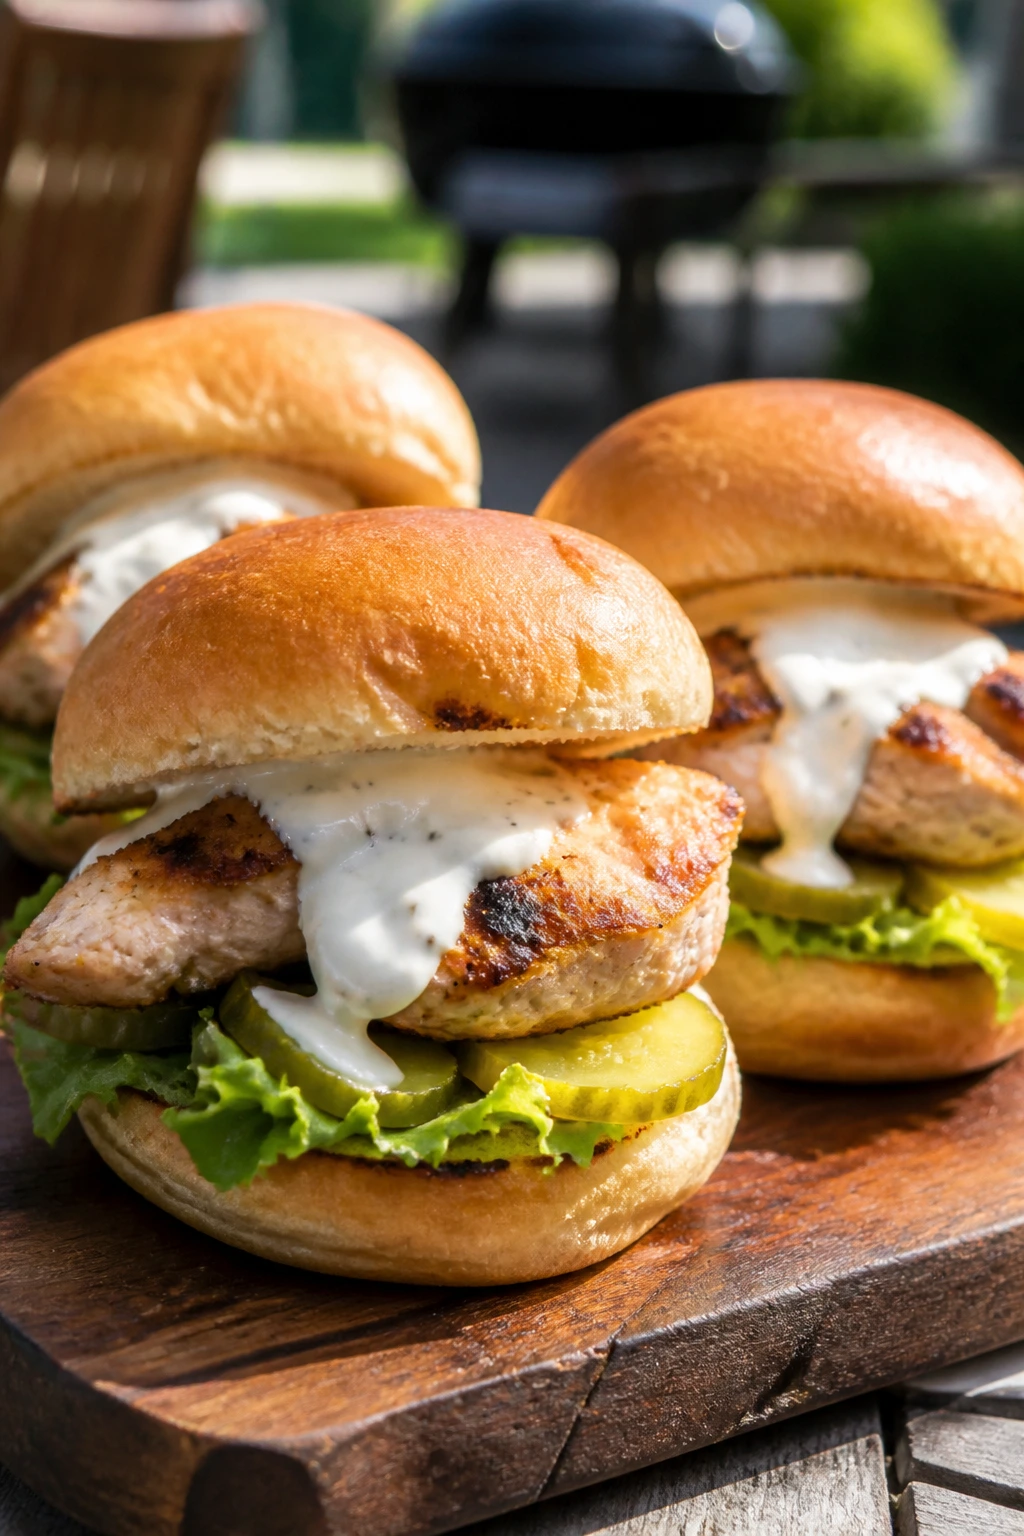
White barbecue sauce is the sly one in the group. It looks creamy and tame, then hits you with vinegar, pepper, and a little horseradish bite. On grilled chicken thighs, it makes a slider that feels cool and tangy on the surface but still smoky underneath.
Why It Works: The sauce is best when it stays fresh and sharp, which is why grilled chicken is such a good match. Dark meat holds up to the tang without going stringy. A quick brush of sauce after grilling keeps the mayonnaise base from breaking.
Key Ingredients:
- 2 1/2 lb boneless chicken thighs
- 1 tbsp olive oil
- 2 tsp kosher salt
- 1 tsp black pepper
- 1 cup Alabama white sauce
- 12 slider buns
- 1 cup shredded lettuce
- 1 cup dill pickles, sliced
Quick Steps:
- Preheat the grill to 425°F (220°C).
- Season the chicken with oil, salt, and pepper.
- Grill 6 to 7 minutes per side until the chicken reaches 165°F.
- Rest the thighs for 5 minutes, then slice or chop.
- Toss with half the white sauce and spoon a little extra on the cut buns.
- Top with lettuce and pickles.
Equipment for This Recipe:
- Covered grill
- Tongs
- Small bowl for sauce
- Knife and cutting board
How to Serve This Dish: Serve them cool-weather style with potato chips and sliced tomatoes, or hot-off-the-grill with coleslaw. A little black pepper on top makes the sauce look finished.
Pro Tips for This Recipe:
- Add the sauce after cooking so it stays bright, not greasy.
- Slice the chicken while it’s warm; the sauce grabs better.
- If the sauce is thick, thin it with a spoonful of apple cider vinegar.
Variations on This Dish:
- Smoked Paprika: Add a pinch of smoked paprika to the sauce for more color.
- Pickle Juice Kick: Stir in 1 tbsp pickle brine for extra bite.
- Hot White Sauce: Add cayenne or prepared horseradish.
Common Mistakes to Avoid with This Dish:
- Don’t cook the sauce on the grill; mayo-based sauces can split.
- Don’t drown the sliders. White sauce should coat, not flood.
- Don’t use raw lettuce straight from the crisper without drying it first.
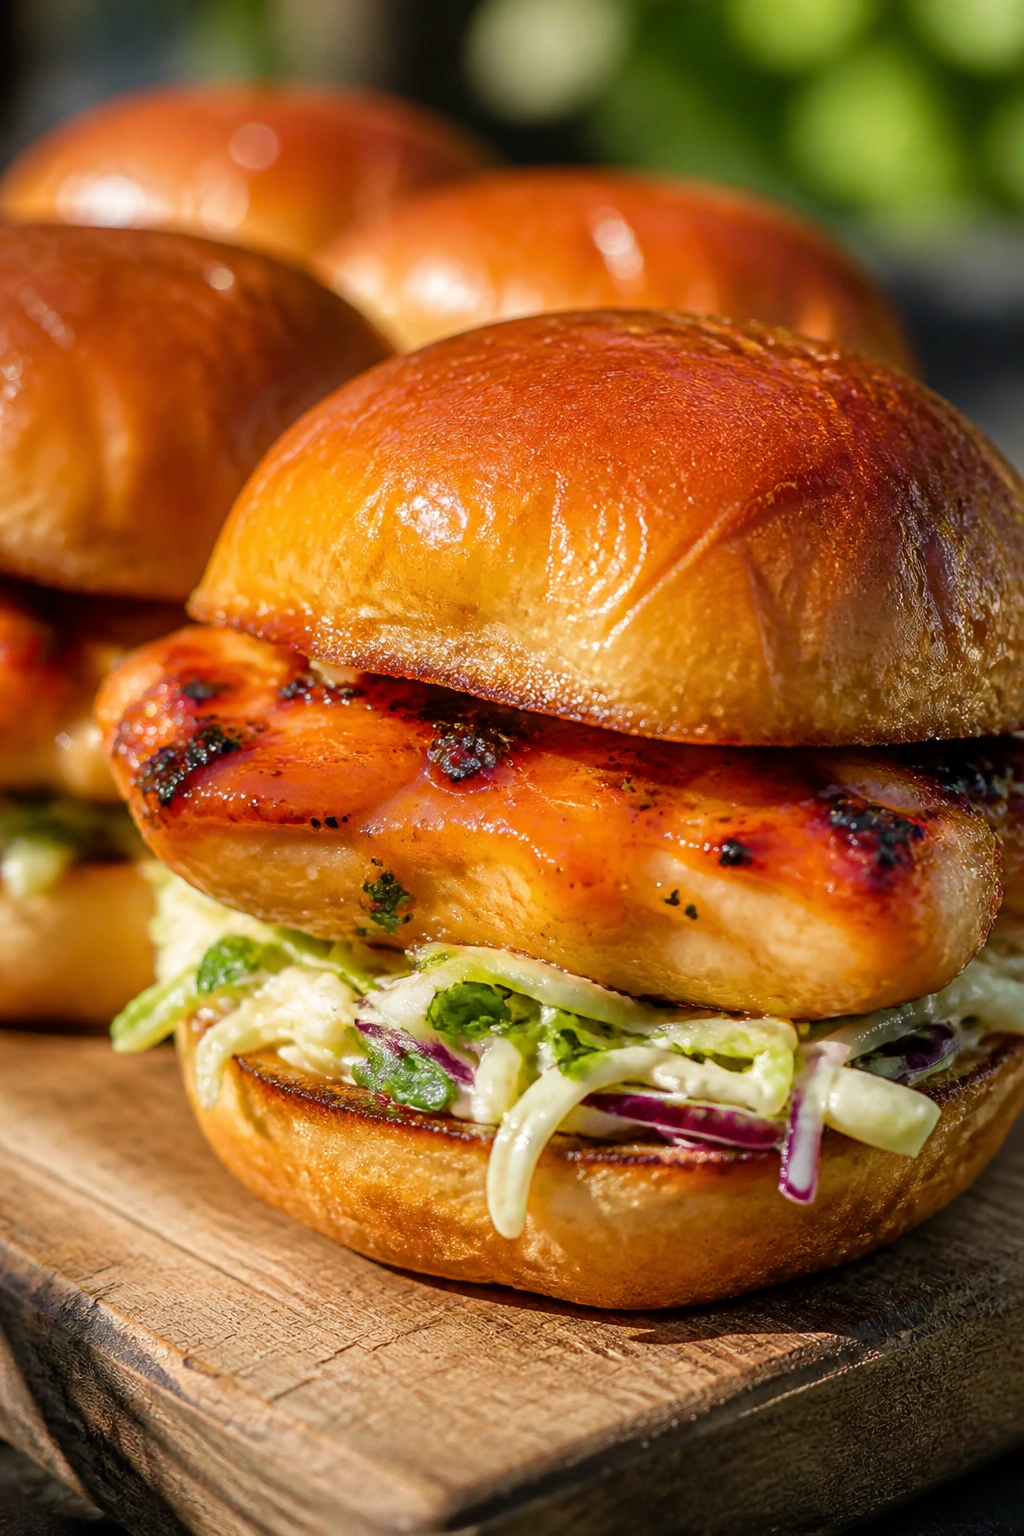
6. Bacon Ranch BBQ Chicken Sliders
This is the one that tastes like a cookout went to a diner and came back with better shoes. Bacon brings salt and crunch, ranch softens the smoke, and the barbecue sauce ties everything together without turning the bun into paste. It’s a little louder than the other chicken sliders, and that’s the point.
Why It Works: Chicken thighs or breasts can go dry fast if they’re left naked on the grill, but bacon and sauce give you a margin for error. The ranch cools the smoke while the cheddar melts into the meat. A quick bun toast is the difference between neat and soggy.
Key Ingredients:
- 2 lb boneless chicken thighs
- 8 slices bacon, cooked crisp
- 1 tbsp oil
- 2 tsp salt
- 1 cup barbecue sauce
- 1/2 cup ranch dressing
- 1 cup shredded cheddar
- 12 slider buns
Quick Steps:
- Heat the grill to medium-high, about 425°F (220°C).
- Season the chicken with oil and salt, then grill 6 to 7 minutes per side.
- Brush with barbecue sauce during the last minute, just enough to gloss the surface.
- Rest 5 minutes, then slice.
- Layer chicken, cheddar, bacon, and a drizzle of ranch on toasted buns.
- Close and serve while the cheese is soft.
Equipment for This Recipe:
- Grill
- Tongs
- Small skillet or foil tray for bacon
- Sharp knife
How to Serve This Dish: Pair with dill pickles and crunchy slaw so the plate does not feel all-soft, all-salty. These disappear fast, so set out extra bacon bits in a bowl.
Pro Tips for This Recipe:
- Cook the bacon first so you can use the drippings if you want extra flavor on the grill.
- Add ranch sparingly; too much and the bun loses its grip.
- If using chicken breasts, pound them to an even thickness.
Variations on This Dish:
- Spicy Ranch: Add hot sauce to the ranch dressing.
- Pepper Jack Swap: Replace cheddar with pepper jack for more heat.
- Smoky Maple: Brush the chicken with a 50/50 mix of barbecue sauce and maple syrup.
Common Mistakes to Avoid with This Dish:
- Don’t sauce too early or the sugar in the barbecue sauce can burn.
- Don’t pile on two sauces plus bacon plus cheese unless the bun is sturdy.
- Don’t skip the rest; sliced hot chicken loses juice fast.
7. Mesquite Turkey Burger Sliders
Turkey burgers get blamed for being dull, but that usually means they were cooked without enough seasoning or fat. Mesquite smoke, onion, and a little Worcestershire give these sliders a darker, meatier edge than people expect. The trick is to keep the patties small and the cook time short so they don’t dry out.
Why It Works: Ground turkey needs help, and this recipe gives it plenty: fat from olive oil, umami from Worcestershire, and smoke from mesquite seasoning. The smaller slider size means the patties finish before the meat gets chalky. Melted cheese handles any dryness the grill tries to sneak in.
Key Ingredients:
- 1 1/2 lb ground turkey, 93% lean
- 1 small onion, finely grated
- 1 tbsp Worcestershire sauce
- 1 tbsp olive oil
- 1 tbsp mesquite seasoning
- 1 tsp kosher salt
- 1 cup shredded cheddar or pepper jack
- 12 slider buns
Quick Steps:
- Mix the turkey, onion, Worcestershire, oil, seasoning, and salt until just combined.
- Shape into 12 small patties.
- Preheat the grill to medium-high, about 400°F (205°C).
- Grill 4 to 5 minutes per side until the centers reach 165°F.
- Top with cheese during the last minute and close the lid.
- Serve on toasted buns with mustard or pickle relish.
Equipment for This Recipe:
- Grill or grill pan
- Mixing bowl
- Spatula
- Instant-read thermometer
How to Serve This Dish: These go well with sliced tomatoes and lettuce because the turkey likes a cool, crisp companion. Set out mustard, relish, and pickles instead of heavy sauces.
Pro Tips for This Recipe:
- Grate the onion finely so it disappears into the meat.
- Make the patties a little wider than the buns; they shrink as they cook.
- Chill the formed patties for 15 minutes if the mix feels soft.
Variations on This Dish:
- Smoked Gouda Turkey: Swap cheddar for smoked gouda.
- Chipotle Turkey: Add minced chipotle in adobo for a deeper heat.
- Herb Turkey: Stir in chopped parsley and thyme for a brighter profile.
Common Mistakes to Avoid with This Dish:
- Don’t use ultra-lean turkey or the burger gets dry and tight.
- Don’t press the patties with the spatula.
- Don’t undercook them; turkey needs to reach 165°F in the center.
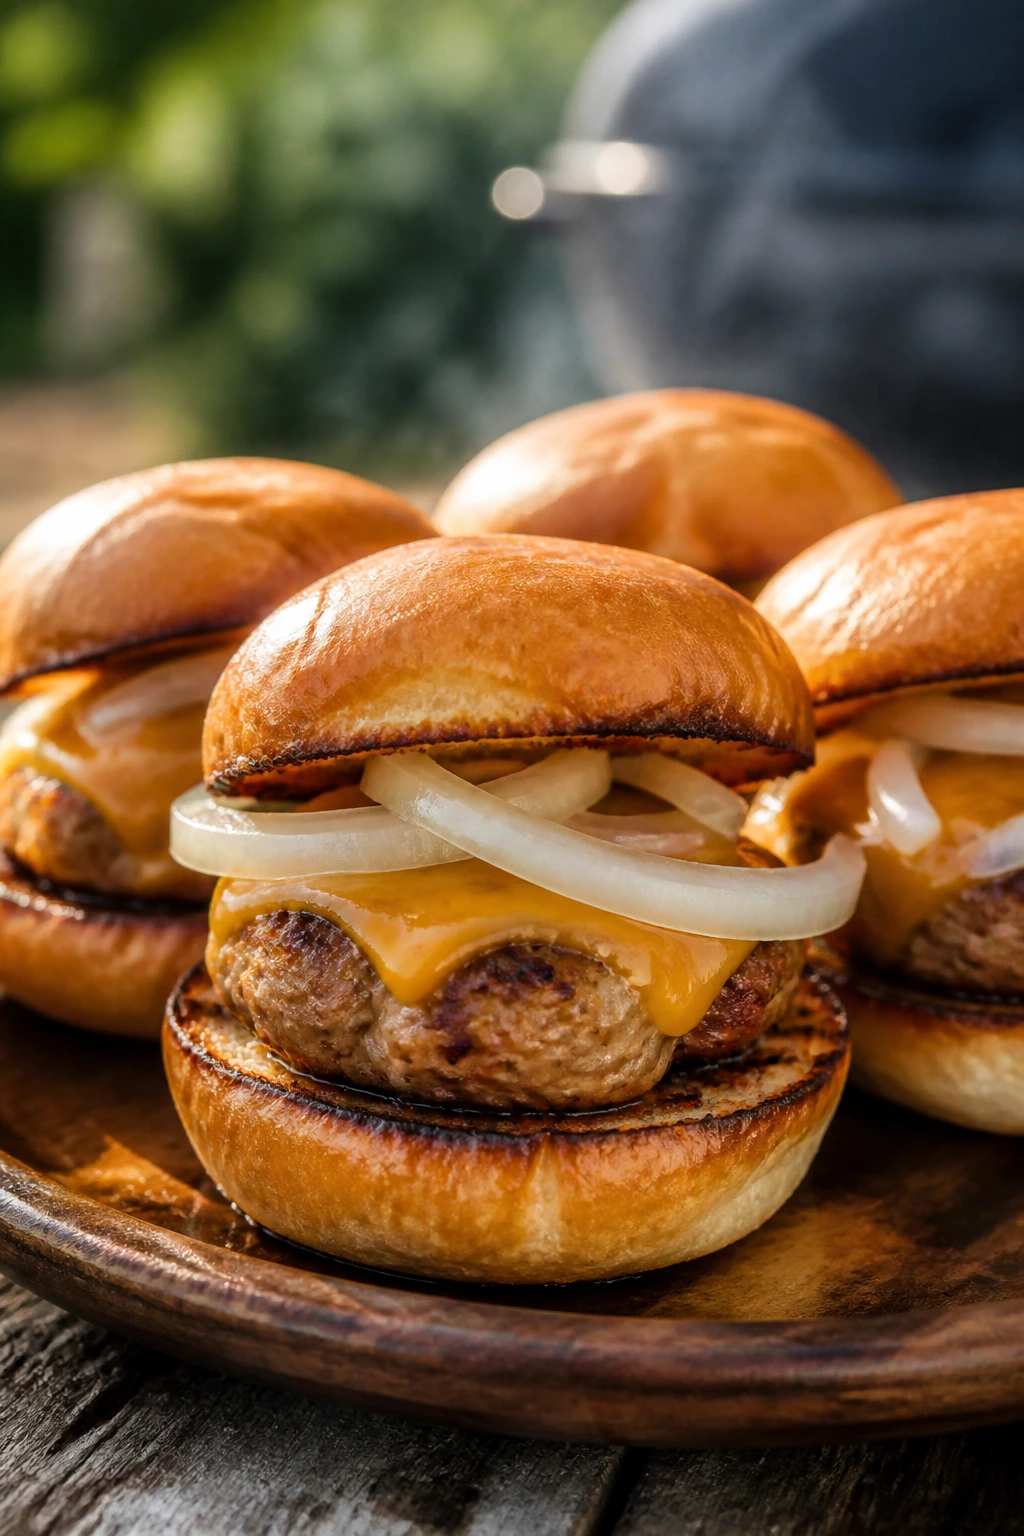
8. Classic Cheeseburger BBQ Sliders
Sometimes the best move is the one everyone already wants. These are the classic beef sliders with enough barbecue sauce to make them feel cookout-ready, plus melted cheese and pickles for the familiar bite you expect from a good backyard burger. Small size, big flavor. No drama.
Why It Works: An 80/20 beef blend gives you enough fat for a juicy patty and enough structure to stay put on the grill. A quick sear locks in the outside, and the cheese seals the top before the bun can get messy. Pickles and a little barbecue sauce keep the whole thing from tasting flat.
Key Ingredients:
- 2 lb ground beef, 80/20
- 1 tsp kosher salt
- 1 tsp black pepper
- 1 tbsp Worcestershire sauce
- 1/2 cup barbecue sauce
- 8 slices cheddar cheese, cut in half
- 12 slider buns
- 1 cup dill pickle chips
- 1 small red onion, thinly sliced
Quick Steps:
- Mix the beef with salt, pepper, and Worcestershire just enough to combine.
- Shape into 12 small patties, each a little wider than the buns.
- Preheat the grill to high, around 450°F to 500°F (230°C to 260°C).
- Grill 2 to 3 minutes per side for medium, adding cheese during the last minute.
- Brush the cut buns with a little barbecue sauce or butter and toast briefly.
- Build with pickles, onion, and the cheeseburger patties.
Equipment for This Recipe:
- Grill
- Wide spatula
- Tongs
- Instant-read thermometer
How to Serve This Dish: Serve with potato salad or corn on the cob and let the pickles stay visible on top; they look better than they sound in the middle. I like these with a cold, sharp side because the beef brings enough richness on its own.
Pro Tips for This Recipe:
- Keep the seasoning simple. Beef should still taste like beef.
- Make a shallow thumb dent in the center so the patties stay flat.
- Toast the buns cut-side down for a few seconds only.
Variations on This Dish:
- Bacon Cheddar: Add a slice of cooked bacon and swap in sharp cheddar.
- Jalapeño Burger: Mix minced jalapeño into the beef.
- Onion Jam: Replace raw onion with a spoonful of grilled onion jam.
Common Mistakes to Avoid with This Dish:
- Don’t make the patties too thick; they should fit the slider bun without hanging off in a sad spiral.
- Don’t overwork the meat or the burgers turn tough.
- Don’t leave the cheese off. It matters here.
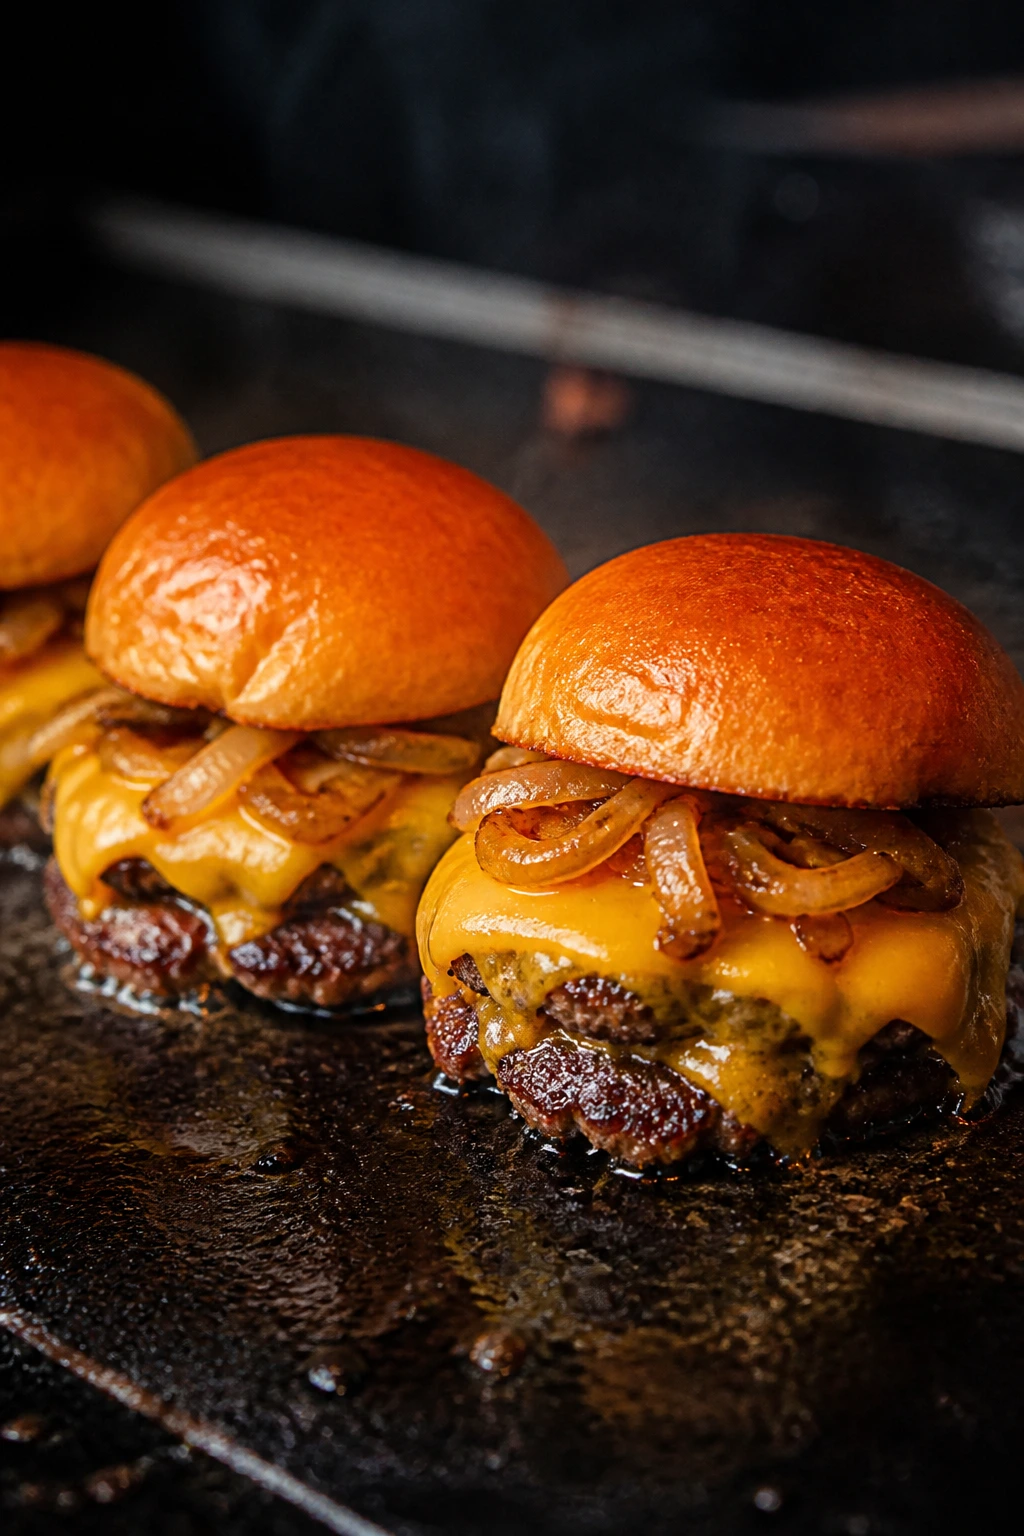
9. Double-Cheese Smash Burger Sliders
These are the loud ones. Thin beef patties hit a hot griddle or cast-iron plate on the grill and go from raw to lacy-edged in minutes. The double cheese melts into the meat, not around it, and the onions char just enough to smell like the neighborhood cookout has arrived early.
Why It Works: Smash burgers rely on contact, not thickness. The hot surface builds a crust fast, and thin patties give you more browned edges per bite. A second cheese layer keeps the slider from feeling too lean after the smash.
Key Ingredients:
- 2 lb ground beef, 80/20
- 1 tsp kosher salt
- 1 tsp black pepper
- 1 tbsp neutral oil
- 12 slices American cheese
- 8 slices sharp cheddar, halved
- 12 slider buns
- 1 small yellow onion, thinly sliced
- Burger sauce for serving
Quick Steps:
- Heat a cast-iron griddle or skillet on the grill until very hot, about 500°F (260°C) surface heat if you can test it.
- Portion the beef into 12 loose balls and season lightly.
- Oil the surface, place the beef on the griddle, and smash hard with a spatula or burger press for 10 seconds.
- Cook 1 1/2 to 2 minutes, flip, and add American cheese on one side and cheddar on the other.
- Toast the buns on the cooler edge of the griddle.
- Stack with burger sauce and onions.
Equipment for This Recipe:
- Cast-iron griddle or skillet
- Heavy spatula or burger press
- Grill-safe mitts
- Metal scraper
How to Serve This Dish: Serve these immediately; smash burgers lose their magic if they sit. A tray lined with parchment keeps the buns from sticking while you build the next batch.
Pro Tips for This Recipe:
- Use loose meat balls, not packed patties, so the crust stays craggy.
- Scrape the griddle between batches to prevent burnt bits from turning bitter.
- Don’t press the burger after the first smash; that juice is yours to keep.
Variations on This Dish:
- Caramelized Onion Smash: Add sweet onions cooked on the griddle beside the patties.
- Smokehouse Sauce: Mix barbecue sauce into the burger sauce.
- Pickle Bomb: Double the pickles and skip the ketchup.
Common Mistakes to Avoid with This Dish:
- Don’t use medium heat. Smash burgers need a real sizzle.
- Don’t form tight balls like meatballs; loose is better.
- Don’t stack them too early or the cheese steam softens the crust.
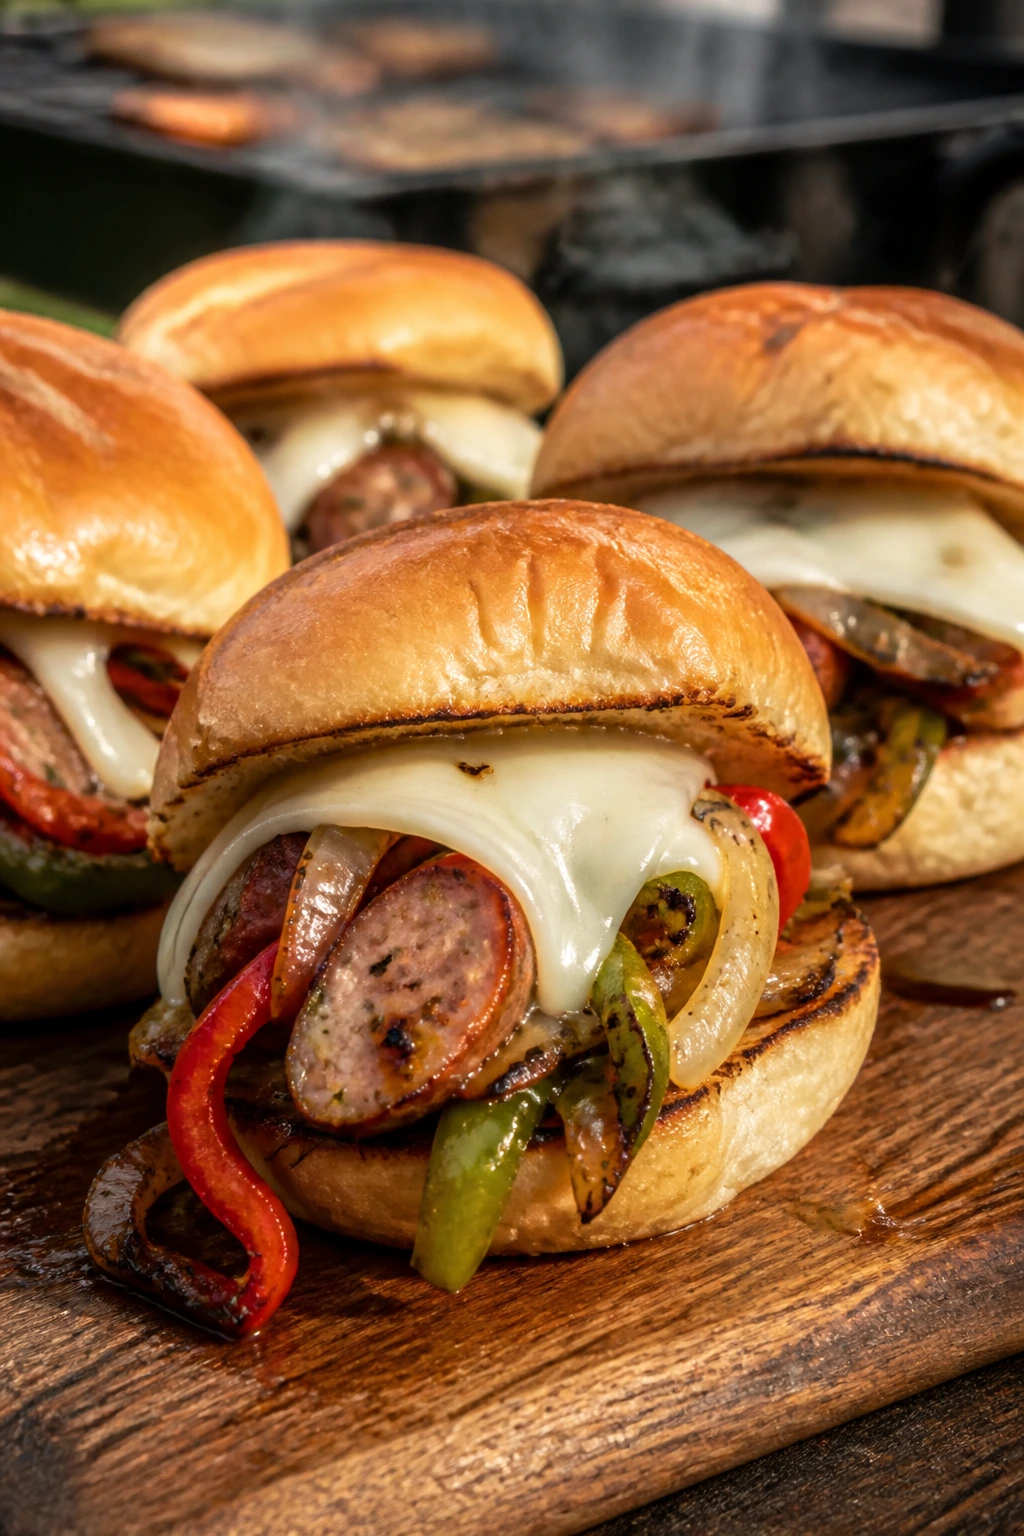
10. Grilled Sausage and Peppers Sliders
There’s something old-school and satisfying about sausage and peppers on a roll, and the slider version makes the whole thing easier to serve and easier to eat. The sausages char first, the peppers soften and sweeten on the grill, and the bun catches the drips without getting overwhelmed. That’s a tidy little cookout move.
Why It Works: Sausage carries its own fat, which means it browns well and stays juicy. Grilled peppers and onions add sweetness and a bit of smoke, so the sandwich doesn’t need much else. Provolone melts into the creases and helps bind the filling.
Key Ingredients:
- 8 Italian sausages, sweet or hot
- 2 bell peppers, sliced
- 1 large onion, sliced
- 2 tbsp olive oil
- 1 tsp kosher salt
- 1 cup provolone cheese, shredded or sliced
- 12 slider buns
- 1/2 cup marinara or barbecue sauce, optional
Quick Steps:
- Preheat the grill to medium, around 375°F (190°C).
- Toss peppers and onion with olive oil and salt, then grill in a basket or foil tray until softened and charred at the edges.
- Grill the sausages, turning often, until browned and cooked through to 160°F.
- Slice the sausages into short segments.
- Fill each bun with sausage, peppers, onions, and provolone.
- Serve with a spoon of sauce if you want extra moisture.
Equipment for This Recipe:
- Grill basket or foil tray
- Tongs
- Sharp knife
- Sheet pan for holding the filling
How to Serve This Dish: Put these next to mustard, pickles, or a simple chopped salad. They are sturdy enough for casual eating, but they still disappear fast.
Pro Tips for This Recipe:
- Par-grill the peppers first if you like them softer than the sausage.
- Let the sausages rest before slicing so the juices stay inside.
- Use buns with some chew; ultra-soft rolls collapse under the weight.
Variations on This Dish:
- Spicy Italian: Use hot sausage and add Calabrian chili paste.
- Smoky Marinara: Spoon warmed marinara over the top.
- Cheese Lover’s: Melt mozzarella instead of provolone.
Common Mistakes to Avoid with This Dish:
- Don’t slice the sausage before it rests.
- Don’t let the peppers go limp and pale; a little char gives the sandwich depth.
- Don’t stuff in too much sauce or the slider turns into a fork meal.
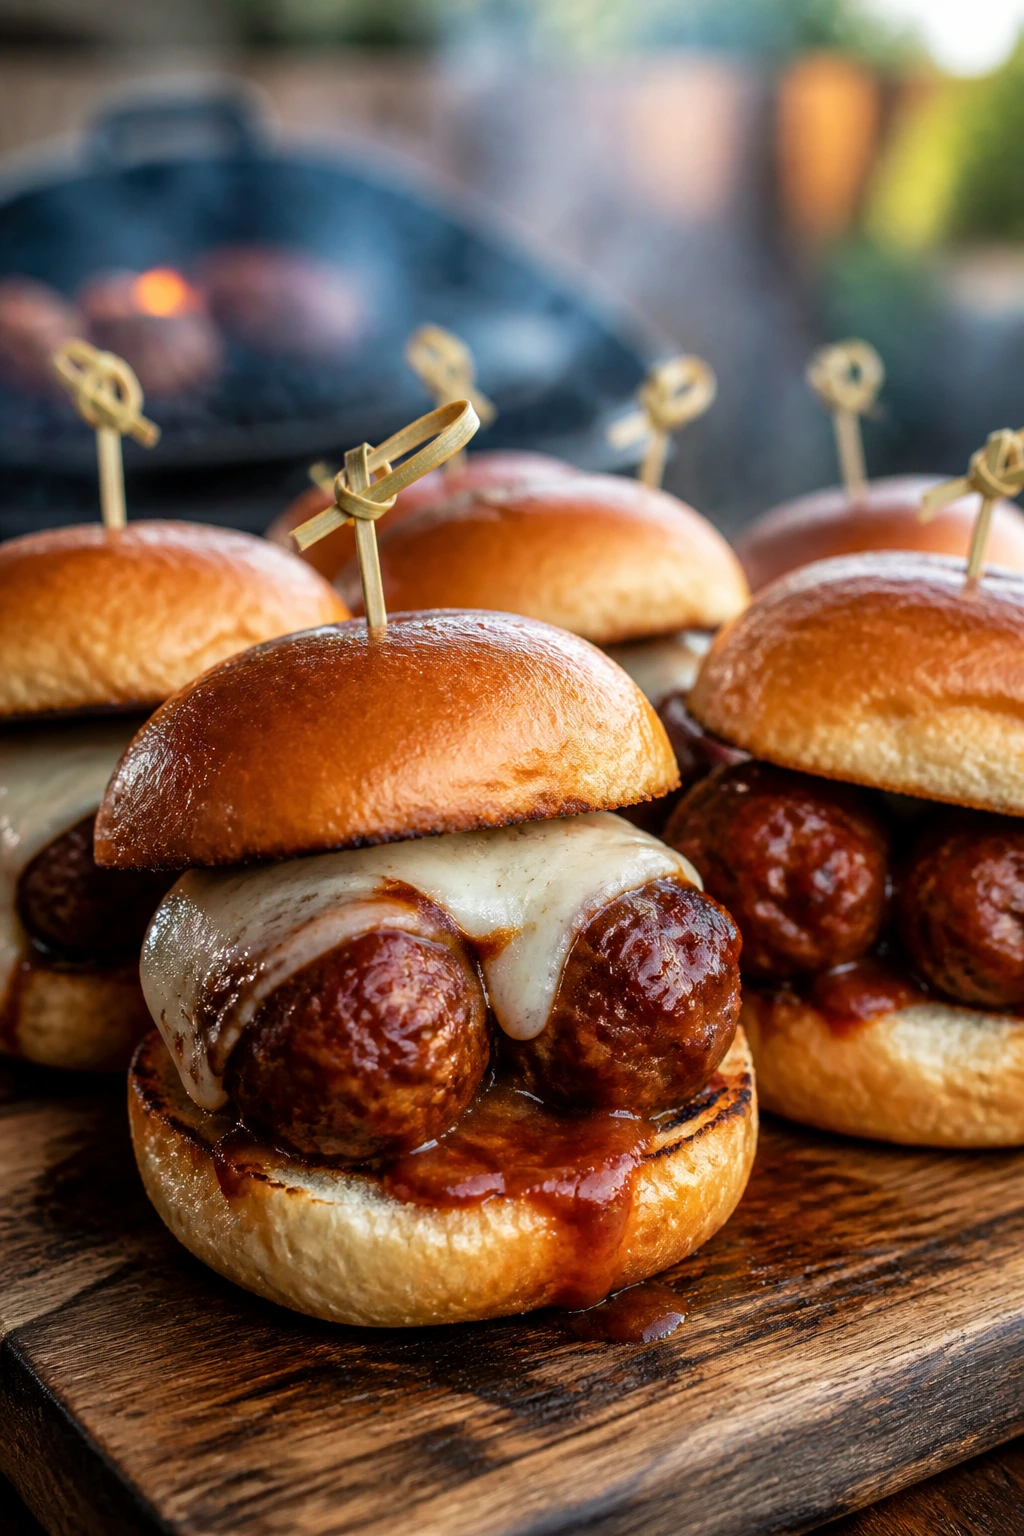
11. BBQ Meatball Sliders
Meatball sliders sound like a game-day idea until you grill them and realize they can carry real smoke flavor. These are compact beef-and-pork meatballs brushed with barbecue sauce, then tucked into buns with melted cheese. The shape helps them brown all around, which is half the point.
Why It Works: Smaller meatballs cook faster and take on grill flavor from more surface area. A little binder keeps them from falling apart on the grates. Barbecue sauce at the end gives you gloss without burning the sugar early.
Key Ingredients:
- 1 lb ground beef
- 1 lb ground pork
- 1 egg
- 1/2 cup breadcrumbs
- 2 tbsp grated onion
- 1 tsp salt
- 1 cup barbecue sauce
- 1 cup mozzarella or provolone
- 12 slider buns
Quick Steps:
- Mix the beef, pork, egg, breadcrumbs, onion, and salt until just combined.
- Form into 12 compact meatballs.
- Preheat the grill to medium, around 375°F (190°C), and oil the grates or use a grill basket.
- Grill the meatballs for 10 to 12 minutes, turning every few minutes, until they reach 165°F.
- Brush with barbecue sauce and add cheese during the last minute.
- Serve in toasted buns.
Equipment for This Recipe:
- Grill basket or skewers
- Mixing bowl
- Tongs
- Instant-read thermometer
How to Serve This Dish: Set out extra sauce on the side and keep toothpicks nearby if you’re serving a crowd. A pile of crunchy slaw makes a good contrast to the soft meatball texture.
Pro Tips for This Recipe:
- Make the meatballs uniform so they finish at the same time.
- Chill them for 15 minutes if the mix feels sticky.
- Use a basket if your grates are wide; meatballs love to escape.
Variations on This Dish:
- Buffalo BBQ: Mix hot sauce into the glaze.
- Garlic Mozzarella: Add minced garlic to the meatball mix.
- Sweet Onion: Serve with caramelized onions instead of plain cheese.
Common Mistakes to Avoid with This Dish:
- Don’t pack the mix too hard or the meatballs get dense.
- Don’t skip the thermometer; meatballs need to be cooked through.
- Don’t sauce them from the start or the glaze burns before the center is done.
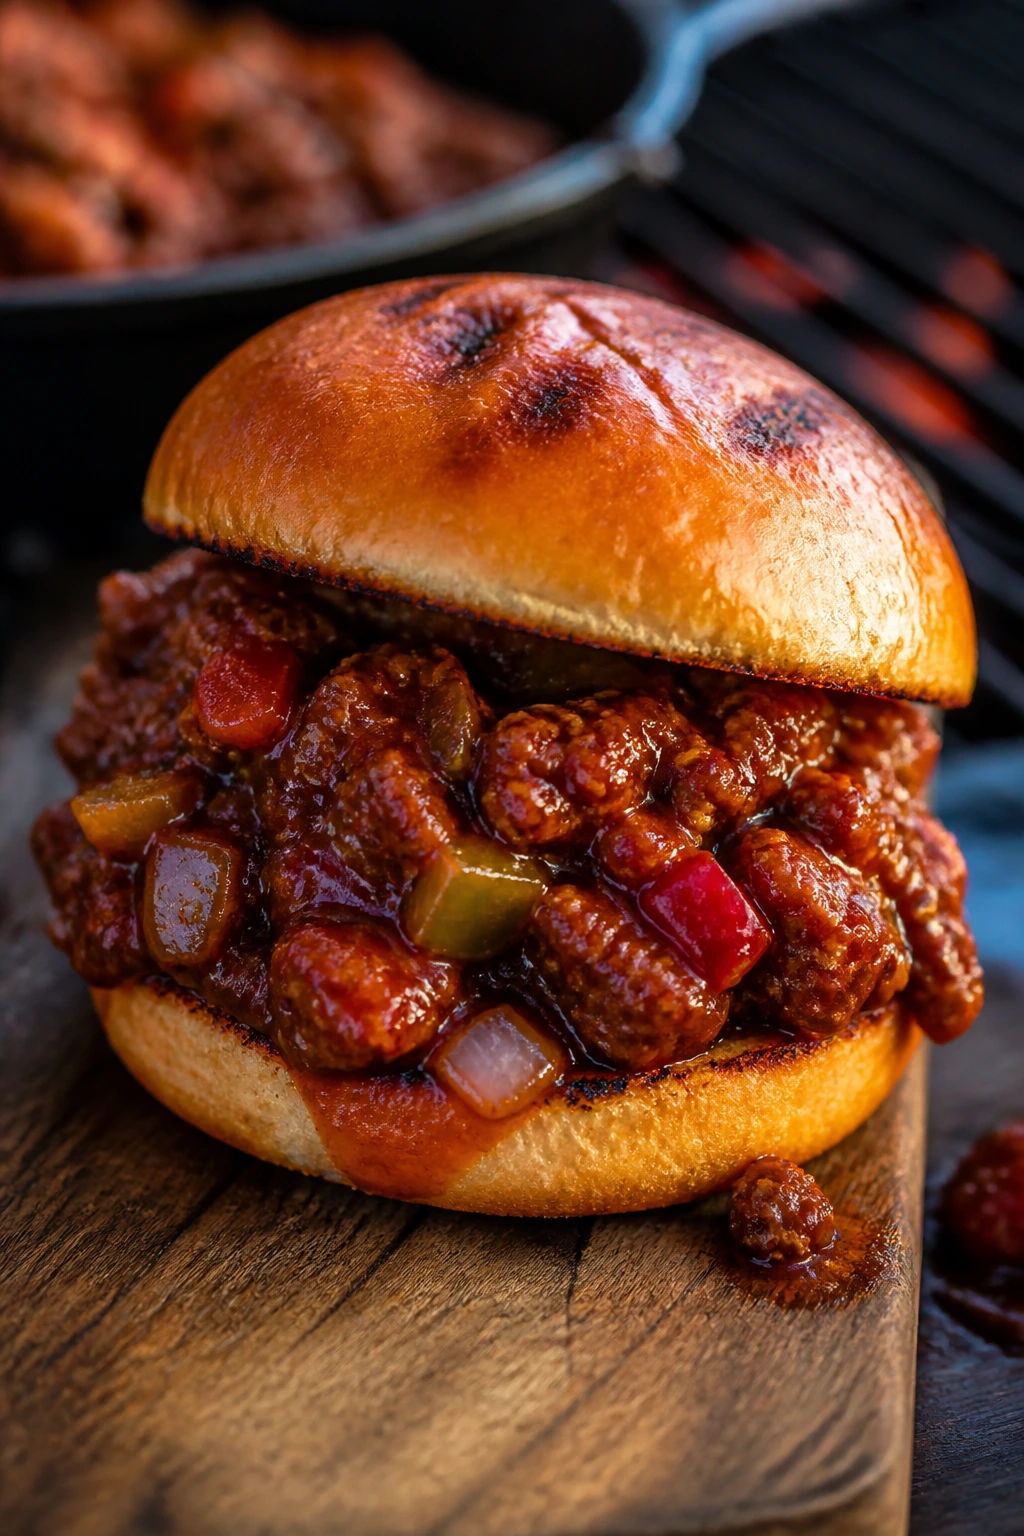
12. Sloppy Joe BBQ Sliders
This is the tray that disappears first when people are standing around talking with their hands full. Ground beef simmers with onions, tomato, and barbecue sauce until it’s thick enough to stay inside the bun. It’s saucy, but not runny, which is the whole game.
Why It Works: A quick skillet cook on the grill gives you the flavor of a stovetop Sloppy Joe without losing the smoky edge. The sauce thickens as it reduces, so it clings to the meat instead of sliding off. Slider buns handle the filling better than regular sandwich bread.
Key Ingredients:
- 1 1/2 lb ground beef
- 1 small onion, diced
- 1 bell pepper, diced
- 1 cup barbecue sauce
- 1/2 cup tomato sauce
- 1 tbsp Worcestershire sauce
- 1 tsp kosher salt
- 12 slider buns
Quick Steps:
- Heat a cast-iron skillet on the grill over medium heat.
- Cook the beef, onion, and bell pepper until the beef browns and the onion softens.
- Stir in barbecue sauce, tomato sauce, Worcestershire, and salt.
- Simmer 8 to 10 minutes, stirring often, until the mixture is thick and spoonable.
- Toast the buns.
- Spoon the filling into buns and serve right away.
Equipment for This Recipe:
- Cast-iron skillet
- Wooden spoon
- Grill
- Spoon for portioning
How to Serve This Dish: These are best with dill pickles, kettle chips, or a crisp lettuce salad. If you want a cleaner bite, serve them open-faced and let people close their own buns.
Pro Tips for This Recipe:
- Reduce the sauce until it mounds on the spoon.
- Use ground beef with enough fat to taste rich, not lean and dry.
- Toast the buns; Sloppy Joes punish soft bread.
Variations on This Dish:
- Spicy Joe: Add chopped jalapeño and cayenne.
- Smoked Cheddar: Stir in shredded smoked cheddar before serving.
- Turkey Swap: Ground turkey works if you add a little more oil.
Common Mistakes to Avoid with This Dish:
- Don’t leave the filling watery.
- Don’t use sweet barbecue sauce without balancing it with Worcestershire or vinegar.
- Don’t build the sliders too early or the buns turn spongy.
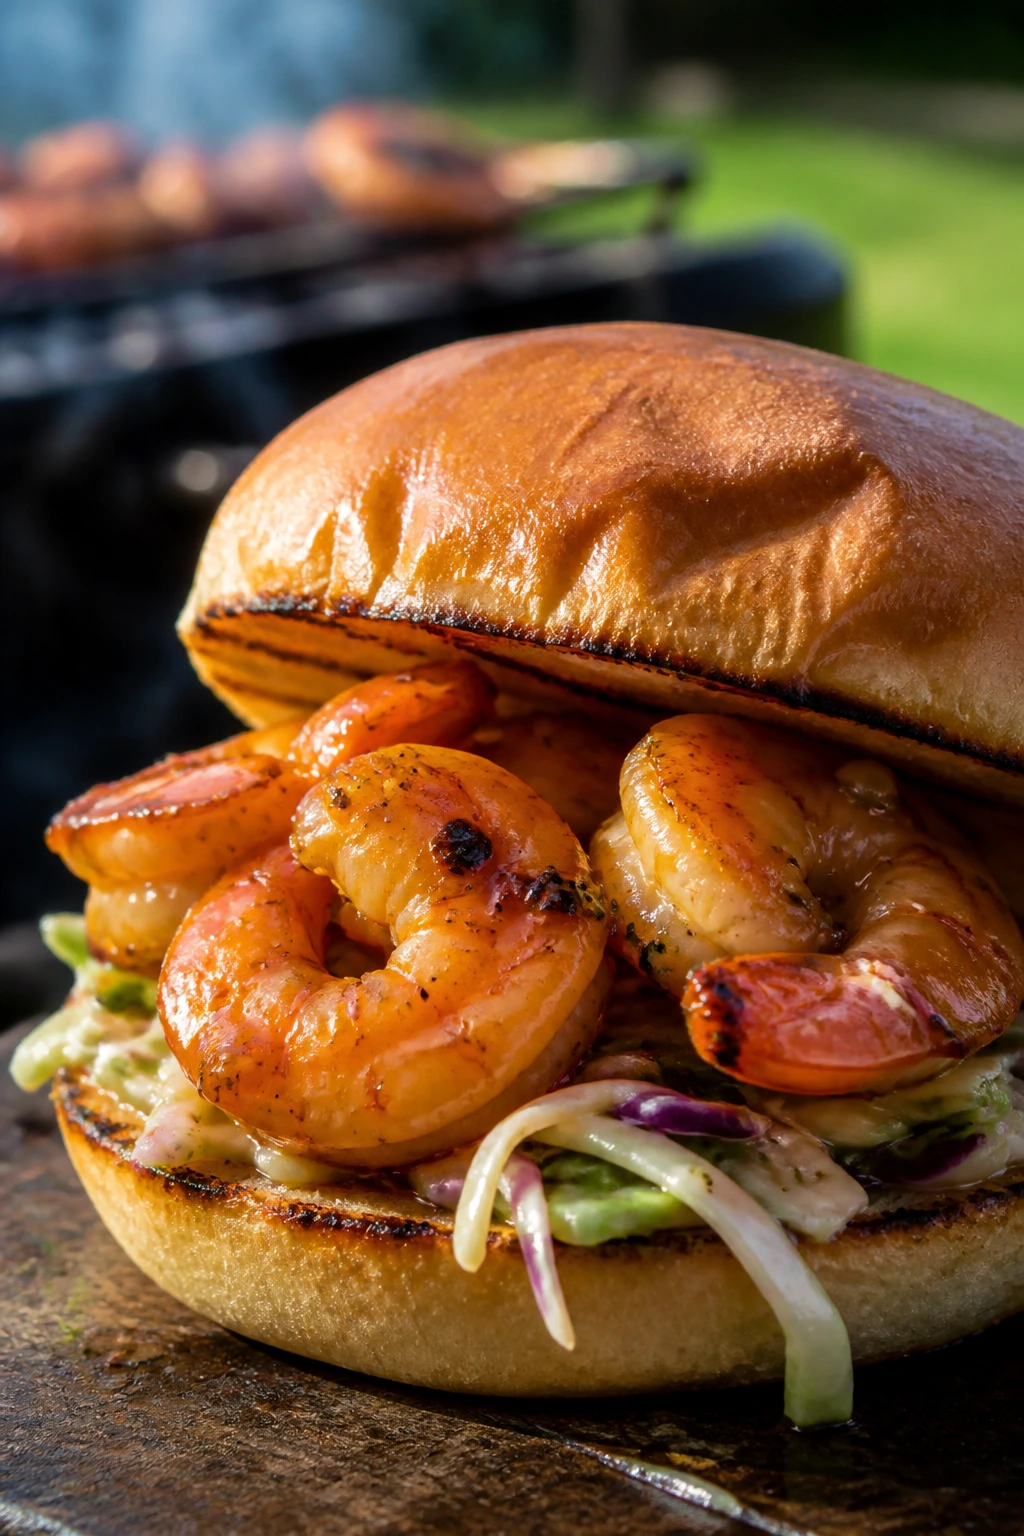
13. Honey-Lime BBQ Shrimp Sliders
Shrimp sliders are fast, bright, and a little cheeky on a barbecue spread that’s otherwise heavy. The shrimp take smoke and char in minutes, then get glossed with a honey-lime barbecue glaze that tastes sharper than the usual sweet sauce. A cabbage slaw keeps the texture crisp.
Why It Works: Shrimp are perfect for direct heat because they cook before they dry out, as long as you don’t leave them on too long. Honey caramelizes quickly, so the grill should be hot but watched carefully. Lime cuts the sweetness and keeps the sandwich light on its feet.
Key Ingredients:
- 1 1/2 lb jumbo shrimp, peeled and deveined
- 2 tbsp olive oil
- 1 tsp smoked paprika
- 1/2 tsp kosher salt
- 1/4 cup barbecue sauce
- 1 tbsp honey
- 1 lime, juiced
- 2 cups cabbage slaw
- 12 slider buns
Quick Steps:
- Toss the shrimp with oil, paprika, and salt.
- Preheat the grill to high, about 450°F (230°C).
- Thread the shrimp onto skewers or use a grill basket.
- Grill 2 minutes per side, then brush with barbecue sauce mixed with honey and lime juice.
- Toast the buns for 20 seconds.
- Add slaw, shrimp, and a final squeeze of lime.
Equipment for This Recipe:
- Skewers or grill basket
- Tongs
- Small bowl for glaze
- Instant-read thermometer if you want to be precise, though shrimp are done when opaque and curled
How to Serve This Dish: Serve these with corn salad or cucumber slices so the plate stays bright. They’re best eaten immediately, while the glaze is sticky and the shrimp are still springy.
Pro Tips for This Recipe:
- Use jumbo shrimp so they don’t overcook in the blink of an eye.
- Dry the shrimp well before seasoning; wet shrimp steam.
- Add the lime at the end, not in the marinade, or the flavor gets flat.
Variations on This Dish:
- Chipotle Lime: Add minced chipotle for smoke and heat.
- Avocado Finish: Add thin avocado slices for creaminess.
- Pineapple Glaze: Swap part of the honey for pineapple juice.
Common Mistakes to Avoid with This Dish:
- Don’t walk away from the grill; shrimp go from done to rubbery fast.
- Don’t use tiny shrimp unless you like overcooked edges.
- Don’t overload the bun with sauce. The shrimp should still taste like shrimp.
14. BBQ Salmon Sliders with Dill Slaw
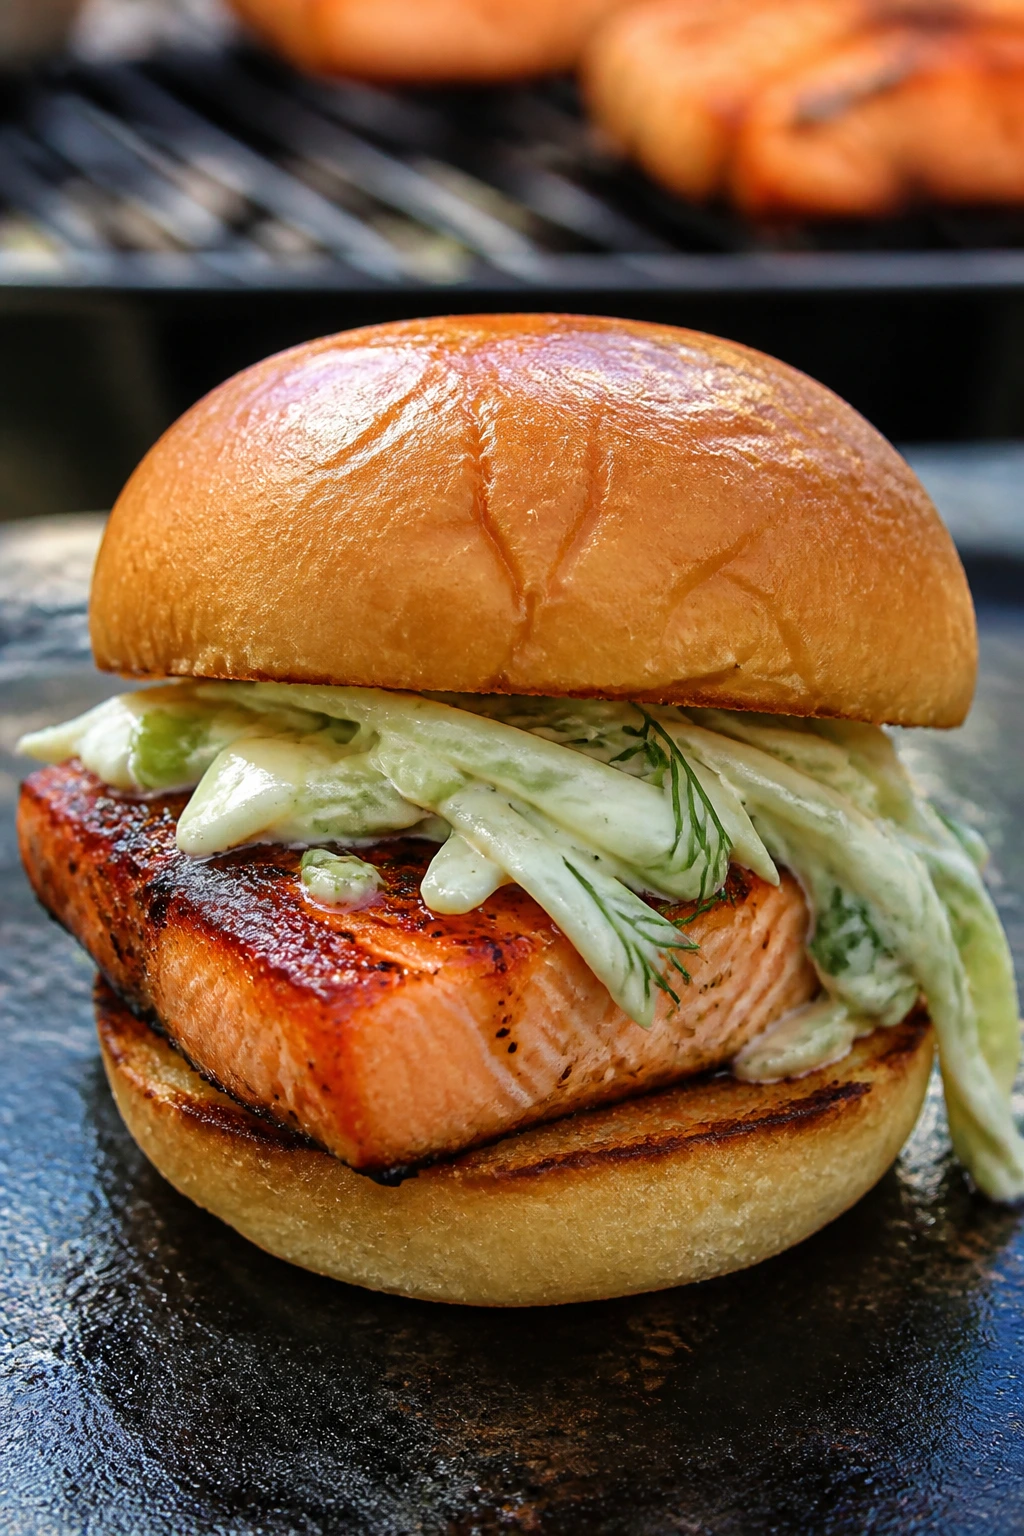
Salmon on a slider bun sounds fancier than it is. On the grill, the fish gets a clean char, the sauce caramelizes lightly, and the dill slaw gives you that cool, herb-heavy contrast that keeps each bite sharp. It’s one of the least fussy seafood options on the list.
Why It Works: Salmon has enough fat to take grill heat without falling apart, especially if you keep the skin on or use a fish basket. Barbecue sauce should go on near the end so it doesn’t scorch. Dill and lemon make the rich fish taste brighter.
Key Ingredients:
- 1 1/2 lb salmon fillet, skin on if possible
- 1 tbsp olive oil
- 1 tsp salt
- 1/2 tsp black pepper
- 1/3 cup barbecue sauce
- 2 cups cabbage slaw
- 2 tbsp chopped dill
- 1 tbsp lemon juice
- 12 slider buns
Quick Steps:
- Heat the grill to medium-high, about 400°F (205°C).
- Brush salmon with oil and season with salt and pepper.
- Grill skin-side down for 6 to 8 minutes, then carefully flip for 1 to 2 minutes if needed.
- Brush lightly with barbecue sauce in the last minute.
- Mix the slaw with dill and lemon.
- Flake salmon into chunks and tuck into toasted buns with slaw.
Equipment for This Recipe:
- Fish spatula
- Grill basket or oiled grates
- Small bowl for slaw
- Tongs
How to Serve This Dish: Keep the toppings light: dill slaw, a few pickles, maybe thin red onion. Salmon slides around if you overfill the bun, so small and neat is the right move.
Pro Tips for This Recipe:
- Leave the salmon skin on if you can; it protects the flesh.
- Oil the grates well so the fish releases cleanly.
- Brush sauce lightly. Too much sweet glaze overpowers the salmon.
Variations on This Dish:
- Mustard Dill: Use mustard-mayo instead of barbecue sauce.
- Smoked Salmon Sliders: Cold-smoke the fillet, then grill only the buns.
- Spicy Citrus: Add a pinch of chili flakes and extra lemon zest.
Common Mistakes to Avoid with This Dish:
- Don’t overflip the fish.
- Don’t use a sauce so sweet it masks the salmon.
- Don’t shred the fish into mush; leave chunks.
15. Grilled Steak Sliders with Horseradish Mayo
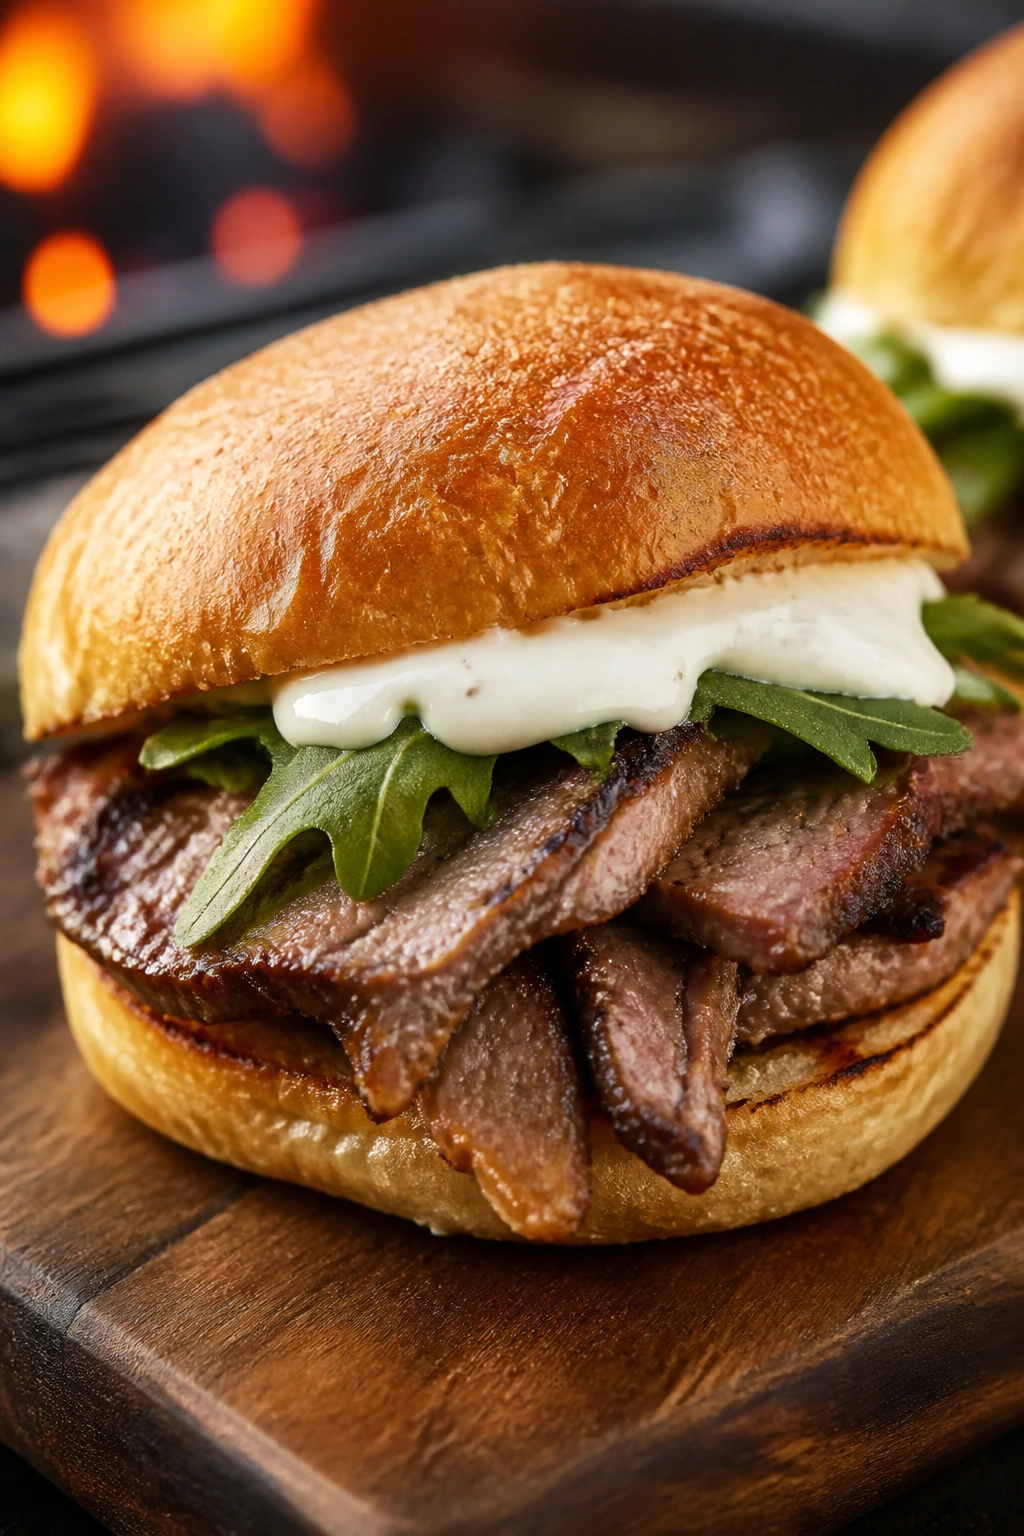
Steak sliders are the strongest argument for keeping a small menu on the grill. You get char on the outside, pink slices in the middle, and a horseradish mayo that wakes everything up without drowning the meat. The key is cutting the steak thin against the grain once it rests.
Why It Works: Skirt or flank steak loves hot, fast grilling and gives you beefy flavor without a long cook. Horseradish mayo brings heat and creaminess, which is a nice break from the usual barbecue sweetness. A little arugula or onion keeps the bite from feeling heavy.
Key Ingredients:
- 1 1/2 lb skirt steak or flank steak
- 1 tbsp olive oil
- 1 tsp kosher salt
- 1 tsp black pepper
- 1/3 cup mayonnaise
- 1 tbsp prepared horseradish
- 12 slider buns
- 1 cup arugula
- 1/2 cup pickled onions
Quick Steps:
- Preheat the grill to high, about 500°F (260°C).
- Rub the steak with oil, salt, and pepper.
- Grill 3 to 4 minutes per side for medium-rare, then rest 10 minutes.
- Slice very thinly against the grain.
- Mix the mayo and horseradish, then spread on toasted buns.
- Fill with steak, arugula, and pickled onions.
Equipment for This Recipe:
- Grill
- Long tongs
- Sharp carving knife
- Cutting board with a groove
How to Serve This Dish: Serve these with grilled corn or roasted potatoes if you want a full plate. They look best when the steak is still pink and the onions sit on top instead of disappearing underneath.
Pro Tips for This Recipe:
- Slice against the grain or the meat feels stringy.
- Let the steak rest before cutting, even if you’re impatient.
- Keep the horseradish mayo on the cool side; that sharpness matters.
Variations on This Dish:
- Garlic Herb Steak: Add chopped parsley and minced garlic to the mayo.
- Blue Cheese: Replace horseradish with blue cheese spread.
- Peppery Heat: Add cracked pepper and a little hot sauce to the mayo.
Common Mistakes to Avoid with This Dish:
- Don’t overcook flank steak; it gets tight fast.
- Don’t slice with the grain.
- Don’t use a thick sandwich bun that buries the meat.
16. Jerk Chicken Sliders with Pineapple Slaw
These bring heat, fruit, and smoke in one compact bite. Jerk seasoning gives the chicken a crusty, fragrant exterior, and pineapple slaw cools the edges without flattening the spice. The slider bun is just a carrier here; the real action is on top.
Why It Works: Chicken thighs stand up to jerk seasoning better than breasts because they stay juicy under high heat. The pineapple adds sweetness that matches the char from the grill, and the slaw keeps the sandwich from feeling dry. A little mayo helps bind the fruit and cabbage together.
Key Ingredients:
- 2 1/2 lb boneless chicken thighs
- 2 tbsp jerk seasoning
- 1 tbsp oil
- 2 cups shredded cabbage
- 1 cup diced pineapple
- 2 tbsp mayonnaise
- 1 tbsp lime juice
- 12 slider buns
Quick Steps:
- Toss chicken with jerk seasoning and oil.
- Grill over medium-high heat, about 425°F (220°C), for 6 to 7 minutes per side until 165°F.
- Mix cabbage, pineapple, mayo, and lime juice for the slaw.
- Rest the chicken 5 minutes, then chop.
- Toast the buns.
- Assemble with chicken and pineapple slaw.
Equipment for This Recipe:
- Grill
- Mixing bowl
- Knife and cutting board
- Tongs
How to Serve This Dish: These work well with rice salad or grilled plantains if you want to lean into the island feel. Keep napkins nearby; the spice and pineapple juice tend to run.
Pro Tips for This Recipe:
- Use thighs so the jerk seasoning has time to brown without drying the meat.
- Make the slaw just before serving so the pineapple stays bright.
- If your jerk blend is salty, skip extra salt on the chicken.
Variations on This Dish:
- Mango Slaw: Swap pineapple for diced mango.
- Extra Hot: Add scotch bonnet sauce or extra cayenne.
- Charred Pineapple: Grill the pineapple first for more smoke.
Common Mistakes to Avoid with This Dish:
- Don’t use too much seasoning without checking the salt level.
- Don’t let the slaw sit for hours or it goes watery.
- Don’t under-toast the buns; the juicy filling needs support.
17. Peach-Glazed Chicken Sliders
Peaches on a grill can feel like a trick, but when they’re used right, they make barbecue sauce taste rounder and less one-note. Here, the glaze has a little fruit sweetness, a little vinegar bite, and enough char to keep it from sliding into dessert territory. The chicken stays the anchor.
Why It Works: Grilled chicken thighs handle sweet glazes better than breasts. Peach preserves cook down quickly and cling to the meat near the end, which is when you want sweetness, not blackened sugar. A basil or cabbage slaw gives the slider some green snap.
Key Ingredients:
- 2 1/2 lb boneless chicken thighs
- 1 tbsp oil
- 1 tsp salt
- 1/2 cup peach preserves
- 2 tbsp barbecue sauce
- 1 tbsp apple cider vinegar
- 1 cup slaw or shredded basil lettuce mix
- 12 slider buns
Quick Steps:
- Preheat the grill to medium-high, about 425°F (220°C).
- Season the chicken with oil and salt.
- Grill 6 to 7 minutes per side until the thighs reach 165°F.
- Warm the peach preserves with barbecue sauce and vinegar, then brush on during the last minute.
- Rest the chicken, slice it, and pile it onto toasted buns.
- Add slaw and serve.
Equipment for This Recipe:
- Grill
- Small saucepan or foil cup for glaze
- Tongs
- Knife
How to Serve This Dish: These look good with grilled corn, cucumber salad, or a handful of pickles on the side. The glaze makes them a touch sticky, so keep the buns lightly toasted.
Pro Tips for This Recipe:
- Use real peach preserves, not syrup, so the glaze sets.
- Add vinegar to keep the sweetness from flattening out.
- Brush glaze late, or it will burn before the chicken finishes.
Variations on This Dish:
- Apricot Swap: Apricot preserves work the same way.
- Bourbon Peach: Add 1 tbsp bourbon to the glaze.
- Pepper Peach: Add black pepper for a sharper finish.
Common Mistakes to Avoid with This Dish:
- Don’t glaze too early.
- Don’t use thin chicken cutlets; they cook too fast for the glaze.
- Don’t skip the vinegar or the glaze gets sticky-sweet.
18. Teriyaki Pineapple Chicken Sliders
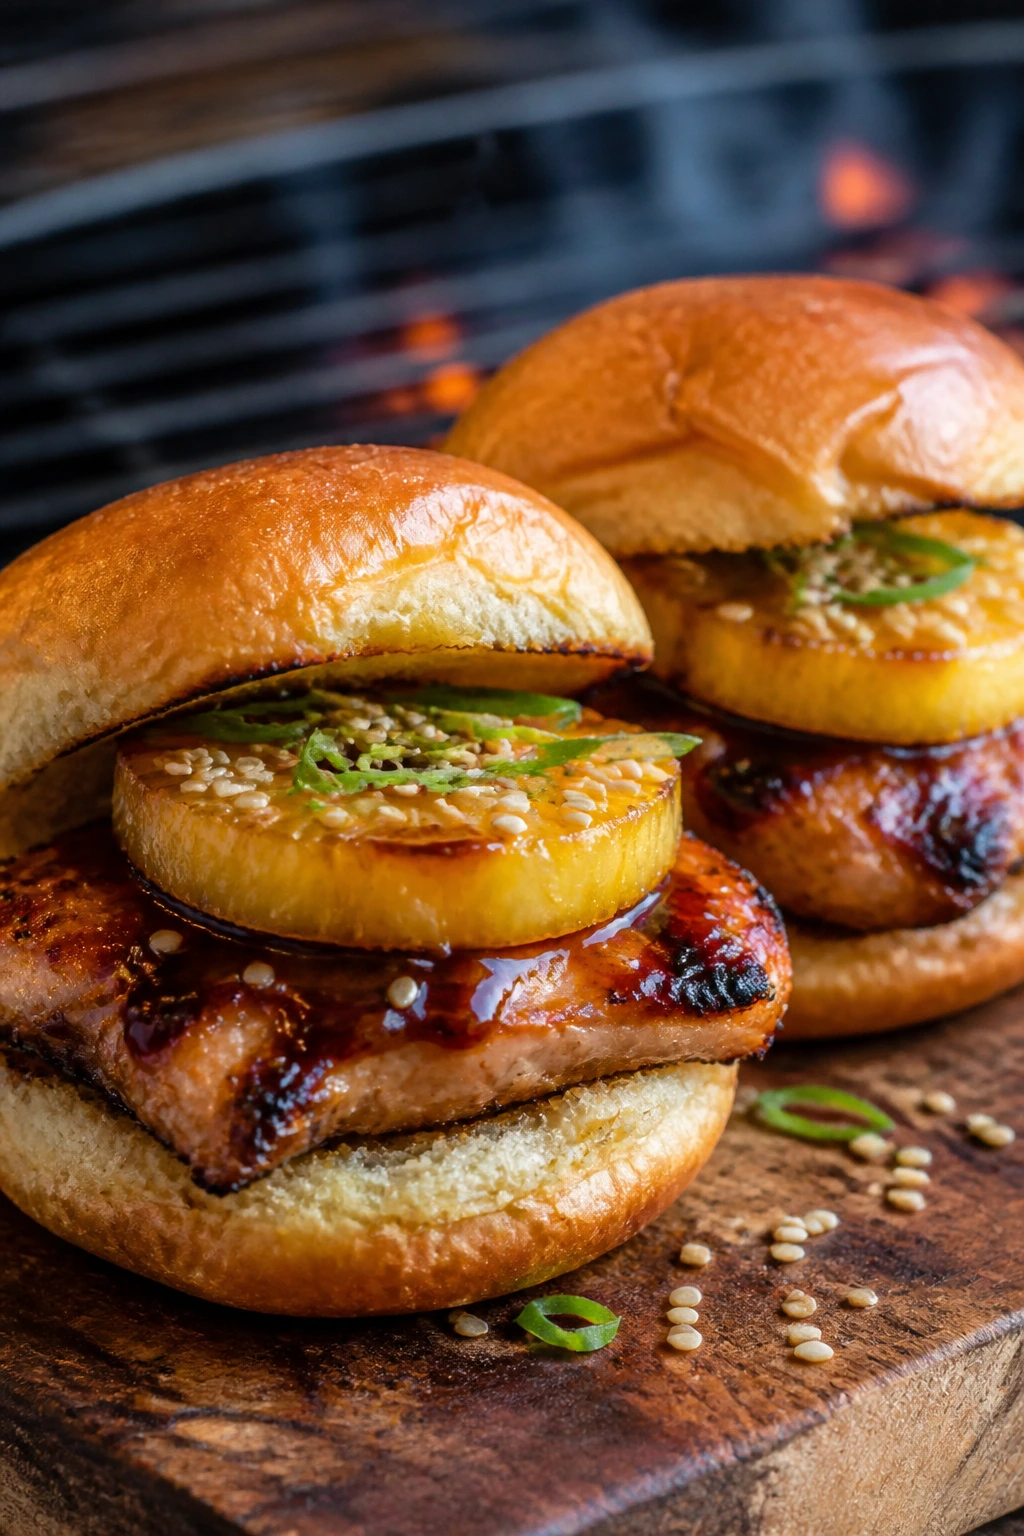
This is the sweet-and-salty lane, and it works because the grill brings a little char to keep the teriyaki from tasting one-dimensional. Pineapple gets a quick caramel edge, chicken thighs stay juicy, and the sesame finish makes the sliders feel finished instead of thrown together. They’re the easiest way to make the tray look bright.
Why It Works: Teriyaki sauce loves high heat in small doses. The chicken gets coated late so the sugars don’t scorch, while pineapple gives you a juicy, acidic counterpoint. Sesame seeds and scallions add texture without making the sliders heavy.
Key Ingredients:
- 2 1/2 lb boneless chicken thighs
- 1/2 cup teriyaki sauce
- 1 tbsp oil
- 8 pineapple rings or 1 cup pineapple chunks
- 1 tbsp sesame seeds
- 2 scallions, sliced
- 12 slider buns
- 1 cup shredded cabbage
Quick Steps:
- Heat the grill to medium-high, about 425°F (220°C).
- Brush chicken with oil and grill 6 to 7 minutes per side.
- Grill pineapple until lightly charred, about 1 to 2 minutes per side.
- Brush the chicken with teriyaki during the last minute.
- Slice the chicken and pineapple, then stack on toasted buns with cabbage.
- Finish with sesame seeds and scallions.
Equipment for This Recipe:
- Grill
- Tongs
- Knife and cutting board
- Small brush for sauce
How to Serve This Dish: Serve these with a cucumber salad or plain rice if you want to stretch the meal. They look nicest when the pineapple sits on top of the chicken so the char shows.
Pro Tips for This Recipe:
- Brush the teriyaki on near the end to keep the sugars from burning.
- Grill pineapple dry; wet fruit steams instead of browning.
- Slice chicken after it rests so the juices stay where they belong.
Variations on This Dish:
- Spicy Teriyaki: Add chili flakes or sriracha.
- Miso Teriyaki: Stir 1 tsp miso into the sauce.
- Pineapple Slaw: Chop the pineapple and mix it into the slaw instead of serving it whole.
Common Mistakes to Avoid with This Dish:
- Don’t flood the bun with sauce.
- Don’t let pineapple overcook into mush.
- Don’t use breasts if you’re not watching the grill closely.
19. Gochujang Beef Sliders
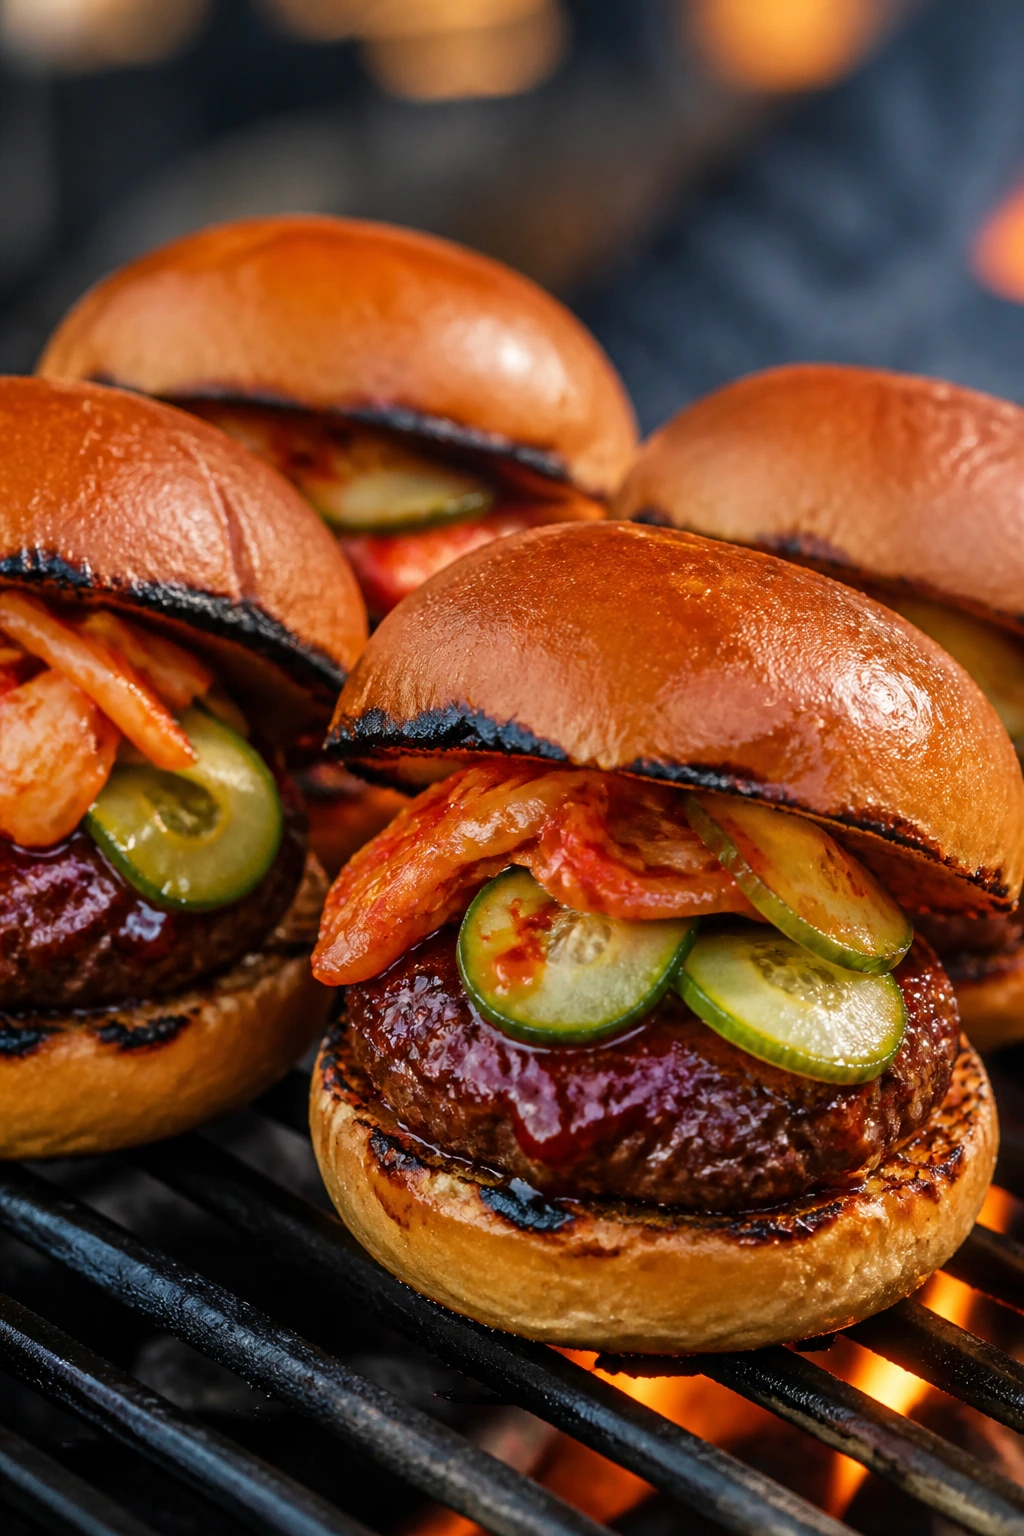
These are the boldest beef sliders on the list. Gochujang brings chili heat, deep savoriness, and a faint sweetness that works surprisingly well with charred beef. Kimchi or quick-pickled vegetables on top give the slider a crunchy, fermented punch that keeps the beef from feeling heavy.
Why It Works: Ground beef patties take gochujang well because the paste clings to the surface and browns instead of running off. The heat of the grill deepens the chili flavor, and the pickled toppings keep the sandwich bright. This is one of those recipes that tastes more deliberate than it looks.
Key Ingredients:
- 2 lb ground beef, 80/20
- 2 tbsp gochujang
- 1 tsp soy sauce
- 1 tsp sesame oil
- 1 tsp salt
- 1 cup shredded cheese, optional
- 12 slider buns
- 1 cup kimchi or pickled cucumbers
Quick Steps:
- Mix the beef with gochujang, soy sauce, sesame oil, and salt.
- Shape into 12 small patties.
- Grill over high heat, about 450°F (230°C), for 2 to 3 minutes per side.
- Add cheese during the last minute if using.
- Toast the buns lightly.
- Top with kimchi or pickles and serve hot.
Equipment for This Recipe:
- Grill
- Spatula
- Bowl
- Tongs
How to Serve This Dish: Serve with sesame cucumber salad or fries dusted with a little salt and chili. The toppings should stay crisp; soggy kimchi is not the move.
Pro Tips for This Recipe:
- Mix gochujang evenly so the patties don’t have hot spots.
- Keep the patties thin; the paste can darken quickly.
- Use pickled toppings with real acidity, not sweet relish.
Variations on This Dish:
- Korean BBQ Style: Add grated pear and garlic to the meat.
- Mayo Finish: Drizzle with spicy mayo.
- Lettuce Layer: Add a lettuce leaf for extra crunch.
Common Mistakes to Avoid with This Dish:
- Don’t use too much gochujang or the patties can taste salty and dense.
- Don’t cook over low heat; the flavor needs browning.
- Don’t bury the spicy topping under cheese unless you want to mute it.
20. Cuban-Style Pork Sliders
These borrow from a Cuban sandwich, then shrink the format down to slider size. You still get roast pork, ham, Swiss, mustard, and pickles, but the grill gives the buns a crisp edge that the original press can’t match. It’s salty, tangy, and a little bit luxurious.
Why It Works: Pork and ham together give you layered flavor without a long ingredient list. The grill can toast and press the buns slightly, which helps the cheese melt into the meat. Pickles and mustard keep the richness from running away.
Key Ingredients:
- 2 lb cooked pulled pork or sliced roast pork
- 8 slices deli ham, folded
- 8 slices Swiss cheese
- 1/4 cup yellow mustard
- 1 tbsp butter, softened
- 12 slider buns
- 1 cup dill pickles, sliced
Quick Steps:
- Heat the grill to medium, about 375°F (190°C).
- Warm the pork in a foil pan or skillet on the grill.
- Build each slider with pork, folded ham, Swiss, mustard, and pickles.
- Butter the outside of the buns.
- Set the sliders on the grill or a griddle plate and press lightly until the cheese melts and the buns toast.
- Serve warm.
Equipment for This Recipe:
- Grill with lid
- Foil pan or cast-iron skillet
- Spatula
- Butter knife
How to Serve This Dish: Put these on a tray with extra mustard for dipping. A simple cabbage slaw or black beans makes the plate feel complete.
Pro Tips for This Recipe:
- Press lightly, not hard, or the filling squeezes out.
- Use deli ham that isn’t too wet.
- Warm the pork first so the cheese melts in time.
Variations on This Dish:
- Garlic Butter: Brush the buns with garlic butter before grilling.
- Spicy Mustard: Use Dijon plus a little hot sauce.
- Pepper Jack Swap: Replace Swiss with pepper jack for more bite.
Common Mistakes to Avoid with This Dish:
- Don’t skip the butter on the bun exterior.
- Don’t overstuff with ham and pork at the same time.
- Don’t use thick, cold cheese slices straight from the fridge.
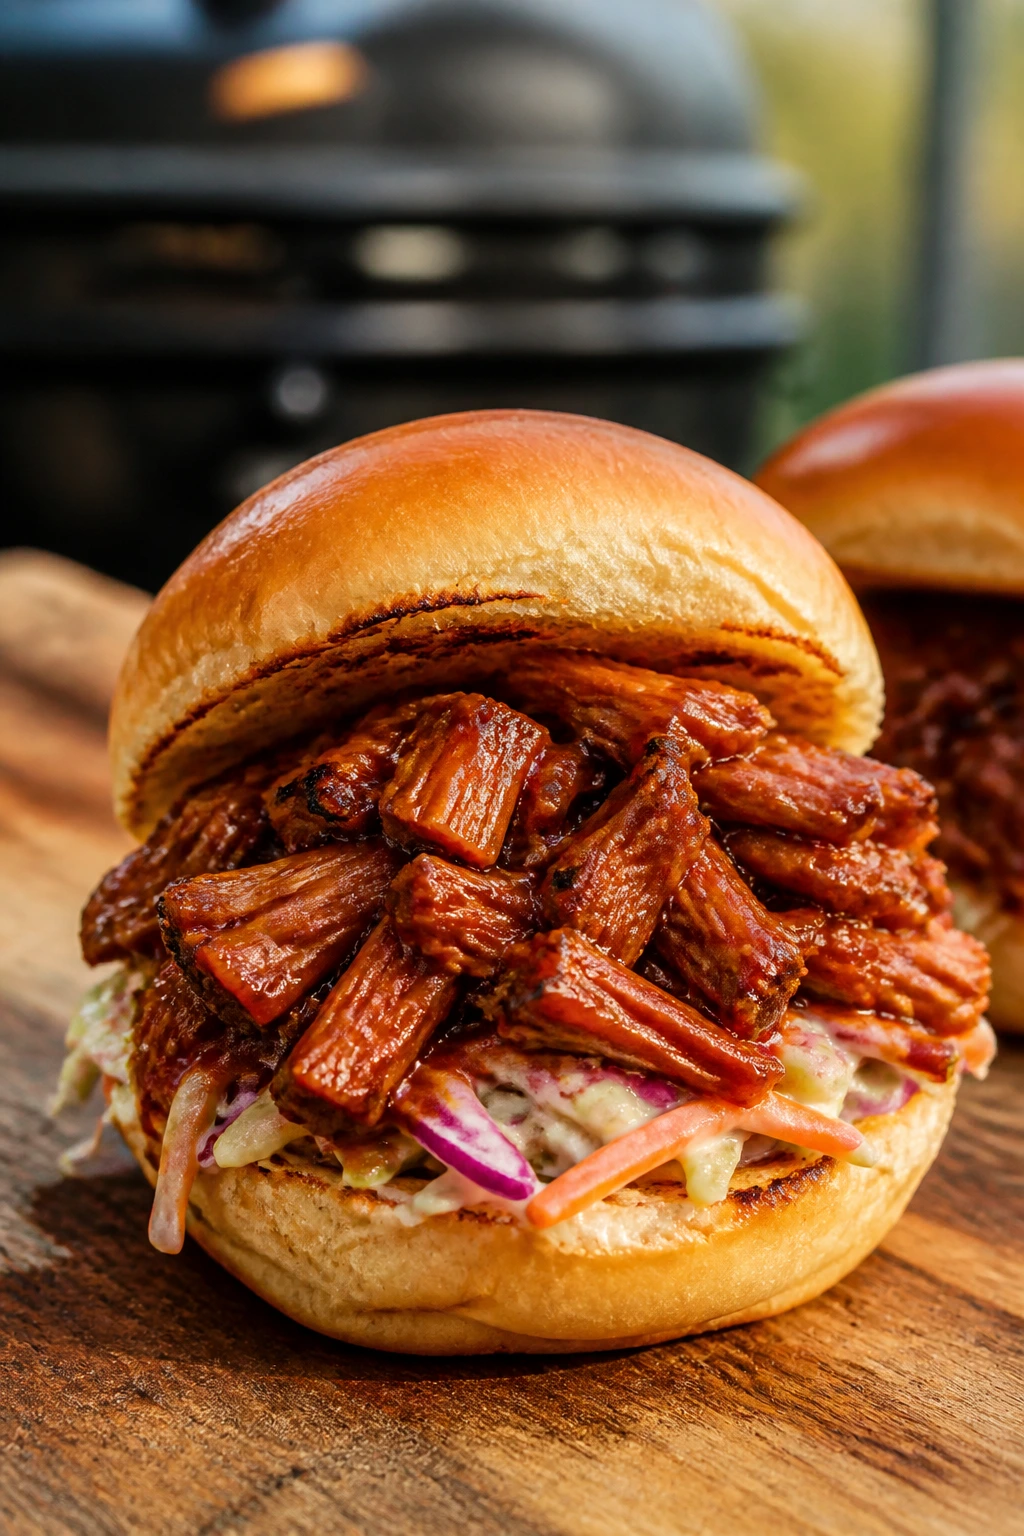
21. Pork Belly Burnt-End Sliders
These are unapologetically rich, and that’s part of the fun. Pork belly turns sticky and almost candy-like on the grill, with a salty crust and soft center that loves a sharp pickle or a vinegary slaw. It’s a less polite slider, which means it tends to vanish first.
Why It Works: Pork belly already has the fat you need for long indirect cooking. Cutting it into cubes gives you more surface for the rub and sauce to cling to, and the final glaze on the grill makes the edges lacquered instead of greasy. A tart garnish keeps it from becoming one-note.
Key Ingredients:
- 2 1/2 lb pork belly, skin removed, cut into 1 1/2-inch cubes
- 2 tbsp barbecue rub
- 1 cup barbecue sauce
- 2 tbsp brown sugar
- 1 tbsp butter
- 12 slider buns
- 1 cup dill pickles
- 1 cup quick slaw
Quick Steps:
- Preheat the grill to 275°F (135°C) for indirect cooking.
- Toss the pork belly cubes with rub and place in a foil pan.
- Cook 2 1/2 to 3 hours until tender and browned on the edges.
- Stir in barbecue sauce, brown sugar, and butter, then cook 20 to 25 minutes more until sticky.
- Toast the buns.
- Assemble with pickles and slaw.
Equipment for This Recipe:
- Covered grill
- Foil pan
- Tongs
- Sheet pan for assembly
How to Serve This Dish: Keep the sides sharp and simple: pickles, slaw, maybe a vinegar potato salad. This is not the time for another rich cream sauce.
Pro Tips for This Recipe:
- Trim only the toughest bits of skin or membrane; some fat is the point.
- Use a pan for the second glaze stage so the sauce catches the meat.
- Give the cubes time to caramelize; pale pork belly is a missed opportunity.
Variations on This Dish:
- Hot Honey Belly: Add hot honey to the glaze.
- Mustard Glaze: Swap part of the barbecue sauce for yellow mustard.
- Apple Belly: Add a spoon of apple jelly for a sharper sweet note.
Common Mistakes to Avoid with This Dish:
- Don’t cook it too hot or the fat renders before the cubes brown.
- Don’t over-sauce during the first stage.
- Don’t forget the acidic garnish; it keeps the bite readable.
22. Mushroom and Halloumi BBQ Sliders
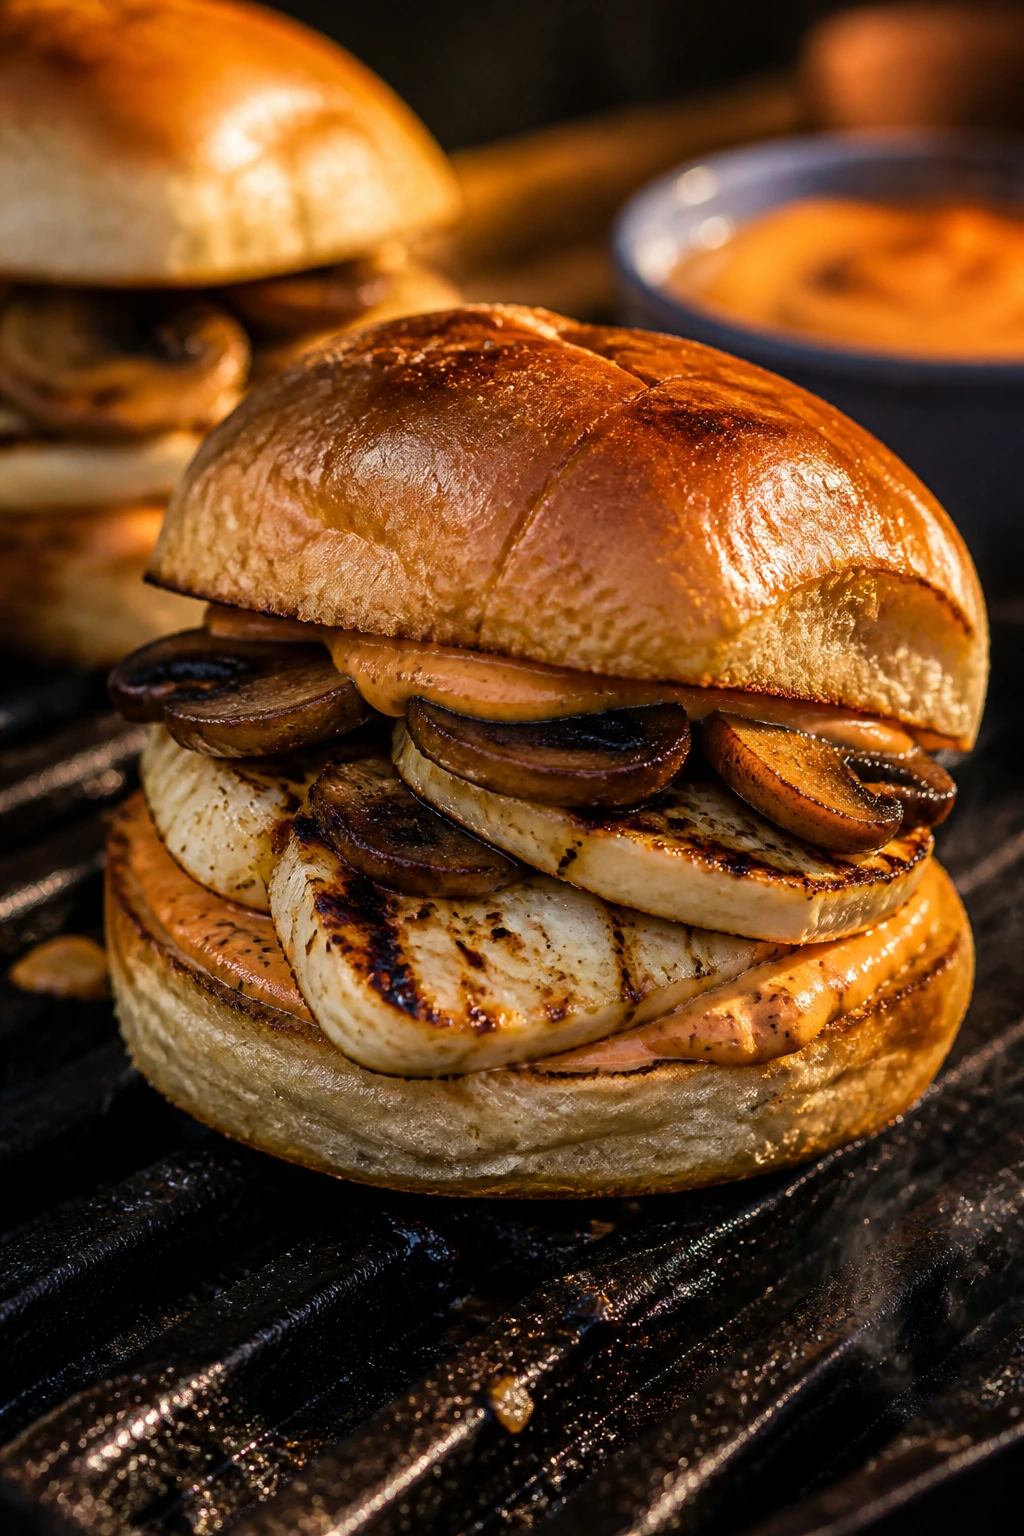
Not every good slider needs meat, and this one has enough grill character to prove it. Halloumi browns into salty, squeaky edges, mushrooms turn meaty and juicy, and a red pepper or garlic yogurt sauce brings all the pieces together. It eats like a real cookout sandwich, not a token vegetarian option.
Why It Works: Halloumi holds its shape on the grill, which means you get browning instead of melting puddles. Portobello or cremini mushrooms soak up smoke and sauce fast, giving you a filling with real heft. The yogurt sauce cools the salt and char without making the bun slippery.
Key Ingredients:
- 12 oz halloumi, sliced
- 4 large portobello caps, stems removed
- 2 tbsp olive oil
- 1 tsp salt
- 1/2 tsp black pepper
- 1/2 cup barbecue sauce or roasted red pepper sauce
- 1/2 cup yogurt sauce
- 12 slider buns
Quick Steps:
- Preheat the grill to medium-high, about 400°F (205°C).
- Brush mushrooms and halloumi with oil and season with salt and pepper.
- Grill mushrooms 4 to 5 minutes per side and halloumi 2 minutes per side.
- Brush the mushrooms with barbecue sauce in the last minute.
- Slice the mushrooms into strips.
- Build sliders with sauce, mushrooms, and halloumi.
Equipment for This Recipe:
- Grill basket or direct grill grate
- Tongs
- Small brush
- Knife
How to Serve This Dish: Serve with tomato slices and arugula or a crisp cucumber salad. The halloumi looks best when it’s golden at the edges, so don’t hide it under too much sauce.
Pro Tips for This Recipe:
- Pat the halloumi dry before grilling so it browns instead of steaming.
- Keep mushrooms whole until after grilling; they’re easier to handle that way.
- Use a sauce with some acidity or the cheese can feel heavy.
Variations on This Dish:
- Mediterranean Herb: Add oregano and lemon to the yogurt sauce.
- Spicy Red Pepper: Use harissa in place of barbecue sauce.
- Extra Umami: Add a thin smear of miso mayo.
Common Mistakes to Avoid with This Dish:
- Don’t let the halloumi sit in a wet marinade.
- Don’t slice the mushrooms too soon or they lose juice.
- Don’t use a bun that falls apart under cheese and sauce.
23. Jackfruit BBQ Sliders
Jackfruit gets a bad reputation from people who treat it like a miracle and then cook it like fruit. The trick is to drain it well, shred it after the first grill or skillet pass, and give it enough sauce to taste like barbecue filling instead of sweet mush. When it’s done right, it scratches the same itch as pulled pork.
Why It Works: Young jackfruit has a stringy texture that works when it’s pressed, browned, and sauced. A hot skillet on the grill helps it lose moisture and pick up color before the sauce goes in. Slaw gives it crunch, which it needs.
Key Ingredients:
- 2 cans young green jackfruit in brine, drained and rinsed
- 1 small onion, sliced
- 1 tbsp olive oil
- 1 cup barbecue sauce
- 1 tsp smoked paprika
- 1 tsp salt
- 2 cups slaw
- 12 slider buns
Quick Steps:
- Heat a cast-iron skillet on the grill over medium heat.
- Cook the jackfruit and onion in olive oil until the pieces start to brown, about 8 to 10 minutes.
- Use a spoon to shred the jackfruit into strands.
- Stir in barbecue sauce, paprika, and salt, then cook 5 to 8 minutes more until sticky.
- Toast the buns.
- Add jackfruit and slaw to each bun.
Equipment for This Recipe:
- Cast-iron skillet
- Spoon or potato masher
- Grill
- Tongs
How to Serve This Dish: Serve these with pickles, crunchy slaw, and maybe baked beans if you want the plate to feel like a full cookout. They’re best hot, while the jackfruit still has some edge.
Pro Tips for This Recipe:
- Rinse the jackfruit well or the brine tastes metallic.
- Brown it before saucing; otherwise it tastes flat.
- Add a little vinegar if your barbecue sauce is very sweet.
Variations on This Dish:
- Smoky Chipotle: Add chipotle in adobo.
- Carolina Jackfruit: Use vinegar sauce instead of sweet sauce.
- Mushroom Mix: Fold in chopped mushrooms for more heft.
Common Mistakes to Avoid with This Dish:
- Don’t skip the browning step.
- Don’t use ripe jackfruit; the texture is wrong.
- Don’t leave it watery in the pan.
24. Crispy Tofu Sliders with Smoked Paprika Sauce
Tofu sliders can be excellent if you stop expecting tofu to behave like meat and let it do what it does best: soak, crisp, and take on flavor. A good press and a hot grill give you a sturdy exterior, while smoked paprika sauce and crunchy slaw carry the barbecue note. The result is clean, smoky, and not trying too hard.
Why It Works: Extra-firm tofu holds together on the grill if you press it and oil it properly. High heat makes the edges crisp, and a brushed-on sauce adds the barbecue character without soaking the tofu into oblivion. A crunchy topping gives the slider the bite it needs.
Key Ingredients:
- 2 blocks extra-firm tofu, pressed and sliced into slabs
- 2 tbsp oil
- 1 tsp salt
- 1 tsp smoked paprika
- 1/2 cup barbecue sauce
- 1 cup slaw
- 12 slider buns
- 1 tbsp cornstarch, optional for extra crust
Quick Steps:
- Press the tofu for 20 to 30 minutes, then cut it into slider-sized slabs.
- Toss with oil, salt, smoked paprika, and cornstarch if using.
- Grill over medium-high heat, about 400°F (205°C), for 3 to 4 minutes per side.
- Brush with barbecue sauce during the last minute.
- Toast the buns.
- Add tofu and slaw to each bun.
Equipment for This Recipe:
- Tofu press or heavy pan
- Grill basket or well-oiled grate
- Tongs
- Cutting board
How to Serve This Dish: Serve with cucumber salad, corn, or anything crisp and bright. These are strongest when the tofu stays visible and the sauce sits on the surface instead of soaking through.
Pro Tips for This Recipe:
- Press tofu longer than you think you need to.
- Use a grill basket if your grate spacing is wide.
- Brush sauce near the end so it stays sticky, not burnt.
Variations on This Dish:
- Buffalo Tofu: Swap barbecue sauce for barbecue plus hot sauce.
- Sesame Tofu: Add sesame oil and scallions.
- Baked Backup: If the grill is crowded, crisp the tofu in a hot oven first.
Common Mistakes to Avoid with This Dish:
- Don’t use silken tofu or anything too soft.
- Don’t skip pressing.
- Don’t smother the tofu with sauce before it crisps.
25. Grilled Lamb Sliders with Mint Chimichurri
Lamb gives this list a deeper, earthier finish than beef, and the mint chimichurri keeps it from feeling heavy. The grilled patties should be charred outside and pink in the middle, with enough seasoning to hold up to the herbs. It’s the slider I’d put on the platter when I want the last batch to feel a little special.
Why It Works: Ground lamb has enough fat to grill well without drying out, and cumin or garlic works naturally with the meat. Mint chimichurri cuts through the richness and gives you a cold, bright finish against the hot grill marks. It’s a simple combination that tastes more intentional than it looks.
Key Ingredients:
- 2 lb ground lamb
- 2 tsp kosher salt
- 1 tsp black pepper
- 1 tsp ground cumin
- 1 tbsp olive oil
- 1/2 cup mint chimichurri
- 12 slider buns
- 1/2 cup sliced red onion
Quick Steps:
- Mix lamb with salt, pepper, cumin, and olive oil.
- Shape into 12 small patties and chill for 10 minutes.
- Preheat the grill to high, about 450°F (230°C).
- Grill 3 to 4 minutes per side for medium, or longer if you prefer.
- Rest the patties for 5 minutes.
- Assemble with mint chimichurri and red onion on toasted buns.
Equipment for This Recipe:
- Grill
- Spatula
- Mixing bowl
- Knife and cutting board
How to Serve This Dish: Put these with grilled vegetables, potato wedges, or a lemony salad. They hold up well on a platter and feel good next to sharper sides.
Pro Tips for This Recipe:
- Chill the patties briefly so they keep their shape.
- Don’t over-season; lamb already has a clear flavor.
- Use chimichurri with plenty of herbs and a little acidity.
Variations on This Dish:
- Garlic Mint: Add minced garlic to the chimichurri.
- Feta Finish: Crumble feta over the top.
- Spiced Lamb: Add coriander and paprika to the meat mix.
Common Mistakes to Avoid with This Dish:
- Don’t overcook lamb into a dry gray puck.
- Don’t use a heavy sauce that buries the meat.
- Don’t skip the rest or the juices run out.
Why the Grill Makes Slider Night Better
A grill does three jobs that a skillet can’t quite match at the same time. It gives you heat from below, smoke from the drippings, and enough room to move foods around so the buns can toast while the meat finishes. That matters for BBQ sliders because each element behaves a little differently: beef wants a hard sear, chicken wants reliable heat, shrimp wants a quick kiss, and buns only need a few seconds before they go from useful to dry.
There’s also the texture issue, which is the real reason grill sliders feel different from oven-baked ones. The meat gets browned at the edges, the sauces tighten on contact, and the buns pick up just enough toast to stop the filling from soaking through. That last part sounds boring until you bite into a slider with a soggy bottom. Then it’s suddenly the whole story.
A grill also lets you cook in batches without losing steam. One tray can hold warm pork, another can catch buns, and a third can stage pickles, slaw, or cheese. That flow makes BBQ sliders feel like a proper spread instead of a sandwich assembly line.
Essential Equipment for These Recipes
- Covered gas or charcoal grill: You need a lid for indirect cooking, quick searing, and keeping temperatures steady.
- Instant-read thermometer: This is the difference between juicy chicken and dry regret.
- Tongs with a good grip: Thin sliders and sticky glazes both need clean handling.
- Cast-iron skillet or griddle: Handy for sloppy joe filling, jackfruit, smash burgers, and anything saucy.
- Grill basket: Worth having for shrimp, meatballs, mushrooms, or sliced vegetables that might fall through the grate.
- Foil pan: Great for warming pulled pork, brisket, and burnt ends without losing the juices.
- Sharp knife and cutting board: You’ll use these for slicing onions, chopping chicken, and trimming buns.
- Sheet pan or tray: Makes assembly faster and keeps the slider line organized.
- Basting brush: Useful for barbecue sauce, glaze, and butter on buns.
- Grill-safe mitts: Hot handles on a grill are sneaky; mitts save skin.
Smart Shopping and Ingredient Tips
The bun matters more than most people admit. Go for potato rolls, soft brioche, or sturdy slider buns that can take sauce without tearing at the first squeeze. If the buns are tiny, the filling will fall out; if they’re too fluffy, they’ll collapse once the glaze hits.
For meat, fat is your friend in slider form. Use 80/20 ground beef for burgers, boneless chicken thighs when the sauce is sweet, and pork shoulder when you want something shred-friendly. Lean cuts can work, but they need more attention and a gentler hand on the grill.
Barbecue sauce should match the heat. Sweet sauces can scorch fast over direct flame, so keep them for the end or use them in a foil pan. Vinegar sauces can go on earlier because they don’t caramelize the same way. If you buy a bottled sauce, taste it first; if the first note is only sugar, add vinegar, mustard, or hot sauce to bring it back into balance.
For vegetables and garnishes, buy more acidity than you think you need. Pickles, onions, slaw, and citrus are what stop a slider from feeling flat. They are not extras. They are structure.
How to Serve These Recipes
Presentation: Stack the sliders on a wide platter or sheet pan lined with parchment, then scatter pickles, herbs, or onion slices around the edges so the whole tray looks intentional. Keep the sauciest ones in the center where any drips stay contained.
Accompaniments: Potato salad, corn on the cob, baked beans, kettle chips, cucumber salad, and a crisp slaw all fit this menu well. If you’re serving seafood or spicy sliders, add a cold salad with lemon or vinegar so the plate doesn’t feel heavy.
Portions: Two sliders are a light lunch, three make a solid serving, and four is where people start calling it dinner. For a mixed crowd, plan 3 sliders per adult and 2 per child, then add extra buns because somebody always wants a second round.
Beverage Pairing: Cold lager, iced tea with lemon, and sparkling lime water all work across the board. If you want something with more bite, a dry cider or a light red with a chill on it handles smoky meat well.
Additional Tips and Flavor Boosters
Flavor Enhancement: Brush the cut buns with melted butter mixed with a teaspoon of barbecue sauce or a little garlic powder. It gives you a toasted edge that tastes richer than plain dry buns.
Customization: Keep a toppings station with pickles, sliced onions, jalapeños, slaw, cheese, and hot sauce. Sliders get better when people can choose how sharp, sweet, or hot each one should be.
Serving Suggestions: Cut each slider on a slight diagonal before serving if the filling is stacked tall. It looks neater and makes the layers easier to see, which matters when you’ve gone to the trouble of char and sauce and cheese.
Make-It-Yours: For gluten-free eaters, use sturdy gluten-free buns and toast them first; for dairy-free sliders, skip cheese and lean harder on pickles, slaw, and sauce; for low-carb plates, turn the filling into a lettuce wrap and keep the same toppings. The core flavors hold up.
Make-Ahead, Storage, and Reheating Guidance
Most slider fillings keep well for 3 to 4 days in the refrigerator, but the buns need their own plan. Store meat, sauces, slaw, and cheese separately in airtight containers, then toast the buns fresh when you’re ready to eat. That single step keeps the whole thing from tasting like leftovers on a wet roll.
Pulled pork, brisket, burnt ends, chopped chicken, beef fillings, and jackfruit freeze well for up to 2 months. Pack them flat in freezer bags or small containers so they thaw faster. Shrimp, salmon, and tofu do not freeze as gracefully once cooked; they can still be frozen, but the texture usually softens a bit when reheated.
For reheating, use a covered skillet over medium-low heat for saucy fillings, adding a spoonful of water or broth if needed. Chicken and pork can also go into a 300°F (150°C) oven for 10 to 15 minutes, covered with foil. Burgers and steak slices are better in a hot skillet for a minute or two than in the microwave, which tends to push the meat past the point of tenderness.
Slaw and pickled toppings should be made a few hours ahead at most, then drained if they sit too long. The flavor often improves overnight, but the texture gets softer, so keep the wet and crisp parts apart until service.
Variations and Adaptations to Try
Gluten-Free Slider Tray: Use gluten-free slider buns that are sturdy enough to toast without crumbling. Keep the fillings the same, but watch the sauces for hidden wheat and thickeners.
Dairy-Free Back Porch Spread: Skip cheese, ranch, and creamy white sauce, then lean on vinegar slaws, mustard, pickles, and herb sauces instead. The barbecue flavor reads just as clearly, and nothing feels like it’s missing.
Heat-Lover’s Board: Set out hot sauce, jalapeños, pepper jack, and a little chile oil so people can finish their own sliders. This works especially well with chicken, turkey, and pork, where the heat can sit on top without taking over.
Kid-First Version: Use milder barbecue sauce, keep onions on the side, and choose cheese-heavy fillings like classic beef or chicken with cheddar. Cut the buns smaller if the first round is too large for little hands.
Smoke-Free Weeknight Fix: Make the fillings in a skillet or cast-iron pan on the stovetop, then toast the buns under a broiler. You lose a bit of grill perfume, but the structure and flavor stay solid.
Vegetarian Grill Lineup: Combine the mushroom-halloumi sliders, jackfruit sliders, and tofu sliders on one tray so there’s a meatless trio that still feels deliberate. The trick is to keep the sauces distinct so the plate doesn’t taste like one long note.
Common Mistakes to Avoid
The biggest mistake is soggy bread. It happens when the buns aren’t toasted, the slaw is too wet, or the sauce goes on too early. Fix it by drying toppings, toasting the buns for a few seconds, and putting the saucy meat on last.
Another problem is cooking every filling the same way. Shrimp needs minutes, not patience. Steak needs a hot, quick sear and a rest. Pork shoulder wants low, steady heat. If you treat them all like burger patties, at least half the tray suffers.
People also overfill sliders because the small size makes them look easy to pile up. They are not. A slider with too much meat and no balance just falls apart on the first bite. Keep the stack tight enough to hold, but not so tall that it collapses when someone picks it up.
The last common miss is skipping acidity. Rich meat, cheese, and sweet sauce need something sharp: pickles, vinegar slaw, mustard, onions, lime, or all of the above. Without that bite, the whole tray eats heavy and dull.
Frequently Asked Questions
Can I make BBQ sliders without a smoker?
Absolutely. A covered grill can create plenty of smoke and char, especially if you cook over indirect heat and keep the lid closed. For extra smoke, add wood chips or use a cast-iron skillet to catch drippings and steam.
What buns work best for sliders?
Potato rolls and soft brioche are reliable because they toast well without falling apart. If the filling is especially saucy, pick a bun with a little chew rather than the softest pack on the shelf.
How do I keep sliders warm for a party?
Hold the cooked meat in a foil pan over indirect heat or in a low oven around 200°F (95°C), then toast buns in batches right before serving. Assemble only what you expect people to eat in the next few minutes so the buns stay firm.
Can I prep the fillings a day ahead?
Yes, and for pulled pork, brisket, chopped chicken, and sausage fillings, that often helps. Reheat gently with a little sauce or broth, then toast the buns fresh so the texture stays in place.
What if my buns keep getting soggy?
Reduce the sauce slightly, drain the slaw, and toast the buns longer on the cut side. If the filling is still too wet, spoon it with a slotted spoon and let excess liquid fall away before assembly.
Can I scale these recipes for a larger crowd?
Very easily. Slider fillings double cleanly, but the grill space does not, so cook in batches and hold the finished meat in foil pans. Buy extra buns; people always eat more than the math suggests.
Are frozen patties okay for slider burgers?
Yes, especially for the beef and turkey versions, but thaw them enough to season evenly and keep the cooking time predictable. Frozen patties straight from the bag can char outside before the center is ready.
Which recipes are best for cooking on a grill pan instead of an outdoor grill?
The burger sliders, steak sliders, chicken sliders, mushroom-halloumi sliders, and tofu sliders all adapt well to a grill pan or cast-iron griddle. Seafood works too, but you need to watch it closely because indoor heat can spike fast.
How do I stop barbecue sauce from burning?
Use it late. Brush it on during the last minute or two, or warm it separately and spoon it over the finished filling. Sugary sauces love to scorch when they sit over direct heat for too long.
One Last Flip on the Grill

There’s a good reason BBQ sliders keep showing up at cookouts: they’re small enough to move fast, but they still give you room to play with smoke, sauce, crunch, and heat. You can run the whole spread heavy and sticky, or split it into bright, sharp, and savory trays so every plate feels a little different.
The nice part is that none of these recipes asks for perfection. Toast the buns. Watch the grill. Give the filling one clear flavor idea and let it do its job. That’s enough.