
The best backyard cookouts smell a little scorched in the right places.
Not burnt. Scorched in the way a pepper blisters, a burger crusts, and a cob of corn perfumes the whole yard before the first plate leaves the table. A charred summer cookout has that specific confidence that comes from heat doing its job well: crisp edges, smoke curling off the grate, and food that tastes bigger than the sum of its parts.
That line is easy to cross, though. A grill that runs too cool leaves food gray and limp; a grill that runs too hot turns sugary sauce into black glue and chicken skin into cardboard. The sweet spot sits between those two mistakes, and once you learn to hold it, the whole cookout gets calmer. Meat cooks more evenly. Vegetables turn sweeter. You stop treating flare-ups like a personal insult.
A good backyard cookout is not about chaos. It is about control with a little swagger. Heat zones, timing, resting, and the order you put things on the grate matter more than any glossy marinade. Get those pieces right, and the food starts tasting like it belongs outdoors.
Why a Little Char Changes the Whole Table
- Char adds depth fast: A hot grate builds browned edges in minutes, which gives burgers, chicken thighs, corn, and onions a savory layer that would take far longer in a skillet.
- Smoke and sweetness play well together: Corn, peppers, peaches, and even watermelon taste brighter once their surface sugars caramelize and pick up a hint of smoke.
- Texture is half the point: A cookout with no char tends to feel soft all the way through; one with controlled browning gives you crisp skin, blistered vegetables, and a better bite.
- It stretches the budget: Thighs, sausages, flank steak, and sturdy vegetables hold up better than delicate cuts, and a smart fire makes them taste like they cost more than they did.
- Service gets easier: Food with a little crust can rest for a few minutes without collapsing, which means you can cook in waves instead of panicking over timing.
The Difference Between Browning, Blistering, and Burnt Edges
The nicest thing about grill heat is also the part that trips people up: it works fast. Surface moisture has to cook off before browning starts, so wet food sits there steaming while you wait for a crust that never comes. Patting meat dry and wiping excess marinade off vegetables is not fussy. It is the difference between mahogany edges and gray disappointment.
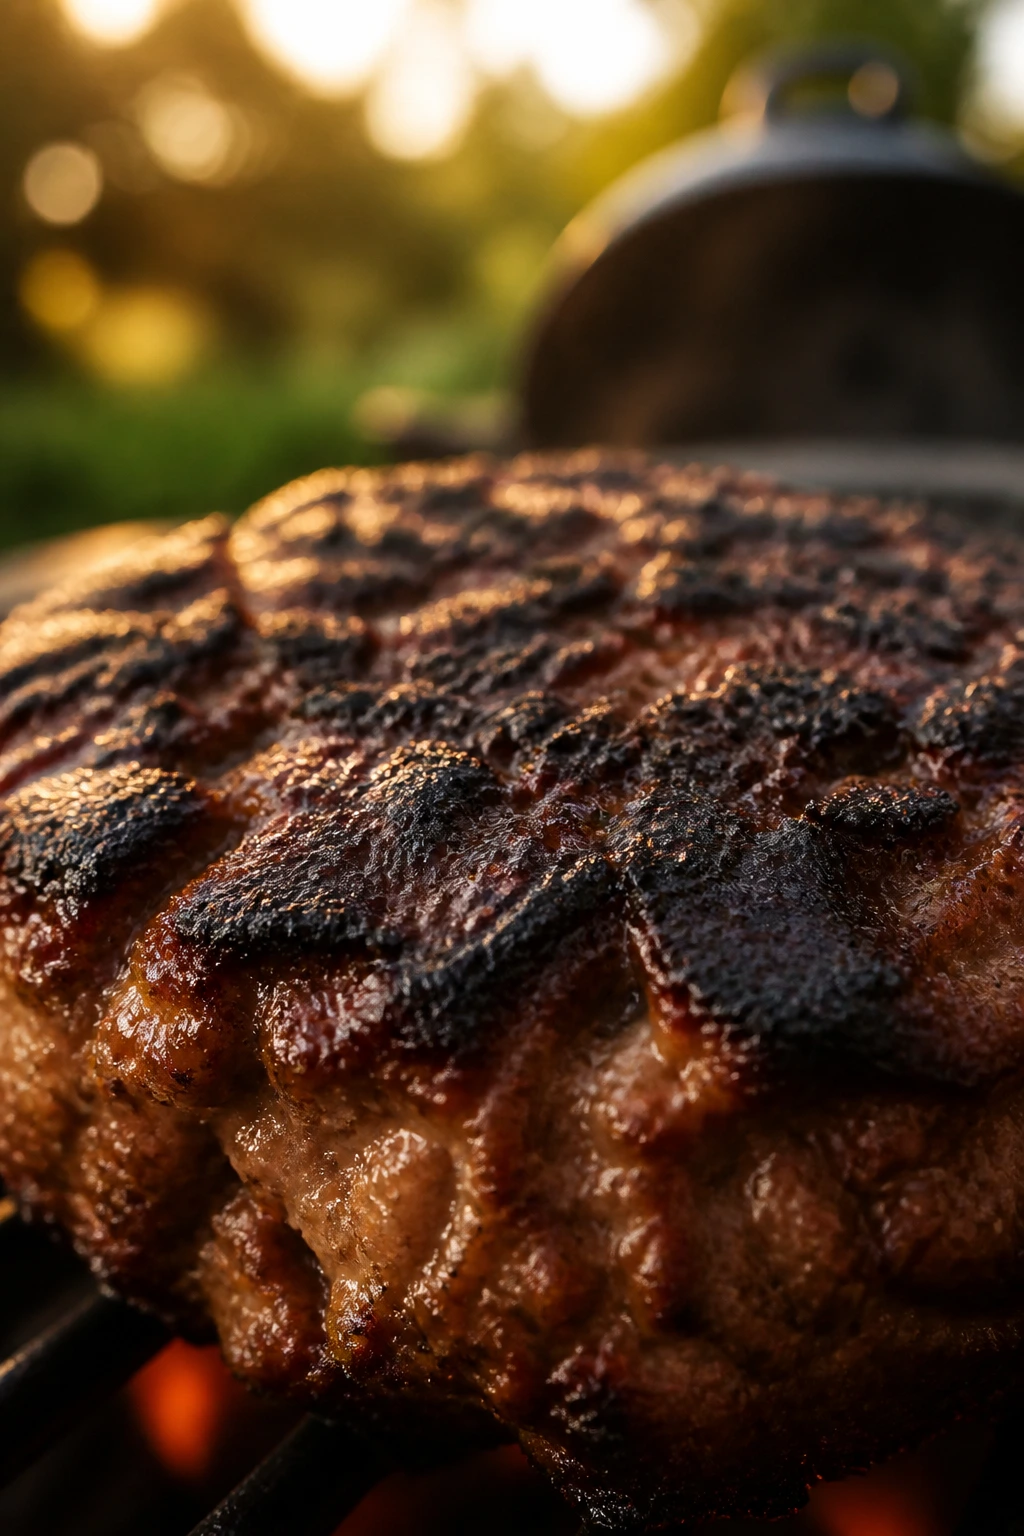
What Good Char Actually Looks Like
Good char looks dark, dry, and even in patches. A steak should show a crust with tiny browned ridges. Corn kernels should have a few browned spots, not a soot-black shell. On vegetables, the best sign is usually a little collapse at the edge and a sweet smell that turns nutty after a few seconds over the flame.
Where Burn Begins
Burn starts when sugar, fat, or surface seasoning stays in direct heat too long. Honey glazes, barbecue sauce, and very sweet marinades can blacken in seconds. That does not mean you should avoid them. It means you save them for the last minute or two, after the food is mostly cooked.
Why Moisture Matters So Much
A dry surface browns faster because the heat is not wasting itself on evaporation. That is why a chicken breast straight from a wet marinade often steams before it sears. It is also why people think the grill is “too hot” when the real problem is that the food was wet and crowded.
A little patience fixes most of that. Not all of it. Most.
Charcoal, Gas, or Wood: Picking the Fire You Can Control
The grill is not the star. The fire is.
Charcoal gives you deeper smoke and a hotter, more uneven surface, which is lovely if you like a little drama and are willing to watch the fire closely. Gas is cleaner and more predictable. Neither one is “better” in the abstract. The right choice is the one you can manage without fiddling with it every sixty seconds.
Gas Grill: Clean, Quick, Repeatable
Gas shines when you want a reliable cookout with less setup. Preheat the grates for 10 to 15 minutes, close the lid, and let the metal get genuinely hot before anything touches it. A gas grill also makes two-zone cooking simple: one burner on high for direct heat, the others low or off for finishing thicker cuts.
That predictability matters when you are cooking for a crowd. Chicken thighs on one side. Corn on the other. A tray of buns warming near the edge. No guesswork about how fast the coals are fading.
Charcoal Grill: Deeper Flavor, More Attention
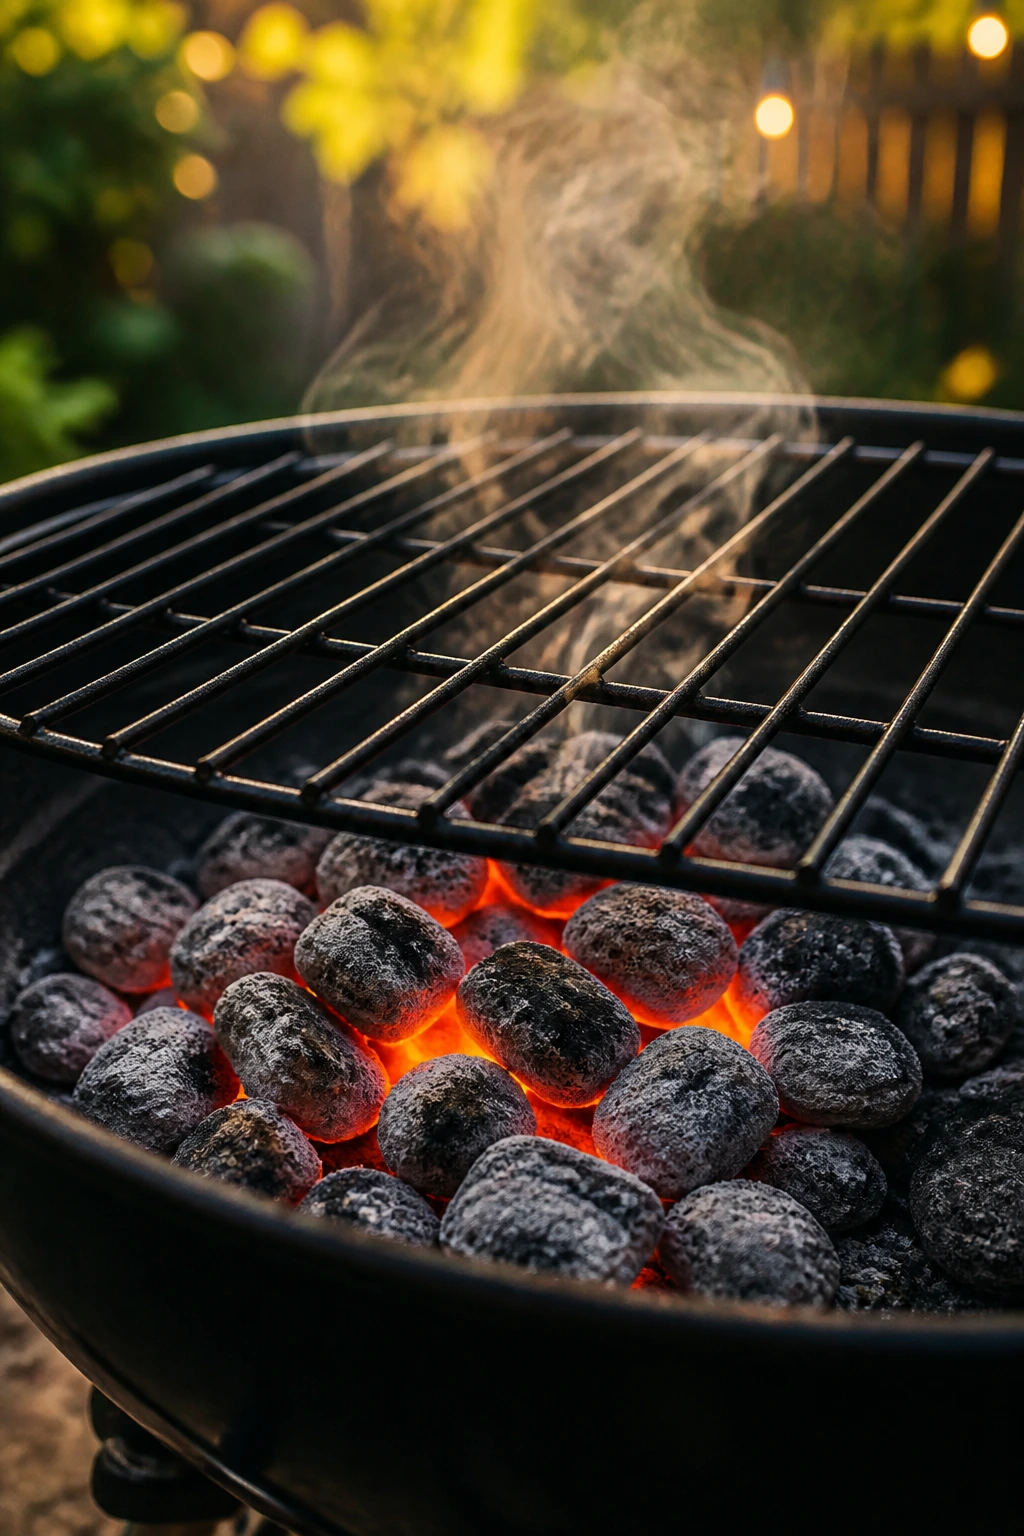
Charcoal rewards people who like a hotter, slightly messier fire. Briquettes give steadier heat. Lump charcoal burns hotter and less evenly, which is useful if you know how to steer it and irritating if you don’t. A chimney starter is still the cleanest way to get the coals going. Wait until most of the briquettes are ashed over and glowing through the cracks, usually 15 to 20 minutes, before you dump them into the grill.
That little wait matters. Half-lit charcoal smells harsh and cooks unevenly. Fully lit charcoal gives you the kind of heat that actually sears instead of smoldering.
Wood Chunks and Chips: Use Them Like Seasoning
Wood is not a bonfire trick. It is a seasoning. A couple of fist-sized chunks on hot coals give you smoke that reads as oak, hickory, apple, or cherry instead of the burnt-tire smell you get from piling in too much. On a gas grill, a smoker box or foil packet with a few holes punched in it is enough.
Too much smoke turns bitter. Too little disappears. The middle is where the good stuff lives.
Building a Backyard Menu Around Heat, Not Guesswork
A cookout menu works best when every item earns its place on the grate. That sounds obvious. People still ignore it and then wonder why the meal feels rushed.
The easiest way to plan is with a simple formula: one anchor protein, one quick protein, two vegetables, one cold or acidic side, and one bread or starch that can take on a little color. That gives you a menu with movement. Something can be searing while something else rests, while a third thing finishes over lower heat.
Choose One Anchor
An anchor is the thing that needs the most attention. Bone-in chicken thighs, a whole flank steak, pork chops, or a tray of sausage links all work. The point is not to make the anchor fancy. The point is to pick one food that sets the tempo for everything else.
I’ll take thighs over chicken breast almost every time for a cookout like this. They forgive small mistakes, they stay juicy, and their skin can take a proper hit from the flame. Breast meat asks for more precision than most backyard grills deliver.
Add One Fast Thing
Shrimp, hot dogs, thinly sliced vegetables, or thin burger patties can fill the gaps while the anchor rests. These are the items that make the grill feel alive. They cook quickly enough that people can stand around and watch without getting bored.
Balance the Smoke With Something Cold
A vinegar slaw. Tomato salad. Cucumber with dill. Potato salad with a sharp dressing instead of a mayo blanket. Char needs a cool side to keep the plate from feeling heavy. Without that contrast, the meal can feel like a dare.
Proteins That Hold Up to a Hot Grate
The grill is ruthless with protein. It rewards cuts that handle high heat and punishes delicate ones that dry out before you can blink. That is not a reason to keep things boring. It is a reason to choose better.
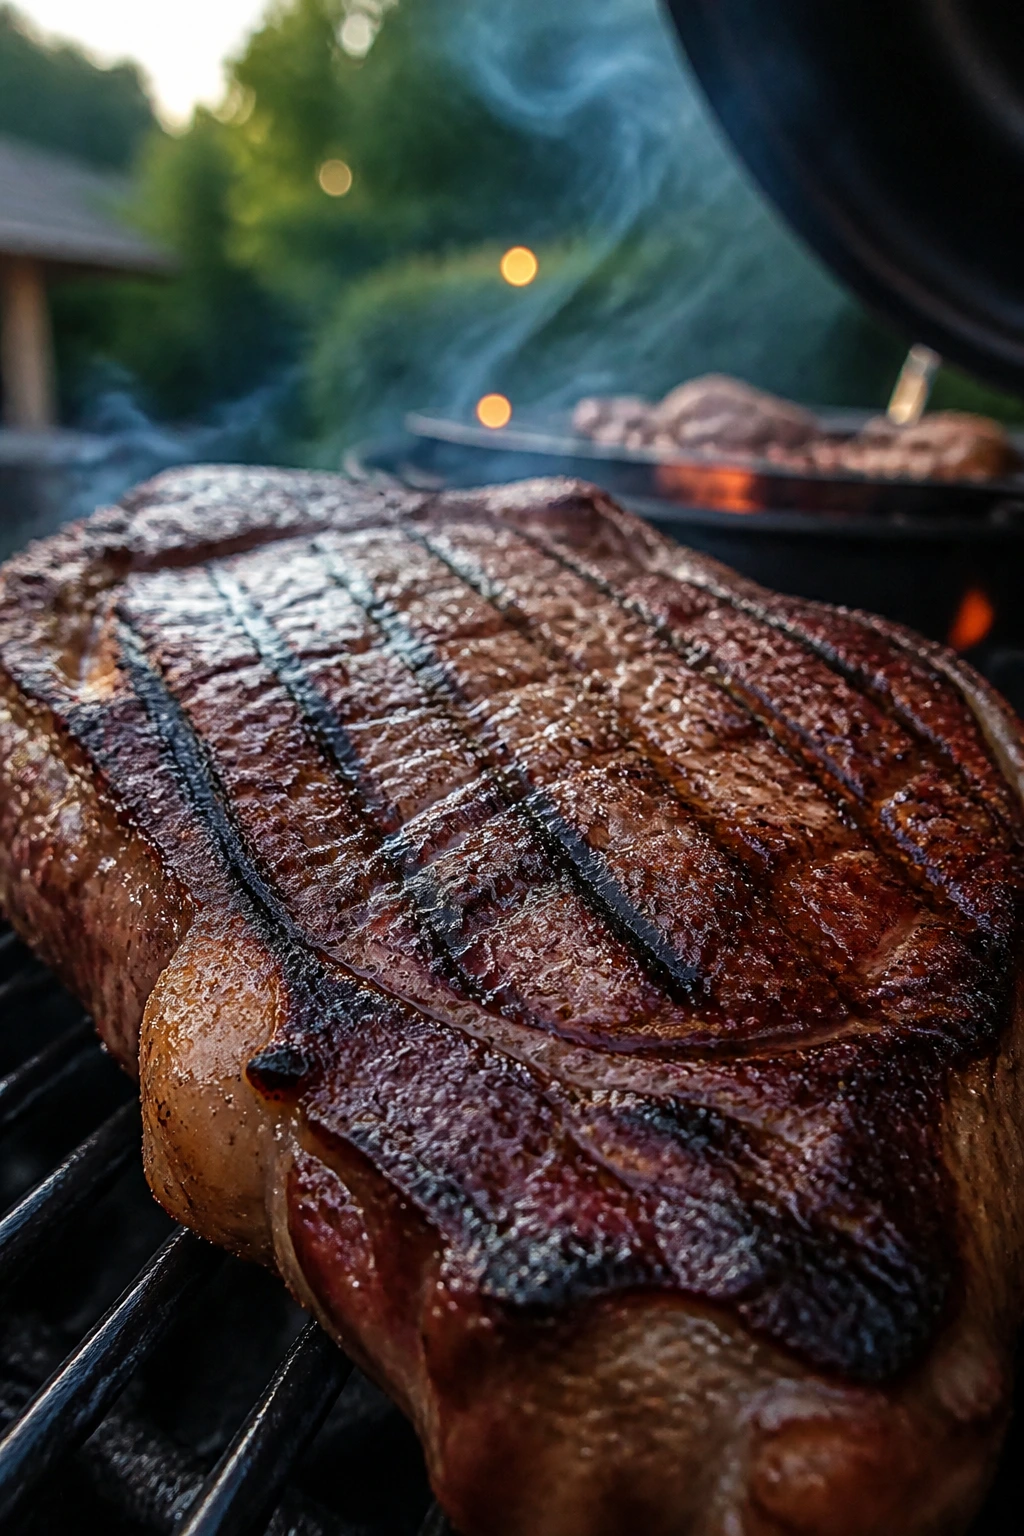
Beef Wants a Real Crust
Burgers are easiest when you start with ground beef that has enough fat—80/20 is the sweet spot for flavor and shape. Too lean and the patties dry out. Too fatty and flare-ups start acting like a sports event. Press the center of each patty slightly thinner than the edges so they cook evenly instead of puffing into little meat domes.
Steaks need a hot, clean grate. Strip steak, ribeye, flank, and skirt all behave differently, but they share one truth: dry the surface, season well, and leave them alone long enough to form a crust before you flip. If you cut into a steak and the juice runs all over the board, that usually means you were impatient at the grill and impatient at the rest.
Chicken Is Better Than It Gets Credit For
Chicken thighs are the quiet heroes of the cookout. Bone-in, skin-on thighs take a rub, handle direct heat, and keep their shape better than breasts. If you want breasts, go thinner, cook over two zones, and pull them as soon as they hit 165°F at the thickest point. The USDA temperature is not a suggestion. It is the line that keeps a backyard dinner from turning awkward later.
Pork Loves a Little Smoke
Pork chops, sausages, and tenderloin all do well on the grill, but they need different handling. Sausages should be cooked gently first and then blistered. Thick chops are best when you sear them and finish over indirect heat. Tenderloin is lean enough that it needs watching, plus a short rest before slicing.
Fish and Shrimp Need Less Drama
Fish tastes best when the grill is clean and the fillet is thick enough to turn without falling apart. Salmon and swordfish are the obvious choices. Shrimp cook in a flash—usually just a few minutes per side until opaque and curled into loose C-shapes. Keep the seasoning simple. Olive oil, salt, pepper, citrus, and a little garlic go farther than a heavy sauce here.
Vegetables That Taste Better with a Few Dark Spots
Some vegetables are built for fire. Others only tolerate it. That difference matters.
Corn, zucchini, eggplant, peppers, onions, mushrooms, asparagus, and thick tomato slices are the easy winners. They have enough structure to survive the grate, and enough water to stay sweet instead of collapsing into mush. Thin, delicate vegetables can still work, but they do better in a basket, a foil packet, or a cast-iron pan.
Corn Needs Either Full Husk or Full Confidence
You can grill corn in the husk for steam-soft kernels or naked for sharper char. Both work. Naked corn gives you more smoke and more browned kernels, which is the route I prefer if the rest of the meal is already rich. Butter it after grilling, not before, unless you enjoy watching dairy hit the flame and disappear in a sad hiss.
Zucchini and Eggplant Need Thickness
Cut zucchini into long slabs or thick rounds, about 1/2 to 3/4 inch thick. Eggplant likes a similar treatment. Thin slices dry out before they get color. Thick slices hold moisture and can sit over the flame long enough to pick up those dark grill lines that make them taste sweeter.
Salt eggplant a little ahead of time if it tends to be bitter or watery. Wipe off the beads of moisture before grilling. That old trick still works because it gives the surface room to brown instead of steaming.
Onions, Peppers, and Mushrooms Like the Edges Charred
Keep onion wedges intact by leaving a little root at the base. That prevents the layers from falling apart. Peppers should be turned until the skins blister and blacken in spots, then peeled if you want them softer, or left as is if you like the texture. Mushrooms need space and a little oil. Crowded mushrooms go soggy fast.
Asparagus and Tomatoes Are Short-Timers
Asparagus does not need long. A few minutes over a hot grate is enough to give it color while keeping the stalks snappy. Thick tomato slices are trickier; they can fall apart if you treat them like steak. Brush them with oil, use medium-high heat, and take them off while they still hold their shape.
Bread, Fruit, and Side Dishes That Deserve a Spot on the Grate
A good cookout is not all meat. If it is, the meal starts feeling like a dare instead of dinner.
Grilled bread is one of the most underrated parts of outdoor cooking. A split sourdough loaf brushed with olive oil and put cut-side down for a minute or two picks up smoke, crunch, and just enough heat to carry butter or dip without turning into toast that shatters. Flatbreads work too. They puff, blister, and hold charred vegetables or sliced meat without asking for much in return.
The Case for Grilled Fruit
Peaches and plums are the obvious picks. Slice them in half, brush the cut side with a little oil or melted butter, and place them cut-side down until they soften and show grill marks. The heat turns the fruit’s sugar into a caramel edge that tastes like dessert with better posture. Pineapple does the same thing, only louder. Watermelon is more specific; it works best as a quick sear, then a shower of salt, lime, and maybe a few chile flakes.
Cold Sides Need Acid, Not Just Cream
Potato salad is fine, but the version that usually survives a charred cookout is the one with vinegar or mustard in the dressing. Coleslaw should crunch and bite back a little. Tomato salad, cucumber salad, and bean salads all play the same role: they cool the palate and keep the smoke from flattening the plate.
I like one side that is clearly cold and one side that still has some warmth. That contrast makes the whole spread feel deliberate.
Marinades, Rubs, and Finishes That Work with Smoke
Fire does not need a lot of help. It needs the right kind.
A dry rub is your best friend on anything with a decent surface: steaks, pork chops, chicken thighs, and thick vegetables. Salt, black pepper, garlic powder, paprika, coriander, and a small amount of brown sugar can make a lot happen without creating a sticky mess. Keep sugar modest on direct heat. It should support the crust, not burn before the meat is done.
Marinades Need Balance, Not Volume
Acid, oil, salt, and aromatics are the four pieces that matter. Citrus juice, vinegar, yogurt, or buttermilk can help tenderize chicken and pork if you give them enough time. Shrimp needs less. Too much acid for too long and the texture goes soft in a way that feels wrong the second you bite into it.
A marinade should coat the food, not drown it. Excess liquid just drops through the grate and burns.
Finishing Sauces Should Come Last
Chimichurri, salsa verde, herb oil, hot honey, yogurt sauce, and lemon butter all belong at the end. That is where they stay bright. A sauce applied too early on a hot grill can blacken before the food is ready, which is how a sweet barbecue glaze goes from glossy to bitter in a few breaths.
A final hit of acid is useful too. A squeeze of lemon over grilled asparagus or a few drops of vinegar over sliced steak can wake up the whole plate. The char handles the heat; the acid keeps it from feeling heavy.
Running a Two-Zone Fire Without Losing Your Mind
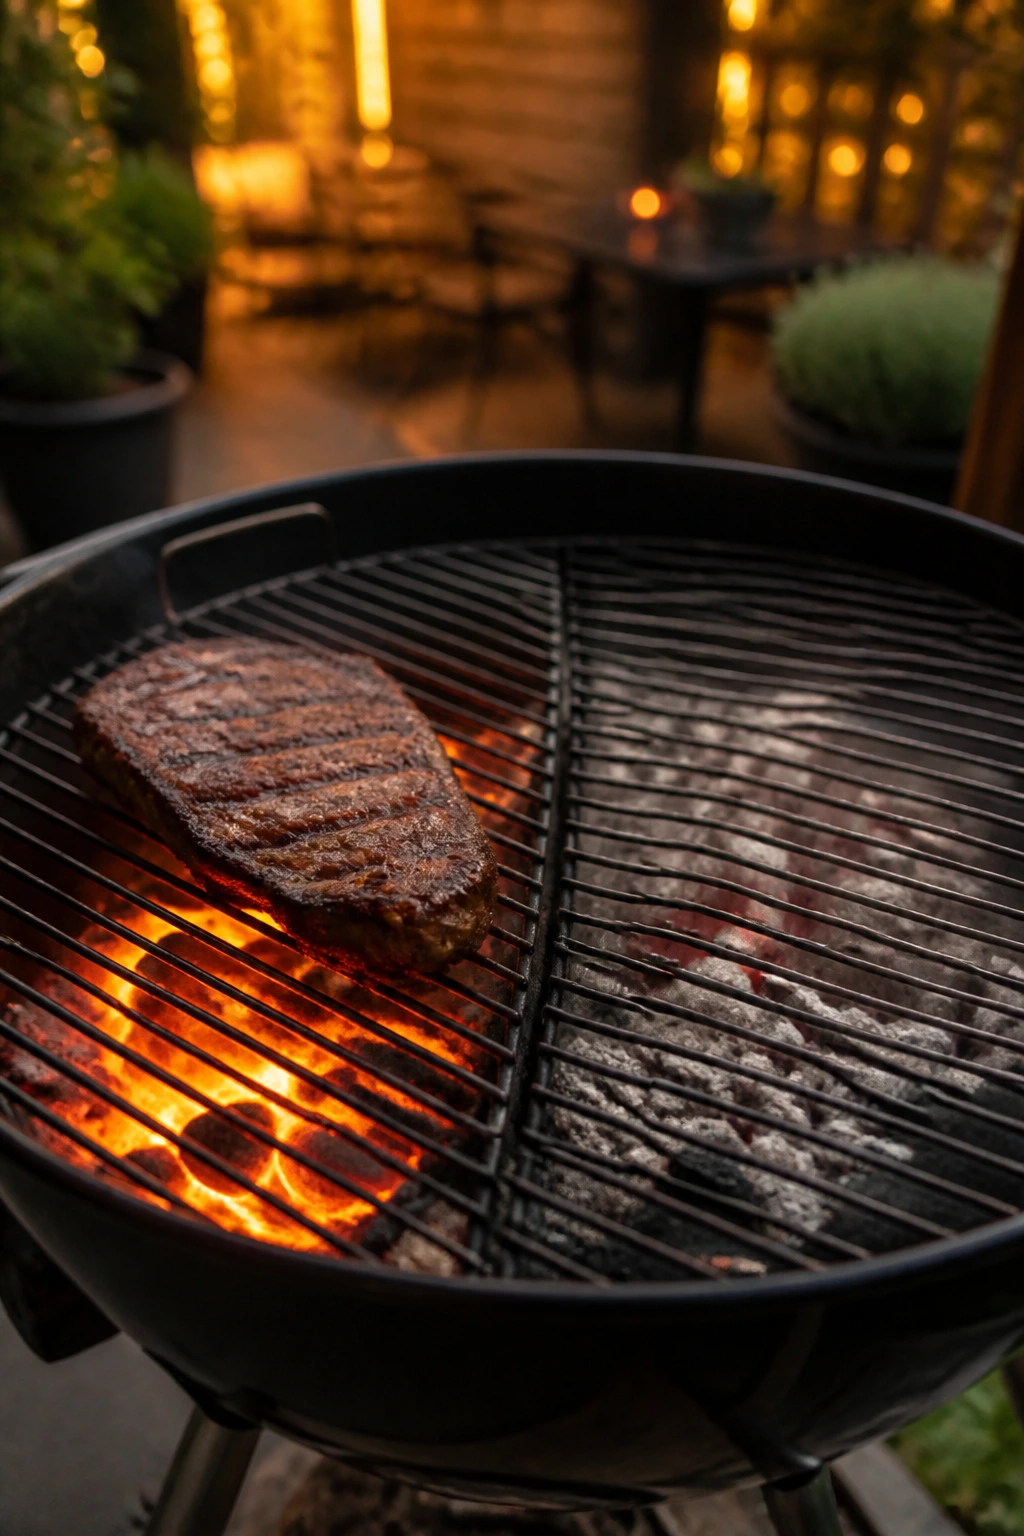
A two-zone setup sounds technical until you actually use it. Then it turns into common sense.
One side of the grill gets the direct heat. The other side stays cooler, either because the burners are off or because the coals are banked to one side. Food starts over the hot zone to build color, then moves to the cooler side to finish without burning. That is the whole trick, and it saves more backyard dinners than any fancy gadget ever will.
Start With a Hot Grate
Preheat the grill for at least 10 minutes, longer if the grate is thick or the weather is cool. A hot grate releases food more cleanly and gives you those dark lines people think require magic. Clean it first. Then oil it lightly with a paper towel held by tongs or a folded cloth dipped in high-smoke-point oil. Do not pour oil onto a hot grate. That is how little flames turn into unnecessary chaos.
Flare-Ups Are a Heat Problem
Fat drips. Sugar burns. The flare-up is not mysterious. If flames keep licking the food, move it to the cooler zone and close the lid for 30 to 60 seconds. That usually settles things without killing the crust. Spraying water at the fire is a blunt move. It can cool the grate, stir up ash, and leave food tasting smoky in the wrong way.
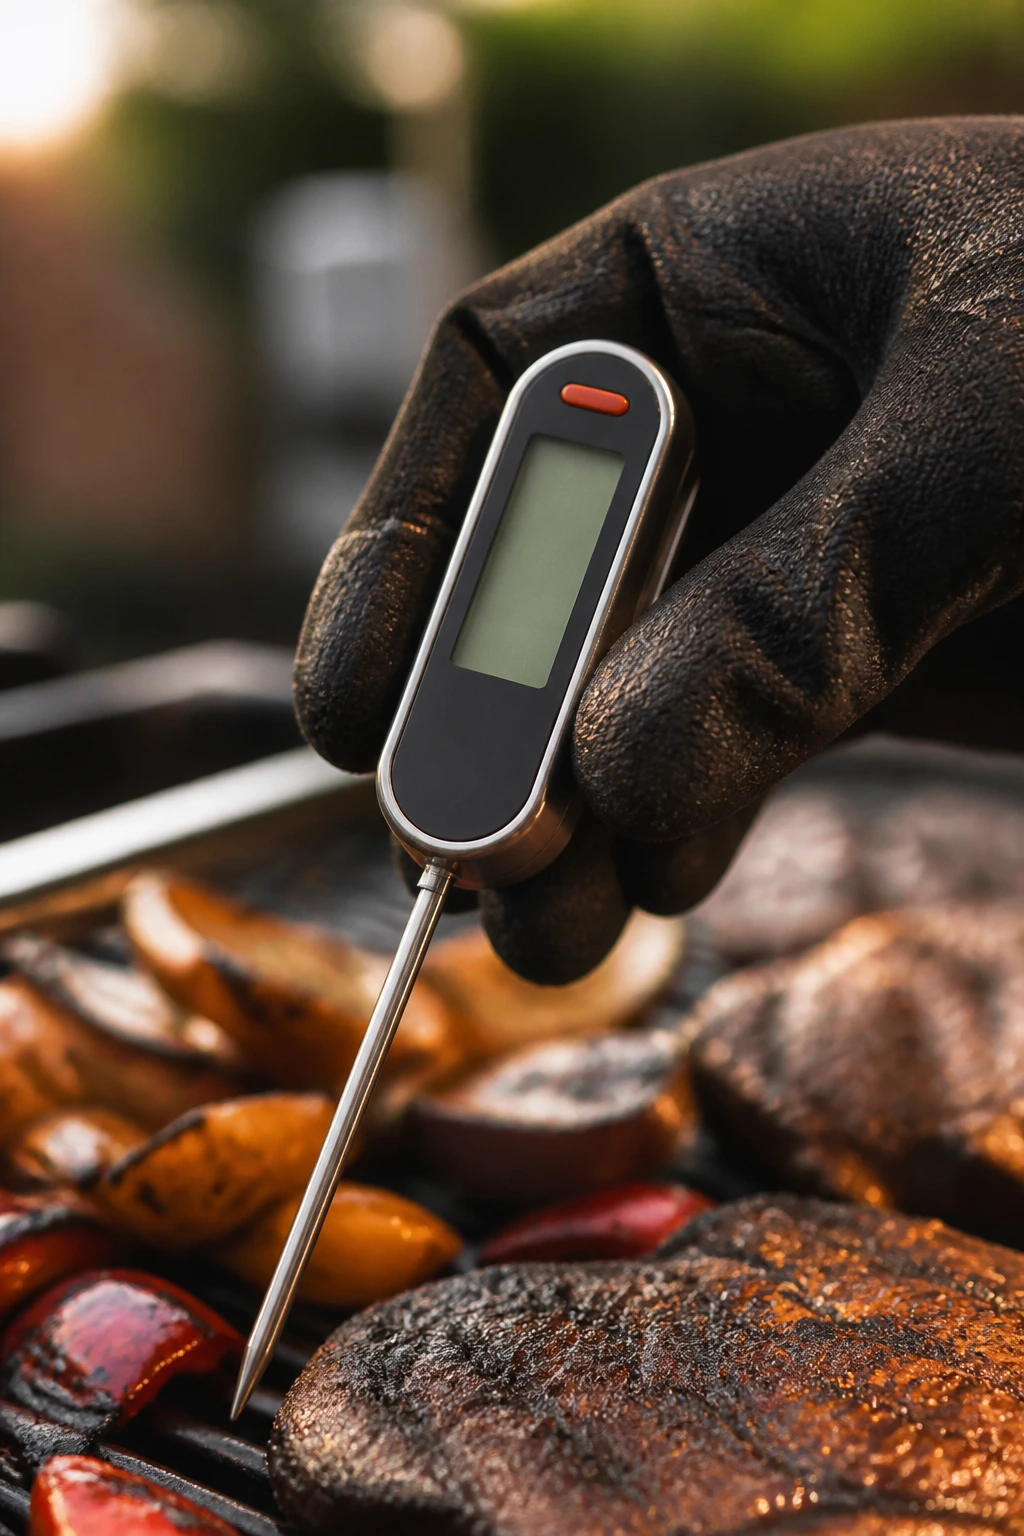
Thermometers End Arguments
An instant-read thermometer is the one tool that removes guesswork. Chicken should reach 165°F. Ground beef and sausage need 160°F. Pork chops and whole pork cuts are safe at 145°F with a three-minute rest. Steak can be pulled earlier if you want medium-rare, but that is a preference call, not a safety target.
And yes, carryover cooking matters. Thick meat can climb a few degrees after it comes off the grill, so pull it a little before the final temperature and let it rest on a rack, not in a heap on the board.
Serving the Cookout While the Food Still Has Texture
Cookout food can lose itself during the last 10 feet between grill and plate.
The fix is to think in stages. Rest the meat. Hold the vegetables separately. Keep sauces on the side until people are actually eating. A loose foil tent is fine for short rests, but wrapping food tightly will soften the crust you worked to build. That matters most with chicken skin, grilled bread, and vegetables that were supposed to keep a little snap.
Keep the First Batch Warm Without Stalling It
A low oven, around 200°F, can hold cooked food while the rest finishes. A sheet pan fitted with a wire rack is better than a deep bowl because it keeps steam from pooling underneath. If you have a platter, warm it briefly so the food does not cool on contact. Cold plates are a small thing. They still show up.
Slice Smarter
Steak and flank cuts should be sliced against the grain. Burgers should be left whole until the plate hits the table. Grilled chicken thighs can be served as is, while bone-in pieces need just enough space on the plate that the skin does not steam under its own weight. This sounds finicky until you taste the difference.
Build the Plate With Contrast
A charred cookout plate wants brightness: herbs, pickles, lime, lemon, yogurt, tomato, cucumber, or a sharp salad. If everything on the plate is brown, the meal feels flat. If you give the food one cold or acidic partner, the smoky parts pop harder.
Food Safety and Leftovers When the Cooler Starts Full
This is the part of outdoor cooking that gets ignored right until somebody regrets it later.
Raw meat, cooked meat, salads, and sauces all need separation. Use one cutting board for raw proteins and another for everything else. Keep clean tongs for cooked food. And once food leaves the hot zone, do not let it sit out forever because people are still talking on the patio. The standard food-safety rule is plain: refrigerate perishable food within two hours, or within one hour if the temperature outside is high enough that the food heats up fast.
Temperature Targets That Matter
The USDA’s safe minimums are not glamorous, but they are useful. Poultry should hit 165°F. Ground beef and ground pork should reach 160°F. Whole cuts of beef, pork, veal, and lamb are safe at 145°F with a three-minute rest. Fish is generally held to 145°F as well. Those numbers save you from guessing, and guessing is where backyard food goes sideways.
Cooling Leftovers the Right Way
If you have a lot of grilled food left over, spread it out in shallow containers so it cools faster. Big piles stay warm in the middle too long. Slice large cuts before refrigerating if you need them to chill fast. Keep sauces separate. That keeps bread from getting soggy and grilled vegetables from turning gray in a puddle.
Reheating Without Ruining the Textures
Chicken thighs and sausages reheat well in a 325°F oven, loosely covered, until warm through. Steak is better sliced and warmed briefly in a skillet or low oven so it does not overcook. Grilled vegetables do fine in a hot skillet for a minute or two. Bread should be re-crisped in a dry pan or a hot oven. The microwave is a last resort for most of this spread.
Small Moves That Make the Grill Do More
A few small habits change the whole cookout.
Flavor Enhancement: Finish grilled corn, zucchini, or sliced tomatoes with a spoon of olive oil, a pinch of flaky salt, and citrus zest. That last bit of salt wakes up the smoke instead of hiding it.
Time-Saver: Set up a three-tray system before you light the fire: one tray for raw food, one for cooked food, one for things that need a second pass. It keeps you from using the wrong spatula when your hands are full and the grill is hot.
Cost-Saver: Buy chicken thighs, sausages, and seasonal vegetables when the goal is a big backyard spread. They handle char better than lean cuts, and they feed more people without turning the shopping list into a punch in the wallet.
Crowd Control: Keep sauces in squeeze bottles or small bowls, not buried at the back of the table. People can dress their own plates, and the grilled food stays crisp longer because it is not sitting in a pool of sauce before anyone gets to it.
Pro Move: Rest meat on a wire rack instead of directly on a cutting board. The bottom stays dry, the crust stays intact, and you do not end up with a soggy underside that looks fine until you serve it.
Mistakes That Turn Char Into Bitterness
- Starting on a cold grate: Food sticks, tears, and never browns cleanly. Let the grill preheat fully and clean the grates before you cook so the surface can do its job.
- Saucing too early: Sweet sauces blacken fast on direct heat. Brush them on only at the end, or pass them at the table if the glaze is sugary.
- Crowding the grate: Too many items in one batch trap steam and cool the metal. Leave space between pieces and cook in waves if you need to.
- Ignoring the thermometer: Cutting into meat to “check” it drains juices and still does not guarantee doneness. Use an instant-read thermometer and pull food a little early to account for resting.
- Flipping every few seconds: Food needs contact time to form a crust. If it tears when you try to turn it, leave it alone for another minute.
- Using wet food straight from marinade: Excess liquid causes flare-ups and weak browning. Pat protein dry, shake off extra marinade, and let the surface dry a bit before it meets the fire.
Three Ways to Shape the Same Cookout
The Smoke-Forward Night
This version leans into charcoal, wood chunks, and thicker cuts. Think pork chops, bone-in chicken thighs, onions, corn, and grilled sourdough. It suits people who like the grill to taste obvious, not subtle.
The Cleaner Gas-Grill Spread
Here the focus shifts to control and speed. Gas heat, a grill basket for vegetables, shrimp skewers, and quick flatbreads make the whole meal easier to manage. You still get char, but the flavor stays a little sharper and less smoky.
The Vegetable-First Table
This one pushes produce to the front. Corn, zucchini, eggplant, mushrooms, peppers, peaches, and halloumi can carry more of the meal than most people expect. Add a cold bean salad and a sharp herb sauce, and you do not miss the heavy meat at all.
The Spice-Heavy Version
Harissa, chili paste, jerk seasoning, cumin, coriander, and hot honey fit well here, as long as you keep sweet glazes for the last minute. This is the right route when you want the char to meet some heat instead of just smoke.
Gear Worth Keeping Near the Grill
- Instant-read thermometer — The fastest way to hit safe temperatures without overcooking.
- Long metal tongs — Better control than a fork, and they do not tear chicken skin or burger crust.
- Wide grill spatula — Useful for fish, burgers, and thick vegetable slices.
- Grill brush or scraper — Clean grates brown food better and release it more cleanly.
- Chimney starter — The easiest way to light charcoal evenly without lighter fluid.
- Heat-resistant gloves — Helpful when moving grates, chimneys, or hot sheet pans.
- Grill basket — Worth having for mushrooms, sliced zucchini, cherry tomatoes, and delicate fish.
- Sheet pans with wire racks — Excellent for staging raw food, resting cooked food, and keeping crusts dry.
- Squeeze bottles or small bowls — Handy for finishing sauces and quick oil brushing.
- Cutting board with a moat or rim — Keeps juice from running all over the patio when you slice meat.
Keeping Leftovers Worth Eating Tomorrow
Cookout leftovers are usually good for three to four days in the refrigerator if you cool them properly and store them in shallow, covered containers. Grilled chicken, steak, pork, sausages, and most vegetables freeze well for up to about two to three months, though vegetables lose some texture after thawing. Bread is the exception. It tends to go stale fast and should be eaten the same day or toasted the next.
Reheat meat gently. A 325°F oven works well for chicken and sausages, while sliced steak is better warmed briefly in a skillet so it does not cross into overcooked territory. Vegetables are usually happiest in a hot pan with a drop of oil. Fish is the most fragile leftover in the group and should be eaten within a day or two if you want the texture to stay pleasant.
Keep sauces separate. Always. A container of grilled chicken sitting in sauce will taste softer and more muddled by day two, and not in a useful way. If you know you will have leftovers, under-sauce the first night and finish the food again when you reheat it.
Backyard Cookout Questions People Actually Ask
How do I get char without burning the food?
Use a hot grate, dry the surface of the food, and build a two-zone fire so you can move items away from direct flame if they start coloring too fast. Sugar-heavy sauces should wait until the end. That single change prevents a lot of bitter edges.
Is charcoal better than gas for a charred cookout?
Charcoal gives a stronger smoke note and hotter surface browning, but gas is easier to control and much less fussy. If you like a cleaner flavor and tight temperature control, gas works fine. If you want deeper smoke and do not mind tending the fire, charcoal has the edge.
What should chicken, burgers, and pork reach on the grill?
Chicken should hit 165°F, ground beef and ground pork should reach 160°F, and whole cuts of pork are safe at 145°F with a three-minute rest. Those numbers are worth memorizing. They keep backyard cooking simple when people are chatting and the grill timer gets ignored.
Can I use barbecue sauce on the grill?
Yes, but late. Brush it on during the final minute or two, or after the food comes off the heat if the sauce contains a lot of sugar. A thin glaze can work; a thick, sweet coat tends to burn before the food is done.
Which vegetables hold up best on the grill?
Corn, zucchini, eggplant, onions, peppers, mushrooms, and thick asparagus are the easiest. They have enough structure to take heat without falling apart. Thin tomatoes and small mushrooms can still work, but they need more careful handling or a basket.
How do I keep food hot while people are going back for seconds?
Use a low oven around 200°F and hold the food on a wire rack over a sheet pan. That setup keeps steam from collecting underneath. Sauces should stay separate until serving, and grilled bread should be toasted again right before it hits the table.
What should I do if the grill keeps flaring up?
Move the food to indirect heat, close the lid, and give the fire a short pause. High-fat foods like sausages and fatty burgers often need that step. Trimming excess fat helps, but it does not remove the need to manage the flame.
Can I make parts of the cookout ahead?
Absolutely. Chop vegetables, mix sauces, and season proteins earlier in the day. Cold sides often taste better after a few hours in the fridge, and meats can be dry-brined or marinated ahead so the grill only has to do the last part of the work.
After the Last Burger Leaves the Grate
A charred summer cookout does not need theatrics. It needs a hot grate, a little patience, and food that can handle the directness of flame. Once you stop fighting the char and start steering it, the whole meal gets easier to time and better to eat.
That is the piece people miss. The smoke is not there to mask anything. The char is there to sharpen what is already good—sweet corn, juicy chicken, sturdy vegetables, cold salad, grilled bread with a little bite. Get the balance right and the yard smells like you knew exactly what you were doing all along.