
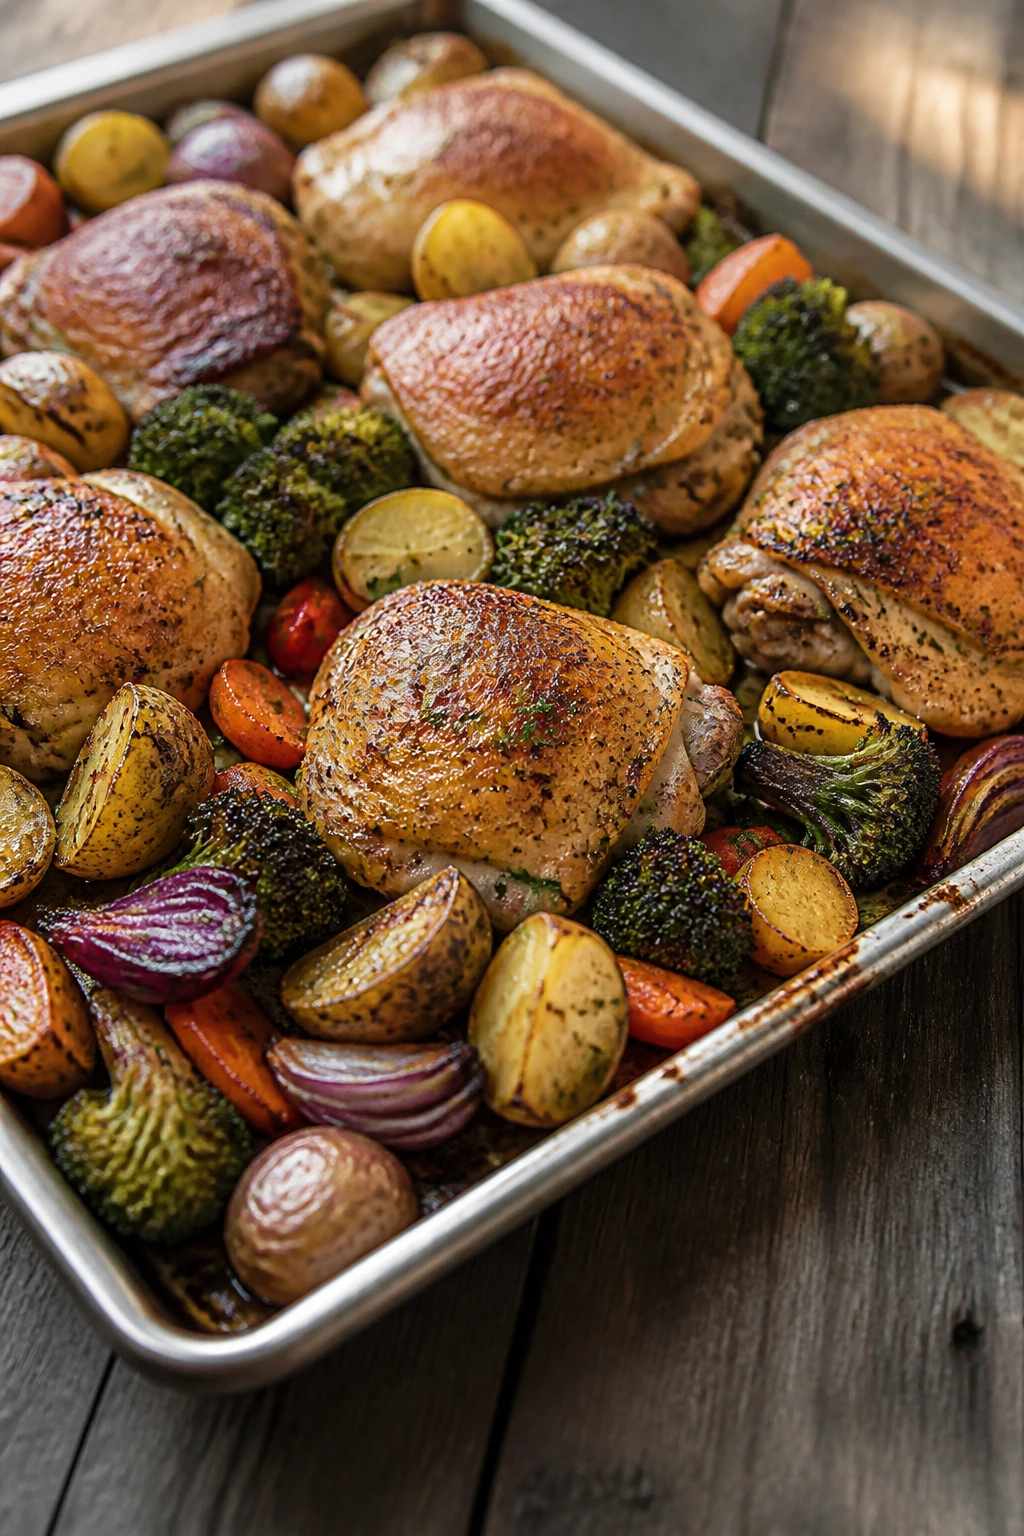
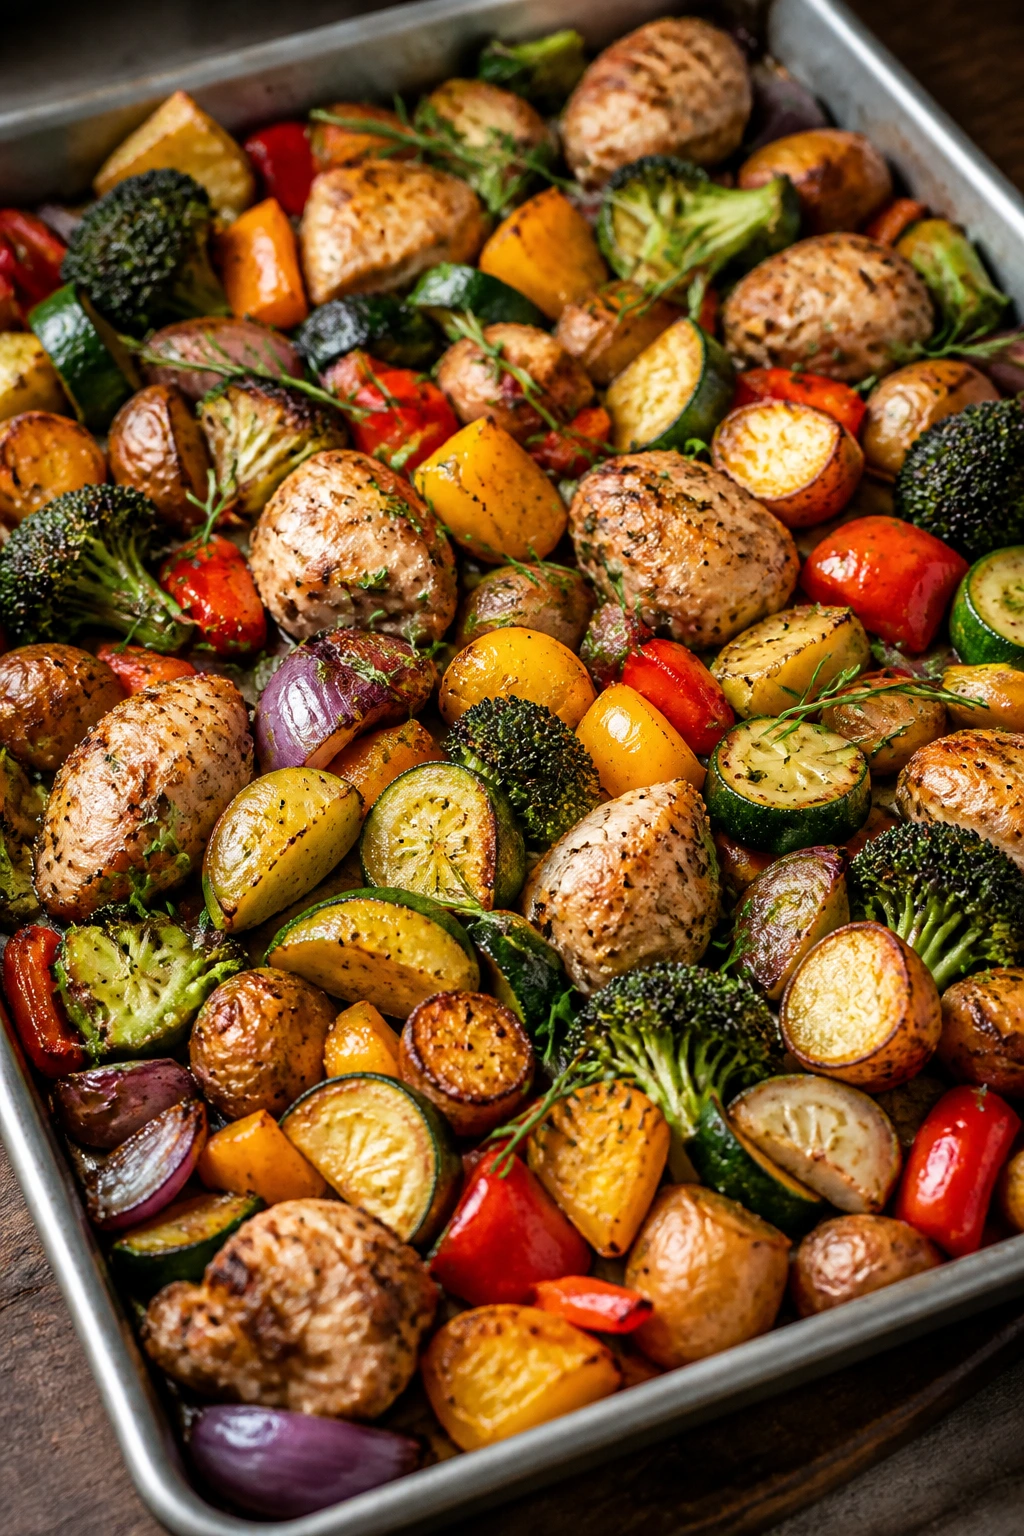
Six hungry people can make a weeknight feel like a demolition derby. One pan of sizzling chicken, potatoes, and blistered vegetables can make it feel calm again. That is the quiet appeal of sheet pan dinners for big families: you get a lot of food, a lot of flavor, and a sink that does not look like a crime scene.
I like this style of cooking because it rewards good timing instead of constant attention. Heat the oven hard, space the ingredients out, and let the edges brown while you do something more useful than standing over a stove with a spatula in your hand. If you’ve ever watched a tray of chicken thighs turn lacquered and golden while onions collapse into sweet little ribbons underneath, you already know why this method has staying power.
There is also a practical truth here that too many dinner lists ignore. Big families do not need fussy. They need meals that scale without turning watery, bland, or expensive. A half-sheet pan, a sharp knife, and a few smart seasoning choices can get you dinner for six, seven, or eight without making you cook in shifts. The trick is knowing which ingredients can share the same oven time and which ones need a staggered entrance.
These are the trays that keep showing up in real kitchens because they work. Some are old-school, some borrow from takeout, some lean on pantry staples, and a few are the sort of thing you can throw together when the fridge is full of odds and ends. The common thread is simple: they feed a crowd and still taste like you tried.
Why You’ll Love This Collection
- Built for big appetites: Most of these trays serve 6 to 8 people, and several can stretch further with bread, rice, or a simple salad.
- Cleanup stays civilized: One or two rimmed pans beat a stack of skillets, saucepans, and casserole dishes every single time.
- The method stays flexible: Chicken, sausage, pork, fish, tofu, shrimp, and vegetarian combos all fit the same roasting rhythm.
- Weeknight-friendly timing: The majority land in the 30- to 45-minute window, which is about where real-life dinner needs to live.
- Easy to scale up: Add another pan instead of crowding the first one, and you can feed a bigger table without changing the recipe much.
- Leftovers work hard: Many of these trays turn into lunch bowls, wraps, quesadillas, or salad toppers the next day.
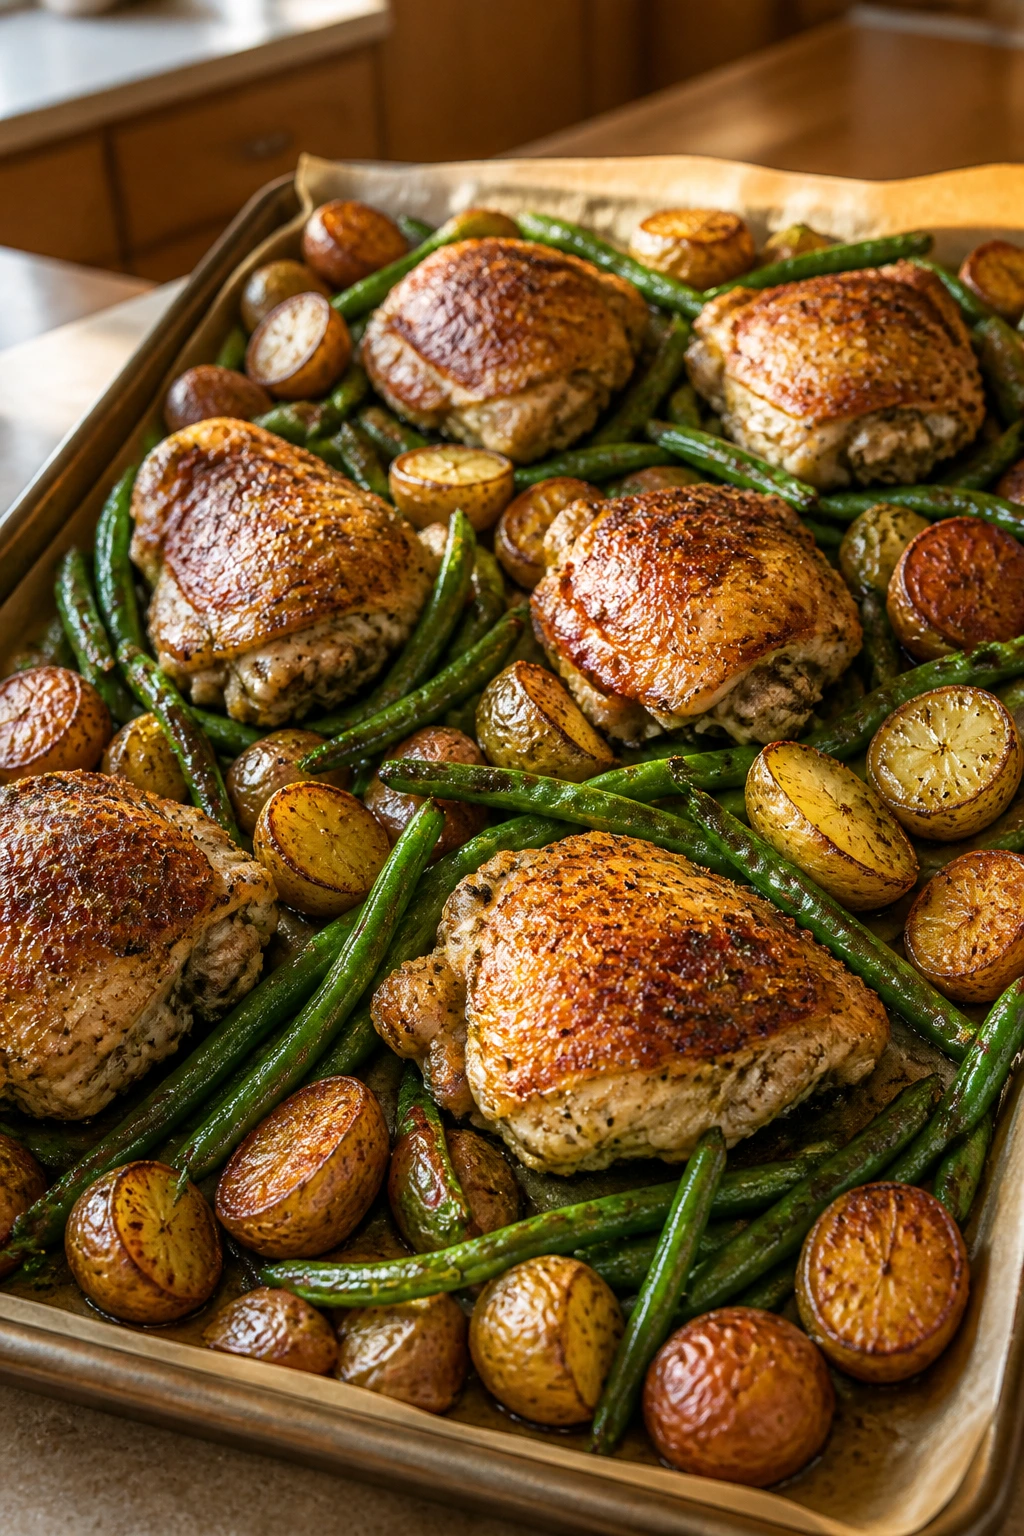
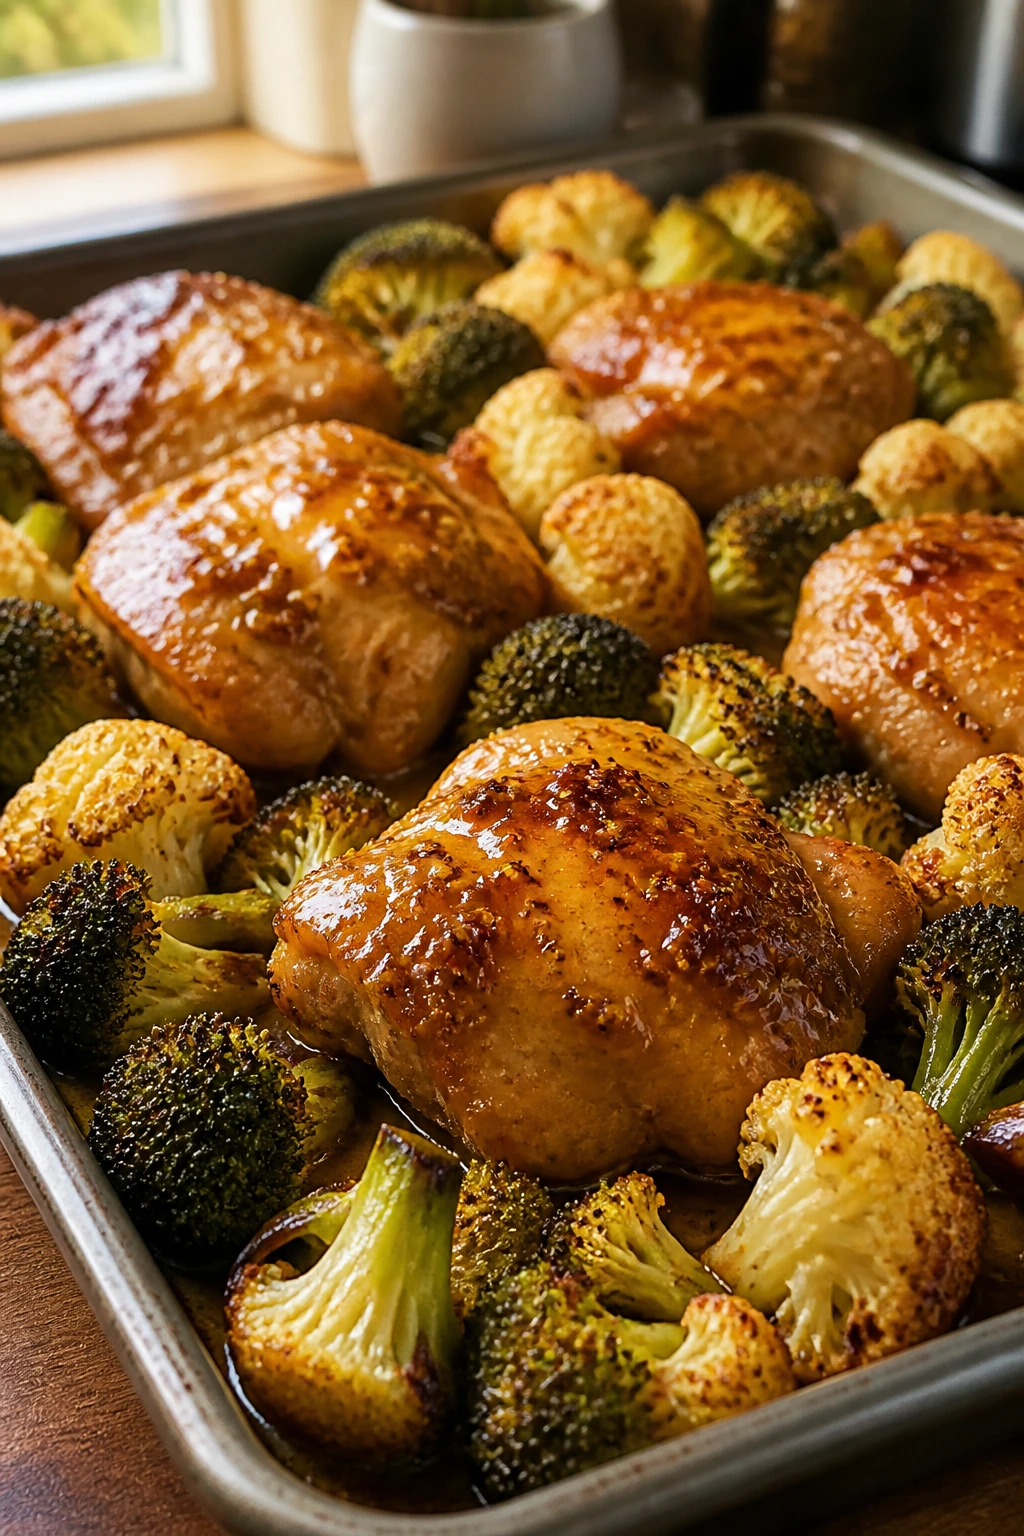
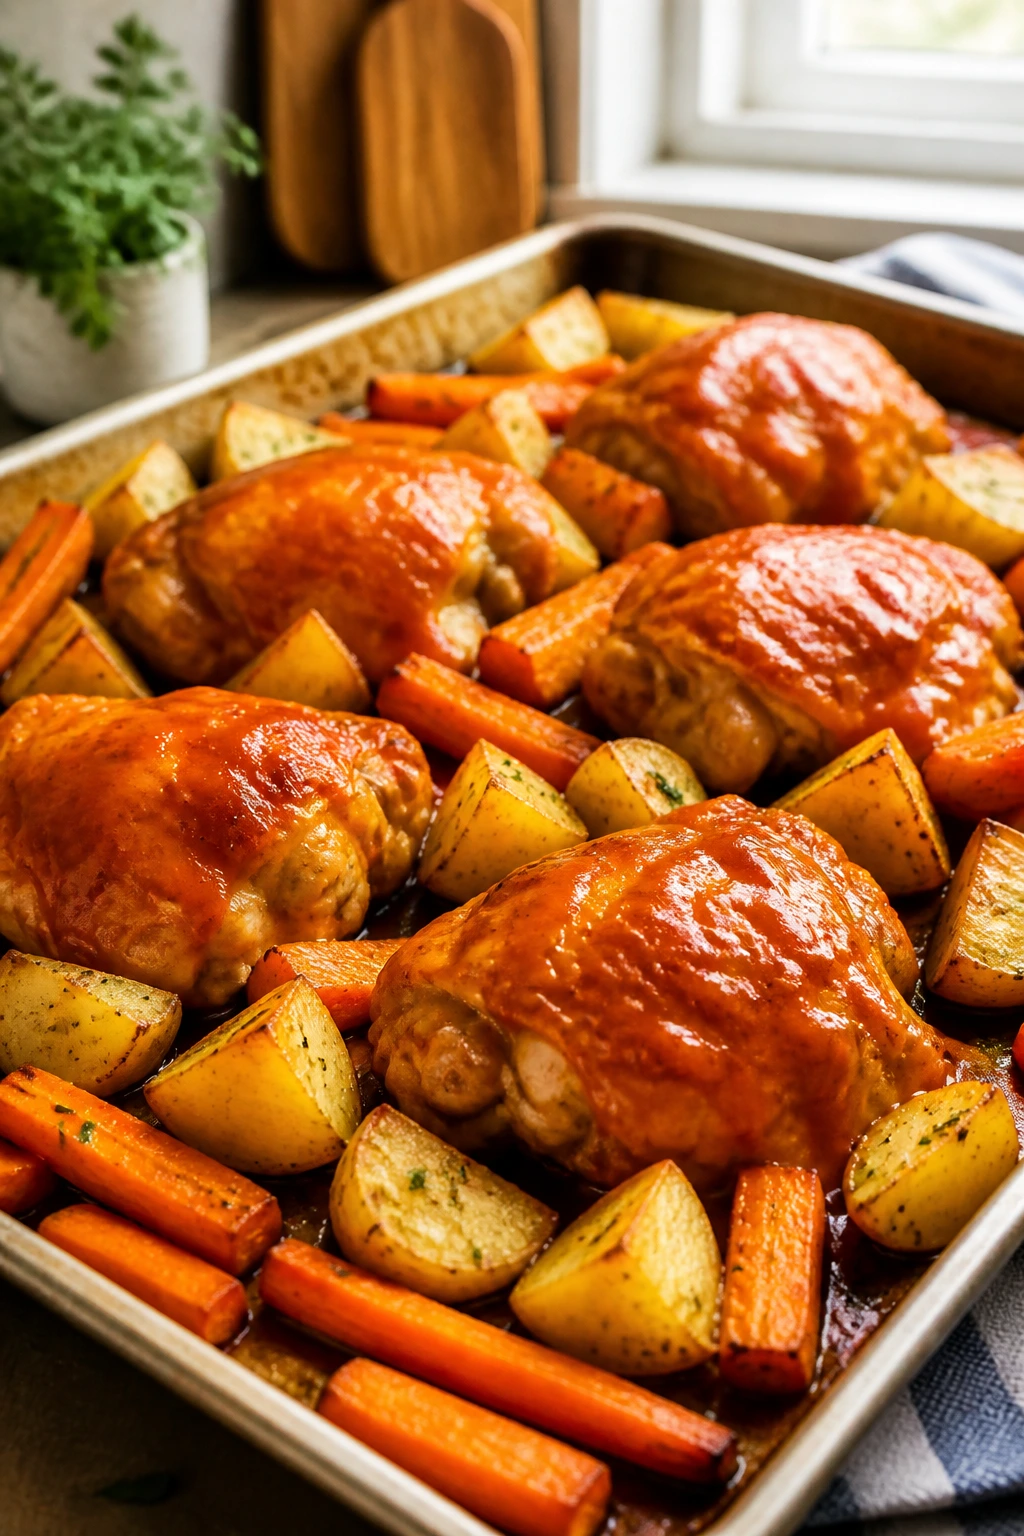
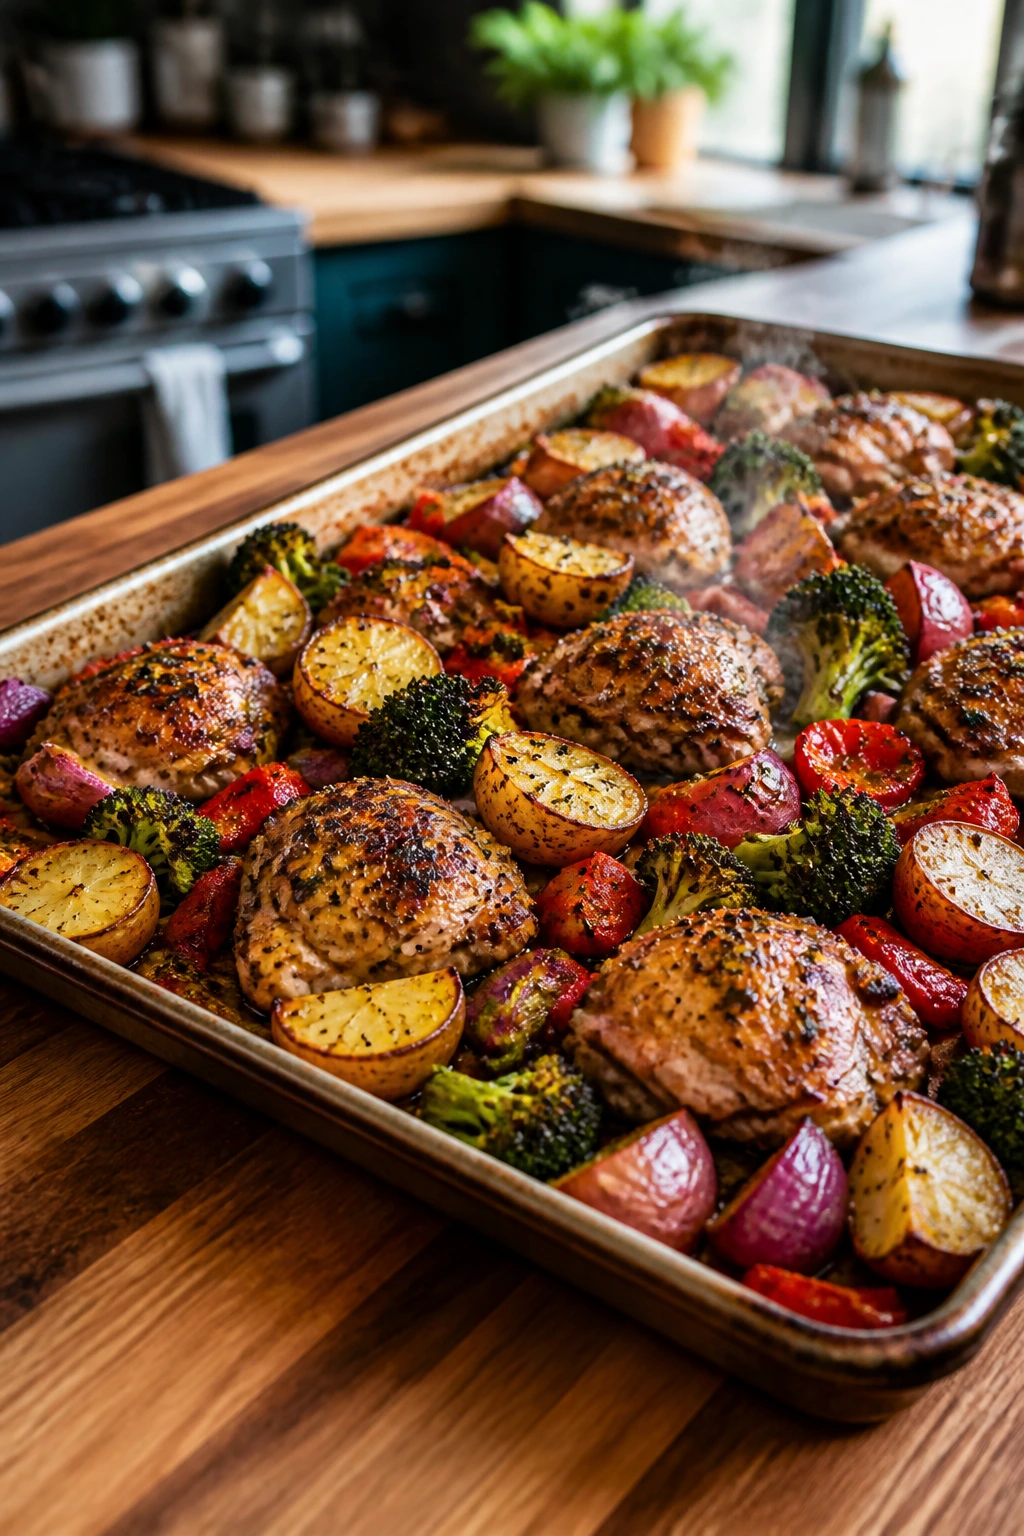
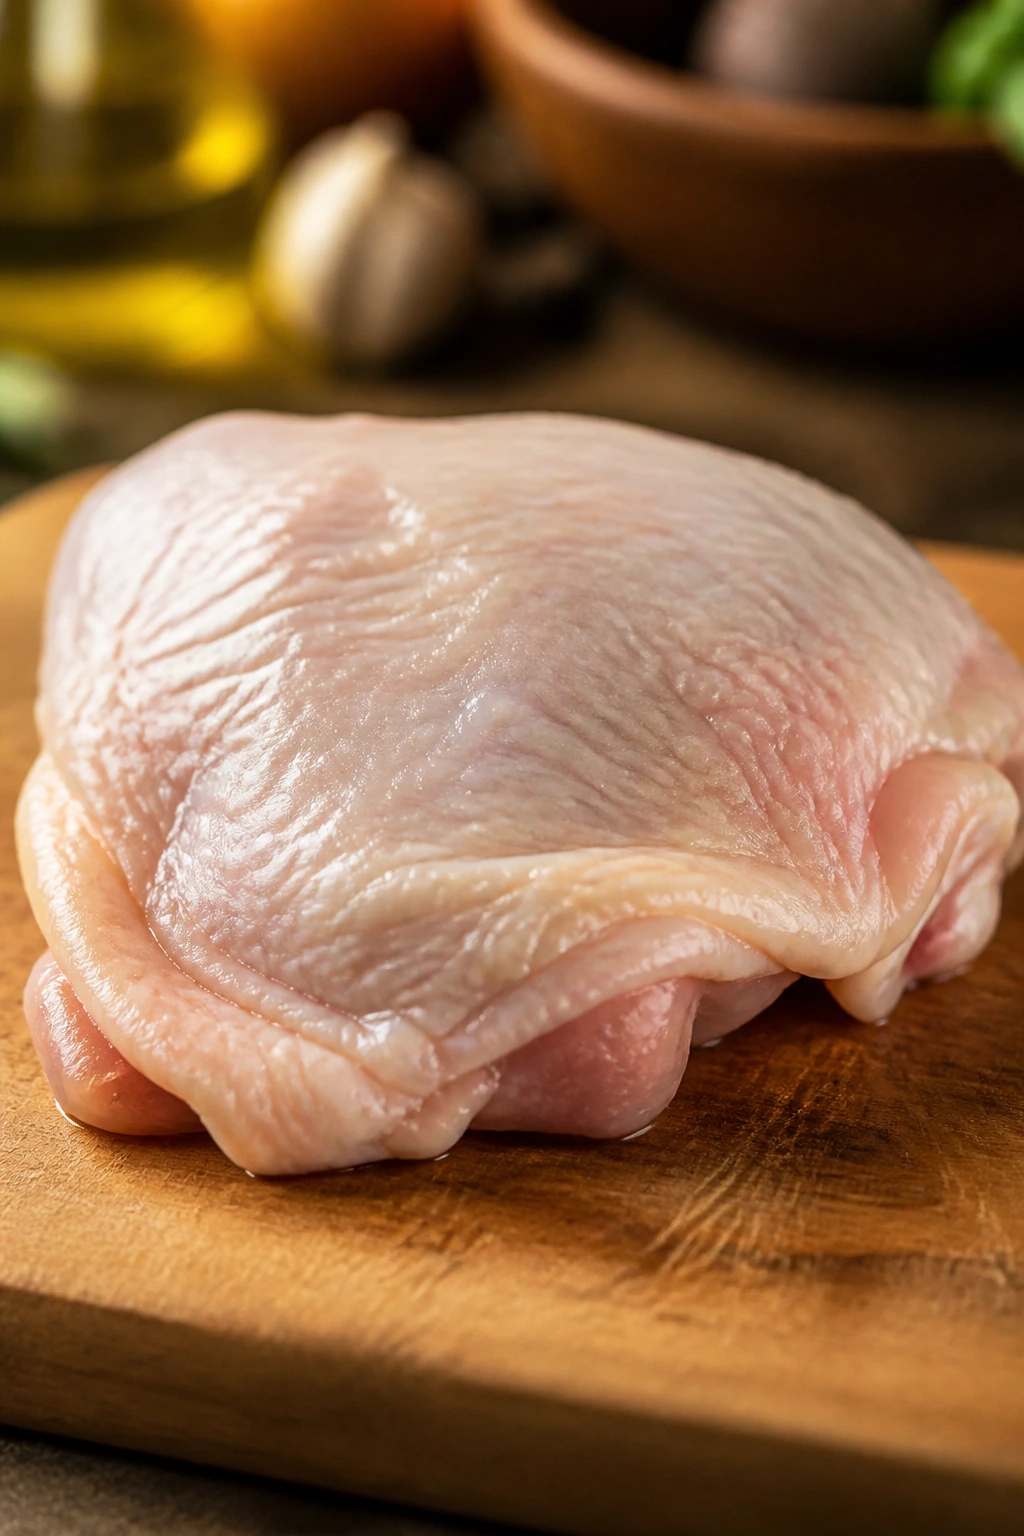
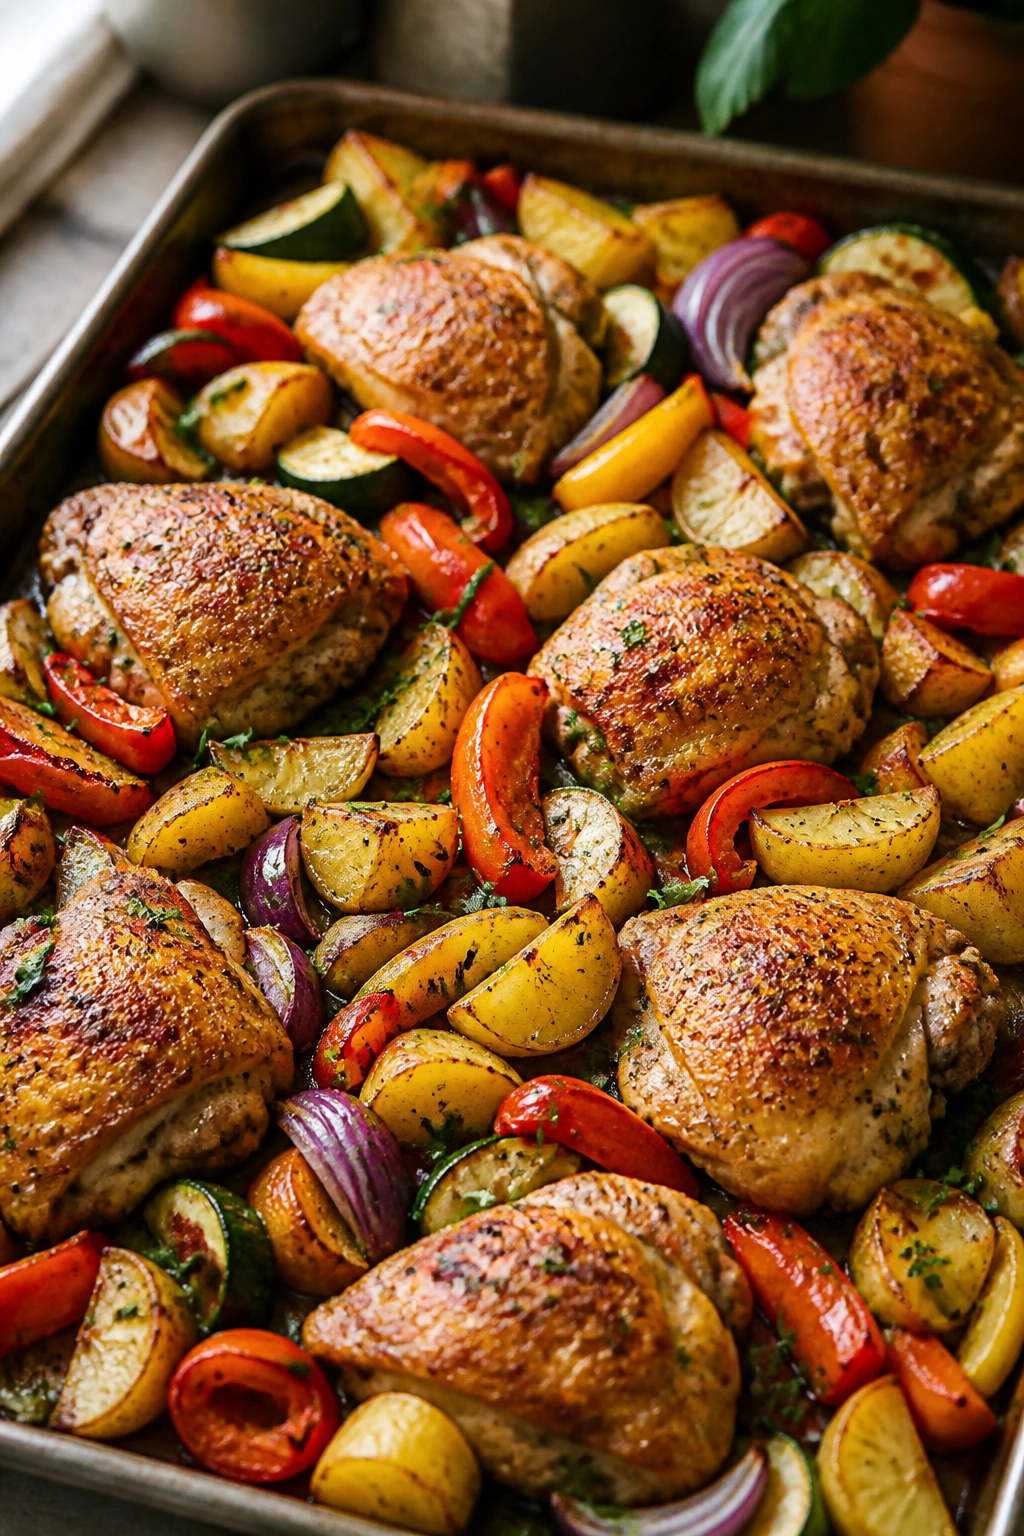
1. Lemon-Garlic Chicken Thighs with Potatoes and Green Beans
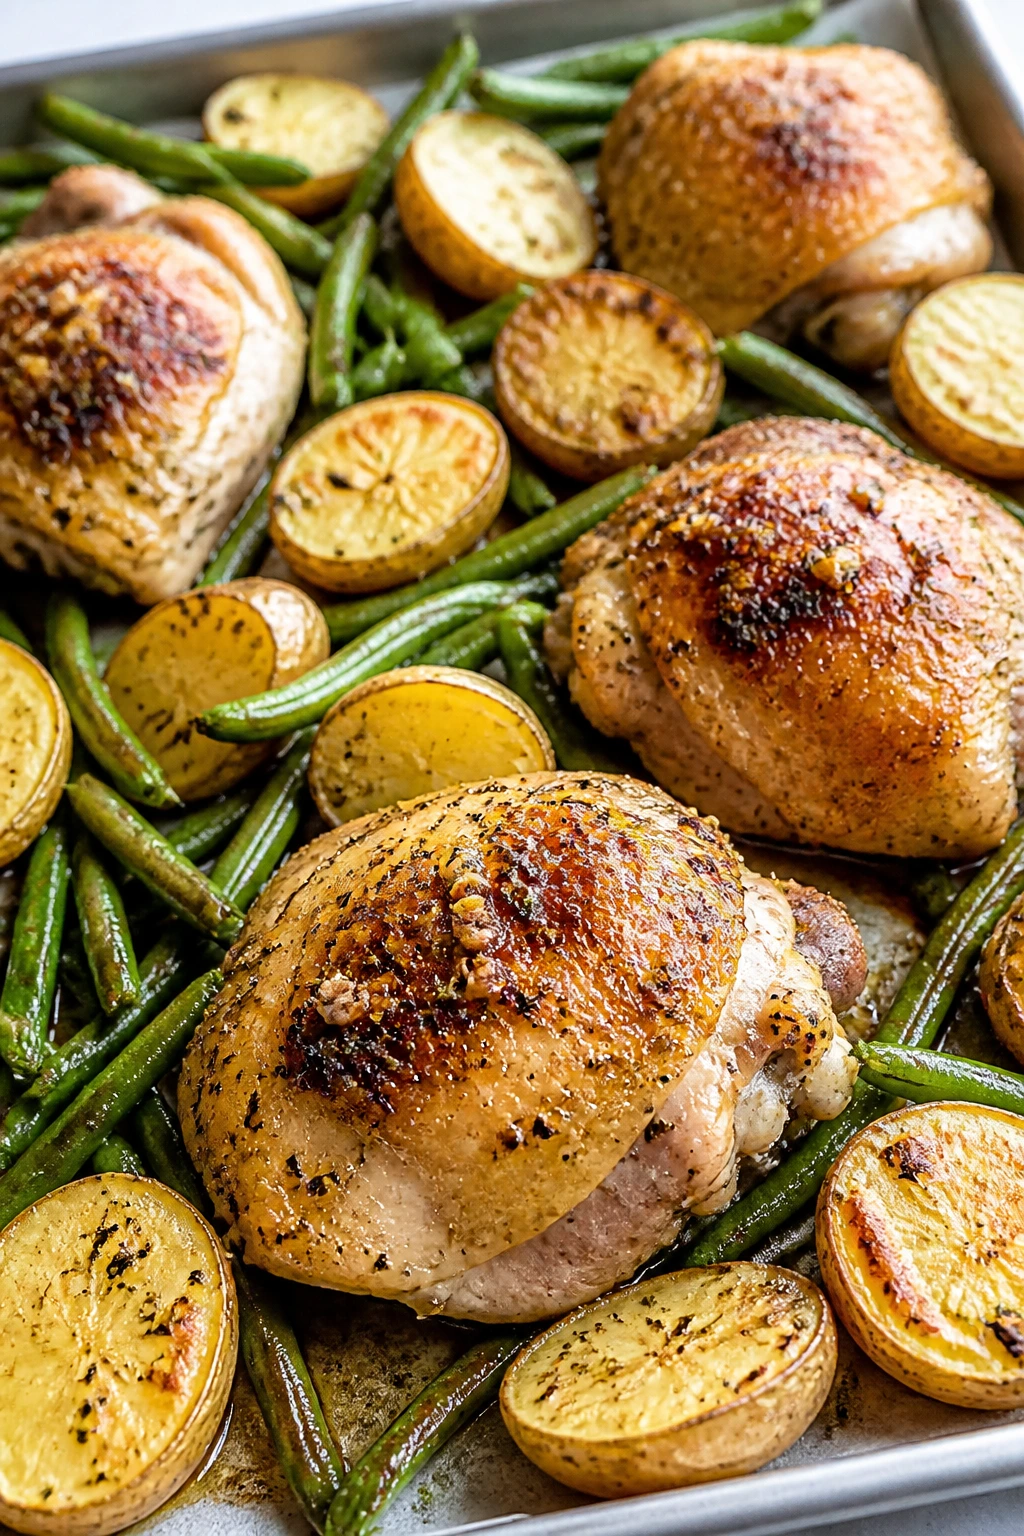
Bright lemon, browned chicken skin, and potatoes that come out with crisp edges and soft centers. That combination never gets old, partly because it smells like someone actually cared about dinner. The green beans soak up the lemon-garlic drippings and stay snappy instead of collapsing into mush.
Why It Works:
Chicken thighs are the smart move for a big-family sheet pan dinner because they stay juicy even if the tray sits in the oven a few minutes too long. Potatoes go in first so they can get a head start, and green beans join later so they keep their color and bite. A quick lemon-Dijon-garlic coating pulls everything together without needing a sauce pan.
Key Ingredients:
- 2½ lbs bone-in, skin-on chicken thighs
- 2 lbs baby potatoes, halved
- 1 lb green beans, trimmed
- 3 tbsp olive oil
- 4 garlic cloves, minced
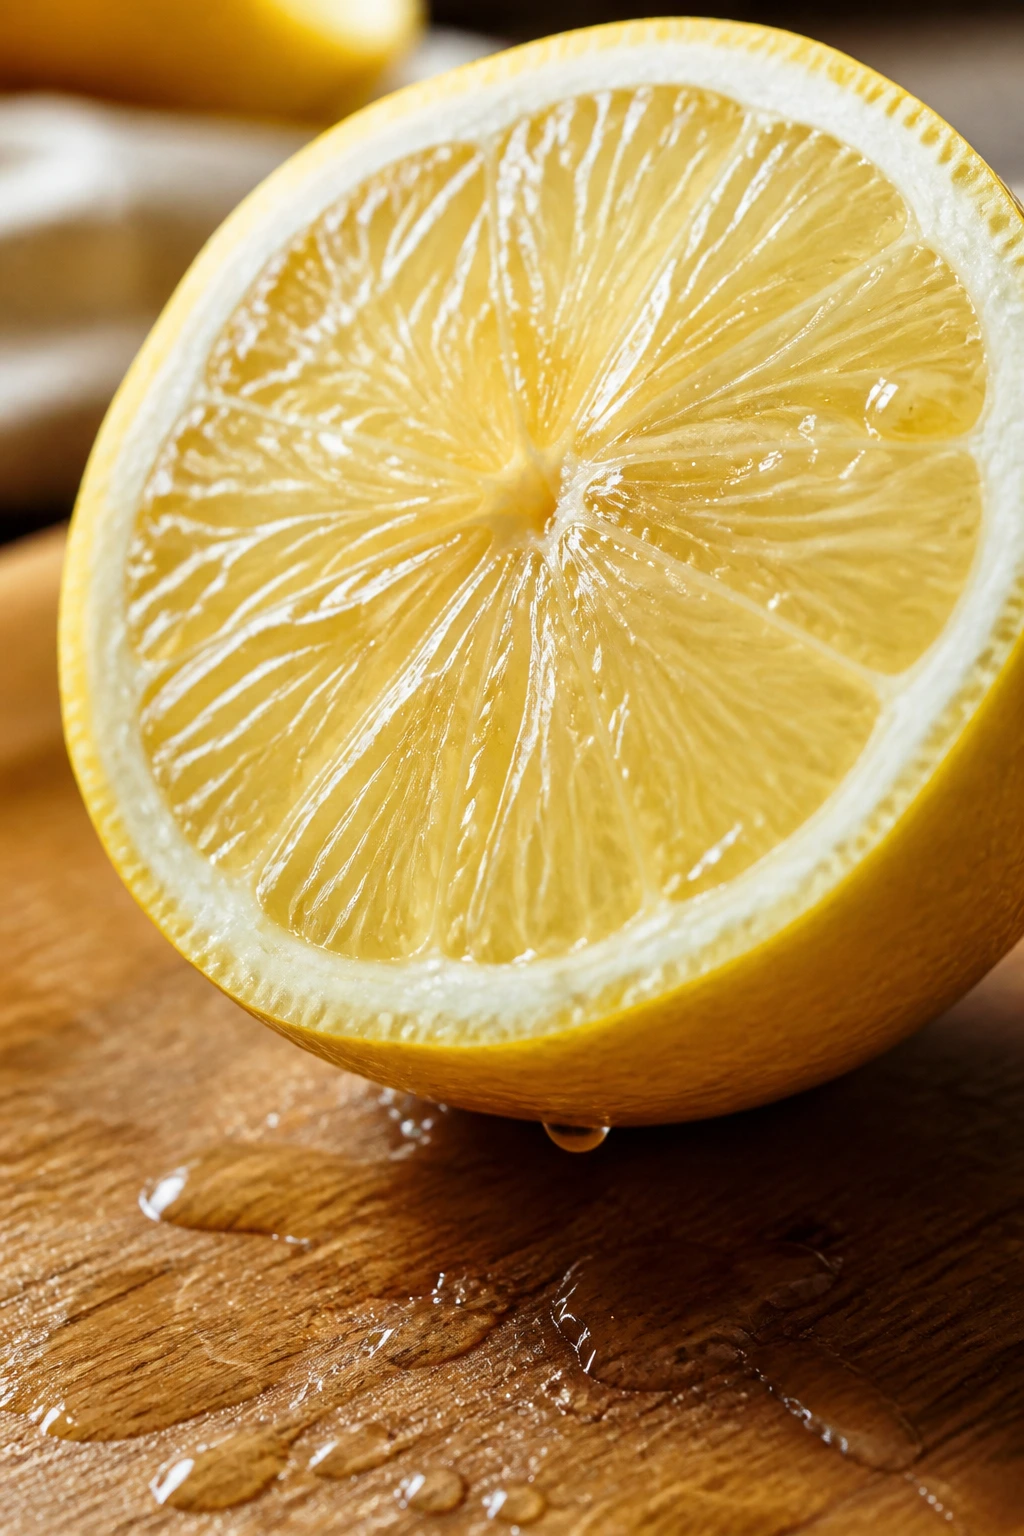
- Zest and juice of 2 lemons
- 1 tbsp Dijon mustard
- 2 tsp kosher salt
- 1 tsp black pepper
- 1 tsp paprika
Quick Steps:
- Preheat the oven to 425°F and line a large rimmed sheet pan with parchment.
- Toss the potatoes with half the oil, half the garlic, 1 teaspoon salt, ½ teaspoon pepper, and the paprika.
- Roast the potatoes for 20 minutes, until the edges start to brown.
- Pat the chicken thighs dry, then coat them with the remaining oil, lemon zest and juice, Dijon, garlic, salt, and pepper.
- Nestle the chicken onto the pan, add the green beans, and roast 20 to 25 minutes more, until the chicken reaches 165°F and the potatoes are tender.
- Broil for 1 to 2 minutes if you want extra crisp skin, then finish with parsley.
Tips and Variations:
- Add lemon slices in the last 10 minutes for a stronger citrus note.
- Swap green beans for asparagus if the stalks are thick enough to hold up.
- A handful of chopped parsley or dill right before serving makes the tray taste fresher.
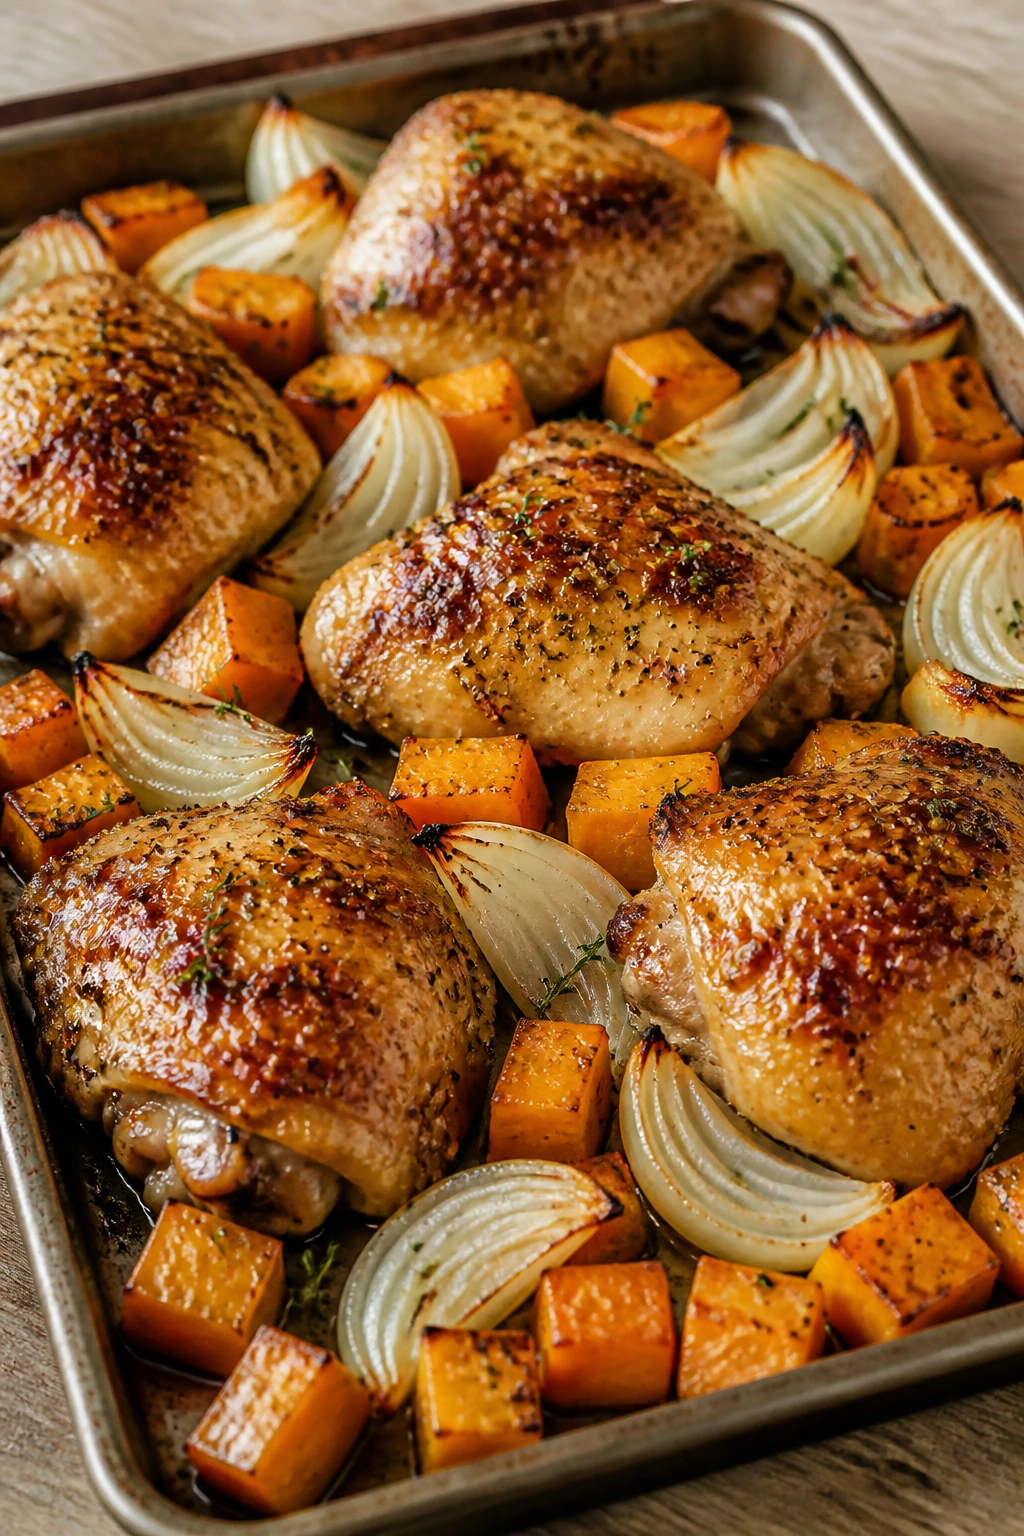
2. BBQ Chicken with Sweet Potatoes and Red Onions
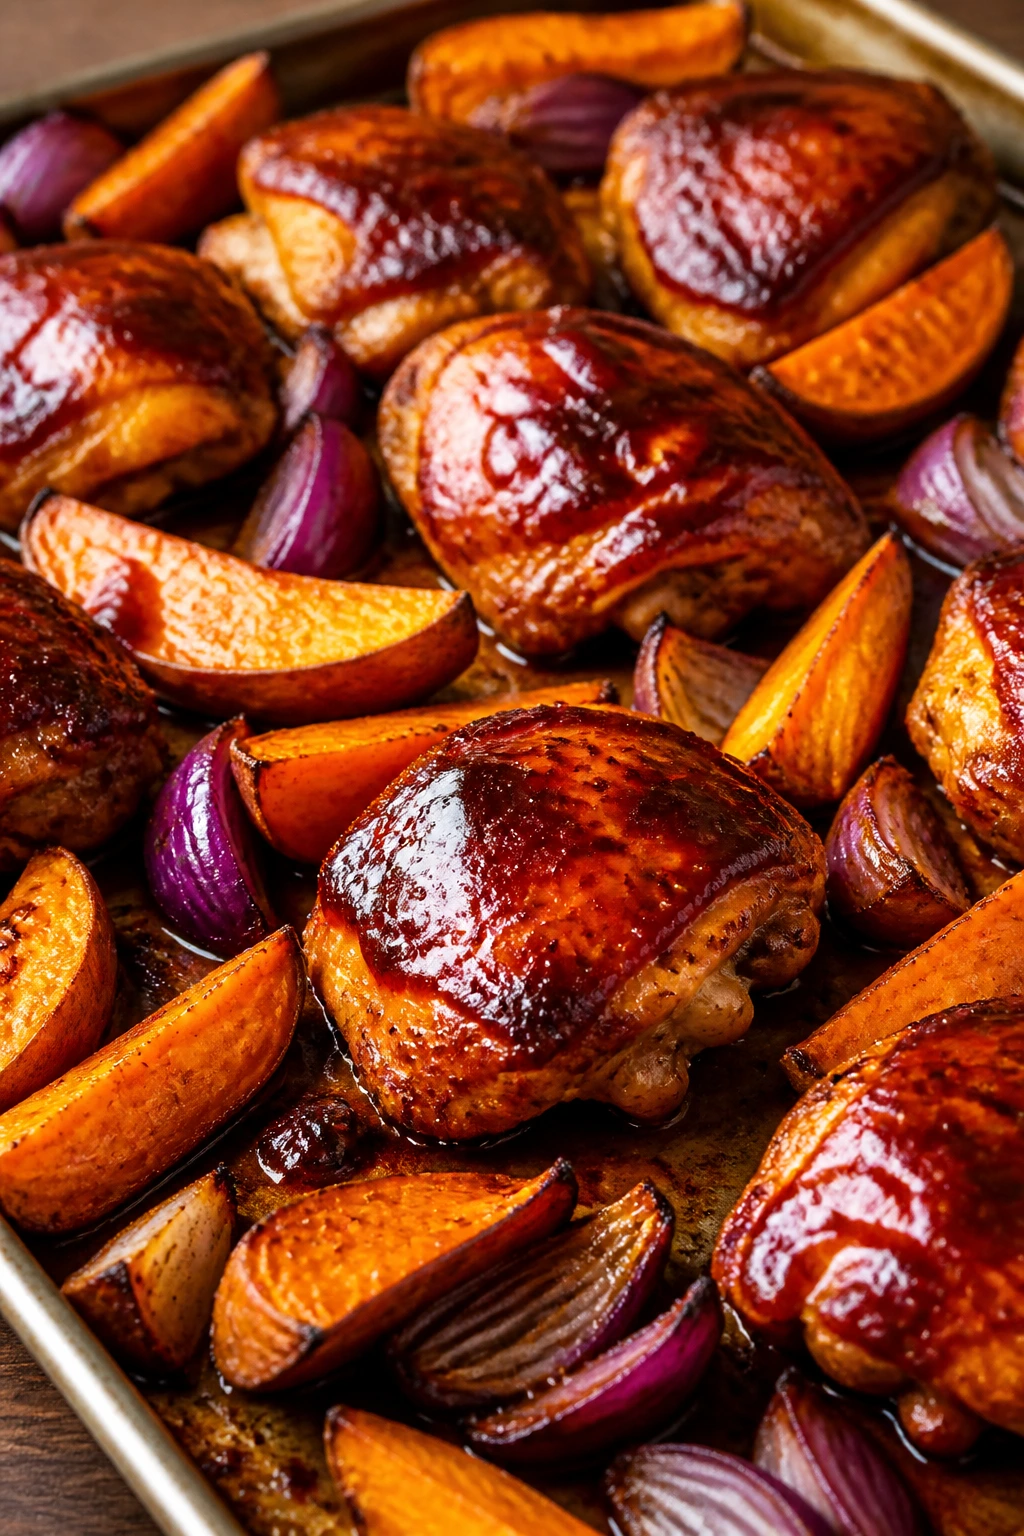
This one tastes like a backyard dinner without the grill smoke and without the weather argument. Sweet potatoes caramelize into soft, sticky wedges, red onions go jammy at the edges, and the BBQ sauce turns glossy on the chicken. It’s the tray I’d make when I need something obvious in the best possible way.
Why It Works:
Sweet potatoes need a little more time than chicken, so they go in early and roast until they start to brown before the meat joins them. A thicker BBQ sauce clings better in the oven than a thin, sugary one that puddles on the pan. Chicken thighs give you room to breathe; chicken breasts work too, but they ask for closer timing and a lower sigh count.
Key Ingredients:
- 2½ lbs boneless, skinless chicken thighs
- 2 large sweet potatoes, peeled and cut into 1-inch wedges
- 2 red onions, cut into thick wedges
- ¾ cup BBQ sauce
- 2 tbsp olive oil
- 1 tsp smoked paprika
- 1 tsp garlic powder
- 1½ tsp kosher salt
- ½ tsp black pepper
Quick Steps:
- Heat the oven to 425°F and oil a rimmed sheet pan lightly.
- Toss the sweet potatoes and onions with olive oil, smoked paprika, garlic powder, salt, and pepper.
- Roast the vegetables for 15 minutes, until the potatoes start to soften at the edges.
- Coat the chicken thighs with half the BBQ sauce, then arrange them on the pan with the vegetables.
- Roast 18 to 22 minutes more, brushing on the remaining sauce during the last 5 minutes.
- Let the chicken rest for 5 minutes before serving so the juices stay put.
Tips and Variations:
- Add 1 cup frozen corn in the last 8 minutes if you want a sweeter, more filling tray.
- Use boneless chicken breasts only if you check them early; they dry out faster than thighs.
- A sprinkle of sliced scallions gives the finished tray a sharper edge.
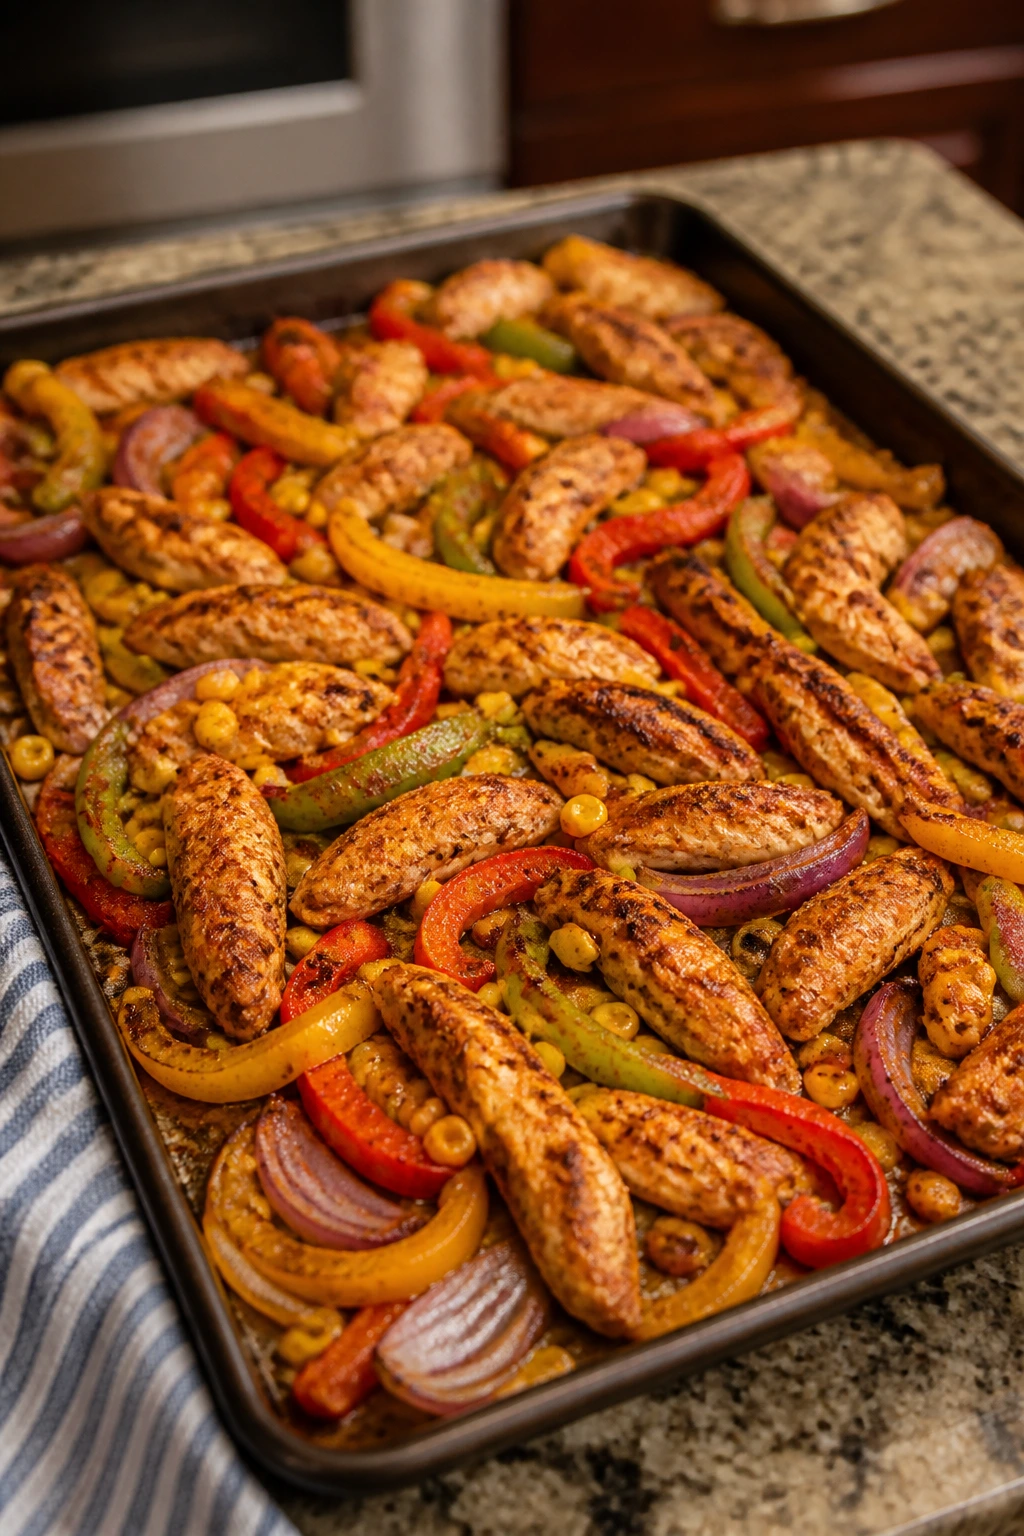
3. Sausage, Peppers, and Baby Potatoes
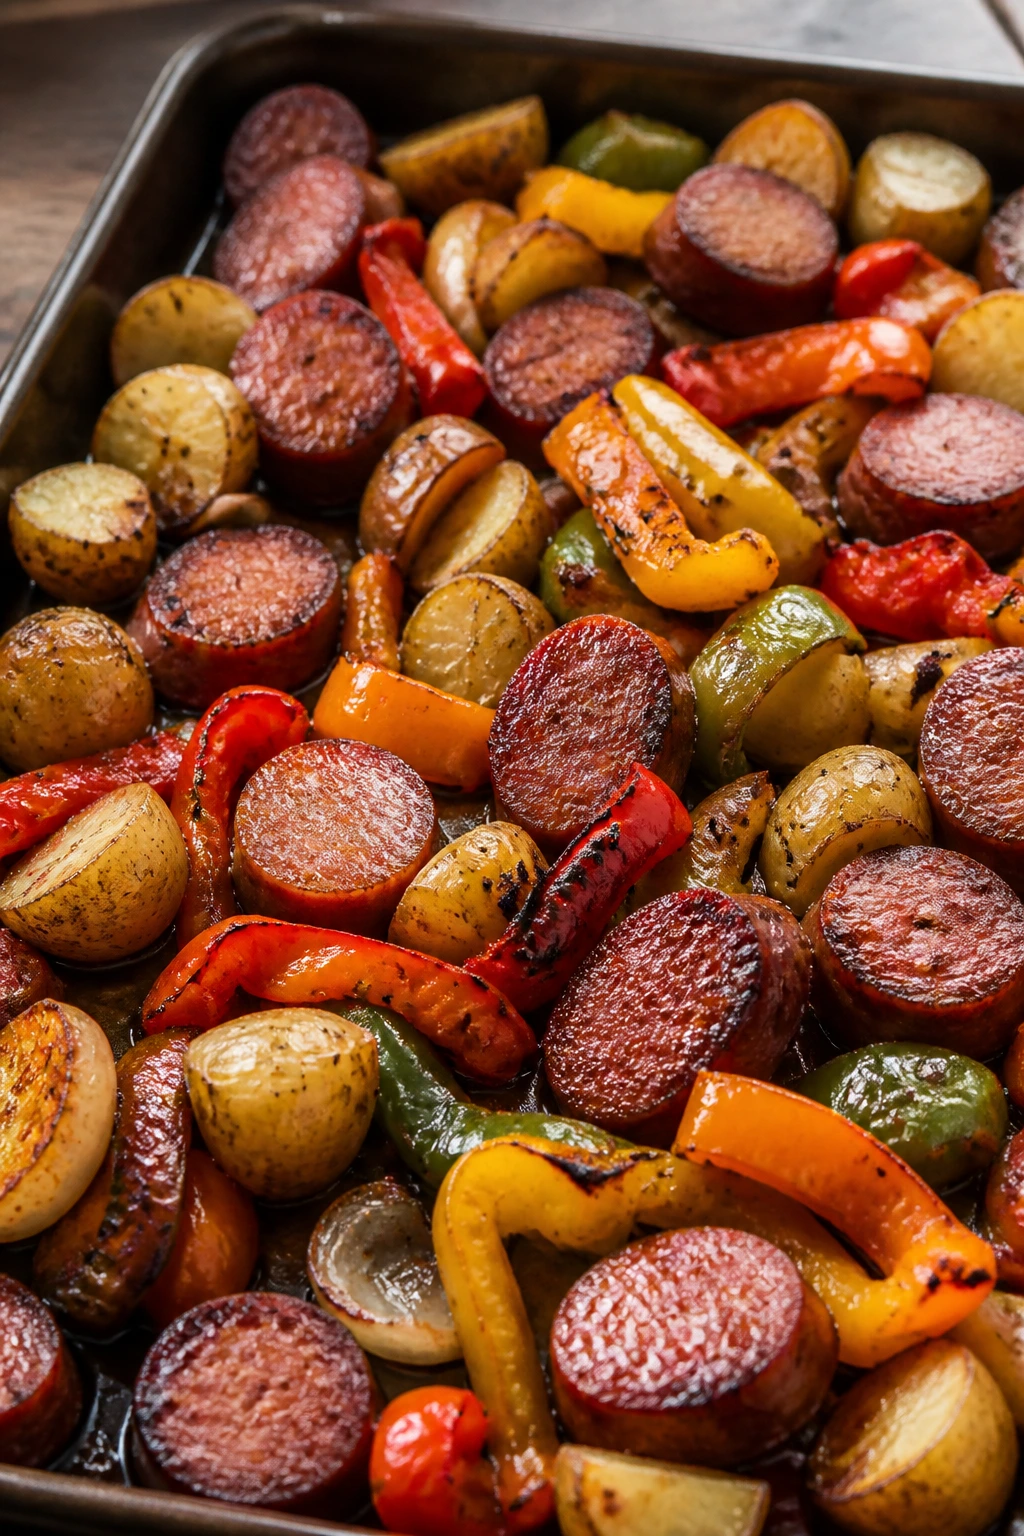
This is the dependable tray dinner that never asks for applause. Smoked sausage gives you built-in seasoning, peppers turn sweet and soft, and baby potatoes pick up all the browned bits that fall off the sausage. It smells like a weeknight should smell: garlic, onions, and something savory enough to make the whole kitchen drift toward the oven.
Why It Works:
Fully cooked sausage needs less time than raw meat, which makes it perfect for sheet pan cooking. Baby potatoes get enough surface area to crisp if you cut them in half and start them first. The vegetables roast in the sausage fat, which is exactly the sort of thing that makes a simple dinner taste more complete than it has any right to.
Key Ingredients:
- 1½ lbs smoked sausage, sliced into ½-inch rounds
- 2 lbs baby potatoes, halved
- 3 bell peppers, sliced into strips
- 1 large yellow onion, sliced
- 3 tbsp olive oil
- 2 tsp Italian seasoning
- 1 tsp garlic powder
- 1½ tsp kosher salt
- ½ tsp black pepper
Quick Steps:
- Preheat the oven to 425°F.
- Toss the potatoes with half the oil, Italian seasoning, garlic powder, salt, and pepper.
- Roast the potatoes for 15 minutes, until they start to soften and brown underneath.
- Add the sausage, peppers, and onion, then drizzle with the remaining oil and toss lightly on the pan.
- Roast 15 to 18 minutes more, stirring once halfway through, until the peppers are tender and the sausage edges are browned.
- Serve hot with mustard or a spoonful of pesto on the side if you want a sharper finish.
Tips and Variations:
- Use kielbasa, andouille, or chicken sausage depending on how much heat your table likes.
- Cut the peppers thick so they keep some texture.
- A splash of red wine vinegar right before serving wakes up the whole tray.
4. Teriyaki Salmon with Broccoli and Snap Peas
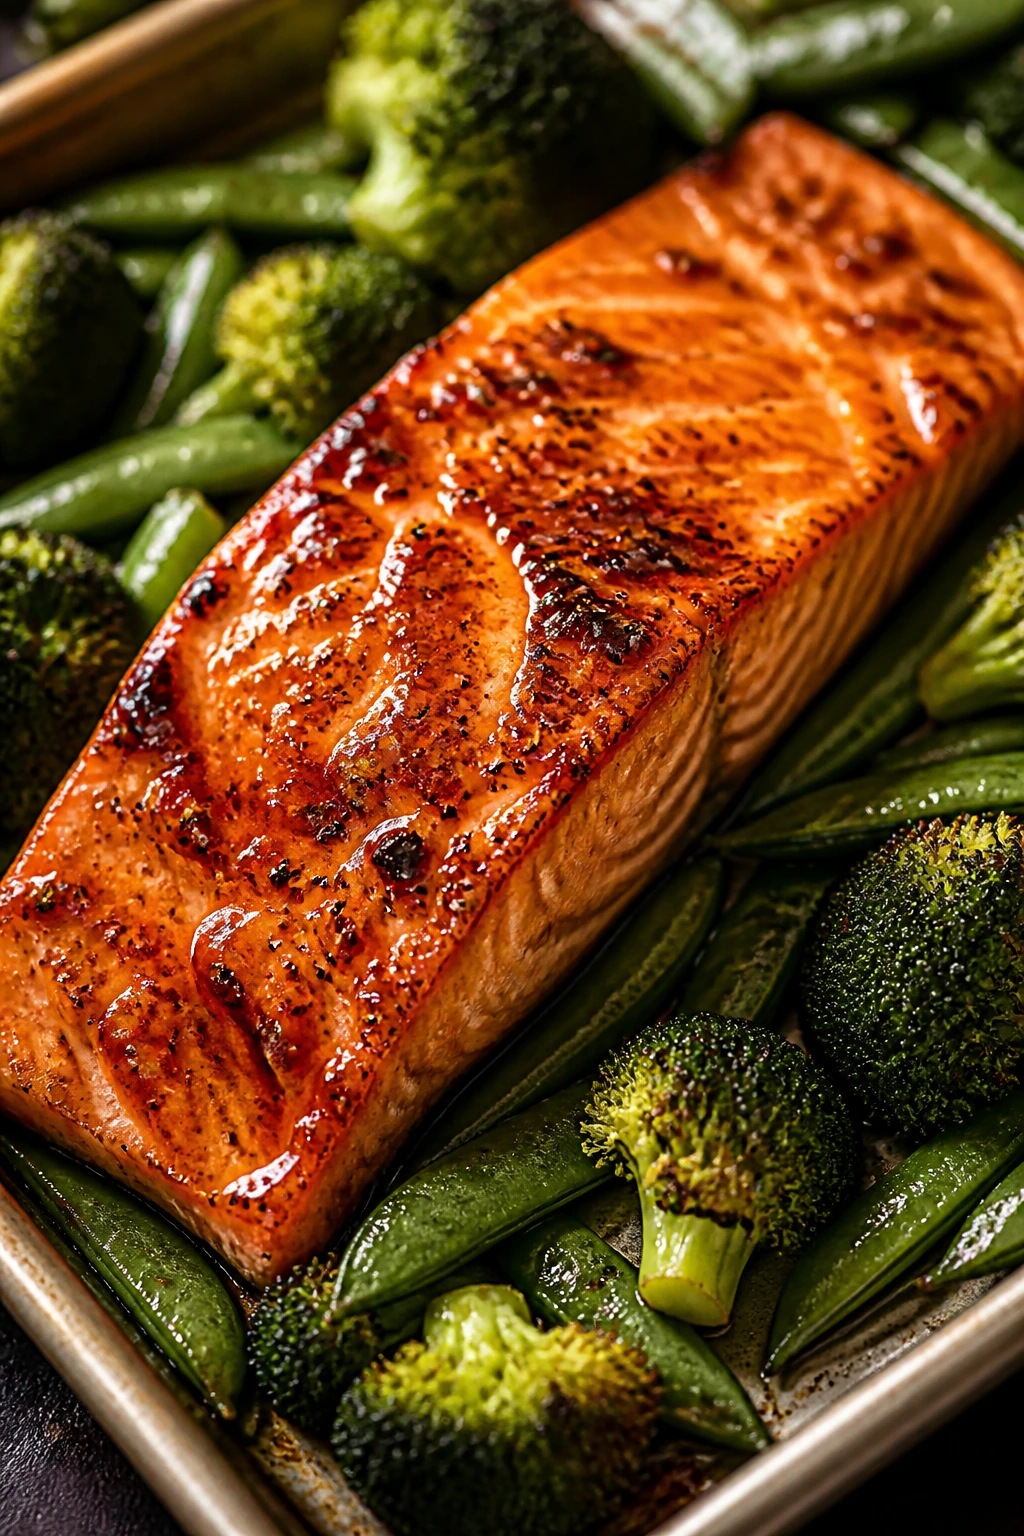
Salmon on a sheet pan can go bland fast if you treat it like chicken. Give it a sticky teriyaki glaze, keep the vegetables crisp, and you get a dinner that feels light without being flimsy. The broccoli gets little charred edges, the snap peas stay bright, and the salmon flakes into glossy pieces that disappear fast.
Why It Works:
Salmon cooks fast, so the vegetables need a head start or they’ll still be hard when the fish is done. A thicker teriyaki glaze—store-bought or homemade—reduces in the oven and clings to the fish instead of sliding off. The short cook time is the whole point here, which makes this one especially handy when you need dinner fast and still want enough food to feed a crowd.
Key Ingredients:
- 2½ lbs salmon fillet, cut into 6 portions
- 2 large heads broccoli, cut into florets
- 12 oz snap peas, trimmed
- ½ cup teriyaki sauce
- 1 tbsp sesame oil
- 2 tsp grated fresh ginger
- 2 garlic cloves, minced
- 1 tbsp sesame seeds
- 2 scallions, sliced
Quick Steps:
- Heat the oven to 400°F and line a sheet pan with foil or parchment.
- Toss the broccoli with sesame oil, ginger, garlic, and 2 tablespoons teriyaki sauce.
- Roast the broccoli for 10 minutes, until it starts to brown on the edges.
- Add the salmon and snap peas to the pan, then brush the fish with the remaining teriyaki sauce.
- Roast 10 to 12 minutes more, until the salmon flakes easily and the thickest part reaches 125 to 130°F for medium or 145°F for fully cooked.
- Finish with sesame seeds and scallions.
Tips and Variations:
- Dry the salmon well before glazing so the sauce sticks.
- Add cooked rice underneath if you want a more filling plate.
- A squeeze of lime at the end brightens the sweet-salty glaze.
5. Greek Chicken with Tomatoes, Zucchini, and Feta
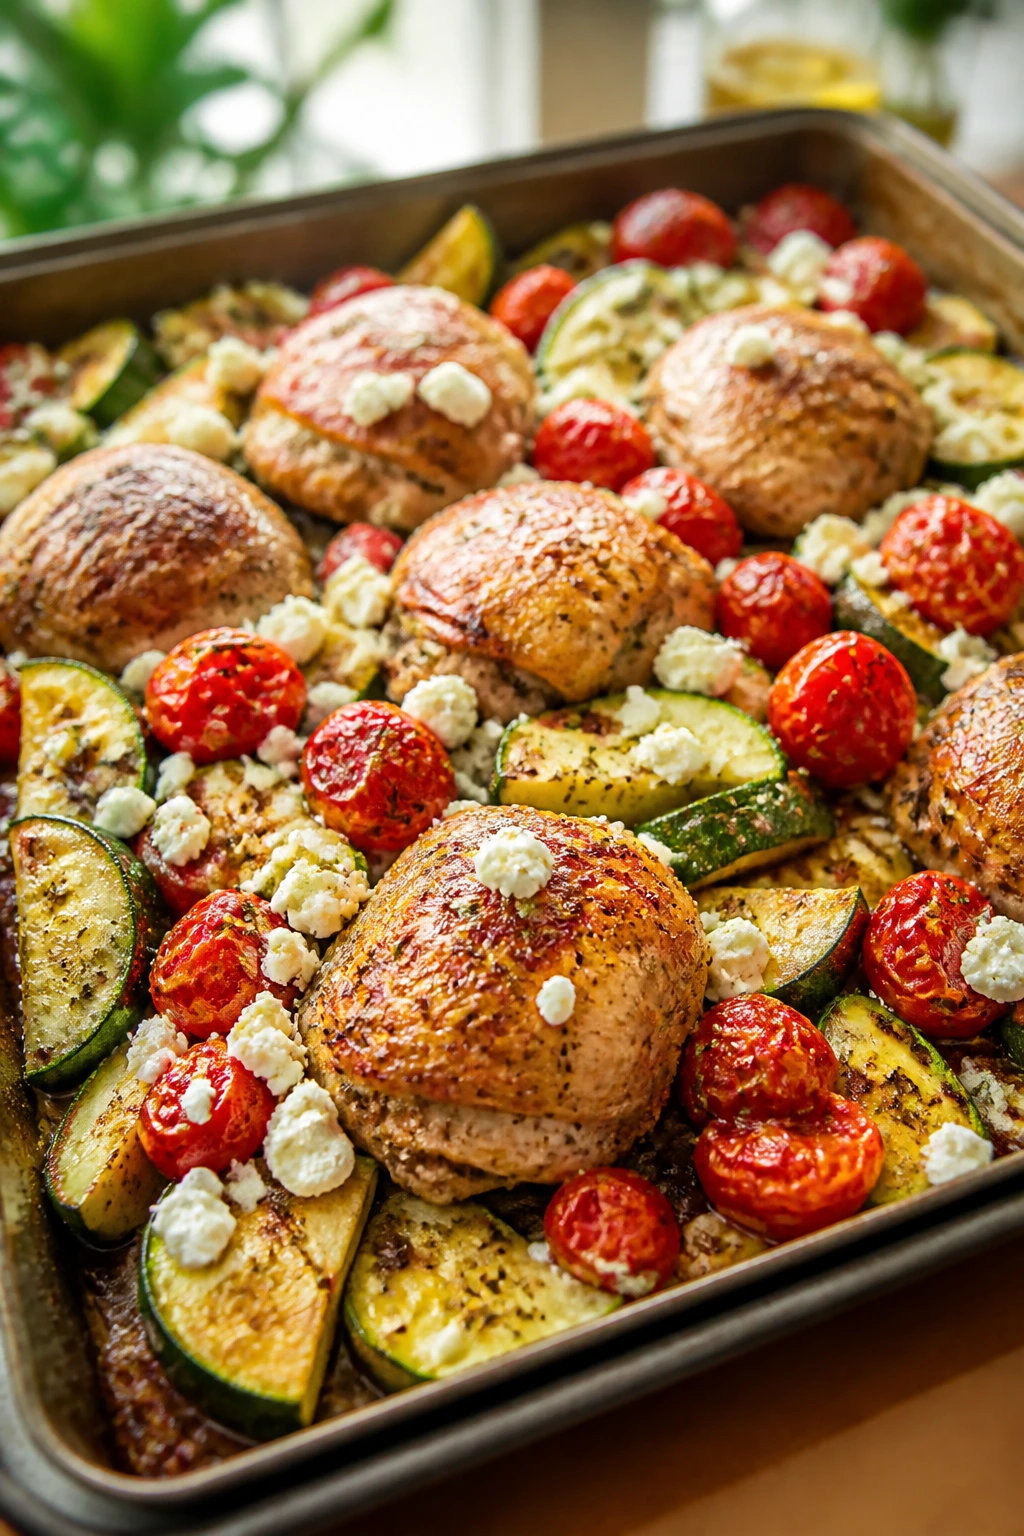
This tray tastes like summer tomatoes and oregano even when the weather says otherwise. The chicken roasts in olive oil and lemon, the zucchini softens at the edges, and the tomatoes burst into little pockets of sauce. Feta goes on at the end so it stays crumbly instead of disappearing into the pan.
Why It Works:
Greek-style sheet pan dinners work because the ingredients like the same hot oven and the same olive-oil-heavy seasoning. Tomatoes release enough juice to keep the tray from drying out, while zucchini brings a soft, almost silky texture. Feta should be added after roasting; if it goes in too early, it melts into the vegetables and loses the salty punch that makes the dish feel complete.
Key Ingredients:
- 2½ lbs boneless, skinless chicken thighs
- 2 medium zucchini, cut into thick half-moons
- 2 cups cherry tomatoes
- 1 red onion, cut into wedges
- 3 tbsp olive oil
- 2 tsp dried oregano
- 4 garlic cloves, minced
- Juice of 1 lemon
- 1 tsp kosher salt
- ¾ cup crumbled feta
Quick Steps:
- Preheat the oven to 425°F.
- Toss the zucchini, tomatoes, and onion with olive oil, oregano, garlic, salt, and lemon juice.
- Roast the vegetables for 12 to 15 minutes until the tomatoes begin to blister.
- Nestle the chicken thighs into the pan and roast 20 to 25 minutes more, until the chicken reaches 165°F.
- Scatter the feta over the tray and let it sit for 2 minutes so it softens slightly.
- Serve with warm pita or rice.
Tips and Variations:
- Add Kalamata olives if your family likes a saltier finish.
- Chicken breasts can work, but keep them thin and watch the clock.
- Fresh dill at the end gives the tray a greener, brighter finish.
6. Parmesan Ranch Pork Chops with Carrots and Potatoes
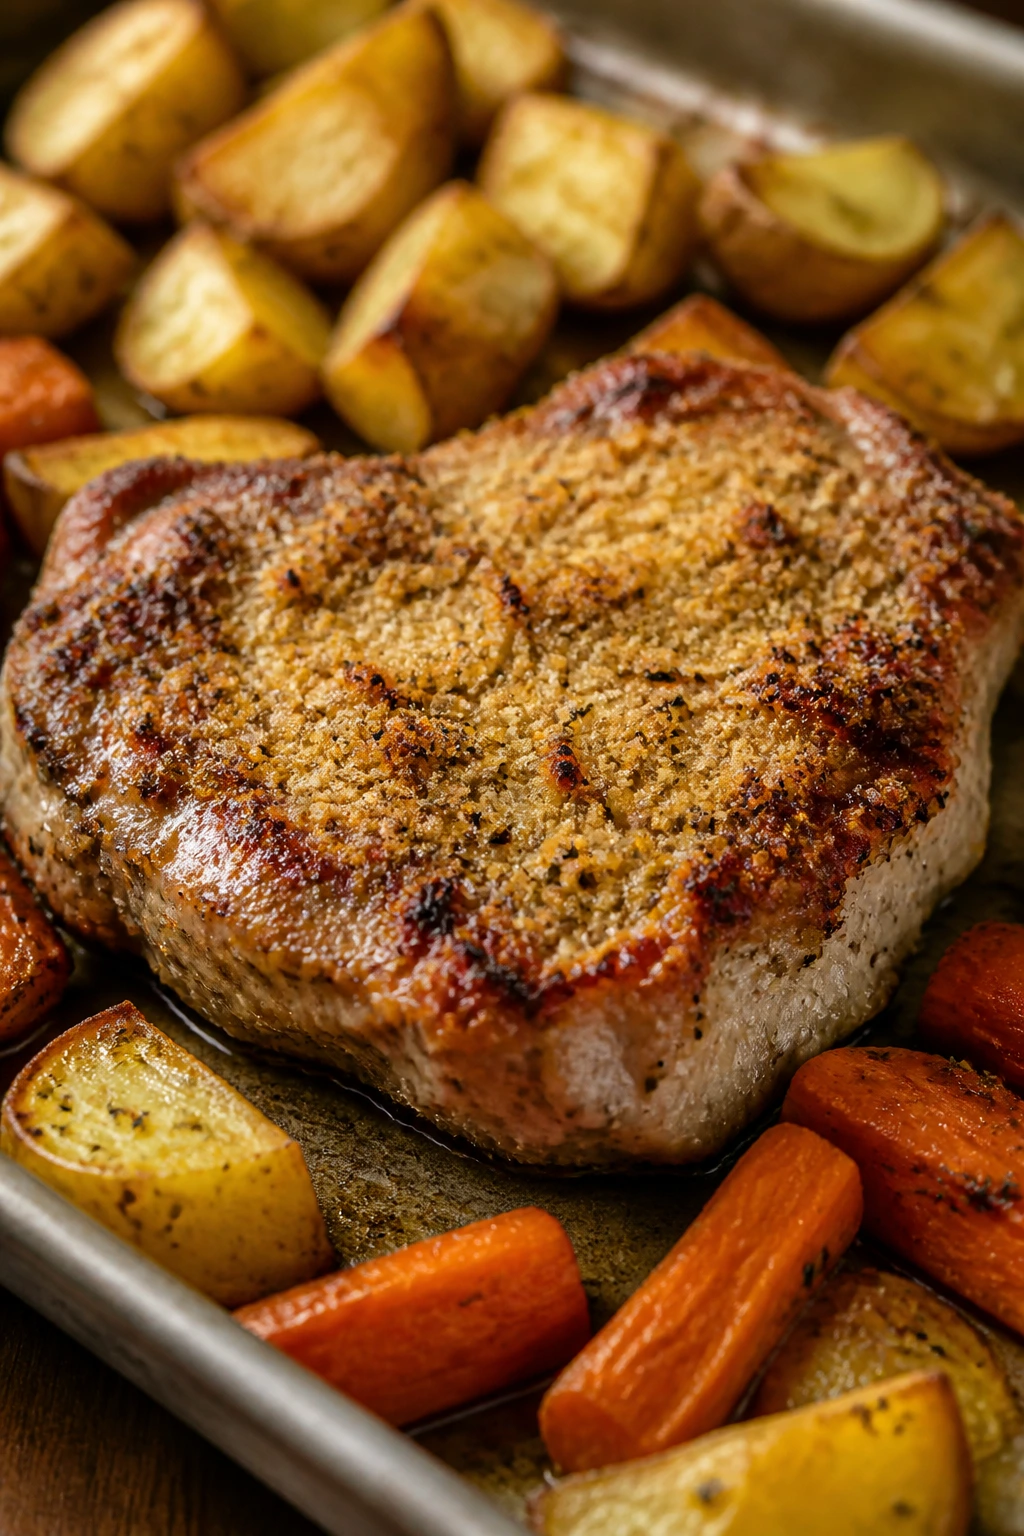
Pork chops can be dry if you blink at them wrong. These stay much more interesting because the Parmesan-ranch coating gives the surface a salty crust and the vegetables roast underneath, catching every crumb that falls off. The carrots go sweet and the potatoes go crisp, which is a better use of a sheet pan than most of us give it credit for.
Why It Works:
Boneless pork chops cook quickly, and a breaded or seasoned coating helps protect them from drying out. Carrots and potatoes need a little time before the meat goes in, so the tray gets staged in two acts. Parmesan adds flavor and helps the top brown in a way plain seasoning cannot.
Key Ingredients:
- 6 boneless pork chops, about 1 inch thick
- 1½ lbs baby potatoes, halved
- 1 lb carrots, cut into 2-inch pieces
- 2 tbsp olive oil
- 2 tbsp ranch seasoning
- ½ cup grated Parmesan
- 1 tsp garlic powder
- 1 tsp kosher salt
- ½ tsp black pepper
Quick Steps:
- Heat the oven to 425°F.
- Toss the potatoes and carrots with oil, half the ranch seasoning, garlic powder, salt, and pepper.
- Roast the vegetables for 15 minutes, until they start to brown.
- Rub the pork chops with the remaining ranch seasoning and press the Parmesan onto both sides.
- Add the chops to the pan and roast 12 to 15 minutes, until the pork reaches 145°F.
- Rest for 5 minutes before serving so the juices don’t run onto the pan.
Tips and Variations:
- Thin chops cook faster, so cut the time by a few minutes if needed.
- A little Dijon brushed on before the Parmesan gives the crust more bite.
- Fresh thyme works nicely if you want the tray to taste less ranch-heavy.
7. Taco-Spiced Chicken Fajita Sheet Pan
This is the tray I reach for when everyone wants dinner to feel a little louder. Chicken strips, peppers, and onions roast until they’re browned but still juicy, and the spice mix gives off that toasted cumin smell that makes people wander into the kitchen before you call them. Finish it with lime and cilantro, and you’ve got the sort of dinner that disappears into tortillas fast.
Why It Works:
Sliced chicken cooks fast, which makes it perfect for a high-heat sheet pan dinner. Peppers and onions release just enough moisture to season the pan without turning the whole thing soggy. If you add black beans or corn, do it near the end so they warm through without drying out.
Key Ingredients:
- 2½ lbs boneless chicken thighs or breasts, sliced into strips
- 3 bell peppers, sliced
- 1 large red onion, sliced
- 1 cup corn kernels
- 1 can black beans, drained and rinsed
- 3 tbsp olive oil
- 2 tbsp taco seasoning
- Juice of 1 lime
- 1 tsp kosher salt
- ¼ cup chopped cilantro
Quick Steps:
- Preheat the oven to 425°F.
- Toss the chicken, peppers, and onion with oil, taco seasoning, and salt.
- Spread everything in a single layer and roast for 12 minutes.
- Add the corn and black beans, then roast 10 to 12 minutes more, until the chicken reaches 165°F and the vegetables have browned edges.
- Squeeze lime juice over the tray and scatter cilantro on top.
- Serve with warm tortillas, sour cream, salsa, or shredded cheese.
Tips and Variations:
- Cut the chicken in even strips so it finishes at the same time.
- A few jalapeño slices add heat without changing the whole tray.
- Leftovers make excellent burrito bowls the next day.
8. Kielbasa, Apples, and Brussels Sprouts

Sweet apples and smoky sausage sound like an odd pair until they hit the oven together. Then it makes complete sense. Brussels sprouts crisp at the edges, apples soften just enough to keep their shape, and the whole tray smells like maple, pepper, and browned sausage.
Why It Works:
Kielbasa is already cooked, so it behaves beautifully in the oven and doesn’t need much time. Brussels sprouts need to be cut in half so the flat side can brown, and apples should be cut thick so they don’t collapse. A little maple-Dijon glaze ties the sweet and savory parts together without making the tray sticky in the wrong way.
Key Ingredients:
- 1½ lbs kielbasa, sliced on the bias
- 1½ lbs Brussels sprouts, trimmed and halved
- 2 firm apples, cored and cut into wedges
- 1 red onion, sliced
- 2 tbsp olive oil
- 2 tbsp maple syrup
- 1 tbsp Dijon mustard
- 1 tsp kosher salt
- ½ tsp black pepper
Quick Steps:
- Heat the oven to 425°F.
- Toss the Brussels sprouts and onion with oil, salt, and pepper.
- Roast for 15 minutes, until the sprouts start to brown on the cut sides.
- Add the kielbasa and apples, then drizzle with maple syrup mixed with Dijon.
- Roast 10 to 12 minutes more, turning once, until the apples are tender but still intact.
- Serve right away while the sausage is still sizzling.
Tips and Variations:
- Honeycrisp or Pink Lady apples hold their shape well.
- A pinch of crushed red pepper gives the glaze a little edge.
- If your family likes sharper flavors, finish with a splash of apple cider vinegar.
9. Honey Mustard Chicken with Broccoli and Cauliflower
The sauce is the point here. Honey mustard goes glossy in the oven, turns the chicken a little lacquered, and picks up the roasted flavor from broccoli and cauliflower. It tastes familiar in a good way, like something you already trust before the first bite.
Why It Works:
Broccoli and cauliflower roast well together because they like the same temperature and the same amount of time. The honey mustard mixture acts like both seasoning and glaze, which keeps the chicken from drying out and helps the vegetables pick up flavor. This is one of those trays that looks simple but eats like more work went into it than actually did.
Key Ingredients:
- 2½ lbs boneless, skinless chicken thighs
- 1 large head broccoli, cut into florets
- 1 medium head cauliflower, cut into florets
- 3 tbsp olive oil
- 3 tbsp Dijon mustard
- 3 tbsp honey
- 3 garlic cloves, minced
- 1½ tsp kosher salt
- ½ tsp black pepper
- 1 tsp dried thyme
Quick Steps:
- Preheat the oven to 425°F.
- Whisk the Dijon, honey, garlic, salt, pepper, and thyme with half the oil.
- Toss the broccoli and cauliflower with the remaining oil and spread them on the pan.
- Roast the vegetables for 10 minutes, until they start to color.
- Add the chicken and brush it with the honey mustard mixture.
- Roast 20 to 25 minutes more, until the chicken hits 165°F and the vegetables are browned at the edges.
Tips and Variations:
- Add a handful of sliced red onion if you want more sweetness.
- A little whole-grain mustard makes the sauce feel less sugary.
- Serve with rice if you want the tray to stretch farther.
10. Shrimp Fajita Sheet Pan with Peppers and Corn
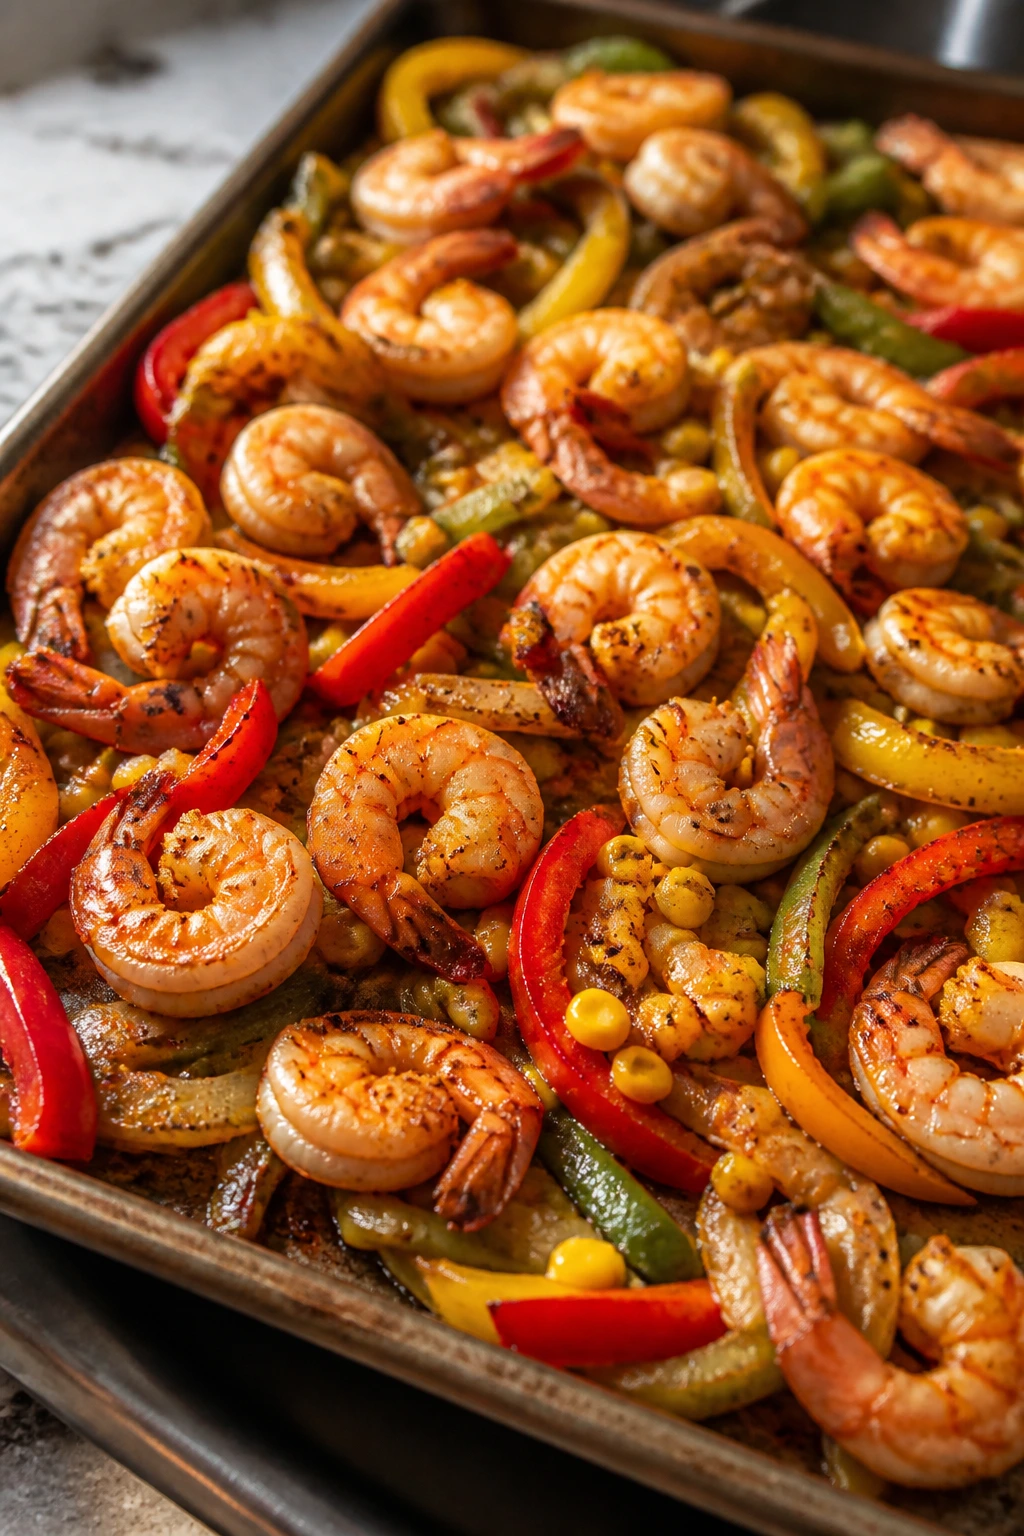
Shrimp needs speed, not patience. That’s what makes this tray useful. The peppers and onions get a head start, the shrimp go in at the end, and the whole thing finishes before anyone has time to ask what’s for dinner again.
Why It Works:
Shrimp overcooks fast, so it should only spend a short time in the oven. Peppers, onions, and corn can handle the longer roast and bring sweetness that balances the spice. The key is dry shrimp and a hot pan; wet shrimp steam, and steaming is not the vibe you want here.
Key Ingredients:
- 2 lbs large shrimp, peeled and deveined
- 3 bell peppers, sliced
- 1 large red onion, sliced
- 1½ cups corn kernels
- 3 tbsp olive oil
- 2 tbsp fajita seasoning
- Juice of 2 limes
- 2 garlic cloves, minced
- ¼ cup chopped cilantro
- Salt, if needed
Quick Steps:
- Heat the oven to 425°F and pat the shrimp dry.
- Toss the peppers, onion, corn, garlic, oil, and fajita seasoning on the sheet pan.
- Roast for 10 minutes, until the peppers begin to soften.
- Add the shrimp in a single layer, then roast 6 to 8 minutes more, until they turn pink and curl into loose C shapes.
- Squeeze lime juice over the tray and top with cilantro.
- Serve with rice, tortillas, or avocado slices.
Tips and Variations:
- If your shrimp are extra large, give them one more minute.
- Frozen shrimp work fine if they’re thawed and dried well.
- A dollop of sour cream cools down the spice without muting it.
11. Mediterranean Sausage and Chickpeas
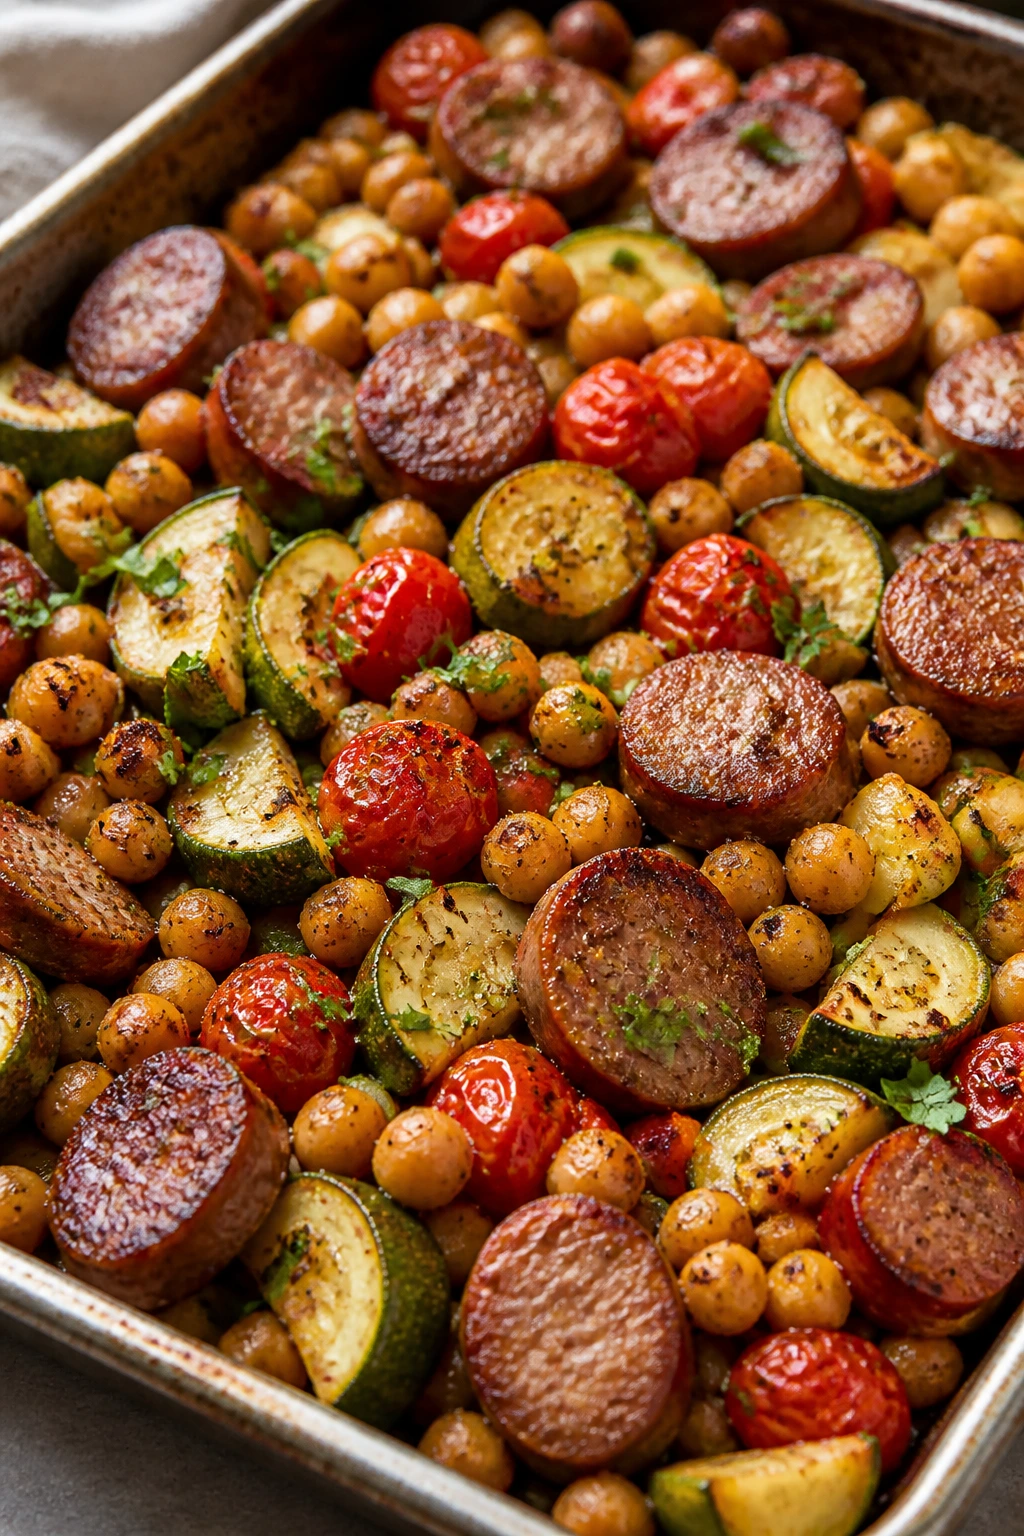
This tray leans hearty without becoming heavy. Chickpeas crisp at the edges, sausage browns deeply, and zucchini plus tomatoes keep everything from feeling too dense. There’s a little oregano, a little lemon, and enough olive oil to make the whole thing taste like it came from a kitchen that knows how to season vegetables properly.
Why It Works:
Chickpeas roast well because they like dry heat and a bit of oil. Sausage gives the dish its main body, while vegetables bring color and moisture. Since chickpeas can stand in for part of the starch, this tray stretches farther than you’d expect, which is useful when the table keeps growing.
Key Ingredients:
- 1½ lbs chicken sausage or Italian sausage, sliced
- 2 cans chickpeas, drained, rinsed, and well dried
- 2 medium zucchini, cut into thick half-moons
- 2 cups cherry tomatoes
- 1 red onion, sliced
- 3 tbsp olive oil
- 2 tsp dried oregano
- 1 tsp kosher salt
- ½ tsp black pepper
- Juice of 1 lemon
- ½ cup crumbled feta
Quick Steps:
- Preheat the oven to 425°F.
- Toss the chickpeas, zucchini, tomatoes, and onion with oil, oregano, salt, and pepper.
- Roast the vegetables and chickpeas for 15 minutes.
- Add the sausage and roast 12 to 15 minutes more, until the sausage is browned and the chickpeas feel crisp at the edges.
- Finish with lemon juice and feta.
- Serve with warm pita or couscous if you want to stretch the tray.
Tips and Variations:
- Dry the chickpeas well or they’ll steam instead of crisp.
- Add baby spinach after roasting if you want more greens.
- A spoonful of harissa makes the tray sharper and hotter.
12. Baked Cod with Cherry Tomatoes and Asparagus
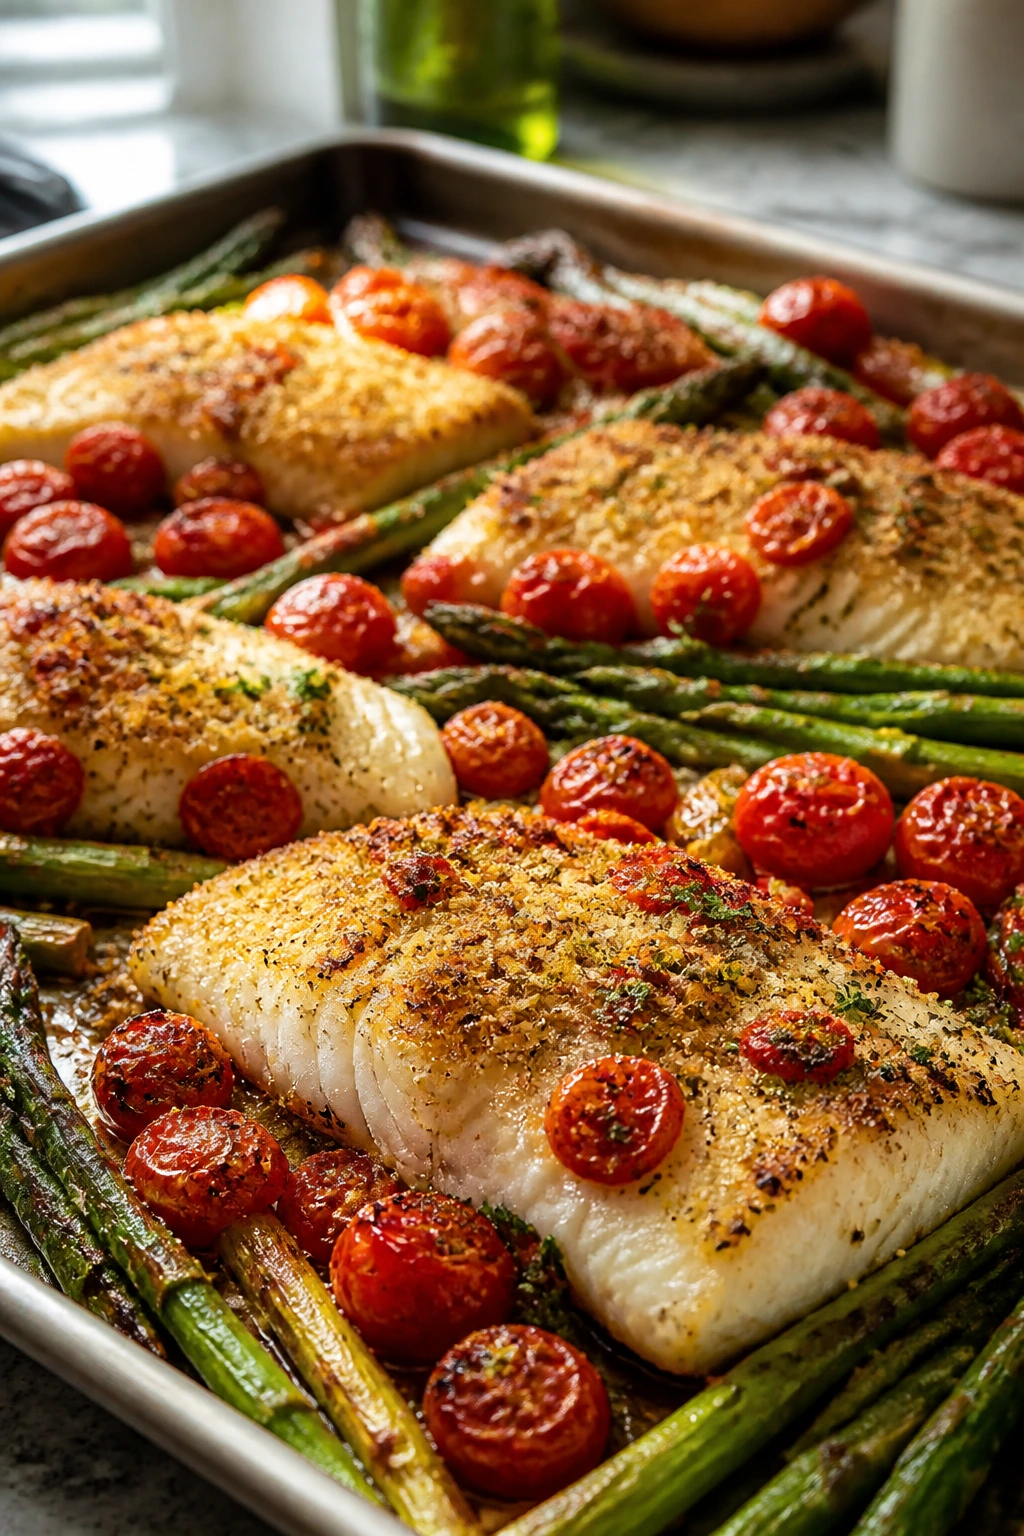
Cod is delicate, which means the rest of the tray has to behave. Tomatoes soften into a light sauce, asparagus stays crisp-tender, and the fish bakes just long enough to flake without turning dry and cottony. It’s a gentler dinner, but still enough food to handle a busy table.
Why It Works:
Cod cooks quickly and benefits from a moist environment, which the tomatoes provide. Asparagus needs only a short roast, so it fits the fish’s timeline instead of fighting it. A breadcrumb topping adds texture and keeps the top from feeling too soft, which matters when dinner needs a little more contrast.
Key Ingredients:
- 2½ lbs cod fillets, cut into large portions
- 1½ lbs asparagus, trimmed
- 2 cups cherry tomatoes
- 3 tbsp olive oil
- 2 garlic cloves, minced
- 1 lemon, sliced and juiced
- ½ cup panko breadcrumbs
- 2 tbsp grated Parmesan
- 1 tsp kosher salt
- ½ tsp black pepper
Quick Steps:
- Heat the oven to 400°F and lightly oil a sheet pan.
- Toss the asparagus and tomatoes with 2 tablespoons oil, garlic, salt, pepper, and half the lemon juice.
- Roast for 8 minutes, until the tomatoes start to burst.
- Add the cod, brush with the remaining oil and lemon juice, and top with panko mixed with Parmesan.
- Bake 10 to 12 minutes more, until the fish flakes easily and reaches 145°F.
- Serve immediately with extra lemon wedges.
Tips and Variations:
- Thicker cod fillets hold up better than thin ones.
- A little chopped parsley at the end keeps the tray from feeling too rich.
- If asparagus looks woody, trim a full inch from the bottoms.
13. Maple Dijon Chicken with Butternut Squash and Onions
Butternut squash on a sheet pan can go from plain to deeply satisfying if you let it brown instead of babying it. Maple and Dijon give the chicken a sweet-sharp glaze, and red onion threads itself through the squash like a built-in seasoning. The result is cozy without being muddy.
Why It Works:
Butternut squash needs more oven time than most vegetables, so it anchors the tray from the start. Maple brings caramel notes, while Dijon keeps the glaze from turning sugary. Chicken thighs are forgiving here, and their drippings help season the squash underneath them.
Key Ingredients:
- 2½ lbs boneless, skinless chicken thighs
- 1 large butternut squash, peeled and cut into 1-inch cubes
- 2 red onions, cut into wedges
- 3 tbsp olive oil
- 3 tbsp maple syrup
- 2 tbsp Dijon mustard
- 2 tsp chopped rosemary
- 1½ tsp kosher salt
- ½ tsp black pepper
Quick Steps:
- Preheat the oven to 425°F.
- Toss the squash and onions with oil, rosemary, salt, and pepper.
- Roast for 20 minutes, stirring once so the squash browns evenly.
- Whisk the maple syrup and Dijon, then coat the chicken thighs.
- Nestle the chicken on the pan and roast 20 to 25 minutes more, until the chicken reaches 165°F and the squash is tender.
- Let it rest for 5 minutes before serving.
Tips and Variations:
- A pinch of chili flakes gives the glaze a little heat.
- Cubes smaller than 1 inch can turn soft too fast.
- Fresh sage works if rosemary feels too piney for your family.
14. Italian Turkey Meatballs with Peppers and Zucchini
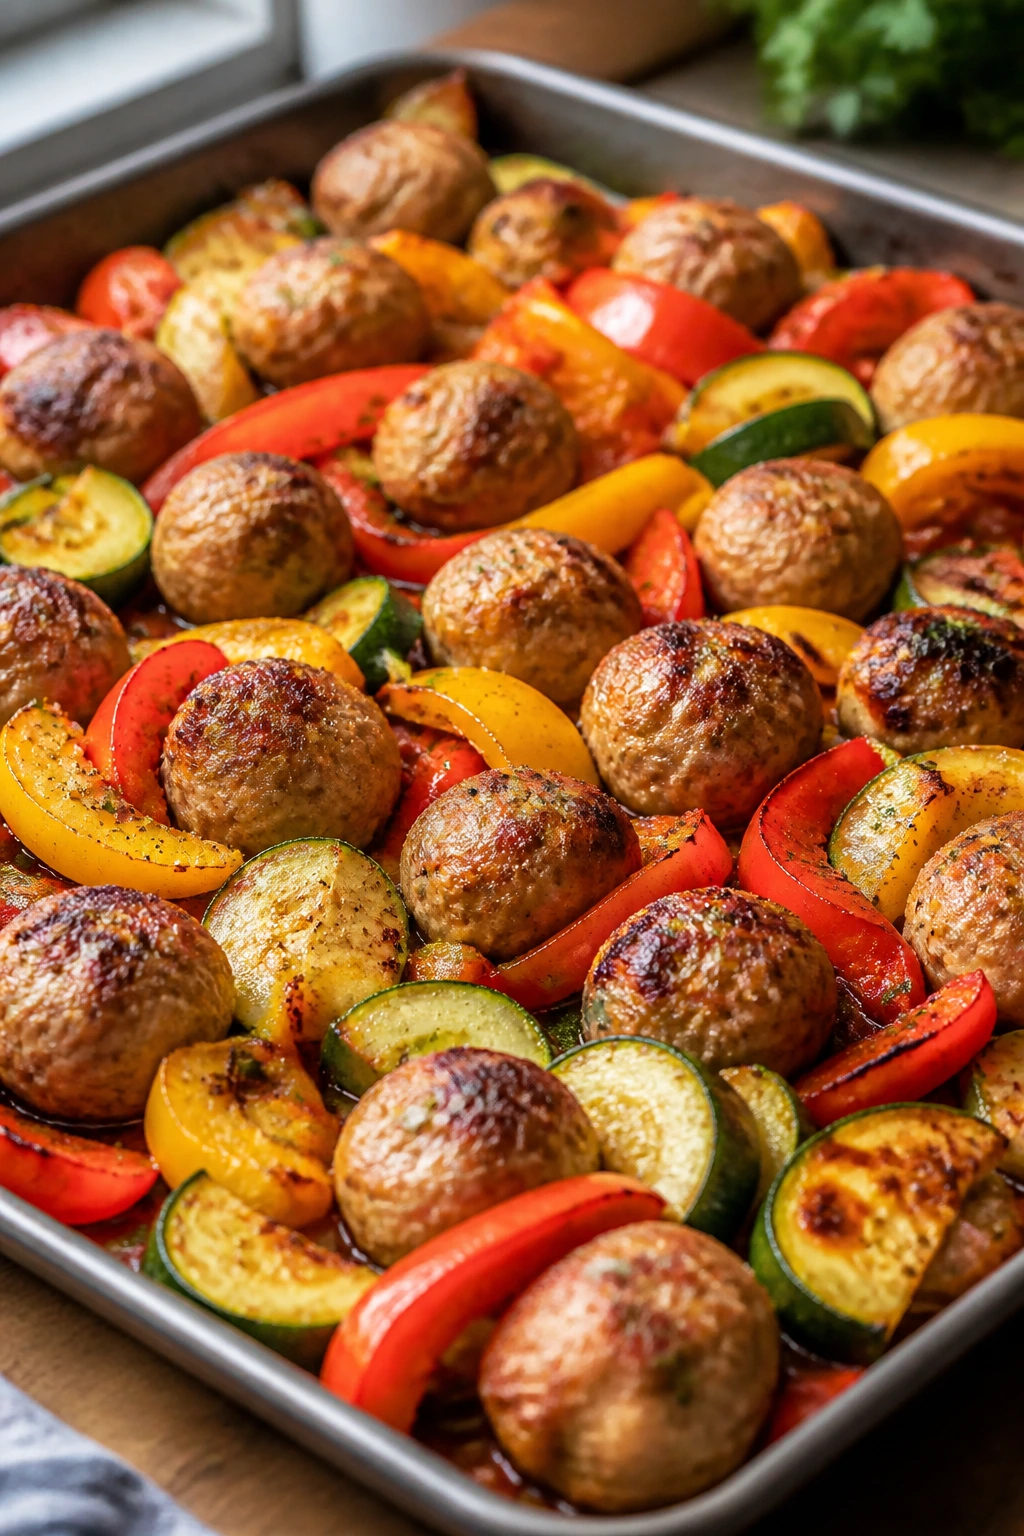
This tray tastes like a red-sauce dinner without requiring a pot of simmering sauce on the stove. Turkey meatballs brown up on the outside, peppers soften around them, and zucchini picks up the savory juices. Spoon warmed marinara over the top and the whole thing suddenly looks like you tried harder than you did.
Why It Works:
Meatballs make sheet pan dinners stretch because they give you a lot of surface area and a texture people actually want to eat. Turkey keeps the tray lighter than beef, but Parmesan and breadcrumbs give the meatballs enough structure and flavor to stay interesting. Vegetables roast beside them and catch the drippings, so nothing tastes separate.
Key Ingredients:
- 2 lbs ground turkey
- ¾ cup breadcrumbs
- ½ cup grated Parmesan
- 1 large egg
- 2 tsp Italian seasoning
- 3 bell peppers, sliced
- 2 medium zucchini, sliced into half-moons
- 1 onion, sliced
- 3 tbsp olive oil
- 2 cups warm marinara
Quick Steps:
- Heat the oven to 425°F.
- Mix the turkey, breadcrumbs, Parmesan, egg, and Italian seasoning until just combined.
- Form 18 to 20 meatballs and place them on the pan with the peppers, zucchini, and onion tossed in oil.
- Roast for 18 to 20 minutes, until the meatballs reach 165°F.
- Warm the marinara and spoon it over the tray before serving.
- Finish with basil or extra Parmesan if you want more richness.
Tips and Variations:
- A cookie scoop helps keep the meatballs even.
- Use lean turkey, but not the driest blend you can find.
- Leftovers make a solid sub sandwich filling.
15. Chimichurri Steak with Potatoes and Green Beans
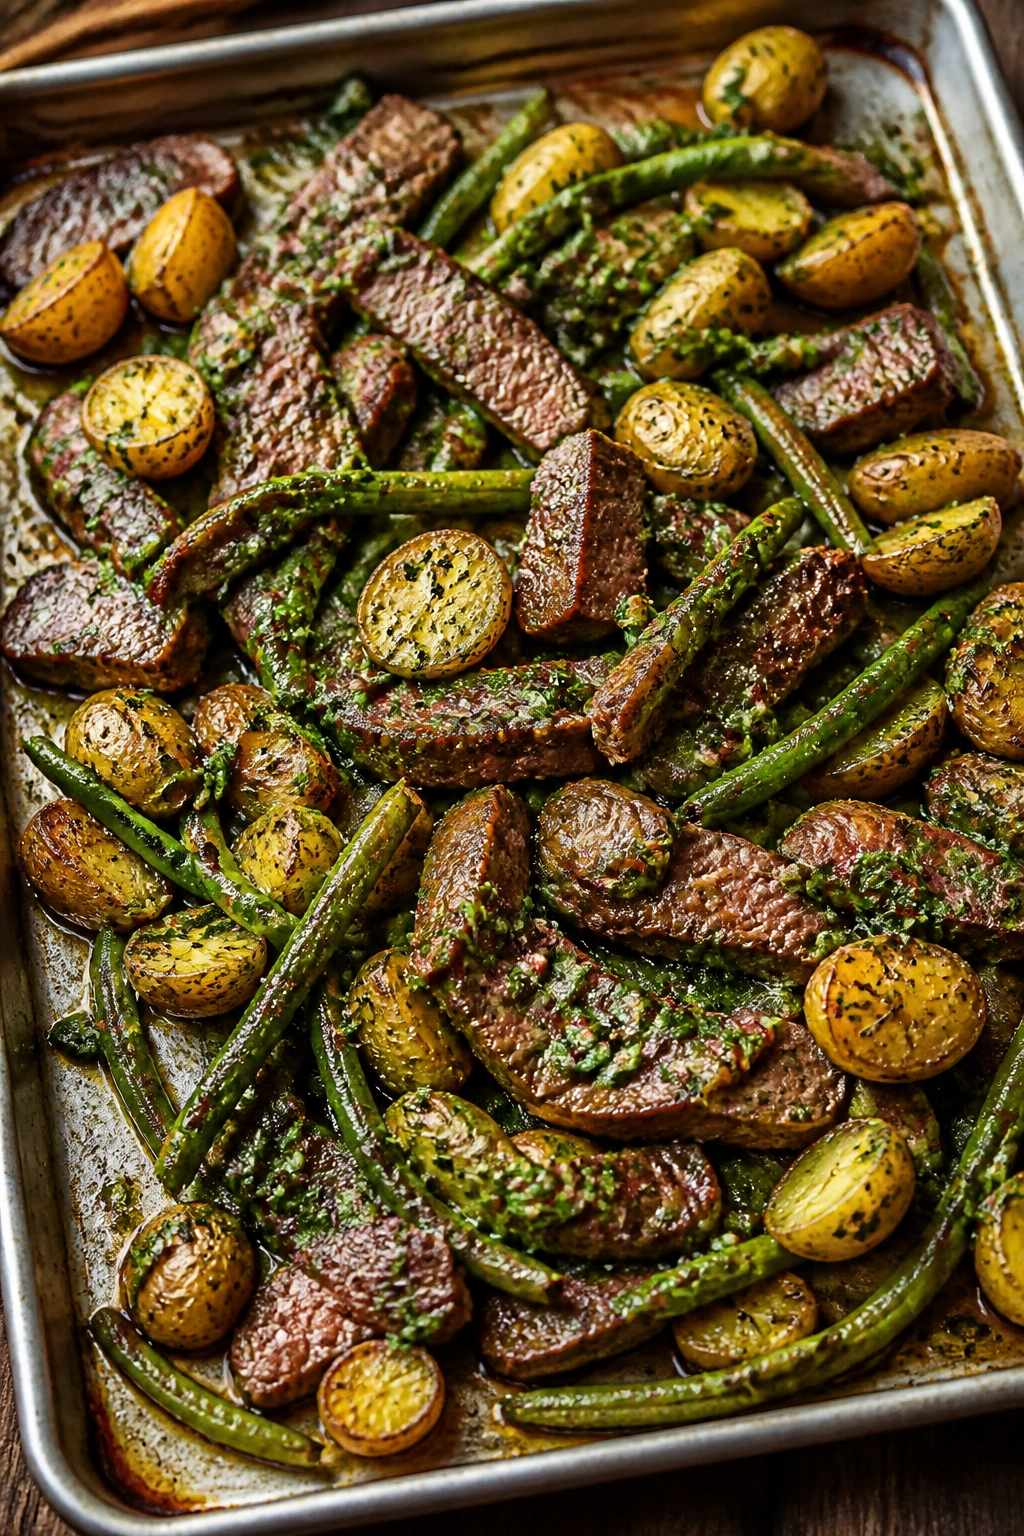
Steak on a sheet pan works best when you don’t overthink it. Roast the potatoes first, keep the steak in strips or chunks, and finish with chimichurri so the whole tray wakes up at the end. The green beans stay bright, and the potatoes catch enough char to feel like they came from a steakhouse side plate.
Why It Works:
Steak cooks fast in the oven, so it needs vegetables that can get a head start. Cutting the steak into strips speeds things up and makes portioning easier for a big family. Chimichurri is the right kind of finishing sauce here because it brings garlic, vinegar, and herbs without needing heat on the stove.
Key Ingredients:
- 2 lbs sirloin or flank steak, cut into strips
- 2 lbs baby potatoes, halved
- 1 lb green beans, trimmed
- 3 tbsp olive oil
- 2 tsp kosher salt
- 1 tsp black pepper
- 1 cup chopped parsley
- ¼ cup chopped cilantro
- 2 garlic cloves, minced
- 3 tbsp red wine vinegar
Quick Steps:
- Preheat the oven to 425°F.
- Toss the potatoes with olive oil, salt, and pepper, then roast for 20 minutes.
- Mix the parsley, cilantro, garlic, vinegar, and 2 tablespoons oil for the chimichurri.
- Add the green beans and steak to the pan, season lightly, and roast 8 to 10 minutes more for medium.
- Rest the steak for 5 minutes, then spoon chimichurri over the top.
- Serve immediately so the beans stay crisp.
Tips and Variations:
- Slice flank steak against the grain or it’ll chew harder than you want.
- If your family likes more heat, add crushed red pepper to the sauce.
- A squeeze of lime in the chimichurri gives it a brighter snap.
16. Buffalo Chicken with Ranch Potatoes and Carrots
Buffalo sauce on a sheet pan feels a little mischievous, which is part of the fun. The potatoes come out with ranch seasoning baked into the crust, carrots soften and soak up the spicy sauce, and the chicken stays juicy under a glossy orange finish. It’s the sort of dinner that makes people reach for extra ranch without shame.
Why It Works:
Buffalo sauce can scorch if it’s exposed too early, so the chicken should be brushed near the end or baked with a little butter to soften the heat. Potatoes and carrots need a longer roast than the meat, which makes them the natural starting point. Ranch seasoning gives the tray its salty backbone and keeps the spice from feeling flat.
Key Ingredients:
- 2½ lbs boneless chicken thighs
- 1½ lbs baby potatoes, halved
- 1 lb carrots, cut into sticks
- 3 tbsp olive oil
- 2 tbsp ranch seasoning
- ⅓ cup Buffalo sauce
- 2 tbsp melted butter
- 1 tsp garlic powder
- 1 tsp kosher salt
Quick Steps:
- Heat the oven to 425°F.
- Toss the potatoes and carrots with oil, ranch seasoning, garlic powder, and salt.
- Roast for 15 minutes, until the potatoes start to brown.
- Mix the Buffalo sauce with melted butter and brush it onto the chicken thighs.
- Add the chicken to the pan and roast 20 to 25 minutes more, until the chicken reaches 165°F.
- Serve with ranch dressing and celery if you want the full wing-night feel.
Tips and Variations:
- Use less Buffalo sauce if kids are eating this tray.
- Sweet potatoes can replace the carrots if you want a softer sweet-spicy balance.
- A crumble of blue cheese on top works if your table likes sharper flavors.
17. Sesame Ginger Tofu with Broccoli and Edamame
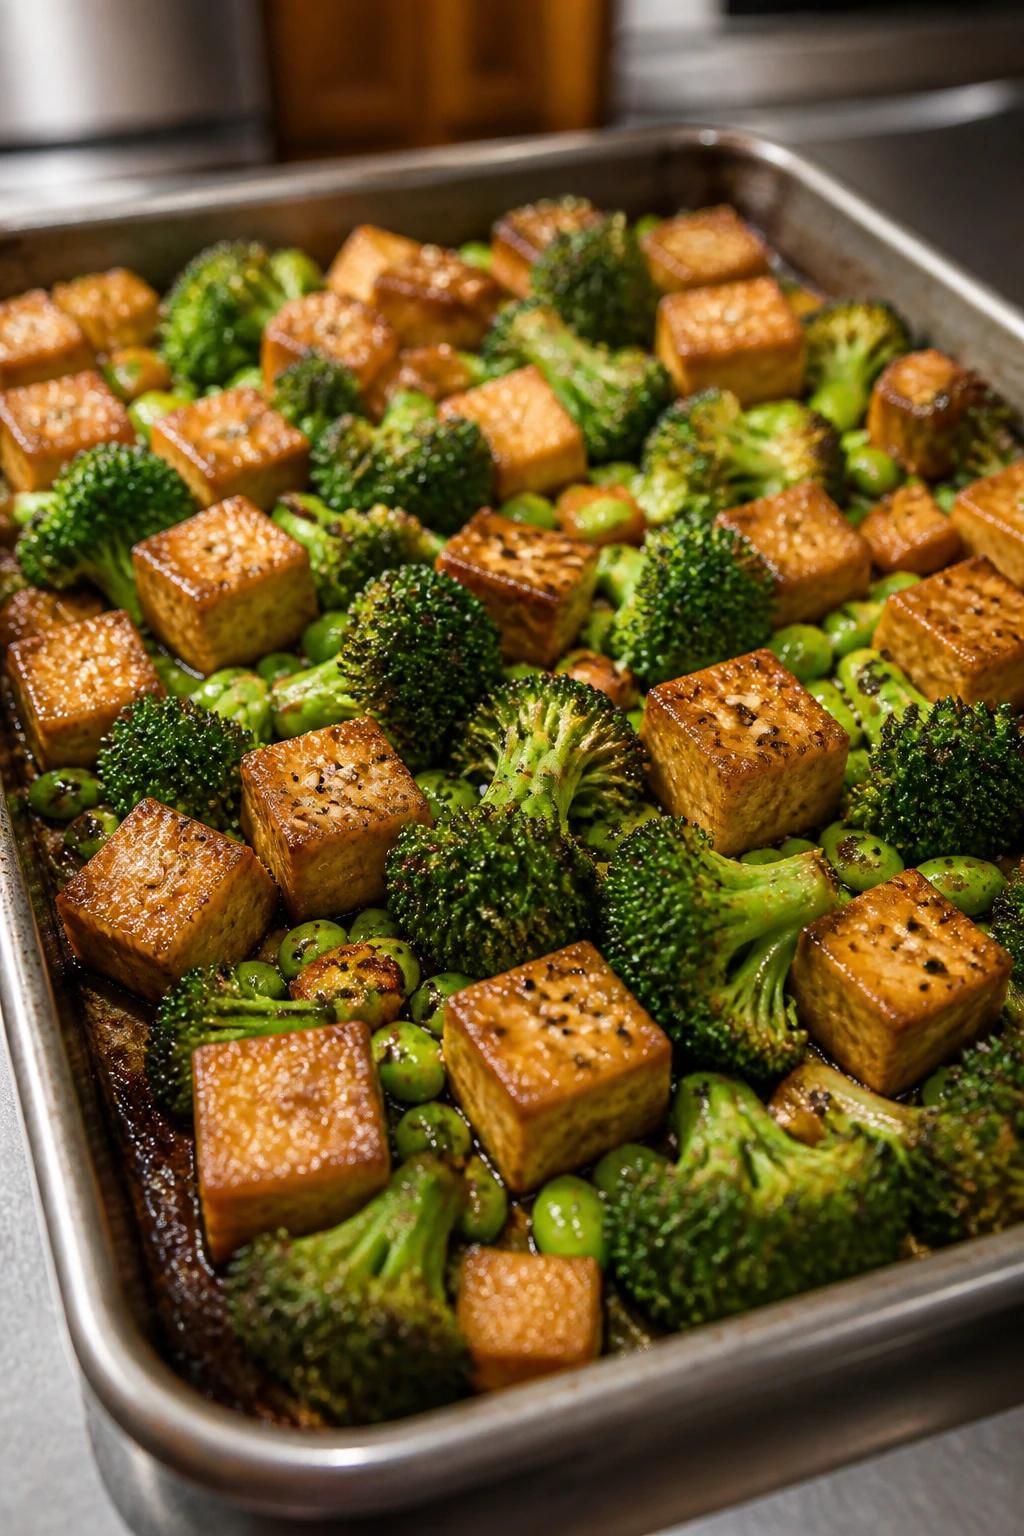
Tofu earns its place on a sheet pan when you give it heat, space, and enough seasoning to matter. The tofu edges crisp, broccoli gets browned tips, and edamame adds extra protein so the tray still feels like dinner for a crowd. Sesame and ginger keep it punchy rather than mild.
Why It Works:
Extra-firm tofu responds well to dry heat, especially if you press it first and give it a light coating of oil or cornstarch. Broccoli and edamame roast in roughly the same window, which keeps the tray easy. A sauce made with soy, ginger, and maple turns the whole pan into something savory-sweet that even tofu skeptics usually respect.
Key Ingredients:
- 2 blocks extra-firm tofu, pressed and cut into cubes
- 2 large heads broccoli, cut into florets
- 2 cups shelled edamame
- 2 carrots, cut into thin matchsticks
- 3 tbsp sesame oil or neutral oil
- 3 tbsp soy sauce
- 2 tbsp maple syrup
- 2 tsp grated ginger
- 2 garlic cloves, minced
- 1 tbsp sesame seeds
Quick Steps:
- Preheat the oven to 425°F.
- Toss the tofu with 1 tablespoon oil and a light dusting of cornstarch if you want extra crispness.
- Spread the broccoli, edamame, and carrots on the pan with the remaining oil, soy sauce, ginger, garlic, and maple syrup.
- Roast for 15 minutes, then add the tofu and roast 12 to 15 minutes more, turning once.
- Sprinkle with sesame seeds and serve over rice or noodles.
- Add chili crisp at the table for anyone who wants more heat.
Tips and Variations:
- Press the tofu for at least 15 minutes so it browns instead of steaming.
- Frozen edamame is fine; just thaw it first.
- A squeeze of lime at the end keeps the soy sauce from feeling heavy.
18. Cajun Pork Tenderloin with Corn and Bell Peppers
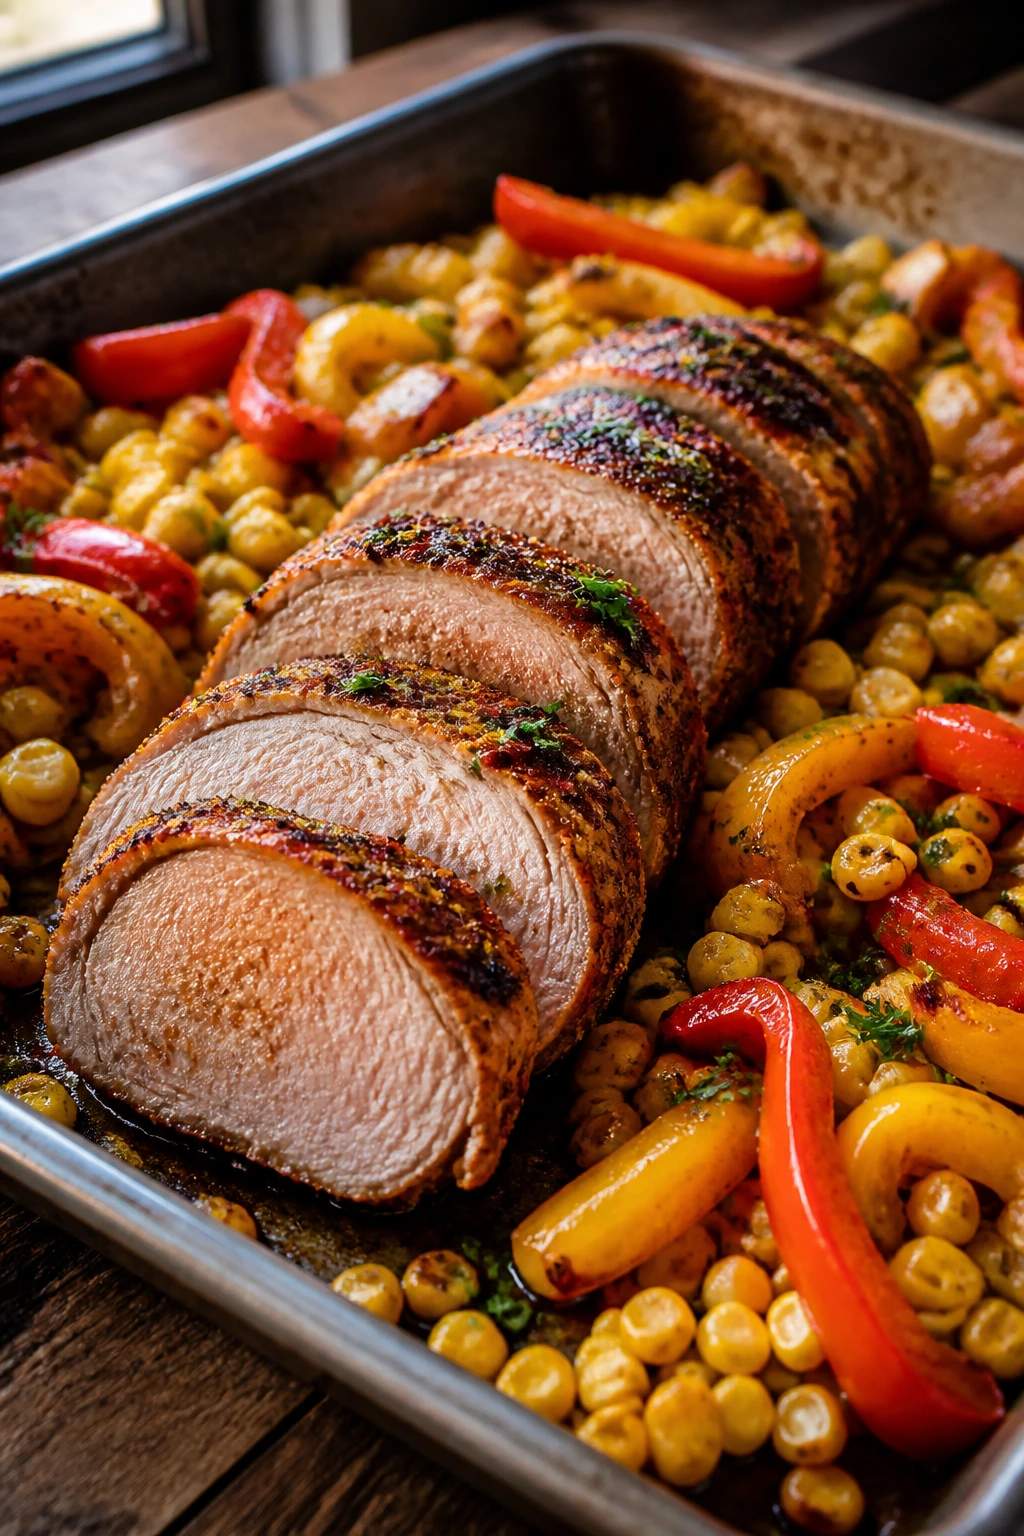
Pork tenderloin is one of those cuts that looks fancy but cooks with almost no drama. Here it gets a spicy Cajun rub, sweet corn, and peppers that soften into the pan juices. The trick is to roast it just until done and then let it rest, because overcooked tenderloin is a sadness you can avoid.
Why It Works:
Pork tenderloin cooks quickly and evenly when it’s left whole, then sliced after resting. Corn and peppers roast in the same hot oven and bring sweetness that balances Cajun seasoning. Since the cut is lean, a little olive oil and butter on the vegetables help keep the whole tray from tasting dry.
Key Ingredients:
- 2 pork tenderloins, about 1½ lbs each
- 3 bell peppers, sliced
- 2 cups corn kernels
- 1 large red onion, sliced
- 3 tbsp olive oil
- 2 tbsp Cajun seasoning
- 1 tsp kosher salt
- ½ tsp black pepper
- 2 tbsp melted butter
- 2 tbsp chopped parsley
Quick Steps:
- Heat the oven to 425°F.
- Toss the peppers, corn, and onion with oil, salt, pepper, and half the Cajun seasoning.
- Roast the vegetables for 10 minutes.
- Rub the pork tenderloins with the remaining Cajun seasoning and place them on the tray.
- Roast 18 to 20 minutes more, until the pork reaches 145°F in the thickest part.
- Rest for 5 minutes, slice thickly, and finish with melted butter and parsley.
Tips and Variations:
- A pork tenderloin needs rest time, or the juices flood the cutting board.
- If your Cajun seasoning is very salty, cut back on the extra salt.
- Serve with cornbread if you need to stretch the meal.
19. Pesto Chicken with Tomatoes and Mozzarella
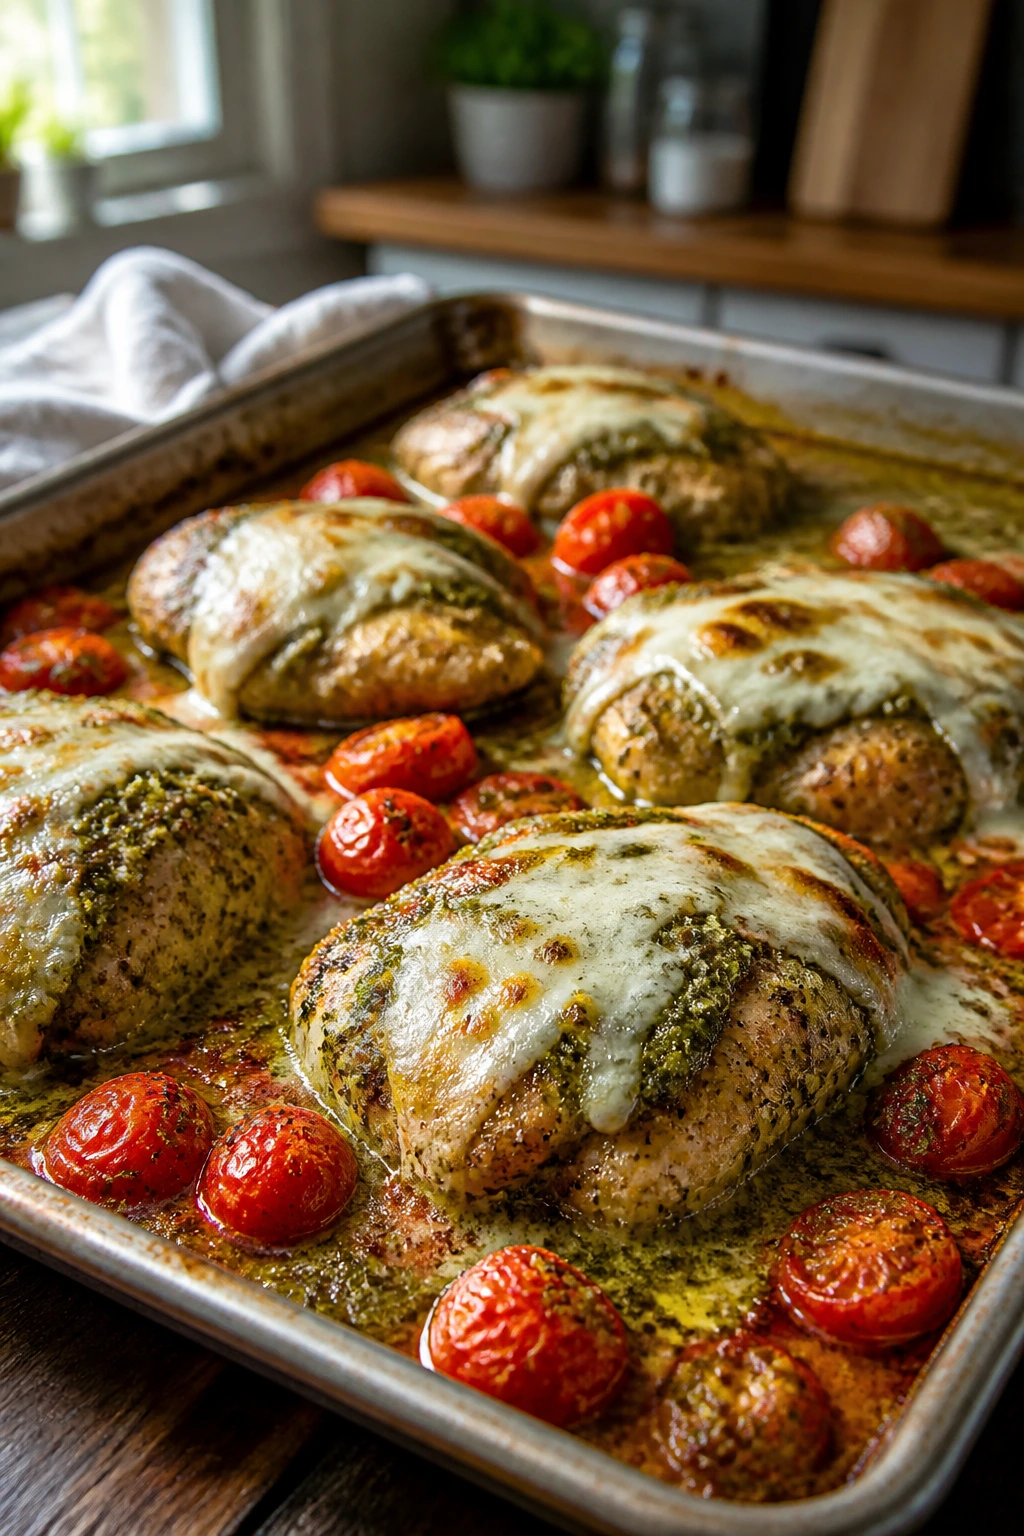
This is the tray that tastes like it should come with basil still attached to the stems. Pesto coats the chicken and vegetables, tomatoes burst into a quick sauce, and mozzarella melts just enough to make the whole pan feel rich without turning into a casserole. It’s one of the easiest ways to make a weeknight dinner feel polished without extra work.
Why It Works:
Pesto is doing a lot of heavy lifting here: fat, herbs, garlic, and salt all in one spoonful. Tomatoes roast into a quick pan sauce, which keeps chicken breasts from drying out if you use them instead of thighs. Mozzarella goes on at the end so it softens rather than disappearing into an oily layer.
Key Ingredients:
- 2½ lbs chicken thighs or boneless chicken breasts
- 2 cups cherry tomatoes
- 2 medium zucchini, sliced
- ½ cup pesto
- 2 tbsp olive oil
- 1 tsp kosher salt
- ½ tsp black pepper
- 8 oz mozzarella balls, drained
- 2 tbsp pine nuts, toasted
- Fresh basil leaves
Quick Steps:
- Preheat the oven to 425°F.
- Toss the zucchini and tomatoes with olive oil, salt, and pepper.
- Coat the chicken with pesto and arrange everything on the sheet pan.
- Roast for 20 to 25 minutes, until the chicken reaches 165°F and the tomatoes have collapsed.
- Add the mozzarella balls in the last 3 minutes so they soften.
- Finish with pine nuts and basil before serving.
Tips and Variations:
- If your pesto is salty, ease up on the added salt.
- A few sliced red onions give the tray a sharper note.
- Spoon the juices over rice or crusty bread; they’re worth catching.
20. Sheet Pan Sausage and Gnocchi with Broccoli and Mushrooms
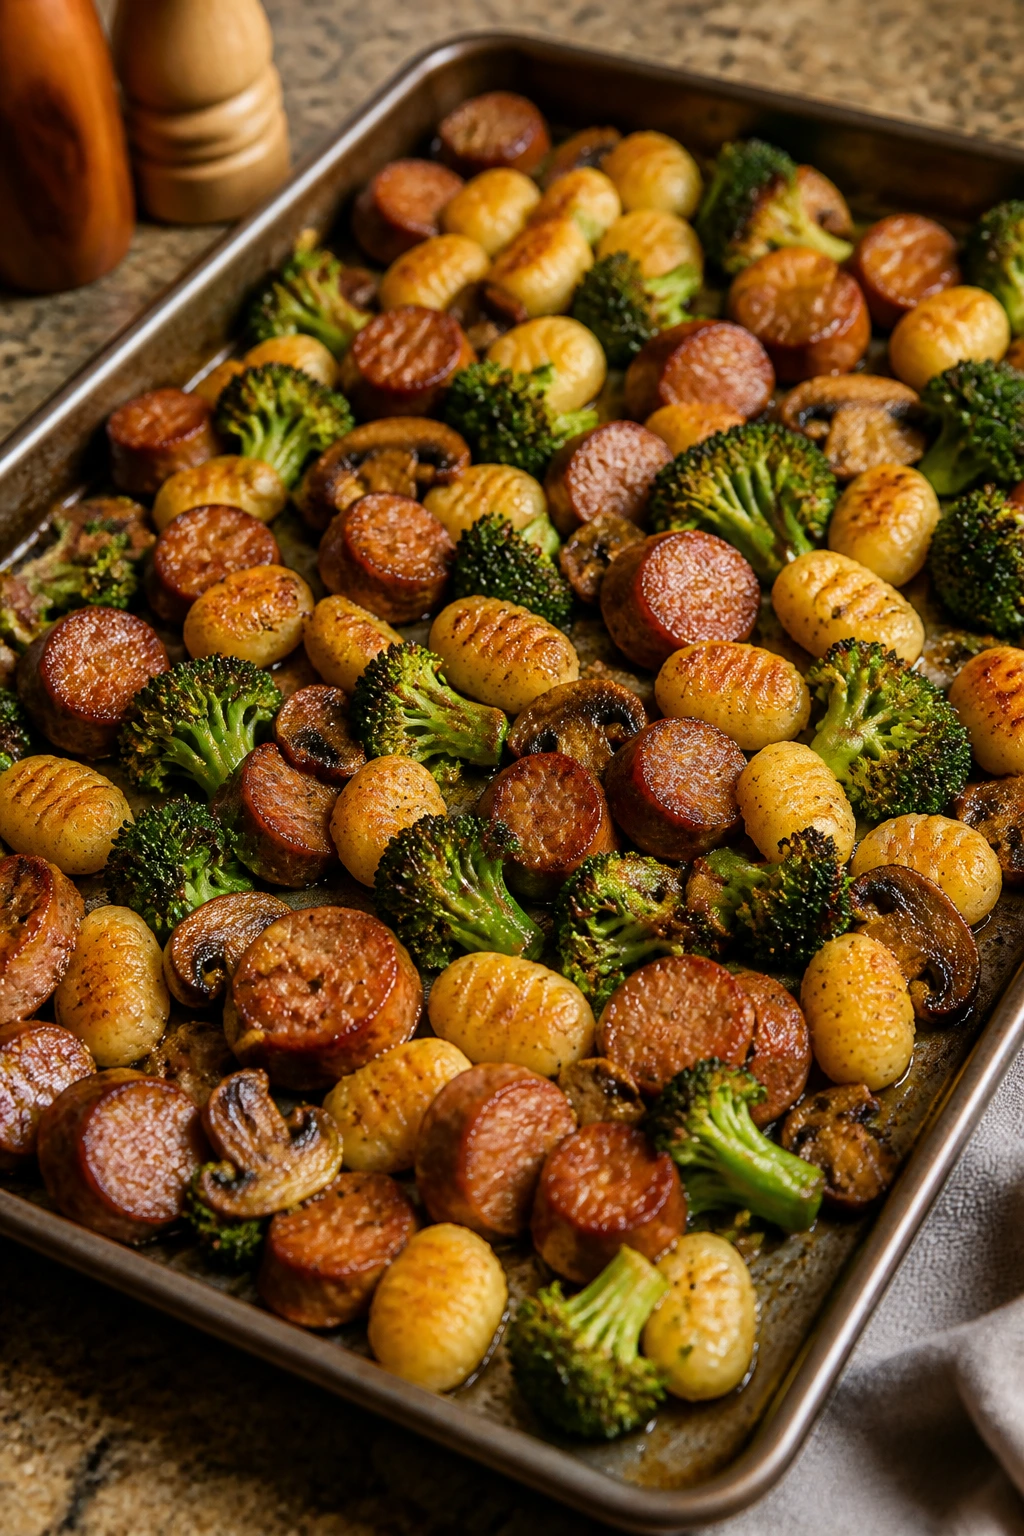
Gnocchi on a sheet pan sounds like a trick until you try it. The little potato dumplings crisp on the outside, sausage browns, mushrooms go meaty, and broccoli keeps the tray from feeling too heavy. It’s a solid big-family dinner because it eats like pasta without requiring a pot of boiling water.
Why It Works:
Shelf-stable or refrigerated gnocchi roasts well because it already has enough structure to hold in the oven. Sausage provides fat and seasoning, while mushrooms and broccoli bring texture. The goal is browning, not softening everything into one uniform pile, which is why the tray needs space.
Key Ingredients:
- 1½ lbs Italian sausage, sliced
- 2 lbs potato gnocchi
- 2 large heads broccoli, cut into florets
- 12 oz mushrooms, halved
- 1 large onion, sliced
- 3 tbsp olive oil
- 3 garlic cloves, minced
- 1 tsp kosher salt
- ½ tsp black pepper
- ½ cup grated Parmesan
Quick Steps:
- Preheat the oven to 425°F.
- Toss the broccoli, mushrooms, onion, and gnocchi with oil, garlic, salt, and pepper.
- Spread them on the pan and roast for 15 minutes.
- Add the sausage and roast 12 to 15 minutes more, turning once, until the gnocchi is golden and the sausage is cooked through.
- Shower with Parmesan and serve hot.
- Add a squeeze of lemon if you want the tray to taste a little lighter.
Tips and Variations:
- Don’t boil the gnocchi first; that defeats the whole point.
- Use chicken sausage if you want a leaner tray.
- A spoonful of jarred pesto stirred in at the end adds a fast flavor boost.
21. Breakfast-for-Dinner Sausage, Eggs, and Hash Browns
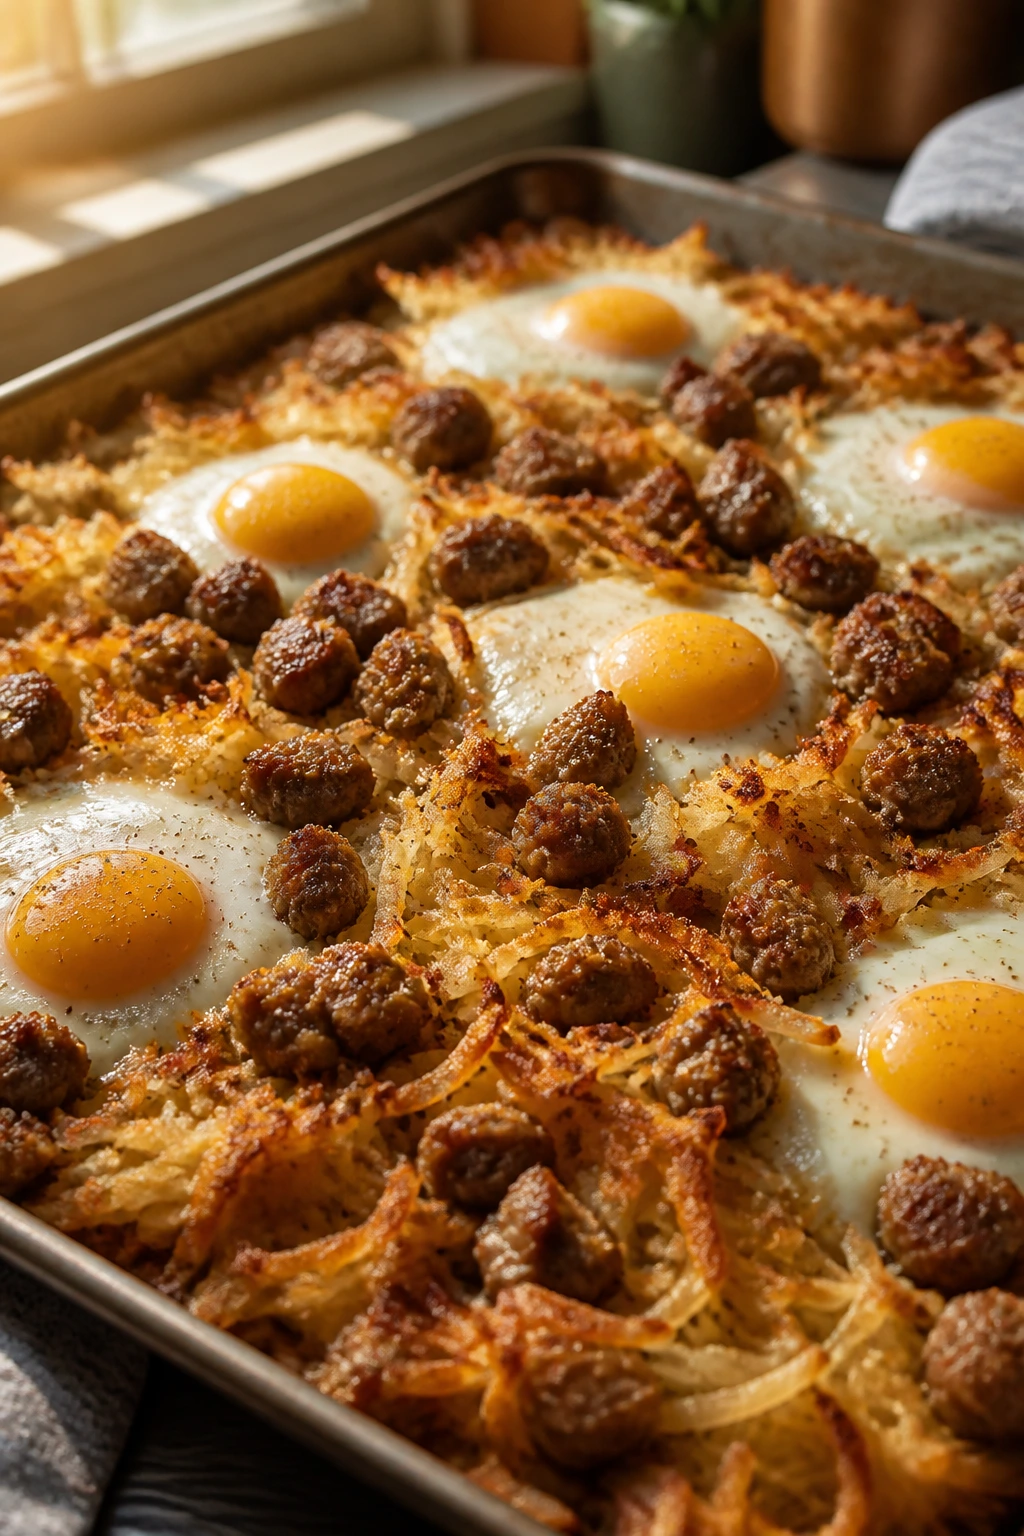
There are nights when dinner needs to be comforting, not clever. This is that tray. Hash browns crisp on the bottom, sausage browns and perfumes the pan, and eggs baked into little wells make the whole thing feel like diner food that learned how to behave at home.
Why It Works:
Hash browns need direct contact with the pan to get crisp, so they go down first and stay there. Sausage cooks alongside them and releases enough fat to season the tray. The eggs should be added near the end so the yolks stay soft unless you want them fully set, which is a personal battle best fought with a timer.
Key Ingredients:
- 1½ lbs breakfast sausage links or patties
- 1 bag frozen hash browns, about 30 oz, thawed
- 1 red bell pepper, diced
- 1 small onion, diced
- 2 tbsp olive oil
- 8 large eggs
- 1 cup shredded cheddar
- 1 tsp kosher salt
- ½ tsp black pepper
- 2 tbsp chopped parsley
Quick Steps:
- Preheat the oven to 425°F.
- Toss the thawed hash browns with oil, salt, and pepper, then spread them on the pan with the sausage, pepper, and onion.
- Roast for 20 minutes, stirring the hash browns once so they brown evenly.
- Make 8 small wells, crack in the eggs, and sprinkle with cheddar.
- Bake 8 to 10 minutes more, until the egg whites are set but the yolks still look soft.
- Finish with parsley and serve right away.
Tips and Variations:
- Thaw the hash browns first or they release too much water.
- A little hot sauce at the table keeps the tray from feeling too plain.
- Bacon works too, but it tends to crisp faster than sausage.
22. Loaded Sheet Pan Nachos with Chicken, Black Beans, and Corn
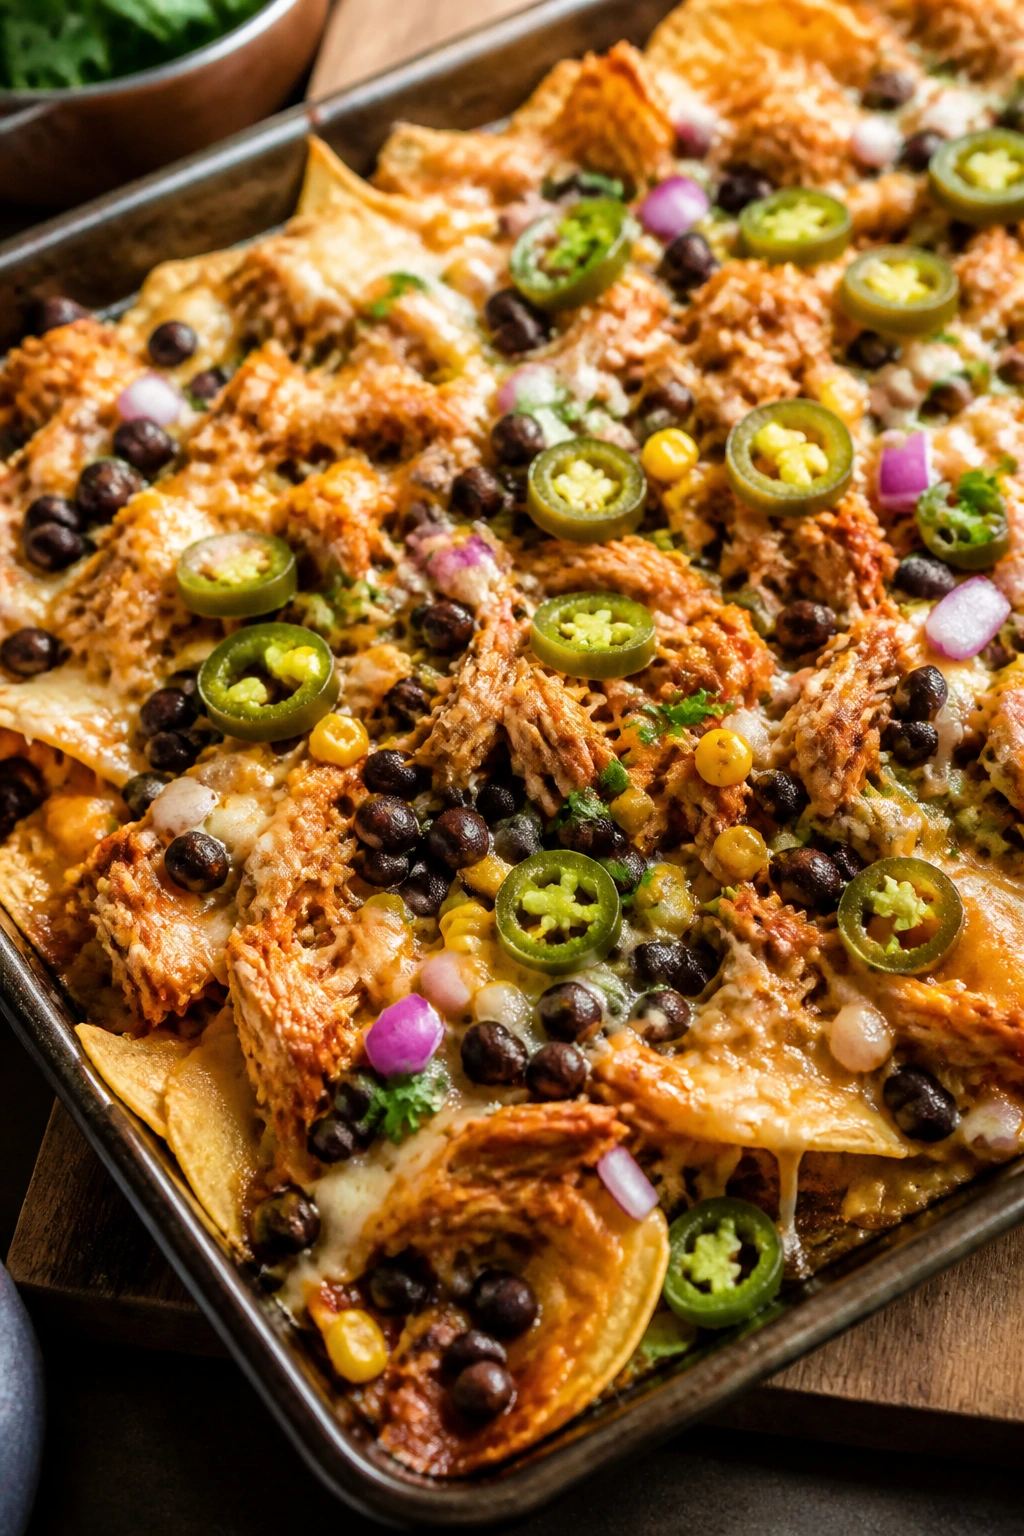
This is the tray you make when the family wants dinner to feel like a small event. Tortilla chips get layered with seasoned chicken, black beans, corn, and cheese, then everything melts into one giant pan of edible noise. It’s messy in the best possible way, and it disappears faster than a more serious dinner probably should.
Why It Works:
Nachos are about layering, not piling. If you dump everything in a mountain, the bottom goes soggy and the top never gets enough cheese. Warm chicken and beans keep the bake short, while fresh toppings go on after the tray leaves the oven so they stay bright and crisp.
Key Ingredients:
- 10 to 12 oz sturdy tortilla chips
- 2 cups cooked shredded chicken
- 1 can black beans, drained and rinsed
- 1½ cups corn kernels
- 3 cups shredded cheddar or Monterey Jack
- 1 jalapeño, sliced
- ½ red onion, thinly sliced
- ½ cup salsa
- 1 avocado, diced
- ¼ cup chopped cilantro
Quick Steps:
- Heat the oven to 400°F.
- Spread half the chips on the sheet pan, then add half the cheese, chicken, beans, corn, jalapeño, and onion.
- Repeat with the remaining chips and toppings so the whole tray is evenly covered.
- Bake for 8 to 10 minutes, until the cheese is fully melted and the edges of the chips start to brown.
- Add salsa, avocado, and cilantro after baking.
- Serve immediately so the chips stay crisp.
Tips and Variations:
- Use sturdy chips or the weight of the toppings will crush them.
- If you want more protein, add extra chicken rather than more cheese.
- A drizzle of sour cream or crema makes the tray feel complete.
Why the Sheet Pan Wins on Busy Nights
A good sheet pan dinner works because the oven does the hard part in a steady, predictable way. Hot air browns the edges while the center stays tender, and that little contrast is half the appeal. When the pan is loaded correctly, the chicken drips onto potatoes, the sausage seasons the onions, and the tomatoes collapse into a sauce you didn’t need to simmer separately.
The method does ask for a little discipline. Space matters. A crowded tray steams, and steamed vegetables taste tired. If you’re feeding a very large family or you like generous portions, use two pans and rotate them halfway through rather than cramming everything into one tray and hoping for the best. That move alone fixes more bad sheet pan dinners than any fancy seasoning ever will.
I also like sheet pan cooking because it creates a clear rhythm. Sturdy vegetables go first. Quick-cooking proteins go later. Delicate ingredients—fish, shrimp, soft herbs, cheese—arrive at the end, which keeps them from losing their shape. Once you learn that timing, the whole style opens up. And it stops feeling like a recipe and starts feeling like a habit, which is where dinner gets easier.
Essential Equipment for These Recipes
- 2 rimmed half-sheet pans: The standard 18 x 13-inch size gives vegetables room to brown instead of steam.
- Parchment paper or foil: Parchment is cleaner for most trays; foil is useful when you want easier cleanup with sticky sauces.
- Large mixing bowls: Big enough to toss vegetables without spilling half of them onto the counter.
- Tongs: Essential for turning sausage, chicken, and vegetables without shredding them.
- Instant-read thermometer: The easiest way to avoid dry chicken, rubbery shrimp, and undercooked pork.
- Sharp chef’s knife: Clean cuts make vegetables roast evenly and keep proteins from tearing.
- Cutting board with a moat or lip: Handy when you’re slicing juicy tomatoes, lemons, or marinated meat.
- Measuring spoons and cups: Sheet pan dinners depend on seasoning balance more than many people think.
- Small whisk: Useful for quick glazes, mustards, and vinaigrettes.
- Kitchen timer: Not glamorous, but it keeps you from guessing when different ingredients need to come out.
Smart Shopping and Ingredient Tips
The best sheet pan dinners start before the oven turns on. Buy proteins that match the cooking time you actually want. Chicken thighs are forgiving, pork tenderloin is quick, sausage is easy, salmon and shrimp move fast, and tofu needs pressing and drying before it earns its spot on the pan. If you try to force everything into the same timing window, the result usually tastes a little tired.
Vegetables deserve more attention than they get. Potatoes, carrots, squash, cauliflower, broccoli, Brussels sprouts, onions, and peppers are the heavy lifters here because they can handle high heat. Zucchini, asparagus, tomatoes, green beans, and snap peas are quicker, so they should come in later or be cut larger than you think. Tiny pieces burn before the rest of dinner is done.
Choose a sauce with some thickness. Thin marinades can burn or slide off the food, leaving the pan wet and the tray strangely flat. BBQ sauce, pesto, teriyaki, Dijon-honey mixtures, and chimichurri all work because they cling. If you’re buying jarred sauce, check that it tastes good straight from the spoon—sheet pan heat concentrates everything, including weak flavors.
Frozen vegetables are a mixed bag. Corn and edamame usually behave well. Broccoli florets can work if they’re thawed and dried. Frozen zucchini or mushrooms tend to dump too much water, which is how a tray ends up looking roasted but eating steamed. If you need frozen produce, dry it hard and keep the pan roomy.
How to Serve These Recipes
Presentation:
A sheet pan dinner looks best when you give it a final lift right before it hits the table. Add herbs, citrus wedges, sliced scallions, toasted seeds, crumbled cheese, or a quick drizzle of sauce after roasting. Keep a serving spoon nearby and let some of the browned edges show; a tidy pile on a platter is fine, but a little mess tells people the tray came from a real kitchen.
Accompaniments:
For a big family, simple sides do the work: crusty bread, rice, buttered noodles, coleslaw, green salad, or roasted corn tortillas all stretch the meal. If the tray already has potatoes, skip another starch and lean into a fresh salad or a bright pickle. If the tray is fish or shrimp, rice and a crisp slaw make the plate feel complete.
Portions:
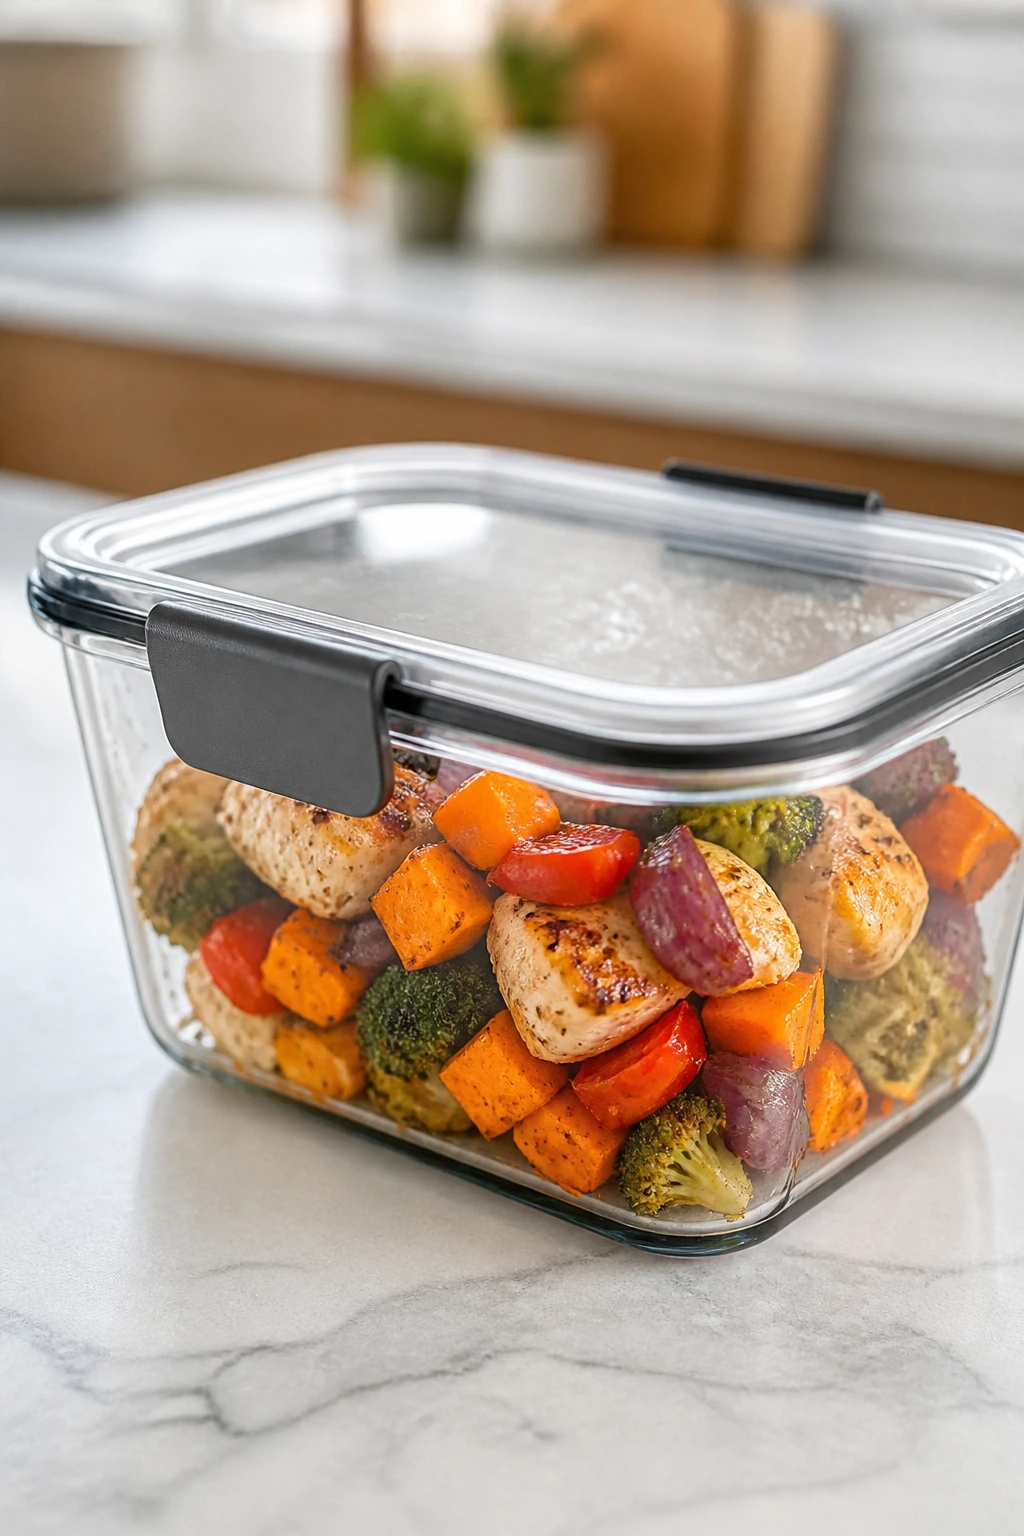
Most of these recipes serve 6 to 8 generously, but a very hungry crowd can push them to 8 or 9 if you add bread, grains, or a side vegetable. For smaller households, halve the recipe only if your sheet pan still allows breathing room; otherwise make the full amount and plan for leftovers. Sheet pan dinners keep their dignity in lunch boxes.
Beverage Pairing:
Citrus-heavy trays do well with sparkling water, iced tea, or a cold lager. BBQ, sausage, and buffalo flavors lean nicely toward lemonade or a simple amber beer. For the fish and Mediterranean trays, a crisp white wine or a tart mocktail with lemon and mint feels right without making dinner fussy.
Additional Tips and Flavor Boosters
Flavor Enhancement:
A finishing acid changes everything. Lemon juice, red wine vinegar, or a splash of pickle brine can wake up roasted chicken, sausage, or vegetables that taste a little heavy after the oven. If a tray feels flat, it usually needs acid before it needs more salt.
Customization:
You can swap vegetables with more freedom than most recipes admit. Broccoli can stand in for cauliflower, carrots can replace squash, and green beans can slide in for asparagus. Keep an eye on cut size, not just the ingredient name, because a thick wedge and a thin slice do not roast the same way.
Serving Suggestions:
Keep a few fast toppings around. Chopped parsley, dill, basil, scallions, crumbled feta, shaved Parmesan, toasted sesame seeds, and sliced chilies each push a tray in a different direction. Those little finishers matter more on sheet pan dinners than they do on braises because there’s less sauce to hide behind.
Make-It-Yours:
For gluten-free trays, use corn tortillas, gluten-free sausage, tamari, or potatoes instead of breadcrumb-heavy coatings. For dairy-free versions, skip the cheese and use olive oil, herbs, and citrus to build flavor instead. If you want more protein without changing the whole dish, add chickpeas, edamame, or extra vegetables to fill in the gaps.
Make-Ahead, Storage, and Reheating Guidance
A lot of these trays can be partially prepped earlier in the day. Chop the vegetables, mix the sauces, and marinate the chicken or pork for up to 24 hours in the fridge. That said, I wouldn’t coat delicate vegetables like zucchini or tomatoes too early, because they release water and turn the tray mushy before it ever reaches the oven.
Most cooked sheet pan dinners keep well for 3 to 4 days refrigerated in airtight containers. Fish and shrimp are the exceptions; they’re best eaten within 2 days and honestly taste best on day one. Chicken, sausage, pork, and roasted vegetables also freeze better than seafood. If you want to freeze portions, do it once they’ve cooled, and use them within 2 months for the best texture.
Reheat at 350°F in the oven, loosely covered with foil, until hot. That usually takes 10 to 15 minutes for a moderate portion. The microwave works for speed, but it softens crisp edges and makes potatoes a little rubbery. For trays with chicken skin or roasted potatoes, a few minutes in a hot skillet or air fryer brings the texture back faster than a microwave ever will.
Variations and Adaptations to Try
Lean-and-Green Tray:
Use chicken breast, cod, or tofu with extra vegetables like broccoli, green beans, and peppers. Keep the sauce light—lemon, herbs, mustard, or pesto—and cut back on heavy cheese. This version fits when you want the tray to feel brighter and less rich.
Gluten-Free Crunch:
Swap breadcrumb toppings for crushed gluten-free crackers, almond flour, or simply skip them and rely on browned edges. Use tamari instead of soy sauce and check sausage labels carefully. The texture changes a little, but the dinner still lands with plenty of flavor.
Dairy-Free Dinner Night:
Leave off the cheese and build flavor with olive oil, garlic, citrus, herbs, and a little extra salt. Buffalo chicken, lemon-garlic chicken, taco chicken, and chimichurri steak already work well this way. Add avocado or tahini-based drizzle if you want a creamy finish without dairy.
Low-Sodium Pantry Tray:
Choose unsalted or low-sodium sauces, rinse canned beans well, and lean hard on lemon, vinegar, garlic, onion, and herbs. Smoked sausage and prepared seasoning mixes can be salt bombs, so taste before adding more. This version is less flashy, but it lets the actual ingredients come through.
Kid-Friendly Mild Bake:
Use milder seasoning, hold back on hot sauce and jalapeños, and let people add spice at the table. Sweet potato, chicken, mozzarella, and sausage trays tend to work especially well here because they feel familiar. A dipping sauce on the side helps picky eaters feel in control.
Big-Batch Double Pan Plan:
When the table gets larger than one pan can handle, split everything across two trays and rotate them halfway through cooking. Crowding is the enemy, not the extra pan. This adaptation is the difference between roasted and steamed, and that distinction matters more than clever seasoning.
Common Mistakes to Avoid
Crowding the pan:
If ingredients are stacked on top of each other, they steam instead of roast. The symptom is pale vegetables and soft chicken skin. The fix is simple: use a bigger pan, split the batch, or reduce the amount of food per tray.
Cutting everything to the same size:
Potatoes, chicken strips, carrots, and zucchini do not all want the same treatment. If every piece is randomly chopped, some will burn while others stay raw. Match the cut to the cook time—thicker for slower vegetables, thinner for fast-cooking ones.
Adding delicate ingredients too early:
Shrimp, fish, asparagus, snap peas, tomatoes, and fresh herbs can turn soft or dry if they sit in the oven too long. The symptom is chalky seafood or limp vegetables. Stagger them, and remember that smaller pieces need less time than whole fillets or big chicken thighs.
Using a weak glaze:
Thin sauces run off the food and pool on the pan, which leaves the tray underseasoned. If the sauce looks watery before cooking, it will probably taste even weaker after. Use a thicker glaze, reduce it first, or brush it on near the end.
Skipping the preheat:
A half-hot oven leaves you with soggy bottoms and uneven browning. The fix is plain: let the oven fully come to temperature before the pan goes in. If you want crisp edges, the oven has to be ready to work.
Forgetting the thermometer:
Guessing is how chicken dries out and pork gets pulled too late. A quick temperature check keeps you from overcooking food that was otherwise on track. For poultry, aim for 165°F; for pork, 145°F; for shrimp, look for pink, opaque curls that are no longer translucent.
Frequently Asked Questions

Can I double these sheet pan dinners for a bigger family?
Yes, but don’t cram everything onto one pan and expect the oven to save you. Use two sheet pans if needed, and rotate them halfway through cooking so both trays brown evenly. If the oven is crowded with pans, add a few extra minutes and check the hotter tray first.
What size sheet pan works best?
A standard half-sheet pan, about 18 x 13 inches, is the sweet spot for most of these recipes. Smaller pans crowd too fast, which causes steaming and pale vegetables. If your family is large, owning two half-sheet pans is more useful than buying one oversized pan that handles poorly.
Can I use frozen vegetables?
Some, yes. Frozen corn and edamame usually behave well, and thawed broccoli can work if you dry it first. Frozen zucchini, mushrooms, and watery blends are trouble unless you’re willing to accept more steam than roast.
How do I keep chicken skin crispy?
Pat the chicken dry before seasoning, don’t drown it in sauce too early, and keep the pan spacious. If the skin still needs help, broil it for 1 to 2 minutes at the end, watching closely so it doesn’t burn. Dry surface + hot oven = better skin.
Can I prep these meals in the morning?
Absolutely. Chop the vegetables, mix the spice blends, and marinate the proteins earlier in the day. Just avoid salting delicate vegetables too far ahead, because they’ll leak water and soften before dinner starts.
What if my vegetables finish before the protein?
Pull them off the pan and keep them warm under loose foil while the protein finishes. Or start the denser vegetables first and add the fast ones later. That staggered method is the cleanest fix and keeps everything from feeling overcooked.
Are sheet pan dinners good for meal prep?
They are, especially the chicken, sausage, pork, and tofu trays. Store the components in airtight containers and reheat in the oven or air fryer if you want the edges back. Seafood is the exception; it loses texture faster and doesn’t reward long storage.
How do I know when the food is done without cutting into everything?
An instant-read thermometer is the easiest answer, and it keeps dinner from drying out. Chicken should reach 165°F, pork 145°F, salmon should flake cleanly, and shrimp should be opaque and pink. For vegetables, look for browned edges and fork-tender centers.
A Bigger Dinner, Not a Bigger Mess
The charm of sheet pan dinners for big families is that they feel generous without turning the kitchen into a second job. You get browning, seasoning, and enough volume to satisfy a crowd, but you don’t have to juggle four burners and a sink full of pans to make it happen. That balance is rare. It’s also useful.
The best trays here all share the same common sense: start the hard vegetables first, give proteins enough room, and finish with something bright so the food doesn’t taste like it spent the evening under a heat lamp. Do that, and you can keep this whole style in steady rotation without anyone at the table getting bored.
One good pan can save a weeknight. Two good pans can save the whole evening.