
The 6 o’clock scramble is always the same: hungry people, a sink full of things that need washing, and a fridge that somehow contains ingredients but not a dinner. That’s exactly where low carb dinners earn their keep. They don’t ask for pasta water, breading stations, or a whole afternoon of chopping. They ask for a good pan, a hot burner, and enough seasoning to make a piece of chicken or a pile of vegetables taste like you meant it.
The trick is that low-carb food only gets boring when it’s built like punishment. Real weeknight dinners need color, salt, acid, and some kind of sauce that clings instead of slides off the plate. A skillet of garlicky chicken thighs with green beans does more heavy lifting than a sad grilled breast ever will. So does salmon with lemon and dill, or a beef stir-fry that smells like ginger the second it hits the pan.
What follows leans hard into that kind of dinner: fast, filling, and practical, with enough variation that you won’t feel like you’re eating the same thing in different clothes every night. Some of these are one-pan jobs. Some are sheet-pan. A few are the sort of dinner you can pull together from pantry basics and a couple of fresh vegetables. None of them require you to be precious.
Why This Collection Is Worth Your Time

- Fast cleanup: Most of these dinners use one skillet or one sheet pan, which matters more at 7 p.m. than any fancy garnish ever will.
- Real weeknight food: The flavors are bold enough to feel like dinner, not “diet food dressed in a blazer.”
- Flexible proteins: Chicken, beef, pork, shrimp, salmon, and turkey give you room to shop the sale rack without changing your whole plan.
- Low-carb without the drag: Cauliflower rice, cabbage, lettuce, zucchini, and green beans keep the plate full while skipping the starch pile-up.
- Meal-prep friendly: Several of these leftovers hold up well for lunch, especially the skillet dinners and bowl-style recipes.
- Easy to scale: Most recipes here double cleanly, which is handy when the hungry crowd grows by one without warning.
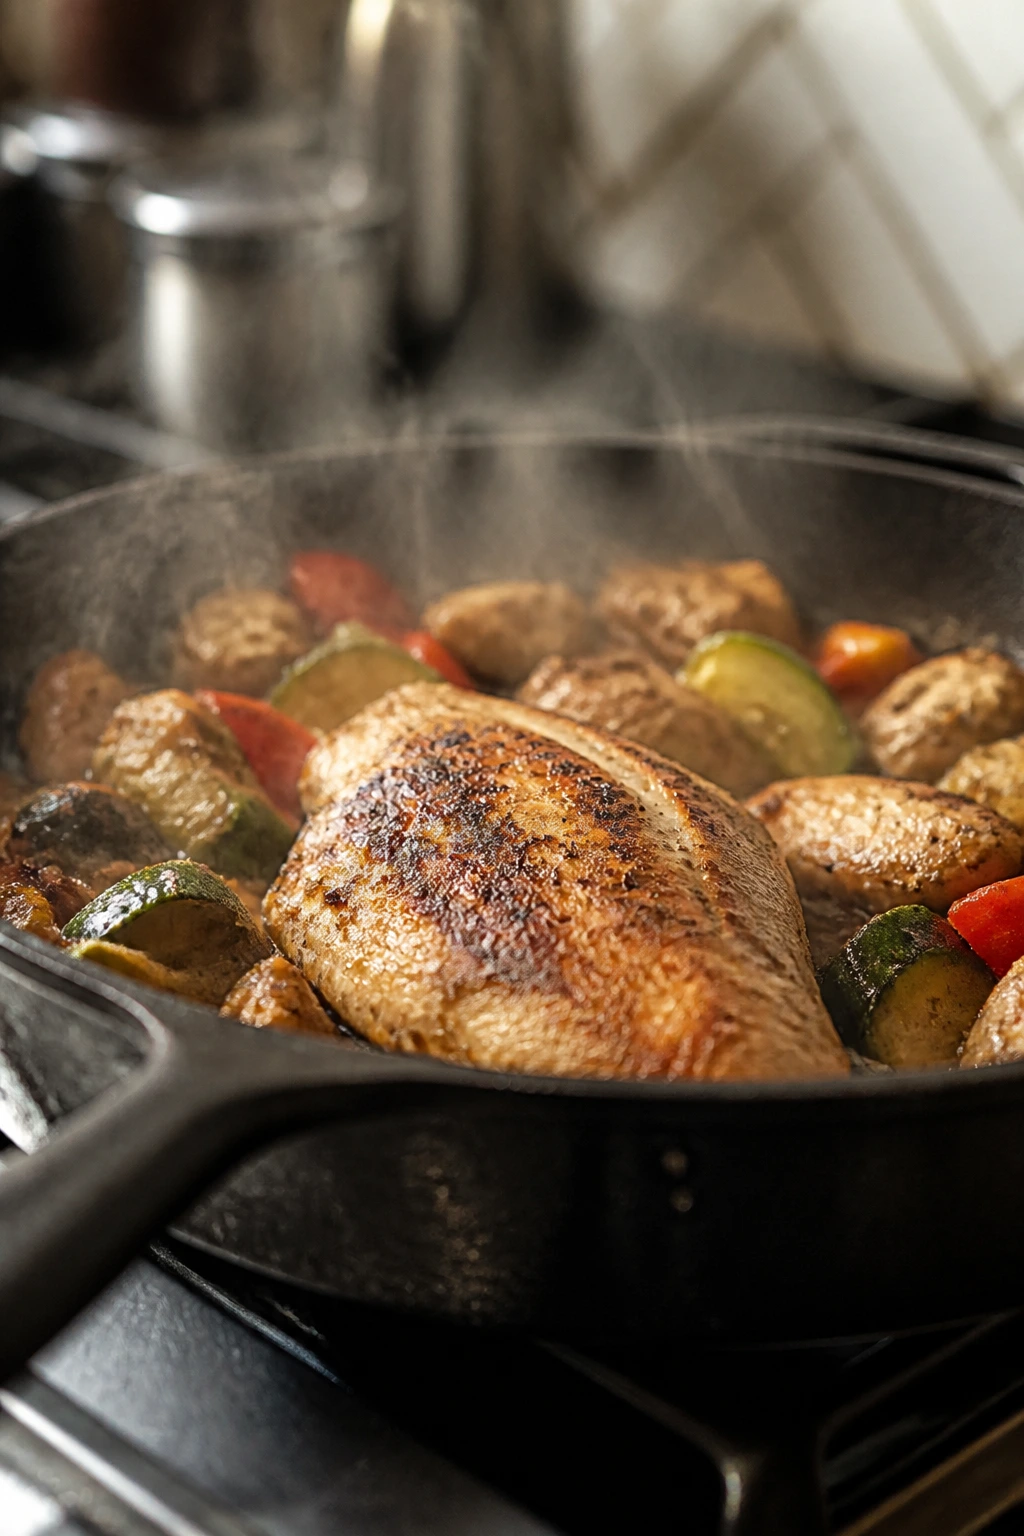
1. Garlic Butter Chicken with Green Beans
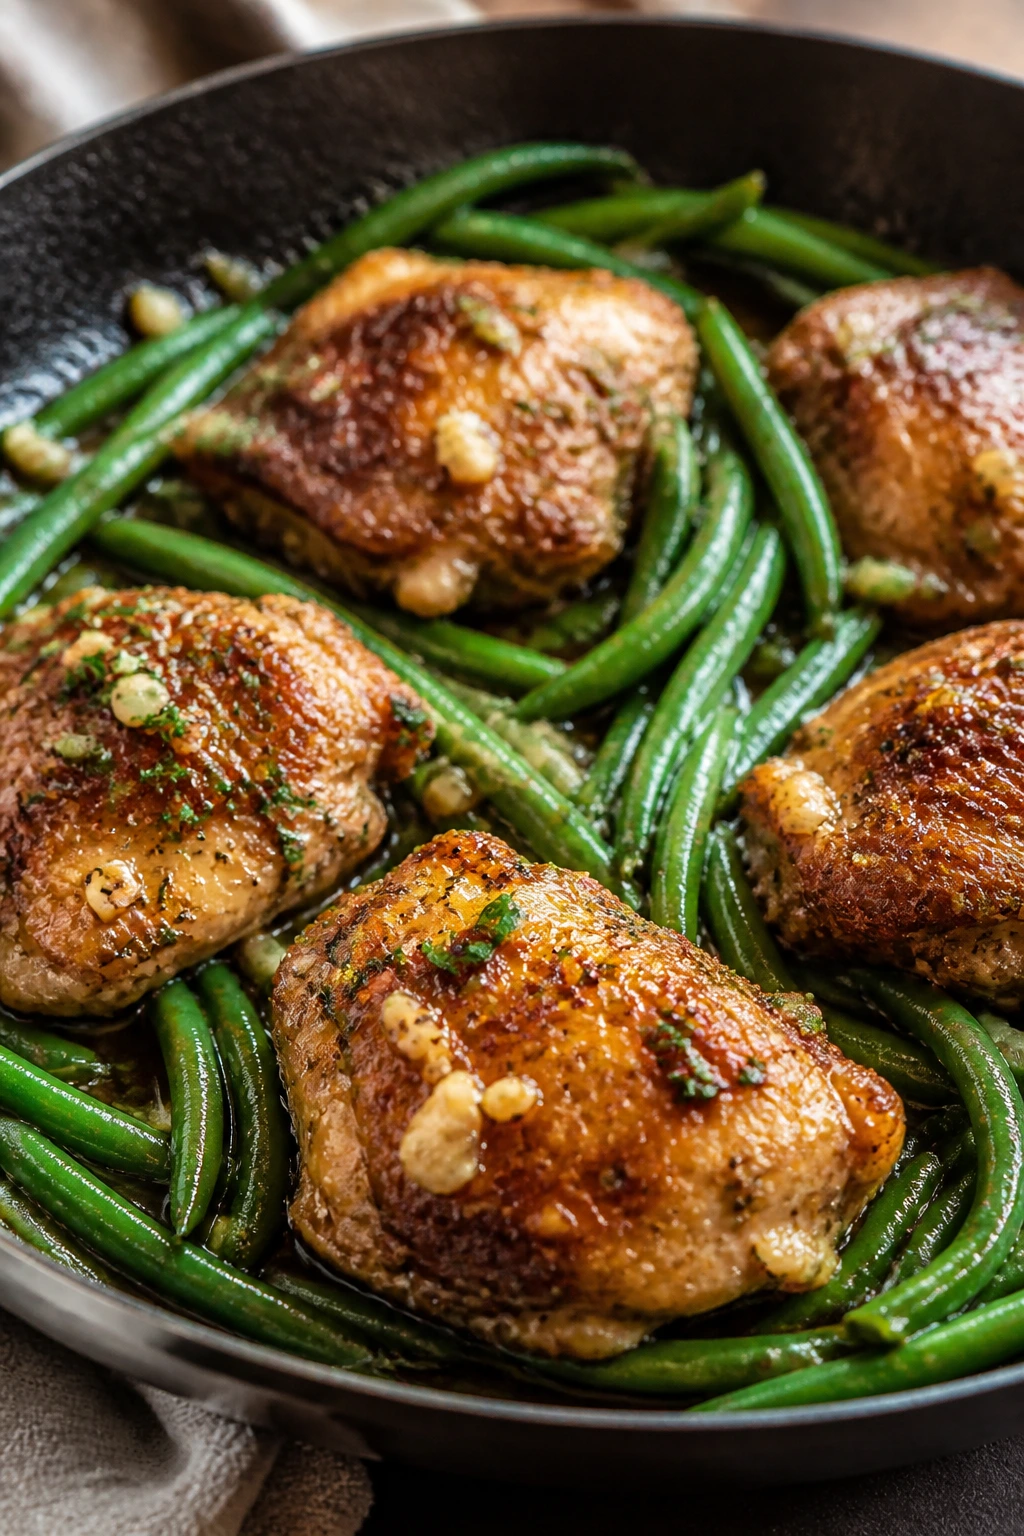
The skillet goes quiet for a second when the butter hits the garlic, and that’s the moment this dinner wins. The chicken gets bronzed edges, the green beans stay crisp-tender, and the whole pan smells like you’ve been cooking longer than you have. Time and yield: Serves 4 | Prep 10 minutes | Cook 15 minutes | Total 25 minutes.
Why It Works:
Boneless chicken thighs are forgiving, which is exactly what a busy night needs. They stay juicy even if the phone rings or the timer gets ignored for 30 seconds.
Green beans cook fast enough to share the same pan without turning to mush. The lemon at the end keeps the butter from tasting heavy, and the whole thing feels bright instead of greasy.
Key Ingredients:
- 2 lb boneless, skinless chicken thighs — choose pieces of similar size so they sear evenly.
- 1 lb green beans, trimmed — fresh beans keep a nice snap.
- 3 tbsp unsalted butter — this is the sauce base.
- 2 tbsp olive oil — helps the chicken brown without scorching the butter.
- 4 garlic cloves, minced — add them late so they stay sweet.
- 1 tsp paprika — gives the chicken color and a little warmth.
- 1 tsp kosher salt — seasons the meat all the way through.
- 1 lemon, cut into wedges — the finish that wakes everything up.
- 1 tbsp chopped parsley — optional, but it makes the pan look and taste fresher.
Quick Steps:
- Pat the chicken dry, then season both sides with salt, pepper, and paprika. Dry meat browns; wet meat steams.
- Heat the olive oil in a large skillet over medium-high heat. Add the chicken and cook for 5 to 6 minutes per side, until deeply golden and the thickest part reaches 165°F.
- Transfer the chicken to a plate and keep it warm. Leave the browned bits in the pan.
- Add the green beans with 2 tablespoons water and cook for 3 to 4 minutes, stirring occasionally, until bright green and crisp-tender.
- Stir in the butter and garlic and cook for 30 seconds, just until fragrant. Do not let the garlic turn dark brown.
- Return the chicken to the skillet, spoon the garlicky butter over the top, and cook for 1 minute more. Finish with lemon juice and parsley.
Equipment for This Recipe:
- 12-inch skillet — big enough to keep the beans in one layer.
- Tongs — for turning the chicken cleanly.
- Cutting board and sharp knife — trimming the beans and mincing garlic goes faster.
- Instant-read thermometer — the surest way to avoid dry chicken.
How to Serve This Dish:
Pile the chicken over the green beans and spoon the butter from the pan right over everything. A spoonful of cauliflower mash or a simple cucumber salad works well on the side. The plate should look glossy, green, and a little rustic.
Pro Tips for This Recipe:
- Let the chicken sit at room temperature for 10 minutes before cooking if you have the time; it sears more evenly.
- Trim the green beans ahead of time and store them in a paper towel-lined container.
- A squeeze of lemon at the end matters more than another pinch of salt.
Variations on This Dish:
- Cajun Butter Chicken: Swap the paprika for Cajun seasoning and add a pinch of cayenne for heat.
- Asparagus Swap: Use trimmed asparagus instead of green beans and shorten the vegetable cook time by 1 to 2 minutes.
- Creamy Pan Sauce: Stir in 2 tablespoons of heavy cream after the garlic for a softer, richer sauce.
Common Mistakes to Avoid with This Dish:
- Crowding the chicken: If the pieces are packed too tightly, they steam instead of browning. Cook in batches if needed.
- Burning the garlic: Garlic goes bitter fast in hot butter. Add it only after the beans are nearly done.
- Overcooking the beans: They should still bend with a little resistance. Limp green beans make the whole plate feel tired.
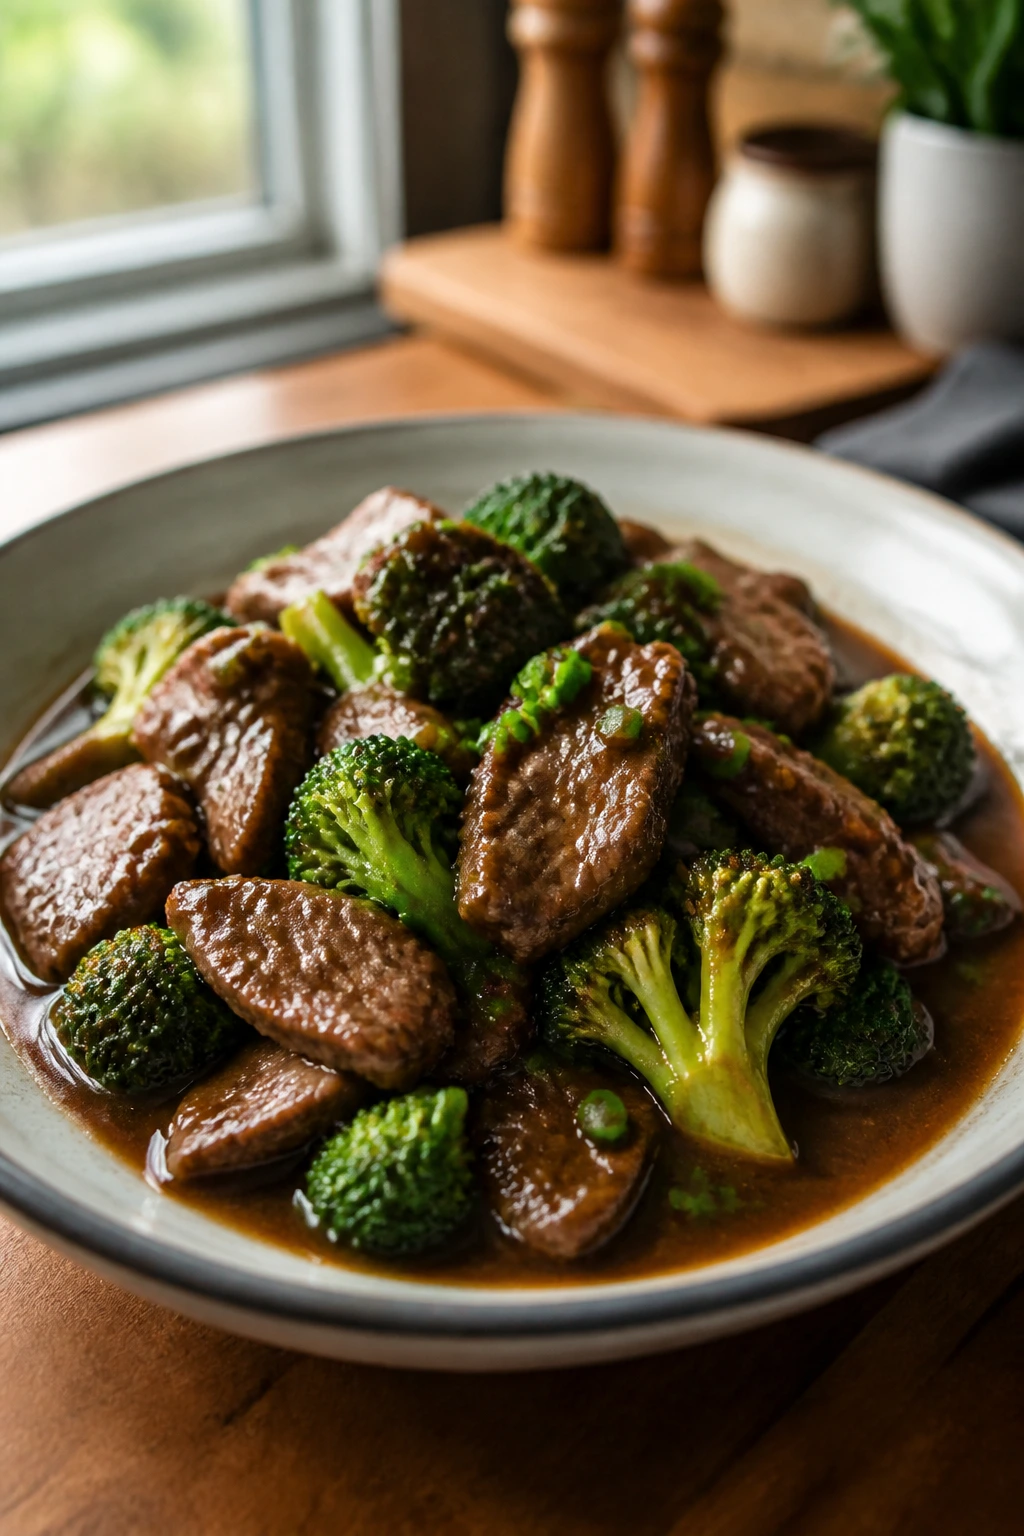
2. Beef and Broccoli Skillet
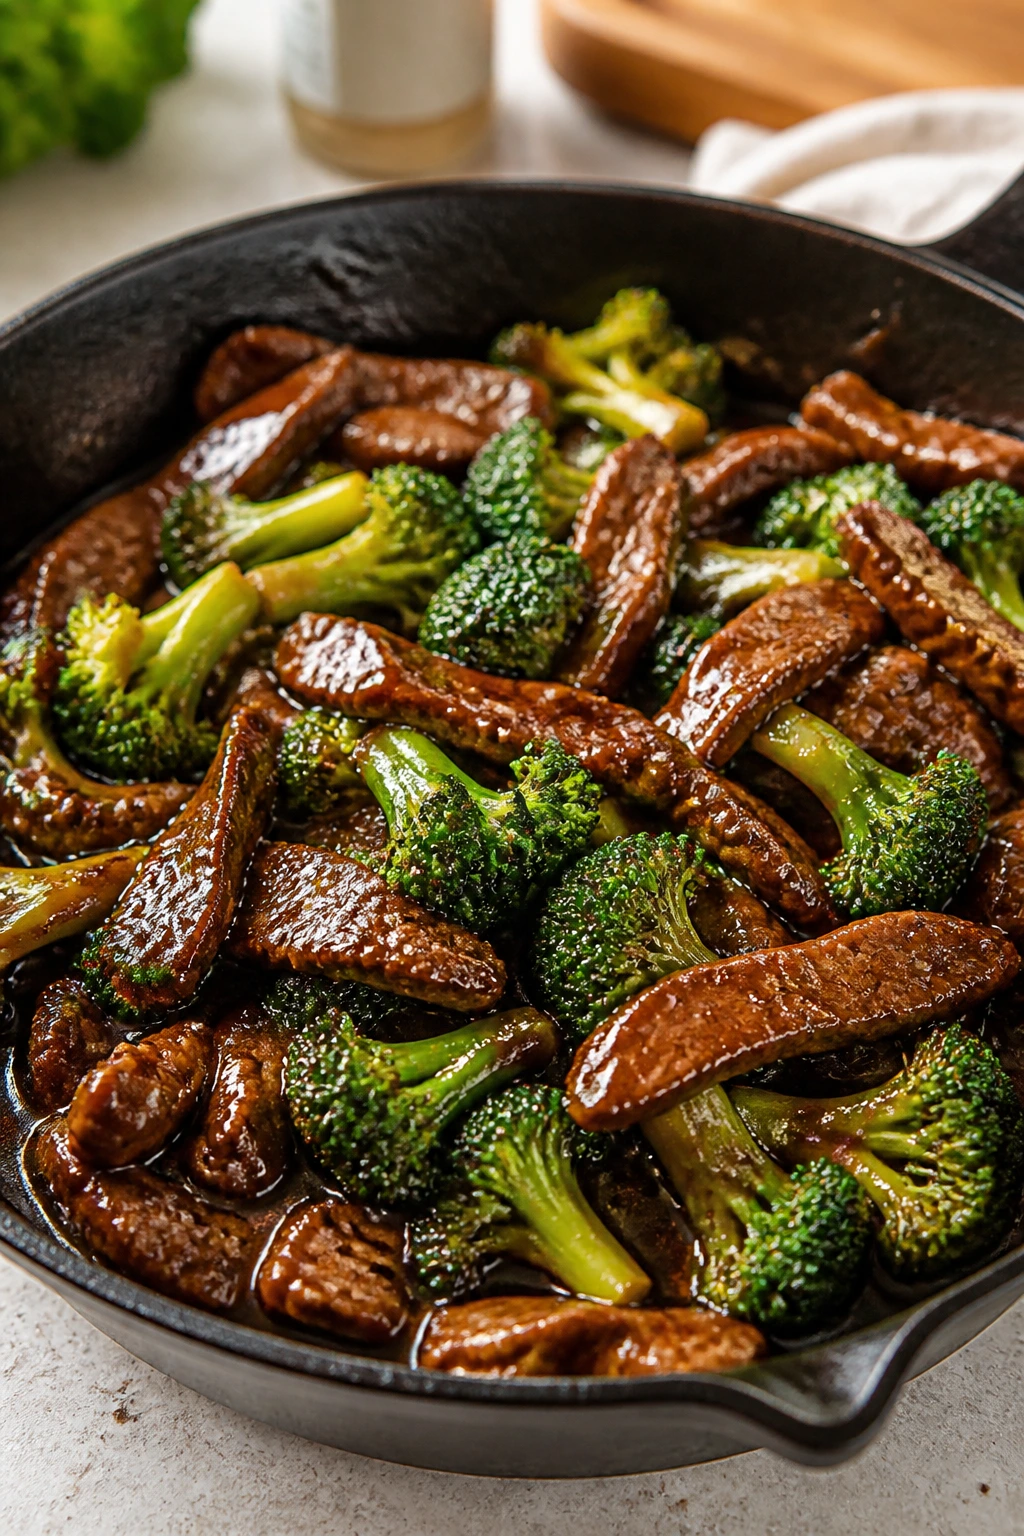
This tastes like takeout that got a promotion. Thin beef, glossy sauce, and broccoli with a little bite make it the kind of dinner that disappears fast, especially when the ginger and sesame start doing their thing. Time and yield: Serves 4 | Prep 15 minutes | Cook 15 minutes | Total 30 minutes.
Why It Works:
Flank steak cooks in minutes when it’s sliced thin and added to a hot pan. That means you get a lot of flavor without standing over the stove for half an hour.
Broccoli and beef like the same sharp, savory sauce, so there’s no dead weight on the plate. Tamari, ginger, and rice vinegar give you the same salty-sour balance people love in stir-fry, minus the sugary gloss.
Key Ingredients:
- 1½ lb flank steak, sliced thin against the grain — the cut matters here.
- 4 cups broccoli florets — keep the pieces bite-sized.
- 2 tbsp avocado oil — good for high heat.
- 1 small yellow onion, sliced — adds sweetness and volume.
- 3 garlic cloves, minced — the backbone of the sauce.
- 1 tbsp fresh ginger, grated — don’t skip this.
- ⅓ cup low-sodium tamari — the main savory note.
- ½ cup beef broth — loosens the sauce without adding carbs.
- 1 tbsp rice vinegar — sharpens everything at the end.
- 1 tsp sesame oil — a finishing oil, not a cooking oil.
Quick Steps:
- Mix the tamari, beef broth, rice vinegar, ginger, and garlic in a small bowl.
- Heat 1 tablespoon avocado oil in a large skillet over high heat. Add half the beef and sear for 1 to 2 minutes per side, just until browned. Remove and repeat with the rest.
- Add the remaining oil, onion, and broccoli to the pan. Cook for 4 to 5 minutes, tossing often, until the broccoli is bright and just tender. If the pan looks dry, add 2 tablespoons water.
- Pour in the sauce and let it bubble for 1 to 2 minutes.
- Return the beef to the skillet and toss until coated and hot, about 1 minute.
- Turn off the heat and drizzle with sesame oil. Sesame oil goes in at the end or it loses its aroma.
Equipment for This Recipe:
- Large skillet or wok — hot surface, quick cooking.
- Sharp knife — slicing beef thinly is half the battle.
- Mixing bowl — for the sauce.
- Slotted spoon or spatula — helpful when removing the beef in batches.
How to Serve This Dish:
Serve it over cauliflower rice or in shallow bowls with a sprinkle of sesame seeds. A few sliced scallions on top give it a cleaner finish. It should look saucy, dark, and scattered with green broccoli florets.
Pro Tips for This Recipe:
- Freeze the steak for 15 minutes before slicing; it firms up and cuts much cleaner.
- Don’t overcrowd the pan or you’ll end up braising the beef.
- If your broccoli stalks are thick, give them a 1-minute steam in the pan with a splash of water before the sauce goes in.
Variations on This Dish:
- Ground Beef Shortcut: Use 1½ lb ground beef and skip the slicing step when you need dinner on the table even faster.
- Mushroom Broccoli Bowl: Add 8 ounces of sliced mushrooms for more volume and a deeper savory note.
- Spicy Chili Crisp Version: Stir in 1 teaspoon chili crisp at the end if you like heat and crunch.
Common Mistakes to Avoid with This Dish:
- Using thick beef slices: Thick pieces cook unevenly and turn chewy. Slice across the grain as thin as you can.
- Adding broccoli too late: If the florets never get heat before the sauce, they stay raw in the middle.
- Letting the sauce sit too long: Stir-fry sauce thickens fast. Toss and serve while it still clings.
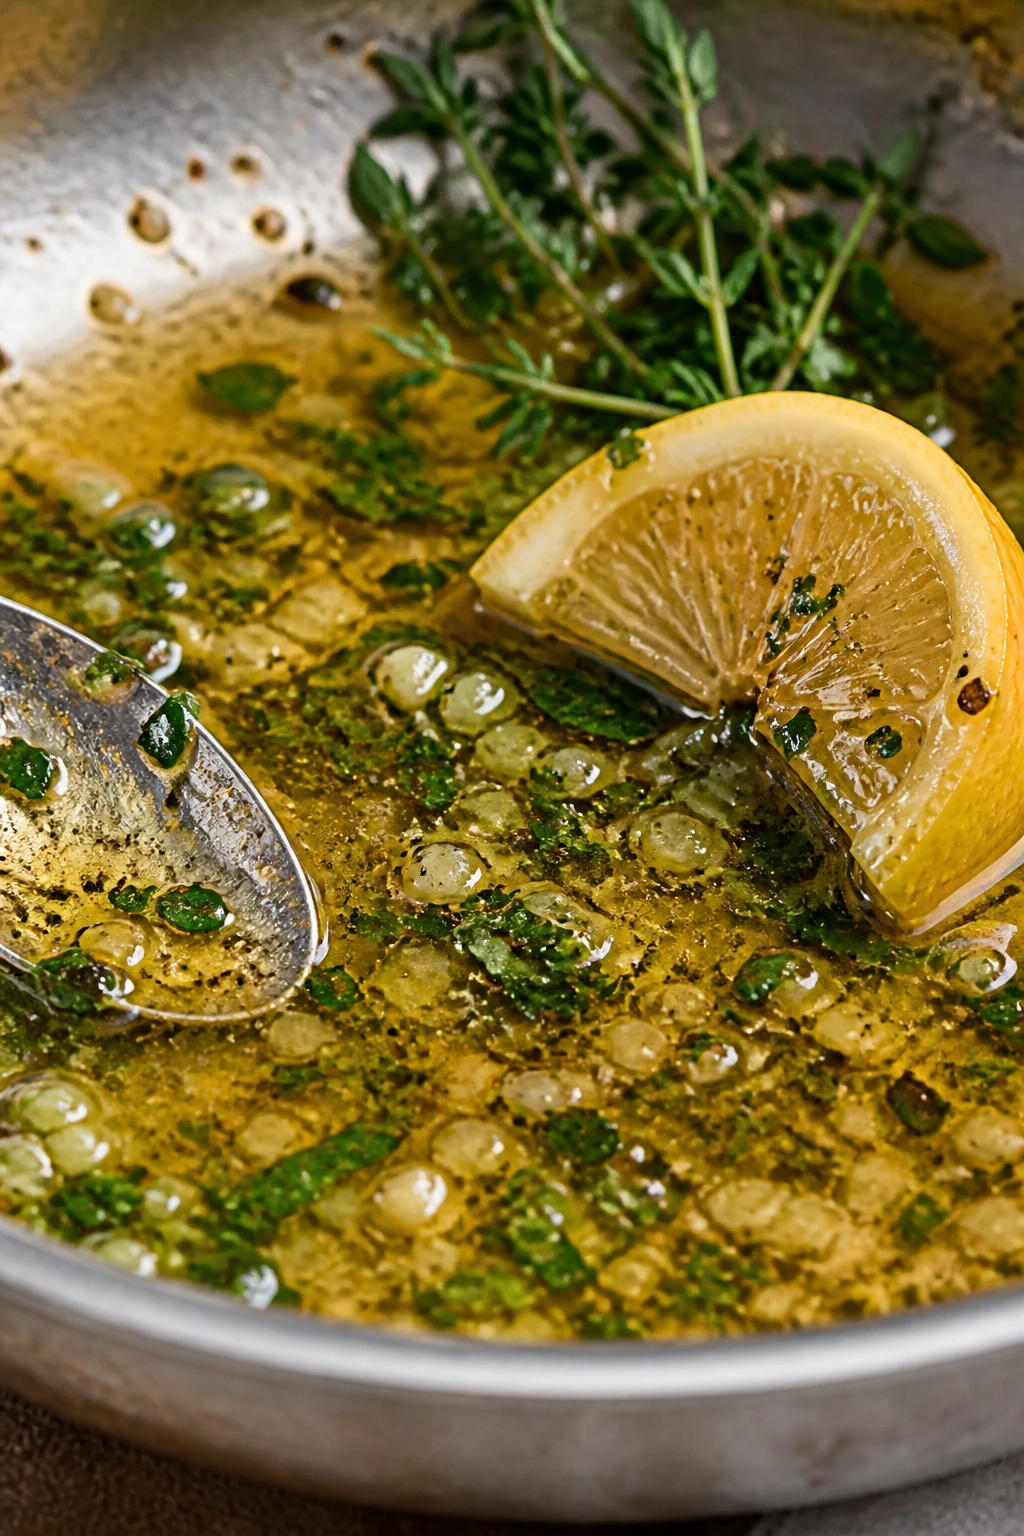
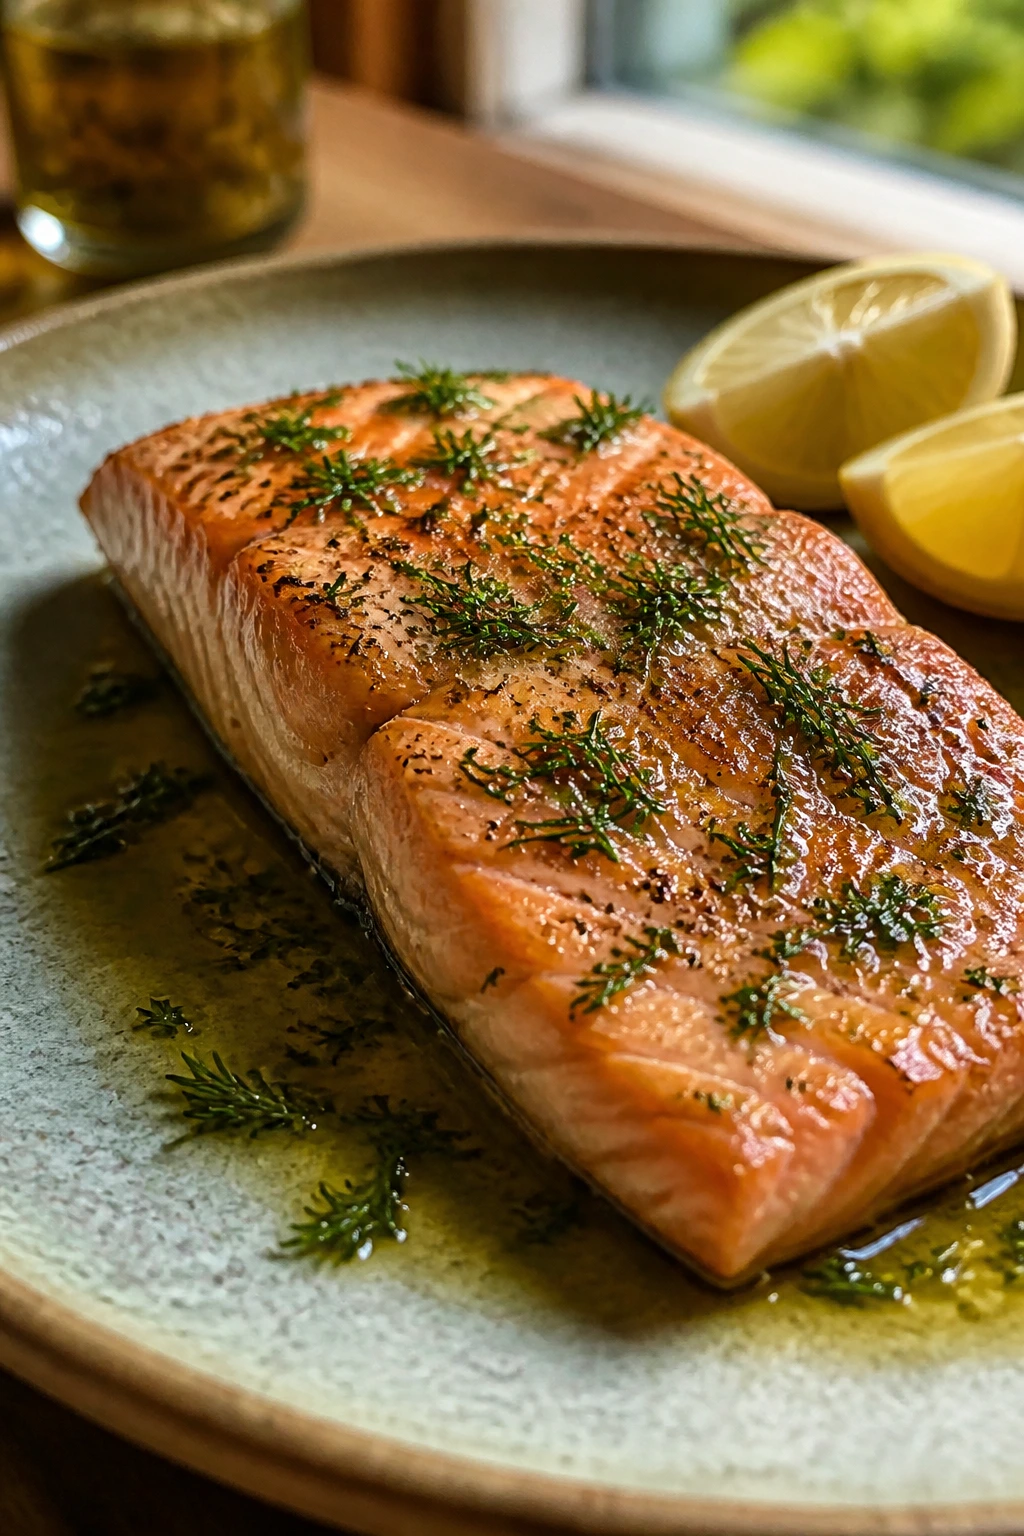
3. Salmon with Lemon-Dill Asparagus
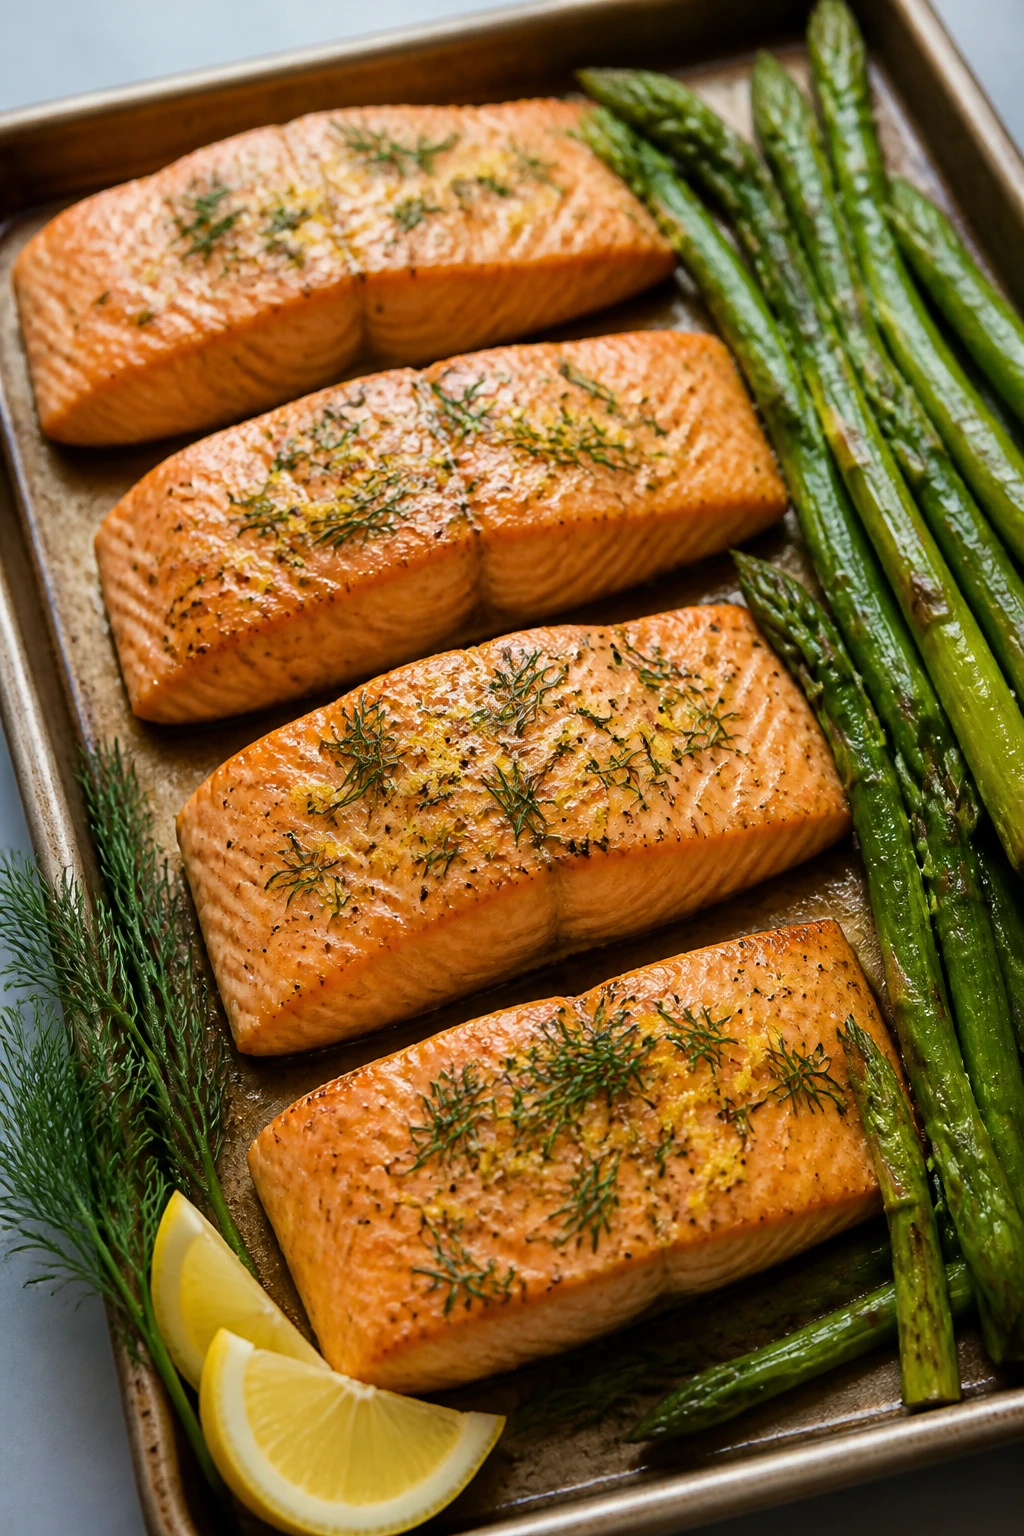
A good salmon dinner should feel clean and sharp, not fussy. This one does exactly that: tender fish, asparagus with a little snap, and lemon-dill running through the whole pan like a bright line. Time and yield: Serves 4 | Prep 10 minutes | Cook 12 minutes | Total 22 minutes.
Why It Works:
Salmon and asparagus finish at nearly the same pace, which is the sort of small kitchen miracle that keeps weeknights sane. A sheet pan also means the oven does the work while you clear the counter or pour a drink.
Dijon and lemon give the fish a little edge, while dill makes the whole dish taste fresh without asking for much. That’s the beauty of it. Not much prep, not much cleanup, and dinner still looks deliberate.
Key Ingredients:
- 4 salmon fillets, about 6 oz each — similar thickness helps them cook evenly.
- 1 lb asparagus, trimmed — look for stalks that bend, not snap in the store.
- 2 tbsp olive oil — for the vegetables and the fish.
- 2 tsp Dijon mustard — a quiet little flavor booster.
- 2 garlic cloves, minced — enough to perfume the pan.
- 1 lemon, zested and juiced — use both parts.
- 1 tbsp chopped fresh dill — add after baking for the cleanest flavor.
- 1 tsp kosher salt — divide between the fish and asparagus.
- Black pepper, to taste — keep it simple.
Quick Steps:
- Heat the oven to 400°F and line a sheet pan with parchment.
- Toss the asparagus with 1 tablespoon olive oil, half the salt, and a little pepper. Spread it out in a single layer.
- Rub the salmon with the remaining olive oil, Dijon, garlic, lemon zest, salt, and pepper.
- Nestle the salmon on the pan beside the asparagus and bake for 10 to 12 minutes, until the salmon flakes easily and the thickest part reaches 145°F.
- If you want a little color, broil for 1 minute at the end. Watch closely; salmon goes from glossy to dry fast.
- Finish with lemon juice and dill right before serving.
Equipment for This Recipe:
- Rimmed sheet pan — keeps the juices from spilling.
- Parchment paper — helps with cleanup.
- Microplane or fine grater — ideal for lemon zest.
- Fish spatula — nice, but not required.
How to Serve This Dish:
Serve the salmon directly from the sheet pan or move it to a platter with the asparagus tucked alongside. A chilled cucumber salad or a pile of roasted radishes makes a nice low-carb side. The plate should look simple and fresh, not crowded.
Pro Tips for This Recipe:
- Choose asparagus stalks of similar thickness so they finish at the same time.
- Pat the salmon dry before seasoning; moisture on the surface keeps it from browning.
- Add dill after baking so it stays green and lively.
Variations on This Dish:
- Herb Butter Salmon: Top each fillet with a thin slice of compound butter after baking for a richer finish.
- Cherry Tomato Sheet Pan: Add a handful of cherry tomatoes to the pan for a juicier, slightly sweeter side.
- Lime-Cilantro Version: Swap dill and lemon for cilantro and lime if you want a brighter, Southwest-style plate.
Common Mistakes to Avoid with This Dish:
- Overbaking the salmon: Pull it when it flakes but still looks moist in the center.
- Using skinny asparagus with thick fillets: Thin stalks can overcook before the fish is done.
- Adding herbs too early: Dill loses its spark in the oven.
4. Turkey Taco Lettuce Wrap Skillet
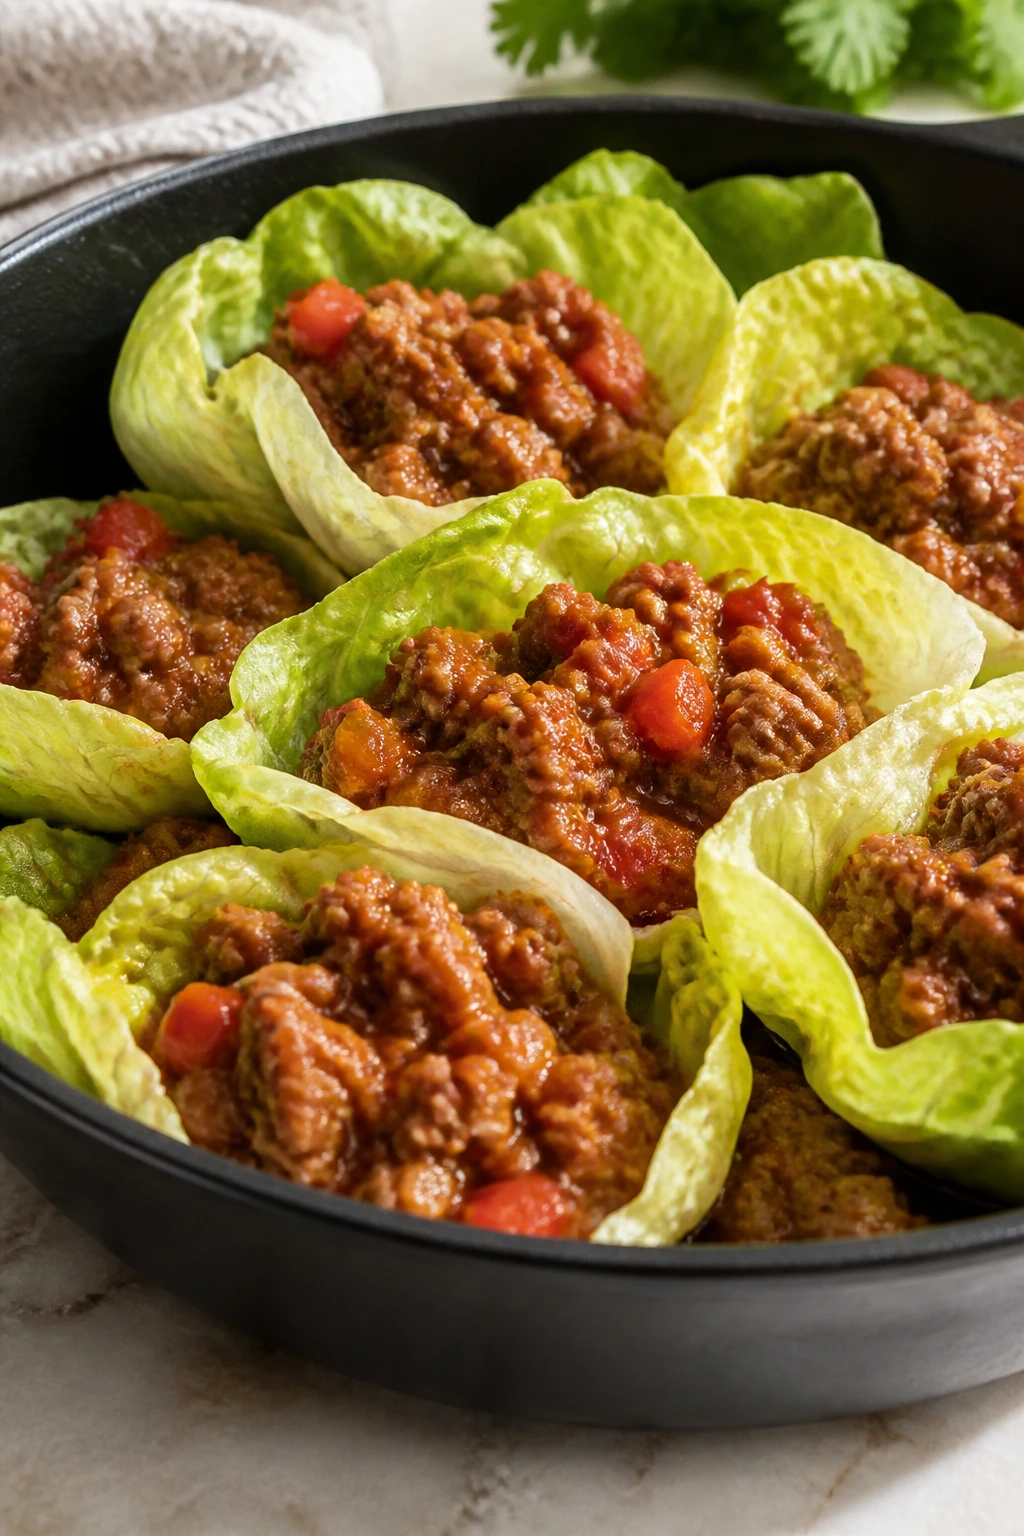
If taco night keeps getting derailed by tortillas, this is the fix. The filling is savory, a little smoky, and sturdy enough to hold up in lettuce cups without sliding straight onto the plate. Time and yield: Serves 4 | Prep 10 minutes | Cook 15 minutes | Total 25 minutes.
Why It Works:
Ground turkey absorbs seasoning fast, which makes it ideal when you do not have time for a marinade. Tomato paste and broth deepen the flavor so the filling tastes like more than “spiced meat.”
Lettuce wraps keep the carbs down while still giving you the crunchy, hand-held feel people actually want from taco night. You get the fun part without the flour or corn tortilla.
Key Ingredients:
- 1½ lb ground turkey — choose 93% lean for enough flavor without too much grease.
- 1 small onion, diced — builds the base.
- 3 garlic cloves, minced — helps the turkey taste richer.
- 2 tbsp tomato paste — adds body and color.
- 2 tbsp taco seasoning — check the label if you want less salt.
- ½ cup chicken broth — keeps the filling moist.
- 1 tbsp lime juice — brightens the finished skillet.
- 1 head butter lettuce or romaine, separated into leaves — your “shells.”
- 1 cup shredded cheddar or Monterey Jack — optional, but popular.
- 1 avocado, sliced — for creaminess.
Quick Steps:
- Heat a skillet over medium-high heat and cook the onion for 2 minutes.
- Add the turkey and break it up with a spoon. Cook for 5 to 6 minutes, until no pink remains.
- Stir in the garlic, tomato paste, taco seasoning, and broth. Simmer for 3 to 4 minutes, until the mixture thickens and looks glossy.
- Turn off the heat and stir in the lime juice.
- Spoon the filling into lettuce leaves and top with cheese, avocado, and salsa.
- Serve immediately. Lettuce waits for no one.
Equipment for This Recipe:
- Large skillet — wide enough for browning, not steaming.
- Wooden spoon — helps break up the turkey.
- Knife and cutting board — for onion, avocado, and garnish.
- Serving platter — useful if you want the wraps to look neat at the table.
How to Serve This Dish:
Set out the lettuce leaves, filling, and toppings separately so people can build their own wraps. A side of cauliflower rice turns this into a fuller dinner, while sliced tomatoes or cucumber salad keep it crisp and cool. The plate should feel casual and a little messy in the best way.
Pro Tips for This Recipe:
- If your taco seasoning is salty, start with 1½ tablespoons and add more only after tasting.
- Drain excess liquid if the turkey releases a lot of moisture.
- Fill the lettuce cups right before serving so they stay crisp.
Variations on This Dish:
- Buffalo Turkey Cups: Swap taco seasoning for buffalo sauce and add diced celery for a sharper, wing-style flavor.
- Tex-Mex Bowl: Serve the turkey over cauliflower rice with shredded lettuce, avocado, and salsa instead of wrapping it.
- Dairy-Free Fiesta: Skip the cheese and finish with extra avocado and cilantro.
Common Mistakes to Avoid with This Dish:
- Watery filling: If you leave too much liquid in the pan, the lettuce gets soggy fast. Simmer until the skillet looks nearly dry.
- Weak seasoning: Turkey needs a firm hand with spices. Taste before serving.
- Using brittle lettuce: Iceberg cracks too easily; butter lettuce or romaine holds together better.
5. Shrimp Zucchini Noodle Scampi
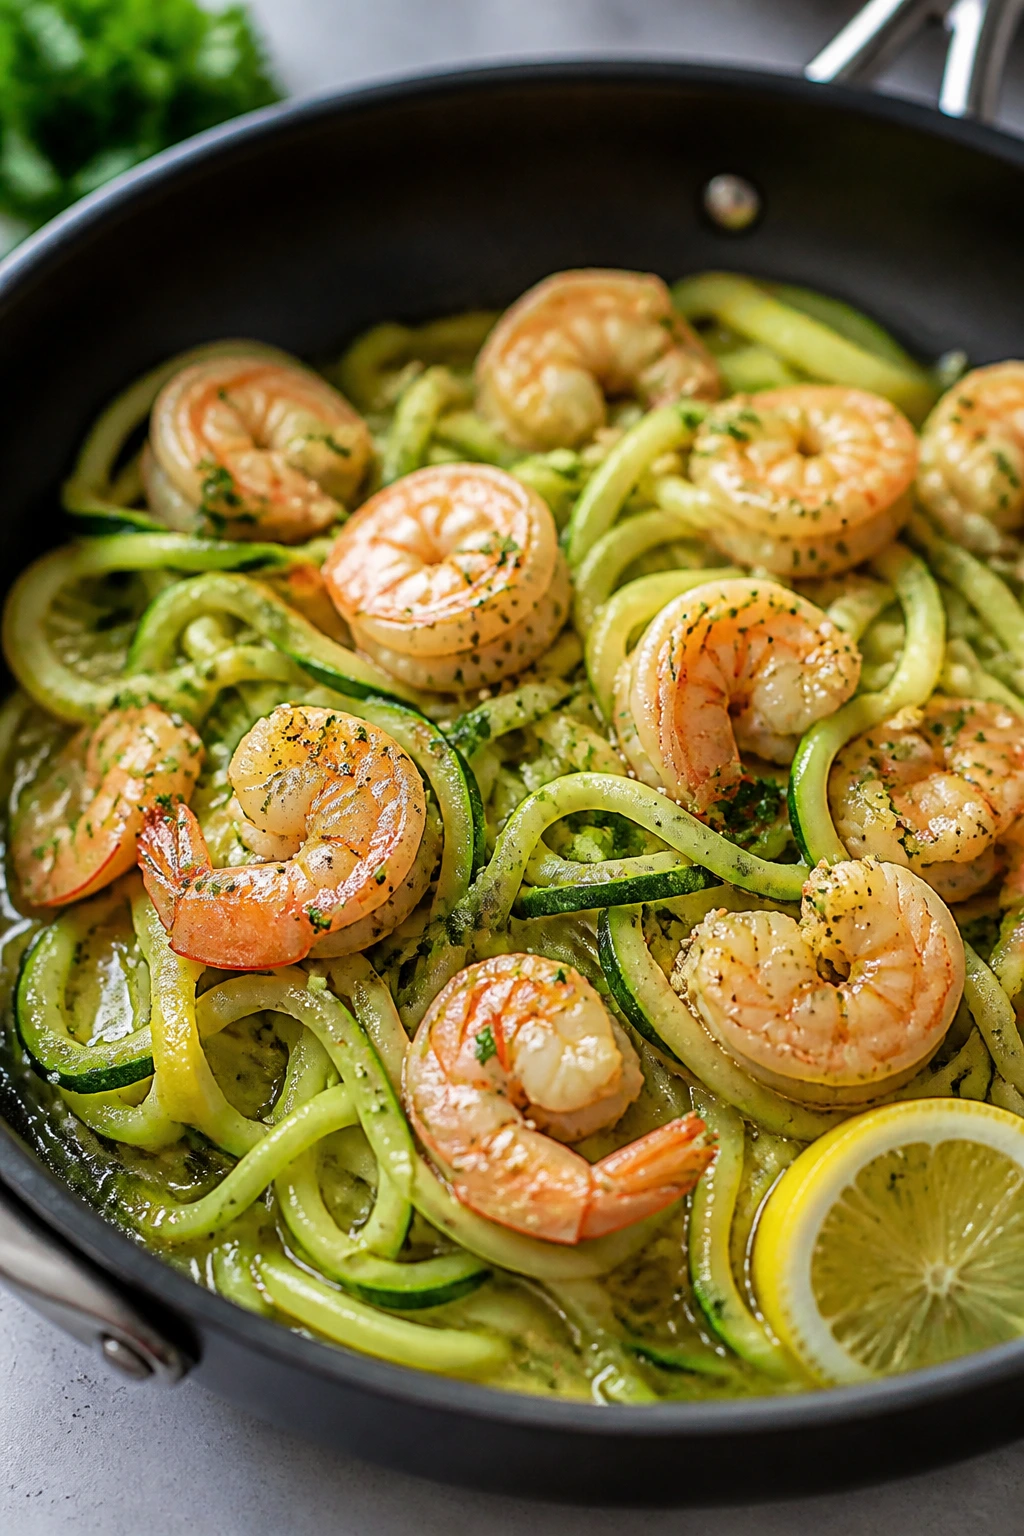
This is the dinner that feels a little fancy even when you made it in twenty-five minutes between answering texts. The shrimp turn pink and sweet, the garlic butter smells like it belongs in a restaurant, and the zucchini noodles soak up just enough sauce without turning heavy. Time and yield: Serves 4 | Prep 15 minutes | Cook 10 minutes | Total 25 minutes.
Why It Works:
Shrimp cooks in a flash, which makes it one of the easiest proteins to use when time is tight. Zucchini noodles are also fast, but they need restraint; a quick toss is enough.
The lemon-butter sauce gives you the comfort of scampi without a mountain of pasta. If you keep the zucchini dry and the shrimp just barely cooked, the whole dish stays lively.
Key Ingredients:
- 1½ lb large shrimp, peeled and deveined — buy them thawed or thaw them fully first.
- 4 medium zucchini, spiralized — medium zucchini hold up better than giant ones.
- 3 tbsp unsalted butter — for the sauce.
- 2 tbsp olive oil — helps the shrimp sear.
- 4 garlic cloves, minced — the main flavor.
- ¼ cup dry white wine or chicken broth — gives the sauce something to cling to.
- 1 lemon, juiced — keep the flavor bright.
- ¼ tsp red pepper flakes — optional heat.
- 2 tbsp chopped parsley — fresh finish.
- ¼ cup grated Parmesan — optional, but nice.
Quick Steps:
- Spiralize the zucchini and lightly salt it. Let it sit for 5 minutes, then blot it dry with paper towels.
- Heat the olive oil in a large skillet over medium-high heat. Cook the shrimp for 1 to 2 minutes per side, just until pink and opaque. Remove them.
- Add the butter and garlic to the pan and cook for 30 seconds.
- Pour in the wine or broth and lemon juice, scraping up the browned bits.
- Add the zucchini noodles and toss for 1 to 2 minutes, just until warmed through.
- Return the shrimp, add the parsley and red pepper flakes, and toss once more. Do not cook the zucchini until limp.
- Finish with Parmesan if you want it.
Equipment for This Recipe:
- Large skillet — roomy enough for the shrimp and noodles.
- Spiralizer or julienne peeler — either works.
- Paper towels — useful for drying the zucchini.
- Colander — helps drain excess moisture.
How to Serve This Dish:
Serve it in shallow bowls with a little extra lemon on the side. A simple arugula salad fits nicely because it adds peppery bite without complicating the plate. The finished dish should look glossy and light, with the zucchini still showing its shape.
Pro Tips for This Recipe:
- Salt the zucchini, then blot it dry to keep the sauce from getting watery.
- Pull the shrimp as soon as they curl into a loose “C”; tight little “O” shapes usually mean overcooked.
- If you want a thicker sauce, let the wine or broth reduce for 1 extra minute before adding the zoodles.
Variations on This Dish:
- Creamy Scampi: Stir in 2 tablespoons of heavy cream after the garlic for a softer sauce.
- Pesto Scampi: Toss the shrimp and zoodles with 2 tablespoons basil pesto at the end.
- Garlic-Chili Scampi: Add extra red pepper flakes and a few spoonfuls of chili oil for a sharper kick.
Common Mistakes to Avoid with This Dish:
- Watery zucchini noodles: Dry them well or the sauce thins out fast.
- Overcooked shrimp: Shrimp go from perfect to rubbery in seconds.
- Adding Parmesan while the pan is raging hot: The cheese can clump instead of melting smoothly.
6. Pork Chops with Creamy Mushroom Sauce
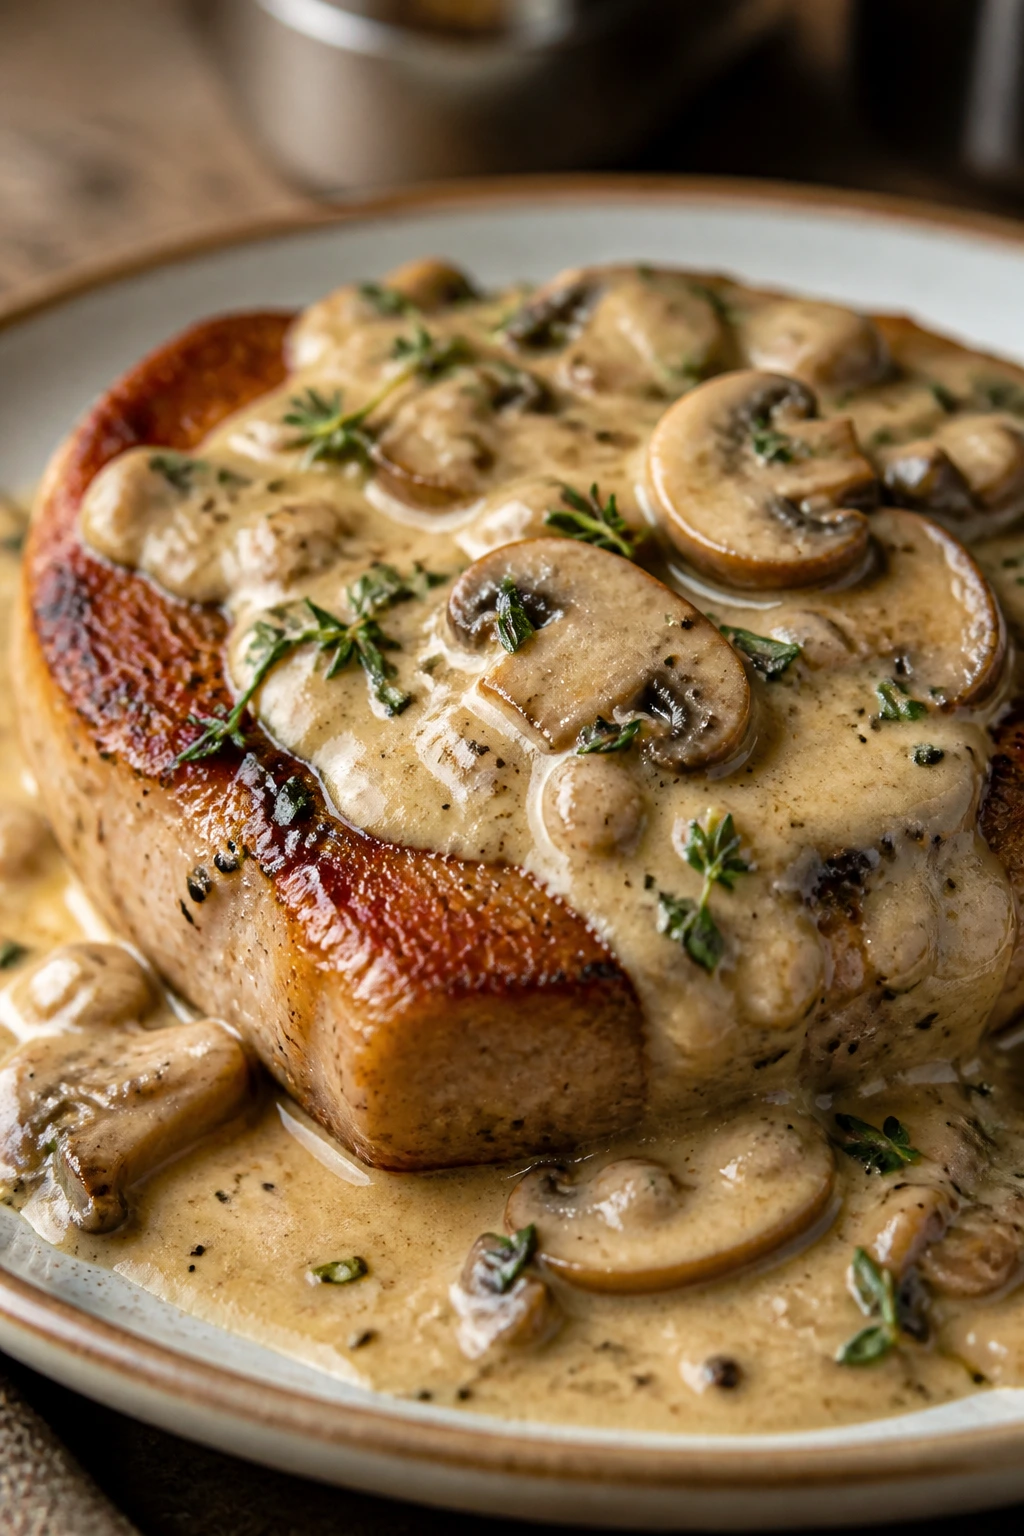
Pork chops love a pan sauce. They especially love one that starts with browned mushrooms, a little shallot, and enough cream to make the whole skillet look like it knows what it’s doing. Time and yield: Serves 4 | Prep 10 minutes | Cook 20 minutes | Total 30 minutes.
Why It Works:
Thick pork chops stay juicy if you give them a hard sear and then finish them gently. The mushrooms catch all the good browned bits from the pan, which is where the flavor lives.
Dijon and thyme keep the sauce from tasting heavy. The result is rich without needing flour, potatoes, or anything else to carry it.
Key Ingredients:
- 4 pork chops, 1 inch thick — bone-in or boneless both work, but thickness matters.
- 8 oz cremini mushrooms, sliced — they bring the savory flavor.
- 1 shallot, minced — sweeter than onion in this sauce.
- 2 garlic cloves, minced — enough to perfume the cream.
- 2 tbsp olive oil — for the sear.
- 1 tbsp butter — for the sauce.
- ½ cup chicken broth — deglazes the pan.
- ½ cup heavy cream — turns it silky.
- 1 tsp Dijon mustard — sharpens the flavor.
- 1 tsp fresh thyme or ½ tsp dried — earthy and clean.
Quick Steps:
- Pat the pork chops dry and season both sides with salt and pepper.
- Heat the olive oil in a skillet over medium-high heat and sear the chops for 3 to 4 minutes per side, until golden. Remove them.
- Add the butter, mushrooms, and shallot to the skillet. Cook for 4 to 5 minutes until the mushrooms release their liquid and start to brown.
- Stir in the garlic and thyme for 30 seconds, then pour in the broth and scrape the bottom of the pan.
- Add the cream and Dijon and simmer for 2 to 3 minutes, until the sauce thickens slightly.
- Return the pork chops and cook for 3 to 4 minutes, or until the thickest part reaches 145°F. Let them rest for 5 minutes before serving.
Equipment for This Recipe:
- Heavy skillet, preferably cast iron — helps with browning.
- Tongs — for flipping the chops.
- Instant-read thermometer — the cleanest way to avoid dry pork.
- Small spoon — for tasting and adjusting the sauce.
How to Serve This Dish:
Serve the pork chops with the mushroom sauce spooned over the top. Cauliflower mash or sautéed spinach makes a good base, because both catch the sauce without competing with it. The finished plate should look creamy and deep brown, not pale.
Pro Tips for This Recipe:
- Thick chops are easier to manage than thin ones.
- Do not stir the mushrooms constantly; let them sit long enough to brown.
- If the sauce gets too thick, loosen it with a splash of broth.
Variations on This Dish:
- Rosemary Garlic Pork: Swap thyme for rosemary and add a little black pepper for a woodsy finish.
- Spinach Cream Sauce: Stir in a handful of spinach at the end for extra color and volume.
- Dairy-Light Version: Use half cream and half broth for a thinner sauce that still coats the meat.
Common Mistakes to Avoid with This Dish:
- Using thin pork chops: They dry out before the sauce finishes.
- Skipping the rest time: Pork that cuts immediately leaks juice all over the plate.
- Boiling the cream hard: Gentle heat keeps the sauce smooth.
7. Buffalo Chicken Stuffed Peppers
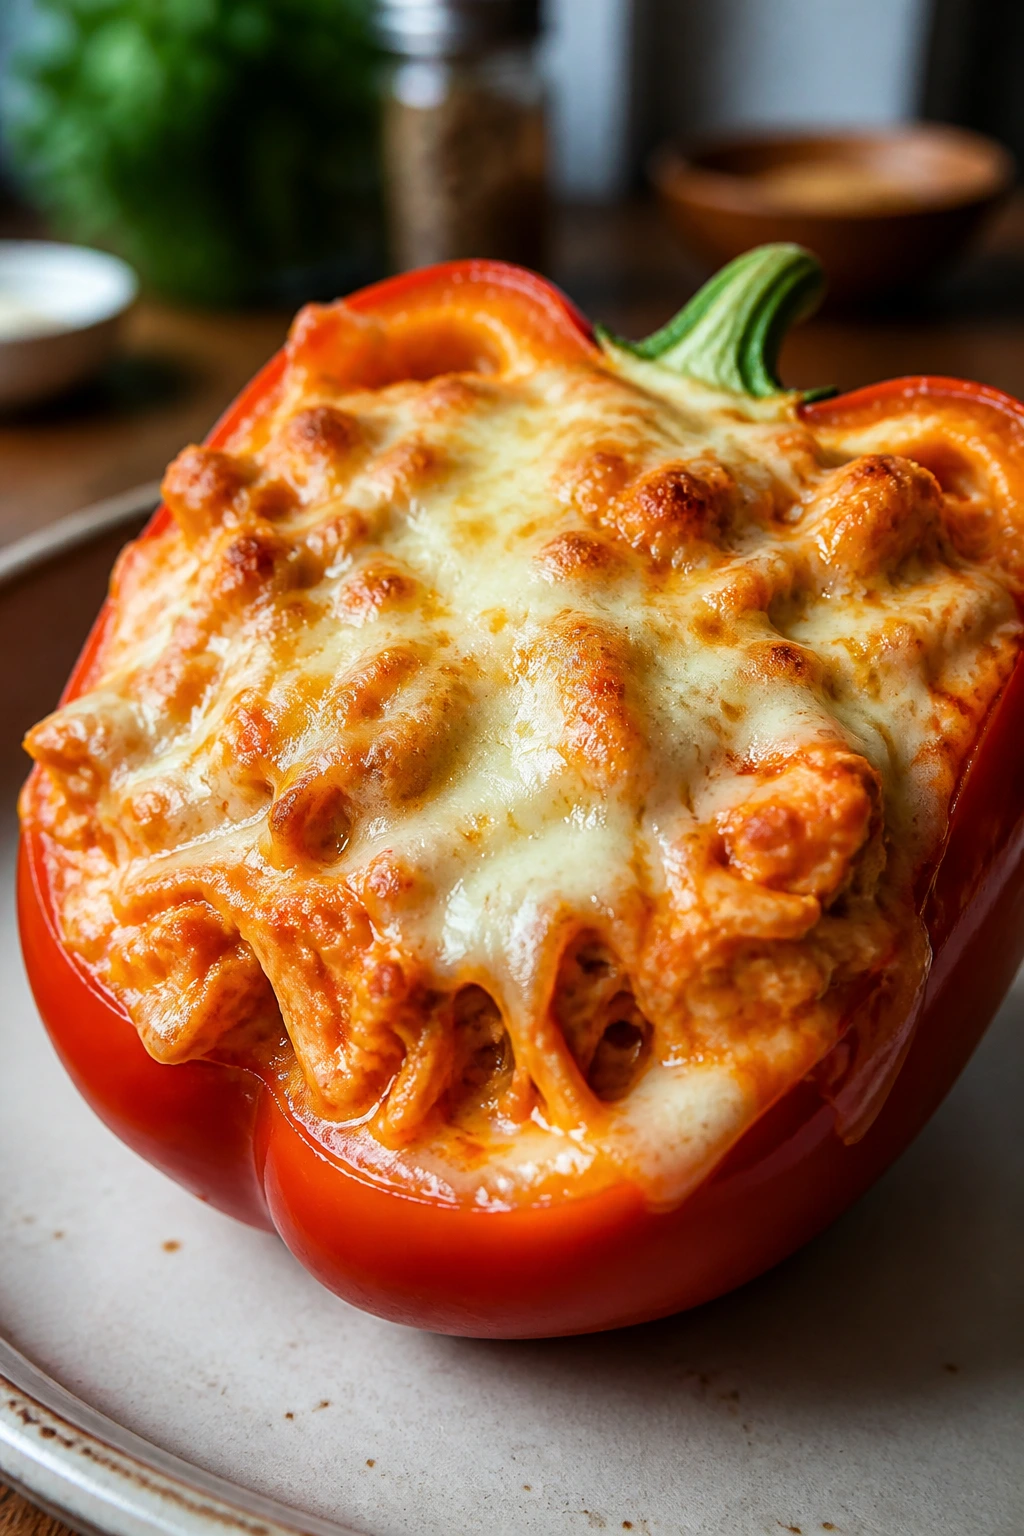
These are spicy, creamy, and sturdy enough to hold their own as dinner. The peppers soften just enough in the oven, and the buffalo chicken filling tastes like game-day food that decided to behave. Time and yield: Serves 4 | Prep 15 minutes | Cook 25 minutes | Total 40 minutes.
Why It Works:
Bell peppers act like little edible baking dishes, which means the filling stays together instead of running all over the pan. Using cooked chicken keeps the process fast, and rotisserie chicken works when you need dinner to happen in a hurry.
Buffalo sauce plus cream cheese gives you heat and body at the same time. The cheddar on top browns into a salty lid, which is exactly what stuffed peppers need.
Key Ingredients:
- 4 large bell peppers, halved and seeded — choose peppers with flat bottoms if possible.
- 3 cups cooked shredded chicken — rotisserie chicken is fair game.
- ⅓ cup buffalo sauce — use your heat level.
- 4 oz cream cheese, softened — holds the filling together.
- 1 cup shredded cheddar — for the top.
- ¼ cup diced celery — adds crunch inside the filling.
- 2 green onions, sliced — fresh and sharp.
- 2 tbsp ranch or blue cheese dressing, optional — for serving.
Quick Steps:
- Heat the oven to 400°F. Set the pepper halves cut-side up in a baking dish and bake for 10 minutes to soften slightly.
- In a bowl, mix the chicken, buffalo sauce, cream cheese, celery, and half the cheddar.
- Spoon the filling into the peppers and top with the remaining cheddar.
- Bake for 15 to 20 minutes, until the peppers are tender and the cheese is melted and bubbling.
- Broil for 1 minute if you want a browned top. Stay close; cheese goes from golden to scorched quickly.
- Finish with green onions and a drizzle of ranch or blue cheese, if using.
Equipment for This Recipe:
- Baking dish — keeps the peppers upright.
- Mixing bowl — for the filling.
- Foil — useful if the tops brown too quickly.
- Spoon — for packing the filling in neatly.
How to Serve This Dish:
Put two pepper halves on each plate and add celery sticks or a crisp salad on the side. If you want a bigger dinner, a scoop of cauliflower rice underneath makes the plate feel fuller. The peppers should look glossy and a little blistered at the edges.
Pro Tips for This Recipe:
- Pre-bake the peppers if you like them soft rather than just tender.
- Let the cream cheese come to room temperature so it mixes without lumps.
- Use chicken that’s already seasoned or the filling can taste flat.
Variations on This Dish:
- Blue Cheese Version: Stir crumbled blue cheese into the filling and skip the ranch.
- Cauliflower-Rice Booster: Add 1 cup cooked cauliflower rice to stretch the filling.
- Milder Ranch Style: Use more ranch and less buffalo sauce for a gentler heat.
Common Mistakes to Avoid with This Dish:
- Raw peppers at the table: If you skip the pre-bake, the shells can stay too firm.
- A filling that leaks everywhere: Too much sauce makes the peppers slide. Keep the mix thick.
- Using cold cream cheese: It leaves stubborn lumps in the filling.
8. Sausage and Cabbage Skillet
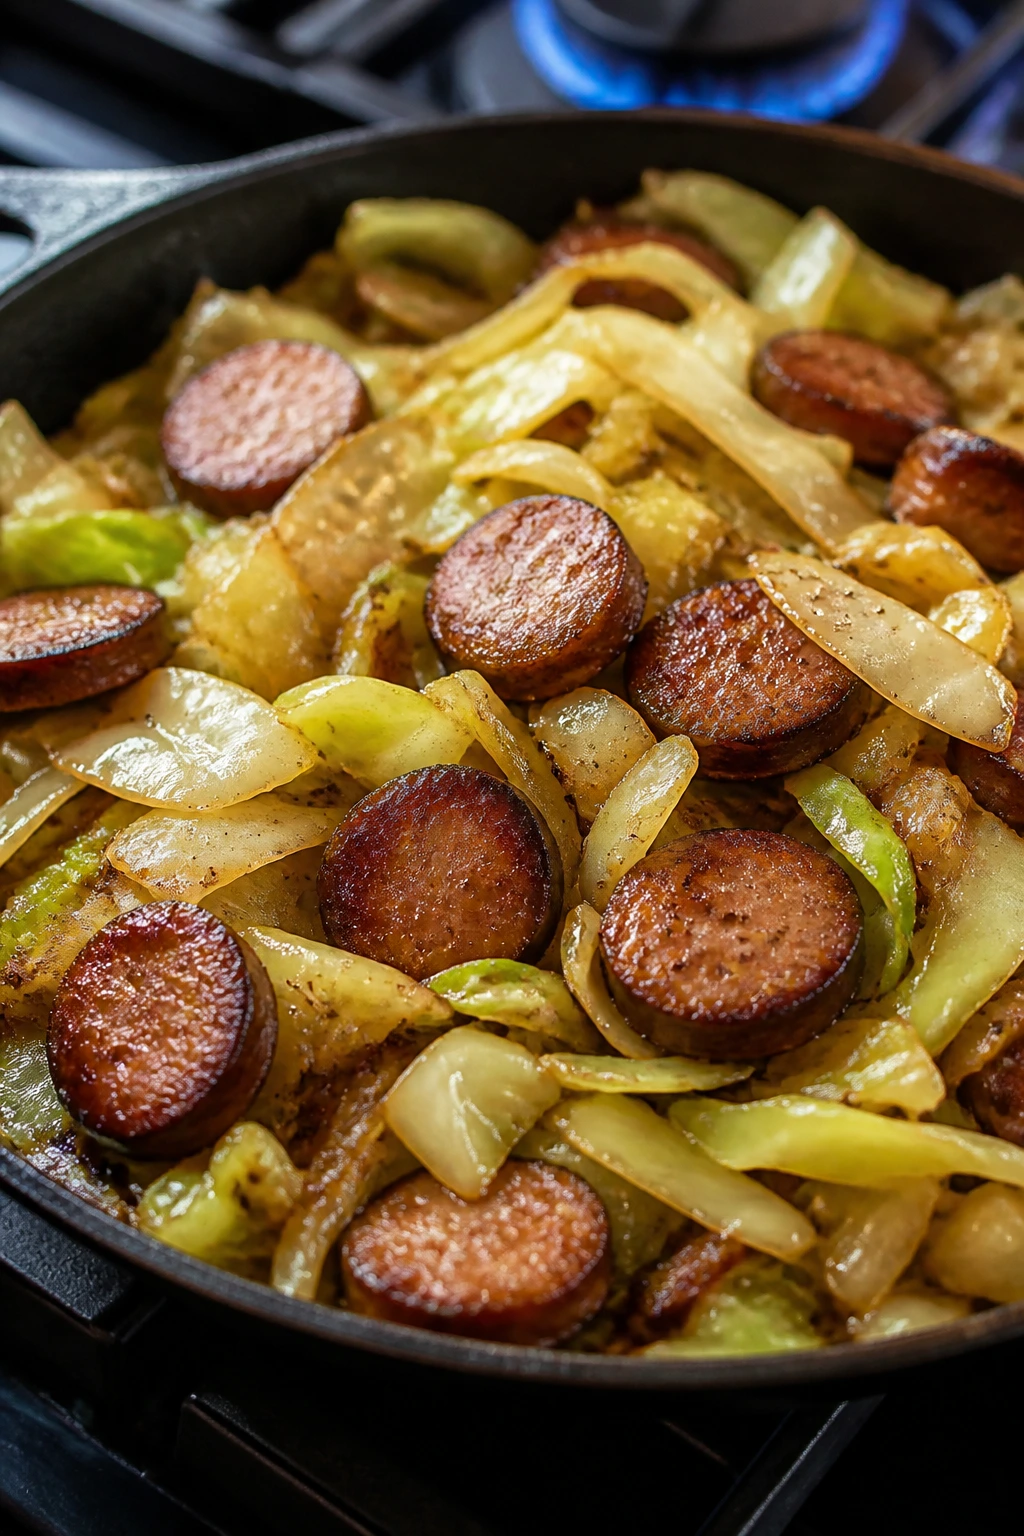
This one is old-school in the best way. Smoked sausage brings the salt and smoke, cabbage softens into silky ribbons, and the vinegar at the end keeps the skillet from feeling too heavy. Time and yield: Serves 4 to 6 | Prep 10 minutes | Cook 20 minutes | Total 30 minutes.
Why It Works:
Sausage is already cooked, so the pan only has to brown it and warm it through. Cabbage is cheap, filling, and fast once it hits heat, which makes this a strong weeknight move.
The skillet needs one sharp note to keep everything from tasting flat. That’s where the mustard and vinegar come in. They cut through the richness and wake the whole dish up.
Key Ingredients:
- 1½ lb smoked sausage, sliced into half-moons — kielbasa or chicken sausage both work.
- 1 medium green cabbage, shredded — about 8 cups.
- 1 yellow onion, sliced — adds sweetness.
- 2 garlic cloves, minced — keep them from burning.
- 2 tbsp butter or oil — for browning.
- 1 tbsp Dijon mustard — gives the pan some edge.
- 1 tbsp apple cider vinegar — bright finish.
- 1 tsp caraway seeds, optional — classic cabbage flavor.
- Salt and pepper, to taste — go lightly until you taste the sausage.
Quick Steps:
- Heat the butter or oil in a large skillet over medium-high heat. Brown the sausage for 3 to 4 minutes.
- Add the onion and cook for 2 minutes until it starts to soften.
- Stir in the cabbage and garlic. Cook for 8 to 10 minutes, tossing often, until the cabbage is tender but still has some structure.
- Stir in the Dijon, vinegar, caraway, salt, and pepper.
- Cook for 1 minute more and serve hot. If the cabbage looks wet, keep cooking until the steam cooks off.
Equipment for This Recipe:
- Large skillet with a lid — optional, but handy if the cabbage needs a quick steam.
- Wooden spoon — good for lifting browned bits.
- Sharp knife — shredding cabbage by hand works fast enough.
- Cutting board — nothing fancy needed.
How to Serve This Dish:
Serve it as-is in shallow bowls, or add a fried egg on top if you want dinner to feel a little more substantial. Pickles or mustard on the side give it a diner-style edge. The plate should look homey and a little rustic.
Pro Tips for This Recipe:
- Taste the sausage before salting; many brands are already quite salty.
- Cut the cabbage into even ribbons so it cooks at the same pace.
- A splash of vinegar at the end is not optional in my book.
Variations on This Dish:
- Chicken Sausage Version: Use a lighter sausage if you want less richness.
- Bacon Cabbage Skillet: Add chopped bacon first and use the rendered fat for the rest.
- Spicy Kielbasa: Swap in hot sausage and a pinch of red pepper flakes.
Common Mistakes to Avoid with This Dish:
- Steaming the cabbage too early: If you cover the pan right away, it turns soft and watery.
- Oversalting too soon: Sausage already brings plenty of salt.
- Skipping the acid: Vinegar or mustard keeps the dish from tasting dull.
9. Greek Chicken Bowls with Tzatziki
This is the kind of dinner that looks like you worked harder than you did. Juicy chicken, cool cucumber, salty feta, and a yogurt sauce with garlic and dill make the bowl taste fresh and layered instead of plain. Time and yield: Serves 4 | Prep 20 minutes | Cook 20 minutes | Total 40 minutes.
Why It Works:
Greek flavors are built for fast cooking. Lemon, oregano, garlic, and olive oil do a lot of work without a long marinating time, especially if you use chicken thighs.
Bowls also solve the low-carb problem neatly. You get crunch, creaminess, and enough variety in one dish that nobody starts asking where the rice went.
Key Ingredients:
- 2 lb chicken thighs or breasts — thighs stay juicier, breasts cook faster.
- 2 tbsp olive oil — for the marinade.
- 1 lemon, juiced — the main acid.
- 2 tsp dried oregano — classic Greek flavor.
- 2 garlic cloves, minced — in the chicken and the sauce.
- 1 cucumber, diced — keep it cool and crisp.
- 1 pint cherry tomatoes, halved — juicy contrast.
- ½ red onion, thinly sliced — sharp and colorful.
- ½ cup crumbled feta — salty finish.
- ⅓ cup kalamata olives — optional but good.
- 1 cup Greek yogurt, 1 tbsp dill, and 1 tbsp lemon juice — for the tzatziki.
- Chopped romaine or 3 cups cauliflower rice — your bowl base.
Quick Steps:
- Toss the chicken with olive oil, lemon juice, oregano, garlic, salt, and pepper. Let it sit for at least 10 minutes.
- Cook the chicken in a skillet over medium-high heat for 5 to 6 minutes per side, or bake at 425°F for about 18 minutes, until it reaches 165°F.
- Mix the yogurt, dill, lemon juice, garlic, salt, and a little grated cucumber for the tzatziki.
- Chop the vegetables and arrange the romaine or cauliflower rice in bowls.
- Slice the chicken and pile it on top, then add feta, olives, and tzatziki.
- Serve right away. The bowl only works if the vegetables stay crisp.
Equipment for This Recipe:
- Skillet or sheet pan — either cooking route works.
- Mixing bowls — one for the chicken, one for the sauce.
- Grater — for cucumber in the tzatziki.
- Sharp knife — thin onion slices matter here.
How to Serve This Dish:
Build each bowl with a base of greens or cauliflower rice, then layer the vegetables around the chicken rather than burying them under sauce. A lemon wedge on the side makes the bowl taste brighter. It should look colorful, cool, and clean.
Pro Tips for This Recipe:
- Squeeze excess water from the grated cucumber before mixing the sauce.
- Rest the chicken before slicing so the juices stay inside.
- If using breasts, watch them closely; they dry out faster than thighs.
Variations on This Dish:
- Lamb Greek Bowls: Swap chicken for ground lamb seasoned with oregano and garlic.
- Dairy-Free Tahini Bowl: Replace the yogurt sauce with tahini, lemon juice, and water whisked to a pourable consistency.
- Meal-Prep Containers: Pack the sauce separately and keep the salad base dry until lunchtime.
Common Mistakes to Avoid with This Dish:
- Watery tzatziki: Grate and drain the cucumber first.
- Overcooked chicken breast: Use a thermometer and pull it at 165°F.
- Drowning the bowl in sauce: Add sauce in spoonfuls, not a flood.
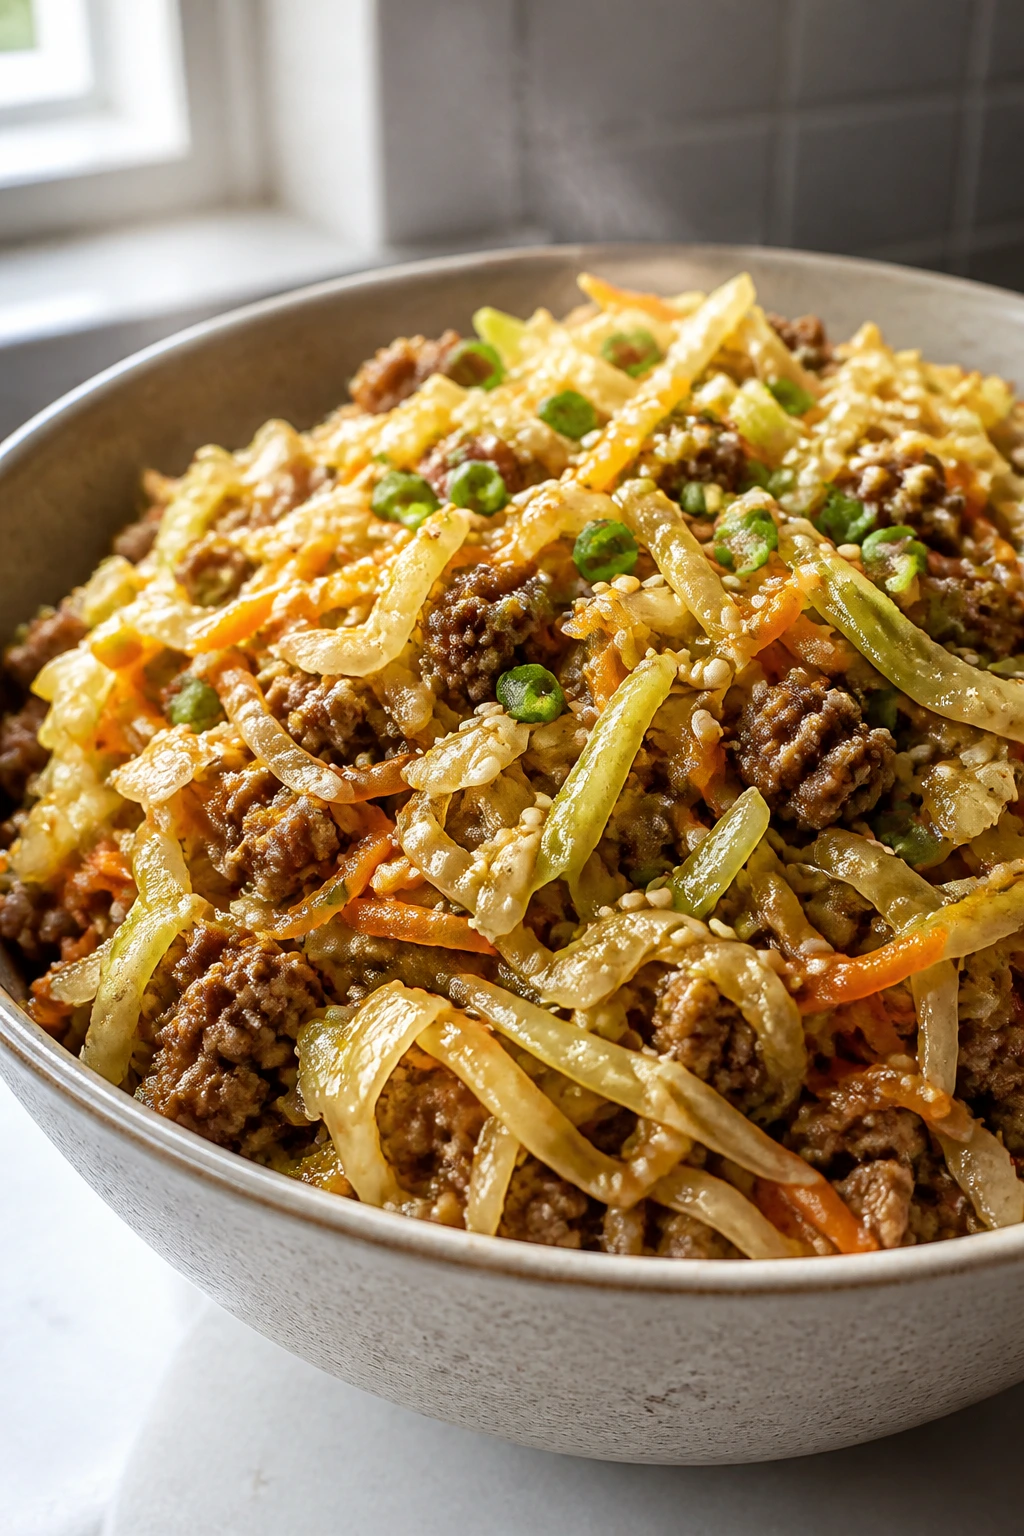
10. Ground Beef Cauliflower Rice Stir-Fry
This is the dinner you make when you want something fast, filling, and not the least bit delicate. The beef gets browned, the cauliflower rice soaks up all the savory bits, and the eggs make the whole thing feel like a proper fried-rice situation without the rice. Time and yield: Serves 4 | Prep 15 minutes | Cook 15 minutes | Total 30 minutes.
Why It Works:
Ground beef cooks quickly and brings enough fat to flavor the whole pan. Cauliflower rice is neutral enough to carry tamari, ginger, and sesame without tasting like a replacement doing a bad impression.
Eggs pull the whole skillet together and make the meal feel more finished. It’s a smart use of basic ingredients, which is exactly what a weeknight wants.
Key Ingredients:
- 1½ lb ground beef — 85/15 or 90/10 both work.
- 4 cups cauliflower rice — fresh or frozen.
- 2 eggs — scrambled into the pan.
- 1 small onion, diced — the base flavor.
- 2 garlic cloves, minced — always useful here.
- 1 tbsp grated ginger — sharp and warm.
- 3 tbsp tamari — savory sauce without the sugar load.
- 1 tbsp sesame oil — finish, not fry oil.
- 2 tbsp avocado oil — for cooking.
- 2 green onions, sliced — for the top.
- ½ cup shredded carrots, optional — use sparingly if you want a little sweetness.
Quick Steps:
- Heat the avocado oil in a large skillet over medium-high heat. Brown the beef for 5 to 6 minutes, breaking it into small pieces.
- Push the beef to one side and scramble the eggs in the empty space. Move them out once just set.
- Add the onion, garlic, and ginger. Cook for 1 to 2 minutes.
- Stir in the cauliflower rice and tamari. Cook for 4 to 5 minutes, until the moisture cooks off and the pan starts to sound a little dry.
- Fold the eggs back in and drizzle with sesame oil.
- Top with green onions and serve hot.
Equipment for This Recipe:
- Large skillet or wok — room to stir matters.
- Spatula — helps break up the beef and eggs.
- Cutting board and knife — for onion and scallions.
- Colander, if using frozen cauliflower rice — helps thaw and dry it faster.
How to Serve This Dish:
Serve it in bowls with a little extra tamari or chili sauce on the side. A simple cucumber salad makes a nice cold contrast. The finished pan should look loose and savory, not soggy.
Pro Tips for This Recipe:
- If you use frozen cauliflower rice, cook off the moisture before seasoning too heavily.
- Brown the beef properly; pale beef tastes flat.
- Add sesame oil at the end so the flavor stays strong.
Variations on This Dish:
- Pork Fried “Rice”: Use ground pork for a richer version.
- Curry Beef Bowl: Stir in curry powder and a spoonful of coconut milk for a different flavor lane.
- Tex-Mex Skillet: Swap tamari for taco seasoning and top with avocado and cilantro.
Common Mistakes to Avoid with This Dish:
- Wet cauliflower rice: If it’s not dry, it tastes mushy.
- Too much tamari: The dish gets salty fast.
- Skipping the browning step: Color on the beef means flavor in the pan.
11. Creamy Tuscan Chicken with Spinach
There’s a reason this style of chicken shows up everywhere: it’s rich, quick, and still feels like dinner rather than a side dish in disguise. Sun-dried tomatoes, garlic, cream, and spinach make a sauce that clings to the chicken and looks far more complicated than it is. Time and yield: Serves 4 | Prep 10 minutes | Cook 20 minutes | Total 30 minutes.
Why It Works:
Chicken sears quickly, then the same pan turns into the sauce base. That means the browned bits stay where they belong, which is where the flavor lives.
The spinach melts down into the sauce, so you get some vegetables in every bite without making the plate feel overloaded. It’s a smart balance of creamy and sharp, and that’s why the recipe never gets old.
Key Ingredients:
- 4 chicken breasts or 6 boneless thighs — cut breasts in half horizontally if they’re thick.
- 2 tbsp olive oil — for searing.
- 2 tbsp butter — adds flavor to the sauce.
- 4 garlic cloves, minced — Tuscan chicken needs it.
- ⅓ cup sun-dried tomatoes, drained and sliced — concentrated flavor.
- 1 cup chicken broth — loosens the pan.
- ¾ cup heavy cream — makes the sauce lush.
- ½ cup grated Parmesan — thickens and seasons.
- 3 cups baby spinach — wilts down quickly.
- 1 tsp salt and black pepper, to taste — adjust after the Parmesan goes in.
Quick Steps:
- Season the chicken with salt and pepper.
- Heat the olive oil in a skillet over medium-high heat and sear the chicken for 4 to 5 minutes per side, until golden. Remove it.
- Add the butter, garlic, and sun-dried tomatoes to the pan. Cook for 30 seconds.
- Pour in the broth and cream, scraping up the browned bits. Simmer for 2 to 3 minutes.
- Stir in the Parmesan and spinach until the spinach wilts.
- Return the chicken to the skillet and simmer for 3 to 5 minutes, until cooked through. Keep the heat gentle so the cream stays smooth.
Equipment for This Recipe:
- Large skillet — the sauce needs room.
- Tongs — for the chicken.
- Grater — fresh Parmesan melts best.
- Spoon — for basting the chicken with sauce.
How to Serve This Dish:
Serve it over zucchini ribbons, sautéed spinach, or cauliflower mash. Spoon extra sauce over the top and let some of the tomatoes sit visibly on the chicken. It should look creamy with spots of dark red and bright green.
Pro Tips for This Recipe:
- Drain oil-packed sun-dried tomatoes well so the sauce doesn’t turn greasy.
- If your chicken breasts are thick, pound them to even thickness first.
- Lower the heat before adding cream; hard boiling can make the sauce split.
Variations on This Dish:
- Mushroom Tuscan Chicken: Add sliced mushrooms with the garlic for more body.
- Shrimp Tuscan Skillet: Swap in shrimp and shorten the final simmer to just a couple of minutes.
- Coconut Cream Version: Use full-fat coconut cream instead of heavy cream for a dairy-free path.
Common Mistakes to Avoid with This Dish:
- Overcooking chicken breasts: They dry out fast if left in the pan too long.
- Oversalting the sauce: Parmesan and sun-dried tomatoes both bring salt.
- Boiling the cream hard: Gentle simmer, not a rolling boil.
12. Baked Cod with Tomato-Olive Relish
Cod is one of those quiet fish that turns into something special when you give it strong company. Tomato, olives, capers, lemon, and parsley bring salt, acid, and brightness, and suddenly the fish tastes alive instead of mild. Time and yield: Serves 4 | Prep 15 minutes | Cook 12 minutes | Total 27 minutes.
Why It Works:
Cod cooks fast and flakes beautifully, which makes it friendly to people who do not want to babysit dinner. The relish can be mixed while the oven heats, so there’s no dead time.
The olives and capers do the heavy lifting here. They add enough punch that you don’t need a starch to make the meal feel complete.
Key Ingredients:
- 4 cod fillets, about 6 oz each — look for even thickness.
- 1 pint cherry tomatoes, halved — juicy and sweet.
- ½ cup pitted olives, chopped — Kalamata or green olives both work.
- 1 tbsp capers — salty little bursts.
- 2 garlic cloves, minced — for the relish.
- 2 tbsp olive oil — ties the topping together.
- 1 lemon, juiced — finishes the fish.
- 2 tbsp chopped parsley — fresh finish.
- Red pepper flakes, a pinch — optional.
Quick Steps:
- Heat the oven to 400°F.
- Mix the tomatoes, olives, capers, garlic, olive oil, parsley, and a pinch of salt in a bowl.
- Place the cod in a lightly oiled baking dish and season with salt and pepper.
- Spoon the relish over the top.
- Bake for 10 to 12 minutes, until the fish flakes easily and reaches 145°F in the center. Cod dries out fast, so check early.
- Finish with lemon juice and serve right away.
Equipment for This Recipe:
- Baking dish — the fish needs a snug fit.
- Mixing bowl — for the relish.
- Sharp knife — chopping olives and tomatoes quickly.
- Thin spatula or fish spatula — useful for serving.
How to Serve This Dish:
Serve the cod with the relish spooned over the top and a green salad or sautéed zucchini on the side. A few extra parsley leaves and lemon wedges make the plate look polished without effort. The result should be juicy, bright, and almost Mediterranean in feel.
Pro Tips for This Recipe:
- Pat the cod dry before baking so the topping doesn’t slide off.
- Keep an eye on thinner fillets; they may be done sooner than 12 minutes.
- If your olives are very salty, rinse them briefly before chopping.
Variations on This Dish:
- Feta-Topped Cod: Crumble feta over the relish before baking for a creamier finish.
- Halibut Swap: Use halibut fillets if you want a firmer, meatier fish.
- Almond-Crust Version: Sprinkle a little almond meal and parsley over the fillets before baking for extra texture.
Common Mistakes to Avoid with This Dish:
- Overbaking the fish: Dry cod is the fastest way to ruin a good idea.
- Using too much liquid in the relish: You want spoonable, not soupy.
- Forgetting the acid: Lemon is not decorative here; it changes the whole dish.
13. Egg Roll in a Bowl
This is the kind of dinner that makes you wonder why you ever bothered with wrappers. You get all the flavor notes of a takeout egg roll — pork, cabbage, ginger, garlic, sesame — but the pan stays lighter and the cleanup stays easier. Time and yield: Serves 4 to 5 | Prep 10 minutes | Cook 15 minutes | Total 25 minutes.
Why It Works:
Bagged coleslaw mix is the real time-saver here. It gives you shredded cabbage and carrot in one bag, which means half the work is already done before the pan even heats up.
The sesame oil and rice vinegar give the dish its familiar takeout flavor. That little combination makes the bowl taste complete without requiring a wrapper, fryer, or extra carbs.
Key Ingredients:
- 1½ lb ground pork or ground turkey — pork is richer, turkey is leaner.
- 1 bag coleslaw mix, about 14 oz — the shortcut ingredient.
- 1 small onion, diced — helps the meat taste deeper.
- 3 garlic cloves, minced — the savory base.
- 1 tbsp fresh ginger, grated — don’t skip it.
- 3 tbsp low-sodium tamari — salty and savory.
- 1 tbsp sesame oil — finish only.
- 2 tbsp rice vinegar — brings the sharp edge.
- 2 green onions, sliced — for freshness.
- Sesame seeds and sriracha, optional — for topping.
Quick Steps:
- Brown the pork or turkey in a large skillet over medium-high heat, breaking it into crumbles.
- Add the onion and cook for 2 minutes.
- Stir in the garlic and ginger and cook for 30 seconds.
- Add the coleslaw mix and tamari. Cook for 4 to 6 minutes, tossing often, until the cabbage softens but still has some bite.
- Stir in the sesame oil and rice vinegar.
- Top with green onions, sesame seeds, and sriracha if you want heat. Keep the cabbage from going floppy.
Equipment for This Recipe:
- Large skillet or wok — the cabbage needs space.
- Spatula — for breaking up the meat.
- Measuring spoons — the sesame oil is small but important.
- Knife — if you want a finer onion dice.
How to Serve This Dish:
Serve it in bowls with extra scallions on top and a little chili sauce on the side. It pairs nicely with cucumber slices or a simple radish salad if you want crunch. The bowl should look loose and glossy, not wet.
Pro Tips for This Recipe:
- Use a very hot pan so the meat browns before the cabbage goes in.
- If the mix is watery, keep cooking until the liquid evaporates.
- Add sesame oil last or the flavor fades.
Variations on This Dish:
- Chicken Egg Roll Bowl: Use ground chicken and add a little extra sesame oil for flavor.
- Spicy Ginger Bowl: Double the ginger and add chili paste.
- Mushroom-Heavy Vegetarian Version: Swap meat for chopped mushrooms and extra cabbage for a meatless skillet.
Common Mistakes to Avoid with This Dish:
- Overcooking the cabbage: It should soften, not collapse into a puddle.
- Adding too much tamari: The dish gets salty fast.
- Skipping the vinegar: Without acid, the flavor feels one-note.
14. Chicken Shawarma Salad Plates
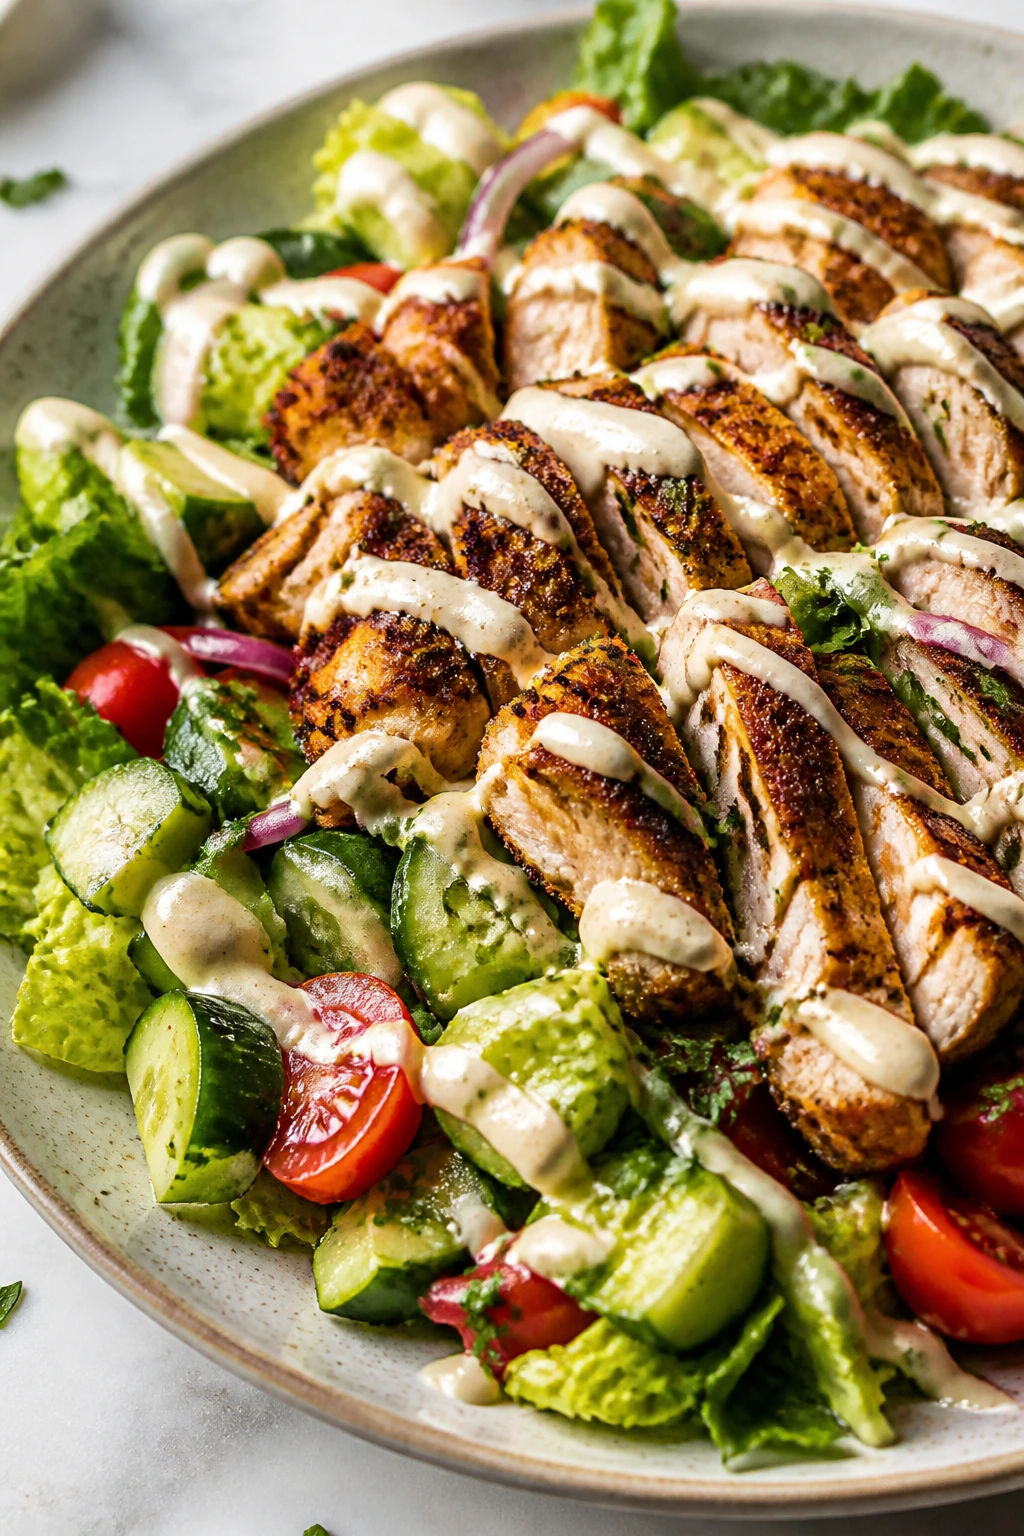
This is salad for people who are tired of boring salad. The chicken is warm, spiced, and deeply savory; the vegetables are cool and crisp; the tahini sauce or yogurt drizzle ties it together with just enough richness to make the plate feel like dinner. Time and yield: Serves 4 | Prep 20 minutes | Cook 18 minutes | Total 38 minutes.
Why It Works:
Shawarma spices carry a lot of flavor in a small amount of time. Cumin, coriander, paprika, turmeric, and cinnamon create a warm, layered seasoning that tastes like more effort than it is.
Using chicken thighs keeps the meat juicy, especially if you’re cooking in a skillet. Salad plates also let you control the carb count very easily, since the base is all vegetables.
Key Ingredients:
- 2 lb chicken thighs — more forgiving than breasts.
- 3 tbsp olive oil — for the marinade.
- 2 tsp cumin — earthy and warm.
- 2 tsp coriander — brightens the spice mix.
- 1 tsp paprika — adds color.
- ½ tsp turmeric — just enough to tint the chicken.
- ¼ tsp cinnamon — a small pinch goes a long way.
- 3 garlic cloves, minced — for the marinade.
- 1 lemon, juiced — helps the spices bloom.
- 1 head romaine, chopped — the salad base.
- 1 cucumber, sliced; 1 pint tomatoes; ½ red onion — the fresh side of the plate.
- ½ cup tahini or 1 cup Greek yogurt — for the sauce.
Quick Steps:
- Mix the olive oil, spices, garlic, lemon juice, salt, and pepper in a bowl.
- Toss the chicken in the spice mixture and let it sit for 10 to 20 minutes.
- Cook the chicken in a hot skillet for 5 to 6 minutes per side, or roast it at 425°F for about 18 minutes, until it reaches 165°F.
- Whisk tahini with water and lemon juice until pourable, or stir up a yogurt sauce with garlic and salt.
- Arrange the romaine, cucumber, tomatoes, and onion on plates.
- Slice the chicken and pile it onto the salad, then drizzle with sauce. Let the chicken rest before slicing or the juices run everywhere.
Equipment for This Recipe:
- Skillet or sheet pan — either one works.
- Mixing bowl — for the spice marinade.
- Whisk — especially useful for tahini sauce.
- Sharp knife — for clean slices and thin onion.
How to Serve This Dish:
Serve the chicken warm over cool vegetables with plenty of sauce on the side. Pickled onions, a few olives, or extra cucumber make the plate look fuller without changing the carb count much. It should feel bright, spiced, and a little messy in a good way.
Pro Tips for This Recipe:
- If using chicken breasts, pound them thin so they cook evenly.
- Thin the tahini sauce with water one tablespoon at a time.
- Rest the chicken for 5 minutes before slicing.
Variations on This Dish:
- Steak Shawarma Plates: Use flank steak instead of chicken for a bolder version.
- Dairy-Free Tahini Drizzle: Stick with tahini sauce and skip the yogurt entirely.
- Cauliflower Rice Bowl: Serve everything over cauliflower rice if you want more base and less salad.
Common Mistakes to Avoid with This Dish:
- Bland spice mix: Shawarma should taste warm and layered, not dusty.
- Wet salad leaves: Dry the greens well or the sauce slides off.
- Slicing too soon: Resting matters here more than people think.
15. Steak Fajita Skillet with Peppers

The smell of sizzling peppers and seared steak can fix a bad evening faster than most things. This skillet has charred edges, soft onions, and enough lime at the end to keep the whole pan sharp instead of heavy. Time and yield: Serves 4 | Prep 15 minutes | Cook 15 minutes | Total 30 minutes.
Why It Works:
Steak fajitas are naturally fast because the ingredients want the same treatment: hot pan, short cook time, finish with acid. That’s a gift on a night when you do not want to think too hard.
The peppers and onions bring sweetness and volume without relying on tortillas. Served in lettuce cups or bowls, the whole skillet stays low carb but still feels like dinner with a pulse.
Key Ingredients:
- 1½ lb flank steak, skirt steak, or sirloin — slice against the grain.
- 3 bell peppers, sliced — use a mix of colors if you have them.
- 1 large onion, sliced — classic fajita base.
- 2 tbsp avocado oil — high-heat cooking.
- 2 tsp chili powder — the main seasoning.
- 1 tsp cumin — earthy depth.
- 1 tsp paprika — color and warmth.
- ½ tsp garlic powder — keeps the seasoning even.
- 1 lime, juiced — the finish.
- Chopped cilantro and sliced avocado — for serving.
Quick Steps:
- Toss the steak with chili powder, cumin, paprika, garlic powder, salt, and pepper.
- Heat 1 tablespoon oil in a very hot skillet and sear the steak for 1 to 2 minutes per side, just until browned. Remove it.
- Add the remaining oil, peppers, and onion. Cook for 5 to 6 minutes until the vegetables are tender with a little char.
- Return the steak and any juices to the pan and toss for 30 seconds.
- Finish with lime juice and cilantro.
- Serve hot in bowls or lettuce cups. If you slice the steak against the grain, the texture changes completely.
Equipment for This Recipe:
- Cast-iron or heavy skillet — heat retention matters.
- Sharp knife — for clean steak slices.
- Tongs — for searing and tossing.
- Cutting board — give the steak a short rest before slicing.
How to Serve This Dish:
Serve it with avocado, salsa, and shredded lettuce, either in bowls or tucked into crisp lettuce leaves. A spoonful of sour cream is optional if you want a cooler finish. The plate should look colorful and a little smoky from the char.
Pro Tips for This Recipe:
- Pre-slice the peppers and onion so the steak does not overcook while you chop.
- Let the steak rest before slicing or the juices drain out.
- Keep the pan hot enough to char the vegetables instead of steaming them.
Variations on This Dish:
- Chicken Fajita Skillet: Use sliced chicken thighs and cook them until golden before adding the peppers.
- Mushroom Fajita Version: Add sliced mushrooms for extra volume and a deeper savory note.
- Chipotle Heat: Add chipotle powder or a spoonful of adobo sauce if you want smoke and heat.
Common Mistakes to Avoid with This Dish:
- Crowding the steak: It needs space to sear.
- Overcooking the strips: Thin steak cooks very quickly.
- Skipping the grain direction: Slice the wrong way and dinner gets chewy.
Why Low-Carb Dinners Work So Well on Busy Nights
The best low-carb dinners do not feel stripped down. They feel organized. A protein gets seared or roasted, a vegetable gets browned or softened, and a sauce or finishing acid keeps the whole thing from tasting flat. That structure matters because it gives you a dependable formula: meat or fish for substance, vegetables for volume, fat for satisfaction, and something sharp at the end so the plate wakes up.
What tends to go wrong is not the low-carb part. It’s the laziness part. A dinner with plain chicken and steamed broccoli will always feel like a lecture, while a skillet with garlic butter, lemon, Dijon, sesame oil, or a quick pan sauce feels like someone actually cared. That is why these recipes lean on skillets and sheet pans so hard. They brown food quickly, and browning is where weeknight dinner earns flavor without adding carbs.
I also like how forgiving this style of cooking is. Chicken thighs stay juicy. Cabbage tolerates a little extra time. Ground turkey becomes interesting once you give it enough salt and tomato paste. Even salmon and cod, which people overthink, are easier when the oven does most of the work. Low-carb cooking gets a bad reputation when it’s treated as subtraction. In practice, it works better as subtraction plus smarter building.
Essential Equipment for These Recipes

- 12-inch skillet or sauté pan: The workhorse for chicken, beef, turkey, sausage, and shrimp.
- Cast-iron skillet: Best for fajitas, searing pork chops, and anything that needs a strong crust.
- Rimmed sheet pan: Useful for salmon, stuffed peppers, and baked chicken.
- Baking dish: Helpful for cod and stuffed pepper recipes that need a little structure.
- Instant-read thermometer: The easiest way to keep chicken, pork, and fish from drying out.
- Sharp chef’s knife: Thin slices matter for steak, peppers, onions, and cabbage.
- Cutting board: Choose one with enough space for quick chopping.
- Tongs: Better than a fork for flipping meat without losing juices.
- Mixing bowls: Handy for marinades, sauces, and quick seasoning blends.
- Grater or microplane: Lemon zest, garlic, and ginger all benefit from fine grating.
- Spiralizer or julienne peeler: Optional, but useful for zucchini noodles.
- Colander or salad spinner: Great for drying greens and zucchini so dinner doesn’t turn watery.
Smart Shopping and Ingredient Tips
The easiest way to make low-carb dinners more useful is to shop for ingredients that behave well under weeknight pressure. Chicken thighs are one of my first picks because they stay tender even if you cook them a minute too long. Flank steak, skirt steak, and sirloin are all good for quick searing, but they need to be sliced thin and across the grain or they can turn tough fast. For fish, choose fillets that are close in thickness so they finish together, and don’t be shy about buying frozen shrimp or fish when they’re handled well; thaw them fully and pat them dry.
Vegetables matter just as much. Cabbage, broccoli, green beans, asparagus, peppers, zucchini, and cauliflower rice are the low-carb staples that keep showing up because they hold their shape, cook quickly, and don’t ask for babysitting. Cabbage and broccoli are especially forgiving if dinner gets delayed by ten minutes. Zucchini and shrimp, on the other hand, are more delicate; they do better with high heat and short cooking windows.
Sauce ingredients deserve a quick label check. Bottled stir-fry sauce, teriyaki, and even some marinades can hide a surprising amount of sugar. Tamari, Dijon, lemon juice, vinegar, garlic, ginger, olive oil, butter, tahini, and canned tomatoes with no added sugar go a long way without making the carbs creep up. If you keep a few of those on hand, half the recipes in this collection become possible with one trip to the store and no special planning.
How to Serve These Recipes
Presentation:
Saucy dishes like beef and broccoli or creamy Tuscan chicken look best in shallow bowls where the sauce can pool a little. Sheet-pan dinners and stuffed peppers do better on a wide platter with a few herbs scattered over the top. Keep the garnish simple: lemon wedges, parsley, dill, cilantro, scallions, or sesame seeds are enough.
Accompaniments:
Cauliflower mash, cauliflower rice, roasted broccoli, cucumber salad, sautéed spinach, and shredded romaine show up as the safest low-carb partners. When you want a little more texture, add a quick slaw or a tray of roasted radishes. For saucier meals, a crisp side keeps the plate from feeling heavy.
Portions:
A solid serving usually means 4 to 6 ounces of cooked protein plus 1 to 2 cups of vegetables. If you’re feeding bigger eaters, scale by protein first; vegetables are easier to stretch than a skimpy piece of chicken. For family-style dinners, doubling the vegetable side is often more useful than chasing a second pan of meat.
Beverage Pairing:
Sparkling water with lime, unsweetened iced tea, and dry white wine are easy wins. Salmon, cod, and shrimp like something crisp and bright, while steak, sausage, and pork chops can handle a deeper drink, even a light red if that’s your thing.
Additional Tips and Flavor Boosters
Flavor Enhancement:
A squeeze of lemon, a splash of vinegar, or a spoonful of Dijon at the end can fix a flat low-carb dinner faster than another pinch of salt. Fresh herbs also matter more than people think. Add them after cooking, not before, if you want them to taste alive.
Customization:
If a dish feels too rich, add something sharp or crunchy: pickled onions, celery, cucumber, or extra greens. If it feels too light, fold in avocado, a pat of butter, a spoonful of tahini, or a bit of feta. That small shift changes the whole plate.
Serving Suggestions:
Keep garnishes tied to the flavor of the dish. Sesame seeds fit the stir-fry and egg-roll bowl. Dill belongs with salmon. Cilantro and lime make fajitas and taco bowls feel finished. Little choices like that keep dinner from tasting random.
Make-It-Yours:
For a dairy-free version, use olive oil, tahini, or coconut cream instead of butter and heavy cream. For a spicier plate, add chili flakes, cayenne, or hot sauce at the very end so the heat stays bright. If you need a milder version for kids, keep the spice in a side dish and let the base stay simple.
Make-Ahead, Storage, and Reheating Guidance
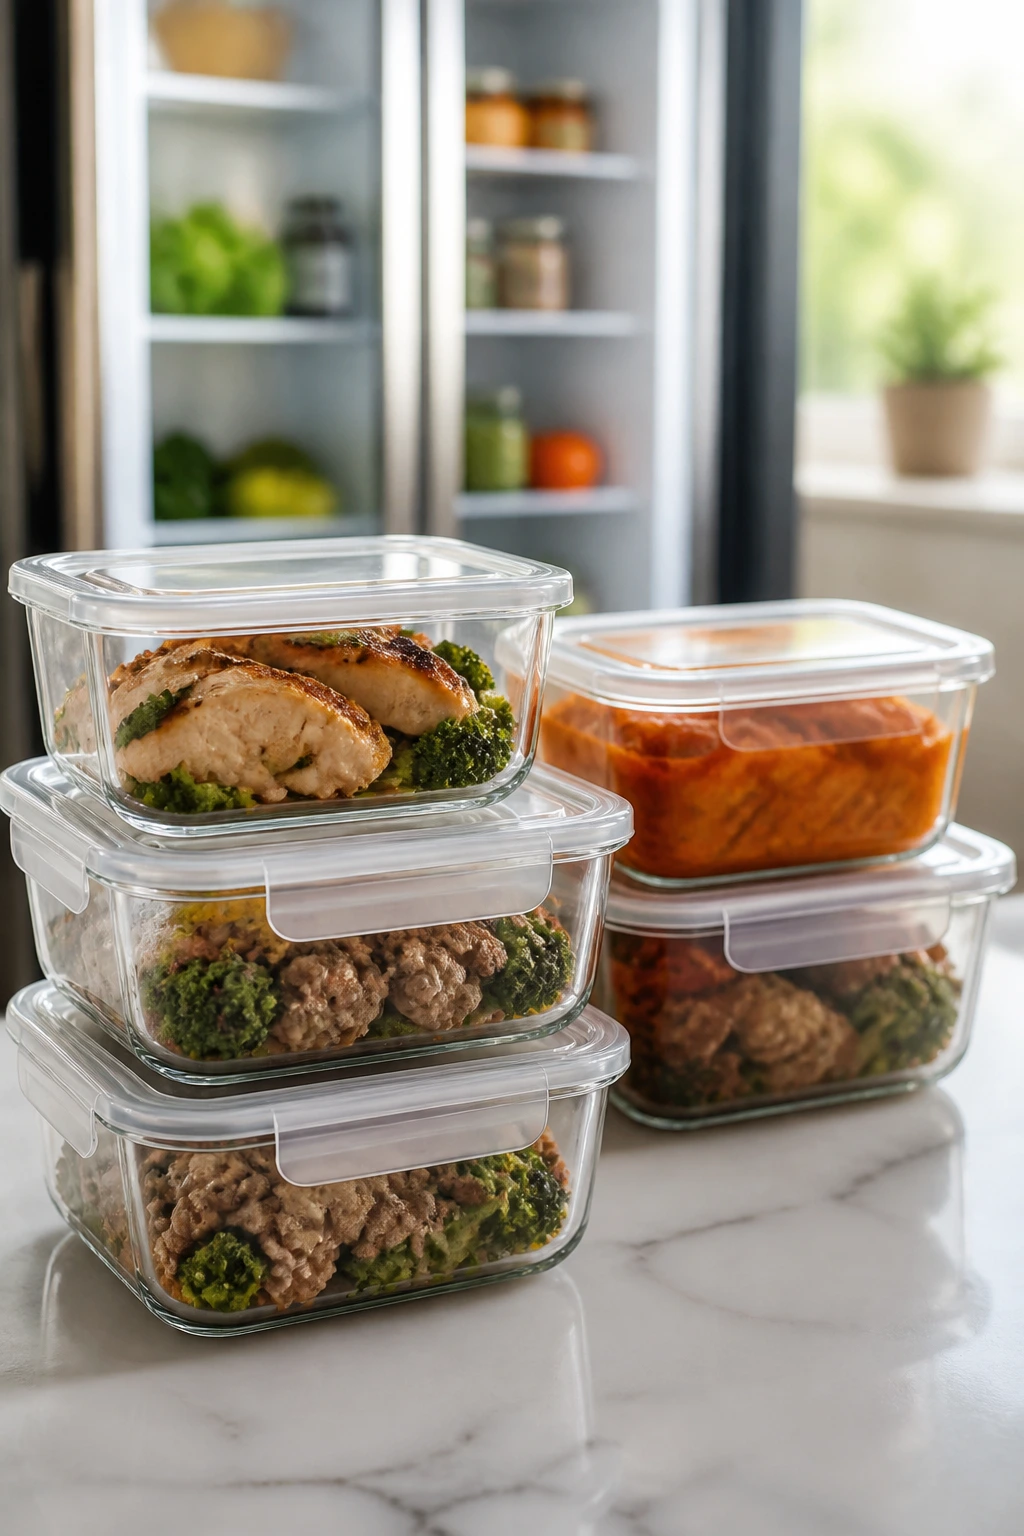
Most of these dinners keep well for 3 to 4 days in the refrigerator, with a few exceptions. Seafood is the one to watch: salmon, cod, and shrimp are best within 2 days because the texture goes downhill after that. Cooked chicken, beef, pork, sausage, and turkey all hold up nicely in airtight containers, and skillet dishes often taste even better the next day because the seasoning settles in.
Freezing works best for the meatier recipes. Beef and broccoli, sausage and cabbage, pork chops with sauce, turkey taco filling, and creamy chicken dishes can usually be frozen for up to 2 months. Keep lettuce wraps, salad plates, and zoodles out of the freezer; they do not forgive that treatment. For bowls and skillet meals, freeze the protein and vegetables together, but if a sauce is especially dairy-heavy, consider freezing the sauce separately so it reheats more smoothly.
Reheating matters. For skillet dinners, the stove usually beats the microwave: use a covered pan over medium-low heat with a splash of broth or water until the food is hot through. For chicken, pork, and beef, reheat just until warmed; overcooking leftovers is how you turn a good dinner into dry lunch scraps. Seafood needs a gentler hand. Warm it in a low oven, around 300°F, or in a skillet on low heat so it stays tender instead of breaking apart.
A few make-ahead tricks help a lot. Chop peppers, onions, cabbage, and green beans a day or two ahead. Mix spice blends in small jars. Make sauces the night before if they don’t contain fresh herbs. And for lettuce wrap recipes, keep the filling separate from the leaves until the last minute. That one habit saves more limp lettuce than anything else.
Variations and Adaptations to Try
Dairy-Free Nights:
Swap butter for olive oil and heavy cream for coconut cream or a tahini-based sauce. This works especially well in salmon, chicken, and shawarma-style recipes. The flavor changes, but the structure stays the same.
Extra-Veggie Plates:
Add mushrooms, spinach, cabbage, or broccoli wherever the pan has room. These vegetables take on flavor fast and make the meal feel fuller without adding starch. If a recipe already uses zucchini or cauliflower rice, you can usually increase the vegetable volume without changing the cook time much.
Mild Family Version:
Keep the heat low, serve hot sauce on the side, and lean on lemon, herbs, and garlic for flavor. Buffalo chicken, fajitas, and egg roll bowls can all be dialed down without losing character. That makes them easier to get past picky eaters.
Budget Pantry Swap:
Use ground turkey, chicken thighs, cabbage, cauliflower rice, and frozen vegetables. Those ingredients are usually easier on the grocery bill and still cook quickly. A strong sauce does the rest of the work.
Spice-Forward Dinner:
If you like heat, add cayenne, red pepper flakes, chipotle, or chili crisp at the finish. Heat lands better when it is layered over a finished dish instead of cooked to death. A little acid afterward keeps the spice sharp, not harsh.
Common Mistakes to Avoid
- Treating low-carb dinners like they need to be plain: The carb count is not the problem; bland food is. Use salt, acid, herbs, and a real sauce.
- Cooking everything in a crowded pan: A crowded skillet steams food instead of browning it. That’s how chicken goes pale and vegetables go soft.
- Ignoring moisture: Zucchini, cabbage, mushrooms, and frozen vegetables can dump water into the pan. Dry them well and cook off the liquid before you call it done.
- Overcooking lean proteins: Salmon, shrimp, cod, pork chops, and chicken breast all go dry fast. Use an instant-read thermometer and pull them on time.
- Skipping the final hit of brightness: Lemon juice, vinegar, or lime is not garnish here. It changes the flavor from heavy to finished.
Frequently Asked Questions

How low carb are these dinners, really?
Most of them skip grains, pasta, tortillas, and bread altogether, so the carb count stays low by design. The exact total depends on portion size and the ingredients you choose, especially sauces and toppings.
Can I use chicken breast instead of thighs?
Yes, but keep a close eye on the clock. Chicken breast dries out faster, so flatten thick pieces for even cooking and pull them as soon as they hit 165°F.
What’s the easiest dinner on the list?
Garlic butter chicken, salmon with asparagus, and egg roll in a bowl are the fastest to get moving. They use short ingredient lists and simple methods, which makes them especially useful on chaotic nights.
Can I use frozen vegetables?
Absolutely, especially for broccoli, cauliflower rice, and some stir-fry vegetables. Thaw them fully if needed, then dry them well so they do not flood the pan with water.
How do I keep low carb dinners filling without rice or pasta?
Use a real portion of protein and plenty of vegetables with texture — cabbage, green beans, broccoli, cauliflower rice, peppers, or romaine. A little fat from butter, olive oil, tahini, avocado, or cheese also helps the meal feel complete.
Can I make these ahead for lunches?
Yes. Turkey taco filling, sausage and cabbage, beef and broccoli, and egg roll in a bowl all hold up nicely. Store sauces and crisp toppings separately so they stay fresh.
What if my sauce turns thin or watery?
Keep the pan over medium heat and let it reduce for a couple of minutes longer. With zucchini, cabbage, and mushrooms, extra water is usually the culprit, so dry the vegetables better next time.
Can I use an air fryer or oven instead of a skillet?
For chicken, salmon, shrimp, peppers, and stuffed peppers, yes. Saucy stir-fries and skillet bowls usually taste better on the stove because you get those browned bits in the pan.
How do I make these kid-friendly?
Keep the spice on the side, use familiar vegetables like peppers or green beans, and offer a simple dip or sauce. Turkey taco lettuce cups, garlic butter chicken, and creamy Tuscan chicken tend to go down easiest.
What should I keep in the pantry to make these more often?
Olive oil, butter, tamari, Dijon, vinegar, broth, garlic, ginger, and a few dried spices cover a lot of ground. Add cauliflower rice, cabbage, and frozen shrimp to that list, and a lot of these dinners become possible with very little planning.
A Smoother Way to Eat Dinner

Good weeknight food should lower your stress, not add to it. These low carb dinners do that by leaning on a simple pattern: fast protein, sturdy vegetables, and a sauce or finish that makes the whole plate feel cared for. That combination is dependable, and honestly, dependable is underrated at dinner time.
Pick two or three of these to keep in your regular rotation and the work gets easier. One sheet-pan meal. One skillet dinner. Maybe one bowl recipe for the night when you need everyone fed without a lot of drama. That small system saves more time than any complicated plan ever will, and it tastes better too.
Quick Reference for All 15 Dinners

- 1. Garlic Butter Chicken with Green Beans — Prep 10 min, Cook 15 min, Total 25 min. Serves 4. Standout: one skillet, lemony butter finish.
- 2. Beef and Broccoli Skillet — Prep 15 min, Cook 15 min, Total 30 min. Serves 4. Standout: glossy takeout-style flavor without sugar.
- 3. Salmon with Lemon-Dill Asparagus — Prep 10 min, Cook 12 min, Total 22 min. Serves 4. Standout: fast sheet-pan dinner with a bright finish.
- 4. Turkey Taco Lettuce Wrap Skillet — Prep 10 min, Cook 15 min, Total 25 min. Serves 4. Standout: taco night without the tortillas.
- 5. Shrimp Zucchini Noodle Scampi — Prep 15 min, Cook 10 min, Total 25 min. Serves 4. Standout: the lightest, quickest dinner in the group.
- 6. Pork Chops with Creamy Mushroom Sauce — Prep 10 min, Cook 20 min, Total 30 min. Serves 4. Standout: rich pan sauce with no flour needed.
- 7. Buffalo Chicken Stuffed Peppers — Prep 15 min, Cook 25 min, Total 40 min. Serves 4. Standout: spicy, creamy filling tucked into sweet peppers.
- 8. Sausage and Cabbage Skillet — Prep 10 min, Cook 20 min, Total 30 min. Serves 4 to 6. Standout: old-school comfort with minimal prep.
- 9. Greek Chicken Bowls with Tzatziki — Prep 20 min, Cook 20 min, Total 40 min. Serves 4. Standout: cool, crisp bowl with bold Mediterranean flavor.
- 10. Ground Beef Cauliflower Rice Stir-Fry — Prep 15 min, Cook 15 min, Total 30 min. Serves 4. Standout: fried-rice feel without the rice.
- 11. Creamy Tuscan Chicken with Spinach — Prep 10 min, Cook 20 min, Total 30 min. Serves 4. Standout: the richest sauce of the bunch.
- 12. Baked Cod with Tomato-Olive Relish — Prep 15 min, Cook 12 min, Total 27 min. Serves 4. Standout: bright, salty topping that wakes up mild fish.
- 13. Egg Roll in a Bowl — Prep 10 min, Cook 15 min, Total 25 min. Serves 4 to 5. Standout: takeout flavor in a single skillet.
- 14. Chicken Shawarma Salad Plates — Prep 20 min, Cook 18 min, Total 38 min. Serves 4. Standout: salad that eats like dinner.
- 15. Steak Fajita Skillet with Peppers — Prep 15 min, Cook 15 min, Total 30 min. Serves 4. Standout: charred steak and peppers with lime at the finish.