
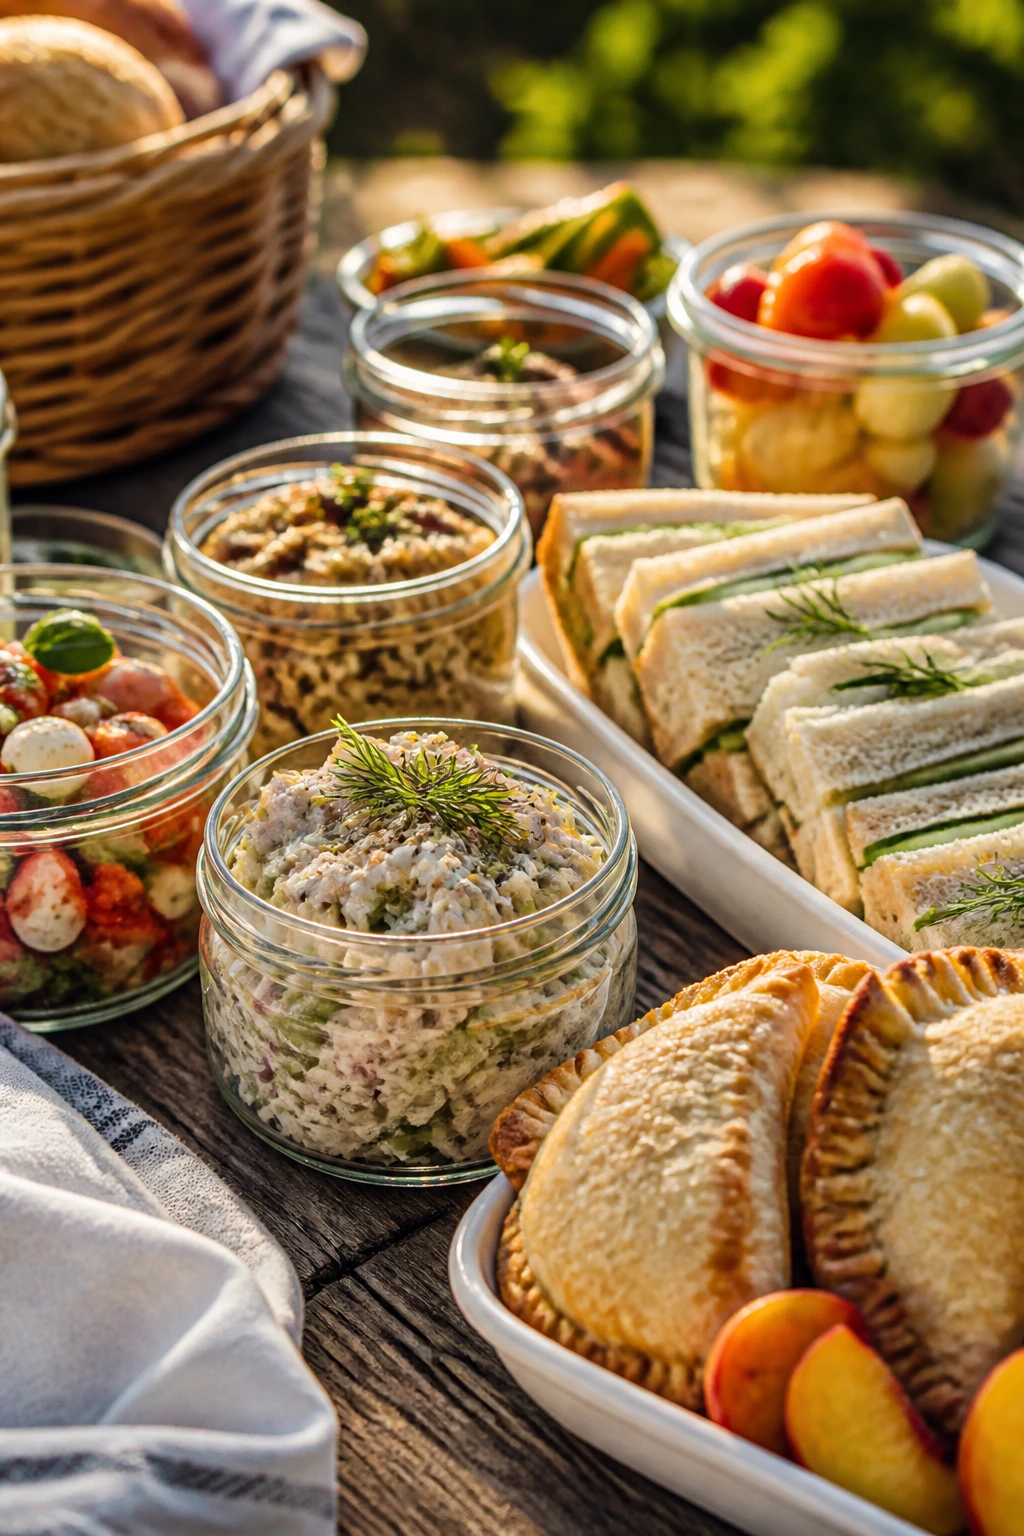
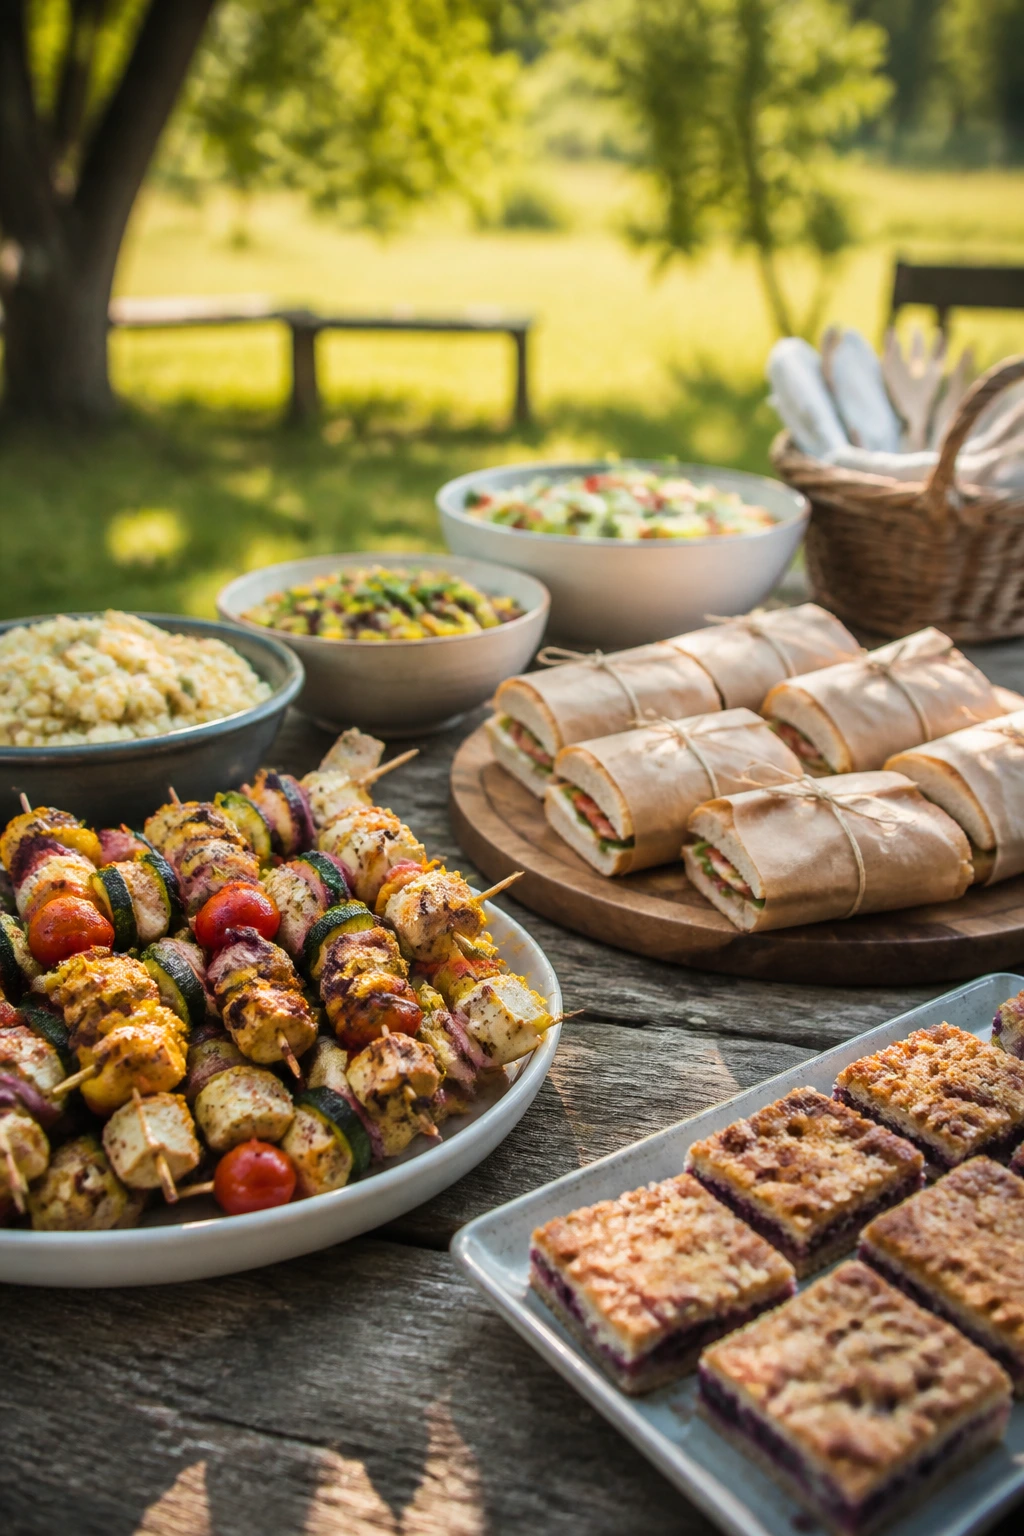
Cold chicken salad straight from the fridge, paper-thin cucumber sandwiches that stay crisp instead of collapsing, peach hand pies you can eat with one hand while standing in the yard — that’s the kind of picnic food that makes a summer night feel easy. Not fussy. Not hot enough to make you regret turning on the oven. Just a spread of cold salads, sturdy sandwiches, handheld bites, and a sweet finish that doesn’t demand a knife and fork.
Picnic foods live or die by how they travel. A good one holds its shape after a few minutes in a tote bag, tastes fine after a little chill time, and doesn’t leak mayonnaise through the bottom of the container the second you set it down. If you’ve ever opened a lunch box to find limp bread or watery tomatoes, you already know why that matters. Texture is the whole game here.
The recipes below are built for that exact problem. Some are make-ahead main dishes, some are little snacks that disappear fast, and some are desserts that survive the trip without melting into a puddle. A few are no-cook. A few need a quick turn in the oven. All of them are simple enough to pull off on a weeknight, which is exactly when the best picnic food starts to earn its keep.
Why These Picnic Foods Make Summer Nights Easier
-
They hold up outside the kitchen: These recipes are chosen because they stay good at room temperature for a bit, or they taste even better after a short chill in the fridge.
-
They travel in plain containers: Most of these foods pack neatly into lidded bowls, jars, wrapped sandwiches, or shallow trays that won’t tip around in the car.
-
They balance rich and fresh: You get creamy fillings, crunchy vegetables, salty cheese, and bright herbs, so the meal doesn’t feel heavy even when it eats like dinner.
-
They make prep feel manageable: A lot of the work happens ahead of time — boil the pasta, mix the filling, chill the bars, slice the fruit — and the evening itself stays calm.
-
They scale up without drama: Double the pasta salad, stack extra sliders, or add another jar of cheesecake and the whole spread still makes sense.
-
They cover the whole table: There’s enough variety here to build a picnic with a main, a side, a snack, and dessert without needing a separate menu.
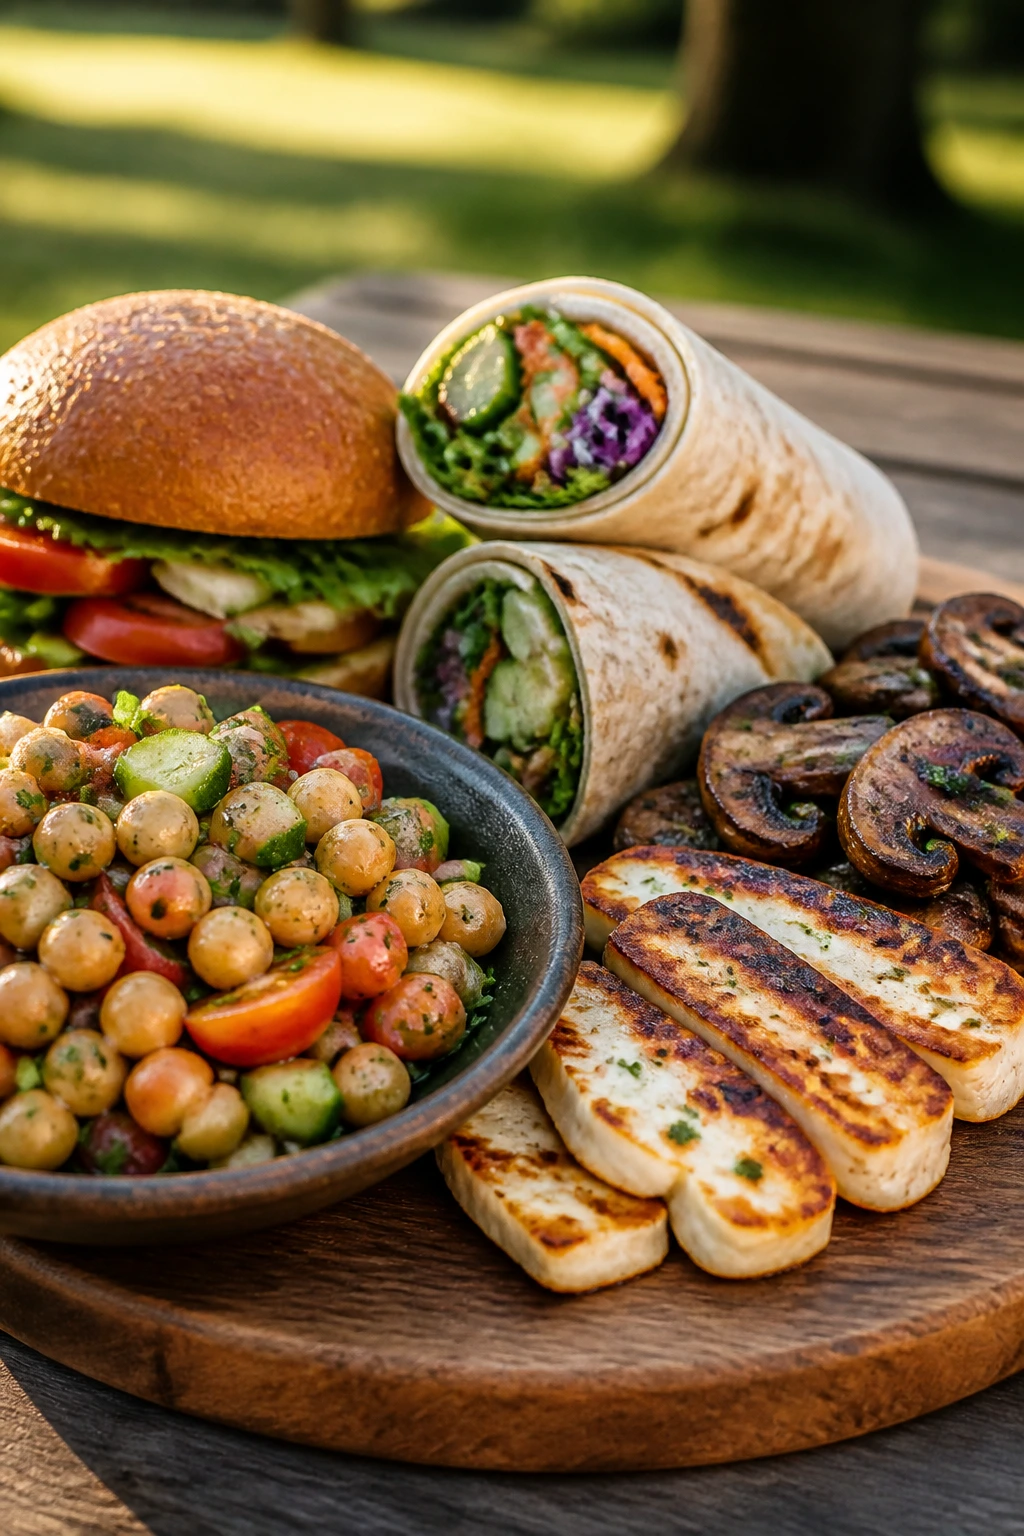
1. Lemon-Herb Chicken Salad Sandwiches
Cold chicken salad has a very particular charm when it’s done right. The lemon wakes it up, the dill keeps it from tasting heavy, and the celery gives each bite that clean snap you want in a sandwich meant to travel. This version leans bright and creamy, not gloopy.
Why It Works:
Chicken salad is one of those picnic foods that gets better after a short rest in the fridge. The yogurt loosens the mayo without making the filling thin, and the lemon zest keeps the flavor sharp even when everything is cold. Chopped chicken with small pieces of celery and scallion gives you enough texture that the filling doesn’t smear into the bread. It’s the kind of sandwich that still tastes good after sitting on a plate for fifteen minutes.
Key Ingredients:
- 3 cups cooked chicken, chopped into 1/2-inch pieces
- 1/2 cup mayonnaise
- 1/2 cup plain Greek yogurt
- 2 celery stalks, finely diced
- 2 scallions, thinly sliced
- 2 tablespoons chopped fresh dill
- 1 tablespoon lemon juice
- 1 teaspoon lemon zest
- 1/2 teaspoon kosher salt
- 1/4 teaspoon black pepper
- 8 slices soft sandwich bread, lightly toasted
Quick Steps:
- Place the chicken, mayonnaise, yogurt, celery, scallions, dill, lemon juice, lemon zest, salt, and pepper in a large bowl.
- Stir until the chicken is coated and the filling looks creamy but not runny.
- Taste and adjust the salt or lemon if needed. Cold filling needs a little more seasoning than warm filling.
- Cover and chill for at least 20 minutes so the flavors settle.
- Lightly toast the bread, then let it cool for a minute so it doesn’t steam.
- Spoon the chicken salad onto 4 slices of bread, top with the remaining slices, and cut each sandwich in half.
Equipment for This Recipe:
- Large mixing bowl
- Rubber spatula or sturdy spoon
- Chef’s knife and cutting board
- Measuring cups and spoons
- Toaster or skillet for light browning
How to Serve This Dish:
Pile these on a tray with kettle chips and dill pickles. A small leaf of lettuce under the filling helps keep the bread from softening. Cut them on the diagonal so the filling shows at the edges.
Pro Tips for This Recipe:
- Use chicken that’s completely cool before mixing; warm chicken loosens the dressing and makes the filling greasy.
- If you like a firmer sandwich, spread a thin layer of butter on the bread before adding the chicken salad.
- Chop the celery finely. Big chunks slide out when you bite down.
- Make the filling an hour ahead if you can. It settles into a better texture after chilling.
Variations on This Dish:
- Curry Chicken Salad: Add 1 to 2 teaspoons curry powder and 1/4 cup chopped apple for a sweeter, warmer flavor.
- Cranberry-Walnut Chicken Salad: Stir in 1/3 cup dried cranberries and 1/4 cup chopped walnuts for more crunch.
- Lettuce Cup Version: Spoon the filling into romaine leaves when you want something lighter and less bread-heavy.
Common Mistakes to Avoid with This Dish:
- Too much dressing: If the filling slumps off the bread, it’s overloaded. Add mayo and yogurt a spoonful at a time.
- Bread that’s too soft: Thin, squishy sandwich bread tears fast. Use sturdier slices or split croissants.
- Skipping the chill: The flavor tastes flat if you eat it right away. Even 20 minutes in the fridge helps.
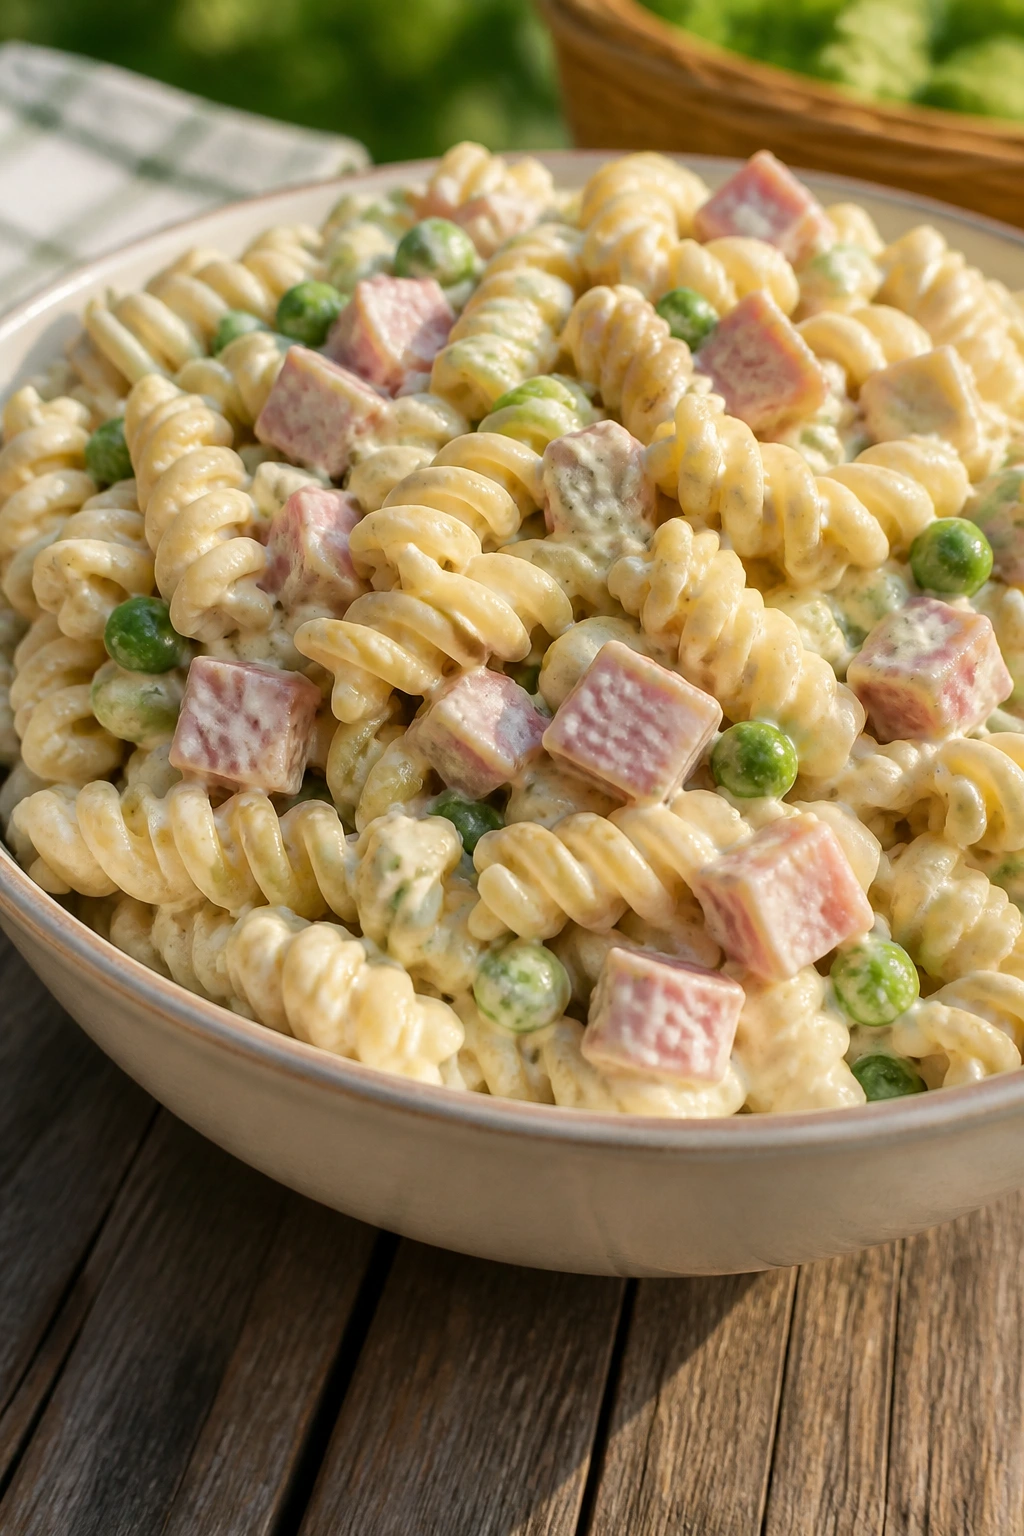
2. Creamy Pasta Salad with Peas and Ham
Pasta salad earns its place at a picnic when it’s cold, creamy, and not shy about salt. The peas stay sweet, the ham gives it some backbone, and the dressing clings to the ridges of rotini instead of pooling at the bottom of the bowl.
Why It Works:
Rotini is the right shape here because the spirals trap the dressing in their grooves. That matters more than people think. Mayo and sour cream make the sauce rich, but Dijon and vinegar keep it from tasting heavy, and the peas give tiny pops of sweetness that cool the whole bowl down. This is the sort of side that can quietly become dinner if you let it.
Key Ingredients:
- 12 ounces rotini pasta
- 1 cup frozen peas, thawed
- 1 cup diced ham
- 1 cup cheddar cheese cubes
- 1/2 cup diced celery
- 1/4 cup finely diced red onion
- 3/4 cup mayonnaise
- 1/4 cup sour cream
- 2 tablespoons Dijon mustard
- 1 tablespoon apple cider vinegar
- 3/4 teaspoon kosher salt
- 1/2 teaspoon black pepper
Quick Steps:
- Bring a large pot of salted water to a boil and cook the rotini until just al dente, about 8 to 10 minutes.
- Drain the pasta and rinse it under cold water until it feels cool and no longer steams.
- Whisk the mayonnaise, sour cream, Dijon, vinegar, salt, and pepper in a large bowl.
- Add the pasta, peas, ham, cheddar, celery, and red onion.
- Toss until every piece looks lightly coated. If the salad seems dry, add 1 tablespoon of cold water or more vinegar, not a big splash of mayo.
- Chill for at least 30 minutes before serving.
Equipment for This Recipe:
- Large pot
- Colander
- Large mixing bowl
- Whisk
- Measuring cups and spoons
How to Serve This Dish:
Spoon it into a wide bowl and top with a little black pepper right before it goes out. It sits well next to grilled chicken, sliced tomatoes, or a pile of cold cucumber spears. A chilled spoon helps, which sounds fussy until you’ve tried serving pasta salad with a warm one.
Pro Tips for This Recipe:
- Salt the pasta water well. Bland pasta stays bland even under dressing.
- Rinse the pasta until it’s fully cool, then drain it again. Extra water at the bottom makes the dressing thin.
- Dice the ham and celery small so every bite feels balanced.
- If you want the salad to stay creamy overnight, hold back a few spoonfuls of dressing and stir them in just before serving.
Variations on This Dish:
- Bacon Ranch Pasta Salad: Swap the ham for cooked bacon and use ranch seasoning in the dressing.
- Garden Pasta Salad: Leave out the meat and add chopped bell pepper, cucumber, and cherry tomatoes.
- Pickle-Dill Version: Stir in 1/4 cup chopped dill pickles and a spoonful of pickle brine for a sharper bite.
Common Mistakes to Avoid with This Dish:
- Overcooking the pasta: Soft pasta turns mushy after chilling. Stop at al dente.
- Adding watery vegetables without draining them: Thawed peas and diced cucumbers need to be patted dry.
- Underseasoning the dressing: Cold pasta dulls salt and acid, so taste it before you chill the bowl.
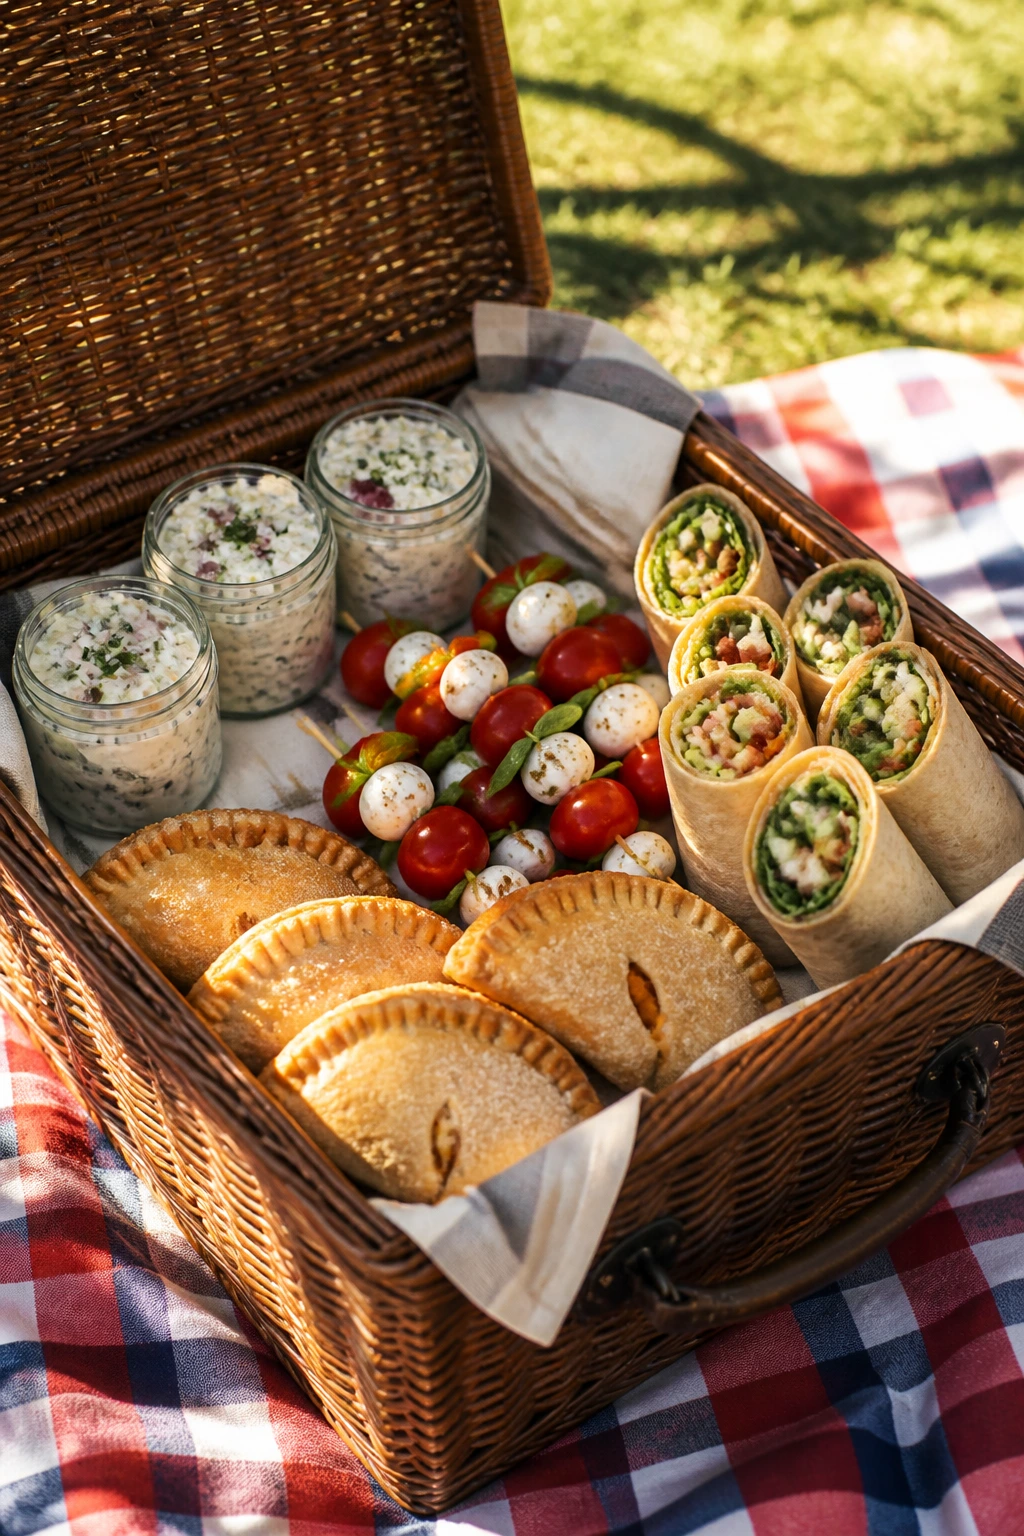
3. Caprese Skewers with Basil Pesto Drizzle
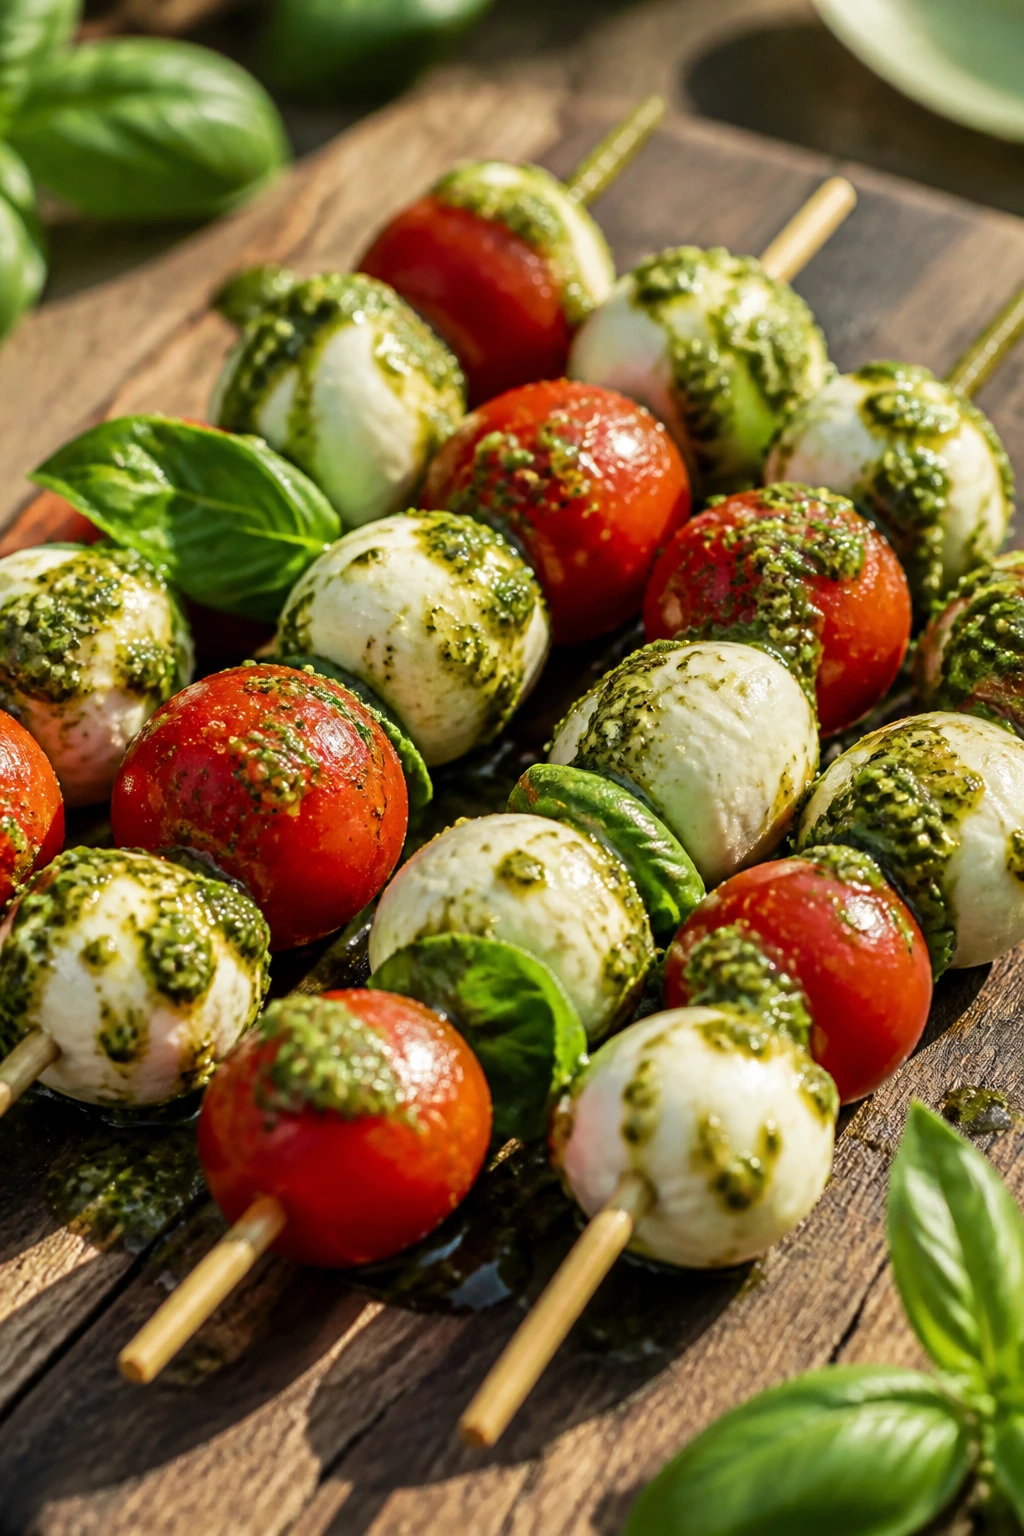
A good Caprese skewer feels like a salad on a stick, which is to say: it’s neat, bright, and gone in about four bites. The tomatoes burst, the mozzarella stays cool and milky, and the basil makes the whole thing smell like a summer garden.
Why It Works:
Caprese is already built for warm weather, and skewers make it easier to serve without a knife. The ingredients are sturdy enough to sit out for a little while, but they still taste fresh when cold. Pesto gives the skewers a salty, herby finish, while balsamic glaze adds sweetness without turning the plate wet. It’s simple, but not dull.
Key Ingredients:
- 1 pint cherry tomatoes
- 8 ounces mini mozzarella balls, drained
- 1 packed cup fresh basil leaves
- 16 wooden skewers
- 1/4 cup pesto
- 1 tablespoon olive oil
- 1 tablespoon balsamic glaze
- 1/4 teaspoon kosher salt
- Pinch of black pepper
Quick Steps:
- Pat the mozzarella balls dry with paper towels so they don’t slide.
- Thread a tomato, a folded basil leaf, and a mozzarella ball onto each skewer. Repeat until all skewers are filled.
- Arrange the skewers on a platter.
- Whisk the pesto and olive oil together until loose enough to drizzle.
- Drizzle the pesto mixture over the skewers, then finish with balsamic glaze, salt, and pepper.
- Serve right away or cover and chill for up to 2 hours.
Equipment for This Recipe:
- Wooden skewers
- Paper towels
- Small bowl
- Spoon for drizzling
- Serving platter
How to Serve This Dish:
Lay them in a single layer on a long plate or tray, not in a pile. They’re best with crusty bread or crackers on the side if you want to make them part of a bigger spread. A few extra basil leaves scattered around the platter make the whole thing look fresh without much effort.
Pro Tips for This Recipe:
- Dry the mozzarella well. Wet cheese makes the drizzle slide off.
- Fold the basil leaves once before skewering so they don’t tear.
- Keep the balsamic glaze light. Too much turns the plate sticky.
- If your tomatoes are large, cut them in half and use shorter skewers.
Variations on This Dish:
- Prosciutto Caprese: Add a folded strip of prosciutto between the basil and mozzarella for a saltier bite.
- Peach Caprese: Swap some tomatoes for peach wedges and keep the basil and mozzarella.
- Dairy-Free Skewers: Use marinated tofu cubes instead of mozzarella and add extra olive oil and herbs.
Common Mistakes to Avoid with This Dish:
- Assembling too far ahead: Basil wilts quickly. Put these together close to serving.
- Too much drizzle: Pesto and glaze should accent the skewers, not bury them.
- Choosing soft tomatoes: Overripe tomatoes split on the skewer and drip.
4. Pimento Cheese Pinwheels

Pimento cheese wrapped in a tortilla is not fancy. That’s the point. You get sharp cheddar, a little heat, creamy filling, and a neat spiral that slices cleanly after it chills. These are the sort of picnic bites people reach for before they’ve even finished asking what they are.
Why It Works:
Pinwheels solve the usual pimento cheese problem, which is that a bowl of spread wants crackers and a lot of hovering. Rolled in tortillas, the filling stays contained and easy to slice. Cream cheese firms the mix just enough to hold its shape, and the pimentos give you color and a soft sweet note against the cheddar. They’re sturdy, fast, and better after a chill.
Key Ingredients:
- 8 ounces cream cheese, softened
- 1 cup shredded sharp cheddar cheese
- 1/2 cup diced pimentos, drained well
- 2 tablespoons mayonnaise
- 1 teaspoon Worcestershire sauce
- 1/4 teaspoon garlic powder
- Pinch of cayenne
- 2 tablespoons chopped scallions
- 4 large flour tortillas
Quick Steps:
- Mix the cream cheese, cheddar, pimentos, mayonnaise, Worcestershire, garlic powder, cayenne, and scallions until well combined.
- Lay one tortilla flat and spread one-quarter of the filling in a thin, even layer all the way to the edges.
- Roll the tortilla up tightly from one side to the other. Tight rolling matters here; loose rolls slice badly.
- Wrap the roll in plastic wrap and chill for at least 30 minutes.
- Slice into 1-inch pinwheels with a sharp knife.
- Arrange on a platter and serve cold.
Equipment for This Recipe:
- Mixing bowl
- Spatula
- Sharp knife
- Plastic wrap
- Cutting board
How to Serve This Dish:
Set them out with celery sticks, grapes, or a bowl of cherry tomatoes so the plate doesn’t feel heavy. They’re also good with pickle chips tucked beside them. If you want clean edges, wipe the knife between slices.
Pro Tips for This Recipe:
- Drain the pimentos well or the filling turns loose.
- Soften the cream cheese fully so the mixture spreads without tearing the tortillas.
- Chill before slicing. Warm pinwheels squish.
- Use regular flour tortillas, not extra-thick wraps, or the roll gets bulky.
Variations on This Dish:
- Jalapeño Pimento Pinwheels: Add 1 to 2 tablespoons minced pickled jalapeños for a sharper kick.
- Bacon Pimento Pinwheels: Stir in 1/3 cup cooked crumbled bacon.
- Smoked Paprika Version: Replace part of the cayenne with smoked paprika for a deeper, warmer flavor.
Common Mistakes to Avoid with This Dish:
- Overfilling the tortilla: Too much filling spills out when you slice.
- Skipping the chill: Cold pinwheels hold their shape; warm ones don’t.
- Using watery add-ins: Anything wet makes the center slippery.
5. Cold Sesame Noodle Salad
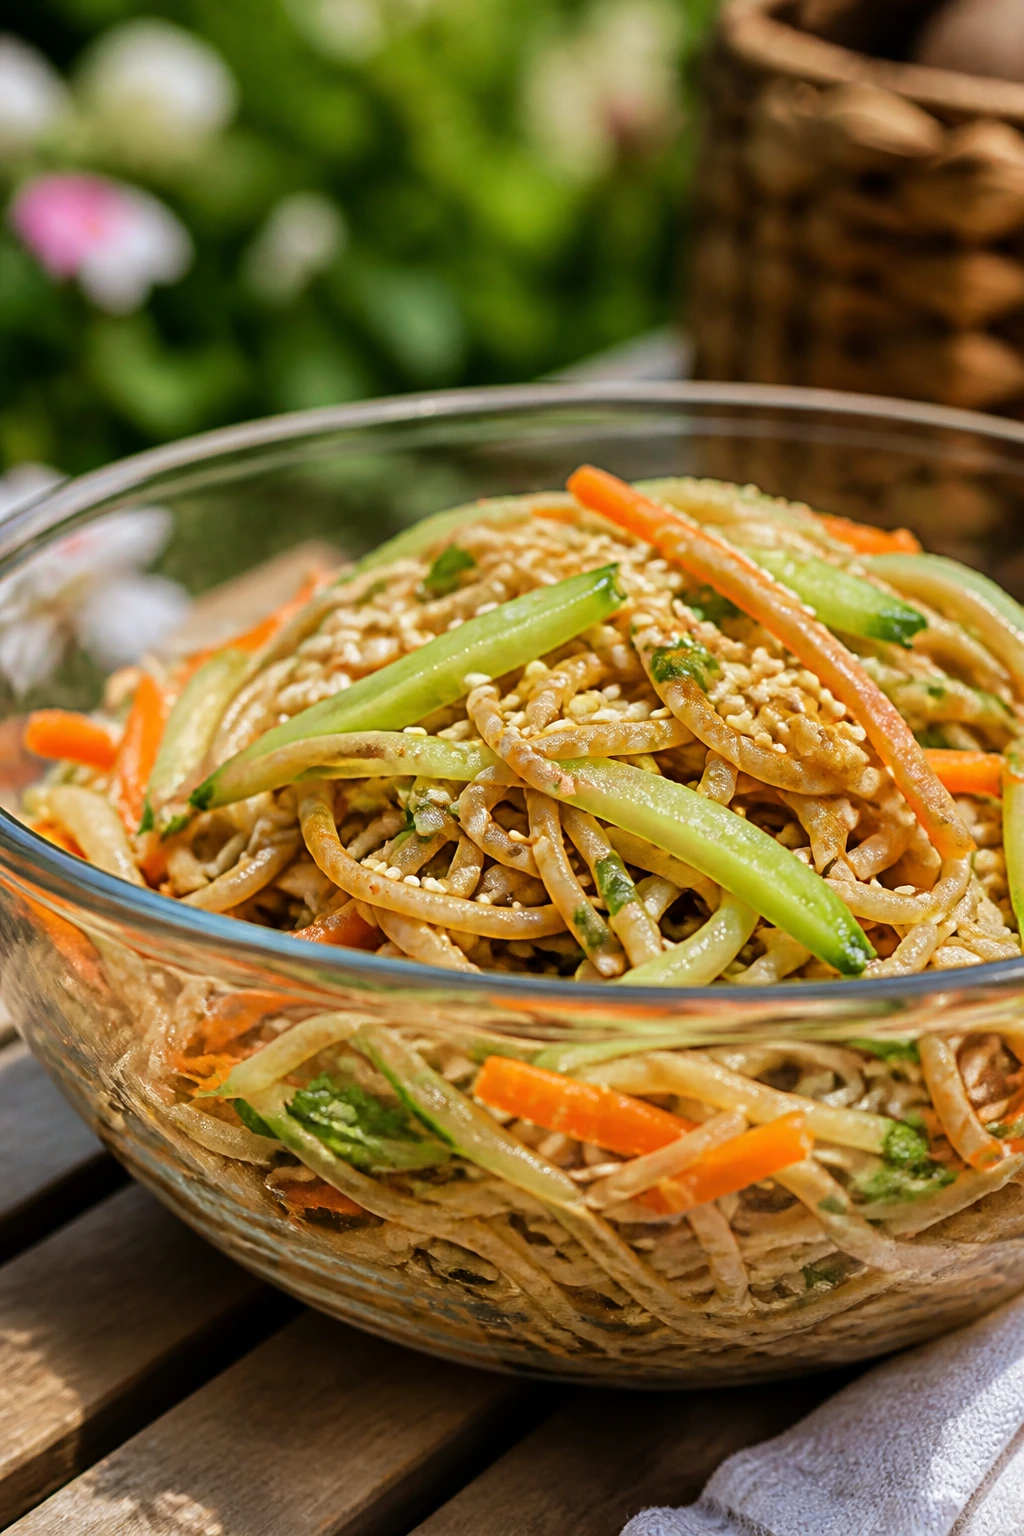
A bowl of cold sesame noodles hits a different part of the picnic brain. It’s savory, slick in the best way, a little nutty, and bright with vinegar. The noodles stay firm if you cook them right, and the cucumber and carrots keep the bowl from feeling dense.
Why It Works:
This salad is built for make-ahead meals because the sauce clings instead of soaking in too fast. Toasted sesame oil gives it depth, peanut butter rounds out the sauce, and rice vinegar keeps the whole thing from tasting heavy. Edamame adds protein without changing the texture too much, which is useful when you want something that eats like a full lunch. It also tastes good cold, which is half the battle.
Key Ingredients:
- 12 ounces spaghetti or soba noodles
- 1 cucumber, cut into thin matchsticks
- 1 cup shredded carrots
- 1 cup shelled edamame, thawed
- 2 scallions, thinly sliced
- 1 tablespoon toasted sesame seeds
- 1/4 cup soy sauce
- 2 tablespoons rice vinegar
- 2 tablespoons toasted sesame oil
- 1 tablespoon peanut butter
- 1 tablespoon honey
- 1 garlic clove, grated
- 1 teaspoon grated fresh ginger
- 1 to 2 tablespoons water, as needed
Quick Steps:
- Cook the noodles in salted water until just tender, then drain and rinse under cold water.
- Whisk the soy sauce, rice vinegar, sesame oil, peanut butter, honey, garlic, ginger, and water until smooth.
- Toss the noodles with the cucumber, carrots, edamame, and scallions.
- Pour the sauce over the top and toss until the noodles are coated.
- Sprinkle with sesame seeds.
- Chill for 20 to 30 minutes before serving.
Equipment for This Recipe:
- Large pot
- Colander
- Large bowl
- Whisk
- Tongs or serving fork
How to Serve This Dish:
Serve it in a shallow bowl with extra scallions scattered on top. It can sit beside grilled chicken, shrimp, or even fried tofu if you want more protein. A lime wedge on the side is optional, but I like the extra bite.
Pro Tips for This Recipe:
- Rinse the noodles well so they stop cooking and don’t stick together.
- Use a little water to loosen the dressing if it feels thick.
- Cut the cucumber thin. Big chunks throw off the texture.
- If you pack this ahead, keep a small extra spoonful of dressing back and stir it in before serving.
Variations on This Dish:
- Spicy Chili Crisp Noodles: Add 1 to 2 teaspoons chili crisp to the sauce.
- Gluten-Free Version: Use rice noodles and tamari instead of soy sauce.
- Peanut-Free Swap: Replace the peanut butter with sunflower seed butter.
Common Mistakes to Avoid with This Dish:
- Overcooking the noodles: Soft noodles become gluey after chilling.
- Too much dressing at once: Start with most of it and add more only if needed.
- Skipping the salt in the noodle water: The noodles need seasoning from the inside out.
6. Deviled Eggs with Pickle Relish
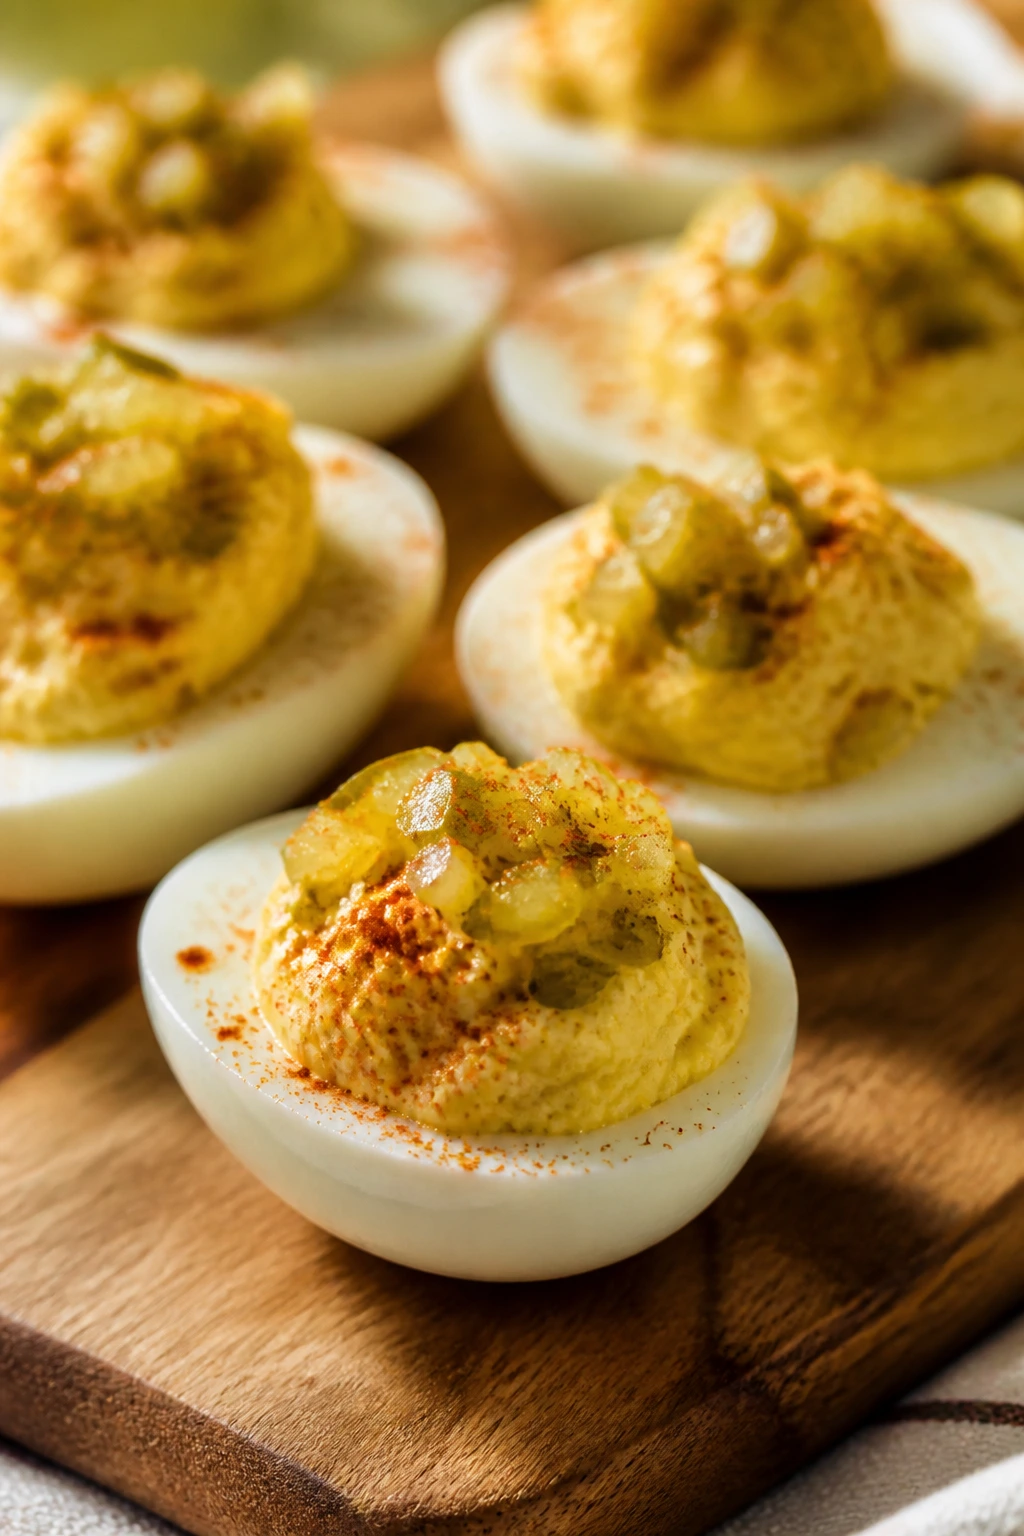
Deviled eggs are one of those picnic foods that disappear before the paper plates do. The filling should be smooth, a little tangy, and firm enough to hold a swirl. Pickle relish gives the yolks a bright, briny bite that keeps them from tasting flat.
Why It Works:
Eggs are portable, cheap, and easy to make ahead, which is exactly why they stay on picnic menus. The vinegar and Dijon cut through the mayo, while the relish adds texture so the filling isn’t just one soft note after another. A little paprika on top does more than look nice; it gives a tiny hit of warmth the first time you bite in. If you peel the eggs well and chill them properly, these travel better than most people expect.
Key Ingredients:
- 12 large eggs
- 1/3 cup mayonnaise
- 1 tablespoon Dijon mustard
- 2 tablespoons dill pickle relish, drained if very wet
- 1 teaspoon white vinegar
- 1/4 teaspoon kosher salt
- 1/4 teaspoon black pepper
- Paprika, for topping
- Chopped chives, for garnish
Quick Steps:
- Place the eggs in a saucepan and cover them with cold water by 1 inch.
- Bring the water to a boil, then turn off the heat, cover the pan, and let the eggs sit for 10 to 12 minutes.
- Transfer the eggs to an ice bath and cool completely.
- Peel the eggs, slice them in half lengthwise, and scoop the yolks into a bowl.
- Mash the yolks with mayonnaise, Dijon, relish, vinegar, salt, and pepper until smooth.
- Spoon or pipe the filling back into the egg whites.
- Finish with paprika and chives, then chill until serving.
Equipment for This Recipe:
- Medium saucepan
- Slotted spoon
- Mixing bowl
- Fork or small mixer
- Piping bag or zip-top bag, optional
How to Serve This Dish:
Nestle the eggs in a shallow tray lined with lettuce leaves so they don’t slide around. Keep them cold until the last minute. They’re good with sliced ham, crackers, or a pile of celery sticks if you want more crunch.
Pro Tips for This Recipe:
- Older eggs peel more cleanly than very fresh ones.
- Drain the relish if it looks watery, or the filling gets loose.
- Chill the eggs before filling if your kitchen is warm.
- Use a zip-top bag with the corner snipped off if you want neat, bakery-style filling.
Variations on This Dish:
- Bacon Deviled Eggs: Top each half with a pinch of crisp bacon.
- Curry Deviled Eggs: Add 1/2 teaspoon curry powder to the yolk mixture.
- Avocado Deviled Eggs: Replace part of the mayo with mashed avocado and serve them the same day.
Common Mistakes to Avoid with This Dish:
- Overcooking the yolks: Green-tinged yolks look dull and taste dry.
- Filling too early: The whites can absorb moisture and get slippery.
- Using too much relish liquid: The filling should hold its shape, not slump.
7. Tuna White Bean Salad Cups
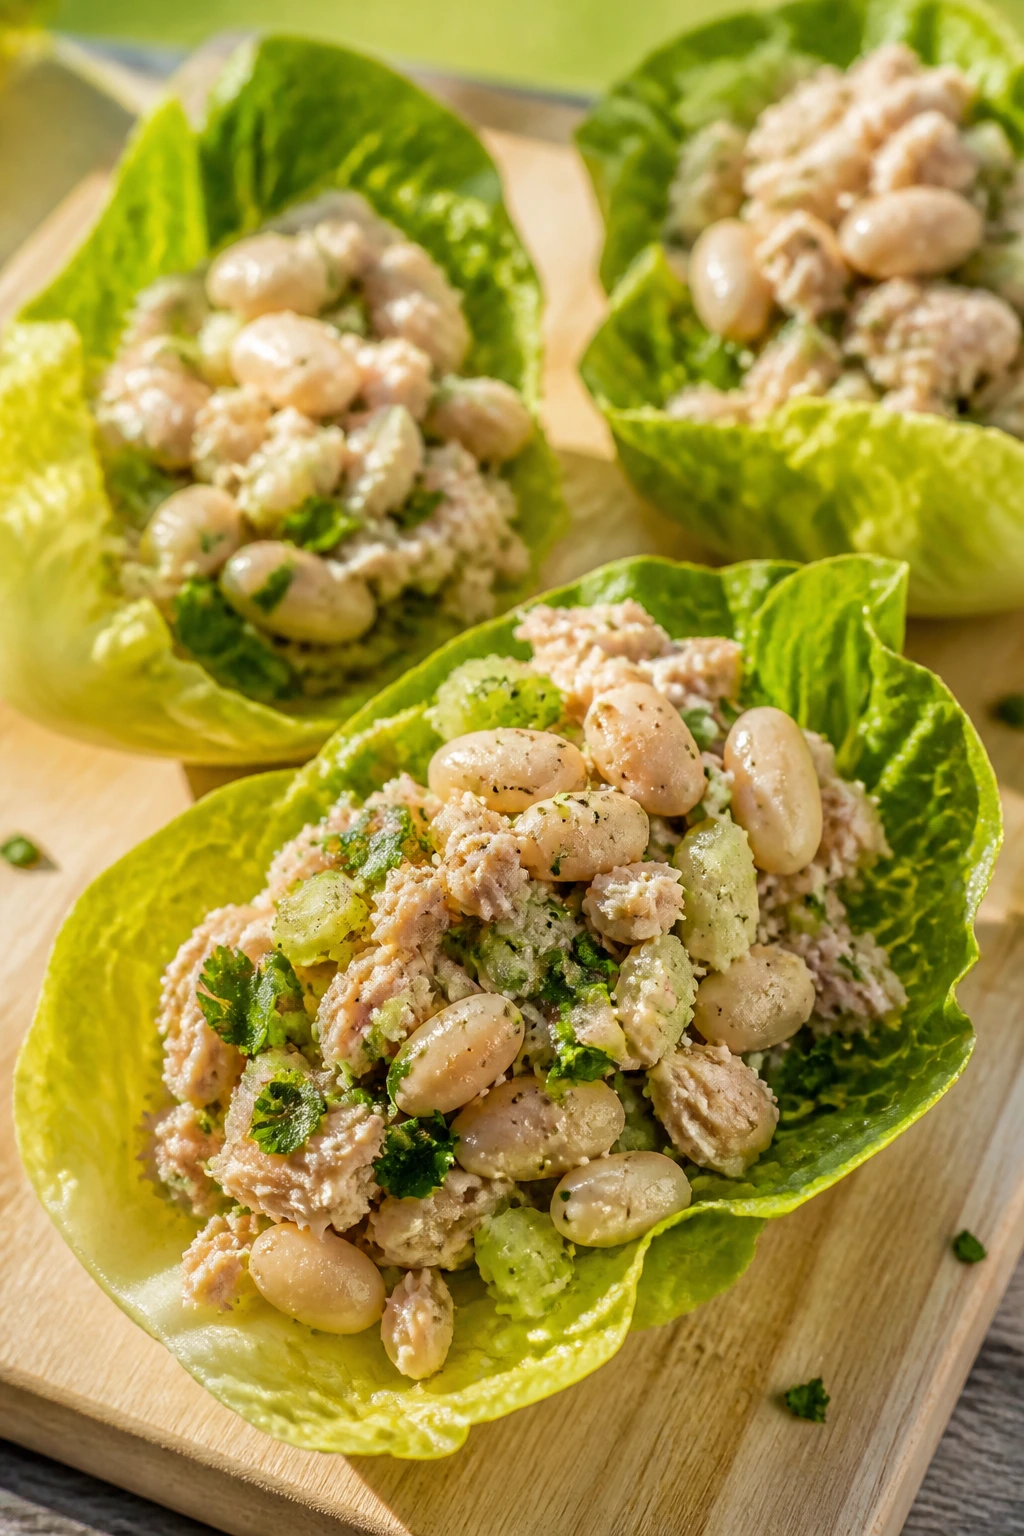
Tuna salad can be much better than its reputation suggests when you swap some of the mayonnaise for olive oil and add creamy white beans. The beans soften the texture, the lemon wakes up the tuna, and the romaine leaves turn the whole thing into a crisp little hand-held bite.
Why It Works:
White beans bring body without making the salad heavy. They also stretch a couple cans of tuna into something that feels like a meal. Lemon juice and Dijon do the usual lift, but parsley and celery keep the texture bright and fresh, which matters a lot when the tuna is served cold. Spoon it into lettuce leaves and you get a picnic food that feels tidy instead of messy.
Key Ingredients:
- 2 cans tuna, 5 ounces each, drained
- 1 can cannellini beans, 15 ounces, drained and rinsed
- 1 celery stalk, finely diced
- 1/4 red onion, finely diced
- 2 tablespoons chopped parsley
- 2 tablespoons lemon juice
- 3 tablespoons olive oil
- 1 teaspoon Dijon mustard
- 1/2 teaspoon kosher salt
- 1/4 teaspoon black pepper
- 8 romaine leaves or endive spears
Quick Steps:
- Combine the tuna, cannellini beans, celery, red onion, and parsley in a bowl.
- Whisk the lemon juice, olive oil, Dijon, salt, and pepper in a small cup.
- Pour the dressing over the tuna mixture and fold gently so the beans don’t break apart too much.
- Taste and add more lemon or salt if needed.
- Spoon the salad into romaine leaves or endive spears.
- Chill for 15 minutes if you want it colder before serving.
Equipment for This Recipe:
- Mixing bowl
- Small whisk or fork
- Cutting board and knife
- Spoon
- Serving tray
How to Serve This Dish:
Arrange the lettuce cups on a platter and keep extra salad in a bowl beside them. Crackers work too if you want a more snacky setup. A few lemon wedges on the side make the tuna taste brighter.
Pro Tips for This Recipe:
- Rinse the beans well so the salad doesn’t taste canned.
- Use good-quality tuna packed in water or olive oil.
- Dice the onion very small so it doesn’t dominate the bowl.
- Pat the lettuce dry before filling, or the cups slide apart.
Variations on This Dish:
- Chickpea Swap: Use chickpeas instead of tuna for a vegetarian version.
- Caper Tuna Salad: Add 1 tablespoon capers for a briny edge.
- Mayo-Style Version: Stir in 2 tablespoons mayonnaise if you want a richer texture.
Common Mistakes to Avoid with This Dish:
- Mashing the beans too hard: A few intact beans give the salad a better bite.
- Using soggy lettuce: Dry leaves are what make the cups work.
- Underseasoning cold tuna: Cold food needs more salt and lemon than you expect.
8. Corn and Black Bean Salsa with Tortilla Chips
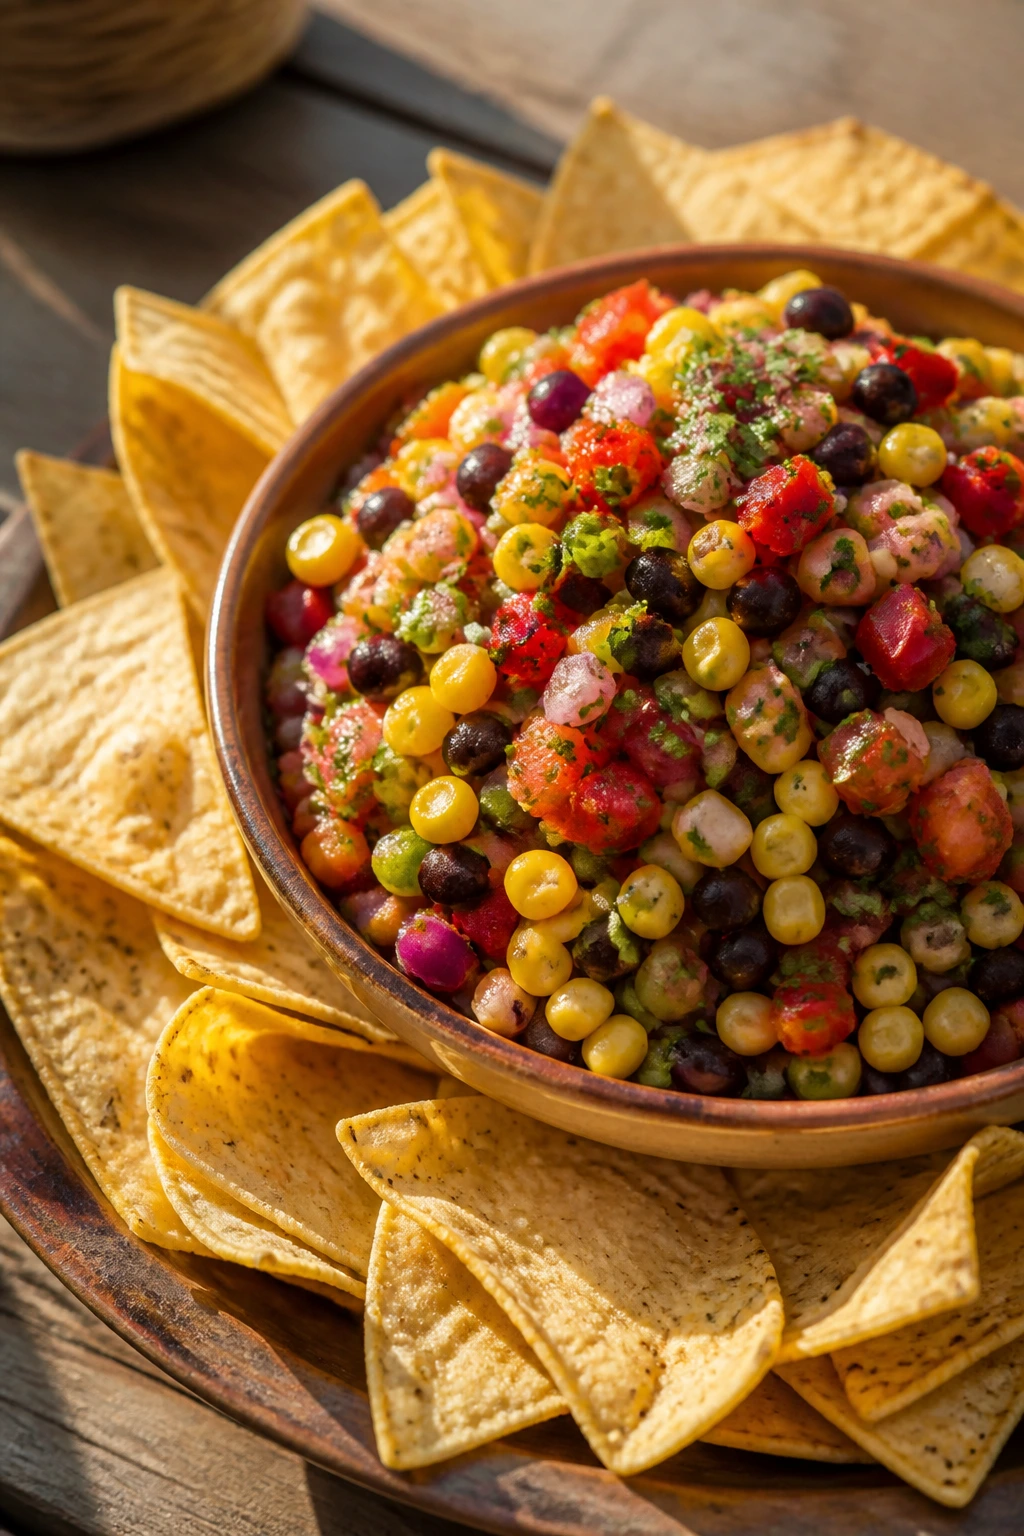
This is the bowl that gets scraped clean with the last chip. Sweet corn, black beans, lime, and cilantro make a salsa that feels fresh enough for summer nights but still hearty enough to count as part of dinner. It’s also one of the easiest things on the table.
Why It Works:
The corn brings sweetness, the beans bring heft, and the lime keeps the whole thing bright. If you use grilled corn, you get smoky edges; if you use frozen, thawed corn, you get convenience without sacrificing much. The salsa improves after a short rest because the salt pulls a little juice out of the tomatoes and peppers, which ties the bowl together. It’s cheap, fast, and very hard to mess up once you’ve salted it properly.
Key Ingredients:
- 2 cups corn kernels
- 1 can black beans, 15 ounces, drained and rinsed
- 1 red bell pepper, diced
- 1/2 red onion, finely diced
- 1 jalapeño, seeded and minced
- 1 cup cherry tomatoes, quartered
- 1/4 cup chopped cilantro
- Juice of 2 limes
- 2 tablespoons olive oil
- 1 teaspoon ground cumin
- 3/4 teaspoon kosher salt
Quick Steps:
- Add the corn, black beans, bell pepper, red onion, jalapeño, cherry tomatoes, and cilantro to a bowl.
- Whisk the lime juice, olive oil, cumin, and salt together.
- Pour the dressing over the salsa and toss gently.
- Taste and adjust with more lime or salt.
- Let the bowl sit for 10 minutes so the flavors marry.
- Serve with tortilla chips.
Equipment for This Recipe:
- Large bowl
- Sharp knife
- Cutting board
- Whisk
- Serving spoon
How to Serve This Dish:
Serve it with sturdy tortilla chips, not thin ones that crack under the first scoop. It also works spooned over grilled chicken or tucked into tacos if you want to stretch it into dinner. A wide bowl makes scooping easier.
Pro Tips for This Recipe:
- Drain the beans well, or the salsa gets cloudy.
- Use ripe but firm tomatoes. Soft ones break down fast.
- If you want heat without a lot of chopping, add a spoonful of pickled jalapeños.
- Make it 20 minutes ahead if you can. The lime and salt pull the flavors together.
Variations on This Dish:
- Mango Corn Salsa: Add 1 diced mango for a sweeter, fruitier bowl.
- Avocado Version: Fold in 1 diced avocado right before serving.
- Grilled Corn Salsa: Char the corn in a skillet or on the grill for a smokier taste.
Common Mistakes to Avoid with This Dish:
- Watery tomatoes: Seed them a little if they’re very juicy.
- Thin chips: Use thick chips that can handle the scoop.
- Skipping the rest time: Ten minutes makes the bowl taste more connected.
9. BBQ Pulled Pork Sliders
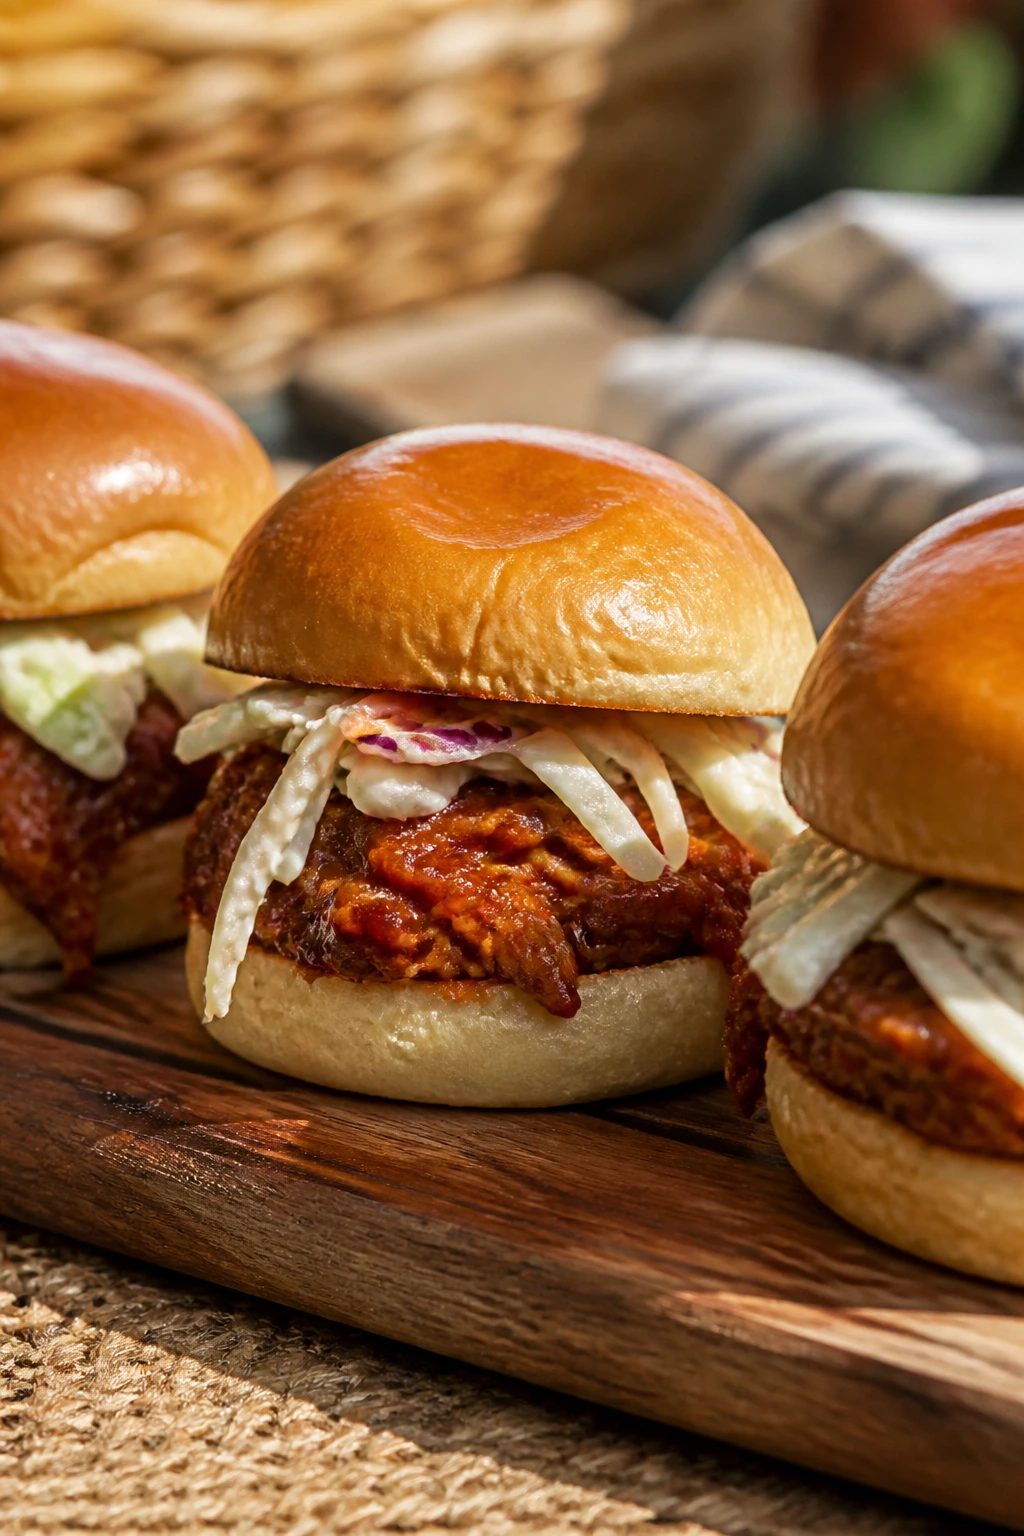
If you want something that feels a little more like dinner and a little less like snacking, pulled pork sliders do the job. Soft buns, saucy pork, and crunchy slaw hit all the right notes. They’re messy in the good way, the kind of mess that comes with napkins and second helpings.
Why It Works:
Pulled pork is forgiving, which is why it works so well for a picnic. The meat stays tender even after reheating, and barbecue sauce keeps it moist without making it soggy if you assemble it carefully. Slaw gives the sliders a fresh crunch that cuts through the sweet sauce. If you build them with a little restraint, they travel well and eat even better.
Key Ingredients:
- 3 cups cooked pulled pork
- 1 cup barbecue sauce
- 12 slider buns
- 2 cups coleslaw mix
- 1/4 cup mayonnaise
- 1 tablespoon apple cider vinegar
- 1 teaspoon sugar
- 1/4 teaspoon kosher salt
- 1/4 teaspoon black pepper
- Pickle chips, optional
Quick Steps:
- Warm the pulled pork in a skillet or microwave with the barbecue sauce until hot and glossy.
- Whisk the mayonnaise, apple cider vinegar, sugar, salt, and pepper together in a bowl.
- Toss the coleslaw mix with the dressing.
- Split the slider buns and fill them with a spoonful of sauced pork.
- Top with slaw and pickle chips if you want them.
- Serve warm or at room temperature.
Equipment for This Recipe:
- Skillet or microwave-safe bowl
- Mixing bowl
- Spoon or tongs
- Knife
- Serving platter
How to Serve This Dish:
Pile the sliders on a tray and tuck a pickle spear beside each one if you like a sharper bite. They’re good with potato salad, chips, or extra slaw on the side. If the buns are soft, keep the filling in the center and don’t overstuff them.
Pro Tips for This Recipe:
- Warm the pork gently so it doesn’t dry out.
- Toast the cut sides of the buns if you want more structure.
- Keep the slaw a little dry rather than heavily dressed.
- Pack pork and buns separately if you’re taking them a long way.
Variations on This Dish:
- Carolina-Style Sliders: Use a vinegar-heavy sauce instead of a sweet barbecue sauce.
- Chicken Sliders: Shredded rotisserie chicken works if you don’t have pork.
- Spicy Slider Version: Add sliced pickled jalapeños and hot sauce.
Common Mistakes to Avoid with This Dish:
- Soggy buns: Assemble close to serving time or keep parts separate.
- Too much sauce: Pork should glisten, not drip.
- Overpacked sliders: If you can’t close the bun without pressing, it’s too full.
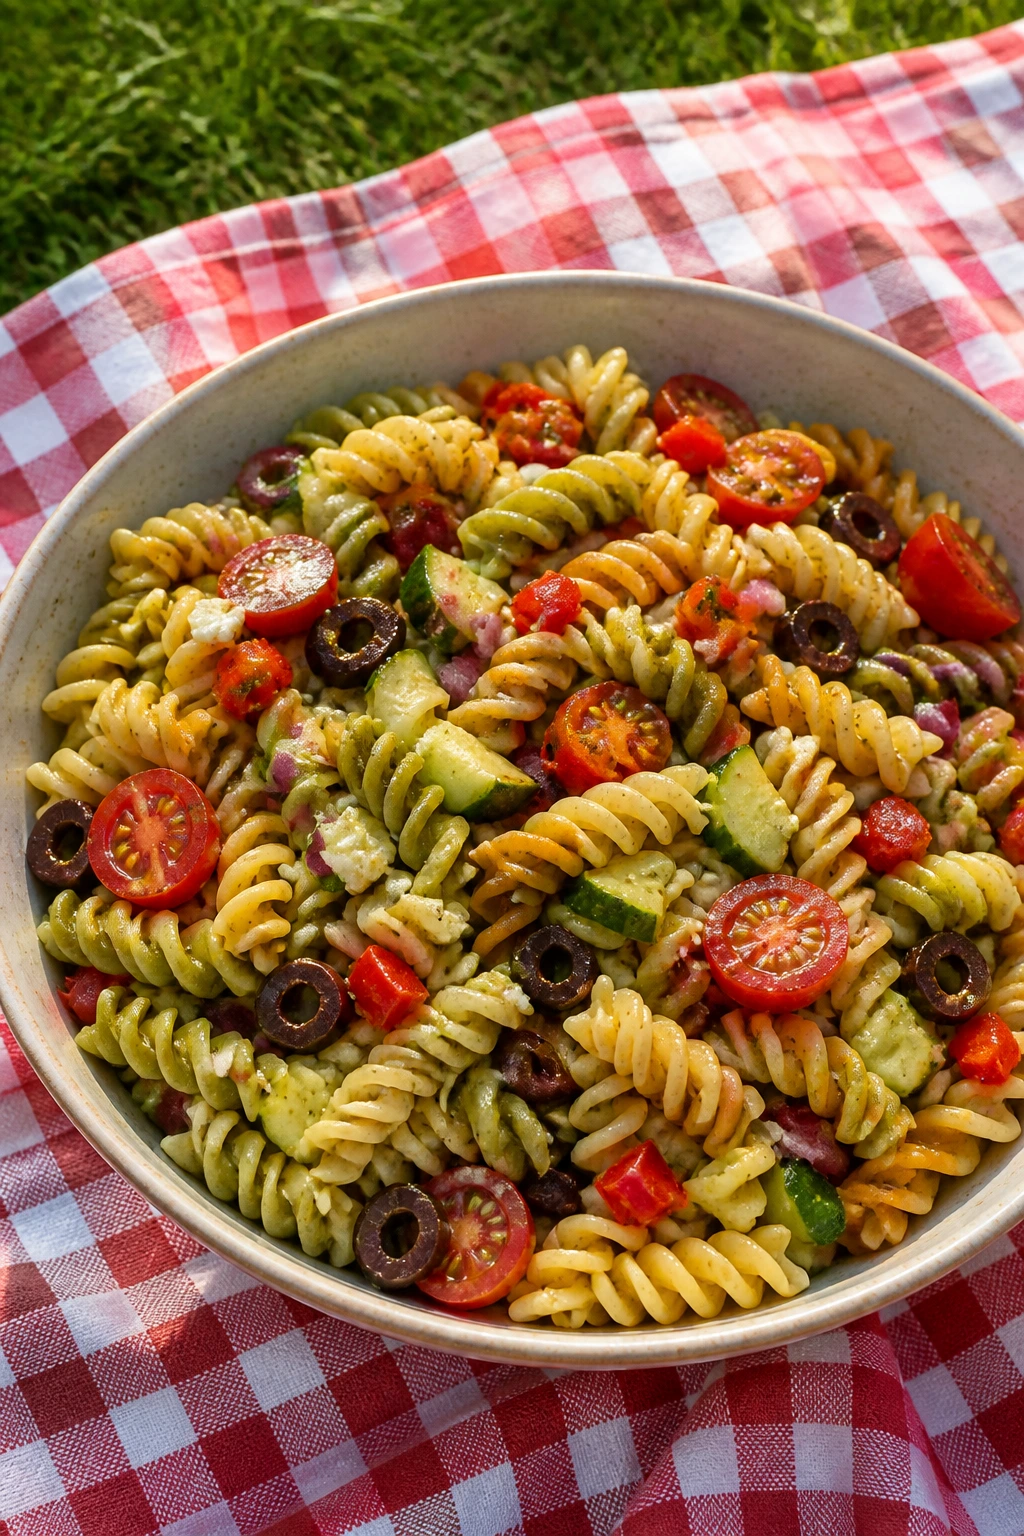
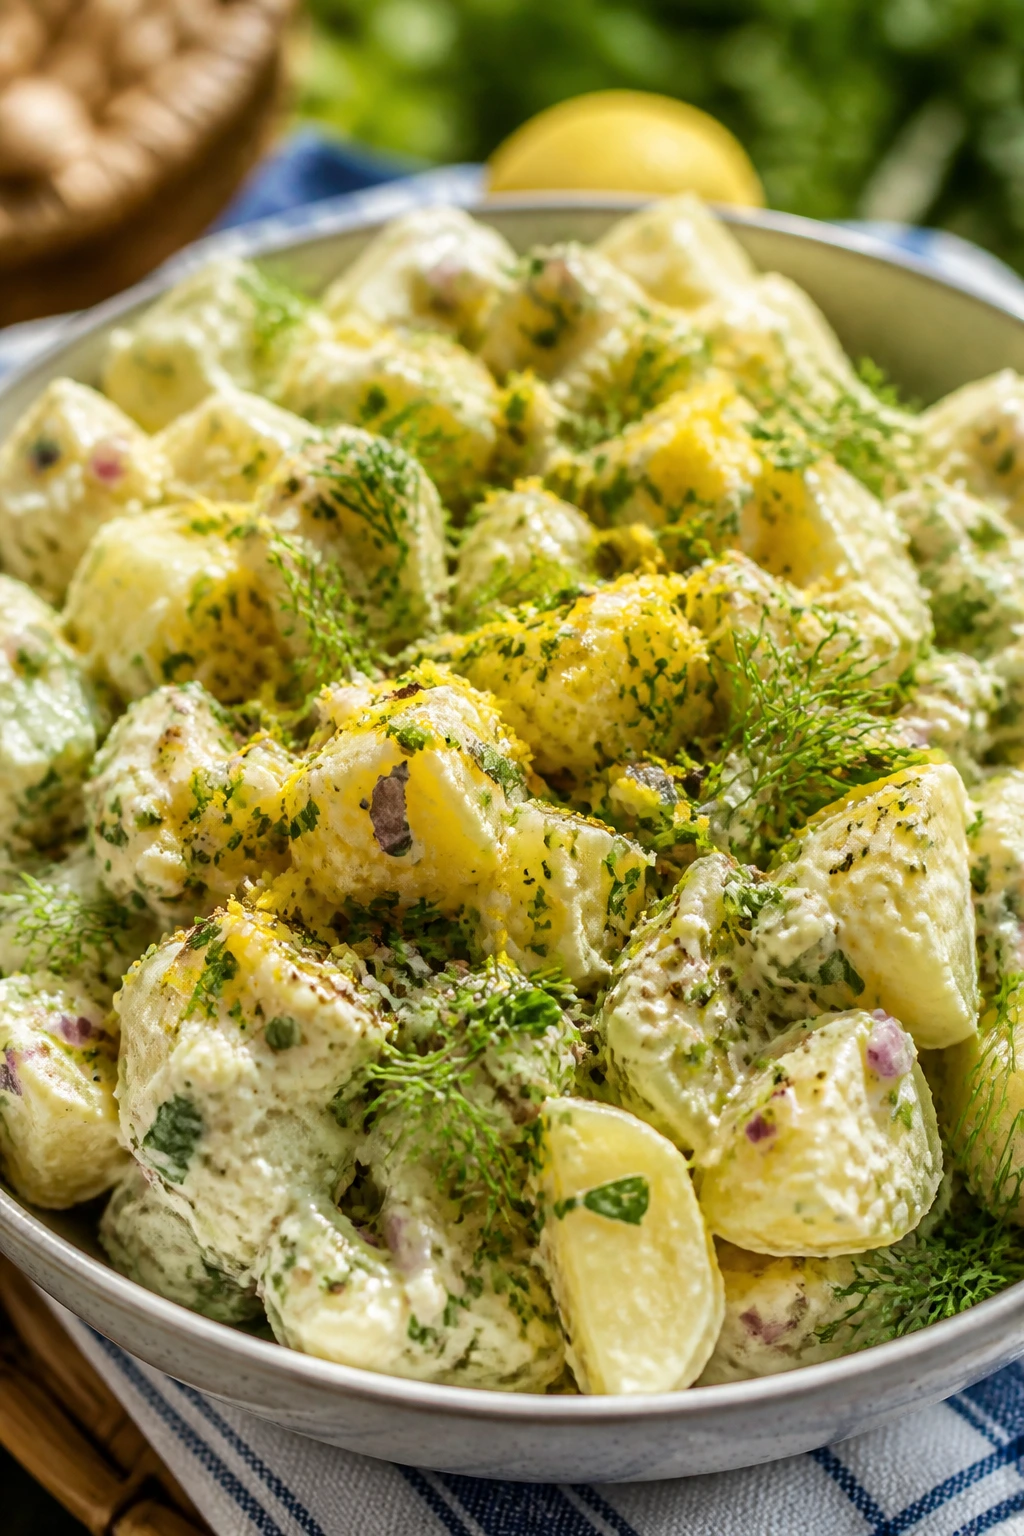
10. Greek Orzo Salad
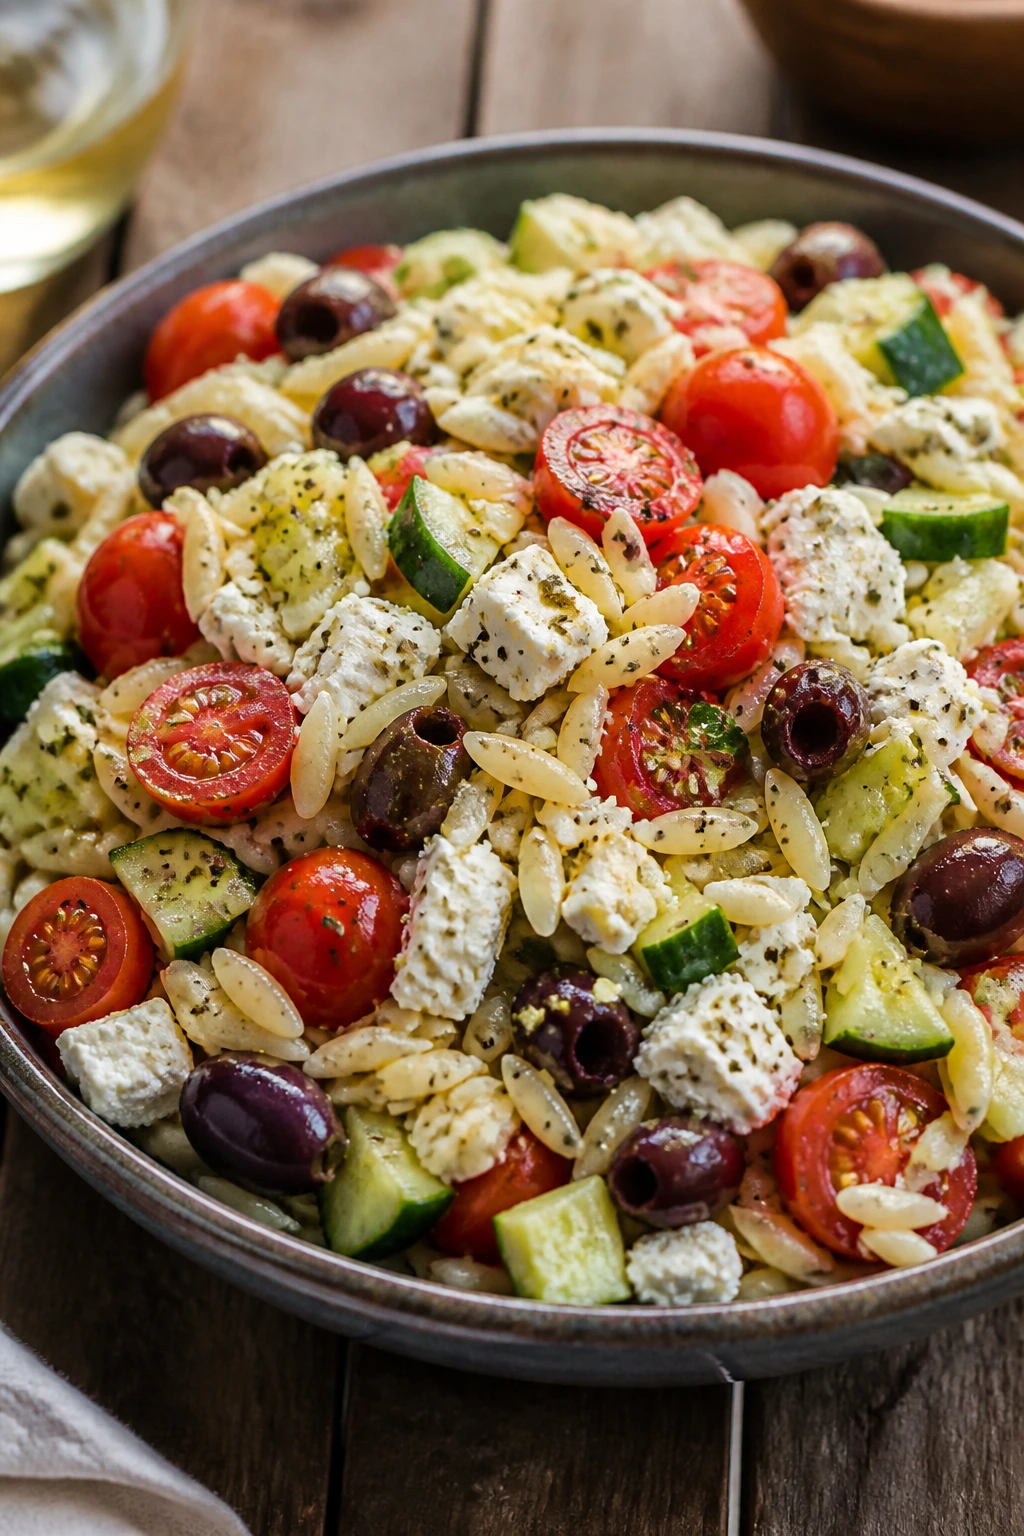
Greek orzo salad has the right kind of picnic energy: briny, cool, and full of little things that taste better after they sit together for a while. The pasta holds the dressing, the feta breaks into salty pockets, and the olives keep the whole bowl from leaning too sweet.
Why It Works:
Orzo is small enough to eat with a spoon but sturdy enough to hold up in a bowl for hours. Lemon juice, red wine vinegar, and oregano give the salad that punchy Greek-style flavor without making it sharp. The cucumber and tomatoes add water and crunch, so the bowl stays lively instead of stodgy. It’s the sort of side that can sit next to grilled meat or stand on its own.
Key Ingredients:
- 12 ounces orzo
- 1 cucumber, diced
- 1 pint cherry tomatoes, halved
- 1/2 red onion, thinly sliced
- 1 cup crumbled feta
- 1 cup kalamata olives, halved
- 1/4 cup olive oil
- 3 tablespoons lemon juice
- 1 tablespoon red wine vinegar
- 1 teaspoon dried oregano
- 1 small garlic clove, grated
- 3/4 teaspoon kosher salt
- 1/4 teaspoon black pepper
Quick Steps:
- Cook the orzo in salted boiling water until just tender, then drain and rinse briefly under cool water.
- Whisk the olive oil, lemon juice, vinegar, oregano, garlic, salt, and pepper in a large bowl.
- Add the orzo, cucumber, tomatoes, red onion, feta, and olives.
- Toss gently so the feta stays in pieces instead of dissolving.
- Taste and adjust the seasoning.
- Chill for 20 minutes before serving.
Equipment for This Recipe:
- Medium pot
- Colander
- Large bowl
- Whisk
- Spoon
How to Serve This Dish:
Serve it cold in a wide bowl with a spoon that can scoop all the way to the bottom. It goes well with grilled chicken, lamb, or a plate of hummus and pita. A few extra herbs on top make it look fresher than it is.
Pro Tips for This Recipe:
- Rinse the orzo just enough to stop the cooking, then drain well.
- Slice the onion thin so it doesn’t take over the bowl.
- Add a little more lemon after chilling if the flavors need a lift.
- Crumble the feta by hand for larger, creamier pieces.
Variations on This Dish:
- Chickpea Greek Salad: Add a can of chickpeas for more protein.
- Dairy-Free Version: Skip the feta and add more olives and cucumbers.
- Grilled Chicken Orzo: Fold in sliced grilled chicken for a fuller meal.
Common Mistakes to Avoid with This Dish:
- Overcooked orzo: Soft orzo clumps after chilling.
- Dry salad: Orzo soaks up dressing, so taste before serving.
- Too much onion: Keep it thin and moderate so it doesn’t sharpen the whole bowl.
11. Watermelon Feta Mint Salad
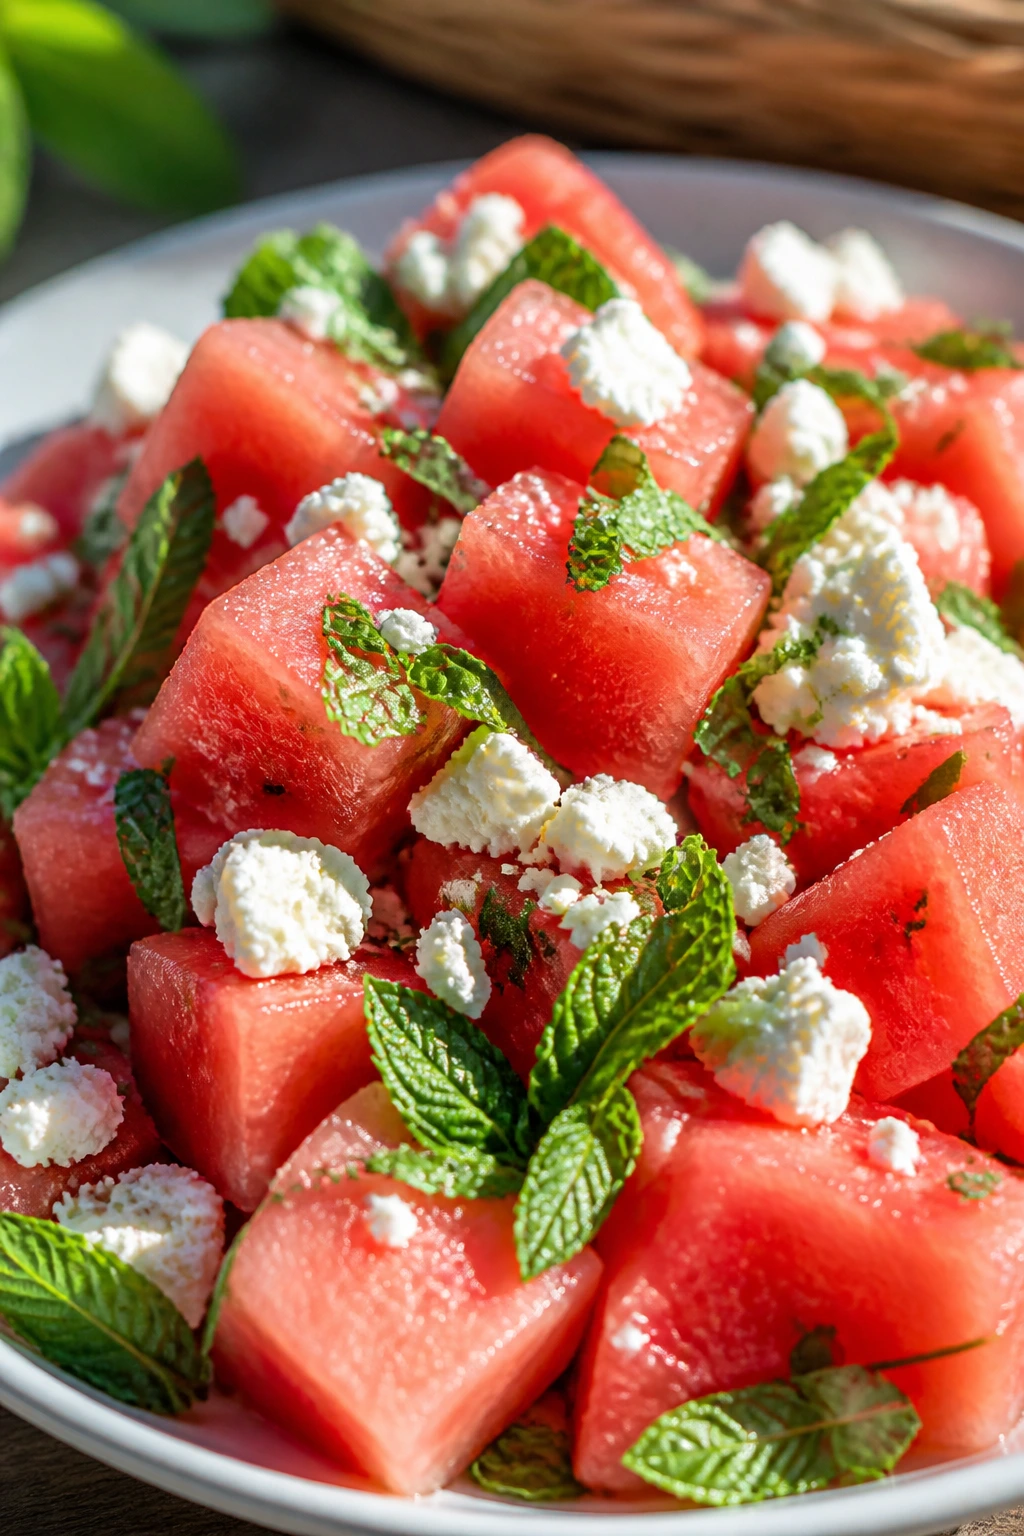
Watermelon salad can be too sweet if you’re careless. The fix is simple: a salty feta, a handful of mint, and a little lime to pull the juice into something more interesting than a fruit bowl. This one is cold, bright, and almost too easy.
Why It Works:
Watermelon brings a huge amount of juice and sweetness, so the salty feta has a real job to do. Mint keeps the flavor cool, and lime adds enough acidity to stop the bowl from tasting flat. The trick is to keep the melon pieces big enough that they don’t collapse into slush when you toss them. This is the salad you make when the rest of dinner feels too hot to think about.
Key Ingredients:
- 6 cups watermelon, cut into 1-inch cubes
- 1 cup feta crumbles
- 1/4 cup fresh mint leaves, torn
- 2 tablespoons olive oil
- 1 tablespoon lime juice
- Flaky salt, to finish
Quick Steps:
- Cut the watermelon into even cubes and let any extra juice drain off.
- Place the watermelon in a large bowl.
- Add the feta, mint, olive oil, and lime juice.
- Toss very gently. Heavy stirring turns the melon into soup.
- Taste and finish with a pinch of flaky salt.
- Serve right away.
Equipment for This Recipe:
- Sharp knife
- Cutting board
- Large bowl
- Spoon or silicone spatula
- Slotted spoon, optional
How to Serve This Dish:
Serve it in a shallow bowl so the mint stays on top and the cubes don’t get buried. It works beside grilled meats, pita, or a plate of sliced tomatoes. If you want it to look especially fresh, add a few whole mint leaves at the end.
Pro Tips for This Recipe:
- Chill the watermelon before cutting if you want the salad colder.
- Pat the cubes dry if they’re very wet.
- Use good feta; the salt and texture matter here.
- Add the lime right before serving so the melon stays firm.
Variations on This Dish:
- Cucumber Watermelon Salad: Add diced cucumber for a crisper bite.
- Tajín Version: Sprinkle a light dusting of Tajín for a sweet-salty edge.
- Basil Swap: Use basil instead of mint if that’s what you have.
Common Mistakes to Avoid with This Dish:
- Cutting the melon too small: Tiny pieces break down fast.
- Salting too early: Salt pulls out juice and the bowl gets watery.
- Using limp mint: Fresh leaves matter here. No exceptions.
12. Crispy Baked Chicken Tenders with Honey Mustard
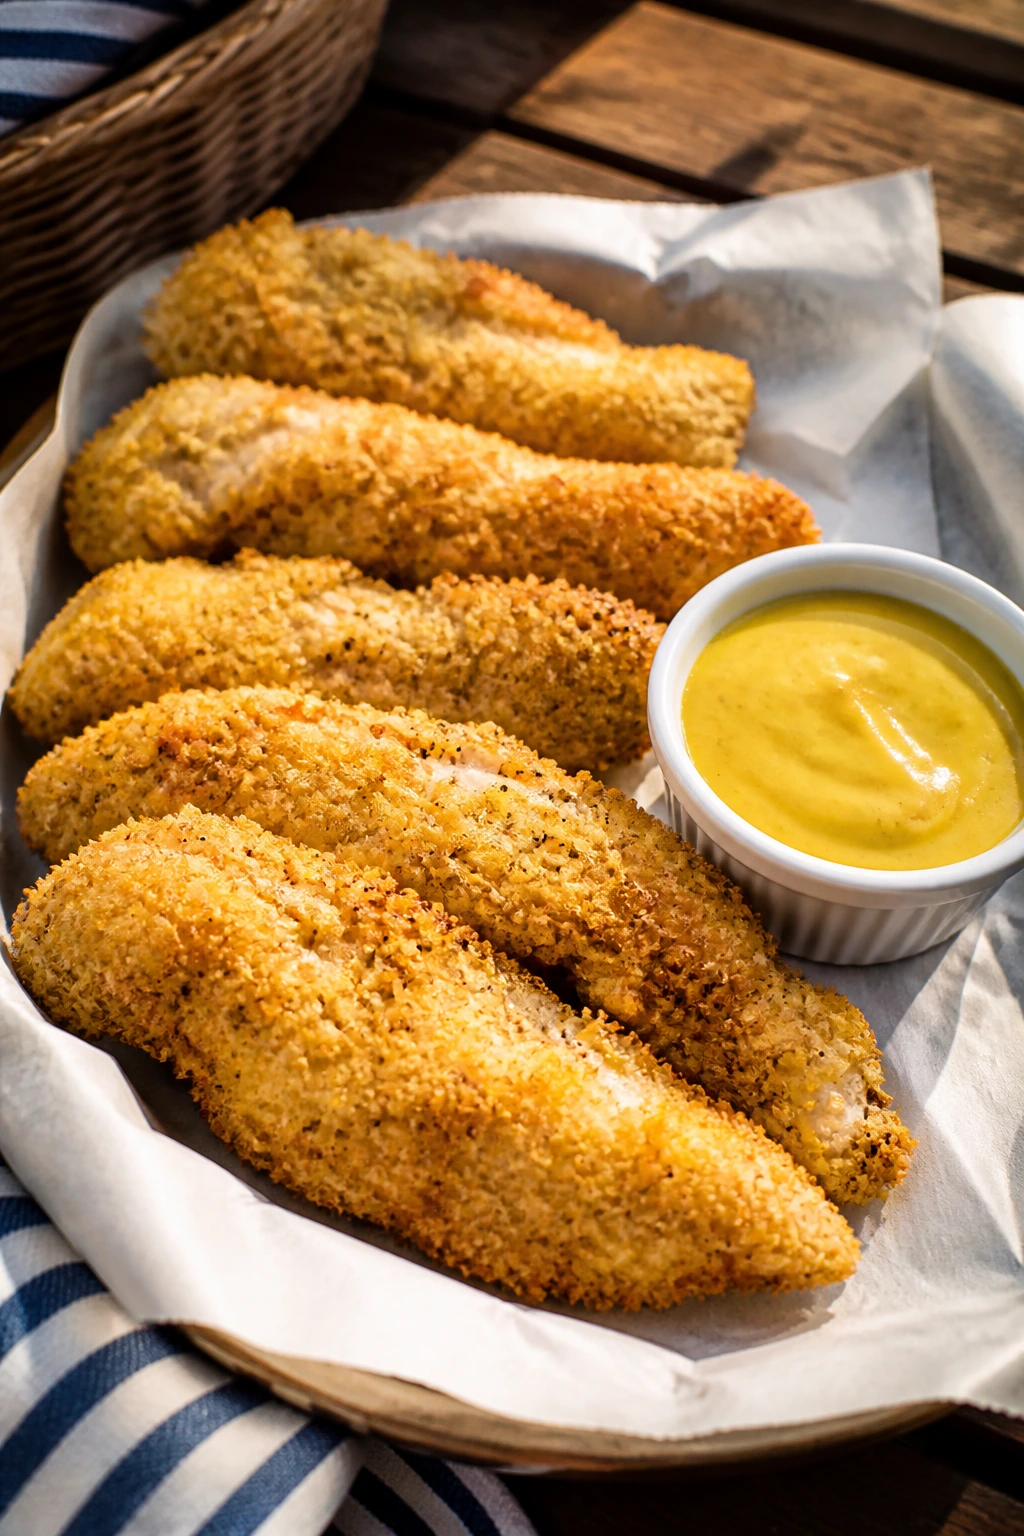
These chicken tenders are for the picnic table that still wants something hot, even if you eat them after they cool a little. The panko gives a crisp shell, the buttermilk keeps the meat tender, and the honey mustard brings a sharp-sweet dip that makes the whole tray disappear.
Why It Works:
Baked tenders hold up better than fried ones once they leave the kitchen, and the coating stays crisp if you don’t drown it in sauce. Buttermilk seasons the chicken all the way through, which matters because thin strips can taste bland fast. Panko makes a louder crunch than regular breadcrumbs, and a quick bake at high heat gives you browned edges without drying out the meat. They’re picnic food with enough structure to survive a container.
Key Ingredients:
- 1 1/2 pounds chicken tenders
- 1 cup buttermilk
- 1 cup all-purpose flour
- 1 1/2 cups panko breadcrumbs
- 1 teaspoon paprika
- 1 teaspoon garlic powder
- 1 teaspoon kosher salt
- 1/2 teaspoon black pepper
- 2 eggs, beaten
- Cooking spray or 2 tablespoons oil
For the Honey Mustard:
- 1/3 cup Dijon mustard
- 1/4 cup mayonnaise
- 2 tablespoons honey
- 1 teaspoon lemon juice
Quick Steps:
- Put the chicken tenders in the buttermilk and let them sit for at least 15 minutes.
- Heat the oven to 425°F and line a baking sheet with a rack if you have one.
- Mix the flour, panko, paprika, garlic powder, salt, and pepper in two shallow bowls or one wide dish.
- Dip each tender in the flour, then the beaten eggs, then the seasoned panko. Press the crumbs on firmly.
- Arrange the tenders on the rack or baking sheet and spray lightly with oil.
- Bake for 18 to 20 minutes, flipping once halfway through, until the coating is golden and the chicken reaches 165°F.
- Stir the honey mustard ingredients together and serve on the side.
Equipment for This Recipe:
- Rimmed baking sheet
- Wire rack, optional but useful
- Shallow bowls or plates for breading
- Tongs
- Instant-read thermometer
How to Serve This Dish:
Serve them warm or room temp with the honey mustard in a small bowl. Potato salad, slaw, or corn on the cob work well next to them. If you’re packing them for later, keep the sauce separate so the crust stays crisp.
Pro Tips for This Recipe:
- Press the panko on firmly so it doesn’t flake off in the oven.
- Use a rack if you have one. Air under the chicken helps the crust brown.
- Don’t skip the thermometer; thin chicken dries out fast.
- Let the tenders cool on the pan for 5 minutes before packing them up.
Variations on This Dish:
- Spicy Tenders: Add cayenne to the crumb mixture.
- Gluten-Free Version: Use GF flour and GF crumbs or crushed rice cereal.
- Air Fryer Tenders: Cook at 400°F until crisp and done, flipping once.
Common Mistakes to Avoid with This Dish:
- Crowding the pan: Steam ruins the crust.
- Uneven breading: Press crumbs on every side so the coating stays put.
- Saucing too early: Dip at the table, not before packing.
13. Strawberry Shortcake Bars
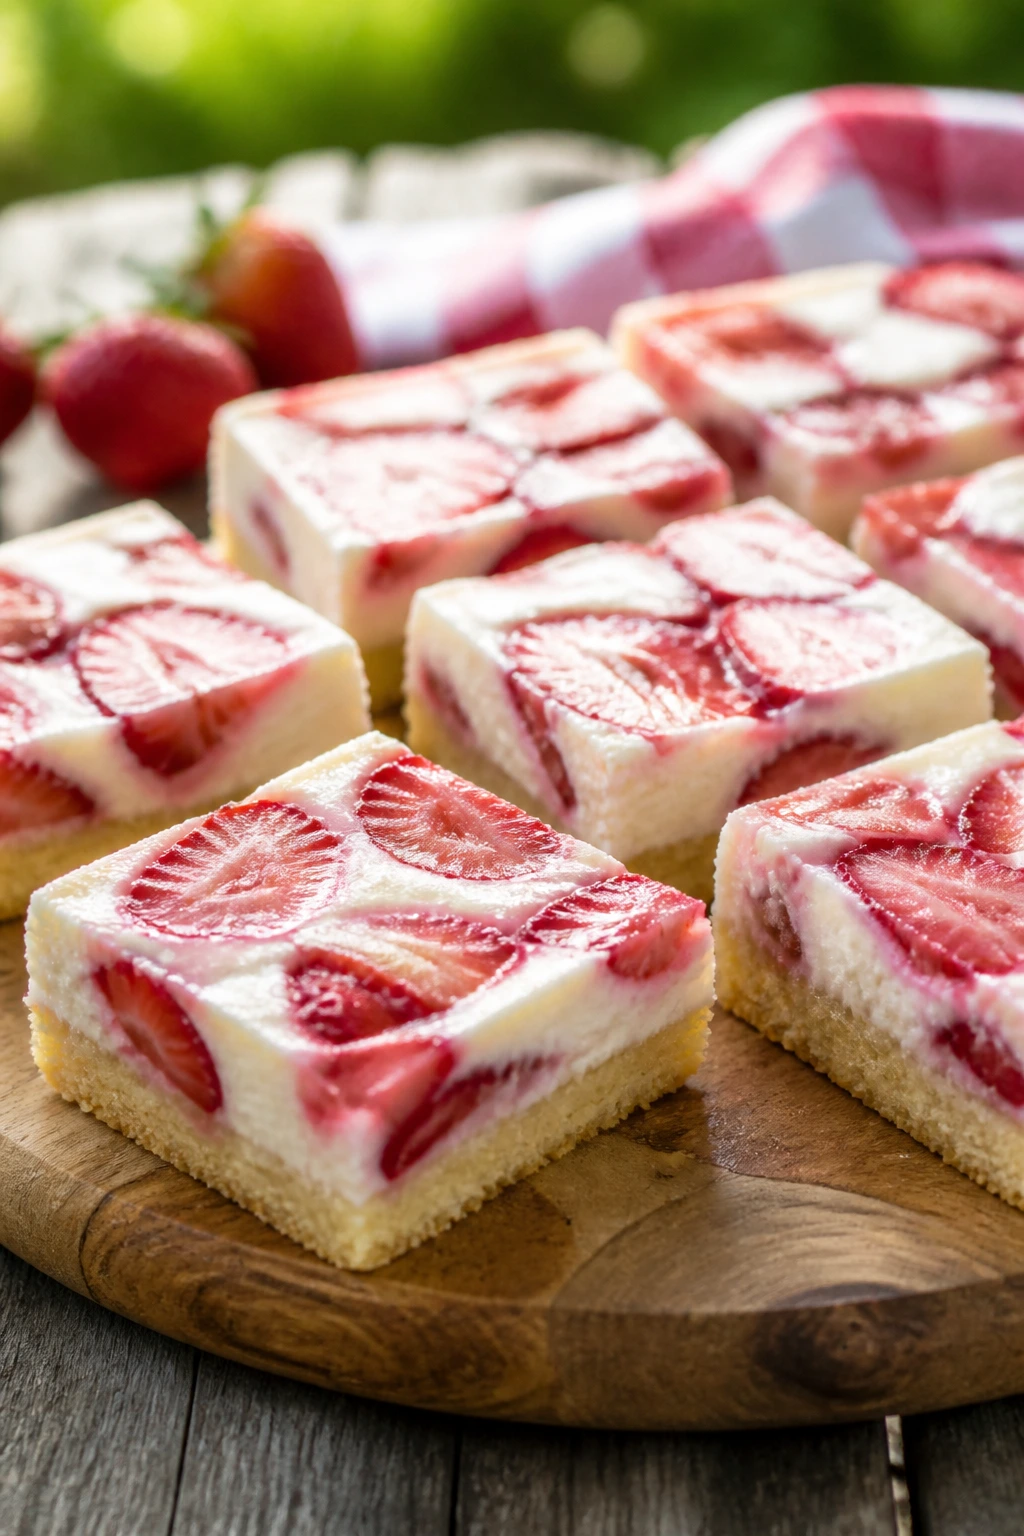
These bars taste like shortcake that learned how to travel. You get a buttery crust, a cool cream layer, and strawberries that still taste like strawberries instead of syrup. The square shape makes them easy to stack, wrap, and hand out.
Why It Works:
A bar dessert is better for a picnic than a slice of cake because it cuts cleaner and carries without a mess. The shortbread base stays sturdy if you bake it until the edges just turn golden, and the cream cheese filling gives the strawberries something rich to sit on. A little lemon in the berries keeps them from turning one-note sweet. Chill them well, and they hold together like they mean it.
Key Ingredients:
- 1 1/2 cups all-purpose flour
- 1/2 cup granulated sugar
- 3/4 cup unsalted butter, cold and cubed
- Pinch of kosher salt
- 8 ounces cream cheese, softened
- 1/2 cup powdered sugar
- 1 teaspoon vanilla extract
- 1 cup heavy cream, whipped to soft peaks
- 3 cups strawberries, sliced
- 2 tablespoons sugar
- 1 tablespoon lemon juice
Quick Steps:
- Heat the oven to 350°F and line an 8×8-inch or 9×9-inch pan with parchment.
- Mix the flour, sugar, butter, and salt until the mixture looks sandy and starts clumping.
- Press into the pan and bake for 18 to 22 minutes, until lightly golden.
- Beat the cream cheese, powdered sugar, and vanilla until smooth, then fold in the whipped cream.
- Toss the strawberries with sugar and lemon juice and let them sit for 10 minutes.
- Spread the cream filling over the cooled crust, spoon the strawberries on top, and chill for at least 2 hours before slicing.
Equipment for This Recipe:
- Baking pan
- Parchment paper
- Mixing bowls
- Electric mixer or sturdy whisk
- Offset spatula, optional
How to Serve This Dish:
Cut the bars with a sharp knife wiped clean between slices. Serve them chilled from the fridge, not warm. A few mint leaves on top make them look finished without needing any extra work.
Pro Tips for This Recipe:
- Cool the crust completely before adding the cream layer.
- Let the strawberries sit with the sugar briefly so they soften but do not turn watery.
- Use parchment overhang so you can lift the bars out in one piece.
- Chill before slicing or the layers slide.
Variations on This Dish:
- Mixed Berry Bars: Swap half the strawberries for blueberries or raspberries.
- Lemon Version: Add extra lemon zest to the filling.
- Almond Shortcake Bars: Stir a little almond extract into the cream layer.
Common Mistakes to Avoid with This Dish:
- Warm crust under the filling: The cream layer melts if the base isn’t cool.
- Berries with too much juice: Drain off excess liquid before topping.
- Cutting too soon: Chilled bars slice cleanly; rushed ones smear.
14. No-Bake Cheesecake Jars
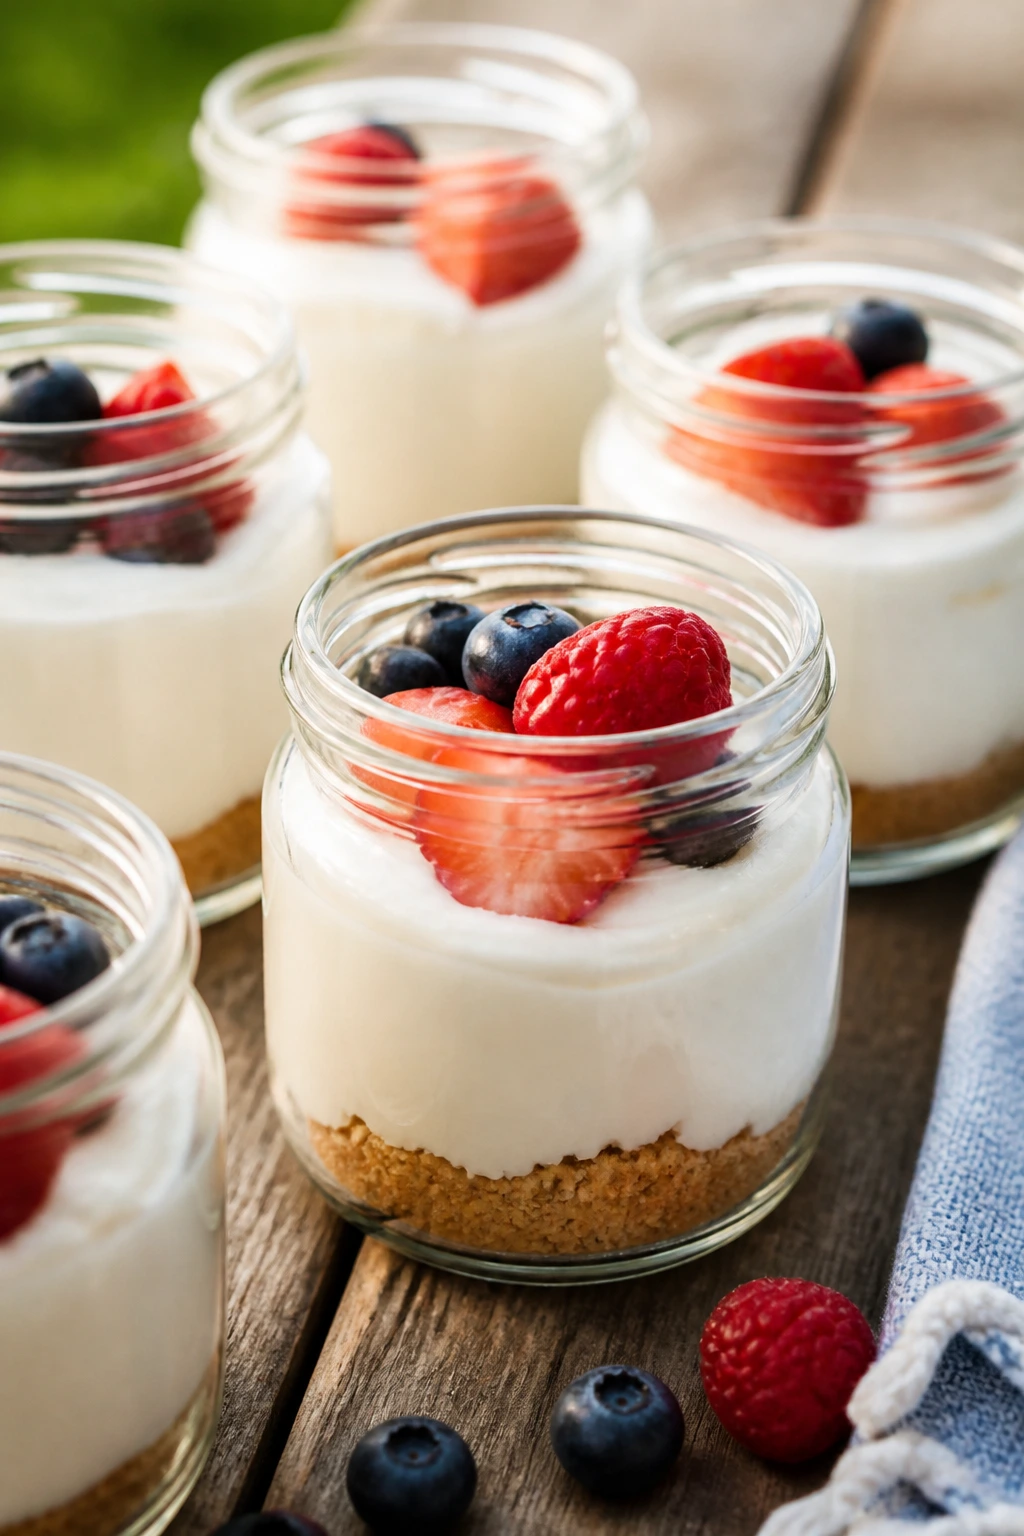
These little jars are the easiest way to make dessert feel intentional without baking a thing. The crumb base stays crisp enough, the cheesecake layer is cold and tangy, and the berries on top give every spoonful some brightness. They also look neat, which never hurts.
Why It Works:
A jar dessert solves the usual cheesecake problem, which is how to serve it without cutting a perfect slice under pressure. The crust stays at the bottom, the filling stays cool, and each person gets their own portion. Greek yogurt or sour cream lightens the filling a little so it doesn’t feel dense after dinner. It’s a strong picnic move because nothing has to be plated at the last minute.
Key Ingredients:
- 1 1/2 cups graham cracker crumbs
- 4 tablespoons melted butter
- 8 ounces cream cheese, softened
- 1/2 cup Greek yogurt or sour cream
- 1/2 cup powdered sugar
- 1 teaspoon vanilla extract
- 1 cup heavy cream, whipped to soft peaks
- 2 cups berries or fruit compote
- 4 to 6 small jars
Quick Steps:
- Mix the graham crumbs and melted butter until the crumbs look like damp sand.
- Divide the crumb mixture between the jars and press it down lightly.
- Beat the cream cheese, yogurt, powdered sugar, and vanilla until smooth.
- Fold in the whipped cream until the filling looks airy.
- Spoon the cheesecake filling over the crumbs.
- Top with berries or fruit compote and chill for at least 1 hour.
Equipment for This Recipe:
- Small jars or cups with lids
- Mixing bowl
- Hand mixer or whisk
- Spoon
- Measuring cups and spoons
How to Serve This Dish:
Hand these out with small spoons and keep them cold until the end of the meal. They’re good with berries, peaches, or even a spoonful of jam swirled on top. Because they’re portioned individually, they’re easy to pack and easy to serve.
Pro Tips for This Recipe:
- Press the crumb layer lightly. Pack it too hard and it turns like a brick.
- Use full-fat cream cheese so the filling sets with some body.
- Chill the jars with lids on if you’re taking them out.
- Keep fruit topping separate if you want the crumb layer to stay crisp.
Variations on This Dish:
- Chocolate Cheesecake Jars: Add cocoa powder to the filling and use chocolate cookie crumbs.
- Lemon Cheesecake Jars: Add lemon zest and top with blueberries.
- Dairy-Free Version: Use dairy-free cream cheese and whipped coconut cream.
Common Mistakes to Avoid with This Dish:
- Loose filling: Whip the cream to soft peaks, not runny peaks.
- Overfilled jars: Leave a little room at the top so the lids close cleanly.
- Wet fruit on the crumbs: Fruit juice will soften the base fast.
15. Brown Butter Rice Krispie Treats with Sea Salt
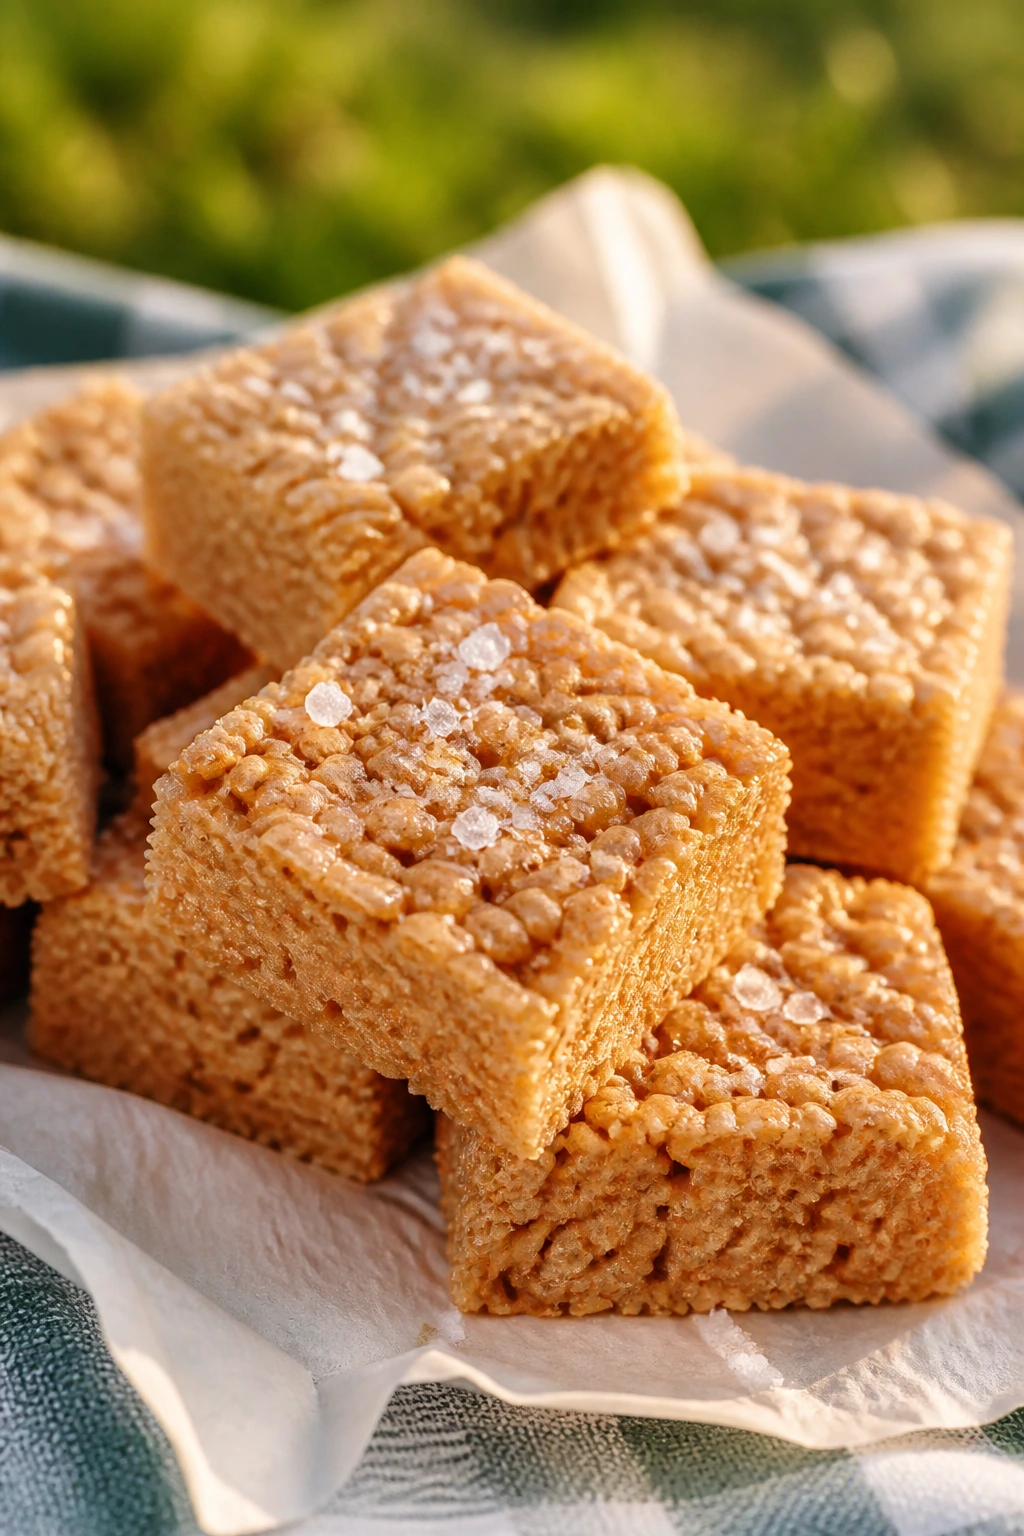
There’s a reason rice cereal treats keep showing up at picnics: they travel like champs. Brown butter gives them a nutty edge, the marshmallows keep them soft, and the sea salt on top stops them from tasting like pure sugar. They’re simple, but the simple version with brown butter is the one worth making.
Why It Works:
Brown butter adds depth in about two extra minutes, which is a trade I’ll take every time. The cereal gives crunch, the marshmallows bind everything together, and a little salt sharpens the sweetness so the squares don’t feel childish. Because they’re bar-shaped, they stack neatly in a container and hold up better than most frosted desserts. If you pack them once they cool, they stay chewy for days.
Key Ingredients:
- 6 tablespoons unsalted butter
- 10 ounces marshmallows
- 6 cups crispy rice cereal
- 1/2 teaspoon vanilla extract
- 1/2 teaspoon fine salt
- Flaky sea salt, for finishing
Quick Steps:
- Melt the butter in a large pot over medium heat and cook until it smells nutty and the milk solids turn golden brown.
- Add the marshmallows and stir until melted and smooth.
- Remove the pot from the heat and stir in the vanilla and fine salt.
- Fold in the cereal until every piece is coated.
- Press the mixture into a parchment-lined pan with lightly greased hands. Press gently; packing too hard makes the squares dense.
- Sprinkle with flaky sea salt and cool completely before cutting.
Equipment for This Recipe:
- Large pot
- Rubber spatula
- 9×13-inch pan
- Parchment paper
- Lightly greased hands or spatula
How to Serve This Dish:
Cut them into neat squares and stack them with parchment between layers. They’re easy to tuck into lunch boxes, cooler bags, or a snack tray after dinner. I like them plain, but a drizzle of melted chocolate works if you want a dessert-looking finish.
Pro Tips for This Recipe:
- Watch the butter closely once it starts foaming. Brown butter goes from nutty to burnt fast.
- Use fresh marshmallows. Stale ones melt badly.
- Grease your hands lightly before pressing the mixture into the pan.
- Let them cool fully before cutting or they’ll smear.
Variations on This Dish:
- Peanut Butter Treats: Stir in 1/2 cup peanut butter with the melted marshmallows.
- Chocolate Drizzle Version: Drizzle melted dark chocolate over the cooled bars.
- Pretzel Crunch Treats: Fold in 1/2 cup crushed pretzels for a salty crunch.
Common Mistakes to Avoid with This Recipe:
- Burning the butter: Keep the heat moderate and watch the color.
- Overpacking the pan: Dense treats lose their chew.
- Cutting warm bars: They need time to set.
16. Turkey Club Wraps
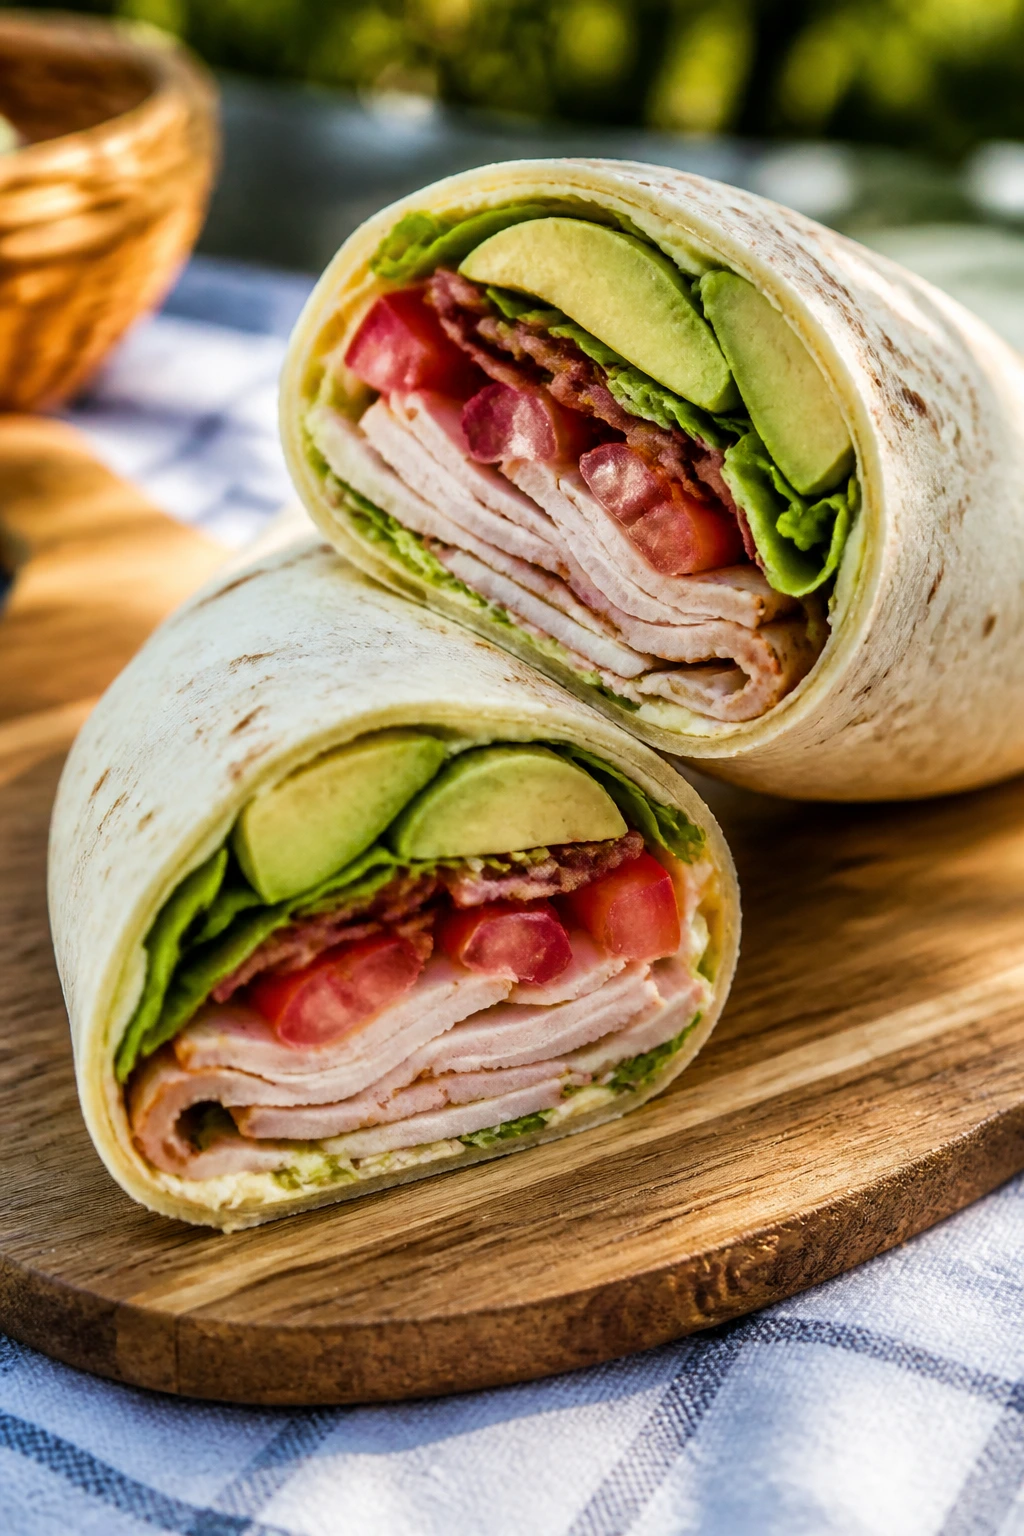
Turkey club wraps taste like a sandwich that decided to behave better in a cooler. You get turkey, bacon, lettuce, tomato, and avocado all wrapped into one neat cylinder, which means fewer loose slices and less sandwich fallout on your lap.
Why It Works:
The tortilla keeps everything contained, and that matters more than people admit. Mayo and Dijon give the wrap a little moisture and bite, bacon brings salt, and avocado softens the edges without making the whole thing wet if you slice it right. The trick is to keep the tomato dry and the lettuce crisp. Then you get that club sandwich flavor without the stack trying to slide apart.
Key Ingredients:
- 4 large flour tortillas
- 8 ounces sliced turkey
- 8 slices bacon, cooked crisp
- 1 cup shredded lettuce
- 1 large tomato, sliced and patted dry
- 1 avocado, sliced
- 1/3 cup mayonnaise
- 1 teaspoon Dijon mustard
- 4 slices cheddar or Swiss cheese, optional
Quick Steps:
- Stir the mayonnaise and Dijon together.
- Lay the tortillas flat and spread the mayo mixture down the center of each one.
- Layer the turkey, bacon, lettuce, tomato, avocado, and cheese on top.
- Fold in the sides, then roll tightly from the bottom up.
- Wrap in parchment or plastic and chill for 10 minutes.
- Slice in half and serve.
Equipment for This Recipe:
- Cutting board
- Knife
- Small bowl
- Spoon or spatula
- Parchment or plastic wrap
How to Serve This Dish:
Serve the wraps cut on a diagonal with chips, pickles, or a simple fruit bowl. If you want them to look tidy on a tray, secure each half with a toothpick. They’re filling enough to stand in for dinner, which is exactly what a summer night needs sometimes.
Pro Tips for This Recipe:
- Pat the tomato dry with paper towels or it will seep into the tortilla.
- Don’t overfill the wrap. Thin layers roll better.
- Chill briefly before slicing so the filling settles.
- Use large tortillas with enough surface area to fold cleanly.
Variations on This Dish:
- Ranch Chicken Wraps: Swap the turkey for sliced chicken and use ranch instead of Dijon.
- Vegetarian Club Wraps: Replace the turkey and bacon with roasted mushrooms and extra avocado.
- Spinach Wrap Version: Use spinach tortillas for a slightly sturdier wrap with extra color.
Common Mistakes to Avoid with This Dish:
- Wet tomatoes: They’re the fastest way to ruin a wrap.
- Loose rolling: A sloppy roll opens at the ends.
- Skipping the chill: Even ten minutes helps the wrap slice cleanly.
17. Cucumber Dill Tea Sandwiches
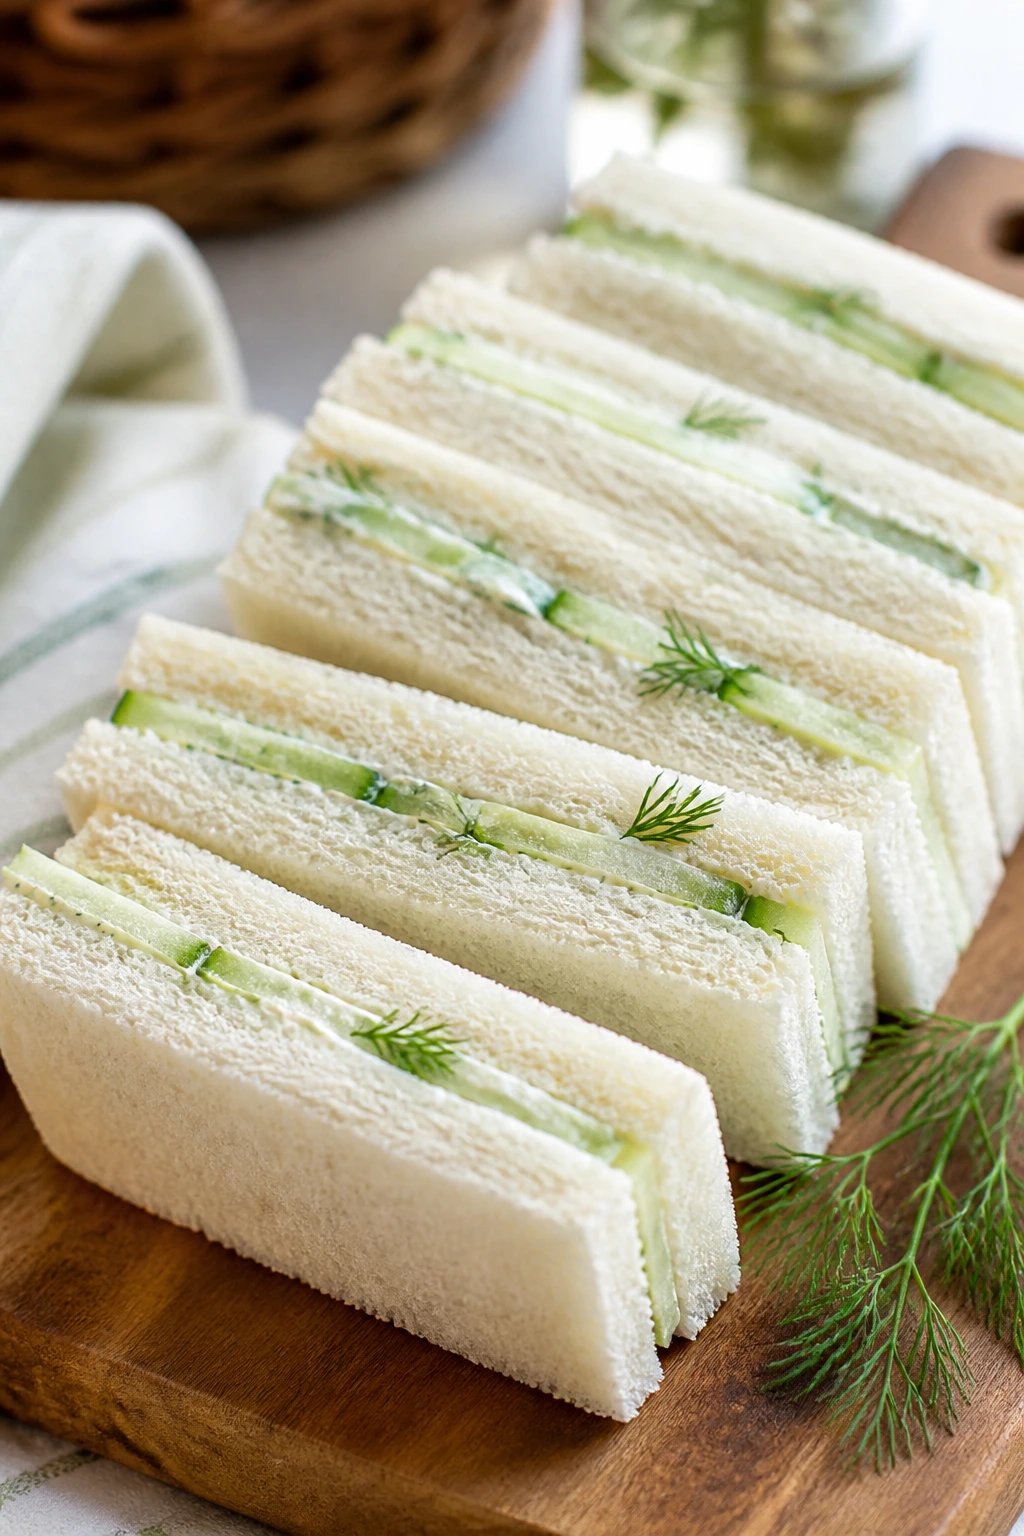
These are the sandwiches that look delicate and eat cooler than anything else on the table. The cucumber stays crisp, the dill makes the cream cheese taste fresh, and the trimmed crusts turn a simple lunch into something that feels a little more polished.
Why It Works:
Cucumber sandwiches rely on restraint. Thin slices, not thick slabs. A thick layer of filling, not a wet flood. Salting the cucumber first pulls out extra moisture, which keeps the bread from turning gummy. Cream cheese gives the filling enough body to hold the slices together, and lemon keeps the whole thing from tasting flat. They’re soft but not soggy, and that’s the line to hit.
Key Ingredients:
- 16 thin slices sandwich bread
- 8 ounces cream cheese, softened
- 2 tablespoons unsalted butter, softened
- 2 tablespoons chopped fresh dill
- 1 tablespoon lemon juice
- 1/2 teaspoon kosher salt
- 1/4 teaspoon black pepper
- 1 large cucumber, thinly sliced
- 1 teaspoon kosher salt, for drawing out moisture
Quick Steps:
- Toss the cucumber slices with the teaspoon of salt and let them sit for 10 minutes.
- Pat the cucumber dry with paper towels.
- Mix the cream cheese, butter, dill, lemon juice, salt, and pepper until smooth.
- Spread the mixture onto the bread and layer the cucumber slices on half the pieces.
- Top with the remaining bread, trim the crusts, and cut into fingers or triangles.
- Chill briefly before serving.
Equipment for This Recipe:
- Mixing bowl
- Paper towels
- Sharp knife
- Cutting board
- Small spatula
How to Serve This Dish:
Stack them on a platter with the crusts trimmed and the cuts clean. They’re good with iced tea and a plate of fruit, or as a quiet contrast to louder items like sliders and salsa. If you’re serving a crowd, cut them smaller than you think.
Pro Tips for This Recipe:
- Slice the cucumber very thin. Thick slices can slide out.
- Dry the cucumber well after salting or the bread softens.
- Spread the filling all the way to the edges to seal the sandwich.
- Use fresh bread, but not super-soft bakery bread that squishes under the knife.
Variations on This Dish:
- Smoked Salmon Tea Sandwiches: Add a thin layer of smoked salmon and a little extra dill.
- Rye Version: Use rye bread for a sharper, more savory edge.
- Greek Yogurt Spread: Replace part of the cream cheese with thick Greek yogurt for a lighter filling.
Common Mistakes to Avoid with This Dish:
- Leaving the cucumber wet: That’s how you get soggy bread.
- Slices that are too thick: They make the sandwiches slip apart.
- Making them too far ahead: These are best close to serving time.
18. Peach Hand Pies

Peach hand pies are what happens when pie gets more practical. You still get flaky crust, soft fruit, and cinnamon, but you can hold the whole thing in one hand while standing in the yard. They’re tidy enough for a picnic and warm enough in flavor to finish the meal with a little comfort.
Why It Works:
Peaches need just enough sugar and starch to become jammy without leaking all over the tray. A little lemon keeps the filling bright, cinnamon adds warmth, and the egg wash gives the crust that gold sheen people always hope for. Because the pies are sealed individually, they travel far better than a full pie slice. They also cool faster, which means you’re not waiting forever before dessert.
Key Ingredients:
- 2 refrigerated pie crusts or homemade pie dough
- 3 peaches, peeled and diced, about 3 cups
- 1/3 cup granulated sugar
- 1 tablespoon cornstarch
- 1 teaspoon lemon juice
- 1/2 teaspoon cinnamon
- 1/2 teaspoon vanilla extract
- 1 egg, beaten with 1 tablespoon water
- 1 tablespoon coarse sugar
Quick Steps:
- Mix the peaches, sugar, cornstarch, lemon juice, cinnamon, and vanilla in a bowl.
- Roll out the pie crusts and cut them into 4- to 6-inch circles or squares.
- Spoon a small amount of filling onto each piece, leaving room at the edges. Do not overfill or the pies burst.
- Brush the edges with egg wash, fold over, and crimp with a fork.
- Cut a tiny steam slit in the top of each pie, brush with more egg wash, and sprinkle with coarse sugar.
- Bake at 400°F for 20 to 24 minutes, until golden brown and bubbling.
- Cool before packing or serving.
Equipment for This Recipe:
- Baking sheet
- Parchment paper
- Rolling pin, if needed
- Fork
- Small bowl for egg wash
How to Serve This Dish:
Serve them warm or room temperature. A scoop of vanilla ice cream is nice at home, but for a picnic, they’re perfectly good on their own. I like to pack them in a single layer so the crust stays crisp.
Pro Tips for This Recipe:
- If the peaches are very juicy, let them sit with the sugar for 10 minutes and spoon off some liquid before filling.
- Chill the assembled hand pies for 15 minutes before baking if the dough feels soft.
- Cut a steam vent in every pie.
- Let them cool fully before stacking.
Variations on This Dish:
- Berry Hand Pies: Use blueberries or mixed berries in place of peaches.
- Apricot Version: Apricots make a slightly sharper, tangier filling.
- Glazed Hand Pies: Drizzle cooled pies with a simple powdered sugar glaze.
Common Mistakes to Avoid with This Dish:
- Overfilling: That’s the fastest route to leaking pies.
- Warm filling: Hot fruit softens the dough before baking.
- Skipping the vent: Steam has to escape or the crust can split.
Why Room-Temperature Foods Win on a Picnic Blanket
A picnic table is a rough audience. It does not care how clever the recipe sounded in the kitchen. Once a dish leaves the house, it needs to handle bumps, heat, handling, and a little delay before anyone eats. That’s why the best picnic foods are usually the ones with structure: pasta that holds sauce, bread that resists sog, fruit that keeps its shape, and fillings that stay put when you cut into them.
Cold and room-temperature dishes are also easier on the cook. You can make them in the morning, or even the day before, and spend the evening being part of the picnic instead of standing over a stove. A bowl of pasta salad, a tray of pinwheels, or a jar dessert doesn’t ask for timing gymnastics. It asks for a good lid and a little chill time.
There’s also a texture thing people miss. Hot food can be wonderful, but it gets fragile when it cools too far. Crispy food goes soft. Sauces separate. Melted cheese turns into a skin. Picnic food should be designed for the temperature it will actually be eaten at, not the one it has in the pan.
That’s the real trick. Pick recipes that don’t mind a pause. The moment food can sit for 20 minutes without losing its mind, the whole night gets easier.
Essential Equipment for a Picnic-Ready Kitchen
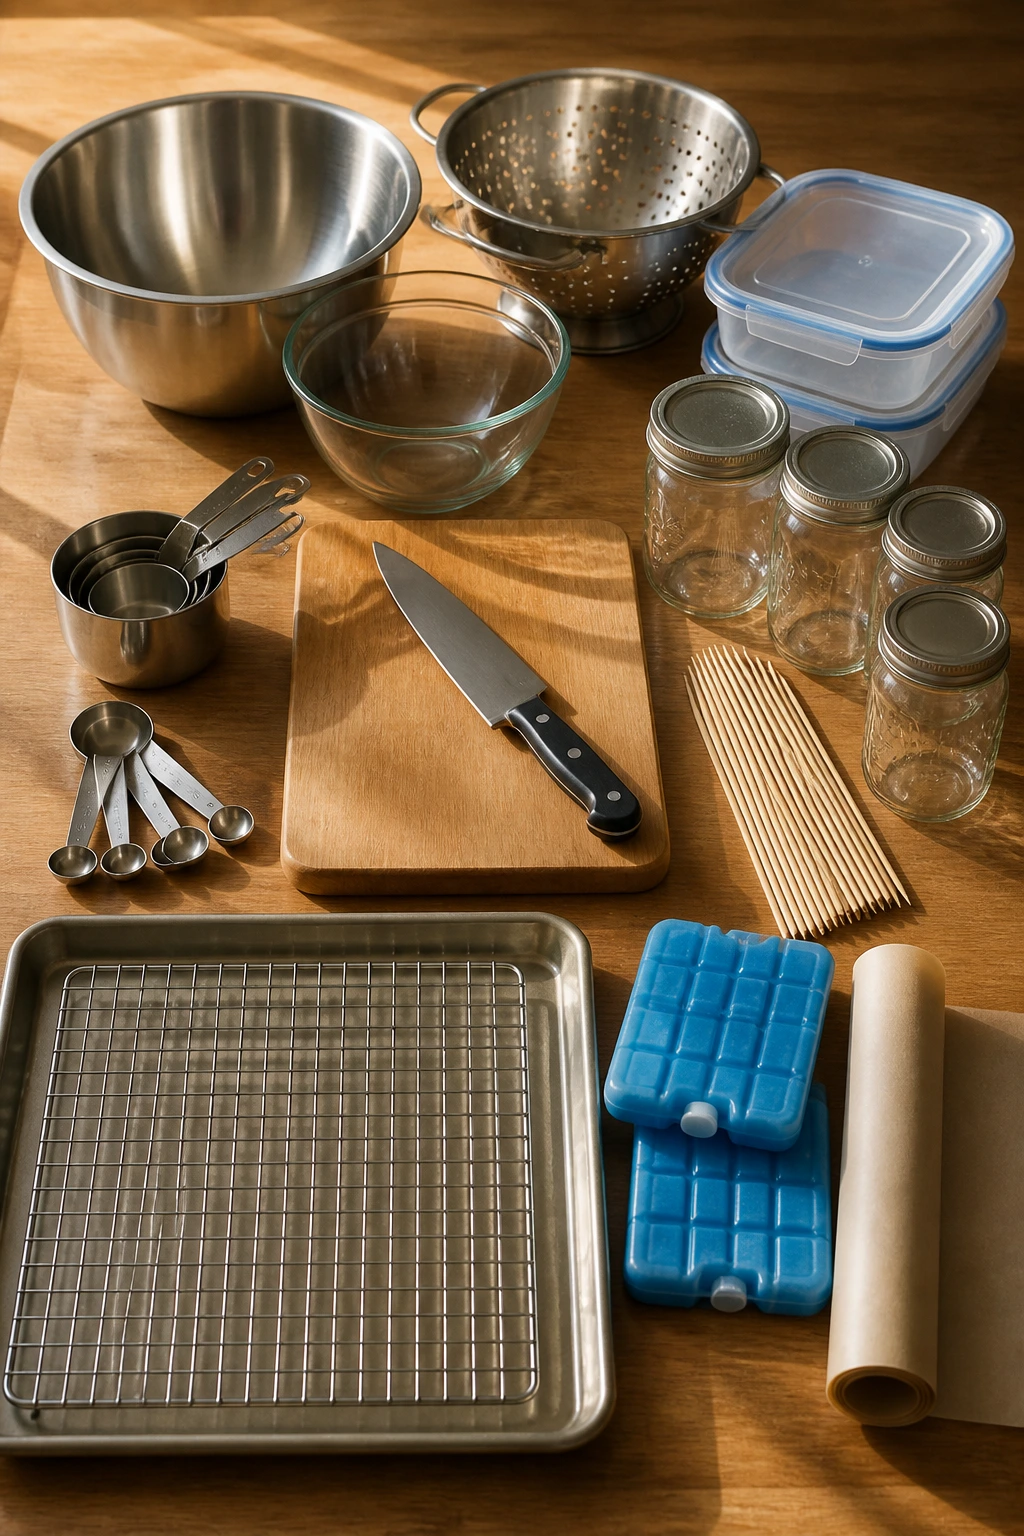
- Large mixing bowls: You’ll use them for chicken salad, pasta salad, slaws, fillings, and anything that needs a proper toss.
- Sharp chef’s knife: Clean cuts matter for sandwiches, cucumbers, fruit, and hand pies.
- Cutting board: Use one for produce and one for bread or cooked meat if you can swing it.
- Measuring cups and spoons: The dressings and fillings depend on actual amounts, not guesses.
- Colander: Pasta, beans, and noodles need a good drain before they hit a bowl.
- Rimmed baking sheet: Useful for chicken tenders, hand pies, and anything that might drip.
- Wire rack: Handy for keeping baked coatings crisp while they cool.
- Airtight containers: Flat containers are best for sandwiches, bars, and sliced dessert.
- Small jars or lidded cups: Perfect for cheesecake jars, dipping sauces, and dressings.
- Wooden skewers or toothpicks: Needed for Caprese bites and wrap halves that need a little help staying shut.
- Ice packs and a cooler: Not glamorous, but they’re the reason mayo, eggs, and dairy stay safe.
- Parchment paper: Keeps bars and hand pies from sticking and makes cleanup less annoying.
Smart Shopping for Bread, Produce, and Chilled Fillings

Bread makes or breaks half this list. If you’re buying sandwich bread, pick something with a tighter crumb and a little structure. Thin supermarket white bread works for tea sandwiches if it’s fresh, but for chicken salad or club wraps, sturdier slices or tortillas hold up better. Soft rolls are fine for sliders, but give them a light toast if you want them to stay intact longer.
Produce deserves a little more attention than it usually gets. Tomatoes should smell like tomatoes near the stem. Cucumbers should feel firm from end to end, not soft in the middle. Watermelon should sound dull and full when tapped, not hollow and dry. For berries, buy the ones with dry bottoms and no juice pooling in the box. If they already leak in the store, they’ll leak in your dessert.
Dairy is where people get careless. Mini mozzarella should be drained and patted dry before skewering. Cream cheese needs to be softened so it blends without lumps. Feta should be crumbly, not wet and salty in a puddle. If you’re making a chilled filling, choose full-fat yogurt or cream cheese; low-fat versions can turn thin once they sit in the fridge.
Beans, pasta, and packaged items need the same common sense. Rinse canned beans until the foam is gone. Check that jarred pimentos are drained. Buy a pasta shape with ridges or curves if the salad needs to hold dressing. And if you’re packing anything with mayonnaise or eggs, build in cooler space before you pack the napkins and fruit. Food safety is boring until it isn’t.
How to Serve Picnic Food Without a Sad, Soggy Mess
Presentation:
Use low, wide platters for skewers, hand pies, and bars so each item has room and nothing gets buried. Wrap sandwiches and sliders in parchment before cutting; they look cleaner and hold together better. For salads, choose shallow bowls instead of deep ones so the toppings stay visible.
Accompaniments:
Kettle chips, sliced pickles, simple green salads, crackers, and fresh fruit are the easy sidekicks here. A loaf of crusty bread works with the pasta salad and tuna salad cups. If you want the spread to feel complete, pair one creamy item with one crisp item and one sweet finish.
Portions:
For a small picnic dinner, count on one main dish per person plus one side and one sweet bite. Two sliders or two sandwich halves usually land in the right place. For salads, plan about 1 cup per person if it’s a side and closer to 1 1/2 cups if it’s the meal itself.
Beverage Pairing:
Iced tea with lemon is the easy default. Lemonade works with nearly everything here, especially the salty and creamy dishes. If you want something less sweet, sparkling water with cucumber or citrus keeps the palate clean between bites.
Extra Flavor Moves That Make Simple Picnic Food Taste Brighter
Flavor Enhancement:
A little acid goes a long way with cold food. Lemon zest in chicken salad, lime on watermelon, balsamic glaze on Caprese skewers, and pickle brine in tuna salad all wake the dish up without changing the recipe’s bones. Flaky salt at the end matters too, especially on desserts and fruit.
Customization:
Think of these recipes as templates with guardrails. Swap ham for turkey in pasta salad, use chickpeas instead of tuna, or trade the herbs depending on what’s in the fridge. If you want a little heat, add minced pickled jalapeños to pinwheels or hot sauce to the pulled pork.
Serving Suggestions:
Keep garnishes separate until the last minute when possible. Extra herbs, chopped scallions, crushed crackers, and a little hot sauce on the side make the table feel more flexible. For dessert, a tiny dusting of powdered sugar or a few mint leaves is enough. No need to fuss harder than the food deserves.
Make-It-Yours:
For gluten-free eaters, use rice noodles, gluten-free buns, lettuce cups, certified gluten-free cereal, and a good gluten-free pie crust. For dairy-free versions, lean on olive oil, hummus, avocado, and dairy-free cream cheese where the recipe needs richness. The point is not to force one ingredient everywhere. The point is to keep the texture and the job the ingredient was doing.
Make-Ahead, Storage, and Reheating Guidance
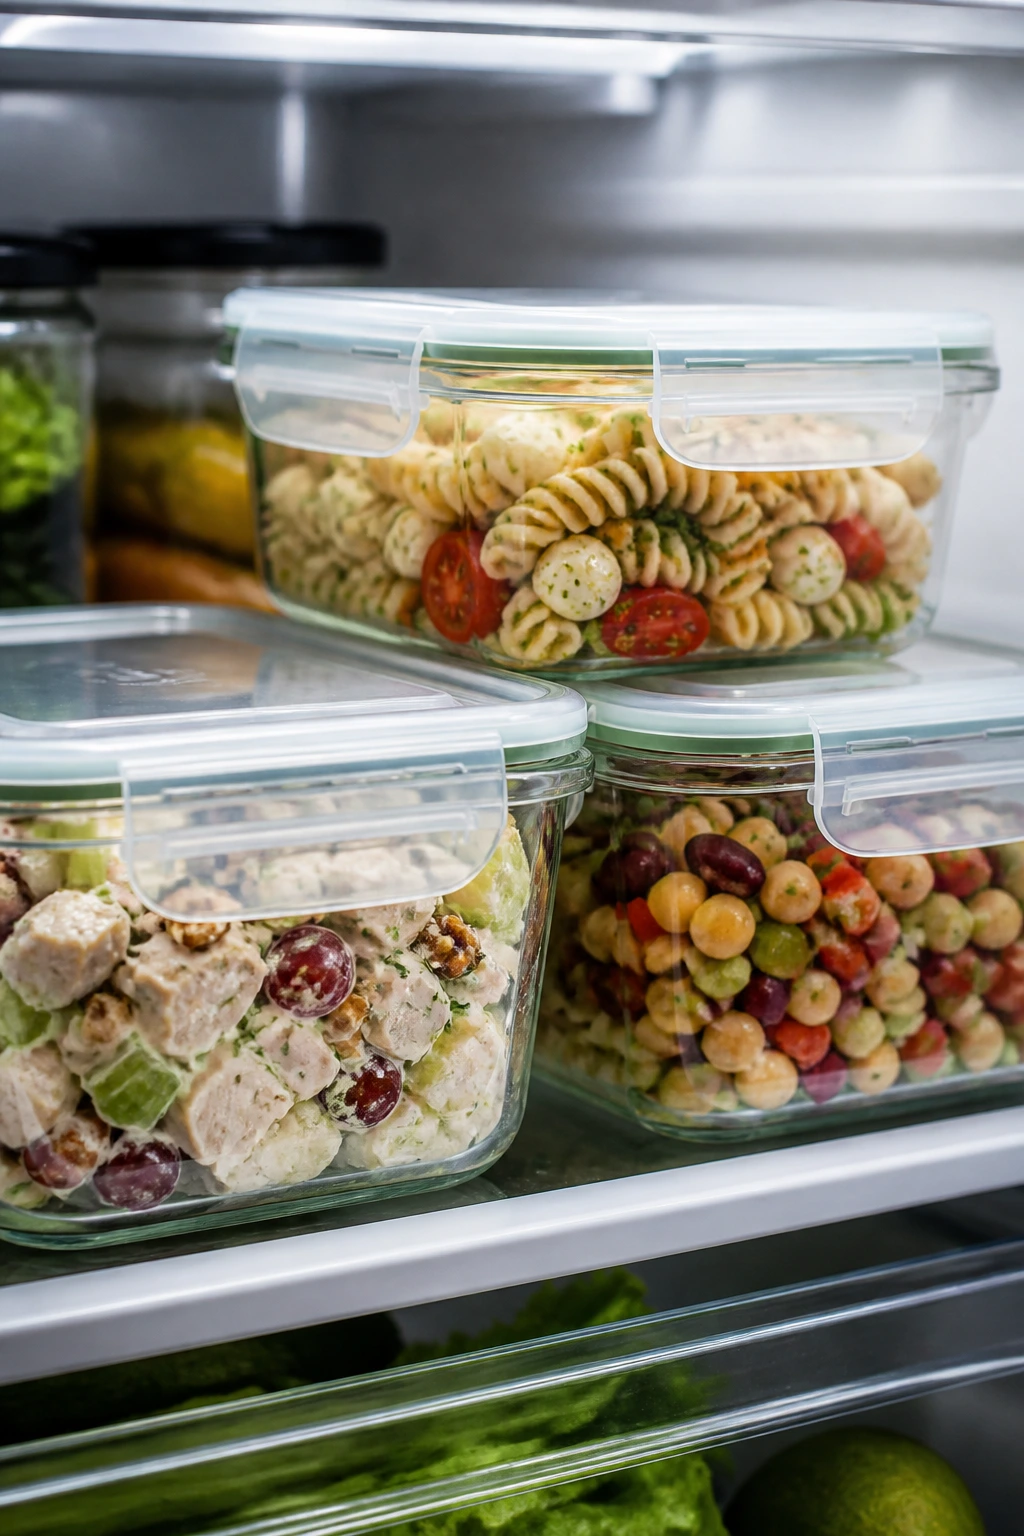
Most of these picnic foods are happiest when they’re made ahead and chilled, but the details matter. Chicken salad, tuna salad, pasta salad, orzo salad, and bean salads keep well for 3 to 4 days in the refrigerator in airtight containers. Deviled eggs are best within 2 days, though the yolk filling can be made a day ahead and piped into the whites closer to serving. Caprese skewers, cucumber sandwiches, and watermelon salad are best the day they’re made, though you can prep the ingredients separately and assemble them a few hours ahead.
Baked items have their own rules. Brown butter rice krispie treats keep at room temperature for up to 5 days in a sealed container. Strawberry bars and cheesecake jars keep for 3 days refrigerated. Peach hand pies hold for 2 days at room temperature if the filling is fully cooled, or up to 4 days in the fridge. If you freeze hand pies, wrap them tightly and use them within 2 months. Wraps and sandwiches should be eaten the same day if possible, but the fillings can usually be made a day ahead and assembled later.
For reheating, use dry heat when you can. Chicken tenders come back best on a sheet pan at 400°F for 8 to 10 minutes or in an air fryer for a few minutes until the coating crisps again. Pulled pork reheats gently in a skillet with a splash of water or extra sauce. Don’t microwave crisp foods unless you’ve accepted that they’ll go soft. For cooler transport, keep cold dishes with ice packs and pack mayo-based items near the cold source, not on top of the bag where they warm up first.
One more thing: if a dish is meant to be cold, don’t fight it by serving it warm. A chicken salad sandwich, a pasta salad, or a cheesecake jar tastes better when it’s properly chilled than when it’s room-temp from neglect. That little bit of planning changes everything.
Variations and Adaptations to Try
-
Gluten-Free Basket: Swap in gluten-free buns, rice noodles, GF tortillas, and certified gluten-free cereal. The textures stay familiar, which matters more than people think.
-
Dairy-Light Swap: Use olive-oil-based dressings, dairy-free cream cheese, and a thinner yogurt or mayo dressing where you want richness without a lot of milk fat. This works especially well in wraps, salads, and jars.
-
Vegetarian Picnic Plate: Replace tuna, chicken, and pork with chickpeas, white beans, roasted mushrooms, or grilled halloumi. The goal is still the same: something sturdy enough to travel and satisfying enough to stand in for dinner.
-
Kid-Friendly Build: Keep onions, jalapeños, and strong herbs on the side. Mild cheese, soft bread, and simple fruit make the table easier for younger eaters without changing the whole menu.
-
Heat-Lover’s Version: Add pickled jalapeños, hot sauce, chili crisp, or pepper jack to the savory recipes. Use a light hand on the heat, though. Picnic food should still be pleasant after the first bite.
-
Budget Picnic Mix: Lean on pasta salad, bean salsa, egg dishes, and bars. Those ingredients stretch far, and the meal still feels complete without dragging in expensive extras.
Common Mistakes to Avoid

The biggest picnic mistake is packing wet ingredients like they’re all the same. They’re not. Tomatoes, cucumbers, watermelon, and dressed salads all shed liquid at different rates, and that liquid is what turns bread soft and crackers limp. Dry your produce, drain your beans, and keep sauces where they belong until the last minute.
The second mistake is treating chill time like an optional suggestion. Chicken salad, pinwheels, cheesecake jars, and bars all improve when they rest. Some of them need it to set. If you slice too soon, you get squashed sandwiches, loose layers, and bars that look like they lost a fight.
Another one: overstuffing. It’s tempting with wraps, sliders, sandwiches, and hand pies because the fillings are the fun part. But too much filling pushes out the sides, makes slicing messy, and leaves you with a plate full of spillover. If you want the food to travel, give it a little breathing room.
People also underseason cold food. Chilling mutes salt and acid. That’s why chicken salad often tastes bright in the bowl and dull after an hour in the fridge. Taste before you pack and again after chilling if the recipe allows it. A squeeze of lemon or a pinch more salt can rescue a bland bowl faster than almost anything else.
And finally, don’t ignore the container. A squishy bag is the enemy of bars, skewers, and hand pies. Use rigid containers, keep like foods together, and put the heaviest items on the bottom. Picnic food is only easy when the transport part is easy too.
Frequently Asked Questions
Which picnic foods hold up best if I can’t keep them cold for long?
The most forgiving options here are rice krispie treats, peach hand pies, Caprese skewers for a short window, and some sandwiches if they’re wrapped tightly and eaten quickly. Anything with mayo, eggs, or dairy should stay chilled until serving time.
Can I make most of these dishes the night before?
Yes, and many of them are better that way. Pasta salad, chicken salad, pulled pork, cheesecake jars, hand pies, and bars all benefit from a head start. Sandwiches and cucumber tea sandwiches are the ones I’d assemble later if I wanted the best texture.
How do I keep sandwiches from getting soggy?
Use a barrier. Butter, cheese, lettuce, or even a thin swipe of mayo on the bread can help keep moisture away from the crumb. Dry tomatoes, cool fillings, and sturdy bread matter just as much.
What can I use instead of mayonnaise in the creamy recipes?
Greek yogurt works in chicken salad and some pasta salads, and a mix of olive oil and lemon works well in tuna and bean salads. Avocado can stand in for some of the creaminess in wraps, but it should be used the same day.
Are deviled eggs safe for a picnic?
Yes, if you keep them cold. Pack them in a cooler with ice packs and put them out only when you’re ready to eat. Once they’ve been sitting in warm air for a couple of hours, move them back to the cooler or skip them.
What’s the easiest way to transport bars and hand pies without breaking them?
Use a rigid, shallow container and line the layers with parchment. Put the bars in a single layer if you can. For hand pies, let them cool fully before stacking or wrapping.
Can I turn this list into a full dinner instead of snacks?
Easily. Pick one main like sliders, chicken tenders, or wraps, then add one cold side and one fruit or dessert. That’s a picnic dinner, not a snack board pretending to be one.
Which recipes work best for kids?
Turkey club wraps, chicken tenders, pasta salad, rice krispie treats, and strawberry bars usually go over well because the flavors are familiar. If kids don’t like sharp onions or herbs, keep those separate and let them build their own plate.
What if I need to feed a bigger group?
Double the pasta salads, salsa, and bars first. Those scale cleanly and don’t require much extra equipment. For sandwiches and sliders, set up a build station and assemble them in batches so the bread stays intact.
A Basket Worth Packing Again
The best picnic dinner isn’t complicated. It’s a mix of food that holds up, tastes good cold, and doesn’t make you regret every decision by the time you reach dessert. That’s why this kind of menu works so well on summer nights: you can do the work early, pack it cleanly, and still have energy left to sit down and eat.
Pick one creamy thing, one crunchy thing, one handheld thing, and one sweet. That’s enough. If the food travels well and still looks like itself when you open the container, you’ve already won the night.