
A good picnic food does two jobs at once: it travels without sulking, and it tastes better after a little chill time. That’s the real test. If it can sit in a cooler next to condensation-heavy glasses of iced tea, survive a bumpy ride, and still look tidy when you hand someone a napkin, it earns its spot in the basket.
Portable picnic food ideas work best when they’re built with restraint. Less messy sauce. More structure. A crust that stays crisp, a filling that doesn’t leak, a salad that isn’t swimming by the time you get to the park bench. I’ve lost count of how many sandwiches have gone limp because someone treated mayonnaise like mortar. Don’t do that. Keep the wet stuff controlled, and picnic food turns from fragile into reliable fast.
Cold drinks change the whole mood, too. A salty skewer beside sparkling lemonade feels different from the same skewer beside sweet tea or a light lager. The pairing matters because picnic food isn’t just about eating outdoors; it’s about balancing heat, shade, crunch, and a drink that fogs up the cup a little when you set it down on the blanket.
Why This Picnic Spread Works
- Built for one hand: Most of these foods can be eaten from a skewer, a square of parchment, or a napkin-held sandwich, which matters when your other hand is holding a cold drink.
- Cooler-friendly: These recipes lean on ingredients that hold texture after chilling, so you’re not racing a soggy deadline.
- Low-mess by design: Crisp edges, tucked fillings, and sealed bites keep crumbs and drips where they belong.
- Good at room temperature: Several of these taste fine after a short rest outside the cooler, which makes serving simpler.
- Easy to mix and match: You can build a whole basket from the same handful of staples—herbs, citrus, sturdy produce, and a few reliable breads.
- Pairs naturally with cold drinks: Salty, tangy, creamy, and crisp foods all have a drink that loves them back.
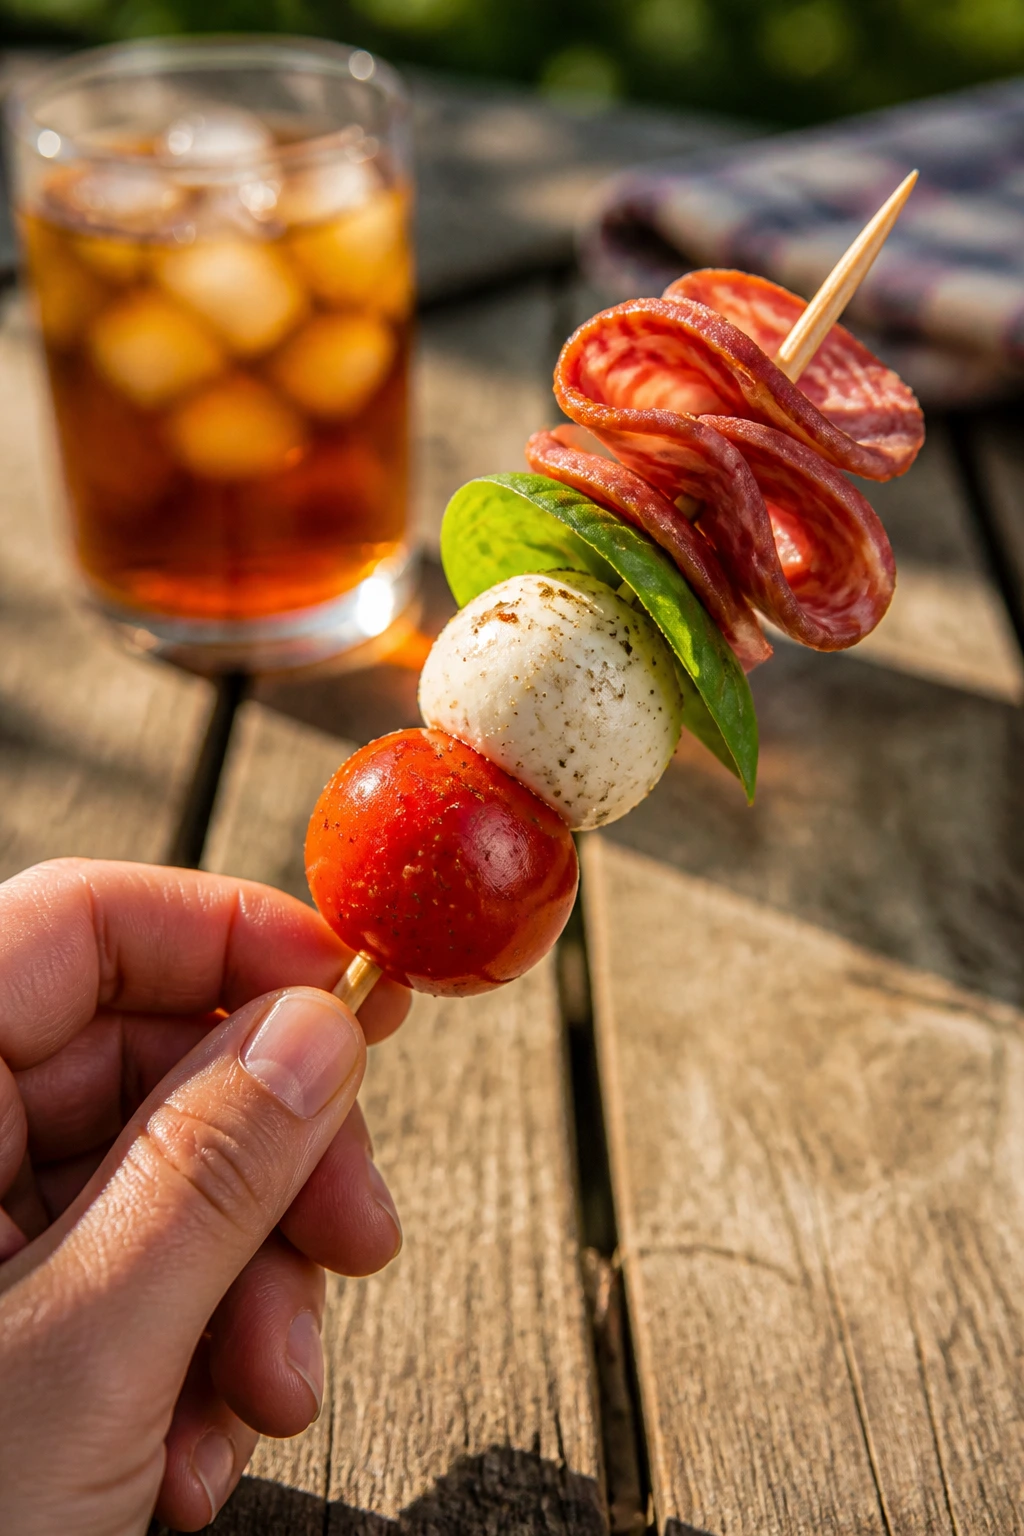
1. Tomato-Basil Caprese Skewers
A caprese skewer is one of those rare picnic foods that looks fussy and acts easy. The tomatoes stay juicy, the mozzarella gives you that soft, milky bite, and the basil brings the whole thing back to earth. I like these best when they’re cold enough to feel almost refreshing against a warm afternoon.
Why It Works:
The ingredients are sturdy, the assembly is fast, and there’s no bread to go soft. A little balsamic glaze gives the tomatoes more snap without turning the skewers into a saucy mess.
Key Ingredients:
- 20 cherry tomatoes
- 20 mini mozzarella balls, drained
- 20 small basil leaves
- 2 tablespoons extra-virgin olive oil
- 1 tablespoon balsamic glaze
- 1/2 teaspoon flaky sea salt
Quick Steps:
- Pat the mozzarella dry with paper towels so the skewers do not weep in the cooler.
- Thread one tomato, one basil leaf, and one mozzarella ball onto each small skewer.
- Arrange on a tray and drizzle with olive oil.
- Finish with balsamic glaze and flaky salt right before packing.
- Chill for 15 minutes, then serve cold or cool.
Equipment for This Recipe:
- 20 small skewers
- Paper towels
- Shallow tray or platter
How to Serve This Dish:
Pile them on a chilled platter and set them next to sparkling lemonade or a dry prosecco spritz. Three skewers make a tidy snack portion; six work as part of a bigger spread.
Pro Tips for This Recipe:
- Use cherry tomatoes that feel heavy for their size; they taste sweeter.
- Keep the glaze off until serving if you want the basil leaves to stay bright.
- If your basil is large, fold the leaf once before threading.
Variations on This Dish:
- Peach Caprese: Add a thin peach slice between the tomato and mozzarella for a sweeter bite.
- Salami Caprese: Slip in a folded salami ribbon for a saltier, heartier skewer.
Common Mistakes to Avoid with This Dish:
- Skipping the drying step: Wet mozzarella makes the whole skewer slick and watery.
- Overdressing early: Balsamic glaze should sit on top, not soak in.
- Using giant skewers: Small skewers keep the bites neat and easier to carry.
2. Lemon Chicken Salad Lettuce Cups
Chicken salad gets a bad reputation when it’s built like a bowl of mayo with chicken hiding inside it. This version stays bright. Lemon, celery, and dill cut through the richness, and butter lettuce gives you a crisp little cup that doesn’t fall apart under the filling.
Why It Works:
The filling chills well, the lettuce stays cold in the cooler, and each bite feels clean instead of heavy. It’s the kind of lunch that doesn’t need a fork if you pack it right.
Key Ingredients:
- 2 cups cooked shredded chicken
- 1/4 cup mayonnaise
- 2 tablespoons plain Greek yogurt
- 1 celery stalk, finely diced
- 1 tablespoon lemon juice
- 1 tablespoon chopped fresh dill
- 8 butter lettuce leaves
- 1/2 teaspoon kosher salt
- 1/4 teaspoon black pepper
Quick Steps:
- Stir the mayonnaise, yogurt, lemon juice, dill, salt, and pepper in a bowl.
- Fold in the chicken and celery until every piece is coated.
- Chill the mixture for 20 minutes so the flavors settle.
- Spoon into chilled lettuce leaves just before packing.
- Pack the filling and lettuce separately if you want extra crunch later.
Equipment for This Recipe:
- Mixing bowl
- Rubber spatula
- Airtight container
How to Serve This Dish:
Serve with iced tea, cucumber water, or a pale lager. Two lettuce cups make a light lunch; four will hold up as a main with fruit on the side.
Pro Tips for This Recipe:
- Use chicken from thighs if you want a juicier texture.
- Dice the celery small so it doesn’t poke through the lettuce.
- Pack a few extra leaves; one always tears in transit.
Variations on This Dish:
- Curry Chicken Cups: Add 1 teaspoon curry powder and 2 tablespoons chopped raisins.
- Crunchy Apple Chicken: Fold in 1/2 cup diced apple for a sweeter, crisper filling.
Common Mistakes to Avoid with This Dish:
- Packing the cups too early: Lettuce turns floppy fast once the filling sits inside it.
- Using watery chicken salad: Drain any excess liquid before filling the leaves.
- Overloading the leaves: Smaller scoops hold better and eat cleaner.
3. Lemon Orzo Salad in Mason Jars
Orzo has the right shape for a picnic because it behaves like pasta but eats like a grain salad. Add lemon, herbs, and a few crunchy vegetables, and it stays lively after a couple of hours in a cooler. Mason jars keep the dressing where it belongs. Mostly.
Why It Works:
The pasta is small enough to coat evenly, and the jars layer beautifully without smashing the vegetables. This is one of the few picnic salads that actually gets better after an hour of sitting.
Key Ingredients:
- 2 cups cooked orzo, cooled
- 1 cup diced cucumber
- 1 cup halved cherry tomatoes
- 1/2 cup crumbled feta
- 1/4 cup chopped parsley
- 3 tablespoons olive oil
- 2 tablespoons lemon juice
- 1 teaspoon Dijon mustard
- 1/2 teaspoon salt
Quick Steps:
- Whisk olive oil, lemon juice, Dijon, and salt into a dressing.
- Toss the orzo with half the dressing while it is still slightly warm.
- Layer cucumber, tomatoes, feta, and parsley into jars.
- Spoon the orzo on top and seal tightly.
- Shake the jar just before eating.
Equipment for This Recipe:
- 4 wide-mouth mason jars
- Small whisk
- Medium bowl
How to Serve This Dish:
Cold sparkling water with lime is the cleanest match, though an icy white wine works too. One jar makes a neat lunch portion; two smaller jars can anchor a shared picnic plate.
Pro Tips for This Recipe:
- Cool the orzo before adding feta so it does not clump.
- Keep the dressing separate if you want the cucumbers extra crisp.
- Use wide-mouth jars; narrow ones are annoying to eat from.
Variations on This Dish:
- Greek-Style Orzo: Add olives and red onion.
- Herbed Summer Orzo: Swap parsley for dill and mint.
Common Mistakes to Avoid with This Dish:
- Overcooking the pasta: Soft orzo turns mushy in the jar.
- Packing the dressing on the bottom without a barrier: The vegetables get soggy fast.
- Using fine jars for serving: You’ll end up shaking more than eating.
4. Prosciutto-Melon Skewers
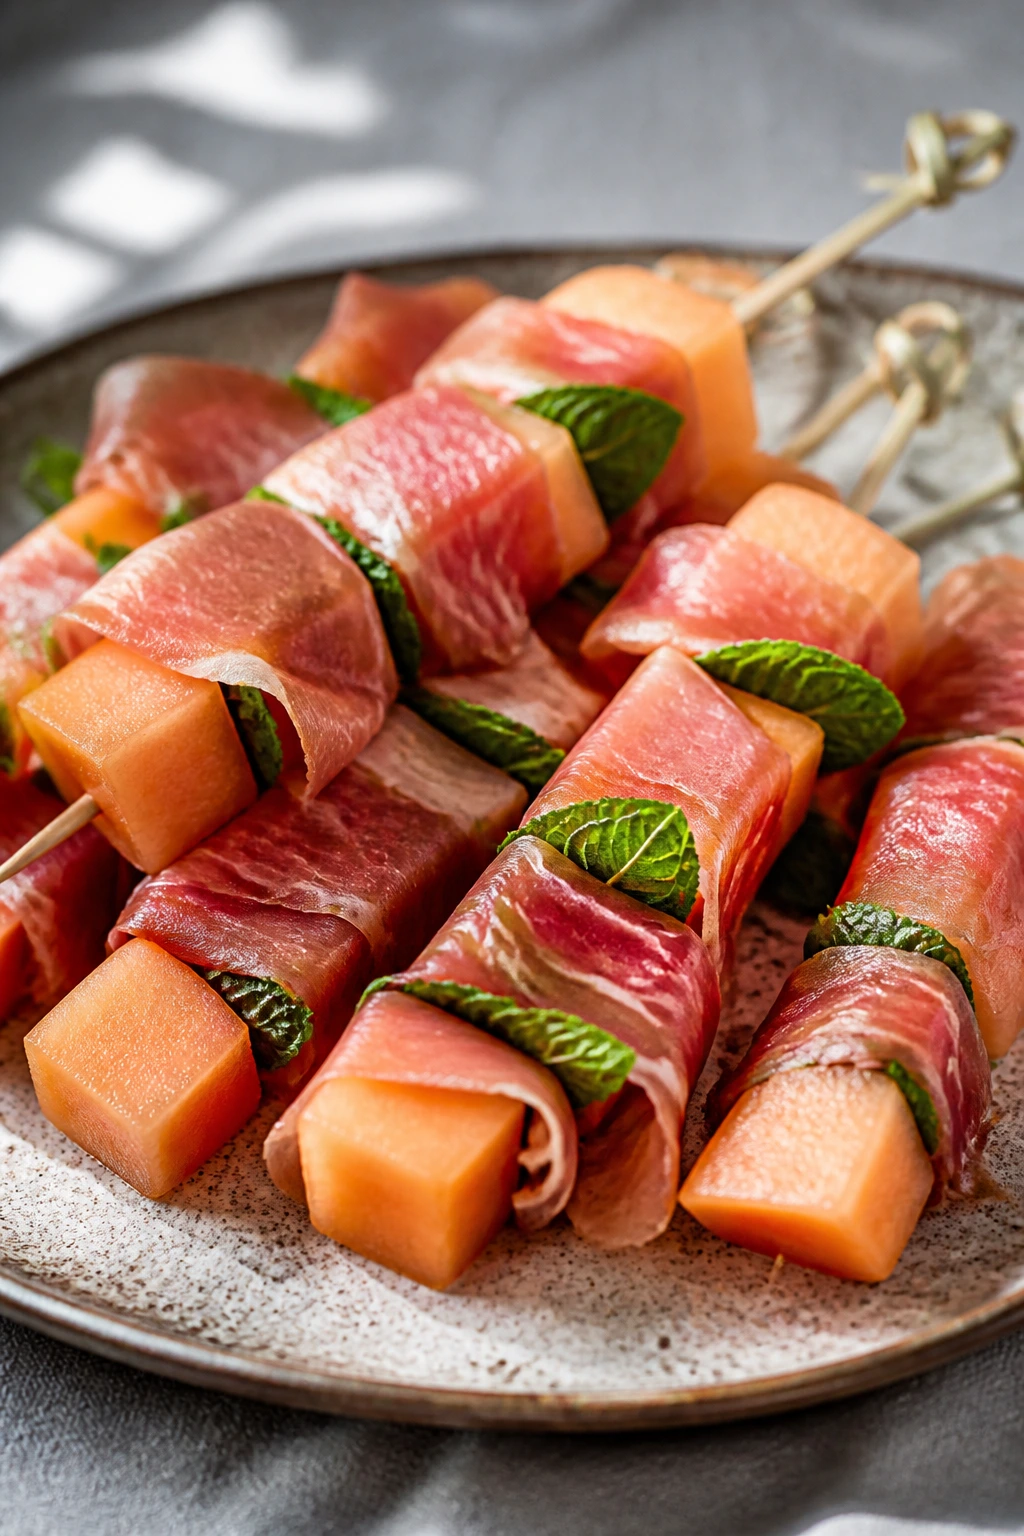
Sweet melon and salty prosciutto are one of those combinations that don’t need much explanation. They just work. A quick skewer keeps the slices neat, and a little mint keeps the whole thing from feeling too rich beside a cold drink.
Why It Works:
There’s no sauce to leak and no bread to collapse. You get sweetness, salt, and a cold, juicy bite that feels tailor-made for a hot blanket in the shade.
Key Ingredients:
- 1 small ripe cantaloupe, cut into cubes
- 8 ounces prosciutto, sliced into ribbons
- 1/4 cup fresh mint leaves
- 1 tablespoon olive oil
- 1 teaspoon lime zest
- 24 small skewers or toothpicks
Quick Steps:
- Cut the melon into tidy 1-inch cubes.
- Fold each prosciutto slice into a loose ribbon.
- Thread melon, prosciutto, and mint onto small skewers.
- Brush lightly with olive oil and sprinkle with lime zest.
- Chill until serving.
Equipment for This Recipe:
- Sharp knife
- Cutting board
- Small skewers
How to Serve This Dish:
Set these beside a glass of cold sparkling wine or salted lime soda. Two or three skewers make a starter; six feel like a full snack with cheese and crackers.
Pro Tips for This Recipe:
- Buy melon that smells fragrant at the stem end.
- Keep the prosciutto ribbons loose so they do not tear when threaded.
- Add mint just before packing if you want it extra fresh.
Variations on This Dish:
- Peach and Prosciutto: Use firm peach wedges instead of melon.
- Watermelon Feta Skewers: Swap in feta cubes and basil for a sharper finish.
Common Mistakes to Avoid with This Dish:
- Using underripe melon: Bland melon makes the whole skewer flat.
- Packing them warm: The prosciutto gets greasy and loses its clean texture.
- Making them too large: Small bites are easier to eat over a picnic blanket.
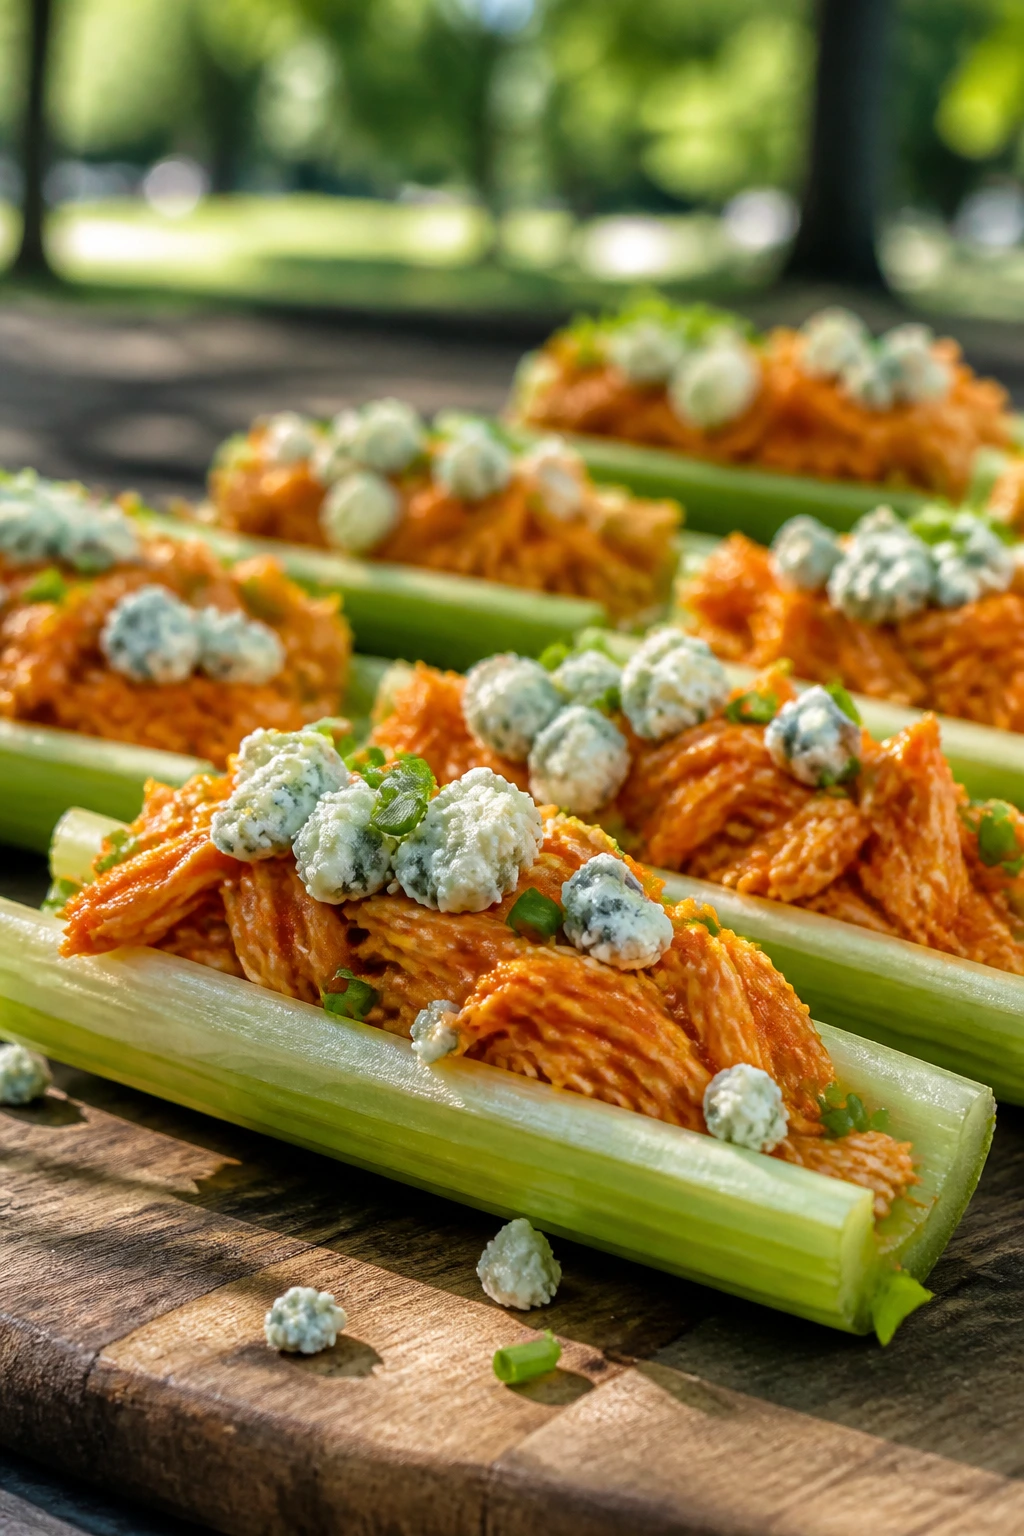
5. Chive-Paprika Deviled Eggs
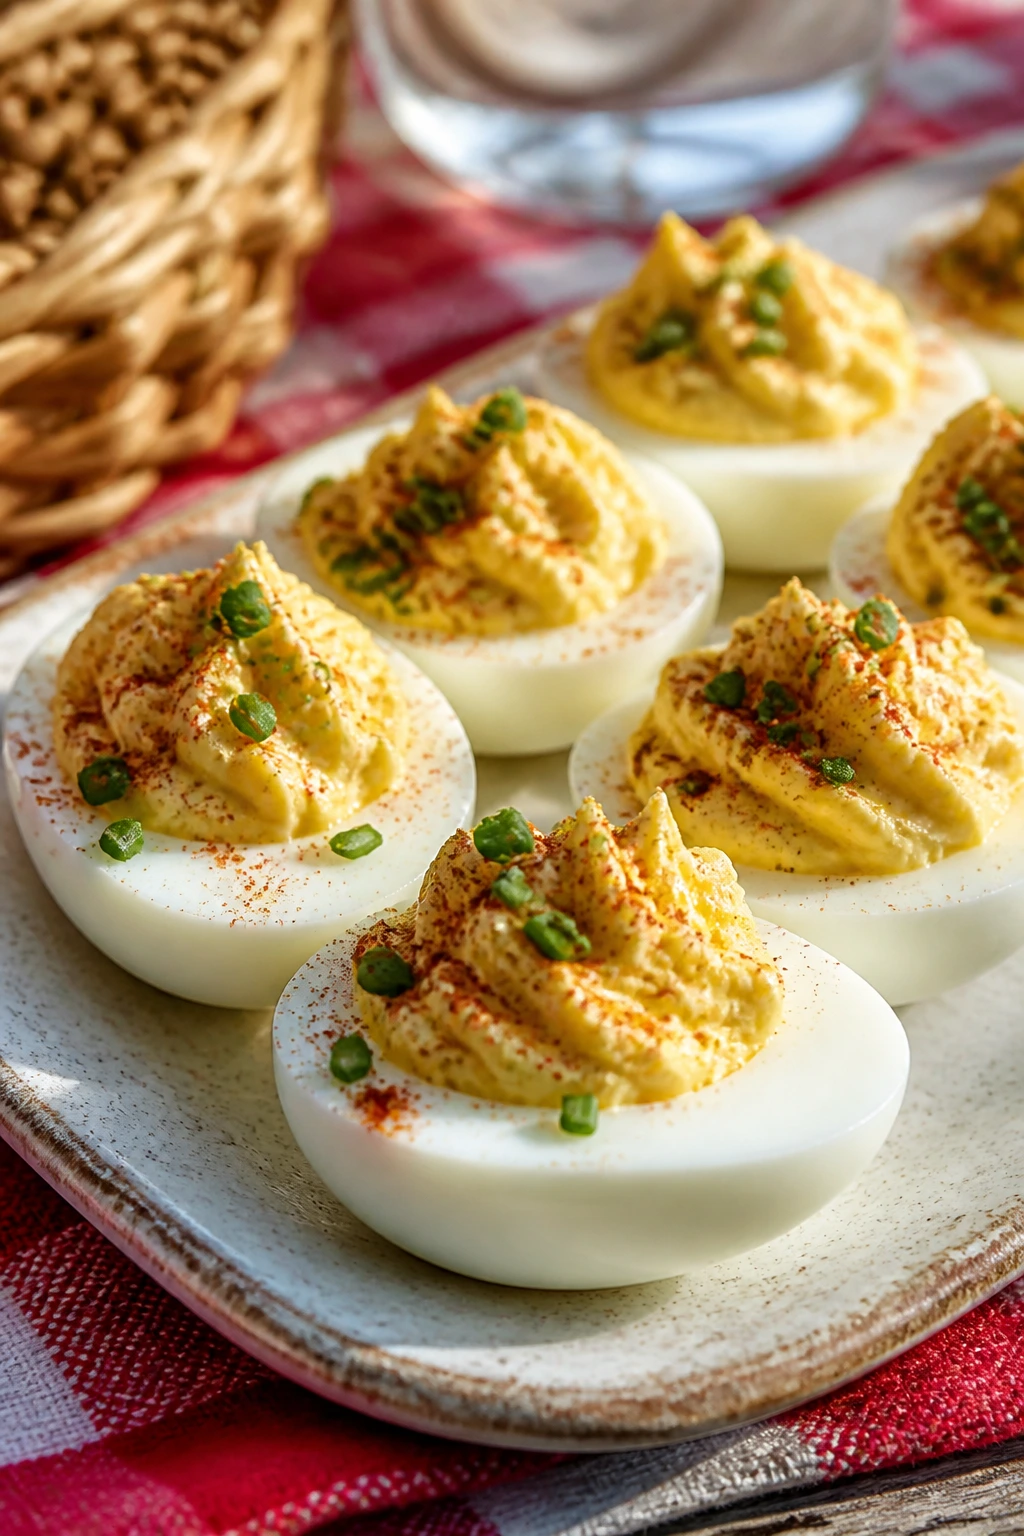
Deviled eggs are the picnic classic that never needed fixing, only better handling. Keep them chilled, keep the filling smooth, and they vanish fast. Chives and paprika give the filling a little edge without making the eggs feel dressed up for no reason.
Why It Works:
The filling is rich but stable, and the eggs are easy to hold with one hand. They’re also one of the few picnic foods that feel complete in two bites.
Key Ingredients:
- 6 large eggs
- 3 tablespoons mayonnaise
- 1 teaspoon Dijon mustard
- 1 teaspoon white vinegar
- 1 tablespoon finely chopped chives
- 1/4 teaspoon paprika
- 1/4 teaspoon salt
- 1/8 teaspoon black pepper
Quick Steps:
- Hard-boil the eggs, then cool them in ice water.
- Peel and halve the eggs lengthwise.
- Mash the yolks with mayonnaise, mustard, vinegar, salt, and pepper.
- Pipe or spoon the filling back into the whites.
- Finish with chives and paprika, then chill at least 30 minutes.
Equipment for This Recipe:
- Medium saucepan
- Mixing bowl
- Spoon or piping bag
How to Serve This Dish:
Serve with a salty pilsner, iced tea, or lemonade with extra ice. Two halves make a snack; four halves turn into a real plate with pickles and bread.
Pro Tips for This Recipe:
- Older eggs peel more cleanly than very fresh ones.
- Chill them in a covered egg tray so the filling does not smear.
- A tiny pinch of sugar softens the vinegar edge if you want it milder.
Variations on This Dish:
- Dill Pickle Eggs: Stir in 1 tablespoon minced pickle and a little pickle brine.
- Smoked Egg Filling: Add a pinch of smoked salt for a deeper finish.
Common Mistakes to Avoid with This Dish:
- Overcooking the eggs: Gray yolks make the filling taste chalky.
- Overwhipping the yolks: Keep the filling creamy, not gluey.
- Leaving them out too long: Deviled eggs belong in the cold part of the picnic setup.
6. Mediterranean Hummus Wraps
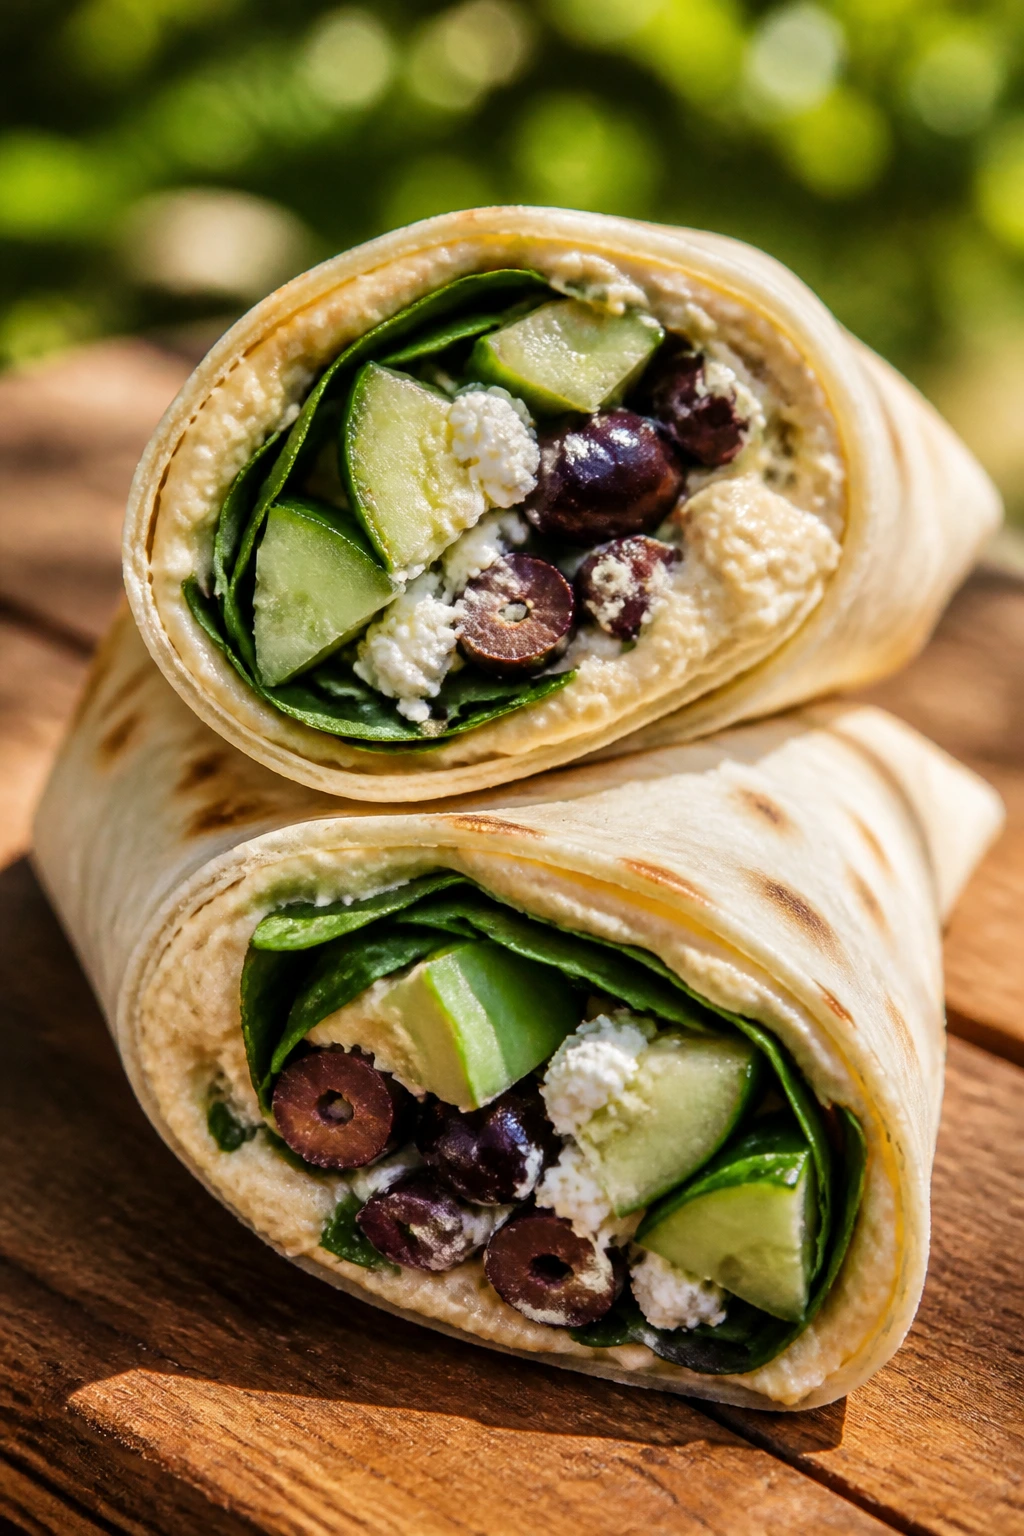
A good hummus wrap should fold like it means it. This one stays tidy because the filling is dry enough to hold together and the vegetables do most of the crunching. Feta and hummus bring the creaminess, so you do not need a lot of anything else.
Why It Works:
The wrap seals the filling inside, the hummus acts like glue, and the cucumbers stay crisp if you salt them lightly first. It is a solid choice when you want lunch that eats cleanly in the car or under a tree.
Key Ingredients:
- 4 large flour tortillas
- 1 cup hummus
- 1 cup diced cucumber
- 1 cup shredded carrots
- 1 cup baby spinach
- 1/2 cup crumbled feta
- 1/4 cup sliced olives
- 1 tablespoon lemon juice
Quick Steps:
- Pat the cucumber dry and toss it with lemon juice.
- Spread hummus across each tortilla, leaving a bare edge.
- Layer spinach, cucumber, carrots, feta, and olives.
- Roll tightly, tucking the sides in as you go.
- Slice in half and wrap in parchment.
Equipment for This Recipe:
- Cutting board
- Sharp knife
- Parchment paper
How to Serve This Dish:
These like minty iced tea or sparkling water with cucumber. One wrap is a full lunch; half a wrap works as a side with chips or fruit.
Pro Tips for This Recipe:
- Warm the tortillas for 10 seconds so they roll without cracking.
- Do not overfill the center; the wrap will burst.
- Keep wet vegetables dry or the tortilla softens fast.
Variations on This Dish:
- Roasted Red Pepper Wraps: Swap hummus for roasted red pepper hummus.
- Falafel Wraps: Add crushed falafel pieces for more heft.
Common Mistakes to Avoid with This Dish:
- Using wet cucumbers: They turn the tortilla soggy by lunch.
- Rolling too loosely: The filling shifts and leaks.
- Skipping the parchment: It keeps the wrap from unrolling in the basket.
7. Spinach-Feta Mini Quiches
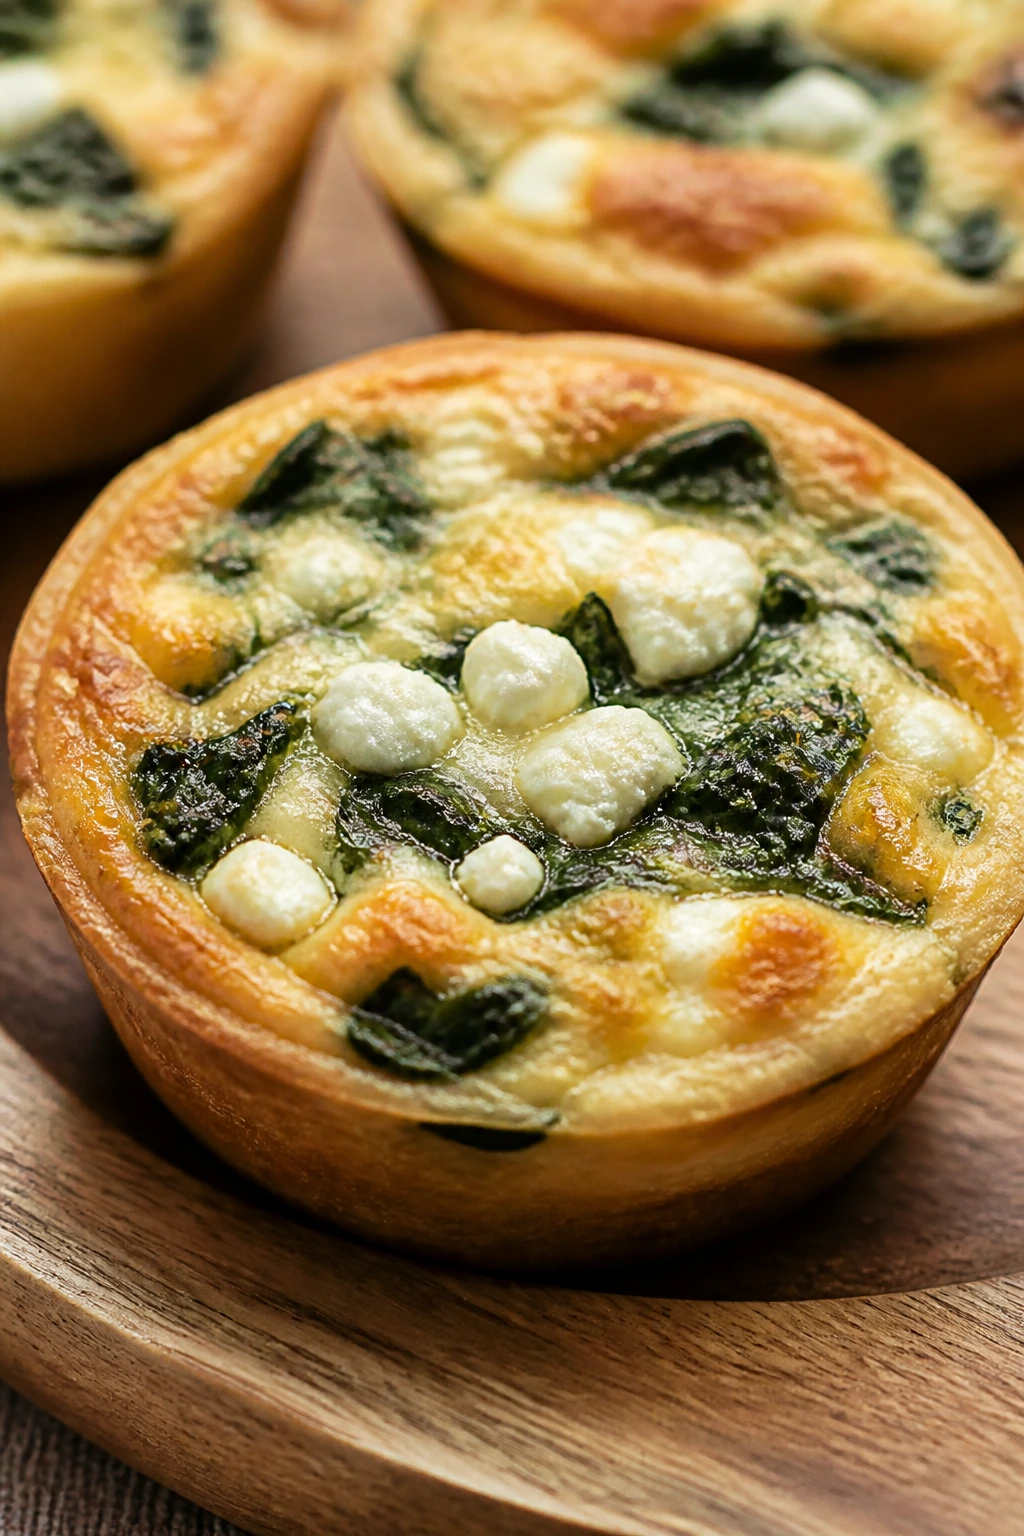
Mini quiches feel like little picnic armor. They hold their shape, eat cleanly, and taste good cold or room temperature. Spinach and feta keep the filling savory without going heavy, which is exactly what you want when the rest of the basket is full of bright food.
Why It Works:
Egg custard sets firmly in a muffin tin, so each quiche travels like a compact slice. They also pair easily with almost any drink, from iced coffee to a crisp white wine.
Key Ingredients:
- 6 large eggs
- 1/2 cup whole milk
- 1 cup chopped spinach
- 1/2 cup crumbled feta
- 1/4 cup diced onion
- 1 cup shredded cheddar
- 1/4 teaspoon salt
- 1/4 teaspoon black pepper
- 1 sheet pie dough or 6 mini tart shells
Quick Steps:
- Preheat the oven to 375°F.
- Whisk eggs, milk, salt, and pepper.
- Divide spinach, onion, feta, and cheddar among the shells.
- Pour in the egg mixture until each cup is three-quarters full.
- Bake 18 to 22 minutes until set and lightly puffed.
Equipment for This Recipe:
- Muffin tin
- Mixing bowl
- Whisk
How to Serve This Dish:
Serve with iced black tea or a dry sparkling rosé. Two mini quiches make a nice snack; four feel like lunch with tomato slices.
Pro Tips for This Recipe:
- Squeeze spinach dry so the custard sets properly.
- Let them cool in the tin for 10 minutes before lifting out.
- Bake until the centers no longer jiggle.
Variations on This Dish:
- Ham and Cheese Quiches: Add 1/3 cup diced ham.
- Mushroom Herb Quiches: Swap spinach for sautéed mushrooms and thyme.
Common Mistakes to Avoid with This Dish:
- Adding wet vegetables: Extra moisture makes the crust go soggy.
- Pulling them too early: Underbaked centers collapse as they cool.
- Skipping the cool-down: Hot quiches steam themselves soft in the container.
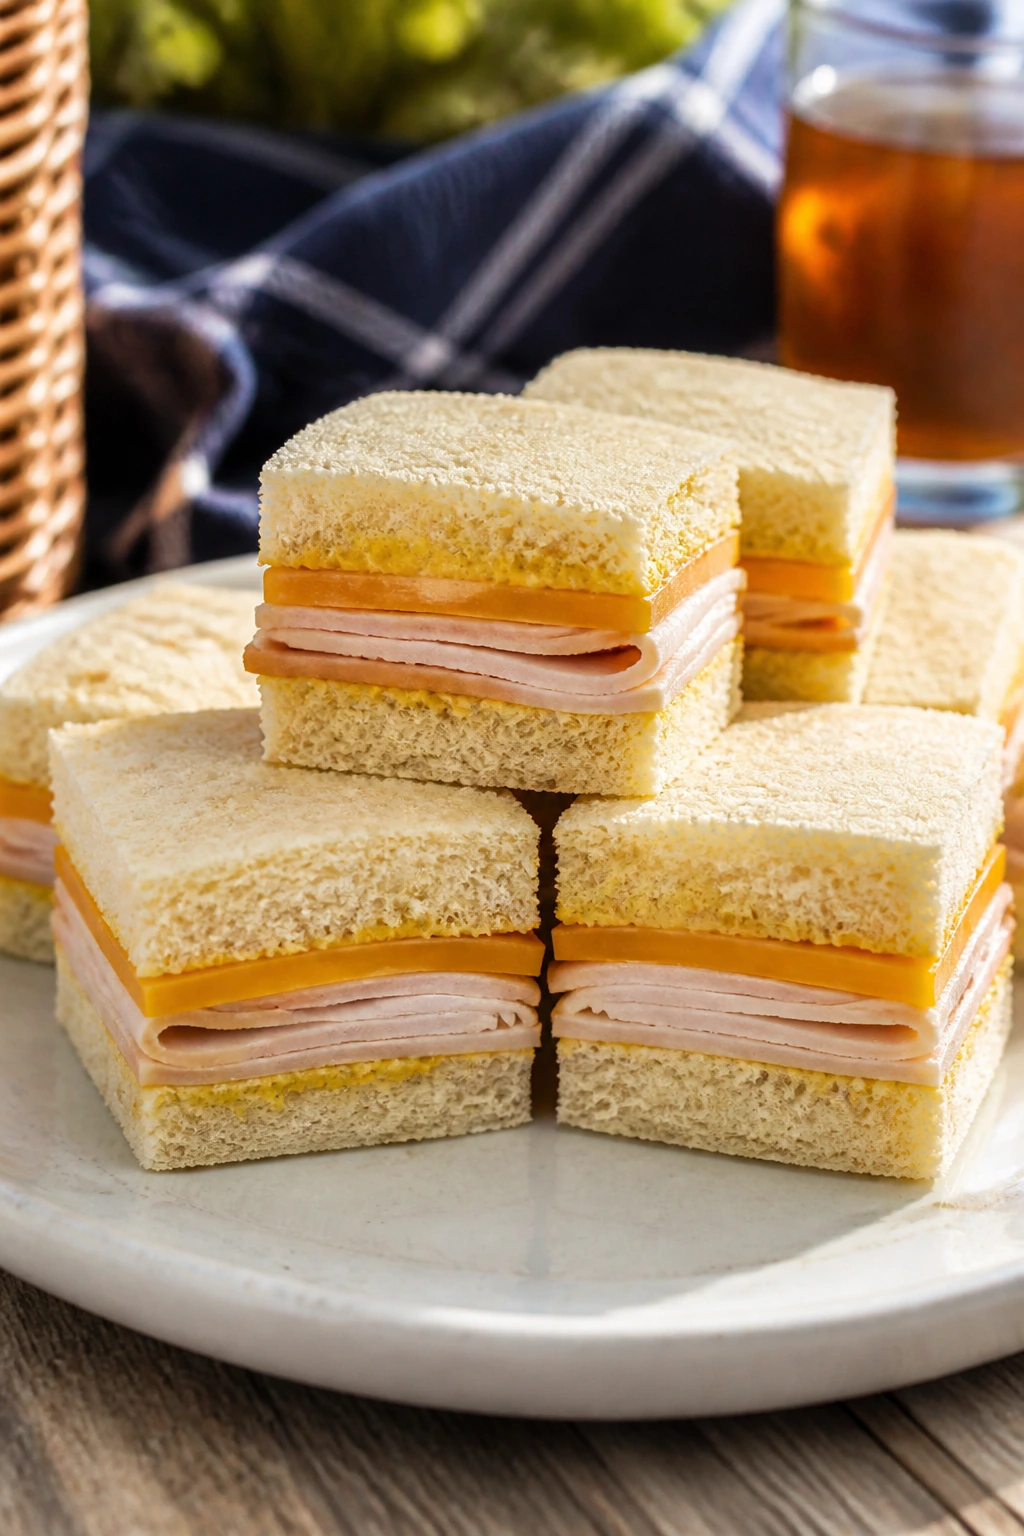
8. Pimento Cheese Tea Sandwiches
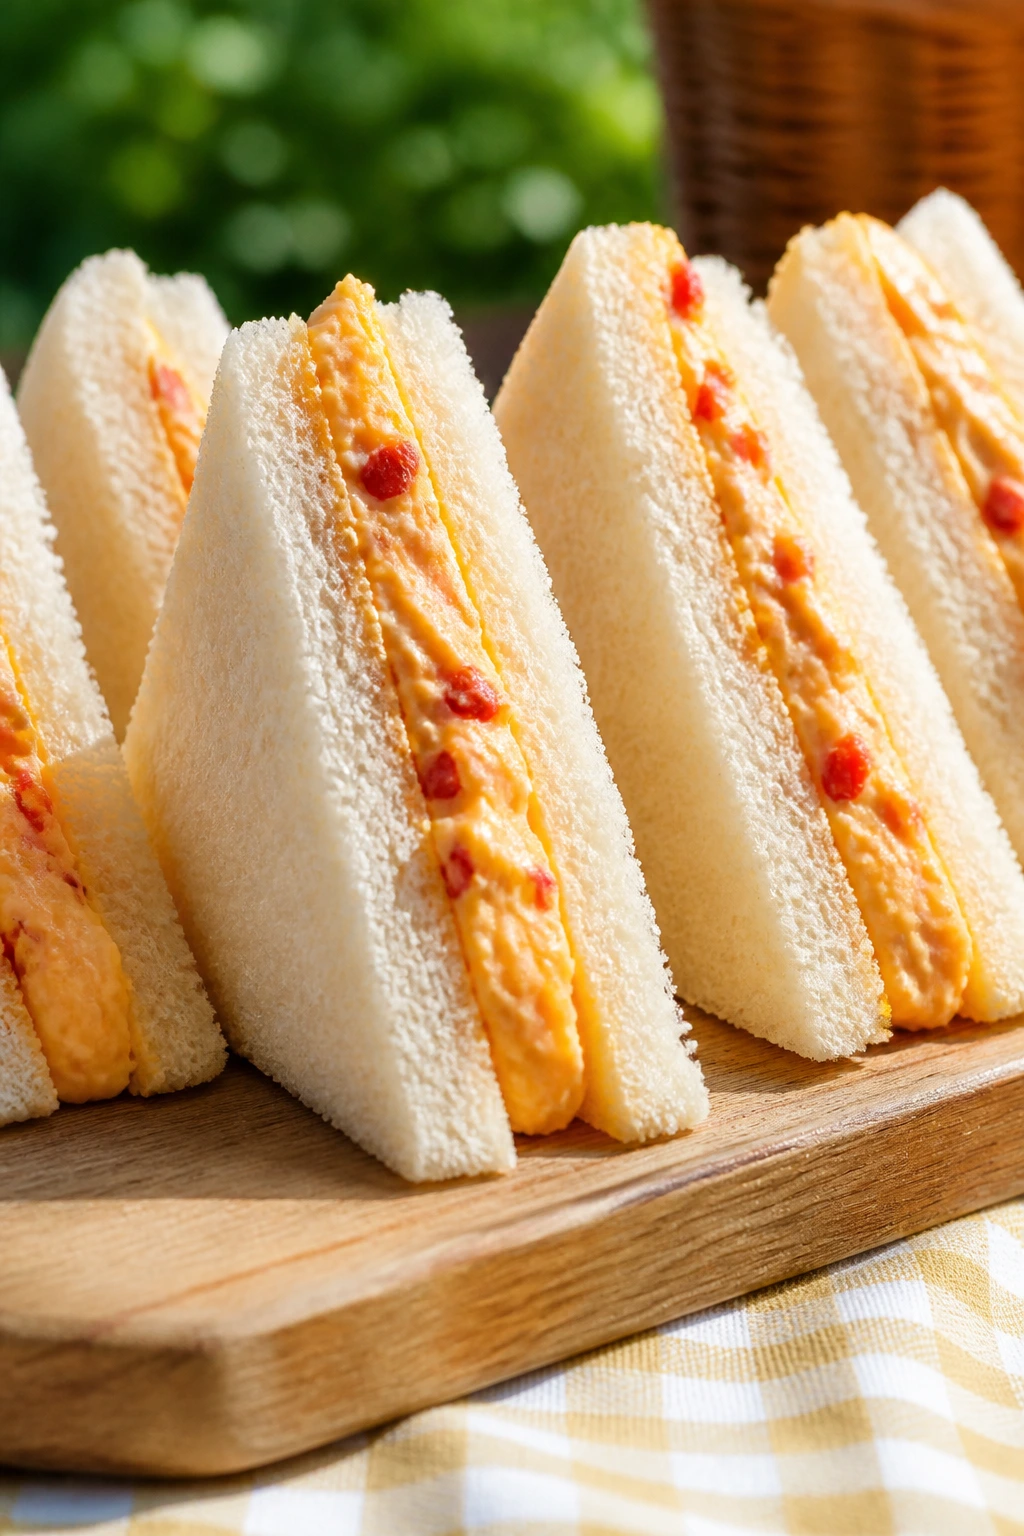
Pimento cheese has the kind of sharp, creamy punch that belongs between soft bread slices. For a picnic, make them small, trim the crusts if you like, and keep them cool. They feel a little old-school in the best way.
Why It Works:
The filling is thick enough to stay put, and the bread can be sealed with a thin layer of butter to protect it from moisture. That means no sad, limp corners by the time you unfold the cloth.
Key Ingredients:
- 1 cup shredded sharp cheddar
- 4 ounces cream cheese, softened
- 1/4 cup mayonnaise
- 1/4 cup diced pimentos, drained
- 1 teaspoon hot sauce
- 8 slices soft sandwich bread
- 1 tablespoon softened butter
- 1/4 teaspoon black pepper
Quick Steps:
- Stir cheddar, cream cheese, mayo, pimentos, hot sauce, and pepper until thick.
- Butter one side of each bread slice lightly.
- Spread the filling on the unbuttered side and top with another slice.
- Cut into fingers or quarters.
- Wrap tightly and chill before packing.
Equipment for This Recipe:
- Mixing bowl
- Butter knife
- Serrated knife
How to Serve This Dish:
They go well with sweet tea, dill pickle spears, or a cold lager. Four fingers make one lunch portion, especially if you add fruit.
Pro Tips for This Recipe:
- Use block cheddar, not pre-shredded, for a smoother filling.
- Press the sandwiches lightly before cutting so the filling firms up.
- Pack them in a single layer to protect the edges.
Variations on This Dish:
- Jalapeño Pimento Cheese: Stir in minced jalapeño for heat.
- Bacon Pimento Cheese: Add 1/4 cup crisp bacon bits.
Common Mistakes to Avoid with This Dish:
- Using wet pimentos: Drain them well or the filling loosens.
- Cutting the bread with a dull knife: It crushes the soft slices.
- Packing them warm: The filling smears and softens too fast.
9. Cold Sesame Noodle Cups
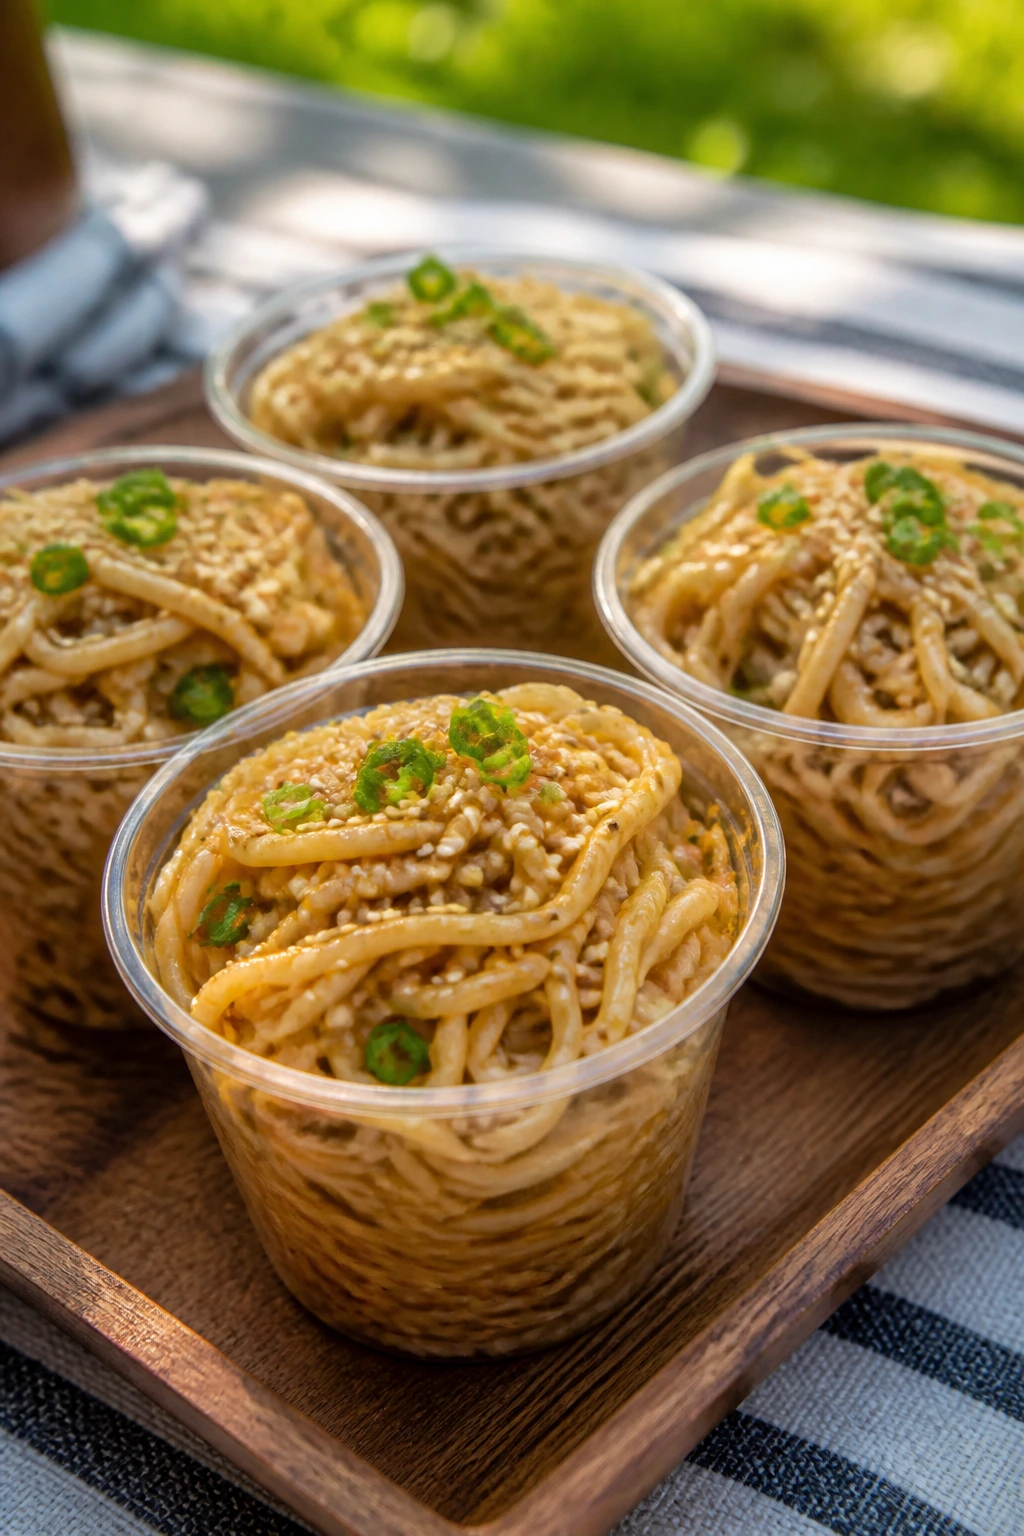
Cold sesame noodles are picnic food with excellent manners. They stay slippery, savory, and a little nutty, and they do not mind being eaten with chopsticks or a fork. Pack them in small cups, and they behave like a proper lunch.
Why It Works:
The sauce clings to the noodles instead of pooling at the bottom, and the vegetables add crunch without making the dish watery. It is one of the best choices when you want something substantial but not heavy.
Key Ingredients:
- 8 ounces noodles
- 3 tablespoons peanut butter
- 2 tablespoons soy sauce
- 1 tablespoon rice vinegar
- 1 tablespoon sesame oil
- 1 teaspoon honey
- 1 cup shredded carrots
- 1/2 cup sliced cucumber
- 2 tablespoons sliced scallions
Quick Steps:
- Cook the noodles until just tender, then rinse cold.
- Whisk peanut butter, soy sauce, vinegar, sesame oil, and honey.
- Toss the noodles with the sauce until glossy.
- Fold in carrots, cucumber, and scallions.
- Chill in cups or containers for at least 20 minutes.
Equipment for This Recipe:
- Saucepan
- Whisk
- Meal-prep containers
How to Serve This Dish:
Pair with iced green tea or a cold citrus soda. One cup works as a light lunch; two cups plus grilled protein turns it into a bigger picnic plate.
Pro Tips for This Recipe:
- Rinse the noodles well so they do not clump.
- Add cucumber right before packing if you want it extra crisp.
- A splash of warm water loosens the sauce if it gets too thick.
Variations on This Dish:
- Spicy Sesame Noodles: Add chili crisp or sriracha to the sauce.
- Chicken Sesame Noodles: Fold in 1 cup shredded cooked chicken.
Common Mistakes to Avoid with This Dish:
- Overcooking the noodles: Soft noodles break apart when chilled.
- Using too little sauce: The dish feels dry and sticky.
- Packing warm noodles: They steam themselves soggy in the container.
10. Grapes, Cheddar, and Salami Skewers
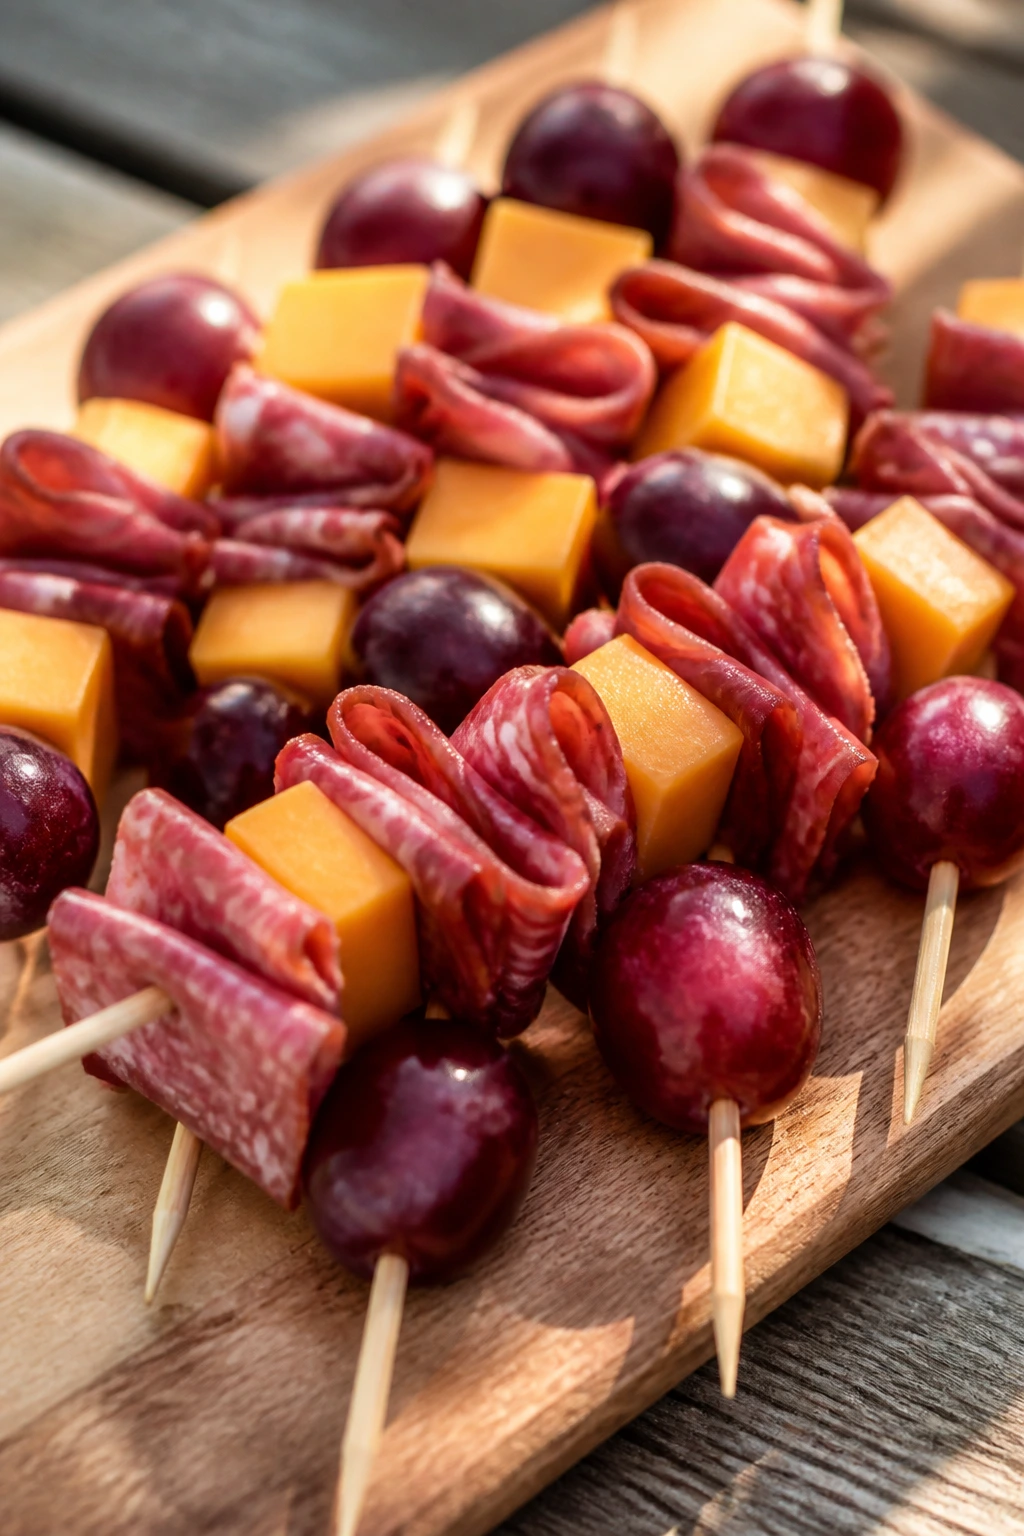
This is the snack board, simplified. Sweet grapes, sharp cheddar, and salty salami hit three notes at once, which is why people keep reaching for these even when the basket has fancier food. They’re fast, tidy, and weirdly hard to stop eating.
Why It Works:
The ingredients are sturdy, nothing leaks, and the balance of sweet and salty plays well with cold fizzy drinks. You can make them in batches without thinking too hard, which I count as a picnic virtue.
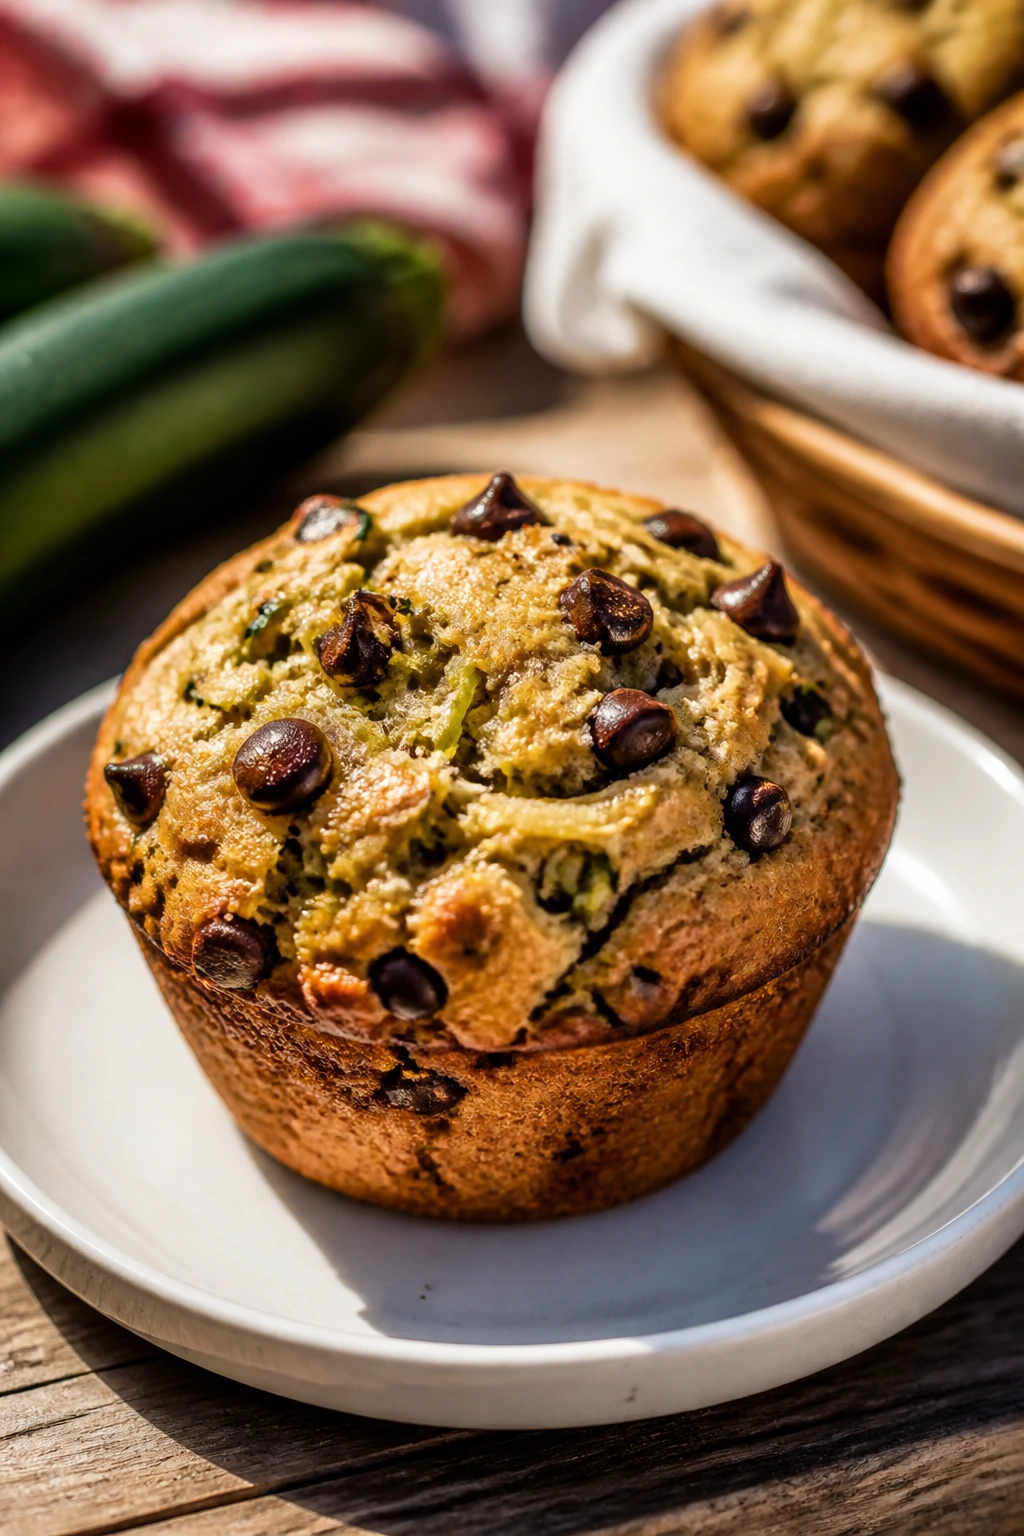
Key Ingredients:
- 24 seedless grapes
- 8 ounces sharp cheddar, cut into cubes
- 12 slices salami, folded
- 1 tablespoon honey
- 1 teaspoon Dijon mustard
- 24 small skewers
Quick Steps:
- Cut the cheddar into 1-inch cubes.
- Fold the salami slices into quarters.
- Thread grape, salami, and cheddar onto each skewer.
- Whisk honey and Dijon together for a tiny dip, if using.
- Chill and pack with parchment between layers.
Equipment for This Recipe:
- Knife
- Cutting board
- Small skewers
How to Serve This Dish:
Serve them with chilled apple cider or a dry lager. Four skewers make a snack; eight can anchor a whole plate with crackers.
Pro Tips for This Recipe:
- Chill the grapes first so the skewers feel extra fresh.
- Use a cheddar with a little bite; mild cheddar gets lost.
- Fold the salami tightly so it does not slide off.
Variations on This Dish:
- Turkey Cheese Skewers: Swap salami for folded turkey.
- Fig and Brie Skewers: Use brie cubes and a dried fig half.
Common Mistakes to Avoid with This Dish:
- Using tiny cheese cubes: They fall apart when you thread them.
- Letting grapes roll loose in the basket: Pre-skewer them or they become a mess.
- Overcomplicating the dip: Keep it tiny; the skewers already carry the flavor.
11. Classic Tuna Pasta Salad
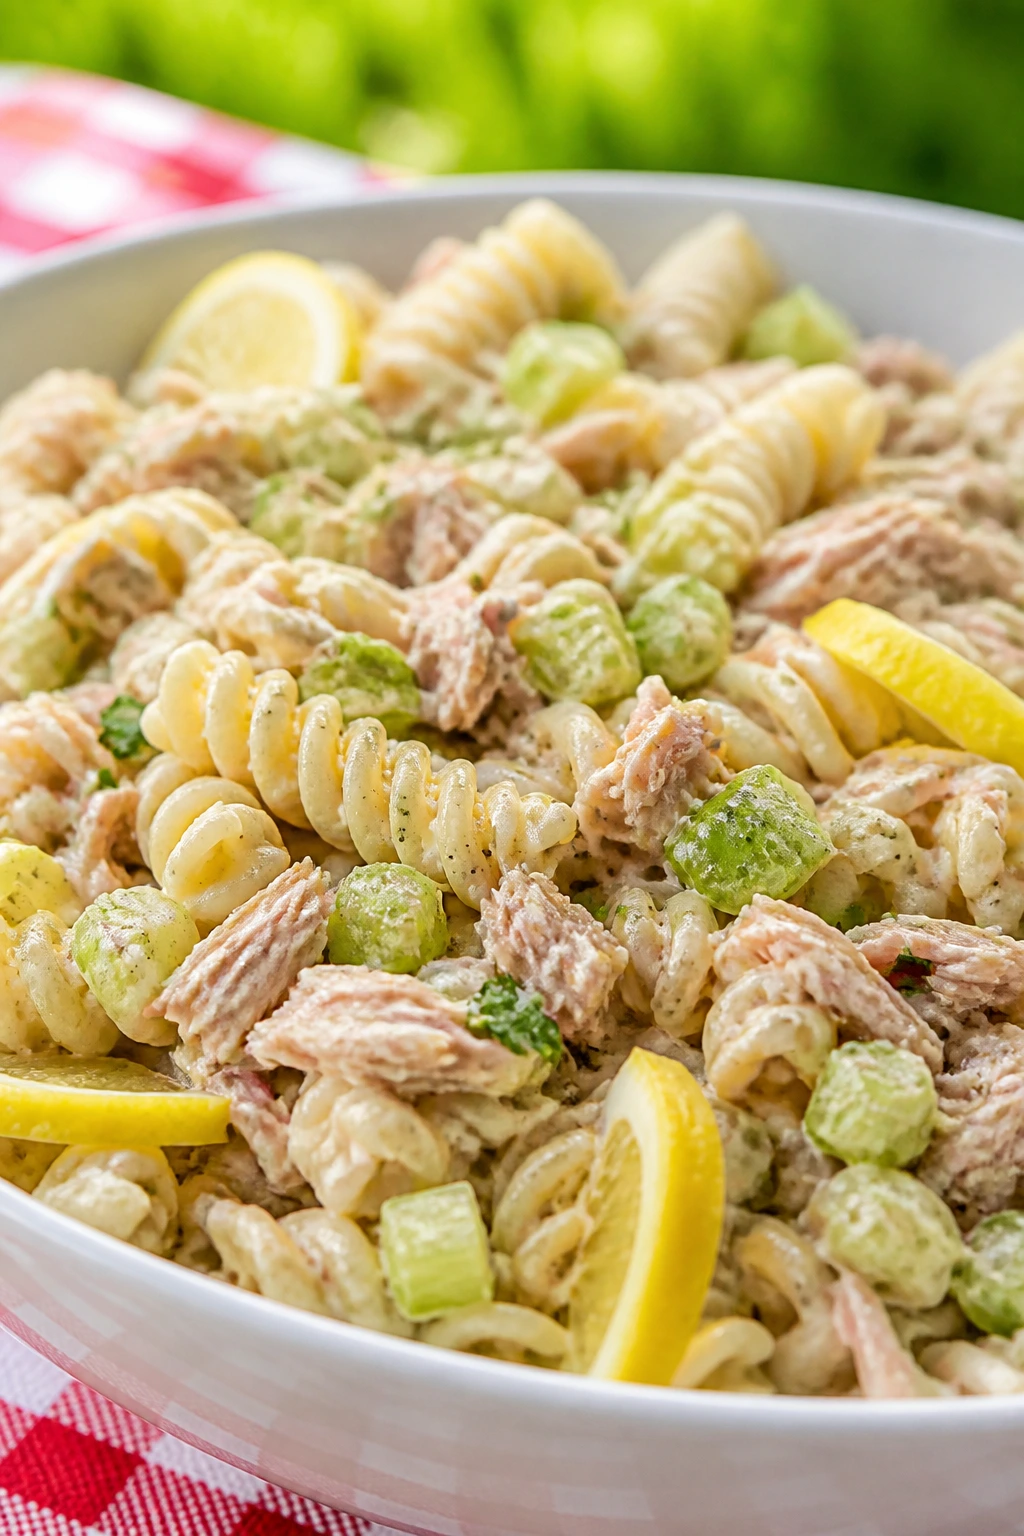
Tuna pasta salad can go bland fast, which is why this version stays sharp with celery, lemon, and a good hit of pepper. The pasta gives it body, the tuna gives it salt, and the whole thing lands in that useful middle ground between lunch and picnic side.
Why It Works:
It chills well, carries in a container without drama, and can be eaten with a fork straight from a cooler. The lemon keeps the mayo from tasting flat after a few hours.
Key Ingredients:
- 8 ounces short pasta
- 2 cans tuna, drained
- 1/3 cup mayonnaise
- 1 tablespoon lemon juice
- 1 celery stalk, diced
- 2 tablespoons chopped dill pickles
- 2 tablespoons chopped parsley
- 1/4 teaspoon black pepper
- 1/4 teaspoon salt
Quick Steps:
- Cook the pasta, drain it, and rinse under cold water.
- Stir mayo, lemon juice, salt, and pepper in a bowl.
- Fold in tuna, celery, pickles, parsley, and pasta.
- Chill for 30 minutes so the flavors settle.
- Pack in a sealed container with a fork tucked on top.
Equipment for This Recipe:
- Saucepan
- Mixing bowl
- Colander
How to Serve This Dish:
Cold lemonade or iced black tea works well here, especially with a few extra pickles on the side. It serves as a full lunch on its own, or as a side for grilled chicken.
Pro Tips for This Recipe:
- Slightly undercook the pasta so it stays firm after chilling.
- Flake the tuna well so there are no dry clumps.
- Taste again after chilling; cold food always needs a little more salt.
Variations on This Dish:
- Curried Tuna Pasta: Add 1 teaspoon curry powder and a few raisins.
- Mediterranean Tuna Pasta: Swap pickles for olives and add cucumber.
Common Mistakes to Avoid with This Dish:
- Using mushy pasta: It falls apart once it sits in dressing.
- Skipping acid: Without lemon, the salad tastes heavy.
- Packing it warm: Warm mayo-based salads are a bad picnic gamble.
12. Crispy Chicken Cutlet Sliders
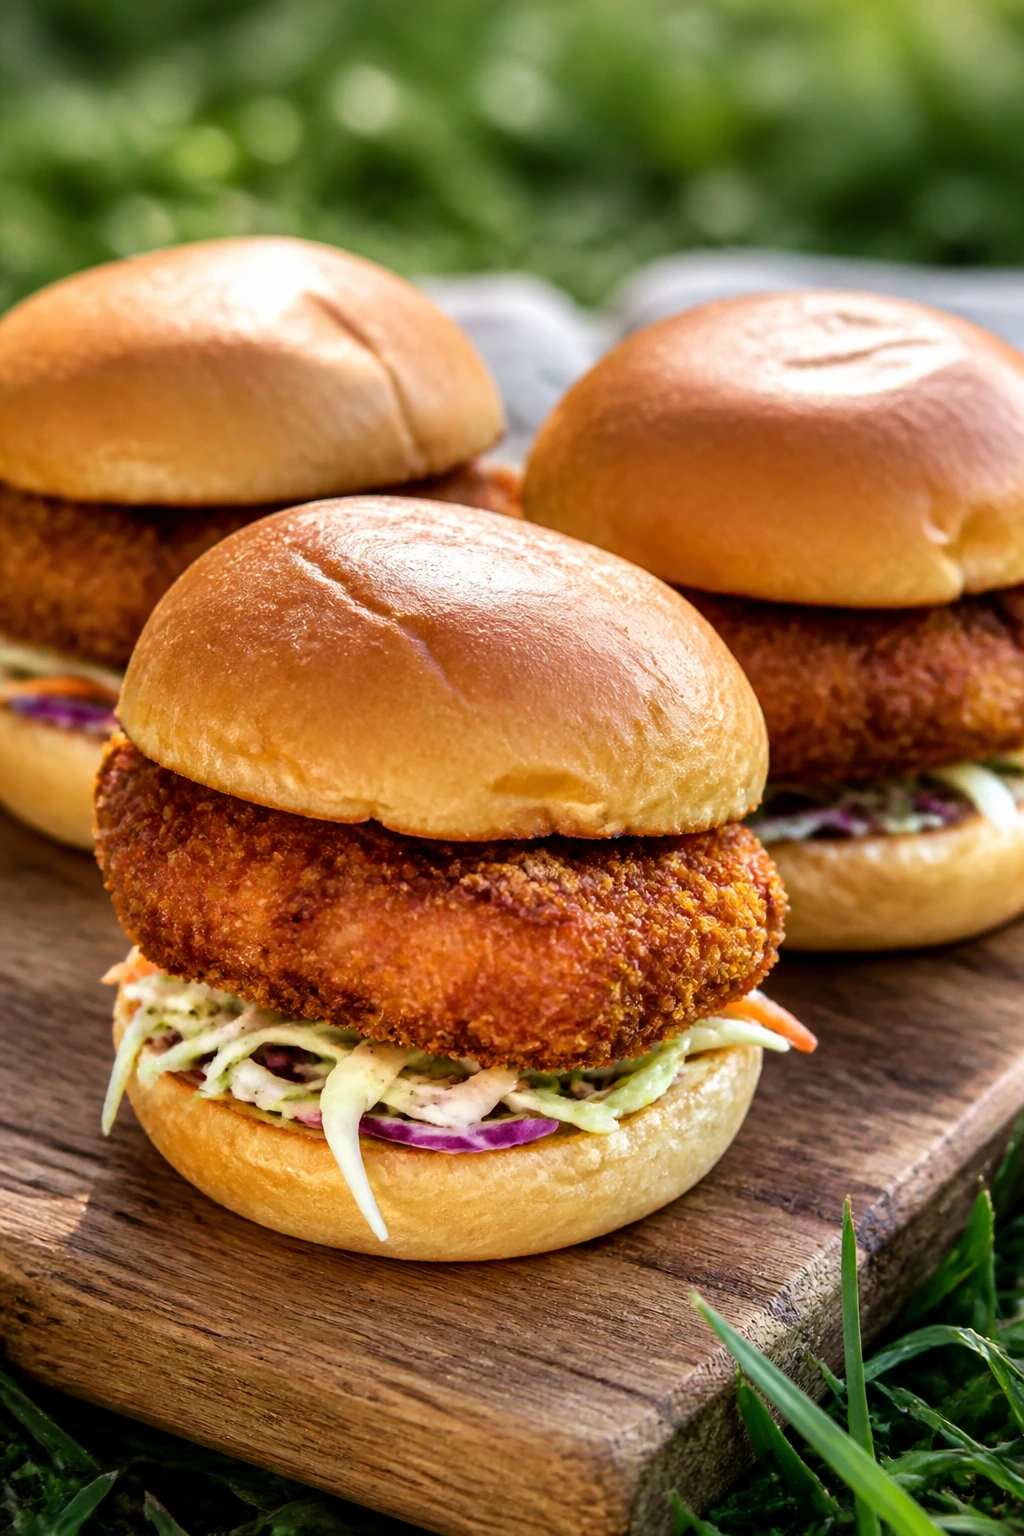
Crispy chicken cutlet sliders solve the “I want a sandwich, but I don’t want a big sandwich” problem. The breaded cutlet stays crisp if you cool it properly, and the small buns keep everything contained. Add a little slaw, and it feels like a real meal.
Why It Works:
Smaller bread means less filling squeeze-out, and the crunch holds up better than shredded chicken ever will. A thin layer of sauce gives flavor without soaking through the bun.
Key Ingredients:
- 2 chicken cutlets, pounded thin
- 1/2 cup flour
- 2 eggs, beaten
- 1 cup seasoned breadcrumbs
- 4 slider buns
- 1/2 cup shredded cabbage slaw
- 2 tablespoons mayonnaise
- 1 tablespoon pickle brine
- Salt and pepper
Quick Steps:
- Dredge the cutlets in flour, egg, then breadcrumbs.
- Fry or bake until golden and cooked through.
- Cool on a rack so the crust stays crisp.
- Mix mayo with pickle brine and spread lightly on buns.
- Add slaw and sliced cutlet, then pack once fully cool.
Equipment for This Recipe:
- Three shallow bowls
- Skillet or sheet pan
- Wire rack
How to Serve This Dish:
They go well with chilled cola, lemonade, or a light beer. Two sliders make a proper lunch; one slider works as a snack beside fruit salad.
Pro Tips for This Recipe:
- Cool the cutlets on a rack, not paper towels, to avoid steam.
- Keep the sauce thin so it does not flood the bun.
- Pack slaw separately if you want maximum crunch.
Variations on This Dish:
- Hot Honey Sliders: Add hot honey on the cutlet before packing.
- Parmesan Chicken Sliders: Mix grated Parmesan into the breadcrumb coating.
Common Mistakes to Avoid with This Dish:
- Packing cutlets while warm: The crust softens almost immediately.
- Using thick buns: They overwhelm the filling and get clumsy.
- Over-saucing: A slider should feel dressed, not drenched.
13. Spinach-Artichoke Pinwheels
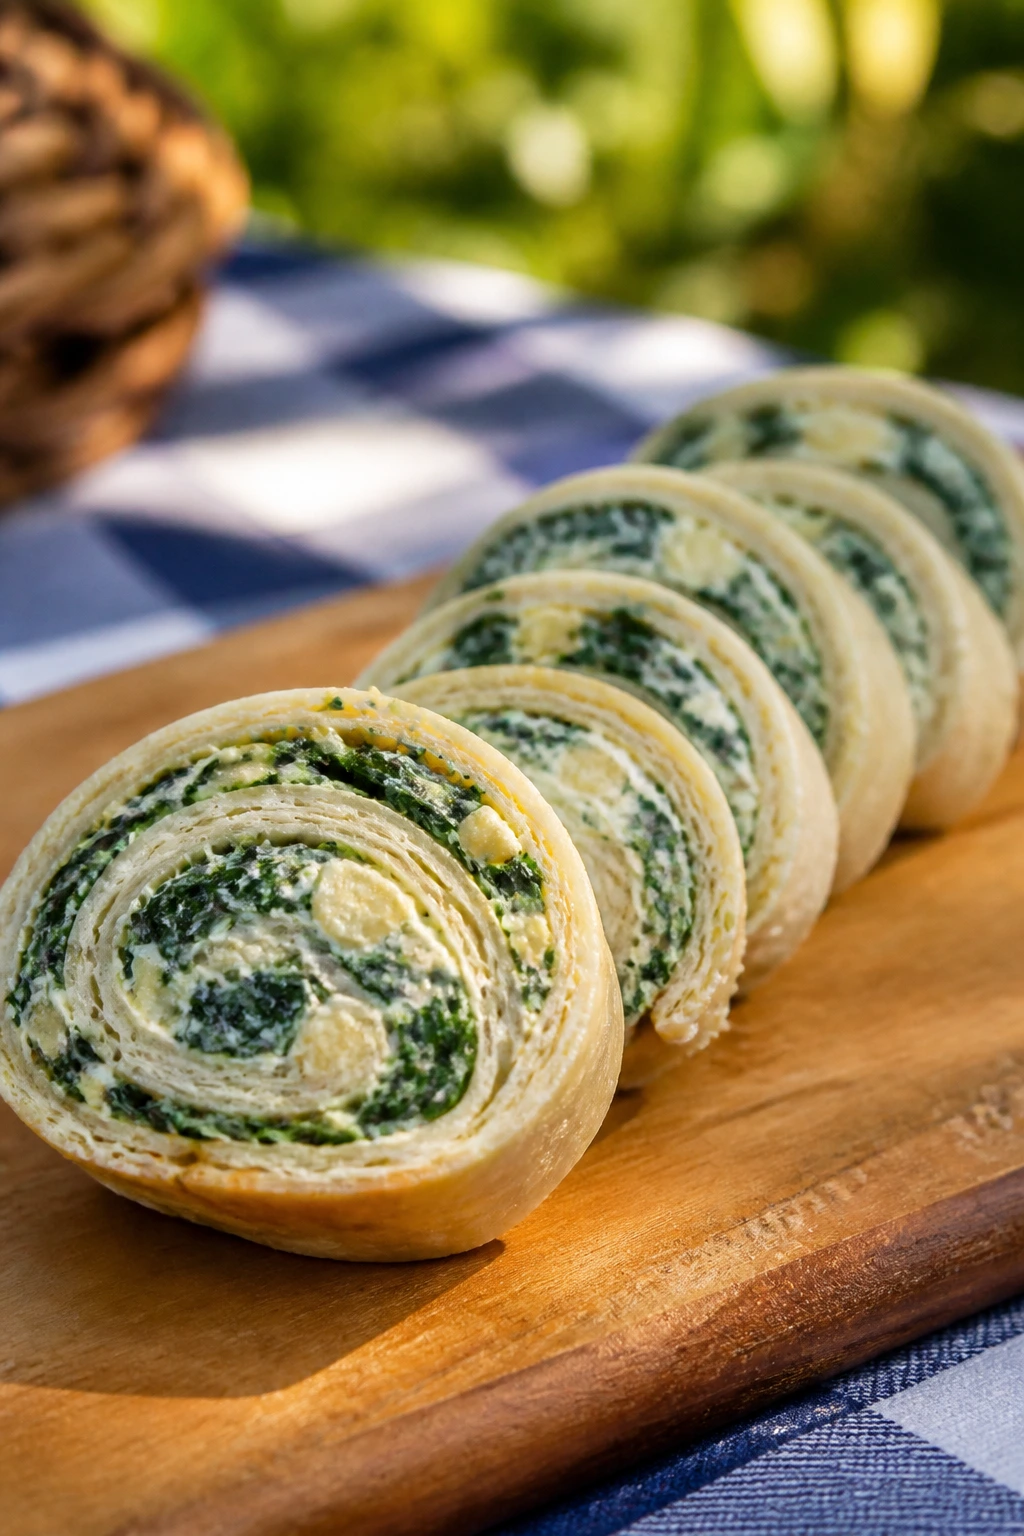
Spinach-artichoke dip turned into a wrap is exactly the kind of picnic move I like. You get the creamy, garlicky filling without needing a spoon, and the tortilla keeps the whole thing from splatting across a plate. Slice it thin and it looks smarter than it should.
Why It Works:
The filling is thick, the tortilla seals well, and the spirals hold their shape in a chilled container. These are especially good when you want something creamy that still feels easy to eat.
Key Ingredients:
- 4 large tortillas
- 1 cup cream cheese, softened
- 1/2 cup chopped spinach, squeezed dry
- 1/2 cup chopped artichoke hearts, drained
- 1/4 cup grated Parmesan
- 1 garlic clove, minced
- 1 tablespoon lemon juice
- 1/4 teaspoon salt
- 1/4 teaspoon black pepper
Quick Steps:
- Mix cream cheese, spinach, artichokes, Parmesan, garlic, lemon juice, salt, and pepper.
- Spread the filling in a thin layer over each tortilla.
- Roll tightly into logs and chill for 20 minutes.
- Slice into 1-inch pinwheels with a sharp knife.
- Pack standing up or in a single layer.
Equipment for This Recipe:
- Mixing bowl
- Sharp knife
- Plastic wrap or parchment
How to Serve This Dish:
Cold sparkling water and a slice of lemon suit these well. Six pinwheels make a snack; ten can stand in for lunch with carrot sticks.
Pro Tips for This Recipe:
- Squeeze the spinach dry or the wrap loosens.
- Chill the rolled log before slicing so the spirals stay clean.
- Use flour tortillas, not dry corn tortillas.
Variations on This Dish:
- Sun-Dried Tomato Pinwheels: Add chopped sun-dried tomatoes.
- Turkey Pinwheels: Add a thin layer of sliced turkey before rolling.
Common Mistakes to Avoid with This Dish:
- Spreading the filling too thick: The roll splits when sliced.
- Cutting too soon: Warm pinwheels smear instead of spiral.
- Skipping the dry spinach step: It’s the fastest way to wreck the texture.
14. Salsa Verde Bean Salad
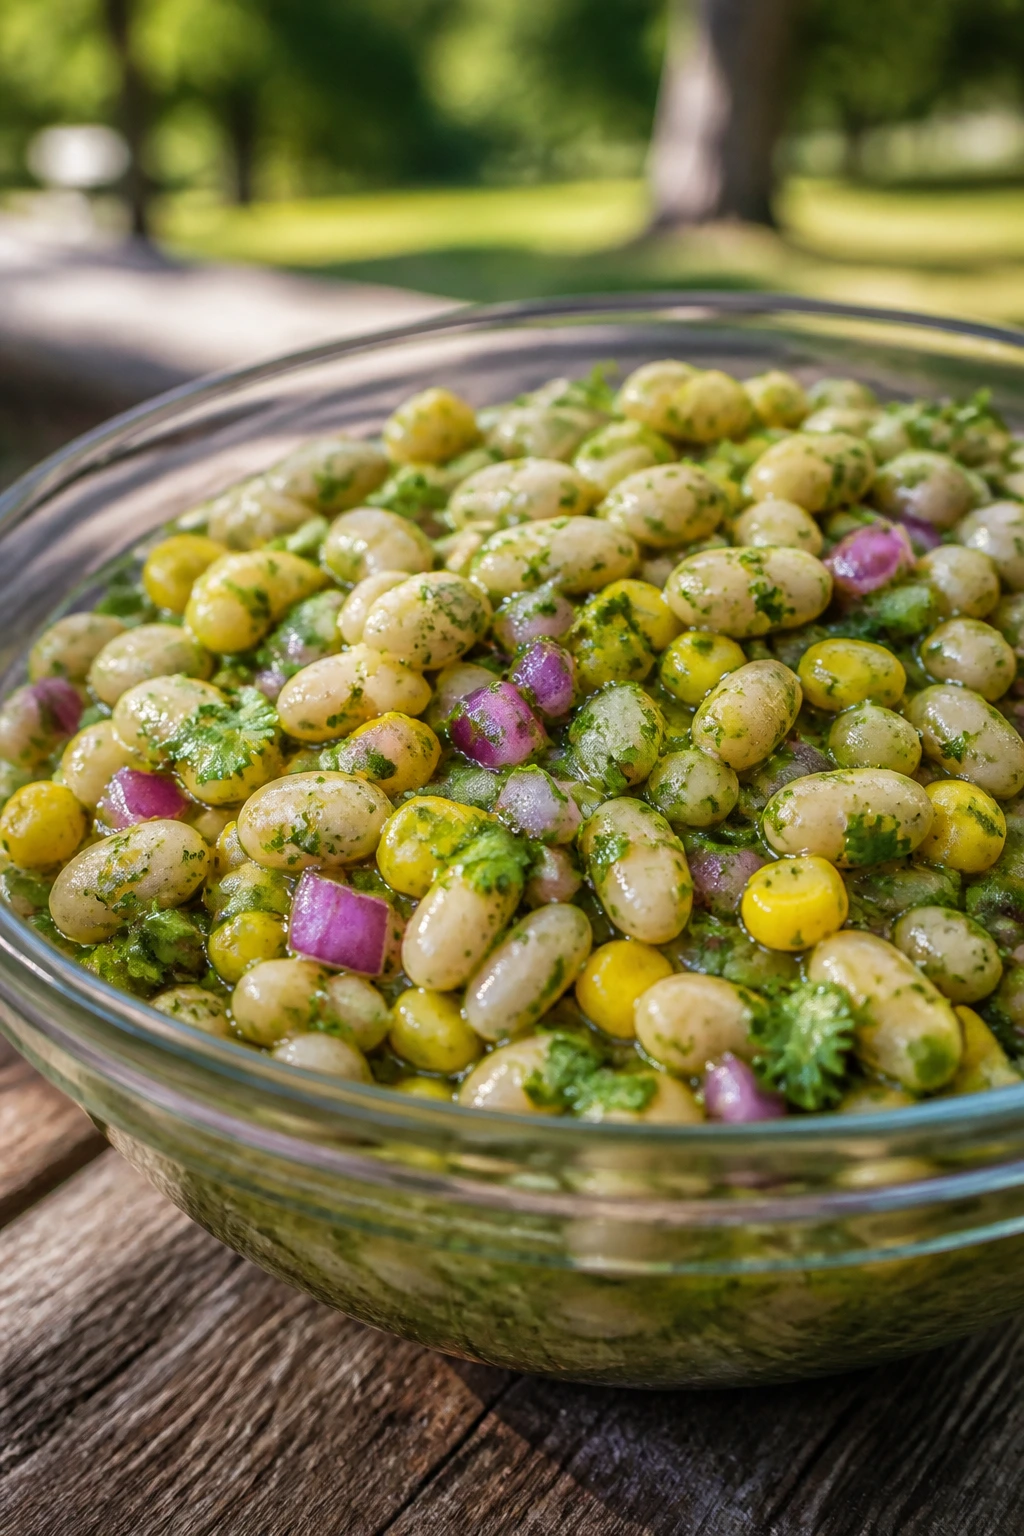
Bean salad can be dull, but salsa verde wakes it up fast. The bright, tangy sauce coats the beans and corn, and the whole thing holds up beautifully in a cooler. It’s one of the few picnic dishes that tastes more alive after it sits.
Why It Works:
Beans are sturdy, salsa verde brings acidity, and there’s no fragile lettuce in sight. That means less worry, more eating.
Key Ingredients:
- 2 cans white beans, drained and rinsed
- 1 cup corn kernels
- 1/2 cup salsa verde
- 1/4 cup diced red onion
- 1/4 cup chopped cilantro
- 1 tablespoon lime juice
- 1/2 teaspoon salt
- 1 avocado, diced just before serving
Quick Steps:
- Combine beans, corn, onion, cilantro, salsa verde, lime juice, and salt.
- Stir gently so the beans stay whole.
- Chill for 20 minutes.
- Fold in avocado right before packing or serving.
- Taste and add another squeeze of lime if needed.
Equipment for This Recipe:
- Mixing bowl
- Can opener
- Spoon
How to Serve This Dish:
A cold cerveza, lime soda, or iced tea fits nicely. Serve it with tortilla chips for scooping, or spoon it next to grilled chicken.
Pro Tips for This Recipe:
- Rinse canned beans well so the dressing tastes clean.
- Add avocado at the end so it stays green.
- Choose a salsa verde with some tang, not a flat one.
Variations on This Dish:
- Black Bean Version: Swap in black beans and a little cumin.
- Feta Bean Salad: Add crumbled feta for extra salt.
Common Mistakes to Avoid with This Dish:
- Mashing the beans while stirring: Keep the texture intact.
- Adding avocado too early: It browns and turns soft.
- Underseasoning cold beans: They need more salt than you think.
15. Turkey-Cheddar Tea Sandwiches
Turkey sandwiches can be forgettable when they’re oversized and dry. Cut them small, use sharp cheddar, and add a little mustard butter. Suddenly they feel like the polished part of the picnic basket.
Why It Works:
Soft bread and a thin spread keep the sandwich from drying out, while the mustard gives each bite enough bite to stay interesting. Small squares also stack neatly and don’t crush themselves.
Key Ingredients:
- 8 slices soft white or wheat bread
- 6 ounces sliced turkey
- 4 ounces sharp cheddar, sliced thin
- 2 tablespoons softened butter
- 1 tablespoon Dijon mustard
- 1 cup baby lettuce
- 1/4 teaspoon black pepper
Quick Steps:
- Mix butter and Dijon together.
- Spread a thin layer on each bread slice.
- Layer turkey, cheddar, lettuce, and pepper.
- Close and press lightly, then cut into fingers or squares.
- Wrap tightly and chill before packing.
Equipment for This Recipe:
- Butter knife
- Serrated knife
- Parchment or wax paper
How to Serve This Dish:
Serve with iced tea or a cold apple spritz. Four small triangles make one lunch portion; two are enough for a snack with fruit.
Pro Tips for This Recipe:
- Use thin-sliced turkey so the sandwich doesn’t bulge.
- Butter the bread edge to edge to slow sogginess.
- Press the sandwiches before cutting for cleaner edges.
Variations on This Dish:
- Apple Turkey Sandwiches: Add thin apple slices for crunch.
- Herb Turkey Sandwiches: Mix chopped parsley into the butter.
Common Mistakes to Avoid with This Dish:
- Loading on too much turkey: The bread splits.
- Using wet lettuce: It softens the slice fast.
- Skipping the butter barrier: The bread absorbs moisture too quickly.
16. Roasted Vegetable Focaccia Squares
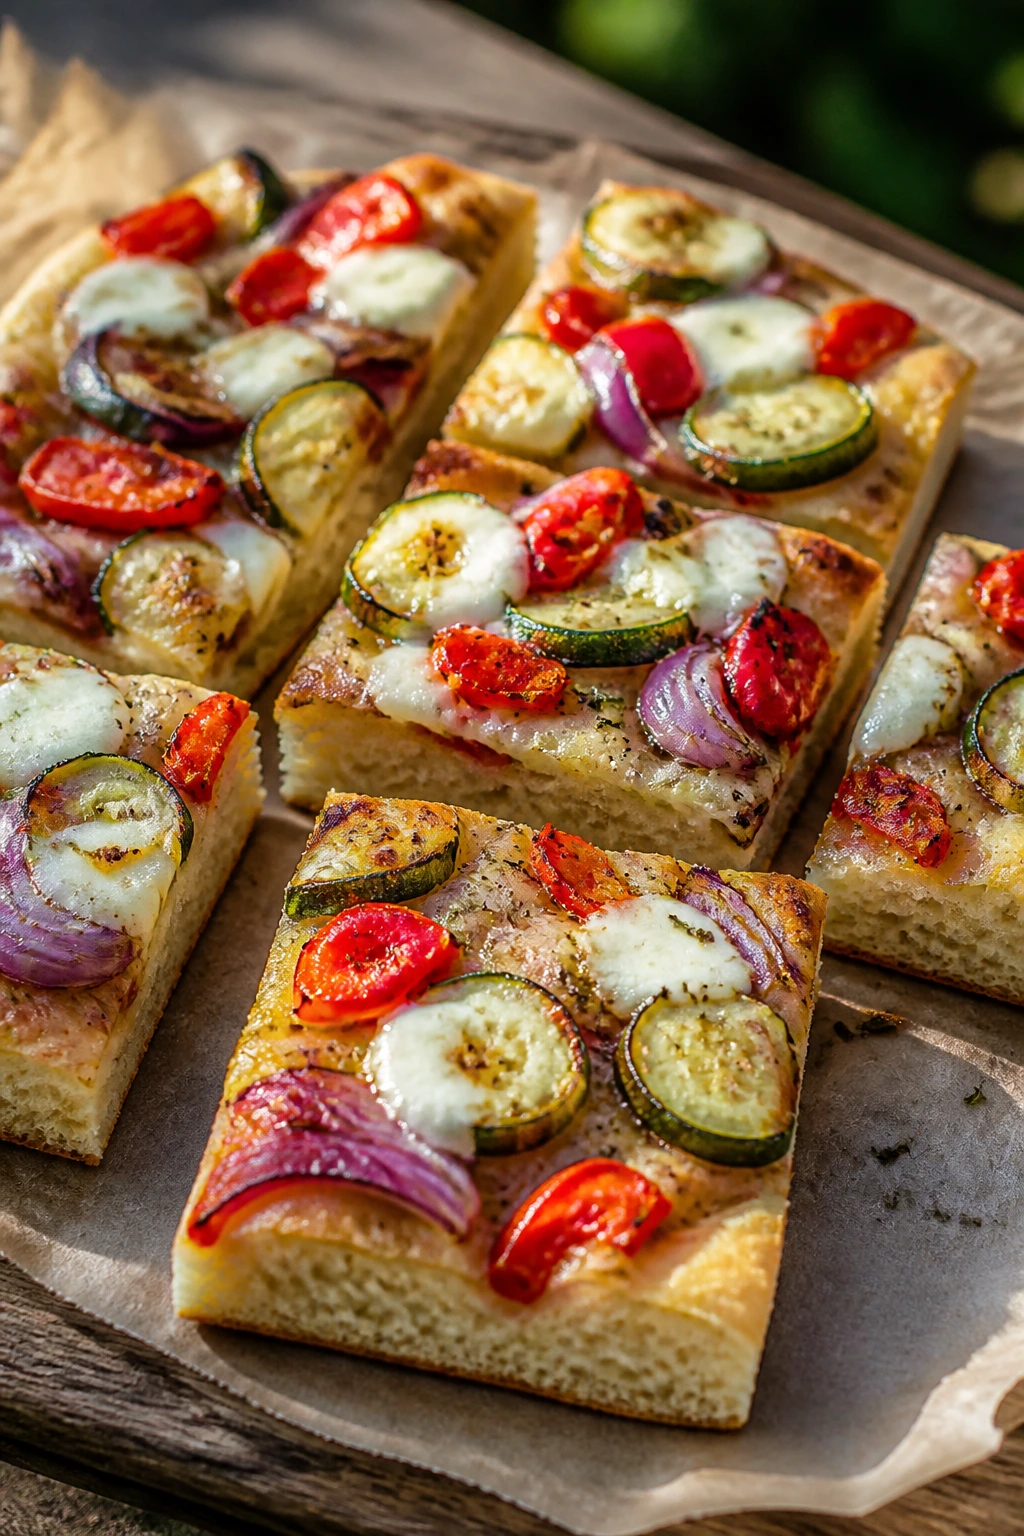
Focaccia is one of the best picnic breads because it has a sturdy crust and a tender middle. Add roasted vegetables, cut it into squares, and you get a sliceable dish that eats like a sandwich without needing one.
Why It Works:
The bread resists crushing, and the vegetables bring enough flavor that you do not need extra sauce. A good focaccia square tastes fine cold, which is a bigger compliment than it sounds.
Key Ingredients:
- 1 large focaccia loaf
- 1 zucchini, sliced and roasted
- 1 red bell pepper, roasted and sliced
- 1/2 red onion, roasted
- 4 ounces mozzarella
- 2 tablespoons olive oil
- 1 tablespoon pesto
- 1/2 teaspoon salt
Quick Steps:
- Roast the vegetables until soft and lightly browned.
- Slice the focaccia horizontally if needed.
- Spread pesto over the bread and layer on vegetables and mozzarella.
- Cut into squares and press gently.
- Pack in parchment with a paper towel to catch moisture.
Equipment for This Recipe:
- Baking sheet
- Knife
- Parchment paper
How to Serve This Dish:
Good with cold soda water, lemonade, or a crisp white wine. One square makes a snack; two squares and a salad make lunch.
Pro Tips for This Recipe:
- Let the vegetables cool before assembling or the bread gets soggy.
- Use a loaf with a sturdy bottom crust.
- Slice into picnic-sized squares before packing, not after.
Variations on This Dish:
- Tomato Mozzarella Focaccia: Add sliced tomatoes and basil.
- Olive Focaccia: Use olives and thyme for a saltier version.
Common Mistakes to Avoid with This Dish:
- Packing hot vegetables: Steam softens the bread fast.
- Using a flimsy loaf: It collapses under the filling.
- Skipping the paper towel: Moisture control matters here.
17. Shrimp Ceviche Cups
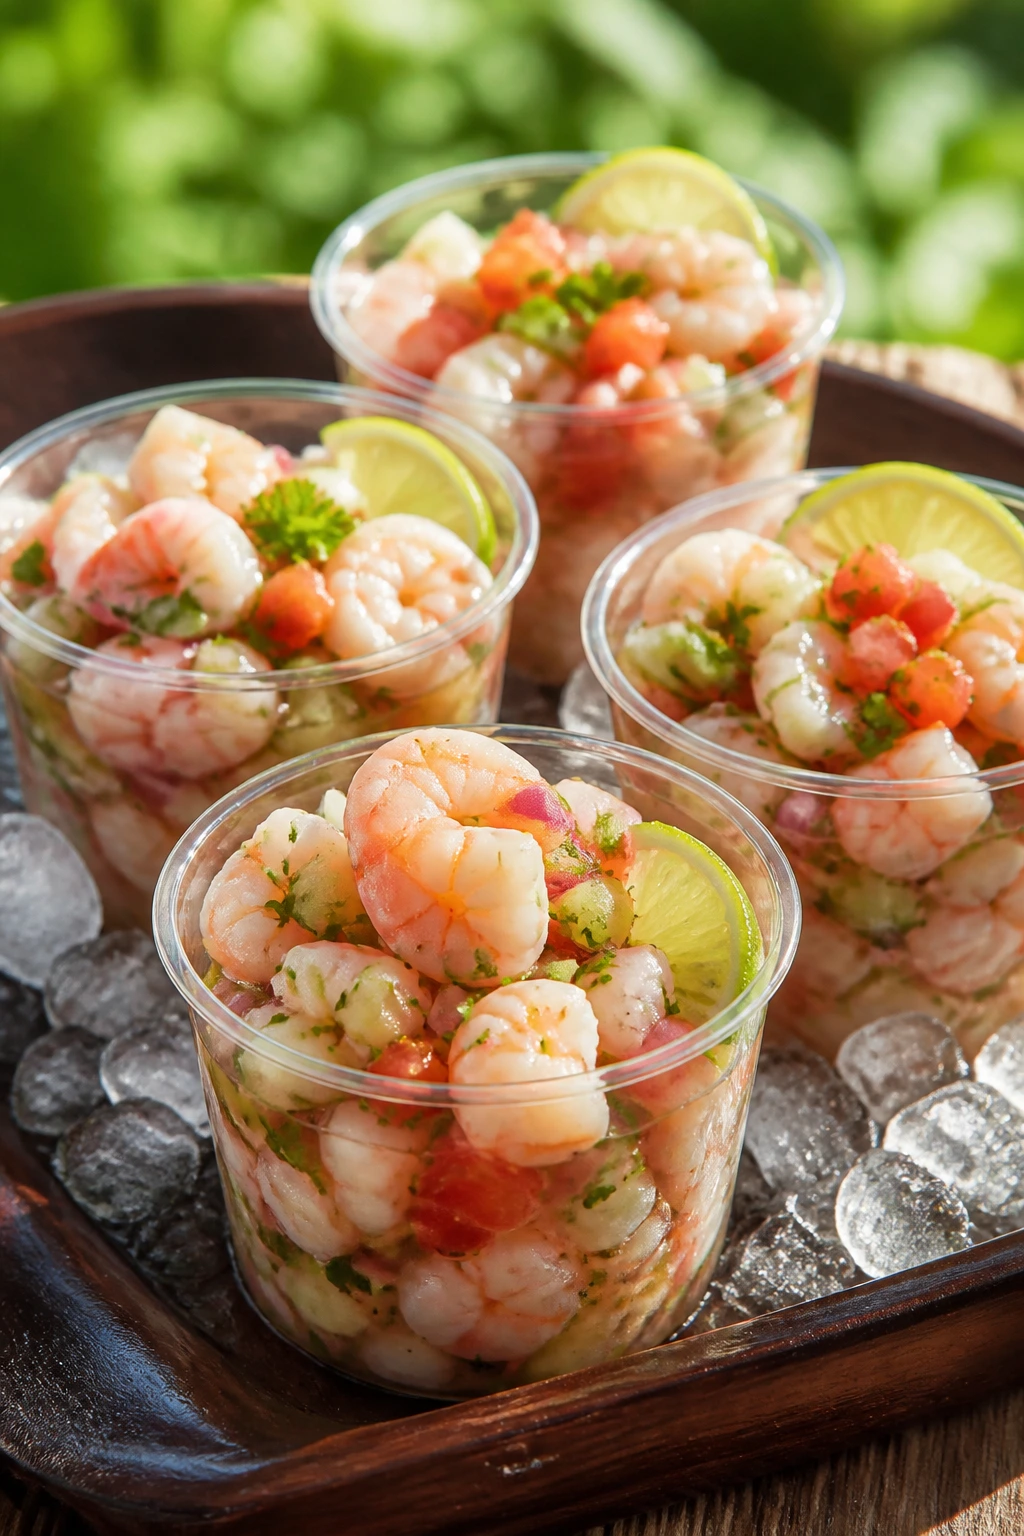
Shrimp ceviche belongs in a chilled cup, not a bowl. Keep it small, keep it cold, and the lime does all the heavy lifting. Each spoonful feels bright and sharp, which is exactly what a warm picnic wants.
Why It Works:
The acid keeps the shrimp lively, the cucumber adds crunch, and the cups make portioning easy. It is a standout choice when you want something that feels light but still special.
Key Ingredients:
- 1 pound cooked shrimp, chopped
- 1/2 cup lime juice
- 1/2 cup diced tomato
- 1/2 cup diced cucumber
- 1/4 cup diced red onion
- 2 tablespoons chopped cilantro
- 1 avocado, diced
- Salt to taste
Quick Steps:
- Combine shrimp, lime juice, tomato, cucumber, onion, and cilantro.
- Chill for at least 20 minutes so the flavors marry.
- Stir in avocado right before serving.
- Spoon into small cups.
- Serve over ice or from the coldest part of the cooler.
Equipment for This Recipe:
- Mixing bowl
- Citrus juicer
- Small cups
How to Serve This Dish:
Pair with a salted margarita, lime seltzer, or cold Mexican lager. One cup makes a starter; two cups plus chips can stand in for lunch.
Pro Tips for This Recipe:
- Use fully cooked shrimp if you want the safest picnic route.
- Drain off extra liquid before packing.
- Keep avocado separate until the end.
Variations on This Dish:
- Mango Shrimp Cups: Add diced mango for sweetness.
- Spicy Shrimp Cups: Stir in minced jalapeño or hot sauce.
Common Mistakes to Avoid with This Dish:
- Letting it warm up: Seafood belongs at the cold end of the picnic.
- Using too much lime juice: It can overpower the shrimp.
- Packing avocado early: It softens and turns muddy.
18. Peanut Butter Banana Oat Bars
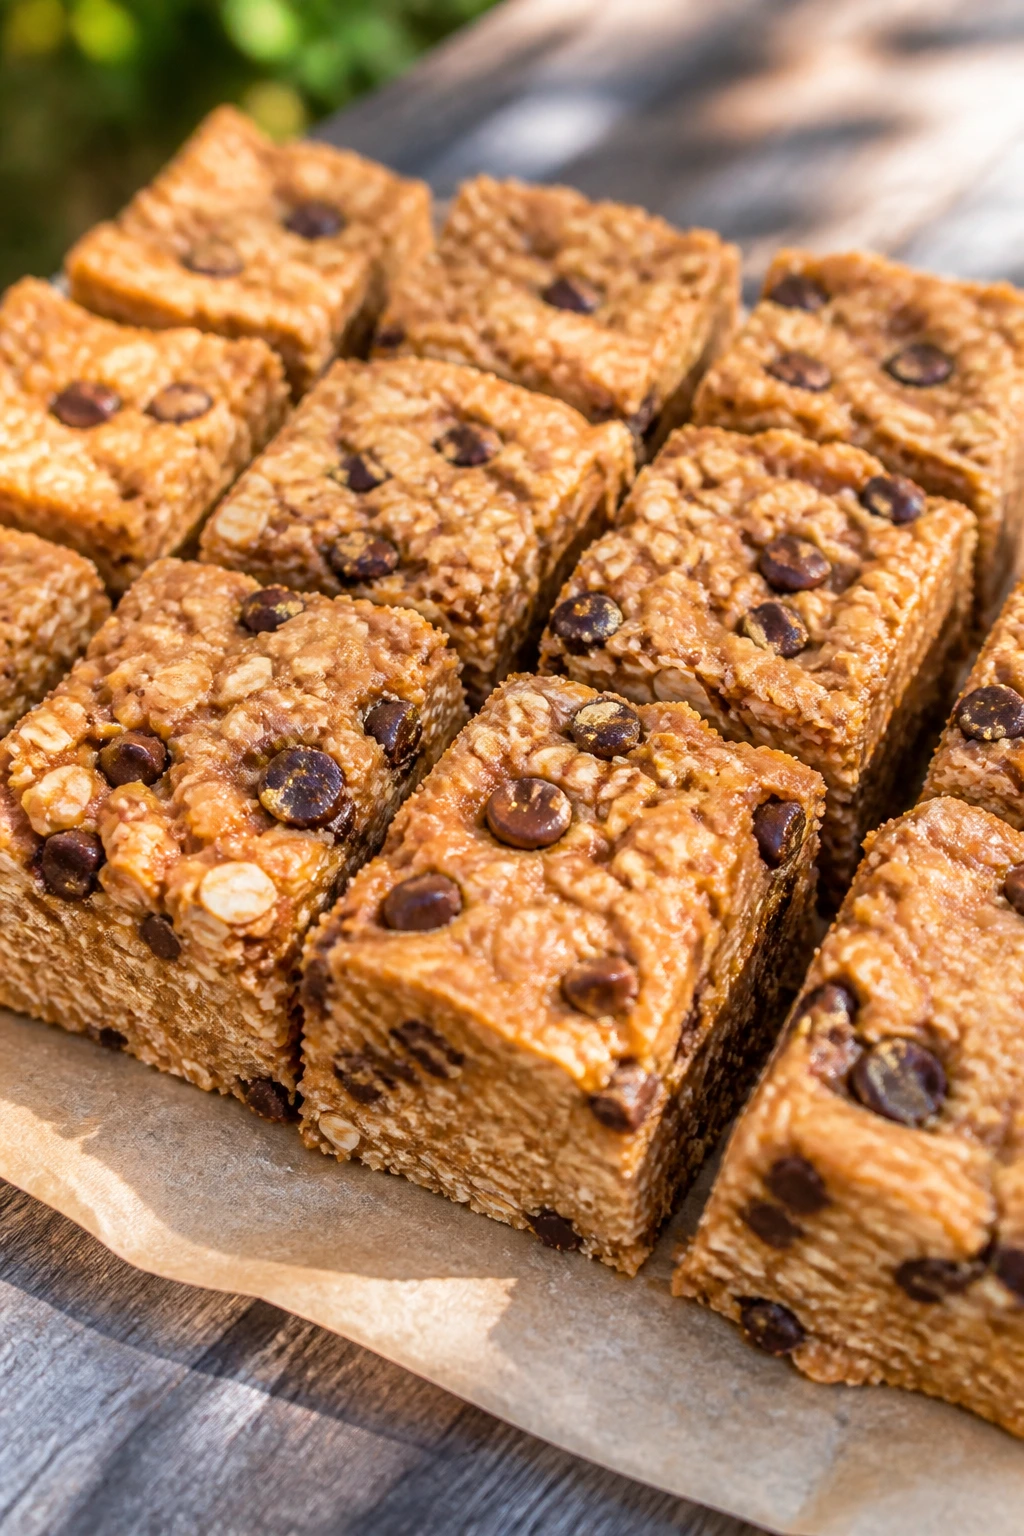
These bars are picnic gold because they hold together without a wrapper or fork. Peanut butter brings the chew, banana keeps them soft, and oats give them enough structure to survive the ride. I like them when the cooler is full of savory food and the basket needs one sweet thing that won’t crumble everywhere.
Why It Works:
The bars bake into a compact slab, then cool into clean slices. They’re sturdy enough for fingers, which is exactly the point.
Key Ingredients:
- 2 cups rolled oats
- 2 ripe bananas, mashed
- 1/2 cup peanut butter
- 1/4 cup honey
- 1 teaspoon cinnamon
- 1/2 teaspoon baking powder
- 1/4 teaspoon salt
- 1/3 cup chocolate chips
Quick Steps:
- Preheat the oven to 350°F.
- Mix bananas, peanut butter, honey, cinnamon, baking powder, and salt.
- Stir in oats and chocolate chips.
- Press into a lined 8-inch square pan.
- Bake 20 to 25 minutes, then cool completely before slicing.
Equipment for This Recipe:
- Mixing bowl
- Square baking pan
- Parchment paper
How to Serve This Dish:
Serve cold with iced coffee or a cold milk drink. One bar is a snack; two bars can end a picnic on a sweet note.
Pro Tips for This Recipe:
- Use very ripe bananas for the best flavor.
- Cool fully before slicing or the bars will crumble.
- A pinch of flaky salt on top makes the peanut butter pop.
Variations on This Dish:
- Almond Butter Bars: Swap peanut butter for almond butter.
- Raisin Oat Bars: Use raisins instead of chocolate chips.
Common Mistakes to Avoid with This Dish:
- Cutting them warm: The bars fall apart.
- Using underripe bananas: The flavor stays flat.
- Pressing the mix loosely: Dense packing is what keeps them portable.
19. BLT Pasta Salad
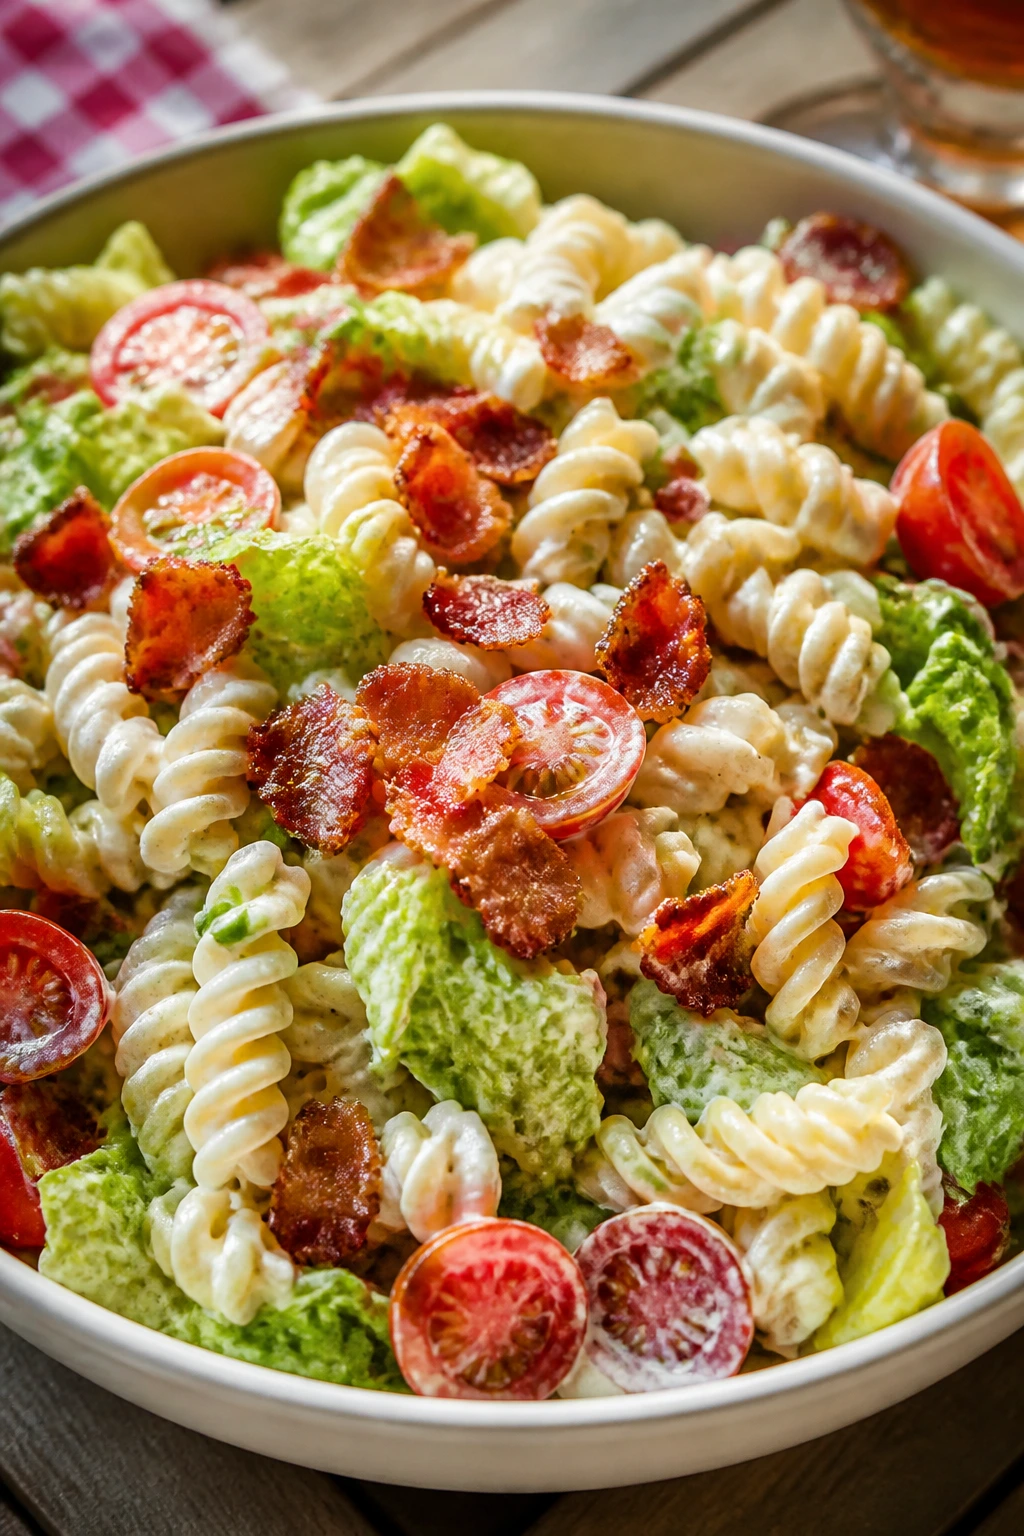
BLT pasta salad tastes like a sandwich that decided to become better at parties. The bacon gives it salt, the tomatoes add juice, and the lettuce—added at the right moment—keeps the whole thing from turning into mush.
Why It Works:
It has the familiar flavors of a BLT without the bread going stale. The pasta makes it filling enough for lunch, and the mayo dressing clings instead of pooling.
Key Ingredients:
- 8 ounces short pasta
- 6 slices bacon, cooked and crumbled
- 1 cup cherry tomatoes, halved
- 1 cup chopped romaine
- 1/3 cup mayonnaise
- 1 tablespoon lemon juice
- 1 teaspoon Dijon mustard
- Salt and black pepper
Quick Steps:
- Cook the pasta, drain, and cool it.
- Whisk mayo, lemon juice, Dijon, salt, and pepper.
- Toss pasta with dressing, bacon, and tomatoes.
- Fold in romaine just before packing.
- Chill briefly and serve cold.
Equipment for This Recipe:
- Saucepan
- Mixing bowl
- Colander
How to Serve This Dish:
Cold lemonade or a crisp pilsner fits the salt and acidity nicely. It serves as a full lunch portion or as a side alongside grilled chicken.
Pro Tips for This Recipe:
- Add lettuce last so it stays crisp.
- Crisp the bacon well; soft bacon gets lost.
- Use a short pasta shape with ridges to hold the dressing.
Variations on This Dish:
- Avocado BLT Pasta: Add diced avocado at serving.
- Chicken BLT Pasta: Fold in diced cooked chicken.
Common Mistakes to Avoid with This Dish:
- Adding lettuce too early: It wilts and disappears.
- Overdressing the pasta: The salad turns slick.
- Using undercooked bacon: The chew throws off the texture.
20. Savory Sausage Roll Bites

Sausage rolls are picnic food with a proper spine. Wrapped in pastry and baked until browned, they hold their shape well and taste good warm or at room temperature. Cut them into bite-size pieces, and they disappear faster than you expect.
Why It Works:
The pastry insulates the filling, so the bites stay tidy in transport. You get fat, salt, and flake in one compact piece.
Key Ingredients:
- 1 sheet puff pastry, thawed
- 1/2 pound sausage meat
- 1 egg
- 1 tablespoon Dijon mustard
- 1 tablespoon chopped parsley
- 1/4 teaspoon black pepper
- Sesame seeds for topping
Quick Steps:
- Preheat the oven to 400°F.
- Mix sausage, egg, mustard, parsley, and pepper.
- Spread the filling along the pastry sheet and roll it into a log.
- Slice into bite-size pieces and place seam-side down.
- Bake 18 to 22 minutes until deep golden.
Equipment for This Recipe:
- Baking sheet
- Parchment paper
- Sharp knife
How to Serve This Dish:
Serve with cold beer, sparkling cider, or iced tea with lemon. Four bites make a snack; eight can anchor the savory part of the picnic.
Pro Tips for This Recipe:
- Chill the rolled log before slicing for cleaner cuts.
- Keep the pastry cold so it flakes instead of smearing.
- Let the bites cool on a rack to protect the crust.
Variations on This Dish:
- Apple Sausage Bites: Add a little grated apple to the filling.
- Cheese Sausage Bites: Tuck a small strip of cheddar inside each roll.
Common Mistakes to Avoid with This Dish:
- Overfilling the pastry: It leaks out in the oven.
- Slicing while hot: The pastry crushes.
- Using warm pastry: It turns greasy instead of flaky.
21. Couscous Cucumber Mint Salad
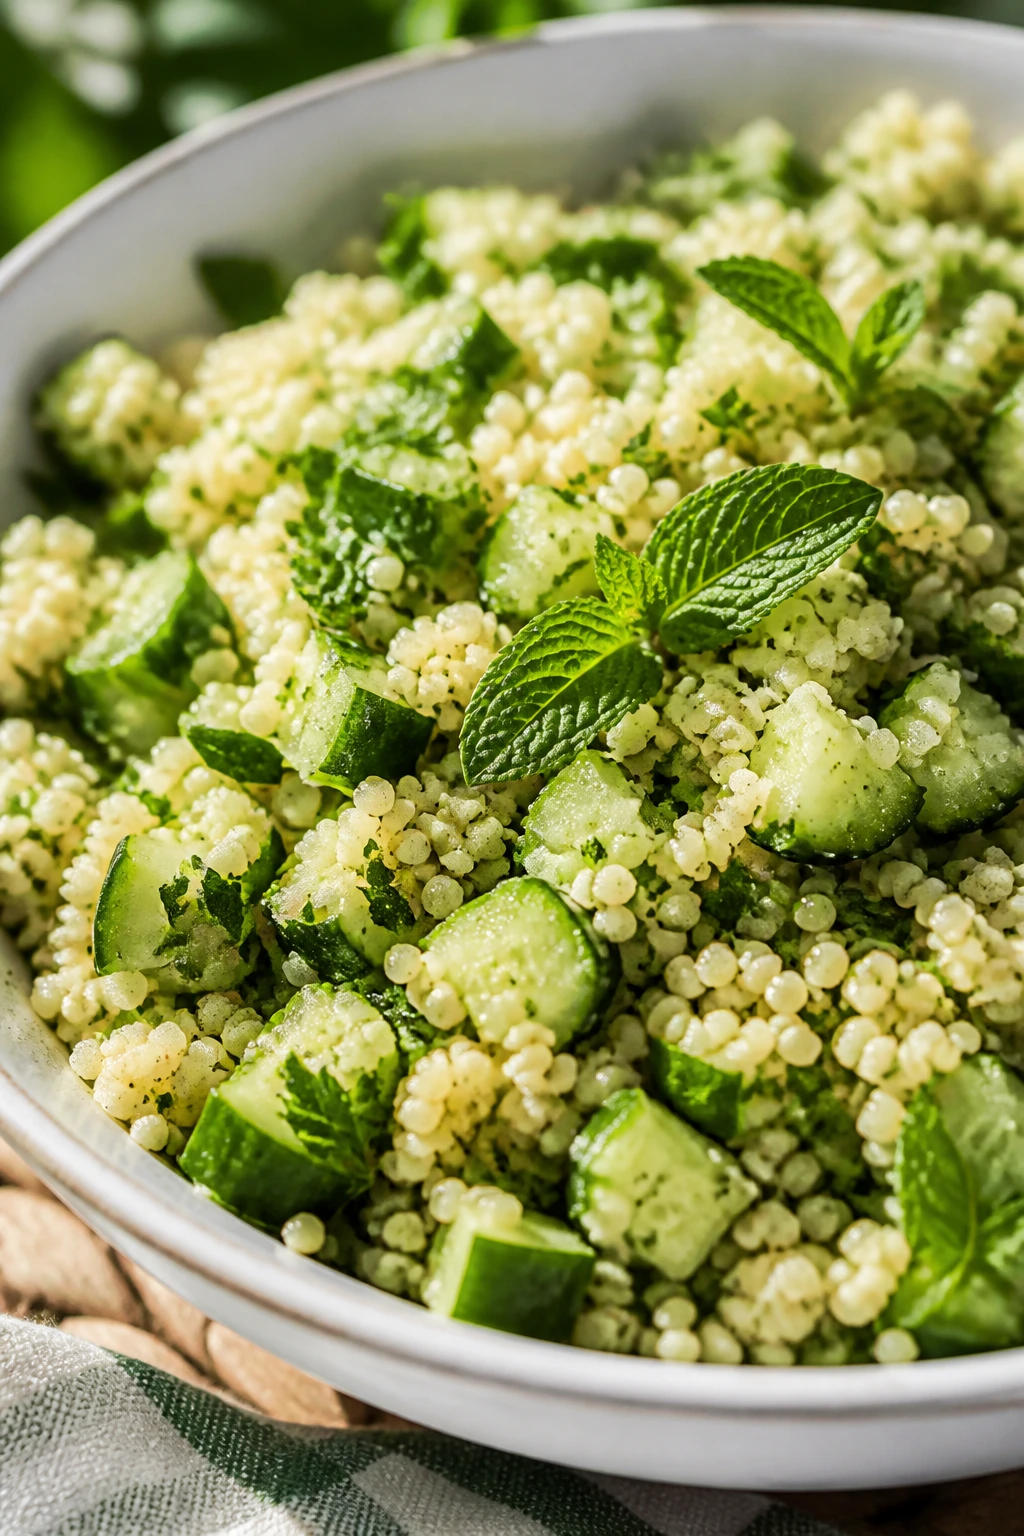
Couscous is one of the easiest grains to picnic with because it soaks up dressing without turning heavy. Add cucumber, mint, and lemon, and it tastes bright even after a few hours in a container. It’s a quiet little workhorse.
Why It Works:
The small grains stay separate if you fluff them right, and the herbs bring a fresh finish that holds up in the cold. This is a side that does not need babysitting.
Key Ingredients:
- 1 cup couscous
- 1 cup boiling water
- 1 cucumber, diced
- 1/4 cup chopped mint
- 1/4 cup chopped parsley
- 2 tablespoons olive oil
- 2 tablespoons lemon juice
- 1/2 teaspoon salt
Quick Steps:
- Pour boiling water over couscous, cover, and let stand 5 minutes.
- Fluff with a fork and cool slightly.
- Stir in cucumber, mint, parsley, olive oil, lemon juice, and salt.
- Chill for 20 minutes.
- Taste again before packing.
Equipment for This Recipe:
- Heatproof bowl
- Fork
- Sharp knife
How to Serve This Dish:
Pair with iced mint tea or sparkling water with lime. It works as a side for grilled chicken, or as a light lunch with cheese.
Pro Tips for This Recipe:
- Fluff the couscous while it’s still warm so it stays light.
- Salt the cucumber lightly and drain if it’s very watery.
- A little lemon zest brightens the whole bowl.
Variations on This Dish:
- Feta Couscous Salad: Add crumbled feta.
- Apricot Couscous Salad: Fold in chopped dried apricot for sweetness.
Common Mistakes to Avoid with This Dish:
- Skipping the fluffing step: The grains clump into a lump.
- Using too much water: The texture goes pasty.
- Packing it hot: Steam softens the cucumber.
22. Gochujang Chicken Lettuce Wraps
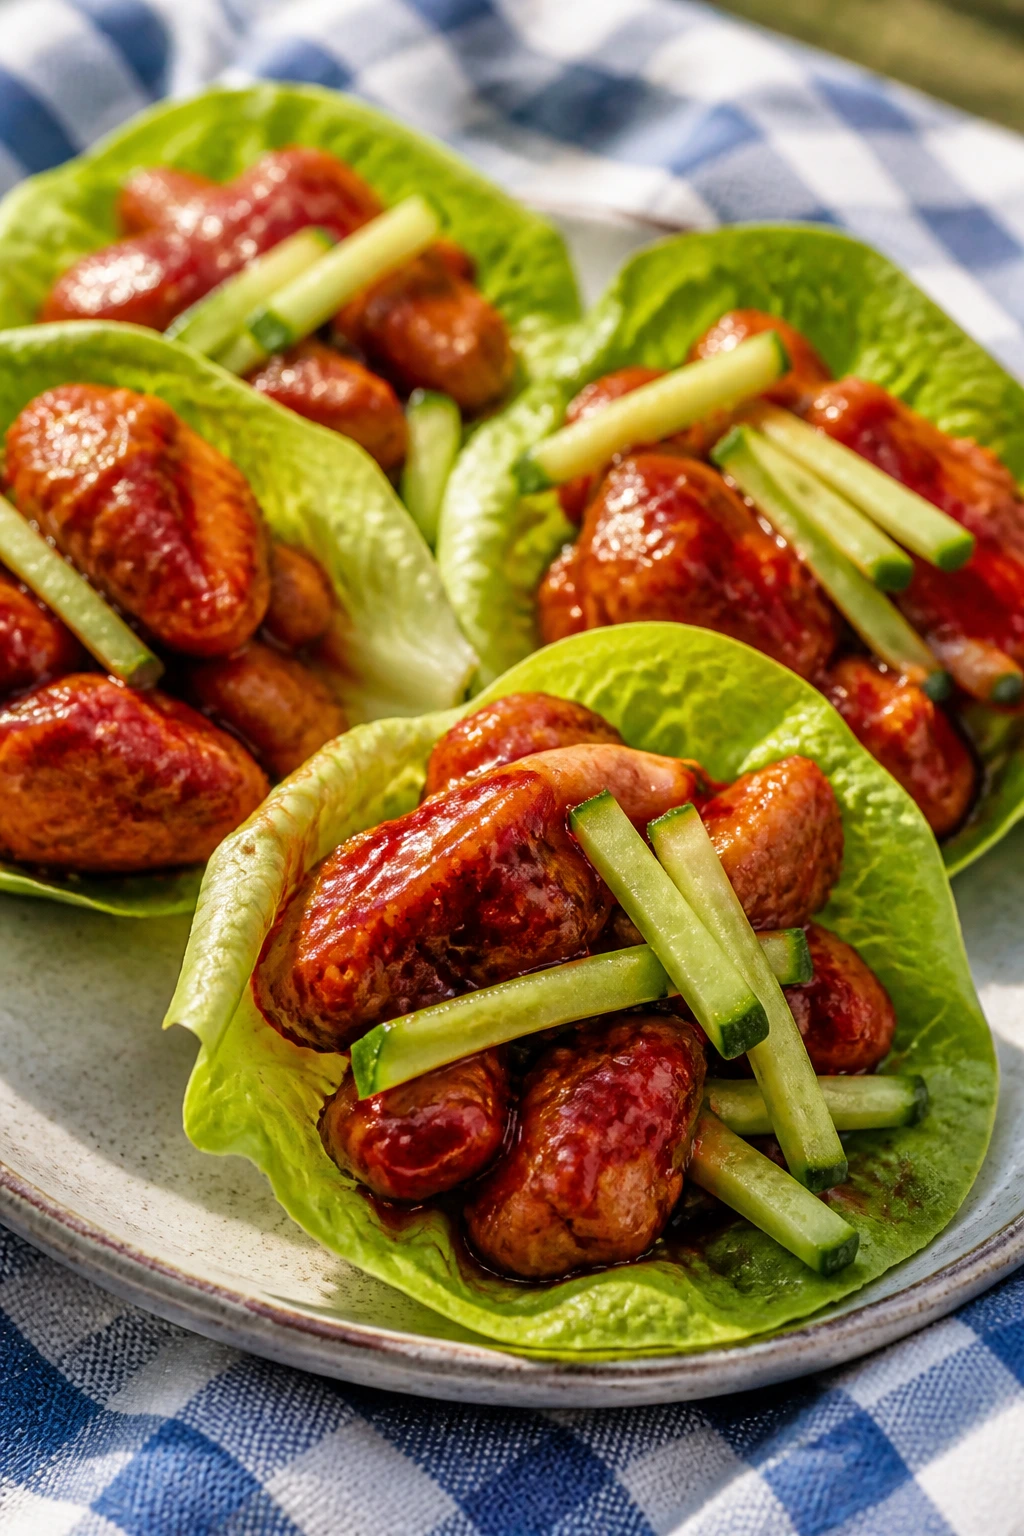
These wraps bring heat, sweetness, and crunch in a package that stays civilized. The gochujang glaze clings to the chicken, and lettuce keeps it crisp and easy to handle. I’d pack these when the picnic basket needs something with a little more attitude.
Why It Works:
The sauce is bold enough to flavor the chicken without making it wet, and the lettuce acts like a fresh shell. Cold cucumber on top keeps each bite from feeling too heavy.
Key Ingredients:
- 2 cups cooked diced chicken
- 2 tablespoons gochujang
- 1 tablespoon honey
- 1 tablespoon soy sauce
- 1 teaspoon sesame oil
- 1/2 cucumber, thinly sliced
- 8 butter lettuce leaves
- 1 tablespoon sesame seeds
Quick Steps:
- Whisk gochujang, honey, soy sauce, and sesame oil.
- Toss the chicken in the sauce until coated.
- Chill the chicken for 15 minutes.
- Spoon into lettuce leaves and top with cucumber.
- Finish with sesame seeds just before serving.
Equipment for This Recipe:
- Mixing bowl
- Spoon
- Small container for packing
How to Serve This Dish:
Cold lager or iced green tea both work well. Two wraps make a snack; four can be lunch if you add rice on the side.
Pro Tips for This Recipe:
- Use chilled cooked chicken so the lettuce stays crisp.
- Thin the sauce with a teaspoon of water if it gets too thick.
- Keep the cucumber separate if you want the wraps extra neat.
Variations on This Dish:
- Tofu Gochujang Wraps: Swap chicken for cubed pressed tofu.
- Milder Wraps: Use half the gochujang and extra honey.
Common Mistakes to Avoid with This Dish:
- Making the sauce too wet: It leaks out of the lettuce.
- Using brittle lettuce: It cracks before you take the first bite.
- Overstuffing the leaves: Small, tidy wraps hold better.
23. Smoked Salmon Cucumber Bites
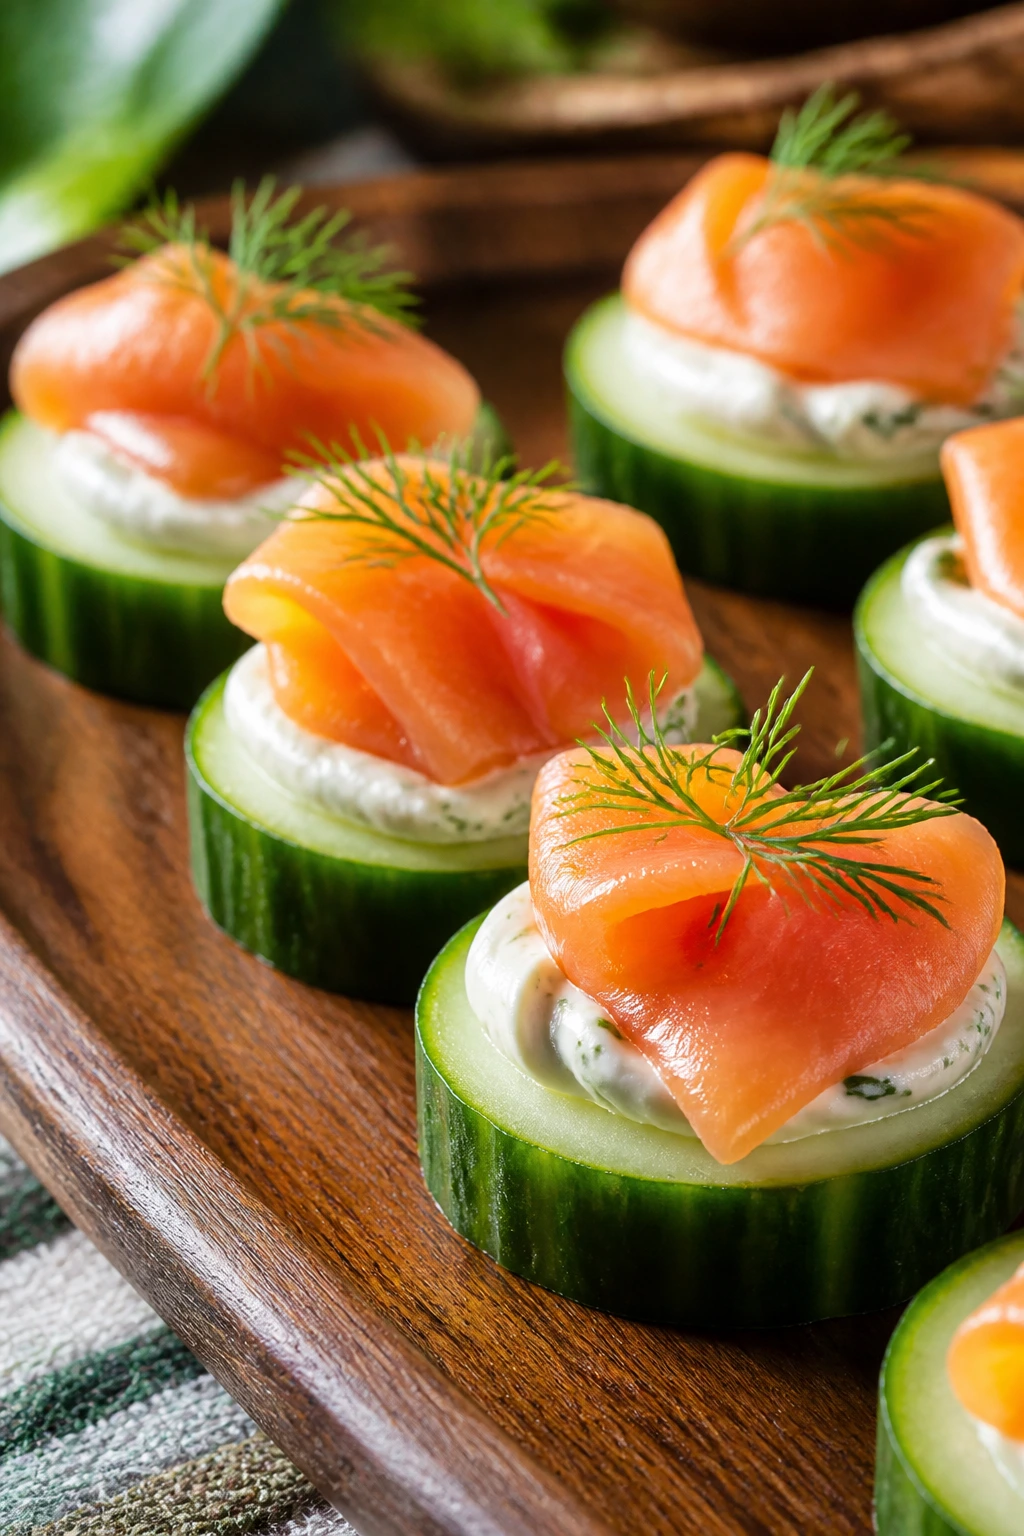
Smoked salmon on cucumber is the picnic version of a canapé, minus the formal suit. The cucumber stays crisp, the salmon brings salt and smoke, and a little cream cheese ties it together. These feel cool in the hand, which is half the charm.
Why It Works:
The cucumber replaces bread, so there is no soggy middle. That makes it one of the best low-mess, cold-drink-friendly bites in the basket.
Key Ingredients:
- 1 large cucumber
- 4 ounces smoked salmon
- 4 ounces cream cheese, softened
- 1 tablespoon chopped dill
- 1 teaspoon lemon juice
- 1 tablespoon capers
- Black pepper
Quick Steps:
- Slice the cucumber into 1/2-inch rounds.
- Mix cream cheese, dill, and lemon juice.
- Spread a little on each cucumber round.
- Top with folded smoked salmon and capers.
- Chill until ready to serve.
Equipment for This Recipe:
- Knife
- Mixing bowl
- Small spoon or piping bag
How to Serve This Dish:
Serve with chilled sparkling water, dry white wine, or a crisp gin spritz. Three to four bites make a starter; a dozen can fill out a lighter picnic spread.
Pro Tips for This Recipe:
- Pat the cucumber dry so the topping sticks.
- Use cold smoked salmon, not hot smoked, for the right texture.
- Pipe the cream cheese if you want them to look neat fast.
Variations on This Dish:
- Everything Bagel Bites: Sprinkle everything seasoning on top.
- Avocado Salmon Bites: Add a thin avocado slice under the salmon.
Common Mistakes to Avoid with This Dish:
- Cutting cucumber too thin: The bite bends and leaks.
- Using too much cream cheese: It overwhelms the salmon.
- Leaving them warm: The salmon tastes flat and the topping softens.
24. Mexican Street Corn Salad Cups
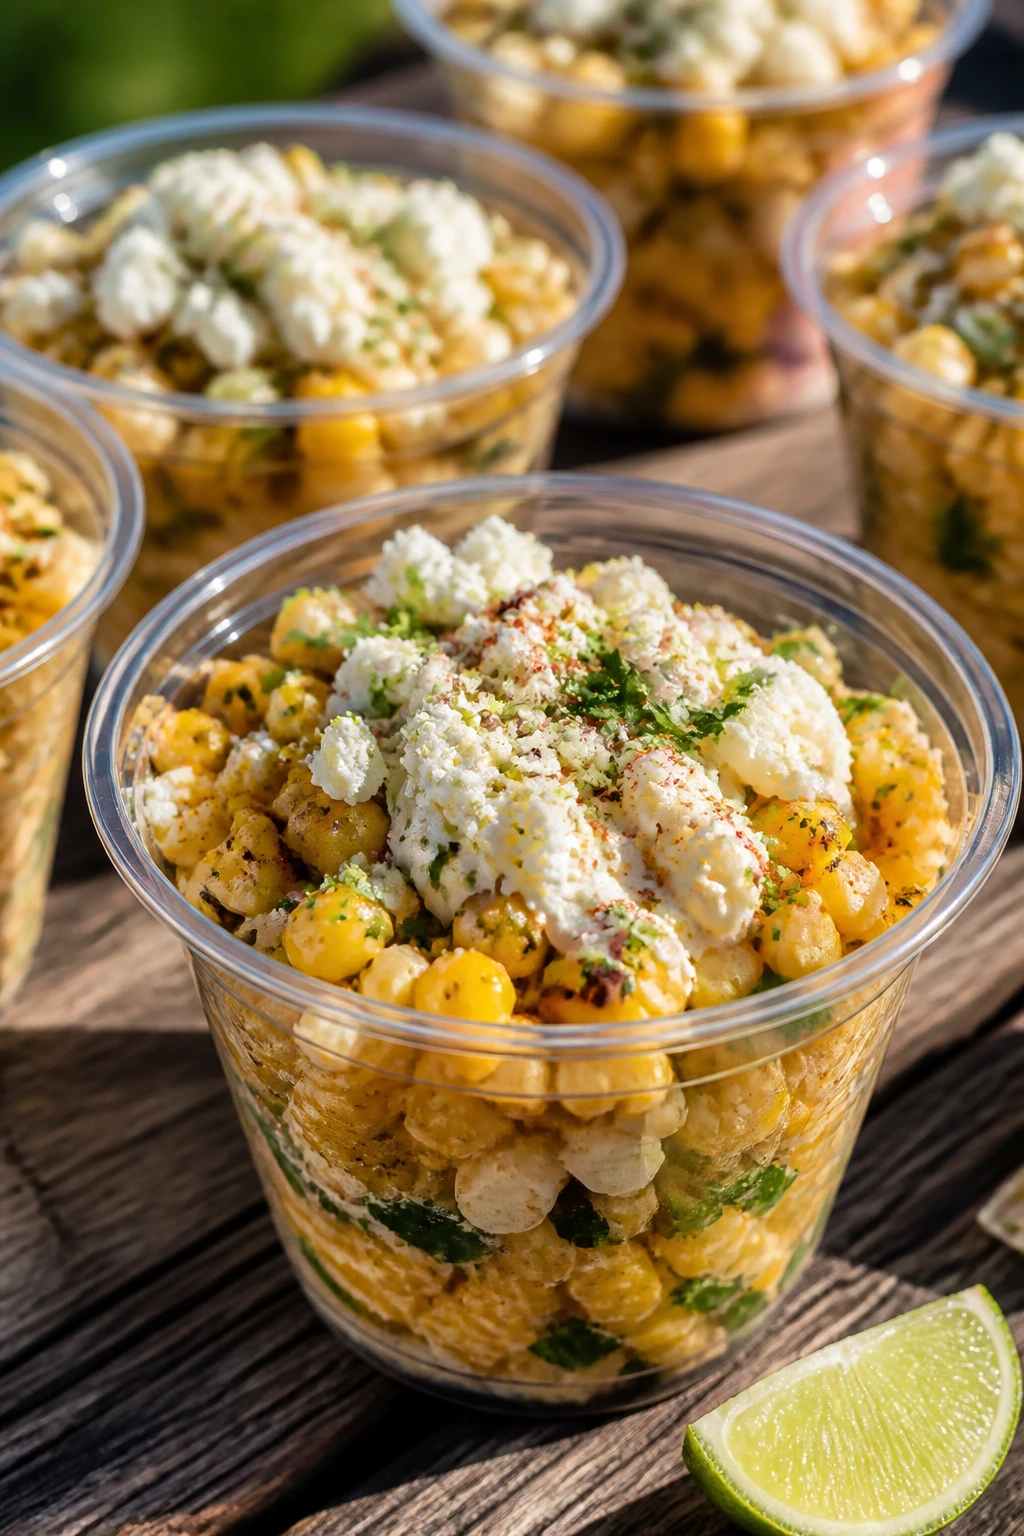
Street corn is messy by nature, so the cup is doing a lot of good work here. You get charred corn, lime, chili, cheese, and a little cream in a tidy portable format. This is the sort of picnic side that disappears before the main food does.
Why It Works:
The corn stays juicy but not drippy, and the cup keeps the dressing where it belongs. Lime and chili keep it sharp enough to sit next to salty chips or grilled meat.
Key Ingredients:
- 3 cups corn kernels, cooked or charred
- 2 tablespoons mayonnaise
- 2 tablespoons sour cream
- 1 tablespoon lime juice
- 1/4 teaspoon chili powder
- 1/4 teaspoon salt
- 1/4 cup crumbled cotija
- 2 tablespoons chopped cilantro
Quick Steps:
- Whisk mayonnaise, sour cream, lime juice, chili powder, and salt.
- Toss with warm or cooled corn.
- Fold in cotija and cilantro.
- Spoon into small cups.
- Chill briefly before packing.
Equipment for This Recipe:
- Mixing bowl
- Spoon
- Small serving cups
How to Serve This Dish:
A cold margarita, lime seltzer, or iced tea fits nicely. One cup works as a side; two cups can stand in for lunch with tortilla chips.
Pro Tips for This Recipe:
- Char some of the corn for deeper flavor.
- Keep the dressing light so the cups do not slump.
- Add extra lime right before serving if it tastes muted.
Variations on This Dish:
- Avocado Street Corn: Add diced avocado at the end.
- Spicy Street Corn: Stir in minced jalapeño or hot sauce.
Common Mistakes to Avoid with This Dish:
- Using too much dressing: The salad turns soupy.
- Skipping acid: Lime is what keeps it lively.
- Packing in deep bowls: Cups are cleaner and easier to handle.
25. Egg Salad Croissant Bites

Egg salad and croissants are a soft-on-soft pairing that can go wrong if you get heavy-handed. Keep the filling light, use small croissants, and chill them well. The result feels a little fancy without turning precious.
Why It Works:
The croissant gives a rich, buttery base, while the filling stays compact enough not to squish out in every bite. Small portions are the move here.
Key Ingredients:
- 6 hard-boiled eggs
- 1/4 cup mayonnaise
- 1 teaspoon Dijon mustard
- 1 tablespoon chopped chives
- 1 teaspoon lemon juice
- 4 mini croissants
- Salt and black pepper
Quick Steps:
- Chop the eggs into small pieces.
- Mix with mayonnaise, mustard, chives, lemon juice, salt, and pepper.
- Split the croissants and spoon in the filling.
- Press gently and chill.
- Cut in half just before serving, if desired.
Equipment for This Recipe:
- Mixing bowl
- Fork
- Serrated knife
How to Serve This Dish:
Best with iced tea or a dry sparkling wine. One croissant bite is a snack; two make a light lunch with tomato slices.
Pro Tips for This Recipe:
- Keep the egg chunks small so the croissant doesn’t split.
- Add the filling close to serving time if you want the pastry flakiest.
- Chill the eggs before mixing for a firmer salad.
Variations on This Dish:
- Dill Egg Salad: Swap chives for dill.
- Curry Egg Salad: Add a pinch of curry powder.
Common Mistakes to Avoid with This Dish:
- Overstuffing the croissant: It crushes under pressure.
- Using warm egg salad: The pastry softens too quickly.
- Adding too much mayo: The filling slips and squishes.
26. Parmesan Pretzel Bites
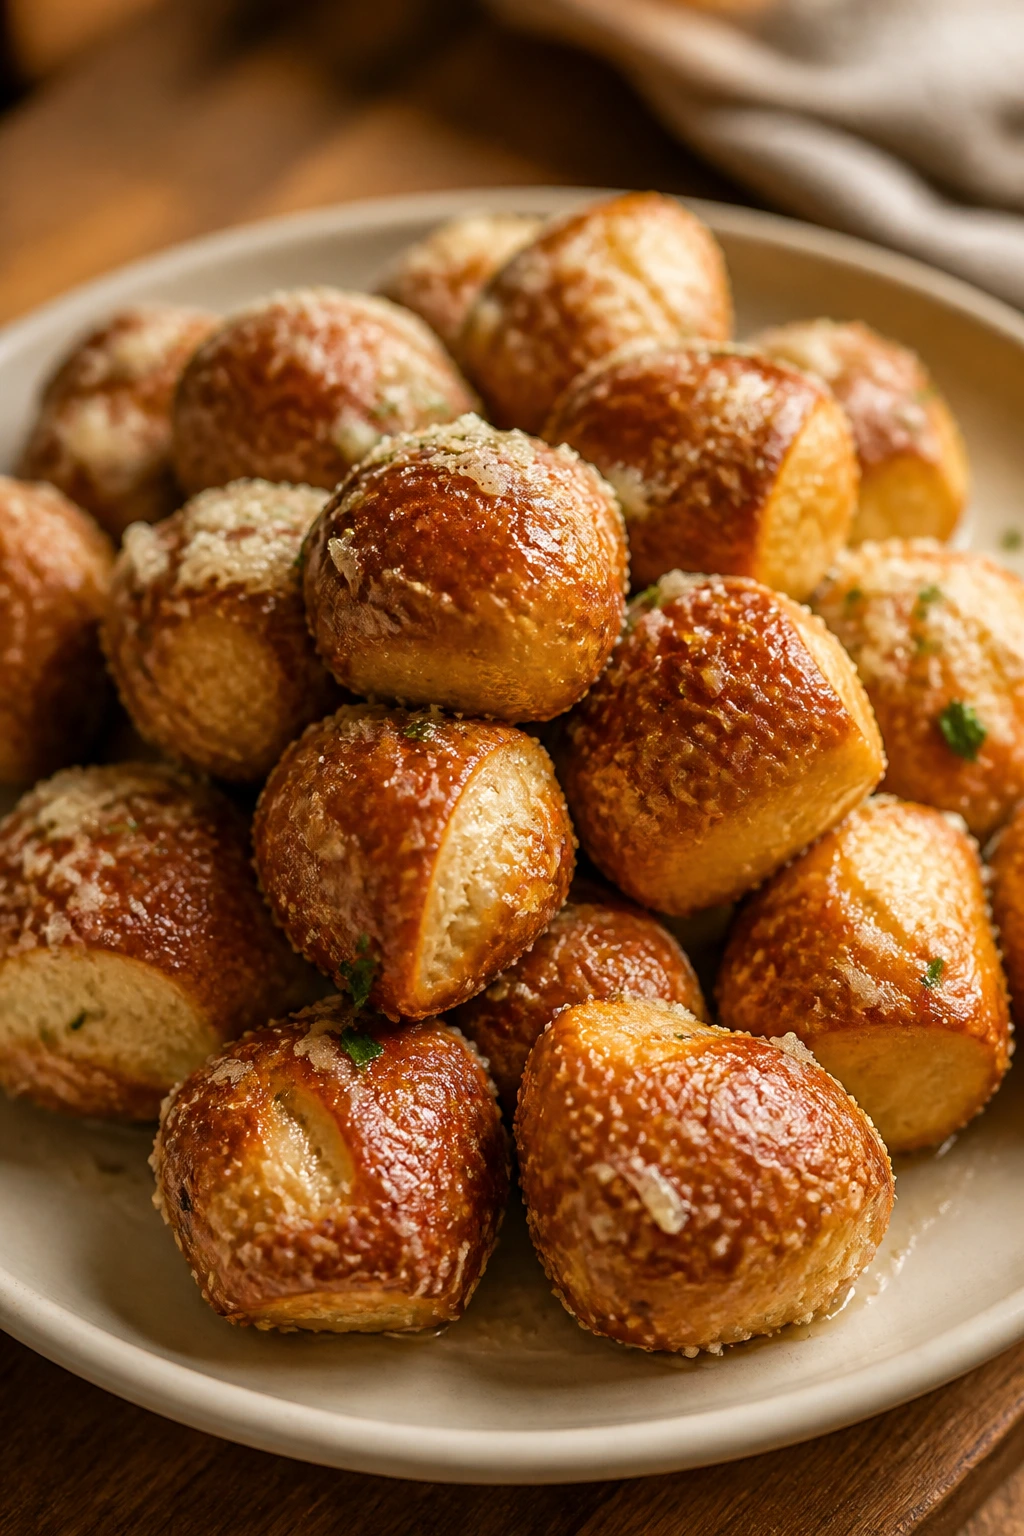
Pretzel bites are the snack that makes people hover near the basket. Add Parmesan and a little garlic butter, and they turn from plain bread into something you keep reaching for. They’re best when they still have a faint chew in the middle.
Why It Works:
The bite-size shape travels well, the Parmesan gives a salty crust, and they pair cleanly with cold beer or soda. No forks. No fuss.
Key Ingredients:
- 1 pound pretzel dough
- 2 tablespoons melted butter
- 1/4 cup grated Parmesan
- 1/2 teaspoon garlic powder
- 1/2 teaspoon coarse salt
- Marinara or mustard for dipping
Quick Steps:
- Shape the dough into small bite-size pieces.
- Boil or bake according to the dough recipe.
- Brush the warm bites with melted butter.
- Sprinkle with Parmesan, garlic powder, and salt.
- Cool on a rack and pack with dip on the side.
Equipment for This Recipe:
- Baking sheet
- Pastry brush
- Small bowl for dip
How to Serve This Dish:
Cold lager, lemonade, or iced root beer all work. A small handful makes a snack; a big cup of bites is enough for grazing.
Pro Tips for This Recipe:
- Use coarse salt lightly; Parmesan brings plenty of salt already.
- Brush the butter on while the bites are warm so it sticks.
- Pack dip separately so the crust stays firm.
Variations on This Dish:
- Cinnamon Pretzel Bites: Skip Parmesan and use cinnamon sugar.
- Everything Pretzel Bites: Add everything seasoning after buttering.
Common Mistakes to Avoid with This Dish:
- Over-salting: Parmesan and pretzel salt add up fast.
- Packing them with sauce: Moisture kills the chew.
- Skipping the rack cool-down: Steam softens the crust.
27. Quinoa Chickpea Salad
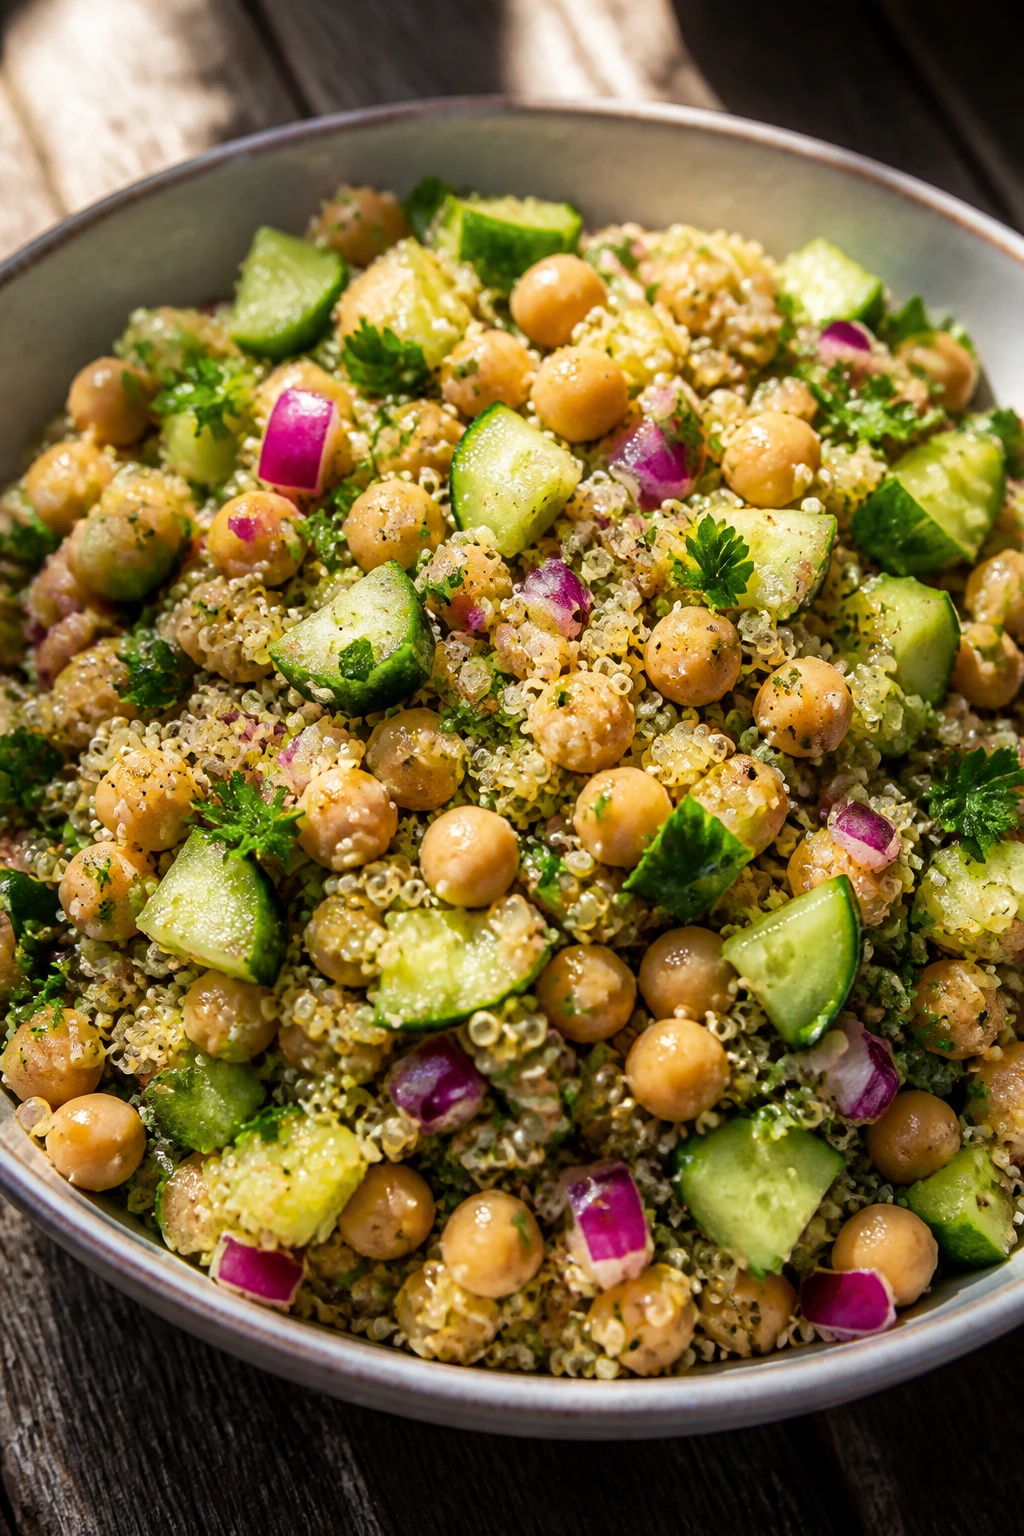
Quinoa and chickpeas make a picnic salad that behaves. It is sturdy, filling, and happy to sit in a cooler without losing its shape. Lemon, cucumber, and herbs keep it from tasting like health food that lost its way.
Why It Works:
Both main ingredients hold texture after chilling, and the salad carries a lot of flavor without needing mayo. That makes it useful when you want something that feels fresh but not fragile.
Key Ingredients:
- 1 cup quinoa
- 1 can chickpeas, drained and rinsed
- 1 cucumber, diced
- 1/4 cup chopped parsley
- 2 tablespoons olive oil
- 2 tablespoons lemon juice
- 1/2 teaspoon salt
- 1/4 teaspoon black pepper
Quick Steps:
- Cook the quinoa, then cool it.
- Toss quinoa with chickpeas, cucumber, and parsley.
- Whisk olive oil, lemon juice, salt, and pepper.
- Pour over the salad and stir gently.
- Chill for 20 minutes before packing.
Equipment for This Recipe:
- Saucepan
- Mixing bowl
- Fork
How to Serve This Dish:
Good with sparkling water, iced tea, or a cold white wine. It works as a side or a full lunch with feta and olives.
Pro Tips for This Recipe:
- Rinse quinoa well before cooking or it tastes bitter.
- Salt the salad after it chills, not before, if you want a brighter finish.
- A little feta gives it extra bite without much effort.
Variations on This Dish:
- Mediterranean Quinoa: Add olives and feta.
- Spiced Quinoa Salad: Add cumin and roasted peppers.
Common Mistakes to Avoid with This Dish:
- Overcooking the quinoa: It turns sticky.
- Using too much dressing: The grains get heavy.
- Skipping the cool-down: Warm salad feels dull and limp.
28. Ham and Swiss Pinwheels

Ham and Swiss pinwheels are a neat little trick: everything people like about a sandwich, rolled up and sliced into tidy spirals. A thin layer of mustard cream cheese keeps them from unfolding. They’re especially useful when you need food that looks tidy on a paper plate.
Why It Works:
The tortillas or wraps hold shape better than soft bread, and the filling stays sealed inside. Cold, salty, and easy to grab.
Key Ingredients:
- 4 large tortillas
- 4 ounces cream cheese, softened
- 1 tablespoon Dijon mustard
- 8 ounces sliced ham
- 4 ounces Swiss cheese, sliced thin
- 1/4 cup baby spinach
- Black pepper
Quick Steps:
- Mix cream cheese and Dijon.
- Spread thinly over each tortilla.
- Layer ham, Swiss, spinach, and a little pepper.
- Roll tightly and chill 20 minutes.
- Slice into 1-inch pinwheels.
Equipment for This Recipe:
- Mixing bowl
- Sharp knife
- Plastic wrap
How to Serve This Dish:
They go well with sparkling water, iced tea, or a cold lager. Six pinwheels make a snack; ten work as part of a bigger spread.
Pro Tips for This Recipe:
- Use thin cheese slices so the roll stays tight.
- Chill the log before slicing for cleaner spirals.
- Pat the spinach dry to keep the wrap from slipping.
Variations on This Dish:
- Turkey and Swiss Pinwheels: Swap ham for turkey.
- Honey Mustard Pinwheels: Use honey mustard in the cream cheese.
Common Mistakes to Avoid with This Dish:
- Overstuffing the roll: It bursts when sliced.
- Using soggy spinach: The tortilla softens quickly.
- Skipping the chill time: The spirals smear instead of cutting cleanly.
29. Apricot-Almond Energy Balls
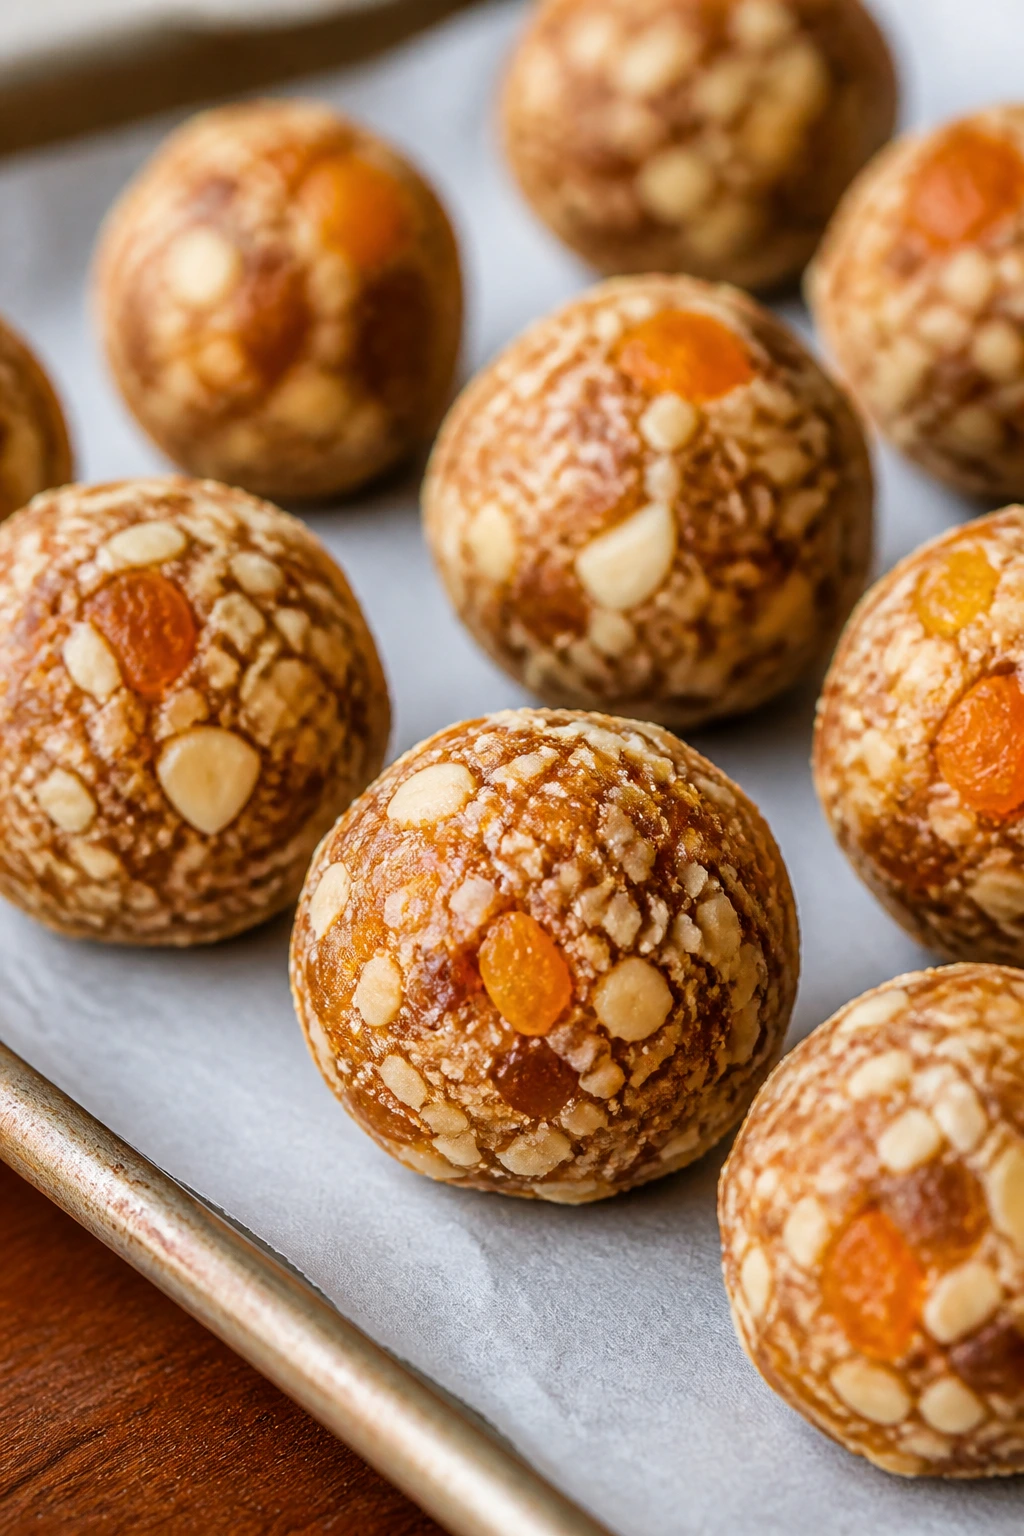
These little bites are what I reach for when the picnic needs something sweet that won’t melt into a puddle. Apricots bring chew and tang, almonds bring texture, and oats hold the whole thing together. No oven. No drama.
Why It Works:
The mixture is dense enough to roll, and the dried fruit keeps the flavor bright after a day in the cooler. It is the easiest dessert on this list to pack.
Key Ingredients:
- 1 cup pitted dried apricots
- 1 cup rolled oats
- 1/2 cup almond butter
- 1/4 cup chopped almonds
- 1 tablespoon honey
- 1/2 teaspoon cinnamon
- Pinch of salt
Quick Steps:
- Pulse apricots, oats, almonds, cinnamon, and salt in a food processor.
- Add almond butter and honey.
- Blend until the mixture sticks together.
- Roll into 1-inch balls.
- Chill before packing.
Equipment for This Recipe:
- Food processor
- Bowl
- Parchment-lined tray
How to Serve This Dish:
Cold brew, iced tea, or sparkling water with orange all fit. Two balls make a snack; four can stand in for dessert without feeling heavy.
Pro Tips for This Recipe:
- If the mix is dry, add another teaspoon of almond butter.
- Wet your hands slightly before rolling.
- Chill before packing so they stay firm.
Variations on This Dish:
- Coconut Apricot Balls: Roll in shredded coconut.
- Chocolate Almond Balls: Add cocoa powder and a few chocolate chips.
Common Mistakes to Avoid with This Dish:
- Using apricots that are too dry: The balls won’t hold.
- Overprocessing: You want a sticky mixture, not paste.
- Packing them warm: They soften and smear in the container.
30. Buffalo Chicken Celery Boats
Celery boats are pure picnic common sense. The celery gives a cold, crisp base, and buffalo chicken brings the heat. You get the wing flavor without sticky fingers, which is enough reason for me.
Why It Works:
The celery stays crunchy, the chicken filling is sturdy, and blue cheese gives the whole thing the right tang. These are fast to assemble and easy to portion.
Key Ingredients:
- 2 cups cooked shredded chicken
- 1/4 cup buffalo sauce
- 2 tablespoons ranch or blue cheese dressing
- 4 celery stalks
- 2 tablespoons crumbled blue cheese
- 1 tablespoon chopped chives
Quick Steps:
- Stir chicken, buffalo sauce, and dressing together.
- Trim and wash the celery stalks.
- Spoon the filling into the celery grooves.
- Top with blue cheese and chives.
- Chill until serving.
Equipment for This Recipe:
- Mixing bowl
- Spoon
- Knife and board
How to Serve This Dish:
Cold beer or lemonade both handle the heat well. Two boats make a snack; four can fill out a lunch with chips and fruit.
Pro Tips for This Recipe:
- Use thick celery stalks so the filling sits properly.
- Keep the sauce light enough to coat, not drown.
- Add blue cheese right before serving if you want maximum texture.
Variations on This Dish:
- Mild Chicken Boats: Use less buffalo sauce and more ranch.
- Turkey Buffalo Boats: Swap in shredded turkey.
Common Mistakes to Avoid with This Dish:
- Using thin celery: It snaps under the filling.
- Making the filling too wet: It slides out.
- Letting them sit warm: The celery loses its snap.
31. Greek Veggie Cups with Ranch Dip
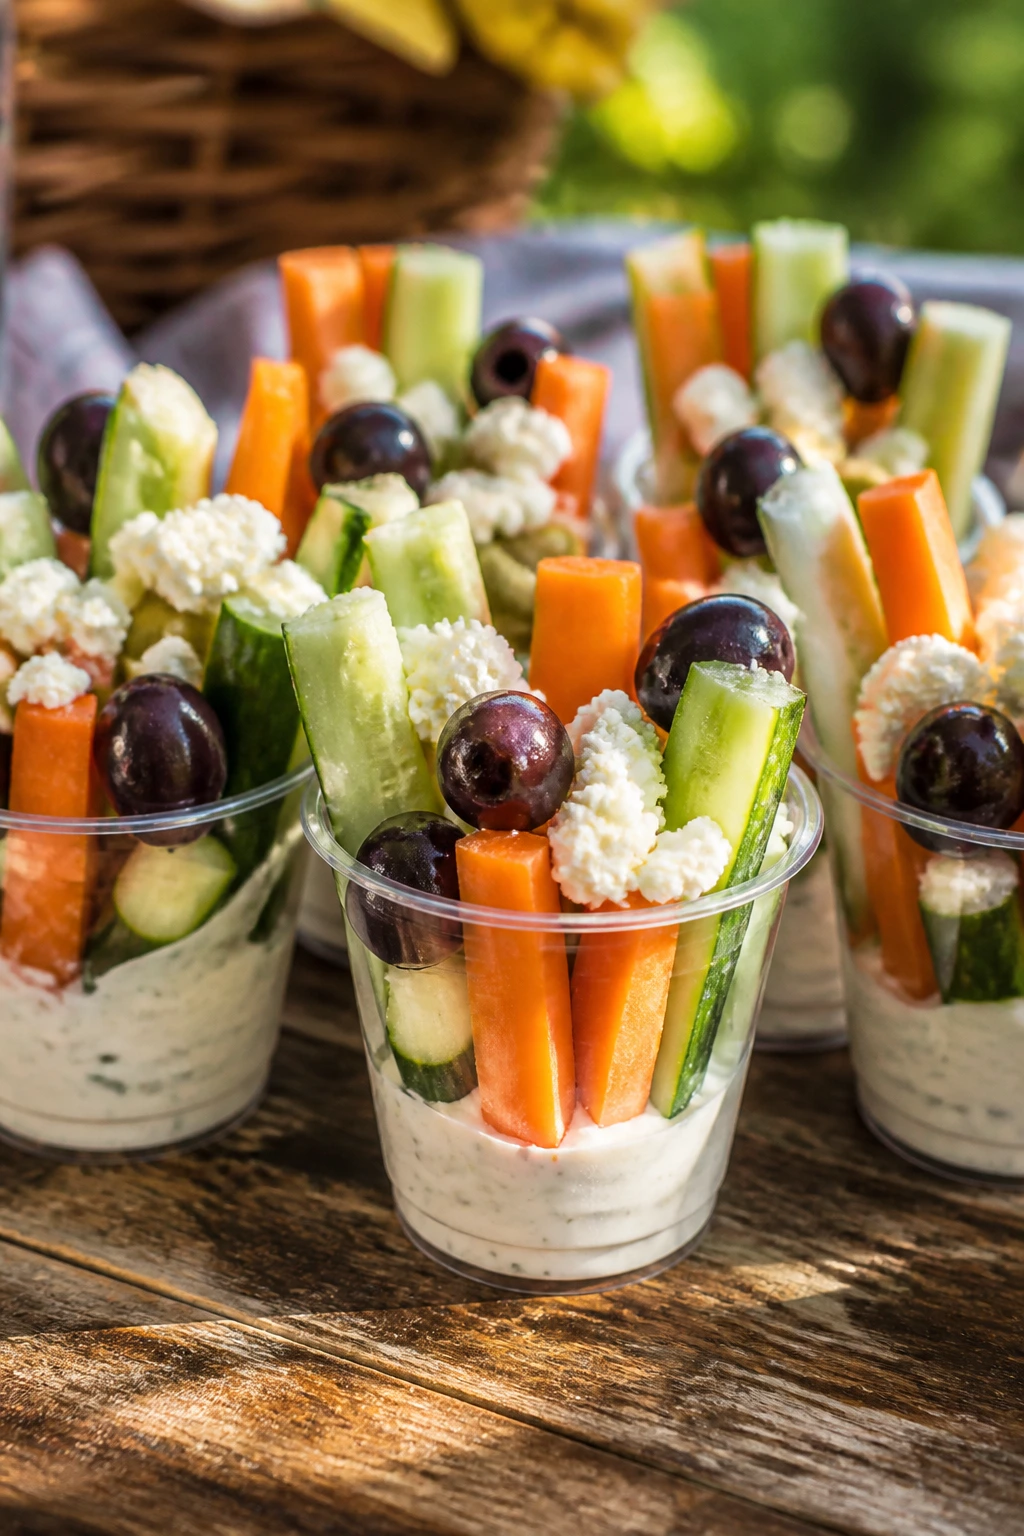
These cups solve the picnic vegetable problem: people like the idea of veg, but not a floppy tray of sticks. Give them a small cup, a thick dip, and a few salty toppings, and suddenly the carrots and cucumbers disappear at speed.
Why It Works:
The vegetables stay upright, the dip stays contained, and the whole thing looks tidy without extra work. It is the snack I pack when I want something that keeps hands busy between heavier dishes.
Key Ingredients:
- 2 carrots, cut into sticks
- 1 cucumber, cut into sticks
- 1 red bell pepper, sliced
- 1 cup cherry tomatoes
- 1/2 cup ranch dip
- 1/4 cup crumbled feta
- 2 tablespoons sliced olives
Quick Steps:
- Cut the vegetables into sturdy sticks.
- Spoon ranch into the bottom of small cups.
- Add feta and olives on top of the dip.
- Stand the vegetables upright in each cup.
- Chill until ready to serve.
Equipment for This Recipe:
- Knife
- Cutting board
- Small cups with lids
How to Serve This Dish:
Cold sparkling water or a light white wine fits well. One cup makes a side; two cups can replace a salad without dragging down the basket.
Pro Tips for This Recipe:
- Dry the vegetables well after washing.
- Use thicker sticks so they do not flop over.
- Keep the dip in the bottom for a cleaner presentation.
Variations on This Dish:
- Hummus Veggie Cups: Swap ranch for hummus.
- Spicy Veggie Cups: Add a spoon of harissa to the dip.
Common Mistakes to Avoid with This Dish:
- Cutting vegetables too thin: They bend and break.
- Packing wet produce: The cup fills with water.
- Using a thin dip: It won’t hold the vegetables upright.
32. Tomato Pie Squares
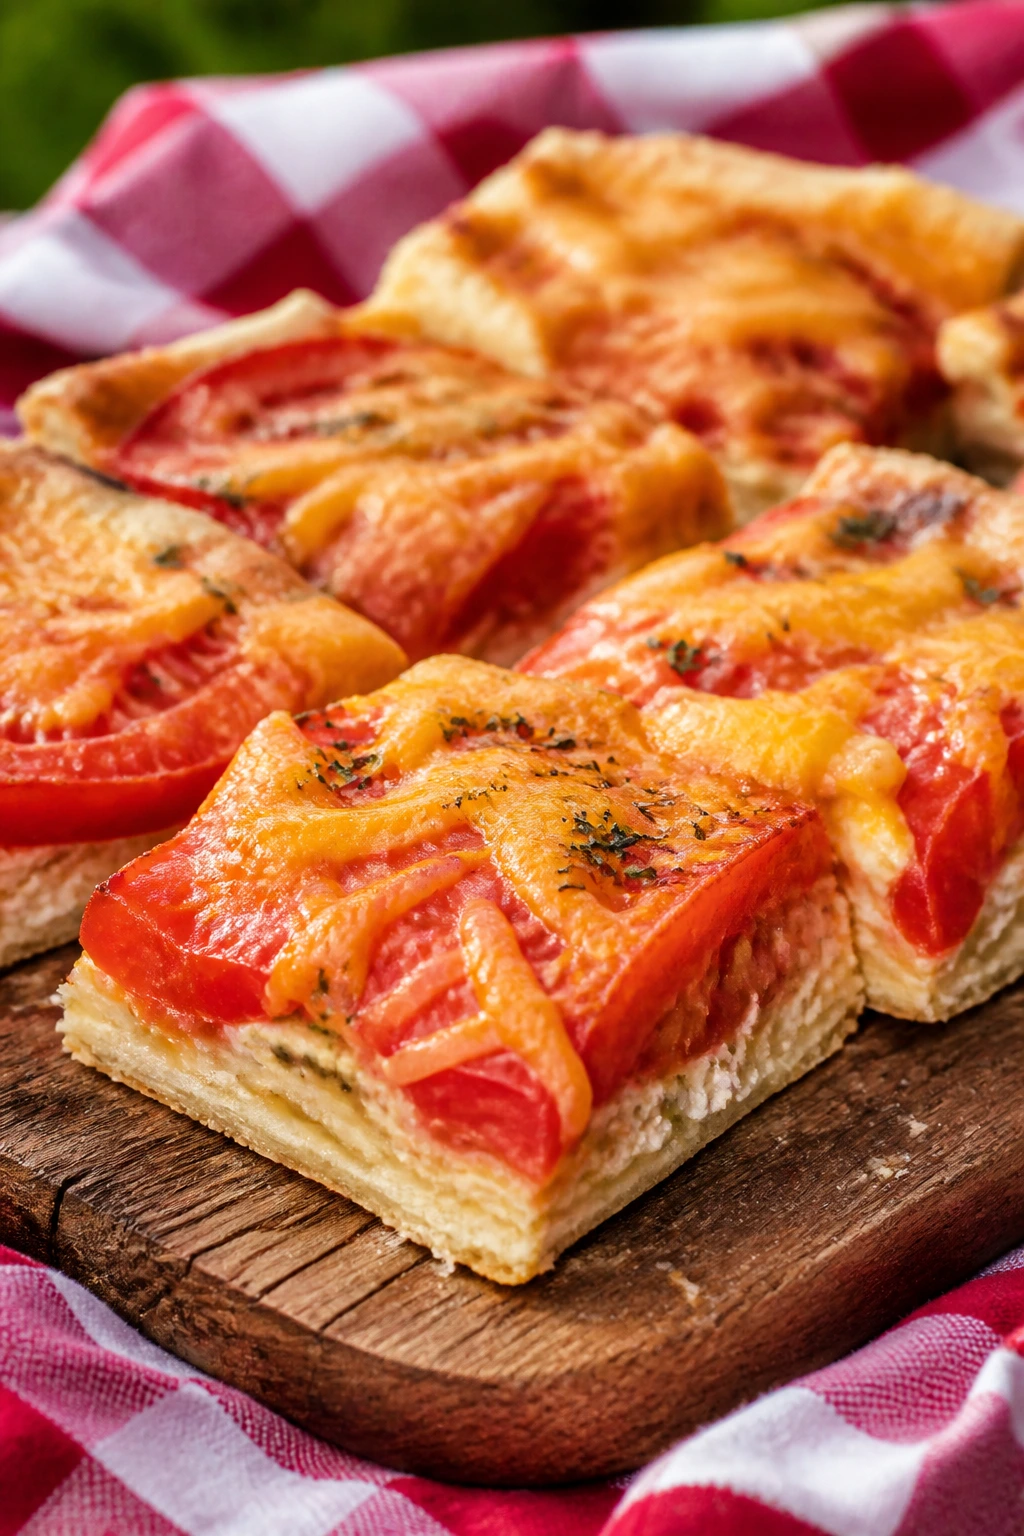
Tomato pie is one of those dishes that sounds old-fashioned because it is, in the best sense. Buttery crust, ripe tomatoes, herbs, and cheese baked into a sliceable square is about as picnic-ready as tomato-heavy food gets. Serve it cool, not cold.
Why It Works:
The filling sets enough to cut cleanly, and the crust protects the juicy tomatoes from turning the whole thing into a puddle. It tastes rich without needing much else.
Key Ingredients:
- 1 pie crust, baked in a square or round pan
- 3 large tomatoes, sliced and salted
- 1 cup shredded cheddar
- 1/2 cup mayonnaise
- 1/4 cup chopped basil
- 1 tablespoon chopped chives
- Black pepper
Quick Steps:
- Salt the tomato slices and let them drain well.
- Layer tomatoes in the baked crust.
- Mix mayo, cheddar, basil, chives, and pepper.
- Spread the topping over the tomatoes.
- Bake until bubbly, then cool fully and cut into squares.
Equipment for This Recipe:
- Baking pan
- Knife
- Mixing bowl
How to Serve This Dish:
Cold sweet tea or a crisp white wine suits it nicely. One square makes a side; two square pieces can carry a picnic lunch with cucumber salad.
Pro Tips for This Recipe:
- Drain the tomatoes well or the crust goes soggy.
- Cool completely before slicing.
- Use ripe tomatoes with real flavor; this dish lives or dies on them.
Variations on This Dish:
- Bacon Tomato Pie: Add crisp bacon bits to the topping.
- Herbed Tomato Pie: Use thyme and parsley instead of basil.
Common Mistakes to Avoid with This Dish:
- Skipping the tomato drain: The filling turns watery.
- Cutting while hot: The pie falls apart.
- Using bland tomatoes: The whole dish tastes flat.
33. Crispy Tofu Banh Mi Wraps
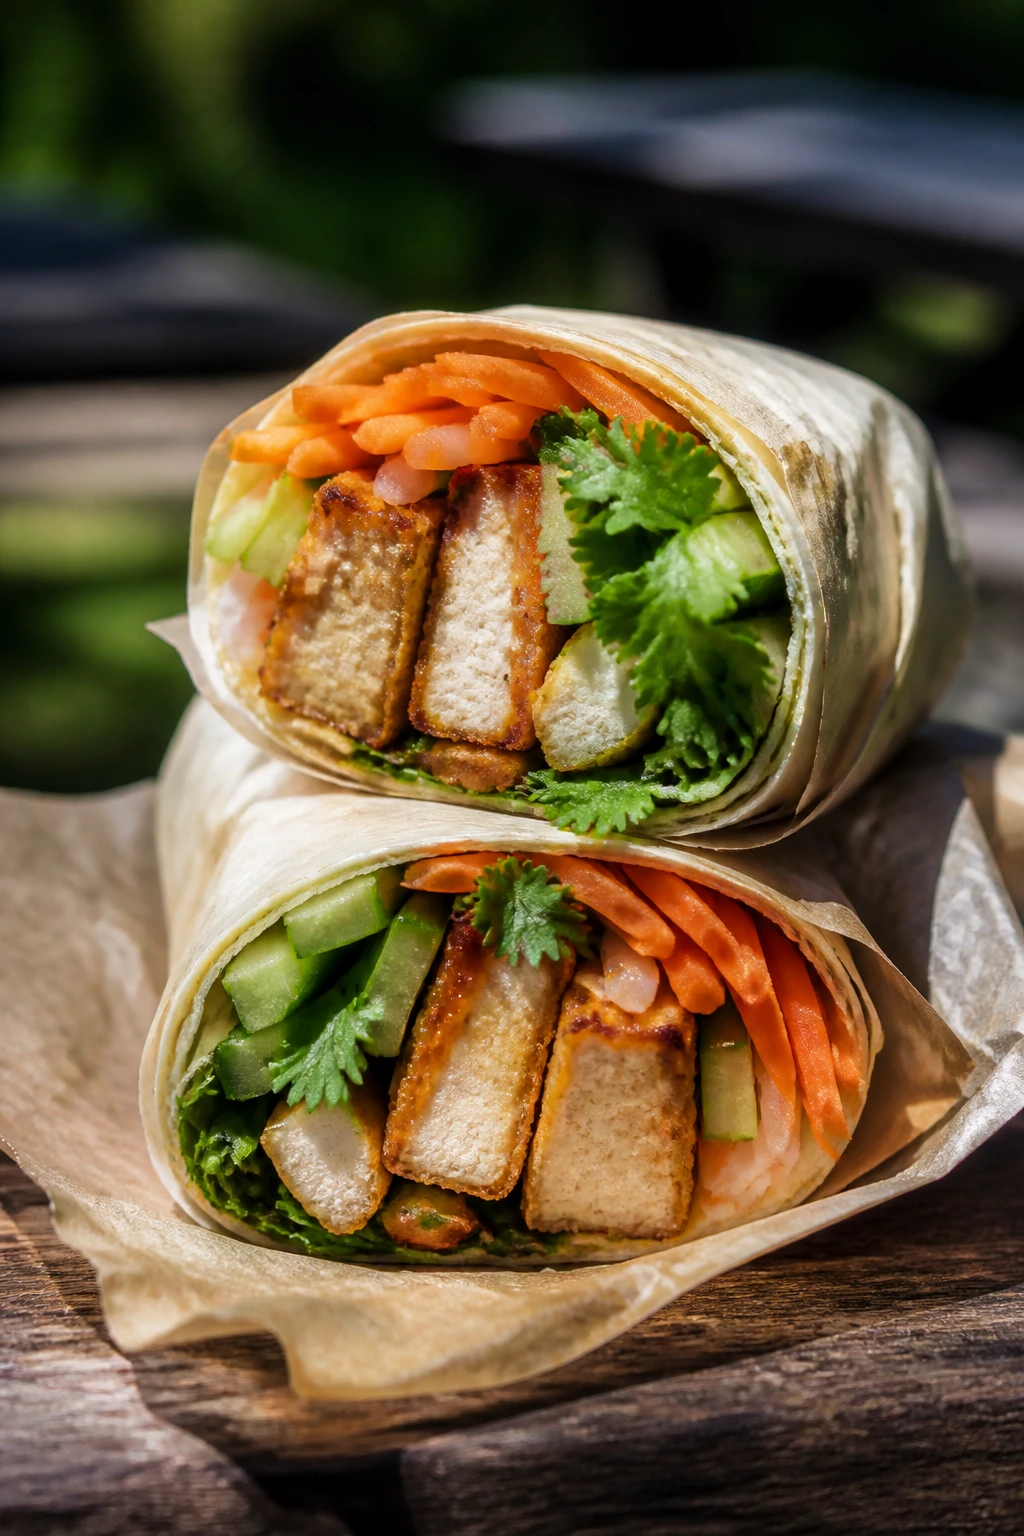
Banh mi flavors are sharp enough to wake up a picnic basket. Pickled carrots, cucumber, herbs, and crispy tofu give you crunch and bite without needing a hot griddle at the park. Wrapped tightly, these stay neat and lively.
Why It Works:
The tofu gives substance, the pickles keep things bright, and the wrap tames everything into a carryable shape. It’s a solid vegetarian main that does not feel like an afterthought.
Key Ingredients:
- 1 block firm tofu, pressed and sliced
- 1 tablespoon soy sauce
- 1 tablespoon oil
- 2 large tortillas or baguette rolls
- 1/2 cup quick-pickled carrots
- 1/2 cucumber, sliced
- 1/4 cup chopped cilantro
- 2 tablespoons mayonnaise or vegan mayo
- 1 teaspoon sriracha
Quick Steps:
- Toss tofu with soy sauce and oil, then pan-sear until crisp.
- Stir mayo and sriracha together.
- Spread the sauce on the wrap or roll.
- Add tofu, pickled carrots, cucumber, and cilantro.
- Roll tightly and wrap in parchment.
Equipment for This Recipe:
- Skillet
- Knife and board
- Parchment paper
How to Serve This Dish:
Pair with iced jasmine tea or a cold citrus soda. One wrap serves as lunch; half a wrap works as a snack alongside fruit.
Pro Tips for This Recipe:
- Press tofu well or it won’t brown.
- Keep pickled carrots drained so the wrap stays firm.
- Slice the tofu thin for easier rolling.
Variations on This Dish:
- Chicken Banh Mi Wraps: Use sliced cooked chicken instead of tofu.
- Extra Spicy Wraps: Add sliced jalapeño and more sriracha.
Common Mistakes to Avoid with This Dish:
- Using wet tofu: It steams instead of crisping.
- Overpacking the wrap: It tears as you roll.
- Skipping the pickles: The sandwich needs that bright bite.
34. Berry Shortbread Bars
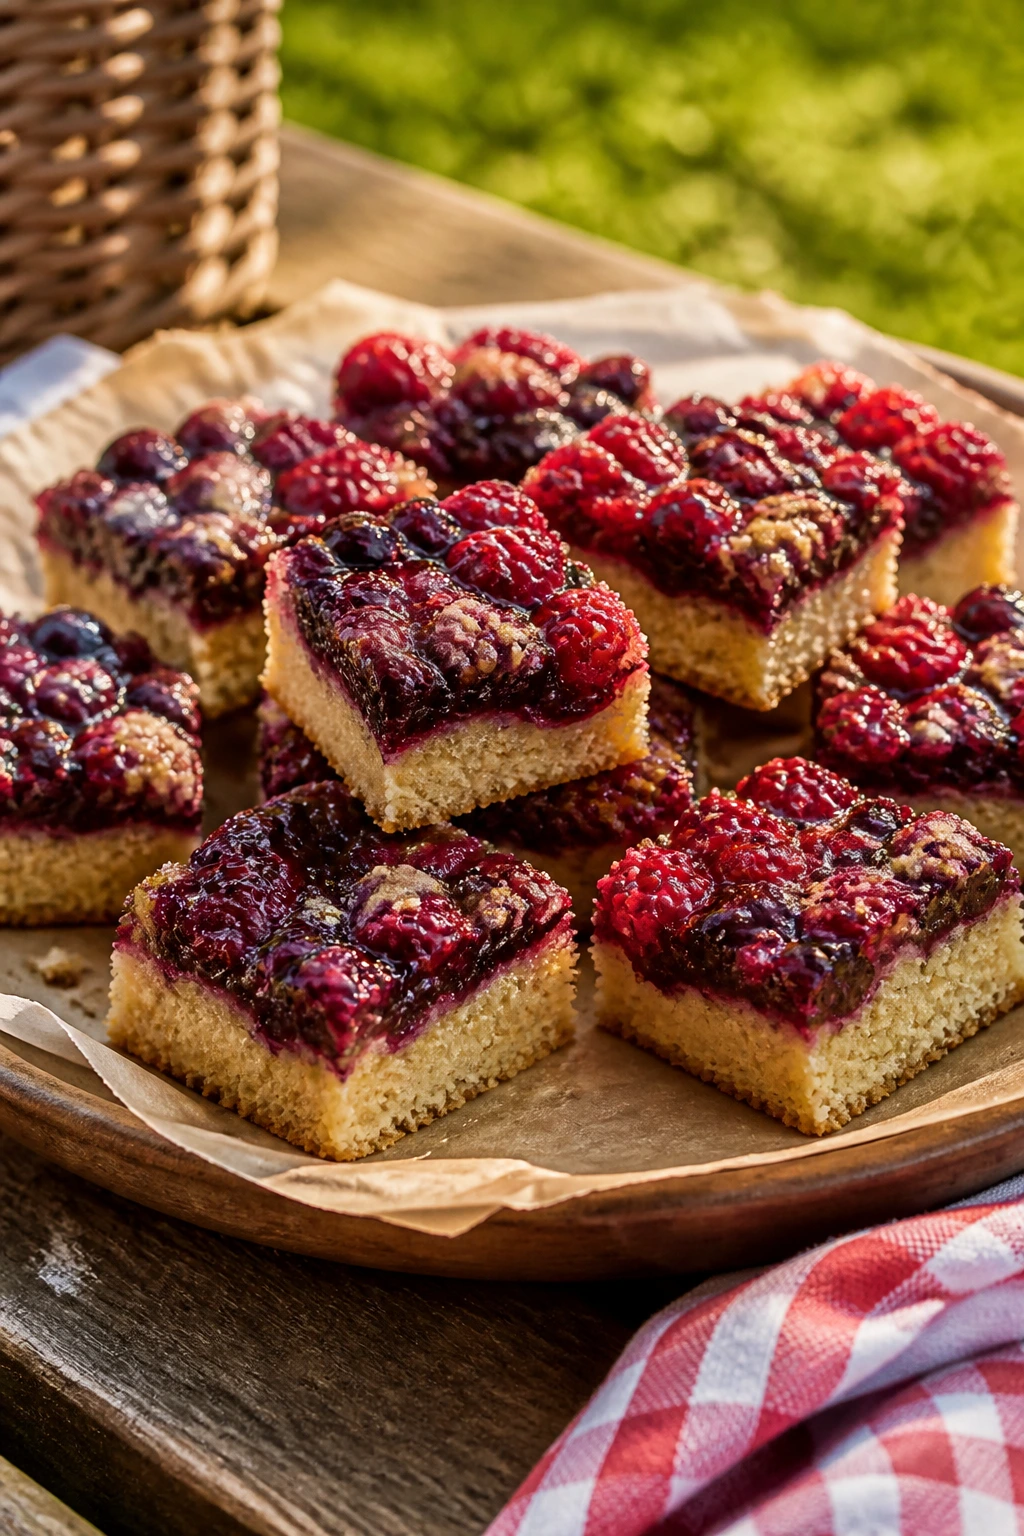
Shortbread bars are the kind of dessert that travels better than cake ever will. A buttery base, a berry layer, and a crumb topping keep the pieces neat enough for a napkin. They’re sweet without being sticky, which is picnic-friendly in the best way.
Why It Works:
The bars bake into a firm slab and cut clean once cooled. Berries bring brightness that stands up to the rich crust.
Key Ingredients:
- 1 1/2 cups all-purpose flour
- 1/2 cup sugar
- 1 cup unsalted butter, cold and cubed
- 1 1/2 cups mixed berries
- 2 tablespoons cornstarch
- 1 tablespoon lemon juice
- 1/2 teaspoon vanilla extract
Quick Steps:
- Mix flour, sugar, and butter into crumbly dough.
- Press two-thirds into a lined pan.
- Toss berries with cornstarch, lemon juice, and vanilla.
- Spread berries over the crust and sprinkle the rest of the crumbs on top.
- Bake until golden, then cool fully before slicing.
Equipment for This Recipe:
- Square baking pan
- Mixing bowl
- Parchment paper
How to Serve This Dish:
Serve with cold brew, iced tea, or sparkling lemonade. One bar is a dessert; two bars can end the meal with a little more generosity.
Pro Tips for This Recipe:
- Cool completely before cutting or the bars smear.
- If the berries are very juicy, add another teaspoon of cornstarch.
- Line the pan with parchment for easy lifting.
Variations on This Dish:
- Peach Shortbread Bars: Swap berries for diced peaches.
- Lemon Blueberry Bars: Increase the lemon juice slightly.
Common Mistakes to Avoid with This Dish:
- Cutting too soon: The bars need time to set.
- Using watery fruit without thickener: The base goes soft.
- Pressing the crust too lightly: It crumbles when sliced.
35. Sesame Rice Onigiri
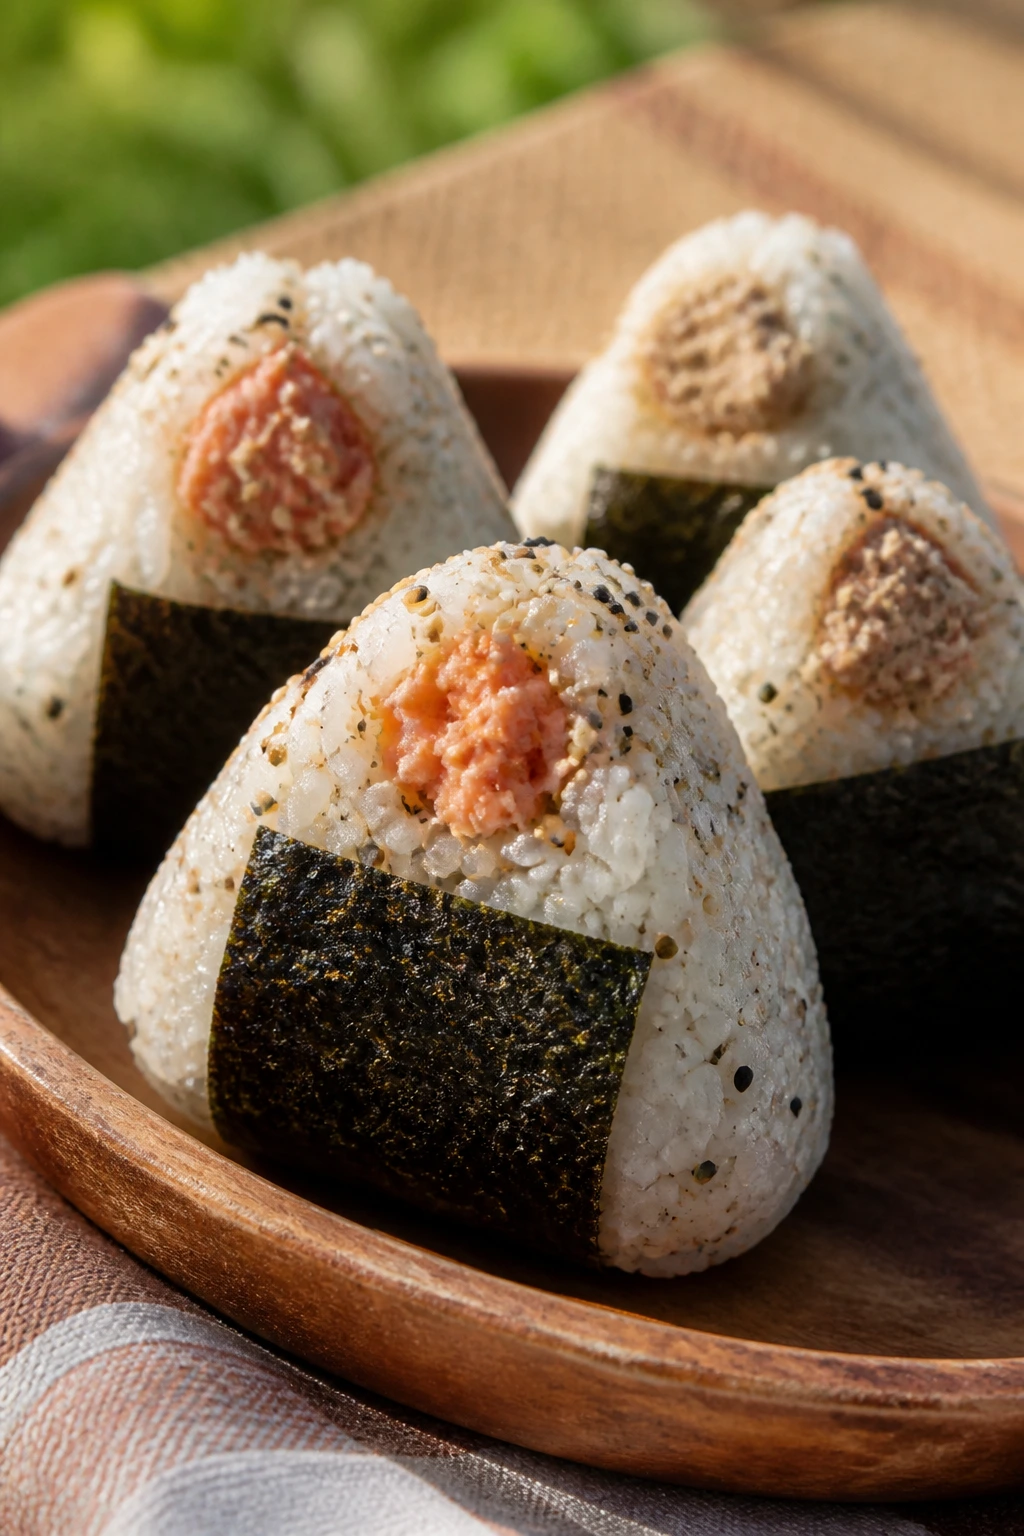
Onigiri may be the most elegant thing you can make from leftover rice. They’re hand-held, satisfying, and easy to flavor with sesame, salt, or a tucked-in filling. Wrapped partly in nori, they feel made for picnics and train rides alike.
Why It Works:
Warm rice shapes more easily, and the compact triangle or ball form keeps the filling sealed inside. They eat cleanly and pair well with salty drinks or tea.
Key Ingredients:
- 3 cups cooked sushi rice
- 1 tablespoon rice vinegar
- 1 teaspoon sugar
- 1/2 teaspoon salt
- 2 tablespoons toasted sesame seeds
- 4 sheets nori, cut into strips
- Optional filling: 1/4 cup flaked salmon or tuna
Quick Steps:
- Mix vinegar, sugar, and salt into the warm rice.
- Stir in sesame seeds.
- Shape the rice around a small filling, if using.
- Wrap with nori strips.
- Cool slightly before packing.
Equipment for This Recipe:
- Rice bowl
- Small bowl of water for shaping
- Nori scissors or knife
How to Serve This Dish:
Cold green tea or sparkling water is the cleanest match. Two onigiri make a snack; three can hold down a lunch with fruit and pickles.
Pro Tips for This Recipe:
- Wet your hands lightly so the rice doesn’t stick.
- Use freshly cooked rice; cold rice cracks.
- Wrap nori separately if you want it crisp.
Variations on This Dish:
- Salmon Onigiri: Fill with flaked cooked salmon.
- Pickled Plum Onigiri: Use umeboshi for a sharp, salty center.
Common Mistakes to Avoid with This Dish:
- Using dry rice: It refuses to form properly.
- Packing warm onigiri tightly: Condensation softens the nori.
- Skipping the salt: The outside needs it.
36. Turkey-Apple Slaw Wraps
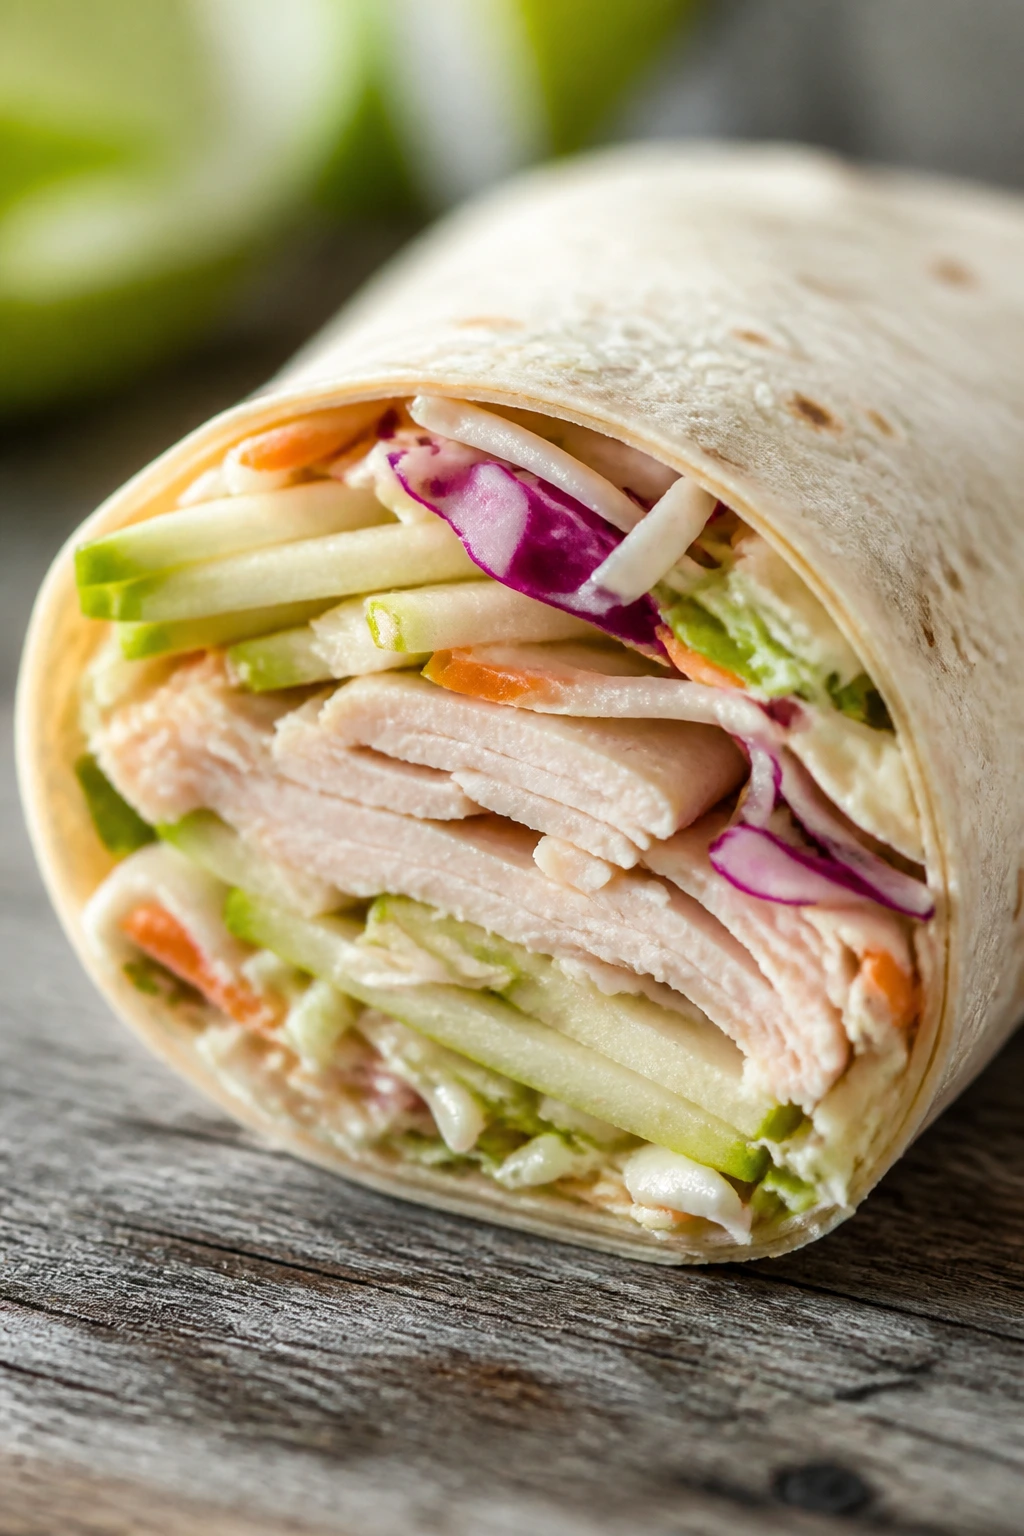
This is the sandwich for people who like crunch more than filler. Turkey, crisp apple, and a light slaw make a wrap that stays interesting all the way to the last bite. It also tastes better cold than at room temperature, which helps.
Why It Works:
The apple keeps the wrap bright, the slaw adds texture, and the tortilla keeps everything compact. You get a sweet-salty balance without needing heavy sauces.
Key Ingredients:
- 4 large tortillas
- 8 ounces sliced turkey
- 1 apple, julienned
- 1 cup shredded cabbage
- 2 tablespoons mayonnaise or yogurt
- 1 teaspoon lemon juice
- 1 teaspoon Dijon mustard
- Salt and pepper
Quick Steps:
- Mix mayonnaise, lemon juice, Dijon, salt, and pepper.
- Toss cabbage and apple with the dressing.
- Layer turkey and slaw on tortillas.
- Roll tightly and wrap in parchment.
- Chill before slicing.
Equipment for This Recipe:
- Knife
- Mixing bowl
- Parchment paper
How to Serve This Dish:
Serve with iced tea or sparkling apple soda. One wrap makes a lunch portion, especially if you add chips or cucumber on the side.
Pro Tips for This Recipe:
- Use a tart apple so the filling stays bright.
- Drain the slaw lightly if it gets too wet.
- Roll tightly to keep the apple from falling out.
Variations on This Dish:
- Chicken Apple Wraps: Swap turkey for chicken.
- Cranberry Turkey Wraps: Add dried cranberries for sweetness.
Common Mistakes to Avoid with This Dish:
- Using a soft apple: It turns mushy in the wrap.
- Too much dressing: The tortilla softens fast.
- Skipping the parchment: These wraps like to unroll.
37. Pasta Frittata Squares
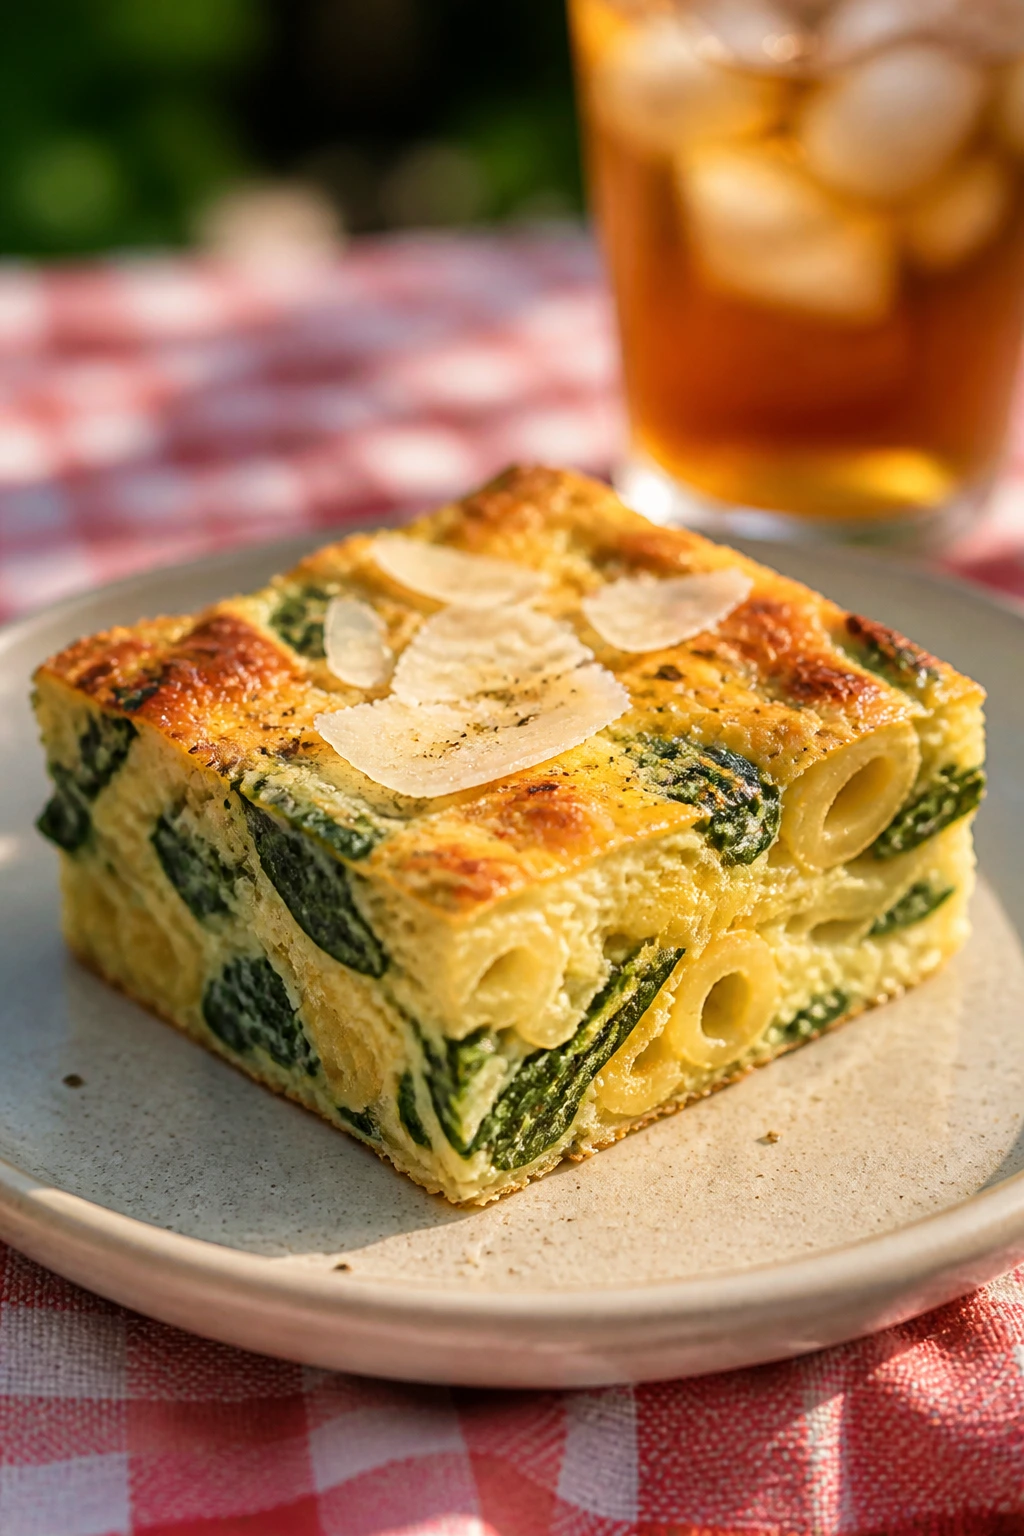
A frittata with pasta sounds like a leftover trick until you try it cold at a picnic. Then it makes sense. The eggs hold everything together, the pasta gives body, and the squares are easy to grab and eat with no ceremony at all.
Why It Works:
It slices clean once cooled, travels in a container without flopping, and can be eaten warm, cool, or cold. That flexibility earns space in any basket.
Key Ingredients:
- 4 eggs
- 1 cup cooked pasta
- 1/2 cup chopped spinach
- 1/4 cup grated Parmesan
- 1/4 cup diced onion
- 2 tablespoons milk
- 1 tablespoon olive oil
- Salt and pepper
Quick Steps:
- Preheat the oven to 375°F.
- Whisk eggs, milk, Parmesan, salt, and pepper.
- Stir in pasta, spinach, and onion.
- Bake in an oiled pan until set in the center.
- Cool fully and cut into squares.
Equipment for This Recipe:
- Oven-safe skillet or baking dish
- Whisk
- Knife
How to Serve This Dish:
Cold soda water or iced tea works well. One square makes a snack; two squares with salad can be a full lunch.
Pro Tips for This Recipe:
- Use leftover pasta that is already dry and firm.
- Let the frittata cool before slicing or the pieces tear.
- A nonstick or well-oiled pan makes lifting easier.
Variations on This Dish:
- Ham Frittata Squares: Add diced ham.
- Tomato Basil Squares: Add chopped tomato and basil.
Common Mistakes to Avoid with This Dish:
- Using wet pasta: The squares turn loose.
- Overbaking: The eggs get rubbery.
- Cutting while hot: You lose the clean edges.
38. Chocolate Chip Zucchini Muffins
These muffins are the picnic sweet that no one complains about. Zucchini keeps them soft, chocolate chips make them feel like dessert, and they carry well in a tin. They’re a smart use of extra zucchini without tasting like a gardening project.
Why It Works:
The zucchini adds moisture, which means the muffins stay tender even after a day. They’re sturdy enough to pack and simple enough to eat one-handed.
Key Ingredients:
- 1 1/2 cups grated zucchini
- 1 3/4 cups all-purpose flour
- 1/2 cup sugar
- 1/3 cup brown sugar
- 1/2 cup oil
- 2 eggs
- 1 teaspoon baking soda
- 1 teaspoon cinnamon
- 3/4 cup chocolate chips
Quick Steps:
- Preheat the oven to 350°F.
- Whisk flour, baking soda, cinnamon, and sugars.
- Stir in oil, eggs, and zucchini.
- Fold in chocolate chips and portion into muffin cups.
- Bake until a toothpick comes out mostly clean.
Equipment for This Recipe:
- Muffin tin
- Grater
- Mixing bowl
How to Serve This Dish:
Cold coffee, iced milk, or tea pairs nicely. One muffin is a snack; two make a sweet end to the picnic.
Pro Tips for This Recipe:
- Grate zucchini finely so it disappears into the crumb.
- Do not squeeze it bone-dry; a little moisture helps.
- Cool completely before packing so the chips set.
Variations on This Recipe:
- Walnut Zucchini Muffins: Add chopped walnuts.
- Lemon Zucchini Muffins: Add lemon zest and skip some cinnamon.
Common Mistakes to Avoid with This Dish:
- Overmixing the batter: The muffins get tough.
- Packing while warm: They sweat in the container.
- Using too much zucchini: The batter gets heavy and wet.
39. Tortellini Skewers
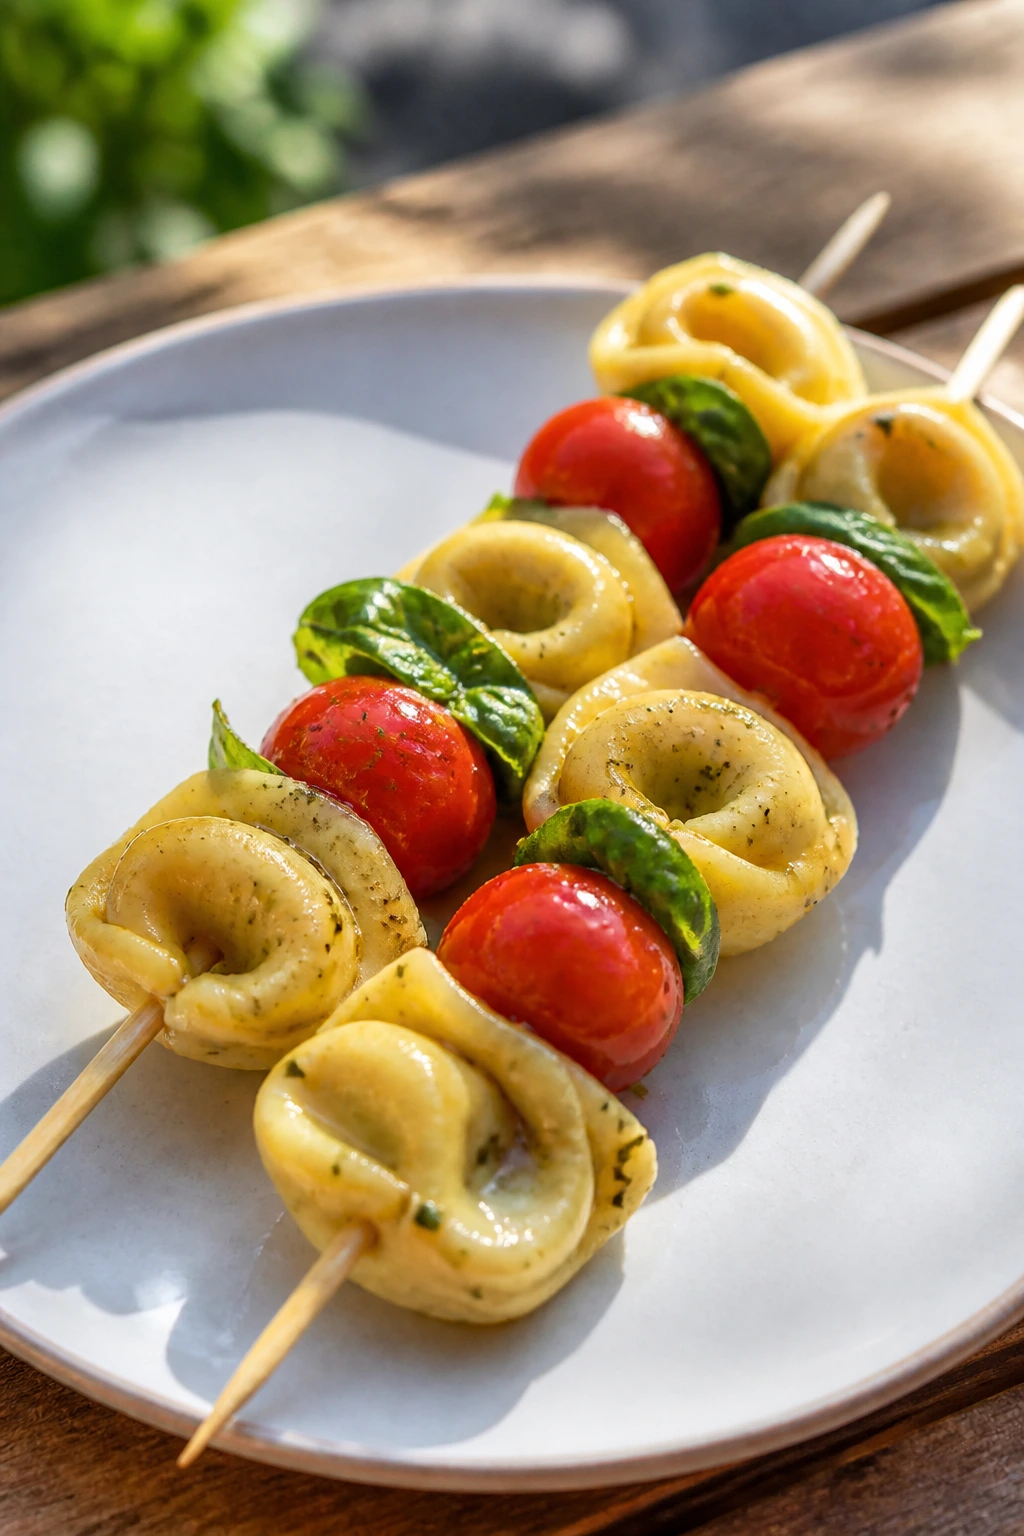
Tortellini skewers feel playful, which is why people grab them first. Cheese tortellini, cherry tomatoes, and basil make a small pasta salad you can eat without a fork. A little olive oil and vinegar keeps them from tasting plain.
Why It Works:
The pasta gives substance, the tomato gives brightness, and the skewer keeps the portions simple. They’re tidy, colorful, and easy to chill.
Key Ingredients:
- 20 cooked cheese tortellini, cooled
- 20 cherry tomatoes
- 20 small basil leaves
- 2 tablespoons olive oil
- 1 tablespoon red wine vinegar
- 1/4 teaspoon salt
- 24 small skewers
Quick Steps:
- Cook and cool the tortellini fully.
- Thread tortellini, tomato, and basil onto skewers.
- Whisk olive oil, vinegar, and salt.
- Brush or drizzle lightly over the skewers.
- Chill until serving.
Equipment for This Recipe:
- Saucepan
- Skewers
- Colander
How to Serve This Dish:
Cold sparkling water, lemonade, or a crisp white wine all work. Two or three skewers make a snack; six can replace a side salad.
Pro Tips for This Recipe:
- Cool the tortellini all the way down so it doesn’t stick.
- Use a sturdy cheese tortellini that holds shape.
- Keep the dressing light; too much makes them slippery.
Variations on This Dish:
- Pesto Tortellini Skewers: Brush with pesto instead of vinegar.
- Antipasto Skewers: Add olives and salami.
Common Mistakes to Avoid with This Dish:
- Using hot pasta: It steams the basil.
- Overdressing: The skewers become messy fast.
- Choosing tiny tomatoes that burst easily: Cherry tomatoes hold better than very soft ones.
40. Mini Peach Galettes

Mini galettes are pie for people who do not want to behave like pie needs a whole plate. The rustic edges hold the fruit in place, the peach filling turns syrupy in the oven, and the little size makes them easy to pack once cooled.
Why It Works:
The crust bakes firm enough to travel, and the peach slices stay contained without needing a pie dish. These are sweet, portable, and easier to portion than a whole tart.
Key Ingredients:
- 1 sheet pie dough, thawed
- 2 peaches, sliced
- 2 tablespoons sugar
- 1 tablespoon flour
- 1 teaspoon lemon juice
- 1 egg, beaten
- 1 tablespoon coarse sugar
Quick Steps:
- Preheat the oven to 400°F.
- Toss peaches with sugar, flour, and lemon juice.
- Cut the dough into small rounds and mound peaches in the center.
- Fold the edges over the fruit and brush with egg.
- Sprinkle with coarse sugar and bake until golden.
Equipment for This Recipe:
- Baking sheet
- Parchment paper
- Pastry brush
How to Serve This Dish:
Serve cooled with iced coffee, cold tea, or a sparkling peach drink. One galette makes a dessert; two can stand alone if the picnic is light.
Pro Tips for This Recipe:
- Use peaches that are ripe but still firm.
- Let the galettes cool fully so the filling sets.
- A little extra flour under the fruit helps absorb juice.
Variations on This Dish:
- Berry Galettes: Swap peaches for blueberries or raspberries.
- Peach Almond Galettes: Add a few sliced almonds before baking.
Common Mistakes to Avoid with This Dish:
- Using overripe peaches: They leak everywhere.
- Skipping the cool-down: The filling spills when you lift them.
- Overfilling the centers: The crust cannot hold the fruit properly.
Why These Foods Hold Up in a Cooler
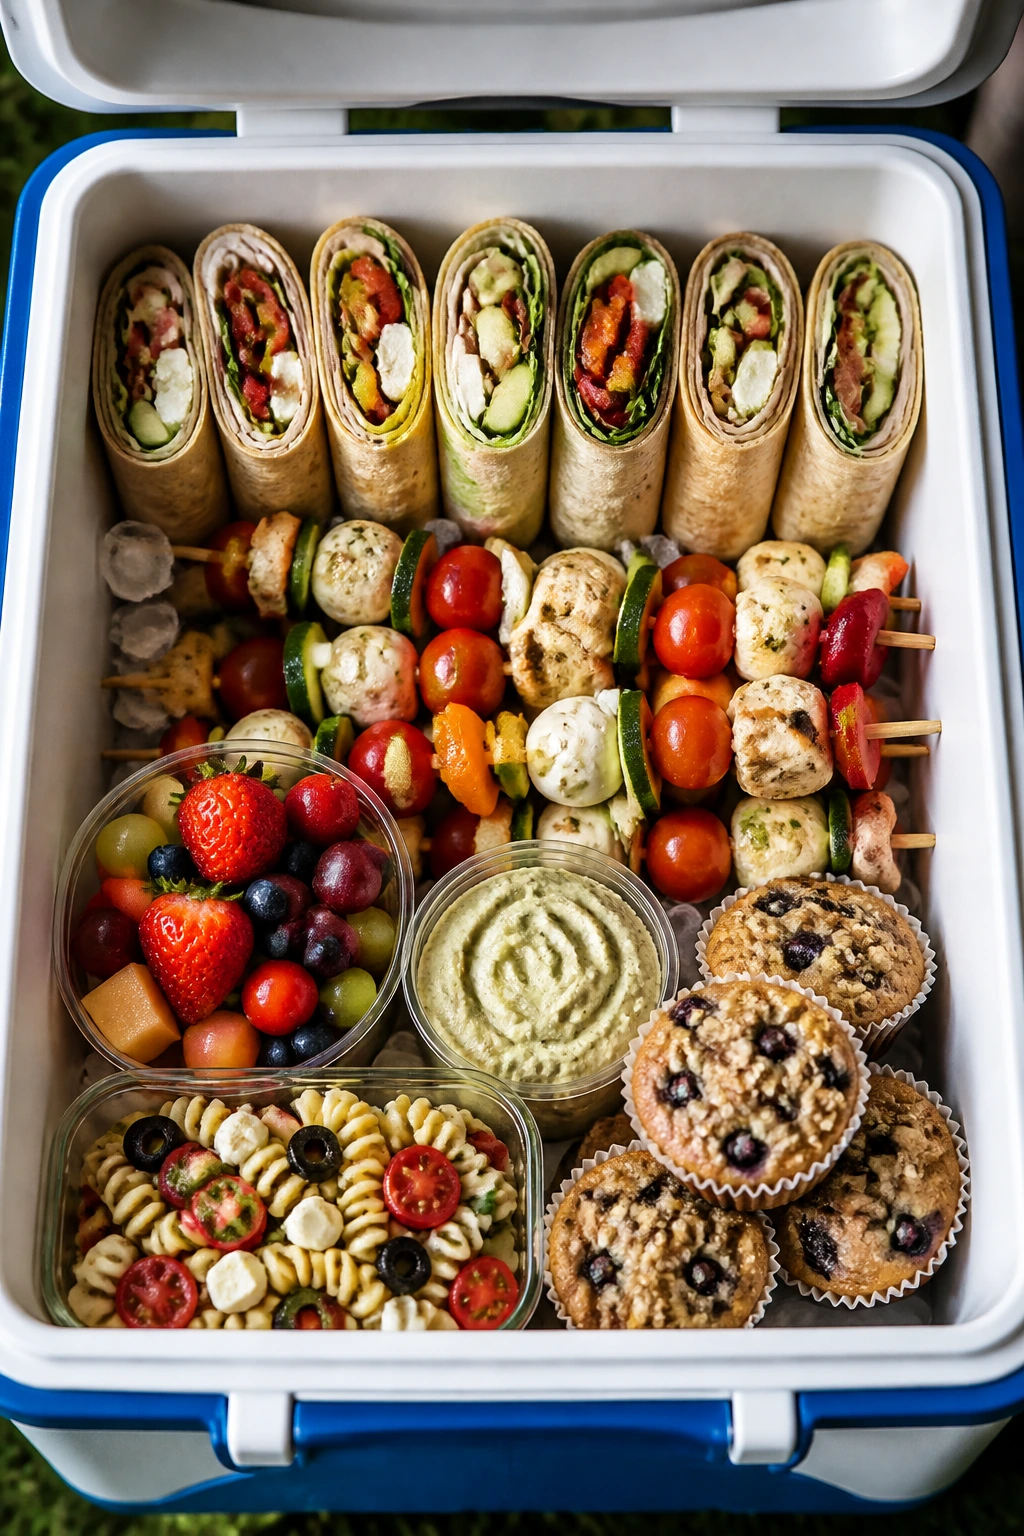
Picnic food lives or dies by texture. A cooler full of chilled containers can rescue a lot, but it cannot save a sandwich that was built like a sponge. The best portable foods use a little structure—skewers, wraps, cups, crusts, or firm salads—to stay recognizable after they leave the kitchen.
Acid helps more than people think. Lemon juice, vinegar, pickles, salsa verde, and mustard all keep flavors sharp when the food is cold, because cold mutes salt and sweetness. That’s why so many of these recipes lean on bright ingredients. A dish that tastes perfect off the stove can taste sleepy once it’s chilled; a dish with a little bite still sings.
I also like foods that separate jobs. One layer for crunch, one for creaminess, one for salt, and maybe one for sweetness. That’s the whole trick. If every bite is just soft and beige, the picnic gets boring fast.
Essential Equipment for These Picnic Foods
- Insulated cooler: Keeps mayo-based salads, seafood, and dairy fillings safely cold on the ride.
- Reusable ice packs: Better than loose ice for keeping boxes dry and steady.
- Leakproof containers: Mason jars, snap-lid boxes, and bento-style trays save you from soggy blankets.
- Parchment paper and foil: Useful for wrapping sandwiches, lining trays, and keeping greasy items separate.
- Small skewers and toothpicks: These turn loose ingredients into tidy bites.
- Sharp knife: Clean cuts matter for sandwiches, bars, wraps, and fruit.
- Cutting board: A sturdy board makes prep and serving easier, especially for assembled items.
- Paper towels: Quietly essential for drying cucumbers, herbs, mozzarella, and washed greens.
- Serving tongs or small spoons: Helpful for salads and cup-style foods that need a clean scoop.
Smart Shopping and Ingredient Tips
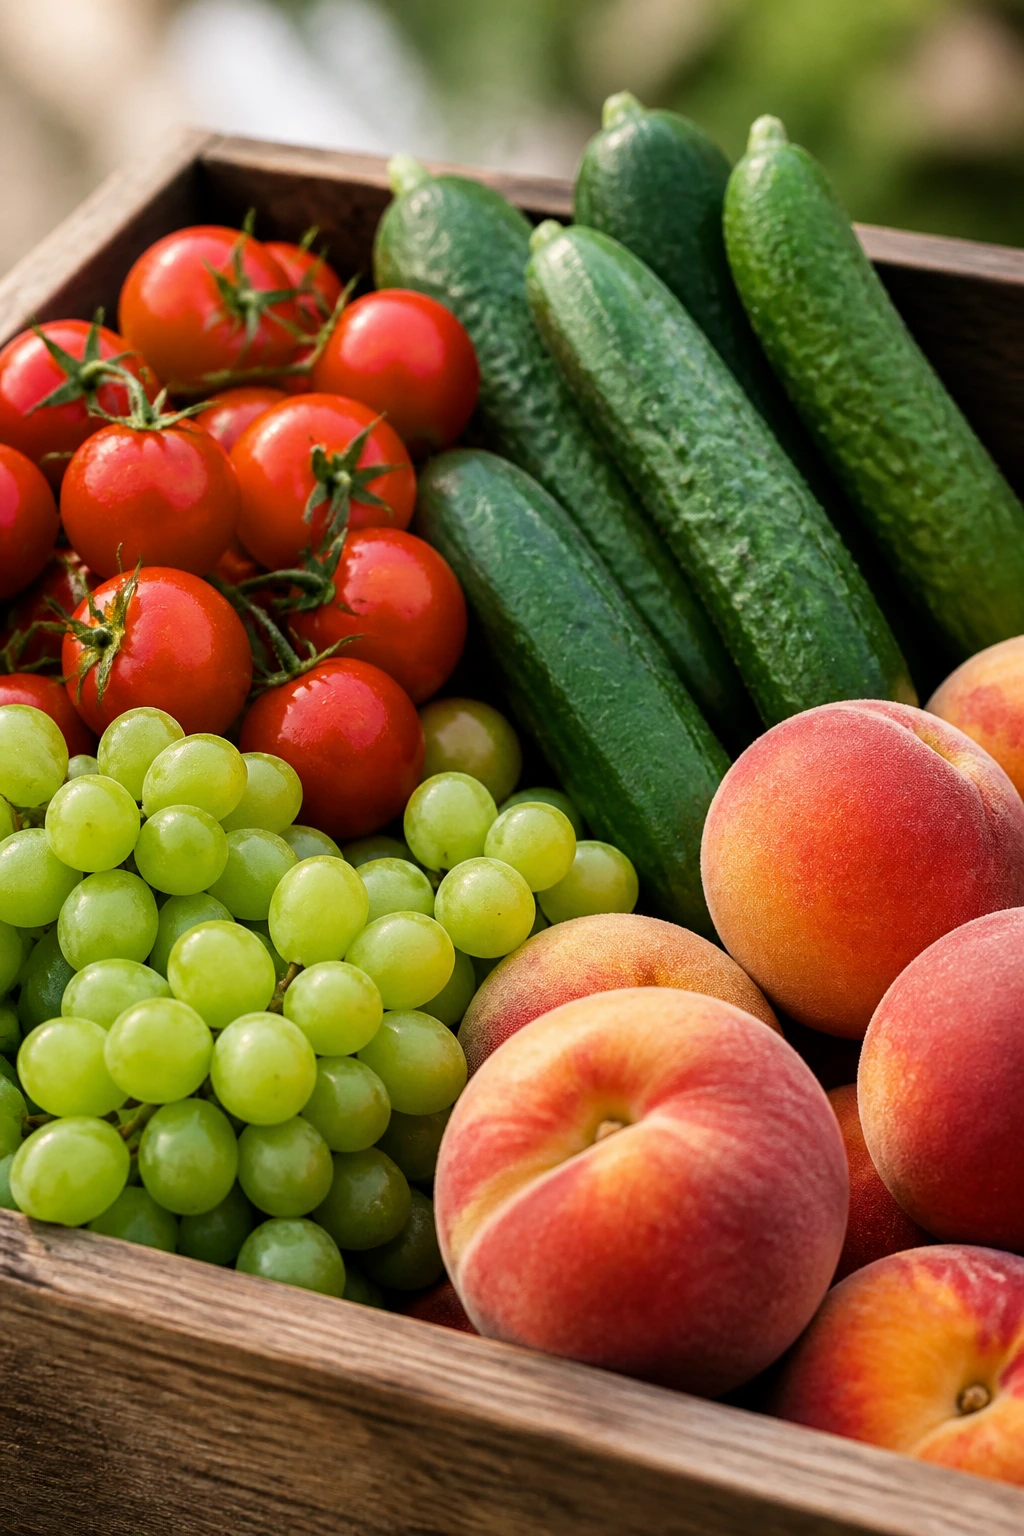
Start with sturdy produce. Cherry tomatoes, cucumbers, grapes, peaches that are ripe but firm, and small herbs like basil and mint all travel better than fragile greens or overripe fruit. If you’re buying lettuce, choose butter lettuce or romaine hearts over delicate spring mix; the leaves hold shape longer and don’t collapse under filling.
For breads and wraps, softness is useful, but not if it turns to paste. Flour tortillas, mini croissants, slider buns, and focaccia all do better than airy sandwich loaves when the filling is moist. I’d rather use a slightly denser bread and have the picnic survive than chase a bakery-perfect crumb that falls apart in the cooler.
Cheese matters too. Block cheese you cut yourself usually tastes cleaner and holds its shape better than super-soft pre-shredded cheese, especially in skewers, tea sandwiches, and wraps. For anything creamy, like deviled eggs or pimento cheese, buy ingredients cold and mix them cold. That simple habit keeps fillings thicker and easier to pack.
How to Serve These Foods With a Cold Drink
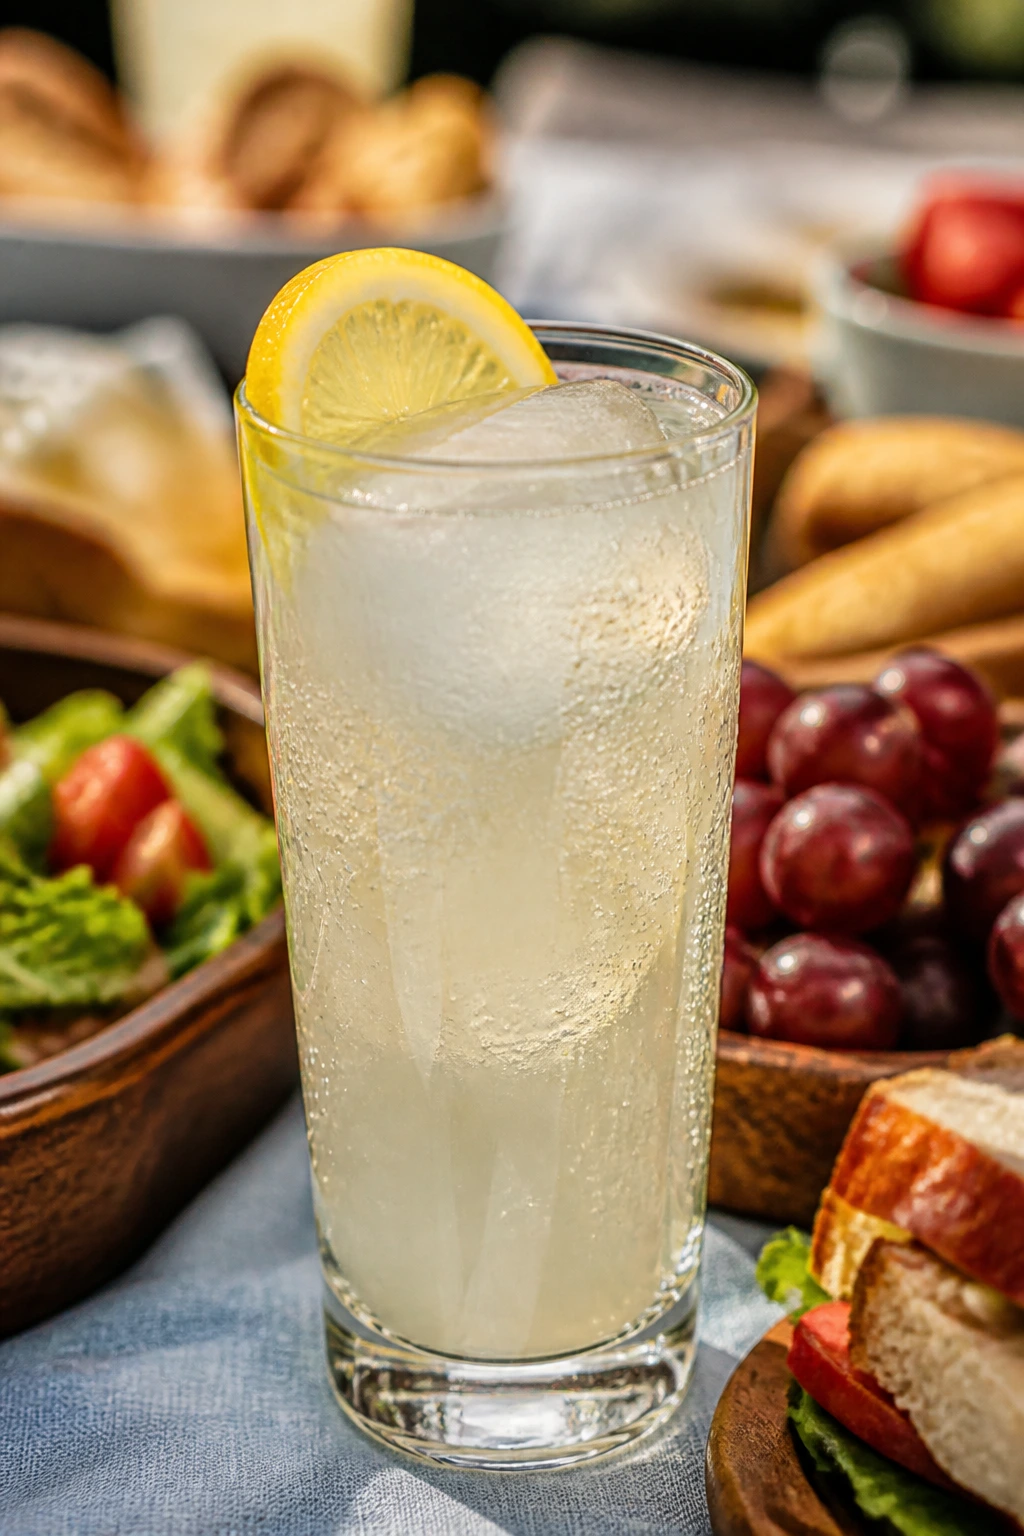
Presentation:
Keep the basket divided into tidy zones: skewers in one container, wraps and sandwiches wrapped in parchment, cups stacked upright, and sweet bars in a separate tin. A few herb sprigs or lemon wedges on the tray make the spread look intentional without extra work.
Accompaniments:
Crisps, salted nuts, sliced melon, pickles, and a simple green salad all pair well with these foods because they add either crunch or sharpness. If the picnic leans rich—think quiches, sliders, or pimento cheese—bring something acidic like pickled onions or vinegar slaw to reset the palate.
Portions:
Plan on 2 to 3 savory bites, or one substantial sandwich/wrap, per person for a light picnic meal. For a fuller spread, build around one main item, one cold side, one snacky finger food, and one sweet thing; that balance keeps people from filling up on the first container they open.
Beverage Pairing:
Sparkling lemonade works with almost everything here because the bubbles cut through richness. Iced tea is the quiet all-purpose pick, while a dry lager or crisp white wine suits the saltiest foods—deviled eggs, skewers, and sandwiches with mustard or pickles.
Additional Tips and Flavor Boosters

Flavor Enhancement: A small hit of acid changes everything. Lemon zest, pickled onions, splashy vinegar dressings, and mustard butter all wake up cold food that would otherwise taste flat after chilling.
Customization: If you’re feeding mixed eaters, lean on a base recipe and let people finish their own food. Keep the fillings plain, then offer hot sauce, extra herbs, flaky salt, or a spoon of pesto on the side. It’s a cleaner way to handle different tastes than making four separate dishes.
Serving Suggestions: Use small cups, tight rolls, and bite-size cuts. People relax around picnic food when they don’t need a knife for every item. A garnish of chives, basil, sesame seeds, or citrus zest goes farther than a heavy sauce.
Make-It-Yours: For gluten-free eaters, focus on skewers, cups, salads, and rice-based bites. For dairy-free picnics, hummus wraps, bean salads, and fruit-heavy desserts do the job without fuss. For extra heat, add chili crisp, jalapeño, or hot sauce at the last minute so the spice stays bright.
Make-Ahead, Storage, and Reheating Guidance
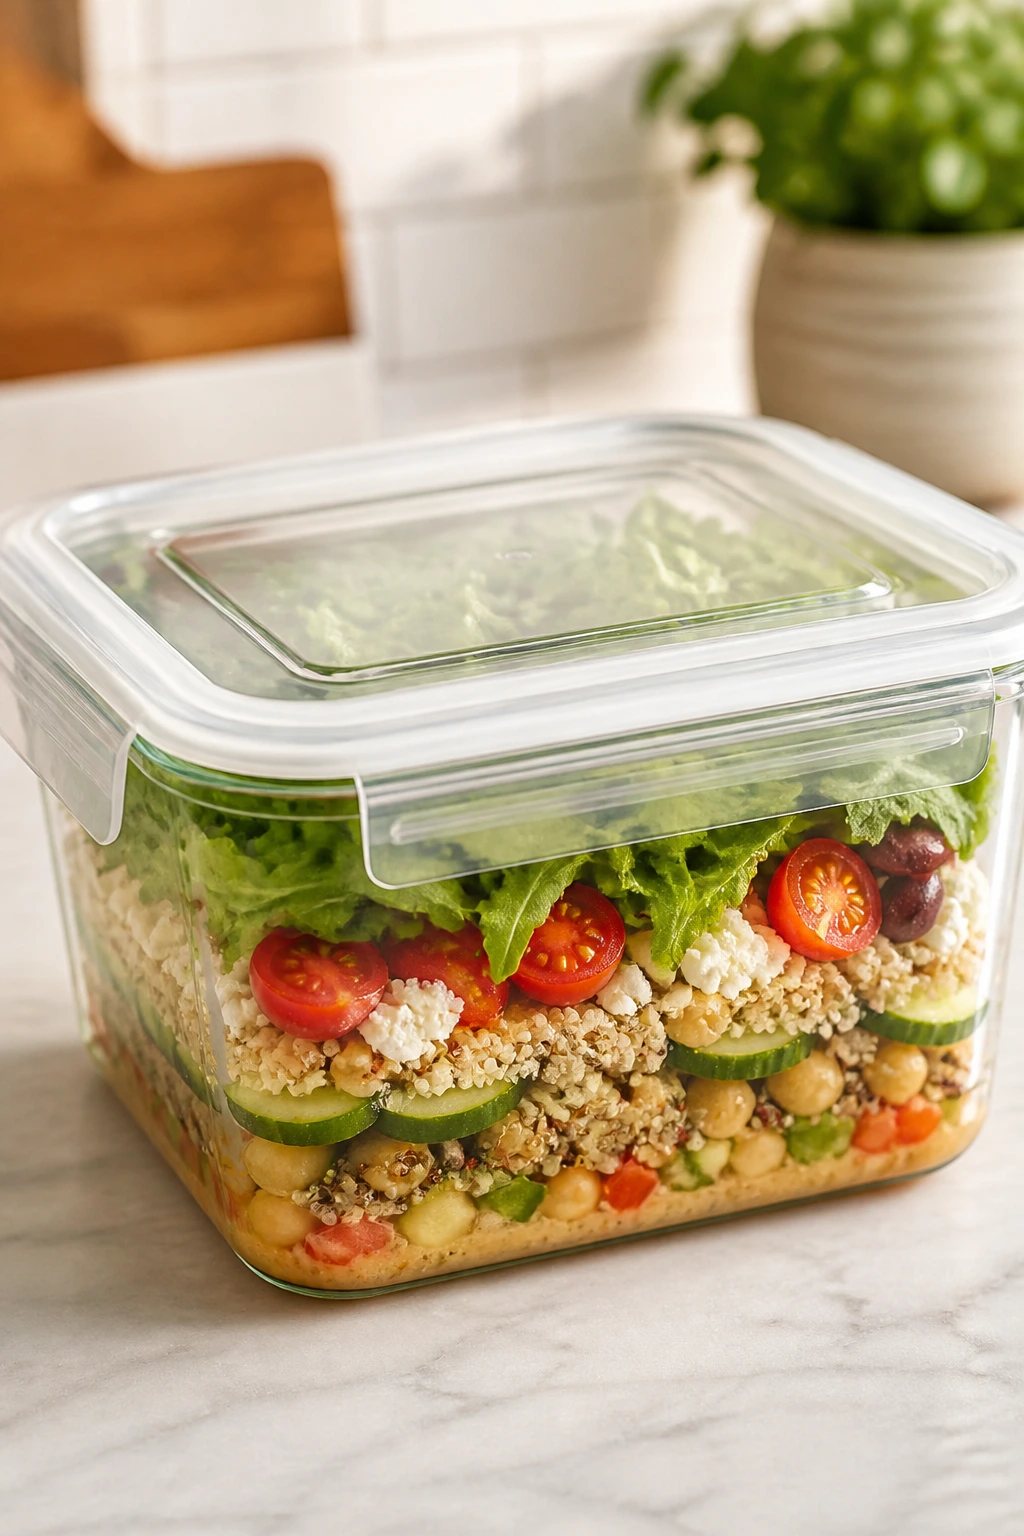
Most of the savory picnic foods here keep well for 3 to 4 days refrigerated, as long as they’re sealed and chilled promptly. Egg salads, chicken salads, tuna pasta salads, and quiches should be eaten from the fridge or a well-iced cooler, not left sitting out. If they’ve been in warm air for more than 2 hours—or 1 hour if the day is hot—treat them as done.
Baked bars, muffins, pretzel bites, and energy balls are more forgiving. They’ll usually stay good for 4 to 5 days in an airtight container at room temperature, or about 1 week in the fridge if your kitchen runs warm. Freeze bars, muffins, quiches, and sausage bites for up to 2 months; wrap them tightly, then thaw in the fridge overnight.
For reheating, use a 300°F oven for items that should stay crisp, like sausage roll bites, focaccia squares, or chicken cutlet sliders. Ten to 12 minutes is usually enough. Microwave only the soft items you actually want soft—frittata squares and some wraps—because the microwave turns crusts and bread into regret. Always pack sauces separately when you can. That one habit saves more picnic food than any clever trick.
Variations and Adaptations to Try
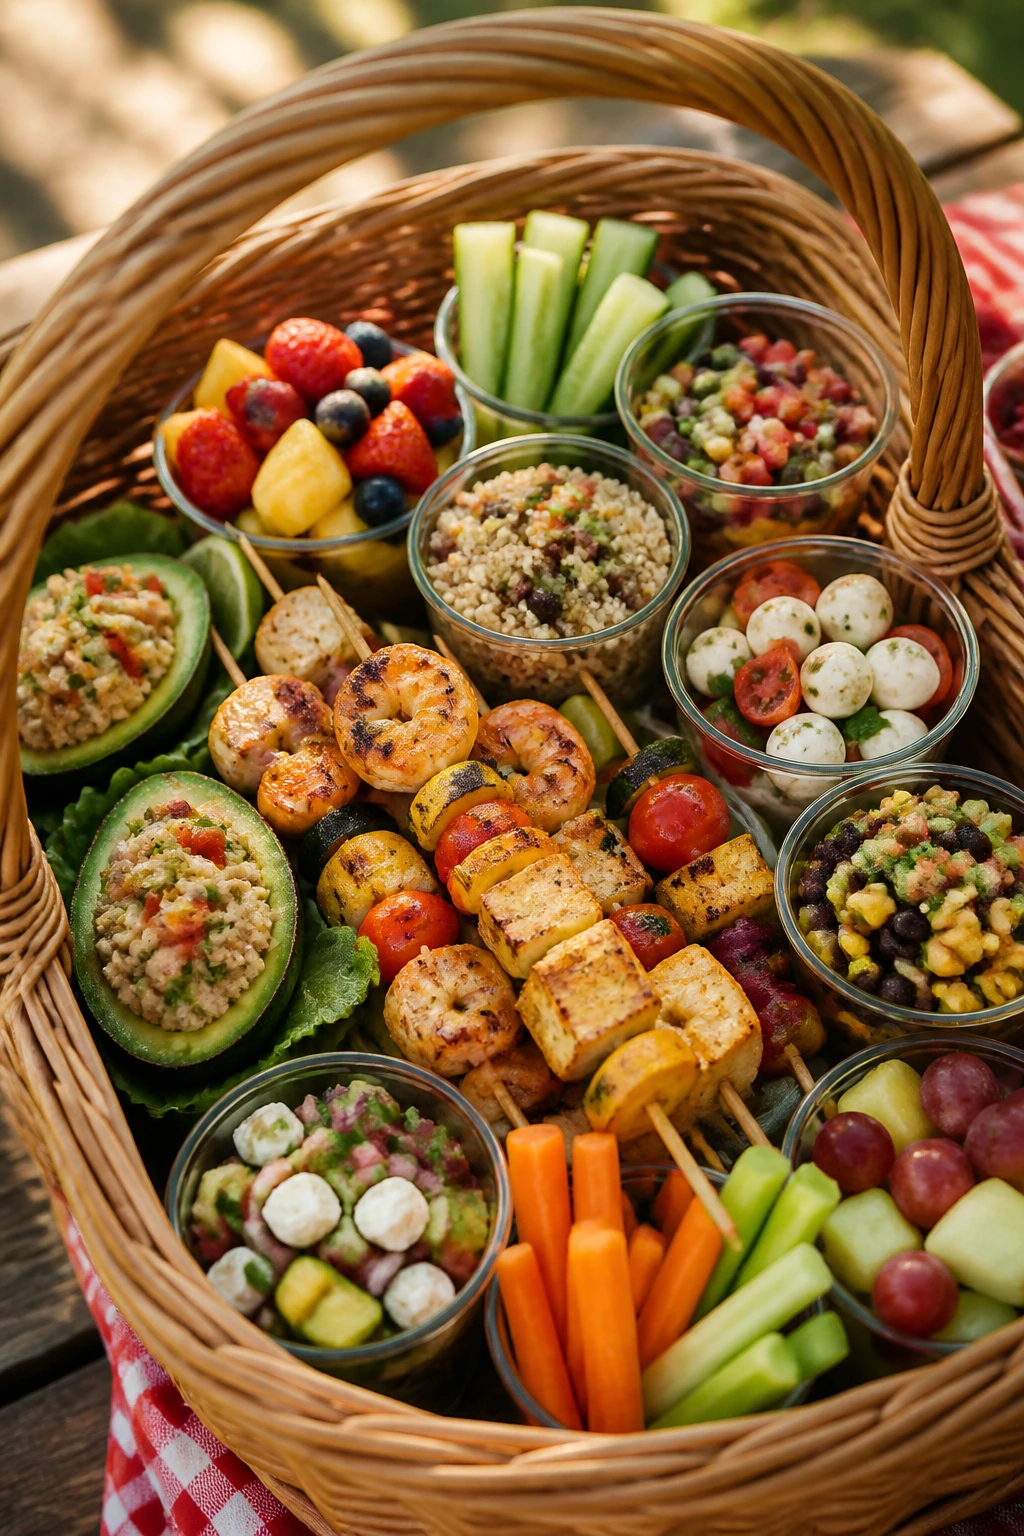
Gluten-Free Basket: Build around skewers, cups, salads, onigiri, and lettuce wraps. Swap in gluten-free crackers or rice cakes where you’d normally use bread, and keep a separate container for anything crumb-coated.
Dairy-Free Spread: Hummus wraps, bean salads, sesame noodles, fruit skewers, and onigiri make this easy. Use olive oil, mustard, tahini, or avocado for creaminess instead of cheese or yogurt.
Vegetarian Cooler: Lean hard on caprese skewers, pinwheels, veggie cups, bean salad, couscous salad, quinoa salad, and galettes. The trick is to keep one salty element in each dish so the basket doesn’t taste sweet and flat.
Spice-Lover Pack: Add chili crisp to noodles, hot sauce to deviled eggs, jalapeño to corn cups, and extra gochujang to lettuce wraps. Spicy food works best beside cold drinks because the first sip resets your mouth.
Kid-Friendly Swap: Choose mild cheeses, skip visible onions, and cut everything smaller than you think. Mini quiches, fruit-cheese skewers, oat bars, and turkey sandwiches tend to get eaten first because they look familiar and don’t drip.
Common Picnic Food Mistakes to Avoid
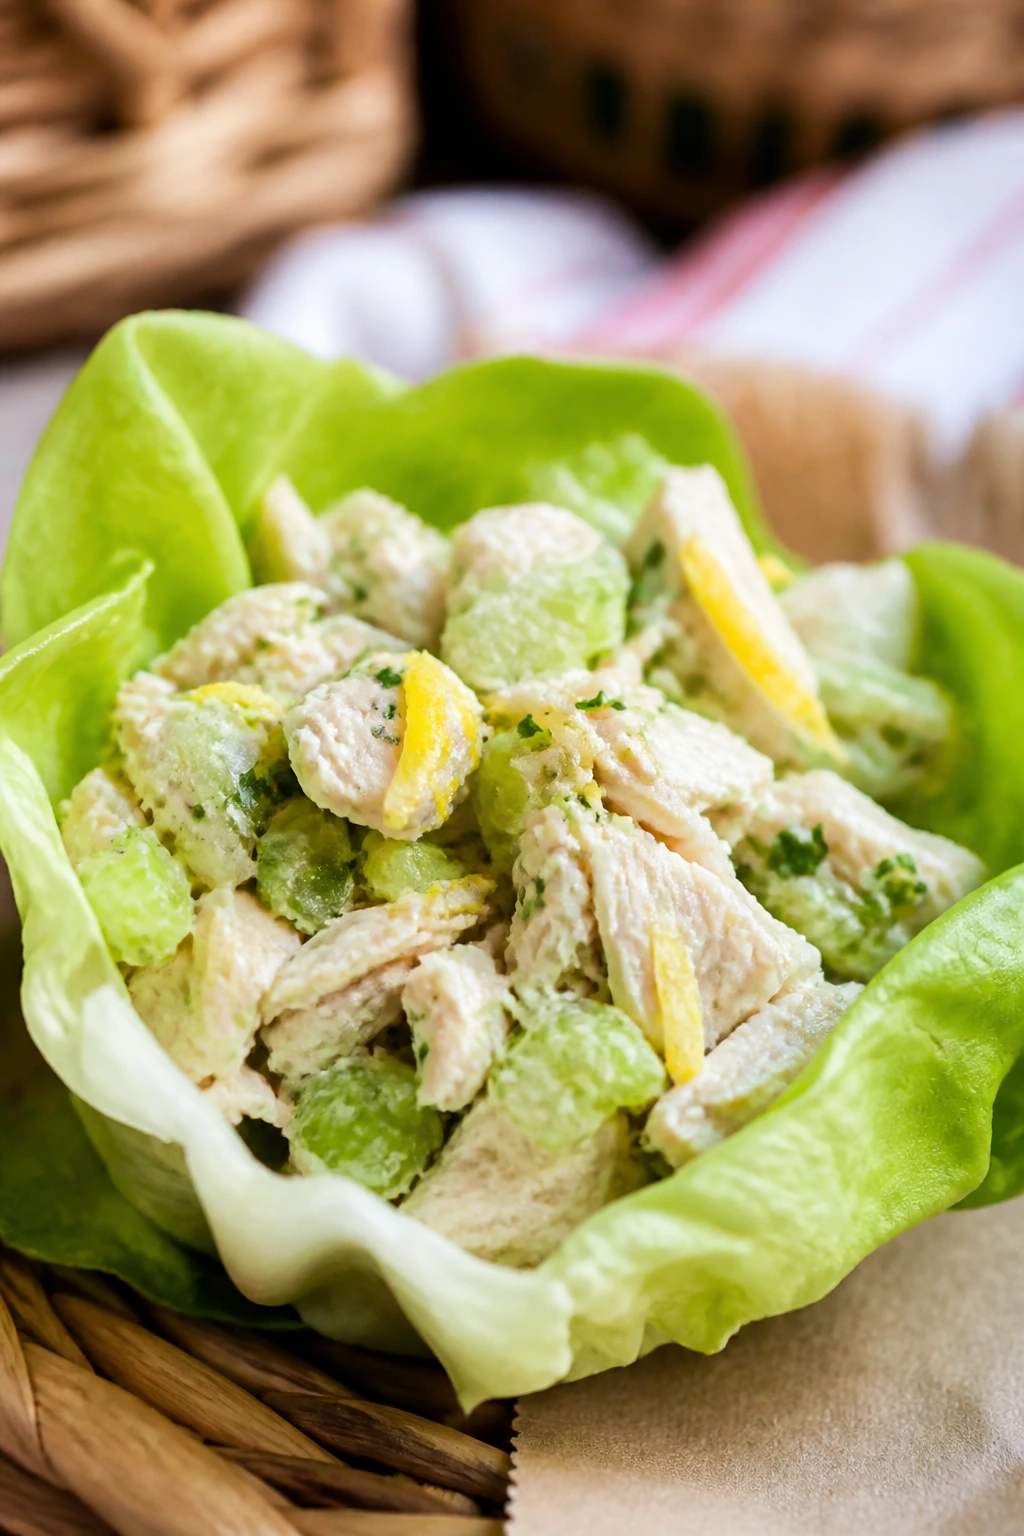
The biggest mistake is building for the table instead of the ride. A sandwich that looks fine on a plate can be a mess after an hour in a cooler if the filling is wet or the bread is too soft. Think in layers and barriers: butter on bread, paper towel under cucumbers, dressing at the bottom only if there’s a sturdy divider.
Another common problem is underseasoning cold food. Chilled pasta, beans, rice, and eggs taste quieter than they do warm. That means a little more salt, acid, or herbs is not optional; it’s the difference between “fine” and “worth making again.”
People also cram too many different textures into one container and hope for the best. Don’t. Keep crunchy items separate from moist ones until the last minute. If the lettuce is going limp, the crumbs are getting wet, or the pastry is steaming itself soft, the packing method is the issue, not the recipe.
And do not forget the cooler. If the food belongs cold, give it real ice packs, not wishful thinking.
Frequently Asked Questions
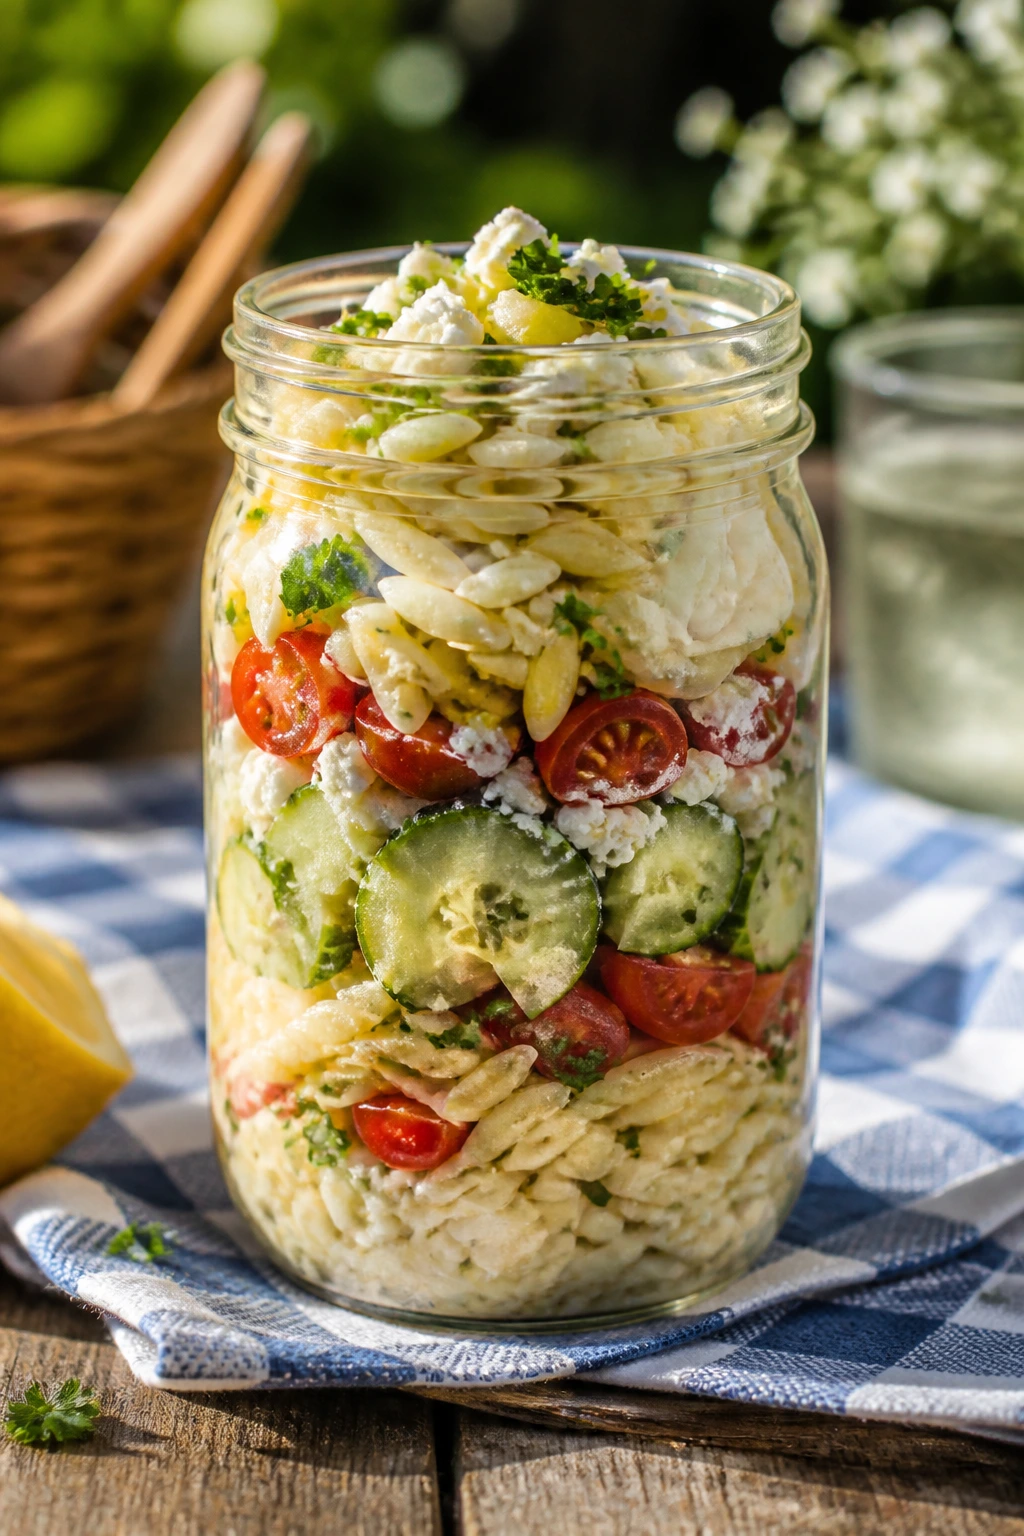
What foods are safest for a picnic in a cooler?
Foods that are fully cooked, chilled quickly, and packed in sealed containers are the safest bets. Think deviled eggs, chicken salad, pasta salad, quiches, wraps, and bars. Seafood dishes like shrimp ceviche need extra attention and should stay in the coldest part of the cooler.
How do I keep sandwiches from getting soggy?
Use a moisture barrier like butter, cream cheese, or hummus, and keep wet ingredients—tomatoes, pickles, cucumbers—dry before assembly. Wrapping sandwiches in parchment also helps absorb a little condensation without crushing the bread.
Can I make picnic food the day before?
Yes, and many of these are better after a night in the fridge. Pasta salads, bean salads, energy balls, bars, and egg mixtures all benefit from resting. Just wait to add fragile herbs, lettuce, or avocado until closer to serving time.
What cold drink pairs best with salty picnic food?
Sparkling lemonade is the easiest all-around match because the bubbles and acidity cut through salt and fat. Iced tea is a quieter choice, while a cold lager works well with pretzels, sliders, deviled eggs, and sausage bites.
How long can picnic food sit out?
Use the 2-hour rule for chilled foods, and the 1-hour rule if the weather is warm enough that the cooler starts losing its chill. If a food item contains eggs, dairy, seafood, or cooked meat and it’s been sitting warm, pack it back only if it stayed properly cold.
What if my wrap keeps falling apart?
Usually the filling is too wet or the wrap is overstuffed. Dry the vegetables, spread the filling thinner, and roll tightly with parchment around the outside. A quick chill before slicing also helps the wrap hold shape.
Can I swap ingredients without ruining the recipe?
Yes, if you keep the texture logic intact. Swap chicken for turkey, feta for cheddar, quinoa for couscous, or tortillas for lettuce leaves, but don’t trade a sturdy ingredient for a watery one unless you’ve got a good moisture barrier.
What should I do if I don’t have a cooler?
Focus on foods that are stable at room temperature for a few hours: bars, muffins, onigiri, pretzel bites, focaccia, sausage roll bites, and fruit. Skip mayo-heavy salads, seafood, and anything that relies on staying very cold.
A Cooler Full of Easy Wins
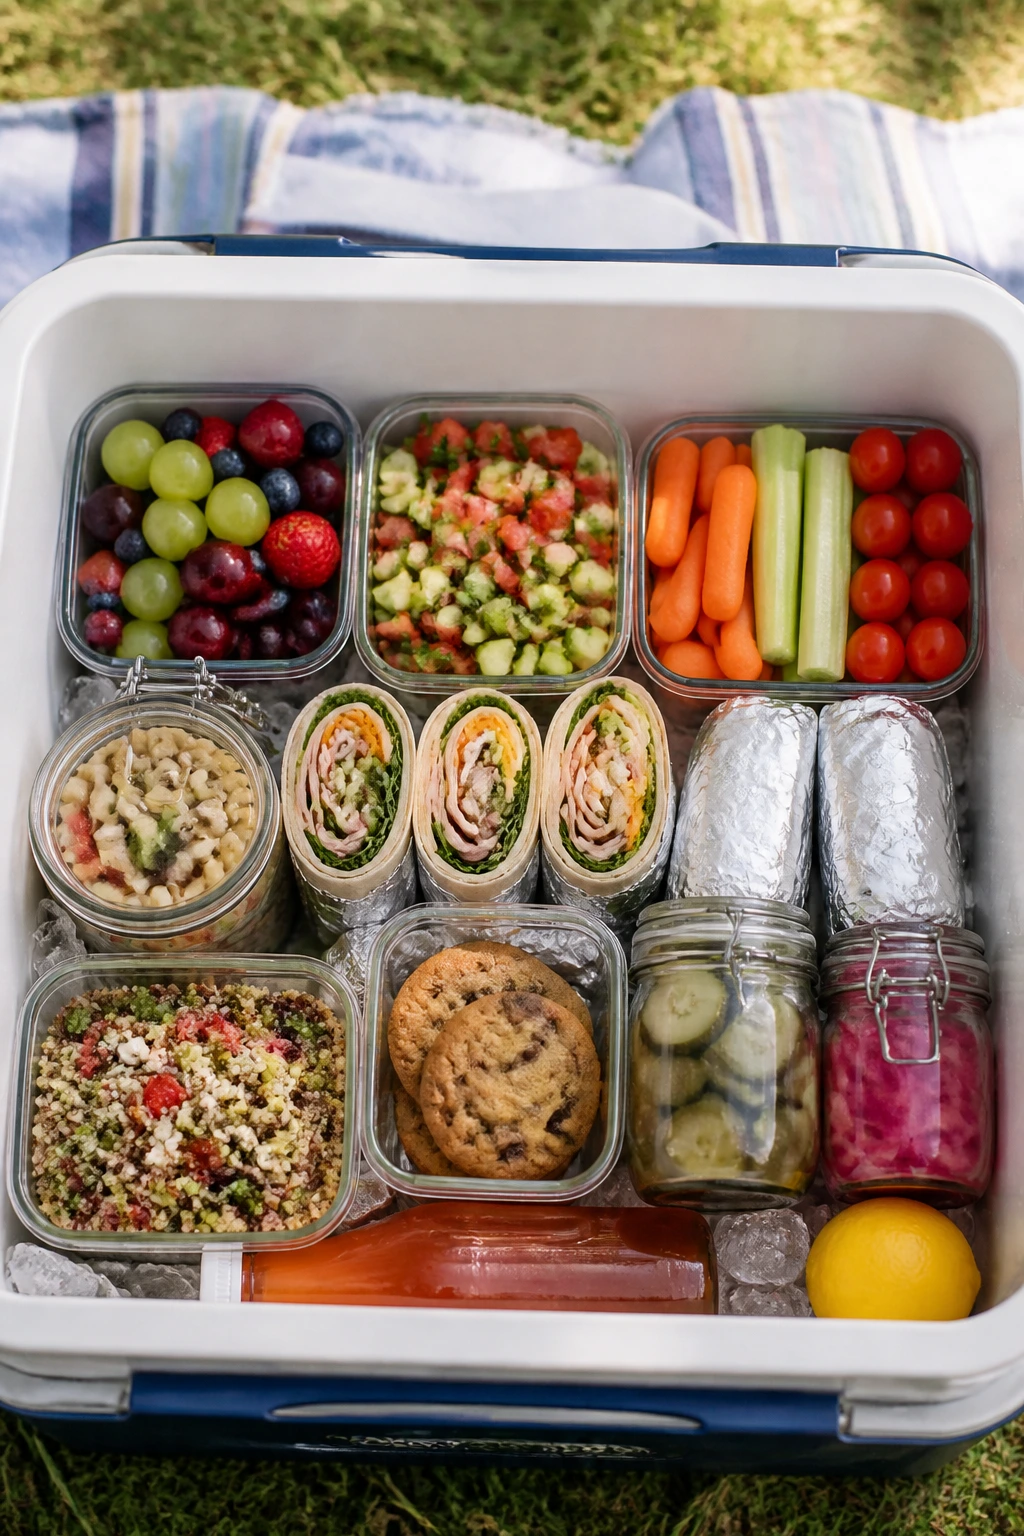
Picnic food should feel cooperative. It should sit well in a container, stay recognizable on a paper plate, and get along with a cold drink without demanding a knife, a fork, and a cleanup crew. That’s the real standard, and honestly, it’s a good one.
The nicest part is that none of these foods asks for perfection. A slightly rough square, a hand-rolled skewer, a jar layered a little crooked—those all belong at a picnic. Pack the sturdy things first, keep the wet things contained, and the blanket will look like you meant every detail.